HIT orporated HITBTUDHBU001 Bluetooth USB Dongle User Manual HBU 001
HIT Incorporated Bluetooth USB Dongle HBU 001
User Manual

this function, Windows will detect that the device is connected and it will
automatically launch the Add New Hardware Wizard. Please refer to “Audio
install manual” file on the CD for detailed install process.
Input Pin-Code (*2)
- You can input the Pin-Code in advance.
- Press the ‘Pin-Code select Key’ once.
- You will see the digital ‘0’ is flashing.
- If you press the ‘Pin-Code select Key’ again, it will change to digital ‘1’
- If the number is what you want, then press the ‘Confirm Key’ once and the
number will not flash. Please press ‘Pin-Code select Key’ to select next
number you want.
- When last number is inputted ok, please press ‘Confirm Key’ again in order to
complete the ‘Input Pin-Code’ procedure.
- If any number is wrong or you want to update the Pin-Code, You must restart
the ‘Input Pin-Code’ procedure again.
Pair with Headset (*2)
- Please let the headset to be in the pairing mode.
- Plug USB cable into the computer (*3) and you will see the Green LED flash
every 2 seconds.
- Press the ‘Pair Key’ 3 seconds continually, you will see the Green and Red
LED are flashing alternately.
- When pairing is completed, the device will enter into standby mode & the
Green LED will be flashing every 2 seconds.
(*3) The pairing procedure can only be done in standby mode.
LED status
Standby mode Green LED will flash once in 2 seconds
Park mode Green LED will flash once in 2 seconds
Talk mode Green LED will flash twice in 1 second
Pair mode Green & Red LED will flash alternately
HBU-001/HBU-001D
Bluetooth USB dongle manual
Features
ò Embedded Audio Gateway profile (*2)
ò User-friendly interface that can be used with Bluetooth enabled headset devices.
ò Support pin-code input in order to pair with various Bluetooth headsets
ò 100 meter working distance
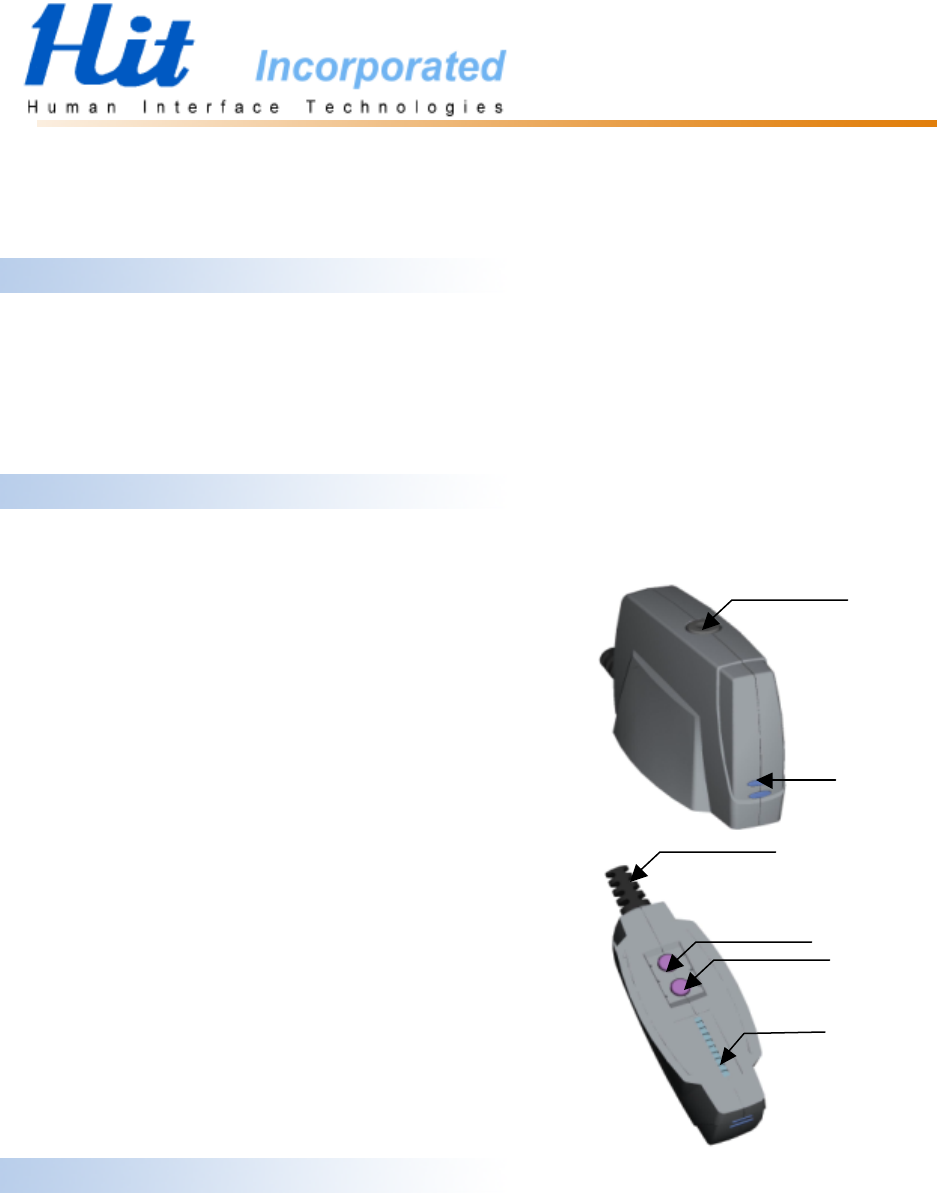
Front panel
1. Data/Audio mode select Key(*2)
2. Status LED
3. USB cable
4. Pin-Code select Key(*2)
5. Pair Key ( also as Confirm Key) (*2)
6. Digital 0~9 number indicated LEDs(*1) (*2)
(*1)Digital arrangement
○
0
○
1
○
2
○
3
○
4
○
5
○
6
○
7
○
8
○
9
(*2) HBU-001D doesn’t have this function.
Connect with computer
- When you first plug in the USB, it will automatically select AUDIO mode while
the HBU-001D only works in the data mode.
- Plug the USB connector into an available USB port on your computer (You can
plug it in before or after you start your computer). If it’s the first time to use
3
1
2
4
5
6

Select DATA mode
Press the ‘Data/Audio mode select Key’ once, you will see the status LED turns
OFF (When link succeeds, the LED will be flashing).
If you press the ‘Data/Audio mode select Key’ again, it will change to Audio mode.
Please refer to “BTW Installation Instructions” file on the CD for detailed install
process.
HBU-001 With Audio Specification
Please refer to “HBU-001 With Audio Specification” file on the CD.
HBU-001D Data Only Specification
Please refer to “HBU-001D Data Only Specification” file on the CD.
FCC Statement
THIS DEVICE COMPLIES WITH PART 15 OF THE FCC RULES. OPERATION IS
SUBJECT TO THE FOLLOWING TWO CONDITIONS: (1) THIS DEVICE MAY
NOT CAUSE HARMFUL INTERFERENCE AND (2) THIS DEVICE MUST
ACCEPT ANY INTERFERENCE RECEIVED, INCLUDING INTERFERENCE
THAT MAY CAUSE UNDESIRED OPERATION.
THE CHANGES OR MODIFICATIONS NOT EXPRESSLY APPROVED BY THE
PARTY RESPONSIBLE FOR COMPLIANCE COULD VOID THE USER’S
AUTHORITY TO OPERATE THE EQUIPMENT.
IMPORTANT NOTE: TO COMPLY WITH THE FCC RF EXPOSURE
COMPLIANCE REQUIREMENTS, A SEPARATION DISTANCE OF AT LEAST
20CM MUST BE MAINTAINED BETWEEN THE ANTENNA OF THIS DEVICE
AND ALL PERSONS. NO CHANGE TO THE ANTENNA OR THE DEVICE IS
PERMITTED. ANY CHANGE TO THE ANTENNA OR THE DEVICE COULD
RESULT IN THE DEVICE EXCEEDING THE RF EXPOSURE REQUIREMENTS
AND VOID USER’S AUTHORITY TO OPERATE THIS DEVICE.