HKC Technology 318 2.4GHz DSSS Cordless Phone system w/ CID and DAM User Manual manual base
HKC Technology Ltd. 2.4GHz DSSS Cordless Phone system w/ CID and DAM manual base
Contents
- 1. Base User Manual
- 2. Desktop User manual
- 3. Handset User Manual
- 4. User Manual
Base User Manual

Circle Communication Products, Inc
2.4GHz Multi-line and Multi-handset
Cordless Telephone System
Configuration Guide
Version 1.00

Circle Communication Products, Inc
2.4G Cordless Telephone System configuration guide
Page 2
COPYRIGHT
COPYRIGHT 2004, Circle Communication Products, Inc. ALL RIGHTS RESERVED.
This manual is the copyright of Circle Communication Products, Inc. You may not reproduce,
transmit, transcribe, store in a retrieval system, or translate into any language, in any form or
by any means, electronic, mechanical, magnetic, optical, chemical, manual, or otherwise,
any part of this publication without the express written permission of Circle Communication
Products, Inc.
Disclaimer
Circle Communication Products, Inc. makes no representations or warranties regarding the
content of this manual. We reserve the right to revise the manual or make changes in the
specifications of the product described within it at any time without notice and without
obligation to notify any person of such revision or change.

Circle Communication Products, Inc
2.4G Cordless Telephone System configuration guide
Page 3
Table of Contents
COPYRIGHT.................................................................................................................................................2
DISCLAIMER ....................................................................................................................................................2
INTRODUCTION ...............................................................................................................................................6
PACKAGE CONTENT .........................................................................................................................................6
INSTALLATION ................................................................................................................................................7
OVERVIEW OF MAIN CONTROL BASE .................................................................................................................7
EQUIPMENT LOCATION .....................................................................................................................................8
INSTALLATION OF THE MAIN CONTROL BASE......................................................................................................8
CHARGING THE BATTERY..................................................................................................................................9
CONNECTION OF TELEPHONE LINE ....................................................................................................................9
CONNECTION OF EXTERNAL MOH (MUSIC ON HOLD) .........................................................................................9
CONNECTION OF PAGING SYSTEM (OPTION).....................................................................................................10
CONNECTION OF SINGLE LINE PHONE FOR POWER FAILURE TRANSFER (OPTION)...............................................10
SOFTWARE INSTALLATION ..............................................................................................................................10
CALL FEATURES DESCRIPTIONS ...............................................................................................................11
AUTO ATTENDANCE (AA) ...............................................................................................................................11
AUTOMATIC CALL DISTRIBUTION .....................................................................................................................11
AUTOMATIC RECALL.......................................................................................................................................11
CALL FORWARD, ALL CALLS ...........................................................................................................................12
CALL FORWARD, BUSY...................................................................................................................................12
CALL FORWARD, BUSY OR NO ANSWER ..........................................................................................................12
CALL FORWARD, NO ANSWER ........................................................................................................................12
CALL FORWARD, TO EXTERNAL LINE ...............................................................................................................12
CALL FORWARD, TO VOICE MAIL.....................................................................................................................13
CALL HOLD, NORMAL.....................................................................................................................................13
CALL HOLD, EXCLUSIVE .................................................................................................................................13
CALL LOG .....................................................................................................................................................13
CALL PAGING ................................................................................................................................................14
CALL PICKUP, LINE ........................................................................................................................................14
CALL PICKUP, EXTENSION..............................................................................................................................14
CALL TRANSFER, LINE CALL ...........................................................................................................................14
CALL TRANSFER, INTERCOM CALL ..................................................................................................................14
CONFERENCE................................................................................................................................................14
DIAL TYPE SELECTION ...................................................................................................................................15
DIGITAL VOLUME CONTROL ............................................................................................................................15
DIRECT IN LINES (DIL) ...................................................................................................................................15
DISPLAY........................................................................................................................................................15
DO NOT DISTURB (DND)................................................................................................................................15
DP TO MF CONVERSION ................................................................................................................................16
END-TO-END SIGNALING ................................................................................................................................16
FLASH FUNCTION...........................................................................................................................................16
HANDS FREE OPERATION ...............................................................................................................................16
HEADSET OPERATION ....................................................................................................................................16
IDLE LINE AUTOMATIC SELECTION ...................................................................................................................16
INTERCOM TO LINE FORWARDING....................................................................................................................17
LAST NUMBER REDIAL....................................................................................................................................17
LINE ASSIGNMENT .........................................................................................................................................17
LINE OR EXTENSION CAMP ON........................................................................................................................17
LINE-TO-LINE FORWARDING............................................................................................................................17
MUSIC ON HOLD ............................................................................................................................................18
MEMO RECORDING ........................................................................................................................................18
NEW CALL INDICATION ...................................................................................................................................18
NIGHT SERVICE .............................................................................................................................................18
ON-HOOK DIALING.........................................................................................................................................19

Circle Communication Products, Inc
2.4G Cordless Telephone System configuration guide
Page 4
PAUSE INSERTION..........................................................................................................................................19
POWER FAILURE TRANSFER ...........................................................................................................................19
REAL TIME CLOCK PROGRAMMING..................................................................................................................19
TOLL RESTRICTION CODE...............................................................................................................................20
TOLL CALL SECURITY CODE ...........................................................................................................................20
CALL FEATURES CONFIGURATION............................................................................................................21
1) CALL FEATURES CONFIGURATION BY COMPUTER (SEE PC PROGRAMMING GUIDE).....................................21
2) CALL FEATURES CONFIGURATION BY HANDSET .......................................................................................21
Start Call Features Configuration ............................................................................................................21
Menu Hierarchy.......................................................................................................................................22
System Configuration Menu....................................................................................................................24
1 Basic Setup..........................................................................................................................................24
1.1 TIME..................................................................................................................................................24
1.2 Outgoing Call ....................................................................................................................................26
1.3 Incoming Call ....................................................................................................................................26
1.4 Tone/Pulse Dialing ............................................................................................................................26
1.5 Password ..........................................................................................................................................27
2 Advanced Call Features.......................................................................................................................27
2.1 Day/Night mode.................................................................................................................................28
2.2. Line Mode ........................................................................................................................................28
2.3 Line to Line........................................................................................................................................30
2.4 ACD Options .....................................................................................................................................31
2.5 Toll Restriction...................................................................................................................................31
3 Voice Mail / AA.....................................................................................................................................32
3.1 VOICE MAIL......................................................................................................................................32
3.2 Auto Attendant...................................................................................................................................34
4 Handset Manage..................................................................................................................................35
4.1 Edit User Name.................................................................................................................................35
4.2 Delete User .......................................................................................................................................36
5 Technical Setting..................................................................................................................................36
5.1 Restore Technical Default .................................................................................................................36
5.2 Call Setting........................................................................................................................................36
5.3 Restore Factory Default.....................................................................................................................37
VOICE MAIL CONFIGURATION.....................................................................................................................39
INTRODUCTION ..............................................................................................................................................39
FEATURES.....................................................................................................................................................39
Voice Mail................................................................................................................................................39
Auto Attendant ........................................................................................................................................39
Multi-level Interactive Voice Response....................................................................................................39
VOICE MAIL...................................................................................................................................................40
Related Setting by Computer (See PC programming Guide) ..................................................................40
Mailbox....................................................................................................................................................40
Global Parameters ..................................................................................................................................40
Other Voice Mail Features.......................................................................................................................40
Verification of Voice Mail Setup...............................................................................................................42
Voice Mail Operation Flow.......................................................................................................................43
Administration by Phone .........................................................................................................................45
AUTO ATTENDANT..........................................................................................................................................47
Day / Night / Afternoon............................................................................................................................47
Day Mode Afternoon Greeting.................................................................................................................47
Time of Silence after Announcement.......................................................................................................47
Auto Switch Day / Night Mode, Day Mode Start Time, Night Mode Start Time........................................47
Other Auto Attendant Features................................................................................................................48
MULTI-LEVEL INTERACTIVE VOICE RESPONSE ..................................................................................................50
Configuration of IVR Call Flow ................................................................................................................51
IVR Call Flow and Configuration Example...............................................................................................53
Termination of Call Flow..........................................................................................................................55
Example of Multi-level IVR Application....................................................................................................55

Circle Communication Products, Inc
2.4G Cordless Telephone System configuration guide
Page 5
IMPORTANT SAFETY INSTRUCTION...........................................................................................................59
SPECIFICATION.............................................................................................................................................61
HARDWARE SPECIFICATION ............................................................................................................................61
OPERATING CONDITIONS:...............................................................................................................................61
LIMITED WARRANTY.....................................................................................................................................62
IMPORTANT CONSUMER INFORMATION....................................................................................................66
CUSTOMER SERVICE......................................................................................................................................68

Circle Communication Products, Inc
2.4G Cordless Telephone System configuration guide
Page 6
Introduction
The Circle 2.4G Cordless Telephone System provides professional quality digital
voice mail and PBX call handling capability with the convenience of a cordless
phone.
The configuration of the Cordless Telephone System can be accomplished by
one of the following options:
1. From the keypad and LCD display on extension “0”.
2. From a standard PC via the RS232 port
Configuration from the PC provides a simple Graphic User Interface while
configuration from the Extension affords convenience.
There are four sections in this document.
Installation: Procedures and Precaution
Call Features: All the various call features
Configuration programming: Configuration Procedures in detail
Voice mail configuration: Voice Mail Features and Configuration
Package Content
Main Control Base (WMC ER ) (1)
AC Adaptor (1)
Rechargeable battery pack (1)
Desktop Stand (1)
Telephone Cord (3)
System Programming Disk (1)
RS232 Serial Cable
Circle Communication Products, Inc
2.4G Cordless Telephone System configuration guide
Page 7
LINE 1 PHONE 1 LI NE 2 PHONE 2 LINE 3 P HONE 3
DC IN 9V TO COMPUTER A UDIO IN
5
6
789
AUDIO OUT
10
E
C
L
C
R
I
Co rdl ess PBX WMC
PAGE
SET
RESET
1
2
3
4
LOCK
DOOR
11
Installation
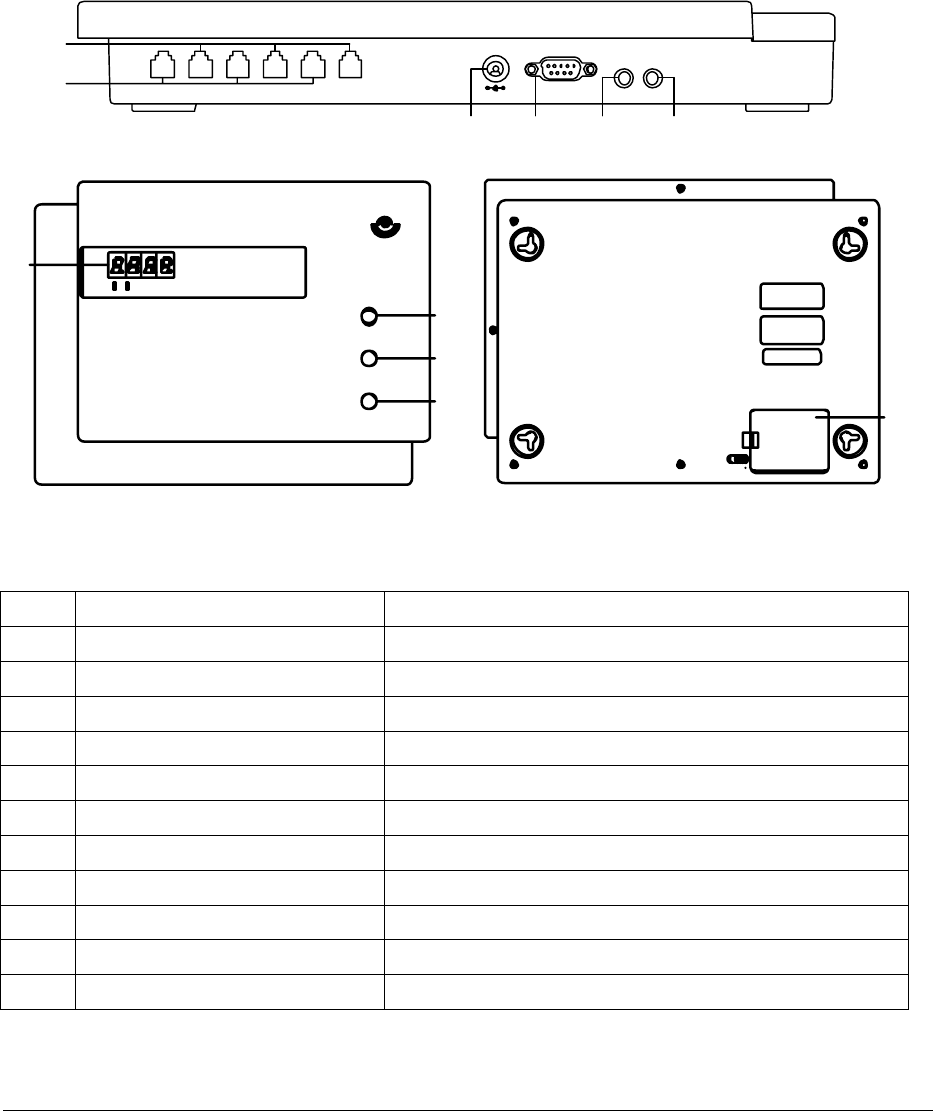
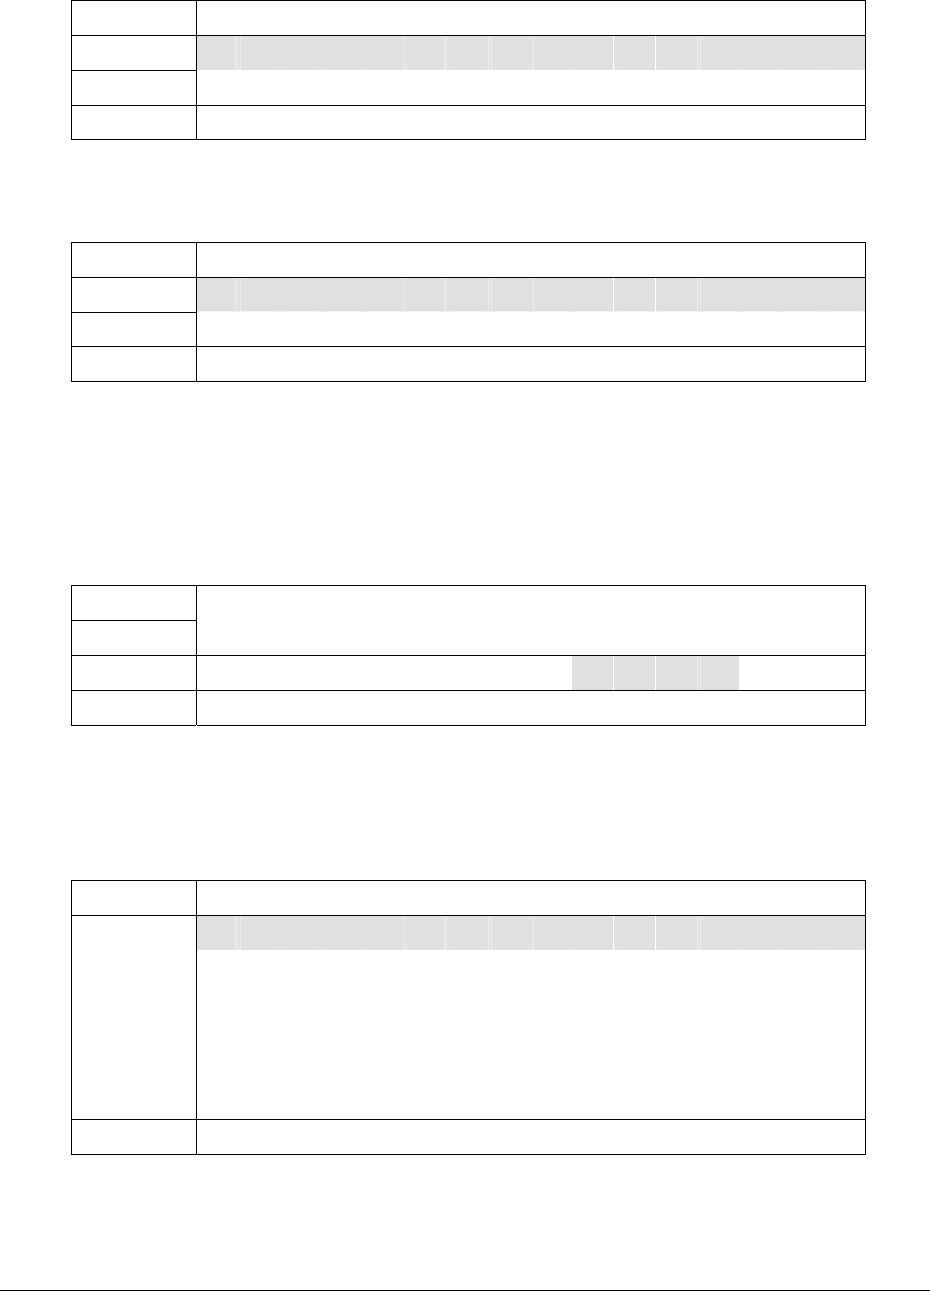
Overview of Main Control Base
Fig.1: Overview
Item Key Description Functionality
1 LED Display Show time
2 PAGE Recall the system’s extensions
3 SET Press for the extension registration
4 RESET System reset
5 Line 1-3 Telephone Line Ports
6 Phone 1-3 Single Line Telephone Port for Power Failure Transfer
7 DC 9V / 1.4A INPUT Connects AC switching power supply
8 TO COMPUTER RS232 PORT to computer
9 AUDIO IN Connects to a sound source
10 AUDIO OUT Connects to a PA system for voice announcement
11 BATTERY COVER (7.2V BATTERY) Allows replacement of Batteries
Circle Communication Products, Inc
2.4G Cordless Telephone System configuration guide
Page 8
1
LOC K
DOOR
2
5
6
D OOR
LOC K
D OOR
LOC K
3
4
AAx6
Equipment Location
When selecting a location for the equipment, consider the following:
1. The location should not be subject to excessive dirt, dust, or extremes of heat and
humidity.
2. Avoid a location subject to shock or vibration.
3. Avoid a location where equipment might be subjected to water.
4. Avoid location with direct sunlight or near high frequency noise-generating equipment,
such as next to a radio or television set.
5. Always install the equipment near a power outlet with easy access to a power switch.
6. The equipment should not be placed on top of a metal surface as this can affect the RF
signal transmission.
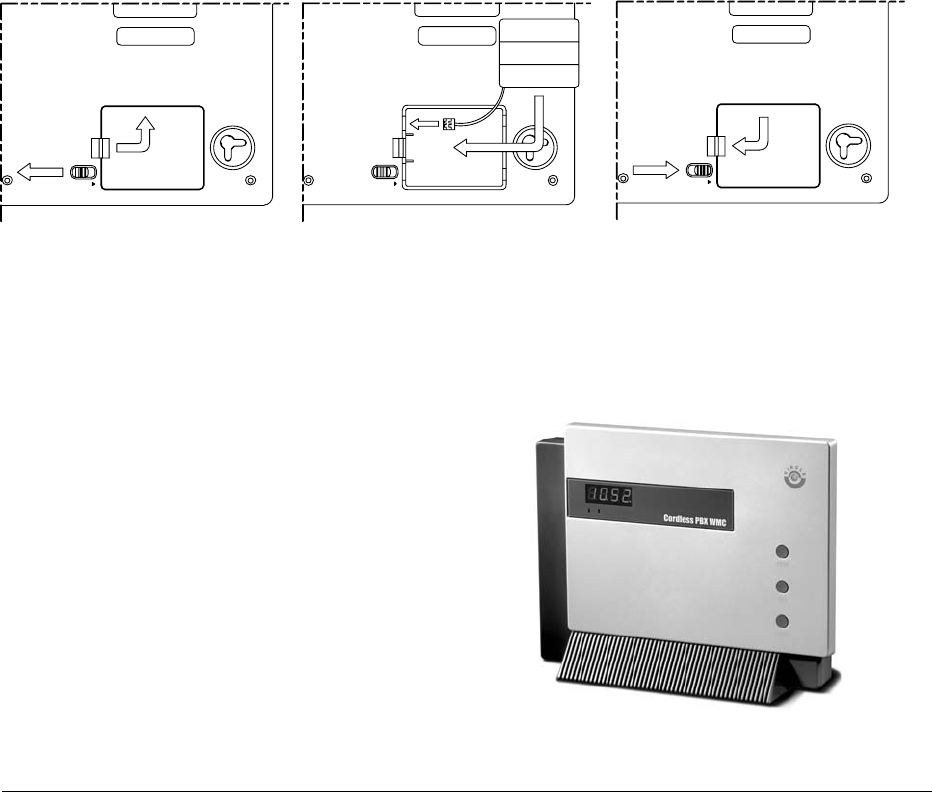
Installation of The Main Control Base
1. Insert the backup rechargeable battery.
a. Open the battery cover
b. Install the battery
c. Close the battery cover
Fig. 2 Backup rechargeable battery
2. The Base should be placed at the center of the desired service area as much as
possible so as to have maximum RF transmission performance.
3. The Base should be placed on a raised
surface, desk or shelf so that the
equipment is likely to neither fall down nor
topple over. The Stand provided should be
used to hold the Base in an upright
position.
Fig. 3 Base Stand
Circle Communication Products, Inc
2.4G Cordless Telephone System configuration guide
Page 9
PHONE 1LINE 1 PHONE 2LINE 2 LINE 3 PHONE 3
TO COMP UTERDC IN 9V AUDIO IN
1
2
AUDIO OUT
DOOR
LOCK
256.0mm
154.0mm
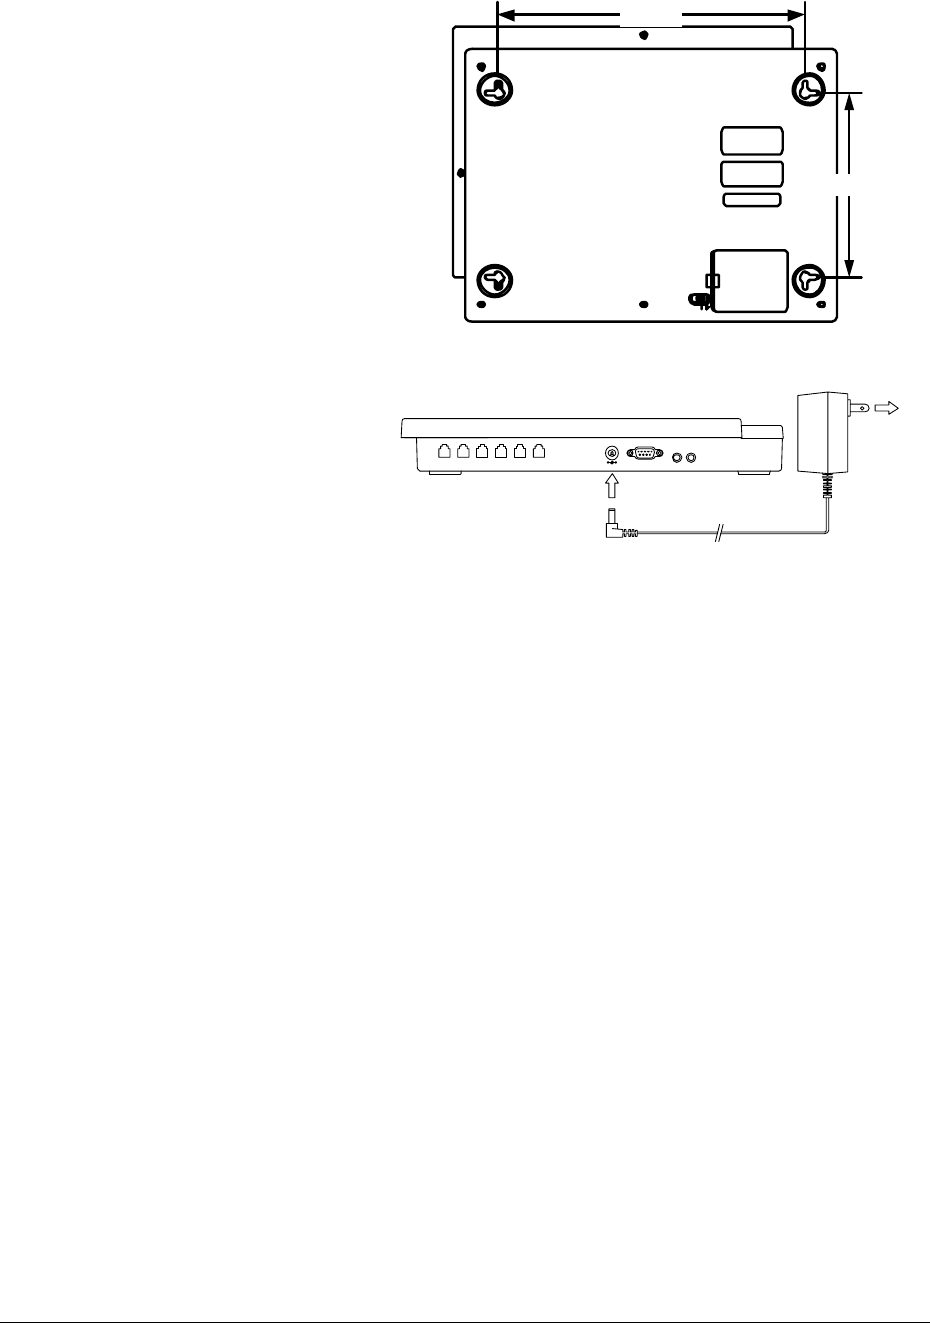
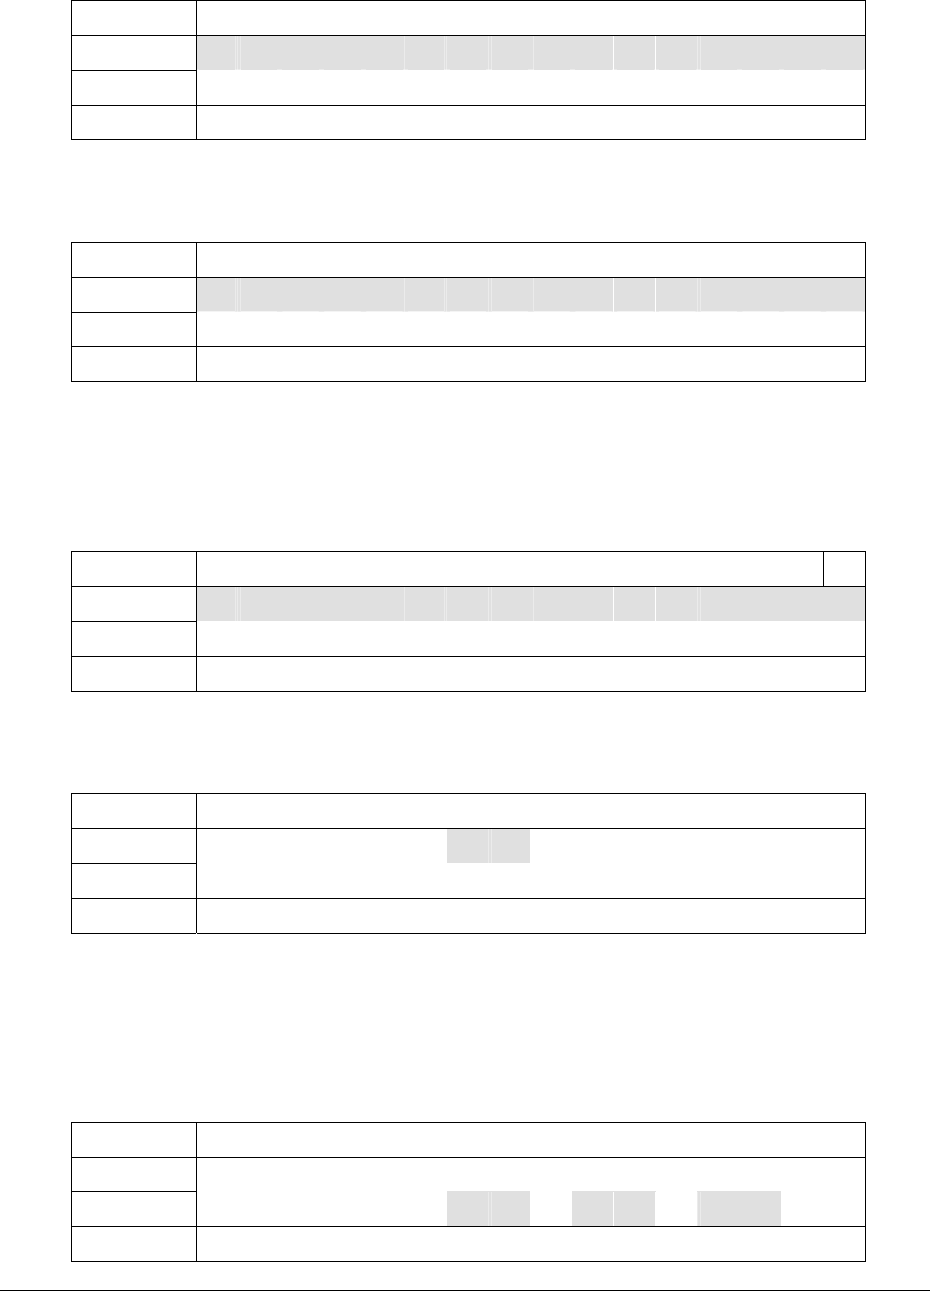
4. It can also be wall mounted by
hooks located at the 4 corners.
(256.0x154.0mm)
Fig. 4: Back View
5. Plug in the power supply (use
9V/1.4A adaptor) and the clock
should come on to indicate that
it is working.
Fig. 5: Power Supply Connection
6. Follow the System Configuration Section for system programming, if necessary.
Charging the Battery
The Base (WMC ER ) should always be kept in the AC power mode. The battery is for
emergency backup only and should always be connected as shown above. The battery
will be fully charged within 24 hours of connection. A fully charged battery can maintain
the system for about 10 minutes after power is lost. See the section under Connection
of Single Line Phone for Power Failure Transfer.
Connection of Telephone Line
1. Telephone lines are connected to the Line ports of the Base.
2. Telephone lines can be connected to any of the Line1, Line2 or Line3 ports.
3. If less than 3 Telephone lines are being connected, those unconnected Lines should
be programmed so as not to be used in System Configuration.
Connection of External MOH (Music on Hold)
The specifications of external MOH Audio input are:
Input Impedance = 47kohm
Input Level = Nominal 50mV

Circle Communication Products, Inc
2.4G Cordless Telephone System configuration guide
Page 10
Maximum Input = 1 Vrms
Phone Jack = 3.5mm mono or stereo jack
A sound source such as a Radio or CD Player can be connected to the Audio-In connector
of the Base to provide music on hold as an option to the built-in internal MOH generator.
Connection of Paging System (option)
The specifications of paging Audio Output are:
Output level = Approx. 500mV at 47 k ohm load impedance
Phone Jack = 3.5mm mono or stereo jack
You can connect the paging port in the Main Control Base to a PA system using an audio
cable to make a voice announcement using the system’s extensions.
Connection of Single Line Phone for Power
Failure Transfer (option)
A maximum of 3 sets of Corded phones can be connected to the Main Control Base phone1,
2 and 3 ports. The three line ports can be automatically transferred to the corresponding
corded phones connected to the three phone ports during a power failure. Any of these
phones can be used as a normal single line phone for emergency calls.
Software Installation
Software Installation Requirements:
1. System Programming Software CDROM is included in the packing.
2. System Programming Software requires an IBM – Pentium 100M Personal Computer
with Window 98 (or above) operating system. Minimum Ram requirement is 128M Byte.
Software Installation Procedures
1. Boot up the PC in Window environment.
2. Put the System Programming CDROM into the CDROM drive.(e.g. D drive).
3. The CDROM will auto start, or
use the Window File Explore, go to D: and run setup.exe, or
use Desktop ’Start’, then ‘Run’, type D: \setup.exe.
Wait until the installation is finished.

Circle Communication Products, Inc
2.4G Cordless Telephone System configuration guide
Page 11
Call Features Descriptions
Auto Attendance (AA)
Description This feature is useful to back up the operator in receiving
incoming calls. When the operator is unavailable, incoming
calls will be forwarded to the voice mail system. The outside
caller can press an extension number to call a desired
extension or leave a message after a beep tone.
Conditions Extension 0 is the default location of the system operator.
This feature should be activated at extension ‘0’ for the
system by pressing the AA button.
When the called extension is not set call forward to voice
mail, the outside caller will leave message in extension “0”.
Setting Call features configuration 3.2 &User Guide’s Feature
Operation.
Automatic Call Distribution
Description An incoming call can be distributed to ring the desired
extensions in turn automatically. The feature is very useful in
Help Desk or Call Center operation.
Conditions For example, if extension 0, 2 and 5 are programmed to ring,
then the 1st incoming call will ring port 0 only, the 2nd incoming
call will ring port 2 only and so on. If port 2 is busy, then the
next extension port, which is 5, will be rung.
The distribution algorithm can be Longest idle first or Circular
Hunt.
Setting Call features configuration 2.2.1.3 & 2.2.4
Automatic Recall
Description After the recall time-out, the extension putting a call on hold
or transferring a call to a no answer extension will be
recalled. The recall time is programmable from 10 sec. to 90
sec. in steps of 10 sec.
Conditions Off hook prior to the start of recall cancels this operation.
Setting Call features configuration 5.2.2

Circle Communication Products, Inc
2.4G Cordless Telephone System configuration guide
Page 12
Call Forward, All Calls
Description All incoming calls will be forwarded to the desired extension
immediately. All calls will be redirected to the forwarded
number.
Conditions The extension will not receive any incoming call.
Setting User Guide’s Feature Operation. (MenutCall Setting)
Call Forward, Busy
Description When the extension is off hook, incoming calls will be
forwarded to the desired extension immediately.
Conditions Incoming calls will only be forwarded to the desired extension
under busy condition.
Setting User Guide’s Feature Operation. (MenutCall Setting)
Call Forward, Busy or No Answer
Description When the extension is off hook or not answering for a period,
incoming calls will be forwarded to the desired extension.
Conditions When the extension is off hook, incoming calls will be
forwarded to the desired extension immediately.
When the extension is not answering for a preset time limit,
incoming calls will be forwarded to the desired extension.
Setting User Guide’s Feature Operation. (MenutCall Setting)
Call Forward, No Answer
Description When the extension is not answering for a period, incoming
calls will be forwarded to the desired extension.
Conditions When the extension is not answering for a preset time limit,
incoming calls will be forwarded to the desired extension.
Setting User Guide’s Feature Operation. (MenutCall Setting)
Call Forward, to External Line
Description An external number can be set as the forwarded number
(destination) in all call forward modes for an internal call.
Conditions Call forward operation complies with the conditions of the call
forward modes. This feature is subjected to a time limit for

Circle Communication Products, Inc
2.4G Cordless Telephone System configuration guide
Page 13
the conversation.
Setting User Guide’s Feature Operation. (MenutCall Setting)
Call Forward, to Voice Mail
Description Voice mail service can be set as a forwarded number
(destination) in all call forward modes.
Conditions Call forward operation complies with the conditions of the call
forward modes.
Setting User Guide’s Feature Operation. (MenutCall Setting)
Call Hold, Normal
Description By pressing the HOLD button, the call in progress can be put
in the common hold condition. The call can be picked up
again at any extension or transferred to another extension by
making an intercom call.
Conditions If a call on hold is not retrieved in a specified period, the
system will automatically recall the extension user.
Call Hold, Exclusive
Description By pressing the CONF button, the call in progress can be put
into the exclusive hold condition. The call can only be picked
up again at the same extension. When time out occurs, the
exclusive hold condition will change to common hold
condition and can be picked up at any extension.
Conditions If a call on hold is not retrieved in a specified period, the
system will automatically recall the extension user.
Call Log
Description Call Log detail is available if call logging is desired..
Conditions This includes all incoming & outgoing.
Connect the serial cable provided to the RS232-C serial port
of the computer. The Call Log can be activated with the
Windows based software provided.
Setting PC programming, the system call log

Circle Communication Products, Inc
2.4G Cordless Telephone System configuration guide
Page 14
Call Paging
Description Paging allows you to make a voice announcement through a
PA system via the paging port of the main control base.
Setting It is optional. To Connection of the Paging Port to a PA
system use an audio cable with a 3.5mm plug.
Call Pickup, Line
Description By pressing the PICK button, any extension can answer an
incoming line even if the call is not ringing that extension.
Call Pickup, Extension
Description By pressing the PICK button, any extension can pick up a
call ringing at another extension.
Call Transfer, Line Call
Description An external incoming call from an external line can be
transferred from the first answering extension to another
extension.
Conditions When an extension is on a line call, first call the destination
extension number and then go on-hook and it will activate
ring-inward transfer automatically.
Operation See User Guide’s Feature Operation for details.
Call Transfer, Intercom Call
Description An intercom call can be transferred from the first answering
extension to another extension.
Conditions The same operation as call transfer, line call.
Conference
Description The system supports a three party conference call. Each
conference call can include up to 2 lines. During a two party
conversation, the extension user can add a third party to
their conversation, hence establishing a conference.
Conditions The combinations of conference call are:
2 internal extensions and 1 line

Circle Communication Products, Inc
2.4G Cordless Telephone System configuration guide
Page 15
1 internal extension and 2 lines.
The system can only facilitate one conference call at a time
Operation See User Guide’s Feature Operation for details.
Dial Type Selection
Description The system allows users to select the desired dialing mode:
pulse or tone.
Setting call features configuration 1.4
Digital Volume Control
Description The ringing and receiving volumes can be controlled
individually with discrete levels.
Setting User Guide’s Feature Operation.(MenutPhone
SettingtRinger)
Direct In Lines (DIL)
Description The system directs incoming calls from line to one or more
answering extensions.
Conditions When the Auto-attendance feature is activated, incoming
calls from line can also be directed to the voice mail system
for auto-attendant service.
Display
Description On the extension, the following information can be shown:
extension number and name, dialed telephone number,
number or name of the extension owner, line number, call
duration, time and date.
Do Not Disturb (DND)
Description An extension user except extension ‘0’ can set the Do Not
Disturb feature to reject incoming calls.
Conditions By activating the Do Not Disturb feature, any incoming
exchange line or internal calls will be directed to a
pre-assigned extension 0.
DND cancels any Call Forward feature currently set.

Circle Communication Products, Inc
2.4G Cordless Telephone System configuration guide
Page 16
DP to MF conversion
Description By pressing the [*] button in conversation mode, an
extension can change the dialing signal from dial pulse to
MF in subsequent dialing. The dialing signal will return to
dial pulse after the call is finished.
End-to-End Signaling
Description After making an outgoing call, the calling extension can
continue sending tone (MF) signal to the called party in order
to access various facilities provided by the called party such
as tele-banking service.
Flash Function
Description Flashing time of system can be programmed from 50 ms. to
950 ms. in step of 50 ms.
Conditions It is available at Desktop extension (WDE ER ).
Setting call features configuration 5.3.1
Hands free Operation
Description With the hands free feature phone, the user can make and
receive calls with hands free operation. Besides, the user
can turn the microphone on and off (mute) during hands free
operation.
Headset Operation
Description With the headset connected to the extension, the user can
make and receive calls with the headset.
Condition It is optional. A headset jack is available on the side of the
extension.
Idle Line Automatic Selection
Description An idle line will be accessed in ascending order
automatically:
by picking up the handset or by pressing the Speaker key on
the desktop phone (WDE ER )

Circle Communication Products, Inc
2.4G Cordless Telephone System configuration guide
Page 17
or press Talk or the Speaker Key on the handheld phone
(WHE ER ).
Intercom to Line Forwarding
Description When an extension receives an intercom call, the call can be
transferred to an external destination such as a mobile
phone.
Conditions The destination number should be pre-stored. It works for
Extension 1 to 9.
Setting User Guide’s Feature Operation. (MenutCall Setting)
Last Number Redial
Description The last outgoing calls telephone number is stored in the
system and it can be recalled by pressing the redial key.
Line Assignment
Description A line port in the system can be enabled or disabled.
Setting call features configuration 2.2
Line or Extension Camp On
Description An extension can camp on a busy line or busy extension.
Connection will be established once the called party and the
calling party are idle.
Operation See User Guide’s Feature Operation for details.
Line-to-Line Forwarding
Description An incoming call on a pre-defined line can be automatically
transferred to an external destination.
Conditions The incoming and outgoing line having this feature is
programmable and the destination number should be
pre-stored.
It can only be set at extension 0.
Setting call features configuration 2.4

Circle Communication Products, Inc
2.4G Cordless Telephone System configuration guide
Page 18
Music on Hold
Description Either internal or external music-on-hold will be provided for
any calls on hold.
Conditions No additional system hardware is required for connecting
external music-on-hold. The customer has only to provide
the desired music source such as a music player or radio.
Setting Connection of External MOH for external music on hold.
Memo Recording
Description This function allows the user to record memos during
conversation and save them for playback later.
Conditions The phone must be in the conversation mode.
The memo recording is counted as a conference call.
Operation See User Guide’s Feature Operation for details.
New Call indication
Description When there is any new unanswered call, the New Call
indicator light will come on.
Conditions The indicator light is available on the Desktop Phone (WDE
ER ) only.
The light is off when the user browses the call history.
Night Service
Description The System can be changed between day and night modes
as required. The incoming signal can be programmed
accordingly in the Day and Night mode.
Conditions Day and night modes can be changed automatically
according to the Night mode start and end time.
Or it can be changed manually at extension 0 as desired.
Setting call features configuration 2.1

Circle Communication Products, Inc
2.4G Cordless Telephone System configuration guide
Page 19
On-Hook Dialing
Description Extension can make an outgoing call in speaker mode. If the
handset is lifted when the called party answers, the system
will change the talk path to handset from the speaker.
Pause Insertion
Description A pause can be inserted into the pre-dialing mode when
needed.
Conditions The pause time is programmable from 0.5 sec.to 4.5 sec. in
steps of 0.5 sec.
Setting call features configuration 5.3.2
Power Failure Transfer
Description During power failure condition, telephone lines 1, 2 and 3 will
be automatically connected to the corresponding single line
phones (option).
Condition A maximum of 3 sets of Corded phones can be connected to
the Main Control Base . Any of these can be used as a
normal single line phone for emergency calls.
Real Time Clock Programming
Description The System provides a real time clock (RTC) on the display,
which is programmed as part of the system programming.
Conditions RTC is programmed by the extension ‘0’ and can be set
automatically and adjusted from the incoming valid Caller ID
signal.
Setting call features configuration 1.1

Circle Communication Products, Inc
2.4G Cordless Telephone System configuration guide
Page 20
Toll Restriction Code
Description Restricted codes can be set in the system to bar restricted
extensions from dialing.
Conditions The individual extension can be configured to be restricted
from dialing certain numbers, e.g. Toll Call access codes.
Three sets of code can be set restricted.
The restricted extensions will require the input of a password
as set for making calls in the Toll Restricted Codes on the list
everytime the extension user wants to make such a call.
Setting call features configuration 2.5.1 & 2.5.2
Toll Call Security Code
Description An extension can be permitted to Toll access as set by
entering a 4-digit security code before dialing.
Setting call features configuration 2.5.3
Circle Communication Products, Inc
2.4G Cordless Telephone System configuration guide
Page 21
Call Features Configuration
1) Call Features Configuration by Computer (see
PC Programming guide)
2) Call Features Configuration by Handset
Start Call Features Configuration
System configuration can be programmed at the Extension 0.
1. Press the MENU Button and press up/down arrow to select “system config”.
2. Press the soft key “SELECT” to confirm. The system will download the data to the
extension.
1st Row < M A I N M E N U >
2nd Row r e g i s t e r
3rd Row s y s t e m c o n f i g
4th Row B A C K S E L E C T
Prompt for password if Password Enabled, Press OK to confirm.
Password setting : see system configuration 1.5.
1st Row P a s s w o r d R e q u i r e
2nd Row
3rd Row p a s s w o r d : * *
4th Row B A C K D E L O K
3. Set up the required application via the user friendly Main Menu & its Sub Menu.
Main Menu
1st Row < S y s t e m C o n f i g >
b a s i c s e t u p
a d v a n c e d s e t u p
v o i c e m a i l / a a
h a n d s e t m a n a g e
2nd/3rd
Row
t e c h n i c a l
4th Row B A C K S E L E C T
Press up/down arrow to select and press “Select” to confirm

Circle Communication Products, Inc
2.4G Cordless Telephone System configuration guide
Page 22
4. When you finish all required setting, press the soft key “BACK” until the screen appears
as shown below :
1st Row
2nd Row S u r e t o E x i t ?
3rd Row
4th Row N o Y e s
1st Row S a v e t h e n e w
2nd Row s e t t i n g s ?
3rd Row
4th Row N o Y e s
5. You have to select “Yes” to confirm “Exit Setting” and “Save new settings”. Then the new
setting will upload to the Main Control Base. The screen will return to normal when it
completes.
Menu Hierarchy
1. Basic Setup
1.1 Time
1.1.1- Set Time/Date
1.1.2- Set Time Format
1.1.3- Set Date Format
1.1.4- Set Daylight Saving
1.1.5- Set CID update
1.2 Outgoing Call
1.3 Incoming Call
1.4 Tone/Pulse Dialing
1.5 Password
- Set Password Enable/Disable
- Set System Password
2. Advanced Call Features
2.1 Day/Night Mode Selection
2.1.1 Day/Night mode Enable
2.1.2 Night Mode start/end Selection
2.2 Line Mode
2.2.1 Line Selection
2.2.2 Line Mode Selection

Circle Communication Products, Inc
2.4G Cordless Telephone System configuration guide
Page 23
2.2.2.1 Normal (Extension Selection for receiving and making call)
2.2.2.2 Line out only (Extension for making call)
2.2.2.3 Auto Call Distribute (ACD) (Extension Selection for receiving and
making call)
2.2.2.4 Line Disabled
2.3 Line to Line Forward (Forward Number Selection)
2.4 ACD Mode Selection
2.5 Toll restriction
2.5.1 Restricted Extension
2.5.2 Restricted Numbers
2.5.3 Toll Enabled Password
3. Voice Mail
3.1 Voice Mail Setting
3.1.1 Password Change
3.1.2 Max Recording Time
3.1.3 Max Message No
3.1.4 Greeting Time
3.1.5 Sound Level
3.1.6 Silence Detect
3.1.7 Route to AA
3.1.8 Min Duration
3.2 Auto Attendance Setting
3.2.1 Afternoon Mode
3.2.2 AA Timeout
3.2.3 Supervisor Password
4. Handset Management
4.1 Edit User Name
4.2 Delete Extension
5. Technical Setting
5.1 Technical Default
5.2 Call Setting
5.2.1 Call Hold Recall Time
5.2.2 Automatic Call Transfer
5.2.3 Disable Music On Hold
5.3 Restore Factory Default

Circle Communication Products, Inc
2.4G Cordless Telephone System configuration guide
Page 24
System Configuration Menu
Main Menu
1st Row < S y s t e m C o n f i g >
b a s i c s e t u p
a d v a n c e d s e t u p
v o i c e m a i l / a a
h a n d s e t m a n a g e
2nd/3rd
Row
t e c h n i c a l
4th Row B A C K S E L E C T
Press up/down arrow to select and press “Select” to confirm
1 Basic Setup
1st Row < B a s i c S e t u p >
t i m e s e t t i n g
o u t c a l l
i n c a l l
t o n e / p u l s e
2nd/3rd
Row
p a s s w o r d
4th Row B A C K S E L E C T
Press up/down arrow to select and press “Select” to confirm
1.1 TIME
1st Row < T i m e S e t t i n g >
s e t t i m e / d a t e
s e t t i m e f o r m a t
s e t d a t e f o r m a t
d a y l i g h t s a v i n g
2nd/3rd
Row
c i d u p d a t e
4th Row B A C K S E L E C T
1.1.1 Set Time/Date
1st Row S e t t i m e / d a t e
T i m e : 1 1 : 3 0 a m
2nd/3rd D a t e : 0 4 - 1 5 - 2 0 0 3

Circle Communication Products, Inc
2.4G Cordless Telephone System configuration guide
Page 25
Row
W e e k : T u e
4th Row B A C K N E X T O K
Press “NEXT” to change the current field. Press up/down to change value. Press “OK” to
confirm all settings
1.1.2 Set Time Format
1st Row < S e t T i m e F o r m a t
2nd Row 1 ) 1 2 h o u r <
3rd Row 2 ) 2 4 h o u r
4th Row B A C K S E L E C T
“<” show the current status. Press up/down to select and press “SELECT” to confirm.
1.1.3 Set Date Format
1st Row < S e t D a t e F o r m a t
1 ) m m - d d - y y y y <
2 ) m m m - d d - y y y y
3 ) d d - m m - y y y y
2nd/3rd
Row
4 ) d d - m m m - y y y y
4th Row B A C K S E L E C T
“<” show the current status. Press up/down to select and press “SELECT” to confirm.
1.1.4 Set Daylight Saving
1st Row < D a y l i g h t S a v i n g
2nd Row 1 ) o f f <
3rd Row 2 ) o n
4th Row B A C K S E L E C T
“<” show the current status. Press up/down to select and press “SELECT” to confirm.
This sets the clock one hour ahead for daylight savings in some countries.
1.1.5 CID Update
1st Row < C I D U p d a t e >
2nd Row 1 ) o n <
3rd Row 2 ) o f f
4th Row B A C K S E L E C T
“<” show the current status. Press up/down to select and press “SELECT” to confirm.
Incoming calls with caller ID service can automatically update the time and date of system

Circle Communication Products, Inc
2.4G Cordless Telephone System configuration guide
Page 26
clock.
1.2 Outgoing Call
1st Row E x t c a n m a k e
2nd Row c a l l o n a l l l i n e
3rd Row E x t : 0 1 2 3 4 5 6 7 8 9
4th Row B A C K O K
Press 0 to 9 to toggle the extension. Press “OK” to confirm all settings
Default: all extensions can make outgoing call.
1.3 Incoming Call
1st Row E x t w i l l r i n g
2nd Row o n a l l l i n e
3rd Row E x t : 0 1 - 3 4 5 6 7 - -
4th Row B A C K O K
Press 1 to 9 to toggle the extension. The setting will be applied to both day and night mode.
Press “OK” to confirm all settings
Default: all extensions will ring for all incoming calls. Ext 0 should be always ringing.
For both 1.2 & 1.3 , when “OK” is pressed, the following screen shall be appeared to remind
the user that the Advanced Setting will be affected.
1st Row W a r n i n g : A d v a n c e d
2nd Row S e t t i n g w i l l b e
3rd Row a f f e c t e d
4th Row B A C K O K
If “BACK” is pressed, then the change shall be cancelled.
1.4 Tone/Pulse Dialing
1st Row < T o n e / P u l s e >
2nd Row 1 ) t o n e <
3rd Row 2 ) p u l s e
4th Row B A C K S E L E C T
“<” show the current status. Press up/down to select and press “SELECT” to confirm.
It is a dialing mode. Normally the operator offers the tone.
Circle Communication Products, Inc
2.4G Cordless Telephone System configuration guide
Page 27
1.5 Password
1st Row < P a s s w o r d >
2nd Row e n a b l e / d i s a b l e
3rd Row c h a n g e p a s s w o r d
4th Row B A C K S E L E C T
Press up/down arrow to select and press “Select” to confirm
1.5.1 Enable/Disable Password
1st Row < E n a b l e / D i s a b l e >
2nd Row 1 ) o f f <
3rd Row 2 ) o n
4th Row B A C K S E L E C T
“<” show the current status. Press up/down to select and press “SELECT” to confirm. Default:
Password disable (off).
When “on” is selected, the system password is enabled. It is effective when entering the
system configuration by the phone.
1.5.2 Change Password
1st Row P a s s w o r d C h a n g e
2nd Row
3rd Row P a s s w o r d : 1 2 3 4
4th Row B A C K D E L O K
Input 4 digit password when you select Password enabled.
Default: blank
2 Advanced Call Features
1st Row A d v a n c e d S e t u p
d a y / n i g h t m o d e
l i n e m o d e
l i n e - t o - l i n e
a c d o p t i o n s
2nd/3rd
Row
t o l l r e s t r i c t
4th Row B A C K S E L E C T
Press up/down arrow to select and press “Select” to confirm
Circle Communication Products, Inc
2.4G Cordless Telephone System configuration guide
Page 28
2.1 Day/Night mode
1st Row < D a y / N i g h t M o d e >
2nd Row e n a b l e n m
3rd Row n m a u t o m a t i o n
4th Row B A C K S E L E C T
Press up/down arrow to select and press “Select” to confirm
2.1.1 Enable night mode
1st Row < E n a b l e N M >
2nd Row 1 ) o f f <
3rd Row 2 ) o n
4th Row B A C K S E L E C T
If “on” is selected, you can set Day / Night mode manually according to your selection in the
“Menu tCall Setting tDay/Night Mode” via the extension 0, or
if night mode automation (on) is also selected, the system follows the automatic mode.
2.1.2 Night mode Automation
1st Row < N M A u t o m a t i o n >
2nd Row 1 ) o f f <
3rd Row 2 ) o n
4th Row B A C K S E L E C T
If nm automation (on) is selected, then night mode time shall be appeared for setting.
Set Night mode time
1st Row N i g h t M o d e
2nd Row S t a r t : 0 5 : 3 0 p m
3rd Row E n d : 0 8 : 0 0 a m
4th Row B A C K N E X T O K
Press up/down to change value, press next to change field. Press “OK” to confirm all
settings in the fields.
2.2. Line Mode
2.2.1 Line Selection
1st Row L i n e S e l e c T i o n
2nd Row P r e s s 1 , 2 O r 3
3rd Row L i n e : L 1 L 2 L 3
4th Row B A C K O K

Circle Communication Products, Inc
2.4G Cordless Telephone System configuration guide
Page 29
Press 1, 2 or 3 to toggle the Line selected.
Then with the following selection
2.2.2 Line Mode Selection
1st Row < M o d e S e l e C t i o n >
n o r m a l m o d E
l i n e o u t o N l y
c a l l d i s t r I b u t e
2nd/3rd
Row
l i n e d i s a b L e d
4th Row B A C K S E L E C T
Press up/down arrow to select and press “Select” to confirm
2.2.2.1 Normal mode
1st Row E x t w i l l r I n g
2nd Row o n l i n e 1
3rd Row D a y : 0 1 2 3 4 5 6 7 8 9
4th Row B A C K O K
The LCD will show the line no. you selected for extension receiving call. Press 1 to 9 to
toggle extension selection. Ext 0 should be always ringing.
If night mode is enabled that set at “2.1.1”, the extension for both day/night modes are
allowed to select. Press up/down to select the “Day” or “Night”.
Press “OK” to confirm all settings.
Then the LCD will show the next line no. you selected. Repeat same procedure for settings
until you complete all lines you selected.
Press “OK” to confirm all settings and the following screen will appear.
1st Row E x t c a n m a K e
2nd Row c a l l o n l i N e 1
3rd Row E x t : 0 1 2 3 4 5 6 7 8 9
4th Row B A C K O K
Press 1 to 9 to toggle extension selection. Press “OK” to confirm. Repeat same procedure
for settings until you complete all lines you selected.
2.2.2.2 Line out Only
1st Row E x t c a n m a K e
2nd Row c a l l o n l i N e 1
3rd Row E x t : 0 1 2 3 4 5 6 7 8 9

Circle Communication Products, Inc
2.4G Cordless Telephone System configuration guide
Page 30
4th Row B A C K O K
Press 1 to 9 to toggle extension selection. Press “OK” to confirm. Repeat same procedure
for settings until you complete all lines you selected.
2.2.2.3 Call Distribute
1st Row E x t w i l l r I n g
2nd Row o n A C D l i n E
3rd Row D a y : 0 1 2 3 4 5 6 7 8 9
4th Row B A C K O K
If night mode is enabled, then extension selection for both day/night modes is allowed,
otherwise, only “Day” is shown for selection.
Press up/down to select the line Day / Night. Press 1 to 9 to toggle extension selection. Ext 0
should be always ringing.
Press “OK” to confirm all settings and the following screen will appear.
1st Row E x t c a n m a K e
2nd Row c a l l o n A C D l i n e
3rd Row E x t : 0 1 2 3 4 5 6 7 8 9
4th Row B A C K O K
Press 1 to 9 to toggle extension selection. Press “OK” to confirm.
2.2.2.4 Disable Line
1st Row L i n e D i s a b l e d
2nd Row o n
3rd Row L i n e : L 2 L 3
4th Row B A C K O K
Display the selection and let user to press “OK” to confirm.
2.3 Line to Line
1st Row E n t e r F W D n u m b e r
2nd Row
3rd Row
4th Row B A C K D E L O K
Prompt for number and max allowed 32 digits. Press “DEL” for backspace.
Press “OK” to confirm.

Circle Communication Products, Inc
2.4G Cordless Telephone System configuration guide
Page 31
2.4 ACD Options
1st Row < A C D B y >
2nd Row 1 ) l o n g e s t i d l e <
3rd Row 2 ) c i r c u l a r
4th Row B A C K S E L E C T
“<” show the current status. Press up/down to select and press “SELECT” to confirm.
Default: longest idle
2.5 Toll Restriction
1st Row < T o l l R e s t r i c t >
r e s t r i c t e d e x t
r e s t r i c t n u m b e r
2nd/3rd
Row
e n a b l e p a s s w o r d
4th Row B A C K S E L E C T
Press up/down to select.
2.5.1 Restricted Extension
1st Row T o l l R e s t r i c t e d
2nd Row e x t e n s i o n
3rd Row E x t : 0 1 2 3 4 5 6 7 8 9
4th Row B A C K S E L E C T
Press 0 to 9 to toggle the extension. .Press OK to confirm Default: all extensions are
restricted.
The restricted extensions will require the input of a password as set in 2.5.3 for making calls
in the Toll Restricted Codes on the list everytime the extension user wants to make such a
call. (Menu tCall Settingt Make Toll call)
2.5.2 Restricted Number
1st Row R e s t r i c t e d C o d e
S e t 1 : <
S e t 2 :
2nd/3rd
Row
S e t 3 :
4th Row B A C K D E L O K
Three sets of code (e.g. Toll Call Access code) can be set restricted. Press up/down to
select which set to be entered. Input a number of digit not greater than 4. Press “DEL” for

Circle Communication Products, Inc
2.4G Cordless Telephone System configuration guide
Page 32
backspace.
2.5.3 Enable password
1st Row T o l l E n a b l e
2nd Row P a s s w o r d
3rd Row P a s s w o r d :
4th Row B A C K D E L O K
Input a number of digit equal to 4 for password. Press “DEL” for backspace. Blank means
that it does not allow password override.
3 Voice Mail / AA
1st Row < V O I C E M A I L / A A >
2nd Row v o i c e m a i l
3rd Row a u t o a t t e n d a n t
4th Row B A C K S E L E C T
Press up/down arrow to select and press “Select” to confirm
3.1 VOICE MAIL
1st Row < V O I C E M A I L >
p a s s w o r d c h a n g e
m a x r e c o r d t i m e
m a x m e s s a g e N o
g r e e t i n g t i m e
s o u n d l e v e l
s i l e n c e d e t e c t
r o u t e t o a a
2nd/3rd
Row
m i n d u r a t i o n
4th Row B A C K S E L E C T
Press up/down arrow to select and press “Select” to confirm
3.1.1 Password Change
1st Row P a s s w o r d
2nd Row E x t e n s i o n : 0
3rd Row p a s s w o r d :
4th Row B A C K D E L O K
Press up/down arrow to select extension (0-9). Input / edit a number of 4 digit password.

Circle Communication Products, Inc
2.4G Cordless Telephone System configuration guide
Page 33
0000 is reserved for the system. Press “OK” to confirm. There is no default password in
Ex-factory setting.
3.1.2 Max Recording
1st Row M a x R e c o r d i n g
2nd Row T i m e
3rd Row V a l u e : 6 0 s e c <
4th Row B A C K O K
Press up/down arrow to select setting. Press OK to confirm.
Range: 10-240 sec Default: 60 Step size: 10
3.1.3 Max Message Number, per Voice Box
1st Row M a x M e s s a g e N O
2nd Row P e r V o i c e B o x
3rd Row V a l u e : 2 4 0 <
4th Row B A C K O K
Press up/down arrow to select setting. Press OK to confirm.
Range: 20-240 Default: 240 Step size: 20
3.1.4 Max Recording Time for Greeting
1st Row M a x R e c o r d T i m e
2nd Row F o r G r e e t i n g
3rd Row V a l u e : 6 0 s e c <
4th Row B A C K O K
Press up/down arrow to select and press OK to confirm.
Range: 10-120 sec Default: 60 Step size: 10
3.1.5 Announcement Sound Level
1st Row A n n o u n c e m e n T
2nd Row S o u n d L e v e l
3rd Row V a l u e : 1 3 <
4th Row B A C K O K
Press up/down arrow to select setting. Press OK to confirm.
Range: 0-31 sec Default: 13 Step size: 1
3.1.6 Silence detect
1st Row S i l e n c e d e t e c t
2nd Row 1 ) o f f <

Circle Communication Products, Inc
2.4G Cordless Telephone System configuration guide
Page 34
3rd Row 2 ) o n
4th Row B A C K O K
Press up/down arrow to select setting. Press OK to confirm.
When “on’ is selected, recording will be stopped when 6 seconds of silence is detected.
3.1.7 Route to AA
1st Row < R o u t e t o A A >
2nd Row 1 ) o f f <
3rd Row 2 ) o n
4th Row B A C K O K
Press up/down arrow to select setting. Press “OK” to confirm.
When ‘on’ is selected, after a caller has listened to the personal greeting message and in
addition to leaving a message, he/she can press the [0] key to go back to auto attendant for
selecting other extensions.
3.1.8 Min Message Duration
1st Row M i n M e s s a g e
2nd Row D u r A t i o n
3rd Row V a l U e : 3 s e c <
4th Row B A C K O K
Press up/down arrow to select setting. Press OK to confirm.
Range: 1-8 sec Default: 3 Step size: 1
3.2 Auto Attendant
1st Row < A u T o A t t e n d a n t >
a f t E r n o o n m o d e
a a T i m e o u t
2nd/3rd
Row
s u p E r p a s s w o r d
4th Row B A C K S E L E C T
Press up/down arrow to select setting. Press “Select” to confirm
3.2.1 Afternoon mode
1st Row < A f T e r n o o n M o d e >
2nd Row 1 ) O f f <
3rd Row 2 ) O n
4th Row B A C K O K
Press up/down arrow to select setting. Press “OK” to confirm.

Circle Communication Products, Inc
2.4G Cordless Telephone System configuration guide
Page 35
If you have enabled this function, the afternoon greeting will be activated automatically at
12:00. (Note : an afternoon greeting should be recorded for this feature.)
3.2.2 Announcement Silent Timeout
1st Row A n n O u c e m e n t
2nd Row S i l E n t T i m e o u t
3rd Row V a l U e : 5 s e c <
4th Row B A C K O K
Press up/down arrow to select setting. Press “OK” to confirm.
Range: 1-10 sec Default: 5 Step size: 1
If the caller does not enter an extension within a specified time after announcement, then the
mail box 0 will be opened for the caller to leave a message.
3.2.3 Supervisor Password
1st Row S u p E r v i s o r
2nd Row p a s S w o r d :
3rd Row p a s S w o r d :
4th Row B A C K D E L O K
Input / edit 3 digit password. Press “OK” to confirm..
The System Administrator can use this password enter the administrator menu of the system
from a remote phone call and do some global modifications on voice mail parameters. (see
details in the Configuration Guide – Administration by Phone)
4 Handset Manage
1st Row < H a N d s e t M a n a g e >
2nd Row 1 E d I t U s e r N a m e
3rd Row 2 D e L e t e U s e r
4th Row B A C K S E L E C T
Press up/down arrow to select setting. Press “Select” to confirm.
4.1 Edit User Name
1st Row E d i T U s e r N a m e
2nd Row E x t E n s i o n : 0
3rd Row B O
4th Row B A C K D E L O K
Press up/down arrow to select the extension. Input name by using dial keypad. Press “DEL”
to delete the last word. Press “OK” to confirm when all selected extensions are completed.
Circle Communication Products, Inc
2.4G Cordless Telephone System configuration guide
Page 36
The name is a maximum of 12 alpha numeric characters.
4.2 Delete User
1st Row D e l E t e U s e r
2nd Row E x t E n s i o n : 1
3rd Row A B C
4th Row B A C K D E L
Press up/down arrow to select the extension. Press “DEL” to delete the user.
The handset will become unregistered.
5 Technical Setting
1st Row < T e C H n i c a l >
t e c H d e f a u l t
c a l L s e t t i n g
t e c H s e t t i n g
2nd/3rd
Row
f a c T O r y d e f a u l t
4th Row B A C K S E L E C T
5.1 Restore Technical Default
1st Row R e s T O r e D e f a u l t
2nd Row T e c H N i c a l
3rd Row S e t T I n g ?
4th Row B A C K O K
Press “OK” to confirm. Then the following screen will acknowledge the setting restored.
1st Row T e c H N i c a l
2nd Row S e t T I n g R e s t o r e d
3rd Row
4th Row O K
Press “OK” to return to previous sub-menu.
5.2 Call Setting
1st Row C a l L S e t t i n g
h o l D r e c a l l
a u t O c a l l t x f r
2nd / 3rd
Row
d i s A B l e m o h

Circle Communication Products, Inc
2.4G Cordless Telephone System configuration guide
Page 37
4th Row B A C K S E L E C T
Press up/down to select different menu
5.2.1 Hold Recall Timer
After the call time out, the extension putting a call on hold or transferring a call to a no
answer extension will be recall.
1st Row H o l d R e c a l l
2nd Row H i t U p / d o w n k e y
3rd Row V a l u E : 2 0 S e c <
4th Row B A C K O K
Press up/down arrow to change value.
Range: 10-90 sec Default: 20 Step size: 10
5.2.2 Call Auto Transfer
1st Row < A u t O C a l l T x f r
2nd Row 1 ) o F f
3rd Row 2 ) o N <
4th Row B A C K S E L E C T
Press up/down arrow to change value.
Default: on
When an extension is on a line call, first hold and call the destination extension number and
then go on-hook, it will activate ring-inward transfer automatically. It is not required to press
transfer key.
5.2.3 Music On Hold Disable
1st Row < D i s A b e M O H >
2nd Row 1 ) o F f <
3rd Row 2 ) o N
4th Row B A C K S E L E C T
Press up/down arrow to select “Music On Hold” Off or On.
5.3 Restore Factory Default
1st Row R e s t o r e S e t t i n g s
2nd Row T o F a c t o r y
3rd Row D e f a u l t ?
4th Row B A C K O K

Circle Communication Products, Inc
2.4G Cordless Telephone System configuration guide
Page 38
When “OK” is pressed, the following screen shall be appeared to remind all user
configuration will be erased and restore factory default.
However, the user name & phone book remain the same.
1st Row W a r n i n g :
2nd Row A l l u s e r c o n f i g
3rd Row w i l l b e e r a s e d !
4th Row B A C K O K
If “BACK” is pressed, then the change shall be cancelled.

Circle Communication Products, Inc
2.4G Cordless Telephone System configuration guide
Page 39
Voice Mail Configuration
Introduction
The Interactive Voice Response (IVR) function is a built in feature in the Cordless Telephone
System. It integrates voice mail, auto attendant, and day / night modes solutions. The target
of IVR is to meet all the voice processing requirements in today’s SOHO communications.
The system uses digital recording and non-volatile memory making it advanced, innovative
and reliable equipment.
Features
Voice Mail
Personal Greeting
Time Stamp
Message Waiting Notification
Remote access to mailbox
Menu browse and selection of voice mail
Incoming Call Direct Transfer to Mailbox
Auto Attendant
Operator Backup
Day / Night Mode
Automatic switch Day / Night Mode
Multi-level Interactive Voice Response
Multi-level announcements
Voice message, call Transfer, single digit menu functions
Maximum allowable time for incoming call

Circle Communication Products, Inc
2.4G Cordless Telephone System configuration guide
Page 40
Voice Mail
Related Setting by Computer (See PC programming Guide)
Mailbox
The System provides 10 mailboxes. You can attach any user’s extension to a mailbox. The
mailbox number should be the same as the user’s extension number.
Global Parameters
This defines global parameters for mailboxes. All users should follow these settings.
Silence Detection
When selected, recording will be stopped when 6 seconds of silence is detected.
Setting: See call feature configuration: 3.1.7
Route to Auto Attendant if “0” pressed
After a caller has listened to the personal greeting message, in addition to leaving a
message, he/she can press [0] key to go back to Auto Attendant for calling other extensions
or operator.
Setting: See call feature configuration: 3.1.8
Minimum Message Duration
To prevent message recorded with only a busy tone (e. g. the caller hangs up the line
immediately after greeting) or silence, any message less than 3 seconds (default) will not be
stored. Nor will the message waiting acknowledgment be activated in this case. The
programming option for this parameter is from 0 (no minimum message feature) to 10
seconds.
Setting: See call feature configuration: 3.1.6
Other Voice Mail Features
Message with Time Stamp
A record of a message’s creation date and time can be heard prior to message playback. For
example, the message will be announced as ‘Message one, Sunday, Ten, Twenty Two PM’,
and then the voice message will be played.

Circle Communication Products, Inc
2.4G Cordless Telephone System configuration guide
Page 41
Password for Every Mailbox
Every mailbox has a 4-digit password and the user can modify it at any time at his/her
extension (MenutVoicemailtPassword). There is no default password in Ex-factory setting
and the user has to created password. [0000] is reserved for the system.
If the password is forgotten, it can be changed and reviewed by the System Configuration.
Setting : See call feature configuration: 3.1.1
Personal Greeting and Name
You can record a personal greeting for your mailbox with your own voice to prompt a caller to
leave a message in your mailbox.
If you don’t want a personal greeting, you can record just your name. Then your name will be
played each time when your mailbox is opened.
The priority is higher for the personal greeting over the name if both are recorded.
A system greeting will be played if no personal greeting or name is recorded.
Setting: use the extension to call into the system directly by pressing the Voice Mail key on
the WDE ER or the soft key VM on the WHE ER when the voice mail indicator is off. (see
fig. 17 Mailbox Greeting Recording flow for details)
Message Playback Function
When there is a new message or a memo in a mailbox, the voice mail indicator of that
extension will be turned on. (voice mail key for WDE ER and “MW” icon for WHE ER ’s
LCD).
A user can preview the voice mail list for caller information, such as date and time of the call.
The user can choose which mail to listen to first. (Menu tVoicemailtBrowse Mode
tall/new memo/all memo/new voice mail/all voice mail/filter/greeting).
Or the user can use the extension to call into the system directly by pressing the Voice Mail
key on the WDE ER or the soft key VM on the WHE ER .
During playback, a user can go to the next message, repeat a message, delete a message
and/or delete all old messages. (see fig. 16 user retrieves messages flow for details)

Circle Communication Products, Inc
2.4G Cordless Telephone System configuration guide
Page 42
Operation Key
Go to next message 3
Repeat current message 2
Delete current message Double 0
Delete all old messages Double 8
Message Copying
The system can copy a message from your mailbox to another mailbox in 2 ways:
a. When you have listened to a message, you can copy this message to another mailbox.
The system will ask you for a mailbox number.
b. You can also setup the system to copy every incoming message to another mailbox (e.
g. executive and assistant pair). In this case, you need to input the destination mailbox
number first in user menu. For user menu details, please refer to the section
‘Administration by Phone’.
Setting: see Fig. 18 Set Message Copy flow.
Remote Access
c. Mailbox can be accessed remotely. During personal greeting, user can press [**] and
then the password, to access the user menu remotely. For user menu details, please
refer to the section ‘Administration by Phone’.
Remark: If a mailbox has no password, the remote access feature of that mailbox is disabled
for security.
Verification of Voice Mail Setup
Leave a Message
1. To test the operation of leaving a message (by a guest) in voice mail service, use
another extension or external line to call to a busy or no answer extension. For
example, extension X is the owner of mailbox X.
2. Let the call being forwarded to system from extension X (i. e., keep extension X busy or
no answer to invoke the busy or no answer call forward to voice mail).
3. Now the system should answer the incoming call.
4. The System should open the mailbox X automatically. The calling party can now leave
a message to the mailbox owner X and then hang up.
5. The System will send the new message signal to the extension X to indicate that there
is a new message in X mailbox and turn on the Voice Mail indicator (voice mail key for
WDE ER and “MW” icon for WHE ER ’s LCD).
Retrieve a Message
1. To test the operation of retrieving a message (by mailbox owner) in voice mail service,
first record a message. See the above section “Leave a Message”.
2. Afterwards, use extension X to call into the system directly by pressing the Voice Mail
key on the WDE ER or the soft key VM on the WHE ER .
3. Now the system should answer the incoming call.
Circle Communication Products, Inc
2.4G Cordless Telephone System configuration guide
Page 43
4. The System should open the user menu of mailbox X for message checking.
5. Listen to the new message. After the message is played, hang up.
6. The System will send the new message signal to the extension X to indicate that there
is no new message in mailbox X and turn off the Voice Mail Indicator.
Retrieve a Message Remotely
1. To test the operation of retrieving a message (e. g. mailbox owner is at home) by an
external line in voice mail service, first record a message. See the section “Leave a
Message”.
2. Afterwards, use an external line to call inside the system.
3. Now the system should answer the incoming call.
4. Press [**] when a welcome greeting is playing, the system will ask the caller for a
mailbox number and password. Enter X plus the correct password and then the system
will open the user menu of mailbox X.
5. Listen to the new message. After the message has played, hang up.
6. The System will send the new message signal to the extension X to indicate that there
is no new message in mailbox X and turn off the Voice Mail Indicator..
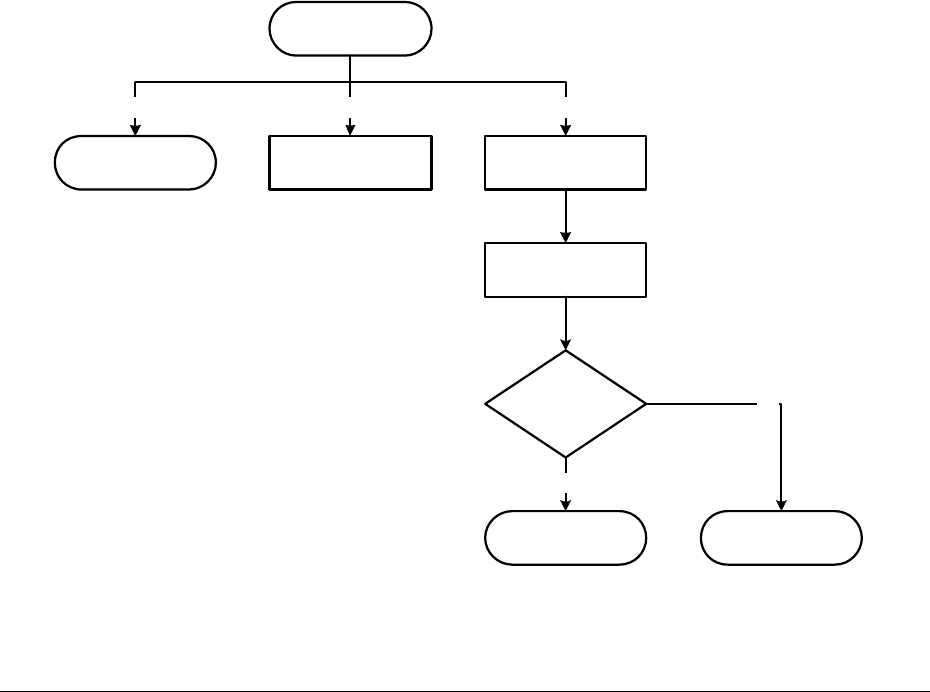
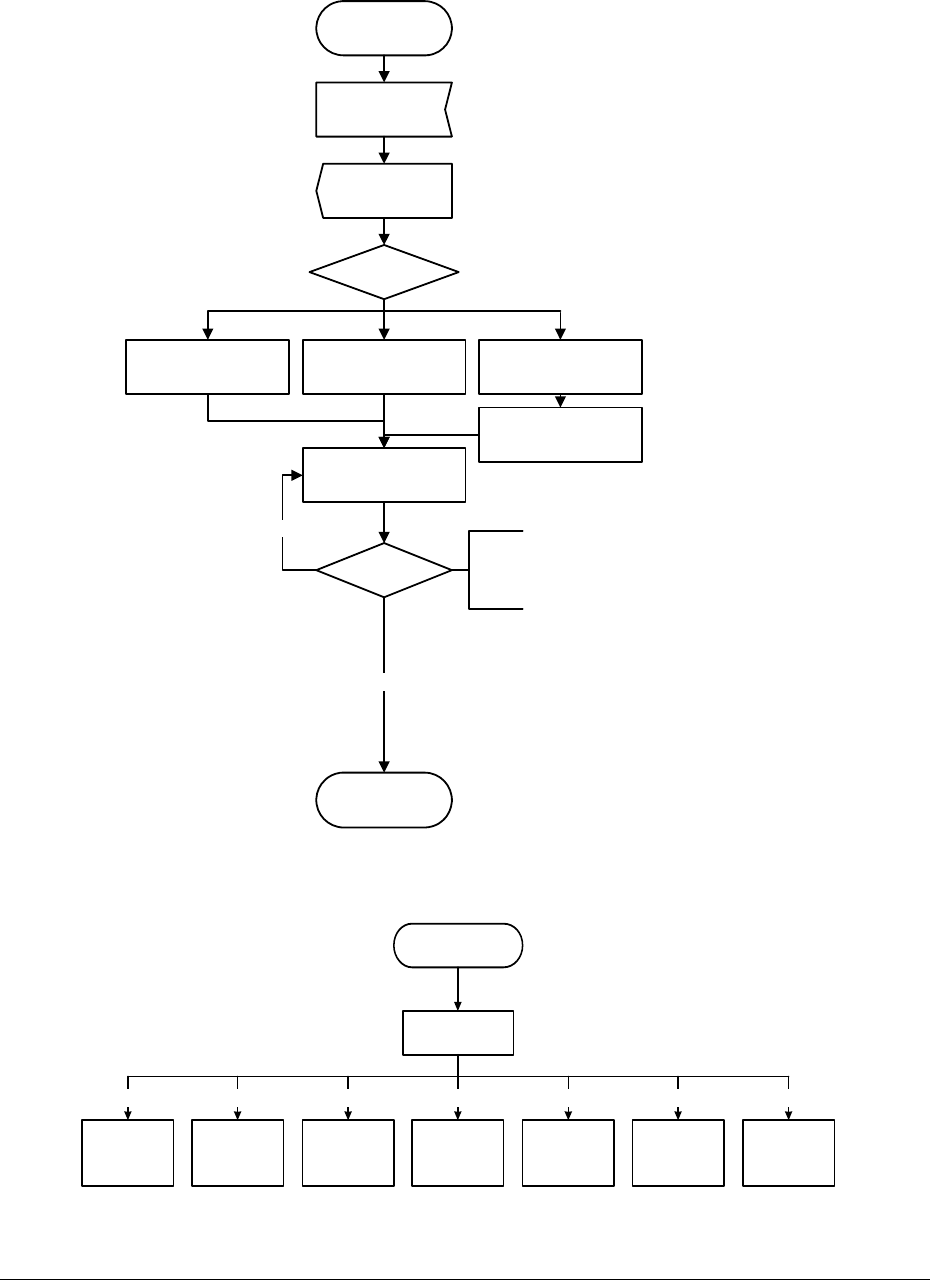
Voice Mail Operation Flow
Caller Leaves a Message
System greeting or
user's personal
greeting
System Greeting Remote Access recording
[0] [**] No Input
Recording Finish and
Disconnect
Check if message
is longer than
minimum message
duration
Store message and
send message waiting
signal
Yes
Abort Message
No
Fig. 6 Leave a Message
Circle Communication Products, Inc
2.4G Cordless Telephone System configuration guide
Page 44
User Retrieves Messages
Message Retrieval
Select service
Enter
Password
Echo Number
of messages in
mailbox
3. Listen to Next
Message
Quit and
Disconnect
2. Repeat Current
Message
Message Playback
Select
Operation
2. Repeat this message
3. Listen to next message
6. Copy current message to another mailbox
00. Delete this message
88. Delete all old messages
6. Copy current
message to another
mailbox
2, 3, 00
88 or no new message
Input a mailbox
number
Fig. 7: Retrieve Messages
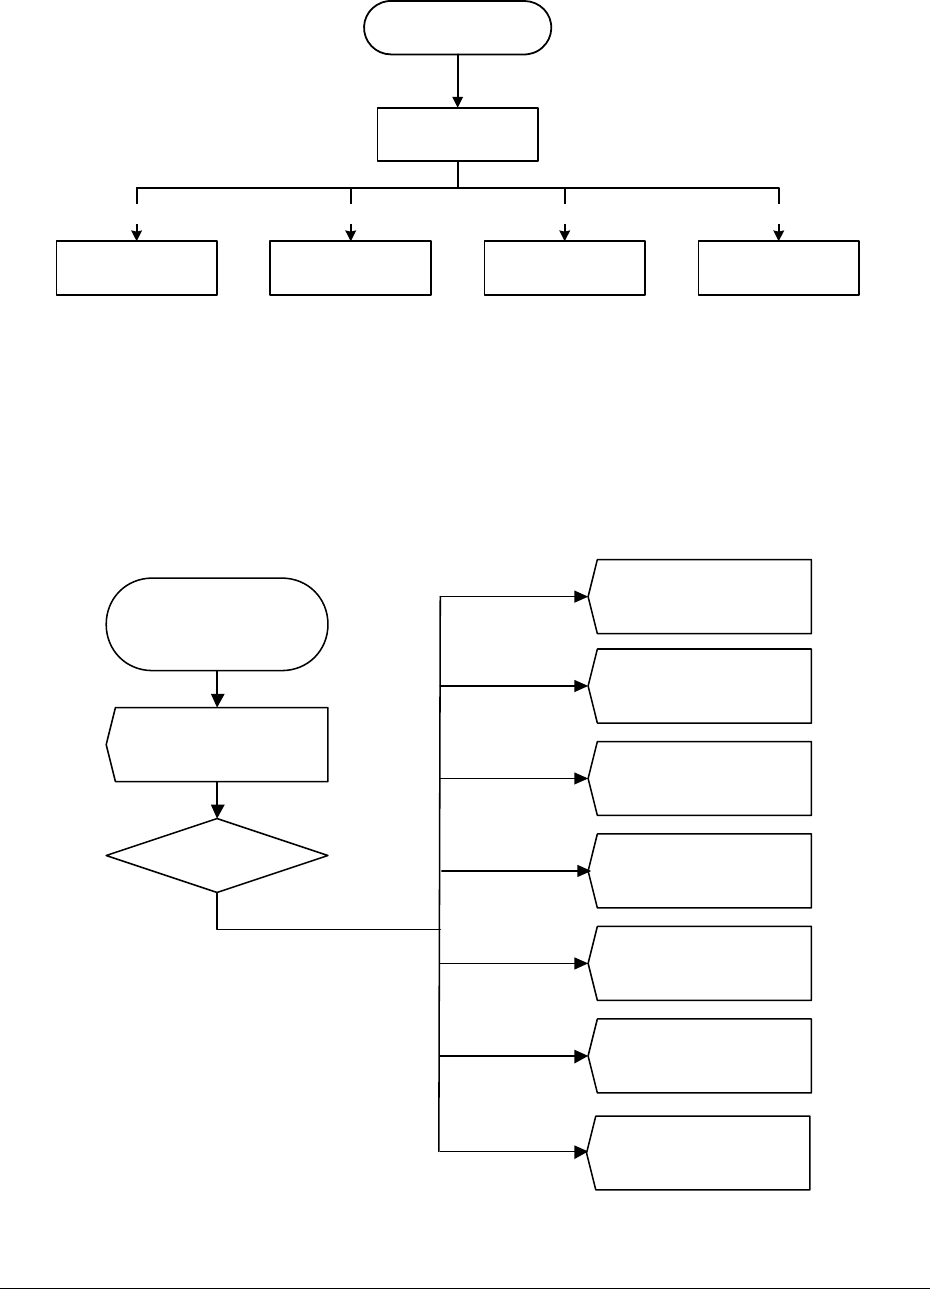
Mailbox Greeting Recording
Delete Personal
Greeting (Restore
to S ys te m De fault
Mailbox Greeting)
Listen to Personal
Greeting
Record Personal
Greeting Record Name
From User Menu,
press [5] to change
Personal Greeting
Personal Greeting
Menu
[3][2][1]
Listen to Name
Delete Name
(Restore to S ystem
Default Mailbox
Greeting)
End
[4] [5] [6] [*]
Fig. 8: Personal Greeting and Name Recording
Circle Communication Products, Inc
2.4G Cordless Telephone System configuration guide
Page 45
Set Auto Message Copy
Input Auto Message
Copy Mailbox Number
Enable Auto Message
Copy
Disable Auto Message
Copy End
From User Menu, press [8]
to set Message Copy
Message Copy Menu
[*][5][3][1]
Fig. 9: Set Message Copy
Administration by Phone
There are 2 levels of administration provided by system user level and administrator level.
By a phone call, provided the system is in Auto attendant mode, user or administrator can
change some parameters in the system.
User Level
3. Play Messages
(see Retrieves
message flow)
4. Change Memo
1. play memo
7. record memo
*. End
5. Change Personal
greeting
(see M ailbox Greeting
Recording Flow)
6. Change Password
8. Set Message Copy
(see Set Auto
Message Copy Flow)
*. End
Enter User Menu by
pressing [**] when
greeting is playing
Enter Mailbox
Number and
Password
Select Service
##XXX
Administrator’s
Menu
Fig. 10: User’s Menu

Circle Communication Products, Inc
2.4G Cordless Telephone System configuration guide
Page 46
There is a user menu providing selections to the normal mailbox user. Most of the selections
are related to mailbox customization. Hence, the mailbox owner can control their mailbox by
a phone call remotely.
Mailbox owners can call directly to the system by accessing the voice prompt ((Menu tvoice
mailtvoice prompt). They will be asked for a password and then the user menu will be
opened directly
Administrator Level
The Administrator Menu is designed for both the system installer and the system
administrator. The Administrator can enter this menu by a phone call and do some global
modifications on system parameters. For example, make a change to the Auto Attendant
greeting and recording.
To enter the administrator menu, the caller can press [## plus the supervisor password, the
default setting of 000, see call feature configuration 3.2.3] while the Auto Attendant greeting
or announcement box 07 greeting is playing.
Fig. 11: Administrator’s Menu
[1]
Day Greeting
(00 Box)
[2]
Night G reeting
(01 Box)
[5]
Afternoon Greeting
(04 Box)
[6]
Music on Hold
(05 Box)
[7]
O ther IV R Greeting
(06 - 49 Box)
[*]
Finish and Hang Up
Enter Administrator Menu
by pr essi ng [## xxx]
when Auto Attendant greeting or
07 box greeting
or user menu is playing
Select Service
Input IVR
Box No.
(00 - 49)
[7] Record
[8] Play
[0] Delete
[*] Go back to Select Service Menu
[7] Record
[8] Play
[0] Delete
[*] Go back to Select Service Menu
[7] Record
[8] Play
[0] Delete
[* ] Go back to Select Service Menu
[7] R ec ord
[8] Play
[0] Delete
[*] Go back to Select Service Men
u
[7] Record
[8] Play
[0] Delete
[*] Go back to Select Service Menu

Circle Communication Products, Inc
2.4G Cordless Telephone System configuration guide
Page 47
Auto Attendant
Day / Night / Afternoon
The Auto Attendant has several modes of operation. The System can be programmed to
have either “Day, Night or Afternoon modes”. The Day and Night modes have two
parameters: greeting and operator number. In day mode, there is day greeting (or normal
company greeting) and day operator number for Auto Attendant operation. There is also a
night greeting (or off duty greeting) and a night operator number for off duty hours in Night
mode. The Day / Night mode feature mainly governs the information and response of the
Auto Attendant service.
To provide maximum flexibility, these 3 modes can be changed:
1. automatically according to time defined by user, or
2. manually changed
Day Mode Afternoon Greeting
In normal day mode Auto Attendant operation, you can input 2 greetings: default and
afternoon. If you have enabled this function, the afternoon greeting will be activated
automatically at 12:00 noontime.
For example, ‘Good morning, …’ will be played before 12:00 noontime and ‘Good
afternoon, ……’ will be played after 12:00 noontime.
Setting: see call features configuration 3.2.1
Note: the afternoon greeting should be recorded for this feature.
Time of Silence after Announcement
If the caller does not enter an extension within a specified time after the announcement, then
the mail box 0 of extension 0 will be opened for the caller to leave a message.
Setting: see call features configuration 3.2.2
Auto Switch Day / Night Mode, Day Mode Start Time, Night Mode Start
Time
Day and Night Modes of Auto Attendant are different in their greeting and operator extension.
You can have the system change from Day to Night mode automatically according to a
predefined time (e. g. 6:00 P.M.).
This function automatically has the system respond to incoming calls. For example,
‘Welcome to xxx company, please dial an extension or press [0] for operator assistance’ for
Day Mode operation programmed from 9:00 AM to 6:00 PM; or for calls after 6:00P.M., a

Circle Communication Products, Inc
2.4G Cordless Telephone System configuration guide
Page 48
suitable after hours message can be recorded.
Setting: see call features configuration 2.1
Other Auto Attendant Features
Announcement Message
There are 4 announcements for Auto Attendant feature. Each announcement can have a
maximum recording time of 10 minutes.
Setting see PC programming/System Configuration/Hierarchy3.3.4
The User can record a desired messages to replace the default Auto Attendant messages.
On the other hand, it is unnecessary to record an announcement for night mode and
afternoon mode if they are not activated.
Here is a list of Auto Attendant messages and their meanings:
Announcement
Number
Description Message Example
1 Day Greeting and
Instruction Message
Good morning. This is ABC company.
Please dial an extension or leave a
message after the tone.
2 Night Greeting and
Instruction Message
Thank you for calling ABC Company, we
are closed now, please call again
tomorrow
5 Afternoon Greeting
Message
Good afternoon. This is ABC company.
Please dial an extension or leave a
message after the tone.
6 Message before Music on
Hold (Optional)
Please wait. Your call is being transferred
There are 2 methods to record a customized announcement:
1. Record by a phone call to the system remotely. (see the section “Administration by
phone” for details.)
2. Use an extension telephone to record locally by accessing the voice prompt. (see
the section “Administration by phone” for details.)
3. Use an external music source to record locally via the system configuration by
using a personal computer.

Circle Communication Products, Inc
2.4G Cordless Telephone System configuration guide
Page 49
Auto Attendant features memory Reset
This can be accessed by system programming (see call features configuration 5.4). All the
Auto Attendant features settings will return to their default values without erasing the
announcement.
Note: When factory default setting is restored, the auto-attendant features memory is also
reset.
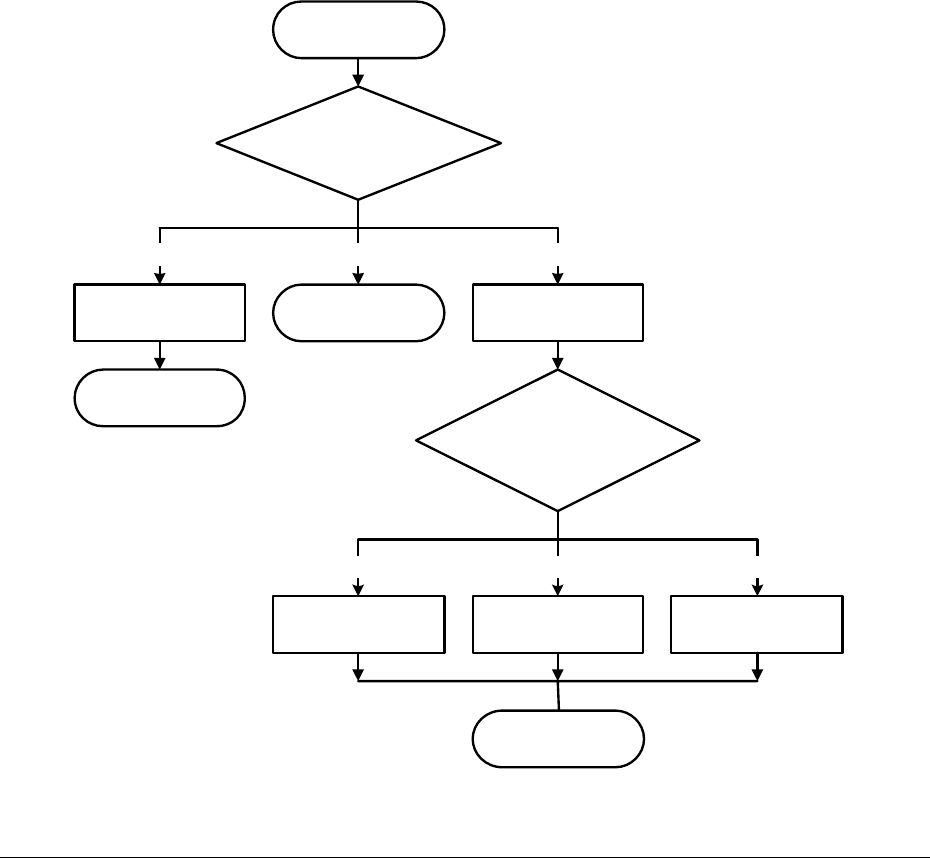
Circle Communication Products, Inc
2.4G Cordless Telephone System configuration guide
Page 50
Multi-level Interactive Voice Response
The Multi-level Interactive Voice Response IVR feature allows the caller to access a function
via a series of key press selections. It can be a voice prompt of a product description, a
message prepared by the system owner, a call transfer option to select a person, a voice
mailbox, etc.
With the Multi-level IVR feature, you can setup your system to provide a customer oriented
voice service. Examples are:
i. Customer service hot line
ii. Company products or services introduction
iii. Auto attendant service with direct call transfer to a person or department
iv. Voice announcement service with multi-language prompts
v. Access to a mailbox directly upon unsuccessful call transfer or in night mode
Here is an example of multi-level IVR call flow:
(07)
Incoming C all
Select L anguage:
1. English
2. Mandarin
3. Cantonese
Call Transfer to
Customer Services
Department Mailbox
Go to product
description menu
[3][2 ][1]
Select Product:
1. Car K it
2. IVR4
3. 5.8G Phone
Car Kit
Product Description 5.8G Phone
Product Description
IVR4
Product Description
[3][2][1]
Call Transfer to Sales
Department, END
Call Transfer to
Operator, END
Record a Message,
END
Fig. 12: Multi-level IVR Call Flow Sample
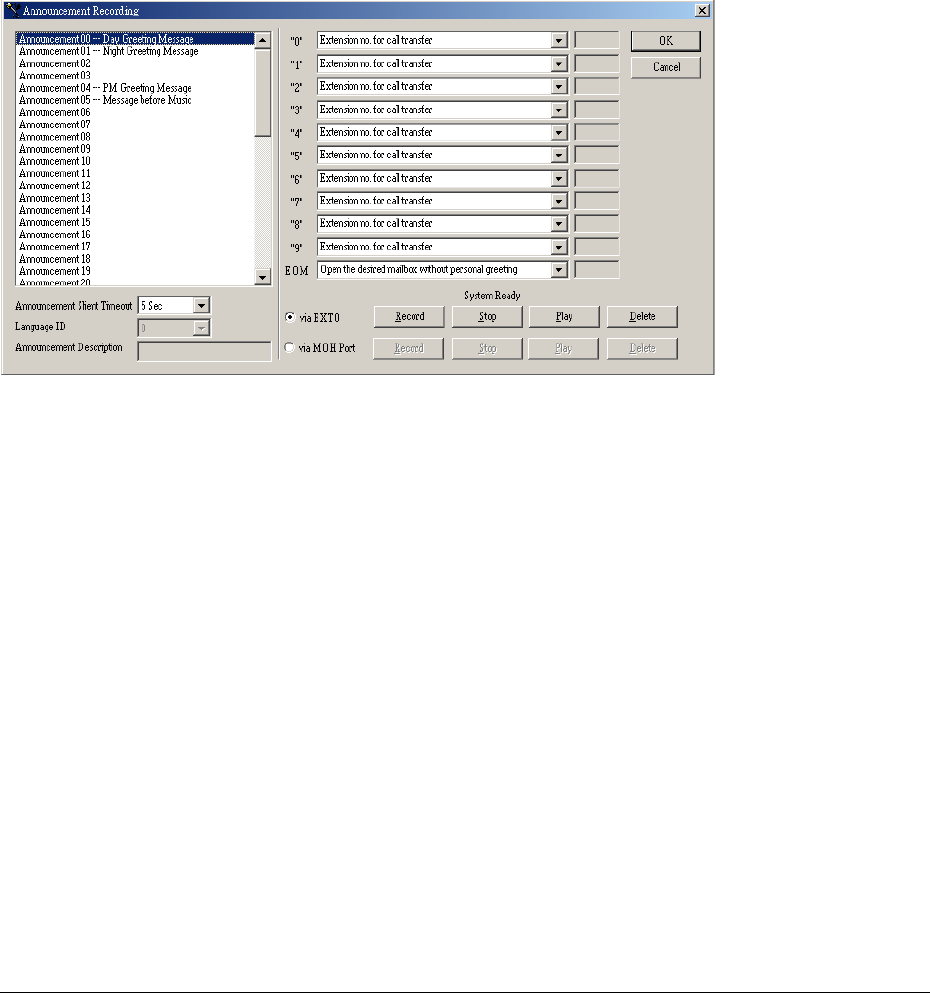
Circle Communication Products, Inc
2.4G Cordless Telephone System configuration guide
Page 51
Configuration of IVR Call Flow
This feature should be set by using PC programming. Before doing the configuration of IVR
call flow, you should have finished the call flow design. It is recommended that you write
down the flow on a piece of paper, so that you have a clear picture of the call flow. This
procedure can prevent a lot of mistakes (such as infinite close looping or long waiting without
termination) in your call flow.
The next step is to program and record every box in your call flow in the system. To start the
procedure, select ‘Announcement Recording’ in System Configuration Bar.
Fig. 13: Configuration Window
There are 3 portions in this Window: announcement selection, functions of announcement
and announcement recording.
Announcement Selection
The announcements represent the boxes of the call flow. There are 50 announcements (00
to 49). You need to put an announcement to each box in your call flow but you don’t need to
have all announcements recorded. Some announcements are just bringing some functions
to your call flow.
An announcement may be a product description box, language selection box, call transfer
box, etc. For each announcement, you can define the waiting time, the language, the
function for each key press, and the function for no key press.
There is also a name field for each announcement. You can put a remark here to help you to
remember the functionality of the announcement.

Circle Communication Products, Inc
2.4G Cordless Telephone System configuration guide
Page 52
Functions of Announcement
On the right hand side of the configuration window, you can put the function for each key
press when an announcement is playing. The last row is EOM (end of message). It defines
the function when there is no input from the listener upon expiration of the waiting time.
If the listener has pressed a digit (0 – 9), the announcement will stop playing and execute the
corresponding function according to the definition on the digit.
Here is a list of the functions:
Function Description
Invalid Input Do nothing
extension number for call transfer When the listener has pressed a digit, the
function will wait until a complete extension
number is received and transfer the listener to
the extension number
Go to announcement xx (00-49) Move the listener to the next level
Transfer to extension x (0-9) Transfer the listener to a predefined extension
Go to day/night greeting Move the listener to auto attendant operation
Open the desired mailbox with
personal greeting
Open a mailbox for the listener and start with
personal greeting
Open the desired mailbox without
personal greeting
Open a mailbox for the listener and start with
‘beep’
Transfer to voice mail user login of
language ID 0
Ask the listener for a password and open the
mailbox user mode, the listener is expected to
be the mailbox owner
Open a mailbox x (0-9) with personal
greeting
Open a predefined mailbox and start with
personal greeting
Open a mailbox x (0-9) without
personal greeting
Open a predefined mailbox and start with ‘beep’
Input mailbox no. & transfer it with
personal greeting
Open the appropriate mailbox as input by the
listener and start with personal greeting
Input mailbox no. & transfer it without
personal greeting
Open the appropriate mailbox as input by the
listener and start with ‘beep’
Disconnect Hang up the call
Play goodbye message with language
ID 0 and disconnect
Say Goodbye and hang up the call
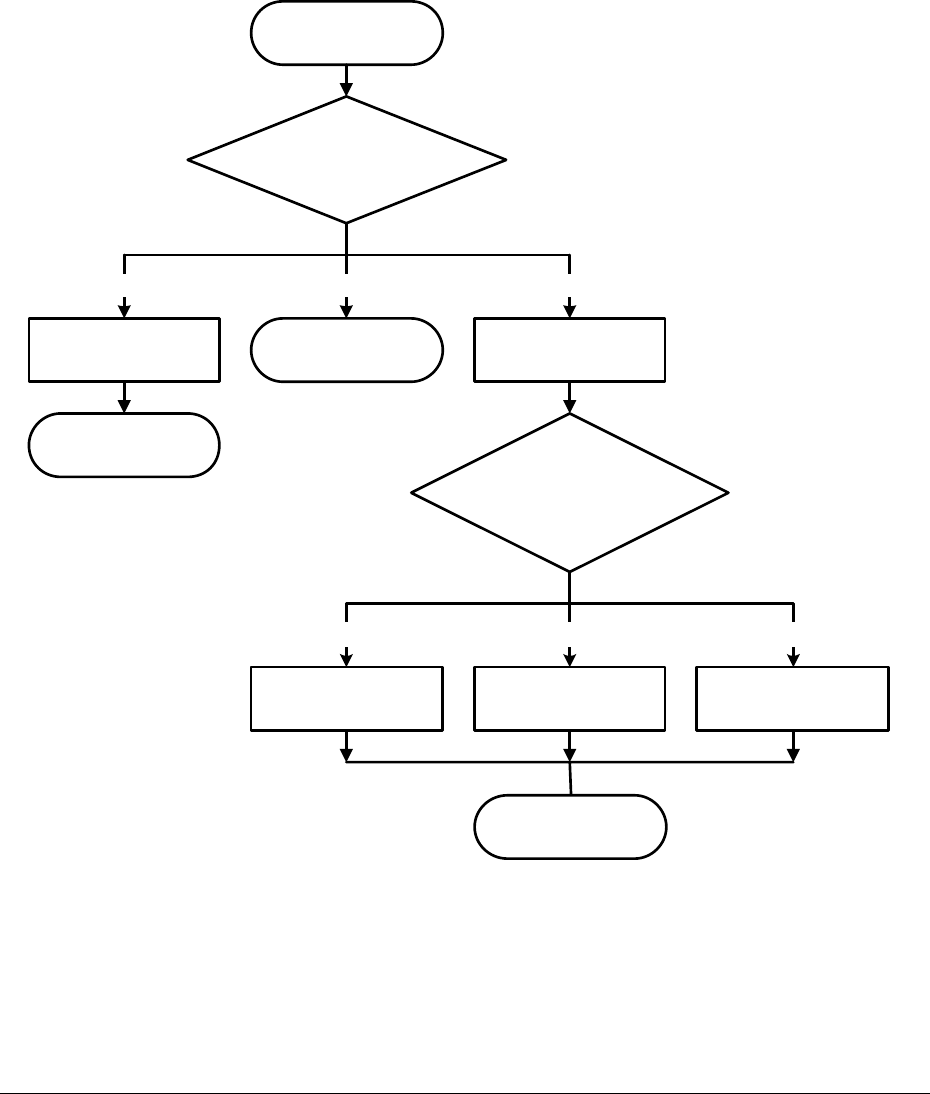
Circle Communication Products, Inc
2.4G Cordless Telephone System configuration guide
Page 53
Announcement Recording
In the lower portion of the configuration window, there are buttons for you to play, record or
delete the voice message part of an announcement box.
IVR Call Flow and Configuration Example
Here we repeat the previous call flow diagram with announcement numbers input:
(07)
Incoming C all
(08)
Select Language:
1. English
2. Mandarin
3. Cantonese
(09)
Call Transfer to
Customer Services
Department Mailbox
(11)
Go to product
description menu
[3][2][1]
(12)
Select Product:
1. Car Kit
2. IVR4
3. 5.8G Phone
(13)
Car Kit
Product Description
(15)
5.8G Phone
Product Description
(14)
IVR4
Product Description
[3][2][1]
Call Transfer to Sales
Department, END
(10)
Call Transfer to
Operator, END
Record a Message, END
Fig. 14: Multi-level IVR Call Flow Sample with Announcement Numbers
When an announcement is executed, it plays the pre-recorded message and waits for the
input from the user. The waiting time is also defined here. If there is no input from the listener
when the waiting time expires, the announcement will execute the EOM function on the right
hand side of the window.
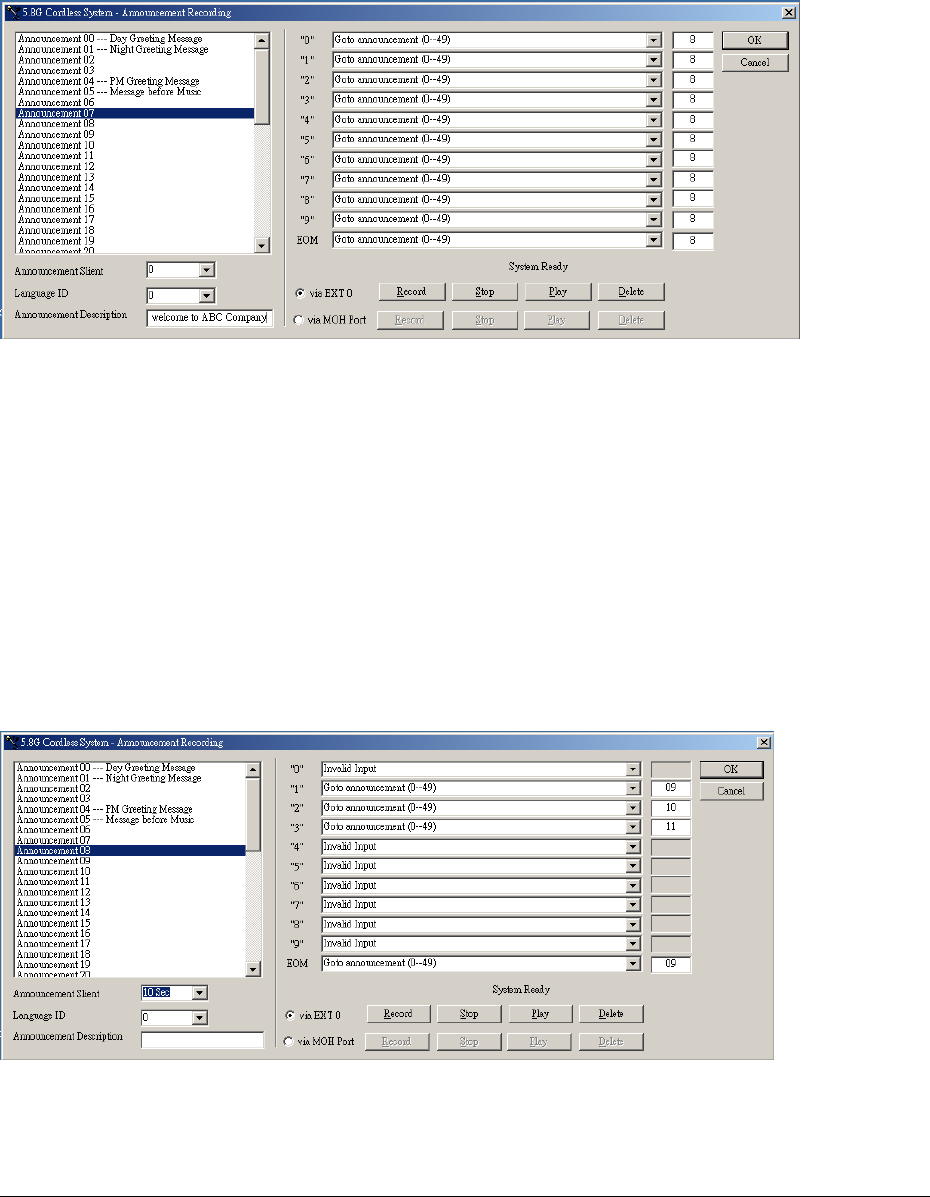
Circle Communication Products, Inc
2.4G Cordless Telephone System configuration guide
Page 54
You don’t need to put an announcement number to the termination box in your call flow,
because the termination box is always equal to the hang up operation. You can clearly
define the hang up operation in the announcement boxes prior to the termination.
Let’s take a look at the configuration windows for box (07) and (08) in the sample call flow:
Fig. 15 Configuration for Announcement Box (07) in the Example
In this example, announcement (07) is the starting point of the call flow. You don’t need any
function here. You may record a message ‘Welcome to ABC Company’ and then move the
listener to next level.
This level has announcement (08). It is a language selection box. You need to ask the
listener to select a language and then move to next level.
If the listener doesn’t press a selection, after 10 seconds, the call flow will go to the default
branch, the English branch. The voice message of this announcement box can be ‘Please
select a language, press 1 for English, press 2 for Mandarin, press 3 for Cantonese’.
Here is the configuration window:
Fig. 16: Configuration for Announcement Box (08) in the Example

Circle Communication Products, Inc
2.4G Cordless Telephone System configuration guide
Page 55
Termination of Call Flow
On your call flow, you should always remember to terminate a branch appropriately.
Otherwise, the listener will be directed to some unknown state. The System is then unable to
bring the listener back to any announcement box if the listener has entered such an
unknown state. Moreover, in a worst case, this unknown state creates a situation where the
port cannot be released when the listener has hung up the phone. In such a case, you will
see that the port’s LED on the IVR cabinet will remain turned on even when there is no
incoming call. This would require a power reset on the system.
To terminate a call flow branch, you can use these functions:
Functions
Open a desired mailbox with a personal greeting
Open a desired mailbox without a personal greeting
Transfer to voice mail for user login
Open mailbox x with a personal greeting
Open mailbox x without a personal greeting
Disconnect
Play goodbye message with language ID 0 and disconnect
Example of Multi-level IVR Application
Multi-level IVR features provide maximum flexibility for you to create your desired call flow
and call applications. You can use the following tools to configure an application:
Multiple languages
Voice Message
Call Transfer
Open a voice mailbox
Here is an example for customized application.
Single Digit Menu (Department Call Transfer)
The example shows how to configure the system to differentiate an incoming call for different
departments in a company.
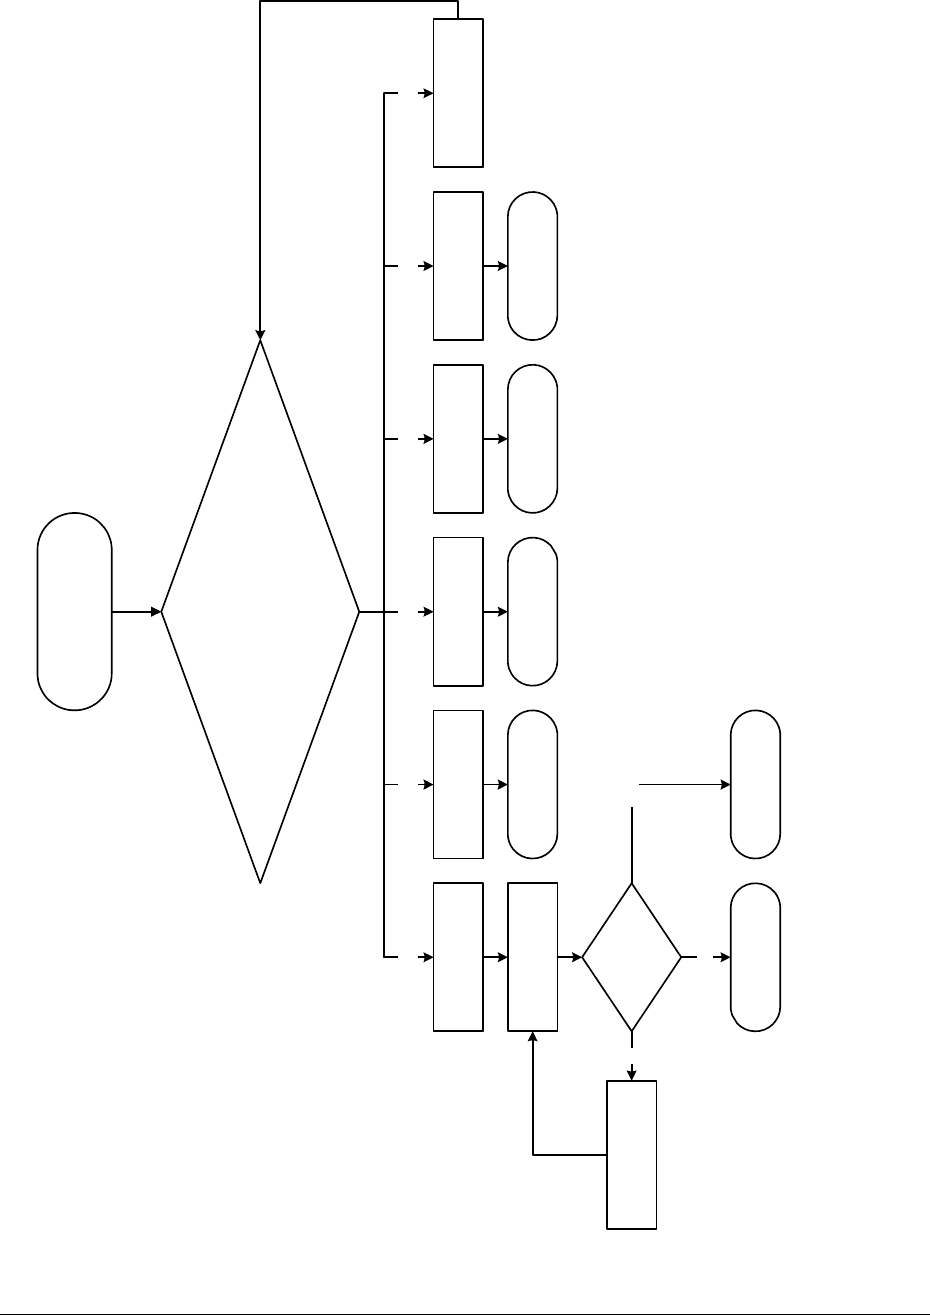
Circle Communication Products, Inc
2.4G Cordless Telephone System configuration guide
Page 56
(07)
Welcome to ABC Company,
please select a department
(08)
Press [1] for Sales Department;
Press [2] for Accounts Department;
Press [3] for Customer Services Department;
Press [4] if you know the extension number of the called party;
Press [0] for the operator
Sales Department Customer Services
Department Operator
Input extension number
directly Accounts Department
[0] or time out[3][2][1][4]
(11)
Invalid input, try again
[5 - 9]
Call Transfer to 1 Call Transfer to 2 Call Transfer to 3 Call Transfer to the
operator
(09)
Input extension number
Valid extension
number?
(10)
Invalid input, try again
Yes (ext = 0 to 9)
Call Transfer to EXT
No Time out
Call Transfer to the
operator
Fig. 17 Single Digit Menu
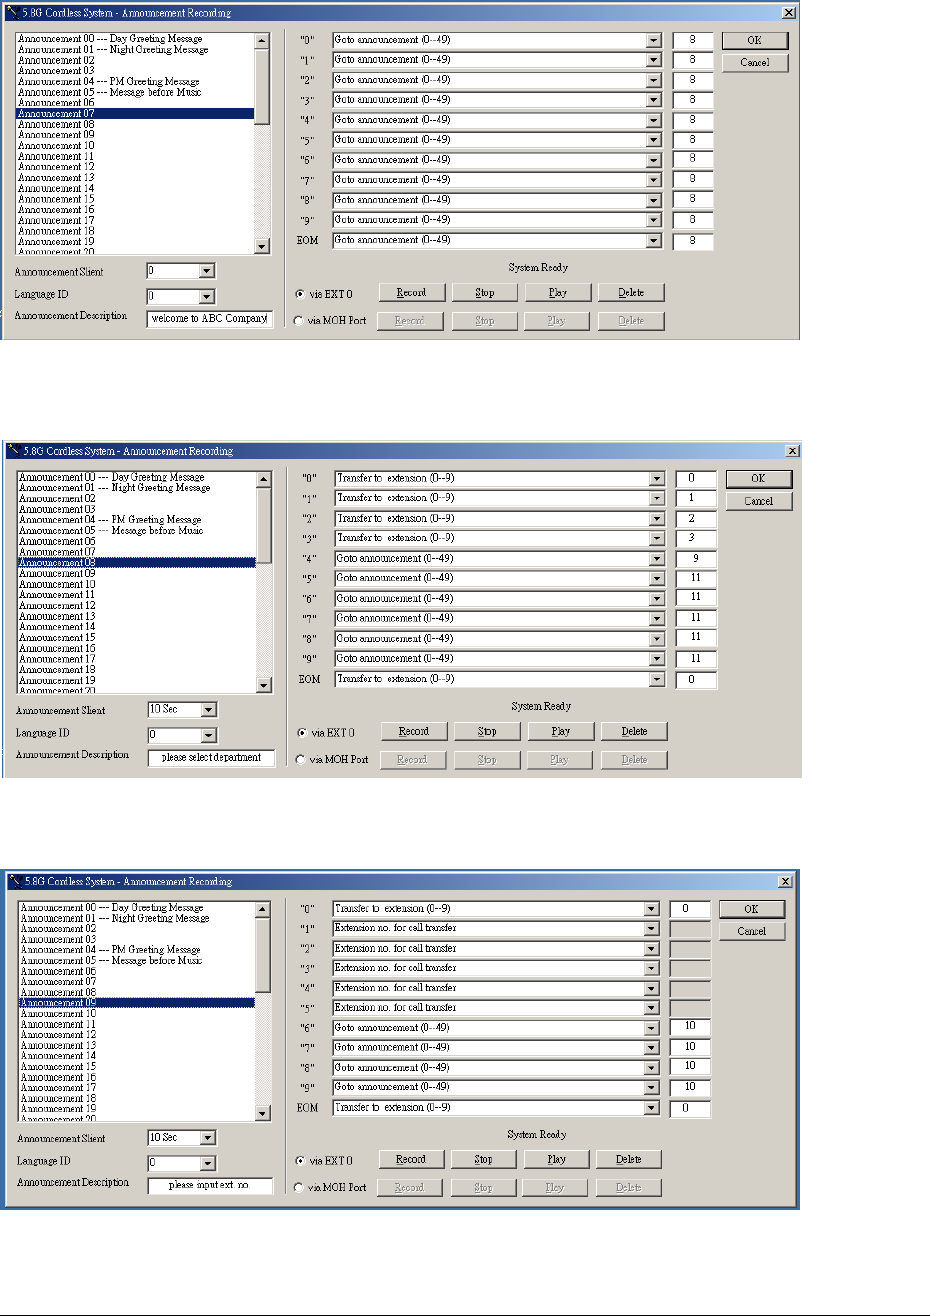
Circle Communication Products, Inc
2.4G Cordless Telephone System configuration guide
Page 57
Fig. 18: Configuration Window for Single Digit Menu 07 Box
Fig. 19: Configuration Window for Single Digit Menu 08 Box
Fig. 20: Configuration Window for Single Digit Menu 09 Box
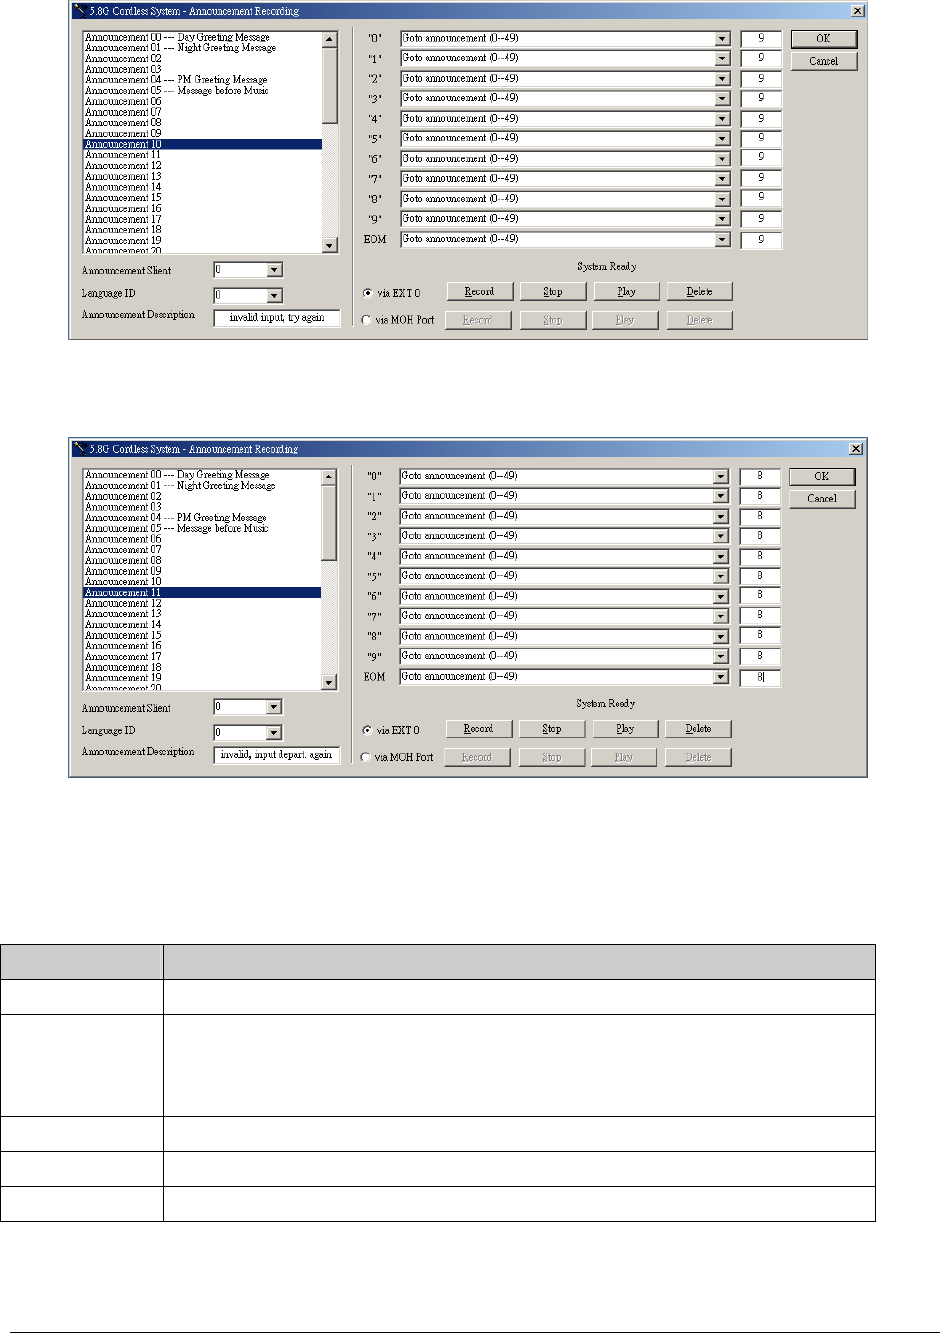
Circle Communication Products, Inc
2.4G Cordless Telephone System configuration guide
Page 58
Fig. 21: Configuration window for Single Digit Menu 10 Box
Fig. 22: Configuration window for Single Digit Menu 11 Box
The recommended voice messages for the boxes:
Box number Voice Message Content
07 Welcome to ABC company
08 Please select a department, press [1] for the sales department, [2] for
accounts department, [3] for customer service, press [4] for general
information, press [0] for the operator
09 Please input the extension number or press [0] for the operator
10 Invalid extension number, please input again
11 Invalid department selection, please select department again

Circle Communication Products, Inc
2.4G Cordless Telephone System configuration guide
Page 59
Important Safety Instruction
When using this unit, basic safety precautions should always be followed to reduce the risk
of fire, electric shock, or personal injury.
1. Read and understand all instructions.
2. Follow all warnings and instructions marked on this unit.
3. Unplug this unit from the wall outlet before cleaning. Do not use liquid or aerosol
cleaners; use a damp cloth for cleaning.
4. Do not use this unit near water; for example, near a bathtub, washbowl, kitchen sink, or
laundry tubs, in a wet basement, or near a swimming pool.
5. Do not place this unit on an unstable cart, stand or table. It could fall, causing serious
damage or impeding operation.
6. This unit should never be placed near or over a radiator or heat register.
7. Never push objects of any kind into this unit as they may touch dangerous voltage
points or short out parts that could result in the risk of fire or electrical shock. Never
spill liquid of any kind on this unit.
8. Never touch bare telephone wires or terminals unless the telephone line has been
disconnected.
9. Use only the power source marked on the unit. If you are not sure of the type of power
supplied to your home, consult your dealer or local power company.
10. Do not place objects on the power cord. Install the unit where no one can step or trip
on the cord.
11. Do not overload wall outlets and extension cords. This can result in the risk of fire or
electric shock.
12. Under the following conditions the telephone unit should be returned for maintenance:
i. If liquid has been spilled into the unit
ii. If the unit has been exposed to rain or water
iii. If the unit does not operate normally when following the operating instructions
iv. If the unit has been dropped or the casing damaged
v. If the unit exhibits a distinct change in performance.
13. Do not disassemble this unit. It will void the warranty. Opening or removing covers may
expose you to dangerous voltages or other risks. Incorrect re-assembly can cause
electrical shock during subsequent use.
14. Avoid using the telephone except cordless type during a thunderstorm. There may be a
slight risk of electrical shock from lightning.
15. Do not use this unit to report a gas leak, when in the vicinity of the leak.

Circle Communication Products, Inc
2.4G Cordless Telephone System configuration guide
Page 60
CAUTION:
To reduce the risk of fire or injury to persons, read and follow these instructions.
1. Use only the battery(ies) specified.
2. Do not dispose of the battery(ies) in a fire. They may explode. Check with local waste
management codes for special disposal instruction.
3. Do not open or mutilate the battery(ies). Released electrolyte is corrosive and may
cause burns or injury to the eyes or skin. The electrolyte may be toxic if swallowed.
4. Exercise care in handling batteries in order not to short the battery to conductive
materials such as rings, bracelets, and keys. The battery may overheat and cause
burns.
5. Charge the battery(ies) provided with or identified for use with this product only in
accordance with the instructions in this instruction.
Warning:
To prevent Fire or shock hazard, do not expose this product to rain or any type of moisture
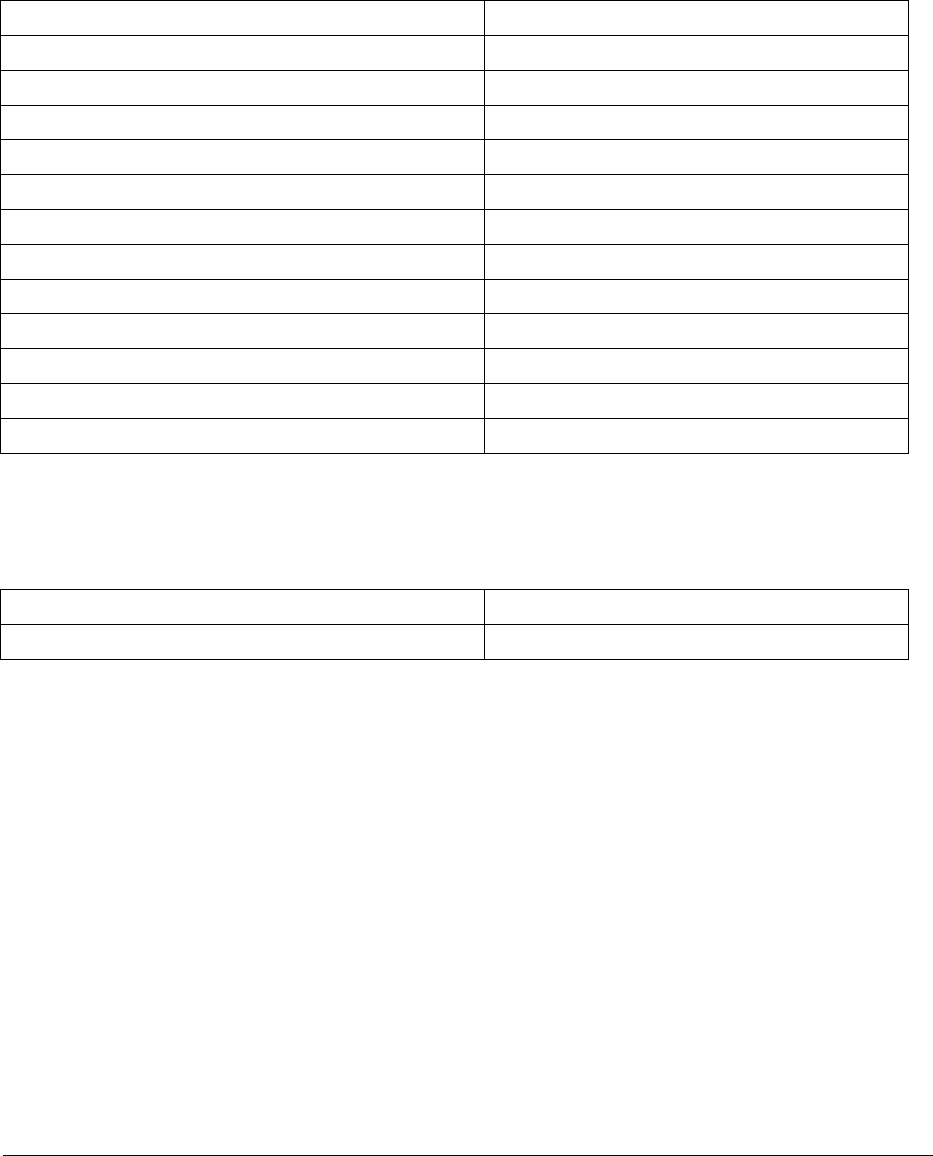
Circle Communication Products, Inc
2.4G Cordless Telephone System configuration guide
Page 61
Specification
Hardware Specification
RF Frequency Band 2.4GHz
Telephone Line 3
Hands Free Hands Free Speaker Phone
LCD Display Module 4 line LCD Alpha Numeric Display
Display Date and Time Display
Caller ID with Call Waiting Type 1 (FSK) & Type II
Voice Mail / Message Recording 1 hour
Maximum Distance (open space, line at sight) 1300 ft.
WMC ER Weight 1.2 kg
Color Dark Grey / Silver
WMC ER Dimension (WxDxH ) 323 x 250 x 470 mm
WMC ER Power / Adaptor DC 9V (1.4A)
Back Up Battery (rechargeable) 7.2V
Operating Conditions:
Temperature 0 to 45
Humidity 10% to 95%

Circle Communication Products, Inc
2.4G Cordless Telephone System configuration guide
Page 62
Limited Warranty
Circle Communication Product Inc (“Circle”) warrants that this 2.4G Multi-line &
Multi-handset Cordless Telephone (“Product”) is free from defects in material and
workmanship that result in
Product failure during normal usage, according to the following terms and conditions:
1. The limited warranty for the Product extends for ONE (1) year beginning on the date of the
purchase of the Product.
2. The limited warranty extends to the original customer of the Product (“Customer”) and is
not assignable or transferable to any subsequent customer/end-user.
3. The limited warranty extends only to the Customer who purchased the Product in the
United States.
4. During the limited warranty period, Circle will repair, or replace, at Circle's option, any
defective parts, or any parts that will not properly operate for their intended use with new or
factory rebuilt replacement items if such repair or replacement is needed because of product
malfunction or failure during normal usage. No charge will be made to the Consumer for any
such parts. Circle will also pay for the labor charges incurred by Circle in repairing or
replacing the defective parts. The limited warranty does not cover defects in appearance,
cosmetic, decorative or structural items, including framing, and any non-operative parts.
Circle's limit of liability under the limited warranty shall be the actual cash value of the
Product at the time the Consumer returns the Product for repair, determined by the price
paid by the Consumer for the Product less a reasonable amount for usage. Circle shall not
be liable for any other losses or damages.
These remedies are the Customer’s exclusive remedies for breach of warranty.
5. Upon request from Circle, the Consumer must prove the date of the original purchase of
the Product by a dated bill of sale or dated itemized receipt.
6. The Customer shall bear the cost of shipping the Product to Circle in United Status. Circle
shall bear the cost of shipping the Product back to the Customer after the completion of
service under this limited warranty.
7. The Customer shall have no coverage or benefits under this limited warranty if any of the
following conditions are applicable:
a) The Product has been subject to abnormal use, abnormal conditions, improper storage,
exposure to moisture or dampness, unauthorized modifications, unauthorized connections,
un-authorized repair, misuse, neglect, abuse, accident, alteration, improper installation, or
other acts which are not the fault of Circle, including damage caused by shipping.
b) The Product has been damaged from external causes such as collision with an object, or

Circle Communication Products, Inc
2.4G Cordless Telephone System configuration guide
Page 63
from fire, flooding, sand, dirt, windstorm, lightning, earthquake or damage from exposure to
weather conditions, an Act of God, or battery leakage, theft, blown fuse, or improper use of
any electrical source, or damage caused by the connection to other products not
recommended for interconnection by Circle.
c) Circle was not advised by the Customer in writing of the alleged defect or malfunction of
the Product within fourteen (14) days after the expiration of the applicable limited warranty
period.
d) The Product serial number plate or the accessory data code has been removed, defaced
or altered.
8. If a problem develops during the limited warranty period, the Customer shall take the
following step-by-step procedure:
a) the Customer shall contact Circle Customer Service:
Circle Communication Product Inc.
Phone: 310-335-0305
Email : cs@circleproducts.com
b) The Customer shall include a return address, daytime phone number and/or fax number,
complete description of the problem, proof of purchase and service agreement (if applicable).
Expenses related to removing the Product from an installation are not covered under this
limited warranty.
c) The Customer will be billed for any parts or labor charges not covered by this limited
warranty. The Customer will be responsible for any expenses related to reinstallation of the
Product.
d) Circle will repair or authorize the repair of the Product under the limited warranty within 30
days after receipt of the Product by Circle or any Circle authorized service center. If Circle
cannot perform repair covered under this limited warranty within 30
days, or after a reasonable number of attempts to repair the same defect, Circle at its option,
will provide a replacement Product or refund the purchase price of the Product less a
reasonable amount for usage.
e) If the Product is returned to Circle during the limited warranty period, but the problem with
the Product is not covered under the terms and conditions of this limited warranty, the
Customer will be notified and given an estimate of the charges the Customer must pay to
have the Product repaired, with all shipping charges billed to the Customer. If the estimate is
refused, the Product will be returned freight collect. If the Product is returned to Circle after
the expiration of the limited warranty period, Circle's normal service policies shall apply and
the Customer will be responsible for all shipping charges.
9. The Product consists of newly assembled equipment that may contain used components
that have been reprocessed to allow machine compliance with Product performance and
reliability specifications.

Circle Communication Products, Inc
2.4G Cordless Telephone System configuration guide
Page 64
10. ANY IMPLIED WARRANTY OF MERCHANTABILITY, OR FITNESS FOR A
PARTICULAR PURPOSE OR USE, SHALL BE LIMITED TO THE DURATION OF THE
FOREGOING LIMITED WRITTEN WARRANTY. OTHERWISE, THE FOREGOING
LIMITED WARRANTY IS THE CONSUMER'S SOLE AND EXCLUSIVE REMEDY AND IS
IN LIEU OF ALL OTHER WARRANTIES, EXPRESS OR IMPLIED. CIRCLE SHALL NOT
BE LIABLE FOR SPECIAL, INCIDENTAL OR CONSEQUENTIAL DAMAGES, INCLUDING
BUT NOT LIMITED TO, LOSS OF ANTICIPATED BENEFITS OR PROFITS, LOSS OF
SAVINGS OR REVENUE, PUNITIVE DAMAGES, LOSS OF USE OF THE PRODUCT OR
ANY ASSOCIATED EQUIPMENT, COST OF CAPITAL, COST OF ANY SUBSTITUTE
EQUIPMENT OR FACILITIES, DOWN-TIME, THE CLAIMS OF ANY THIRD PARTIES,
INCLUDING CUSTOMERS, AND INJURY TO PROPERTY, RESULTING FROM THE
PURCHASE OR USE OF THE PRODUCT OR ARISING FROM BREACH OF THE
WARRANTY, BREACH OF CONTRACT, NEGLIGENCE, STRICT TORT, OR ANY OTHER
LEGAL OR EQUITABLE THEORY, EVEN IF CIRCLE KNEW OF THE LIKELIHOOD OF
SUCH DAMAGES. CIRCLE SHALL NOT BE LIABLE FOR DELAY IN RENDERING
SERVICE UNDER THE LIMITED WARRANTY, OR LOSS OF USE DURING THE PERIOD
THAT THE PRODUCT IS BEING REPAIRED.
11. Some states do not allow limitation of how long an implied warranty lasts, so the above
one-year warranty limitation may not apply to you (the Consumer). Some states do not allow
the exclusion or limitation of incidental and consequential damages, so certain of the above
limitations or exclusions may not apply to you (the Consumer). This limited warranty gives
the Customer specific legal rights and the Customer may also have other rights, which vary
from state to state.
12. Circle neither assumes nor authorizes any authorized service center or any other person
or entity to assume for it any other obligation or liability beyond that which is expressly
provided for in this limited warranty including the provider or seller of any extended warranty
or service agreement.
13. This is the entire warranty between Circle and the Customer, and supersedes all prior
and contemporaneous agreements or understandings, oral or written, and all
communications relating to the Product, and no representation, promise or condition not
contained herein shall modify these terms.
14. This limited warranty allocates the risk of failure of the Product between the Consumer
and Circle. The allocation is recognized by the Customer and is reflected in the purchase
price of the Product.
15. Any action or lawsuit for breach of warranty must be commenced within twelve (12)
months following delivery of the Product.
16. Questions concerning this limited warranty may be directed to:
Circle Communication Product Inc.

Circle Communication Products, Inc
2.4G Cordless Telephone System configuration guide
Page 65
Phone: 310-335-0305
Email : cs@circleproducts.com
17. The limited warranty period for Circle supplied attachments and accessories is
specifically defined within their own warranty cards and packaging.

Circle Communication Products, Inc
2.4G Cordless Telephone System configuration guide
Page 66
Important Consumer Information
When using this unit, basic safety precautions should always be followed to reduce the risk
of fire, electric shock, or personal injury.
Warning: Changes or modifications to this unit not expressly approved by the party
responsible for compliance could void the user’s authority to operate the equipment.
NOTE:
1) This equipment has been tested and found to comply with the limits for a Class B digital
device, pursuant to Part 15 of the FCC Rules. These limits are designed to provide
reasonable protection against harmful interference in a residential installation. This
equipment generates, uses and can radiate radio frequency energy and, if not installed and
used in accordance with the instructions, may cause harmful interference to radio
communications.
However, there is no guarantee that interference will not occur in a particular installation. If
this equipment does cause harmful interference to radio or television reception, which can
be determined by turning the equipment off and on, the user is encouraged to try to correct
the interference by one or more of the following measures:
Reorient or relocate the receiving antenna.
Increase the separation between the equipment and receiver.
Connect the equipment into an outlet on a circuit different from that to which the receiver
is needed.
Consult the dealer or an experienced radio/TV technician for help.
CAUTION : To maintain compliance with the FCC's RF exposure guidelines place the base
unit at least 20cm from nearby persons.
2) This equipment complies with Part 68 of the FCC rules and the requirements adopted by
the ACTA. On the bottom of this equipment is a label that contains, among other information,
a product identifier in the format US:AAAEQ##TXXXX. If requested, this number must be
provided to the telephone company.
3) An applicable certification jacks Universal Service Order Codes (USOC) for the
equipment is provided (i.e., RJ11C) in the packaging with each piece of approved terminal
equipment.

Circle Communication Products, Inc
2.4G Cordless Telephone System configuration guide
Page 67
4) A plug and jack used to connect this equipment to the premises wiring and telephone
network must comply with the applicable FCC Part 68 rules and requirements adopted by
the ACTA. A compliant telephone cord and modular plug is provided with this product. It is
designed to be connected to a compatible modular jack that is also compliant. See
installation instructions for details.
5) The REN is used to determine the number of devices that may be connected to a
telephone line. Excessive RENs on a telephone line may result in the devices not ringing in
response to an incoming call. In most but not all areas, the sum of RENs should not exceed
five (5.0). To be certain of the number of devices that may be connected to a line, as
determined by the total RENs, contact the local telephone company. [For products approved
after July 23, 2001, the REN for this product is part of the product identifier that has the
format US:AAAEQ##TXXXX. The digits represented by ## are the REN without a decimal
point (e.g., 03 is a REN of 0.3). For earlier products, the REN is separately shown on the
label.]
6) If this equipment causes harm to the telephone network, the telephone company will
notify you in advance that temporary discontinuance of service may be required. But if
advance notice isn't practical, the telephone company will notify the customer as soon as
possible. Also, you will be advised of your right to file a complaint with the FCC if you believe
it is necessary.
7) The telephone company may make changes in its facilities, equipment, operations or
procedures that could affect the operation of the equipment. If this happens the telephone
company will provide advance notice in order for you to make necessary modifications to
maintain uninterrupted service.
8) Should you experience trouble with this equipment, please contact (Circle Communication
Products, 2554 Lincoln Blvd #111 Marina Del Rey CA 90291 USA) for repair or warranty
information. If the equipment is causing harm to the telephone network, the telephone
company may request that you disconnect the equipment until the problem is resolved.
9) Please follow instructions for repairing if any (e.g. battery replacement section); otherwise
do not alternate or repair any parts of device except specified.
10) Connection to party line service is subject to state tariffs. Contact the state public utility
commission, public service commission or corporation commission for information.

Circle Communication Products, Inc
2.4G Cordless Telephone System configuration guide
Page 68
11) NOTICE: If your home has specially wired alarm equipment connected to the telephone
line, ensure the installation of this [equipment ID] does not disable your alarm equipment. If
you have questions about what will disable alarm equipment, consult your telephone
company or a qualified installer.
12) This equipment is hearing aid compatible.
NOTICE: According to telephone company reports, AC electrical surges, typically resulting
from lightning strikes, are very destructive to telephone equipment connected to AC power
sources. To minimize damage from these types of surges, a surge arrestor is recommended.
Customer Service
For customer support for any questions or help in installing or using your new
Circle Cordless Telephone,
Call Toll Free
1-888-584-9262
7:00 AM to 5:00 PM
Pacific Standard Time
www.circleproducts.com
2554 Lincoln Blvd. #111
Marina Del Rey, Ca 90291