HKC Technology 318 2.4GHz DSSS Cordless Phone system w/ CID and DAM User Manual manual base
HKC Technology Ltd. 2.4GHz DSSS Cordless Phone system w/ CID and DAM manual base
Contents
- 1. Base User Manual
- 2. Desktop User manual
- 3. Handset User Manual
- 4. User Manual
Base User Manual

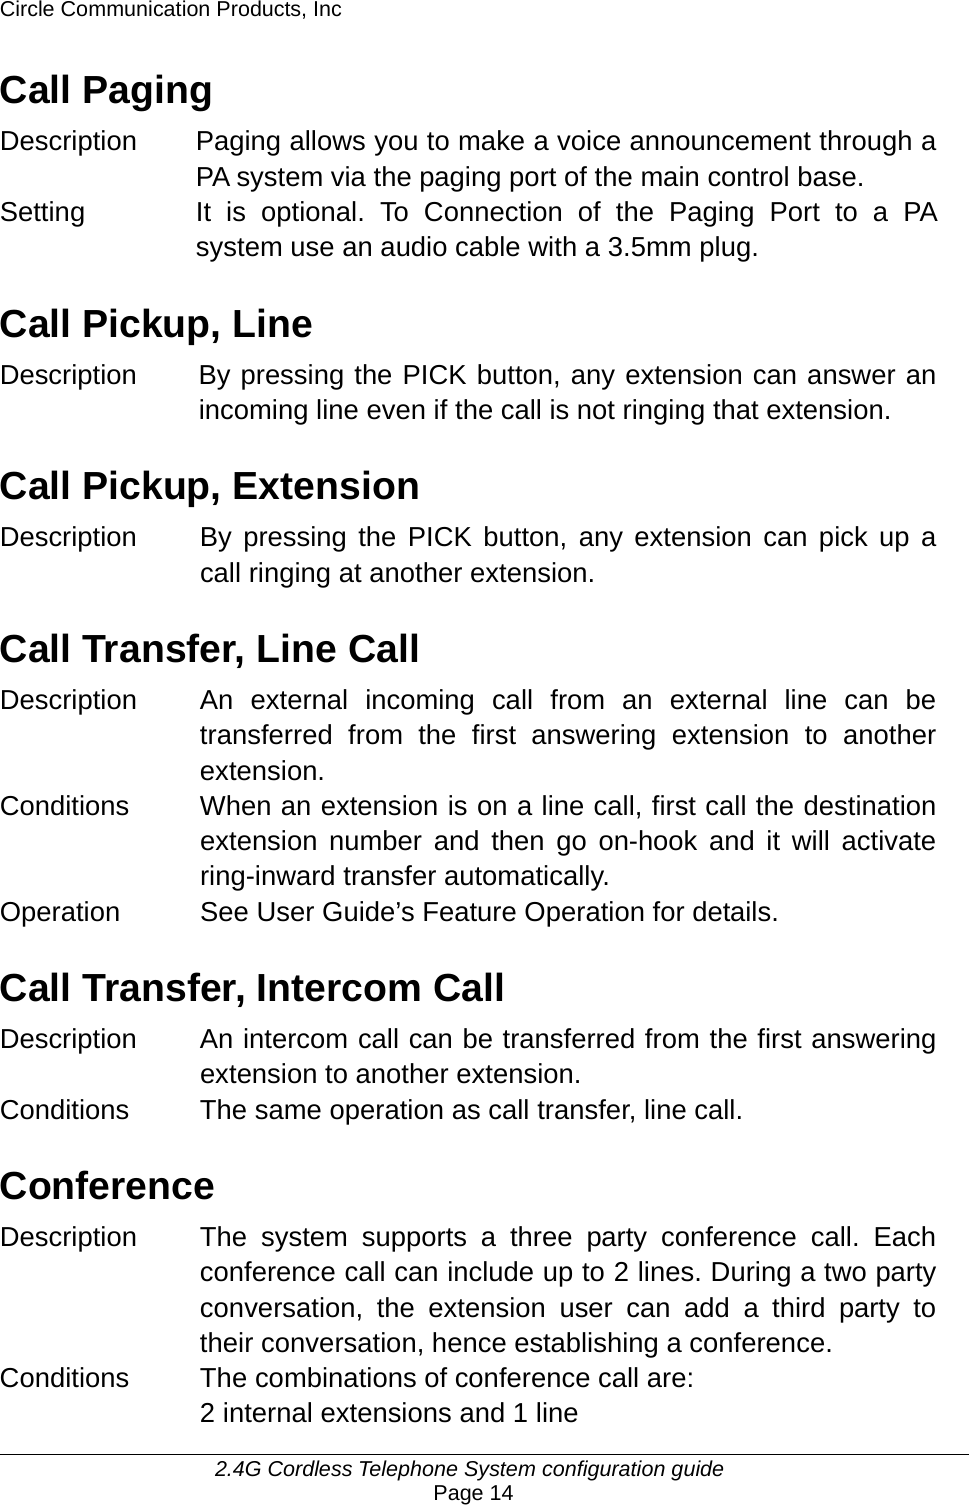
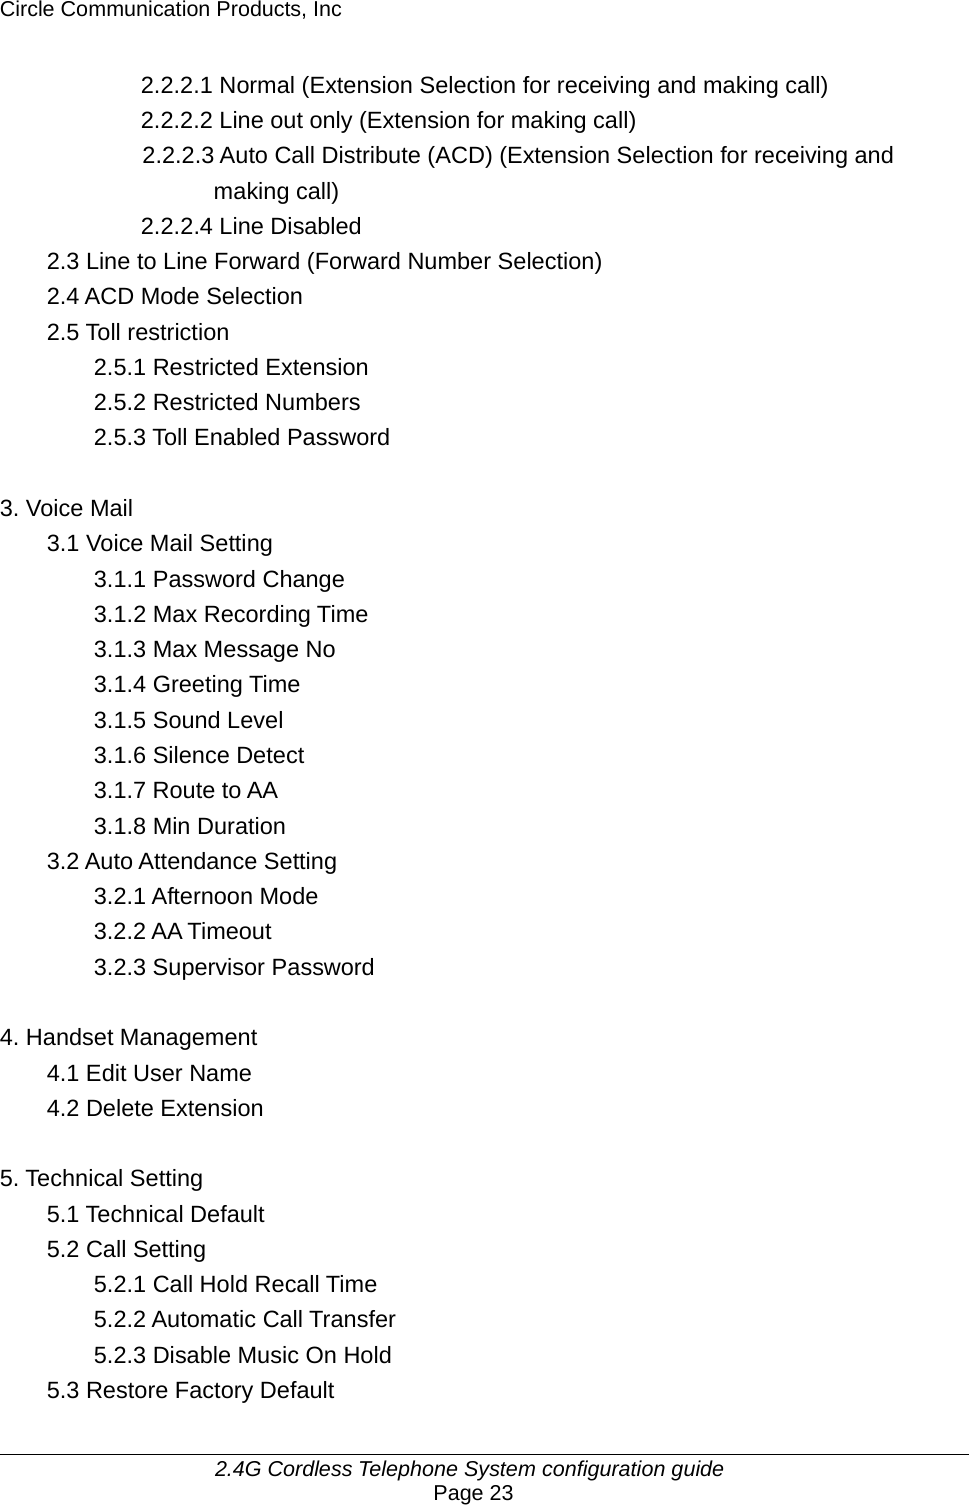
![Circle Communication Products, Inc 2.4G Cordless Telephone System configuration guide Page 16 DP to MF conversion Description By pressing the [*] button in conversation mode, an extension can change the dialing signal from dial pulse to MF in subsequent dialing. The dialing signal will return to dial pulse after the call is finished. End-to-End Signaling Description After making an outgoing call, the calling extension can continue sending tone (MF) signal to the called party in order to access various facilities provided by the called party such as tele-banking service. Flash Function Description Flashing time of system can be programmed from 50 ms. to 950 ms. in step of 50 ms. Conditions It is available at Desktop extension (WDE ER ). Setting call features configuration 5.3.1 Hands free Operation Description With the hands free feature phone, the user can make and receive calls with hands free operation. Besides, the user can turn the microphone on and off (mute) during hands free operation. Headset Operation Description With the headset connected to the extension, the user can make and receive calls with the headset. Condition It is optional. A headset jack is available on the side of the extension. Idle Line Automatic Selection Description An idle line will be accessed in ascending order automatically: by picking up the handset or by pressing the Speaker key on the desktop phone (WDE ER )](https://usermanual.wiki/HKC-Technology/318.Base-User-Manual/User-Guide-563174-Page-16.png)
![Circle Communication Products, Inc 2.4G Cordless Telephone System configuration guide Page 34 3rd Row 2 ) o n 4th Row B A C K O K Press up/down arrow to select setting. Press OK to confirm. When “on’ is selected, recording will be stopped when 6 seconds of silence is detected. 3.1.7 Route to AA 1st Row < R o u t e t o A A > 2nd Row 1 ) o f f < 3rd Row 2 ) o n 4th Row B A C K O K Press up/down arrow to select setting. Press “OK” to confirm. When ‘on’ is selected, after a caller has listened to the personal greeting message and in addition to leaving a message, he/she can press the [0] key to go back to auto attendant for selecting other extensions. 3.1.8 Min Message Duration 1st Row M i n M e s s a g e 2nd Row D u r A t i o n 3rd Row V a l U e : 3 s e c < 4th Row B A C K O K Press up/down arrow to select setting. Press OK to confirm. Range: 1-8 sec Default: 3 Step size: 1 3.2 Auto Attendant 1st Row < A u T o A t t e n d a n t > a f t E r n o o n m o d e a a T i m e o u t 2nd/3rd Row s u p E r p a s s w o r d 4th Row B A C K S E L E C T Press up/down arrow to select setting. Press “Select” to confirm 3.2.1 Afternoon mode 1st Row < A f T e r n o o n M o d e > 2nd Row 1 ) O f f < 3rd Row 2 ) O n 4th Row B A C K O K Press up/down arrow to select setting. Press “OK” to confirm.](https://usermanual.wiki/HKC-Technology/318.Base-User-Manual/User-Guide-563174-Page-34.png)

![Circle Communication Products, Inc 2.4G Cordless Telephone System configuration guide Page 40 Voice Mail Related Setting by Computer (See PC programming Guide) Mailbox The System provides 10 mailboxes. You can attach any user’s extension to a mailbox. The mailbox number should be the same as the user’s extension number. Global Parameters This defines global parameters for mailboxes. All users should follow these settings. Silence Detection When selected, recording will be stopped when 6 seconds of silence is detected. Setting: See call feature configuration: 3.1.7 Route to Auto Attendant if “0” pressed After a caller has listened to the personal greeting message, in addition to leaving a message, he/she can press [0] key to go back to Auto Attendant for calling other extensions or operator. Setting: See call feature configuration: 3.1.8 Minimum Message Duration To prevent message recorded with only a busy tone (e. g. the caller hangs up the line immediately after greeting) or silence, any message less than 3 seconds (default) will not be stored. Nor will the message waiting acknowledgment be activated in this case. The programming option for this parameter is from 0 (no minimum message feature) to 10 seconds. Setting: See call feature configuration: 3.1.6 Other Voice Mail Features Message with Time Stamp A record of a message’s creation date and time can be heard prior to message playback. For example, the message will be announced as ‘Message one, Sunday, Ten, Twenty Two PM’, and then the voice message will be played.](https://usermanual.wiki/HKC-Technology/318.Base-User-Manual/User-Guide-563174-Page-40.png)
![Circle Communication Products, Inc 2.4G Cordless Telephone System configuration guide Page 41 Password for Every Mailbox Every mailbox has a 4-digit password and the user can modify it at any time at his/her extension (MenutVoicemailtPassword). There is no default password in Ex-factory setting and the user has to created password. [0000] is reserved for the system. If the password is forgotten, it can be changed and reviewed by the System Configuration. Setting : See call feature configuration: 3.1.1 Personal Greeting and Name You can record a personal greeting for your mailbox with your own voice to prompt a caller to leave a message in your mailbox. If you don’t want a personal greeting, you can record just your name. Then your name will be played each time when your mailbox is opened. The priority is higher for the personal greeting over the name if both are recorded. A system greeting will be played if no personal greeting or name is recorded. Setting: use the extension to call into the system directly by pressing the Voice Mail key on the WDE ER or the soft key VM on the WHE ER when the voice mail indicator is off. (see fig. 17 Mailbox Greeting Recording flow for details) Message Playback Function When there is a new message or a memo in a mailbox, the voice mail indicator of that extension will be turned on. (voice mail key for WDE ER and “MW” icon for WHE ER ’s LCD). A user can preview the voice mail list for caller information, such as date and time of the call. The user can choose which mail to listen to first. (Menu tVoicemailtBrowse Mode tall/new memo/all memo/new voice mail/all voice mail/filter/greeting). Or the user can use the extension to call into the system directly by pressing the Voice Mail key on the WDE ER or the soft key VM on the WHE ER . During playback, a user can go to the next message, repeat a message, delete a message and/or delete all old messages. (see fig. 16 user retrieves messages flow for details)](https://usermanual.wiki/HKC-Technology/318.Base-User-Manual/User-Guide-563174-Page-41.png)
![Circle Communication Products, Inc 2.4G Cordless Telephone System configuration guide Page 42 Operation Key Go to next message 3 Repeat current message 2 Delete current message Double 0 Delete all old messages Double 8 Message Copying The system can copy a message from your mailbox to another mailbox in 2 ways: a. When you have listened to a message, you can copy this message to another mailbox. The system will ask you for a mailbox number. b. You can also setup the system to copy every incoming message to another mailbox (e. g. executive and assistant pair). In this case, you need to input the destination mailbox number first in user menu. For user menu details, please refer to the section ‘Administration by Phone’. Setting: see Fig. 18 Set Message Copy flow. Remote Access c. Mailbox can be accessed remotely. During personal greeting, user can press [**] and then the password, to access the user menu remotely. For user menu details, please refer to the section ‘Administration by Phone’. Remark: If a mailbox has no password, the remote access feature of that mailbox is disabled for security. Verification of Voice Mail Setup Leave a Message 1. To test the operation of leaving a message (by a guest) in voice mail service, use another extension or external line to call to a busy or no answer extension. For example, extension X is the owner of mailbox X. 2. Let the call being forwarded to system from extension X (i. e., keep extension X busy or no answer to invoke the busy or no answer call forward to voice mail). 3. Now the system should answer the incoming call. 4. The System should open the mailbox X automatically. The calling party can now leave a message to the mailbox owner X and then hang up. 5. The System will send the new message signal to the extension X to indicate that there is a new message in X mailbox and turn on the Voice Mail indicator (voice mail key for WDE ER and “MW” icon for WHE ER ’s LCD). Retrieve a Message 1. To test the operation of retrieving a message (by mailbox owner) in voice mail service, first record a message. See the above section “Leave a Message”. 2. Afterwards, use extension X to call into the system directly by pressing the Voice Mail key on the WDE ER or the soft key VM on the WHE ER . 3. Now the system should answer the incoming call.](https://usermanual.wiki/HKC-Technology/318.Base-User-Manual/User-Guide-563174-Page-42.png)
![Circle Communication Products, Inc 2.4G Cordless Telephone System configuration guide Page 43 4. The System should open the user menu of mailbox X for message checking. 5. Listen to the new message. After the message is played, hang up. 6. The System will send the new message signal to the extension X to indicate that there is no new message in mailbox X and turn off the Voice Mail Indicator. Retrieve a Message Remotely 1. To test the operation of retrieving a message (e. g. mailbox owner is at home) by an external line in voice mail service, first record a message. See the section “Leave a Message”. 2. Afterwards, use an external line to call inside the system. 3. Now the system should answer the incoming call. 4. Press [**] when a welcome greeting is playing, the system will ask the caller for a mailbox number and password. Enter X plus the correct password and then the system will open the user menu of mailbox X. 5. Listen to the new message. After the message has played, hang up. 6. The System will send the new message signal to the extension X to indicate that there is no new message in mailbox X and turn off the Voice Mail Indicator.. Voice Mail Operation Flow Caller Leaves a Message System greeting oruser's personalgreetingSystem Greeting Remote Access recording[0] [**] No InputRecording Finish andDisconnectCheck if messageis longer thanminimum messagedurationStore message andsend message waitingsignalYesAbort MessageNo Fig. 6 Leave a Message](https://usermanual.wiki/HKC-Technology/318.Base-User-Manual/User-Guide-563174-Page-43.png)
![Circle Communication Products, Inc 2.4G Cordless Telephone System configuration guide Page 44 User Retrieves Messages Message RetrievalSelect serviceEnterPasswordEcho Numberof messages inmailbox3. Listen to NextMessageQuit andDisconnect2. Repeat CurrentMessageMessage PlaybackSelectOperation2. Repeat this message3. Listen to next message6. Copy current message to another mailbox00. Delete this message88. Delete all old messages6. Copy currentmessage to anothermailbox2, 3, 0088 or no new messageInput a mailboxnumber Fig. 7: Retrieve Messages Mailbox Greeting Recording Delete PersonalGreeting (Restoreto S ys te m De faultMailbox Greeting)Listen to PersonalGreetingRecord PersonalGreeting Record NameFrom User Menu, press [5] to changePersonal GreetingPersonal GreetingMenu[3][2][1]Listen to NameDelete Name(Restore to S ystemDefault MailboxGreeting)End[4] [5] [6] [*] Fig. 8: Personal Greeting and Name Recording](https://usermanual.wiki/HKC-Technology/318.Base-User-Manual/User-Guide-563174-Page-44.png)
![Circle Communication Products, Inc 2.4G Cordless Telephone System configuration guide Page 45 Set Auto Message Copy Input Auto MessageCopy Mailbox NumberEnable Auto MessageCopyDisable Auto MessageCopy EndFrom User Menu, press [8]to set Message CopyMessage Copy Menu[*][5][3][1] Fig. 9: Set Message Copy Administration by Phone There are 2 levels of administration provided by system user level and administrator level. By a phone call, provided the system is in Auto attendant mode, user or administrator can change some parameters in the system. User Level 3. Play Messages (see Retrieves message flow)4. Change Memo 1. play memo 7. record memo *. End5. Change Personal greeting (see M ailbox Greeting Recording Flow)6. Change Password8. Set Message Copy(see Set Auto Message Copy Flow)*. EndEnter User Menu bypressing [**] whengreeting is playingEnter MailboxNumber andPasswordSelect Service##XXX Administrator’s Menu Fig. 10: User’s Menu](https://usermanual.wiki/HKC-Technology/318.Base-User-Manual/User-Guide-563174-Page-45.png)
![Circle Communication Products, Inc 2.4G Cordless Telephone System configuration guide Page 46 There is a user menu providing selections to the normal mailbox user. Most of the selections are related to mailbox customization. Hence, the mailbox owner can control their mailbox by a phone call remotely. Mailbox owners can call directly to the system by accessing the voice prompt ((Menu tvoice mailtvoice prompt). They will be asked for a password and then the user menu will be opened directly Administrator Level The Administrator Menu is designed for both the system installer and the system administrator. The Administrator can enter this menu by a phone call and do some global modifications on system parameters. For example, make a change to the Auto Attendant greeting and recording. To enter the administrator menu, the caller can press [## plus the supervisor password, the default setting of 000, see call feature configuration 3.2.3] while the Auto Attendant greeting or announcement box 07 greeting is playing. Fig. 11: Administrator’s Menu [1]Day Greeting(00 Box)[2]Night G reeting(01 Box)[5]Afternoon Greeting(04 Box)[6]Music on Hold(05 Box)[7]O ther IV R Greeting(06 - 49 Box)[*]Finish and Hang UpEnter Administrator Menu by pr essi ng [## xxx]when Auto Attendant greeting or07 box greetingor user menu is playingSelect ServiceInput IVRBox No.(00 - 49)[7] Record[8] Play[0] Delete[*] Go back to Select Service Menu[7] Record[8] Play[0] Delete[*] Go back to Select Service Menu[7] Record[8] Play[0] Delete[* ] Go back to Select Service Menu[7] R ec ord[8] Play[0] Delete[*] Go back to Select Service Menu[7] Record[8] Play[0] Delete[*] Go back to Select Service Menu](https://usermanual.wiki/HKC-Technology/318.Base-User-Manual/User-Guide-563174-Page-46.png)
![Circle Communication Products, Inc 2.4G Cordless Telephone System configuration guide Page 47 Auto Attendant Day / Night / Afternoon The Auto Attendant has several modes of operation. The System can be programmed to have either “Day, Night or Afternoon modes”. The Day and Night modes have two parameters: greeting and operator number. In day mode, there is day greeting (or normal company greeting) and day operator number for Auto Attendant operation. There is also a night greeting (or off duty greeting) and a night operator number for off duty hours in Night mode. The Day / Night mode feature mainly governs the information and response of the Auto Attendant service. To provide maximum flexibility, these 3 modes can be changed: 1. automatically according to time defined by user, or 2. manually changed Day Mode Afternoon Greeting In normal day mode Auto Attendant operation, you can input 2 greetings: default and afternoon. If you have enabled this function, the afternoon greeting will be activated automatically at 12:00 noontime. For example, ‘Good morning, …’ will be played before 12:00 noontime and ‘Good afternoon, ……’ will be played after 12:00 noontime. Setting: see call features configuration 3.2.1 Note: the afternoon greeting should be recorded for this feature. Time of Silence after Announcement If the caller does not enter an extension within a specified time after the announcement, then the mail box 0 of extension 0 will be opened for the caller to leave a message. Setting: see call features configuration 3.2.2 Auto Switch Day / Night Mode, Day Mode Start Time, Night Mode Start Time Day and Night Modes of Auto Attendant are different in their greeting and operator extension. You can have the system change from Day to Night mode automatically according to a predefined time (e. g. 6:00 P.M.). This function automatically has the system respond to incoming calls. For example, ‘Welcome to xxx company, please dial an extension or press [0] for operator assistance’ for Day Mode operation programmed from 9:00 AM to 6:00 PM; or for calls after 6:00P.M., a](https://usermanual.wiki/HKC-Technology/318.Base-User-Manual/User-Guide-563174-Page-47.png)
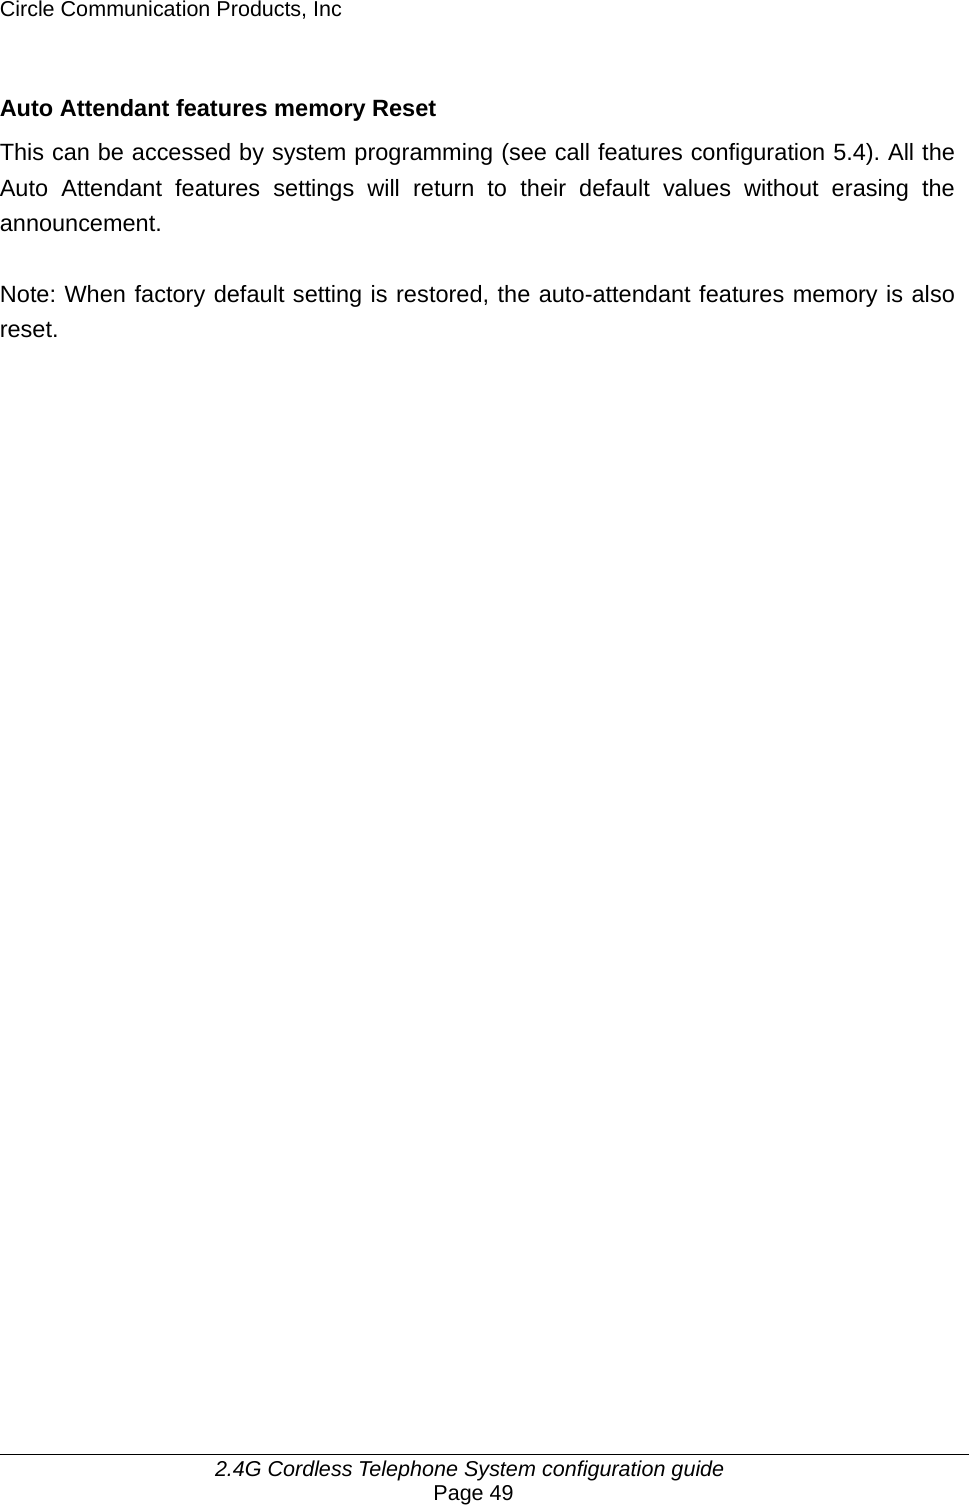
![Circle Communication Products, Inc 2.4G Cordless Telephone System configuration guide Page 50 Multi-level Interactive Voice Response The Multi-level Interactive Voice Response IVR feature allows the caller to access a function via a series of key press selections. It can be a voice prompt of a product description, a message prepared by the system owner, a call transfer option to select a person, a voice mailbox, etc. With the Multi-level IVR feature, you can setup your system to provide a customer oriented voice service. Examples are: i. Customer service hot line ii. Company products or services introduction iii. Auto attendant service with direct call transfer to a person or department iv. Voice announcement service with multi-language prompts v. Access to a mailbox directly upon unsuccessful call transfer or in night mode Here is an example of multi-level IVR call flow: (07)Incoming C all Select L anguage:1. English 2. Mandarin 3. CantoneseCall Transfer toCustomer ServicesDepartment MailboxGo to productdescription menu[3][2 ][1] Select Product: 1. Car K it 2. IVR4 3. 5.8G PhoneCar KitProduct Description 5.8G Phone Product DescriptionIVR4 Product Description[3][2][1]Call Transfer to SalesDepartment, ENDCall Transfer toOperator, ENDRecord a Message,END Fig. 12: Multi-level IVR Call Flow Sample](https://usermanual.wiki/HKC-Technology/318.Base-User-Manual/User-Guide-563174-Page-50.png)
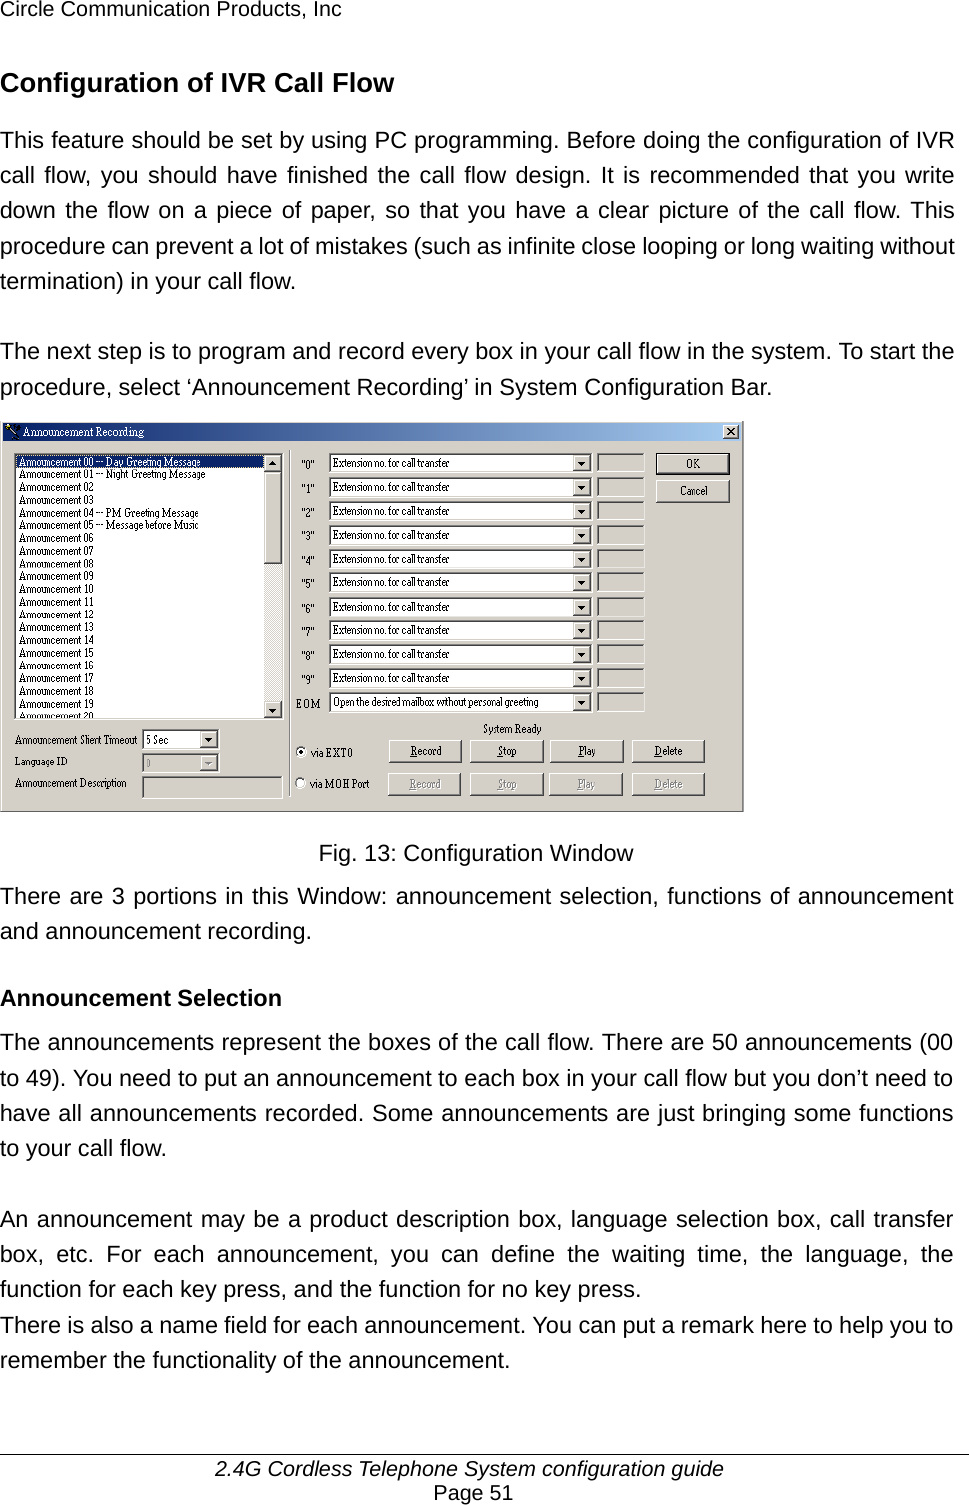
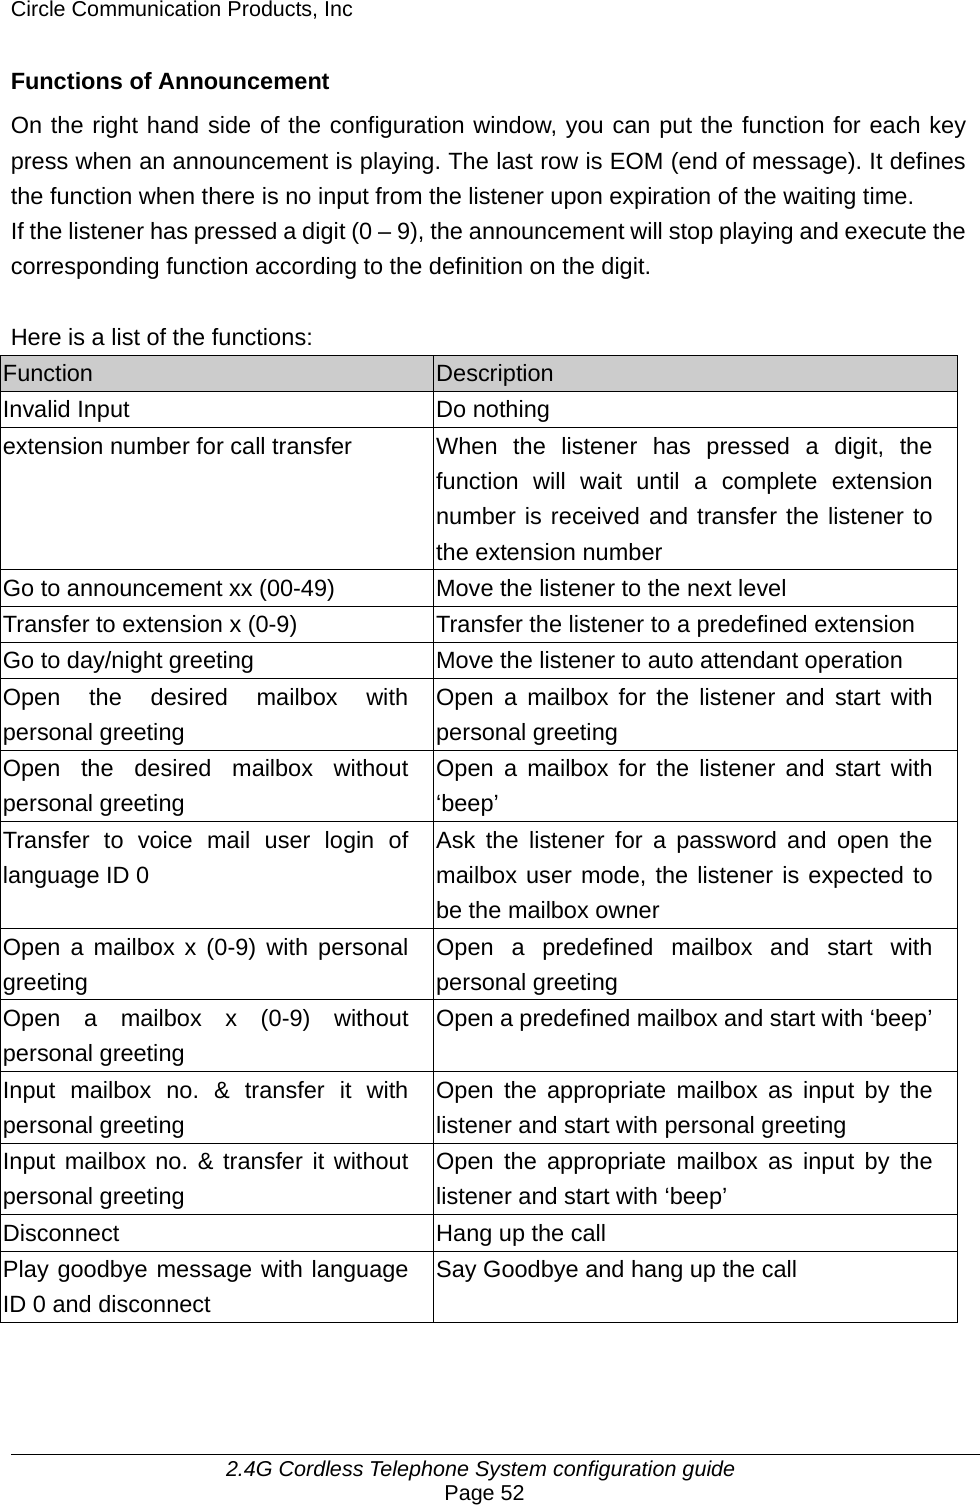
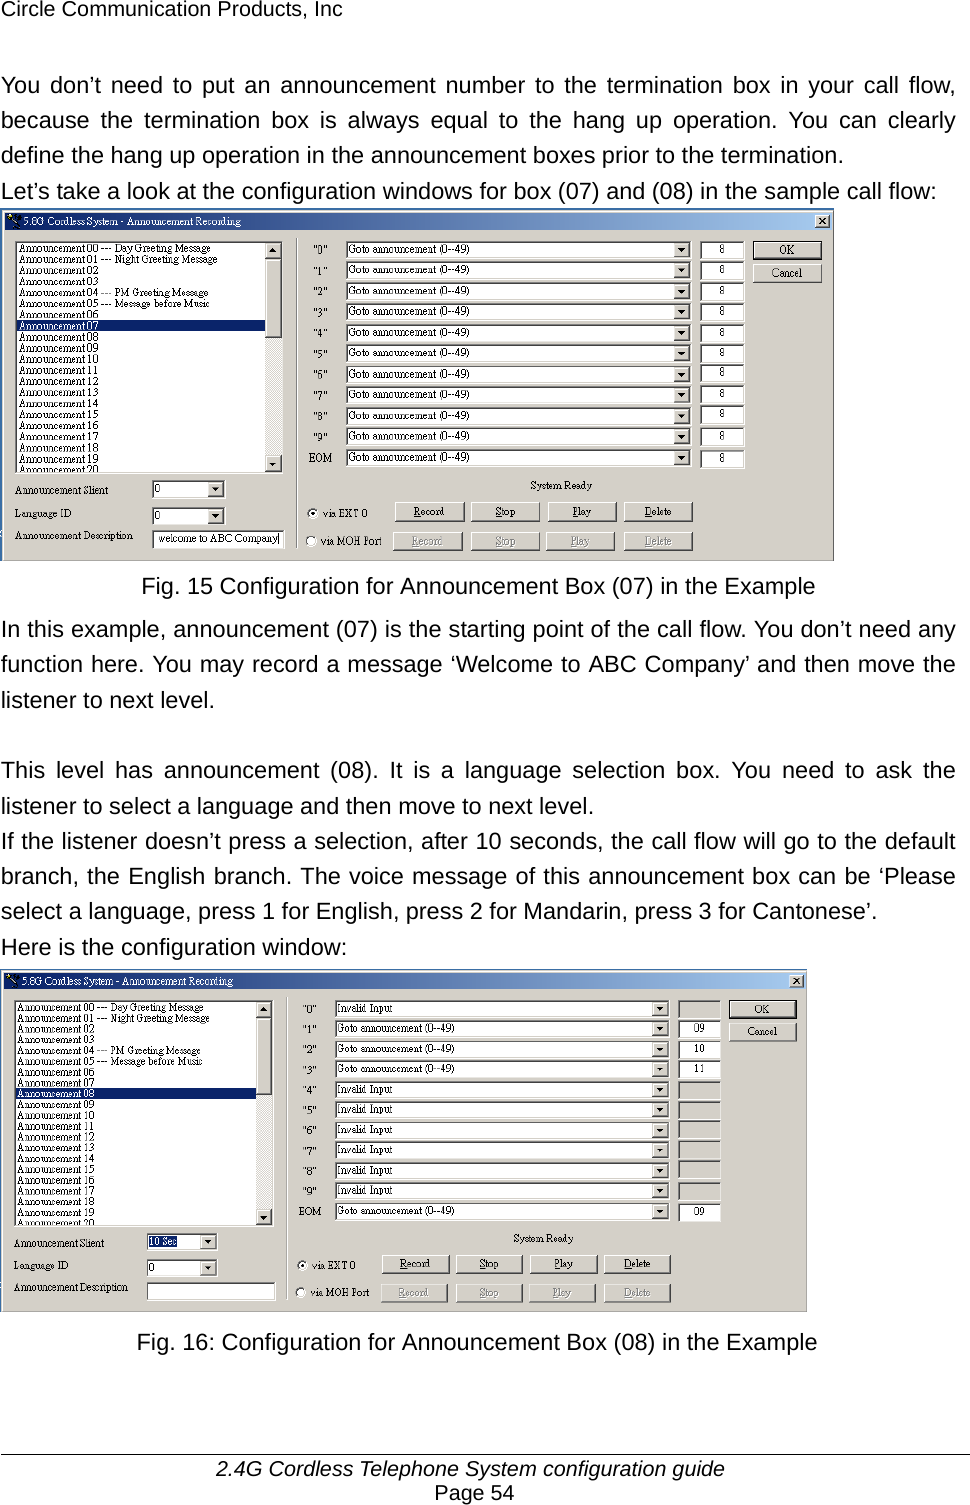
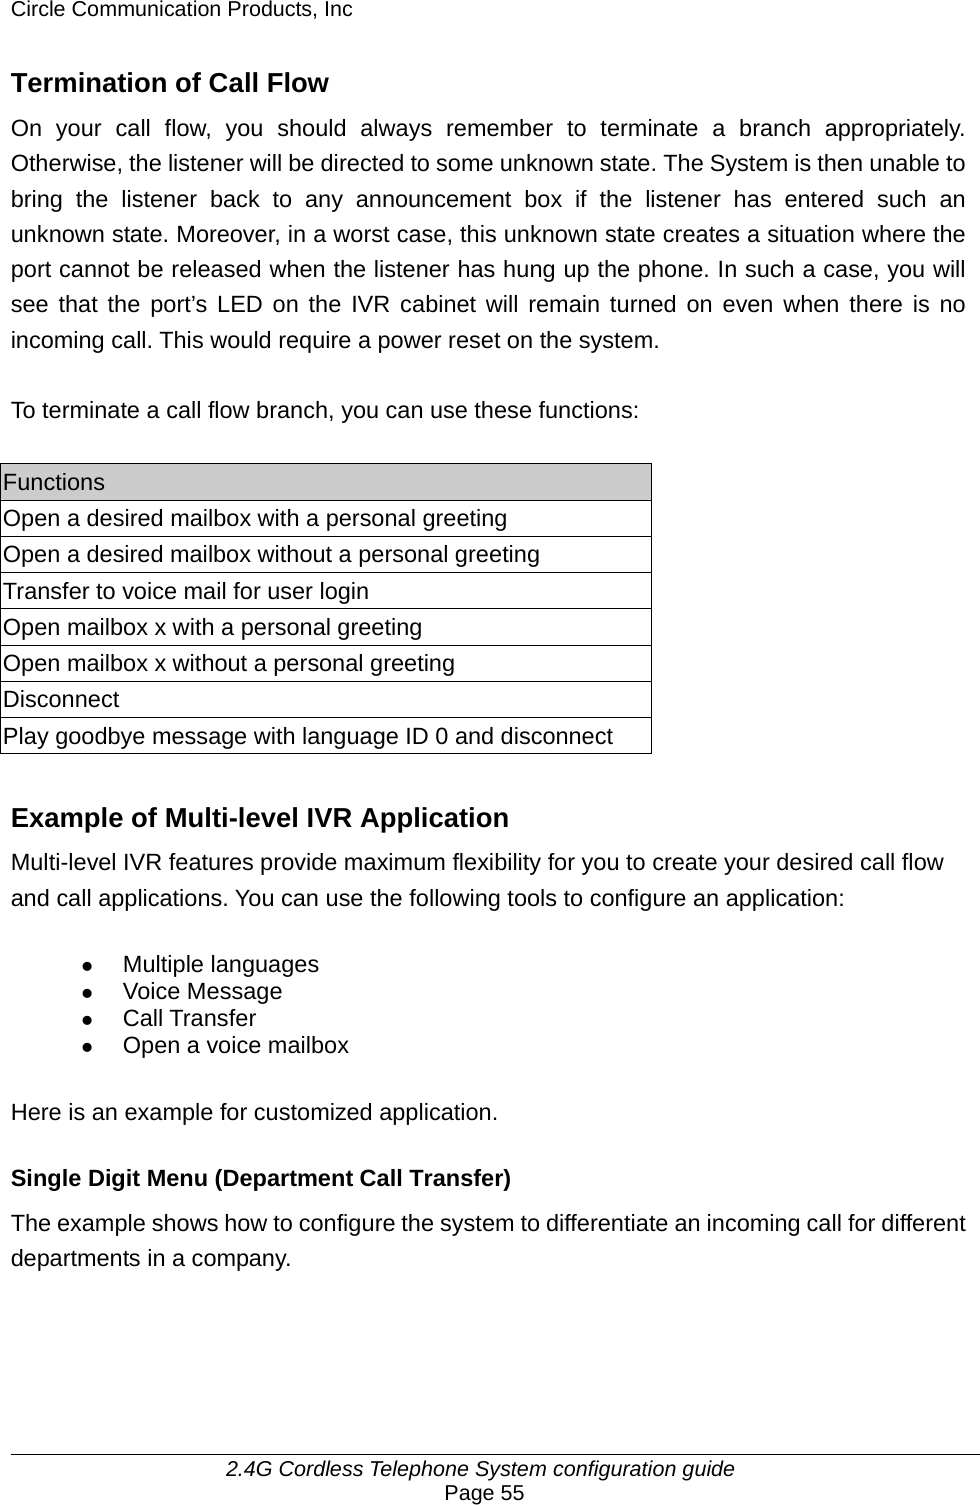
![Circle Communication Products, Inc 2.4G Cordless Telephone System configuration guide Page 53 Announcement Recording In the lower portion of the configuration window, there are buttons for you to play, record or delete the voice message part of an announcement box. IVR Call Flow and Configuration Example Here we repeat the previous call flow diagram with announcement numbers input: (07)Incoming C all (08) Select Language: 1. English 2. Mandarin 3. Cantonese(09)Call Transfer toCustomer ServicesDepartment Mailbox(11)Go to productdescription menu[3][2][1] (12) Select Product: 1. Car Kit 2. IVR4 3. 5.8G Phone(13)Car KitProduct Description(15)5.8G Phone Product Description(14)IVR4 Product Description[3][2][1]Call Transfer to SalesDepartment, END(10)Call Transfer toOperator, ENDRecord a Message, END Fig. 14: Multi-level IVR Call Flow Sample with Announcement Numbers When an announcement is executed, it plays the pre-recorded message and waits for the input from the user. The waiting time is also defined here. If there is no input from the listener when the waiting time expires, the announcement will execute the EOM function on the right hand side of the window.](https://usermanual.wiki/HKC-Technology/318.Base-User-Manual/User-Guide-563174-Page-53.png)
![Circle Communication Products, Inc 2.4G Cordless Telephone System configuration guide Page 56 (07)Welcome to ABC Company,please select a department(08)Press [1] for Sales Department;Press [2] for Accounts Department;Press [3] for Customer Services Department;Press [4] if you know the extension number of the called party;Press [0] for the operatorSales Department Customer ServicesDepartment OperatorInput extension numberdirectly Accounts Department[0] or time out[3][2][1][4](11)Invalid input, try again[5 - 9]Call Transfer to 1 Call Transfer to 2 Call Transfer to 3 Call Transfer to theoperator(09)Input extension numberValid extensionnumber?(10)Invalid input, try againYes (ext = 0 to 9)Call Transfer to EXTNo Time outCall Transfer to theoperator Fig. 17 Single Digit Menu](https://usermanual.wiki/HKC-Technology/318.Base-User-Manual/User-Guide-563174-Page-56.png)
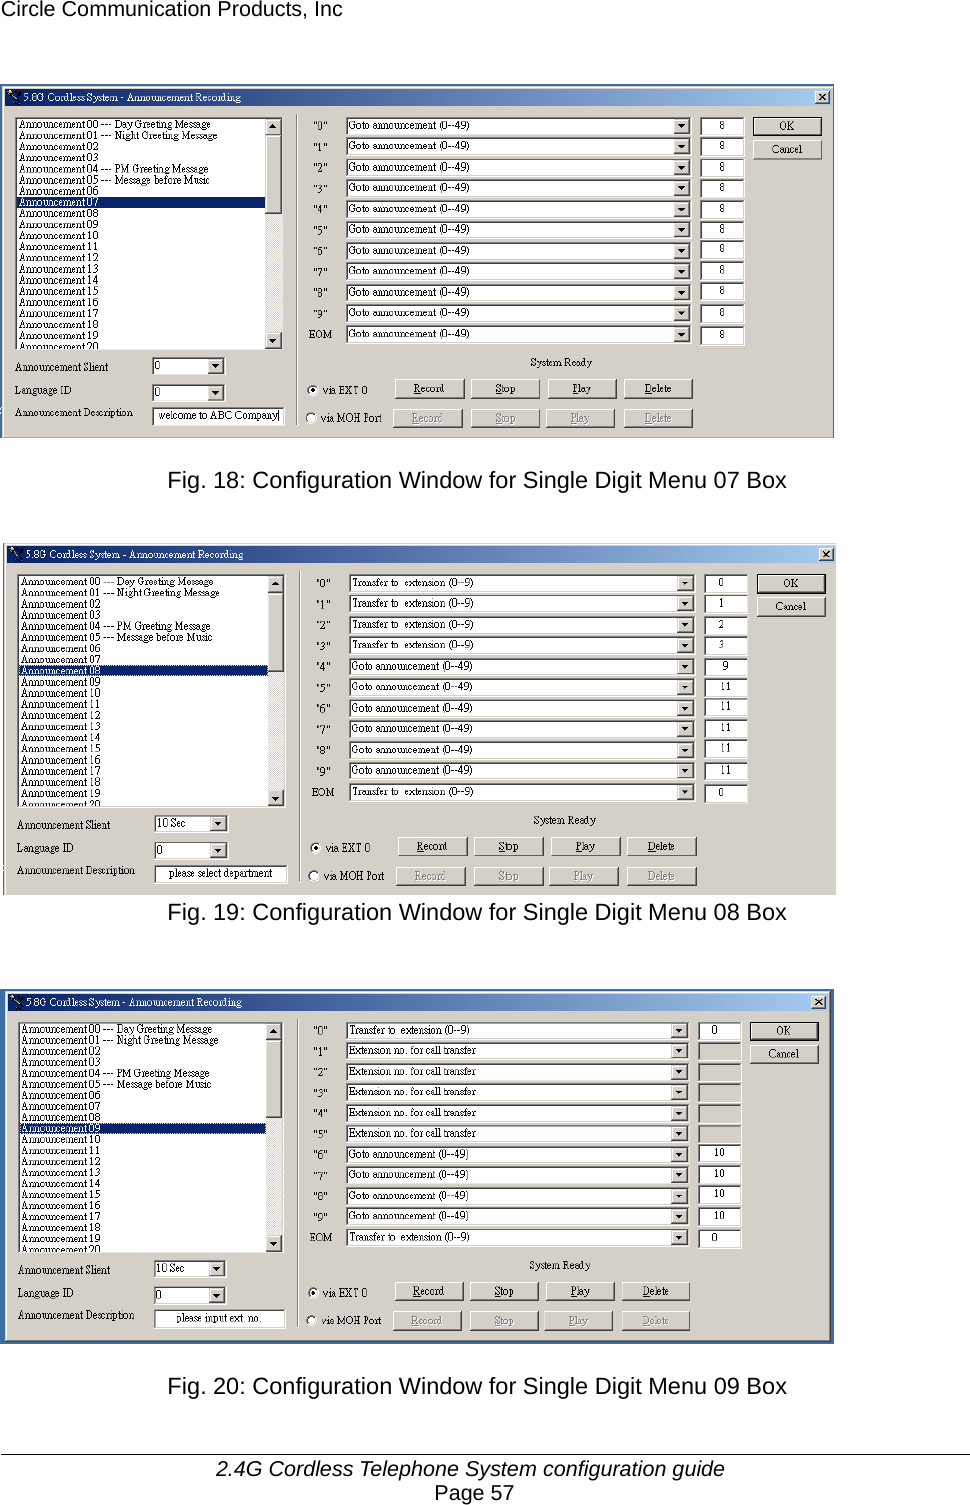
![Circle Communication Products, Inc 2.4G Cordless Telephone System configuration guide Page 58 Fig. 21: Configuration window for Single Digit Menu 10 Box Fig. 22: Configuration window for Single Digit Menu 11 Box The recommended voice messages for the boxes: Box number Voice Message Content 07 Welcome to ABC company 08 Please select a department, press [1] for the sales department, [2] for accounts department, [3] for customer service, press [4] for general information, press [0] for the operator 09 Please input the extension number or press [0] for the operator 10 Invalid extension number, please input again 11 Invalid department selection, please select department again](https://usermanual.wiki/HKC-Technology/318.Base-User-Manual/User-Guide-563174-Page-58.png)

![Circle Communication Products, Inc 2.4G Cordless Telephone System configuration guide Page 67 4) A plug and jack used to connect this equipment to the premises wiring and telephone network must comply with the applicable FCC Part 68 rules and requirements adopted by the ACTA. A compliant telephone cord and modular plug is provided with this product. It is designed to be connected to a compatible modular jack that is also compliant. See installation instructions for details. 5) The REN is used to determine the number of devices that may be connected to a telephone line. Excessive RENs on a telephone line may result in the devices not ringing in response to an incoming call. In most but not all areas, the sum of RENs should not exceed five (5.0). To be certain of the number of devices that may be connected to a line, as determined by the total RENs, contact the local telephone company. [For products approved after July 23, 2001, the REN for this product is part of the product identifier that has the format US:AAAEQ##TXXXX. The digits represented by ## are the REN without a decimal point (e.g., 03 is a REN of 0.3). For earlier products, the REN is separately shown on the label.] 6) If this equipment causes harm to the telephone network, the telephone company will notify you in advance that temporary discontinuance of service may be required. But if advance notice isn't practical, the telephone company will notify the customer as soon as possible. Also, you will be advised of your right to file a complaint with the FCC if you believe it is necessary. 7) The telephone company may make changes in its facilities, equipment, operations or procedures that could affect the operation of the equipment. If this happens the telephone company will provide advance notice in order for you to make necessary modifications to maintain uninterrupted service. 8) Should you experience trouble with this equipment, please contact (Circle Communication Products, 2554 Lincoln Blvd #111 Marina Del Rey CA 90291 USA) for repair or warranty information. If the equipment is causing harm to the telephone network, the telephone company may request that you disconnect the equipment until the problem is resolved. 9) Please follow instructions for repairing if any (e.g. battery replacement section); otherwise do not alternate or repair any parts of device except specified. 10) Connection to party line service is subject to state tariffs. Contact the state public utility commission, public service commission or corporation commission for information.](https://usermanual.wiki/HKC-Technology/318.Base-User-Manual/User-Guide-563174-Page-67.png)
![Circle Communication Products, Inc 2.4G Cordless Telephone System configuration guide Page 68 11) NOTICE: If your home has specially wired alarm equipment connected to the telephone line, ensure the installation of this [equipment ID] does not disable your alarm equipment. If you have questions about what will disable alarm equipment, consult your telephone company or a qualified installer. 12) This equipment is hearing aid compatible. NOTICE: According to telephone company reports, AC electrical surges, typically resulting from lightning strikes, are very destructive to telephone equipment connected to AC power sources. To minimize damage from these types of surges, a surge arrestor is recommended. Customer Service For customer support for any questions or help in installing or using your new Circle Cordless Telephone, Call Toll Free 1-888-584-9262 7:00 AM to 5:00 PM Pacific Standard Time www.circleproducts.com 2554 Lincoln Blvd. #111 Marina Del Rey, Ca 90291](https://usermanual.wiki/HKC-Technology/318.Base-User-Manual/User-Guide-563174-Page-68.png)