HM Electronics HS6000 Wireless Headset User Manual user ins HS6000 rev3
HM Electronics Inc Wireless Headset user ins HS6000 rev3
Users manual
OPERATING INSTRUCTIONS
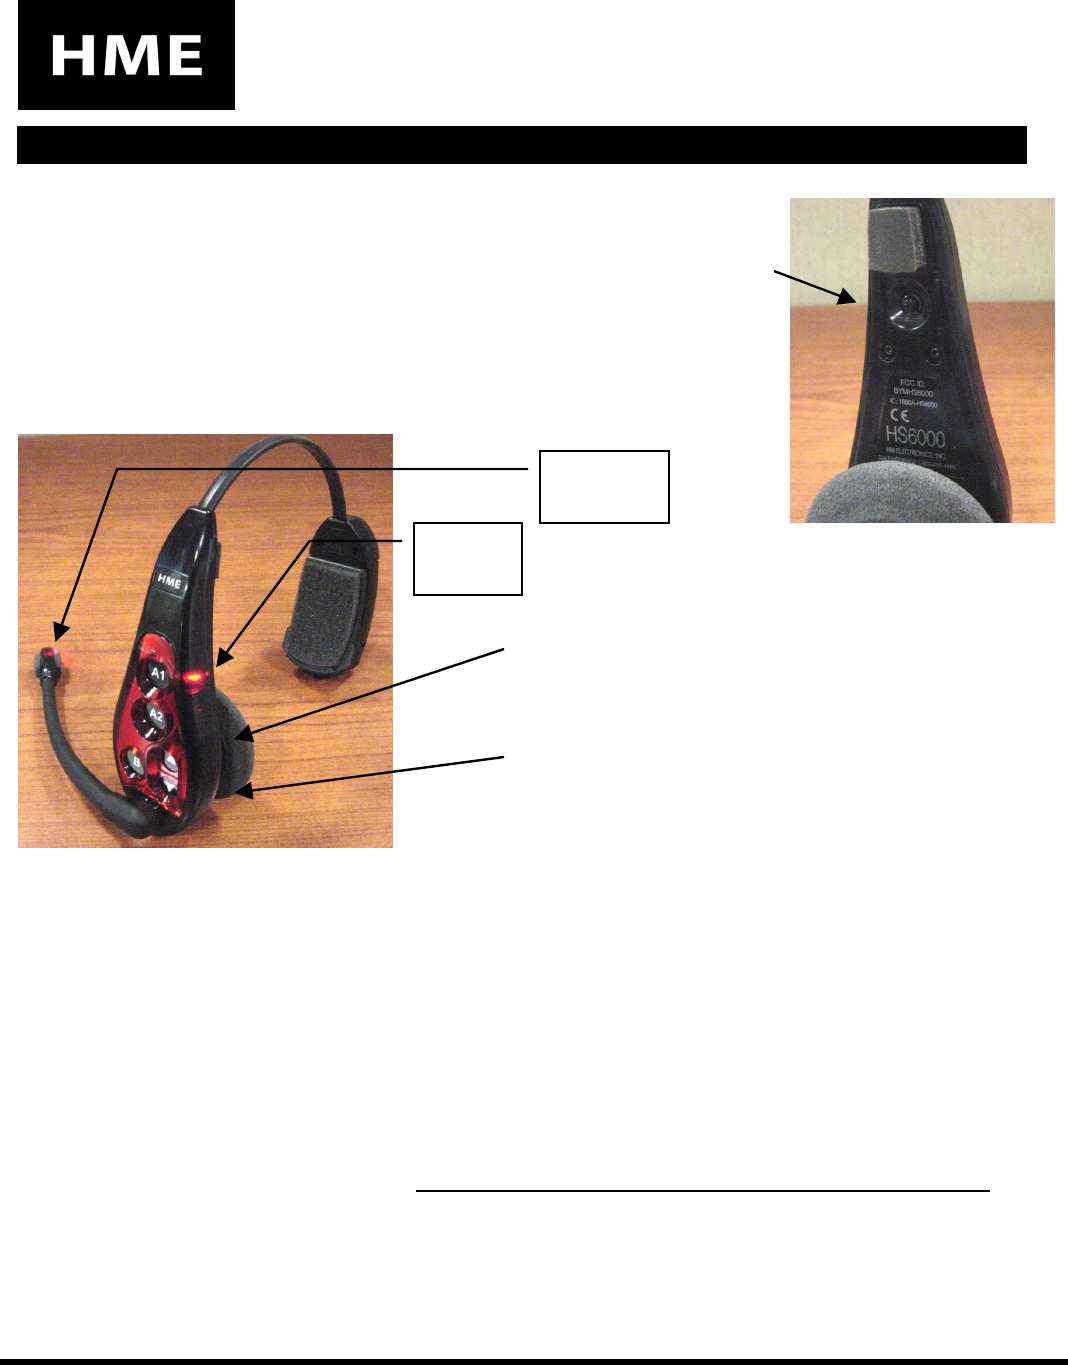
POWER ON: Press and release the power button on the inside of the headset
housing, shown in Figure 1. A voice message in the earpiece will say “Headset #,
Battery Full/Half or Low” and the power light on the opposite side of the earpiece will
go on (See Figure 2).
POWER OFF: Press and hold the power button on the inside of the headset
earpiece for approximately 3 seconds. A voice message in the earpiece will say
“Headset off,” and the power light on the opposite side of the earpiece will go off.
VOLUME UP: Lightly press the “VOL” up-arrow
button on the side of the earpiece. Each time it is
pressed, a short beep will be heard in the earpiece.
VOLUME DOWN: Lightly press the “VOL” down-
arrow button on the side of the earpiece. Each time it is
pressed, a short beep will be heard in the earpiece.
Figure 2
CONFIGURE HEADSET: Start with power OFF and press any of the following button combinations while
powering the unit ON. Immediately release all buttons after pressing the power button. All of these settings have
associated voice prompts when applying the setting. Please listen to confirm desired setting:
• Hands Free (HF) on / off – Press and hold “B” and UP arrow to turn on HF. Press and hold “B” and
DOWN arrow to turn HFoff.
• Auto HF (AHF) – Press “A1” (or A2) and the UP arrow to turn on the Auto HF mode. Set the base Xcvr
switch K1-3 to on. When you power the unit off AHF mode is not saved.
• Language selection – Press and hold “A1” and the DOWN arrow to toggle between English and another
language. Doing this again toggles back to first language.
• Registration to Base – Set base to accept registration and power up HS6000 while holding “B”. Hold the
HS6000 within 2 meters of the base. (Must be done before use, see Wireless I/Q operation manual)
• Play Status – Press “A2” and DOWN arrow buttons. (e.g. “Headset #, Battery Full/Half/Low,
English/Espanol, Hands-free on/off, firmware version #”)
If you have questions regarding the HS6000, please call HM Electronics, Inc. at (800)848-4468.
DRAFT October 3, 2005 DRAFT
Figure 1
Transmit
Light
Power
Light
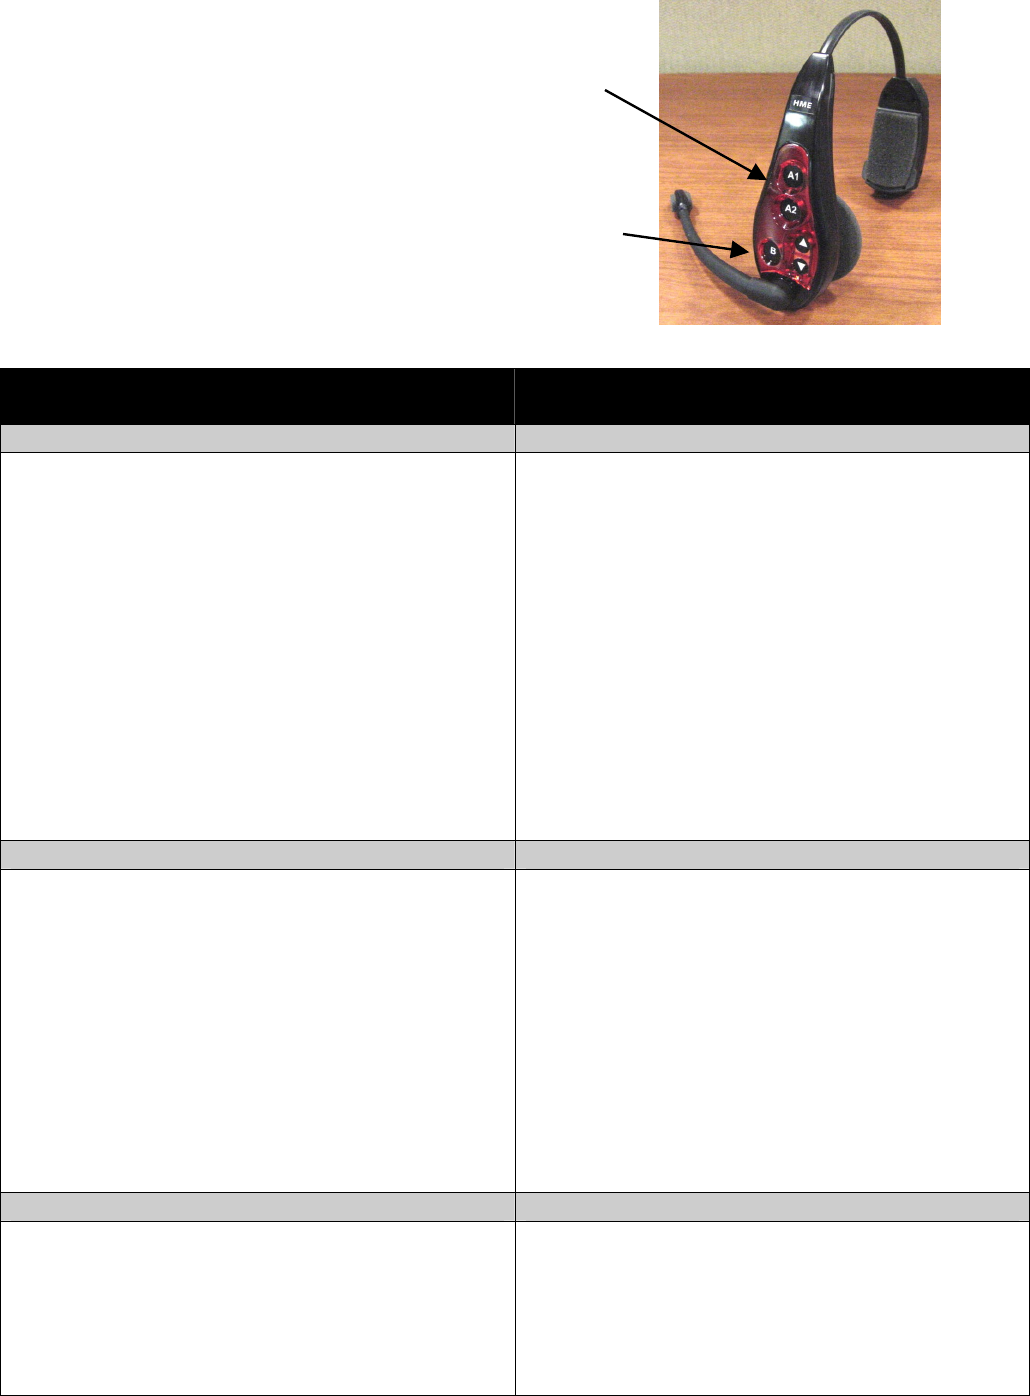
TO TALK TO CUSTOMERS: With your fingertip
(not your fingernail), press and release either the A1 or the
A2 button according to the instructions below, and speak into the
microphone. When you have finished talking to the customer, press
the A1 or A2 button again. The headset will automatically stop
transmitting when the car drives away.
TO TALK TO OTHER CREW MEMBERS: Press and hold
the B button near the microphone, shown in Figure 3, and speak into
the microphone. Release the button when you finish speaking.
Figure 3
Single-Lane Operation
(one base station for one speaker post)
Dual-Lane Operation
(two base stations for two speaker posts)
Hands-Free (HF) Mode: Hands-Free (HF) Mode:
* Alert tone (single beep) sounds in headset, then customer
at speaker post or menu board can be heard.
* Adjust customer’s voice level in headset if necessary.
* Press and release A1 or A2 button to speak and listen to
customer. You will see microphone boom tip light up.
* Press and release A1, A2 or B button to end communication
with customer. Microphone boom tip light will go out.
* Press and release A1 or A2 button if you want to speak to
the customer again. You will see microphone boom tip light
up.
* If customer drives away from speaker post or menu board,
headset automatically stops transmitting microphone boom tip
light will go out.
* Alert tone (single beep for Lane 1, double beep for Lane 2)
sounds in headset, then customer at speaker post or menu
board can be heard.
* Adjust customer’s voice level in headset if necessary.
* Press and release A1 button for Lane 1 or A2 for Lane 2, to
speak and listen to customer. You will see microphone boom
tip light up.
* Press and release A1, A2 (depending on lane) or B button
to end communication with customer. Microphone boom tip
light will go out.
* Press and release A1 button for Lane 1 or A2 for Lane 2, to
speak to the customer again. You will see microphone boom
tip light up.
* To change lanes, press and release the opposite A button.
A voice in the headset will say “Lane 1” or “Lane 2.”
* If customer drives away from speaker post or menu board,
headset automatically stops transmitting. Microphone boom tip
light will go out.
Auto Hands-Free (AHF) Mode: Auto Hands-Free (AHF) Mode:
* Alert tone (single beep) sounds in headset, then customer
at speaker post or menu board can be heard.
* Adjust customer’s voice level in headset if necessary.
* Speak and listen to customer without pressing any buttons.
You will see microphone boom tip light up.
* Press and release A1, A2 or B button to end communication
with customer. Microphone boom tip light will go out.
* Press and release A1 or A2 button if you want to speak to
the customer again. You will see microphone boom tip light
up.
* If customer drives away from speaker post or menu board,
headset automatically stops transmitting. Microphone boom tip
light will go out.
* Alert tone (single beep for Lane 1, double beep for Lane 2)
sounds in headset, then customer at speaker post or menu
board can be heard.
* Adjust customer’s voice level in headset if necessary.
* Speak and listen to customer without pressing any buttons.
You will see microphone boom tip light up.
* Press and release A1, A2 (depending on lane) or B button
to end communication with customer. Microphone boom tip
light will go out.
* Press and release A1 button for Lane 1 or A2 for Lane 2, to
speak to the customer again. You will see microphone boom
tip light up.
* If customer drives away from speaker post or menu board,
headset automatically stops transmitting. Microphone boom tip
light will go out.
Push-To-Talk (PTT) Mode: Push-To-Talk (PTT) Mode:
* Alert tone (single beep) sounds in headset, then customer
at speaker post or menu board can be heard.
* Adjust customer’s voice level in headset if necessary.
* Press and hold A1 or A2 button to speak to customer. You
will see microphone boom tip light up.
* Alert tone (single beep for Lane 1, double beep for Lane 2)
sounds in headset, then customer at speaker post or menu
board can be heard.
* Adjust customer’s voice level in headset if necessary.
* Press and hold A1 button to speak to customer in Lane 1;
A2 to speak to customer in Lane 2.
* To change lanes, press and release the opposite A
button.
A voice in the headset will say “Lane 1” or “Lane 2.”
NOTE: Pressing A1, A2 or B while someone else is talking will not prevent their communications, however, they
will hear you as well as whomever they are talking to.
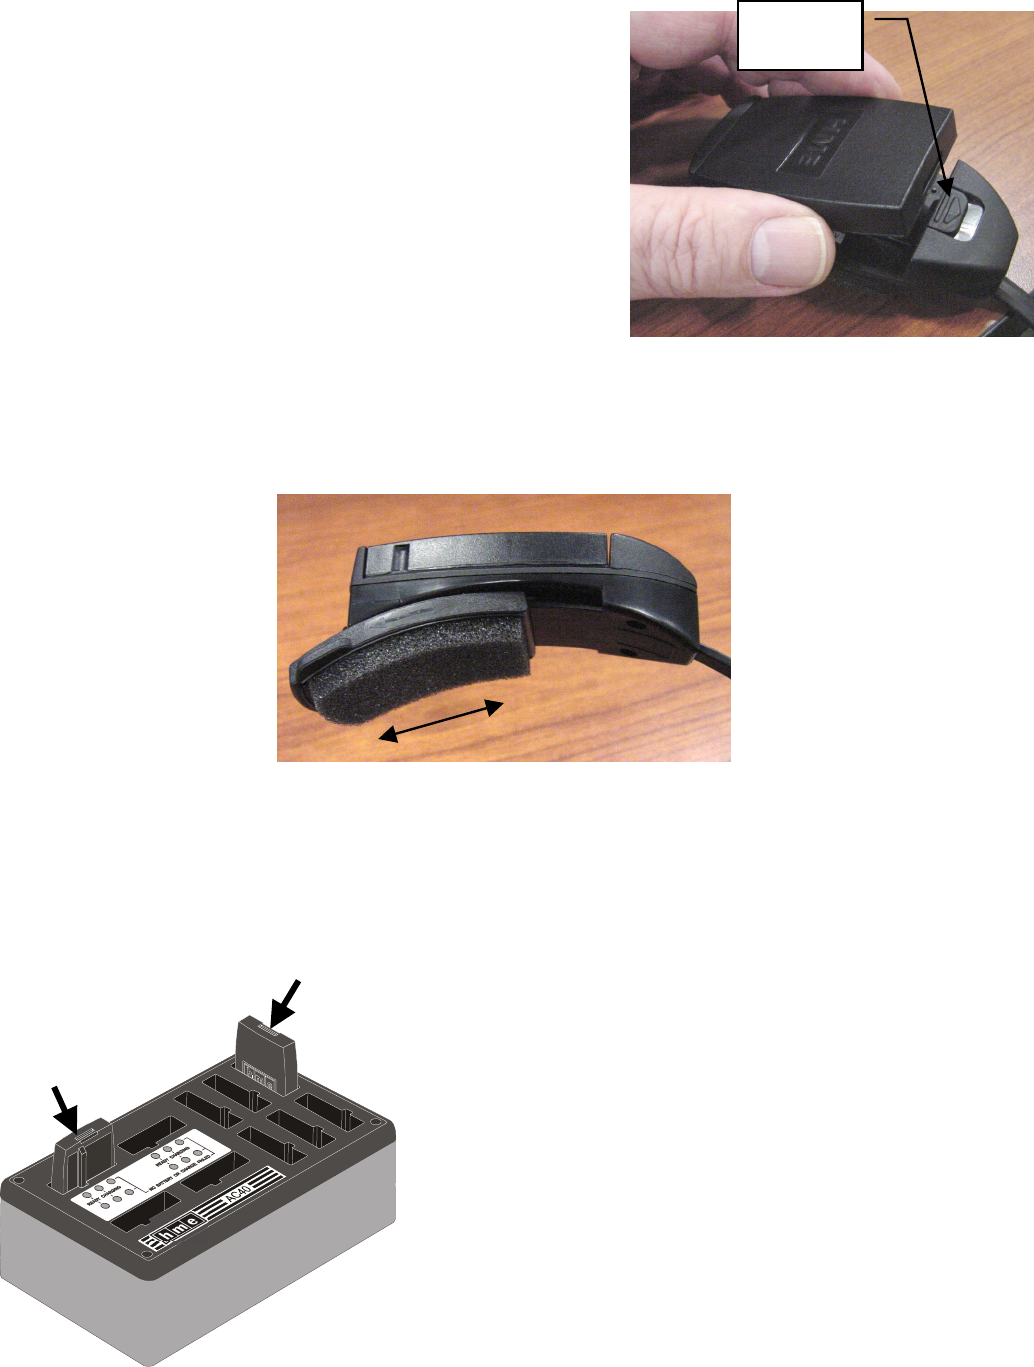
TO CHANGE BATTERIES: When a battery is becoming
weak, a voice in the earpiece will say “Change battery.” When this
happens, remove the battery from the headset by carefully sliding
the battery-release button shown in Figure 4. Pull the end of the
battery near the battery-release button away from the headset and lift
the battery out.
TO REPLACE BATTERIES: When replacing a battery in
the headset, place the end of the battery with the metal contacts into
the battery holder on the headset, in the same position as the battery
you removed. Press the top of the battery carefully into the battery
holder until it snaps in place under the battery-release button.
Figure 4
MAKING HEAD SIZE ADJUSTMENTS: You may adjust the head size of HS6000 for best fit.
Adjustments are made using the adjuster behind the battery holder as show in Figure 4a. The adjuster ratchets in
and out on a track to accommodate almost any head size.
Figure 4a
NOTE: This headset will accept only batteries with a “red color” label. Other batteries will not fit this unit.
TO RECHARGE THE BATTERY: Place the
battery in one of the four charging ports as shown in
Figure 5. When the battery is charging, the red
CHARGING light next to it will be on. When a battery is
fully charged, the green READY light next to it will be on.
Battery charging time is approximately 2 hours. When a
battery is fully charged, it can be stored in one of the six
storage ports on the battery charger.
Battery in
storage port
Battery
charging
Figure 5.
Battery
Release

This device complies with Part 15 of the FCC Rules. Operation is subject to the following two conditions: (1) This device may not cause
harmful interference, and (2) This device must accept any interference received, including interference that may cause undesired operation.
This equipment has been tested and found to comply with the limits for Class B Digital Device, pursuant to Part 15 of the FCC Rules. These
limits are designed to provide reasonable protection against harmful interference in a residential installation. This equipment generates and
can radiate radio frequency energy and, if not installed and used in accordance with the instructions, may cause harmful interference to radio
communications. However, there is no guarantee that interference will not occur in a particular installation.
Any changes or modifications not expressly approved by HM Electronics, Inc. could void the user’s authority to operate the equipment.
To comply with FCC radiation exposure requirements, use of this device is limited to configurations tested and approved by HM Electronics.
Other accessories used with this device must not contain any metallic components.
This headset is a radio transmitter and receiver. When it is on, it receives and sends out RF energy. In August 1996, the U.S. Federal
Communications Commission (FCC) adopted RF exposure guidelines with safety levels for hand-held wireless devices. These guidelines are
consistent with the safety standards previously set by both U.S. and international standards bodies in the following reports:
• ANSI C95.1 (American National Standards Institute, 1999)
• NCRP Report 86 (National Council on Radiation Protection and Measurements, 1986)
• ICNIRP (International Commission on Non-Ionizing Radiation Protection, 1996)
This headset complies with the standards set by these reports and the FCC guidelines.
The term “IC:” before the certification/registration number only signifies that the Industry Canada technical specifications were met.
Hereby, HM Electronics, Inc. declares that the HS6000 is in compliance with the essential requirements and other relevant provisions of
R&TTE Directive 1999/5/EC.
This product operates in the 2400 to 2483.5 MHz frequency range. The use of this frequency range is not yet harmonized between all
countries. Some countries may restrict the use of a portion of this band or impose other restrictions relating to power level or use. You should
contact your Spectrum authority to determine possible restrictions.