HOLUX Technology NAV-51XX GPSmile51 User Manual Datasheet NAV 51 20050221
HOLUX Technology, Inc GPSmile51 Datasheet NAV 51 20050221
UserManual.wiki
>
HOLUX Technology
>
NAV 51XX User Manual
Users Manual
Navigation menu
Upload a User Manual
Namespaces
Wiki Guide
HTML
PDF
Info
Views
User Manual
Discussion / Help
Navigation
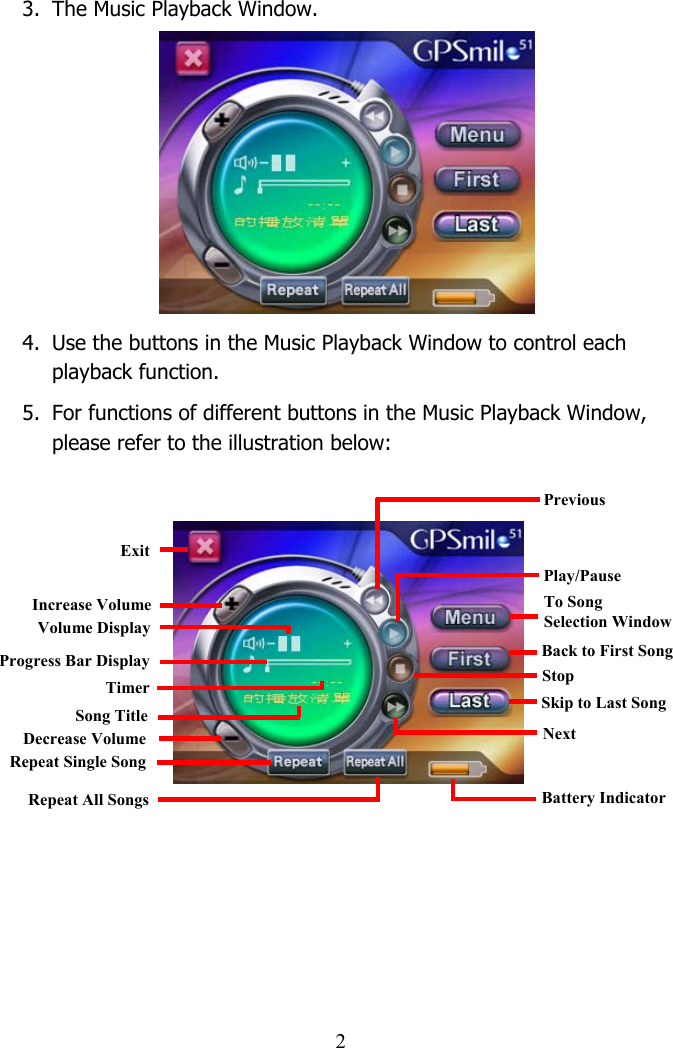
![1In addition to the navigation system, this unit also provides functions for music playback, image browsing, and system settings. You can control and operate the system on screen with a stylus, or by using the directional keys located on the right hand side of the unit. Control the menus by moving up, down, left and right. Music Playback Function This unit has a complete MP3 Music Playback function, capable of playing back MP3 files stored on SD memory cards. Storing MP3 files onto SD memory cards On your computer, you must first convert the music from an audio CD into MP3 files, then save them onto the SD memory card. Starting music playback 1. Insert the SD memory card with stored MP3 files into the SD memory card slot on the unit. 2. Power on, and at the Main Menu Screen, select the [ Music ] icon.](https://usermanual.wiki/HOLUX-Technology/NAV-51XX/User-Guide-599518-Page-3.png)
![3Create Custom Playlist The Create Custom Playlist function lets you create a personalized playlist, specifying which songs to play and in what order. Adding/removing a song from the playlist will not copy or delete the actual file. It will only add/remove the path and position of the music file from the playlist. 1. Under the Music Playback Window, select [ Select Song ] and go to the Song Selection Window. 2. The panel on the left lists the source directories, select a directory and double click to enter the directory.](https://usermanual.wiki/HOLUX-Technology/NAV-51XX/User-Guide-599518-Page-5.png)
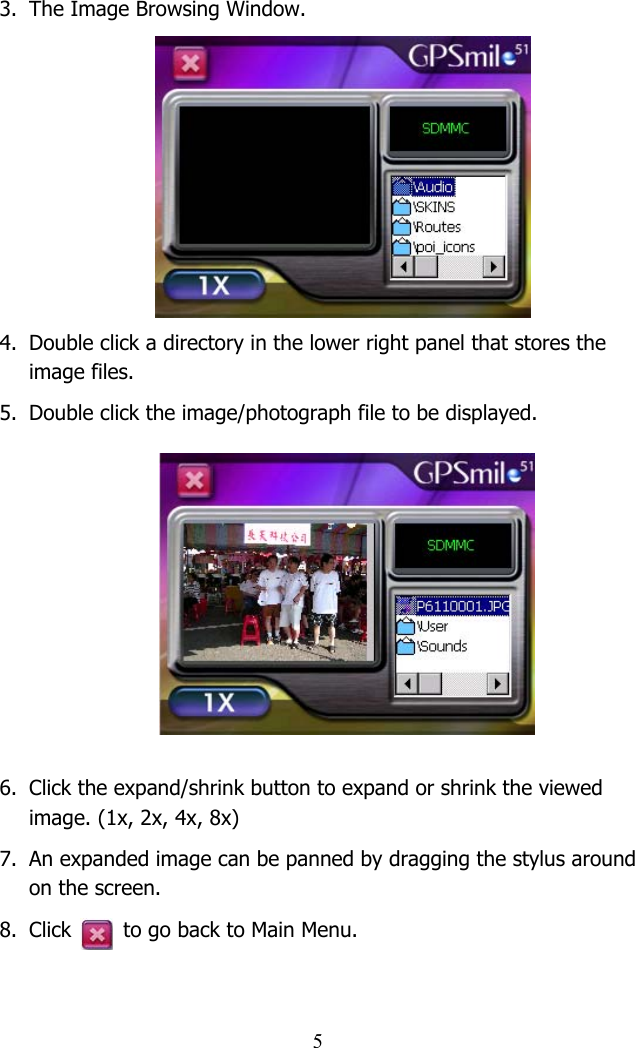
![43. After loading the list of MP3 files contained in the directory, select the desired file to be played and double click to add to playlist. Or click the [ Add ] button to add to playlist. 4. The file will be added to the panel/playlist on the right. 5. Clicking the [ Add All ] button will add all songs currently in the left panel into the playlist. 6. To remove a song from the playlist, please select the song from the right panel and then click the [ Remove ] button. 7. Clicking the [ Remove All ] button removes all songs at once from the playlist from the right panel. 8. Click the button to exit the Song Selection Window and go back to the Music Playback Window. Image Browsing Function The system has an Image Browsing function, capable of displaying images/photographs stored on SD memory cards. 1. Insert the SD memory card with stored image files into the SD memory card slot on the unit. 2. Power on, and at the Main Menu Screen, select the [ Images ] icon.](https://usermanual.wiki/HOLUX-Technology/NAV-51XX/User-Guide-599518-Page-6.png)
![6Setting The setting function gives you the ability to adjust the basic system options, including time settings, volume control, screen calibration, startup message, backlight setting, version info etc… You can modify the settings to your personal preference. System Settings [Time] 1. After system startup, from main menu screen, select [Setting] to go into the System Settings window. 2. Select from the [Hour] pull down menu and choose the correct value. 3. Select from the [Minute] pull down menu and choose the correct value. 4. Select to confirm, or select to keep original settings. 5. Go back to the settings window and select to return to main menu screen.](https://usermanual.wiki/HOLUX-Technology/NAV-51XX/User-Guide-599518-Page-8.png)
![7[Volume] 1. Under the settings window, control the volume directly with the scroll bar. There are six levels of volume in total. Scroll bar [Startup Message] 1. Under the settings window, select the Warning Voice [Off] or [On] squares for whether the startup message is to be broadcast.](https://usermanual.wiki/HOLUX-Technology/NAV-51XX/User-Guide-599518-Page-9.png)
![8[Align Screen] Control of this unit is accomplished primarily through the stylus by touching/writing on the screen. If the system cannot correctly identify your stylus’ input, please run through the screen calibration procedure. 1. From the settings window, select the [Stylus Adjustment] option to start the screen calibration procedure. 2. Use the stylus and touch once on the center of the cross displayed on screen. 3. Touch once on the cross at the second position. 4. Touch once on the cross at the third position.](https://usermanual.wiki/HOLUX-Technology/NAV-51XX/User-Guide-599518-Page-10.png)
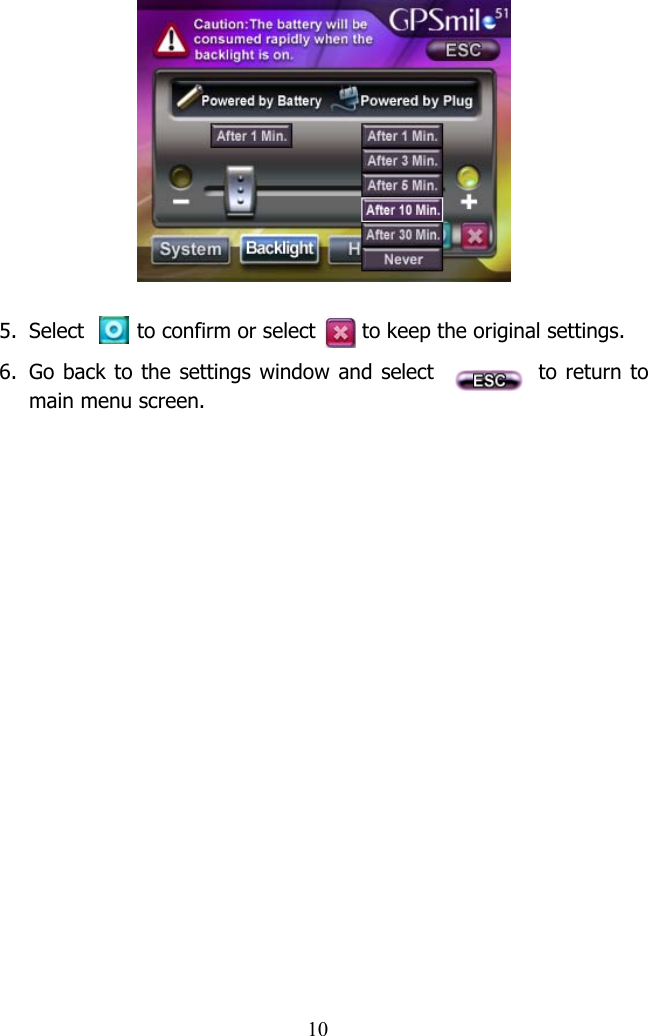
![95. Follow the procedures and finish touching on the forth and fifth positions. 6. To finish the screen calibration procedure, select to confirm or select to keep the original settings. 7. Go back to the settings window and select to go back to the main menu screen. Backlight Settings The backlight settings will let you set the brightness of the backlight and the auto-off time. 1. Under the setting window, select the [Backlight] to enter the backlight settings window. 2. Select the time to turn off backlight for “When running off the battery”. (1 min, 3 min, 5 min, 10 min, 30 min, Always On) 3. Select the time to turn off backlight for “When running off the external adapter”. (1 min, 3 min, 5 min, 10 min, 30 min, Always On) 4. Scroll the brightness bar to control backlight brightness for a total of six levels.](https://usermanual.wiki/HOLUX-Technology/NAV-51XX/User-Guide-599518-Page-11.png)
![11Help/Tips 1. Under the setting window, select [Help] to enter the help window. 2. The screen display will show instructions for operation of music playback and image browsing functions. ※ For instructions on the navigation software, please refer to the [Navigation Software Operation Manual].](https://usermanual.wiki/HOLUX-Technology/NAV-51XX/User-Guide-599518-Page-13.png)