HOLUX Technology NAV-55XX GPSmile55 Car Navigator User Manual
HOLUX Technology, Inc GPSmile55 Car Navigator
UserManual.wiki
>
HOLUX Technology
>
NAV 55XX User Manual
Manual
Navigation menu
Upload a User Manual
Namespaces
Wiki Guide
HTML
PDF
Info
Views
User Manual
Discussion / Help
Navigation
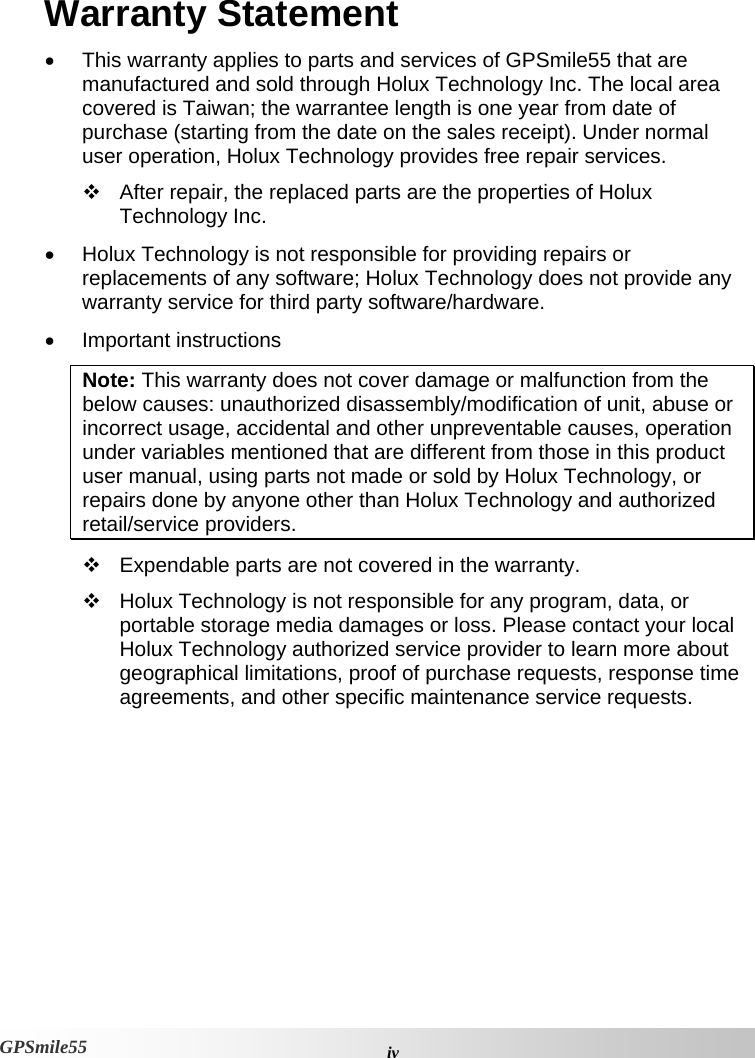


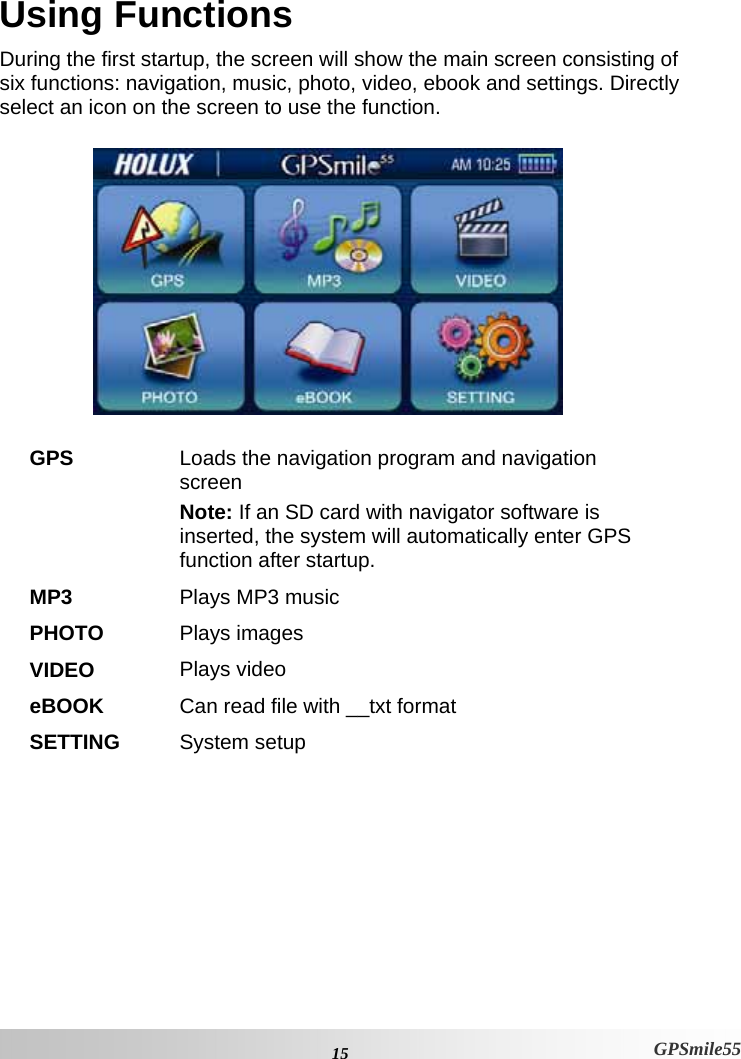
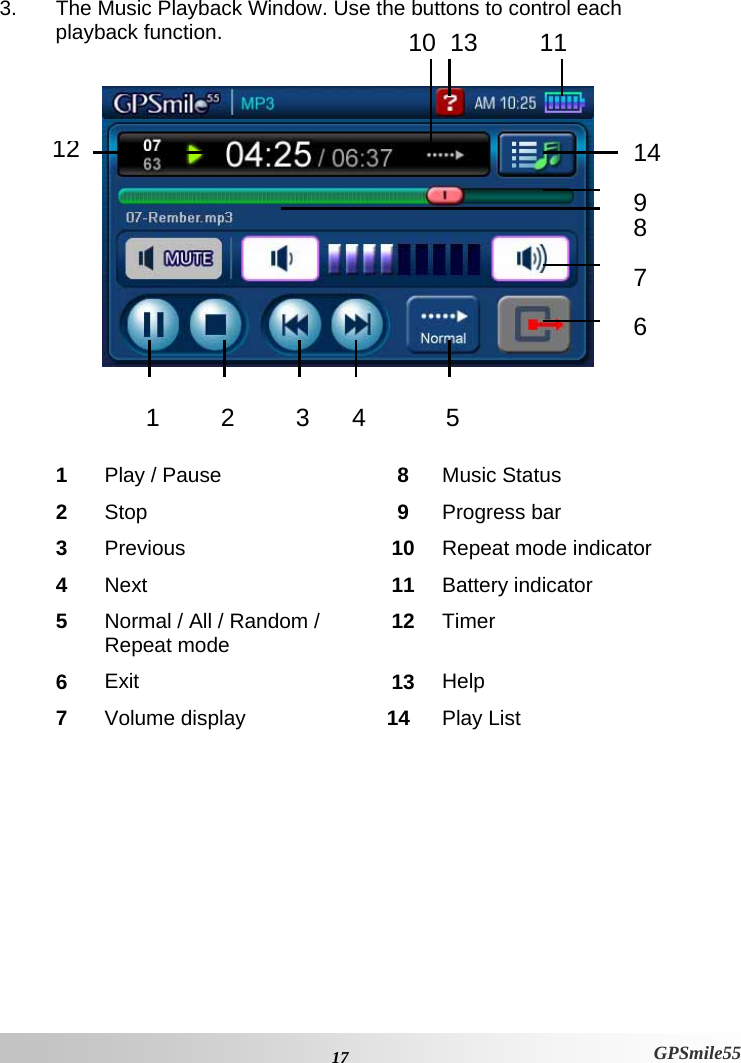
![16GPSmile55 Function Menu Music Playback Function This unit has an MP3 Music Playback function that is capable of playing back MP3 files stored on SD memory cards. Storing MP3 files on SD memory cards You must first convert the music from an audio CD into MP3 files on your computer. Then, save them onto the SD memory card. All the files need to be stored under the MP3 directory, and the file format needs to be “*.mp3”. Starting music playback 1. Insert the SD memory card with stored MP3 files into the SD memory card slot on the unit. 2. Turn the power on, and select the [MP3] icon on the main menu.](https://usermanual.wiki/HOLUX-Technology/NAV-55XX/User-Guide-839331-Page-24.png)
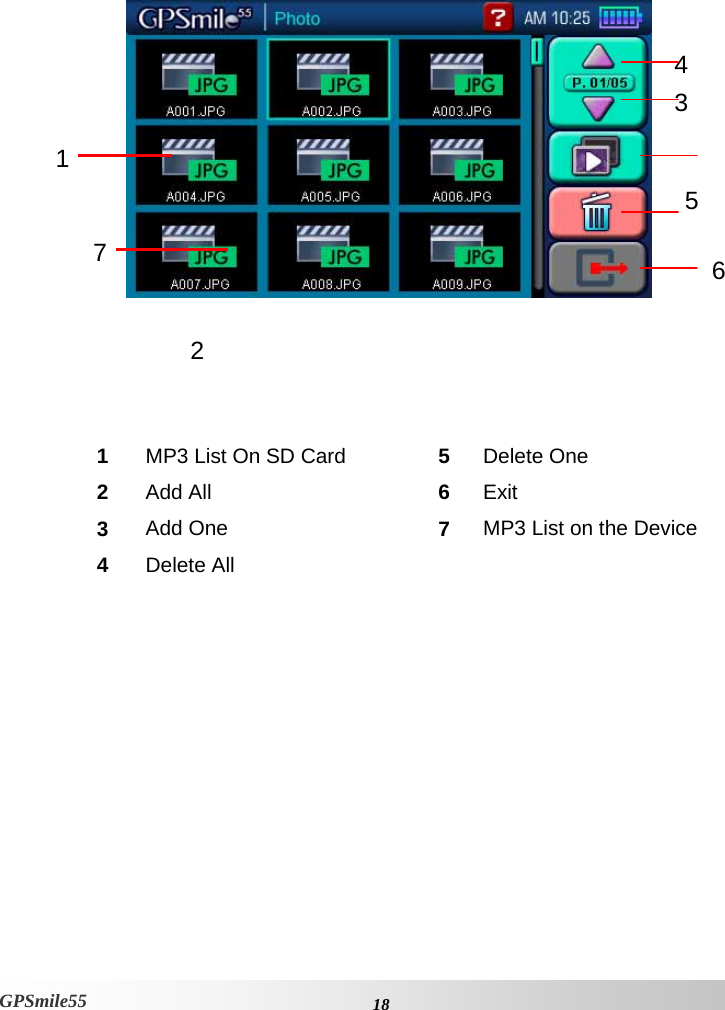
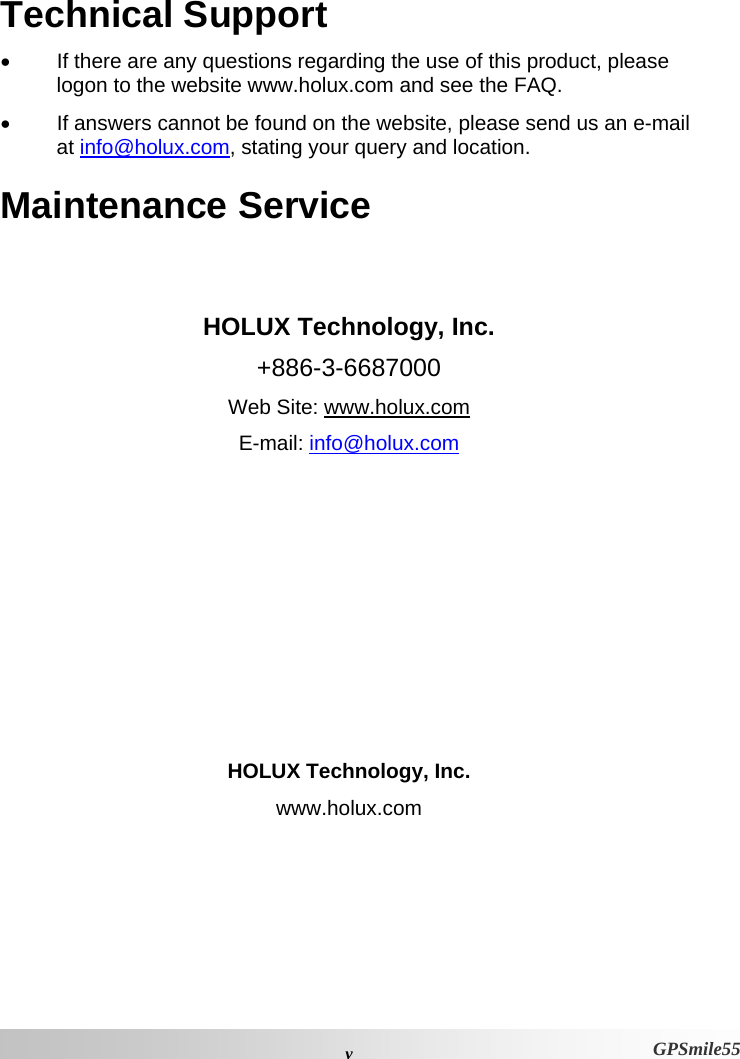
![19 GPSmile55 Image Browsing Function 1. The system has an Image Browsing function that is capable of displaying images/photographs stored on SD memory cards. All the files need to be stored under the Image directory, and the file format needs to be “*.jpg”. 2. Insert the SD memory card with stored image files into the SD memory card slot on the unit. 3. Turn the power on, and select the [Photo] icon on the Main Menu. 4. The Image Browsing Window. Next Rotate Zoom in Previous Next Previous Photo Status Slide show Delete Exit Zoom out Exit Photo title Delete Information Help Slide show Viewing Size](https://usermanual.wiki/HOLUX-Technology/NAV-55XX/User-Guide-839331-Page-27.png)
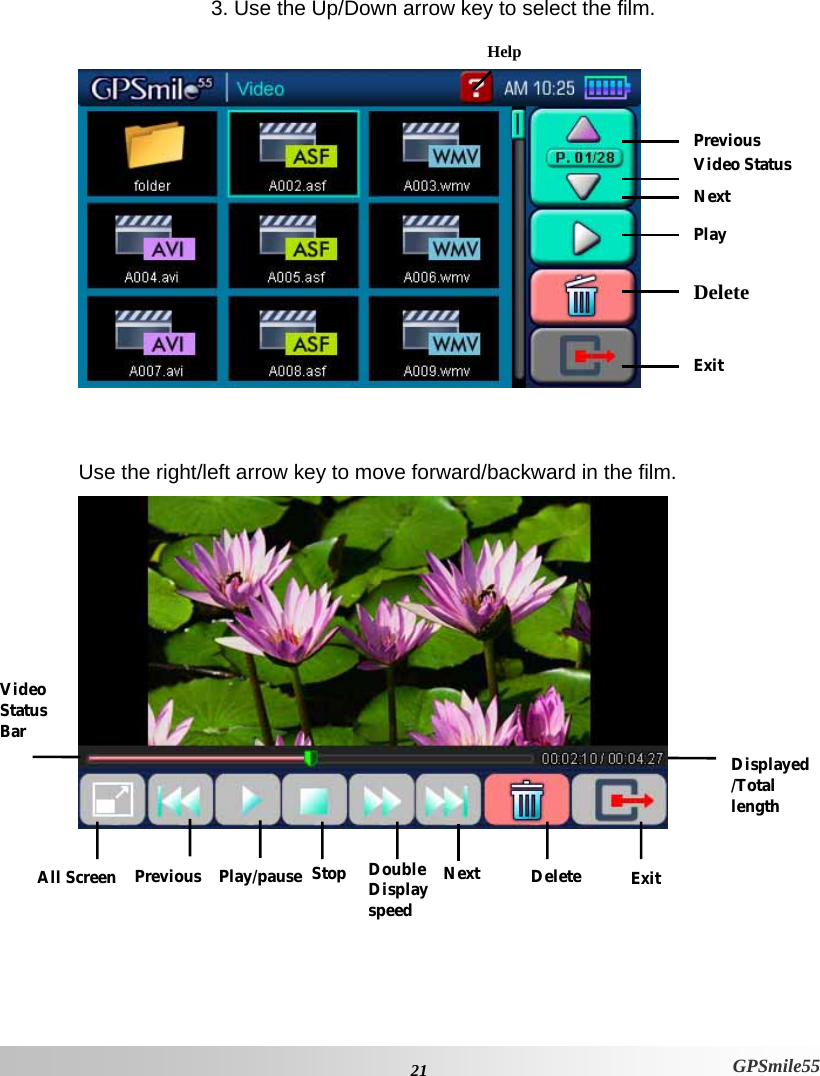
![20GPSmile55 Video Video can read the film with the following data format: __.wmv, __.asf. Please convert files into a readable format and save them on the SD memory card in a folder named "film". 1. Insert the SD memory card with Video files into the SD memory card slot on the unit. 2. Turn the power on, and select the [ Video ] icon from the Main Menu Screen.](https://usermanual.wiki/HOLUX-Technology/NAV-55XX/User-Guide-839331-Page-28.png)
![22GPSmile55 eBook eBook can only read files with __txt format. Please save them on the SD memory card in a folder named "ebook". 1. Insert the SD memory card with ebook files into the SD memory card slot on the unit. 2. Turn the power on, and select the [eBook ] icon from the Main Menu Screen. 3. Use the up and down arrow key to change between books. Previous Page Previous File Next File Exit Help File Status Page Status Next Page](https://usermanual.wiki/HOLUX-Technology/NAV-55XX/User-Guide-839331-Page-30.png)
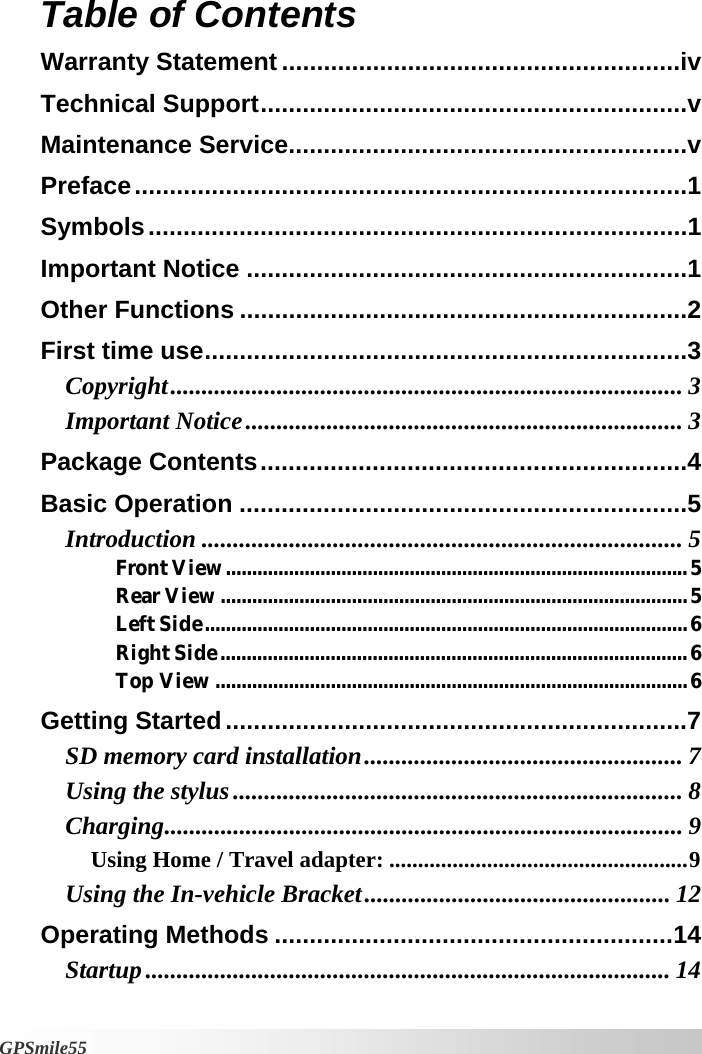
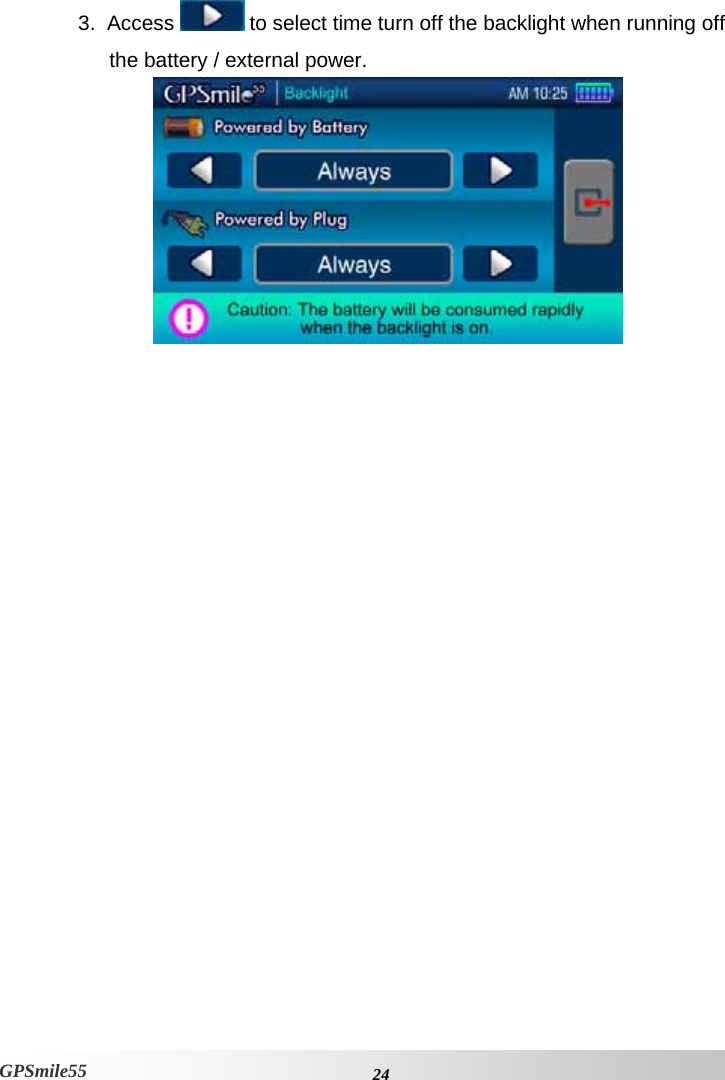
![23 GPSmile55 Setting Power 1. After starting up the system, select the [SETTING] icon to enter. 2. Select [Backlight] from the main screen to access the Power settings screen.](https://usermanual.wiki/HOLUX-Technology/NAV-55XX/User-Guide-839331-Page-31.png)
![25 GPSmile55 Time 1. Select [Time] from the main screen to access the Time settings screen. 2. Access the Date pull down menu and choose the correct value. 3. Access the Time pull down menu and choose the correct value. 4. Access the Time Zone pull down menu and choose the correct value. 5.Select to return to main menu screen.](https://usermanual.wiki/HOLUX-Technology/NAV-55XX/User-Guide-839331-Page-33.png)
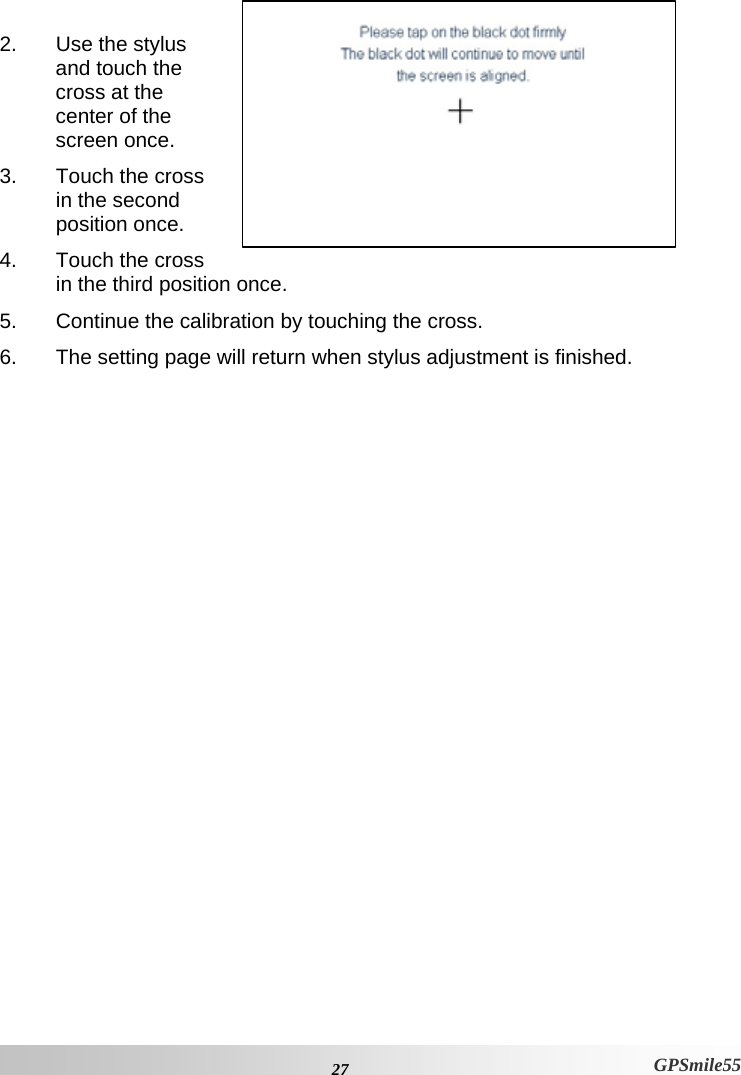
![26GPSmile55 Panel Adjustment Control the unit through the stylus by touching/writing on the screen. If the system cannot correctly identify your stylus’ input, please run through the screen calibration procedure. 1. From the settings window, select [Panel Adjustment] to start the screen calibration procedure.](https://usermanual.wiki/HOLUX-Technology/NAV-55XX/User-Guide-839331-Page-34.png)
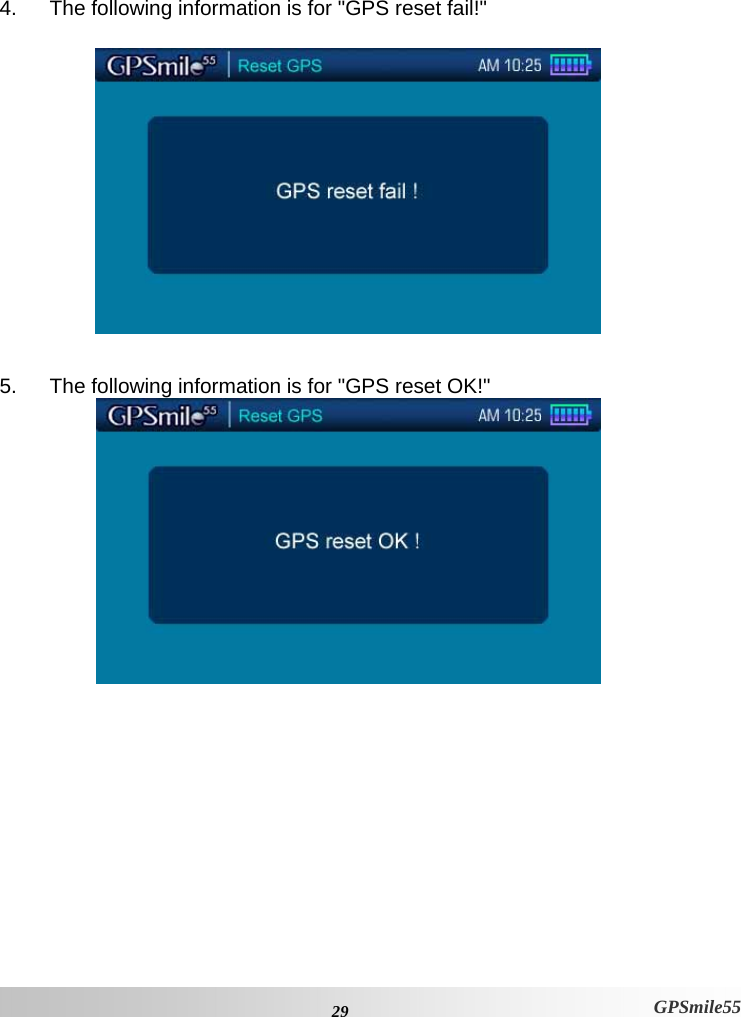
![28GPSmile55 Reset GPS 1. Select [Reset GPS] from the main screen to access the GPS settings screen. 2. Select the “YES” icon to start the GPS reset procedure. 3. Select the “NO” icon to return to the main “Setting” screen.](https://usermanual.wiki/HOLUX-Technology/NAV-55XX/User-Guide-839331-Page-36.png)
![30GPSmile55 Version 1. Select [Version] from the main screen to access the Version screen. 2. The screen display will show the version information.](https://usermanual.wiki/HOLUX-Technology/NAV-55XX/User-Guide-839331-Page-38.png)
![31 GPSmile55 Bluetooth 1. Select [Bluetooth] from the main screen to access the Main Menu screen. 2. Click the [Setup] icon to access the Bluetooth Setup screen.](https://usermanual.wiki/HOLUX-Technology/NAV-55XX/User-Guide-839331-Page-39.png)
![32GPSmile55 3. Click the [Search Phone], you will see the search screen. (Before you click on Search Phone, make sure the Bluetooth is enabled on your handset.) 4. After the phone searching is done, you’ll see a phone model list. Click on the one you’d like to use.](https://usermanual.wiki/HOLUX-Technology/NAV-55XX/User-Guide-839331-Page-40.png)
![33 GPSmile55 5. Click [Pair] to start the pairing process. (During the pairing process, if your handset requires you to specify a password, please enter”1234”.) 6. When the connection is established, you can click to return to the Main Menu and start using Bluetooth PhoneLink.](https://usermanual.wiki/HOLUX-Technology/NAV-55XX/User-Guide-839331-Page-41.png)
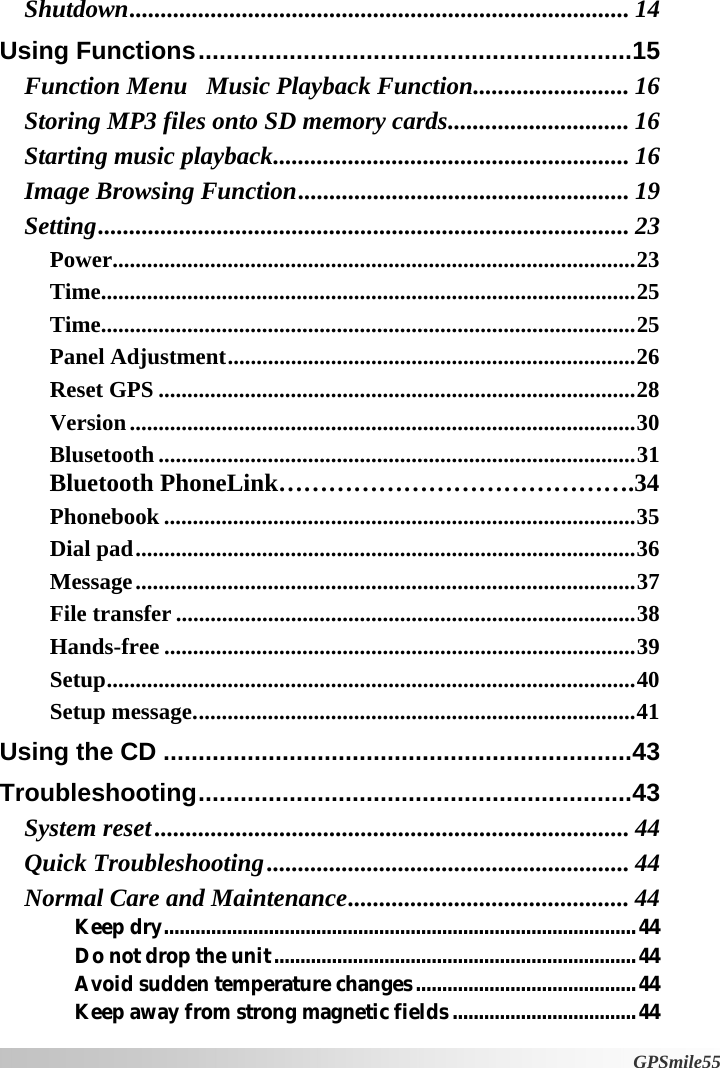
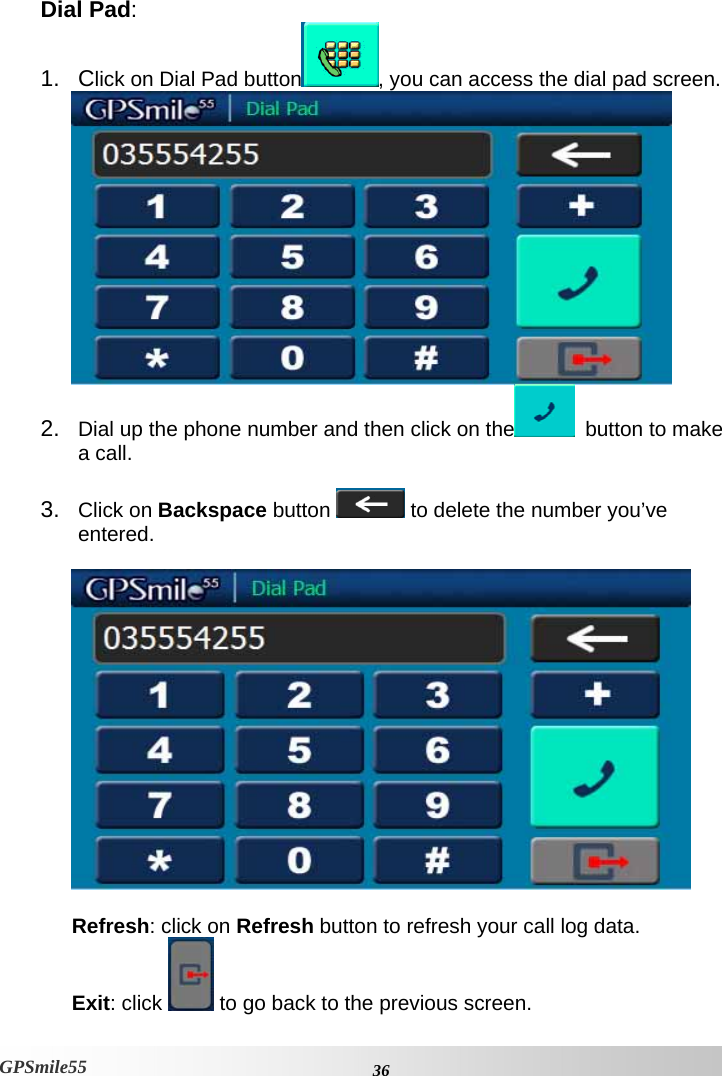
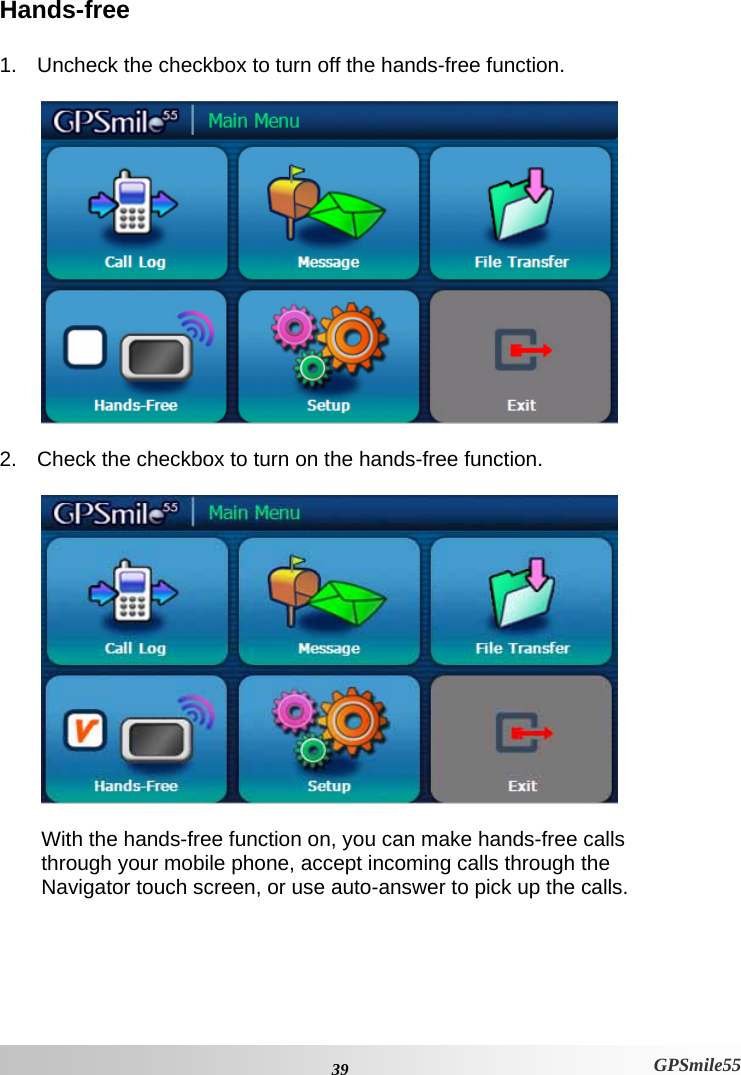
![34GPSmile55 Bluetooth PhoneLink On the Main Menu, you can see the following icons: [Call log], [Message], [File Transfer], [Hands-free], [Setup], and [Exit]. Click on the icon to enter and operate the function. Call Log: 1. Click on [Call log] icon and wait for the call log transferring. 2. Click the phone number on the list to view the detailed information of that call. 3. Click on the button below to make the call.](https://usermanual.wiki/HOLUX-Technology/NAV-55XX/User-Guide-839331-Page-42.png)
![37 GPSmile55 Message: 1. Click on [Message] to view your SMS list. 2. Click on each message to see the content. Refresh: click on Refresh button to refresh your call log data. Up/down: click on Up/down button to view the previous/next message. Exit: click Exit to go back to the previous level.](https://usermanual.wiki/HOLUX-Technology/NAV-55XX/User-Guide-839331-Page-45.png)

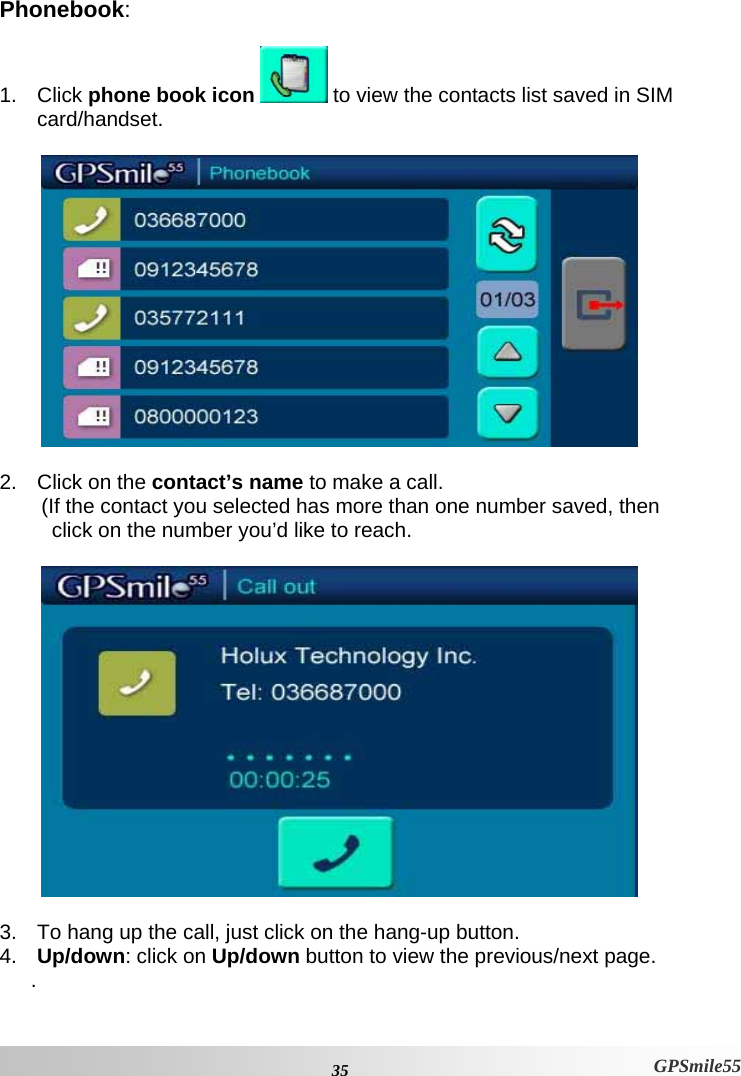
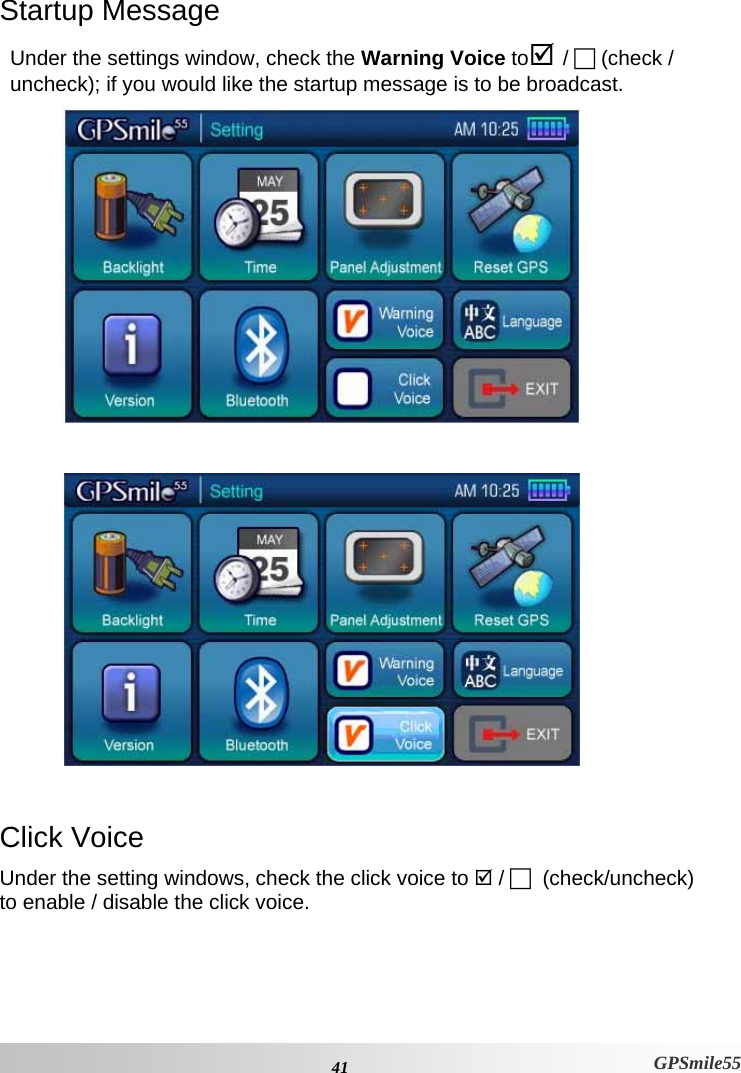
![40GPSmile55 Setup Click [Setup] to open the Bluetooth setup screen. Phonebook: Click Phonebook to open the phonebook setup. Here you can adjust your phonebook settings by checking/uncheck the checkboxes. Exit: click Exit to return to the previous level. Message: Click Message to open the SMS setup. Here you can adjust your SMS settings by checking/uncheck the checkboxes. Exit: click Exit to go back to the previous level.](https://usermanual.wiki/HOLUX-Technology/NAV-55XX/User-Guide-839331-Page-48.png)
![42GPSmile55 Hot Key Press the [Hot key] to enter the “Volume” and ”LCD Brightness” screen. 1. Control the volume directly with the “speaker” icon. There are four levels of volume. Select the “MUTE” icon to mute the Volume. 2. Control the LCD Brightness with “light bulb” icon. There are four levels of brightness. Select the “AUTO” icon and the LCD Brightness will be kept as a standard value. Hot key](https://usermanual.wiki/HOLUX-Technology/NAV-55XX/User-Guide-839331-Page-50.png)