HOLUX Technology PAR72SNP01 Shot Navi Pocket User Manual
HOLUX Technology, Inc Shot Navi Pocket
User Manual
User’s Manual (PAR72SNP01)

Introduction
Thank you very much for purchasing the Shot Navi Pocket (Hereinafter : product). Please
read this instruction manual carefully before operating the product and understand the
operation method to the prdocut. Please keep this manual handy at all time when you need
it.. If you have any queires please contact our customer supporting desk informed on the
final page of this manual.
“Shot Navi” is a registered trademarks of NEC Corporation.
(TM4962208)
Safety Precautions (To be strictly followed)
WARNING!!!
PROHIBITED ITEMS!!!
■ Do not use this product in the airplanes or in medical institutions. This product involving
radio transmission.
■ Do not touch this product with wet hands or expose to water. This product is not
waterproof. This kind of conditions play the mischief of this product.
■ Do not use this product under direct sunlight. It may cause malfunctioning to the
product.
■ Do not use this product in extremely cold, hot or humid condition. It may cause
malfunctioning to the product.
■ Do not use this product in a dusty place. It may cause malfunctioning to the product.Do
not vibrate this product strongly. It may cause malfunctioning to the product.
■ Do not place this product close to the fire. It may cause malfunctioning and deform to
the product.
■ Do not disassemble, modify or replace the component of this product.
■ Do not use batteries that are not specified. It may cause malfunctioning to the product.

Table of Contents
PACKAGE CONTENTS
1. GETTING READY
1-1. Inserting batteries.
1-2. Acrylic panel.
2. OUTLINE
3. FUNCTIONS
4. MAIN SPECIFICATIONS
4-1. GPS Specifications
4-2. Bluetooth Specifications
4-3. USB Specifications
4-4. Terminal Specifications
5. COMPNENT NAMES
6. PRECAUTIONS
7. DISPLAY SCREEN
7-1. Selection Screen
7-2. Distance Screen
7-3. Flying Distance Screen
8. SCREEN TRANSITION
9. MENU SCREEN
10. OPERATION FLOW
11. SELECTING GOLF COURSE
11-1. Select favorite
11-2. Automatic search for golf courses
11-3. Manual selection
12. SELECTING COURSE
13. SELECTING HOLE
14. CHANGING HOLE
15. NAVIGATION
16. MARK INFORMATION REGISTERATION
17. FLYING DISTANCE DISPLAY
18. ADDING GOLF COURSE TO FAVOITE
19. SETTING
19-1. Today’s Mark Position
19-2. Unit of distance display
19-3. Hole detection method
19-4. Contrast of screen
19-5. Language
20. DELETING REGISTERED DATA
20-1. Deleting mark data
20-2. Deleting registered favorite lists
21. TROUBLE SHOOTING
22. WARRANTY
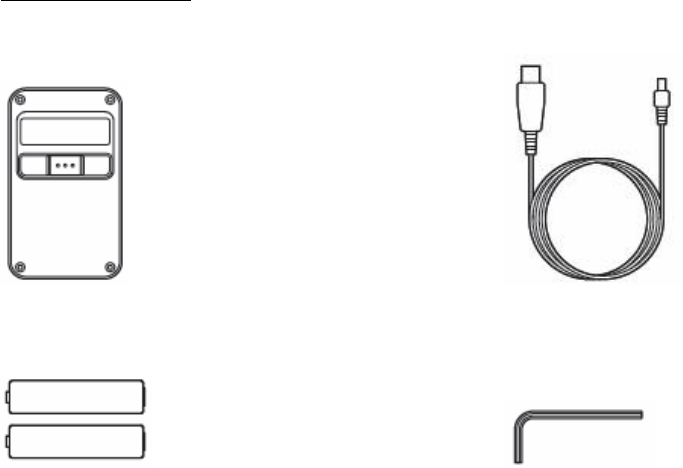
Package Contents
・One terminal (including acrylic panel) ・One mini USB cable
・Two triple A batteries ・One hexagonal wrench
・Quick start guide
・Manual booklet
・Warranty
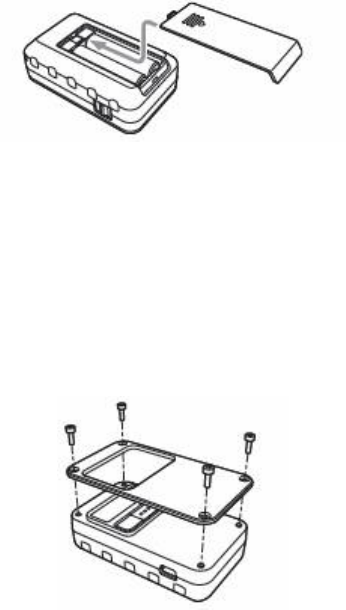
1. GETTING READY
■1-1.Inserting batteries.
This product uses batteries for its power. Insert batteries properly before using.
*Please be aware of the direction of batteries.
■1-2. Acrylic panel
Acrylic panel can be removed by using hexagonal wrench.
Enjoy with favorite picture or various pattern by attaching them to this product and protect
them with acrylic panel.
*Please be aware that the acrylic panel can be broken if screws are tightened too strong.
2. OUTLINE
This product stores more than 90% of golf course data in Japan in its internal memory. It
determines a position (calculates your current longitudeand latitude on the earth.) by using
GPS satellite and displays calculated distance to the target position on the golf course that is
recorded internally in this product.
Note) Please see support page on our website regarding to the registered golf courses of this
product. Also the information on adding corresponded golf course and corrected golf course
data are on our website.
3. FUNCTIONS
・ Automatic golf course search
This product determines which golf course you are located by searching golf course data
registered in this product from current position.
・ Automatic Hole information display
This product displays information of the hole automatically when you go into tee ground. It
may not display information of the hole automatically, since it depending on the condition of
golf course. In this case, operate this product and select the hole by manually.
・ Distance display
Object for distance display: green edge, green center, and specific target.
The target (object) can be changed as pushing select button.
・ Registering mark and flying distance display
This product stores (registration position) specific mark (e.g. ball position) into internal
memory with button operation. It can store 1000 positions. And it displays distance (flying
distance) between registered position and current position if positioning registration is
completed.
4. MAIN SPECIFICATIONS
■4-1. GPS specifications
① positioning specifications
Received frequency : 1575.42 MHz(L1 frequency band)
Received code : C/A code (1.023MHz)
Number of received channels : parallel 32 channels
Positioning system : independent positioning, DGPS
Geographic coordinate system : World Datum (WGS-84)
② Positioning performance
Positioning accuracy : 5m (2D-RMS)
Acceleration accuracy : 0.4m/sec.
Hot start : 2 sec. (Typ.)
Warm start : 35 sec (Typ.)
Cold star : 42 sec (Typ)
Received sensitivity : Acquisition -146dBm
Tracking -158dBm
Output updating cycle : 1 sec
③ Maximum performance
Altitude : 18,000m
Velocity : 515m/sec
Acceleration : 4G
■ 4-2. Bluetooth specifications
BT version : Bluetooth V1.2
Output : Class 2
Communication distance : Max 10m
■ 4-3. USB specifications
Connector type : mini-USB typeB
■ 4-4.Terminal specifications
Dimension : width46mm×height78mm×depth25mm
Weight : 65g (batteries are not included)
Display : Monochrome 128×32 dots
Power : Two triple A type batteries
Airtime : About 15 hours (with alkali battery)
Airtime depends on what type of batteries is used.
Operating temperature : 0-40oC
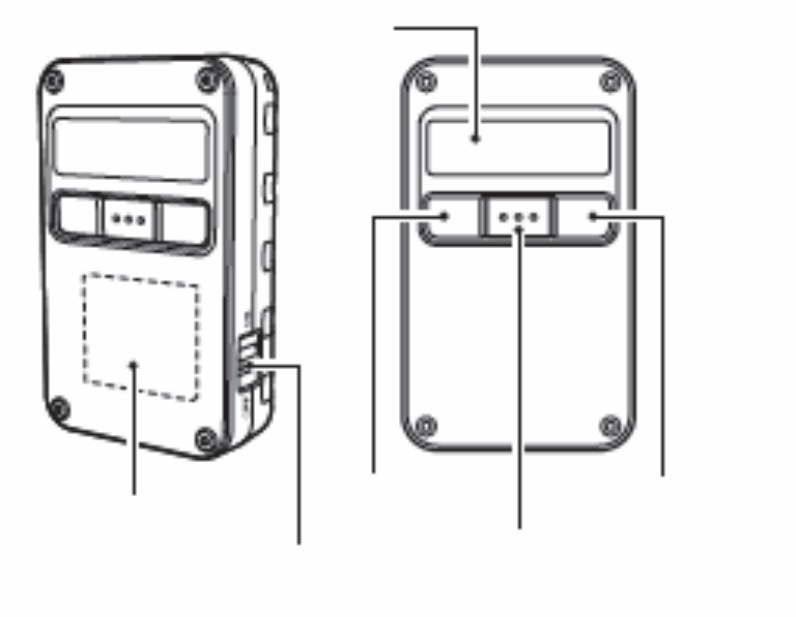
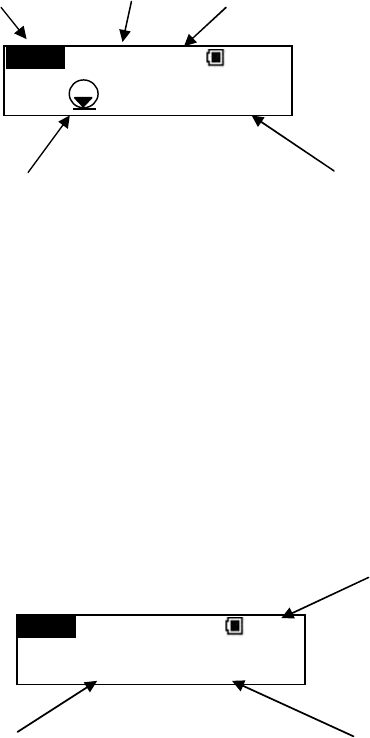
5. PART NAMES
Power switch : Turns on/off the power.
Select button : Changes selections.
Back button : Returns to the previous title.
Ok button : Determines selection item.
Screen : Displays selection item and distance information
Antenna : GPS antenna (internally embedded.)
Screen
Back button
OK button
Select button
Antenna
Power switch
6. PRECAUTIONS
・ This product specifies the position by receiving radio wave from GPS satellite.Therefore,
it may have a large margin of distance error on the screen. Covering antenna or directing
it to the person cause lowering the sensitivity and the product can not locate the accurate
position. Try not to cover antenna with body when you use it.
・ Positioned location may vary slightly even though you are in the same position. GPS
satellite always moves around the earth as a result the location of GPS satellite changes
from your point of view. Also it is difficult to acquire the satellite under big trees or high
buildings.
・ This product may have measurement error due to positioning accuracy of GPS(5m) and
Course data accuracy (5m).
・ This product is not waterproof. Do not operate it with wet hand or water it, it may cuase
mal functioning to the product.
・ Batteries that included with this product is for short term use. New batteries (alkaline
battery) can last about 15 hours at normal condition.
・ Be aware of the remaining battery before using it. It may not be able to locate the
position when battery is low.
・ This product has stored course data in internal memory. Longitude and latitude
information of green center and green edge point on golf course is set. Therefore,
information may be different from edge position that is set by a golf course. Also stored
golf course data may be different from actual course data due to overhaul of golf course
or naming change although these information has been carefully acquired and
researched.
・ The positioning distance of this product only shows distance from point to point. It does
not include undulation of golf courses such as vertical interval.
・ This product can be used for official game only if local rule of each committee has
authorized it. Inquiry to each committee is recommended before the game.
・ Be careful with slow play when you use this product.
・ Because this product shows straight distance to green from any position, the distance
from tee ground to green may be shorter than actual distance especially on dogleg.
・ We have planned on updating and adding more stored golf course data of this product.
Also we offer user support regarding to this product on our website. Please visit our
website and perform user registration.

7. DISPLAY SCREEN
・ Title: Shows the title of selection item.
“Menu” : Select menu
“Area” : Select area
“Prefectures” : Select prefectures
“Golf course” : Select golf course
“Course” : Select course
“Hole” : Select hole
・ Battery power : Shows remaining batteries by third step
→ Enough remaining batteries
→ Low remaining batteries
→ Change the batteries
・ Time:Shows current time
12:25 → Receiving GPS satellite radio wave
―:― → Not receiving GPS satellite radio wave
・ Selecting item: Shows selecting items
Items are changes with button operation.
Title
Battery power
Time
Selecting item
Menu 12:25
Golf Navi
■ 7-2. Distance screen
Hole No : Selected hole number
Par : Selected par number
Target : Name of target
Target mark : Target mark
Distance to target : Distance to the target
■ 7-3.Flying distance screen
Number of shot : Number of shots on display hole
Flying distance : Distance from previous mark registration to current position
Hole No.
Par
Target mark
Target
Target distance
Number of shot
Flying distance Distance to target
PAR4 LEdge 12:25
123y
18
H
L
PAR4 LEdge 1st
230/115y
18
H
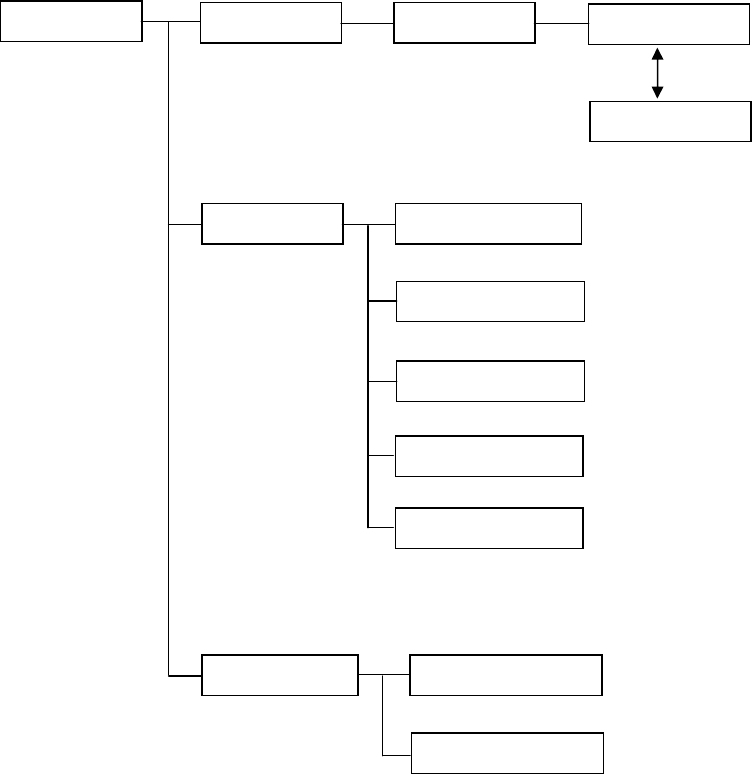
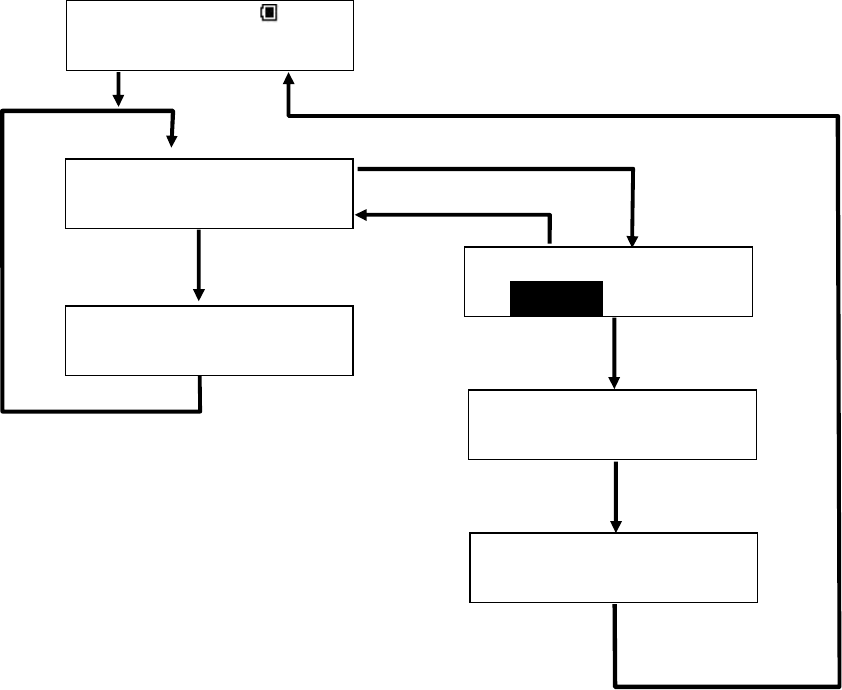
8. SCRREN TRANSITION
Product logo
Golf Navi Course select
Distance
Flying distance
Setting Today’s Mark Pos
Distance Unit
Hole Detect
Contrast
Language
Data Deletion Mark Information
Favorites
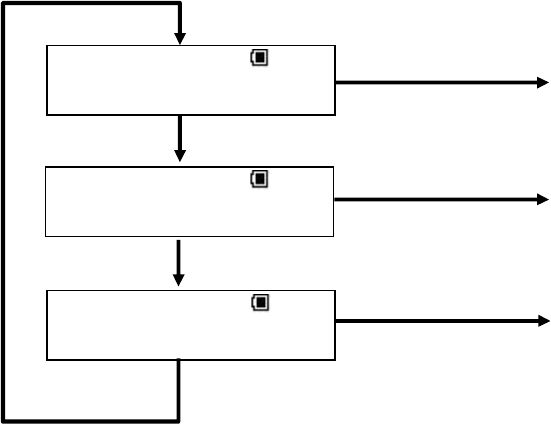
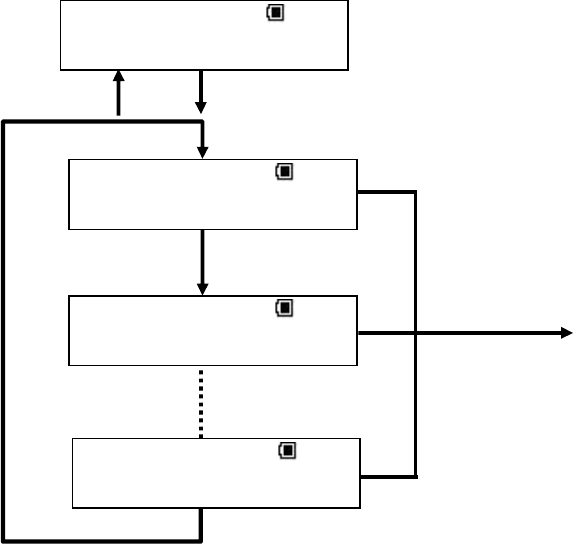
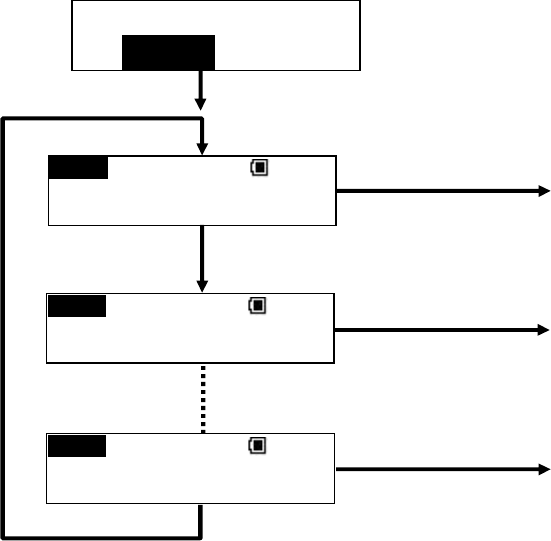
9. MENU SCREEN
There are “Golf Navi”, “Setting”, and “Deleting data” on the menu.
Selecting course : Select golf course and display distance to target, flying
distance and hole information.
Changing setting : Change “Today’s Mark Pos”, “Distance Unit”,
“Hole Detection”, “Contrast”, and “Language”.
Deleting data : Delete registered Mark Information and Favorites.
Select Button
Menu 12:25
Setting
Menu 12:25
Golf Navi
Menu 12:25
Data Deletion
Select Button
Select Button
OK Button
OK Button
OK Button
To Golf course selection
To changing setting
To deleting data
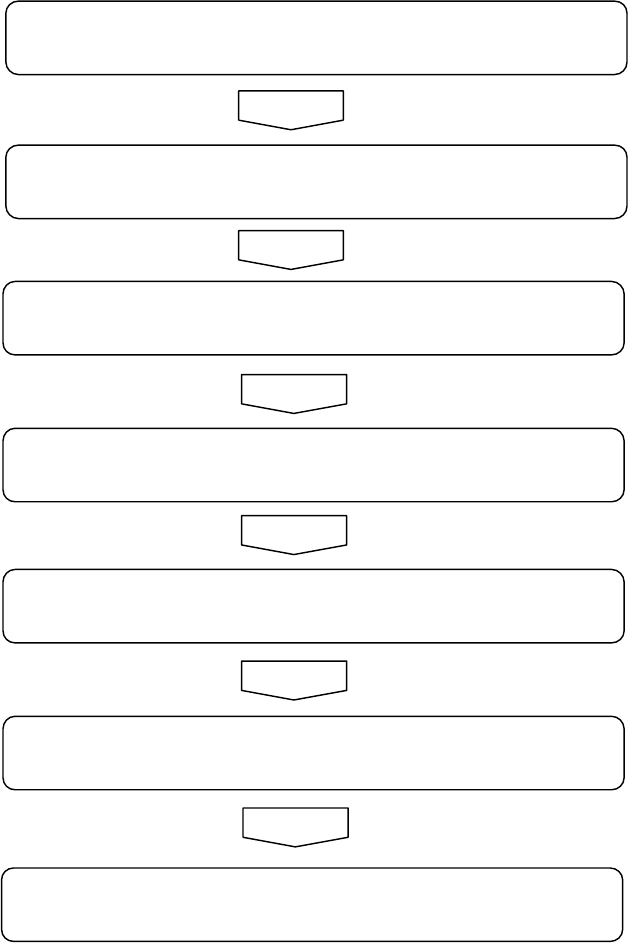
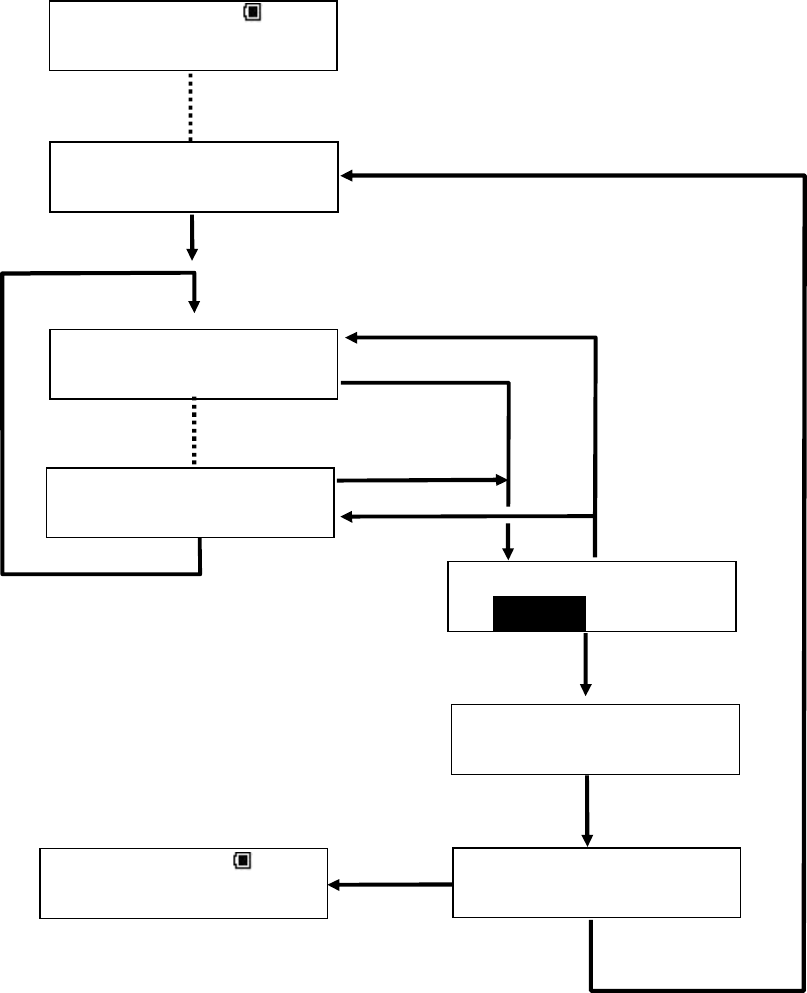
10. OPERATION FLOW
Turn on the power
Select golf navi
Select golf course
Select course
Select hole
Display distance to the target
Flying distance after mark registration
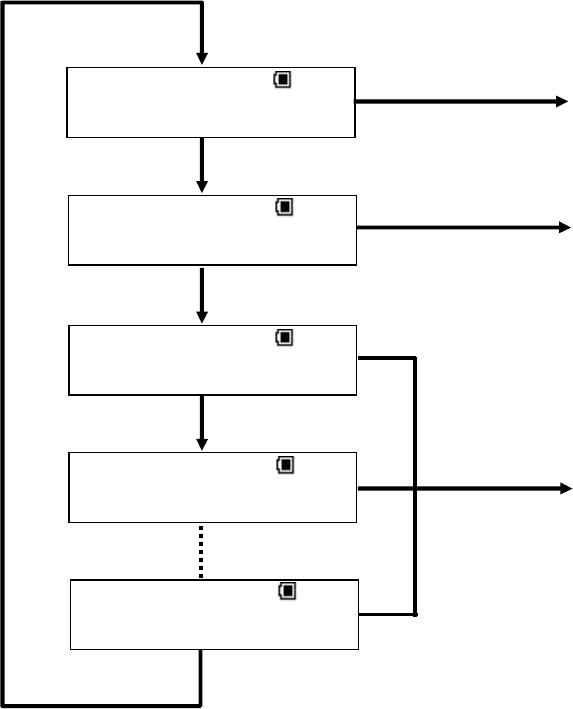
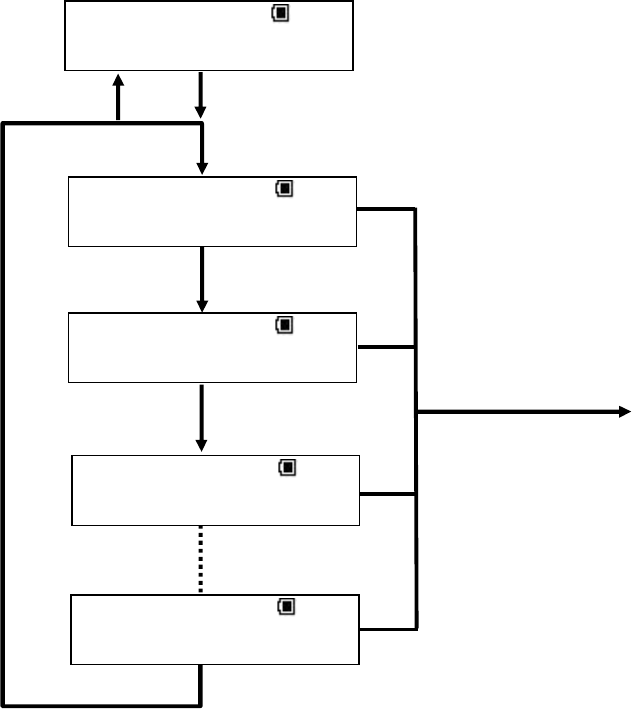
11. SELECTING COURSE
There are three ways to select golf course, they are “Favorite selection”, “Auto Course Find”,
and “Manual selection”.
Area 12:25
Auto Course Find
Area 12:25
Hokkaido・Tohoku
Area 12:25
Kyushu・Okinawa
Area 12:25
Select Favorite
Area 12:25
Kanto
Select Button
OK Button
Select Button
OK Button
Select Button
OK Button
Select Button
To manual selection
To Auto Course Find
To select favorite
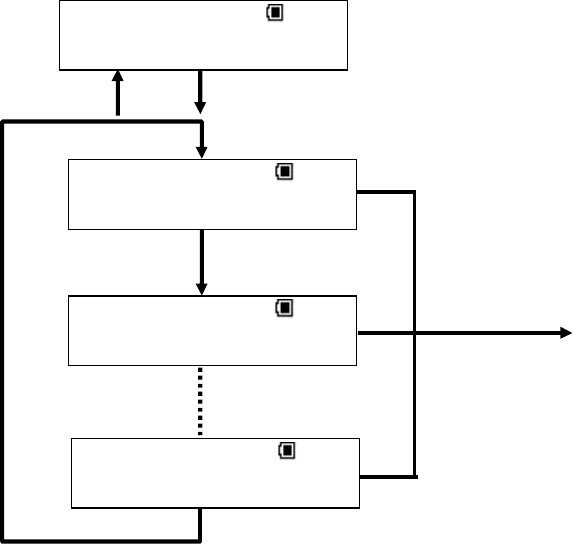
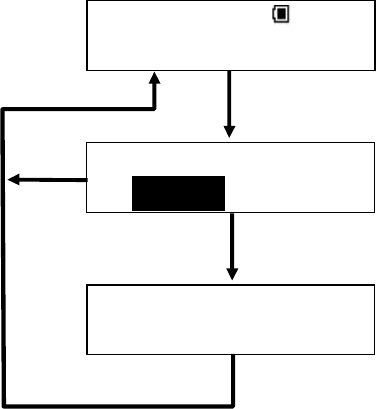
■ 11-1. Select favorite
The name of golf courses that were added to favorite is shown. Here if there is mark on
the left side of battery power logo, means there are other candidates. Then select golf course
from favorite. Names of golf course appear as scroll if there are more than certain numbers
of word. It shows “No List” if nothing is registered as favorite.
Area 12:25
Select Favorite
Golf Course
12:25
Tokyo C.C
Golf Course
12:25
Chiba C.C
Golf Course 12:25
Osaka C.C
Golf Course 12:25
No List
OK Button
To course selection
OK Button
Select Button
Select Button
OK Button
Return to area
Back Button
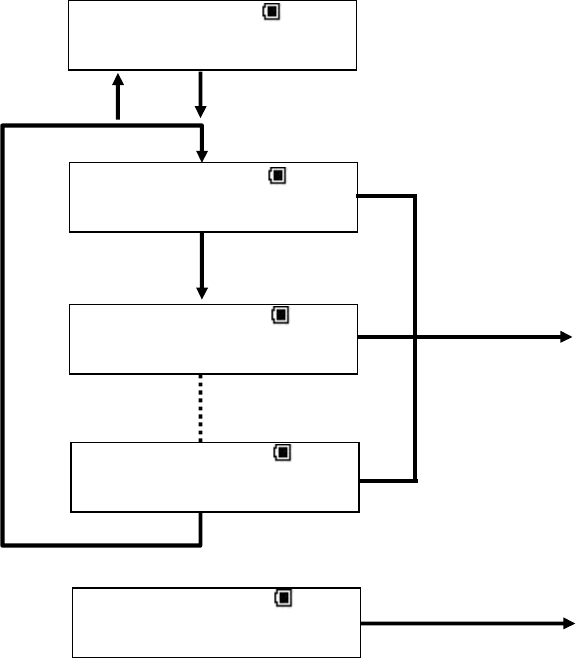
■ 11-2. Auto Course Find (Automatic search for courses)
Current position fixed by GPS has searched the golf course within golf course area stored
internal body automatically. Golf course which is not preferred may be shown in the course
where two golf courses are next to each other. In this case, select “Search Other” on the
screen. Name of golf course appear as scroll if there are more than certain numbers of word.
Also if the golf course is not stored, it shows “Course Not Found”.
Area 12:25
Auto Course Find
Searching Course
Cancel
Golf Course
12:25
Tokyo C.C
Golf Course 12:25
Search Other
Golf Course 12:25
Course Not Found
OK Button
Back Button
Select Button
OK Button
OK Button
OK Button
OK Button
Select Button
Finish searching
To course selection
To research course
Return to area
To cancel course search

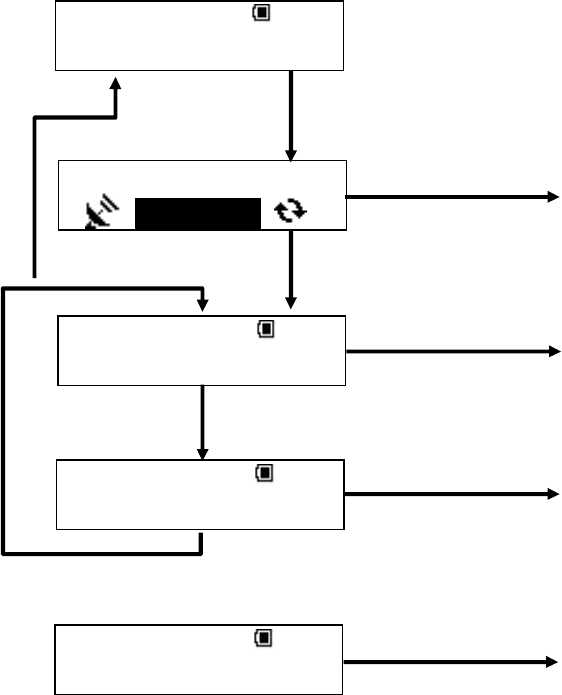
When Auto Course Find is canceled during the search, detected area or prefecture at that
point is displayed on the screen. If the area can not be detected at that point, it displays “Out
of Area”. Refer to 11-3 manual selection for operation in case automatic course selection is
canceled during the search.
In case the area can not be detected at the cancellation.*
Incase the area can be detected at the cancellation.
Incase the prefecture is detected during the cancellation.
*Displayed message may not be accurate if the search is cancelled halfway.
Searching Course
Cancel
OK Button (Cancel the search)
Area 12:25
Out of Area
Area 12:25
Kanto
prefecture 12:25
Tokyo
To menu
To prefecture selection
To Kana selection
OK Button
OK Button
OK Button
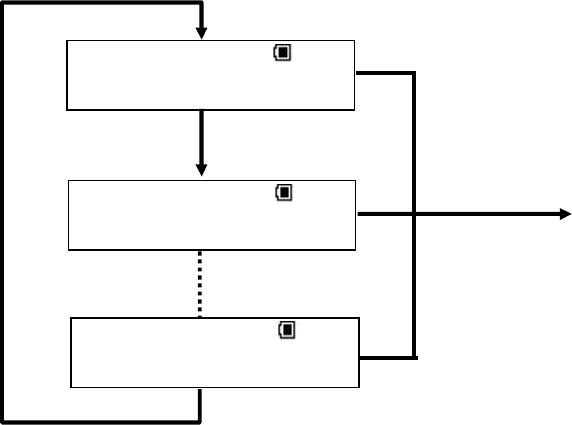
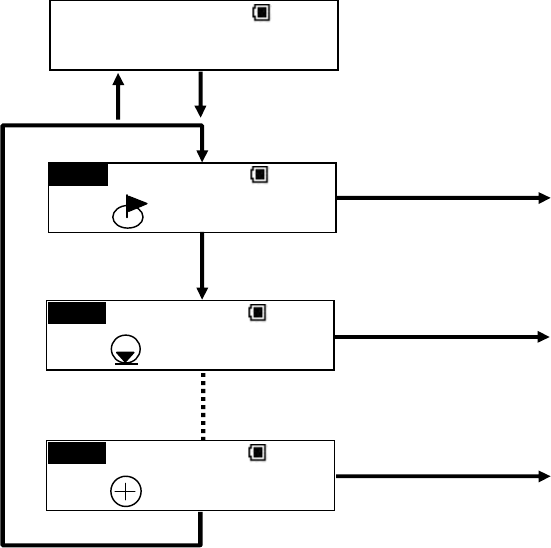
■ 11-3. Manual selection
Select items as follows : ①Area→①Prefecture→①Kana row→①Kana column→①Golf course.
And target golf course is displayed at the end.
① Select area
Select Area from six areas as “Hokkaido・Touhoku”, “Kanto”, “Cyubu”,” Kansai”, “Chugoku・
Shikoku”, and “Kyusyu・Okinawa”.
Area 12:25
Hokkaido・Tohoku
Area 12:25
Kanto
Area 12:25
Kyushu・Okinawa
OK Button
To prefecture selection
Select Button
Select Button
② Select prefecture
Select prefecture that belongs to each area.
OK Button
To Kana Row selection
Select Button
Select Button
OK Button
Back Button
Area 12:25
Kanto
prefecture 12:25
Ibaraki
prefecture 12:25
Kanagawa
prefecture 12:25
Tochigi
③ Select Kana Row
Select Kana Row which is the initial of the target golf course in Japanese pronunciation.
prefecture 12:25
Ibaraki
OK Button
To Kana Column selection
Select Button
Select Button
OK Button
Back Button
Kana Row 12:25
Ibaraki>A
Kana Row 12:25
Ibaraki>SA
Kana Row 12:25
Ibaraki>KA
Kana Row 12:25
Ibaraki>WA
Select Button
④ Select Kana Row
Select Kana Column which is the initial of the target golf course in Japanese pronunciation.
⑤ Select golf course
Select golf course which is chosen by Kana selection.
If there is mark on the left side of battery power logo, it means there are other candidates.
Then select the golf course from the list. Name of golf course appear as scroll if there are
more than certain numbers of word. Also if the golf course is not stored, it displays “No
Courses”.
OK Button
To Kana Row selection
Select Button
Select Button
OK Button
Back Button
Kana Row 12:25
Ibaraki>A
Kana Column 12:25
Ibaraki>A>A
Kana Column 12:25
Ibaraki>A>O
Kana Column 12:25
Ibaraki>A>I

12. SELECTING COURSE
Once golf course is selected, the name of the course is displayed on the screen. If there is
mark on the left side of battery power logo, it means there are other candidates. Then
select the golf course from the list. Also if favorite course is selected, the course is added to
favorite however, if the course is already added to favorite, the course can not be shown as
favorite. Refer to article18 Register golf course as favorite for registering favorite.
13. SELECTING HOLE
Once the course is selected, hole is shown on the screen. If there is mark on the left side of
battery power logo, it means there are other candidates. Then select the golf hole from the
list. Also if hole detect is set as automatic, hole information is shown automatically when you
move to teeing ground. Hole detect is set as automatic when it is delivered from the factory.
Refer to article 19-3 Hole detect method for hole detection setting. For manual operation, see
article 14 Change the hole in case hole is not changed automatically with automatic setting.
14. CHANGING HOLE
This product has automatic hole traveling function however, it may not work automatically. In
this case follow the operation as below.
PAR4 LEdge 12:25
10y
1
H
L
PAR5 LEdge 12:25
478y
2
H
L
Hole
12:25
1H
Hole
12:25
2H
Back Button
Select Button
OK Button
15. NAVIGATION
Navigation screen is displayed if hole is selected or detected by automatic hole detection
function. Target of mark*, edge, and center can be changed. Also if there are 2 holes on the
green, it Displayed L (Left green) or R (Right green) on the screen. If OK button is pressed on
the Navigation screen, it moves to positioning registration and penalty.
*The distance to mark will be displayed only if today’s Mark Position is received from external
device via communication.
Hole
12:25
1H
PAR4 LMark 12:25
315y
1
H
L
PAR4 LEdge 12:25
310y
1
H
L
PAR4 LCnt 12:25
312y
1
H
L
OK Button
To Mark Info registration
Select Button
OK Button
Back Button
Select Button
OK Button
To Mark Info registration
OK Button
To Mark Info registration

16. MARK INFORMATION REGISTRATION
Mark Information registration is shown once OK button is pressed on Navigation screen.
Registered Mark Information can be registered as shot number and shot number can be
changed (penalty) in the case of OB etc. There will be – or + for adjusting penalty after first
Mark Information registration is completed. Once Mark Information is done, it moves to flying
distance.
*Select item with Select Button, and then decide with OK Button.
PAR4 LEdge 12:25
310y
1
H
L
PAR4 LEdge 12:25
310y
1
H
L
PAR4 LEdge 12:25
310y
1
H
L
1st Register?
+1
YES
2nd
Register?
+1 ‒1
YES
YES*
YES*
+1
−1
OK Button
OK Button
Back Button OK Button
17. FLYING DISTANCE DISPLAY
Flying distance will be shown once Mark Information registration is completed. On the flying
distance screen, target of mark*1, edge, and center can be changed. In this case, if there are
2 holes on the green, it displays L (Left green) or R (Right green) on the screen. Once OK
button is pressed on flying distance screen, it moves to positioning registration.
*1 The distance to mark will be displayed only if today’s target is received from external
device via communication.
*2 Select item with Select Button, and then decide with OK Button.
1st Register?
+1
YES
PAR4 LMark 12:25
0/315y
1
H
PAR4 LEdge 12:25
0/310y
1
H
PAR4 RCnt 12:25
0/312y
1
H
OK Button
To Mark Info registration
Select Button
OK Button (YES*2)
Select Button
OK Button
To Mark Info registration
OK Button
To Mark Info registration
18. ADDING GOLF COURSE TO FAVORITE
Frequently used golf courses can be added up to 10 golf courses to favorite. If there have
been already 10 golf course added in favorite, some golf course have to be deleted in order
to add new ones. Once the golf course is added in favorite, it becomes easy to select golf
course from favorite.
① With data vacancy
* Select item with select button, and then define with Ok button.
Course 12:25
Add To Favorites
Add to Favorite?
NO
YES
Add to Favorite
Favorite Added
YES*
OK Button
OK Button
NO*
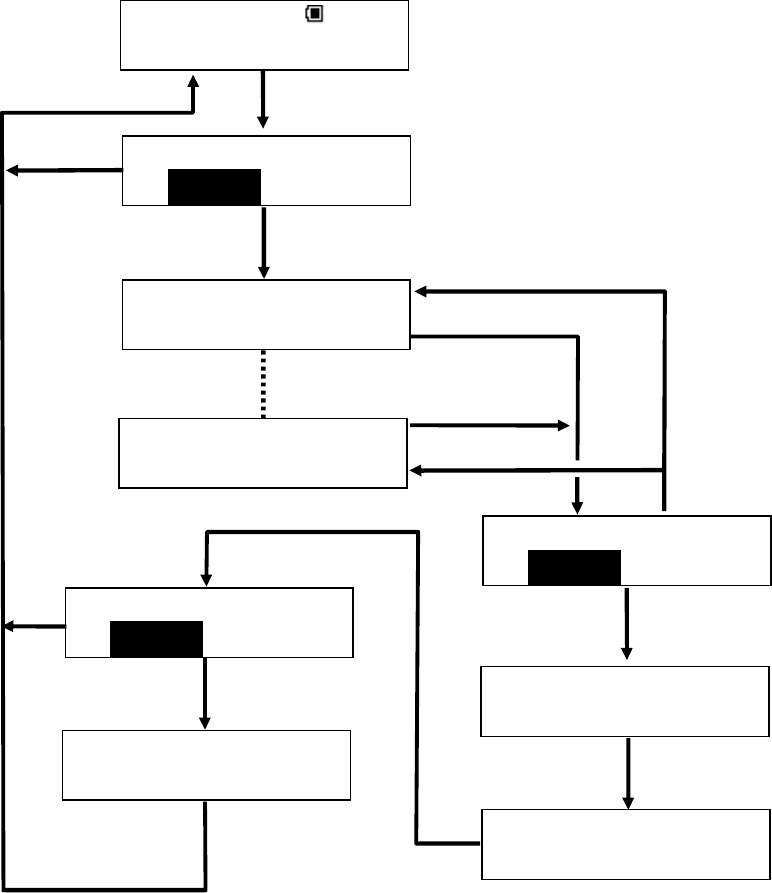
①No data vacancy
* Select item with select button, and then define with Ok button.
Course 12:25
Add To Favorites
NO
YES
List Full Del?
Del Favorite
Tokyo CC
Delete Data
?
NO
YES
Add to Favorite?
NO
YES
Del Favorite
Osaka CC
Add to Favorite
Favorite Added
Del Favorite
Deleting
Del Favorite
Favorite Deleted
YES*
OK Button
NO*
OK Button
OK Button
NO*
YES*
YES*
OK Button
OK Button
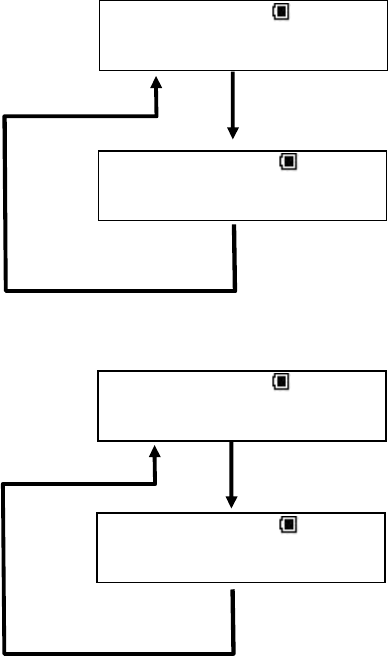
19. SETTING
Change settings of this product.
There are “Today’s Mark Pos”, “Distance Unit”, “Hole Detect”, “Contrast”, “Language” as
setting items.
■ 19-1. Today’s Mark Position
Make sure if the target for the day in formation is registered. The target for the day is only
effective on that day. The data registered other than that day is not displayed.
① Target for the day is already registered.
② With no target for the day
Today’s Mark 12:25
No Data
Setting 12:25
Today’s Mark Pos
Today’s Mark 12:25
Hourai C.C
Setting 12:25
Today’s Mark Pos
OK Button
OK Button
OK Button
OK Button

■ 19-2.Unit of distance display
Set unit for distance to a target and flying distance. Unit can be set as Yard or Meter. The unit
is set as Yard when it is delivered from the factory. The unit which is selected currently is
displayed, and then selects the unit for display distance.
■ 19-3 Hole detection method
Set hole detection method. The mode for setting is automatic or manual. When automatic is
selected as setting, automatic hole detection function is on. It displays hole information
automatically after selecting course. The mode is set as automatic when it is delivered from
the factory. The mode which is selected currently is displayed on the screen, and then selects
the mode.
■ 19-4 Contrast of screen
Set the contrast on the screen. The setting range is from 1 to 16. The contrast is set as 10
when it is delivered from the factory. The current setting value is displayed, then change the
setting value.
■19-5 Language
Set Language of the screen. Japanese or English are for setting. The Language is set as
Japanese when it is delivered from the factory. The language which is selected currently is
displayed, then select language.
Setting 12:25
Contrast
Contrast 12:25
10
Contrast 12:25
12
OK Button
OK Button
Back Button (−) Select Button (+)
20. DELETING REGISTERED DATA
Delete variety of registered data of this product. Deleting items are “Mark Information” and
“Favorites”.
■ 20-1. Deleting Mark data
Delete registered positioning data of this product. If there is no data registered, it shows “No
Data”.
■ 20-2 Deleting Favorite lists
Delete registered favorite list of this product. There are collective deleting and individual
deleting as deleting method. If there is no golf course data, it displays “No Favorite”
①. collective deleting
* Select items with select button and then define with OK button.
Area 12:25
Select Favorite
Del Favorite
Delete All
Del Favorite
Delete One
Delete Data
?
NO
YES
Del Favorite
Deleting
Del Favorite
Favorite Deleted
YES*
NO*
OK Button
OK Button
① Individual deleting
* Select items with select button and then define with OK button.
Area 12:25
Select Favorite
Del Favorite
Delete One
Delete Data
?
NO
YES
Del Favorite
Deleting
Del Favorite
Favorite Deleted
YES*
OK Button
Del Favorite
Tokyo CC
Del Favorite
Osaka CC
OK Button
OK Button
NO*
Area 12:25
Select Favorite
No more favorite
Favorite exist
OK Button
OK Button
Select Button

21. TROUBLE SHOOTING
Check with this table if there is something wrong with this product.
If it does not operate properly after checking it with this table, please contact to customer
service.
Case Reason How to fix
It can not be turned on Low battery power Change batteries
It returns to initial screen
without touching power
switch
Low battery power Change batteries
It does not show time It can not receive GPS
signals
Make sure if antenna is not
covered or used it inside.
It shows 999Y on distance
screen
Distance from the target is
far away
Make sure the current hole
and the selected hole are the
same
It shows ------on distance
screen
It can not receive GPS
signals
Make sure if antenna is not
covered or used it inside.
22. Warranty
This product can be fixed for free one year after purchase if it got broken under the proper
condition. Please bring this product with warranty and go to the store that you purchased it
when you need to fix it. For frequently asked questions and inquiries, refer to our home page
or e-mail address below:
URL http:www.par72.co.jp/snp/
Mail snp-info@par72.co.jp
About handling of personal information for customers
We, PAR72PLAZA Co., Ltd. and the other related companies, may use or keep record of
customer’s personal information such as name, address and his/her consulting content for
responding to customer or confirmation of provided services. However, we manage
customer’s personal information properly and do not provide it to any third parties without
for right purpose and commission for fixing this product. For customer’s personal information,
please inquire to customer service that you consult with.
Producer: PAR72PLAZA Co., Ltd.
Customer service Toll free 0120-872-072
"FEDERAL COMMUNICATIONS COMMISSION INTERFERENCE STATEMENT
This equipment has been tested and found to comply with the limits for a Class B digital device,
pursuant to Part 15 of the FCC Rules. These limits are designed to provide reasonable protection against
harmful interference in a residential installation. This equipment generates, uses and can radiate radio
frequency energy and, if not installed and used in accordance with the instructions, may cause harmful
interference to radio communications. However, there is no guarantee that interference will not occur in a
particular installation. If this equipment does cause harmful interference to radio or television reception,
which can be determined by turning the equipment off and on, the user is encouraged to try to correct the
interference by one or more of the following measures:
--Reorient or relocate the receiving antenna.
--Increase the separation between the equipment and receiver.
--Connect the equipment into an outlet on a circuit different from that to which the receiver is connected.
--Consult the dealer or an experienced radio/TV technician for help."
"RF exposure warning??
·This equipment must be installed and operated in accordance with provided instructions and the
antenna(s) used for this transmitter must be installed to provide a separation distance of at least 20 cm
from all persons and must not be co-located or operating in conjunction with any other antenna or
transmitter. End-users and installers must be provide with antenna installation instructions and transmitter
operating conditions for satisfying RF exposure compliance. "