HON HAI PRECISION IND AIRMPI350 Wireless MiniPCI Card User Manual AIR MPI350
HON HAI Precision Ind. Co., Ltd. Wireless MiniPCI Card AIR MPI350
Users Manual

1
User Manual
Wireless MiniPCI Card
Model Name:
AIR-MPI350

2
Contents
Chapter 1 About the U58H004 MiniPCI Card
1-1 Features
1-2 Applications
1-3 Product Kit
Chapter 2 Network Configuration and Planning
2-1 Network Topology
2-2 Roaming
Chapter 3 Adapter Installation and Configuration – Windows ® 98 / NT / 2000
3-1 System Requirements
3-2 Inserting the Adapter
3-3.1 U58H004 Driver Installation - Windows ® 98
3-3.2 Adapter Configuration - Windows ® 98
3-3.3 Protocol Installation - Windows ® 98
3-4 U58H004 Setup for Windows ® 2000
Appendix A Troubleshooting
Appendix B Glossary

3
Chapter 1 About the U58H004 MiniPCI Card
The IEEE 802.11 U58H004 MiniPCI Card is compatible with any standard, notebook computer Type III
MiniPCI slot. As a Plug-and-Play device, Windows 95/98/2000 will automatically recognize the U58H004 MiniPCI Card
and initiate the installation process. Upon successful installation, the U58H004 MiniPCI card will communicate seamlessly
with other U58H004 wireless home and office networking products.
1-1 FEATURES
1. Supports up to 11 Mbps data rate: T-1 line alternative/replacement that dramatically cuts costs.
2. Working range up to 800 ft. in an open environment enhances mobility.
3. Supports point-to-point and point-to-multipoint access provides increased flexibility.
4. Seamless connectivity to wired Ethernet and PC network LAN’s offers quick, trouble-free integration with existing
networks.
5. Robust Direct Sequence Spread Spectrum (DSSS) technology provides secure, interference-resistant wireless
connection.
6. Wireless connections eliminate the hassle and cost of cabling.
7. Supports a wide range of LAN (Local Area Network) Network Operating Systems (NOS) including Windows ® 98
and Windows ® 2000
8. Easy Plug and Play installation(U58H004.00).
9. Omni - directional antenna included
10. Greater flexibility to locate or move networked PC’s
1-2 APPLICATIONS
U58H004 products offer a fast, reliable, cost-effective solution for wireless client access to the
network the following applications and environments:
Remote access to corporate network information
E-mail, file transfer and terminal emulation
Difficult-to-wire environments
Historic or older buildings
Buildings with asbestos insulation
Open areas where wiring is difficult to employ
Frequently changing environments
Retailers, manufacturers or other organizations that frequently rearrange the workplace or relocate
Temporary LANs for special projects or peak time usage
Trade shows, exhibitions and construction sites that employ temporary networks.

4
Retailers, airline and shipping companies that need additional workstations for a peak
period and Auditors that require workgroups at customer sites.
Access to database for mobile workers
Medical, Technical and Retail specialists that require roaming access to a database or
other network resources.
SOHO (Small Office and Home Office) users
Perfect for users that need a small, easy-to-install network that deploys rapidly.
Inter-building connection
Wireless building-to-building networks are quickly and easily installed, require no monthlylease fees, and
provide the flexibility to reconfigure easily.
1-3 PRODUCT KIT
The U58H004 product kit includes the following items. Ensure that the items in the following list have been
included. If any of the listed items are missing, please contact your local dealer.
1 X Type III U58H004 MiniPCI Adapter
1 X Driver
1 X User Manual & Utility
5
Chapter 2 Network Configuring and Planning
The U58H004 supports legacy Ethernet LAN network configuration options as defined by the IEEE 802.11
standards committee.
The U58H004 can be configured as:
. Ad-Hoc for departmental or SOHO LANs.
. Infrastructure for enterprise LANs.
. LAN-Interconnection for to point-to-point link as a campus backbone.
2-1 Network Topology
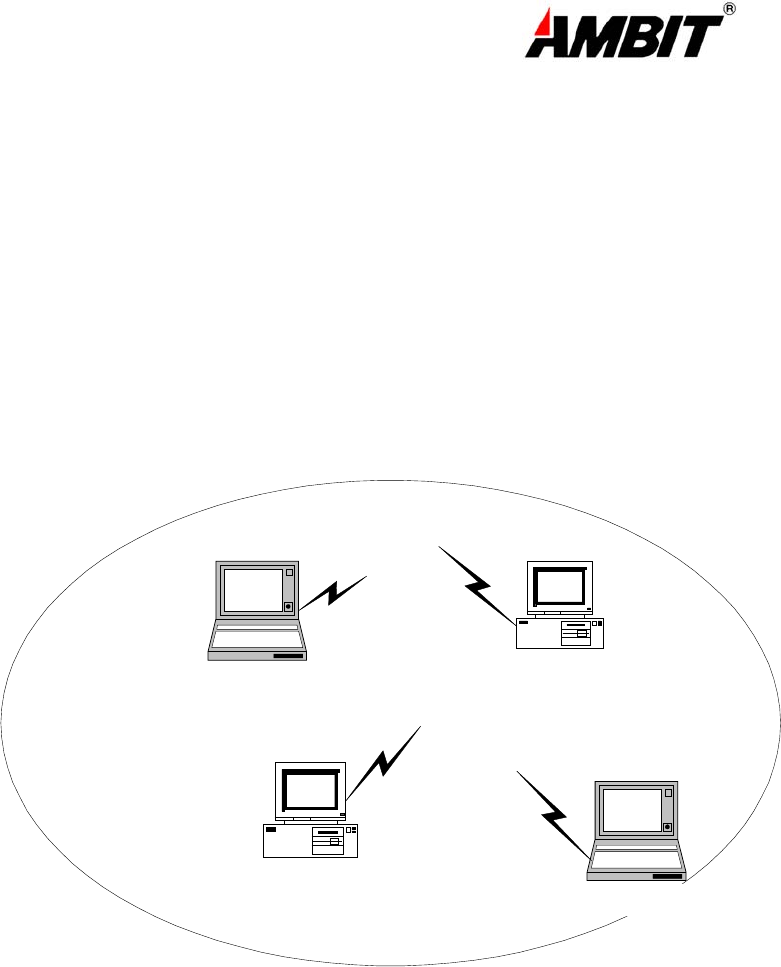
Ad-Hoc Wireless LAN
Notebook with
T60L198/T60L244
Notebook with
T60L198/T60L244
Desktop PC with
T60L198/T60L244
Desktop PC with
T60L198/T60L244
Fig.1 Ad-Hoc Wireless LAN
An Ad-Hoc wireless LAN is a group of computers. Each equipped with on U58H004 adapter, connected as
an independent wireless LAN Computers in a specific Ad-Hoc wireless LAN must be configured to share the same
radio channel.
Ad-Hoc wireless LAN configurations are appropriate for branch level departments or SOHO operations.

6
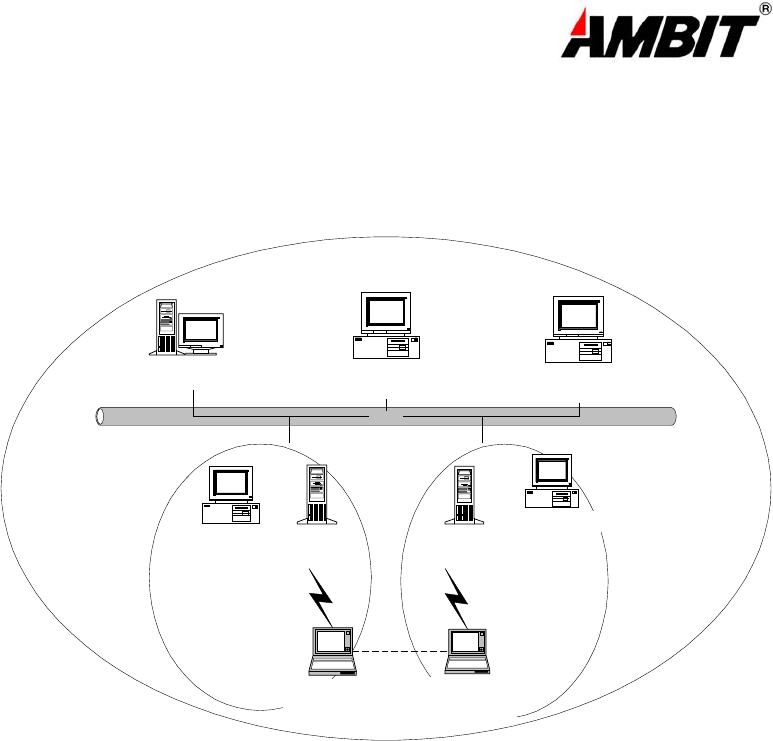
乙太網路
File Server Desktop PC Desktop PC
Desktop PC with
T60L198/T60L244
Desktop PC with
T60L198/T60L244
Access Point Access Point
Notebook with
T60L198/T60L244
Notebook with
T60L198/T60L244
Fig.2 Infrastructure Wireless LAN Configuration
Desktop PC with
T60L198/T60L244
Desktop PC with
T60L198/T60L244
The U58H004 provides access to a wired LAN for wireless workstations. An integrated wireless and wired LAN
is called an Infrastructure configuration. A group of U58H004 PC users and an Access Point compose a Basic
Service Set (BSS).Each U58H004 can talk to any computer in the wired LAN infrastructure via the Access Point.
An Infrastructure configuration extends the accessibility of a U58H004 equipped PC to a wired LAN and
doubles the effective wireless transmission range for 2 U58H004 PCs. Since the Access Point is able to forward
data within its BSS, the effective transmission range in an infrastructure LAN is doubled.
Ad-Hoc Infrastructure
Access Point
Notebook with
T60L198/T60L244
Notebook with
T60L198/T60L244
Notebook with
T60L198/T60L244
Notebook with
T60L198/T60L244
Fig 3 The effective transmission ranges
7
2-2 Roaming
Infrastructure mode also supports roaming capabilities for mobile users More than one BSS can be configured
as an Extended Service Set (ESS). The continuous network allows users to roam freely within an ESS. All U58H004
PCs and Access Point within one ESS must be configured with the same ESSID and use the same radio channel.
Ess
BSS1 BSS2
乙太網路
File Server Desktop PC Desktop PC
Desktop PC with
T60L198/T60L244
Desktop PC with
T60L198/T60L244
Access Point Access Point
Notebook with
T60L198/T60L244
Notebook with
T60L198/T60L244
Fig.4 Roaming in an Extended Service Set (ESS)
Before enabling an ESS with roaming capability, choosing a feasible radio channel and optimum Access Point
position is recommended. Proper Access Point positioning combined with a clear radio signal will greatly enhance
performance.
8
Chapter 3 Adapter Installation and Configuration – Windows ® 98 / 2000
3-1 SYSTEM REQUIREMENTS
In order to install and use the U58H004 MiniPCI card your PC system must meet the following requirements:
A PCMCIA Type II or Type III slot / Type III MiniPCI slot
PCMCIA/MiniPCI revision 2.10 compliant card and socket services
Windows 98 (with the Floppy, for use during installation)
500 Kbytes free disk space for utility and driver installation
3-2 INSERTING THE ADAPTER
To insert the U58H004 Network Adapter into a notebook computer, do the following:
1. Locate an available Type II or Type III PCMCIA slot / Type III MiniPCI slot.
2. With the PCMCIA adapter’s 68-pin / MiniPCI Adapter’s 124-pin connector facing the PCMCIA/MiniPCI
slot and the “U58H004 MiniPCI” label facing up slide the PCMCIA adapter
completely into the PCMCIA slot , the MiniPCI Adapter completely into the MiniPCI slot.
Notebook with
T60L198/U58H004
PCMCIA slot
MiniPCI slot
Notebook with
T60L198/U58H004
Fig. 5.1 Insert the PCMCIA Adapter into Notebook Fig. 5.2 Insert the MiniPCI Adapter into Notebook
After properly inserting the Network Adapter into your notebook, continue with the U58H004 driver
and Lan-Express Configuration Utility installation.
9
NOTE: The PCMCIA slot allows “hot swap” of PCMCIA adapter. You may insert or remove the
T60L198 / PCMCIA adapter from the slot anytime, even when the power of your computer is on.
NOTE: Windows 98 requires that the Network card and socket services must be compliant with
the PCMCIA revision 2.10 specification. Please check the documentation of the PCMCIA/MiniPCI driver
before installing the T60L198 PCMCIA/U58H004 MiniPCI adapter.
3-3.1 U58H004 DRIVER INSTALLATION -WINDOWS 98
Note: Before proceeding, have the Windows 98 Floppy ready, as it will be required during the
software installation process.
1. Insert the U58H004 MiniPCI adapter into a standard Type II or Type III PCMCIA /Type III MiniPCI card slot, as
described in the preceding section.
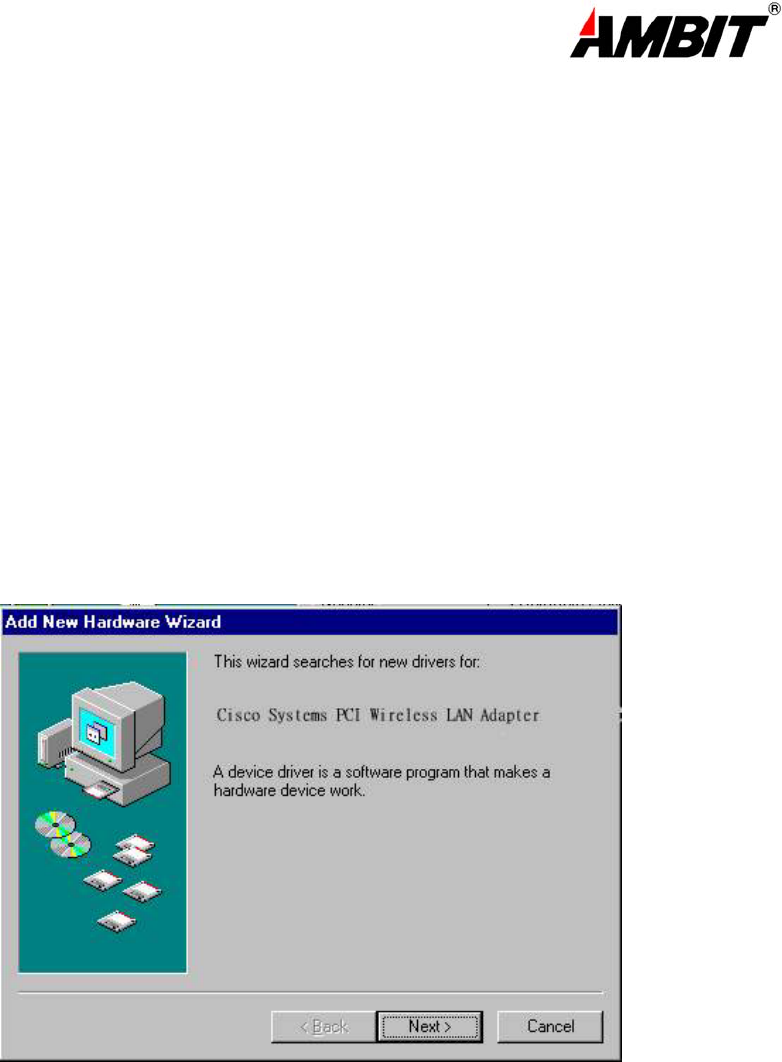
2. Windows 98 will automatically detect the U58H004 and prompt you to install the
necessary driver. Click “Next” to begin the installation.
(PCMCIA Adapter is left-hand or right-hand side ; MiniPCI Adapter is button side)
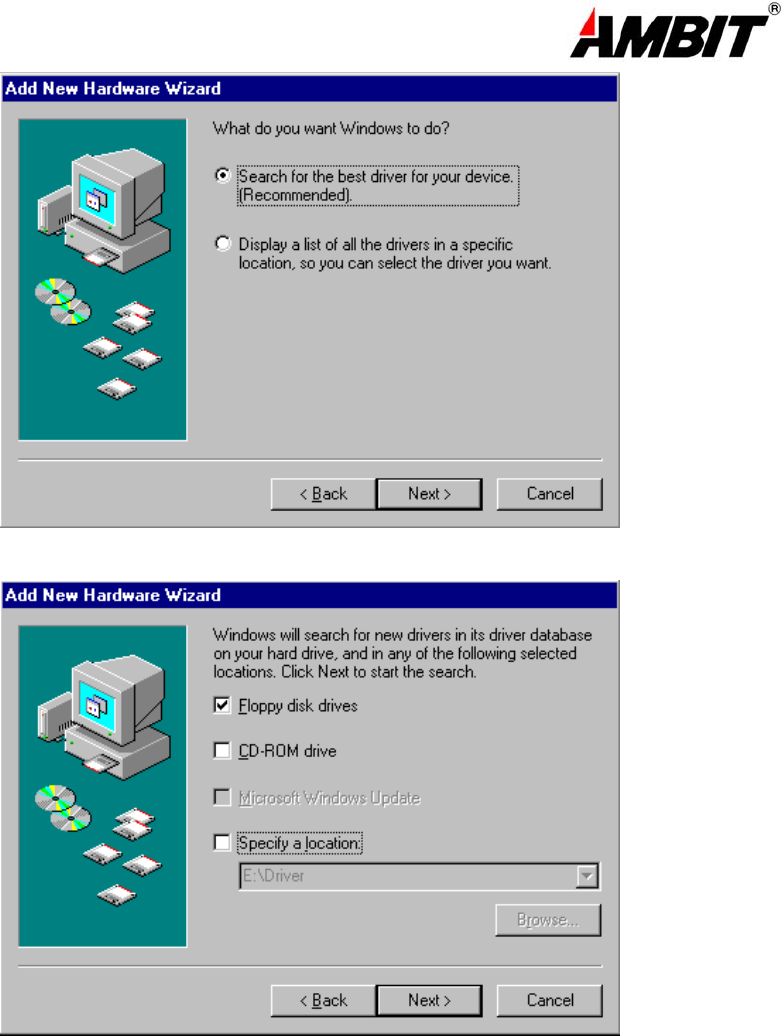
3. Check “Search for the best driver…” click “Next”.
10
4. Check “floppy disk drivers” , click “Next”. Windows ® 98 will automatically find the file.
5. Windows ® 98 will then acknowledge that it has found the appropriate driver, click "Next".
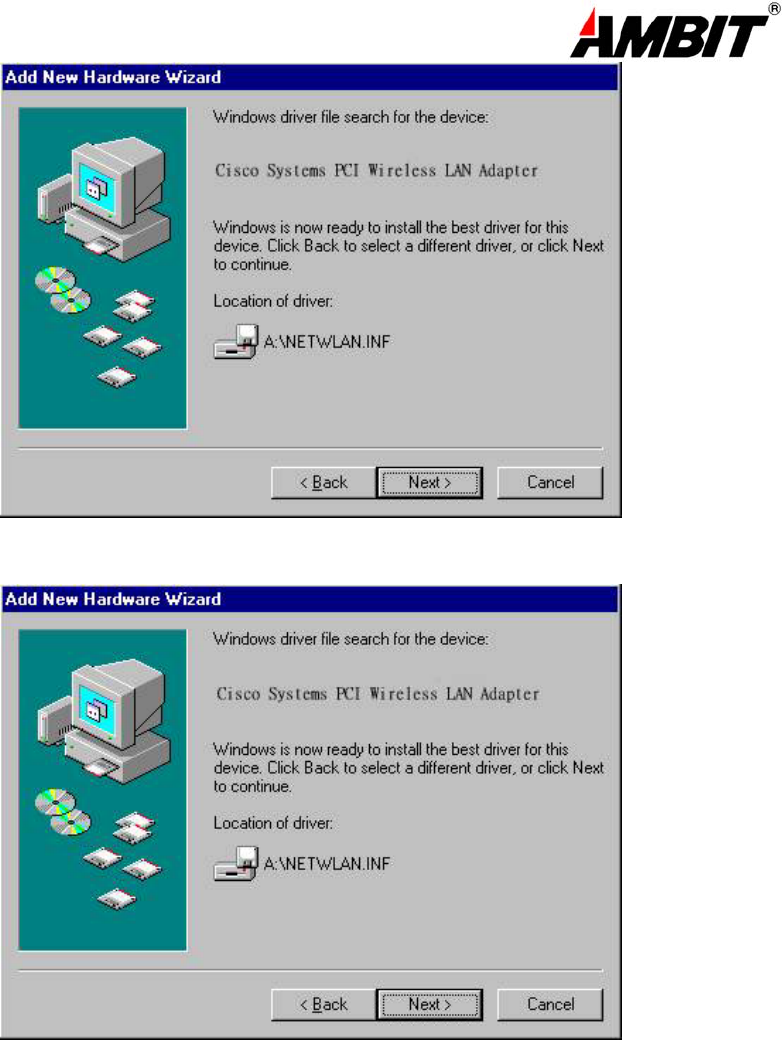
11
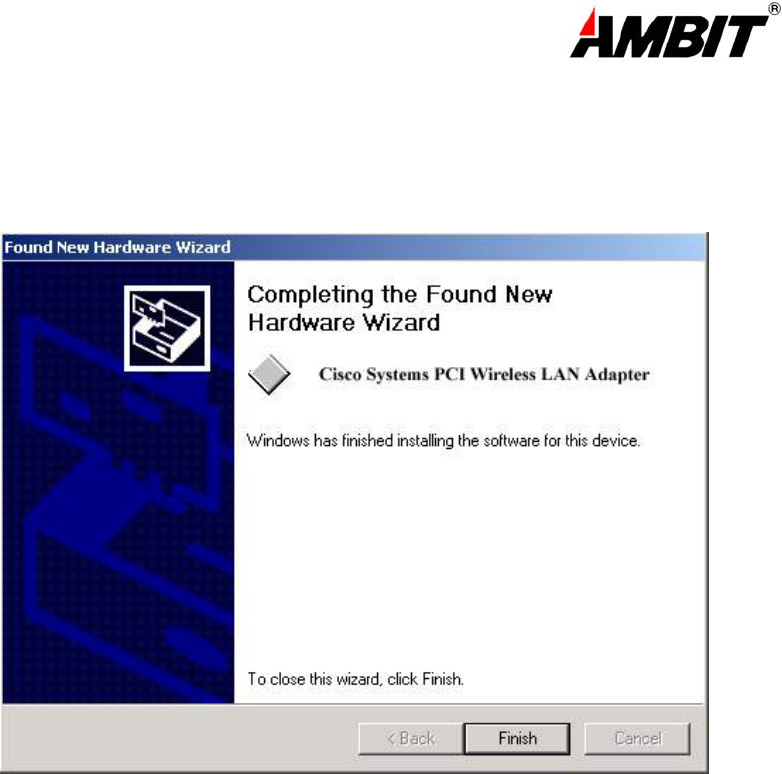
6. Clink “Finish” to compete the installation.
3-3.2 ADAPTER CONFIGURATION – WINDOWS 98
After successful installation of the U58H004 and its driver, continue the installation process by
configuring the U58H004 adapter properties. To configure the U58H004 Adapter complete the
following steps :
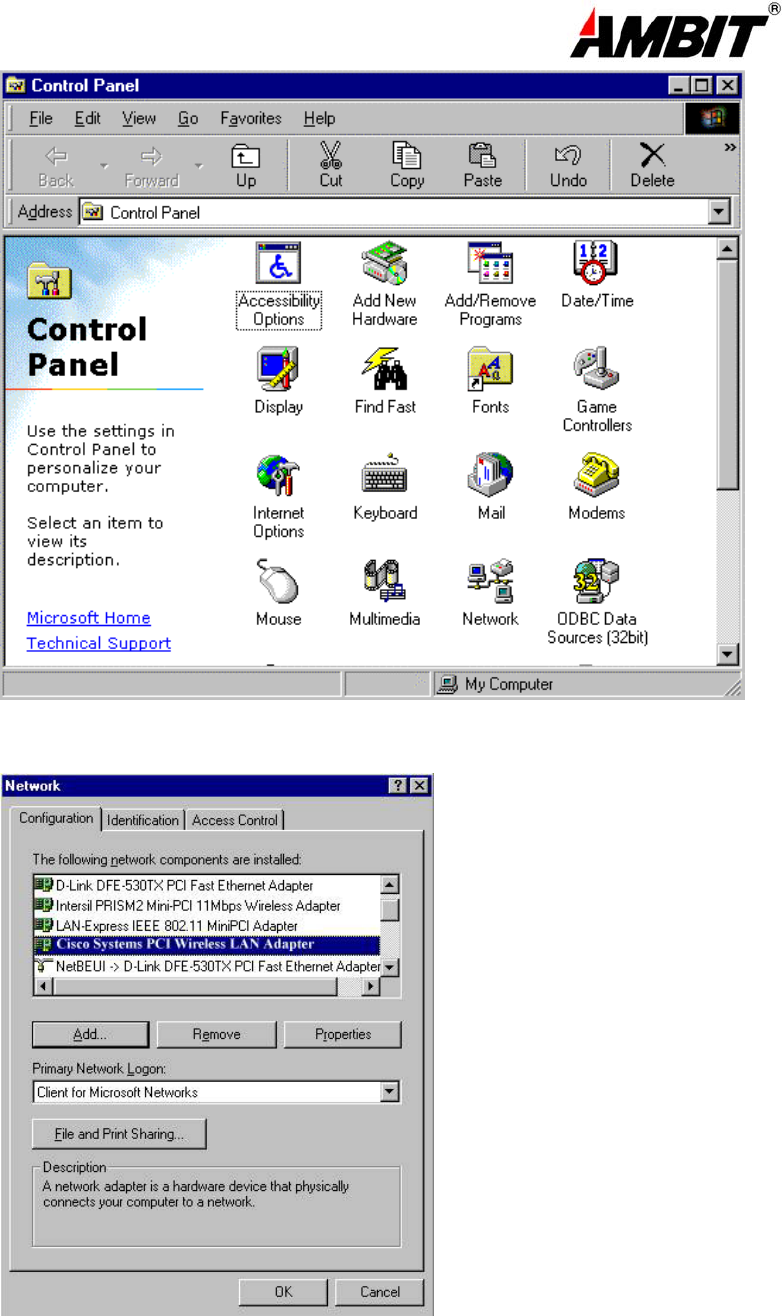
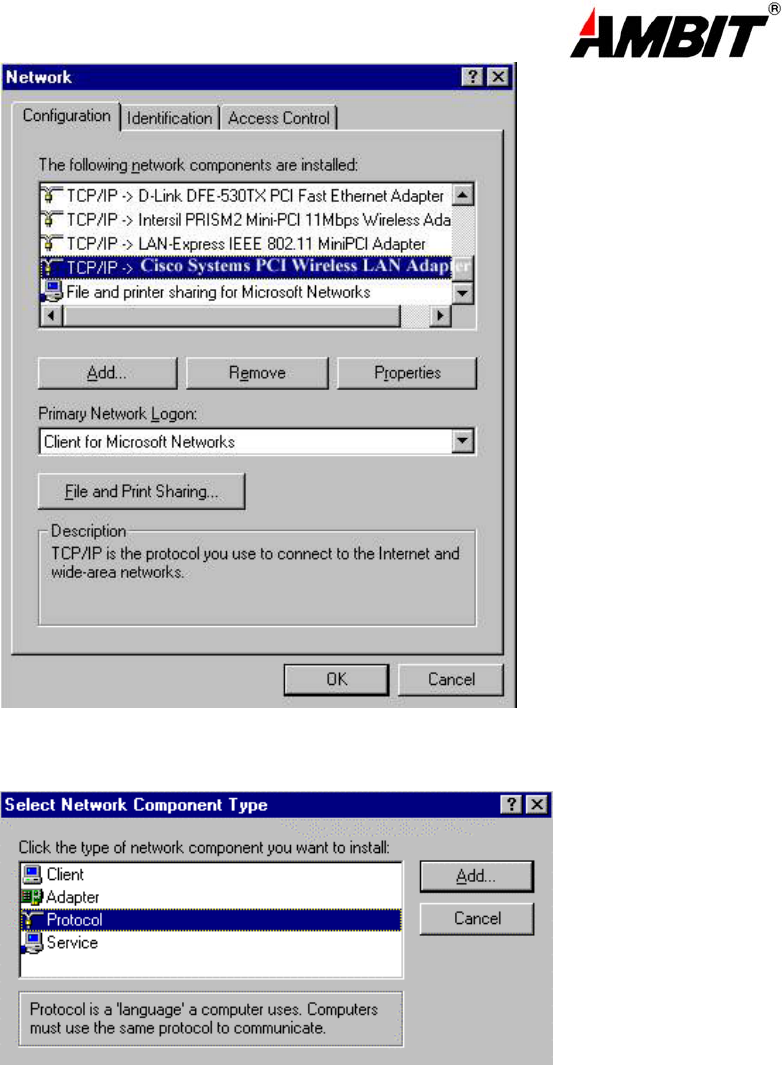
1.From the Control Panel, double-click the “Network” icon.
12
2.Select "LAN-Express IEEE 802.11 PC Card Adapter" or "LAN-Express IEEE 802.11 MiniPCI Adapter" from the
list and press the “Properties” button.
13
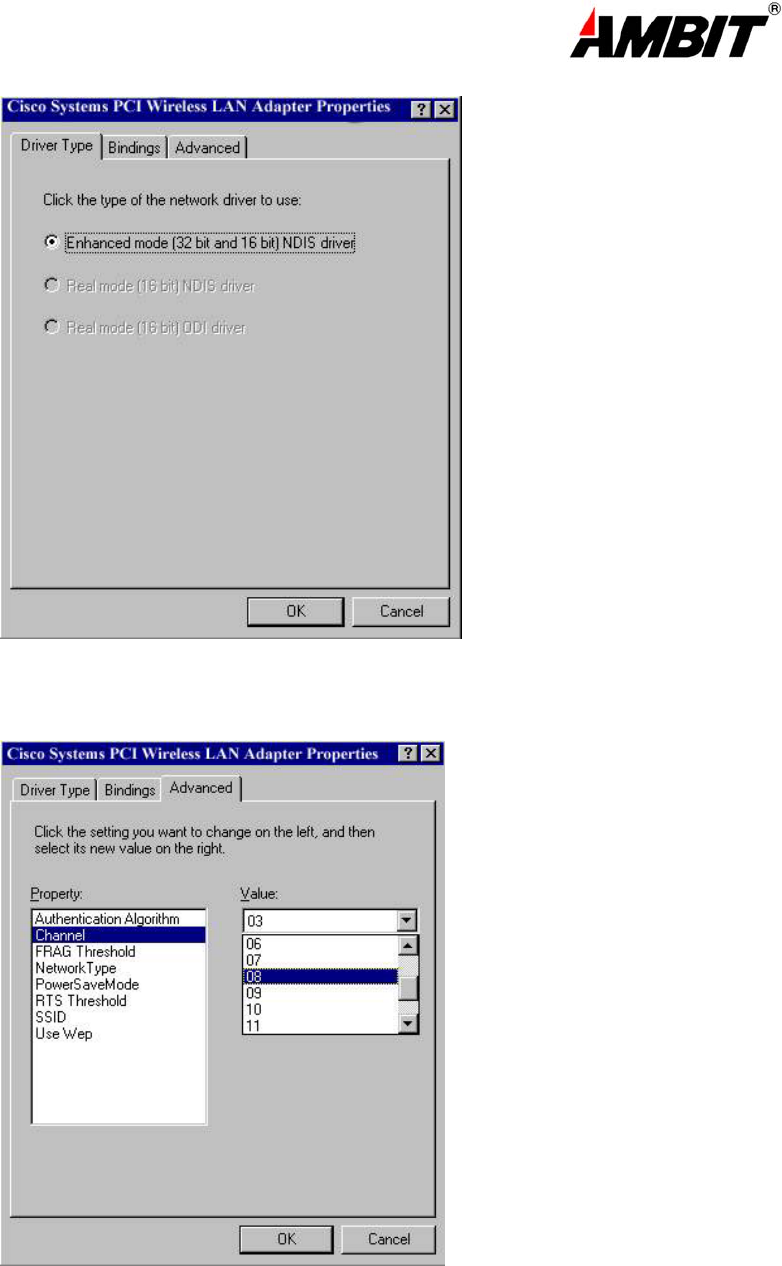
3. From the “Properties” menu select the “Advanced” tab.
4. Select “Channel” from the list, and choose a “Value” from the drop down list. FCC
regulations require a “Value” between 1 and 11.
14
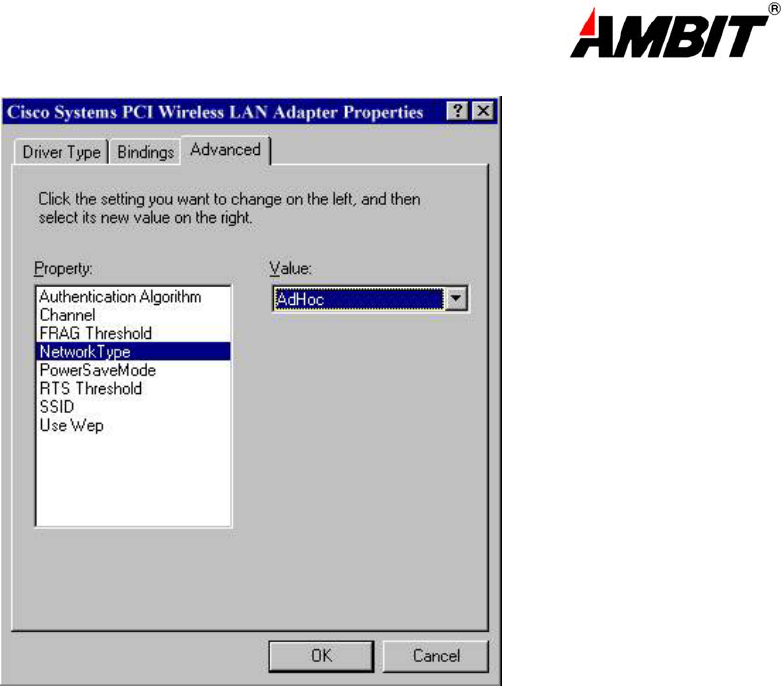
5. Select “Network Type”, and choose “Infrastructure” or “Ad-Hoc” as the “Value”.
Note: “Infrastructure” mode allows a wireless adapter to communicate with a wired network,
While “Ad-Hoc” mode allows wireless-to-wireless communication. Consult your System
Administrator for information about your network communication type. For more information
About Infrastructure and Ad-Hoc networks, see Chapter 2 of this manual
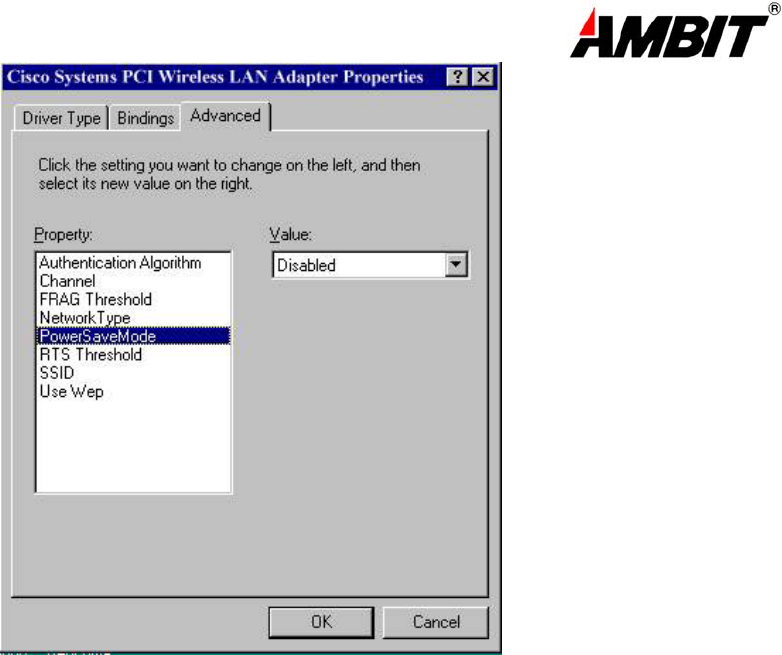
6. Select “Power Save Mode” and choose a “Value”.
15
NOTE: To allow uninterrupted data communication, choose “Disabled” as the “Value”.
Choosing “Enabled” allows your notebook to enter “sleep” mode, however, this will interrupt
data communication. Consult your System Administrator to find out the best setting for your
network type. For more information about Power Save Mode, see the chapter entitled “LAN-Express
Configuration Utility” in this manual.
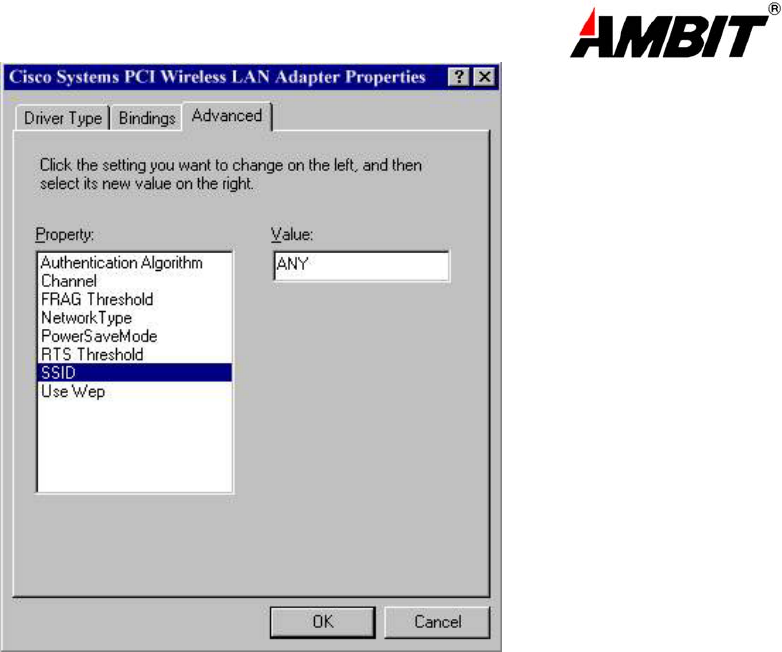
8. Select “SSID”; enter a “Value” of “ANY”.
16
NOTE: The SSID can have any value, but should have the same value as the Access Point
(AP). In Ad-Hoc mode, all clients should share the same SSID
9. Select “Transmit Rate”, and choose a “Value”.

17
NOTE: Fixed 11 Mb/s is the preferred “Value” for environments where the client has line of
sight access and is a short distance away from the AP. Fully Auto is the recommended setting
for clients that are farther away from the AP and where there may be interference between the
client and the AP.
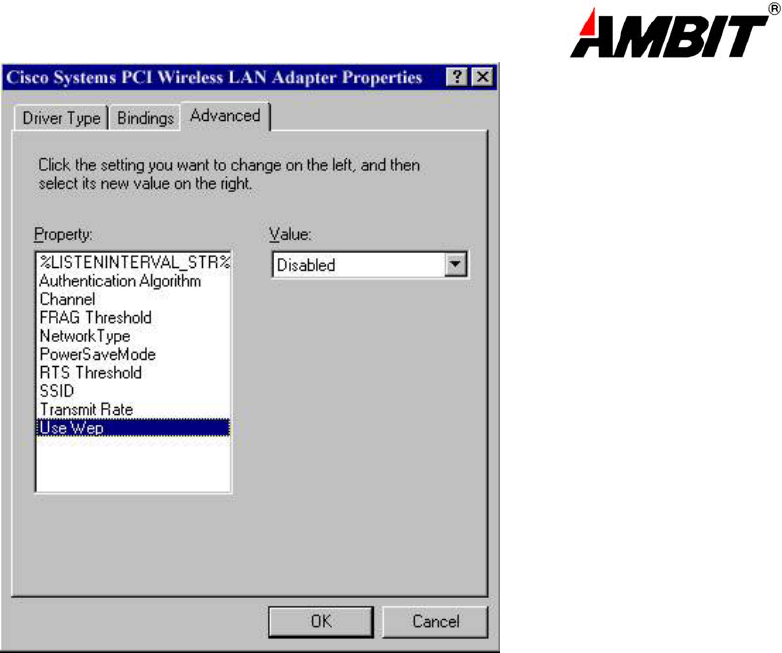
10. Select “Use Wep”, and choose a “Value”.
18
NOTE: Wired Equivalent Privacy (Wep) is an encryption scheme used to protect wireless data
communication. Selecting “Disabled” will prevent you from sharing data with other computers if
your network uses Wep. If your network is Wep enabled, you must choose “64bit” or ”128bit”.
Consult your System Administrator for more information about your network type. For more
information about Wep, see the chapter entitled “PRISM Configuration Utility” in this manual.
11. After the configuring the “Properties”, click “OK” and continue with the Protocol
Installation, described in the following section.
3-3.3 PROTOCOL INSTALLATION – WINDOWS 98
Before continuing with the Protocol installation consult your System Administrator for details about
your specific network. To install network protocols complete the following steps.
1. From the “Control Panel” double-click the “Network” icon.
2. Select “LAN-Express IEEE 802.11 PC Card Adapter” or “LAN-Express IEEE 802.11 MiniPCI Adapter” and click
“Add”.
19
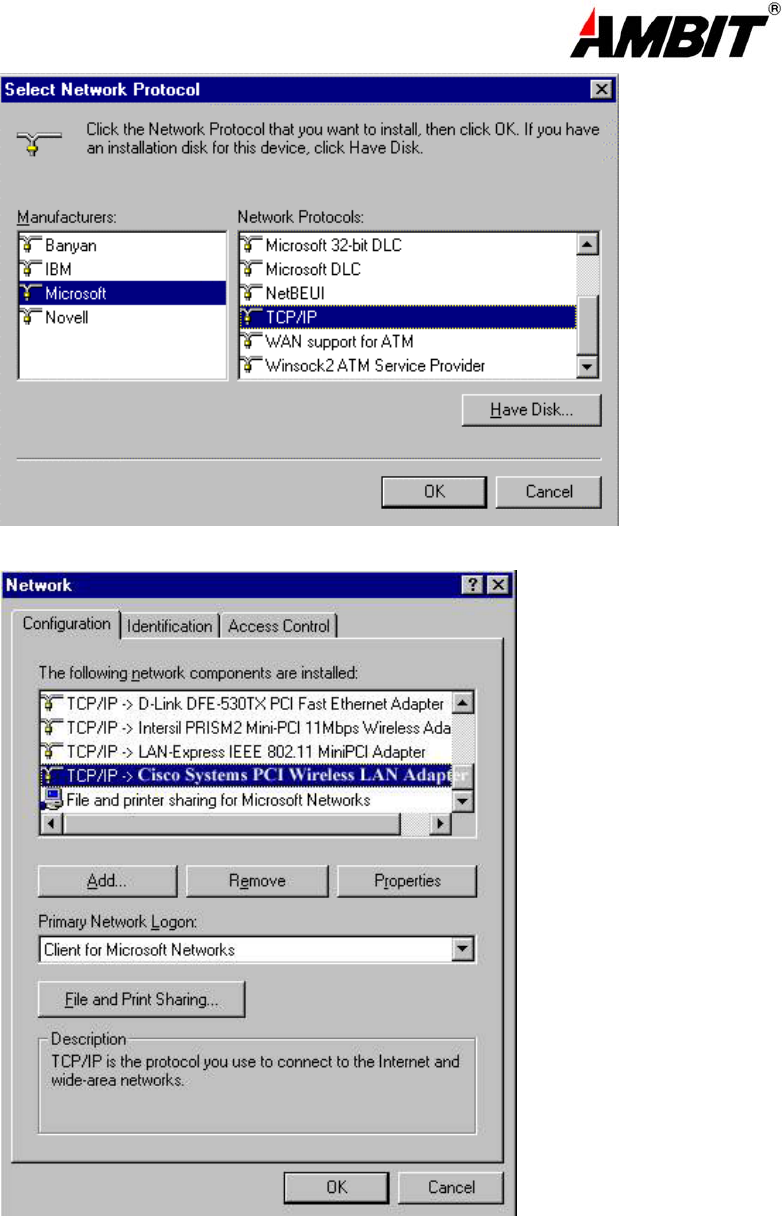
3. Highlight “Protocol” and click “Add”.
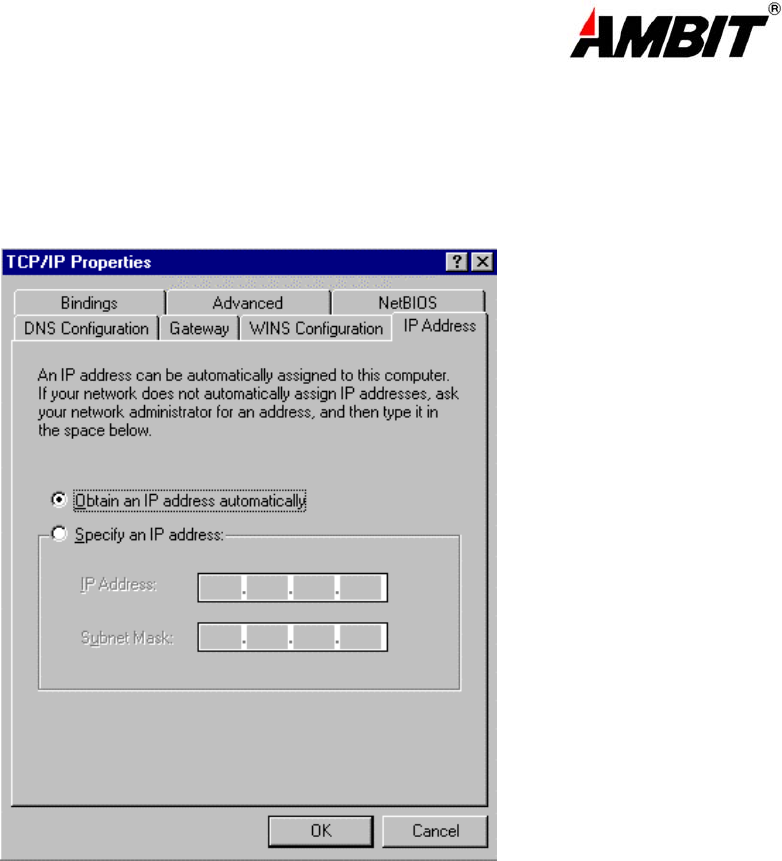
4. Select “Microsoft” from the list of “Manufacturers” and “TCP-IP” from the list of “Network
Protocols”, click “OK”
20
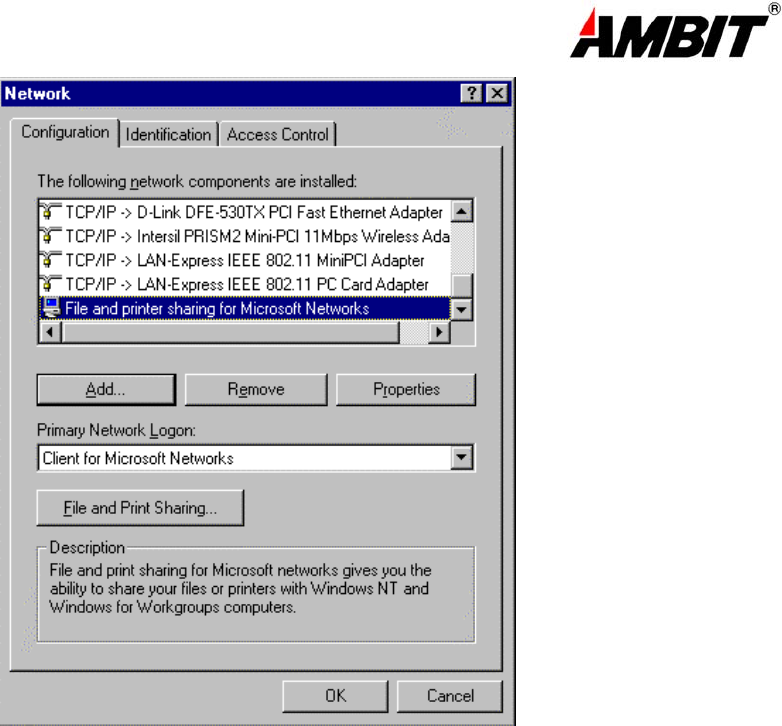
5. Select “TCP/IP “ and click “Properties”.
Repeat step 2 – 5 to install other protocols such as NetBeui or IPX/SPX.
NOTE: The following steps apply to DHCP servers. Consult your system administrator for
21
specific information regarding your server type, and for help in specifying an IP address if you do
not use a DHCP server and must manually enter the IP address and DNS number.
6. Check “Obtain an IP address…” and click “OK”. If you are using a DHCP server the IP
address will be entered automatically.
7. From the Network menu highlight “Client from Microsoft Networks”, and click" File and
Print Sharing”.
22
8. Check both boxes and click “OK”.
9. Enter a “Computer name”, “Workgroup” and “Computer Description”, click “OK”
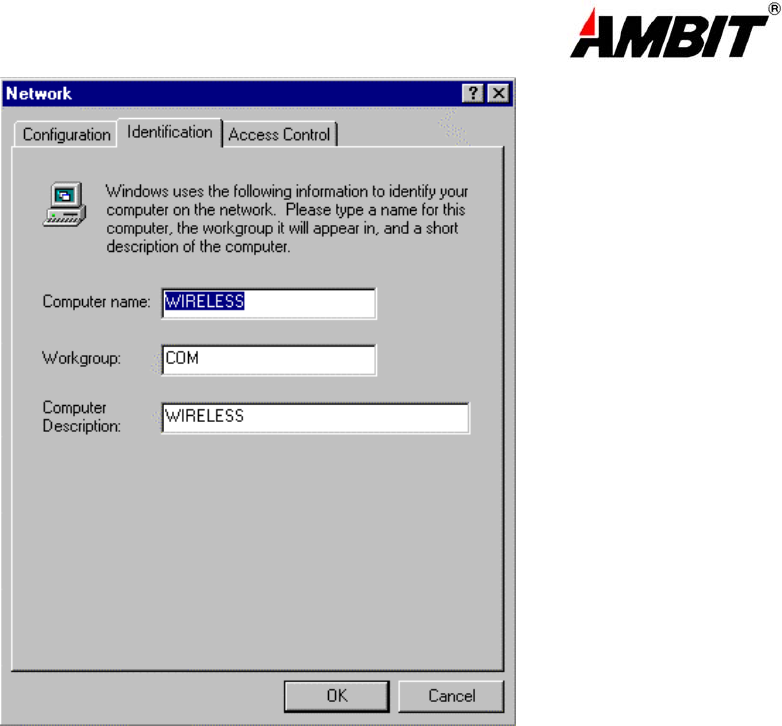
23
11. You will be prompted to restart your computer, click “Yes” to complete the installation.
Note: Please see the trouble shooting if you encounter some problem while installing the PC-Card
or your PC-Card is non-functional.
24
3-5 U58H004 SETUP FOR WINDOWS ® 2000
1. Insert the U58H004 MiniPCI adapter into a standard Type II or Type III PCMCIA
card slot / Type MiniPCI card slot, as described in the preceding section.
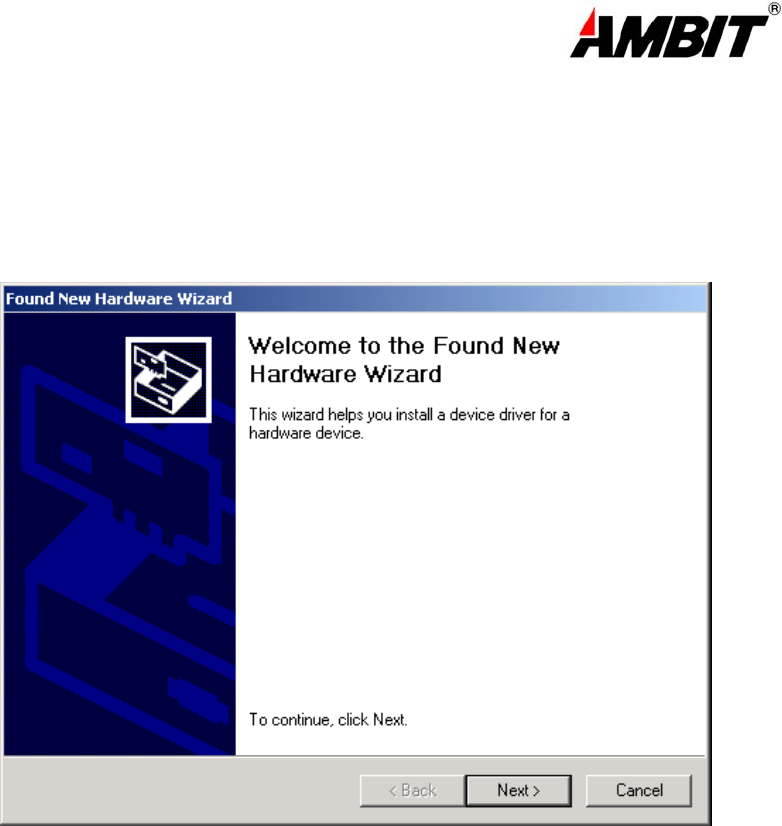
2. Windows ® 2000 will automatically detect the U58H004 and prompt you to install the
necessary driver. Click “Next” to begin the installation.
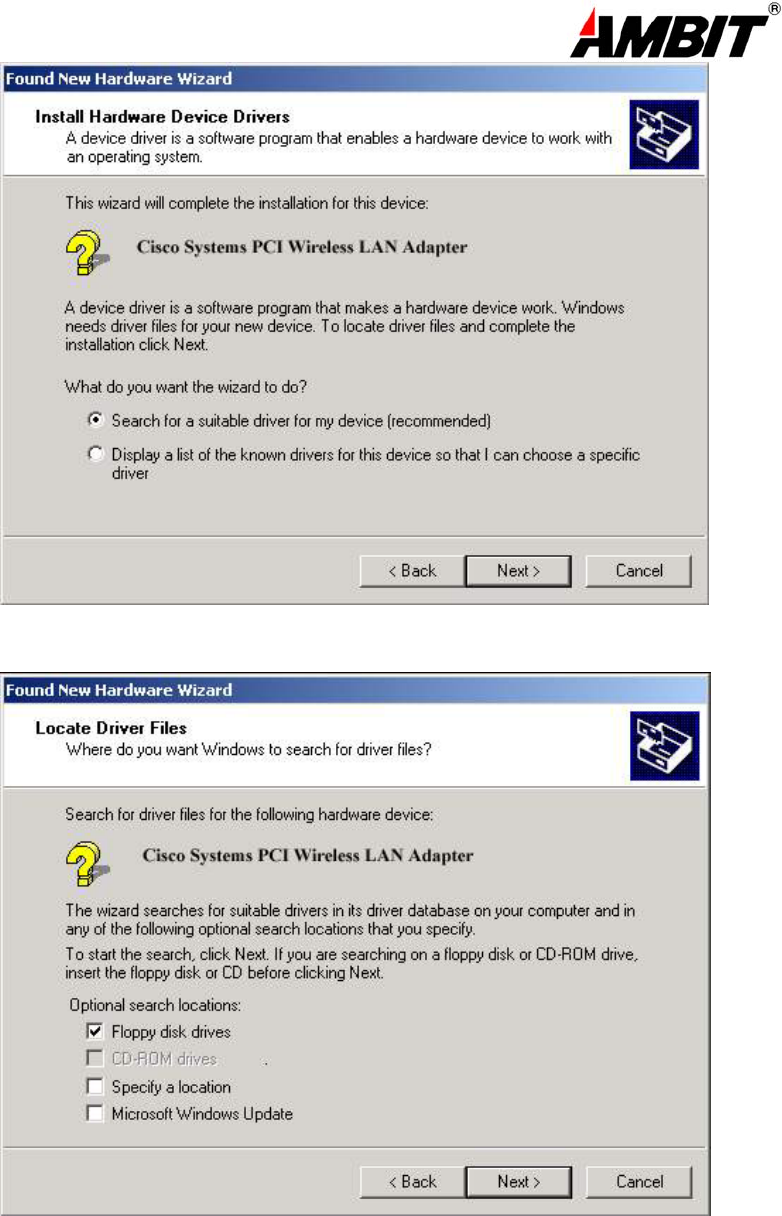
3. Check “search for the best driver…” click “Next”.
25
4. Check “floppy disk drivers” , click “Next”. Windows ® 2000 will automatically find the file.
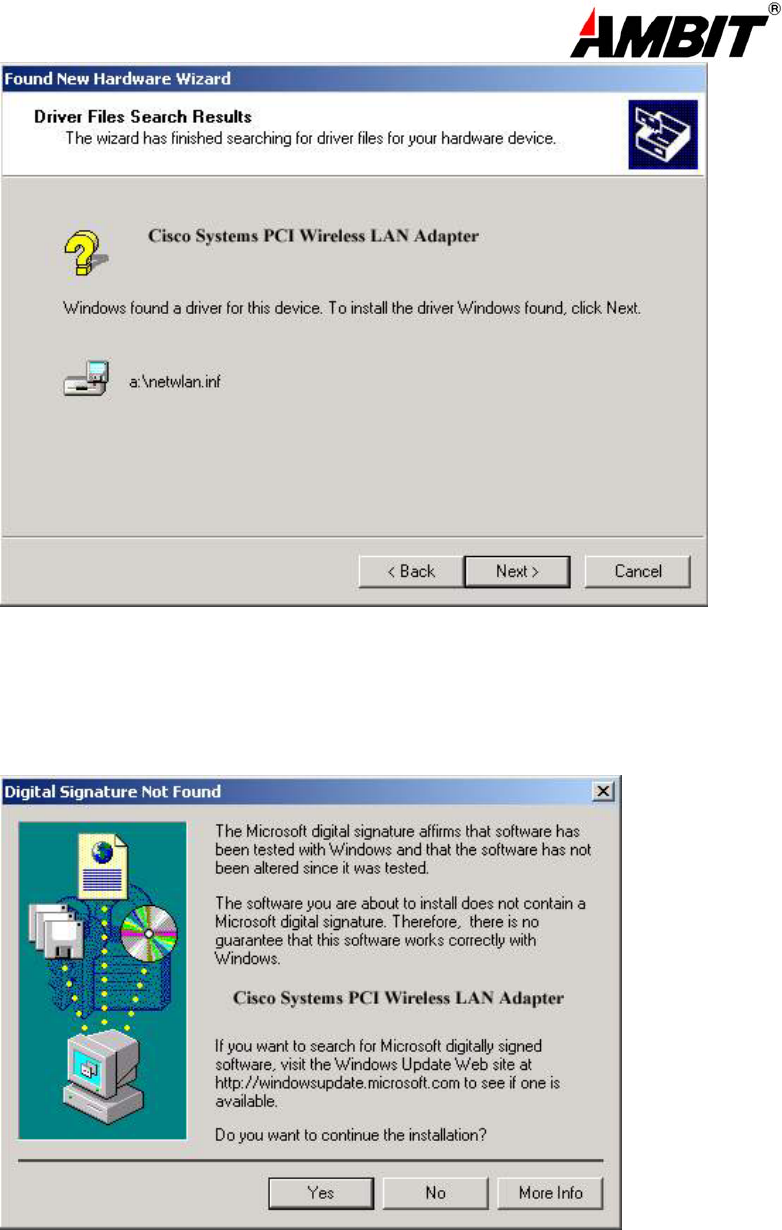
5. Windows ® 2000 will then acknowledge that it has found the appropriate driver, click "Next".
26
6. Click “Yes” to continue the installation.
27
7. Clink “Finish” to compete the installation.
28
Appendix A Troubleshooting
Problem Solving
My computer does not recognize the U58H004.
Probable Solution:
The U58H004 is not properly inserted into the PCMCIA/MiniPCI slot.
Ensure that the U58H004 has been inserted into an available PCMCIA/MiniPCI slot.
The U58H004 does not work properly.
Probable Solution:
Insert the PCMCIA/MiniPCI adapter into Notebook’s slot again. A beep should be heard if the
adapter is properly inserted.
Check the I/O cable that connects the RF module and the PCMCIA/MiniPCI adapter. The power
LED(T60L198) indicator will be active if the cable is properly connected.
For non-Windows 95/98 environments, ensure that a PCMCIA/MiniPCI card service driver is
installed in your computer.
1) Click on the Control Panel and then on PC-Card/MiniPCI. Check whether it has PCMCIA/MiniPCI card
in one of the sockets or not. If you find “LAN-Express IEEE 802.11 PC-Card Adapter” or “LAN-Express IEEE
802.11 MiniPCI Adapter” in one of the sockets, it means the card is detected properly. If you see the yellow sign of
question-mark(?), the resources are conflicting.
29
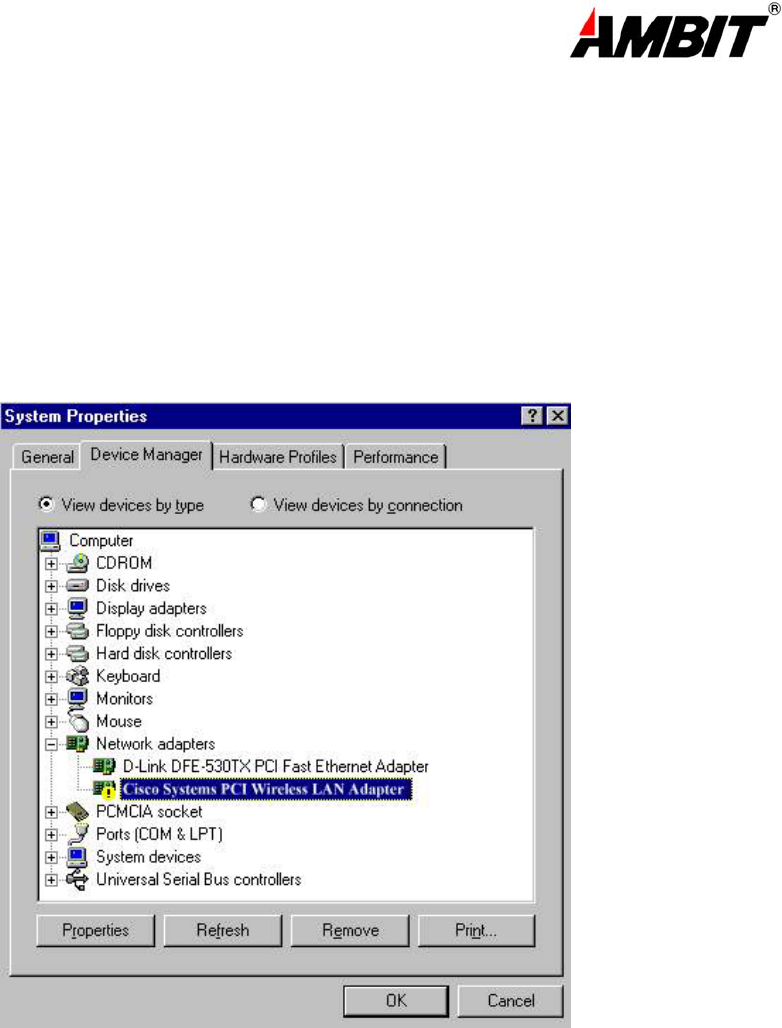
2)Right click on “My Computer” and the select Properties. Select the device Manager and click on the Network
Adapter. You will find “LAN-Express IEEE 802.11 PC-Card Adapter” or “LAN-Express IEEE 802.11 MiniPCI
Adapter” if it is installed successfully. If you see the Yellow sign the resources are conflicting. Click on
PCMCIA/MiniPCI card and then on PCMCIA/MiniPCI Card service, you can see the status of PCMCIA/MiniPCI.
card. If there are yellow sign either on adapter or PCMCIA/MIniPCI card, please check followings.
2-1) Check if your Notebook supports 3.3V card.
2-2)Check if your Notebook has a free IRQ
2-3) Check that you have inserted the right card and have installed the proper driver.
If the U58H004 does not function after attempting the above steps, remove the PCMCIA adapter,
and do the following:
From the run window enter, c:\windows\system, locate and delete the Express.sys file
Open the “Control Panel” double-click “System” and delete “LAN-Express IEEE 802.11 PC-card
Adapter” or “LAN-Express IEEE 802.11 MiniPCI Adapter”.
Restart the PC and repeat the hardware and software installation steps outlined in
Chapters 3 and 4.
The U58H004 station cannot communicate with other computers linked via Ethernet in the
Infrastructure configuration.
Probable Solution:

30
Ensure that the U58H004 with which the station is associated is powered on.
Confirm the station is configured with the same operating radio channel as the U58H004. If
the IDs are different, change the U58H004 and all the stations within the BSS to another
radio channel.
Ensure that the station is configured with the same security options as the U58H004, and
can be turned off and on with the same security key.
Confirm that the BSS ID is the same as the U58H004 for a roaming disabled station.
Alternately confirm that the ESS ID is the same as the U58H004 for a roaming enabled
Station
Appendix B Glossary
Access Point - An internetworking device that seamlessly connects wired and wireless networks together.
Ad-Hoc - An Ad-Hoc wireless LAN is a group of computers each with wireless adapters, connected as an
independent wireless LAN.
Backbone - The core infrastructure of a network, the portion of the network that transports information from one
central location to another central location. The information is then off-loaded onto a local system.
Base Station - In mobile telecommunication, a base station is the central radio transmitter/ receiver that
maintains communication with the mobile radio telephone sets within range. In cellular and personal
communications applications, each cell or microcell has its own base station; each base station in turn
is interconnected with other cells’ base.
BSS - Stands for “Basic Service Set.” An Access Point associated with several wireless stations.
ESS - Stands for “Extended Service Set.” More than one BSS can be configured as an Extended Service Set. An
ESS is basically a roaming domain.
Ethernet - A popular local area data communications network, originally developed by Xerox Corp., which
accepts transmission from computers and terminals. Ethernet operates on 10 Mbps baseband
transmission over shielded coaxial cable or over shielded twisted pair telephone wire.
Infrastructure - An integrated wireless and wired LAN is called an Infrastructure configuration.
PCMCIA - Personal Computer Memory Card International Association, which develops standards for PC cards,
formerly known as PCMCIA cards, are available in three “types” which are about the same length and
width as credit cards, but range in thickness from 3.3 mm (Type I) to 5.0 mm (Type II) to 10.5 mm (Type
III). These cards can be used for many functions, including memory storage, as landline modems and
as wireless LAN.
Roaming - A function that allows one to travel with a mobile end system (wireless LAN mobile station, for
example) through the territory of a domain (an ESS, for example) while continuously connecting to the
infrastructure.
RTS Threshold – Transmitters contending for the medium may not hear each other. RTS/CTS mechanism can
solve this “ Hidden Node Problem”.

31
Product Specifications for U58H004 :
Radio: Complies with IEEE 802.11
Frequency Band: 2400 ~ 2483.5MHz ( for US, Canada, and ETSI
2400 ~ 2497MHz (for Japan)
Modulation TYPE: CCK,BPSK,QPSK
Operating Channels: IEEE 802.11 compliant
11 channels (US, Canada)
13 channels (ETSI)
14 channels (Japan)
Radio Technology: Direct Sequence Spread Spectrum
Data Rate: 1 / 2 / 5.5 / 11 Mbps
Output Power: > +13dBm
Receive sensitivity: Min. -76dBm for 11Mbps; Min. -80dBm for
5.5/2/1
Mbps ;(@BER 10E-5)
Antenna Type: De-attached PCB patch diversity antenna or
MMCX
connector for external antenna
Current
Consumption : 3.3 V/5 V , Tx mode 350 m A (Max.) ; Rx mode 230
m A (Max.);
Package : PCMCIA Type II/MiniPCI Type III
Certification: FCC Part 15
ETSI 300.328
ARIB STD33 & T66
Driver : Windows 95/98/2000/ME