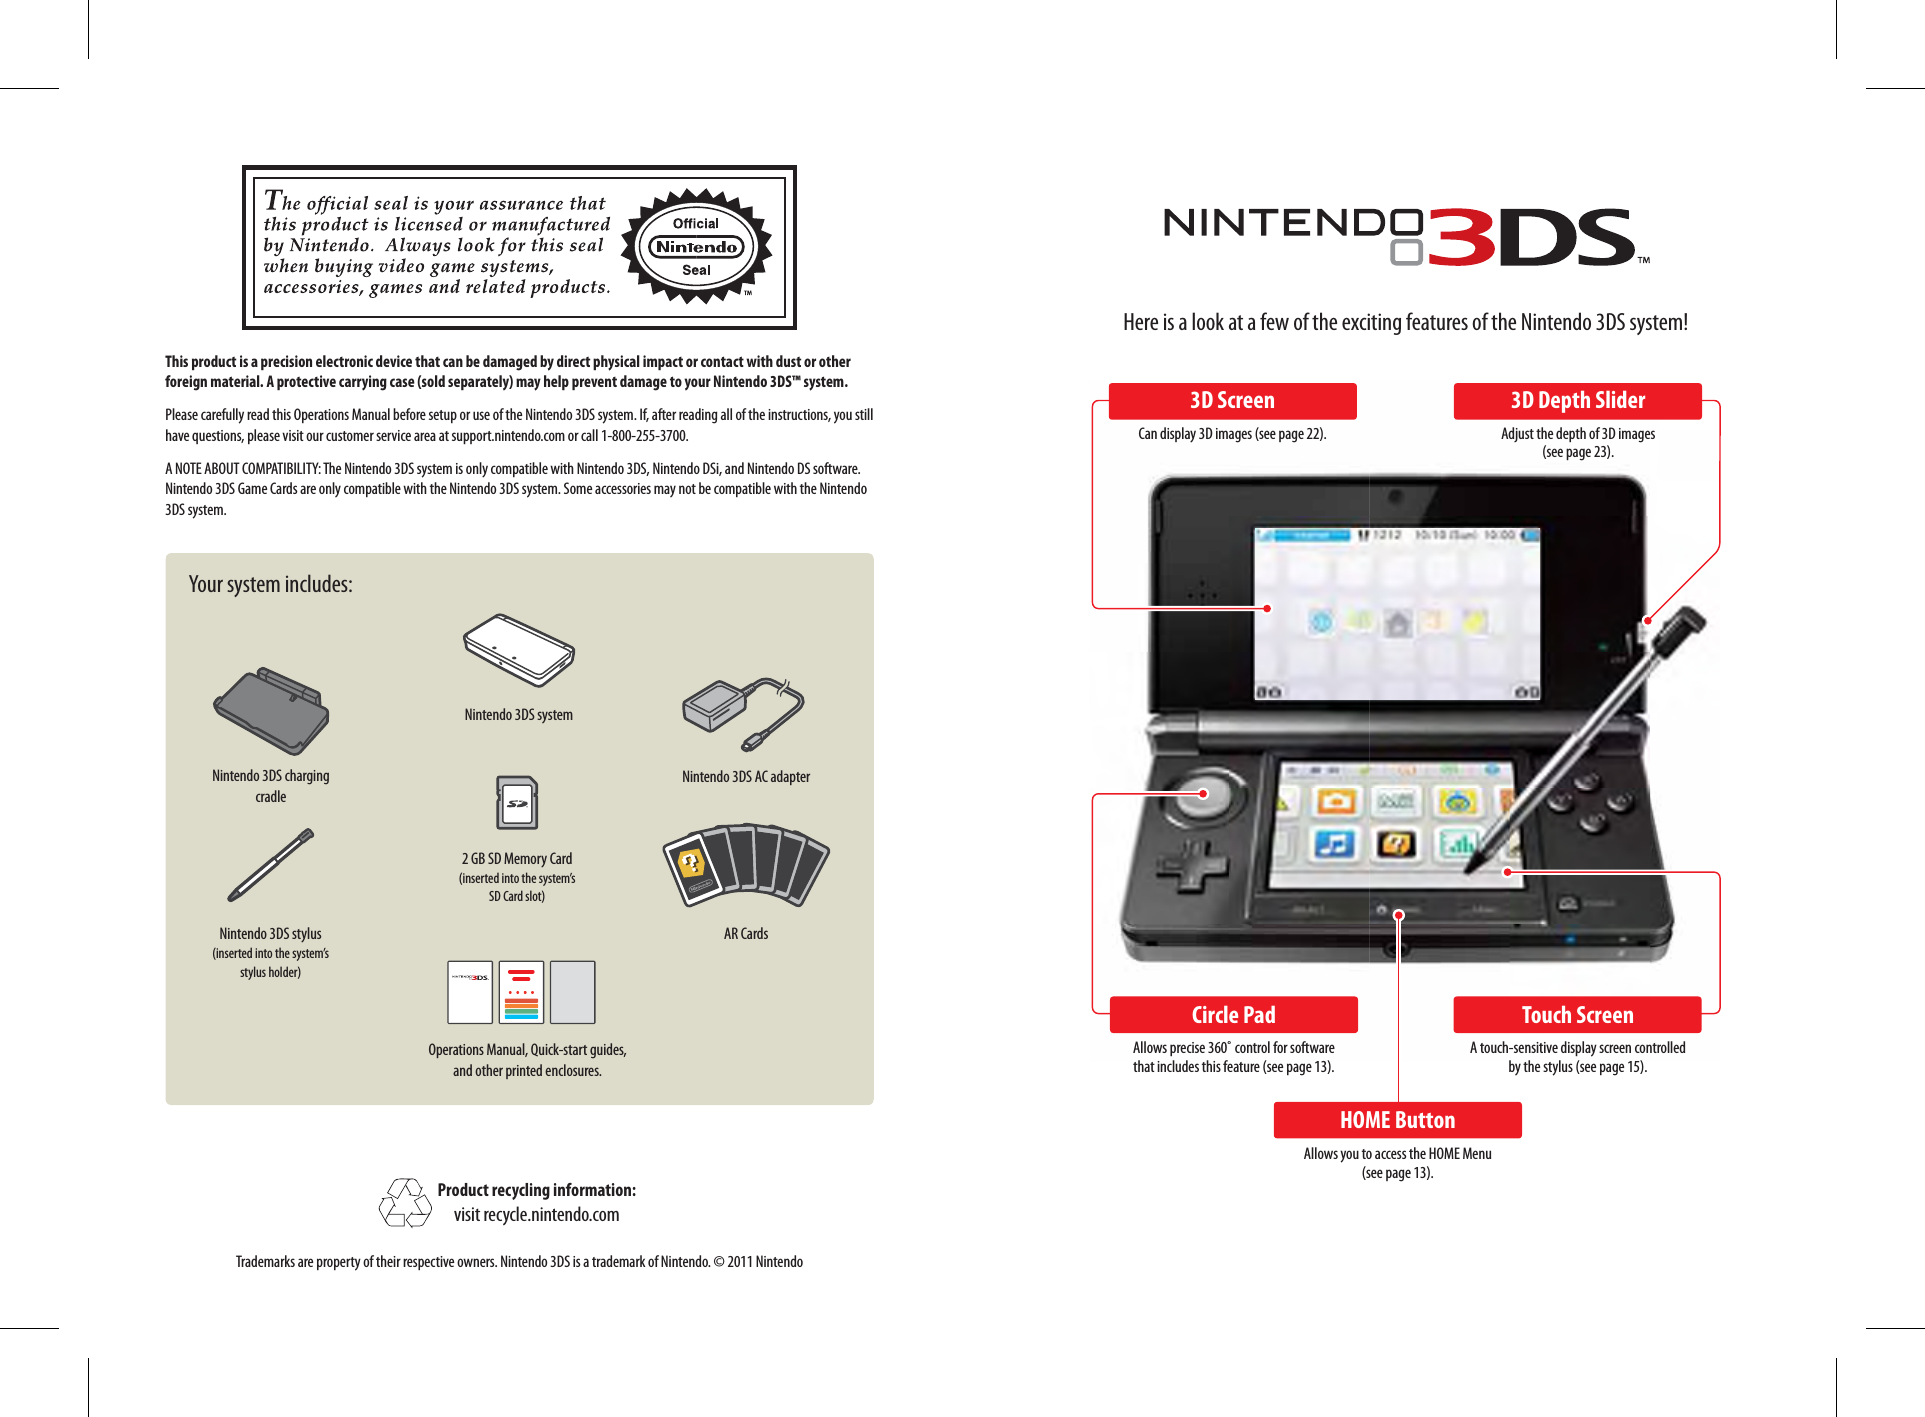
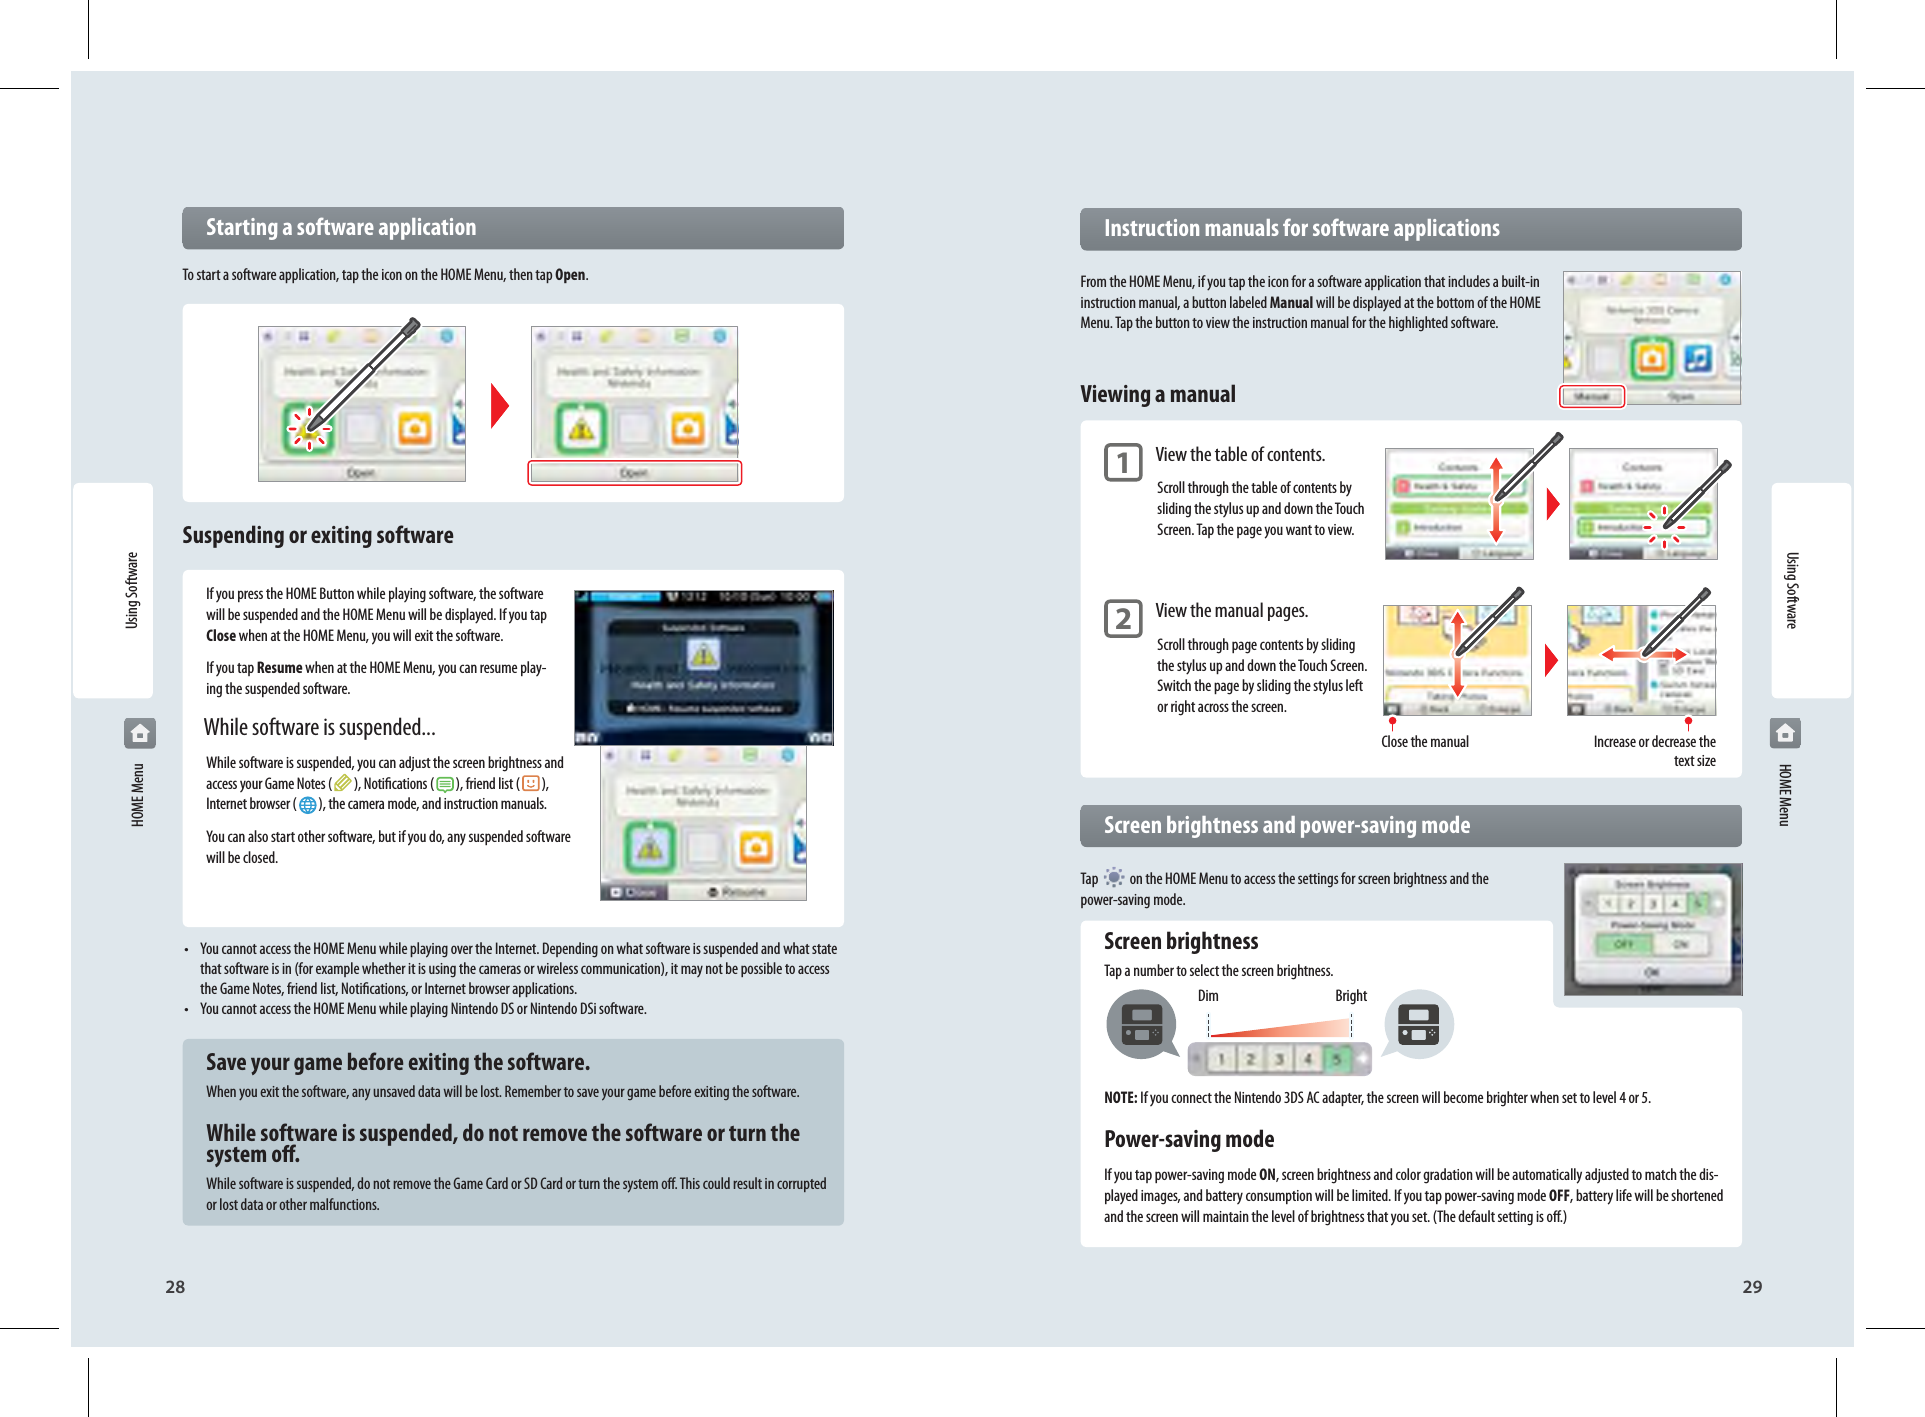
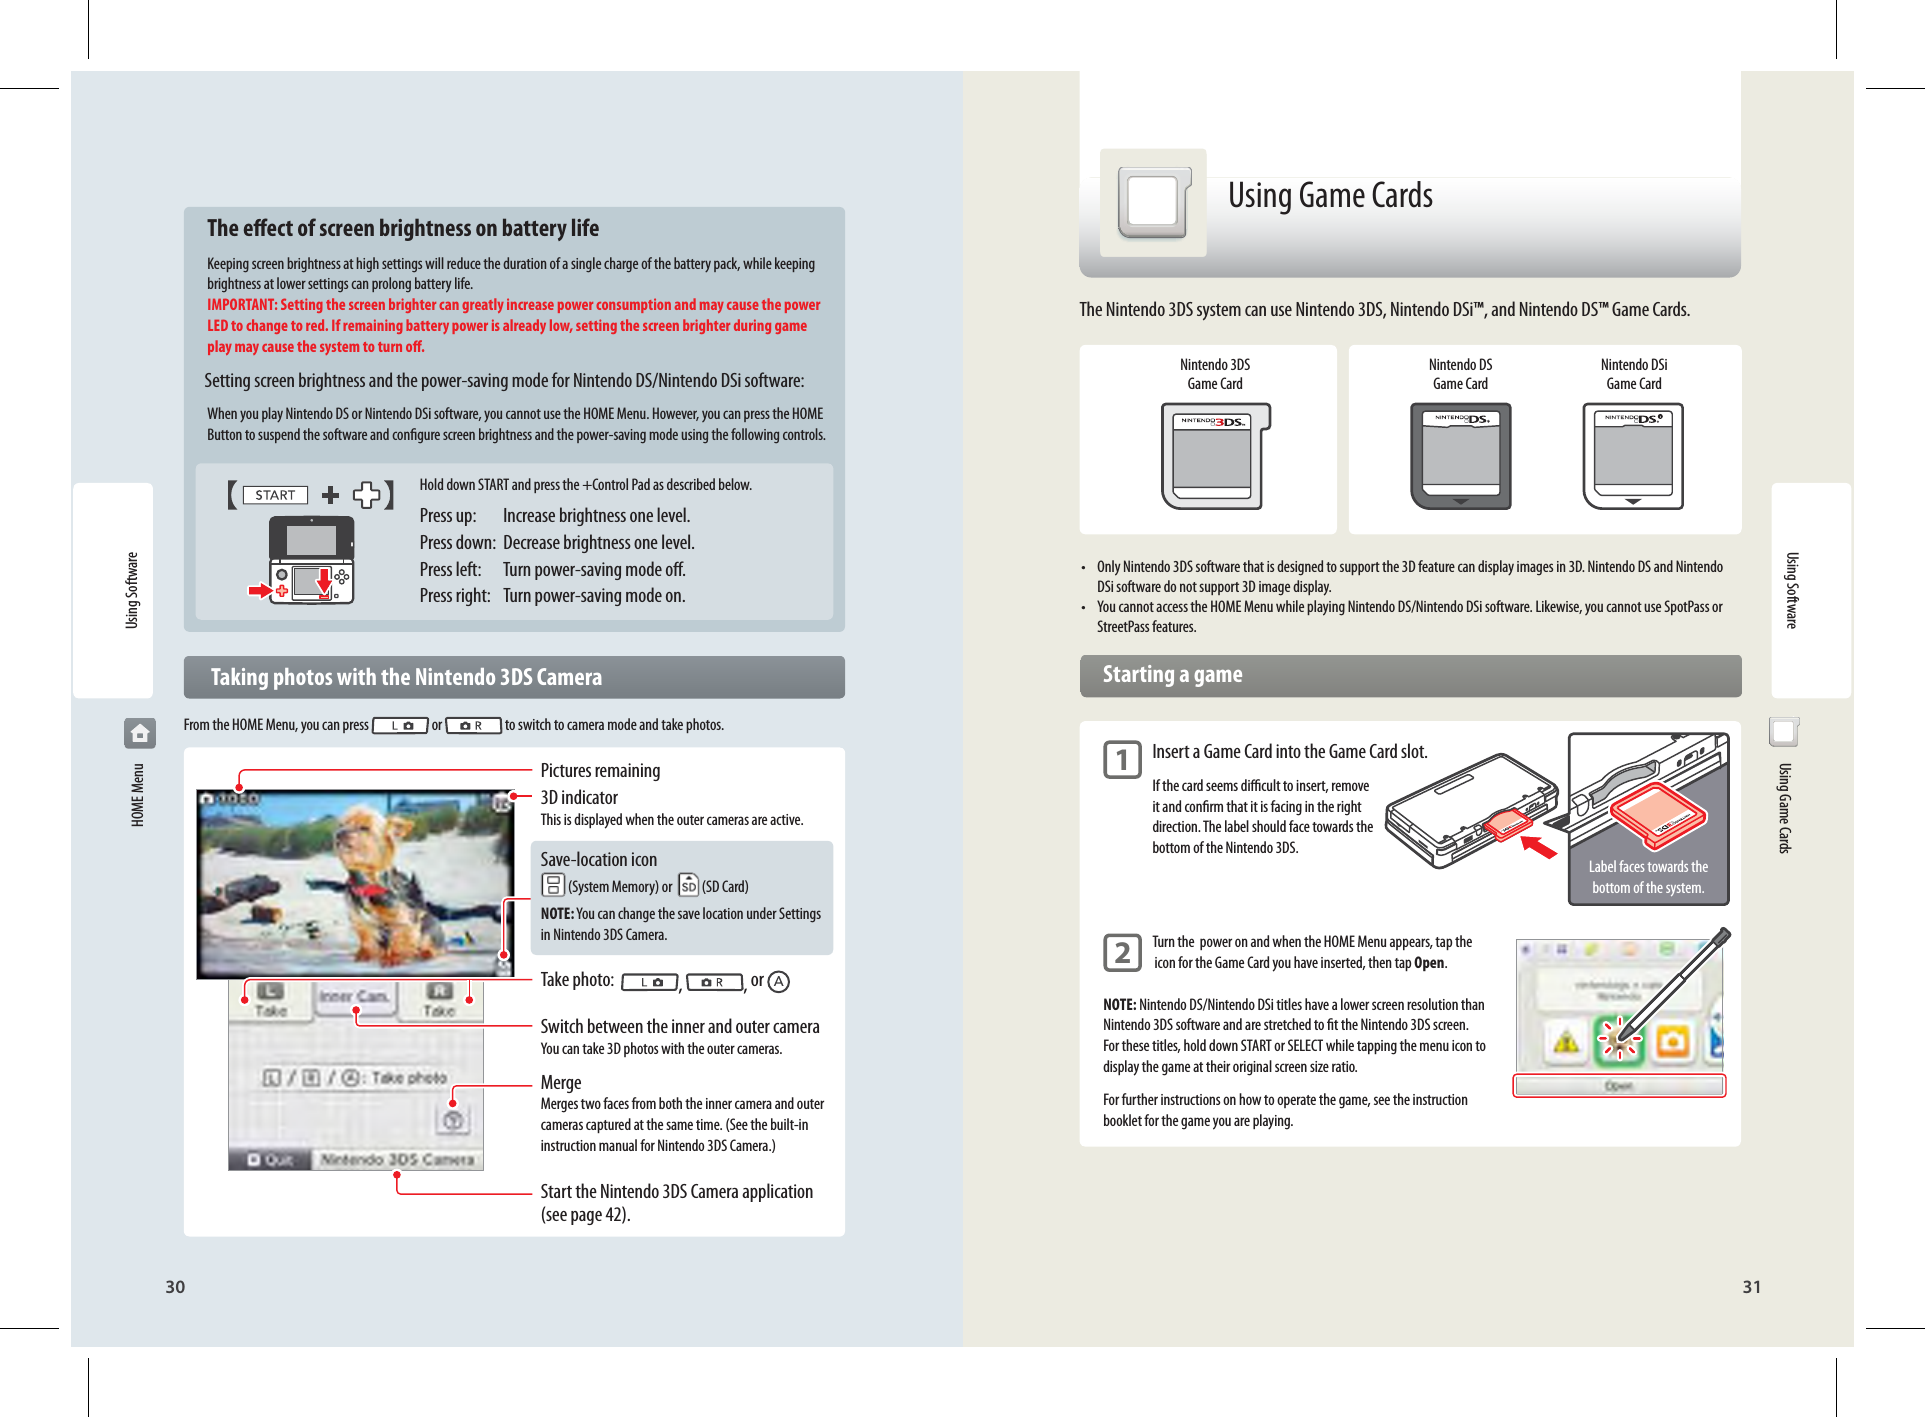
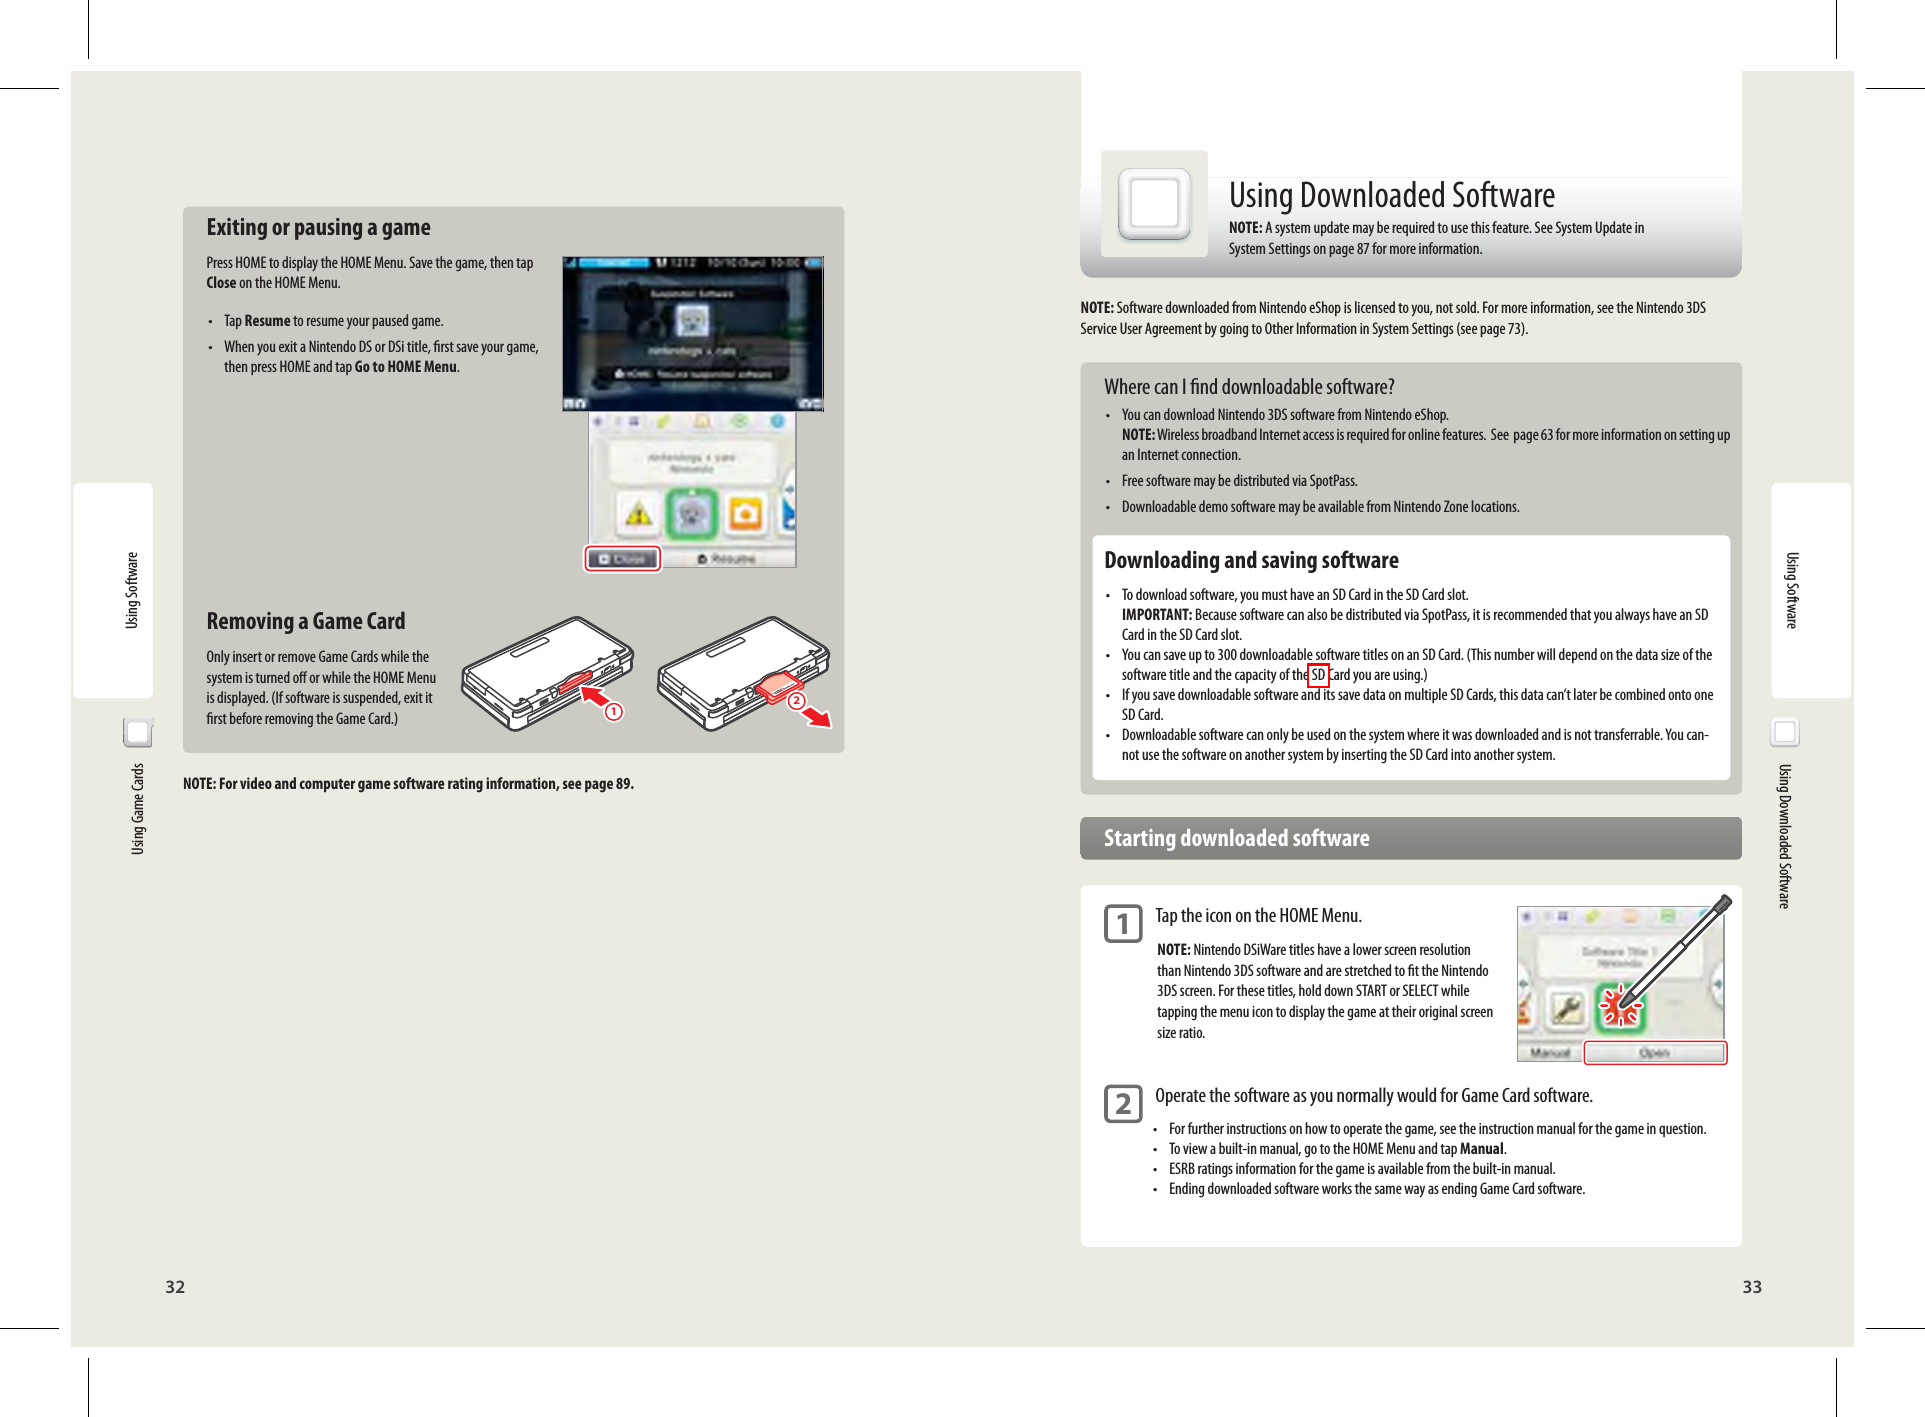
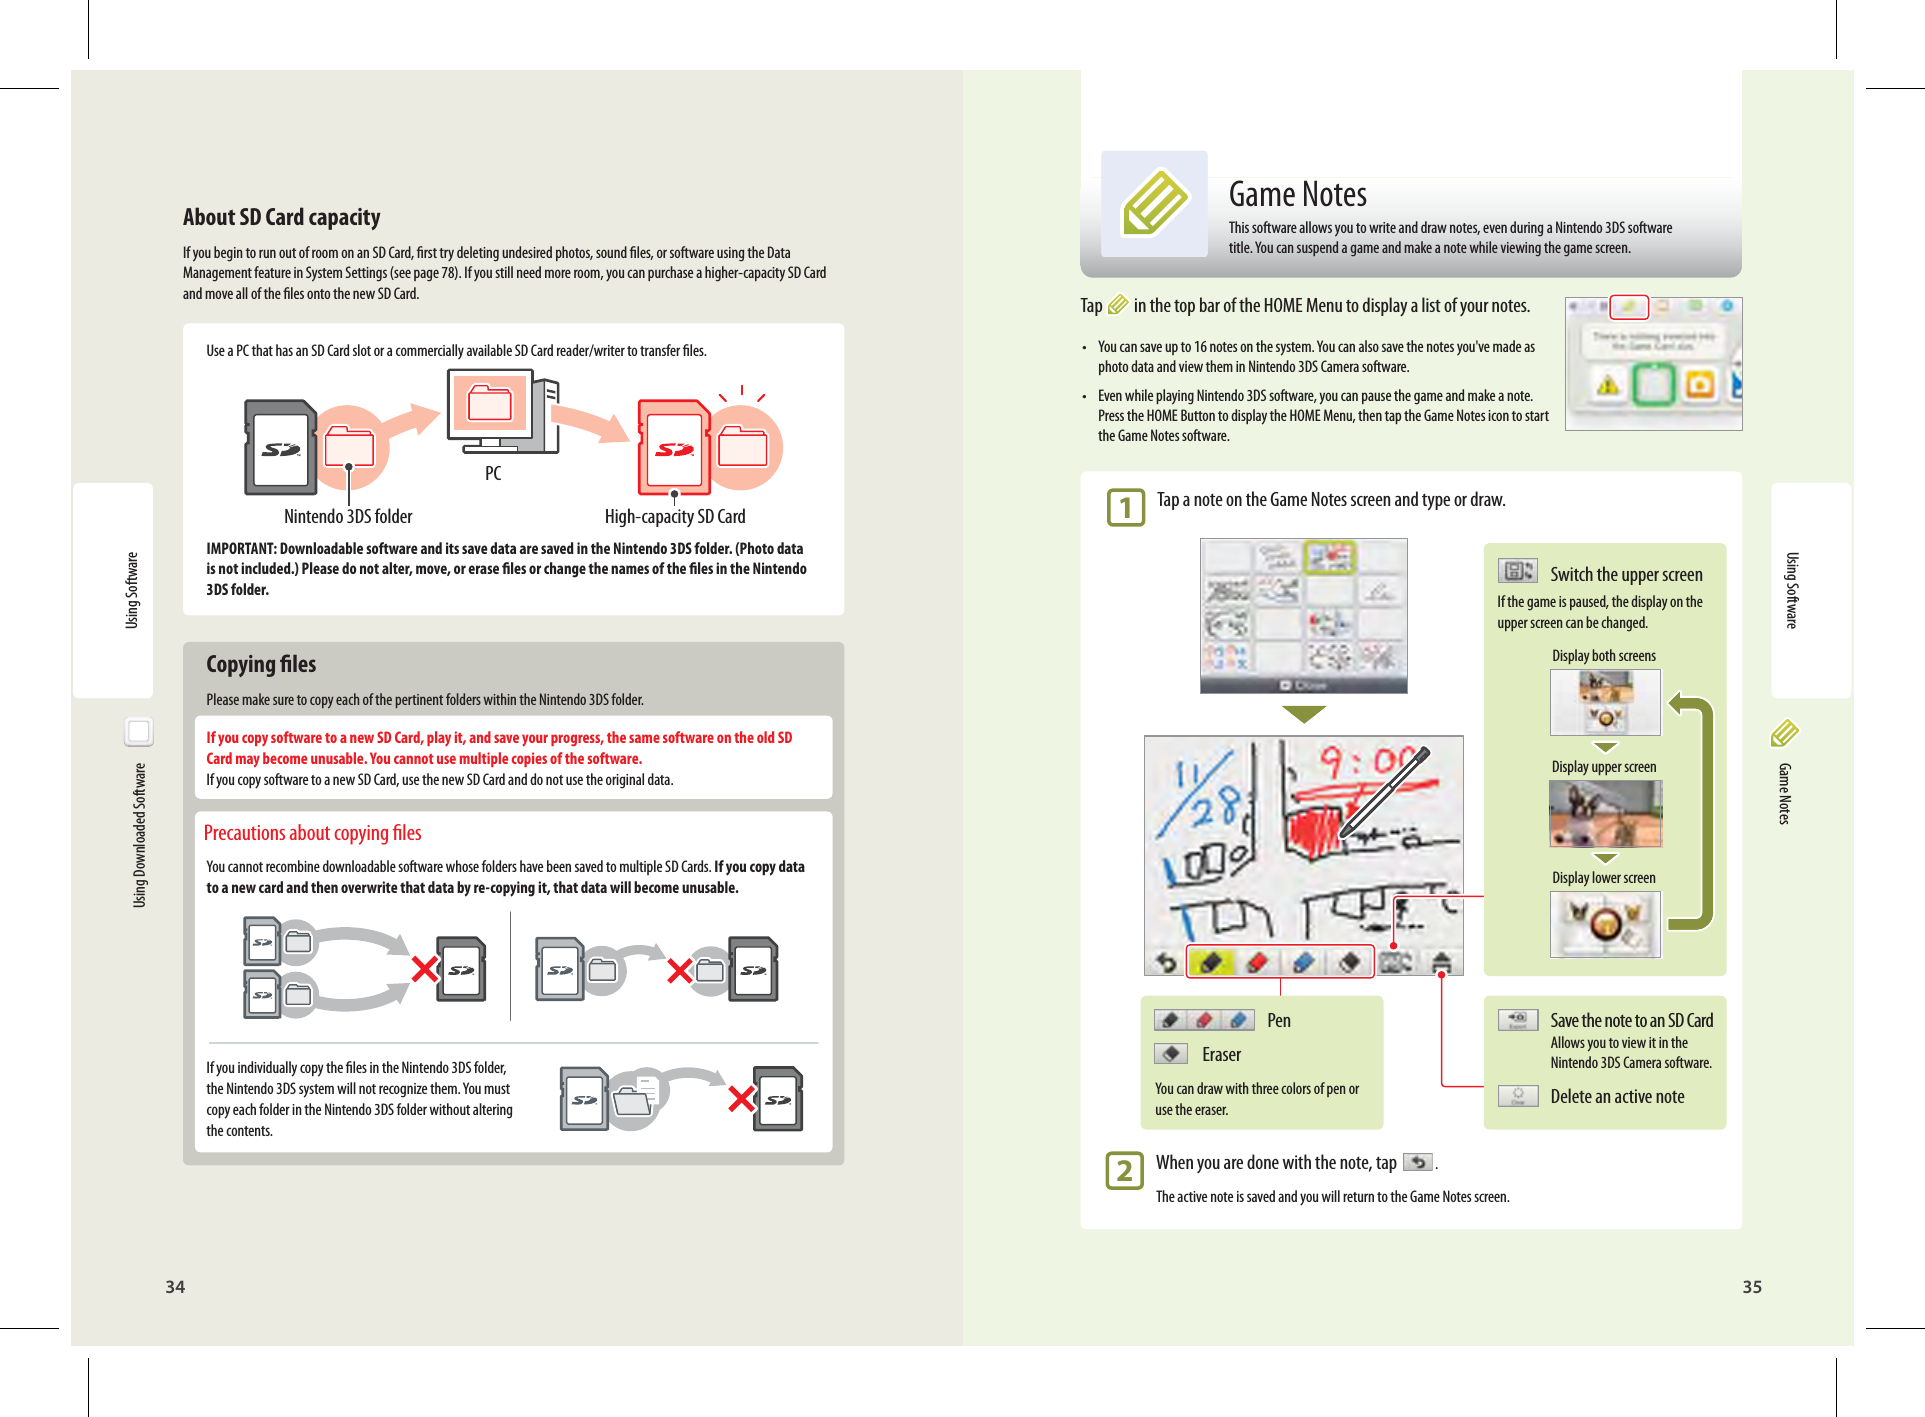
HON HAI PRECISION IND J27H023 WLAN MODULE User Manual MAN MAA CTR S USZ C0 H1 H4 indd

HON HAI Precision Ind. Co., Ltd. WLAN MODULE MAN MAA CTR S USZ C0 H1 H4 indd

Contents

Host user manual 1 of 2

OPERATIONS MANUALNINTENDO 3DS OPERATIONS MANUALFRANÇAIS Pg. 109 ESPAÑOL Pg. 219
NINTENDO 3DS OPERATIONS MANUALPRINTED IN CHINA MAA-CTR-S-USZ-C0 73238ANINTENDO OF AMERICA INC.    P.O. BOX 957, REDMOND, WA    98073-0957  U.S.A.NEED HELP WITH INSTALLATION,MAINTENANCE OR SERVICE?Nintendo Customer ServiceSUPPORT.NINTENDO.COMor call 1-800-255-3700BESOIN D’AIDE POUR L’INSTALLATION,L’ENTRETIEN OU LA RÉPARATION?Service à la clientèle de NintendoSUPPORT.NINTENDO.COMou composez le 1 800 255-3700¿NECESITAS AYUDA DE INSTALACIÓN, MANTENIMIENTO O SERVICIO?Servicio al cliente de NintendoSUPPORT.NINTENDO.COMo llama al 1-800-255-3700
Nintendo 3DS systemNintendo 3DS stylus(inserted into the system’s stylus holder)2 GB SD Memory Card(inserted into the system’s SD Card slot)Operations Manual, Quick-start guides, and other printed enclosures.Nintendo 3DS AC adapterAR CardsNintendo 3DS charging cradleThis product is a precision electronic device that can be damaged by direct physical impact or contact with dust or other foreign material. A protective carrying case (sold separately) may help prevent damage to your Nintendo 3DS™ system.Please carefully read this Operations Manual before setup or use of the Nintendo 3DS system. If, after reading all of the instructions, you still have questions, please visit our customer service area at support.nintendo.com or call 1-800-255-3700.A NOTE ABOUT COMPATIBILITY: The Nintendo 3DS system is only compatible with Nintendo 3DS, Nintendo DSi, and Nintendo DS software. Nintendo 3DS Game Cards are only compatible with the Nintendo 3DS system. Some accessories may not be compatible with the Nintendo 3DS system.Your system includes:Product recycling information:visit recycle.nintendo.comTrademarks are property of their respective owners. Nintendo 3DS is a trademark of Nintendo. © 2011 NintendoHere is a look at a few of the exciting features of the Nintendo 3DS system!3D ScreenCan display 3D images (see page 22).Circle PadAllows precise 360˚ control for software that includes this feature (see page 13).HOME ButtonAllows you to access the HOME Menu (see page 13).Touch ScreenA touch-sensitive display screen controlled by the stylus (see page 15).3D Depth SliderAdjust the depth of 3D images (see page 23).
©1998-2011 Nintendo2 3Experience 3D images without the need for special eyewear (page 22). The Nintendo 3DS system includes this built-in software:Take 3D photos with the outer cameras (page 42).Play Nintendo 3DS, Nintendo DS, and Nintendo DSi software (page 31).Nintendo 3DS Game Cards Nintendo DS & Nintendo DSi Game CardsTake 3D photos with the built-in cameras and software.Listen to music or record sounds.Create Mii™ characters as alter egos for you and your family and friends.Play augmented-reality games using the AR Cards included with your system and the Nintendo 3DS Camera application.Play a shooting game where your face and your friends’ faces become game characters.Check your play times for software you are using or see the amount of steps you have walked while carrying your Nintendo 3DS with you.Download various software titles to play on your Nintendo 3DS system.NOTE: To use this feature, you must connect to the Internet and perform a system update. See page 63 for more information on setting up a wireless broadband Internet connection. See page 80 for more information on how to do a system update.Outer camerasOnly specially designed Nintendo 3DS software titles that support 3D image display will appear in 3D. Nintendo DS and Nintendo DSi software do not support 3D display.Nintendo eShop
Free software3D photos Notications System updatesOther informationThe Wireless LED lights up when wireless communication is turned on.The Wireless LED illuminates when wireless communication is activated.A message will appear on your notication list (see page 40 for more information on the Notica-tions application and receiving messges).4 5SpotPass™ StreetPass™The SpotPass feature allows the Nintendo 3DS system to automatically communicate with a nearby wireless LAN access point, enabling it to connect to the Internet and transmit a variety of data. The system can also do this while playing a game or in Sleep Mode (power is on, but the system is closed).To connect to a wireless LAN access point, you will need to congure the Internet settings for your Nintendo 3DS system (see page 63).•  Within the service area of a Nintendo Zone or other wireless services, you can connect to the Internet without congur-ing your Internet settings.•  System updates may unlock the ability to receive more types of data via SpotPass, depending on the game you are playing. It is recommended that you perform system updates to keep your Nintendo 3DS system current with the latest features (see page 80).•  If you turn wireless communication o with the wireless switch, the system will not be able to use the communication features.Keeping your system charged.Your system includes a charging cradle to make charging easy. When not in use, you can put the Nintendo 3DS system in Sleep Mode and keep it in the charging cradle, so it stays fully charged and can still communicate using the SpotPass feature.See page 21 for more information on battery endurance.The StreetPass feature allows the Nintendo 3DS system to automatically search for and communi-cate with other Nintendo 3DS systems and to exchange information with them as you walk by.If you are playing a game, or if the system is in Sleep Mode (turned on but closed) and you pass someone who has enabled StreetPass for the same software, you will exchange data with them. (If you don’t want to allow data exchange, you can disable wireless communication.)If StreetPass is successful...StreetPass settings for Nintendo 3DS software are saved on the system.  The data you transmit with StreetPass varies depending on the software using this feature. Each software program has its own StreetPass settings.•  Up to 12 Nintendo 3DS software titles can use StreetPass simultaneously.•  With Nintendo DS and Nintendo DSi software, you must start the software rst, and then put it in tag mode (the name for this mode may vary depending on the game you are playing).•  If you turn the power o or disable wireless communication, the system cannot communicate.•  StreetPass does not work if you are connected to the Internet, or are using local communication, depending on the software you are using (see page 26).
6 7Basic Operations  12Nintendo 3DS Components  12Using the Touch Screen and Stylus  15Using the stylus  15Calibrating the Touch Screen  15Charging the Battery Pack  16Battery charging procedure using the charging cradle  17Power On/O and Basic Conguration  18Sleep Mode and turning your system o  18Conguring System Settings for the rst time  18Using the keyboard  20Power LED status  21Battery endurance  21Viewing and Adjusting the 3D Image  22To view the best-quality 3D images  22Adjusting the depth of the 3D images  23Using SD Memory Cards  24Using Software  25HOME Menu  25Steps and Play Coins  25Scrolling, changing the display, and moving icons  26Communication modes  26Software icons  27Starting a software application  28Activity Log  58Daily Records  58Software Library  59Download Play  60Nintendo eShop  61Downloadable software  61System Conguration 62System Settings  62Internet Settings  63Internet connection requirements  64Congure your Internet settings  65Setup using Search for Access Point  66Setup using Wi-Fi Protected Setup (WPS)  68Setup using AOSS™  69Changing, deleting, or testing Internet settings  70Setup using Manual Setup  71Nintendo DS Connections  72Other Information  73If an Error Code is displayed during setup  73Parental Controls  74Limiting the use of content or features  74Conguring Parental Controls  75Suspending, changing, or removing restrictions 76If you forget your PIN or secret question answer 77Data Management  78Managing Nintendo 3DS or Nintendo DSiWare software data  78StreetPass Management  79Reset Blocked-User Settings  79Suspending or exiting software  28Instruction manuals for software applications 29Screen brightness and power-saving mode 29Taking photos with the Nintendo 3DS camera 30Using Game Cards  31Using Downloaded Software  33About SD Card capacity  34Copying les  34Game Notes  35Friend List  36Registering friends  37Editing your friend card / Viewing friend cards  38Friend list settings  39Notications 40To receive notications  40To view notications  41Nintendo 3DS Camera  42Nintendo 3DS Camera functions  42Taking photos  43Change camera mode  45Viewing photos  46Nintendo 3DS Sound  47Recording and playing with sounds  48Playing music from an SD Card  49Mii Maker  50Create a Mii  50Main menu  52Editing or erasing a Mii  53AR Games  54AR Cards  54Playing AR Card games  55Face Raiders  56Playing Face Raiders  57Other Settings  80Prole 81Date & Time  82Touch Screen  823D Screen Check  83Sound 83Mic Test  83Outer Cameras  84Circle Pad  86System Transfer  86Language 87System Update  87Format System Memory  88Consumer Information 89Video and Computer Game Software Rating Information  89Replacing the Battery Pack  90Troubleshooting 92Warranty and Service Information 99Nintendo 3DS System Privacy Policy  100Nintendo 3DS Code of Conduct  104Regulations for Equipment Use in U.S.A. and Canada  105Specications 106Legal Notices  108Table of ContentsHealth and Safety Information and Usage Guidelines  8Health and Safety Information  8Usage Guidelines  10
8Health and Safety Information9Health and Safety InformationWARNINGWARNING - SEIZURESWARNING - 3D FEATURE ONLY FOR CHILDREN 7 AND OVERWARNING - REPETITIVE MOTION INJURIESWARNING - EYESTRAIN AND MOTION SICKNESSWARNING - BATTERY LEAKAGEWARNING - RADIO FREQUENCY INTERFERENCECAUTIONImportant Safety Information – Read the following warnings before setup or use of the Nintendo 3DS system. If this product will be used by young children, this manual should be read and explained to them by an adult. Failing to do so may cause injury. Please carefully review the instruction booklet for the game you are playing for additional health and safety information.Throughout this manual, you will see this symbol   followed by WARNING or CAUTION, or you may see the term IMPORTANT. These terms have dierent levels of meaning as outlined below. Please read and understand these terms and the information that appears after them before using your Nintendo 3DS system:Warns you about incorrect use of the Nintendo 3DS system that could result in serious personal injury.Cautions you about incorrect use of the Nintendo 3DS system that could result in personal injury or damage to the Nintendo 3DS system, components, games, or accessories.Informs you about incorrect use of the Nintendo 3DS system that could result in damage to the Nintendo 3DS system, components, games, or accessories.IMPORTANT:•  Some people (about 1 in 4000) may have seizures or blackouts triggered by light ashes or patterns, and this may occur while they are watching TV or playing video games, even if they have never had a seizure before.•  Anyone who has had a seizure, loss of awareness, or other symptom linked to an epileptic condition should consult a doctor before playing a video game.•  Parents should watch their children play video games. Stop playing and consult a doctor if you or your child has any of the following symptoms:  Convulsions  Eye or muscle twitching  Loss of awareness  Altered vision  Involuntary movements  DisorientationTo reduce the likelihood of a seizure when playing video games:1.  Sit or stand as far from the screen as possible.2.  Play video games on the smallest available television screen.3.  Do not play if you are tired or need sleep.4.  Play in a well-lit room.5.  Take a 10 to 15 minute break every hour.Viewing of 3D images by children 6 and under may cause vision damage. Use the Parental Control feature to restrict the display of 3D images for children 6 and under. See the Parental Controls section in this manual for more information.Health and Safety Information The Nintendo 3DS system contains a rechargeable lithium ion battery pack. Leakage of ingredients contained within the battery pack, or the combustion products of the ingredients, can cause personal injury as well as damage to your Nintendo 3DS system. If battery leakage occurs, avoid contact with skin. If contact occurs, immediately wash thoroughly with soap and water. If liquid leaking from a battery pack comes into contact with your eyes, immediately ush thoroughly with water and see a doctor.To avoid battery leakage:•  Do not expose battery to excessive physical shock, vibration, or liquids.•  Do not disassemble, attempt to repair, or deform the battery.•  Do not dispose of battery pack in a re.•  Do not touch the terminals of the battery or cause a short between the terminals with a metal object.•  Do not peel or damage the battery label.The Nintendo 3DS system can emit radio waves that can aect the operation of nearby electronics, including cardiac pacemakers.•  Do not operate the Nintendo 3DS system within 9 inches of a pacemaker while using the wireless feature.•  If you have a pacemaker or other implanted medical device, do not use the wireless feature of the Nintendo 3DS system without rst consulting your doctor or the manufacturer of your medical device.•  Observe and follow all regulations and rules regarding use of wireless devices in locations such as hospitals, airports, and on board aircraft. Operation in those locations may interfere with or cause malfunctions of equipment, with resulting injuries to persons or damage to property.IMPORTANT: The Nintendo 3DS system allows you to disable wireless communication. To turn o all wireless communication, push the wireless switch to turn the feature o. See page 12 for more information. Make sure the wireless LED is o.Playing video games can make your muscles, joints or skin hurt. Follow these instructions to avoid problems such as tendinitis, carpal tunnel syndrome or skin irritation: •  Avoid excessive play. Parents should monitor their children for appropriate play.•  Take a 10 to 15 minute break every hour, even if you don’t think you need it.•  When using the stylus, you do not need to grip it tightly or press it hard against the screen. Doing so may cause fatigue or discomfort.•  If your hands, wrists or arms become tired or sore while playing, or if you feel symptoms such as tingling, numbness, burning or stiness, stop and rest for several hours before playing again.•  If you continue to have any of the above symptoms or other discomfort during or after play, stop playing and see a doctor.Playing video games can result in eyestrain after a sustained period of time, and perhaps sooner if using the 3D feature. Playing video games can also result in motion sickness in some players. Follow these instructions to help avoid eyestrain, dizziness, or nausea: •  Avoid excessive play. It is recommended that parents monitor their children for appropriate play. •  Take a 10 to 15 minute break every hour, or every half hour when using the 3D feature, even if you don’t think you need it.Each person is dierent, so take more frequent and longer breaks if you feel discomfort.•  If your eyes become tired or sore while playing, or if you feel dizzy or nauseated, stop and rest for several hours beforeplaying again. •  If you continue to have any of the above symptoms, stop playing and see a doctor.NOTE: This product does not contain latex.This product complies with applicable laws barring the use of toxic materials such as lead, mercury, cadmium, hexavalent chromium, PBB, or PBDE in consumer products.Health and Safety Information and Usage Guidelines
10 11Usage GuidelinesUsage Guidelines  IMPORTANT BATTERY GUIDELINES1.  Do not remove the battery pack from the Nintendo 3DS system unless it needs to be replaced.2.  Do not use any battery other than the Nintendo 3DS rechargeable battery pack, Model No. CTR-003. A replacement battery may be ordered through Nintendo’s website at store.nintendo.com (USA/Canada only) or by calling Customer Service at 1-800-255-3700. See page 90 for more information on replacing the battery.3.  When recharging the battery, use ONLY the included AC adapter, Model No. WAP-002(USA).4.  When disposing of the battery, follow appropriate local guidelines and regulations. For information on battery disposal contact your local solid waste authority. See page 90 for more information on recycling the battery.5.  If liquid comes into contact with the battery, do not reuse it. Call Nintendo Customer Service at 1-800-255-3700 for further instructions on battery replacement and possible service for your Nintendo 3DS system.  IMPORTANT STYLUS AND SCREEN GUIDELINES1.  Use the stylus ONLY on the Touch Screen (lower screen).2.  Use only enough pressure to operate the game. Excessive pressure may damage the Touch Screen.3.  Do not use the stylus if it is broken.4.  Use only a Nintendo licensed stylus on the Touch Screen.5.  Retract and replace the stylus in the stylus holder when not in use.6.  If you use a screen protector on your Nintendo 3DS system, use only a Nintendo licensed screen protector.  CLEANING THE TOUCH SCREEN AND 3D SCREENIMPORTANT: If the Touch Screen becomes dirty or contaminated with foreign material, do not continue to use your Nintendo 3DS system. It may not work properly and can become more damaged. Follow the cleaning procedures below. If it still does not work after cleaning, visit support.nintendo.com for information on repair services.If the screens on your Nintendo 3DS system have visible smudges, ngerprints, or other foreign material on them, you can clean them by using a soft clean cloth, such as a lens or eyeglass cleaning cloth.1.  Slightly dampen the cloth with water ONLY and wipe o the screens to loosen any dirt or foreign material.2.  Using a dry cloth, wipe the screens to dry them and nish the cleaning process. If needed, repeat the process.  HARDWARE PRECAUTIONS AND MAINTENANCE1.  Do not disassemble or try to repair the Nintendo 3DS system, components, or accessories. Doing so voids your warranty.2.  Always turn the Nintendo 3DS power o before loading or removing a Game Card. Insert the Game Card completely until it clicks into place, without forcing either the Game Card or the Nintendo 3DS system. 3.  Do not store the Nintendo 3DS system in a humid place, on the oor, or in any location where it may contact moisture, dirt, dust, lint, or any other foreign material.4.  Do not drop, hit, or otherwise abuse the Nintendo 3DS system, components, or accessories. Doing so may damage the LCD screens or other precision components of the Nintendo 3DS system.5.  Make sure all connections to the Nintendo 3DS system are made carefully and inserted into the correct locations only. Hold plugs straight when inserting them into sockets.6.  When disconnecting any plugs from the Nintendo 3DS system or wall outlet, rst turn the Nintendo 3DS system o. Then carefully pull by the plug itself rather than by the cord. Do not step on, sharply pull, or bend any wires or cables.7.  Do not expose the Nintendo 3DS system, Game Cards or any of the Nintendo 3DS components or accessories to extreme heat or cold. The liquid crystal displays (LCD) may become slower or may not work when the temperature is low. The LCD will deteriorate at a high temperature. Take care not to expose the Nintendo 3DS system to direct sunlight for extended periods of time.8.  The LCD screens may be damaged by sharp objects or pressure. Take care to protect the displays from scratches or stains.9.  Connect ONLY accessories designed and licensed for use with the Nintendo 3DS system to any external connectors.10.  Do not spill liquids on the Nintendo 3DS system, Game Cards, or other components or accessories. If the Nintendo 3DS system comes into contact with liquids, wipe clean with a soft, slightly damp cloth (use water only). Remove the battery cover and battery. If liquid came into contact with the battery, do not reuse it. Call Nintendo Customer Service at 1-800-255-3700 for further instructions on battery replacement and possible service for your Nintendo 3DS system.11.  Do not rapidly turn the power switch ON and OFF, as this may shorten the life of the battery and cause Game Cards to lose your stored game information.12.  To avoid dirt or dust from getting into the Nintendo 3DS system, always leave a Game Card loaded (with the power o), when not in use.13.  When using an AC adapter, make sure you are using the correct model appropriate for your Nintendo 3DS system. Always unplug the AC adapter from the wall outlet when not in use.14.  Do not use the AC adapter if the cable or plug is damaged.15.  The AC adapter is intended to be correctly oriented in a vertical or oor mounted position.  GAME CARD PRECAUTIONS AND MAINTENANCE1.  Avoid touching the connectors with your ngers. Do not blow on them or allow them to get wet or dirty. Doing so may damage the Game Card and/or the Nintendo 3DS system.2.  The Game Card is a high-precision electronic device. Do not store it in places that are very hot or cold. Do not hit, drop, or otherwise abuse it. Do not attempt to take it apart.3.  Do not clean with benzene, paint thinner, alcohol or any other solvent.4.  Always check the Game Card edge connector for foreign material before inserting the Game Card into the Nintendo 3DS system.
Basic OperationsBasic Operations12Basic Operations13   Nintendo 3DS Components  Nintendo 3DS ComponentsNintendo 3DS ComponentsNotication LEDIndicates the status of the system. (blue) You have received a notication; blinks for about ve seconds  (see page 40). (green) You have received StreetPass data; blinks for about ve seconds  (see page 40). (orange) A friend has come online; blinks for about ve seconds (see page 36). (red) Battery power is low; blinks continuously when very low  (see page 16).MicrophoneUsed by games and applications that include microphone features. Wireless LED ( )Lights when wireless communica-tion is turned on, turns o when communication is turned o, and blinks while data is being sent or received.Wireless switch (WIRELESS)Push this switch to turn wireless communication on or o. NOTE: For Nintendo DS or Nintendo DSi software, you must enable wireless communication before starting the game. However, once enabled, you can turn communications o by pushing the wireless switch.Power LED ( )Lights when the power is turned on. See page 21.Power Button (POWER)See page 18.3D Depth SliderAdjusts the depth of the 3D image from zero to maximum. See page 22.3D LEDLights with a steady green light when the image on the upper screen (the 3D screen) can be displayed in 3D. See page 22.3D Screen (Upper screen)Capable of displaying 3D content for games that include this feature. See page 22.Touch Screen (Lower screen)Touch-sensitive screen. This screen should only be operated with a Nintendo licensed stylus. See page 15.  When opening the Nintendo 3DS system, keep your ngers away from the hinge to avoid pinching them.Control buttonsFor game-play control. See the instructions for the game you are play-ing for specic control information.Inner cameraUsed by games or other applications that include camera features. NOTE: Avoid getting the camera lens dirty. If it becomes dirty, wipe gently with a soft cloth, being careful not to damage the lens.Left speaker Right speakerSELECTSTARTCircle PadFor game-play control that supports this feature. See the instructions for the game you are playing for specic control information.Volume controlSlide to adjust the volume. NOTE: The camera shutter sound always plays at a xed volume and is not aected by the volume control.  HOMEDisplays the HOME Menu during a game.+ Control PadFor game-play control.Recharge LEDLights when the battery is being charged. See page 16.Audio jackFor connection of stereo headphones (sold separately). If headphones are connected, no sound will play through the speakers.   When using headphones, set the volume at a safe level. Setting the volume too high may harm your hearing or damage the headphones.
14Basic Operations15Basic Operations  Using the Touch Screen and StylusSD Memory Card slotFor inserting SD or SDHC memory cards. See page 24.Wrist strap attachmentFor attachment of a licensed wrist strap (sold separately).Infrared transceiverSends and receives information when using infrared communication.Stylus holderAlways replace the stylus into the stylus holder after use. See page 15. NOTE: To prevent damage to the Nintendo 3DS system, do not insert anything other than a Nin-tendo 3DS licensed stylus into the stylus holder.Game Card slotFor loading Nintendo 3DS Game Cards. Also compatible with Nintendo DS and Nintendo DSi Game Cards.Outer camerasUsed by games or other applica-tions that include camera features. Two cameras allow you to take 3D photographs. NOTE: Avoid getting the camera lenses dirty. If they become dirty, wipe gently with a soft cloth, being careful not to damage the lenses.R ButtonL ButtonBattery coverRemove cover to replace the battery. NOTE: Do not remove the cover unless you need to replace the battery or check battery installation.Cradle connectorsAllows connection to the Nintendo 3DS charging cradle (included). See page 16.AC adapter connectorAllows connection of the Nintendo 3DS AC adapter (included), for recharging the battery or operation using household current. See page 16.Camera LEDLights up when the outer cameras are in use.Using the Touch Screen and Stylus  Using the stylusAfter removing the stylus from the stylus holder, it can be adjusted to your desired length. Return it to the retracted length before replacing it in the stylus holder. The lower LCD screen, or Touch Screen, is touch-sensitive. For games that include this game control feature, operate the screen by using the included stylus. Lightly touch or slide the stylus across the Touch Screen as shown at right.  Calibrating the Touch ScreenIf the Touch Screen doesn’t seem to be responding properly...NOTE: If the Touch Screen is not responding properly, rst try removing any screen protectors (sold separately) that you may have added to your Nintendo 3DS system.Then you can try calibrating it from within System Settings, accessible from the HOME Menu (see page 80 for more information).If you are unable to operate the HOME Menu successfully, use the following procedure to switch directly to the Touch Screen calibration screens. First turn the power o.  Then hold down the L Button, R Button, and X Button and turn the system on as shown below.While holding, press  Nintendo 3DS Components
Basic Operations16Basic Operations17WARNING32121Logo faces upCharging cradleSwing prongs outRecharge LED will light up  Charging the Battery Pack  Charging the Battery Pack32Be sure to charge the battery pack before using it for the rst time or when it has not been used in the last six months. Do not use the Nintendo 3DS AC adapter or charging cradle during a lightning storm. There may be a risk of electric shock from lightning.IMPORTANT: The Nintendo 3DS AC adapter, Model No. WAP-002(USA), is for use only with the Nintendo 3DS, Nintendo DSi, and Nintendo DSi XL portable video game systems. It is not compatible with any other Nintendo system. Do not use the AC adapter with voltage transformers, dimmer switches, or any other equipment. It is only for use in a standard 120-volt AC wall outlet. Battery informationBattery recharge time is approximately 3 1/2 hoursIt takes about 3 1/2 hours to charge the battery pack with the power o, although this will vary depending on the remaining charge when you begin to recharge the battery. You can use the system while the battery is charging, but this will increase the recharging time.Optimal charging temperature is between 40º and 95º Fahrenheit (5-35º Celsius)Ambient temperature above or below these temperatures may permanently decrease the life of the battery pack and adversely aect the ability of the battery to charge.The battery pack can be recharged approximately 500 timesBattery life will decrease over time. After 500 recharges, battery life may be only 70% of the battery life when new.If usage time gets very short, replace the battery packBattery packs become worn with repeated charge/discharge cycles, and the amount of time they can be used when fully charged will decrease gradually over time. If you feel the usage time has dropped o noticeably, replace the battery (see page 90.)Charging the Battery Pack  Battery charging procedure using the charging cradleInsert the DC plug from the AC adapter into the AC adapter connector on the back of the Nintendo 3DS charging cradle. Be sure to insert it straight into the connector.IMPORTANT: Be sure the DC connector plug is facing in the correct direction before inserting into the connector to avoid damaging either the plug or connector.Place the Nintendo 3DS system on top of the charging cradle. It will click into place.Swing the prongs out of the AC adapter   and insert into a standard 120-volt AC wall outlet . The recharge LED will light, indicating the system is charging. When fully charged, the recharge LED will go out.IMPORTANT: The AC adapter should be correctly oriented in a vertical or oor-mounted position. The cord should always face downward.When charging is complete, remove the AC adapter from the wall outlet and fold the prongs back into the housing. Remove the Nintendo 3DS from the charging cradle, pulling the back edge out rst.IMPORTANT: When disconnecting any plugs from the Nintendo 3DS, charging cradle, or wall outlet, carefully pull by the plug itself rather than by the cord.Battery charging by connecting directly to the AC adapter...You can also charge the battery pack by plugging the AC adapter directly into the AC adapter connector on the back of the Nintendo 3DS system.NOTE: If you play a game while the system is recharging, the recharge LED may not always turn o once charging has completed.1
Basic Operations18Basic Operations19Power LED will light upPress the POWER Button  Power On/O and BasiC Ccnguration  Power On/O and BasiC CcngurationPower On/O and Basic CongurationPress the POWER Button to turn the system on. The Power LED lights up when the power is on.The rst time you turn the Nintendo 3DS on, you will need to select a language and then congure the System Settings.For more information on the Power LED and battery life, see page 21.  Sleep Mode and turning your system oPutting the system into Sleep ModeClosing the system while it is turned on will put the system into Sleep Mode.  Sleep Mode will reduce power consumption while still using features such as StreetPass and SpotPass (see page 4 and page 5 for more information on these features).Depending on the software you are using, closing the system may not place it  in Sleep Mode. (For example, when listening to music with Nintendo 3DS Sound.)Turning the system oTo turn the system o, either press the POWER button to display the Power menu and tap Power O, or press and hold the POWER button until the power LED turns o.  Conguring System Settings for the rst timeFirst select a language. Then you will need to congure the basic system settings. Using the stylus on the lower screen, follow the on-screen instructions. If a child will be using the Nintendo 3DS, an adult should assist with these settings.Conrm that you are holding the system in the best way to view 3D images by following the on-screen instructions. See page 22 for more information on viewing 3D images.Set the date and time. Tap the    arrows to adjust the settings, then tap OK to conrm and move to the next option.Use the keyboard to enter a nickname (or user name). You can enter up to 10 characters.Remember that other Nintendo 3DS users will see your nickname when interacting with them, so do not use your real name or otherwise share any personal information in your nickname.Set your birthday.Tap the     arrows to adjust the month and day, then tap OK to conrm and move to the next option.Set the country and state or province where you live.Read the Nintendo 3DS Service User Agreement, and after reading, tap I Accept.To continue without agreeing, tap Later. If you tap Later, you cannot connect to the Internet until you agree to the Nintendo 3DS Service User Agreement.Congure the Internet SettingsIf you connect to the Internet, you can use SpotPass, Nintendo Wi-Fi Connection, and other features to enjoy more ways of playing and interacting. See page 63 for more information on setting up an Internet connection. To congure these settings later, tap Wait Till Later.Congure the Parental ControlsParental Controls allow you to restrict the use or download of games and some features by children (such as 3D image display). See page 74 for more information.If you don’t need to congure these settings, tap Wait Till Later.You have now completed the basic system conguration. Press the   HOME Button to display the HOME Menu (see page 25) and explore the many features of the Nintendo 3DS.12345678
20Basic Operations21Basic OperationsThe Notication LED also blinks redFull chargeSteady blue lightBattery endurance timeAbout 3 hoursSteady red lightScreen brightnessAbout 5 hoursBlinking red lightBrightDimLow Very low  Using the keyboardA keyboard will display when you are required to enter characters. There are two types of keyboards: a standard alphanumeric keyboard and a ten-key keyboard.  Power LED statusThe power LED lights when the system is on. The color and status of the LED changes depending on the remaining battery charge.NOTE: If you run out of remaining battery life while playing a game, you must replay the game from your last saved location. If the power LED turns red, save your game and charge the system.If you put the system into Sleep Mode while the power LED is a steady blue light, the LED will slowly brighten and darken. Battery enduranceThe battery endurance times are estimates. They will vary depending on factors such as the software being played, the amount of data received by wireless communication, and the ambient temperature. Using the camera features may also reduce the battery endurance times shown below.The screen brightness setting aects the battery endurance time. The factory setting is 5 – for more information on adjusting screen bright-ness, see page 29.NOTE: Power-saving mode will increase the battery endurance by automatically adjusting the screen brightness and color based on what is being displayed at the time. For more information on power-saving mode, see page 29.•  If you put the system in Sleep Mode when not using it, you can reduce power consumption while still being able to send and receive information from StreetPass and SpotPass via the wireless communication features. If the system is fully charged and put into Sleep Mode, the system's battery endurance time in Sleep Mode is roughly 3 days.•  The power LED slowly brightens and darkens while the system is in Sleep Mode. NOTE: Depending on the software you are using, sometimes closing the system will not cause the system to enter Sleep Mode. In these cases the power LED will remain steadily lit. (For example, when listening to music with Nintendo 3DS Sound.)Delete last characterSwitch input methodAlphanumeric keyboardTen-key keyboard  Power On/O and BasiC Ccnguration  Power On/O and BasiC CcngurationDelete last characterReturnSwitch the last character between upper and lower case.Switch between upper and lower caseUppercase onlySwitch between upper and lower caseEach tap changes which character you would use from each keyMove to next characterEnglish Special characters or symbols Cell phone-style
Basic Operations22Basic Operations2310”–14”25cm–35cm3D depth adjustmentGreater depthLess depth  Viewing and Adjusting the 3D Image  Viewing and Adjusting the 3D ImageThe upper 3D screen allows you to view stereoscopic 3D images. You can adjust the apparent depth of these images with the 3D depth slider.The Nintendo 3DS system uses binocu-lar parallax (the fact that your left and right eyes are located a short distance apart, causing them to see dierent images) to produce 3D images with a feeling of depth.If you view the 3D screen from the correct distance, it displays an image for your left eye in such a way that only your left eye can see it, and an image for your right eye in such a way that only your right eye can see it. Binocular parallax then allows you to see 3D depth in the image.Viewing the 3D screen from a diagonal or tilted position, or viewing it with the system held vertically, will not produce a 3D eect. Viewing it this way could cause you to see double images overlapped or cause the screen to appear black.  To view the best-quality 3D imagesViewing and Adjusting the 3D Image  Adjusting the depth of the 3D imagesYou can use the 3D depth slider to adjust the apparent depth when viewing 3D images. If it is dicult to view the image with the 3D slider moved up to the maximum (with the depth set as deep as it will go), try moving the slider to the minimum and then increasing it in small steps until you nd a level where it is easy for you to view the 3D images. Once your eyes are accustomed to 3D images, you may be able to achieve the best-quality image by moving the 3D slider up.•  If the 3D LED is not lit, moving the 3D slider toward “3D”  will not produce a 3D image.•  Some software switches between 2D and 3D imagery. With this software, moving the 3D slider does not change the 3D eect.•  It may be dicult to see the 3D eect in locations with strong direct light, such as sunlight.A note about viewing 3D imagesIMPORTANT: The ability to view 3D images may vary from person to person, depending on physical condition, content of images, and the environment you are viewing them in. A small percentage of people may not be able to see 3D images at all. If you see double images or have diculty seeing the 3D eect, turn the 3D eect o with the 3D depth slider and refrain from using it. The 3D feature can also be turned o with Parental Controls in System Settings - see page 62 for more information.Be sure to read the Health and Safety information regarding 3D images at the beginning of this manual (see page 8).NOTE: You can use Parental Controls to restrict the display of 3D images (see page 74).Image for left eye Image for right eye3D image1  View the screen from directly in front 2  Hold the screen 10 to 14 inches  (25–35 centimeters) from your eyes  Adjust the distance for the easiest viewing of 3D images.3D LED Lights up when 3D images are supported by the software you are using.3D depth sliderMove the 3D depth slider down to its lowest position to switch to 2D (at) display.
Basic Operations24 25Using Software1 2Communication modeScreen brightness/ power-saving modeChanging the displaySoftware iconsIf there is new data or notication for any software application,  or   will be displayed next to the software icon. StreetPass icon (see next page) Reception signal-strength icon (see page 67) Reception signal-strength icon (see page 26) Game Notes (see page 35) Friend list (see page 36) Notications (see page 40) Internet browser NOTE: Your Nintendo 3DS system  may require a system update to   use this software (see page 80).Steps/Play CoinsDate / TimeBattery status icon High Low Almost out  (blinking) Charging (blinking) Charging completeLabel faces downOpen the SD Card slot cover and press on the end of the card until it clicks and partially ejects from the slot. Grasp the SD Card and remove from the card slot.Write-protection switch  Using SD Memory CardsThe Nintendo 3DS system comes with an SD Memory Card inserted into the SD Card slot. With SD Memory Cards (SD Cards), you will be able to save photos you have taken with the system or play music saved to the SD Card. (The data that can be saved to an SD Card varies depending on the software.) Software that you have downloaded is saved to the SD Card. NOTE: Downloaded software that has been saved on several cards cannot be re-saved onto a single card.Using miniSD Cards or microSD Cards (sold separately)These require an SD Card adapter (sold separately).IMPORTANT: Inserting or removing a miniSD Card or microSD Card while the card adapter is still inserted in the system could cause the system to be damaged or mal-function, or cause loss of data. Always insert and remove the entire card adapter.Removing an SD CardMake sure the power is o.IMPORTANT:  To prevent damage to the system or the SD Card, do not remove the SD card while the system is on, unless instructed to do so by the software you are using.  Doing so may destroy data.Inserting an SD Card1 Open the SD Card slot cover. IMPORTANT: Do not pull or twist the slot cover forcefully. Doing so could stretch  or deform it, which could prevent the cover from closing correctly. 2 Insert the SD Card. Insert the SD Card into the SD Card slot until it clicks into place, making sure the  label side faces down. Close the SD Card slot cover. SD Card write-protection switchIn the down position, the SD Card write-protection switch will prevent you from saving or erasing data on the card. In the up position, you can save and erase data on the card.Using SD Memory CardsThe Nintendo 3DS uses SD Memory Cards up to 2GB in size and SDHC Memory Cards of 4GB and larger.HOME MenuThe HOME Menu will display after you turn the system on. From here you can start Nintendo 3DS software applications.To start a software title, tap its icon on the HOME Menu. On the HOME Menu, you can see several important status indicators including the time, date, and current day’s step information. Also, if any of your software received new data via SpotPass, will be displayed next to the software icon.NOTE: If you press   or   when the HOME Menu is displayed, you can enter camera mode and take photos.Steps and Play CoinsEach time you take 100 steps with your Nintendo 3DS, you will earn one Play Coin. You can collect up to 10 Play Coins in one day, up to a maximum of 300 Play Coins. You can then use them in games that support Play Coins.•  Steps are counted when the system is on but closed.•  A maximum of seven days’ worth of steps and play-time data can be recorded while Nintendo DS or Nintendo DSi software titles are left running. Exit the software once during that time to save your steps. HOME Menu
26Using Software27Hold down... ...and slide.Connected to the Internet (see page 63).Searching for a StreetPass partner. If you congure StreetPass settings for the Nintendo 3DS or for software that supports this feature, the system can automatically search for other nearby Nintendo 3DS systems and communicate with them to exchange information (see page 40). A StreetPass icon (  ) is displayed when this mode is active.Communicating with other Nintendo 3DS systems. Registering nearby people as friends in the friend list (see page 36) and Download Play (see page 60) requires a local wireless connection for communication. During local wireless communication, the signal strength icon (   ) will be displayed. A stronger signal makes wireless communication easier.Use the wireless switch to enable wireless communication (see page 12). When wireless com-munication is enabled but the system is not communicating,   and   will be displayed. When wireless communication is disabled,   and   will be displayed.Nintendo 3DS Game Card Nintendo DS or Nintendo DSi Game CardHealth and Safety InformationReview important health and safety informa-tion concerning the use of the Nintendo 3DS system.Nintendo 3DS CameraTake 3D photos with the built-in cameras and software (see page 42).Nintendo 3DS SoundListen to music or record sounds (see page 47).Mii MakerCreate Mii characters as alter egos for you and your family and friends (see page 50).AR GamesPlay augmented-reality games using the AR Cards included with your system and the Nintendo 3DS Camera application (see page 54).Face Raiders Play a  game where your face and your friends’ faces become game characters (see page 56).Activity Log Check the play times of your software or the steps you have walked while carrying your Nintendo 3DS system with you (see page 58).Download Play With a single copy of Download Play-compatible software, you can play multiplayer games with other Nintendo 3DS system users (see page 60).System Settings Congure your system’s Internet settings, Paren-tal Controls, and other settings (see page 62).Using Software HOME Menu HOME MenuScrolling, changing the display, and moving icons ScrollingTap the Touch Screen and slide the stylus across it to scroll.You can also scroll by tapping  or .  Changing the displayTap   or   to decrease or increase the number of software icons displayed on the screen.  Moving software iconsTo move an icon, touch and hold it for a moment. Then you can slide it to a new location. Slide the icon to a new location on the HOME Menu and lift the stylus from the screen to place the icon.NOTE: If you move one icon over another icon, the icons will switch places when you lift the stylus from the screen.Communication modes Software iconsWhen free software is received via SpotPass, or when software is downloaded through Nintendo eShop, software icons are added to the HOME Menu. (Up to 300 software titles can be saved to an SD Card.) Shown below is a list of the software icons you may see on the HOME Menu.Game Card iconsWhen you insert a Game Card into the Game Card slot, an icon for the game title will be displayed.Built-in software icons (Tap the icon to start the software application.) Other iconsThese icons will display when you have new software added to the HOME Menu. Tap the icon to open it.NOTE: You may be using more than one communication mode at a time, but only one mode will be displayed on your system.
28 29Using SoftwareClose the manualDim BrightIncrease or decrease the text size  Instruction manuals for software applicationsFrom the HOME Menu, if you tap the icon for a software application that includes a built-in instruction manual, a button labeled Manual will be displayed at the bottom of the HOME Menu. Tap the button to view the instruction manual for the highlighted software.Viewing a manual 1 View the table of contents.Scroll through the table of contents by sliding the stylus up and down the Touch Screen. Tap the page you want to view.  2 View the manual pages.Scroll through page contents by sliding the stylus up and down the Touch Screen. Switch the page by sliding the stylus left or right across the screen.  Screen brightness and power-saving modeTap   on the HOME Menu to access the settings for screen brightness and the power-saving mode. Screen brightnessTap a number to select the screen brightness.NOTE: If you connect the Nintendo 3DS AC adapter, the screen will become brighter when set to level 4 or 5. Power-saving modeIf you tap power-saving mode ON, screen brightness and color gradation will be automatically adjusted to match the dis-played images, and battery consumption will be limited. If you tap power-saving mode OFF, battery life will be shortened and the screen will maintain the level of brightness that you set. (The default setting is o.)Using Software HOME Menu HOME Menu  Starting a software applicationTo start a software application, tap the icon on the HOME Menu, then tap Open.Suspending or exiting softwareIf you press the HOME Button while playing software, the software will be suspended and the HOME Menu will be displayed. If you tap Close when at the HOME Menu, you will exit the software.If you tap Resume when at the HOME Menu, you can resume play-ing the suspended software.  While software is suspended...While software is suspended, you can adjust the screen brightness and access your Game Notes ( ), Notications ( ), friend list ( ),Internet browser ( ), the camera mode, and instruction manuals.You can also start other software, but if you do, any suspended software will be closed.•  You cannot access the HOME Menu while playing over the Internet. Depending on what software is suspended and what state that software is in (for example whether it is using the cameras or wireless communication), it may not be possible to access the Game Notes, friend list, Notications, or Internet browser applications.•  You cannot access the HOME Menu while playing Nintendo DS or Nintendo DSi software.  Save your game before exiting the software.When you exit the software, any unsaved data will be lost. Remember to save your game before exiting the software.  While software is suspended, do not remove the software or turn the   system o.While software is suspended, do not remove the Game Card or SD Card or turn the system o. This could result in corrupted or lost data or other malfunctions.
30 31Using SoftwareHold down START and press the +Control Pad as described below. Press up:   Increase brightness one level.Press down:  Decrease brightness one level.Press left:  Turn power-saving mode o.Press right:  Turn power-saving mode on.Pictures remaining3D indicatorThis is displayed when the outer cameras are active.Save-location icon (System Memory) or    (SD Card)NOTE: You can change the save location under Settings in Nintendo 3DS Camera.Take photo:   ,  , or Switch between the inner and outer cameraYou can take 3D photos with the outer cameras.MergeMerges two faces from both the inner camera and outer cameras captured at the same time. (See the built-in instruction manual for Nintendo 3DS Camera.)Start the Nintendo 3DS Camera application (see page 42).Label faces towards the bottom of the system.  The eect of screen brightness on battery lifeKeeping screen brightness at high settings will reduce the duration of a single charge of the battery pack, while keeping brightness at lower settings can prolong battery life.IMPORTANT: Setting the screen brighter can greatly increase power consumption and may cause the power LED to change to red. If remaining battery power is already low, setting the screen brighter during game play may cause the system to turn o.  Setting screen brightness and the power-saving mode for Nintendo DS/Nintendo DSi software:When you play Nintendo DS or Nintendo DSi software, you cannot use the HOME Menu. However, you can press the HOME Button to suspend the software and congure screen brightness and the power-saving mode using the following controls.   Taking photos with the Nintendo 3DS CameraFrom the HOME Menu, you can press   or   to switch to camera mode and take photos.  Using Game CardsUsing Game CardsNintendo 3DS Game CardNintendo DS Game CardNintendo DSi Game Card•  Only Nintendo 3DS software that is designed to support the 3D feature can display images in 3D. Nintendo DS and Nintendo DSi software do not support 3D image display.•  You cannot access the HOME Menu while playing Nintendo DS/Nintendo DSi software. Likewise, you cannot use SpotPass or StreetPass features.  Starting a game1 Insert a Game Card into the Game Card slot.  If the card seems dicult to insert, remove   it and conrm that it is facing in the right   direction. The label should face towards the   bottom of the Nintendo 3DS.2 Turn the  power on and when the HOME Menu appears, tap the   icon for the Game Card you have inserted, then tap Open.NOTE: Nintendo DS/Nintendo DSi titles have a lower screen resolution than Nintendo 3DS software and are stretched to t the Nintendo 3DS screen. For these titles, hold down START or SELECT while tapping the menu icon to display the game at their original screen size ratio.For further instructions on how to operate the game, see the instruction booklet for the game you are playing.The Nintendo 3DS system can use Nintendo 3DS, Nintendo DSi™, and Nintendo DS™ Game Cards.Using Software HOME Menu
32 33Using Software12Using Software  Using Game Cards  Exiting or pausing a gamePress HOME to display the HOME Menu. Save the game, then tap Close on the HOME Menu.• Tap Resume to resume your paused game.•  When you exit a Nintendo DS or DSi title, rst save your game, then press HOME and tap Go to HOME Menu.  Removing a Game CardOnly insert or remove Game Cards while the system is turned o or while the HOME Menu is displayed. (If software is suspended, exit it rst before removing the Game Card.)NOTE: For video and computer game software rating information, see page 89.  Using Downloaded SoftwareUsing Downloaded SoftwareNOTE: A system update may be required to use this feature. See System Update in System Settings on page 87 for more information.NOTE: Software downloaded from Nintendo eShop is licensed to you, not sold. For more information, see the Nintendo 3DS Service User Agreement by going to Other Information in System Settings (see page 73). Where can I nd downloadable software?•  You can download Nintendo 3DS software from Nintendo eShop. NOTE: Wireless broadband Internet access is required for online features.  See  page 63 for more information on setting up an Internet connection.•  Free software may be distributed via SpotPass.•  Downloadable demo software may be available from Nintendo Zone locations.  Downloading and saving software•  To download software, you must have an SD Card in the SD Card slot. IMPORTANT: Because software can also be distributed via SpotPass, it is recommended that you always have an SD Card in the SD Card slot.•  You can save up to 300 downloadable software titles on an SD Card. (This number will depend on the data size of the software title and the capacity of the SD Card you are using.)•  If you save downloadable software and its save data on multiple SD Cards, this data can’t later be combined onto one SD Card.•  Downloadable software can only be used on the system where it was downloaded and is not transferrable. You can-not use the software on another system by inserting the SD Card into another system.  Starting downloaded software 1 Tap the icon on the HOME Menu.NOTE: Nintendo DSiWare titles have a lower screen resolution than Nintendo 3DS software and are stretched to t the Nintendo 3DS screen. For these titles, hold down START or SELECT while tapping the menu icon to display the game at their original screen size ratio. 2 Operate the software as you normally would for Game Card software.•  For further instructions on how to operate the game, see the instruction manual for the game in question.•  To view a built-in manual, go to the HOME Menu and tap Manual.•  ESRB ratings information for the game is available from the built-in manual.•  Ending downloaded software works the same way as ending Game Card software.
34 35Using SoftwareHigh-capacity SD CardNintendo 3DS folderPCPen EraserYou can draw with three colors of pen or use the eraser.Using Software  Using Downloaded SoftwareAbout SD Card capacityIf you begin to run out of room on an SD Card, rst try deleting undesired photos, sound les, or software using the Data Management feature in System Settings (see page 78). If you still need more room, you can purchase a higher-capacity SD Card and move all of the les onto the new SD Card.Use a PC that has an SD Card slot or a commercially available SD Card reader/writer to transfer les.IMPORTANT: Downloadable software and its save data are saved in the Nintendo 3DS folder. (Photo data is not included.) Please do not alter, move, or erase les or change the names of the les in the Nintendo 3DS folder. Copying lesPlease make sure to copy each of the pertinent folders within the Nintendo 3DS folder.If you copy software to a new SD Card, play it, and save your progress, the same software on the old SD Card may become unusable. You cannot use multiple copies of the software.If you copy software to a new SD Card, use the new SD Card and do not use the original data. Precautions about copying lesYou cannot recombine downloadable software whose folders have been saved to multiple SD Cards. If you copy data to a new card and then overwrite that data by re-copying it, that data will become unusable.If you individually copy the les in the Nintendo 3DS folder, the Nintendo 3DS system will not recognize them. You must copy each folder in the Nintendo 3DS folder without altering the contents. Game NotesTap  in the top bar of the HOME Menu to display a list of your notes.•  You can save up to 16 notes on the system. You can also save the notes you've made as photo data and view them in Nintendo 3DS Camera software.•  Even while playing Nintendo 3DS software, you can pause the game and make a note. Press the HOME Button to display the HOME Menu, then tap the Game Notes icon to start the Game Notes software. 1 Tap a note on the Game Notes screen and type or draw. 2  When you are done with the note, tap    .The active note is saved and you will return to the Game Notes screen.Save the note to an SD Card Allows you to view it in the Nintendo 3DS Camera software.Delete an active noteSwitch the upper screenIf the game is paused, the display on the upper screen can be changed.Display both screensDisplay upper screenDisplay lower screenGame NotesThis software allows you to write and draw notes, even during a Nintendo 3DS software title. You can suspend a game and make a note while viewing the game screen.
36Using Software37Register friendsDisplay friend cards•  Edit your own friend card•  View friend cards of your friendsFriend list settings•  Friend notication settings•  Delete a friend card Friend ListFriend ListPlay and communicate with other people registered as your friends via the Internet, no matter how far away they are.Tap  in the top bar of the HOME Menu to open your friend list.The rst time you open the friend list, follow the on-screen instructions to create your own friend card.From the friend list, you can see if your registered friends are online (whether they are con-nected to the Internet). Even while playing Nintendo 3DS software, you can pause the game and view your friend list. Just press the HOME Button to display the HOME Menu and start the friend list.NOTE: The friend list feature is available only when using Nintendo 3DS software titles.What you will need to do to use the friend listCreate your Personal Mii™  To create your own friend card, you will need to create your Personal Mii in Mii   Maker. See page 50.Congure your Internet settings  To know when your friends are online, you must connect to the Internet.   See page 63.  The friend list screenEnter the name of the person you want to register. If you are not regis-tered as the other person's friend, the registration will be temporary. (When the temporary friend registers you as a friend, the registration becomes permanent and the other person's ocial name and Mii are displayed.)If you are registered as the other person’s friend, the other person’s data from the friend card will be received automatically, and they will be registered as a friend. Registering friendsTo register a friend locallyTap Local to connect directly to  another Nintendo 3DS user nearby and register each other as friends.NOTE: You can register a maximum of 100 friends in the friend list.From among the displayed friend cards, tap the card of a person you want to register as a friend.NOTE: If you both tap each others’ cards, you will begin exchanging your friend cards. When the exchange nishes, you are registered as friends.To register a friend over the InternetTap Internet to connect to another Nintendo 3DS user over the Internet and register each other as friends.NOTE: You can check your friend code by looking at your own friend card.Enter the friend code of the person you want to register.Using Software Friend List
38Using Software39Choose whether or not to show your online status and the software you are playing.Notication LED blinksDelete friend cards from the friend list.Friends are not notied if their friend cards are deleted.Using Software Friend List Friend List  Editing your friend card / Viewing friend cardsSelect your friend card from the friend list to edit your details or view friend cards belonging to other people. Your friend card will identied by a  icon.Editing your friend card Choose your friend card to edit your favorite software, message, or other information.Choose your favorite software from among the titles you have played.Enter a short greeting of up to 16 characters. This greeting will be visible to your friends.The title of the friend’s favorite software will be shown, or the title of the software they are currently playing.Viewing friend cards Choose the friend card you would like to view. Details will be displayed on the upper screen.Remember that other Nintendo 3DS users will see your greeting when interacting with them, so do not use your real name or otherwise share any personal information in your greeting.NOTE: If the Mii of one of your friends is replaced by a dierent Mii with the name “???”, the creator of your friend’s Mii might have been added to the blocked-user list.Display of your friends' online (Internet connection) statusWhen your friends go online (when they connect to the Internet), the appearance of their friend card changes. The software they are playing is also displayed.NOTE: For this to happen, they must adjust their settings to allow their online status to be visible.Notication LEDWhen an oine friend comes online, the notication LED on your Nintendo 3DS system blinks orange for ve seconds. Friend-list settingsCongure your friend notication settings or delete friend cards.Online Oine
40Using Software41Using Software Notications NoticationsTap  in the top bar of the HOME Menu to start Notications and display a list of your notications.Even when using Nintendo 3DS software, you can pause the game and view Notications. Press the HOME Button to display the HOME Menu and tap the Notications icon to start the Notications software.Types of noticationsSpotPass Notications  These contain data or information from Nintendo or from the software you are   using, and will vary depending on the game you are playing.  NOTE: The system cannot receive notications from Nintendo DS or  Nintendo DSi software.StreetPass Notications  These contain information received via the StreetPass feature.   To receive noticationsFollow these steps to allow your Nintendo 3DS system to receive notications:•  Turn the system on. (The system will also receive notications in Sleep Mode.)•  Turn wireless communication on by pushing the Wireless switch towards the top of the Nintendo 3DS. The Wireless LED will light.•  Congure the Internet connection settings. (Within a Nintendo Zone service area, the system can receive notications even without its Internet settings congured. Also, the system can receive StreetPass notications without connecting to the Internet.)NOTE: Notications sent to you by software may be sent directly without requiring an Internet connection.  When you receive a notication...When you receive a notication, the notication LED on your Nintendo 3DS system will blink for ve seconds. For StreetPass notications, it blinks green, and for SpotPass, it blinks blue.Additionally,   or  will be displayed on the Notications icon and any related software icons in the HOME Menu.NOTE: If a notication is received when the system is in Sleep Mode, the notication LED will blink for about ve seconds and then stay lit. It will turn o when you open the Nintendo 3DS system.Notication LED blinksNoticationsThis software allows you to receive notications from Nintendo, from StreetPass, and from other types of software.   To view notications  Tap the notication you want to view in your notication list.•  Unread notications will show  for StreetPass notications or  for SpotPass notications.•  Up to 12 StreetPass notications and up to 100 other notications can be saved on the system. If you receive more notications than that, or if the storage limit is exceeded (such as when there are many notications saved with image attachments), notications are deleted starting with the oldest notications rst. NOTE: Notications sent to you by software may be sent directly without requiring an Internet connection.  To stop notication deliveryTap Opt out of all notications for this software inside the message and follow the on-screen instructions.NOTE: Notications that do not require an Internet connection, such as those from software titles, cannot be stopped from the notication list. These are delivered during game play and can be stopped from within the software. The method for stopping these notications may vary depending on the software title.Stopping StreetPass noticationsTap Opt out of notications for this software and also deactivate StreetPass from StreetPass Management in the System Settings (see page 78). If you deactivate StreetPass, these notications will no longer reach you.To resume delivery of notications, adjust the software settings. For details, see the instruction booklet for the game you are playing.You cannot stop delivery of notications from Nintendo. (SpotPass notications from Nintendo may contain important consumer information.)Tap and slide the scroll bar up or down to view your notication list.
Nintendo 3DS Camera42Using Software43  Nintendo 3DS CameraImage for right eye Image for left eyeTake PhotosCamera ModeYou can choose dierent camera settings such as bright-light camera or night camera.TimerYou can use the timer or voice command to automati-cally take a photo.LevelerThe leveler can help you take photos level with the horizon. A red line will appear that you can use as a reference.View PhotosGratiYou can draw all kinds of designs on your photos.Slide ShowYou can automatically display photos in a sequence. Taking photosTap   or   on the lower screen to take a photo.  You can also press  ,   ,or   to take a photo. NOTE: If you press down on the +Control Pad, you can turn the leveler feature on and o.Remaining number of photos you can save3D indicator This icon will display if you are taking a photo with the outer cameras.Save locationIndicates the save location for your photos:  (System Memory) or   (SD Card)Tap to switch between the inner and outer cameras.NOTE: The inner camera takes only 2D photos.Tool leverUse the stylus to drag the lever handle to select the following functions: Change camera mode Adjust 3D focusBy default, the  camera’s 3D autofocus is on. You can turn it o and manually adjust the 3D focus if needed. TimerSettingsAdjust various settings such as information display and data managment.View photosTap the parakeet to get hints about using the camera. You can also review hints in the Settings for Nintendo 3DS Camera, under Usage Tips.Using Software  Nintendo 3DS CameraNintendo 3DS Camera can be started from the Nintendo 3DS HOME Menu. This software allows you to take and view 2D and 3D photos.For more detailed information, tap Manual on the HOME Menu.About 3D photosWhen taking 3D photos, both outer cameras will capture images–one for the left eye and one for the right eye. When the two images are combined and displayed on the 3D Screen, they appear as a 3D photo. See page 22 for more information about 3D images.  Nintendo 3DS Camera functions
44Using Software4512”(30cm)or more12”(30cm)or more39” (1m)39” (1m)Remaining number of photos you can save.Using Software  Nintendo 3DS Camera  Nintendo 3DS CameraHow many photos can you save?The remaining number of photos you can save is displayed on the upper screen. This is the approximate number of photos you can save in the current save location (System Memory or an SD Card), but it’s only an estimate.Data size can vary depending on the photo, so it’s possible that taking one photo may reduce the number of remaining photos by two or not reduce the number at all.NOTE: A maximum of 3,000 photos can be saved to an SD Card.About photo data•  When you take photos with the outer cameras, both 3D photo data (saved as MPO format), and left-eye photo data (saved as JPEG format) are created. When you take a photo with the inner camera, photo data is saved in JPEG format.•  Photo data is saved to the “DCIM” folder on the SD Card.How far away should your subject be?When taking photos, it’s best to be at least 12 inches away from your subject. If you take a photo of something too close, the photo may turn out blurry, similar to when you try to look at something too close to your face.Taking photos of objects less than 12” (30cm) away may result in blurry photos or double images.For best results, your subject should be more than 12” (30cm) away.The ideal range for your subject for the best 3D photos is about 39” (1m) away from the camera lens.Background objects in the distance can produce a better 3D eect.Change camera modeTap the tool lever icon (   ), and then tap the camera-mode icon (  ) to display the camera-mode selection screen. Then tap the camera mode you would like to use. SparkleBlow into the microphone to add a variety of visual eects. DreamTake photos that look as if they appeared from a dream. Low LightTake photos in a dark environment, such as at night. NormalReturn to Normal mode. MergeMerge two faces – one from the inner camera and one from the outer cameras – captured at the same time. PinholeTake a picture that looks like it was taken with a pinhole camera (darker edges and a lighter center). MysteryApply random lters and eects - you won’t know what you’ve got until you take the picture! Manual ControlsAdjust the picture settings manually.Camera-mode icon Camera modes
46 47Using SoftwareNintendo 3DS Sound Viewing photosTap View Photos to see the photos you’ve taken. A series of smaller thumbnail images will be displayed on the Touch Screen. The red outline in the thumbnail selection indicates which image is displayed on the 3D Screen.Tap a thumbnail image on the Touch Screen to display it on the 3D Screen.Begin slide show.Take Photos – see page 43.Slide the stylus on the Touch Screen to scroll through the thumbnail images.Tap   or   to change the number of images that are displayed on the Touch Screen.Access the Settings menu.3D indicator This icon will display if you are viewing a 3D photo.  Nintendo 3DS SoundThe Nintendo 3DS Sound application can be started from the Nintendo 3DS HOME Menu. This software allows you to play music and sounds saved on an SD Card or recorded with the microphone on the Nintendo 3DS system. You can also play with and alter your music or recorded sounds.For more detailed information, tap Manual on the HOME Menu.After starting Nintendo 3DS Sound, you can select from the options below.•  View the results of StreetPass encounters•  Turn StreetPass on/oYou can view the results of StreetPass, such as hit parade and compatibility analysis. To use StreetPass, rst register a song in your StreetPass favorites and then turn StreetPass on.If you speak to the parakeet, he may remember the sound when he speaks. He might even call out a few recorded sounds at his own discretion.Tap the parakeet on the Touch Screen to make him say a previously recorded sound.Record sounds or play with recorded sounds.Playing music Music les saved on the SD Card will be displayed.NOTE: Resume will be displayed if you previously stopped listening during playback. If you tap Resume, the music will begin playing from the point at which it stopped.Nintendo 3DS Sound settings and formatting dataUsing Software  Nintendo 3DS CameraAbout the photo catalogPhotos are arranged by capture date, with older photos to the left.If the photo is a le type that cannot be displayed by the system,  will be displayed.If there are many photos in the catalog, it can take some time before all photos are displayed.More about photo dataPhotos taken with a digital camera or mobile phone may not display. A photo taken with the Nintendo 3DS system may not display if it has been edited or processed on a PC, moved or deleted on an SD Card, or if the le name has been changed.Thumbnail images are attached to photos taken with the Nintendo 3DS. If you use a PC or other device to edit photos, in some cases the thumbnails will not reect these changes. Be aware that if you upload an edited photo to the Internet or pass it on to a third party, it may be possible to view the unedited thumbnail of the image. When you use the Nintendo 3DS Camera application to edit a photo taken with the Nintendo 3DS, the thumbnail image will also be edited.
48Using Software49Switch between moving and copying.Slide to scroll through music les or folders.2 Transfer the songs to an SD Card using the SD Card slot in your PC or a commercially available SD Card reader/writer.Using Software  Nintendo 3DS Sound  Nintendo 3DS Sound  Recording and playing with soundsYou can record a maximum of 10 seconds of sound in one sound le using the microphone. You can save up to 18 sound les in System Memory and up to 180 sound les on an SD Card.1 Tap   to select a le, then tap Record.2 Tap   to begin recording.•  Recording will begin automatically if the microphone detects a sound.• Tap  to end the recording.3 Tap a color for the le icon.The color you tap will become the color for the icon representing the recorded data.NOTE: To delete a sound le, select the le icon and tap Erase.Switching pagesTap   or   to switch between pages of sound les.Moving and copying sound dataTo move  or copy a sound data le, tap and hold the data and then slide it to a new location.•  If you slide the sound data le to  or   , the page will switch and you can move or copy the le to another page.•  You cannot copy audio data into a location where audio data already exists.Sound les (System Memory) Sound les (SD Card)  Playing music from an SD CardBegin by inserting an SD Card that contains music les that are compatible with the Nintendo 3DS. See the section below for information on compatible music formats.1 Select a folder and tap Open.2 Select a music le and tap Play to begin playback.  About compatible music lesThe following music formats can be played (copy-protected les cannot be played):AAC les with .m4a, .mp4, and .3gp extensions, or MP3 les with .mp3 extensionsBit rate of 16kbps - 320kbps and sampling frequency of 32kHz - 48kHz  Saving music to an SD Card1 Use a PC and appropriate software to transfer songs into your PC.  About folders and les on an SD Card•  Only folders with music les saved in them are displayed. The maximum number of folders displayed is 1,000.•  If there are two or more folders with the same name on an SD Card, the music les in those folders will be combined into one folder.•  The maximum number of music les displayed is 3,000.•  A maximum of 100 music les per folder will be displayed.•  Folders and les with hierarchies deeper than eight levels will not be displayed.•  Folder names are unrelated to hierarchy depth. They are displayed in numeric and alphabetical order.
50Using Software51Mii MakerFavoritesWhen you make a Mii a Favorite,  will be displayed. Favorite Mii characters will have priority in games that support Mii characters.You can create up to 10 Mii characters. Your Personal Mii is indicated by  and cannot be removed from Favorites.Share your MiiSharing a Mii allows it to be sent wirelessly to other people’s Nintendo 3DS systems, where it may remain and appear later in other supported games they play. (The Mii creator's name and birth date are not shared.)Copy permission settingsIf you set this option to Don’t Allow, those who receive the selected Mii will not be able to copy or edit that Mii. Mii MakerMii Maker can be started from the Nintendo 3DS HOME Menu. This software allows you to build faces from various parts to create virtual alter egos for yourself, your family members, and your friends.For more detailed information, tap Manual on the HOME Menu.NOTE: You can also play as your Mii characters in games that support this feature.  Create a MiiStep 1: Create your own Personal Mii character. After you have created your Mii, you can view it in the Mii Maker main menu and create more Mii characters.1 Tap the creation method you would like to use.Select a gender and proceed to step 2.If you tap Create from Photo:You can use a photo of your face to create your Mii.Follow the on-screen instructions to select your Mii character’s gender, skin tone, eye color, hair color, and hairstyle, and then take the photo using the inner camera of the Nintendo 3DS.NOTE: If your face isn’t recognized, try re-taking the photo (see page 96 for more information on facial recognition).Select the face you like and then tap Next.2 Tap the face parts and body type to edit the Mii character.Next/previous pageCreate from photoTake a photo of your face and use the photo to create your Mii.Change colorSelect the part you want to change.Select the part you want to edit.When you are nished editing, tap Next.•  Change the Mii viewing angle with the   or   buttons or the Circle Pad.•  If you selected Create from Photo in step  1, the photo will be displayed next to the Mii on the upper screen.•  The types of adjustments you can make (color, number, etc.) will dier from part to part.3 Creating a prole•  When you have nished creating your prole, tap Save to register the Mii. When you have nished registering your Mii, you will be returned to the main menu.•  You cannot delete your Personal Mii, but you can edit it.NOTE: All Mii features and likenesses are the intellectual property of Nintendo and cannot be distributed freely or used for personal gain.Adjust parts: Move up/down Change spacing Change angle Expand/reduce Expand/reduce up/down Reset partsUsing Software Mii Maker
52 53Using SoftwareCreate a Mii.Using Software  Warning about Mii prolesIf you send a Mii character to another Nintendo 3DS system, the Mii character’s name and prole will be sent with it. Therefore, take care not to use oensive words or any personally identiable information in the nickname or prole of your Mii. Someone who receives your Mii can edit it or send it on to others, and you cannot remotely delete Mii characters sent to other people using your Nintendo 3DS system.If you use oensive words in the name or prole, it’s possible they will be displayed as “???” on another person’s Nintendo 3DS system. If this happens, please change the nickname or prole.  About blocking another userYou can set your system to block those who use oensive content in their Mii nickname, prole or appearance. If you choose to block a Mii whose creator has used an oensive content, all Mii characters from that person will be blocked and other Mii characters will be displayed instead. Some applications do not allow any content from an blocked player to be displayed. To access the blocked-user settings, from the Main menu press   and   while holding left on the +Control Pad. Follow the on-screen instructions to make your settings. Main menuWhen you start Mii Maker, the main menu appears. Tap an item to select it.NOTE: You can register a maximum of 100 Mii characters in Mii Maker.Select a Mii from the Mii list.Display the instructions for viewing Mii characters.•  Communicate with another Nintendo 3DS system and send or receive Mii characters.•  Receive Mii characters from the Mii Channel on the Wii console.NOTE: You cannot send Mii characters to the Mii Channel.Create a Mii QR Code and save the Mii image.(A QR Code is a two-dimensional code that can be read by scanners or devices that include cameras.)  Editing or erasing a MiiAfter selecting a Mii character from the Mii list, you can edit, erase, or adjust its Favorite settings.From the Mii list displayed on the Touch Screen, tap the Mii that you would like to edit or erase.NOTE: You can change a Mii character’s location in the Mii list by touching and sliding the Mii to a new location.Edit Selected Mii.Edit the Mii using the same tools you used when creating it.If you are working on a Mii that you received from another system and that Mii can be copied, you will be asked whether or not you want to copy it. If you make a copy of that Mii, you will be able to edit the copy as well as the original. Mii Maker Mii MakerMii slotsIn the Mii list, there are 10 rooms. Up to 10 Mii characters can be saved in each slot. To move a Mii to a dierent slot, touch and slide it on the Mii List. Favorites displayFavorite Mii characters will appear with a  icon. If you tap the icon, you can change the Mii character’s status as a Favorite.Share displayShared Mii charactersMii characters you can copyDisplay Mii characters that can be copied. Creator name displayIf the creator of a Mii character has been added to the Mii character’s prole, you can tap the Mii character's nickname    and the creator’s name will be displayed.Erase selected Mii.

Navigation menu