HON HAI PRECISION IND J27H02301 WLAN Module User Manual CTR ops eng 0718
HON HAI Precision Ind. Co., Ltd. WLAN Module CTR ops eng 0718
UserManual.wiki
>
HON HAI PRECISION IND
>
J27H02301 User Manual
>
manual
Contents
1.
User Manual
2.
manual
3.
User manual
manual
Navigation menu
Upload a User Manual
Namespaces
Wiki Guide
HTML
PDF
Info
Views
User Manual
Discussion / Help
Navigation


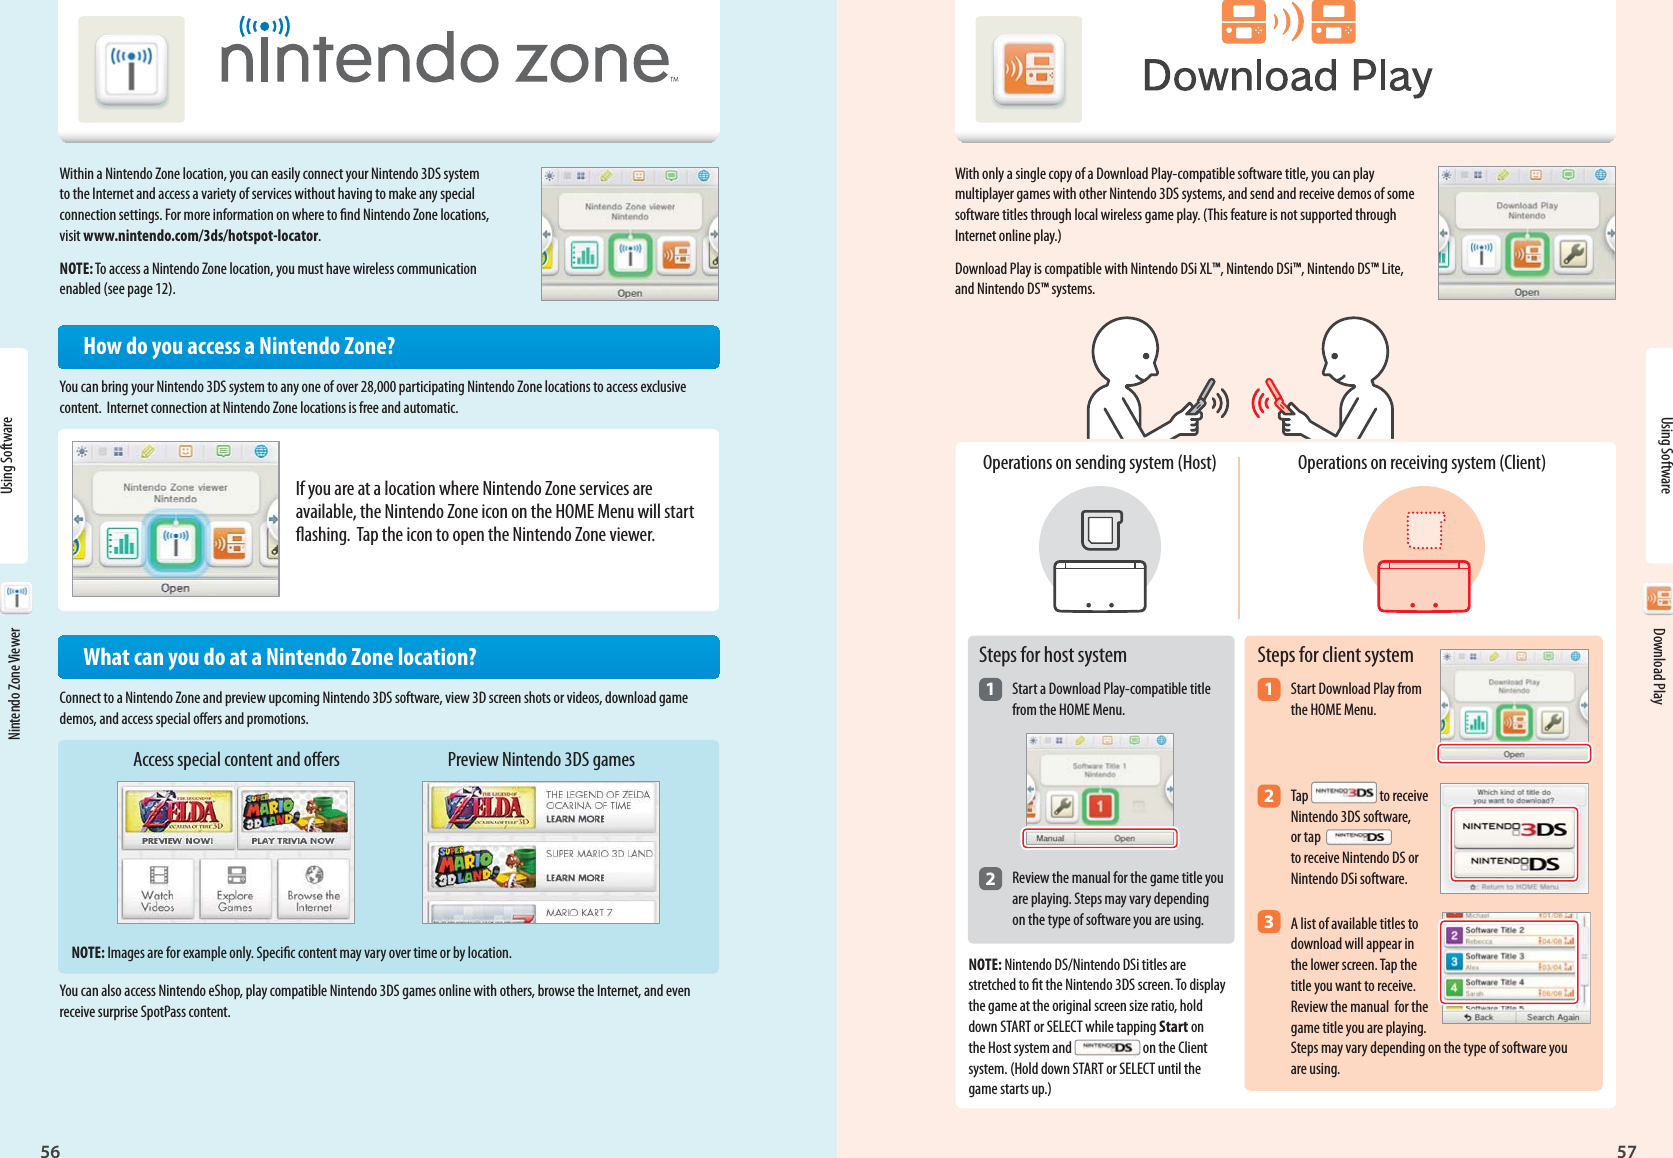
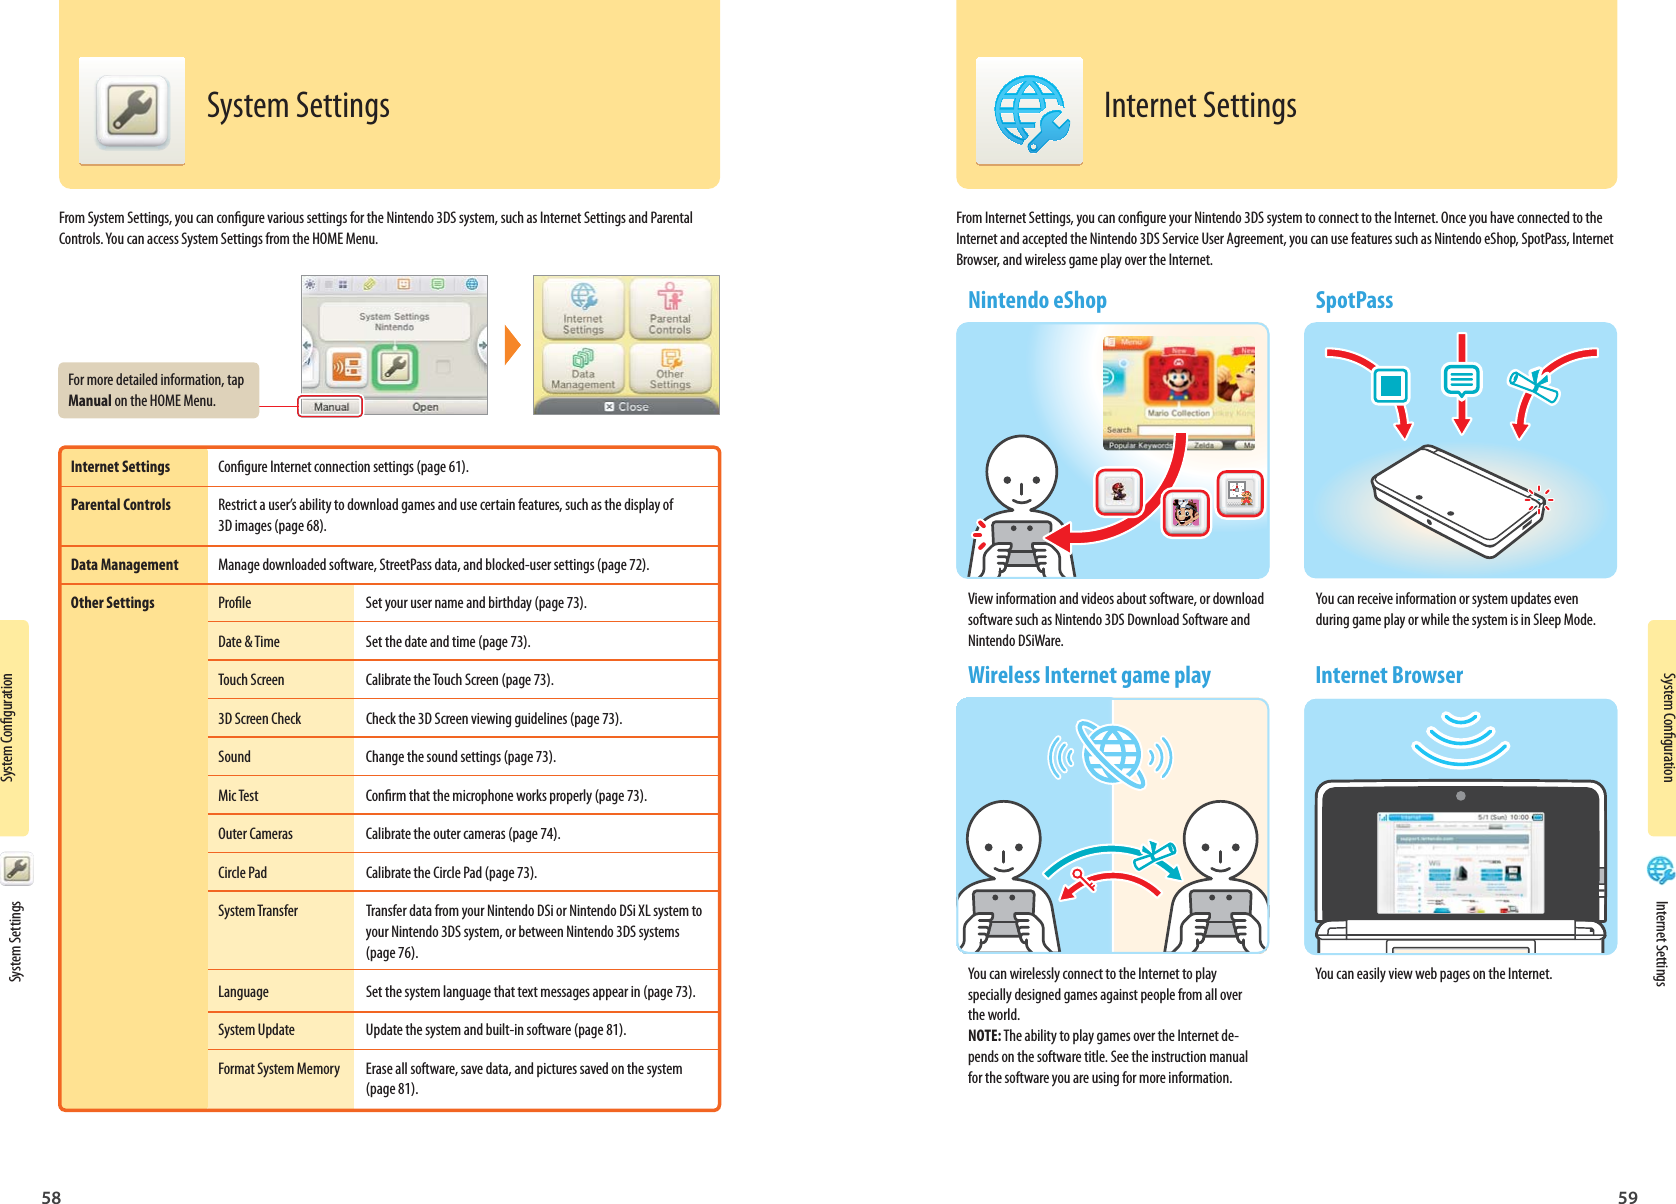
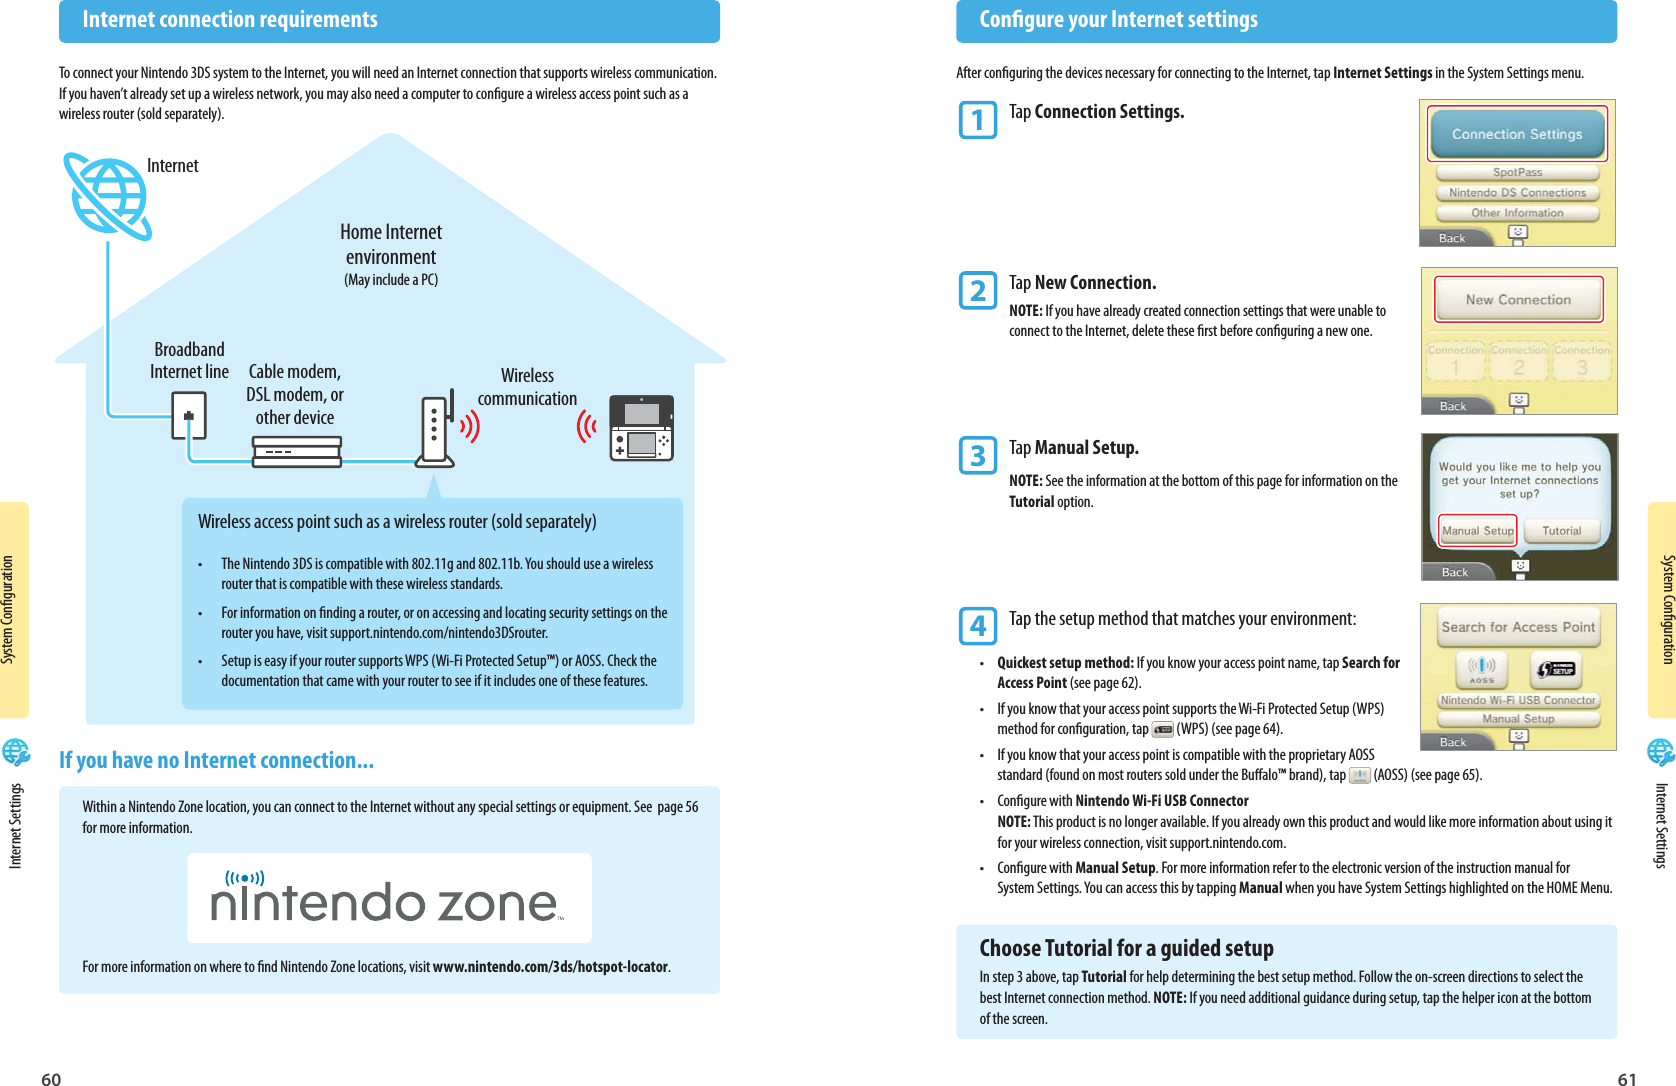
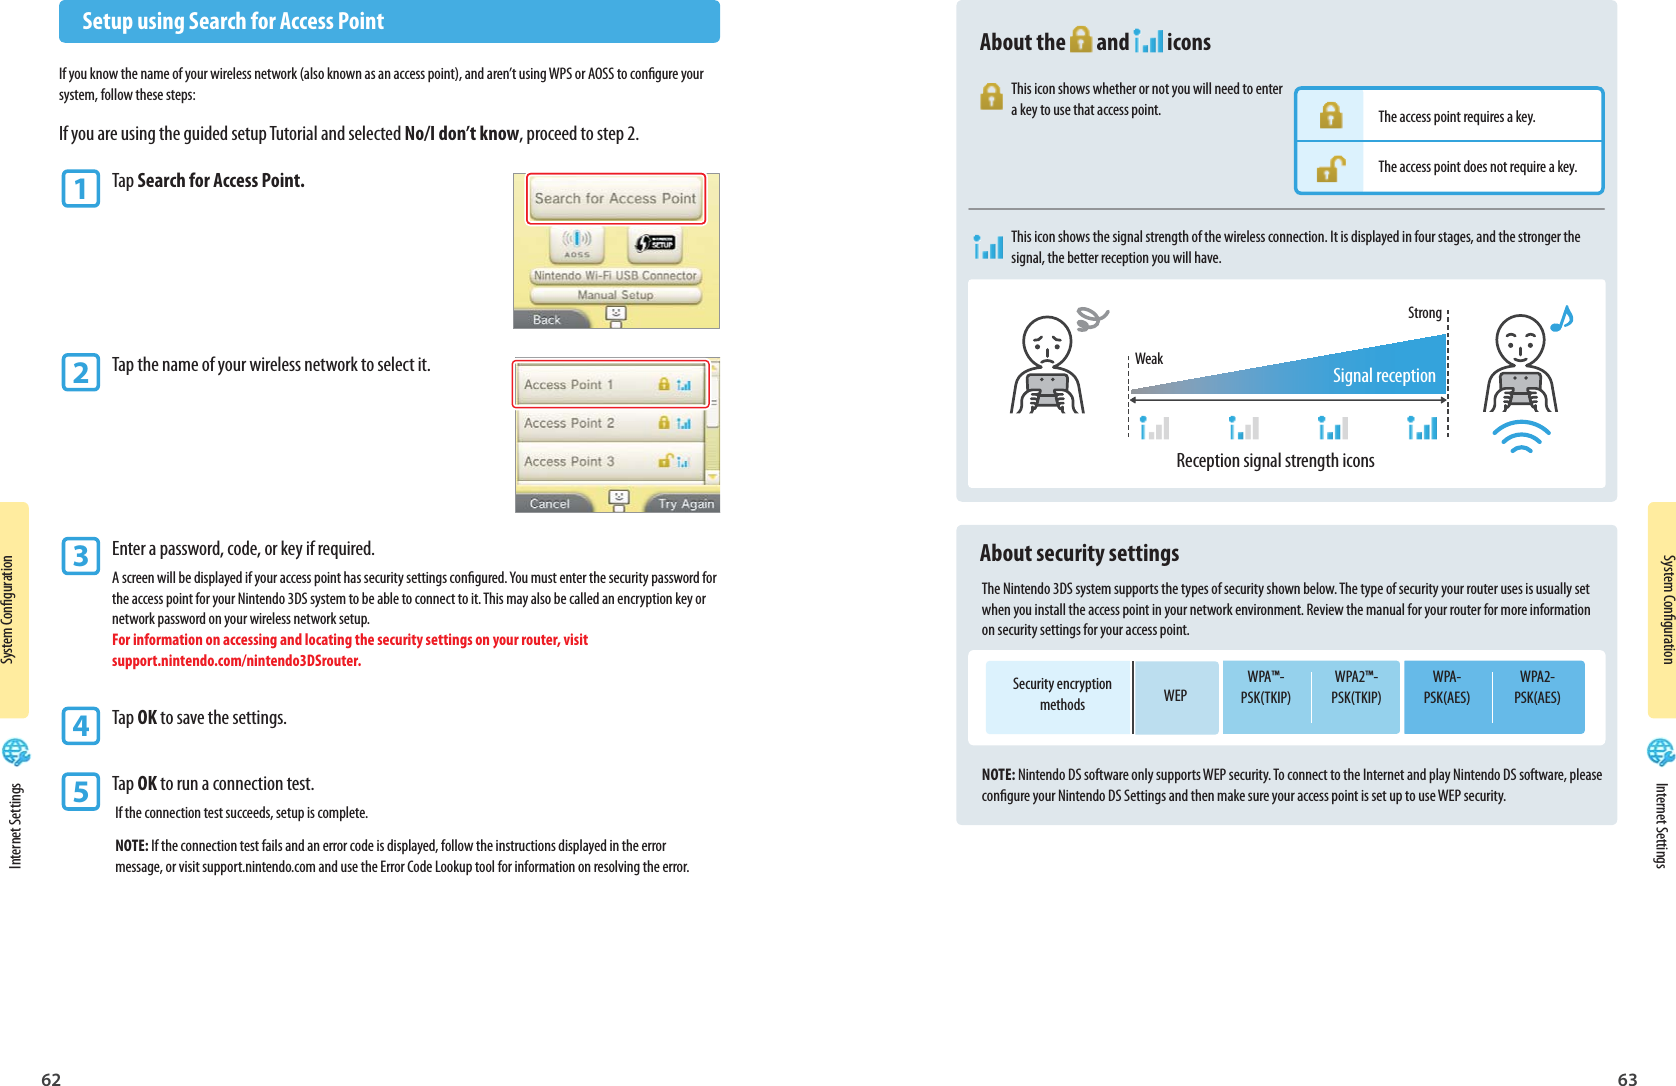

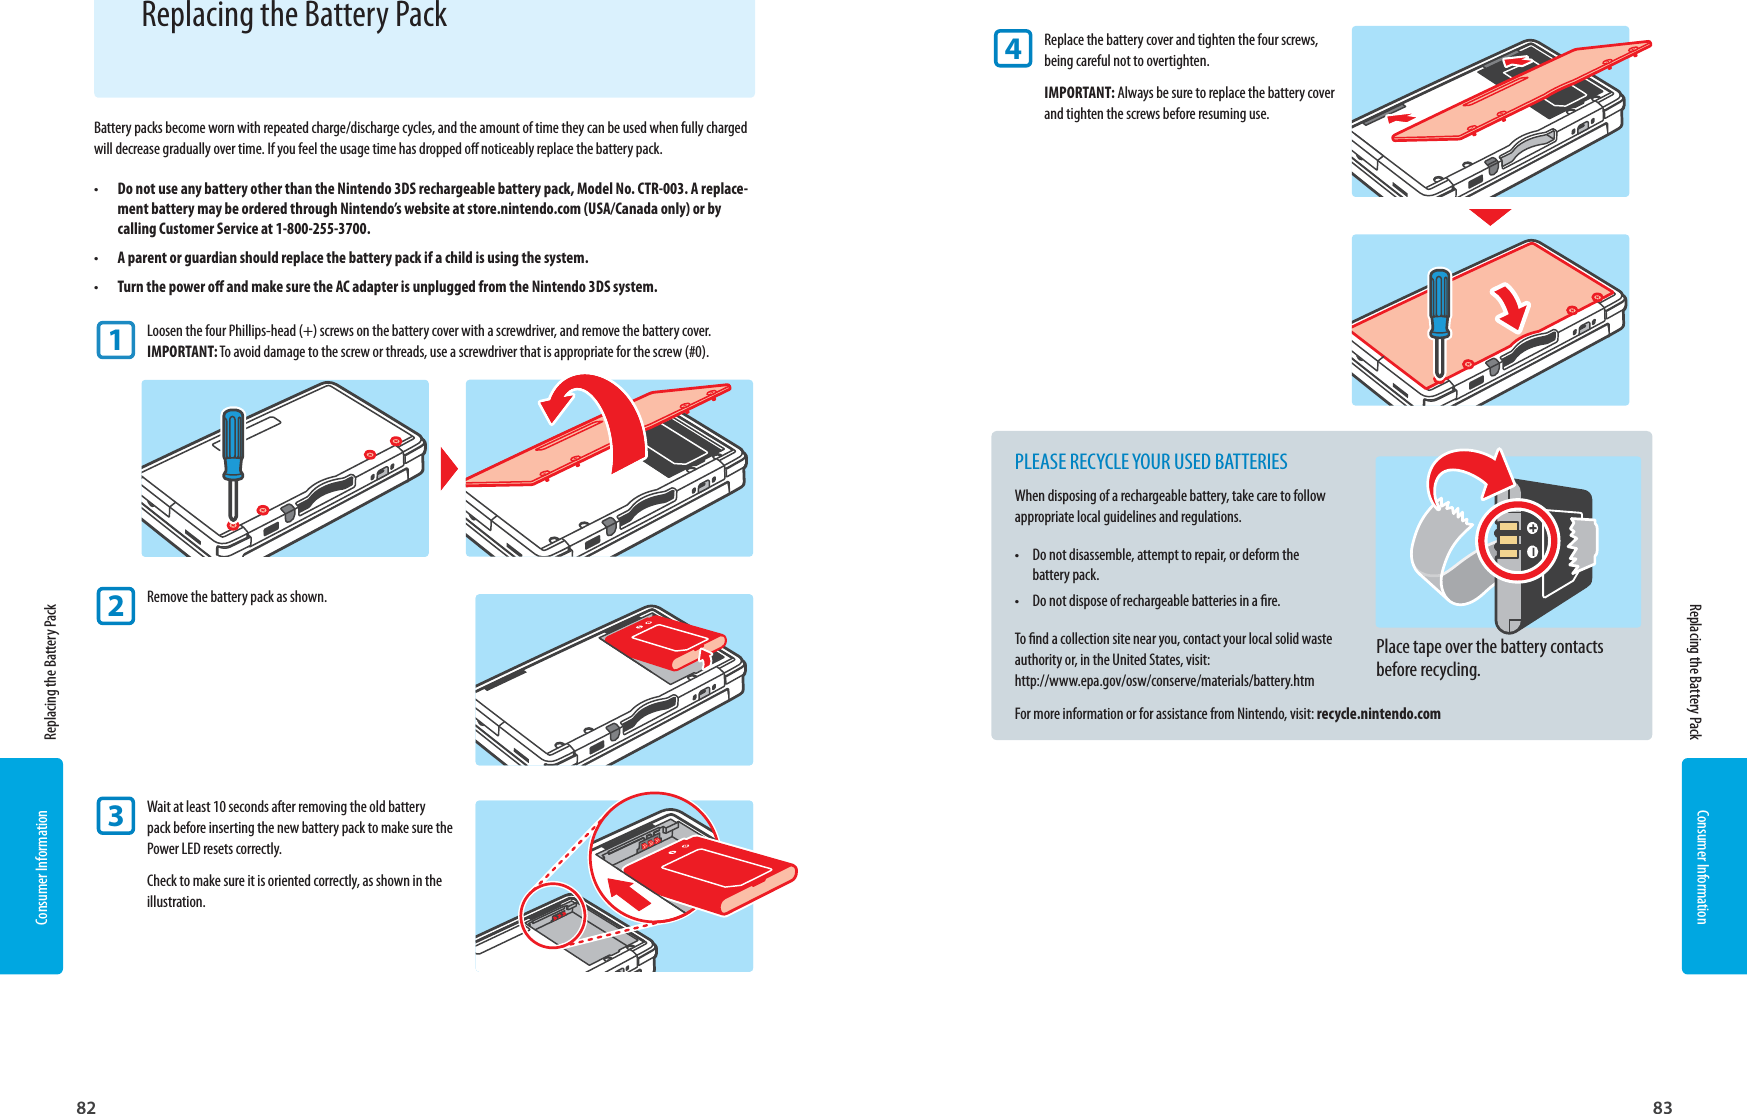
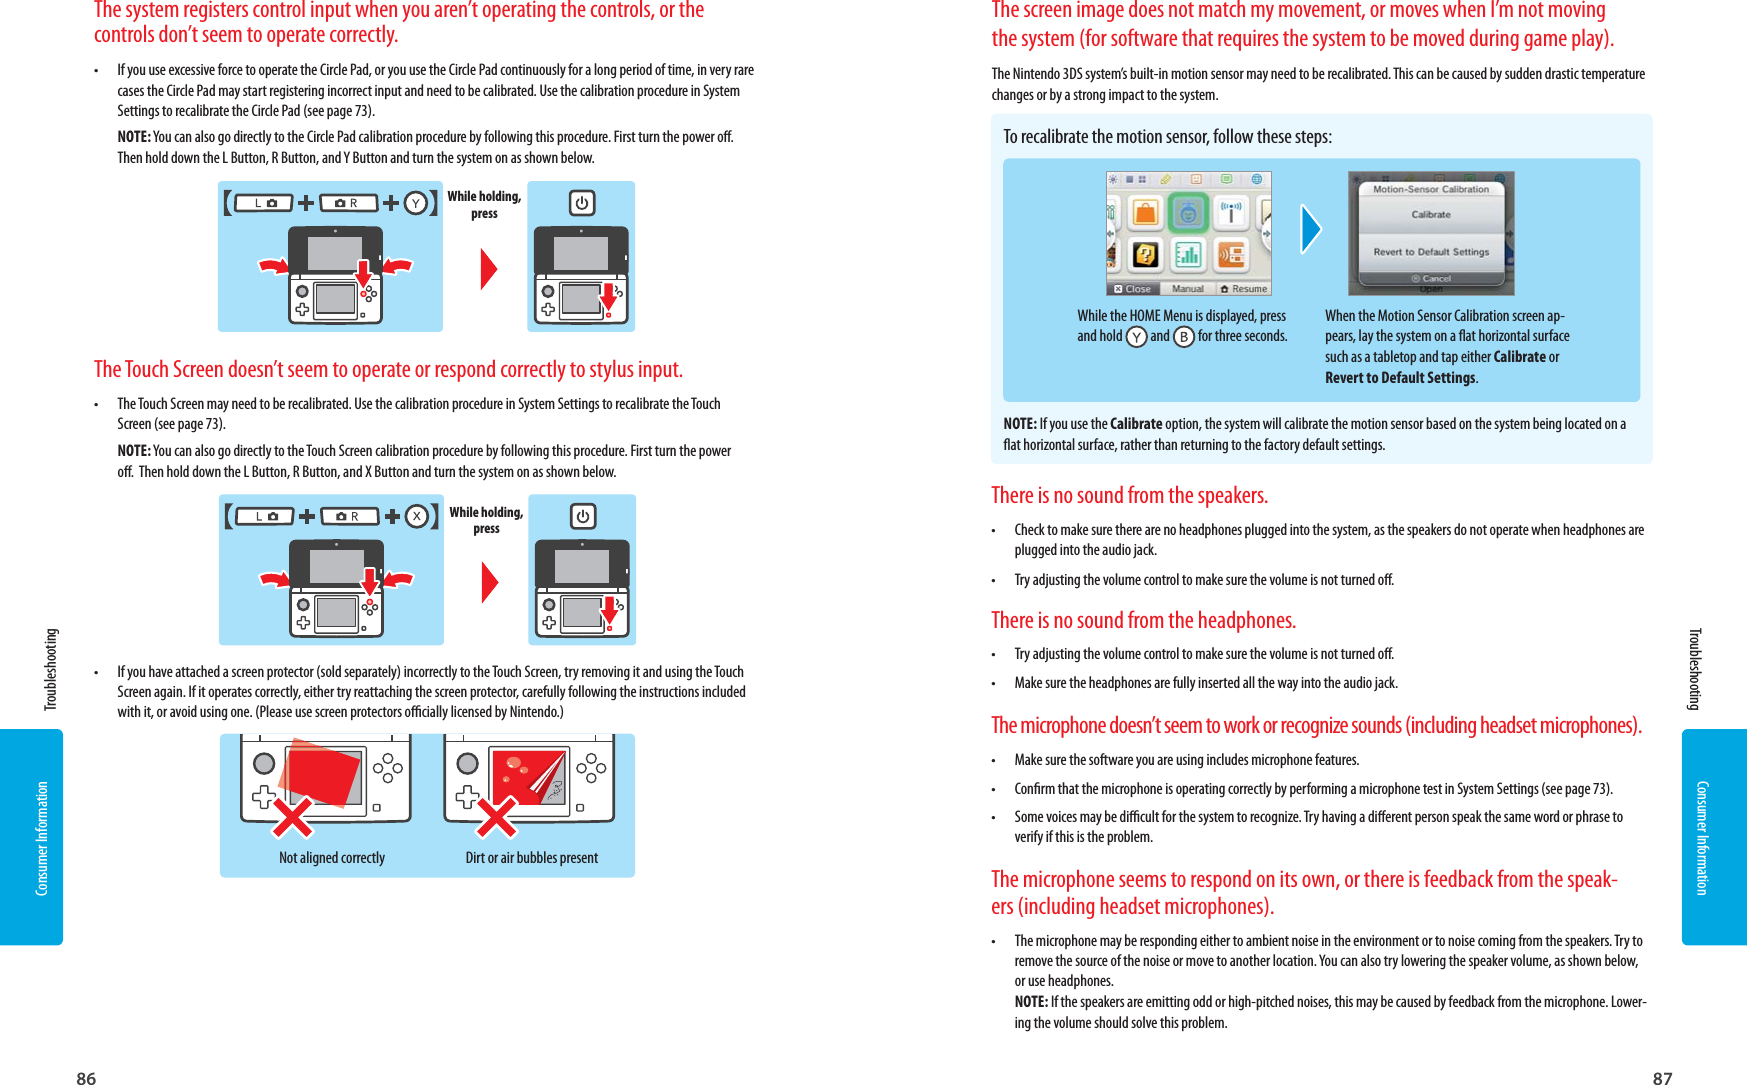
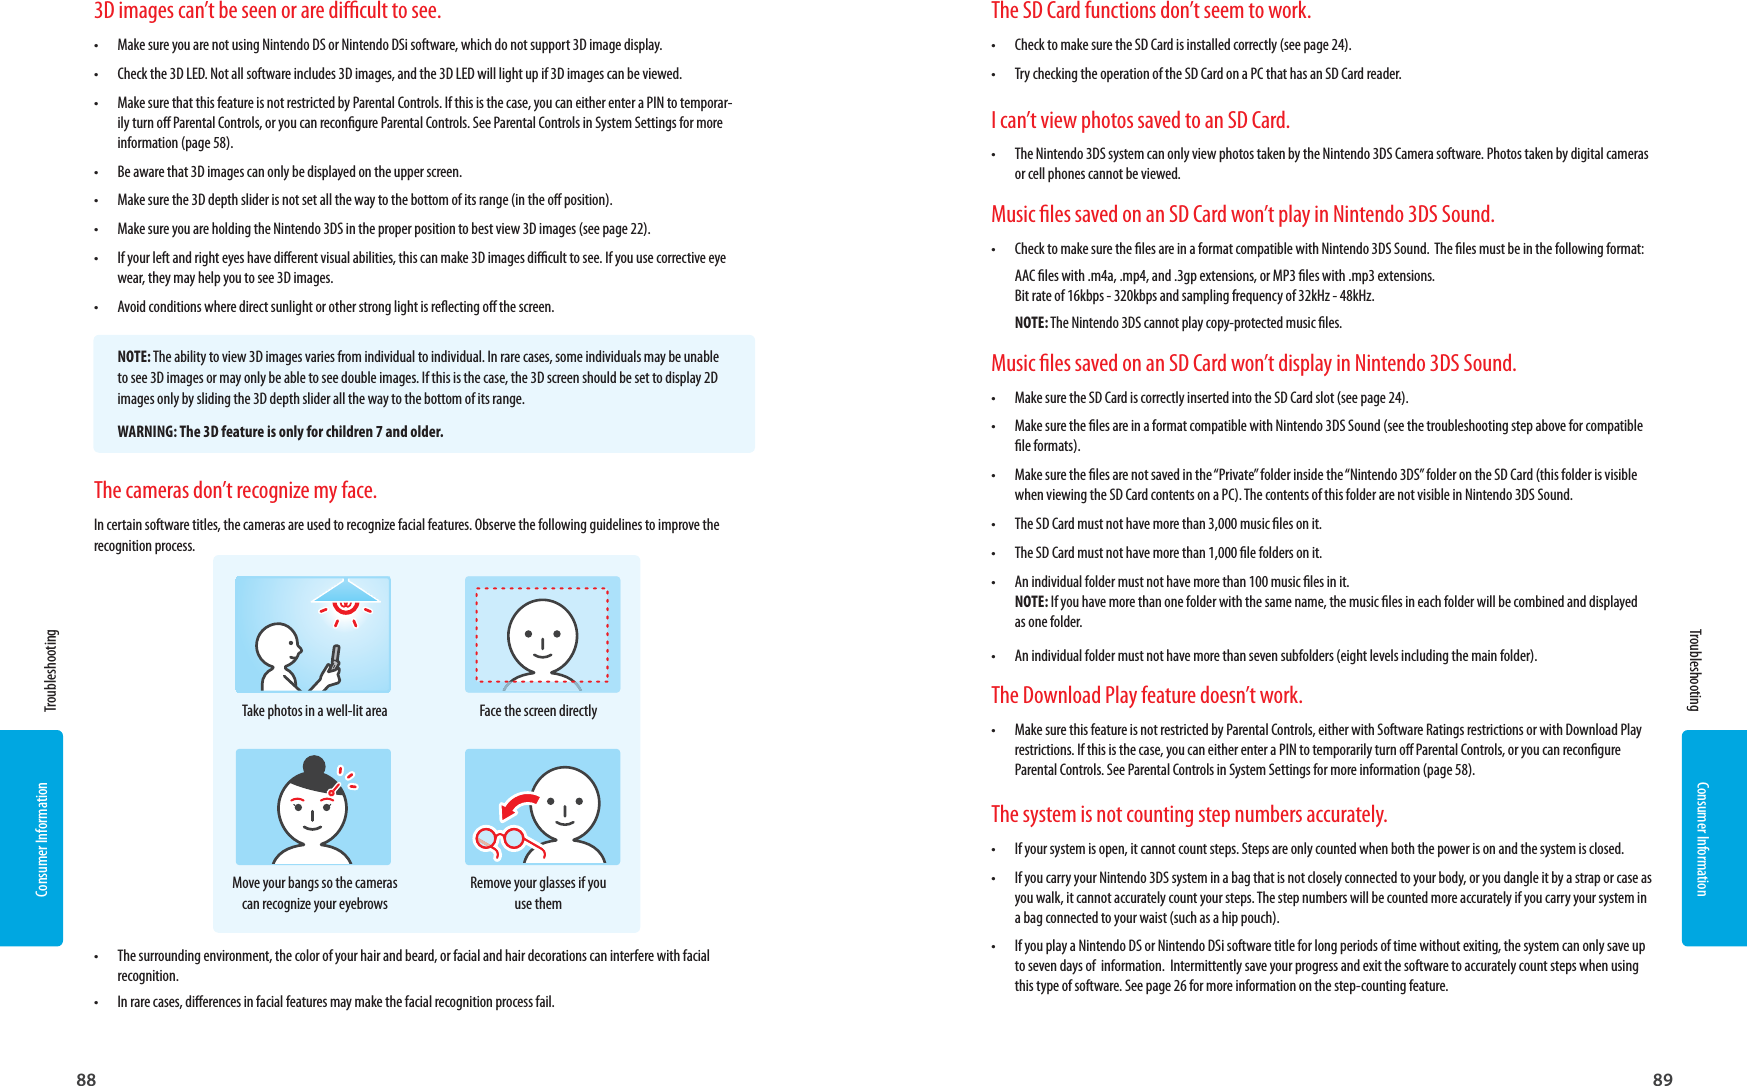
![Consumer Information98Consumer Information99Legal Notices Nintendo 3DS Code of Conduct Legal NoticesNintendo 3DS Code of ConductThis Nintendo 3DS Code of Conduct outlines the rules that you must follow to participate in the Nintendo 3DS Service. These rules are designed to keep the Nintendo 3DS Service a friendly and safe environment.The Nintendo 3DS Code of Conduct may be found at http://support.nintendo.com and may be revised by us at anytime. If you do not have Internet access, please contact Nintendo Consumer Service by (i) sending a letter to Nintendo of America Inc., Attn: Nintendo 3DS Code of Conduct, 4600 150th Ave NE, Redmond, WA 98052 USA; or (ii) calling, toll free, 1-888-977-7627, and they will mail you a current version of the Nintendo 3DS Code of Conduct, free of charge. All capitalized terms not dened in this Nintendo 3DS Code of Conduct will have the meaning set forth in the Nintendo 3DS Service User Agreement.1. Your use of the Nintendo 3DS is subject to this Nintendo 3DS Code of Conduct, which prohibits all harmful, illegal or otherwise oensive conduct, including, but not limited to the following: • Misrepresenting, impersonating, abusing, stalking, threatening or harassing any person or company, including, but not limited to other users, Nintendo, and/or its employees, moderators, or sta. • Doing anything illegal, discriminatory, defamatory, hateful, harassing, abusive, obscene, threatening, physically dangerous or otherwise objectionable in connection with the Nintendo 3DS System or Nintendo 3DS Service. • Making, disseminating, sharing or playing unauthorized copies of games, music or images on the Nintendo 3DS System. This activity is illegal! • Making new versions of existing Content or Products. • Trying to modify or gain access to another person’s Nintendo 3DS System or Nintendo 3DS Service without permission or trying to modify or gain access to any of Nintendo’s computers, hardware or networks used to provide the Nintendo 3DS Service or any feature of the Nintendo 3DS System. • Cheating in a game, unless such cheats have been deliberately enabled. • Hosting, intercepting, emulating, reverse engineering or redirecting the communication protocols used by Nintendo as part of the Nintendo 3DS System or Nintendo 3DS Service, regardless of the method used to do so. • Engaging in any commercial activity using the Nintendo 3DS System or any other activity that disrupts, diminishes the quality of, interferes with the performance of, or impairs the functionality of a Nintendo 3DS System, including the Nintendo 3DS Service or networks connected to the Nintendo 3DS Service. • Accessing or attempting to access another person’s Nintendo 3DS System, including, but not limited to a person’s Nintendo 3DS Shop Ac-count without permission or trying to modify, destroy or lose information from, copy or access any third party’s, including, but not limited to Nintendo’s computers, hardware or networks. • Uploading, posting, emailing, transmitting or otherwise making available: (a) any content that you do not have a legal right to make available; (b) any content that infringes any patent, trademark, trade secret, copyright or other intellectual property or proprietary rights of any party; (c) any unsolicited or unauthorized advertising or promotional materials (e.g. “spam”); (d) information which personally identi-es you or any third party; (e) content to which you have disguised the origin; or (f) content that is obscene, unlawful or prohibited from publication in your jurisdiction, including but not limited to publishing news, stories or pictures associated with a third party.2. Nintendo is not responsible for, and to the fullest extent permitted by law, will not accept liability for, anything you say or anything that happens on the Nintendo 3DS System and Nintendo 3DS Service or as a result of your use of the Nintendo 3DS System and Nintendo 3DS Service; you alone are responsible. 3. Virtual Property. Some games or other content may have certain features that may be traded with other Nintendo 3DS users. For example, a game might give you the ability to create a character that gathers objects (like a car or gold coins) and has certain characteristics (like a special ability or appearance). These features are sometimes called “virtual property.” Nintendo (or its licensors) own this virtual property, and you may not sell, trade, assign, license, or otherwise convey virtual property for real money. 4. Nintendo reserves the right to immediately terminate, block or suspend, in whole or in part, your use of the Nintendo 3DS Service or any feature of the Nintendo 3DS System for, in Nintendo’s sole discretion, any violation of this Nintendo 3DS Code of Conduct. Nintendo reserves the right to contact and cooperate with any law enforcement agencies, government ocials or Internet Service Providers, as Nintendo believes in its sole discretion, is necessary or appropriate to investigate or resolve possible problems or inquiries, or as otherwise required by law.This product includes RSA BSAFE Cryptographic software from RSA Security Inc. RSA is a registered trademark of RSA Security Inc. BSAFE is a registered trademark of RSA Security Inc. in the United States and/or other countries. ©2005 RSA Security Inc. All Rights Reserved.SDHC Logo is a trademark of SD-3C, LLC.This product uses certain fonts provided by Fontworks Inc.This product includes speech rate conversion software developed by Toshiba corporation. Copyright ©2008 TOSHIBA CORPORATION“QR code reader” includes software deliverables of Information System Products Co., Ltd. and Institute of Super Compression Technologies, Inc. QR Code is a registered trademark of DENSO WAVE INCORPORATED in JAPAN and other countries.“ “ and AOSS™ are the trademarks of BUFFALO INC.“Yahoo!” and the Yahoo! logo are registered trademarks of Yahoo! Inc.Google™ search is a trademark of Google Inc.ACCESS, ACCESS logo and NetFront are registered trademarks or trademarks of ACCESS CO., LTD. in the United States, Japan and/or other countries. © 2011 ACCESS CO., LTD. All rights reserved.THIS PRODUCT IS LICENSED UNDER THE MPEG-4 SYSTEMS PATENT PORTFOLIO LICENSE FOR ENCODING IN COMPLIANCE WITH THE MPEG-4 SYSTEMS STANDARD. EXCEPT THAT AN ADDITIONAL LICENSE AND PAYMENT OF ROYALTIES ARE NECESSARY FOR ENCODING IN CONNECTION WITH (i) DATA STORED OR REPLICATED IN PHYSICAL MEDIA WHICH IS PAID FOR ON A TITLE BY TITLE BASIS AND/OR (ii) DATA WHICH IS PAID FOR ON A TITLE BY TITLE BASIS AND IS TRANSMITTED TO AN END USER FOR PERMANENT STORAGE AND/OR USE. SUCH ADDITIONAL LICENSE MAY BE OBTAINED FROM MPEG LA, LLC. SEE <HTTP://WWW.MPEGLA.COM> FOR ADDITIONAL DETAILS.Ubiquitous TCP/IP+SSL Copyright ©2001-2010 Ubiquitous Corp.Powered by Devicescape Software. Portions of this products are © 2003-2010 Devicescape Software, Inc. All rights reserved.Copyright ©2003-2010, Jouni Malinen <j@w1.> and contributors All Rights Reserved.WPA Supplicant licensed pursuant to BSD License.Redistribution and use in source and binary forms, with or without modication, are permitted provided that the following conditions are met:1. Redistributions of source code must retain the above copyright notice, this list of conditions and the following disclaimer.2. Redistributions in binary form must reproduce the above copyright notice, this list of conditions and the following disclaimer in the documentation and/or other materials provided with the distribution.3. Neither the name(s) of the above-listed copyright holder(s) nor the names of its contributors may be used to endorse or promote products derived from this software without specic prior written permission.THIS SOFTWARE IS PROVIDED BY THE COPYRIGHT HOLDERS AND CONTRIBUTORS ”AS IS” AND ANY EXPRESS OR IMPLIED WARRANTIES, INCLUDING, BUT NOT LIMITED TO, THE IMPLIED WARRANTIES OF MERCHANTABILITY AND FITNESS FOR A PARTICULAR PURPOSE ARE DISCLAIMED. IN NO EVENT SHALL THE COPYRIGHT OWNER OR CONTRIBUTORS BE LIABLE FOR ANY DIRECT, INDIRECT, INCIDENTAL, SPE-CIAL, EXEMPLARY, OR CONSEQUENTIAL DAMAGES (INCLUDING, BUT NOT LIMITED TO, PROCUREMENT OF SUBSTITUTE GOODS OR SERVICES; LOSS OF USE, DATA, OR PROFITS; OR BUSINESS INTERRUPTION) HOWEVER CAUSED AND ON ANY THEORY OF LIABILITY, WHETHER IN CONTRACT, STRICT LIABILITY, OR TORT (INCLUDING NEGLIGENCE OR OTHERWISE) ARISING IN ANY WAY OUT OF THE USE OF THIS SOFTWARE, EVEN IF ADVISED OF THE POSSIBILITY OF SUCH DAMAGE.This product includes software developed by the OpenSSL Project for use in the OpenSSL Toolkit. (http://www.openssl.org/). Copyright ©1998-2007 The OpenSSL Project. All rights reserved. Redistribution and use in source and binary forms, with or without modication, are permitted provided that the following conditions are met:1. Redistributions of source code must retain the above copyright notice, this list of conditions and the following disclaimer. 2. Redistributions in binary form must reproduce the above copyright notice, this list of conditions and the following disclaimer in the documentation and/or other materials provided with the distribution.3. All advertising materials mentioning features or use of this software must display the following acknowledgment: ”This product includes software developed by the OpenSSL Project for use in the OpenSSL Toolkit. (http://www.openssl.org/)”4. The names ”OpenSSL Toolkit” and ”OpenSSL Project” must not be used to endorse or promote products derived from this software without prior written permission. For written permission, please contact openssl-core@openssl.org.5. Products derived from this software may not be called ”OpenSSL” nor may ”OpenSSL” appear in their names without prior written permission of the OpenSSL Project.6. Redistributions of any form whatsoever must retain the following acknowledgment: This product includes software developed by the OpenSSL Project for use in the OpenSSL Toolkit (http://www.openssl.org/)THIS SOFTWARE IS PROVIDED BY THE OpenSSL PROJECT “AS IS” AND ANY EXPRESS OR IMPLIED WARRANTIES, INCLUDING, BUT NOT LIMITED TO, THE IMPLIED WARRANTIES OF MERCHANTABILITY AND FITNESS FOR A PARTICULAR PURPOSE ARE DISCLAIMED. IN NO EVENT SHALL THE OpenSSL PROJECT OR ITS CONTRIBUTORS BE LIABLE FOR ANY DIRECT, INDIRECT, INCIDENTAL, SPECIAL, EXEMPLARY, OR CONSEQUENTIAL DAMAGES (INCLUDING, BUT NOT LIMITED TO, PROCUREMENT OF SUBSTITUTE GOODS OR SERVICES; LOSS OF USE, DATA, OR PROFITS; OR BUSINESS INTERRUPTION) HOWEVER CAUSED AND ON ANY THEORY OF LIABILITY, WHETHER IN CONTRACT, STRICT LIABILITY, OR TORT (INCLUDING NEGLIGENCE OR OTHERWISE) ARISING IN ANY WAY OUT OF THE USE OF THIS SOFTWARE, EVEN IF ADVISED OF THE POSSIBILITY OF SUCH DAMAGE.This product includes cryptographic software written by Eric Young. Copyright ©1995-1998 Eric Young (eay@cryptsoft.com). All rights reserved. This package is an SSL implementation written by Eric Young (eay@cryptsoft.com). The implementa-tion was written so as to conform with Netscapes SSL.This library is free for commercial and non-commercial use as long as the following conditions are adhered to. The following conditions apply to all code found in this distribution, be it the RC4, RSA, lhash, DES, etc., code; not just the SSL code. The SSL documentation included with this distribution is covered by the same copyright terms except that the holder is Tim Hudson (tjh@cryptsoft.com). Copyright remains Eric Young’s, and as such any Copyright notices in the code are not to be removed. If this package is used in a product, Eric Young should be given attribution as the author of the parts of the library used. This can be in the form of a textual message at program startup or in documentation (online or textual) provided with the package.Redistribution and use in source and binary forms, with or without modication, are permitted provided that the following conditions are met:1. Redistributions of source code must retain the copyright notice, this list of conditions and the following disclaimer.2. Redistributions in binary form must reproduce the above copyright notice, this list of conditions and the following disclaimer in the documentation and/or other materials provided with the distribution.3. All advertising materials mentioning features or use of this software must display the following acknowledgement: ”This product includes cryptographic software written by Eric Young (eay@cryptsoft.com)” The word ‘cryptographic’ can be left out if the routines from the library being used are not cryptographic related :-).4. If you include any Windows specic code (or a derivative thereof) from the apps directory (ap-plication code) you must include an acknowledgement: This product includes software written by Tim Hudson (tjh@cryptsoft.com).THIS SOFTWARE IS PROVIDED BY ERIC YOUNG ”AS IS” AND ANY EXPRESS OR IMPLIED WARRANTIES, INCLUDING, BUT NOT LIMITED TO, THE IMPLIED WARRANTIES OF MERCHANTABILITY AND FITNESS FOR A PARTICULAR PURPOSE ARE DISCLAIMED. IN NO EVENT SHALL THE AUTHOR OR CONTRIBUTORS BE LIABLE FOR ANY DIRECT, INDIRECT, INCIDENTAL, SPECIAL, EXEMPLARY, OR CONSEQUENTIAL DAMAGES (INCLUDING, BUT NOT LIMITED TO, PROCUREMENT OF SUBSTITUTE GOODS OR SERVICES; LOSS OF USE, DATA, OR PROFITS; OR BUSINESS INTERRUPTION) HOWEVER CAUSED AND ON ANY THEORY OF LIABILITY, WHETHER IN CONTRACT, STRICT LIABILITY, OR TORT (INCLUDING NEGLIGENCE OR OTHERWISE) ARISING IN ANY WAY OUT OF THE USE OF THIS SOFTWARE, EVEN IF ADVISED OF THE POSSIBILITY OF SUCH DAMAGE.The licence and distribution terms for any publicly available version or derivative of this code cannot be changed. i.e. this code cannot simply be copied and put under another distribution licence [including the GNU Public Licence.]This product uses the LC Font by Sharp Corporation. LCFONT, LC Font and the LC logo mark are trademarks of Sharp Corporation.The Wi-Fi CERTIFIED logo, Wi-Fi Protected Access® (WPA and WPA2), and the Wi-Fi Protected Setup icon are registered trademarks of the Wi-Fi Alliance.](https://usermanual.wiki/HON-HAI-PRECISION-IND/J27H02301.manual/User-Guide-1746840-Page-51.png)