HON HAI PRECISION IND T60N871 802.11b/g MiniPCI Module User Manual User Guide
HON HAI Precision Ind. Co., Ltd. 802.11b/g MiniPCI Module User Guide
Users Manual

1
Trade Name : T60N871
802.11b/g Wireless LAN MiniPCI module
User Manual

2
1. Wireless LAN Configuration Utility
Introduction
The Wireless LAN Configuration Utility is a powerful application that helps you to configure
FOXCONN WLAN card and monitor the statistics of the communication status. Unlike the standard
method of configuring the card via the operating system utilities, this application permits the dynamic
modification of the configuration parameters while the card is operating. It also offers more
configuration options.
FOXCONN offers the Wireless LAN Configuration Utility for Windows 95/98/Me/2000/XP.
3
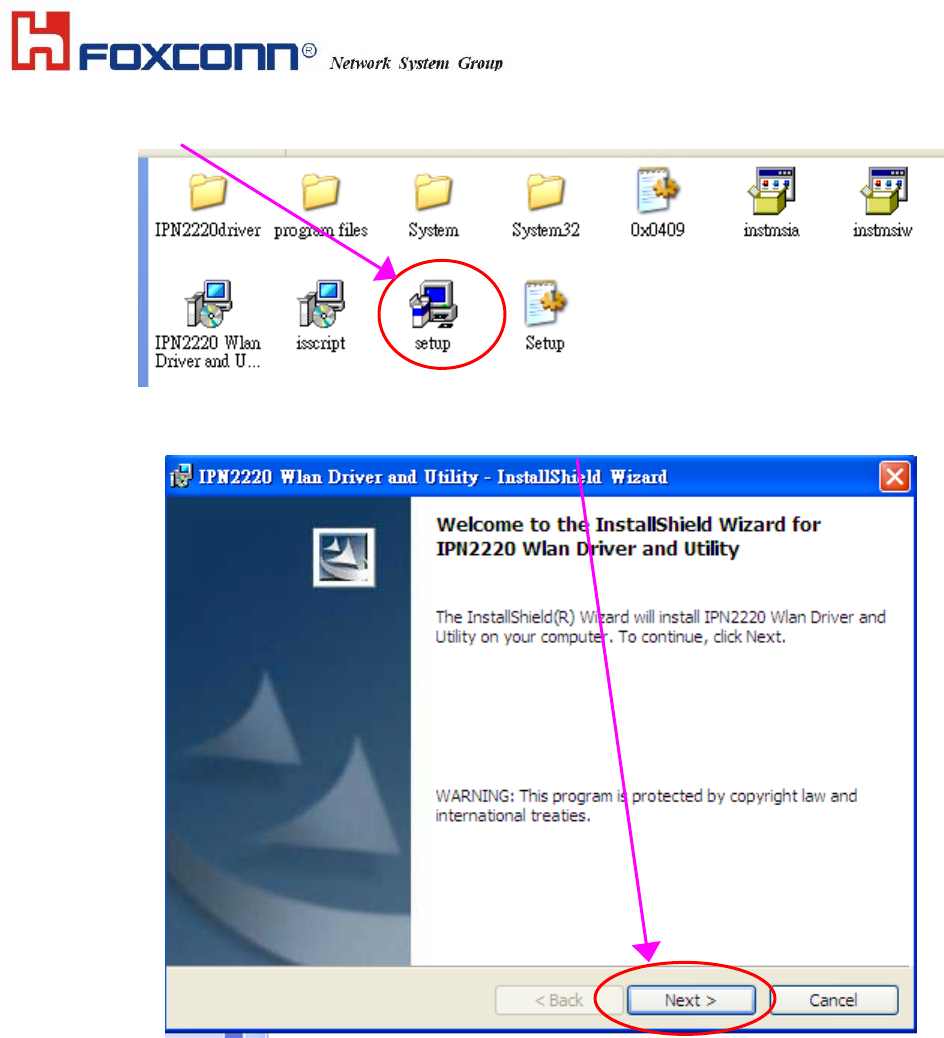
1.1 How to install the driver and Wireless LAN Configuration Utility
Double click the “setup” located in “\WLAN_Utility\”
Fig 1-1
The program will automatically proceed with installing. Press “Next” to continue.
Fig 1-2
4
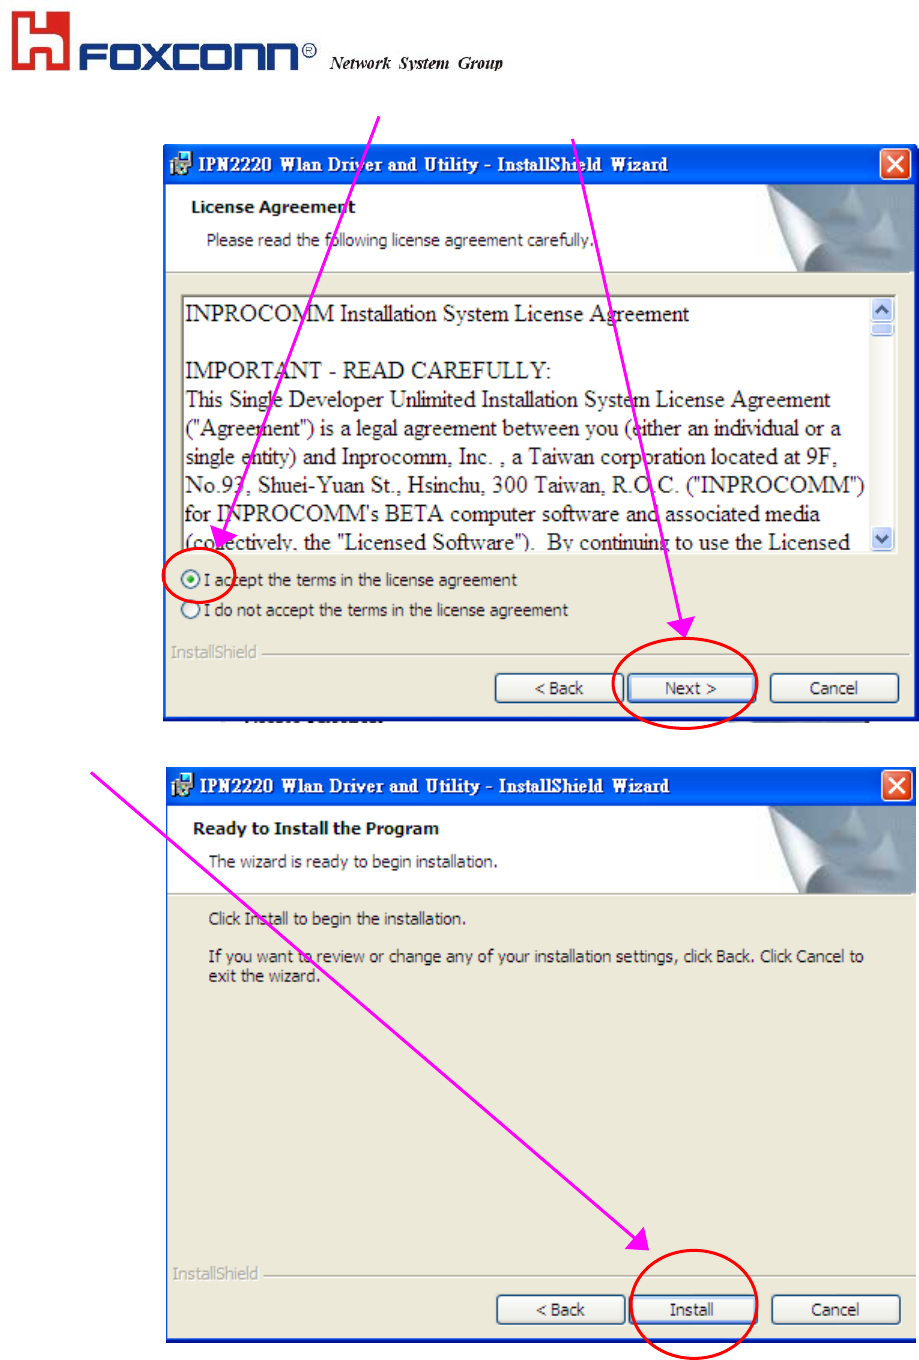
Press “I accept the terms in the license agreement” to continue the install shield. Or press “I do not accept the terms
in the license agreement” quit install process. Then, press “Next” to continue.
Fig 1-3
Press “Install” to continue installing
Fig 1-4
5
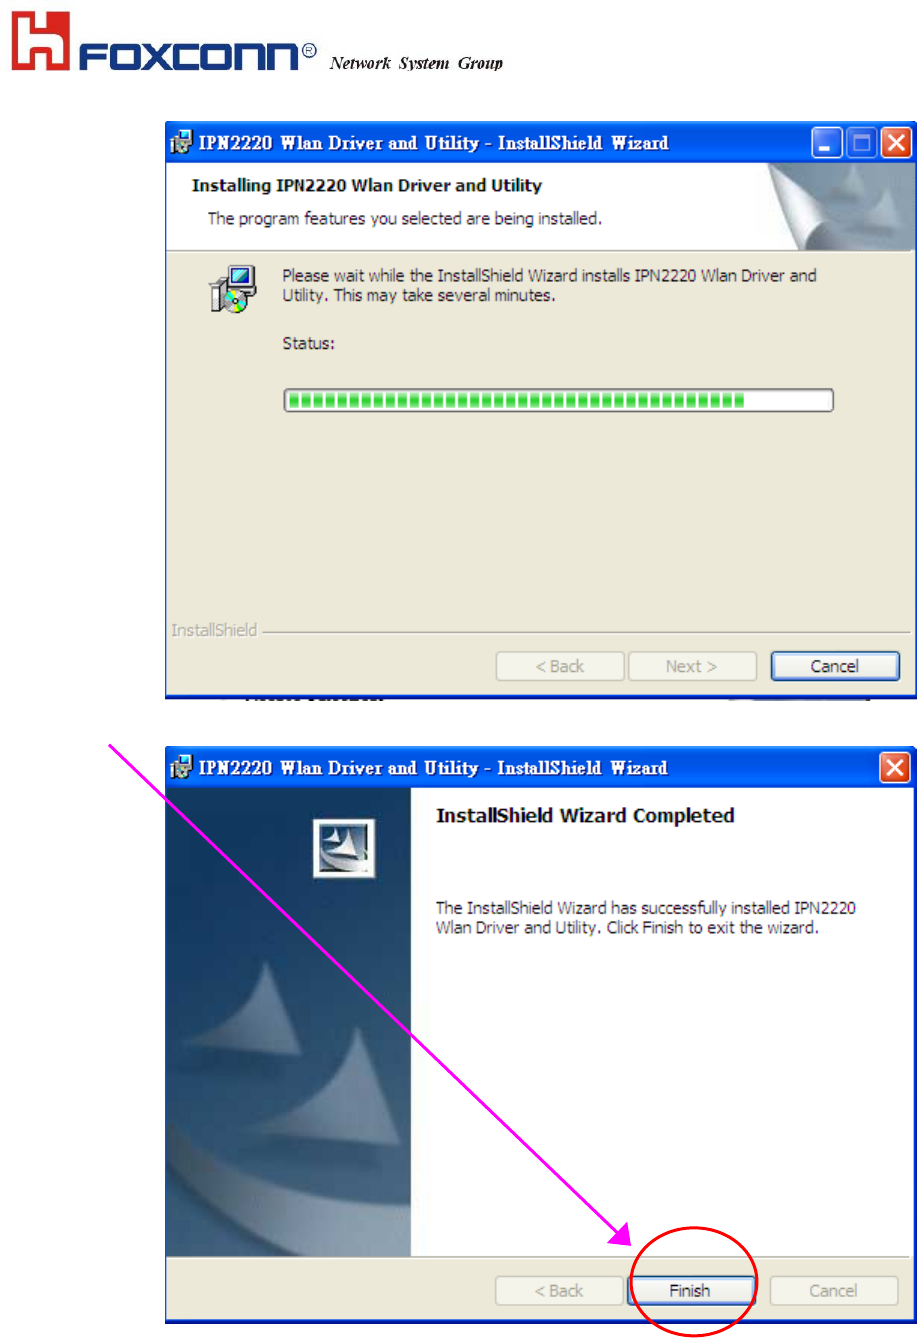
Install Shield is processing
Fig 1-5
Choose “Finish” to complete the installation
Fig 1-6
6
The usage of Wireless LAN Configuration Utility
2.1 Introduction
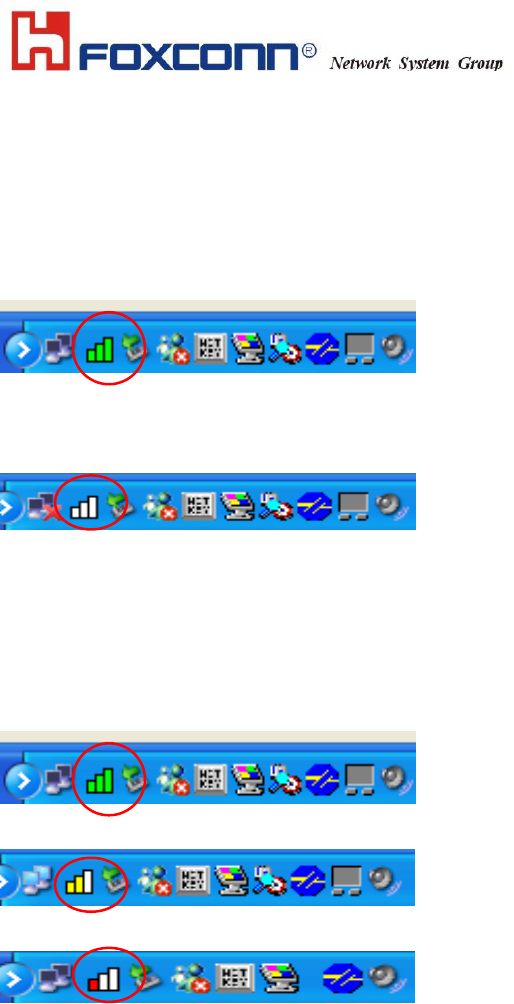
The Wireless LAN Configuration Utility appears as an icon on the system tray of Windows while the
card is running. You can open it by double clinking the icon (Fig 2-1) to show full screen of WLAN
Utility.
Fig 2-1 icon on the system tray
While the station is in infrastructure mode and not associated to an Access Point, the color of the
icon is “White (blank)”(Fig 2-2).
Fig 2-2 No Connection
As soon as the station associates to an Access Point, the icon color automatically turns to “Green”,
“Yellow” or “Red”. Which indicates the receiving signal strength from Access Point. “Green” (Fig
2-3) indicates the signal is “Good”. “Yellow”(Fig 2-4) indicates the signal is “Fair”. “Red”(Fig 2-5)
indicates the signal is “Poor”.
Fig 2-3 Good Connection
Fig 2-4 Fair Connection
Fig 2-5 Poor Connection
The Wireless LAN Configuration Utility is a powerful and highly integrated application include the
following options (tabs),
Status
Site Survey
Statistics
About
7
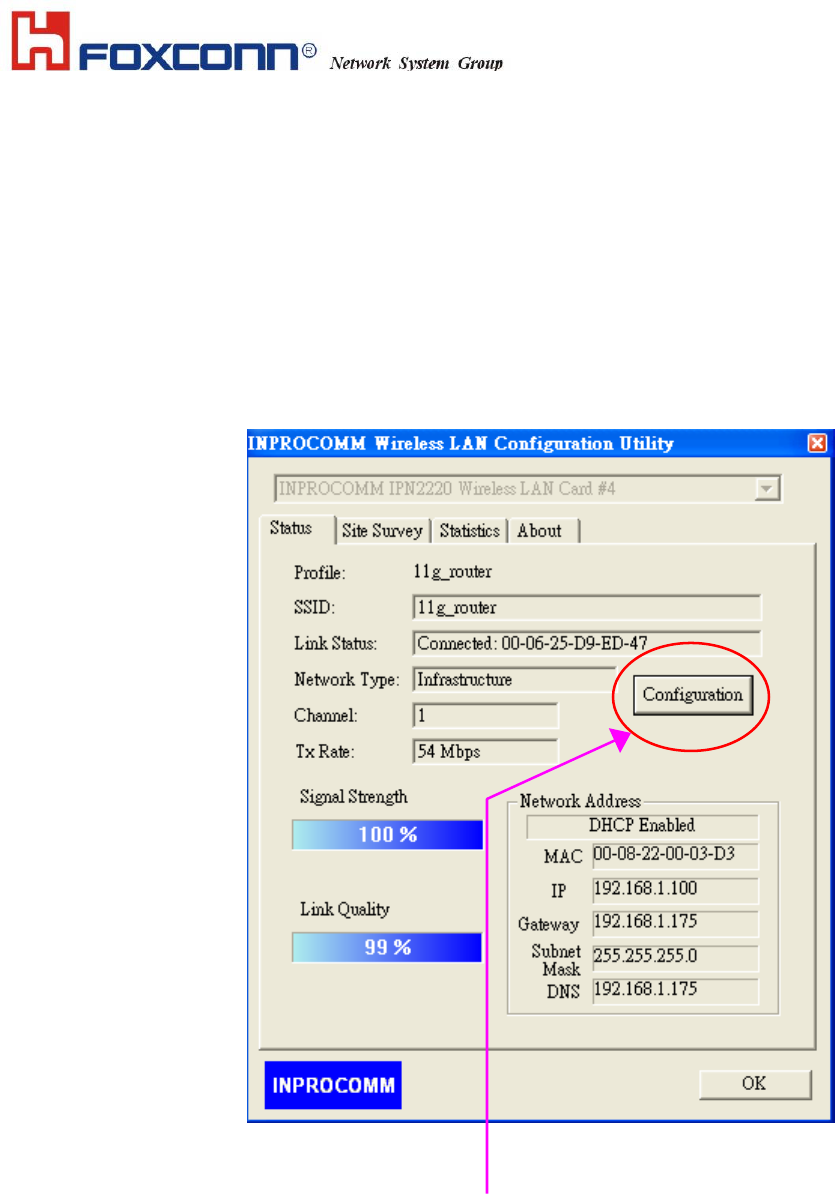
2.2.1 Status
A typical screen of the application in Infrastructure mode is shown in Fig 2-6. The Wireless LAN Configuration Utility
contains the following information for Wireless LAN.
Profile: The profile name which user selected. If there is no profile selected, it would show “default”.
SSID: The Network Service Set Identification provided by Access Point.
Link Status: The MAC address of Access Point.
Network Type: Infrastructure or Ad-Hoc.
Channel: Operation channel provided by Access Point.
Tx (Transmit ion) Rate: Current transmit ion rate.
Signal Strength: The Signal level of Wireless Network.
Link Quality: The Signal Quality of Wireless Network.
Network Address: shows the current Network status such as MAC address (Wireless Card), DHCP (Enable or not),
IP address, Subnet Mask address, Gateway Address and DNS server address.
Fig 2-6 Typical screen of the Wireless LAN Configuration Utility in Infrastructure mode.
Users can change the configuration by clicking the “Configuration” Button.

8
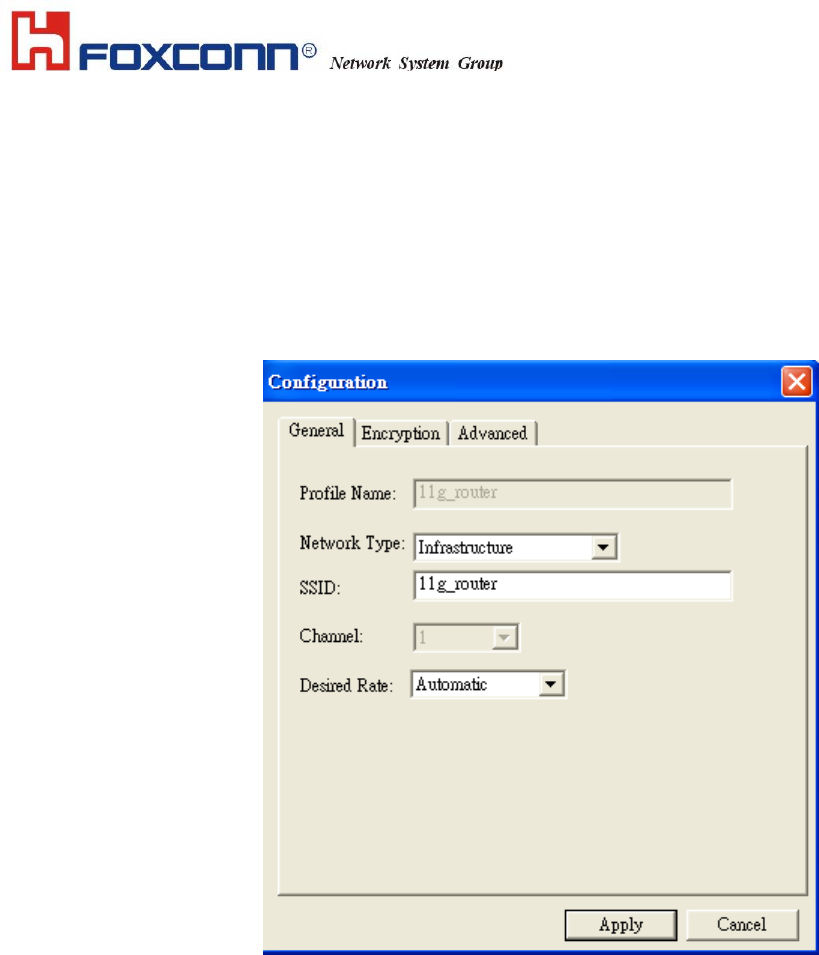
2.2.2 Configuration
Users can edit Wireless Network setting by pressing “Configuration” button.
There are 3 tabs in “Configuration”.
General
Encryption
Advance
9
2.2.2.1 General Page
General Page include the following options, (See Fig 2-7)
Profile Name: Name of Selected Profile. (Default profile name: default). If users want to change settings of profile,
please refer to Edit Profile option in “Site Survey” page.
Network Type: User can choose either Infrastructure or Ad-Hoc mode.
SSID: Define the SSID.
Channel: Provided by Access Point in Infrastructure mode. User can only define when choose Ad-Hoc mode in
Network Type option.
Desired Rate: User can choose the desired rate from 1Mbps~11Mbps (associated with 802.11b Access Point) and
1Mbps~54Mbps (associated with 802.11g Access Point). (Default Setting: Automatic).
Fig 2-7
10
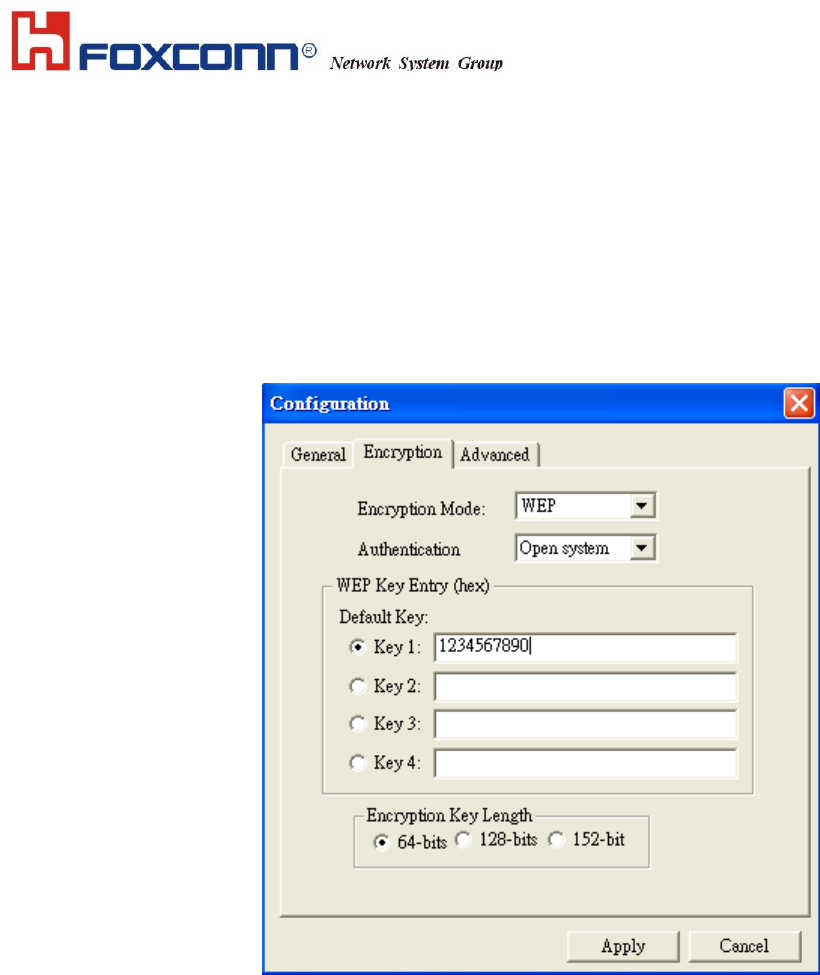
2.2.2.2 Encryption Page
IPN2220 WLAN Utility provides powerful and intelligent setting of WEP Key. The Encryption page include the following
options, (see Fig 2-8)
Encryption Mode: User can choose WEP On or None WEP for the Network. This option will be automatically
defined after “Site Survey”.
Authentication: There are 2 modes of Authentication of 802.11b/g Wireless Network. Open System and Share Key.
These are defined by Access Point. IPN2220 WLAN Utility provides the “Auto Switch” option for easy to use. This
option can be also automatically defined after “Site Survey”.
WEP Key Entry (hex): Users have 4 sets of WEP to use. Each will need to be defined by user according to Access
Point. The Key value is in Hex format (from 0~9, a~f).
Encryption Key Length: User can choose 64bits, 128bits or 152bits encryption for the network according Access
Point.
Fig 2-8
11
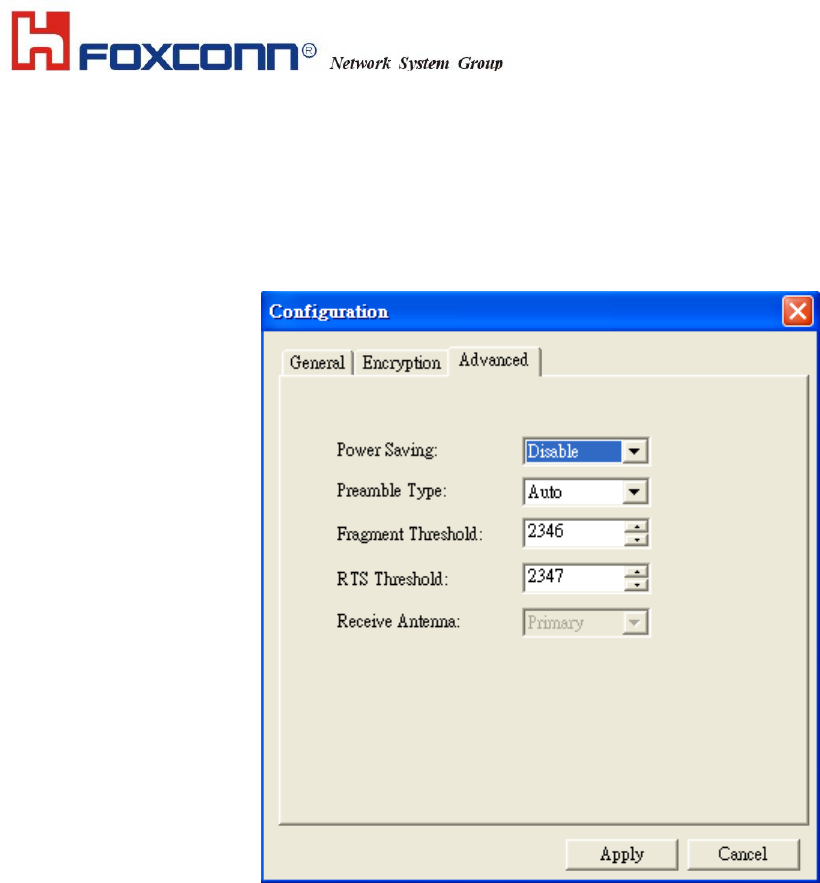
2.2.2.3 Advance Page
Advance Page provides more advanced options for Wireless Network. This include the followings, (See Fig 2-9)
Power Saving: Enable or Disable the Power Saving Mode. (Default: Disable)
Preamble Type: User can choose Long Preamble or Short Preamble type according to Access Point. IPN2220
provides “Auto” setting for choosing “Preamble Type”.
Fragment Threshold:
RTS Threshold:
Receive Antenna:
Fig 2-9
12
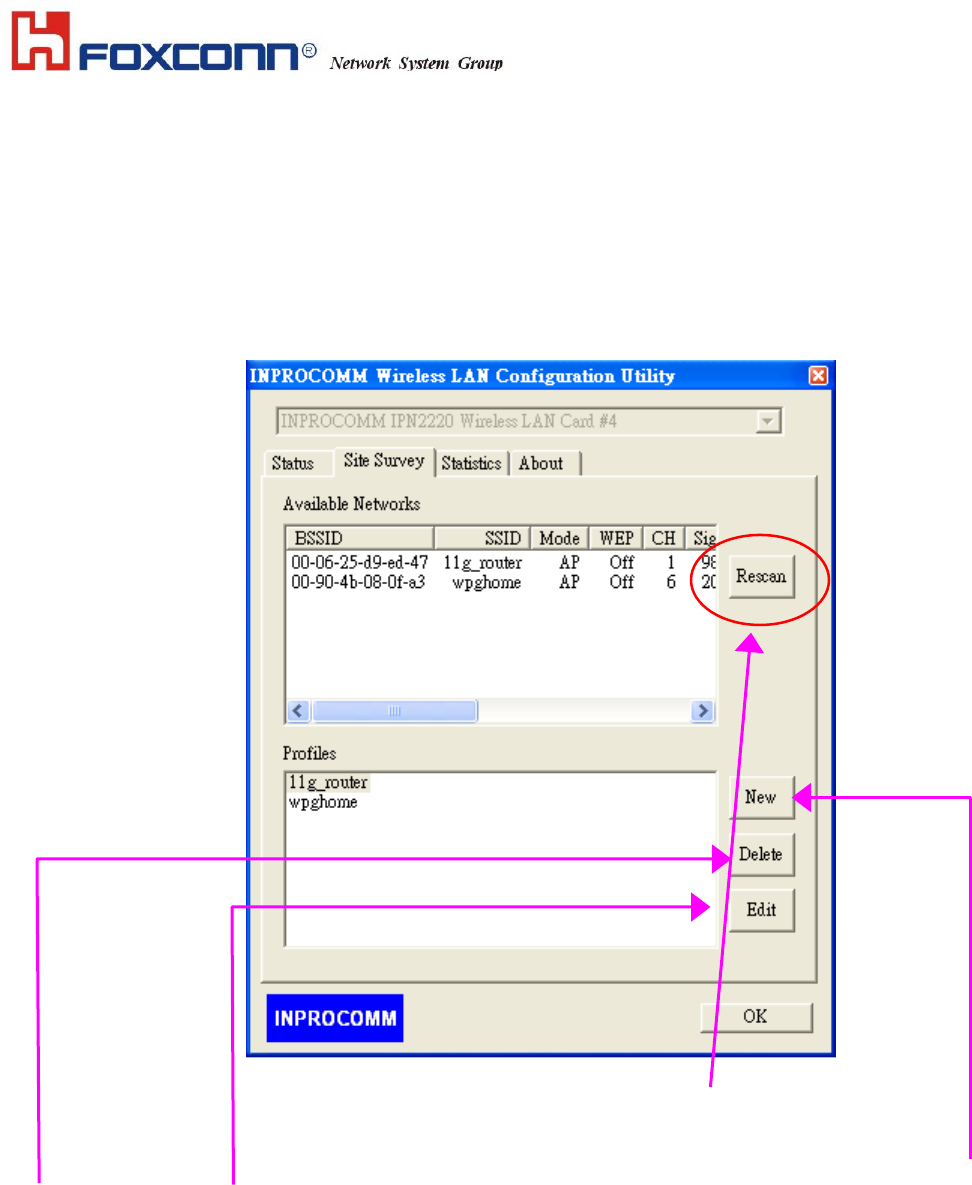
2.2.3 Site Survey
IPN2220 WLAN Utility provides the easy to link “Site Survey” option. This will allow users to connect to Access Point
intelligently. By choosing the Site Survey option, you can scan all the channels to find all the Access Points within the
range of card. The list includes information about the BSSID and SSID of the access point(s), the Mode (Network Type),
whether or not WEP encryption is used, Channel, Signal Strength and Support Rate. In order to update this list, press the
“Rescan” button.
The “Site Survey” page include, (See Fig 2-10)
Available Networks: Users can press “Rescan” button to Scan/Rescan the environment for all existing Access
Points. User can move the cursor on the desired Access Point to join.
Profiles: Users can click the “New”, “Delete” and “Edit” button to configure the selected profile and/or create new
profile.
Fig 2-10
If you want to associate with any of the access point(s) listed after pressing “Rescan”, Double-clicking on your choice
and the system will take you back to the Configuration page showing you the parameters of the connection newly
established. Then user can give a Profile Name for the connection. System will save all changes and options
automatically.
After connecting to Access Point, system will create a Profile in the “Profiles” screen. Users can create a “New” profile,
“Delete” profile and/or “Edit” profile by pressing the button on the right of screen. When users press the “New” and “Edit”
button, system will also pop up the Configuration page to enter the desired settings.
13
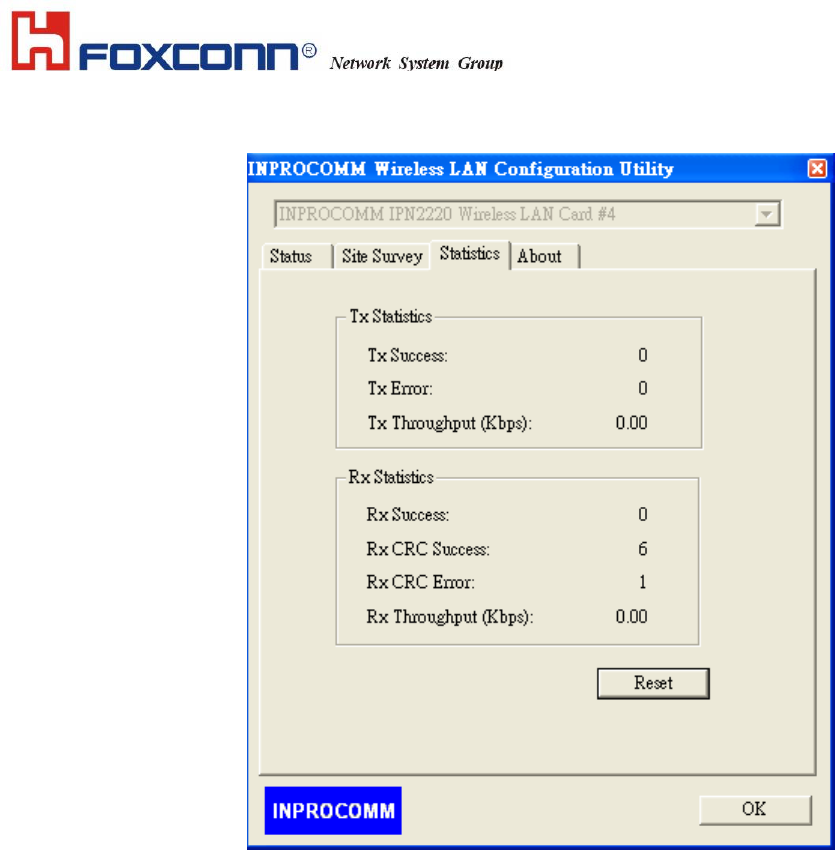
2.2.4 Statistics
This page includes the Statistics for the Wireless Network. (See Fig 2-11)
Fig 2-11
14
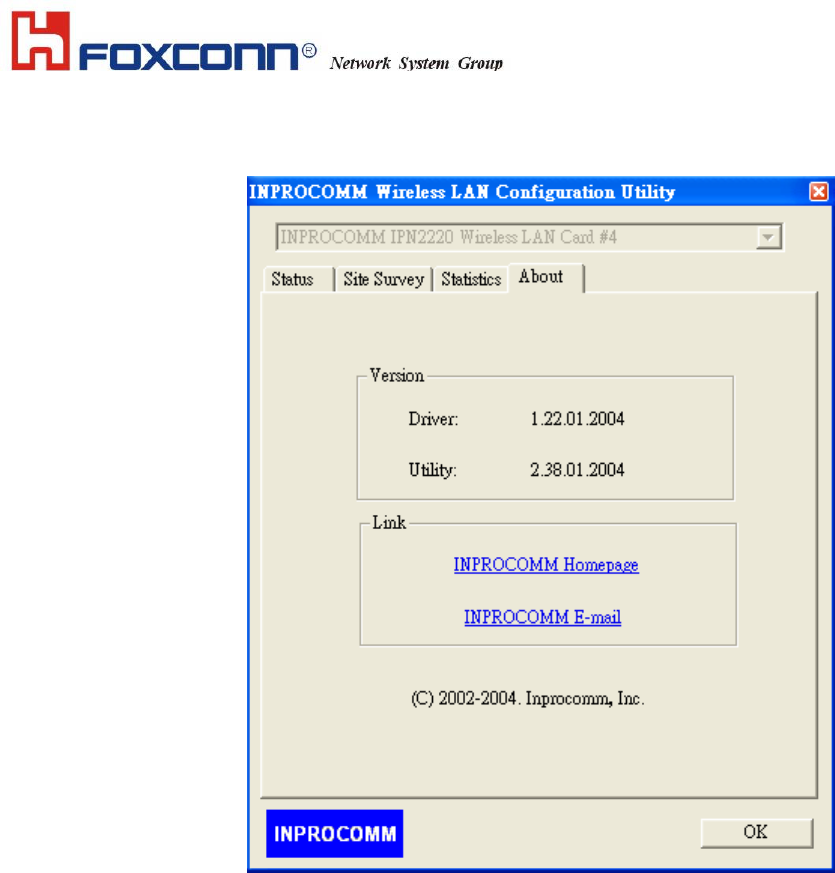
2.2.5 About
This page shows the software information for IPN2220.
The Version of Driver and Utility are subject to change by FOXCONN. (See Fig 2-12)
Fig 2-12
15
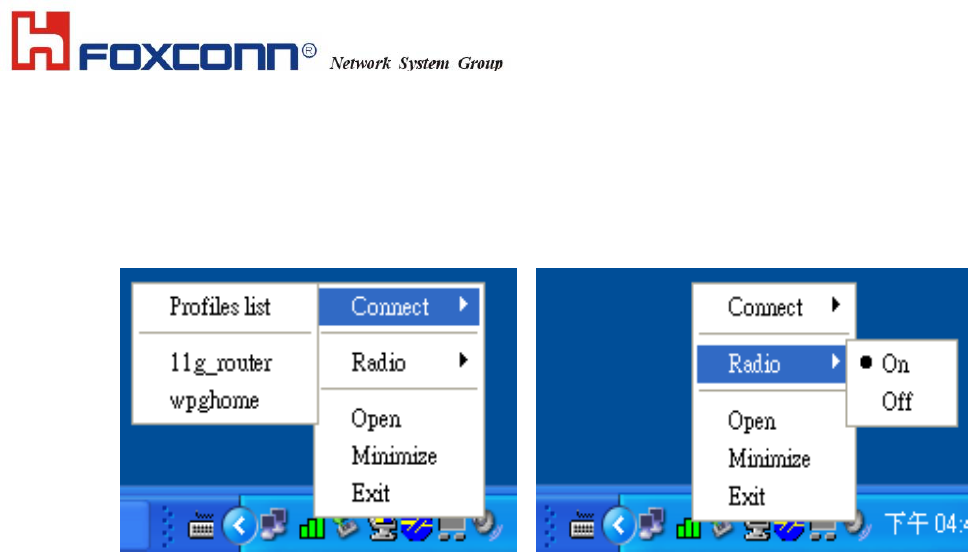
2.3 Quick Launch
IPN2220 WLAN Utility also gives users the quick way to set up Wireless Network and recall the profiles. (See Fig 2-13
and Fig 2-14)
By “Right- Clicking” the icon in system tray then choose “Connect” for proper profile list or turn-on/off the “Radio” while
in same restricted area. Also can click on the “Open” to open the full screen of Utility and “Minimize” to hide the Utility.
Or press the “Exit” to quit the Utility from system tray.
.
Fig2-13 Fig 2-14
16
FCC Warning Notice