HOOVER Vacuum, Upright Manual L0608599
User Manual: HOOVER HOOVER Vacuum, Upright Manual HOOVER Vacuum, Upright Owner's Manual, HOOVER Vacuum, Upright installation guides
Open the PDF directly: View PDF ![]() .
.
Page Count: 36
@
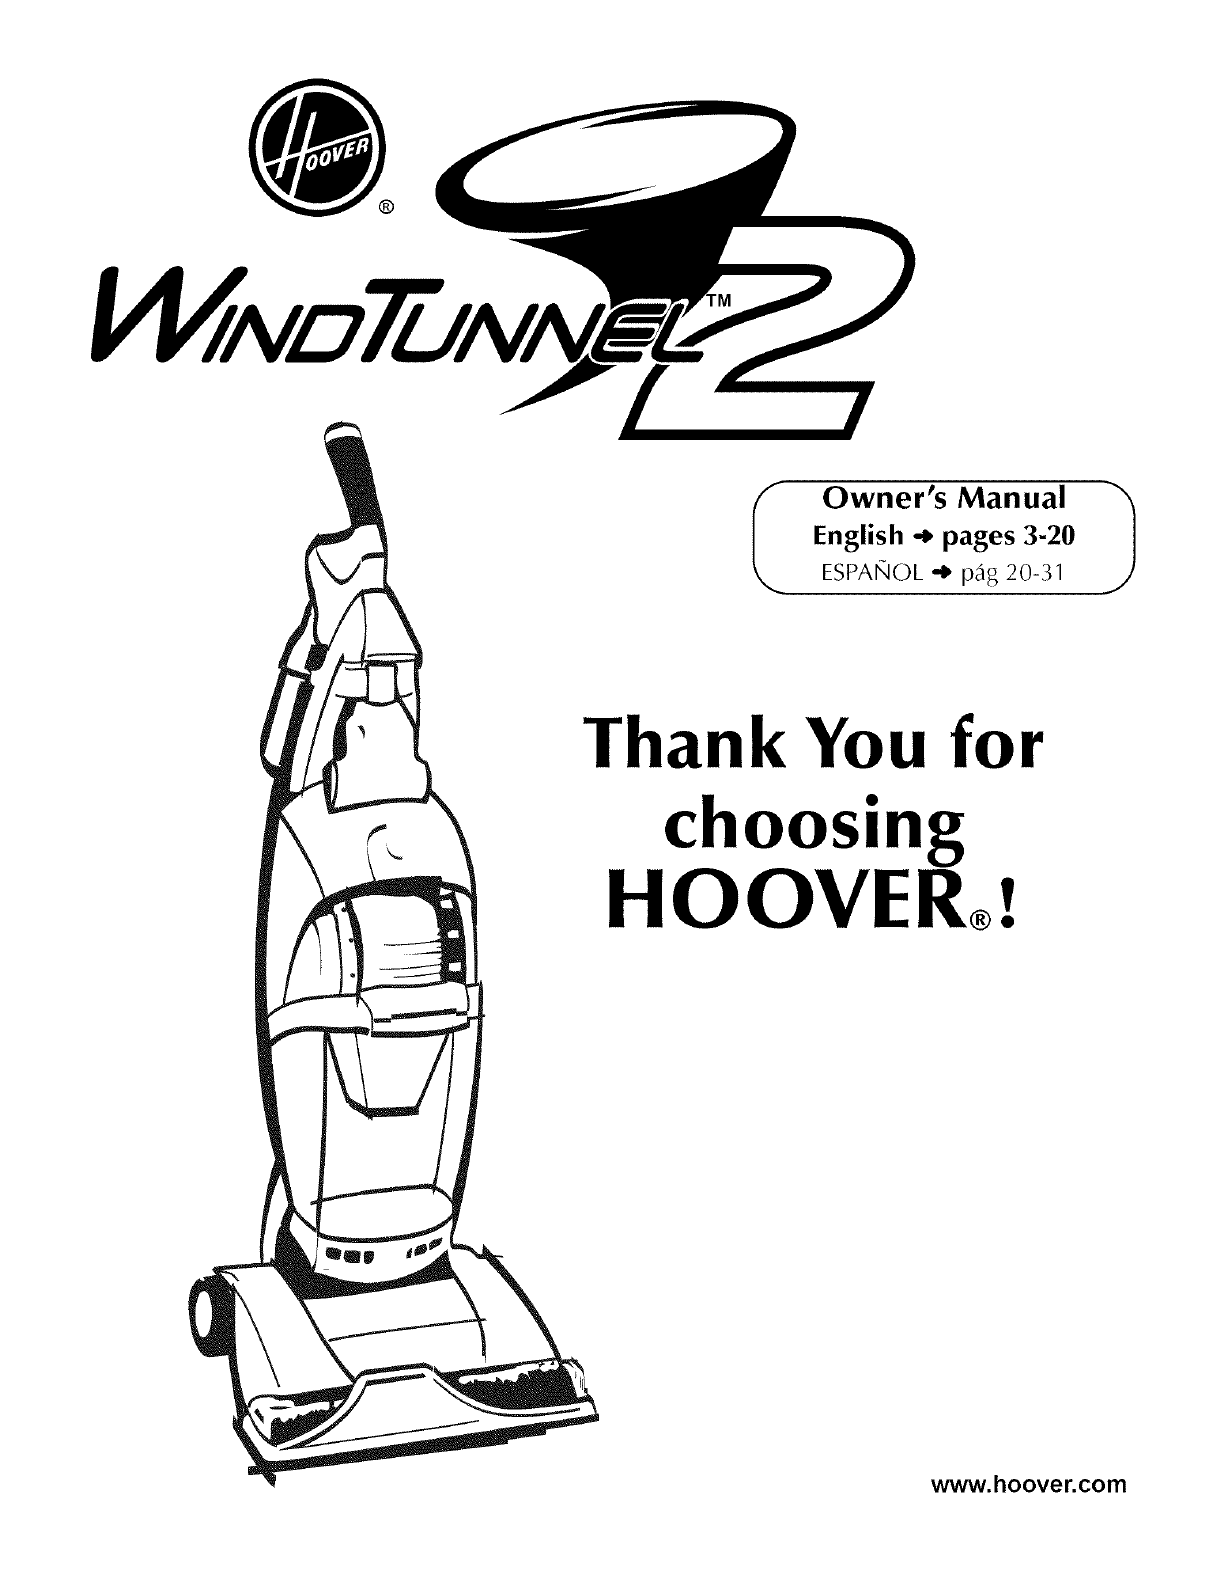
Owner's Manual
English -_ pages 3-20
ESPANOL "_ p_g 20-31
Thank You fo
choosing
HOOVER®
www.hoover.com
HOOVER SALES &SERVICE CENTERS
ALABAMA
Pinebrook Bhpg. Ctr.
3980B Airport Blvd.
Mobile, AL 36608
(251) 341-0304
(251) 341-0395 fax
ARIZONA
3434 West Bell Rd.
Phoeniz, AZ 85053
(602) 439-2751
(602) 564-0938 fax
4881 E. Speedway Blvd.
Tucson, AZ 85712
(520) 795-5612
(520) 322-6016 fax
Mesa Shores Shpg Ctr.
2136 East Baseline Rd.
Suite B-1
Mesa, AZ 85204
(480) 633-0622
(480) 633-0626 fax
COLORADO
Academy PI. Shpg. Ctr,
5142 N. Academy Blvd.
Colorado Springs, CO 80918
(719) 260-9988
(719) 260-8353 fax
Monaco Village Shpg. Ctr.
2200 S. Monaco Pkwy.
Denver, CO 80222
303 757-4904
303 757-2723 fax
MiCHiGAN NORTH CAROLINA
Evergreen Plaza Shpg. Ctr. Four Seasons Plaza
19799 West 12 Mile Rd. 6449 Albemarle Rd.
Southfield, MI 48076 Charlotte, NC 28212
(704) 568-0371
(248) 552-6253 (704) 568-4283 fax
(248) 552-6256 fax
OHIO
MINNESOTA 4032 Bekten Village St.
Knollwood Village Shpg. Ctr. Canton, OH 44718
8922 Highway 7 (330) 491-0086
St. Louis Park, MN 55426 (330) 491-0140 fax
FLORIDA (952) 935-0091
303 E. AItamonte Dr, Ste 1100 (952) 935-0462 fax
AItamonte Springs, FL 32701 Falcon Crossing Shpg. Ctr.
(407) 831-1444 1539 W. Larpenteur Ave.
(407) 831-5444 fax
102 S. Flamingo Rd.
Pembroke Pines, FL 33027
(954) 432-0031
(954) 432-6350 fax
CALIFORNIA
Sycamore Plaza
1047 N. State CoNege Blvd. (404) 814-1574
Anaheim, CA 92806 (404) 814-1035 fax
(714) 635-5710
(714) 635-8432 fax 1064 Old Peachtree Rd.
Ste 102
BurIingame Plaza Shpg.Ctr. Lawrenceville, GA 30043
1803A El Camino Real
Burlingame, CA 94010
(650) 652-7810
(650) 652-7811 fax
1660 Contra Costa Blvd.
Suite C
Pleasant Hill, CA 94523
(925) 674-1206
(925) 674-1304 fax
West Gate Shpg. Ctr.
17498 Hawthorne Blvd.
Torrance, CA 90504
(310) 921-6523
(310) 921-6533 fax
1834 Fulton Ave.
Sacramento, CA 95825
(916) 481-4860
(916) 481-1528 fax
St. Paul, MN 55113
(651)644-8684
(651) 644-6621 fax
MISSOURI
201 East Gregory
Kansas City, MO 64114
GEORGIA 126 (816) 333-7440
3655 Roswell Rd. NE, Ste (816) 333-3184 fax
Buckhead, GA 30342
18931 Valley View Pkwy.
Ste F
Independence, MO 64055
(816) 795-5303
(816) 795-5759 fax
(678) 442-9907
(678) 442-9947 fax
2960 Shallowford Rd. #200
Marietta, GA 30066
(678) 560-0066
(678) 560-0068 fax
10779 Alpharetta Hwy.
Suite 170
Roswell, GA 30076
(770) 649-0425
(770) 649-0704 fax
IDAHO
520 B. Meridan Rd, Ste. 150
Meridian, ID 83642
(208) 855-4775
(208) 855-4776 fax
ILLiNOiS
Winston Plaza Shpg. Ctr.
1372 Winston Plaza
Melrose Park, IL 60160
(708) 344-3800
(708) 344-3853 fax
Yorkshire Plaza
4328 East New York Street
Aurora, iL 60504
(630) 499-5728
(630) 499-5816 fax
IOWA
3001-100th St.
Urbandale, IA 50322
(515) 331-0550
(515) 331-0545 fax
3628 Geary Blvd.
San Franciso, CA 94118
(415) 668-5101
(415) 668-5976 fax
Greenhouse Market Place
699 Lewelling Blvd, Ste182
San Leandro, CA 94579
(510) 346-2400
(510) 346-2402 fax
6487 N. BlackstoneAve.
Fresno, CA 93710
(559) 449-8258
(559) 449-0302 fax
230 S. Lake Ave., #2
Pasadena, CA 91101
(626) 229-0636
(626) 229-0638 fax
19030 Ventura Blvd.
Tarzana, CA 91356
(818) 345-7637/7827
(818) 609-1246 fax
1287 Morena Blvd.
San Diego, CA 92110
(619) 276-9560
(619) 276-4359 fax
KENTUCKY
4131 Shelbyville Rd.
Louisville, KY 40207
(502) 895-4775
(502) 895-9874 fax
MARYLAND
Belair Beltway Plaza
7632 Belair Rd.
Baltimore, MD 21236
(410) 668-8100
(410) 668-9228 fax
The Festival at
Muddy Branch
305 Muddy Branch Rd.
Gaithersburg, MD 20878
(301) 948-0864
(301) 948-0866 fax
NEBRASKA
Plaza II Shpg_ Ctr.
2449 S. 120 u_Street
Omaha, NE 68144
(402) 330-2290
(402) 330-7675 fax
NEVADA
Eastern Beltway Shpg. Ctr.
2050 East Serence Ave.
Suite 620-3
Las Vegas, NV 89123
(702) 614-0777
(702) 614-0787 fax
7920 W. Tropical Parkway
Suite 110
Las Vegas, NV 89149
(702) 645-4320
(702) 645-7518 fax
NEW MEXICO
Fiesta Crossings
4770 Montgomery VC NE
Suite A-103
Albuquerque, NM 87109
(505) 683-0800
(505) 883-4970 fax
NEW YORK
Sheridan Centre
3312 Sheridan Drive
Amherst, NY 14226
(716) 631-0153
(716) 833-2423 fax
Kohl's Shopping Plaza
3523A Hempstead Turnpike
Levittown, NY 11756
(516) 520-1233
(516) 520-1293 fax
1577 Ridge Rd. West
Rochester, NY 14615
(585) 865-7190
(585) 865-7214 fax
Northern Lights Shpg. Ctr.
320 Northern Lights Plaza
No. Syracuse, NY 13212
(315) 454-4682
(315) 454-4782 fax
Cross Pointe Shpg. Ctr. 109
101 E. Alex-BeN Rd
CentervilIe, OH 45459
(937) 291-3560
(937) 291-0076 fax
Civic Center Plaza
2256Waycross Rd.
Forest Park, OH 45240
(513) 522-7575
(513) 522-7580 fax
Shoppes of Kenwood II
7714 B Montgomery Rd.
Cincinnati, OH 45236
(513) 791-7930
(513) 791-7934 fax
5160 Great Northern Plaza
North Olmsted, OH 44070
(440) 734-2755
(440) 734-2799 fax
Cranston Center
5831 Sawmill Rd.
Columbus, OH 43017
(614) 760-9399
(614) 760-9331 fax
104 Boardman-Poland Rd.
Youngstown, OH 44512
(330) 758-1828
(330) 758-1332 fax
3109West Market St_et
Fairlawn, OH 44333
(330) 864-6700
(330) 864-6702 fax
OKLAHOM_A
3710 NW 50 'H St.
Oklahoma City, OK 73112
(405) 947-4436
(405) 947-0886 fax
OREGON
4130 SW Lombard Ave.
Ste 110
Beaverton, OR 97005
(503) 574-2696
(503) 574-2762 fax
PENNSYLVANIA
Great Southern Shpg. Ctr.
1155 Washington Pike
BridgevilIe, PA 15017
(412) 221-4568
(412) 221-0145 fax
Lincoln Court Shpg. Ctr.
245 Lancaster Pike
FrazecPA 19355
(610) 651-0570
(610) 651-0572 fax
TENNESSEE
2200 N. Germantown Pky.
Ste. 7
Cordova, TN 38016
(901) 266-0333
(901) 266-0811 fax
Market Place Shpg. Ctr.
9309A Kingston Pike
Knoxville, TN 37922
(865) 690-0785
(865) 694-9985 fax
The Maples Shpg. Ctr. 10244 W. National Ave.
1010 Murfreesboro Rd. West Allis, WI 53227
Suite 126 (414) 327-7430
Franklin, TN 37064 (414) 327-9875 fax
(615) 599-2949
(615) 599-9663 fax Lakeside Marketplace
11211 120 th Ave.
TEXAS Suite D-067
13536 Preston Rd, Ste 100 Pleasant Prairie, WI
Dallas, TX 75240 53142
(972) 503-9494 (262) 857-3176
(972) 503-9496 fax (262) 857-6815 fax
S. Frisco Village Shpg Ctr
2930 Preston Rd. CANADA
Frisco, TX 75034 Hoover Canada
(469) 633-0555 9012 L'Acadie Blvd.
(469) 633-0745 fax Montreal, Quebec
H4N 2Y8
Westhill Village Shpg. Ctr. (514) 384-8030
7613 Westheimer (514) 384-5940 fax
Houston, TX 77063
(713) 334-0199 Hoover Canada
(713) 334-1341 fax 4151 North Service Rd.
Burlington, Ontario
L7R 4A8
N. Towne Plaza Shpg. Ctr.
6900 San Pedro, Suite 137 (905) 335-3311
San Antonio, TX 78216
(210) 829-1906 (905) 335-3320 fax
(210) 805-0612 fax
19507 1-45, Suite #900
Cypresswood Ct.
Spring, TX 77388
(281) 288-5803
(281) 288-5876 fax
1823 West Bay Area Blvd.
Webster, TX 77598
(281) 338-2830
(281) 338-2835 fax
1491 Lee _evino, Ste D
El Paso, TX 79936
(915) 598-8633
(915) 598-8610
UTAH
6935 Park Centre Drive
Salt Lake City, UT 84121
(801) 304-0516
(801) 304-0546 fax
VIRGINIA
Tuckernuck Sq. Shpg. Ctr.
9018 W. Broad Street
Richmond, VA 23294
(804) 747-8249
(804) 747-3395 fax
WASHINGTON
837 NE Northgate Way
Seattle, WA 98125
(206) 367-4425
(206) 367-0632 fax
North 2911 Monroe
Spokane, WA 99205
(509) 328-9514
(509) 328-9562 fax
WEST VIRGINIA
35 Riverwalk Plaza
S. Charleston, WV 25303
(304) 744-4748
(304) 744-4779 fax
WISCONSIN
Stein Mart Plaza
2791 South Oneida St.
Ashwaubenon, WI 54304
(920) 494-9441
(920) 494-5059 fax
Midvale Plaza
505 S. Midvale Blvd.
Madison, Wl 53711
(608) 238-3470
(608) 238-0120 fax 1/06
02
When using an electrical appliance, always follow basic precautions,
including the following:
READ ALE INSTRUCTIONS BEFORE USING APPLIANCE.
electric shock, or injury:
•Do not use outdoors or on wet • Do not put any object into
surfaces, openings. Do not use with any
opening blocked; keep free of dust,
•Close supervision is necessary lint, hair, and anything that may
when any appliance is used by or reduce air flow.
near children. Do not allow vacu-
um cleaner to be used as a toy or •Do not pull or carry by cord,
to run unattended at any time. use cord as a handle, close door
on cord or pull cord around sharp
•Keep hair, loose clothinR, fin- edges or corners. Do not run
gets, feet and all parts of body appliance over cord. Keep cord
away from openings, rotatinR aRi- away from heated surfaces.
tators and other movinR parrs. Do
not operate cleaner in hare feet or •Always disconnect cord from elec-
when wearing open toe shoes or trical outlet before servicing the
sandals, cleaner.
• Do not pick up anything that is • Turn cleaner off and unplug
burning or smokmR, such as ciga- when not in use.
rettes, matches, or_hot ashes. • Do not unplug by pulling on
•Do not use to pick up flamma- cord. To unpluR, grasp the plug,
ble or combustible liqm'ds such as not the cord. I_ever handle plug or
gasoline or fine wood sandinRs or appliance with wet hands.
use in areas where they may I)e
present. • The use of an extension cord is
not recommended.
• Avoid Ricking up hard, sharp
objects with the cleaner. They may • Do not use with damaged cord
damage the cleaner, or pluR. If appliance is not working
as it st_ould, has been dropped,
• Always turn off this appliance damaged, left outdoors, or
before connecting or disconnect- dropped into water, take it to a
ing hose. Hoover Sales and Service Center
or Authorized Hoover Warranty
• Unplug cleaner before connect- Service Dealer.
ing the powered pet hair cleaning
tool. •Use vacuum cleaner only for its
intended use as described in the
•Do not use without dirt cup or instructions.
filters in place. Empty cup fre-
quently when picking up very fine • Use only attachments recom-
materials such as powder, mended by Hoover; others may
cause hazards.
• Use extra care when cleaning on
stairs.
Owner's Manual )
English -_ pages 3-20
ESPANOL _ p,_g 22-34
Important safeguards ........ 3
Unpacking ................ 4
Carton contents ............ 4
Cleaner description .......... 6
Using the cleaner ........... 7
Transporting ............. 7
Embedded DirtFinder TM
feature (some models) ...... 8
Cleaning rugs ............ 8
Using tools ........... 9-10
Powered pet hair cleaning
tool ............... 14-16
Cleaning stairs ......... 10
Maintenance .............. 10
Emptying dirt cup ...... 10-11
Filters ................. 11
Replacing headlight ....... 12
Luorication ............. 17
Clearing blockages ........ 16
Agitator brush roll ...... 12-13
Agitator brush roll belt ..... 13
Replacing powered pet hair
cleaning tool brush roll. 14-15
Replacing powered pet hair
oeaning tool belt ........ 15
Thermal protector ........ 15
Service ................. 17
Troubleshooting ........... 18
Warranty ................ 19
Parts & accessories mail
reorder form ............ 29
© 2006 The Hoover Company
www.hoover.oom
O3
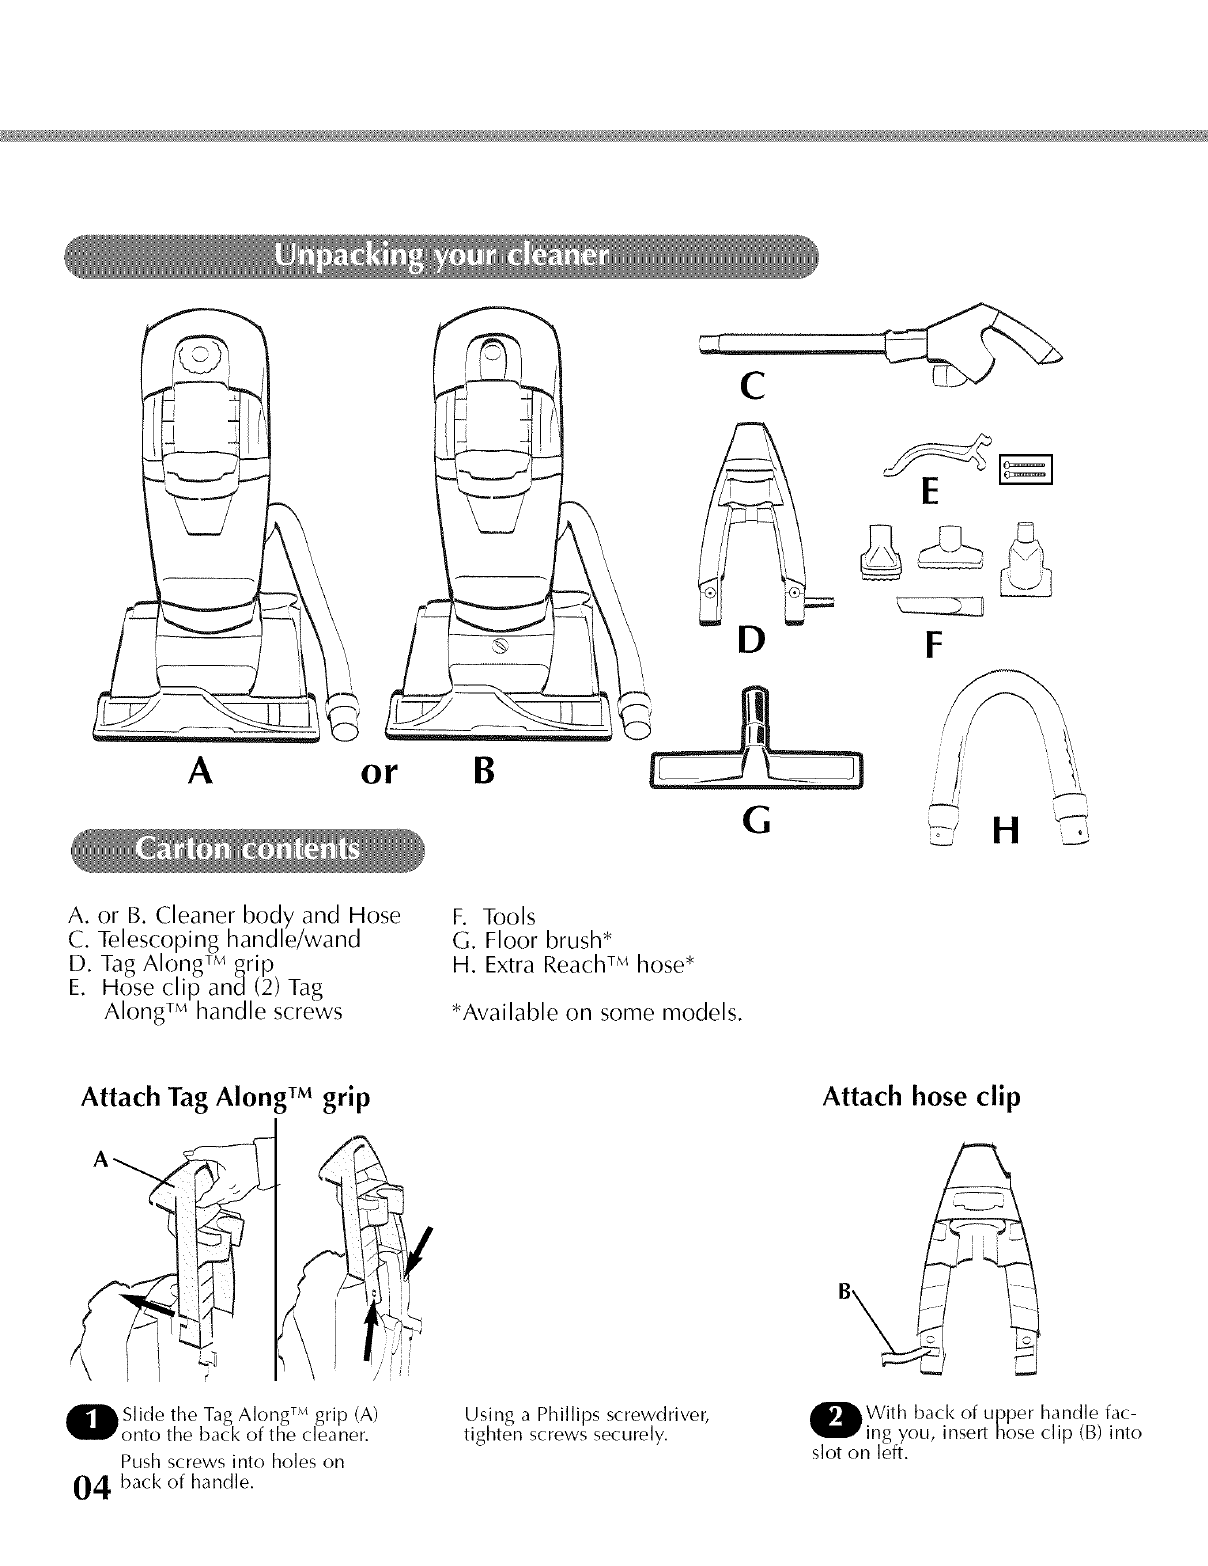
A or B
m
2
!
C
A. or B. Cleaner body and Hose
C. Telescoping handle/wand
D. Tag Along TM grip
E. Hose clip and (2) Tag
Along TM handle screws
F. Tools
G. Floor brush*
H. Extra Reach TMhose*
*Available on some models.
Attach Tag Along TMgrip
Q TM
Slide the Tag Along grip (A)
onto the back of the cleaner.
Push screws into holes on
04 back of handle.
Using a Phillips screwdriver,
tighten screws securely.
Attach hose clip
OWith back of upper handle fac-
ing you, insert hose clip (B) into
slot on left.

Position handle
E
/
The telescoping handle/wand
(C) needs to be positioned and
secured inplace. Ali_n the telescop-
ing handle/wand with the recesses on
the upper handle. Push the wand all
the way down into the cup (D) until
the handle/wand release latches (E)
snap into position.
Remove telescoping
handle/wand
E\
Oo remove the telescoping
handle/wand for tool use,
push down either release latch (E)
and pull upwards to remove.
Attach hose
Otretch hose and guide into hose
clip. Align button on hose end (F)
with hole on hose connector (G). Slide
hose end over connector until the but-
ton "pops up" into place. To remove
hose from hose connector, press button
and pull hose end to release.
The hose connector swivels 360 ° for
convenience.
Position tools
Towered pet hair cleaning
H) is stored on the front of
the cleaner. Place bottom of tool into
recessed area first, pivot tool up and
snap in place.
<!z
mapcrevice tool (I), dusting brush
, and furniture nozzle (K) into
storage areas on back of cleaner.
(Cont'd) --_ 05

Features
g Use the following to identify the
parts and features of your cleaner.
Your model will resemble one of the two
illustrations shown below.
1. Soft grip handle/wand assembly
2. Tag Along TMgrip
3. Powered pet hair cleaning too[
4. POWER button
5. Carry handle
6. Lifetime HEPA filter
7. Dirt cup
8. Headlight
9. Edge groomers
10. Furniture guard
11. Embedded DirtFinder Ts_(some
models)
12. Surface Command Ts_control dial
(some models)
13. Surface Selector (some models)
14. Hose connector
15. Hose
16. Telescoping handle/wand
17. Hose clip
18. Dusting brush
19. Furniture nozzle
20. Crevice tool
21. Cord hooks
22. Handle release pedal
23. Soft wheels
1/
9\
5
6
14
17
21
8
9
Operate cleaner only at voltage specified on data plate on the back of the cleaner.
This cleaner is intended for household use.
Polarized plug
To reduce the risk of electric shock, this appliance has a polarized plug (one blade is wider than the other). This plug will fit in a
polarized outlet only one way.
Ifthe plug does not fit fully in the outlet, reverse the plug. If it still does not fit, contact a qualified electrician to install the proper
outlet. Do not change the plug in any way.
06
DO NOT USE CLEANER OUTDOORS
or ON DAMP or WET SURFACES.
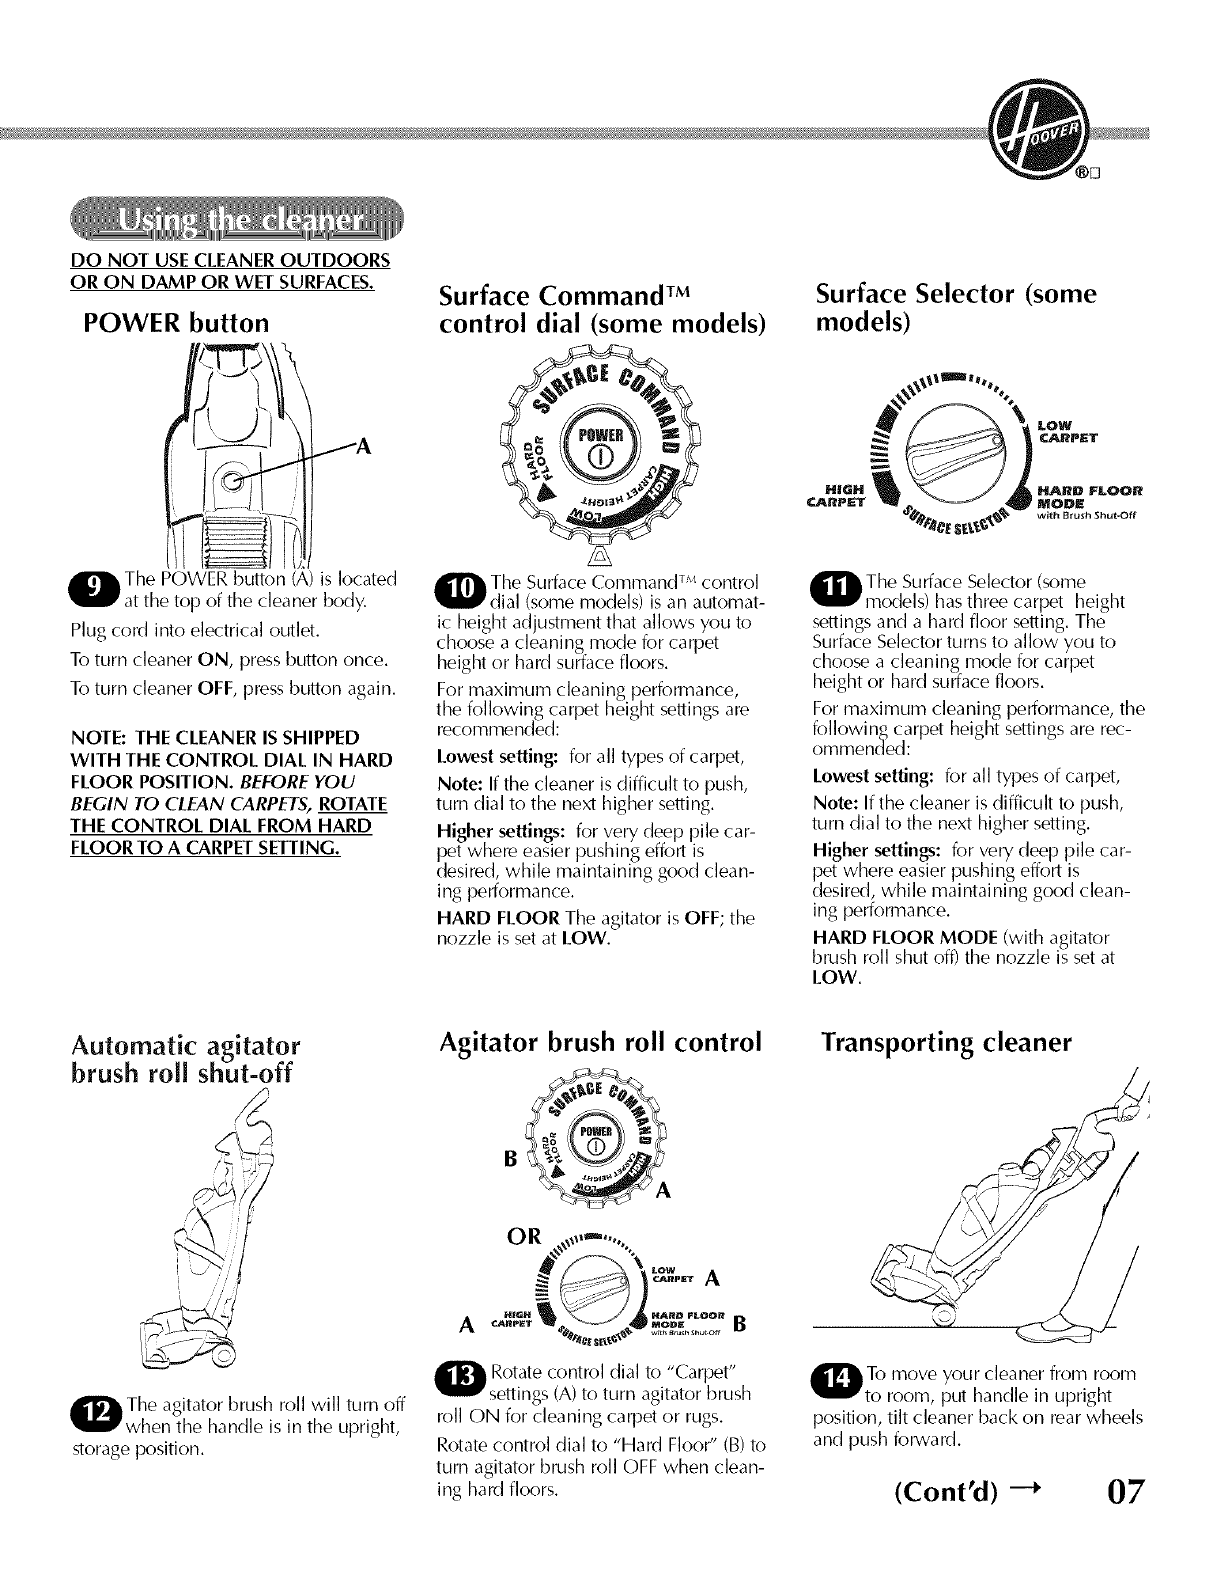
POWER button
OThe POWER button (A) is located
at the top of the cleaner body.
Plug cord into electrical outlet.
To turn cleaner ON, pressbutton once.
To turn cleaner OFF, pressbutton again.
NOTE: THE CLEANER IS SHIPPED
WITH THE CONTROL DIAL IN HARD
FLOOR POSITION. BEFORE YOU
BEGIN TO CLEAN CARPETS, ROTATE
THE CONTROL DIAL FROM HARD
FLOOR TO A CARPET SETTING.
Surface Command TM
control dial (some models)
The Surface Command TM control
(some models) is an automat-
ic height adjustment that allows you to
choose a cleaning mode for carpet
height or hard surface floors.
For nqaxinqumcleaning performance,
the following carpet height settingsare
recornrnended:
Lowest setting: for all types of carpet,
Note: If the cleaner is difficult to push,
turn dial to the next higher setting.
Higher settings: for very deep pile car-
pet where easier pushing effort is
desired, while maintaining good clean-
ing performance.
HARD FLOOR The agitator is OFF; the
nozzle is set at LOW.
Surface Selector (some
models)
Q The SurfaceSelector (some
models) has three carpet height
settingsand a hard floor setting. The
SurfaceSelector turns to allow you to
choose a cleaning mode for carpet
height or hard surface floors.
For rnaximurn cleaning performance, the
following carpet height settingsare rec-
ommended:
Lowest setting: for all types of carpet,
Note: If the cleaner is difficult to push,
turn dial to the next higher setting.
Higher settings: for very deep pile car-
pet where easier pushing effort is
desired, while maintaining good clean-
ing performance.
HARD FLOOR MODE (with agitator
brush roll shut off) the nozzle is set at
LOW,
Automatic agitator
brush roll shut-off
Q he agitator brush roll will turn off
when the handle is in the upright,
storageposition.
Agitator brush roll control
OR
HiGH
_ otate control dial to "Carpet"
settings (A)to turn agitator brush
roll ON for cleaning carpet or rugs.
Rotate control dial to "Hard Floor" (B)to
turn agitator brush roll OFF when clean-
ing hard floors.
Transporting cleaner
/
Q To rnove your cleaner frorn room
to room, put handle in upright
position, tilt cleaner back on rearwheels
and push forward.
(Cont'd) -_ 07
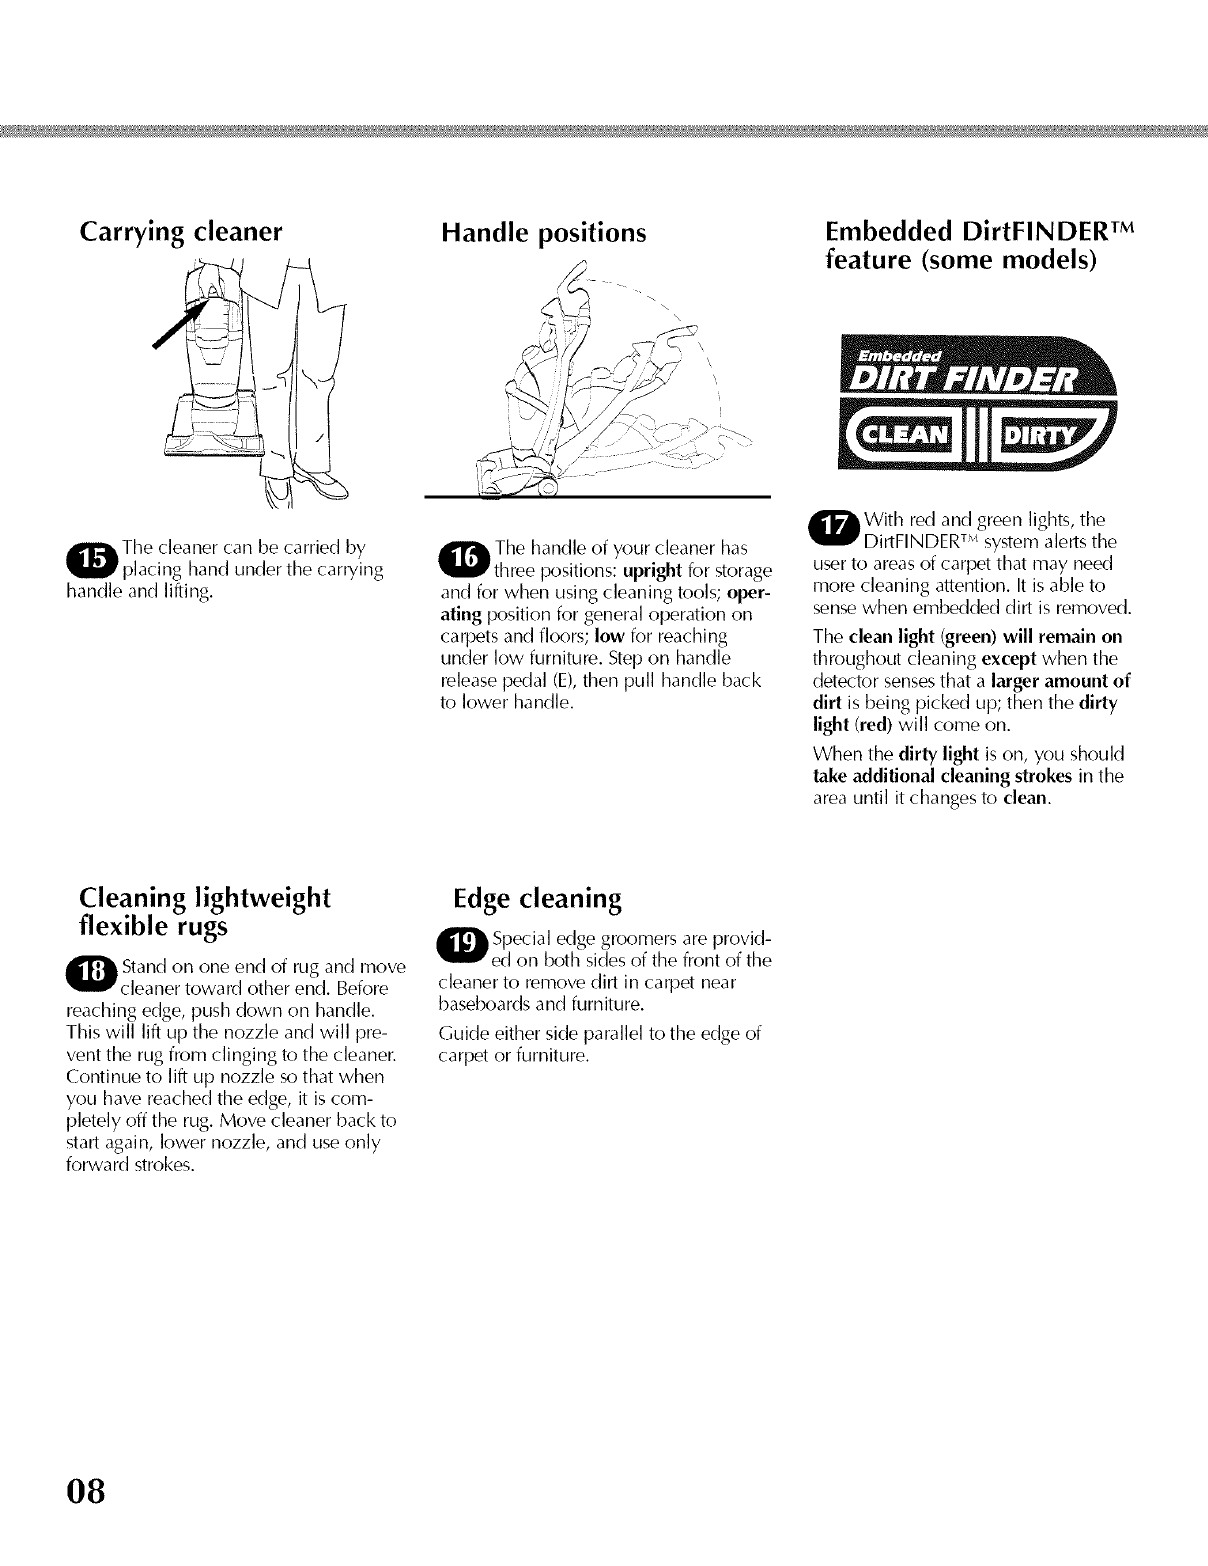
Carrying cleaner
_i_ he cleaner can be carried by
placing hand under the carrying
handle and lifting.
Handle positions
The handle of your cleaner has
positions: uprightfor storage
and for when using cleaning tools; oper-
ating position for general operation on
carpets and floors; low for reaching
under low furniture. Step on handle
release pedal (E),then pull handle back
to lower handle.
Embedded DirtFINDER TM
feature (some models)
With red and green lights, the
DirtFINDER TMsystem alerts the
user to areas of carpet that may need
more cleaning attention. It is able to
sense when embedded dirt is removed.
The clean light (green) will remain on
throughout cleaning except when the
detector sensesthat a larger amount of
dirt is being picked up; then the dirty
light (red) will come on.
When the dirty light is on, you should
take additional cleaningstrokes in the
area until it changes to clean.
Cleaning lightweight
flexible rugs
Q tand on one end of rug an(] move
cleaner toward other end. Before
reaching edge, push down on handle.
This will lift up the nozzle and will pre-
vent the rug from clinging to the cleaner.
Continue to lift up nozzle so that when
you have reached the edge, it is com-
pletely off the rug. Move cleaner back to
start again, lower nozzle, and use only
forward strokes.
Edge cleaning
_[_ pecial edge groomers are provid-
ed on both sidesof the front of the
cleaner to remove dirt in carpet near
baseboardsand furniture.
Guide either side parallel to the edge of
carpet or furniture.
O8
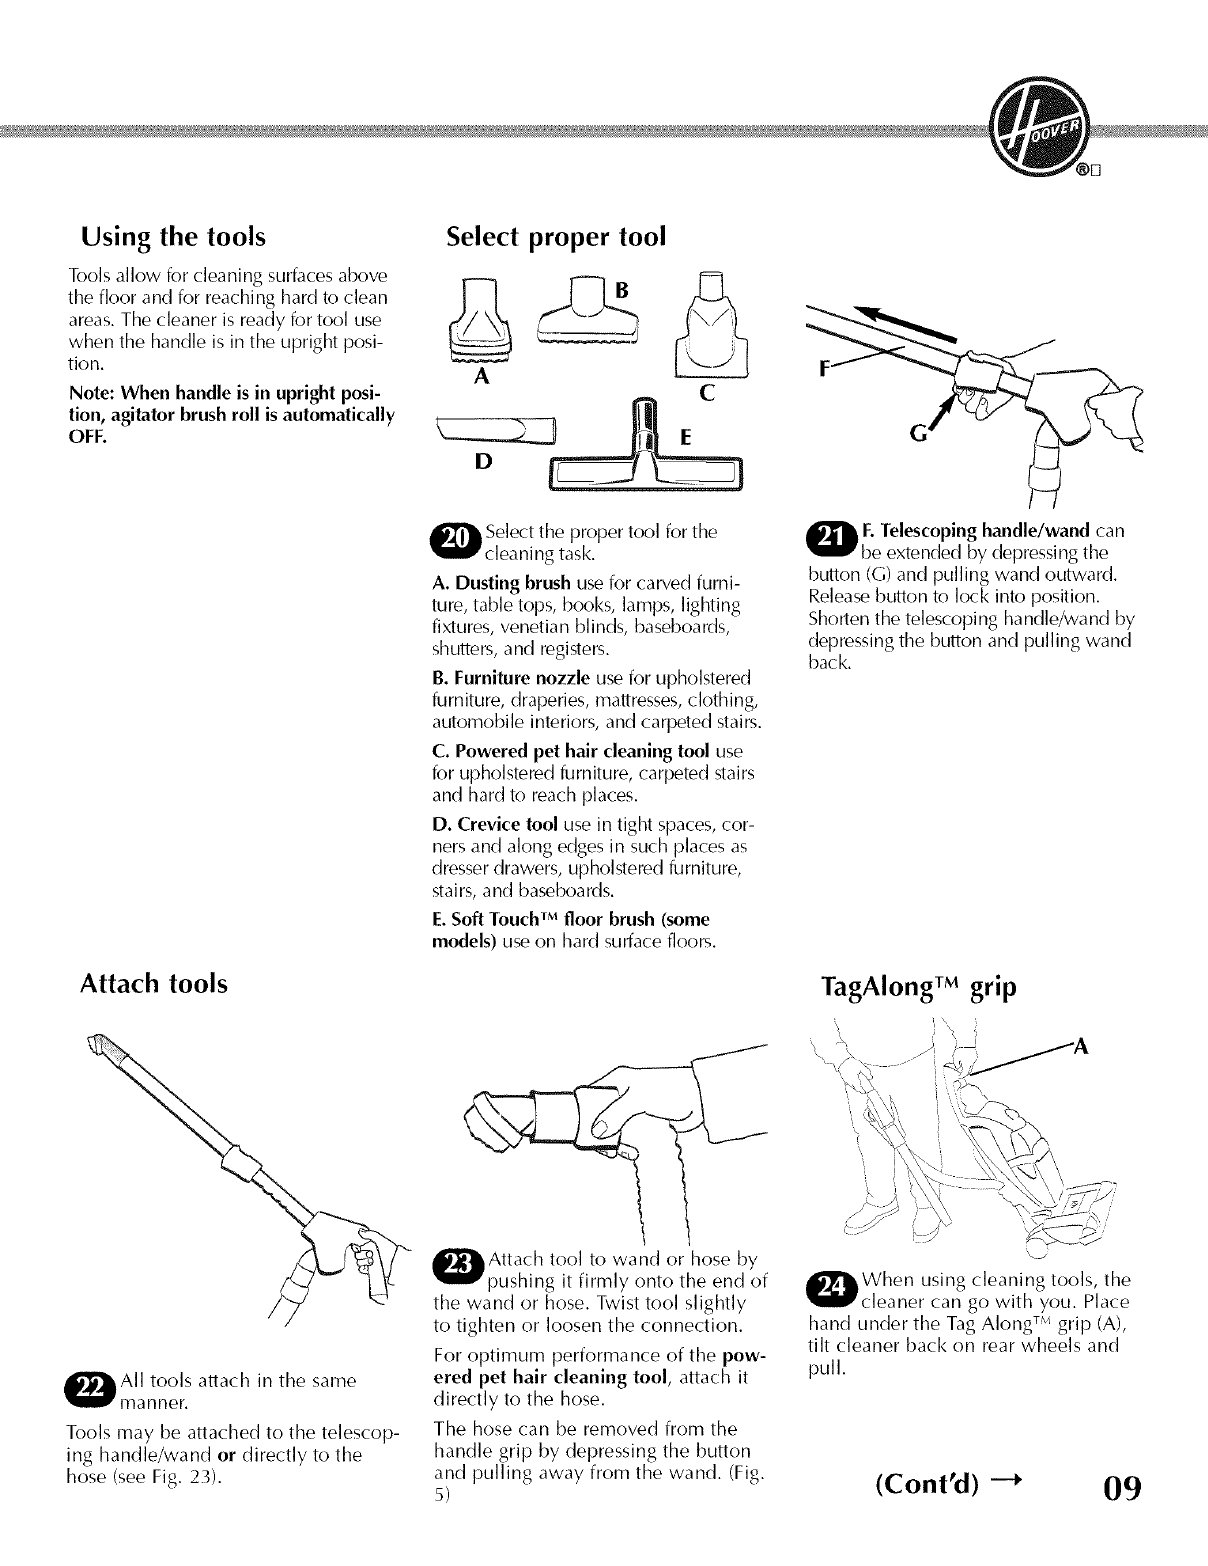
Using the tools
Tools allow for cleaning surfaces above
the floor and for reaching hard to clean
areas. The cleaner is ready for tool use
when the handle is in the upright posi-
tion.
Note: When handle is in upright posi-
tion, agitator brush roll is automatically
OFF.
Attach tools
Select proper tool
A
D
C
O elect the proper tool for the
cleaning task.
A. Dusting brush use for carved furni-
ture, table tops, books, lamps, lighting
fixtures, venetian blinds, baseboards,
shutters,and registers.
B. Furniture nozzle use for upholstered
furniture, draperies, mattresses,clothing,
automobile interiors, and carpeted stairs.
C. Poweredpet hair cleaningtool use
for upholstered furniture, carpeted stairs
and hard to reach places.
D. Crevice tool use in tight spaces,cor-
ners and along edges in such places as
dresserdrawers, upholstered furniture,
stairs,and baseboards.
E.Soft TouchTM floor brush(some
models) use on hard surface floors.
Q E Telescoping handle/wand can
be extended by depressing the
button (G) and pulling wand outward.
Release button to lock into position.
Shorten the telescoping handle/wand by
depressing the button and pulling wand
back.
TagAIong TM grip
IAI[ tools attach in the same
manner.
Tools may be attached to the telescop-
ing handle/wand or directly to the
hose (see Fig. 23).
Attach tool to wand or hose by
pushing it firmly onto the end of
the wand or hose. Twist tool slightly
to tighten or loosen the connection.
For optimum performance of the pow-
ered pet hair cleaning tool, attach it
directly to the hose.
The hose can be removed from the
handle grip by depressing the button
and pulling away from the wand. (Fig.
5)
When using cleaning tools, the
cleaner can go with you. Place
hand under the Tag Along TM grip (A),
tilt cleaner back on rear wheels and
pull.
(Cont'd) --_ 09

How to clean tools
To clean the hose and the powered
hand tool, wipe off dirt with a cloth
dampened in a mild detergent. Rinse
with a damp cloth. Do not submerge
powered pet hair cleaning tool in
water.
Cleaning tools may be washed in
warm water with a detergent. Rinse
and air dry before using.
Extra Reach TM hose
(some models)
Some models include an Extra
ReachT_ hose to provide you with a
20 foot reach (when connected to the
regular hose), to allow easier cleaning
of stairs and hard to reach high
places.
Press POWER button to turn cleaner
OFF. Remove regular hose from
handle/wand. (Fig. 5)
attach Extra'each '1_ hoseto
regular hose, align button (A) on
Extra ReachT_ hose end with hole (B)
on regular hose end. The button will
"pop up" when the hose ends are
secured in place.
O Next, attach opposite end of
extra reach hose to hose con-
nector on handle/wand. Align the but-
ton (C) on hose connector with hole
(D) on end of Extra ReachT_ hose.
Slide the Extra ReachT_ hose end onto
the hose connector until the button
"pops up" in place.
To remove hose from hose connector,
press button on hose connector and
pull hose end to release. 3 o
The hose connector swivels. 60 for
convenience.
Soft Touch TMfloor brush
(some models) /
eiHard surface flooring may be
cleaned using the SoftTouchTM
floor brush. Attach the floor brush to the
end of the telescoping handle/wand.
Extend the telescoping wand to reach
the floor.
10
Stair cleaning
Q se the hose and the powered
pet hair cleaning tool for stair
cleaning.
Always place the cleaner at the bottom
of the stairs. Clean from bottom to top.
CAUTION: To avoid personal injury, and
to prevent the cleaner from falling, use
extra care if the cleaner is placed on
stairs.
NOTE: Maximum performance of the
powered hand tool will be achieved if
the powered pet hair cleaning tool is
used on the end of the hose without the
telescoping wand.
Familiarize yourself with these home
maintenance tasksas proper use and
care of your cleaner will ensure contin-
ued cleaning effectiveness.
Dirt cup
When to empty
It is recommended that the dirt cup be
emptied after every use or before the dirt
reachesthe top of the dirt cup.
How to empty
Disconnect cleaner from electrical out-
let. Do not use cleaner without dirt cup
or filters in place.
Place the cleaner in the upright position
before removing dirt cup.
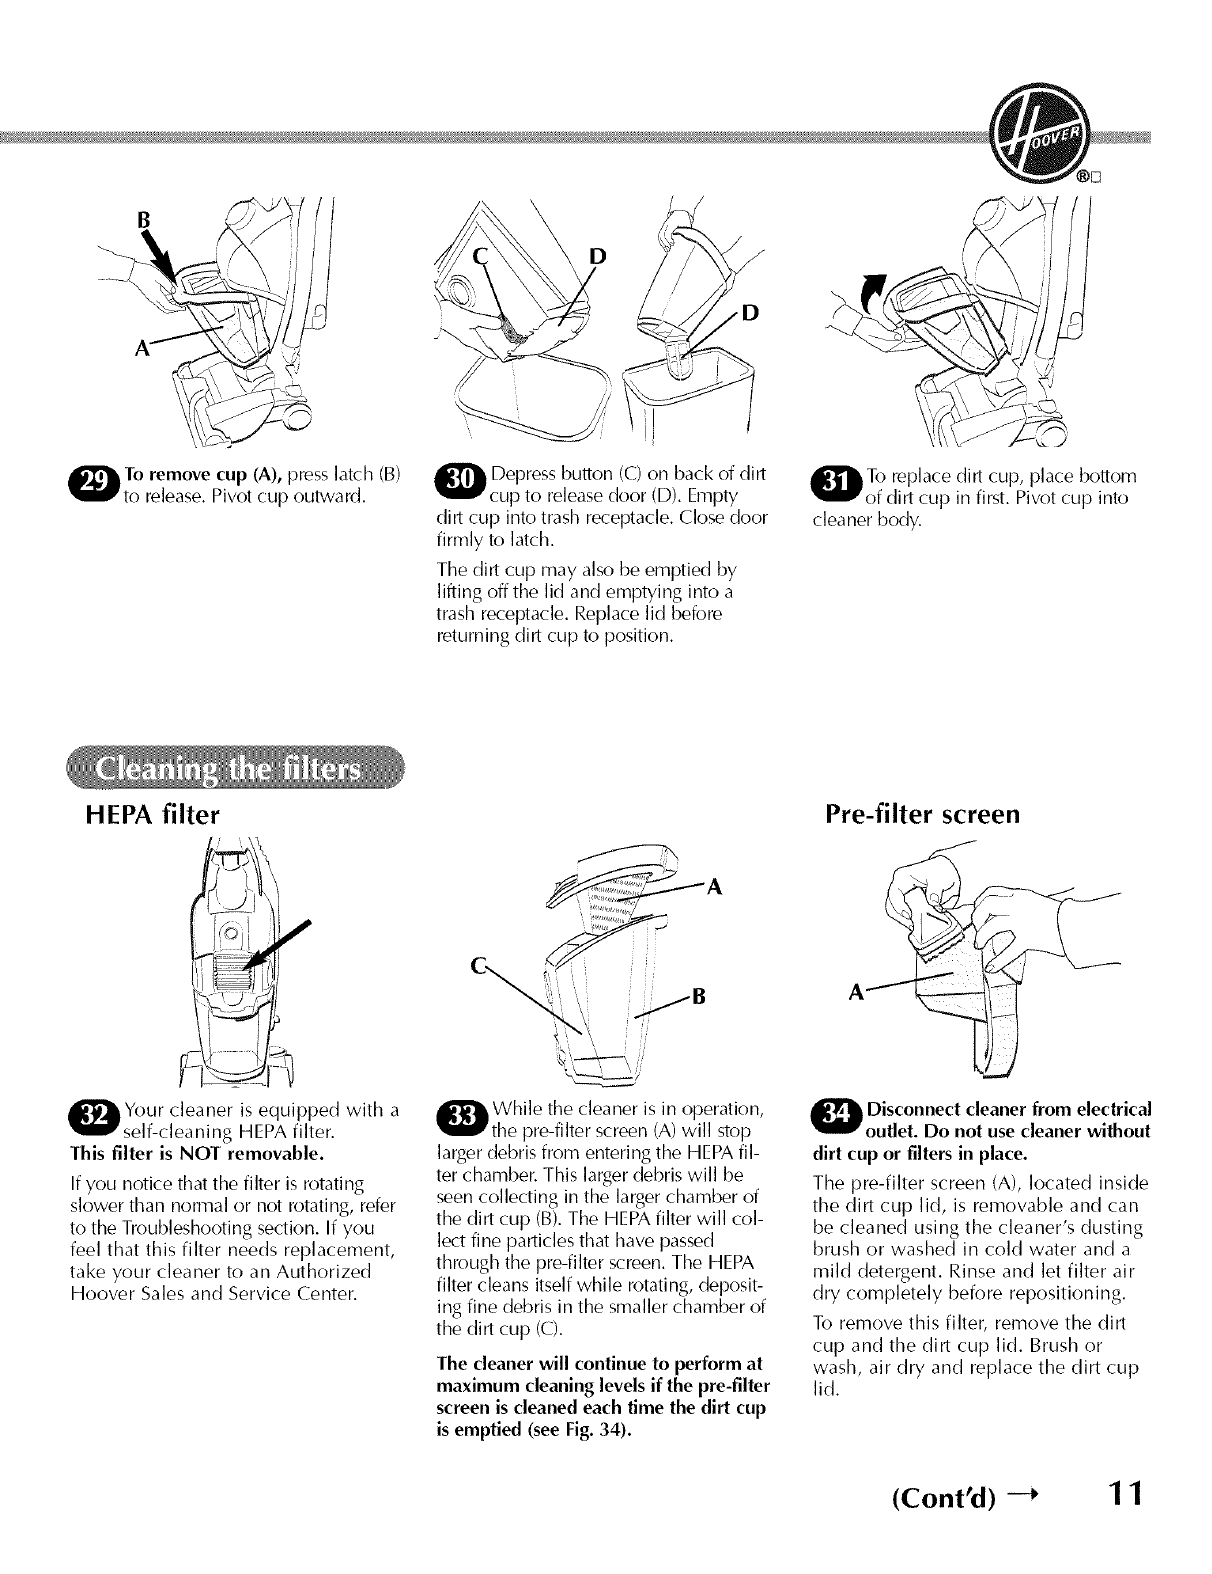
To remove cup (A), press latch (B)
to release. Pivot cup outward.
HEPA filter
Q epressbutton (C) on back of dirt
cup to release door (D). Empty
dirt cup into trash receptacle. Close door
firmly to latch.
The dirt cup may also be emptied by
lifting offthe lid and emptying into a
trash receptacle. Replace lid before
returning dirt cup to position.
QTo replace dirt cup, place bottom
of dirt cup in first. Pivot cup into
cleaner body.
Pre-filter screen
Your cleaner is equipped with a
self-cleaning HEPA filter.
This filter is NOT removable.
If you notice that the filter is rotating
slower than normal or not rotating, refer
to the Troubleshooting section. If you
feel that this filter needs replacement,
take your cleaner to an Authorized
Hoover Sales and Service Center.
Q While the cleaner is in operation,
the pre-filter screen(A) will stop
larger debris from entering the HEPA fil-
ter chamber. This larger debris will be
seen collecting in the larger chamber of
the dirt cup (B).The HEPAfilter will col-
lect fine particles that have passed
through the pre-filter screen. The HEPA
filter cleans itself while rotating, deposit-
ing fine debris in the smaller chamber of
the dirt cup (C).
The cleaner will continue to perform at
maximum cleaning levels if the pre-filter
screen is cleaned each time the dirt cup
is emptied (see Fig. 34).
O isconnect cleaner from electrical
outlet. Do not use cleaner without
dirt cup or filters in place.
The pre-filter screen (A), located inside
the dirt cup lid, is removable and can
be cleaned using the cleaner's dusting
brush or washed in cold water and a
mild detergent. Rinse and let filter air
dry completely before repositioning.
To remove this filter, remove the dirt
cup and the dirt cup lid. Brush or
wash, air dry and replace the dirt cup
lid.
(Cont'd) --* 11
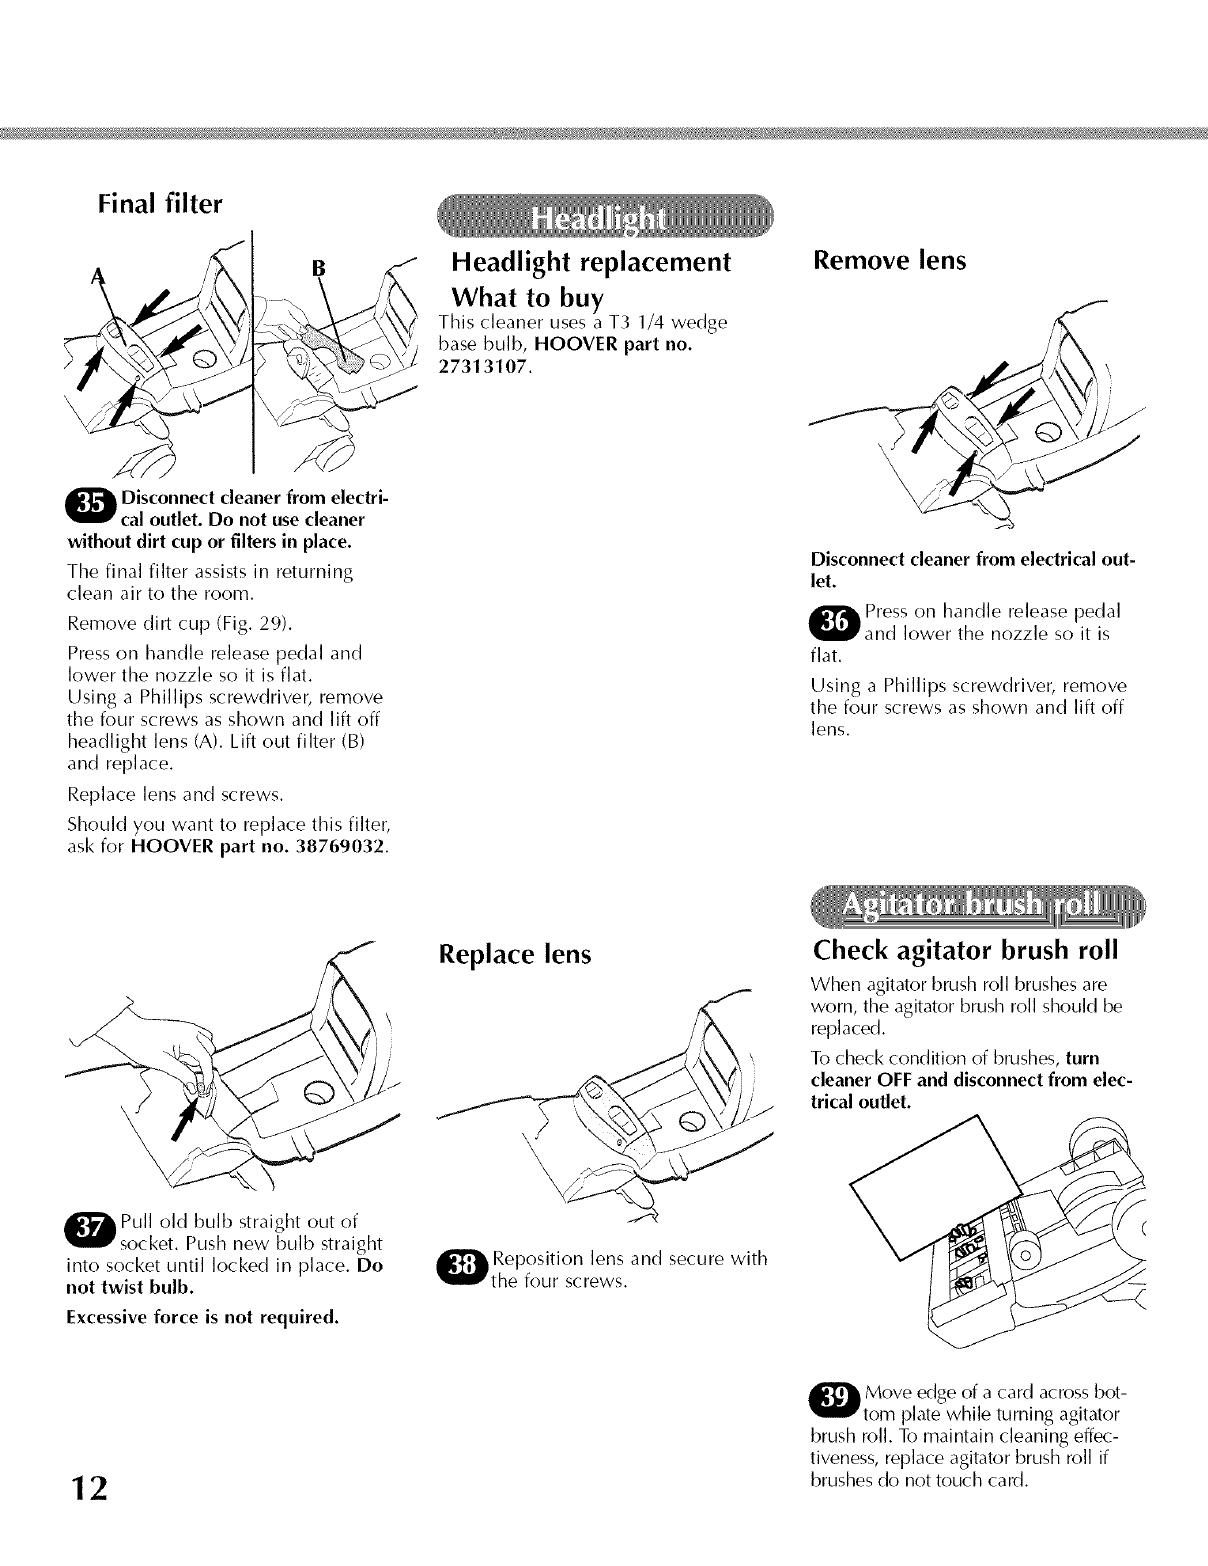
Final filter
BHeadlight replacement
What to buy
This cleaner uses a T3 1/4 wedge
base bulb, HOOVER part no.
27313107.
Remove lens
_ isconnect cleaner from electri-
cal outlet. Do not use cleaner
without dirt cup or filters in place.
The final filter assists in returning
clean air to the room.
Remove dirt cup (Fig. 29).
Presson handle release pedal and
lower the nozzle so it is flat.
Using a Phillips screwdriver, remove
the four screws as shown and lift off
headlight lens (A). Lift out filter (B)
and replace.
Replace lens and screws.
Should you want to replace this filter,
ask for HOOVER part no. 38769032.
Disconnect cleanerfrom electricalout-
let.
Press on handlerelease pedal
lower the nozzle so it is
flat.
Using a Phillips screwdriver, remove
the four screws as shown and lift off
lens.
Pull old bulb straight out of
socket. Push new bulb straight
into socket until locked in place. Do
not twist bulb.
Excessive force is not required.
\
/
Replace lens
O eposition lens and secure with
the four screws.
Check agitator brush roll
When agitator brush roll brushes are
worn, the agitator brush roll should be
replaced.
To check condition of brushes, turn
cleaner OFF and disconnectfrom elec-
trical outlet.
12
O ove edge of a card across bot-
tom plate while turning agitator
brush roll. To maintain cleaning effec-
tiveness, replace agitator brush roll if
brushesdo not touch card.
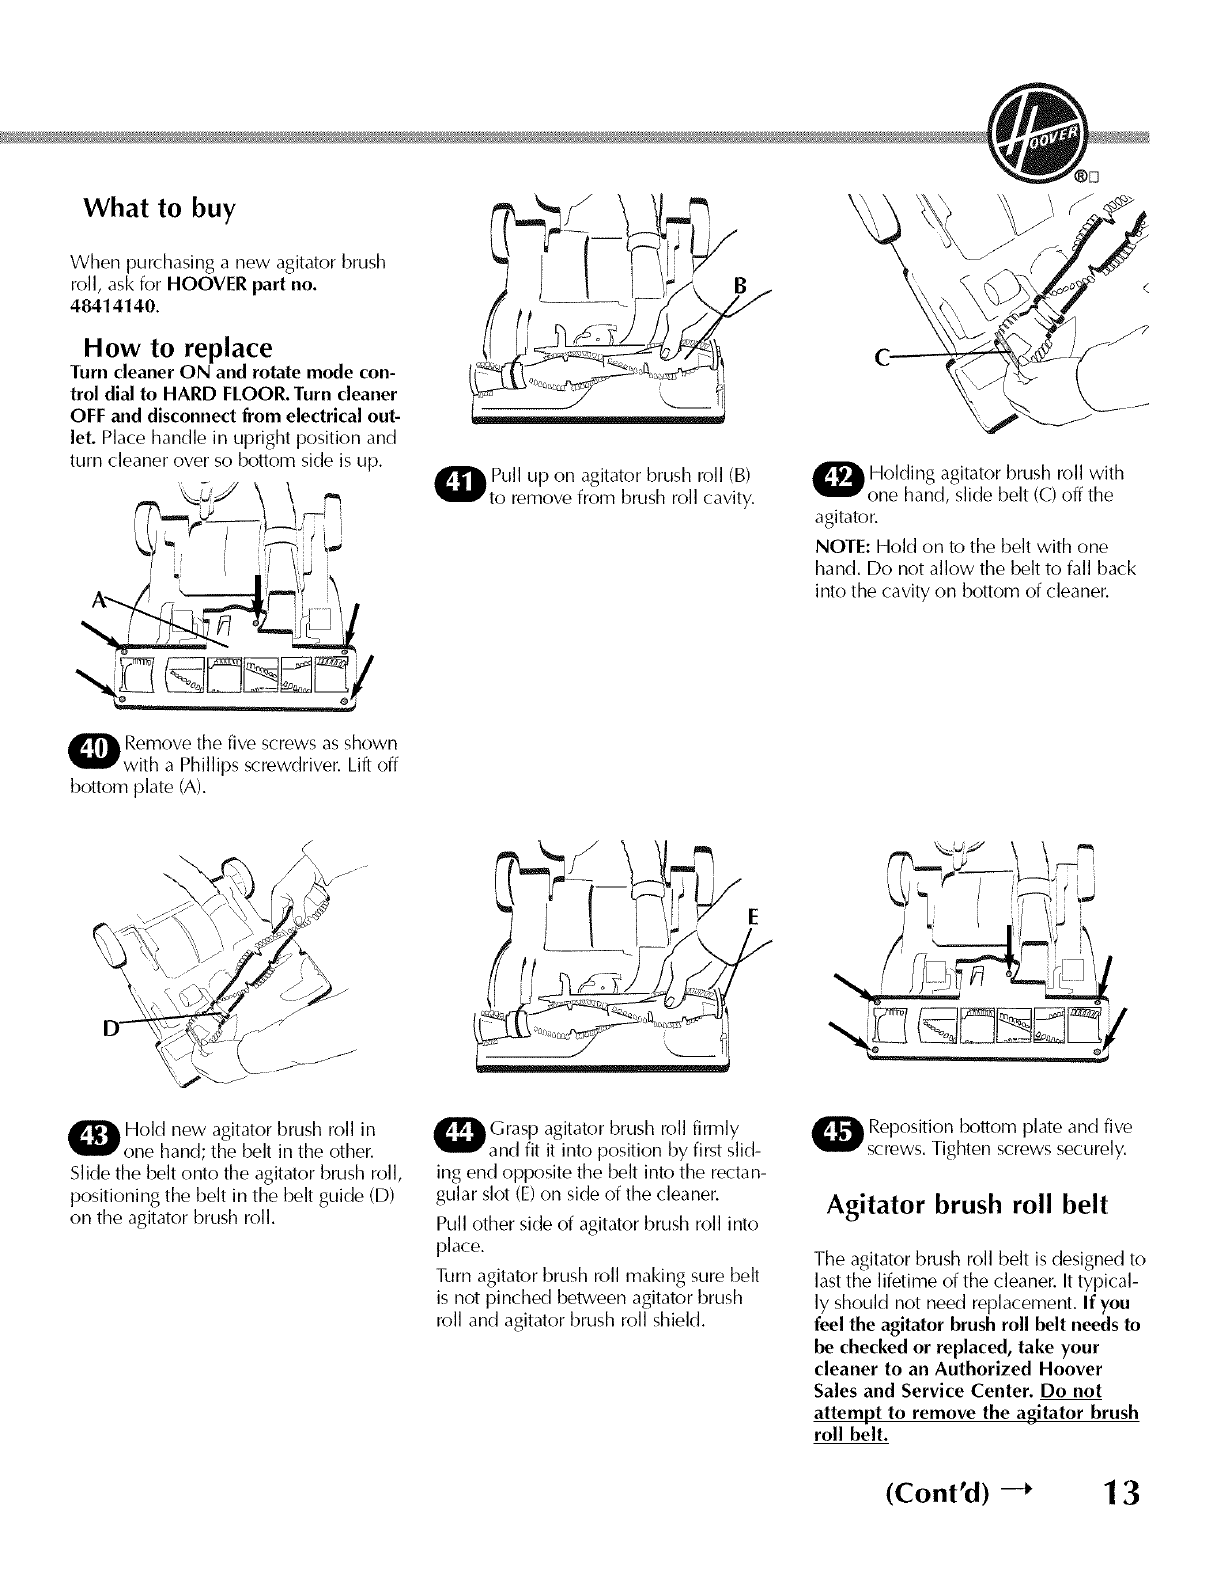
What to buy
When purchasing a new agitator })rush
roll, ask for HOOVER part no.
48414140.
How to replace
Turn cleanerON and rotate mode con-
trol dial to HARD FLOOR.Turn cleaner
OFF and disconnectfrom electricalout-
let. Place handle in upright position and
turn cleaner over so bottom side is up.
" I B
Q Pull up on agitator brush roll (B)
to remove from })rush roll cavity. _ Holding agitator brush roll with
one hand, slide belt (C) off the
agitator.
NOTE: Hold on to the belt with one
hand. Do not allow the belt to fall back
into the cavity on bottom of cleaner.
Q emove the five screws as shown
'with a Phillips screwdriver. Lift off
bottom plate (A).
Q old new agitator brush roll in
one hand; the belt in the other.
Slide the belt onto the agitator brush roll,
positioning the belt in the belt guide (D)
on the agitator brush roll.
Grasp agitator })rush roll firmly
and fit it into position by first slid-
ing end opposite the belt into the rectan-
gular slot (E)on side of the cleaner.
Pull other side of agitator brush roll into
place.
Turn agitator brush roll making sure belt
is not pinched between agitator brush
roll and agitator brush roll shield.
Q eposition bottom plate and five
screws. Tighten screws securely.
Agitator brush roll belt
The agitator brush roll belt is designed to
last the lifetime of the cleaner. It typical-
ly should not need replacement. If you
feel the agitator brush roll belt needs to
be checked or replaced, take your
cleaner to an Authorized Hoover
Sales and Service Center. Do not
attempt to remove the agitator brush
roll belt.
(Cont'd) -_ 13
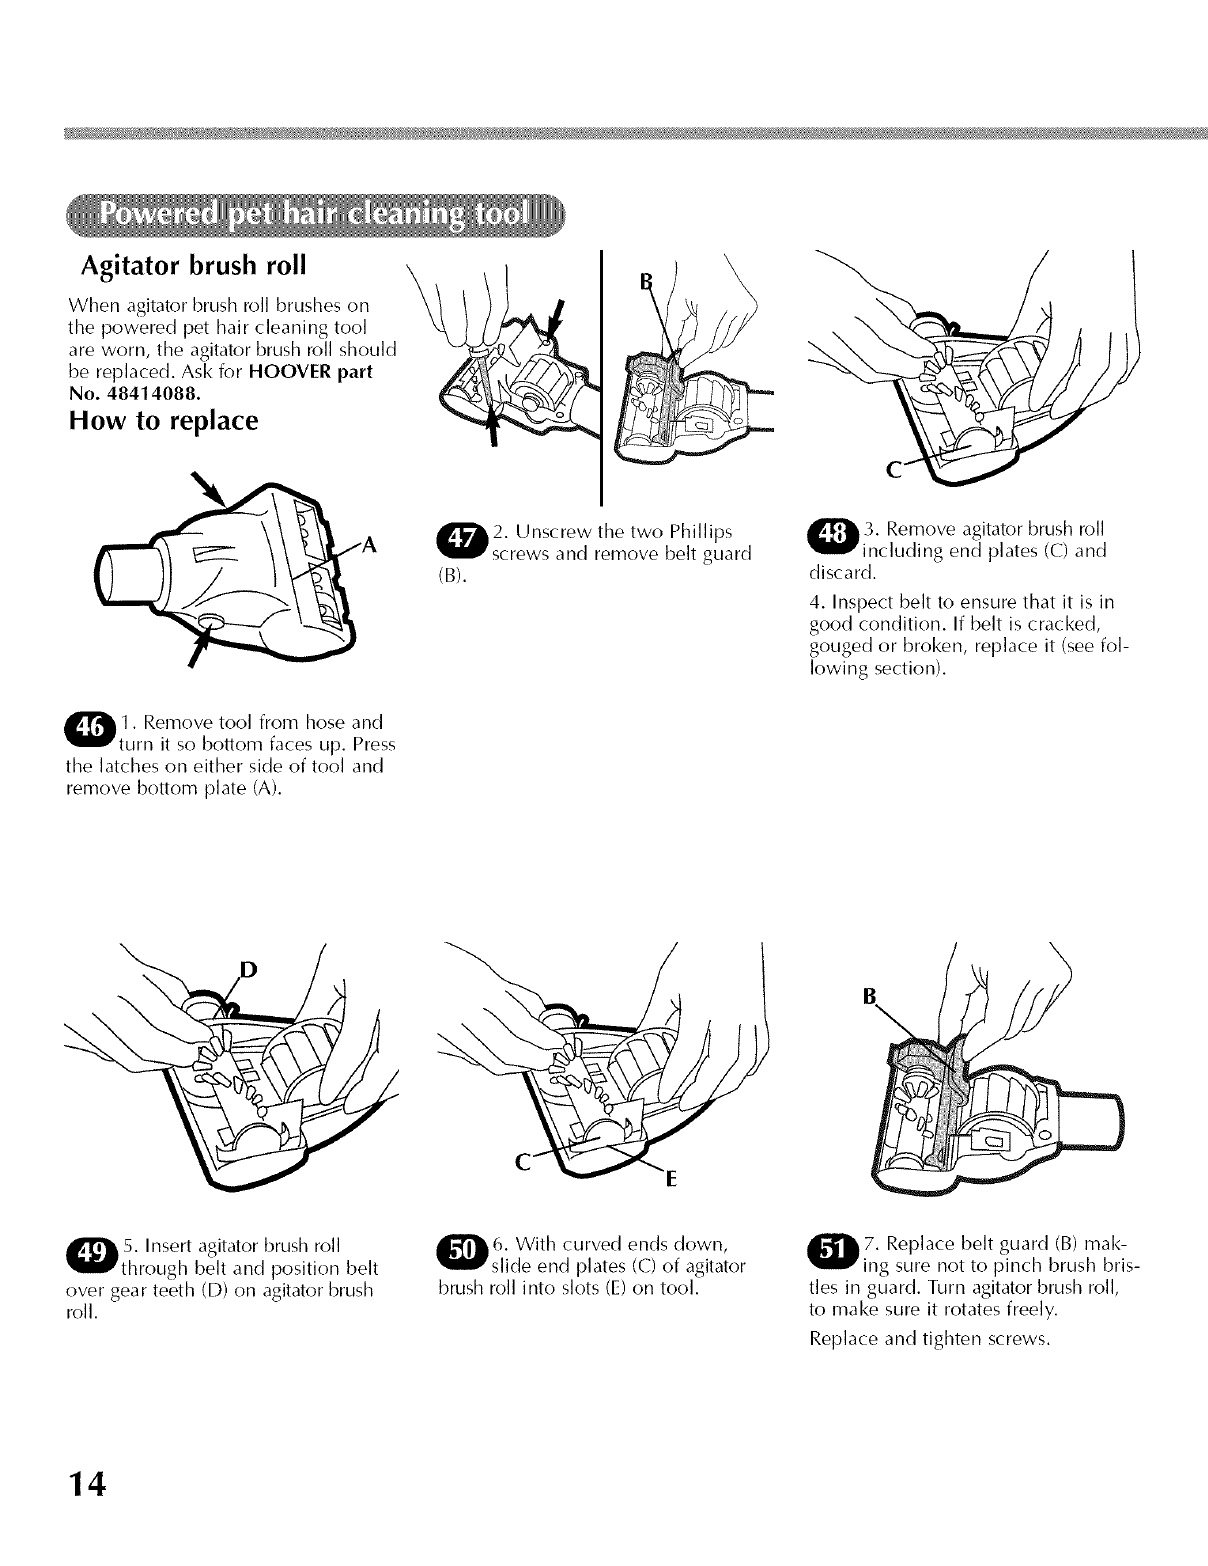
Agitator brush roll
When agitator brush roll brushes on
the powered pet hair cleaning tool
are worn, the agitator brush roll should
be replaced. Ask for HOOVER part
No. 48414088.
How to replace
Q1. Remove tool from hose and
turn it so bottom faces up. Press
the latches on either side of tool and
remove bottom plate (A).
Q2. Unscrew the two Phillips
screws and remove belt guard
(B).
3. Remove agitator })rush roll
including end plates (C) and
discard.
4. Inspect belt to ensure that it is in
good condition. If belt is cracked,
gouged or broken, replace it (see fol-
lowing section).
D
B\
5. Insert agitator })rush roll
through belt and position belt
over gear teeth (D) on agitator })rush
roll.
6. With curved ends down,
slide end plates (C) of agitator
})rush roll into slots (E) on tool.
7. Replace belt guard (B) mak-
ing sure not to pinch })rush bris-
tles in guard. Turn agitator })rush roll,
to make sure it rotates freely.
Replace and tighten screws.
14
8. To replace bottom plate (A),
insert the four tabs on edge of
bottom plate into slots on front of
tool.
Pivot bottom plate down and snap
closed.
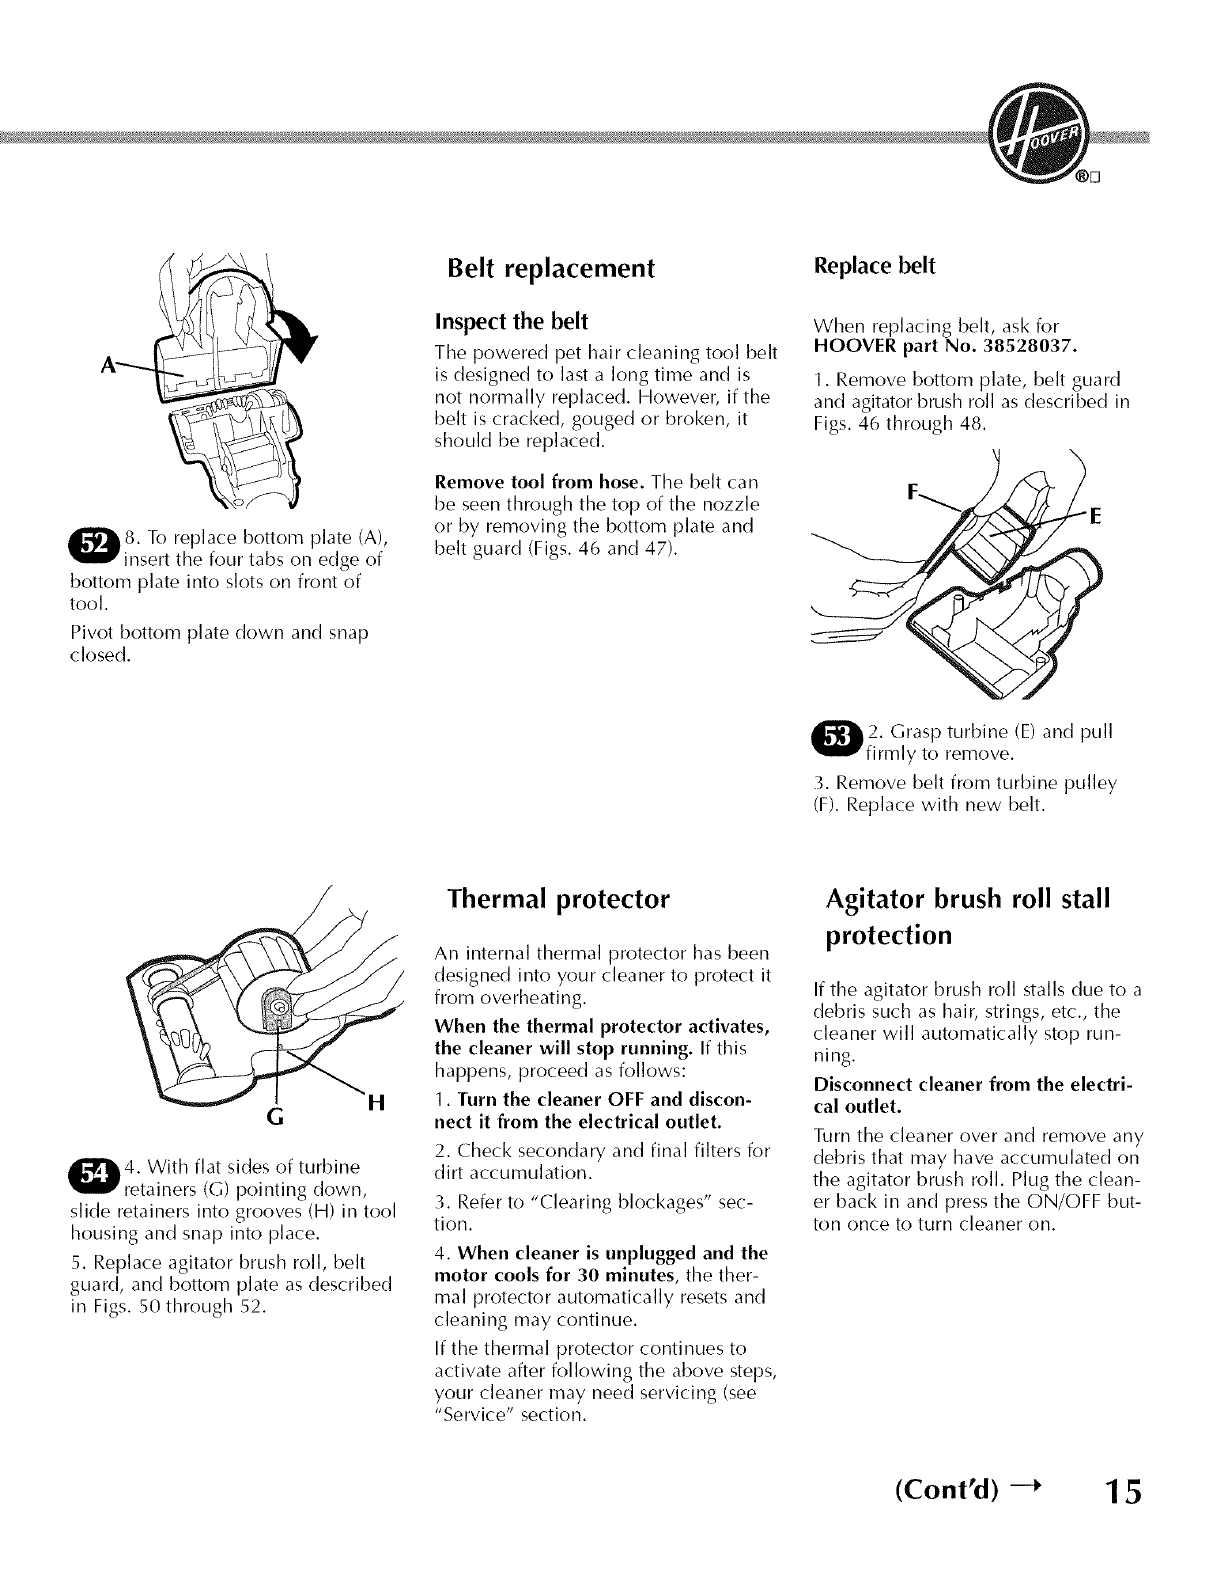
Belt replacement
Inspect the belt
The powered pet hair (leaning tool belt
is designed to last a long time and is
not normally replaced. However, if the
belt is cracked, gouged or broken, it
should be replaced.
Remove tool from hose. The belt can
be seen through the top of the nozzle
or by removing the bottom plate and
belt guard (Figs. 46 and 47).
Replace belt
When replacing belt, ask for
HOOVER part No. 38528037.
1. Remove bottom plate, belt guard
and agitator brush roll as described in
Figs. 46 through 48.
_i_2. Grasp turbine (E) and pull
firmly to remove.
3. Remove belt from turbine pulley
(F). Replace with new belt.
G
4. With flat sides of turbine
retainers (G) pointing down,
slide retainers into grooves (H) in tool
housing and snap into place.
5. Replace agitator brush roll, belt
guard, and bottom plate as described
in Figs. 50 through 52.
Thermal protector
An internal thermal protector has been
designed into your cleaner to protect it
from overheating.
When the thermal protector activates,
the cleaner will stop running. If this
happens, proceed as follows:
1. Turn the cleaner OFF and discon-
nect it from the electrical outlet.
2. Check secondary and final filters for
dirt accumulation.
3. Refer to "Clearing blockages" sec-
tion.
4. When cleaner is unplugged and the
motor cools for 30 minutes, the ther-
mal protector automatically resets ant[
cleaning may continue.
If the thermal protector continues to
activate after following the above steps,
your cleaner may need servicing (see
"Service" section.
Agitator brush roll stall
protection
If the agitator brush roll stalls due to a
debris such as hair, strings, etc., the
cleaner will automatically stop run-
ning.
Disconnect cleaner from the electri-
cal outlet.
Turn the cleaner over and remove any
debris that may have accumulated on
the agitator brush roll. Plug the clean-
er back in and press the ON/OFF but-
ton once to turn cleaner on.
(Cont'd) --_ 15
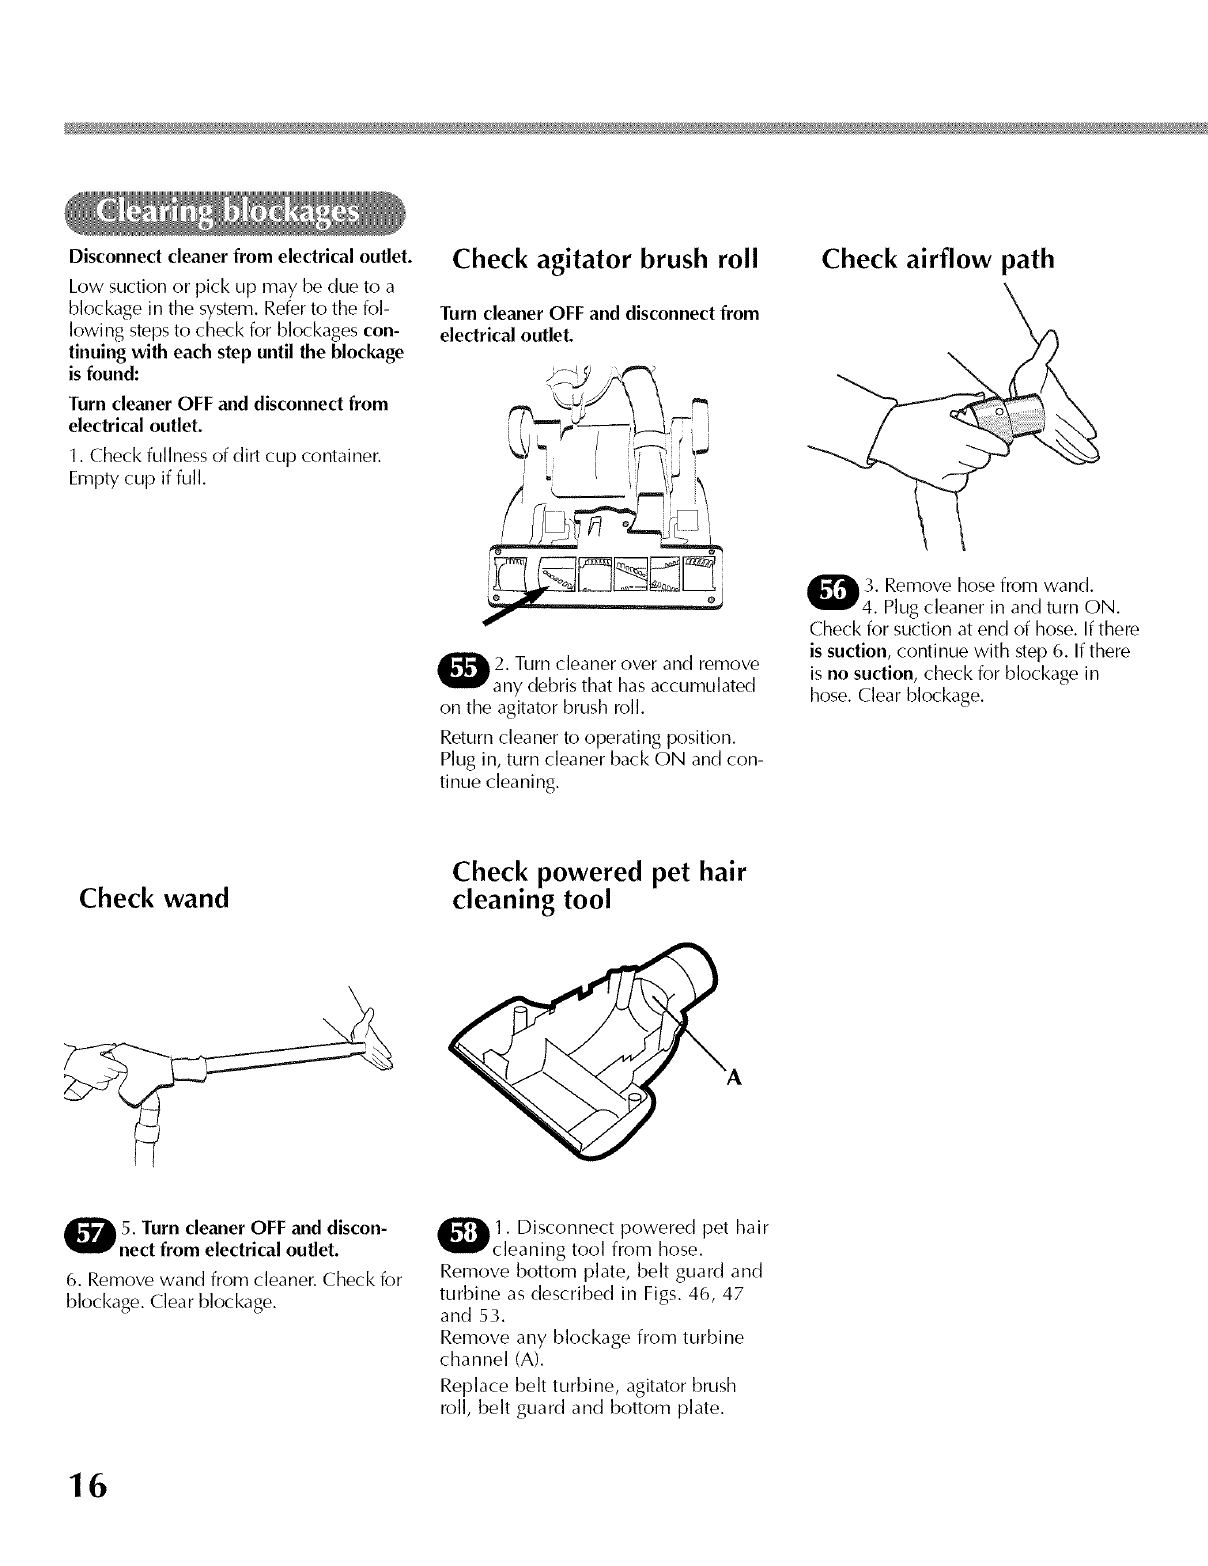
Disconnect cleaner from electrical outlet.
Low suction or pick up may be due to a
blockage in the system. Referto the fol-
lowing stepsto check for blockages con-
tinuingwith each step until the blockage
is found:
Turn cleaner OFF and disconnect from
electrical outlet.
1. Check fullness of dirt cup container.
Empty cup if full.
Check agitator brush roll
Turncleaner OFF and disconnectfrom
electricaloutlet.
2. Turn cleaner over and remove
any debris that has accumulated
on the agitator brush roll.
Return cleaner to operating position.
Plug in, turn cleaner back ON and con-
tinue cleaning.
Check airflow path
O_. Remove hose from wand.
_. Plugcleaner in and turn ON.
Check for suction at end of hose. Ifthere
is suction, continue with step 6. If there
is no suction, check for blockage in
hose. Clear blockage.
Check wand Check powered pet hair
cleaning tool
5. Turn cleaner OFF and discon-
nect from electrical outlet.
6. Remove wand from cleaner. Check for
blockage. Clear blockage.
1. Disconnect powered pet hair
cleaning tool from hose.
Remove bottom plate, belt guard and
turbine as described in Figs. 46, 47
and 53.
Remove any blockage from turbine
channel (A).
Replace belt turbine, agitator brush
roll, belt guard and bottom plate.
16
®El
The cleaner is equipped with bearings that contain sufficient lubrication for the life of the cleaner. The addition of
lubricant could cause damage. Therefore, do not add lubricant to any bearings.
To obtain approved HOOVER service and genuine HOOVER parts, locate the nearest Hoover Sales and Service Center
or Authorized Hoover Warranty Service Dealer (Depot) by:
¢' Checking the Service Section of Hoover on-line at www.hoover.com OR
¢' Checking the list of Sales and Service Centers provided with this cleaner OR
_/ Checking the Yellow Pages under "Vacuum Cleaners - Household" OR
¢' Calling 1-800-944-9200 for an automated referral of authorized service outlet locations
(U.S. only)
Do not send your cleaner to Hoover in North Canton, Ohio for service; this will only result in delay.
If further assistance is needed, contact the Hoover Consumer Response Center, Phone: 330-499-9499.
In Canada, contact Hoover Canada, Burlington, Ontario L7R 4A8, Phone: 1-800-263-6376.
Always identify your cleaner by the complete model number when requesting information or ordering parts. (The
model number appears on the back of the cleaner.)
If you need any assistance or need to contact us:
•www.hoover.com
•1-800-944-9200 -automated service dealer Iocator
•1-330-499-9499 - our Consumer Response Center (8 AM to 5 PM Monday - Friday)
Please do not return this product to the store.
17
If a minor problem occurs, it usually can be solved quite easily when the cause is found by using the check list below.
IWhat's the cause? What's the solution? 1
Not firmly plugged in. Plug unit in firmly.
No voltage in wall plug. Replace fuse or reset circuit.
What's the problem? Agitator brush roll brushes aren't turning.
[What's the cause? What's the solution? ]
Hard Surface mode selected on Surface Command _M Select a suitable carpet mode setting.
control dial.
Agitator brush roll is obstructed. Disconnectcleaner from electrical outlet. Turn cleaner over and
remove any debris that has accumulated on the agitator brush
roll.
[What's the cause?
Dirt cup full.
Pre-filter screen dirty.
Incorrect carpet height setting.
Blockage in system.
What's the solution? j
Empty dirt cup.
Clean the pre-filter screen using the dusting brush tool.
Selectanother carpet height setting on the Surface Command T_
control dial.
dear blockage (see"Clearing blockages" section).
What's the problem? Cleaner hard to push.
[What's the cause? What's the solution? j
Incorrect carpet height setting. Select a hig_her carpet height setting on the Surface Command TM
control di_[.
[What's the cause? What's the solution? ]
Dirt cup full.
Pre-filter screen dirty.
Blockage in system.
Empty dirt cup.
Clean the pre-filter screen using the dusting brush tool.
Clear blockage (see"Clearing blockages" section).
What's the problem? Powered pet hair cleaning tool agitator brush roll won't turn.
IWhat's the cause?
Too much pressure being applied to tool.
Blockage in turbine channel.
Broken or worn belt.
Low cleaner suction.
What's the solution? ]
Continue using tool applying light pressure.
Remove blockage.
Replace belt.
Refer to items under "Cleaner won't pick up".
18

(Domestic use)
Your HOOVER@ appliance is warranted in normal household use, in accordance with the Owner's Manual against original
defects in material and workmanship for a period of one full year from date of purchase. This warranty provides, at no cost to
you, all labor and parts to place this appliance in correct operating condition during the warranted period. This warranty
applies when the appliance is purchased in the United States including its territories and possessions, or in Canada or from a
U. S. Military Exchange. Appliances purchased elsewhere are covered by a limited one year warranty which covers the cost
of parts only. This warranty does not apply if the appliance is used in a commercial or rental application.
This warranty only applies when the product is in use in the country or territory in which it is purchased.
Warranty service can only be obtained by presenting the appliance to one of the following authorized warranty service out-
lets. Proof of purchase will be required before service is rendered.
1. Hoover Sales and Service Centers
2. Hoover Authorized Warranty Service Dealers (Depots)
For an automated referral of authorized service outlets in the U.S.A., phone 1-800-944-9200
OR visit Hoover on-line at www.hoover.com
This warranty does not cover pick up, delivery, or house calls; however, if you mail your appliance to a Hoover Sales and
Service Center for warranty service, transportation will be paid one way.
While this warranty gives you specific legal rights, you may also have other rights which vary from state to state.
If further assistance is needed, or if there are questions concerning this warranty or the availability of warranty service out-
lets, phone the Hoover Consumer Response Center, Phone 1-330-499-9499.
In Canada, contact Hoover Canada, Burlington, Ontario L7R 4A8, 1-800-263-6376.
For your records, enter the model number and serial numbers in the spaces provided. These
numbers are located on the data label on the back of the cleaner.
Model No.
Serial No.
Save your sales receipt and attach it to this manual. Proof of date of purchase may be required
for warranty service of your cleaner.
Serial
No.
19
Manual del propietario
ESPANOL -_ p. 20-31
Salvaguardias importantes .................................... 20
Desempaque .......................................................... 21
Contenido de la caja ............................................ 21
Descripci6n de la aspiradora ................................ 21
Uso de la aspiradora .............................................. 22
Transporte .......................................................... 22
Localizador de suciedad incrustada
Embedded DirtFinder TM (algunos modelos) .......... 22
Limpieza de alfombras ........................................ 22
Uso de los accesorios ........................................ 23
Accesorio turboaccionado para eliminar
el pelo de las mascotas .................................... 25
Limpieza de escaleras ........................................ 23
Mantenimiento ...................................................... 23
Vaciado del dep6sito para polvo ...................... 23-24
Filtros .................................................................. 24
Reemplazo de la luz delantera .......................... 24
Lubricaci6n ........................................................ 26
Eliminaci6n de obstrucciones ............................ 26
Rodillo de escobillas del agitador ...................... 24
Correa del rodillo de escobillas del agitador ...... 25
Reemplazo del rodillo de escobillas del agitador
del accesorio turboaccionado para eliminar el
pelo de las mascotas ........................................ 25
Reemplazo de la correa del accesorio
turboaccionado para eliminar el pelo
de las mascotas ................................................ 25
Protector t_rmico .............................................. 25
Servicio ............................................................ 26
Identificaci6n y soluci6n de problemas ................ 27
Garant[a .............................................................. 28
Formulario para e! pedido por correo de
piezas y accesor,os ............................................ 30
iSalva uardas "
AU precauci_nes b_sicas, induyendo las siguientes:
LEA TODAS LAS INSTRUCCIONES ANTES DE USAR ESTE APARATO
ADVERTENCiA:
Para reduc[r e[ riesgo de incendios, choques eM_ctricos o lesiones:
.No use este aparato a la intemperie ni en superficies moiadas.
.Es necesaria una supervisi6n estricta cuando cualquier aparato es utilizado pot los nifios ocerca de ellos. No permita
que la aspiradora se'a usada como un iuguete ni q6e func'ione sin atenci6n e'n ningfin momento.
.Mantenga emcabeHo, maropa hol_ada, los dedos de las manos y,pies _(todas maspartes den cuerpo aleiados de las
aberturas, de mosagitadores rotat'orios v otras piezas en movimiento. No haga funcionar la aspmradora descalzo ni
cuando calce sandalias o zapatos que deien los dedos de los pies al descubmerto.
*No recoia nada que se est_ quemando oechando humo, como cigarrillos, ceriHos o cenizas calientes.
,No use este aparato para aspirar liquidos inflamables o combustibles como gasoEna o restos de madera liiada , ni en
_reas donde estos pudieran encontrarse presentes.
,Evite recoger obietos duros o afilados con la aspiradora. [_stos pueden dafiar la aspiradora.
, Apague siempre este aparato antes de conectar o desconectar la manguera.
*Desenchufe la aspiradora antes de conectar el accesorio turboaccionado para eliminar el pelo de las mascotas.
No use la aspiradora sin tenet el depfisito para polvo o los filtros en su lugar. Vac_e el dep6sito con frecuencia cuando
aspire maten'ales muy finos como talco.
Tenga especial cuidado al limpiar escaleras.
o No coloque ningtin obieto en las aberturas. No la use con ninguna abertura obstruida; mant6ngala libre de polvo,
pelusa, cabello o cualquier cosa que pueda reducir el fluio de aire.
*No tire de 6sta ni la transporte pot el cord6n, ni tampoco use el cord6n como mango, no cierre lapuerta sobre el
cord6n ni tire del mismo alrededor de bordes afilados ni esquinas. No pase el aparato sobre el cord6n. Mantenga el
cord6n aleiado de Massuperficies caiientes.
Desenchufe siempre el cord6n de la toma de corriente el6ctrica antes de prestar servicio ala aspiradora.
Apague la aspiradora y desenchfifela cuando no est6 en uso.
No la desenchufe tirando del cord6n. Para desenchufarla, suiete el enchufe y no el cord6n. Nunca toque el enchufe ni el
aparato con 1as manos moiadas.
No se recomienda el uso de cordones de e×tensi6n.
,No use el aparato si el cord6n o el enchufe estA dafiado. Si el aoarato no estA funcionando aoropiadamente, se ha
deiado caer, ha sido dafiado, se ha deiado aMaintemperie o se ha deiado caer en agua, II_velo a un Centro de ventas y
servicio de Hoover oa un Concesionario autorizado de servicio de garantia de Hoover.
,Use la aspiradora solamente para Io que ha sido disefiada segtin se describe en las instrucciones.
,Use solamente los accesorios recomendados pot Hoover; el uso de otros accesorios puede set peligroso.
2O
iGuarde estas
www.hoover.com
(O 2006 The Hoover Company
ins|rucciones!
Use estas instrucciones en
espaffo[ junto con [as figuras
provistas en el manual de
ing[6s.
Desempaque [a
aspiradora
Contenido de [a caja
A. or B. Cuerpo y manguera de [a
aspiradora
C. Mango/tube de extensi6n
telesc6pico
D. Asidero Tag Along Ts_
E. Tornillos del clip para la manguera
y (2) del asidero Tag Along Ts_
F.Accesorios
G. Escobilla para el piso*
H. Manguera de extensi6n*
* Disponible en algunos modelos.
Coloque el asidero Tag
Along TM
1. Deslice el asidero Tag Along TM (A)
sobre la parte posterior de la
aspi radora.
Empuje los tornillos en los agujeros de
la parte posterior del mango.
Usando un destornillador Phillips,
apriete bien los tornillos.
Coloque el dip para la
manguera
2. Con la parte posterior del mango
superior mirando hacia usted, inserte
el clip para la manguera (B) en la
ranura a la izquierda.
Coloque e[ mango
3. Debe colocar y asegurar en su
lugar el mango/tube de extensi6n
telesc6pico (C). Alinee el mango/tube
de extensi6n telesc6pico con los
huecos del mango superior. Empuje el
tube de extensi6n completamente
hacia abajo dentro de la cavidad (D)
hasta que las trabas (E) para sol,at el
mango/tubo de extensi6n encajen en
su lugar.
Saque el mango/tube de
extensi6n telesc6pico
4. Para sacar el mango/tube de
extensi6n telesc6pico a fin de usar[o
con los accesorios, empuje hacia
abajo cualquier traba para soltar (E) y
tire hacia arriba para sacarlo.
Co[oque ia manguera
5. Estire la manguera y gufela dentro
del clip para la manguera. Alinee el
bot6n del extreme de la manguera (F)
con el agujero del conector para la
manguera (G). Deslice el extreme de
la manguera sobre el conector hasta
"S t,
que el bot6n .alte en su lugar. Para
sacar la manguera del conector para
la manguera, optima el bot6n y tire
del extreme de la manguera para
soltarla.
El conector para la manguera gira
360 ° para su conveniencia.
Co[oque los accesorios
6. El accesorio turboaccionado Data
eliminar el polo de las mascotas (H)
se almacena en la parte delantera de
la aspiradora. Coloque primero la
parte inferior del accesorio en el _irea
hueca, gire el accesorio hacia arriba y
enc_ijelo en su lugar.
7. Encaje el accesorio para
hendiduras (I), la escobilla para
desempolvar (J)y la boquilla para
muebles (K) en las 4teas de
almacenamiento en la parte posterior
de la aspiradora.
Oescripd6n de la
aspMraaora
Caracteristicas
8. Use la siguiente lista para
identificar las piezas y caracterfsticas
de su aspiradora. Su modelo se
parecer4 a una de Jas dos iJustracions
que se muestran abajo.
1. Con junto del mango con asidero
suave/tube de extensi6n
2. Asidero Tag Along TM
3. Accesorio turboaccionado para
eliminar el pelo de las mascotas
4. Bot6n POWER
(ENCENDER/APAGAR)
5. Asidero de transporte
6. Filtro HEPA de per vida
7. Dep6sito para polvo
8. Luz delantera
9. Limpiadores de bordes
10. Protector para muebles
11. Localizador de suciedad
incrustada Embedded
DirtFinder TM (algunos modelos)
12. Selector de control de superficie
Surface Command TM (algunos
modelos)
13. Selector de superficie (algunos
modelos)
14. Conector para la manguera
15. Manguera
16. Mango/tube de extensi6n
telesc6pico
17. Clip para la manguera
18. Escobilla para desempolvar
19. Boquilla para muebles
20. Accesorio para hendiduras
21. Ganchos para el cord6n
22. Pedal para soltar el mango
23. Ruedas blandas
Haga funcionar Ja aspiradora
solamente con eJ voltaje especificade
en Uaplaca de dates en Uaparte de
posterior de Uaaspiradera.
Esta aspiradora ha side disefiada para
use dem6stico.
Enchufe polarizado
Para disminuir el riesgo de cheque
el6ctrico, este aparato tiene un
enchufe polarizado (una patilla es
m4s ancha que la otra). Este enchufe
podr4 usarse en una toma de
corriente polarizada, s6lo de una
manera.
Si el enchufe no encaja
completamente en la toma de
corriente, invi6rtalo. Si aun asf no
encaja, COlTrlun[quese con un
electricista calificado para que le
instale la toma de corriente adecuada.
No modifique el enchufe de manera
alguna.
Use de la aspimdom
NO USE ILA ASPIRADORA EN EL
EXTERIOR O EN SUPERFICIES
HUMEDAS O MOJADAS.
Bot6n POWER
(ENCENDERYAPAGAR)
_. El bot6n POWER
(ENCENDER/APAGAR) (A) se
encuentra en la parte superior (]el
cuerpo de la aspiradora.
Enchufe el cordon en una toma de
corriente e]6ctrica.
Para ENCENDER la aspiradora,
optima el botOn una vez. 21
ParaAPAGAR[aaspiradora,oprirr_a
elbot6ndenuevo.
NOTA:LAASP[RADORAES
ENV[ADADELAFABR[CACONEL
SELECTOR DE CONTROL EN LA
POS[CION PARA HARD FLOOR
(P[SOS DE SUPERF[CIE DURAL
ANTES DE COMENZAR ALIMPIAR
ALFOMBRAS, GIRE EL SELECTOR DE
CONTROL DE HARD FLOOR A UNA
POSICION PARA "CARPET"
(ALFOMBRAS).
Selector de control de
superfide Surface
Command tm (algunos
modeios)
-[0. El selector de control de
superficie Surface Command TM
(algunos modelos) es un ajuste
autom_tico del espesor que le permite
seleccionar un modo de limpieza
adecuado para el espesor de la
alforr_bra o para pisos de superficie
dura.
Para obtener el m_ximo rendimiento
de limpieza, se recomiendan las
siguientes posiciones seg0n la altura
de la alfombra:
Posici6n m;.s baja: para todo tipo de
alfombras.
Nora: Si le cuesta mucho emjoujar la
aspiradora, gire el selector a la
siguiente posici6n m4s alta.
Posiciones mg.s amtas: para alfombras
de gran espesor, en cuyo caso se
desea facilitar el esfuerzo al empujar
para mantener una buena limpieza.
HARD FLOOR (PISO DE SUPERFICIE
DURA) el agitador est,1 APAGADO; la
boquilla est(_ en [a posiciOn LOW
(BAJA).
Selector de superfide
(algunos modelos)
-[-[. El selector de superficie (algunos
modelos) tiene tres posiciones seg0n
el espesor de la alfombra y una
posici6n para pisos de superficie
dura. El selector de superficie gira
para permitirle seleccionar un modo
de limpieza adecuado para el espesor
de la alfombra o para pisos de
superficie dura.
Para obtener el m4ximo rendimiento
de limpieza, se recomiendan las
siguientes posiciones seg0n la altura
de la alfombra:
Posici6n m4.s baja: para todo tipo de
alfombras.
Nora: Si le cuesta mucho empujar la
aspiradora, sire el selector a la
siguiente posici6n m_s alta.
22
Posiciones m_.s altas: para alfombras
de gran espesor, en cuyo caso se
desea facilitar e[ esfuerzo a[ empujar
para mantener una buena [impieza.
HARD FLOOR MODE (MODO PARA
PISO DE SUPERFICIE DURA) (con el
agitador APAGADO) [a boquiJJa est_
en la posiciOn LOW (BAJA).
Apagado autom;_tico del
agitador
-[2. Eiagitadorseapagar_cuandoel
mango est6 en [a posiciOn vertical de
aimacenamiento.
Control dei agitador
"[3. Gire el selector de control a [as
• " ) S " " "
poslcK ne Carpet (aifombra) para
encender e[ rodillo de escobillas y
[impiar alfombras de pared a pared o
de _irea.
Gire e[ selector de control a "Hard
Floor" (piso de superficie dura) para
apagar e[ agitador y limpiar pisos de
superficie dura.
Traslado de ia aspiradora
1_. Para mover la aspiradora de una
habitaciOn a otra, coloque el mango
en la posici6n vertical, incline la
aspiradora hacia atr_s sobre las
ruedas traseras y empOjela hacia
adelante.
Transporte de ia
aspiradora
-[5. Se podr4 transportar la
aspiradora poniendo la mano debajo
del asidero de transporte y
levant4ndola.
Posidones del mango
-[6. El mango de su aspiradora tiene
tres posiciones: vertical, para
gluardarla y para usar los accesorios
e ]impieza; de funcionamiento, para
uso general sobre alfombras y pisos; y
baja, para aspirar debajo de muebles
de poca altura. Para bajar el mango,
pise el pedal para soltar el mango (E)
y tire de] mango hacia arras.
Localizador de sudedad
incrustada Embedded
DirtFINDER tm (aigunos
modelos)
17. Con luces rojas y verdes, el
sistema DirtFINDER TM alerta a]
usuario cuando hay _ireasde la
alfombra que pueden necesitar m_is
limpieza. Puede detectar cuando ]a
suciedad incrustada es eliminada.
La luz de "limpio" (verde)
permanecerb, encendida durante la
limpieza excepto cuando e[ detector
sienta que se est(_ recogiendo una
mayor cantidad de suciedad;
entonces se encender_ [a [uz de
"sucio" (roja).
Cuando se encienda la [uz de
"sucio", deber_ dar pasadas
adicionales sobre el _irea hasta que la
luz cambie a "limpio".
Limpieza de aifombras
iivianas yflexibles
"[8. P_rese en un extremo de la
alfombra y paso la aspiradora hacia el
otro extremo. Antes de [[egar a[
borde, empuje e[ mango hacia abajo.
Esto [evantar_ [a boquilla y evitar_
que la alfombra se adhiera a la
aspiradora. ContinOe [evantando [a
boquilla de modo cjue cuando Ilegue
al borde est6 completamente
separada de la alfombra. Retroceda la
aspiradora para cornenzar otra vez,
baje la boquilla y p_sela solamente
hacia delante.
Limpieza de los bordes
"[9. Ambos costados de la parte
delantera de la aspiradora vienen con
limpiadores de bordes para eliminar
la suciedad de las alfombras cerca de
los zOcalos y muebies.
Paso cualquier costado paralelo al
borde de la alfombra o el mueble.
Uso de los accesorios
Los accesorios le permiten limpiar
superficies que se encuentran a
mayor altura que el piso y alcanzar
las _ireas diffciles de limpiar. La
aspiradora est,1 listapara usarse con
los accesorios cuando el mango est_
en la posiciOn vertical.
Nora: Cuando el mango est,. en
posici6n vertical, el agitador se apaga
automg.ticamente.
Selecd6n del accesorio
apropiado
20. Seleccione el accesorio
apropiado para la tarea de limpieza.
A. La escobilla para desempolvar se
puede usar para muebles tallados,
superficies de las mesas, libros,
kimparas, accesorios de iluminaciOn,
persianas venecianas, zOcalos,
pOst!_;os, de ventana y rejillas de
ventllaclOn.
B. ta boquilla para muebmes se puede
usar para muebles tapizados,
cortinajes, colchones, prendas de
vestir,interioresdeautomOvilesy
escalerasalfombradas.
C.Elaccesariaturbaacdanadapara
elhninar el pelo de las mascaras se
usa para muebles tapizados, escaleras
alfombradas y lugares de diffcil
acceso.
D. El accesaria para hendiduras se
puede usar en espacios estrechos,
esquinas yen los bordes de lugares
como ca jones de cOmodas, muebles
tapizados, escaleras y z6calas.
E. Use la escabilla para pisas Soft
Touch _M (algunas madelas) en pisos
de superficie dura.
21. E El mango/tuba de extensi6n
telesc6pica se puede alargar
oprirniendo el [)()tOn (G) y tirando de[
tuba de extension hacia fuera. Suelte
e[ bot0n para trabar el tuba de
extension en su posiciOn. Acorte el
mango/tuba de extension telescopic()
oprimiendo el botOn y tiranda del
tuba de extension hacia atr_s.
Coioque los accesorios
22. Todas los accesorios se colocan
del misrno modo.
Los accesorios se pueden conectar a]
manga/tubo de extension telescopic()
a directamente a la manguera (yea la
figura 23).
23. Conecte el accesorio al tub() de
extension o a la manguera,
empuj_ndolo firmemente sabre el
extremo del tub() de extensi6n o de la
manguera. Gire el accesorio
ligeramente para apretar o aflojar la
conexi6n.
Para el rendimiento 6ptimo del
accesario turbaaccianada para
eliminar el pelo de las mascotas,
conOcte]o directamente a la
manguera.
Se puede sacar la manguera del
asidero del mango, aprimiendo el
baton y tirando de 6sta para alejarla
del tuba de extension. (Fig. 5)
Asidero Tag Along TM
24. AI usar los accesorios de
limpieza, la limpiadora se puede
mover con usted. Coloque una mano
en el asidero Tag Alang (A), incline
la limpiadora hacia atr_s sabre las
ruedas traseras y tire de ella.
C6mo ii.mpiar los
accesorlos
Para limpiar la manguera y el
accesorio de mano turboaccionado,
limpie la suciedad con un patio
humedecido en detergente suave.
Enjuague con un patio hOrnedo. Na
sumerja el accesorio turboaccianado
para eliminar el pelo de las mascotas
en agua.
Las accesorios de limpieza se pueden
lavar en agua tibia con un detergente.
Enju_uelos y deje que se sequen al
aire liDre antes de usarlos.
La manguera Extra
Reach TMpara alcance
adicional (aigunos
modelos)
Algunos modelos incluyen una
manguera Extra Reach TM para alcance
que le ofrece un alcance de 6 metros
(20 pies) (cuanda est_ conectada a la
manguera normal), para facilitar la
limpieza de escaleras y lugares
elevados de diffci[ acceso.
Oprima el bot6n POWER
(ENCENDER/APAGAR) para apagar la
aspiradora. Saque la manguera
normal del mango/tubo de extensi6n.
(Fig. 5)
25. Para conectar la manguera Extra
Reach TM para alcance a la manguera
normal, alinee el baton (A) del
extremo de la manguera Extra
Reach T_ para alcance can el agujero
(B) del extremo de la manguera
normal. El botOn "saltar_" cuando los
extremos de las mangueras estOn
asegurados en su lugar.
2_. A continuaciOn, enganche el
extremo apuesta de la manguera
TM
Extra Reach para alcance al
conectar para la manguera en el
manga/tubo de extension. Alinee el
botOn (C) del conector para la
manguera con el agujero (D) del
extrerno de la manguera Extra
ReacM x_para alcance. Deslice el
extremo de la manguera Extra
ReacM x_para alcance sabre el
conector para la manguera hasta qua
el botOn "salte" en su lugar.
Para sacar la manguera del conector,
optima el baton del conector y tire
del extremo de la manguera para
soltarla. El conector para la manguera
gira 360 ° para su conveniencia.
Escobiila para pisos Soft
Touch +M(aigunos
modelos)
27. Los pisos de superficie dura se
pueden limpiar can la escobilla para
pisas Soft ToucM_t Coloque la
escobilla para pisos en el extremo del
mango/tuba de extension telescOpico.
Extienda el tub() de extension
telescopic() para alcanzar el piso.
Limpieza de escaleras
28, Use la manguera y el accesorio
turboaccionado para eliminar el polo
de las mascotas para limpiar las
escaleras.
Panga siempre la aspiradara al pie de
las escaleras. Eimpie de abaja hacia
arriba.
PRECAUClON: Para evitar lesianes
persanales ypara impedir que la
aspiradora se cmga, ten_a especial
cuidada si calaca la aspmradora en las
peldafios de las escaleras.
NOTA: Se lagrar4, el rendimienta
mb.xima del accesaria de maria
turbaaccianada si el accesario
turbaaccianada para eliminar el pela
de las mascaras se usa en el extrema
de la manguera sin el tuba de
extensi6n telesc6pica.
Mantenimiento
Familiaffcese can estas tareas de
mantenimienta en el hogar, ya qua el
uso y cuidado adecuados de su
aspiradora asegurar_n la eficacia en
la limpieza par largo tiempo.
Dep6sito para polvo
Cu ndo vaciarlo
Se recomienda que el dep6sito para
polvo se vacfe despuOs de cada usa o
antes que la suciedad Ilegue a la
parte superior del dep6sito para
pol vo.
C6mo vaciarlo
Descanecte la aspiradora de la tama
de carriente el6ctrica. Na use la
aspiradora sin tener el dep6sita para
palva o las fimtras en su lugar.
Camaque la aspiradara en pasici6n
vertical antes de sacar el dep6sita
para palva.
29. Para sacar el dep6sita (A),
presione la traba (B) para soltarla.
Gire el depOsito hacia afuera.
30. Optima el bat6n (C) de la parte
posterior del dep6sito para polvo para
soltar la puerta (D). Vacfe el depOsito
para polvo en un recipiente de
basura. Cierre bien la puerta para
trabarla.
El recipiente para polvo tambiOn se
puede vaciar levantando la tapa y
vaci_ndolo en un recipiente de
basura. Vuelva a calocar la tapa antes
de colocar el deposit() para polvo en
su lugar.
23
31. Para w)lver a colocar el dep6sito
para polvo, coloque prirnero la parle
inferior del dep6sito. Gire el dep6sito
para insertarlo en el cuerpo de la
aspi radora.
Lirnpieza de los filtros
IFiitro HERA
32. Su aspiradora est_ equipada con
un filtro autolirnpiable HEPA.
Este fimtro no es removible.
Si observa que el filtro gira m_s
despacio de Io normal o no gira,
consulte la secciOn de IdentificaciOn y
soluci6n de problemas. Si piensa que
hay que reemplazar dicho filtro, Ileve
su aspiradora a un Centro autorizado
de ventas y servicio de Hoover.
:3:3. Cuando la aspiradora est6
funcionando, la malla (]el antefiltro
(A) evitar_ que los residuos de mayor
tamafio entren a la cMnara del filtro
HEPA. Se podr_ vet cOmo estos
residuos de mayor tarnafio se
depositan en la c_irnara m_s grande
del depOsito para polvo (B). El filtro
HEPA recoger_ ]as parlfcu]as finas que
hayan pasado a trav6s de ]a mal]a del
antefiltro. El filtro HEPA se
autolirnpiar_ al girar, depositando
los residuos finos en ]a c_mara
m_s pequefia del depOsito para polvo
(C).
La aspiradora continuarg.
funcionando con el m_×imo
rendimiento de limpieza si la mafia
del antefiltro se limpia cada vez que
se vacia el dep6sito para polvo (yea
la figura 34).
Malla del antefiltro
34. Desconecte la aspiradora de la
toma de corriente el6ctrica. No use
la aspiradora sin tenet el dep6sito
para polvo o los filtros en su lugar.
La malla del antefiltro (A), ubicada en
el interior de la tapa del depOsito para
polvo, es removible y se puede
[impiar usando la escobilla para
desernpolvar de la aspiradora o [avar
en agua frfa y detergente suave.
Enjui_guela y deje que el filtro se
seque al aire pot completo antes de
volver a colocar]o.
Para sacar este fi]tro, saque el
depOsito para polvo y ]a tapa de 6ste.
Cepil]e o ]ave, deje secar a] aire y
vuelva a colocar la tapa del depOsito
para polvo.
Filtro final
35, Desconecte la aspiradora de la
24
toma de corriente el6ctrica. No use
la aspiradora sin tenet el dep6sito
para polvo o los filtros en su lugar.
El filtro final ayuda a devolver aire
[impio a [a habitaciOn.
Saque el depOsito para polvo
(figura 29).
Pise el pedal para soltar el mango
y baje [a boquilla de rnanera que est6
plana.
Con tin destornillador Phillips, saque
los cuatro tornillos como se muestra y
[evante la lente de la luz delantera
(A). Levante el filtro para sacarlo (B) y
reempl_celo.
Vuelva a colocar la lente y los
tornillos.
Si desea reemplazar este filtro, pida la
pieza No. 38769032 de Hoover.
Luz delantera
Reemplazo de la luz
delantera
Qu6 comprar
Esta aspiradora usa un bombillo de
base en curia de 1/4, tipo T3, pieza
No. 27313107 de Hoover.
Saque la iente
Desconecte la aspiradora de la toma
de corriente el_ctrica.
36. Pise el pedal para soltar el
mango y baje la boquilla de rnanera
que estr_plana.
Con un destornillador Phillips, saque
los cuatro tornillos como se muestra y
levante la lente para sacarla.
37. Saque el bombillo usado,
tirando de 6ste directarnente fuera de
su recept_iculo. Empuje el nuevo
bombillo directamente dentro del
recept_iculo hasta que quede fijo en
su lugar. No gire el bombillo.
No se requiere usar fuerza excesiva.
Reemplace la iente
38. Vuelva a colocar la lente y
asegl_rela con los cuatro tornillos.
Rodillo de escobillas
del agitador
Revise el rodillo de
escobillas del agitador
El rodillo de escobillas del agitador se
debe reemplazar cuando las
escobillas del rodillo de escobillas del
agitador est6n desgastadas.
Para revisar la condiciOn de las
escobillas, apague la aspiradora y
descon6ctela de la toma de
corriente el6ctrica.
39. Pase el borde de una tarjeta a
Io ancho de la placa inferior,
mientras hace girar el rodillo de
escobillas del agitador. Para
mantener una limpieza eficaz,
reemplace el rodillo de escobillas
del agitador si las escobillas no
tocan la tarjeta.
Qu6 comprar
Cuando compre un nuevo rodillo de
escobillas del agitador, pida la pieza
No. 48414140 de Hoover.
C6mo reemplazarlo
Encienda la aspiradora y gire el
selector de control de modo a
HARD FLOOR (PISO DE
SUPERFICIE DURA). Apague la
aspiradora y descon6ctela de la
toma de corriente el6ctrica.
Coloque el mango en posici()n
vertical y voltee la aspiradora de
manera que la parle inferior est6
hacia arriba.
40. Quite los cinco tornillos
con un destornillador Phillips, como
se muestra. Saque la placa inferior
(A).
41. Levante el rodillo de escobillas
del agitador (B) para sacarlo de la
cavidad para el rodillo de escobillas.
42. Sujetando el rodillo de
escobillas del agitador con una
mano, deslice la correa (C) para
sacarla del rodillo de escobillas del
agitador.
NOTA: Sujete la correa con una
mano. No permita que la correa
vuelva a caer en [a cavidad del
fondo de la aspiradora.
43. Sujete el rodillo de escobillas
del agitador nuevo en una mano, y
la correa en la otra. Deslice la
correa sobre el rodillo de escobillas
del agitador, colocando la correa en
la gufa para la correa (D) del rodillo
de escobillas del agitador.
44. Sujete firmemente el rodillo de
escobillas del agitador y colOquelo
en posiciOn, deslizando primero el
extremo opuesto de la correa en la
ranura rectangular (E) al costado de
la aspiradora.
Tire del otro lado del rodillo de
escobillas del agitador para
colocarlo en su lugar.
Gire el rodillo de escobillas del
agitador, asegur_ndose que la correa
no quede pellizcada entre el rodillo
de escobillas del agitador y el
protector.
45, Vuelva a colocar la placa inferior
y los cinco tornillos Apriete bien los
tornillos.
Correa del rodiilo de
escobilJas del agitador
La correa del rodillo de escobillas del
agitador est4 disefiada para durar pot
e/perfodo de vida 0til de la
aspiradora. Nc_rmalmente no
necesitaKi ser reemplazada. Si piensa
que es necesario revisar o
reemplazar Ja correa del rodiJlo de
escoBillas de[ agitador, ]love su
aspiradora a ua Centro autorizado de
ventas y servicio de Hoover. No trate
de sacar [a correa del rodillo de
escobillas de[ a_gitador.
Accesorio
turboacdonado para
e[iminar e[ pe[o de [as
mascotas
Rodillo de escobilJas de[
agitador
Cuando las escobillas del rodillo de
escobillas del agitador del accesorio
turboaccionado para eliminar el pelo
de los mascotas est6n desgastadas,
habr_i que reemplazar agitador. Pida
la pieza HOOVER no. 484114088
C6mo reemplazarlo
46. 1. Saque el accesorio de la
manguera y volt6ek_ de manera que
la porte inferior mire hacia arriba.
Presione ]as trabas a ambos ]ados del
accesorio y saque la placa inferior
(A).
47.2. Destornille los dos tornillos
Phillips y saque el protector de la
correa (B).
_8, 3. Saque el rodillo de escobillas
del agitador, incluyendo las placas de
extremo (C) y des6chelo.
4. Inspeccione la correa para
asegurarse de que est6 en buenos
condiciones. Si la correa est4
agrietada, mellada o rota,
reempl4cela (yea la siguiente
secci6n).
49. 5. Introduzca el rodillo de
escobillas del agitador a trav6s de la
correa y coloque la correa sobre los
dientes del engranaje (D) del rodillo
de escobillas del agitador.
50.6. Con los extremos curvados
hacia abajo, deslice los placas de
extremo (C) del rodillo de escobillas
del agitador en los ranuras (E) del
accesorio.
51, 7. Vuelva a colocar el protector
de la correa (B), asegur4ndose de no
pellizcar los cerdas de los escobillas
en el protector. D6 vuelta a el rodillo
de escobillas del agitador para
asegurarse de que gire libremente.
Vuelva a colocar los tornillos y
apri6telos.
52, 8. Para volver a colocar la placa
inferior (A), inserte las cuatro
leng0etas del borde de la placa
inferior en los ranuras de la porte
delantera del accesorio.
Gire la placa inferior hacia abajo y
enc_ijela para cerrarla.
Reemplazo de la correa
Inspecdone de ia correa
La correa de] accesorio
turboaccionado para eliminar el pelo
de los mascotas ha sido disefiada para
una larga duraciOn y normalmente no
se tendr_ que reemplazar. Sin
embargo, si la correa est_ agrietada,
me]]ada o rota, se deber_ reemp]azar.
Saque el accesorio de la manguera.
La correa se puede ver a trav6s de la
porte superior de la boquilla o
sacando la placa inferior y el
protector de la correa
(figuras 46 y 47).
Reemplace la correa
AI reemplazar la correa, pida la pieza
No. 38528037 de HOOVER.
1. Saque la placa inferior, el protector
de la correa y el rodillo de escobillas
del agitador como se describe en los
ilustraciones 46 a 48.
5_. 2. Sujete la turbina (E) y tire con
fuerza para sacarla.
3. Saque la correa de la polea de la
turbina (F). Reempl4cela con una
correa nueva.
54.4. Con los lados pianos de los
dispositivos de retenci6n de la turbina
(G) apuntando hacia abajo, deslice
los dispositivos de retenci6n en los
ranuras (H) del compartimiento para
accesorios y enc4jelos en su lugar.
5. Vuelva a colocar el rodillo de
escobillas del agitador, el protector de
la correa y la placa inferior como se
describe en los ilustraciones 50 a 52.
Protector t6rmico
Su aspiradora tiene incorporado un
protector t6rmico para impedir el
sobrecalentamiento.
Cuando el protector t6rmico se
activa, la aspiradora deiar4 de
funcionar. Siesto sucede, proceda de
la siguiente manera:
1. Apague la aspiradora y
descon_ctela de la toma de corriente
el6ctrica.
2. Revise si se ha acumulado
suciedad en los filtros secundario y
final.
3. Consulte la secci6n "Eliminaci6n
de obstrucciones".
4. Una vez que la aspiradora est6
desconectada y el motor se haya
enfriado durante 30 minutos, el
protector t6rmico se reajusta
autom_iticamente y se puede seguir
pasando la aspiradora.
Si el protector t6rmico sigue
activ_indose despu6s de efectuar los
pasos anteriores, es probable que su
aspiradora necesite servicio (vea la
secci6n "Servicio").
Protecci6n en caso de
atascamiento del agitador
Si el agitador se atasca debido a
desperdicios como cabello, hilos,
etc., la aspiradora se detendr_
autom_ticamente.
Desconecte la aspiradora de la toma
de corriente el_ctrica.
Voltee la aspiradora y saque cualquier
residuo que se haya podido acumular
en el agitador. Vuelva a enchufar la
aspiradora y oprima el bot6n de
encender y apagar una vez para
encender la aspiradora.
Eliminaci6n de
obstrucciones
Desconecte la aspiradora de la toma
de corriente el6ctrica.
La succi6n o aspiraci6n baja se puede
deber a una obstrucci6n en el
sistema. Consulte los si_,uientes pasos
a fin de revisor si hay obstrucciones,
siguiendo los pasos uno auno basra
que encuentre la obstrucci6n:
Apague la aspiradora ydescon6ctela
de la toma de corriente el6ctrica.
1. Revise si el dep6sito para polvo
est4 Ileno. Vacfe el dep6sito si
estuviera Ileno.
Revise el rodillo de
escobillas del agitador
25

Apague la aspiradora y descon_ctela
de la toma de corriente el_ctrica.
55. 2. Voltee la aspiradora y saque
los residuos acumulados en el rodillo
de escobillas del agitador.
Vuelva a colocar la aspiradora en la
_aOSiciOnde funcionamiento. Enchufe
aspiradora, enciOndala y contin0e
la limpieza.
Revise el flujo de aire
56. 3. Saque la manguera del tubo
de extension.
4. Enchufe la aspiradora y
enciendala. Revise si hay succiOn en
el extremo de la manguera. Si hay
succiOn, contin0e con el paso 6. Si
no hay succion, revise si hay
alguna obstrucciOn en la manguera.
Elimine la obstrucciOn.
Revise el tubo de
extension
57. 5Apague la aspiradora y
descon_ctela de la toma de corriente
el_ctrica.
6. Saque el tubo de extensiOn de la
aspiradora. Revise para ver si hay
alguna obstrucciOn. Elimine [a
obstrucciOn.
Revise el accesorio
turboaccionado para
eliminar el pelo de las
mascotas
58. 1. Desconecte el accesorio
turboaccionado para eliminar el pelo
de las mascotas de la manguera.
Saque [a placa inferior, el protector de
[a correa y [a turbina como se
describe en [as ilustraciones 46, 47 y
53.
Elimine cualquier obstrucciOn del
canal de la turbina (A).
Vuelva a colocar la correa de la
turbina, el agitador, el protector de la
correa y la placa inferior.
Servicio para su
aspiradora
Para obtener el servicio aprobado
HOOVER y piezas genuinas
HOOVER, Iocalice el Centro de
ventas y servicio de Hoover o el
Concesionario autorizado de servicio
de garanda de Hoover (DepOsito) m_s
cercano, ya sea:
,/ Consultando la secciOn "Service"
(Servicio) de Hoover en I[nea en
www.hoover.com O
,/ Consultando la lista de Centros de
ventas y servicio de Hoover pro-
porcionada con esta
aspiradora O
,/ Consultando las p,_ginas ama-
rillas de la gufa de telOfonos, bajo
"Vacuum Cleaners-Household"
("Aspiradoras - Art[culos del
hogar") O
,/ Llamando al 1-800-944-9200
para obtener una referencia
automatizada de las ubicaciones
de los centros de servicio autor-
izados (solamente en EE.UU.)
No envfe su aspiradora a Hoover en
North Canton, Ohio para obtener
servicio; esto sOlo resultar_ en
demoras.
Si necesita asistencia adiciona],
comunfquese con el Centro de
respuesta al cliente de Hoover,
telOfono 330-499-9499.
En Canada, comunfquese con Hoover
Canada, Burlington, Ontario L7R 4A8,
telOfono: 1-800-263-6376.
AI solicitar informaciOn u ordenar
piezas, siempre identifique su
aspiradora por el n0mero completo
del modelo. (El n0mero de modelo se
encuentra en la parte de posterior de
la aspiradora.).
Si necesita ayuda o si
necesita comunicarse
con nosotros:
• www.hoover.com
• 1-800-944-9200 - Iocalizador
automatizado de
concesionarios de servicio
•1-330-499-9499 - nuestro
Centro de respuesta al cliente
dunes a viernes de 8 de la
maffana a 5 de
la tarde)
Por favor no devuelva este
producto a la tienda.
LubricaciOn
La aspiradora tiene cojinetes que
cuentan con suficiente lubricaciOn
para la vida 0til de la misma. La
adiciOn de lubricantes podria causar
daffos. Pot Io tanto, no a_ada
lubricante a los cojinetes.
26
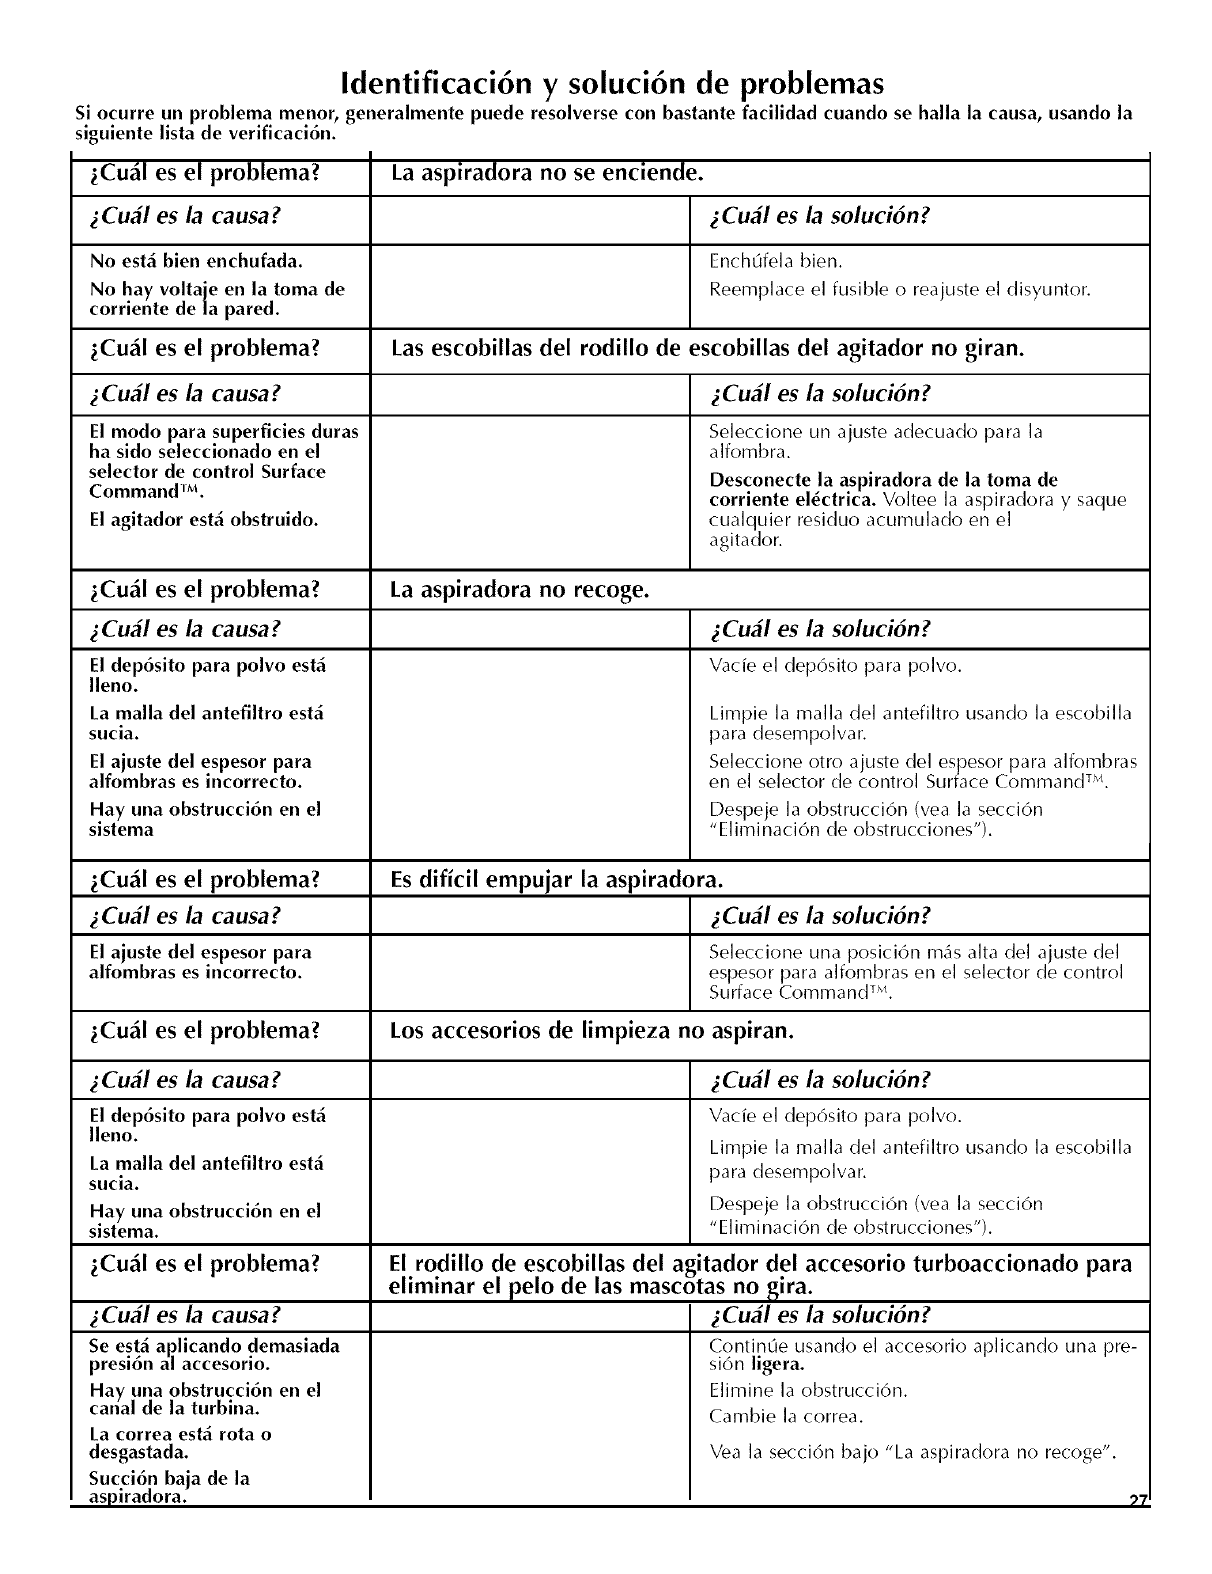
Identificaci6n y soluci6n de problemas
Si ocurre un problema menor, generalmente puede resolverse con bastante facilidad cuando se halla la causa, usando la
siguiente lista de verificaci6n.
_Cu_l es el problema?
iCu_l es la causa?
No est_ bien enchufada.
No hay voltaje en la toma de
corriente de la pared.
_Cu_l es el problema?
iCu_l es la causa?
El modo para superficies duras
ha sido seleccionado en el
selector de control Surface
Command IM.
El agitador est_ obstruido.
_Cu_l es el problema?
iCu_l es la causa?
El dep6sito para polvo est_
Ileno.
La malla del antefiltro est_
Sncia.
El ajuste del espesor para
alfombras es incorrecto.
Hay una obstrucci6n en el
sistema
La aspiradora no se enciende.
iCu_l es la soluci6n?
EnchOfela bien.
Reemplace el fusible o reajuste el disyuntor.
Las escobillas del rodillo de escobillas del agitador no giran.
iCu_l es la soluci6n?
Seleccione un ajuste adecuado para la
alfombra.
Desconecte la aspiradora de la toma de
corriente el_ctrica. Voltee la aspiradora y saque
cualquier residuo acumulado en el
agitador.
La aspiradora no recoge.
iCu_l es la soluci6n?
Vacie el dep6sito para polvo.
Limpie la malla del antefiltro usando la escobilla
para desempolvar.
Seleccione otro ajuste del espesor para alfombras
TM
en el selector de control Surface Command _.
Despeje la obstrucci6n (yea la secci6n
"Eliminaci6n de obstrucciones").
_Cu_l es el problema? Es dificil empujar la aspiradora.
iCu_l es la causa? iCu_l es la soluci6n?
El ajuste del espesor para Seleccione una posici6n nq,_salta (]el ajuste (]el
alfombras es incorrecto, espesor para alfombras en el selector de control
Surface Command TM.
Los accesorios de limpieza no aspiran._Cu_l es el problema?
iCu_l es la causa?
El dep6sito para polvo est_
Ileno.
La malla del antefiltro est_
Sncia.
Hay una obstrucci6n en el
sistema.
_Cu_l es el problema?
iCu_l es la causa?
Se est_ aplicando demasiada
presi6n al accesorio.
Hay una obstrucci6n en el
canal de la turbina.
La correa est_ rota o
desgastada.
Succi6n baja de la
aspkadora.
iCu_l es la soluci6n?
Vacie el dep6sito para polvo.
Limpie la malla del antefiltro usando la escobilla
para desempolvar.
Despeje la obstrucci6n (yea la secci6n
"Eliminaci6n de obstrucciones").
El rodillo de escobillas del agitador del accesorio turboaccionado para
eliminar el pelo de las mascotas no gira.
iCu_l es la soluci6n?
Contin0e usando el accesorio aplicando una pre-
si6n ligera.
Elimine la obstrucciOn.
Cambie la correa.
Vea la secci6n bajo "La aspiradora no recoge".
' ' ' ?7
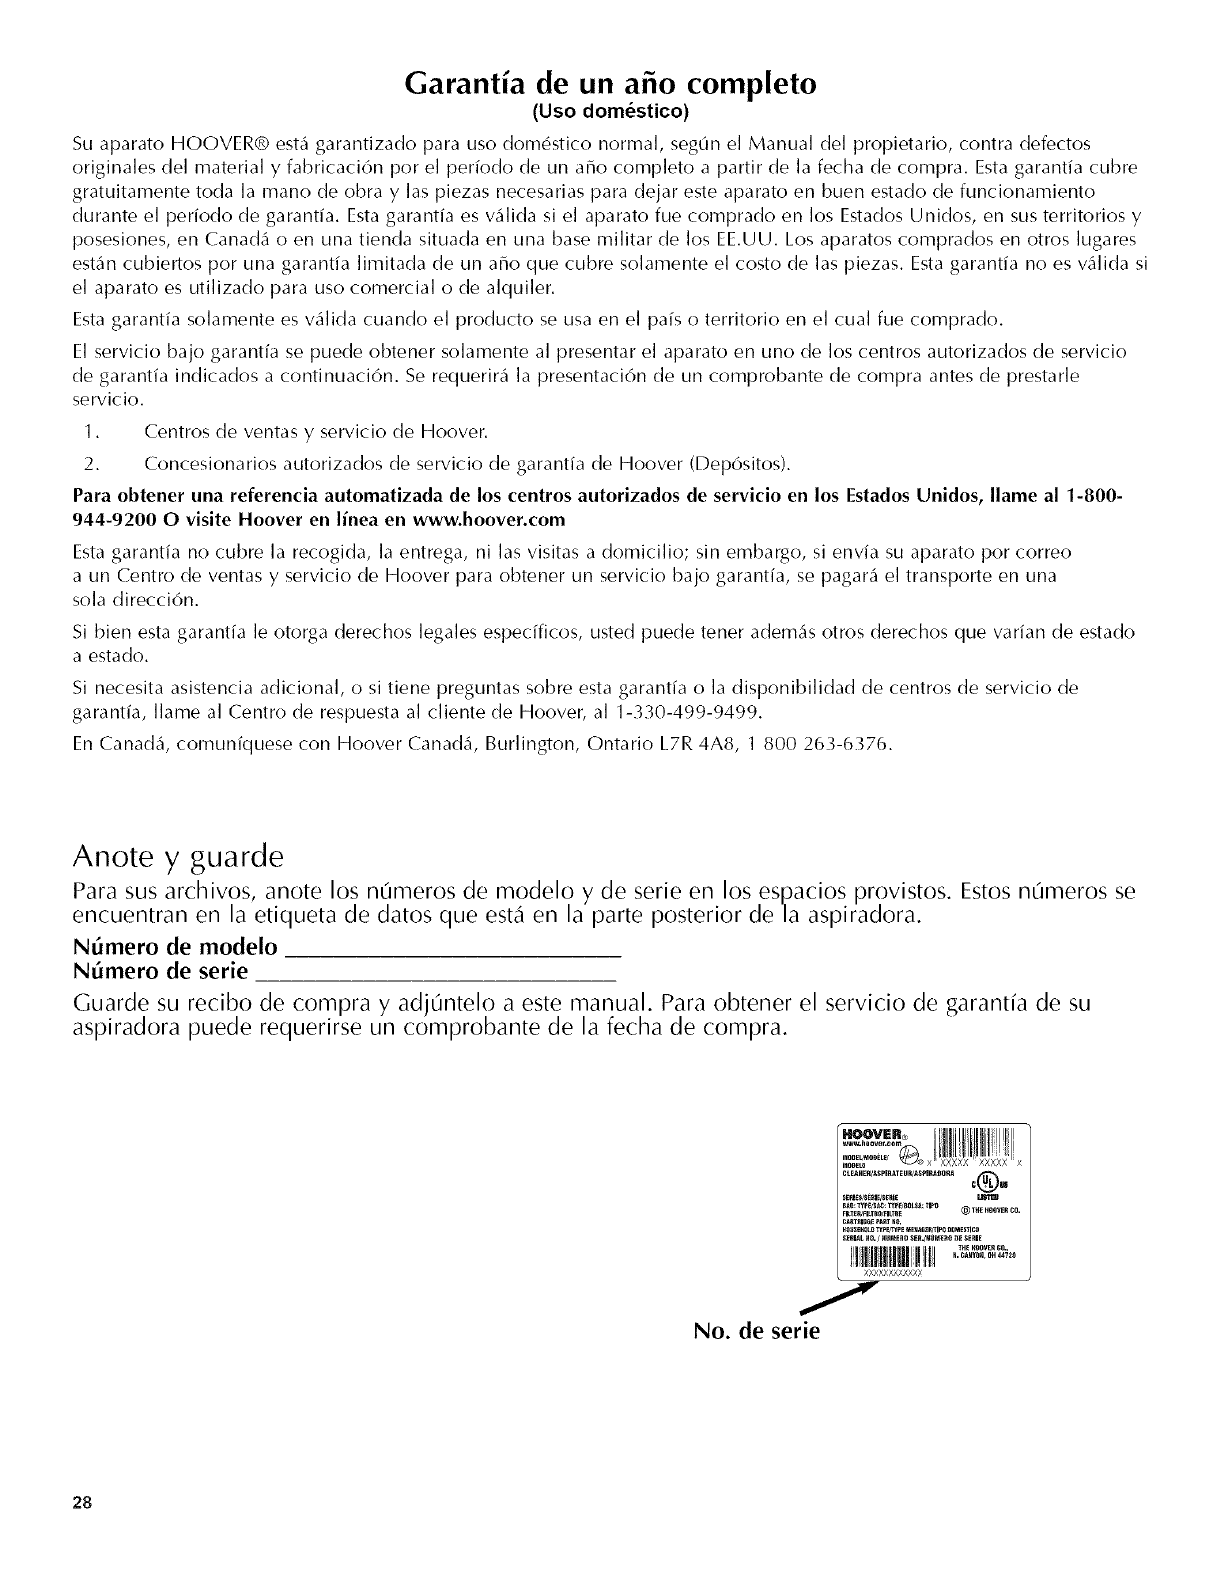
Garant/a de un afro completo
(Uso domestico)
Su aparato HOOVER® est_ garantizado para uso dom6stico normal, seg0n el Manual del propietario, contra defectos
originales del material y fabricaci6n por el periodo de un afro completo a partir de la fecha de compra. Esta garantia cubre
gratuitamente toda la mano de obra y las piezas necesarias para dejar este aparato en buen estado de funcionamiento
durante el periodo de garantfa. Esta garantia es v,_lida si el aparato fue comprado en los Estados Unidos, en sus territorios y
posesiones, en Canad,_ o en una tienda situada en una base militar de los EE.UU. Los aparatos comprados en otros lugares
est,_n cubiertos por una garantfa limitada de un afro que cubre solamente el costo de las piezas. Esta garantfa no es v_lida si
el aparato es utilizado para uso comercial o de alquiler.
Esta garantia solamente es v_lida cuando el producto se usa en el pals o territorio en el cual fue comprado.
El servicio bajo garantia se puede obtener solamente al presentar el aparato en uno de los centros autorizados de servicio
de garantia indicados a continuaci6n. Se requerir_ la presentaci6n de un comprobante de compra antes de prestarle
servicio.
1. Centros de ventas y serviclo de Hoover.
2. Concesionarios autorizados de servicio de garantia de Hoover (Dep6sitos).
Para obtener una referencia automatizada de los centros autorizados de servicio en los Estados Unidos, Ilame al 1-800-
944-9200 Ovisite Hoover en linea en www.hoover.com
Esta garant_a no cubre la recogida, la entrega, ni las visitas a domicilio; sin embargo, si env_a su aparato por correo
a un Centro de ventas y servicio de Hoover para obtener un servicio bajo garant_a, se pagar,_ el transporte en una
so[a direcci6n.
Si bien esta garant_a le otorga derechos legales especfficos, usted puede tener adem,_s otros derechos que vaffan de estado
a estado.
Si necesita asistencia adiciona[, o si tiene preguntas sobre esta garant[a o [a disponibi[idad de centros de servicio de
garant_a, Ilame al Centro de respuesta al cliente de Hoover, al 1-330-499-9499.
En Canad,_, comun_quese con Hoover Canad,_, Burlington, Ontario L7R 4A8, 1 800 263-6376.
Anote y guarde
Para sus archivos, anote los n0meros de modelo y de serie en los espacios provistos. Estos n0meros se
encuentran en la etiqueta de datos que est_ en la parte posterior de la aspiradora.
Nfmero de modelo
Nfmero de serie
Guarde su recibo de compra y adj0ntelo a este manual. Para obtener el servicio de garantfa de su
aspiradora puede requerirse un comprobante de la fecha de compra.
0®=
@ Tff_HOOVERCO.
liH@H!I!Itll ................
No. de serie
28
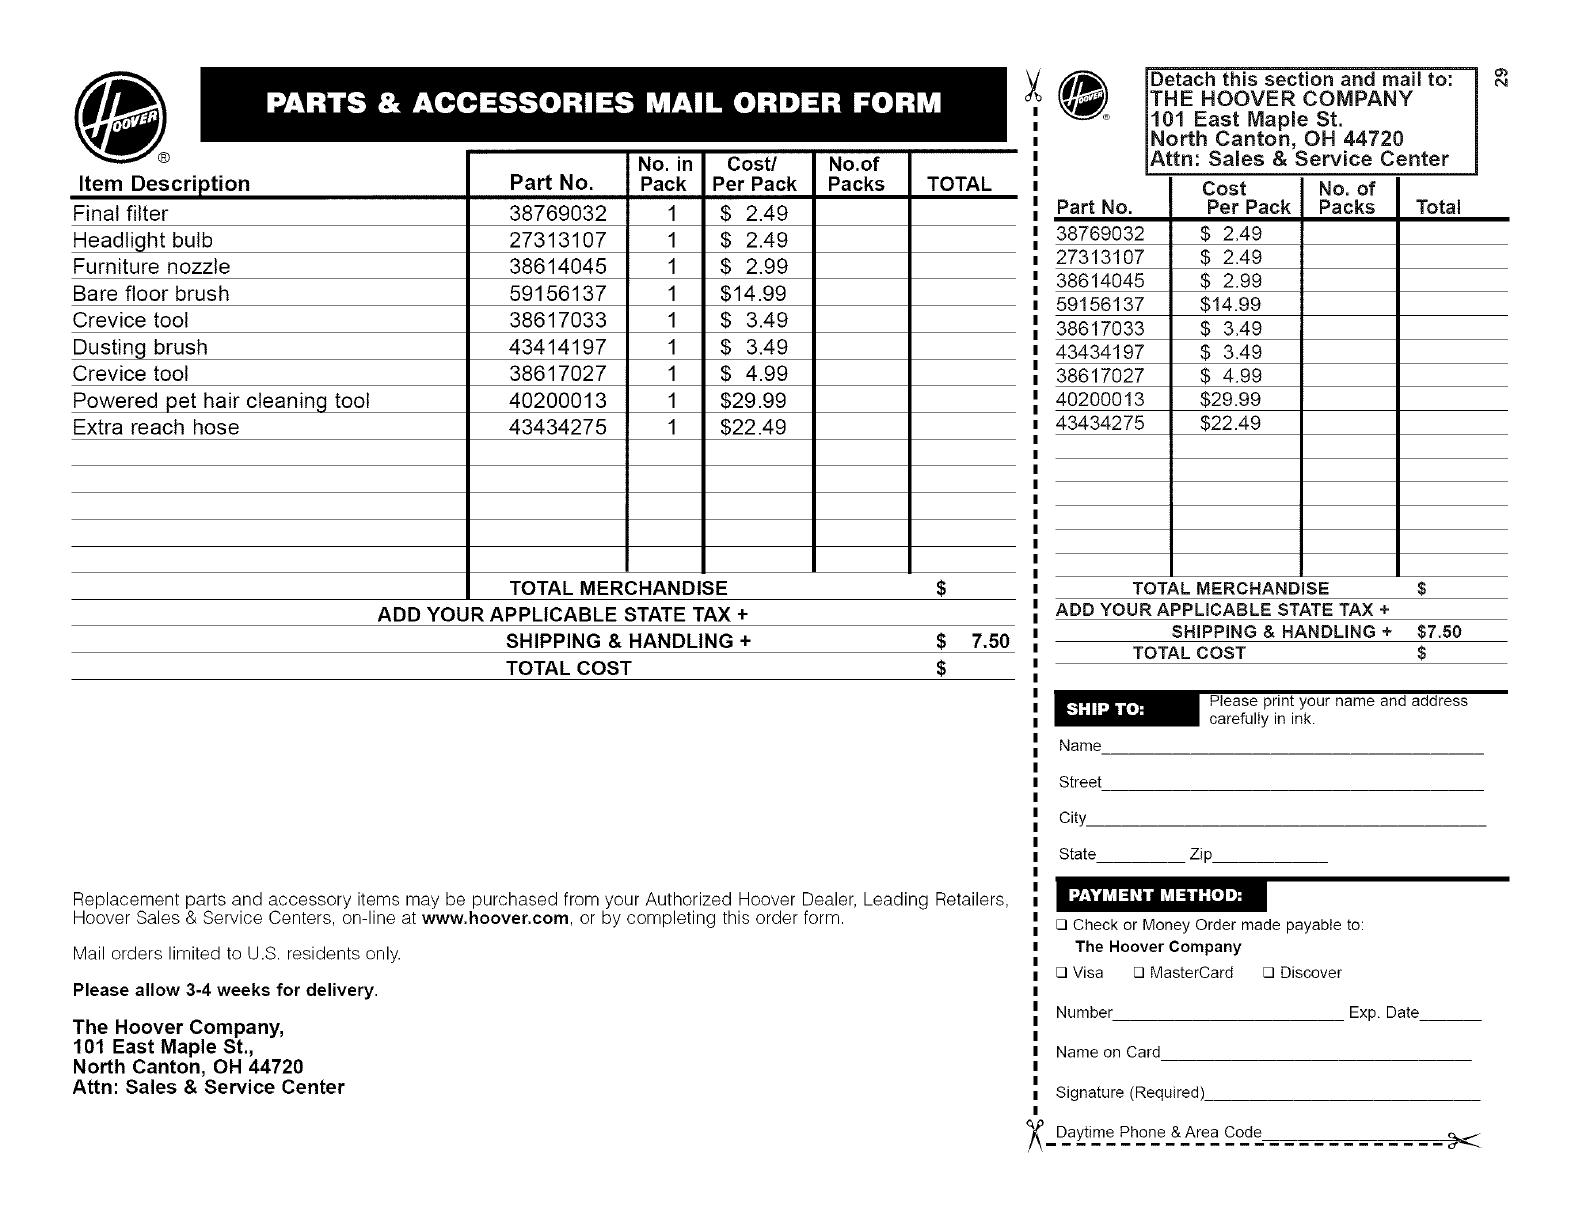
®
item Description
Final filter
Headlight bulb
Furniture nozzle
Bare floor brush
Crevice tool
Dusting brush
Crevice toot
Powered pet hair cleaninq toot
Extra reach hose
Part No.
38769032
27313107
38614045
59156137
38617033
43414197
38617027
40200013
43434275
No. in
Pack
1
1
1
1
1
1
1
1
1
Cost/
Per Pack
$ 2.49
$ 2.49
$ 2.99
$14.99
$ 3.49
$ 3.49
$ 4.99
$29.99
$22.49
No.of
Packs TOTAL
TOTAL MERCHANDISE $
ADD YOUR APPLICABLE STATE TAX +
SHIPPING & HANDLING + $ 7.50
TOTAL COST $
Replacement parts and accessory items may be purchased from your Authorized Hoover Dealer, Leading Retailers,
Hoover Sales & Service Centers, on-line at www.hoover.com, or by completing this order form.
Mail orders limited to U.S. residents only.
Please allow 3-4 weeks for delivery.
The Hoover Company,
101 East Maple St.,
North Canton, OH 44720
Attn: Sales & Service Center
Part No.
38769032
27313107
38614045
59156137
38617033
43434197
38617027
40200013
43434275
etach this section and mail to:
HE HOOVER COMPANY
31 East Maple St.
orth Canton, OH 44720
ttn: Sales & Service Center
Cost No. of
Per Pack Packs Total
$ 2.49
$ 2.49
$ 2.99
$14.99
$ 3.49
$ 3.49
$ 4.99
$29.99
$22.49
TOTAL MERCHANDISE $
ADD YOUR APPLICABLE STATE TAX +
SHIPPING & HANDLING + $7.50
TOTAL COST $
Name
Street
City,
Please print your name and address
carefully in ink.
State Zip
[3 Check or Money Order made payable to:
The Hoover Company
[3 Visa [3 MasterCard [3 Discover
Number Exp. Date__
Name on Card
Signature (Required).
Daytime Phone & Area Code

oDesprenda esta secci6n yenviela por
correo a:
]'HE HOOVER COMPANY
101 East Maple St.
North Canton, OH 44720
Numero Costo/ No. en
de pieza pot Paqte. Paqte. Total
38769032 $ 2.49
27313107 $ 2.49
38614045 $ 2.99
59156137 $14.99
38617033 $ 3.49
43434197 $ 3.49
38617027 $ 4.99
40200013 $29.99
43434275 $22.49
MERCANCIA TOTAL $
ANADA SU IMPUESTO ESTATAL CORRESPONDIENTE +
GASTOS DE ENVIO + $7.50
COSTO TOTAL $
_ Escriba su hombre y direccidn en letra de
imprenta con boligrafo.
Nombre y Apeltido
Calle
Ciudad
Estado Codigo postal
I_'] ;t =v,P'.'!t] =11:,/.'T_']_
E3Cheque o giro postal pagadero a: The Hoover Company
[3 Visa [3 MasterCard 13 Discover
No. tarjeta. Fecha de venc
Nombre en la tarjeta_
Firma (Requerida_
Tel6fono diurno y c6digo de
area
Descripcibn del articulo
Fittro final
Bombilta de luz delantera
_ara muebles
Escobilla _iso
Tubo _iar hendiduras
para desempolvar
_ara hendiduras
Accesorio turboaccionado para eliminar
_eto de las mascotas
Manguera de alcance suplementario
Numero No. en Costo/
de pieza Paqte. porPaqte.
38769032 1 $ 2.49
27313107 1 $ 2.49
38614045 1 $ 2.99
59156137 1 $14.99
38617033 1 $ 3.49
43414197 1 $ 3.49
38617027 1 $ 4.99
40200013 1 $29.99
43434275 1 $22.49
No.de
Paqte. TOTAL
MERCANClA TOTAL $
AglADA SU IMPUESTO ESTATAL CORRESPONDIENTE +
GASTOS DE ENVlO + $7.50
COSTO TOTAL $
Se aceptan pedidos hechos por correo de residentes de EE.UU. solamente.
Permita de 3 a 4 semanas para la entrega.
The Hoover Company,
101 East Maple St.,
_ North Canton, OH 44720
Las piezas y accesorios de repuesto se pueden comprar a traves del concesionario autorizado de Hoover, las prin-
cipales tiendas, los Centros de ventas y servicio de Hoover, en Internet en www.hoover.com, o rellenando este for-
mulario de pedido.
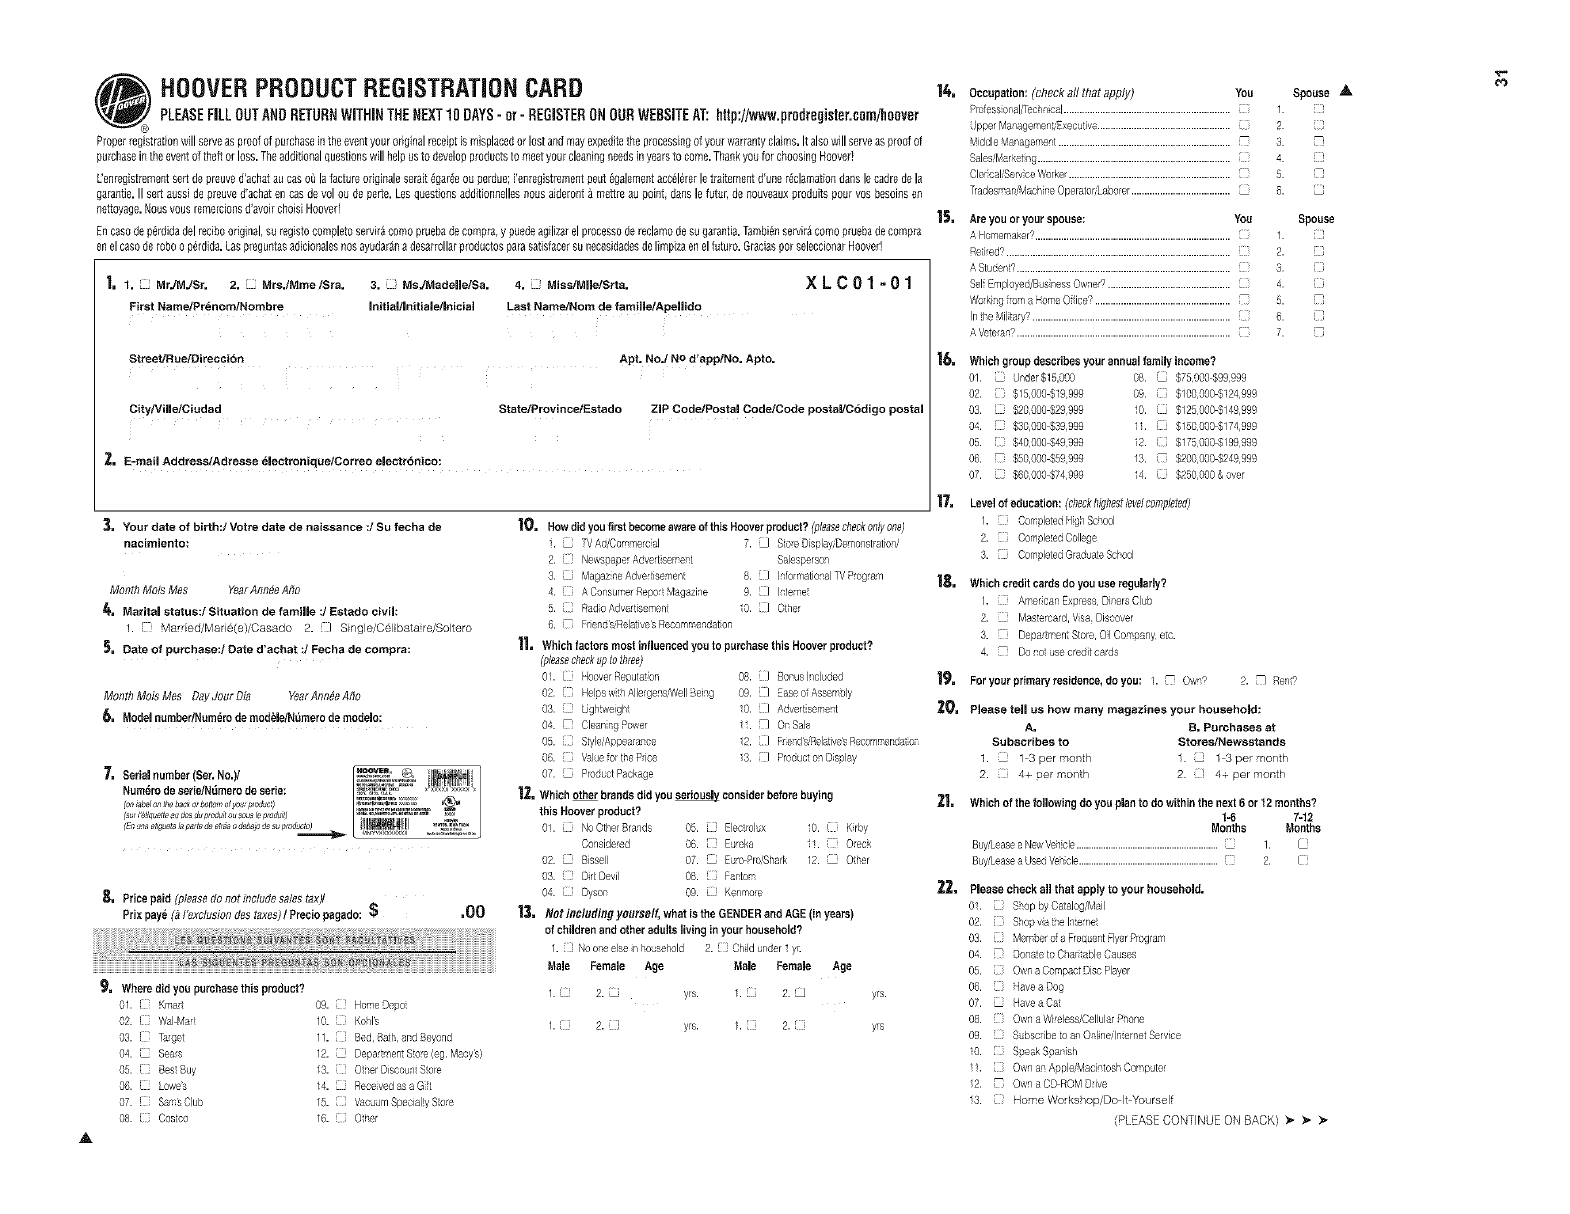
HOOVERPRODUCTREGiSTRATiONCARD
PLEASEFiLLOUTANDRETURNWiTHiNTHENEXT10 RAYS-or- REGISTERONOURWEBSITEAT: http://www.prodregister.com/hoover
Proper registration will serve as proof of purchasein the event your original receipt is misplacedor lost and may expeditethe processing of your warranty claims. It also will serve as proof of
purchasein the event oftheft or loss• Theadditional questionswill help usto develop products to meet your cleaning needsin years to come•Thank you for choosing Hooved
k'enregistrement sert de preuve d'achat au eas oQla lecture odginale smak @ar@ oa perdue; i'enregisbement pout @ulemeot acc_16rerle traitement d'une r_clamationduns le cadre dela
garantie. II sort aussi de preuve d'achat en can de vol ou de perte. Lee questions addgionnelles nous aJderonta mettre au point, dans le Mar, de oouvaaux produits pour vos beeries eo
aettoyage.Nounvous remercionsd'avoir chobi Hoover!
En casode p_rdida dal redbo odginal, suregisto completoservirA cams pruebade comprary puedeagilizar el processode reclamo desu garantia.Tambi_asen/irAcoma pruebade compra
en elcaso de robe o p_rdida. Lee preguntas adicionales ass ayudarAoa desarrollarproductos para satisfacer su necesidadesdelimpiza en elfuturo. Graciaspar seleccioaar Hoover!
1. 1, MrJMJSr, 2, Mrs.tMme/era, 3, Ms JMadelle/Sa, 4, MisslMlle/Srta,
First Name/Pr_nom/Mombre ]nitiaflJnltiale/iniclal Last Name/Nom de famliie/ApeHido
XLC01 -01
StreetlRue]Mirecci6n ARt. NoJ No d'app/Mo, Apto,
City/Vige/Ciudad StatelProvincetEstado ZiP Code/Postal Code/Code postaVC6digo postal
Z. E-mad Address/Adresse _lectronique/Correo electr6nico:
3. Your date of birth:/Votre date de naissance :1Su fecha de t_.
nacimiento:
Month Mois Men YearAnn_e Ado
4. Marital status:i Situation de faraille :/Estado civil:
1. {B Married/Mari6(e)/Casado 2. _] Single/C61ibatareiSoltero
_, Date of purchased Date d'achat :] Fecha de compra:
Month Mois Mes Day Jour Dta YearAnn#e Afio
_. tvlodel numbertNumero de modele/N_mero de models:
7=S_ra_umber(SerNo) ........ _ _t_ll
Num_ro de serie/Nemero de serie: _#,_,,_,_,_ x×_xxx××xx
en una et_guetMa oarte de ett#s o deba'o de su _fo_.cto) I1_ "_'_
S. Price paid (please do not indufle sales tax)/
Prix pay_ (a I'exdusion des taxes)I Precis pagado: $ ,00
_. Where did you pumhase this product?
02. [ WalMar
03. [ T_get
04. Sears
05. Best Buy
%. ] owe's
07. [} SamsClub
08. E[ Cosmos
09. [ HomeDeer
10. [ ] Kehls
11. Bed, 2a:h, and eyond
12. DepatmereSo,e (eg. Macy's)
13. O _,erDscoun( S ore
14. Receved asa G [
15. Vac m Special y Sto_e
16. [ O_;er
Howdid you first become aware of this Hooverproduct?(pleasecheekonlyone)
•TVAd!Commercal 7. _ SiRe DisplaylDemenstratio_U
2. } Nev_soaperAdvertsemer[ Salesperson
3. {_ MagazneAdvertisemeni 8. _d Pqorma[io':alWProgram
• ] AConsumerfiepo Magazine 9. [] Peeme
5. RadoAdvetisement 10. } Othe
8. Frend'siRelative'sRecommendaton
11. WhichfaetorsmostinfluencedyoutopurcbesethisHooverproduct?
(pleasecheckupto three)
01. _ HooverReputa on
02. Helpswth Allerge,/sfWellBei,/g
03. Lighweigh
04. Clean n9 Power
05. Style Appearance
06. _ ValuefothePice
07. ProductPackage
1_, Which other brands did you _ consider before buying
this Hoover product?
0t. No Othe_Brands 05. Elec rolux 0. _ Krby
Considered 08. } Eureka 11. { Reck
02. Bissell 07. EarsPrdShark 12. Oher
03. ] Dr[Devil 88. [] Fantom
04. { Dyson 09. _ Keg,moo
1_. Notincludin_yotltself, whatistbeOENDERandAGE(inyears)
of children and other adults living in your household?
1. k;ooqe else n qo se_old P. Chld urder I y.
Male Female Age Male Female Age
1. 2. yrs. 1. _ 2. yrs.
I. 2. yrs. 1. [ 2. yrs
08. 3 Bonushcluded
09. :] £aseofAssembly
0. ] Advertseme_=t
• _ OnSale
2. F!endu_£elative_Recommer,da:o-
13. ] ProduconDs#lay
14.
15,
16,
Occupation:(check all that apply) You
Piofess{onali%ec/ncal................................................................ 1.
pper ManagemenpP_xecuire................................................... 2.
MiddleManagement.................................................................. 3.
Sales/Marxt pg.......................................................................... 4.
Cb caliServce Worker.............................................................. 5.
Tradesman!Machr e Operator/Laborer...................................... 8.
Are you or your spouse: You
ABomemal<er?........................................................................... 1.
Rebed?...................................................................................... 2.
AStuden?.................................................................................. 3.
Sol Emeloyed/SushessOw:-e{?............................................... 4.
Wclki g _oma _omeOffice? .................................................... 5.
IPthe Miltary?............................................................................ 6.
A Veto!an?.................................................................................. 7.
Which group describes your annual family income?
01. rider$15,000 08. $75,000599,999
02. [ $15,000 $19999 09. $100,0005124,999
93. L] 520,909 $29999 10. { $128000 $149,999
0. [ $30,009539999 i. [ $1500005174,999
05. $40,009 $49999 i2. [ $175,000$199,999
08. --i $50,009 $59999 13. $2{}0,000$249,999
07. $80,000 $74,999 IA $250,000& over
Spouse '&
[
{
Spouse
C3
}
[3
[:3
13
{3
11. Level of education: (cheekhighestlevelcompleted)
1. CompletecHgh School
2. C/omplemdCollege
3. il CompletedGradateScheol
1_. Which credit cards do you use regularly?
I. hmer car' Expess, Dir_ersClub
2. /Masercard, Vsa Discover
3. [][ Depariment Store, OI Company etc.
4. Do"o usecredit cards
1_. Foryourprimaryresidence, doyou: 1. Own? 2. Re:,P?
_. Please tell us how many magazines your household:
A, B, Purchases at
Subscribes to Stores/Newsstands
1. 1 3 per mort_- . t 3 pe_ month
2. 4+ Del month 2. 4+ per month
_1. Which of the following do you plan to do within the next S or 12 months?
f-6 7-f 2
Months Months
BUyl'LeasesNe_'_Vehcle.......................................................... 1.
2uyi'Leasea UsedVehcle......................................................... [ Z 2. I
_, Please check all that apply to you_ household,
01. Sr_opbyCa alog/Mail
02. []] Shopvameln'ene
03. }Mem[_e o_a Frequentqyer Progam
84. ! Ooca:e to Cnartable Causes
05. Own a Compact DiscPlayer
06. Have a Dog
07. Have a Cat
08. } O_'_naWi!eless!Cellulal _%ne
09. S bsc be [o a_,Solneiln ernmService
0. 3 Speak Spanish
11. [ Own a_,Apple/Macintosh Compute
12. Ow:, a CD aRM D ire
!3. ]} Home Workshop/Do It Yourself
(OLEASE CONTINUE ON BACK) _* _* _-

@
RETURNTHiS CARDNOW FOR:
• Warranty Confirmation
With the information you provide we can confirm the date of purchase of
your product. This confirmation is of benefit to you, especially if your
original proof of purchase is lost.
. Proof of Ownership
Your model number, serial number, and other information will
be kept in our files for up to ten years.
,$100,000 Give Away VI
We'll automatically enter you for a chance to win $5,000,
$25,000, or even $50,000!
OFFICIAL SWEEPSTAKES RULES: NO PORCHASE NECESSARY TO WIN. PURCHASES DO NOT ENHANCE CHANCES OF
WINNING. Sweepstakes is sponso_d by Equitax Marketing Services ("EMS"), and will be offered iN a number of different
/_se_ations. EMS will award _he following pd_s: one 1st Prize of $50,000; one 2_d Prize of $25,000; and five 3rd Prizes of
$5,000, Sweepstakes begins May 20, 2005 at 12:00 a,m, E,D,S,_, and ends December 3t 2007 at 11:59 p,m, E,S,_ Edter by
completing this product regist_dor_ or printing a 3' x 5 ¸' card with Vo_r name,, address, cSy, state¸ ZIP Code, and the words
"$100000 Give, Aw_ VI" and mailing tee e_try form or card to F_0, Box 173245, Dept, XLC_Oenve_ CO 80217-3245, Entde_
mu_t be received before December St, 2007 _nd are limited to one per household, Mecbatacally reproduced e_tries _ot
acceptable, Not _sponsible for late,,lost or illegible entries, A random drawing will he held on or around March 3£ SOS& Odds
of winning depend on th_ total number o! e_tries re,ceivod, Open to I_gal U,S, _side_ts at I_ast 18 ye_ old except EMS
employees and their imm_diata family (spouse, parents, or children), Winne_ will bo noticed by certified mail at the address
)rovided on the ently form, Each wilmer must s_hrTiN a signed ;_ndnotarized affidavit of eligibility withta thirty days of
notNicatta£ of th_O prospective winne; status and Na s_tisfactory aeidavit is not received w_th_nthat time, a_ ademate wi_ner
will be selected. Altemat_ winners _re subject _o_11eligibilSy requfr_rlle_s. By subrtatO_g a_ ent/y, wtane_s agree to the use of
theo name, address, _nd photog_ph te_ _dveltising/publicdy pur_osos without compensation. All e_tdes become tee properly
of EMS. I_ case of a dispute of any online entry, the authorized account holder of the e-mail address iJsed to enter the
sweep_akes will be, deemed to be tee entrant, Winner m_y b_ _equoed to show p_oof ol being 07e"a_t hodzed account holder"
Win_er is solely responsible for all taxes, All tad_ral state and local laws appl_ EMS reserves the right to correct o_rors in
_weepslakes ma_eoal_, Offer void i_ Florida a_d where prohibited by I_w, For Its1of winners¸ send _ self-addressed st_mped
e_velope to: _$100,0go Give Away VI" _e, eox 173133, Dense!, CO 80217-3133,
ZS, Tohelpusunderstandour customers'lifestyJes,pleaseindicatethe interestsand
activitiesin whichyouor yourspouseenjoyparticipatingonare_lar basis;
01 [ Bcyclng 19 Automotive Work 35 [ Wries
02 Golf 20 J Electronics 36 Stamp/Coin Collecting
03 E Physcal Fitness/ 21 J Recre_LiollVehicles 37 ( Collectbles
Exercise (BVs) 38 _ Our Naton's Hertage
04 [ Running/Jogging 22 listen to Records/ 39 [ Real Estate
05 [ Snow Sk ing Tapes/CDs Investments
06 qennis 23 Avid Book Reading 40 Stocks/Bond
0T Camp*_g/Hikng 24 [] Bble/Devotional Investments
08 [Fishing Reading 41 Contests/Sweepstakes
09 Hunting/Shootng 25 Health/Natural Foods 42 ;Casino Gambling
10 Power Boating 26 Photography 43 ; Science Fictiol_
11 Salin o 2T ] Cultural/Arts Events 44 } Wldlife/Envronmental
12 Grandchildren 28 Fashlon Clothing Issues
13 [ Needlework/ 29 Art/Antique 45 ) Dieting/WeightControl
Kn tting Collecting 46 ( Science/New
14 [ Sewing 30 } ForegnTravel T_c_'nology
15 Flower Gardenrlg 31 } Cruise Shp 47 Sel_-Improvement
16 [ V(_getable Vacations 48 ' Walking for Health
Garderlb_g 32 } travel in USA 49 ( Watchng Sports on TV
1T [ Crafts 33 ] Gourmet Cooking/ 50 -i Home Video Recording
18 Buy Prerecorded Fine Foods 51 [ Moneymaking
Videos/DVDs 34 [_ NASCAR Opportunities
_4. Using the numbers in the above fist, p/ease
indicate your 3 most important activities:
Thanksfortakh_gthe timetotill out thisquestionl!aile.Youranswerswill b_usedfor marketresealchstudiesandreports.They
will also _llow you to _eceiveimportantmailingsand specialottersfrom a numbe_of ftaecompaqWswhoseproductsa_d
selviceslelatedirectlyto thesp_cifc intalests,hobbies,andother inf0rlnad0nhldicatadabove.Throughthisselec0vei}rog am,
yo_will be ableto obtainmozeinformationabo_tscrimtiesif_whchyou are_nvolvedand lessabo_tthosein wHchyo_a_ nob
Pleasacheckhere]ter scrimreasonyouwouldpr_errloito parlicipatein thisopport_rdy.
Ealueto returrths cardwll i_otdimtaishyourw_rra_tyiON,S.
If you haveany comments or suggestions about our product, please contact:
CossemmRespoNseCaster;,248EdwardsStreet,Claselsnd,IN 37311
Call (330) 499-9499 or visit us online at: www.hoover.com
Copyright@2006 All rights reserved
AFoldhere, Soalwithtape(donetstaple), PliezlcLVeuillezcacheter(Nepasaglater). DobleaquLFavordesellarcencintaadhesiv&Nousargrapas.
I"l'!'l'!'l"l"!'l'!"!'l'l'"ll"l'"lll'"l'l ..... ll'l"ll
£'t;,_E;ZLX08 0d
&O'_OO'IX
'e6_3sod I
3e^!lep 3ou
M Oo _O 3SOd
PeHnba_ I
e6_sod III
L_Z_ NI 'Puele^eIO
_,eaJTSspJeh_p_ O_
_e%uaO esuodseld JeuJnsuo O
:0% eouepuodse_oo
_eq%o pues eseeid
32

33

34

35
HOOVER and (_ are registered trademarks
HOOVER y son marcas registradas
R2 6-06 U8341-/8347-/8351-/8361-/8371-900 Printed in Mexico/Impreso en Mexico 56511-C48
