HP Dillinge Laser Jet Print To Mail (English) User Guide, C7833 90901 Bpl07855
User Manual: HP HP LaserJet Print to Mail - (English) User Guide, C7833-90901
Open the PDF directly: View PDF ![]() .
.
Page Count: 50
C7833-90901

HP LaserJet Print to Mail System
User Guide
Hewlett-Packard Company
11311 Chinden Boulevard
Boise, Idaho 83714 U.S.A.
Copyright Information
© Copyright Hewlett-Packard
Company 2000
All Rights Reserved.
Reproduction, adaptation, or
translation without prior written
permission is prohibited, except
as allowed under the copyright
laws.
Part number: C7833-90901
First Edition, May 2000
Warranty
The information contained in
this document is subject to
change without notice.
Hewlett-Packard makes no
warranty of any kind with
respect to this information.
HEWLETT-PACKARD
SPECIFICALLY DISCLAIMS
THE IMPLIED WARRANTY OF
MERCHANTABILITY AND
FITNESS FOR A PARTICULAR
PURPOSE.
Hewlett-Packard shall not be
liable for any direct, indirect,
incidental, consequential, or
other damage alleged in
connection with the furnishing or
use of this information.
Trademark Credits
Capella is a U.S. registered
trademark of Capella
Technologies, LLC.
Intuit, the Intuit logo, Quicken,
QuickBooks, QuickBooks Pro,
TurboTax, MacInTax, ProSeries
and InsureMarket, among
others, are registered
trademarks and/or registered
service marks of Intuit Inc. or
one of its subsidiaries.
Quicken.com,
QuickenMortgage, Quicken
Business CashFinder, Lacerte,
QuickTax and QuickSteuer,
Kobanto and Yayoi, among
others, are trademarks and/or
service marks of Intuit Inc. or
one of its subsidiaries.
Microsoft®, MS Windows®,
Windows®, and Windows NT®
are U.S. registered trademarks
of Microsoft Corporation.
MindGate and PrintChef are
U.S. registered trademarks of
MindGate.
Moore is a U.S. registered
trademark of Moore North
America, Inc.
Peachtree Software® is a
U.S. registered trademark
of Peachtree Software, Inc.
Stamps.com Internet Postage is
a U.S. registered trademark of
Stamps.com.
TrueType™ is a U.S. trademark
of Apple Computer, Inc.
EN Table of Contents 3
Table of Contents
1 Automating the mailing process
The HP LaserJet Print to Mail system. . . . . . . . . . . . . . . . . . . . . . . . . . . . . . . . . . . . . 5
2 Setup
Checking the contents. . . . . . . . . . . . . . . . . . . . . . . . . . . . . . . . . . . . . . . . . . . . . . . . . 7
Identifying parts. . . . . . . . . . . . . . . . . . . . . . . . . . . . . . . . . . . . . . . . . . . . . . . . . . . . . . 8
Installing the accessory. . . . . . . . . . . . . . . . . . . . . . . . . . . . . . . . . . . . . . . . . . . . . . . . 9
Preparing the printer . . . . . . . . . . . . . . . . . . . . . . . . . . . . . . . . . . . . . . . . . . . . . . . 9
Attaching the HP LaserJet Print to Mail accessory to the printer . . . . . . . . . . . . 10
Installing the fold-chutes. . . . . . . . . . . . . . . . . . . . . . . . . . . . . . . . . . . . . . . . . . . 13
Installing the output bin. . . . . . . . . . . . . . . . . . . . . . . . . . . . . . . . . . . . . . . . . . . . 14
Turning on the accessory . . . . . . . . . . . . . . . . . . . . . . . . . . . . . . . . . . . . . . . . . . 15
Loading software . . . . . . . . . . . . . . . . . . . . . . . . . . . . . . . . . . . . . . . . . . . . . . . . 15
Safety . . . . . . . . . . . . . . . . . . . . . . . . . . . . . . . . . . . . . . . . . . . . . . . . . . . . . . . . . . . . 16
3 Using the accessory
Printing on Print to Mail forms . . . . . . . . . . . . . . . . . . . . . . . . . . . . . . . . . . . . . . . . . . 17
Form layout. . . . . . . . . . . . . . . . . . . . . . . . . . . . . . . . . . . . . . . . . . . . . . . . . . . . . 17
Formatting tools . . . . . . . . . . . . . . . . . . . . . . . . . . . . . . . . . . . . . . . . . . . . . . . . . 18
Setting the HP LaserJet Print to Mail accessory . . . . . . . . . . . . . . . . . . . . . . . . . . . . 20
Setting fold-stops . . . . . . . . . . . . . . . . . . . . . . . . . . . . . . . . . . . . . . . . . . . . . . . . 21
Software settings . . . . . . . . . . . . . . . . . . . . . . . . . . . . . . . . . . . . . . . . . . . . . . . . 22
Working with the printer. . . . . . . . . . . . . . . . . . . . . . . . . . . . . . . . . . . . . . . . . . . . . . . 23
Large mailings . . . . . . . . . . . . . . . . . . . . . . . . . . . . . . . . . . . . . . . . . . . . . . . . . . 23
Additional information . . . . . . . . . . . . . . . . . . . . . . . . . . . . . . . . . . . . . . . . . . . . . . . . 24
4 Troubleshooting and Maintenance
Solving setup problems. . . . . . . . . . . . . . . . . . . . . . . . . . . . . . . . . . . . . . . . . . . . . . . 25
Solving printing and folding problems . . . . . . . . . . . . . . . . . . . . . . . . . . . . . . . . . . . . 27
Jams . . . . . . . . . . . . . . . . . . . . . . . . . . . . . . . . . . . . . . . . . . . . . . . . . . . . . . . . . . . . . 30
Clearing jams . . . . . . . . . . . . . . . . . . . . . . . . . . . . . . . . . . . . . . . . . . . . . . . . . . . 31
Resetting the accessory . . . . . . . . . . . . . . . . . . . . . . . . . . . . . . . . . . . . . . . . . . . 33
Jam recovery . . . . . . . . . . . . . . . . . . . . . . . . . . . . . . . . . . . . . . . . . . . . . . . . . . . 33
Interpreting the Event Log . . . . . . . . . . . . . . . . . . . . . . . . . . . . . . . . . . . . . . . . . 34
Cleaning the accessory. . . . . . . . . . . . . . . . . . . . . . . . . . . . . . . . . . . . . . . . . . . . . . . 35
Covers . . . . . . . . . . . . . . . . . . . . . . . . . . . . . . . . . . . . . . . . . . . . . . . . . . . . . . . . 35
Rollers. . . . . . . . . . . . . . . . . . . . . . . . . . . . . . . . . . . . . . . . . . . . . . . . . . . . . . . . . 35
4 Table of Contents EN
Appendix A Specifications
HP LaserJet Print to Mail Accessory. . . . . . . . . . . . . . . . . . . . . . . . . . . . . . . . . . . . . 37
Regulatory information . . . . . . . . . . . . . . . . . . . . . . . . . . . . . . . . . . . . . . . . . . . . . . . 39
FCC regulations . . . . . . . . . . . . . . . . . . . . . . . . . . . . . . . . . . . . . . . . . . . . . . . . . 39
Hewlett-Packard Year 2000 warranty . . . . . . . . . . . . . . . . . . . . . . . . . . . . . . . . . . . . 40
Appendix B Service and Support
Warranty information. . . . . . . . . . . . . . . . . . . . . . . . . . . . . . . . . . . . . . . . . . . . . . . . . 41
Hewlett-Packard limited warranty statement . . . . . . . . . . . . . . . . . . . . . . . . . . . 41
HP Express Exchange . . . . . . . . . . . . . . . . . . . . . . . . . . . . . . . . . . . . . . . . . . . . . . . 42
Returning the unit . . . . . . . . . . . . . . . . . . . . . . . . . . . . . . . . . . . . . . . . . . . . . . . . . . . 43
Service information form. . . . . . . . . . . . . . . . . . . . . . . . . . . . . . . . . . . . . . . . . . . 44
HP Customer Care service and support . . . . . . . . . . . . . . . . . . . . . . . . . . . . . . . . . . 45
Ordering supplies . . . . . . . . . . . . . . . . . . . . . . . . . . . . . . . . . . . . . . . . . . . . . . . . . . . 46
EN The HP LaserJet Print to Mail system 5
1Automating the mailing
process
The HP LaserJet Print to Mail system
The HP LaserJet Print to Mail system combines your HP LaserJet
series printer with a powerful set of tools to help you automate routine
office mailings. Many mailing tasks can be set up and completed
quickly by inserting Print to Mail media in the printer, opening the
printer’s rear output bin to engage the HP LaserJet Print to Mail
accessory, and selecting “print” in your software program. To
complete your end-to-end solution, you might want to combine
additional elements in the system, including components from other
vendors. These solution-providers can help you automatically
reformat your forms, print postage on your mail, print checks, and
much more.
You can use the HP LaserJet Print to Mail accessory with such
popular programs as Intuit Quickbooks, Peachtree Complete
Accountant, and Microsoft Word. You can customize your forms with
the help of samples included on the installation CD-ROM. You can
even develop your own templates within the programs (see the
documentation that came with your programs).

6 1 Automating the mailing process EN
Where to start? Just take a look at the HP LaserJet Print to Mail
Solution Guide included with the HP LaserJet Print to Mail accessory.
Save time and money by:
automating monthly invoice and payment functions.
managing your own payroll mailings (checks, statements, tax
forms).
sending reminders and statements to customers on a regular
basis.
distributing confidential reports, such as customer information,
PIN numbers, or test results.
sending small promotional pieces, such as coupons and offers.
The Moore Media Catalog is your source for all of your print media:
obtain standard media and create forms on your computer.
obtain media customized with your logo and form format—in
color!
create, print, and prepare your own checks into mail-ready
pieces.
print checks with MICR (magnetic ink character recognition) bank
encoded numbers or purchase an optional MICR toner cartridge
system for your printer.
print signatures on checks as they pass through the printer.
automatically print postage using special software packages.
You now have the means to provide a highly professional look while
automating your company’s office mailings. Start today!

EN Checking the contents 7
2Setup
Checking the contents
The graphic below illustrates the contents of the box:
Figure 1. HP LaserJet Print to Mail accessory—contents of the box
3
2
1
45
789
10 11 12
HP LaserJet Print to Mail
6
Print Mail
to
HP LaserJet Printto Mail Accessory
123
45
6
7
9
8
1HP LaserJet Print to Mail 7Quick setup guide
2Upper fold-chute 8Software, HP LaserJet Print to
Mail Solution Guide, Media
sample pack, Moore Media
Catalog
3Lower fold-chute
4Power cables
5Output bin 9Reversible base (cutout cover
taped to bottom)
6User guide
8 2 Setup EN
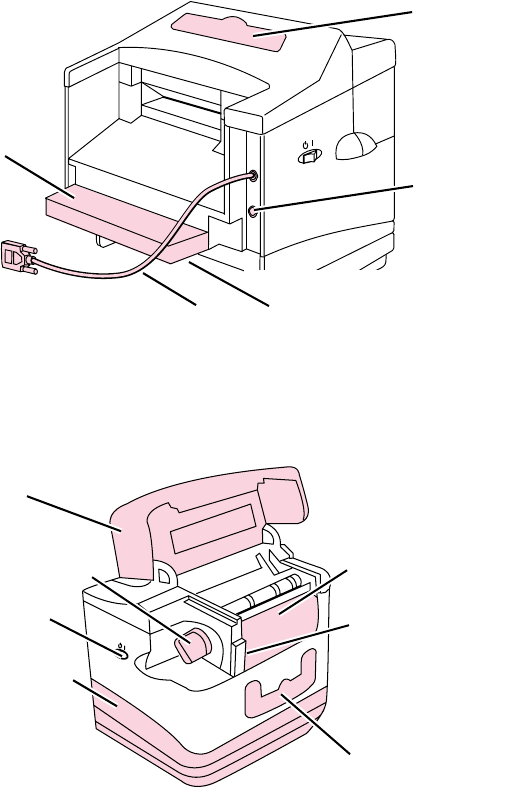
Identifying parts
Before you begin to set up the HP LaserJet Print to Mail accessory,
identify the following parts of the accessory:
Figure 2. Front view
Figure 3. Rear view
bottom of the alignment guide)
Accessory interface cable (C-Link)
Alignment
Alignment tips (on the
Power
connector
guide
Upper
fold-chute
slot
Output bin slot
Lower fold-chute slot
Reversible base
Power switch
Top cover
Jam-clearing knob
Serial number plate
(inside output bin slot)
EN Installing the accessory 9
Installing the accessory
Preparing the printer
The printer, by itself, measures 16.8 inches (42.7 cm) from front to
rear. To attach the HP LaserJet Print to Mail accessory, allow for an
additional 21.75 inches (55.2 cm) at the rear of the printer.
1Turn off the printer.
2At the rear of the printer, remove the dust cover, if installed (not all
printers have dust covers), from the rear of the paper tray by
grasping it on both sides and pulling it straight back, away from
the printer.
3Remove the two duplexer tabs, if installed, from the rear of the
printer by first gently pulling the bottoms of the tabs straight back,
and then rotating them up and away from the printer.
Note If a duplexer accessory is installed on the printer, it must be removed
to install the HP LaserJet Print to Mail accessory.
Figure 4. Duplexer tabs removal
Duplexer rail
Dust cover
Duplexer tabs
10 2 Setup EN
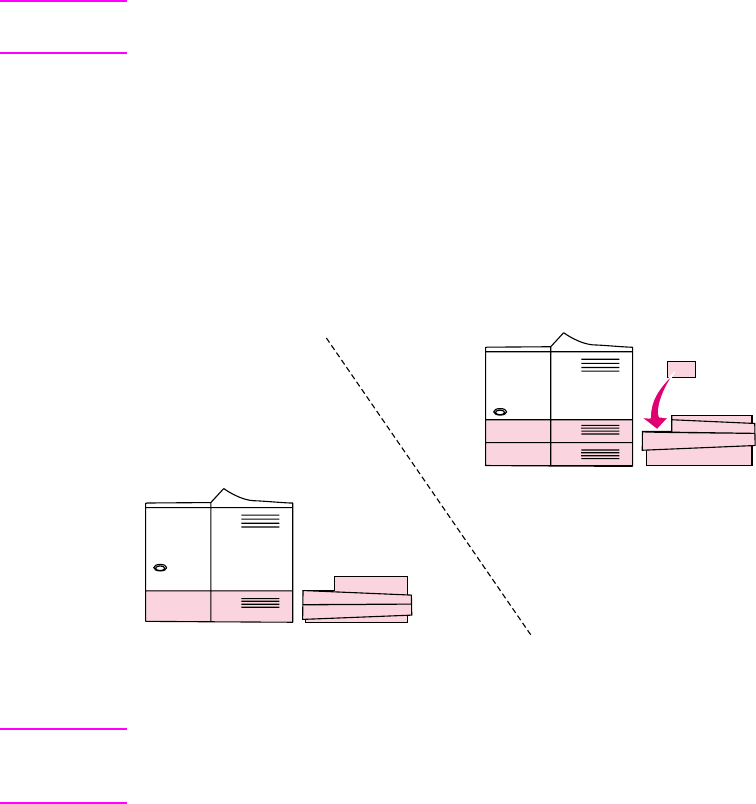
Attaching the HP LaserJet Print to Mail
accessory to the printer
The reversible base of the accessory can be turned upside-down.
This allows the accessory to match the height of a single-tray (1 x
500) HP LaserJet 4050 or 4050N printer or a two-tray (2 x 250)
HP LaserJet 4050T or 4050TN printer.
Note The HP LaserJet Print to Mail accessory is not designed for use with
a printer with two 500-sheet trays.
1Remove packing tape from the accessory.
2Lift the accessory off of the reversible base.
3Determine whether your printer is a single-tray (1 x 500)
HP LaserJet 4050 or 4050N printer or a two-tray (2 x 250)
HP LaserJet 4050T or 4050TN printer.
4Check the illustrations embossed on the inside of the reversible
base and flip the base so that the illustration that faces up
matches your printer’s tray configuration.
Figure 5. Positioning the reversible base
Note For a two-tray configuration, remove the cutout cover that is taped to
the inside of the reversible base and insert it into the cutout at the upper
corner of the base before you proceed to step 5.
5Place the reversible base near the rear of the printer.
6Place the accessory on the reversible base so that the front of the
accessory faces the rear of the printer.
Reversible base setup for
HP LaserJet 4050 or 4050N
Reversible base setup for
HP LaserJet 4050T or 4050TN
printer (1 x 500)
printer (2 x 250)

EN Installing the accessory 11
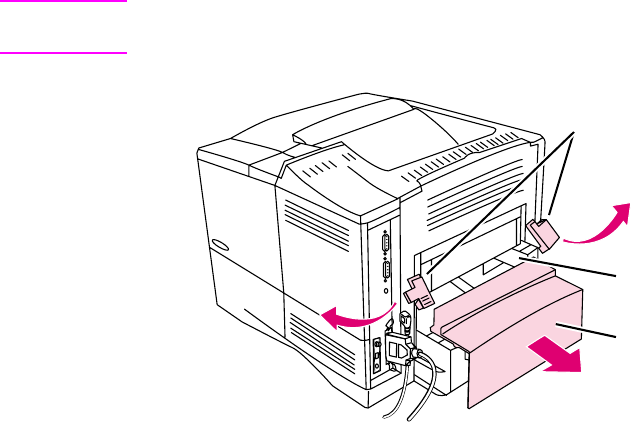
7Locate the accessory interface cable (C-Link) and plug it into the
connector on the printer labeled “ACCESSORY.”
8Plug the power cable into the power connector on the front,
toward the right, of the accessory.
9Route the accessory power cable, printer power cable, and
printer data cable through the rectangular cutout in the left side of
the reversible base.
Figure 6. Connecting accessory cables
12 2 Setup EN
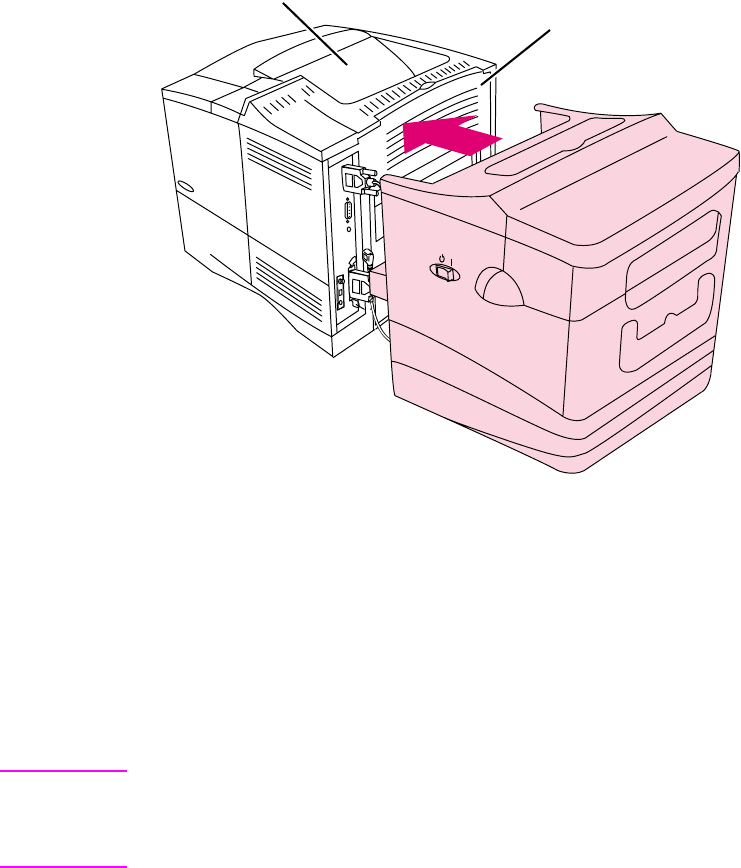
10 Slide the accessory toward the rear of the printer so that the
alignment guide from the accessory slides firmly into the duplexer
slot.
Figure 7. Attaching the HP LaserJet Print to Mail accessory
11 When the tips on the bottom of the alignment guide rest in the
indentations in the duplexer rails, the front of the accessory is
approximately one-eighth of an inch (3.18 mm) from the rear of
the printer.
12 Flip down the rear output door of the printer into the opening in
the accessory until it stops. The top edge of the rear output door
should be even with the paper feed opening of the accessory.
Note When the rear output door of the printer is flipped down, the printer
delivers printed sheets to the HP LaserJet Print to Mail accessory. To
deliver printed sheets to the printer’s top output bin, simply flip the rear
output door back up to its closed position.
Top output bin
Rear output door
EN Installing the accessory 13
Installing the fold-chutes
Note Fold-stop settings (for different paper sizes and different folds) can only
be changed when the fold-chutes are removed from the accessory. For
information about changing fold-stop settings, see “Setting fold-stops”
in Chapter 3—Using the accessory.
Figure 8. Installing fold-chutes
1Insert the upper fold-chute (the smaller fold-chute with numerical
stop identifiers) into the chute guide with the labels facing up.
Note The top cover must be closed to install or remove the upper fold-chute.
2Gently push the fold-chute into the guide until the thumb tabs lock
with an audible “click.” When locked in place, fold-chutes cannot
be pulled out without pressing the thumb tabs.
3Install the lower fold-chute (the larger fold-chute with alphabetic
stop identifiers) in the same manner, with the labels facing up.
Thumb
tab
14 2 Setup EN
Installing the output bin
The output bin must be installed and seated correctly before the
accessory will operate.
1Locate two notches on each side, just inside the opening at the
rear of the accessory.
2Also locate two tabs on each side of the output bin.
3Insert the output bin into the opening, first sliding the tabs all the
way into the notches, and then lowering the output bin down into
place.
Figure 9. Installing the output bin
Adjusting the output bin
The output bin has two settings:
Retracted, the output bin works well for letter-sized media.
Extended, the output bin works well for legal-sized media.
Simply slide the bottom of the output bin to the retracted or extended
position.
The bottom of the output bin can be removed to allow folded media to
fall into a separate container. For information about using a separate
container, see “Large mailings” in Chapter 3—Using the accessory.

EN Installing the accessory 15
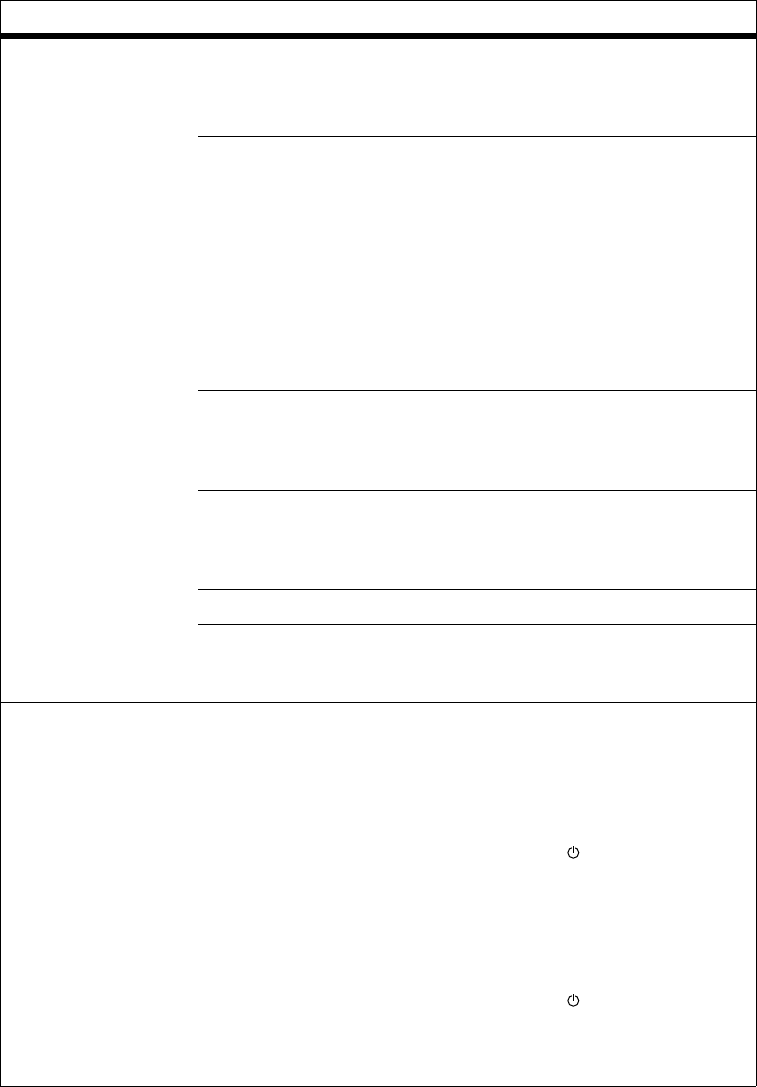
Turning on the accessory
Note The accessory will not operate if either the upper fold-chute or the
output bin are removed.
1Plug the power supply into an appropriate power outlet.
2Press the power switch to “I” to turn on power to the accessory.
Note The accessory does not start until paper exits the printer and enters
the accessory. When it is plugged into a power source, there will always
be power to the accessory interface (“” is “standby” mode). For the
accessory to operate, the power switch must be placed in the “on” (“I”)
position.
3Turn on power to the printer.
Loading software
The software that comes with the accessory contains an updated
driver and example files for common programs, such as Microsoft
Word, that ensure correct placement of variable data on the printed
material. When you use the information about setting margins, you
can be sure that your print-to-mail forms will print correctly.
To load software
1Insert the CD-ROM that came with the HP LaserJet Print to Mail
accessory into the CD-ROM drive in the computer.
Note If the CD-ROM does not start automatically, use Microsoft Windows
Explorer to locate the file Setup.Exe and double-click the file’s icon.
2Follow the instructions on the screen.
During the software installation process, the printer prints a test page
and sends it to the accessory, and the accessory folds the test page
and delivers it to the output bin.
After the software is installed, double-click the HP LaserJet Print to
Mail icon on your desktop any time to learn more about the accessory
or about installing and using templates.

16 2 Setup EN
Safety
Several safety precautions are built into the HP LaserJet Print to Mail
accessory. For the protection of the operator, power to the accessory
motor is stopped under the following conditions:
when a media jam occurs
when the output bin is overfilled
when the output bin is removed
when the upper fold-chute is removed
WARNING! To ensure continued operation of the HP LaserJet Print to Mail
accessory as well as for the operator’s safety, follow these important
safety tips:
Never block the flow of media between the printer and the
accessory.
Never manually feed media into the accessory.
Never attempt to operate the accessory with one or both of the
fold-chutes removed.
Never attempt to adjust fold-stop settings without first removing
the fold-chutes from the accessory.
Never use media that does not meet the specifications of the
accessory.
Never feed non-media items into the accessory.
Never place hands near accessory openings when operating the
accessory.
Be careful of loose objects (for example, jewelry) while operating
the accessory.
EN Printing on Print to Mail forms 17
3Using the accessory
Printing on Print to Mail forms
Before you use the Print to Mail accessory, make sure that you have
successfully:
installed the Print to Mail accessory
installed the software
checked the test page to ensure that the Print to Mail accessory
is set up correctly
Note Printing a test page was part of the software installation. If you did not
print a test page, reinstall the software (see page 15).
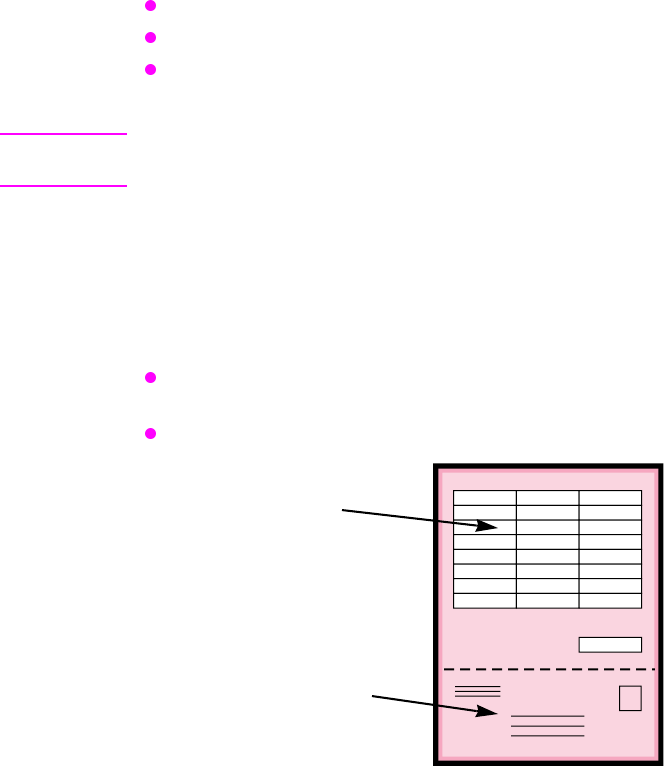
Form layout
So that the Print to Mail accessory works with the software programs
you use, you might have to manipulate the placement of information.
There are two parts to Print to Mail forms:
Print area—information other than address information should
appear in the print area (for example, invoice information)
Address area—“to:” and “from:” addresses appear here
Print area
Address area

18 3 Using the accessory EN
Formatting tools
To format data so that it fits Print to Mail forms, use any of three
methods:
templates
auto-formatting tools
manual adjustment
Templates for Peachtree, Quickbooks, and Microsoft
Word
Templates for Peachtree, Quickbooks, and Microsoft Word are
included with the Print to Mail software. Follow the steps below to find
the templates and the instructions for installing them:
1Double-click the “My Computer” icon on your desktop.
2Double-click the “C” drive.
3Double-click the “HPP2M” folder.
4Double-click the “Templates” folder.
5Locate the folder that corresponds to the software program you
use and double-click the folder.
6Double-click the Template Installation Instructions file.
The instructions file contains all of the information you need about
installing the templates for the software program you use.
Auto-formatting tools
If you find it difficult to modify your software program, auto-formatting
tools can reformat forms without changing the software program.
Auto-formatting tools reformat data after you send print jobs to the
printer.
For more information about auto-formatting tools, contact Capella
Technologies or Mindgate at the following Web addresses:
http://www.capellatech.com
http://www.mindgate.com
The Print to Mail Solution Guide included with the accessory also
contains information about auto-formatting tools.
EN Printing on Print to Mail forms 19
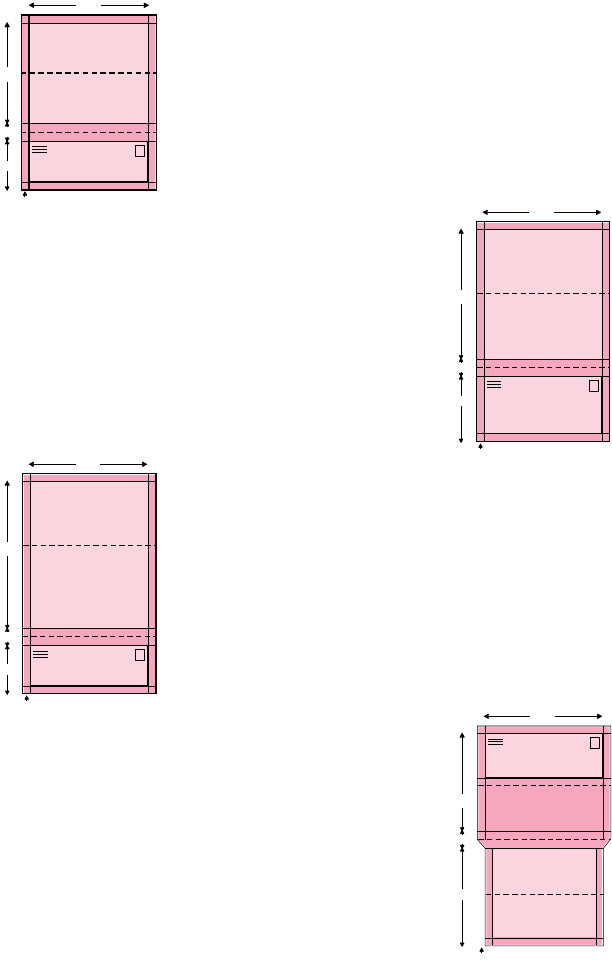
Manual formatting tools
Use the examples below to create your own templates for the
software programs you use. The templates you create should match
the size specifications shown in the examples. All examples include a
7.5-inch printable width and a 1.1-inch gap between the print area
and the address area.
Letter size 4B—the print
area is 6.3 inches long
Legal size 2C—the print
area is 8.3 inches long
Legal size, extended
image 1B—the print
area is 9.5 inches long
Legal size, easy open
4D—the print area is
6.15 inches long and is
at the bottom of the form
7.5"
.5"
6.3"
3.1"
1.1"
PRINT AREA
7.5"
8.3"
4.2"
1.1"
.5"
PRINT AREA
7.5"
9.5"
3"
1.1"
.5"
PRINT AREA
7.5"
6.3"
6.15"
1.1"
.5"
PRINT AREA

20 3 Using the accessory EN
Setting the HP LaserJet Print to Mail accessory
To use the HP LaserJet Print to Mail accessory, complete the
following steps:
1Set the fold-stops for the media you want to print (see Table 1
below for the correct fold-stop settings).
2Load media into the tray you want to use (see Table 1 below for
orientation instructions).
3Check the print settings in the software (see Table 2 for details
about software settings).
*Availability of media may be limited.
Note For letter-sized plain paper, use fold-stop settings 4 and B. For legal-
sized plain paper, use fold-stop settings 2 and C.
The Print to Mail media identification also indicates the fold-stop
settings. For example if you are using “Letter size 4B” media, the
upper fold-chute setting is 4 and the lower fold-chute setting is B.
Table 1. Fold-stop settings and media orientation
Print to Mail media
Step 1 Step 2
Fold-stop
settings Media orientation
Upper
chute Lower
chute Tray 1
(manual feed tray) Trays 2 and 3
Letter size 4B 4 B
Printed opening
instructions facing
down and away from
the printer.
Printed opening
instructions facing up
and towards the
printer.
Letter size check 4B 4 B
Letter size—extended
image 3A* 3A
Legal size 2C 2 C
Legal size—extended
image 1B 1B
Legal size—easy-
open 4D* 4D
Printed opening
instructions facing up,
narrow part of the
media away from the
printer.
Printed opening
instructions facing
down, narrow part of
the media towards
the printer.
EN Setting the HP LaserJet Print to Mail accessory 21
Setting fold-stops
1Remove the fold-chute by pressing the thumb tabs to release the
fold-chute and sliding the fold-chutes out of the chute guides.
2Squeeze the fold-stop between your thumb and index finger to lift
the locking end of the fold-stop.
3Slide the fold-stop to the setting you want; settings are visible
through the “window” on the fold-stop.
Note The fold-stop must lock firmly in place at the selected setting.
Figure 10. Setting the fold-stops
Fold-chutes
Fold-stops
Table 2. Software settings
Print to Mail media Step 3, software settings
Letter size 4B
1Click File, click Print, and then click Properties.
2Click the Basics tab.
3Under Orientation, select Portrait and Rotated.
Letter size check 4B
Letter size—extended image 3A
Legal size 2C
Legal size—extended image 1B
Legal size—easy-open 4D 1Click File, click Print, and then click Properties.
2Click the Basics tab.
3Under Orientation, select Portrait and make sure that
Rotated is NOT selected.

22 3 Using the accessory EN
Software settings
To print documents
1Click File, click Print, and then click Properties.
2Click the Basics tab.
3Under Orientation, select Portrait and Rotated as appropriate
for the specific media. See Table 2—Software settings—to
determine the correct Portrait and Rotated settings.
For more information about printer settings, see the Readme on the
CD-ROM.
Note For other printer jobs, check printer settings before printing.

EN Working with the printer 23
Working with the printer
Once HP LaserJet Print to Mail accessory is installed and turned on,
the fold-stops are set, the fold-chutes are in place, and the printer
input tray is loaded, the accessory is ready to use.
Note In continuous operation, the printer might slow after printing 30 to 60
sheets. This is normal behavior; the HP LaserJet Print to Mail
accessory adjusts to the printer’s output.
Send a print job to the printer. As media is printed and sent to the rear
output, the accessory senses that media is present, takes the media
from the rear output, and completes the fold for which it was set.
Pressure-sensitive media is folded, sealed, and then sent to the
output bin. Plain paper is only folded and sent to the output bin.
Remove the folded items from the output bin when it is full.
Note Remove folded media often to prevent an output-bin-full shutdown (also
see “Large Mailings” below).
Large mailings
During large mailings, the output bin can become full often. To
prevent an “output bin full” shutdown, carefully remove the extendable
piece of the output bin. Depending on the placement of the printer
and accessory, a shallow tray, a box, or a mail bag may be placed
below the output bin to catch the folded media.

24 3 Using the accessory EN
Additional information
The following companies offer additional solutions for the HP Print to
Mail accessory:
Moore
http://www.themoorestore.com
Moore designs and manufactures
business forms specifically for the
HP LaserJet Print to Mail accessory.
MindGate
http://www.mindgate.com
PrintChef reformats the output of
any Windows application to work
with the HP LaserJet Print to Mail
system.
Peachtree
http://www.peachtree.com
With a complete line of business
checks and forms, Peachtree has
the Print to Mail forms you’re looking
for!
Capella Technologies
http://www.capellatech.com
Customize your Print to Mail process
to meet your business needs.
Capella Technologies offers “add-
on” options for printing secure MICR
checks, bar codes, signatures,
logos, e-forms, transform data, and
offers forms design services.
Stamps.com
http://www.stamps.com
It’s the easiest, quickest way to get
postage: Stamps.com Internet
Postage. There is no need to stamp
or meter your mail. U.S. Postal
Service-approved postage is
automatically printed onto
envelopes, labels, or Print to Mail
mailers from your HP printer, all in
one step.

EN Solving setup problems 25
4Troubleshooting and
Maintenance
Solving setup problems
Table 3. Solving setup problems
Problem Cause Solution
Accessory doesn’t
match up to the printer. The reversible base is not
oriented correctly. See “Attaching the HP LaserJet Print to
Mail accessory to the printer” in
Chapter 2 to reposition the reversible
base.
Printer cable is too
short. Cable not routed through
cable cutout in reversible
base.
See “Attaching the HP LaserJet Print to
Mail accessory to the printer” in
Chapter 2 to reroute the cable.
The printer/accessory is not
close enough to the
computer.
Move the printer/accessory closer to
the computer.
-or-
Reposition the printer/accessory.
-or-
Purchase a longer cable.
A hole is exposed in the
upper, right side of the
reversible base.
The cable cutout cover is
not installed. See “Attaching the HP LaserJet Print to
Mail accessory to the printer” in
Chapter 2 to install the cutout cover.
26 4 Troubleshooting and Maintenance EN
Accessory will not
attach to rear of printer. The paper tray dust cover or
duplexer tabs were not
removed.
See “Preparing the printer” in Chapter 2
to make sure the printer will accept the
accessory.
Cables are routed
incorrectly. See “Attaching the HP LaserJet Print to
Mail accessory to the printer” in
Chapter 2 reroute the cables.
Cables are tangled. Untangle cables from the paper tray
You are not pushing hard
enough. See “Attaching the HP LaserJet Print to
Mail accessory to the printer” in
Chapter 2 to make sure the accessory
is aligned correctly, and use a firm push
to attach the accessory.
Printer doesn’t
recognize the
accessory.
The accessory is not
plugged into a power
source.
Make sure the power supply is plugged
into the accessory and the power
source. Set the power switch on the
accessory to “on” (“I”) first and then turn
on the printer.
The accessory interface
cable is not plugged in. See “Attaching the HP LaserJet Print to
Mail accessory to the printer” in
Chapter 2 to install the interface cable.
The fold-chutes and output
bin are either not installed or
installed incorrectly.
See “Installing the fold-chutes” and
“Installing the output bin” in Chapter 2
to install the fold-chutes and the output
bin.
The printer and accessory
were not turned on in the
correct sequence.
Turn off the printer and set the power
switch on the accessory to “standby”
(“”). Set the power switch on the
accessory to “on” (“I”) first and then turn
on the printer.
The printer is an HP
LaserJet 4000 printer. The accessory does not communicate
with an HP LaserJet 4000 printer.
Paper tray does not
open. Cables are routed
incorrectly. See “Attaching the HP LaserJet Print to
Mail accessory to the printer” in
Chapter 2 to reroute the cables.
Table 3. Solving setup problems
Problem Cause Solution
EN Solving printing and folding problems 27
Solving printing and folding problems
Table 4. Solving printing and folding problems
Problem Cause Solution
Unable to create forms
that work correctly with
the accessory.
Margins/working space set
up incorrectly. Use the samples included on the
installation CD-ROM to help customize
your forms.
See the documentation that came with
your software program for instructions
about how to develop your own
templates.
Contact the software manufacturer for
help with templates.
Form doesn’t print
correctly. Form is not oriented
correctly in paper tray. See Table 1—”Fold-stop settings and
media orientation”—in Chapter 3 to
orient forms correctly.
Software settings are
incorrect. See “Software settings” in Chapter 3 for
correct settings.
Margins/working space set
up incorrectly. Use the samples included on the
installation CD-ROM to help customize
your forms.
Accessory will not
accept printed media. The power switch on the
accessory is set to “standby”
(“”).
Set the power switch on the accessory
to “on” (“I”).
The rear output door is
closed. Open the rear output door.
No media or incorrect media
is present in the printer. See Appendix A and Table 1—”Fold-
stop settings and media orientation”—in
Chapter 3 for information about media.
The fold-chutes and output
bin are either not installed or
installed incorrectly.
See “Installing the fold-chutes” and
“Installing the output bin” in Chapter 2
to install the fold-chutes and the output
bin.
The top cover is open. Close the top cover.

28 4 Troubleshooting and Maintenance EN
Form doesn’t fold
correctly. The fold-stop settings are
incorrect. See Table 1—“Fold-stop settings and
media orientation”— in Chapter 3 to set
the fold-stops. Fold stop settings must
be completely visible through the fold-
stop windows. Fold-stops must be
seated firmly against the fold-stop
ridges.
Forms are not oriented
correctly in paper tray. See Table 1—“Fold-stop settings and
media orientation”— in Chapter 3 to
orient forms correctly.
Form doesn’t seal
correctly. Forms are not oriented
correctly in paper tray. See Table 1—“Fold-stop settings and
media orientation”— in Chapter 3 to
orient forms correctly.
The wrong form is loaded in
the tray. See Table 1—“Fold-stop settings and
media orientation”— in Chapter 3 to
choose the right form and to orient
forms correctly.
Toner or paper dust has
accumulated on rollers in
the accessory.
See “Cleaning the accessory” later in
this chapter to clean the rollers.
Media doesn’t stack
correctly in the output
bin.
The output bin is set
incorrectly. See “Adjusting the output bin” in
Chapter 2 to set the output bin correctly.
Cannot detach the
accessory from the
printer.
Alignment tips on the bottom
of the alignment guide hold
the accessory in place.
To separate the accessory from the
printer, pull the accessory firmly and
steadily away from the printer. Do not
attempt to jerk them apart. Also, be
careful not to stretch the cables.
Table 4. Solving printing and folding problems
Problem Cause Solution
EN Solving printing and folding problems 29
Printer displays a 12.01
error code; the
accessory is not
running.
The fold-chutes and output
bin are either not installed or
installed incorrectly.
See “Installing the fold-chutes” and
“Installing the output bin” in Chapter 2
to install the fold-chutes and the output
bin.
There is a jam in the
accessory. See “Clearing jams” later in this chapter
for instructions about how to clear jams.
If, after clearing the jam, the printer still
indicates that there is a jam, try opening
and closing the top cover of the printer
once. If the printer still indicates that
there is a jam, see the documentation
that came with your printer for
information about how to clear a printer
jam. After clearing the jam, check the
output bin and reprint as needed.
There is a jam in the printer. See the documentation that came with
your printer for information about how to
clear a printer jam. You might have to
reprint the print job.
The accessory interface
cable is not plugged in. See “Attaching the HP LaserJet Print to
Mail accessory to the printer” in
Chapter 2 to connect the accessory
interface cable.
The top cover is open. Close the top cover.
There are loose sheets
between the printer and the
accessory.
Remove loose sheets.
Printer displays a
66.xx.yy error code and
the accessory is not
running.
There is a jam in the
accessory. 1See “Clearing jams” later in this
chapter for instructions about how
to clear jams.
2Turn the printer off and then back
on (your print job will be lost).
3Set the accessory power switch to
“standby” (“”) and then back to
“on” (“I”).
4Check the output bin and reprint as
needed.
Power to the accessory has
been interrupted or the
accessory interface cable
(C-link) has been
disconnected.
1Check cable connections.
2Set the accessory power switch to
“standby” (“”) and then back to
“on” (“I”).
3Turn the printer off and then back
on (your print job will be lost).
Table 4. Solving printing and folding problems
Problem Cause Solution
30 4 Troubleshooting and Maintenance EN
Jams
After the HP LaserJet Print to Mail accessory is installed and plugged
in, there is continuous communication between the accessory and the
HP LaserJet 4050 series printer.
When the accessory senses a jam, it ceases operation, and
Paper Jam In Output Device appears on the printer control
panel display.
To clear a jam, follow the instructions that begin on the following page
under “Clearing jams.”
The printer Event Log contains more information about the location of
the jam. To display and interpret the Event Log, see “Interpreting the
Event Log” later in this chapter.
EN Jams 31
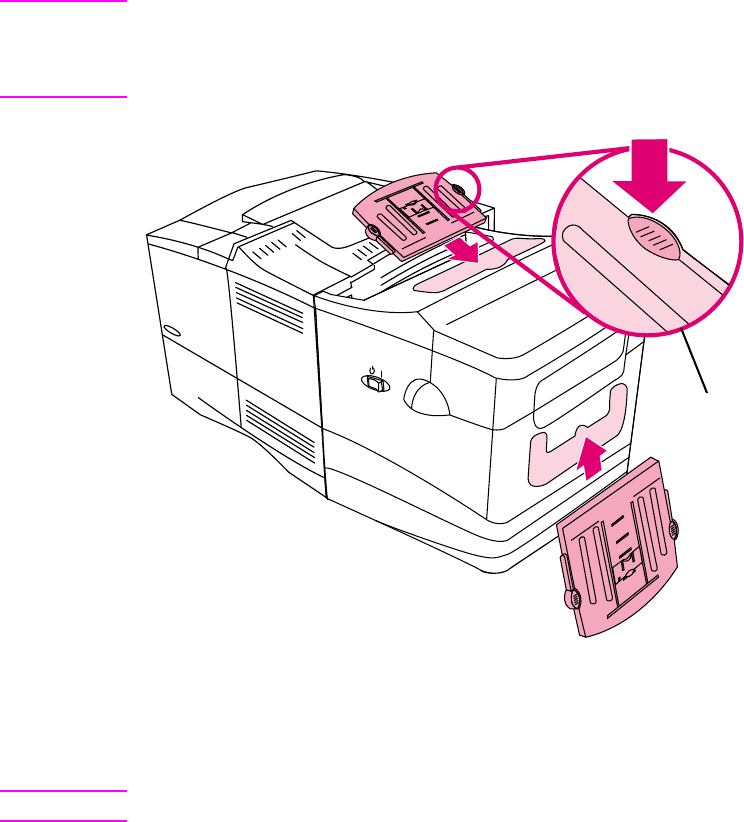
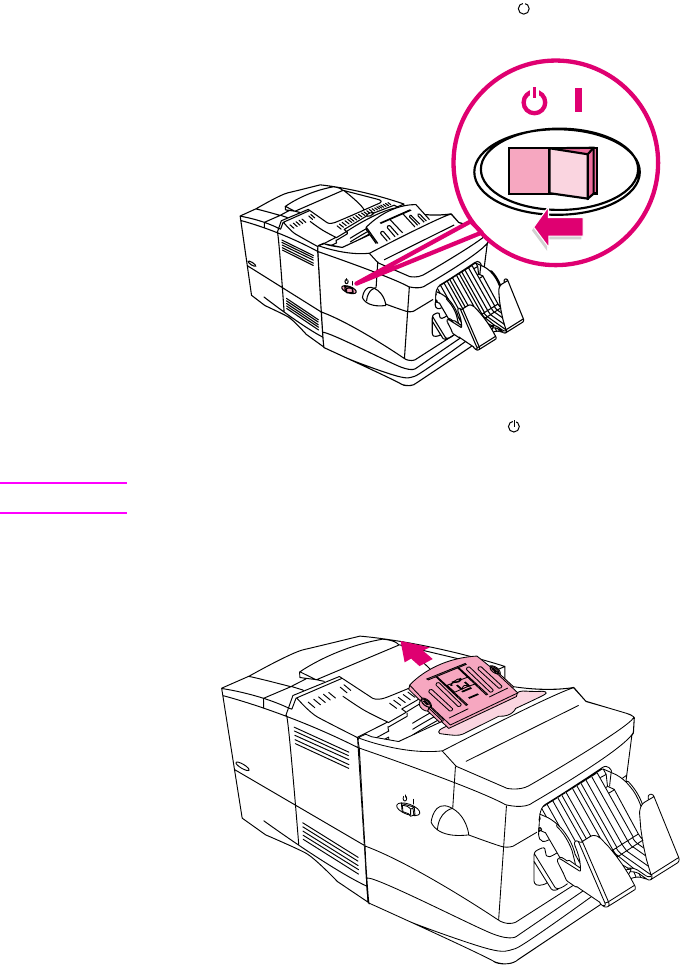
Clearing jams
1Press the power switch to “standby” (“”).
Figure 11. Turning the accessory to “standby” (“”)
Note Do not turn off power to the printer. All print job information will be lost.
2Press the thumb tabs to remove the upper fold-chute. Do not
attempt to open the top cover until the upper fold-chute is
removed.
Figure 12. Removing the upper fold-chute

32 4 Troubleshooting and Maintenance EN
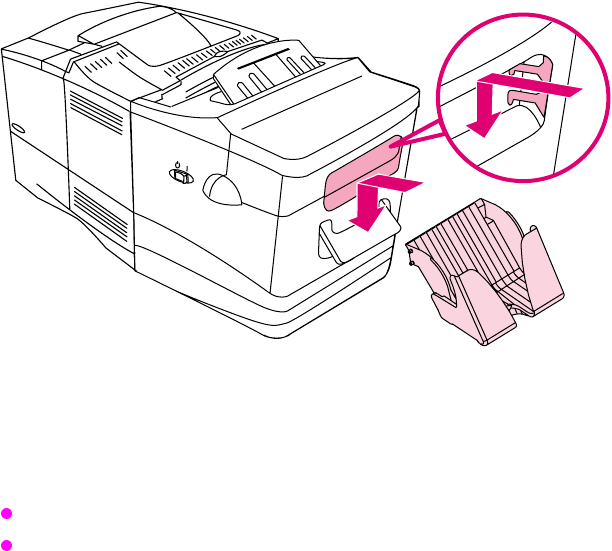
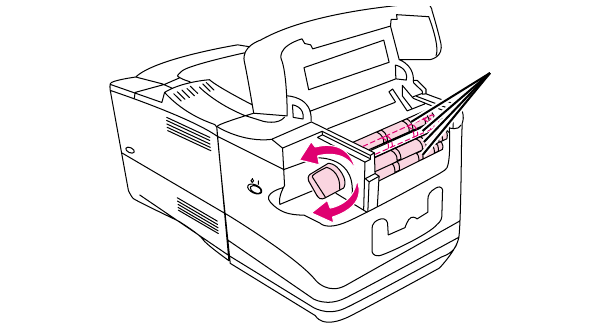
3Open the top cover of the accessory.
4Remove the output bin.
5Press the thumb tabs to remove the lower fold-chute.
Figure 13. Opening the top cover
6Locate the jam-clearing knob at the end of the upper roller and
rotate the knob in either direction with one hand while pulling the
jammed media out with the other hand, if necessary.
Figure 14. Rotating the jam-clearing knob
Note Avoid ripping media from the accessory. Rotate the knob in the direction
of least resistance.

EN Jams 33
7Close the top cover.
8Check the fold-chutes to make sure that they are clear of media
and that the correct settings are still in place.
9Replace both fold-chutes and the output bin.
10 Press the power switch to the “on” (“I”) position.
Note Depending on the nature of the accessory jam, the printer might stop
immediately. If it does, a jam condition might have occurred in the
printer. The paper path jam in the printer must be cleared before
operation can resume.
Resetting the accessory
After clearing a jam, reset the accessory using one of the three
methods shown below:
Remove and reinstall the upper fold-chute.
Remove and reinstall the output bin.
Set the accessory power switch to “standby” (“”), and then back
to the “on” (“I”) position.
Jam recovery
After a jam is cleared, when jam recovery is enabled, the printer
reprints pages that might have jammed. Check the output to see
which pages should be reprinted.
You can prevent this when you print certain items (such as checks) by
disabling jam recovery.
To disable jam recovery
1Press MENU until Configuration Menu appears on the printer
control panel display.
2Press ITEM until Jam Recovery appears on the display.
3Press VALUE until Jam Recovery = Off appears on the display.
4Press SELECT and then press GO.

34 4 Troubleshooting and Maintenance EN
Interpreting the Event Log
When the message Paper Jam In Output Device appears on the
printer control panel display, check the printer Event Log for
information about the location of the jam.
To show the Event Log
1Press MENU until Information Menu appears on the display.
2Press ITEM until Show Event Log appears on the display.
3Press SELECT and then press GO.
To interpret the Event Log
Event explanations appear in the table below:
Note See printer documentation for explanations of other event messages.
Table 5. Events
Event Action
Paper in input during startup (event message
12.01). During an internal test at startup, a
page was found at the accessory input. The
print job has not run and there should not be a
jam in the printer.
1Remove the page.
2Clear the paper path in the accessory.
3Make sure that the accessory power
switch is set to the “on” (“I”) position.
4Reset the accessory.
Paper at input too long.
The print job was in process. A jam is likely to
be located at the accessory input.
1Clear the jam in the accessory. If there is
also a jam in the printer, clear the printer.
2Reset the accessory.
Paper did not exit.
The print job was in process. A jam is likely to
be located inside the accessory.
1Clear the jam in the accessory. If there is
also a jam in the printer, clear the printer.
2Reset the accessory.
Any event (event message 66.xx.yy). 1Clear the jam in the accessory.
-Or-
Reconnect the accessory power cable
and accessory interface cable (C-Link).
2Reset the accessory.
3Turn the printer off and then back on (your
print job will be lost).
EN Cleaning the accessory 35
Cleaning the accessory
Cleaning is limited to two procedures: covers and rollers.
Covers
Clean the outside covers monthly or as necessary.
To clean the covers
Clean the outside of the accessory by wiping the covers with a water-
dampened cloth.
Rollers
Clean all four rollers monthly or as necessary. As the rollers
accumulate stray toner and paper dust, they must be cleaned with a
soapy, water-dampened lint-free cloth.
To clean the rollers
1Turn off power to and then unplug the power cords for both the
accessory and the printer from their power outlets.
2Remove the output bin and both fold-chutes.
36 4 Troubleshooting and Maintenance EN
3Open the top cover of the accessory and locate the four rollers
and the jam-clearing knob inside the accessory.
Figure 15. Locating the four rollers
4Lightly dampen a lint-free cloth with soapy water and wipe clean
the exposed surfaces of the rollers, including the black roller
bands.
5Keep the cloth and your hands free of the rollers and turn the jam-
clearing knob to expose more of the surfaces of the four rollers.
6Repeat step 5 until the rollers and black roller bands are clean.
7Lightly dampen a lint-free cloth with plain water and wipe clean
the exposed surfaces of the four rollers and black roller bands.
8Allow the rollers and black roller bands to completely air-dry
before proceeding to step 9.
9Close the cover, replace the fold-chutes and output bin, and plug
in the power cords for both the accessory and the printer to their
power outlets.
Four rollers

EN HP LaserJet Print to Mail Accessory 37
ASpecifications
HP LaserJet Print to Mail Accessory
Physical
Height—HP LaserJet 4050, 4050N (1 x 500) 15 inches (38.1 cm)
Height—HP LaserJet 4050T, 4050TN (2 x
250) 16.5 inches (41.9 cm)
Width 15.5 inches (39.4 cm)
Depth with output bin retracted 19 inches (48.3 cm)
Depth with output bin extended 21.75 inches (55.2 cm)
Weight, approximate 28 pounds (12.7 kilograms)
Electrical
Power consumption (average, in watts) Folding: 32
Standby: less than 1
Minimum recommended circuit capacity 100 to 127 Volt,
less than 1.5 amps
220 to 240 Volt,
less than 1.2 amps
Power requirements (acceptable line voltage) 100 to 127 Volt, 50/60 Hz
220 to 240 Volt, 50/60 Hz

38 A Specifications EN
Operating environment
Temperature 50 to 91 degrees Fahrenheit
(10 to 32 degrees Celsius)
Relative humidity 20 to 80 percent
Media
Forms 24 to 29 lb. (90 to 109 g/m2)
Paper 20 to 24 lb. (75 to 90 g/m2)

EN Regulatory information 39
Regulatory information
FCC regulations
This equipment has been tested and found to comply with the limits
for a Class B digital device, pursuant to Part 15 of the FCC rules.
These limits are designed to provide reasonable protection against
harmful interference in a residential installation. This equipment
generates, uses, and can radiate radio frequency energy, and if not
installed and used in accordance with the instructions, may cause
harmful interference to radio communications. However, there is no
guarantee that interference will not occur in a particular installation. If
this equipment does cause harmful interference to radio or television
reception, which can be determined by turning the equipment off and
on, the user is encouraged to try to correct the interference by one or
more of the following measures:
Reorient or relocate the receiving antenna.
Increase separation between equipment and receiver.
Connect equipment to an outlet on a circuit different from that to
which the receiver is located.
Consult your dealer or an experienced radio/TV technician.
Note Any changes or modifications to the HP LaserJet Print to Mail
accessory not expressly approved by HP could void the user’s authority
to operate the equipment.
40 A Specifications EN
Hewlett-Packard Year 2000 warranty
Subject to all of the terms and limitations of the HP Limited Warranty
Statement provided with this HP Product, HP warrants that this HP
product will be able to accurately process date data (including, but not
limited to, calculating, comparing, and sequencing) from, into, and
between the 20th and 21st centuries, and the year 1999 and 2000,
including leap year calculations, when used in accordance with the
Product documentation provided by HP (including any instructions for
installing patches or upgrades), provided that all other products (e.g.,
hardware, software, firmware) used in combination with such HP
product(s) properly exchange date data. The duration of the Year
2000 warranty extends through January 31, 2001.
EN Warranty information 41
BService and Support
Warranty information
Hewlett-Packard limited warranty statement
HP LaserJet Print to Mail accessory
ONE-YEAR LIMITED WARRANTY
1HP warrants to you, the end-user customer, that HP hardware
accessories, and supplies will be free from defects in materials
and workmanship after the date of purchase for the period
specified above. If HP receives notice of such defects during the
warranty period, HP will, at its option, either repair or replace
products which prove to be defective. Replacement products may
be either new or like-new.
2HP warrants to you that HP software will not fail to execute its
programming instructions after the date of purchase, for the
period specified above due to defects in material and
workmanship when properly installed and used. If HP receives
notice of such defects during the warranty period, HP will replace
software media which does not execute its programming
instructions due to such defects.
3HP does not warrant that the operation of HP products will be
uninterrupted or error free. If HP is unable, within a reasonable
time, to repair or replace any product to a condition as warranted,
you will be entitled to a refund of the purchase price upon prompt
return of the product.
4HP products may contain remanufactured parts equivalent to new
in performance or may have been subject to incidental use.
5Warranty does not apply to defects resulting from: (a) improper or
inadequate maintenance or calibration, (b) software, interfacing,
parts, or supplies not supplied by HP, (c) unauthorized
modification or misuse, (d) operation outside of the published
environmental specifications for the product, or (e) improper site
preparation or maintenance.

42 B Service and Support EN
6 HP MAKES NO OTHER EXPRESS WARRANTY OR
CONDITION WHETHER WRITTEN OR ORAL. TO THE
EXTENT ALLOWED BY LOCAL LAW, ANY IMPLIED
WARRANTY OR CONDITION OF MERCHANTABILITY,
SATISFACTORY QUALITY, OR FITNESS FOR A PARTICULAR
PURPOSE IS LIMITED TO THE DURATION OF THE EXPRESS
WARRANTY SET FORTH ABOVE. Some countries, states, or
provinces do not allow limitations on the duration of an implied
warranty, so the above limitation or exclusion might not apply to
you. This warranty gives you specific legal rights and you might
also have other rights that vary from country to country, state to
state, or province to province.
7TO THE EXTENT ALLOWED BY LOCAL LAW, THE REMEDIES
IN THIS WARRANTY STATEMENT ARE YOUR SOLE AND
EXCLUSIVE REMEDIES. EXCEPT AS INDICATED ABOVE, IN
NO EVENT WILL HP OR ITS SUPPLIERS BE LIABLE FOR
LOSS OF DATA OR FOR DIRECT, SPECIAL, INCIDENTAL,
CONSEQUENTIAL (INCLUDING LOST PROFIT OR DATA), OR
OTHER DAMAGE, WHETHER BASED IN CONTRACT, TORT,
OR OTHERWISE. Some countries, states, or provinces do not
allow the exclusion or limitation of incidental or consequential
damages, so the above limitation or exclusion might not apply to
you.
HP Express Exchange
If the HP LaserJet Print to Mail accessory requires service,
customers have an option to initiate Express Exchange through
Customer Care Centers in the United States. Under this option,
customers may have a factory-refurbished accessory sent to them
within 24 hours.
Note If you have on-site support service provided by HP, work directly with
the local Customer Care Center instead of following the steps below.
1Contact the local HP Customer Care Center listed on the
following pages. A technician troubleshoots the situation and
determines whether the accessory has actually failed. If it has,
you will be referred to the HP Service Center.
2A service center representative requests product and customer
information. In some regions, collateral might also be requested.
3HP ships a refurbished replacement accessory to arrive the next
day (depending on availability).

EN Returning the unit 43
4See “Returning the unit” below for guidelines for how to send the
defective accessory to Hewlett-Packard. Shipping charges are at
HP’s expense.
Exchanged units carry the remainder of the original unit’s warranty or
90 days, whichever is greater. Faster turnaround from HP Express
Exchange minimizes downtime over traditional service programs that
require users to ship failed units to the manufacturer and wait for them
to be repaired and returned. Because HP pays the shipping charges,
users incur no hidden costs for HP Express Exchange.
Returning the unit
When shipping equipment, HP recommends insuring it. Also, include
a copy of your proof of purchase. Please also fill out the Service
Information Form, on the following page, to ensure the most accurate
repairs.
CAUTION Shipping damage as a result of inadequate packaging is the customer’s
responsibility. See “Repackaging guidelines” below.
For technical support assistance regarding the unit within the one-
year warranty period, see “HP Customer Care service and support”
later in this Appendix.
Repackaging guidelines
Include the completed copy of the Service information form on
the following page. Note on the form which items were returned.
Use the original shipping container and packaging materials, if
possible.
Include samples that illustrate the problems you are having, if
applicable.
Include five sheets of the paper or other media you are having
trouble printing or folding.
44 B Service and Support EN
Service information form
Who is returning the equipment?
Person to contact:
Date:
Phone:
Alternate contact: Phone:
Return shipping Address: Special shipping instructions:
What is being sent?: Model number: Serial number:
Please attach any relevant printouts when returning equipment.
Do not ship accessories that are not required to complete the repair (manuals, cleaning supplies, etc.).
What needs to be done?
1. Describe the conditions of the failure. (What was the failure? What were you doing when the failure
occurred? What software were you running? Is the failure repeatable?)
2. If the failure is intermittent, how much time elapses between failures?
3. HP Express Exchange number (this is the number given to you by the service center representative):
4. Additional comments:

EN HP Customer Care service and support 45
HP Customer Care service and support
Thank you for your purchase. Along with your product, you receive a
variety of support services from Hewlett-Packard and our support
partners designed to give you the results you need, quickly and
professionally.
Online services
For 24-hour access to information over your modem, we suggest these
services.
Customer Support Options Worldwide
World Wide Web
Printer drivers, updated HP printer software, plus product and support information
can be obtained from the following URL:
http://www.hp.com/go/support
Obtaining software utilities and electronic information
for U.S. Monday through Friday: 6:00 A.M. to 10:00 P.M. Mountain Time
Saturday: 9:00 A.M. to 4:00 P.M. Mountain Time
Phone: (661) 257-5565
Fax: (661) 257-6995
HP website: http://www.hp.com/
Mail:
Hewlett-Packard Co.
P.O. Box 907
Santa Clarita, CA 91380-9007
U.S.A.
HP Customer Care and Product Repair Assistance for the U.S. and
Canada
Call (208) 323-2551 Monday through Friday from 6:00 A.M. to 6:00 P.M. (Mountain
Time) free of charge during the warranty period. However, your standard long-
distance phone charges still apply. Have your system nearby and your serial number
ready when calling.
If you know your accessory needs repair, call (800) 243-9816 to locate your nearest
authorized HP service provider.
Post-warranty telephone assistance is available to answer your product questions.
Call (900) 555-1500 ($2.50* per minute, U.S. only) or call (800) 999-1148 ($25.00 per
call, Visa or MasterCard, U.S. and Canada) Monday through Friday from 7:00 A.M. to
6:00 P.M (Mountain Time).
Charges begin only when you connect with a support technician.
*Prices subject to change.

46 B Service and Support EN
Accessories, supplies, support, and service information
Ordering supplies
See the Moore Media Catalog for information about ordering
supplies.
HP direct ordering for accessories or supplies
Call (800) 538-8787 (U.S.) or (800) 387-3154 (Canada).
HP direct ordering for genuine HP parts
In the U.S., call (800) 227-8164.
HP service parts information compact disc
This powerful, CD-ROM-based parts information tool is designed to give users fast,
easy access to parts information such as pricing and recommended stocking lists for a
wide range of HP products. To subscribe to this quarterly service in the U.S. or
Canada, call (800) 336-5987. Parts identification and pricing information worldwide
can also be accessed via the World Wide Web at http://www.hp.com/go/partsinfo.
HP support assistant compact disc
This support tool offers a comprehensive online information system designed to
provide technical and product information on HP products. To subscribe to this
quarterly service in the U.S. or Canada, call (800) 457-1762.
HP service information
To locate authorized HP resellers, call (800) 243-9816 (U.S.) or (800) 387-3867
(Canada).
HP service agreements
U.S.: call (800) 835-4747
Western Canada: call (800) 268-1221
Eastern Canada (French and English): call (800) 361-9790
Extended service: (800) 446-0552.

C7833-90901
