HP Color Laser Jet 4550 Printer Family Software Technical Reference Bpl08831
User Manual: HP HP Color LaserJet 4550 printer family - Software Technical Reference
Open the PDF directly: View PDF ![]() .
.
Page Count: 241 [warning: Documents this large are best viewed by clicking the View PDF Link!]
software
technical
reference
Notice
HEWLETT-PACKARD COMPANY MAKES NO WARRANTY OF ANY KIND WITH REGARD TO THIS
MATERIAL, INCLUDING, BUT NOT LIMITED TO, THE IMPLIED WARRANTIES OF
MERCHANTABILITY AND FITNESS FOR A PARTICULAR PURPOSE. Hewlett-Packard shall not be
liable for errors contained herein or for incidental or consequential damages in connection with the
furnishing, performance, or use of this material.
Version 1 (11/00) © Copyright Hewlett-Packard Company 2000
All rights reserved. Reproduction, adaptation, or translation without prior written permission is prohibited,
except as allowed under the copyright laws.
Trademark notices
The following product names are U.S. registered trademarks of Microsoft Corporation:
• Windows(R) for Workgroups
• Windows(R) 95
• Windows(R) 98
• Windows(R) NT
• Windows(R) 2000
• Windows(R) Millennium
• Microsoft(R)
TrueType (TM) is a trademark of Apple Computer.
Adobe (R), PageMaker (TM), and PS (R) are registered trademarks of Adobe Systems.
PANTONE(R)* is *PANTONE, Inc.’s check-standard trademark for color.
Java (TM) is a trademark of Sun Microsystems.

Table of Contents
HP Color LaserJet 4550 Software Technical Reference 3
Table of contents
Notice ........................................................................................................................................ 2
Trademark notices.................................................................................................................... 2
Table of contents...................................................................................................................... 3
HP COLOR LASERJET 4550/4550N/4550DN/4550HDN SOFTWARE TECHNICAL
REFERENCE............................................................................................................................. 7
Purpose and scope .................................................................................................................. 7
Software description ................................................................................................................ 7
Platforms (operating systems) supported .............................................................................. 7
Printing system components................................................................................................... 9
Printing system and installer ............................................................................................................... 9
Unattended install ............................................................................................................................... 9
Installer software components.............................................................................................. 10
Bidirectional (Bidi) Communication for the PCL 6 and PCL 5c Windows Drivers............................... 13
Automatic Driver Configuration ......................................................................................................... 13
Job Status and Alerts........................................................................................................................ 14
Pull Status ........................................................................................................................................ 15
Custom Installation ........................................................................................................................... 15
Uninstaller......................................................................................................................................... 15
End-user software components ............................................................................................ 16
Drivers .............................................................................................................................................. 16
Postscript Printer Description for Apple Macintosh and compatible systems..................................... 16
Additional components and features ................................................................................................. 17
Additional driver availability............................................................................................................... 17
Additional end-user software components .......................................................................... 17
Installer/Uninstaller ........................................................................................................................... 17
Screen Fonts .................................................................................................................................... 17
ICC color profiles .............................................................................................................................. 17
PANTONE®* color profiles ............................................................................................................... 18
Printing System Documentation........................................................................................................ 19
Software CD-ROMs in the printer box............................................................................................... 19
Additional Drivers not included with the Printing System Components.............................................. 19
Network Administrator Software Management Tools......................................................................... 19
Web JetAdmin .................................................................................................................................. 20
Embedded Web Server..................................................................................................................... 20
HP Resource Manager ..................................................................................................................... 23
Other Communications ..................................................................................................................... 23
PCL 6 and PCL 5c driver features ......................................................................................... 24
Finishing tab features........................................................................................................................ 24
Print Quality settings......................................................................................................................... 27
Output Settings................................................................................................................................. 29
Effects tab features........................................................................................................................... 30
Paper tab features ............................................................................................................................ 35
Destination tab features .................................................................................................................... 47
Basics tab features ........................................................................................................................... 52
Color tab features ............................................................................................................................. 54
Configure tab features ...................................................................................................................... 57
NT Forms tab features ...................................................................................................................... 64

Table of Contents
HP Color LaserJet 4550 Software Technical Reference 4
Help system...................................................................................................................................... 65
PCL 6 driver feature set .................................................................................................................... 67
PCL 5c driver feature set .................................................................................................................. 69
Background information........................................................................................................ 72
Bidirectional communication ............................................................................................................. 72
Euro character .................................................................................................................................. 72
Year 2000 compliance ...................................................................................................................... 73
Enhancements........................................................................................................................ 73
HP ColorSmart II............................................................................................................................... 73
In-box file layout..................................................................................................................... 73
Autocad directory.............................................................................................................................. 73
Drivers directory................................................................................................................................ 74
Foninst directory ............................................................................................................................... 76
ICM directory .................................................................................................................................... 76
Manuals directory ............................................................................................................................. 76
PANTONE® directory ....................................................................................................................... 77
Resource manager directory............................................................................................................. 79
Availability .............................................................................................................................. 82
In-box versions ................................................................................................................................. 82
END-USER SOFTWARE......................................................................................................... 83
Windows 2000......................................................................................................................... 83
System requirements ........................................................................................................................ 83
Components and features................................................................................................................. 83
Background information .................................................................................................................... 85
Font support ..................................................................................................................................... 85
Windows 2000 installation instructions.............................................................................................. 88
Installation options and user prompts for Windows 2000 .................................................................. 93
Uninstalling printing system components .......................................................................................... 94
PCL 6 and PCL 5c driver modifications............................................................................................. 94
PS driver modifications ..................................................................................................................... 95
Windows 95, Windows 98 and Windows Millennium ........................................................... 96
System requirements ........................................................................................................................ 96
Components and features................................................................................................................. 96
Background information .................................................................................................................... 98
Font support ..................................................................................................................................... 98
Windows 95, Windows 98, and Windows Millennium installation instructions.................................. 102
Installation options and user prompts for Windows 95, Windows 98, and Windows Millennium ...... 105
Uninstalling printing system components ........................................................................................ 107
PCL 6 and PCL 5c driver modifications........................................................................................... 107
PS driver modifications ................................................................................................................... 108
Windows NT 4.0.................................................................................................................... 110
System requirements ...................................................................................................................... 110
Components and features............................................................................................................... 110
Background information .................................................................................................................. 112
Font support ................................................................................................................................... 112
Windows NT 4.0 installation instructions ......................................................................................... 115
Installation options and user prompts for Windows NT 4.0.............................................................. 120
Uninstalling printing system components ........................................................................................ 122
Standard PCL 6 and PCL 5c driver modifications ........................................................................... 122

Table of Contents
HP Color LaserJet 4550 Software Technical Reference 5
PS driver modifications ................................................................................................................... 122
Windows NT 3.51.................................................................................................................. 124
System requirements ...................................................................................................................... 124
Background information .................................................................................................................. 126
Font support ................................................................................................................................... 126
Windows NT 3.51 installation instructions ....................................................................................... 129
Uninstalling printing system components ........................................................................................ 130
PCL 5c driver modifications ............................................................................................................ 130
PS driver modifications ................................................................................................................... 131
Windows 3.1x/Windows for Workgroups............................................................................ 133
System requirements ...................................................................................................................... 133
Printer support ................................................................................................................................ 133
Background information .................................................................................................................. 134
Font support ................................................................................................................................... 134
Windows 3.1x installation instructions............................................................................................. 137
Uninstalling printing system components ........................................................................................ 137
PCL driver modifications ................................................................................................................. 137
PS driver modifications ................................................................................................................... 138
Macintosh printing system .................................................................................................. 140
System requirements ...................................................................................................................... 140
Components ................................................................................................................................... 140
Background information .................................................................................................................. 140
Font support ................................................................................................................................... 141
Printer support ................................................................................................................................ 143
Installing the Macintosh Printing System......................................................................................... 143
IBM OS/2, 2.0, and greater ................................................................................................... 144
System requirements ...................................................................................................................... 144
Font support ................................................................................................................................... 144
OS/2 installation instructions........................................................................................................... 145
Network Operating Systems ................................................................................................ 148
Novell.............................................................................................................................................. 148
Log onto a server in Bindery Mode ................................................................................................. 148
Installing HP drivers using NDPS and ZenWorks............................................................................ 149
Remove printer objects from the Novell Server. .............................................................................. 151
Bindery-NDS-NDPS Queue Quickset ............................................................................................. 152
Building an NDPS Printer................................................................................................................ 154
APPENDIX A: JOB STATUS AND ALERTS IN WINDOWS OPERATING SYSTEMS ........ 156
Operating systems supported ............................................................................................. 156
Overview ............................................................................................................................... 156
Job status and alerts window.............................................................................................. 157
Job status panel.............................................................................................................................. 157
Printer status panel......................................................................................................................... 159
Options panel.................................................................................................................................. 160
System tray icon................................................................................................................... 161
Job status and alerts files.................................................................................................... 162
Win32 (Common files between Win9x and WinNT/2K) ................................................................... 162
Windows 95, Windows 98, and Windows Millennium...................................................................... 164
Windows NT 4.0 ............................................................................................................................. 164
Windows 2000 ................................................................................................................................ 165

Table of Contents
HP Color LaserJet 4550 Software Technical Reference 6
INI file entries........................................................................................................................ 165
Windows 95, Windows 98, and Windows Millennium Ini Entries ..................................................... 165
Windows 95, Windows 98, Windows Millennium, Windows NT4.0, and Windows 2000 ini entries .. 165
Enabling/disabling job status and alerts support .............................................................. 173
Disable job tracking ............................................................................................................. 173
Adding/removing job status and alerts printers................................................................. 173
Steps to add support for a specific driver ........................................................................................ 173
Steps to remove support for a specific printer ................................................................................. 173
Steps to remove support for a specific driver .................................................................................. 174
Driver support matrix....................................................................................................................... 174
Troubleshooting ................................................................................................................... 175
General problem solving ................................................................................................................. 175
Job status and alerts is causing problems with a specific driver model ........................................... 182
Job status and alerts is conflicting with other application(s) ............................................................ 184
README FILES .................................................................................................................... 185
Hewlett-Packard Color LaserJet 4550, 4550N, 4550DN, 4550HDN Printer Late-breaking
Readme File .......................................................................................................................... 185
Hewlett-Packard Color LaserJet 4550, 4550N, 4550DN, 4550HDN Printer Printing
System CD-ROM Readme File ............................................................................................. 197
Hewlett-Packard Color LaserJet 4550, 4550N, 4550DN, 4550HDN Printer PANTONE®*
and ICC ReadMe File ............................................................................................................ 208
INDEX.................................................................................................................................... 230

Purpose and scope
HP Color LaserJet 4550 Software Technical Reference 7
HP Color LaserJet 4550/4550N/4550DN/4550HDN Software
Technical Reference
Purpose and scope
This technical reference provides information about and troubleshooting tips for the software of the HP
Color LaserJet 4550/4550N/4550DN/4550HDN Printer series. The following information is included in this
technical reference:
• Driver and platform Descriptions with system modifications
• Procedures for installing and removing HP Color LaserJet 4550/4550N/4550DN/4550HDN software
components
• Descriptions of problems that might arise while using the printer and known solutions to those
problems
• Descriptions of known software bugs and workarounds
• Each printer model is slightly different, as explained below. The system software is written to
accommodate these differences:
• The HP Color LaserJet 4550 printer is the base model. It is PCL and PS ready, includes 64 MB RAM
and features Memory Enhancement Technology (MEt). Memory can expand to 192 MB.
• The HP Color LaserJet 4550N Printer is similar to the base model. In addition to the base model, it
includes an HP Jet Direct Card, and can expand memory to 192 MB.
• The HP Color LaserJet 4550DN Printer is similar to the 4550N. IN addition to the 4550N, it includes
128 MB of RAM, the HP LaserJet Duplex Printing Accessory and the HP 500-Sheet Paper Feeder.
• The HP Color LaserJet 4550HDN Printer is the same as the 4550DN with the addition of the HP
LaserJet Hard Drive Accessory.
This reference is prepared in an electronic format to serve as a quick reference tool for Customer Care
Center (CCC) agents, support engineers, system administrators, MIS personnel, Help desks, and HP
Color LaserJet 4550/4550N/4550DN/4550HDN end users.
Software description
The printer comes with software and installers for Windows, Windows NT, and Macintosh systems. The
OS/2 system is supported but is available only through Internet download. For particular information
about a system’s installer, drivers, and components, locate the section that corresponds to that system.
Platforms (operating systems) supported
The following systems support a full-feature configuration of the HP printer software, which includes HP
PCL 5c, HP PCL 6 and PS drivers:
• Windows 2000
• Windows 95, Windows 98, and Windows Millennium
• Windows NT Workstation 4.0
• Windows 2000
• IBM OS/2 2.0 or greater
The following systems support a limited configuration of the HP printer software, which includes HP PCL
5c and PS drivers:
• Windows 3.1x (includes Windows 3.1)

Purpose and scope
HP Color LaserJet 4550 Software Technical Reference 8
• Windows NT Workstation 3.51
The following systems support a PS emulation configuration of the printer software:
• Macintosh OS System 7.5.3 and later

Printing system installer
HP Color LaserJet 4550 Software Technical Reference 9
Printing system components
Printing system and installer
Printing system
HP Color LaserJet 4550 Printing System version 1.0
Installer
HP Color LaserJet 4550 Installer version 1.0
Unattended install
Silent Install allows you to configure Setup to run without user interaction. This installation method
is useful when you want to use the default selections provided by Setup or when you want to run
the installation without being prompted. A system administrator can also create a custom disk
image containing specific drivers and utilities, allowing you to run Setup without further
interaction.
Silent installation can be performed in two ways:
Customized silent install
This method lets you create a customized silent installer allowing the selection of
operating system, language, printer models, drivers, and utilities. Network administrators
can create a customized silent installer to be used by their clients without any
intervention.
Command line silent install
This method cannot be customized and only installs the components in the Typical Install
option without any user intervention.
NOTE: Values that follow equal signs (=) in a command line must not
contain intervening spaces.
Method 1: Command line:
<CD-ROOT>/SETUP/SETUP.EXE /U /PORT=XXXX /PRINTER=N /PD=N
Method 2: Setup.lst
Use the SETUP.1ST file to specify command line arguments to the installer for an
unattended installation. You can send command line arguments in one of the following
ways:
• Send the command directly to the installer.
• Send the command using the SETUP.1ST file.
• Use a combination of the two.
For example, this file contains two options: /port and /printer. The installer operates as
normal because the /u option has not been specified. If you use setup /u for the installer,
it operates in unattended mode and uses the two values specified in the Defaults section
of the SETUP.1ST file. If you use setup /u /printer=1 for the installer, it operates in
unattended mode and chooses the second printer from the list below. (The options
specified on the command line override the options specified in the SETUP.1ST file.) The
options available (see below) can also include the /u option. Using this option key makes
the installer always operate as unattended.

Printing system installer
HP Color LaserJet 4550 Software Technical Reference 10
The following Descriptions explain the available options:
• /u Signals the installer to use the specified port and printer given on the command
line (or in this file), and use all default selections. Installation then proceeds without
prompting the user.
• /port=xxxx Used to specify the default port when doing an unattended install. The
value specified by xxxx should be a valid port and should contain no spaces.
• /printer=n Used to specify the default printer when doing an unattended install. The
value specified by n is an integer that references the list of available printers. For
example, the following printers are available for the HP Color LaserJet 4550
installation:
0 = HP Color LaserJet 4550
1 = HP Color LaserJet 4550N
2 = HP Color LaserJet 4550DN
3 = HP Color LaserJet 4550HDN
• /pd=n Used to specify whether the selected printer is the default printer, when you
have multiple printers connected to your network. The value specified by n is an
integer (i.e., 0 or 1). For this argument, entering 1 sets the selected printer as the
default printer. Entering zero sets the printer as a non-default printer.
You can preset these options in the SETUP.1ST file located on in the root directory of
the CD-ROM. In the [Defaults] section, add the following syntax:
[Defaults]
Options= /port=<value> /printer=<number> /pd=<number>
Installer software components
The common installer, shown in Figures 1-3, is designed to provide a simple and consistent method of
installing printers across the product line. This new installer offers several improvements over the Color
LaserJet 4500 series:
• Less interaction is required during the simplified installation using the Typical installation.
• The installer is Web enabled, so the user has the option to compare the CD-ROM contents to the HP
web site and load the most current driver version.
• Network Connection is integrated so that users will be able to install drivers and connect to a network
printer as part of a single process.
In addition to these new features, the common installer offers:
• Auto-sensing of the user’s Windows operating system environment and language. (Windows 95/98,
Windows NT 4.0, Windows 2000, Windows Millennium only) in all 18 CLJ 4550 languages.
• Full localization and enabling for two-byte fonts.
• Customization utility for copying drivers to other locations.
• Robust de-installer utility.
• Web Registration site launching.
Printing system installer
HP Color LaserJet 4550 Software Technical Reference 11
Figure 1: Installer Main Screen
Printing system installer
HP Color LaserJet 4550 Software Technical Reference 12
Figure 2: Installation Type dialog box
Install Printer – This wizard guides you through the installation of your HP color LaserJet 4550 Printing
System. Only the necessary software will be installed.
• Register Product: Register your HP Color LaserJet 4550 through the Internet.
• View Documentation: View the HP Color LaserJet 4550 Documentation.
• Customization Utility: Create a custom software Installer for the HP color LaserJet 4550 that can be
copied to other media like floppy disks, a local hard drive, or a network drive.
• Optional Software: To increase the productivity and get the most out of your HP color LaserJet 4550
printer, view a list of Optional Software available for Installation.
The Customization Utility options are shown below.
Printing system installer
HP Color LaserJet 4550 Software Technical Reference 13
Figure 3: Typical Install options
Bidirectional (Bidi) Communication for the PCL 6 and PCL 5c Windows Drivers
Automatic Driver Configuration and Job Status and Alerts use bidirectional communications
software. The Typical Installation installs all of the above components which includes Automatic
Driver Configuration, which contain the bi-directional software. These features can be unselected
in the Custom Installation.
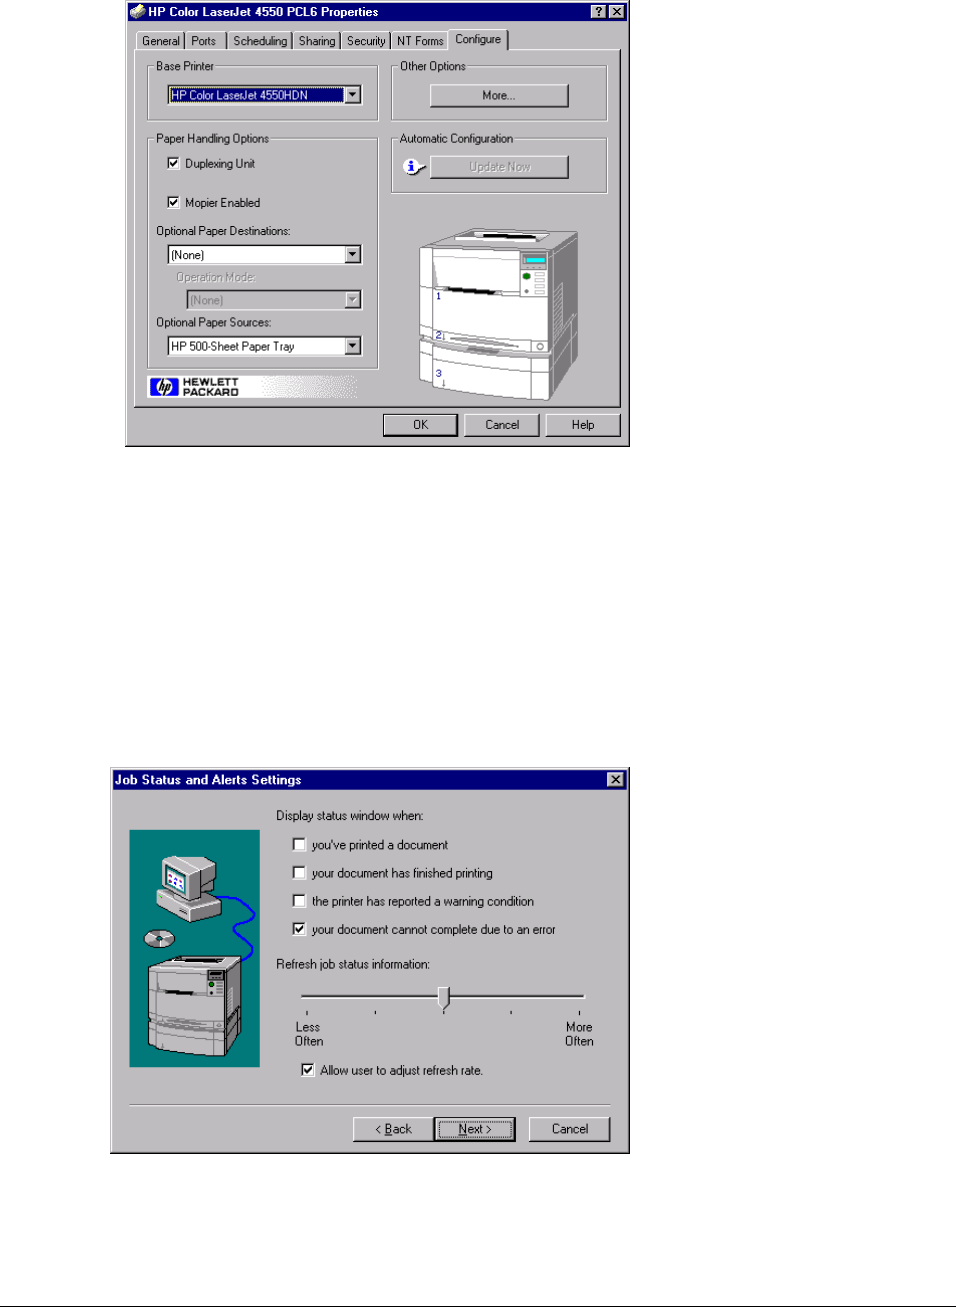
Automatic Driver Configuration
The Hewlett-Packard Color LaserJet 4550 PCL 6 and PCL 5c drivers for Windows feature
bidirectional capability that provides automatic discovery and driver configuration for printer
accessories at the time of installation and later if needed. For example, if the printer has a
duplexer, that choice will automatically be made available in the driver. Other accessories the
driver will sense are tray three, font DIMMs, and the hard drive.
NOTE: The Mopier Enabled (multiple original prints) function will be
enabled only when the hard drive is enabled.
To use the Automatic Driver Configuration feature, select the
button under “Automatic Configuration” on the Configure tab on
the PCL 6/5c drivers. If Automatic Driver Configuration is not
installed, the button will be grayed out like the screen shot below.
You can also configure the accessories can by selecting the
printer model number under “Base Printer” if the Automatic
Driver Configuration feature was not installed.
Printing system installer
HP Color LaserJet 4550 Software Technical Reference 14
Figure 4: PCL 6 driver Configuration tab
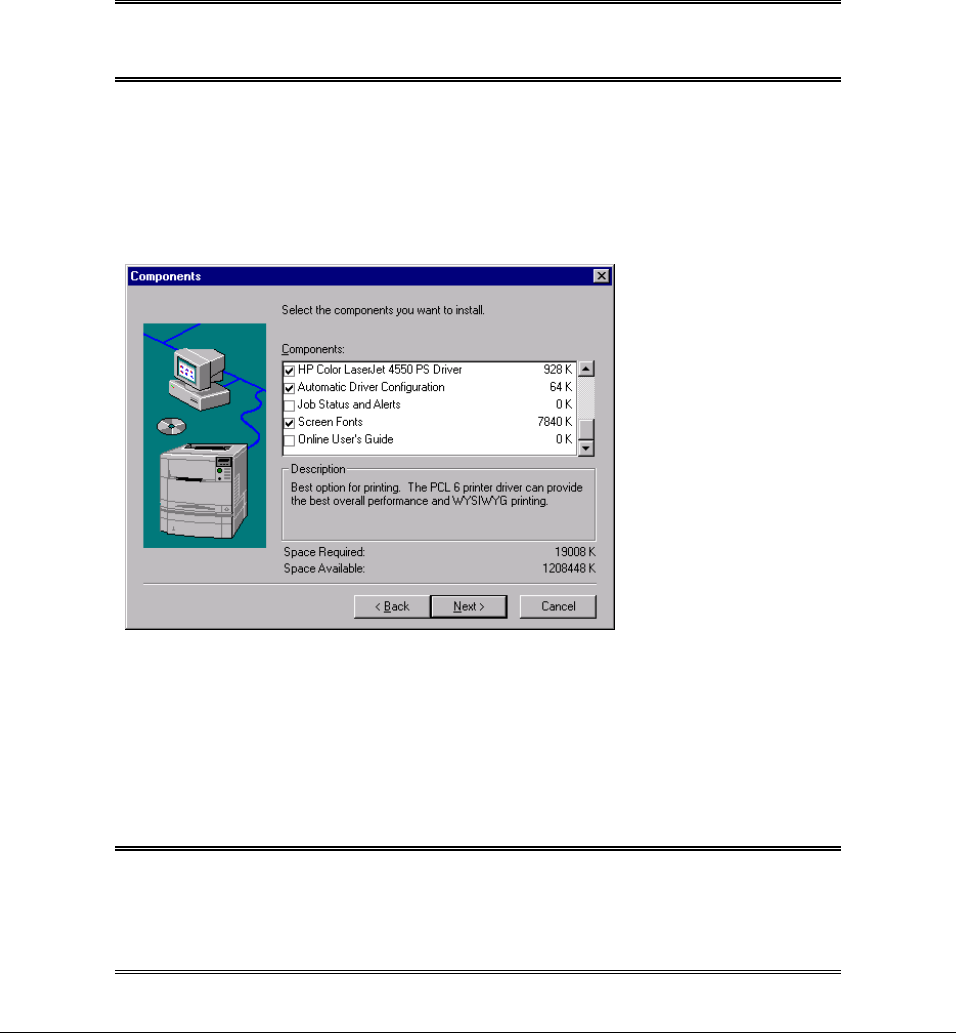
Job Status and Alerts
This feature will notify users with a pop-up message when their active print job is interrupted or
completed. Interrupt conditions could include paper jam, toner out, paper out, etc. Pop-up
messages will appear regardless of the application the user is in. Users can choose which alerts
to deliver, or to turn them all off.
The default setting upon installation is to notify the user only when their job was unable to
complete. This means that users will be unaware of the feature until they have job fail and are
notified.
Figure 5: Job Status and Alerts dialog box
Printing system installer
HP Color LaserJet 4550 Software Technical Reference 15
Example messages are:
• Toner Out: Job Stopped. Replace: (Black, Cyan, Magenta, Yellow).
• Media Out: Job Stopped. Load: (transparencies, letter paper, etc.).
• No printer response (either not connected or not functioning properly).
• Job Complete.
Pull Status
In addition to the pop-up status alerts, Job Status and Alerts allows the user to remotely view the
printer status. Available information includes consumables status and any control panel
messages. This information is presented in the same format as when using the embedded web
server. Users will also be able to order consumables through the web.
NOTE: These features are available for a network connected printers
only. Parallel connection is not supported at this time of this
writing.
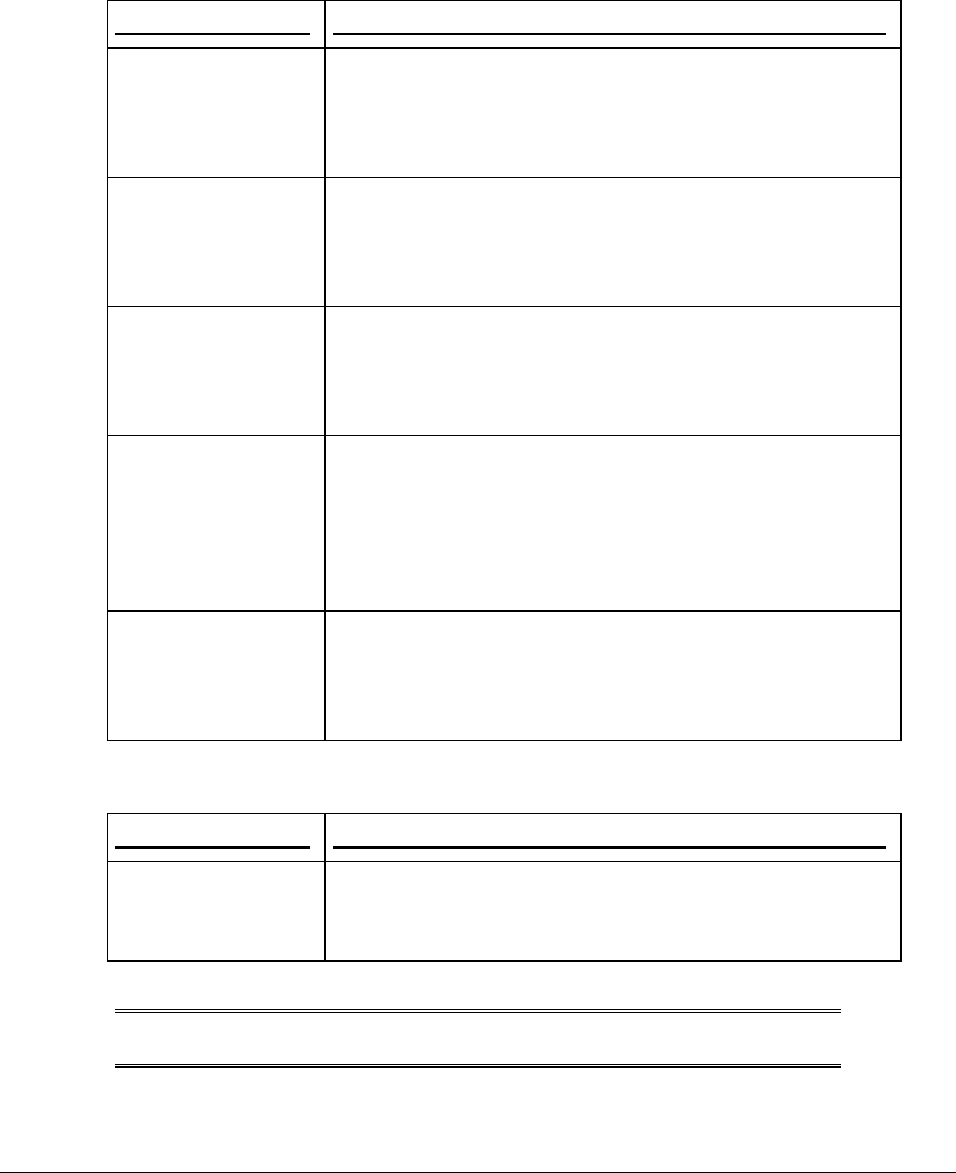
Custom Installation
The Custom Installation includes every option the Typical Installation includes with the addition of
“Job Status and Alerts” and the “Online User’s Guide.” The Custom Installation allows the choice
of what is installed.
Figure 6: Custom Installation component selection dialog box
Uninstaller
After a successful printing system installation, the Uninstall icon in the HP Color LaserJet 4550
program group allows you to select and remove any or all of the HP printing system components.
To uninstall some or all HP printer software components, select the HP Color LaserJet 4550
Uninstaller icon from the HP Color LaserJet 4550 program group. Click Next and follow the
prompts to continue the uninstall process.
NOTE: No uninstaller is available for driver-only installation using
Windows "Add Printer" or Print Manager. For driver-only
installations, delete the printer icon from the Printers folder
(Windows 95/98, NT 4.0, and 2000) or Print Manager (Windows
3.x).
Printing system software components
HP Color LaserJet 4550 Software Technical Reference 16
End-user software components
Drivers
The printing system for the HP Color LaserJet 4550 printer family includes the following printer
drivers: Windows drivers
Operating System Driver Description
Windows 2000 • HP Color LaserJet 4550 PCL 6, PCL 5c
• HP Color LaserJet 4550 PS PPD for use with
Microsoft PSCRIPT driver, version 5.00.1234
Windows 95,
Windows 98, and
Windows
Millennium
• HP Color LaserJet 4550 PCL 6, PCL 5c
• HP Color LaserJet 4550 PS PPD for use with
Microsoft PSCRIPT driver, version 4.0
Windows NT 4.0 • HP Color LaserJet 4550 PCL 6, PCL 5c
• HP Color LaserJet 4550 PS PPD for use with
Microsoft PSCRIPT driver, version 4.5
Windows NT 3.51 • HP Color LaserJet 4550 PCL 5c (available via Web only)
Microsoft Unidriver, version 3.51
• HP Color LaserJet 4550 PS PPD and WPD for use with
Microsoft PSCRIPT driver, version 3.51
Windows 3.1x • HP Color LaserJet 4550 HP PCL 5c
• HP Color LaserJet 4550 PS WPD for use with
Microsoft PSCRIPT driver, version 3.58
Postscript Printer Description for Apple Macintosh and compatible systems
Driver Description
HP LaserJet PS PPD • Includes PS Printer Description files (PPDs), which are
used by the driver and applications to determine the
features and PS commands supported in the printer.
NOTE: HP recommends the Apple LaserWriter driver present on the
Mac OS.
Printing system software components
HP Color LaserJet 4550 Software Technical Reference 17
Additional components and features
The HP Color LaserJet 4550/4550N/4550DN/4550HDN Printing System (version 1.00) includes
the following components for Windows and Macintosh environments. Following the table are
descriptions of each component.
Component Version
HP Installer 1.0
HP Online User Guide 2.0
Macintosh LaserJet Utility (Mac OS 8.0 and later) 3.5.6
Macintosh Font Installer
Online Utility Help (HTML)
Online Printing Help (HTML)
Additional driver availability
Additional drivers available from the HP Web site http://www.hp.com/support/lj4550 are:
• IBM OS/2 Drivers
• UNIX/HP-UX/LINUX driver scripts
Additional end-user software components
Installer/Uninstaller
The uninstaller easily and safely uninstalls printing system components and their related files
without affecting other system components or shared system files. Removing printer files without
the use of the uninstaller is not recommended and can affect the integrity of the your system files.
Screen Fonts
Eighty Latin True Type fonts are printer resident and available for PCL5, PCL6, and PostScript
jobs. All 80 fonts are also available for Unix/DOS applications.
When you install any driver, the Installer will include all 80 of these as screen fonts in the user OS
in Windows. This ensures that the fonts displayed in the host applications have identical
appearance and metrics to the fonts in the printer. Screen fonts are installed by default in the
“Typical” path of the installer and are optional in the "Custom" path of the installer.
NOTE: The FontSmart utility is not included in the print system CD-
ROM.
ICC color profiles
HP provides CMYK (hp4550c.icm) and sRGB (hp4550r.icm) ICC profiles with its Color LaserJet
4550 printers. The CMYK profile can only be used with the PostScript driver while the sRGB
profile can be used with any of the HP4550 drivers. The profiles are in the ICM directory of the
driver CD-ROM 1 or on the HP Web site. These profiles describe the way color will be

Printing system software components
HP Color LaserJet 4550 Software Technical Reference 18
interpreted in the default CMYK and RGB modes. The sRGB profile matches the default RGB
mode (sRGB) which is enabled with the Screen Match or Automatic Color Smart II setting in
either the PCL or PostScript driver. The CMYK profile is based on the default mode, which is a
SWOP simulation with a CMYK Inkset setting of FAST in the PostScript driver. These profiles
can be used for color conversions in a color-managed workflow.
PANTONE®* color profiles
Automatic PANTONE®* Calibration is the default setting for HP Color LaserJet printers. This
feature automatically converts PANTONE®* colors to optimal color values for the printer by
recognizing the PANTONE®* color name or number in the data stream sent to the printer. The
feature is activated when printing colors that were chosen using the PANTONE®* Color picker in
supported graphics applications.
Applications known to generate PostScript files with graphic objects preserving the PANTONE®*
name are listed below:
• Adobe Illustrator 7 & 8
• Adobe PageMaker 6.5
• CorelDraw 7, 8 & 9
• Deneba Canvas 5 (see note below)
• Macromedia Freehand 7 & 8
• Micrografx Designer
• Quark Xpress 3 & 4
NOTE: Deneba Canvas versions 6 and 7 are not compatible with the
Automatic PANTONE®* Calibration feature.
The Automatic PANTONE Calibration feature only applies to graphic objects, not picture (raster)
data such as scanned images and TIFF files. Adobe PhotoShop, for example, being a raster
image editor, is not on the above list of applications that support the Automatic PANTONE®*
calibration feature.
Some applications substitute CMYK values to the printer if they cannot provide PANTONE®*
names. If your application does not pass the PANTONE®* names to the printer, the application
will substitute default CMYK values to be printed for each color. In this case, the accuracy of
color matching will depend on the ink emulation selected - FAST, SWOP, Euro standard, or DIC
(Dainippon). If your application does not pass the PANTONE®* names to the printer, the custom
CMYK values created by PANTONE®* for this printer are available in the manual PANTONE®*
palettes.
PANTONE® * Application Palettes are available on the web for:
• Adobe Illustrator 4–8
• PageMaker 5, 6, and 6.5
• PhotoShop 3–5.5
• CorelDRAW 6–9
• Micrographics Designer 6–7
• Macromedia Freehand 4–8
• QuarkXpress (as EPS files) 3.3–4.04
• Deneba Canvas 3.5–6.1

Printing system software components
HP Color LaserJet 4550 Software Technical Reference 19
• Fractal Design Painter 2–5.5
• EPSF Charts
• TIFF Charts
• PANTONE® * Color Drive
• Text Format (ASCII)
• Raw PostScript File
• Adobe Acrobat
Vector graphics such as company logos created in one of the above applications (using palettes
or applications preserving the PANTONE ® * name) can be imported into Microsoft Word,
PowerPoint or other MS Office applications. To do this, the color application must create an
Encapsulated PostScript (EPS) file of the image for insertion as a file into the Office document
using the insert file function.
NOTE: Cutting and pasting from the clipboard will not work. These tasks
do not preserve the PANTONE ® * name or the CMYK palette
value.
Printing System Documentation
Documentation includes a color Readme file (color.wri), printing system Readme file
(readme.wri), User Guide, AcroRead, hp JetDirect Guide, hp FIR Guide, and English only
Release Notes.
The Hewlett-Packard Color LaserJet 4550 color Readme file, printing system Readme file, and
User Guide is localized for 18 languages: English, French, Italian, German, Spanish, Portuguese,
Swedish, Dutch, Danish, Finnish, Norwegian, Polish, Czechoslovakian, Russian, Traditional
Chinese (Taiwan), Simplified Chinese (China), Korean, and Japanese.
Software CD-ROMs in the printer box
Each Hewlett-Packard Color LaserJet 4550 will be shipped with the appropriate CD-ROMs in the
box based on the language of the region where the printer is shipped. There are a total of three
CD-ROMs.
• CD-ROM one: Printing Systems Software CD for English and Western Europe.
• CD-ROM two: Printing Systems Software and documentation for English and Northern
Europe and Eastern Europe.
• CD-ROM three: Printing Systems Software and documentation CD for English and Asia.
Additional Drivers not included with the Printing System Components
OS/2
IBM provides OS/2 drivers. Available OS/2 drivers are listed on the web at
http://www.hp.com/support/lj4550 in “downloads and drivers.”
Network Administrator Software Management Tools
Network printer solutions for The CLJ 4550 use two tools:
• Web JetAdmin
• Printer embedded web server / JetDirect card embedded web server
Both tools are targeted at MIS or network administrators, although some end users will use the
tools. Both tools are described in the following sections.
Printing system software components
HP Color LaserJet 4550 Software Technical Reference 20
NOTE: Hewlett-Packard supports JetAdmin for existing products, but
does not provide applets for new products released after Spring,
2000. The HP Color LaserJet 4550 series can use JetAdmin with
basic functionality, but Trays and the Paper tab will not be
available for configuration.
Web JetAdmin
A link to download Web JetAdmin over the web is under Optional Software in the Installer.
Web JetAdmin will support the key environments for the CLJ 4550 as listed in the table below.
Network utility Available from
Web JetAdmin
Web JetAdmin for NT (all versions)
Web JetAdmin for HP-UX
Web JetAdmin for Solaris
Web JetAdmin for OS/2
LaserJet Utility for the Mac
Other Network Printing Tools
JetPrint for Unix
Web Only
Web Only
Web Only
Web Only
CD-ROM, Web
Web Only
For complete details on Web JetAdmin functionality refer to the Web JetAdmin User Guide.
Embedded Web Server
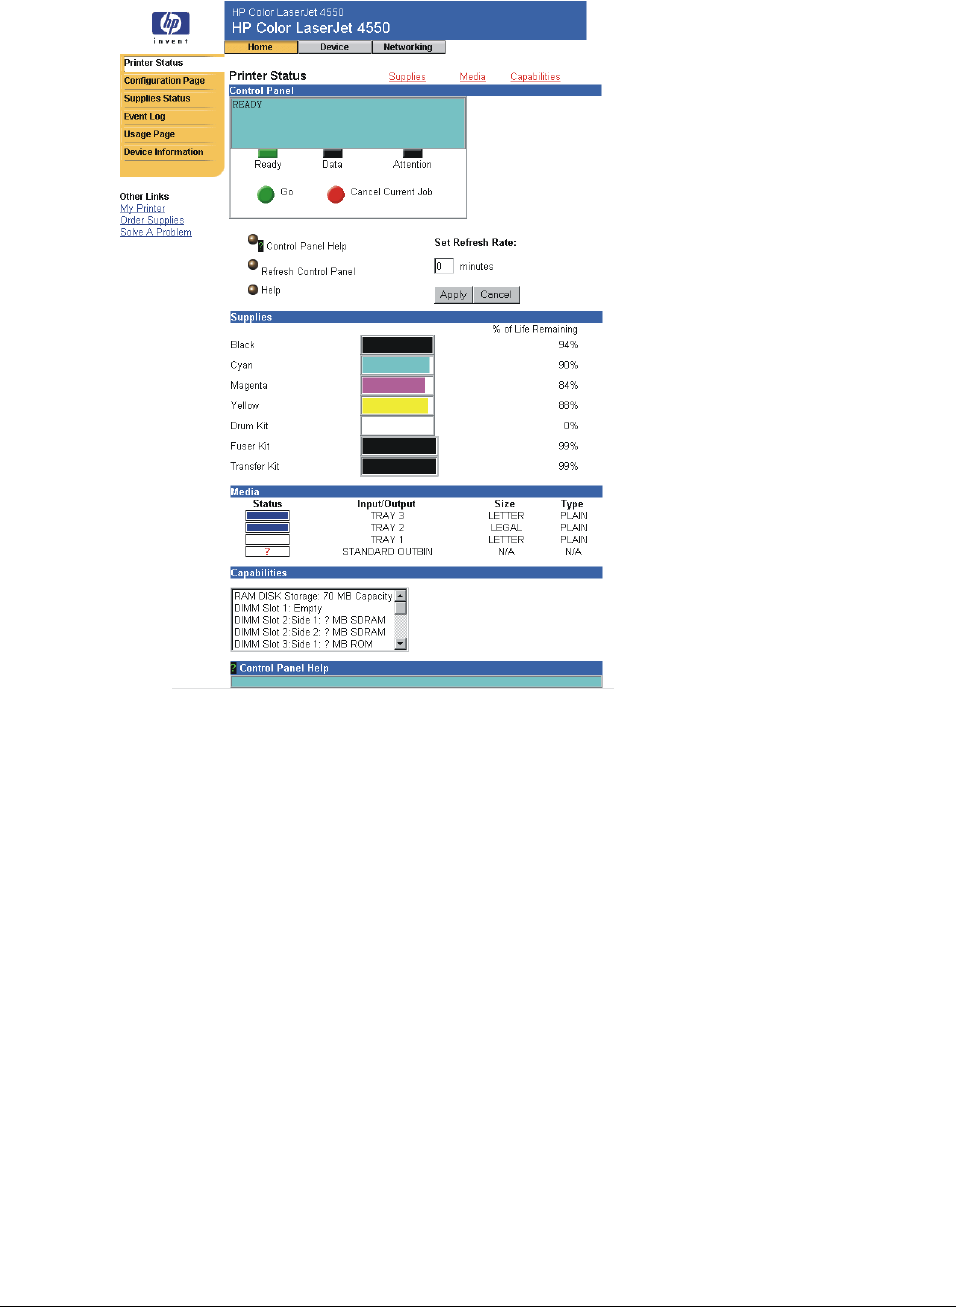
The HP Color LaserJet 4550 series is the first HP LaserJet printer to include embedded Web
Server functionality. This tool will allow direct access to printer configuration and diagnostics via
the most popular standard browsers (such as Netscape and Explorer). These features are
primarily intended for use in remote diagnostics and troubleshooting by MIS and help desks. They
work on a printer-by-printer basis only, providing no "batch" or group management functions.
Printing system software components
HP Color LaserJet 4550 Software Technical Reference 21
Figure 7: Embedded Web Server home page
JetDirect Web Server Requirement
The embedded web server is available only when using a JetDirect network card
released Spring 2000 or later. Previous versions and third party cards are not supported.
The JetDirect card has its own embedded web server that allows remote configuration of
the JetDirect card. When the printer Web server is supported the interface between the
two web servers is seamless; they will appear to be different pages on the same server.
Menus and features of the embedded web server include:
Home Pages
• Printer Status - Shows control panel messages, including help. Provides remote Go
and Job Cancel functions. Shows consumables levels. Shows installed accessories.
• Configuration Page: Shows all printer configuration settings.
• Event Log - Shows all printer events and errors.
• Supplies Page - Shows consumables levels and assists with consumables ordering.
• Usage Page - Shows a complete list of all pages printed. Divides by size type, etc.
• Device ID Page - Shows the network address and identification of the printer.

Printing system software components
HP Color LaserJet 4550 Software Technical Reference 22
Device Pages
• Configure Printer - Lets you change any printer configuration setting
• Alerts - Lets you set up the printer to send problem and status alerts to anyone you
choose via e-mail (See detailed description below).
• Order Supplies - Lets you automatically order supplies over the web.
• Security - Lets you set up passwords to control who can remotely cancel jobs or
access the Device Pages.
• Language - Lets you select the language in which to display the embedded web
pages.
Networking Pages
• Provides the capability to display and control JetDirect card settings
Embedded Web Server (EWS) Printer Alerts
With Alerts enabled, the printer can send e-mail notices on problems or required
maintenance to specified individuals. Alert events range from toner low, to paper jams, to
fuser life low, to more serious problems such as a formatter failure.
The printer manager chooses what alerts to send, and who to send them to. More than
one individual can receive alerts, with each person receiving only the alerts they desire.
For example, an administrative assistant might be responsible for keeping toner loaded in
a printer, while an external service provider is responsible for major consumables. Alerts
could be set up so the administrator gets advanced warning on toner low situations, and
the external service provider gets alerts on fusers, OPCs, and ITBs.
Expanded EWS Functionality
Some of the EWS features require non-volatile RAM in order to allow users to set up and
retain specific information on a permanent basis. This applies to the Alerts feature and
the Printer Owner field. The user has the ability to save two e-mail addresses to which to
send alerts. Similarly, the user has a limited space in which to save the name, phone
number, etc., of the individual in charge of the printer.
In the N and DN bundles a flash DIMM can be added to provide additional non-volatile
memory in which to store information. The HDN bundle relies on the hard drive for non-
volatile storage. This allows users to enter more addresses to which to send alerts, and
also allows more detailed printer owner information.
Embedded Virtual Machine (EVM) for Java Applications
The CLJ 4550 is the first HP Laser Jet printer to include an embedded virtual machine for
Java applications. The Hewlett-Packard trade name for this functionality is "ChaiVM
virtual machine." The ChaiVM has two primary functions:
1. Internet "send and respond." The ChaiVM virtual machine is able to receive e-mails,
Java applications, and send results back to the originator. A typical use of this would
be to remotely run diagnostics.
NOTE: The EVM has no specific implementation in the Color LaserJet
4550 series printer.
2. Third party accessible architecture. The ChaiVM virtual machine offers a consistent
platform (or "virtual machine") on which to run applications. A Java ™ application that
can run on a ChaiVM virtual machine in a Win 98 PC can also run on a ChaiVM
virtual machine in a WIN NT PC, a MAC PC… or on a printer ChaiVM virtual

Printing system software components
HP Color LaserJet 4550 Software Technical Reference 23
machine. This means that third parties will be able to develop custom printer
capabilities much more easily, and that those capabilities will apply to all printers with
a ChaiVM virtual machine.
HP Resource Manager
This network administration software utility allows you to control the hard disk and flash memory
features that are not found in the software drivers. Use HP Resource Manager to do the following:
• Initialize the hard disk
• Initialize flash memory
• Download, delete, and manage fonts and macros across networks
NOTE: To download Type 1 fonts, you must have Adobe ® Type
Manager installed and turned on. HP Resource Manager is
included on CD-ROM with the HP Color LaserJet 4550HDN
printer under Optional Software in the Installer. However, if you
order the hard disk as an optional accessory, you can download
the HP Resource Manager utility from the Web. The HP
Resource Manager utility is not available for the Macintosh.
Download the HP Resource Manager utility from http://www.hp.com/cposupport, and type HP
Resource Manager in the Quick Find box.
Other Communications
HP JetSend Communications
HP JetSend is a technology from Hewlett-Packard that allows devices to communicate
with each other simply and directly. HP JetSend is built into your printer, allowing it to
receive information from any HP JetSend-enabled sending device anywhere on your
network, whether it is in the same office or at a remote location. When you use the HP
InfraRed Receiver accessory, your printer also can receive information from any HP
JetSend-enabled infrared device.
Examples of HP JetSend sending devices include digital cameras, computers or laptops
running HP JetSend software, or scanners with HP JetSend built in. HP JetSend uses
simple IP addressing between networked devices and cableless communication between
infrared devices.
To enable HP JetSend on your computer or laptop, visit the HP JetSend website at
http://www.jetsend.hp.com/products.
With the software, you will be able to exchange intra-company documents directly
between two or more computers and between any HP JetSend-enabled printers, without
the problems of incompatible software applications or versions. HP JetSend software will
allow your colleagues to create documents on their computers and send copies directly to
this printer without any device-specific drivers or configuration difficulties. You can visit
the HP JetSend website to learn which other devices are available to communicate easily
and directly with your HP JetSend-enabled printer.
NOTE: HP JetSend software is not supported for Traditional Chinese,
Simplified Chinese, Korean, and Japanese.
Printing system software components
HP Color LaserJet 4550 Software Technical Reference 24
Online user guide
The online user guide is supplied as a portable document format (PDF) file. You can
install the online user guide while installing the printer software (choose Custom
installation), or you can install it later. The online user guide installs in the HP LaserJet
folder.
Viewing the online user guide, in PDF format, requires either Adobe Acrobat Reader or
another PDF reader. During user-guide installation, the installer scans for a PDF reader
currently residing on the system, and installs Adobe Acrobat Reader if no reader is found.
To install the online user guide while you are installing the printer software, follow the
instructions that appear on your screen.
PCL 6 and PCL 5c driver features
Finishing tab features
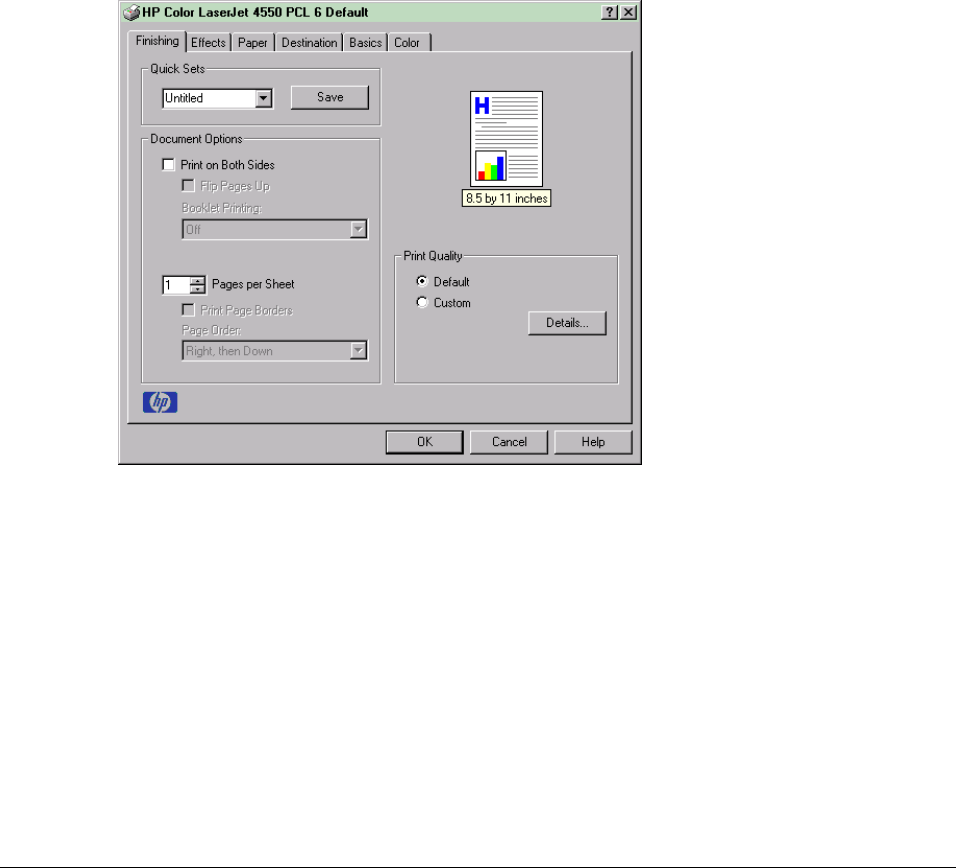
The Finishing tab is the first tab you will see when they go to the driver through a program.
Figures 8 and 9 shows this tab as it appears in the default configuration.
Figure 8: The default appearance of the Finishing tab (PCL 6 version)

Printing system software components
HP Color LaserJet 4550 Software Technical Reference 25
Figure 9: The default appearance of the Finishing tab (PCL 5c version)
Document Options
The Document Options group box dynamically sizes itself and positions its controls
according to the configuration of optional devices that affect its appearance. For the HP
Color LaserJet 4550 printer, the only device that affects the appearance of the Finishing
tab is the duplex unit. The group box with the duplex unit is shown below in Figure 10.
Figure 10: The Document Options group box (all PCLdrivers)
Print on Both Sides
The Print on Both Sides command for duplex printing is available only if a duplexer is
installed (indicated in the Configure tab). The default setting is off (not selected). Print on
Both Sides does not function when:
• Paper Type is set to Transparency, Cardstock, or Labels.
• Paper Size is not one of the following: Letter, Legal, A4, B5 (JIS), Executive and
Custom sizes greater than or equal to 127 mm by 190.5 mm (5.0 inches by 7.5
inches).
Printing system software components
HP Color LaserJet 4550 Software Technical Reference 26
Flip Pages Up
Selecting Print on Both Sides activates the Flip Pages Up and Booklet Printing options
when Paper Size is set to: Letter, Legal, or A4. The default for both of these controls is
off.
The Flip Pages Up checkbox, visible only when the Print on Both Sides is visible, is used
to specify the duplex-binding option. The following table demonstrates the results of
selecting this box, depending on the orientation of paper.
Orientation Flip Pages Up Selected Flip Pages Up Not Selected
Portrait Short-edge binding Long-edge binding
Landscape Long-edge binding Short-edge binding
The preview image will show a spiral binding along either the left or the top edge of the
page to indicate the edge of the document across which the pages is flipped when Print
on Both Sides is on. Also, a turned up corner appears in the lower right of the preview
image with an arrow that points in the direction that the pages is flipped.
Booklet Printing
The Booklet Printing drop-down list, visible when Print on Both Sides is visible, contains
five choices, four of which are based on the current paper size. The list contains the
following items based on the current paper size:
Paper Size = Letter Paper Size = A4 Paper Size = Legal
Off Off Off
Letter (Left Binding) A4 (Left Binding) Legal (Left Binding)
Letter (Right Binding)
Legal (Left Binding) A4 (Right Binding) Legal (Right Binding)
Legal (Right Binding)
The Booklet Printing drop-down list appears only when:
• Print on Both Sides is selected.
• % of Normal Size (on the Effects tab) is 100 percent.
• Pages per Sheet is 1.
• Paper size is Letter, A4, or Legal.
• Print Document On: (on the Effects tab) is not selected.
• A “scaled from large sizes” paper size is not selected (Paper tab).
If any but the first of these conditions is not met, a help bubble appears next to Booklet
Printing to tell you why it is disabled.
Pages per Sheet
The Pages per Sheet feature, also known and referred to as n-up, has six settings: 1
(default), 2, 4, 6, 9 and 16. An entry typed into the edit box other than these values will
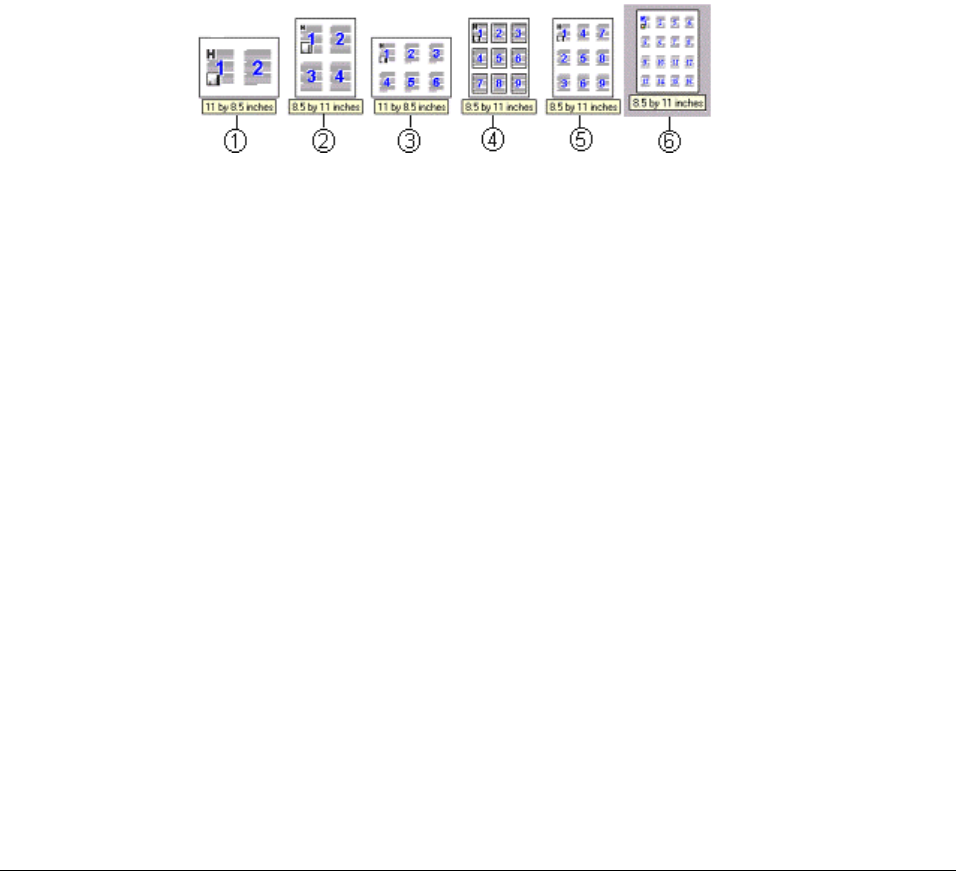
Printing system software components
HP Color LaserJet 4550 Software Technical Reference 27
round to the nearest valid value. Related controls indented beneath the edit box are Print
Page Borders and Page Order, which become active when When Pages Per Sheet is
greater than 1. Print Page Borders sets a line around each page image to help visually
define the borders of each logical page.
The Page Order drop-down list contains four items:
• Right, then Down
• Down, then Right
• Left, then Down
• Down, then Left
The paper preview image will change to reflect the various combinations of these
settings.
The Pages Per Sheet feature might be disabled if you select Allow Scaling from Large
paper as a paper size on the Paper tab. Some examples are shown in Figure 11.
Figure 11: Preview image
1- 2 Pages per sheet (2-up)
2 - 4-up
3 - 6-up
4 - 9-up with Print Page Borders
5 - 9-up with Page Order (Down, then Right)
6 - 16-up
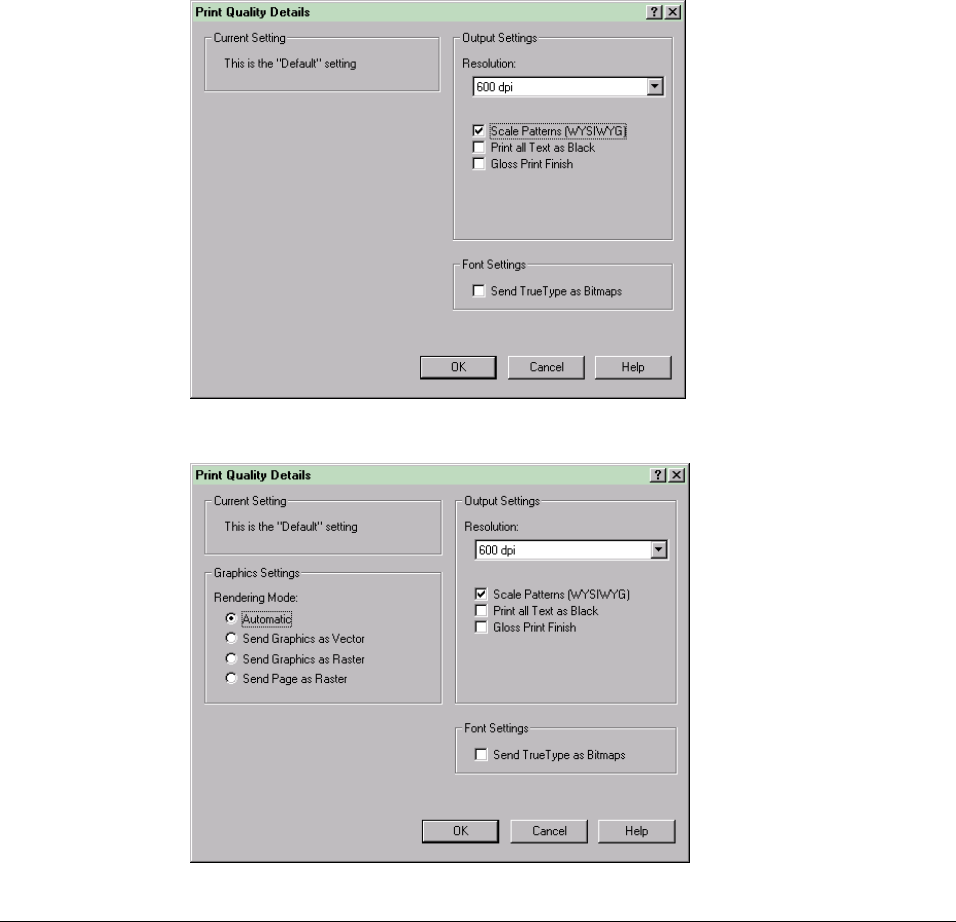
Print Quality settings
The HP Color LaserJet 4550 driver’s Print Quality group box (refer back to Figures 8 and
9) includes one predefined Print Quality (PQ) setting and one custom setting. A Details
button invokes a dialog where the settings can be customized. The specific PQ choices
defined by these settings are as follows:
Default
For PCL 6 and PCL 5c, the Default mode is as follows:
• 600 dots per inch (dpi)
• Rendering Mode is automatic (PCL 5c only)
• Scale Patterns is on
• Print all Text as Black is off
• Gloss Print Finish is off
• Send TrueType as Bitmap is not selected
Printing system software components
HP Color LaserJet 4550 Software Technical Reference 28
Custom
The default custom setting for PCL6 and PCL 5c does not have Scale Patterns selected.
Details
The Details button displays the Print Quality Details dialog box (Figures 12 and 13). The
driver leaves the Details button enabled regardless of which PQ setting is selected.
The Custom setting will include any combination of settings in this dialog box that differ
from the Default settings when you click the OK button. If you make choices that
correspond to the Default settings, then the PQ setting on the Finishing tab is changed
from Custom to the default.
Figures 12 and 13 show the Print Quality Details dialog box for the PCL 6 and PCL 5c
drivers.
Figure 12: Features controlled within the dialog box (PCL 6)
Figure 13: Features controlled within the dialog box (PCL 5c)

Printing system software components
HP Color LaserJet 4550 Software Technical Reference 29
Current setting
The Current Setting sentence dynamically changes the word in quotation marks to reflect
the current PQ setting based upon the current choices in this dialog. The default is
“Custom” but can change to “Default” whenever the selections match those settings
(defined above).
Graphics settings
In the PCL 5c driver, there are four settings under Rendering Mode that control the way
in which the driver expresses a page:
• Automatic (Auto Mode), the default, will send pages as HP GL/2 unless you are
currently in an application which is found in one of the exception lists. In this case,
the rendering mode will depend on which exception list the application is found.
• Send Graphics as Vector uses HP GL/2 as the imaging model.
• Send Graphics as Raster uses PCL 5c raster mode as the imaging model.
• Send Page as Raster uses PCL 5c raster mode as the imaging model and images all
text as raster graphics without using downloaded or resident fonts.
Output Settings
Resolution
For PCL 6 and PCL 5c drivers, there is one setting: 600 dpi.
Ret
HP Color LaserJet 4550 printer does not support Resolution Enhancement Technology
(RET).
Scale Patterns (WYSIWYG)
This is implemented to address the moiré effect some applications can encounter with
certain types of patterns. This feature will allow you to turn off the pattern scaling that the
driver performs. What you will lose is WYSIWYG with patterns, but the printed result
might look better. This feature works only with programs that use vector hatch patterns.
This option is on by default.
Print all Text as Black
This is not selected by default. When selected, this option will cause the driver to image
all text as black regardless of the document’s text color settings except for white text,
which will remain white.
Gloss Print Finish
This is not selected by default. When selected this option applies a glossy finish to
documents that are printed on non-glossy paper. The gloss print option also improves
print quality when you are printing on rough or heavy media.
Font Settings
Send TrueType as Bitmaps is the only setting available and provides you a safety net for
applications that have trouble using TrueType fonts for special graphic purposes, such as
shading, rotation or slanting. This feature is also in place for backward compatibility
purposes. When Send Page as Raster is selected (in the PCL 5c driver only), Send True
Type as Bitmaps is not available. Using this feature allows TrueType fonts to be
converted to bitmap soft fonts before downloading.
When True Type as Bitmaps is unchecked, the driver sends True Type fonts to the
printer as outlines, which retain the standard format (Outline) of the fonts.
Printing system software components
HP Color LaserJet 4550 Software Technical Reference 30
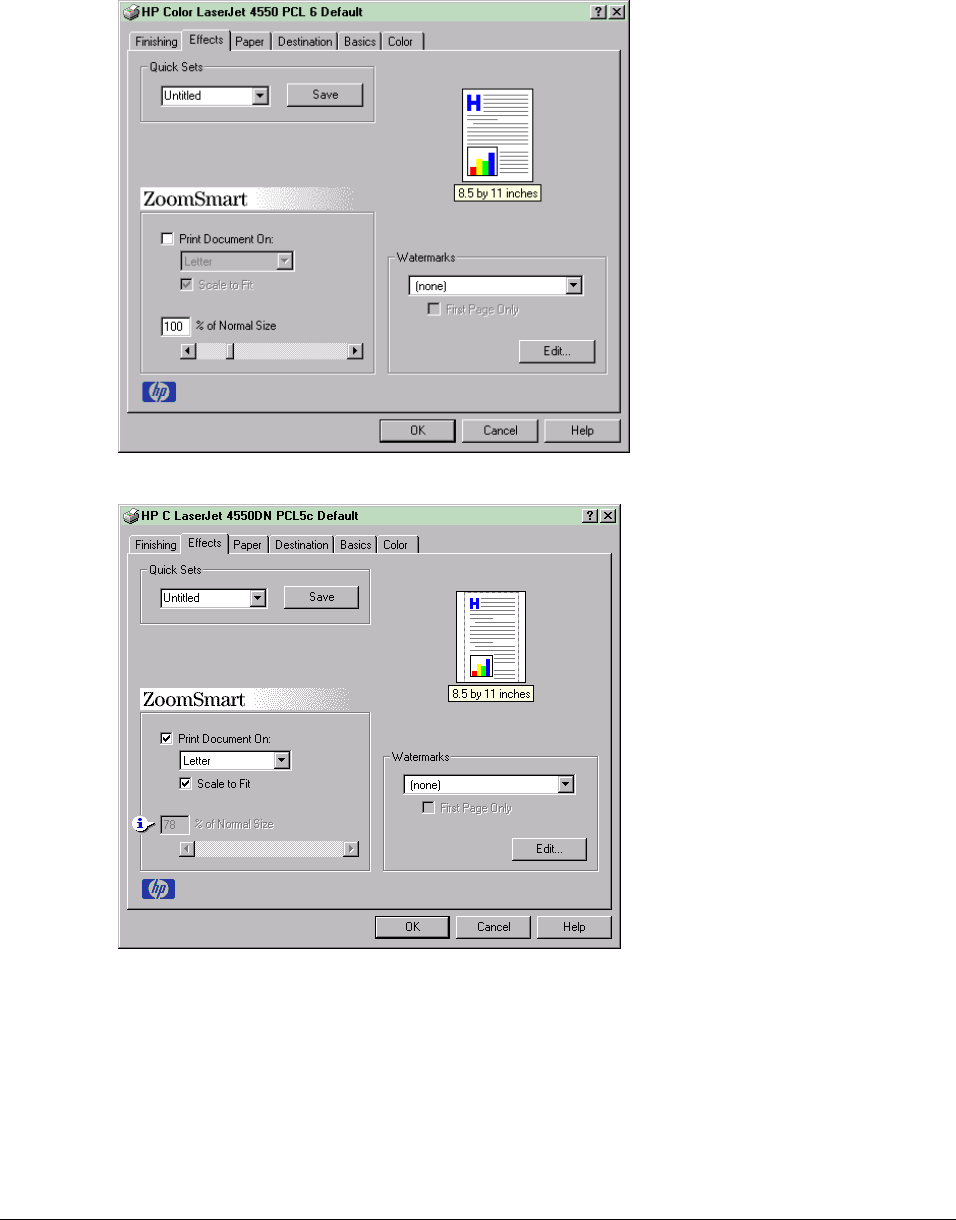
Effects tab features
The Effects tab is intended for unique paper effects such as scaling and watermarks. Figures 14
and 15 show this tab.
Figure 14: The Effects tab (PCL 6)
Figure 15: The Effects tab (PCL 5c)
ZoomSmart
The ZoomSmart group box is for features that scale the page image, either by a numeric
percentage or by specifying a scale change to a different paper size. ZoomSmart handles
scale transformations.
Printing system software components
HP Color LaserJet 4550 Software Technical Reference 31
Print Document On:
This feature allows you to format the document for one paper size but print the document
on a different paper size, with or without scaling the page image to fit the new paper size.
The Print Document On: control is disabled by any of the following:
• % of Normal Size is not 100 percent
• Pages per Sheet is not 1
• Booklet Printing is not off
When the control is selected, the drop-down list will specify the target paper size on
which to print. The list contains all standard paper sizes supported by the currently
selected paper source and any custom paper sizes that you have created (if the currently
selected paper source is Manual, Auto, or any Tray). When the Print Document On: box
is selected, the Scale to Fit option is enabled.
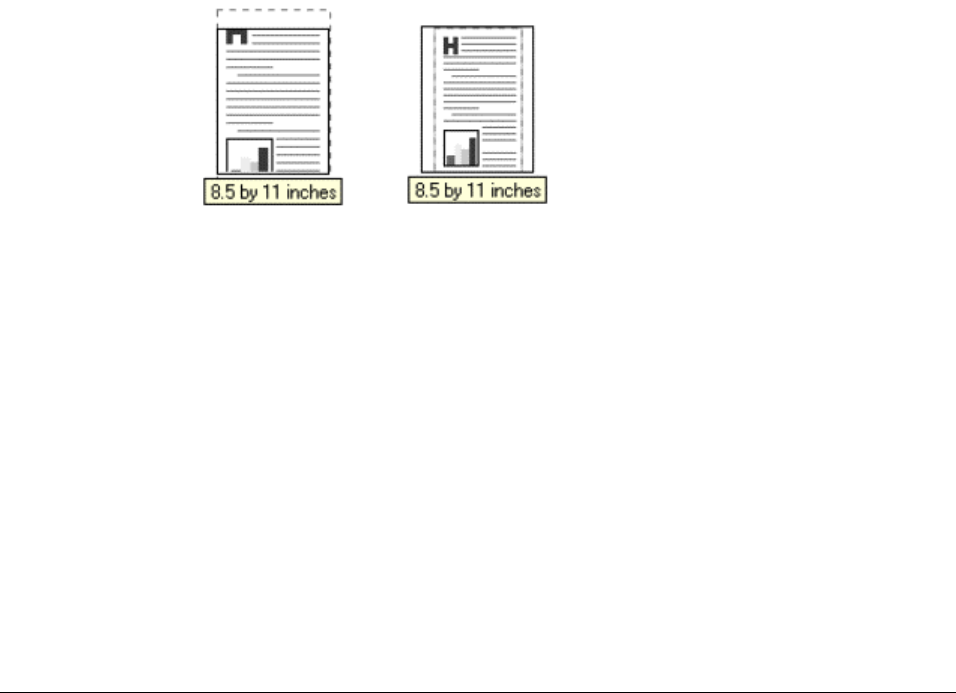
Scale to Fit
The Scale to Fit option specifies whether each formatted document page image is scaled
to fit the target paper size. The default setting is selected. If the setting is turned off, then
the document page images will not be scaled, but instead is centered at full size on the
target paper. If the document size is larger than the target paper size, then the document
image is clipped. If it is smaller, then it is centered within the target paper. Figure 16
shows preview images for a document formatted for Legal paper with the Print Document
On: option selected, and the target size specified as Letter.
Figure 16: Preview images - legal on letter; Scale to Fit off (left) and on (right)
Whenever the size for which the document is formatted (that is, the logical size) differs
from the target size, the preview image uses a dashed gray line to show the boundaries
of the logical page in relation to the target page size.
Percent of normal size (Scaling)
The default setting in the entry box is 100 percent of Normal Size. Normal Size is defined
as the paper size selected within the driver or what the driver receives from the
application (if the application does not negotiate paper size with the driver). The driver will
scale the page by the appropriate factor and send it to the printer.
The limits of the range are from 25 percent to 400 percent and any values outside of the
range is clipped to those limits as soon as the focus is removed from the control (that is,
when the tab key is pressed or another control is selected).
When this control is not selected, its value is 100 except when the Scale to Fit option is
selected. In this case, the dimmed value represents the percentage of normal size to
which the page image is scaled to fit the specified target paper size. For example, when

Printing system software components
HP Color LaserJet 4550 Software Technical Reference 32
Print Document On: is checked, the formatted size is Letter, the target size is set to
Executive, and the Scale to Fit option is checked, the edit box will indicate 85 percent of
Normal Size. If Scale to Fit is not selected, this value will return to 100.
If there is any change to the scale, the page preview will also change; increasing or
decreasing from the top left corner of the preview.
The slider bar controls the scale directly. The value in the edit box changes as the scroll
bar indicator is dragged, and the preview image updates to the new image scale. Each
click on the scroll bar arrows will increment or decrement the scale by 1 percent. Each
click on the page up/down region of the scroll bar will affect the scale by 10 percent.
You cannot get an exact value by dragging the scroll bar indicator at the default Windows
resolution; use the scroll bar indicator to approximate the desired value, then use the
scroll bar arrows to refine it.
The following settings will disable % of Normal Size:
• Print Document On: is selected.
• Pages per Sheet is not 1.
• Booklet Printing is on.
• A “scaled from large sizes” paper size is selected on the Paper tab.
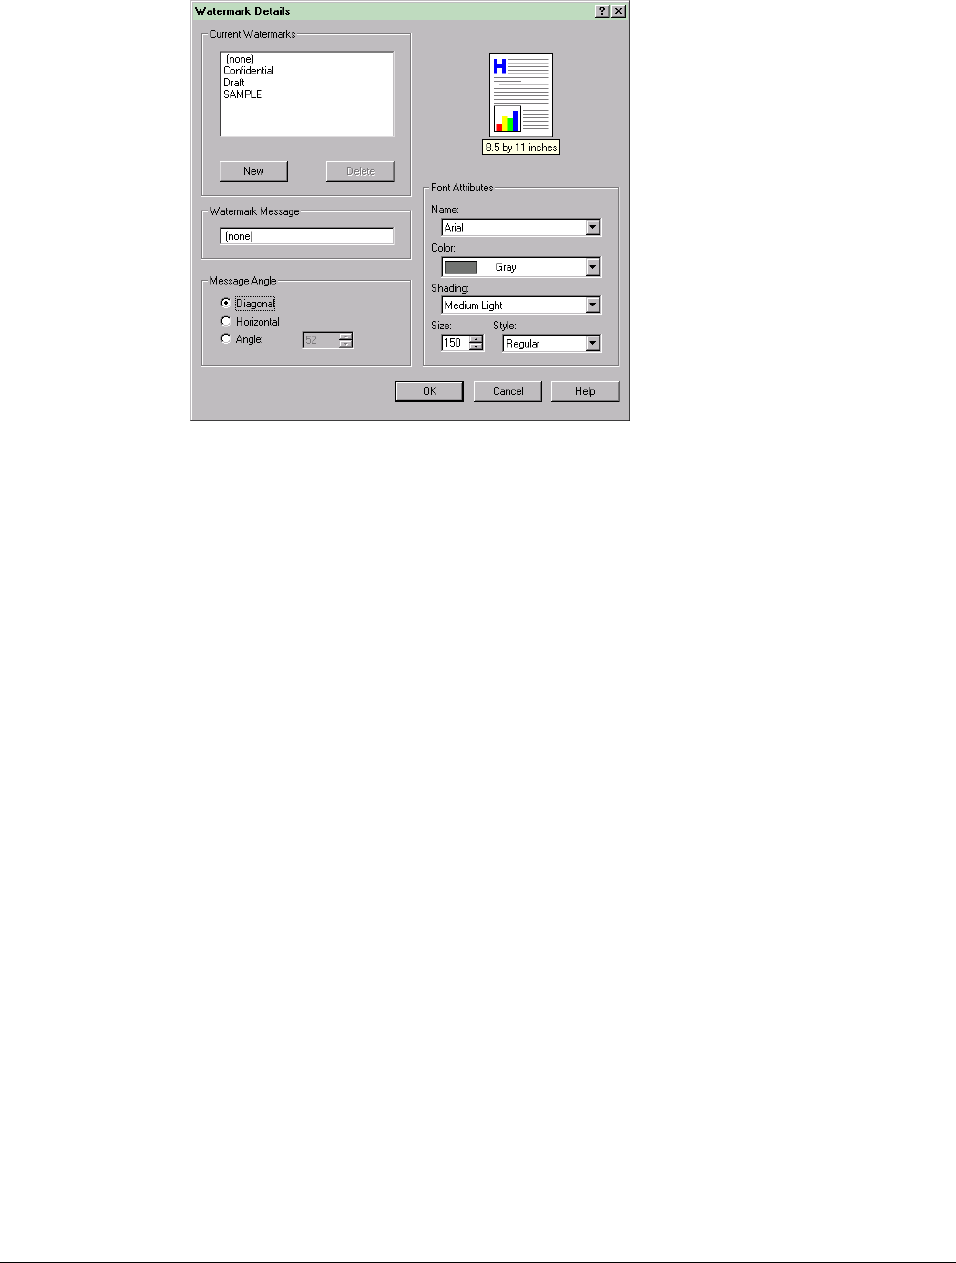
Watermarks
The Watermarks feature allows you to choose a watermark, create your own custom
watermarks (text only), or edit an existing watermark. The following watermarks are
preset in the driver:
• Confidential
• Draft
• SAMPLE
The drop-down list contains the name of watermarks that are currently available on the
system (sorted alphabetically), plus the string “none,” which represents no watermark at
all and is the default setting. Any other watermark selected from this list is displayed in
the preview image.
Watermarks are applied to logical pages. So, for example, when Page per Sheet is set to
4 and First Page Only is turned off, there are four watermarks on the physical page (one
on each logical page).
First Page Only
When First Page Only is checked, the watermark is printed only on the first page of the
document. When not checked, the watermark will appear on every page of the document.
First Page Only is not checked by default.
The First Page Only checkbox is disabled only when the watermark list is set to "none."
Edit …
Selecting the Edit button will display the Watermark Details dialog box shown in Figure
17.
Printing system software components
HP Color LaserJet 4550 Software Technical Reference 33
Figure 17: Watermark Details dialog
The dialog box shows a preview image and controls the current set of watermarks,
including editing, coloring, shading, sizing or styling watermark text.
Click OK to accept all changes made in the Watermark details dialog box; however,
selecting Cancel does not cancel all changes. If you make changes to a watermark, then
select a different watermark or by select the New, all changes made to the previous
watermark are saved, and only the most recent (current) unsaved changes can be
canceled. For example, if you select Draft from the Effects tab, select Edit, and then
change the font, then select SAMPLE from the Current Watermarks list and click Cancel,
only the switch to the SAMPLE watermark is canceled.
Current Watermarks and Watermark Message
This list box displays the preset watermarks and any custom watermarks that have been
created. The driver has a limit of 30 watermarks. When the list is too lengthy to display all
the watermarks, a vertical scroll bar appears on the right side of the list box. Selecting
one of the watermarks enables the Delete button and the page preview. When the limit of
30 watermarks is reached, the New button is disabled and a help bubble appears next to
it that explains why the button is disabled and how to enable it.
Selecting the New button selects the Watermark Message box where the default
message “Untitled” appears. Begin typing to create a custom watermark and
automatically display the text across the page preview. Other watermark characteristics
are inherited from current settings at the time you create the new watermark. Click OK to
save a new watermark.
To edit an existing watermark, select it so that it appears in the Watermark Message box.
Once selected, the watermark message (the actual text that will appear over each page
of the document) can be changed.
The message string is also the name used to identify the watermark in the list, except
when more than one watermark has the same message. For example, you might want
several different watermarks whose message is “Draft,” but whose font or size is different
for each one. When this occurs, the string is appended with a space, a pound sign, and a
Printing system software components
HP Color LaserJet 4550 Software Technical Reference 34
number. The number 2 is used first, but if the resulting name is also in the list, then the
number is incremented until the name is unique.
Message angle
This feature will allows you to print the watermark in a Diagonal, Horizontal, or Angle
(custom) orientation to the Page's text. The default is Diagonal. While all three settings
automatically center the watermark string within the page, these settings affect only the
angle of the string placement. Diagonal places the text along a line that spans the lower-
left and upper-right corners of the page.
Font attributes
The controls in this group box allow you to change the font style and appearance of the
watermark.
The Name selection is a Windows list that shows TrueType fonts currently installed on
the system. The Style setting offers a choice of Regular, Bold, Italic, and Bold Italic. The
sizes allowed are from 1 to 999 points.
The Color selection combo box provides a fixed, unalterable set of color choices, in
palette/color name pair form, for the watermark. Below are the triplets for these colors:
Setting Red Yellow Green Cyan Blue Magenta Gray
Lightest 255,
232,
232
255,
255,
232
232,
255,
232
232,
255,
255
232,
232,
255
255,
232,
255
255,
255,
255
Very
Light
255,
224,
224
255,
255,
224
224,
255,
224
224,
255,
255
224,
224,
255
255,
224,
255
224,
224,
224
Light 255,
192,
192
255,
255,
192
192,
255,
192
192,
255,
255
192,
192,
255
255,
192,
255
192,
192,
192
Med
Light
255,
160,
160
255,
255,
160
160,
255,
160
160,
255,
255
160,
160,
255
255,
160,
255
160,
160,
160
Medium 255,
128,
128
255,
255,
128
128,
255,
128
128,
255,
255
128,
128,
255
255,
128,
255
128,
128,
128
Med
Dark
255,
96,
96
255,
255,
96
96,
255,
96
96,
255,
255
96,
96,
255
255,
96,
255
96,
96,
96
Dark 255,
64,
64
255,
255,
64
64,
255,
64
64,
255,
255
64,
64,
255
255,
64,
255
64,
64,
64
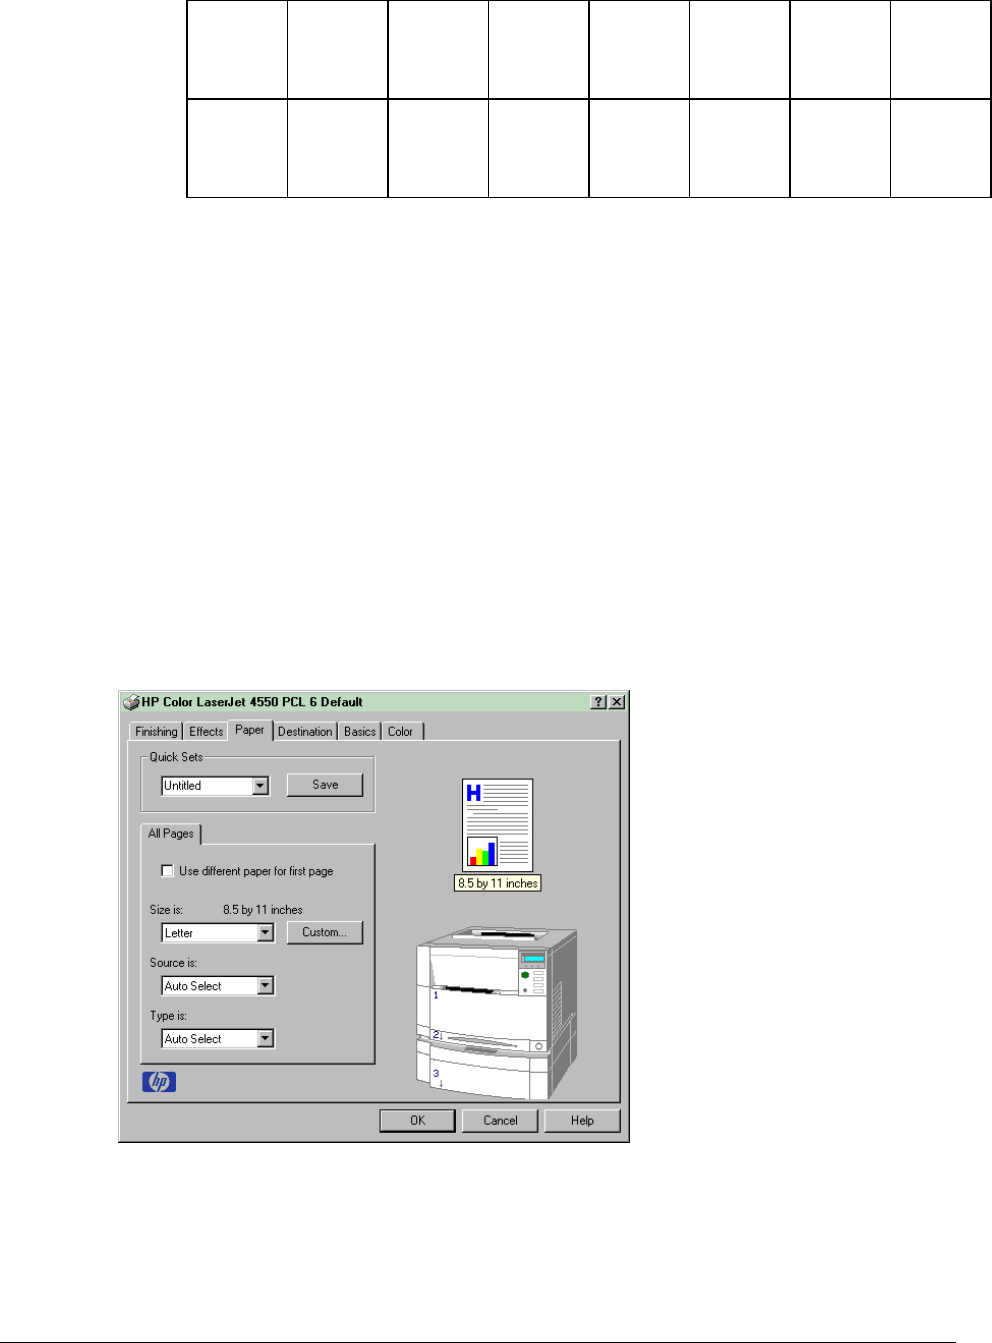
Printing system software components
HP Color LaserJet 4550 Software Technical Reference 35
Very
Dark
255,
32,
32
255,
255,
32
32,
255,
32
32,
255,
255
32,
32,
255
255,
32,
255
32,
32,
32
Darkest 255,
0,
0
255,
255,
0
0,
255,
0
0,
255,
255
0,
0,
255
255,
0,
255
0,
0,
0
The Shading attribute provides the following choices: lightest, very light, light, medium
light, medium, medium dark, dark, very dark, and darkest. These values represent the
intensity of the color chosen in the Color attribute.
For example, a choice of “Light” plus “Yellow” (from the Color attribute) would produce a
lightly saturated yellow watermark. “Very Dark” plus “Yellow” would produce a strongly
saturated, deep-yellow watermark. Likewise, the various shading choices from “Lightest”
to “Darkest” plus “Gray” color would produce shades of gray from white to black.
The default attributes for watermarks on the HP Color LaserJet 4550 printer are Arial,
Regular Style, 150 point, Gray, and Medium Light shading.
Paper tab features
The Paper tab allows you to specify the size, type, and source of the medium on which to print.
You can also use the Paper tab to define a custom paper size. If desired, you can also indicate
paper selection choices for the first page and back cover of the document that are different from
the choices for the other pages. The Paper tab sheet is shown in Figures 18 and 19 with the
graphic of the HP Color LaserJet 4550 printer.
Figure 18: The Paper tab (PCL 6)
Printing system software components
HP Color LaserJet 4550 Software Technical Reference 36
Figure 19: The Paper tab (PCL 5c)
All Pages or First Page/Other Pages/Back Cover
The controls on this tab are contained in a mini-tab named All Pages. As the name
implies, this means that the settings specified on that tab apply to all pages of the
document. Its three parts (activated by the checkbox described in Use Different Paper for
First Page) are as follows:
• First Page contains the same controls as All Pages
• Other Pages contains different controls, as noted in the following sections
• Back Cover contains different controls, as noted in the following sections
Use Different Paper for First Page
This checkbox allows you to specify a different paper for the first page of the document or
a blank cover page. When selected, it shows three tabs above it: First Page, Other
Pages, and Back Cover. Whenever Use Different Paper for First Page is selected, the
settings for the Other Pages are reset to match the settings for the First Page. For the
desired effect, you must then select a different source or type from either of the other two
tabs.
Other pages
The Other Pages mini-tab allows you to select an alternate paper type or source for the
pages of a document after the first page. The choices and defaults of the two controls
(Source is: and Type is:) are the same as First Page.
Back cover
The Back Cover mini-tab allows you to select an alternate paper source or the same
source as First Page, from which a blank page is drawn and placed after the last page of
a document. There are three radio buttons and a drop-down box. No Back Cover is
selected as the default, with the drop-down source selection box disabled. Selecting Use
an Alternate Source activates the drop-down selection box. The drop-down box value
defaults to the same source as on the First Page tab. Selecting Use the First Page
Source changes the drop-down value to match the first page, if necessary, but the drop-
down box remains inactive.
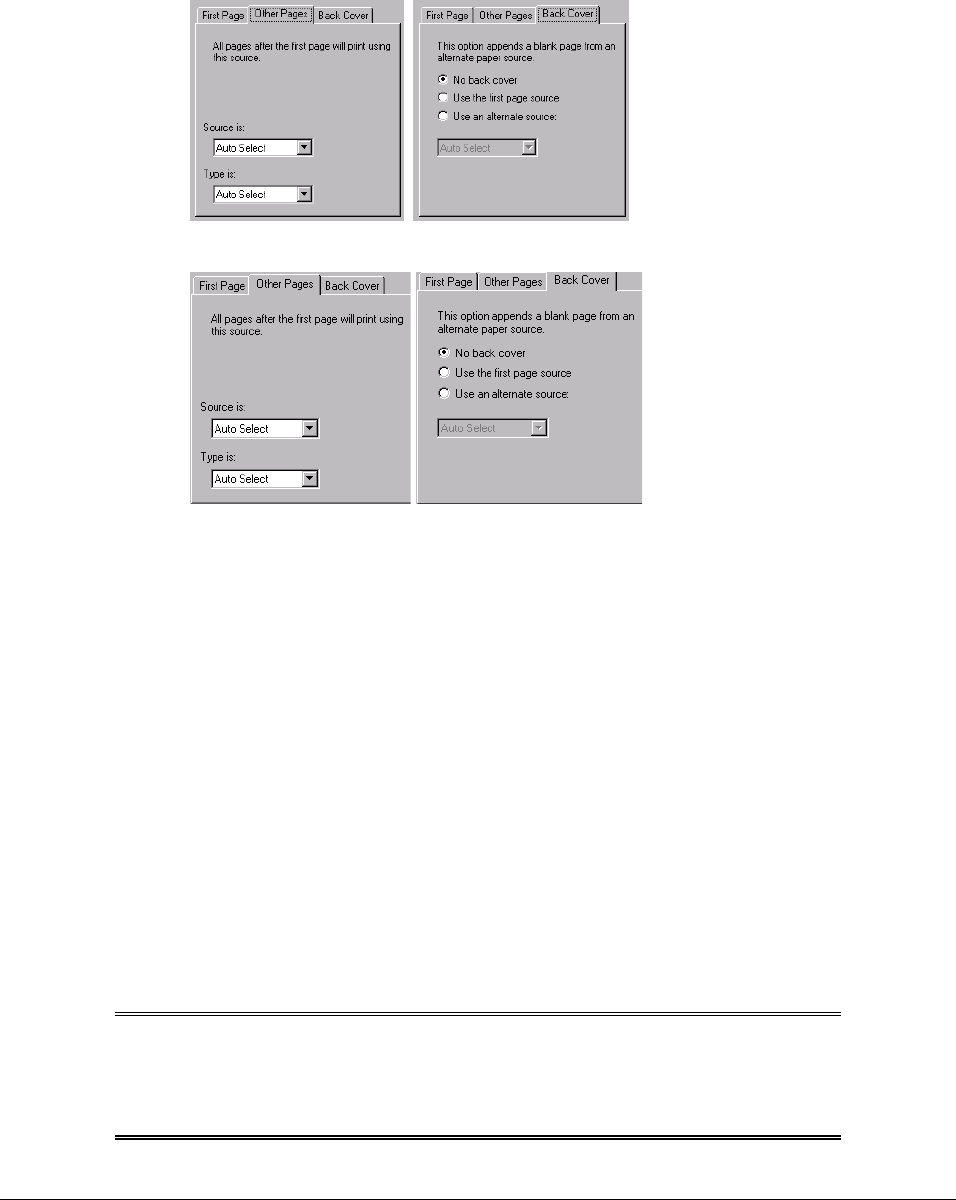
Printing system software components
HP Color LaserJet 4550 Software Technical Reference 37
When the Back Cover tab is active, selecting “No back cover” de-activates the drop-down
box, but does not change the value of the drop-down box. No bubble help is available for
the inactive drop-down box. The settings will revert to their defaults when Use Different
Paper for First Page is selected again.
Figure 20: Other pages (left) and back cover (right) (PCL 6)
Figure 21: Other Pages (left) and Back Cover (right) (PCL 5c)
Size is:
This feature is actually two controls: a drop-down list containing all the supported paper
sizes (including any user-defined custom sizes) and a text label that indicates the
dimensions of the selected size.
Moving the mouse pointer over the text label causes the pointer to change to a gloved
hand image, which indicates that the area underneath the pointer is selectable. Selecting
here toggles the units of measure between inches and millimeters, the same as selecting
on the dimensions label in the preview image. Selecting a new size from the drop-down
list updates the paper dimensions text label as well as the preview image. Changing the
orientation also update the dimensions text label.
The Size can be specified only for the First Page (or All Pages). On the Other Pages and
Back Cover tabs, the Size drop-down list does not appear because the paper size must
be consistent for all pages of the job. (Certain applications can override this command
and specify different paper sizes within a single document.) Any change in the paper size
selection causes the Booklet Printing feature to be turned off.
The drivers' standard paper sizes are (as they appear in the list) in the table below. User-
defined Custom sizes appear at the end of the list.
NOTE: The following table lists the paper size order for Windows 95,
Windows 98, and Windows Millennium. The order can be
different for Windows NT 4.0 and Windows 2000. The list will
contain all the sizes shown below, and may contain sizes from
other drivers.

Printing system software components
HP Color LaserJet 4550 Software Technical Reference 38
Paper
Name Width Height
PCL 5
margin
x,y
portrait
PCL 5
margin
x,y
landscape
PCL6
margins
Letter 216 mm
(8.5 inches)
279 mm
(11.0 inches)
150,100 120,100 100,100
Legal 216 mm
(8.5 inches)
356 mm
(14.0 inches)
150,100 120,100 100,100
Executive 184 mm
(7.25 inches)
267 mm
(10.5 inches)
150,100 120,100 100,100
A5 148.0 mm
(5.83 inches)
210.0 mm
(8.27 inches)
150,100 120,100 100,100
A4 210.0 mm
(8.27 inches)
297.0 mm
(11.69”
inches)
142,100 118,100 100,100
Envelope
#10
105 mm
(4.12 inches)
241 mm
(9.5 inches)
150,100 120,100 100,100
Envelope
DL
110 mm
(4.33 inches)
220 mm
(8.66 inches)
142,100 118,100 100,100
Envelope
C5
162 mm
(6.38 inches)
229 mm
(9.01 inches)
142,100 118,100 100,100
Envelope
B5
176 mm
(6.93 inches)
250 mm
(9.84 inches)
142,100 118,100 100,100
Envelope
Monarch
98 mm
(3.87 inches)
190 mm
(7.5 inches)
150,100 120,100 100,100
B5 ISO * 176.0 mm
(6.93 inches)
250 mm
(9.84 inches)
142,100 118,100 100,100
B5 (JIS) 182.0 mm
(7.16 inches)
257.0 mm
(10.12 inches)
150,100 118,100 100,100
* Windows NT4.0 and Windows 2000 treat unrecognized paper sizes as custom lists
them as Custom, not standard. For the HP Color LaserJet 4550, this affects B5 ISO.
Selecting Allow Scaling from Large Paper on the Config tab's More button dialog box lists
additional large paper sizes in the Paper tab’s Size is: box and in the application. The
additional paper sizes are larger than the printer can normally handle, to allow printing,
without reflow (reformatting of text into more pages), of documents that are formatted for
other larger format laser printers.
Printing system software components
HP Color LaserJet 4550 Software Technical Reference 39
The table below lists the paper sizes added to the bottom of the paper size list while the
Allow Scaling from Large Paper checkbox is selected on the Configure (More) tab:
Paper Name Width Height
Scales to
(Default)
A3 297.0 mm
(11.69 inches)
420.0 mm
(16.53 inches)
A4
11 x 17 279 mm
(11.0 inches)
432 mm
(17.0 inches)
Letter
B4 (JIS) 257.0 mm
(10.12 inches)
364.0 mm
(14.33 inches)
A4
8K 273 mm
(10.75 inches)
394 mm
(15.5 inches)
16K
If you select a simulated size without selecting a Print Document On: size, the scaled size
will default as noted in the table above.
After selecting a larger paper size, the following actions occur:
• N-up and Booklet (Finishing tab) and % of Normal Size (Effects tab) options are
unavailable, with bubble help available
• Print Document On (Effects tab) is selected, along with the appropriate default for
paper size
• Bubble help appears next to the Paper Size control, indicating that this size is scaled
according to the Effects tab settings.
Custom …
The Custom Paper Size dialog appears when you click the Custom… button on the paper
tab. Figure 21 shows the initial appearance of the Custom Paper Size dialog.
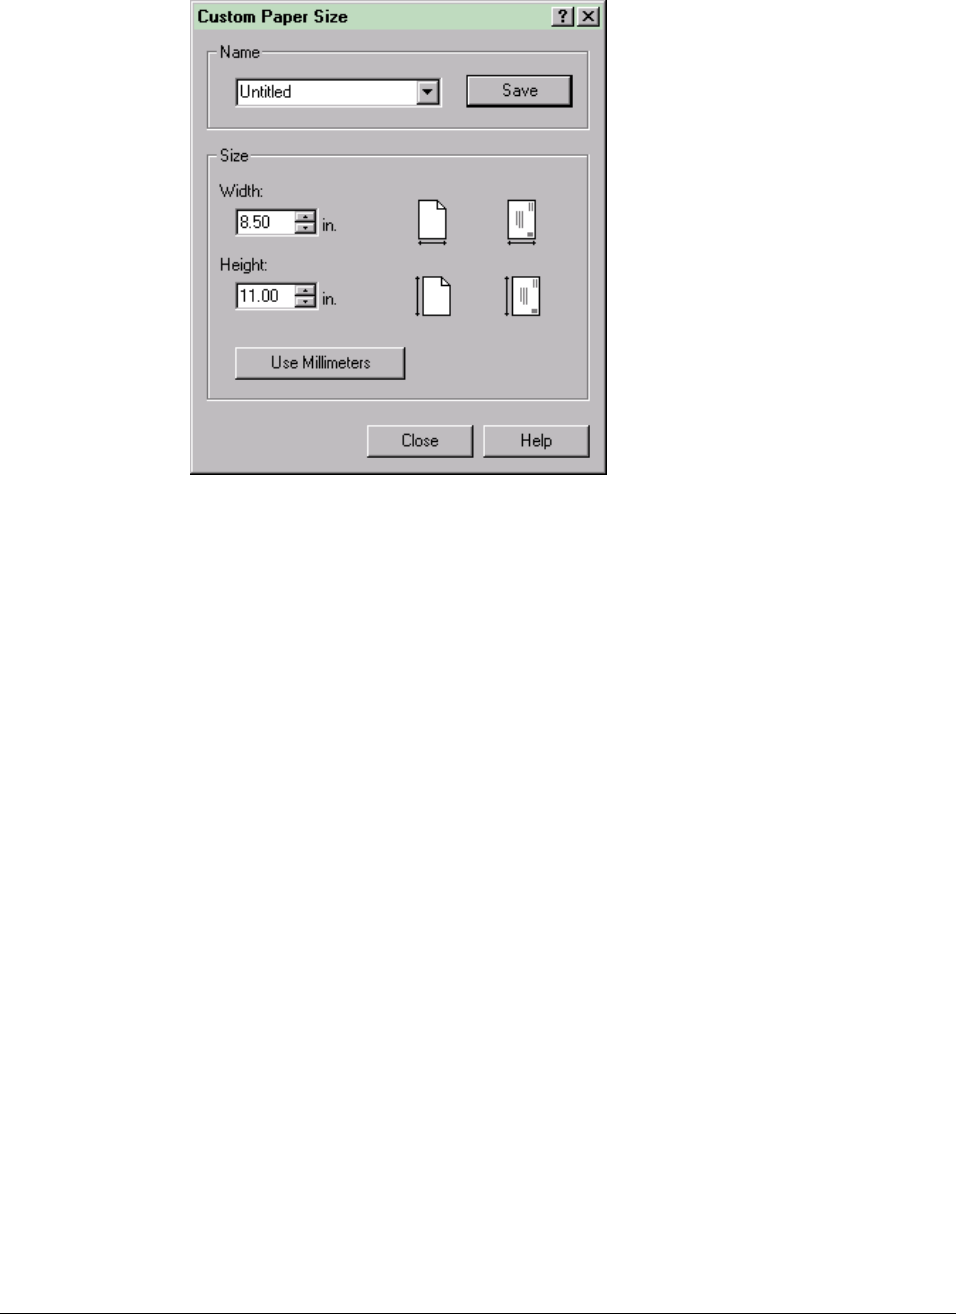
Printing system software components
HP Color LaserJet 4550 Software Technical Reference 40
Figure 21: The Custom Paper Size dialog box (all drivers)
Initial settings
When the dialog appears, the combo box in the Name group contains one of two things
depending on the current paper size selection in the Paper tab:
• If the paper size selection is a custom size defined previously, then the combo box
contains the name of that custom size.
• If the paper size selection is a standard paper size, then the combo box shows the
default name for a custom paper size, Untitled.
The complete set of titles for this button and the specific characteristics that determine its
title and behavior are discussed in “Dynamic Command Button.”
Combo box
The combo box displays the name of the last selected custom paper size, allows you to
enter new names for custom paper sizes, and allows you to select from the list of
currently defined custom paper sizes.
The name displayed in the Quick Sets combo box is one of three things, depending on
the following conditions:
• If a saved custom paper size has been selected from the drop-down list and the other
controls in the dialog have not been changed since then, the combo box displays the
name of the last selected custom paper size.
• If the Width and/or Height controls have been changed since a custom size was
selected or saved, or if a saved paper size has just been deleted, then the combo
box displays the default name (Untitled).
• If a new name has been typed into the combo box for the purpose of saving a new
size or renaming an existing size, then that new name will remain in the combo box
display until a saved custom paper size has been selected from the drop-down list.
Printing system software components
HP Color LaserJet 4550 Software Technical Reference 41
If a new name is typed into the combo box but the Save button is not selected, then you
should be able to change the Width and Height values without losing the name. However,
if a saved paper size name is selected from the drop-down list, any unsaved name or
size values is lost without warning, and replaced by the values of the selected custom
paper size.
Dynamic command button
The command button located to the right of the combo box has three possible labels:
Save, Delete, and Rename.
• Save is the button title whenever the Height and Width values have been changed
since the last save or the selection of an existing custom paper size. Selecting the
button causes the name in the combo box to be compared against each of the saved
names. If a duplicate is found, a dialog appears asking you if it is okay to replace the
existing item. If you select yes, the old item is updated with the new values. If you
select no, the driver returns to the Custom Paper Size dialog box for you to type a
different name. Whenever the command button has the Save title, it is the default
button.
NOTE: In Windows 9x, the custom paper size entry and storage are
case sensitive; Big and BIG can co-exist. However, in Windows
NT 4.0 and 2000, the custom paper size entry is case sensitive
but storage is not; so Big and BIG cannot co-exist.
The new name is compared only against the list of user-defined
custom paper names, and not against the standard paper size
names.
• Delete is the button title whenever the name of an existing (previously saved) custom
paper size appears in the combo box, such as immediately after selecting an item
from the drop-down list or selecting the Save button. Selecting the Delete button
causes the saved custom paper size to be deleted, after which the combo box
changes to Untitled, the Height and Width controls are unchanged, and the button
title changes to Save.
• Rename is the button title when the you type something into the combo box after
selecting an existing custom paper size from the drop-down list. If no duplicate is
found, the name of the stored custom paper size changes to match the contents of
the combo box. Whenever the command button has the Rename title, it is also the
default button.
The following state table illustrates the relationships between the combo box, the
command button, and the actions that take users from one state to another.
State
Combo Box
Contents
Button
Label Action
Next
State
Click Save. 3
Type something into combo box. 2
1 Untitled Save
Change the Width or Height values. 1
Printing system software components
HP Color LaserJet 4550 Software Technical Reference 42
State
Combo Box
Contents
Button
Label Action
Next
State
Select a saved item from the drop-
down list.
3
Click Save. 3
Type something into combo box. 2
Change the Width or Height values. 2
2 <user-typed
text>
Save
Select a saved item from the drop-
down list.
3
Click Delete.1
Type something into combo box. 4
Change the Width or Height values. 1
3 <name of
saved item>
Delete
Select a saved item from the drop-
down list.
3
Click Rename (when the name is
unique).
3
Click Rename (when the name is a
duplicate).
4
Type something into the combo box. 4
Change the Width or Height values. 2
4 <user-typed
text>
Rename
Select a saved item from the drop-
down list.
3
Width and height controls
The Width and Height values can be changed either by typing numeric strings into the
edit boxes, or by selecting the up and down arrows.
Any entry that is greater than the width and height control maximum limits (see below)
will round down to the maximum valid entry while any entry that is smaller than the Width
and Height control minimum limits (see below) will round up to the minimum valid entry.
Printing system software components
HP Color LaserJet 4550 Software Technical Reference 43
NOTE: If units are in millimeters, the custom paper size range minimum
is the limit rounded up to the nearest whole millimeter. Custom
paper size range maximum is the limit rounded down to the
nearest whole millimeter. Any non-numerical entry will revert to
the last valid entry. Width and Height entries are validated when
the focus has changed.
The resolution of each control is one tenth of an inch or one millimeter, depending on the
current measurement units. Clicking the up and down arrows increments or decrements
the current value by the increment amount (within the allowed range of values). The
computer determines the rate at which the values change.
Unit indicator labels change dynamically to indicate in. or mm., depending on the
measurement units the driver is currently using. To change measurement units, click the
Measurement Units Button.
Width and Height control limits
The minimum paper size for the HP Color LaserJet printer is 76.2 mm by 127 mm (3
inches by 5 inches) and the maximum is 216 mm by 356 mm (8.5 inches by 14 inches).
The following table summarizes custom paper constraints:
Media Source or Paper
Handling Accessory
Minimum Size -
Width by Height
Maximum Size -
Width by Height
Tray 1 (multi-purpose) 76 mm x 127 mm
(3.0 inches x 5.0 inches)
216 mm x 356 mm
(8.5 inches x 14.0 inches)
Tray 2 (250-Sheet) 148.0 mm x 210.0 mm
(5.83 inches x 8.27 inches)
A5
216 mm x 356 mm
(8.5 inches x 14.0 inches)
Tray 3 (500-Sheet) 182.0 mm x 257.0 mm
(7.2 inches x 10.1 inches)
B5
216 mm x 356 mm
(8.5 inches x 14.0 inches)
Duplexer 148.0 mm x 210.0 mm
(5.83 inches x 8.27 inches)
A5
216 mm x 356 mm
(8.5 inches x 14.0 inches)
Imageable area
The imageable area for custom paper sizes specifies how much space around the outer
edge of the page cannot be printed on because of the printer's hardware restrictions. The
hardware margins for custom paper are 100 pixels (at 600 dpi) from each edge, or 1/6
inch.
Icons
The paper and envelope icons visually define Width and Height.
Printing system software components
HP Color LaserJet 4550 Software Technical Reference 44
Measurement units button
Like the Dynamic Command button described above, the measurement units button is
also multi-titled, although its function is always to change from English to metric and vice
versa.
Close button
The Close button closes the Custom Paper Size dialog box according to the logic in the
table below. In all cases, any custom paper sizes that are successfully saved (and not
renamed or deleted) while the dialog box is open will remain in the paper size list in the
Paper tab. The following table lists options that appear when you click the Close button.
If the Combo
Box contains …
And the
Button says …
Then it will do this when the Close button
is selected
Untitled Save • Close the dialog box, but lose the
changes that were not saved.
• Leave the current paper size the way it
was when the Custom button was
selected.
<user-typed text> Save • Close the dialog box, but lose the
changes that were not saved.
• Leave the current paper size the way it
was when the Custom button was
selected.
<name of saved
item>
Delete • Close the dialog box, and set the current
paper size to the one that was last
displayed in the combo box.
<user-typed text> Rename • Close the dialog box, but lose the
changes that were not saved.
• Leave the current paper size the way it
was when the Custom button was
selected.
Source is:
This drop-down list shows the input trays available according to Configure tab settings.
The minimum list contains Auto Select, Manual Feed, Tray 1, and Tray 2. The default
setting is Auto Select, which allows the printer firmware to select the media source. When
fully configured, the driver offers the additional choice of Tray 3.
Some media source trays are constrained from using certain media types or sizes. If you
attempt to select a media source that is incompatible with the current size or type (from
Optimize for), the driver will display a message box explaining the conflict.
The following constraints exist among the media source, size, and type:
• Tray 1 (150-sheet multi-purpose tray): All types and sizes supported; Custom from
76.2 mm by 127 mm (3 inches by 5 inches) to 216 mm by 356 mm (8.5 inches by 14
inches).
• Tray 2 (250-sheet cassette tray): Type cannot be Labels or Cardstock; size must be
Letter, Executive, Legal, A4, A5, B5 (JIS), or B5 ISO.
• Tray 3 (Optional 500-sheet tray): Type cannot be Labels or Cardstock; size must be
Letter, Executive, Legal, A4, B5 (JIS), or B5 ISO.
Printing system software components
HP Color LaserJet 4550 Software Technical Reference 45
If there is a conflict among paper source, size, or type, and you choose to keep the
conflicting size or type setting, then the paper source must be Tray 1, the multipurpose
tray, which can handle any supported paper size or type.
Paper source commands
The PCL 5c escape sequence for paper source is Esc&l#H. The table below shows
values of #.
Paper source PCL 5c
Tray 1 4
Tray 2 1
Tray 3 5
Auto Select 7
Manual Feed 2
NOTE: The commands above assume that Deferred Media Selection
(DMS) is false. If DMS is true, the printer selects paper by itself
based on media dimensions.
Type is:
This drop-down list shows all the paper types supported by the HP Color LaserJet 4550
printer, as well as any user-defined types created by a printer administrator. The default
setting is Auto Select, which allows the printer's firmware to select the paper source.
There is no mechanism for manually adding custom paper types from the driver; these
can be added only via the bidirectional communication mechanism (bidi), so they must
already exist in the printer when the bidirectional query occurs. If bidi is working, then the
information returned is an updated list of paper types. If bidi is not working, then the
driver looks for custom paper types saved from a previous bidi query, and uses those (if
any). Otherwise, no custom paper types is accessible through the driver.
The standard types that appear in the lists are:
• Auto Select
• Bond
• Cardstock
• Color
• Labels
• Letterhead
• Plain
• Preprinted
• Prepunched
• Recycled
Printing system software components
HP Color LaserJet 4550 Software Technical Reference 46
• Rough
• Transparency
Paper Type commands
The PCL 5c escape sequence for paper type is Esc&n#W [operation][string], where
operation byte 100 and string ('d') as follows. The table below shows values of #.
Paper type #
Bond 5
Cardstock 10
Color 6
Labels 7
Letterhead 11
Plain 6
Preprinted 11
Prepunched 11
Recycled 9
Rough 6
Transparency 13
Printer image
The bitmap image in the lower-right portion of the Paper tab screen represents the
current physical configuration of the printer and corresponds to its configuration data,
obtained either automatically through bidi, or from manual configuration. It should look
the same as the image that appears in the same location on the Destination tab and the
Configure tab.
On the Paper tab, the printer image contains hot spots where you can select a paper
source. When the mouse pointer moves over a hot spot, the arrow cursor reverts to the
gloved hand cursor used in the Bubble Help, the preview image, and other areas. The
current paper source, whether selected from the drop-down list or by selecting a hot spot,
is highlighted in bright green on the printer bitmap. The following points are worth noting:
• The Auto Select does not have a corresponding area to highlight on the bitmap.
• Selecting Manual Feed or Tray 1 highlights the same part of the bitmap.
• Selecting on the area that represents Tray 1 in the bitmap will always select Tray 1;
Manual Feed cannot be selected by selecting the bitmap.
• On the Paper tab, only input trays have hot spots and can be highlighted; output bins
must be selected from the Destination tab.
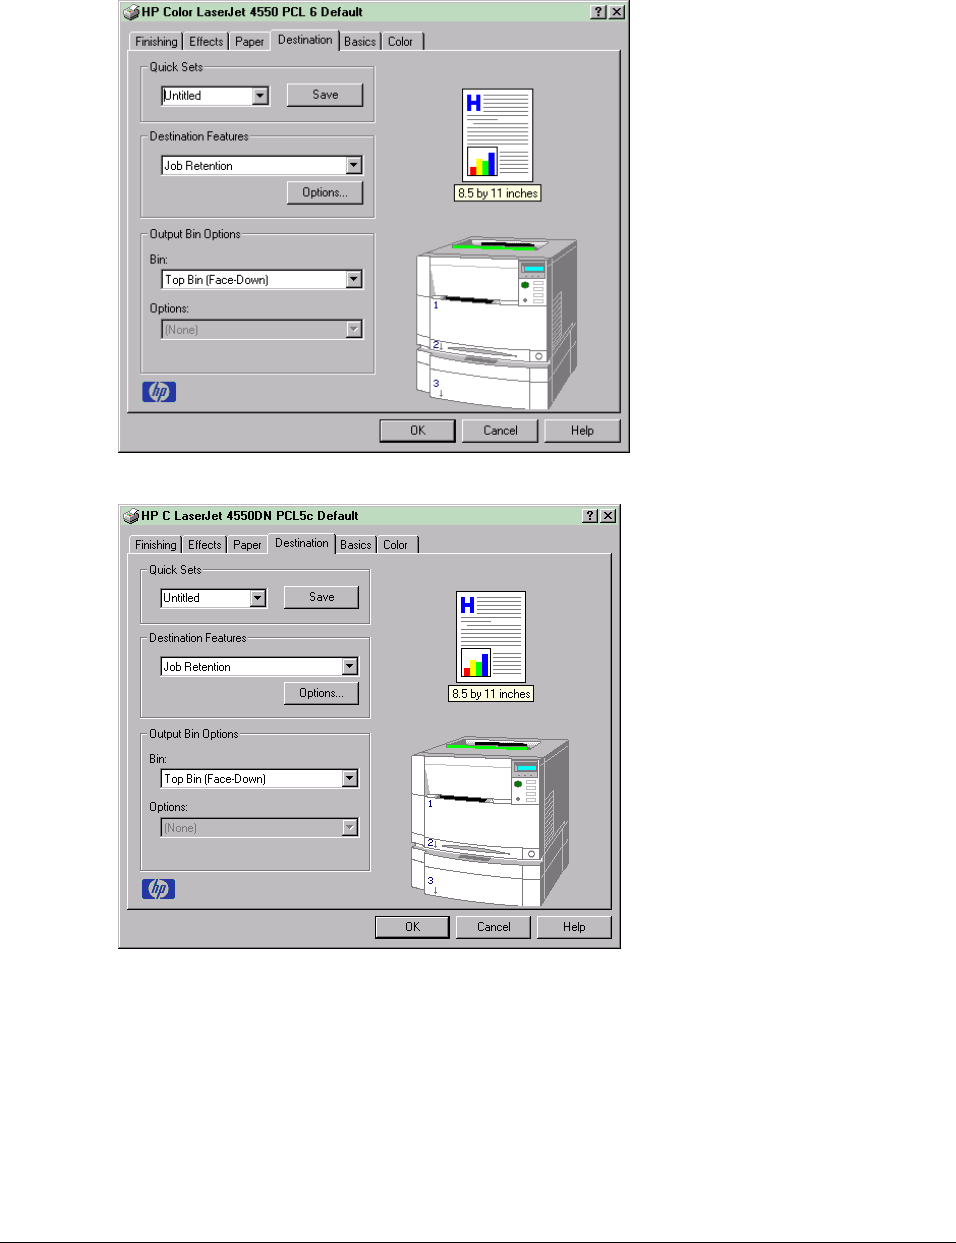
Printing system software components
HP Color LaserJet 4550 Software Technical Reference 47
Destination tab features
The Destination tab supports Job Retention. Figures 22 and 23 show the Destination tab.
Figure 22: The Destination tab (PCL 6)
Figure 23: The Destination tab (PCL 5c)
Destination features
Destination tab features are controlled through the Destination Features group box. The
group box includes a drop-down list and an Options button. For the HP Color LaserJet
4550 printer, this drop-down list will either be blank, or contain Job Retention.
The Job Retention feature requires a printer hard disk and a minimum of 64 MB RAM.
To activate the group box from the Configure tab, see page 57.
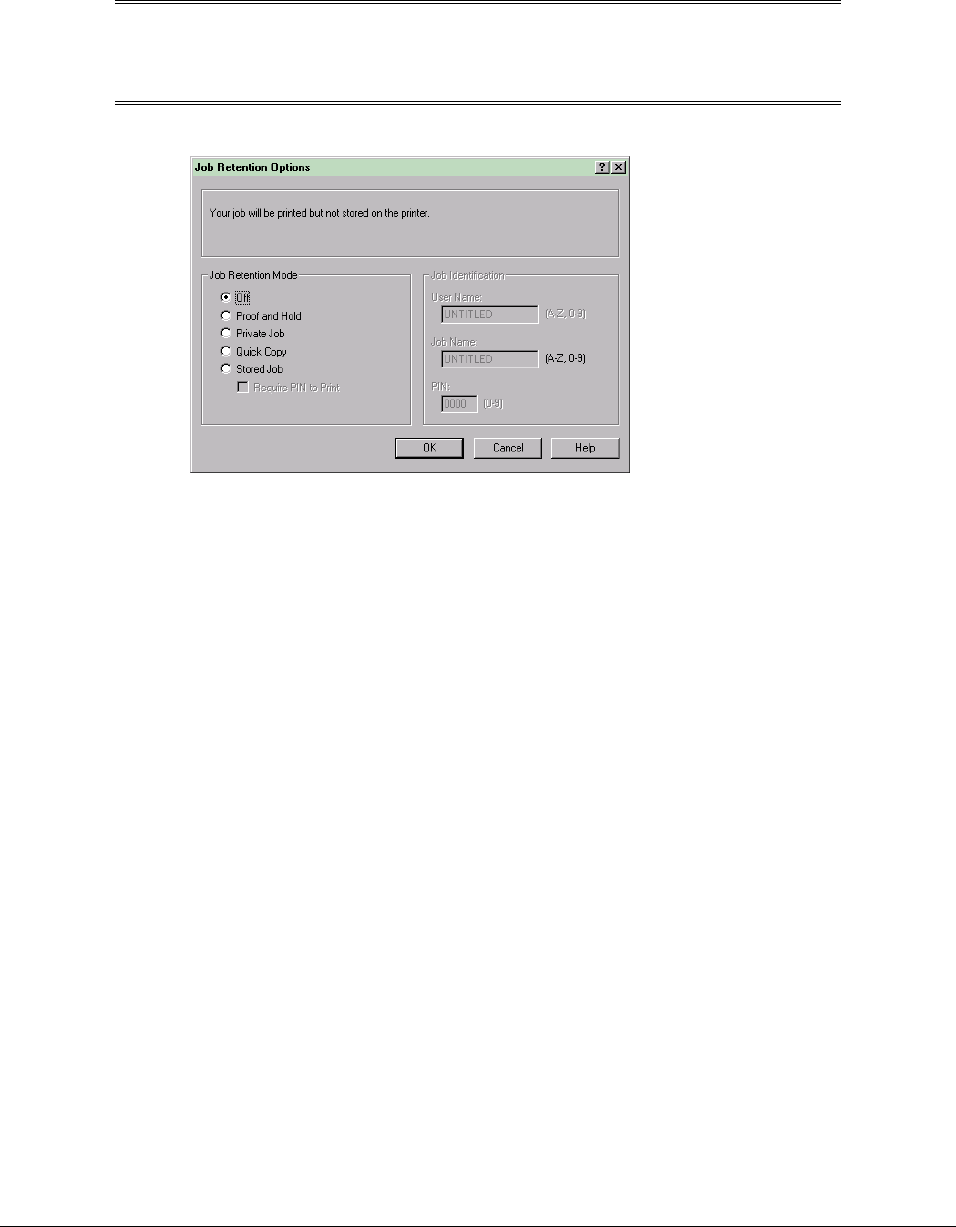
Printing system software components
HP Color LaserJet 4550 Software Technical Reference 48
Assuming the controls are visible (that is, the hardware conditions are met and the Job
Retention Enabled box is selected), selecting Options displays the Job Retention
Options dialog box shown in Figure 24.
NOTE: This screen shot appears this way because the Printer Hard Disk
option is selected. If it were not selected, the Quick Copy and
Stored Job (and Require PIN to Print) options would not be
available.
Figure 24: Job Retention options as seen with Printer Hard Disk configured
Job retention modes
Five radio buttons activate the modes of job retention.
• Off turns Job Retention off, which means the print job will not be stored on the hard
disk.
• Proof and Hold will store the print job on the hard disk and print only the first copy of
the job. You must release subsequent copies from the front panel.
• Private Job will store the print job on the hard disk and will release it only after you
type in the personal identification number (PIN) on the printer’s front panel. Selection
of Private Job activates the PIN field, and a PIN number must be entered to complete
the selection.
• Quick Copy allows you to print additional copies of a print job using the front panel.
This option is available only when the Printer Hard Disk is checked on the More
dialog of the Configure tab.
• Stored Job stores the print job on the hard disk and prints only when you release it
using the front panel. This storage and release can be handled in two ways: as
private or public. Private mode is initiated by selecting the Require PIN to Print
checkbox. In this mode, a PIN entry at the front panel is required to release the job.
This option is available only when the Printer Hard Disk is checked on the More
dialog of the Configure tab.
• Require PIN to Print activates if you select Stored Job. If selected, you must enter a
PIN to make the Stored Job private. This generates the commands @PJL SET
HOLDTYPE=PRIVATE and @PJL SET HOLDKEY=”xxxx” in addition to the stored
job commands.
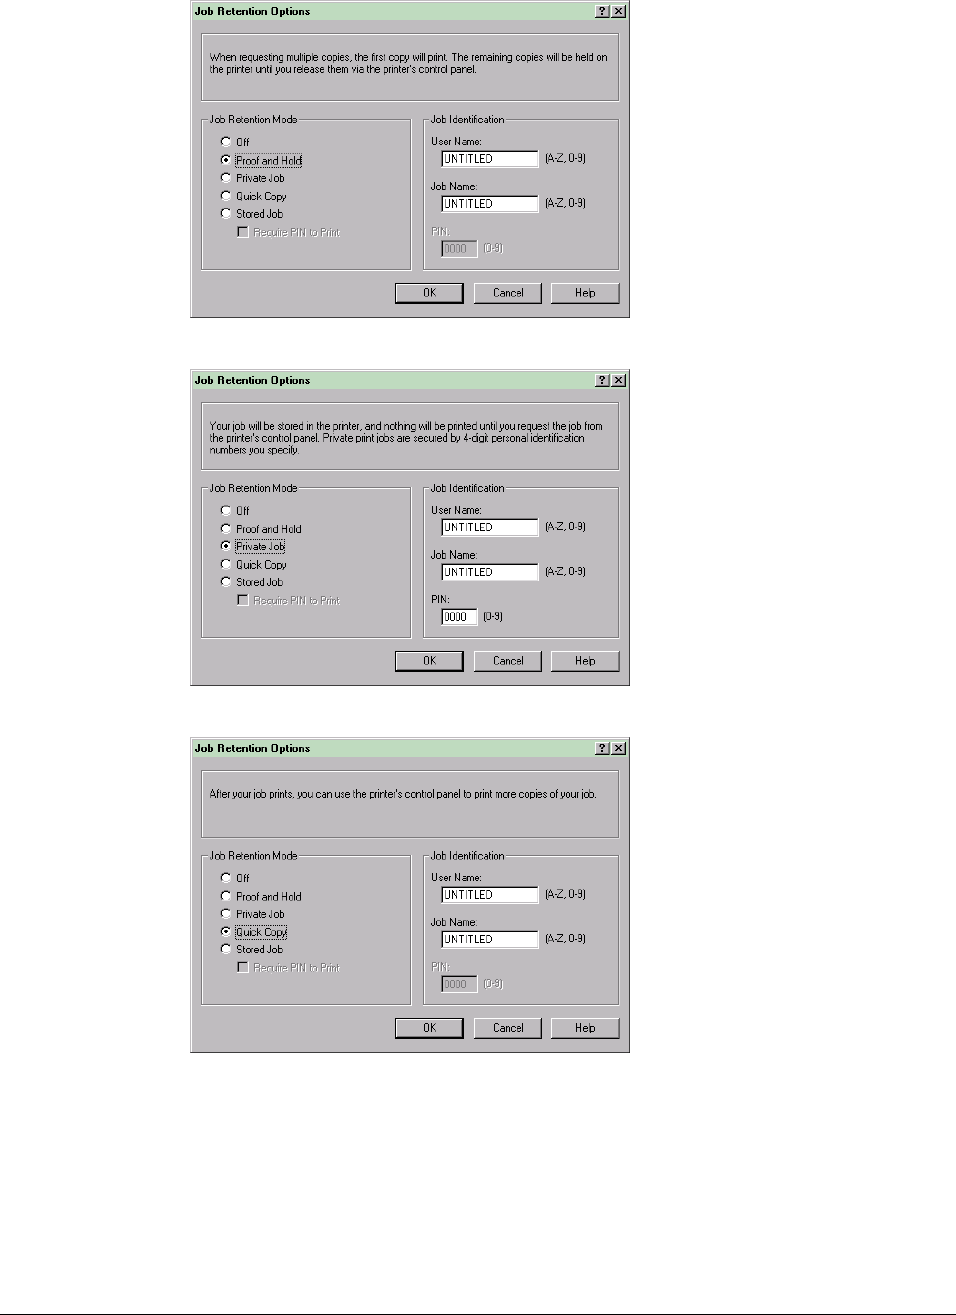
Printing system software components
HP Color LaserJet 4550 Software Technical Reference 49
Figure 25: "Proof and Hold" Job Retention Option
Figure 26: "Private Job" Job Retention Option
Figure 27: "Quick Copy" Job Retention Option
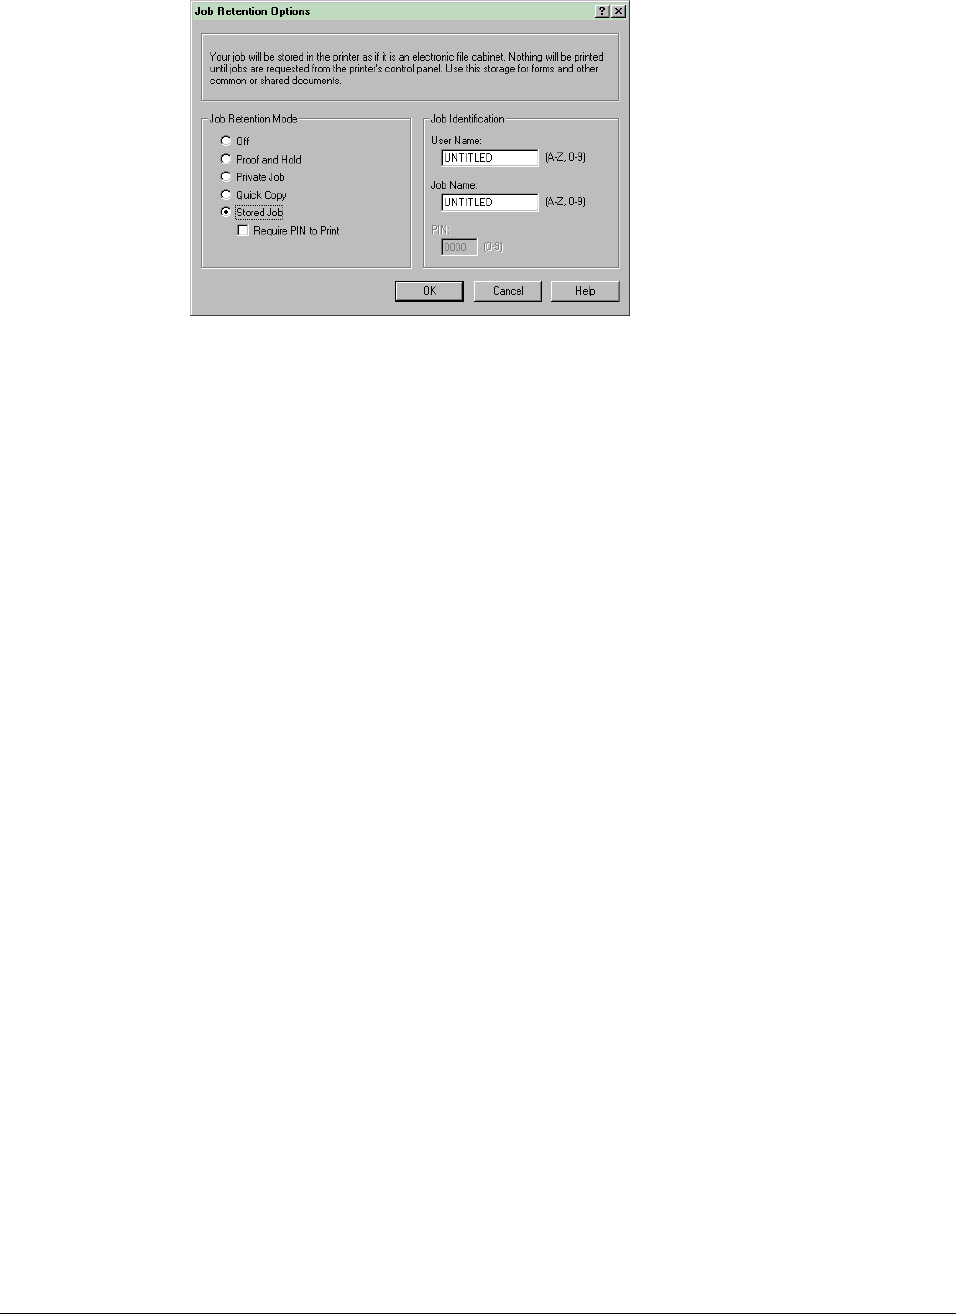
Printing system software components
HP Color LaserJet 4550 Software Technical Reference 50
Figure 28: "Stored Job" Job Retention Option
User Name
The User Name edit box allows you to identify the job at the printer's control panel. The
restrictions for the User Name field are identical to those of the Job Name field as
described below. When the driver is first installed (or when the Factory Defaults Quick
Set is selected), this string initializes to the empty string (""), but the dialog box detects
this condition and replace the string with your logon name in Windows 98, Windows NT
4.0, and Windows 2000. It replaces it with UNTITLED Windows 95 and 3.x.
Job Name
The Job Name is used for specifying a name to identify the job on the printer's control
panel. When the driver is first installed (or when the "Factory Defaults" Quick Set is
selected), this string is initialized to the empty string (""), but the dialog box will detect this
condition and replace the string with UNTITLED.
The Job Name field can contain no more than 16 characters, and is limited to A-Z and 0-
9, because the name is displayed on the printer control panel. If you try to enter a lower-
case character, it automatically shifts to upper case. If you try to enter a character with an
ASCII code of less than 32 or greater than 126, the character is removed from the edit
field, along with all characters that follow it. If you try to enter more than 16 characters,
any characters beyond the 16th is truncated.
When the dialog is closed, or the edit box loses focus, an empty string is replaced with
UNTITLED. In those languages for which UNTITLED cannot be translated without the
use of invalid characters, the driver will use a string of three dashes. The acceptable
characters for Job Name and User Name vary for each operating system. The string
must be displayable on the printer’s control panel.
PIN
The box labeled PIN: is usually inactive. Select Private Job or Stored Job together with
Require PIN to Print to activate it. The Stored Job/PIN coupling has a PIN restriction of
four ASCII numeric characters (ASCII 0x30 through 0x39).
If you enter non-numeric characters, they are removed immediately. If you enter more
than four characters, the characters past the fourth one are truncated. The field
temporarily allows fewer than four digits in the string, but when edit field loses focus, the
zeroes pad the left end until there are exactly four digits. The default initialized value for
PIN is 0000 for Private Job and Stored Job with Require PIN to Print checked.

Printing system software components
HP Color LaserJet 4550 Software Technical Reference 51
Output bin options
Bin
The HP Color LaserJet 4550 printer has one output bin that can be selected in the driver,
so there is one item in the Bin list: Top Bin (Face-Down). There is also a rear face-up bin
that can be manually set for a straight paper path.
• Top Bin (Face-Down) refers to the main output bin at the top of the printer and is the
only setting for the HP Color LaserJet 4550 printer. Jobs sent to this bin are printed
face-down. This option is always available and there are no paper size/type
constraints.
Options
The Options drop-down list is inactive.
Printer image
The bitmap image in the lower-right portion of the Destination tab screen represents the
current physical configuration of the printer according to the driver’s configuration data
(obtained automatically through bidi, or manually configured through the driver). It should
have the same appearance as the image in the same location on the Paper tab and the
Configure tab.
On the Destination tab, the printer image contains hot spots for selecting an output bin,
but, since the HP Color LaserJet 4550 printer supports only one output bin in the driver,
there is no other selection possible. When the mouse pointer moves over a hot spot, the
arrow cursor reverts to the gloved hand cursor used in the Bubble Help, the preview
image, and other areas. The current output bin is highlighted in a bright green color on
the printer bitmap.
NOTE: On the Destination tab, only output bins have hot spots and can
be highlighted; source trays must be selected from the Paper
tab.
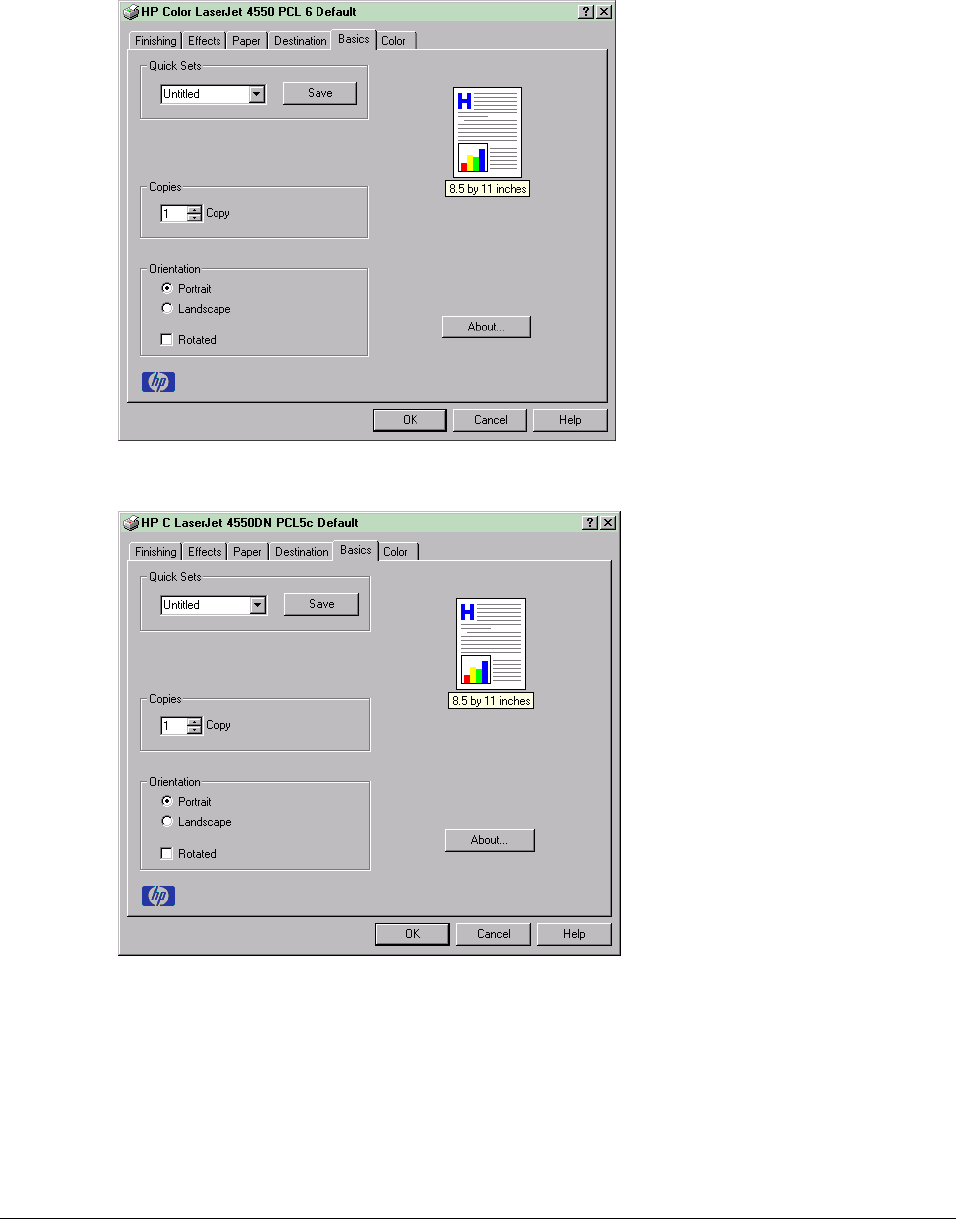
Printing system software components
HP Color LaserJet 4550 Software Technical Reference 52
Basics tab features
Figures 29 and 30 display the Basics tab.
Figure 29: The Basics tab (PCL 6)
Figure 30: The Basics tab (PCL 5c)
Copies
The Copies feature allows you to specify the number of copies to print.
The number of copies you request appears in the box. You can change the number by
typing in the box or using the up and down arrows to the right of the edit box to increase
or decrease the value. Valid entries are numbers from one to 999. The Copies value will
not wrap around from 999 to one or vice-versa. Invalid entries into the edit box (e.g., non-
numerical input, numbers less than one or greater than 999) are changed to the default
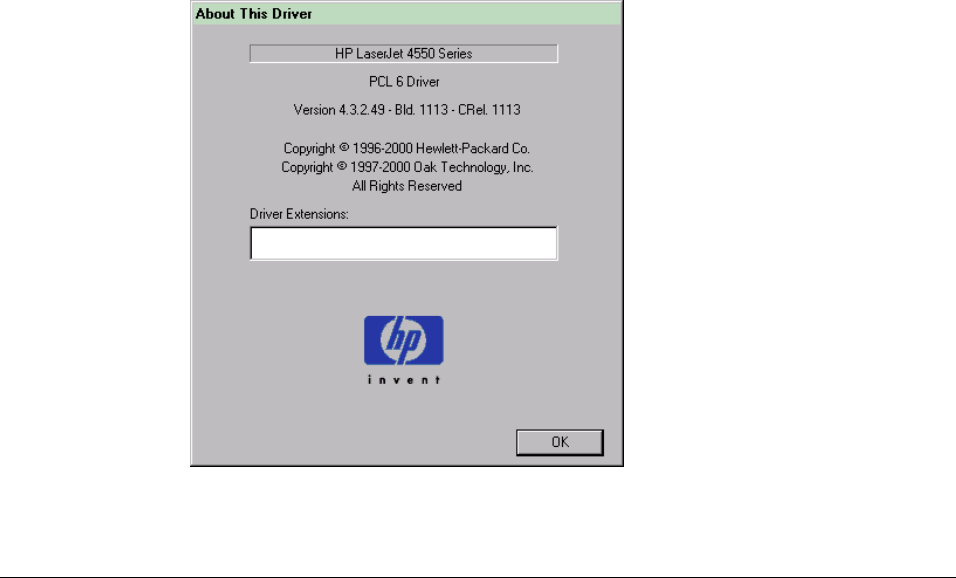
Printing system software components
HP Color LaserJet 4550 Software Technical Reference 53
last valid value when focus is removed from the control. The default number of copies is
one.
Since applications can also be used to set the desired number of copies, conflicts
between the application and the driver can arise. In most cases, the application and the
driver communicate, so that the number of copies set in the application will appear in the
driver and vice-versa. For some applications, this communication does not take place
and the copies values are treated independently. For these applications, setting 10
copies in the application and then setting 10 copies in the driver will result in 100 copies
(10 x 10) printed.
Orientation
You can specify the orientation of the printed output. The three available orientations are
Portrait, Landscape, and Rotated. Orientation refers to the layout of the image on the
page, and does not affect the manner in which media are fed into the printer. The default
orientation is Portrait.
The three orientation options are have these configurations:
• Portrait - the top edge of the document is the shorter edge of the paper.
• Landscape - the top edge of the document is the longer edge of the paper.
• Rotated - Rotated is a form of Landscape or Portrait in which the image is rotated
180 degrees. This setting is useful for printing envelopes and pre-punched paper.
Orientation can toggle between Portrait and Landscape by left-clicking the preview
image. If you check Rotation, there is no change in the preview image.
About
Selecting the About button on the Basics tab and selecting the HP logo on any of the
driver property pages both display the About box. To close the About box, click OK, press
ESC, press ALT + F4, or press ENTER. Figures 31 and 32 show the About box.
Figure 31: The About Box (PCL 6)
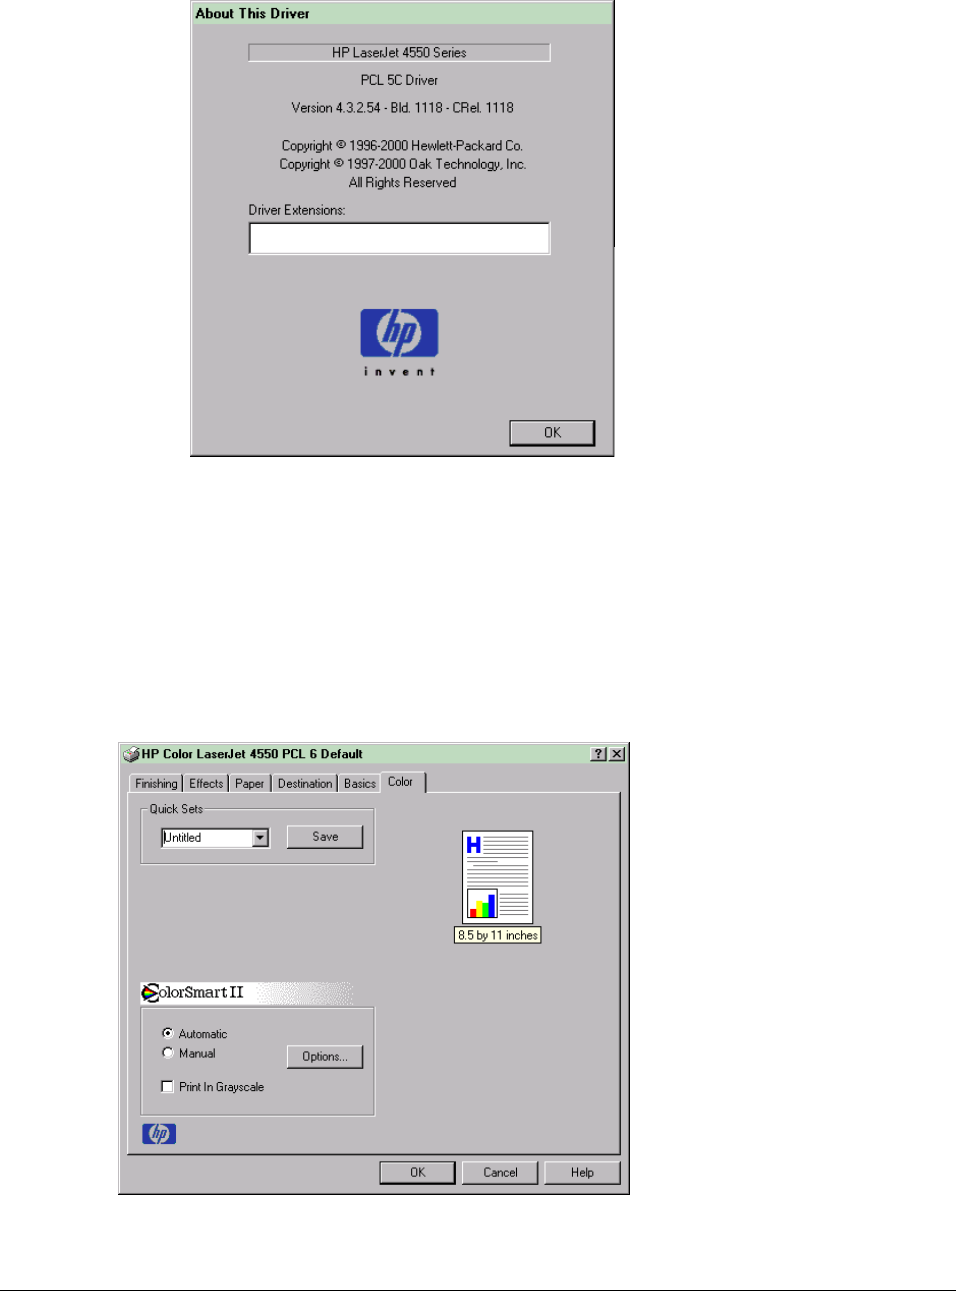
Printing system software components
HP Color LaserJet 4550 Software Technical Reference 54
Figure 32: The About box (PCL 5c)
Driver extensions
This text box provides you with some visibility of any extended driver functionality. It can
contain a brief description of the driver extension and a version number.
Color tab features
The Color tab allows you to use factory pre-defined ColorSmart II settings or to fine-tune color
treatments and halftoning. Color output can also be converted to grayscale in this tab. Figures 33
and 34 show the appearance of the Color tab.
Figure 32: Color tab (PCL 6)
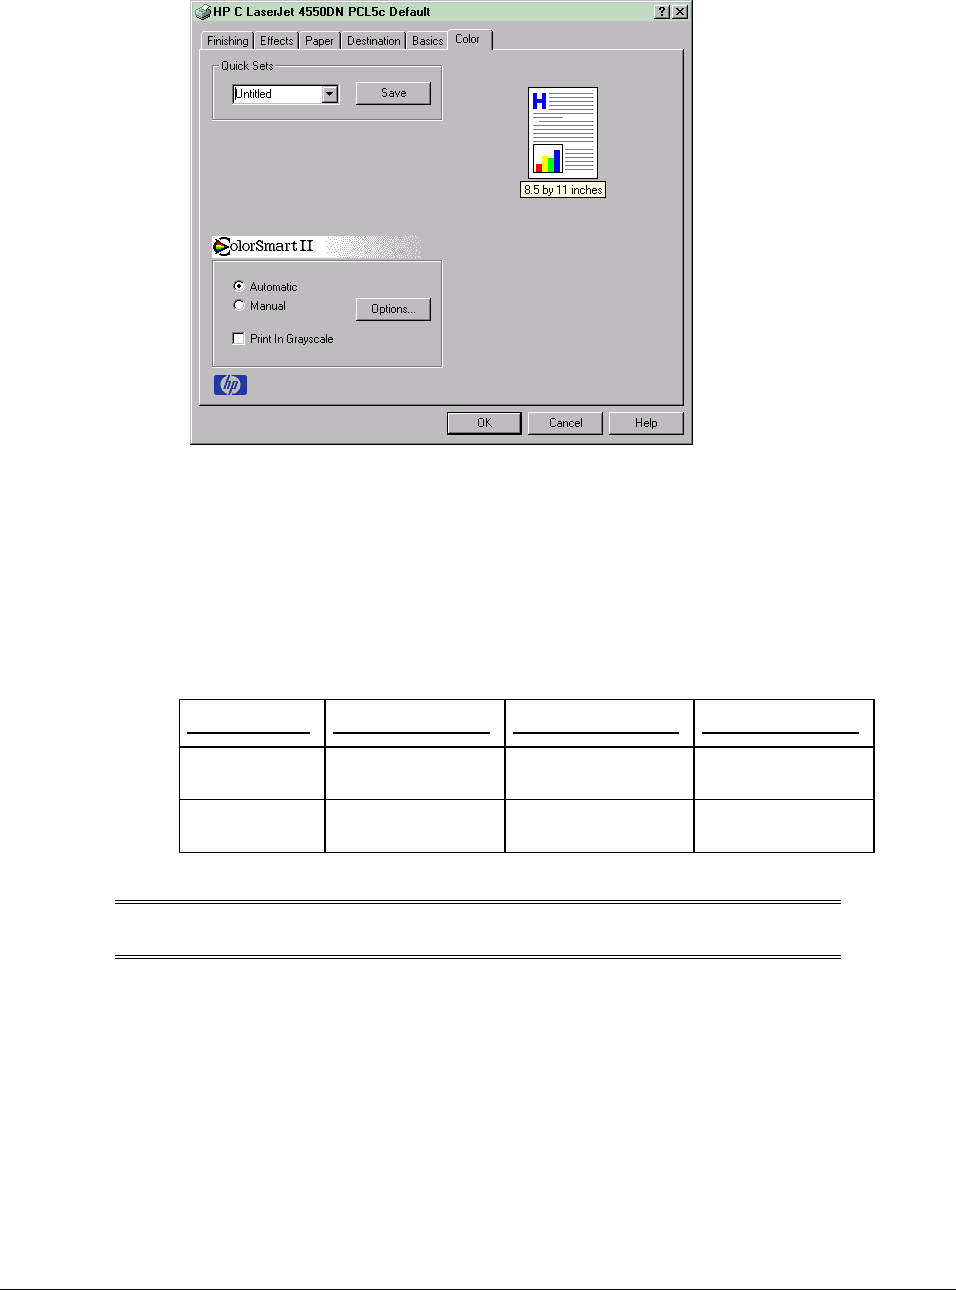
Printing system software components
HP Color LaserJet 4550 Software Technical Reference 55
Figure 33: Color tab (PCL 5c)
HP ColorSmart II
The ColorSmart II group box controls printing coloration. It has two main modes,
Automatic and Manual, that allows you to choose between factory default coloration
settings and various manually set color controls. Other options allow for grayscale
printing of colors.
Automatic
In this mode, factory defaults, shown below, control ColorSmart. The default values make
up the Automatic setting.
Setting Text Graphics Photos
Color Map Screen Match Screen Match Screen Match
Halftone Detail Smooth Smooth
NOTE: When the Automatic setting is selected, none of the individual
settings is necessary for quick sets.
Manual
To use Manual color, you can make a manual color selection via the Manual Color
Options dialog box (below) or select the "Manual" radio button. When you enter then exit
the Manual Color Options dialog box, the driver compares the manual settings with the
Automatic defaults, and selects the Automatic radio button if they match. If the manual
settings do not match the Automatic setting, the Manual button is selected.
HP Color LaserJet 4550 manual quick sets
When Manual is selected, the individual settings for Halftone and Color Map should be
saved or restored. When this option is selected, the Quick Set name changes to Untitled.
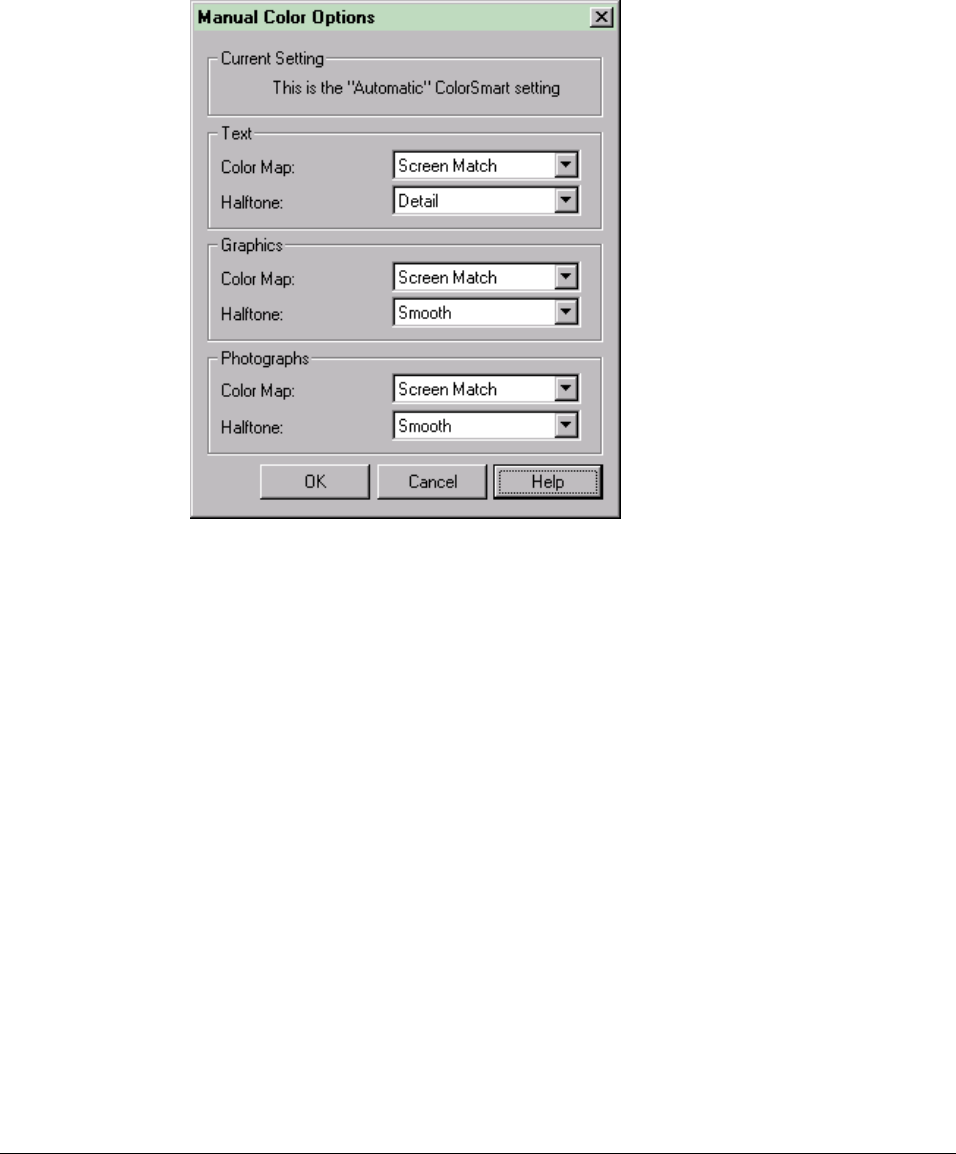
Printing system software components
HP Color LaserJet 4550 Software Technical Reference 56
Options
The Options button displays the Manual Color Options dialog box (see below). Any
combination of settings in this dialog that does not match the Automatic settings when the
OK button is clicked is saved as a Custom setting. If choose settings that are the same
as the Automatic settings, the driver changes the ColorSmart setting on the Color tab
from Manual to the appropriate predefined setting.
Figure 35: Manual Color Options dialog
HP Color LaserJet 4550 printer manual color options quick sets
The setting of each of the six controls for this dialog box is stored within driver Quick Sets
when you choose ColorSmart Manual.
Current setting
The Current Setting sentence changes dynamically to reflect the current ColorSmart
setting, based upon the current choices in this dialog box. The default "This is the
'Automatic' ColorSmart setting" changes to "This is a 'Custom' setting" whenever
nondefault selections are made. When the current setting is Manual and the selections
match the settings for Automatic, the string changes appropriately.
Color map/halftone
The Manual Color Options dialog box allows you to separately control Color Map and
Halftone for the three major page components: Text, Graphics, and Photos.
The Color Map control allows you to select a color mapping lookup table embedded in
the firmware. The default setting for Color Map is Screen Match for Text, Graphics and
Photos, which corresponds to sRGB output gamut selection.
Printing system software components
HP Color LaserJet 4550 Software Technical Reference 57
The choices of Color Map under each are Screen Match and Vivid. The Halftone setting
controls the selection of a halftone algorithm embedded in the firmware. The choices for
Halftone under each are Detail (the default for Text) and Smooth (the default for Graphics
and Photographs).
There is no requirement that the settings identified by a single string for color map or
halftone select the same physical output characteristic, but similarly named selections
create similar results. For example, Detail for text need not select the same halftone as
Detail for graphics. The available settings for all object types (text, raster, and vector) are
the same for both Color Map and Halftone. Those settings are listed below:
Setting Specifications
Color Map • Screen Match
• Vivid
Halftone • Smooth
• Detail
NOTE: The settings for text, graphics, and photos are overridden in the
PCL 5c driver if the Rendering Mode (Print Quality Details) is set
to Page as Raster or Graphics as Raster.
Print in grayscale
When selected, this control causes all printed output to be printed in grayscale. The
default setting is off. The driver communicates to the firmware to print in grayscale.
The halftone for grayscale printing follows the standard ColorSmart selections.
To test Print in Grayscale, print a color photograph in the default setting and then print it
in Print in Grayscale. The photograph printed in grayscale should also print as a single
color-plane (using only black, without spending time to render additional color planes on
the paper).
Visually compare the two with a copy of the same image printed on a monochrome laser
printer at the same resolution. Visible dithering will usually be present on the
monochrome laser's output, more prominently in and around areas of highlights. This
visible dithering should not be present on the grayscale output from the color device.
HP Color LaserJet 4550 printer quick sets
The state of this user-interface control is maintained via the existing HP Color LaserJet
4550 printer driver Quick Set. When this option is selected, the Quick Set name changes
to Untitled.
Configure tab features
The Configure tab lets you tell the driver about the hardware configuration of the printer. To set
up this page if bidi is enabled and working properly, click the “Update Now” button.
This tab is on top when you open the driver from the Printers folder by selecting Properties. When
you open the driver from within a program, the Configure tab will not be visible, with a few
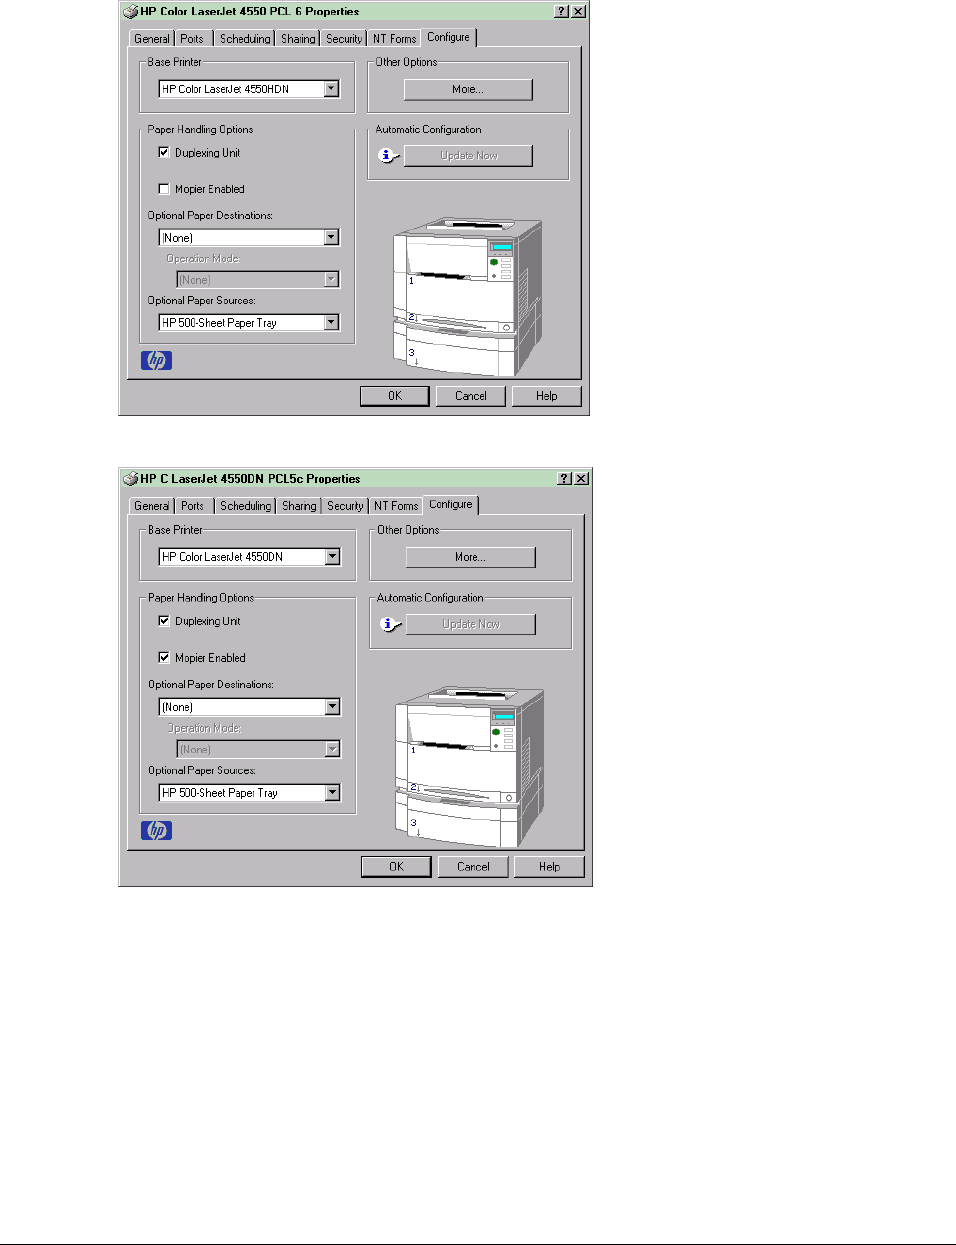
Printing system software components
HP Color LaserJet 4550 Software Technical Reference 58
exceptions, such as Excel 5.0 and Corel Chart 4.0. When opened from the Printers folder, the
Configure tab looks like Figure 36.
Figure 36: The Configure tab (PCL 6)
Figure 37: The Configure tab (PCL 5c)
Printer Model
In the Printer Model group box, the driver title remains 4550 for all models. Selection of a
Printer Model makes the appropriate changes to other configuration options on the tab.
The list of models and the changes they produce are as follows:
HP Color LaserJet 4550 resets all configuration settings to match the capabilities of a
base HP Color LaserJet 4550 printer. Settings affected are:
• The Driver Work Space (DWS) (see page 62) value shown in the Other Options
dialog box changes to 6.0. If you subsequently select a hard disk or Auto Config
detects a hard disk, the DWS value changes to 7.0. If you manually select the base
model, DWS resets to the non-hard disk value.
• The Total Printer Memory value is 64 MB.

Printing system software components
HP Color LaserJet 4550 Software Technical Reference 59
• No optional paper destinations, paper sources, duplexer, or hard disk are selected.
HP LaserJet 4550N resets all configuration settings to match the capabilities of 4550N
model. Settings affected are:
• The DWS value shown in the Other Options dialog box will change to 6.0. If you
subsequently select a hard disk or Auto Config also detects a hard disk, the DWS
value changes to 7.0. If you manually select the N Bundle, DWS resets to the non-
hard disk value.
• The Total Printer Memory value is 64 MB.
• No optional paper destinations, paper sources, duplexer, or hard disk are selected.
HP LaserJet 4550DN resets all configuration settings to match the capabilities of 4550DN
model. Settings affected are:
• The DWS value shown in the Other Options dialog box will change to 15.0. If you
subsequently select a hard disk or Auto Config also detects a hard disk, the DWS
value changes to 12.5. If you manually select the DN Bundle, DWS resets to the non-
hard disk value.
• The Total Printer Memory value is 128 MB.
• Duplexing Unit is checked.
• Printer hard disk is not checked.
• 500-Sheet optional paper tray (tray 3) is selected.
HP LaserJet 4550HDN resets all configuration settings to match the capabilities of
4550HDN model. Settings affected are:
• The DWS value shown in the Other Options dialog changes to 15.0. If you
subsequently deselect a hard disk or Auto Config also detects no hard disk, the DWS
value changes to 12.5. If you manually select the HDN Bundle, DWS resets to the
hard disk value.
• The Total Printer Memory value is 128 MB.
• Duplexing Unit is checked.
• Printer hard disk is checked.
• 500-Sheet optional paper tray (tray 3) is selected.
If installed and working, the bidi mechanism will detect the correct model and update the
configuration accordingly.
Paper handling options
The Paper Handling Options group box is where the majority of the device options are
configured.
Duplexing unit
Select this option if a duplexing unit is installed in the printer. When it is selected,
additional controls appear in the Document Options group box in the Finishing tab. Unlike
most other options in this group box, the Duplexing Unit option does not affect the printer
image because the duplexer is contained inside the printer.
NOTE: This option is checked by default if the DN or HDN model is
selected from the Printer Model drop-down list, or if detected by
bidi.
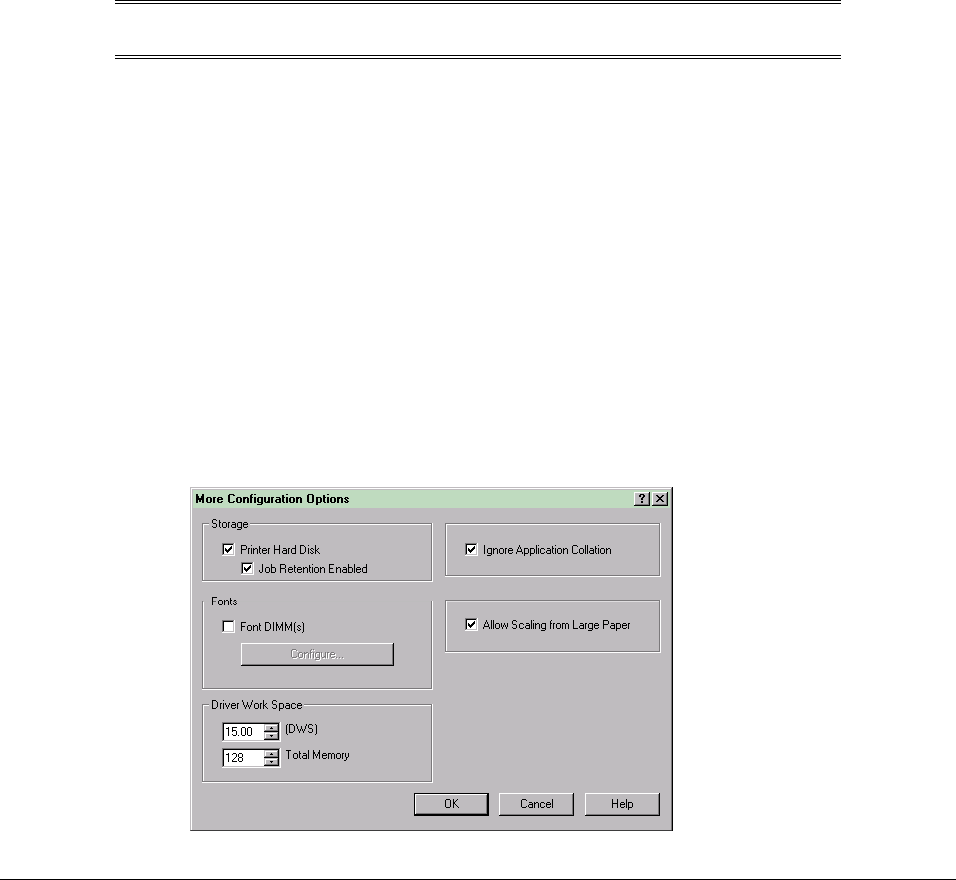
Printing system software components
HP Color LaserJet 4550 Software Technical Reference 60
Envelope feeder
There is no envelope feeder option for the HP Color LaserJet 4550 printer.
Mopier enabled
Multiple Original Printing (Mopying) increases printer performance and reduces network
traffic by sending the job to the printer once, then storing it on the hard disk. The rest of
the copies are printed at the printer's fastest speed.
When this Mopier Enabled is selected, the Collate at Printer PJL command SET QTY=
(for example, @PJL SET QTY=3 where 3 is the number of collated copies to generate) is
sent at the beginning of each print job. The Mopier Enabled option does not affect the
printer image.
Mopier Enabled is enabled only when the Configure Tab settings indicate (whether set
manually or via Auto Configure) that the printer has a hard disk and at least 64 MB of
RAM installed. When the Mopier Enabled checkbox is disabled, a Bubble Help icon
displays next to it, explaining that a printer hard disk and at least 64 MB of Total Printer
Memory is required to enable this feature.
NOTE: All models of the HP Color LaserJet 4550 Series Printer ship
with 64 MB or more memory installed.
Optional paper destinations
The Optional Paper Destinations drop-down list consists of "None," because no option
paper devices exist for the HP Color LaserJet 4550 printer. The Operation Mode control
cannot be enabled.
Operation mode
The Operation Mode drop-down list contains any supported modes for output devices.
Because the HP Color LaserJet 4550 printer supports no optional output devices, this
control is disabled.
Other options
The Other Options group box contains a single More... command button. Selecting the
More... button opens the dialog shown in Figure 37.
Figure 37: More Configuration Options dialog
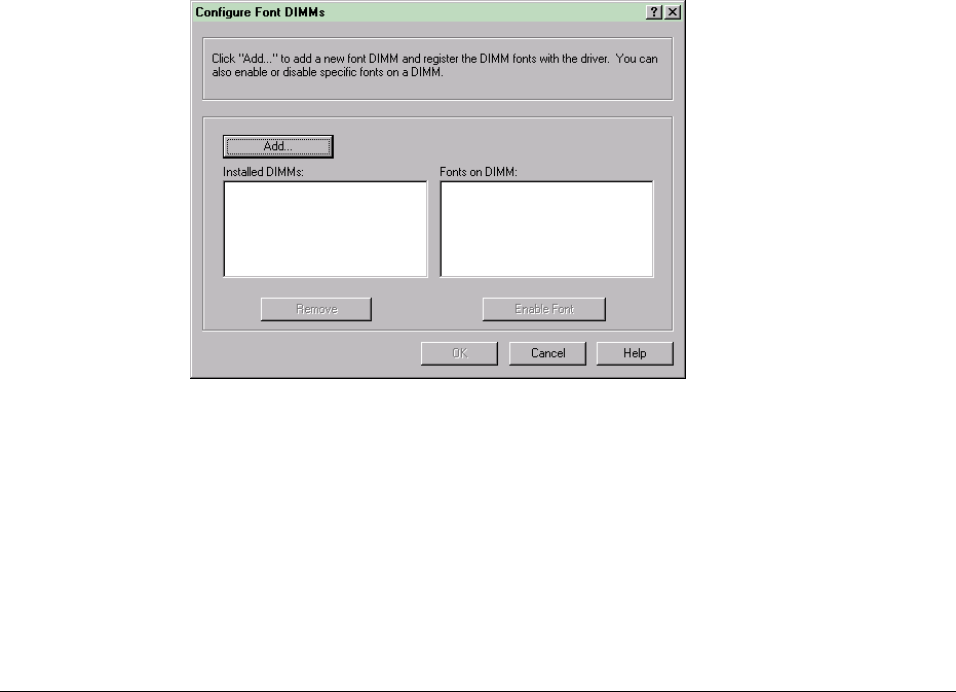
Printing system software components
HP Color LaserJet 4550 Software Technical Reference 61
Storage
In Storage, you can specify whether a hard disk is installed and whether Job Retention is
enabled. Job Retention is disabled by default. The printer hard disk control can be set
manually and are updated by a successful bidi query. Job Retention Enabled determines
whether Job Retention appears as a Destination Feature on the Destination tab. Because
this is the only possible Destination Feature for the HP Color LaserJet 4550 printer, this
also determines if the Destination Features group box appears on the Destination tab.
The Job Retention Enabled checkbox is disabled unless the More. . . dialog box of the
Configure tab indicates the printer has a hard disk and at least 64 MB of RAM installed.
When enabled, the Job Retention Enabled checkbox is not be checked by default.
When the Mopier Enabled or Job Retention Enabled checkboxes are disabled, a Bubble
Help icon appears next to the checkboxes, explaining that a printer hard disk and at least
64 MB of Total Printer Memory are required to enable these features.
Fonts
The second group box, Fonts, contains a Font DIMM checkbox and a corresponding
Configure... button. Checking the Font DIMM control tells the driver that a Font DIMM is
installed, and that stored data are available regarding which fonts are on the DIMM.
When the box is selected, the Configure Font DIMMs dialog box comes up or the
Configure button becomes enabled depending on the state of the Font DIMM checkbox
upon entering the More Config box.
Selecting the Configure button will open a dialog entitled Configure Font DIMMs. This
dialog is shown below in Figure 38.
Figure 38: The Configure Font DIMMs dialog
Additionally, you can do the following:
• Add up to two fonts DIMMs by clicking the Add button.
• Specify a unique font DIMM name.
• Select specific PFM files or HPD files. HPD files are predefined font DIMM data
files that the driver knows how to read, which contains a list of fonts on a
specified DIMM.
• Select one or more installed DIMMs in the Installed DIMM list, and based on the
selected DIMM(s); the list to the right (Fonts on DIMM) will display all of the fonts
available on the selected DIMM(s).

Printing system software components
HP Color LaserJet 4550 Software Technical Reference 62
• Enable or disable one or more of the selected font(s).
Printer memory
Printer Memory allows you to set the amount of installed printer memory and driver work
space.
The Total Printer Memory box indicates the total amount of installed RAM in megabytes.
It can be directly edited or adjusted with the up and down arrows of the spin control. The
only allowable values for this box are 64 and 128 (MB). If an invalid number is entered
into the box, the value snaps to 64 if the value entered is 63 or less and 128 for all values
greater than 128. The default numbers for Total Printer Memory are specified in the
Printer Model Section of the Config tab and are based on the Printer Model.
Selecting 64 MB or greater and Hard Disk enables the Job Retention checkbox, but
leaves it unchecked as the default. Selecting 64 MB or more and Hard Disk enables the
Mopier Enabled checkbox, which is also unchecked by default. Total Printer Memory
updates from a successful bidi query.
The Driver Work Space allows you to specify the amount of work space available in the
printer for functions such as font downloading. To define Driver Work Space, print a self-
test/configuration page and find the PCL DWS value; enter that value in Driver Work
Space. An accurate DWS value optimizes driver performance.
Driver Work Space value also updates through a successful bidi query. Any custom
values you may have entered are replaced with one of the two default values (based on
your printer model) whenever the state of the Printer Hard Disk checkbox changes or
when a bidi query detects such a change. It might change if you switch printer model
settings.
Ignore application collation
Selecting Ignore Application Collation sets the driver as the only arbiter of how many
copies to print. This option is checked by default. The Ignore Application Collation
checkbox is disabled (grayed) and set to Off if the Mopier Enabled checkbox is off.
The table below shows the expected behavior for a two-page job when the number of
copies is three.
Hard disk
on printer
Mopier
Enabled
checkbox
Ignore App
Collation
checkbox
App
Collation
checkbox in
Print Dialog
Commands
sent by
driver
Pages
sent to
printer
Pages
output
from
printer
Yes On On On
Off
None
QTY=3 1, 2 1, 2, 1, 2,
1, 2
Yes On Off On QTY=3 1, 2 1, 2, 1, 2,
1, 2
Yes On Off Off Copies=3 1, 2 1, 1, 1, 2,
2, 2

Printing system software components
HP Color LaserJet 4550 Software Technical Reference 63
Yes/No Off [disabled]
Off
On Copies=1 1, 2, 1, 2,
1, 2
1, 2, 1, 2,
1, 2
Yes/No Off [disabled]
Off
Off Copies=3 1, 2 1, 1, 1, 2,
2, 2
Yes/No Off [disabled]
Off
None
(Collate*)
Copies=1 1, 2, 1, 2,
1, 2
1, 2, 1, 2,
1, 2
Yes/No Off [disabled]
Off
None
(Do not
Collate**)
Copies=3 1, 2 1, 1, 1, 2,
2, 2
No On On On
Off
None
QTY=3 1, 2 1, 2 plus
page error
No On Off On
Off
None
QTY=3 1, 2 1, 2 plus
page error
*Behavior when there is no Collate checkbox and dmCollate default is Collate.
**Behavior when there is no Collate checkbox and dmCollate default is Do not Collate or an application
sets dmCollate to Do not Collate.
Ignore Application Collation Notes
1. Placing the IgnoreAppCollate setting in the printer properties means that, on a
Windows NT network, clients connecting to the printer through a network share
cannot change its value; only the print queue administrator has the power to
decide how the printer driver is set up. In the same way that form-to-tray linking is
determined by an administrator, the handling of the dmCollate field can also be
determined by the administrator.
2. The IgnoreAppCollate setting is not a means to print non-collated copies. If you
want to print non-collated, disable mopying.
The Ignore Application Collate setting is disabled if Enable Mopying is not selected. If
Enable Mopying is not selected, the dmCollate setting in the DEVMODE is irrelevant.
Allow Scaling from Large Paper
Select Allow Scaling from Large Paper to allow additional larger-than-supported paper
sizes to appear in the Paper tab’s Size Is: drop-down list. This checkbox is unselected by
default in all drivers except in Asian variations, where the default is selected.
Automatic Configuration
The Automatic Configuration uses bidirectional communications to receive configuration
information from the printer. If the software components needed for bidi are disabled or
not installed, Update Now is disabled. The help bubble explains that the button is dimmed
because bidi is not available.
If bidi is installed and enabled, the Update Now button is enabled. Selecting queries the
printer for the latest configuration information. Because network communications are

Printing system software components
HP Color LaserJet 4550 Software Technical Reference 64
never guaranteed, this query attempt might or might not be successful. If not, then none
of the configuration settings should change.
A successful bidi query updates all of the settings in the Printer Model, Paper Handling
Options, and Other Options group boxes on the Configure tab, as well as any custom
media type names. Automatic Configuration does not update configuration information
Font DIMMs. Automatic Configuration can enable does not select Mopier Enabled or Job
Retention Enabled.
NT Forms tab features
The NT Forms tab only appears in Windows NT. The NT Forms tab (like the Configure tab) can
be viewed only from the Properties window within the Printers folder. Figure 39 illustrates NT
Forms tab.
Figure 39: Driver NT Forms tab (all PCL drivers)
This tab allows you (or administrator) to specify which media sizes and types are loaded into
each of the available paper trays. The advantage of doing this is that it constrains the choices
available in the Size and Type lists on the Paper tab. This constraint prevents overwhelming the
printer with paper mount messages if you request sizes or types that are not available.
Available Trays is a drop-down list containing all printer trays specified on the Configure tab. This
Tray Contains/Size (Forms) contains standard HP Color LaserJet 4550 series-supported paper
sizes, as well as any custom forms that have been defined in the Forms tab. This Tray
Contains/Type lists all the media types supported by the HP Color LaserJet 4550 printer. The
Clear All button removes all size and type constraints in the Paper tab.
To configure the trays
1. Select the tray to configure from the "Available Trays:" list.
2. In the "Size (Forms):" list, select the paper size (or form) that is loaded into that
tray.
3. In the "Type:" list, select the paper type that is configured for that tray.
4. Repeat steps 1 through 3 for the remaining trays.
Printing system software components
HP Color LaserJet 4550 Software Technical Reference 65
Click the Clear All button to un-configure all the trays and remove the size and type
constraints imposed on the Paper tab.
Help system
What’s this help
Windows 95 and NT 4.0 What’s this? help is supported. To use What's this? Help:
• Click the right mouse button on a control to display a context-sensitive menu,
then select What’s this? to display a popup help window.
• Click the ? button located on the top-right corner of the frame next to the close
(x) button to change the cursor to an arrow with a question mark. Selecting a
control with this special cursor displays the popup help window for that feature.
• Press the F1 key to display the help window for the control that currently has
focus.
Page-sensitive help
Press the common Help button to open the driver help system to the contents that
correspond to the active property page. There is also a Help button with dialog-sensitive
help for the Custom Paper Size, Watermarks Details, Print Quality Details, and Job
Retention Options dialog boxes.
Constraint messages
Constraint messages are any unsolicited messages that appear in response to specific
actions you take. These messages alert you to selections that are illogical or impossible
given the capabilities of the printer or the current settings of other controls. For example,
if you select duplex printing and then changes the paper type to transparencies, a
message appears asking you to resolve this conflict. (See below for a table of the
constraint messages.) Figure 40 shows a typical constraint message.
Figure 40: A typical constraint message with an OK button
Whenever a constraint message appears with an OK and a Cancel button, the
interpretation of the buttons is as follows:
• Selecting OK accepts the change that was just made, and the driver then resets the
conflicting control to a setting that is compatible with the new value.
• Selecting Cancel rejects the change that was just made, setting the control back to
its previous value.
Constraint messages
No. Condition Message
String
ID
1 Example: Type = Plain +
Source = Manual Feed
The Paper Type chosen is not
compatible with the source
selected. Continue?
1414
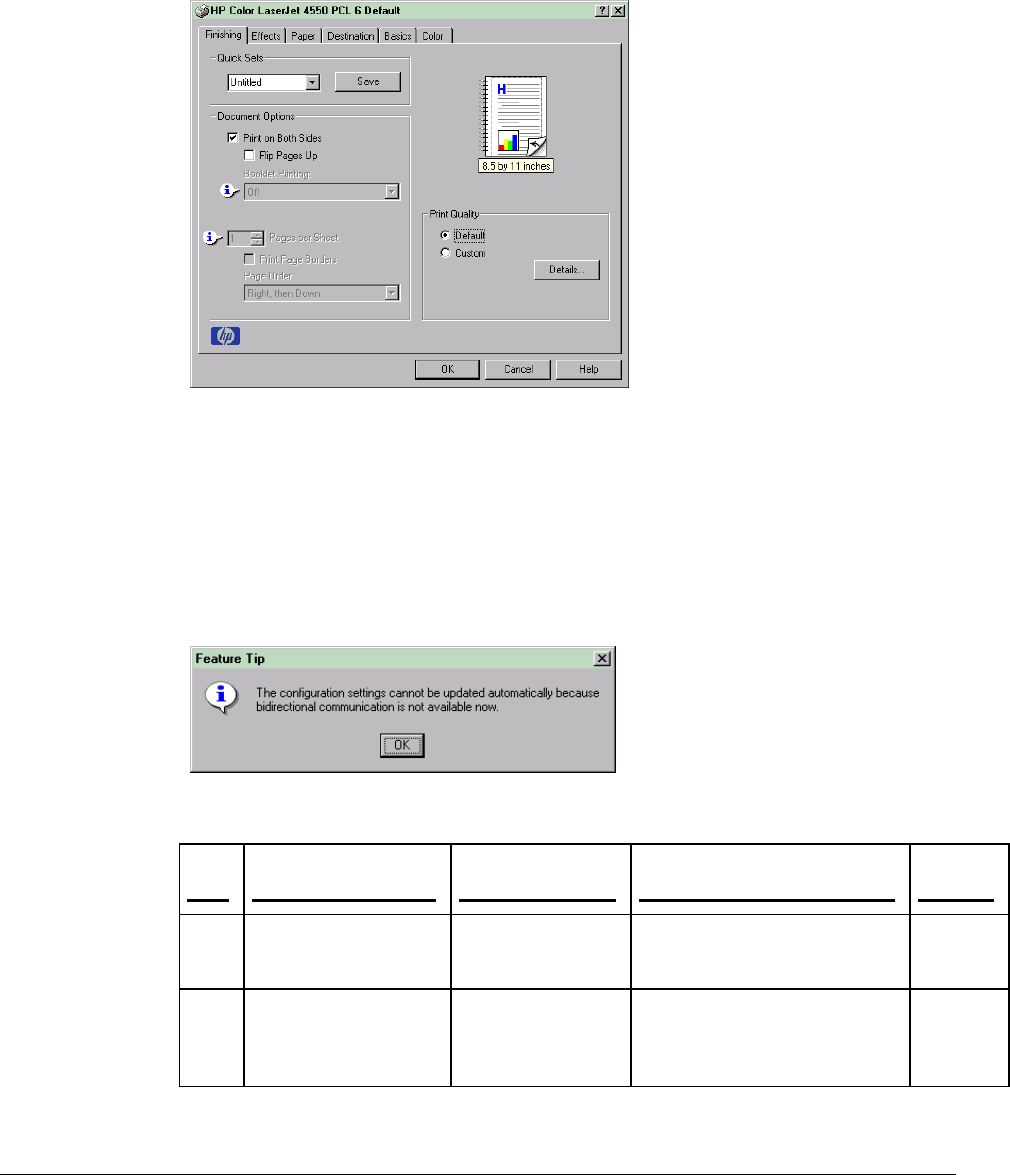
Printing system software components
HP Color LaserJet 4550 Software Technical Reference 66
Bubble help
Bubble Help features a graphical icon resembling a cartoon speech bubble with a small
“i” in it, representing the international symbol for information. (See below for a list of the
Bubble Help messages.) Figure 41 shows Bubble Help icons on a driver tab.
Figure 41: A property page with two Bubble Help icons
The bubble typically appears next to a disabled control, although it can also accompany
an enabled control if there is an important note concerning its use. Moving the mouse
pointer over the bubble changes the pointer to a gloved hand, which indicates that the
area underneath the pointer is selectable. You can select the bubble using either the
mouse or the keyboard, and a message box will appear with a brief explanation of why
the control is disabled and what can be done to enable it. If the control is not disabled,
the message is a tip or precaution to be aware of when using that particular feature.
Figure 42 shows a typical bubble help message.
Figure 42: The typical format for Bubble Help messages
Bubble help messages
No. Condition Action Message
String
ID
1 Check Print
Document On.
Disable % of
Normal Size.
To use, turn off the Print
Document On option (see
Effects tab).
1798
2 Change % of
Normal Size to
anything but 100
percent.
Print Document
On becomes
disabled.
To use, set % of Normal
Size to 100. (See Effects
tab.)
Printing system software components
HP Color LaserJet 4550 Software Technical Reference 67
3 Allow Scaling from
Large Paper
checkbox on
Configure tab us
disabled by default.
Allows documents to be
formatted for larger paper,
but can be scaled and
printed on smaller paper,
such as 11x17 scaled to
letter.
PCL 6 driver feature set
The following table presents supported PCL features for each operating system. Not all features
are available with each operating system.
Finishing tab Win Me
Win
2000
Win
98
Win
95
NT
4.0
Document Options Yes Yes Yes Yes Yes
Print on both sides Yes Yes Yes Yes Yes
Pags per sheet Yes Yes Yes Yes Yes
Print Quality Settings Yes Yes Yes Yes Yes
Output Settings Yes Yes Yes Yes Yes
Effects tab
Win
Me
Win
2000
Win
98
Win
95
NT
4.0
ZoomSmart Yes Yes Yes Yes Yes
% of Normal Size Yes Yes Yes Yes Yes
Watermarks Yes Yes Yes Yes Yes
Paper tab
Win
Me
Win
2000
Win
98
Win
95
NT
4.0
All Pages or First Page/
Other Pages/ Back Cover
Yes Yes Yes Yes Yes
Size Is: Yes Yes Yes Yes Yes
Custom…. Yes Yes Yes Yes Yes
Initial Settings Yes Yes Yes Yes Yes
Combo Box Yes Yes Yes Yes Yes
Printing system software components
HP Color LaserJet 4550 Software Technical Reference 68
Paper tab
Win
Me
Win
2000
Win
98
Win
95
NT
4.0
Measurement Units
button
Yes Yes Yes Yes Yes
Close button Yes Yes Yes Yes Yes
Source Is: Yes Yes Yes Yes Yes
Type Is: Yes Yes Yes Yes Yes
Printer Image Yes Yes Yes Yes Yes
Destination tab
Win
Me
Win
2000
Win
98
Win
95
NT
4.0
Destination Features Yes Yes Yes Yes Yes
Output Bin Options and
Accessible Architecture
Yes Yes Yes Yes Yes
Printer Image Yes Yes Yes Yes Yes
Basics tab
Win
Me
Win
2000
Win
98
Win
95
NT
4.0
Copies Yes Yes Yes Yes Yes
Orientation Yes Yes Yes Yes Yes
About (driver extensions) Yes Yes Yes Yes Yes
Quick Sets Yes Yes Yes Yes Yes
Color tab
Win
Me
Win
2000
Win
98
Win
95
NT
4.0
ColorSmart II–Automatic,
Manual
Yes Yes Yes Yes Yes
ColorSmart II– Color
Map/ Halftone
Yes Yes Yes Yes Yes
ColorSmart II– Print in
Grayscale
Yes Yes Yes Yes Yes
Printing system software components
HP Color LaserJet 4550 Software Technical Reference 69
Quick Sets Yes Yes Yes Yes Yes
Configure tab
Win
Me
Win
2000
Win
98
Win
95
NT
4.0
Printer model Yes Yes Yes Yes Yes
Paper Handling Options* Yes Yes Yes Yes Yes
Other Options** Yes Yes Yes Yes Yes
Automatic
Configuration***
Yes Yes Yes Yes Yes
*Duplexer, envelope feeder, mopier enabled, optional paper destination, operation mode
**Storage, fonts, printer memory, Ignore Applicatin Collation, allow scaling from larger paper
***Bidirectional communication must be functional, and printer friendly name must match printer
device name.
NT forms tab
Win
Me
Win
2000
Win
98
Win
95
NT
4.0
Form/Tray Assignments Yes Yes Yes Yes Yes
Help system
Win
Me
Win
2000
Win
98
Win
95
NT
4.0
What's This? Help Yes Yes Yes Yes Yes
Page Sensitive Help Yes Yes Yes Yes Yes
Constraint Messages Yes Yes Yes Yes Yes
Bubble Help Yes Yes Yes Yes Yes
Localization
Win
Me
Win
2000
Win
98
Win
95
NT
4.0
Western/Euro Languages Yes Yes Yes Yes Yes
Asian (TKC&J) Yes Yes Yes Yes Yes
PCL 5c driver feature set
The following table presents supported PCL features for each operating system. Not all features
are available with each operating system.
Printing system software components
HP Color LaserJet 4550 Software Technical Reference 70
Finishing tab Win Me
Win
2000
Win
98
Win
95
NT
4.0
Document Options Yes Yes Yes Yes Yes
Print on both sides Yes Yes Yes Yes Yes
Pags per sheet Yes Yes Yes Yes Yes
Print Quality Settings Yes Yes Yes Yes Yes
Output Settings Yes Yes Yes Yes Yes
Effects tab
Win
Me
Win
2000
Win
98
Win
95
NT
4.0
ZoomSmart Yes Yes Yes Yes Yes
% of Normal Size Yes Yes Yes Yes Yes
Watermarks Yes Yes Yes Yes Yes
Paper tab
Win
Me
Win
2000
Win
98
Win
95
NT
4.0
All Pages or First Page/
Other Pages/ Back Cover
Yes Yes Yes Yes Yes
Size Is: Yes Yes Yes Yes Yes
Custom…. Yes Yes Yes Yes Yes
Initial Settings Yes Yes Yes Yes Yes
Combo Box Yes Yes Yes Yes Yes
Measurement Units
button
Yes Yes Yes Yes Yes
Close button Yes Yes Yes Yes Yes
Source Is: Yes Yes Yes Yes Yes
Type Is: Yes Yes Yes Yes Yes
Printer Image Yes Yes Yes Yes Yes

Printing system software components
HP Color LaserJet 4550 Software Technical Reference 71
Destination tab
Win
Me
Win
2000
Win
98
Win
95
NT
4.0
Destination Features Yes Yes Yes Yes Yes
Output Bin Options and
Accessible Architecture
Yes Yes Yes Yes Yes
Printer Image Yes Yes Yes Yes Yes
Basics tab
Win
Me
Win
2000
Win
98
Win
95
NT
4.0
Copies Yes Yes Yes Yes Yes
Orientation Yes Yes Yes Yes Yes
About (driver extensions) Yes Yes Yes Yes Yes
Quick Sets Yes Yes Yes Yes Yes
Color tab
Win
Me
Win
2000
Win
98
Win
95
NT
4.0
ColorSmart II–Automatic,
Manual
Yes Yes Yes Yes Yes
ColorSmart II– Color
Map/ Halftone
Yes Yes Yes Yes Yes
ColorSmart II– Print in
Grayscale
Yes Yes Yes Yes Yes
Quick Sets Yes Yes Yes Yes Yes
Configure tab
Win
Me
Win
2000
Win
98
Win
95
NT
4.0
Printer model Yes Yes Yes Yes Yes
Paper Handling Options* Yes Yes Yes Yes Yes
Other Options** Yes Yes Yes Yes Yes
Automatic
Configuration***
Yes Yes Yes Yes Yes
Printing system software components
HP Color LaserJet 4550 Software Technical Reference 72
*Duplexer, envelope feeder, mopier enabled, optional paper destination, operation mode
**Storage, fonts, printer memory, Ignore Applicatin Collation, allow scaling from larger paper
***Bidirectional communication must be functional, and printer friendly name must match printer
device name.
NT forms tab
Win
Me
Win
2000
Win
98
Win
95
NT
4.0
Form/Tray Assignments Yes Yes Yes Yes Yes
Help system
Win
Me
Win
2000
Win
98
Win
95
NT
4.0
What's This? Help Yes Yes Yes Yes Yes
Page Sensitive Help Yes Yes Yes Yes Yes
Constraint Messages Yes Yes Yes Yes Yes
Bubble Help Yes Yes Yes Yes Yes
Localization
Win
Me
Win
2000
Win
98
Win
95
NT
4.0
Western/Euro Languages Yes Yes Yes Yes Yes
Asian (TKC&J) Yes Yes Yes Yes Yes
Background information
Bidirectional communication
Bidirectional communication (bidi) describes the printer's ability to respond to data inquiries from
your computer and report back information, such as what type of paper is available or what
accessories are connected to the printer. If a printer does not have this capability (no bidirectional
mode), it can only accept commands for the host and cannot report information back.
Bidirectional communication depends on the network operating system you have and the way in
which your printer is connected to the network.
Euro character
The Euro is the name for the currency of the European Union (EU). Use of this unit was launched
on 1 January 1999. It has changed the way business is conducted in Europe and affected every
company and industry on the continent. It is vital that companies understand and prepare for the
changes the Euro has brought and will continue to bring.
HP has equipped the HP Color LaserJet 4550 printer series with the Euro characters designed for
each of their internal fonts. The HP Color LaserJet 4550 printer series is currently enabled to print
the Euro character in Windows 9x and Windows NT 4.0. HP is committed to maximizing
document portability through supporting and promoting Euro symbol standards.
Printing system software components
HP Color LaserJet 4550 Software Technical Reference 73
Year 2000 compliance
All printers in the HP Color LaserJet 4550 printer series are Year 2000 compliant.
Enhancements
The following enhancement was added to the LaserJet 4550 printing software to maximize printer
performance.
HP ColorSmart II
ColorSmart II ensures the best printing results by automatically selecting the best half-toning and
color treatment. The sRGB feature provides excellent color matching across a variety of input,
display, and printing devices by defining an industry standard color space.
In-box file layout
The following directories are from the software CD-ROM English language PC partition. Localized files
are located in similar directory structures for each language. Non-Windows drivers are not shipped on
the software CD-ROM.
Autocad directory
Directory Structure Directories in this Directory
<drive>:\EN\AUTOCAD\ DOS
WIN16
WIN32
<DIR>
<DIR>
<DIR>
Directory Structure Files in this Directory
<drive>:\ EN\AUTOCAD\DOS\ _INSTAL2.EXE
HPADS12.EXE
HPADS13.EXE
HPCOMON.EXE
HPDRV11.EXE
HPPLOT.EXE
HPREND.EXE
INSTALL.EXE
README.TXT
Directory Structure Files in this Directory
<drive>:\ EN\AUTOCAD\WIN16\ _INST16.EX_
_ISDEL.EXE
_SETUP.DLL
_SETUP.LIB
ADISK1.ID
R12DRV.Z
R12SUP.Z
R13DRV.Z
R13SUP.Z
README.TXT
SETUP.EXE
SETUP.INS
SETUP.PKG
Directory Structure Directories in this Directory
<drive>:\ EN\ AUTOCAD\WIN32 DISK1
DISK2
<DIR>
<DIR>
Directory Structure Files in this Directory
<drive>:\ EN\AUTOCAD\WIN32\ _INST32I.EX_
_ISDEL.EXE
R14DRV.Z
R14SUP.Z
CD-ROM directory structure
HP Color LaserJet 4550 Software Technical Reference 74
DISK1\ _SETUP.DLL
_SETUP.LIB
DISK1.ID
R13DRV.Z
R13SUP.Z
README.TXT
SETUP.EXE
SETUP.INS
SETUP.ISS
SETUP.PKG
Directory Structure Files in this Directory
<drive>:\ EN\AUTOCAD\WIN32\
DISK2\
APDS.Z
COMSUP.Z
DISK2.ID
Drivers directory
Directory Structure Directories in this Directory
<drive>:\EN\DRIVERS\ WIN2K
WIN3X
WIN9X
WINNT
<DIR>
<DIR>
<DIR>
<DIR>
Directory Structure Directories in this Directory
<drive>:\EN\DRIVERS\WIN2K PS <DIR>
Directory Structure Files in this Directory
<drive>:\EN\DRIVERS\WIN2K\PS\ HP4550_6.PPD HP4550PS.INF
Directory Structure Directories in this Directory
<drive>:\EN\DRIVERS\WIN3X PCL5C
PS
<DIR>
<DIR>
Directory Structure Files in this Directory
<drive>:\EN\DRIVERS\WIN3X\
PCL5C\
FINSTALL.DL_
FINSTALL.HL_
HPCLJDM.DL_
HPCLUI.DL_
HPPCLRF.DR_
HPPCL5F.HL_
HPPCL5F1.DL_
HPPCL5F2.DL_
HPPCL5F3.DL_
HPPCL5F4.DL_
OEMSETUP.INF
Directory Structure Files in this Directory
<drive>:\EN\DRIVERS\WIN3X\PS\ HP4550_4.PP_
HP4550_6.WP_
OEMSETUP.INF
PSCRIPT.DR_
PSCRIPT.HEL_
CD-ROM directory structure
HP Color LaserJet 4550 Software Technical Reference 75
Directory Structure Directories in this Directory
<drive>:\EN\DRIVERS\WIN9X PCL5C
PCL6
PS
<DIR>
<DIR>
<DIR>
Directory Structure Files in this Directory
<drive>:\EN\DRIVERS\WIN9X
\PCL5C
HPBAFD16.DL_
HPBF4120.DR_
HPBF4120.HL_
HPBF4120.INF
HPBF4120.PM_
HPBF4121.DL_
HPBFAB.DD_
HPBFAB16.DL_
HPBFAB32.DL_
HPBFTM16.DL_
HPBFTM32.DL_
HPDCMON.DL_
Directory Structure Files in this Directory
<drive>:\EN\DRIVERS\WIN9X\PCL6 HPBAFD16.DL_
HPBF4110.DR_
HPBF4110HL_
HPBF4110.INF
HPBF4110.PM_
HPBF4111.DL_
HPBFAB.DD_
HPBFAB16.DL_
HPBFAB32.DL_
HPBFTM16.DL_
HPBFRM32.DL_
HPDCMON.DL_
Directory Structure Files in this Directory
<drive>:\EN\DRIVERS\WIN9X\PS FONTS.MF_
HP4550_R.PP_
HP4550PS.INF
HPDCMON.DL_
ICONLIB.DL_
PSCRIPT.DR_
PSCRIPT.HL_
PSCRIPT.IN_
Directory Structure Directories in this Directory
<drive>:\EN\DRIVERS\WINNT PCL5C
PCL6
PS
<DIR>
<DIR>
<DIR>
Directory Structure Files in this Directory
<drive>:\EN\DRIVERS\WINNT
\PCL5C
HPBAFD32.DL_
HPBF4120.DL_
HPBF4121.DL_
HPBF4122.DL_
HPBF4123.DL_
HPBF4124.DL_
HPBF4124.HL_
HPBF4124.INF
HPBF4124.PM_
HPBF4125.DL_
HPBF4126.DL_
HPBFTM32.DL_
HPDCMON.DL_>
Directory Structure Files in this Directory
CD-ROM directory structure
HP Color LaserJet 4550 Software Technical Reference 76
<drive>:\EN\DRIVERS\WINNT\PCL6 HPBAFD32.DL_
HPBF4110.DL_
HPBF4111.DL_
HPBF4112.DL_
HPBF4113.DL_
HPBF4114.DL_
HPBF4114.HL_
HPBF4114.INF
HPBF4114.PM_
HPBF4115.DL_
HPBF4116.DL_
HPBFTM32.DL_
HPDCMON.DL_
Directory Structure Files in this Directory
<drive>:\EN\DRIVERS\WINNT\PS HP4550_6.PP_
HP4550PS.INF
HPDCMON.DL_
PS4UI.DL_
PSCRIPT.NT_
PSCRIPT4.DL_
PSCRIPT4.HL_
Foninst directory
Directory Structure Directories in this Directory
<drive>:\EN\FONTINST\ WIN3X <DIR>
Directory Structure Files in this Directory
<drive>:\EN\FONTINST\WIN3X FONTIN31.EXE
FONTINST.DLL
FONTS.INI
ICM directory
Directory Structure Directories in this Directory
<drive>:\EN\ICM\ CMYK
SRGB
<DIR>
<DIR>
Directory Structure Files in this Directory
<drive>:\EN\ICM\CMYK HP4550C.ICM
Directory Structure Files in this Directory
<drive>:\EN\ICM\SRGB HP4550R.ICM
Manuals directory
Directory Structure Files in this Directory
<drive>:\EN\MANUALS COLOR.WRI
HP4550EN.PDF
IRDAEN.PDF
JDS99IEN.PDF
REAT4550.WRI
CD-ROM directory structure
HP Color LaserJet 4550 Software Technical Reference 77
PANTONE® directory
Directory Structure Directories and Files in this Directory
<drive>:\EN\PANTONE\ ACROBAT
APPLICAT
COLORSUP
EPSCHART
LUTTXT
RAWPS
TIFCHART
HOWTOPAN.PDF
<DIR>
<DIR>
<DIR>
<DIR>
<DIR>
<DIR>
<DIR>
Directory Structure Files in this Directory
<drive>:\EN\PANTONE\ACROBAT HPCL4500.PDF
Directory Structure Directories in this Directory
<drive>:\EN\PANTONE\APPLICAT ADOBE
CORELDRW
DESIGNER
FREEHAND
QUARK
<DIR>
<DIR>
<DIR>
<DIR>
<DIR>
Directory Structure Directories in this Directory
<drive>:\EN\PANTONE\APPLICAT\
ADOBE
ILLUSTRA
PAGEMAKE
PHOTOSHP
<DIR>
<DIR>
<DIR>
Directory Structure Files in this Directory
<drive>:\EN\PANTONE\APPLICAT\
ADOBE\ ILLUSTRA
HPCL4500.AI
Directory Structure Files in this Directory
<drive>:\EN\PANTONE\APPLICAT\
ADOBE\ PAGEMAKE
HPCL4500.ACF
HPCL4500.BCF
Directory Structure Files in this Directory
<drive>:\EN\PANTONE\APPLICAT\
ADOBE\ PHOTOSHP
HPCL4500.ACO
CD-ROM directory structure
HP Color LaserJet 4550 Software Technical Reference 78
Directory Structure Directories and Files in this Directory
<drive>:\EN\PANTONE\APPLICAT\
CORELDRW
HPCL4500.CPL
HPCL4500.PAL
Directory Structure Directories and Files in this Directory
<drive>:\EN\PANTONE\APPLICAT\
DESIGNER
HPCL4500PL4
Directory Structure Files in this Directory
<drive>:\EN\PANTONE\APPLICAT\
FREEHAND
HPCL4500.ACF
HPCL4500.BCF
HPCL4500.CLB
Directory Structure Files in this Directory
<drive>:\EN\PANTONE\APPLICAT\
QUARK
113-128.EPS
1-16.EPS
129-136.EPS
17-32.EPS
33-48.EPS
49-64.EPS
65-80.EPS
81-96.EPS
97-112.EPS
Directory Structure Files in this Directory
<drive>:\EN\PANTONE\COLORSUP HPCL4500.PCD
Directory Structure Files in this Directory
<drive>:\EN\PANTONE\EPSCHART 1-11.EPS
12-23.EPS
24-30.EPS
31-40.EPS
41-52.EPS
52-62.EPS
63-71.EPS
71-84.EPS
85-92.EPS
Directory Structure Directories and Files in this Directory
<drive>:\EN\PANTONE\ LUTTXT HPCL4500.TXT
Directory Structure Directories and Files in this Directory
<drive>:\EN\PANTONE\RAWPS HPCL4500.PS
CD-ROM directory structure
HP Color LaserJet 4550 Software Technical Reference 79
Directory Structure Directories and Files in this Directory
<drive>:\EN\PANTONE\TIFCHART 1-11.TIF
12-23.TIF
24-30.TIF
31-40.TIF
41-52.TIF
52-62.TIF
63-71.TIF
71-84.TIF
85-92.TIF
Resource manager directory
Directory Structure Directories in this Directory
<drive>:\EM\RESMGR WIN9X
WINNT
<DIR>
<DIR>
Directory Structure Directories in this Directory
<drive>:\EM\RESMGR\WIN9X DISK1 <DIR>
Directory Structure Files in this Directory
<drive>:\EM\RESMGR\WIN9X SETUP32.DL_
BJRES.DL_
CABINET.DL_
CFGMGR32.DL_
COMCTL32.DL_
FINDPTRS.AV_
HPALERTS.DL_
HPALP.HP_
HPALPUI.HP_
HPBCOM.DL_
HPBLPT.VX_
HPBMLC.HP_
HPBNRACO.DL_
HPBPML.DL_
HPBPST.HL_
HPBST16.DL_
HPBSTJ.DL_
HPCOLA..DL_
HPDCMON.DL_
HPDMIP.HP_
HPDMIPX.HP_
HPECLUI.HP_
HPELKUI.HP_
HPEXPAND.DL_
HPFL.HP.HP_
HPFLASH.HL_
HPFLSH.HP_
HPGENAPP.DL_
HPHCO.HL_
HPIPXMIB.DL_
HPIPXMON.DL_
HPIPXMON.IN_
HPIPXMUI.DL_
HPIPXMUI.HL_
HPJAHLP.CN_
HPJCMN1.DL_
HPJCMN1U.DL_
HPJDCOM.HP_
HPJDNP.DL_
HPDJPP.DL_
HPJDUI.HP_
HPJDUND.HL_
HPMSUI.HP_
HPNETSRV.HP_
HPNPSNMP.DL_
HPNRA.EX_
HPNW416.DL_
HPNW432.DL_
HPNWPSRV.DL_HP
NWSHIM.DL_
HPOBJ.HP_
HPPAL16.DL_
HPPAL416.DL_
HPPAL432.DL_
HPPDS.DL_
HPPELK.HP_
HPPJL.HP_
HPPRECL.HL_
CD-ROM directory structure
HP Color LaserJet 4550 Software Technical Reference 80
Directory Structure Files in this Directory
HPHCO.HP_
HPHCOUI.HP_
HPHUGOUI.HL_
HPJDUND.HP_
HPJIPX1U.DL_
HPJMON.DL_
HPJMON.HL_
HPIPRO1.DL_
HPIPTS1.DL_
HPJSI.DL_
HPJSI.HL_
HPJSIADP.DL_
HPJSIEXD.IN_
HPJSIME.IN_
HPJSIPM.IN_
HPJSIRA.EX_
HPJSIRES.DL_
HPJSIRES.HP_
HPJSNM1.DL_
HPKOAUI.HP_
HPLOCMON.DL_
HPLOCMON.HL_
HPLOCP.HP_
HPLOTUI.HP_
HPMNSNMP.DL_
HPMOBYUI.HP_
HPMS.HP_
HPMSTOR.HL_
HPHUGOUI.HP_
HPPRECL.HP_
HPPRELK.HL_
HPPRKOA.HP_
HPPRMOBY.HL_
HPPRMOBY.HP_
HPPRNTR.HL_
HPPRNTR.HP_
HPPRUI.HP_
HPPTS.DL_
HPRESMGR.CN_
HPRESMGR.EX_
HPRESMGR.HL_
HPRRM.HP_
HPSETUP.HL_
HPSHELL.DL_
HPSNMP.DL_
HPTCPMIB.DL_
HPTCPMON.DL_
HPTCPMON.IN_
HPTCPMUI.DL_
HPTCPMUI.HL_
HPTRBIT.HL_
HPUNINST.EX_
LICENSE.TXT
MFC42.DL_
MGMTAPI.DL_
MSVCIRT.DL_
MSVCRT.DL_
Directory Structure Directories in this Directory
<drive>:\EM\RESMGR\WINNT DISK1 <DIR>
Directory Structure Files in this Directory
<drive>:\EM\RESMGR\WINNT SETUP32.DL_
BJRES.DL_
CABINET.DL_
CFGMGR32.DL_
COMCTL32.DL_
FINDPTRS.AV_
HPALERTS.DL_
HPALP.HP_
HPALPUI.HP_
HPBECP00.SY_
HPMNSNMP.DL_
HPMOBYUI.HP_
HPMS.HP_
HPMSTOR.HL_
HPMSUI.HP_
HPNETSRV.HP_
HPNPSNMP.DL_
HPNRA.EX_
HPNWPSRV.DL_
HPNWSHIM.DL_

CD-ROM directory structure
HP Color LaserJet 4550 Software Technical Reference 81
Directory Structure Files in this Directory
HPBMLC.HP_
HPBNRACO.DL_
HPBPML.DL_
HPBPST.HL_
HPBSTT.DL_
HPBVCMNT.DL_
HPCOLA..DL_
HPDCMON.DL_
HPDMIP.HP_
HPDMIPX.HP_
HPECLUI.HP_
HPELKUI.HP_
HPEXPAND.DL_
HPFL.HP_
HPFLASH.HL_
HPFLSH.HP_
HPGENAPP.DL_
HPHCO.HL_
HPHCO.HP_
HPHCOUI.HP_
HPHUGOUI.HL_
HPHUGOUI.HP_
HPIPXMIB.DL_
HPIPXMON.DL_
HPIPXMON.IN_
HPIPXMUI.DL_
HPIPXMUI.HL_
HPJAHLP.CN_
HPJCMN1.DL_
HPJCMN1U.DL_
HPJDCOM.HP_
HPJDUI.HP_
HPJDUND.HL_
HPJDUND.HP_
HPJIPX1U.DL_
HPJMON.DL_
HPJMON.HL_
HPIPRO1.DL_
HPIPTS1.DL_
HPJSI.DL_
HPJSI.HL_
HPJSIADP.DL_
HPJSIEXD.IN_
HPJSIME.IN_
HPJSIPM.IN_
HPJSIRA.EX_
HPOBJ.HP_
HPPDS.DL_
HPPELK.HP_
HPPJL.HP_HPPREC
L.HL_
HPPRECL.HP_
HPPRELK.HL_
HPPRKOA.HP_
HPPRMOBY.HL_
HPPRMOBY.HP_
HPPRNTR.HL_
HPPRNTR.HP_
HPPRUI.HP_
HPPTS.DL_
HPRESMGR.CN_
HPRESMGR.EX_
HPRESMGR.HL_
HPRRM.HP_
HPSETUP.HL_
HPSHELL.DL_
HPSNMP.DL_
HPTCPMIB.DL_
HPTCPMON.DL_
HPTCPMON.IN_
HPTCPMUI.DL_
HPTCPMUI.HL_
HPTRBIT.HL_
HPUNINST.EX_
LICENSE.TXT
MFC42.DL_
MFC42U.DL_
MGMTAPI.DL_
MSVCIRT.DL_
MSVCRT.DL_
PFMMAKE.DL_
READRSMG.WRI
RUNONCE.ST_
SETUP.EXE
SETUP.IMG
SETUP.LST
SETUP.PID
SETUP.STT
SETUPRES.DLL
SETUPUI.DL_
SNMP_PP.DL_
SNMPAPI.DL_

CD-ROM directory structure
HP Color LaserJet 4550 Software Technical Reference 82
Directory Structure Files in this Directory
HPJSIRES.DL_
HPJSIRES.HP_
HPJSNM1.DL_
HPKOAUI.HP_
HPLOCMON.DL_
HPLOCMON.HL_
HPLOTCP.HP_
HPLOTUI.HP_
TLS704D.DL_
UNINSTAL.ST_
UNINSTAL.UN_
WSNMP32.DL_
Z_BIDI.PE_
Z_COLA.PE_
Z_READ.PE_
Z_RESMGR.PE_
Availability
HP Color LaserJet 4550/4550N/4550DN/4550HDN printing software is available from the sources listed
below.
In-box versions
The HP Color LaserJet 4550 printer family ships with:
• Windows printing system
• Print Server NLM utility
• Macintosh software
Windows 2000
HP Color LaserJet 4550 Software Technical Reference 83
End-User Software
This section describes the software available to end-users of the HP Color LaserJet
4550/4550N/4550DN/4550HDN printing systems. Software is listed by operating system.
Windows 2000
NOTE: In the Descriptions that follow, the $ symbol before a path name
indicates that the path to that directory can change from system
to system. The term $Path indicates that the path and the
subdirectory can change from system to system.
System requirements
The minimum system requirements for clients running Windows 2000 are:
• 133 MHz x86-based microprocessor (such as Intel Pentium or higher)
• VGA or higher resolution
• 2 GB of free hard disk space
• 64 GB RAM;
Components and features
The HP Color LaserJet 4550/4550N/4550DN/4550HDN Printing System (version 1.00) includes
the following components for Windows. Following the table are Descriptions of each component.
Component Version
HP Installer
HP C LaserJet 4550 HP PCL 6 driver
HP C LaserJet 4550 HP PCL 5c driver
HP C LaserJet 4550 PS PPD for use with Microsoft PSCRIPT
driver
5.00.1234
HP Online User Guide 2.0
Bidirectional Communication
HP Resource Manager
The printer drivers included in the HP Color LaserJet 4550/4550N/4550DN/4550HDN Printing
System for Windows are HP PCL 6, HP PCL 5c, and PS. These printer drivers communicate with
the printer to access the printer’s features. Along with other standard components each driver for
the printer is described in the following table.

Windows 2000
HP Color LaserJet 4550 Software Technical Reference 84
Components Features/Descriptions
HP PCL 6,
HP PCL 5c
• PCL 6 and PCL 5c drivers feature a Graphical User Interface with a
common "look and feel."
• Provides access to the printer’s paper handling and print quality features.
• Job Status and Alerts provides job status messages at the host PC when
printing problems occur (toner out, paper out, etc.) or when a print job is
complete. It also allows you to proactively check the status of the printer.
This utility can be configured to display only those messages you want.
• Supplies Information and Reordering allows you to order the
consumables and supplies needed for your HP printers directly from the
Web. This feature is available during a custom install and requires Job
Status and Alerts
• Selected from the printer driver, Job Retention lets you store a print job
on the printer's hard disk. This allows you to perform a number of
advanced print job functions, including quick copying a job, proofing and
holding a job, printing a private job, and storing a job. Job Retention is a
standard feature of the HP Color LaserJet 4550HDN printer, and is
optional on the 4550, 4550N, and 4550DN printers.
PS Driver • Included as a component of the printing system.
• Provides access to PS features of printer.
• Print to PS or EPS file.
• Set general printing options.
• Automatic PANTONE* Calibration is the default setting for HP Color
LaserJet printers. This feature automatically converts PANTONE* colors
to optimal color values for the printer by recognizing the PANTONE*
color name or number in the data stream sent to the printer. The feature
is activated when printing colors that were chosen using the PANTONE*
Color Picker in supported graphics applications. See the color.wri
Readme file included on the printer CD-ROM for more information about
PANTONE* and ICC color.
Windows 2000
HP Color LaserJet 4550 Software Technical Reference 85
Background information
Online user guide installation
The online user guide for this printer is supplied in online format for viewing on your
computer screen. You can install the online user guide while you are installing the printer
software, or you can install it later. When you install the online user guide, both the guide
and Adobe Acrobat Reader are installed in the HP LaserJet folder.
To install the online user guide while you are installing the printer software, follow the
instructions that appear on your screen.
Font support
Microsoft Windows software includes these basic standard fonts that can be used with any HP
printer:
Standard Fonts
Arial Courier New Italic Times New Roman Italic
Arial Italic Courier New Bold Times New Roman Bold
Arial Bold Courier New Bold Italic Times New Roman Bold
Italic
Arial Bold Italic Symbol Wingdings
Courier New Times New Roman
The following PCL device fonts reside in the HP Color LaserJet 4550 printers and can be
accessed by all users:
PCL Device Fonts
Antique Olive Garamond Antiqua New Century Schoolbook Bold
Antique Olive Bold Garamond Halbfett New Century Schoolbook Bold
Italic
Antique Olive Italic Garamond Kursiv New Century Schoolbook Italic
Albertus Medium Garamond Kursiv Halbfett New Century Schoolbook Roman
Albertus Extra Bold Helvetica Palatino Bold
Arial Helvetica Bold Palatino Bold Italic
Arial Bold Helvetica Bold Oblique Palatino Italic
Arial Bold Italic Helvetica Oblique Palatino Roman

Windows 2000
HP Color LaserJet 4550 Software Technical Reference 86
Arial Italic Helvetica Narrow Symbol
CG Times Helvetica Narrow Bold Symbol
CG Times Bold Helvetica Narrow Bold
Oblique
Times Bold
CG Times Bold Italic Helvetica Narrow Oblique Times Bold Italic
CG Times Italic ITC Avant Garde Book Times Italic
CG Omega ITC Avant Garde Demi Times New Bold
CG Omega Bold ITC Avant Garde Book
Oblique
Times New Bold Italic
CG Omega Bold Italic ITC Avant Garde Demi
Oblique
Times New Italic
CG Times Italic ITC Bookman Demi Times New Roman
Clarendon Condensed ITC Bookman Demi Italic Times Roman
Coronet ITC Bookman Light Wingdings
Courier ITC Bookman Light Italic Univers Bold
Courier Bold ITC Zapf Chancery Italic Univers Bold Condensed
Courier Bold Italic ITC Zapf Dingbats Univers Bold Condensed Italic
Courier Italic Letter Gothic Univers Bold Italic
Courier Letter Gothic Bold Univers Medium
Courier Bold Letter Gothic Bold Italic Univers Medium Condensed
Courier Bold Oblique Line Printer Univers Medium Condensed Italic
Courier Oblique Marigold Univers Medium Italic
The following PS device fonts reside in the HP Color LaserJet 4550 printers. Only those fonts
with an (*) can be accessed by Windows users:

Windows 2000
HP Color LaserJet 4550 Software Technical Reference 87
PS Device Fonts
Antique Olive Garamond Antiqua (*) New Century Schoolbook Bold
Italic
Antique Olive Bold Garamond Halbfett (*) New Century Schoolbook Italic
Antique Olive Italic Garamond Kursiv (*) New Century Schoolbook
Roman
Albertus Medium Garamond Kursiv Halbfett (*) Palatino
Albertus Extra Bold (*) Helvetica (*) Palatino Bold
Arial (*) Helvetica Bold (*) Palatino Bold Italic
Arial Bold (*) Helvetica Bold Oblique (*) Palatino Italic
Arial Bold Italic (*) Helvetica Oblique Palatino Roman
Arial Italic (*) Helvetica Narrow (*) Symbol
CG Times (*) Helvetica Narrow Bold Symbol
CG Times Bold (*) Helvetica Narrow Bold
Oblique
(*) Times Bold
CG Times Bold Italic (*) Helvetica Narrow
Oblique
(*) Times Bold Italic
CG Times Italic (*) ITC Avant Garde Gothic
Book
(*) Times Italic
CG Omega (*) ITC Avant Garde Gothic
Demi
Times New Bold
CG Omega Bold (*) ITC Avant Garde Gothic
Book Oblique
Times New Bold Italic
CG Omega Bold Italic (*) ITC Avant Garde Gothic
Demi Oblique
Times New Italic
CG Times Italic (*) ITC Bookman Demi Times New Roman
Clarendon Condensed (*) ITC Bookman Demi Italic (*) Times Roman
Coronet (*) ITC Bookman Light Wingdings
Windows 2000
HP Color LaserJet 4550 Software Technical Reference 88
(*) Courier (*) ITC Bookman Light Italic Univers Bold
(*) Courier Bold (*) ITC Zapf Chancery
Medium Italic
Univers Bold Condensed
Courier Bold Italic (*) ITC Zapf Dingbats Univers Bold Condensed Italic
Courier Italic Letter Gothic Univers Bold Italic
Courier Letter Gothic Bold Univers Medium
Courier Bold Letter Gothic Bold Italic Univers Medium Condensed
(*) Courier Bold Oblique Marigold Univers Medium Condensed Italic
(*) Courier Oblique (*) New Century
Schoolbook Bold
Univers Medium Italic
Windows 2000 installation instructions
General installation
1. Close all applications, terminate-and-stay-resident (TSR) programs, and virus checkers. After
installation, you can restart these programs.
2. If you are installing from the CD-ROM, insert the CD-ROM into the CD-ROM drive.
3. If the CD-ROM begins to auto-play, go to step 6.
4. If the installation CD-ROM does not begin to auto-play, select Run from the Start menu.
5. In the Run box, type the drive and path for the installation CD-ROM (usually D:\Setup.exe). If
you are a network user installing from a shared Windows directory, see your network
administrator for the correct drive and path.
6. Click Install Printer to begin installation, and then respond to each prompt that appears on
the screen. Click Next to proceed to the next screen, or click Back to return to the previous
screen.
NOTE: If you downloaded the Printing System electronically,
you need to first run the downloaded .EXE file(s). If SETUP.EXE
does not run automatically, browse to the root location of the
downloaded SETUP.EXE file, double-select the file, and go to
step 6.
Driver only installation
1. Close all applications.
2. Click Start, Settings, and Printers.
3. Double-click Add Printer.
4. Answer the questions in the Add Printer Wizard until you reach the screen with the
printer manufacturer list.
5. Click Have Disk.
6. Browse to the driver location using one of the options in this step:
Windows 2000
HP Color LaserJet 4550 Software Technical Reference 89
a. Inbox CD-ROM option: Browse to the appropriate
\<language>\Drivers\<os>\<pdl> directory for your operating system and
language.
b. Internet download option: Browse to the folder where the Web files were
downloaded and decompressed.
7. Select the appropriate .INF file.
8. Click Open, and then click OK.
9. Select the appropriate printer.
10. Follow the remaining instructions to complete the printer installation. At this point, the
driver has been copied to your hard disk and added to the list of installed printers.
Setting a default printer
1. Click Start, click Settings, and then click Printers.
2. Select the printer you wish to set as the default printer.
3. From the File menu, select Set As Default.
A check appears next to the menu option.
4. Click Close.
Windows Installation Options
Typical Custom
Installs:
• Printer drivers
• Uninstaller
• Readme files
• Resource Manager
• Bidirectional Communication
Installs:
• Uninstaller
• Printer drivers
• Readme files
• Bidirectional
Communication
• Resource Manager
Optional:
• Online User Guide
Installation for network administrators
This installation process copies the installation disks to a network drive or hard disk drive.
Anyone with access to that drive can run the installation.
1. Close all applications and turn off virus checkers and terminate stay resident
(TSR) programs. After installation these programs can be turned back on.
2. Insert the installation CD-ROM for the appropriate language into the CD-ROM
drive.
3. If AutoPlay is bypassed, select Run from the Start menu.

Windows 2000
HP Color LaserJet 4550 Software Technical Reference 90
4. Type D:\SETUP.EXE and press ENTER (or click OK).
5. Click Install Printer.
6. To install printer software for the language and version of Windows being used to
install from, click Next.
7. Click Continue until asked to select an installation option.
8. To install software for Windows on a peer-to-peer network, choose Custom. This
option installs the following software components:
• Uninstaller
• Printer drivers
• Readme files
• Bidirectional communication
• Resource Manager
• Online User Guide
NOTE: When installing the software on a network that uses a shared
version of Windows, install the software twice. During the first
installation, install files on the shared Windows directory. Once
the installation is complete, run the installation software again,
and choose Typical or Custom to install the printer software onto
the workstation used to install from.
9. Define the printer port to use for this printer. The options available are:
• Use an Existing Port - select the port you wish to use.
• Add a Port - select the port you wish to use.
• Connect to a Shared Network Printer - browse the directory structure to
locate the path and name of the shared network printer.
10. Once the installer has installed the chosen printer software, and Windows has
been restarted, the installation is complete. Network administrators must now
configure the printer on the network (refer to “Configuring the Printer on the
Network”).
Configuring the printer on the network
Before the printer can be used, configure it on the network. For more information, see the
appropriate chapters on Windows 2000 networks in the HP JetDirect Print Server
Software Installation Guide.
Distributing the installation software to network clients
Before a network client can print to the HP Color LaserJet 4550 Printer, the printer
software must be installed on the client’s workstation. Rather than distributing the CD-
ROM to each client, place disk images of the installation software onto a public directory.
The printer software’s Customization Utilities option lets you copy disk images for
Windows operating systems to a designated directory. To create disk images with the
Customization Utility:
1. Insert the CD-ROM for the appropriate language into the CD-ROM drive.
2. Click the Start button, and then select Run.
3. If AutoPlay is bypassed, select Run from the Start menu.
4. Type D:\SETUP.EXE and press ENTER (or click OK).
5. Click Install Printer.
Windows 2000
HP Color LaserJet 4550 Software Technical Reference 91
6. When you are prompted to choose the method of installation, click
Customization Utilities.
7. Select the language and operating system versions for which the disk images are
to be created, and choose the drivers to be included in the disk images.
8. Click the Browse button to assign a path to the drive and directory where the
disk images are to be copied.
9. Click Next and follow the on-screen instructions to complete the disk copy.
NOTE: Use a file management tool such as Windows File Manager or XCOPY to
copy disk images. If using an application or utility other than Disk Copy,
browse the image directory on the CD-ROM to determine the location of the
disk images.
If a disk copy utility other than Disk Copy (in the installer) is used to create
disk images, the Online User Guide will not be included in the disk images.
Installing the printer software for network clients
Before a client can print to the HP Color LaserJet 4550 printer, the printer software must
be installed on the client’s workstation.
The procedures for installing end-user software on client workstations are similar to the
installation procedures for network administrators. Install the end-user software on client
workstations by running SETUP.EXE from the root directory of the CD-ROM.
To install end-user software, select Typical or Custom.
Windows Installation Options
Typical Custom
Installs:
• Printer drivers
• Uninstaller
• Readme files
• Resource Manager
• Bidirectional Communication
Installs:
• Uninstaller
• Printer drivers
• Readme files
• Bidirectional Communicatio
• Resource Manager
Optional:
• Online User Guide
Do not install the PCL 5c Driver, PCL 6 Driver or PS Driver(s) onto Windows 2000
workstations when installing other end-user software. Clear the PCL and PS Driver
checkboxes in the Components list during the Custom Installation. The driver(s) is
installed from the server when connected to the network printer.

Windows 2000
HP Color LaserJet 4550 Software Technical Reference 92
NOTE: To connect to the network printer on a Windows NT workstation,
the installer must have ADMINISTRATOR PRIVILEGES on that
workstation.
Users of a shared network version of Windows can install only those software
components that the Network Administrator installed during the Network Administrator
installation.
Connecting to the printer
After installing the end-user software on a client workstation, the user or the network
administrator must connect the printer drivers to the printer on the proper port before the
client can print to the printer. The procedures for connecting to a port vary, depending on
which operating system is being used. Use the instructions below that apply to operating
system is being used.
When connecting to the network printer on a Windows 2000 workstation, the printer
driver is installed from the server. If the operating system is unable to install the driver
from the server, use the CD_ROM to install the driver. If prompted for the driver, browse
the HPPRINT.inf in the WINNT\<language>\PCL\Disk1\file subdirectory (where
<language> is the language being used).
NOTE: To connect to the network printer on a Windows NT workstation,
you must have ADMINISTRATOR PRIVILEGES on that
workstation.
In Windows 2000, there are three options for connecting to the network printer:
• Open Network Neighborhood and locate the printer on the network. Drag the printer
icon from the Network Neighborhood to the Printers folder.
• Open Network Neighborhood and double-click on the printer icon. Follow the
instructions on the screen for connecting to a printer.
• Use the Add Printer Wizard in the Printers folder to connect to a network printer.
Online user guide installation
The online User Guide for this printer is supplied in online format for viewing on individual
screens. The online User Guide can be installed while installing the printer software or it
can be installed later. When installing the online User Guide, both the Guide and Adobe
Acrobat Reader are installed in the HP LaserJet folder.
To install the online User Guide while you are installing the printer software, follow the
instructions that appear on the screen.
Windows 2000
HP Color LaserJet 4550 Software Technical Reference 93
Installation options and user prompts for Windows 2000
The following table assumes you are using the HP Color LaserJet installer CD.
Installation
Option Description User Prompts
Typical
Installation
Installs the printing system
already configured for the
average user. This includes the
PCL 6 driver, PS driver,
Readme files, bidirectional
communication, Resource
Manager and the uninstaller.
Select Port. Allows you to select the
type of port the printer is to be
connected to.
• Use an existing port
• Add a port
• Connect to a shared network
printer
Custom
Installation
Installs the printing system,
allowing you to customize the
printing configuration.
Select Components. Choice is:
• Printer Drivers (default
selection). Shows space
required and available for each.
Default has all drivers selected.
• PCL 6
• PCL 5c
• PS
• Bidirectional communication
• Standalone Status
• Resource Manager
• User Guide. You can choose to
install the online user guide.

Windows 2000
HP Color LaserJet 4550 Software Technical Reference 94
Disk Image Copy Copies the Installation disks to
a network drive or hard drive.
Anyone with access to that
drive can run the installation.
• Language. Allows you to select
the language the printer
software is to be installed in.
• Change directory option.
• Prompts for disks during disk
copy.
• User Guide. You can choose to
install the online User Guide into
the public directory.
• Operating System. Allows you
to select the operating system
and printer model.
Network
Administrator
The installer will provide this
option only if it detects that a
user is running a shared copy of
Windows and has read/write
capabilities. It copies installation
files to the shared Windows
directory on the network.
• User Guide. You can choose to
install the online User Guide.
• Prompts for appropriate
installation disks.
Uninstalling printing system components
CAUTION: Hewlett-Packard strongly recommends using the
Uninstaller to remove printing system components.
Removing printing system components and files
manually can impact the operation of other installed
components of this printing system, as well as
components of other printing systems installed on this
computer. System integrity can also be affected by
removing files from the printing system. Before
removing any files, perform a complete backup of the
system.
1. From the Start Menu click Programs.
2. Select the HP LaserJet folder.
3. Select the HP CLJ 4550 uninstall icon.
4. Select a component to uninstall by checking the appropriate box. Then, click Next.
PCL 6 and PCL 5c driver modifications
Files added to the system for the PCL 6 and PCL 5c Driver
$SYSTEM directory
Windows 2000
HP Color LaserJet 4550 Software Technical Reference 95
The following files are added to the $WINNT\SYSTEM directory upon installation of the
PCL 5c driver:
Filename Description Shared With Component(s)
HPC4C.DLL PCL 5c driver 4550 Printing Systems
HPC4K.DLL PCL 5c driver 4550 Printing Systems
HPC4L.DLL PCL 5c driver 4550 Printing Systems
HPC4P.DLL PCL 5c driver 4550 Printing Systems
HPC4PCL5.DLL PCL 5c driver 4550 Printing Systems
HPC4U.DLL PCL 5c driver 4550 Printing Systems
READ_HP.TXT Readme file
PS driver modifications
Files added to the system for the PS driver
$SYSTEM directory
The following driver files are added to the $SYSTEM directory upon installation of the PS
driver:
Filename Description Shared With Component(s)
PSCRIPT.DLL PS driver
PSCRIPTUI.DLL PS UI driver
PSCRIPT.HLP PS help file
HP4550-4.PPD Printer description file
READ_.WRI PS Readme file
UN.DLL PS Uninstaller
Windows 95, Windows 98 and Windows Millennium
HP Color LaserJet 4550 Software Technical Reference 96
Windows 95, Windows 98 and Windows Millennium
NOTE: In the Descriptions that follow, the $ symbol before a path name
indicates that the path to that directory can change from system
to system. The term $Path indicates that the path and the
subdirectory can change from system to system.
System requirements
The minimum system requirements for users running Windows 95, Windows 98, and Windows
Millennium are:
• Windows 95, Windows 98, and Windows Millennium
• 386 processor or greater
• 8 MB RAM, 16 MB recommended
• 4 MB available disk space
Components and features
The HP Color LaserJet 4550/4550N/4550DN/4550HDN Printing System (version 1.00) includes
the following components for Windows. Following the table is a description of each component.
Component Version
HP Installer
HP C LaserJet 4550 HP PCL 6 driver
HP C LaserJet 4550 HP PCL 5c driver
HP C LaserJet 4550 PS PPD for use with Microsoft PSCRIPT
driver
5.00.1234
HP Online User Guide 2.0
Bidirectional Communication
HP Resource Manager
The printer drivers included in the HP Color LaserJet 4550/4550N/4550DN/4550HDN Printing
System for Windows are HP PCL 6, HP PCL 5c, and PS. These printer drivers communicate with
the printer to access the printer’s features.
Each driver, along with other standard components for the HP Color LaserJet 4550/
4550N/4550DN printer, is described in the following table.

Windows 95, Windows 98 and Windows Millennium
HP Color LaserJet 4550 Software Technical Reference 97
Components Features/Descriptions
HP PCL 6,
HP PCL 5c
• PCL 6 and PCL 5c drivers feature a Graphical User Interface with a
common "look and feel."
• Provides access to the printer’s paper handling and print quality features.
• Job Status and Alerts provides job status messages at the host PC when
printing problems occur (toner out, paper out, etc.) or when a print job is
complete. It also allows you to proactively check the status of the printer.
This utility can be configured to display only those messages you want.
• Supplies Information and Reordering allows you to order the
consumables and supplies needed for your HP printers directly from the
Web. This feature is available during a custom install and requires Job
Status and Alerts
• Selected from the printer driver, Job Retention lets you store a print job
on the printer's hard disk. This allows you to perform a number of
advanced print job functions, including quick copying a job, proofing and
holding a job, printing a private job, and storing a job. Job Retention is a
standard feature of the HP Color LaserJet 4550HDN printer, and is
optional on the 4550, 4550N, and 4550DN printers.
PS Driver • Included as a component of the printing system.
• Provides access to PS features of printer.
• Print to PS or E file.
• Set general printing options.
• Automatic PANTONE®* Calibration is the default setting for HP Color
LaserJet printers. This feature automatically converts PANTONE®*
colors to optimal color values for the printer by recognizing the
PANTONE®* color name or number in the data stream sent to the
printer. The feature is activated when printing colors that were chosen
using the PANTONE®* Color Picker in supported graphics applications.
See the color.wri Readme file included on the printer CD-ROM for more
information about PANTONE®* and ICC color.
Windows 95, Windows 98 and Windows Millennium
HP Color LaserJet 4550 Software Technical Reference 98
Background information
Online user guide
The online user guide for this printer is supplied in online format for viewing on your
computer screen. You can install the online user guide while you are installing the printer
software or you can install it later. When you install the online user guide, both the guide
and Adobe Acrobat Reader are installed in the HP LaserJet folder.
To install the online user guide while you are installing the printer software, follow the
instructions that appear on your screen.
Plug and Play
The HP installer detects if the operating system has Plug and Play. Follow directions on
the screen.
Font support
Microsoft Windows software includes these basic standard fonts that can be used with any HP
printer:
Standard Fonts
Arial Courier New Italic Times New Roman Italic
Arial Italic Courier New Bold Times New Roman Bold
Arial Bold Courier New Bold Italic Times New Roman Bold
Italic
Arial Bold Italic Symbol Wingdings
Courier New Times New Roman
The following PCL device fonts reside in the HP Color LaserJet 4550 printers and can be
accessed by all users:
PCL Device Fonts
Antique Olive Garamond Antiqua New Century Schoolbook
Bold
Antique Olive Bold Garamond Halbfett New Century Schoolbook
Bold Italic
Antique Olive Italic Garamond Kursiv New Century Schoolbook
Italic
Albertus Medium Garamond Kursiv Halbfett New Century Schoolbook
Roman
Albertus Extra Bold Helvetica Palatino Bold

Windows 95, Windows 98 and Windows Millennium
HP Color LaserJet 4550 Software Technical Reference 99
Arial Helvetica Bold Palatino Bold Italic
Arial Bold Helvetica Bold Oblique Palatino Italic
Arial Bold Italic Helvetica Oblique Palatino Roman
Arial Italic Helvetica Narrow Symbol
CG Times Helvetica Narrow Bold Symbol
CG Times Bold Helvetica Narrow Bold
Oblique
Times Bold
CG Times Bold Italic Helvetica Narrow Oblique Times Bold Italic
CG Times Italic ITC Avant Garde Book Times Italic
CG Omega ITC Avant Garde Demi Times New Bold
CG Omega Bold ITC Avant Garde Book
Oblique
Times New Bold Italic
CG Omega Bold Italic ITC Avant Garde Demi
Oblique
Times New Italic
CG Times Italic ITC Bookman Demi Times New Roman
Clarendon Condensed ITC Bookman Demi Italic Times Roman
Coronet ITC Bookman Light Wingdings
Courier ITC Bookman Light Italic Univers Bold
Courier Bold ITC Zapf Chancery Italic Univers Bold Condensed
Courier Bold Italic ITC Zapf Dingbats Univers Bold Condensed
Italic
Courier Italic Letter Gothic Univers Bold Italic
Courier Letter Gothic Bold Univers Medium
Courier Bold Letter Gothic Bold Italic Univers Medium Condensed
Courier Bold Oblique Line Printer Univers Medium Condensed
Italic
Courier Oblique Marigold Univers Medium Italic
Windows 95, Windows 98 and Windows Millennium
HP Color LaserJet 4550 Software Technical Reference 100
The following PS device fonts reside in the HP Color LaserJet 4550 printers. Only those fonts
with an (*) can be accessed by Windows users:
PS Device Fonts
Antique Olive Garamond Antiqua (*) New Century Schoolbook
Bold Italic
Antique Olive Bold Garamond Halbfett (*) New Century Schoolbook
Italic
Antique Olive Italic Garamond Kursiv (*) New Century Schoolbook
Roman
Albertus Medium Garamond Kursiv Halbfett (*) Palatino
Albertus Extra Bold (*) Helvetica (*) Palatino Bold
Arial (*) Helvetica Bold (*) Palatino Bold Italic
Arial Bold (*) Helvetica Bold Oblique (*) Palatino Italic
Arial Bold Italic (*) Helvetica Oblique Palatino Roman
Arial Italic (*) Helvetica Narrow (*) Symbol
CG Times (*) Helvetica Narrow Bold Symbol
CG Times Bold (*) Helvetica Narrow Bold
Oblique
(*) Times Bold
CG Times Bold Italic (*) Helvetica Narrow Oblique (*) Times Bold Italic
CG Times Italic (*) ITC Avant Garde Gothic
Book
(*) Times Italic
CG Omega (*) ITC Avant Garde Gothic
Demi
Times New Bold
CG Omega Bold (*) ITC Avant Garde Gothic
Book Oblique
Times New Bold Italic
CG Omega Bold Italic (*) ITC Avant Garde Gothic
Demi Oblique
Times New Italic
CG Times Italic (*) ITC Bookman Demi Times New Roman
Clarendon Condensed (*) ITC Bookman Demi Italic (*) Times Roman

Windows 95, Windows 98 and Windows Millennium
HP Color LaserJet 4550 Software Technical Reference 101
Coronet (*) ITC Bookman Light Wingdings
(*) Courier (*) ITC Bookman Light Italic Univers Bold
(*) Courier Bold (*) ITC Zapf Chancery
Medium Italic
Univers Bold Condensed
Courier Bold Italic (*) ITC Zapf Dingbats Univers Bold Condensed
Italic
Courier Italic Letter Gothic Univers Bold Italic
Courier Letter Gothic Bold Univers Medium
Courier Bold Letter Gothic Bold Italic Univers Medium Condensed
(*) Courier Bold Oblique Marigold Univers Medium Condensed
Italic
(*) Courier Oblique (*) New Century Schoolbook
Bold
Univers Medium Italic
Windows 95, Windows 98 and Windows Millennium
HP Color LaserJet 4550 Software Technical Reference 102
Windows 95, Windows 98, and Windows Millennium installation instructions
General installation
1. Connect the printer to the computer and turn the printer on.
2. Close the MS Office toolbar and all applications. Turn off virus checkers and
terminate stay resident (TSR) programs. After installation, these programs can
be turned back on.
3. Insert the installation CD-ROM for the appropriate language into the CD-ROM
drive.
4. If AutoPlay is bypassed, select Run from the Start menu.
5. Type D:\SETUP.EXE and press ENTER (or click OK).
6. Click Install Printer.
7. To install printer software for the language and version of Windows being used to
install from, click Next. To install printer software in another language, select the
language you wish to install from the dropdown menu list.
8. Click Continue until you are asked to select an installation option.
9. Select an installation option, Typical or Custom, and follow the on-screen
instructions to complete the installation.
Windows Installation Options
Typical Custom
Installs:
• Printer drivers
• Uninstaller
• Readme files
• Resource Manager
• Bidirectional Communication
Installs:
• Uninstaller
• Printer drivers
• Readme files
• Bidirectional Communicatio
• Resource Manager
Optional:
• Online User Guide
10. Once the installer has installed the chosen printer software and Windows has
been restarted, the installation is complete.
Installation for network administrators
This installation process copies the installation disks to a network drive or hard disk drive.
Anyone with access to that drive can run the installation.
1. Close all applications and turn off virus checkers and terminate stay resident
(TSR) programs. After installation these programs can be turned back on.

Windows 95, Windows 98 and Windows Millennium
HP Color LaserJet 4550 Software Technical Reference 103
2. Insert the installation CD-ROM for the appropriate language into the CD-ROM
drive.
3. If AutoPlay is bypassed, select Run from the Start menu.
4. Type D:\SETUP.EXE and press ENTER (or click OK).
5. Click Install Printer.
6. To install printer software for the language and version of Windows being used to
install from, click Next.
7. Click Continue until asked to select an installation option.
8. To install software for Windows on a peer-to-peer network, choose Custom. This
option installs the following software components:
• Uninstaller
• Printer drivers
• Readme files
• Bidirectional communication
• Resource Manager
• Online User Guide
NOTE: When installing the software on a network that uses a shared
version of Windows, install the software twice. During the first
installation, install files on the shared Windows directory. Once
the installation is complete, run the installation software again,
and choose Typical or Custom to install the printer software onto
the workstation used to install from.
9. Define the printer port to use for this printer. The options available are:
• Use an Existing Port - select the port you wish to use.
• Add a Port - select the port you wish to use.
• Connect to a Shared Network Printer - browse the directory structure to
locate the path and name of the shared network printer.
10. Once the installer has installed the chosen printer software, and Windows has
been restarted, the installation is complete. Network administrators must now
configure the printer on the network (refer to “Configuring the Printer on the
Network”).
Configuring the printer on the network
Before you can print to the network printer, you must configure the printer on the network.
For more information, refer to the HP JetDirect Print Server Software Installation Guide.
Distributing the installation software to network clients
Before a network client can print to the HP Color LaserJet 4550 printer, the printer
software must be installed on the client’s workstation. Rather than distributing the CD-
ROM to each client, the Network Administrator can place disk images of the installation
software onto a public directory. The printer software’s Customization Utilities option lets
you copy disk images for Windows Operating Systems to a designated directory.
To create disk images with Customization Utilities:
1. Insert the CD-ROM for the appropriate language into the CD-ROM drive.
2. Click the Start button, and then select Run.
3. If AutoPlay is bypassed, select Run from the Start menu.
Windows 95, Windows 98 and Windows Millennium
HP Color LaserJet 4550 Software Technical Reference 104
4. Type D:\SETUP.EXE and press ENTER (or click OK).
5. Click Install Printer.
6. When you are prompted to choose the method of installation, select
Customization Utilities.
7. Select the language and operating system versions for which disk images to
create and then choose the drivers to be included in the disk images.
8. Click the Browse button to assign a path to the drive and directory where the
Network Administrator wants to copy the disk images.
9. Click Next, and then follow the on-screen instructions to complete the disk copy.
NOTE: Use a file management tool such as Windows File Manager or
XCOPY to copy disk images. If using an application or utility
other than Disk Copy, browse the image directory on the CD-
ROM to determine the location of the disk images. For example,
to copy disk images for Windows 3.1x in Spanish, the path on
the CD-ROM is \image\win3x\sp\….
Installing the printer software for network clients
Before a client can print to the HP Color LaserJet 4550 printer, the printer software must
be installed on the client’s workstation. Procedures for installing the printer software vary
depending on the operating system being used.
The procedures for installing end-user software on client workstations are similar to the
installation procedures for Network Administrators. Install the end-user software on client
workstations by running SETUP.EXE from the root directory of the CD-ROM or from the
Disk 1 directory of the disk images.
To install end-user software, select Typical or Custom.
Windows Installation Options
Typical Custom
Installs:
• Printer drivers
• Uninstaller
• Readme files
• Resource Manager
• Bidirectional Communication
Installs:
• Uninstaller
• Printer drivers
• Readme files
• Bidirectional Communicatio
• Resource Manager
Optional:
• Online User Guide

Windows 95, Windows 98 and Windows Millennium
HP Color LaserJet 4550 Software Technical Reference 105
Users of a shared network version of Windows can install only those software
components that the Network Administrator installed during the Network Administrator
installation.
Connecting to the printer
After installing the end-user software on a client workstation, you or the network
administrator must connect the printer drivers to the printer on the proper port before the
client can print to the printer. The procedures for connecting to a port vary depending on
which operating system is being used. Use the instructions below that apply to which
operating system is used.
1. Select the printer in the Printers folder, and then open Properties from the File
menu.
2. Select the correct port from the Details tab. If the port is not present, select the
Add Port button and browse for the correct path to the printer.
Installation options and user prompts for Windows 95, Windows 98, and Windows
Millennium
The following table assumes you are using the HP Color LaserJet Installation CD.
Installation Option Description User Prompts
Typical
Installation
Installs the printing
system already
configured for the
average user. This
includes the PCL 6 driver,
PS driver, Readme files,
bidirectional
communication, Resource
Manager and the
uninstaller.
Select Port. Allows you to select
the type of port the printer is to
be connected to.
• Use an existing port
• Add a port
• Connect to a shared
network printer

Windows 95, Windows 98 and Windows Millennium
HP Color LaserJet 4550 Software Technical Reference 106
Custom
Installation
Installs the printing
system, allowing you to
customize the printing
configuration.
Select Components. Choice is:
• Printer Drivers (default
selection). Shows space
required and available for
each. Default has all drivers
selected.
• PCL 6
• PCL 5c
• PS
• Bidirectional communication
• Standalone Status
• Resource Manager
• User Guide. You can
choose to install the online
user guide.
Disk Image Copy Copies the Installation
disks to a network drive
or hard drive. Anyone
with access to that drive
can run the installation.
• Language. Allows you to
select the language the
printer software is to be
installed in.
• Change directory option.
• Prompts for disks during
disk copy.
• User Guide. You can
choose to install the online
User Guide into the public
directory.
• Operating System. Allows
you to select the operating
system and printer model.

Windows 95, Windows 98 and Windows Millennium
HP Color LaserJet 4550 Software Technical Reference 107
Network Administrator The installer will provide
this option only if it
detects that a user is
running a shared copy of
Windows and has
read/write capabilities. It
copies installation files to
the shared Windows
directory on the network.
• User Guide. You can
choose to install the online
User Guide.
• Prompts for appropriate
installation disks.
Uninstalling printing system components
CAUTION: HP developed the Uninstaller as a means to easily and
safely uninstall printing system components and their
related files without affecting other system
components or shared system files. Hewlett-Packard
strongly recommends the use of the Uninstaller as the
primary means to uninstall printing system
components. See the individual component sections.
1. From the Start menu, click Programs.
2. Select the HP LaserJet folder.
3. Select the HP CLJ4550 uninstall icon.
4. Select a component to uninstall by checking the appropriate box. Then, click Next.
PCL 6 and PCL 5c driver modifications
Files added to the System for the PCL Driver
$SYSTEM directory
The following files are added to the $SYSTEM directory upon installation of the PCL
driver:
Filename Description Shared With Component(s)
FINSTALL.DLL Font installer 4550 Printing Systems
FINSTALL.HLP Font installer help 4550 Printing Systems
HPCLJUI.HLP
HPPCLJDM.DLL PCL 5c driver help 4550 Printing Systems
HPPCL5F.DRV PCL 5c driver 4550 Printing Systems
HPPCL5F.HLP
Windows 95, Windows 98 and Windows Millennium
HP Color LaserJet 4550 Software Technical Reference 108
Filename Description Shared With Component(s)
HPPCL5F1.DLL PCL 5c driver 4550 Printing Systems
HPPCL5F2.DLL PCL 5c driver 4550 Printing Systems
HPPCL5F2.HLP Driver Help file 4550 Printing Systems
HPPCL5F3.DLL PCL 5c driver 4550 Printing Systems
HPPCL5F4.DLL PCL 5c driver 4550 Printing Systems
HPCLJ5.ICM
HPCAFE32.EXE
HPCAFD16.DLL
HPC4550
HPCFRP32.DLL
HPCCPANL.EXE
HPCFRP32.DLL
HPCFRPAP.EXE
MSVCRT.DLL
PS driver modifications
Files added to the system for the PS driver
$SYSTEM directory
The following driver files are added to the $SYSTEM directory upon installation of the PS
driver:
Filename Description
Shared With
Component(s)
PSCRIPT.DRV Microsoft PSCRIPT driver.
PSCRIPT.HLP Microsoft Help file.
PSCRIPT.INI Microsoft’s Configuration file
associated with PSCRIPT.drv.
Windows 95, Windows 98 and Windows Millennium
HP Color LaserJet 4550 Software Technical Reference 109
Filename Description
Shared With
Component(s)
FONTS.MFM Microsoft’s Font Metric file.
ICONLIB.DLL Microsoft’s Shared Library required
by the PSCRIPT.drv.
HP4550-4.PPD HP Color LaserJet 4550 printer
description file.
HPC4550P.ICM
Japanese $SYSTEM directory
The following driver files are added to the Japanese $SYSTEM directory upon installation
of the PS driver:
Filename Description
Shared With
Component(s)
PSCRIPT.DRV Microsoft PSCRIPT driver.
PSCRIPT.HLP Microsoft Help file.
PSCRIPT.INI Microsoft’s Configuration file
associated with PSCRIPT.drv.
FONTS.MFM Microsoft’s Font Metric file.
ICONLIB.DLL Microsoft’s Shared Library required
by the PSCRIPT.drv.
UN.DLL
HPDCMON.DLL
HP4550-4.PPD HP Color LaserJet 4550 printer
description file.
READ_.WRI
HPCLJ_CP.HPA Image color match file.
HPCLJ_UI.HLP
HPCLJ16U.HLP
HPCLJ_UI.HPA
Windows NT 4.0
HP Color LaserJet 4550 Software Technical Reference 110
Windows NT 4.0
NOTE: In the Descriptions that follow, the $ symbol before a path name
indicates that the path to that directory can change from system
to system. The term $Path indicates that the path and the
subdirectory can change from system to system.
System requirements
The minimum system requirements for clients running Windows NT4.0/5.0 Workstation are:
• 32-bit x86-based microprocessor (such as Intel 80386/25 or higher), or Intel Pentium
• VGA or higher resolution
• 8 MB of free hard disk space
• 12 MB RAM; 16 MB recommended
Components and features
The HP Color LaserJet 4550/4550N/4550DN/4550HDN Printing System (version 1.00) includes
the following components for Windows. Following the table are Descriptions of each component.
Component Version
HP Installer
HP C LaserJet 4550 HP PCL 6 driver
HP C LaserJet 4550 HP PCL 5c driver
HP C LaserJet 4550 PS PPD for use with Microsoft PSCRIPT
driver
4.5
HP Online User Guide 2.0
Bidirectional Communication
HP Resource Manager
The printer drivers included in the HP Color LaserJet 4550/4550N/4550DN/4550HDN Printing
System for Windows are HP PCL 5c, HP PCL 6 and PS. These printer drivers communicate with
the printer to access the printer’s features. Along with other standard components each driver for
the printer is described in the following table.

Windows NT 4.0
HP Color LaserJet 4550 Software Technical Reference 111
Components Features/Descriptions
HP PCL 6,
HP PCL 5c
• PCL 6 and PCL 5c drivers feature a Graphical User Interface with a
common "look and feel."
• Provides access to the printer’s paper handling and print quality features.
• Job Status and Alerts provides job status messages at the host PC when
printing problems occur (toner out, paper out, etc.) or when a print job is
complete. It also allows you to proactively check the status of the printer.
This utility can be configured to display only those message you want.
• Supplies Information and Reordering allows you to order the
consumables and supplies needed for your HP printers directly from the
Web. This feature is available during a custom install and requires Job
Status and Alerts
• Selected from the printer driver, Job Retention lets you store a print job
on the printer's hard disk. This allows you to perform a number of
advanced print job functions, including quick copying a job, proofing and
holding a job, printing a private job, and storing a job. Job Retention is a
standard feature of the HP Color LaserJet 4550HDN printer, and is
optional on the 4550, 4550N, and 4550DN printers.
PS Driver • Included as a component of the printing system.
• Provides access to PS features of printer.
• Print to PS or E file.
• Set general printing options.
• Automatic PANTONE®* Calibration is the default setting for HP Color
LaserJet printers. This feature automatically converts PANTONE®*
colors to optimal color values for the printer by recognizing the
PANTONE®* color name or number in the data stream sent to the
printer. The feature is activated when printing colors that were chosen
using the PANTONE®* Color Picker in supported graphics applications.
See the color.wri Readme file included on the printer CD-ROM for more
information about PANTONE®* and ICC color.
Windows NT 4.0
HP Color LaserJet 4550 Software Technical Reference 112
Background information
Online user guide installation
The online user guide for this printer is supplied in online format for viewing on your
computer screen. You can install the online user guide while you are installing the printer
software, or you can install it later. When you install the online user guide, both the guide
and Adobe Acrobat Reader are installed in the HP LaserJet folder.
To install the online user guide while you are installing the printer software, follow the
instructions that appear on your screen.
Font support
Microsoft Windows software includes these basic standard fonts that can be used with any HP
printer:
Standard Fonts
Arial Courier New Italic Times New Roman Italic
Arial Italic Courier New Bold Times New Roman Bold
Arial Bold Courier New Bold Italic Times New Roman Bold
Italic
Arial Bold Italic Symbol Wingdings
Courier New Times New Roman
The following PCL device fonts reside in the HP Color LaserJet 4550 printers and can be
accessed by all users:
PCL Device Fonts
Antique Olive Garamond Antiqua New Century Schoolbook
Bold
Antique Olive Bold Garamond Halbfett New Century Schoolbook
Bold Italic
Antique Olive Italic Garamond Kursiv New Century Schoolbook
Italic
Albertus Medium Garamond Kursiv Halbfett New Century Schoolbook
Roman
Albertus Extra Bold Helvetica Palatino Bold
Arial Helvetica Bold Palatino Bold Italic
Arial Bold Helvetica Bold Oblique Palatino Italic

Windows NT 4.0
HP Color LaserJet 4550 Software Technical Reference 113
Arial Bold Italic Helvetica Oblique Palatino Roman
Arial Italic Helvetica Narrow Symbol
CG Times Helvetica Narrow Bold Symbol
CG Times Bold Helvetica Narrow Bold
Oblique
Times Bold
CG Times Bold Italic Helvetica Narrow Oblique Times Bold Italic
CG Times Italic ITC Avant Garde Book Times Italic
CG Omega ITC Avant Garde Demi Times New Bold
CG Omega Bold ITC Avant Garde Book
Oblique
Times New Bold Italic
CG Omega Bold Italic ITC Avant Garde Demi
Oblique
Times New Italic
CG Times Italic ITC Bookman Demi Times New Roman
Clarendon Condensed ITC Bookman Demi Italic Times Roman
Coronet ITC Bookman Light Wingdings
Courier ITC Bookman Light Italic Univers Bold
Courier Bold ITC Zapf Chancery Italic Univers Bold Condensed
Courier Bold Italic ITC Zapf Dingbats Univers Bold Condensed
Italic
Courier Italic Letter Gothic Univers Bold Italic
Courier Letter Gothic Bold Univers Medium
Courier Bold Letter Gothic Bold Italic Univers Medium Condensed
Courier Bold Oblique Line Printer Univers Medium Condensed
Italic
Courier Oblique Marigold Univers Medium Italic
The following PS device fonts reside in the HP Color LaserJet 4550 printers. Only those fonts
with an (*) can be accessed by Windows users:
Windows NT 4.0
HP Color LaserJet 4550 Software Technical Reference 114
PS Device Fonts
Antique Olive Garamond Antiqua (*) New Century Schoolbook
Bold Italic
Antique Olive Bold Garamond Halbfett (*) New Century Schoolbook
Italic
Antique Olive Italic Garamond Kursiv (*) New Century Schoolbook
Roman
Albertus Medium Garamond Kursiv Halbfett (*) Palatino
Albertus Extra Bold (*) Helvetica (*) Palatino Bold
Arial (*) Helvetica Bold (*) Palatino Bold Italic
Arial Bold (*) Helvetica Bold Oblique (*) Palatino Italic
Arial Bold Italic (*) Helvetica Oblique Palatino Roman
Arial Italic (*) Helvetica Narrow (*) Symbol
CG Times (*) Helvetica Narrow Bold Symbol
CG Times Bold (*) Helvetica Narrow Bold
Oblique
(*) Times Bold
CG Times Bold Italic (*) Helvetica Narrow Oblique (*) Times Bold Italic
CG Times Italic (*) ITC Avant Garde Gothic
Book
(*) Times Italic
CG Omega (*) ITC Avant Garde Gothic
Demi
Times New Bold
CG Omega Bold (*) ITC Avant Garde Gothic
Book Oblique
Times New Bold Italic
CG Omega Bold Italic (*) ITC Avant Garde Gothic
Demi Oblique
Times New Italic
CG Times Italic (*) ITC Bookman Demi Times New Roman
Clarendon Condensed (*) ITC Bookman Demi Italic (*) Times Roman
Coronet (*) ITC Bookman Light Wingdings
(*) Courier (*) ITC Bookman Light Italic Univers Bold
Windows NT 4.0
HP Color LaserJet 4550 Software Technical Reference 115
(*) Courier Bold (*) ITC Zapf Chancery
Medium Italic
Univers Bold Condensed
Courier Bold Italic (*) ITC Zapf Dingbats Univers Bold Condensed
Italic
Courier Italic Letter Gothic Univers Bold Italic
Courier Letter Gothic Bold Univers Medium
Courier Bold Letter Gothic Bold Italic Univers Medium Condensed
(*) Courier Bold Oblique Marigold Univers Medium Condensed
Italic
(*) Courier Oblique (*) New Century Schoolbook
Bold
Univers Medium Italic
Windows NT 4.0 installation instructions
General installation
NOTE: You must have administrator rights on the system to install the
software.
1. Close all applications, terminate-and-stay-resident (TSR) programs, and virus
checkers. After installation, you can restart these programs.
2. If you are installing from the CD-ROM, insert the CD-ROM into the CD-ROM
drive.
3. If the CD-ROM begins to auto-play, go to step 6.
4. If the installation CD-ROM does not begin to auto-play, select Run from the Start
menu.
5. In the Run box, type the drive and path for the installation CD-ROM (usually
D:\SETUP.EXE). If you are a network user installing from a shared Windows
directory, see your network administrator for the correct drive and path.
6. Click Install Printer to begin installation, and then respond to each prompt that
appears on the screen. Click Next to proceed to the next screen, or click Back to
return to the previous screen.
NOTE: If you downloaded the Printing System electronically,
you need to first run the downloaded .exe file(s). If SETUP.EXE
does not run automatically, browse to the root location of the
downloaded SETUP.EXE file, double-click the file, and go to step
6.
Driver only installation
1. Close all applications.
2. Click Start, click Settings, and then Printers.
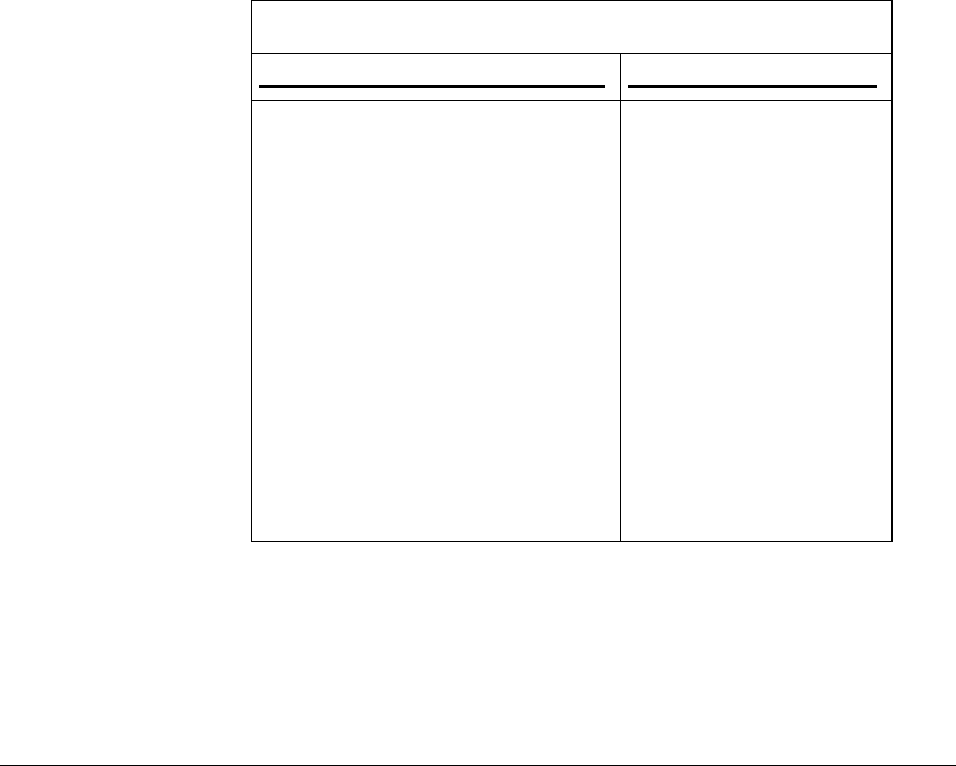
Windows NT 4.0
HP Color LaserJet 4550 Software Technical Reference 116
3. Double-click Add Printer.
4. Answer the questions in the Add Printer Wizard until you reach the
screen with the printer manufacturer list.
5. Click Have Disk.
6. Browse to the driver location using one of the options in this step:
a. Inbox CD-ROM option: Browse to the appropriate
\<language>\Drivers\<os>\<pdl> directory for your operating system
and language.
b. Internet download option: Browse to the folder where the Web files
were downloaded and decompressed.
7. Select the appropriate .INF file.
8. Click Open, and then click OK.
9. Select the appropriate printer.
10. Follow the remaining instructions to complete the printer installation. At
this point, the driver has been copied to your hard disk and added to the
list of installed printers.
Setting a default printer
1. From the Start menu, click Settings, and then click Printers.
2. Select the printer you wish to set as the default printer.
3. From the File menu, select Set As Default. A check appears next to the
menu option.
4. Click Close.
Windows Installation Options
Typical Custom
Installs:
• Printer drivers
• Uninstaller
• Readme files
• Resource Manager
• Bidirectional Communication
Installs:
• Uninstaller
• Printer drivers
• Readme files
• Bidirectional
Communicatio
• Resource Manager
Optional:
• Online User Guide
Installation for network administrators
This installation process copies the installation disks to a network drive or hard disk drive.
Anyone with access to that drive can run the installation.

Windows NT 4.0
HP Color LaserJet 4550 Software Technical Reference 117
1. Close all applications and turn off virus checkers and terminate stay resident
(TSR) programs. After installation these programs can be turned back on.
2. Insert the installation CD-ROM for the appropriate language into the CD-ROM
drive.
3. If AutoPlay is bypassed, select Run from the Start menu.
4. Type D:\SETUP.EXE and press ENTER (or click OK).
5. Click Install Printer.
6. To install printer software for the language and version of Windows being used to
install from, click Next.
7. Click Continue until asked to select an installation option.
8. To install software for Windows on a peer-to-peer network, choose Custom. This
option installs the following:
• Uninstaller
• Printer drivers
• Readme files
• Bidirectional communication
• Resource Manager
• Online User Guide
NOTE: When installing the software on a network that uses a shared
version of Windows, install the software twice. During the first
installation, install files on the shared Windows directory. Once
the installation is complete, run the installation software again,
and choose Typical or Custom to install the printer software onto
the workstation used to install from.
9. Define the printer port to use for this printer. The options available are:
• Use an Existing Port - select the port you wish to use.
• Add a Port - select the port you wish to use.
• Connect to a Shared Network Printer - browse the directory structure to
locate the path and name of the shared network printer.
10. Once the installer has installed the chosen printer software and Windows has
been restarted, the installation is complete. Network administrators must now
configure the printer on the network (refer to “Configuring the Printer on the
Network”).
Configuring the printer on the network
Before the printer can be used, configure it on the network. For more information, see the
appropriate chapters on Windows NT networks in the HP JetDirect Print Server Software
Installation Guide.
Distributing the installation software to network clients
Before a network client can print to the HP Color LaserJet 4550 Printer, the printer
software must be installed on the client’s workstation. Rather than distributing the CD-
ROM to each client, place disk images of the installation software onto a public directory.
The printer software’s Customization Utilities option lets you copy disk images for
Windows operating systems to a designated directory. To create disk images with the
Customization Utility:

Windows NT 4.0
HP Color LaserJet 4550 Software Technical Reference 118
1. Insert the CD-ROM for the appropriate language into the CD-ROM drive.
2. Click the Start button, and then select Run.
3. If AutoPlay is bypassed, select Run from the Start menu.
4. Type D:\SETUP.EXE and press ENTER (or click OK).
5. Click Install Printer.
6. When you are prompted to choose the method of installation, click
Customization Utilities.
7. Select the language and operating system versions for which the disk images are
to be created, and choose the drivers to be included in the disk images.
8. Click the Browse button to assign a path to the drive and directory where the
disk images are to be copied.
9. Click Next and follow the on-screen instructions to complete the disk copy.
NOTE: Use a file management tool such as Windows File Manager or XCOPY
to copy disk images. If using an application or utility other than Disk
Copy, browse the image directory on the CD-ROM to determine the
location of the disk images.
If a disk copy utility other than Disk Copy (in the installer) is used to
create disk images, the Online User Guide will not be included in the disk
images.
Installing the printer software for network clients
Before a client can print to the HP Color LaserJet 4550 printer, the printer software must
be installed on the client’s workstation.
The procedures for installing end-user software on client workstations are similar to the
installation procedures for network administrators. Install the end-user software on client
workstations by running SETUP.EXE from the root directory of the CD-ROM or from the
Disk 1 directory of the disk images.
To install end-user software, select Typical or Custom.
Windows Installation Options
Typical Custom
Windows NT 4.0
HP Color LaserJet 4550 Software Technical Reference 119
Installs:
• Printer drivers
• Uninstaller
• Readme files
• Resource Manager
• Bidirectional Communication
Installs:
• Uninstaller
• Printer drivers
• Readme files
• Bidirectional Communicatio
• Resource Manager
Optional:
• Online User Guide
Do not install the PCL 5c Driver, PCL 6 Driver or PS Driver(s) onto Windows NT
workstations when installing other end-user software. Clear the PCL and PS Driver
checkboxes in the Components list during the Custom Installation. The driver(s) is
installed from the server when connected to the network printer.
NOTE: To connect to the network printer on a Windows NT workstation,
the installer must have ADMINISTRATOR PRIVILEGES on that
workstation.
Users of a shared network version of Windows can install only those software
components that the Network Administrator installed during the Network Administrator
installation.
Connecting to the printer
After installing the end-user software on a client workstation, the user or the network
administrator must connect the printer drivers to the printer on the proper port before the
client can print to the printer. The procedures for connecting to a port vary, depending on
which operating system is being used. Use the instructions below that apply to operating
system is being used.
When connecting to the network printer on a Windows NT workstation, the printer driver
is installed from the server. If the operating system is unable to install the driver from the
server, use the CD_ROM to install the driver. If prompted for the driver, browse the
HPPRINT.inf in the WINNT\<language>\PCL\Disk1\file subdirectory (where <language>
is the language being used).
NOTE: To connect to the network printer on a Windows NT workstation,
you must have ADMINISTRATOR PRIVELAGES on that
workstation.
In Windows NT 4.0, there are three options for connecting to the network printer:
• Open Network Neighborhood and locate the printer on the network. Drag the printer
icon from the Network Neighborhood to the Printers folder.
Windows NT 4.0
HP Color LaserJet 4550 Software Technical Reference 120
• Open Network Neighborhood and double-click on the printer icon. Follow the
instructions on the screen for connecting to a printer.
• Use the Add Printer Wizard in the Printers folder to connect to a network printer.
Online user guide installation
The online User Guide for this printer is supplied in online format for viewing on individual
screens. The online User Guide can be installed while installing the printer software or it
can be installed later.
To install the online User Guide while you are installing the printer software, follow the
instructions that appear on the screen.
Installation options and user prompts for Windows NT 4.0
The following table assumes you are using the HP Color LaserJet installer CD.
NOTE: Installing the Color laserJet 4550 print system will overwrite the
Windoews NT 4.0 Pscript 4.0 driver with the Windows NT 4.0
Pscript 4.5 driver.
Installation Option Description User Prompts
Typical
Installation
Installs the printing system
already configured for the
average user. This includes the
PCL 6 driver, PS driver,
Readme files, bidirectional
communication, Resource
Manager and the uninstaller.
Select Port. Allows you to select
the type of port the printer is to
be connected to.
• Use an existing port
• Add a port
• Connect to a shared
network printer

Windows NT 4.0
HP Color LaserJet 4550 Software Technical Reference 121
Custom
Installation
Installs the printing system,
allowing you to customize the
printing configuration.
Select Components. Choice is:
• Printer Drivers (default
selection). Shows space
required and available for
each. Default has all drivers
selected.
• PCL 6
• PCL 5c
• PS
• Bidirectional communication
• Standalone Status
• Resource Manager
• User Guide. You can
choose to install the online
user guide.
Customization Utility Copies the Installation disks to
a network drive or hard drive.
Anyone with access to that
drive can run the installation.
• Language. Allows you to
select the language the
printer software is to be
installed in.
• Change directory option.
• Prompts for disks during
disk copy.
• User Guide. You can
choose to install the online
User Guide into the public
directory.
• Operating System. Allows
you to select the operating
system and printer model.
Network
Administrator
The installer will provide this
option only if it detects that a
user is running a shared copy of
Windows and has read/write
capabilities. It copies installation
files to the shared Windows
directory on the network.
• User Guide. You can
choose to install the online
User Guide.
• Prompts for appropriate
installation disks.
Windows NT 4.0
HP Color LaserJet 4550 Software Technical Reference 122
Uninstalling printing system components
CAUTION: Hewlett-Packard strongly recommends using the
Uninstaller to remove printing system components.
Removing printing system components and files
manually can impact the operation of other installed
components of this printing system, as well as
components of other printing systems installed on this
computer. System integrity can also be affected by
removing files from the printing system. Before
removing any files, perform a complete backup of the
system.
1. From the Start menu, click Programs.
2. Select the HP LaserJet folder.
3. Select the HP CLJ 4550 uninstall icon.
4. Select a component to uninstall by checking the appropriate box. Then, click
Next.
Standard PCL 6 and PCL 5c driver modifications
Files added to the system for the PCL driver
$SYSTEM directory
The following files are added to the $WINNT\SYSTEM directory upon installation of the
PCL 5c driver:
Filename Description Shared With Component(s)
HPC4C.DLL PCL 5c driver 4550 Printing Systems
HPC4K.DLL PCL 5c driver 4550 Printing Systems
HPC4L.DLL PCL 5c driver 4550 Printing Systems
HPC4P.DLL PCL 5c driver 4550 Printing Systems
HPC4PCL5.DLL PCL 5c driver 4550 Printing Systems
HPC4U.DLL PCL 5c driver 4550 Printing Systems
READ_HP.TXT Read me file
PS driver modifications
Files added to the system for the PS driver
$SYSTEM directory
Windows NT 4.0
HP Color LaserJet 4550 Software Technical Reference 123
The following driver files are added to the $SYSTEM directory upon installation of the PS
Driver:
Filename Description Shared With Component(s)
PSCRIPT4.DLL Microsoft Pscript driver
PSUUI.DLL PS UI driver
PSCRIPT.HLP PS help file
HP4550-6.PPD Printer description file
PSCRIPT.NTF
HP4550.INF PS Installer
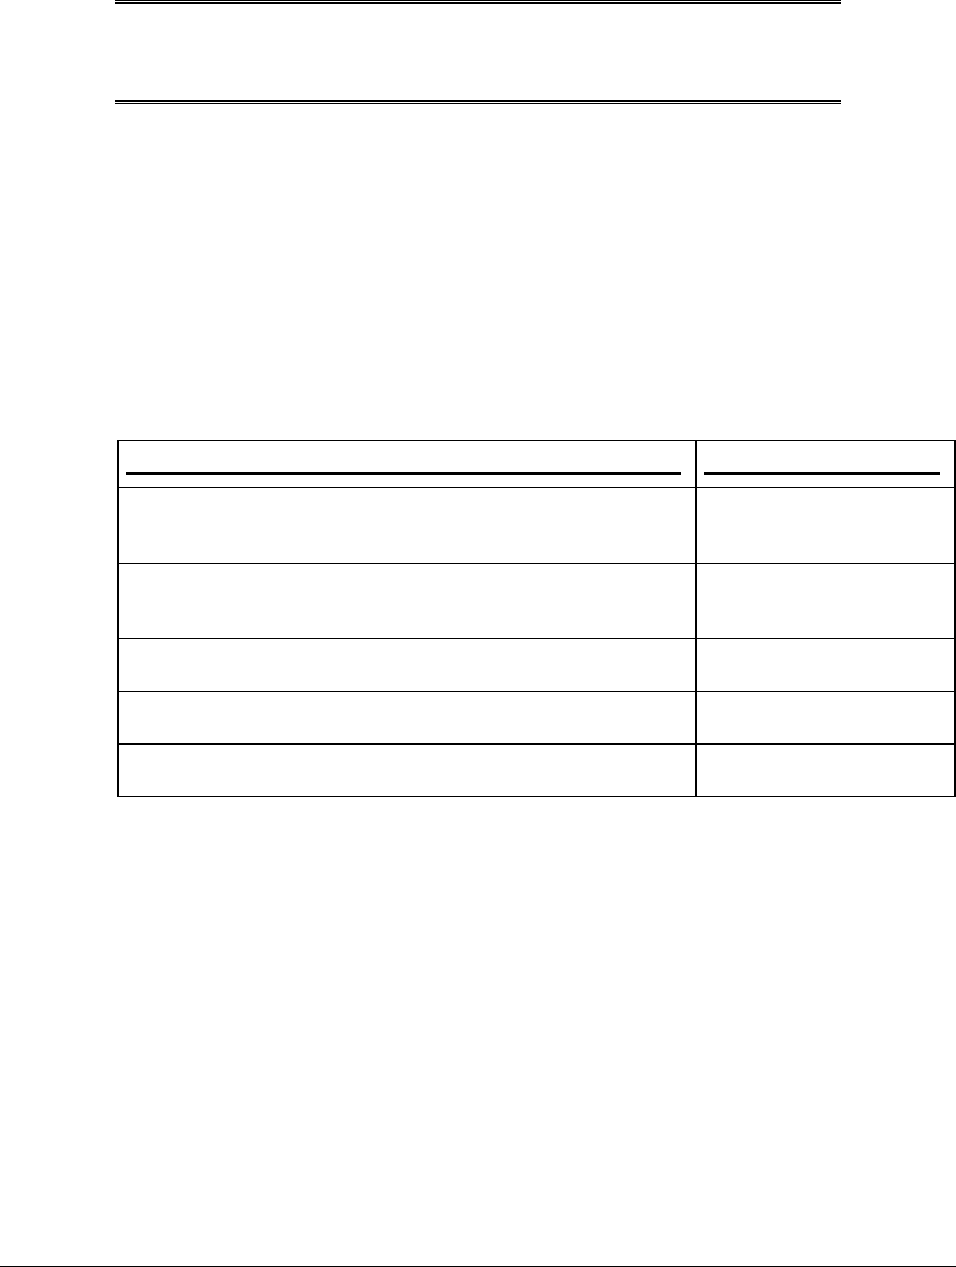
Window s NT 3.51
HP Color LaserJet 4550 Software Technical Reference 124
Windows NT 3.51
NOTE: In the Descriptions that follow, the $ symbol before a path name
indicates that the path to that directory can change from system
to system. The term $Path indicates that the path and the
subdirectory can change from system to system.
System requirements
The minimum system requirements for clients running Windows NT 3.51 Workstation are:
• 32-bit x86-based microprocessor (such as Intel 386/25 or higher) or Intel Pentium
• VGA or higher resolution
• 8 MB of free hard disk space
• 12 MB RAM; 16 MB recommended
The HP Color LaserJet 4550/4550N/4550DN/4550HDN Printing System (version 1.00) includes
the following components for Windows. Following the table are Descriptions of each component.
Component Version
Microsoft Unidriver (HP Color LaserJet 4500 HP PCL 5c
driver)
HP Color LaserJet4550 PS PPD for use with Microsoft
PSCRIPT driver
HP Online User Guide
Bidirectional Communication
HP Resource Manager
The printer drivers included in the HP Color LaserJet 4550/4550N/4550DN/4550HDN Printing
System for Windows are HP PCL 5c and PS. These printer drivers communicate with the printer
to access the printer’s features. Each driver along with other standard components for the printer
is described in the following table.

Window s NT 3.51
HP Color LaserJet 4550 Software Technical Reference 125
Components Features/Descriptions
HP PCL 5c • PCL 6 and PCL 5c drivers feature a Graphical User Interface with a
common "look and feel."
• Provides access to the printer’s paper handling and print quality features.
• Job Status and Alerts provides job status messages at the host PC when
printing problems occur (toner out, paper out, etc.) or when a print job is
complete. It also allows users to proactively check the status of the
printer. This utility can be configured to display only those messages you
want.
• Supplies Information and Reordering allows you to order the
consumables and supplies needed for your HP printers directly from the
Web. This feature is available during a custom install and requires Job
Status and Alerts
• Selected from the printer driver, Job Retention lets you store a print job
on the printer's hard disk. This allows you to perform a number of
advanced print job functions, including quick copying a job, proofing and
holding a job, printing a private job, and storing a job. Job Retention is a
standard feature of the HP Color LaserJet 4550HDN printer, and is
optional on the 4550, 4550N, and 4550DN printers.
PS Driver • Included as a component of the printing system. Installed when installer
detects PS-ready printer.
• Provides access to PS features of printer.
• Print to PS or E file.
• Set general printing options.
• Automatic PANTONE®* Calibration is the default setting for HP Color
LaserJet printers. This feature automatically converts PANTONE®*
colors to optimal color values for the printer by recognizing the
PANTONE®* color name or number in the data stream sent to the
printer. The feature is activated when printing colors that were chosen
using the PANTONE®* Color Picker in supported graphics applications.
See the color.wri Readme file included on the printer CD-ROM for more
information about PANTONE®* and ICC color.
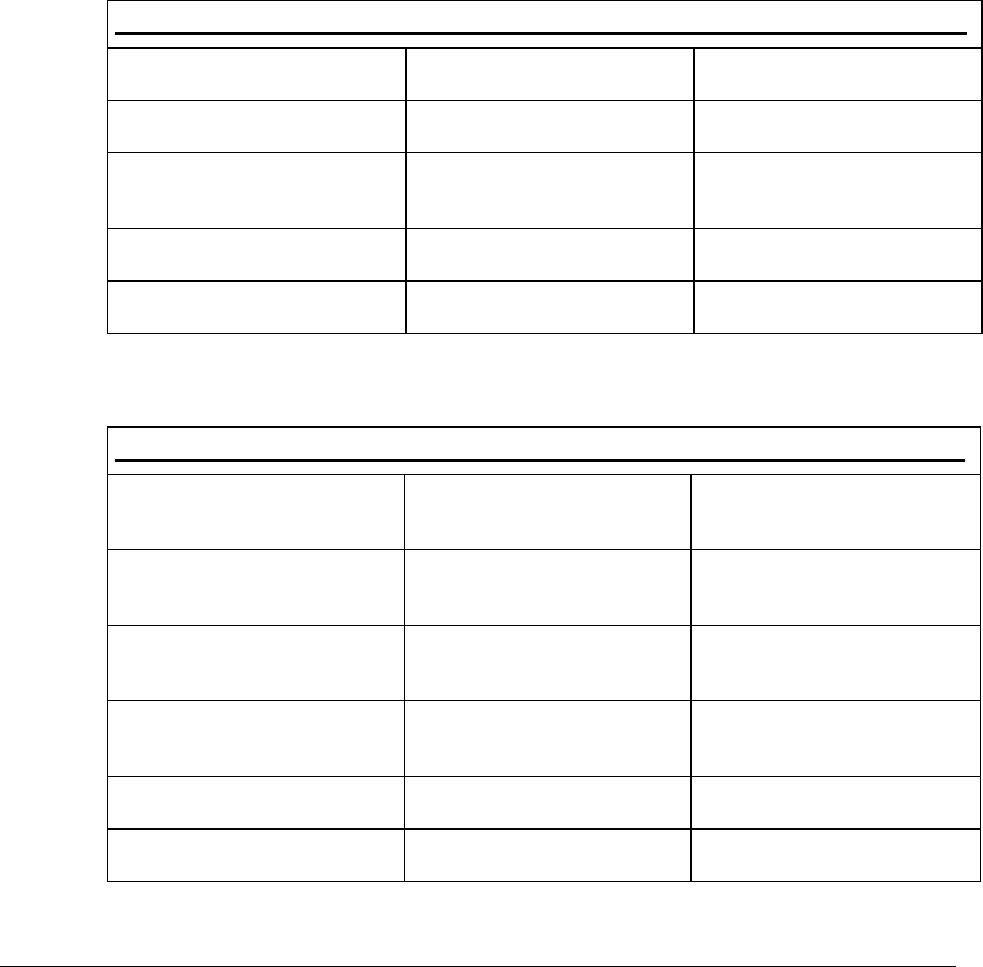
Window s NT 3.51
HP Color LaserJet 4550 Software Technical Reference 126
Background information
Online user guide
The online user guide for this printer is supplied in online format for viewing on your
computer screen. You can install the online user guide while you are installing the printer
software, or you can install it later. When you install the online user guide, both the guide
and Adobe Acrobat Reader are installed in the HP LaserJet folder.
To install the online user guide while you are installing the printer software, follow the
instructions that appear on your screen.
Font support
Microsoft Windows software includes these basic standard fonts that can be used with any HP
printer:
Standard Fonts
Arial Courier New Italic Times New Roman Italic
Arial Italic Courier New Bold Times New Roman Bold
Arial Bold Courier New Bold Italic Times New Roman Bold
Italic
Arial Bold Italic Symbol Wingdings
Courier New Times New Roman
The following PCL device fonts reside in the HP Color LaserJet 4550 printers and can be
accessed by all users:
PCL Device Fonts
Antique Olive Garamond Antiqua New Century Schoolbook
Bold
Antique Olive Bold Garamond Halbfett New Century Schoolbook
Bold Italic
Antique Olive Italic Garamond Kursiv New Century Schoolbook
Italic
Albertus Medium Garamond Kursiv Halbfett New Century Schoolbook
Roman
Albertus Extra Bold Helvetica Palatino Bold
Arial Helvetica Bold Palatino Bold Italic

Window s NT 3.51
HP Color LaserJet 4550 Software Technical Reference 127
Arial Bold Helvetica Bold Oblique Palatino Italic
Arial Bold Italic Helvetica Oblique Palatino Roman
Arial Italic Helvetica Narrow Symbol
CG Times Helvetica Narrow Bold Symbol
CG Times Bold Helvetica Narrow Bold
Oblique
Times Bold
CG Times Bold Italic Helvetica Narrow Oblique Times Bold Italic
CG Times Italic ITC Avant Garde Book Times Italic
CG Omega ITC Avant Garde Demi Times New Bold
CG Omega Bold ITC Avant Garde Book
Oblique
Times New Bold Italic
CG Omega Bold Italic ITC Avant Garde Demi
Oblique
Times New Italic
CG Times Italic ITC Bookman Demi Times New Roman
Clarendon Condensed ITC Bookman Demi Italic Times Roman
Coronet ITC Bookman Light Wingdings
Courier ITC Bookman Light Italic Univers Bold
Courier Bold ITC Zapf Chancery Italic Univers Bold Condensed
Courier Bold Italic ITC Zapf Dingbats Univers Bold Condensed
Italic
Courier Italic Letter Gothic Univers Bold Italic
Courier Letter Gothic Bold Univers Medium
Courier Bold Letter Gothic Bold Italic Univers Medium Condensed
Courier Bold Oblique Line Printer Univers Medium Condensed
Italic
Courier Oblique Marigold Univers Medium Italic
The following PS device fonts reside in the HP Color LaserJet 4550 printers. Only those fonts
with an (*) can be accessed by Windows users:

Window s NT 3.51
HP Color LaserJet 4550 Software Technical Reference 128
PS Device Fonts
Antique Olive Garamond Antiqua (*) New Century Schoolbook
Bold Italic
Antique Olive Bold Garamond Halbfett (*) New Century Schoolbook
Italic
Antique Olive Italic Garamond Kursiv (*) New Century Schoolbook
Roman
Albertus Medium Garamond Kursiv Halbfett (*) Palatino
Albertus Extra Bold (*) Helvetica (*) Palatino Bold
Arial (*) Helvetica Bold (*) Palatino Bold Italic
Arial Bold (*) Helvetica Bold Oblique (*) Palatino Italic
Arial Bold Italic (*) Helvetica Oblique Palatino Roman
Arial Italic (*) Helvetica Narrow (*) Symbol
CG Times (*) Helvetica Narrow Bold Symbol
CG Times Bold (*) Helvetica Narrow Bold
Oblique
(*) Times Bold
CG Times Bold Italic (*) Helvetica Narrow Oblique (*) Times Bold Italic
CG Times Italic (*) ITC Avant Garde Gothic
Book
(*) Times Italic
CG Omega (*) ITC Avant Garde Gothic
Demi
Times New Bold
CG Omega Bold (*) ITC Avant Garde Gothic
Book Oblique
Times New Bold Italic
CG Omega Bold Italic (*) ITC Avant Garde Gothic
Demi Oblique
Times New Italic
CG Times Italic (*) ITC Bookman Demi Times New Roman
Clarendon Condensed (*) ITC Bookman Demi Italic (*) Times Roman
Coronet (*) ITC Bookman Light Wingdings

Window s NT 3.51
HP Color LaserJet 4550 Software Technical Reference 129
(*) Courier (*) ITC Bookman Light Italic Univers Bold
(*) Courier Bold (*) ITC Zapf Chancery
Medium Italic
Univers Bold Condensed
Courier Bold Italic (*) ITC Zapf Dingbats Univers Bold Condensed
Italic
Courier Italic Letter Gothic Univers Bold Italic
Courier Letter Gothic Bold Univers Medium
Courier Bold Letter Gothic Bold Italic Univers Medium Condensed
(*) Courier Bold Oblique Marigold Univers Medium Condensed
Italic
(*) Courier Oblique (*) New Century Schoolbook
Bold
Univers Medium Italic
Windows NT 3.51 installation instructions
NOTE: For more information about installation options, refer to the
tables “Installation Options and User Prompts for Windows NT
3.51.”
Installed files and installation environments
A set of files is installed onto your system for each component in the printing system.
However, the ultimate location of these files varies, depending on the environment
(network or no network) and depending on whether a standalone version of Windows NT
3.51 or a shared version is running.
General installation
1. Install both drivers and fonts from your CD.
2. Close all running applications.
3. Insert the CD into the CD drive.
4. From the Program Manager, click Main, click Control Panel, click Printers, and then
click Install.
5. Follow the instructions on the screen to add a printer.
6. For latest or additional drivers, go to http://www.hp.com/support/lj4550 on the World
Wide Web.
Installation for network administrators
1. Install both drivers and fonts from your CD.
2. Close all running applications.
3. Insert the CD into the CD drive.
4. From the Program Manager, click Main, click Control Panel, click Printers, and then
click Install.
5. Follow the instructions on the screen to add a printer.
Window s NT 3.51
HP Color LaserJet 4550 Software Technical Reference 130
6. To install fonts, locate the appropriate font installer on the CD for your system and
run it.
7. For latest or additional drivers, go to http://www.hp.com/support/lj4100 on the World
Wide Web.
8. Network administrators must now configure the printer on the network.
NOTE: When installing the software on a network that uses a shared
version of Windows, install the software twice. During the first
installation, install files on the shared Windows directory. Once
the installation is complete, install the printer software onto the
workstation you are installing from.
Configuring the printer on the network
Before printing to the printer on a network, the printer must be configured to the network.
To configure the printer on the network, refer to the HP JetDirect Print Server Software
Installation Guide.
Connecting to the printer
After installing the end-user software on a client workstation, you or the network
administrator must connect the printer drivers to the printer on the proper port before the
client can print to the printer. The procedures for connecting to a port vary depending on
which operating system is being used. Use the instructions below that apply to which
operating system is used.
NOTE: To connect to the network printer on a Windows NT workstation,
the installer must have ADMINISTRATOR PRIVILEGES on that
workstation.
In Windows NT 3.51, use Connect to Printer in the Printer menu. Under Shared Printers,
double-click on the printer’s network name, and then follow the instructions on the
screen.
Uninstalling printing system components
To uninstall the PCL 5c driver, remove the files listed below.
PCL 5c driver modifications
Files added to the system for the PCL 5c driver
$SYSTEM directory
The following files are added to the $\WINDOWS\SYSTEM directory upon installation of
the PCL driver:
Filename Description Shared With Component(s)
RASDDUI.HLP PCL 5c driver
MON1.DLL PCL 5c driver
Window s NT 3.51
HP Color LaserJet 4550 Software Technical Reference 131
Filename Description Shared With Component(s)
HPPCL5F PCL 5c driver
RASDDUI.DLL PCL 5c driver
UNPCL.DLL PCL 5c driver
UNPCL.DLL PCL 5c driver
HPPCLJ_CP.HPA PCL 5c driver help
HPPCLJ_UI.HLP UI support file
HPPCLJ_UI.HPA UI support file
HPPCLJ16U.HLP Font installer
PS driver modifications
Files added to the system for the PS driver
$SYSTEM directory
The following driver files are added to the $SYSTEM directory upon installation of the PS
driver:
Filename Description Shared With Component(s)
PSCRIPT.DLL Microsoft Pscript driver for
Windows NT 3.51.
PSCRIPTUI.DLL PS driver user interface code
associated with PSCRIPT.dll.
PSCRIPT.HLP PS driver Help file
PSCRIPT.CNT
HP_4550.PPD Printer description file.
READ_.WRI Readme file for PS
UNPS.DLL PS Uninstaller
Japanese $SYSTEM directory
The following driver files are added to the Japanese $SYSTEM directory upon installation
of the PS driver:
Window s NT 3.51
HP Color LaserJet 4550 Software Technical Reference 132
Filename Description Shared With Component(s)
PSCRIPT.DLL PS driver for Windows NT
3.51.
PSCRIPTUI.DLL PS driver user interface code
associated with PSCRIPT.dll.
PSCRIPT.HLP PS driver Help file
PSCRIPT.CNT
HP_4550.PPD Printer description file.
READ_.WRI Readme file for PS
UNPS.DLL PS Uninstaller
HPCLJ_CP.HPA
HPCLJ_UI.HLP
HPCLJ_UI.HPA
HPCLJ16U.HLP
Windows 3.1x
HP Color LaserJet 4550 Software Technical Reference 133
Windows 3.1x/Windows for Workgroups
NOTE: Windows 3.1x refers to Windows 3.1 and Windows for
Workgroups 3.11.
In the Descriptions that follow, the $ symbol before a path name
indicates that the path to that directory can change from system
to system. The term $Path indicates that the path and the
directory can change from system to system.
System requirements
The minimum system requirements for users running Windows 3.1x or Windows for Workgroup
3.1x are:
• Windows 3.1x or Windows for Workgroups 3.1x
• DOS 5.0 or greater
• 386 processor or greater
• 4 MB RAM
• 4 MB available disk space
The HP Color LaserJet 4550/4550N/4550DN/4550HDN CD-ROM contains the following
components for Windows. Descriptions of each component follow the table
Component Version
HP Installer 1.0
Microsoft Unidriver (HP Color LaserJet 4500 HP PCL 5c ) F3.0
HP Online User Guide 1.0
Adobe Acrobat Reader
Bidirectional Communication
HP Color LaserJet 4550 PS WPD for use with
Microsoft PSCRIPT driver
3.58
Printer support
• The PCL 6 and PCL 5c drivers will support all HP Color LaserJet 4550 printers.
• The PS driver will support all HP Color LaserJet 4550 printers.
Windows 3.1x
HP Color LaserJet 4550 Software Technical Reference 134
Background information
Online user guide installation
The online user guide for this printer is supplied in online format for viewing on your
computer screen. You can install the online user guide while you are installing the printer
software, or you can install it later. To install the online user guide, copy it onto your
system.
Adobe Acrobat Reader
Adobe Acrobat Reader allows you to read the PDF format of the online user guide.
Font support
Microsoft Windows software includes the following standard fonts, which can be used with any
HP printer:
Standard Fonts
Arial Courier New Italic Times New Roman Italic
Arial Italic Courier New Bold Times New Roman Bold
Arial Bold Courier New Bold Italic Times New Roman Bold
Italic
Arial Bold Italic Symbol Wingdings
Courier New Times New Roman
The following PCL device fonts reside in the HP Color LaserJet 4550 printers and can be
accessed by all users:
PCL Device Fonts
Antique Olive Garamond Antiqua New Century Schoolbook
Bold
Antique Olive Bold Garamond Halbfett New Century Schoolbook
Bold Italic
Antique Olive Italic Garamond Kursiv New Century Schoolbook
Italic
Albertus Medium Garamond Kursiv Halbfett New Century Schoolbook
Roman
Albertus Extra Bold Helvetica Palatino Bold
Arial Helvetica Bold Palatino Bold Italic

Windows 3.1x
HP Color LaserJet 4550 Software Technical Reference 135
Arial Bold Helvetica Bold Oblique Palatino Italic
Arial Bold Italic Helvetica Oblique Palatino Roman
Arial Italic Helvetica Narrow Symbol
CG Times Helvetica Narrow Bold Symbol
CG Times Bold Helvetica Narrow Bold
Oblique
Times Bold
CG Times Bold Italic Helvetica Narrow Oblique Times Bold Italic
CG Times Italic ITC Avant Garde Book Times Italic
CG Omega ITC Avant Garde Demi Times New Bold
CG Omega Bold ITC Avant Garde Book
Oblique
Times New Bold Italic
CG Omega Bold Italic ITC Avant Garde Demi
Oblique
Times New Italic
CG Times Italic ITC Bookman Demi Times New Roman
Clarendon Condensed ITC Bookman Demi Italic Times Roman
Coronet ITC Bookman Light Wingdings
Courier ITC Bookman Light Italic Univers Bold
Courier Bold ITC Zapf Chancery Italic Univers Bold Condensed
Courier Bold Italic ITC Zapf Dingbats Univers Bold Condensed
Italic
Courier Italic Letter Gothic Univers Bold Italic
Courier Letter Gothic Bold Univers Medium
Courier Bold Letter Gothic Bold Italic Univers Medium Condensed
Courier Bold Oblique Line Printer Univers Medium Condensed
Italic
Courier Oblique Marigold Univers Medium Italic
The following PS device fonts reside in the HP Color LaserJet 4550 printers. Only those fonts
with an (*) can be accessed by Windows users:

Windows 3.1x
HP Color LaserJet 4550 Software Technical Reference 136
PS Device Fonts
Antique Olive Garamond Antiqua (*) New Century Schoolbook
Bold Italic
Antique Olive Bold Garamond Halbfett (*) New Century Schoolbook
Italic
Antique Olive Italic Garamond Kursiv (*) New Century Schoolbook
Roman
Albertus Medium Garamond Kursiv Halbfett (*) Palatino
Albertus Extra Bold (*) Helvetica (*) Palatino Bold
Arial (*) Helvetica Bold (*) Palatino Bold Italic
Arial Bold (*) Helvetica Bold Oblique (*) Palatino Italic
Arial Bold Italic (*) Helvetica Oblique Palatino Roman
Arial Italic (*) Helvetica Narrow (*) Symbol
CG Times (*) Helvetica Narrow Bold Symbol
CG Times Bold (*) Helvetica Narrow Bold
Oblique
(*) Times Bold
CG Times Bold Italic (*) Helvetica Narrow Oblique (*) Times Bold Italic
CG Times Italic (*) ITC Avant Garde Gothic
Book
(*) Times Italic
CG Omega (*) ITC Avant Garde Gothic
Demi
Times New Bold
CG Omega Bold (*) ITC Avant Garde Gothic
Book Oblique
Times New Bold Italic
CG Omega Bold Italic (*) ITC Avant Garde Gothic
Demi Oblique
Times New Italic
CG Times Italic (*) ITC Bookman Demi Times New Roman
Clarendon Condensed (*) ITC Bookman Demi Italic (*) Times Roman
Coronet (*) ITC Bookman Light Wingdings
Windows 3.1x
HP Color LaserJet 4550 Software Technical Reference 137
(*) Courier (*) ITC Bookman Light Italic Univers Bold
(*) Courier Bold (*) ITC Zapf Chancery
Medium Italic
Univers Bold Condensed
Courier Bold Italic (*) ITC Zapf Dingbats Univers Bold Condensed
Italic
Courier Italic Letter Gothic Univers Bold Italic
Courier Letter Gothic Bold Univers Medium
Courier Bold Letter Gothic Bold Italic Univers Medium Condensed
(*) Courier Bold Oblique Marigold Univers Medium Condensed
Italic
(*) Courier Oblique (*) New Century Schoolbook
Bold
Univers Medium Italic
Windows 3.1x installation instructions
1. Install both drivers and fonts from your CD.
2. Close all running applications.
3. Insert the CD into the CD drive.
4. From the Program Manager, click Main, click Control Panel, click Printers, and then
click Install.
5. Follow the instructions on the screen to add a printer.
6. To install fonts, locate the appropriate font installer on the CD for your system and run it.
7. For latest or additional drivers, go to http://www.hp.com/support/lj4100 on the World Wide
Web.
Uninstalling printing system components
PCL driver modifications
Files added to the system for the PCL 5c driver
$SYSTEM directory
The following files are added to the $SYSTEM directory when the PCL driver is installed
in both a standalone and a shared Windows 3.1x system; they must be uninstalled to
uninstall the printing system:
Filename Description Shared With Component(s)
HPPCL5F.DRV PCL 5c driver 4500 Printing Systems
Windows 3.1x
HP Color LaserJet 4550 Software Technical Reference 138
Filename Description Shared With Component(s)
HPPCL5F2.DLL PCL 5c driver 4500 Printing Systems
HPPCL5F2.HLP PCL 5c driver 4500 Printing Systems
HPPCL5F3.DLL PCL 5c driver 4500 Printing Systems
HPPCL5F4.DLL PCL 5c driver 4500 Printing Systems
HPCLJUI.DLL PCL 5c driver 4500 Printing Systems
HPPCL5F.DRV PCL 5c driver 4500 Printing Systems
HPPCL5F.HLP PCL 5c driver help 4500 Printing Systems
HPCLJDM.DLL
Changes made to WIN.INI for the PCL 5c driver
The following modifications are made to the WIN.INI file upon installation of the Standard
PCL driver:
[PrinterPorts]
device=HP Color LaserJet4500-HP=HPPCL5F,LPT1:,15,45
[devices]
device=HP Color LaserJet4500-HP=HPPCL5F,LPT1:
If the printer is set as the default printer, there is a line in the [windows] section of the
WIN.INI file:
device=HP Color LaserJet4500-HP, HPPCL5F,LPT1:
PS driver modifications
Files added to the system for the PS driver
$SYSTEM directory
The following driver files are added to the $\WINDOWS\SYSTEM directory upon
installation of the PS driver:
Filename Description Shared With Component(s)
OEMSETUP.INF PS installer
PSCRIPT.DRV PS driver
PSCRIPT.HLP Microsoft Help file

Windows 3.1x
HP Color LaserJet 4550 Software Technical Reference 139
Filename Description Shared With Component(s)
HP_4500-6.WPD Printer description file
HP_4500-4.PPD Printer description file
READ_.WRI PS Readme
OEMSETUP.INI Installation script
Changes made to INI FILes for the PS driver
The following modifications are made to the specified .INI files upon installation of the PS
driver:
WIN.INI
[Windows]
device=HP Color LaserJet4500 PS,PSCRIPT.DLL,LPT1
[PS,LPT1]
ATM=placeholder
[PrinterPorts]
HP Color LaserJet4500 PS =PSCRIPT.DLL,LPT1:,15, 45
[devices]
HP Color LaserJet4500 PS=PSCRIPT.DLL,LPT1:
[Adobe TrueType Substitutions]
Arial=Helvetica
Arial Narrow=Helvetica-Narrow
Book Antiqua=Palatino
Bookman Old Style=Bookman
Century Gothic=AvantGarde
Century Schoolbook=New Century Schoolbook
Courier New=Courier
Monotype Corsiva=Zapf Chancery
Monotype Sorts=Zapf Dingbats
Symbol=Symbol
Times New Roman=Times
Macintosh operating system
HP Color LaserJet 4550 Software Technical Reference 140
Macintosh printing system
System requirements
The minimum requirements for the Macintosh Printing System are:
• Macintosh Operating System 7.5.3 or later
Components
The Macintosh Printing System for the HP Color LaserJet 4550/4550N/4550DN/4550HDN printer
includes the following components:
Component Version Filename Installed In
Font and
Configuration Utility
v. 3.5.6 HP LaserJet Utility
3.5.6
HP LaserJet folder in root
directory of startup disk or as
specified by user
PS Printer
Description file
(PPD)
v. 1.0 HP Color LaserJet
4550 PPD for use
with Apple Laser
Writer driver
Printer Descriptions folder in
Extensions folder
Online HTML Guide v. 1.0 HP LaserJet folder in root
directory of startup disk (or as
specified by user) on older
Mac OS versions; in the Help
folder in the Systemn Folder in
newer Mac OS versions.
HTML Utility Help
HTML Printing Help
Font Installer
PANTONE®*
ICC Profiles
NOTE: If any of the components already exist in the target location with
the same name but a higher version number, the newer
components will not be replaced.
Background information
DocMaker
DocMaker is the user guide for the Macintosh operating system. It is a self-executable
Doc. file that does not require a PDF reader for all languages except Asian. In Asian
languages, the DocMaker is in PDF format and requires either Adobe Acrobat Reader or
another PDF reader. You can install the DocMaker file while installing the printer software
Macintosh operating system
HP Color LaserJet 4550 Software Technical Reference 141
and it is installed in the HP LaserJet folder. To access DocMaker, open the HP LaserJet
folder and double-click on DocMaker.
To install the DocMaker while you are installing the printer software, follow the
instructions that appear on your screen.
Adobe Acrobat Reader
Adobe Acrobat Reader enables you to read the PDF format of the DocMaker file in Asian
languages. It is available for installation on the CD.
Font support
To ensure you have access to all fonts installed with the HP Color LaserJet 4550 printer, the
Macintosh Printing System includes the standard 35 screen fonts in 11 families:
Standard Screen Fonts
Avant Garde Helvetica Narrow Times
Bookman New Century Schoolbook Zapf Chancery
Courier Palatino Zapf Dingbats
Helvetica Symbol
The following bitmap screen fonts reside on the HP Color LaserJet 4550 printer:
Bitmap Screen Fonts
ITC Avant Garde Gothic Book Helvetica Palatino
ITC Avant Garde Gothic Book
Oblique
Helvetica Bold Palatino Bold
ITC Avant Garde Gothic Demi Helvetica Bold Oblique Palatino Bold Italic
ITC Avant Garde Gothic Demi
Oblique
Helvetica Oblique Palatino Italic
ITC Bookman Demi Helvetica Narrow Symbol
ITC Bookman Demi Italic Helvetica Narrow Bold Times Bold
ITC Bookman Light Helvetica Narrow Bold
Oblique
Times Bold Italic
ITC Bookman Light Italic Helvetica Narrow Oblique Times Italic
Courier New Century Schoolbook
Bold
Times Roman
Macintosh operating system
HP Color LaserJet 4550 Software Technical Reference 142
Courier Bold New Century Schoolbook
Bold Italic
ITC Zapf Chancery Medium
Italic
Courier Bold Oblique New Century Schoolbook
Italic
ITC Zapf Dingbats
Courier Oblique New Century Schoolbook
Roman
The following fonts are resident on all HP Color LaserJet 4550 printers but can be used by
Macintosh platforms only by installing additional screen fonts. The screen fonts can be accessed
on either the CD or the World Wide Web at: www.hp.com
Additional Screen Fonts
Albertus Extra Bold CG Times Italic Marigold
Albertus Medium Clarendon Condensed Bold Symbol
Antique Olive Coronet Times New Roman
Antique Olive Bold Courier Times New Roman Bold
Antique Olive Italic Courier Bold Times New Roman Bold Italic
Arial Courier Bold Oblique Times New Roman Italic
Arial Bold Courier Italic Univers Bold
Arial Bold Italic Garamond Antiqua Univers Bold Italic
Arial Italic Garamond Halbfett Univers Condensed Bold
Italic
CG Omega Garamond Kursiv Univers Condensed Medium
CG Omega Bold Garamond Kursiv Halbfett Univers Condensed Medium
Italic
CG Omega Bold Italic Letter Gothic Univers Medium
CG Omega Italic Letter Gothic Bold Univers Medium Italic
CG Times Letter Gothic Italic Univers Italic
CG Times Bold CG Times Bold Italic Wingdings
CG Times Bold Italic

Macintosh operating system
HP Color LaserJet 4550 Software Technical Reference 143
Printer support
The Macintosh Printing System will operate on the HP Color LaserJet 4550/4550N/4550DN. All
the Macintosh components will work if the printer has both emulated PS and an AppleTalk I/O
installed.
Installing the Macintosh Printing System
On a Macintosh-compatible computer, the installation procedures are the same for a Network
Administrator, a Network Client, and a single user. Install the software on any computer that is
printing to the printer.
NOTE: If the computer is connected to the printer by a LocalTalk (Printer
Port) or EtherTalk connection, the AppleTalk (or Network) control
panel must be configured for the correct connection to
communicate with the printer.
The Macintosh partition contains an installer program for each language. Find the language that
is appropriate for the operating system being used, and use the installer program for that
language.
Uninstalling the Macintosh Printing System
To uninstall the Macintosh Printing System, drag the PPDs, Helpf folders for HP Utility
and Printing and HP LaserJet Folder to the Trash. Do not drag the Laser Writer driver to
the Trash; it is a component of the Mac OS.
In-box disk layout
The Macintosh Printing System consists of one file: the HP Color LaserJet 4550 Installer
- Integrated installer program.

IBM O/S 2, 2.0 and greater
HP Color LaserJet 4550 Software Technical Reference 144
IBM OS/2, 2.0, and greater
System requirements
The minimum system requirements for users running OS/2 are:
• OS/2 2.0 with FixPack, OS/2 2.11, OS/2 Warp 3.0 or OS/2 Warp 4.0
• MB RAM for preWarp 4.0; 16 MB RAM for Warp 4.0
• 2 MB available disk space for installing driver
• 10 MB available disk space for Spooler/Swap space for printing. Large print jobs can require
more free disk space.
Font support
NOTE: Fonts can be downloaded to the printer by using the Font
Installer feature of the printer driver.
Standard Fonts
Albertus CG Times Italic Symbol
Albertus Extra Bold Clarendon Condensed Times New Roman
Antique Olive Coronet Times New Roman Bold
Antique Olive Bold Courier Times New Roman Bold Italic
Antique Olive Italic Courier Bold Times New Roman Italic
Arial Courier Bold Italic Univers
Arial Bold Courier Italic Univers Bold
Arial Bold Italic Garamond Antiqua Univers Bold Italic
Arial Italic Garamond Halbfett Univers Italic
CG Omega Garamond Kursiv Univers Condensed
CG Omega Bold Garamond Kursiv Halbfett Univers Condensed Bold
CG Omega Bold Italic Letter Univers Condensed Bold
Italic
CG Omega Italic Letter Bold Univers Condensed Medium
Italic
CG Times Letter Italic Wingdings

IBM O/S 2, 2.0 and greater
HP Color LaserJet 4550 Software Technical Reference 145
CG Times Bold Line Printer
CG Times Bold Italic Marigold
OS/2 installation instructions
NOTE: Installation procedures differ depending on whether or not a
printer object does or does not exist on the OS/2 Desktop being
used. Use the instructions that match the Desktop.
Installing a printer in OS/2 when a printer object does not appear on the computer’s
desktop
NOTE: Use this procedure if the OS/2 Desktop does not have a printer
object. A system can have this configuration if no printer was
selected during OS/2 installation, or all the print objects have
been deleted from the Desktop.
To create a printer object and install a printer driver use the following procedures:
1. Open the Templates Folder (located in OS/2 system folder after OS/2 installation).
2. Select the Printer template. Press and hold the right mouse button.
3. Drag the template to the Desktop.
4. Release the right mouse button.
5. Type a name for the printer in the Name field.
6. Select a port to which the printer is connected.
7. Click Install new printer driver. A window appears with a list of the printer drivers
that are shipped with O/S2.
8. Click Other printer driver.
9. Point to the downloaded printer drivers.
10. Click Refresh. Wait until the window fills with printer drivers.
11. Select one or more drivers by clicking the left mouse button over the desired driver.
12. Click Install.
Installing a printer in OS/2 when a printer object does appear on your desktop
NOTE: If the old 16-bit HP LaserJet driver is installed on a system,
delete it before installing this driver.
Use these directions if a printer object does exist on the OS/2
desktop, but you do not have the correct printer driver installed
on the system. This could happen if a different printer was added
to the system.
To install a new printer driver and use an existing printer object, use the following
procedure:
1. Select the Printer object using the right mouse button.
2. Click Settings.

IBM O/S 2, 2.0 and greater
HP Color LaserJet 4550 Software Technical Reference 146
3. Click the Printer Driver tab.
4. Select one of the Printer Driver Objects using the right mouse button.
5. Click Install.
6. Select Other OS/2 printer driver.
7. Point to the downloaded printer drivers.
8. Click the Refresh button. Wait until the window fills with printer drivers.
9. Select one or more drivers by clicking the left mouse button over the desired driver.
10. Click the Install button.
Additional information about the OS/2 drivers is included in the Readme files that come
with each driver.
Changing a printer driver in the Printer Object
Once both the printer object and the printer driver have been installed, the correct printer
driver should be selected in the print object. This might also be necessary if using
different printer drivers with a single print object. To change to a different printer driver:
1. Right-click the Printer Object.
2. Click Settings.
3. Click the Printer Driver tab.
4. Double-click on the Title-bar icon.
The printer object is now set up to use a different printer driver. To customize the settings
for this printer driver, see “Changing the Printer Properties” or “Changing the Job
Properties.”
Changing the Printer Properties
A printer driver has settings called Printer Properties. Printer Properties describe how
a particular printer is physically set up. Examples of printer properties include the amount
of memory in a printer, forms defined by the printer, forms associated with the printer
paper trays, and installed printer patterns.
To set or change Printer Properties:
1. Point to the Printer Object. Right-click the Printer Object.
2. Click Settings.
3. Click the Printer Driver tab.
4. Select the printer driver, and then right-click the mouse button.
5. Click Settings.
6. Change the properties to match the printer setup.
7. Double-click on the title-bar icon.
The printer object is now set up to print a job. For information about how to print a job,
see the OS/2 Tutorial or the Information folder for information on printing.
Changing the Job Properties
A printer driver has settings called Job Properties. Job Properties describe how a
particular print job is printed. Examples of job properties include number of copies, print
resolution, print quality, color effects, and orientation (portrait or landscape). Applications
generally allow the selection of a printer object (sometimes referred to as a printer queue)
and they allow you to change the “Job Properties” associated with a particular job by

IBM O/S 2, 2.0 and greater
HP Color LaserJet 4550 Software Technical Reference 147
selecting on setup or options buttons. There are times, such as when performing drag-
n-drop printing, when it is appropriate to change Job Properties outside of an application.
To change the default Job Properties associated with a printer object outside of an
application:
1. Right-click the Printer Object.
2. Click Settings.
3. Click the Job Properties tab.
4. Change the properties.
5. Click Save.
The default job properties associated with a printer object are now set up. For more
information about how to print a job, see the OS/2 Tutorial or the Information folder.
Online user guide installation
The online user guide for this printer is supplied in online format for viewing on your
computer screen. You can install the online user guide by copying the file to your hard
drive and viewing with Adobe (R) Acrobat Reader.

Network operating systems
HP Color LaserJet 4550 Software Technical Reference 148
Network Operating Systems
Novell
Installing a printer driver to the Nd Broker
These steps use components of Netware and ND. If any of these steps do not work, you
will need to contact Novell for assistance.
1. Run NWADMN32.EXE.
2. Double-click the ND Broker Object.
3. Click the Resource Management (RMS) tab.
4. Click Add Resources.
5. Select the printer drivers for the operating system.
6. Click Add.
7. Browse to the .INF file of a printer.
NOTE: Some downloaded drivers will expand into several different
directories labeled disk1, disk2, and disk3. After downloading a
driver and expanding it, make sure all files are in the same
directory so that all files - disk 1 through disk 4 - are together in
the same directory.
8. Click OK.
The printer driver is added to the Server_Name>SYS:ND\RESDIR\PRNDRV\WIN95
directory on the server where the Broker Service is loaded (BROKER.NLM in the
SYS:SYSTEM).
NOTE: NPD files are not needed for newer printers. See Novell
document "Printer Not Listed in Printer Type Box" or "What are
NPR, NPX, and NPD Files?"
Log onto a server in Bindery Mode
Use the following procedure to overcome the default NDS login mode when logging on to a
Novell server.
Determine current connection
1. In order to see what kind of connection you have with the server, right click on red
Novell “N” located in the Systray.
2. In the menu that appears, select “Netware Connections….”
3. A new window will appear showing the Tree(s) you are connected too and what
server you are connected too. You will also see the type of connection. If it is a
bindery connection it will say “Bindery” under the heading of Authentication State.
Otherwise you will see “Directory Services” which is a NDS connection.
Client setup for bindery mode login
1. To view your mode of connection with the server, right click on the Novell logo
located in the Systray.
2. In the menu that appears, select Novell Client Properties.

Network operating systems
HP Color LaserJet 4550 Software Technical Reference 149
3. Select the Location Profiles tab.
4. Select Default in the Location Profile area, then select Properties at the bottom of
the window.
5. You will now see a new window with a tab labeled Services. Below that is another
selection window labeled as Services, where you should see the words Login Service
highlighted.
6. Below the Services selection drop-down list, another drop-down should have Default
highlighted. Select Properties from that list.
7. The next window, select the Bindery tab.
8. Check the Active Authenticator box and select the lower Clear Current
Connections box.
9. Click the browse button on the right side of the server drop-down box and select the
server you want to connect to as default.
10. Select OK on all of the open windows.
11. Right click on the Novell logo located in the Systray, select NetWare Login and re-
login into the server.
Once you have logged in, check that your connection is now in Bindery mode.
Installing HP drivers using NDPS and ZenWorks
To install HP drivers using NDPS and ZenWorks, you must have Novell ZenWorks 2.0 (or later),
Novell Client for NT Version 4.71, NDPS Ver. 2.0, and the appropriate HP and drivers and
postscript printer description (PPD) files.
NOTE: This procedure requires Novell Client 4.71 for NT to loaded on
the workstation, and ZenWorks 2.0 with Service Pack 1 loaded
on the server. ZenWorks Service Pack 1 should be loaded only
on English language servers. Service Pack 1 is included in
ZenWorks 2.0 for all non-English versions.
The user must create PPD configuration files, but the driver
assigns mailbox and stacker bins to user groups.
To verify that ZenWorks Service Pack 1 has been installed on English-language servers, obtain a
DOS prompt and make Z: the active directory. The DOS command ZENVER will display the
version and service packs installed. If Service Pack 1 has not been installed, it is available for
download from the Novell website; the English language filename is: ZFD2SP1.EXE.
1. Load HP printer drivers into RMS of the NDPS Broker
Using NWAdmin32,
a. Open the Broker.
b. Click the Resource Management button.
c. Click the Add Resources button.
d. Select the Windows NT 4 Printer Drivers icon.
e. Select Add; this will open a window labeled Add Resources.
f. Select the Browse button and navigate to the location of the HP printer drivers to be
installed.
g. Select the correct driver INF file
h. Install the first driver; when the install window closes, select Add to install more
drivers.
i. When you have completed installing the desired HP printer drivers, select OK and
OK.
j. Browse to where the drivers are located.

Network operating systems
HP Color LaserJet 4550 Software Technical Reference 150
k. When you have completed loading the drivers, verify their installation by locating
them in the Current Resources field.
l. Select OK and Cancel to complete the installation.
2. Make print queue objects.
a. Create a standard NDS Printer Queue using NWAdmin32.
b. Label the queue for the person or group that will be using a specific bin location.
Create one Queue for each bin/driver that will be used. (Example: user1-printer2-
bin3)
3. Make NDPS print agents
a. Create the NDPS Printer Agent Object.
b. Enter the name for the printer agent (Example: User1-printer2-PA).
c. Select the NDPS Manager.
d. Select the HP Gateway.
e. Select OK.
f. Select the printer to use for this printer agent.
g. Select the WinNT4 tab.
h. Scroll down to the correct driver to be used with this user or users, then click
Continue and OK.
i. Open the Printer agent again (you should see a HP status window).
j. Select Jobs v.
k. Select spooling configuration.
l. Select Add.
m. Select the printer queue object for this user.
n. Click OK, OK, and Cancel.
4. Make User Policies.
a. Create a user policy for the specific user and enable the printer policy.
NOTE: If the Policy icon does not appear, ZenWorks support pack 1 has
not been installed on the server.
b. Name the policy.
NOTE: It is helpful to name policies in such a way that administrators
can easily understand the purpose of the specific policies.
c. Select Next.
d. Add a user or users and select Next. To create more than one policy, select the
create another policy box.
e. When all of the policies have been created, select Finish. A unique user policy is
required for each printer driver or printer driver configuration used.
5. Associate queues with the printer agent
a. Open the user policy and select the NT user printer policy box.
b. Select details and Add.
c. Highlight the NDS print queue object previously created for this user or group.
d. Select OK.
e. Select New driver.
f. Select Clear Current Settings.
g. Select the Select printer model button.
h. Select have disk and browse to the location of the drivers.
i. Install the correct driver to be associated with the policy.
j. Select OK, OK, and Cancel.
Verify that the configuration works properly.
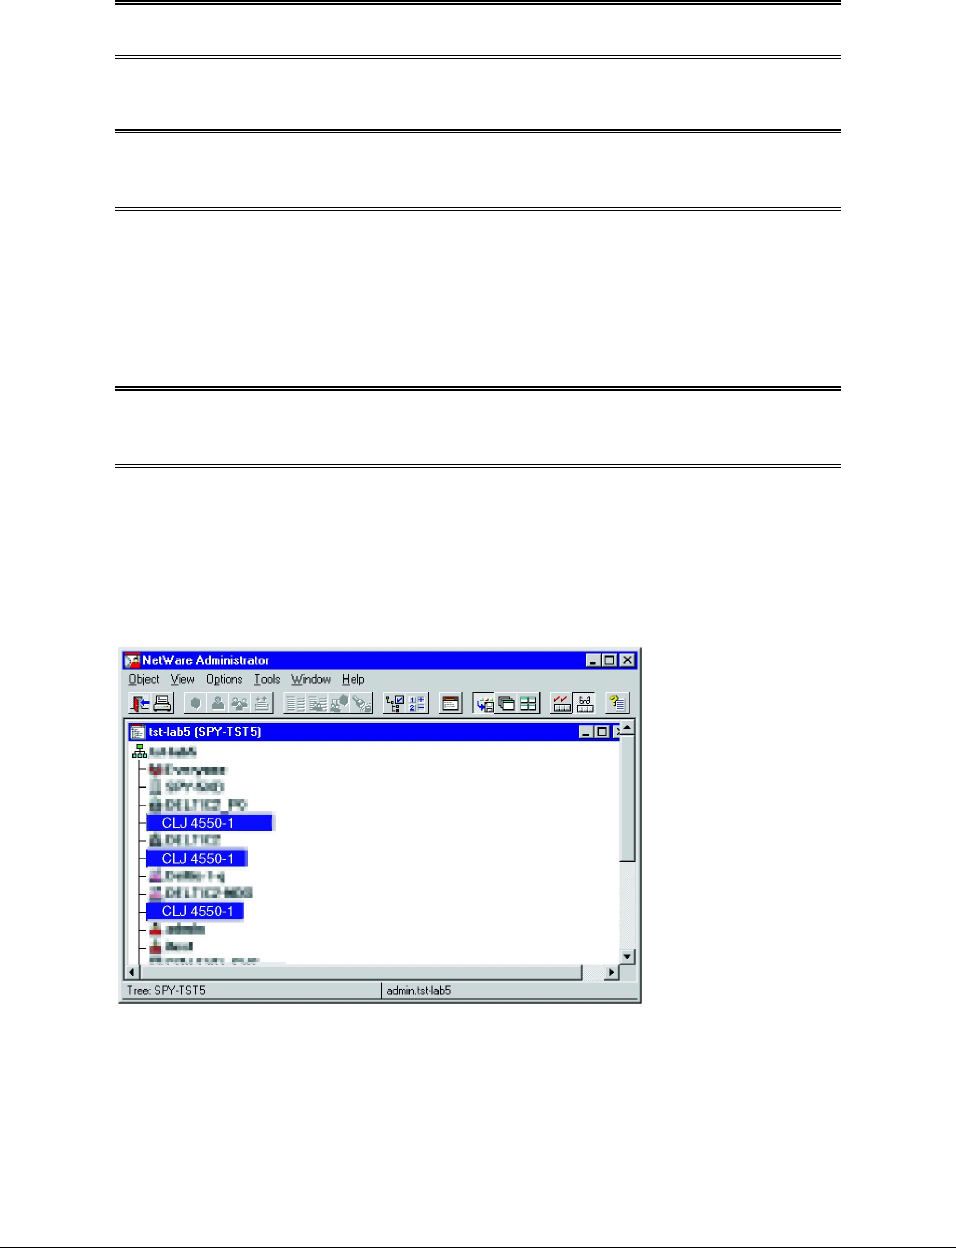
Network operating systems
HP Color LaserJet 4550 Software Technical Reference 151
Remove printer objects from the Novell Server.
To remove printer objects, it is first necessary to delete from the Novell serverall old queues that
were associated with the printer.
NOTE: A Bindery Queue as seen on a Novell server is made up of two
Objects: the Printer Queue and the Printer Server Object.
Verify that no previous Queue has been made and associated to the printer.
NOTE: The print queue or the print server object can detach from the
printer device. This will cause a malfunction and none of the
print jobs will print.
Check existing print queue and print server objects
1. Find NWAdmin32. If ZenWorks has been installed on the server, browse to
NWAdmin32 by the following path: Network Neighborhood > Server (Spy-5xb) > Sys
> Public > win32 > Nwadmin.exe.
2. Open NWAdmin32.
NOTE: If the administrator is not logged in to the specific server where
the file is installed, authentication for that server might be
required.
3. Select all references to the printer; Bindery mode printers have two objects and NDS
mode printers have three objects.
Figure 44 shows NDS print queue objects.
Figure 44: NDS print queue objects (NWAdmin32)
Figure 45 shows bindery print queue objects.
Figure 45: Binder print queue objects (NWAdmin32)
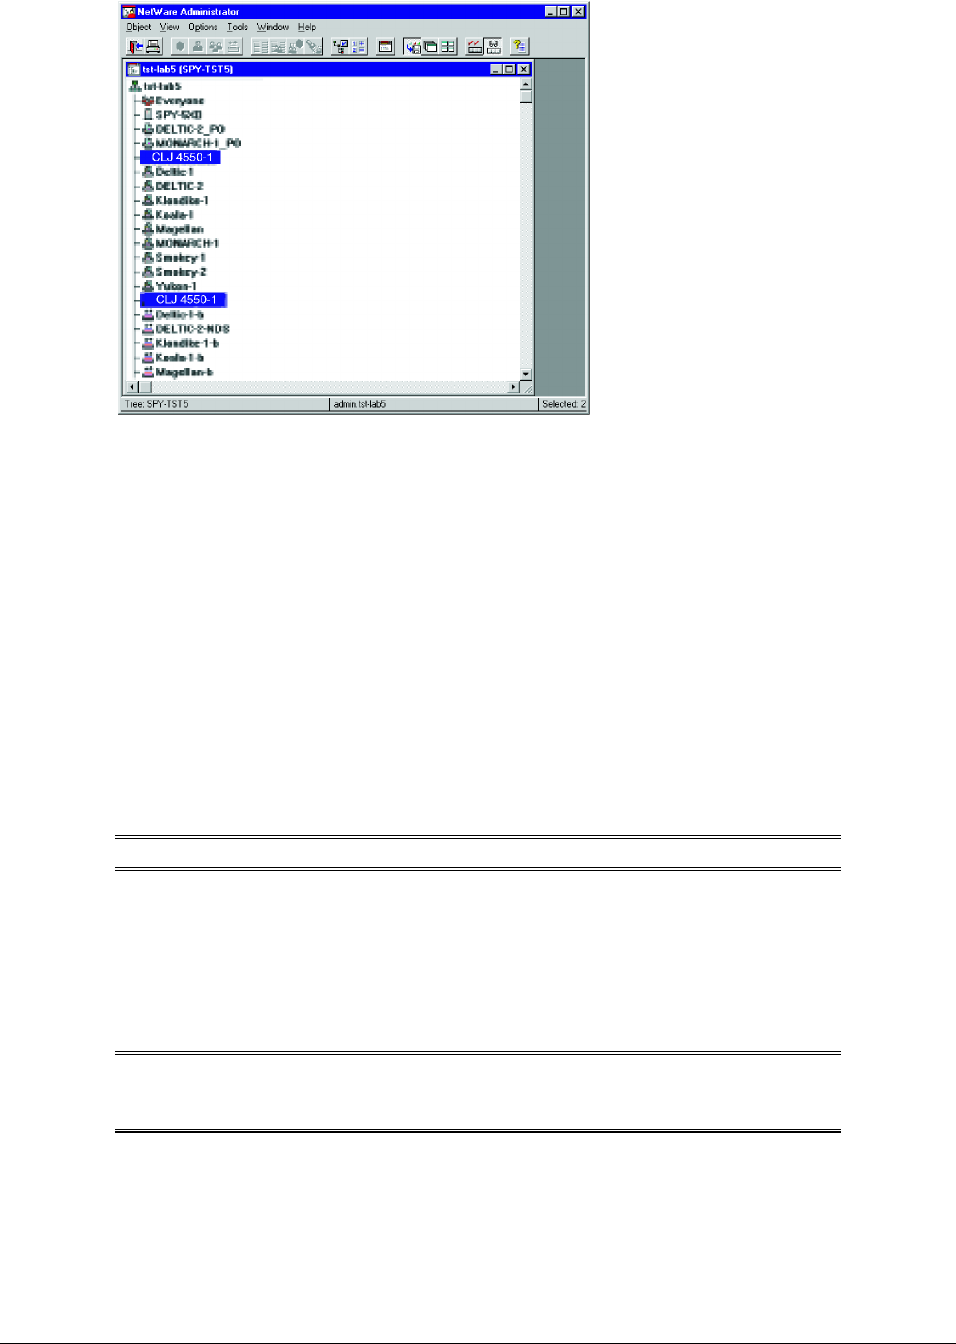
Network operating systems
HP Color LaserJet 4550 Software Technical Reference 152
To build a new print queue, all present objects must be deleted.
After deleting print queue object, double click the topmost icon to collapse its directory, then
double click it again to refresh its directory. Verify that all printer-associated items have been
deleted.
The Nwadmin program window can now be closed or minimized.
Bindery-NDS-NDPS Queue Quickset
Build a Bindery queue on a Novell server
1. Remove any previously built print queues.
2. Open Web JetAdmin and verify the IPX/SPX protocol is active.
NOTE: This is indicated at the lower/bottom right corner of the screen.
3. Right click the Printer icon and select Modify.
4. Verify that the printer name and description are correct and select Next.
Both fields on the right side (NDS Tree Name & Print Server Context) should be set
to [unconfigured].
NOTE: The convention used for this name is the printer name only. If
there are other units, a dash is included with the unit number
next. The description will always be the Spp number).
5. Select the printer icon labeled Queues.
6. Select the Change button.
7. If the old queue or Unknown Queue appears in the right pane, highlight the queue
name and select Remove. Otherwise continue to the next step.

Network operating systems
HP Color LaserJet 4550 Software Technical Reference 153
8. In the left pane, if the old queue is listed, highlight the Queue name and select
Delete. To confirm the deletion, select OK. If the old queue is not listed, proceed to
the next step.
9. In the left pane, select the server where the new queue will be created.
10. Select the Create button.
11. Enter the queue name (Example: CLJ4550-1-B) and select OK
NOTE: The naming convention being used is as follows: Printer name,
dash, Unit number, dash, type of Queue (B for Bindery).
12. Select Yes to add this to the list of serviced queues.
13. Select OK.
14. The new queue should appear in the right pane. Select Next.
15. Verify that the queue’s IP, Gateway, and Sub-mask numbers are correct.
16. Select Next, then Finish, then OK to complete creation of a Bindery printer queue.
Build an NDS queue on a Novell server
1. Remove any previously built print queues.
2. Open Web JetAdmin and verify the IPX/SPX protocol is active.
NOTE: Protocol is indicated at the lower/bottom right corner of the
screen.
3. Right click the printer icon and select Modify.
4. Verify the printer name and description are correct, then select Next.
NOTE: The default icon shown will be Netware Directory Services; if it is
not, select it.
The convention used for this name is the printer name only. If
there are other units, a dash is included with the unit number
next. The description will always be the Spp number.
5. In NDS Tree name, select the tree where the server is located.
6. Verify or enter the correct Print Server Context.
7. Select the Operating Mode icon (no actual mode selection is necessary).
8. Select the Printer Queue icon.
9. Select the Change button.
10. If the old queue or Unknown Queue appears in the right pane, highlight the queue
name and select Remove. If not, continue to the next step.
11. If the old Queue is listed in the left pane, highlight the Queue name and select
Delete. To confirm the deletion, select OK. If it is not listed, proceed to the next step.
12. In the left pane, select the tree (not the server) where the NDS queue will be created.
13. Select the Create button.
14. Enter the queue name (Example: CLJ4550-1-NDS)

Network operating systems
HP Color LaserJet 4550 Software Technical Reference 154
NOTE: The naming convention being used is as follows: Printer name,
dash, unit number, dash, NDS (For the type of Queue you are
creating.
15. Verify the server and context are correct, then select OK.
16. To add this to the list of serviced queues, select Yes.
17. Select OK.
18. If the new queue appears, connected to the tree in the right pane, select Next.
19. Verify the IP, Gateway, and Sub mask numbers are correct.
20. Select Next, then Finish, then OK to complete the a NDS queue.
Build a queue with a new or reset JetDirect card
1. Open Web JetAdmin and select Device then New.
2. Select the correct MAC address of the printer JetDirect card.
3. Enter the Printer server name (this is the printer name) and the Spp description.
4. To create a Bindery Queue, see Build a Bindery queue on a Novell server complete the
installation.
5. To create an NDS Queue, see Build an NDS queue on a Novell server to complete the
installation.
Troubleshooting:
To correct errors concerning administrative rights, check server login type (verify the login
has the correct administrative rights). Refresh Web JetAdmin. If this does not eliminate
the error, login to the server again; reselect the tree, context and server to establish a
good link with the server.
If this does not eliminate the error, turn the printer off, hold down the green button and
turn the printer on again. The front panel will display “Cold Boot.” This will also reset the
JetDirect card; see Build a queue with a new or reset JetDirect card to proceed.
Building an NDPS Printer
Loading a driver to vend
1. Logon to the correct server with Administration rights.
2. If an NDPS Manager does not exist, create an NDPS Manager.
3. Double click on the Broker object.
4. Select the Resource Management button on the right side; it also might be labeled
(RMS).
5. Select the Add button.
6. Verify in the Current Resources field that no driver for the printer is loaded.
7. Select browse and navigate to the location of the driver .inf driver files, then select
the .inf file for the driver you want to load.
8. Select OK.
9. If a driver was already loaded, select Replace the current driver to load the new
driver.
10. After the driver has loaded, verify in the Current Resources field that the driver
loaded correctly.
11. Close the window.

Network operating systems
HP Color LaserJet 4550 Software Technical Reference 155
Creating a Printer agent
1. Right click the container object.
2. Select Create
3. Select NDPS Printer.
4. Type in the printer name and select OK.
NOTE: HP suggests the printer be named with the following convention:
printer name - number (if applicable) – NDPS. All example
printer names use this convention
5. Highlight the HP Gateway.
6. Select the NDPS Manager previously created, click OK, and OK.
7. If the printer manager has not been previously loaded a window will appear stating
the NDPS Manager must be loaded. Click OK to close this window.
8. Select the printer to be used and click OK.
NOTE: The printer can be selected by the IP address, the IPX address,
or the Jet Direct Name.
9. To vend to a specific OS, select the printer name to be vended. If no drivers are to be
vended, select None under all of the OS icons in this window, then select OK.
Finding the NDPS printer object you just created from Windows
1. The Novell client must be running Novell Distributed printer Services for Windows to
find and connect to an NDPS printer object. Verify this in the properties of Network
Neighborhood under services, or by looking for the printer through Add Printer.
2. In Windows 95, Windows 98, or Windows Millennium, select Start, Settings, then
Printers.
3. Double click the Add Printer icon, select Network Printer and click Next, choose
Browse, then Entire Network (or tree), select a context, and select the printer
Agent Object (listed as “xxx-x-NDPS” if the HP naming convention was used).
NOTE: Do not use the NDPS Public access Printers
4. In Windows NT4.0 and Windows 2000, select Start, Settings, then Printers.
5. Double click the Add Printers icon. Choose NDPS Printers, then NDPS
Controlled Access Printers. Select the context, then select the printer Agent
Object.
6. If the driver has not been loaded through RMS or selected to vend, a window will
appear that requests the location of the driver to be loaded.
7. If you did load a driver in section A and selected that driver in section B, then you will
see the driver being vended to your system at this time.
8. You can use the default printer name, or you can enter your own printer name at this
point.

Appendix A: Job Status and Alerts
HP Color LaserJet 4550 Software Technical Reference 156
Appendix A: Job status and alerts in Windows operating
systems
Operating systems supported
This component can be installed on:
• Windows 2000
• Windows 95, Windows 98 and Windows Millennium
• Windows NT 4.0
Overview
The Job Status and Alerts feature is an extension to the printing system to help users stay informed about
the status of jobs they have submitted. Job Status and Alerts installs as part of the default driver
installation. If the user wants to install the driver without Job Status and Alerts for some reason, it is
necessary to use the custom install option and uncheck the status component before proceeding.
There is no help file or help button associated with the Job Status and Alerts window. The window is a
system-global printing status monitor. That is, there is only one Job Status and Alerts window, regardless
of how many printers or print jobs are being processed on the system.
Job Status and Alerts functionality is a background process launched at system startup. Normally, it runs
until the system shuts down. This Status process installs and maintains an icon in the system tray. The
behavior and appearance of this icon is described in depth in System tray icon.
The Options panel allows the user to specify what types of events (if any) should cause the Job Status
and Alerts window to display automatically.
The following definitions are used in the Job Status and Alerts feature:
• Active job: a job that has been submitted, is represented by an icon in the Job Status and Alerts icon
list, and is not yet completed.
• Active panel: the panel that is currently being displayed if the Job Status and Alerts window is open,
or that would be displayed if the window were opened; the panel associated with the currently
selected icon
• Alert condition: a job status condition that would trigger a document alert, whether or not that type of
alert were enabled in the Document Alerts options panel.
• Completed job: a job that cannot proceed because it has either finished successfully, failed with
some sort of error, was canceled, or Job Status and Alerts is unable to locate the job or communicate
with the printer (bidi communication failure).
• Current job: see Active panel.
• Current panel: see Active panel.
• Inactive job: see Completed job.
• Panel: the collection of display elements (similar to a dialog) associated with a particular icon, and
displayed in the right side of the Job Status and Alerts window when that icon is selected.
• Selected panel: see Active panel
• Top job: the job that was submitted most recently, earning it the top position in the icon list.
• Triggering job: the job with the most recent alert condition.

Appendix A: Job Status and Alerts
HP Color LaserJet 4550 Software Technical Reference 157
Job status and alerts window
The Job Status and Alerts window is a standard Windows resizable application window with a title bar,
but no menu bar across the top.
The status window is divided into several distinct regions. At the bottom of the window is the nameless
region that contains the HP logo on the left end and the Cancel Job and Close buttons on the right end.
The Cancel Job button is disabled (grayed out) unless a job status icon is selected, or if the selected job
is finished, failed, was canceled, or is being canceled. If enabled, clicking the Cancel Job button will
remove the job from the spooler queue and/or the target printer.
The upper portion of the status window is divided into two regions by a vertical divider bar that can be
dragged right or left to adjust the relative widths of the two regions. On the left is a list of job icons, printer
icons, and the Options icon. The icons are ordered primarily by these groups--first the jobs, if any, then
the printers, and finally the Options icon at the end of the list. The job icons will be presented in the
reverse of the order in which the jobs were submitted--most recent jobs first, followed by older jobs. The
printer icons are sorted in alphabetical order.
On the right is the display area for currently selected icon. Job Status icons appear (one for each pending
job) when jobs are submitted for printing. When a job finishes printing, its status icon shows the finished
state (green circle with blue check mark), and the icon remains in the icon list until another icon is
selected (either manually, or automatically by the Job Status and Alerts feature).
Printer status icons appear in the icon list for each printer configured on the system. Clicking these icons
will update and display the Printer Status panel. Printers that are involved with at least one of the active
print jobs are queried for their status periodically. If a printer responds with an error or warning condition,
the Job Status and Alerts window might displayed according to the Document Alerts options described in
the Job Status Panel.
Job status panel
The job status panel has a dynamic icon and title that represents the current status of the print job
being monitored. Normally, the title of the job status icon will be the name of the document being
printed, subject to the availability of that information from the application. If the application does
not provide a document title, Job Status and Alerts will use the label "Unknown."
The state of the job may be one of several possibilities:
• Receiving indicates that the job data is being written to the spooler queue (local or remote)
by the application.
• Unknown is shown when the Job Status and Alerts software cannot communicate with the
destination printer.
• Printing indicates that the spooler is now sending our job to the printer, and/or the printer is
processing our job.
• Waiting indicates that there are other jobs queued up in the spooler or printer ahead of ours.
• Stopped indicates that there is some sort of problem with the printer and progress is not
being made. Typically, this would be caused by a paper jam or similar printer error that
occurs while printing our job or one of the jobs ahead of ours.
• Finished indicates that the document has been printed successfully.
• Failed indicates that the printer reported an error of some kind and the job was terminated, or
was completed with some kind of compromise (such as print resolution)
• Canceled indicates that the job was removed from the spooler or terminated before the
printer could finish it.
• Canceling indicates that the software is attempting to cancel the job at the user's request.

Appendix A: Job Status and Alerts
HP Color LaserJet 4550 Software Technical Reference 158
The Warning icon is used in conjunction with one of the other job status icons, and does not
represent a job state by itself. The Receiving icon will be rarely seen, because a typical print job
takes very little time to write to the spooler, especially if the spooler is on the local host. After
Receiving, the job enters the Waiting state or the Printing state.
Since the largest portion of time before a job completes will be spent in either the Waiting or the
Printing states, both of these employ an animated icon.
NOTE: The animated icons will appear in the job status panel only--the
icon list will use only the static icons.
It is possible that when the Job Status window is displayed, more than one job is being
processed. In that event, there is a separate job status icon for each job being processed. Each
has the appropriate icon indicating the current status of that job, but the job (document) name will
be used to distinguish them. In the event that more than one job has been submitted with the
same name, some identifier is appended to the second and subsequent icon titles (engineering
resources permitting) to keep them unique (e.g., two documents named "untitled" might appear
as "untitled" and "untitled2").
When the job status icon is selected, the right side of the window displays the status panel
containing information about the status of the current job. The general layout of the status panel
is:
• a status icon followed by a single-word title, followed by the name of the target printer in
parentheses
• a one-line sentence describing the details of the current status
• additional information (not always present) that pertains to the current status.
In case of a printer warning condition, the current status of the job does not change--the job
progresses as usual, until either the user cancels the job or the printer develops a more serious
(error) condition. To notify the user of warning conditions that do not (immediately) impact the
current job, a warning icon is displayed along with a brief description of the condition.
NOTE: The job icon (in the list of the left side) will never change to the
warning icon because, as stated above, the caution icon does
not represent a state by itself--it only supplements one of the
other states.
Warning conditions will not be reported for jobs that are completed, but they can be combined
with any other state, including error (stopped) states.
With the job completed, it is no longer possible to cancel the job, so the Cancel Job button
becomes disabled.
If the destination printer is an unknown type, it will be impossible to gather status information
about the job. In this case, Job Status and Alerts displays the "Unknown" state. This also displays
when the printer is a known type, but for whatever reason, Job Status and Alerts could not get
status information.
Dynamic Behavior of Job Status
When the Job Status window is opened, it contains at least one icon in the list, and
exactly one icon is selected, with its panel displayed in the right side of the window.
When the Job Status window is opened, it will select either the most recent triggering job
(if an alert condition has occurred since the window was last closed), or the same panel

Appendix A: Job Status and Alerts
HP Color LaserJet 4550 Software Technical Reference 159
that was selected when the window was last closed. If the previously selected panel is no
longer present (because it has been deleted), then the first job panel in the list will be
selected. If no job panels exist, then the Options panel will be selected as a last-case
default.
When the window is open, there are three types of events that can cause the program to
display a different panel:
1. The user manually selects a different panel by clicking on a different icon.
2. Another job has an alert condition and that type of alert is enabled.
3. Another job has an alert condition and the current panel corresponds to a completed
job.
In the case of event number one, the Job Status window will display the panel
corresponding to the icon that was clicked by the user. In the case of events two and
three, the window will display the panel for the triggering job. If none of these events
occur, the panel currently being displayed will remain in the display indefinitely.
When a completed job is no longer selected, its icon will remain in the icon list for 10
seconds. This delay allows the user to quickly check the status of other jobs without
losing a completed job (say, one that failed with a peculiar error message). However, if
the completed job remains unselected for 10 seconds, it will be deleted from the icon list.
When the Job Status and Alerts window is closed, the rules are a little bit simpler. The
closed Job Status and Alerts window (even though it's not visible) will select a new panel
when:
1. the system tray icon changes
2. the selected panel is a completed job and has been for 10 seconds
In the first case, the new panel that is selected would be the triggering job. In the second
case, the selected panel would be deleted and the top job would be selected. Closing the
Job Status and Alerts window when the selected panel is a completed job will delete that
job panel immediately--no 10-second timer is used in this case.
Printer status panel
The printer status feature has a generic printer icon and a title that matches the particular printer
whose status is being monitored. If there is more than one printer configured, each printer will be
represented by a separate printer status icon in the icon list (one status icon per printer icon in the
Printers folder, except for unsupported drivers). Selecting a printer status icon causes the right
side of the window to display the printer status panel.
The printer status panel has five browser navigation buttons positioned over a browser window
element which is used to display web pages either supplied by the printer or created locally from
current status information. The five navigation buttons are designated as follows (from left to
right):
• Back: If the user clicks on a hyperlink within a displayed page, clicking the Back button will
return to the previous page. The repeatedly clicking the Back button will take the user back to
the main printer status page, after which it will no longer have an effect.
• Forward: Think of this button as an "Undo" for the Back button. Clicking it has no effect
unless the Back button was clicked recently.
• Refresh: Refreshes the contents of the page. If the page is served by a printer's embedded
web server, then a request is made to reload that page. If the page is synthesized from the
bidi status returned by a printer, then that status is updated and the page recreated and
redisplayed.
• Home: This button reloads the main page for the selected printer--it has nothing to do with
the Home page that may be configured for Internet Explorer.

Appendix A: Job Status and Alerts
HP Color LaserJet 4550 Software Technical Reference 160
• Job History: displays a page containing information about the history of jobs printed to this
printer from this PC (described further below).
Of the five buttons at the top of the printer status panel, the first four should be readily apparent to
anyone who has used a web browser. The Refresh button is necessary for updating the printer
status page when the printer has no embedded web server. When displaying embedded web
content, the web server will automatically repost its page contents and refresh the browser
window when status changes. The last button represents job history.
The Job History page consists of a table containing Document Name, Owner, State, and Pages.
The Document Name is the name reported to the driver by the application. The Owner is the
windows user (login) name. The State is either Printed, Canceled, Failed, or Unknown. The
Pages column is "N of M" where N is the number of pages printed. and M is the total number of
pages to print. For jobs whose state is "Printed," N should be equal to M. They may differ in
Canceled or Failed jobs. The specific layout and cosmetic appearance of this page is subject to
change.
There are a number of situations where the printer status panel will not be able to display printer
status information. These situations occur when:
1. Job Status and Alerts is retrieving information from the printer;
2. There is a bidi communication failure; and
3. Job Status and Alerts can communicate with the printer but they don't understand each other.
For each of these three cases, the printer status window will display an animated gif image that is
intended to substitute for an error or progress message.
Options panel
There are a number of aspects of the Job Status and Alerts software that users may wish to
configure in order to specify a combination of behaviors that's well suited to the user's style of
working. What makes the Options panel unique is the category selection, located in the light gray
band across the top of the panel. These controls include a drop-down list control, where the user
may select from an expandable list of options categories, and a Next button, which selects the
next category in the list in circular fashion. Selecting a different choice from the drop-down list (or
clicking the Next button) causes the contents of the panel below to be updated with a different set
of options that correspond to the selected category.
The installer program allows the administrator to create a custom installation disk that will install
preconfigured options for Job Status and Alerts. The administrator will be able to specify the
default Document Alert and Refresh Rate options, and will have the choice of making the Refresh
Rate sub-panel not appear to the end user. If this option is selected, then the end user will only
have one sub-panel available for Job Status and Alerts Options (Document Alerts), and the scope
controls will not be shown at the top of the Options panel.
Within both the Document Alerts and the Refresh Rate sub-panels, the user must first select a
printer to set the scope of the Options settings to be changed. The default setting is All Printers,
which means that any changes made to the settings below will apply to all configured printers. If a
change in scope is desired, the specific printer (or All Printers) must be selected before the
settings are adjusted. At any given time, any change made to any of the Options settings will
apply to the printer specified in the drop-down list. Changing the printer scope after changing the
Options settings will not have the desired effect.
The Document Alerts options consist of four check boxes representing four different types of
notice that the user may be interested in. If none of these options are checked, then no document
alerts will appear during the course of a print job to the selected printer. When at least one option
is checked and an in-progress print job has triggered that condition, the Job Status window will
appear with the Job Status panel displaying the particular status condition that triggered the alert.
Appendix A: Job Status and Alerts
HP Color LaserJet 4550 Software Technical Reference 161
The second alert option, labeled "your document has finished printing," will notify the user if any
job completes successfully. Failed jobs are covered under the "your document cannot complete
due to an error" option, and there is no alert option that covers canceled jobs.
The Refresh Rate options specify the intervals at which the printer and spooler are queried over
the network for updated job status information. The default setting for the Refresh Rate is the
center unlabeled detent, halfway between Less Often and More Often.
The three labeled refresh rate settings are accompanied by a notice that appears below the slider
control. The notices are intended to warn the user about the trade-offs between network
performance and responsiveness of the status window. When the Never selection is active, the
notice will inform the user that no status monitoring will be performed on the selected printer. If
the current scope control is set to All Printers, the notice will state that the whole status
monitoring system is now disabled. When in this state, the obvious way to turn it back on is to
drag the slider control off of the Never setting.
The following table shows the text of the notice messages for the four unique settings that
produce them.
Refresh Rate Setting Notice Message Text
More Often This setting will give you the most timely status updates, but
may have a negative impact on network performance.
Less Often This setting has minimal impact on network traffic, but
document alerts may be delayed by several minutes.
Never (one printer) This setting disables status monitoring for all documents sent to
the printer printername.
Never (all printers) This setting disables all document status monitoring.
System tray icon
In the system tray, an icon will represent only the most significant status conditions. This icon serves as
an abbreviated status indicator when the Job Status and Alerts window is not open. It also serves as a
control point for interacting with the status process.
The system tray icon provides access to the status functions in the following ways:
• Its icon represents the worst status of all jobs being monitored. That is, if three jobs are being
monitored, and two of them are proceeding nicely but the third is blocked because of a paper jam, the
icon will show the red Stop image to signal the error condition. The tray icons will be similar to (but
smaller than) some of the status icons, plus there will be an Idle icon that will just show a printer when
there is no job status to report.
• A double-click on the icon with the left mouse button will cause the Job Status and Alerts window to
display if it is not already visible.
• A single left-click or right-click on the icon will present a context menu with the following items:
• Open: opens the Job Status and Alerts window as if the user had double-clicked on the icon. It's
bold to show the default (recommended) option.
• Options: opens the Job Status and Alerts window and automatically selects the Options panel
• Exit: presents a confirmation dialog, then terminates the Job Status and Alerts app
When the Exit... item is selected from the context menu, a dialog box appears.
Appendix A: Job Status and Alerts
HP Color LaserJet 4550 Software Technical Reference 162
If Job Status and Alerts has been configured not to run automatically on restart, the same dialog will
appear again the next time the program is executed manually (either from the Run command or by
double-clicking the application icon). If it is already configured for auto-run, this dialog will not appear
when the program is executed.
There are seven significant states visible from tray icon:
• Failed: A job has recently completed with an error, such as memory out, or was canceled.
• Error: A job being processed is being held up by an error condition.
• Finished: A job has recently completed successfully.
• Warning: A printer for a job being processed has a warning condition, but no error conditions have
been detected (warning alerts are enabled).
• Busy: A job recently began being processed and is proceeding normally.
• Idle: The Job Status and Alerts software has been installed, and there are no active jobs being
processed.
• Unknown: A print job that Job Status and Alerts was tracking cannot be found. It was probably
printed, but Job Status and Alerts cannot determine the exact outcome.
These states represent the maximum detail we should expect to convey through the system tray icon. If
the user sees the Busy icon and wants more detail on the current status of a job, they can double- click
the icon to display the Job Status and Alerts window.
The tray icon will always represent the triggering job whose status changed (had an alert condition) most
recently. Even if the last job completed an hour ago, the tray icon will indicate the last alert condition of
that job (e.g., Finished, Failed, or Unknown). If warning alerts are not checked (enabled) in the Document
Alerts options, then the Warning icon will not be displayed in the system tray when a warning alert
condition is detected. However, Error and Failed icons will be shown when appropriate, even if the error
alerts are not enabled.
Because a completed job panel will only be deleted when it is not the active panel, the last job panel will
remain the active panel (and the tray icon will remain either Finished, Failed, or Unknown) until another
triggering job is submitted. This new job will become the active panel. However, without submitting a new
job, the old job panel can be deleted manually by opening the window and closing it again. At this time, if
there are no other jobs to be selected in the list, the system tray icon will return to the Idle state (the icon).
Job status and alerts files
Win32 (Common files between Win9x and WinNT/2K)
Filename Directory Description
Hpbdrtpl.dll $SYSTEM (Print Job Specific) Printer delivery step module
responsible for communicating with the printer via bidi to
determine the state of a print job (uses a polling
mechanism).
hpbskpng.dll $SYSTEM (Print Job Specific) Printer socket ping delivery step
module responsible for listening for pushed job events
from the printer, data is transmitted via sockets.
hpbewsdm.dll $SYSTEM Embedded web server device monitor that is
responsible for determining a printers device status URL
if the printer has an embedded web server.

Appendix A: Job Status and Alerts
HP Color LaserJet 4550 Software Technical Reference 163
Filename Directory Description
hpbwspds.dll $SYSTEM (Print Job Specific) Windows spooler delivery step that
communicates with the windows spooler to determine
the state of the print job while it exists within the
windows print subsystem.
hpbsubmn.dll $SYSTEM (Print Job Specific) Submission monitor that listens for
events coming back from the printer/spooler/socket ping
delivery steps and then forwards the appropriate
information to a User Interface module that will display
something meaningful from the event data sent from the
delivery steps.
hpbmappr.dll $SYSTEM The mapper creates/maps print jobs to the appropriate
delivery steps and also maps printers to specific device
monitors.
hpbsbmui.dll $SYSTEM (Print Job Specific) Submission monitor UI component
that interprets job event data sent to it from a
submission monitor, and displays a meaningful UI
based on the job data.
hpbswsdm.dll $SYSTEM Synthetic web server device monitor that performs bidi
requests to the printer to generate a synthesized web
page that represents the current state of the device and
its capabilities.
hpbdvmui.dll $SYSTEM Device monitor UI that hosts the HTML control (From IE
4.0 or greater) that will display the HTML data the
embedded web server (hpbewsdm.dll) or the synthetic
web server (hpbswsdm.dll) generate.
hpbspsvr.exe $SYSTEM Socket Ping Server executable that listens for pushed
events from any printer on windows sockets, and then
forwards the connection data/events to the job specific
socket ping delivery step (hpbskpng.dll).
hpbJob Status and
Alertsui.dll
$SYSTEM Job Status and Alerts core UI component that displays
the main application window.
hpbspref.dll $SYSTEM Job Status and Alerts options component that is
responsible for displaying the Options UI.
HpStatus.exe $SYSTEM Main Job Status and Alerts executable.
Hpbdrvin.dll $SYSTEM Job Status and Alerts Proxy driver installation module.
Hpbdrvhk.exe $SYSTEM Command line utility that can be used by CCC agents to
add/remove Job Status and Alerts support for specific
drivers and printers.
Appendix A: Job Status and Alerts
HP Color LaserJet 4550 Software Technical Reference 164
Filename Directory Description
blackbar.gif
brokenconnection.g
if
greenbar.gif
greenblink.gif
Level-00N.gif
Level-012.gif
Level-025.gif
Level-050.gif
Level-075.gif
Level-100.gif
Level-Empty.gif
Level-OK.gif
Level-Unknown.gif
OK.gif
redbar.gif
redblink.gif
Unknown.gif
working.gif
Typically installed
in something like:
C:\Program
Files\Hewlett-
Packard\HP
Status\Images
Graphics image files that are used by Job Status and
Alerts when displaying the printer/device status.
HPJob Status and
AlertsDRV.MTX
$WINDOWS The driver support matrix file that Job Status and Alerts
uses to determine whether Job Status and Alerts will
support specific driver models, and/or specific driver
model files.
Windows 95, Windows 98, and Windows Millennium
Filename Directory Description
Hpbjds9x.exe $SYSTEM Windows 9X job detector application that detects when
new print jobs are started and it notifies the Job Status
and Alerts application to start tracking the print job.
HPBPRX9X.DRV $SYSTEM Windows 9x Status Proxy driver.
Hpbdrp16.dll $SYSTEM Windows 9x status proxy driver installation module.
Hpsync9x.exe $SYSTEM Windows 9x driver synchronization utility.
Windows NT 4.0
Filename Directory Description
Hpbjdsnt.exe $SYSTEM Windows NT/2K Job detector application.
Hpbprxkm.dll $SYSTEM Windows NT 4.0 Kernel Mode status proxy driver.
Appendix A: Job Status and Alerts
HP Color LaserJet 4550 Software Technical Reference 165
Hpbdrvrp.dll $SYSTEM Windows NT/2K status proxy driver installation module.
Hpsyncnt.exe $SYSTEM Windows NT/2k driver synchronization utility.
Windows 2000
Filename Directory Update
Hpbprx2k.dll $SYSTEM Windows 2K User Mode status proxy driver.
hpb2ksrv.exe $SYSTEM Windows 2K Status Service.
Hpbjdsnt.exe $SYSTEM Windows NT/2K Job detector application.
Hpbprxkm.dll $SYSTEM Windows NT 4.0 Kernel Mode status proxy driver.
Hpbdrvrp.dll $SYSTEM Windows NT/2K status proxy driver installation module.
Hpsyncnt.exe $SYSTEM Windows NT/2k driver synchronization utility.
For Windows 2000, the status service can be manually installed by running the command
hpb2ksrv.exe –install
To uninstall the Windows 2000 status service manually, run the following command:
hpb2ksrv.exe –remove
The hpb2ksrv.exe file is a Windows NT Service that runs only on Windows 2000. The –install
option will install the service on the users computer, and after reboot it will start itself
automatically. The –remove option will stop the service and remove itself as a service, and then
it can be deleted.
INI file entries
Windows 95, Windows 98, and Windows Millennium Ini Entries
INI File Section Key Value
win.ini hpstatus-aggressive pscript.drv 1
The following ini file entries are used by status to enable/disable certain functions within Job
Status and Alerts.
Windows 95, Windows 98, Windows Millennium, Windows NT4.0, and Windows 2000 ini
entries
INI File Section Key Value
Hpstatus.ini allprinters independent 1
Hpstatus.ini allprinters Onejobprocessing alert 1
Appendix A: Job Status and Alerts
HP Color LaserJet 4550 Software Technical Reference 166
INI File Section Key Value
Hpstatus.ini allprinters finishedjobalert 1
Hpstatus.ini allprinters warningalert 1
Hpstatus.ini allprinters erroralert 1
Hpstatus.ini refreshrate allprinters 5
Hpstatus.ini LegacyPrinterDSRates MoreOften 10000
Hpstatus.ini LegacyPrinterDSRates MoreOftenLessOne 30000
Hpstatus.ini LegacyPrinterDSRates Middle 40000
Hpstatus.ini LegacyPrinterDSRates LessOftenPlusOne 90000
Hpstatus.ini LegacyPrinterDSRates LessOften 120000
Hpstatus.ini WindowsSpoolerDSRates MoreOften 275
Hpstatus.ini WindowsSpoolerDSRates MoreOftenLessOne 275
Hpstatus.ini WindowsSpoolerDSRates Middle 275
Hpstatus.ini WindowsSpoolerDSRates LessOftenPlusOne 275
Hpstatus.ini WindowsSpoolerDSRates LessOften 275
Hpstatus.ini images redbar $IMAGEPATH\
redbar.gif
Hpstatus.ini images redblink $IMAGEPATH\
redblinkgif
Hpstatus.ini images greenbar $IMAGEPATH\gre
enbar.gif
Hpstatus.ini images greenblink $IMAGEPATH\gre
enblink.gif
Hpstatus.ini images blackbar $IMAGEPATH\bla
ckbar.gif
Hpstatus.ini images working $IMAGEPATH\wor
king.gif
Appendix A: Job Status and Alerts
HP Color LaserJet 4550 Software Technical Reference 167
INI File Section Key Value
Hpstatus.ini images brokenconnection $IMAGEPATH\bro
kenconnection.gif
Hpstatus.ini images LevelUnknown $IMAGEPATH\l
evel-unknown.gif
Hpstatus.ini images LevelOk $IMAGEPATH\
level-ok.gif
Hpstatus.ini images LevelEmpty $IMAGEPATH\
level-Empty.gif
Hpstatus.ini images Level00N $IMAGEPATH\
level-00N.gif
Hpstatus.ini images Level12 $IMAGEPATH\
level-012.gif
Hpstatus.ini images Level25 $IMAGEPATH\
level-025.gif
Hpstatus.ini images Level50 $IMAGEPATH\
level-050.gif
Hpstatus.ini images Level75 $IMAGEPATH\
level-075.gif
Hpstatus.ini images Level100 $IMAGEPATH\
level-100.gif
Hpstatus.ini images Ok $IMAGEPATH\ok.
gif
Hpstatus.ini images Unknown $IMAGEPATH\unk
nown.gif
The $IMAGEPATH is just a place holder for where the actual path of the .gif files are installed. It
will typically be something like: c:\program files\hewlett-packard\hp status\images
Description of HPSTATUS.INI Entries and their Purpose
Below is a description of each section that HPSTATUS.INI can have, and the possible
keys that each section contains as well as a description of the purpose for each key.
[allprinters]
The name of this section indicates that the keys are for each printer installed, unless
there is a printer specific section, which has independent alert, and refresh rate settings.
These keys are specific to the tracking of a print job.
Appendix A: Job Status and Alerts
HP Color LaserJet 4550 Software Technical Reference 168
Key Name Values Meaning
onejobprocessingalert 0* Job Status and Alerts will not activate/display
itself when a new job is detected.
1 Job Status and Alerts will activate/display itself
when a new job is detected.
finishedjobalert 0* Job Status and Alerts will not activate/display
itself when a print job has completed (includes
finished or unknown).
1 Job Status and Alerts will activate/display itself
when a job has completed (includes finished or
unknown).
warningalert 0* Job Status and Alerts will not activate/display
itself when a warning is active in the printer.
1 Job Status and Alerts will activate/display itself
when a warning is active in the printer.
erroralert 0 Job Status and Alerts will not activate/display
itself when an error has been detected.
1* Job Status and Alerts will activate/display itself
when an error has been detected.
* Default values after installation
[refreshrate]
The keys in this section are specific to each printer, or all printers. The value for each
printer indicates the update interval for which status will query the printer for the state of
the print job. These keys are specific to the tracking of a print job.
Key Name Values Meaning
hidden 0* The hidden key controls whether or not the refresh rate
panel should appear within the Job Status and Alerts
options. This entry may be useful for administrators who
do not wish to let their end users control the refresh rate
setting due to negative impact on network performance.
(See LegacyPrinterDSRates for more information on the
refresh rate intervals.)
Do not hide the refresh rate panel.
1 Hide the refresh rate panel within the Job Status and
Alerts Options so that users can not change the refresh
rate interval.
Appendix A: Job Status and Alerts
HP Color LaserJet 4550 Software Technical Reference 169
allprinters 0 Maps to the Refresh Rate setting of Never (Job Status
and Alerts will not track the status of print jobs).
1Maps to the Refresh Rate setting of LessOften (see
LegacyPrinterDSRates for more information).
2Maps to the Refresh Rate setting of LessOftenPlusOne
(see LegacyPrinterDSRates for more information). The
refresh rate setting one tick to the right of LessOften.
3* Maps to the Refresh Rate setting of Middle (see
LegacyPrinterDSRates for more information). The middle
refresh rate setting.
4Maps to the Refresh Rate setting of MoreOftenLessOne
(see LegacyPrinterDSRates for more information). The
refresh rate setting one tick to the left of MoreOften.
5Maps to the Refresh Rate setting of MoreOften (see
LegacyPrinterDSRates for more information).
SpecificPrin
terName
0-5 Each printer can have its own independent refresh rate,
just as the allprinters key does above.
* Default values after installation
[LegacyPrinterDSRates]
This section contains key/value pairs that control the update interval Job Status and
Alerts will use while querying for the state of a print job within a printer. The values for
each key are in terms of milliseconds. So a value of 1000 is has the equivalent of 1
second. The lower the refresh rate value, the more often the printer is queried for the
state of a print job. (See the WindowsSpoolerDSRates section for similar update
intervals)
An administrator could speed up (lower the interval) or slow down (increase the interval)
these refresh rates by modifying an HPSTATUS.INI file and then replicate that file on all
of the client systems. This is done by coping the file to each client’s WINDOWS directory,
or if the clients are running a shared version of Windows (win9x), then simply putting the
HPSTATUS.INI in the server’s SYSTEM directory would also suffice.
Key Name Values Meaning
LessOften 120000 When the refresh rate slider control is set to the
LessOften, print jobs will use the value for this
key to check the status of a print job. (Update job
state every 2 minutes.)
LessOftenPlusOne 90000 When the refresh rate slider control is set to the
LessOftenPlusOne, print jobs will use the value
for this key to check the status of a print job.
(Update job state every 1 minute and 30
seconds.)
Appendix A: Job Status and Alerts
HP Color LaserJet 4550 Software Technical Reference 170
Middle 40000 When the refresh rate slider control is set to the
Middle, print jobs will use the value for this key to
check the status of a print job. (Update job state
every 40 seconds.)
MoreOftenLessOne 30000 When the refresh rate slider control is set to the
MoreOftenLessOne, print jobs will use the value
for this key to check the status of a print job.
(Update job state every 30 seconds.)
MoreOften When the refresh rate slider control is set to the
MoreOften, print jobs will use the value for this
key to check the status of a print job. (Update job
state every 10 seconds.)
All values above are default values
[WindowsSpoolerDSRates]
This section contains key/value pairs that control the update interval Job Status and
Alerts will use while querying for the state of a print job within the context of the current
computer (spooler queue). The values for each key are in terms of milliseconds. So a
value of 1000 is has the equivalent of 1 second. The lower the refresh rate value, the
more often the computer (spooler queue) is queried for the state of a print job. (See the
LegacyPrinterDSRates section for similar update intervals) Since the spooler queue
resides on the local computer, no networking is performed to get this state, so these
update intervals can be set fairly high (0.2 of second) without affect system performance.
An administrator could speed up (lower the interval) or slow down (increase the interval)
these refresh rates by modifying an HPSTATUS.INI file and then replicate that file on all
of the client systems. This is done by copying the file to each client’s WINDOWS
directory, or if the clients are running a shared version of Windows (win9x), then simply
putting the HPSTATUS.INI in the server’s SYSTEM directory would also suffice.
Key Name Values Meaning
LessOften 275 When the refresh rate slider control is set to the
LessOften, print jobs will use the value for this key to
check the status of a print job. (Update job state every
275 milliseconds = ~3/10 of second.)
LessOftenPl
usOne
275 When the refresh rate slider control is set to the
LessOftenPlusOne, print jobs will use the value for this
key to check the status of a print job. (Update job state
every 275 milliseconds = ~3/10 of second.)
Middle 275 When the refresh rate slider control is set to the Middle,
print jobs will use the value for this key to check the
status of a print job. (Update job state every 275
milliseconds = ~3/10 of second.)
Appendix A: Job Status and Alerts
HP Color LaserJet 4550 Software Technical Reference 171
MoreOftenLe
ssOne
275 When the refresh rate slider control is set to the
MoreOftenLessOne, print jobs will use the value for this
key to check the status of a print job. (Update job state
every 275 milliseconds = ~3/10 of second.)
MoreOften 275 When the refresh rate slider control is set to the
MoreOften, print jobs will use the value for this key to
check the status of a print job. (Update job state every
275 milliseconds = ~3/10 of second.)
All values above are default values
[EWSConnect]
This section controls the timeout value for attempting to connect to the Embedded Web
Server (EWS) within the printer. If the printer doesn’t respond within the timeout value
specified below, Job Status and Alerts will assume that the EWS is not present within the
printer.
Key Name Values Meaning
EWSTimeout 4000 Timeout value for retrieving data from the EWS within
the printer. The time specified is in milliseconds. (4000
milliseconds = 4 seconds.)
[LostJobTimer]
This section controls the default amount of time Job Status and Alerts will continue to
track a print job without any change in the job state. When Job Status and Alerts starts
tracking a new print job, it sets up a timer for the value specified below. Whenever the
state of the print job changes, the timer is reset. If the state of print job does not change
within the time specified, Job Status and Alerts will give up trying to track the print job,
and set the job state as Unknown.
Key Name Values Meaning
LostJobtimeout 300000 Timeout value for indicating that the state of the
job is unknown and Job Status and Alerts will no
longer try to track the job if the job state hasn’t
been updated within the time specified. Time
specified is in milliseconds. (300000 milliseconds
= 5 minutes [(300000/1000 milliseconds)/ 60
seconds].)
Appendix A: Job Status and Alerts
HP Color LaserJet 4550 Software Technical Reference 172
[biditimeout]
This section controls the bidi connection timeout values when attempting to open a
connection printer, and it also controls the timeout values for getting information from the
device as well as how long to wait before retrying again.
Key Name Values Meaning
Timeout1 3000 Timeout value to wait before retrying the failed
bidi call, before trying the call again. On a failed
call, it will retry retry1 number of times before it
completely fails. Time specified is in
milliseconds.
Timeout2 3000 Timeout value to wait until repeating the first retry
loop. After the retry1 loop has completed without
response, it will retry retry2 number of times
before it completely fails. Time specified is in
milliseconds.
Retry1 1 Number of times to retry a bidi call in the event of
a failure, waiting timeout1 milliseconds before
retrying.
Retry2 1 Number of times to repeat the retry1 loop in the
event of a failure, before failing completely.
Waiting timeout2 milliseconds before repeating
the retry1 loop.
[bidilevel]
This section controls the bidi protocol level at which to perform queries on the device.
Key Name Values Meaning
Bidilevel 1* Performs standard PML get requests from the
device.
2 Performs advanced PML multi-get requests from
the device. This value should only be used for
JetDirect cards that have a firmware version
higher than G.05.35. If the bidilevel is set to 2,
and the printer frequently errors out with the
error EIO 82.0180, then the bidilevel must be set
1. This bidilevel setting will help improve
response time, but due to bad firmware in the
JetDirect card it can cause errors in the printer.
* Default values after installation

Appendix A: Job Status and Alerts
HP Color LaserJet 4550 Software Technical Reference 173
Enabling/disabling job status and alerts support
When Job Status and Alerts is closed, by right clicking on the Job Status and Alerts tray icon and
selecting Exit, it will prompt the user to restart Job Status and Alerts on startup. If the user chooses “No,
don’t start automatically”, this entry will be removed.
To start status manually, select the Start|Run menu, and type HPSTATUS.
Disable job tracking
To temporarily disable job tracking for one or more printers available in Job Status and Alerts, select the
Options icon, and then in the Options panel select “Refresh Rate”. A window similar to the image below
will appear. Move the slider control all the way to the left so that it is pointing at “Never”.
Adding/removing job status and alerts printers
Job Status and Alerts determines which drivers it supports and which ones it doesn’t by consulting the
driver support matrix file HPJob Status and AlertsDRV.MTX. If a printer is known to be supported, but it
isn’t appearing with the Job Status and Alerts window, you can run a command to enable Job Status and
Alerts support for the driver that the printer uses.
NOTE: Take care when adding a driver to the Job Status and Alerts supported
list, because it may be unsupported for a reason, and adding in support
for a driver that hasn’t been tested/supported may break printing for the
specified driver or the entire printing system.
Steps to add support for a specific driver
1. Open a command prompt window.
2. Change directories so that the current directory is the windows\system directory (For win9x
systems it will typically be windows\system, for NT/2K machines it will be winnt\system32).
3. Make sure Job Status and Alerts is shutdown, if it is not right click on the Job Status and
Alerts tray icon and choose exit.
4. Type the command: hpbdrvhk –s “printername.”
5. Repeat step 4 for each printer name that is to be added.
6. Type the command: hpstatus.
7. When Job Status and Alerts is finished loading, the name of the printer supplied in step 4 will
appear in the left pane of the Job Status and Alerts application window.
8. Any printer that uses the same driver model name as the printer referenced in step 4 will also
appear in the left pane of the Job Status and Alerts application window.
Steps to remove support for a specific printer
1. Open a command prompt window.
2. Change directories so that the current directory is the windows\system directory (for win9x
systems it will typically be windows\system, for NT/2K machines it will be winnt\system32).
3. Make sure Job Status and Alerts is shutdown, if it is not right click on the Job Status and
Alerts tray icon and choose exit.
4. Type the command: hpbdrvhk –u “printername.”
5. Repeat step 4 for each printer name that is to be removed.
6. Type the command: hpstatus.
7. When Job Status and Alerts is finished loading, the name of the printer(s) supplied in step 4
will no longer appear in the Job Status and Alerts application window.

Appendix A: Job Status and Alerts
HP Color LaserJet 4550 Software Technical Reference 174
Steps to remove support for a specific driver
1. Open a command prompt window.
2. Change directories so that the current directory is the windows\system directory (for win9x
systems it will typically be windows\system, for NT/2K machines it will be winnt\system32).
3. Make sure Job Status and Alerts is shutdown, if it is not right click on the Job Status and
Alerts tray icon and choose exit.
4. Type the command: hpbdrvhk –r “printername.”
5. Repeat step 4 for each printer name that is to be removed.
6. Type the command: hpstatus.
7. Job Status and Alerts will no longer support any printer that refers to the same driver model
name.
Driver support matrix
The status component determines which printer drivers it supports by consulting a file called the
Driver Support Matrix (DSM) named HPJob Status and AlertsDRV.MTX. This DSM file is nothing
more than an INI file that contains entries of driver model names that it specifically supports, or
specifically does not support.
DSM File Format
The format of the DSM file looks like:
[Driver Model Name]
supported=[0|1]
Each driver model name that status supports will have an entry in this file. For example
the 8150 PS driver would have an entry in the DSM file that looks like:
[HP LaserJet 8150 Series PS]
supported=1
The DSM can also have entries that specifically prohibit known drivers that status will not
support:
[Driver Model Name, NotSupported]
driverFileName,x.y.z=1
This type of entry is used by status to exclude support for a specific driver model name,
using a specific driver file and version. For example, the 8500 PCL drivers for 9x and NT
are not supported because the printer drivers are not written in a standard way that status
proxy drivers can hook the OS functions they call. Disabling support for these types of
drivers is accomplished by having the following entries in the DSM:
[HP CLJ 8500 - PCL,NotSupported]
HPCPCLA.DRV,1.0.0090=1
;; windows 9x pcl driver is not supported
[HP CLJ 8500 - PCL,NotSupported]
HPCPCLA.DLL,1.0.0090=1
;; windows NT4 Kernel Mode driver is not supported
Appendix A: Job Status and Alerts
HP Color LaserJet 4550 Software Technical Reference 175
Troubleshooting
If Job Status and Alerts is conflicting with some other application or a specific driver model is causing
problems follow the steps below to resolve the appropriate issue.
General problem solving
To determine the state of Job Status and Alerts and which printers it is currently monitoring, and
how to remove a specific printer, consult the table below.
Problem Solution(s) Description of Solution(s)
When I print a job and Job
Status and Alerts tracks
the status of my print job,
it immediately shows the
Unknown Job state.
Try changing the device
to a port.
Bidi is only supported to a limited
set of Port types for version 1.01
of Job Status and Alerts, and they
include:
• HP Standard TCP/IP Port
• HP JetDirect Port
• MS Standard TCP/IP Port
• LPR Ports
Bidi does not support USB, or
LPT ports, or shared LPT ports.

Appendix A: Job Status and Alerts
HP Color LaserJet 4550 Software Technical Reference 176
Problem Solution(s) Description of Solution(s)
When I print a job and Job
Status and Alerts tracks
the status of my print job,
after a few minutes of
time, it eventually shows
the Unknown Job state.
(It always behaves this
way.)
Verify the connection is
valid by selecting the
printer icon within Job
Status and Alerts.
If the printer device status shows
up correctly, then this is most
likely a compatibility issue with the
printer driver, see #2 for this
problem.
If it shows a broken connection
gif, then the problem is with the
device, and Job Status and Alerts
is unable to communicate with it.
Resolve the communication
problem with the printer.
If the device is working properly,
and Job Status and Alerts still
can’t communicate with it, then
Job Status and Alerts will not
support the device:
1. Open a command prompt
window.
2. Change directories so that the
current directory is the
windows\system directory (For
win9x systems it will typically
be windows\system, for NT/2K
machines it will be
winnt\system32).
3. Verify Job Status and Alerts is
shut down; if not, right click on
the Job Status and Alerts tray
icon and choose exit.
4. Verify all other applications are
shut down.
5. Type the command:
hpbdrvhk –u “printername.”

Appendix A: Job Status and Alerts
HP Color LaserJet 4550 Software Technical Reference 177
Problem Solution(s) Description of Solution(s)
If the device status
works correctly from #1
above then the problem
is most likely due to an
unsupported printer
driver model.
The printer driver may be
incompatible with the Job Status
and Alerts proxy drivers, so it
should be disabled/removed.
Follow the steps below.
1. Open a command prompt
window.
2. Change directories so that the
current directory is the
windows\system directory (for
win9x systems it will typically
be windows\system, for NT/2K
machines it will be
winnt\system32).
3. Make sure Job Status and
Alerts is shutdown, if it is not
right click on the Job Status
and Alerts tray icon and
choose exit.
4. Make sure that all other
applications are shutdown.
5. Type the command:
hpbdrvhk –r “printername”.
6. Type the command:
hpbdrvhk –u “printername.”
I don’t want Job Status
and Alerts to track job
status or show device
status for a specific
printer.
Remove the printer from
the Job Status and
Alerts list.
1. Open a command prompt
window.
2. Change directories so that the
current directory is the
windows\system directory (for
win9x systems it will typically
be windows\system, for NT/2K
machines it will be
winnt\system32).
3. Type the command: hpbdrvhk
–u “printername.”
Appendix A: Job Status and Alerts
HP Color LaserJet 4550 Software Technical Reference 178
Problem Solution(s) Description of Solution(s)
I don’t want Job Status
and Alerts to track job
status on any of my
printers, but I do want to
use the Device Status
feature.
Select the Options Icon,
and then select the Next
button so that the
Refresh Rate option is
displayed in the right
panel. Move the slider
to the far left, pointing at
Never.
Setting the refresh rate option to
Never will disable all print job
tracking, but it will still allow the
user to select one of the printer
icons to get device status.
In the event that the administrator
has hidden the refresh rate option
and the user cannot see this
option complete the following
steps:
1. Choose the Start | Run menu
and type in notepad.
2. When notepad opens, choose
the File | Open menu and
browse to the windows
directory, and select the file
HPSTATUS.INI.
3. In the HPSTATUS.INI file,
locate the [refreshrate] section,
and set the allprinters entry
equal to 0.
4. Save the file and exit notepad.
5. The change will take effect for
the next print job.

Appendix A: Job Status and Alerts
HP Color LaserJet 4550 Software Technical Reference 179
Problem Solution(s) Description of Solution(s)
I don’t want Job Status
and Alerts to track job
status or show device
status for a specific
printer, but I want to see
the device status for that
printer.
Select the Options Icon,
and then select the Next
button so that the
Refresh Rate option is
displayed in the right
panel. Select the specific
printer in the For list, and
then move the slider to
the far left, pointing at
Never.
Setting the refresh rate option to
Never will disable print job
tracking for the specific printer,
but it will still allow the user to
select the printer icon to get
device status.
In the event that the administrator
has hidden the refresh rate option
and the user cannot see this
option complete the following
steps:
1. Choose the Start, Run menu
and type in notepad.
2. When notepad opens, choose
the File, Open menu and
browse to the windows
directory, and select the file
HPSTATUS.INI.
3. In the HPSTATUS.INI file,
locate the [refreshrate] section,
and create a new entry with
the exact name of the printer
and set it equal to 0.
4. Save the file and exit notepad
5. The change will take effect for
the next print job.
The entry would look something
like this:
[refreshrate]
HP LaserJet 8150 Series PCL6=0
When I renamed my
printer, Job Status and
Alerts didn’t detect the
changes.
Job Status and Alerts
may not update the
printer list immediately,
and a shutdown of Job
Status and Alerts and
restart of Job Status and
Alerts is needed.
In version 1.01 of Job Status and
Alerts, it typically will not update
the name of the printer, or even
remove the old printer name.
To fix this problem, right click on
the Job Status and Alerts system
tray icon, and choose exit. Then
choose the Start | Run menu and
type in hpstatus to reload status.
It will then pick up the printer
changes and display the renamed
printer.
Appendix A: Job Status and Alerts
HP Color LaserJet 4550 Software Technical Reference 180
Problem Solution(s) Description of Solution(s)
How do I get my newly
installed printers to show
up within Job Status and
Alerts.
Shutdown and restart
the system.
When Job Status and Alerts first
loads up, it performs a check of
the system to see if any new
printers have been installed. If it
detects a new printer that it
supports it will automatically add it
to the printer list.
If the printer was installed, then
removed, and installed again, Job
Status and Alerts my not add it
automatically and it will need to
be added manually. To do this
complete the following steps:
1. Open a command prompt
window.
2. Change directories so that the
current directory is the
windows\system directory (for
win9x systems it will typically
be windows\system, for NT/2K
machines it will be
winnt\system32)
3. Make sure Job Status and
Alerts is shutdown, if it is not
right click on the Job Status
and Alerts tray icon and
choose exit.
4. Type the command:
hpbdrvhk –i –a.
5. Restart the system.
In general the HPBDRVHK.EXE can be used to solve various problems. The following is a list of
the command line options available to the support utility and their meaning.
Command Line
Option
Sample Meaning
-e hpbdrvhk –e Enumerates all printers installed on the
computer.
-h hpbdrvhk –h Enumerates all printers installed on the
computer that Job Status and Alerts is
currently tracking print jobs on, or has
hooked.
-u hpbdrvhk –u “My
8100”
The –u parameter means to uninstall Job
Status and Alerts support for the specified
printer or for all printers depending on the
following command line parameter.
Appendix A: Job Status and Alerts
HP Color LaserJet 4550 Software Technical Reference 181
Command Line
Option
Sample Meaning
hpbdrvhk –u –a Uninstall Job Status and Alerts support for
all printers
-I hpbdrvhk –i “My 8150” Install Job Status and Alerts support for the
specified printer, or for all printers
depending on the following command line
parameter. If the driver model name used
by this printer is supported, then the printer
will be supported by Job Status and Alerts,
otherwise it will report back the error
message:
The driver used by (My 8150) is not
supported.
hpbdrvhk –i –a Install Job Status and Alerts support for all
printers that use a driver model which is
Supported by Job Status and Alerts
-s hpbdrvhk –s “My 9000” Adds the driver model name used by the
specified printer, to the driver support matrix
file.
-r hpbdrvhk –r “My 9000” Removes the driver model name used by
the specified printer from the driver support
matrix. This means that any other printer
which uses the same driver model as the
printer “My 9000” will no longer be
supported by Job Status and Alerts.
Appendix A: Job Status and Alerts
HP Color LaserJet 4550 Software Technical Reference 182
Command Line
Option
Sample Meaning
-x hpbdrvhk –x “HP
DeskJet”
Excludes the driver model name using the
specified printer driver file from the driver
support matrix. This option is generally not
needed, but could be useful in a shared
environment.
If an administrator discovers that Job Status
and Alerts is causing problems with a
specific driver/printer, but works correctly
with a newer version of the driver/printer,
this option can then be run on one machine,
and then replicated to other machines.
This option records the printer driver file
version for the driver model name, used by
the specified printer, as an unsupported
driver model. Yet if a new printer driver file
with the same name, and a newer version is
released and is found to work with Job
Status and Alerts, Job Status and Alerts will
support the printer using the newer driver
files.
-c hpbdrvhk –c “My
Printer”
Cleans the registry information and Job
Status and Alerts driver hooking information
should any remnants be left behind.
This option should only be run if the
hpbddrvhk –u (uninstall) option fails after
running it 3 times in a row.
hpbdrvhk –c –a Use the –a option to clean up all printer
settings after the hpbdrvhk –u –a command
has been run.
Job status and alerts is causing problems with a specific driver model
To resolve this issue, perform the following steps:
1. Open a command prompt window.
2. Change directories so that the current directory is the windows\system directory (for win9x
systems it will typically be windows\system, for NT/2K machines it will be winnt\system32).
3. Make sure Job Status and Alerts is shutdown, if it is not right click on the Job Status and
Alerts tray icon and choose exit.
4. Make sure that all other applications are shutdown.
5. Type the command: hpbdrvhk –r “Name of the Printer Goes Here.”
6. Type the command: hpbdrvhk –u “Name of the Printer Goes Here.”
7. Repeat step 5 and 6 for each printer name that references the driver model name which is
causing problems.
8. Restart the system.

Appendix A: Job Status and Alerts
HP Color LaserJet 4550 Software Technical Reference 183
9. Any printer that references the same driver model name will no longer be supported by Job
Status and Alerts.
If the user is still experiencing problems with this driver/printer and Job Status and Alerts,
complete the following steps:
1. Repeat steps 1-4 above.
2. Type the command: hpbdrvhk –c “Name of the Printer Goes Here.”
3. Repeat step 11 for each printer name that was used in the steps 1-4 originally.
4. Restart the system.
If the user is still having problems then follow the next steps below:
1. Repeat steps 1-4 above.
2. Type the command: hpbdrvhk -u -a.
3. Type the command: hpbdrvhk -c -a.
4. Choose the Start|Run menu and type in: REGEDIT.
5. Browse to HKEY_LOCAL_MACHINE\Software\Hewlett-Packard\HPSpoolerImportFixup.
6. Delete any subkeys that have a printer driver model name (such as “HP LaserJet 8150 PS”).
7. Delete all values except these three if they are present: NewImportModule,
ReplacerModule, NewImportModuleUM.
8. In the registry editor, browse to
HKEY_LOCAL_MACHINE\System\CurrentControlSet\Control\Print\Environments.
9. If this is a windows 9X machine proceed to Windows 9X Steps.
10. If this is a windows NT 4.0 machine proceed to Windows NT 4.0 Steps.
11. If this is a windows 2000 machine proceed to Windows NT 4.0 Steps and then complete the
Windows 2000 Steps.
Windows 9X steps
1. In the registry editor select the Windows 4.0\Drivers key.
2. Select the first driver key and perform the steps below.
Windows NT 4.0 steps
1. At the command prompt type: net stop spooler.
2. In the registry editor select the Windows NT x86\Drivers\Version-2 key.
3. Select the first driver key and perform the steps below:
a. If there is a value named RealDriver, right click on the Driver value and choose delete,
then right click on the RealDriver value and choose rename, rename the RealDriver value
to be Driver.
b. If there is not a value named RealDriver, proceed to the next step.
c. Select the next driver model name key in the registry and repeat step d-f until each one
has been inspected.
d. At the command prompt type: net start spooler.
e. Restart the system.
Windows 2000 steps
1. Complete Windows NT 4.0 steps a-g, DO NOT reboot the system until these steps below are
complete.
2. In the registry editor select the Windows NT x86\Drivers\Version-3 key.
3. Select the first driver key and perform the steps below:

Appendix A: Job Status and Alerts
HP Color LaserJet 4550 Software Technical Reference 184
a. If there is a value named RealDriver, right click on the Driver value and choose delete,
then right click on the RealDriver value and choose rename, rename the RealDriver value
to be Driver.
b. If there is not a value named RealDriver, proceed to the next step
c. Select the next driver model name key in the registry and repeat step d-f until each one
has been inspected.
d. At the command prompt type: net start spooler
e. Reboot the system
Job status and alerts is conflicting with other application(s)
If Job Status and Alerts is conflicting with another application, and the user wishes to remove Job
Status and Alerts manually, it can be removed by doing the following steps:
1. Open a command prompt window
2. Change directories so that the current directory is the windows\system directory (for win9x
systems it will typically be windows\system, for NT/2K machines it will be winnt\system32).
3. Make sure Job Status and Alerts is shutdown, if it is not right click on the Job Status and
Alerts tray icon and choose exit, and after choosing exit, make sure the user selects the “No,
don’t start automatically” option.
4. Make sure that all other applications are shutdown.
5. Type the command: hpbdrvhk -u -a.
6. Type the command: hpbdrvhk -c -a.
7. Restart the system.
8. If printing is not working after reboot, see Job Status and Alerts is causing problems with a
specific driver model.

Readme files
HP Color LaserJet 4550 Software Technical Reference 185
Readme Files
Hewlett-Packard Color LaserJet 4550, 4550N, 4550DN, 4550HDN Printer Late-breaking
Readme File
Hewlett-Packard Color LaserJet 4550 Series Printer
Printing System Late Breaking Readme
The Late-Breaking Readme file contains information that may impact
the installation and use of your HP Color LaserJet 4550 printer.
*********************************
Readme File Contents:
I. Introduction
II. Late Breaking Information
--Known issues and workarounds
III Technical Assistance
IV. Legal Statements
--Trademark notices
--Software license and copyright
************************
I. INTRODUCTION
************************
This Readme file provides specific information you should know
before you install and use the printing system. Information
and Known issues are provided for the following operating
systems:
-Microsoft (R) Windows (R) 2000
-Windows NT (R) 4.0
-Windows 95/98/Millennium (Me)
-Windows 3.1x
This file provides specific compatibility, and troubleshooting
information. For additional information on the printer features
and driver features, see the online help included with each
software component and see the printer user guide.
************************************************
II. Known Issues
************************************************
________________________________________________________________
Job Status and Alerts
__________

Readme files
HP Color LaserJet 4550 Software Technical Reference 186
Issue: The Job Status and Alerts utility will not be included
on the in-box software CD or the Web at product introduction.
This utility will be provided on the in-box CD and the Web at
a later date.
_____________________________________________________________
Printer
__________
Issue:
The paper jam error codes have changed to be compatible across
multiple LaserJet printers.
Description:
13.XX PAPER JAM
alternates with
CHECK ALL REAR DOORS
or
CHECK MIDDLE FRONT DRAWER
or
CHECK FRONT DUPLEX DRAWER
-------------------------
The 13.XX paper jam error codes are listed below:
4500 XX 4550 XX Description
------- ------- ---------------------------------
0 1 Paper jam in paper feed area
1 5 Paper jam in fusing unit area
2 6 Paper jam in fusing unit area
3 10 Paper jam in reversing area
4 11 Paper jam in reversing area
5 12 Paper jam in path to duplexer area
6 13 Paper jam in path to duplexer area
7 20 Paper jam in paper path area
8 21 Door open jam
9 23 Unexpected media type
10 24 Unexpected media type
11 25 Unexpected media type
12 2 Paper jam in paper feed area
For more information on troubleshooting paper jams, go to the
Color LaserJet 4550 website at:
http://www.hp.com/support/lj4550_solve_a_problem
and click on the topic for how to clear a paper jam
_________________________________________________________________
CD Browser

Readme files
HP Color LaserJet 4550 Software Technical Reference 187
__________
Issue:
When using the Customization Utility to create a custom printing
system, the floppy drive destination is not available.
Description:
When using the Customization Utility to create a custom printing
system, only the "Copy Printer Drivers Only" selection will allow
the use of a floppy drive as a destination. When selecting
"Create Customized Installer" or "Copy Entire Printing System
Installer" from the Customization Utility, only local or network
hard drives can be selected.
_________________________________________________________________
Issue:
When using the Customization Utility to create a custom printing
system, the operating system being used to create the custom set
must be included in the list of operating systems for the custom
set.
Description:
When using the Customization Utility to create a custom printing
system, you must include the current operating system that is
being used to create the "Create Customized Installer" or "Copy
Entire Printing System Installer." For example, if you are using
Windows NT 4.0 and you want to create a customized installer for
Windows 98, you must also include Windows NT 4.0 in the new
customized installer. If you want to create a customized
installer that includes software for Windows 98 only, you must
create the customized installer while running Windows 98.
_________________________________________________________________
Issue:
When installing the printing system software using a custom disk
set created with the Customization Utility, the following
error message appears:
"Setup is unable to find _SETUP.DLL, which is needed to complete
the installation. Error 103"
Description:
When installing from a customer printing system, the language
selection must match the language selection that was used when
the custom printing system was created.
The custom installation program will prompt the user for a
language selection. If the language selected during
installation is different from the language selected during
the creation of the custom printing system, the above error message
appears. The custom printing system installer created
with the Customization Utility only contains the language

Readme files
HP Color LaserJet 4550 Software Technical Reference 188
that was selected during the creation of the custom
printing system. Therefore, the same language must be
selected when using the custom installer.
Workaround:
Verify the same language is selected during both the creation
and use of the custom installer.
_________________________________________________________________
Printing System Installer
_________________________
Hard Disk Free Space Requirements:
Before installing the printing system software, verify there is at
least 20 MB of free disk space available for the installation of
the software.
_________________________________________________________________
Issue:
Cannot cancel the printing system installer after file copy
has begun.
Description:
There is no Cancel button available when the printing system
installer is copying files and updating the system. The Cancel
button is not available because cancellation during the file
copy or system update processes could leave the user's system
in an unknown state. Also, do not use "End Task" or shut down
the computer during the file copy and system update process.
Workaround:
Complete the printing system installation and then use the printing
system uninstaller located in the HP Color LaserJet 4550 programs
folder to uninstall the printing system. After the uninstall process
is complete, the printing system installer may be re-run with the
new selections.
_________________________________________________________________
Issue:
User does not receive a response when trying to run the installer
setup.exe file.
Description:
The installation program checks for a minimum of 7 MB of free disk
space on the computer before starting the installation of the
software. If there is not at least 7 MB of free disk space the
installer will not start. No error messages or warnings
appear.

Readme files
HP Color LaserJet 4550 Software Technical Reference 189
Workaround:
Verify there is at least 20 MB of free disk space available for
the installation of the software.
_________________________________________________________________
Printing System Uninstaller
___________________________
Issue:
The printing system uninstaller does not completely uninstall the
printing system software.
Description:
If the printing system installer is used to install more than one
language on the same system, only the files and components from
the last installation will be removed. The printing system
installer only stores one uninstallation file per system.
Workaround:
Uninstall the printing system for one language before installing
the printing system for another language.
_________________________________________________________________
Parallel and USB Support
________________________
Issue:
Some advanced features of the HP Color LaserJet 4550 printing
system are not supported using a parallel or USB connection.
Description:
Printing system components that require bidirectional
functionality are not supported using a parallel or USB
connection.
The components that are not supported using parallel or USB are:
Automatic Driver Configuration
Update Now
Job Status and Alerts
Workaround:
This functionality will be added in a future release of the
printing system software for the HP Color LaserJet 4550 printer.
_________________________________________________________________
Printer Drivers
_______________

Readme files
HP Color LaserJet 4550 Software Technical Reference 190
Issue:
Job Retention, Proof and Hold, prints all of the copies of a
print job.
Description:
Some applications may send each copy of a print job as a separate
job.
Workaround:
Clear the Collation option in the application.
_________________________________________________________________
Issue:
Windows PCL6/5c drivers
User cannot print on the backside of the first sheet when duplexing
using the "Use Different Paper" option for the first page.
Description:
The printing system does not allow for this capability at this
time. This functionality may be added in future products.
_________________________________________________________________
Issue:
When printing a duplexed document with multiple copies, the second
copy prints on first copy's last page instead of on a separate page.
Description:
This is a known issue with several applications. For example, an
application sends a 3 page, 2-copy job as one 6-page document.
When print data is sent to the printer in this manner, the driver
cannot distinguish that it is really 2 copies of the same print
job.
Workaround:
Turn on "Ignore Application Collation" in the PCL 6/5c printer
driver and turn off the Collation option in the Print dialog box
of the application.
_________________________________________________________________
Issue:
PNG graphic images do not print with the current version of
Netscape Navigator (TM) (4.73).

Readme files
HP Color LaserJet 4550 Software Technical Reference 191
Description:
Netscape Navigator does not support PNG images by default. A PNG plug-in
must be downloaded from Netscape (TM) and installed into the browser.
Workaround:
Download and install the PNG plug-in from Netscape.
_________________________________________________________________
Bidirectional Functionality
____________________________
Description:
When running the HP Port Resolver, bidirectional functionality,
from an NT 4.0 client machine to a remote printer connected via an
NT 4.0 share, one of the following problems may occur:
1. When clicking the printer driver "Update Now"
button, a "printer communication error" is posted.
2. When using the Job Status and Alerts utility, a broken
connection is displayed.
3. When using the porttest.exe test utility, the error
code 0x80070005 is returned.
Solution:
If an "Update Now" or "Stand Alone Status" from an
NT 4.0 client, fails to communicate with a printer on a remote
NT 4.0 share, check that the Network -> Services -> RPC Configuration
service is correctly installed on both the client AND host
(print server) computers and that the RPC "Name Service Provider"
field (click RPC - "Properties" to view this info) is set to
"Windows NT Locator."
Windows 95, 98 and 2000 are not affected by this problem.
_________________________________________________________________
Job Status and Alerts
_____________________
Supported Operating Systems and Environments:
Job Status and Alerts are Supported on Windows 95 with Internet
Explorer 4 or higher, Windows 98, Windows Me, Windows NT, and
Windows 2000.
Job Status and Alerts are not supported for Terminal Server.
Job Status and Alerts functionality is available for printers
connected to the network from a client using the Windows
PCL 6/5c drivers.
Job Status and Alerts are not supported when using a parallel
connection.

Readme files
HP Color LaserJet 4550 Software Technical Reference 192
Device Status requires Internet Explorer version 4 or greater.
_________________________________________________________________
Issue:
Device Status stops responding and print job icons freeze.
Description:
When Job Status and Alerts is tracking a large number of print
jobs, Device Status may stop responding and icons may not be
removed from the Job Status and Alerts window.
Workaround:
Download updated Job Status and Alerts software when available
from www.hp.com
_________________________________________________________________
Issue:
Job status does not work when using Novell Client on a Windows NT 4.0
or Windows 2000 client.
Workaround:
Download updated Job Status and Alerts software when available
from www.hp.com
_________________________________________________________________
Issue:
Multiple copies of the same print job show up in the Job Status
and Alerts window as separate jobs.
Description:
Some applications send each copy of a print job as a separate
job. Therefore, Job Status and Alerts will represent each copy
as a separate job.
Workaround:
Turn off Job status when using applications that send each copy
of a print job as a separate job.
_________________________________________________________________
Install Network Printer Wizard
________________________________
Issue:

Readme files
HP Color LaserJet 4550 Software Technical Reference 193
When port name is more than 63 characters, port creation fails.
Description:
If a user chooses to change the port name and uses a new name
of more than 63 characters, the port creation will fail. A dialog box
appears with the following message "There was an error creating
the port. Please refer to the Read Me file about how to
create network Printer Ports. The printer will be set up to
the local printer port." The driver installation finishes,
and the printer is setup to print to LPTx.
Workaround:
Run the installer again and type in a name with fewer than
63 characters.
_________________________________________________________________
Issue:
IP Address set via "Suggest Settings" and printer creation fails.
Conditions required:
The computer is configured with TCP/IP only and a Dial Up Adapter,
the printer has an assigned IP address, and the user performs specific
device search by hardware address.
Description:
After the printer is discovered via the hardware address, on the
IP Settings screen, the user can choose the Suggest Settings
option (auto net). If user uses the Suggest Settings option, the
installation continues as though the installer is assigning an
autonet address to the printer. However, the installation will
fail and IP on printer will not be written.
Workaround:
Do not change the IP Address via the Suggest Settings option.
_________________________________________________________________
Issue:
No default queue name is suggested by Install Network Printer Wizard.
Description:
Each time the Install Network Printer Wizard is run on different
workstations a new queue is created. For the first eight installs,
Install Network Printer Wizard will suggest a default queue
name incrementing by _q2, _q3... This is successful until
the ninth queue. When the ninth queue should be created, the queue name
field is left blank instead.
Workaround:

Readme files
HP Color LaserJet 4550 Software Technical Reference 194
The user can then type in the name of the queue.
Additional Information:
The user should be using Add Printer or the appropriate installer to
attach to an existing queue rather than using the Install Network
Printer Wizard to create a new queue for each workstation. If
the user wants a new queue for each workstation, he or she will
have to type in a new queue name.
_________________________________________________________________
Novell
_________
Issue:
'vending' many HP (and other manufacturers') drivers to the client
using Novell's Point and Print technology causes spoolss.exe
to display a Dr.Watson error (page fault).
Description:
When running the Novell 4.7 or 4.71 clients on Windows NT 4.0,
and using Novell 5.x servers with NDPS printers, the process of
'vending' many HP (and other Mfr's) drivers to the client
using Novell's Point and Print technology causes spoolss.exe
to display a Dr.Watson error (page fault). Novell is addressing
this issue.
Workaround:
Use either the 4.6 or 4.8 Novell clients for NT 4.0 when using
NDPS printers.
_________________________________________________________________
************************************
III. TECHNICAL ASSISTANCE
************************************
OBTAINING ADDITIONAL INFORMATION FROM HP SERVICES
See the online user guide on the CD-ROM supplied with the
printer for additional methods of obtaining software and support
information, such as driver distribution centers, fax service,
and online services and support.
__________________________________________________________________
OBTAINING INFORMATION VIA THE INTERNET
Printer drivers, updated HP printer software, and product and
support information may be obtained from the following URLs.
Access the Internet or FTP address and use the menus to locate
the software or support of your choice.
(Paths may change without notice.)
In the U.S. http://www.hp.com/support/lj4550

Readme files
HP Color LaserJet 4550 Software Technical Reference 195
In Europe http://www2.hp.com
Printer drivers may be obtained from the following sites:
In Japan ftp://www.jpn.hp.com/drivers/
In Korea http://www.hp.co.kr
In Taiwan http://www.hp.com/tw
or the local driver website at http://www.dds.com.tw
URL for Access HP:
http://www.hp.com
FTP library service
Anonymous FTP library service is available for around-the-clock
access to drivers and technical support information for
Hewlett-Packard peripheral and computer products.
FTP address: ftp.hp.com
Login: anonymous
Password: your Internet name (or user identification)
_________________________________________________________________
OBTAINING SUPPORT SERVICES OUTSIDE OF THE UNITED STATES
See the printer online user guide and visit the HP website at
http://www.hp.com for more information on driver distribution
and customer support options, or contact your
authorized HP Dealer.
*********************************
IV. LEGAL STATEMENTS
*********************************
TRADEMARK NOTICES
-Microsoft, MS-DOS, Windows, and Windows NT are
registered trademarks of the Microsoft Corporation.
-PostScript is a registered trademark of Adobe
Systems, Incorporated.
-Netscape Navigator is a U.S. trademark of
Netscape Communications Corporation.
-Netscape is a U.S. trademark of Netscape
Communications Corporation.
SOFTWARE LICENSE AND COPYRIGHT
Information provided in this document and software
for the Hewlett-Packard Color LaserJet 4550 Series printer is
provided "as is." No implied warranties of
merchantability and or fitness for a particular
purpose are given.
The HP Color LaserJet 4550 Series printing system may be
copied and distributed only to users of an
HP Color LaserJet 4550 Series printer. All files on the
CD-ROM must be copied without modification. All

Readme files
HP Color LaserJet 4550 Software Technical Reference 196
components of the HP Color LaserJet 4550 Series printing
system must be distributed together. The
HP Color LaserJet 4550 Series printing system may not
be distributed for profit.
Copyright (c) 1990-2000 Hewlett-Packard Company.
Copyright (c) 1985-1990 Microsoft Corp.
All Rights Reserved.

Readme files
HP Color LaserJet 4550 Software Technical Reference 197
Hewlett-Packard Color LaserJet 4550, 4550N, 4550DN, 4550HDN Printer Printing System
CD-ROM Readme File
Hewlett-Packard Color LaserJet 4550, 4550N, 4550DN, and 4550HDN Printers
Printing System Readme File for Windows®
* * * * * * * * * * * * * * * * * * * * * * * * * * * * * * * * * * * * * * * * * * * * * * * * * * * * * * * * * * * * * * * * *
NOTICE!
PLEASE READ THE README.TXT FILE FOR
"LATE-BREAKING INFORMATION."
The Late-Breaking Information README.TXT file contains information
that can impact the installation and use of your
HP Color LaserJet printer. Late-breaking information appears only in English.
* * * * * * * * * * * * * * * * * * * * * * * * * * * * * * * * * * * * * * * * * * * * * * * * * * * * * * * * * * * * * * * * *
ReadMe File Contents:
1. Introduction
1.1 -- Purpose of this ReadMe File
1.2 -- Who needs this software?
1.3 -- Overview of the Printing System software components
2. Installation Instructions
2.1 -- Installation Overview: Windows 95, Windows 98, and Windows Millennium, NT® 4.0, and 2000
2.2 -- Installation Options: Windows 95, Windows 98, and Windows Millennium, NT 4.0, and 2000
2.3 -- Installation Instructions: Windows 95, Windows 98, and Windows Millennium, NT 4.0, and 2000
2.4 -- Installation Instructions: Windows 3.1x
2.5 -- Customization Utility
2.6 -- Silent Install (Unattended Installer)
2.7 -- Uninstaller
2.8 -- Documentation
2.9 -- Optional Software
3. Technical Assistance
3.1 -- Obtaining Additional Information from HP Services
3.2 -- Obtaining Information via the Internet
3.3 -- Obtaining Support Services Outside of the United States
4. Legal Statements
4.1 -- Trademark Notices
4.2 -- Legal Notice
4.3 -- Copyright
************************
1. INTRODUCTION
************************
1.1 PURPOSE OF THIS README FILE

Readme files
HP Color LaserJet 4550 Software Technical Reference 198
This ReadMe file provides specific installation instructions and other information for the HP Color LaserJet 4550,
4550N, 4550DN, and 4550HDN printers. Installation instructions are provided for the following operating systems:
• Windows 2000
• Windows NT 4.0
• Windows 95, Windows 98, and Windows Millennium
• Windows 3.1x
For instructions on installing OS/2 printer drivers or Macintosh OS components, see the associated ReadMe files
or installation notes for that particular system.
This file provides specific installation, compatibility, and troubleshooting information. For additional information on
the printer features and driver features, refer to the online Help included with each software component and the
printer online user guide.
1.2 WHO NEEDS THIS SOFTWARE?
HP recommends using this software to install the HP Color LaserJet 4550 printing system, which is required for
printing with the HP Color LaserJet 4550, 4550N, 4550DN, and 4550HDN printers. Network clients will need the
installation CD-ROM, or the name of the appropriate network directory, to install the software on their individual
workstations.
1.3 OVERVIEW OF THE PRINTING SYSTEM SOFTWARE COMPONENTS
The printer CD-ROM has software and documentation that supports HP Color LaserJet 4550, 4550N, 4550DN,
and 4550HDN printers. For more information about a particular driver or software component, see its associated
online Help.
End-User Software Components
The Printing System also includes the following software components for end-users. Refer to the online user
guide for more information.
Drivers
A printer driver is a software program that enables your software applications to access your printer's features.
Typically, you should install a printer driver for each printer and each printing language you are using. In addition,
each operating system needs different printer drivers.
The CD-ROM includes the following printer drivers for Windows 3.1x, Windows 95, Windows 98, and Windows
Millennium, Windows NT 4.0, and Windows 2000
Operating System PCL 5c PCL 6 PS
Windows 3.1 x x
Windows 95, Windows 98, and Windows Millennium x x x
Windows NT4.0/2000 x x x
***NOTES:
• PCL 6 and PCL 5c drivers feature a Graphical User Interface with a common "look and feel"
• Microsoft® Pscript driver using PPD files
• AutoCad R15 driver included
• The printer automatically switches between PCL5, PCL6, and PS printer languages.

Readme files
HP Color LaserJet 4550 Software Technical Reference 199
Available printing features vary between printer drivers. See the printer driver Help files for instructions on using
specific printing features.
Additional Drivers
The following drivers are not included on the CD-ROM but are available from the internet or customer care. See
Section IV, "Technical Assistance," in this ReadMe or "HP Customer Care" in the printer online user guide for
more information on obtaining drivers and other HP software.
•OS/2 PCL 5c printer driver
• OS/2 PS printer driver
• Windows NT 3.51 PCL 5c and PS printer drivers
• UNIX and Linux Model scripts
Additional Features
Job Status and Alerts
Job Status and Alerts provides job status messages at the host PC when printing problems occur (toner out,
paper out, etc.) or when a print job is complete. It also allows the users to proactively check the status of the
printer. This utility can be configured to display only those message the user wants.
Supplies Information and Reordering
This feature allows you to order the consumables and supplies needed for your HP printers directly from the Web.
This feature is available during a custom install and requires Job Status and Alerts.
Job Retention Features
Selected from the printer driver, Job Retention lets you store a print job on the printer's hard disk. This allows you
to perform a number of advanced print job functions, including quick copying a job, proofing and holding a job,
printing a private job, and storing a job. Job Retention is a standard feature of the HP Color LaserJet 4550HDN
printer, and is optional on the 4550, 4550N, and 4550DN printers.
Automatic PANTONE®* Calibration (PS® driver only)
Automatic PANTONE®* Calibration is the default setting for HP Color LaserJet printers. This feature automatically
converts PANTONE®* colors to optimal color values for the printer by recognizing the PANTONE®* color name
or number in the data stream sent to the printer. The feature is activated when printing colors that were chosen
using the PANTONE®* Color Picker in supported graphics applications. See the color.wri Readme file included
on the printer CD-ROM for more information about PANTONE®* and ICC color.
Network Administrator Software Components
HP Web JetAdmin
The HP Web JetAdmin software is a printer management tool for Windows that allows network administrators to
remotely install, configure, troubleshoot, manage, and set passwords for HP JetDirect-connected printers and
accessories from an intuitive browser interface. This simplifies cross-platform management of these devices from
anywhere with corporate Internet access, and allows more proactive management and fewer trips to the printer.
This software is available at the HP Internet site.
HP Resource Manager

Readme files
HP Color LaserJet 4550 Software Technical Reference 200
The HP Resource Manager is a Windows 95, Windows 98, and Windows Millennium, NT 4.0 and Windows 2000
application that allows you to download, delete, and manage the contents of your optional printer hard disk driver,
including printer-based fonts and forms. The Resource Manager supports the most common network protocols
(TCP/IP & IPX/SPX) as well as direct parallel port connection. HP Resource Manager can be used with any 4550
series printer equipped with a hard drive.
************************************************
2. INSTALLATION INSTRUCTIONS
*************************************************
When operating in a Windows environment, the CD-ROM setup software will detect the version of the operating
system that you are running. The software is installed in the language that you have selected in your Windows
Control Panel.
If you are working on a network and wish to specify a new port during the installation of the printer software, the
HP Network Printer Wizard will help automate this process. The HP Network Printer Wizard is integrated into the
installer.
***NOTE: When you upgrade to a different operating system, you must reinstall the printer driver.
2.1 INSTALLATION OVERVIEW: WINDOWS 95, WINDOWS 98, AND WINDOWS MILLENNIUM, NT, and 2000
When the CD-ROM is inserted and auto-play is enabled, a selection menu appears that provides access to the
CD-ROM contents. The selection menu includes the following choices:
Install printer - Allows you to select the installation method you prefer (see Installation Options)
Registration - Lets you register your HP Color LaserJet 4550 printer via the Internet
Documentation - Provides access to the documentation included on the CD-ROM
Customization utility - Create disk images or copy the printing system CD-ROM
Optional software - Lets you install the optional software included on the CD-ROM
***NOTE:
The latest printer drivers and printing software for HP LaserJet printers are available on the Internet at
http://www.hp.com. The installer automatically detects if you have Internet access, and asks if you want to check
the HP Internet site for the latest drivers. If the printer drivers or printing software have been updated since your
CD-ROM was created, the installer updates the driver from the Internet.
2.2 INSTALLATION OPTIONS: WINDOWS 95, WINDOWS 98, AND WINDOWS MILLENNIUM, NT, and 2000
• Typical Installation
Installs the PCL drivers, MS Pscript driver for PS Emulation, and the Uninstaller.
HP Color LaserJet 4550 PCL 6 Driver.
Default driver. The PCL 6 printer driver usually provides the best combination of performance and
WYSIWYG printing.
HP Color LaserJet 4550 PCL 5c Driver.
Use the PCL 5c printer driver for best page layout compatibility on documents previously printed
in PCL 5e.
HP Color LaserJet 4550 PS Driver.

Readme files
HP Color LaserJet 4550 Software Technical Reference 201
The PS emulation drivers are usually the best choice when printing from PS-based applications
such as QuarkXPress, CorelDRAW™, or any Adobe application. You should also use the PS
emulation driver if you want to control CYMK values.
Screen Fonts.
Printer-matching TrueType fonts to help ensure WYSIWYG printing.
Job Status and Alerts.
Alerts you if a job you sent to the printer cannot finish printing, or when the job is complete. Also,
allows you to view the status of your printer (toner levels, configuration, etc.).
Driver Auto-configuration.
Provides automatic enabling of connected printer accessories in the driver.
HP Color LaserJet 4550 Readme.
HP Color LaserJet 4550 Printer ReadMe, which includes installation information and description
of printing system features (this document).
• Custom Installation
Allows you to specify which printing system components you wish to install. Choose from the printer drivers,
the Uninstaller, fonts, bidirectional communication features (Job Status and Alerts and Auto-configuration),
Supplies Information and Reordering (provides additional supplies information and helps you order
replacement supplies for your printer).
2.3 INSTALLATION INSTRUCTIONS: WINDOWS 95, WINDOWS 98, AND WINDOWS MILLENNIUM,
WINDOWS NT 4.0 and Windows 2000
***NOTE:
Administrator privileges are required to install the Printing System onto a Windows NT system.
Printing System installation
1. Close all applications, terminate-and-stay-resident (TSR) programs, and virus checkers. After installation, you
can restart these programs.
2. If you are installing from the CD-ROM, insert the CD-ROM into the CD-ROM drive.
3. If the CD-ROM begins to auto-play, go to step 6.
4. If the installation CD-ROM does not begin to auto-play, select Run from the Start menu.
5. In the Run box, type the drive and path for the installation CD-ROM (usually D:\Setup.exe). If you are a
network user installing from a shared Windows directory, see your network administrator for the correct drive
and path.
6. Select Install Printer to begin installation, and then respond to each prompt that appears on the screen.
Select Next to proceed to the next screen, or select Back to return to the previous screen.
***NOTE: Web Files:
If you downloaded the Printing System electronically, you need to first run the downloaded .exe file(s). If
SETUP.EXE does not run automatically, browse to the root location of the downloaded SETUP.EXE file,
double-select the file, and go to step 6.
Driver Only Installation
1. Close all applications.
2. Select on Start, Settings, Printers.
3. Double select on Add Printer.
4. Answer the questions in the Add Printer Wizard until you reach the screen with the printer manufacturer list.

Readme files
HP Color LaserJet 4550 Software Technical Reference 202
5. Select on Have Disk.
6. Browse to the driver location using one of the options in this step:
• Inbox CD-ROM option: Browse to the appropriate \<language>\Drivers\<os>\<pdl> directory for your
operating system and language.
• Internet download option: Browse to the folder where the Web files were downloaded and
decompressed.
7. Select the appropriate .INF file.
8. Select Open and OK.
9. Select the appropriate printer.
10. Follow the remaining instructions to complete the printer installation. At this point, the driver has been copied
to your hard disk and added to the list of installed printers.
Setting a Default Printer
1. From the Start menu, select Settings and then select Printers.
2. Select on the printer you wish to set as the default printer.
3. From the File menu, select Set As Default.
A check appears next to the menu option.
4. Select Close.
Port Selection
Once the installation process is complete, you can now need to assign the printer to a port on your network if you
didn't assign a port during setup. To assign the printer to a port on your network:
1. Select Start
2. Select Settings.
3. Select Printers.
4. Highlight the printer you just installed.
5. Select the File menu.
6. Select Properties.
7. In Windows 95, Windows 98, and Windows Millennium, select on the Details tab to change your port
information. In Windows NT 4.0 or 2000, select the Port tab.
2.4 INSTALLATION INSTRUCTIONS: WINDOWS 3.1x
Driver Only
1. Close all applications. Turn off virus checkers and terminate stay resident (TSR) programs. After installation,
these programs can be turned back on.
2. Go to Main in the Program Manager and select Control Panel.
3. Select Printers.
4. Under Printer, choose Add.
5. Under List of Printers choose Unlisted and select Install.
6. Browse to the driver location using one of the options in this step:
• Inbox CD-ROM option: Browse to the appropriate \<language>\Drivers\<PDL>\Win3x directory on the
CD-ROM for your operating system and language.
•Internet download option: Browse to the folder where the Web files were downloaded and
decompressed.
7. Select the appropriate printer and select OK.
8. Follow the remaining instructions to complete the printer installation.

Readme files
HP Color LaserJet 4550 Software Technical Reference 203
Font Installation
1. Close all applications. Turn off virus checkers and terminate stay resident (TSR) programs. After installation,
these programs can be turned back on.
2. Browse to the FontInst\Win3x directory under the directory for your language.
3. Double-select the file fontin31.exe to install fonts onto your system.
2.5 CUSTOMIZATION UTILITY
The HP Color LaserJet 4550 Printing System Installer includes customization utility that will create custom
installations.
To create disk sets, use one of the following methods to access Customization Utility:
• When using CD-ROM auto-play, choose the "Customization Utility" button.
• Run setup.exe located at the root of the CD-ROM and choose the "Customization Utility" button.
The HP Color LaserJet 4550 Printing System Customization utility includes the following options:
Copy printer drivers only
Copies printer drivers to selected media. The resulting files can be used with Microsoft's Add Printer
Wizard or Windows 3.x Create Printer installations.
Create a customized installer (allows for interactive or silent installations)
Creates an interactive or silent (no user input required) installer customized by language, operating
system(s), model(s) and components
Copy the entire Printing System installer (NOTE: Floppy disks are not supported.)
Copies the Printing System installer for selected language and operating system(s) to media other than
floppy disks (e.g., shared Network location).
2.6 SILENT INSTALL (Unattended Installation)
Silent Install allows you to configure Setup to run without user interaction. This installation method is useful when
you want to use the default selections provided by Setup or when you want to run the installation without being
prompted. A system administrator can also create a custom disk image containing specific drivers and utilities,
allowing users to run Setup without further interaction.
Silent installation can be performed in two ways:
• Customized silent install
This method lets you create a customized silent installer allowing the selection of OS, language, printer
models, drivers, and utilities. Network administrators can create a customized silent installer to be used by
their clients without any intervention.
• Command line silent install
This method is not customizable and only installs the components in the Typical Install option without any
user intervention. The command line values mentioned below must be provided.
Command Line Values

Readme files
HP Color LaserJet 4550 Software Technical Reference 204
***NOTE: Values that follow equal signs (=) in a command line must not contain intervening spaces.
Method 1: Command line:
<cd-root>/setup/setup.exe /u /port=xxxx /printer=n /pd=n
Method 2: Setup.lst
Use the setup.lst file to specify command line arguments to the installer for an unattended installation. You can
send command line arguments in one of the following ways:
• send the command directly to the installer
• send the command using the setup.lst file
• use a combination of the two.
For example, this file contains two options: /port and /printer. The installer operates as normal because the /u
option has not been specified. If you use setup /u for the installer, it operates in unattended mode and uses the
two values specified in the Defaults section of the setup.lst file. If you use setup /u /printer=1 for the installer, it
operates in unattended mode and chooses the second printer from the list below. (The options specified on the
command line override the options specified in the setup.lst file.) The options available (see below) can also
include the /u option. Using this option key makes the installer always operate as unattended.
The following Descriptions explain the available options:
/u Signals the installer to use the specified port and printer given on the command line (or in this file), and use
all default selections. Installation then proceeds without prompting the user.
/port=xxxx Used to specify the default port when doing an unattended install. The value specified by xxxx
should be a valid port with no spaces.
/printer=n Used to specify the default printer when doing an unattended install. The value specified by n is an
integer that references the list of available printers. For example, the following printers are available for the HP
Color LaserJet 4550 installation:
0 = HP Color LaserJet 4550
1 = HP Color LaserJet 4550N
2 = HP Color LaserJet 4550DN
3 = HP Color LaserJet 4550HDN
/pd=n Used to specify whether the selected printer is the default printer, when you have multiple printers
connected to your network. The value specified by n is an integer (i.e., 0 or 1). For this argument, entering 1 sets
the selected printer as the default printer. Entering zero sets the printer as a non-default printer.
You can preset these options in the setup.lst file located on in the root directory of the CD-ROM. In the [Defaults]
section, add the following syntax:
[Defaults]
Options= /port=<value> /printer=<number> /pd=<number>
2.7 UNINSTALLER
After a successful printing system installation, the Uninstall icon in the HP Color LaserJet 4550 program group
allows you to select and remove any or all of the HP printing system components. To uninstall some or all HP
printer software components, select the HP Color LaserJet 4550 Uninstaller icon from the HP Color LaserJet
4550 program group. Select Next and follow the prompts to continue the uninstall process.

Readme files
HP Color LaserJet 4550 Software Technical Reference 205
***NOTE:
No uninstaller is available for driver-only installation using Windows "Add Printer" or Print Manager. For driver-
only installations, delete the printer icon from the Printers folder (Windows 95, Windows 98, and Windows
Millennium, NT 4.0, and 2000) or Print Manager (Windows 3.x).
2.8 DOCUMENTATION
The CD ROM contains the following documentation, in addition to this ReadMe, for the HP Color LaserJet 4550
printer.
• Documentation can be viewed from the CD-ROM by running setup.exe at the root of the CD-ROM and
selecting the Documentation option. If you do not have Adobe Acrobat Reader installed, the CD-ROM
provides an installation option.
• Documentation can be copied to your system and printed by browsing to the paths provided below.
***NOTE: In the paths shown below, browse to the appropriate folder for your language.
User Guide (PDF format)
The HP Color LaserJet 4550 User Guide includes information about product operation, troubleshooting, warranty
and specifications, supplies, and support. The user guide is located at
<CD-ROM Drive>:\<language>\Manuals\
FIR Guide (PDF format)
The HP Fast InfraRed Receiver guide includes the information about installation, troubleshooting, specifications,
and support. The FIR Guide is located at <CD-ROM Drive>:\<language>\Manuals\
JetDirect Guide (PDF format)
The HP JetDirect Administrator's Guide includes network installation and troubleshooting information.
The JetDirect Guide is located at <CD-ROM Drive>:\<language>\Manuals\
PANTONE®* and ICC ReadMe file (Write format)
Provides an introduction to color printing, describes how to print the best simulation of the PANTONE®*
MATCHING SYSTEM colors, and describes how to install and use ICC profiles on an HP Color LaserJet 4550
printer. The PANTONE®* and ICC ReadMe file is located at
<CD-ROM Drive>:\<language>\Manuals\
Release Notes (Text format - English Only)
The HP Color LaserJet 4550 Printer release notes include late breaking information. The Late Breaking ReadMe
file is located at <CD-ROM Drive>:\
Besides this documentation, online Help is available with each driver and printer utility. Printed Getting Started
and Quick Reference guides are provided with the printer at the time of purchase. Installation guides are provided
in each consumable kit, and accessory installation guides are included with each accessory.
Additional software driver information can be obtained at http://www.hp.com/support/lj4550. Once connected,
select "Manuals," and then select the "Software Technical Reference for the HP Color LaserJet
4550/4550N/4550DN/4550HDN Printer Family."
2.9 OPTIONAL SOFTWARE
The following Optional software is available for your HP Color LaserJet 4550 printer:
Web JetAdmin

Readme files
HP Color LaserJet 4550 Software Technical Reference 206
Follow these steps to download HP Web JetAdmin from the HP WebSite:
1. Run setup.exe at the root of the CD-ROM.(If auto-play is enabled, setup will automatically launch).
2. Select Optional Software option.
3. Select Web JetAdmin option.
4. Select on download link on Web page that appears.
Resource Manager
Follow the steps to install HP Resource Manager Software:
1. Run setup.exe at the root of the CD-ROM.(If auto-play is enabled, setup will automatically launch).
2. Select Optional Software option.
3. Select Resource Manager option.
4. Select Next and follow the prompts to install.
Resource Manager can also be installed by browsing to the following path :
<CD-ROM drive>:\<lang>\ResMgr\setup.exe
************************************
3. TECHNICAL ASSISTANCE
************************************
3.1 OBTAINING ADDITIONAL INFORMATION FROM HP SERVICES
See the online user guide that was supplied on CD-ROM with the printer for additional methods of obtaining
software and support information, such as driver distribution centers, fax service, and online services and support.
3.2 OBTAINING INFORMATION VIA THE INTERNET
Printer drivers, updated HP printer software, and product and support information can be obtained from the
following URLs. Access the Internet or FTP address and use the menus to locate the software or support of your
choice. (Paths can change without notice.)
In the U.S. http://www.hp.com/support/lj4550
In Europe http://www2.hp.com
Printer drivers can be obtained from the following sites:
In Japan ftp://www.jpn.hp.com/drivers/
In Korea http://www.hp.co.kr
In Taiwan http://www.hp.com/tw
or the local driver website at http://www.dds.com.tw
URL for Access HP:
http://www.hp.com
FTP library service
Anonymous FTP library service is available for around-the-clock access to drivers and technical support
information for Hewlett-Packard peripheral and computer products.
FTP address: ftp.hp.com
Login: anonymous
Password: your Internet name (or user identification)

Readme files
HP Color LaserJet 4550 Software Technical Reference 207
3.3 OBTAINING SUPPORT SERVICES OUTSIDE OF THE UNITED STATES
See the printer online user guide and visit the HP website at http://www.hp.com for more information on driver
distribution and customer support options, or contact your authorized HP Dealer.
******************************************************
4. LEGAL STATEMENTS
******************************************************
4.1 TRADEMARK NOTICES
Adobe® and PS® are trademarks of Adobe Systems Incorporated.
CorelDRAW™ is a trademark of Corel Corporation or Corel Corporation Limited.
Microsoft®, Windows®, and Windows NT® are U.S. registered trademarks of Microsoft Corp.
*Pantone, Inc.'s check-standard trademark for color.
4.2 LEGAL NOTICE
This Software is owned and copyrighted by Hewlett-Packard or its third party suppliers.
Additional copies of the Software are available through the Windows Installer Disk Copy utility or at the HP
website: http://www.hp.com
"NO WARRANTY. This Software is provided "As Is" with no Warranty.
LIMITATION OF LIABILITY. IN NO EVENT WILL HP OR HP SUPPLIERS BE RESPONSIBLE FOR ANY
DIRECT, INDIRECT, SPECIAL, INCIDENTAL, CONSEQUENTIAL (INCLUDING LOSS OF USE OR LOSS OF
DATA) OR OTHER DAMAGES ALLEGED TO BE CAUSED BY THE USE OF THIS SOFTWARE."
U.S. GOVERNMENT RESTRICTED RIGHTS: The Software and any accompanying documentation have been
developed entirely at private expense. They are delivered and licensed as "commercial computer software" as
defined in DFARS 252.227-7013 (Oct 1988 ), DFARS 252.211-7015 (Can 1991) or DFARS 252.227-7014 (Jun
1995), as a "commercial item" as defined in FAR 2.101(a), or as "Restricted computer software" as defined in
FAR 52.227-19 (Jun 1987) (or any equivalent agency regulation or contract clause), whichever is applicable. You
have only those rights provided for such Software and any accompanying documentation by the applicable FAR
or DFARS clause or the HP standard software agreement for the product involved. The owner is Hewlett-Packard
Company, 3000 Hanover Street, Palo Alto, California 94304.
4.3 COPYRIGHT
Copyright (c) 2000 Hewlett-Packard Company

Readme files
HP Color LaserJet 4550 Software Technical Reference 208
Hewlett-Packard Color LaserJet 4550, 4550N, 4550DN, 4550HDN Printer PANTONE®*
and ICC ReadMe File
Hewlett-Packard Color LaserJet Printer
4550, 4550N, 4550DN, 4550HDN
PANTONE®* and ICC Readme File
* * * * * * * * * * * * * * * * * * * * * * * * * * * * * * * * * * * * * * * * * * * * * * * * * * * * * * * * * * * * * * * *
NOTICE!
PLEASE READ "LATE-BREAKING INFORMATION" IN THIS Readme FILE FOR THE LATEST
INFORMATION ABOUT YOUR PRODUCT. THIS SECTION IS IN ENGLISH ONLY.
For additional information, see the CD-ROM Installation Notes, which contain information that might
affect the installation and use of your HP Color LaserJet 4550 printer. Installation Notes are located in the
HP LaserJet 4550 folder or on CD-ROM 1.
* * * * * * * * * * * * * * * * * * * * * * * * * * * * * * * * * * * * * * * * * * * * * * * * * * * * * * * * * * * * * * * *
Readme File Contents
TIP: To find information quickly, search the text document for the section number or title as it appears in the
contents.
1. INTRODUCTION
1.1 -- Purpose of this Readme file
1.2 -- Printing color documents
Getting good results automatically
sRGB color workspace standard
ColorSmart II
Features for CMYK color control (PS® driver)
2. PRINTING PANTONE®* COLORS
2.1 -- Automatic PANTONE®* calibration (PS only)
Enabling PANTONE®* support
2.2 -- Printing non-automatic PANTONE®* Colors
2.3 -- Loading custom PANTONE®* palettes in applications
Adobe® Illustrator
Adobe Photoshop®
Adobe PageMaker®
QuarkXpress
CorelDRAW
Macromedia FreeHand
Deneba Canvas
2.4 -- Using PANTONE®* color support in other applications
Using EPS or TIFF charts to import PANTONE®* colors
2.5 -- Printing the PANTONE®* calibrated color charts
Adobe Acrobat Reader
Adobe Photoshop
Microsoft® Word, PowerPoint or Publisher
Other formats of the color palette
Notes on PANTONE®* calibration
3. USING ICC PROFILES AND COLOR MANAGEMENT SYSTEMS (CMS)

Readme files
HP Color LaserJet 4550 Software Technical Reference 209
3.1 -- Overview of color management systems
3.2 -- Custom ICC profiles
3.3 -- Enabling CMS support in Macintosh OS
3.4 -- Enabling CMS support in Windows OS
Enabling ICM by right-selecting on the profile
Enabling ICM by from printer properties
3.5 -- Enabling CMS support in specific applications
Color profile filename concentions
Installing color profiles in ICC-compliant applications
Adobe Illustrator
Adobe Pagemaker
Adobe Photoshop
CorelDraw
Macromedia Freehand
Microsoft Publisher
Quark Xpress
4. HINTS AND TROUBLESHOOTING
4.1 -- Improving color printing
4.2 -- Improving printing speed
4.3 -- Frequently asked questions
5. HP SOFTWARE AND SUPPORT SERVICES -- ADDITIONAL INFORMATION
6. LEGAL STATEMENTS
*****************************
1. INTRODUCTION
*****************************
1.1 PURPOSE OF THIS README FILE
The Hewlett-Packard Color LaserJet 4550 printers support both automatic and manual PANTONE®* Color
Calibration. The printers are also compatible with color management systems (CMS) using ICC profiles such as
ColorSync on the Macintosh, ICM on Windows, and CMS systems built into application software. This Readme
file provides an introduction to color printing, describes how to print the best simulation of the PANTONE®*
MATCHING SYSTEM colors and describes how to install and use ICC profiles on an HP Color LaserJet 4550
printer.
Note:
The term "HP Color LaserJet 4550" printer refers to the HP Color LaserJet 4550, 4550N, 4550DN, and 4550HDN
printers.
1.2 PRINTING COLOR DOCUMENTS
Getting good results automatically
The HP Color LaserJet 4550 printers provide great color easily and automatically right out-of-the-box. With a
powerful blend of automatic color features, the 4550 series printers generate excellent color results for the
general office user while offering sophisticated tools for the experienced color professional.
To provide excellent color, the HP Color LaserJet 4550 series printers offer several powerful capabilities:

Readme files
HP Color LaserJet 4550 Software Technical Reference 210
• ColorSmart II optimizes the rendition of text, graphics and images automatically
• Industry standard sRGB default color space for effortless color matching
• Automatic PANTONE®* Calibration for easy use of PANTONE®* calibrated colors
• Color tables crafted to provide smooth, accurate rendition of all printable colors.
sRGB color workspace standard
sRGB is a world-wide color standard (IEC 61966-2-1) originally developed by HP and Microsoft as a common
color language for monitors, input devices (scanners, digital cameras) and output devices (inkjet printers, laser
printers, plotters). It is the default color space used for HP peripherals, Microsoft Operating Systems, the
Worldwide Web, and most office software sold today. sRGB is representative of the typical Windows PC monitor
today and the convergence standard for High Definition TV.
ColorSmart II
ColorSmart II is a set of technologies that enables optimal color output automatically for diverse types of
documents. ColorSmart II utilizes object tagging and sRGB color technologies. Object tagging allows optimal
color and halftone settings to be used for different objects on a page (text, graphics and images). The printer
analyzes the page (what objects it contains) and intelligently uses the halftone and color settings that provide the
best print quality for each object. Object tagging, combined with optimized default settings, produces great color
automatically. For more information on ColorSmart II, see HP ColorSmart II in chapter 4 of the online user guide.
Features for CMYK color control (PS driver)
Cyan, magenta, yellow and black (CMYK) are the inks used by a printing press. It is often called four-color
printing. CMYK data files are typically used by and originate from graphic arts (printing and publishing)
environments. The HP Color LaserJet 4550 series printer is optimized to print RGB colors for a good match to
the screen, but will also accept CMYK colors through the PS printer driver. By default, the HP Color LaserJet
4550 series printer interprets CMYK data according to the Specification for Web Offset Publications (SWOP)
standard. This standard defines process control points for CMYK inks to achieve common color output.
Emulations for Dainippon Ink and Chemical ink sets (DIC) and Euroscale CMYK inks used in the Far East and
Europe, respectively, are also available and can be selected from the printer driver. Detailed Descriptions of each
option are given below.
CMYK ink emulation options
•FAST or SWOP - Generates color according to the Specification for Web Offset Publications (SWOP) as
defined by ISO Type 1 printing (TR001). This is the only CMYK color set with a fixed color definition and is
the most prevalent color set used in North America. This is the default value for press emulation that is used
with the PS driver CMYK data. The SWOP CMYK Inkset setting applies a more strict emulation of the SWOP
colors than the FAST CMYK Inkset setting.
•Euroscale - Generates color according to the norm for European printing as defined by the Dupont Cromalin
proofing system. This color set is frequently encountered in Europe. These colors tend to be more saturated
than the same data printed with the SWOP setting.
•DIC - Generates colors according to the norm for Asia as defined by Dainippon Ink and Chemical Company.
This color set is frequently encountered in Asia. These colors tend to be more saturated than even the
Euroscale colors.
*************************************************
2. PRINTING PANTONE®* COLORS
*************************************************

Readme files
HP Color LaserJet 4550 Software Technical Reference 211
The PANTONE®* MATCHING SYSTEM is widely used by the printing industry to specify the color of objects. By
using PANTONE®* certified colors and palettes, you can be assured of getting the closest color match possible
when a file is printed on the HP Color LaserJet 4550 printer.
The Automatic PANTONE®* Calibration feature lets the printer substitute the best simulation obtainable on this
printer when a PANTONE®* color name is found in the PS code sent by an application. For PCL printing and
other situations where the name is not sent to the printer, application specific palettes are available and can be
used to color the objects in a document with the best PANTONE®* color simulation for the HP 4550. In addition,
the HP 4550 RGB and CMYK values for to each PANTONE®* color are available by printing an .eps, .tif or .ps
file or by finding the value in a text lookup table.
2.1 AUTOMATIC PANTONE®* CALIBRATION (PS driver only)
Automatic PANTONE®* Calibration is the default setting for HP Color LaserJet printers. This feature
automatically converts PANTONE®* colors to optimal color values for the printer by recognizing the PANTONE®*
color name or number in the data stream sent to the printer. The feature is activated when printing colors that
were chosen using the PANTONE®* Color picker in supported graphics applications.
Applications known to generate PS files with graphic objects preserving the PANTONE®* name are listed below:
• Adobe Illustrator 7 & 8
• Adobe PageMaker 6.5
• CorelDRAW 7, 8 & 9
• Deneba Canvas 5 (see note below)
• Macromedia Freehand 7 & 8
• Micrografx Designer
• Quark Xpress 3 & 4
Note:
Deneba Canvas versions 6 and 7 are not compatible with the Automatic PANTONE®* Calibration feature
The Automatic PANTONE Calibration feature only applies to graphic objects, not picture (raster) data such as
scanned images and TIFF files. Adobe Photoshop, for example, being a raster image editor, is not on the above
list of applications that support the Automatic PANTONE®* calibration feature.
Some applications substitute CMYK values to the printer if they cannot provide PANTONE®* names. If your
application does not pass the PANTONE®* names to the printer, the application will substitute default CMYK
values to be printed for each color. In this case, the accuracy of color matching will depend on the ink emulation
selected - FAST, SWOP, Euro standard, or DIC (Dainippon). If your application does not pass the PANTONE®*
names to the printer, the custom CMYK values created by PANTONE®* for this printer are available in the
manual PANTONE®* palettes described next.
Enabling PANTONE®* support in the printer driver
The printer is PANTONE®* ready in its default configuration. To turn off Automatic PANTONE®* Calibration in
the printer driver, go to Properties, Advanced, and then Printer Features. Note that this feature must be
disabled when printing color separations (one grayscale page per colorant) from many applications.
2.2 PRINTING NON-AUTOMATIC PANTONE®* COLORS
The PANTONE®* calibration data for each printer are provided for situations where the Automatic PANTONE®*
Calibration is not available. The Automatic PANTONE®* Calibration feature only applies to graphic objects, not

Readme files
HP Color LaserJet 4550 Software Technical Reference 212
picture (raster) data such as scanned images and TIFF files. Adobe Photoshop, for example, being a raster
image editor, is not on the list of applications that support the Automatic PANTONE®* calibration feature.
The printer specific PANTONE®* palettes are available on the HP web site and on the driver CD-ROM 1 in the
PANTONE directory. The directory includes application specific palettes as well as a specific name-to-printer
CMYK color tables for your printer (LUTTXT directory). Also available are tiff (Tifchart) and eps (EPSchart) files
that can be printed to create color charts of the PANTONE®* calibrated printer colors. The files are named
HP4550{X}.{ext} where the X is "C" for a CMYK PS palette and an "R" for an RGB PCL palette. The {ext} is the
file extension indicating the type of file as explained below in the description for each application.
You must choose the correct palette and color chart based on the print driver you is using. The CMYK palettes
can only be used with the PS driver. The CMYK palettes are optimized for the default setting (FAST CMYK
Inkset) of the printer. The RGB palettes work best with the PCL (5 or 6) driver. The RGB palettes are optimized
for the sRGB default (automatic) ColorSmart II setting. They can be used in many applications with the PS driver,
but will produce unpredictable results with some software that does not send RGB data through PS.
Any color management software such as ICM or ColorSync must be turned off when printing PANTONE®* Colors
specified as CMYK or sRGB values. These color conversions will change the colors sent to the printer and
reduce the accuracy of the PANTONE®* color simulation.
To disable Color Management:
• Windows 98 and Windows 2000: ICM-2 - make sure that no color profiles are associated with the printer.
This is found under the color management tab of the print properties dialog box.
• Windows NT® 4.0 - There is no system color management and nothing to disable.
• Windows 95: ICM-1 - The printer installation process must set up a profile for use in ICM-1. The HP4550
installation processes do not do this, so color management will not be enabled.
• Macintosh: ColorSync - From the Chooser, disable ColorSync Matching.
2.3 LOADING CUSTOM PANTONE®* PALETTES IN APPLICATIONS
To use the palettes, load the printer PANTONE®* palette for your application, as explained later in this document.
Each palette is specifically designed for the application/printer combination. Because each palette is unique, the
palette must be loaded into the application that you are using to create documents with HP4550 calibrated
PANTONE®* colors.
ADOBE ILLUSTRATOR
Adobe Illustrator loads color palettes through the Open command from the File menu. Once opened, the colors
are available in the Custom Colors box.
The color palette for Adobe Illustrator is stored in the Applicat\ADOBE\ILLUSTRA folder. The palette file,
HP4550C.ai for PS or HP4550R.ai for PCL, should be copied to the folder where other Illustrator files are stored
on your hard disk before continuing.
Adobe Illustrator 8, 7, 6 and 5.5
To open a color palette in Illustrator 8, 7, 6.0.1 and 5.5
1. Start Illustrator.
2. From the File menu, choose Import Styles.
3. Select the HP4550 color palette.

Readme files
HP Color LaserJet 4550 Software Technical Reference 213
To use the PANTONE®* color palette in Illustrator 6.0.1 and 5.5
1. Follow the previous steps to open the color palette.
Note: You must open the palette for every session before you can use PANTONE®* colors.
2. Choose Open or New from the File menu.
3. From the Object menu, choose Paint Style and select the appropriate PANTONE®* color.
Adobe Illustrator 4.x
To open a color palette in Illustrator 4.x
1. Start Illustrator.
2. From the File menu, choose Open.
3. Select the HP4550 color palette.
To use the PANTONE®* color palette in Illustrator 4.x
1. Follow the previous steps to open the color palette.
Note: You must open the palette for every session before you can use PANTONE®* colors.
2. Choose Open or New from the File menu.
3. From the Object menu, choose Custom Colors and select the appropriate PANTONE®* color.
ADOBE PHOTOSHOP
Adobe Photoshop does not allow colors to be defined by a name. When the HP4550 PANTONE®* palette is
opened, the colors is shown but the color names are not available. If you use colors that are similar to each
other, it might be difficult for you to see the difference between the colors. If you are working with an extensive
palette or if you want to see the color names, see Using PANTONE®* Colors Support In Other Applications at
the end of this section, which provides instructions on using EPS or TIFF files to import PANTONE®* colors.
The color palette for Photoshop is stored in the Applicat\ADOBE\PHOTOSHP directory. Before continuing, copy
the palette file named HP4550C.aco for CMYK Images or HP4550R.aco for RGB images to the folder where
other Photoshop files are stored on your hard disk. Note that CMYK images can not be printed to the PCL printer
without an implicit conversion to RGB by Photoshop. To locate the folder, search for files with an extension of
.aco.
Adobe Photoshop 4.X and 5.X
To open a color palette in Photoshop
1. Open Photoshop.
2. If the palette swatches do not appear, select Show Swatches from the Window menu.
3. Select the arrow in the upper-right corner of the Swatches Window and choose Load Swatches.
4. Select the color palette (the file is named HP CLJ 4550.aco) and Open.
Note: If you do not see this file, check the drop-down bar titled List files of format type. Make certain this
option is set to .aco files rather than .act files.
To use a color from your color palette
1. Select the Paint Bucket tool.
2. Select one of the custom colors in the Swatches window.
3. Select anywhere on an object to fill it with the color.

Readme files
HP Color LaserJet 4550 Software Technical Reference 214
To print PANTONE®* colors, set the Image Mode to either CMYK Color or RGB Color depending on the color
space of the image. Do not select the "Printer Color Management" or "PS Color Management" option.
ADOBE PAGEMAKER
PageMaker 6.x and 5.x support both .bcf (binary color format) and .acf (ASCII color format) formats. The
PANTONE®* color palette for PageMaker is stored in the Applicat\ADOBE\PAGEMAKE directory of the driver
CD-ROM. The palette files are named HP4550C.bcf and HP4550C.acf for PS or HP4550R.bcf and HP4550R.acf
for PCL printing.
Adobe PageMaker 6.x
PageMaker 6.x requires that you store the palettes in the Color folder under RSRC, located under the PageMaker
folder. Copy the files to that location before continuing.
To open a color palette in PageMaker 6.x
1. Open PageMaker 6.x.
2. From the Element menu (version 6.0) or the Utilities menu (version 6.5), choose Define Colors.
3. In the Define Colors dialog box, select New to add new colors.
4. In the Edit Color dialog box, select the Libraries arrow.
5. Select a palette from the list. You are now in Color Picker.
6. Choose the colors you wish to include from your palette and select OK.
Note: PageMaker can only import a maximum of 500 colors at once. If you choose more than 500 colors, an
error message results and only the first 500 colors are loaded.
7. Select OK to close the Edit Color dialog box.
8. Select OK again to close the Define Color dialog box.
To use colors from your color palette
1. If the Color Palette window is not open, from the Window menu, choose Color Palette.
2. Choose the object that you want to color.
3. In the Color Palette box, choose Fill to apply the color to the object, Line to apply the color to the line
(border), or Both to apply the color to the object and its border.
4. Select a color in the Colors window to apply the color to the selected object.
Adobe PageMaker 5.x
To open a color palette in PageMaker 5.x
1. Open PageMaker 5.x.
2. From the Element menu, choose Define Colors.
3. In the Define Colors dialog box, select New to add new colors.
4. In the Edit Color dialog box, select the Libraries arrow.
5. Choose the color palette for use in PageMaker 5.x and select Open.
6. Choose the colors you wish to include from your palette and select OK.
Note: PageMaker can only import a maximum of 500 colors at once. If you choose more than 500 colors, an
error message results and only the first 500 colors are loaded.
7. Choose OK to close the Edit Color dialog box.
8. Select OK again to close the Define Color dialog box.
To use colors from your color palette

Readme files
HP Color LaserJet 4550 Software Technical Reference 215
1. If the Color Palette window is not open, from the Window menu, choose Color Palette.
2. Choose the object that you want to color.
3. In the Color Palette box, choose Fill if you want to apply the color to the object, Line to apply the color to the
line (border), or Both to apply the color to the object and its border.
4. In the Colors window, select a color to apply to the selected object.
QUARKXPRESS
You must add colors to a QuarkXpress color palette by importing an .eps file. QuarkXpress adds the colors in an
.eps file to its color list. Once the colors are in your color list, you can use the colors in your document.
To load PANTONE®* colors into QuarkXpress
1. Open Applicat\Quark folder and copy the contents to a folder on your hard disk.
2. Use a printout of the PANTONE®* color palette to locate the colors that you want to import. (See the section
on printing the PANTONE®* color chart for instructions.)
3. On the printout, note the number that appears at the bottom of the column containing your color. This number
ranges from 1 to 92 and might include decimal values.
4. Refer to the following list to determine which chart file contains the color you want:
Column number from
PANTONE®* printout: PS or TIFF chart filename
Column 1 through column 11.5 1-16.eps or 1-16.tif
Column 12 through column 2 17-32.eps or 17-32.tif
Column 24 through column 30.5 33-48.eps or 33-48.tif
Column 31 through column 40 49-64.eps or 49-64.tif
Column 41 through column 52.3 65-80.eps or 65-80.tif
Column 52.4 through column 62.5 81-96.eps or 81-96.tif
Column 63 through column 71 97-112.eps or 97-112.tif
Column 71.3 through column 84 113-128.eps or 113-128.tif
Column 85 through column 92 129-135.eps or 129-135.tif
5. Import the correct EPS file.
The colors automatically load into your palette for use in QuarkXpress.
Note:
Depending on your system configuration, QuarkXpress might not add all the colors in the PANTONE®* library into
the color list. The number of colors within a QuarkXpress palette is limited by the amount of memory you have
allocated to the program and the complexity of the file.
Do not rename PANTONE®* Colors created in ColorDrive from within QuarkXpress. Removing the leading space
in front of the color name causes QuarkXpress to redefine the color from its built-in values.
CORELDRAW
CorelDRAW Supports the .cpl format for version 7 and beyond and the .pal format for older versions. The files
HP4550C.cpl and HP4550C.pal for PS and HP4550R.cpl and HP4550R.pal for PCL are stored in the
Applicat\CORELDRW folder. Place these files in a folder on your hard disk, the CUSTOM directory in the
CorelDRAW directory structure is recommended. Do not use the RGB palettes with the PS driver in CorelDRAW.
Note:

Readme files
HP Color LaserJet 4550 Software Technical Reference 216
CorelDRAW 7 and 8 have built-in application-level color correction which must be disabled first. Please refer to
the CorelDRAW manual for detailed instructions.
To open a color palette in CorelDRAW:
1. Open CorelDRAW.
2. Select the Fill tool.
3. Select the Palette icon.
4. From the right arrow pop-up next to the Custom Palette, choose Open Palette. In version 8, the palette
filename is in a pull down menu box.
5. Open the appropriate palette for the HP4550.
6. Select the color palette for use in CorelDRAW and select OK.
To use the colors in a drawing use the palette tab of the color fill tool and scroll through the choices to find the
desired color.
MACROMEDIA FREEHAND
Macromedia FreeHand supports both .bcf and .acf formats for color palettes. You can store custom color palettes
anywhere on your hard disk. If you save your palette in the Color folder, it automatically appears on the Options
menu in the Color List dialog box the next time you open FreeHand.
The files HP4550C.acf and HP4550C.bcf for PS and HP4550R.acf and HP4550R.bcf for PCL are stored in
theApplicat\FREEHAND folder. Place these files in the folder on your hard disk where other .acf or .bcf files are
stored. HP recommends that you place them in your FreeHand Color folder.
Macromedia FreeHand 4.X and beyond
To open a color palette in FreeHand 5.x and 4.x
1. Open FreeHand .
2. From the File menu, open a new or existing FreeHand document.
3. If the Color List window is not open, from the Window menu, choose Color List. On some versions the Color
List window is found under "Panels->" in the Window menu.
4. Open the Options menu in the Color List palette.
5. If you stored your color palette in the Colors folder, choose the color palette name in the Options list. - Or
-
If you stored your color palette anywhere else, from the Options menu, choose Import.
6. Select your color palette and select Open.
7. Choose the colors you wish to use and select OK.
To use colors in FreeHand 5.x and 4.x
From the Color List dialog box, drag the color square you want onto the object to which you want to apply the
color. Drag the color square into the center of an object to fill the object with the chosen color or onto the border of
an object to apply the chosen color to the border.
Macromedia FreeHand 3.x
Earlier versions of FreeHand did not support .acf or .bcf formats and instead use .clb format.

Readme files
HP Color LaserJet 4550 Software Technical Reference 217
The files HP4550C.clb for PS and HP4550R.clb for PCL are provided for users of FreeHand 3.x and are stored in
the Applicat\FREEHAND folder. Place the appropriate file in the folder on your hard drive where other .clb files
are stored. HP recommends that you place it in your FreeHand Color folder.
To open a color palette in FreeHand 3.x
1. Open FreeHand 3.x.
2. Open a new or existing document.
3. If the Colors window is not open, from the View menu choose the Window menu, and then choose Colors.
4. Select the arrow on the right side of the Colors window and choose Import.
5. Choose the file HP4550C.clb or HP4550R.clb and select Open.
6. Choose the colors you wish to use and select OK.
To use colors from your color palette
1. Select the object you want to color.
2. From the Colors window, choose the Fill box.
3. Choose Fill to fill the object, Line to fill the line (border), or Both to fill both the object and its border.
4. Choose a color in the Colors window to apply the color to the chosen object.
DENEBA CANVAS VERSION 3.5+
A special palette for Canvas is provided in the Canvas folder. The files are named HP4550C.pal and
HP4550R.pal.
To open a color palette in Canvas
1. In the Canvas folder, select the PANTONE®* Colors item in the Window menu.
2. Select Load... in the pop-up menu for Color Sets.
3. Load the Canvas palette HP CLJ 4550.pal.
These colors can now be used in your artwork.
2.4 USING PANTONE®* COLOR SUPPORT IN OTHER APPLICATIONS
If your application is not listed, you might have access to PANTONE®* colors in that program through EPS charts
or TIFF charts.
Using EPS or TIFF charts to import PANTONE®* colors
Most graphics and desktop publishing programs allow the import of EPS files, TIFF files, or both. Many programs
also have an "eyedropper" tool, which you can use to pick up colors out of an imported graphic. If necessary, you
can use the EPS or TIFF files to import colors into any application that supports one of these formats and has an
eyedropper tool (or functional equivalent).
1. Open the Epschart or Tifchart Folder on your desktop.
2. Locate the color that you want to import from a printout of the PANTONE®* Color Chart. (See the section on
printing the color chart for instructions.)
3. On the printout, note the number that appears at the bottom of the column containing your color. This number
ranges from 1 to 92 and might include decimals.
Also note the PANTONE®* number, directly under the swatch containing your color on the PANTONE®*
color palette. For instance, 106 refers to a shade of yellow on the first page of your printout, in column three.

Readme files
HP Color LaserJet 4550 Software Technical Reference 218
Refer to the following list to determine which chart file contains the color you want:
Column number from
PANTONE®* printout EPS or TIFF chart filename
Column 1 through column 11.5 1-16.eps or 1-16.tif
Column 12 through column 23 17-32.eps or 17-32.tif
Column 24 through column 30.5 33-48.eps or 33-48.tif
Column 31 through column 40 49-64.eps or 49-64.tif
Column 41 through column 52.3 65-80.eps or 65-80.tif
Column 52.4 through column 62.5 81-96.eps or 81-96.tif
Column 63 through column 71 97-112.eps or 97-112.tif
Column 71.3 through column 84 113-128.eps or 113-128.tif
Column 85 through column 92 129-135.eps or 129-135.tif
5. Open or Import the EPS or TIFF file containing the desired color.
6. After opening the proper chart file, find the exact color you wish to use by referring to the PANTONE®*
number.
These numbers are listed below the color swatch in both the PANTONE®* color palette printout and in the EPS or
TIFF file. For example, to load the shade of yellow 106 mentioned earlier, first open 1-16.eps or 1-16.tif and then
find the color swatch in the EPS file. The number 106 appears directly below the swatch containing this color.
CD-ROM 1 includes text format files called HP4550C.txt and HP4550R.txt in the LUTTXT directory. These files
might be helpful if you are working in a program that does not support loading color palettes and cannot import an
EPS or TIFF file. You can open the file in a word processor, text editor, or a spreadsheet program and print a crib
sheet of the colors and their definitions.
You can use this sheet to set up the colors in your program. This Readme file does not provide detailed
instructions for this procedure because the procedure varies for each program. However, if you are already
familiar with how to manually create RGB or CMYK color values in your application, HP4550.txt might be useful to
you.
2.5 PRINTING THE PANTONE®* CALIBRATED COLOR CHARTS
Once you have printed the complete PANTONE®* color palette, you can use it as a swatch booklet for permanent
reference. The swatch color chart is available in pdf, tif, ps and eps formats. If you wish to print the color palette,
use one of the options described below.
You must choose the correct palette based on the print driver you is using. The CMYK palettes can only be used
with the PS driver. The CMYK palettes and color charts are optimized for the default setting (FAST CMYK Inkset)
of the printer. The RGB palettes work best with the PCL (5 or 6) driver. The RGB palettes are optimized for the
sRGB default (automatic) ColorSmart II setting. They can be used in many applications with the PS driver, but will
produce unpredictable results with some software that does not send RGB data through PS.
Any color management software built into an application or the operating system (such as ICM or ColorSync)
must be turned off when printing PANTONE®* Colors specified as CMYK or sRGB values. These color
conversions will change the colors sent to the printer and reduce the accuracy of the PANTONE®* color
simulation.
Printing the color palette from Adobe Acrobat Reader

Readme files
HP Color LaserJet 4550 Software Technical Reference 219
The Acrobat folder includes a portable document format (.pdf) that contains the PANTONE®* color palette. The
file names are HP4550C.pdf and HP4550R.pdf. Use Acrobat Reader to print the color palette.
Printing the color palette from Adobe Photoshop
The tif files found in the Tifchart directory and the eps files in the Epschart directory can be printed using
Photoshop. All color management options must be disabled. The CMYK format must be printed using "CMYK
Color" and the RGB format with "RGB Color". Do not enable PS Color Management or Printer Color
management.
Printing the color palette from Microsoft Word, PowerPoint or Publisher
The .tif files found in the Tifchart directory can be inserted as a picture in a Microsoft Word, PowerPoint or
Publisher document. The HP4550R files must be used whether the PS or PCL driver is to be used.
Other formats of the color palette
CD-ROM 1 also includes two other versions of the color palette. One is a PS file, and one is a PANTONE®*
ColorDrive file.
•PS file: The PS file is in the Raw PS subdirectory on CD-ROM 1. The name of the file is HP4550C.ps.
•PANTONE®* ColorDrive file: The PS file is in the PANTONE®* ColorDrive Support subdirectory on
CD-ROM 1. The name of the file is HP4550C.pcd.
Notes on the PANTONE®* calibration:
PANTONE®* Colors generated by the Hewlett-Packard Color LaserJet 4550 are four-color process simulations
and can not match PANTONE-identified solid color standards. Use current PANTONE Color Reference Manuals
for accurate color.
PANTONE Color simulations are only obtainable on this product when driven by qualified Pantone-licensed
software packages. Contact Pantone, Inc. for a current list of qualified licensees.
There are many variables in the four-color process reproduction of colors generated by the Hewlett-Packard Color
LaserJet 4550, any one of which can affect the quality of the PANTONE Color simulation, including:
• Type of paper used
• Type of toner used
• CMYK Inkset setting
• ColorSmart settings
• Environmental conditions
• Overhead lighting
• Personal differences in perception of color
• Software applications
• Printer drivers
For optimum results, we recommend that the following be used:
• Paper - Hewlett-Packard LaserJet Paper
• Toner - Hewlett-Packard Color LaserJet 4550 Toner cartridges
• CMYK Inkset - FAST
• ColorSmart - Automatic

Readme files
HP Color LaserJet 4550 Software Technical Reference 220
*******************************************************************************************
3. USING ICC PROFILES AND COLOR MANAGEMENT SYSTEMS (CMS)
*******************************************************************************************
3.1 OVERVIEW OF COLOR MANAGEMENT SYSTEMS (CMS)
Color professionals with more exacting color requirements can use color management systems (software) to
control the color data exchange between devices. Color management is used to convert color data for different
devices with dissimilar color definitions. Color management systems, such as ICM in Windows and ColorSync on
the Macintosh, are available at the operating system level, while others can be integrated into an application.
For most purposes, the sRGB and CMYK Ink emulation paths provide great color on the HP 4550 without any
color management. The HP 4550 is compatible with color management systems when color conversions are
required or desired for more control of the printer color.
A color management system (CMS) performs two main functions:
• Mapping colors between devices with different ranges of color (gamuts), such as scanners and printers.
• Transforming colors from one working space to another, such as from CMYK (cyan/magenta/yellow/black)
to sRGB (a term generally used to define red/green/blue color output for monitors).
When mapping colors from one gamut space to another, the best method often depends on the type of data being
mapped. Some systems provide the option of choosing the method or rendering intent of the color transform. For
example, when transforming photographic data to a smaller data space, it is important to maintain the relative
color differences that give the image a realistic appearance. This process is often called perceptual or image color
mapping. The process of transforming named colors, such as PANTONE®* colors, and matching a standard ink
color as closely as possible, is called a colorimetric transformation. Printing PANTONE®* colors that have been
through a color management system is not as accurate as using the custom calibrated values as described in the
previous section. The other less used option in a color management system is the saturation or graphics intent.
For most practical purposes, the perceptual or image intent will provide the best results.
HP provides CMYK (hp4550c.icm) and sRGB (hp4550r.icm) ICC profiles with its Color LaserJet 4550 printers.
The CMYK profile can only be used with the PS driver while the sRGB profile can be used with any of the HP4550
drivers. The profiles are in the ICM directory of the driver CD-ROM 1 or on the HP Web site. These profiles
describe the way color is interpreted in the default CMYK and RGB modes. The sRGB profile matches the default
RGB mode (sRGB) which is enabled with the Screen Match or Automatic Color Smart II setting in either the PCL
or PS driver. The CMYK profile is based on the default mode which is a SWOP simulation with a CMYK Inkset
setting of FAST in the PS driver. These profiles can be used for color conversions in a color managed workflow.
3.2 CUSTOM ICC PROFILES
Color professionals can also use color management to calibrate specific color devices. This use of color
management requires a custom ICC profile to be built for the specific device. There are many software packages
and measurement devices on the market for this purpose.
To create the best ICC profile for the HP 4550 printer, it should be put in the "Vivid" or full gamut color mode in
the Color Smart II controls. Note that the "Vivid" setting must be set for all object types: text, graphics and
images. An RGB can be built by printing the ICC profile software measurement target with the printer in the Vivid
mode and then keeping the printer in this mode when printing color managed data from the profile.
Note:

Readme files
HP Color LaserJet 4550 Software Technical Reference 221
The HP 4550 does not have a device CMYK mode but will work well in the Vivid RGB mode with either the PS or
PCL driver provided the application supports RGB ICC profiles.
3.3 ENABLING CMS SUPPORT IN MACINTOSH OS
To enable CMS support in Macintosh OS System 7.0, complete the following steps:
1. From the Chooser, select the HP Color LaserJet 4500 printer, and then select Setup.
2. Select Print Options.
3. Select ColorSync Matching.
The Printer Profile option becomes available.
4. Select the printer profile you want to use.
5. Close the Setup window.
3.4 ENABLING CMS SUPPORT IN WINDOWS OS
The HP4550R.icm or HP4550C.icm ICC profiles can be installed at the system level using ICM-2 built into the
Windows 98 and 2000 operating systems. Windows NT 4.0 does not have ICM, and ICM-1 on Windows 95 is not
supported. The HP4550C.icm CMYK profile can only be used with the PS driver while the HP4550R.icm sRGB
profile can be used with any of the HP4550 drivers.
ICM is not recommended for use with the HP Color LaserJet 4550. The default RGB path is sRGB which is
compatible with the default settings of ICM and all color data processed through the Windows operating systems.
The default ICM profile is "sRGB Color Space Profile.icm" and works very well with HP printers. If there is a need
to manually enable ICM, it can be done from the Printer Properties dialog, or by right-selecting on the profile as
described below.
ICM is enabled by associating an ICC profile with the printer. Microsoft Office and other applications including
Microsoft Word, Microsoft PowerPoint and Microsoft Publisher will process printer colors through the associated
ICC profile when a document is printed. A profile can be associated with the printer in two different ways:
Enabling ICM by right selecting on the profile:
Copy the ICC profile to the appropriate directory for the OS.
• Win 98 \<windows>\system\color
• Win 2000 \<windows>\system32\spool\drivers\color
Hold the mouse pointer over the profile name, HP4550r.icm (recommended for PS and PCL) or HP4550c.icm (PS
only), and select the right mouse button.
Select "Install Profile." Right select on the profile again and select "Associate". A dialog box opens to select the
devices this profile is associated with. Select "Add…" and choose the correct HP Color LaserJet 4550 printer.
Enabling ICM from the Printer Properties dialog box:
A second way to view, install or change the ICC profile associated with a printer is to open the printer properties
dialog box. Under the "Color Management" tab any profiles associated with the printer is shown. Select Add…
and choose the file HP4550r.icm. Select Manual while this filename is selected to make this the default profile for
the printer.
The HP4550 PS driver has additional control over ICM when printing under the Advanced Options of the Printer
dialog . The ICM Method: ICM Handled by Host System and ICM Intent: Pictures options are recommended.

Readme files
HP Color LaserJet 4550 Software Technical Reference 222
3.5 ENABLING CMS SUPPORT IN SPECIFIC APPLICATIONS
Color profile filename conventions
The printer supports both RGB and CMYK color input paths. The RGB path is based on sRGB (Standard RGB)
and is the preferred path for the HP Color LaserJet 4550. To enable color management, an ICC-compliant color
profile for the data type must be installed. The convention used to distinguish between CMYK and sRGB color
profiles is HP4550c.icm for CMYK and HP4550r.icm for sRGB.
Since the Windows graphics design interface (GDI) is sRGB compliant, the HP4550r.icm color profile is
recommended for most color management tasks. When using the PCL printer drivers, the HP4550r.icm color
profile is recommended for best performance, since the data is converted to sRGB.
Many applications that use ICC color profiles expect to find them in specific locations. The default locations for
ICC color profiles are:
• Windows 95: <windows>/system/color
• Windows NT 4.0: <windows>/system32/color
• Windows 98: \<windows>\system\color
• Windows 2000: \<windows>\system32\spool\drivers\color or \<windows>\system32\color
Some applications can use color profiles that are stored anywhere, however, using the default location for shared
or system color profiles ensures that all applications can use the color profiles.
Although many of the applications with built-in Color Management software do not allow the use of the RGB or
HP4550r.icm profile, the Windows Color Management system (ICM) works very well with RGB printer profiles.
(The CMYK profile HP4550c.icm can be used as an alternative with the PS driver, however the HP4550r.icm file
is the recommended profile for all drivers including PS.)
The printer default settings of ColorSmart II Automatic (or ScreenMatch) and CMYK Inkset FAST must be used
with the HP supplied ICC profiles.
Installing color profiles in ICC-compliant applications
The ICC color profiles for the printer can also be used with ICC-compliant applications. ICC-compliant
applications are capable of managing color transformations within the application and in some cases use the
information for printing directly to the printer with internal printer drivers rather than using the operating system
printer drivers.
The following applications are ICC compliant, and the accompanying procedures show how to install ICM color
profiles in these applications. Other applications will soon be compliant. Check with your software vendor for more
information.
Adobe Illustrator 7.0 and later
1. From the File menu, select Color Settings.
2. Select the Printer drop-down list box.
3. From the Profile drop-down list box, select HP CLJ4550 SWOP CMYK PS. Note that Illustrator will not
accept the sRGB profile. The profile is ignored when printing with the PCL driver.
4. (Optional) Select the Intent drop-down list box and select the intent you wish to use. (Image or Perceptual is
recommended for most uses.)
5. Select OK.

Readme files
HP Color LaserJet 4550 Software Technical Reference 223
Adobe PageMaker 6.5
1. From the File menu, select Print.
2. Select the Printer drop-down list box and select HP CLJ4550 SWOP CMYK PS. Note that PageMaker will
not accept the sRGB profile. The profile is ignored when printing with the PCL driver.
3. If you selected a PS printer driver, select HP CLJ 4550-PS from the PPD drop-down list box.
4. Select Color, and then select CMS Setup.
5. From the Composite Printer drop-down list box, select the HP Color LaserJet 4550 printer.
6. Select Color Management ON.
7. Select OK.
8. Hold the SHIFT key down to change the Print button to Done.
9. Select Done.
Adobe Photoshop 4.0
Adobe Photoshop 4.0 uses ICC color profiles to create an Adobe Photoshop-specific separation table (.aci file).
These tables are used to convert to and from CMYK.
1. From the File menu, select Color Settings, and then select Separation Tables.
2. Select Build Tables Using ICC Profiles.
3. From the Profile drop-down list box, select HP CLJ4550 SWOP CMYK PS.
4. (Optional) From the Render Intent drop-down list box, select the intent you wish to use. (Perceptual is
recommended for most uses.)
5. Select Build.
6. Select OK.
Adobe Photoshop 5.0 and 5.5
Adobe Photoshop allows separate settings for the RGB setup and CMYK setup in the File-> Color Settings dialog.
The RGB setup applies to RGB images while the CMYK setup applies to CMYK images. When printing from
Photoshop, the color space should be set to RGB Color or CMYK color to print without any color conversions.
Choosing an ICC profile for the Color Space causes Photoshop to convert from the current setup setting to the
color space defined in the ICC profile. This can be used to convert from one color space to another such as RGB
to CMYK or to a different version of the same space such as to convert from one RGB space to sRGB for the
HP4550.
1. In the Print dialog box, select the desired profile HP CLJ4550 sRGB or HP CLJ4550 SWOP CMYK PS. In
addition, the built in sRGB choice in Photoshop can be used.
2. Do not select PS Color Management or Printer Color Management.
3. (Optional) From the Render Intent drop-down list box, select the intent you wish to use. (Perceptual is
recommended for uses.)
4. Select OK.
CorelDRAW 7
1. Start the Color Manager 7 either independently or from CorelDRAW 7 or Corel PHOTO-PAINT 7 by selecting
Color Manager from the Tools menu.
2. If the Composite Line checkbox is not selected, select the checkbox to select it.
3. From the Composite drop-down list box, select Install from Disk.
4. Select the directory containing the HP4550 ICC profiles
5. Select OK, and then Select OK again.

Readme files
HP Color LaserJet 4550 Software Technical Reference 224
6. From the Manufacturer list, select Hewlett-Packard.
7. From the Model list, select
PS Driver -HP Color LaserJet 4550 SWOP CMYK PS
PCL Driver - HP Color LaserJet 4550 sRGB
8. Select OK.
9. Select Finish.
CorelDRAW 8 or later
1. Setup Color Management by opening the Options dialog from the Tools menu.
2. Expand the Global options and then the Color Management options
3. Select Profiles
4. Select Get Profile From Disk in the Composite Printer option list
5. Browse to the directory with the HP 4550 ICC profiles from the CD-ROM
6. From the Manufacturer list, select Hewlett-Packard.
7. From the Model list, select:
PS Driver -HP Color LaserJet 4550 SWOP CMYK PS
PCL Driver - HP Color LaserJet 4550 sRGB
When printing, check the Miscellaneous tab of the print dialog box and see that the correct profile is shown and
Use Color profile is selected.
Macromedia FreeHand 7 and 8
1. From the File menu, select Print.
2. Select Color Management and make sure the Color Management checkbox is selected.
3. From the Monitor Simulates drop-down list box, select Composite Printer.
4. From the Composite Printer list, select HP CLJ4550 SWOP CMYK PS.
5. Select OK.
6. Select Cancel.
Microsoft Publisher
1. From the Tools drop-down list box, select Options.
2. Make sure the Improve Screen and Printer Color Matching checkboxes are selected.
3. Select OK.
Microsoft Publisher automatically uses the ICM profile for the printer driver you have currently selected. See the
section above on enabling the profile with ICM.
QuarkXpress 4.0
1. Check the XTensions Manager in the Utilities menu to make sure the Color Management XTension is active.
(If the Color Management XTension is active, a check appears in the Active column next to Quark CMS.)
Note:
If the Color Management XTension is not available, see the QuarkXpress documentation for information
about installing XTensions.
2. From the Edit menu, point to Edit Preferences, and then select Color Management.
3. Select the checkbox in front of Color Management Active to turn the Quark CMS on.
4. From the Composite Printer drop-down list box, select HP CLJ4550 SWOP CMYK PS.

Readme files
HP Color LaserJet 4550 Software Technical Reference 225
5. Select OK.
***************************************************
4. HINTS AND TROUBLESHOOTING
***************************************************
4.1 IMPROVING COLOR PRINTING
The process of matching printer output color to your monitor is quite complex because printers and computer
monitors use different methods of producing color. Monitors display colors by light pixels using an additive RGB
(red, green, blue) color process, but printers print colors using a subtractive CMYK (cyan, magenta, yellow, and
black) process.
For most users, the best method for matching colors on your screen to your printer is to print sRGB colors. The
HP Color LaserJet 4550 uses ColorSmart II, which uses sRGB and automatically optimizes color output. Several
factors can influence your ability to match printed colors to those on your monitor. These factors include:
• Print media
• Printer colorants (inks or toners for example)
• Printing process (inkjet, press or laser technology for example)
• Overhead lighting
• Personal differences in perception of color
• Software applications
• Printer drivers
• Operating System of Personal Computer
• Monitors
• Video cards and drivers
The HP web site contains a set of images that allow you to print a sampling of the entire RGB printer color space.
This allows you to create a master print showing the colors to expect for each RGB color requested.
4.2 IMPROVING PRINTING SPEED
Apparent printing speed is affected by the size of the file that is transferred to the printer. The file size can be
minimized without losing color quality in several ways.
• Keep images an appropriate size. The amount of data in images often dominates the data sent to the printer.
Images can be resampled to150 to 200 dots per printed inch (sampled at the size of the final output) with no
loss of quality. This is because the halftone line screen lpi (lines per inch) affects the usefulness of the pixels
more than the printer dot size or dpi.
• If the printed size of an image has been reduced within the document without resampling the image, an image
with a very high dpi (dots per printed inch) can result. Resample the image to an appropriate dpi using the
actual printed size for better performance. Some applications have an option to automatically resample
images to a reasonable size before printing.
• Converting a CMYK file to RGB reduces the number of bytes per pixel of an image by three-fourths. The
effectiveness of file compression can change the exact gain, but in general an RGB file will transfer fewer bits
for faster printing. When converting a file to RGB, select the "sRGB" option if it is available.
• Turn off any options in the application that cause it to resample an image to a higher resolution before
sending it to the printer. Some applications have options to resample images to 300 or 600 dpi before

Readme files
HP Color LaserJet 4550 Software Technical Reference 226
sending to the printer. This is unnecessary as the printer can do resampling after the image has been
transferred.
4.3 FREQUENTLY ASKED QUESTIONS
Why does the color look different on today's job or from the first to the last copy?
All electrophotographic printers can vary in the way they deposit toner onto the paper from one period to the next
due to a variety of environmental factors:
• environmental changes in the room where the printer is located
• changes in the environment inside the printer during operation
• different moisture content of the paper.
These environmental changes affect the electronic charge of the toner and the drum which results in very small
changes in the amount of toner deposited on the paper. This can cause subtle differences in the color on the
page. In general, these color differences are not objectionable, especially with images that include a wide mix of
colors. Typically, very small color shifts are lost in the overall look of the image.
However, changes in light, flat color areas, especially neutral grays, can become noticeable. Neutral gray colors
are those caused by mixing several colors together to generate a shade of gray. An example of this is a Windows
menu or tool bar. The differences are also more noticeable in areas with very low amounts of color, where small
differences can represent a relatively larger percentage change.
Despite onboard calibration and other techniques that HP uses to minimize these small effects, very small
variations in color are an inherent part of electrophotographic printing technology.
Why is the color quality poor or not what I expected?
There are many possible reasons why the color just does not look "right." Unfortunately, color does not have a
hard scientific definition. Consequently, different devices handle color in different ways.
• Color scanners, for example, can render identical pictures differently; these scanning differences affect the
final output.
• Monitors vary in the way they render color onscreen; adjustments to color settings can add to color variations.
As a result, color generated directly on the computer can look different on different computers. (See the next
question, Why don't the printed colors match the colors on the screen?)
• Software applications can process or display color in different ways and can change the appearance of color
images.
• Surrounding light affects the way color look, often causing significant differences in appearance from one light
source to the other.
• All RGB color data is not the same, which is why different applications can generate different results.
• The color "numbers" can be the same, an individual's perception can vary according to the circumstances.
When all operations are performed under one roof in one location, the scanner, the applications, the monitor, and
the printers can be tuned to each other by selecting settings that optimize the color match to the final printed
output. However, once the document is exchanged from one operation to another, the color can change because
the values for each color are encoded without a constant reference point.
To minimize problems associated with the different interpretation of color, Hewlett-Packard, in conjunction with
Microsoft, developed the sRGB color rendering space to provide a fixed reference point for color used in the
office. Because sRGB represents color the way most color monitors do, it is possible to use it to calibrate all
devices together. Use sRGB as the target for your scanners, your application program defaults, and your printed

Readme files
HP Color LaserJet 4550 Software Technical Reference 227
output. Using sRGB will help you generate good color every time, both within your operating environment and
between different operating environments.
Why don't the printed colors match the colors on the screen?
The process of matching printer output color to your monitor is quite complex because printers and computer
monitors use different methods of producing color. Monitors display colors by adding the light from RGB (red,
green and blue) colored pixels using an additive color process. Printers print colors using a subtractive color
process that removes color from the viewing light source as it reflects through the CMYK (cyan, magenta, yellow,
and black) inks.
These two different color rendering processes have different color gamuts. Color gamut is the range of colors
that can be displayed. Matching the color from one color gamut to the other requires converting the colors.
Because some colors from each device are outside the gamut of the other device, it is impossible to match all the
colors exactly, resulting in some color shifts regardless of how well everything else is working.
Some of the main reasons that colors can not appear to match the screen are due to the monitor white point
setting, the color depth, the gamut mismatch and CMYK color conversions. In addition, the kind of lighting in the
room can affect the perception of color. A print viewed in sunlight will often look very different under incandescent
lighting.
White point setting
The white point setting of a monitor can have a dramatic affect on the color appearance of a displayed color. The
white point setting is easily modified on most monitors. Monitors are usually shipped with the white point set to
9300 degrees Kelvin, which has a very blue appearance. This can be seen by holding a piece of white paper,
illuminated by natural or indoor lighting, near a white part of the monitor display. The monitor will appear bluish
when compared to the paper.
The sRGB color space is designed for a 6500 Kelvin monitor white. Many monitors have a white setting that can
be changed with a user control. Choosing a 6500 K white point will produce optimum conditions for matching
printed colors with displayed colors.
Color bit depth
Display drivers and many applications provide controls over the bit depth of the color information. Whenever
possible, 24-bit color, or "Millions of Colors," should be chosen to avoid losing color information.
Monitor vs. printer gamuts
Because monitors display colors using an additive RGB (red, green and blue) color process but printers print
colors using a subtractive CMYK (cyan, magenta, yellow, and black) process, fundamental differences in the
colors possible on the devices exist.
As an example, in an additive color system, cyan (a light greenish-blue color) is displayed as a combination of
green and blue phosphors. In a subtractive color system, cyan is one of the primary colorants used on the print
and can be placed directly on the paper. The green and blue phosphors in a monitor combine to display a very
light and bright cyan color. The cyan used as a printing colorant is usually a darker color. A very light cyan would
not allow the printer to reproduce dark blue colors and would be unacceptable to most observers. This difference
in color primaries makes it extremely difficult to print a cyan that matches the monitor cyan perfectly.
In general, the differences in the color technology used in monitors and printers, and the ways the colors
combine, create very different gamuts or ranges of colors that can be produced. HP Color LaserJet printers have
proprietary technology to map the colors of the monitor into colors that can be printed in a manner that creates
excellent color output. Because of the monitor/printer gamut mismatch, some colors are moved from their
absolute color on the monitor to a color that can be printed.
CMYK Color Conversions

Readme files
HP Color LaserJet 4550 Software Technical Reference 228
Many designers create color documents using CMYK color rather than RGB color. This allows them to control
colors in the same color space as they will eventually be printed. Because monitors are RGB devices, when an
application displays a CMYK color on the monitor, it has to convert the CMYK values to RGB. There are many
assumptions that must be made when converting colors. Some of these assumptions include:
• the color of the cyan, magenta, yellow, and black colorants
• the color of the red, green and blue phosphors
• how the colors change as they are mixed together
• what the room lighting conditions are
• the white point of the monitor
• the type of media being printed
Because of these assumptions, the same CMYK value can be displayed onscreen as an RGB color differently by
each application. HP Color LaserJet printers use a SWOP ink emulation as their default CMYK color space.
Choosing SWOP as the assumed CMYK space in an application will generally produce the best results for these
color conversions.
*****************************************************************
5. HP SOFTWARE AND SUPPORT SERVICES -
ADDITIONAL INFORMATION
*****************************************************************
Refer to the printer online user guide for additional methods of obtaining software and support information,
including the latest printer drivers, online services, fax-back service, and online support.
INTERNET
Anonymous FTP library service is available for around-the-clock access to drivers and technical support
information for Hewlett-Packard peripheral and computer products. Note that the paths might change without
notice. Access the Internet or FTP address and use the menus to locate the software or support of your choice.
URL for Software and Support: http://www.hp.com/go/cposupport
URL for Access HP: http://www.hp.com
FTP address: ftp.hp.com
Login: anonymous
Password: your Internet name (or user identification)
*************************************
6. LEGAL STATEMENTS
*************************************
TRADEMARK NOTICES
Adobe®, Adobe PhotoShop®, and PS® are trademarks of Adobe Systems Incorporated, which can be registered
in certain jurisdictions.
CorelDRAW(TM) is a trademark or of Corel Corporation.
PageMaker® is a U.S. registered trademark of Adobe Systems Incorporated.

Readme files
HP Color LaserJet 4550 Software Technical Reference 229
*Pantone, Inc.'s check-standard trademark for color.
Microsoft®, Windows®, and Windows NT® are U.S. registered trademarks of Microsoft Corp.
SOFTWARE LICENSE AND COPYRIGHT
This Software is owned and copyrighted by Hewlett-Packard or its third-party suppliers. Additional copies of the
Software are available at the HP website: http://www.hp.com
"NO WARRANTY". This Software is provided "As Is" with no Warranty.
LIMITATION OF LIABILITY. IN NO EVENT WILL HP OR HP SUPPLIERS BE RESPONSIBLE FOR ANY
DIRECT, INDIRECT, SPECIAL, INCIDENTAL, CONSEQUENTIAL (INCLUDING LOSS OF USE OR LOSS OF
DATA) OR OTHER DAMAGES ALLEGED TO BE CAUSED BY THE USE OF THIS SOFTWARE."
U.S. GOVERNMENT RESTRICTED RIGHTS: The Software and any accompanying documentation have been
developed entirely at private expense. They are delivered and licensed as "commercial computer software" as
defined in DFARS 252.227-7013 (Oct 1988 ), DFARS 252.211-7015 (Can 1991) or DFARS 252.227-7014 (Jun
1995), as a "commercial item" as defined in FAR 2.101(a), or as "Restricted computer software" as defined in
FAR 52.227-19 (Jun 1987) (or any equivalent agency regulation or contract clause), whichever is applicable. You
have only those rights provided for such Software and any accompanying documentation by the applicable FAR
or DFARS clause or the HP standard software agreement for the product involved. The owner is Hewlett-Packard
Company, 3000 Hanover Street, Palo Alto, California 94304.
Copyright © 2000 Hewlett-Packard Company.
All Rights Reserved.

Index
HP Color LaserJet 4550 Software Technical Reference 230
Index
$
$ symbol, 87
1
150-Sheet tray
media supported, 51
paper sizes supported, 50
2
250-Sheet tray
media supported, 51
paper sizes supported, 50
5
500-Sheet tray
media supported, 51
models including, 6
paper sizes supported, 50
A
A4 paper size, 43
A5 paper, 43
Acrobat Reader, Adobe
printing PANTONE charts, 222
active job, definition, 173
active panel, definition, 173
Add a Port, 96
Add Printer Wizard, 99
adding font DIMMs, 72
Adobe Acrobat Reader
printing PANTONE charts, 222
Adobe applications
PANTONE support, 216
PS emulation driver, 207
alert condition, definition, 173
Alerts software. See SAS
alerts, embedded Web Server, 25
Alerts, Job Status, 15, 89
All Pages, 41
Allow Scaling from Large Paper
default settings, 74
Pages per Sheet option, 32
paper sizes, 44
allprinters keys, 183
alternate paper sources, 41
angles, watermark, 39
Apple Macintosh. See Macintosh
AppleTalk
configuration, 152
drivers, 18
applications
closing before installation, 92
collation issues, 73
enabling color management, 224
ICC compliant, 225
number of copies, 61
PANTONE palettes, loading, 217
PANTONE support, 216
PS emulation driver, 207
arguments, command line, 7
arrow cursor, 53
Asian variations
Allow Scaling from Large Paper, 74
Macintosh user guide, 150
Auto Mode, Rendering, 33
Auto Select
paper source, 51
paper types, 52
Autocad directory structure, 81
Automatic Configuration, 74
automatic driver configuration, 12
Automatic mode, ColorSmart II, 64
automatic PANTONE calibration, 20, 216
availability, software, 86
Available Trays, 74
B
B5 (JIS), 44
B5 envelope size, 43
B5 ISO, 43, 44
Back button, printer status panel, 177
Back Cover, 41
Basics tab, 61
bidi. See bidirectional communications
bidilevel values, 187
bidirectional communications
AppleTalk, 18
automatic configuration, 74
custom paper types, 52
installation options, 12
printer model configuration, 68
purpose, 80
biditimeout values, 187
bin options, 60
binding sides
Booklet Printing options, 31
Flip Pages Up option, 31
bit depth, color, 229
bitmap screen fonts, Macintosh, 151
bitmaps
printer image, 53
sending TrueType fonts as, 34
Black, Print all Text as, 32, 34
Booklet Printing, 31
borders, page, 31
Both Sides, Print on, 30
box, CD-ROMs included in, 21
Bubble Help, 77
Busy state, icon, 180

Index
HP Color LaserJet 4550 Software Technical Reference 231
C
C5 envelope size, 43
Cancel button, 76
Canceled, definition, 174
Canceling, definition, 174
cardstock, trays supporting, 51
case sensitivity, 47
cassettes. See trays
CD-ROM
components, 21
directory structures, 81
readme file, 205
centering document, 36
ChaiVM virtual machines, 25
character limits, field, 58
charts, PANTONE, 221
clipping, Scale to Fit, 36
Close button, 51
CMYK
color management, 215
color matching, 227
converting to RGB, 227, 229
palettes, 217, 222
PANTONE substitutions, 20, 216
profiles, 223, 224
PS emulation driver, 207
collating, 73
color management
CMYK, 215
disabling, 217
frequently asked questions (FAQ), 227
ICC profiles, 223
Macintosh, enabling, 224
matching, 227
options, 215
profiles, included, 19
systems (CMS), 223
variables, 222
Windows, enabling, 224
Color Map
CMS, 223
options, 65
color printing, troubleshooting
color matching, 227
frequently asked questions (FAQ), 224
Color tab, 63
colors, watermarks, 39
ColorSmart II
definition, 215
options, 63
ColorSync, 217
combo box, custom paper size, 45
commands
Mopier Enabled, 70
paper source, 52
paper type, 53
PIN required, 56
SAS, 193
silent install, 7
completed definition, 173
complex graphics, 33
compliance, Year 2000, 81
components, Printing System, 19
Configuration Page, embedded Web Server, 24
configurations
AppleTalk, 152
automatic detection, 12, 74
over network, 96
physical, image of, 53
supported, 6
trays, 74
Configure Font DIMMs, 71
conflicts, number of copies, 61
Connect to a Shared Network Printer, 96
connecting printer
Windows 2000, 98
Windows 95/98, 113
Windows NT 3.51, 141
Windows NT 4.0, 129
constraint messages, 75
consumables, ordering, 89
context-sensitive help, 75
control panel, identifying print jobs, 58
conversions, color, 223
copies, number of, 61
Copy, Quick, 55
CorelDRAW
ICC color profiles, 226
loading PANTONE palettes, 220
PS emulation driver, 207
covers, different paper for, 41
creating watermarks, 38
Current Setting
ColorSmart II, 65
print quality, 33
cursors, 53
Custom Installation
options, 16, 94
Windows 95/98, 114
Windows NT 4.0, 130
Custom Paper Size, 44
custom paper types, 52
custom settings
color, 64
finishing tab, 33
silent installer, 7
watermarks, 38
customer support, 212
Customization Utility
installing, 96, 209
options, 11
D
Dainippon Ink (DIC), 215
default ports, selecting, 8
default printer, selecting
command line options, 8
Windows, 94
default settings
normal size, 36
number of copies, 61
print quality, 32

Index
HP Color LaserJet 4550 Software Technical Reference 232
Deferred Media Selection (DMS), 52
deinstalling. See uninstalling
Delete button, 47, 51
Deneba Canvas
loading PANTONE palettes, 221
PANTONE support, 216
depth, color, 229
desktop objects, IBM OS/2, 155
Destination tab, 53
Detail option (ColorSmart II), 65
Details button, Finishing tab, 33
detection, automatic, 12
Device ID Page, embedded Web Server, 24
Device Pages, embedded Web Server, 25
diagnositcs, remote, 23
diagonal orientation, watermarks, 39
dialog boxes, installation, 11
dialog-sensitive help, 75
DIMMs. See memory
directory structures
Autocad, 81
drivers, 81
fonts, 82
ICM, 83
manuals, 83
PANTONE, 83
Resource Manager, 84
Disk Copy, 97
disk images, creating, 96
disk space requirements
IBM OS/2, 154
Job Retention, 54
Windows 2000, 87
Windows 3.1x, 145
Windows 95/98, 104
Windows NT 3.51, 135
Windows NT 4.0, 118
display colors, 227, 228
dithering, 66
DL envelope size, 43
DocMaker, 150
Document Options, 30
documentation
directory structure, 83
FIR guide, 211
languages, 21
menu, 207
online user guide, 29
viewing, 11
DOS, system requirements, 144
dots per inch (dpi). See resolution
double-byte fonts, supported, 9
downloading drivers, 19
Driver Extensions, 63
Driver Support Matrix (DSM), 189
Driver Work Space (DWS)
printer models, 67
setting values, 72
drivers. See also PCL 5c driver; PCL 6 driver; PS driver;
SYSTEM directory, driver modifications
Automatic Driver Configuration, 12
directory structure, 81
fonts, 19
IBM OS/2, downloading, 22
Macintosh, 18
Microsoft PSCRIPT, 17
optimizing performance, 72
SAS support, 188
Web site, 19
Windows, 17
duplexer
configuration, 68
Flip Pages Up option, 30
models including, 6
paper sizes supported, 50
Print on Both Sides command, 30
DWS values
printer models, 67
setting, 72
dynamic command button, 46
E
editing watermarks, 38
Effects tab, 34
e-mail alerts, 25
embedded Web Server, 23
embedded Web Server Printer Alerts, 25
emulation, PS, 6, 207
envelope feeder, 70
envelope sizes, 43
EPSchart, 217, 221
equal signs, command lines, 7
Error state, icon, 180
escape sequences. See commands
EtherTalk, 152
Euro character, 80
Euroscale, 215
Event Log, embedded Web Server, 24
EWSConnect, 185
executive paper size, 43
Extensions, Driver, 63
eyedropper tool, 221
F
face down bin, 60
Failed state, icon, 180
Failed, definition, 174
FAQ, color printing, 227
FAST CMYK, 215
Fast InfraRed Receiver (FIR) guide, 211
features
Basics tab, 61
Color tab, 63
Destination tab, 53
Effects tab, 34
Finishing tab, 29
HP Color LaserJet models, 6
installer, 8
NT Forms tab, 74
Paper tab, 40
PCL drivers, 89
PS driver, 89

Index
HP Color LaserJet 4550 Software Technical Reference 233
fields
character limits, 58
Job Name, 58
number of copies, 61
User Name, 58
file management tools, 97
file sizes, troubleshooting, 227
files added by drivers
Japanese, 117, 143
Windows 2000, 102
Windows 3.1x, 148
Windows 95/98, 116
Windows NT 3.51, 142
Windows NT 4.0, 133
files, SAS, 180
Finished state, icon, 180
Finished, definition, 174
Finishing tab, 29
FIR Guide, 211
First Page Only (watermark), 37
First Page, Use Different Paper for, 41
Flip Pages Up, 30
floppy disks, not supported, 209
fonts
DIMMs, 71
directory structures, 82
double-byte, 9
downloading, 26
enabling and disabling, 72
Euro character, 80
IBM OS/2, 154
installation, 19
Macintosh, 151
PCL 6 driver features, 78, 79
PCL device, 90
PS device, 91
Sent TrueType as Bitmaps, 34
sizes, 39
watermarks, 39
Windows standard, 90
Forward button, printer status panel, 177
four-color simulations, 222
Freehand
ICC color profiles, 226
loading PANTONE palettes, 220
frequently asked questions, color, 227
FTP library service, 212
full-feature configurations, 6
G
gamuts, color, 228
Gloss Print Finish
default setting, 32
option, using, 34
gloved hand cursor, 53
graphics
color control, 65
settings, 33
grayscale, printing in, 66
guides. See documentation; help system
H
Halftone options, 65
hand cursors, 53
hard disk space. See disk space requirements
Hard Drive Accessory, HP LaserJet, 6
heavy media, 34
height
controls, 48
maximum, 50
standard paper sizes, 43
help system
Bubble Help, 77
online, 19
page-sensitive, 75
What's This?, 75
highlighting, hot spots, 53
Home button, printer status panel, 177
horizontal orientation
Flip Pages Up, 31
margins, 43
selecting, 61
watermarks, 39
hot spots, 53, 60
HP ColorSmart II. See ColorSmart II
HP Fast InfraRed Receiver (FIR) guide, 211
HP GL/2, 33
HP Installer, 19
HP JetDirect Administrator's Guide, 211
HP JetSend, 27
HP LaserJet Duplex Printing Accessory. See duplexer
HP LaserJet Hard Drive Accessory, 6
HP LaserJet PS Printer driver. See PS driver
HP LaserJet Utility, MAC, 19
HP Resource Manager
directory structure, 84
features, 26
installing, 211
HP Web JetAdmin, 211
HPD files, 72
HP-UX drivers, 19
I
IBM OS/2
drivers, downloading, 22
font support, 154
installation, 154
Job Properties, 158
Printer Properties, 157
system requirements, 154
ICC
profiles, custom, 223
profiles, included, 19
readme file, 214
ICM
directory structure, 83
disabling, 217
enabling, 224
icons
paper and envelope, 50
printer status panel, 177

Index
HP Color LaserJet 4550 Software Technical Reference 234
SAS window, 173
states, 180
system tray, 179
identifying print jobs, 58
Idle state, icon, 180
Ignore Application Collation, 73
Illustrator
ICC color profiles, 225
loading PANTONE palettes, 217
image, printer, 53
imageable area, 50
inactive job, definition, 173
in-box software, 86
inches, 50, 51
increments
resolution, 50
scroll bar, 37
infrared devices, sending to, 27
InfraRed Receiver guide, 211
INI file modifications, 149, 182
inks, CMYK, 215
Install Printer wizard, 11
installation
custom, 94
dialog boxes, 11
IBM OS/2, 154
installer components, 8
Macintosh, 152
Novell, 159
options, 12, 16
readme file, 207
Resource Manager, 211
silent, 7
typical, 94
unattended, 7
Web JetAdmin, 211
Windows 2000, 92
Windows 3.1x, 147
Windows 3.51, 139
Windows 95/98, 109
Windows NT 4.0, 122
wizards, 11
installer
components, 8
version, 19
internet registration, 11
interrupted print job alerts, 15
invalid entries
number of copies, 61
rounding, 48
J
Japanese system modifications, 117, 143
Java applications, 25
JetAdmin, HP Web, 23, 211
JetDirect Administrator's Guide, 211
JetDirect cards, 24
JetSend, 27
Job History, printer status panel, 177
Job Name, 58
Job Properties, IBM OS/2, 158
Job Retention, 54, 71
Job Status Alerts, 15, 89
Job Status and Alerts software. See SAS
Job Status icons, 174
Job Status panel, 174
L
labels, trays supporting, 51
landscape orientation
Flip Pages Up option, 31
margins, 43
selecting, 61
languages, documentation, 21
Large Paper, Allow Scaling from
default settings, 74
Pages per Sheet option, 32
paper sizes, 44
LaserJet Duplex Printing Accessory. See duplexer
LaserJet Hard Drive Accessory, 6
LaserJet PS Printer Driver. See PS driver
LaserJet Utility, MAC, 19
late-breaking readme file, 197
LegacyPrinerDSRates, 184
legal paper size, 43
Less Often, Refresh Rate, 179
letter paper size, 43
library service, FTP, 212
limited configurations, 6
lines per inch (lpi), 227
LINUX drivers, 19
localized versions
documentation, 21
LocalTalk, 152
logical pages
scaled, 36
watermarks, 37
long-edge binding, 31
LostJobTimer, 186
M
Macintosh
color management, disabling, 217
components, Printing System, 150, 152
drivers, 18
enabling color management, 224
font installer, 19
font support, 151
installing Printing System, 152
LaserJet Utility, 19
system requirements, 150
user guide, 150
Macromedia Freehand
ICC color profiles, 226
loading PANTONE palettes, 220
main screen, installer, 10
Manual Color Options, 64
Manual Feed, 51
manuals directory structure, 83
map. See Color Map
margins

Index
HP Color LaserJet 4550 Software Technical Reference 235
hardware, 50
standard paper sizes, 43
matching, color, 227, 228
maximum valid entries, 48
Measurement Units button, 51
media. See paper
memory
Configure Font DIMMs, 71
embedded Web Server requirements, 25
IBM O/S2 requirements, 154
Job Retention requirements, 54
Mopier requirements, 70
settings, 72
slots, 6
Total Printer Memory, 72
Windows 2000 requirements, 87
Windows 3.1x requirements, 144
Windows 95/98 requirements, 104
Windows NT 3.51 requirements, 135
Windows NT 4.0 requirements, 118
Message Angle, 39
messages
Bubble Help, 77
constraint, 75
watermark, 38
metric units, 51
Microsoft PowerPoint
PANTONE charts, printing, 222
Microsoft PSCRIPT driver, 17
Microsoft Publisher
ICC color profiles, 226
PANTONE charts, printing, 222
Microsoft taskbar icons. See system tray icons
Microsoft Windows. See Windows
Microsoft Word
PANTONE charts, printing, 222
millimeters
changing units, 51
rounding, 49
minimum valid entries, 48
models, printer
command line integers, 8
Configure tab settings, 67
features, 6
modes, Job Retention, 55
modifications. See SYSTEM directory, driver modifications
moire patterns, 34
monarch envelope size, 44
monitors, color, 229
Mopier Enabled
memory requirements, 70
More Often, Refresh Rate, 179
multiple copies, number of, 61
Multipurpose tray
media supported, 51
paper sizes supported, 50
N
names
color profiles, 224
custom paper sizes, 47
Job, 58
path, 87
User, 58
ND broker, 159
NDPS printers, building, 170
NDPS, installing drivers with, 161
Network Neighborhood, 99
Networking Pages, embedded Web Server, 25
networks
connecting printer, 98
customized silent installs, 7
driver installation, 97
embedded Web Server, 23
HP JetDirect Administrator's Guide, 211
HP JetSend, 27
Ignore Application Collation, 73
infrared devices, sending to, 27
JetDirect cards, 24
Novell, 159
NT Forms tab, 74
paper options, constraining, 74
status alerts, 16
Web JetAdmin, 22
Windows 2000 installation, 94, 96
Windows 95/98 installation, 109, 113
Windows NT 3.51 installation, 140
Windows NT 4.0 installation, 125, 128
Never, Refresh Rate, 179
No Back Cover, 41
Normal Size, % of, 36
Novell systems
Bindery queues, building, 166
installing drivers, 159
JetDirect Cards, building queues, 170
NDPS driver installation, 161
NDPS printers, building, 170
NDS queues, building, 168
removing printer objects, 164
ZenWorks, 161
NT. See Windows NT
NT Forms tab, 74
number of copies, 61
N-up printing. See Pages per Sheet
NVRAM, 25
O
objects, IBM OS/2, 155
OK button, 76
Online Printing Help, 19
online user guide, 29
Online Utility Help, 19
operating systems
SAS, supported, 173
sRGB, 215
supported, 6
upgrading, 207
Operation Mode, 70
optimizing drivers, 72
Optional Paper Destinations, 70
Optional software, 11, 207
Options panel, SAS, 178

Index
HP Color LaserJet 4550 Software Technical Reference 236
order, page, 31
ordering supplies, 25, 89
orientation. See also landscape orientation; portrait orientation
Flip Pages Up, 31
options, 61
watermarks, 39
OS/2. See IBM OS/2
Other Options, Configure tab, 70
Other Pages, 41
output bin options, 60
output settings, 34
P
Page Borders, printing, 31
Page Order, 31
PageMaker
ICC color profiles, 225
loading PANTONE palettes, 218
Pages per Sheet, 31
page-sensitive help, 75
palettes, PANTONE, 216
panel, definition, 173
PANTONE
applications, compatible, 20
calibration, automatic, 216
charts, 221
directory structure, 83
disabling color management, 217
optimizing quality, 222
palettes, applications, 20
palettes, loading, 216
profiles, included, 20
readme file, 214
swatch booklets, printing, 222
Paper Handling Options, 68
paper sizes
Allow Scaling from Large Paper, 44
Booklet Printing options, 31
constraining options, 74
custom, 44
maximum, 50
minimum, 50
names, custom, 47
Print Document On, 36
Scale to Fit, 36
selecting, 42
trays, 50
paper sources
commands, 52
selecting, 51, 53
Use Different Paper for First Page, 41
Paper tab, 40
paper types
constraining options, 74
selecting, 52
standard, 52
passwords, 25
path names, 87
patterns, moire, 34
PCL 5c driver
automatic configuration, 12
Basics tab, 61
Color tab, 63
Custom setting, Finishing tab, 33
Destination tab, 53
Effects tab, 34
features, 89
Finishing tab features, 29
fonts, 90
graphic settings, 33
margins, 43
modifications, Windows 2000, 102
modifications, Windows 3.1x, 148
modifications, Windows 95/98, 116
modifications, Windows NT 3.51, 142
modifications, Windows NT 4.0, 133
network installation, 97
NT Forms tab, 74
operating systems supported, 6
paper source commands, 52
Paper tab, 40
paper type commands, 53
print quality settings, default, 32
WIN.INI file modifications, 148
PCL 6 driver
automatic configuration, 12
Basics tab, 61
Color tab, 63
Destination tab, 53
Effects tab, 34
features, 89
Finishing tab features, 29
fonts, 90
margins, 43
modifications, Windows 2000, 102
modifications, Windows 3.1x, 148
modifications, Windows 95/98, 116
modifications, Windows NT 3.51, 142
modifications, Windows NT 4.0, 133
network installation, 97
NT Forms tab, 74
operating systems supported, 6
Paper tab, 40
print quality settings, default, 32
pd=n command line option, 8
PDF (portable document format)
online user guide, 29
PANTONE color charts, 222
PDFs (Printer Description Files), 18
percentages, scaling
% of Normal Size, 36
ZoomSmart, 35
performance, optimizing, 72
PFM files, 72
Photo color control, 65
Photoshop
ICC color profiles, 225
PANTONE color charts, printing, 222
PANTONE not supported, 216
PANTONE palettes, 218
physical configuration, image of, 53
picture, printer, 53
PIN numbers, 55, 58

Index
HP Color LaserJet 4550 Software Technical Reference 237
PJL commands
Mopier Enabled, 70
PIN required, 56
resolution settings, 34
platforms supported, 6
Plug and Play, 107
point sizes, fonts, 39
pointers, 53
pop-up alerts, 15
port=xxxx command line option, 8
portable document format. See PDF
portrait orientation
Flip Pages Up option, 31
margins, 43
selecting, 61
ports, Windows 2000 options, 96
PowerPoint
PANTONE charts, printing, 222
PPDs, 18
preview images
binding, 31
Flip Pages Up, 31
orientation, 62
Pages per Sheet, 31
paper size, 42
Scale to Fit, 36
scaling, 37
watermarks, 37
Print all Text as Black, 32, 34
Print Document On, 36
Print in Grayscale, 66
print jobs. See jobs
Print on Both Sides, 30
Print Page Borders, 31
Print Quality settings, 32
printable area, 50
Printer Description files (PPDs), 18
printer drivers. See drivers
printer image, 53
Printer Memory, 72
Printer Model
command line integers, 8
Configure tab settings, 67
features, 6
Printer Properties, IBM OS/2, 157
Printer Status page, embedded Web Server, 24
Printer Status panel, 177
printer=n command line option, 8
Printers folder
Configure tab, accessing, 67
NT Forms tab, accessing, 74
Printing System
components, 19
version, 7
Printing, definition, 174
Private Job, 55
processor requirements
Windows 2000, 87
Windows 3.1x, 144
Windows 95/98, 104
Windows NT 3.51, 135
Windows NT 4.0, 118
profiles
filename conventions, 224
ICC Custom, 223
ICM, 224
types of, 223
prompts
Windows 95/98, 114
Windows NT 4.0, 130
Proof and Hold, 55
Properties
Configure tab, accessing, 67
IBM OS/2, 157
NT Forms tab, accessing, 74
PS driver
Basics tab, 61
Color tab, 63
Destination tab, 53
Effects tab, 34
fonts, 91
HP LaserJet, 18
INI file modifications, 149
Japanese system modifications, 117
modifications, Windows 2000, 102
modifications, Windows 3.1x, 148
modifications, Windows 95/98, 117
modifications, Windows NT 3.51, 142
modifications, Windows NT 4.0, 134
network installation, 97
NT Forms tab, 74
operating systems supported, 6
PANTONE calibration, automatic, 216
Paper tab, 40
PS emulation driver, 6, 207
PS file, PANTONE chart, 222
PS Printer Description files (PPDs), 18
PSCRIPT driver, Microsoft, 17
Publisher
ICC color profiles, 226
PANTONE charts, printing, 222
pull status, 16
Q
quality
settings, 32
troubleshooting, 228
QuarkXPress
ICC color profiles, 226
loading PANTONE palettes, 219
printer description files, 18
PS emulation driver, 207
queries, bidi. See bidirectional communications
question mark button, 75
queues, building, 166, 168
Quick Copy, 55
Quick Sets
custom paper sizes, 45
grayscale, printing in, 66
R
RAM. See memory

Index
HP Color LaserJet 4550 Software Technical Reference 238
raster images
PANTONE not supported, 216
sending graphics as, 33
Reader, Adobe Acrobat
printing PANTONE charts, 222
readme files
CD-ROM, 205
late-breaking, 197
PANTONE and ICC, 214
Receiving, definition, 174
Refresh button, printer status panel, 177
refreshrate keys, 184
Register Product, 11
Registration, 207
release notes, 211
remote troubleshooting, 23
remote viewing, printer status, 16
Rename button, 47, 51
Rendering Mode
default settings, 32
graphic settings, 33
Require PIN to Print, 56
requirements, system. See system requirements
resolution
default, 32
file size, 227
PJL commands, 34
system requirements, 87
Resolution Enhancement Technology (REt), 34
Resource Manager
directory structure, 84
features, 26
installing, 211
REt, not supported, 34
Retention, Job, 54, 71
RGB
color matching, 227
converting from CMYK, 227
palettes, 217, 222
profiles, 223
Rotated orientation, selecting, 61
rough media, 34
rounding invalid entries, 48
S
SAS
adding and removing printers, 188
allprinters keys, 183
bidilevel values, 187
biditimeout values, 187
Cancel button, 173
command line options, 193
conflicts, 196
definitions, 173
disabling job tracking, 188
display logic, 176
display options, 173
driver specific problems, 194
Driver Support Matrix (DSM), 189
enabling, 188
EWSConnect, 185
files, 180
goals, 173
icons, 173
INI files, 182
Job Status icons, 174
Job Status panel, 174
job tracking, disabling, 188
LegacyPrinerDSRates, 184
LostJobTimer, 186
operating systems, supported, 173
Options panel, 173, 178
Printer Status icons, 174
Printer Status panel, 177
printers, adding, 188
refreshrate keys, 184
settings, 178
specific drivers, adding support for, 188
states, system tray icon, 180
system tray icons, 179
troubleshooting, 191
Warning icon, 174
window, 173
WindowsSpoolerDSRates, 185
Save button, 51
saving custom paper sizes, 45
Scale Patterns
default settings, 32
settings, 34
Scale to Fit, 36
scaling
% of Normal Size, 36
ZoomSmart, 35
Scaling from Large Paper
default settings, 74
Pages per Sheet option, 32
paper sizes, 44
Screen Match option, 65
scroll bar increments, 37
security, 25
selected panel, definition, 173
Send Graphics as Raster, 33
Send Graphics as Vector, 33
Send Page as Raster, 33
Send TrueType as Bitmaps
default settings, 32
using, 34
settings. See custom settings; default settings
setup. See installation
shading, watermarks, 40
shared Windows networks. See networks
short-edge binding, 31
Silent Install, 7
Size Is, 42
sizes, fonts, 39
sizes, paper. See paper sizes
slots, memory, 6
Smooth option (ColorSmart II), 65
Source Is, 51
spaces, command lines, 7
Specification for Web Offset Publications. See SWOP
speed, improving, 227
spiral binding, preview image, 31

Index
HP Color LaserJet 4550 Software Technical Reference 239
sRGB
color matching, 227
definition, 215
palettes, 217
profiles, 223, 224
Standalone Status. See SAS
Status Alerts, 15, 89
Status software. See SAS
status, remote viewing, 16
Stopped, definition, 174
Storage, 71
Stored Job, 55
Supplies Information and Reordering, 89
Supplies Page, embedded Web Server, 24
support, technical, 212
supported operating systems, 6
swatches, PANTONE, 222
SWOP, 215
symbols, $, 87
syntax, command line, 8
SYSTEM directory, driver modifications
Japanese, 117, 143
Windows 2000, 102
Windows 3.1x, 148
Windows 95/98, 116
Windows NT 3.51, 142
Windows NT 4.0, 133
system requirements
DOS, 144
IBM OS/2, 154
Macintosh, 150
Windows 2000, 87
Windows 3.1x, 144
Windows 95/98, 104
Windows NT 3.51, 135
Windows NT 4.0, 118
system tray icons, status, 179
T
tabs
All Pages, 41
Basics, 61
Color, 63
Destination, 53
Effects, 34
Finishing, 29
NT Forms, 74
Paper, 40
taskbar icons. See system tray icons
technical support, 212
Templates Folder, 156
testing
grayscale output, 66
Text color option, 65
Text, Print all as Black, 32, 34
TIF files
color palettes, 217
PANTONE charts, 221
Top Bin (Face Down), 60
top job, definition, 173
Total Printer Memory, 72
Tray 1
media supported, 51
paper sizes supported, 50
Tray 2
media supported, 51
paper sizes supported, 50
Tray 3
media supported, 51
models including, 6
paper sizes supported, 50
trays
configuring, 74
media supported, 51
triggering job, definition, 173
troubleshooting
remote, 23
SAS, 191
TrueType fonts
included, 90
installing, 19
Send as Bitmaps, 32, 34
watermarks, 39
TSR programs, closing, 92
Type Is, 52
Typical Installation
options, 12, 94
silent, 7
Windows 95/98, 114
Windows NT 4.0, 130
U
u (/u) command line option, 8
unattended installation, 7
uninstaller
using, 16, 19
uninstalling
Macintosh Printing System, 153
Windows 2000, 100
Windows 3.1x, 148
Windows 95/98, 115
Windows NT 3.51, 142
Windows NT 4.0, 132
units, changing, 51
UNIX drivers, 19
Unknown
definition, 174
icon, 180
upgrading, 207
Usage Page, embedded Web Server, 24
Use an Alternate Source, 41
Use an Existing Port, 96
Use Different Paper for First Page, 41
user guide
localized versions, 21
Macintosh, 150
online, 29
User Name, 58
user-defined custom paper sizes, 44
utilities
Customization, 96, 209
file management, 97

Index
HP Color LaserJet 4550 Software Technical Reference 240
HP Resource Manager, 211
MAC LaserJet, 19
V
valid entries
edit boxes, 48
number of copies, 61
vector images
hatch patterns, 34
PANTONE, 21
sending graphics as, 33
versions
driver extensions, 63
HP LaserJet PS Printer Driver, 18
in-box, 86
installer, 19
MAC LaserJet Utility, 19
Microsoft PSCRIPT driver, 17
Printing System, 7
View Documentation, 11
virus checkers, closing, 92
Vivid option, 65, 224
W
Waiting, definition, 174
Warning icon, 174
Warning state, icon, 180
Watermark Message, 38
Watermarks, 37
Web JetAdmin, 23, 211
Web Server, embedded, 23
Web sites
drivers, 19, 212
supplies, ordering, 89
What's This? Help, 75
white point setting, 229
white text, 34
width
controls, 48
maximum, 50
standard paper sizes, 43
WIN.INI file modifications, 148
Windows 2000
case sensitivity, 47
color profiles, 225
components, 87
connecting printer, 98
default printer, setting, 94
driver installation, 93, 97
drivers, 17
enabling color management, 224
font support, 90
installing software, 92
network installation, 94, 96
online user guide installation, 90
paper sizes, 43
PCL driver modifications, 102
PS driver modifications, 102
SAS files, 180, 182
SAS INI files, 182
system requirements, 87
uninstalling software, 100
Windows 3.1x
driver components, 145
driver support, 18, 145
font support, 146
INI file modifications, 149
installation, 147
PCL driver modifications, 148
PS driver modifications, 148
system requirements, 144
uninstalling components, 148
Windows 95/98
case sensitivity, 47
color management, disabling, 217
color profiles, 225
connecting printer, 113
custom installation, 114
driver components, 104
drivers, 17
enabling color management, 224
fonts, 107
help system, 75
installation, 109
Japanese system modifications, 117
network installation, 109, 113
paper sizes, 43
PCL driver modifications, 116
Plug and Play, 107
PS driver modifications, 117
SAS files, 180, 181
SAS INI files, 182
system requirements, 104
typical installation, 114
Windows File Manager, 97
Windows for Workgroups. See Windows 3.1x
Windows Millenium
SAS files, 181
Windows NT 3.51
connecting printer, 141
driver components, 135
drivers, 18
file locations, 140
fonts, 138
installation, 139
Japanese system modifications, 143
network installation, 140
PCL driver modifications, 142
PS driver modifications, 142
system requirements, 135
uninstalling components, 142
Windows NT 4.0
case sensitivity, 47
color management, disabling, 217
color profiles, 225
connecting printer, 129
custom installation, 130
default printer, setting, 125
driver components, 118
driver installation, 124
drivers, 17
font support, 121

Index
HP Color LaserJet 4550 Software Technical Reference 241
help system, 75
Ignore Application Collation, 73
installation, 122
network installation, 125, 128
NT Forms tab, 74
paper sizes, 43
PCL driver modifications, 133
PS driver modifications, 134
SAS files, 180, 181
SAS INI files, 182
system requirements, 118
typical installation, 130
uninstalling printing system, 132
WindowsSpoolerDSRates, 185
Wizard, Add Printer, 99
wizards, installation, 11
Word
PANTONE charts, printing, 222
Workgroups, Windows for. See Windows 3.1x
X
XCOPY, 97
Y
Y2K compliance, 81
Z
ZenWorks, installing drivers with, 161
ZoomSmart, 35
