HP Griffin Laser Jet 6L Pro Printer User Guide Bpl10135
LaserJet 6L pro bpl10135
User Manual: HP HP LaserJet 6L Pro Printer - User Guide
Open the PDF directly: View PDF ![]() .
.
Page Count: 178 [warning: Documents this large are best viewed by clicking the View PDF Link!]
- English
- Contents
- Setup
- Introduction
- Identifying the printer’s parts
- Installing the toner cartridge
- Connecting printer’s cable and cord
- Using generic power strips and adapters
- Attaching the label to the printer
- Loading paper into the printer
- Printer software information
- Installing your printer software
- Standard installation for Windows 95, Windows 98, Windows 2000, and NT 4.0
- Standard installation for Windows 3.x
- Alternative Installation for Windows 95 and Windows 98
- Alternative Installation for Windows NT 4.0
- Alternative installation for Windows 3.x
- Making diskettes from your CD for installation on Windows 95, Windows 98 and Windows NT
- Making diskettes from your CD for installation on Windows 3.x
- Printer control panel
- Printing
- Troubleshooting
- Warranty and support information
- Printer specifications
- Paper specifications
- Index
- Bahasa Indonesia
- DAFTAR ISI
- Pengaturan
- Kata Pengantar
- Mengenali bagian-bagian printer
- Memasang toner cartridge
- Menghubungkan kabel printer
- Menggunakan sambungan listrik generik dan adaptor
- Menempelkan label pada printer
- Memasukkan kertas ke dalam printer
- Informasi perangkat lunak printer
- Menginstalasi perangkat lunak printer
- Instalasi standar untuk Windows 95, Windows 98, Windows 2000, dan NT 4.0
- Instalasi standar untuk Windows 3.x
- Instalasi Alternatif untuk Windows 95 dan Windows 98
- Instalasi Alternatif untuk Windows NT 4.0
- Instalasi Alternatif untuk Windows 3.x
- Membuat disket dari CD untuk instalasi pada Windows 95, Windows 98 dan Windows NT
- Membuat disket dari CD untuk instalasi pada Windows 3.x
- Panel kontrol printer
- Mencetak
- Pemecahan masalah
- Mengatasi masalah yang umum
- Mengeluarkan kertas macet
- Kertas tidak mau mengumpan
- Membersihkan printer
- Mengatasi berbagai masalah pada printer
- Mengatasi berbagai masalah kualitas cetak
- Mengatasi berbagai masalah perangkat lunak
- Mengatasi berbagai masalah pencetakan dari MS- DOS
- Jaringan dan kotak switch
- Kehabisan memori
- Informasi garansi dan dukungan
- Spesifikasi printer
- Spesifikasi kertas
- Indeks
®
User Guide
LaserJet 6L Pro
HP Printer
English
Bahasa Indonesia

Customer Support Options
In addition to the phone numbers listed below, appendix A, “Warranty and Support
Information," contains sales and service addresses and phone numbers.
Thank you for your purchase. Along with your product, you receive a variety of support services from
Hewlett-Packard. Our goal is to give you the results you need, quickly and professionally.
Obtaining Software Utilities and Electronic
Information:
Asia-Pacific Countries (65) 740 4477 (Asia Rim). Monday through Friday from
08:30 to 17:30 (Singapore time)
HP Support
Assistant CD-ROM This support tool offers a comprehensive online
information system designed to provide technical and
product information on HP products. To subscribe to this
quarterly service call (65) 740 4477, Monday through
Friday from 08:30 to 17:30 (Singapore time).
Online Services: for 24-hour access to
information over your modem, we suggest
these services.
World Wide Web URL: Printer drivers, updated HP printer
software, product and support information may be
obtained from http://www.hp.com/country/us/eng/
othercountrieswel.html, or http://www.hp.com/
cpso_support/guide/psd/cscap.html, or http://
www.hp.com/cpso_support/guide/psd/crcap.html
In-Country Support Numbers
If you require support after your warranty has expired or additional product repair services, or if your
country is not listed below, please refer to the Worldwide sales and services offices in appendix A.
China
(86 10) 6564-3888
(86 10) 6564-5959
India
(91 11) 682-6000
(91 11) 682-6035
Indonesia
(62 21) 350-3408
Australia
61 3 8877-8000
HP LaserJet 6L Pro Printer
User Guide
Copyright and License
© Copyright Hewlett-Packard
Company 2001
All Rights Reserved. Except as
allowed by copyright laws
herein, reproduction,
adaptation, or translation
without prior written permission
is prohibited.
A user of the Hewlett-Packard
printer associated with this user
guide is granted a license to: a)
print hard copies of this user
guide for PERSONAL,
INTERNAL, or COMPANY use
subject to the restriction not to
sell, re-sell or otherwise
distribute the hard copies; and
b) place an electronic copy of
this user guide on a network
server provided access to the
electronic copy is limited to
PERSONAL, INTERNAL users
of the Hewlett-Packard printer
associated with this user guide.
Publication number
C8060-90929
First Edition, January 2001
Documentation
Warranty
Statement
The information contained in
this document is subject to
change without notice. Hewlett-
Packard makes no warranty of
any kind with regard to this
material, including, but not
limited to, the implied warranties
of merchantability and fitness for
a particular purpose. Hewlett-
Packard shall not be liable for
errors contained herein or for
incidental or consequential
damage in connection with the
furnishing, performance, or use
of this manual.
Material Safety Data
Sheet (MSDS)
The Toner Material Safety Data
Sheet (MSDS) can be obtained
on the internet. International
customers should refer to
“Hewlett-Packard Services” at
the front of this manual for
appropriate numbers and
information.
FCC Regulations
This equipment has been tested
and found to comply with the
limits for a Class B digital
device, pursuant to Part 15 of
the FCC rules. These limits are
designed to provide reasonable
protection against harmful
interference in a residential
installation. This equipment
generates, uses, and can
radiate radio frequency energy,
and if not installed and used in
accordance with the
instructions, may cause harmful
interference to radio
communications. However,
there is no guarantee that
interference will not occur in a
particular installation.
If this equipment does cause
harmful interference to radio or
television reception, which can
be determined by turning the
equipment off and on, the user
is encouraged to try to correct
the interference by one or more
of the following measures:
• Reorient or relocate the
receiving antenna.
• Increase separation between
equipment and receiver.
• Connect equipment to an
outlet on a circuit different from
that to which the receiver is
connected.
Consult your dealer or an
experienced radio/TV
technician.
Note: Any changes or
modifications to the printer not
expressly approved by HP could
void the user’s authority to
operate this equipment.
Use of a shielded interface
cable is required to comply
with the Class B limits of Part
15 of FCC rules.
Trademark Credits
Microsoft®, Windows®, and
MS-DOS® are U.S. registered
trademarks of Microsoft
Corporation.
ENERGY STAR is a U.S.
registered service mark of the
U.S. EPA.
EN Contents 5
Contents
1 Setup
Introduction . . . . . . . . . . . . . . . . . . . . . . . . . . . . . . . . . . . . . . . . . . .7
Identifying the printer’s parts . . . . . . . . . . . . . . . . . . . . . . . . . . . . . .8
Installing the toner cartridge . . . . . . . . . . . . . . . . . . . . . . . . . . . . . .9
Connecting printer’s cable and cord . . . . . . . . . . . . . . . . . . . . . . .11
Using generic power strips and adapters . . . . . . . . . . . . . . . . . . .12
Attaching the label to the printer . . . . . . . . . . . . . . . . . . . . . . . . . .13
Loading paper into the printer . . . . . . . . . . . . . . . . . . . . . . . . . . . .14
Printer software information . . . . . . . . . . . . . . . . . . . . . . . . . . . . .15
Recommended system requirements . . . . . . . . . . . . . . . . . . .15
Installation considerations. . . . . . . . . . . . . . . . . . . . . . . . . . . .15
Installing your printer software . . . . . . . . . . . . . . . . . . . . . . . . . . .16
Standard installation for Windows 95, Windows 98, Windows
2000, and NT 4.0 . . . . . . . . . . . . . . . . . . . . . . . . . . . . . . .16
Standard installation for Windows 3.x. . . . . . . . . . . . . . . . . . .17
Alternative Installation for Windows 95 and Windows 98 . . . .17
Alternative Installation for Windows NT 4.0 . . . . . . . . . . . . . .18
Alternative installation for Windows 3.x . . . . . . . . . . . . . . . . .18
Making diskettes from your CD for installation on Windows 95,
Windows 98 and Windows NT . . . . . . . . . . . . . . . . . . . . .19
Making diskettes from your CD for installation on Windows 3.x21
2 Printer control panel
The control panel. . . . . . . . . . . . . . . . . . . . . . . . . . . . . . . . . . . . . .23
Using the control panel . . . . . . . . . . . . . . . . . . . . . . . . . . . . . . . . .24
3 Printing
Selecting media sizes . . . . . . . . . . . . . . . . . . . . . . . . . . . . . . . . . .27
Selecting the output paper path . . . . . . . . . . . . . . . . . . . . . . . . . .29
Adding paper. . . . . . . . . . . . . . . . . . . . . . . . . . . . . . . . . . . . . .29
Using the single-sheet input slot . . . . . . . . . . . . . . . . . . . . . . . . . .30
Printing on letterhead and envelopes . . . . . . . . . . . . . . . . . . . . . .31
Printing tasks. . . . . . . . . . . . . . . . . . . . . . . . . . . . . . . . . . . . . . . . .33
Printing on both sides (duplexing). . . . . . . . . . . . . . . . . . . . . .33
Pausing the printer between pages . . . . . . . . . . . . . . . . . . . .34
Resetting the printer . . . . . . . . . . . . . . . . . . . . . . . . . . . . . . . .34
Stopping a print job. . . . . . . . . . . . . . . . . . . . . . . . . . . . . . . . .35
Printing on special media . . . . . . . . . . . . . . . . . . . . . . . . . . . . . . .36
Additional tips for custom sizes . . . . . . . . . . . . . . . . . . . . . . .36
6Contents EN
Additional tips for transparencies . . . . . . . . . . . . . . . . . . . . . .37
Additional tips for printing labels . . . . . . . . . . . . . . . . . . . . . . .37
Managing toner cartridge . . . . . . . . . . . . . . . . . . . . . . . . . . . . . . .38
4 Troubleshooting
Solving common problem . . . . . . . . . . . . . . . . . . . . . . . . . . . . . . .41
Printing a self-test page . . . . . . . . . . . . . . . . . . . . . . . . . . . . .41
Clearing paper jams . . . . . . . . . . . . . . . . . . . . . . . . . . . . . . . . . . .42
Paper will not feed. . . . . . . . . . . . . . . . . . . . . . . . . . . . . . . . . . . . .45
Cleaning your printer . . . . . . . . . . . . . . . . . . . . . . . . . . . . . . . . . . .46
Solving printer problems . . . . . . . . . . . . . . . . . . . . . . . . . . . . . . . .47
Solving print quality problems . . . . . . . . . . . . . . . . . . . . . . . . . . . .51
Solving software problems . . . . . . . . . . . . . . . . . . . . . . . . . . . . . .58
Troubleshooting printing problems from MS-DOS . . . . . . . . . . . .59
Networks and switchboxes . . . . . . . . . . . . . . . . . . . . . . . . . . . . . .62
Out of memory. . . . . . . . . . . . . . . . . . . . . . . . . . . . . . . . . . . . . . . .62
Appendix A Warranty and support information
HP limited 1-Year warranty statement. . . . . . . . . . . . . . . . . . . . . .63
Hardware service during the warranty period . . . . . . . . . . . . .64
Hardware service after the warranty period . . . . . . . . . . . . . .64
HP LaserJet toner cartridge warranty . . . . . . . . . . . . . . . . . . .64
HP software license agreement . . . . . . . . . . . . . . . . . . . . . . . . . .65
Accessories and supplies information . . . . . . . . . . . . . . . . . . . . 67
Sales and service offices. . . . . . . . . . . . . . . . . . . . . . . . . . . . . . . .67
Appendix B Printer specifications
Environmental specifications. . . . . . . . . . . . . . . . . . . . . . . . . . . . .69
Electrical specifications . . . . . . . . . . . . . . . . . . . . . . . . . . . . . . . . .69
Physical specifications . . . . . . . . . . . . . . . . . . . . . . . . . . . . . . . . .69
Environmental product stewardship . . . . . . . . . . . . . . . . . . . . . . .70
Laser safety statement . . . . . . . . . . . . . . . . . . . . . . . . . . . . . . . . .72
Declaration of conformity. . . . . . . . . . . . . . . . . . . . . . . . . . . . . . . .73
Appendix C Paper specifications
Paper specifications . . . . . . . . . . . . . . . . . . . . . . . . . . . . . . . . . . .75
Printer paper specifications. . . . . . . . . . . . . . . . . . . . . . . . . . . . . .76
Supported paper sizes (printer). . . . . . . . . . . . . . . . . . . . . . . . . . .76
Guidelines for using paper . . . . . . . . . . . . . . . . . . . . . . . . . . . . . .77
Labels . . . . . . . . . . . . . . . . . . . . . . . . . . . . . . . . . . . . . . . . . . .78
Envelopes . . . . . . . . . . . . . . . . . . . . . . . . . . . . . . . . . . . . . . . .78
Card stock and heavy media . . . . . . . . . . . . . . . . . . . . . . . . .79
Index
EN Introduction 7
1Setup
Introduction
Congratulations on your purchase of the HP LaserJet 6L Pro printer.
The following items are required to set up your printer:
●HP LaserJet 6L Pro Printer ●Power Cord
●HP LaserJet Toner Cartridge ●Sheet of Instructional Labels
●IEEE-1284 Compliant Parallel
Cable (not included)
●HP LaserJet 6L Pro Printer
software on CD

8 Chapter 1 - Setup EN
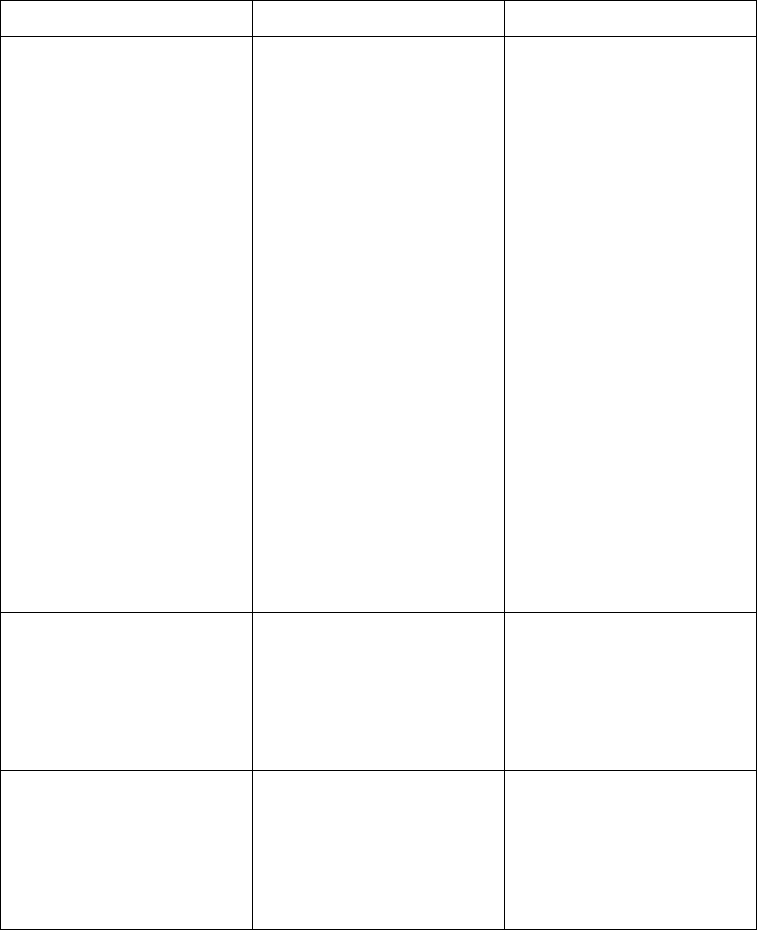
Identifying the printer’s parts
Before using your printer, make sure you can identify the following
parts:
1 = Heavy media output slot 7= Paper input support
2 = Paper path lever 8 = Single-sheet input slot
3 = control panel button 9 = Paper input bin
4 = Indicator lights 10 = Paper guides
5 = Paper output bin 11 = Printer door
6 = Paper output support
1
3
2
4
5
67
9
10
11
8
EN Installing the toner cartridge 9
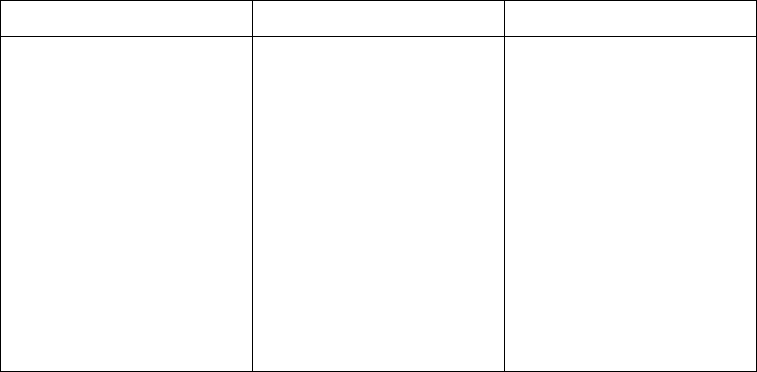
Installing the toner cartridge
HP recommends use of HP LaserJet
toner cartridges. HP has designed the
printer, toner cartridges, and toner
formula to work together to give you
optimal image quality from your printer.
CAUTION
To prevent damage, do not expose the
toner cartridge to bright light. For
extended periods outside the printer,
place the cartridge in a closed drawer,
return it to the original packaging, or
cover it completely with a cloth.
To install your toner cartridge, you will
need to first remove the toner cartridge
from its packaging. (Save the packaging
for possible cartridge storage and
recycling.)
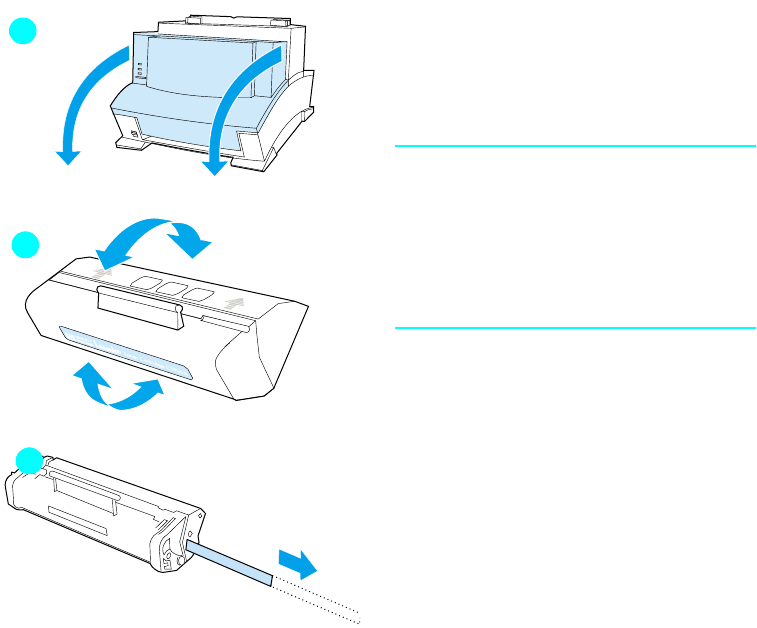
1To open the printer door, pull it
toward you in a forward motion using
both hands.
2Roll the toner cartridge back and
forth briskly to distribute the toner
evenly inside the cartridge.
3Grasp the end of the clear sealing
tape on the side of the cartridge. Pull
firmly to remove the entire length of
the tape. Once removed, the tape
should measure twice the length of
the toner cartridge or 490 mm (19.3
in).
1
2
3
10 Chapter 1 - Setup EN
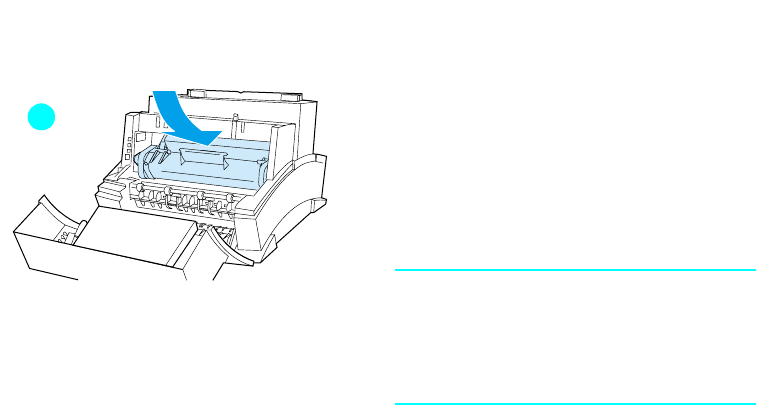
4Hold the cartridge by the handle
(arrows facing the printer) and slide
it down and back into the printer.
The ends of the cartridge slide into
the black plastic grooves in the
printer. Push it firmly into place and
close the printer door.
Note
If toner gets on your clothing, wipe it off
with a dry cloth and wash clothing in
cold water. Hot water sets toner into
fabric.
4
EN Connecting printer’s cable and cord 11
Connecting printer’s cable and cord
Note
For best results, it is important that you
use an IEEE-1284 compliant parallel
cable, such as the HP LaserJet cable, to
connect the printer and computer. This
cable supports all of your printer’s
advanced printing capabilities.
Note
If your computer does not recognize your
printer, you may have a faulty cable.
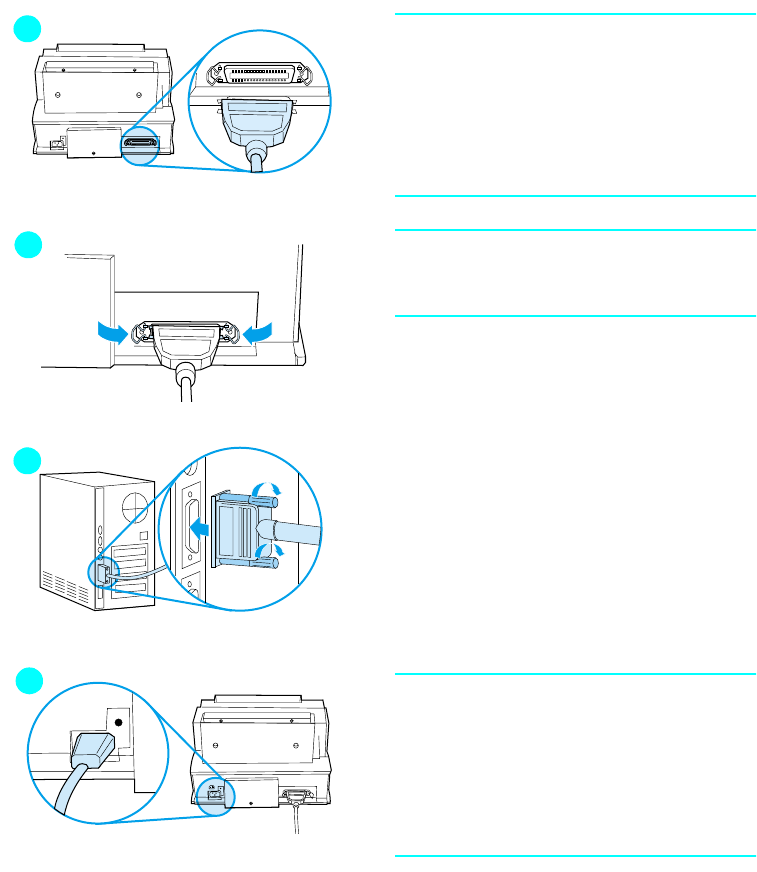
1Connect a parallel cable to your
printer. Ensure the cable points in
the correct direction before inserting.
2Secure the cable by snapping the
two wire clips from the printer to the
cable. A secure cable helps prevent
communication problems between
the computer and printer.
3Connect the cable to a parallel port
on your computer. Secure the cable
by tightening the attached screws to
a parallel port.
CAUTION
Be sure to connect the cable to a parallel
port rather than a serial port. Connecting
to the wrong computer port can cause
damage. See your computer’s
documentation for more information
about the ports.
4Use only the power cord provided
with the printer. Connect the power
cord from the printer to a grounded
power strip or a wall outlet.
1
2
3
4
12 Chapter 1 - Setup EN
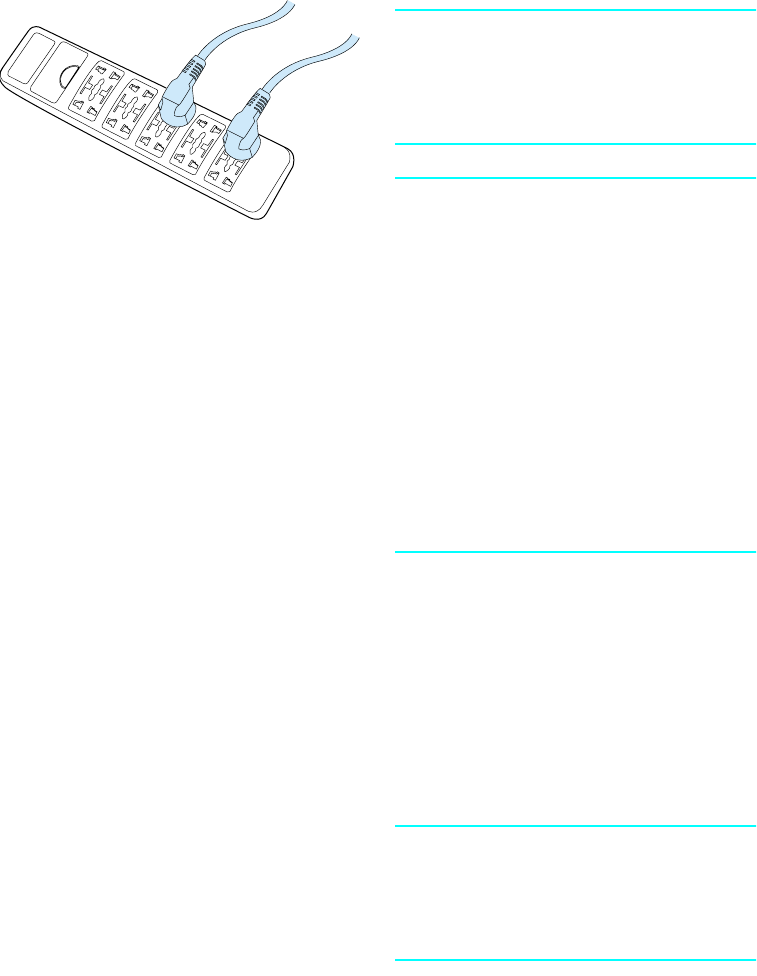
Using generic power strips and adapters
Note
HP does not recommend the use of
generic adapters (or power strips), like
the sample shown here, with your
printer.
WARNING!
Take care when plugging the printer into
a generic adapter, power strip or
universal power strip. When using a
universal power strip, align the printer
and computer power cords so they face
the same direction. It is essential that the
ground contact of the printer power cord
connect to the ground contact of the
power receptacle. You could sustain
serious injuries and cause damage to
your computer and printer if you insert
the printer cable plug incorrectly. Check
the adapter for specifications before
using it with your printer.
Once the power is connected, the
indicator lights on the printer’s control
panel will turn on and then blink in
sequence. The Error (top) light will stay
on if the paper input bin is empty.
You will not find an on/off switch on your
printer. After 15 minutes of inactivity, the
printer will automatically shift to a
powered-down state called SleepMode.
CAUTION
HP does not recommend use of battery
backup or uninterruptable power
supplies with your printer. Using them
could damage your printer.
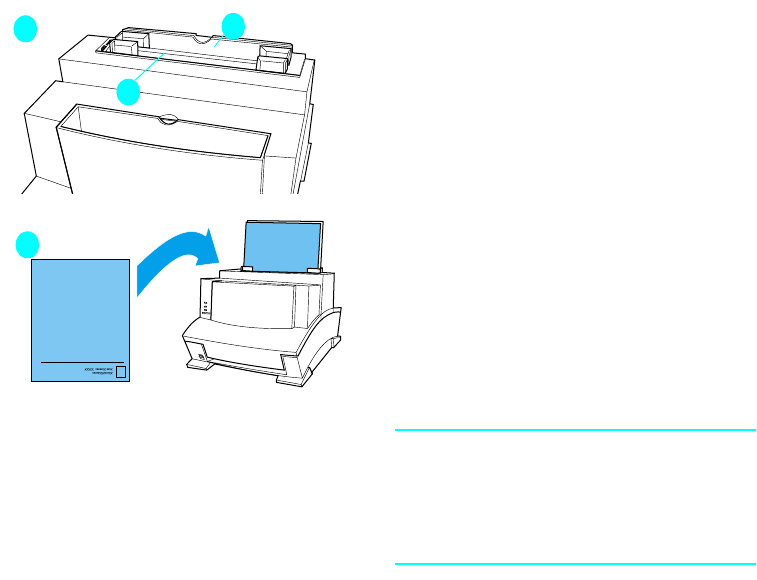
EN Attaching the label to the printer 13
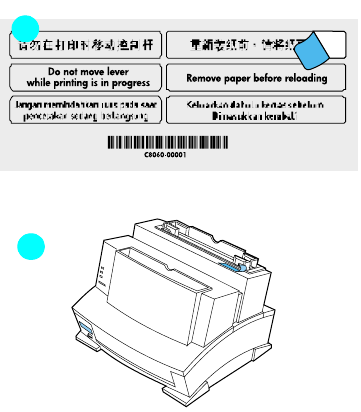
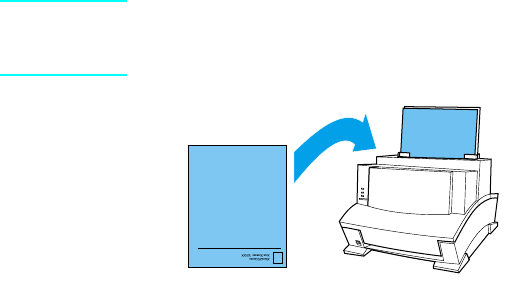
Attaching the label to the printer
A sheet of labels ships in the paper
output bin of your printer. You will need
to attach two labels to your printer: the
first label is entitled “Remove and
Realign Paper Before Reloading," the
second label is entitled, "Do Not Switch
the Paper Path while Printing."
1Carefully remove labels from the
backing sheet. Attach labels to the
printer’s paper input bin.
2As the label indicates, always
remove and realign all paper before
reloading. By doing so, you can
reduce multiple paper feeds, paper
jams, or both.
1
2
14 Chapter 1 - Setup EN
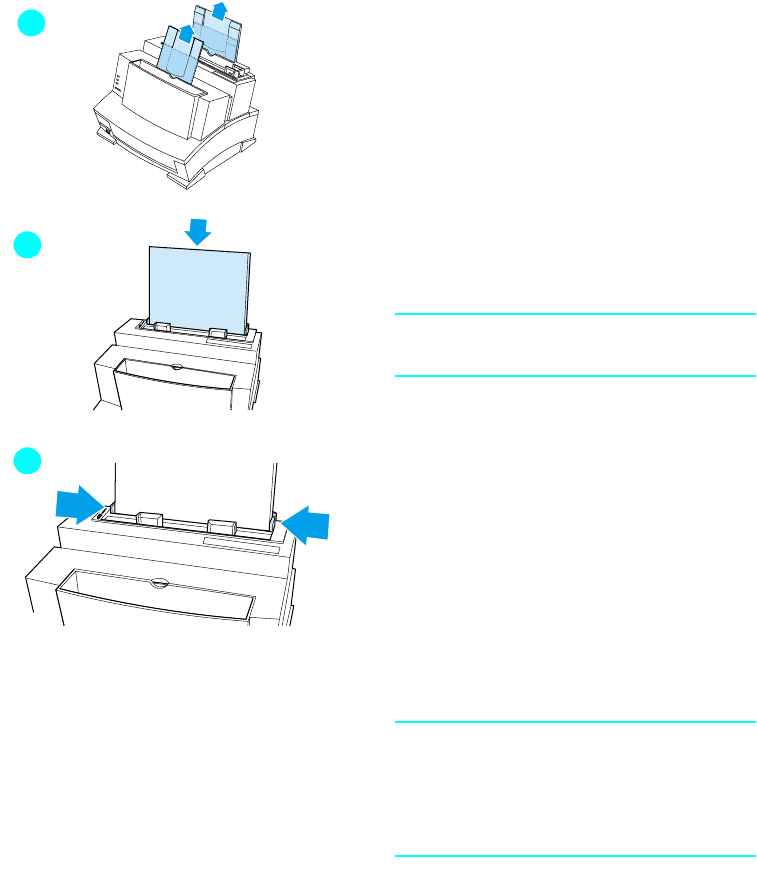
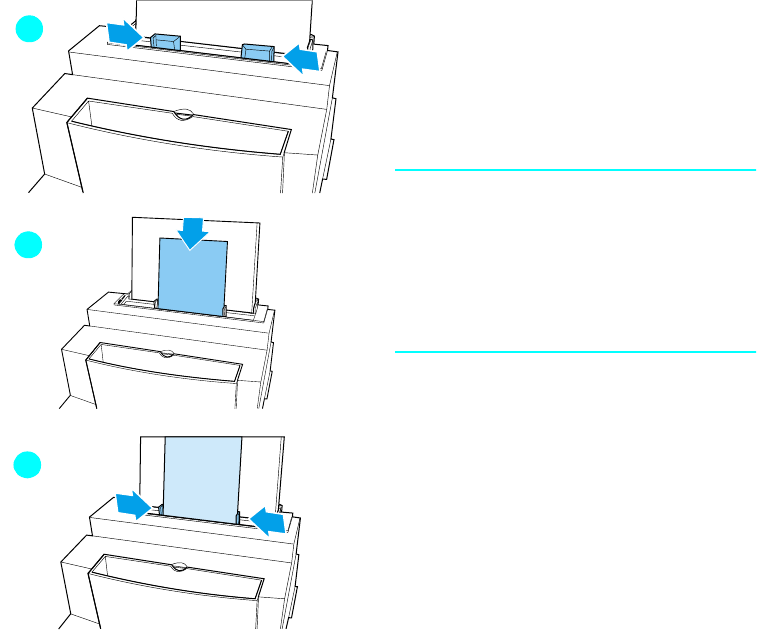
Loading paper into the printer
Before loading paper into the printer,
raise the paper supports located behind
the paper input bin and the paper output
bin. Using paper supports can help
prevent unwanted paper curl and paper
jams.
1Raise the supports on the paper
input bin and on the paper output bin
until they snap into place.
2Insert up to 100 sheets of paper into
the paper input bin.
Note
Be careful not to overfill the bin.
3Center the paper using the paper
guides on the paper input bin.
To test your printer, you can print a self-
test page. To do so, make sure the
Ready (bottom) light is on and all other
indicator lights are off. Press and release
the control panel button. (If the printer is
in SleepMode [all lights are off], you will
need to press the control panel button
twice.) The Data (middle) light will come
on and the Ready (bottom) light will
blink. The self-test page prints.
Note
When adding paper to an existing stack
in the paper input bin, always remove
and realign all paper to avoid multiple
paper feeds, paper jams, or both.
1
2
3
EN Printer software information 15
Printer software information
Before you can use your printer, you must first install the printer’s
software. Your printer’s software includes printer drivers that support
Microsoft Windows® 95, Windows 98, Windows 2000, Windows NT
4.0 and Windows 3.1x.
Recommended system requirements
Installation considerations
If you have any problems during installation, try the following:
●Check the power cord connections and power source.
●Make sure you are using a high-quality IEEE-1284 compliant
parallel cable.
If the installation still could not be successfully completed, see the
alternative installation instructions later in this chapter.
●Pentium processor
●32 MB RAM (Windows 95 and
Windows 98)
●20 MB free hard disk space

16 Chapter 1 - Setup EN
Installing your printer software
The following section lists several different methods of installation.
Use the method most appropriate for your computer system. Make
sure that you quit all software that is currently running, such as
Microsoft® Office Manager, virus checkers, and fax utilities.
Standard installation for Windows 95,
Windows 98, Windows 2000, and NT 4.0
To install your printer software for Windows 95, Windows 98,
Windows 2000, or NT 4.0, refer to the following steps:
1Insert HP LaserJet 6L Pro CD into CD drive.
Note If the installation dialog screen does not appear, click Start, then click
Run. Type your X:/Setup, replacing "X" with the letter of your CD drive,
and click OK.
2Click the Install button.
Note HP recommends the Express install for most users.
3Follow the instructions on your screen to complete the
installation.
4Remove the CD when the installation is complete.
Note If the next time you restart your computer and your screen displays
"New hardware detected" and lists the HP LaserJet 6L Pro printer,
select "Do not install a driver (Windows will not prompt you again)" and
click OK.
EN Installing your printer software 17
Standard installation for Windows 3.x
To install your printer software for 3.x, refer to the following steps:
1Quit all currently running programs.
2Insert the HP LaserJet 6L Pro CD into the CD drive.
3Select the drivers directory.
4Select the language directory of your choice.
5Select the "Win3x" directory.
6Select the Disk-1 directory.
7Run setup.exe.
8Follow the instructions on your screen.
9When the installation program asks you to install the HP LaserJet
6L Pro Disk-2, enter "x\drivers\language\Win3x\disk2". (Replace
"x" with the drive letter of your CD ROM, and replace "language"
with the name of the language directory you chose in step 4 [for
example, the directory "Chi_simp" contains the Simplified
Chinese driver and the directory "en" contains the English
driver]).
10 Remove the CD when the installation is complete.
Alternative Installation for Windows 95 and
Windows 98
1Quit all currently running programs.
2Insert HP LaserJet 6L Pro CD and click OK.
3Click Start, point to Settings/Printers and then click printers.
4Double-click Add Printer.
5Click Next until you come to the List of Printer Manufacturers.
6Click Have Disk.
7Click Browse.
8Select the drive that contains the HP LaserJet 6L Pro CD.
9Select the directory for the language of your choice. The file
named "hpbfgb.inf" will appear in the file name box.
18 Chapter 1 - Setup EN
10 Select the directory "Win9x" to access the drivers for Windows 95
and Windows 98.
11 Click OK, and then click OK again. The name of the printer driver
will appear.
12 Click Next, and then click Next again.
13 Remove the CD when the installation is complete.
Alternative Installation for Windows NT 4.0
1Insert the Windows 6L Pro CD into the CD drive.
2Click Start, point to Settings, and then click Printers. The
printer’s folder appears. Click Add Printer.
3Select Local printer or Network printer.
4If local printer, select the printer port. Click Next.
5Click Next.
6Click Have Disk.
7Click Browse.
8Select the driver that contains the HP LaserJet 6L Pro CD.
9Select the directory for the language of your choice.The file
named "hpbfgf2i.inf" will appear in the file name box.
10 Select the directory "nt" to access drivers for Windows NT and
Windows 2000.
11 Click Open and then click OK.
12 Select your HP LaserJet 6L Pro printer driver from the list, and
then click Next.
13 Continue to follow the instructions on the screen.
Alternative installation for Windows 3.x
To install your printer software for Windows 3.x, refer to the following
steps:
1Quit all currently running programs.
2Insert the HP LaserJet 6L Pro CD into the CD drive.
3From Program Manager, open the Main group.

EN Installing your printer software 19
4Open Control Panel and Printers.
5Click Add. A list of printers appears on your screen with Install
Unlisted or Updated Printer highlighted.
6Click Install.
7Click Browse.
8Select the drive that contains the HP LaserJet 6L Pro CD.
9Select the directory for the language of your choice. (For
example, directory "en" contains the English driver, and the
directory "sc" contains the simplified Chinese driver.)
10 Select the directory "Win3x" to access the drivers for Windows
3.1 and Windows 3.2.
11 Click OK, and then click OK. The name of the printer driver
appears.
12 Follow the instructions on your screen to complete the
installation.
13 Remove the CD when the installation is complete.
Making diskettes from your CD for installation
on Windows 95, Windows 98 and Windows NT
1Insert the HP LaserJet 6L Pro CD into the CD drive.
Note If the installation dialog screen does not appear, click Start, and then
click Run. Type X:/Setup, replacing "X" with the letter of your CD, then
click OK.
2Click the Make Disk button.
3Select the system on which you would like to install the HP
LaserJet 6L Pro printer and follow the instructions on the screen.
Note The printer drivers are copied to the location you selected in the installer
as an executable (.exe) program. You must run this executable
program before you can install the printer drivers on the system.
4Locate and double-click the 6Ldriver.exe file.
The WinZip Self-Extractor program starts.
5In the WinZip Self-Extractor dialog box, select the location where
you want to save the printer drivers, and then click Unzip. (The
files are saved by default in the following location: C:\HPLJ6L.)
20 Chapter 1 - Setup EN
6After the program finishes running, click OK to close the status
box.
7Click Close to quit the WinZip Self-Extractor program.
8To add the printer to the system:
•For Windows 95 or Windows 98: Complete steps 1 through
7 in the "Alternative Installation for Windows 95 and Windows
98" section.
•For Windows NT 4.0 or Windows 2000: Complete steps 1
through 7 in the "Alternative Installation for Windows NT 4.0"
section.
9Select the drive that contains the HP LaserJet 6L Pro printer
drivers.
10 Select the directory that contains the HP LaserJet 6L Pro drivers.
(The files are saved by default in the following location:
C:\HPLJ6L.)
11 Select the folder for the appropriate operating system.
12 To finish the installation:
•For Windows 95 or Windows 98: Complete steps 11 through
13 in the "Alternative Installation for Windows 95 and Windows
98" section.
•For Windows NT 4.0 or Windows 2000: Complete steps 11
through 13 in the "Alternative Installation for Windows NT 4.0"
section.
EN Installing your printer software 21
Making diskettes from your CD for installation
on Windows 3.x
You will need three blank diskettes. Please label your diskettes
diskette-1, diskette-2, and diskette-3 now.
1Insert the HP LaserJet 6L Pro CD into the CD drive.
2Explore/Browse to the CD drive.
3Select the "drivers" directory.
4Select the language directory of your choice.
5Select the "Win3x" directory.
6Select the "Disk-1" directory.
7Insert diskette-1 into the A: drive.
8Copy the contents of the directory "Disk-1" onto Diskette-1 in the
A: drive.
9Insert diskette-2 into the A: drive.
10 Copy the contents of the directory "Disk-2" onto diskette-2 in the
A: drive.
11 Insert diskette-3 into the A: drive.
12 Copy the contents of the directory "Disk-3" onto diskette-3 in the
A: drive.
To run the 3.x installer from a diskette, refer to the following steps:
1Insert diskette-1 into the A: drive.
2Run the setup.exe on diskette-1.
3Follow the instructions on the screen to complete the installation.
4Remove any diskettes from the A: drive.
22 Chapter 1 - Setup EN

EN The control panel 23
2Printer control panel
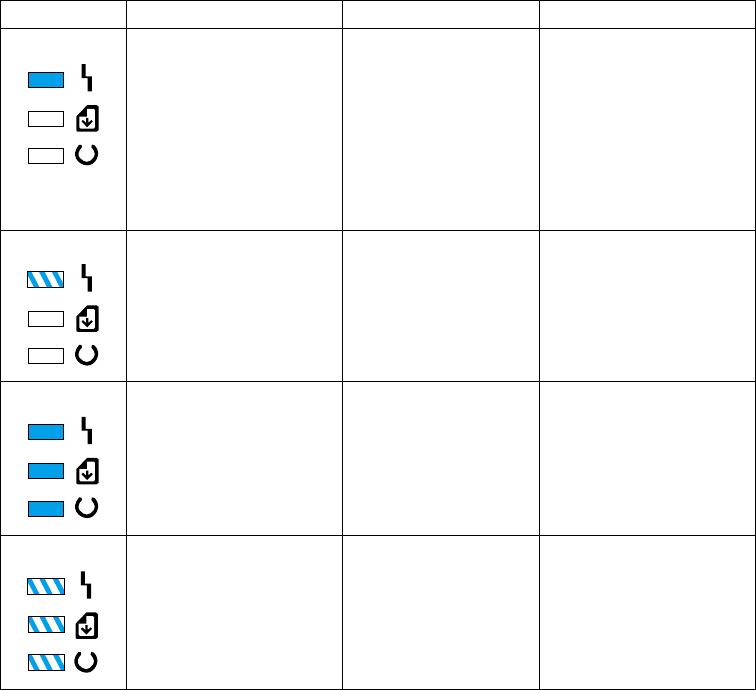
The control panel
The control panel consists of one button and three indicator lights.
Each light will be in one of the following states:
Error (amber)
Data (green)
Ready (green)
On
Off
Blinking
24 Chapter 2 - Printer control panel EN
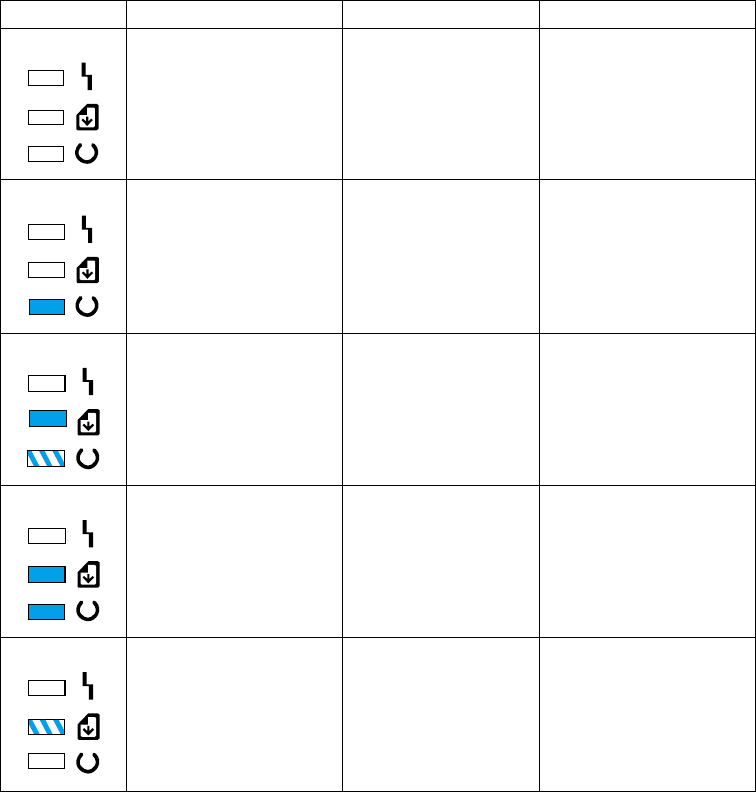
Using the control panel
Use the control panel button to determine the status of your printer
and to accomplish the following tasks:
Status Condition Cause(s) Action(s)
No lights are on or
blinking. Printer is in SleepMode
or printer has been
disconnected.
To print, press and
release the control panel
button or send the job to
print. If no response,
check power cord.
Ready light is on steadily. Printer is ready to print. No action is necessary.
Press and release control
panel button to print self-
test page.
Data light is on steadily
and the Ready light is
blinking.
Printer is receiving or
processing data or
printing a self-test page
or form feeding.
No action is necessary.
Data light and Ready light
both remain on. Unprinted data is in the
printer. Press and release the
control panel button to
print the remaining data.
See Chapter 4,
“Troubleshooting."
Data light is blinking. Printer is in Manual
Feed mode. Check that correct paper
is loaded. Press and
release control panel
button to print.
EN Using the control panel 25
Error light remains on. Printer is out of paper.
Printer has a paper
jam.
No toner cartridge.
Printer door is open.
Load paper.
Clear paper path.
Install toner cartridge.
Close printer door.
Error light is blinking. Page may have too
much data or be too
complex for printer's
memory capacity.
See Chapter,
“Troubleshooting."
All lights are on. Printer is indicating an
internal problem or fatal
error.
See Chapter,
“Troubleshooting."
All lights are blinking. Printer is initializing.
Printer is resetting.
No action is necessary.
No action is necessary.
Status Condition Cause(s) Action(s)
26 Chapter 2 - Printer control panel EN
EN Selecting media sizes 27
3Printing
Selecting media sizes
The type of media you select will affect printer performance and
print quality.
The paper input bin can hold up to 100 sheets of 75 g/m2 (20-lb
bond) paper. The single-sheet input slot is designed to hold one
sheet. Both can be adjusted to hold media measuring from 76.2
by 127 mm (3 by 5 in) to 215.9 by 355.6 mm (8.5 by 14 in). This
includes the following paper and envelope sizes:
●A4 (210 by 297 mm, 8.27 by 11.7 in)
●Letter (215.9 by 279.4mm, 8.5 by 11 in)
●C5 Envelopes (162 by 229 mm, 6.38 by 9 in)
●Other Custom-Sized Media
●Legal (215.9 by 355.6 mm, 8.5 by 14 in)
●COM10 Envelopes (104.7 by 241.3 mm, 4.125 by 9.5 in)
●B5 Envelopes (176 by 250 mm, 6.93 by 9.85 in)
●Executive (184.15 by 266.7 mm, 7.25 by 10.5 in)
●DL Envelopes (110 by 220 mm, 4.33 by 8.67 in)
●Monarch Envelopes (98.4 by 190.5 mm, 3.875 by 7.5 in)
28 Chapter 3 - Printing EN
Note Insert all media lengthwise (portrait) into the printer. If you want to print
horizontally (landscape), make this selection through your software. Do
not print on paper smaller than 76.2 by 127 mm (3 by 5 in).
EN Selecting the output paper path 29
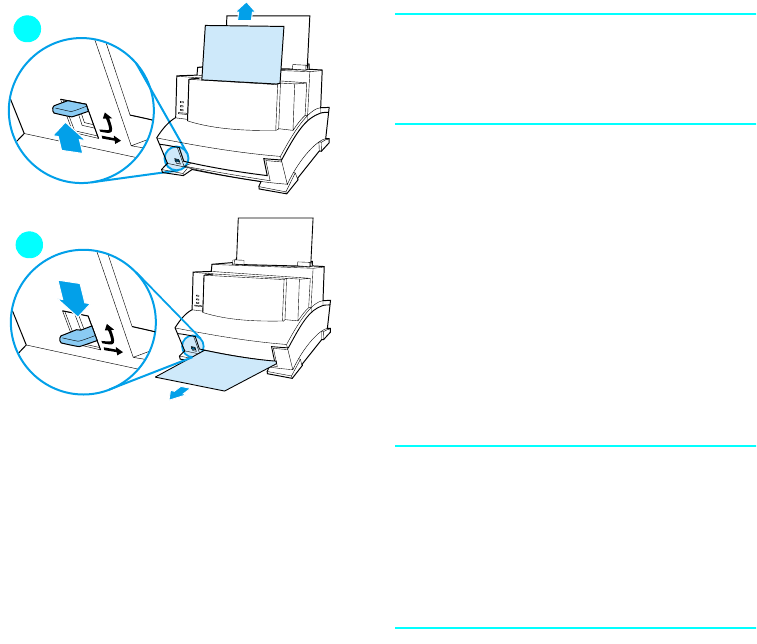
Selecting the output paper path
CAUTION
To avoid paper jams, do not switch the
paper path lever once printer begins to
feed paper.
1Set the paper path lever to the upper
position to use the paper output bin.
By doing so, the sheets will stack in
the correct order.
2Set the paper path lever to the lower
position to use the heavy media
output slot. This straight-through
path is the best output option to print
postcards, transparencies, labels,
envelopes, and heavy paper (100- to
157-g/m2 [28- to 42-lb] bond weight).
CAUTION
If using the straight-through paper path,
do not allow more than one
transparency, 20 sheets of paper, or
other media to stack up in front of the
heavy media output slot. A paper jam
could result.
Adding paper
When adding paper to an existing stack
in the paper input bin, always remove
and realign all paper before reloading to
avoid multiple paper feeds or jams.
1
2
30 Chapter 3 - Printing EN
Using the single-sheet input slot
You can print one sheet of paper at a
time without unloading the paper input
bin. To do so, load one sheet into the
single-sheet input slot. The printer will
take from the single-sheet input slot
before it takes from the input bin.
Note
The single-sheet input slot is helpful to
use when the first page of your job is
different from the rest. For example, you
may want the first page of your print job
on letterhead, or you may want to print
an envelope first.
1Center the paper guides to the
approximate size of the sheet you
want to use.
2Insert one sheet of paper into the
single-sheet input slot.
3Readjust the paper guides to center
the sheet.
1
2
3
EN Printing on letterhead and envelopes 31
Printing on letterhead and envelopes
Letterhead
1If you print one sheet of letterhead
followed by regular sheets of paper,
place a sheet of letterhead into the
(A) single-sheet input slot and
regular sheets of paper into the (B)
paper input bin. If you print several
sheets of letterhead in succession,
fill the paper input bin (B) with the
letterhead.
2Insert the letterhead with the print
side forward and the top side down.
If you are printing only one piece of
letterhead, use the single-sheet input
slot.
Note
If you’re having printing problems on
embossed or pre-printed paper, make
sure the paper meets HP paper
specifications, see appendix C.
A
B
1
2

32 Chapter 3 - Printing EN
Envelopes
If you print one envelope followed by
regular sheets of paper, place the
envelope into the (A) single-sheet input
slot and regular sheets of paper into the
(B) paper input bin.
If you are printing several envelopes in
succession, fill the paper input bin (B)
with up to 10 envelopes. The number of
envelopes depends on envelope
construction and the operating
environment.
If you are printing only one envelope,
use the single-sheet input slot.
1Insert the envelopes print side
forward as shown.
2Set the paper path lever to the lower
position to reduce wrinkling and
curling.
1
2

EN Printing tasks 33
Printing tasks
Your printer capabilities include duplex printing, pausing between
pages, and stopping a print job. You can also reset your printer if
necessary.
Printing on both sides (duplexing)
When you print on both sides of a sheet, you may notice a difference
in the way the printer performs. When printing on the second side of
the sheet, you may experience some difficulties, such as getting the
sheet to feed into the printer or multiple feeds. In addition, the print
quality may be different on the second side of the sheet. To minimize
these problems, you will want to use paper meeting HP paper
specifications in appendix C.
1Print the first side of the sheet as you normally would. Some
software programs include options that are useful when duplex
printing, such as printing just the “odd pages” or the “even
pages." Consult your software user manual.
2Allow the sheet to cool and flatten before printing on the second
side to get the best possible print quality.
3Print the second side by placing the sheet back into the paper
input bin or the single-sheet input slot. Make sure the side that
has already been printed is facing the back of the printer and the
top edge of the paper is down, as illustrated below.
34 Chapter 3 - Printing EN
Tips for duplex printing
●To avoid paper curl, set the paper path lever to the lower position
and use the heavy media output slot for a straight-through paper
path.
●To print one page at a time, select the manual feed option in your
software to pause the printer between pages.
●Make certain that the sheet’s leading edge is not bent or curled.
Pausing the printer between pages
Occasionally, you may need the printer to pause so that you can load
special media, such as letterhead. If you specify manual feed in your
software, the printer will pause before printing the first page and
between each page you print. This will give you time to load the
special media.
1In your software’s printer menu or bin/tray selection, select the
manual feed mode.
2From your software, print the document. The Data light will blink
when the page is ready to print, indicating that the printer is
paused and waiting.
3After inserting the correct medium, the printer will pick the sheet
automatically. The printer will take media from the single-sheet
input slot first. If it does not find media in the single-sheet input
slot, it will take media from the paper input bin.
Resetting the printer
Resetting the printer accomplishes the following:
●Clears all data from the printer memory (including unprinted data,
downloaded fonts, and macros).
●Finishes printing the current page.
●Removes some error conditions.
●Resets the printer to its factory default settings.
To reset the printer
Press and hold the control panel button until the three indicator lights
begin to blink in succession (about 5 seconds), and then let go of the
button. After resetting, the Ready light will remain lit if no printer
errors are found.
EN Printing tasks 35
Stopping a print job
If the file you send to the printer is only one or two pages long, you
can stop the print job by resetting the printer as described above.
If you want to stop a large print job, see the steps below:
1Remove the media from the paper input bin except for any sheet
that is currently being fed into the printer.
2Stop and delete the print job through your software.
3Reset the printer.

36 Chapter 3 - Printing EN
Printing on special media
Your printer is designed to print on a variety of media, including
transparencies, envelopes, and custom-made paper. It is
recommended that you use media that meets HP specifications. See
appendix C for more information.
1Set the paper path lever to the lower position to use the heavy
media output slot for a straight-through paper path. This is
important when printing media such as postcards,
transparencies, labels, envelopes, and heavy paper (100- to 157-
g/m2 [28- to 42-lb] bond weight).
2Adjust the paper guides to the approximate size of media you are
using.
3Insert the media print side forward and top side down into the
single-sheet input slot or the paper input bin.
4Readjust the paper guides to center the media.
5Set the correct margins, paper size, and orientation in your
software.
6Choose Print in your software.
Additional tips for custom sizes
●Do not print on media smaller than 76.2 mm (3 in) wide or 127
mm (5 in) tall.
●Set margins of at least 6.4 mm (.25 in) in your software.
●Always insert media lengthwise (vertically) into the printer. If you
want to print in landscape mode, make this selection through your
software.

EN Printing on special media 37
Additional tips for transparencies
To prevent transparency curl, remove the transparency as it comes
out of the printer and set it on a flat surface to cool.
WARNING! Use only transparencies specified for HP LaserJet printers.
Additional tips for printing labels
●Do not use labels that are separating from the backing sheet or
that are wrinkled or damaged in any way.
●Do not use any sheet of labels that has spaces in it where some
of the labels have been removed.
●Do not feed a sheet of labels through your printer more than
once.
Note Use only labels specified for HP LaserJet printers.
38 Chapter 3 - Printing EN
Managing toner cartridge
It is recommended that you use HP LaserJet toner cartridge. HP has
designed the printer, toner cartridge, and toner formula to work
together to give you optimal image quality from your printer. To order
an HP LaserJet toner cartridge, see appendix A.
You can expect a toner cartridge to print approximately 2,500 pages
when you are printing typical business letters with text covering about
5% of the page. A page containing graphics uses more toner and
shortens the life of the cartridge.
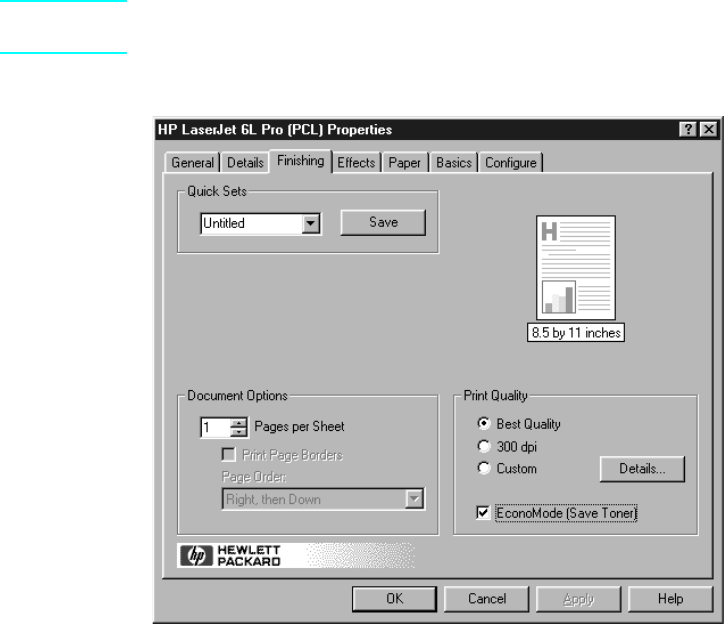
Extending toner life through EconoMode
An excellent way to extend the life of your toner cartridge is by using
EconoMode. EconoMode uses approximately 50% less toner than
normal printing. The printed image is much lighter, but is adequate for
printing drafts or proofs. You can set the EconoMode option through
your software (see to Help for more information).
Note When printing a best-quality document, you must deselect the
EconoMode check box.
EN Managing toner cartridge 39
Extending toner life by redistributing toner
Areas of faded print are often an indicator that the toner cartridge is
near the end of its toner life. You can temporarily reestablish print
quality by redistributing the remaining toner in the cartridge. (This is
typically successful only one time.)
To redistribute toner
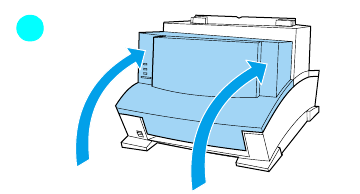
1Open the printer door and remove the toner cartridge.
2Hold the toner cartridge by the handle and pull it toward you so
that it slides out of the plastic grooves. (Remember to protect the
cartridge from light.)
3Briskly roll the toner cartridge back and forth to redistribute the
toner evenly inside the cartridge.
4Reinsert the toner cartridge and close the door.
40 Chapter 3 - Printing EN
EN Solving common problem 41
4Troubleshooting
Solving common problem
This chapter helps you solve common problems you may experience
while using your printer. If you cannot resolve a problem, contact the
HP Customer Care Center for assistance. Phone numbers are listed
on the support pages at the front of this manual.
Printing a self-test page
A self-test page can be useful in identifying your printer’s
configuration and to ensure that your printer is working properly.
To print a self-test page
1Make sure that the Ready light is on and all other lights are off. If
necessary, wake up the printer by briefly pressing and releasing
the control panel button.
2Now briefly press and release the control panel button again. The
Data light will come on and the Ready light will blink. Please wait
for a self-test page to print.
If the self-test page does not print, try the following:
1Ensure that paper is loaded in the printer.
2Check the printer indicator lights to determine the status of your
printer. (See “Solving Printer Problems” later in this chapter.)
3Contact the HP Customer Care Center for assistance. (See the
support pages at the front of this manual for support options.)
42 Chapter 4 - Troubleshooting EN
Clearing paper jams
Occasionally, paper can become jammed while printing. The following
list shows some possible causes:
●The paper was loaded improperly.
●The paper input bin was overfilled.
●The guides were not adjusted to the correct position.
●More paper was added without unloading the bin and realigning
all media first.
●The paper output bin was too full.
●The paper path lever was adjusted while printing.
●The printer door was opened while printing.
●The paper being used does not meet HP’s specifications.
●The paper being used was smaller than 76.2 by 127 mm
(3 by 5 in).
●The power was interrupted while printing.
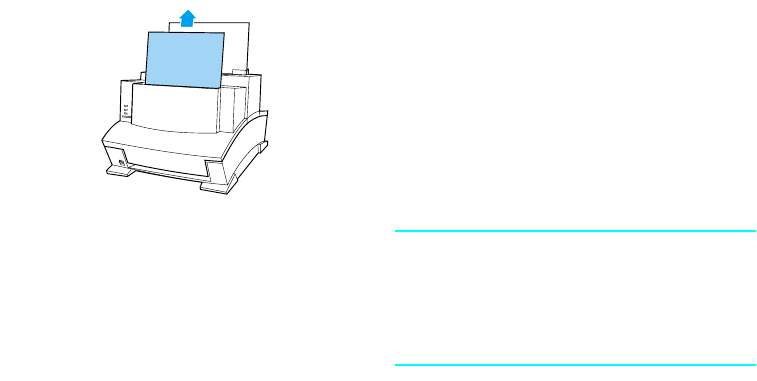
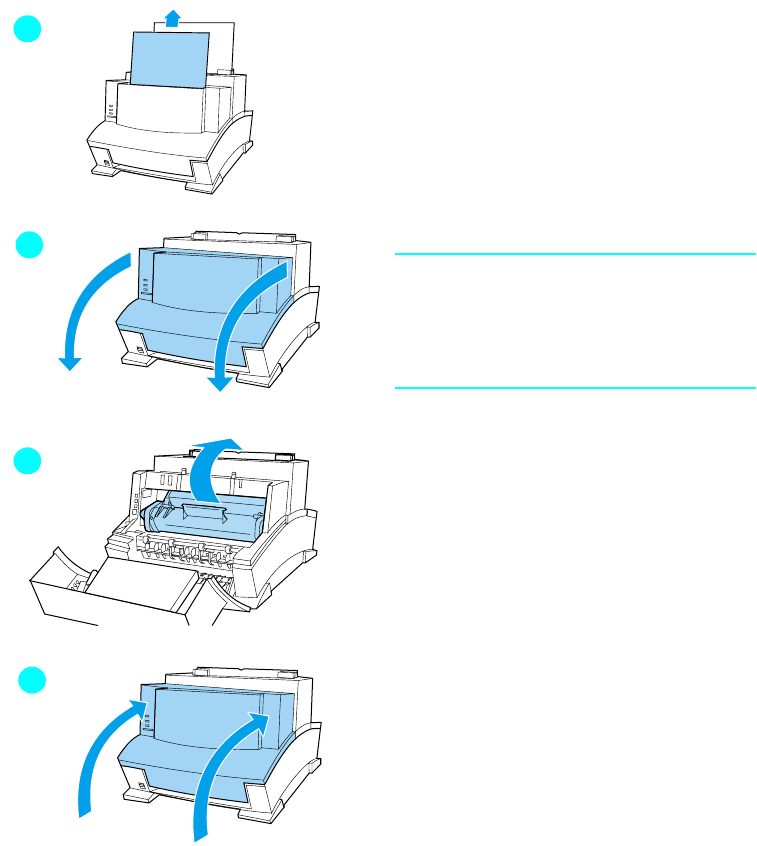
To clear feed jams in the Input
areas
●If most of the jammed sheet of paper
is visible from the paper input bin or
single-sheet input slot, carefully pull
the jammed paper straight up and
out using both hands. Realign the
paper, and reload it.
Note
Be sure to center paper with the paper
guides. Also, verify that the paper guides
are currently adjusted without bending
the media.
The printer will automatically resume
printing.
EN Clearing paper jams 43
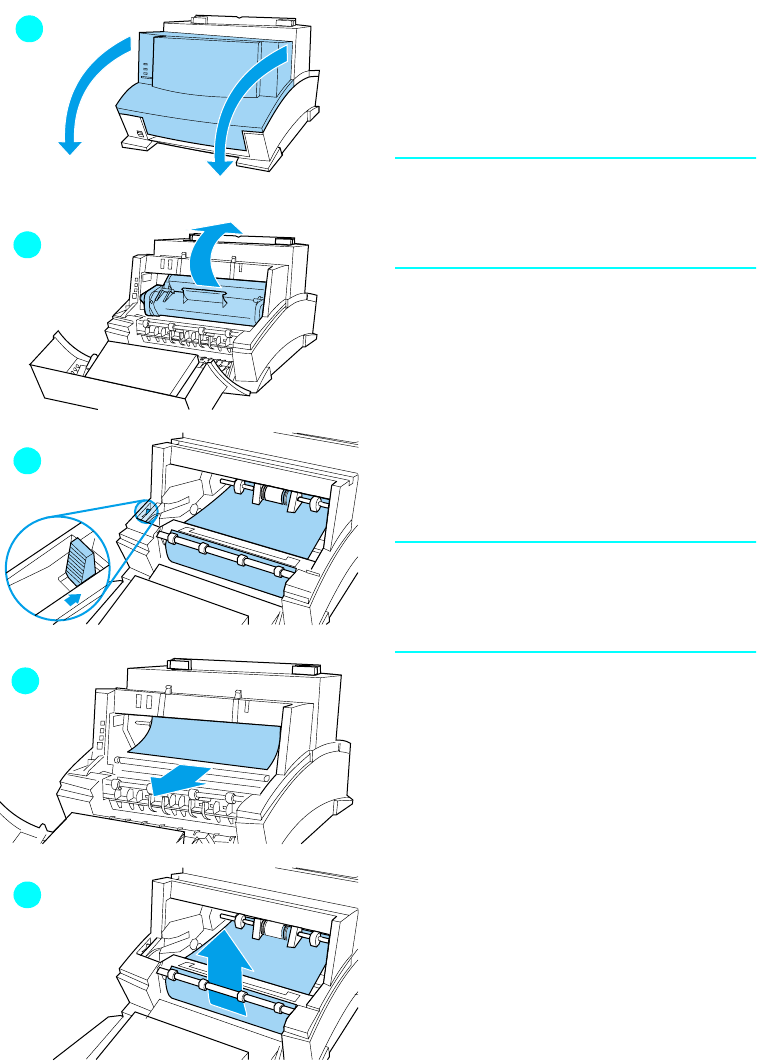
To clear a jam from the interior
area
1If the jam is not visible in the input
paper tray, open the printer door.
2Remove the toner cartridge. Be sure
to protect it from bright light while it
is outside your printer.
CAUTION
Avoid touching the long, black, sponge
roller inside your printer. Touching it may
reduce output quality.
3Push the green paper release lever
toward the back.
4If the paper jam is in the toner
cartridge area but has not reached
the fuser and roller area, reach
inside and carefully pull the sheet
straight forward and out. Do not pull
the sheet straight up. This can
damage your printer.
CAUTION
Only use your hands to remove jammed
paper. Using other objects can damage
internal parts.
5If the paper jam is between the
rollers, grasp the sheet with both
hands and slowly pull it straight up
and out.
1
2
3
4
5
44 Chapter 4 - Troubleshooting EN
6After removing all sheets and
fragments of paper, replace the
toner cartridge and close the printer
door.
Your printer will automatically resume
printing.
6
EN Paper will not feed 45
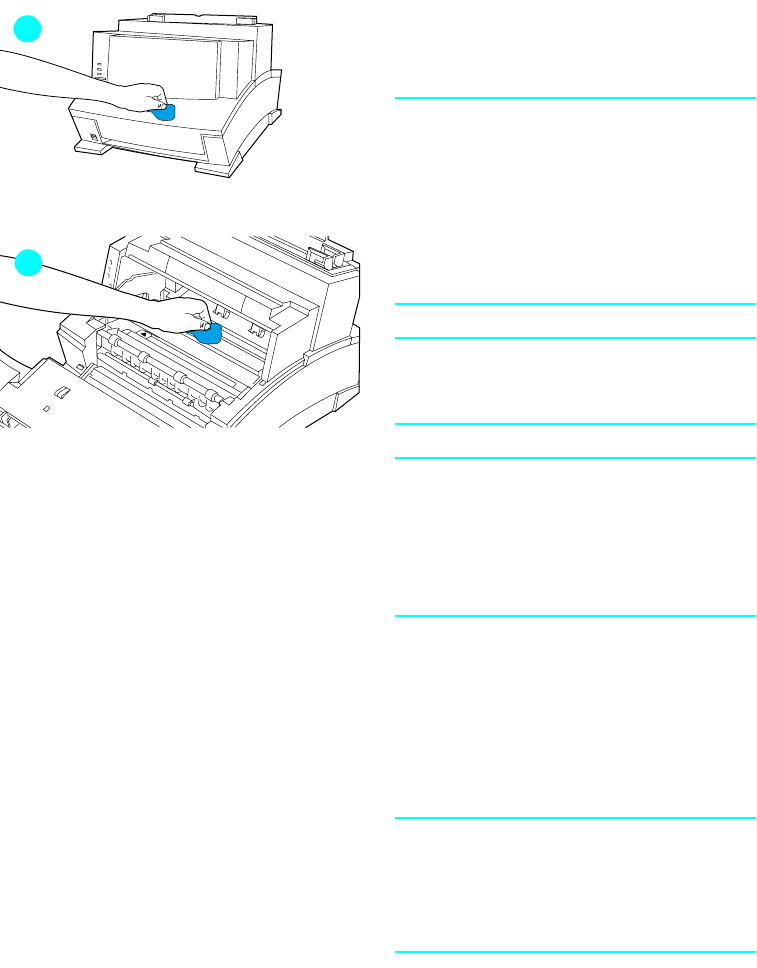
Paper will not feed
If your paper does not feed into the
printer, briefly press and release the
control panel button. The printer will
again attempt to feed the media. If this is
unsuccessful, try the following
procedure:
1Remove the paper from the input
bin, realign the paper, and reload it
into the printer.
Note
Be sure to center paper with the paper
guides. Also, verify that the guides are
not adjusted too tightly or too loosely
against the media.
2Open the printer door.
3Remove the toner cartridge, making
sure you protect it from bright light,
and check for a paper jam.
4Replace the toner cartridge and
close the door.
The printer will automatically resume
printing.
1
2
3
4
46 Chapter 4 - Troubleshooting EN
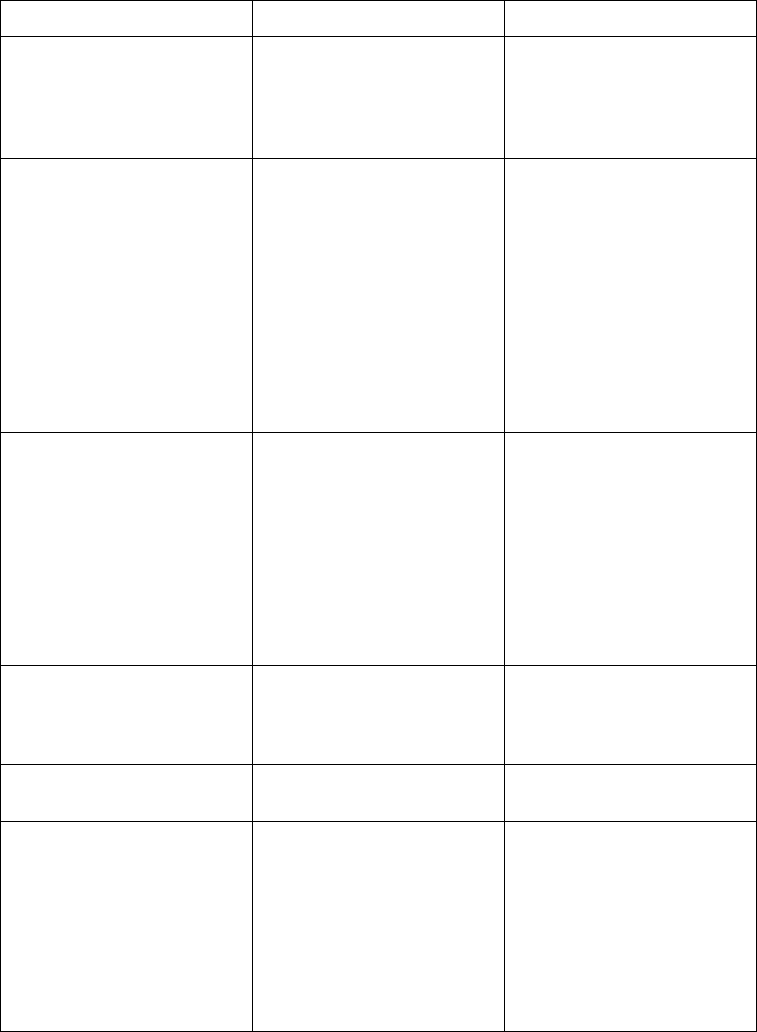
Cleaning your printer
To prevent excessive wear and preserve
print quality, keep the printer free of
excessive dust and debris.
Note
If there are excessive amounts of toner
inside your printer, your toner cartridge
may be defective. It is recommended
that you use HP LaserJet toner
cartridges to ensure high quality printing
and to reduce incidents of excessive
toner in your printer.
WARNING!
Before cleaning your printer, disconnect
it from the power source.
CAUTION
Using ammonia-based cleaners on or
around the printer can cause damage to
the printer. Also, do not touch the black
sponge roller inside the printer. doing so
can reduce the print quality.
1Clean the outside of the printer with
a slightly damp, lint-free cloth (use
only water).
2Clean the inside of the printer with a
dry, lint-free cloth. Remove all dust,
spilled toner, and particles of paper.
Note
If toner gets on your clothing, wipe it off
with a dry cloth and wash clothing in cold
water. Hot water sets toner into the
fabric.
1
2

EN Solving printer problems 47
Solving printer problems
Use the following table to help pinpoint and solve printer problems.
Symptom Possible Cause(s) Solution(s)
The printer is not responding
after “print” is selected in the
software.
The printer is paused. Resume printing from the Print
Manager.
The printer is in Manual Feed
mode (data light blinking). Press and release the control
panel button.
The parallel cable between the
printer and the computer is not
connected properly.
Disconnect and reconnect the
parallel cable between the
printer and the computer.
The parallel cable is defective. If possible, attach your cable to
another system and print a job
that you know works. You may
also try using a different
parallel cable (IEEE-1284).
The wrong printer was
selected in your software. Check your software’s printer
selection menu to see if you
selected the HP LaserJet 6L
Pro printer.
The software for your printer is
not configured for the correct
printer port.
Check your software’s printer
selection menu to make sure it
is accessing the correct printer
port.
If your computer has more
than one parallel port, make
sure the parallel cable is
connected to the correct port.
The power cord is not
connected to the printer or the
power source is not active.
Check the power cord
connection and the power
source. Try a different outlet.
See the important warning on
powerstrip, page 12.
The printer is connected to a
switchbox that is not setup
correctly.
Check the switchbox setting.
Try connecting the printer
directly to the computer. The
switchbox may be defective.
48 Chapter 4 - Troubleshooting EN
The printer is not responding
after “print” is selected in the
software (continued).
The printer is malfunctioning. If all the lights are on, the
printer may be signaling a
hardware error. See “All the
printer’s lights are on” on the
following page.
The Error (top) light
stays on. The printer is out of paper. Add paper or other print
media.
The printer door is open. Close the door securely.
The toner cartridge is not
installed properly. Open the door, reinstall the
toner cartridge, then close the
door securely.
Paper is jammed in the printer. See “Clearing paper jams”
earlier in this chapter or make
sure toner cartridge is
installed.
The Error (top) light is blinking. The page is too complex for
the printer’s memory capacity,
or the printer may not be able
to create the image fast
enough to keep pace with the
printing process.
Briefly press and release the
control panel button to resume
printing. Some data loss may
occur.
Change your page to make it
less complex by reducing
resolution to 300 dpi.
Both the Data (middle) light
and the Ready (bottom) light
are on steadily (not blinking).
Unprinted data is in the printer.
(Your software did not send an
“end of job” or “form feed”
command.)
Briefly press and release the
control panel button to print
the remaining data.
The Data (middle) light is
blinking. The printer is in manual feed
mode. Make sure the correct paper is
loaded into the printer.
All the printer’s lights are off
and the printer does not
respond after attempts to
wake it up.
The printer is unplugged from
the power source.
The printer has malfunctioned.
Check the power cord
connections and power
source. Try a different outlet.
See the important warning on
power strip, page 12.
Refer to the support pages on
the inside, front cover for
support options.
Symptom Possible Cause(s) Solution(s)

EN Solving printer problems 49
All the printer’s lights are on. The printer has a hardware
error. Disconnect the printer from
the power source for 10
seconds, then reconnect it. If
the lights remain on,
disconnect the printer from its
power source again, this time
reconnecting after a 15-minute
wait. If all three lights come
back on again, contact your
HP authorized service
representative.
The printer is feeding multiple
sheets or jams frequently. Paper guides are not adjusted
properly. Remove the paper from the
paper input bin or the single-
sheet input slot. Tap the sides
of the paper stack together,
then reinsert the stack,
reinsert the single sheet into
the slot. Slide the paper
guides against the sides of the
stack in the paper input bin or
against the single sheet in the
single-sheet input slot to
center the paper. Make sure
the guides are not adjusted
too tightly.
The paper input bin is too full. Remove some of the sheets.
The paper input bin can hold
up to 100 sheets of 75g/m2
(20-lb) bond weight paper
(less for heavier paper) or up
to 10 envelopes (no more than
7 envelopes for areas with
climates having high humidity).
More than one sheet was
added into the single-sheet
input slot.
Add only one sheet at a time
into the single-sheet input slot.
If printing more than one sheet
of the same type of media, use
the paper input bin.
The paper was poorly cut by
the manufacturer and is
sticking together.
“Break” the ream of paper by
curving it into an upside-down
u-shape; this may effectively
decrease multi-feeds. You can
also try turning the paper
around to feed the opposite
end first.
Symptom Possible Cause(s) Solution(s)

50 Chapter 4 - Troubleshooting EN
The printer is feeding multiple
sheets or jams frequently
(continued).
The paper does not meet
HP’s specifications for print
media.
Try using different paper. See
appendix C.
The output capacity was
exceeded in the paper output
bin or heavy media output slot.
Do not allow more than 100
sheets of 75g/m2 (20-lb) bond
weight paper (less for heavier
paper) to fill the paper output
bin. Do not allow more than
one transparency or 20 sheets
of other media to stack up in
front of the heavy media
output slot.
Symptom Possible Cause(s) Solution(s)
EN Solving print quality problems 51
Solving print quality problems
Use the following table to help pinpoint and solve print quality
problems.
Problem Cause(s) Solution(s)
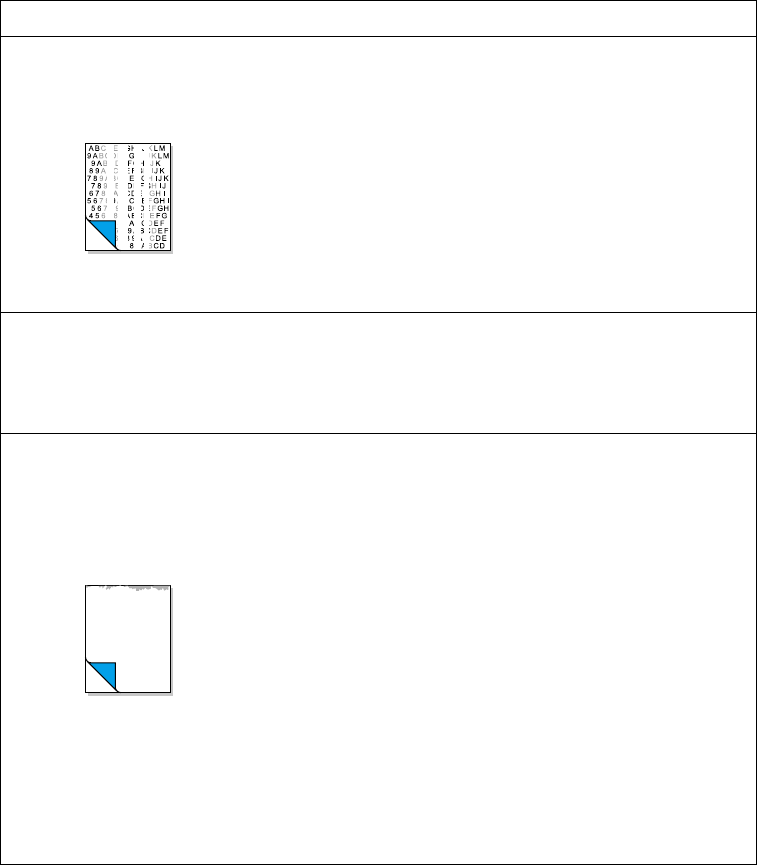
Print is faded or you notice a
block of vertically aligned white
streaks.
The toner cartridge may be
getting low on toner.
The paper you are using may
not meet HP’s paper
specifications (for example, it
may be too moist or too rough).
EconoMode may be on.
See chapter 3, “Managing
toner cartridges."
Try using different paper.
See appendix C.
Turn EconoMode off through
your software. See
information in chapter 3,
page 38.
Cartridge running out of toner. Product defect (non-HP
cartridge).
Transfer roller contamination.
Use an HP cartridge.
Clean printer or call a
service technician.
Stains or smudges appear as
small, round, black dots on the
front or back of a page.
Sometimes inconsistent stains
appear.
The paper you are using may
not meet HP’s paper
specifications (for example, it
may be too moist or too rough).
You may be printing on the
wrong side of the paper.
The printer may need cleaning.
The toner cartridge may be
damaged.
Try using different paper.
See appendix C.
Remove the paper from the
paper input bin and turn it
over. (The wrapper on many
reams of paper has an arrow
indicating the print side.)
See “Cleaning your printer”
in this chapter.
Replace toner cartridge if
maintenance procedures do
not improve print quality. See
chapter 3, “Managing toner
cartridges.”

52 Chapter 4 - Troubleshooting EN
Vertically-aligned black streaks
or smears appear on
successive pages.
The toner cartridge may be
damaged.
The printer may need cleaning.
Replace cartridge if
maintenance procedures do
not improve print quality. See
chapter 3, “Managing toner
cartridges.”
See “Cleaning your printer”
in this chapter.
Horizontally aligned black
streaks or smears appear. The toner cartridge may not be
installed properly.
The toner cartridge may be
defective and need replacing.
Printer may need repair.
Remove the cartridge and
reinsert it. See chapter 1,
“Installing the toner
cartridge” for installation
information.
The toner cartridge may still
be under warranty. See
“HP LaserJet toner cartridge
warranty” in appendix A.
See the support pages at the
front of this manual for
support options.
Light character shadows or
repetitive marks appear on the
page.
The printer may need cleaning.
If you are using transparencies,
they may not meet
HP’s specifications.
The paper’s texture may be too
coarse.
The toner cartridge may be
damaged, causing a repetitive
black flaw on every printout.
The toner cartridge’s
photosensitive drum may have
been overexposed to bright
light, causing repetitive defects
(usually a fuzzy black area).
See “Cleaning your printer”
in this chapter.
Try using different
transparencies.
Try changing to a paper with
a smoother finish.
Replace the toner cartridge.
See “Accessories and
supplies information” in
appendix A or
"Specifications" in appendix
C.
Replace the toner cartridge.
See “Accessories and
supplies information” in
appendix A.
Problem Cause(s) Solution(s)
EN Solving print quality problems 53
Vertical white stripes appear on
the page. The printer’s internal optics are
contaminated. Contact an authorized
HP service representative to
replace the printer’s internal
mirror. See the support
pages at the front of this
manual for support options.
Transfer roller is
contaminated.
Clean printer or call a
service technician.
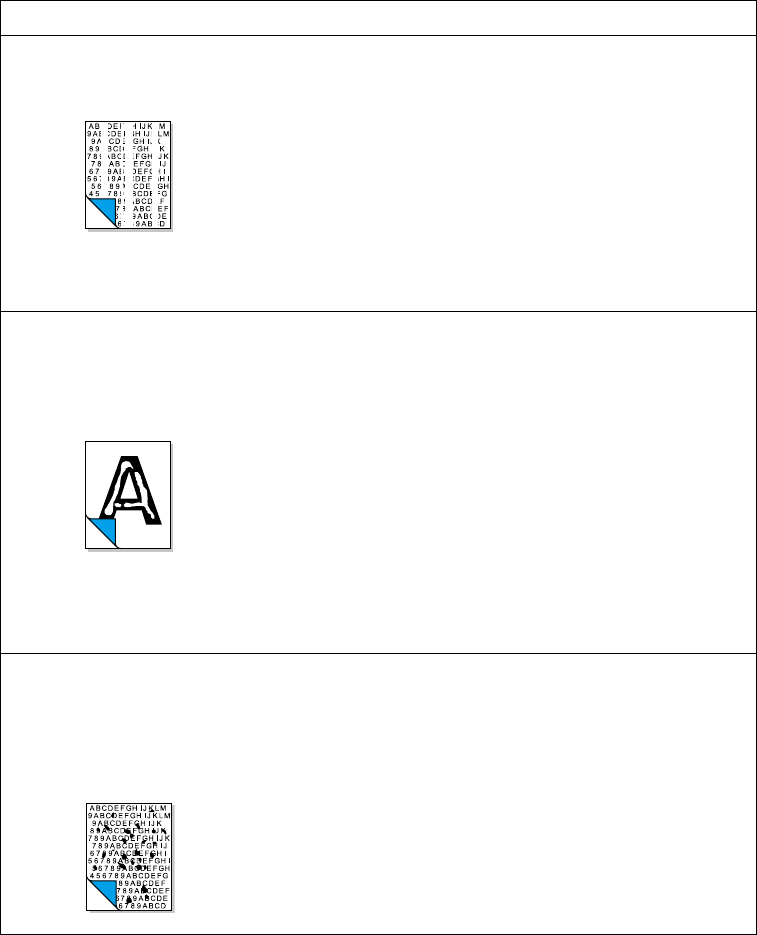
Character voids appear (white
areas within the parts of
characters that should be solid
black).
If you are using transparencies,
they may not meet
HP’s specifications.
You may be printing on the
wrong surface of the paper.
The paper may not meet
HP’s specifications.
Ambient conditions.
Try using different
transparencies.
Remove the paper and turn
it over. (The wrapper on
many reams of paper has an
arrow indicating the print
side.)
Try using different paper.
See appendix C.
Change printer environment.
See appendix B.
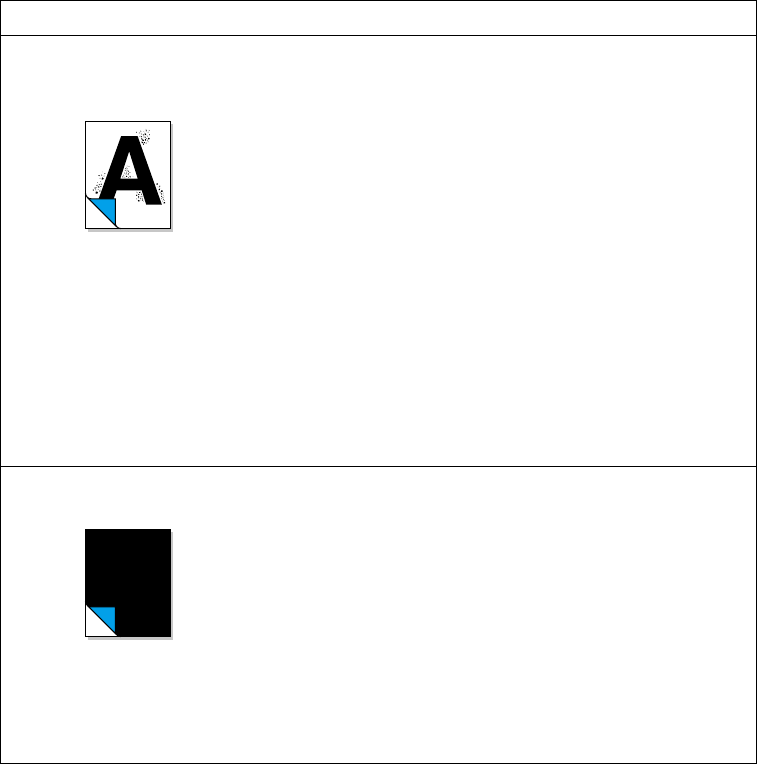
Stains or smudges appear as
small, round, black dots on the
front or back of a page.
Sometimes inconsistent stains
appear.
Internal rollers within the printer
are dirty.
Defective toner cartridge
(damage OPC).
Clean the printer.
Replace cartridge.
Problem Cause(s) Solution(s)
54 Chapter 4 - Troubleshooting EN
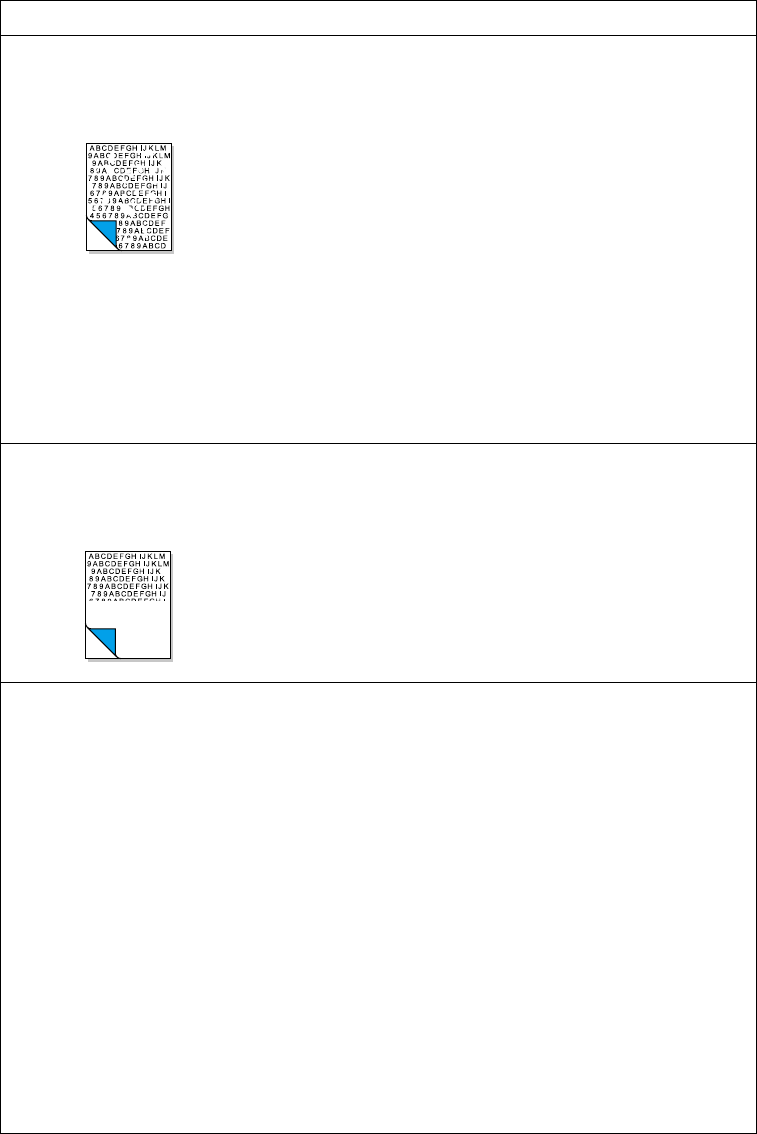
Background scatter appears on
a printed page. Background scatter results
from bits of toner distributed on
the front or back of a printed
page. Background scatter often
is isolated to a specific area of
the page.
Ambient conditions.
Change the paper type,
weight, or surface finish. See
appendix C.
If background scatter occurs
on an envelope, try moving
the text to an area with no
seams. Printing on seams
can cause this problem.
If this problem occurs on the
back of a printed page, it
may be caused by spilled
toner inside the printer. See
“Cleaning your printer” in this
chapter.
Change printer environment.
See appendix B.
The page is completely black. The toner cartridge may not be
installed properly.
The toner cartridge may be
defective and need replacing.
The printer may need to be
repaired if the problem
continues after replacing the
toner cartridge.
Remove and reinstall the
cartridge. See “Installing the
toner cartridge” in chapter 1.
The toner cartridge may still
be under warranty. See
“HP LaserJet toner cartridge
warranty” in appendix A.
See the support pages at the
front of this manual for
support options.
Problem Cause(s) Solution(s)
EN Solving print quality problems 55
Characters are only partially
printed (also referred to as
dropouts).
A single sheet of paper may be
defective.
The print density may need
adjusting.
The moisture content of the
paper may be inconsistent or
the paper may have moist or
wet spots on the surface.
Ambient conditions.
The paper may have been
damaged by inconsistent
manufacturing processes.
Try reprinting the job.
Adjust the print density
through your software.
Use paper from a fresh ream
or a different source. See
appendix C.
Change printer environment.
See appendix B.
Try using paper from a
different source. See
appendix C.
The bottom of the page is blank
or part of a graphic’s image is
cut off.
Your page may be too complex
for the standard printer
memory.
Set the resolution to 300 dpi
through your software.
Pages are coming out of the
printer curled or wrinkled. Paper is curled or wrinkled
when using the paper output
bin.
Paper may not be stored
properly.
Ambient conditions.
Use the heavy media output
slot by pushing the paper
path lever to the lower
position. This provides the
straightest paper path. See
“Selecting the output paper
path” in chapter 3.
Use the paper input support
located behind the paper
input bin. See “Loading the
paper into the printer" in
chapter 1.
Whenever possible, store
paper in its sealed ream at
room temperature.
Change printer environment.
See appendix B.
Problem Cause(s) Solution(s)
56 Chapter 4 - Troubleshooting EN
Blank Page (Occasional) Page length and margins are
not set correctly for the paper
size.
Some sharing devices or
networks may generate a blank
page as a separator.
Your printer may be feeding two
or more sheets of paper at a
time because the paper is
difficult to separate.
Your software application may
be sending an extra page-eject
command.
If you are printing on small
paper and your page is
blank, try printing on larger
paper to see where the
image is printing. Adjust the
margins accordingly.
Contact your Network
Administrator.
Remove the paper from the
paper input bin and align the
edges of the paper. “Break”
the ream of paper by curving
it into an upside-down u-
shape; this may effectively
decrease multi-feeds. You
can also try turning the
paper around to feed the
opposite end first.
Check your software’s
printing configuration
information. If you are using
a word-processing program,
check for a natural page
break and a forced page
break that are close to each
other.
Blank Pages
(All Pages) The toner cartridge may be
improperly installed.
The toner cartridge may be
completely out of toner.
The printer may need to be
serviced.
Make sure you removed the
entire length of the sealing
tape from the toner cartridge
before you installed it. See
“Installing the toner
cartridge” in chapter 1.
Replace the toner cartridge.
See appendix A.
Try printing a self-test page
as described earlier in this
chapter. If the page is still
blank, the printer may need
service. See the support
pages at the front of this
manual for support options.
Problem Cause(s) Solution(s)
EN Solving print quality problems 57
Print is misaligned on the page
(Skewed Pages) The paper input bin may be too
full.
The paper guides may not be
adjusted properly.
Paper may be misfeeding due
to the paper’s weight or
because the surface finish may
not meet HP’s specifications.
Try removing some of the
paper.
Be sure to center the paper
with the paper guides. Also,
verify that the guides are not
adjusted too tightly or too
loosely against the paper.
Try using different paper.
See appendix C.
Problem Cause(s) Solution(s)
58 Chapter 4 - Troubleshooting EN
Solving software problems
If you are having installation problems, check the following table. Also,
you can refer to Help by selecting Help on your menu bar.
Installation Tips
Symptoms Solution(s)
Window message during installation reads: “File
in Use.”Quit all software.
Remove all software from the Startup group
and then restart Windows. Reinstall the
software.
Cannot install the software. Try the Alternative installation as described in
chapter 1.
Bidirectional communication has not been
established during installation. The cable is not bidirectional. Use only a
high-quality IEEE-1284 compliant parallel
cable.
The cable is loose, or not directly connected.
In Windows 3.1x, open the Control Panel and
Printers. Double-click the HP LaserJet 6L
Pro printer, and then click Connect. Be sure
that the correct port has been selected and
that the Fast Printing Direct to Port check
box is selected.
Note: If any of the above apply, click Skip and
continue installation.
Your computer cannot read the installation CD. Check for the proper CD drive.
Check the CD for damage.
Copy CD to the hard drive; then install from
your hard drive.
Printing Tips
Printer is printing too slowly. Select 300 dpi under the Print Quality tab in
your printer software.
Printer is not responding; the system is locked
up. Free up disk space on your computer or
defragment the drive.
Enable “Print Manager in Windows 3.1x
systems” on your computer.
Run fewer software programs at the same
time on your computer.
Do not perform I/O or processor-intensive
tasks on your computer while printing (e.g.,
sending a fax or playing a video).
EN Troubleshooting printing problems from MS-DOS 59
Troubleshooting printing problems from MS-DOS
The following instructions will help you troubleshoot Windows printing
problems using MS-DOS®.
Note Before troubleshooting from MS-DOS, make sure your printer can print
a self-test page. (See “Printing a self-test page” earlier in this chapter.)
To establish basic communication to the printer, follow the steps
below:
1Exit Windows 3.1x. If in Windows 95 and Windows 98, click Start,
click Shut Down, and click Restart the computer in MS-DOS
mode, respectively.
2At the command prompt (for example, C:\), type: Dir>PRN and
press enter. This will send a directory of your hard drive to the
printer.
3See the chart below for recommended solutions.
Printer Status Response Solution(s)
Both the Data light and the
Ready light are on steadily
(not blinking).
Command prompt (C:\)
returned. Press the control panel button.
You will receive a printout of
your hard drive’s directory.
Communication verified; return
to Windows.
Data light comes on;
Ready light flashes. Command prompt (C:\)
returned. No action is needed.
Communication has been
verified; return to Windows.
60 Chapter 4 - Troubleshooting EN
Printer is not responding. Flashing cursor; command
prompt (c:\) not returned;
keyboard locked up.
DOS Message: “Write fault
error writing device PRN.”
Command prompt (C:\)
returned.
Verify that the Ready light is
on.
Hold down CTRL, then press
and release Break to free the
keyboard.
Verify that the Ready light is
on.
Specify the port name when
sending directory (for
example, LPT1).
Hold down CTRL, then press
and release Break to free the
keyboard.
Disconnect the power cable
from the back of the printer.
Disconnect the printer cable
from the computer and printer.
Reconnect the printer cable
directly between the computer
and the printer.
Try using a different parallel
cable (IEEE-1284), parallel
port, or both.
Data light comes on; Ready
light flashes.
Printed text is not legible, or
random characters are
occurring on the page.
Command prompt (C:\)
returned. Disconnect, then reconnect
the parallel cable at both ends.
Ensure a direct connection to
the printer.
Try using a different parallel
cable (IEEE-1284), parallel
port, or both.
Data light comes on; Ready
light flashes. Only one line of
text prints or all text is on one
line.
Command prompt (C:\)
returned. Disconnect, then reconnect
the parallel cable at both ends.
Ensure a direct connection to
the printer.
Try using a different parallel
cable (IEEE-1284), parallel
port, or both.
Printer Status Response Solution(s)
EN Troubleshooting printing problems from MS-DOS 61
Text files will print.
Graphic files do not print or
print garbage.
No error messages.
All appears okay. Disconnect, then reconnect
the parallel cable at both ends.
Ensure a direct connection to
the printer.
If copying a graphic file, type
the following command at the
command prompt:
copy filename LPT1
where filename is the name of
the graphic file.
Be sure to leave a space
before and after the filename.
Try using a different parallel
cable (IEEE-1284), parallel
port, or both.
Printer Status Response Solution(s)
62 Chapter 4 - Troubleshooting EN
Networks and switchboxes
The printer’s status read-back feature requires a direct connection
between the printer and the computer. Most devices connected
between the printer and the host computer prevent the printer from
sending data back to the computer.
If you use a mechanical switchbox, follow these guidelines:
●Do not switch while the printer is printing or receiving data (when
the Ready light is blinking).
●Do not switch to a host computer that is OFF and then turn that
computer ON. The Ready light on the printer will blink as if the
computer is sending data. If the Error light is blinking, reset the
printer. To do so, press and hold the control panel button for five
seconds, and then send the job again.
●Use a surge protector.
Out of memory
If the Error light is blinking, the page may be too complex for the
printer’s memory capacity. To clear this error, briefly press and
release the control panel button. Printing will resume; however, some
data loss may occur. To avoid this error in the future:
●Reset the printer. To do so, press and hold the control panel
button for five seconds.
●Set resolution to 300 dpi with your software.
●See Help for more suggestions regarding printer memory usage.
EN HP limited 1-Year warranty statement 63
AWarranty and support
information
HP limited 1-Year warranty statement
Warranty on this product is available in China, India,
and Indonesia
1HP warrants to you the end-user customer, that HP hardware, accessories and
supplies, will be free from defects in materials and workmanship after the date of
purchase, for the period specified above. If HP receives notice of such defects
during the warranty period, HP will, at its option, either repair or replace products
which prove to be defective.
2HP warrants to you that HP software will not fail to execute its programming
instructions after the date of purchase, for the period specified above, due to
defects in material and workmanship when properly installed and used. If HP
receives notice of such defects during the warranty period, HP will replace
software media which does not execute its programming instructions due to such
defects.
3HP does not warrant that the operation of HP products will be uninterrupted or
error free. HP products may contain remanufactured parts equivalent to new in
performance or may have been subject to incidental use. If HP is unable, within a
reasonable time, to repair or replace any product to a condition as warranted, you
will be entitled to a refund of the purchase price upon prompt return of the
product. Warranty does not apply to defects resulting from (a) improper or
inadequate maintenance or calibration, (b) software, interfacing, parts or supplies
not supplied by HP, (c) unauthorized modification or misuse, (d) operation outside
of the published environmental specifications for the product, or (e) improper site
preparation or maintenance.
4ANY IMPLIED WARRANTY OF MERCHANTABILITY OR FITNESS FOR A
PARTICULAR PURPOSE IS LIMITED TO THE DURATION OF THE EXPRESS
WARRANTY SET FORTH ABOVE. Some states or provinces do not allow
limitations on the duration of an implied warranty, so the above limitation or
exclusion might not apply to you. This warranty gives you specific legal rights and
you might also have other rights that vary from state to state, province to province,
or country to country.
5THE REMEDIES IN THIS WARRANTY STATEMENT ARE YOUR SOLE AND
EXCLUSIVE REMEDIES. EXCEPT AS INDICATED ABOVE, IN NO EVENT WILL
HP BE LIABLE FOR LOSS OF DATA OR FOR DIRECT, SPECIAL, INCIDENTAL,
CONSEQUENTIAL (INCLUDING LOST PROFIT), OR OTHER DAMAGE,

64 Appendix A - Warranty and support information EN
WHETHER BASED IN CONTRACT, TORT, OR OTHERWISE. Some states or
provinces do not allow the exclusion or limitation of incidental or consequential
damages, so the above limitation or exclusion may not apply to you.
Hardware service during the warranty period
If your hardware should fail during the warranty period, HP offers the
following support options:
●HPAuthorized Service Provider: You can return your printer to a
local authorized service dealer.
●HP Repair Services: You can return your printer to an HP repair
office.
When sending equipment, we recommend insuring the equipment for
shipment. Also include a copy of your proof of purchase.
CAUTION Shipping damage as a result of inadequate packaging is the customer’s
responsibility. Use the original packing materials whenever possible.
For technical support assistance regarding your printer within the
one-year warranty period, see the support pages at the front of this
manual.
Hardware service after the warranty period
If your hardware fails after the warranty period, contact an authorized
Hewlett-Packard Dealer Repair Center or a designated Hewlett-
Packard Repair Center. If you have a Hewlett-Packard Maintenance
Agreement, request service under your agreement.
HP LaserJet toner cartridge warranty
HP LaserJet toner cartridges are warranted to be free from defects in
materials and workmanship until the HP toner is depleted. You know
your HP toner is depleted when you begin to see faded or light type
on your printed page.
The warranty, extended for the life of the cartridge, covers any defects
or malfunctions in your new Hewlett-Packard toner cartridge. HP will,
at HP’s option, either replace products which prove to be defective or
refund your purchase price.
In the event the cartridge proves to be defective, attach a printout
sample illustrating what the defective cartridge is printing and return
to the place of purchase. IN NO EVENT SHALL HEWLETT-
PACKARD COMPANY BE LIABLE FOR ANY INCIDENTAL,
EN HP software license agreement 65
CONSEQUENTIAL, SPECIAL, INDIRECT, PUNITIVE, OR
EXEMPLARY DAMAGES OR LOST PROFITS FROM ANY BREACH
OF THIS WARRANTY OR OTHERWISE.
HP software license agreement
ATTENTION: USE OF THE SOFTWARE IS SUBJECT TO THE HP SOFTWARE
LICENSE TERMS SET FORTH BELOW. USING THE SOFTWARE INDICATES YOUR
ACCEPTANCE OF THESE LICENSE TERMS.
HP SOFTWARE LICENSE TERMS
The following License Terms govern your use of the accompanying
Software unless you have a separate written agreement with HP.
License Grant. HP grants you a license to Use one copy of the
Software. “Use” means storing, loading, installing, executing or
displaying the Software. You may not modify the Software or disable
any licensing or control features of the Software. If the Software is
licensed for “concurrent use”, you may not allow more than the
maximum number of authorized users to Use the Software
concurrently.
Ownership. The Software is owned and copyrighted by HP or its third
party suppliers. Your license confers no title or ownership in the
Software and is not a sale of any rights in the Software. HP’s third
party suppliers may protect their rights in the event of any violation of
these License Terms.
Copies and Adaptations. You may only make copies or adaptations
of the Software for archival purposes or when copying or adaptation is
an essential step in the authorized Use of the Software. You must
reproduce all copyright notices in the original Software on all copies
or adaptations. You may not copy the Software onto any bulletin board
or similar system.
No Disassembly or Decryption. You may not disassemble or
decompile the Software unless HP’s prior written consent is obtained.
In some jurisdictions, HP’s consent may not be required for
disassembly or decompilation. Upon request, you will provide HP with
66 Appendix A - Warranty and support information EN
reasonably detailed information regarding any disassembly or
decompilation. You may not decrypt the Software unless decryption is
a necessary part of the operation of the Software.
Transfer. Your license will automatically terminate upon any transfer
of the Software. Upon transfer, you must deliver the Software,
including any copies and related documentation, to the transferee.
The transferee must accept these License Terms as a condition to the
transfer.
Termination. HP may terminate your license upon notice for failure to
comply with any of these License Terms. Upon termination, you must
immediately destroy the Software, together with all copies,
adaptations and merged portions in any form.
Export Requirements. You may not export or re-export the Software
or any copy or adaptation in violation of any applicable laws or
regulations.
U.S. Government Restricted Rights. The Software and
documentation have been developed entirely at private expense and
are provided as “Commercial Computer Software” or “restricted
computer software.” They are delivered and licensed as “commercial
computer software” as defined in DFARS 252.227-7013 (Oct.1988),
DFARS 252.211-7015 (May 1991) or DFARS 252.227-7014 (Jun
1995), as a “commercial item” as defined in FAR 2.101 (a), or as
“Restricted computer software” as defined in FAR 52.227-19 (Jun
1987) (or any equivalent agency regulation or contract clause),
whichever is applicable. You have only those rights provided for such
Software and Documentation by the applicable FAR or DFARS clause
or the HP standard software agreement for the product.
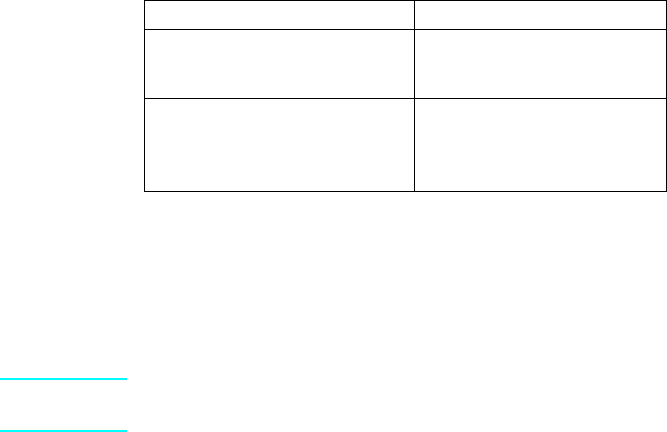
EN Accessories and supplies information 67
Accessories and supplies information
The following table lists items that are available from HP Direct
Ordering and through your local authorized HP dealer.
●For ordering information outside of the U.S., see “Sales and
service offices” in this appendix.
Sales and service offices
Hewlett-Packard products are sold and supported through Hewlett-
Packard Sales and Service Offices and through dealers.
Note Before calling an HP Sales and service office, be sure to contact the
appropriate Customer Care Center number listed in the front of your manual.
Option Part Number(s)
HP LaserJet toner cartridge:
Indonesia, India, China, Korea
Australia C3906F
C3906A
HP LaserJet parallel printer
cable (IEEE-1284)
Two meter A to B
Three meter A to B C2950A
C2951A
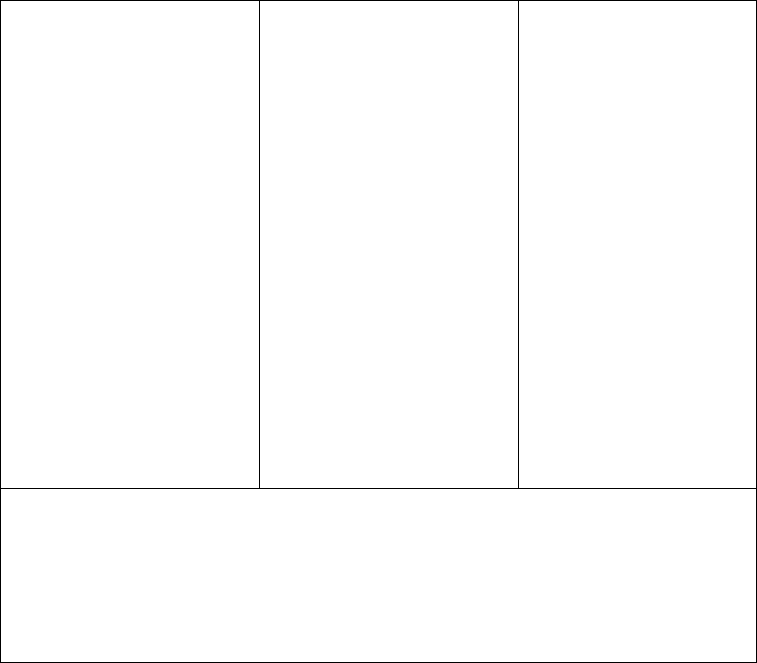
68 Appendix A - Warranty and support information EN
China:
China Hewlett-Packard Co. Ltd.
9/F, HP Building
No. 2 Dong San Huan Nan Lu
Chao Yang District
Beijing 100022, P.R. China
Phone: (86 10) 6564 3888
Support Hotline and Extended
Warranty Support:
(86 10) 6564 5959
Fax: (86 10) 6566 8280
Customer Information Center:
Phone: (86 10) 6564 5858 or
(800) 810-5656
Hardware Repair Center:
Please visit our support
website at:
http://www.hp.com.cn/go/
support
India:
Hewlett-Packard India Ltd.
Chandiwala Estate
Maa Anandmai Marg
Kalkaji, New Delhi - 110019
Phone: (91 11) 682-6000,
(91 11) 682-6035
Fax: (91 11) 682-6030
Hardware Repair Center and
Extended Warranty Support:
(91 11) 682-6042
Indonesia:
Hewlett-Packard Berca
Servisindo
Sentral Senayan 1, 8th floor
Jl. Asia Afrika no. 8
Jakarta 10270
Indonesia
Phone: (62 21) 350-3408
Hardware Repair Center and
Extended Warranty Support:
Phone: (62 21) 348-34567
Fax: (62 21) 352-2048
Hong Kong
Hewlett-Packard Asia Pacific Ltd., 25/F City Plaza One, 1111 King’s Road, Taikoo Shing, Hong Kong
Phone: (85 2) 2599-7777 Fax: (852) 2506-9776 Hardware Repair Center: (852) 2599-7000
Extended Warranty Support: (852) 2599-7000 Customer Information Center (852) 2599-7066
Singapore
Hewlett-Packard Asia Pacific Ltd., Blk A Alexandra Technopark, #02-08 Singapore 119967
Phone: (65) 272-5300 Fax: (65) 273-1146 Main Office Phone: (65) 275-3888
Extended Warranty Support: (65) 374-6441.
EN Environmental specifications 69
B Printer specifications
Environmental specifications
Operating Environment (Printer plugged into an AC outlet):
Temperature: 10° C to 32.5° C (50° F to 90.5° F)
Humidity: 20%-80% (no condensation)
Storage Environment (Printer plugged into an AC outlet):
Temperature: 0° C to 40° C (32° F to 104° F)
Humidity: 10%-80% (no condensation)
Noise Level During printing: 5.5 Bels Sound Power Level (per ISO
9296)
During Standby and SleepMode: silent
Electrical specifications
Power Requirements 220 v (+/-10%), 50/60 Hz (+/-2 Hz)
240 v (+/-10%), 50 Hz (+/- 2Hz)
Power Consumption During printing: 120 W (average)
During standby or SleepMode: 5 W
Minimum Recommended
Circuit Capacity
2.0A @ 230 V
Physical specifications
Dimensions:
Width
Depth
Storage Height
Operating Height (Letter Height)
335.2 mm (13.2 in)
312.4 mm (12.3 in)
228.6 mm (9.0 in)
370.8 mm (14.6 in)
Weight (Cartridge Installed) 7.0 kg (15.5 lb)
Print Speed 6 pages per minute
Paper Input Bin Capacity Holds up to 100 sheets of regular weight paper or up to 10
envelopes
Paper Output Bin Capacity Holds up to 100 sheets
Heavy Media Output Slot
Capacity
Stack 1 transparency or up to 20 sheets of other media in
front of the Heavy Media Output Slot
Minimum paper size 76.2 by 127 mm (3 by 5 in)
Maximum paper size 215.9 by 355.6 mm (8.5 by 14 in)
70 Appendix B - Printer specifications EN
Environmental product stewardship
Hewlett-Packard has created the Environmental product stewardship
program on a corporate-wide level to ensure that HP products
conform to national and worldwide environmental standards.
Protecting the Environment
Hewlett-Packard Company is committed to providing quality products
in an environmentally sound manner. This HP LaserJet printer has
been designed with several attributes to minimize impacts on our
environment.
This HP LaserJet printer design eliminates:
●Ozone production—This HP LaserJet printer uses charging
rollers and generates no appreciable ozone gas (O3).
This HP LaserJet printer design reduces:
●Energy consumption—Energy usage drops from an average of
120W during printing to as little as 5W while in Standby/Sleep
mode. Not only does this save natural resources, but it also saves
money without affecting the high performance of this printer. This
product qualifies for ENERGY STA R . ENERGY STAR is a
voluntary program established to encourage the development of
energy-efficient office products.
ENERGY STAR is a U.S. registered service
mark of the U.S. EPA. As an ENERGY STAR
partner, Hewlett-Packard Company has
determined that this product meets ENERGY
STAR Guidelines for energy efficiency.
●Toner consumption—EconoMode uses significantly less toner,
which may extend the life of the toner cartridge.
●Paper use—This printer allows manual duplexing (two-sided
printing) and this reduces paper usage and the resulting
demands on natural resources.
Physical specifications, continued
Base memory 4 MB of ROM and 4 MB of RAM
Print Resolution 600 dots per inch (dpi)
Duty Cycle 6000 single-sided pages per month
EN Environmental product stewardship 71
HP LaserJet printer: worldwide recycling
●Plastics—Plastic parts have markings according to international
standards that enhance the ability to identify plastics for recycling
purposes at the end of the printer’s life.
●Paper—This printer is suited for the use of recycled papers when
the paper meets the guidelines outlined in the HP LaserJet
Printer Family Paper Specification Guide (English-only
document). This printer is suited for the use of recycled paper
according to DIN 19 309.
●Material safety data sheet— Material Safety Data Sheet (MSDS)
can be obtained by contacting the HP LaserJet Supplies website
at http://www.hp.com/go/msds.
Returns
HP LaserJet printing supplies
In many countries, this product’s printing supplies (e.g., toner
cartridge, drum, fuser) can be returned to HP through the HP Planet
Partners Printing Supplies Environmental Program. An easy-to-use
and free takeback program is available in over 20 countries. Multi-
lingual program information and instructions are included in every
new HP LaserJet toner cartridge and consumables package.
HP Planet Partners Printing Supplies Environmental Program
Information
Since 1990, the HP LaserJet Toner Cartridge Recycling Program has
collected more than 25 million used LaserJet toner cartridges that
otherwise may have been discarded in the world’s landfills. The HP
LaserJet toner cartridges and consumables are collected and bulk
shipped to our resource and recovery partners who disassemble the
cartridge. After a thorough quality inspection, selected parts such as
nuts, screws, and clips are reclaimed for use in new cartridges.
Remaining materials are separated and converted into raw materials
for use by other industries to make a variety of useful products.
For a more environmentally responsible return of used cartridges and
consumables, HP encourages the use of bulk returns. Simply bundle
two or more cartridges together and use the single, pre-paid, pre-
addressed UPS label that is supplied in the package.
For more information regarding the Asia/Pacific region, you may visit
our website at http://www/asiapac.hp.com/planp1.htm.

72 Appendix B - Printer specifications EN
Laser safety statement
The Center for Devices and Radiological Health (CDRH) of the U.S.
Food and Drug Administration has implemented regulations for laser
products manufactured since August 1, 1976. Compliance is
mandatory for products marketed in the United States. This printer is
certified as a “Class 1” laser product under the U.S. Department of
Health and Human Services (DHHS) Radiation Performance
Standard according to the Radiation Control for Health and Safety Act
of 1968. Since radiation emitted inside this printer is completely
confined within protective housings and external covers, the laser
beam cannot escape during any phase of normal user operation.
WARNING! Use of controls, adjustments, or performance of procedures other than
those specified in this manual may result in hazardous radiation
exposure.
EN Declaration of conformity 73
Declaration of conformity
according to ISO/IEC Guide
Manufacturer’s Name: Hewlett-Packard Company
Manufacturer’s Address: 11311 Chinden Boulevard
Boise, Idaho 83714-1021, U.S.A.
declares that the product
Product Name: HP LaserJet 6L Pro Printer
Model Number: C8060A
Product Options: All
conforms to the following Product Specifications:
Safety: IEC 950: 1991+A1+A2+A3/A4/EN 60950: 1992+A1/A2+A3/
A4+A11 GB4943-1995
IEC 825-1:1993 +A1/EN 60825-1:1994 +A11 CLASS 1
(LASER/LED) PRODUCT
EMC: CISPR 22-1997/EN 55022:1998 Class B
EN 61000-3-2:1995
EN 61000-3-3:1995
EN 55024:1198
FCC Title 47 CFR, Part 15 Class B2 / ECES-002, Issue 2/
GB9254-88 AS/NZS 3548:1995
Supplementary Information:
The product herewith complies with requirements of the EMC Directive 89/336/EEC and the Low Voltage
Directive 73/23/EEC, and carries the CE-Marketing accordingly.
1) The product was tested in a typical configuration with Hewlett-Packard Personal Computer Systems.
2) This Device complies with Part 15 of the FCC rules. Operation is subject to the following conditions:
(a) this device may not cause harmful interference, and (b) this device must accept any interference
received, including interference that may cause undesired operation. Boise, Idaho, February 25, 2000
For Regulatory Topics ONLY, contact:
Contact: Product Regulations Manager, Hewlett-Packard Company,
P.O. Box 15, MS 160, Boise, ID 83707-0015 (Phone: 208-396-
6000)
74 Appendix B - Printer specifications EN
EN Paper specifications 75
CPaper specifications
Paper specifications
This chapter provides information on the following topics:
●Printer paper specifications
●Supported paper sizes (printer)
●Guidelines for using paper
76 Appendix C - Paper specifications EN
Printer paper specifications
HP LaserJet printers produce excellent print quality. This printer
accepts a variety of media, such as cut-sheet paper (including
recycled paper), envelopes, labels, transparencies, vellum, and
custom-size paper. Properties such as weight, grain, and moisture
content are important factors affecting printer performance and output
quality.
The printer can use a variety of paper and other print media in
accordance with the guidelines in this manual. Paper that does not
meet these guidelines may cause the following problems:
●Poor print quality
●Increased paper jams
●Premature wear on the printer, requiring repair
Hewlett-Packard Company cannot recommend the use of specific
brands. Because they are not HP products, HP cannot influence or
control their quality.
It is possible for paper to meet all of the guidelines in this manual and
still not produce satisfactory results. This might be the result of
improper handling, unacceptable temperature and humidity levels, or
other variables over which Hewlett-Packard has no control.
Always test paper before purchasing in large quantities. If you still
have questions, refer to the HP LaserJet Printer Family Paper
Specification Guide (English-only document). See the end of this
appendix for specific information.
Using paper outside HP specifications may cause problems for the
printer, requiring repair. This repair is not covered by the Hewlett-
Packard warranty or service agreements.
Supported paper sizes (printer)
●Maximum supported paper size: 216 by 356mm (8.5 by 14 in)
●Minimum supported paper size: 76 by 127mm (3 by 5 in)

EN Guidelines for using paper 77
Guidelines for using paper
For best results, use high-quality paper that is between 70 and
150g/m2 (20-lb bond). Make sure the paper is of good quality, and
free of cuts, nicks, tears, spots, loose particles, dust, wrinkles, voids,
and curled or bent edges.
If you are unsure what type of paper you are loading (such as bond or
recycled), check the label on the package of paper.
Some light-weight or poor-quality papers may cause print quality
problems, jamming, or damage to the printer.
Symptom Problem with Paper Solution
Poor print quality or toner
adhesion. Problems with
feeding.
Too moist, too rough, too
smooth, or embossed; faulty
paper lot.
Try another kind of paper.
Dropouts, jamming, curl. Stored improperly. Store paper flat in its moisture-
proof wrapping.
Increased gray background
shading. Too heavy. Use lighter paper.
Excessive curl.
Problems with feeding. Too moist, wrong grain
direction or short-grain
construction.
Use long-grain paper. Print
using the heavy media output
slot.
Jamming, damage to printer. Cutouts or perforations. Do not use paper with cutouts
or perforations.
Problems with feeding. Ragged edges. Use good quality paper.
78 Appendix C - Paper specifications EN
Labels
Label construction
When selecting labels, consider the quality of each component:
●Arrangement: Only use labels with no exposed backing between
them. Labels can peel off sheets with spaces between the labels,
causing serious jams.
●Curl: Prior to printing, labels must lie flat with no more than 13
mm (0.5 in) of curl in any direction.
●Condition: Do not use labels with wrinkles, bubbles, or other
indications of separation.
Envelopes
Envelope construction
Envelope construction is critical. Envelope fold lines can vary
considerably, not only between manufacturers, but also within a box
from the same manufacturer. Successful printing on envelopes
depends upon the quality of the envelopes. When selecting
envelopes, consider the following components:
●Weight: The weight of the envelope paper should not exceed 105
g/m2 (28 lb), or jamming may result.
●Construction: Prior to printing, envelopes should lie flat with less
than 6mm (0.25 in) curl and should not contain air. (Envelopes
that trap air may cause problems.)
●Condition: Make sure envelopes are not wrinkled, nicked, or
otherwise damaged.
●Sizes: From 90 by 160 mm (3.5 by 6.3 in) to 178 by 254 mm (7 by
10 in).
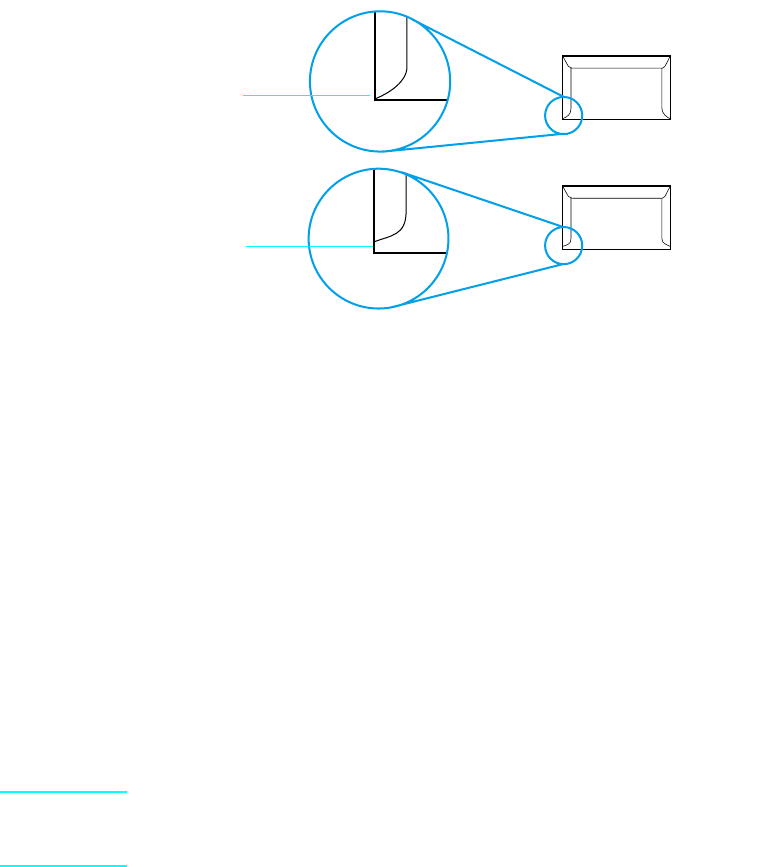
EN Guidelines for using paper 79
Envelopes with double-side seams
Double-side-seam construction has vertical seams at both ends of
the envelope rather than diagonal seams. This style may be more
likely to wrinkle. Be sure the seam extends all the way to the corner of
the envelope as illustrated below.
Envelope storage
Proper storage of envelopes helps contribute to good print quality.
Envelopes should be stored flat. If air is trapped in an envelope,
creating an air bubble, the envelope may wrinkle during printing.
Card stock and heavy media
Many types of card stock can be printed from the paper input tray,
including index cards and postcards. Some card stock performs
better than others because its construction is better suited for feeding
through a laser printer.
For optimum printer performance, do not use paper heavier than
163g/m2 (43 lb). Paper that is too heavy might cause misfeeds,
stacking problems, paper jams, poor toner fusing, poor print quality, or
excessive mechanical wear.
Note Printing on heavier paper may be possible if the tray is not filled to
capacity, and paper with a smoothness rating of 100-180 Sheffield is
used.
Acceptable
Unacceptable
80 Appendix C - Paper specifications EN
Card stock construction
●Smoothness: 135-163 g/m2 (36-43 lb) card stock should have a
smoothness rating of 100-180 Sheffield. 60-135 g/m2 (16-36 lb)
card stock should have a smoothness rating of 100-250 Sheffield.
●Construction: Card stock should lie flat with less than 5 mm
(0.2 in) of curl.
●Condition: Make sure card stock is not wrinkled, nicked, or
otherwise damaged.
●Sizes: Use only card stock within the following size ranges:
Minimum: 76 by 127 mm (3 by 5 in) Maximum: 216 by 356 mm
(8.5 by 14 in).
Card stock guidelines
●If cards curl or jam, print using the heavy media output slot. Set
margins at least 2 mm (0.08 inch) away from the edges of the
paper.
To order additional guidelines
●HP LaserJet Printer Family Paper Specification Guide (English-only
document) 5963-7863 (May 2000 ed.).
EN Index 81
Index
A
aborting print jobs 35
adapters, cautions for 12
adding paper 14
agreement, software license 65
alignment, print 57
alternative installation 17
attaching labels 13
authorized service providers 64
B
background scatter, correcting 54
battery backups, cautions for 12
bidirectional communication 11, 15
black pages, correcting 54
blank pages, correcting 55, 56
blinking lights 24, 25
button, front panel
identifying 8
using 24, 34
C
canceling print jobs 35
capacity, paper 69
card stock 36, 79
cartridges, toner
installing 9
leaking 46
ordering 67
part numbers 67
print life 38
print quality 51, 52, 54
recycling 71
storing 9
warranty 64
CD, making disks from 19
character drop-out, correcting 53, 55
circuit capacity, minimum 69
cleaning
printer 46
rollers 53
clearing
data 34
paper jams 42, 43
clothing, toner on 10
conformity, declaration of 73
connecting
parallel cable 11
power cord 11
control panel 23
curling, preventing
paper 34, 55
transparencies 37
custom paper sizes 36
customer support
HP Customer Care Centers 41
HP Repair Services 64
HP Sales and Service Offices 67
D
Data light 23, 24
declaration of conformity 73
deleting print jobs 35
dimensions, printer 69
disk space, requirements 15
diskettes, making 19
door, printer
indentifying 8
opening 9
DOS, troubleshooting in 59
dots per inch 70
dots, correcting 51
double-sided printing 33, 34
dpi 70
drivers, printer
installing 16
support 15
duplexing 33, 34
duty cycle
printer 70
toner cartridges 38
E
EconoMode 38
embossed paper, printing on 31
energy consumption 69, 70
Energy Star compliance 70
envelopes
choosing 78
printing 32, 36
sizes 27
storing 79
environmental practices 70
Error light 23, 25, 48
error messages 58
82 Index EN
F
faded print 39, 51
feeding problems
misfeeds 45
paper jams 42, 49
flashing lights 24, 25
front panel button
identifying 8
using 24, 34
G
graphics, incomplete 55
grounding 12
guides, paper
indentifying 8
using 42, 49
H
hardware errors 49
hardware requirements 15
heavy media output slot
capacity 69
indentifying 8
using 29
heavy paper
choosing 77, 79
printing on 29, 36
height, printer 69
help. See customer support;
troubleshooting
HP Authorized Service Providers 64
HP Customer Care 41
HP LaserJet Printer Family Paper
Specification Guide, ordering 80
HP Planet Partners Printing Supplies
Environmental Program 71
HP Repair Services 64
HP Sales and Service Offices 67
HP software license agreement 65
humidity, for storing printer 69
I
indicator lights
all stay off 24, 48
all stay on 49
blinking 24, 25
Data 23, 24
Error 23, 25, 48
indentifying 8
Ready 23, 24
input bin, paper
attaching labels to 13
capacity 69
clearing paper jams 42
indentifying 8
troubleshooting 49
using 14
input slot, single-sheet
clearing paper jams 42
indentifying 8
using 30
input support, paper
indentifying 8
using 14
installing
software 15
toner cartridge 9
internal mirror 53
interrupting printing 34
J
jams, paper
clearing 42, 43
frequent 49, 50
preventing 14, 29
L
labels
attaching to printer 13
choosing 78
printing 36, 37
landscape orientation 36
laser safety statement 72
leaking toner 46
letterhead, printing 31
license agreement, software 65
lines, correcting 52
loading paper 14
M
making disks from CD 19
manual feed 34
margins, minimum 36
maximum paper size 69
media, print
choosing 27, 76
sizes 27
special 36
memory
insufficient 62
printer 70
system requirements 15
minimum paper size 69
mirror, internal 53
misaligned print 57
misfeeds, paper 45
MS-DOS, troubleshooting in 59
N
networks, troubleshooting 62
EN Index 83
noise level, printer 69
not responding 47
O
on/off switch 12
operating environment 69
ordering
paper specification guide 80
supplies 67
orientation, page 36
outlet, plugging into 11, 12
output bin, paper
capacity 69
indentifying 8
output slot, heavy media
capacity 69
identifying 8
using 29
output support, paper
indentifying 8
using 14
ozone emissions 70
P
packaging, toner cartridge 9
page orientation 36
paper
adding 14
breaking 56
choosing 76
curling 34, 55
heavy 36, 79
HP LaserJet Printer Family Paper
Specification Guide, ordering 80
jams 42, 49
loading 14
ordering 67
problems with 76, 77
recycled 71
separating 56
sizes 69
smoothness 80
specification guide, ordering 80
specifications for 76
storing 55
troubleshooting 76, 77
weight 79
wrinkling 55
paper guides
indentifying 8
using 42, 49
paper input bin
attaching labels to 13
capacity 69
clearing paper jams 42
indentifying 8
troubleshooting 49
using 14
paper input support
indentifying 8
using 14
paper jams
clearing 42, 43
frequent 49, 50
preventing 14, 29
paper output bin
capacity 69
indentifying 8
paper output support
indentifying 8
using 14
paper path lever
identifying 8
using 29
paper supports
identifying 8
using 14
parallel cable
connecting 11
ordering 67
troubleshooting 47
parallel port
connecting to 11
troubleshooting 47
part numbers 67
parts, printer
identifying 8
ordering 67
returning 71
path, paper 29
pausing printing 34
phone numbers, customer support 41
Planet Partners Printing Supplies
Environmental Program 71
plugging in 11, 12
ports 11
postcards, printing 36
power consumption 69, 70
power cord
connecting 11
troubleshooting 47
power strips, cautions for 12
power supplies, cautions for 12
print cartridges
installing 9
leaking 46
ordering 67
part numbers 67
print life 38
print quality 51, 52, 54
recycling 71
storing 9
84 Index EN
warranty 64
printer door
indentifying 8
opening 9
printer drivers
installing 16
support 15
processor requirements 15
Q
quality, print 46, 51
R
RAM (Random Access Memory)
insufficient 62
printer 70
system requirements 15
Random Access Memory (RAM)
insufficient 62
printer 70
system requirements 15
Ready light 23, 24
recycling 9, 71
redistributing toner 39
repair services 64
requirements, system 15
resetting printer 34
resolution
maximum 70
reducing 38
responding, printer not 47
returning parts 71
rollers 43, 53
S
sales and service offices 67
sealing tape, removing 9
self-test page, printing 41
separating paper 56
serial port 11
setting up 7
shadows, correcting 52
single-sheet input slot
clearing paper jams 42
indentifying 8
using 30
sizes, print media
envelopes 27
paper 27, 69
SleepMode
automatic 12
power consumption 69
waking from 24, 48
smudging, correcting 51
software installation
requirements for 15
standard 16, 18
Windows 2000 16
Windows 3.1 18
Windows 95/98 16
Windows 95/98 alternative 17
Windows NT 16
Windows NT alternative 18
software license agreement 65
special media 36
specifications
paper 76
printer 69
speed, printer
EconoMode 38, 58
maximum 69
stains, correcting 51, 53
standard installation 16, 18
stopping print jobs 35
storing
envelopes 79
paper 55
printer 69
toner cartridges 9
straight-through path 29, 36
streaks, correcting 51
supplies
ordering 67
returning 71
supports, paper
indentifying 8
using 14
surge protectors 62
switchboxes 62
system requirements 15
T
tape, removing 9
temperature, for storing printer 69
test page, printing 41
text prints poorly 53, 55
toner
cleaning 46
excessive 46
redistributing 39
washing off clothing 10
toner cartridges
installing 9
leaking 46
ordering 67
part numbers 67
print life 38
print quality 51, 52, 54
recycling 71
storing 9
warranty 64
EN Index 85
transparencies, printing 36, 37
troubleshooting
cables 47
DOS 59
memory, insufficient 62
networks 62
paper jams 42, 49
paper problems 55, 76, 77
power 47
print quality 51
slow speed 58
software 58
switchboxes 62
Windows printing 59
two-sided printing 33, 34
U
uninterruptible power supplies, cautions
for 12
used supplies, returning 71
W
waking from SleepMode 24, 48
warranty 63, 64
washing toner off clothing 10
web site, Asia Pacific region 71
weight
paper 79
printer 69
white stripes, correcting 53
width, printer 69
Windows 2000
installing software 16
system requirements 15
Windows 3.1
installing software 18
system requirements 15
Windows 95/98
installing software 16
installing software alternative 17
system requirements 15
Windows NT
installing software 16
installing software alternative 18
system requirements 15
Windows printing problems,
troubleshooting 59
wrinkling, preventing 55
86 Index EN
Pilihan Dukungan Konsumen
Selain nomor telepon yang ada pada daftar di bawah ini, lampiran A, “Informasi
Dukungan dan Garansi," berisi alamat dan nomor telepon servis dan penjualan.
Terima kasih Anda telah membeli. Bersama produk ini, Anda menerima berbagai layanan dukungan dari
Hawlett-Packard. Tujuan kami adalah memberikan Anda hasil yang Anda inginkan, secara cepat dan
profesional.
Mendapatkan Informasi Perangkat Lunak
dan Elektronik:
Negara-Negara Asia Pasifik (65) 740 4477 (Asia Rim). Senin sampai Jumat dari
08:30 - 17:30 (Waktu Singapura)
CD-ROM HP Support
Assistant
CD-ROM ini menawarkan sistem informasi online
lengkap yang dirancang untuk menyediakan informasi
teknik dan informasi produk-produk HP. Untuk
berlangganan, hubungi (65) 740 4477, Senin sampai
Jumat dari 08:30 - 17:30 (Waktu Singapura).
Layanan Online: untuk mengakses
informasi 24 jam melalui modem, kami
sarankan layanan ini.
Situs WWW Driver printer, perangkat lunak printer HP
terbaru, informasi produk dan dukungan bisa didapatkan
di http://www.hp.com/country/us/eng/
othercountrieswel.html atau http://www.hp.com/
cpso_support/guide/psd/cscap.html, or http://
www.hp.com/cpso_support/guide/psd/crcap.html
Nomor Dukungan Dalam Negeri
Jika Anda memerlukan dukungan setelah masa garansi berakhir atau servis perbaikan produk tambahan,
atau jika negara Anda tidak terdaftar di bawah ini, harap rujuk pada kantor servis dan penjualan di seluruh
dunia di lampiran A.
Cina
(86 10) 6564-3888
(86 10) 6564-5959
India
(91 11) 682-6000
(91 11) 682-6035
Indonesia
(62 21) 350-3408
Australia
61 3 8877-8000
Printer HP LaserJet 6L Pro
Buku Petunjuk
Hak Cipta dan Lisensi
© Hak Cipta Hewlett-Packard
Company 2000
Semua Hak Dilindungi. Kecuali
diijinkan undang-undang hak
cipta, dilarang menggandakan,
mengadaptasi, atau
menerjemahkan tanpa ijin
tertulis sebelumnya.
Pengguna printer Hawlett-
Packard sehubungan dengan
buku petunjuk ini diberi lisensi
untuk: a) mencetak buku
petunjuk ini untuk penggunaan
PRIBADI, INTERNAL atau
PERUSAHAAN, tidak untuk
dijual, dijual kembali atau
didistribusikan; dan b) menaruh
salinan elektronik buku petunjuk
ini pada server jaringan yang
terbatas untuk penggunaan
PRIBADI dan INTERNAL.
Nomor penerbitan
C8060-90929
Edisi pertama, Mei 2000
Pernyataan Garansi
Dokumentasi
Informasi di dalam dokumen ini
bisa berubah tanpa
pemberitahuan sebelumnya.
Hawlett-Packard tidak menjamin
apapun sehubungan dengan
materi ini termasuk tetapi tidak
terbatas pada garansi barang
siap jual dan kecocokan
pemakaian untuk tujuan
tertentu. Kekeliruan yang
terkandung dalam dokumen ini
atau kecelakaan, konsekuensi
kerusakan sehubungan dengan
pengerjaan akhir, kinerja atau
penggunaan manual ini adalah
di luar tanggungjawab Hawlett-
Packard.
Lembaran Data
Keselamatan Material
(MSDS)
Lembaran Data Keselamatan
Material Toner (MSDS) bisa
diperoleh dari internet.
Konsumen internasional harap
merujuk pada “Layanan
Hewlett-Packard” di bagian
depan manual ini untuk
mendapatkan informasi dan
nomor yang tepat.
Peraturan FCC
Peralatan ini telah diuji dan
dinyatakan sesuai batasan
untuk peralatan digital Kelas B,
sesuai peraturan FCC Bagian
15. Batasan ini dirancang untuk
menyediakan proteksi terhadap
inteferensi yang
membahayakan pada instalasi
di perumahan. Peralatan ini
menghasilkan, menggunakan
dan bisa menghasilkan energi
frekuensi radio, dan jika tidak
diinstalasi sesuai petunjuk bisa
menyebabkan interferensi yang
membahayakan komunikasi
radio. Namun, tidak ada jaminan
bahwa interferensi tidak akan
terjadi pada instalasi khusus.
Jika peralatan ini menyebabkan
interferensi yang
membahayakan pada
penerimaan radio atau televisi,
yang bisa diketahui dengan
mengaktifkan dan
menonaktifkan peralatan ini,
pengguna diharapkan untuk
membetulkan interferensi
dengan cara-cara berikut ini:
• Re-orientasi dan relokasi
antena penerima.
• Membuat jarak lebih antara
peralatan dan penerima.
• Sambung peralatan pada
sumber listrik yang berbeda
dengan penerima.
Hubungi penyalur Anda atau
teknisi radio/TV yang
berpengalaman.
Catatan: Perubahan atau
modifikasi pada printer yang
tidak disetujui HP bisa
menghilangkan hak pengguna
untuk mengoperasikan
peralatan ini.
Penggunaan kabel antarmuka
diperlukan supaya sesuai
dengan peraturan FCC
Bagian 15Kelas B
Kredit Merek Dagang
Microsoft®, Windows®, dan MS-
DOS® adalah merek dagang
terdaftar di Amerika dari
Microsoft Corporation.
ENERGY STAR adalah
tanda layanan terdaftar Amerika
dari U.S. EPA.
IN DAFTAR ISI 5
DAFTAR ISI
1 Pengaturan
Kata Pengantar . . . . . . . . . . . . . . . . . . . . . . . . . . . . . . . . . . . . . . . .7
Mengenali bagian-bagian printer. . . . . . . . . . . . . . . . . . . . . . . . . . .8
Memasang toner cartridge . . . . . . . . . . . . . . . . . . . . . . . . . . . . . . .9
Menghubungkan kabel printer. . . . . . . . . . . . . . . . . . . . . . . . . . . .11
Menggunakan sambungan listrik generik dan adaptor . . . . . . . . .12
Menempelkan label pada printer . . . . . . . . . . . . . . . . . . . . . . . . . .13
Memasukkan kertas ke dalam printer . . . . . . . . . . . . . . . . . . . . . .14
Informasi perangkat lunak printer . . . . . . . . . . . . . . . . . . . . . . . . .15
Kebutuhan sistem yang dianjurkan . . . . . . . . . . . . . . . . . . . .15
Pertimbangan instalasi . . . . . . . . . . . . . . . . . . . . . . . . . . . . . .15
Menginstalasi perangkat lunak printer. . . . . . . . . . . . . . . . . . . . . .16
Instalasi standar untuk Windows 95, Windows 98,
Windows 2000, dan NT 4.0 . . . . . . . . . . . . . . . . . . . . . . .16
Instalasi standar untuk Windows 3.x. . . . . . . . . . . . . . . . . . . .17
Instalasi Alternatif untuk Windows 95 dan Windows 98 . . . . .17
Instalasi Alternatif untuk Windows NT 4.0 . . . . . . . . . . . . . . .18
Instalasi Alternatif untuk Windows 3.x . . . . . . . . . . . . . . . . . .18
Membuat disket dari CD untuk instalasi pada Windows 95,
Windows 98 dan Windows NT . . . . . . . . . . . . . . . . . . . . .19
Membuat disket dari CD untuk instalasi pada Windows 3.x . .20
2 Panel kontrol printer
panel kontrol . . . . . . . . . . . . . . . . . . . . . . . . . . . . . . . . . . . . . . . . .23
Menggunakan panel kontrol . . . . . . . . . . . . . . . . . . . . . . . . . . . . .24
3 Mencetak
Memilih ukuran media . . . . . . . . . . . . . . . . . . . . . . . . . . . . . . . . . .27
Memilih jalur keluaran kertas . . . . . . . . . . . . . . . . . . . . . . . . . . . .29
Menambah kertas . . . . . . . . . . . . . . . . . . . . . . . . . . . . . . . . . .29
Menggunakan slot masukan satu lembar . . . . . . . . . . . . . . . . . . .30
Mencetak pada kop surat dan amplop . . . . . . . . . . . . . . . . . . . . .31
Tugas-tugas pencetakan. . . . . . . . . . . . . . . . . . . . . . . . . . . . . . . .33
Mencetak di kedua sisi (dupleks) . . . . . . . . . . . . . . . . . . . . . .33
Menghentikan sementara printer antar halaman . . . . . . . . . .34
Mengatur ulang printer . . . . . . . . . . . . . . . . . . . . . . . . . . . . . .34
Menghentikan pencetakan . . . . . . . . . . . . . . . . . . . . . . . . . . .35
6DAFTAR ISI IN
Mencetak pada media khusus. . . . . . . . . . . . . . . . . . . . . . . . . . . .36
Tip tambahan untuk ukuran tertentu . . . . . . . . . . . . . . . . . . .36
Tip tambahan untuk transparansi . . . . . . . . . . . . . . . . . . . . .37
Tip tambahan untuk mencetak label. . . . . . . . . . . . . . . . . . . .37
Menangani toner cartridge . . . . . . . . . . . . . . . . . . . . . . . . . . . . . .38
4 Pemecahan masalah
Mengatasi masalah yang umum . . . . . . . . . . . . . . . . . . . . . . . . . .41
Melakukan uji cetak . . . . . . . . . . . . . . . . . . . . . . . . . . . . . . . .41
Mengeluarkan kertas macet . . . . . . . . . . . . . . . . . . . . . . . . . . . . .42
Kertas tidak mau mengumpan . . . . . . . . . . . . . . . . . . . . . . . . . . .45
Membersihkan printer . . . . . . . . . . . . . . . . . . . . . . . . . . . . . . . . . .46
Mengatasi berbagai masalah pada printer . . . . . . . . . . . . . . . . . .47
Mengatasi berbagai masalah kualitas cetak . . . . . . . . . . . . . . . . .51
Mengatasi berbagai masalah perangkat lunak . . . . . . . . . . . . . . .59
Mengatasi berbagai masalah pencetakan dari MS-DOS . . . . . . .60
Jaringan dan kotak switch . . . . . . . . . . . . . . . . . . . . . . . . . . . . . . .63
Kehabisan memori . . . . . . . . . . . . . . . . . . . . . . . . . . . . . . . . . . . .63
lampiran A Informasi garansi dan dukungan
Pernyataan garansi terbatas 1 tahun HP . . . . . . . . . . . . . . . . . . .65
Servis perangkat keras dalam masa garansi . . . . . . . . . . . . .66
Servis perangkat keras setelah masa garansi . . . . . . . . . . . .66
Garansi toner cartridge HP LaserJet . . . . . . . . . . . . . . . . . . .66
Perjanjian lisensi perangkat lunak HP. . . . . . . . . . . . . . . . . . . . . .67
Informasi Aksesori dan perlengkapan . . . . . . . . . . . . . . . . . . . 69
Kantor penjualan dan servis . . . . . . . . . . . . . . . . . . . . . . . . . . . . .69
lampiran B Spesifikasi printer
Spesifikasi Lingkungan . . . . . . . . . . . . . . . . . . . . . . . . . . . . . . . . .71
Spesifikasi listrik . . . . . . . . . . . . . . . . . . . . . . . . . . . . . . . . . . . . . .71
Spesifikasi fisik . . . . . . . . . . . . . . . . . . . . . . . . . . . . . . . . . . . . . . .71
Produk Ramah Lingkungan. . . . . . . . . . . . . . . . . . . . . . . . . . . . . .72
Pernyataan keselamatan laser . . . . . . . . . . . . . . . . . . . . . . . . . . .74
Declaration of conformity. . . . . . . . . . . . . . . . . . . . . . . . . . . . . . . .75
lampiran C Spesifikasi kertas
Spesifikasi kertas . . . . . . . . . . . . . . . . . . . . . . . . . . . . . . . . . . . . .77
Spesifikasi kertas printer . . . . . . . . . . . . . . . . . . . . . . . . . . . . . . . .78
Ukuran kertas yang didukung (printer) . . . . . . . . . . . . . . . . . . . . .78
Petunjuk menggunakan kertas . . . . . . . . . . . . . . . . . . . . . . . . . . .79
Label . . . . . . . . . . . . . . . . . . . . . . . . . . . . . . . . . . . . . . . . . . . .80
Amplop . . . . . . . . . . . . . . . . . . . . . . . . . . . . . . . . . . . . . . . . . .80
Stok kartu dan media tebal . . . . . . . . . . . . . . . . . . . . . . . . . . .81
Indeks
IN Kata Pengantar 7
1Pengaturan
Kata Pengantar
Selamat atas pembelian Printer HP LaserJet 6L Pro. Berikut adalah
beberapa hal yang diperlukan untuk mengatur printer Anda:
●Printer HP LaserJet 6L Pro ●Kabel Listrik
●Toner Catridge HP LaserJet ●Lembar Label Petunjuk
●Kabel Paralel IEEE-1284 (tidak
termasuk)
●HP Perangkat lunak Printer
LaserJet 6L Pro dalam bentuk
CD
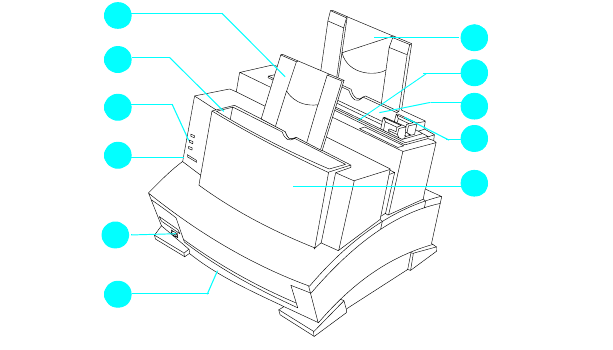
8 Bab 1 - Pengaturan IN
Mengenali bagian-bagian printer
Sebelum menggunakan printer, pastikan Anda mengenali bagian-
bagian printer berikut ini:
1 = Slot keluaran 7= Penyangga masukan kertas
2 = Tuas jalur kertas 8 = Slot masukan satu lembaran
3 = tombol panel kontrol 9 = Wadah masukan kertas
4 = Lampu indikator 10 = Pemandu kertas
5 = Wadah keluaran kertas 11 = Pintu printer
6 = Penyangga keluaran kertas
1
3
2
4
5
67
9
10
11
8

IN Memasang toner cartridge 9
Memasang toner cartridge
HP merekomendasikan penggunaan
toner cartridge HP LaserJet. HP telah
merancang printer, toner cartridge, dan
formula toner bekerja terpadu untuk
memberikan kualitas gambar yang
optimal dari printer Anda.
PERHATIAN
Untuk mencegah kerusakan, jangan
mengarahkan toner cartridge ke cahaya
yang terang. Jika cartridge berada di
luar printer untuk jangka waktu yang
lama, simpan di dalam laci tertutup,
kembalikan ke kemasan semula, atau
bungkus dengan kain.
Untuk memasang toner cartridge,
pertama-tama Anda harus
mengeluarkan cartridge dari
kemasannya. (Simpan kemasannya
untuk tempat cartridge jika diperlukan
dan pendauran ulang.)
1Untuk membuka pintu printer,
tariklah ke arah Anda dengan
gerakan maju dengan menggunakan
kedua tangan.
2Gerakkan toner cartridge maju dan
mundur dengan cepat untuk
meratakan toner di dalam cartridge.
3Pegang ujung pita perekat di sisi
cartridge. Tarik dengan kuat untuk
melepaskan keseluruhan pita.
Setelah dilepas, ukuran pita harus
dua kali panjang toner cartridge atau
sepanjang 490 mm (19,3 inci).
1
2
3
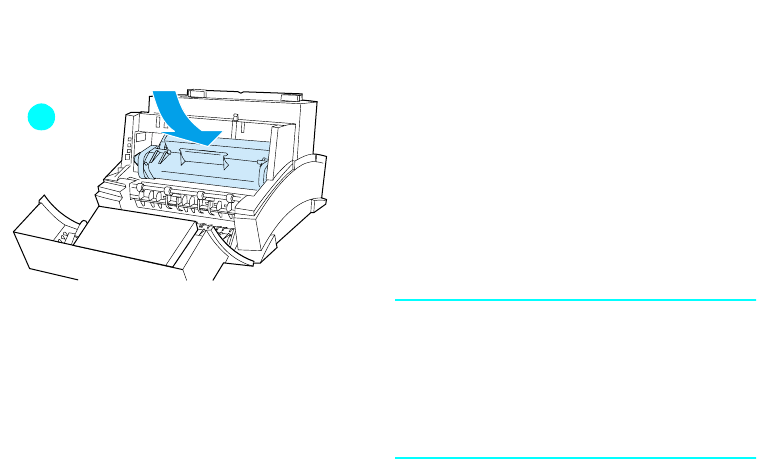
10 Bab 1 - Pengaturan IN
4Pegang cartridge pada
pegangannya (panah menghadap
printer) dan masukkan ke bawah
kembali ke dalam printer. Ujung
cartridge masuk ke dalam celah
plastik di dalam printer. Tekan
dengan kuat ke tempatnya lalu tutup
pintu printer.
Catatan
Jika toner mengenai baju Anda,
bersihkan
dengan kain kering lalu cuci di
air dingin. Air panas akan meresap toner
ke dalam kain.
4
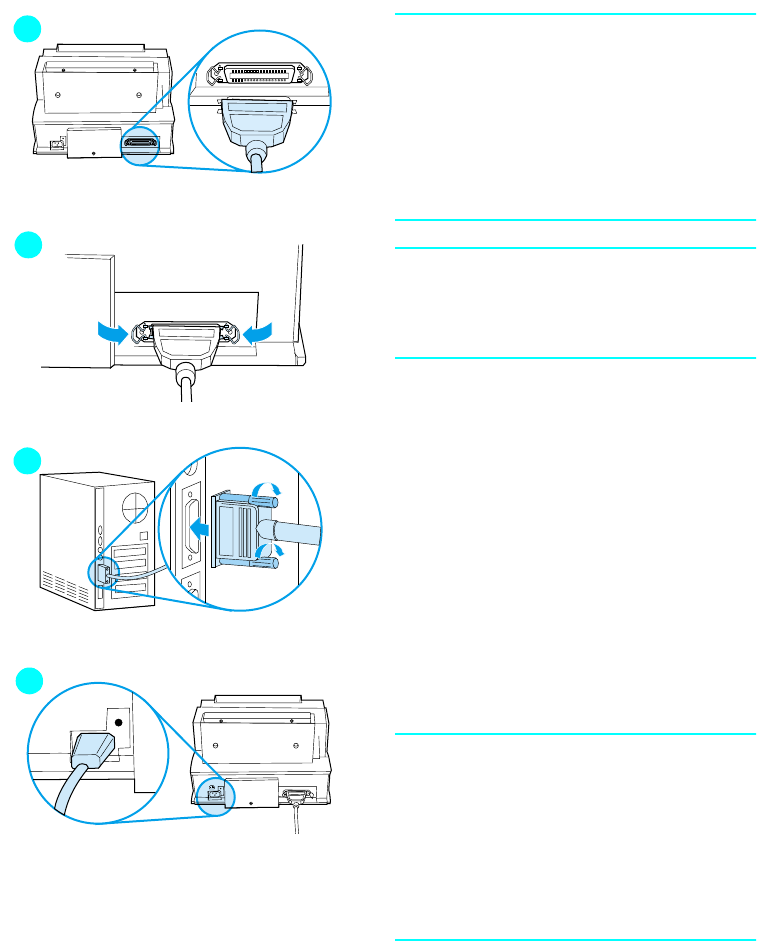
IN Menghubungkan kabel printer 11
Menghubungkan kabel printer
Catatan
Untuk hasil terbaik, sangatlah penting
bagi Anda untuk menggunakan kabel
paralel IEEE-1284, seperti kabel
HP LaserJet untuk menghubungkan
printer dengan komputer. Kabel ini
mendukung seluruh kemampuan
pencetakan printer.
Catatan
Jika komputer tidak mengenali printer,
mungkin Anda menggunakan kabel yang
salah.
1Hubungkan kabel paralel ke printer
Anda. Pastikan kabel menunjuk ke
arah yang benar sebelum
dimasukkan.
2Amankan kabel dengan menjepitkan
kedua jepitan dari printer ke kabel.
Kabel yang diamankan membantu
mencegah masalah komunikasi
antara komputer dan printer.
3Hubungkan kabel ke port paralel
komputer Anda. Amankan kabel
dengan mengencangkan sekrup
yang ada di port paralel.
PERHATIAN
Pastikan bahwa kabel terhubung ke port
paralel, bukan port serial.
Menghubungkan ke port yang salah bisa
menyebabkan kerusakan. Untuk
informasi lebih lanjut mengenai port
komputer, baca dokumentasi komputer
Anda.
4Gunakanlah hanya kabel yang
disertakan bersama printer.
Hubungkan kabel printer ke sumber
listrik di dinding.
1
2
3
4
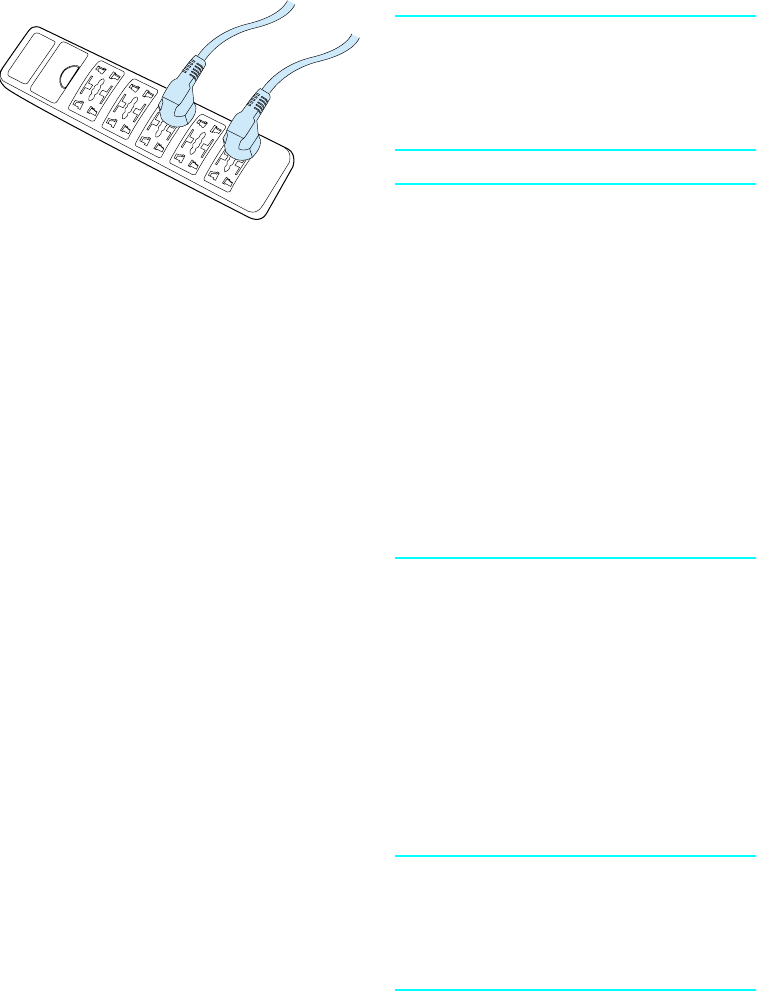
12 Bab 1 - Pengaturan IN
Menggunakan sambungan listrik generik dan
adaptor
Catatan
HP tidak merekomendasikan
penggunaan adaptor generik (atau
sambungan listrik) pada printer Anda
seperti contoh yang diperlihatkan di sini.
PERINGATAN!
Hati-hati bila memasang printer pada
adaptor generik atau sambungan listrik.
Bila menggunakan sambungan listrik,
atur kabel printer dan komputer supaya
menghadap arah yang sama. Sangatlah
penting kontak ground kabel printer
terhubung ke kontak ground stopkontak
listrik. Anda bisa mengalami cedera
yang serius dan menyebabkan
kerusakan pada komputer dan printer
jika salah memasukkan colokan kabel
printer. Periksalah spesifikasi adaptor
sebelum menggunakannya pada printer
Anda.
Setelah listrik tersambung, lampu
indikator pada panel kontrol printer akan
menyala lalu berkedip teratur. Lampu
Salah (atas) akan menyala bila wadah
masukan kertas kosong.
Anda tidak akan menemukan sakelar on/
off pada printer. Setelah tidak aktif
selama 15 menit, printer secara otomatis
akan beralih ke situasi rendah daya yang
disebut Modus Tidur.
PERHATIAN
HP tidak merekomendasikan
penggunaan baterai cadangan atau UPS
dengan printer Anda. Penggunaan
tersebut bisa merusak printer Anda..

IN Menempelkan label pada printer 13
Menempelkan label pada printer
Lembaran label-label ada di wadah
keluaran kertas printer. Anda perlu
menempelkan dua label pada printer:
label pertama bertuliskan “Remove and
Realign Paper Before Reloading," label
kedua bertuliskan, "Do Not Switch the
Paper Path while Printing."
1Lepaskan label dengan hati-hati dari
lembarannya. Tempelkan label pada
wadah masukan kertas printer.
2Seperti tertera pada label, selalu
keluarkan dan susun kembali kertas
sebelum dimasukkan kembali.
Dengan demikian, tidak akan terjadi
pemasukan beberapa lembar kertas
sekaligus, kertas macet, atau
keduanya.
2
1
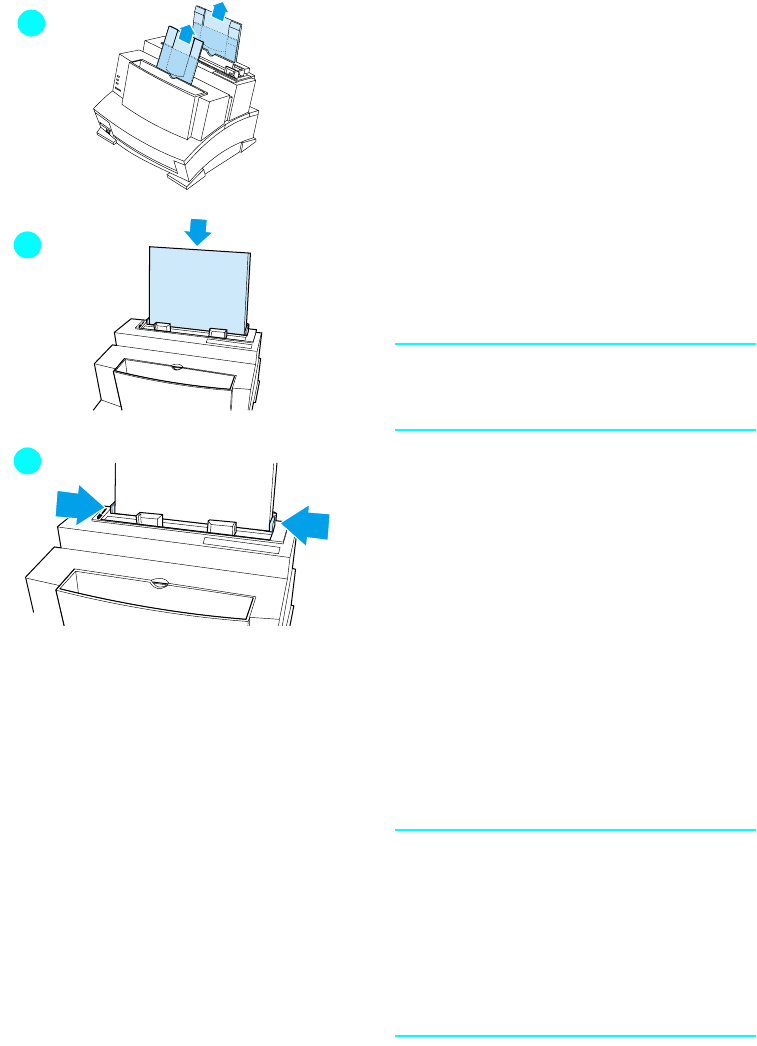
14 Bab 1 - Pengaturan IN
Memasukkan kertas ke dalam printer
Sebelum memasukkan kertas ke dalam
printer, naikkan penyangga kertas yang
terletak di belakang wadah masukan
kertas dan wadah keluaran kertas.
Menggunakan penyangga kertas dapat
membantu mencegah lipatan kertas dan
kemacetan kertas yang tidak diinginkan.
1Naikkan penyangga pada wadah
masukan kertas dan pada wadah
keluaran kertas sampai pada
tempatnya.
2Masukkan 100 lembar kertas ke
dalam wadah masukan kertas.
Catatan
Hati-hati jangan mengisi wadah terlalu
penuh.
3Tengahkan kertas dengan
menggunakan pemandu kertas
pada wadah masukan kertas.
Untuk menguji printer, Anda bisa
melakukan uji cetak. Untuk
melakukannya, pastikan lampu Siaga
(bawah) menyala dan lampu-lampu
indikator lainnya mati. Tekan dan
lepaskan tombol panel kontrol. (Jika
printer berada pada Modus Tidur [semua
lampu mati], Anda harus menekan
tombol panel kontrol dua kali.) Lampu
Data (tengah) akan menyala dan lampu
Siaga (bawah) akan berkedip. Uji cetak
sendiri bekerja.
Catatan
Saat menambah kertas pada tumpukan
kertas yang ada di wadah masukan
kertas, selalu keluarkan dan susun
kembali kertas untuk menghindari
pemasukan kertas beberapa lembar
sekaligus, kemacetan kertas, atau
keduanya.
1
2
3
IN Informasi perangkat lunak printer 15
Informasi perangkat lunak printer
Sebelum dapat menggunakan printer, Anda harus menginstalasi
terlebih dahulu perangkat lunak printer. Perangkat lunak printer terdiri
dari driver printer yang mendukung Microsoft Windows® 95,
Windows 98, Windows 2000, Windows NT 4.0 dan Windows 3.1x.
Kebutuhan sistem yang dianjurkan
Pertimbangan instalasi
Jika ada masalah selama instalasi, cobalah sebagai berikut ini:
●Periksa sambungan kabel listrik dengan sumber listrik.
●Pastikan Anda menggunakan kabel paralel IEEE-1284 yang
berkualitas tinggi.
Jika instalasi masih juga tidak berhasil, lihat petunjuk instalasi
alternatif di bagian akhir bab ini.
●Prosesor Pentium
●32 MB RAM (Windows 95 dan Windows 98)
●20 MB kapasitas hard disk

16 Bab 1 - Pengaturan IN
Menginstalasi perangkat lunak printer
Bagian berikut memberikan beberapa cara instalasi. Gunakanlah
cara yang paling sesuai dengan sistem komputer Anda. Pastikan
Anda menghentikan semua perangkat lunak yang sedang bekerja,
misalnya Microsoft® Office Manager, pengecek virus, dan program
faks.
Instalasi standar untuk Windows 95, Windows
98, Windows 2000, dan NT 4.0
Untuk menginstalasi perangkat lunak printer untuk Windows 95,
Windows 98, Windows 2000, atau NT 4.0, ikuti langkah-langkah
berikut:
1Masukkan CD HP LaserJet 6L Pro ke dalam drive CD.
Catatan Jika layar dialog instalasi tidak muncul, klik Mulai, lalu klik Jalankan.
Ketik X:/Setup, ganti "X" dengan huruf drive CD Anda, lalu klik OK.
2Klik tombol Instalasi.
Catatan HP merekomendasikan instalasi Ekspres.
3Ikuti petunjuk di layar untuk menyelesaikan instalasi.
4Keluarkan CD bila instalasi sudah selesai.
Catatan Jika lain kali Anda menyalakan komputer dan layar menampilkan "New
hardware detected" dan memberi daftar printer HP LaserJet 6L Pro,
pilih "Do not install a driver (Windows will not prompt you again)" lalu
klik OK.
IN Menginstalasi perangkat lunak printer 17
Instalasi standar untuk Windows 3.x
Untuk menginstalasi perangkat lunak printer untuk Windows 3.x, ikuti
langkah-langkah berikut:
1Hentikan semua program yang sedang aktif.
2Masukkan CD HP LaserJet 6L Pro ke dalam drive CD.
3Pilih direktori driver.
4Pilih direktori bahasa yang Anda inginkan.
5Pilih direktori "Win3x".
6Pilih direktori Disk-1.
7Jalankan setup.exe
8Ikuti petunjuk pada layar.
9Saat program instalasi meminta Anda menginstalasi HP LaserJet
6L Pro Disk-2, masukkan "x\drivers\languange\Win3x\disk2".
(Ganti "x" dengan drive CD ROM, dan ganti "languange" dengan
nama direktori bahasa yang Anda pilih di langkah 4 [contohnya,
direktori "Chi_simp" berisi driver bahasa Cina sederhana dan
direktori "en" berisi driver bahasa Inggris]).
10 Keluarkan CD bila instalasi sudah selesai.
Instalasi Alternatif untuk Windows 95 dan
Windows 98
1Hentikan semua program yang sedang aktif.
2Masukkan CD HP LaserJet 6L Pro lalu klik OK.
3Klik Start, tunjuk Settings/Printers lalu klik printer.
4Klik dua kali Add Printer.
5Klik Next sampai ketemu Daftar Pembuat Printer.
6Klik Have Disk.
7Klik Browse.
8Pilih drive yang berisi CD HP LaserJet 6L Pro .
9Pilih direktori bahasa yang Anda pilih. File bernama "hpbfgb.inf"
akan muncul pada kotak nama file.
18 Bab 1 - Pengaturan IN
10 Pilih direktori "Win 9x" untuk mengakses driver untuk Windows
95 dan Windows 98.
11 Klik OK, lalu klik OK sekali lagi. Nama driver printer akan muncul.
12 Klik Next, lalu klik Next sekali lagi.
13 Keluarkan CD bila instalasi sudah selesai.
Instalasi Alternatif untuk Windows NT 4.0
1Masukkan CD Windows 6L Pro ke dalam drive CD.
2Klik Start, tunjuk Settings, lalu klik Printers. Folder printer
muncul. Klik Add Printer.
3Pilih Local printer atau Network printer.
4Jika printer lokal, pilih port printer. Klik Next.
5Klik Next.
6Klik Have Disk.
7Klik Browse.
8Pilih driver yang berisi CD HP LaserJet 6L Pro.
9Pilih direktori bahasa yang Anda pilih. File "hpbfgf2i.inf" akan
muncul di kotak nama file.
10 Pilih direktori "nt" untuk mengakses driver Windows NT dan
Windows 2000.
11 Klik Open lalu klik OK.
12 Pilih driver printer HP LasertJet 6L dari daftar, lalu klik Next.
13 Lanjutkan dengan mengikuti petunjuk di layar.
Instalasi Alternatif untuk Windows 3.x
Untuk menginstalasi perangkat lunak printer untuk Windows 3.x, ikuti
langkah-langkah berikut ini:
1Hentikan semua program yang sedang aktif.
2Masukkan CD HP LaserJet 6L ke drive CD,
3Dari Program Manager, buka grup Main.
4Buka Control Panel dan Printer.

IN Menginstalasi perangkat lunak printer 19
5Klik Add. Daftar printer muncul di layar dengan Install Unlisted
atau Updated Printer disorot.
6Klik Install.
7Klik Browse.
8Pilih drive yang berisi CD HP LaserJet 6L Pro.
9Pilih direktori bahasa yang Anda pilih. (Contohnya, direktori "en"
berisi driver Bahasa Inggris, dan direktori "sc" berisi driver
bahasa Cina Sederhana).
10 Pilih direktori "Win3x" untuk mengakses driver Windows 3.1 dan
Windows 3.2.
11 Klik OK, lalu klik OK sekali lagi. Nama driver printer akan muncul.
12 Ikuti petunjuk di layar untuk menyelesaikan instalasi.
13 Keluarkan Cd bila instalasi sudah selesai.
Membuat disket dari CD untuk instalasi pada
Windows 95, Windows 98 dan Windows NT
1Masukkan CD HP LaserJet 6L Pro ke dalam drive CD.
Catatan Jika layar dialog instalasi tidak muncul, klik Start lalu klik Run. Ketik
X:\Setup, ganti "X" dengan drive CD lalu klik OK.
2Klik tombol Make Disk.
3Pilih sistem yang ingin diinstalasi printer HP LaserJet 6L Pro lalu
ikuti petunjuk di layar.
Catatan Driver printer disalin pada lokasi yang Anda pilih sebagai program yang
bisa langsung dijalankan (.exe). Anda harus menjalankan program ini
sebelum bisa menginstalasi driver printer pada sistem.
4Cari dan klik dua kali file 6Ldriver.exe.
Program WinZip Self-Extractor mulai bekerja.
5Pada kotak dialog WinZip Self-Extractor, pilih lokasi tempat Anda
ingin menyimpan driver printer, lalu klik UnZip. (File akan
disimpan pada lokasi berikut: C:\HPLJ6L.)
6Setelah program selesai bekerja, klik OK untuk menutup kotak
status.
7Klik Close untuk keluar dari program WinZip Self-Extractor.
20 Bab 1 - Pengaturan IN
8Untuk menambahkan printer ke sistem:
•Untuk Windows 95 atau Windows 98: Lakukan langkah 1
sampai 7 pada bagian "Instalasi Alternatif untuk Windows 95
dan Windows 98".
•Untuk Windows NT 4.0 atau Windows 2000 : Lakukan
langkah 1 sampai 7 pada bagian "Instalasi Alternatif untuk
Windows NT 4.0".
9Pilih drive yang berisi driver printer HP LaserJet 6L Pro.
10 Pilih direktori yang berisi driver HP LaserJet 6L Pro.(File akan
disimpan pada lokasi C:\HPLJ6L.)
11 Pilih folder sistem operasi yang sesuai.
12 Untuk menyelesaikan instalasi:
•Untuk Windows 95 atau Windows 98: Lakukan langkah 11
sampai 13 pada bagian "Instalasi Alternatif untuk Windows 95
dan Windows 98".
•Untuk Windows NT 4.0 atau Windows 2000 : Lakukan
langkah 11 sampai 13 pada bagian "Instalasi Alternatif untuk
Windows NT 4.0".
Membuat disket dari CD untuk instalasi pada
Windows 3.x
Anda memerlukan tiga disket kosong. Labeli disket Anda disket-1,
disket-2 dan disket-3 sekarang.
1Masukkan CD HP LaserJet 6L Pro ke dalam drive CD.
2Explore / Browse drive CD.
3Pilih direktori "drivers".
4Pilih direktori bahasa yang Anda inginkan.
5Pilih direktori "Win3x".
6Pilih direktori "Disk-1".
7Masukkan disket-1 ke drive A.
8Salin isi direktori "Disk-1" ke disket-1 pada drive A.
9Masukkan disket-2 ke drive A.
10 Salin isi direktori "Disk-2" ke disket-2 pada drive A.
11 Masukkan disket-3 ke drive A.
12 Salin isi direktori "Disk-3" ke disket-3 pada drive A.
IN Menginstalasi perangkat lunak printer 21
Untuk menjalankan dari disket, ikuti langkah-langkah berikut:
1Masukkan disket-1 ke drive A:
2Jalankan setup.exe pada disket-1.
3Ikuti petunjuk di layar untuk menyelesaikan instalasi.
4Keluarkan disket dari drive A:
22 Bab 1 - Pengaturan IN

IN panel kontrol 23
2Panel kontrol printer
panel kontrol
Panel kontrol terdiri dari satu tombol dan tiga lampu indikator.
Lampu akan berada pada salah satu keadaan berikut:
Salah (kuning)
Data (Hijau)
Siaga (Hijau)
Nyala
Mati
Kedip
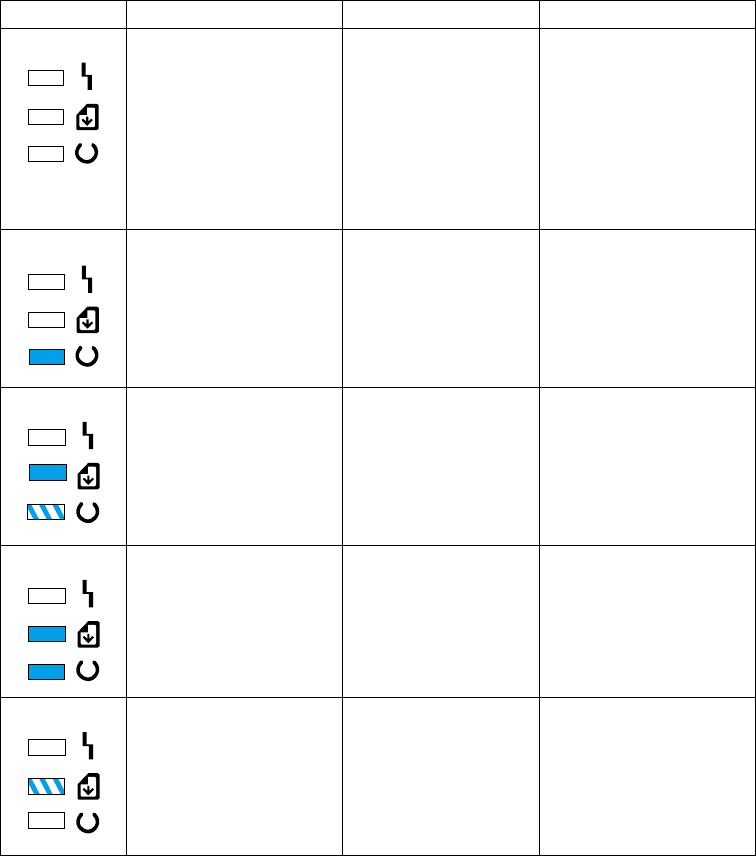
24 Bab2 - Panel kontrol printer IN
Menggunakan panel kontrol
Gunakan tombol kontrol panel untuk menentukan status printer dan
untuk melakukan hal-hal berikut ini:
Status Kondisi Penyebab Tindakan
Tidak ada lampu yang
menyala atau berkedip. Printer berada dalam
Modus Tidur atau aliran
listrik sudah diputus.
Jika Anda ingin
mencetak, tekan dan
lepaskan tombol kontrol
panel atau kirim
pekerjaan yang ingin
dicetak. Jika tidak ada
respons, periksa kabel
listrik.
Lampu Siaga menyala
terus. Printer siap mencetak. Tidak diperlukan tindakan
apapun. Tetapi, bila Anda
menekan dan
melepaskan tombol
kontrol panel, akan terjadi
uji cetak.
Lampu Data menyala
terus dan lampu Siaga
berkedip.
Printer sedang
menerima atau
memproses data.
Atau melakukan uji
cetak atau
pengumpanan
Tidak diperlukan tindakan
apapun.
Kedua lampu Data dan
lampu Siaga menyala
terus.
Ada data yang belum
tercetak di dalam
printer.
Tekan dan lepaskan
tombol panel kontrol
untuk mencetak sisa data.
Lihat Bab 4 "Pemecahan
masalah"
Lampu Data berkedip. Printer berada dalam
modus Umpan Manual. Periksa apakah Anda
sudah memasukkan
kertas yang sesuai. Lalu,
tekan dan lepaskan
tombol kontrol panel
untuk mencetak.

IN Menggunakan panel kontrol 25
Lampu Salah menyala
terus. Printer kehabisan kertas.
Toner cartridge belum
dipasang.
Ada kertas macet di
printer.
Pintu printer terbuka.
Masukkan kertas.
Pasang toner cartridge.
Bersihkan jalur kertas.
Tutup pintu printer.
Lampu Salah berkedip. Cetakan terlalu
kompleks bagi
kapasitas memori
printer.
Lihat Bab 4, “Pemecahan
masalah."
Semua lampu menyala. Ada masalah internal
pada printer. Lihat Bab 4, “Pemecahan
masalah."
Semua lampu berkedip. Printer sedang memulai
Printer sedang
mengatur ulang
Tidak diperlukan tindakan
apapun
Tidak diperlukan tindakan
apapun
Status Kondisi Penyebab Tindakan
26 Bab2 - Panel kontrol printer IN
IN Memilih ukuran media 27
3Mencetak
Memilih ukuran media
Jenis media yang Anda pilih akan mempengaruhi kinerja printer
dan kualitas cetakan.
Wadah masukan kertas bisa menampung sampai 100 lembar
kertas 75 g/m2. Slot masukan satu lembar dirancang untuk
menampung satu lembar. Keduanya bisa diatur untuk
menampung media berukuran dari 76,2 x 127 mm (3 x 5 inci)
sampai 215,9 x 355,6 mm (8,5 x 14 inci). Termasuk ukuran
kertas dan amplop berikut ini:
●A4 (210 x 297 mm, 8,27 x 11,7 inci)
●Letter (215,9 x 279,4mm, 8,5 x 11 inci)
●Amplop C5 (162 x 229 mm, 6,38 x 9 inci)
●Media-Media Lain
●Legal (215,9 x 355,6 mm, 8,5 x 14 inci)
●Amplop COM10 (104,7 x 241,3 mm, 4,125 x 9,5 inci)
●Amplop B5 (176 x 250 mm, 6,93 by 9,85 inci)
●Executive (184,15 x 266,7 mm, 7.25 x 10.5 inci)
●Amplop DL (110 x 220 mm, 4,33 by 8,67 inci)
●Amplop Monarch (98,4 x 190,5 mm, 3,875 x 7,5 inci)
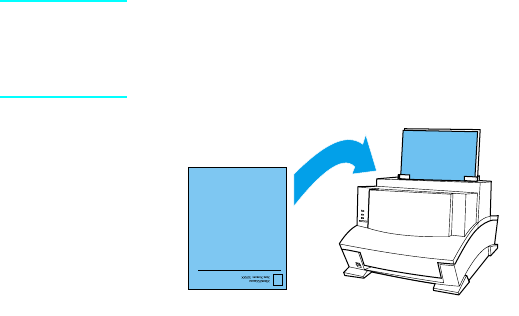
28 Bab3 - Mencetak IN
Catatan Masukkan semua media menurut panjangnya (portrait) ke dalam
printer. Jika Anda ingin mencetak horisontal (landscape), lakukan
pilihan melalui perangkat lunak. Jangan mencetak pada kertas yang
lebih kecil dari 76,2 x 127 mm (3 x 5 inci).
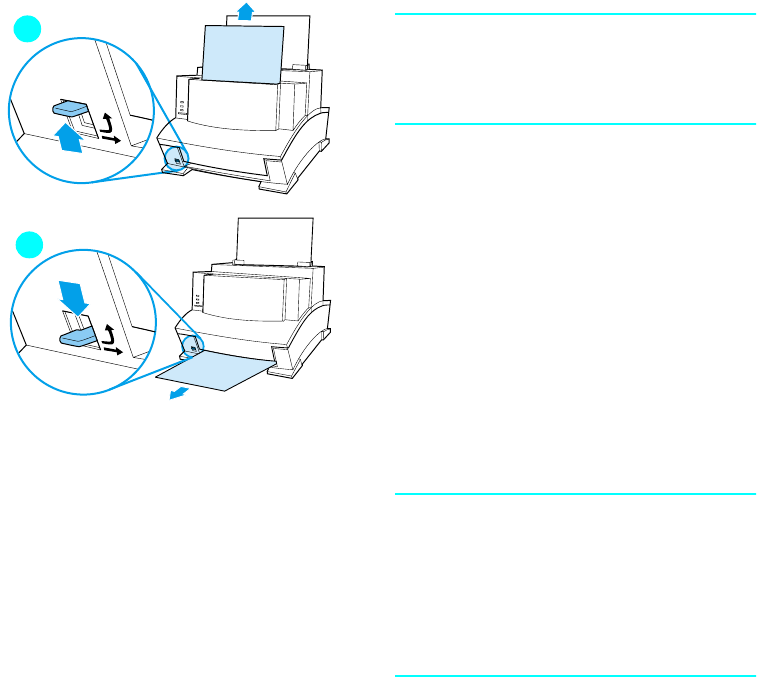
IN Memilih jalur keluaran kertas 29
Memilih jalur keluaran kertas
PERHATIAN
Untuk menghindari kemacetan kertas,
jangan memindahkan tuas jalur kertas
pada saat printer mulai menarik kertas.
1Atur tuas jalur kertas ke posisi atas
untuk menggunakan wadah
keluaran kertas. Dengan demikian,
lembaran kertas akan bertumpuk
dengan urutan yang benar.
2Atur tuas jalur kertas pada posisi
bawah untuk menggunakan slot
keluaran media yang tebal. Jalur
lintasan lurus adalah pilih keluaran
terbaik untuk mencetak kartu pos,
transparansi, label, amplop, dan
kertas tebal (100 sampai 157-g/m2
[28- to 42-pon].
PERHATIAN
Jika menggunakan jalur kertas lintasan
lurus, jangan melebihi satu transparansi,
20 lembar kertas, atau media lain
menumpuk di depan slot keluaran media
tebal. Akan mengakibatkan kemacetan
kertas.
Menambah kertas
Saat menambah kertas pada tumpukan
kertas di wadah masukan kertas, selalu
keluarkan dan susun kembali seluruh
kertas sebelum dimasukkan kembali
untuk menghindari beberapa lembar
kertas masuk sekaligus atau kemacetan.
1
2
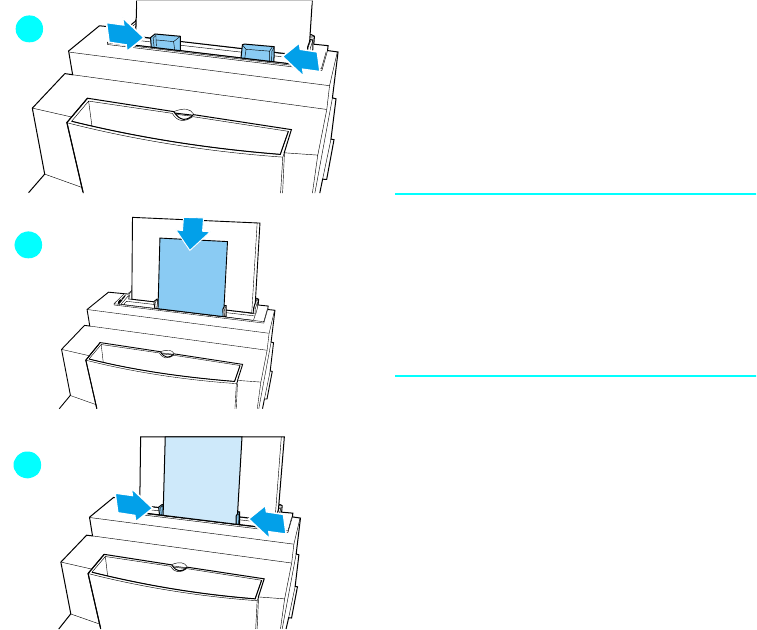
30 Bab3 - Mencetak IN
Menggunakan slot masukan satu lembar
Anda bisa mencetak satu lembar per
satu lembar tanpa mengeluarkan wadah
masukan kertas. Untuk itu, masukkan
satu lembar kertas ke slot masukan satu
lembar. Printer akan mengambil dari slot
masukan satu lembar dahulu sebelum
mengambil dari wadah masukan.
Catatan
Slot masukan satu lembar berguna bila
halaman pertama cetakan berbeda
dengan sisanya. Misalnya, Anda
mungkin ingin halaman pertama cetakan
adalah kop surat, atau Anda mungkin
ingin mencetak amplop terlebih dahulu.
1Atur pemandu kertas sesuai ukuran
kertas yang ingin digunakan.
2Masukkan kertas ke slot masukan
satu lembar.
3Atur kembali pemandu kertas untuk
mengetengahkan lembaran kertas.
1
2
3

IN Mencetak pada kop surat dan amplop 31
Mencetak pada kop surat dan amplop
Kop surat
1Jika Anda mencetak satu lembar
kop surat diikuti oleh lembaran
kertas biasa, tempatkan lembar kop
surat pada (A) slot masukan satu
lembar dan lembaran kertas biasa
pada (B) wadah masukan kertas.
Jika Anda mencetak beberapa
lembar kop surat berurutan, isi
wadah masukan kertas (B) dengan
lembaran kop surat.
2Masukkan kop surat dengan bagian
yang dicetak didepan dan terbalik.
Jika Anda hanya mencetak satu lembar
kop surat, gunakan slot masukan satu
lembar.
Catatan
Jika Anda mengalami masalah
pencetakan pada kertas timbul atau
kertas pra-cetak, pastikan kertas-kertas
tersebut sesuai spesifikasi kertas HP,
lihat lampiran C.
A
B
1
2
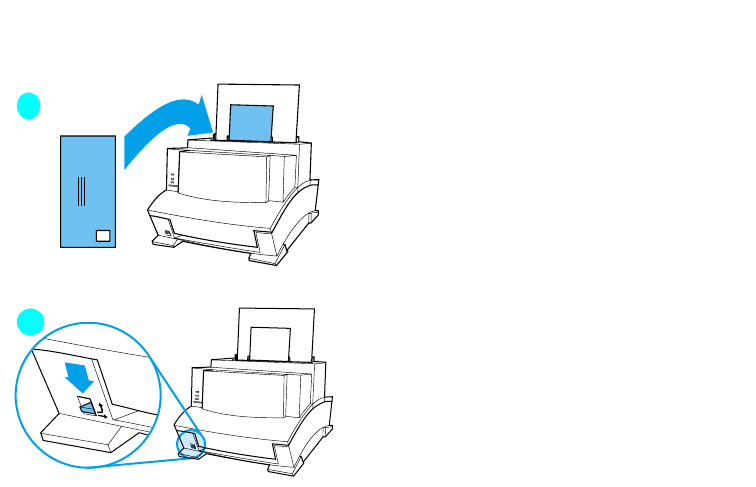
32 Bab3 - Mencetak IN
Amplop
Jika Anda mencetak amplop diikuti
dengan lembaran kertas biasa,
tempatkan amplop pada (A) slot
masukan satu lembar dan lembaran
kertas biasa pada (B) wadah masukan
kertas.
Jika Anda mencetak beberapa amplop
berurutan, isi wadah masukan kertas
(B) sampai 10 amplop. Jumlah amplop
tergantung bentuknya dan lingkungan
pengoperasiannya.
Jika Anda hanya mencetak satu amplop,
gunakan slot masukan satu lembar.
1Masukkan amplop bagian yang
dicetak ke depan seperti terlihat
pada gambar.
2Atur tuas jalur kertas ke posisi
bawah untuk mengurangi kerut dan
lekukan.
1
2

IN Tugas-tugas pencetakan 33
Tugas-tugas pencetakan
Kemampuan printer Anda termasuk pencetakan dupleks, berhenti
sementara antar halaman, dan menghentikan pencetakan. Jika perlu,
Anda juga bisa mengatur ulang printer.
Mencetak di kedua sisi (dupleks)
Jika Anda mencetak di kedua sisi lembaran, Anda akan melihat
perbedaan cara kerja printer. Pada saat mencetak pada lembar sisi
kedua, mungkin Anda mengalami kesulitan, misalnya memasukkan
lembaran ke dalam printer atau beberapa lembar pengumpanan.
Selain itu, kualitas cetak mungkin berbeda pada sisi kedua lembaran.
Untuk meminimalkan masalah-masalah tersebut, Anda mungkin ingin
menggunakan kertas yang sesuai dengan spesifikasi kertas HP di
lampiran C.
1Cetak sisi pertama lembaran seperti biasa. Ada program
perangkat lunak yang memberi pilihan yang berguna untuk
pencetakan dupleks, misalnya hanya mencetak “halaman ganjil”
atau “halaman genap." Lihat buku petunjuk perangkat lunak.
2Untuk mendapatkan kualitas cetak terbaik, biarkan lembaran
dingin dan ratakan sebelum mencetak sisi kedua.
3Cetak sisi kedua dengan menempatkan lembaran kembali ke
wadah masukan kertas atau ke slot masukan satu lembar.
Pastikan sisi yang sudah dicetak menghadap ke belakang printer
dan ujung atas kertas menghadap ke bawah, seperti terlihat pada
gambar di bawah ini.
34 Bab3 - Mencetak IN
Tip untuk pencetakan dupleks
●Untuk menghindari kertas kusut, atur tuas jalur kertas ke posisi
bawah dan gunakan slot keluaran media tebal untuk jalur kertas
lintasan lurus.
●Untuk mencetak satu lembar per satu lembar, pilih pengumpanan
manual pada perangkat lunak untuk menghentikan printer setiap
mencetak satu lembar.
●Pastikan ujung lembaran tidak menekuk atau kusut.
Menghentikan sementara printer antar
halaman
Kadangkala, Anda perlu menghentikan printer sementara sehingga
Anda bisa memasukkan media khusus, misalnya kop surat. Jika Anda
memilih pengumpanan manual pada perangkat lunak, printer akan
berhenti sementara sebelum mencetak halaman pertama dan antar
setiap halaman yang Anda cetak. Dengan demikian akan
memberikan Anda waktu untuk memasukkan media khusus.
1Pada menu perangkat lunak printer atau pemilihan wadah, pilih
modus Pengumpanan manual.
2Dari perangkat lunak, cetaklah dokumen. Lampu Data akan
berkedip bila halaman siap dicetak, menandakan printer berhenti
sementara dan menunggu.
3Setelah memasukkan media yang benar, printer akan mengambil
lembaran tersebut secara otomatis. Printer akan mengambil
media dari slot masukan satu lembar dahulu. Jika tidak
menemukan media di slot masukan satu lembar, printer akan
mengambil media dari wadah masukan kertas.
Mengatur ulang printer
Mengatur ulang printer menyebabkan hal-hal berikut ini:
●Menghapus semua data dari memori printer (termasuk data yang
belum dicetak, font yang diambil dari internet, dan makro-makro).
●Menyelesaikan pencetakan halaman yang sedang berlangsung.
●Menghapus kondisi kesalahan.
●Mengatur ulang printer ke pengaturan awal.
IN Tugas-tugas pencetakan 35
Untuk mengatur ulang printer
Tekan dan tahan tombol panel kontrol sampai ketiga lampu indikator
mulai berkedip berurutan (sekitar 5 detik), lalu lepaskan tombol.
Setelah diatur ulang, lampu Siaga akan tetap menyala jika tidak
ditemukan kesalahan printer.
Menghentikan pencetakan
Jika file yang Anda kirim ke printer panjangnya hanya satu atau dua
halaman, Anda bisa menghentikan pencetakan dengan mengatur
ulang printer seperti yang diuraikan diatas.
Jika Anda ingin menghentikan pencetakan yang banyak, lihat
langkah-langkah dibawah ini:
1Keluarkan media dari wadah masukan kertas kecuali lembar
yang sedang dimasukkan ke dalam printer.
2Hentikan dan hapus pencetakan melalui perangkat lunak.
3Atur ulang printer.
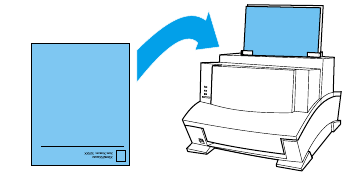
36 Bab3 - Mencetak IN
Mencetak pada media khusus
Printer Anda dirancang untuk mencetak berbagai media, termasuk
transparansi, amplop, dan kertas buatan tertentu. Disarankan Anda
menggunakan media yang sesuai dengan spesifikasi HP. Untuk
informasi lebih lanjut, lihat lampiran C.
1Atur tuas jalur kertas ke posisi bawah untuk menggunakan slot
keluaran media tebal untuk jalur kertas lintasan lurus. Hal ini
penting saat mencetak media seperti kartu pos, transparansi,
label, amplop, dan kertas tebal (100 sampai 157 g/m2 [28 sampai
42 pon]).
2Atur pemandu kertas sesuai ukuran media yang Anda gunakan.
3Masukkan media dengan bagian yang dicetak di muka dan
terbalik ke dalam slot masukan satu lembar atau wadah masukan
kertas.
4Atur kembali pemandu kertas supaya media berada ditengah.
5Atur margin yang benar, ukuran kertas, dan orientasi melalui
perangkat lunak.
6Pilih Cetak pada perangkat lunak.
Tip tambahan untuk ukuran tertentu
●Jangan mencetak pada media yang lebarnya lebih kecil dari 76,2
mm (3 inci) atau yang tingginya kurang dari 127 mm ( 5 inci).
●Atur margin sekurangnya 6,4 mm (0,25 inci) pada perangkat
lunak Anda.
●Selalu masukkan media menurut panjangya (vertikal) ke dalam
printer. Jika Anda ingin mencetak dalam modus landscape,
lakukan melalui perangkat lunak.

IN Mencetak pada media khusus 37
Tip tambahan untuk transparansi
Untuk mencegah transparansi kusut, angkat transparansi begitu
keluar dari printer dan letakkan di permukaan yang rata hingga
dingin.
PERINGATAN! Gunakanlah hanya transparansi yang diperuntukkan printer HP
LaserJet.
Tip tambahan untuk mencetak label
●Jangan menggunakan label yang terpisah dari lembar
perekatnya atau label yang berkerut atau rusak.
●Jangan menggunakan lembaran label yang sebagian labelnya
sudah dilepas.
●Jangan memasukkan lembaran label ke dalam printer lebih dari
sekali.
Catatan Gunakan hanya label yang diperuntukkan printer HP LaserJet.
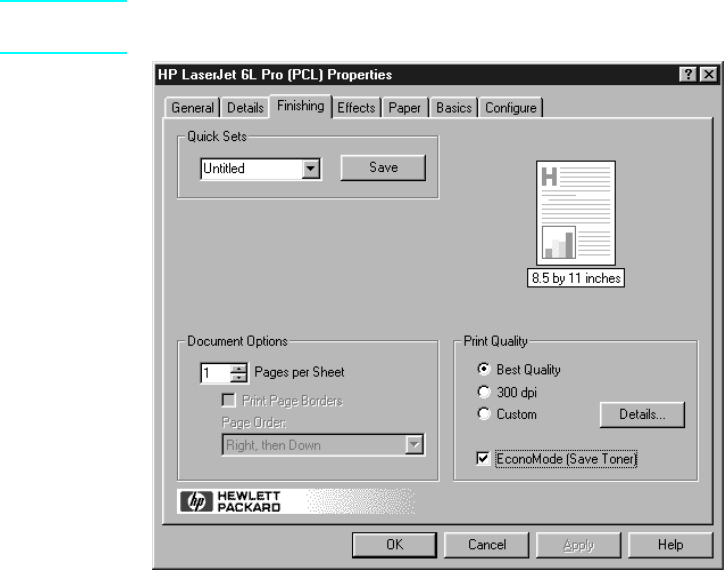
38 Bab3 - Mencetak IN
Menangani toner cartridge
Anda dianjurkan menggunakan toner cartridge HP LaserJet. HP
telah merancang printer, toner cartridge, dan formula toner untuk
bekerjasama untuk memberikan kualitas gambar optimal dari printer
Anda. Untuk memesan toner cartridge HP LaserJet, lihat lampiran A.
Anda bisa mengharapkan toner cartridge mencetak sekitar 2500
halaman bila Anda mencetak surat-surat biasa dengan jumlah teks
sekitar 5% dari setiap halaman. Halaman yang berisi gambar
menggunakan lebih banyak toner dan memperpendek masa pakai
cartridge.
Memperpanjang usia toner melalui Modus Ekonomi
Cara terbaik untuk memperpanjang usia pakai toner cartridge Anda
adalah dengan menggunakan Modus Ekonomi. Modus Ekonomi
menggunakan toner sekitar 5% lebih sedikit dibandingkan
pencetakan normal. Hasil cetakan agak pudar, tetapi cukup baik
untuk mencetak draft atau contoh. Anda bisa mengatur pilihan Modus
Ekonomi melalui perangkat lunak (lihat Bantuan untuk informasi lebih
lanjut).
Catatan Saat mencetak dokumen kualitas terbaik, jangan memilih Modus
Ekonomi.
IN Menangani toner cartridge 39
Memperpanjang usia pakai toner dengan
mendistribusi ulang toner
Daerah cetak yang memudar seringkali menandakan bahwa toner
cartridge hampir habis. Untuk sementara, Anda bisa mendapatkan
kembali mutu cetak dengan mendistribusi ulang sisa toner dalam
cartridge. (Hal ini hanya bisa dilakukan satu kali saja.)
Untuk mendistribusi ulang toner
1Buka pintu printer dan keluarkan toner cartridge.
2Pegang pegangan toner cartridge dan tarik ke muka mengarah
ke Anda supaya keluar dari tempat plastiknya. (Ingat untuk
melindungi cartridge dari cahaya.)
3Gerakkan toner cartridge maju mundur dengan cepat untuk
mendistribusikan toner secara merata di dalam cartridge.
4Masukkan kembali toner cartridge dan tutup pintu printer.
40 Bab3 - Mencetak IN
IN Mengatasi masalah yang umum 41
4Pemecahan masalah
Mengatasi masalah yang umum
Bab ini membantu Anda mengatasi masalah umum yang mungkin
Anda alami pada saat menggunakan printer. Jika Anda tidak bisa
mengatasi suatu masalah, hubungi Pusat Pelayanan Konsumen HP
untuk mendapatkan bantuan. Nomor-nomor telepon bisa dilihat pada
halaman dukungan pada bagian depan buku manual ini.
Melakukan uji cetak
Halaman uji cetak berguna untuk mengidentifikasi konfigurasi printer
dan memastikan bahwa printer Anda bekerja dengan baik.
Untuk melakukan uji cetak
1Pastikan lampu Siaga menyala dan lampu-lampu lainnya mati.
Jika perlu, aktifkan printer dengan menekan dan melepaskan
tombol panel kontrol dengan cepat.
2Sekarang tekan dan lepaskan tombol panel kontrol lagi dengan
cepat. Lampu Data akan menyala dan lampu Siaga berkedip.
Harap tunggu uji cetak bekerja.
Jika uji cetak tidak bekerja, coba lakukan sebagai berikut:
1Pastikan ada kertas pada printer.
2Periksa lampu indikator printer untuk menentukan status printer.
(Lihat “Mengatasi Berbagai Masalah pada Printer” pada akhir bab
ini.)
3Hubungi Pusat Pelayanan Konsumen untuk mendapatkan
bantuan. (Lihat halaman dukungan di bagian depan manual ini
untuk pilihan-pilihan dukungan)
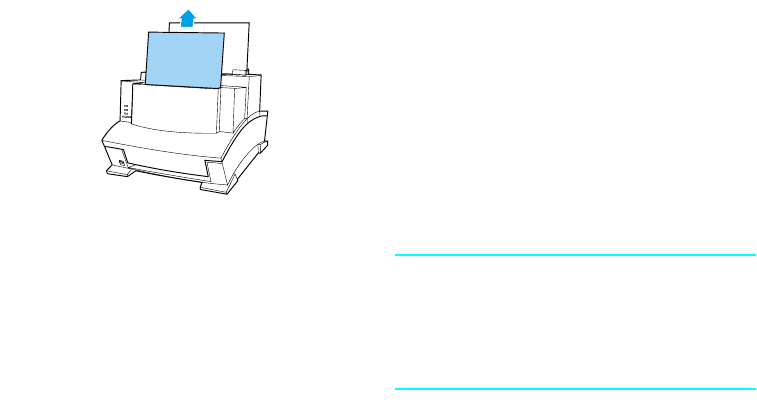
42 Bab4 - Pemecahan masalah IN
Mengeluarkan kertas macet
Ada kalanya, terjadi kertas macet saat pencetakan. Daftar berikut ini
memperlihatkan berbagai kemungkinan penyebabnya:
●Kertas dimasukkan dengan cara yang salah.
●Wadah masukan kertas terlalu penuh.
●Pemandu tidak diatur pada posisi yang benar.
●Penambahan kertas tanpa mengeluarkan kertas dari wadah dan
tanpa menyusun ulang.
●Wadah keluaran kertas terlalu penuh.
●Tuas jalur kertas disesuaikan pada saat sedang mencetak.
●Pintu printer terbuka pada saat sedang mencetak.
●Kertas yang digunakan tidak sesuai spesifikasi HP.
●Kertas yang digunakan lebih kecil dari ukuran 76,2 x 127 mm
(3 x 5 inci).
●Terjadi gangguan listrik pada saat sedang mencetak.
Mengeluarkan kertas macet
pada area masukan
●Jika sebagian besar lembaran yang
macet terlihat dari wadah masukan
kertas atau dari slot masukan satu
lembar, perlahan tarik kertas macet
tersebut lurus ke atas keluar dengan
menggunakan kedua tangan. Susun
kembali kertas lalu masukkan.
Catatan
Pastikan kertas berada di tengah
dengan menggunakan pemandu kertas.
Selain itu, pastikan bahwa pemandu
kertas tidak menekuk media.
Printer secara otomatis akan
melanjutkan pencetakan.
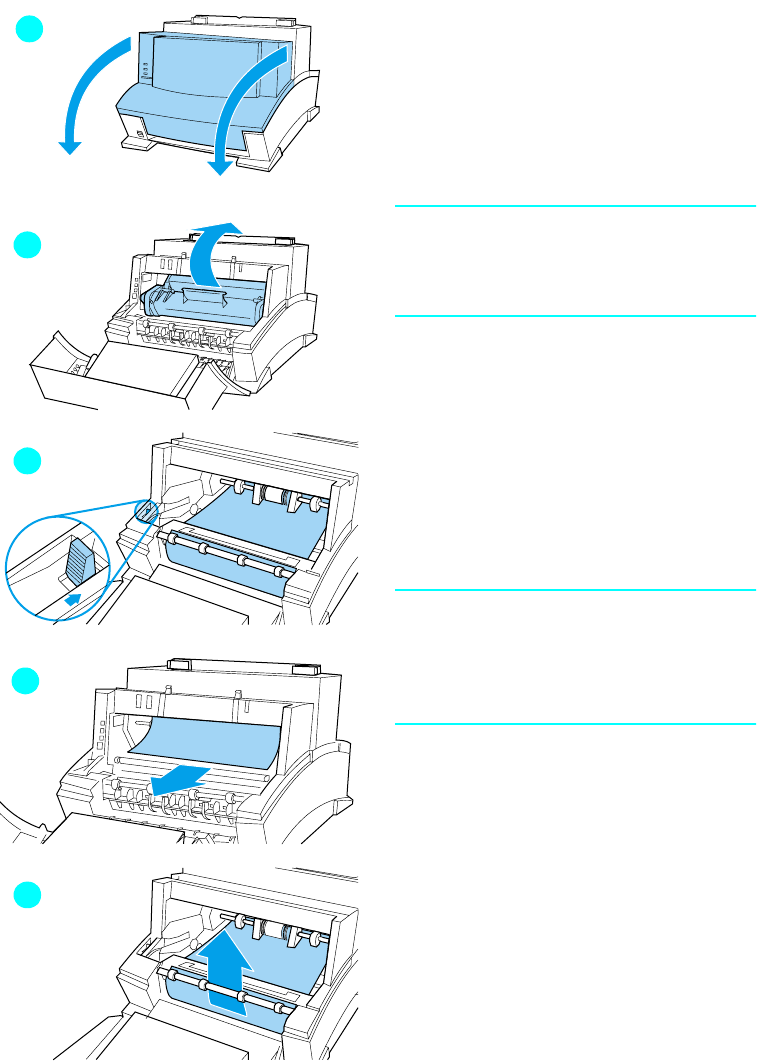
IN Mengeluarkan kertas macet 43
Untuk mengeluarkan kertas
macet di area interior
1Jika kemacetan tidak terlihat pada
nampan kertas masukan, buka pintu
printer.
2Keluarkan toner cartridge. Pastikan
terlindung dari cahaya yang terang
pada saat toner cartridge berada di
luar printer.
PERHATIAN
Hindari menyentuh roda panjang yang
berwarna hitam di dalam printer. Bisa
mengurangi kualitas keluaran.
3Tekan tuas pelepas kertas yang
berwarna hijau ke belakang.
4Jika kertas macet ada di area toner
cartridge tetapi belum menyentuh
area fuser dan roda, raih ke dalam
dan perlahan tarik lembaran kertas
lurus ke depan dan keluar. Jangan
menarik lembaran kertas lurus ke
atas. Bisa merusak printer.
PERHATIAN
Gunakan hanya tangan untuk
mengeluarkan kertas macet.
Menggunakan alat-alat lain bisa
merusak bagian dalam.
5Jika kemacetan kertas berada di
antara roda, pegang lembaran
kertas dengan kedua tangan dan
perlahan tarik lurus ke atas dan
keluar.
1
2
3
4
5

44 Bab4 - Pemecahan masalah IN
6Setelah mengeluarkan semua
lembaran dan potongan kertas,
letakkan kembali toner cartridge lalu
tutup pintu printer.
Secara otomatis, printer akan
melanjutkan pencetakan.
6

IN Kertas tidak mau mengumpan 45
Kertas tidak mau mengumpan
Jika kertas tidak mau mengumpan ke
dalam printer, tekan dan lepas tombol
panel kontrol dengan cepat. Printer akan
kembali mencoba mengumpan media
tersebut. Jika tidak berhasil juga, coba
lakukan prosedur berikut ini:
1Keluarkan kertas dari wadah
masukan, susun kembali kertas, lalu
masukkan kembali ke dalam printer.
Catatan
Pastikan kertas berada di tengah
dengan menggunakan pemandu kertas.
Selain itu, pastikan pemandu tidak
terlalu kencang atau kendor pada media.
2Buka pintu printer.
3Keluarkan toner cartridge, pastikan
terlindung dari cahaya yang terang,
lalu periksa kemacetan kertas.
4Letakkan kembali toner cartridge
lalu tutup pintu printer.
Printer secara otomatis akan
melanjutkan pencetakan.
1
2
3
4
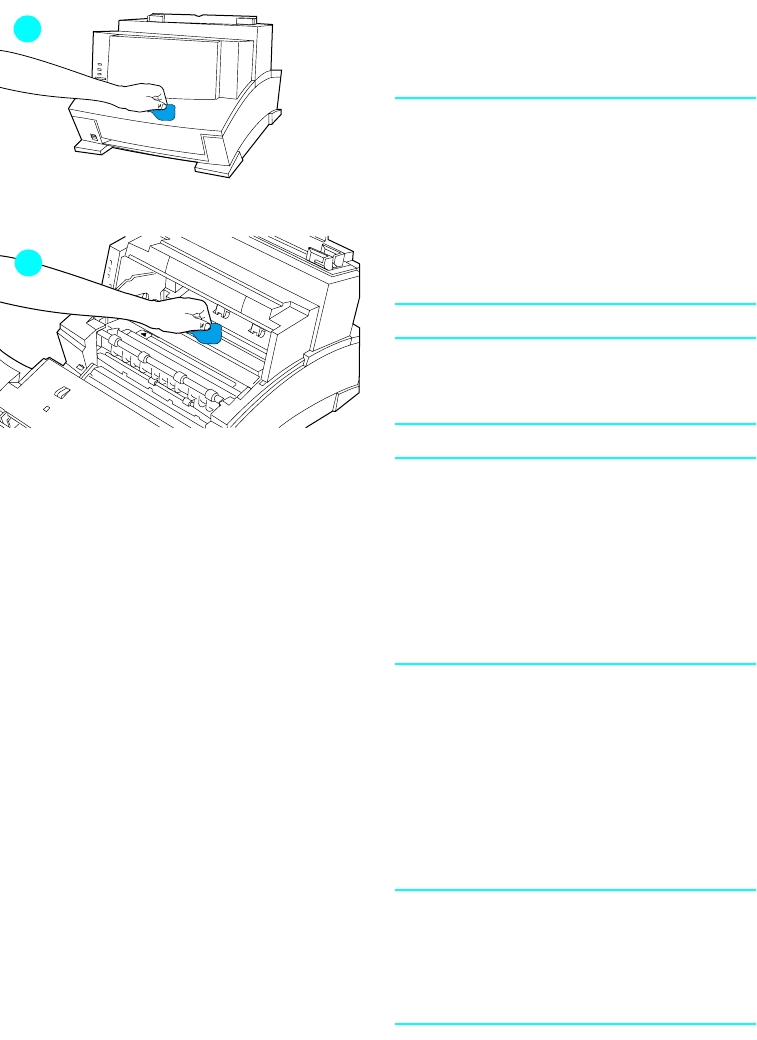
46 Bab4 - Pemecahan masalah IN
Membersihkan printer
Untuk mencegah pemakaian yang
berlebihan dan menjaga kualitas cetak,
amankan printer dari debu dan sampah.
Catatan
Jika terlihat toner bocor di dalam printer,
mungkin toner cartridge rusak.
Dianjurkan Anda menggunakan toner
cartridge HP LaserJet untuk
memastikan pencetakan kualitas tinggi
dan mengurangi kejadian toner bocor di
dalam printer.
PERINGATAN!
Sebelum membersihkan printer,
putuskan hubungan listriknya.
PERHATIAN
Menggunakan pembersih yang
mengandung amonia pada printer atau
di sekelilingnya bisa menyebabkan
kerusakan pada printer. Selain itu,
jangan menyentuh roda yang berwarna
hitam di dalam printer karena bisa
mengurangi kualitas cetakan.
1Bersihkan bagian luar printer
dengan kain sedikit basah
(gunakanlah hanya air).
2Bersihkan bagian dalam printer
dengan kain kering. Bersihkan debu-
debu, tumpahan toner, dan partikel
kertas.
Catatan
Jika toner mengenai baju Anda,
bersihkan dengan kain kering lalu cuci di
air dingin. Air panas akan meresap toner
ke dalam kain.
1
2

IN Mengatasi berbagai masalah pada printer 47
Mengatasi berbagai masalah pada printer
Gunakan tabel berikut untuk membantu menemukan dan mengatasi
berbagai masalah pada printer.
Gejala Kemungkinan Penyebab Solusi
Printer tidak bereaksi setelah
memilih “cetak” pada
perangkat lunak
Printer sedang dihentikan
sementara. Lanjutkan pencetakan dari
Print Manager.
Printer berada pada modus
Pengumpanan Manual (lampu
data berkedip).
Tekan dan lepaskan tombol
panel kontrol.
Kabel paralel antara printer
dan komputer tidak terhubung
dengan baik.
Cabut dan hubungkan kembali
kabel paralel penghubung
printer dengan komputer.
Kabel paralel rusak. Jika memungkinkan,
sambungkan kabel pada
sistem lain dan lakukan
pencetakan yang Anda tahu
pasti bekerja. Anda juga bisa
coba menggunakan kabel
paralel lain (IEEE-1284).
Salah memilih printer pada
perangkat lunak. Periksa menu pilihan printer
perangkat lunak untuk
memastikan Anda memilih
printer HP LaserJet 6L Pro.
Perangkat lunak printer tidak
dikonfigurasi untuk port printer
yang sesuai.
Periksa menu pilihan printer
perangkat lunak untuk
memastikan printer
mengakses port printer yang
sesuai.
Jika ada lebih dari satu port
paralel, pastikan kabel paralel
terhubung pada port yang
sesuai.
Kabel listrik tidak terhubung
pada printer atau sumber
listrik tidak aktif.
Periksa hubungan kabel listrik
dengan sumber listrik. Coba
stopkontak lain. Lihat
peringatan penting mengenai
sambungan listrik di halaman
12.
Printer terhubung pada kotak
switch yang tidak diatur
dengan benar.
Periksa pengaturan kotak
switch. Coba menghubungkan
kembali printer langsung ke
komputer. Mungkin kotak
switch rusak.

48 Bab4 - Pemecahan masalah IN
Printer tidak bereaksi setelah
memilih “cetak” pada per-
angkat lunak (lanjutan).
Printer rusak. Jika semua lampu menyala,
mungkin menandakan
kerusakan perangkat keras.
Lihat “Semua lampu printer
menyala” pada halaman
berikut.
Lampu Salah (atas)
menyala. Printer kehabisan kertas. Tambahkan kertas atau media
cetakan lain.
Pintu printer terbuka. Tutup pintu printer.
Toner cartridge tidak
terpasang dengan benar. Buka pintu printer, pasang
kembali toner cartridge, lalu
tutup kembali.
Kertas macet pada printer. Lihat “Mengeluarkan kertas
macet” sebelumnya pada bab
ini atau pastikan toner
cartridge terpasang.
Lampu Salah (atas) berkedip. Halaman yang ingin dicetak
terlalu kompleks bagi
kapasitas memori, atau printer
tidak mampu membuat
gambar secepat proses
pencetakan.
Tekan dan lepaskan tombol
panel kontrol untuk
melanjutkan pencetakan.
Sebagian data mungkin bisa
hilang.
Ubah halaman yang dicetak
supaya tidak terlalu kompleks
dengan mengurangi
resolusinya ke 300 dpi.
Lampu Data (tengah) dan
lampu Siaga (bawah)
keduanya menyala terus (tidak
berkedip).
Ada data yang belum dicetak
pada printer. (Perangkat lunak
Anda tidak mengirim perintah
“akhir pencetakan” atau
“pengumpanan kertas”.)
Tekan dan lepaskan tombol
panel kontrol untuk mencetak
sisa data.
Lampu Data (tengah)
berkedip. Printer berada pad modus
pengumpanan manual. Pastikan kertas yang benar
dimuatkan ke dalam printer.
Semua lampu printer mati dan
printer tidak bereaksi setelah
mencoba untuk menyala.
Printer tidak terhubung pada
sumber listrik.
Printer rusak.
Periksa sambungan kabel
listrik dengan sumber listrik.
Coba stopkontak lain. Lihat
peringatan penting mengenai
sambungan listrik, halaman
12.
Lihat halaman dukungan pada
sampul bagian dalam untuk
pilihan dukungan.
Gejala Kemungkinan Penyebab Solusi

IN Mengatasi berbagai masalah pada printer 49
Semua lampu printer menyala. Ada kerusakan perangkat
keras pada printer. Putuskan hubungan printer
dari sumber listrik selama 10
detik, lalu hubungkan kembali.
Jika lampu tetap menyala,
putuskan lagi hubungan
printer dari sumber listrik, kali
ini hubungkan lagi setelah 15
menit. Jika ketiga-tiga lampu
kembali menyala, hubungi
perwakilan servis resmi HP.
Printer mengumpan beberapa
lembar kertas atau sering
terjadi kertas macet.
Pemandu kertas tidak diatur
dengan baik. Keluarkan kertas dari wadah
masukan kertas atau dari slot
masukan satu lembar. Ketuk
kedua sisi tumpukan
kertas,lalu masukkan kembali,
masukkan kembali satu
lembaran kertas ke dalam slot.
Geser pemandu kertas
sampai mengenai tumpukan
kertas pada wadah masukan
kertas atau mengenai satu
lembar kertas pada slot
masukan satu lembar supaya
kertas ada di tengah. Pastikan
pemandu tidak diatur terlalu
kencang.
Wadah masukan kertas terlalu
penuh. Keluarkan sebagian lembaran
kertas. Wadah masukan
kertas bisa menampung
hingga 100 lembar kertas 75g/
m2 (20 pon) (lebih sedikit
untuk kertas yang lebih berat)
atau sampai 10 amplop (tidak
lebih dari 7 amplop di daerah
yang tinggi tingkat
kelembabannya).
Lebih dari satu lembar kertas
dimasukkan pada slot
masukan satu lembar.
Tambahkan hanya satu per
satu lembar kertas ke dalam
slot masukan satu lembar. Jika
mencetak lebih dari satu
lembar untuk media yang
sama, gunakan wadah
masukan kertas.
Gejala Kemungkinan Penyebab Solusi

50 Bab4 - Pemecahan masalah IN
Printer mengumpan beberapa
lembar kertas atau sering
terjadi kertas macet (lanjutan).
Pemotongan kertas oleh
pabrik tidak bagus dan saling
menempel.
“Belah” tumpukan kertas
dengan melengkungkannya
secara terbalik membentuk
huruf u; ini bisa mengurangi
secara efektif beberapa kertas
masuk sekaligus. Anda juga
bisa coba membalikkan kertas
untuk memasukkannya
terbalik.
Kertas tidak memenuhi
spesifikasi HP sebagai media
cetakan.
Coba menggunakan kertas
lain. Lihat lampiran C.
Kapasitas keluaran pada
wadah keluaran kertas atau
pada slot keluaran untuk
media yang tebal sudah
melebihi batas.
Jangan membiarkan lebih dari
100 lembar kertas 75g/m2 (20
pon) (lebih sedikit untuk kertas
yang lebih berat) memenuhi
wadah keluaran. Jangan
membiarkan lebih dari satu
tranparansi atau 20 lembar
media lain menumpuk di
depan slot keluaran.
Gejala Kemungkinan Penyebab Solusi
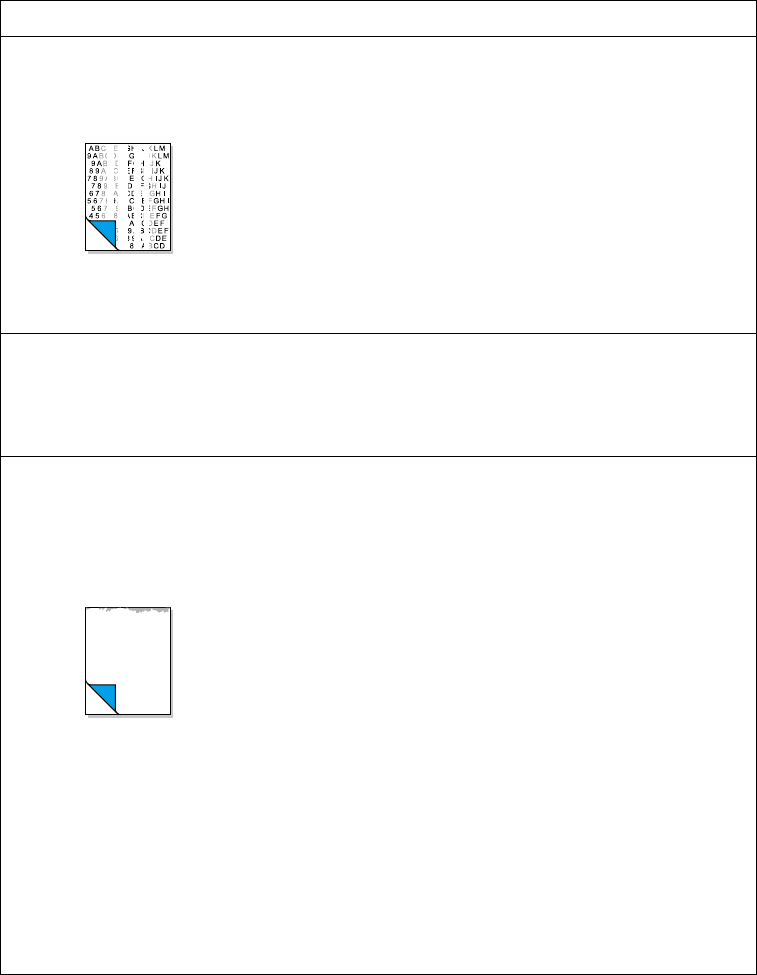
IN Mengatasi berbagai masalah kualitas cetak 51
Mengatasi berbagai masalah kualitas cetak
Gunakan tabel berikut untuk membantu menemukan dan mengatasi
berbagai masalah kualitas cetak.
Masalah Penyebab Solusi
Cetakan kabur atau Anda
melihat ada blok garis-garis
putih vertikal.
Mungkin toner sudah mau
habis.
Kertas yang Anda gunakan
mungkin tidak sesuai
spesifikasi kertas HP
(misalnya, mungkin terlalu
lembab atau kasar).
Mungkin Modus Ekonomis
sedang aktif.
Lihat bab 3, “Menangani
toner cartridge."
Coba menggunakan kertas
lain. Lihat lampiran C.
Nonaktifkan Modus
Ekonomis melalui perangkat
lunak. Lihat informasi di bab
3, halaman 38.
Cartridge kehabisan toner. Produk cacat (cartridge bukan
dari HP).
Kontaminasi roda transfer.
Gunakan cartridge HP.
Bersihkan printer atau
hubungi teknisi servis.
Muncul noda atau titik-titik
hitam, bulat, kecil di muka atau
belakang halaman. Kadang-
kadang muncul noda yang tidak
beraturan.
Kertas yang Anda gunakan
mungkin tidak sesuai
spesifikasi kertas HP
(misalnya, mungkin terlalu
lembab atau kasar).
Mungkin Anda mencetak di sisi
kertas yang salah.
Mungkin printer perlu
dibersihkan.
Mungkin toner cartridge rusak.
Coba menggunakan kertas
lain. Lihat lampiran C.
Keluarkan kertas dari wadah
masukan kertas lalu
balikkan. (Biasanya ada
panah yang menunjukkan
bidang cetak pada
pembungkus tumpukan
kertas.)
Lihat “Membersihkan printer”
pada bab ini.
Ganti toner cartridge jika
prosedur perawatan tidak
memperbaiki kualitas cetak.
Lihat bab 3, “Menangani
toner cartridge.”
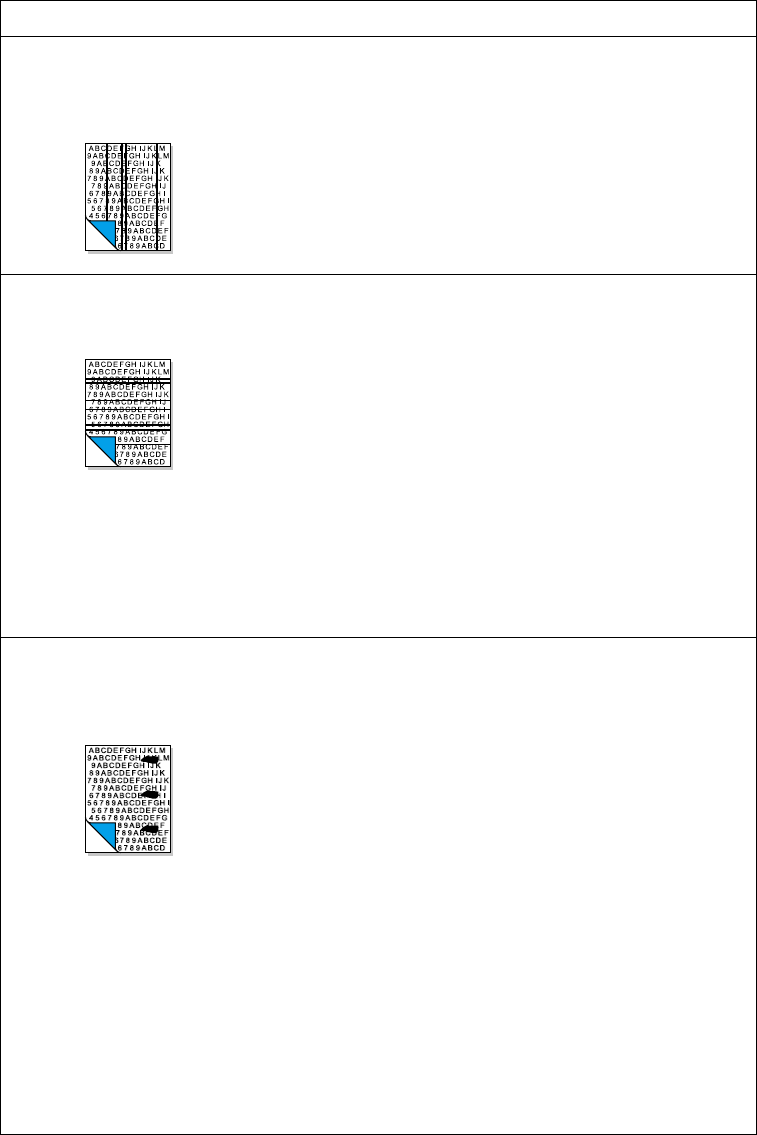
52 Bab4 - Pemecahan masalah IN
Garis-garis hitam vertikal atau
tanda bekas muncul di
halaman-halaman berikutnya.
Mungkin toner cartridge rusak.
Mungkin printer perlu
dibersihkan.
Ganti cartridge jika prosedur
pemeliharaan tidak
memperbaiki kualitas cetak.
Lihat bab 3, “Menangani
toner cartridge.”
Lihat “Membersihkan printer”
pada bab ini.
Muncul garis-garis hitam
horisontal atau tanda bekas. Mungkin toner cartridge tidak
terpasang dengan baik.
Mungkin toner cartridge rusak
dan harus diganti.
Mungkin printer perlu
diperbaiki.
Keluarkan cartridge lalu
masukkan kembali. Untuk
informasi pemasangan, lihat
bab 1, “Memasang toner
cartridge” .
Mungkin toner cartridge
masih dalam jaminan. Lihat
Garansi toner cartridge
“HP LaserJet” pada lampiran
A.
Lihat halaman dukungan di
bagian depan manual ini
untuk pilihan-pilihan
dukungan.
Muncul bayangan karakter tipis
atau tanda-tanda yang
berulang.
Mungkin printer perlu
dibersihkan.
Jika Anda menggunakan
transparansi, mungkin tidak
memenuhi spesifikasi HP.
Mungkin tekstur kertas terlalu
kasar.
Mungkin toner cartridge rusak
sehingga menyebabkan
pengulangan garis hitam pada
setiap hasil cetakan.
Mungkin drum foto sensitif
toner cartridge terkena cahaya
terang sehingga menyebabkan
kerusakan berulang (biasanya
area hitam).
Lihat “Membersihkan printer”
pada bab ini.
Coba gunakan transparansi
lain.
Coba mengganti dengan
kertas yang lebih halus.
Ganti toner cartridge. Lihat
“Informasi aksesori dan
perlengkapan” pada
lampiran A atau
"Specifikasi" pada lampiran
C.
Ganti toner cartridge. Lihat
“Informasi aksesori dan
perlengkapan” pada
lampiran A.
Masalah Penyebab Solusi
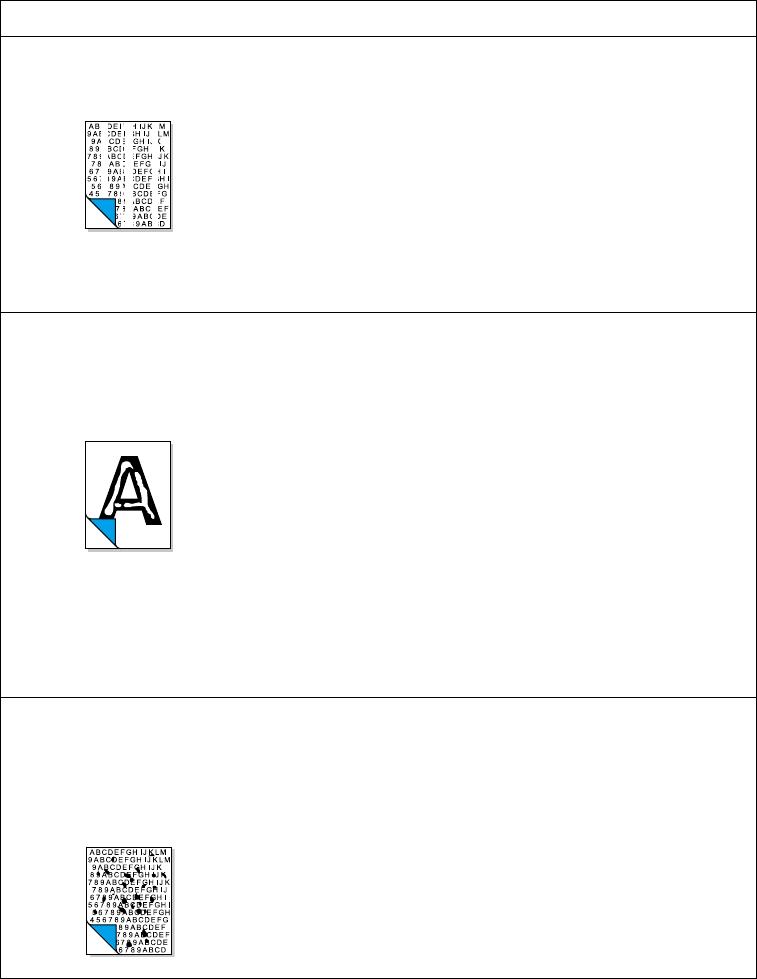
IN Mengatasi berbagai masalah kualitas cetak 53
Muncul garis putih vertikal
pada halaman. Optik internal printer terkena
kotoran. Hubungi perwakilan servis
resmi HP untuk mengganti
cermin internal printer. Lihat
halaman dukungan di bagian
depan manual ini untuk
pilihan-pilihan dukungan.
Roda transfer terkena
kotoran.
Bersihkan printer atau
hubungi teknisi servis.
Karakter tidak muncul (bekas
putih di tempat karakter yang
seharusnya tercetak hitam
pekat).
Jika Anda menggunakan
transparansi, mungkin tidak
memenuhi spesifikasi HP.
Mungkin Anda mencetak pada
sisi kertas yang salah.
Mungkin kertas yang
digunakan tidak memenuhi
spesifikasi HP
Kondisi sekitar.
Coba gunakan transparansi
lain.
Keluarkan kertas lalu
balikkan. (Biasanya ada
panah yang menunjukkan
bidang cetak pada
pembungkus tumpukan
kertas.)
Coba menggunakan kertas
lain. Lihat lampiran C.
Ubah lingkungan printer.
Lihat lampiran B.
Muncul noda atau titik-titik
hitam, bulat, kecil di muka atau
belakang halaman. Kadang-
kadang muncul noda yang tidak
beraturan.
Roda internal di dalam printer
kotor.
Toner cartridge rusak (OPC
rusak).
Bersihkan printer.
Ganti cartridge.
Masalah Penyebab Solusi
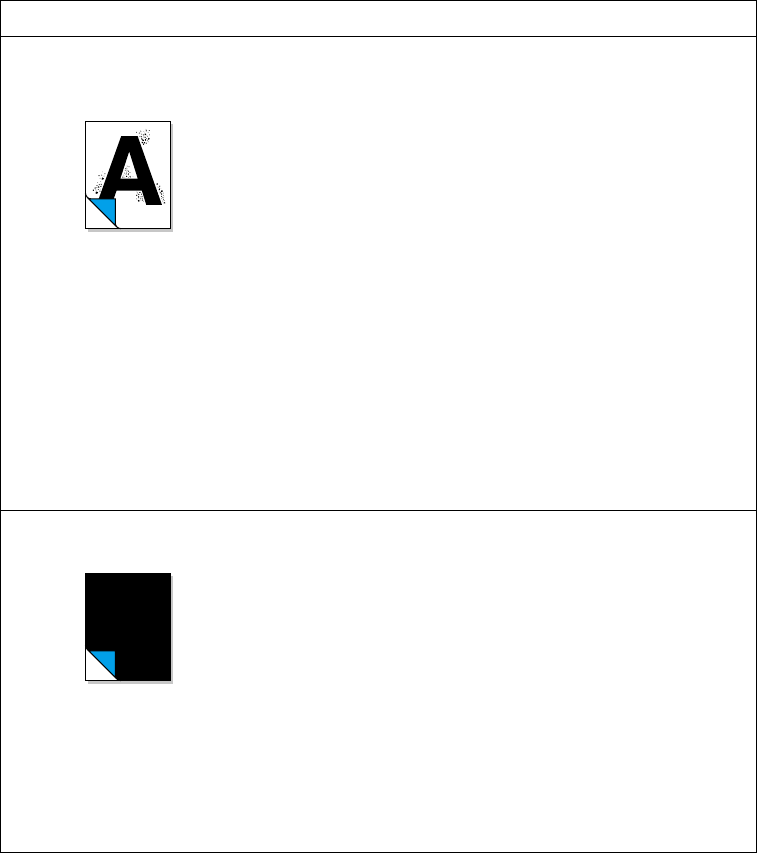
54 Bab4 - Pemecahan masalah IN
Muncul pecah-pecah di latar
belakang halaman cetakan. Latar belakang yang pecah-
pecah adalah akibat dari
bagian toner yang tersebar di
muka atau belakang halaman
cetakan. Latar belakang pecah-
pecah seringkali terisolasi di
area tertentu pada halaman.
Kondisi sekitar.
Ganti jenis, berat atau
permukaan kertas. Lihat
lampiran C.
Jika pecah-pecah latar
belakang terjadi pada
amplop, coba pindahkan
teks ke area yang tak ada
lipatan. Mencetak pada
lipatan bisa menyebabkan
masalah ini.
Jika masalah ini terjadi di
balik halaman cetak,
mungkin disebabkan
tumpahan toner di dalam
printer. Lihat “Membersihkan
printer” pada bab ini.
Ubah lingkungan printer.
Lihat lampiran B.
Halaman gelap sama sekali. Mungkin toner cartridge tidak
terpasang dengan baik.
Mungkin toner cartridge rusak
dan harus diganti.
Mungkin printer perlu diperbaiki
jika masalah ini tetap ada
setelah mengganti toner
cartridge.
Keluarkan dan pasang
kembali cartridge. Lihat
“Memasang toner cartridge”
pada bab 1.
Mungkin toner cartridge
masih dalam jaminan. Lihat
Garansi toner cartridge
“HP LaserJet” pada lampiran
A.
Lihat halaman dukungan di
bagian depan manual ini
untuk pilihan-pilihan
dukungan.
Masalah Penyebab Solusi
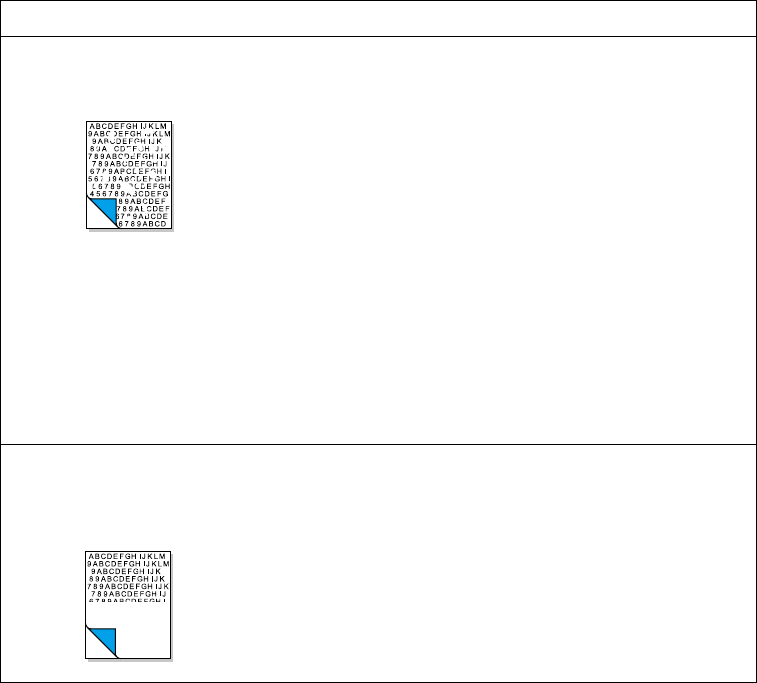
IN Mengatasi berbagai masalah kualitas cetak 55
Karakter tercetak sebagian
(disebut juga dropout). Mungkin ada lembaran kertas
yang rusak.
Mungkin kepadatan cetak perlu
disesuaikan.
Mungkin isi kelembaban kertas
tidak konsisten atau ada
lembab atau basah di
permukaan kertas.
Kondisi sekitar.
Mungkin kertas sudah rusak
pada saat proses
pembuatannya.
Coba ulangi mencetak.
Atur kepadatan cetak
melalui perangkat lunak.
Gunakan kertas baru atau
dari sumber lain. Lihat
lampiran C.
Ubah lingkungan printer.
Lihat lampiran B.
Coba gunakan kertas dari
sumber lain. Lihat lampiran
C.
Bagian bawah halaman kosong
atau sebagian gambar
terpotong.
Mungkin halaman terlalu
kompleks untuk memori
standar printer.
Atur resolusi ke 300 dpi
melalui perangkat lunak.
Masalah Penyebab Solusi

56 Bab4 - Pemecahan masalah IN
Lembaran yang keluar dari
printer kusut atau berkerut. Kertas menjadi kusut atau
berkerut bila menggunakan
wadah keluaran kertas.
Mungkin kertas tidak diletakkan
dengan benar.
Kondisi sekitar.
Gunakan slot keluaran untuk
media yang tebal dengan
mendorong tuas jalur kertas
ke posisi bawah. Sehingga
jalur kertas lurus. Lihat
“Memilih jalur kertas keluar”
pada bab 3.
Gunakan penyangga
masukan kertas yang
terletak di belakang wadah
masukan kertas. Lihat
“Memasukkan kertas ke
dalam printer" pada bab 1.
Jika memungkinkan, simpan
kertas di dalam
pembungkusnya dan pada
suhu ruangan.
Ubah lingkungan printer.
Lihat lampiran B.
Masalah Penyebab Solusi
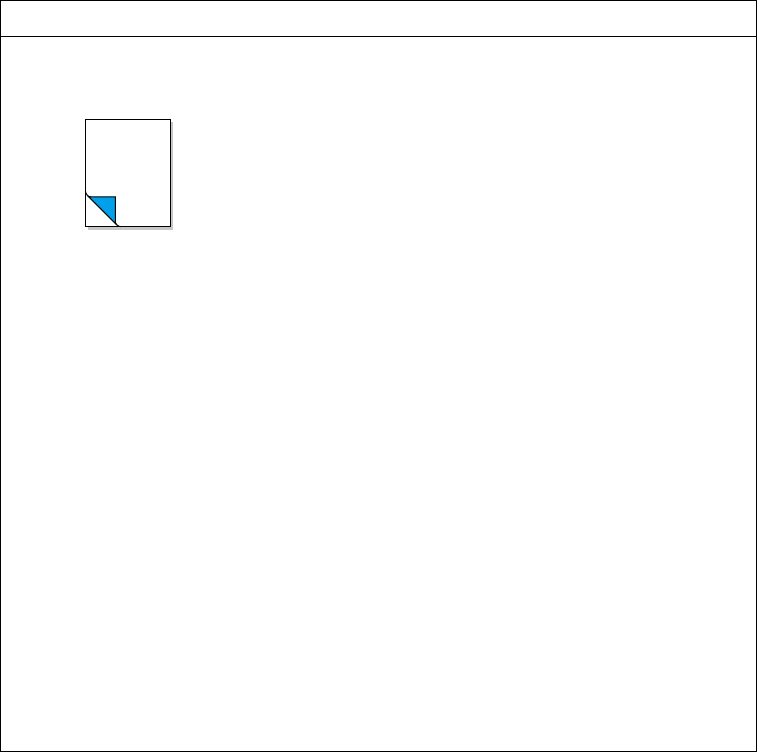
IN Mengatasi berbagai masalah kualitas cetak 57
Lembaran Kosong
(Kadangkala) Panjang dan margin halaman
tidak diatur sesuai ukuran
kertas.
Sejumlah peralatan atau
jaringan yang dipakai bersama
mencetak halaman kosong
sebagai pemisah.
Mungkin printer Anda
mengumpan dua atau lebih
lembar sekaligus karena kertas
sulit dipisah.
Mungkin aplikasi perangkat
lunak Anda mengirim perintah
ekstra halaman.
Jika Anda mencetak pada
kertas kecil dan halamannya
kosong, coba cetak pada
kertas yang lebih besar
untuk melihat letak cetakan.
Sesuaikan margin
sebagaimana mestinya.
Hubungi Administrator
Jaringan.
Keluarkan kertas dari wadah
masukan kertas lalu rapikan
ujung kertas. “Belah”
tumpukan kertas dengan
melengkungkannya secara
terbalik membentuk huruf u;
ini bisa mengurangi secara
efektif beberapa kertas
masuk sekaligus. Anda juga
bisa coba membalikkan
kertas untuk
memasukkannya terbalik.
Periksa informasi konfigurasi
pencetakan perangkat lunak.
Jika Anda menggunakan
program pengolah kata,
periksa pemisah halaman
yang saling berdekatan.
Masalah Penyebab Solusi

58 Bab4 - Pemecahan masalah IN
Halaman Kosong
(Semua Halaman) Mungkin toner cartridge tidak
terpasang dengan benar.
Mungkin kehabisan toner.
Mungkin printer perlu diservis.
Pastikan Anda sudah
mengeluarkan seluruh pita
perekat dari toner cartridge
sebelum dipasang. Lihat
“Memasang toner cartridge”
pada bab 1.
Ganti toner cartridge. Lihat
lampiran A.
Coba lakukan uji cetak
seperti yang sudah diuraikan
sebelumnya pada bab ini.
Jika halaman masih juga
kosong, mungkin printer
perlu diservis. Lihat halaman
dukungan di bagian depan
manual ini untuk pilihan-
pilihan dukungan.
Cetakan pada halaman miring-
miring (Halaman cetakan
berdesakan)
Mungkin wadah masukan
kertas terlalu penuh.
Mungkin pemandu kertas tidak
diatur sebagaimana mestinya.
Mungkin kertas salah
pengumpanan karena beratnya
atau karena permukaannya
tidak memenuhi spesifikasi
HP.
Coba keluarkan sebagian
kertas.
Pastikan kertas berada di
tengah dengan
menggunakan pemandu
kertas. Selain itu, pastikan
pemandu kertas tidak terlalu
kencang atau kendor pada
kertas.
Coba menggunakan kertas
lain. Lihat lampiran C.
Masalah Penyebab Solusi
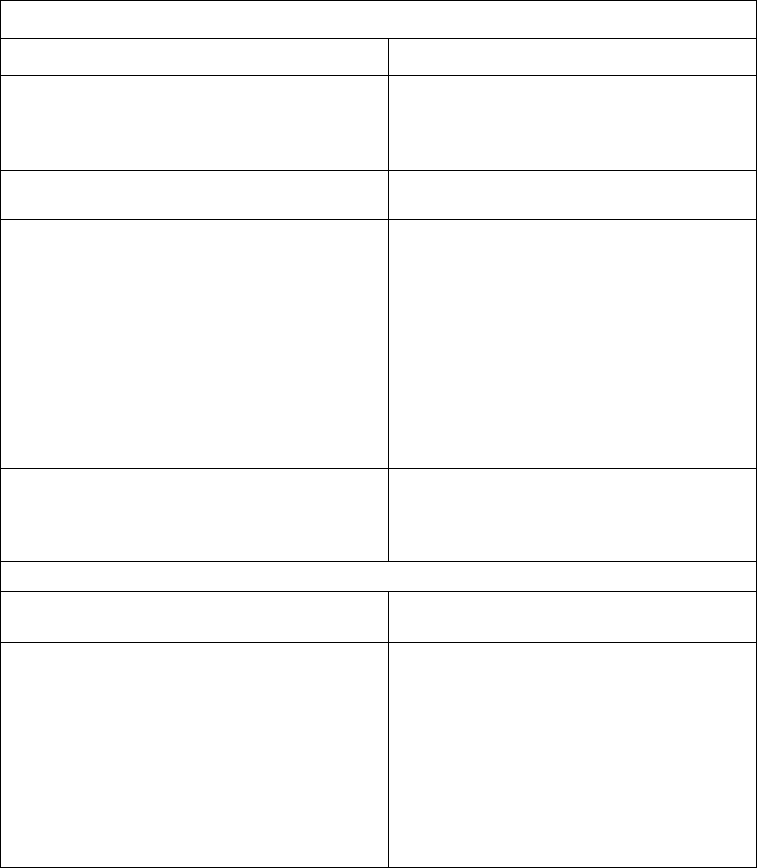
IN Mengatasi berbagai masalah perangkat lunak 59
Mengatasi berbagai masalah perangkat lunak
Jika Anda mengalami masalah instalasi, periksa tabel berikut. Selain
itu, Anda bisa merujuk Bantuan dengan memilih Bantuan pada baris
menu.
Tip Instalasi
Gejala Solusi
Muncul pesan di Windows pada saat instalasi
yang berbunyi: “File sedang Digunakan.”Hentikan semua perangkat lunak.
Keluarkan semua perangkat lunak dari grup
Startup lalu jalankan kembali Windows.
Instalasi kembali perangkat lunak.
Tidak bisa instalasi perangkat lunak. Coba instalasi alternatif seperti yang
diuraikan pada bab 1.
Komunikasi dua arah belum terlaksana pada
saat instalasi. Kabel tidak dua arah. Gunakan hanya kabel
paralel kualitas tinggi IEEE-1284.
Kabel longgar atau tidak terhubung
langsung.Pada Windows 3.1x, , buka Control
Panel dan Printers. Klik dua kali printer
HP LaserJet 6L Pro , lalu klik Connect.
Pastikan pilihan port sudah benar dan kotak
periksa Fast Printing Direct to Port sudah
ditandai.
Catatan: Jika semua yang diatas sudah, klik
Skip dan lanjutkan instalasi.
Komputer tidak dapat membaca CD instalasi. Periksa drive CD.
Periksa apakah ada kerusakan pada CD.
Salin CD ke hard drive; lalu instalasi dari
hard drive.
Tip Pencetakan
Printer mencetak terlalu lamban. Pilih 300 dpi di bawah Print Quality pada
perangkat lunak.
Printer tidak bereaksi; sistem terkunci. Bebaskan tempat di komputer atau padatkan
drive.
Aktifkan “Print Manager pada sistem
Windows 3.1x ”.
Jangan menjalankan banyak program
sekaligus pada komputer.
Jangan melakukan I/O atau tugas tugas yang
banyak melibatkan prosesor pada saat
mencetak (mis., mengirim faks atau
menjalankan video).

60 Bab4 - Pemecahan masalah IN
Mengatasi berbagai masalah pencetakan dari MS-
DOS
Petunjuk-petunjuk berikut ini akan membantu Anda mengatasi
masalah pencetakan Windows dengan menggunakan MS-DOS®.
Catatan Sebelum mengatasi masalah dari MS-DOS, pastikan printer dapat
melakukan uji cetak. (Lihat “Melakukan uji cetak” pada bagian awal bab
ini.)
Untuk mendapatkan komunikasi dasar dengan printer, ikuti langkah-
langkah berikut ini:
1Keluar dari Windows 3.1x. Pada Windows 95 dan Windows 98,
klik Start, klik Shut Down, lalu klik Restart the computer in MS-
DOS mode, berurutan.
2Pada command prompt (misalnya, C:\), ketik: Dir>PRN lalu tekan
enter. Direktori hard drive akan dikirim ke printer.
3Lihat skema di bawah untuk solusi yang dianjurkan.
Status Printer Respons Solusi
Lampu Data dan lampu Siaga
keduanya menyala terus (tidak
berkedip).
Command prompt (C:\)
kembali. Tekan tombol panel kontrol.
Anda akan menerima cetakan
direktori hard drive.
Komunikasi diverifikasi;
kembali ke Windows.
Lampu Data menyala;
Lampu Siaga berkedip. Command prompt (C:\)
kembali. Tidak diperlukan tindakan
apapun. Komunikasi sudah
diverifikasi; kembali ke
Windows.

IN Mengatasi berbagai masalah pencetakan dari MS-DOS 61
Printer tidak bereaksi. Kursor berkedip; command
prompt (c:\) tidak kembali;
keyboard terkunci.
Pesan DOS: “Write fault error
writing device PRN.”
Command prompt (C:\)
kembali.
Verifikasi bahwa lampu Siaga
menyala.
Tekan dan tahan CTRL, lalu
tekan dan lepaskan Break
untuk mengaktifkan keyboard.
Verifikasi bahwa lampu Siaga
menyala.
Sebutkan nama port saat
mengirim direktori (misalnya ,
LPT1).
Tekan dan tahan CTRL, lalu
tekan dan lepaskan Break
untuk mengaktifkan keyboard.
Putuskan hubungan kabel
listrik dari printer.
Putuskan sambungan kabel
printer dari komputer dan
printer.
Hubungkan kembali kabel
printer langsung antara
komputer dan printer.
Coba gunakan kabel paralel
(IEEE-1284) atau port paralel
lain.
Lampu Data menyala; Lampu
Siaga berkedip.
Teks cetakan tidak bisa
dibaca atau terjadi karakter-
karakter acak pada halaman.
Command prompt (C:\)
kembali. Putuskan, lalu hubungkan
kembali kabel paralel di kedua
ujung.
Pastikan hubungan langsung
ke printer.
Coba gunakan kabel paralel
(IEEE-1284) atau port paralel
lain.
Lampu Data menyala; Lampu
Siaga berkedip. Hanya satu
baris teks yang dicetak atau
seluruh teks dicetak dalam
satu baris.
Command prompt (C:\)
kembali. Putuskan, lalu hubungkan
kembali kabel paralel di kedua
ujung.
Pastikan hubungan langsung
ke printer.
Coba gunakan kabel paralel
(IEEE-1284) atau port paralel
lain.
Status Printer Respons Solusi

62 Bab4 - Pemecahan masalah IN
File teks mau mencetak.
File gambar tidak mau
mencetak atau sampah
(garbage).
Tidak ada pesan salah.
Semua kelihatan normal. Putuskan, lalu hubungkan
kembali kabel paralel di kedua
ujung.
Pastikan hubungan langsung
ke printer.
Jika menyalin file gambar,
ketik perintah berikut pada
command prompt:
salin nama file LPT1,
nama file adalah nama file
grafik.
Pastikan ada spasi sebelum
dan sesudah nama file.
Coba gunakan kabel paralel
(IEEE-1284) atau port paralel
lain.
Status Printer Respons Solusi
IN Jaringan dan kotak switch 63
Jaringan dan kotak switch
Fasilitas baca status printer memerlukan sambungan langsung
antara printer dengan komputer. Sebagian besar peralatan yang
tersambung antara printer dengan komputer utama menghalangi
printer mengirim data kembali ke komputer.
Jika Anda menggunakan kotak switch, ikuti petunjuk-petunjuk berikut
ini:
●Jangan memindahkan pada saat printer sedang mencetak atau
menerima data (saat lampu Siaga berkedip).
●Jangan memindahkan ke komputer utama yang sedang nonaktif
baru kemudian mengaktifkan. Lampu Siaga pada printer akan
berkedip sepertinya komputer sedang mengirim data. Jika lampu
Salah berkedip, atur ulang printer. Untuk melakukannya, tekan
dan tahan tombol panel kontrol selama lima detik, lalu kirimkan
lagi.
●Gunakan pengaman kejut.
Kehabisan memori
Jika lampu Salah berkedip, mungkin halaman terlalu kompleks untuk
kapasitas memori printer. Untuk menghapus kesalahan ini, tekan dan
lepaskan tombol panel kontrol dengan cepat. Pencetakan akan
berlanjut; tetapi, mungkin sebagian data akan hilang. Untuk
menghindari kesalahan ini pada masa yang akan datang:
●Atur ulang printer. Untuk melakukannya, tekan dan tahan tombol
panel kontrol selama lima detik.
●Atur resolusi ke 300 dpi melalui perangkat lunak.
●Lihat Bantuan untuk lebih banyak saran mengenai penggunaan
memori printer.
64 Bab4 - Pemecahan masalah IN
IN Pernyataan garansi terbatas 1 tahun HP 65
AInformasi garansi dan
dukungan
Pernyataan garansi terbatas 1 tahun HP
Garansi produk ini tersedia di Cina, India, dan
Indonesia
1HP memberi jaminan kepada konsumen bahwa semua perangkat keras, aksesori
dan perlengkapan HP bebas dari kerusakan materi dan pengerjaan setelah
tanggal pembelian, untuk jangka waktu yang ditetapkan di atas. Jika HP
menerima pemberitahuan kerusakan selama masa garansi maka HP akan
memperbaiki atau mengganti produk yang terbukti rusak.
2HP memberi jaminan kepada Anda bahwa perangkat lunak HP tidak akan gagal
menjalankan intruksi program setelah tanggal pembelian, untuk jangka waktu
yang ditetapkan di atas, disebabkan kerusakan materi dan pembuatannya jika
diinstalasi dan digunakan sebagaimana mestinya. Jika HP menerima
pemberitahuan kerusakan tersebut selama masa garansi maka HP akan
mengganti media perangkat lunak yang tidak bisa menjalankan instruksi program
karena kerusakan tersebut.
3HP tidak menjamin bahwa pengoperasian produk-produk HP tidak pernah ada
gangguan atau bebas dari kesalahan. Produk-produk HP mungkin berisi suku
cadang yang dibuat ulang setara dengan yang baru dalam kinerjanya atau yang
tidak sengaja terpakai. Jika HP dalam jangka waktu yang masuk akal tidak
mampu memperbaiki atau mengganti produk sesuai kondisi seperti yang
digaransi, Anda berhak mendapatkan pengembalian uang seharga pembelian
pada saat pengembalian produk. Garansi tidak berlaku untuk kerusakan yang
disebabkan (a) pemeliharaan atau kalibrasi yang tidak benar, (b) perangkat lunak,
antar muka, suku cadang atau perlengkapan yang tidak dipasok oleh HP, (c)
modifikasi tidak resmi atau salah penggunaan, (d) pengoperasian di luar
spesifikasi lingkungan yang sudah ditentukan untuk produk tersebut, atau (e)
persiapan atau pemeliharaan yang tidak benar.
4GARANSI ATAS BARANG ATAU KESESUAIANNYA UNTUK TUJUAN
TERTENTU DIBATASI JANGKA WAKTU SEPERTI DIMUAT DI ATAS. Ada negara
bagian atau provinsi yang tidak memperbolehkan pembatasan jangka waktu
garansi, sehingga mungkin pembatasan atau pengecualian di atas tidak berlaku
untuk Anda. Garansi ini memberikan hak hukum khusus dan Anda juga bisa
memiliki hak-hak lain yang berbeda-beda di tiap negara bagian, provinsi, atau
negara.

66 lampiran A - Informasi garansi dan dukungan IN
5BAIK BERDASARKAN KONTRAK, TINDAK PERDATA ATAU LAINNYA. Ada
negara bagian atau provinsi yang tidak memperbolehkan pengecualian atau
pembatasan kerusakan baik yang disengaja maupun tidak, sehingga mungkin
pembatasan atau pengecualian di atas tidak berlaku untuk Anda.
Servis perangkat keras dalam masa garansi
Jika perangkat keras rusak dalam masa garansi, HP menawarkan
pilihan dukungan sebagai berikut:
●Penyedia Servis Resmi HP : Anda bisa mengembalikan printer ke
penyalur servis resmi setempat.
●Pelayanan Perbaikan HP : Anda bisa mengembalikan printer ke
kantor perbaikan HP.
Saat mengirim peralatan, kami menganjurkan supaya peralatan
diasuransikan. Jangan lupa menyertakan salinan bukti pembelian.
PERHATIAN Kerusakan pengiriman sebagai akibat dari pengepakan yang tidak
sebagaimana mestinya menjadi tanggungjawab konsumen. Bila
memungkinkan, gunakan material pengepakan orisinal.
Untuk bantuan dukungan teknik mengenai printer Anda selama masa
garansi, lihat halaman dukungan di bagian depan manual ini.
Servis perangkat keras setelah masa garansi
Jika perangkat keras Anda rusak setelah lewat masa garansi,
hubungi Pusat Perbaikan Resmi Hawlett-Packard atau Pusat
Perbaikan Hawlett-Packard yang ditunjuk. Jika Anda memiliki
Perjanjian Perawatan Hawlett-Packard, mintalah servis sesuai
perjanjian.
Garansi toner cartridge HP LaserJet
Toner cartridge HP LaserJet dijamin bebas kerusakan pada material
dan pembuatannya sampai isinya habis. Anda tahu toner HP sudah
mulai habis bila Anda melihat halaman cetakan pudar atau tipis.
Garansi sepanjang usia pakai cartridge meliputi semua kerusakan
atau malfungsi toner cartridge Hawlett-Packard Anda. HP akan
mengganti produk yang terbukti rusak atau mengembalikan uang
sesuai harga pembelian.
HP SAMA SEKALI TIDAK DIKENAKAN PERTANGGUNGJAWABAN
ATAS KERUSAKAN BAIK DISENGAJA ATAU TIDAK, LANGSUNG
ATAU TIDAK LANGSUNG, UNTUNG ATAU RUGI DARI GARANSI INI.
IN Perjanjian lisensi perangkat lunak HP 67
Perjanjian lisensi perangkat lunak HP
PERHATIAN: PENGGUNAAN PERANGKAT LUNAK MENURUT PASAL-PASAL
LISENSI PERANGKAT LUNAK HP DI BAWAH INI. MENGGUNAKAN PERANGKAT
LUNAK MENANDAKAN PENERIMAAN ANDA TERHADAP PASAL-PASAL LISENSI
INI.
PASAL-PASAL LISENSI PERANGKAT LUNAK HP
Pasal-pasal Lisensi berikut ini mangatur penggunaan perangkat
lunak yang disertakan kecuali Anda memiliki perjanjian tertulis lain
dengan HP.
Pemberian Lisensi. HP memberikan Anda lisensi untuk
Menggunakan satu salinan Perangkat Lunak. “Menggunakan” artinya
menyimpan, mengambil, menginstalasi, menjalankan atau
menampilkan Perangkat Lunak. Anda tidak boleh memodifikasi
Perangkat Lunak atau menonaktifkan fasilitas lisensi atau kontrol
Perangkat Lunak. Jika Perangkat Lunak dilisensikan untuk
“penggunaan bersama”, Anda tidak boleh membiarkan lebih dari
jumlah maksimal pengguna untuk Menggunakan Perangkat Lunak
bersamaan.
Kepemilikan. Perangkat Lunak dimiliki dan hak ciptanya oleh HP
atau pemasok pihak ketiga. Lisensi Anda tidak menyandang hak atau
kepemilikan dalam Perangkat Lunak serta hak penjualan atas
Perangkat Lunak tersebut. Para pemasok pihak ketiga HP dapat
melindungi hak mereka dalam hal terjadinya pelanggaran atas Pasal-
Pasal Lisensi tersebut.
Salinan dan Adaptasi. Anda hanya diperkenankan membuat salinan
atau adaptasi atas Perangkat Lunak untuk tujuan pengarsipan atau
apabila penyalinan atau pengadaptasian merupakan langkah penting
dalam Menggunakan Perangkat Lunak tersebut. Anda harus
mereproduksi semua pemberitahuan hak cipta dalam Perangkat
Lunak orisinal pada semua penyalinan dan pengadaptasiannya.
Anda dilarang menyalin Perangkat Lunak ke bulletin board atau
sejenisnya.
Anda dilarang menguraikan Perangkat Lunak kecuali jika penguraian
itu diperlukan untuk pengoperasian Perangkat Lunak.
Transfer. Lisensi Anda akan secara otomatis berakhir saat Anda
mentransfer Perangkat Lunak. Saat transfer, Anda harus
menyerahkan Perangkat Lunak termasuk salinan dan dokumentasi
yang terkait, kepada penerima transfer. Penerima transfer harus
menerima Pasal-Pasal Lisensi ini sebagai syarat transfer.
68 lampiran A - Informasi garansi dan dukungan IN
Pemutusan. HP dapat memutuskan lisensi Anda jika ada
pemberitahuan pelanggaran atas Pasal-Pasal Lisensi. Saat
pemutusan, And harus segera memusnahkan Perangkat Lunak
berikut semua salinan, adaptasi dan penggabungan berbagai bagian
dalam bentuk apapun.
Persyaratan Ekspor. Anda tidak boleh mengekspor atau
mengekspor ulang Perangkat Lunak atau salinannya atau
adaptasinya yang bertentangan dengan undang-undang atau
peraturan yang berlaku.
Hak Perlindungan Pemerintah A.S.. Perangkat Lunak dan
dokumentasi ini telah dikembangkan seluruhnya dengan biaya pribadi
dan tersedia sebagai “Perangkat Lunak Komputer Komersial” atau
“Perangkat Lunak Komputer Terbatas.” Perangkat Lunak ini
diserahkan dan dilisensikan sebagai “perangkat lunak komputer
komersial” sebagaimana ditentukan dalam DFARS 252.227-7013
(Okt1988), DFARS 252.211-7015 (Mei 1991) atau DFARS 252.227-
7014 (Jun 1995), sebagai " “barang komersial” seperti ditentukan
dalam FAR 2.101 (a), atau sebagai “Perangkat Lunak komputer
terbatas” sebagaimana ditentukan dalam FAR 52.227-19 (Jun 1987)
(atau peraturan yang sama atau pasal kontrak), tergantung mana
yang berlaku. Anda hanya mendapatkan hak-hak untuk Perangkat
Lunak dan Dokumentasi tersebut berdasarkan pasal FAR atau
DFARS yang berlaku atau perjanjian perangkat lunak standar HP
untuk produk dimaksud.
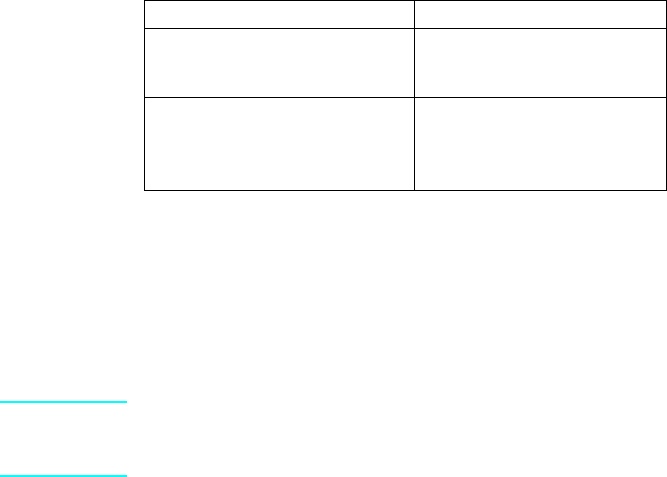
IN Informasi Aksesori dan perlengkapan 69
Informasi Aksesori dan perlengkapan
Tabel berikut berisi daftar barang-barang yang tersedia di
HP Pemesanan Langsung dan melalui penyalur HP resmi setempat.
●Untuk informasi pemesanan di luar Amerika, lihat “Kantor
Penjualan dan Servis” di lampiran ini.
Kantor penjualan dan servis
Produk-produk Hewlett-Packard dijual dan didukung melalui Kantor-
Kantor Penjualan dan Servis Hewlett-Packard dan melalui para
penyalur.
Catatan Sebelum menghubungi Kantor penjualan dan servis HP, pastikan Anda
menghubungi nomor Pusat Pelayanan Konsumen yang sesuai seperti pada
daftar di bagian depan buku manual ini.
Pilihan Nomor Suku Cadang
Toner cartridge HP LaserJet:
Indonesia, India, Cina, Korea
Australia C3906F
C3906A
Kabel paralel printer
HP LaserJet (IEEE-1284)
Dua meter A ke B
Tiga meter A ke B C2950A
C2951A
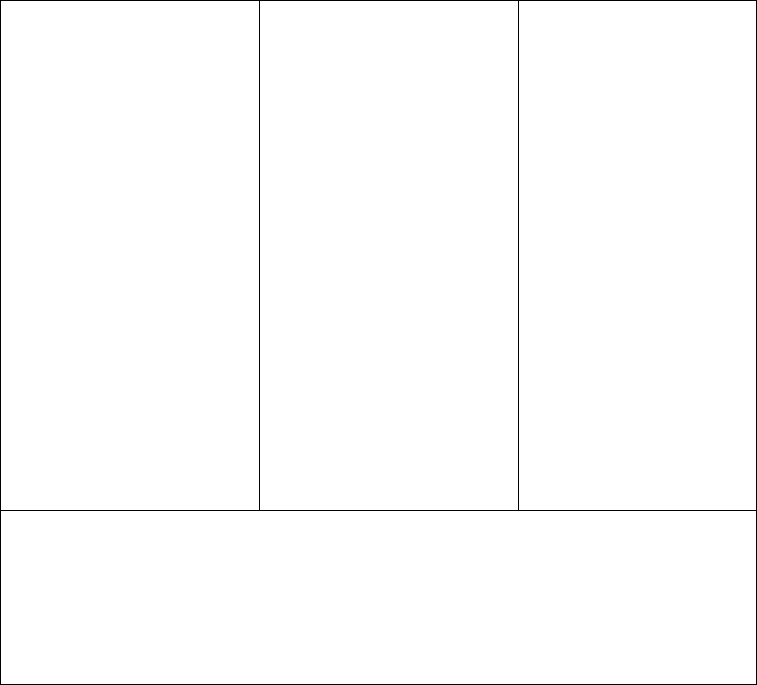
70 lampiran A - Informasi garansi dan dukungan IN
Cina:
China Hewlett-Packard Co. Ltd.
9/F, HP Building
No. 2 Dong San Huan Nan Lu
Chao Yang District
Beijing 100022, P.R. Cina
Telepon: (86 10) 6564 3888
Nomor Dukungan dan
Dukungan Garansi:
(86 10) 6564 5959
Faks: (86 10) 6566 8280
Pusat Informasi Konsumen:
Telepon: (86 10) 6564 5858
atau (800) 810-5656
Pusat Perbaikan Perangkat
Keras:
Silakan mengunjungi situs
dukungan kami di:
http://www.hp.com.cn/go/
support
India:
Hewlett-Packard India Ltd.
Chandiwala Estate
Maa Anandmai Marg
Kalkaji, New Delhi - 110019
Telepon: (91 11) 682-6000,
(91 11) 682-6035
Faks: (91 11) 682-6030
Pusat Perbaikan Perangkat
Keras dan Dukungan Garansi:
(91 11) 682-6042
Indonesia:
Hewlett-Packard Berca
Servisindo
Sentral Senayan 1, 8th floor
Jl. Asia Afrika no. 8
Jakarta 10270
Indonesia
Telepon: (62 21) 350-3408
Pusat Perbaikan Perangkat
Keras dan Dukungan
Garansi:
Telepon: (62 21) 348-34567
Faks: (62 21) 352-2048
Hong Kong
Hewlett-Packard Asia Pacific Ltd., 25/F City Plaza One, 1111 King's Road, Taikoo Shing, Hong Kong
Telepon: (85 2) 2599-7777 Faks: (852) 2506-9776 Pusat Perbaikan Perangkat Keras: (852) 2599-7000
Dukungan Garansi: (852) 2599-7000 Pusat Informasi Konsumen (852) 2599-7066
Singapura
Hewlett-Packard Asia Pacific Ltd., Blk A Alexandra Technopark, #02-08 Singapore 119967
Telepon: (65) 272-5300 Faks: (65) 273-1146 Telepon Kantor Utama: (65) 275-3888
Dukungan Garansi: (65) 374-6441.
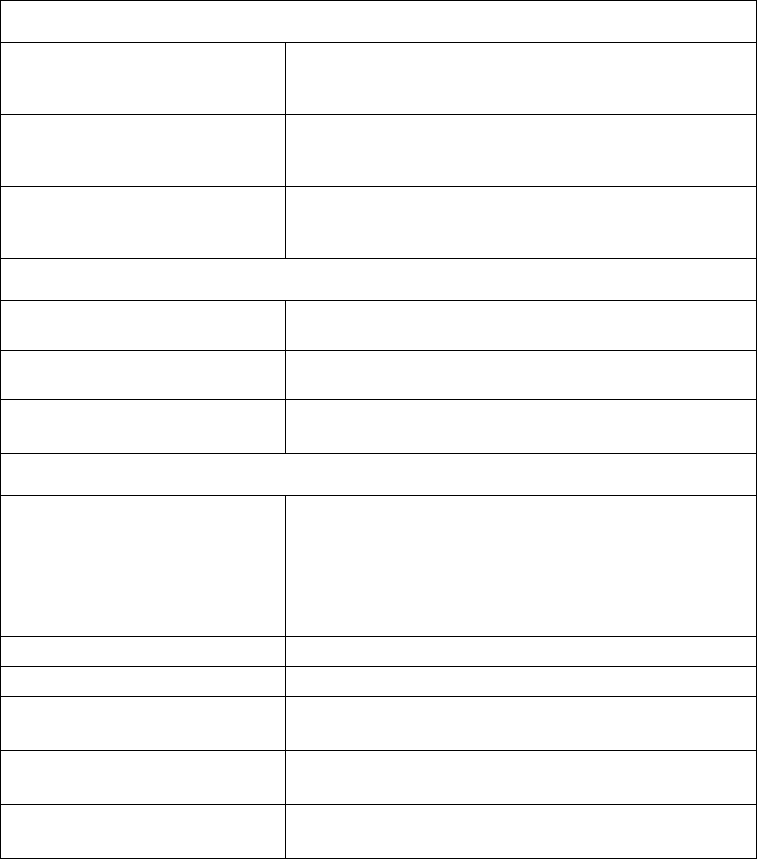
IN Spesifikasi Lingkungan 71
BSpesifikasi printer
Spesifikasi Lingkungan
Lingkungan Pengoperasian (Printer disambung ke sumber listrik):
Temperatur: 10°C sampai 32.5°C (50°F sampai 90.5°F)
Kelembaban: 20%-80% (tidak ada kondensasi)
Lingkungan Penyimpanan (Printer disambung ke sumber listrik):
Temperatur: 0°C sampai 40°C (32°F sampai 104°F)
Kelembaban: 10%-80% (tidak ada kondensasi)
Tingkat Kebisingan Selama pencetakan: 5.5 Bels Sound Power Level (per ISO
9296)
Saat Siaga dan Modus Tidur: tidak ada suara
Spesifikasi listrik
Kebutuhan Listrik 220 v (+/-10%), 50/60 Hz (+/-2 Hz)
240 v (+/-10%), 50 Hz (+/- 2Hz)
Konsumsi Listrik Selama pencetakan: 120 W (rata-rata)
Saat siaga atau Modus Tidur: 5 W
Kapasitas Sirkuit Minimum
yang Dianjurkan
2.0A @ 230 V
Spesifikasi fisik
Dimensi:
Lebar
Kedalaman
Tinggi Penyimpanan
Tinggi Pengoperasian (Tinggi
Huruf)
335,2 mm (13,2 inci)
312,4 mm (12,3 inci)
228,6 mm (9,0 inci)
370,8 mm (14,6 inci)
Berat (Cartridge Terpasang) 7,0 kg (15,5 pon)
Kecepatan Pencetakan 6 halaman per menit
Kapasitas Wadah Masukan
Kertas
Menampung sampai 100 lembar kertas berat biasa atau
sampai 10 amplop
Kapasitas Wadah Keluaran
Kertas
Menampung sampai 100 lembar
Kapasitas Slot Keluaran
Media yang Tebal
Menumpuk 1 transparansi atau sampai 20 lembar media
lain di depan Slot Keluaran Media yang Tebal
72 lampiran B - Spesifikasi printer IN
Produk Ramah Lingkungan
Hewlett-Packard menciptakan program Produk Ramah Lingkungan
untuk memastikan bahwa produk-produk HP mengikuti standar
lingkungan nasional dan internasional.
Melindungi Lingkungan
Perusahaan Hewlett-Packard bertekad menyediakan produk-produk
berkualitas yang ramah lingkungan. Printer HP LaserJet ini dirancang
untuk mengurangi dampak terhadap lingkungan.
Rancangan printer HP LaserJet ini menghilangkan:
●Produksi ozone—Printer HP LaserJet ini menggunakan roda
dan tidak menimbulkan gas ozone (O3).
Rancangan printer HP LaserJet ini mengurangi:
●Konsumsi listrik—Penggunaan listrik turun dari rata-rata 120W
selama pencetakan sampai 5W pada modus Siaga/Tidur. Tidak
saja hal ini menghemat sumber daya alam, namun juga
menghemat uang tanpa mempengaruhi kinerja printer yang
tinggi. Produk ini memenuhi syarat ENERGY STAR.
ENERGY STAR adalah program sukarela yang didirikan untuk
mendorong pengembangan produk kantor yang hemat energi.
ENERGY STAR adalah tanda layanan
terdaftar Amerika dari U.S. EPA. Sebagai
mitra ENERGY STAR, Hewlett-Packard
Company bertekad bahwa produk ini
memenuhi Petunjuk-Petunjuk ENERGY
STAR untuk penghematan energi.
●Konsumsi toner—EconoMode sangat menghemat pemakaian
toner sehingga toner cartridge menjadi lebih awet.
●Penggunaan kertas—This Printer ini memungkinkan
pencetakan dua sisi sehingga mengurangi penggunaan kertas
dan penghamburan sumber daya alam.
Ukuran kertas minimum 76,2 x 127 mm (3 x 5 inci)
Ukuran kertas maksimum 215,9 x 355,6 mm (8,5 x 14 inci)
Spesifikasi fisik, lanjutan
Memori dasar 4 MB ROM dan 4 MB RAM
Resolusi Cetakan 600 dots per inch (dpi)
Siklus 6000 lembar satu sisi per bulan
IN Produk Ramah Lingkungan 73
Printer HP LaserJet: Daur ulang di seluruh dunia
●Plastik—Bagian-bagian plastik mempunyai tanda sesuai
standar internasional sehingga meningkatkan kemampuan untuk
mengidentifikasi plastik untuk tujuan daur ulang pada akhir usia
pakai printer.
●Kertas—Printer ini cocok menggunakan kertas daur ulang
apabila memenuhi Petunjuk Spesifikasi Kertas Keluarga Printer
HP LaserJet (dokumen berbahasa Inggris saja). Printer ini cocok
menggunakan kertas daur ulang sesuai DIN 19 309.
●Lembar data mengenai keselamatan material— Lembar data
mengenai keselamatan material (MSDS) bisa didapatkan dengan
menghubungi situs Perlengkapan HP LaserJet di http://
www.hp.com/go/msds.
Pengembalian
Perlengkapan cetak HP LaserJet
Di banyak negara, produk perlengkapan cetak ini (mis. toner
cartridge, drum, fuser) bisa dikembalikan ke HP melalui Program
Lingkungan Perlengkapan Cetak Partner Planet HP. Program
pengambilan kembali yang mudah tersedia di lebih dari 20 negara.
Petunjuk dan informasi program multi bahasa disertakan pada setiap
toner cartridge dan paket yang habis dipakai.
Informasi Program Lingkungan Perlengkapan Cetak Partner
Planet HP
Sejak 1990, Program Daur Ulang Toner Cartridge HP LaserJet telah
mengumpulkan lebih dari 25 juta toner cartridge LaserJet bekas yang
kalau tidak mungkin sudah dibuang. Toner cartridge HP LaserJet dan
barang yang habis dipakai dikumpulkan dan dikapalkan ke mitra kami
yang memasang kembali cartridge tersebut. Setelah pengecekan
kualitas secara menyeluruh, suku cadang yang dipilih misalnya mur,
sekrup, dan klip akan digunakan lagi pada cartridge baru. Sisa
material dipisahkan dan diubah menjadi bahan mentah untuk
digunakan oleh industri lain menjadi berbagai produk yang
bermanfaat.
Untuk pengembalian cartridge bekas yang lebih bertanggungjawab
dan lebih ramah lingkungan, HP menganjurkan pengembalian yang
terbungkus. Cukup bungkus dua atau lebih cartridge dan gunakan
bungkus UPS yang sudah dibayar dan sudah ditempel alamat yang
disertakan.
Untuk informasi lebih lanjut mengenai wilayah Asia/Pasifik, Anda bisa
mengunjungi situs kami di http://www/asiapac.hp.com/planp1.htm.

74 lampiran B - Spesifikasi printer IN
Pernyataan keselamatan laser
Pusat Peralatan dan Kesehatan Radiologi, Administrasi Obat dan
Makanan Amerika telah menerapkan peraturan bagi produk-produk
laser sejak 1 Agustus 1976. Kepatuhan merupakan keharusan bagi
produk-produk yang dipasarkan di Amerika Serikat.Menurut Undang-
Undang Pengendalian Radiasi untuk Kesehatan dan Keselamatan
tahun 1968, Printer ini telah dinyatakan sebagai produk laser “Kelas
1” dalam Urutan Standar Kinerja Radiasi Departemen Layanan
Kesehatan dan Kemanusiaan.Karena emisi radiasi dalam printer ini
terlindungi oleh penutup printer dan penutup eksternal, sinar laser
tidak dapat lolos selama pengoperasian yang normal.
PERINGATAN! Penggunaan kontrol, penyesuaian, atau prosedur kinerja selain yang
dinyatakan pada buku manual ini bisa mengakibatkan bahaya radiasi.
IN Declaration of conformity 75
Declaration of conformity
according to ISO/IEC Guide
Manufacturer’s Name: Hewlett-Packard Company
Manufacturer’s Address: 11311 Chinden Boulevard
Boise, Idaho 83714-1021, U.S.A.
declares that the product
Product Name: HP LaserJet 6L Pro Printer
Model Number: C8060A
Product Options: All
conforms to the following Product Specifications:
Safety: IEC 950: 1991+A1+A2+A3/A4/EN 60950: 1992+A1/A2+A3/
A4+A11 GB4943-1995
IEC 825-1:1993 +A1/EN 60825-1:1994 +A11 CLASS 1
(LASER/LED) PRODUCT
EMC: CISPR 22-1997/EN 55022:1998 Class B
EN 61000-3-2:1995
EN 61000-3-3:1995
EN 55024:1198
FCC Title 47 CFR, Part 15 Class B2 / ECES-002, Issue 2/
GB9254-88 AS/NZS 3548:1995
Supplementary Information:
The product herewith complies with requirements of the EMC Directive 89/336/EEC and the Low Voltage
Directive 73/23/EEC, and carries the CE-Marketing accordingly.
1) The product was tested in a typical configuration with Hewlett-Packard Personal Computer Systems.
2) This Device complies with Part 15 of the FCC rules. Operation is subject to the following conditions:
(a) this device may not cause harmful interference, and (b) this device must accept any interference
received, including interference that may cause undesired operation. Boise, Idaho, February 25, 2000
For Regulatory Topics ONLY, contact:
Contact: Product Regulations Manager, Hewlett-Packard Company,
P.O. Box 15, MS 160, Boise, ID 83707-0015 (Phone: 208-396-
6000)
76 lampiran B - Spesifikasi printer IN
IN Spesifikasi kertas 77
CSpesifikasi kertas
Spesifikasi kertas
Bab ini memberikan informasi mengenai topik-topik berikut ini:
●Spesifikasi kertas printer
●Ukuran kertas yang didukung (printer)
●Petunjuk menggunakan kertas
78 lampiran C - Spesifikasi kertas IN
Spesifikasi kertas printer
Printer HP LaserJet menghasilkan kualitas cetak terbaik. Printer ini
menerima berbagai media, misalnya kertas potongan (termasuk
kertas daur ulang), amplop, label, tranparansi, vellum dan kertas
ukuran tertentu. Hal-hal seperti berat, butiran dan kandungan
kelembaban merupakan faktor penting yang mempengaruhi kinerja
Printer dan kualitas cetaknya.
Printer bisa menggunakan berbagai kertas dan media cetak lain
sesuai dengan petunjuk di dalam buku manual ini. Kertas yang tidak
mengikuti petunjuk bisa mengakibatkan masalah-masalah berikut ini:
●Kualitas cetak yang buruk
●Kertas sering macet
●Printer menjadi cepat rusak, memerlukan perbaikan
Perusahaan Hewlett-Packard tidak dapat merekomendasikan
penggunaan merek tertentu. Karena bukan merupakan produk HP,
HP tidak dapat mempengaruhi atau mengontrol kualitasnya.
Mungkin saja kertas sudah memenuhi semua petunjuk pada manual
ini tetapi tetap tidak memberikan hasil yang memuaskan. Hal ini
mungkin akibat dari penanganan yang tidak tepat, tingkat suhu dan
kelembaban yang tidak dapat diterima atau hal-hal lain di luar kendali
Hawlett-Packard.
Sebelum membeli kertas dalam jumlah besar, ujilah terlebih dahulu.
Jika Anda masih mempunyai pertanyaan, lihat HP Petunjuk
Spesifikasi Kertas Keluarga Printer LaserJet (Dokumen berbahasa
Inggris saja). Lihat bagian akhir lampiran ini untuk informasi khusus.
Menggunakan kertas di luar spesifikasi HP dapat menyebabkan
pada printer yang memerlukan perbaikan. Perbaikin ini tidak tercakup
dalam garansi ataupun perjanjian servis Hawlett-Packard.
Ukuran kertas yang didukung (printer)
●Ukuran maksimum kertas yang didukung: 216 x 356mm (8,5 x 14
inci)
●Ukuran minimum kertas yang didukung: 76 x 127mm (3 x 5 inci)

IN Petunjuk menggunakan kertas 79
Petunjuk menggunakan kertas
Untuk hasil terbaik, gunakan kertas kualitas tinggi yaitu antara 70 dan
150g/m2 (20 pon). Pastikan kertas berkualitas baik, tidak ada
potongan, tekukan, sobekan, noda, ceceran partikel, debu, kerutan,
rusak, kusut atau ujung kertas terlipat.
Jika Anda tidak yakin atas jenis kertas yang Anda gunakan (misalnya
kertas bond atau kertas daur ulang), periksa label kemasan kertas.
Kertas ringan atau yang berkualitas jelek bisa menyebabkan
berbagai masalah pada kualitas cetakan, kemacetan, atau kerusakan
printer.
Gejala Masalah dengan Kertas Solusi
Kualitas cetak yang jelek atau
toner menggumpal. Masalah
pada pengumpanan.
Terlalu lembab, terlalu kasar,
terlalu licin, atau embos;
kertas rusak.
Coba jenis kertas lain.
Dropout, macet, kusut. Penyimpanan yang tidak
benar. Simpan kertas di tempat rata
dalam kemasannya yang
tahan lembab.
Banyak bayangan latar
keabuan. Terlalu tebal. Gunakan kertas yang lebih
ringan.
Sangat kusut.
Masalah pada pengumpanan. Terlalu lembab, arah urat
kertas yang salah atau
konstruksi urat kertas yang
terlalu pendek.
Gunakan kertas dengan urat
kertas yang panjang. Cetak
dengan menggunakan slot
keluaran media yang tebal.
Kemacetan, kerusakan pada
printer. Potongan atau bolongan. Jangan menggunakan kertas
potongan atau kertas
berlubang.
Masalah pada pengumpanan. Ujung kertas bergerigi. Gunakan kertas berkualitas
baik.
80 lampiran C - Spesifikasi kertas IN
Label
Konstruksi label
Saat memilih label, pertimbangkan kualitas tiap komponen:
●Susunan: Gunakan hanya label yang tak kelihatan lapisannya.
Label bisa mengelupas dari lapisannya sehingga ada jarak
diantaranya yang menyebabkan kemacetan serius.
●Lipatan: Sebelum mencetak, label harus rata, arah lipatan tidak
lebih dari 13 mm (0,5 inci).
●Kondisi: Jangan menggunakan label yang kusut, bergelembung
atau yang bisa lepas.
Amplop
Konstruksi amplop
Konstruksi amplop penting diperhatikan. Garis lipatan amplop bisa
berbeda-beda, tidak hanya antar pabrik pembuat, tetapi bisa juga di
satu kotak dari pabrik yang sama. Keberhasilan pencetakan pada
amplop tergantung pada kualitas amplop. Saat memilih amplop,
pertimbangkan komponen-komponen berikut ini:
●Berat: Berat kertas amplop jangan melebihi 105 g/m2 (28 pon)
atau akan macet.
●Konstruksi: Sebelum mencetak, amplop harus rata dengan
lekukan di bawah 6mm (0,25 inci) dan tidak boleh mengandung
udara. (Amplop yang mengandung udara bisa menyebabkan
masalah).
●Kondisi: Pastikan amplop tidak berkerut, berlubang ataupun
rusak.
●Ukuran: Dari 90 x 160 mm (3,5 x 6,3 inci) sampai 178 x 254 mm
(7 x 10 inci).
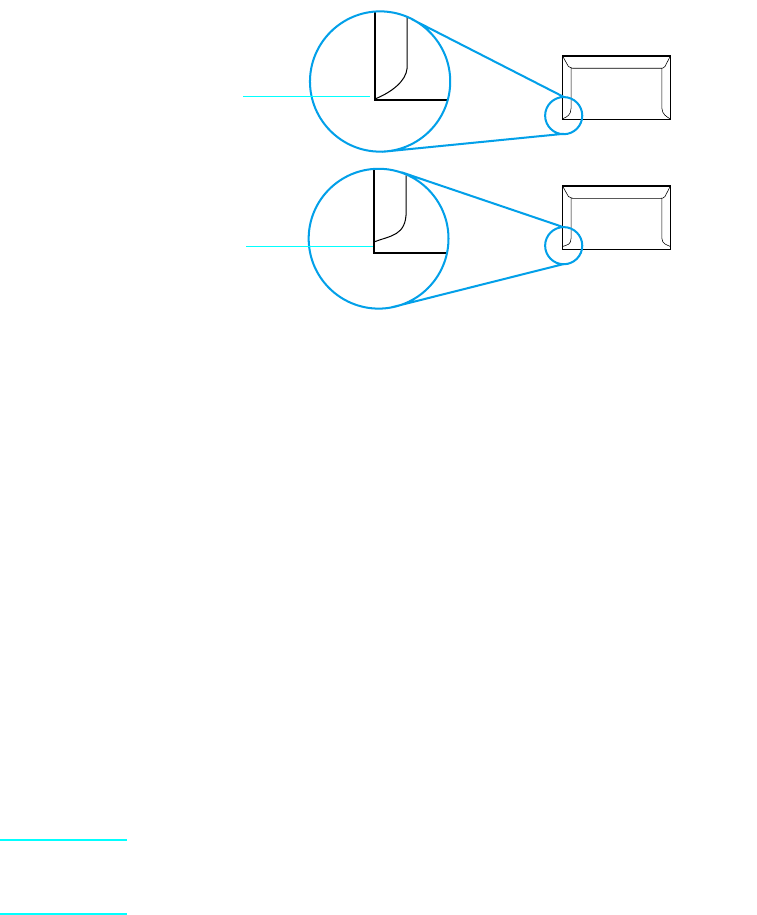
IN Petunjuk menggunakan kertas 81
Amplop dengan sambungan dua sisi
Konstruksi sambungan dua sisi memiliki sambungan vertikal di kedua
ujung amplop, bukan diagonal. Jenis seperti ini mudah berkerut.
Pastikan sambungannya tidak putus hingga sudut amplop seperti
digambarkan di bawah ini.
Penyimpanan amplop
Penyimpanan amplop dengan benar membantu kualitas cetakan
yang baik. Amplop harus disimpan secara rata. Jika ada udara di
dalam amplop yang menimbulkan gelembung udara, amplop bisa
berkerut saat pencetakan.
Stok kartu dan media tebal
Banyak stok kartu yang bisa dicetak dari nampan masukan kertas,
termasuk kartu indeks dan kartu pos. Hasil cetakan sejumlah stok
kartu lebih baik dari yang lain karena konstruksinya lebih sesuai
masuk ke printer laser.
Untuk kinerja printer maksimal, jangan menggunakan kertas lebih
berat dari 163g/m2 (43 pon). Kertas yang terlalu berat bisa
menyebabkan kesalahan pengumpanan, masalah penumpukan,
kertas macet, campuran toner yang buruk, kualitas cetakan jelek atau
penggunaan mekanis berlebihan.
Catatan Menmcetak pada kertas tebal bisa dilakukan bila nampan tidak diisi
penuh dan menggunakan kertas yang kelicinannya berkisar antara
100-180 Sheffield.
Bisa diterima
T
idak bisa diterima
82 lampiran C - Spesifikasi kertas IN
Konstruksi stok kartu
●Kelicinan: Kartu stok 135-163 g/m2 (36-43 pon) sebaiknya
mempunyai tingkat kelicinan 100-180 Sheffield. Kartu stok 60-
1353 g/m2 (16-36 pon) sebaiknya mempunyai tingkat kelicinan
100-250 Sheffield.
●Konstruksi: Stok kartu sebaiknya rata dengan lekukan kurang
dari 5 mm (0.2 in).
●Kondisi: Pastikan stok kartu tidak berkerut, terpotong atau
rusak.
●Ukuran: Gunakan hanya stok kartu berukuran berikut ini:
Minimum: 76 x 127 mm (3 x 5 inci) Maksimum: 216 x 356 mm
(8,5 x 14 inci).
Petunjuk stok kartu
●Jika kartu berlekuk atau macet, cetaklah dengan menggunakan
slot keluaran media tebal. Atur margin sekurang-kurangnya 2 mm
(0,08 inci) dari tepi kertas.
Untuk memesan petunjuk tambahan
●Petunjuk Spesifikasi Kertas Printer Keluarga HP LaserJet (hanya dalam
bahasa Inggris) 5963-7863 (Edisi Mei 2000).
IN Indeks 83
Indeks
A
adaptor, perhatian 12
aktif/nonaktif 12
amplop
memilih 80
mencetak 32, 36
menyimpan 81
ukuran 27, 46
B
bagian-bagian, printer
mengenali 8
baju, toner
toner
mencucu baju 10
bangun dari Modus Tidur 24, 48
bayangan, membetulkan 52
berat
kertas 81
printer 71
bereaksi, printer tidak 47
C
cadangan baterai,perhatian 12
cartridge cetak
garansi 66
kualitas cetak 51, 52, 54
memasang 9, 46
memesan 69
mendaur ulang 73
menyimpan 9
nomor suku cadang 69
usia cetakan 38
cartridge, toner
memasang 9, 46
menyimpan 9
cartridges, toner
garansi 66
kualitas cetak 51, 52, 54
memesan 69
mendaur ulang 73
nomor suku cadang 69
usia cetakan 38
CD, membuat disk dari 19
cermin internal 53
cermin, internal 53
cetakan pudar 39, 51
cetakan teks buram 53, 55
cetakan tidak lurus 58
corengan, membetulkan 51
D
daur ulang 9, 46, 73
dimensi, printer 71
disket, membuat 19
DOS, pemecahan masalah 60
dot per inci 72
dot, membetulkan 51
dpi 72
driver printer
mendukung 15
menginstalasi 16
driver, printer
mendukung 15
menginstalasi 16
dukungan konsumen
Kantor Pelayanan dan Penjualan HP 69
Layanan Perbaikan HP 66
Pusat Pelayanan Konsumen HP 41
dupleks 33, 34
E
emisi ozone 72
G
gambar, tidak lengkap 55
garansi 65, 66
garis, membetulkan 52
garis-garis putih, membetulkan 53
H
halaman hitam, membetukkan 57
halaman hitam, membetulkan 54, 55, 58
help. See customer support;
troubleshooting
I
instalasi alternatif 17
instalasi perangkat lunak
alternatif Windows NT 18
kebutuhan 15
standar 16, 17
Windows 2000 16
Windows 3.1 17
Windows 95/98 16
84 Indeks IN
Windows 95/98 alternatif 17
Windows NT 16
instalasi standar 16, 17
J
jalur lurus 29, 36
jaringan, pemecahan masalah 63
K
kabel listrik
pemecahan masalah 47
kabel paralel 11
memesan 69
menghubungkan
kabel daya
menghubungkan 11
pemecahan masalah 47
Kantor Pelayanan dan Penjualan 69
Kantor Pelayanan dan Penjualan HP 69
kapasitas disk, kebutuhan 15
kapasitas sirkuit, minimum 71
kapasitas, kertas 71
karakter drop out, membetulkan 53, 55
kartu pos, mencetak 36
kebutuhan perangkat keras 15
kebutuhan prosesor 15
kebutuhan sistem 15
kebutuhan, sistem 15
kecepatan, printer
maksimal 71
Modus Ekonomis 38, 59
kelembaban, untuk menyimpan printer 71
kemacetan kertas
mencegah 14, 29, 50
mengeluarkan 42, 43
sering 49
kemacetan, kertas
mencegah 14, 29, 50
mengeluarkan 42, 43
sering 49
kertas
berat 81
berkerut 56
daur ulang 73
kehalusan 82
kemacetan 42, 49
kerut 34, 56
masalah dengan 78
memasukkan 14
memesan 69
memilih 78
memisah 57
memisah-misahkan 57
menambah 14
menyimpan 56
pemecahan masalah 78, 79
Petunjuk Spesifikasi Kertas HP LaserJet
Printer memesan 82
petunjuk spesifikasi, memesan 82
promasalah dengan 79
spesifikasi untuk 78
tebal 36, 81
ukuran 72
kertas tebal
memilih 79, 81
mencetak pada 29, 36
kertas timbul, mencetak pada 31
kerut, mencegah 56
kertas 34, 56
transparansi 37
kesalahan perangkat keras 49
kesesuaian, pernyataan 75
komunikasi dua arah 11, 15
konsumsi listrik 71, 72
kop surat, mencetak 31
kotak switch 63
kualitas, cetak 51
L
label
memilih 80
mencetak 36, 37
menempelkan pada printer 13
lampu berkedip 24, 25
Lampu data 23, 24
lampu indikator
berkedip 24, 25
Data 23, 24
mengenali 8
Salah 23, 25, 48
semua aktif 49
semua nonaktif 24, 48
Siaga 23, 24
Lampu salah 23, 25, 48
Lampu Siaga 23, 24
latar belakang pecah-pecah,
membetulkan 54
Layanan Perbaikan 66
Layanan Perbaikan HP 66
lebar, printer 71
lembar uji cetak, mencetak 41
lingkaran kerja
printer 72
toner cartridge 38
lingkungan pengoperasian 71
M
margin, minimum 36
masalah pencetakan Windows,
pemecahan masalah 60
IN Indeks 85
masalah pengumpanan
kemacetan kertas 42, 49
salah pengumpanan 45
media khusus 36
media, mencetak
memilih 27, 78
spesial 36
ukuran 27
memasang 11, 12
memasukkan kertas 14
membatalkan pencetakan 35
membersihkan
roda 53
membuat disk dari CD 19
memesan
perlengkapan 69
petunjuk spesifikasi kertas 82
memisahkan kertas 57
memori
kebutuhan sistem 15
printer 72
tidak cukup 63
menambah kertas 14
mencuci toner dari baju 10
menempelkan label 13
mengatur ulang printer 34
mengeluarkan
data 34
kemacetan kertas 42, 43
mengembalikan suku cadang 73
menghapus pencetakan 35
menghentikan pencetakan 35
menghentikan sementara pencetakan 34
menghubungkan 11
kabel daya 11
menginstalasi
perangkat lunak 15
menginterupsi pencetakan 34
menyimpan
amplop 81
kertas 56
printer 71
toner cartridge 9
meratakan toner 39
Modus Ekonomis 38
Modus Siaga
otomatis 12
Modus Tidur
bangun dari 24, 48
konsumsi listrik 71
MS-DOS, pemecahan masalah pada 60
N
noda, membetulkan 51, 53
nomor suku cadang 69
nomor telepon, dukungan konsumen 41
O
orientasi halaman 36
orientasi landscape 36
orientasi, halaman 36
P
panel kontrol 23
Pelayanan Konsumen HP 41
pelindung kejut 63
pelurusan, mencetak 58
pemandu kertas
mengenali 8
menggunakan 49
menunakan 42
pemandu, kertas
mengenali 8
menggunakan 42, 49
pemecahan masalah
DOS 60
jaringan 63
kabel 47
kecepatan rendah 59
kemacetan kertas 42, 49
kotak switch 63
kualitas, cetak 51
listrik 47
masalah kertas 56, 78, 79
memori, tidak cukup 63
Pencetakan Windows 60
perangkat lunak 59
pencetakan dua sisi 33, 34
pengaturan 7
pengepakan, toner cartridge 9, 46
pengumpanan manual 34
penyangga keluaran kertas
mengenali 8
menggunakan 14
penyangga keluaran, kertas
menggunakan 14
penyangga keluaran,kertas
mengenali 8
penyangga kertas
mengenali 8
menggunakan 14
penyangga masukan kertas
mengenali 8
menggunakan 14
penyangga masukan, kertas
menggunakan 14
penyangga masukan,kertas
mengenali 8
penyangga, kertas
mengenali 8
penyangga,kertas
menggunakan 14
penyedia servis resmi 66
86 Indeks IN
Penyedia Servis Resmi HP 66
perjanjian lisensi perangkat lunak 67
Perjanjian lisensi perangkat lunak HP 67
perjanjian lisensi, perangkat lunak 67
perjanjian, lisensi perangkat lunak 67
perlengkapan
memesan 69
mengembalikan 73
perlengkapan bekas, mengembalikan 73
pernyataan keselamatan lase 74
pernyataan kesesuaian 75
pesan salah 59
Petunjuk Spesifikasi Kertas HP LaserJet
Printer, memesan 82
pintu printer
membuka 9, 46
mengenali 8
pintu, printer
mengenali 8
pintu,printer
membuka 9
pita, membuka ?? 9
port 11
port paralel
menghubungkan 11
pemecahan masalah 47
port serial 11
praktek lingkungan 72
Program Lingkungan Perlengkapan Cetak
Partner Planet 73
Program Lingkungan Perlengkapan Cetak
Partner Planet HP 73
R
RAM (Memori Akses Acak)
kebutuhan sistem 15
RAM (Random Access Memory)
printer 72
tidak cukup 63
Random Access Memory (RAM)
printer 72
tidak cukup 63
resolusi
maksimal 72
mengurangi 38
roda 43, 53
S
salah pengumpanan, kertas 45
sambungan listrik, perhatian 12
Sesuai Energy Star 72
situs, wilayah Asia Pasifik 73
slot keluaran
mengenali 8
slot keluaran untuk media yang tebal
kapasitas 71
menggunakan 29
slot keluaran, media
mengenali 8
slot keluaran, media tebal
kapasitas 71
menggunakan 29
slot masukan satu lembar
mengeluarkan kertas macet 42
slot masukan satu lembaran
mengenali 8, 30
slot masukan, satu lembar
mengeluarkan kertas macet 42
slot masukan, satu lembaran
mengenali 8, 30
spesifikasi
kertas 78
printer 71
stok kartu 36, 81
suku cadang, printer
memesan 69
mengembalikan 73
sumber listrik tidak terinterupsi, perhatian
12
sumber listrik, memasang 11, 12
sumber listrik,perhatian 12
T
temperatur, untuk menyimpan printer 71
tidak bereaksi 47
tinggi, printer 71
tingkat kebisingan, printer 71
tombol panel muka
mengenali 8
mengguakan 24
menggunakan 34
tombol, panel muka
mengenali 8
menggunakan 24, 34
toner
meratakan 39
toner cartridge
garansi 66
kualitas cetak 51, 52, 54
memasang,memasang
toner cartridge 9
memesan 69
mendaur ulang 73
menyimpan 9
nomor suku cadang 69
usia cetakan 38
transparansi, mencetak 36, 37
IN Indeks 87
tuas jalur kertas
mengenali 8
menggunakan 29
tuas, kertas 29
U
ukuran kertas khusus 36
ukuran kertas maksimal 72
ukuran kertas minimum 72
ukuran, media cetakan
amplop 27, 46
kertas 27, 72
W
wadah keluaran kertas
kapasitas 71
mengenali 8
wadah keluaran, kertas
kapasitas 71
mengenali 8
wadah masukan kertas
capacity 71
menempelkan label pada 13
mengeluarkan kertas macet 42
mengenali 8
menggunakan 14
pemecahan masalah 49
wadah masukan, kertas
kapasitas 71
menempelkan label pada 13
mengeluarkan kertas macet 42
mengenali 8
pemecahan masalah 49
wadah masukan, kertas menggunakan 14
Windows 2000
instalasi perangkat lunak 16
kebutuhan sistem 15
Windows 3.1
instalasi perangkat lunak 17
kebutuhan sistem 15
Windows 95/98
instalasi perangkat lunak 16
kebutuhan sistem 15
menginstalasi perangkat lunak,
alternatif 17
Windows NT
instalasi perangkat lunak 16
instalasi perangkat lunak alternatif 18
kebutuhan sistem 15
88 Indeks IN


User Guide
LaserJet 6L Pro
HP Printer
© Copyright 2001
Hewlett-Packard Co.
Manual Part No.
C8060-90929
Chinese
English
Indonesian
*C8060-90929*
C8060-90929
*C8060-90929*
