HP Color LaserJet 2550 Series Gsg XLWW Laser Jet Getting Started Guide C00242843
User Manual: HP HP Color LaserJet 2550 series - Getting Started Guide
Open the PDF directly: View PDF  .
.
Page Count: 40
Copyright and License
© 2004 Copyright Hewlett-Packard Development Company, L.P.
Reproduction, adaptation or translation without prior written permission
is prohibited, except as allowed under the copyright laws.
The information contained herein is subject to change without notice.
The only warranties for HP products and services are set forth in the
express warranty statements accompanying such products and
services. Nothing herein should be construed as constituting an
additional warranty. HP shall not be liable for technical or editorial errors
or omissions contained herein.
Part number: Q3702-90943
Edition 1, 03/2004
FCC Regulations
This equipment has been tested and found to comply with the limits for
a Class B digital device, pursuant to Part 15 of the FCC rules. These
limits are designed to provide reasonable protection against harmful
interference in a residential installation. This equipment generates,
uses, and can radiate radio frequency energy. If this equipment is not
installed and used in accordance with the instructions, it may cause
harmful interference to radio communications. However, there is no
guarantee that interference will not occur in a particular installation. If
this equipment does cause harmful interference to radio or television
reception, which can be determined by turning the equipment off and
on, the user is encouraged to try to correct the interference by one or
more of the following measures:
Reorient or relocate the receiving antenna.
Increase separation between equipment and receiver.
Connect equipment to an outlet on a circuit different from that to which
the receiver is located.
Consult your dealer or an experienced radio/TV technician.
Any changes or modifications to the printer that are not expressly
approved by HP could void the user's authority to operate this
equipment.
Use of a shielded interface cable is required to comply with the Class B
limits of Part 15 of FCC rules.
See the electronic User Guide for more regulatory information.
Trademark Credits
Microsoft Windows® and Windows NT® are U.S. registered trademarks
of Microsoft Corporation.
版权和许可证
© 2004 版权所有 Hewlett-Packard Development
Company, L.P.
除非版权法许可,否则,在事先未经书面许可的情况下,
严禁复制、改编或翻译本书。
此处的信息如有更改,恕不另行通知。
HP 产品及服务的保修仅以随该产品及服务提供的书面保修
声明为准。 本文所述任何内容不应被视为附加保修。 对任
何技术或编辑错误或者本文所述内容的遗漏,HP 不承担任
何责任。
产品号: Q3702-90943
Edition 1, 03/2004
商标声明
Microsoft Windows® 和 Windows NT® 是微软公司在美国
的注册商标。
1
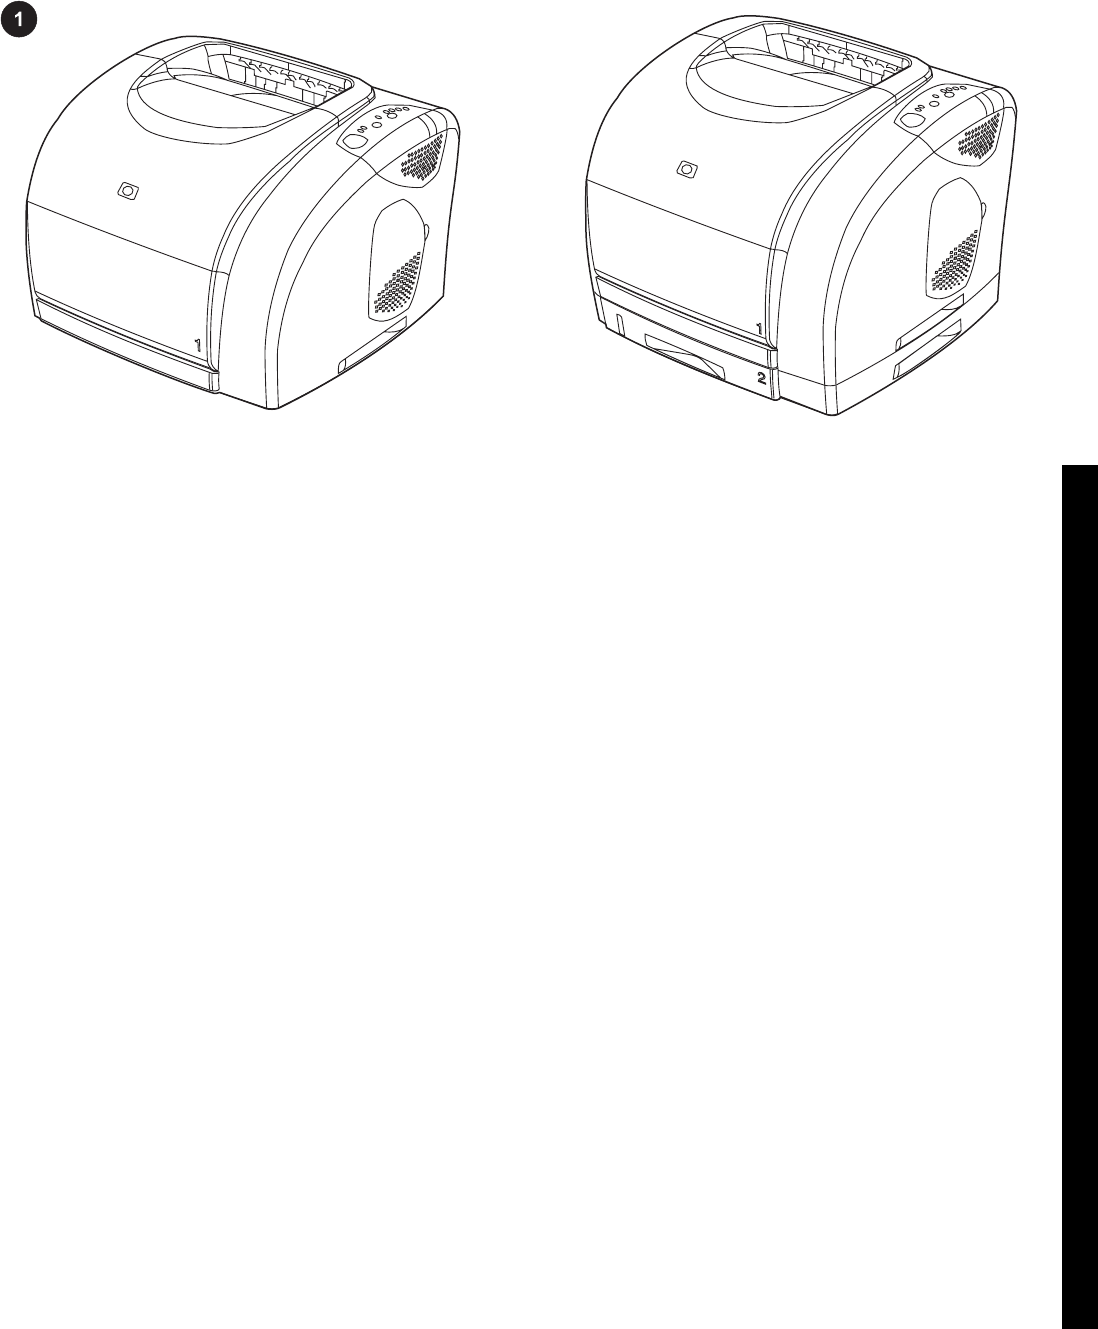
Printer configurations. All HP color LaserJet 2550 series printers
come with the same features as the HP color LaserJet 2550L
model: a 125-sheet multipurpose tray (tray 1), parallel and universal
serial bus (USB) interface ports, and 32 MB RAM. The HP color
LaserJet 2550Ln model also includes an HP Jetdirect internal print
server.
打印机配置。 所有 HP color LaserJet 2550 系列打印
机随附的功能部件均与 HP color LaserJet 2550L 型相
同: 一个 125 页多用途纸盘(纸盘 1),并行及通用串
行 总 线 (USB) 接 口 ,以 及 32 MB RAM 。 HP color
LaserJet 2550Ln 型号还配有 HP Jetdirect 内置打印服
务器。
Konfigurasi printer. Semua printer seri HP color LaserJet 2550
dilengkapi fitur yang sama dengan model HP color LaserJet 2550L:
sebuah baki multiguna 125-lembar (baki 1); port antarmuka paralel
dan universal serial bus (USB), dan RAM 32 MB. Model HP color
LaserJet 2550Ln juga dilengkapi dengan print server internal HP
Jetdirect.
프린터 구성. 모든 HP color LaserJet 2550 시리즈 프린터는 HP
color LaserJet 2550L 모델과 마찬가지로, 125매 다목적 용지함(용지
함 1) 1개, 병렬 포트와 USB 포트, 32MB RAM으로 구성되어 있습니
다. HP color LaserJet 2550Ln 모델에는 HP Jetdirect 내장형 프린트
서버가 함께 제공됩니다.
การกําหนดคาเครื่องพิมพ เครื่องพิมพ HP color LaserJet 2550 series ทั้ง
หมดจะมาพรอมกับคุณสมบัติตางๆ เชนเดียวกับเครื่องพิมพรุน HP color
LaserJet 2550L: ถาดอเนกประสงคความจุ 125 แผน (ถาด 1), พอรต
อินเตอรเฟซแบบขนานและแบบ USB และ RAM ขนาด 32 เมกะไบต เครื่อง
พิมพ HP color LaserJet 2550Ln มีเซิรฟเวอรการพิมพภายใน HP
Jetdirect
印表機組態。 所有 HP color LaserJet 2550 系列印表機隨附的配件
與 HP color LaserJet 2550L 機型相同: 一個可容納 125 張紙的多功
能紙匣 (1 號紙匣)、平行與通用序列匯流排 (USB) 介面連接埠及 32
MB RAM。 HP color LaserJet 2550Ln 機型另外包含 HP Jetdirect 內
接式列印伺服器。
The HP color LaserJet 2550n printer includes all of the features of
the HP color LaserJet 2550L printer, plus a 250-sheet tray (tray 2)
and an HP Jetdirect internal print server.
HP color LaserJet 2550n 打 印 机 配 有 HP color
LaserJet 2550L 打印机的所有功能部件,另外还配有一
个 250 页纸盘(纸盘 2)以及一个 HP Jetdirect 内置打
印服务器。
Printer HP color LaserJet 2550n dilengkapi semua fitur printer HP
color LaserJet 2550L, ditambah baki 250-lembar (baki 2) dan print
server internal HP Jetdirect.
HP color LaserJet 2550n 프린터에는 HP color LaserJet 2550L 프린
터에 기본적으로 제공되는 항목 외에 250매 용지함(용지함 2) 1개와
HP Jetdirect 내장용 프린트 서버가 제공됩니다.
เครื่องพิมพ HP color LaserJet 2550n ไดรวมคุณสมบัติทั้งหมดของเครื่อง
พิมพ HP color LaserJet 2550L รวมทั้งถาดกระดาษความจุ 250 แผน
(ถาด 2) และเซิรฟเวอรการพิมพภายใน HP Jetdirect
HP color LaserJet 2550n 包含 HP color LaserJet 2550L 印表機的所
有功能,另外還附有可容納 250 張紙的紙匣 (2 號紙匣) 與 HP
Jetdirect 內接式列印伺服器。
2
English 简体中文 Bahasa Indonesia 한국어 ภาษาไทย 繁體中文
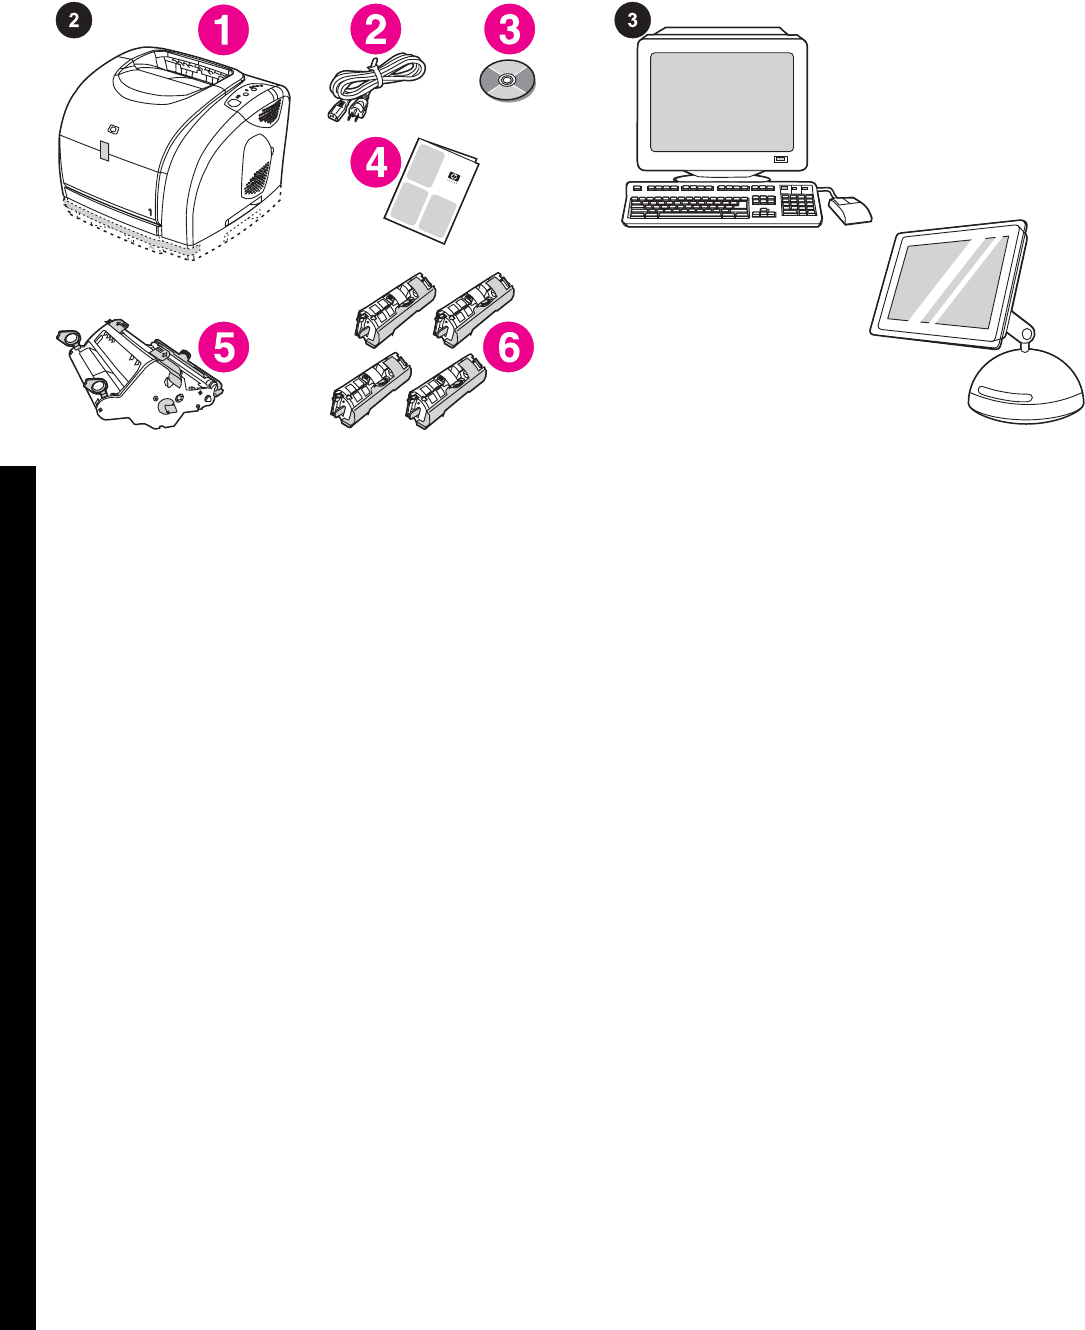
Check the package contents. 1) the printer; 2) a power cable; 3) a
CD-ROM (includes the User Guide and printer software); 4) this
Getting Started Guide; 5) an imaging drum; 6) four print cartridges:
yellow (Y), magenta (M), cyan (C), and black (K).
Note Parallel and USB cables are not included.
检查包装箱内的物品。 1) 打印机;2) 电源线;3) CD-
ROM(包括用户指南和打印机软件);4) 本入门指
南;5) 成像鼓;6) 四个打印碳粉盒: 黄色 (Y)、品红
色 (M)、青色 (C) 及黑色 (K)。
注意 不提供并行和 USB 电缆。
Periksa isi kemasan. 1) printer; 2) kabel daya; 3) CD-ROM (berisi
Panduan Penggunaan dan piranti lunak printer); 4) Panduan untuk
Memulai ini; 5) drum gambar; 6) empat kartrid tinta: kuning (Y),
magenta (M), cyan (C), dan hitam (K).
Perhatikan Kabel paralel dan USB tidak disertakan.
패키지 내용물 확인. 1) 프린터, 2) 전원 케이블 1개, 3) CD-ROM 1개
(사용 설명서와 프린터 소프트웨어 포함), 4) 시작 설명서, 5) 이미지
드럼 1개, 6) 프린트 카트리지 4개: 노란색(Y), 마젠타색(M), 시안색
(C) 및 검은색(K)
주 병렬 케이블과 USB 케이블은 포함되지 않습니다.
ตรวจสอบสิ่งที่อยูในกลอง 1) เครื่องพิมพ; 2) สายไฟ; 3) แผนซีดีรอม (ซึ่งมี
คูมือผูใชและซอฟตแวรเครื่องพิมพ); 4) คูมือการเริ่มตนใชงานฉบับนี้ 5)
อุปกรณสรางภาพ และ 6) ตลับหมึกพิมพสี่ตลับ ดังนี้ สีเหลือง (Y), สีแดง (M),
สีน้ําเงิน (C) และสีดํา (K)
หมายเหตุ ไมไดจําหนายพรอมสายเคเบิลแบบขนานและสาย USB
檢查包裝箱中的物件。 1) 印表機;2) 電源線;3) CD-ROM (包含使
用指南與印表機軟體);4) 本使用入門指南;5) 感光鼓;6) 四個碳粉
匣: 黃色 (Y)、紫紅色 (M)、青藍色 (C) 及黑色 (K)。
注意 印表機未隨附平行電纜與 USB 電纜。
Minimum system requirements. See the outside of the box in
which the printer shipped, or see the Readme on the CD-ROM.
最低系统要求。 请参阅打印机装运箱的外表面,或者
参阅 CD-ROM 上的自述文件。
Persyaratan sistem minimal. Simak bagian luar kotak kemasan
printer, atau simak file Readme pada CD-ROM.
최소 시스템 사양. 프린터 포장 상자 바깥쪽이나 CD-ROM의
Readme 파일을 참조하십시오.
ขอกําหนดขั้นต่ําของระบบ โปรดดูที่ดานนอกของกลองที่บรรจุเครื่องพิมพ
หรือที่ไฟล Readme ในแผนซีดีรอม
最低系統要求。 請參閱印表機包裝箱上的說明或 CD-ROM 上的
「Readme (讀我)」檔案。
3
繁體中文 ภาษาไทย 한국어 Bahasa Indonesia 简体中文 English
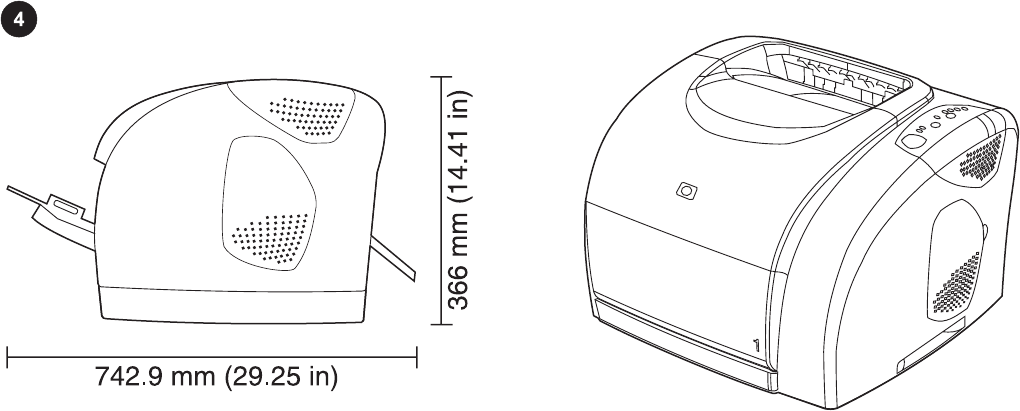
Prepare the location. Select a sturdy, level surface in a well-
ventilated, dust-free area. Make sure there is enough space around
the printer so that the air vents on the left side and rear of the
printer are not blocked. If you have purchased the optional 500-
sheet tray (tray 3), it is 138 mm (5.43 inches) high.
准备安装位置。 选择一个稳固的水平台面,且四周通
风良好,含尘量少。 确保在打印机周围留出足够空间,
以便打印机左侧和后面通风良好,并且没有障碍物。 如
果您购买了 500 页可选纸盘(纸盘 3),此纸盘高为
138 毫米。
Siapkan lokasinya. Pilih permukaan yang kokoh, rata di daerah
yang berventilasi-cukup, bebas-debu. Pastikan ada cukup ruang di
sekitar printer sehingga aliran udara di sebelah kiri dan belakang
printer tidak terhalang. Apabila Anda membeli baki 500-lembar
opsional (baki 3), tingginya 138 mm.
설치 장소 확보. 통풍이 잘되고 먼지가 없으며 표면이 단단하고 편평
한 곳에 두어야 합니다. 프린터 주변 공간이 충분해야 프린터 왼쪽과
뒤쪽에 통풍이 제대로 이루어집니다. 500매 용지함(선택 사양 용지
함 3)을 구입한 경우 높이는 138mm가 됩니다.
เตรียมพื้นที่การจัดวาง เลือกพื้นผิวที่เรียบและมั่นคงในที่มีอากาศถายเทดี
และปราศจากฝุนละออง ตรวจดูใหแนใจวามีที่วางรอบเครื่องพิมพ เพื่อไมใหมี
สิ่งกีดขวางการถายเทของอากาศที่ดานซายและดานหลังของเครื่องพิมพ หาก
คุณซื้อถาดกระดาษเสริมความจุ 500 แผน (ถาด 3) ความสูงของถาดจะเทา
กับ 138 มม.
準備放置地點。 請在通風良好且無塵的區域中選擇堅固平坦的表
面。 確保印表機周圍有足夠的空間,以使印表機左側與背面的通風孔
不會被堵塞。 如果您購買了可容納 500 張紙的選購紙匣 (3 號紙匣),
則高度為 138 公釐 。
Note When preparing a location for the HP color LaserJet 2550L
printer, make sure that the surface on which you are placing the
printer is larger than the bottom of the printer. No portion of the
printer base should extend past the surface on which it rests.
注意 为 HP color LaserJet 2550L 打印机准备放置位置
时,请确保用于放置打印机的台面大于打印机底部。 打
印机底部的任一部分都不能超出打印机所处台面。
Perhatikan Sewaktu menyiapkan lokasi printer HP color LaserJet
2550L, pastikan bahwa permukaan tempat Anda meletakkan printer
lebih luas dari alas printer. Tidak ada bagian alas printer yang boleh
melampai permukaan penyangganya.
주 HP color LaserJet 2550L 프린터 설치 공간은 프린터 바닥보다 더
넓어야 하고, 프린터 바닥이 설치 공간을 넘지 않아야 합니다.
หมายเหตุ เมื่อคุณเตรียมพื้นที่จัดวางเครื่องพิมพ HP color LaserJet 2550L
โปรดตรวจสอบใหแนใจวาพื้นที่สําหรับวางเครื่องตองมีขนาดใหญกวาฐาน
ของเครื่องพิมพ โดยที่ตองไมมีสวนหนึ่งสวนใดของฐานเครื่องพิมพยื่นเกิน
พื้นที่ที่เครื่องตั้งอยู
注意 在為 HP color LaserJet 2550L 印表機準備放置地點時,放置印
表機的表面必須大於印表機的底部。 印表機基座的任何部分均不得超
出放置表面的範圍。
4
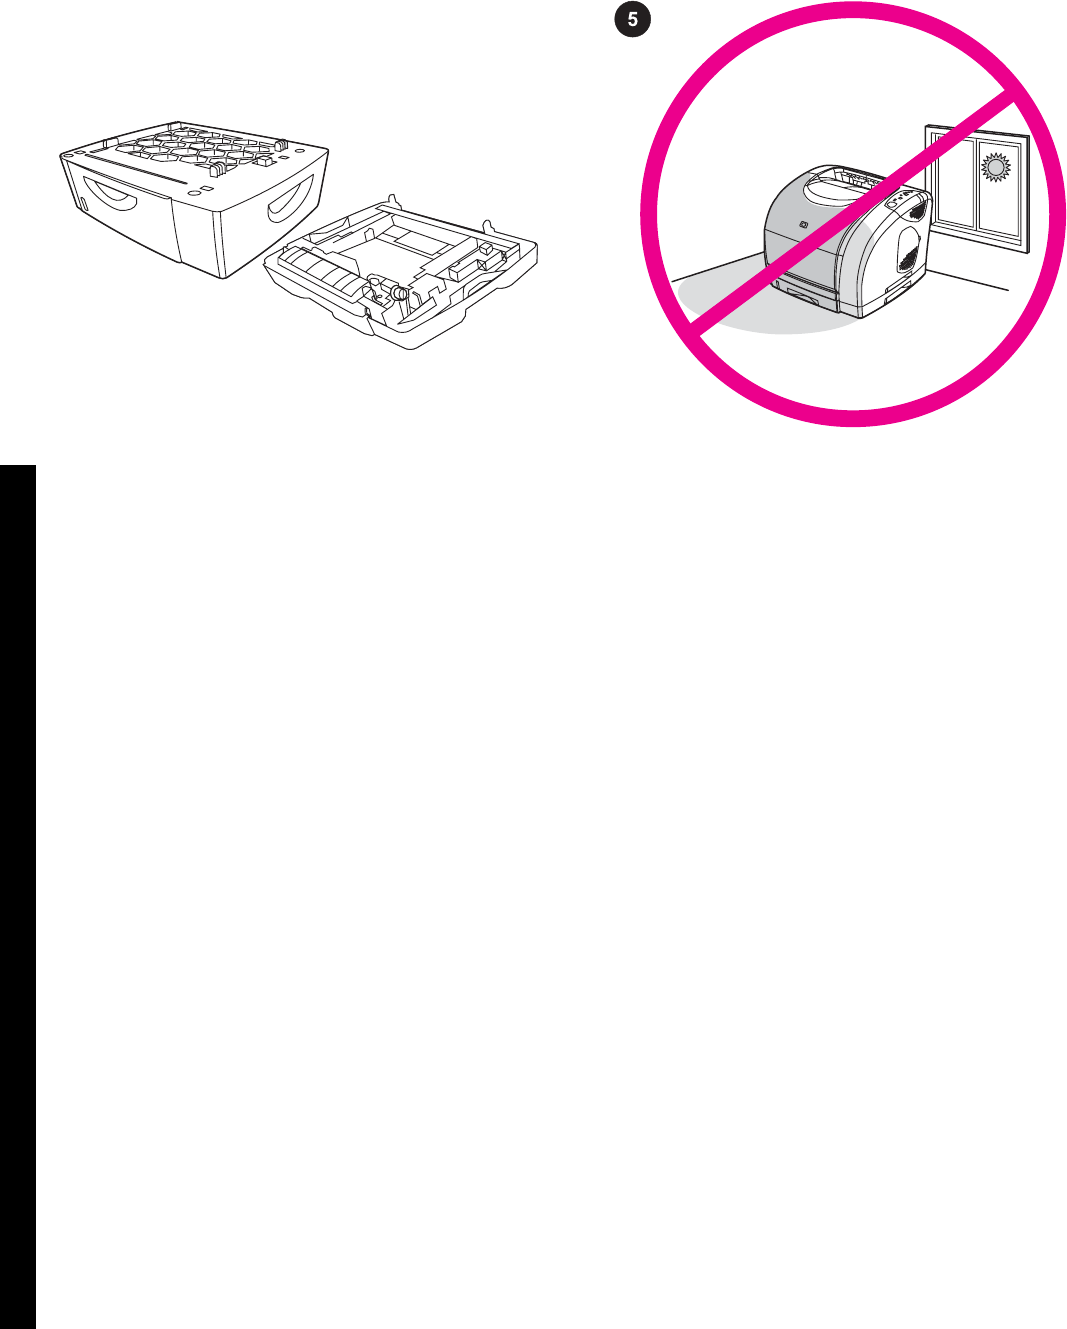
If you have purchased an optional 250-sheet tray (tray 2) or an
optional 500-sheet tray (tray 3), see the documentation that was
provided with the tray in order to install it.
如果您购买了 250 页可选纸盘(纸盘 2)或 500 页可选
纸盘(纸盘 3),请参阅纸盘随附的说明文件,然后进
行安装。
Apabila Anda membeli baki 250-lembar opsional (baki 2) atau baki
500-lembar opsional (baki 3), simak dokumentasi yang disertakan
dengan baki untuk menginstalasinya.
250매 용지함(선택 사양 용지함 2) 또는 500매 용지함(선택 사양 용지
함 3)을 구입한 경우 함께 제공되는 설명서에 따라 설치하십시오.
หากคุณซื้อถาดกระดาษเสริมความจุ 250 แผน (ถาด 2) หรือถาดกระดาษ
เสริมความจุ 500 แผน (ถาด 3) โปรดดูวิธีการติดตั้งถาดจากเอกสารที่ใหมา
พรอมกับถาดนั้น
如果您購買了可容納 250 張紙的選購紙匣 (2 號紙匣) 或可容納 500
張紙的選購紙匣 (3 號紙匣),安裝時請參閱紙匣隨附的說明文件。
Regulate the environment. Do not place the printer in direct
sunlight or an area that has abrupt temperature and humidity
changes. Recommended ranges: 20 to 27 degrees C (68 to 81
degrees F) and 20 to 70 percent relative humidity.
控制环境。 请勿将打印机放在日光直射或温度和湿度
变化剧烈的地方。 建议的范围: 20 至 27°C(68 至
81°F),相对湿度为 20% 至 70%。
Jaga kondisi lingkungannya. Jangan menempatkan printer di
daerah dengan sinar matahari langsung atau perubahan suhu dan
kelembaban yang drastis. Rentang yang disarankan: 20 s/d 27
derajat C (68 s/d 81 derajat F) dan kelembaban relatif 20 s/d 70
persen.
환경 조절. 직사광선이 들어 오거나 기온과 습도 변화가 심한 장소
에 프린터를 두지 마십시오. 권장 환경: 섭씨 20 - 27도(화씨 68 - 81
도) 및 상대습도 20 - 70%.
จัดสภาพแวดลอมใหเหมาะสม หามใหเครื่องพิมพถูกแสงแดดโดยตรง หรือ
อยูในที่ที่อุณหภูมิหรือความชื้นเปลี่ยนแปลงอยางรวดเร็ว อุณหภูมิที่แนะนํา
คือ 20 ถึง 27 องศาเซลเซียส (68 ถึง 81 องศาฟาเรนไฮต) และมีความชื้น
สัมพัทธ 20 ถึง 70 เปอรเซ็นต
保持良好的環境。 請勿將印表機置於陽光直射或溫度與濕度會發生
急劇變化的區域。 建議的溫度與濕度範圍: 攝氏 20 到 27 度 (華氏
68 到 81 度),相對濕度百分之 20 到 70。
5
繁體中文 ภาษาไทย 한국어 Bahasa Indonesia 简体中文 English
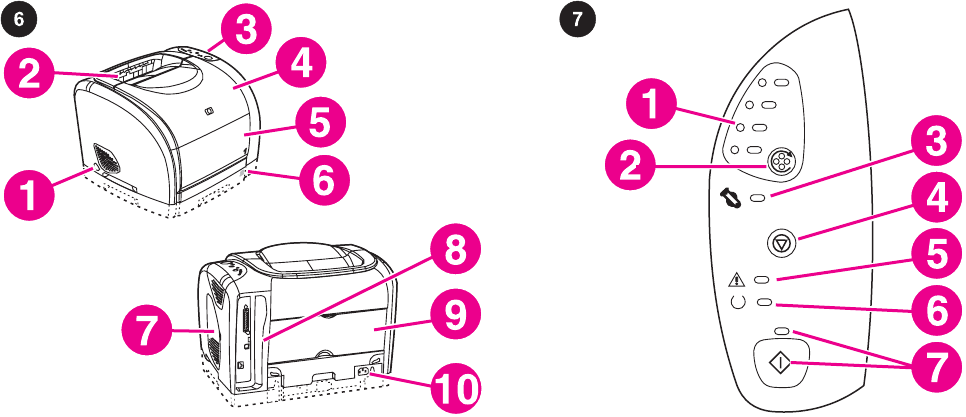
Locate the printer parts. 1) power switch; 2) top output bin; 3)
control panel; 4) top cover; 5) tray 1; 6) optional tray 2 (2550n
model); 7) dual inline memory module (DIMM) access door; 8)
interface ports; 9) rear output door; 10) power connector.
识别打印机部件。 1) 电源开关;2) 顶部出纸槽;3) 控
制面板;4) 顶盖;5) 纸盘 1;6) 可选纸盘 2(2550n 型
号);7) 双列直插内存模块 (DIMM) 装卸盖;8) 接口;
9) 后部出纸盖;10) 电源接口。
Kenali komponen printer. 1) saklar power (daya); 2) nampan
keluaran atas; 3) panel kontrol; 4) penutup atas; 5) baki 1; 6) baki 2
opsional (model 2550n); 7) pintu akses modul memori dual inline
(DIMM); 8) port antarmuka; 9) pintu keluaran belakang; 10)
konektor daya.
프린터 부품 위치 확인. 1) 전원 스위치, 2) 상단 출력 용지함, 3) 제어
판, 4) 상단 덮개, 5) 용지함 1, 6) 용지함 2(선택 사양)(2550n 모델),
7) DIMM 액세스 도어, 8) 포트, 9) 후면 출력 도어, 10) 전원 커넥터.
ตําแหนงสวนตางๆ ของเครื่องพิมพ 1) สวิตชเปด/ปดเครื่อง; 2) ถาดกระดาษ
ออกดานบน; 3) แผงควบคุม; 4) ฝาปดเครื่องพิมพดานบน; 5) ถาด 1; 6) ถาด
เสริม 2 (รุน 2550n); 7) ฝาปดชองใส Dual Inline Memory Module
(DIMM); 8) พอรตอินเตอรเฟซ; 9) ฝาปดถาดกระดาษออกดานหลัง; 10)
ชองเสียบไฟ
瞭解印表機零件的位置。 1) 電源開關;2) 上方出紙槽;3) 控制面
板;4) 頂蓋;5) 1 號紙匣;6) 選購的 2 號紙匣 (2550n 機型);7) 雙
排直插式記憶體模組 (DIMM) 裝卸機蓋;8) 介面連接埠;9) 後出紙槽
擋門;10) 電源連接器。
Understand the control panel. 1) print-cartridge lights; 2) R
OTATE
C
AROUSEL
button; 3) imaging drum light; 4) C
ANCEL
J
OB
button; 5)
Attention light (amber); 6) Ready light (green); 7) Go light (green)
and G
O
button.
了解控制面板。 1) 打印碳粉盒指示灯;2) 旋转传送带
按钮;3) 成像鼓指示灯;4) 取消作业按钮;5) 注意指
示灯(琥珀色);6) 就绪指示灯(绿色);7) 执行指示
灯(绿色)和执行按钮。
Memahami panel kontrol. 1) lampu kartrid cetak; 2) tombol P
UTAR
K
ORSEL
; 3) lampu drum gambar; 4) tombol B
ATALKAN
P
EKERJAAN
; 5)
lampu Perhatian (gading); 6) lampu Siap (hijau); 7) lampu Jalan
(hijau) dan tombol J
ALAN
.
제어판 설명. 1) 프린트 카트리지 표시등, 2) 회전 장치 버튼, 3) 이미
지 드럼 표시등, 4) 작업 취소 버튼, 5) 주의 표시등(노란색), 6) 준비
표시등(초록색), 7) 진행 표시등(초록색) 및 진행 버튼.
การทําความเขาใจเกี่ยวกับแผงควบคุม 1) ไฟตลับหมึกพิมพ; 2) ปุม
R
OTATE
C
AROUSEL
; 3) ไฟของอุปกรณสรางภาพ; 4) ปุมยกเลิกงานพิมพ; 5)
ไฟพิจารณา (สีเหลืองอําพัน); 6) ไฟพรอมทํางาน (สีเขียว); 7) ไฟทํางาน (สี
เขียว) และปุม ทํางาน
瞭解控制面板。 1) 碳粉匣指示燈;2) 轉動轉盤 按鈕;3) 感光鼓指
示燈;4) 取消列印 按鈕;5) 指示燈 (琥珀色);6) 就緒指示燈 (綠
色);7) 列印指示燈 (綠色) 與 列印 按鈕。
6
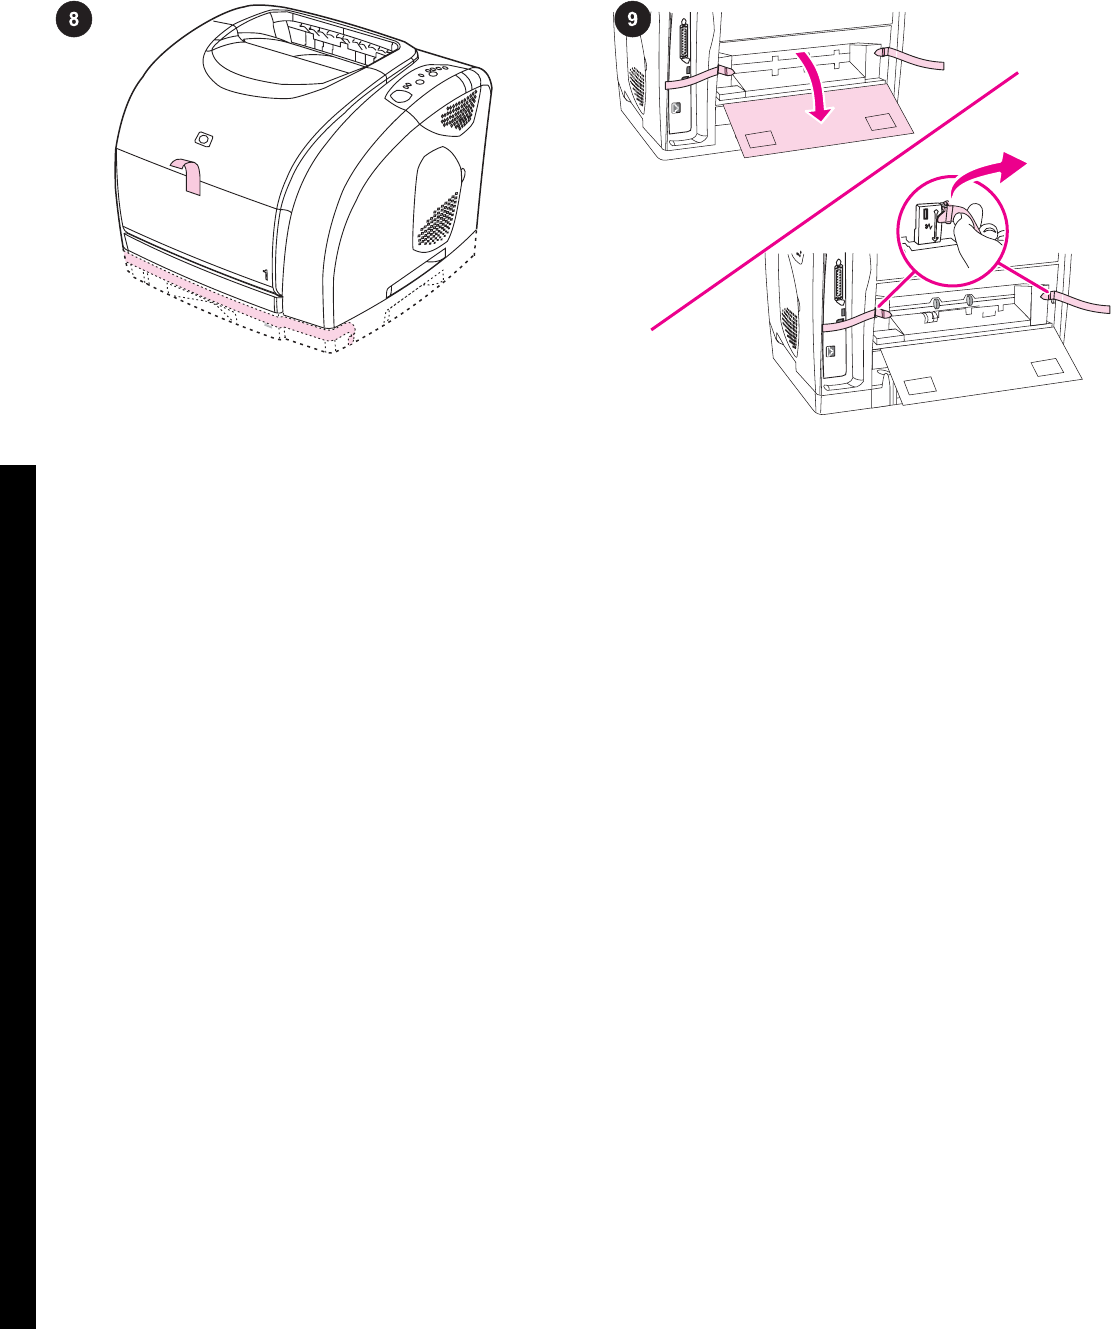
Remove the packing materials. Remove all orange tape from the
printer.
撕下包装材料。 从打印机上撕下所有橙色胶带。
Lepaskan bahan kemasan. Lepaskan semua pita perekat oranye
dari printer.
포장재 제거. 프린터에서 주황색 테이프를 모두 벗겨내십시오.
นําวัสดุที่ใชหอหุมออก ลอกเทปกาวสีสมออกจากเครื่องพิมพ
去除包裝材料。 撕下印表機的所有橙色膠帶。
Remove the shipping locks. 1) Open the rear output door. 2)
Remove the orange shipping locks on either side of the output area.
3) Close the rear output door.
取出装运锁。 1) 打开后部出纸盖。 2) 取出输出区域
两侧的橙色装运锁。 3) 合上后部出纸盖。
Lepaskan kunci pengaman pengiriman. 1) Buka pintu keluaran
belakang. 2) Lepaskan kunci pengaman pengiriman oranye di
kedua sisi daerah keluaran. 3) Tutup pintu keluaran belakang.
운송 고정 장치 분리. 1) 후면 출력 도어를 여십시오. 2) 출력 영역에
서 주황색 운송 고정 장치를 떼어내십시오. 3) 후면 출력 도어를 닫으
십시오.
ถอดตัวล็อคที่ใชในการขนสง 1) เปดฝาปดถาดกระดาษออกดานหลัง 2)
ถอดดัวล็อคระหวางการขนสงสีสมที่ดานขางของบริเวณกระดาษออกแตละ
ดาน 3) ปดฝาปดถาดกระดาษออกดานหลัง
取出固定鎖。 1) 打開後出紙槽擋門。2) 取出輸出區域兩側的橙色固
定鎖。3) 闔上後出紙槽擋門。
7
繁體中文 ภาษาไทย 한국어 Bahasa Indonesia 简体中文 English
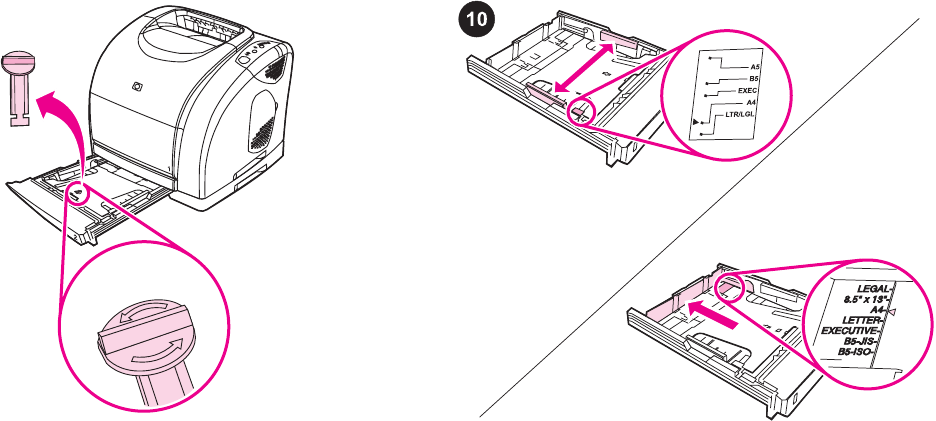
Remove the tray 2 shipping locks. Open optional tray 2 (HP color
LaserJet 2550n printer only), and then remove the orange shipping
lock inside the tray.
取出纸盘 2 的装运锁。打开可选纸盘 2(仅适用于 HP
color LaserJet 2550n 打印机),然后取出纸盘内的橙
色装运锁。
Lepaskan kunci pengaman pengiriman baki 2. Buka baki 2 opsional
(hanya printer warna HP LaserJet 2550n), kemudian lepaskan kunci
pengaman pengiriman oranye di dalam baki.
용지함 2 포장용 잠금 장치를 떼어내십시오. 용지함 2(선택 사양)(HP
color LaserJet 2550n 프린터만 해당)를 열고 안에서 주황색 운송 고
정 장치를 떼어내십시오.
ถอดตัวล็อคที่ใชในการขนสงของถาด 2 เปดถาดเสริม 2 (เฉพาะเครื่องพิมพ
HP color LaserJet 2550n) แลวถอดตัวล็อคสีสมที่ใชในการขนสงที่อยูดาน
ในถาดออก
取出 2 號紙匣固定鎖。開啟選購的 2 號紙匣 (限 HP color LaserJet
2550n 印表機),然後取下紙匣內的橙色固定鎖。
Adjust the guides on optional tray 2. 1) Pull the tray out of the
printer. 2) Move the blue width guides to match the paper size being
loaded. 3) Extend the rear of the tray until the arrow points to the
paper size being loaded.
调整可选纸盘 2 上的导板。 1) 将纸盘从打印机中拉
出。 2) 移动蓝色宽度导板,使其与所装纸张的尺寸相
匹配。 3) 拉出纸盘后部,直至箭头指向所装纸张的尺
寸。
Atur pemandu pada baki 2 opsional. 1) Tarik keluar baki dari
printer. 2) Geser pemandu lebar biru sesuai ukuran kertas yang
diisikan. 3) Panjangkan bagian belakang baki sampai ke titik panah
ukuran kertas yang diisikan.
용지함 2(선택 사양)의 조정대 조정. 1) 용지함을 프린터에서 빼내십
시오. 2) 파란색 너비 조정대를 용지 크기에 맞추십시오. 3) 화살표가
해당 용지 크기에 닿을 때까지 용지함 뒤쪽을 빼내십시오.
ปรับตัวกั้นบนถาดเสริม 2 1) ดึงถาดออกจากเครื่องพิมพ 2) เลื่อนตัวกั้นความ
กวางกระดาษสีฟาใหตรงกับขนาดกระดาษที่ตองการใส 3) ขยายดานหลัง
ของถาดออกจนกวาลูกศรจะชี้ไปที่ขนาดกระดาษที่ตองการใส
調整 2 號選購紙匣的導板。 1) 將紙匣從印表機中拉出。 2) 移動藍
色寬度導板,使其與裝入的紙張尺寸相符。 3) 拉長紙匣的後端,直至
箭頭指向裝入的紙張尺寸。
8
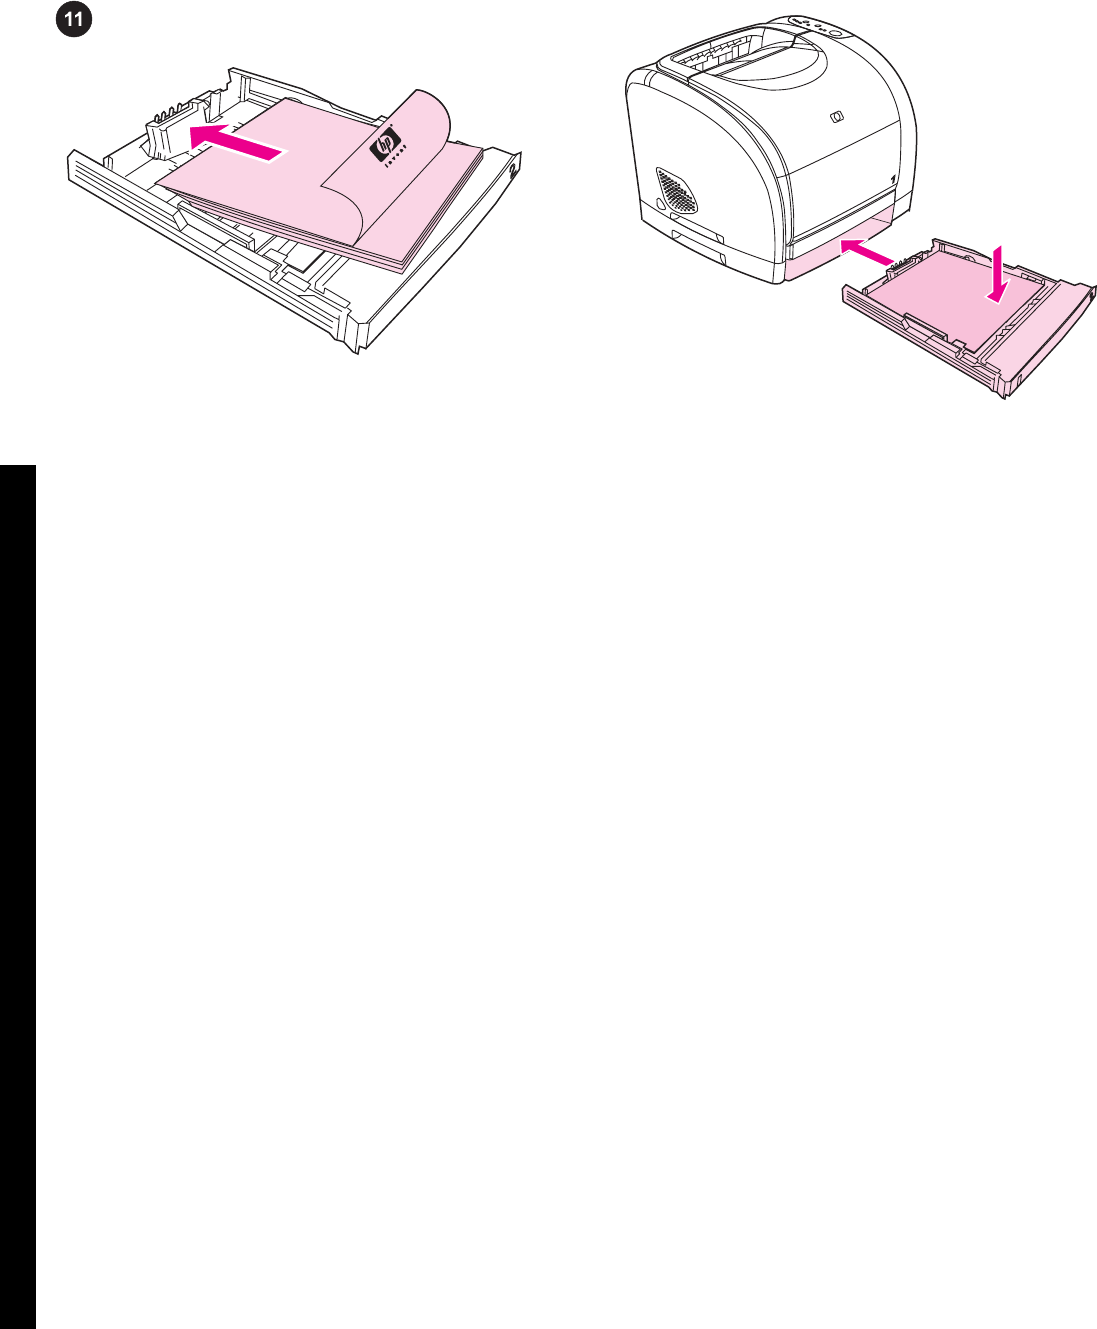
Load paper in tray 2.
Note Never fan paper before loading it.
1) Load the paper with the side to be printed face-down, with the top
edge toward the front. 2) Make sure the paper is flat at all corners
and below the height marks.
将纸张装入纸盘 2。
注意 在装入纸张前切勿展开纸张。
1) 装入纸张,使其打印面朝下,顶缘朝向前部。 2) 确
保纸张四角平整并且位于高度标记下。
Mengisikan kertas ke baki 2.
Perhatikan Jangan mengipas kertas sebelum mengisikannya.
1) Isikan kertas dengan sisi yang akan dicetak menghadap bawah,
ujung atasnya di depan. 2) Pastikan kertas rata di semua sudutnya
dan di bawah batas ketinggian.
용지함 2에 용지 넣기.
주 용지를 넣기 전에 펼치지 마십시오.
1) 인쇄면이 아래로 가고 위쪽 가장자리가 앞쪽을 향하게 하여 용지
를 넣으십시오. 2) 용지의 네 모서리가 접히지 않고 용지가 높이 표시
선 아래에 있는지 확인하십시오.
ใสกระดาษในถาด 2
หมายเหตุ อยาคลี่กระดาษกอนใส
1) ใสกระดาษโดยคว่ําดานที่จะพิมพลง และใหขอบดานบนอยูทางดานหนา
2) ตรวจสอบวากระดาษทุกมุมเรียบและอยูต่ํากวาขีดความสูงกระดาษ
在 2 號紙匣中裝入紙張。
注意 切勿在裝紙之前翻動紙張。
1) 裝入紙張時,使列印面向下,並使上方邊緣朝向前端。 2) 確保紙
張四個角落均已放置平整,並且在高度標記的下方。
3) Push down on the paper to lock the metal plate in the tray into
place. 4) Slide the tray back into the printer.
3) 向下推动纸张,将纸盘中的金属板锁定到位。 4) 将
纸盘滑回打印机。
3) Tekan kertas ke bawah untuk mengunci pelat logam di baki. 4)
Sorong kembali baki ke dalam printer.
3) 용지를 눌러 용지함의 금속판이 제자리로 들어가게 하십시오. 4)
용지함을 프린터로 밀어 넣으십시오.
3) กดกระดาษลงใหเขาล็อคของแผนโลหะในถาด 4) เลื่อนถาดกลับเขาไปใน
เครื่องพิมพ
3) 向下按壓紙張以將紙匣的金屬盤鎖定。 4) 將紙匣滑回印表機。
9
繁體中文 ภาษาไทย 한국어 Bahasa Indonesia 简体中文 English
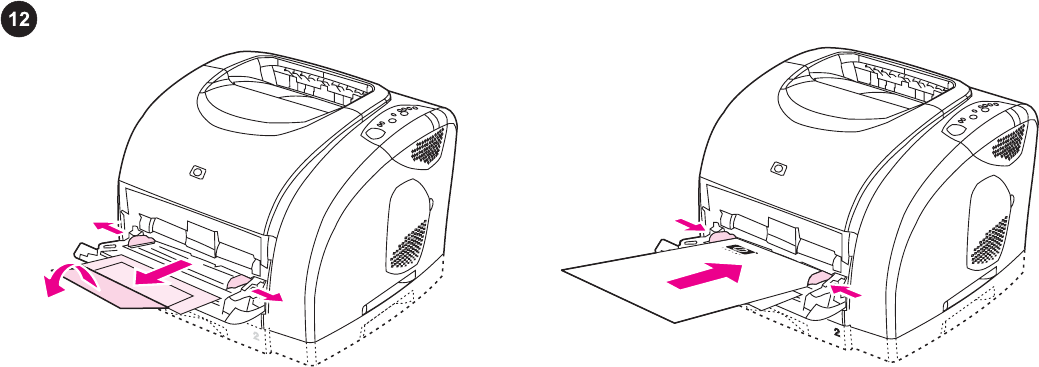
Load tray 1. 1) Open tray 1, and then slide out the tray extender. 2)
Slide the width guides until they are slightly wider than the paper.
装入纸盘 1。 1) 打开纸盘 1,然后滑出纸盘延伸板。
2) 滑动宽度导板,直至导板间的宽度略宽于纸张。
Mengisikan ke baki 1. 1) Buka baki 1, lalu tarik keluar
perpanjangan baki. 2) Geser pemandu lebar sampai sedikit lebih
lebar dari kertas.
용지함 1에 용지 넣기. 1) 용지함 1을 열고 용지함 확장판을 빼내십
시오. 2) 너비 조정대를 용지보다 넓게 당기십시오.
ใสกระดาษในถาด 1 1) เปดถาด 1 แลวเลื่อนสวนขยายของถาดออก 2)
เลื่อนตัวกั้นความกวางกระดาษจนกวางกวาขนาดกระดาษเพียงเล็กนอย
在 1 號紙匣中裝入紙張。 1) 打開 1號紙匣並滑出紙匣延伸板。 2) 滑
動寬度導板,直至其寬度稍微超過紙張。
3) Load the paper with the side to be printed face-up, with the top
edge toward the printer. 4) Slide the width guides in so that they
lightly touch the paper. 5) Make sure that the paper fits under the
tabs on the width guides.
3) 装入纸张,使其打印面朝上,顶缘朝向打印机。 4)
向里滑动宽度导板,以使其稍稍接触纸张。 5) 确保宽
度导板的卡子恰好卡住纸张。
3) Isikan kertas dengan sisi yang akan dicetak menghadap atas,
ujung atasnya ke arah printer. 4) Geser masuk pemandu lebar
sampai sedikit menyentuh kertas. 5) Pastikan kertas berada di
bawah tab pada pemandu lebar.
3) 인쇄면이 위로 가고 위쪽 가장자리가 프린터를 향하게 하여 용지
를 넣으십시오. 4) 너비 조정대가 용지에 살짝 닿도록 미십시오. 5) 용
지가 너비 조정대 탭 아래에 있는지 확인하십시오.
3) ใสกระดาษโดยหงายดานที่จะพิมพขึ้น และใหหันขอบดานบนเขาหาเครื่อง
พิมพ 4) เลื่อนตัวกั้นความกวางกระดาษเขาหากันเพื่อใหชิดกับกระดาษ 5)
โปรดตรวจสอบใหแนใจวากระดาษอยูใตแท็บบนตัวกั้นความกวางกระดาษ
3) 裝入紙張時,使列印面向上,並使上方邊緣朝向印表機。 4) 向內
滑動寬度導板,使其稍微碰到紙張。 5) 確定紙張裝在寬度導板彈片下
方。
10
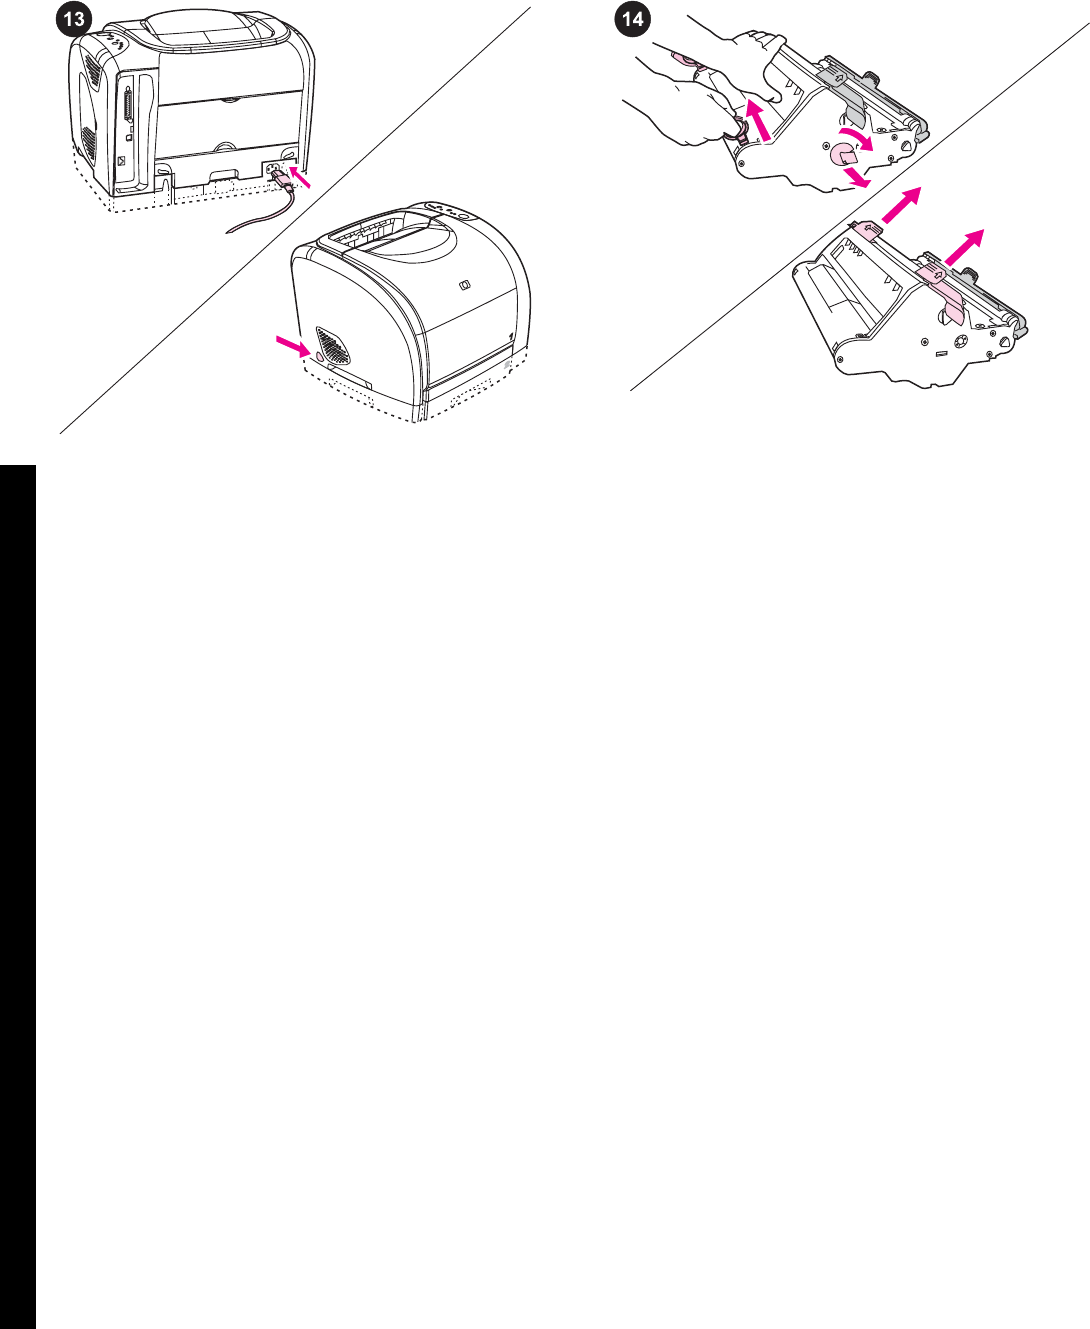
Connect the power cable, and then turn on the printer.
Note Do not connect the printer to a computer at this time.
1) Connect the power cable between the power connector on the
back of the printer and an ac outlet. 2) Press the power switch on
the left side of the printer.
连接电源线,然后打开打印机电源。
注意 此时,请勿将打印机连接至计算机。
1) 将电源线的一端插入打印机背面的电源接口,另一端
插入交流电源插座。 2) 按下打印机左侧的电源开关。
Sambungkan kabel daya, lalu hidupkan printer.
Perhatikan Pada tahap ini jangan menghubungkan printer ke
komputer.
1) Sambungkan kabel daya antara konektor daya di bagian
belakang printer dan stopkontak AC. 2) Tekan saklar daya di
sebelah kiri printer.
전원 케이블 연결 및 프린터 켜기.
주 이때 프린터를 컴퓨터에 연결하지 마십시오.
1) 프린터 뒤에 있는 전원 커넥터와 AC 콘센트에 전원 케이블을 꽂으
십시오. 2) 프린터 왼쪽에 있는 전원 스위치를 누르십시오.
เสียบสายไฟ แลวเปดเครื่องพิมพ
หมายเหตุ อยาตอเครื่องพิมพเขากับเครื่องคอมพิวเตอรในขณะนี้
1) ตอสายจากชองเสียบไฟที่ดานหลังเครื่องพิมพเขากับเตาเสียบไฟ AC 2)
กดสวิตชเปด/ปดเครื่องที่ดานซายของเครื่องพิมพ
連接電源線,然後開啟印表機電源。
注意 此時請勿將印表機連接至電腦。
1) 使用電源纜線將印表機背面的電源連接器連接到交流電源插座。
2) 按下印表機左側的電源開關。
Install the imaging drum. 1) Remove the imaging drum from its
packaging. 2) Place the imaging drum on a firm surface, and then
pull the orange rings to remove the shipping pins. 3) Remove the
orange shipping lock on each end of the imaging drum. 4) Remove
the two orange shipping spacers.
安装成像鼓。 1) 从包装袋中取出成像鼓。 2) 将成像
鼓放在平稳坚固的表面上,然后拉动橙色拉环,卸下装
运销。 3) 取下成像鼓两端的橙色装运锁。 4) 取出两个
橙色隔片。
Menginstalasi drum gambar. 1) Lepaskan drum gambar dari
kemasannya. 2) Letakkan drum gambar di permukaan yang kokoh,
lalu tarik cincin oranye untuk melepaskan pin pengiriman. 3)
Lepaskan kunci pengiriman di setiap ujung drum gambar. 4)
Lepaskan dua bantalan pengiriman oranye.
이미지 드럼 설치. 1) 이미지 드럼 포장지를 벗겨내십시오. 2) 표면
이 단단한 곳에 이미지 드럼을 놓고 주황색 고리를 당겨 운송용 고정
핀을 떼어내십시오. 3) 이미지 드럼 양쪽에 있는 주황색 운송 고정 장
치를 떼어내십시오. 4) 주황색 운송용 스페이서를 떼어내십시오.
ติดตั้งอุปกรณสรางภาพ 1) ถอดอุปกรณสรางภาพออกจากหีบหอบรรจุ 2)
วางอุปกรณสรางภาพบนพื้นผิวเรียบ แลวดึงวงแหวนสีสมดานบนออกเพื่อถอด
หมุดที่มากับการขนสง 3) ถอดตัวล็อคสีสมที่ใชในการขนสงซึ่งอยูดานปลาย
ของอุปกรณสรางภาพ 4) ถอดแผนที่ใชกั้นชองวางในระหวางการขนสงสีสม
2 ชิ้นออก
安裝感光鼓。 1) 取出包裝中的感光鼓。 2 將感光鼓置於平穩的表面
上,然後拉動橙色拉環以除去固定栓。 3) 取出感光鼓兩側的橙色固定
鎖。 4) 取出兩塊橙色固定墊塊。
11
繁體中文 ภาษาไทย 한국어 Bahasa Indonesia 简体中文 English
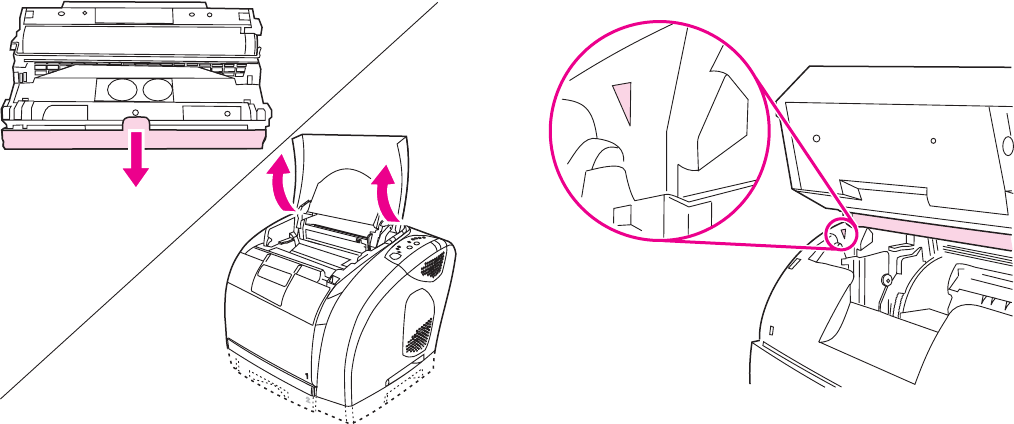
5) Remove the orange cover from the imaging drum.
CAUTION Do not touch the surface of the white roller or expose the
roller to light for an extended period of time. Doing so could cause
print-quality issues.
6) Open the top cover of the printer.
5) 从成像鼓上取下橙色遮盖。
小心 请勿触及白色滚筒的表面或将滚筒置于光照条件下
太长时间。 否则可能导致打印质量问题。
6) 打开打印机顶盖。
5) Lepaskan penutup oranye dari drum gambar.
AWAS Jangan menyentuh permukaan roller putih atau
membiarkannya terkena cahaya untuk waktu yang lama. Hal itu
dapat menyebabkan masalah kualitas cetakan.
6) Buka penutup atas printer.
5) 이미지 드럼에서 주황색 덮개를 떼어내십시오.
주의 흰색 롤러 표면을 만지거나 직사광선에 장시간 노출시키지 마십
시오. 인쇄 품질이 나빠질 수 있습니다.
6) 프린터 상단 덮개를 여십시오.
5) ถอดฝาครอบสีสมออกจากอุปกรณสรางภาพ
ขอควรระวัง หามสัมผัสพื้นผิวของลูกกลิ้งสีขาว หรืออยาใหลูกกลิ้งถูกแสง
แดดเปนเวลานาน มิฉะนั้น อาจทําใหคุณภาพการพิมพลดลงได
6) เปดฝาครอบดานบนของเครื่องพิมพ
5) 取下感光鼓的橙色護蓋。
小心 請勿碰觸白色滾筒的表面或將滾筒長時曝露於光線下, 以免影
響列印品質。
6) 打開印表機的頂蓋。
Note To avoid damaging the imaging drum, make sure that the
cover is completely open.
7) Align the green arrows on the side of the imaging drum with the
green arrows inside the printer.
注意 确保遮盖已完全打开,以免损坏成像鼓。
7) 使成像鼓两侧的绿色箭头与打印机内的绿色箭头对
齐。
Perhatikan Untuk menghindari kerusakan drum gambar, pastikan
penutup terbuka penuh.
7) Atur anak panah hijau di samping drum gambar tepat pada anak
panah hijau di dalam printer.
주 이미지 드럼이 손상될 수 있으므로 덮개를 완전히 열어두십시오.
7) 이미지 드럼의 초록색 화살표를 프린터 안의 초록색 화살표에 맞추
십시오.
หมายเหตุ โปรดตรวจสอบวาไดเปดฝาจนสุดแลว เพื่อปองกันความเสียหาย
ของอุปกรณสรางภาพที่อาจเกิดขึ้น
7) จัดแนวลูกศรสีเขียวที่ดานขางอุปกรณสรางภาพตามลูกศรสีเขียวที่ปรากฏ
ภายในเครื่องพิมพ
注意 為了避免損壞感光鼓,請將頂蓋完全打開。
7) 將感光鼓兩側的綠色箭頭與印表機內的綠色箭頭對齊。
12
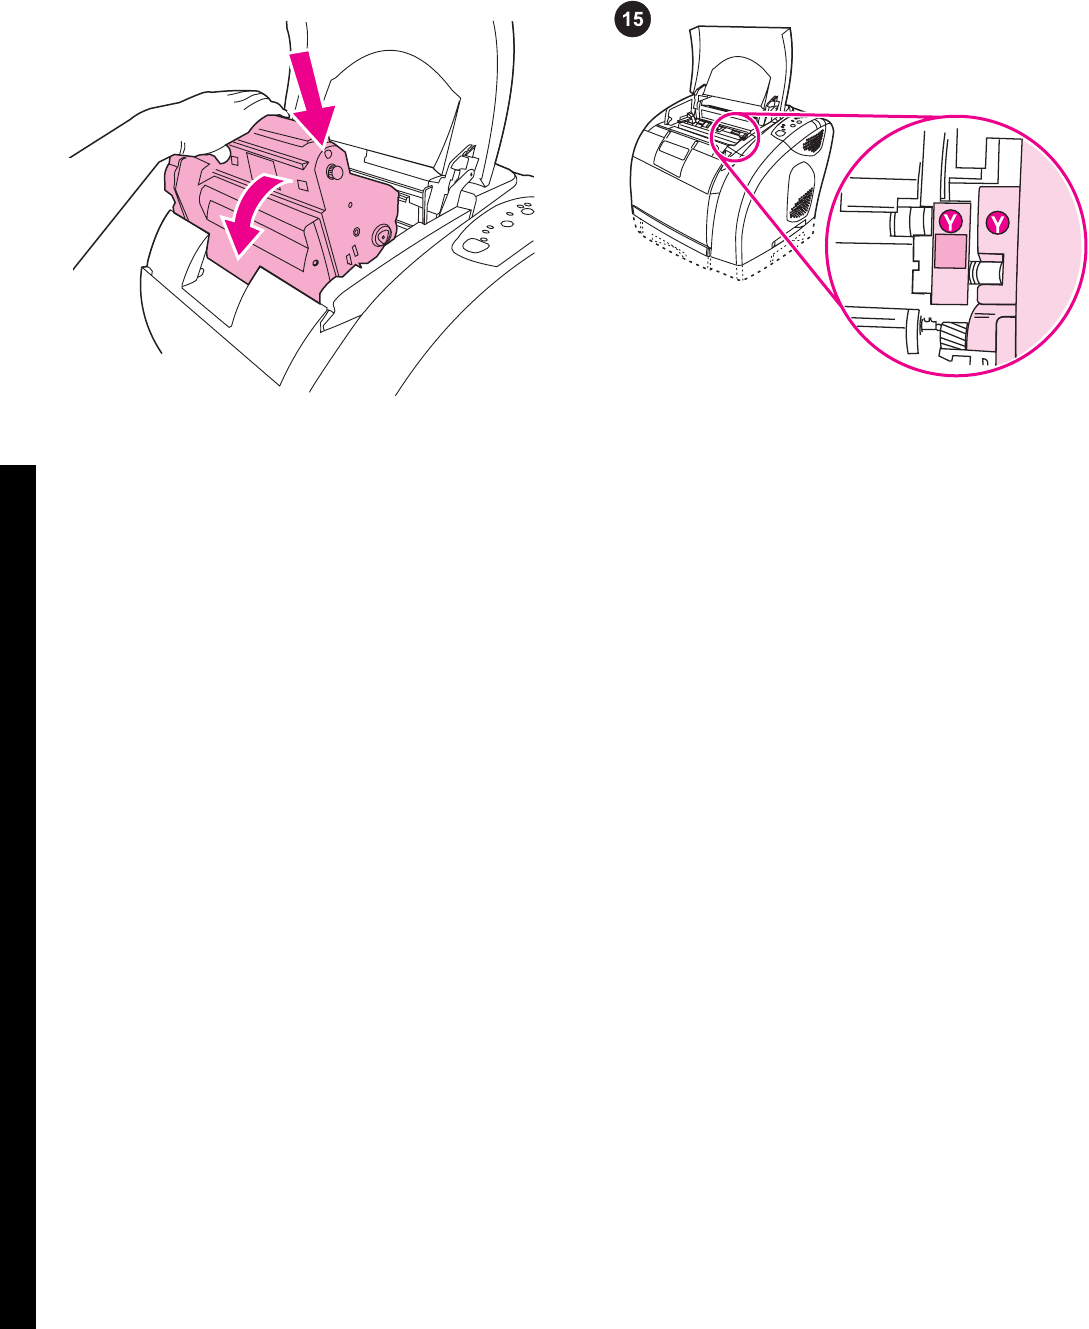
8) Lower the imaging drum into the printer, slightly rotate the
imaging drum toward the front of the printer, and then press it firmly
into place.
8) 将成像鼓放入打印机并轻微旋转,使其朝向打印机前
端,然后用力将其压入到位。
8) Turunkan drum gambar ke dalam printer, putar sedikit drum
gambar ke arah depan printer, lalu tekan dengan kuat ke tempatnya.
8) 이미지 드럼을 프린터에 넣고 프린터 앞쪽으로 약간 돌려 눌러서
제자리에 단단히 고정시키십시오.
8) วางอุปกรณสรางภาพลงในเครื่องพิมพ แลวคอยๆ ขยับไปทางดานหนา
ของเครื่องพิมพ และกดใหเขาที่
8) 將感光鼓向下放入印表機中,將感光鼓稍微轉向印表機前方,然後
用力壓入固定。
Install the print cartridges. 1) Look inside the printer on the right to
see which print-cartridge slot is in the access position. 2) Locate the
color of print cartridge that matches the color of the slot, and then
remove the print cartridge from its packaging.
安装打印碳粉盒。 1) 从打印机右侧向里查看,看一下
哪个打印碳粉盒插槽处在装卸位置。 2) 找到颜色与插
槽颜色相匹配的打印碳粉盒,然后将其从包装中取出。
Menginstalasi kartrid cetak. 1) Lihat ke dalam printer sebelah
kanan untuk melihat selot kartrid cetak mana yang dapat diakses.
2) Temukan warna kartrid cetak yang cocok dengan warna selot,
lalu keluarkan kartrid cetak dari kemasannya.
프린트 카트리지 설치. 1) 오른쪽에서 프린터 안을 보고 바로 넣을
수 있는 위치에 있는 프린트 카트리지 슬롯을 확인하십시오. 2) 해당
슬롯 색상에 맞는 프린트 카트리지를 찾아 포장지를 벗겨내십시오.
ติดตั้งตลับหมึกพิมพ 1) ใหดูภายในเครื่องพิมพทางดานขวาวาชองใสตลับ
หมึกพิมพใดที่อยูในตําแหนงที่เขาถึงได 2) เลือกสีของตลับหมึกพิมพใหตรง
กับสีของชองใส และนําตลับหมึกพิมพนั้นออกจากหีบหอบรรจุ
安裝碳粉匣。 1) 從右側查看印表機內部,以瞭解位於裝卸位置的碳
粉匣插槽。 2) 找出與該插槽色彩相符的碳粉匣,然後將其從包裝中取
出。
13
繁體中文 ภาษาไทย 한국어 Bahasa Indonesia 简体中文 English
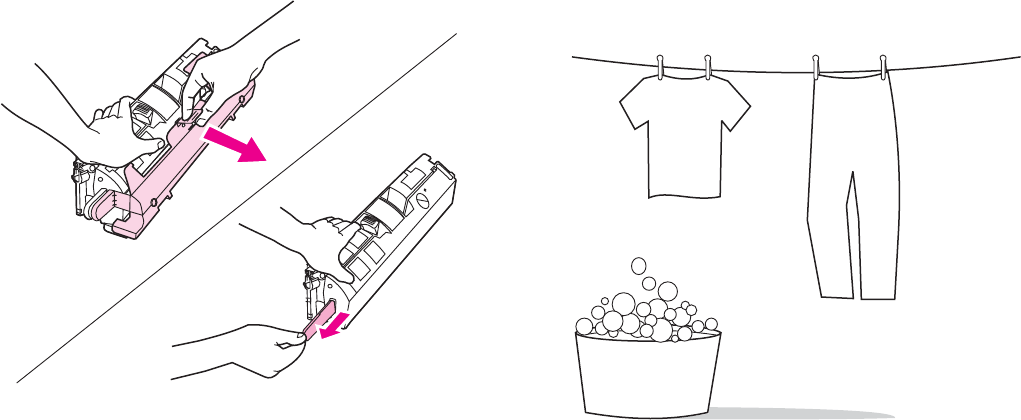
3) Remove the orange cover from the print cartridge. 4) Place the
print cartridge on a flat surface, and then pull the orange tab straight
out to remove the sealing tape completely.
CAUTION Do not touch the surface of the roller, or print-quality
issues can occur.
3) 从打印碳粉盒上取下橙色遮盖。 4) 将打印碳粉盒放
在平整的表面上,然后平直拉出橙色标签,将密封胶带
完全撕下。
小心 切勿触及滚筒表面,否则可能产生打印质量问题。
3) Lepaskan penutup oranye dari kartrid cetak. 4) Letakkan kartrid
cetak di permukaan yang rata, lalu tarik lurus keluar tab oranye
untuk melepaskan pita segel sepenuhnya.
AWAS Jangan sentuh permukaan roller, atau masalah kualitas
cetakan dapat muncul.
3) 프린트 카트리지에서 주황색 덮개를 떼어내십시오. 4) 표면이 편평
한 곳에 프린트 카트리지를 놓고 주황색 탭을 당겨 봉합 테이프를 완
전히 벗겨내십시오.
주의 롤러 표면을 만지지 마십시오. 그렇지 않으면 인쇄 품질에 문제
가 생길 수 있습니다.
3) ถอดฝาครอบสีสมออกจากตลับหมึกพิมพ 4) วางตลับหมึกพิมพไวบนพื้นผิว
เรียบ และดึงแท็บสีสมออกมาตรงๆ เพื่อดึงเทปที่ปดผนึกอยูออกใหหมด
ขอควรระวัง หามสัมผัสพื้นผิวของลูกกลิ้ง มิฉะนั้น อาจเกิดปญหาเกี่ยวกับ
คุณภาพการพิมพได
3) 取下碳粉匣的橙色護蓋。 4) 將碳粉匣置於平坦的表面上,然後平
直地拉出橙色標籤以將密封膠帶完全撕下。
小心 切勿觸摸滾筒的表面,以免影響列印品質。
CAUTION If toner gets on your clothing, wipe the toner off with a
clean cloth, wash the items in cold water, and then air dry the items.
Using hot water or heat from a dryer will set the toner in the fabric.
小心 如果有碳粉附着于衣物,请用干净布块将碳粉擦拭
掉,将衣物放入冷水洗净,然后晾干。 使用热水或烘干
机将使碳粉沉积在衣物纤维上。
AWAS Jika pakaian Anda terkena toner, hapus toner dengan kain
bersih, cuci dengan air dingin, lalu diangin-anginkan sampai kering.
Menggunakan air panas atau panas dari pengering akan
melekatkan toner ke serat.
주의 토너가 옷에 묻으면 깨끗한 헝겊으로 닦아내고 찬물로 씻어낸
후 자연 건조시키십시오. 뜨거운 물에 세탁하거나 건조기로 말리면
옷에 토너가 남을 수 있습니다.
ขอควรระวัง หากผงหมึกเลอะเสื้อผา ใหเช็ดผงหมึกออกดวยผาสะอาด ลาง
ออกดวยน้ําเย็น จากนั้นจึงตากเสื้อผาใหแหง การใชน้ํารอนหรือความรอน
จากเครื่องเปาผมจะทําใหผงหมึกยิ่งติดเขาเนื้อผามากขึ้น
小心 如果衣服沾上碳粉,請用乾布擦掉,並用冷水清洗衣服,然後晾
乾。 使用熱水或烘乾機的高溫會使碳粉滲入纖維。
14
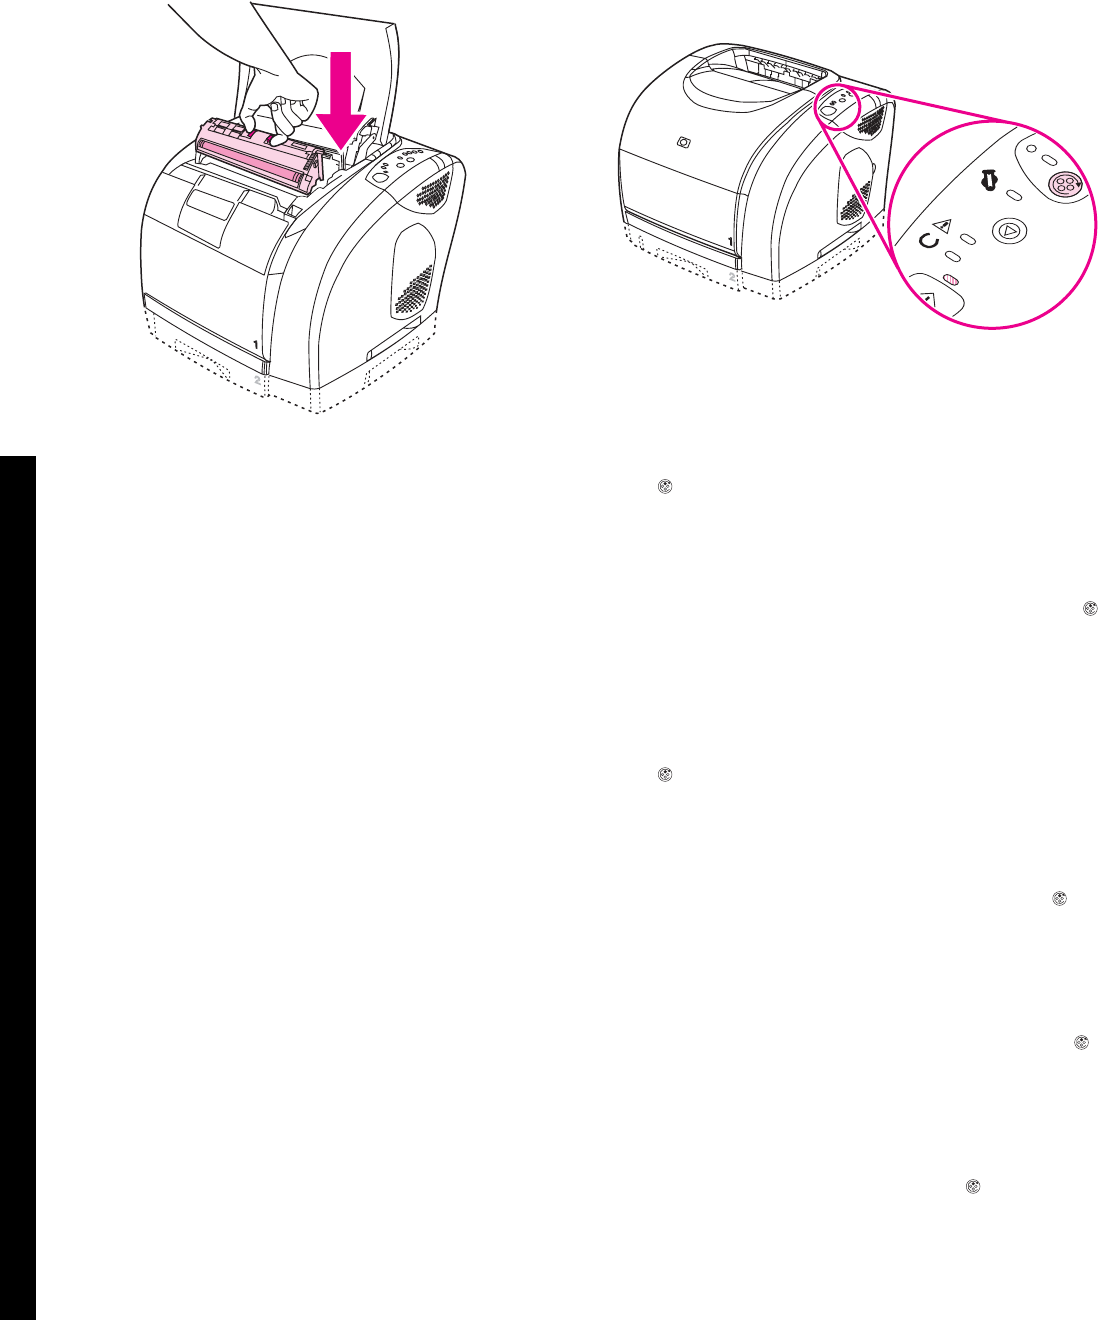
5) Squeeze the blue release levers on the print cartridge, holding it
with the roller facing you. Lower the cartridge straight down into the
carousel until it is firmly in place.
5) 捏住打印碳粉盒上的蓝色释出手柄,拿起碳粉盒并使
滚筒朝向自己。 将碳粉盒竖直向下放进传送带,直至其
稳固就位。
5) Jepit tuas pelepas pada kartrid cetak, pegang dengan roller
menghadap ke arah Anda. Turunkan kartrid lurus ke bawah ke
dalam korsel sampai terpasang kokoh.
5) 프린트 카트리지와 롤러를 고정시키는 파란색 배출 레버를 꽉 쥐십
시오. 카트리지를 똑바로 회전 장치에 넣고 단단히 고정시키십시오.
5) บีบตัวปลดล็อคสีฟาบนตลับหมึกพิมพ ถือคางไวโดยใหลูกกลิ้งหันเขาหา
คุณ คอยๆ วางตลับหมึกลงไปในแกนหมุนตรงๆ จนเขาที่
5) 按壓碳粉匣的藍色釋放柄,握住碳粉匣並使滾筒朝向自己。 將碳粉
匣垂直向下放入轉盤,直至其穩固定位。
6) Close the top cover. When the green Go light begins blinking,
press (R
OTATE
C
AROUSEL
). Repeat this process (step 15) to install
the other three print cartridges.
6) 合上顶盖。 在绿色执行指示灯开始闪烁时,按下
(旋转传送带)。 重复此过程(步骤 15),安装其它三个
打印碳粉盒。
6) Tutup penutup atas. Bila lampu Go (Jalan) hijau mulai berkedip,
tekan (P
UTAR
K
ORSEL
). Ulangi proses ini (langkah 15) untuk
menginstalasi ketiga kartrid cetak lainnya.
6) 상단 덮개를 닫으십시오. 초록색 진행 표시등이 깜박거리면 (회
전 장치)을 누르십시오. 15단계를 반복하여 나머지 세 프린트 카트리
지도 설치하십시오.
6) ปดฝาปดดานบนเครื่องพิมพ เมื่อไฟทํางานสีเขียวเริ่มกะพริบ ใหกดปุม
(R
OTATE
C
AROUSEL
) ทําซ้ําขั้นตอนนี้ (ขั้นตอนที่ 15) เพื่อติดตั้งตลับหมึกพิมพ
อีกสามตลับ
6) 合上頂蓋。 綠色列印指示燈開始閃爍時,按下 (轉動轉盤)。 重
複此程序 (步驟 15) 以安裝其他三個碳粉匣。
15
繁體中文 ภาษาไทย 한국어 Bahasa Indonesia 简体中文 English
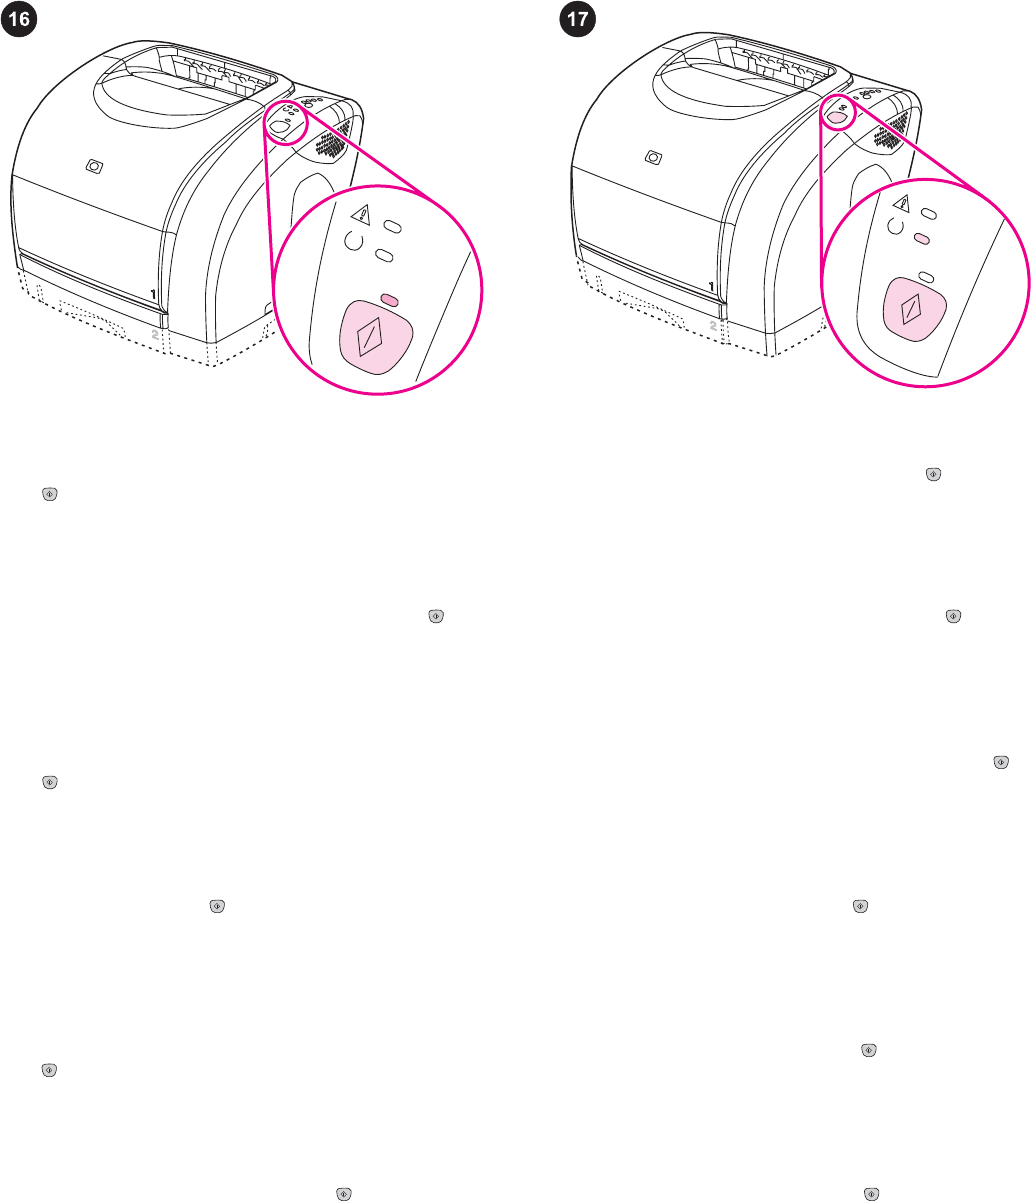
Bring the printer to the Ready state. Close the top cover, and then
press (G
O
). For approximately two minutes, the control panel
lights flash in sequence, and then the green Ready light turns on.
使打印机进入就绪状态。 合上顶盖,然后按下(执
行)。 控制面板指示灯将相继闪烁约两分钟,然后绿色
就绪指示灯亮起。
Membawa printer ke keadaan Siap. Tutup penutup atas, lalu
tekan (J
ALAN
). Selama kurang lebih dua menit, lampu panel
kontrol berkedip berurutan, lalu lampu Siap hijau menyala.
인쇄 준비. 상단 덮개를 닫고 (진행)을 누르십시오. 약 2분 동안 제
어판 표시등이 차례대로 켜지고 초록색 준비 표시등이 켜집니다.
ใหเครื่องพิมพอยูในสถานะพรอมทํางาน ปดฝาปดดานบนเครื่องพิมพ แลว
กดปุม (ทํางาน) หลังจากผานไปประมาณ 2 นาที ไฟที่แผงควบคุมทุกดวง
จะกะพริบถี่ จากนั้นไฟพรอมสีเขียวจะสวาง
使印表機處於就緒狀態。 合上頂蓋,然後按下 (列印)。 約 2 分鐘
後,所有控制面板指示燈會依次閃爍,然後綠色就緒指示燈會亮起。
Print a Demo page. With the Ready light on, press (G
O
) to print
a Demo page, which verifies that the printer works.
Note If the page does not print, reconnect the power cable. Make
sure the Ready light is on and no other lights are on or blinking.
Make sure paper is loaded and supplies are installed correctly.
打印演示页。 在就绪指示灯亮起时,按下(执行)
按钮打印演示页,检验打印机运行是否正常。
注意 如果不打印页面,请重新连接电源线。 确保只有
就绪指示灯亮起,其它指示灯均未亮起或闪烁。 确保已
装入纸张并且耗材安装正确。
Cetak halaman Demo. Pada saat lampu Siap menyala, tekan
(G
O
) untuk mencetak halaman Demo, yang menegaskan bahwa
printer bekerja.
Perhatikan Jika halaman tidak tercetak, sambungkan ulang kabel
daya. Pastikan lampu Siap menyala dan lampu lain tidak menyala
atau berkedip. Pastikan kertas sudah diisikan dan suplai terpasang
dengan benar.
데모 페이지 인쇄. 준비 표시등이 켜지면 (진행)을 눌러 데모 페이
지를 인쇄하여 프린터가 제대로 작동하는지 확인하십시오.
주 페이지가 인쇄되지 않으면 전원 케이블을 다시 꽂으십시오. 준비
표시등만 켜지고 다른 표시등은 켜지거나 깜박거리지 않아야 합니
다. 용지함에 용지가 있고 소모품이 제대로 설치되었는지 확인하십시
오.
พิมพหนาตัวอยาง เมื่อไฟพรอมสวาง ใหกดปุม (ทํางาน) เพื่อพิมพหนาตัว
อยาง ซึ่งแสดงใหเห็นวาเครื่องพิมพทํางานได
หมายเหตุ หากเครื่องไมพิมพหนาตัวอยางออกมา ใหตอสายไฟใหมอีกครั้ง
โปรดตรวจสอบวาไฟพรอมสวาง และไมมีไฟอื่นสวางหรือกะพริบ โปรดตรวจ
สอบวาใสกระดาษและอุปกรณสิ้นเปลืองอื่นๆ อยางถูกตอง
列印示範頁。 在就緒指示燈亮起時,按下 (列印) 以列印示範頁,
您可透過該頁面確認印表機是否正常工作。
注意 如果無法列印頁面,請重新連接電源線。 請確認就緒指示燈已
亮起,且其他指示燈並未亮起或閃爍。 確認紙張與耗材皆已正確安
裝。
16
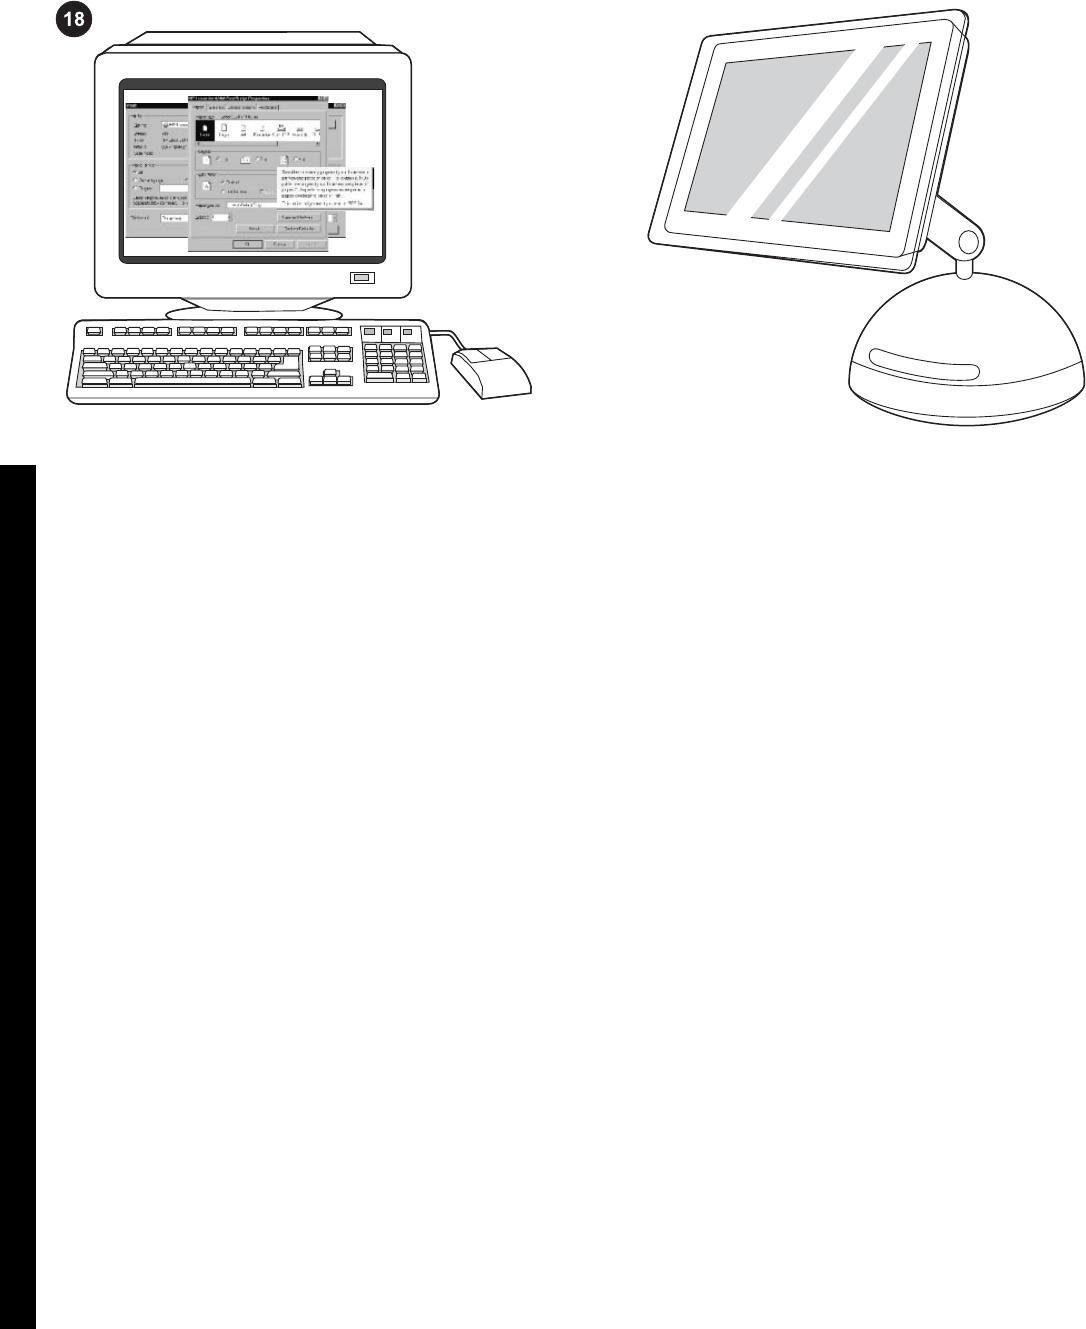
Choose one of these installations. To connect directly for
Windows®, go to step 19. To install for a network, go to step 20. If
the "New Hardware Found" message is on your computer screen,
go to step 21. To install only the printer driver for Windows NT 4.0®,
go to step 22.
从以下安装步骤中选择一个。 要直接连接至
Windows®,请转至步骤 19。要为网络安装,请转至步
骤 20。如果计算机屏幕上显示“找到新硬件”信息,请转
至步骤 21。要仅为 Windows NT 4.0® 安装打印机驱动
程序,请转至步骤 22。
Pilih salah satu dari instalasi ini. Untuk menghubungkan langsung
pada Windows(r), pergi ke langkah 19. Untuk menginstalasi ke
jaringan, pergi ke langkah 20. Jika pesan "New Hardware Found
(Perangkat Keras Baru Ditemukan)" tampil di layar komputer, pergi
ke langkah 21. Untuk hanya menginstalasi driver printer pada
Windows NT 4.0(r), pergi ke langkah 22.
한 설치 방법 선택. Windows® 컴퓨터에 바로 연결하려면 19단계로
가십시오. 네트워크에 설치하려면 20단계로 가십시오. 컴퓨터 화면
에 "새 하드웨어 발견" 메시지가 나타나면 21단계로 가십시오.
Windows NT 4.0®용 프린터 드라이버만 설치하려면 22단계로 가십
시오.
เลือกการตั้งคาใดการตั้งคาหนึ่งดังตอไปนี้ การเชื่อมตอโดยตรงเขากับ
เครื่อง Windows® ใหไปที่ขั้นตอนที่ 19 การติดตั้งแบบเครือขาย ใหไปที่ขั้น
ตอนที่ 20 หากขอความ "New Hardware Found" ปรากฏบนหนาจอ
คอมพิวเตอร ใหไปที่ขั้นตอนที่ 21 ในการติดตั้งเฉพาะไดรเวอรเครื่องพิมพ
เขากับเครื่อง Windows NT 4.0® ใหไปที่ขั้นตอนที่ 22
選擇以下其中一種安裝方法。 要直接連接至 Windows® 電腦,請移
至步驟 19。要進行網路安裝,請移至步驟 20。如果您的電腦螢幕上
出現「找到新硬體」的訊息,請移至步驟 21。要僅安裝用於
Windows NT 4.0® 的印表機驅動程式,請移至步驟 22。
To connect directly for Macintosh, go to step 23. To connect to a
Macintosh on a network, go to step 24.
要直接连接至 Macintosh,请转至步骤 23。要通过网络
连接至 Macintosh,请转至步骤 24。
Untuk menghubungkan langsung pada Macintosh, pergi ke langkah
23. Untuk menghubungkan Macintosh ke jaringan, pergi ke langkah
24.
Macintosh 컴퓨터에 바로 연결하려면 23단계로 가십시오. 네트워크
에 있는 Macintosh 컴퓨터에 연결하려면 24단계로 가십시오.
การเชื่อมตอโดยตรงเขากับเครื่อง Macintosh ใหไปที่ขั้นตอนที่ 23 การเชื่อม
ตอเขากับเครื่อง Macintosh ในระบบเครือขาย ใหไปที่ขั้นตอนที่ 24
要直接連接至 Macintosh 電腦,請移至步驟 23。要連接到網路上的
Macintosh 電腦,請移至步驟 24。
17
繁體中文 ภาษาไทย 한국어 Bahasa Indonesia 简体中文 English
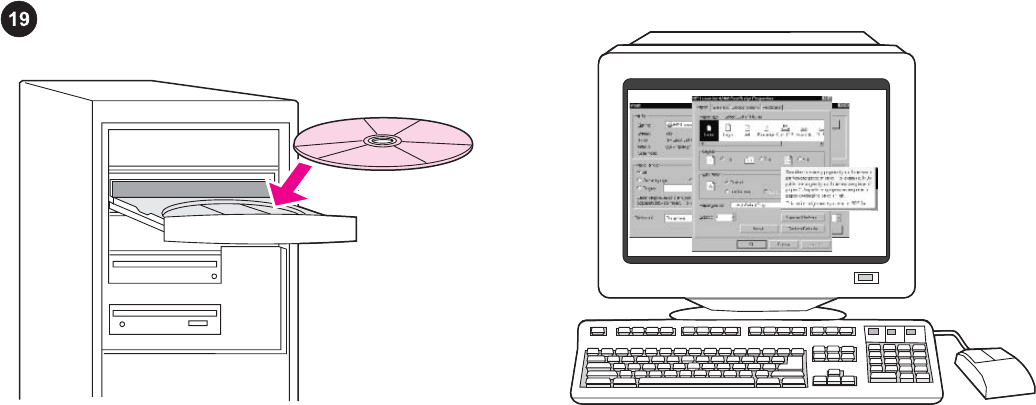
Connect directly for Windows. 1) Place the CD-ROM in the CD-
ROM drive. 2) On the Welcome screen, click Install Printer. The
Setup Wizard appears.
直接连接至 Windows。 1) 将 CD-ROM 放入 CD-
ROM 驱动器。 2) 在“欢迎”屏幕上,单击安装打印机。
“安装向导”随即出现。
Menghubungkan langsung pada Windows. 1) Masukkan CD-ROM
ke dalam CD-ROM drive. 2) Pada layar Pembuka, klik Install
Printer. Setup Wizard akan ditampilkan.
Windows 컴퓨터에 바로 연결하기. 1) CD-ROM 드라이브에 CD-
ROM을 넣으십시오. 2) 시작 화면에서 Install Printer를 누르십시오.
설치 마법사가 나타납니다.
การเชื่อมตอโดยตรงเขากับเครื่องที่ใชระบบปฏิบัติการ Windows 1) ใส
แผนซีดีรอมลงในไดรฟซีดีรอม 2) คลิก Install Printer ที่หนาจอเริ่มตน วิ
ซารดการติดตั้งจะปรากฏขึ้น
直接連接至 Windows。 1) 將 CD-ROM 放入 CD-ROM 光碟機。 2)
在「歡迎使用」畫面上,按一下說明文件。 「安裝精靈」將會顯示。
Note If the Welcome screen does not appear, click Start, and then
click Run. Type X:hpsetup (replace "X" with the CD-ROM drive
letter), and then click OK.
注意 如果未显示“欢迎”屏幕,请单击开始,然后单击运
行。 键入 X:hpsetup(用 CD-ROM 盘符代替“X”),
然后单击确定。
Perhatikan Jika layar Pembuka tidak muncul, klik Start (Mulai), lalu
klik Run (Jalankan). Ketikkan X:hpsetup (ganti "X" dengan huruf
CD-ROM drive), lalu klik OK.
주 시작 화면이 나타나지 않으면 시작, 실행을 차례대로 누르십시오.
X:hpsetup("X"는 CD-ROM 드라이브 문자를 나타냄)을 입력하고 확
인을 누르십시오.
หมายเหตุ หากหนาจอเริ่มตนไมปรากฏ ใหคลิกที่ Start จากนั้นคลิกที่ Run
พิมพ X:hpsetup (แทนที่ "X" ดวยตัวอักษรแสดงไดรฟซีดีรอม) แลวคลิก
OK
注意 如果未出現「歡迎使用」畫面,請依次按一下開始與執行。 鍵
入 X:hpsetup (以 CD-ROM 光碟機代號取代「X」),然後按一下確
定。
18
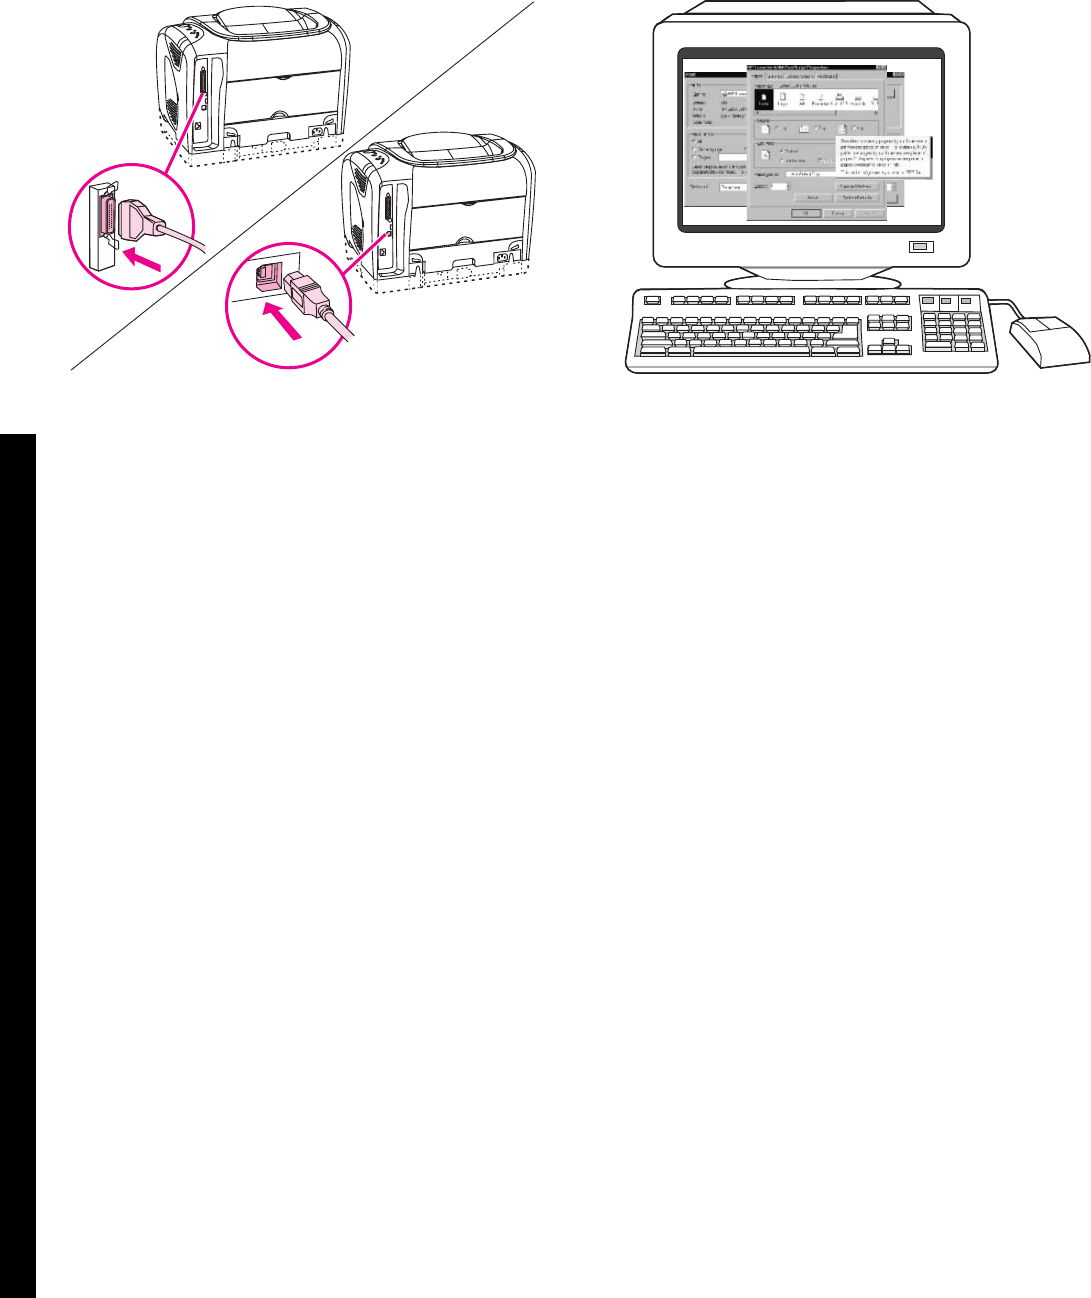
3) Follow the onscreen instructions. When prompted, connect either
a parallel cable or a USB cable between the printer and the
computer. Note that parallel and USB cables are not included. Use
an IEEE 1284-compliant parallel cable or a standard USB cable not
longer than 5 meters.
3) 按屏幕显示的说明操作。 系统提示时,用一根并行
电缆或 USB 电缆连接打印机和计算机。 注:不提供并
行和 USB 电缆。 请使用长度不超过 5 米的符合 IEEE
1284 标准的并行电缆或标准 USB 电缆。
3) Ikuti petunjuk pada layar. Ketika diminta, hubungkan kabel
paralel atau kabel USB antara printer dan komputer. Perhatikan
bahwa kabel paralel dan USB tidak disertakan. Gunakan kabel
paralel standar-IEEE 1284 atau USB standar tidak lebih panjang
dari 5 meter.
3) 화면에 나타나는 지시사항에 따르십시오. 관련 메시지가 나타나면
프린터와 컴퓨터를 병렬 케이블이나 USB 케이블로 연결하십시오. 병
렬 케이블과 USB 케이블은 별매품입니다. IEEE 1284 호환 병렬 케이
블이나 표준 USB 케이블은 5m를 넘지 넘지 않아야 합니다.
3) ทําตามคําแนะนําที่ปรากฏบนหนาจอ เมื่อพรอมดําเนินการ ใหเชื่อมตอสาย
เคเบิลแบบขนานหรือแบบ USB ระหวางเครื่องพิมพและคอมพิวเตอร โปรด
ทราบวา เครื่องพิมพนี้ไมไดจําหนายมาพรอมกับสายเคเบิลแบบขนานและ
สาย USB โปรดใชสายเคเบิลแบบขนานหรือสาย USB แบบมาตรฐานที่ตรง
ตามขอกําหนด IEEE 1284 ที่มีความยาวไมเกิน 5 เมตร
3) 按照畫面上的說明進行。 系統出現提示時,請連接印表機與電腦的
平行電纜或 USB 電纜。 請注意,印表機未隨附平行電纜與 USB 電
纜。 請使用長度不超過 5 公尺的 IEEE 1284 相容平行電纜或標準
USB 電纜。
4) Click Finish. If prompted, restart the computer. 5) Go to step 25.
4) 单击完成。 如果系统提示重新启动计算机,则重新
启动。 5) 转至步骤 25。
4) Klik Finish (Selesai). Bila diminta, hidupkan ulang komputer. 5)
Pergi ke langkah 25.
4) 완료를 누르십시오. 관련 메시지가 나타나면 컴퓨터를 다시 시작하
십시오. 5) 25단계로 가십시오.
4) คลิก Finish รีสตารตคอมพิวเตอร เมื่อพรอม 5) ไปที่ขั้นตอนที่ 25
4) 按一下 完成。 系統出現提示時,重新啟動電腦。 5) 移至步驟
25。
19
繁體中文 ภาษาไทย 한국어 Bahasa Indonesia 简体中文 English
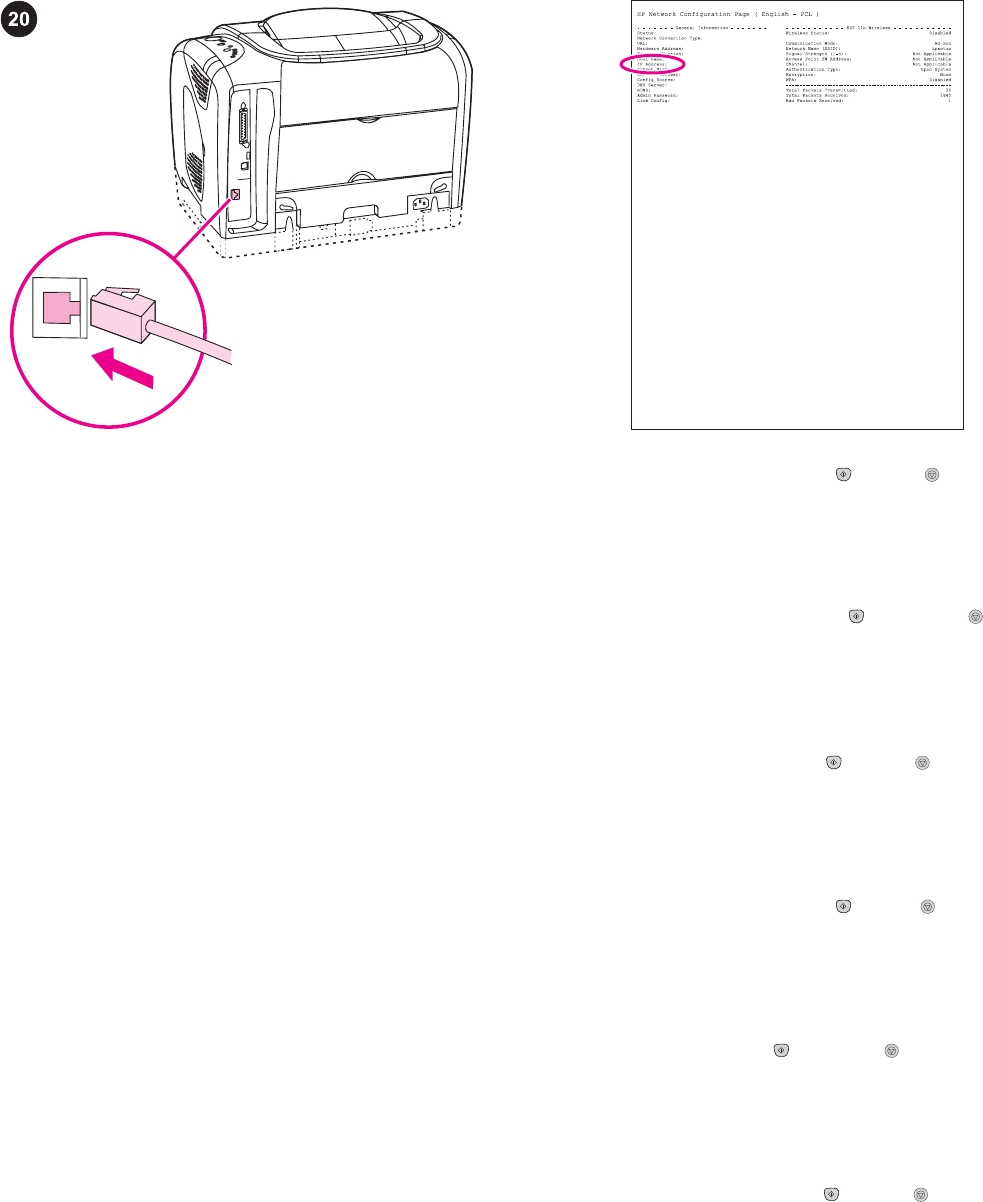
Install for a network.
Note The 2550Ln and 2550n printers have an HP Jetdirect internal
print server for network connection.
For a 10/100 Base-T network, connect a twisted-pair network cable
between the printer port and an active network port.
网络安装。
注意 2550Ln 和 2550n 打印机配有 HP Jetdirect 内置打
印服务器,可用于网络连接。
对于 10/100 Base-T 网络,请将双绞线网络电缆的一端
插入打印机端口,另一端插入有源网络端口。
Menginstalasi pada jaringan.
Perhatikan Printer 2550Ln dan 2550n dilengkapi dengan print
server internal HP Jetdirect untuk koneksi jaringan.
Untuk jaringan 10/100 Base-T, sambungkan kabel jaringan ganda-
terpilin antara port printer dan port jaringan yang aktif.
네트워크 설치.
주 2550Ln 및 2550n 프린터에는 네트워크 연결에 필요한 HP
Jetdirect 내장형 프린트 서버가 포함되어 있습니다.
10/100 Base-T 네트워크인 경우 프린터 포트와 활성 네트워크 포트
에 차폐형 네트워크 케이블을 꽂으십시오.
การติดตั้งแบบเครือขาย
หมายเหตุ เครื่องพิมพ 2550Ln และ 2550n มีเซิรฟเวอรการพิมพภายใน HP
Jetdirect สําหรับการเชื่อมตอเครือขาย
สําหรับเครือขายแบบ 10/100 Base-T ใหคุณเชื่อมตอสายเคเบิลเครือขาย
แบบเกลียวคูระหวางพอรตของเครื่องพิมพและพอรตของเครือขายที่ใชงาน
進行網路安裝。
注意 2550Ln 與 2550n 印表機包含可連線網路的 HP Jetdirect 內接式
列印伺服器。
對於 10/100 BaseT 網路,請使用雙絞線網路電纜連接印表機連接埠
與現用網路連接埠。
Make sure the Ready light is on. Press (G
O
) and (C
ANCEL
J
OB
)
simultaneously to print a Configuration page, an HP Jetdirect page,
and a Supplies Status page. On the HP Jetdirect page, locate the
printer's IP address (circled in the illustration above).
确保就绪指示灯亮起。 同时按下(执行)和(取消
作业)按钮,打印配置页、HP Jetdirect 页和耗材状态
页。 在 HP Jetdirect 页上,找到打印机的 IP 地址(在
上面的插图中圈出)。
Pastikan lampu Siap menyala. Tekan (G
O
) dan (C
ANCEL
J
OB
)
bersamaan untuk mencetak halaman Konfigurasi, halaman HP
Jetdirect, dan halaman Supplies Status (Status Suplai). Pada
halaman HP Jetdirect, temukan alamat IP printer (dilingkari pada
ilustrasi di atas).
준비 표시등이 켜지는지 확인하십시오. (진행) 및 (작업 취소)을
함께 눌러 구성 페이지, HP Jetdirect 페이지 및 소모품 상태 페이지
를 인쇄하십시오. HP Jetdirect 페이지에서 프린터 IP 주소를 확인하
십시오(위 그림에서 동그라미 표시 부분).
ตรวจสอบวาไฟพรอมสวาง กดปุม (ทํางาน) และ (ยกเลิกงานพิมพ)
พรอมๆ กัน เพื่อพิมพหนากําหนดคา หนา HP Jetdirect และหนาแสดง
สถานะอุปกรณสิ้นเปลือง ในหนา HP Jetdirect ใหดูที่ IP แอดเดรสของ
เครื่องพิมพ (ตามที่วงกลมในภาพประกอบขางตน)
請確認就緒指示燈已亮起。 同時按下 (列印) 與 (取消列印) 以列
印組態頁、HP Jetdirect 頁及耗材狀態頁。 在 HP Jetdirect 頁上,尋
找印表機的 IP 位址 (上圖圈起部分)。
20
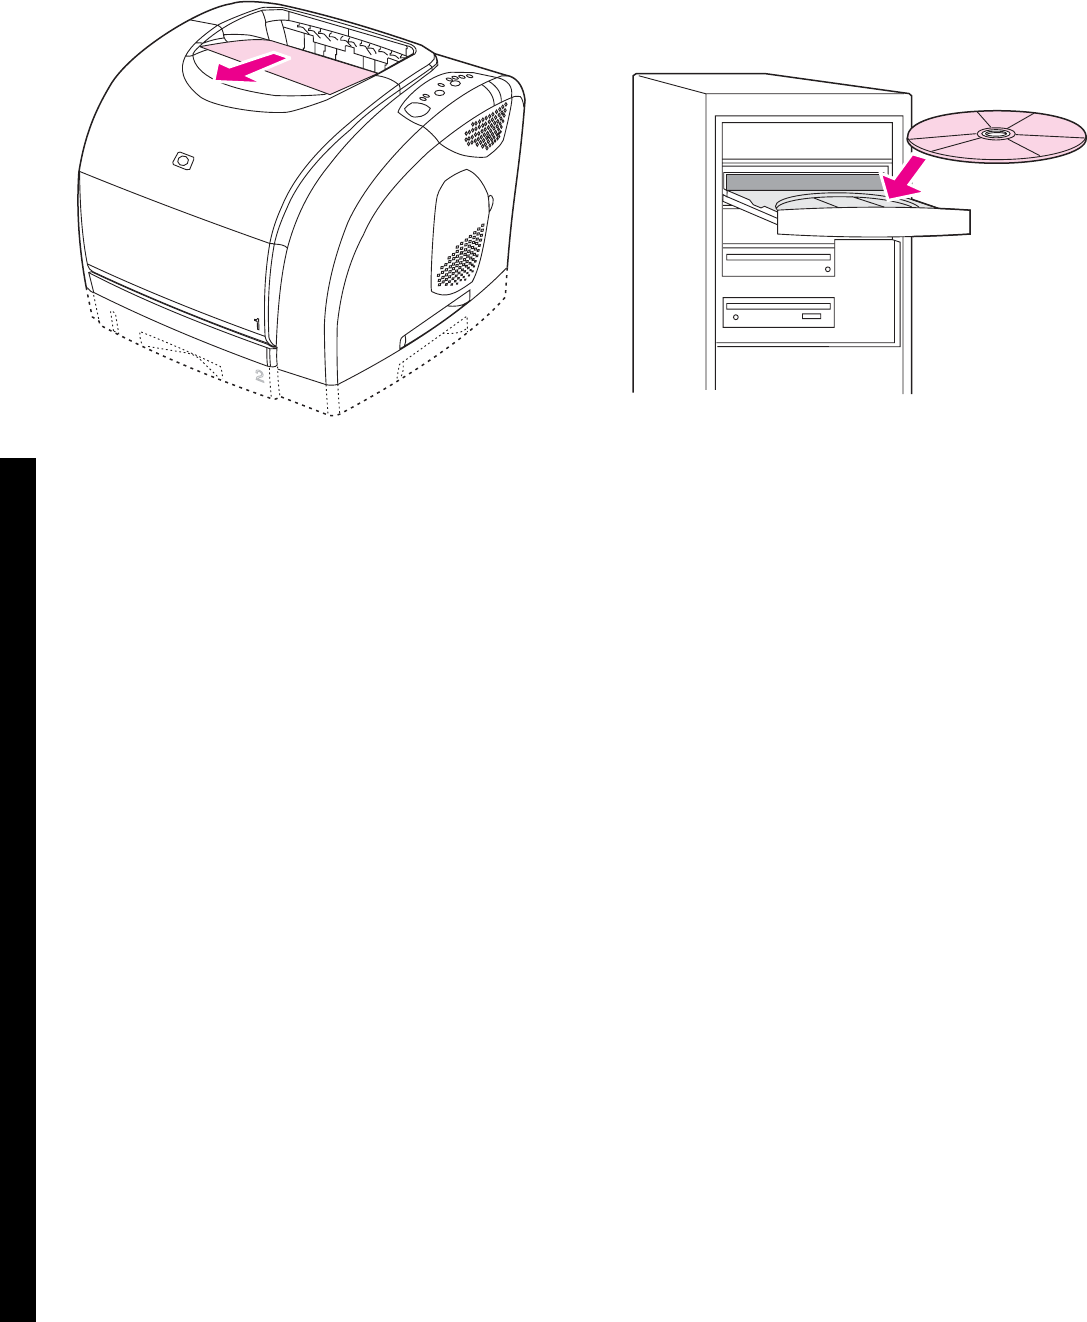
Note If no HP Jetdirect page was printed, wait 30 seconds for the
network card to initialize, and then try to print the page again.
注意 如果未打印 HP Jetdirect 页,请等待 30 秒,以便
网卡完成初始化,然后尝试再次打印该页。
Perhatikan Jika halaman HP Jetdirect tidak tercetak, tunggu 30
detik untuk inisialisasi card jaringan, lalu cobalah mencetak kembali.
주 HP Jetdirect 페이지가 인쇄되지 않으면 30초 동안 네트워크 카드
가 초기화될 때까지 기다리고 다시 인쇄해보십시오.
หมายเหตุ หากเครื่องไมพิมพหนา HP Jetdirect ออกมา ใหรอประมาณ 30
วินาทีเพื่อใหการดเครือขายเริ่มทํางาน จากนั้นจึงลองพิมพหนาดังกลาวอีก
ครั้ง
注意 如未列印 HP Jetdirect 頁,請等待 30 秒讓網路卡進行初始化,
然後再列印一次。
Install the network software. 1) Place the CD-ROM in the CD-ROM
drive, and then follow the onscreen instructions. 2) Click Finish,
restart the computer, and then go to step 25.
安装网络软件。 1) 将 CD-ROM 放入 CD-ROM 驱动
器,然后按屏幕显示的说明进行操作。 2) 单击完成,
重新启动计算机,然后转至步骤 25。
Menginstalasi piranti lunak jaringan. 1) Masukkan CD-ROM ke
dalam CD-ROM drive, lalu ikuti petunjuk pada layar. 2) Klik Finish,
hidupkan ulang komputer, lalu pergi ke langkah 25.
네트워크 소프트웨어 설치. 1) CD-ROM 드라이브에 CD-ROM을 넣
고 화면에 나타나는 지시사항에 따르십시오. 2) 완료를 누르고 컴퓨터
를 다시 시작한 후 25단계로 가십시오.
ติดตั้งซอฟตแวรเครือขาย 1) ใสแผนซีดีรอมลงในไดรฟซีดีรอม แลวทําตาม
คําแนะนําที่ปรากฏบนหนาจอ 2) คลิกที่ Finish รีสตารตเครื่องคอมพิวเตอร
แลวไปที่ขั้นตอนที่ 25
安裝網路軟體。 1) 將 CD-ROM 放入 CD-ROM 光碟機,然後按照指
示進行。 2) 按一下完成,重新啟動電腦,然後移至步驟 25。
21
繁體中文 ภาษาไทย 한국어 Bahasa Indonesia 简体中文 English
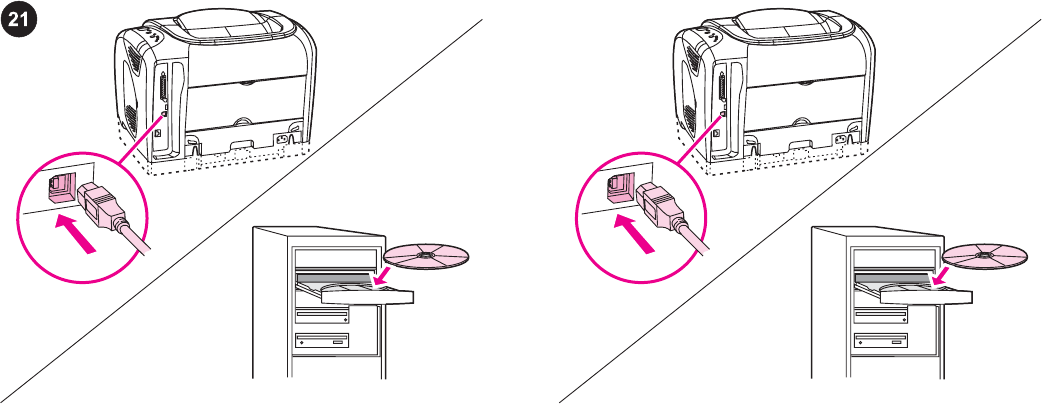
Plug and Play. If you connected a parallel or USB cable to a
Windows computer before you installed the software, the "New
Hardware Found" message appears when you turn on the
computer. Windows 98 and Millennium Edition (Me): 1) Click
Search CD-ROM drive, click Next, and follow the instructions. 2) Go
to step 25.
即插即用。 如果在安装软件之前将并行或 USB 电缆
连接至 Windows 计算机,则在打开计算机时,屏幕上
会显示“找到新硬件”信息。 Windows 98 和 Millennium
Edition (Me):1) 单击搜索 CD-ROM 驱动器,然后单击
下一步,并按说明进行操作。 2) 转至步骤 25。
Plug and Play. Jika Anda hubungkan kabel paralel atau USB ke
komputer Windows sebelum menginstalasi piranti lunak, pesan
"New Hardware Found" tampil saat Anda menghidupkan komputer.
Windows 98 dan Millennium Edition (Me): 1) Klik Search CD-ROM
drive, klik Next, lalu ikuti petunjuknya. 2) Pergi ke langkah 25.
플러그 앤 플레이. 소프트웨어를 설치하기 전에 Windows 컴퓨터에
병렬 케이블이나 USB 케이블을 연결한 경우 컴퓨터를 켜면 "새 하드
웨어 발견" 메시지가 나타납니다. Windows 98 및 Me: 1) CD-ROM 드
라이브 검색, 다음을 차례대로 누르고 지시사항에 따르십시오. 2) 25
단계로 가십시오.
พลักแอนดเพลย หากคุณเชื่อมตอสายเคเบิลแบบขนานหรือสาย USB เขา
กับเครื่องคอมพิวเตอรที่ใชระบบปฏิบัติการ Windows กอนที่จะติดตั้ง
ซอฟตแวร ขอความ "New Hardware Found" จะปรากฏขึ้นเมื่อคุณเปด
เครื่องคอมพิวเตอร Windows 98 และ Millennium Edition (Me): 1) คลิกที่
Search CD-ROM drive และคลิกที่ Next แลวทําตามคําแนะนํา 2) ไปที่ขั้น
ตอนที่ 25
隨插即用。 如果您在安裝軟體之前將平行電纜或 USB 電纜連接至
Windows 電腦,則在您開啟電腦電源時,螢幕上將會出現「找到新硬
體」的訊息。 Windows 98 與 Millennium Edition (Me): 1) 依次按一
下搜尋 CD-ROM 光碟機、下一步,然後按照指示進行。 2) 移至步驟
25。
Windows 2000 and XP: 1) Click Search. 2) On the Located Driver
Files screen, select the Specify a Location check box, clear all of
the other check boxes, and then click Next. 3) Type X:\ (replace
"X" with the CD-drive letter), and then click Next. 4) Follow the
onscreen instructions, and then click Finish. 5) Go to step 25.
Windows 2000 和 XP: 1) 单击搜索。 2) 在“查找驱动
程序文件”屏幕上,选中指定位置复选框,取消选择其它
所有复选框,然后单击下一步。 3) 键入 X:\(用 CD
盘符代替“X”),然后单击下一步。 4) 按屏幕上的说明
操作,然后单击完成。 5) 转至步骤 25。
Windows 2000 dan XP: 1) Klik Search. 2) Pada layar Located
Driver Files, pilih kotak bertanda Specify a Location, kosongkan
semua kotak lain, lalu klik Next. 3) Ketikkan X:\ (ganti "X" dengan
huruf CD-ROM drive), lalu klik Next. 4) Ikuti petunjuk pada layar,
lalu klik Finish. 5) Pergi ke langkah 25.
Windows 2000 및 XP: 1) 검색을 누르십시오. 2) '찾은 드라이버 파일'
화면에서 위치 지정 확인란을 선택하고 기타 모든 확인란은 선택 해
제한 후 다음을 누르십시오. 3) X:\("X"는 CD-ROM 드라이브 문자를
나타냄)를 입력하고 다음을 누르십시오. 4) 화면에 나타나는 지시사항
에 따르고 완료를 누르십시오. 5) 25단계로 가십시오.
Windows 2000 และ XP: 1) คลิก Search 2) ในหนาจอ Located Driver
Files ใหทําเครื่องหมายที่ชอง Specify a Location จากนั้น ยกเลิกการทํา
เครื่องหมายที่ชองอื่นๆ ทั้งหมดแลวคลิกที่ Next 3) พิมพ X:\ (แทนที่ "X"
ดวยตัวอักษรแสดงไดรฟซีดีรอม) แลวคลิก Next 4) ทําตามคําแนะนําที่
ปรากฏบนหนาจอ แลวคลิก Finish 5) ไปที่ขั้นตอนที่ 25
Windows 2000 與 XP: 1) 按一下搜尋。 2) 在「尋找驅動程式檔案」
畫面上,選擇指定位置核取方塊,清除所有其他核取方塊,然後按一
下下一步。 3) 鍵入 X:\ (以 CD-ROM 光碟機代號取代「X」),然後
按一下下一步。 4) 按照畫面上的說明進行,然後按一下 完成。 5) 移
至步驟 25。
22
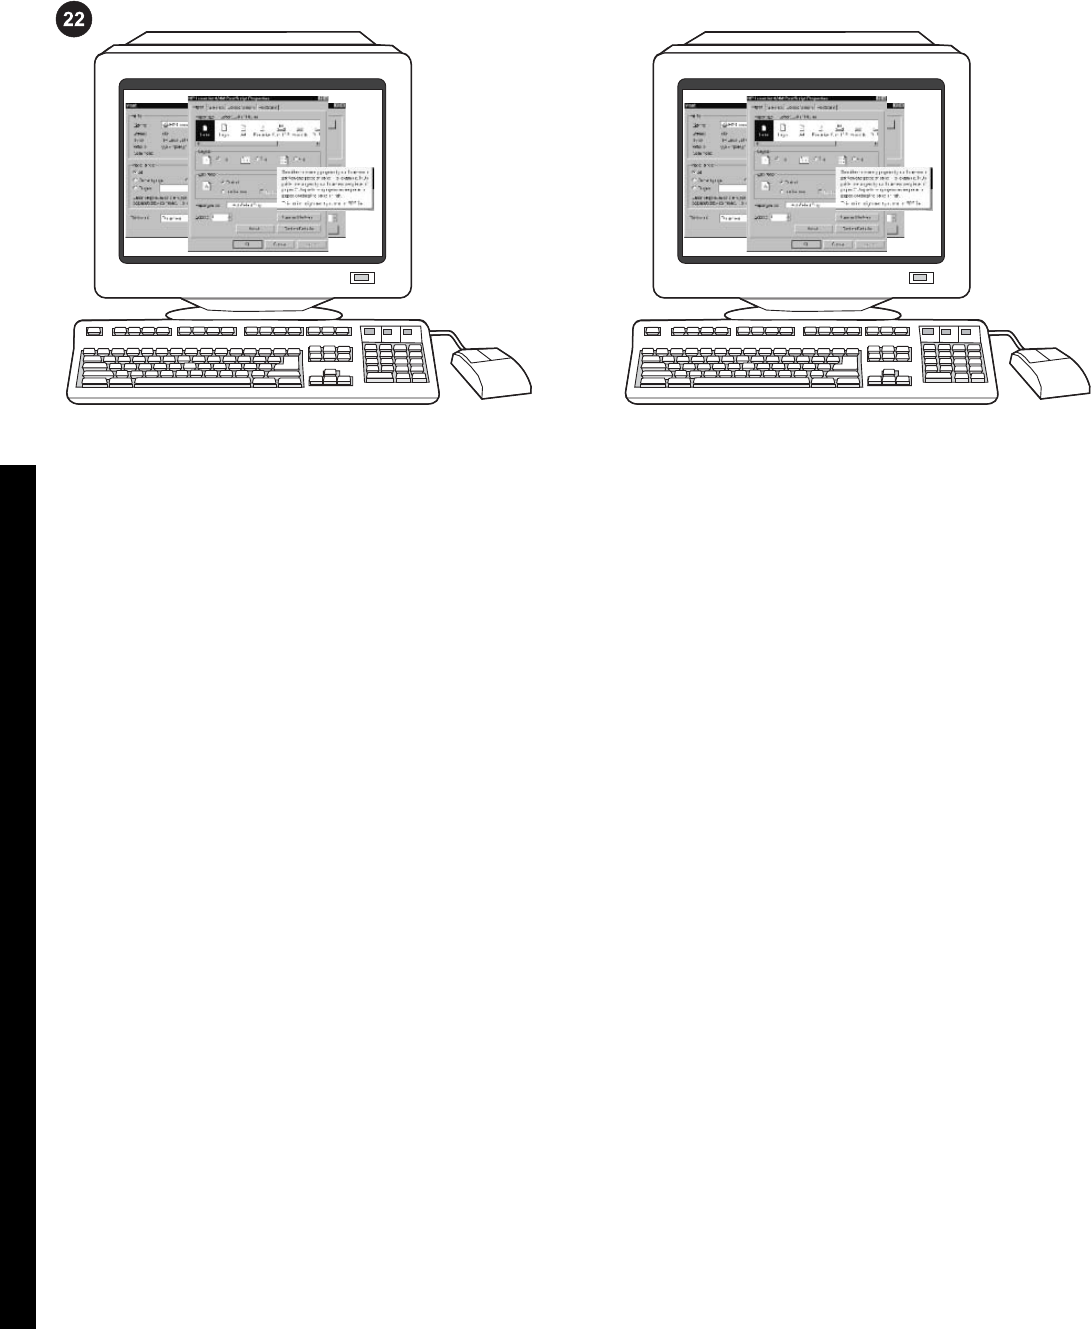
Install the printer driver only (Windows NT 4.0). If the printer is
connected to the network, have the network administrator add a
port. 1) Click Start, click Settings, and then click Printers.
仅安装打印机驱动程序 (Windows NT 4.0)。 如果打印
机连接至网络,则请网络管理员添加端口。 1) 单击开
始,单击设置,然后单击打印机。
Hanya menginstalasi driver printer (Windows NT 4.0). Jika printer
terhubung ke jaringan, minta administrator jaringan untuk
menambah port. 1) Klik Start, klik Settings, lalu klik Printers.
프린터 드라이버만 설치(Windows NT 4.0). 프린터를 네트워크에 연
결하고 네트워크 관리자에게 포트 추가를 요청하십시오. 1) 시작, 설
정, 프린터를 차례대로 누르십시오.
ติดตั้งเฉพาะไดรเวอรเครื่องพิมพ (Windows NT 4.0) ในกรณีที่เครื่องพิมพ
เชื่อมตอกับระบบเครือขาย คุณสามารถติดตอใหผูดูแลระบบเพิ่มพอรตได 1)
คลิกที่ Start แลวคลิกที่ Settings จากนั้นคลิก Printers
僅安裝印表機驅動程式 (Windows NT 4.0)。 如果印表機已連線至網
路,您可讓網路管理員新增連接埠。 1) 依次按一下開始、設定與印表
機。
2) Double-click Add Printer, and then follow the onscreen
instructions. When prompted for a manufacturer, click Have Disk.
Note Windows NT 4.0 does not support USB connections.
2) 双击添加打印机,然后按屏幕上的说明进行操作。
屏幕提示选择生产商时,单击从软盘安装。
注意 Windows NT 4.0 不支持 USB 连接。
2) Dobel klik Add Printer, kemudian ikuti petunjuk pada layar. Bila
nama pabrik pembuat diminta, klik Have Disk.
Perhatikan Windows NT 4.0 tidak mendukung koneksi USB.
2) 프린터 추가를 두 번 누르고 화면에 나타나는 지시사항에 따르십시
오. 제조업체 선택 창이 나타나면 디스크 있음을 누르십시오.
주 Windows NT 4.0에서는 USB 포트에 연결할 수 없습니다.
2) ดับเบิลคลิกที่ Add Printer แลวทําตามคําแนะนําที่ปรากฏบนหนาจอ เมื่อ
หนาจอแสดงขอความหารายชื่อผูผลิตไดรเวอร ใหคลิกที่ Have Disk
หมายเหตุ Windows NT 4.0 ไมสนับสนุนการเชื่อมตอ USB
2) 連按兩下新增印表機,然後按照指示進行。 在系統提示您輸入製造
廠商時,按一下從磁片安裝。
注意 Windows NT 4.0 不支援 USB 連線。
23
繁體中文 ภาษาไทย 한국어 Bahasa Indonesia 简体中文 English
3) Double-click the folder for your language, and then double-click
Drivers. 4) Double-click WinNT40, and then double-click the folder
for the driver you want (PCL 6 or PS). (Hewlett-Packard
recommends the PCL 6 driver.) 5) Finish the installation, and then
go to step 25.
3) 双击适用于您的语言的文件夹,然后双击驱动程
序。 4) 双击 WinNT40,然后双击包含所需驱动程序的
文件夹(PCL 6 或 PS)。 (Hewlett-Packard 建议安
装 PCL 6 驱动程序。) 5) 完成安装,然后转至步骤
25。
3) Dobel klik folder untuk bahasa Anda, kemudian dobel klik
Drivers. 4) Dobel klik WinNT40, kemudian dobel klik folder untuk
driver yang Anda inginkan (PCL 6 atau PS). (Hewlett-Packard
menganjurkan driver PCL 6.) 5) Selesaikan instalasi, kemudian
pergi ke langkah 25.
3) 해당 언어 폴더를 두 번 누르고 드라이버를 두 번 누르십시오. 4)
WinNT40을 두 번 누르고 원하는 드라이버 폴더(PCL 6 또는 PS)를
두 번 누르십시오 (PCL 6 드라이버 권장). 5) 설치가 끝나면 25단계
로 가십시오.
3) ดับเบิลคลิกที่แฟมขอมูลของภาษาที่คุณตองการใช จากนั้น ดับเบิลคลิกที่
Drivers 4) ดับเบิลคลิก WinNT40 แลวดับเบิลคลิกที่แฟมขอมูลของไดรเวอร
ที่คุณตองการ (PCL 6 หรือ PS) (Hewlett-Packard ขอแนะนําใหใชได
รเวอร PCL 6) 5) การติดตั้งเสร็จสมบูรณ จากนั้นใหไปที่ขั้นตอนที่ 25
3) 依次連按兩下您所用語言的資料夾與驅動程式。 4) 依次連按兩下
WinNT40 與您所要的驅動程式 (PCL 6 或 PS) 資料夾。 (Hewlett-
Packard 建議您使用 PCL6 驅動程式)。 5) 完成安裝,然後移至步驟
25。
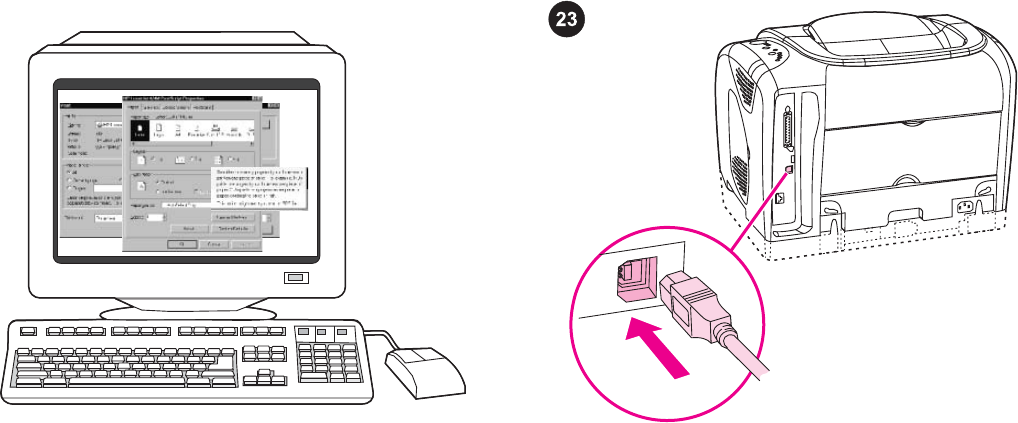
Connect the printer directly to a Macintosh. Connect a USB cable
between the USB port on the printer and the USB port on the
computer.
Note A USB cable is not included. Use a standard USB cable that is
less than 5 meters in length.
将打印机直接连接至 Macintosh。 将 USB 电缆的一端
插入打印机的 USB 端口,另一端插入计算机的 USB 端
口。
注意 不提供 USB 电缆。 请使用长度不超过 5 米的标
准 USB 电缆。
Menghubungkan printer langsung ke Macintosh. Sambungkan
kabel USB antara port USB pada printer dan port USB pada
komputer.
Perhatikan Kabel USB tidak disertakan. Gunakan kabel USB
standar dengan panjang kurang dari 5 meter.
Macintosh 컴퓨터에 바로 연결하기. 프린터와 컴퓨터 USB 포트에
USB 케이블을 꽂으십시오.
주 USB 케이블은 포함되지 않습니다. 표준 USB 케이블은 5m가 넘
지 않아야 합니다.
การเชื่อมตอเครื่องพิมพเขากับเครื่อง Macintosh โดยตรง เชื่อมตอสาย
เคเบิล USB ระหวางพอรต USB ที่เครื่องพิมพและพอรต USB ที่เครื่อง
คอมพิวเตอร
หมายเหตุ ไมไดใหสาย USB มาดวย โปรดใชสายเคเบิล USB มาตรฐานที่มี
ความยาวไมเกิน 5 เมตร
將印表機直接連接至 Macintosh。 使用 USB 電纜連接印表機上的
USB 連接埠與電腦上的 USB 連接埠。
注意 未隨附 USB 纜線。 請使用長度 5 公尺以下的標準 USB 電纜。
24

OS 9.1.x to 9.2.x: 1) Run the installer CD, and then restart the
computer. 2) Run the Apple Desktop Printer Utility (HD/Applications/
Utilities/Desktop Printer Utility). 3) Double-click Printer (USB). Next
to USB Printer Selection, click Change. 4) Select the printer, and
then click OK.
OS 9.1.x 至 9.2.x:1) 运行安装程序 CD,然后重新启
动计算机。 2) 运行 Apple Desktop Printer Utility (HD/
Applications/Utilities/Desktop Printer Utility) 。 3) 双击
Printer (USB), 接着双击 USB Printer Selection,然后
单击 Change。 4) 选择打印机,然后单击 OK。
OS 9.1.x s/d 9.2.x: 1) Jalankan CD installer, kemudian hidupkan
ulang komputer. 2) Jalankan Utility Apple Desktop Printer (HD/
Applikasi/Utilities/Utility Printer Desktop). 3) Dobel klik Printer
(USB). Di samping USB Printer Selection, klik Change. 4) Pilih
printer, kemudian klik OK.
OS 9.1.x - 9.2.x: 1) 인스톨러 CD를 실행하고 컴퓨터를 다시 시작하
십시오. 2) Apple 데스크탑 프린터 유틸리티(HD/Applications/Utilities/
Desktop Printer Utility)를 실행하십시오. 3) 프린터(USB)를 두 번 누
르십시오. USB 프린터 선택 옆에 있는 변경을 누르십시오. 4) 프린터
를 선택하고 확인를 누르십시오.
OS 9.1.x ถึง 9.2.x: 1) รันแผนซีดีโปรแกรมการติดตั้ง จากนั้นใหรีสตารต
เครื่องคอมพิวเตอร 2) รันโปรแกรม Apple Desktop Printer Utility (HD/
Applications/Utilities/Desktop Printer Utility) 3) ดับเบิลคลิกที่ Printer
(USB) ถัดจาก USB Printer Selection ใหคลิกที่ Change 4) เลือกเครื่อง
พิมพ แลวคลิก OK
OS 9.1.x 至 9.2.x: 1) 執行安裝程式 CD,然後重新啟動電腦。 2) 執
行「蘋果桌面印表機工具程式」(HD/應用程式/工具程式/桌面印表機
工具程式)。 3) 連按兩下印表機 (USB)。 接著再連按兩下 USB 印表
機選項,然後按一下更改。 4) 選擇印表機,然後按一下確定。
5) Next to Postscript Printer Description (PPD) File, click Change. 6)
Double-click the appropriate printer description file from the list. 7)
Click Create. 8) Click Save. 9) Click the desktop printer icon. 10) On
the Printing menu, click Set Default Printer. 11) Go to step 25.
5) 接着双击 Postscript Printer Description (PPD) File,
然后单击 Change。 6) 双击列表中相关的打印机描述文
件。 7) 单击 Create。 8) 单击 Save。 9) 单击桌面打印
机图标。 10) 在 Printing 菜单中,单击 Set Default
Printer。 11) 转至步骤 25。
5) Di samping Postscript Printer Description (PPD) File, klik
Change. 6) Dobel klik file deskripsi printer yang sesuai dari daftar.
7) Klik Create. 8) Klik Finish. 9) Klik ikon printer desktop. 10) Pada
menu Printing, klik Set Default Printer. 11) Pergi ke langkah 25.
5) PPD 파일 옆에 있는 변경을 누르십시오. 6) 목록에서 해당 프린터
설명 파일을 두 번 누르십시오. 7) 생성을 누르십시오. 8) 저장을 누르
십시오. 9) 바탕 화면의 프린터 아이콘을 누르십시오. 10) 프린팅 메뉴
에서 기본 프린터 설정을 누르십시오. 11) 25단계로 가십시오.
5) ถัดจาก Postscript Printer Description (PPD) File ใหคลิกที่ Change
6) ดับเบิลคลิกที่ไฟลคําอธิบายเครื่องพิมพที่เหมาะสมจากรายการ 7) คลิก
Create 8) คลิก Save 9) คลิกที่ไอคอนเครื่องพิมพบนเดสกทอป 10) ที่เมนู
Printing ใหคลิกที่ Set Default Printer 11) ไปที่ขั้นตอนที่ 25
5) 接著再連按兩下 Postscript 印表機描述 (PPD) 檔案,然後按一下更
改。 6) 連按兩下清單中適當的印表機描述檔案。 7) 按一下建立。 8)
按儲存。 9) 單按桌面印表機圖像。 10) 在列印清單中,按一下設定預
設印表機。 11) 移至步驟 25。
25
繁體中文 ภาษาไทย 한국어 Bahasa Indonesia 简体中文 English
OS X: 1) Run the installer CD, and then restart the computer. 2)
Open the Print Center (HD/Applications/Utilities/Print Center), and
then verify that the printer has been set up automatically.
OS X:1) 运行安装程序 CD,然后重新启动计算机。
2) 打 开“打印中心”(HD/Applications/Utilities/Print
Center),然后检验打印机是否已自动设置。
OS X: 1) Jalankan CD installer, kemudian hidupkan ulang
komputer. 2) Buka Print Center (HD/Applications/Utilities/Print
Center), kemudian pastikan bahwa printer telah diset up secara
otomatis.
OS X: 1) 인스톨러 CD를 실행하고 컴퓨터를 다시 시작하십시오. 2)
Print Center(HD/Applications/Utilities/Print Center)를 열고 프린터가
자동으로 설치되었는지 확인하십시오.
OS X: 1) รันแผนซีดีโปรแกรมการติดตั้ง จากนั้นใหรีสตารตเครื่อง
คอมพิวเตอร 2) เปด Print Center (HD/Applications/Utilities/Print
Center) แลวตรวจสอบวาโปรแกรมติดตั้งเครื่องพิมพโดยอัตโนมัติหรือไม
OS X: 1) 執行安裝程式 CD,然後重新啟動電腦。 2) 開啟「列印中
心」(HD/應用程式/工具程式/列印中心),確認印表機已自動設定。
Note If the printer has not been set up automatically, complete the
following steps: 1) Open the Print Center. 2) Click Add. 3) In the
Print List box, select USB. 4) In the Printer Model box, select the the
appropriate printer. 5) Click Add.
注意 如果打印机未自动设置,则完成以下步骤: 1) 打
开“打印中心”。 2) 单击 Add。 3) 在 Print List 框中,选
择 USB 。 4) 在 Printer Model 框中,选择相关打印
机。 5) 单击 Add。
Perhatikan Jika printer belum diset up secara otomatis, lakukan
langkah berikut ini: 1) Buka Print Center. 2) Klik Add. 3) Dari kotak
Print List, pilih USB. 4) Dari kotak Printer Model, pilih printer yang
sesuai. 5) Klik Add.
주 프린터가 자동으로 설치되지 않은 경우 다음 단계에 따르십시오.
1) Print Center를 여십시오. 2) 추가를 누르십시오. 3) 프린트 목록 상
자에서 USB를 선택하십시오. 4) 프린터 모델 상자에서 해당 프린터
를 선택하십시오. 5) 추가를 누르십시오.
หมายเหตุ หากเครื่องพิมพไมไดรับการติดตั้งโดยอัตโนมัติ ใหทําตามขั้นตอน
ดังตอไปนี้ 1) เปดหนาจอ Print Center 2) คลิก Add 3) ในชอง Print List
ใหเลือก USB 4) ในชอง Printer Model ใหเลือกเครื่องพิมพที่ตองการ 5)
คลิก Add
注意 如果印表機未自動設定,請完成下列步驟: 1) 開啟「列印中
心」。 2) 按一下新增。 3) 在列印清單方塊中,選擇 USB。 4) 在印
表機機型方塊中,選擇適當的印表機。 5) 按一下新增。
26

Note When the Print Center opens, verify that the printer (if it is
listed) is using the proper PostScript printer description (PPD) file.
Open the Printers menu and select Show Info. In the Printer Info
window, click the up-down arrow next to Name and Location.
注意 “打印中心”打开后,检验打印机(若已列出)是否
使用了正确的 PostScript 打印机描述 (PPD) 文件。 打
开 Printers 菜单,然后选择 Show Info 。 在 Printer
Info 窗口中,单击 Name and Location 旁边的向上向下
箭头。
Perhatikan Sewaktu Print Center terbuka, pastikan bahwa printer
(jika terdaftar) menggunakan file deskripsi printer PostScript (PPD).
Buka menu Printers kemudian pilih Show Info. Dari jendela layar
Printer Info, klik anak panah naik-turun di samping Name and
Location.
주 Print Center가 열리면 프린터(목록에 있는)가 해당 PPD 파일을 사
용하고 있는지 확인하십시오. 프린터 메뉴를 열고 정보 보기를 선택
하십시오. 프린터 정보 창에서 이름 및 위치 옆에 있는 위쪽 화살표를
누르십시오.
หมายเหตุ เมื่อหนาจอ Print Center ปรากฏขึ้น ใหคุณตรวจสอบวาเครื่อง
พิมพ (หากมีแสดงไว) ใชไฟล PostScript printer description (PPD) ที่ถูก
ตองหรือไม จากนั้น คลิกที่เมนู Printers แลวเลือก Show Info ในวินโดว
Printer Info ใหคลิกปุมลูกศรขึ้น-ลงที่อยูถัดจาก Name and Location
注意 「列印中心」開啟後,請確認印表機 (如果列在其中) 使用正確
的 PostScript 印表機描述 (PPD) 檔。 開啟印表機清單,選擇顯示資
訊。 在「印表機資訊」視窗中,按一下名稱與位置旁的上下箭頭。
Select Printer Model or PPD. The line below the selection lists the
PPD. If it is listed as Generic, scroll to HP, and then scroll to the
specific model. Click Apply Changes.
选择 Printer Model 或 PPD。 选项列表下面的行中列出
了 PPD 。 如果 PPD 以 Generic 列出,则滚动查看
HP,然后滚动找到特定型号。 单击 Apply Changes。
Pilih Printer Model atau PPD. Baris di bawah pilihan adalah daftar
PPD. Jika terdaftar sebagai Generic, gulir ke HP, kemudian gulir ke
model yang spesifik. Klik Apply Changes (Terapkan Perubahan).
프린터 모델 또는 PPD를 선택하십시오. 선택한 항목 아래에 PPD가
나와 있습니다. 일반 사용으로 표시되어 있으면 HP, 해당 모델로 차례
대로 찾아 가십시오. 변경 사항 적용을 누르십시오.
เลือก Printer Model หรือ PPD บรรทัดที่อยูดานลางรายการที่เลือกจะแสดง
ไฟล PPD หากไฟลดังกลาวแสดงเปน Generic ใหเลื่อนไปที่ HP แลวเลื่อน
ไปที่รุนที่ตองการ คลิก Apply Changes
選擇印表機機型或 PPD。 選項下方的文字會列出 PPD。 如果列為通
用,請捲動到 HP,然後捲動到特定的機型。 按一下套用變更。
27
繁體中文 ภาษาไทย 한국어 Bahasa Indonesia 简体中文 English
3) In the Print Center, select the printer, and then click Make
Default. 4) Go to step 25.
3) 在 “打印中心”中,选择打印机,然后单击 Make
Default。 4) 转至步骤 25。
3) Dari Print Center, pilih printer, kemudian klik Make Default. 4)
Pergi ke langkah 25.
3) Print Center에서 프린터를 선택하고 기본 프린터로 사용을 누르십
시오. 4) 25단계로 가십시오.
3) ในหนาจอ Print Center ใหคุณเลือกเครื่องพิมพ แลวคลิกที่ Make
Default 4) ไปที่ขั้นตอนที่ 25
3) 在「列印中心」中,選擇印表機,然後按一下設成預設值。 4) 移
至步驟 25。
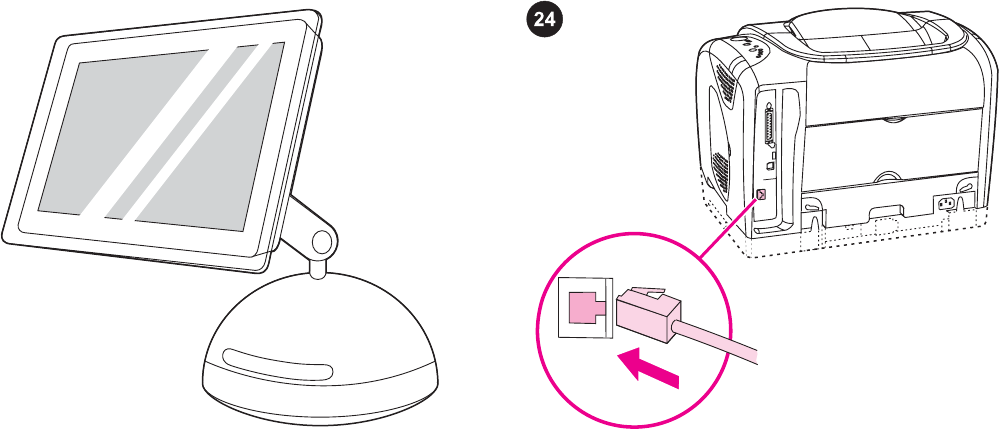
Connect to a Macintosh on a network.
Note The HP color LaserJet 2550Ln and 2550n printers have an HP
Jetdirect internal print server for network connection.
For a 10/100 Base-T network, connect a twisted-pair network cable
between the printer port and an active network port.
通过网络连接至 Macintosh。
注意 HP color LaserJet 2550Ln 和 2550n 打印机配有
HP Jetdirect 内置打印服务器,可用于连接网络。
对于 10/100 Base-T 网络,请将双绞线网络电缆的一端
插入打印机端口,另一端插入有源网络端口。
Menghubungkan Macintosh ke jaringan.
Perhatikan Printer HP color LaserJet 2550Ln dan 2550n dilengkapi
dengan print server internal HP Jetdirect untuk koneksi jaringan.
Untuk jaringan 10/100 Base-T, sambungkan kabel jaringan ganda-
terpilin antara port printer dan port jaringan yang aktif.
네트워크의 Macintosh 컴퓨터에 연결하기.
주 HP color LaserJet 2550Ln 및 2550n 프린터에는 네트워크 연결에
필요한 HP Jetdirect 내장형 프린트 서버가 포함되어 있습니다.
10/100 Base-T 네트워크인 경우 프린터 포트와 활성 네트워크 포트
에 차폐형 네트워크 케이블을 꽂으십시오.
การเชื่อมตอกับเครื่อง Macintosh ในระบบเครือขาย
หมายเหตุ เครื่องพิมพ HP color LaserJet 2550Ln และ 2550n มีเซิรฟเวอร
การพิมพภายใน HP Jetdirect สําหรับการเชื่อมตอเครือขาย
สําหรับเครือขายแบบ 10/100 Base-T ใหคุณเชื่อมตอสายเคเบิลเครือขาย
แบบเกลียวคูระหวางพอรตของเครื่องพิมพและพอรตของเครือขายที่ใชงาน
連接至網路上的 Macintosh 電腦。
注意 HP color LaserJet 2550Ln 與 2550n 印表機包含可連線網路的
HP Jetdirect 內接式列印伺服器。
對於 10/100 BaseT 網路,請使用雙絞線網路電纜連接印表機連接埠
與現用網路連接埠。
28
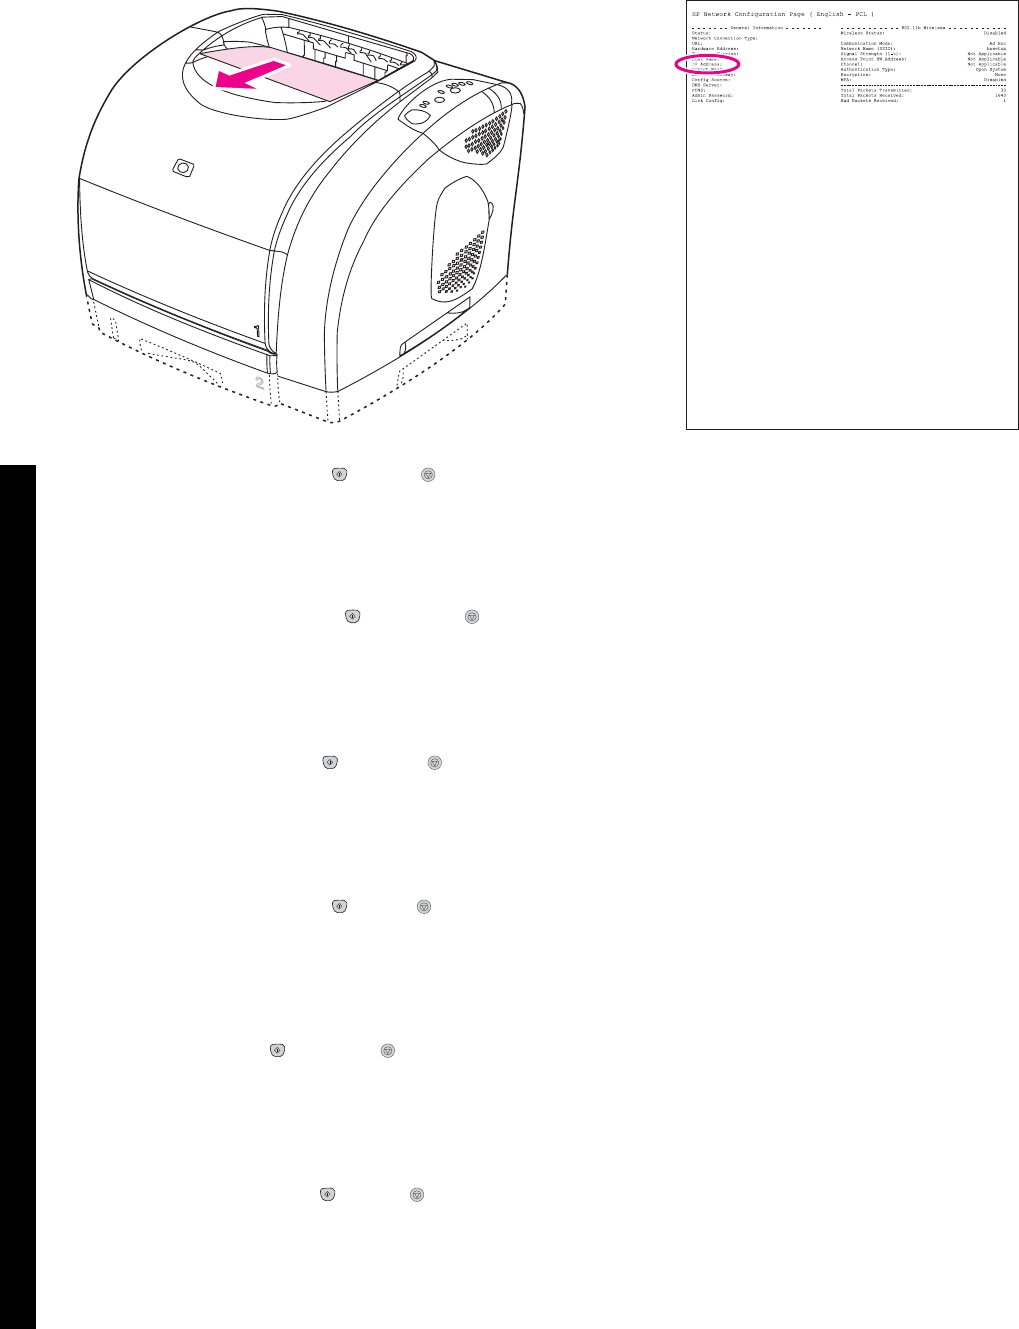
Make sure the Ready light is on. Press (G
O
) and (C
ANCEL
J
OB
)
simultaneously to print a Configuration page, an HP Jetdirect page,
and a Supplies Status page.
Note If no HP Jetdirect page was printed, wait 30 seconds for the
network card to initialize, and then try to print the page again.
确保就绪指示灯亮起。 同时按下(执行)和(取消
作业)按钮,打印配置页、HP Jetdirect 页和耗材状态
页。
注意 如果未打印 HP Jetdirect 页,请等待 30 秒,以便
网卡完成初始化,然后尝试再次打印该页。
Pastikan lampu Siap menyala. Tekan (J
ALAN
) dan (B
ATALKAN
P
EKERJAAN
) bersamaan untuk mencetak halaman Konfigurasi,
halaman HP Jetdirect, dan halaman Status Suplai.
Perhatikan Jika halaman HP Jetdirect tidak tercetak, tunggu 30
detik untuk inisialisasi card jaringan, lalu cobalah mencetak kembali.
준비 표시등이 켜지는지 확인하십시오. (진행) 및 (작업 취소)을
함께 눌러 구성 페이지, HP Jetdirect 페이지 및 소모품 상태 페이지
를 인쇄하십시오.
주 HP Jetdirect 페이지가 인쇄되지 않으면 30초 동안 네트워크 카드
가 초기화될 때까지 기다리고 다시 인쇄해보십시오.
ตรวจสอบวาไฟพรอมสวาง กดปุม (ทํางาน) และ (ยกเลิกงานพิมพ)
พรอมๆ กัน เพื่อพิมพหนากําหนดคา หนา HP Jetdirect และหนาแสดง
สถานะอุปกรณสิ้นเปลือง
หมายเหตุ หากเครื่องไมพิมพหนา HP Jetdirect ออกมา ใหรอประมาณ 30
วินาทีเพื่อใหการดเครือขายเริ่มทํางาน จากนั้นจึงลองพิมพหนาดังกลาวอีก
ครั้ง
請確定就緒指示燈已亮起。 同時按下 (列印) 與 (取消列印) 以列
印組態頁、HP Jetdirect 頁及耗材狀態頁。
注意 如未列印 HP Jetdirect 頁,請等待 30 秒讓網路卡進行初始化,
然後再列印一次。
For OS 9.1.x to 9.2.x, on the HP Jetdirect page, locate the printer IP
address (circled in the illustration above).
对于 OS 9.1.x 至 9.2.x,在 HP Jetdirect 页上找到打印
机的 IP 地址(在上面的插图中圈出)。
Untuk OS 9.1.x s/d 9.2.x, pada halaman HP Jetdirect, temukan
alamat IP printer (dilingkari pada ilustrasi di atas).
OS 9.1.x - 9.2.x인 경우 HP Jetdirect 페이지에서 프린터 IP 주소를 확
인하십시오(위 그림에서 동그라미 표시 부분).
สําหรับระบบปฏิบัติการ 9.1.x ถึง 9.2.x ในหนา HP Jetdirect ใหดูที่ IP แอด
เดรสของเครื่องพิมพ (ตามที่วงกลมในภาพประกอบขางตน)
對於 OS 9.1.x 至 9.2.x,請在 HP Jetdirect 頁上尋找印表機 IP 位址
(上圖圈起部分)。
29
繁體中文 ภาษาไทย 한국어 Bahasa Indonesia 简体中文 English
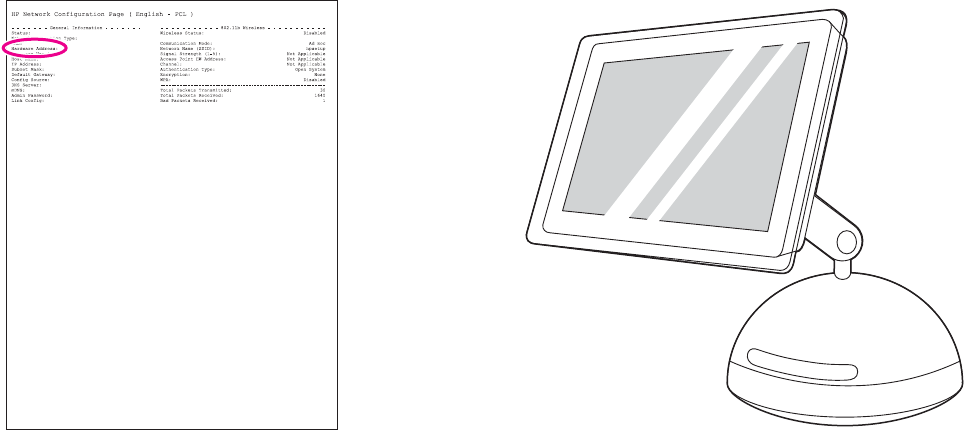
For OS X's Rendezvous feature, on the HPJetdirect page, located
the hardware address (circled in the illustration above).
对于 OS X 的 Rendezvous 功能,请在 HP Jetdirect 页
上,找到硬件地址(在上面的插图中圈出)。
Untuk fitur Rendezvous OS X, pada halaman HP Jetdirect, temukan
alamat perangkat kerasnya (dilingkari pada ilustrasi di atas).
OS X의 Rendezvous 기능을 사용하는 경우 HPJetdirect 페이지에서
하드웨어 주소를 확인하십시오(위 그림에서 동그라미 표시 부분).
สําหรับคุณสมบัติ Rendezvous ของ OS X ในหนา HP Jetdirect ใหดูที่
แอดเดรสของฮารดแวร (ตามที่วงกลมในภาพประกอบขางตน)
對於 OS X Rendezvous 功能,請在 HPJetdirect 頁上尋找硬體位址
(上圖圈起部分)。
Install the software. OS 9.1.x to 9.2.x: 1) Run the installer CD, and
then restart the computer. 2) Run the Apple Desktop Printer Utility
(HD/Applications/Utilities/Desktop Printer Utility). 3) Double-click
Printer (LPR). Next to LPR Printer Selection, click Change. 4) Type
the printer IP address, and then click Verify.
安装软件。 OS 9.1.x 至 9.2.x:1) 运行安装程序 CD,
然后重新启动计算机。 2) 运行 Apple Desktop Printer
Utility (HD/Applications/Utilities/Desktop Printer
Utility)。 3) 双击 Printer (LPR)。 接着双击 LPR Printer
Selection,然后单击 Change。 4) 键入打印机 IP 地
址,然后单击 Verify。
Menginstalasi piranti lunak. OS 9.1.x s/d 9.2.x: 1) Jalankan CD
installer, kemudian hidupkan ulang komputer. 2) Jalankan Utility
Apple Desktop Printer (HD/Applikasi/Utilities/Utility Printer Desktop).
3) Dobel klik Printer (LPR). Di samping LPR Printer Selection, klik
Change. 4) Ketikkan alamat IP printer, kemudian klik Verify.
소프트웨어 설치. OS 9.1.x - 9.2.x: 1) 인스톨러 CD를 실행하고 컴퓨
터를 다시 시작하십시오. 2) Apple 데스크탑 프린터 유틸리티(HD/
Applications/Utilities/Desktop Printer Utility)를 실행하십시오. 3) 프린
터(LPR)를 두 번 누르십시오. LPR 프린터 선택 옆에 있는 변경을 누
르십시오. 4) 프린터 IP 주소를 입력하고 확인을 누르십시오.
การติดตั้งซอฟตแวร OS 9.1.x ถึง 9.2.x:1) รันแผนซีดีโปรแกรมการติดตั้ง
จากนั้นใหรีสตารตเครื่องคอมพิวเตอร 2) รันโปรแกรม Apple Desktop
Printer Utility (HD/Applications/Utilities/Desktop Printer Utility) 3) ดับ
เบิลคลิกที่ Printer (LPR) ถัดจาก LPR Printer Selection ใหคลิกที่
Change 4) พิมพ IP แอดเดรสของเครื่องพิมพ แลวคลิก Verify
安裝軟體。 OS 9.1.x 至 9.2.x: 1) 執行安裝程式 CD,然後重新啟動
電腦。 2) 執行「蘋果桌面印表機工具程式」(HD/應用程式/工具程式/
桌面印表機工具程式)。 3) 連按兩下印表機 (LPR)。 接著再連按兩下
LPR 印表機選項,然後按一下更改。 4) 鍵入印表機 IP 位址,然後按
一下確定。
30

5) Once the IP address has been verified, click OK. 6) Next to
Postscript Printer Description (PPD) File, click Change. 7) Doubled-
click the appropriate printer description file from the list. 8) Click
Create. 9) Click Save. 10) Click the desktop printer icon. 11) On the
Printing menu, click Set Default Printer. 12) Go to step 25.
5) IP 地址验证完后,单击 OK 。 6) 接着双击
Postscript Printer Description (PPD) File ,然后单击
Change。 7) 双击列表中相关的打印机描述文件。 8)
单击 Create。 9) 单击 Save。 10) 单击桌面打印机图
标。 11) 在 Printing 菜单中,单击 Set Default
Printer。 12) 转至步骤 25。
5) Setelah alamat IP selesai diperiksa, klik OK. 6) Di samping
Postscript Printer Description (PPD) File, klik Change. 7) Dobel klik
file deskripsi printer yang sesuai dari daftar. 8) Klik Create. 9) Klik
Save. 10) Klik ikon printer desktop. 11) Pada menu Printing, klik Set
Default Printer. 12) Pergi ke langkah 25.
5) IP 주소를 확인하고 확인을 누르십시오. 6) PPD 파일 옆에 있는 변
경을 누르십시오. 7) 목록에서 해당 프린터 설명 파일을 두 번 누르십
시오. 8) 생성을 누르십시오. 9) 저장을 누르십시오. 10) 바탕 화면의
프린터 아이콘을 누르십시오. 11) 프린팅 메뉴에서 기본 프린터 설정
을 누르십시오. 12) 25단계로 가십시오.
5) เมื่อตรวจสอบ IP แอดเดรสแลว ใหคลิกที่ OK 6) ถัดจาก Postscript
Printer Description (PPD) File ใหคลิกที่ Change 7) ดับเบิลคลิกที่ไฟลคํา
อธิบายเครื่องพิมพที่เหมาะสมจากรายการ 8) คลิก Create 9) คลิก Save
10) คลิกที่ไอคอนเครื่องพิมพบนเดสกทอป 11) ที่เมนู Printing ใหคลิกที่ Set
Default Printer 12) ไปที่ขั้นตอนที่ 25
5) 確認 IP 位址後,請按一下確定。 6) 接著再連按兩下 Postscript 印
表機描述 (PPD) 檔案,然後按一下更改。 7) 連按兩下清單中適當的
印表機描述檔案。 8) 按一下建立。 9) 按儲存。 10) 單按桌面印表機
圖像。 11) 在列印清單中,按一下設定預設印表機。 12) 移至步驟
25。
OS X: 1) Run the installer CD, and then restart the computer. 2)
Open the Print Center, and then click Add. 3) Click IP Printing. 4)
Type the printer IP address. 5) In the Printer Model box, select the
appropriate printer. 6) Click Add.
OS X:1) 运行安装程序 CD,然后重新启动计算机。
2) 打 开“打印中心”,然后单击 Add 。 3) 单击 IP
Printing 。 4) 键入打印机的 IP 地址。 5) 在 Printer
Model 框中,选择相关打印机。 6) 单击 Add。
OS X: 1) Jalankan CD installer, kemudian hidupkan ulang
komputer. 2) Buka Print Center, kemudian klik Add. 3) Klik IP
Printing. 4) Ketikkan alamat IP printer. 5) Dari kotak Printer Model,
pilih printer yang sesuai. 6) Klik Add.
OS X: 1) 인스톨러 CD를 실행하고 컴퓨터를 다시 시작하십시오. 2)
Print Center를 열고 추가를 누르십시오. 3) IP 프린팅을 누르십시오.
4) 프린터 IP 주소를 입력하십시오. 5) 프린터 모델 상자에서 해당 프
린터를 선택하십시오. 6) 추가를 누르십시오.
OS X: 1) รันแผนซีดีโปรแกรมการติดตั้ง จากนั้นใหรีสตารตเครื่อง
คอมพิวเตอร 2) เปดหนาจอ Print Center แลวคลิก Add 3) คลิก IP
Printing 4) พิมพ IP แอดเดรสของเครื่องพิมพ 5) ในชอง Printer Model ให
เลือกเครื่องพิมพที่ตองการ 6) คลิก Add
OS X: 1) 執行安裝程式 CD,然後重新啟動電腦。 2) 開啟列印中
心,然後按一下新增。 3) 按一下IP 列印。 4) 鍵入印表機 IP 位址。
5) 在印表機機型方塊中,選擇適當的印表機。 6) 按一下新增。
31
繁體中文 ภาษาไทย 한국어 Bahasa Indonesia 简体中文 English
Note If you are using the OS X Rendezvous feature, when adding
the printer in the Print Center, select Rendezvous, and then select
the printer with the matching hardware address listed on the HP
Jetdirect configuration page.
注意 如果您使用了 OS X Rendezvous 功能,将打印机
添加至“打印中心”时,请选择 Rendezvous,然后根据
HP Jetdirect 配置页中列出的相应硬件地址选择打印
机。
Perhatikan Jika Anda menggunakan fitur OS X Rendezvous,
sewaktu menambahkan printer di dalam Print Center, pilih
Rendezvous, kemudian pilih printer dengan alamat perangkat keras
yang sesuai di halaman konfigurasi HP Jetdirect.
주 OS X의 Rendezvous 기능을 사용하는 경우 Print Center에 프린터
를 추가할 때 Rendezvous를 선택하고 HP Jetdirect 구성 페이지에 나
타난 하드웨어 주소와 일치하는 프린터를 선택하십시오.
หมายเหตุ หากคุณใชคุณสมบัติ Rendezvous ของ OS X เมื่อคุณตองการ
เพิ่มเครื่องพิมพใน Print Center ใหคุณเลือก Rendezvous แลวเลือกเครื่อง
พิมพที่มีแอดเดรสฮารดแวรที่ตรงกันตามที่แสดงไวในหนาการตั้งคา HP
Jetdirect
注意 如果您使用 OS X Rendezvous 功能,在「列印中心」新增印表
機時,請選擇 Rendezvous,然後選擇 HP Jetdirect 組態頁所列符合
硬體位置的印表機。
Note When the Print Center opens, verify that the printer (if it is
listed) is using the proper PostScript printer description (PPD) file.
Open the Printers menu and select Show Info. In the Printer Info
window, click the up-down arrow next to Name and Location.
注意 “打印中心”打开后,检验打印机(若已列出)是否
使用了正确的 PostScript 打印机描述 (PPD) 文件。 打
开 Printers 菜单,然后选择 Show Info 。 在 Printer
Info 窗口中,单击 Name and Location 旁边的向上向下
箭头。
Perhatikan Sewaktu Print Center terbuka, pastikan bahwa printer
(jika terdaftar) menggunakan file deskripsi printer PostScript (PPD).
Buka menu Printers kemudian pilih Show Info. Dari jendela layar
Printer Info, klik anak panah naik-turun di samping Name and
Location.
주 Print Center가 열리면 프린터(목록에 나와 있는 경우)가 해당
PPD 파일을 사용하고 있는지 확인하십시오. 프린터 메뉴를 열고 정
보 보기를 선택하십시오. 프린터 정보 창에서 이름 및 위치 옆에 있는
위아래 화살표를 누르십시오.
หมายเหตุ เมื่อหนาจอ Print Center ปรากฏขึ้น ใหคุณตรวจสอบวาเครื่อง
พิมพ (หากมีแสดงไว) ใชไฟล PostScript printer description (PPD) ที่ถูก
ตองหรือไม จากนั้น คลิกที่เมนู Printers แลวเลือก Show Info ในวินโดว
Printer Info ใหคลิกปุมลูกศรขึ้น-ลงที่อยูถัดจาก Name and Location
注意 「列印中心」開啟後,請確認印表機 (如果列在其中) 使用正確
的 PostScript 印表機描述 (PPD) 檔。 開啟印表機清單,選擇顯示資
訊。 在「印表機資訊」視窗中,按一下名稱與位置旁的上下箭頭。
32
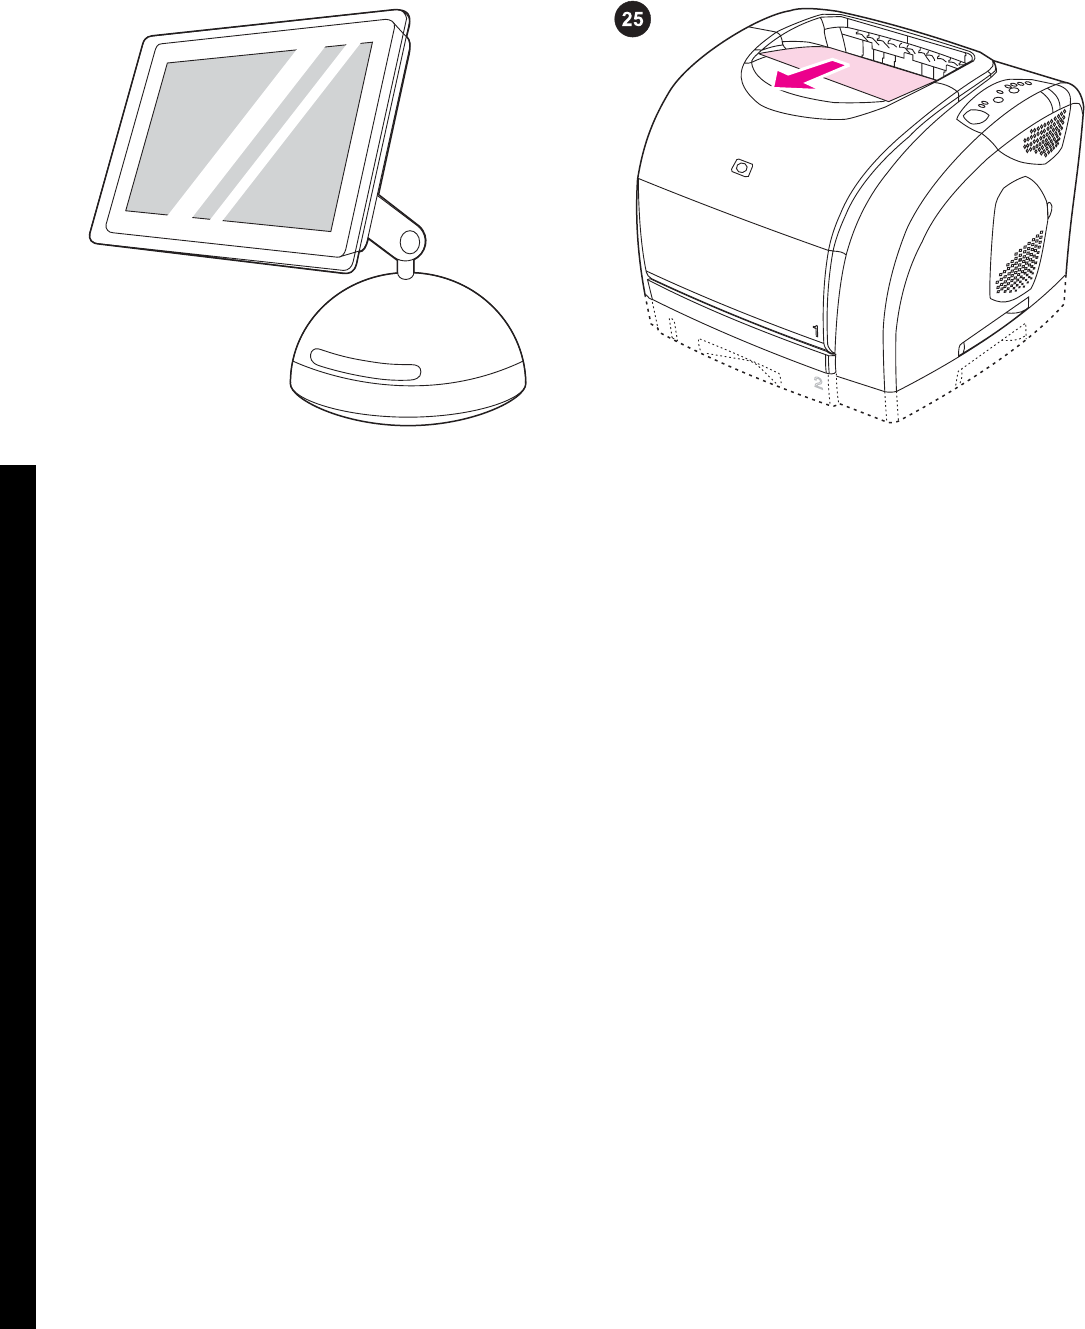
Select Printer Model or PPD. The line below the selection lists the
PPD. If it is listed as Generic, scroll to HP, and then scroll to the
specific model. Click Apply Changes.
选择 Printer Model 或 PPD。 选项列表下面的行中列出
了 PPD 。 如果 PPD 以 Generic 列出,则滚动查看
HP,然后滚动找到特定型号。 单击 Apply Changes。
Pilih Printer Model atau PPD. Baris di bawah pilihan adalah daftar
PPD. Jika terdaftar sebagai Generic, gulir ke HP, kemudian gulir ke
model yang spesifik. Klik Apply Changes (Terapkan Perubahan).
프린터 모델 또는 PPD를 선택하십시오. 선택한 항목 아래에 PPD가
나와 있습니다. 일반 사용으로 표시되어 있으면 HP, 해당 모델을 차례
대로 찾아 가십시오. 변경 사항 적용을 누르십시오.
เลือก Printer Model หรือ PPD บรรทัดที่อยูดานลางรายการที่เลือกจะแสดง
ไฟล PPD หากไฟลดังกลาวแสดงเปน Generic ใหเลื่อนไปที่ HP แลวเลื่อน
ไปที่รุนที่ตองการ คลิก Apply Changes
選擇印表機機型或 PPD。 選項下方的文字會列出 PPD。 如果列為通
用,請捲動到 HP,然後捲動到特定的機型。 按一下套用變更。
Test the software installation. Print a page from any program to
make sure the software is correctly installed.
Note If installation fails, reinstall the software. If reinstallation fails,
see the Readme, see the flyer that came in the printer box, or go to
http://www.hp.com/support/clj2550 for help or more information.
测试软件安装。 从任一程序打印一个页面,确保软件
安装正确。
注意 如果安装失败,请重新安装软件。 如果重新安装
还失败,则参阅自述文件和打印机包装箱随附的说明,
或者访问 http://www.hp.com/support/clj2550,以获得
帮助或更多信息。
Uji coba instalasi piranti lunak. Cetak satu halaman dari program
apa pun untuk memastikan instalasi piranti lunak sudah benar.
Perhatikan Jika instalasi gagal, lakukan instalasi ulang piranti lunak.
Jika masih gagal, simak Readme, simak selebaran yang disertakan
dengan kotak printer, atau kunjungi http://www.hp.com/support/
clj2550 untuk bantuan atau informasi.
소프트웨어 설치 상태 검사. 원하는 응용 프로그램에서 페이지를 인
쇄하여 소프트웨어가 제대로 설치되었는지 확인하십시오.
주 설치가 제대로 되지 않은 경우, 다시 설치하십시오. 그래도, 제대
로 설치되지 않으면 Readme나 함께 제공되는 지원 안내서를 참조하
십시오. 또는 http://www.hp.com/support/clj2550에서 도움을 요청하
거나 자세한 내용을 확인하십시오.
การทดสอบการติดตั้งซอฟตแวร พิมพหนาทดสอบจากโปรแกรมใดก็ไดเพื่อ
ใหแนใจวาติดตั้งซอฟตแวรอยางถูกตอง
หมายเหตุ หากการติดตั้งทําไดไมสมบูรณ ใหติดตั้งซอฟตแวรใหมอีกครั้ง
หากการติดตั้งใหมอีกครั้งยังคงไมสมบูรณ โปรดดูที่ไฟล Readme, แผนพับที่
ใหมาพรอมกับกลองเครื่องพิมพ หรือไปที่ http://www.hp.com/support/
clj2550 เพื่อขอความชวยเหลือหรือขอมูลเพิ่มเติม
測試軟體安裝。 透過任何程式列印一個頁面,以確定軟體已正確安
裝。
注意 如果安裝失敗,請重新安裝軟體。 如果重新安裝失敗,請參閱
Readme ( 讀 我 ) 或 印 表 機 包 裝 箱 中 的 傳單,或瀏覽
http://www.hp.com/support/clj2550 以獲得協助或更多資訊。
33
繁體中文 ภาษาไทย 한국어 Bahasa Indonesia 简体中文 English
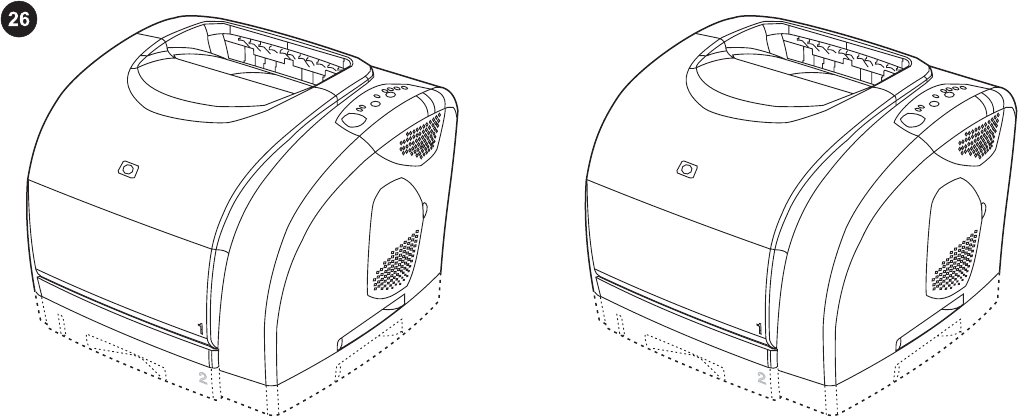
Congratulations! Your printer is ready to use. See the HP Toolbox,
where you can open the electronic User Guide and use tools to
solve problems. The electronic User Guide is also on the software
CD-ROM.
恭喜! 您的打印机已准备就绪,可以使用。 请参阅
HP 工具箱,您可在其中打开电子版用户指南并使用相
关工具解决问题。 电子版用户指南还可在软件 CD-
ROM 中找到。
Selamat! Printer Anda siap untuk digunakan. Simak HP Toolbox,
di mana Anda dapat membuka Panduan Penggunaan elektronik
dan menggunakan peralatan untuk memecahkan masalah.
Panduan Penggunaan elektronik juga terdapat pada CD-ROM.
축하합니다! 이제 프린터를 사용할 수 있습니다. HP 도구 상자를 사
용하면 사용 설명서 파일을 열고 문제를 해결할 수 있습니다. 사용 설
명서 파일은 소프트웨어 CD-ROM에도 들어 있습니다.
ขอแสดงความยินดี! เครื่องพิมพของคุณพรอมใชงานแลว โปรดดูที่กลอง
เครื่องมือ HP ซึ่งคุณสามารถเปดดูคูมือผูใชแบบอิเล็กทรอนิกส และใชเครื่อง
มือตางๆ เพื่อแกไขปญหา นอกจากนี้ คูมือผูใชแบบอิเล็กทรอนิกสยังมีอยูใน
แผนซีดีซอฟตแวรอีกดวย
恭喜您! 印表機已準備就緒,隨時可以使用。 請參閱 HP 工具箱,
以開啟電子版「使用指南」並使用工具解決問題。 電子版「使用指
南」也包含在軟體 CD-ROM 光碟中。
Note You must have performed a complete software installation in
order to use the HP Toolbox. With Windows-based computers, you
also must have TCP/IP installed in order to use the HP Toolbox.
注意 您必须完整安装软件,才能使用 HP 工具箱。 对
于基于 Windows 的计算机,您还必须安装 TCP/IP 才
能使用 HP 工具箱。
Perhatikan Anda seharusnya telah melakukan instalasi penuh
piranti lunak untuk menggunakan Toolbox. Pada komputer berbasis-
Windows, Anda juga harus menginstalasi TCP/IP untuk
menggunakan Toolbox HP.
주 HP 도구 상자를 사용하려면 소프트웨어 구성 요소를 모두 설치해
야 합니다. Windows 컴퓨터에서 HP 도구 상자를 사용하려면 TCP/IP
가 설치되어 있어야 합니다.
หมายเหตุ คุณตองติดตั้งซอฟตแวรอยางสมบูรณ เพื่อใชกลองเครื่องมือของ
HP นอกจากนี้ คุณจะตองติดตั้ง TCP/IP เพื่อใชกลองเครื่องมือของ HP
สําหรับเครื่องคอมพิวเตอรที่ใชระบบปฏิบัติการ Windows อีกดวย
注意 您必須執行完整的軟體安裝程序才能使用 HP 工具箱。 使用
Windows 電腦的使用者,也必須安裝 TCP/IP 才能使用 HP 工具箱。
34
Register the printer. Register online now! Ensure that you have the
latest information that may include:
●Free driver or software update notification
●Product support alerts
●Optional newsletters with tips and tricks for using your HP product
注册打印机。 立即在线注册! 确保您已获得最新信
息,这些信息可能包括:
●免费驱动程序或软件更新通知
●产品支持警报
●使用 HP 产品的相关方法和技巧的可选新闻
Daftarkan printer. Daftarkan secara online sekarang! Pastikan
bahwa Anda menerima informasi yang terbaru yang meliputi:
●Driver gratis atau pemberitahuan pembaruan piranti lunak
●Peringatan dukungan produk
●Warta berkala dengan tips dan trik dalam menggunakan produk
HP Anda
프린터 등록. 온라인으로 지금 등록하십시오! 아래와 같은 혜택을 통
해 제품 관련 최신 정보를 접할 수 있습니다.
●무료 드라이버 또는 소프트웨어 업데이트 통지
●제품 지원 알림 메시지
●HP 제품 사용 관련 각종 정보가 실린 소식지(선택 항목)
การลงทะเบียนเครื่องพิมพ ลงทะเบียนแบบออนไลนไดทันที! ตรวจสอบวา
คุณไดเลือกรับบริการขอมูลลาสุดซึ่งประกอบดวย
●การแจงอัปเดตไดรเวอรหรือซอฟตแวรโดยไมคิดคาใชจาย
●การแจงเตือนการสนับสนุนผลิตภัณฑ
●จดหมายแจงขาวที่ใหคําแนะนําและเคล็ดลับในการใชผลิตภัณฑของ HP
為印表機註冊。 請馬上進行線上註冊! 這可確保您獲得包含以下項
目的最新資訊:
●免費的驅動程式或軟體更新通知
●產品支援警示
●選擇性新聞通訊,含 HP 產品的使用提示與秘訣。
You can register your printer at http://www.hp.com/go/register .
您可在以下网站注册打印机:http://www.hp.com/go/
register。
Anda dapat mendaftarkan printer Anda di http://www.hp.com/go/
register.
http://www.hp.com/go/register에서 컴퓨터를 등록할 수 있습니다.
คุณสามารถลงทะเบียนเครื่องพิมพของคุณไดที่ http://www.hp.com/go/
register
您可以在 http://www.hp.com/go/register 註冊您的印表機。
35
繁體中文 ภาษาไทย 한국어 Bahasa Indonesia 简体中文 English
36
37
38

*Q3702-90943*
*Q3702-90943*
