HP Cousteau_GSG_UFGDIA Het Krijgen Van Begonnen Gids C00633686
User Manual: HP Het krijgen van Begonnen Gids
Open the PDF directly: View PDF ![]() .
.
Page Count: 80
- English
- Step 1: Check the package contents.
- Step 2: Remove the packing tape and materials.
- Step 3: Install tray 2 and the duplex unit (HP Officejet Pro K550dtn/K550dtwn).
- Step 4: Install the ink cartridges.
- Step 5: Install the printheads.
- Step 6: Load paper in the trays.
- Step 7: Connect the power cord and turn on the printer.
- Step 8: Connect the printer.
- Step 9: Test the printer software installation.
- Step 10: Register the printer.
- Finding more information.
- Interpreting control panel lights
- Troubleshooting
- Troubleshooting and configuration tools
- Setting up the printer for wireless communication (HP Officejet Pro K550dtwn)
- Troubleshooting problems for wireless communication
- Hewlett-Packard limited warranty statement
- Deutsch
- Schritt 1: Überprüfen des Verpackungsinhalts.
- Schritt 2: Entfernen der Verpackungsklebestreifen und des Verpackungsmaterials
- Schritt 3: Installieren Sie Fach 2 und die Duplex- Einheit (HP Officejet Pro K550dtn/K550dtwn).
- Schritt 4: Einsetzen der Tintenpatronen.
- Schritt 5: Einsetzen der Druckköpfe.
- Schritt 6: Einlegen von Papier in die Fächer.
- Schritt 7: Anschließen des Netzkabels und Einschalten des Druckers.
- Schritt 8: Anschließen des Druckers.
- Schritt 9: Testen der Softwareinstallation.
- Schritt 10: Registrieren des Druckers
- Weitere Informationsquellen
- Bedeutung der LEDs auf dem Bedienfeld
- Fehlerbehebung
- Fehlerbehebung und Konfigurationstools
- Einrichten des Druckers für drahtlose Kommunikation (HP Officejet Pro K550dtwn)
- Fehlerbehebung bei der drahtlosen Kommunikation
- Vereinbarung zur beschränkten Gewährleistung von Hewlett-Packard
- Français
- Étape 1 : Vérification du contenu du carton.
- Étape 2 : Retrait des matériaux d’emballage.
- Étape 3 : Installez le bac 2 et l’unité auto-duplex (HP Officejet Pro K550dtn/K550dtwn).
- Étape 4 : Installation des cartouches d’encre.
- Étape 5 : Installation des têtes d’impression.
- Étape 6 : Chargement de papier dans les bacs.
- Étape 7 : Branchez le cordon d’alimentation et mettez l’imprimante sous tension.
- Étape 8 : Connexion de l’imprimante.
- Étape 9 : Test de l’installation du logiciel de l’imprimante.
- Étape 10 : Enregistrement de l’imprimante.
- Pour obtenir davantage d’informations.
- Interprétation des voyants du panneau de commande
- Dépannage
- Outils de dépannage et de configuration
- Configuration de l’imprimante pour la fonction de communication sans fil (HP Officejet Pro K550dtwn)
- Dépannage des problèmes de communication sans fil
- Garantie limitée Hewlett-Packard
- Nederlands
- Stap 1: controleer de inhoud van de verpakking.
- Stap 2: verwijder de verpakkingstape en -materialen.
- Stap 3: installeer lade 2 en de duplexeenheid (HP Officejet Pro K550dtn/K550dtwn).
- Stap 4: plaats de inktpatronen.
- Stap 5: installeer de printkoppen.
- Stap 6: plaats papier in de laden.
- Stap 7: Sluit het netsnoer aan en zet de printer aan.
- Stap 8: sluit de printer aan.
- Stap 9: test de installatie van de printersoftware.
- Stap 10: registreer de printer.
- Meer informatie zoeken.
- De betekenis van de lampjes van het bedieningspaneel
- Problemen oplossen
- Hulpmiddelen voor het oplossen van problemen en voor de configuratie
- De printer instellen voor draadloze communicatie (HP Officejet Pro K550dtwn)
- Problemen met draadloze communicatie oplossen
- Beperkte garantie van Hewlett-Packard
- Italiano
- Punto 1: Verificare il contenuto dell’imballo.
- Punto 2: Rimuovere il nastro e il materiale di imballo.
- Punto 3: Installare il vassoio 2 e l’unità duplex (HP Officejet Pro K550dtn/K550dtwn).
- Punto 4: Installare le cartucce di stampa.
- Punto 5: Installare le testine di stampa.
- Punto 6: Caricare la carta nei vassoi.
- Punto 7: Collegare il cavo di alimentazione e accendere la stampante.
- Punto 8: Collegare la stampante.
- Punto 9: Verificare l’installazione del software della stampante.
- Punto 10: Registrare la stampante.
- Ulteriori informazioni.
- Significato delle spie del pannello di controllo
- Risoluzione dei problemi
- Risoluzione dei problemi e strumenti di configurazione
- Impostazione della stampante per la comunicazione wireless (HP Officejet Pro K550dtwn)
- Risoluzione dei problemi relativi alla comunicazione wireless
- Dichiarazione di garanzia limitata Hewlett-Packard
- Arabic
HP Officejet Pro K550
Getting Started Guide
Leitfaden zur Inbetriebnahme
Guide de Mise en Marche
Beknopte Handleiding
Guida introduttiva

2
Copyright Information
© 2005 Copyright Hewlett-Packard Development Company, L.P.
Edition 1, 10/2005
Reproduction, adaptation or translation without prior written permission is
prohibited, except as allowed under the copyright laws.
The information contained herein is subject to change without notice.
The only warranties for HP products and services are set forth in the express
warranty statements accompanying such products and services. Nothing
herein should be construed as constituting an additional warranty. HP shall
not be liable for technical or editorial errors or omissions contained herein.
Trademark credits
Microsoft® and Windows® are U.S. registered trademarks of Microsoft
Corporation. All other products mentioned herein may be trademarks of their
respective companies.
Windows Connect Now™ is a registered trademark of Microsoft Corporation.
Novell® and NetWare® are registered trademarks of Novell Corporation.
Pentium® is a registered trademark of Intel Corporation.
Adobe® and Acrobat® are registered trademarks of Adobe Systems
Incorporate.
SecureEasySetup™ is a registered trademark of HP, Broadcom and LinkSys.
Informations sur le copyright
© 2005 Copyright Hewlett-Packard Development Company, L.P.
Édition 1, 10/2005
Toute reproduction, adaptation ou traduction sans autorisation écrite
préalable est formellement interdite, sauf si cette opération est effectuée
dans le cadre prévu par la loi sur les droits d’auteur.
Les informations contenues dans ce document peuvent faire l’objet de
modifications sans préavis.
Les seules garanties relatives aux produits et services HP sont exposées dans
les déclarations de garantie expresse qui accompagnent lesdits produits et
services. Aucun élément du présent document ne doit être considéré comme
constituant une garantie supplémentaire. HP ne pourra être tenue
responsable des erreurs techniques ou rédactionnelles ou des omissions
figurant dans le présent document.
Marque
Microsoft® et Windows® sont des marques déposées de Microsoft
Corporation aux États-Unis. Tous les autres produits mentionnés dans le
présent document sont des marques de leurs sociétés respectives.
Windows Connect Now™ est une marque déposée de Microsoft
Corporation.
Novell® et NetWare® sont des marques déposées de Novell Corporation.
Pentium® est une marque déposée de Intel Corporation.
Adobe® et Acrobat® sont des marques déposées de Adobe Systems
Incorporate.
SecureEasySetup™ est une marque déposée de HP, Broadcom et LinkSys.
Safety Information
Always follow basic safety precautions when using this product to reduce
risk of injury from fire or electric shock.
1. Read and understand all instructions in the documentation that comes
with the printer.
2. Use only a grounded electrical outlet when connecting this product to a
power source. If you do not know whether the outlet is grounded, check
with a qualified electrician.
3. Observe all warnings and instructions marked on the product.
4. Unplug this product from wall outlets before cleaning.
5. Do not install or use this product near water, or when you are wet.
6. Install the product securely on a stable surface.
7. Install the product in a protected location where no one can step on or
trip over the line cord, and the line cord cannot be damaged.
8. If the product does not operate normally, see “Maintaining and
troubleshooting” in the onscreen user guide on the Starter CD.
9. There are no user-serviceable parts inside. Refer servicing to qualified
service personnel.

3
Informationen zur Sicherheit
Beachten Sie beim Einsatz dieses Produkts immer die folgenden
Sicherheitshinweise, um die Verletzungsgefahr und das Risiko eines
elektrischen Schlags zu verringern.
1. Die Anweisungen in der mit dem Druckergelieferten Dokumentation
müssen von Ihnen gelesen und verstanden worden sein.
2. Verwenden Sie ausschließlich eine geerdete Steckdose für den
Anschluss dieses Produktes an die Stromversorgung. Wenn Sie sich nicht
sicher sind, ob die Steckdose geerdet ist, so lassen Sie dies durch einen
qualifizierten Elektriker überprüfen.
3. Alle am Produkt angebrachten Warnungen und Anweisungen sind
zu befolgen.
4. Ziehen Sie vor dem Reinigen des Produkts den Netzstecker aus der
Steckdose.
5. Dieses Produkt darf nicht in der Nähe von Wasser betrieben bzw. von
einer durchnässten Person aufgestellt oder bedient werden.
6. Sorgen Sie für sicheren Stand des Produkts auf einer stabilen
Auflagefläche.
7. Wählen Sie für das Produkt einen geschützten Standort, an dem keine
Personen auf das Netzkabel treten oder darüber stolpern können. Das
Netzkabel darf nicht beschädigt werden.
8. Wenn die Seite nicht korrekt kopiert wird, lesen Sie den Abschnitt zur
Fehlerbehebung im Online-Benutzerhandbuch der entsprechenden
Starter-CD für Ihr Betriebssystem.
9. Im Inneren des Geräts befinden sich keine Teile, die vom Endnutzer
gewartet werden können. Beauftragen Sie mit Wartung und
Instandsetzung qualifiziertes Kundendienstpersonal.
Consignes de sécurité
Respectez toujours les précautions de sécurité élémentaires quand vous
utilisez ce produit, afin de réduire les risques de blessures dues au feu ou
à un choc électrique.
1. Veuillez lire attentivement toutes les instructions contenues dans la
documentation livrée avec l’imprimante.
2. Utilisez toujours une prise de courant mise à la terre lors du
branchement de ce produit à une source d’alimentation. Si vous ne
savez pas si une prise de courant est mise à la terre, consultez un
électricien qualifié.
3. Suivez tous les avertissements et toutes les instructions indiqués sur
le produit.
4. Débranchez cet appareil des prises murales avant de procéder
à un nettoyage.
5. N’installez jamais cet appareil près d’une source d’eau,
ni si vous êtes mouillé.
6. Installez l’appareil en toute sécurité sur une surface stable.
7. Installez l’appareil dans un lieu protégé où personne ne risque de
marcher sur le cordon ou de trébucher sur celui-ci, et où le cordon ne
risque pas d’être endommagé.
8. Si le produit ne fonctionne pas correctement, reportez-vous à la section
« Entretien et dépannage » du guide de l’utilisateur en ligne disponible
sur le CD de démarrage relatif à votre système d’exploitation.
9. L’appareil ne contient aucune pièce dont l’entretien doit être réalisé par
l’utilisateur. Confiez-en l’entretien à du personnel qualifié.
Veiligheidsinformatie
Neem bij het gebruik van dit product altijd de elementaire
voorzorgsmaatregelen in acht om de kans op letsel ten gevolge van brand
of elektrische schokken te beperken.
1. Zorg dat u alle instructies in de documentatie die wordt geleverd bij de
printer, hebt gelezen en begrepen.
2. Sluit dit product uitsluitend aan op een geaard stopcontact. Als u niet
zeker weet of een stopcontact geaard is, kunt u advies inwinnen bij een
erkende elektricien.
3. Neem alle op dit product vermelde waarschuwingen en instructies
in acht.
4. Haal het netsnoer uit het stopcontact voordat u dit product reinigt.
5. Plaats of gebruik dit product niet in de buurt van water of wanneer
u nat bent.
6. Zorg dat het product stevig op een stabiel oppervlak staat.
7. Zet het product op een veilige plaats waar niemand op het netsnoer kan
trappen of erover kan struikelen en het netsnoer niet wordt beschadigd.
8. Als het product niet goed werkt, raadpleegt u “Onderhoud en
probleemoplossing” in de gebruikershandleiding op de Starter-cd voor
uw besturingssysteem.
9. Dit product bevat geen onderdelen die door de gebruiker kunnen
worden onderhouden. Laat onderhoudswerkzaamheden over aan
erkende onderhoudsmonteurs.
Informazioni sulla sicurezza
Durante l’utilizzo di questo prodotto, attenersi sempre alle precauzioni di
sicurezza di base al fine di ridurre il rischio di lesioni alle persone derivanti
da incendi o scariche elettriche.
1. Si consiglia di leggere e apprendere tutte le istruzioni contenute nei
documenti forniti insieme alla stampante.
2. Per collegare il prodotto a una presa di corrente, utilizzare
esclusivamente una presa elettrica collegata a massa. In caso di
dubbio, contattare un elettricista qualificato per verificare che la presa
elettrica sia collegata a massa.
3. Attenersi a tutte le avvertenze e le istruzioni indicate sul prodotto.
4. Prima di effettuare la pulizia, scollegare il prodotto dalle prese a parete.
5. Non installare o utilizzare il prodotto nelle vicinanze di acqua o se non
si è perfettamente asciutti.
6. Posizionare il prodotto su una superficie stabile.
7. Posizionare il prodotto in un luogo riparato, dove non si possa
inciampare sul cavo di alimentazione, che non deve essere
danneggiato.
8. Se il prodotto non funziona normalmente, consultare la sezione
“Manutenzione e risoluzione dei problemi” della Guida in linea
disponibile sul CD di avviamento.
9. Il prodotto non include parti riparabili dall’utente. Per le riparazioni
rivolgersi esclusivamente al personale qualificato.
4
English
Nederlands Français Deutsch
Italiano
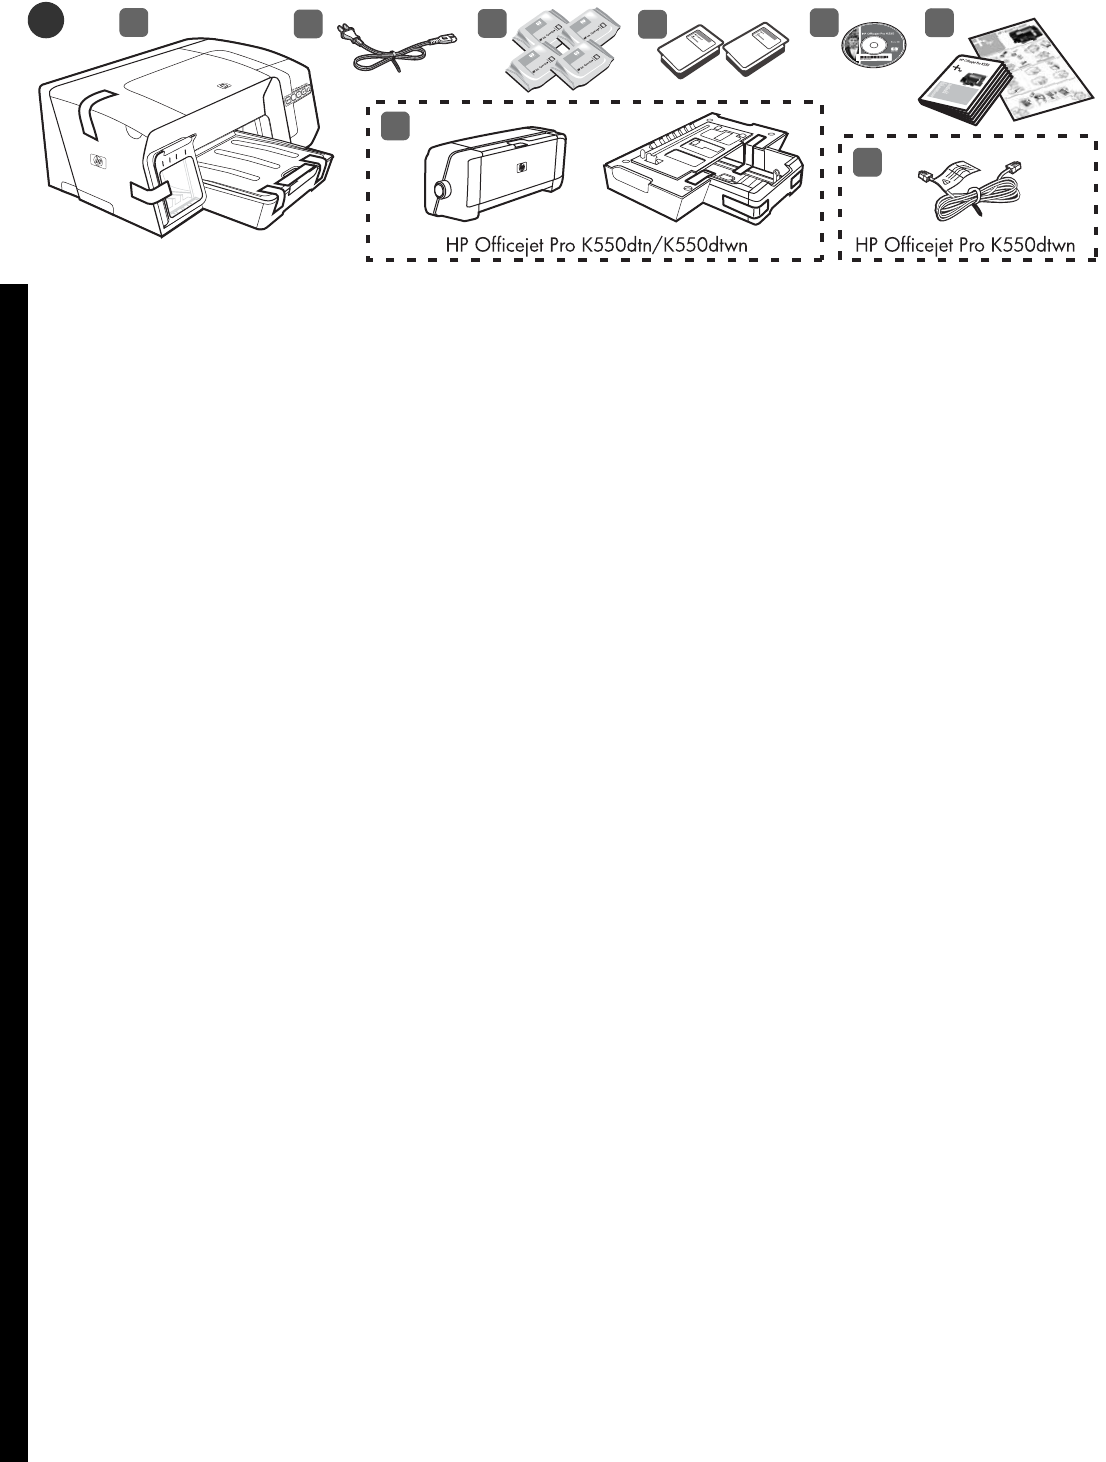
Step 1: Check the package contents.
1) Printer, 2) power cord, 3) four ink cartridges (cyan, magenta,
yellow, black), 4) two printheads, 5) Starter CD (software and
onscreen user guide), 6) printed documentation,
7) automatic two-sided printing accessory (duplex unit)
and tray 2 (HP Officejet Pro K550dtn/K550dtwn), and
8) cross cable (HP Officejet Pro K550dtwn).
Schritt 1: Überprüfen des Verpackungsinhalts.
1) Drucker, 2) Netzkabel, 3) vier Tintenpatronen
(Cyan, Magenta, Gelb, Schwarz), 4) zwei Druckköpfe,
5) Starter-CD (Software und Online-Benutzerhandbuch),
6) gedruckte Dokumentation,
7) automatische optionale Duplex-Einheit und Fach 2
(HP Officejet Pro K550dtn/K550dtwn), und
8) Crossover-Kabel (HP Officejet Pro K550dtwn).
Étape 1 : Vérification du contenu du carton.
1) Imprimante ; 2) cordon d’alimentation ; 3) quatre cartouches
d’encre (cyan, magenta, jaune, noir) ; 4) deux têtes d’impression ;
5) CD de démarrage (logiciel et guide de l’utilisateur en ligne) ;
6) documentation imprimée ;
7) accessoire d’impression automatique recto-verso
(unité auto-duplex) et bac 2 (HP Officejet Pro K550dtn/
K550dtwn) ; 8) câble croisé (HP Officejet Pro K550dtwn).
Stap 1: controleer de inhoud van de verpakking.
1) Printer, 2) netsnoer, 3) vier inktpatronen (cyaan, magenta,
geel, zwart), 4) twee printkoppen, 5) Starter-cd (software en
elektronische gebruikershandleiding), 6) gedrukte
documentatie,
7) accessoire voor automatisch dubbelzijdig afdrukken
(duplexeenheid) en lade 2 (HP Officejet Pro K550dtn/
K550dtwn) en 8) cross-kabel (HP Officejet Pro K550dtwn).
123456
7
8
1
Punto 1: Verificare il contenuto dell’imballo.
1) Stampante, 2) cavo di alimentazione, 3) quattro cartucce di
inchiostro (ciano, magenta, giallo, nero), 4) due testine di stampa,
5) CD di avviamento (software e guida in linea),
6) documentazione stampata,
7) accessorio per la stampa fronte/retro automatica (unità
duplex) e vassoio 2 (HP Officejet Pro K550dtn/K550dtwn) e
8) cavo incrociato (HP Officejet Pro K550dtwn).
5
2
Hinweis: Der Drucker unterstützt das folgende Verbrauchsmaterial:
•Tintenpatronen: HP 88 Schwarz, HP 88 Cyan, HP 88 Magenta,
HP 88 Gelb, HP 88L Schwarz, HP 88L Cyan, HP 88L Magenta
und HP 88L Gelb
•Druckköpfe: HP 88 Schwarz und Gelb, und HP 88 Magenta
und Cyan
Schritt 2: Entfernen der Verpackungsklebestreifen und des
Verpackungsmaterials
1) Stellen Sie den Drucker am ausgewählten Standort ab.
Die Oberfläche muss stabil und eben sein und sich in einem gut
belüfteten Bereich befinden. Um den Drucker herum muss
genügend Platz sein, einschließlich 50 mm für die Belüftung.
2) Entfernen Sie möglicherweise am Drucker vorhandenes
Verpackungsmaterial. Öffnen Sie die obere Abdeckung und
entfernen Sie das Schaumstoff- oder Verpackungsmaterial im
Drucker.
Remarque : l’imprimante prend en charge les consommables
d’impression suivants :
•Cartouches d’encre : HP 88 noir, HP 88 cyan, HP 88 magenta,
HP 88 jaune, HP 88L noir, HP 88L cyan, HP 88L magenta et
HP 88L jaune
•Têtes d’impression : HP 88 noir et jaune, HP 88 magenta
et cyan
Étape 2 : Retrait des matériaux d’emballage.
1) Déplacez l’imprimante vers l’endroit destiné à la recevoir.
Choisissez une surface robuste, de niveau et située dans une
zone bien ventilée. Laissez un espace libre autour de
l’imprimante, dont 50 mm (2 pouces) pour la ventilation.
2) Retirez tous les rubans adhésifs de l’imprimante.
Ouvrez le capot supérieur et retirez la mousse ou les matériaux
d’emballage présents à l’intérieur de l’imprimante.
Opmerking: met deze printer kunt u de volgende
afdrukbenodigdheden gebruiken:
•Inktpatronen: HP 88 zwart, HP 88 cyaan, HP 88 magenta,
HP 88 geel, HP 88L zwart, HP 88L cyaan, HP 88L magenta en
HP 88L geel
•Printkoppen: HP 88 zwart en geel en HP 88 magenta en cyaan
Stap 2: verwijder de verpakkingstape en -materialen.
1) Zet de printer op de plaats die u daarvoor hebt voorbereid.
Het oppervlak moet stevig en vlak zijn en de ruimte moet goed
geventileerd zijn. Laat ongeveer 5 centimeter ruimte rond de
printer vrij voor ventilatie. 2) Verwijder alle verpakkingstape
van de printer. Open de bovenklep en verwijder het
schuimrubber of ander verpakkingsmateriaal uit de printer.
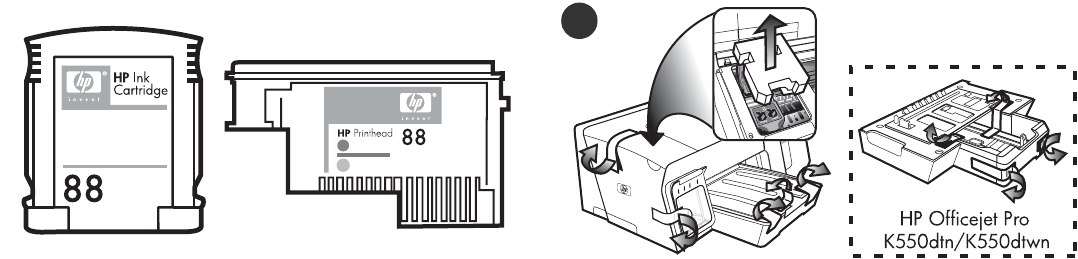
Note: The printer supports the following printing supplies:
•Ink cartridges: HP 88 Black, HP 88 Cyan, HP 88 Magenta,
HP 88 Yellow, HP 88L Black, HP 88L Cyan, HP 88L Magenta,
and HP 88L Yellow
•Printheads: HP 88 Black and Yellow, and HP 88 Magenta
and Cyan
Step 2: Remove the packing tape and materials.
1) Move the printer to the prepared location. The surface must be
sturdy, level, and located in a well-ventilated area. Allow space
around the printer, including 50 mm (2 inches) for ventilation.
2) Remove all packing tape from the printer. Open the top cover
and remove the foam or packing material from the inside of
the printer.
Nota: la stampante supporta i seguenti materiali di consumo:
•Cartucce di inchiostro: HP 88 Black, HP 88 Cyan,
HP 88 Magenta, HP 88 Yellow, HP 88L Black, HP 88L Cyan,
HP 88L Magenta e HP 88L Yellow
•Testine di stampa: HP 88 Black and Yellow e HP 88 Magenta
and Cyan
Punto 2: Rimuovere il nastro e il materiale di imballo.
1) Collocare la stampante nella posizione predisposta. La superficie
deve essere robusta e in piano e deve trovarsi in un’area ventilata.
Lasciare spazio sufficiente intorno alla stampante, inclusi 5 cm per la
ventilazione. 2) Rimuovere completamente il nastro di imballaggio
dalla stampante. Aprire il coperchio superiore e rimuovere le parti in
polistirolo e il materiale di imballaggio dall’interno della stampante.
6
English
Nederlands Français DeutschItaliano
Schritt 3: Installieren Sie Fach 2 und die Duplex- Einheit
(HP Officejet Pro K550dtn/K550dtwn).
1) Setzen Sie den Drucker auf das Fach 2 auf.
WARNUNG! Klemmen Sie sich nicht Ihre Finger oder Hände
an der Unterseite des Druckers ein.
2) Entfernen Sie die Verpackungsklebestreifen von der
Duplex-Einheit. Setzen Sie die Duplex-Einheit an der
Rückseite des Druckers ein, bis diese einrastet.
Étape 3 : Installez le bac 2 et l’unité auto-duplex
(HP Officejet Pro K550dtn/K550dtwn).
1) Posez l’imprimante sur le bac 2.
ATTENTION ! Veillez à ne pas placer vos doigts ou vos mains
sous l’imprimante.
2) Retirez les rubans d’emballage de l’unité auto-duplex.
A l’arrière de l’imprimante, insérez l’unité auto-duplex jusqu’à
son enclenchement.
Stap 3: installeer lade 2 en de duplexeenheid
(HP Officejet Pro K550dtn/K550dtwn).
1) Plaats de printer op lade 2.
WAARSCHUWING! Houd uw vingers en handen niet onder de
printer.
2) Verwijder de verpakkingstapes van de duplexeenheid.
Schuif de duplexeenheid vanaf de achterkant zover in de printer
dat u een klik hoort.
3
1
2
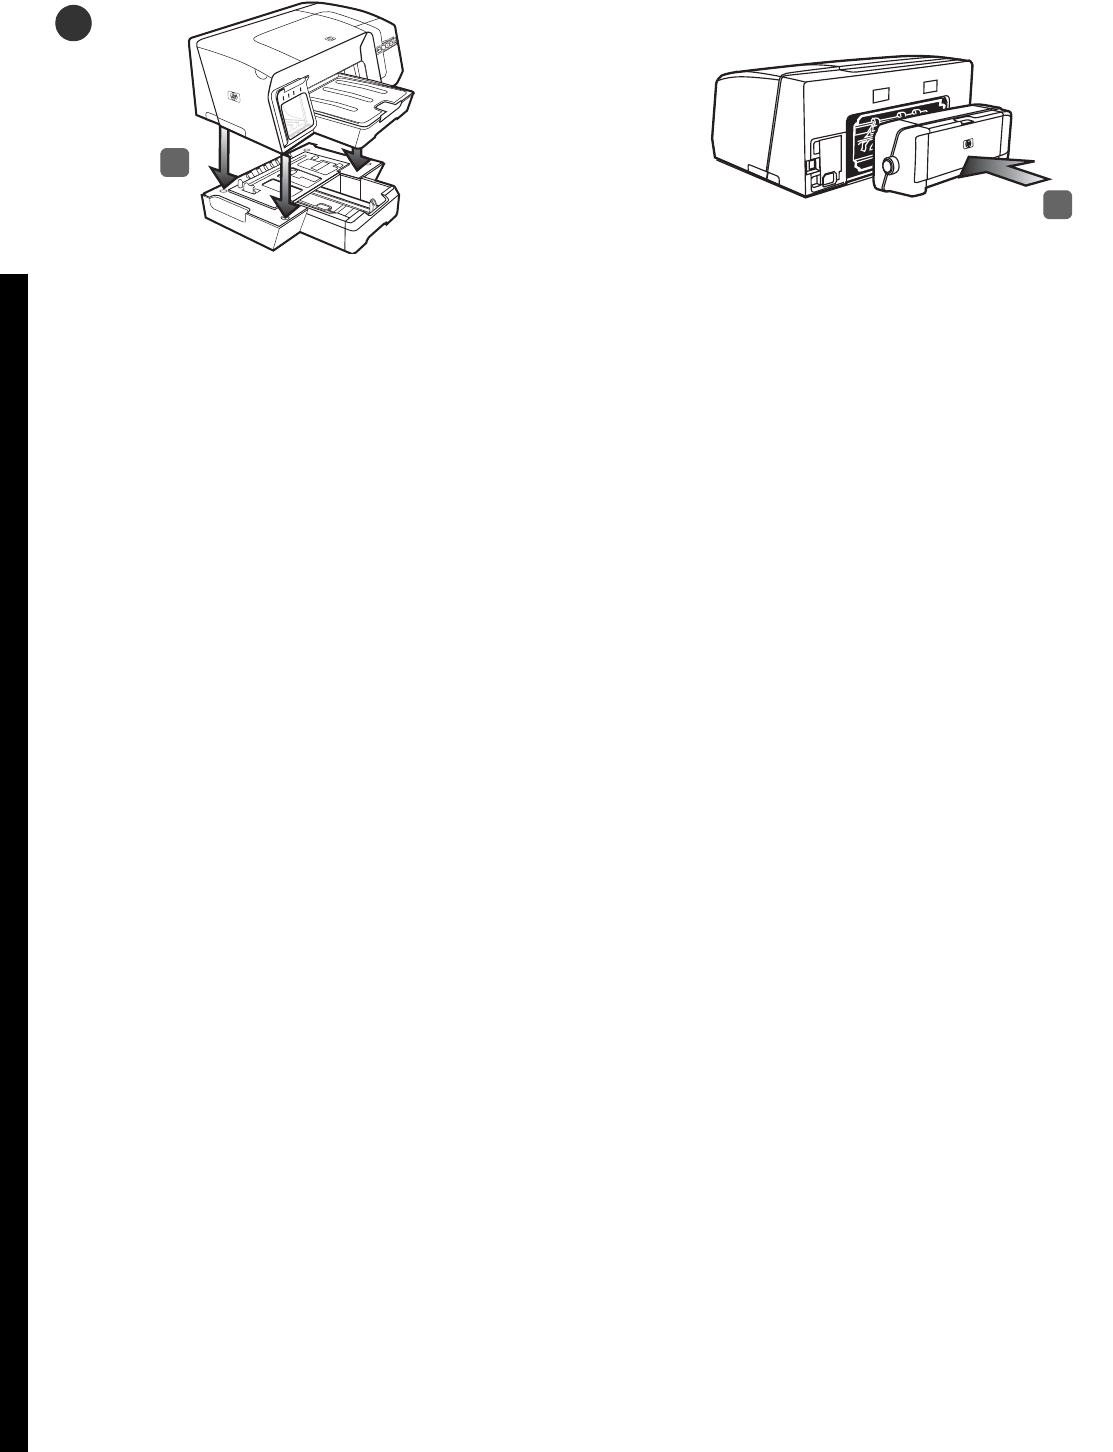
Step 3: Install tray 2 and the duplex unit
(HP Officejet Pro K550dtn/K550dtwn).
1) Set the printer on top of tray 2.
WARNING! Be careful to keep your fingers and hands clear of the
bottom of the printer.
2) Remove the packing tapes from the duplex unit. On the back
of the printer, insert the duplex unit until it clicks.
Punto 3: Installare il vassoio 2 e l’unità duplex
(HP Officejet Pro K550dtn/K550dtwn).
1) Posizionare la stampante sopra il vassoio 2.
AVVERTENZA! non avvicinare mani e dita alla parte inferiore
della stampante.
2) Rimuovere i nastri di imballaggio dall’unità duplex.
Inserire l’unità duplex sulla parte posteriore della stampante
finché non si posiziona con uno scatto.
7
4
1
2
3
4
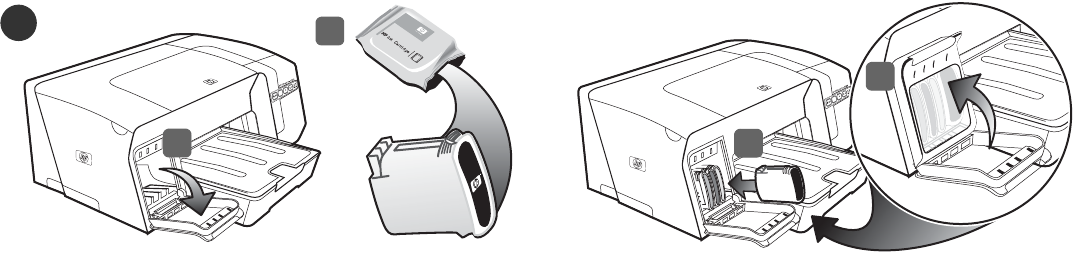
Schritt 4: Einsetzen der Tintenpatronen.
1) Öffnen Sie vorsichtig die Tintenpatronenabdeckung.
2) Nehmen Sie die Tintenpatrone aus der Verpackung.
3) Richten Sie die Patronen nacheinander an ihrem farblich
markierten Schacht aus, und setzen Sie sie in den Schacht
ein. Drücken Sie die Patronen fest nach unten, bis sie
einrasten. Nur dann ist der richtige Kontakt gewährleistet.
Hinweis: Alle vier Tintenpatronen müssen richtig eingesetzt
werden, damit Ihr Drucker ordnungsgemäß funktioniert.
4) Schließen Sie die Tintenpatronen- und
Druckkopfabdeckung.
Étape 4 : Installation des cartouches d’encre.
1) Tirez doucement pour ouvrir le capot des cartouches d’encre.
2) Sortez chaque cartouche d’encre de son emballage.
3) Alignez chaque cartouche sur l’emplacement de la couleur
correspondante, puis insérez la cartouche dans son logement.
Pour assurer un bon contact, appuyez fermement sur la cartouche
dans son emplacement, jusqu’à son enclenchement.
Remarque : les quatre cartouches d’encre doivent être mises en
place correctement pour que l’imprimante fonctionne.
4) Fermez le capot des cartouches d’encre.
Stap 4: plaats de inktpatronen.
1) Trek de klep van de inktpatroon voorzichtig naar voren.
2) Haal de inktpatronen uit de verpakking.
3) Houd elke inktpatroon voor de sleuf met de bijbehorende
kleurcode en steek de patroon in de sleuf. Druk de patronen stevig
omlaag tot ze met een klik op hun plaats zitten. Zo weet u zeker
dat ze goed contact maken. Opmerking: de printer werkt alleen
wanneer alle vier de inktpatronen correct zijn geplaatst.
4) Sluit de klep van de inktpatroon.
Step 4: Install the ink cartridges.
1) Gently pull open the ink cartridge cover.
2) Remove each ink cartridge from its package.
3) Align each cartridge with its color-coded slot, and insert the
cartridge into the slot. To ensure proper contact, press down firmly
on the cartridges until they snap into place.
Note: All four ink cartridges must be correctly installed for the
printer to work. 4) Close the ink cartridge cover.
Punto 4: Installare le cartucce di stampa.
1) Estrarre con cautela il coperchio della cartuccia di inchiostro.
2) Rimuovere ciascuna cartuccia di inchiostro dalla relativa
confezione.
3) Allineare ciascuna cartuccia al relativo alloggiamento
codificato in base al colore, quindi inserire la cartuccia
nell’alloggiamento. Per assicurare un corretto contatto, premere
con decisione sulle cartucce finché non si posizionano con uno
scatto. Nota: perché la stampante funzioni, è necessario installare
le quattro cartucce di inchiostro. 4) Chiudere il coperchio delle
cartucce di inchiostro.

8
English
Nederlands Français Deutsch
Italiano
Schritt 5: Einsetzen der Druckköpfe.
1) Öffnen Sie die obere Abdeckung. 2) Heben Sie die
Druckkopfverriegelung an. 3) Bevor Sie einen Druckkopf
auspacken, schütteln Sie ihn sechs Mal gut durch.
4) Nehmen Sie die Druckköpfe aus der Verpackung,
und ziehen Sie die orangefarbenen Schutzabdeckungen
ab. 5) Setzen Sie die Druckköpfe nacheinander in den
passenden farblich markierten Schacht ein. Drücken Sie
die Druckköpfe fest nach unten, um den richtigen Kontakt
sicherzustellen.
Étape 5 : Installation des têtes d’impression.
1) Ouvrez le capot supérieur. 2) Soulevez le loquet des têtes
d’impression. 3) Conservez chaque tête d’impresssion dans son
emballage et secouez-là rapidement, six fois de suite.
4) Sortez chaque tête d’impression de son emballage, puis
retirez le capuchon de protection orange de chacune d’elles.
5) Insérez chaque tête d’impression dans le logement de la
couleur correspondante. Appuyez fermement sur chaque tête
d’impression pour assurer un bon contact.
Stap 5: installeer de printkoppen.
1) Open de bovenklep. 2) Til de printkopgrendel omhoog.
3) Elke printkop eerst zes keer snel schudden voordat u deze uit
de verpakking haalt.
4) Haal de printkoppen uit de verpakking en verwijder de
oranje beschermingskapjes van elke printkop.
5) Plaats elke printkop in de sleuf met de bijbehorende
kleurcode. Druk de printkoppen goed naar beneden, om ervoor
te zorgen dat ze goed contact maken.
5
2
13
6x
4
5
Step 5: Install the printheads.
1) Open the top cover. 2) Lift the printhead latch. 3) While each
printhead is still in its packaging, shake each printhead rapidly
six times.
4) Remove each printhead from its packaging, and then remove
the orange protective caps from each printhead. 5) Insert each
printhead into its color-coded slot. Press down firmly on each
printhead to ensure proper contact.
Punto 5: Installare le testine di stampa.
1) Aprire il coperchio superiore. 2) Sollevare il fermo delle testine
di stampa. 3) Mantenendo le testine di stampa nelle relative
confezioni, scuoterle rapidamente sei volte.
4) Rimuovere ciascuna testina di stampa dall’imballaggio
e quindi rimuovere il nastro protettivo da ciascuna testina di
stampa. 5) Inserire ciascuna testina di stampa nel relativo
alloggiamento condificato in base al colore. Premere con
decisione su ciascuna testina di stampa per assicurare il
corretto contatto.
9
67
1
6
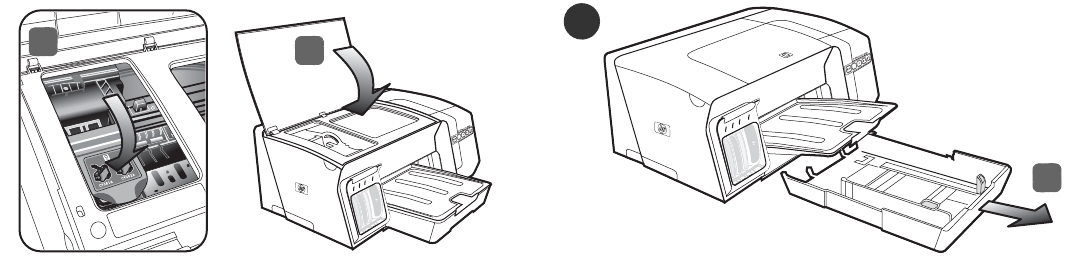
6) Ziehen Sie die Druckkopfverriegelung ganz nach vorne,
und drücken Sie die Verriegelung vollständig nach unten.
Hinweis: Sie müssen möglicherweise etwas Kraft aufwenden,
um die Verriegelung zu schließen. 7) Schließen Sie die obere
Abdeckung.
Schritt 6: Einlegen von Papier in die Fächer.
1) Ziehen Sie das Fach unten an der Vorderseite aus dem
Drucker heraus.
6) Tirez le loquet des têtes d’impression à fond vers l’avant et
appuyez vers le bas pour vous assurer qu’il est correctement
engagé. Remarque : il est parfois nécessaire d’appliquer une
certaine pression pour engager le loquet. 7) Fermez le capot
supérieur.
Étape 6 : Chargement de papier dans les bacs.
1) Retirez le bac de l’imprimante en le saisissant sous sa
partie avant.
6) Trek de printkopgrendel helemaal naar voren en druk deze
omlaag, zodat de grendel goed vastzit. Opmerking: mogelijk
moet u wat druk uitoefenen om de grendel vast te zetten.
7) Sluit de bovenklep.
Stap 6: plaats papier in de laden.
1) Pak de lade onder aan de voorkant vast en trek de lade uit
de printer.
6) Pull the printhead latch all the way forward and press down to
ensure that the latch is properly engaged. Note: You might have to
apply some pressure to engage the latch. 7) Close the top cover.
Step 6: Load paper in the trays.
1) Pull the tray out of the printer by grasping under the front of
the tray.
6) Tirare completamente il fermo delle testine di stampa e premere
verso il basso per assicurarsi che sia correttamente agganciato.
Nota: per fissare il fermo potrebbe essere necessario applicare
una leggera pressione. 7) Chiudere il coperchio superiore.
Punto 6: Caricare la carta nei vassoi.
1) Estrarre il vassoio della stampante afferrandolo dalla
parte anteriore.

10
English
Nederlands Français DeutschItaliano
2) Bei Papier mit einer Länge von mehr als 279 mm heben Sie
die vordere Abdeckung des Fachs an (in der Abbildung
schattiert dargestellt) und klappen die Vorderseite des Fachs
nach unten.
3) Legen Sie maximal 250 Blatt Papier in Fach 1 oder 350 Blatt
Papier in Fach 2 mit der zu bedruckenden Seite nach unten
rechtsbündig in das Fach ein. Achten Sie darauf, dass der
Papierstapel rechts und hinten am Fach anliegt und nicht über
die Markierung im Fach hinausragt. Hinweis: In Fach 2 darf nur
Normalpapier eingelegt werden. 4) Verschieben Sie die
Papierführungen im Fach, um sie an die von Ihnen eingelegte
Papiergröße anzupassen.
2) Pour les supports dont la longueur dépasse 279 mm,
soulevez le capot avant du bac (partie ombrée sur
l’illustration) et abaissez l’avant du bac.
3) Introduisez jusqu’à 250 feuilles de papier dans le bac 1 ou
350 feuilles dans le bac 2, face à imprimer orientée vers le bas,
le long du côté droit du bac. Vérifiez que la pile de papier est
alignée sur les bords droit et arrière du bac et ne dépasse pas le
marquage sur le bac. Remarque : utilisez uniquement du papier
ordinaire pour charger le bac 2. 4) Faites glisser les guides du
bac pour les régler en fonction de la taille du papier à charger.
2) Voor papier dat langer is dan 279 mm tilt u de voorklep van
de lade op (zie gearceerd gedeelte van de lade) en laat u de
voorkant van de lade zakken.
3) Plaats maximaal 250 vellen papier in lade 1 of maximaal
350 vellen in lade 2. Leg het papier met de afdrukzijde omlaag
en tegen de rechterkant van de lade. Controleer of de stapel
papier goed tegen de rechter- en achterkant van de lade ligt en
niet buiten de lijnmarkering in de lade uitsteekt.
Opmerking: in lade 2 kunt u uitsluitend normaal papier
plaatsen. 4) Stel de papiergeleiders in de lade af op het
papierformaat dat u in de lade plaatst.
2
4
3
2) For paper longer than 11 inches (279 mm), lift the front cover
of the tray (see shaded tray part) and lower the front of the tray. 3) Insert up to 250 sheets of paper into tray 1 or up to 350
sheets in tray 2, print-side down along the right of the tray.
Make sure the stack of paper aligns with the right and back
edges of the tray, and does not exceed the line marking in the
tray. Note: Tray 2 can be loaded only with plain paper. 4) Slide
the paper guides in the tray to adjust them for the size that you
are loading.
2) Con i supporti che superano i 279 mm di lunghezza,
sollevare il coperchio anteriore del vassoio (la parte
ombreggiata del vassoio nell’illustrazione) e abbassare la parte
anteriore del vassoio.
3) Inserire fino a 250 fogli nel vassoio 1 o fino a 350 fogli nel
vassoio 2, con il lato di stampa rivolto verso il basso e allineato
a destra del vassoio. Assicurarsi che la risma di carta sia
allineata al bordo destro e a quello posteriore del vassoio e che
non fuoriesca dalla linea contrassegnata nel vassoio.
Nota: nel vassoio 2 è possibile caricare soltanto carta comune.
4) Far scorrere le guide della carta nel vassoio in modo da
regolarle in base al formato che si sta caricando.
11
5
6
7
1
2
3
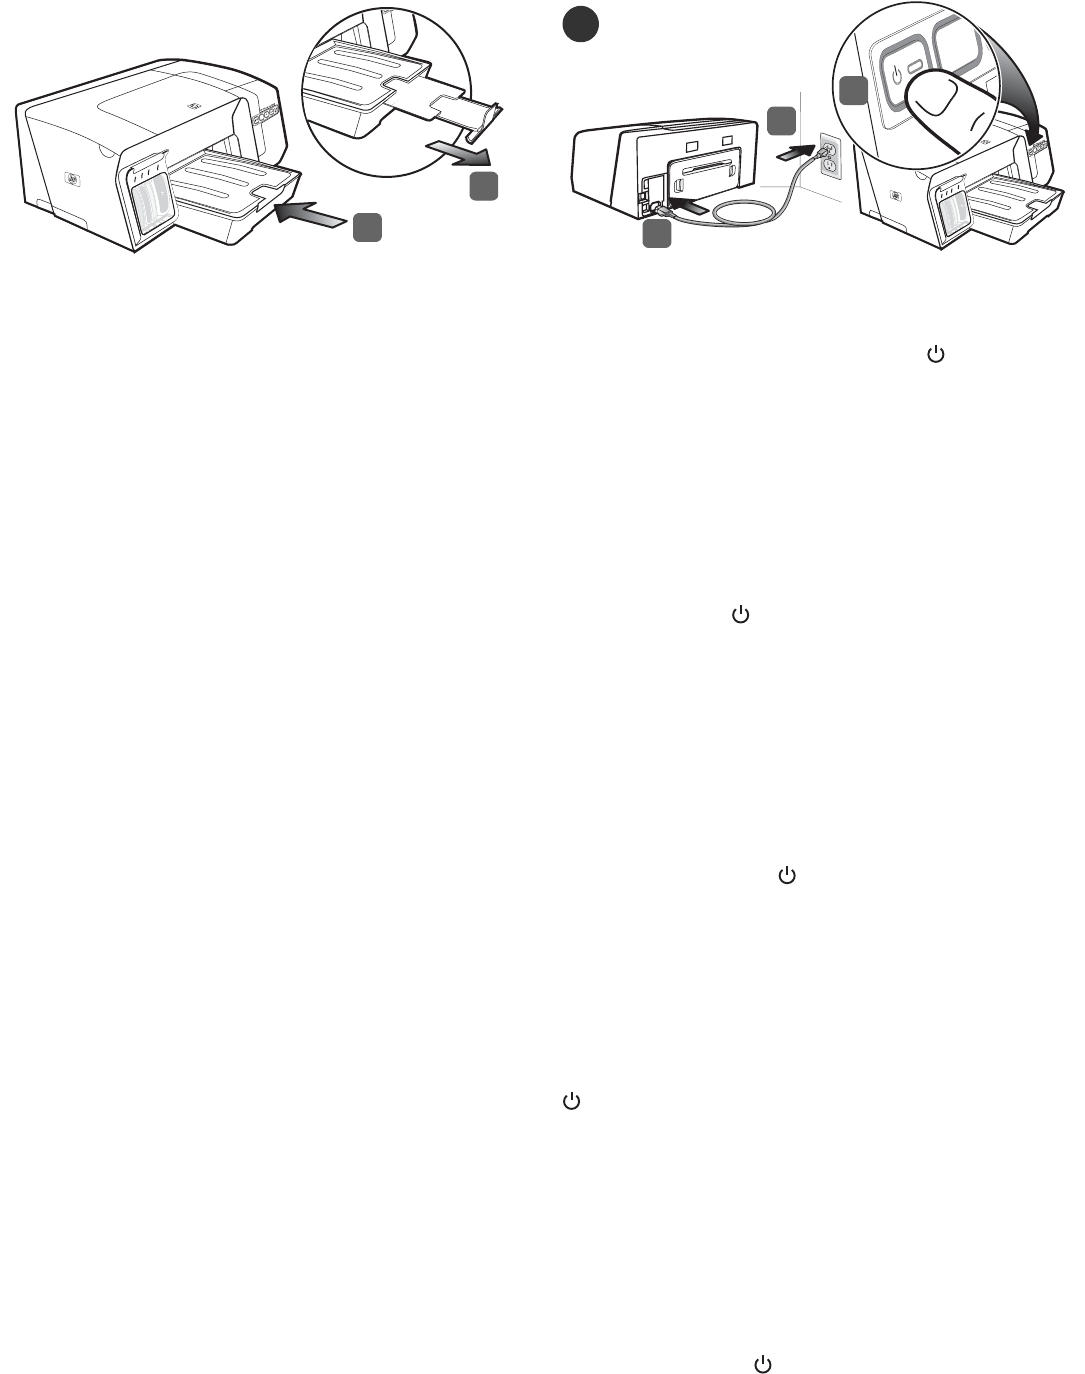
5) Setzen Sie das Fach vorsichtig wieder ein. 6) Ziehen Sie die
Verlängerung des Ausgabefachs heraus. Schritt 7: Anschließen des Netzkabels und Einschalten des Druckers.
1) Schließen Sie das Netzkabel an den Drucker an.
2) Schließen Sie das andere Ende des Netzkabels an eine
Steckdose an. 3) Schaltet sich der Drucker nicht automatisch ein,
drücken Sie die Taste (Netztaste), um das Gerät
einzuschalten.
5) Replacez délicatement le bac. 6) Tirez les extensions du bac
de sortie. Étape 7 : Branchez le cordon d’alimentation et mettez l’imprimante
sous tension.
1) Reliez le cordon d’alimentation à l’imprimante.
2) Branchez l’autre extrémité du cordon d’alimentation sur une prise
secteur. 3) Si l’imprimante ne se met pas en marche
automatiquement, appuyez sur (bouton Alimentation) pour la
mettre sous tension.
5) Schuif de lade voorzichtig terug. 6) Trek het verlengstuk op de
uitvoerbak uit. Stap 7: Sluit het netsnoer aan en zet de printer aan.
1) Sluit het netsnoer aan op de printer. 2) Steek het andere eind
van het netsnoer in een stopcontact. 3) Als de printer niet
automatisch wordt ingeschakeld, drukt u op de knop
(Aan/Uit) om de printer in te schakelen.
5) Gently reinsert the tray. 6) Pull out the extension on the
output tray. Step 7: Connect the power cord and turn on the printer.
1) Connect the power cord to the printer. 2) Connect the other end
of the power cord to an alternating current (AC) power outlet. 3) If
the printer does not turn on automatically, press (Power button) to
turn it on.
5) Reinserire il vassoio con delicatezza. 6) Estrarre l’estensione sul
vassoio di raccolta. Punto 7: Collegare il cavo di alimentazione e accendere
la stampante.
1) Collegare il cavo di alimentazione alla stampante.
2) Collegare l’altra estremità del cavo di alimentazione a una
presa CA. 3) Se la stampante non si accende automaticamente,
per accenderla premere (pulsante Accensione).

12
English
Nederlands Français DeutschItaliano
Um eine optimale Druckqualität zu gewährleisten, wird der
Drucker initialisiert und die Druckköpfe werden vom Drucker
ausgerichtet. Zu Beginn des Ausrichtungsvorgangs blinkt die
Power-LED und der Drucker druckt eine Informationsseite.
Während des Vorgangs druckt der Drucker die
Ausrichtungsseiten (in Farbe). Dieser Vorgang kann bis zu
8Minuten dauern.
Hinweis: Wenn andere Kontrollleuchten des Druckers während
der Druckkopfausrichtung leuchten, finden Sie weitere
Informationen unter “Bedeutung der LEDs auf dem Bedienfeld”
auf Seite 27. Wenn die Ausrichtungsseiten nicht gedruckt
werden, führen Sie folgende Schritte aus. 1) Vergewissern Sie
sich, dass das Netzkabel richtig angeschlossen ist.
2) Vergewissern Sie sich, dass die Druckköpfe und die
Tintenpatronen richtig installiert sind.
Pour offrir une qualité d’impression optimale, l’imprimante
initialise et aligne les têtes d’impression. Au début de la
procédure, le voyant d’alimentation clignote et l’imprimante
imprime une page d’informations. Durant l’opération,
l’imprimante imprime les pages d’alignement (pages couleurs).
Ce processus dure environ 8 minutes.
Remarque : si d’autres voyants de l’imprimante sont allumés lors
de la procédure d’alignement des têtes d’impression, reportez-
vous à la section « Interprétation des voyants du panneau de
commande », à la page 37.
Si les pages d’alignement ne s’impriment pas, procédez comme
suit. 1) Vérifiez que le cordon d’alimentation est correctement
branché. 2) Vérifiez que les têtes d’impression et les cartouches
d’encre sont installées correctement.
Vervolgens wordt de printer geïnitialiseerd en worden de
printkoppen uitgelijnd om te zorgen voor de best mogelijke
afdrukkwaliteit. Aan het begin van deze procedure knippert
het Aan/Uit-lampje eenmaal en wordt een informatiepagina
afgedrukt. Tijdens deze procedure worden de uitlijnpagina’s
(gekleurde pagina’s) afgedrukt. De procedure duurt ongeveer
8 minuten.
Opmerking: zie “De betekenis van de lampjes van het
bedieningspaneel” op pagina 46 als er tijdens de
uitlijnprocedure van de printkop andere lampjes op de printer
branden. Ga als volgt te werk als de uitlijnpagina’s niet worden
afgedrukt: 1) Controleer of het netsnoer goed is aangesloten.
2) Controleer of de printkoppen en de inktpatronen correct
zijn geïnstalleerd.
2
1
To ensure the best possible print quality, the printer initializes
and aligns the printheads. At the beginning of the process, the
Power light blinks and the printer prints an information page.
During the process, the printer prints the alignment pages
(colored pages). This process takes approximately 8 minutes.
Note: If other printer lights are lit during the printhead
alignment process, see “Interpreting control panel lights” on
page 18. If the alignment pages do not print, follow these
steps. 1) Check that the power cord is connected firmly.
2) Check that the printheads and ink cartridges are properly
installed.
Per assicurare la migliore qualità di stampa, la stampante
esegue l’inizializzazione e l’allineamento delle testine. All’inizio
di tale processo, la spia Accensione lampeggia e viene
stampata una pagina informativa. Durante tale processo,
vengono stampate le pagine di allineamento (pagine colorate).
Questo processo richiede circa 8 minuti.
Nota: se durante l’allineamento delle testine di stampa restano
accese altre spie della stampante, vedere “Significato delle spie
del pannello di controllo“ a pagina 55. Se le pagine di
allineamento non vengono stampate, attenersi alla seguente
procedura.
1) Verificare che il cavo di alimentazione sia collegato
saldamente. 2) Verificare che le cartucce e le testine di stampa
siano installate correttamente.

13
3
4
8
3) Achten Sie darauf, dass die hintere Abdeckung (HP Officejet
Pro K550) bzw. die Duplex-Einheit (HP Officejet Pro K550dtn/
K550dtwn) eingerastet ist. 4) Schalten Sie den Drucker aus und
dann wieder ein. Wenn die Ausrichtungsseiten immer noch nicht
gedruckt werden, lesen Sie den Abschnitt “Probleme beim
Drucken einer Ausrichtungsseite” auf Seite 29.
Schritt 8: Anschließen des Druckers.
Folgen Sie den Anweisungen für Ihren Anschlusstyp
(USB oder kabelgebundenes Netzwerk).
Informationen zum Einrichten einer drahtlosen Kommunikation für
den HP Drucker Officejet Pro K550dtwn finden Sie unter
“Einrichten des Druckers für drahtlose Kommunikation
(HP Officejet Pro K550dtwn)” auf Seite 31.
3) Assurez-vous que le panneau d’accès arrière
(HP Officejet Pro K550) ou l’unité recto verso
(HP Officejet Pro K550dtn/K550dtwn) est installé(e).
4) Mettez l’imprimante hors tension, puis à nouveau sous tension.
Si les pages d’alignement ne s’impriment toujours pas,
reportez-vous à la section « Problèmes d’impression d’une
page d’alignement », à la page 39.
Étape 8 : Connexion de l’imprimante.
Consultez les instructions correspondant à votre type de connexion
(USB ou réseau câblé).
Pour configurer la communication sans fil pour l’imprimante
HP Officejet Pro K550dtwn, reportez-vous à la section
« Configuration de l’imprimante pour la fonction de
communication sans fil (HP Officejet Pro K550dtwn) », à la
page 41.
3) Controleer of het toegangspaneel aan de achterzijde
(HP Officejet Pro K550) of de duplex-eenheid
(HP Officejet Pro K550dtn/K550dtwn) is geïnstalleerd.
4) Schakel de printer uit en weer in. Zie “Problemen bij het
afdrukken van een uitlijnpagina” op pagina 48 als de
uitlijnpagina’s ook dan niet worden afgedrukt.
Stap 8: sluit de printer aan.
Zie de aanwijzingen verderop voor uw verbindingstype
(USB of bedraad netwerk).
Zie “De printer instellen voor draadloze communicatie
(HP Officejet Pro K550dtwn)” op pagina 50 als u draadloze
communicatie wilt instellen voor de HP Officejet Pro K550dtwn-
printer.
3) Make sure the rear access panel (HP Officejet Pro K550) or
duplex unit (HP Officejet Pro K550dtn/K550dtwn) is installed.
4) Turn off the printer, and then turn it on again. If the alignment
pages still do not print, see “Problems printing an
alignment page” on page 20.
Step 8: Connect the printer.
See the following instructions for your connection type (USB or wired
network).
To set up wireless communication for HP Officejet Pro K550dtwn
printer, see “Setting up the printer for wireless communication
(HP Officejet Pro K550dtwn)” on page 22.
3) Assicurarsi che il pannello di accesso posteriore (HP Officejet
Pro K550) o l’unità duplex (HP Officejet Pro K550dtn/K550dtwn)
sia installato. 4) Spegnere e riaccendere la stampante. Se il
problema persiste, vedere “Problemi durante la stampa di una
pagina di allineamento“ a pagina 57.
Punto 8: Collegare la stampante.
Vedere le istruzioni riportate di seguito relative al tipo di
collegamento (USB o rete cablata).
Per impostare la comunicazione wireless per la stampante
HP Officejet Pro K550dtwn, vedere “Impostazione della stampante
per la comunicazione wireless (HP Officejet Pro K550dtwn)“ a
pagina 59.
14
English
Nederlands Français DeutschItaliano
USB-Verbindung: 1) Schließen Sie alle laufenden
Anwendungen und legen Sie die Starter-CD in das
CD-Laufwerk ein. Wenn das CD-Menü nicht automatisch
aufgerufen wird, doppelklicken Sie auf das Installationssymbol
der Starter-CD.
2) Klicken Sie im CD-Menü auf Installieren (Windows) oder
Treiber installieren (Mac OS), und folgen Sie den Anleitungen auf
dem Bildschirm, um die Installation der Software abzuschließen.
Schließen Sie das USB-Kabel nach Aufforderung an.
Weitere Informationen zum Installieren der Software finden Sie
im Online-Benutzerhandbuch auf der Starter-CD.
Connexion USB : 1) Fermez toutes les applications ouvertes puis
insérez le CD de démarrage dans le lecteur de CD-ROM. Si le
menu du CD ne démarre pas automatiquement, double-cliquez
sur l’icône d’installation sur le CD de démarrage.
2) Dans le menu du CD, cliquez sur Installer (Windows) ou
Installer le pilote (Mac OS), puis suivez les instructions qui
apparaissent à l’écran pour effectuer l’installation du logiciel.
Connectez le câble USB lorsqu’un message vous y invite.
Pour plus d’informations sur l’installation de logiciels, reportez-
vous au guide de l’utilisateur en ligne, disponible sur le CD de
démarrage.
USB-verbinding: 1) Sluit alle actieve toepassingen en plaats de
Starter-cd in het cd-romstation. Als het cd-menu niet automatisch
wordt geopend, dubbelklikt u op het installatiepictogram op de
Starter-cd.
2) Klik in het cd-menu op Installeren (Windows) of
Stuurprogramma installeren (Mac OS) en volg de aanwijzingen
op het scherm om de software te installeren. Sluit de USB-kabel
aan wanneer hierom wordt gevraagd.
Zie de elektronische gebruikershandleiding op de Starter-cd
voor meer informatie over de installatie van de software.
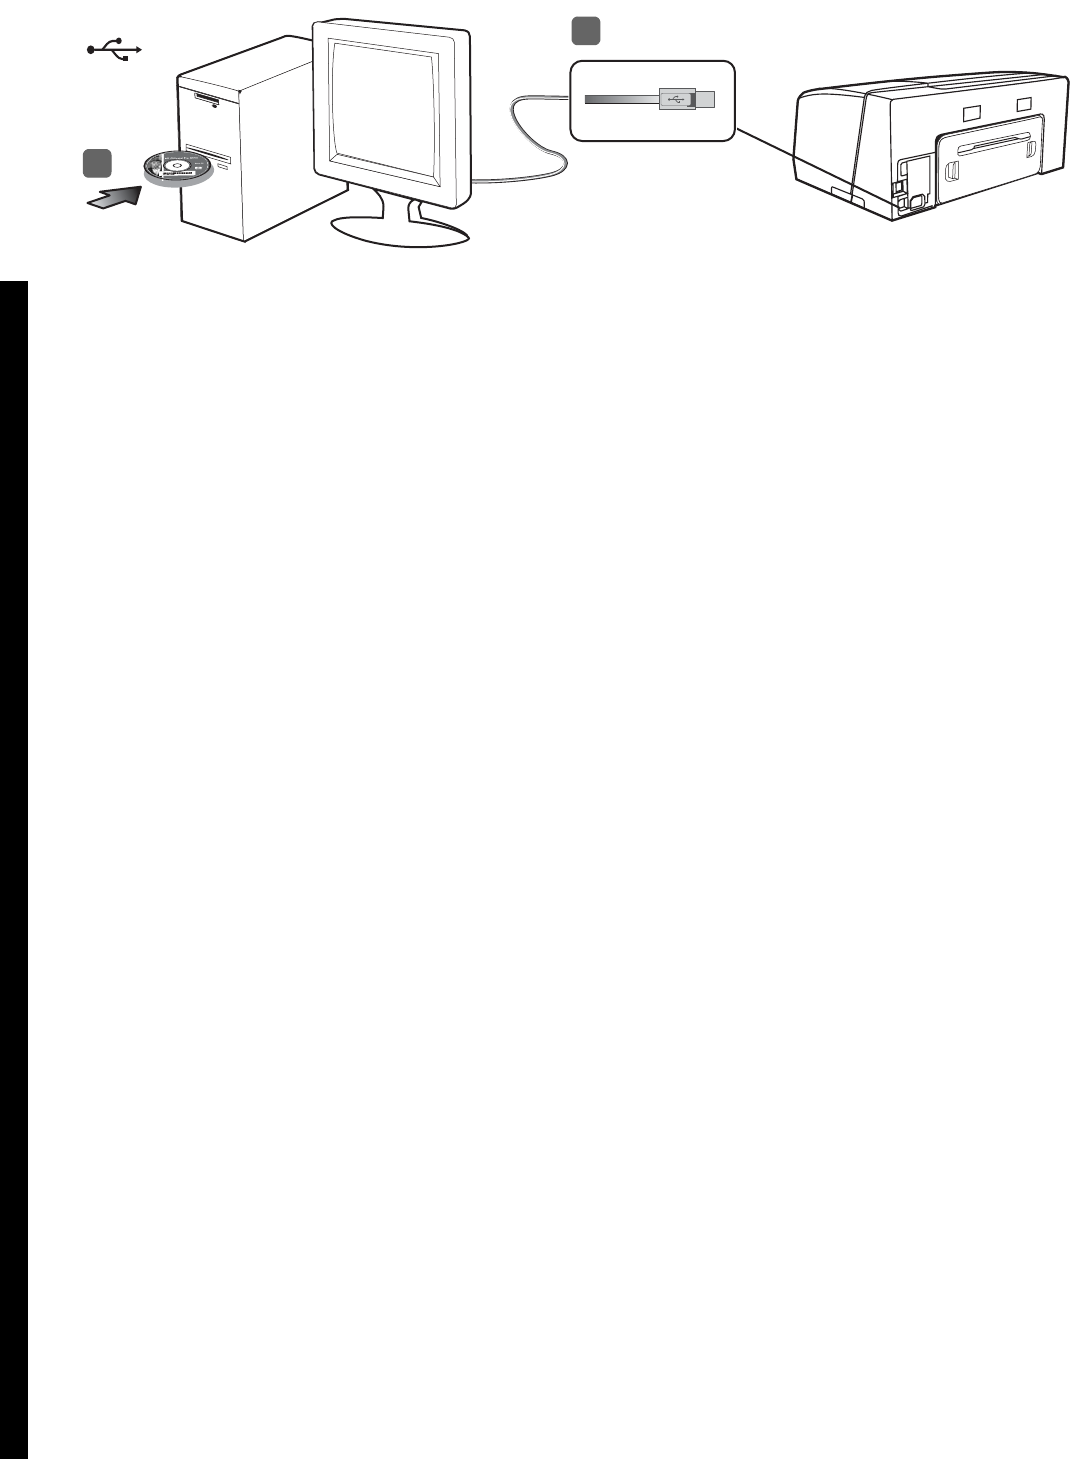
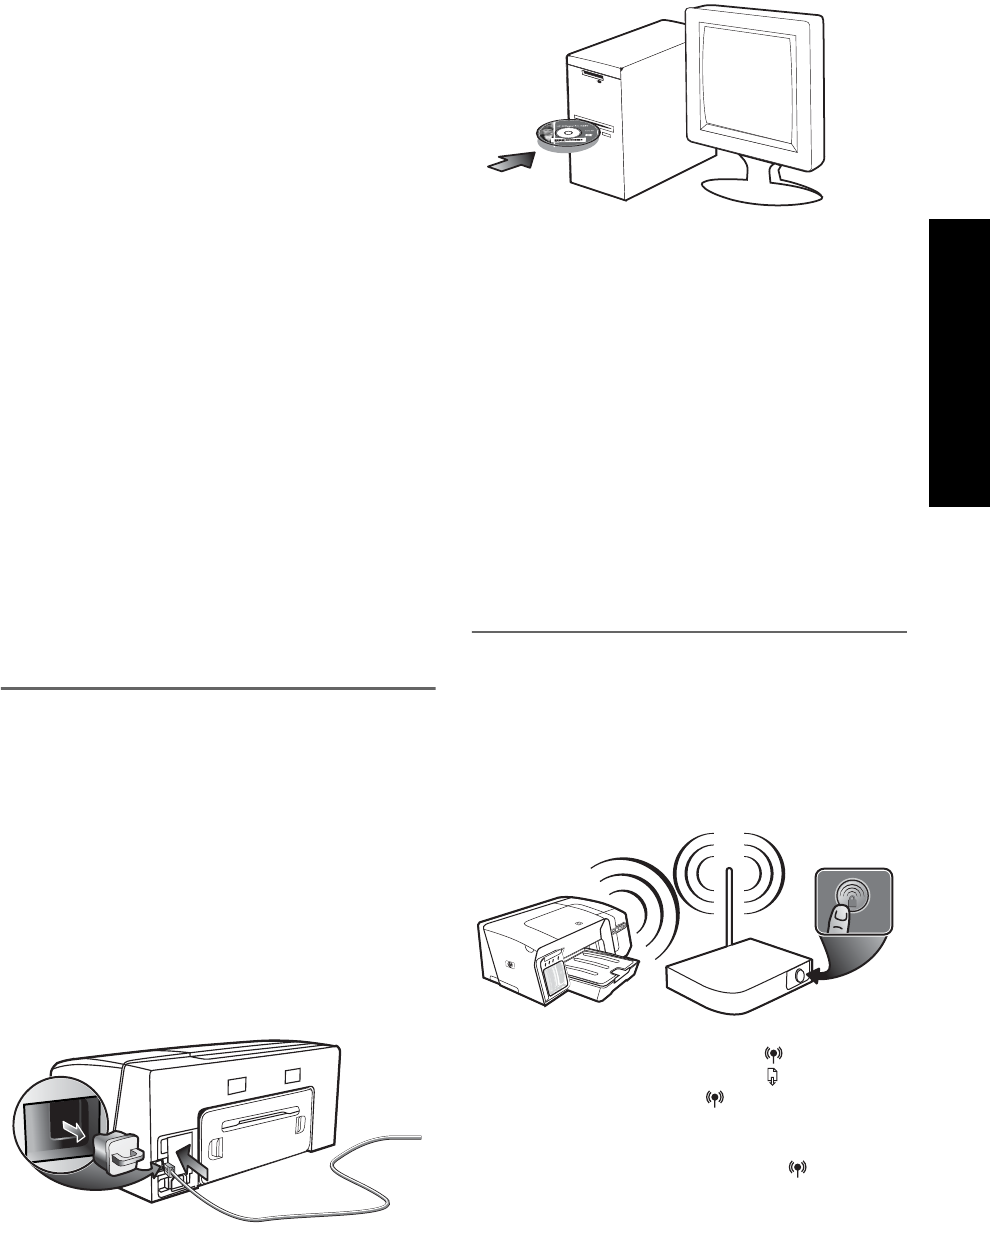
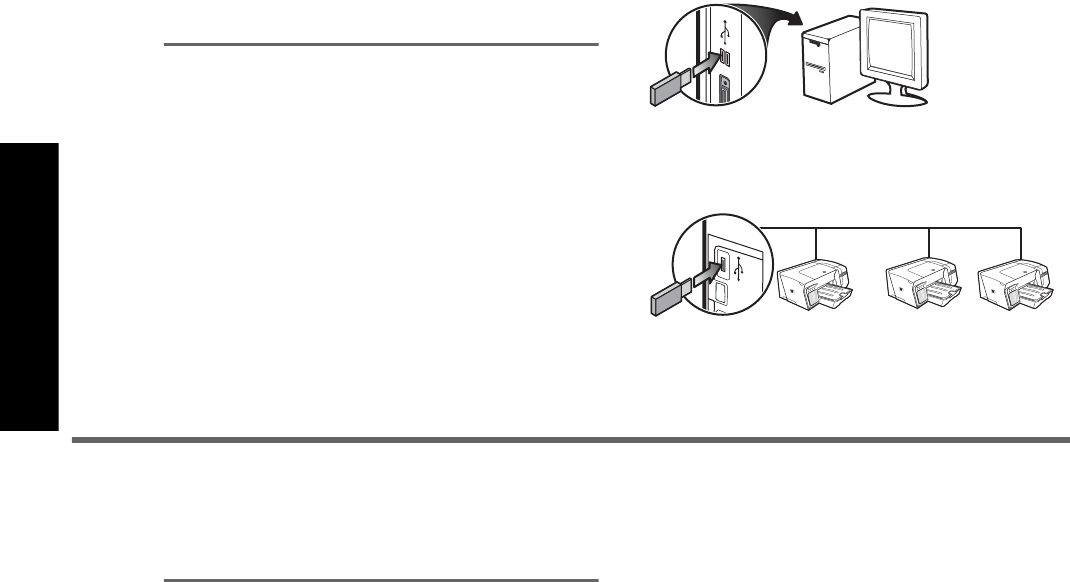
USB connection: 1) Close any running applications and insert the
Starter CD into the CD drive. If the CD menu does not start
automatically, double-click the setup icon on the Starter CD.
2) On the CD menu, click Install (Windows) or Install Driver
(Mac OS), and follow the onscreen instructions to complete the
software installation. Connect the USB cable when prompted.
For more information about installing the software, see the
onscreen user guide on the Starter CD.
2
1
Connessione USB: 1) Chiudere tutte le applicazioni in
esecuzione e inserire il CD di avviamento nell’apposita unità.
Se il menu del CD non si avvia automaticamente, fare doppio
clic sull’icona di installazione del CD di avviamento.
2) Dal menu del CD, scegliere Installa (Windows) o Installa
driver (Mac OS) e seguire le istruzioni visualizzate per
completare l’installazione del software. Quando viene richiesto,
collegare il cavo USB.
Per ulteriori informazioni sull’installazione del software, consultare
la Guida in linea sul CD di avviamento.
15
Kabelgebundenes Netzwerk: 1) Entfernen Sie die
Schutzabdeckung vom Netzwerkanschluss des Druckers.
2) Schließen Sie das Netzwerkkabel an den zugehörigen
Druckeranschluss sowie an einen freien Anschluss des
Netzwerkgeräts (Hub, Switch oder Router) an.
ACHTUNG: Stecken Sie das Netzwerkkabel nicht in einen mit
“WAN”, “Uplink” oder “Internet” beschrifteten Anschluss des
Netzwerkgeräts. Stecken Sie das Crossover-Kabel (im
Lieferumfang des HP Officejet Pro K550dtwn enthalten) nicht in
das Netzwerkgerät (Hub, Switch oder Router).
Hinweis: Es wird empfohlen, den Drucker und die Computer,
die diesen Drucker verwenden, demselben Subnetz zuzuweisen.
Wiederholen Sie die Schritte, wenn die Verbindungs-LED des
Netzwerkanschlusses nicht aufleuchtet. Siehe unter “Probleme mit
der Netzwerkverbindung” im Online-Benutzer handbuch.
3) Legen Sie die Starter-CD in das CD-Laufwerk ein. Wenn das
CD-Menü nicht automatisch aufgerufen wird, doppelklicken Sie
auf das Installationssymbol der Starter-CD.
Réseau câblé : 1) Retirez le capot de protection du connecteur
réseau de l’imprimante. 2) Branchez le câble réseau au connecteur
et à un port disponible sur le concentrateur de réseau, le
commutateur ou le routeur. ATTENTION : ne branchez pas le câble
réseau sur un port appelé WAN, Uplink ou Internet sur le
concentrateur, le commutateur ou le routeur. Ne connectez pas le
câble croisé (fourni avec l’imprimante HP Officejet Pro K550dtwn)
dans le concentrateur de réseau, le commutateur ou le routeur.
Remarque : il est recommandé de disposer l’imprimante et les
périphériques qui l’utilisent sur le même sous-réseau. Répétez cette
étape si le voyant Liaison du connecteur réseau ne s’allume pas.
Reportez-vous à la section « Problèmes de connexion à un réseau »
dans le guide de l’utilisateur en ligne.
3) Introduisez le CD de démarrage dans le lecteur de CD-ROM.
Si le menu du CD ne démarre pas automatiquement, double-
cliquez sur l’icône d’installation sur le CD de démarrage.
Bedraad netwerk: 1) Verwijder de beschermklep van de
netwerkaansluiting van de printer. 2) Sluit de netwerkkabel aan
op deze aansluiting en op een vrije poort op de hub, switch of
router van het netwerk. VOORZICHTIG: sluit de netwerkkabel niet
aan op een poort met de aanduiding WAN, Uplink of Internet in
de hub, switch of router. Steek de cross-kabel (meegeleverd met de
HP Officejet Pro K550dtwn) niet in de hub, switch of router van het
netwerk.
Opmerking: u wordt aangeraden ervoor te zorgen dat de printer
en de computers die de printer gebruiken, zich alle in hetzelfde
subnet bevinden. Herhaal de stap als het verbindingslampje van
de netwerkaansluiting niet gaat branden. Zie “Problemen met
aansluiten op een netwerk” in de elektronische
gebruikershandleiding.
3) Plaats de Starter-cd in het cd-romstation. Als het cd-menu
niet automatisch wordt geopend, dubbelklikt u op het
installatiepictogram op de Starter-cd.
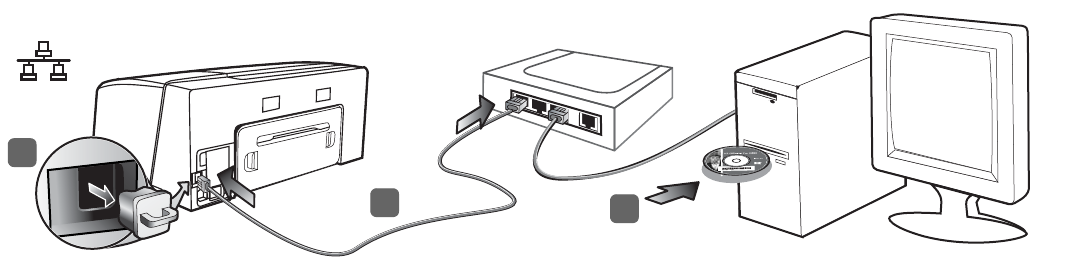
Wired network: 1) Remove the protective cover from the printer’s
network connector. 2) Connect the network cable to the connector
and to an available port on the network hub, switch, or router.
CAUTION: Do not plug the network cable into a port labeled
WAN, Uplink, or Internet in the hub, switch, or router. Do not plug
the cross cable (provided with HP Officejet Pro K550dtwn) into the
network hub, switch, or router.
Note: It is recommended that the printer and the computers that use
it be on the same subnet. Repeat the step if the network connector’s
Link light does not turn on. See “Problems connecting to a network”
in the onscreen user guide.
3) Insert the Starter CD into the CD drive. If the CD menu does not
start automatically, double-click the setup icon on the Starter CD.
2
1
3
Reti cablate: 1) Rimuovere il coperchio di protezione dal
connettore di rete della stampante. 2) Collegare il cavo di rete al
connettore e a una porta disponibile dell’hub di rete, del
commutatore o del router. ATTENZIONE: non collegare il cavo di
rete a una porta etichettata WAN, Uplink o Internet all’hub,
al commutatore o al router. Non collegare il cavo incrociato
(fornito con la stampante HP Officejet Pro K550dtwn) all’hub di
rete, al commutatore o al router.
Nota: si consiglia di posizionare la stampante e i computer che la
utilizzano nella stessa sottorete. Ripetere il punto se la spia
Collegamento del connettore di rete non si accende. Nella Guida in
linea, vedere “Problemi di collegamento alla rete”.
3) Inserire il CD di avviamento nell’apposita unità. Se il menu del
CD non si avvia automaticamente, fare doppio clic sull’icona di
installazione del CD di avviamento.
16
English
Nederlands Français DeutschItaliano
9
4) Drucken Sie die Konfigurationsseite, indem Sie die Taste
/(Konfigurationsseite drücken). 5) Klicken Sie im
CD-Menü auf Installieren (Windows) oder Treiber installieren
(Mac OS), und folgen Sie den Anleitungen auf dem Bildschirm
zur Installation der Software. Verwenden Sie dabei die
Informationen auf der Konfigurationsseite (z. B. die IP-Adresse).
Weitere Informationen zur Installation der Software oder zur
Freigabe des Druckers im Netzwerk finden Sie im Online-
Benutzerhandbuch.
Schritt 9: Testen der Softwareinstallation.
Nachdem Sie die Installation der Software ausgeführt und den
Drucker an den Computer angeschlossen haben, drucken Sie
ein Dokument aus einer Anwendung, die Sie häufig
verwenden. Wenn das Dokument nicht gedruckt wird, lesen
Sie den Abschnitt “Fehlerbehebung und Konfigurationstools”
auf Seite 30.
4) Imprimez la page de configuration en
appuyant sur / (bouton Page de configuration).
5) Sur le menu du CD, cliquez sur Installer (Windows) ou
Installer le pilote (Mac OS), et suivez les instructions qui
s’affichent à l’écran pour installer le logiciel, en utilisant les
informations de la page de configuration (telle que l’adresse IP,
par exemple). Pour plus d’informations sur l’installation du
logiciel ou le partage de l’imprimante en réseau, reportez-vous
au guide de l’utilisateur en ligne.
Étape 9 : Test de l’installation du logiciel de l’imprimante.
Après avoir terminé l’installation du logiciel et connecté
l’imprimante à l’ordinateur, imprimez un document à partir d’une
application que vous utilisez régulièrement pour vous assurer que
le logiciel est bien installé. Si le document ne s’imprime pas,
reportez-vous à la section « Outils de dépannage et de
configuration », à la page 40.
4) Druk de configuratiepagina af door op de knop /
(Configuratiepagina) te drukken. 5) Klik in het cd-menu op
Installeren (Windows) of Stuurprogramma installeren (Mac OS)
en volg de aanwijzingen op het scherm op om de software te
installeren aan de hand van de informatie op de
configuratiepagina (zoals het IP-adres). Zie de elektronische
gebruikershandleiding voor meer informatie over het installeren
van de software of het delen van de printer in een netwerk.
Stap 9: test de installatie van de printersoftware.
Als u de software hebt geïnstalleerd en de printer hebt
aangesloten op de computer, drukt u een document af vanuit
een toepassing die u regelmatig gebruikt, om te controleren of
de software correct is geïnstalleerd. Zie “Hulpmiddelen voor
het oplossen van problemen en voor de configuratie” op
pagina 49 als het document niet wordt afgedrukt.
4) Print the configuration page by pressing /
(Configuration Page button). 5) On the CD menu,
click Install (Windows) or Install Driver (Mac OS),
and follow the onscreen instructions to install the software,
using information from the configuration page (such as the IP
address). For more information about installing the software or
sharing the printer on a network, see the onscreen user guide.
Step 9: Test the printer software installation.
After you complete the software installation and connect the
printer to the computer, print a document from an application
that you use frequently to ensure that the software is installed
correctly. If the document does not print, see “Troubleshooting
and configuration tools” on page 21.
4) Stampare la pagina di configurazione premendo /
(pulsante Pagina di configurazione). 5) Dal menu del CD,
scegliere Installa (Windows) o Installa driver (Mac OS) e seguire le
istruzioni visualizzate per installare il software utilizzando le
informazioni fornite dalla pagina di configurazione (ad esempio
l’indirizzo IP). Per ulteriori informazioni sull’installazione del
software o la condivisione della stampante su una rete, consultare
la Guida in linea.
Punto 9: Verificare l’installazione del software della stampante.
Al termine dell’installazione del software e dopo avere collegato
la stampante al computer, stampare un documento da
un’applicazione utilizzata frequentemente per assicurarsi che
l’installazione sia stata eseguita correttamente. Se il documento
non viene stampato, vedere “Risoluzione dei problemi e strumenti
di configurazione“ a pagina 58.

17
Schritt 10: Registrieren des Druckers
Registrieren Sie den Drucker, damit Sie nützliche
Kundenunterstützung und wichtige technische Informationen
erhalten. Wenn Sie den Drucker nicht während der Installation
der Software registrieren, können Sie dies später unter
www.register.hp.com tun.
Weitere Informationsquellen
Ihr Drucker ist betriebsbereit. Weitere Informationen zur
Verwendung und Fehlerbehebung des Druckers sowie zur
Gewährleistung finden Sie in folgenden Quellen:
•Online-Benutzerhandbuch und Readme-Datei auf der Starter-CD
•HP Instant Support und integrierter Web-Server
(siehe das Online-Benutzerhandbuch)
•Website für Produktunterstützung unter
www.hp.com/support/officejetprok550.
Étape 10 : Enregistrement de l’imprimante.
Enregistrez l’imprimante afin d’obtenir de l’aide et des
informations techniques importantes. Si vous n’avez pas
enregistré votre imprimante au cours de l’installation du
logiciel, vous pourrez le faire ultérieurement à l’adresse
www.register.hp.com.
Pour obtenir davantage d’informations.
Votre imprimante est prête à l’emploi. Pour plus d’informations sur
l’utilisation de l’imprimante, les instructions de dépannage et la
garantie, reportez-vous aux références suivantes :
•guide de l’utilisateur en ligne et au fichier Lisezmoi disponibles
sur le CD de démarrage ;
•HP Instant Support et serveur Web intégré
(voir le guide de l’utilisateur en ligne) ;
•site Web d’assistance produit à l’adresse
www.hp.com/support/officejetprok550.
Stap 10: registreer de printer.
Registreer de printer zodat u belangrijke informatie over
ondersteuning en technische informatie ontvangt. Als u de printer
niet hebt geregistreerd tijdens de installatie van de software,
kunt u de printer later registreren via www.register.hp.com.
Meer informatie zoeken.
De printer is klaar voor gebruik. Voor meer informatie over het
gebruik van de printer en het oplossen van problemen, alsmede
informatie over de garantie, kunt u de volgende bronnen raadplegen:
•Elektronische gebruikershandleiding en het Leesmij-bestand op
de Starter-cd.
•HP Instant Support en de ingebouwde webserver
(zie de elektronische gebruikershandleiding)
•Site voor productondersteuning op
www.hp.com/support/officejetprok550.
10
Step 10: Register the printer.
Register the printer to receive important support and
technical information. If you did not register your printer
while installing the software, you can register later at
www.register.hp.com.
Finding more information.
Your printer is ready to use. For information about using the printer
and troubleshooting, as well as warranty information, see the
following resources:
•Onscreen user guide and readme file on the Starter CD
•HP Instant Support and embedded Web server
(see the onscreen user guide)
•Product support site at www.hp.com/support/officejetprok550
Punto 10: Registrare la stampante.
Per ricevere importanti informazioni tecniche e sull’assistenza,
è necessario effettuare la registrazione della stampante. Se la
registrazione non viene effettuata durante l’installazione del
software, sarà possibile registrarla successivamente all’indirizzo
www.register.hp.com.
Ulteriori informazioni.
La stampante è pronta per l’uso. Per informazioni sull’utilizzo della
stampante e sulla risoluzione dei problemi, nonché sulle garanzie,
fare riferimento alle risorse seguenti:
•Guida in linea e file Readme nel CD di avviamento.
•HP Instant Support e server Web incorporato
(vedere la Guida in linea)
•Sito dell’assistenza prodotti all’indirizzo
www.hp.com/support/officejetprok550.
..
English
18
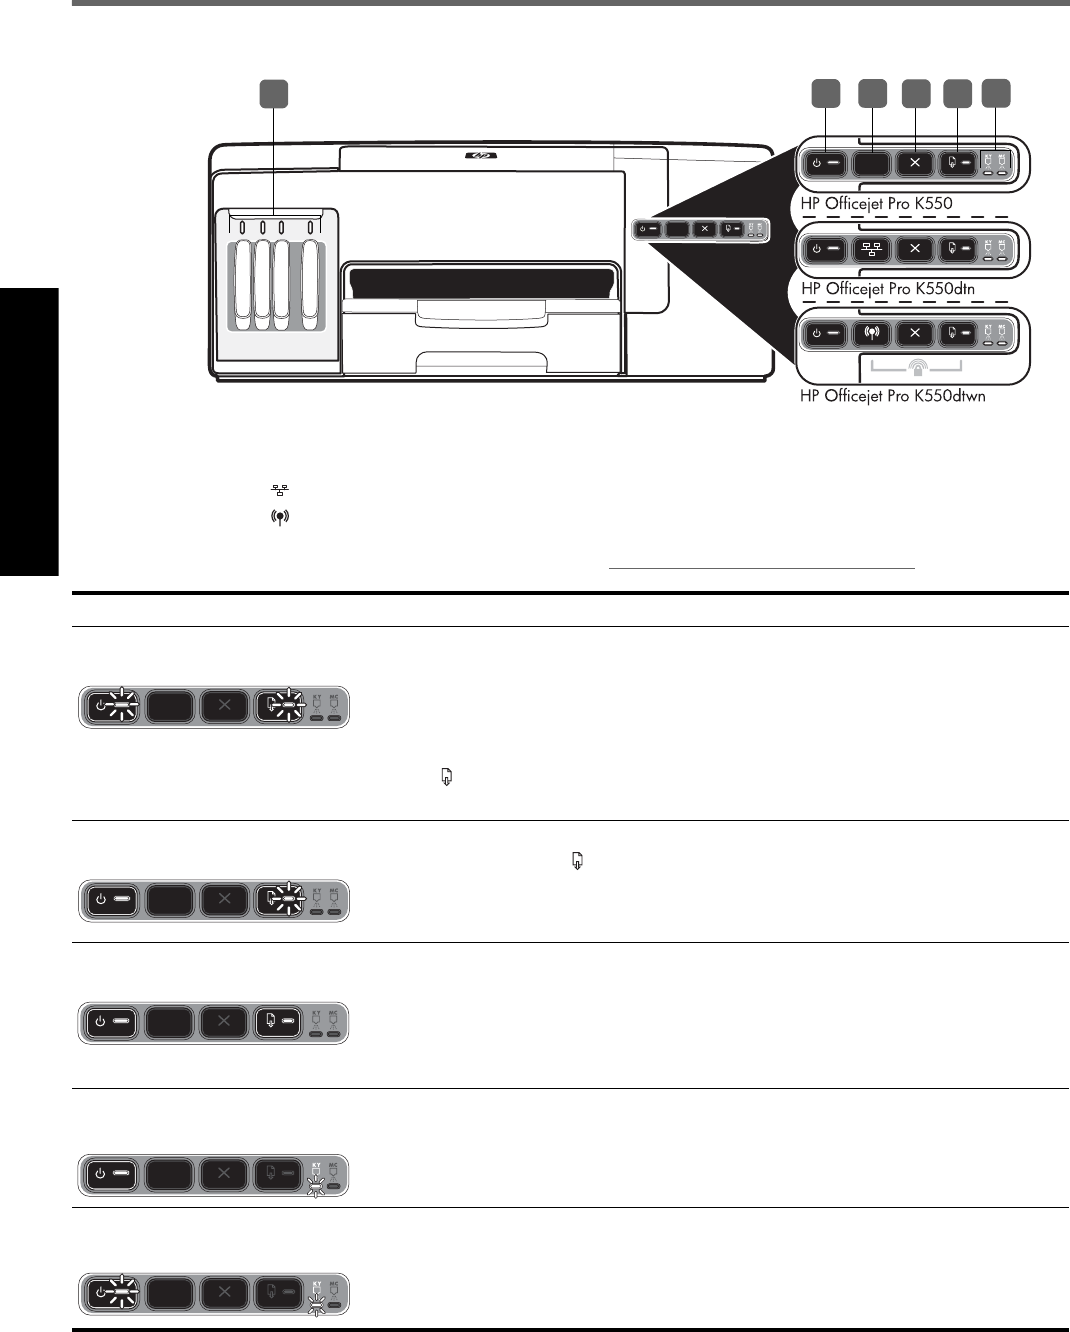
Interpreting control panel lights
For more information, visit the product support website at www.hp.com/support/officejetprok550.
1) Power button and light
2) Configuration Page button
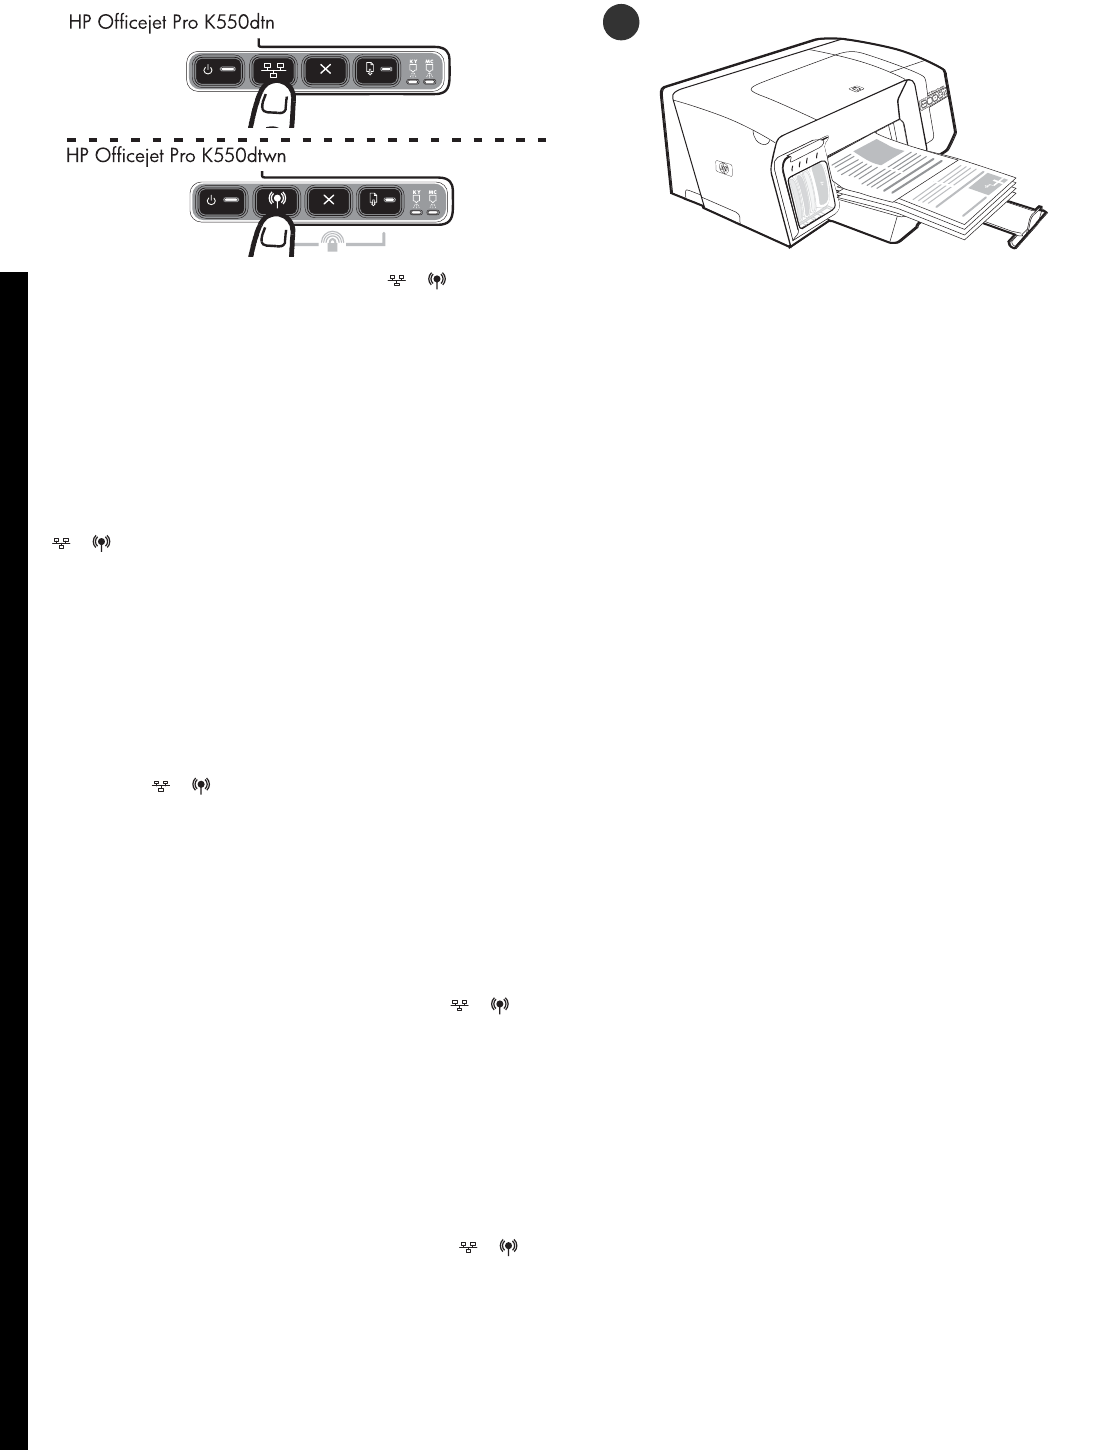
HP Officejet Pro K550dtn
HP Officejet Pro K550dtwn
3) Cancel button
4) Resume button and light
5) Printhead lights
6) Ink cartridge lights
624
15
3
Control panel light pattern Explanation and recommended action
The Power light and the Resume
light blink. Print media is jammed in the printer.
•Remove all media from the output tray. Locate and clear the jam. See “Clearing jams”
in the onscreen user guide.
The printer carriage has stalled.
•Open the top cover and remove any obstructions (such as jammed media).
•Press (Resume button) to continue printing.
•If the error persists, turn the printer off, and then on again.
The Power light is on and the
Resume light blinks. The printer is out of paper.
•Load paper and press (Resume button).
The Power light and the Resume
light are on. A cover is not closed completely.
•Make sure all covers are completely closed.
The rear access panel or duplex unit is missing, or is not inserted completely.
•Make sure the rear access panel (HP Officejet Pro K550) or the duplex unit
(HP Officejet Pro K550dtn/K550dtwn) is inserted completely at the back of the printer.
The Power light is on, and one or
more of the printhead lights blinks. One or more of the printheads are missing.
•Install the printhead indicated, and then try to print.
•If the error persists, replace the printhead indicated.
The Power light, and one or more of
the printhead lights blink. One or more of the printheads are faulty or need attention.
•Ensure the printhead indicated is properly installed, and then try to print.
•If the error persists, replace the printhead indicated.
English
19
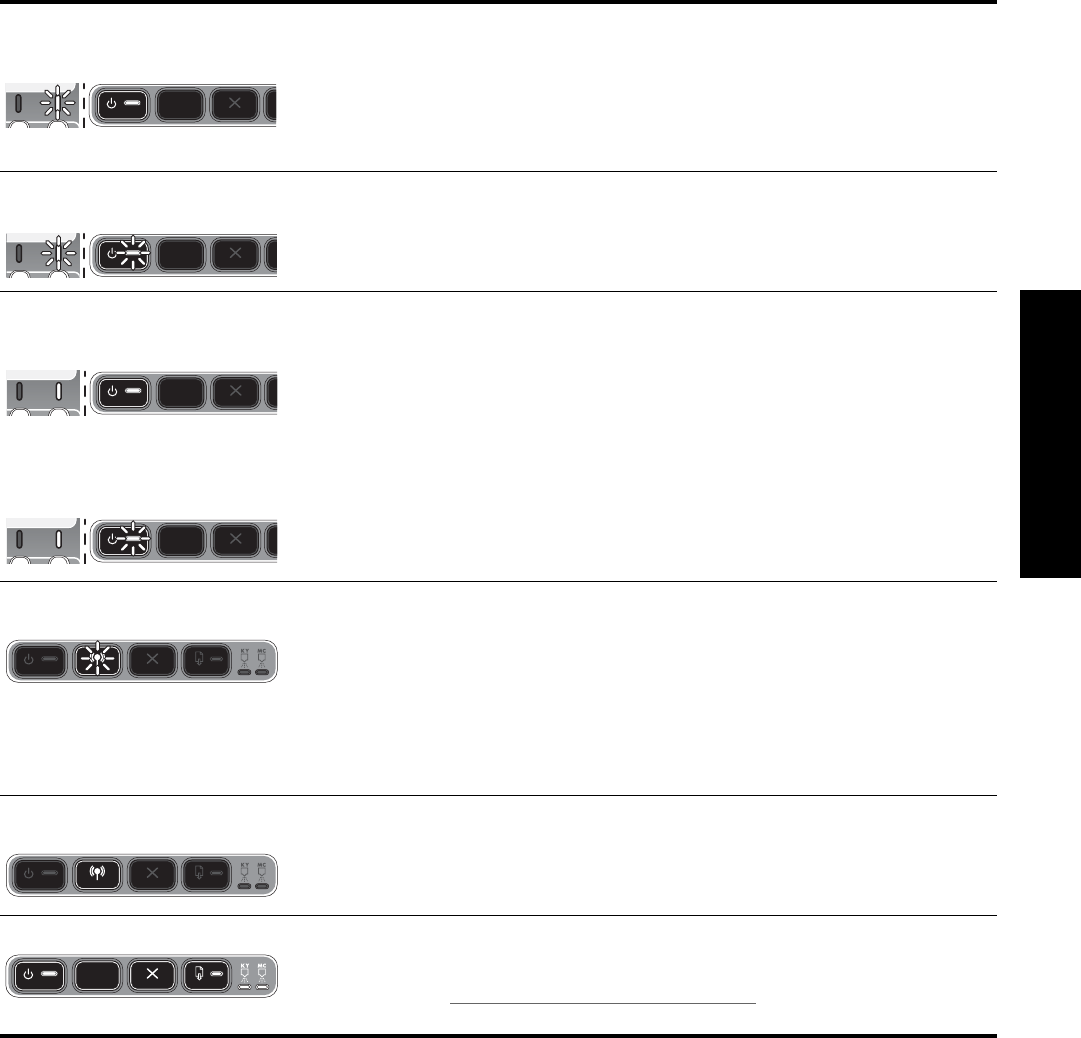
The Power light is on, and one or
more of the ink cartridge lights
blink.
One or more of the ink cartridges are missing.
•Install the ink cartridge indicated, and then try to print.
•If the error persists, replace the ink cartridge indicated.
One or more of the ink cartridges are out of ink and must be replaced before you can
continue printing.
•Replace the ink cartridge indicated.
The Power light, and one or more of
the ink cartridge lights blink. One or more of the ink cartridges are faulty or need attention.
•Ensure the ink cartridge indicated is properly installed, and then try to print.
•If the error persists, replace the ink cartridge indicated.
The Power light is on, and one or
more of the ink cartridge lights
are on.
The Power light blinks, and one or
more of the ink cartridge lights
are on.
One or more of the ink cartridges are low on ink and will need to be replaced soon.
•No action is required.
The Configuration Page light blinks.
(HP Officejet Pro K550dtwn) One of the following processes is taking place:
•The printer is initializing for wireless communication.
•If you are using SecureEasySetup (SES) to set up the printer, the printer might be trying
to connect to the wireless network.
•If you are using Windows Connect Now™ to set up the printer, the printer is receiving
wireless information from the USB flash drive.
Each of the above processes takes less than 2 minutes.
•No action is required.
The Configuration Page light is on.
(HP Officejet Pro K550dtwn) The printer is in wireless communication mode.
•No action is required.
All lights are on. A non-recoverable error has occurred.
•Disconnect all cables (such as power cord, network cable, and USB cable),
wait about 20 seconds, and reconnect the cables. If the problem persists,
visit HP website (www.hp.com/support/officejetprok550) for the latest troubleshooting
information, or product fixes and updates.

English
20
Troubleshooting
This section provides troubleshooting suggestions for some of the most common issues associated with hardware and
software installation.
For late-breaking information, see the readme file and release notes, or visit the product support website at
www.hp.com/support/officejetprok550.
Problems printing an alignment page
Check the printer to ensure the following:
•Power light is on and not blinking. When the printer
is first turned on, it takes approximately 45 seconds
to warm up.
•The printer is in the Ready state, and no other lights
on the control panel are lit or blinking. If lights are lit
or blinking, see “Interpreting control panel lights” on
page 18.
•Ensure power cord and other cables are working,
and are firmly connected to the printer.
•All packing tapes and materials are removed from
the printer.
•Rear access panel (HP Officejet Pro K550) or duplex
unit (HP Officejet Pro K550dtn/K550dtwn) is locked
into place.
•Paper is loaded correctly in the tray, and is not
jammed in the printer.
•Ensure the orange protective caps have been
removed from each printhead.
•Printheads and ink cartridges are properly installed
in their correct color-coded slots. Press down firmly
on each one to ensure
proper contact.
•Printhead latch and all covers are closed.
Problems installing software
Check or perform the following:
•Make sure the computer meets the system
requirements. See the onscreen user guide on the
Starter CD.
•Before installing software on a Windows computer,
ensure all other programs are closed.
•If the computer does not recognize the path to the
CD drive that you typed, ensure you are specifying
the correct drive letter.
•If the computer cannot recognize the Starter CD in
the CD drive, inspect the CD for damage.
You can download the printer driver from
www.hp.com/support/officejetprok550.
•In the Windows device manager, make sure that the
USB drivers have not been disabled.
•If you are using Windows and the computer cannot
detect the printer, run the uninstallation utility
(Util\Scrubber\Uninstall.exe on the Starter CD) to
perform a clean uninstallation of the printer driver.
Restart your computer, and reinstall the printer driver.
Problems connecting to a network
Note: After correcting any of the following, run the
installation program again.
General network troubleshooting
•If you are unable to install the printer software,
verify that:
• All cable connections to the computer and the
printer are secure.
• The network is operational and the network hub
is turned on.
• All applications, including virus protection
programs and personal firewalls, are closed
or disabled.
• Make sure the printer is installed on the same
subnet as the computers that will be using
the printer.
• If the installation program cannot discover
the printer, print the configuration page
(see “To print a configuration page” on
page 21), and enter the IP address manually
in the installation program.
• If you are using a computer running Windows,
make sure that the network ports created in the
printer driver match the printer IP address:
1) Print the printer’s configuration page.
2) From the Windows desktop, click Start, point
to Settings, and then click Printers or Printers
and Faxes.
3) Right-click the printer icon, click Properties,
and then click the Ports tab.
4) Select the TCP/IP port for the printer, and then
click Configure Port.
5) Compare the IP address listed in the dialog
box and make sure it matches the IP address
listed on the configuration page. If the IP
addresses are different, change the IP address in
the dialog box to match the address on the
configuration page.
6) Click OK twice to save the settings and close
the dialog boxes.
Problems connecting to a wired network
•If the Link light on the network connector does not
turn on, make sure that all of the “General network
troubleshooting” conditions listed above are met.
•Though it is not recommended that you assign the
printer with a static IP address, you might resolve
some installation problems (such as a conflict with a
personal firewall) by doing so. For more information,
see the onscreen user guide.

English
21
Troubleshooting and configuration tools
The following tools are available for troubleshooting or configuring the printer. For more information about these tools,
see the onscreen user guide on the Starter CD.
Configuration page
Use the configuration page to view current printer
settings, to help troubleshoot printer problems, and to
verify installation of optional accessories, such as the
duplex unit. The configuration page also contains a log
of recent events. If the printer is connected to a network,
an additional network configuration page prints;
this page shows the network settings for the printer.
If you need to call HP, print the configuration page of the
printer before calling.
To print a configuration page
•HP Officejet Pro K550: Press and hold (Power
button), press (Cancel button) once, and release
(Power button).
HP Officejet Pro K550dtn/K550dtwn: Press /
(Configuration Page button).
Embedded Web server
When the printer is connected to a network, you can use
the printer’s embedded Web server to view status
information, change settings, and manage the printer at
your computer.
To open the embedded Web server
In a supported Web browser on your computer, type the
IP address that has been assigned to the printer.
For example, if the IP address is 123.123.123.123,
type the following address into the Web browser:
http://123.123.123.123
The IP address for the printer is listed on the
configuration page.
After you open the embedded Web server, you can
bookmark it so that you can return to it quickly in
the future.

English
22
Setting up the printer for wireless communication
(HP Officejet Pro K550dtwn)
You may set up the printer for wireless communication using one of the following ways:
•Using a cross cable or network cable
See “To set up the printer for wireless communication” on page 23.
•Using SecureEasySetup (SES)
See “To set up wireless communication using SecureEasySetup (SES)” on page 23.
•Using Windows Connect Now
See “To set up wireless communication for multiple printers (Windows only)” on page 24.
Note:
•If you encounter problems, see “Troubleshooting
problems for wireless communication” on page 24.
•To use the printer with any wireless connection,
you must run the installation program at least once
from the Starter CD and create a wireless
connection.
•Make sure the printer is not connected to the
network using a network cable.
•The sending device must have built-in 802.11
capabilities or an 802.11 wireless card installed.
•It is recommended that the printer and the computers
that use the printer be on the same subnet.
Before installing the printer software, you may wish to
find out the settings of your network. Obtain the
information from your system administrators, or complete
the following tasks:
•Obtain the network name (SSID) and communication
mode (infrastructure or ad hoc) from the
configuration utility for the network’s wireless access
point (WAP) or the computer’s network card.
•Find out the type of encryption your network uses,
such as Wired Equivalent Privacy (WEP) or Wi-Fi®
Protected Access (WPA).
•Find out the security password or encryption key of
the wireless device.
Understanding 802.11 wireless
network settings
Network name (SSID)
By default, the printer looks for the wireless network
name or Service Set Identifier (SSID) named “hpsetup”.
Your network may have a different SSID.
Communication mode
There are two communication mode options:
Ad hoc: On an ad hoc network, the printer is set to ad
hoc communication mode, and communicates directly
with other wireless devices without the use of a wireless
access point (WAP):
All devices on the ad hoc network must:
•Be 802.11 compatible
•Have ad hoc as the communication mode
•Have the same network name (SSID)
•Be on the same subnet and same channel
•Have the same 802.11 security settings
Infrastructure (recommended): On an infrastructure
network, the printer is set to infrastructure communication
mode, and communicates with other devices on the
network, whether the devices are wired or wireless,
through a WAP. WAPs commonly act as routers or
gateways on small networks.
Security Settings
For the available settings for the printer, see the network
configuration page under “Understanding the
configuration page” in the onscreen user guide.
For more information on wireless security,
visit www.weca.net/opensection/pdf/
whitepaper_wifi_security4-29-03.pdf.
English
23
Network authentication: The printer’s factory default
setting is ‘Open‘, which does not require security for
authorization or encryption. The other possible values
are ‘OpenThenShared’, ‘Shared’, and ‘WPA-PSK’
(Wi-Fi® Protected Access Pre-Shared Key).
•WPA increases the level of over-the-air data
protection and access control on existing and future
Wi-Fi networks. It addresses all known weaknesses
of WEP, the original native security mechanism in
the 802.11 standard.
•WPA2 is the second generation of WPA security;
providing enterprise and consumer Wi-Fi users with
a high level of assurance that only authorized users
can access their wireless networks.
Data encryption:
•Wired Equivalent Privacy (WEP) provides security by
encrypting data sent over radio waves from one
wireless device to another wireless device. Devices
on a WEP-enabled network use WEP keys to encode
data. If your network uses WEP, you must know the
WEP key(s) it uses.
•WPA uses the Temporal Key Integrity Protocol (TKIP)
for encryption and employs 802.1X authentication
with one of the standard Extensible Authentication
Protocol (EAP) types available today.
•WPA2 provides a new, encryption scheme,
the Advanced Encryption Standard (AES). AES is
defined in counter cipher-block chaining mode
(CCM) and supports the Independent Basic Service
Set (IBSS) to enable security between client
workstations operating in ad hoc mode.
To set up the printer for wireless
communication
For Windows
1. Remove the protective cover from the printer’s
network connector.
2. Do one of the following:
• Temporarily connect the printer to the computer
with the cross cable (included with the printer).
• Temporarily connect the printer to an available
port on the network hub, switch, or router with a
network cable (sold separately).
3. Close any applications that are running on your
computer system.
4. Insert the Starter CD into the CD drive.
If the CD menu does not start automatically,
double-click the setup icon on the Starter CD.
5. On the CD menu, click Install and follow the
onscreen instructions.
6. On the Connection Type screen, select the option to
connect through network and click Next.
7. Follow the onscreen instructions to complete the
installation, and when prompted, disconnect the
cable.
For Mac OS
1. Open the AirPort Setup Assistant, and then follow
the onscreen instructions for joining an existing
wireless network (hpsetup).
2. Double-click the setup icon on the Starter CD,
and then follow the onscreen instructions.
3. When prompted, click Open Print Center to add
the printer.
To set up wireless communication
using SecureEasySetup (SES)
If your wireless router is SES capable, see the following
instructions to set up using SES.
1. Press the SES button on the wireless router.
2. Within 2 minutes, press and hold (Configuration
Page button) on the printer, press (Resume
button) once, and release (Configuration Page
button).
The Configuration Page light blinks.
3. Wait for about 2 minutes, and press
(Configuration Page button) to print the printer’s
configuration page and verify that the SES settings
match the router’s wireless settings.
Note: If the connection fails, you might need to reset
the printer’s network settings (see “Reset network
configuration settings” on page 25) and repeat the
steps. See also “Check the wireless
communication settings” on page 24.
English
24
4. Close any applications that are running on your
computer system.
5. Insert the Starter CD into the CD drive.
If the CD menu does not start automatically,
double-click the setup icon on the Starter CD.
6. On the CD menu, click Install and follow the
onscreen instructions to install the printer software.
To set up wireless communication
for multiple printers (Windows only)
The printer supports the Windows Connect Now™
technology, which allows you to conveniently set up
multiple printers for wireless connection. Using the
Wireless Configuration Utility provided, export the
computer’s wireless settings to a USB flash drive,
and then configure the printers with these settings by
inserting the flash drive into the USB port of each printer.
1. Remove the protective cover from the printer’s USB
host connector.
2. Insert the Starter CD into the CD drive.
If the CD menu does not start automatically,
double-click the setup icon on the Starter CD.
3. On the CD menu, click Utilities, and then click
Wireless Configuration Utility.
4. Follow the onscreen instructions and connect the
USB flash drive to the computer’s USB port when
prompted. The wireless network configuration
settings are saved to the flash drive.
5. Follow the onscreen instructions and connect the
USB flash drive to each printer that you want to add
to the network.
Troubleshooting problems for wireless communication
If the printer is unable to communicate with the network after completing the wireless setup and software installation,
perform one or more of the following tasks.
Check the wireless
communication settings
•Make sure the computer’s wireless card is set to the
correct wireless profile. A wireless profile is a set of
network settings unique to a given network. A single
wireless card might have several wireless profiles
(for example, one for a home network and one for
an office network). Open the configuration utility for
the network card installed on your computer, and
ensure that the profile selected is the profile for the
printer’s network.
•Make sure the printer’s network settings match those
of your network. Do one of the following to find the
settings for your network:
•Infrastructure communication: Open the wireless
access point’s (WAP) configuration utility.
•Ad hoc communication: Open the configuration
utility for the network card installed in your
computer.
•Compare the network’s settings to those that appear
on the printer’s configuration page (see “To print a
configuration page” on page 21), and note any
differences. Possible problems include the following:
• The WAP filters hardware addresses
(MAC addresses). See “Add hardware
addresses to a wireless access point (WAP)” on
page 25.
• One of these settings in the printer might be
incorrect: communication mode, network name
(SSID), channel (ad hoc networks only),
authentication type, encryption.
See “Understanding 802.11 wireless network
settings” on page 22.
• Print a document. If the document still does not
print, then reset the printer’s network settings
(see “Reset network configuration settings” on
page 25) and reinstall the printer software
(see “Setting up the printer for wireless
communication (HP Officejet Pro K550dtwn)” on
page 22).
If the wireless network settings are correct, the computer
might be associated to another wireless network.
Ensure that the computer is associated to the same
wireless network as that of the printer.
Users can ensure this by checking the wireless settings
on their respective computers. In addition, ensure that
the computers have access to the wireless network.
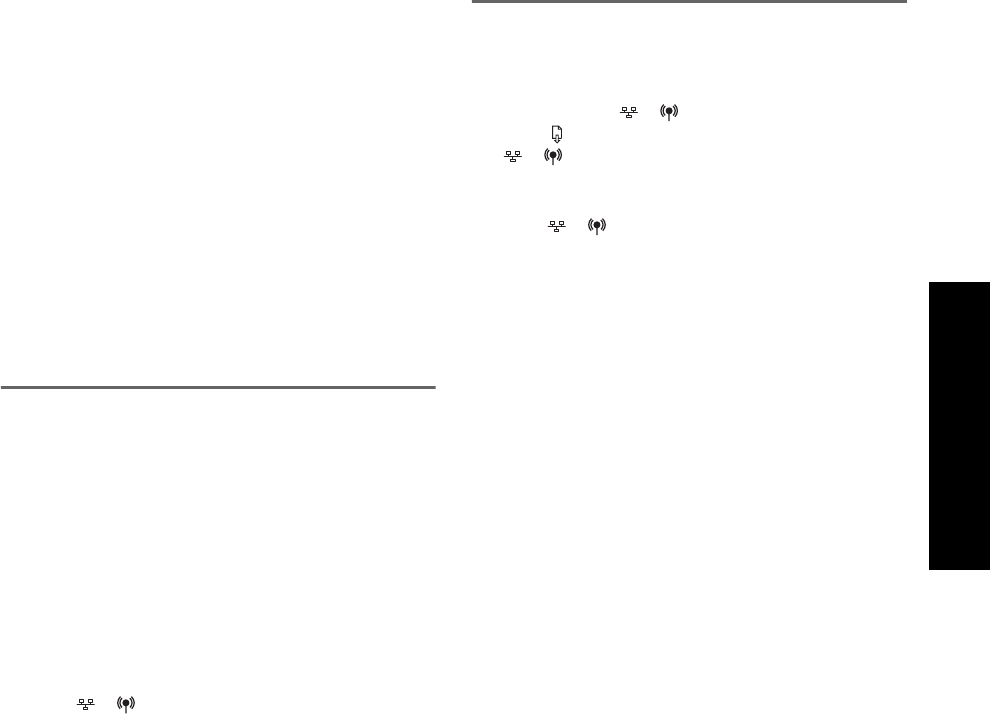
English
25
If the wireless network settings are incorrect, follow these
steps to correct the printer’s settings:
1. Connect the printer to your network with a network
cable or to the computer using the cross cable
included with the printer.
2. Open the printer’s embedded Web server.
3. Click the Networking tab, and then click Wireless
(802.11) in the left pane.
4. Use the Wireless Setup wizard on the Wireless Setup
tab to change the printer’s settings to match the
settings of the network.
5. Close the printer’s embedded Web server, and then
disconnect the network cable from the printer.
6. Uninstall the printer software completely, and then
reinstall the software.
Add hardware addresses to a
wireless access point (WAP)
MAC filtering is a security feature in which a wireless
access point (WAP) is configured with a list of MAC
addresses (also called “hardware addresses”) of devices
that are allowed to gain access to the network through
the WAP. If the WAP does not have the hardware
address of a device attempting to access the network,
the WAP denies the device access to the network. If the
WAP filters MAC addresses, then the printer’s MAC
address must be added to the WAP’s list of accepted
MAC addresses.
1. Press / (Configuration Page button) to print
the configuration page.
2. Open the WAP’s configuration utility, and add the
printer’s hardware address to the list of accepted
MAC addresses.
Reset network configuration settings
If the printer is still unable to communicate with the
network, reset the printer’s network settings.
1. Press and hold / (Configuration Page button),
press (Resume button) three times, and release
/ (Configuration Page button). The Power
light blinks for a few seconds. Wait till the Power
light is on.
2. Press / (Configuration Page button) to print
the configuration page and verify that the network
settings have been reset. By default, the network
name (SSID) is “hpsetup” and the communication
mode is “ad hoc”.

English
26
Hewlett-Packard limited warranty statement
Extent of limited warranty
1. Hewlett-Packard warrants to the end-user customer that the HP
products specified above will be free from defects in materials and
workmanship for the duration specified above, which duration
begins on the date of purchase by the customer.
2. For software products, HP’s limited warranty applies only to
a failure to execute programming instructions. HP does not
warrant that the operation of any product will be uninterrupted or
error free.
3. HP’s limited warranty covers only those defects that arise as a
result of normal use of the product, and does not cover any other
problems, including those that arise as a result of:
a. Improper maintenance or modification;
b. Software, media, parts, or supplies not provided or supported
by HP; or
c. Operation outside the product’s specifications.
d. Unauthorized modification or misuse.
4. For HP printer products, the use of a non-HP ink cartridge or a
refilled ink cartridge does not affect either the warranty to the
customer or any HP support contract with the customer.
However, if printer failure or damage is attributable to the use of a
non-HP or refilled ink cartridge, HP will charge its standard time
and materials charges to service the printer for the particular
failure or damage.
5. If HP receives, during the applicable warranty period, notice of a
defect in any product which is covered by HP’s warranty, HP shall
either repair or replace the product, at HP’s option.
6. If HP is unable to repair or replace, as applicable, a defective
product which is covered by HP’s warranty, HP shall, within a
reasonable time after being notified of the defect, refund the
purchase price for the product.
7. HP shall have no obligation to repair, replace, or refund until the
customer returns the defective product to HP.
8. Any replacement product may be either new or like new, provided
that it has functionality at least equal to that of the product being
replaced.
9. HP products may contain remanufactured parts, components,
or materials equivalent to new in performance.
10. HP’s Limited Warranty Statement is valid in any country/region
where the covered HP product is distributed by HP. Contracts for
additional warranty services, such as on-site service, are available
from any authorized HP service facility in countries/regions where
the product is distributed by HP or by an authorized importer.
Limitations of warranty
TO THE EXTENT ALLOWED BY LOCAL LAW, NEITHER HP NOR
ITS THIRD PARTY SUPPLIERS MAKES ANY OTHER WARRANTY
OR CONDITION OF ANY KIND, WHETHER EXPRESS OR
IMPLIED WARRANTIES OR CONDITIONS OF MERCHANTABILITY,
SATISFACTORY QUALITY, AND FITNESS FOR A PARTICULAR
PURPOSE.
Limitations of liability
1. To the extent allowed by local law, the remedies provided
in this Warranty Statement are the customer’s sole and
exclusive remedies.
2. TO THE EXTENT ALLOWED BY LOCAL LAW, EXCEPT FOR THE
OBLIGATIONS SPECIFICALLY SET FORTH IN THIS WARRANTY
STATEMENT, IN NO EVENT SHALL HP OR ITS THIRD PARTY
SUPPLIERS BE LIABLE FOR DIRECT, INDIRECT, SPECIAL,
INCIDENTAL, OR CONSEQUENTIAL DAMAGES, WHETHER
BASED ON CONTRACT, TORT, OR ANY OTHER LEGAL THEORY
AND WHETHER ADVISED OF THE POSSIBILITY OF SUCH
DAMAGES.
Local law
1. This Warranty Statement gives the customer specific legal rights.
The customer may also have other rights which vary from state to
state in the United States, from province to province in Canada,
and from country/region to country/region elsewhere in the
world.
2. To the extent that this Warranty Statement is inconsistent with local
law, this Warranty Statement shall be deemed modified to be
consistent with such local law. Under such local law, certain
disclaimers and limitations of this Warranty Statement may not
apply to the customer. For example, some states in the United
States, as well as some governments outside the United States
(including provinces in Canada), may:
a. Preclude the disclaimers and limitations in this Warranty
Statement from limiting the statutory rights of a customer
(e.g. the United Kingdom);
b. Otherwise restrict the ability of a manufacturer to enforce such
disclaimers or limitations; or
c. Grant the customer additional warranty rights, specify the
duration of implied warranties which the manufacturer cannot
disclaim, or allow limitations on the duration of implied
warranties.
3. FOR CONSUMER TRANSACTIONS IN AUSTRALIA AND NEW
ZEALAND, THE TERMS IN THIS WARRANTY STATEMENT,
EXCEPT TO THE EXTENT LAWFULLY PERMITTED, DO NOT
EXCLUDE, RESTRICT, OR MODIFY, AND ARE IN ADDITION TO,
THE MANDATORY STATUTORY RIGHTS APPLICABLE TO THE
SALE OF THE HP PRODUCTS TO SUCH CUSTOMERS.
HP product Duration of Limited Warranty
Software 1 year
Accessories 1 year
Ink cartridges 6 months*
Printheads 1 year*
Printer peripheral hardware (see below for details) 1 year
*For more detailed warranty information, see www.hp.com/support/inkjet_warranty.
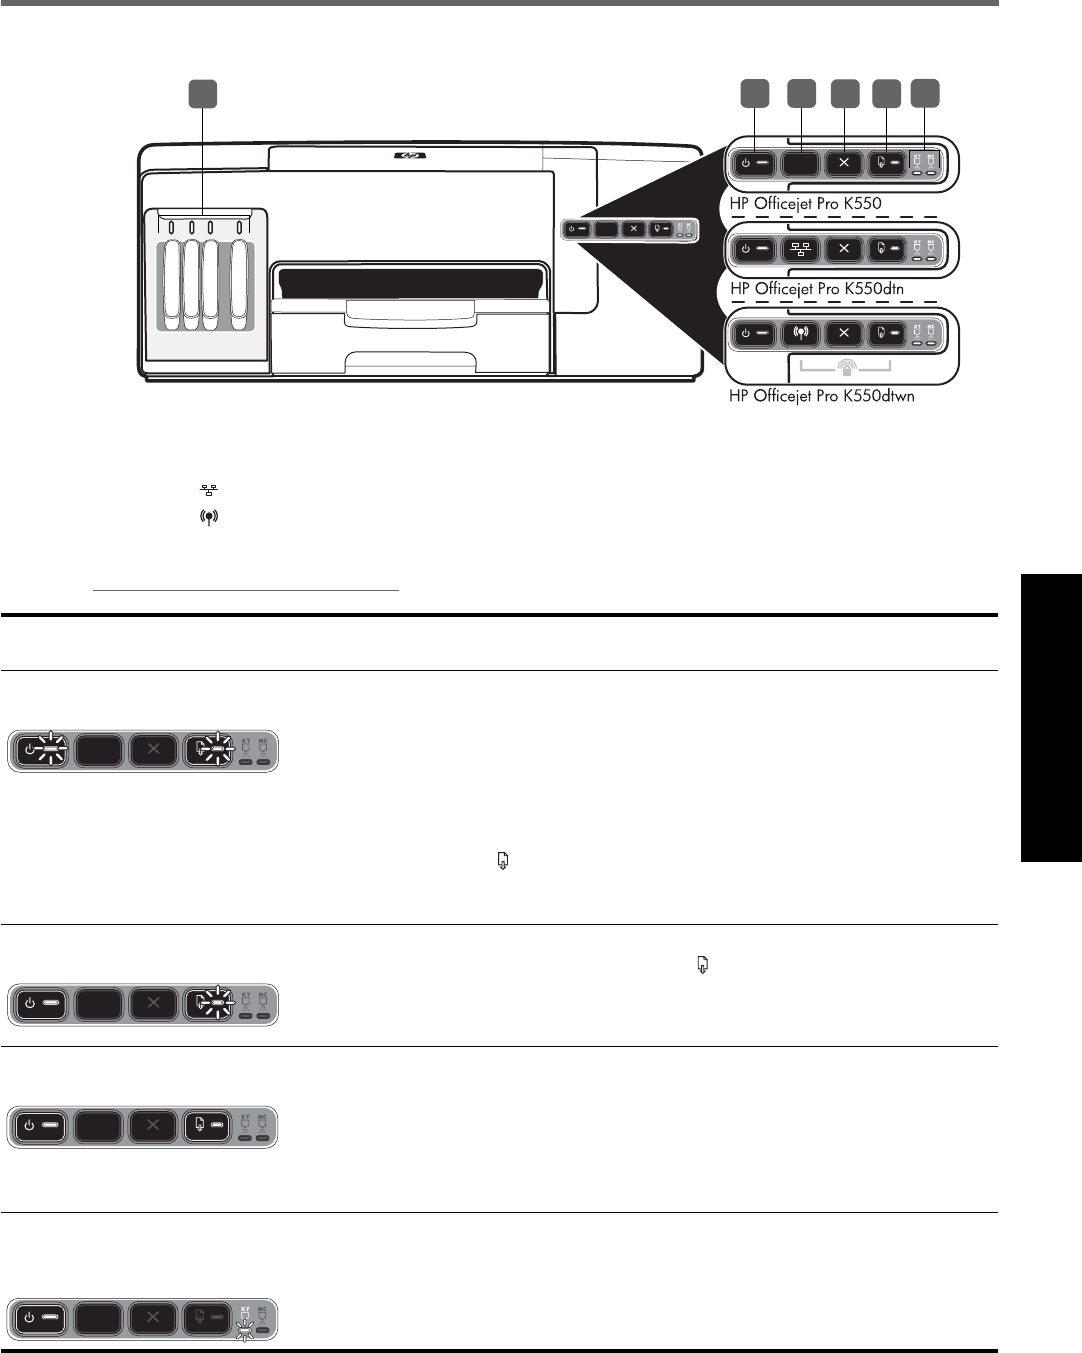
Deutsch
27
Bedeutung der LEDs auf dem Bedienfeld
Weitere Informationen finden Sie auf der Website für Produktunterstützung unter
www.hp.com/support/officejetprok550.
1) Netztaste mit LED
2) Taste ’Konfigurationsseite’
HP Officejet Pro K550dtn
HP Officejet Pro K550dtwn
3) Cancel-Taste
4) Resume-Taste mit LED
5) Druckkopf-LEDs
6) Tintenpatronen-LEDs
624
15
3
LED-Leuchtmuster auf dem
Bedienfeld Erklärung und empfohlene Aktionen
Die Netz-LED und die Resume-LED
blinken. Im Drucker liegt ein Papierstau vor.
•Entfernen Sie alle Medien aus dem Ausgabefach. Suchen Sie nach den gestauten
Medien, und entfernen Sie diese. Siehe “Papierstaus beseitigen” im Online-
Benutzerhandbuch.
Der Druckkopfschlitten ist blockiert.
•Öffnen Sie die obere Abdeckung, und entfernen Sie alle Rückstände (z. ;B. gestaute
Druckmedien).
•Drücken Sie die Taste (Resume), um den Druckvorgang fortzusetzen.
•Wenn das Problem weiterhin auftritt, schalten Sie den Drucker aus und danach
wieder ein.
Die Netz-LED leuchtet und die
Resume-LED blinkt. Das Papierfach ist leer.
•Legen Sie Papier ein, und drücken Sie die Taste (Resume).
Die Netz-LED und die Resume-LED
leuchten. Eine Abdeckung ist nicht vollständig geschlossen.
•Vergewissern Sie sich, dass alle Abdeckungen vollständig geschlossen sind.
Die hintere Abdeckung oder Duplex-Einheit fehlt oder ist nicht vollständig eingesetzt.
•Vergewissern Sie sich, dass die hintere Abdeckung (HP Officejet Pro K550) bzw. die
Duplex-Einheit (HP Officejet Pro K550dtn/K550dtwn) auf der Rückseite des Druckers
vollständig eingesetzt ist.
Die Netz-LED leuchtet, und eine
oder mehrere Druckkopf-LEDs
blinken.
Ein oder mehrere Druckköpfe fehlen.
•Setzen Sie den angezeigten Druckkopf ein, und drucken Sie dann erneut aus.
•Wenn der Fehler weiterhin auftritt, ersetzen Sie den angezeigten Druckkopf.
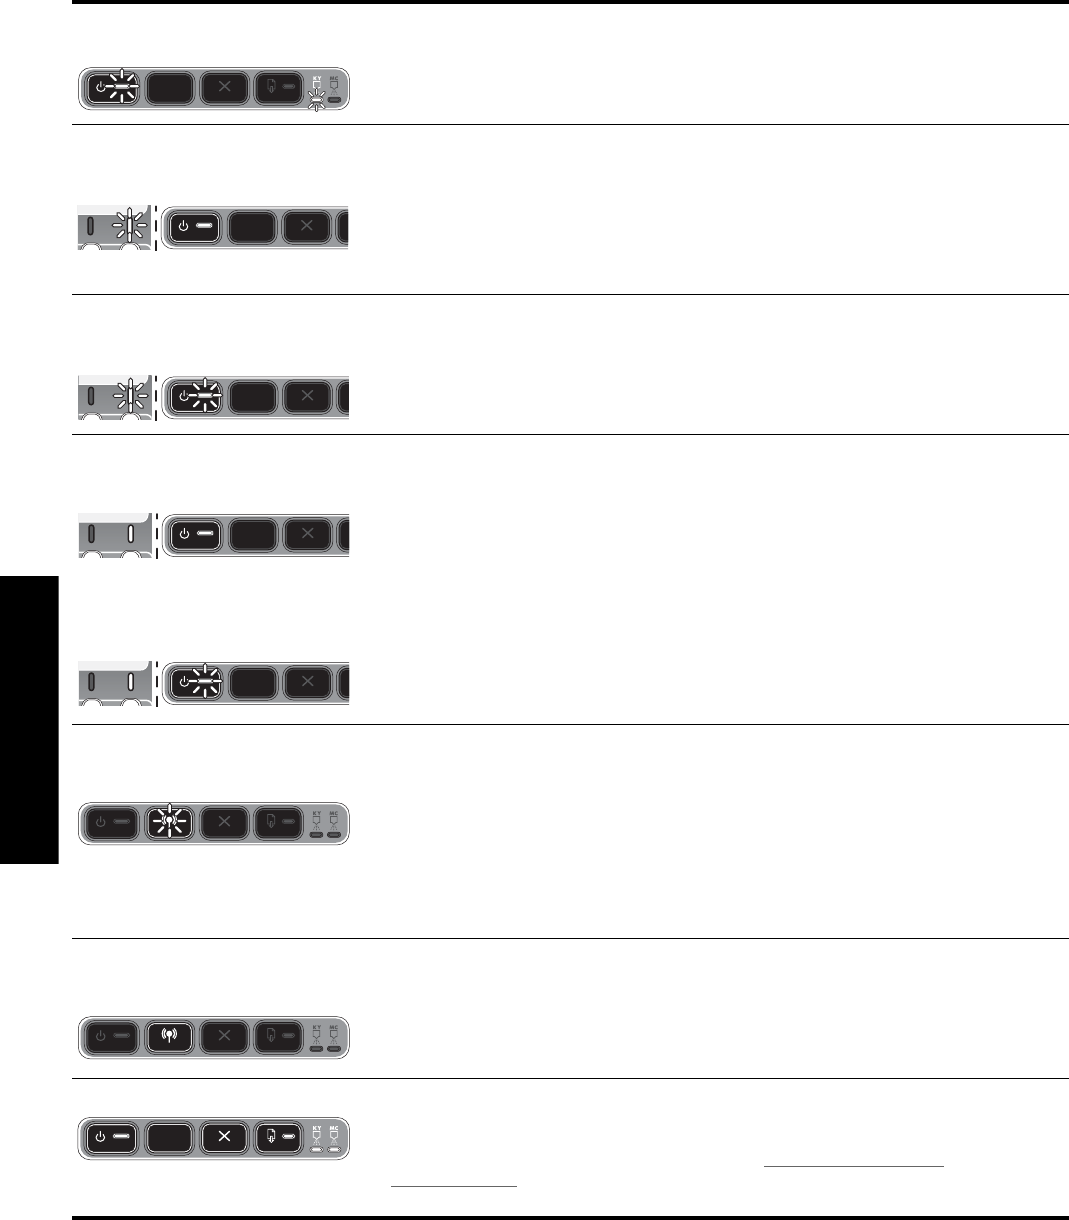
Deutsch
28
Die Netz-LED und eine oder
mehrere Druckkopf-LEDs blinken. Ein oder mehrere Druckköpfe sind defekt oder müssen überprüft werden.
•Achten Sie darauf, dass der angezeigte Druckkopf ordnungsgemäß eingesetzt ist,
und drucken Sie dann erneut aus.
•Wenn der Fehler weiterhin auftritt, ersetzen Sie den angezeigten Druckkopf.
Die Netz-LED leuchtet, und eine
oder mehrere Tintenpatronen-LEDs
blinken.
Eine oder mehrere Tintenpatronen sind nicht eingesetzt.
•Setzen Sie die angezeigte Tintenpatrone ein, und drucken Sie dann erneut aus.
•Wenn der Fehler weiterhin auftritt, ersetzen Sie die angezeigte Tintenpatrone.
Eine oder mehrere Tintenpatronen sind leer und müssen ersetzt werden, um den
Druckvorgang fortsetzen zu können.
•Ersetzen Sie die angezeigte Tintenpatrone.
Die Netz-LED und eine oder
mehrere Tintenpatronen-LEDs
blinken.
Eine oder mehrere Tintenpatronen sind defekt oder müssen überprüft werden.
•Achten Sie darauf, dass die angezeigte Tintenpatrone ordnungsgemäß eingesetzt ist,
und drucken Sie dann erneut aus.
•Wenn der Fehler weiterhin auftritt, ersetzen Sie die angezeigte Tintenpatrone.
Die Netz-LED leuchtet, und eine
oder mehrere Tintenpatronen-
LEDs leuchten.
Die Netz-LED blinkt, und eine oder
mehrere Tintenpatronen-
LEDs leuchten.
Eine oder mehrere Tintenpatronen sind weitgehend verbraucht und müssen bald
ersetzt werden.
•Es ist keine Aktion erforderlich.
Die LED für die Konfigurationsseite
blinkt.
(HP Officejet Pro K550dtwn)
Einer der folgenden Vorgänge findet statt:
•Der Drucker wird für die drahtlose Kommunikation initialisiert.
•Wenn Sie den Drucker mit Hilfe von SecureEasySetup (SES) einrichten, versucht der
Drucker möglicherweise eine Verbindung zum kabellosen Netzwerk herzustellen.
•Wenn Sie den Drucker mithilfe von Windows Connect Now™ konfigurieren,
empfängt der Drucker drahtlos Informationen vom USB-Flash-Laufwerk.
Jeder Vorgang dauert weniger als 2 Minuten.
•Es ist keine Aktion erforderlich.
Die LED für die Konfigurationsseite
leuchtet.
(HP Officejet Pro K550dtwn)
Der Drucker befindet sich im Modus für drahtlose Kommunikation.
•Es ist keine Aktion erforderlich.
Alle LEDs leuchten. Ein nicht behebbarer Fehler ist aufgetreten.
•Ziehen Sie alle Kabel ab (z. B. Netzkabel, Netzwerkkabel und USB-Kabel).
Warten Sie ca. 20 Sekunden, und schließen Sie die Kabel wieder an. Wenn der Fehler
weiterhin auftritt, besuchen Sie die HP Website (www.hp.com/support/
officejetprok550). Dort finden Sie die neuesten Informationen zur Fehlerbehebung
sowie Anpassungen und Updates für das Produkt.

Deutsch
29
Fehlerbehebung
Dieser Abschnitt enthält Hinweise zur Fehlerbehebung für allgemeine Probleme im Zusammenhang mit der
Hardware- und Softwareinstallation.
Aktuelle Informationen finden Sie in der Readme-Datei und in den Versionsinformationen. Sie können auch auf der
Website für Produktunterstützung unter www.hp.com/support/officejetprok550 nachsehen.
Probleme beim Drucken
einer Ausrichtungsseite
Überprüfen Sie den Drucker, um
sicherzustellen, dass folgende
Bedingungen erfüllt sind:
•Power-LED leuchtet und blinkt nicht. Nach einem
Kaltstart benötigt der Drucker etwa 45 Sekunden bis
zum Erreichen der Betriebstemperatur.
•Der Drucker ist betriebsbereit, und auf dem
Bedienfeld leuchten oder blinken keine weiteren
LEDs. Wenn LEDs leuchten oder blinken, siehe unter
“Bedeutung der LEDs auf dem Bedienfeld” auf
Seite 27.
•Prüfen Sie, ob das Netzkabel und die anderen
Kabel in Ordnung und fest mit dem Drucker
verbunden sind.
•Es befindet sich kein Verpackungsmaterial mehr
am Drucker.
•Die hintere Abdeckung (HP Officejet Pro K550) bzw.
die Duplex-Einheit (HP Officejet Pro K550dtn/
K550dtwn) ist eingerastet.
•Das Papier ist richtig im Fach eingelegt, und es liegt
kein Papierstau im Drucker vor.
•Achten Sie darauf, dass die orangefarbenen
Schutzabdeckungen von allen Druckköpfen entfernt
wurden.
•Druckköpfe und Tintenpatronen sind
ordnungsgemäß in die entsprechend farblich
gekennzeichneten Schächte eingesetzt. Drücken Sie
jede Tintenpatrone und jeden Druckkopf fest
herunter, um ihren ordnungsgemäßen Sitz zu
gewährleisten.
•Druckkopfverriegelung und sämtliche Abdeckungen
sind geschlossen.
Probleme beim Installieren der
Software
Gehen Sie jeweils wie beschrieben vor:
•Stellen Sie sicher, dass der Computer die
Systemanforderungen erfüllt. Siehe Online-
Benutzerhandbuch auf der Starter -CD.
•Bevor Software unter Windows auf einem Computer
installiert wird, müssen alle anderen Programme
geschlossen werden.
•Wenn der Computer den von Ihnen eingegebenen
Pfad zur CD nicht erkennt, überprüfen Sie, ob Sie
den richtigen Laufwerksbuchstaben eingegeben
haben.
•Wenn der Computer die Starter -CD im CD-Laufwerk
nicht erkennen kann, überprüfen Sie die CD auf
Beschädigungen. Sie können den Druckertreiber
unter www.hp.com/support/officejetprok550
herunterladen.
•Achten Sie darauf, dass die USB-Treiber im
Windows Geräte-Manager nicht deaktiviert sind.
•Wenn Sie mit Windows arbeiten und der Computer
den Drucker nicht erkennt, führen Sie das
Deinstallationsprogramm
(Util\Scrubber\Uninstall.exe auf der Starter-CD)
aus, um den Druckertreiber vollständig zu
deinstallieren. Starten Sie das System neu,
und installieren Sie den Druckertreiber erneut.
Probleme mit der
Netzwerkverbindung
Hinweis: Nachdem Sie einen der folgenden
Fehlerzustände beseitigt haben, führen Sie das
Installationsprogramm erneut aus.
Behebung allgemeiner Netzwerkfehler
•Wenn die Druckersoftware nicht installiert werden
kann, überprüfen Sie Folgendes:
• Alle Kabel am Computer und am Drucker sind
ordnungsgemäß angeschlossen.
• Das Netzwerk ist betriebsbereit und der
Netzwerk-Hub eingeschaltet.
• Alle Anwendungen, auch
Virenschutzprogramme und persönliche
Firewalls, sind geschlossen oder deaktiviert.
• Stellen Sie sicher, dass der Drucker im gleichen
Subnetz installiert ist wie die Computer, die auf
den Drucker zugreifen.
• Wenn das Installationsprogramm den
Drucker nicht erkennen kann, drucken Sie die
Konfigurationsseite (siehe “Drucken einer
Konfigurationsseite” auf Seite 30) und geben
die IP-Adresse manuell in das
Installationsprogramm ein.
• Wenn Sie einen Computer nutzen, der unter
Windows läuft, achten Sie darauf, dass die vom
Druckertreiber erstellten Netzwerkanschlüsse mit
der IP-Adresse des Druckers übereinstimmen:
1) Drucken Sie die Druckerkonfigurationsseite
aus.
2) Klicken Sie auf dem Windows-Desktop auf
Start, zeigen Sie auf Einstellungen, und klicken
Sie auf Drucker oder Drucker und Faxe.
3) Klicken Sie mit der rechten Maustaste auf das
Druckersymbol, klicken Sie auf Eigenschaften
und dann auf die Registerkarte Anschlüsse.
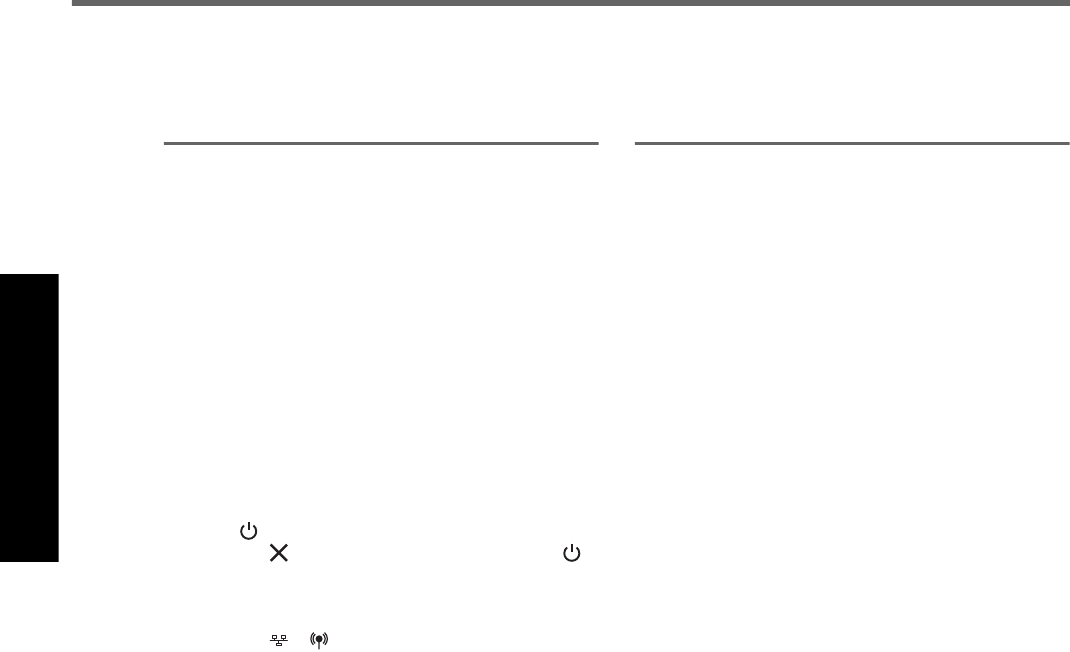
Deutsch
30
4) Wählen Sie den TCP/IP-Anschluss für den
Drucker aus, und klicken Sie auf Anschluss
konfigurieren.
5) Achten Sie darauf, dass die IP-Adresse im
Dialogfeld mit der IP-Adresse auf der
Konfigurationsseite übereinstimmt. Wenn die
IP-Adressen unterschiedlich sind, ändern Sie die
IP-Adresse im Dialogfeld entsprechend der
Konfigurationsseite ab.
6) Klicken Sie zweimal auf OK, um die
Einstellungen zu speichern, und schließen Sie
die Dialogfelder.
Probleme beim Verbinden mit einem
kabelgebundenen Netzwerk
•Wenn die Verbindungs-LED am Netzwerkanschluss
nicht leuchtet, achten Sie darauf, dass alle der unter
„Behebung allgemeiner Netzwerkfehler“ genannten
Bedingungen erfüllt sind.
•Die Zuweisung einer statischen IP-Adresse für den
Drucker wird zwar generell nicht empfohlen,
bestimmte Installationsprobleme (z.B. Konflikte mit
persönlichen Firewalls) lassen sich dadurch jedoch
beheben. Weitere Informationen hierzu finden Sie
im Online -Benutzerhandbuch.
Fehlerbehebung und Konfigurationstools
Die nachfolgenden Tools stehen zur Fehlerbehebung bzw. Konfiguration des Druckers zur Verfügung.
Weitere Informationen zu den Tools finden Sie im Online-Benutzerhandbuch auf der Starter-CD.
Konfigurationsseite
Mit der Konfigurationsseite können Sie die aktuellen
Druckereinstellungen anzeigen, Druckerprobleme
beheben und die Installation von optionalem Zubehör
wie zum Beispiel der Duplex-Einheit überprüfen. Zudem
enthält die Konfigurationsseite ein Protokoll der letzten
Ereignisse. Wenn der Drucker an ein Netzwerk
angeschlossen ist, wird eine zusätzliche Seite für die
Netzwerkkonfiguration ausgedruckt, aus der die
Netzwerkeinstellungen des Druckers hervorgehen.
Wenn Sie HP telefonisch erreichen müssen, drucken Sie
die Druckerkonfigurationsseite vorher aus.
Drucken einer Konfigurationsseite
•HP Officejet Pro K550: Drücken und halten Sie die
Taste (Netztaste) gedrückt, drücken Sie einmal
die Taste (Cancel), und lassen Sie die Taste
(Netztaste) wieder los.
HP Officejet Pro K550dtn/K550dtwn: Drücken Sie
die Taste / (Konfigurationsseite).
Integrierter Web-Server
Wenn der Drucker an ein Netzwerk angeschlossen ist,
können Sie über den integrierten Web-Server des
Druckers Statusinformationen anzeigen, Einstellungen
ändern und den Drucker auf Ihrem Computer verwalten.
Öffnen des integrierten Web-Servers
Geben Sie in den auf dem Computer installierten
Webbrowser die IP-Adresse des Druckers ein. Lautet die
IP-Adresse zum Beispiel 123.123.123.123, geben Sie
die folgende Adresse in den Webbrowser ein:
http://123.123.123.123
Die IP-Adresse für den Drucker befindet sich auf der
Konfigurationsseite.
Nachdem Sie den integrierten Web-Server geöffnet
haben, können Sie ihn mit einem Lesezeichen versehen,
um einen schnellen Zugriff darauf zu ermöglichen.

Deutsch
31
Einrichten des Druckers für drahtlose Kommunikation
(HP Officejet Pro K550dtwn)
Sie können den Drucker auf eine der folgenden Arten für die drahtlose Kommunikation einrichten:
•Verwenden eines Crossover- oder Netzwerkkabels
Siehe “Einrichten des Druckers für drahtlose Kommunikation” auf Seite 32.
•Verwenden von SecureEasySetup (SES)
Siehe “Einrichten der drahtlosen Kommunikation mit SecureEasySetup (SES)” auf Seite 33.
•Verwenden von Windows Connect Now
Siehe “Einrichten der drahtlosen Kommunikation für mehrere Drucker (nur Windows)” auf Seite 33.
Hinweis:
•Falls Probleme auftreten, lesen Sie den Abschnitt
“Fehlerbehebung bei der drahtlosen
Kommunikation” auf Seite 34.
•Um den Drucker mit einer drahtlosen Verbindung zu
nutzen, müssen Sie das Installationsprogramm
mindestens einmal von der Starter-CD ausführen und
eine drahtlose Verbindung einrichten.
•Vergewissern Sie sich, dass der Drucker nicht mit
einem Netzwerkkabel an ein Netzwerk
angeschlossen ist.
•Das sendende Gerät muss über integrierte
Fähigkeiten für 802.11 verfügen bzw. eine
802.11-WLAN-Karte installiert haben.
•Es wird empfohlen, den Drucker und die Computer,
die den Drucker verwenden, demselben Subnetz
zuzuweisen.
Ermitteln Sie vor dem Installieren der Druckersoftware
gegebenenfalls die Einstellungen Ihres Netzwerks.
Sie erhalten diese Angaben von Ihrem
Systemadministrator oder durch Ausführen der
folgenden Schritte:
•Ermitteln Sie den Netzwerknamen (SSID) und den
Kommunikationsmodus mithilfe des
Konfigurationsprogramms für den drahtlosen
Zugangspunkt (Wireless Access Point = WAP)
des Netzwerks oder für die Netzwerkkarte
Ihres Computers.
•Stellen Sie fest, welche Verschlüsselung das
Netzwerk verwendet, etwa Wired Equivalent Privacy
(WEP) oder Wi-Fi® Protected Access (WPA).
•Ermitteln Sie das Sicherheitskennwort oder den
Verschlüsselungscode des kabellosen Geräts.
Einstellungen für drahtlose
802.11-Netzwerke
Netzwerkname (SSID)
Standardmäßig sucht der Drucker den
Funknetzwerknamen oder Service Set Identifier (SSID)
“hpsetup”. Ihr Netzwerk besitzt möglicherweise eine
andere SSID.
Kommunikationsmodus
Für die Kommunikation sind zwei Betriebsarten möglich:
Adhoc: In einem für den Adhoc-Kommunikationsmodus
eingerichteten Netzwerk kommuniziert der Drucker direkt
mit anderen drahtlosen Geräten, ohne dass ein
drahtloser Zugangspunkt (Wireless Access Point, WAP)
erforderlich ist:
Alle Geräte im Adhoc-Netzwerk müssen folgende
Bedingungen erfüllen:
•Kompatibilität mit 802.11
•Vorliegen des Adhoc-Kommunikationsmodus
•Vorliegen desselben Netzwerknamens (SSID)
•Zuweisung zum gleichen Subnetz und Kanal
•Gerät muss dieselben 802.11-
Sicherheitseinstellungen besitzen
Infrastruktur (empfohlen): In einem für den Infrastruktur-
Kommunikationsmodus eingerichteten Netzwerk
kommuniziert der Drucker über einen Zugangspunkt
(WAP) mit allen anderen drahtlosen oder
kabelgebundenen Geräten im Netzwerk. WAPs dienen
üblicherweise als Router oder Gateways für kleine
Netzwerke.
Sicherheitseinstellungen
Die möglichen Einstellungen für den Drucker finden Sie
auf der Netzwerkkonfigurationsseite unter
“Konfigurationsseite” im Online-Benutzer handbuch.
Weitere Informationen zur Sicherheit von drahtlosen
Netzwerken finden Sie unter www.weca.net/
opensection/pdf/whitepaper_wifi_security4-29-03.pdf.
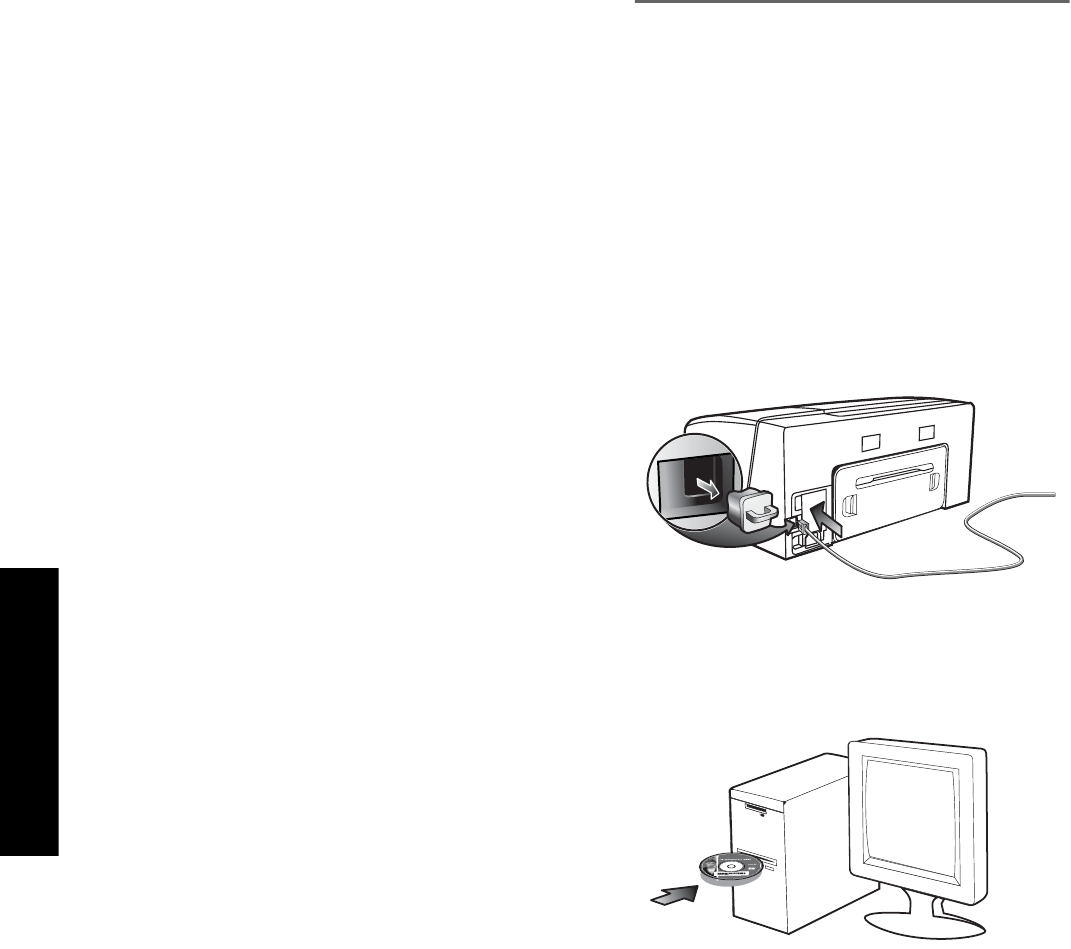
Deutsch
32
Netzwerk-Authentifizierung: Die werkseitige Einstellung
des Druckers ist ’Offen’. Dies erfordert keine Sicherheit
für die Autorisierung oder Verschlüsselung. Die weiteren
möglichen Werte sind ‘OpenThenShared’, ‘Shared’ und
‘WPA-PSK’ (Wi-Fi® Protected Access Pre-Shared Key).
•WPA erhöht den Datenschutz bei drahtloser
Übertragung und die Zugangssteuerung bei
vorhandenen und künftigen Wi-Fi-Netzwerken.
Diese Technologie bietet Lösungen für alle
bekannten Schwachpunkte von WEP,
dem ursprünglichen nativen
Sicherheitsmechanismus im 802.11-Standard.
•WPA2 ist die zweite Generation der WPA-
Sicherheit, die geschäftlichen und privaten Benutzern
von Wi-Fi mit einem hohen Maß an Zuverlässigkeit
gewährleistet, dass nur berechtigte Personen auf ihre
drahtlosen Netzwerke zugreifen können.
Datenverschlüsselung:
•Wired Equivalent Privacy (WEP) bietet Sicherheit
durch Verschlüsselung von Daten, die über
Funkwellen von einem kabellosen Gerät zu einem
anderen kabellosen Gerät gesendet werden.
Geräte auf einem WEP-fähigen Netzwerk
verwenden WEP-Schlüssel zum Verschlüsseln von
Daten. Wenn Ihr Netzwerk WEP verwendet, müssen
Sie den/die verwendeten WEP-Schlüssel kennen.
•WPA bedient sich Temporal Key Integrity Protocol
(TKIP) zur Verschlüsselung und verwendet 802.1X-
Authentifizierung mit einem der heute verfügbaren
standardmäßigen Extensible Authentication Protocol
(EAP)-Typen.
•WPA2 beinhaltet ein neues Verschlüsselungsschema,
den Advanced Encryption Standard (AES). AES wird
im Counter Cipher-Block Chaining Mode (CCM)
definiert und unterstützt das Independent Basic
Service Set (IBSS), um die Sicherheit zwischen
Workstations, die im Ad hoc-Modus betrieben
werden, zu gewährleisten.
Einrichten des Druckers für
drahtlose Kommunikation
Für Windows
1. Entfernen Sie die Schutzabdeckung vom
Netzwerkanschluss des Druckers.
2. Führen Sie einen der folgenden Schritte aus:
• Schließen Sie den Drucker vorübergehend mit
dem mitgelieferten Crossover-Kabel an den
Computer an.
• Schließen Sie den Drucker vorübergehend mit
einem Netzwerkkabel (separat erhältlich)
an einen freien Anschluss am Netzwerkgerät
(Hub, Switch oder Router) an.
3. Beenden Sie alle geöffneten Programme.
4. Legen Sie die Starter-CD in das CD-Laufwerk ein.
Wenn das CD-Menü nicht automatisch aufgerufen
wird, doppelklicken Sie auf das Installationssymbol
auf der Starter- CD.
5. Doppelklicken Sie im CD-Menü auf Installieren,
und folgen Sie den Anleitungen auf dem Bildschirm.
6. Wählen Sie im Bildschirm Verbindungsart die
Option zur Verbindungsherstellung über das
Netzwerk, und klicken Sie auf Weiter.
7. Folgen Sie zum Beenden der Installation den
Anleitungen auf dem Bildschirm, und ziehen Sie das
Kabel ab, wenn Sie dazu aufgefordert werden.
Für Mac OS
1. Öffnen Sie den AirPort Setup-Assistent, und folgen
Sie den Anleitungen auf dem Bildschirm für die
Verbindung mit einem vorhandenen kabellosen
Netzwerk (hpsetup).
2. Doppelklicken Sie auf das Installationssymbol auf
der Starter-CD, und folgen Sie den Anleitungen auf
dem Bildschirm.
3. Klicken Sie nach Aufforderung auf Print Center
öffnen, um den Drucker hinzuzufügen.
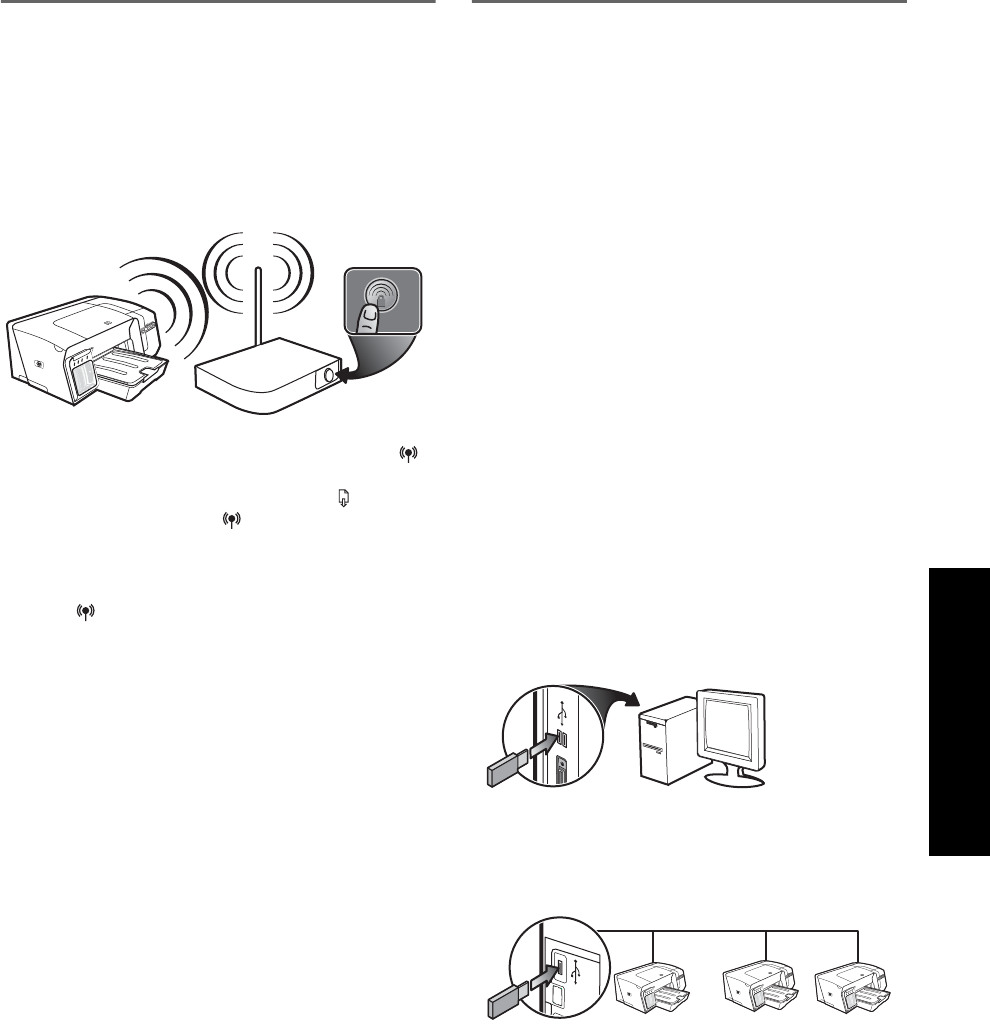
Deutsch
33
Einrichten der drahtlosen
Kommunikation mit
SecureEasySetup (SES)
Wenn Ihr WLAN-Router für SES geeignet ist, lesen Sie
die folgenden Anleitungen zur Konfiguration mit SES.
1. Drücken Sie die SES-Taste des WLAN-Routers.
2. Drücken Sie innerhalb von 2 Minuten die Taste
(Konfigurationsseite am Drucker, und halten Sie sie
gedrückt. Drücken Sie einmal die Taste (Resume,
und lassen Sie die Taste (Konfigurationsseite)
wieder los.
Die LED für die Konfigurationsseite blinkt.
3. Warten Sie ca. 2 Minuten, und drücken Sie die
Taste (Konfigurationsseite), um die
Konfigurationsseite zu drucken und sich zu
vergewissern, dass die SES-Einstellungen mit den
drahtlosen Einstellungen des Routers
übereinstimmen.
Hinweis: Falls keine Verbindung zustande kommt,
müssen Sie gegebenenfalls die
Netzwerkeinstellungen des Druckers zurücksetzen
(siehe unter “Zurücksetzen der Einstellungen für die
Netzwerkkonfiguration” auf Seite 35) und die
Schritte wiederholen. Siehe auch “Überprüfen Sie
die Einstellungen für die drahtlose Kommunikation”
auf Seite 34.
4. Beenden Sie alle geöffneten Programme.
5. Legen Sie die Starter-CD in das CD-Laufwerk ein.
Wenn das CD-Menü nicht automatisch aufgerufen
wird, doppelklicken Sie auf das Installationssymbol
auf der Starter-CD.
6. Klicken Sie im CD-Menü auf Installieren, und folgen
Sie den Anleitungen auf dem Bildschirm, um die
Druckersoftware zu installieren.
Einrichten der drahtlosen
Kommunikation für mehrere Drucker
(nur Windows)
Der Drucker unterstützt Windows Connect Now™,
eine Technologie zum einfachen Konfigurieren mehrerer
Drucker für die drahtlose Kommunikation. Exportieren
Sie mit dem mitgelieferten Dienstprogramm für die
drahtlose Konfiguration die drahtlosen Einstellungen des
Computers auf ein USB-Flash-Laufwerk. Danach können
Sie das USB-Flash-Laufwerk in den USB-Anschluss jedes
Druckers einsetzen und diesen mit den Einstellungen
konfigurieren.
1. Entfernen Sie die Schutzabdeckung vom USB-Host-
Anschluss des Druckers.
2. Legen Sie die Starter-CD in das CD-Laufwerk ein.
Wenn das CD-Menü nicht automatisch aufgerufen
wird, doppelklicken Sie auf das Installationssymbol
auf der Starter-CD.
3. Klicken Sie im CD-Menü zuerst auf
Dienstprogramme und anschließend auf
Dienstprogramm für die drahtlose Konfiguration.
4. Folgen Sie den Anleitungen auf dem Bildschirm,
und schließen Sie das USB-Flash-Laufwerk an den
USB-Anschluss des Computers an, wenn Sie dazu
aufgefordert werden. Die Einstellungen der
drahtlosen Netzwerkkonfiguration werden auf dem
Flash -Laufwerk gespeichert.
5. Folgen Sie den Anleitungen auf dem Bildschirm,
und schließen Sie das USB-Flash-Laufwerk an jeden
Drucker an, den Sie zum Netzwerk hinzufügen
möchten.

Deutsch
34
Fehlerbehebung bei der drahtlosen Kommunikation
Wenn der Drucker nach Durchführen des kabellosen Setups und der Software-Installation nicht mit dem Netzwerk
kommunizieren kann, versuchen Sie es mit einem oder mehreren der folgenden Punkte.
Überprüfen Sie die Einstellungen für
die drahtlose Kommunikation
•Vergewissern Sie sich, dass für die
Funknetzwerkkarte des Computers das richtige
drahtlose Verbindungsprofil konfiguriert ist.
Dieses Profil definiert die Netzwerkeinstellungen für
ein bestimmtes Netzwerk. Einer Funknetzwerkkarte
können mehrere Profile zugewiesen werden
(z. B. eines für zu Hause und eines für das
Firmennetzwerk). Öffnen Sie das
Konfigurationsprogramm für die Netzwerkkarte des
Computers, und stellen Sie sicher, dass das Profil für
das Netzwerk des Druckers ausgewählt ist.
•Vergewissern Sie sich, dass die
Netzwerkeinstellungen des Druckers der
Konfiguration Ihres Netzwerks entsprechen.
Sie können die Einstellungen für Ihr Netzwerk wie
folgt ermitteln:
•Infrastruktur-Kommunikation: Öffnen Sie das
Konfigurationsprogramm des WAP (Wireless
Access Point).
•Adhoc-Kommunikation: Öffnen Sie das
Konfigurationsprogramm für die
Funknetzwerkkarte des Computers.
•Vergleichen Sie die Netzwerkeinstellungen mit
denen auf der Konfigurationsseite des Druckers
(siehe “Drucken einer Konfigurationsseite” auf
Seite 30), und achten Sie auf mögliche
Unterschiede. Folgende Probleme können u.a.
auftreten:
• Falsch konfigurierte Hardware-Adressen (MAC -
Adressen) für WAP-Filter. Siehe “Hinzufügen von
Hardware-Adressen zu einem Wireless Access
Point (WAP)” auf Seite 35.
• Eine der folgenden Druckereinstellungen ist
möglicherweise falsch: Kommunikationsmodus,
Netzwerkname (SSID), Kanal (nur Adhoc-
Netzwerke), Authentifizierungstyp,
Verschlüsselung. Siehe “Einstellungen für
drahtlose 802.11-Netzwerke” auf Seite 31.
• Drucken Sie ein Dokument. Wenn die
Druckausgabe weiterhin nicht möglich ist, setzen
Sie die Netzwerkeinstellungen des Druckers
zurück (siehe unter “Zurücksetzen der
Einstellungen für die Netzwerkkonfiguration” auf
Seite 35), und installieren Sie die
Druckersoftware erneut (siehe “Einrichten des
Druckers für drahtlose Kommunikation
(HP Officejet Pro K550dtwn)” auf Seite 31).
Wenn die Einstellungen für das drahtlose Netzwerk
richtig sind, ist der Computer möglicherweise an ein
anderes drahtloses Netzwerk angeschlossen.
Vergewissern Sie sich, dass Computer und Drucker an
dasselbe drahtlose Netzwerk angeschlossen sind.
Die Benutzer können dies durch Überprüfen der
drahtlosen Einstellungen auf dem jeweiligen Computer
nachprüfen. Stellen Sie ferner auch sicher, dass die
Computer Zugang zum drahtlosen Netzwerk haben.
Sind die Einstellungen für das drahtlose Netzwerk
falsch, korrigieren Sie die Netzwerkeinstellungen des
Druckers anhand der folgenden Schritte:
1. Schließen Sie den Drucker mit einem Netzwerkkabel
an das Netzwerk oder mit dem Crossover-Kabel
(im Lieferumfang des Druckers enthalten) an den
Computer an.
2. Öffnen Sie den integrierten Web-Server des
Druckers.
3. Klicken Sie auf die Registerkarte Netzwerk und dann
im linken Fenster auf Kabellos (802.11).
4. Verwenden Sie den Assistenten Kabelloser Setup auf
der Registerkarte Kabelloser Setup, um die
Druckereinstellungen entsprechend den Einstellungen
des Netzwerks zu ändern.
5. Schließen Sie den integrierten Web-Server,
und ziehen Sie das Netzwerkkabel vom Drucker ab.
6. Führen Sie eine vollständige Deinstallation der
Druckersoftware durch, und installieren Sie die
Software danach erneut.

Deutsch
35
Hinzufügen von Hardware-Adressen
zu einem Wireless Access Point
(WAP)
MAC Filtering ist ein Sicherheitsmerkmal, bei dem ein
Wireless Access Point (WAP) mit einer Liste von MAC-
Adressen von Geräten (auch “Hardware-Adressen”
genannt) konfiguriert wird, denen der Zugang zum
Netzwerk über den WAP erlaubt ist. Wenn der WAP
nicht über die Hardware-Adresse des Geräts verfügt,
das den Zugriff auf das Netzwerk versucht, verweigert
der WAP den Zugriff des Geräts auf das Netzwerk.
Wenn der WAP MAC-Adressen filtert, muss die MAC-
Adresse des Druckers in die WAP-Liste zulässiger MAC-
Adressen aufgenommen werden.
1. Drücken Sie die Taste / (Konfigurationsseite),
um die Konfigurationsseite zu drucken.
2. Öffnen Sie das WAP-Konfigurationsprogramm und
fügen die Hardware-Adresse des Druckers in die
Liste zulässiger MAC-Adressen ein.
Zurücksetzen der Einstellungen für
die Netzwerkkonfiguration
Wenn der Drucker weiterhin nicht mit dem Netzwerk
kommunizieren kann, setzen Sie die
Netzwerkeinstellungen des Druckers zurück.
1. Drücken Sie die Taste / (Konfigurationsseite)
und halten Sie sie fest, drücken Sie dreimal die Taste
(Resume), und lassen Sie die Taste /
(Konfigurationsseite) wieder los. Die Power-LED
blinkt einige Sekunden. Warten Sie, bis die Power-
LED ständig leuchtet.
2. Drücken Sie die Taste / (Konfigurationsseite),
um die Konfigurationsseite zu drucken und zu
überprüfen, ob die Netzwerkeinstellungen
zurückgesetzt wurden. Standardmäßig ist der
Netzwerkname (SSID) auf “hpsetup” und der
Kommunikationsmodus auf “Adhoc” eingestellt.

Deutsch
36
Vereinbarung zur beschränkten Gewährleistung
von Hewlett-Packard
Umfang der beschränkten Gewährleistung
1. Hewlett-Packard (HP) gewährleistet dem Endkunden, dass die
obengenannten HP Produkte während des obengenannten
Gewährleitungszeitraums frei von Material- und
Verarbeitungsfehlern sind. Der Gewährleitungszeitraum beginnt
mit dem Kaufdatum.
2. Bei Softwareprodukten gilt die beschränkte Gewährleistung von
HP nur, wenn Programmanweisungen nicht ausgeführt werden.
HP gewährleistet weder einen unterbrechungs- noch fehlerfreien
Betrieb eines Softwareproduktes.
3. Die beschränkte Gewährleistung von HP deckt nur Defekte ab, die
bei normalem Betrieb des Produkts auftreten. Nicht abgedeckt
sind alle übrigen Probleme, einschließlich der Probleme, die auf
eine der folgenden Ursachen zurückgeführt werden können:
a. Unsachgemäße Wartung oder Modifikationen
b. Verwendung von Software, Druckmedien, Ersatzteilen oder
Zubehör, die von HP nicht zur Verfügung gestellt bzw.
unterstützt werden
c. Betrieb außerhalb der technischen Daten des Produkts
d. Unberechtigte Veränderungen oder missbräuchliche
Verwendung.
4. Bei allen Produkten von Hewlett-Packard hat die Verwendung von
Tintenpatronen oder nachgefüllten Tintenpatronen anderer
Hersteller als Hewlett-Packard weder Auswirkungen auf die
Gewährleistung gegenüber dem Kunden noch auf andere
Support-Vereinbarungen zwischen Hewlett-Packard und dem
Kunden. Wenn jedoch ein Druckerausfall oder -schaden auf die
Verwendung nicht originaler HP Tintenpatronen oder nachgefüllter
Tintenpatronen zurückgeführt werden kann, berechnet HP die
üblichen Gebühren für Arbeitszeit und Material für in diesem
Zusammenhang am Drucker durchgeführte Wartungsarbeiten.
5. Wenn Hewlett-Packard während der geltenden
Gewährleistungsfrist Kenntnis von einem Fehler erhält, der unter
die Gewährleistung durch Hewlett-Packard fällt, repariert oder
ersetzt Hewlett-Packard das Produkt nach eigenem Ermessen.
6. Wenn HP das defekte, unter HP Gewährleistung stehende Produkt
weder reparieren noch ersetzen kann, erstattet HP innerhalb eines
angemessenen Zeitraums den Kaufpreis für das Produkt zurück.
7. HP trägt keine Verpflichtung für Reparatur, Ersatz oder
Kaufpreisrückerstattung, solange der Kunde das defekte Produkt
nicht zurückgesendet hat.
8. Ersatzprodukte können neu oder neuwertig sein. Voraussetzung ist
jedoch, dass sie über mindestens denselben Funktionsumfang
verfügen wie das zu ersetzende Produkt.
9. HP Produkte können instandgesetzte Teile, Komponenten oder
Materialien enthalten, die hinsichtlich ihrer Leistung neuwertigen
gleichgestellt sind.
10. Die beschränkte Gewährleistung von HP ist in allen Ländern/
Regionen gültig, in denen das durch sie gedeckte HP Produkt von
HP vertrieben wird. Vereinbarungen für zusätzliche
Gewährleistung, zum Beispiel Service vor Ort, sind in Ländern/
Regionen, in denen das Produkt durch HP oder durch einen
autorisierten Importeur vertrieben wird, über jede autorisierten HP
Servicestelle verfügbar.
Gewährleistungsausschlüsse
IN DEM NACH GELTENDEM RECHT ZULÄSSIGEN AUSMASS
GEWÄHREN WEDER HP NOCH DIE ZULIEFERER VON HP JEGLICHE
SONSTIGEN GEWÄHRLEISTUNGEN, WEDER AUSDRÜCKLICHE
NOCH STILLSCHWEIGENDE GEWÄHRLEISTUNGEN DER
MARKTGÄNGIGKEIT, ZUFRIEDENSTELLENDEN QUALITÄT ODER
EIGNUNG FÜR EINEN BESTIMMTEN ZWECK.
Haftungsausschlüsse
1. In dem nach geltendem Recht zulässigen Ausmaß stehen dem
Endkunden über die in dieser Gewährleistungsvereinbarung
genannten Ansprüche hinaus keine weiteren Ansprüche an HP zu.
2. IN DEM NACH GELTENDEM RECHT ZULÄSSIGEN AUSMASS,
AUSGENOMMEN DER IN DIESER
GEWÄHRLEISTUNGSVEREINBARUNG FESTGELEGTEN
VERPFLICHTUNGEN, SIND HP ODER DIE ZULIEFERER VON HP
IN KEINEM FALL HAFTBAR FÜR DIREKTE, INDIREKTE,
BESONDERE, ZUFÄLLIGE ODER FOLGESCHÄDEN,
UNABHÄNGIG DAVON, OB DIESE AUF DER BASIS VON
VERTRÄGEN, DELIKTRECHT ODER ANDEREN RECHTSTHEORIEN
GELTEND GEMACHT WERDEN, UND UNABHÄNGIG DAVON,
OB HP ODER DIE ZULIEFERER VON HP VON DER MÖGLICHKEIT
EINES SOLCHEN SCHADENS UNTERRICHTET WURDEN.
Geltendes Recht
1. Diese Gewährleistungsvereinbarung stattet den Endkunden mit
bestimmten Rechten aus. Der Endkunde hat möglicherweise noch
weitere Rechte, die in den Vereinigten Staaten von Staat zu Staat,
in Kanada von Provinz zu Provinz bzw. allgemein von Land/
Region zu Land/Region verschieden sein können.
2. Soweit diese Gewährleistungsvereinbarung nicht dem geltenden
Recht entspricht, soll sie als derart abgeändert gelten, dass die
hierin enthaltenen Bestimmungen dem geltenden Recht
entsprechen. Es ist möglich, dass bestimmte
Haftungsausschlusserklärungen und Einschränkungen dieser
Gewährleistungsvereinbarung nach geltendem Recht für den
Endkunden nicht zutreffen. Bestimmte Bundesstaaten der USA und
Länder/Regionen außerhalb der USA (einschließlich einiger
kanadischer Provinzen):
a. Beschränken die Rechte des Verbrauchers nicht durch die
Erklärungen und Einschränkungen dieser Herstellergarantie
(z.B. in Großbritannien);
b. Schränken die Möglichkeit des Herstellers, solche Erklärungen
und Einschränkungen geltend zu machen, in anderer Weise
ein;
c. Gewähren dem Endkunden weitere Gewährleistungsrechte,
definieren die Dauer von stillschweigenden
Gewährleistungen, die der Hersteller nicht ausschließen kann,
oder gestatten eine Beschränkung der Dauer von
stillschweigenden Gewährleistungen.
3. FÜR ENDKUNDEN IN AUSTRALIEN UND NEUSEELAND:
DURCH DIESE GEWÄHRLEISTUNGSVEREINBARUNG WERDEN
DIE DURCH DAS IN DIESEN LÄNDERN GELTENDE RECHT IM
ZUSAMMENHANG MIT DEM KAUF VON HP PRODUKTEN
GEWÄHRTEN ENDKUNDENANSPRÜCHE NICHT ÜBER DAS
NACH GELTENDEM RECHT ZULÄSSIGE AUSMASS HINAUS
AUSGESCHLOSSEN, EINGESCHRÄNKT ODER GEÄNDERT. DIE
BEDINGUNGEN DIESER GEWÄHRLEISTUNGSVEREINBARUNG
SIND EINE ERWEITERUNG DER GESETZLICHEN GRUNDRECHTE
FÜR ENDKUNDEN.
HP Produkt Dauer der beschränkten Gewährleistung
Software 1 Jahr
Zubehör 1 Jahr
Tintenpatronen 6 Monate*
Druckköpfe 1 Jahr*
Ekstern printerhardware (siehe folgende Details) 1 Jahr
*Weitere Garantieinformationen finden Sie unter www.hp.com/support/inkjet_warranty.

Français
37
Interprétation des voyants du panneau de commande
Pour plus d’informations, rendez-vous sur le site Web d’assistance produit à l’adresse suivante :
www.hp.com/support/officejetprok550.
1) Voyant d’alimentation et interrupteur
marche/arrêt
2) Bouton Page de configuration
HP Officejet Pro K550dtn
HP Officejet Pro K550dtwn
3) Bouton Annuler
4) Bouton et voyant de reprise
5) Voyants Tête d’impression
6) Voyants Cartouche d’encre
624
15
3
Schéma d’allumage des voyants du
panneau de commande Explication et action recommandée
Le voyant Alimentation et le voyant
Reprise clignotent. Du papier est coincé dans l’imprimante.
•Retirez tous les supports du bac de sortie. Localisez le bourrage et supprimez-le.
Reportez-vous à la section « Elimination d’un bourrage » du guide de l’utilisateur
en ligne.
Le chariot de l’imprimante s’est bloqué.
•Ouvrez le capot supérieur et retirez les obstructions (bourrage de papier, par exemple).
•Appuyez sur (bouton Reprise) pour poursuivre l’impression.
•Si l’erreur persiste, mettez l’imprimante hors tension, puis à nouveau sous tension.
Le voyant Alimentation est allumé et
le voyant Reprise clignote. L’imprimante ne contient plus de papier.
•Chargez le papier, puis appuyez sur (bouton Reprise).
Le voyant Alimentation et le voyant
Reprise sont allumés. Un capot n’est pas bien fermé.
•Vérifiez que tous les capots sont bien fermés.
Le panneau d’accès arrière ou l’unité recto verso est absent ou n’est pas
inséré complètement.
•Assurez-vous que le panneau d’accès arrière (HP Officejet Pro K550) ou l’unité
auto-duplex (HP Officejet Pro K550dtn/K550dtwn) est inséré(e) complètement
à l’arrière de l’imprimante.
Le voyant Alimentation est allumé et
un ou plusieurs voyants de têtes
d’impression clignotent.
Il manque une ou plusieurs têtes d’impression.
•Installez la tête d’impression indiquée, puis essayez d’imprimer.
•Si l’erreur persiste, remplacez la tête d’impression désignée.
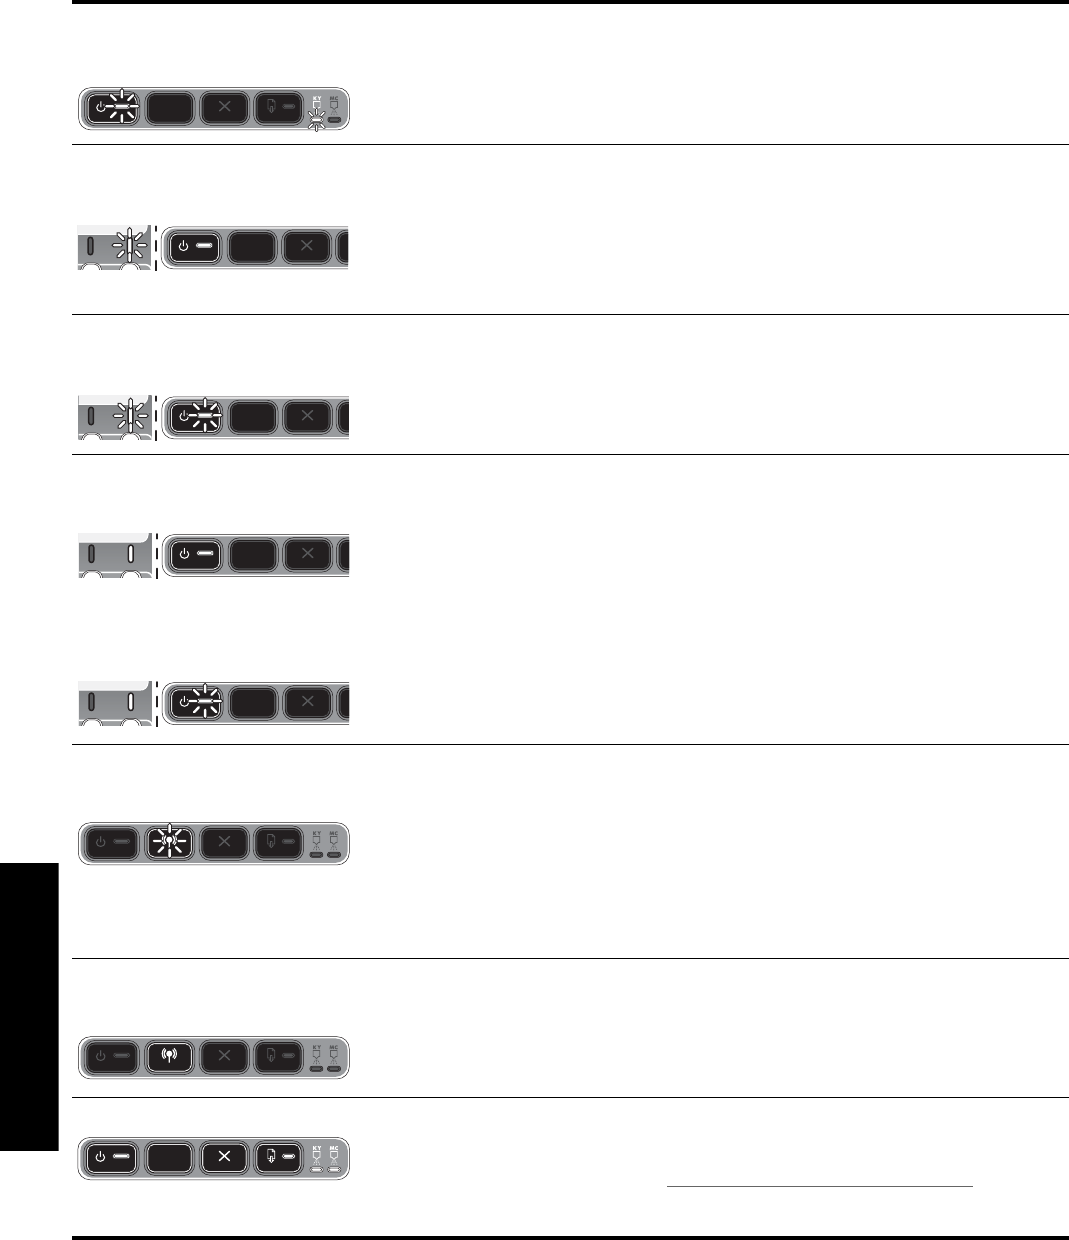
Français
38
Le voyant Alimentation et un ou
plusieurs voyants de têtes
d’impression clignotent.
Une ou plusieurs têtes d’impression sont défectueuses ou demandent une intervention.
•Assurez-vous que la tête d’impression indiquée est bien installée,
puis essayez d’imprimer.
•Si l’erreur persiste, remplacez la tête d’impression désignée.
Le voyant Alimentation est allumé et
un ou plusieurs voyants de
cartouches d’encre clignotent.
Il manque une ou plusieurs cartouches d’encre.
•Installez la cartouche d’encre indiquée, puis essayez d’imprimer.
•Si l’erreur persiste, remplacez la cartouche d’encre désignée.
Une ou plusieurs cartouches d’encre sont vides et doivent être remplacées avant que vous
ne puissiez continuer à imprimer.
•Remplacez la cartouche d’encre désignée.
Le voyant Alimentation et un ou
plusieurs voyants de cartouches
d’encre clignotent.
Une ou plusieurs cartouches d’encre sont défectueuses ou demandent une intervention.
•Assurez-vous que la cartouche d’encre indiquée est bien installée,
puis essayez d’imprimer.
•Si l’erreur persiste, remplacez la cartouche d’encre désignée.
Le voyant Alimentation et un ou
plusieurs voyants de cartouches
d’encre sont allumés.
Le voyant Alimentation clignote et
un ou plusieurs voyants de
cartouches d’encre sont allumés.
Une ou plusieurs cartouches d’encre sont presque vides et devront être
remplacées prochainement.
•Aucune action n’est requise.
Levoyant Page de
configurationclignote.
(HP Officejet Pro K550dtwn)
Un des processus suivants se produit :
•L’imprimante s’initialise en vue d’une communication sans fil.
•Si vous utilisez SecureEasySetup (SES) pour configurer l’imprimante, celle-ci essaie
peut-être de se connecter à un réseau sans fil.
•Si vous utilisez Windows Connect Now™ pour configurer l’imprimante, cette dernière
recevra les informations de communication sans fil à partir du lecteur flash USB.
Chacune des procédures précédentes requiert moins de 2 minutes.
•Aucune action n’est requise.
Le voyantPage de Configurationest
allumé.
(HP Officejet Pro K550dtwn)
L’imprimante est en mode de communication sans fil.
•Aucune action n’est requise.
Tous les voyants sont allumés. Une erreur irrécupérable s’est produite.
•Débranchez tous les câbles (cordon d’alimentation, câble réseau, câble USB, etc.),
attendez environ 20 secondes, puis rebranchez-les. Si le problème persiste,
rendez-vous sur le site Web de HP (www.hp.com/support/officejetprok550) afin
de consulter les dernières informations de dépannage ou de télécharger les
correctifs et mises à jour du produit.

Français
39
Dépannage
Cette section vous propose des suggestions de dépannage pour certains problèmes liés à l’installation du matériel ou
du logiciel.
Pour obtenir des informations de dernière minute, consultez le fichier Lisezmoi et les notes de version ou rendez-vous
sur le site Web d’assistance produit à l’adresse suivante : www.hp.com/support/officejetprok550.
Problèmes d’impression d’une
page d’alignement
Vérifiez l’imprimante pour vous assurer
des points suivants :
•Le voyant d’alimentation est allumé et ne clignote
pas. Lors de la mise sous tension de l’imprimante,
il faut environ 45 secondes pour son préchauffage.
•L’imprimante est prête et aucun voyant sur le
panneau de commande ne s’allume ni ne clignote.
Si des voyants sont allumés ou clignotent, reportez-
vous à la section « Interprétation des voyants du
panneau de commande », à la page 37.
•Vérifiez que le cordon d’alimentation et les autres
câbles fonctionnent et sont bien connectés
àl’imprimante.
•Tous les éléments et rubans d’emballage ont été
enlevés de l’imprimante.
•Assurez-vous que le panneau d’accès arrière
(HP Officejet Pro K550) ou l’unité auto-duplex
(HP Officejet Pro K550dtn/K550dtwn) est installé(e).
•Le papier est correctement chargé dans le bac et il
n’est pas coincé dans l’imprimante.
•Prenez soin de retirer le capuchon de protection
orange de chaque tête d’impression.
•Les têtes d’impression et les cartouches d’encre sont
bien installées dans leurs emplacements respectifs,
de même couleur. Appuyez fermement sur chacune
d’elles pour assurer un bon contact.
•Le loquet des têtes d’impression et tous les capots
sont fermés.
Problèmes liés à l’installation
du logiciel
Vérifiez ou effectuez ce qui suit :
•Vérifiez que l’ordinateur respecte la configuration
minimale requise. Reportez-vous au guide de
l’utilisateur en ligne disponible sur le CD de
démarrage.
•Avant de procéder à l’installation de logiciels sur un
ordinateur Windows, assurez-vous que tous les
autres programmes sont fermés.
•Si l’ordinateur ne reconnaît pas le chemin d’accès
que vous avez indiqué pour le lecteur de CD-ROM,
vérifiez que vous avez spécifié la lettre d’unité
correcte.
•Si votre ordinateur n’arrive pas à lire le CD de
démarrage placé dans le lecteur de CD-ROM,
vérifiez si le CD n’est pas endommagé. Vous pouvez
télécharger les pilotes d’imprimante à l’adresse
www.hp.com/support/officejetprok550.
•Dans le gestionnaire de périphériques Windows,
assurez-vous que les pilotes USB n’ont pas été
désactivés.
•Si votre ordinateur (équipé de Windows) ne parvient
pas à détecter l’imprimante, exécutez l’utilitaire de
désinstallation (Util\Scrubber\Uninstall.exe sur le
CD de démarrage) pour effectuer une
désinstallation complète du pilote de l’imprimante.
Redémarrez l’ordinateur et réinstallez le pilote
d’imprimante.
Problèmes de connexion
àun réseau
Remarque : Après avoir résolu l’un des problèmes
répertoriés ci-dessous, exécutez à nouveau le
programme d’installation.
Résolution des problèmes réseau
•Si l’installation du logiciel d’imprimante s’avère
impossible, vérifiez les points suivants :
• Tous les câbles connectés à l’imprimante et
à l’ordinateur sont bien branchés.
• Le réseau est opérationnel et le concentrateur
réseau est sous tension.
• Toutes les applications, y compris les
programmes de protection contre les virus et les
pare-feu personnels, ont été fermées ou
désactivées.
• Assurez-vous que l’imprimante est installée sur le
même sous-réseau que les ordinateurs qui
l’utiliseront.
• Si le programme d’installation ne parvient pas
à détecter l’imprimante, imprimez la page de
configuration (reportez-vous à la section « Pour
imprimer une page de configuration », à la
page 40), et entrez manuellement l’adresse IP
dans le programme d’installation.
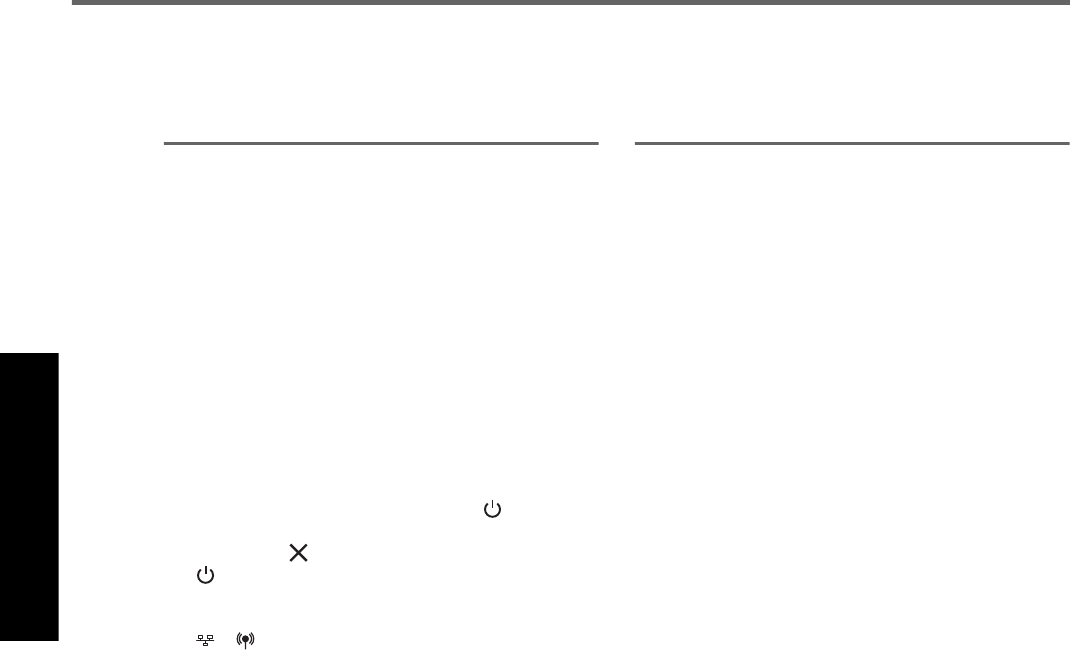
Français
40
• Si votre ordinateur est équipé du système
d’exploitation Windows, assurez-vous que
les ports réseau créés dans le pilote
d’imprimante correspondent à l’adresse IP
de l’imprimante :
1) Imprimez la page de configuration de
l’imprimante.
2) À partir du Bureau de Windows,
cliquez sur Démarrer, pointez sur
Paramètres, puis cliquez sur Imprimantes ou
sur Imprimantes et télécopieurs.
3) Cliquez sur l’icône de l’imprimante avec
le bouton droit de la souris, cliquez sur
Propriétés, puis sur l’onglet Ports.
4) Sélectionnez le port TCP/IP de
l’imprimante, puis cliquez sur Configurer le
port.
5) Assurez-vous que l’adresse IP affichée
dans la boîte de dialogue correspond à celle
indiquée sur la page de configuration.
Si les deux adresses IP sont différentes,
vous devrez modifier celle qui est indiquée
dans la boîte de dialogue afin qu’elle
corresponde à l’adresse sur la page de
configuration.
6) Cliquez à deux reprises sur OK pour
enregistrer les paramètres et fermer les boîtes
de dialogue.
Problèmes de connexion à un
réseau câblé
•Si le voyant de liaison du connecteur réseau ne
s’allume pas, assurez-vous que toutes les conditions
exposées dans la section « Dépannage des
problèmes réseau » ci-dessus sont réunies.
•Bien qu’il soit déconseillé d’attribuer une adresse IP
statique à l’imprimante, cette opération peut vous
permettre de résoudre certains problèmes
d’installation (un conflit avec un pare-feu personnel,
par exemple). Pour plus d’informations, reportez-
vous au guide de l’utilisateur en ligne.
Outils de dépannage et de configuration
Les outils suivants sont disponibles pour dépanner ou configurer l’imprimante. Pour plus d’informations sur ces outils,
reportez-vous au guide de l’utilisateur en ligne disponible sur le CD de démarrage.
Page de configuration
La page de configuration vous permet de consulter les
paramètres actuels de l’imprimante, de résoudre les
problèmes relatifs à l’imprimante et de vérifier
l’installation des accessoires en option, tels que l’unité
auto-duplex. Elle contient également un journal des
événements récents. Si l’imprimante est connectée à un
réseau, une page de configuration supplémentaire est
imprimée. Cette page affiche les paramètres réseau de
l’imprimante.
Si vous devez appeler HP, imprimez au préalable la
page de configuration de l’imprimante.
Pour imprimer une page de configuration
•HP Officejet Pro K550 : Appuyez sur (bouton
Alimentation) et maintenez-le enfoncé, puis appuyez
une fois sur (bouton Annulation) et relâchez
(bouton Alimentation.
HP Officejet Pro K550dtn/K550dtwn : Appuyez sur
/ ( boutonPage de Configuration).
Serveur Web intégré
Si l’imprimante est connectée à un réseau, vous pourrez
utiliser son serveur Web intégré pour consulter des
informations d’état, modifier des paramètres et la gérer
à partir de votre ordinateur.
Pour ouvrir le serveur Web intégré
Entrez l’adresse IP affectée à l’imprimante dans le
champ d’adresse d’un navigateur Web pris en charge
par votre ordinateur. Par exemple, si l’adresse IP est
123.123.123.123, entrez l’adresse suivante dans le
navigateur Web :
http://123.123.123.123
L’adresse IP de l’imprimante figure sur la page
de configuration.
Après avoir ouvert le serveur Web intégré, vous pouvez
lui affecter un signet en vue d’y accéder rapidement
àl’avenir.

Français
41
Configuration de l’imprimante pour la fonction de
communication sans fil (HP Officejet Pro K550dtwn)
Vous pouvez configurer l’imprimante pour la communication sans fil à l’aide de l’une des méthodes
suivantes :
•Utilisation d’un câble croisé ou d’un câble réseau
Reportez-vous à la section « Configuration de la fonction de communication sans fil de l’imprimante », à la
page 42.
•Utilisation de SecureEasySetup (SES)
Reportez-vous à la section « Configuration de la fonction de communication sans fil à l’aide de SecureEasySetup
(SES) », à la page 43.
•Utilisation de Windows Connect Now
Reportez-vous à la section « Configuration de la communication sans fil pour plusieurs imprimantes
(Windows uniquement) », à la page 43.
Remarque :
•si vous rencontrez des problèmes, consultez la
section « Dépannage des problèmes de
communication sans fil », à la page 44.
•Pour utiliser l’imprimante avec une connexion sans
fil, vous devez exécuter le programme d’installation
au moins une fois à partir du CD de démarrage et
créer une connexion sans fil.
•Vérifiez que l’imprimante n’est pas connectée au
réseau à l’aide d’un câble réseau.
•Le périphérique émetteur doit disposer d’une
capacité de carte 802.11 intégrée ou avoir une
carte 802.11 sans fil installée.
•L’imprimante et les ordinateurs qui utilisent celle-ci
doivent, de préférence, se trouver sur le même sous-
réseau.
Avant d’installer le logiciel d’imprimante, vous pourrez
avoir besoin de détecter les paramètres de votre réseau.
Renseignez-vous auprès de vos administrateurs système
ou exécutez les tâches suivantes :
•Obtenez le nom du réseau (SSID) et le mode de
communication (infrastructure ou ad hoc) à partir de
l’utilitaire de configuration du point d’accès sans fil
au réseau (WAP) ou de la carte réseau de
l’ordinateur.
•Trouvez le type de chiffrement utilisé par votre
réseau, tels que les mécanismes de sécurité
WEP (Wired Equivalent Privacy) ou WPA
(Wi-Fi®Protected Access).
•Trouvez le mot de passe de sécurité ou la clé de
chiffrement du périphérique sans fil.
Utilisation des paramètres réseau
sans fil 802.11
Nom de réseau (SSID)
Par défaut, l’imprimante recherche le nom de réseau
sans fil ou l’identifiant SSID (Service Set Identifier)
désigné par « hpsetup ». Votre réseau peut avoir un
SSID différent.
Mode de communication
Il existe deux options de mode de communication :
Ad hoc : Sur un réseau ad hoc, l’imprimante est
configurée sur un mode de communication ad hoc,
et communique directement avec d’autres périphériques
sans fil sans utiliser de point d’accès sans fil (WAP).
Tous les périphériques sur le réseau ad hoc doivent :
•Etre compatibles 802.11
•Etre en mode de communication ad hoc
•Avoir le même nom de réseau (SSID)
•Etre sur le même sous-réseau et le même canal
•Avoir les mêmes paramètres de sécurité 802.11
Infrastructure (recommandé) : Sur un réseau
d’infrastructure, l’imprimante est définie en mode de
communication infrastructure et communique avec
d’autres périphériques du réseau, qu’ils soient câblés ou
sans fil, par le biais d’un point d’accès sans fil (WAP).
Ces points d’accès font généralement office de routeurs
ou de passerelles sur les petits réseaux.
Paramètres de sécurité
Les paramètres disponibles pour l’imprimante peuvent
être consultées à la page de configuration réseau dans
la section « Utilisation de la page de configuration » du
guide de l’utilisateur en ligne.
Pour obtenir de plus amples informations sur la sécurité
sans fil, consultez le site www.weca.net/opensection/
pdf/whitepaper_wifi_security4-29-03.pdf.
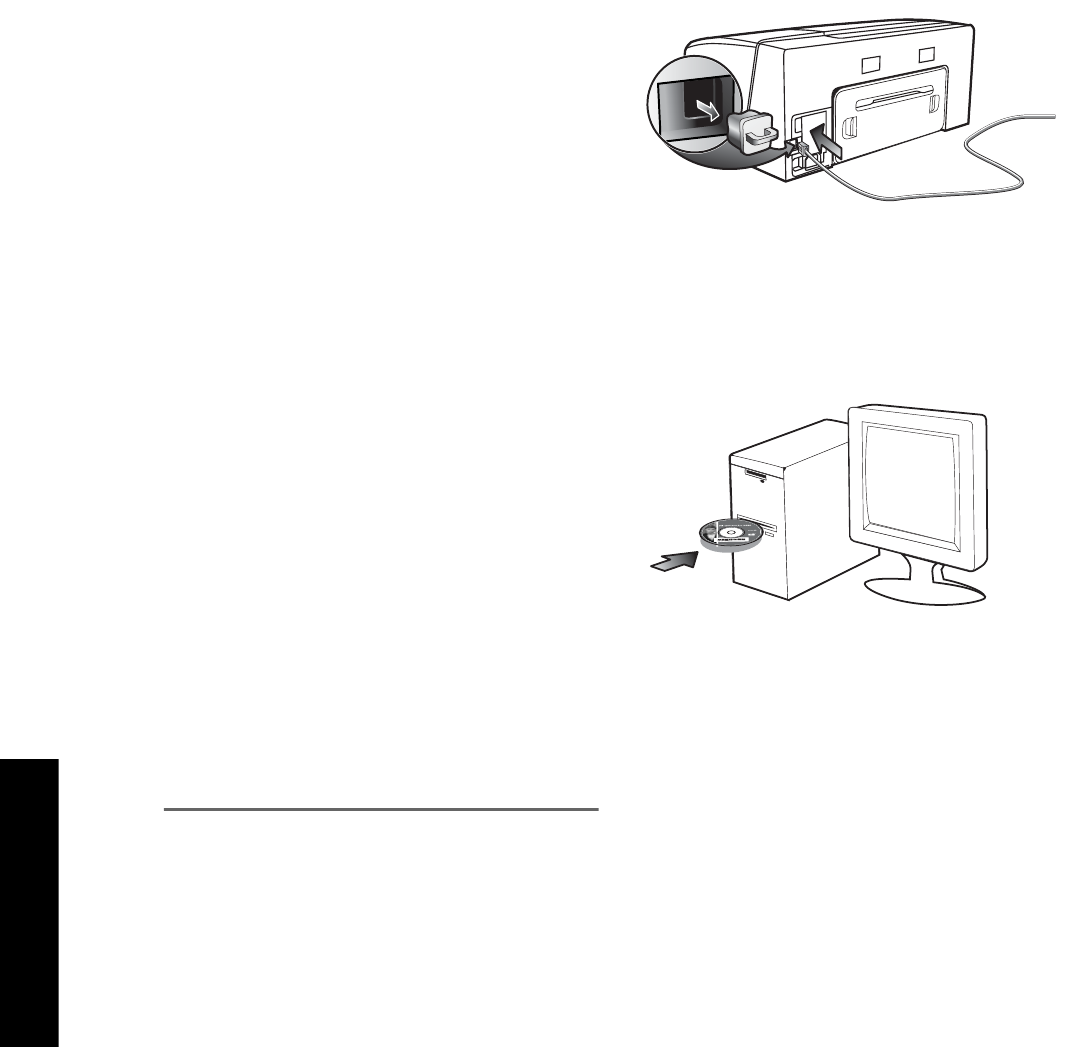
Français
42
Authentification du réseau : Le paramètre d’usine par
défaut de l’imprimante est ’Open’ (Ouvert), qui ne
nécessite aucune sécurité pour les opérations
d’autorisation ou de chiffrement. Les autres valeurs
possibles sont ’OpenThenShared’, ’Shared’ et
’WPA-PSK’ (Wi-Fi® Protected Access Pre-Shared Key).
•Le mécanisme WPA augmente le niveau de
protection des données en liaison radio et le
contrôle d’accès aux réseaux Wi-Fi existants et
futurs. Il remédie aux faiblesses connues du
mécanisme de sécurité natif d’origine WEP de la
norme 802.11.
•WPA2 constitue la deuxième génération du
protocole de sécurité WPA, qui fournit aux
utilisateurs Wi-Fi, particuliers et entreprises, un haut
niveau d’assurance leur garantissant que seuls les
utilisateurs concernés peuvent accéder à leurs
réseaux sans fil.
Chiffrement des données :
•Le mécanisme de sécurité WEP (Wired Equivalent
Privacy) consiste à chiffrer les données envoyées,
par ondes radio, entre deux périphériques sans fil.
Les périphériques d’un réseau compatible WEP
utilisent des clés WEP pour coder les données. Si
votre réseau fait appel au mécanisme WEP, vous
devrez savoir quelle(s) clé(s) WEP celui-ci utilise.
•Le mécanisme WPA a recours au protocole TKIP
(Temporal Key Integrity Protocol) pour le chiffrement
et à l’authentification 802.1X pour l’un des types de
protocoles EAP (Extensible Authentication Protocol)
standard disponibles aujourd’hui.
•WPA2 fournit un nouveau schéma de chiffrement,
la norme AES (Advanced Encryption Standard).
La norme AES est définie en mode de chaînage
CCM (blocs de chiffres de compteur) et prend en
charge le mécanisme IBSS (Ensemble de services de
base indépendants) pour activer la sécurité entre les
postes de travail client s’exécutant en mode ad hoc.
Configuration de la fonction de
communication sans fil de
l’imprimante
Pour Windows
1. Retirez le capot de protection du connecteur réseau
de l’imprimante.
2. Procédez à l’une des opérations suivantes :
• Connectez temporairement l’imprimante
et l’ordinateur à l’aide du câble croisé
(livré avec l’imprimante).
• Connectez temporairement l’imprimante à un
port disponible sur le concentrateur de réseau,
le commutateur ou le routeur, à l’aide d’un câble
réseau (vendu séparément).
3. Fermez toutes les applications en cours d’exécution
sur le système de votre ordinateur.
4. Introduisez le CD de démarrage dans le lecteur
de CD-ROM.
Si le menu du CD ne démarre pas automatiquement,
double-cliquez sur l’icône d’installation sur le CD de
démarrage.
5. Dans le menu du CD, cliquez sur Installer puis
suivez les instructions qui s’affichent à l’écran.
6. Dans l’écran Type de connexion, sélectionnez
l’option permettant la connexion au réseau puis
cliquez sur Suivant.
7. Suivez les instructions à l’écran pour exécuter
l’installation, et débranchez le câble lorsque vous
y êtes invité.
Pour Mac OS
1. Ouvrez l’Assistant de configuration AirPort,
puis suivez les instructions affichées à l’écran
pour vous connecter à un réseau sans fil
existant (hpsetup).
2. Double-cliquez sur l’icône d’installation, sur le CD
de démarrage, puis suivez les instructions qui
apparaissent à l’écran.
3. Lorsque vous y êtes invité, cliquez sur Ouvrir le
Centre d’impression pour ajouter l’imprimante
à la liste.
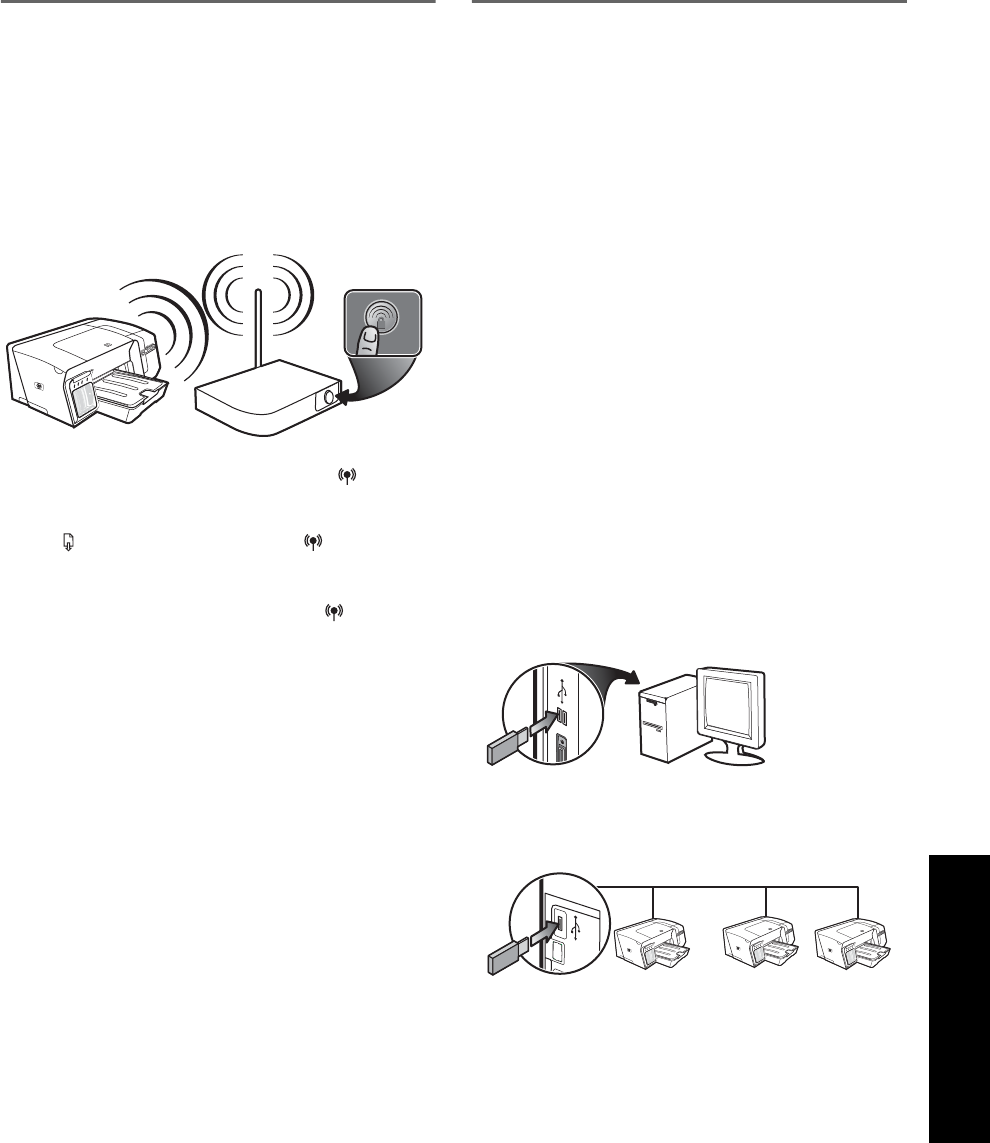
Français
43
Configuration de la fonction de
communication sans fil à l’aide de
SecureEasySetup (SES)
Si votre routeur sans fil est compatible SES,
reportez-vous aux instructions suivantes pour configurer
l’utilisation de SES.
1. Appuyez sur le bouton SES du routeur sans fil.
2. En l’espace de 2 minutes, appuyez sur
(bouton Page de configuration) sur l’imprimante et
maintenez-le enfoncé, puis appuyez une seule fois
sur (bouton Reprise) et relâchez (bouton Page
de configuration).
Le voyant Page de configuration clignote.
3. Attendez 2 minutes, pus appuyez sur
(bouton Page de configuration) pour imprimer la
page de configuration de l’imprimante et vérifiez
que les paramètres SES correspondent à ceux du
routeur sans fil.
Remarque : si la connexion échoue, vous aurez peut-
être à réinitialiser les paramètres réseau de
l’imprimante (reportez-vous à la section
« Réinitialisation des paramètres réseau de
l’imprimante », à la page 44) et répétez les étapes
nécessaires. Consultez également la section
« Vérification des paramètres de
communication sans fil », à la page 44.
4. Fermez toutes les applications en cours d’exécution
sur le système de votre ordinateur.
5. Introduisez le CD de démarrage dans le lecteur
de CD-ROM.
Si le menu du CD ne démarre pas automatiquement,
double-cliquez sur l’icône d’installation sur le CD
de démarrage.
6. Dans le menu du CD, cliquez sur Installer puis
suivez les instructions qui s’affichent à l’écran pour
installer le logiciel d’imprimante.
Configuration de la communication
sans fil pour plusieurs imprimantes
(Windows uniquement)
L’imprimante prend en charge la technologie
Windows Connect Now™, qui vous permet de
configurer facilement plusieurs imprimantes pour une
connexion sans fil. Utilisez l’utilitaire de configuration
sans fil fourni et exportez les paramètres de
communication sans fil de l’ordinateur vers un lecteur
flash USB, puis configurez les imprimantes selon ces
paramètres en insérant le lecteur flash dans le port USB
de chaque imprimante.
1. Retirez le capot de protection du connecteur USB
hôte de l’imprimante.
2. Introduisez le CD de démarrage dans le lecteur de
CD-ROM.
Si le menu du CD ne démarre pas automatiquement,
double-cliquez sur l’icône d’installation sur le CD de
démarrage.
3. Dans le menu du CD, cliquez sur Utilitaires, puis sur
Utilitaire de configuration sans fil.
4. Suivez les instruction à l’écran et connectez le
lecteur flash USB au port USB de l’ordinateur lorsque
vous y êtes invité. Les paramètres de configuration
du réseau sans fil sont sauvegardés sur
le lecteurflash.
5. Suivez les instructions à l’écran et connectez le
lecteur flash USB à chaque imprimante que vous
souhaitez ajouter au réseau.

Français
44
Dépannage des problèmes de communication sans fil
Si l’imprimante n’arrive pas à communiquer avec le réseau après la configuration de la communication sans fil et
l’installation du logiciel, vous devrez exécuter l’une au moins des tâches suivantes.
Vérification des paramètres de
communication sans fil
•Vérifiez que la carte sans fil de l’ordinateur est
paramétrée sur le profil sans fil approprié. Un profil
sans fil est un ensemble de paramètres réseau propres
à un réseau donné. Une carte sans fil unique peut
avoir plusieurs profils sans fil (par exemple, un pour un
réseau privé et un autre pour un réseau de bureau).
Ouvrez l’utilitaire de configuration de la carte de
réseau installée sur l’ordinateur et vérifiez que le profil
sélectionné est celui du réseau de l’imprimante.
•Assurez-vous que les paramètres réseau de
l’imprimante correspondent à ceux de votre réseau.
Exécutez l’une des opérations suivantes pour
rechercher les paramètres de votre réseau :
•Mode de communication infrastructure :
Ouvrez l’utilitaire de configuration du point
d’accès sans fil (WAP).
•Mode de commnication ad hoc :
Ouvrez l’utilitaire de configuration de la carte
réseau installée sur l’ordinateur.
•Comparez les paramètres réseau à ceux qui
apparaissent sur la page de configuration
(reportez-vous à la section « Pour imprimer une page
de configuration », à la page 40), puis notez les
différences éventuelles. Les problèmes éventuels
comprennent ce qui suit :
• Le WAP filtre les adresses matérielles
(adresses MAC). Reportez-vous à la section
« Ajout d’adresses matérielles à un point d’accès
sans fil (WAP) », à la page 44.
• Un des paramètres suivants de l’imprimante est
incorrect : mode de communication, nom du
réseau (SSID), canal (réseaux ad hoc uniquement),
type d’authentification, chiffrement. Reportez-vous
à la section « Utilisation des paramètres réseau
sans fil 802.11 », à la page 41.
• Imprimez un document. Si le document ne
s’imprime pas, vous réinitialiserez les
paramètres de l’imprimante (reportez-vous à la
section « Réinitialisation des paramètres réseau
de l’imprimante », à la page 44) puis
réinstallerez le logiciel d’imprimante (consultez
la section« Configuration de l’imprimante pour
la fonction de communication sans fil
(HP Officejet Pro K550dtwn) », à la page 41).
Si les paramètres réseau sans fil sont corrects,
l’ordinateur pourra être associé à un autre réseau sans
fil. Assurez-vous que l’ordinateur est associé au même
réseau sans fil que celui de l’imprimante.
Les utilisateurs peuvent vérifier cela en examinant les
paramètres sans fil de leurs ordinateurs respectifs.
En outre, veillez à ce que les ordinateurs aient accès au
réseau sans fil.
Si les paramètres réseau sans fil sont incorrects,
vous effectuerez les étapes suivantes pour corriger les
paramètres de l’imprimante :
1. Connectez l’imprimante à votre réseau à l’aide d’un
câble réseau ou à l’ordinateur via un câble croisé
fourni avec l’imprimante.
2. Ouvrez le serveur Web intégré de l’imprimante.
3. Cliquez sur l’onglet Mise en réseau puis sur Sans fil
(802.11) dans le panneau de gauche.
4. Utilisez l’Assistant Configuration sans fil de l’onglet
Configuration sans fil pour modifier les paramètres
de l’imprimante en fonction de ceux du réseau.
5. Fermez le serveur Web intégré de l’imprimante puis
débranchez le câble réseau de l’imprimante.
6. Désinstallez complètement le logiciel de
l’imprimante, puis réinstallez-le.
Ajout d’adresses matérielles à un
point d’accès sans fil (WAP)
Le filtrage MAC est une fonction de sécurité via laquelle
un point d’accès sans fil (WAP) est configuré dans une
liste d’adresses MAC (appelées également « adresses
matérielles ») de périphériques autorisés à accéder au
réseau via le WAP. Si le point d’accès sans fil (WAP) ne
connaît pas l’adresse matérielle d’un périphérique qui
tente d’accéder au réseau, il lui refusera l’accès.
Si le WAP filtre les adresses MAC, il faudra ajouter
l’adresse MAC de l’imprimante à la liste WAP des
adresses MAC acceptées.
1. Appuyez sur / (bouton Page de
Configuration) pour imprimer la page de
configuration.
2. Ouvrez l’utilitaire de configuration du point d’accès
sans fil (WAP), puis ajoutez l’adresse matérielle de
l’imprimante à la liste des adresses MAC acceptées.
Réinitialisation des paramètres
réseau de l’imprimante
Si l’imprimante ne parvient toujours pas à communiquer
avec le réseau, vous réinitialiserez les paramètres réseau
de l’imprimante.
1. Appuyez sur / (bouton Page de configuration)
et maintenez-le enfoncé, puis appuyez trois fois sur
(bouton Reprise) et relâchez / (bouton
Page de configuration). Le voyant Alimentation
clignote pendant quelques secondes. Attendez que
le voyant Alimentation s’allume.
2. Appuyez sur / (bouton Page de configuration)
pour imprimer la page de configuration et vérifiez
que les paramètres de réseau ont été réinitialisés.
Par défaut, le nom réseau (SSID) est « hpsetup » et le
mode de communication « ad hoc ».

Français
45
Garantie limitée Hewlett-Packard
Etendue de la garantie limitée
1. Hewlett-Packard garantit les produits HP au client final contre tout
défaut de fabrication et de main d’œuvre pendant la période
désignée prenant effet à compter de la date d’achat par le client.
2. Concernant les produits logiciels, cette garantie HP ne s’applique
qu’aux instructions de programmation enregistrées sur le support.
HP ne garantit pas le fonctionnement ininterrompu ou sans erreur
de ses produits.
3. La garantie limitée de HP ne couvre que les défauts découlant
d’un usage normal du produit. Par conséquent, cette garantie ne
couvre pas les suites :
a. d’un mauvais entretien ou d’un entretien incorrect ;
b. de l’utilisation de logiciels, de supports, de pièces ou de
consommables non fournis ou pris en charge par HP ;
c. d’une utilisation en dehors des spécifications du produit ;
d. d’une modification non autorisée ou d’une utilisation abusive.
4. En ce qui concerne les imprimantes HP, l’utilisation de
cartouches d’impression d’un autre fabricant que HP ou de
cartouches reconditionnées n’affecte ni la garantie au client,
ni les contrats de maintenance HP conclus avec le client.
Cependant, si la défectuosité présentée par l’imprimante ou
son endommagement est la conséquence de l’utilisation de
telles cartouches, HP facturera le coût de la main d’œuvre et
des pièces détachées à la réparation.
5. Si le client signale à HP, pendant la période de garantie
applicable, la défectuosité d’un produit couvert par la garantie,
HP réparera ou, à son choix, remplacera le produit défectueux.
6. Si HP n’est pas en mesure de réparer ou de remplacer le produit
défectueux dans un délai raisonnable, HP remboursera le produit
sous garantie au prix d’achat payé par le client.
7. HP ne s’engage nullement à réparer, à remplacer ou à
rembourser tout produit défectueux tant que celui-ci ne lui aura
pas été renvoyé.
8. Tout produit de remplacement sera neuf ou remis à neuf et, dans
ce dernier cas, présentera des fonctionnalités au moins égales
à celles du produit remplacé.
9. Les produits HP contiennent parfois des matériaux, des
composants et des pièces remanufacturées présentant des qualités
équivalentes aux produits neufs.
10. La garantie limitée HP est valide dans tous les pays et régions où
les produits HP sont distribués par HP. Des contrats d’extension
des services de garantie sur site peuvent être obtenus auprès de
tout centre d’assistance agréé HP dans tous les pays et régions où
les produits HP sont distribués par Hewlett-Packard ou un
importateur agréé.
Limites de la garantie
HP OU SES FOURNISSEURS TIERS EXCLUENT TOUTE AUTRE
GARANTIE, EXPRESSE OU NON, EN RAPPORT AVEC LES PRODUITS
HP. HP ET SES FOURNISSEURS TIERS EXCLUENT EN PARTICULIER
TOUTE GARANTIE IMPLICITE CONCERNANT SES CONDITIONS DE
MISE SUR LE MARCHÉ ET SON ADEQUATION À QUELQUE
UTILISATION PARTICULIÈRE QUE CE SOIT.
Limites de responsabilité
1. Dans les limites permises par la législation locale, cette garantie
limitée constitue et exprime l’intégralité des droits et prétentions
dont bénéficie le client.
2. A L’EXCEPTION DES OBLIGATIONS SPÉCIFIÉES DANS CETTE
GARANTIE LIMITÉE, HP NE POURRA ÊTRE TENU RESPONSABLE
D’AUCUN DOMMAGE, DIRECT, INDIRECT, NATUREL OU
ADÉQUAT, QUEL QU’IL SOIT, QU’IL SE BASE SUR UN CONTRAT
OU SUR LA LOI OU TOUTE AUTRE THÉORIE JURIDIQUE, ET CELA
MÊME SI HP A ÉTÉ AVERTI DE LA POSSIBILITÉ D’UN TEL
DOMMAGE.
Loi locale
1. La garantie limitée accorde au consommateur des droits
spécifiques. Ce dernier peut cependant bénéficier d’autres droits
dont la nature peut varier en fonction de l’état (aux Etats-Unis),
de la province (au Canada) et du pays/de la région (ailleurs
dans le monde).
2. Si les termes de cette garantie limitée se trouvent en contradiction
avec les lois en vigueur localement, ils seront considérés comme
modifiés pour correspondre aux lois en question. Dans ce cas,
certains termes de cette garantie limitée pourraient ne pas
s’appliquer à notre clientèle. Par exemple, certains états des Etats-
Unis ainsi que certains pays en dehors des Etats-Unis (y compris
certaines provinces du Canada) peuvent :
a. assurer une garantie légale impérative au consommateur
(par exemple au Royaume-Uni) ;
b. limiter la faculté d’un fabricant à restreindre sa responsabilité
ou à imposer des limitations ; ou
c. accorder au client des garanties supplémentaires, stipuler la
durée des garanties implicites que le fabricant ne peut
décliner, ou autoriser une limitation de durée pour les
garanties implicites.
3. POUR LES TRANSACTIONS DES CONSOMMATEURS EN
AUSTRALIE ET EN NOUVELLE-ZELANDE, LES TERMES DE CETTE
GARANTIE, EN DEHORS DES EXCEPTIONS LEGALEMENT
PERMISES, N’EXCLUENT, NE RESTREIGNENT, NI NE
MODIFIENT LES DROITS IMPERATIVEMENT PREVUS PAR LA LOI,
AUXQUELS ILS S’AJOUTENT, ET QUI SONT APPLICABLES A LA
VENTE DES PRODUITS HP A SES CLIENTS.
Produit HP Durée de la garantie limitée
Logiciel 1 an
Accessoires 1 an
Cartouches d’encre 6 mois*
Têtes d’impression 1 an*
Equipement périphérique de l’imprimante (voir les détails
ci-dessous) 1 an
*Pour plus d’informations sur la garantie, consultez le site www.hp.com/support/inkjet_warranty.

Nederlands
46
De betekenis van de lampjes van het bedieningspaneel
Ga naar de website voor productondersteuning op www.hp.com/support/officejetprok550 voor meer informatie.
1) Knop en lampje Aan/Uit
2) Knop Configuratiepagina
HP Officejet Pro K550dtn
HP Officejet Pro K550dtwn
3) Knop Annuleren
4) Knop en lampje Doorgaan
5) Printkoplampjes
6) Inktpatroonlampjes
624
15
3
Lampjespatroon van het
bedieningspaneel Uitleg en uit te voeren handeling
Het Aan/Uit-lampje en het lampje
Doorgaan knipperen. Er is papier vastgelopen in de printer.
•Verwijder al het papier uit de uitvoerbak. Zoek het vastgelopen afdrukmateriaal en
verwijder het. Zie ’Papierstoringen verhelpen’ in de elektronische
gebruikershandleiding.
De wagen van de printer staat stil.
•Open de bovenste klep en verwijder eventuele obstakels
(zoals vastgelopen afdrukmateriaal).
•Druk op de knop (Doorgaan) om het afdrukken te hervatten.
•Als het probleem niet verholpen is, zet u de printer uit en weer aan.
Het Aan/Uit-lampje brandt en het
lampje Doorgaan knippert. Het printerpapier is op.
•Plaats papier en druk op de knop (Doorgaan).
Het Aan/Uit-lampje en het lampje
Doorgaan branden. Een van de kleppen is niet goed gesloten.
•Controleer of alle kleppen zijn gesloten.
Het toegangspaneel aan de achterkant of de duplexeenheid ontbreekt of is niet goed
geplaatst.
•Controleer of het toegangspaneel aan de achterkant (HP Officejet Pro K550) of de
duplexeenheid (HP Officejet Pro K550dtn/K550dtwn) goed is geïnstalleerd aan de
achterkant van de printer.
Het Aan/Uit-lampje brandt en een
of meer printkoplampjes knipperen. Een of meer printkoppen ontbreken.
•Plaats de aangegeven printkop en probeer dan af te drukken.
•Als het probleem aanhoudt, moet de aangegeven printkop worden vervangen.
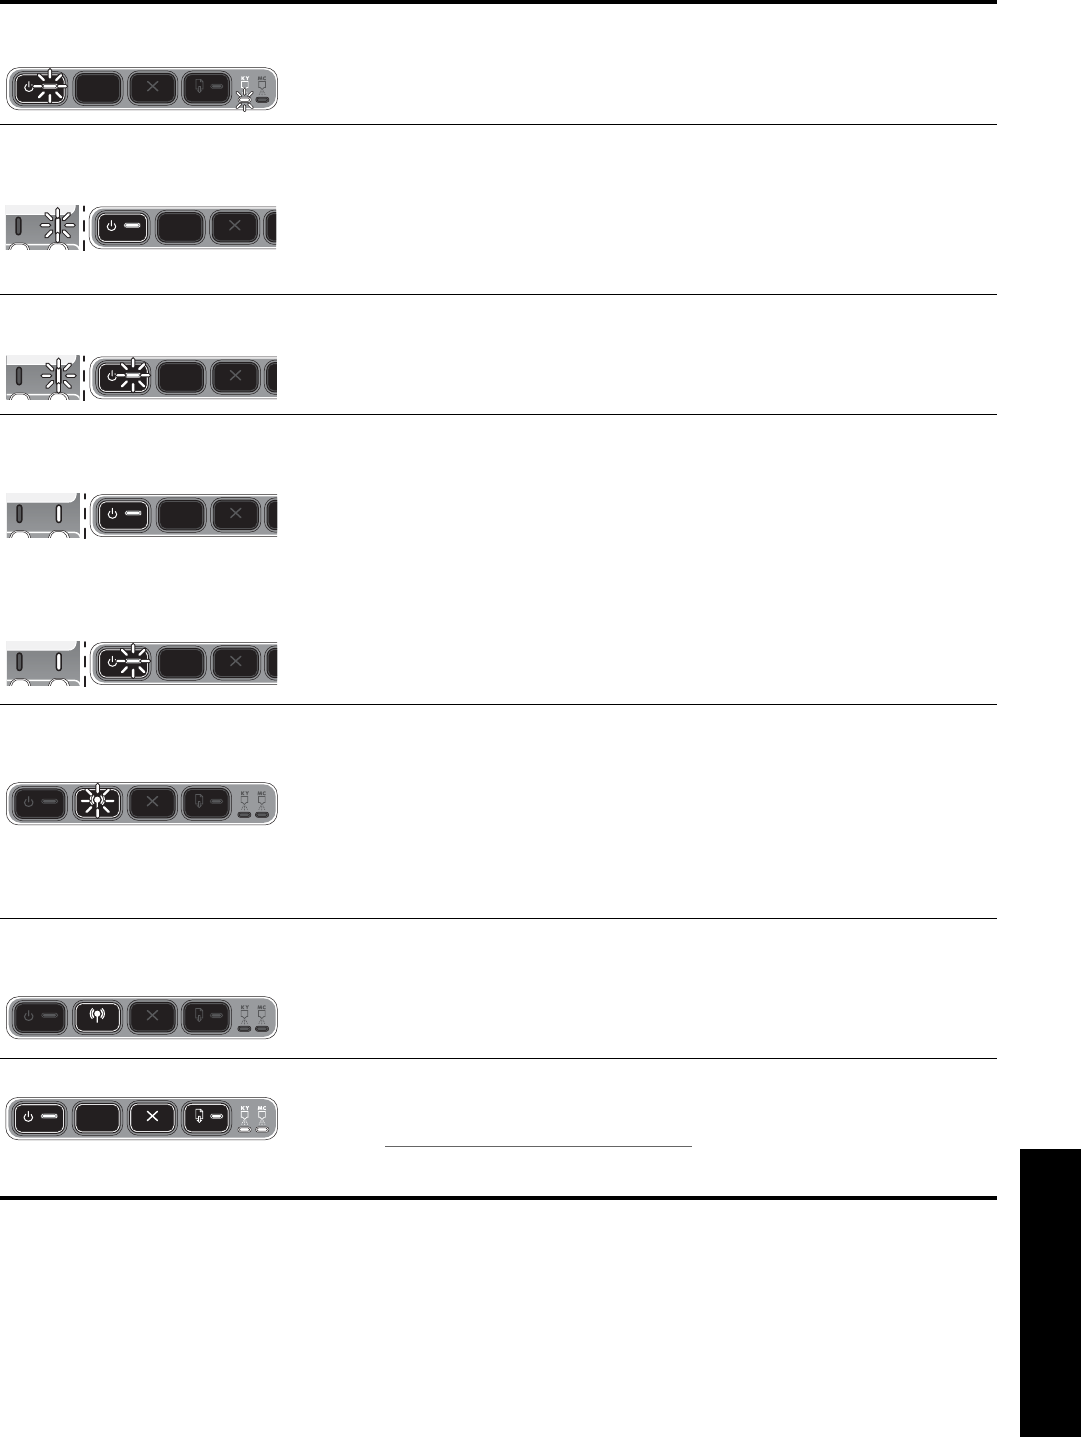
Nederlands
47
Het Aan/Uit-lampje en een of meer
printkoplampjes knipperen. Een of meer printkoppen zijn defect of moeten worden gecontroleerd.
•Zorg ervoor dat de aangegeven printkop goed is geplaatst en probeer dan
af te drukken.
•Als het probleem aanhoudt, moet de aangegeven printkop worden vervangen.
Het Aan/Uit-lampje brandt en een
of meer inktpatroonlampjes
knipperen.
Een of meer inktpatronen ontbreken.
•Plaats de aangegeven printpatroon en probeer dan af te drukken.
•Als het probleem aanhoudt, moet de aangegeven printpatroon worden vervangen.
Een of meer inktpatronen zijn leeg en moeten worden vervangen voordat u verder kunt
gaan met afdrukken.
•Vervang de aangegeven inktpatroon.
Het Aan/Uit-lampje en een of meer
inktpatroonlampjes knipperen. Een of meer inktpatronen zijn defect of moeten worden gecontroleerd.
•Zorg ervoor dat de aangegeven printpatroon goed is geplaatst en probeer
dan af te drukken.
•Als het probleem aanhoudt, moet de aangegeven printpatroon worden vervangen.
Het Aan/Uit-lampje brandt en een
of meer inktpatroonlampjes
branden.
Het Aan/Uit-lampje knippert en een
of meer inktpatroonlampjes
branden.
Een of meer inktpatronen zijn bijna leeg en moeten binnenkort worden vervangen.
•U hoeft niets te doen.
Het lampje Configuratiepagina
knippert.
(HP Officejet Pro K550dtwn)
Eén van de volgende processen vindt plaats:
•De printer wordt geïnitialiseerd voor draadloze communicatie.
•Als u SecureEasySetup (SES) gebruikt voor het installeren van de printer, is het mogelijk
dat geprobeerd wordt verbinding te maken met het draadloze netwerk.
•Als u Windows Connect Now™ gebruikt om de printer in te stellen, ontvangt de printer
draadloos informatie van het USB-flash-station.
Elk van bovenstaande processen neemt minder dan 2 minuten in beslag.
•U hoeft niets te doen.
Het lampje Configuratiepagina
brandt.
(HP Officejet Pro K550dtwn)
De modus voor draadloze communicatie is ingeschakeld.
•U hoeft niets te doen.
Alle lampjes branden. Er is een fout opgetreden die niet kan worden hersteld.
•Koppel alle kabels los (zoals het netsnoer, de netwerkkabel en de USB-kabel),
wacht ongeveer 20 seconden en sluit de kabels weer aan. Ga naar de website
van HP (www.hp.com/support/officejetprok550) als het probleem zich blijft
voordoen. Daar vindt u de laatste informatie over het oplossen van problemen en
de laatste productfixes en -updates.

Nederlands
48
Problemen oplossen
In dit gedeelte vindt u suggesties voor het oplossen van enkele van de meest voorkomende problemen met de
installatie van de hard- en software.
Raadpleeg het Leesmij-bestand en de release-info, of ga naar de website voor productondersteuning op
www.hp.com/support/officejetprok550, voor de meest recente informatie.
Problemen bij het afdrukken van
een uitlijnpagina
Controleer of de printer aan de volgende
punten voldoet:
•Het Aan/Uit-lampje brandt (knippert niet). Wanneer
de printer voor het eerst wordt ingeschakeld, duurt
het ongeveer 45 seconden voordat de printer is
opgewarmd.
•De printer is klaar voor gebruik en er branden of
knipperen geen andere lampjes op het
bedieningspaneel. Zie “De betekenis van de lampjes
van het bedieningspaneel” op pagina 46 wanneer
er wel lampjes branden of knipperen.
•Het netsnoer en de andere kabels werken en zijn
goed aangesloten op de printer.
•Alle verpakkingstape en -materialen moeten van de
printer zijn verwijderd.
•Het toegangspaneel aan de achterzijde
(HP Officejet Pro K550) of de duplexeenheid
(HP Officejet Pro K550dtn/K550dtwn) zit stevig op
zijn plaats.
•Het papier is correct in de lade geplaatst en er is
geen papier vastgelopen in de printer.
•De oranje beschermkapjes van alle printkoppen
zijn verwijderd.
•Printkoppen en inktpatronen moeten goed geplaatst
zijn in de juiste met kleuren gecodeerde sleuven.
Druk de printkoppen en inktpatronen stevig op hun
plaats zodat ze goed contact maken.
•De printkopgrendel en alle kleppen moeten
gesloten zijn.
Problemen bij het installeren van
de software
Controleer of doe het volgende:
•Controleer of de computer voldoet aan de
systeemvereisten. Zie de elektronische
gebruikershandleiding op de Starter-cd.
•Voordat u software op een computer met Windows
installeert, moeten alle andere programma’s zijn
afgesloten.
•Als het pad naar het cd-romstation niet wordt
herkend, controleert u of u de juiste
stationsaanduiding hebt opgegeven.
•Als de computer de Starter-cd in het cd-station niet
herkent, controleert u of de cd is beschadigd. U kunt
het printerstuurprogramma downloaden van
www.hp.com/support/officejetprok550.
•Controleer in Apparaatbeheer van Windows of de
USB-stuurprogramma’s niet zijn uitgeschakeld.
•Als u Windows gebruikt en de computer de printer
niet kan vinden, voert u het hulpprogramma voor het
verwijderen van software uit
(Util\Scrubber\Uninstall.exe op de Starter-cd).
Hiermee verwijdert u het printerstuurprogramma
volledig. Start de computer opnieuw op en installeer
het printerstuurprogramma opnieuw.
Problemen met aansluiten op
een netwerk
Opmerking: als u een van de volgende maatregelen
hebt getroffen, moet u het installatieprogramma
opnieuw uitvoeren.
Algemene netwerkproblemen oplossen
•Als u de printersoftware niet kunt installeren,
moet u het volgende controleren:
• Alle kabelverbindingen tussen de computer en
printer moeten in orde zijn.
• Het netwerk functioneert en de netwerk-hub is
ingeschakeld.
• Alle toepassingen moeten afgesloten of
uitgeschakeld zijn, inclusief eventuele
antivirusprogramma’s en persoonlijke firewalls.
• De printer moet op hetzelfde subnet zijn
geïnstalleerd als de computers die van de printer
gebruikmaken.
• Als het installatieprogramma de printer niet kan
vinden, drukt u de configuratiepagina af
(zie “Een configuratiepagina afdrukken” op
pagina 49) en voert u het IP-adres handmatig in
het installatieprogramma in.
• Als u een computer met Windows gebruikt, moet
u controleren of de netwerkpoorten die in het
printerstuurprogramma zijn gemaakt,
overeenkomen met het IP-adres van de printer:
1) Druk de configuratiepagina van de
printer af.
2) Klik op het bureaublad van Windows op
Start, wijs Instellingen aan en klik vervolgens op
Printers of Printers en faxapparaten.
3) Klik met de rechtermuisknop op het
printerpictogram, klik op Eigenschappen en klik
vervolgens op het tabblad Poorten.
4) Selecteer de TCP/IP-poort voor de printer
en klik op Poort configureren.

Nederlands
49
5) Controleer of het IP-adres in het
dialoogvenster overeenkomt met het IP-adres op
de configuratiepagina. Als de IP-adressen niet
overeenkomen, wijzigt u het IP-adres in het
dialoogvenster in het adres op de
configuratiepagina.
6) Klik tweemaal op OK om de instellingen op te
slaan en de dialoogvensters te sluiten.
Problemen met aansluiten op een
bedraad netwerk
•Als het verbindingslampje op de netwerkaansluiting
niet brandt, controleert u of aan alle voorwaarden
bij ’Algemene netwerkproblemen oplossen’
is voldaan.
•Het verdient weliswaar niet de aanbeveling om een
vast IP-adres toe te wijzen aan de printer, maar het
zou kunnen dat u sommige installatieproblemen
(bijvoorbeeld als gevolg van een conflict met een
firewall) kunt oplossen door een vast IP-adres aan de
printer toe te wijzen. Raadpleeg de elektronische
gebruikershandleiding voor meer informatie.
Hulpmiddelen voor het oplossen van problemen en voor
de configuratie
U kunt de volgende hulpmiddelen gebruiken voor het oplossen van problemen met de printer of voor de configuratie
van de printer. Zie de elektronische gebruikershandleiding op de Starter-cd voor meer informatie hierover.
Configuratiepagina
Gebruik de configuratiepagina om de huidige
printerinstellingen te bekijken, als hulp bij het zoeken
naar oplossingen voor problemen met de printer en om
de plaatsing van optionele accessoires als de
duplexeenheid te controleren. De configuratiepagina
bevat ook een log met recente gebeurtenissen. Als de
printer op een netwerk is aangesloten, wordt een extra
configuratiepagina voor het netwerk afgedrukt. Hierop
staan de netwerkinstellingen voor de printer.
Als u contact moet opnemen met HP, moet u de
configuratiepagina afdrukken voordat u belt.
Een configuratiepagina afdrukken
•HP Officejet Pro K550: druk op de knop (Aan/
Uit) en houd deze ingedrukt, druk eenmaal op de
knop (Annuleren) en laat de knop (Aan/Uit)
los.
HP Officejet Pro K550dtn/K550dtwn: druk op de
knop / (Configuratiepagina).
Ingebouwde webserver
Als de printer is aangesloten op een netwerk, kunt u de
ingebouwde webserver van de printer gebruiken om
informatie over de status te bekijken, instellingen te
wijzigen en de printer vanaf de computer te beheren.
De ingebouwde webserver openen
Typ in een ondersteunde webbrowser op de computer
het IP-adres dat aan de printer is toegewezen. Als het IP-
adres bijvoorbeeld 123.123.123.123 is, typt u het
volgende adres in de webbrowser:
http://123.123.123.123
Het IP-adres voor de printer wordt op de
configuratiepagina vermeld.
Als de ingebouwde webserver wordt weergegeven,
kunt u deze toevoegen aan de favorieten, zodat u er in
het vervolg eenvoudig naartoe kunt gaan.

Nederlands
50
De printer instellen voor draadloze communicatie
(HP Officejet Pro K550dtwn)
U kunt de printer op een van de volgende manieren instellen op draadloze communicatie:
•Met een cross-kabel of netwerkkabel Zie “De printer instellen voor draadloze communicatie” op pagina 51.
•Met SecureEasySetup (SES) Zie “Draadloze communicatie instellen met SecureEasySetup (SES)” op pagina 52.
•Met Windows Connect Now Zie “Draadloze communicatie instellen voor meer printers (alleen voor
Windows)” op pagina 52.
Opmerking:
•Zie “Problemen met draadloze communicatie
oplossen” op pagina 53 als er problemen optreden.
•Als u de printer wilt gebruiken voor draadloze
communicatie, moet u het installatieprogramma
minstens eenmaal uitvoeren vanaf de Starter-cd en
een draadloze verbinding maken.
•De printer mag niet via een netwerkkabel op het
netwerk aangesloten zijn.
•Het apparaat voor verzending moet ingebouwde
802.11-voorzieningen of een ingebouwde 802.11
draadloze kaart hebben.
•U wordt aangeraden ervoor te zorgen dat de printer
en de computers die de printer gebruiken, zich alle
in hetzelfde subnet bevinden.
Voordat u de printersoftware installeert, wilt u wellicht de
instellingen van uw netwerk weten. U kunt deze informatie
verkrijgen bij de systeembeheerders of door de volgende
taken uit te voeren:
•Vraag de naam van het netwerk (SSID) en de
communicatiemodus (infrastructuur of adhoc) op uit
het configuratieprogramma voor het draadloze
toegangspunt van het netwerk (WAP) of de
netwerkkaart van de computer.
•Zoek uit welk type codering in het netwerk wordt
gebruikt, zoals Wired Equivalent Privacy (WEP)
of Wi-Fi® Protected Access (WPA).
•Het beveiligingswachtwoord of de coderingssleutel
van het draadloze apparaat.
Instellingen van een 802.11-
draadloos netwerk
Naam netwerk (SSID)
Standaard zoekt de printer naar de naam van het
draadloze netwerk of de SSID (Service Set Identifier)
met de naam ’hpsetup’. Uw netwerk heeft misschien een
andere SSID.
Communicatiemethode
Er zijn twee mogelijke communicatiemodi:
Ad hoc: in een netwerk in adhocmodus is de printer
ingesteld op adhoc-communicatie en communiceert de
printer rechtstreeks en zonder WAP (draadloos
toegangspunt) met andere draadloze apparaten:
Alle apparaten in het netwerk in adhocmodus moeten aan
de volgende voorwaarden voldoen:
•802.11-compatibel zijn
•Ad hoc moet de communicatiemethode zijn
•Dezelfde netwerknaam (SSID) hebben
•Op hetzelfde subnet en kanaal zitten
•Dezelfde 802.11-beveiligingsinstellingen hebben
Infrastructuur (aanbevolen): in een netwerk in
infrastructuurmodus is de printer ingesteld op de
infrastructuurcommunicatiemethode en communiceert de
printer met andere apparaten op het netwerk, draadloos
én bedraad, via een WAP. WAP’s werken normaal
gesproken als routers of gateways in kleine netwerken.
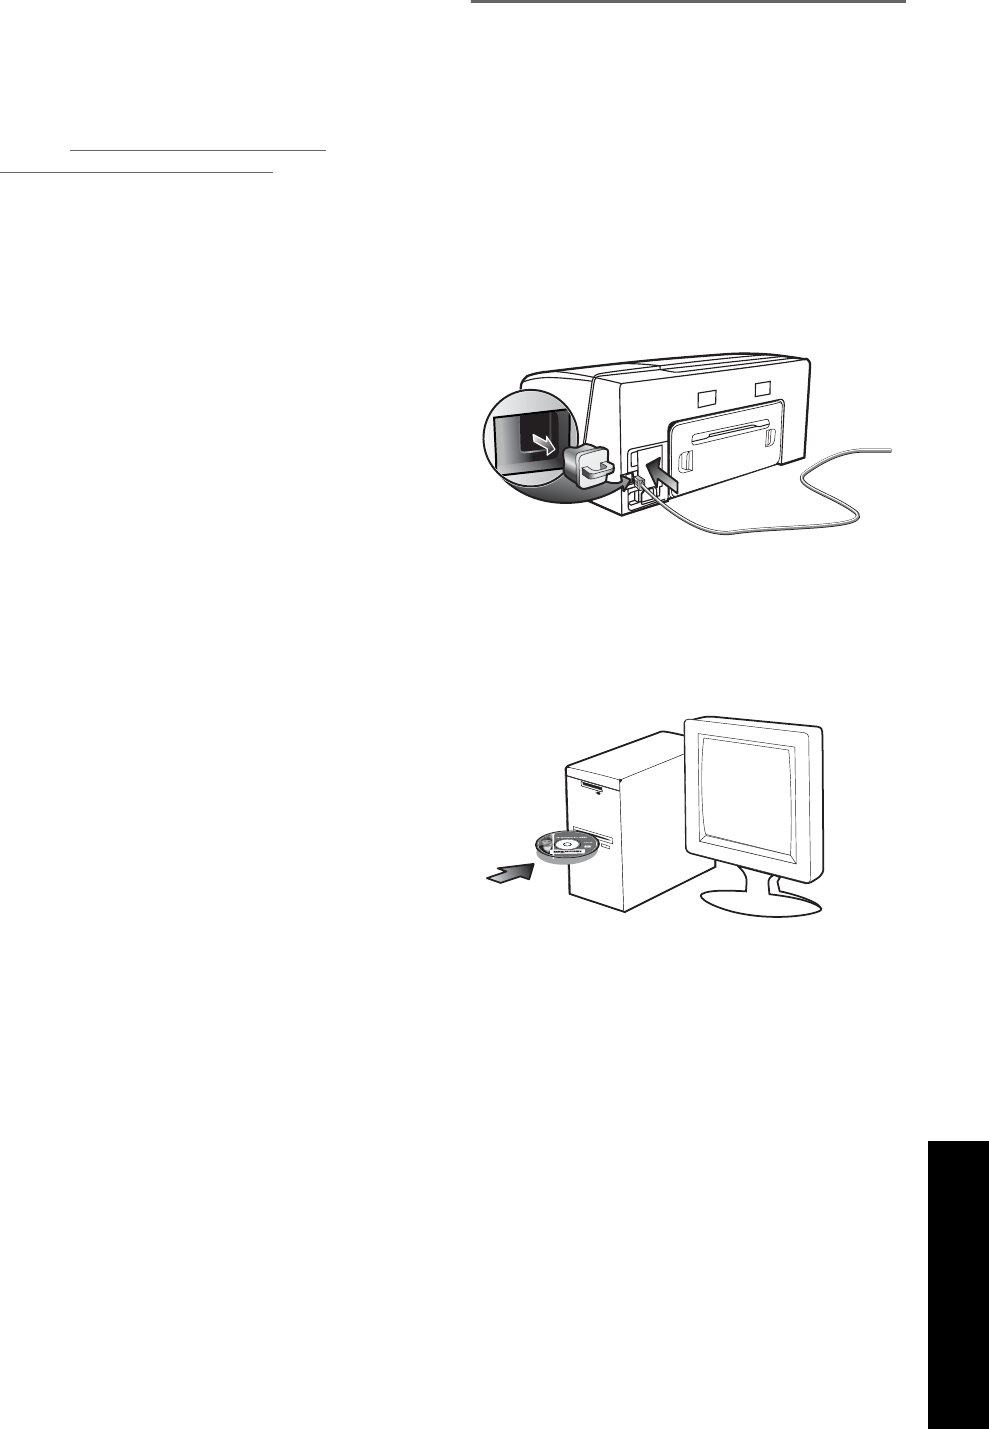
Nederlands
51
Beveiligingsinstellingen
Voor de mogelijke instellingen voor de printer
raadpleegt u de netwerkconfiguratiepagina onder
’De configuratiepagina’ in de elektronische
gebruikershandleiding.
Ga naar www.weca.net/opensection/pdf/
whitepaper_wifi_security4-29-03.pdf voor meer informatie
over beveiliging van draadloze communicatie.
Netwerkverificatie: de standaardfabrieksinstelling van de
printer is ’Open’, waardoor voor verificatie en codering
geen beveiliging nodig is. De andere mogelijke waarden
zijn ’Openen en vervolgens gedeeld’, ’Gedeeld’ en
’WPA-PSK’ (Wi-Fi® Protected Access Pre-Shared Key).
•WPA maakt het verzenden van gegevens en de
toegang tot bestaande en toekomstige Wi-Fi
netwerken veiliger. Alle bekende zwakke punten van
WEP, het originele landelijke
beveiligingsmechanisme in de 802.11-standaard,
worden hiermee verholpen.
•WPA2 is de tweede generatie van WPA-beveiliging
en biedt bedrijven en klanten die Wi-Fi gebruiken
een hoge mate van zekerheid dat alleen
geautoriseerde gebruikers toegang kunnen krijgen
tot hun draadloze netwerken.
Gegevenscodering:
•Wired Equivalent Privacy (WEP) biedt beveiliging
door gegevens die via radiogolven van het ene
draadloze apparaat naar het andere worden
verzonden te coderen. Apparaten op een WEP-
netwerk maken gebruik van zogenoemde WEP-
sleutels om gegevens te coderen. Als uw netwerk
van WEP gebruikmaakt, moet u weten welke WEP-
sleutels worden gebruikt.
•WPA maakt voor codering gebruik van Temporal
Key Integrity Protocol (TKIP) en maakt gebruik van
802.1X-verificatie met een van de standaardtypen
Extensible Authentication Protocol (EAP) die
momenteel beschikbaar zijn.
•WPA2 biedt een nieuw coderingsschema,
de Advanced Encryption Standard (AES). AES wordt
gedefinieerd in de CCM-modus (counter cipher-
block chaining) en ondersteunt de Independent
Basic Service Set (IBSS) voor meer veiligheid tussen
clientwerkstations in de adhocmodus.
De printer instellen voor
draadloze communicatie
Voor Windows
1. Verwijder de beschermklep van de
netwerkaansluiting van de printer.
2. Voer een van de volgende handelingen uit:
• Sluit de printer tijdelijk op de computer aan met
de cross-kabel die bij de printer is meegeleverd.
• Sluit de printer tijdelijk met een netwerkkabel
(wordt apart verkocht) aan op een vrije poort op
de hub, switch of router van het netwerk.
3. Sluit alle toepassingen die op het computersysteem
worden uitgevoerd.
4. Plaats de Starter-cd in het cd-romstation.
Als het cd-menu niet automatisch wordt geopend,
dubbelklikt u op het installatiepictogram op
de Starter-cd.
5. Klik in het cd-menu op Installeren en volg de
aanwijzingen op het scherm.
6. Selecteer op het scherm Verbindingstype de optie
om verbinding te maken via het netwerk en klik
op Volgende.
7. Volg de aanwijzingen op het scherm om de
installatie te voltooien en maak de kabels los
wanneer dit wordt gevraagd.
Voor Mac OS
1. Open de AirPort Setup Assistant en volg de
aanwijzingen op het scherm op om u aan te sluiten
bij een bestaand draadloos netwerk (hpsetup).
2. Dubbelklik op het installatiepictogram van de
Starter-cd en volg de aanwijzingen op het
scherm op.
3. Klik op Open Afdrukbeheer als u daarom wordt
gevraagd, zodat u de printer kunt toevoegen.
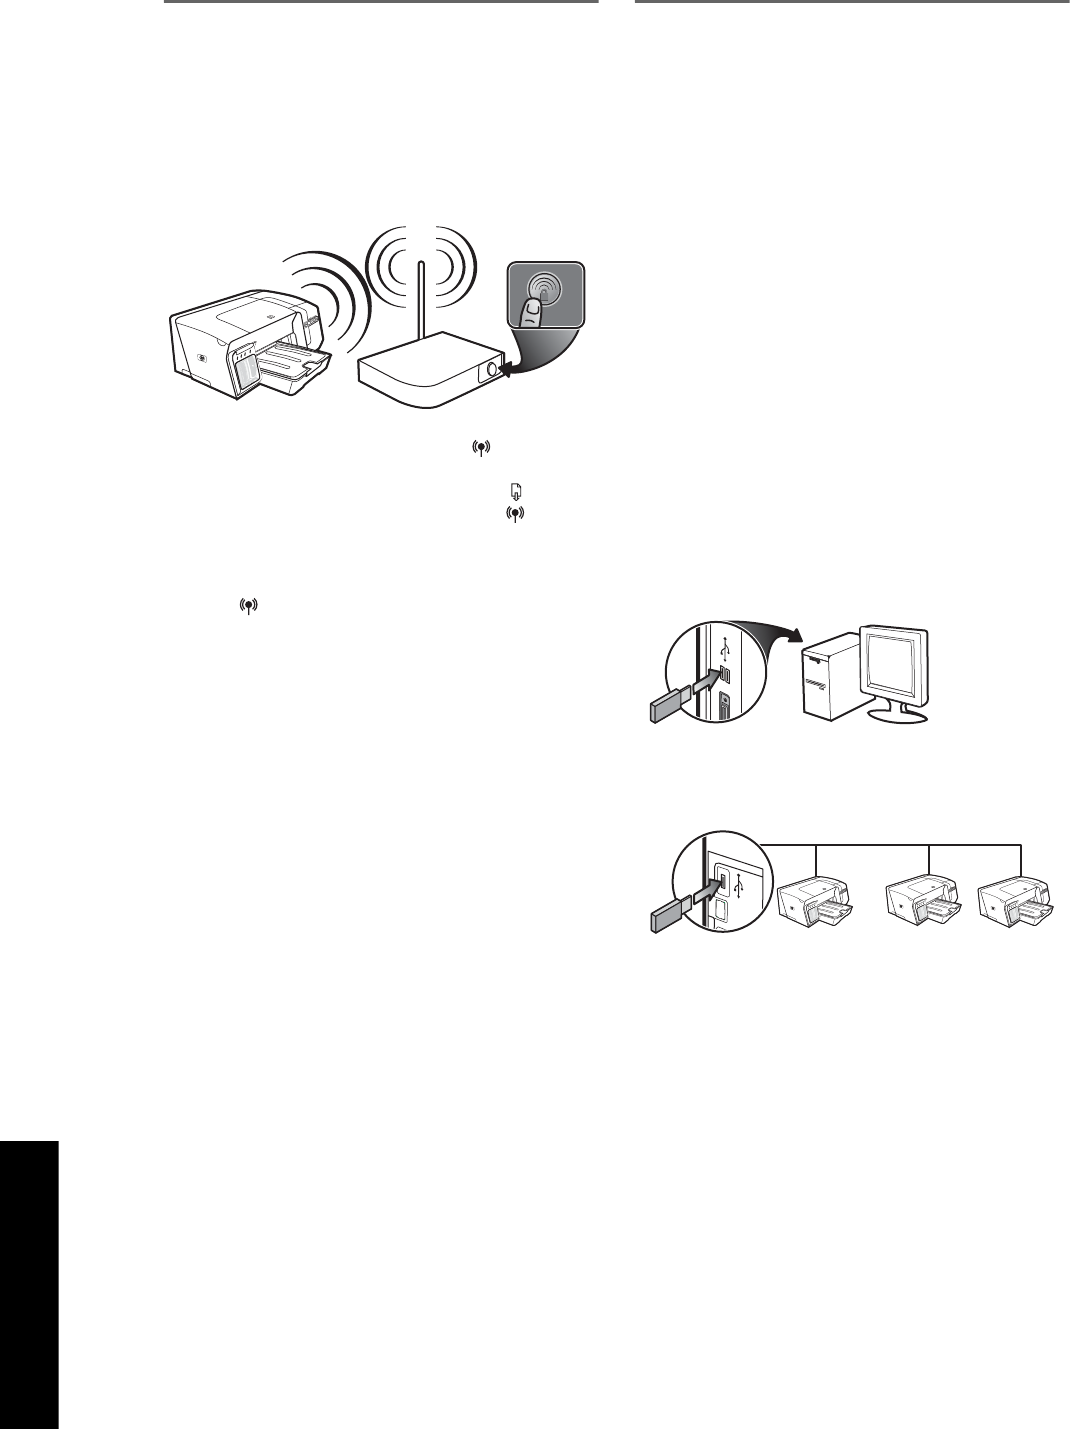
Nederlands
52
Draadloze communicatie instellen
met SecureEasySetup (SES)
Als uw draadloze router geschikt is voor SES, volg dan de
volgende instructies om draadloze communicatie met
behulp van SES in te stellen.
1. Druk op de knop SES op de draadloze router.
2. Druk binnen 2 minuten op de knop
(Configuratiepagina) op de printer en houd deze
ingedrukt terwijl u eenmaal op de knop
(Doorgaan) drukt. Laat daarna de knop
(Configuratiepagina) los.
Het lampje Configuratiepagina knippert.
3. Wacht ongeveer 2 minuten en druk daarna op de
knop (Configuratiepagina) om de
configuratiepagina van de printer af te drukken en
te controleren of de SES-instellingen overeenkomen
met de routerinstellingen voor draadloze
communicatie.
Opmerking: als er geen verbinding tot stand wordt
gebracht, moet u de netwerkinstellingen van de
printer mogelijk opnieuw instellen (zie de
aanwijzingen onder “Configuratie-instellingen van
het netwerk opnieuw instellen” op pagina 53) en de
stappen herhalen. Zie ook “De instellingen voor de
draadloze communicatie controleren” op
pagina 53.
4. Sluit alle toepassingen die op het computersysteem
worden uitgevoerd.
5. Plaats de Starter-cd in het cd-romstation.
Als het cd-menu niet automatisch wordt geopend,
dubbelklikt u op het installatiepictogram op de
Starter-cd.
6. Klik in het cd-menu op Installeren en volg de
aanwijzingen op het scherm om de printersoftware
te installeren.
Draadloze communicatie instellen
voor meer printers (alleen voor
Windows)
De printer ondersteunt de Windows Connect Now™-
technologie, waarmee u op eenvoudige wijze meer
printers kunt instellen voor een draadloze verbinding.
Met de Wireless Configuration Utility exporteert u de
instellingen voor draadloze communicatie van de
computer naar een USB-flash-station en configureert u de
printers vervolgens met deze instellingen door het flash-
station in de USB-poort van elke printer te plaatsen.
1. Verwijder de beschermklep van de USB-
hostaansluiting van de printer.
2. Plaats de Starter-cd in het cd-romstation.
Als het cd-menu niet automatisch wordt geopend,
dubbelklikt u op het installatiepictogram op de
Starter-cd.
3. Klik in het cd-menu op Hulpprogramma’s en klik
vervolgens op Wireless Configuration Utility.
4. Volg de aanwijzingen op het scherm en sluit het
USB-flash-station op de USB-poort aan wanneer dit
wordt gevraagd. De configuratie-instellingen voor
het draadloze netwerk worden opgeslagen op het
flash-station.
5. Volg de aanwijzingen op het scherm en sluit het
USB-flash-station aan op elke printer die u aan het
netwerk wilt toevoegen.

Nederlands
53
Problemen met draadloze communicatie oplossen
Voer één of meer van de volgende taken uit als de printer niet met het netwerk kan communiceren na de installatie
van de draadloze communicatie en de software.
De instellingen voor de draadloze
communicatie controleren
•Controleer of de kaart voor draadloze communicatie
van de computer is ingesteld op het juiste draadloze
profiel. Een draadloos profiel is een verzameling
netwerkinstellingen die uniek zijn voor een bepaald
netwerk. Een enkele draadloze kaart kan meerdere
draadloze profielen hebben (bijvoorbeeld een voor
een privénetwerk en een voor een zakelijk netwerk).
Open het configuratieprogramma voor de
netwerkkaart die op de computer is geïnstalleerd en
controleer of het geselecteerde profiel het profiel van
het netwerk van de printer is.
•Controleer of de netwerkinstellingen van de printer
overeenkomen met die van het netwerk. Voer een
van de volgende handelingen uit om de instellingen
voor uw netwerk te vinden:
•Infrastructuurcommunicatie: open het
configuratieprogramma voor het draadloze
toegangspunt van het netwerk (Wireless Access
Point, WAP).
•Adhoc-communicatie: Open het
configuratieprogramma voor de netwerkkaart
die op uw computer is geïnstalleerd.
•Vergelijk de netwerkinstellingen met de instellingen
op de configuratiepagina van de printer (zie “Een
configuratiepagina afdrukken” op pagina 49) en
noteer eventuele verschillen. Onder andere de
volgende problemen zijn mogelijk:
• Er worden hardware-adressen (MAC-adressen)
gefilterd door het draadloze toegangspunt.
Zie “Hardware-adressen toevoegen aan een
WAP (Wireless Access Point)” op pagina 53.
• Mogelijk is een van de volgende
printerinstellingen onjuist:
communicatiemethode, netwerknaam (SSID),
kanaal (alleen netwerken in adhocmodus),
verificatietype, codering. Zie “Instellingen van
een 802.11-draadloos netwerk” op pagina 50.
• Druk een document af. Als het document nog
steeds niet wordt afgedrukt, stelt u de
netwerkinstellingen van de printer opnieuw in
(zie “Configuratie-instellingen van het netwerk
opnieuw instellen” op pagina 53) en installeert
u de printersoftware opnieuw (zie “De printer
instellen voor draadloze communicatie
(HP Officejet Pro K550dtwn)” op pagina 50).
Als de instellingen voor het draadloze netwerk correct
zijn, is de computer mogelijk verbonden met een ander
draadloos netwerk. Controleer of de computer is
verbonden met hetzelfde draadloze netwerk als de printer.
Gebruikers kunnen dit controleren door de instellingen
voor draadloze communicatie op hun respectievelijke
computers te controleren. Zorg er daarnaast voor dat de
computers toegang hebben tot het draadloze netwerk.
Als de instellingen voor draadloze communicatie niet
correct zijn, volgt u deze stappen om de
netwerkinstellingen van de printer te corrigeren:
1. Sluit de printer met een netwerkkabel aan op het
netwerk of gebruik de meegeleverde cross-kabel om
de printer op de computer aan te sluiten.
2. Open de ingebouwde webserver van de printer.
3. Klik op het tabblad Netwerkmogelijkheden en
vervolgens op Wireless (802.11) in het
linkerdeelvenster.
4. Gebruik de wizard Wireless Setup op het tabblad
Wireless Setup om de printerinstellingen aan te
passen aan de netwerkinstellingen.
5. Sluit de ingebouwde webserver van de printer af en
koppel de netwerkkabel los van de printer.
6. Verwijder de printersoftware volledig en installeer
deze daarna opnieuw.
Hardware-adressen toevoegen aan
een WAP (Wireless Access Point)
MAC-filter is een beveiligingsfunctie waarbij een
draadloos toegangspunt (Wireless Access Point, WAP)
wordt geconfigureerd met een lijst met MAC-adressen
(ook wel ’hardware-adressen’ genoemd) van apparaten
die via de WAP toegang mogen krijgen tot het netwerk.
Als de WAP niet over het hardwareadres beschikt van een
apparaat dat toegang tot het netwerk probeert te krijgen,
wordt de toegang tot het netwerk door de WAP
geweigerd. Als de WAP MAC-adressen filtert, moet het
MAC-adres van de printer worden toegevoegd aan de
WAP-lijst met geaccepteerde MAC-adressen.
1. Druk op de knop / (Configuratiepagina)
om de configuratiepagina af te drukken.
2. Open het configuratieprogramma van de WAP en
voeg het hardware-adres van de printer toe aan de
lijst met geaccepteerde MAC-adressen.
Configuratie-instellingen van het
netwerk opnieuw instellen
Als de printer nog steeds niet kan communiceren met het
netwerk, stelt u de netwerkinstellingen van de printer
opnieuw in.
1. Houd de knop / (Configuratiepagina)
ingedrukt, druk driemaal op (Doorgaan) en laat
de knop / (Configuratiepagina) los.
Het Aan/Uit-lampje knippert enkele seconden.
Wacht tot het Aan/Uit-lampje ononderbroken
brandt.
2. Druk op de knop / (Configuratiepagina)
om de configuratiepagina af te drukken en te
controleren of de netwerkinstellingen opnieuw zijn
ingesteld. Standaard is de naam van het netwerk
(SSID) hpsetup en de communicatiemethode adhoc.

Nederlands
54
Beperkte garantie van Hewlett-Packard
Geldigheid van beperkte garantiey
1. Hewlett-Packard verstrekt aan de eindgebruiker de garantie dat
de bovenvermelde producten van HP vrij zijn van materiaal- en
fabricagefouten gedurende de bovenvermelde tijdsduur die
begint op de dag van aankoop door de klant.
2. Voor softwareproducten is de beperkte garantie van HP alleen
van toepassing op programmeringsinstructies die niet kunnen
worden uitgevoerd. HP garandeert niet dat de werking van een
product ononderbroken of vrij van fouten is.
3. De beperkte garantie van HP geldt alleen voor defecten die zich
voordoen als resultaat van normaal gebruik van het product en is
niet van toepassing bij andere problemen, met inbegrip van
defecten die het resultaat zijn van:
a. Verkeerd of ondeskundig onderhoud of aanpassing
b. Software, informatiedragers, onderdelen of benodigdheden
die niet door HP worden geleverd of ondersteund
c. Gebruik dat niet in overeenstemming is met de specificaties
van het product
d. Niet-geautoriseerde aanpassing of misbruik
4. Voor HP-printerproducten is het gebruik van een niet door HP
vervaardigde of nagevulde inktpatroon niet van invloed op de
garantie aan de klant of op een contract voor ondersteuning dat
tussen de klant en HP is gesloten. Als defecten of beschadigingen
aan de printer echter kunnen worden toegeschreven aan het
gebruik van een niet door HP vervaardigde of nagevulde
inktpatroon, zal HP de gebruikelijke kosten voor arbeidsuren en
materiaal voor het repareren van de printer voor het betreffende
defect of de betreffende beschadiging in rekening brengen.
5. Als HP tijdens de garantieperiode op de hoogte wordt gebracht
van een defect van een product dat onder de garantie van HP
valt, wordt het defecte product door HP gerepareerd of
vervangen.
6. Als een defect product dat onder de garantie van HP valt, niet
door HP gerepareerd of vervangen kan worden, zal HP de
aankoopprijs voor het defecte product terugbetalen binnen een
redelijke termijn nadat HP op de hoogte is gebracht van het
defect.
7. HP is niet verplicht het defecte product te repareren, vervangen of
vergoeden totdat het is geretourneerd aan HP.
8. Een vervangingsproduct mag nieuw of bijna nieuw zijn op
voorwaarde dat het ten minste dezelfde functionaliteit bezit als
het product dat vervangen wordt.
9. Producten van HP kunnen gereviseerde onderdelen, componenten
of materialen bevatten, waarvan de prestaties gelijkwaardig zijn
aan die van nieuwe producten.
10. De beperkte garantie van HP is geldig in elk land/elke regio
waar het gegarandeerde product van HP door HP wordt
gedistribueerd. Contracten voor extra garantieservice, zoals
service op de locatie van de klant, zijn verkrijgbaar bij ieder
erkend HP servicekantoor in landen/regio’s waar het product
door HP of een erkende importeur wordt gedistribueerd.
Beperking van garantie
IN ZOVERRE DOOR DE PLAATSELIJKE WET IS TOEGESTAAN,
VERSTREKKEN NOCH HP, NOCH DERDE LEVERANCIERS ENIGE
ANDERE GARANTIE OF VOORWAARDE, HETZIJ UITDRUKKELIJKE
OF STILZWIJGENDE GARANTIES OF VOORWAARDEN VAN
VERKOOPBAARHEID, BEVREDIGENDE KWALITEIT EN
GESCHIKTHEID VOOR EEN BEPAALD DOEL.
Beperking van aansprakelijkheid
1. In zoverre dit is toegestaan onder de lokale wetgeving zijn de
rechtsmiddelen die in deze garantieverklaring worden verstrekt,
de enige en exclusieve rechtsmiddelen van de klant.
2. IN ZOVERRE DIT IS TOEGESTAAN ONDER DE LOKALE
WETGEVING, MET UITZONDERING VAN DE SPECIFIEKE
BEPALINGEN IN DEZE GARANTIEVERKLARING, ZIJN HP EN
HAAR LEVERANCIERS IN GEEN GEVAL AANSPRAKELIJK VOOR
DIRECTE, INDIRECTE, SPECIALE OF INCIDENTELE SCHADE OF
GEVOLGSCHADE, ZIJ HET OP BASIS VAN CONTRACT,
DWANG OF ENIG ANDERE JURIDISCHE THEORIE, OOK NIET
ALS HP EN HAAR LEVERANCIERS OP DE HOOGTE ZIJN
GEBRACHT VAN DE MOGELIJKHEID VAN DERGELIJKE SCHADE.
Plaatselijke wet
1. Deze garantieverklaring verleent de klant bepaalde juridische
rechten. De klant kan over andere rechten beschikken die in de VS
van staat tot staat, in Canada van provincie tot provincie en elders
van land/regio tot land/regio kunnen verschillen.
2. In zoverre deze garantieverklaring niet overeenstemt met de lokale
wetgeving, zal deze garantieverklaring als aangepast en in
overeenstemming met dergelijke lokale wetgeving worden
beschouwd. Onder deze lokale wetgeving is het mogelijk dat
bepaalde afwijzingen en beperkingen in deze garantieverklaring
niet op de klant van toepassing zijn. Sommige staten in de
Verenigde Staten en bepaalde overheden buiten de Verenigde
Staten (inclusief provincies in Canada) kunnen bijvoorbeeld:
a. De afwijzingen en beperkingen in deze garantieverklaring
als tenietgedaan beschouwen ter bescherming van de
wettelijk voorgeschreven rechten van de klant (bijvoorbeeld in
het Verenigd Koninkrijk);
b. De mogelijkheid van een fabrikant voor het doen gelden van
dergelijke afwijzingen of voorwaarden anderzijds beperken; of
c. De klant aanvullende rechten onder de garantie bieden, de
tijdsduur van stilzwijgende garanties bepalen die niet door
de fabrikant afgewezen kan worden, en beperkingen op de
tijdsduur van stilzwijgende garanties niet toestaan.
3. MET BETREKKING TOT CONSUMENTENTRANSACTIES IN
AUSTRALIË EN NIEUW-ZEELAND WORDEN DE WETTELIJK
VOORGESCHREVEN RECHTEN DIE VAN TOEPASSING ZIJN OP
DE AANKOOP VAN PRODUCTEN VAN HP AAN DERGELIJKE
KLANTEN, DOOR DE VOORWAARDEN IN DEZE
GARANTIEVERKLARING NIET TENIETGEDAAN, BEPERKT OF
VERANDERD, BEHALVE IN ZOVERRE DOOR DE WET IS
TOEGESTAAN, EN VORMEN DE VOORWAARDEN VAN DEZE
GARANTIEVERKLARING EEN AANVULLING OP
DEZE RECHTEN.
Product van HP Duur van beperkte garantie
Software 1 jaar
Accessoires 1 jaar
Inktpatronen 6 maanden*
Printkoppen 1 jaar*
Printerrandapparatuur (zie de volgende gegevens) 1 jaar
*Raadpleeg voor meer gedetailleerde informatie over garantie www.hp.com/support/inkjet_warranty.
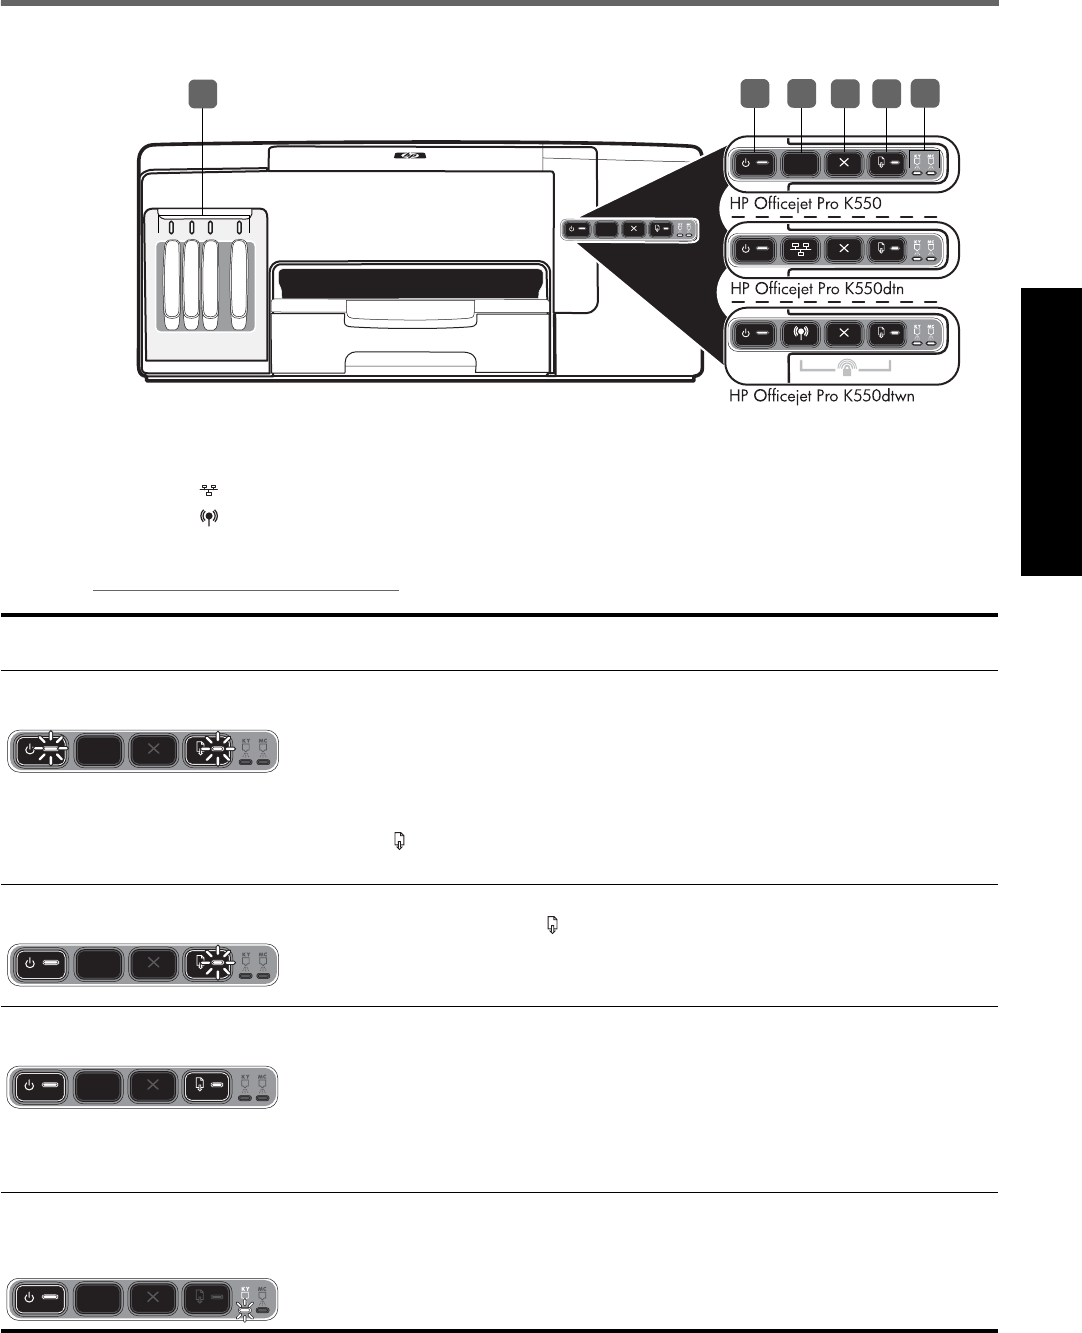
Italiano
55
Significato delle spie del pannello di controllo
Per ulteriori informazioni, visitare il sito Web dell’assistenza del prodotto all’indirizzo
www.hp.com/support/officejetprok550.
1) Pulsante e spia Accensione
2) Pulsante Pagina di configurazione
HP Officejet Pro K550dtn
HP Officejet Pro K550dtwn
3) Pulsante Annulla
4) Pulsante e spia Riavvia
5) Spie Testine di stampa
6) Spie Cartucce di stampa
624
15
3
Schema delle spie del pannello
di controllo Spiegazione e azione consigliata
La spia Accensione e la spia Riavvia
lampeggiano. Il supporto di stampa è inceppato nella stampante.
•Rimuovere tutti i supporti di stampa dal vassoio di raccolta. Individuare ed eliminare
l’inceppamento. Nella Guida in linea, consultare “Eliminazione degli inceppamenti”.
Il carrello della stampante si è bloccato.
•Aprire il coperchio superiore e rimuovere le eventuali ostruzioni
(ad esempio, supporti inceppati).
•Premere (pulsante Riavvia) per continuare la stampa.
•Se l’errore persiste, spegnere e riaccendere la stampante.
La spia Accensione è accesa e la
spia Riavvia lampeggia. La carta nella stampante è esaurita.
•Caricare la carta e premere (pulsante Riavvia).
La spia Accensione e quella Riavvia
sono accese. Un coperchio non è stato chiuso completamente.
•Assicurarsi che tutti i coperchi siano completamente chiusi.
Il pannello di accesso posteriore o l’unità duplex automatico è mancante o non è stato
inserito correttamente.
•Assicurarsi che il pannello di accesso posteriore (HP Officejet Pro K550) o l’unità
duplex (HP Officejet Pro K550dtn/K550dtwn) sia inserito completamente sul retro
della stampante.
La spia Accensione è accesa e una
o più spie Testine di stampa
lampeggiano.
Una o più testine di stampa sono mancanti.
•Installare la testina di stampa indicata e riprovare a stampare.
•Se l’errore persiste, sostituire la testina di stampa specificata.
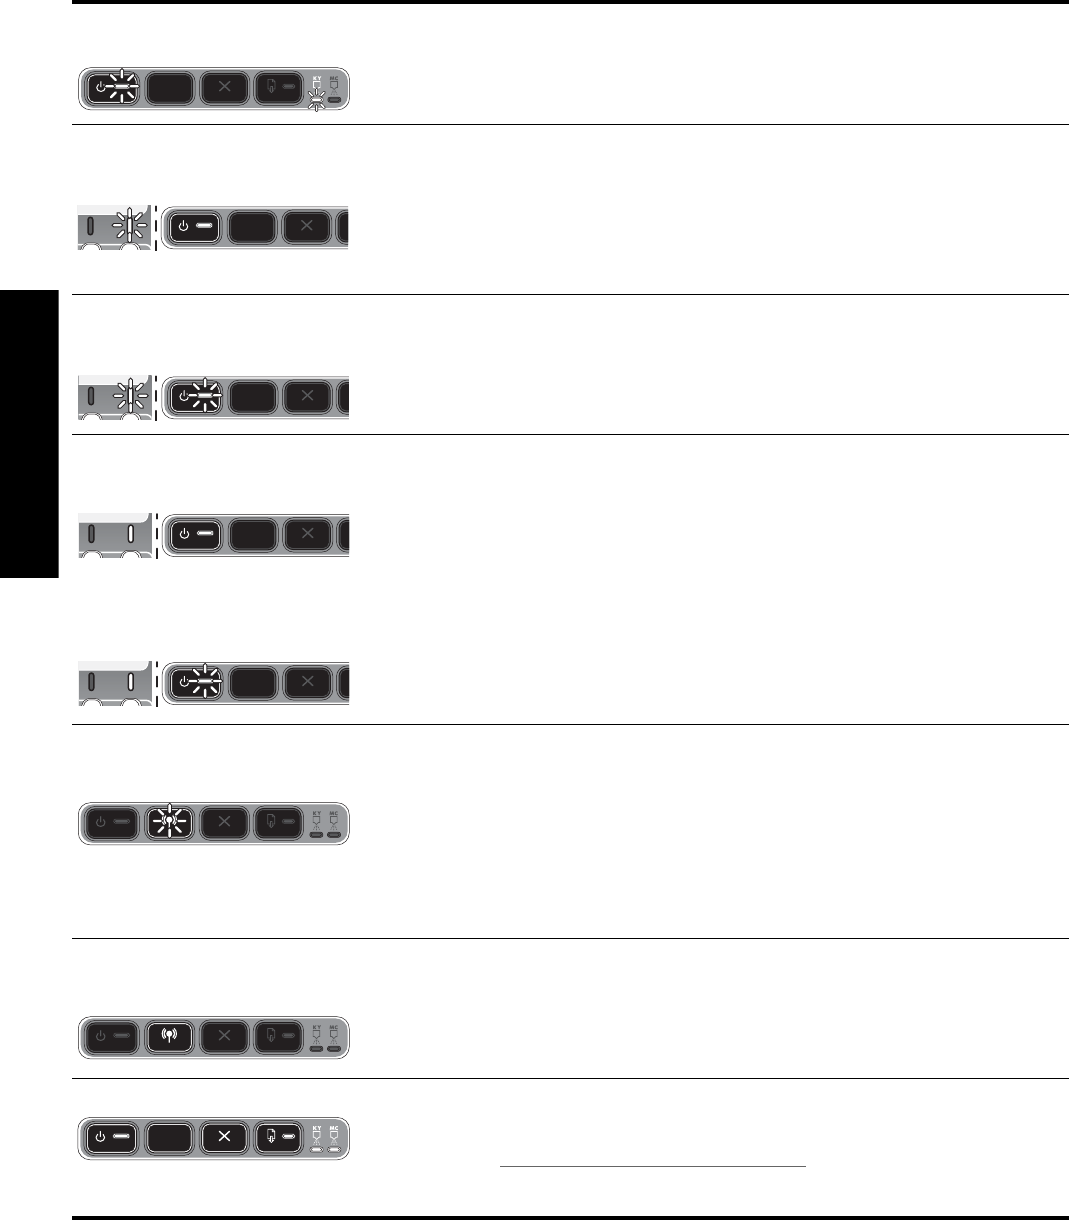
Italiano
56
La spia Accensione e una o più spie
Testine di stampa lampeggiano. Una o più testine di stampa sono difettose o richiedono assistenza.
•Assicurarsi che la testina di stampa indicata sia correttamente installata
e riprovare a stampare.
•Se l’errore persiste, sostituire la testina di stampa specificata.
La spia Accensione è accesa e una
o più spie delle cartucce di stampa
lampeggiano.
Una o più cartucce di stampa risultano mancanti.
•Installare la cartuccia di stampa indicata e riprovare a stampare.
•Se l’errore persiste, sostituire la cartuccia di stampa specificata.
Una o più cartucce di stampa sono esaurite e devono essere sostituite per
continuare a stampare.
•Sostituire la cartuccia di stampa indicata.
La spia Accensione e una o più spie
delle cartucce di stampa
lampeggiano.
Una o più cartucce di stampa sono difettose o richiedono assistenza.
•Assicurarsi che la cartuccia di stampa indicata sia correttamente installata
e riprovare a stampare.
•Se l’errore persiste, sostituire la cartuccia di stampa specificata.
La spia Accensione è accesa e una
o più spie delle cartucce di stampa
sono accese.
La spia Accensione lampeggia e
una o più spie delle cartucce di
stampa sono accese.
Una o più cartucce di stampa sono in esaurimento e devono essere sostituite al più presto.
•Nessuna azione da eseguire.
La spia Pagina di configurazione
lampeggia.
(HP Officejet Pro K550dtwn)
Si sta verificando uno dei seguenti processi:
•La stampante è in fase di inizializzazione per la comunicazione senza fili.
•Se per l’impostazione della stampante si utilizza SecureEasySetup (SES), la stampante
potrebbe tentare di connettersi alla rete senza fili.
•Se per impostare la stampante si utilizza Windows Connect Now™, la stampante sta
ricevendo informazioni wireless dall’unità flash USB.
Tali processi elencati richiedono meno di 2 minuti.
•Nessuna azione da eseguire.
La spia Pagina di configurazione è
accesa.
(HP Officejet Pro K550dtwn)
La stampante è in modalità di comunicazione senza fili.
•Nessuna azione da eseguire.
Tutte le spie sono accese. Si è verificato un errore irreversibile.
•Scollegare tutti i cavi, ad esempio il cavo di alimentazione, il cavo di rete e il cavo
USB, attendere circa 20 secondi e ricollegare i cavi. Se il problema persiste, visitare il
sito Web HP (www.hp.com/support/officejetprok550) per ottenere informazioni
aggiornate sulla risoluzione dei problemi oppure soluzioni correttive e aggiornamenti
del prodotto.

Italiano
57
Risoluzione dei problemi
In questa sezione vengono forniti suggerimenti per la risoluzione di alcuni dei più comuni problemi associati
all’installazione hardware e software.
Per informazioni aggiornate, leggere il file Readme e le note di rilascio oppure visitare il sito Web dell’assistenza del
prodotto all’indirizzo www.hp.com/support/officejetprok550.
Problemi durante la stampa di una
pagina di allineamento
Controllare la stampante e verificare
quanto segue:
•Assicurarsi che la spia Accensione sia accesa e non
lampeggi. Quando la stampante viene accesa per
la prima volta, impiega circa 45 secondi per
riscaldarsi.
•Assicurarsi che lo stato della stampante sia Pronto
e che nessun’altra spia sul pannello di controllo sia
accesa o lampeggiante. Se alcune spie sono accese
o lampeggiante, vedere “Significato delle spie del
pannello di controllo“ a pagina 55.
•Assicurarsi che il cavo di alimentazione e gli altri
cavi siano funzionanti e che siano collegati
saldamente alla stampante.
•Assicurarsi di avere rimosso tutti i nastri e i materiali
di imballo dalla stampante.
•Assicurarsi che il pannello di accesso posteriore
(HP Officejet Pro K550) o l’unità duplex
(HP Officejet Pro K550dtn/K550dtwn) sia bloccato
in posizione.
•Assicurarsi di avere caricato correttamente la carta
nel vassoio e che non vi siano inceppamenti nella
stampante.
•Assicurarsi di aver rimosso le coperture protettive
arancione da ciascuna testina di stampa.
•Assicurarsi di avere installato correttamente le testine
e le cartucce di stampa nei relativi alloggiamenti
codificati in colore. Premere con decisione su
ciascuna di esse per assicurare un contatto
appropriato.
•Assicurarsi di avere chiuso il fermo delle testine di
stampa e tutti i coperchi.
Problemi durante l’installazione
del software
Effettuare i seguenti controlli:
•Assicurarsi che il computer soddisfi i requisiti di
sistema. Vedere la Guida in linea sul CD di
avviamento.
•Prima di installare il software su un computer
Windows, verificare che tutti gli altri programmi
siano chiusi.
•Se il computer non riconosce il percorso dell’unità
del CD, accertarsi di avere specificato la lettera di
unità giusta.
•Se il computer non riconosce il CD di avviamento
nella relativa unità, controllare che il CD non sia
danneggiato. È possibile scaricare il driver di
stampa dal sito Web all’indirizzo www.hp.com/
support/officejetprok550.
•In Gestione periferiche di Windows, accertarsi che
i driver USB non siano stati disabilitati.
•Se si utilizza Windows e il computer non è in grado
di rilevare la stampante, eseguire l’utilità di
disinstallazione (Util\Scrubber\Uninstall.exe sul CD
di avviamento) per eseguire la disinstallazione
completa del driver di stampa. Riavviare il computer
e reinstallare il driver di stampa.
Problemi di collegamento alla rete
Nota: dopo aver corretto il problema, eseguire
nuovamente il programma di installazione.
Risoluzione dei problemi generali di rete
•Se non è possibile installare il software della
stampante, verificare quanto indicato di seguito:
• Assicurarsi che il collegamento del cavo al
computer e alla stampante sia saldo.
• Assicurarsi che la rete sia operativa e che l’hub
di rete sia acceso.
• Assicurarsi di avere chiuso o disabilitato tutte le
applicazioni, inclusi i programmi antivirus.
• Assicurarsi di avere installato la stampante nella
stessa sottorete dei computer che la
utilizzeranno.
• Se la stampante non viene rilevata dal
programma di installazione, stampare la pagina
di configurazione (vedere “Per stampare una
pagina di configurazione“ a pagina 58)
e immettere manualmente l’indirizzo IP nel
programma di installazione.
• Se si utilizza un computer Windows, assicurarsi
che le porte di rete create nel driver della
stampante corrispondano all’indirizzo IP della
stampante:
1) Stampare la pagina di configurazione della
stampante.
2) Dal desktop di Windows, fare clic su Start,
selezionare Impostazioni, quindi fare clic su
Stampanti o Stampanti e fax.
3) Fare clic con il pulsante destro del mouse
sull’icona della stampante, selezionare Proprietà
e fare clic sulla scheda Porte.
4) Selezionare la porta TCP/IP della stampante
e fare clic su Configura porta.

Italiano
58
5) Controllare l’indirizzo IP della finestra di
dialogo e verificare che corrisponda a quello
indicato nella pagina di configurazione. Se gli
indirizzi IP sono diversi, modificare quello della
finestra di dialogo in modo che corrisponda a
quello della pagina di configurazione.
6) Fare due volte clic su OK per salvare le
impostazioni e chiudere le finestre di dialogo.
Problemi di collegamento a una rete con
fili
•Se la spia Collegamento del connettore di rete non
si accende, assicurarsi che le condizioni riportate
nella sezione “Risoluzione dei problemi generali di
rete” siano state soddisfatte.
•Benché non sia consigliabile assegnare alla
stampante un indirizzo IP statico, con tale procedura
si potrebbero risolvere alcuni problemi di
installazione, come ad esempio un conflitto con un
firewall personalizzato. Per ulteriori informazioni,
consultare la Guida in linea.
Risoluzione dei problemi e strumenti di configurazione
Per la risoluzione dei problemi o la configurazione della stampante, sono a disposizione i seguenti strumenti.
Per ulteriori informazioni su tali strumenti, consultare la Guida in linea sul CD di avviamento.
Pagina di configurazione
Utilizzare la pagina di configurazione per visualizzare
le impostazioni correnti della stampante, per la
risoluzione dei problemi di stampa e per verificare
l’installazione degli accessori opzionali, ad esempio
l’unità duplex. La pagina di configurazione include
inoltre un registro degli eventi recenti. Se la stampante
è collegata a una rete, viene stampata un’ulteriore
pagina di configurazione di rete in cui sono indicate le
impostazioni di rete della stampante.
In caso di necessità, prima di contattare HP, stampare la
pagina di configurazione della stampante.
Per stampare una pagina di
configurazione
•HP Officejet Pro K550: Tenere premuto (pulsante
Accensione), premere una volta (pulsante
Annulla) e rilasciare (pulsante Accensione).
HP Officejet Pro K550dtn/K550dtwn: Premere /
(pulsante Pagina di configurazione).
Server Web incorporato
Se la stampante è collegata a una rete, sarà possibile
utilizzare il server Web incorporato per visualizzare le
informazioni sullo stato, per modificare le impostazioni
e per gestire la stampante dal computer.
Per aprire il server Web incorporato
In un browser Web supportato, digitare l’indirizzo IP
assegnato alla stampante. Ad esempio, se l’indirizzo IP
è 123.123.123.123, digitare il seguente indirizzo
nel browser Web:
http://123.123.123.123
L’indirizzo IP della stampante è visualizzato nella
pagina di configurazione.
Dopo aver aperto il server Web incorporato,
sarà possibile creare un segnalibro in modo da poterlo
individuare rapidamente al successivo accesso.

Italiano
59
Impostazione della stampante per la comunicazione wireless
(HP Officejet Pro K550dtwn)
È possibile impostare la stampante per la comunicazione wireless utilizzando una delle seguenti modalità:
•Utilizzando un cavo incrociato o un cavo di rete
Vedere “Impostazione della stampante per la comunicazione wireless“ a pagina 60.
•Utilizzando SES (SecureEasySetup)
Vedere “Impostazione di una comunicazione wireless utilizzando SecureEasySetup (SES)“ a pagina 61.
•Utilizzando il programma Windows Connect Now (WCN)
Vedere “Impostazione di una comunicazione wireless per più stampanti (solo per Windows)“ a pagina 61.
Nota:
•In caso di problemi, vedere “Risoluzione dei
problemi relativi alla comunicazione wireless“ a
pagina 62.
•Per utilizzare la stampante con una connessione
senza fili, è necessario eseguire almeno una volta il
programma di installazione dal CD di avviamento
e creare una connessione senza fili.
•Assicurarsi che la stampante non sia collegata alla
rete con un cavo di rete.
•Il dispositivo di invio deve disporre delle funzionalità
802.11 integrate o essere dotato di un scheda
senza fili 802.11.
•Si consiglia di installare la stampante e i computer
che utilizzano la stampante nella stessa sottorete.
Prima di installare il software della stampante,
potrebbe essere necessario recuperare le
impostazioni della rete. Per ottenere queste
informazioni, rivolgersi agli amministratori di
sistema oppure completare le seguenti attività:
•Ottenere il nome di rete (SSID) e la modalità di
comunicazione (Infrastruttura o Ad hoc) dall’utilità di
configurazione per il WAP (Wireless Access Point)
di rete o la scheda di rete del computer.
•Identificare il tipo di cifratura utilizzato dalla rete,
ad esempio WEP (Wired Equivalent Privacy) o WPA
(Wi-Fi® Protected Access).
•Individuare la password di sicurezza o la chiave di
cifratura del dispositivo wireless.
Descrizione delle impostazioni
wireless 802.11
Nome di rete (SSID)
Per impostazione predefinita, la stampante effettua la
ricerca del nome di rete o Service Set Identifier (SSID)
denominato “hpsetup”. È possibile che la rete disponga
di un SSID diverso.
Modalità di comunicazione
Sono disponibili due opzioni per la modalità di
comunicazione:
Ad hoc: In una rete Ad hoc, la stampante viene
impostata sulla modalità di comunicazione Ad hoc che
consente la comunicazione diretta con altri dispositivi
wireless senza utilizzare un WAP:
Tutti dispositivi della rete Ad hoc devono:
•Essere compatibili 802.11.
•Utilizzare la modalità di comunicazione Ad hoc.
•Disporre dello stesso nome di rete (SSID).
•Posizionarsi sugli stessi sottorete e canale.
•Avere le stesse impostazioni di sicurezza 802.11.
Infrastruttura (consigliata): in una rete Infrastruttura, la
stampante è impostata sulla modalità di comunicazione
Infrastruttura che consente la comunicazione con gli altri
dispositivi della rete tramite un WAP, indipendentemente
se i dispositivi siano cablati o wireless. Sulle reti di
piccole dimensioni i WAP fungono da router o gateway.
Impostazioni di protezione
Per esaminare le impostazioni della stampante
disponibili, consultare la pagina di configurazione della
rete nella sezione “Informazioni sulla pagina di
configurazione” nella Guida in linea.
Per ulteriori informazioni sulla protezione wireless,
visitare il sito Web all’indirizzo www.weca.net/
opensection/pdf/whitepaper_wifi_security4-29-03.pdf.
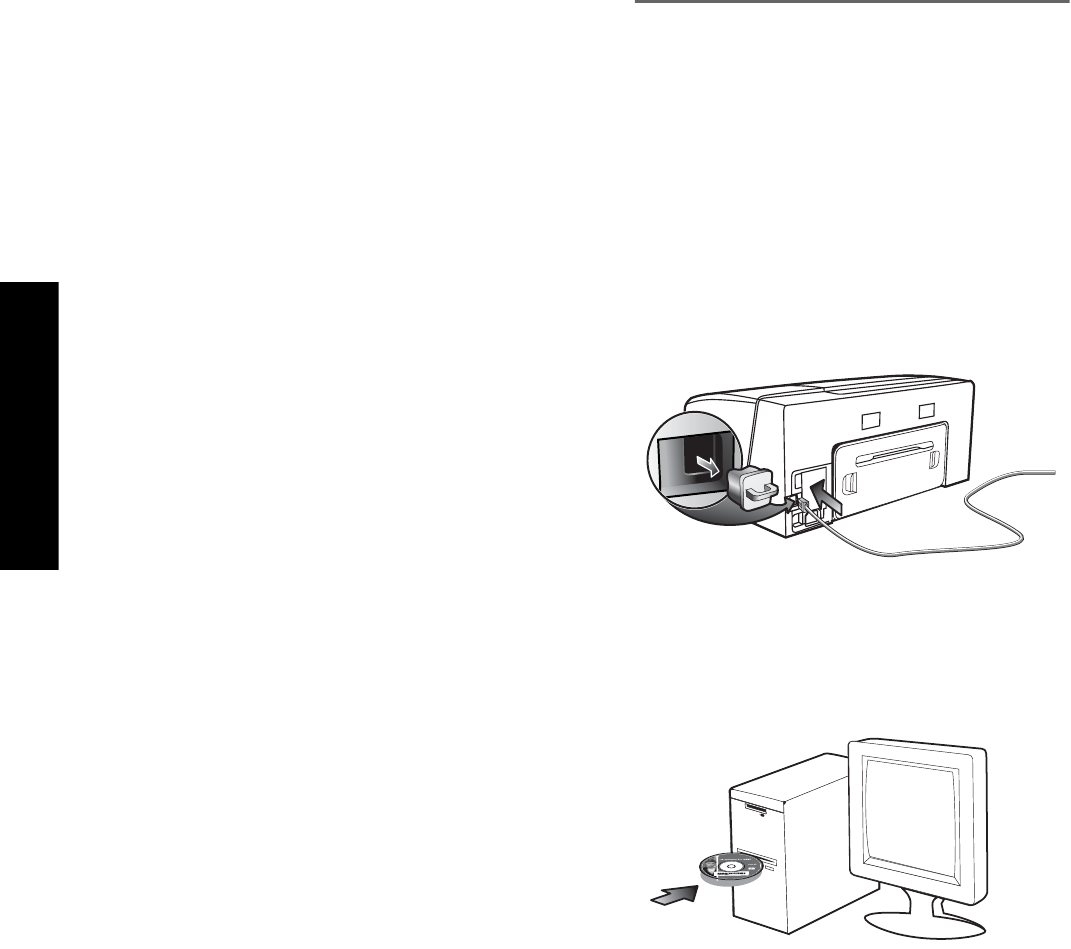
Italiano
60
Autenticazione di rete: L’impostazione di fabbrica
predefinite della stampante è ‘Apri‘ che non richiede
misure di sicurezza per l’autorizzazione o la cifratura.
I valori possibili sono ‘Aperto quindi condiviso’,
‘Condiviso’ e ‘WPA-PSK’ (Wi-Fi® Protected Access
Pre-Shared Key).
•WPA aumenta il livello di protezione dati e il
controllo degli accessi sulle reti Wi-FI esistenti
e future e risolve tutti i punti deboli di WEP,
il meccanismo di sicurezza nativo originale nello
standard 802.11.
•WPA2 rappresenta la seconda generazione della
sicurezza WPA e offre alle imprese e agli utenti
Wi-Fi un livello elevato di protezione consentendo
l’accesso alle reti wireless solo agli utenti autorizzati.
Cifratura dei dati:
•Il protocollo Wired Equivalent Privacy (WEP)
garantisce la sicurezza cifrando i dati inviati tramite
onde radio da un dispositivo senza fili a un altro. I
dispositivi presenti in una rete compatibile con
questo protocollo utilizzano le chiavi WEP per
codificare i dati. Se la rete utilizza il protocollo WEP,
è necessario conoscere le chiavi WEP utilizzate.
•WPA utilizza il protocollo TKIP (Temporal Key
Integrity Protocol) per la cifratura e l’autenticazione
802.1X con uno dei tipi EAP (Extensible
Authentication Protocol) standard attualmente
disponibili.
•WPA2 fornisce un nuovo schema di cifratura, ovvero
lo schema AES (Advanced Encryption Standard).
Lo schema AES viene definito in modalità CCM
(counter cipher-block chaining) e supporta la serie
IBSS (Independent Basic Service Set) per abilitare la
protezione tra le workstation client funzionanti in
modalità Ad hoc.
Impostazione della stampante per la
comunicazione wireless
Per Windows
1. Rimuovere il coperchio di protezione dal connettore
di rete della stampante.
2. Scegliere una delle seguenti operazioni:
• Collegare temporaneamente la stampante al
computer mediante il cavo incrociato fornito con
la stampante.
• Collegare temporaneamente la stampante a una
porta disponibile nel commutatore, nel router
o nell’hub di rete (venduto separatamente).
3. Chiudere tutte le applicazioni in esecuzione
sul computer.
4. Inserire il CD di avviamento nell’unità CD.
Se il menu del CD non si avvia automaticamente,
fare doppio clic sull’icona di installazione del CD
di avviamento.
5. Dal menu del CD, fare clic su Installa e seguire le
istruzioni visualizzate.
6. Nella schermata Tipo di collegamento, selezionare
l’opzione per il collegamento in rete e fare clic
su Avanti.
7. Per completare l’installazione seguire le istruzioni
visualizzate e, quando viene richiesto, scollegare
il cavo.
Per Mac OS
1. Aprire l’Impostazione Assistenza AirPort e seguire le
istruzioni visualizzate per l’installazione in una rete
wireless esistente (hpsetup).
2. Fare doppio clic sull’icona del programma di
installazione sul CD di avviamento e seguire le
istruzioni visualizzate.
3. Quando viene richiesto, fare clic su Aprire Centro
Stampa per aggiungere la stampante.
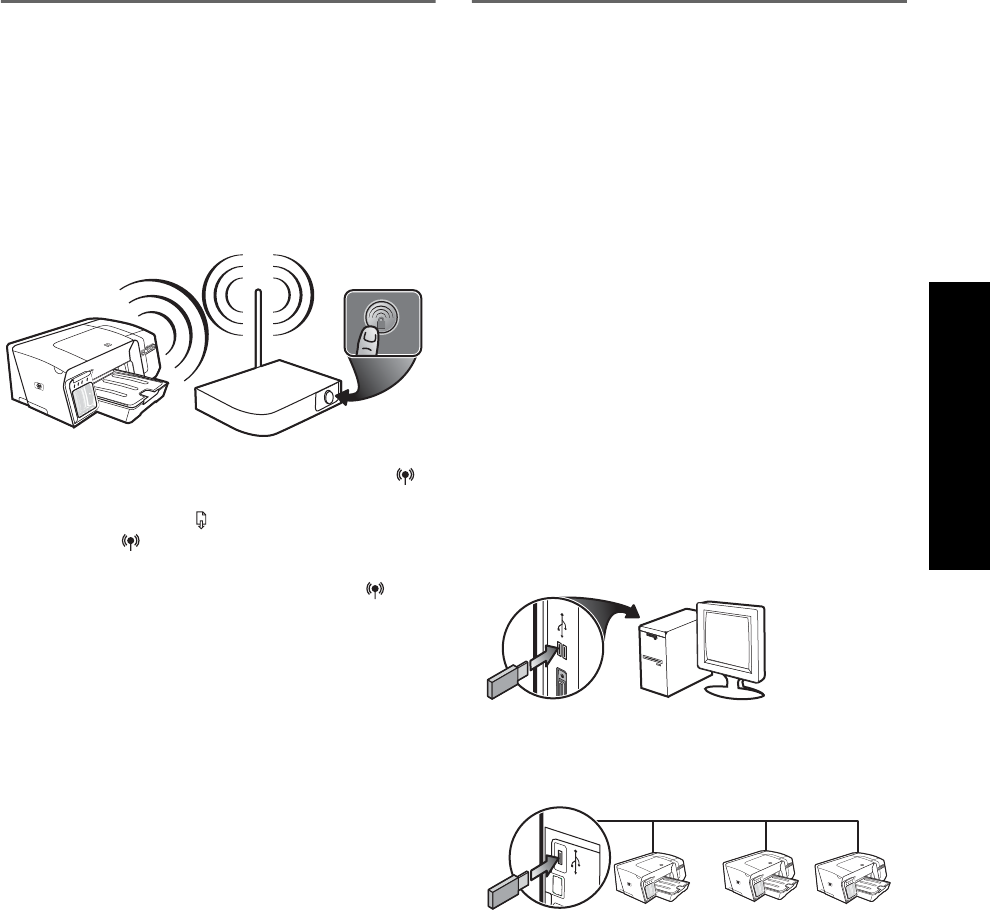
Italiano
61
Impostazione di una comunicazione
wireless utilizzando
SecureEasySetup (SES)
Se il router wireless supporta l’utilizzo di SES,
per effettuare l’impostazione utilizzando SES,
attenersi alle seguenti istruzioni.
1. Premere il tasto SES sul router senza fili.
2. Durante i 2 minuti successivi, tenere premuto il
(pulsante Pagina di configurazione) sulla stampante,
premere una volta il (pulsante Riavvia), quindi
rilasciare il (pulsante Pagina di configurazione).
La spia di Pagina di configurazione lampeggia.
3. Attendere circa 2 minuti, quindi premere il
(pulsante Pagina di configurazione) per stampare la
pagina di configurazione della stampante e
verificare che le impostazioni SES corrispondano
alle impostazioni per la comunicazione wireless del
router.
Nota: se si verificano problemi di connessione,
potrebbe essere necessario ripristinare le
impostazioni di rete della stampante (vedere
“Ripristino delle impostazioni di configurazione
della rete“ a pagina 62) e ripetere la procedura.
Vedere anche “Controllo delle impostazioni della
comunicazione wireless“ a pagina 62.
4. Chiudere tutte le applicazioni in esecuzione
sul computer.
5. Inserire il CD di avviamento nell’unità CD.
Se il menu del CD non viene avviato
automaticamente, fare doppio clic sull’icona di
installazione del CD di avviamento.
6. Dal menu del CD, fare clic su Installa e seguire le
istruzioni visualizzate per installare il software della
stampante.
Impostazione di una comunicazione
wireless per più stampanti (solo per
Windows)
La stampante supporta la tecnologia Windows Connect
Now™ che consente all’utente di configurare in modo
semplice la comunicazione wireless per più stampanti.
Utilizzando l’Utilità di configurazione senza fili fornita,
esportare le impostazioni wireless del computer in
un’unità flash USB, quindi configurare le stampanti in
base a queste impostazioni inserendo l’unità flash nella
porta USB di ciascuna stampante.
1. Rimuovere il coperchio di protezione del connettore
host USB della stampante.
2. Inserire il CD di avviamento nell’unità CD.
Se il menu del CD non viene avviato
automaticamente, fare doppio clic sull’icona di
installazione del CD di avviamento.
3. Dal menu del CD, fare clic su Utilità, quindi fare clic
su Utilità di configurazione senza fili.
4. Seguire le istruzioni visualizzate e, quando viene
richiesto, collegare l’unità flash USB alla porta USB
del computer. Le impostazioni di configurazione
della rete wireless vengono salvate nell’ unità flash.
5. Seguire le istruzioni visualizzate e collegare l’unità
flash USB a ciascuna stampante che si desidera
aggiungere alla rete.

Italiano
62
Risoluzione dei problemi relativi alla comunicazione wireless
Una volta completata l’impostazione wireless e l’installazione del software, se la stampante non riesce a comunicare
con la rete, effettuare una o più delle seguenti attività.
Controllo delle impostazioni della
comunicazione wireless
•Assicurarsi che la scheda di rete senza fili del
computer sia impostata sul profilo senza fili corretto.
Un profilo senza fili consiste in una serie di
impostazioni univoche per una determinata rete.
Una singola scheda di rete senza fili può includere
vari profili senza fili (ad esempio, uno per la rete di
casa e una per quella dell’ufficio). Aprire l’utilità di
configurazione della scheda di rete installata nel
computer e assicurarsi che il profilo selezionato sia
quello adatto alla rete della stampante.
•Assicurarsi che le impostazioni di rete della
stampante corrispondano a quelle della rete.
Eseguire una delle seguenti operazioni per
individuare le impostazioni della rete:
•Modalità di comunicazione Infrastruttura:
aprire l’utilità di configurazione WAP.
•Modalità di comunicazione Ad hoc:
aprire l’utilità di configurazione della scheda di
rete installata sul computer.
•Confrontare le impsotazione della rete con quelle
riportate sulla pagina di configurazione della
stampante (vedere “Per stampare una pagina di
configurazione“ a pagina 58) e prendere nota delle
eventuali differenze. I problemi possibili
comprendono:
• Gli indirizzi hardware dei filtri WAP
(indirizzi MAC). Vedere “Aggiunta degli
indirizzi hardware a un WAP“ a pagina 62.
• Una delle seguenti impostazioni della stampante
potrebbe non essere corretta: modalità di
comunicazione, nome di rete (SSID), canale
(solo reti Ad hoc), tipo di autenticazione,
crittografia. Vedere “Descrizione delle
impostazioni wireless 802.11“ a pagina 59.
• Stampare un documento. Se il documento non
viene ancora stampato, ripristinare le
impostazioni di rete della stampante (vedere
“Ripristino delle impostazioni di configurazione
della rete“ a pagina 62) e reinstallare il software
della stampante (vedere “Impostazione della
stampante per la comunicazione wireless
(HP Officejet Pro K550dtwn)“ a pagina 59).
Se le impostazioni di rete wireless sono corrette,
è possibile che il computer sia stato associato a un’altra
rete wireless. Assicurarsi che il computer sia associato
alla stessa rete wireless della stampante.
A tale scopo, controllare le impostazioni di rete senza
fili dei computer degli utenti. Assicurarsi inoltre che i
computer dispongano dell’accesso alla rete senza fili.
Se le impostazioni di rete wireless non sono corrette,
per correggere le impostazioni della stampante,
attenersi alla seguente procedura:
1. Collegare la stampante alla rete con un cavo di rete
o al computer utilizzando il cavo incrociato fornito
con la stampante.
2. Aprire il server Web incorporato della stampante.
3. Fare clic sulla scheda Rete, quindi su Wireless
(802.11) nel riquadro a sinistra.
4. Utilizzare la procedura guidata Impostazione
wireless nella scheda Impostazione wireless per
modificare le impostazioni della stampante in modo
che corrispondano a quelle della rete.
5. Chiudere il server Web incorporato della stampante
e scollegare il cavo di rete dalla stampante.
6. Disinstallare completamente il software della
stampante, quindi installare di nuovo il software.
Aggiunta degli indirizzi hardware
aun WAP
Il filtro MAC è una funzione di sicurezza grazie alla
quale un WAP viene configurato con un elenco di
indirizzi MAC (noti anche come “indirizzi hardware”)
di dispositivi a cui è consentito l’accesso alla rete tramite
il WAP. Il WAP non consente l’accesso alla rete ai
dispositivi dei quali non dispone dell’indirizzo
hardware. Se il WAP filtra gli indirizzi MAC, l’indirizzo
MAC della stampante dovrà essere aggiunto all’elenco
degli indirizzi MAC accettati dal WAP.
1. Per stampare la pagina di configurazione, premere
/ (pulsante Pagina di configurazione).
2. Aprire l’utilità di configurazione WAP e aggiungere
l’indirizzo hardware della stampante all’elenco
degli indirizzi MAC accettati.
Ripristino delle impostazioni di
configurazione della rete
Se ancora non è possibile stabilire una comunicazione
tra la rete e la stampante, ripristinare le impostazioni
di rete della stampante.
1. Tenere premuto / (puslante Pagina di
configurazione), premere tre volte (pulsante
Riavvia), quindi rilasciare / (pulsante Pagina
di configurazione). La spia Accensione lampeggerà
per alcuni secondi. Attendere che la spia
Accensione si accenda.
2. Per stampare la pagina di configurazione e
verificare che le impostazioni di rete siano state
ripristinate, premere / (pulsante Pagina di
configurazione). Per impostazione predefinita,
il nome di rete SSID è “hpsetup” e la modalità di
comunicazione è “Ad hoc”.

Italiano
63
Dichiarazione di garanzia limitata
Hewlett-Packard
Misura della garanzia limitata
1. La Hewlett-Packard garantisce all’utente finale che i prodotti HP
specificati in questa sede sono esenti da difetti di materiale e di
manodopera per il periodo indicato in precedenza, a partire
dalla data di acquisto del prodotto da parte del cliente.
2. Per i prodotti software, la garanzia limitata di HP viene applicata
solo nel caso in cui non sia possibile eseguire le istruzioni di
programmazione. HP non garantisce tuttavia che il funzionamento
dei propri prodotti sarà ininterrotto e privo di errori.
3. La garanzia limitata di HP copre solo i difetti derivanti dall’utilizzo
regolare del prodotto e non prevede altri problemi, inclusi quelli
risultanti da:
a. Manutenzione o modifiche improprie.
b. Software, supporti, parti o materiali di consumo non
provenienti o non supportati dalla HP.
c. Funzionamento non previsto dalle specifiche del prodotto.
d. Modifica o abuso non autorizzati.
4. Per le stampanti HP, l’uso di una cartuccia di inchiostro non HP
o di una cartuccia ricaricata non compromette la garanzia per il
cliente o qualsiasi altro contratto di assistenza HP con il cliente
stesso. Tuttavia, qualora guasti o difetti alla stampante venissero
attribuiti all’uso di una cartuccia non HP o ricaricata, la HP
addebiterà i costi standard di tempo di manutenzione e materiale
per eliminare il suddetto guasto o difetto.
5. Se, durante il periodo di garanzia, HP riceve avviso di un difetto
di uno dei prodotti coperto dalla garanzia, HP riparerà o
sostituirà il prodotto a sua discrezione.
6. Se HP non è in grado di riparare o sostituire, come di pertinenza,
un prodotto difettoso in garanzia, HP provvederà entro un
periodo di tempo ragionevole dal ricevimento dell’avviso del
difetto a rimborsare il prezzo di acquisto del prodotto.
7. HP non è tenuta in alcun modo a riparare il prodotto, a sostituirlo
o a fornire un rimborso finché il cliente non restituisce il prodotto
difettoso.
8. Qualsiasi prodotto sostitutivo potrà essere nuovo o come nuovo,
fermo restando che le funzionalità saranno almeno equivalenti
a quelle del prodotto sostituito.
9. I prodotti HP possono contenere parti, componenti o materiali
rigenerati equivalenti per prestazioni a parti nuove.
10. La Dichiarazione della garanzia limitata di HP è valida in
qualsiasi Paese/regione in cui il prodotto HP specifico viene
distribuito da HP. I contratti per servizi di garanzia addizionali,
quali l’assistenza in loco, sono disponibili presso qualsiasi centro
di assistenza HP autorizzato nei Paesi/regioni in cui il prodotto
viene distribuito dalla HP o da un rivenditore autorizzato.
Limitazioni di garanzia
NELLA MISURA PREVISTA DALLE LEGGI LOCALI, NÉ LA HP E NÉ
I FORNITORI DI TERZE PARTI OFFRONO GARANZIA ALCUNA
O CONDIZIONI DI ALCUN TIPO, SIANO ESSE ESPRESSE O
IMPLICITE O CONDIZIONI DI COMMERCIABILITÀ, LIVELLO DI
QUALITÀ SODDISFACENTE ED IDONEITÀ AD UNO SCOPO
PARTICOLARE.
Limitazioni di responsabilità
1. Nella misura prevista dalle leggi locali, i rimedi previsti da questa
Dichiarazione di garanzia costituiscono gli unici a disposizione
del cliente.
2. NELLA MISURA PREVISTA DALLE LEGGI LOCALI, FATTA
ECCEZIONE PER LE OBBLIGAZIONI DEFINITE IN MODO
SPECIFICO IN QUESTA DICHIARAZIONE DI GARANZIA, IN
NESSUN CASO LA HP O I SUOI RIVENDITORI DI TERZE PARTI
SARANNO RITENUTI RESPONSABILI PER DANNI DIRETTI,
INDIRETTI, SPECIALI, FORTUITI O DERIVATI, SIA IN BASE A
CONTRATTO, ILLECITO O ALTRA TEORIA LEGALE CHE SU
AVVISO DELL’EVENTUALITÀ DI TALI DANNI.
Leggi locali
1. Questa Dichiarazione di garanzia offre al cliente diritti legali
specifici. Il cliente potrebbe godere di altri diritti che variano da
stato a stato negli Stati Uniti, da provincia a provincia in Canada
e da Paese/regione a Paese/regione nel resto del mondo.
2. Nella misura in cui questa Dichiarazione di garanzia risultasse in
contrasto con le leggi locali, verrà considerata modificata in
modo da renderla conforme a tali leggi. In base alle suddette
leggi vigenti, alcune dichiarazioni e limitazioni di questa
Dichiarazione di garanzia potrebbero non valere per il cliente.
Ad esempio, alcuni stati negli Stati Uniti, così come alcuni governi
fuori dagli Stati Uniti (incluse le province del Canada) potrebbero:
a. Impedire che le esclusioni e le limitazioni di questa
Dichiarazione di garanzia limitino i diritti dei consumatori
previsti dalla legge (ad esempio, nel Regno Unito);
b. Limitare altrimenti il diritto del produttore di applicare tali
esclusioni e limitazioni; oppure
c. Riconoscere al cliente ulteriori diritti derivanti dalla garanzia,
specificare la durata delle garanzie implicite che il produttore
dovrà accettare o consentire limitazioni sulla durata delle
garanzie implicite.
3. PER LE TRANSAZIONI CON I CLIENTI EFFETTUATE IN
AUSTRALIA E IN NUOVA ZELANDA, I TERMINI DELLA PRESENTE
DICHIARAZIONE DI GARANZIA, FATTA ECCEZIONE PER
QUANTO LEGALMENTE CONSENTITO, NON ESCLUDONO,
LIMITANO O MODIFICANO MA INTEGRANO I DIRITTI
STATUTARI OBBLIGATORI APPLICABILI ALLA VENDITA DEI
PRODOTTI HP A TALI CLIENTI.
Prodotto HP Durata della garanzia
Software 1 anno
Accessori 1 anno
Cartucce di inchiostro 6 mesi*
Testine di stampa 1 anno*
Hardware della stampante (vedere i dettagli di seguito) 1 anno
*Per informazioni più dettagliate sulla garanzia, visitare il sito Web all’indirizzo www.hp.com/support/inkjet_warranty.

»HôY
16
ácô°ûd IOhóÙG áfɪ°†dG ¿É«H
Hewlett-Packard
èàæe
HP
èeGÈdG
äÉ≤ë∏ŸG
È◊G ¢û«WGôN
áYÉÑ£dG ¢ShDhQ
(π«°UÉØàdG øe ójõŸ √ÉfOCG ô¶fG) á≤ë∏ŸG á©HÉ£dG Iõ¡LCG
OhóÙG ¿Éª°†dG Ióe
óMGh ΩÉY
óMGh ΩÉY
Qƒ¡°T 6*
óMGh ΩÉY*
óMGh ΩÉY
áfɪ°†dG OhóM
ácô°T Ωõà∏J ’ ,»∏ÙG ¿ƒfÉ≤dG ¬H íª°ùj …òdG óë∏d Ék≤ahHP…CÉH É¡jOQƒe øe ådÉK ±ôW …CG hCG
ɪ«a áëjô°U äÉfɪ°V hCG á«æª°V •hô°T hCG äÉfɪ°V âfÉcCG AGƒ°S ,´ƒf …CG øe •hô°T hCG ¿Éª°V
.Ú©e ¢Vô¨d èàæŸG áªFÓe hCG á«°VôŸG IOƒ÷G hCG …QÉéàdG êGhôdÉH ≥∏©àj
á«dƒÄ°ùŸG OhóM
1
¿É«H ‘ ÉgÒaƒJ ºàj »àdG ¢†jƒ©àdG ¬LhCG Èà©J ,»∏ÙG ¿ƒfÉ≤dG ¬H íª°ùj …òdG óë∏d Ék≤ah
.√óMh ¬«∏Y Iô°UÉbh 𫪩dÉH á°UÉN äÉ°†jƒ©J Gòg ¿Éª°†dG
2
¿Éª°†dG ¿É«H ‘ IOóÙG äÉeGõàd’G AÉæãà°SÉH ,»∏ÙG ¿ƒfÉ≤dG ¬H íª°ùj …òdG óë∏d Ék≤ah
ácô°T πªëàJ ød ,Gòg
HPɪ«a á«dƒÄ°ùe ájCG ,ådÉãdG ±ô£dG ,É¡FÓchh É¡«YRƒe øe …CG hCG
âfÉc AGƒ°S áªLÉf hCG á«°VôY hCG á°UÉN hCG Iô°TÉÑe ÒZ hCG Iô°TÉÑe QGô°VCG ájCÉH ≥∏©àj
” ¿EGh ≈àM iôNCG á«fƒfÉb ájô¶f …CG hCG Oƒ°ü≤e ÒZ hCG Oƒ°ü≤e Qô°V hCG ó≤Y ≈∏Y Ióæà°ùe
.QGô°VC’G √òg OƒLh á«dɪàMÉH ácô°ûdG ÆÓHEG
á«∏ÙG ÚfGƒ≤dG
1
IOófi á«fƒfÉb Ékbƒ≤M 𫪩∏d ¿Éª°†dG ¿É«H íæÁ .iôNG ¥ƒ≤M ¿ƒHõ∏d ¿ƒµj ób ɉEG
øeh ,Góæc ‘ iôNCG á≤£æe ¤EG á©WÉ≤e øeh ,IóëàŸG äÉj’ƒdG ‘ áj’ƒd áj’h øe ∞∏àîJ
.⁄É©dG ‘ iôNCG ádhO …CG ‘ á≤£æe/ádhO ‘ á≤£æe/ádhO
2
»c ¿Éª°†dG Gòg πjó©J ºàj ,»∏ÙG ¿ƒfÉ≤dÉH Oôj Ée ™e ¿Éª°†dG ¿É«H ¥É°ùJG ΩóY ádÉM ‘
≈∏Y ≥Ñ£æJ ’ ób ,»∏ÙG ¿ƒfÉ≤dG Gòg ÖLƒÃh .Gòg »∏ÙG ¿ƒfÉ≤dG ‘ Oôj Ée ™e ≥aGƒàJ
∑Éæg ,∫ÉãŸG π«Ñ°S ≈∏©a .¿Éª°†dG ¿É«ÑH ≥∏©àj ɪ«a ä’RÉæàdGh Ohó◊G ¢†©H ,𫪩dG
á«ÑæLC’G äÉeƒµ◊G ¢†©H ¤EG áaÉ°VE’ÉH ,᫵jôeC’G IóëàŸG äÉj’ƒdG ‘ äÉj’ƒdG ¢†©H
:ób ,(Góæc äÉ©WÉ≤e ¢†©H ∂dP ‘ ÉÃ)
CG
¥ƒ≤◊G øe ¿Éª°†dG ¿É«H ‘ IOQGƒdG Ohó◊Gh äGAÉæãà°S’G ó– ¿CG ¿hO ∫ƒ–
;(IóëàŸG áµ∏ªŸG ,∫ÉãŸG π«Ñ°S ≈∏Y) 𫪩∏d á«fƒfÉ≤dG Ü
hCG ;äGójóëàdGh äGAÉæãà°S’G √òg πãe ¢Vôa ≈∏Y ™«æ°üàdG á¡L IQób øe ó– ,’EGh ê
’ »àdG á«æª°†dG äÉfɪ°†dG Ióe Oó– hCG ,á«aÉ°VEG á«fɪ°V ¥ƒ≤M 𫪩dG íæ“
.á«æª°†dG äÉfɪ°†dG Ióe ≈∏Y GkOƒ«b ¢VôØJ hCG ,ÉgAÉæãà°SG ™«æ°üàdG á¡L ™£à°ùJ 3
,Gòg ¿Éª°†dG ¿É«H •hô°T »æãà°ùJ ’ ,Góæ∏jRƒ«fh É«dGΰSCG ‘ AÓª©dG äÓeÉ©Ã ≥∏©àj ɪ«a
ájQÉÑLE’G á«fƒfÉ≤dG ¥ƒ≤◊G ∫ó©J hCG øe ó– hCG ,¿ƒfÉ≤dG ¬H íª°ùj …òdG ó◊G AÉæãà°SÉH
äÉéàæe ™«H ≈∏Y á≤Ñ£ŸG
HP.AÓª©dG A’Dƒg πãŸ
OhóÙG ¿Éª°†dG ióe
1
ácô°T øª°†J
Hewlett-PackardäÉéàæe ƒ∏N Úeóîà°ùŸG øe É¡FÓª©dHPIQƒcòŸG
øe CGóÑJ »àdGh √ÓYCG áæ«ÑŸG IÎØ∏d áeóîà°ùŸG OGƒŸG hCG ™«æ°üàdG ‘ ܃«Y ájCG øe √ÓYCG
.èàæª∏d 𫪩dG AGô°T ïjQÉJ
2
¿Éª°V ≥Ñ£æj ,èeGÈ∏d áÑ°ùædÉH
HP.á›ÈdG äɪ«∏©J ò«ØæJ ‘ π°ûØdG ≈∏Y §≤a OhóÙG ácô°T øª°†J ’h
HP.´É£≤f’ ¬°Vô©J ΩóY hCG AÉ£NC’G øe èàæe …CG 𫨰ûJ á«∏ªY ƒ∏N
3
ácô°T ¿Éª°V »£¨j
HPájCG »£¨j ’h ,èàæª∏d …OÉ©dG ΩGóîà°S’G øY áªLÉædG ܃«©dG §≤a
:øY áªLÉædG ∂∏J ∂dP ‘ Éà iôNCG äÓµ°ûe
CG
;᪫∏°ùdG ÒZ πjó©àdG hCG áfÉ«°üdG äÉ«∏ªY Ü
É¡ªYO hCG ÉgÒaƒJ ºàj ’ »àdG OQGƒŸG hCG QÉ«¨dG ™£b hCG áYÉÑ£dG §FÉ°Sh hCG èeGÈdG
ácô°T πÑb øe
HPhCG ; ê
;èàæŸG äÉØ°UGƒe ¥É£f êQÉN 𫨰ûàdG O
.ΩGóîà°S’G Aƒ°S hCG óªà©e ÒZ πjó©J AGôLCG
4
á©HÉW äÉéàæŸ áÑ°ùædÉH
HP ácô°T ÉgôaƒJ ’ »àdG È◊G ¢û«WGôN ΩGóîà°SG ôKDƒj ’ ,HP
ácô°T ¬eÈJ ºYO ó≤Y …CG ≈∏Y hCG 𫪩dG ¿Éª°V ≈∏Y AGƒ°S É¡àÄÑ©J OÉ©ŸG È◊G ¢û«WGôN hCG
HP𫪩dG ™e .¢û«WGôN ΩGóîà°S’ áé«àf ∞∏J hCG Qô°V …CG á©HÉ£dÉH ≥◊ GPEG ,∂dP ™eh
ácô°T ÉgôaƒJ ’ »àdG È◊G
HP ácô°T ≈°VÉ≤àà°S ,É¡àÄÑ©J OÉ©ŸG È◊G ¢û«WGôN hCGHP
hCG ∞∏àdG Gòg ìÓ°UE’ áé«àf á©HÉ£dG áeóN ‘ áµ∏¡à°ùŸG ÉgOGƒeh É¡àbh πHÉ≤e Ékeƒ°SQ
.ójóëàdG ¬Lh ≈∏Y ¥ÉØNE’G
5
ácô°T â≤∏J GPEG
HP»àdG äÉéàæŸG øe …CG ‘ Ö«Y OƒLƒH GkQÉ£NEG ,¿Éª°†dG IÎa ∫ÓN , ¿Éª°V É¡«£¨jHP,.ÉgQÉ«àNG Ö°ùM ¬dGóÑà°SG hCG èàæŸG ìÓ°UEÉH ÉeEG ácô°ûdG Ωƒ≤à°ùa
6
ácô°T øµªàJ ⁄ GPEG
HP¬«£¨j ,¬«∏Y ¢Uƒ°üæe ƒg ɪc ,Ö«©e èàæe ∫GóÑà°SG hCG ìÓ°UEG øe ¿Éª°VHPøªK IOÉYEÉH ,Ö«©dG OƒLƒH ÉgQÉ£NEG ó©H ádƒ≤©e IÎa ∫ÓN ,ácô°ûdG Ωƒ≤à°ùa ,
.𫪩∏d èàæŸG AGô°T
7
ácô°T Ωõà∏J ød
HP𫪩dG Ωƒ≤j ¿CG ó©H ’EG èàæŸG øªK IOÉYEG hCG ∫GóÑà°SG hCG ìÓ°UEÉH
.ácô°ûdG ¤EG Ö«©ŸG èàæŸG IOÉYEÉH
8
á«∏«¨°ûàdG ¬JÉØ°UGƒe ¿ƒµJ ¿CG ,á£jô°T ójóL ¬Ñ°T hCG ójóL ÉeEG πjóÑdG èàæŸG ¿ƒµj ób
.∫GóÑà°S’G ó«b èàæª∏d á«∏«¨°ûàdG äÉØ°UGƒª∏d πbC’G ≈∏Y ádOÉ©e
9
äÉéàæe …ƒà– ób
HPäÉØ°UGƒŸ ádOÉ©e ™«æ°üàdG IOÉ©e OGƒe hCG Iõ¡LCG hCG ™£b ≈∏Y
.AGOC’G å«M øe Iójó÷G OGƒŸGh Iõ¡LC’Gh ™£≤dG
10
ácô°ûd OhóÙG ¿Éª°†dG ¿É«H ó©j
HP™jRƒJ É¡«a ºàj á≤£æe/ádhO ájCG ‘ ∫ƒ©ØŸG …QÉ°S
äÉéàæe
HPÉ¡eGôHEG ºàj »àdG äÉfɪ°†dG Oƒ≤Y ôaGƒàJh ,Gòg .¿Éª°†dG Gòg É¡«£¨j »àdG
õcôe …CG ‘ ,äÉéàæŸG óLGƒàJ å«M ™bƒŸÉH áeóÿG πãe ,á«aÉ°VEG äÉeóN ≈∏Y ∫ƒ°üë∏d
áeóN
HP äÉéàæe ™jRƒJ É¡«a ºàj »àdG ∫hódG ‘ óªà©eHP.óªà©e OQƒà°ùe πÑb øe
*. ô¶fG ,¿Éª°†dG øY á∏°üØŸG äÉeƒ∏©ŸG øe ójõe ≈∏Y ∫ƒ°üë∏d
www.hp.com/support/inkjet_warranty
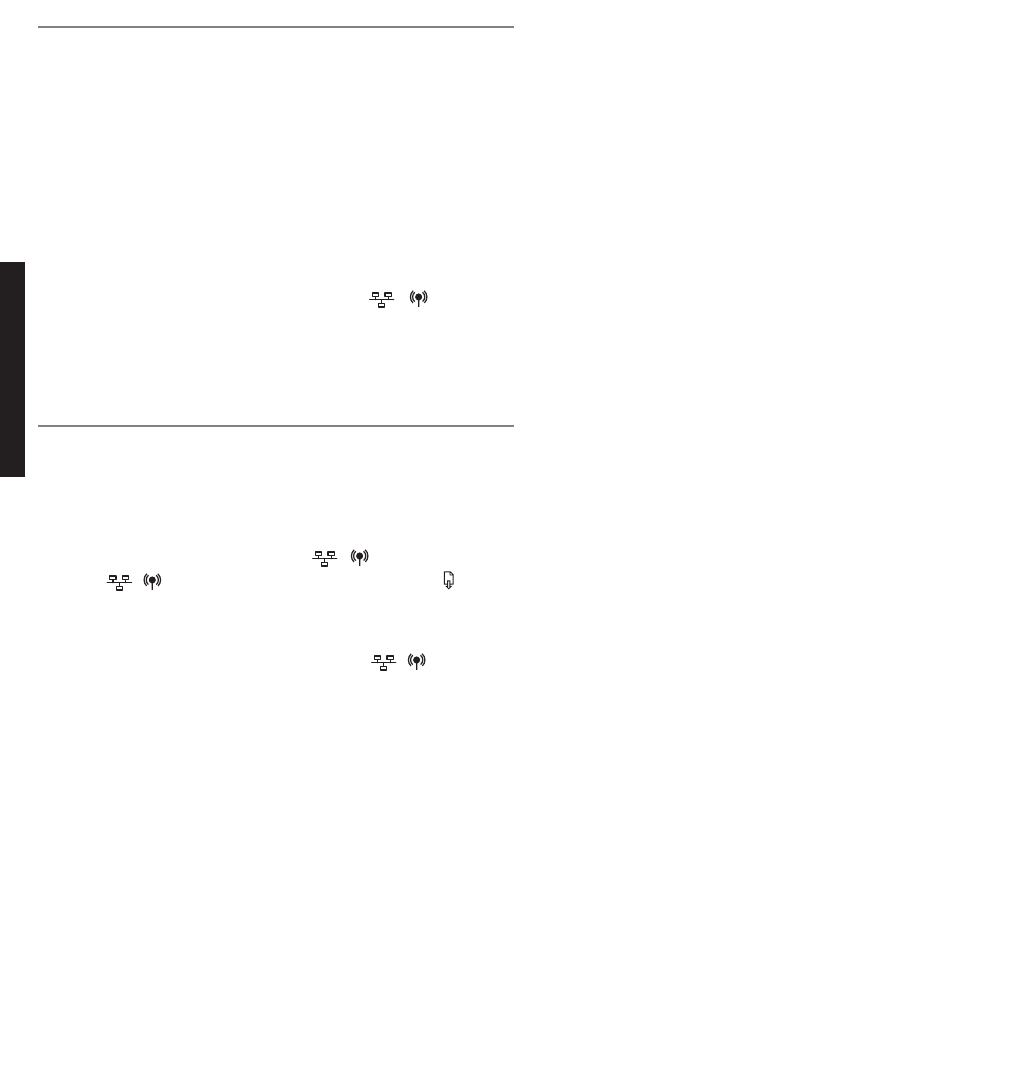
15
»HôY
¿ƒµJ ɪHQ .äÉaÓàNG …CG ßM’h ,(11 áëØ°U »a ''áÄ«¡àdG áëØ°U áYÉÑ£d'' ô¶fG)
:É¡«∏Y Qƒã©dG øµªj »àdG äÓµ°ûªdG øª°V á«dÉàdG äÓµ°ûªdG
● á«Ø°üJ Iõ¡LCG øjhÉæY(WAP) øjhÉæY)MACIõ¡LC’G øjhÉæY áaÉ°VEG'' ô¶fG .( ᫵∏°S’ ∫É°üJG á£≤f ≈dEG(WAP).15 áëØ°U »a ''
●,ä’É°üJ’G ™°Vh :í«ë°U ô«Z á©HÉ£dG »a á«dÉàdG äGOGóYE’G ióMEG ¿ƒµj ɪHQ
áµÑ°ûdG º°SGh(SSID) äɵѰT) IÉæb ,ad hocô¶fG .ô«Ø°ûàdG ,ô«Ø°ûàdG ´ƒf ,(§≤a
.12 áëØ°U »a ''802^11 ´ƒf øe ᫵∏°SÓdG áµÑ°ûdG äGOGóYEG º¡a''
●äGOGóYEG OGóYEG IOÉYEÉH ºb ,áëØ°üdG √òg á©HÉ£dG ™Ñ£J ºd GPEG .óæà°ùe ™ÑWG
ºb ºK (15 áëØ°U »a ''áµÑ°ûdG áÄ«¡J äGOGóYEG OGóYEG IOÉYEG'' ô¶fG) áµÑ°ûdG
»µ∏°SÓdG ∫É°üJÓd á©HÉ£dG OGóYEG'' ô¶fG) á©HÉ£dG èeGôH Ö«côJ IOÉYEÉH
(HP Officejet Pro K550dtwn).(12 áëØ°U »a ''
áµÑ°ûH π°üàe ôJƒ«ÑªµdG ¿CG ∂dP »æ©j ó≤a ,áë«ë°U ᫵∏°SÓdG áµÑ°ûdG äGOGóYEG âfÉc GPEG
á£ÑJôªdG ᫵∏°SÓdG ∫É°üJ’G áµÑ°T ¢ùØæH π°üàe ôJƒ«ÑªµdG ¿CG øe ócCÉJ .iôNCG ᫵∏°S’
.á©HÉ£dG É¡H
»a IOƒLƒªdG ᫵∏°SÓdG äGOGóYE’G ¢üëØH ∂dP øe ¿ƒeóîà°ùªdG ≥≤ëàj ¿CG øµªj
∫ƒ°Uh á«fɵeEG øe ócCÉJ ,∂dP ≈dEG áaÉ°VE’ÉH .É¡fƒeóîà°ùj »àdG ôJƒ«ÑªµdG Iõ¡LCG
.᫵∏°SÓdG áµÑ°û∏d ôJƒ«ÑªµdG Iõ¡LCG
äGOGóYEG í«ë°üàd á«dÉàdG äGƒ£îdG ™ÑJG ,áë«ë°U ᫵∏°SÓdG áµÑ°ûdG äGOGóYEG âfÉc GPEG
:á©HÉ£dG áµÑ°T
.1
hCG áµÑ°T πHÉc ΩGóîà°SÉH É¡eGóîà°SG ܃∏£ªdG ∫É°üJ’G áµÑ°ûH á©HÉ£dG π°U
.á©HÉ£dÉH ≥aôªdG êhOõªdG πHɵdG ΩGóîà°SÉH ôJƒ«Ñªµ∏d
.2
.á©HÉ£dÉH ¢UÉîdG øª°†ªdG ÖjƒdG ΩOÉN íàaG
.3
ÖjƒÑàdG áeÓY ¥ƒa ô≤fG
áµÑ°ûdG
(Networking)) ᫵∏°S’ ¥ƒa ô≤fG ºK ,802^11(
(Wireless (802.11)).ô°ùjC’G AõédÉH
.4
èdÉ©e Ωóîà°SG
»µ∏°SÓdG OGóYE’G
(Wireless Setup) ÖjƒÑJ áeÓY »a
OGóYE’G »µ∏°SÓdG
(Wireless Setup)äGOGóYEG ™e ≥HÉ£àJ ≈àMá©HÉ£dG äGOGóYEG ô««¨àd .áµÑ°ûdG
.5
.á©HÉ£dG øe πHɵdG π°üaG ºK ,øª°†ªdG ÖjƒdG ΩOÉN ≥∏ZCG
.6
.èeÉfôÑdG â«ÑãJ óYCG ºK ,πeɵdÉH á©HÉ£dG èeÉfôH â«ÑãJ AɨdEÉH ºb
᫵∏°S’ ∫É°üJG á£≤f ≈dEG Iõ¡LC’G øjhÉæY áaÉ°VE’
(WAP)
Iõ¡LCG á«Ø°üJ Iõ«e ó©JMAC∫É°üJ’G á£≤f øjƒµJ ºàj É¡«a »àdGh ¿ÉeCG Iõ«e ᫵∏°SÓdG(WAP) Iõ¡LCG øjhÉæ©H áªFÉb AÉ°ûfEG ™eMACÉk°†jCG É¡«∏Y ≥∏£j »àdGh)
∫É°üJ’G á£≤f ôÑY ∫É°üJ’G áµÑ°T ≈dEG ∫ƒ°UƒdÉH É¡d 샪°ùªdG (''Iõ¡LC’G øjhÉæY''
᫵∏°SÓdG(WAP) ᫵∏°SÓdG ∫É°üJ’G á£≤f …ƒàëJ ºd GPEG .(WAP)¿GƒæY ≈∏Y
á£≤f ¢†aôJ ±ƒ°ùa ,∫É°üJ’G áµÑ°T ≈dEG ∫ƒ°UƒdG ∫hÉëJ »àdG Iõ¡LC’G óMC’ RÉ¡édG
᫵∏°SÓdG ∫É°üJ’G(WAP)Ωƒ≤J á©HÉ£dG âfÉc GPEG .∫É°üJ’G áµÑ°T ≈dEG ¬dƒ°Uh Iõ¡LCG øjGƒæY á«Ø°üàHMAC ¿GƒæY áaÉ°VEG Öéj ¬fEÉa ,MACá°UÉîdG áªFÉ≤dG ≈dEG ᫵∏°SÓdG ∫É°üJ’G á£≤æH(WAP) Iõ¡LCG øjhÉæ©dMAC.ádƒÑ≤ªdG
.1
(áÄ«¡àdG áëØ°U QR) / ≈∏Y §¨°VG(Configuration Page)á©HÉ£d .áÄ«¡àdG áëØ°U
.2
᫵∏°SÓdG ∫É°üJ’G á£≤f øjƒµJ IGOCG íàaG(WAP)¿GƒæY ∞°VCGh ,IóYÉ°ùªdG
᫵∏°SÓdG ∫É°üJ’G á£≤æH á°UÉîdG áªFÉ≤dG ≈dEG á©HÉ£dÉH ¢UÉîdG RÉ¡édG(WAP)
Iõ¡LCG øjhÉæ©dMAC.ádƒÑ≤ªdG
áµÑ°ûdG áÄ«¡J äGOGóYEG OGóYEG IOÉYEG
OGóYEG IOÉYEÉH ºb ,áµÑ°ûdG ™e ∫É°üJ’G ≈∏Y á©HÉ£dG â«ÑãJ ≈∏Y IQó≤dG ΩóY ádÉM »a
.áµÑ°ûdG äGOGóYEG
.1
QR) / ≈∏Y §¨°†dG »a ôªà°SG
(áÄ«¡àdG áëØ°U
(Configuration Page)
, QR) §¨°VG
±ÉæÄà°S’G
(
(Resume) QR) / QôM ºK ,äGôe çÓK
áëØ°U (áÄ«¡àdG
(Configuration Page)ô¶àfG .¿GƒK ™°†Ñd ábÉ£dG ìÉÑ°üe ¢†eƒj . .ábÉ£dG ìÉÑ°üe ¢†eƒj ≈àM
.2
QR) / ≈∏Y §¨°VG
(áÄ«¡àdG áëØ°U
(Configuration Page)áYÉÑ£d
º°SG ¿ƒµj Ék«°VGôàaGh .áµÑ°ûdG äGOGóYEG ø««©J IOÉYEG øe ócCÉàdGh áÄ«¡àdG áëØ°U
äÉeóîdG áYƒªée ±ô©e(SSID)'' ƒghpsetup'' ƒg ∫É°üJ’G ™°Vhh ''ad hoc.''
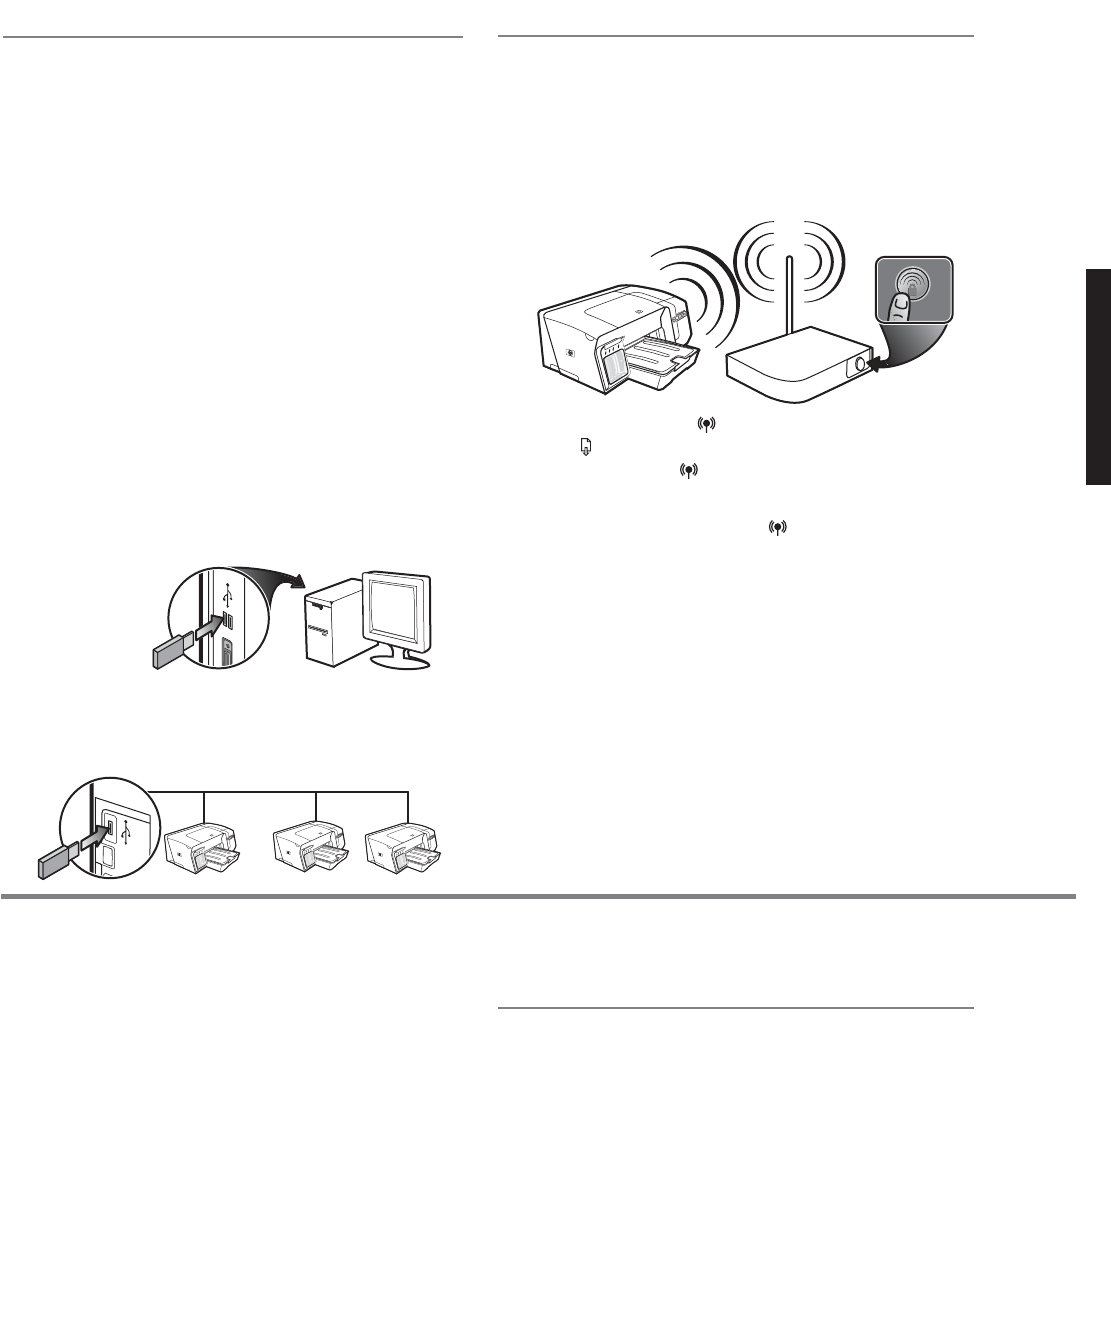
»HôY
14
áØ«Xh ΩGóîà°SÉH »µ∏°S’ ∫É°üJG OGóYE’
SecureEasySetup (SES)
∂H ¢UÉîdG ¬LƒªdG ¿Éc GPEG(SES)ΩGóîà°SÉH OGóYEÓd á«dÉàdG äGOÉ°TQE’G ô¶fG ,πgDƒe
(SES).
.1
QR ≈∏Y §¨°VG(SES) .»µ∏°SÓdG ¬LƒªdÉH OƒLƒªdG
.2
QR) ≈∏Y QGôªà°S’G ™e §¨°VG ,ø«à≤«bO ∫ÓN
(áÄ«¡àdG áëØ°U
(Configuration Page)QR) ≈∏Y §¨°VG ºK ,á©HÉ£dÉH OƒLƒªdG (±ÉæÄà°SG
(Resume) QR) QôM ºK ,IóMGh Iôe
(áÄ«¡àdG áëØ°U
(Configuration Page).¢†eƒj áÄ«¡àdG áëØ°U Aƒ°V .
.3
QR) ≈∏Y §¨°VGh ,ø«à≤«bód ô¶àfG
(áÄ«¡àdG áëØ°U
(Configuration Page)
äGOGóYEG á≤HÉ£e øe ≥≤ëJh áÄ«¡àdG áëØ°U áYÉÑ£d(SES)¬LƒªdG äGOGóYEG ™e .᫵∏°SÓdG
:á¶MÓe
∫É°üJ’G áµÑ°T äGOGóYEG ø««©J IOÉYEG êÉàëJ ób ,∫É°üJ’G π°ûa GPEG
Qôch (15 áëØ°U »a ''áµÑ°ûdG áÄ«¡J äGOGóYEG OGóYEG IOÉYEG'' ô¶fG) á©HÉ£∏d
.14 áëØ°U »a ''»µ∏°SÓdG ∫É°üJ’G äGOGóYEG øe ócCÉàdG'' kÉ°†jCG ô¶fG .äGƒ£îdG
.4
.ôJƒ«ÑªµdG RÉ¡L ≈∏Y É¡∏«¨°ûJ …QÉL äÉ≤«Ñ£J …CG ≥∏ZCG
.5
𫨰ûàdG áfGƒ£°SCG πNOCGStarter CD)(áéeóªdG áfGƒ£°S’G π¨°ûe »a
CD drive)( áfGƒ£°S’G áªFÉb CGóÑJ ºd GPEG .CD menu)(ô≤fÉa ,kÉ«FÉ≤∏J 𫨰ûàdG áfGƒ£°SÉH OGóYE’G õeQ ¥ƒa kÉLhOõe kGô≤fStarter CD)(.
.6
¥ƒa ô≤fG ,•ƒ¨°†ªdG ¢Uô≤dG áªFÉb øe
â«ÑãJ
(Install)»àdG äGOÉ°TQE’G ™ÑJGh
.á©HÉ£dG èeÉfôH â«Ñãàd á°TÉ°ûdG ≈∏Y ô¡¶J
Ωɶf) IójóY äÉ©HÉ£d »µ∏°SÓdG ∫É°üJ’G OGóYE’
Windows
(§≤a
á«æ≤J á©HÉ£dG ºYóJ
TM
Windows Connect NowäÉ©HÉW OGóYEG í«àJ »àdGh , .áMGôdG ≈¡àæªH »µ∏°SÓdG ∫É°üJÓd IójóY
äGOGóYE’G ôjó°üàH ºb ,IóYÉ°ùªdG »µ∏°SÓdG ∫É°üJ’G øjƒµJ IGOCG ΩGóîà°SÉHh
¢TÓa ¢UGôbCG ∑ôëe ≈dEG ôJƒ«ÑªµdÉH á°UÉîdG ᫵∏°SÓdGUSBøjƒµàH ºb ºK ,
òØæe πNGO ¢TÓa ¢UGôbCG ∑ôëe Ö«côJ ≥jôW øY äGOGóYE’G √òg ΩGóîà°SÉH á©HÉ£dG
USB . .1
.∫É°üJ’G áµÑ°T òØæe øe »bGƒdG AÉ£¨dG ∫RCG
.2
𫨰ûàdG áfGƒ£°SCG πNOCGStarter CD)(áéeóªdG áfGƒ£°S’G π¨°ûe »a
CD drive)( áfGƒ£°S’G áªFÉb CGóÑJ ºd GPEG .CD menu)(kGô≤f ô≤fÉa ,kÉ«FÉ≤∏J 𫨰ûàdG áfGƒ£°SÉH OGóYE’G õeQ ¥ƒa kÉLhOõeStarter CD)(.
.3
¥ƒa ô≤fG ,•ƒ¨°†ªdG ¢Uô≤dG áªFÉb øe
IóYÉ°ùe äGhOCG
(Utilities)ô≤fG ºK , ¥ƒa
»µ∏°SÓdG ∫É°üJ’G áÄ«¡J IGOCG
(Wireless Configuration Utility).
.4
¢TÓa ¢UGôbCG ∑ôëe π°Uh á°TÉ°ûdG ≈∏Y IOƒLƒªdG äGOÉ°TQE’G ™ÑJG
USB
òØæªHUSBáµÑ°T øjƒµJ äGOGóYEG ßØM ºàj .∂dòH áÑdÉ£ªdG óæY ôJƒ«ÑªµdÉH
.¢TÓa ¢UGôbCG ∑ôëe ≈∏Y ∫É°üJ’G
É¡MÓ°UEGh »µ∏°SÓdG ∫É°üJE’G πcÉ°ûeh AÉ£NCG ±É°ûµà°SG
.á«JB’G ΩÉ¡ªdG øe ôãcCG hCG …ODƒJ ,èeGôÑdG Ö«côJh »µ∏°SÓdG OGóYE’G ∫ɪàcG ó©H áµÑ°ûdG ™e ∫É°üJÓd á∏gDƒe á©HÉ£dG âfÉc GPEG
.»µ∏°SÓdG ∫É°üJ’G äGOGóYEG øe ócCÉJ
●™°VƒdG .ôJƒ«ÑªµdÉH á°UÉîdG »µ∏°SÓdG ∫É°üJ’G áµÑ°T ábÉ£H OGóYEG áë°U øe ócCÉJ
¿CG øµªj .áæ«©e áµÑ°ûd Iõ«ªàªdG áµÑ°ûdG äGOGóYEG øe áYƒªée øY IQÉÑY »µ∏°SÓdG
,∫ÉãªdG π«Ñ°S ≈∏Y) ᫵∏°S’ ´É°VhCG IóY IóMGh ᫵∏°S’ ábÉ£H ™°Vh øª°†àJ
ábÉ£ÑH á°UÉîdG áÄ«¡àdG IGOCG íàaG .(Ö൪dG áµÑ°ûd ™°Vhh ∫õæªdG áµÑ°ûd ™°Vh
áµÑ°T ™°Vh ƒg OóëªdG ™°VƒdG ¿CG øe ócCÉJh ,ôJƒ«ÑªµdG »a áÑcôªdG áµÑ°ûdG
.á©HÉ£dG
.5
¢TÓa ¢UGôbCG ∑ôëe π°Uh á°TÉ°ûdG ≈∏Y IOƒLƒªdG äGOÉ°TQE’G ™ÑJGUSBπµH .∫É°üJ’G áµÑ°T ≈dEG É¡àaÉ°VEG ójôJ á©HÉW
●IóMGh πª©H ºb .∂H á°UÉîdG áµÑ°ûdG ™e á©HÉ£dG áµÑ°T äGOGóYEG á≤HÉ£e øe ócCÉJ
:∂H á°UÉîdG áµÑ°ûdG äGOGóYEG OÉéjE’ »∏j ɪe
●
:á«àëàdG ∫É°üJ’G á«æH
᫵∏°SÓdG ∫ƒ°UƒdG á£≤f íàaG(WAP)IGOCG øe .IóYÉ°ùªdG áÄ«¡àdG
●
∫É°üJG
Ad hoc
:
»a áÑcôªdG áµÑ°ûdG ábÉ£Ñd IóYÉ°ùªdG áÄ«¡àdG IGOCG íàaG
.∂H ¢UÉîdG ôJƒ«ÑªµdG RÉ¡L
●.á©HÉ£dG áÄ«¡J áëØ°U ≈∏Y ô¡¶J »àdG ∂∏àH áµÑ°ûdG äGOGóYEG ¿QÉb
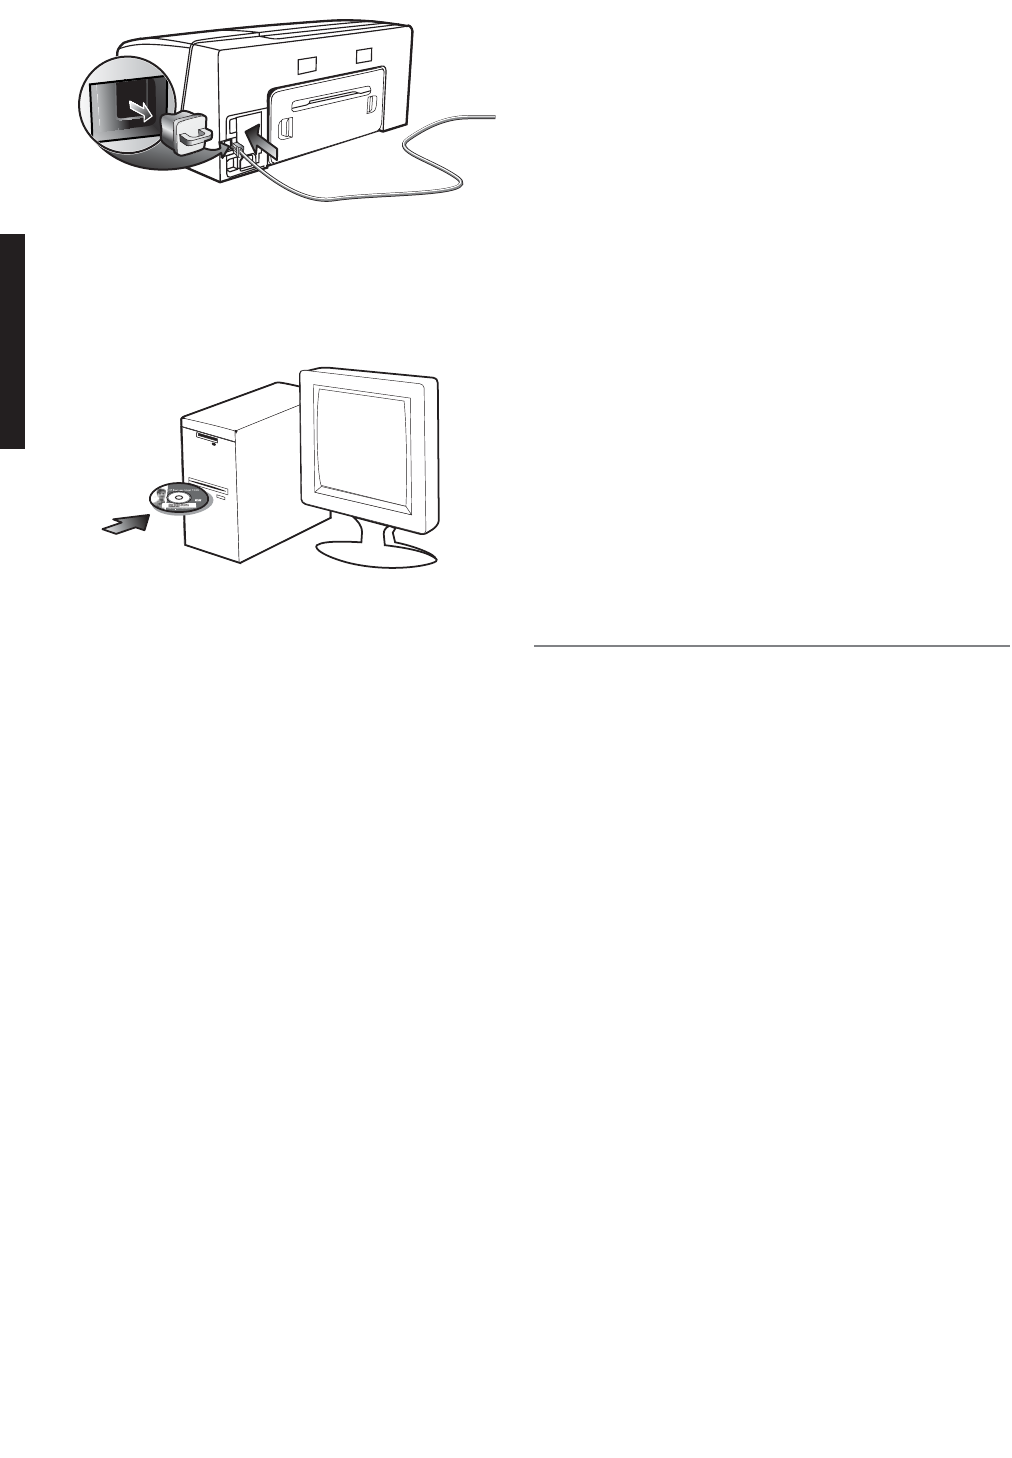
»HôY
13
:∫É°üJ’G áµÑ°T ábOÉ°üe
' 'ìƒàØe' Ωɶf ƒg »°VGôàa’G ™æ°üªdG OGóYEG
Open’ ,'
á浪ªdG iôNC’G º«≤dG ¿ƒµJ .ô«Ø°ûàdG hCG ábOÉ°üª∏d ¿ÉeCG OGóYEG ∫É°üJ’G áµÑ°T Ö∏£àJ'OpenThenShared' ,'Sharedøe) øeB’G ∫ƒ°Uƒ∏d ≥Ñ°ùªdG ácQÉ°ûªdG ìÉàØeh '
∫ƒcƒJhôH ∫ÓN
®
Wi-Fi(' `H ±hô©ªdGhWPA-PSK .'
● iƒà°ùe ójõjWAPºFÉ≤dG ∫ƒNódG ºµëJh ájɪëdG äÉfÉ«H ôÑY ΩRÓdG øe ôãcCG
äɵѰT Iõ«ehWi-Fi. ÖjƒdG äÉëØ°U »a ∞©°†dG •É≤f ™«ªL èdÉ©J »¡aWEP,.802^11 »g á«°SÉ«≤dG á«∏°UC’G á«∏ëªdG ø«eBÉàdG ᫵«fɵ«e
● ∫ƒcƒJhôÑdG ôÑà©jhWPA2 ¿ÉeC’G ∫ƒcƒJhôÑd »fÉãdG π«édG ƒgWPAôaƒj …òdGh
∫ƒcƒJhôH »eóîà°ùeh äÉcô°û∏dWi-Fiø«eóîà°ùªdG ¿CG ¿ÉeC’G øe Ék«dÉY kiƒà°ùe
.᫵∏°SÓdG º¡JɵѰT ≈dEG ∫ƒ°UƒdG º¡æµªj øe ºg §≤a º¡d ìô°üªdG
:äÉfÉ«ÑdG ô«Ø°ûJ
● »µ∏°ùdG ∫OÉ©ªdG áq«°Uƒ°üN ∫ƒcƒJhôH ÉeCG(WEP)»àdG äÉfÉ«ÑdG ô«Ø°ûJ ôaƒj ƒ¡a
»µ∏°S’ RÉ¡L ≈dEG ᫵∏°SÓdG Iõ¡LC’G óMCG øe ᫵∏°SÓdG äÉLƒªdG ôÑY É¡dÉ°SQEG ºàj
ôNBG . ∫ƒcƒJhôH ºYóJ ∫É°üJG áµÑ°T ≈∏Y IOƒLƒªdG Iõ¡LC’ÉaWEPΩóîà°ùJ
í«JÉØeWEPΩóîà°ùJ ∂jód ∫É°üJ’G áµÑ°T âfÉc GPEG .äÉfÉ«ÑdG ô«Ø°ûJ »a
∫ƒcƒJhôÑdGWEP(í«JÉØe) ìÉàØe áaô©e ∂«∏©a ,WEP.áµÑ°ûdG É¡eóîà°ùJ »àdG
● Ωɶf Ωóîà°ùjWPA ∫ƒcƒJhôH(TKIP)ô«Ø°ûà∏d âbDƒªdG »°ù«FôdG áeÓ°ùdG Ωóîà°ùjh802.1Xá«°SÉ«≤dG äGOGóàe’G ä’ƒcƒJhôH ´GƒfCG ióMEG ™e ≥KƒªdG
á≤KƒªdG(EAP) .Ωƒ«dG IôaƒàªdG
● Ωɶf Ωó≤jWPA2 »°SÉ«≤dG Ωó≤àªdG ô«Ø°ûàdG ,ô«Ø°ûàdG §£îe ,ójóédG(AES).
ô¡¶jAES IôØ°ûdG OGóY ™fÉe ó««≤J ™°Vh »a(CCM)áYƒªée OGóYEG ºYójh
á∏≤à°ùªdG á«°SÉ°SC’G áeóîdG(IBSS)𫪩dG πªY äÉ£ëe 𫨰ûJ ø«H ¿ÉeC’G ô«aƒàd ™°Vh »aad hoc .
»µ∏°SÓdG ∫É°üJÓd á©HÉ£dG OGóYE’
Rhóæjh Ωɶæd
(Windows)
.1
.∫É°üJ’G áµÑ°T òØæe øe »bGƒdG AÉ£¨dG ∫RCG
.2
:»∏j ɪe óMGh πª©H ºb
●™e ≥aôe) êhOõªdG πHɵdG ∫ÓN øe ôJƒ«ÑªµdÉH ÉkàbDƒe á©HÉ£dG π«°UƒàH ºb
.(á©HÉ£dG
●¬LƒªdG hCG ìÉàتdG ,áµÑ°ûdG Qƒëe »a ìÉàªdG òØæª∏d kÉàbDƒe á©HÉ£dG π«°UƒàH ºb
.(Ó°üØæe ´ÉÑj) áµÑ°ûdG πHÉc ™e »µ∏°SÓdG
.3
.ôJƒ«ÑªµdG RÉ¡L ≈∏Y É¡∏«¨°ûJ …QÉL äÉ≤«Ñ£J …CG ≥∏ZCG
.4
𫨰ûàdG áfGƒ£°SCG πNOCG(Starter CD)áéeóªdG áfGƒ£°S’G π¨°ûe »a
(drive CD).
áfGƒ£°S’G áªFÉb CGóÑJ ºd GPEG(CD menu)õeQ ¥ƒa kÉLhOõe kGô≤f ô≤fÉa ,kÉ«FÉ≤∏J
𫨰ûàdG áfGƒ£°SÉH OGóYE’G(Starter CD).
.5
áfGƒ£°S’G áªFÉb øe(CD menu) ¥ƒa ô≤fG
â«ÑãJ
(Install)äGOÉ°TQE’G ™ÑJGh .á°TÉ°ûdG ≈∏Y ô¡¶J »àdG
.6
á°TÉ°T »a
∫É°üJ’G ´ƒf
(Connection Type)ôÑY ∫É°üJ’G QÉ«N ójóëàH ºb , ¥ƒa ô≤fG ºK ,∫É°üJ’G áµÑ°T
»dÉàdG
(Next)
.
.7
ºb ∂àÑdÉ£e óæYh ,â«ÑãàdG á«∏ªY ΩɪJE’ á°TÉ°ûdG ≈∏Y IôgɶdG äGOÉ°TQE’G ™ÑJG
.πHɵdG π°üØH
∑Ée Ωɶæd
OS(Mac OS)
.1
íàØH ºb
ábÉ£H OGóYEG óYÉ°ùe
(AirPort Setup Assistant)™ÑJG ºK ,
áªFÉ≤dG ᫵∏°SÓdG áµÑ°ûdG ™e Ωɪ°†f’ á°TÉ°ûdG ≈∏Y IôgɶdG äGOÉ°TQE’G
(hpsetup).
.2
𫨰ûàdG áfGƒ£°SG ≈∏Y OGóYE’G áfƒ≤jCG ¥ƒa kÉLhOõe kGô≤f ô≤fG(Starter CD)ºK , .á°TÉ°ûdG ≈∏Y IôgɶdG äGOÉ°TQE’G ™ÑJG
.3
ô≤fG ,π«°UƒàdG óæY
áYÉÑ£dG õcôe íàa
(Open Print Center).á©HÉ£dG áaÉ°VE’

»HôY
12
»µ∏°SÓdG ∫É°üJÓd á©HÉ£dG OGóYEG
(HP Officejet Pro K550dtwn)
:á«dÉàdG ¥ô£dG ióMEG ΩGóîà°SÉH »µ∏°SÓdG ∫É°üJÓd á©HÉ£dG OGóYEG ∂浪j
●.∫É°üJG áµÑ°T πHÉc hCG êhOõe πHÉc ΩGóîà°SG
.13 áëØ°U »a ''»µ∏°SÓdG ∫É°üJÓd á©HÉ£dG OGóYE’'' ô¶fG
● Iõ«e ΩGóîà°SGSecureEasySetup (SES)
áØ«Xh ΩGóîà°SÉH »µ∏°SÓdG ∫É°üJ’G OGóYE’'' ô¶fGSecureEasySetup (SES).14 áëØ°U »a ''
● á«æ≤J ΩGóîà°SGWindows Connect Now
Ωɶf) IójóY äÉ©HÉ£d »µ∏°SÓdG ∫É°üJ’G OGóYE’'' ô¶fGWindows.14 áëØ°U »a ''(§≤a
:á¶MÓe
●»a ''É¡MÓ°UEGh »µ∏°SÓdG ∫É°üJE’G πcÉ°ûeh AÉ£NCG ±É°ûµà°SG'' ,á∏µ°ûe ∂à¡LGh GPEG
.14 áëØ°U
●IóMGh Iôe â«ÑãàdG èeÉfôH 𫨰ûJ Öéj ,»µ∏°S’ ∫É°üJG …CG ™e á©HÉ£dG ΩGóîà°S’
¢Uôb ∫ÓN øe πbC’G ≈∏Y •ƒ¨°†ªdG AóÑdGStarter CD)(.»µ∏°S’ ∫É°üJG AÉ°ûfEGh
●.áµÑ°ûdG πÑc ΩGóîà°SÉH ∫É°üJ’G áµÑ°ûH á©HÉ£dG ∫É°üJG ΩóY øe ócCÉJ
●ábÉ£H hCG áéeóe 802^11 áµÑ°T äÉfɵeEG ≈∏Y ∫É°SQE’G RÉ¡L …ƒàëj ¿CG Öéjh
.áÑcôe ᫵∏°S’ 802^11
●¢ùØf ≈∏Y IOƒLƒe É¡eóîà°ùJ »àdG ôJƒ«ÑªµdG Iõ¡LCGh á©HÉ£dG ¿ƒµJ ¿CÉH ≈°Uƒj
.áµÑ°ûdG ´Éæb
.∂jód ∫É°üJ’G áµÑ°T äGOGóYEG ≈∏Y ±ô©àdG »a ÖZôJ ób ,á©HÉ£dG èeÉfôH â«ÑãJ πÑb
:á«dÉàdG ΩÉ¡ªdG ΩɪJEG hCG ΩɶædG »dƒÄ°ùe øe äÉeƒ∏©e ≈∏Y ∫ƒ°üëdG ∂浪j
● ∫É°üJ’G áµÑ°T º°SG ≈∏Y ∫ƒ°üëdG(SSID) hCG á«àëJ á«æH) ∫É°üJ’G §ªfhad hoc(
áµÑ°û∏d ᫵∏°SÓdG ∫ƒ°UƒdG á£≤æd IóYÉ°ùªdG áÄ«¡àdG IGOCG øe(WAP)áµÑ°T ábÉ£Ñd hCG .ôJƒ«ÑªµdÉH á°UÉîdG ∫É°üJ’G
● πãe ∂jód ∫É°üJ’G áµÑ°T »a Ωóîà°ùªdG ô«Ø°ûàdG ´ƒf ≈∏Y ±ô©J(WEP)hCG
∫ƒcƒJhôH ∫ÓN øe øeB’G ∫ƒ°UƒdGProtected Access (WPA)
®
Wi-Fi .
●.»µ∏°SÓdG RÉ¡é∏d ô«Ø°ûàdG ìÉàØe hCG QhôªdG áª∏c ≈∏Y ±ô©J
802^11 ´ƒf øe ᫵∏°SÓdG ∫É°üJ’G áµÑ°T äGOGóYEG º¡a
áµÑ°ûdG º°SG
(SSID)
áYƒªée ±ô©e øY hCG ᫵∏°SÓdG ∫É°üJ’G áµÑ°T º°SG øY Ék«°VGôàaG á©HÉ£dG åëÑJ
äÉeóîdG(SSID)'' º°SÉHhpsetup áµÑ°T º°SG ∫É°üJ’G áµÑ°ûd ¿ƒµj óbh .''(SSID)
.ÉkØ∏àîe
∫É°üJ’G §ªf
:ɪgh ∫É°üJ’G §ªæd ¿GQÉ«N ∑Éæg
:Ad hoc ´ƒf øe äɵѰûdG ióMEG ≈∏YAd hoc≈∏Y ∫É°üJ’G §ªf §Ñ°V ºàj
Ad hocáLÉëdG ¿hO iôNC’G ᫵∏°SÓdG Iõ¡LC’ÉH Iô°TÉÑe á©HÉ£dG π°üàJh ,
»µ∏°S’ ∫É°üJG á£≤æH áfÉ©à°SÓd(WAP) .
´ƒf øe áµÑ°T ≈∏Y Iõ¡LC’G πc »aƒà°ùJ ¿CG ÖéjhAd hoc:á«dÉàdG •hô°ûdG
●802^11 QÉ«©e ™e ≥aGƒàdG
● ≈∏Y ∫É°üJ’G §ªf §Ñ°VAd hoc
● áµÑ°ûdG º°SG ¢ùØf §Ñ°V(SSID)
●IÉæ≤dG ¢ùØfh á«YôØdG áµÑ°ûdG ¢ùØf ≈∏Y ¿ƒµJ
● 802^11 ¿ÉeCG äGOGóYEG ¢ùØf §Ñ°V
:(¬H ≈°Uƒe) á«àëJ á«æH
ºàj ,á«àëàdG á«æÑdG äɵѰT ´ƒf øe äɵѰûdG ióMEG ≈∏Y
≈∏Y iôNC’G Iõ¡LC’ÉH á©HÉ£dG π°üàJh ,á«àëàdG á«æÑdG ´ƒf ≈∏Y ∫É°üJ’G §ªf §Ñ°V
»µ∏°S’ ∫É°üJG á£≤f ôÑY ᫵∏°S’ ΩCG ᫵∏°S Iõ¡LC’G âfÉc AGƒ°S ,∫É°üJ’G áµÑ°T
(WAP).äɵѰT ≈∏Y äGQÉqÑY hCG äÉ¡Lƒe áHÉãªH »µ∏°SÓdG ∫É°üJ’G •É≤f πª©Jh
.Iô«¨°üdG ∫É°üJ’G
¿ÉeC’G äGOGóYEG
áëØ°U ìô°T'' áµÑ°ûdG áÄ«¡J áëØ°U ô¶fG ,á©HÉ£∏d áMÉàªdG äGOGóYE’G ≈∏Y ∫ƒ°üë∏d
.»fhôàµdE’G Ωóîà°ùªdG π«dO »a ''áÄ«¡àdG
IQÉjõH ºb ,»µ∏°SÓdG ¿ÉeC’G ∫ƒM äÉeƒ∏©ªdG øe ójõªd
www.weca.net/opensection/pdf/whitepaper_wifi_security4
-29-03.pdf.

11
»HôY
¿GƒæY ¿QÉb (5IP ¿Gƒæ©d ¬à≤HÉ£e øe ócCÉJh QGƒëdG ™Hôe »a êQóªdGIP
`dG ÉfGƒæY ¿Éc GPEG .áÄ«¡àdG áëØ°U »a êQóªdGIPô««¨àH ºb ,ø«Ø∏àîe ¿GƒæYIPáëØ°U »a OƒLƒªdG ¿Gƒæ©dG ≥HÉ£j å«ëH QGƒëdG ™Hôe »a .áÄ«¡àdG
≈∏Y ô≤fG (6
≥aGƒe
(OK).QGƒëdG äÉ©Hôe ≥∏ZCG ºK äGOGóYE’G ßØëd ø«Jôe
áÄ«¡àdG äGhOCGh É¡MÓ°UEGh AÉ£NC’G ±É°ûµà°SG
.𫨰ûàdG áfGƒ£°SCG ≈∏Y ÊhεdE’G Ωóîà°ùŸG π«dO ô¶fG ,äGhOC’G √òg ∫ƒM äÉeƒ∏©ŸG øe ójõª∏d .É¡àÄ«¡àd hCG É¡MÓ°UEGh á©HÉ£dG AÉ£NCG ±É°ûàc’ Iôaƒàe á«dÉàdG äGhOC’G
áÄ«¡àdG áëØ°U
πcÉ°ûe áaô©e »a IóYÉ°ùª∏d ,á«dÉëdG á©HÉ£dG äGOGóYEG ¢Vô©d áÄ«¡àdG áëØ°U Ωóîà°SG
IóMƒdG πãe ,ájQÉ«àN’G äÉ≤ë∏ªdG â«ÑãJ ó«cCÉàdh ,É¡MÓ°UEG ádhÉëeh á©HÉ£dG
ádÉM »a .Iô«NC’G çGóMC’ÉH πé°S ≈∏Y ∂dòc áÄ«¡àdG áëØ°U …ƒàëJ .áLhOõªdG
√òg í°VƒJ ;áµÑ°ûdG áÄ«¡àH á°UÉN iôNCG áëØ°U áYÉÑW ºàJ ,áµÑ°ûH á©HÉ£dG π«°UƒJ
.á©HÉ£dÉH á°UÉîdG áµÑ°ûdG äGOGóYEG áëØ°üdG
ácô°ûH ∫É°üJ’G ≈dEG áLÉëdG ádÉM »aHP.∫É°üJ’G πÑb áÄ«¡àdG áëØ°U áYÉÑ£H ºb ,
áÄ«¡àdG áëØ°U áYÉÑ£d
●:HP Officejet Pro K550ôªà°SGQR) ≈∏Y §¨°†dÉH
(ábÉ£dG
(Power)
,QR) §¨°VCG
(AɨdEG
(Cancel)IôeQR) ôjôëàH ºb ºK ,IóMGh
(ábÉ£dG
(Power)
.
:HP Officejet Pro K550dtn/K550dtwn / §¨°VGQR)
áëØ°U (áÄ«¡àdG
(Configuration Page)
.
øª°†ŸG ÖjƒdG ΩOÉN
á©HÉ£dÉH ¢UÉÿG øª°†ŸG ÖjƒdG ΩOÉN ΩGóîà°SG øµÁ ,áµÑ°ûH á©HÉ£dG ∫É°üJG óæY
RÉ¡L ‘ á©HÉ£dG ‘ ºµëàdGh äGOGóYE’G Ò«¨Jh ,ádÉ◊G äÉeƒ∏©e ¢VGô©à°S’
.ôJƒ«ÑªµdG
øª°†ªdG ÖjƒdG ΩOÉN íàØd
`dG ¿GƒæY ÖàcG ,∑RÉ¡L ≈∏Y óªà©e âfÎfEG íØ°üàe ‘IP≈∏Y .á©HÉ£∏d ¢ü°üıG `dG ¿GƒæY ¿Éc GPEG ,∫ÉãŸG π«Ñ°SIP ƒg123.123.123.123‘ ‹ÉàdG ¿Gƒæ©dG ÖàcG , :âfôàfE’G íØ°üàehttp://123.123.123.123
`dG ¿GƒæYIP .äÉØ°UGƒŸG áëØ°U ‘ OQGh á©HÉ£dÉH ¢UÉÿG
≈æ°ùàj å«ëH ¬d á«©Lôe IQÉ°TEG π«é°ùJ ∂浪j ,øª°†ªdG ÖjƒdG ΩOÉN íàØH ΩÉ«≤dG ó©H
.ó©H ɪ«a ™jô°S πµ°ûH ¬«dEG ´ƒLôdG ∂d
áµÑ°ûdÉH ∫É°üJ’G πcÉ°ûe
●±É°ûµà°SG'' ™«ªL ≥«≤ëJ øe ócCÉJ ,áµÑ°ûdG π°Uƒe »a π«°UƒàdG Aƒ°V A»°†j ºd GPEG
.√ÓYCG •hô°ûdG áªFÉb ''áeÉY áØ°üH É¡MÓ°UEGh áµÑ°ûdG AÉ£NCG
● ¿GƒæY ójóëàH ≈°Uƒj ’ ¬fCG øe ºZôdG ≈∏YIPøe kÉ°†©H πëJ ɪHôa ,á©HÉ£∏d âHÉK
≈∏Y ∫ƒ°üë∏d .Gòg πª©H (»°üî°T …QÉf QGóL ™e ÜQÉ°†àdG πãe) â«ÑãàdG äÓµ°ûe
•ƒ¨°†ªdG ¢Uô≤dG ≈∏Y »fhôàµdE’G Ωóîà°ùªdG π«dO ô¶fG ,äÉeƒ∏©ªdG øe ójõªdG
.𫨰ûàdG AóÑH ¢UÉîdG

»HôY
10
É¡MÓ°UEGh AÉ£NC’G ±É°ûµà°SG
.èeGôÑdG â«ÑãJ hCG äÉfƒµªdG Ö«côàH á°UÉîdGh kÉYƒ«°T ä’ÉëdG ôãcC’ É¡MÓ°UEG ádhÉëeh AÉ£NC’G ±É°ûàc’ äÉMGôàbG Ωó≤j º°ù≤dG Gòg
AÓª©dG ºYO ™bƒe IQÉjõH ºb hCG á°UÉîdG äɶMÓªdGh »fCGôbCG ∞∏e ô¶fCG ,äÉeƒ∏©ªdG ôNCG ≈∏Y ∫ƒ°üë∏d
www.hp.com/support/officejetprok550.
IGPÉëªdG áëØ°U áYÉÑW πcÉ°ûe
:»∏j ɇ ócCÉà∏d á©HÉ£dG ¢üëaG
●á«fÉK 45 ¥ô¨à°ùJ ,Iôe ∫hC’ á©HÉ£dG 𫨰ûJ óæY .¢†eƒj ’h A»°†e ábÉ£dG Aƒ°V
.Úî°ùà∏d
●áMƒd ≈∏Y iôNCG AGƒ°VCG …CG Å°†J ød ,OGó©à°S’G ™°Vh »a á©HÉ£dG ¿ƒµJ ÉeóæY
AGƒ°VCG »fÉ©e ìô°T'' ô¶fCG ,É¡°†«eh hCG AGƒ°VC’G IAÉ°VEG ádÉM »a .¢†eƒJ hCG ºµëàdG
.8 áëØ°U »a ''ºµëàdG áMƒd
●.á©HÉ£dG ™e ó«L πµ°ûH áàÑãeh ,πª©J iôNC’G äÓѵdGh AÉHô¡µdG ∂∏°S ¿CG øe ócCÉJ
●.á©HÉ£dG øe ∞«∏¨àdG OGƒeh áWô°TCG áaÉc ádGREG
● »Ø∏ÿG ∫ƒNódG áMƒd(HP Officejet Pro K550)Ú¡LƒdG ≈∏Y áYÉÑ£dG IóMh hCG
(HP Officejet Pro K550dtn/K550dtwn).É¡fɵe ‘ áæeDƒe
●.á©HÉ£dG »a IQƒ°ûëe â°ù«dh êQódG »a í«ë°üdG πµ°ûdÉH áYƒ°Vƒe §FÉ°SƒdG
●.áYÉÑ£dG ¢ShDhQ πc øe »dÉ≤JôÑdG »bGƒdG §jô°ûdG ádGREG øe ócCÉJ
●á°UÉÿG áfƒ∏ŸG äÉëàØdG ‘ í«ë°üdG πµ°ûdÉH È◊G äGƒÑYh áYÉÑ£dG ¢ShDhQ Ö«côJ
§jô°ûdG ádGREG øe ócCÉJ .Ö°SÉæŸG ¢ùeÓàdG øe ócCÉà∏d É¡æe πc ≈∏Y Ió°ûH §¨°VG .É¡H
.áYÉÑ£dG ¢ShDhQ øe ¢SCGQ πc ≈∏Y øe »bGƒdG
●.á≤∏¨e É¡∏c ¬à«£ZCGh áYÉÑ£dG ¢SCGQ ê’õe
𫨰ûàdG èeÉfôH â«ÑãJ äÓµ°ûe
:»JB’G AGôLEGh ¢üëa
● ¿CG øe ócCÉJô¡¶J »àdG Ωóîà°ùŸG äɪ«∏©J ô¶fG .ΩɶædG äÉÑ∏£àà »Øj ôJƒ«ÑªµdG
𫨰ûàdG áfGƒ£°SCG ≈∏Y á°TÉ°ûdG ≈∏Y(Starter CD).
●áaÉc ¥ÓZEG øe ócCÉJ ,Rhóæjh ôJƒ«Ñªc RÉ¡L ≈∏Y 𫨰ûàdG èeÉfôH â«ÑãJ πÑb
.iôNC’G èeGÈdG
●øe ócCÉJ ,¬ÑàµJ …òdG á›óŸG ¢VGôbC’G π¨°ûe QÉ°ùe ≈∏Y ôJƒ«ÑªµdG ±ô©àj ⁄ GPEG
.Ö°SÉæŸG ¢UGôbC’G ∑ôfi ±ôM ójó–
●¢UGôbC’G ∑ôfi ‘ 𫨰ûàdG áfGƒ£°SG ≈∏Y ±ô©àdG øe ôJƒ«ÑªµdG øµªàj ⁄ GPEG
øe á©HÉ£dG 𫨰ûJ èeÉfôH π«ªëJ ∂浪j .áfGƒ£°SC’G ¢üëØH ºb ,á›óŸG
www.hp.com/support/officejetprok550.
● »°ù«FôdG RhóæjƒdG RÉ¡L »aWindows`dG äÓ¨°ûe ¿CG øe ócCÉJ ,USBô«Z
.á∏£©e
●±É°ûàcG øe ôJƒ«ÑªµdG øµªàj ºdh RhóæjƒdG 𫨰ûJ Ωɶæd ∂eGóîà°SG ádÉM »a
â«ÑãJ AɨdEG/∞«¶æJ RÉ¡L/IóYÉ°ùe IGOCG) â«ÑãàdG AɨdEG IGOCG 𫨰ûàH ºb ,á©HÉ£dG
exe𫨰ûàdG áfGƒ£°SG ≈∏YStarter CD) (Util/Scrubber/Uninstall.exe
≈∏YStarter CDRÉ¡L 𫨰ûJ óYCG .kÉeɪJ á©HÉ£dG π¨°ûe â«ÑãJ AɨdEÉH ΩÉ«≤∏d (
kGOóée á©HÉ£dG π¨°ûe â«ÑãJ ºbh ,ôJƒ«ÑªµdG.
.
áµÑ°ûdÉH ∫É°üJ’G πcÉ°ûe
:á¶MÓe
.kGOóée OGóYE’G èeÉfôH 𫨰ûàH ºb ,»∏j ɪe …CG í«ë°üJ ó©H
É¡MÓ°UEGh áeÉY áØ°üH áµÑ°ûdG AÉ£NCG ±É°ûµà°SG
●»a:»∏j ɇ ≥≤ëJ ,á©HÉ£dG 𫨰ûJ èeÉfôH â«ÑãJ ≈∏Y IQó≤dG ΩóY ádÉM
●.áæeDƒe á©HÉ£dGh ôJƒ«ÑªµdG RÉ¡÷ πHɵdG äÓ°Uh áaÉc
●.π¨°ûe áµÑ°ûdG Qƒfih πª©J áµÑ°ûdG
●ájQÉædG ¿GQó÷Gh äÉ°ShÒØdG øe ájɪ◊G èeÉfôH É¡«a Éà ,äÉ≤«Ñ£àdG áaÉc
.án浪oe ÒZ hCG á≤∏¨e ,á«°üî°ûdG
●É¡«∏Y óLƒJ »àdG á«YôØdG áµÑ°ûdG ¢ùØf ≈∏Y áàÑãe á©HÉ£dG ¿CG øe ócCÉJ
.á©HÉ£dG Ωóîà°ùà°S »àdG ôJƒ«ÑªµdG Iõ¡LCG
●áÄ«¡àdG áØ°U áYÉÑ£H ºb ,á©HÉ£dG ±É°ûàcG â«ÑãàdG èeÉfôH ™£à°ùj ºd GPEG
ô¶fG)11 áëØ°U »a ''áÄ«¡àdG áëØ°U áYÉÑ£d'' `dG ¿GƒæY OóMh (IPkÉjhój .â«ÑãàdG èeÉfôH »a
● 𫨰ûàdG Ωɶf Ωóîà°ùj ôJƒ«Ñªc RÉ¡L ΩGóîà°SG ádÉM »aWindowsócCÉJ ,
á≤HÉ£e øe ¿GƒæY ™e á©HÉ£dG π¨°ûe »a áfƒµàªdG áµÑ°ûdG òaÉæeIP
:á©HÉ£dÉH ¢UÉîdG
.áÄ«¡àdG áëØ°U ™ÑWG (1
RhóæjƒdG 𫨰ûJ Ωɶf ≈∏Y Ö൪dG í£°S øe (2Windows§¨°VCG , CGóHCG
(Start) §¨°VCG ,
äGOGóYEG
(Settings) §¨°VCG ºK ,
äÉ©HÉW
(Printers) §¨°VCG hCG ;
CGóHCG
(Start) §¨°VCG ºK ,
äÉ°ùcÉah äÉ©HÉW
(Printers and Faxes).
≈∏Y ô≤fGh ,á©HÉ£dG õeQ ≈∏Y øªjC’G IQCÉØdG QõH ô≤f (3
¢UGƒN
(Properties) ÖjƒÑàdG áeÓY ≈∏Y ô≤fG Égó©Hh ,
òaÉæe
(Ports) .
òØæe ôàNG (4TCP/IP¥ƒa ô≤fG Égó©Hh ,á©HÉ£∏d
òØæªdG áÄ«¡J
(Configure Port).
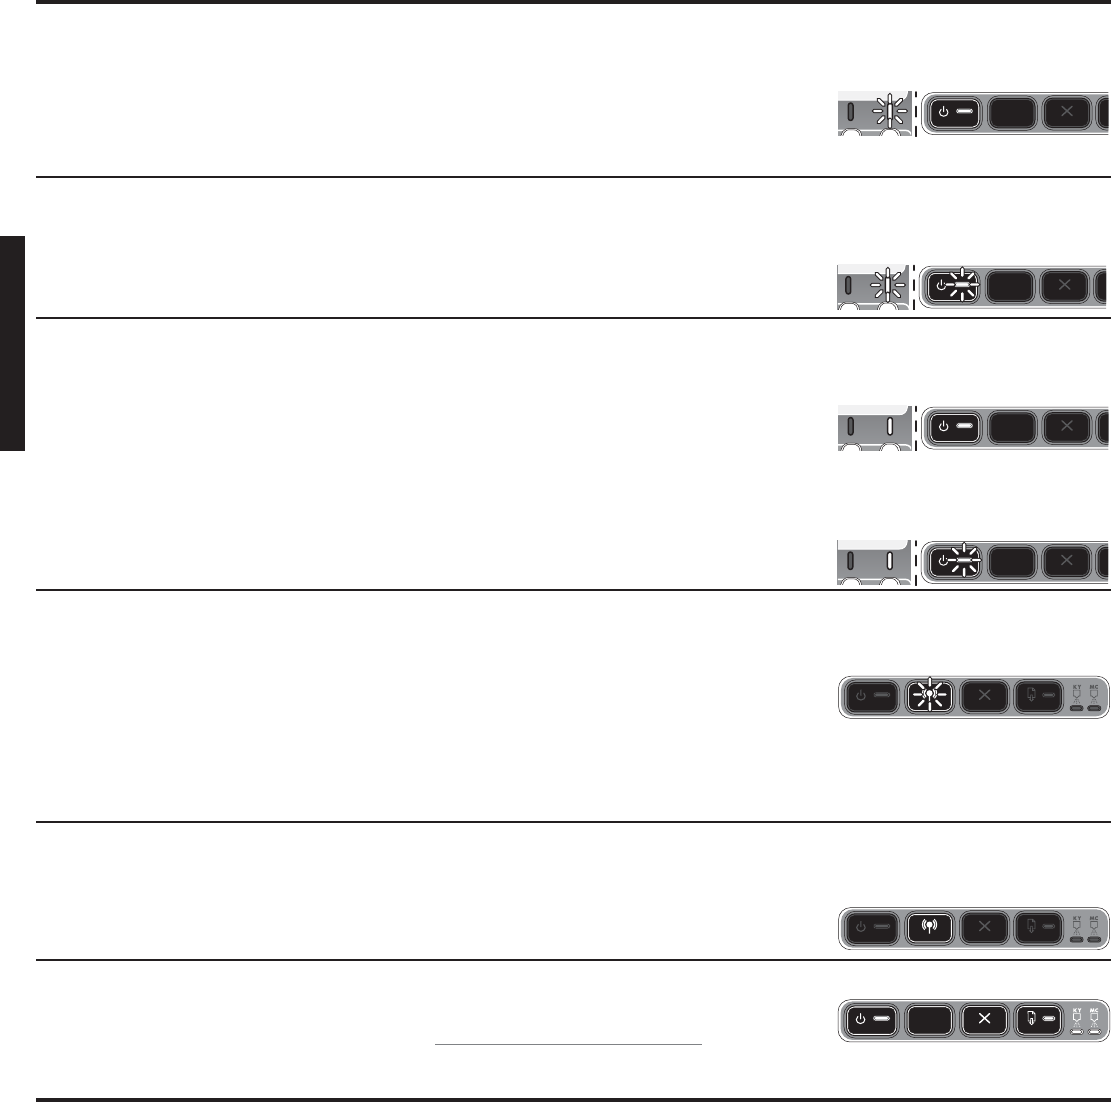
9
»HôY
øe ôãcCG hCG Aƒ°V ¢†«ehh ábÉ£dG Aƒ°V IAÉ°VEG
.ôÑëdG á°TƒWôN AGƒ°VCG
.IOƒLƒe ô«Z ôÑëdG ¢û«WGôN øe ôãcCG hCG IóMGh
●.áYÉÑ£dG ∫hÉM ºK ,á«æ©ªdG ôÑëdG á°TƒWôN ÖcQ
●.á«æ©ªdG ôÑëdG á°TƒWôN ∫óÑà°SÉa ,CÉ£îdG ôªà°SG GPEG
.áYÉÑ£dG á©HÉàe πÑb É¡dGóÑà°SG Öéjh ôÑëdG ¢û«WGôN øe ôãcCG hCG IóMGh øe ôÑëdG óØf
●.á«æ©ªdG ôÑëdG á°TƒWôN ∫óÑà°SG
ábÉ£dG Aƒ°V ¢†«ehAGƒ°VCG øe ôãcCG hCG Aƒ°Vh .ôÑëdG á°TƒWôN
.√ÉÑàf’G ≈dEG áLÉëH hCG áÑ«©e áYÉÑ£dG ôÑëdG ¢û«WGôN øe ôãcCG hCG IóMGh
●.áYÉÑ£dG ∫hÉM ºK ,Ö«côàdG áë«ë°U á«æ©ªdG ôÑëdG á°TƒWôN ¿CG ócCÉJ
●.á«æ©ªdG ôÑëdG á°TƒWôN ∫óÑà°SÉa ,CÉ£îdG ôªà°SG GPEG
øe ôãcCG hCG Aƒ°V IAÉ°VEGh ábÉ£dG Aƒ°V IAÉ°VEG
ôÑëdG á°TƒWôN AGƒ°VCG
.GkQƒa ∫GóÑà°S’G ≈dEG áLÉëH »gh ôãcCG hCG IóMGh ôÑM á°TƒWôN »a ¢†Øîæe ôÑëdG iƒà°ùe
●.ÉkÄ«°T π©ØJ ’
øe ôãcCG hCG Aƒ°V IAÉ°VEGh ábÉ£dG Aƒ°V ¢†«eh
.ôÑëdG á°TƒWôN AGƒ°VCG
.¢†eƒj áÄ«¡àdG áëØ°U Aƒ°V
(HP Officejet Pro K550dtwn)
:á«dÉàdG äÉ«∏ª©dG óMCG çóëJ
●.»µ∏°SÓdG ∫É°üJÓd á©HÉ£dG áÄ«¡J QÉL
● ΩGóîà°SG ádÉM »aSecureEasySetup (SES).᫵∏°SÓdG áµÑ°ûdÉH ∫É°üJ’G á©HÉ£dG ∫hÉëJ ó≤a ,á©HÉ£dG OGóYE’
● á«æ≤J ΩGóîà°SG ádÉM »a
TM
Windows Connect Now π¨°ûe øe ᫵∏°SÓdG äÉeƒ∏©ªdG πÑ≤à°ùJ á©HÉ£dG ¿EÉa ,á©HÉ£dG OGóYE’USB
.¢TÓa
.ø«à≤«bO øe ôãcCG äÉ«∏ª©dG ∂∏J øe …CG ¥ô¨à°ùJ ’h
●.ÉkÄ«°T π©ØJ ’
.Å«°†e áÄ«¡àdG áëØ°U Aƒ°V
(HP Officejet Pro K550dtwn)
.»µ∏°SÓdG ∫É°üJ’G ™°Vh »a á©HÉ£dG
●.ÉkÄ«°T π©ØJ ’
.IAÉ°†e AGƒ°VC’G áaÉc
.¬LÓY øµªj ’ CÉ£N çóM
● πÑch ,áµÑ°ûdG πÑc ,ábÉ£dG ∂∏°ùc) äÓѵdG πc π°üaGUSBºb ,áªFÉb á∏µ°ûe ∑Éæg âfÉc GPEG .äÓѵdG π«°UƒJ óYG ºK ,á«fÉK 20 Ióªd ô¶àfG ,(
™bƒe IQÉjõHHP)www.hp.com/support/officejetprok550(AÉ£NC’G ±É°ûµà°SÉH á≤∏©àªdG äÉeƒ∏©ªdG çóMCG ≈∏Y ∫ƒ°üë∏d .¬JÉãjóëJh èàæªdG äÉÑ«côJ hCG É¡MÓ°UEGh
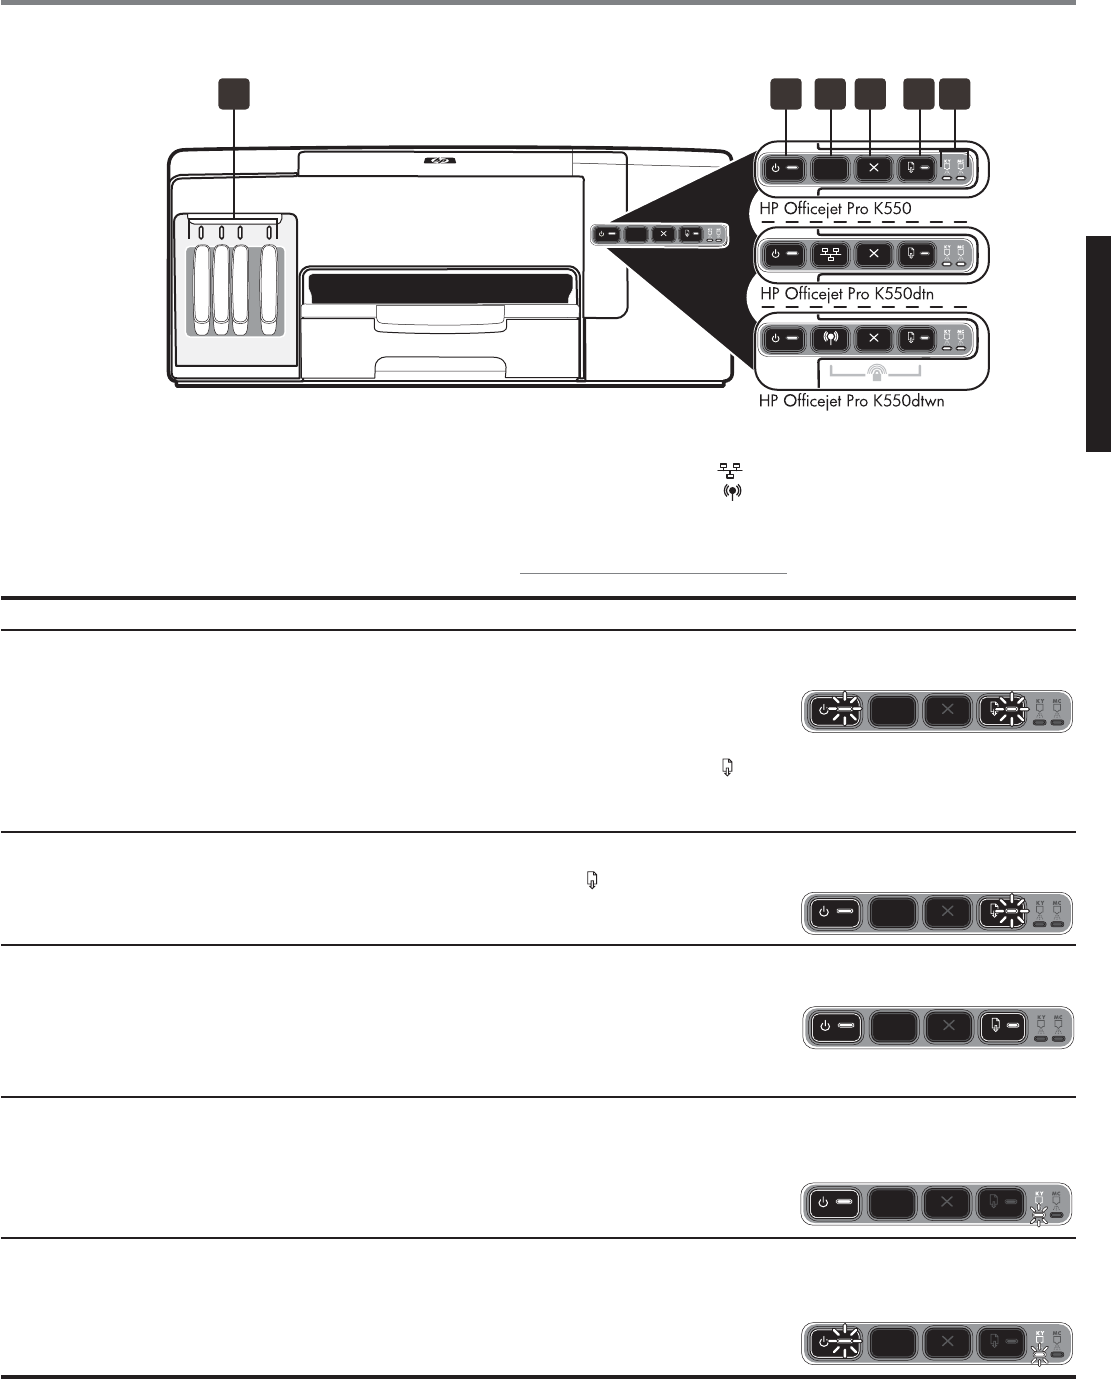
»HôY
8
ºµëàdG áMƒd AGƒ°VCG »fÉ©e ìô°T
HP Officejet Pro K550dtn
HP Officejet Pro K550dtwn
Aƒ°†dGh ábÉ£dG QR (1
áÄ«¡àdG áëØ°U QR (2
AɨdE’G QR (3
Aƒ°†dGh ±ÉæÄà°S’G QR (4
áYÉÑ£dG ¢ShDhQ AGƒ°VCG (5
ôÑëdG á°TƒWôN AGƒ°VCG (6
AÓª©dG ºYO ™bƒe IQÉjõH ºb ,äÉeƒ∏©ªdG øe ójõª∏dwww.hp.com/support/officejetprok550.
.±ÉæÄà°S’G Aƒ°Vh ábÉ£dG Aƒ°V ¢†«eh
.¢†eƒj ±ÉæÄà°S’G Aƒ°Vh Å«°†e ábÉ£dG Aƒ°V
.á©HÉ£dG »a IQƒ°ûëe áYÉÑ£dG §FÉ°Sh
● .»fhôàµdE’G Ωóîà°ùªdG π«dO »a ''¥QƒdG QÉ°ûëfG ádGREG'' ô¶fG .¬æe ¢ü∏îJh QÉ°ûëf’G ™bƒe OóM .êôîdG êQO øe §FÉ°SƒdG áaÉc êôNCG
.áØbƒàe ôÑëdG á°TƒWôN
●.(IQƒ°ûëªdG §FÉ°SƒdÉc) ≥FGƒY …CG øe ¢ü∏îJh …ƒ∏©dG AÉ£¨dG íàaG
● QR) §¨°VG
±ÉæÄà°S’G
((Resume).áYÉÑ£dG á©HÉàªd
●.iôNCG Iôe É¡∏«¨°ûJ óYCG ºK ,á©HÉ£dG 𫨰ûJ ∞bhCG ,CÉ£îdG ôªà°SG GPEG
1 2 3 4 56
Aƒ°†dG πµ°T ºµëJ áMƒd
¬H ≈°Uƒj …òdG AGôLE’Gh ìô°ûdG
.á©HÉ£dG »a ¥Qh óLƒj ’
● QR) §¨°VG ºK êQódG »a ¥QƒdG ™°V
±ÉæÄà°S’G
((Resume)
.
.±ÉæÄà°S’G Aƒ°Vh ábÉ£dG Aƒ°V IAÉ°VEG
.≥∏¨dG ºµëe ¢ù«d AÉ£¨dG
● .≥∏¨dG ᪵ëe á«£ZC’G áaÉc ¿CG ócCÉJ
.πeɵdÉH πNóJ ºd hCG ,IOƒ≤Øe áLhOõªdG IóMƒdG hCG á«Ø∏îdG ∫ƒ°UƒdG áMƒd
● á«Ø∏îdG ∫ƒ°UƒdG áMƒd ¿CG ócCÉJ(HP Officejet Pro K550) ø«¡LƒdG ≈∏Y áYÉÑ£dG IóMh hCG(HP Officejet Pro K550dtn/K550dtwn)
.á©HÉ£dG øe »Ø∏îdG AõédG »a Gkó«L É¡dÉNOEG ºJ
øe ôãcCG hCG Aƒ°V ¢†«ehh ábÉ£dG Aƒ°V IAÉ°VEG
.áYÉÑ£dG ¢SCGQ AGƒ°VCG
.IOƒLƒe ô«Z áYÉÑ£dG ¢ShDhQ øe ôãcCG hCG IóMGh
●.áYÉÑ£dG ∫hÉM ºK ,á«æ©ªdG áYÉÑ£dG ¢SCGQ ÖcQ
●.á«æ©ªdG áYÉÑ£dG ¢SCGQ ∫óÑà°SÉa ,CÉ£îdG ôªà°SG GPEG
AGƒ°VCG øe ôãcCG hCG Aƒ°Vh ábÉ£dG Aƒ°V ¢†«eh
.áYÉÑ£dG ¢SCGQ
.√ÉÑàf’G ≈dEG áLÉëH hCG áÑ«©e áYÉÑ£dG ¢ShDhQ øe ôãcCG hCG IóMGh
●.áYÉÑ£dG ∫hÉM ºK ,Ö«côàdG áë«ë°U á«æ©ªdG áYÉÑ£dG ¢SCGQ ¿CG ócCÉJ
●.á«æ©ªdG áYÉÑ£dG ¢SCGQ ∫óÑà°SÉa ,CÉ£îdG ôªà°SG GPEG
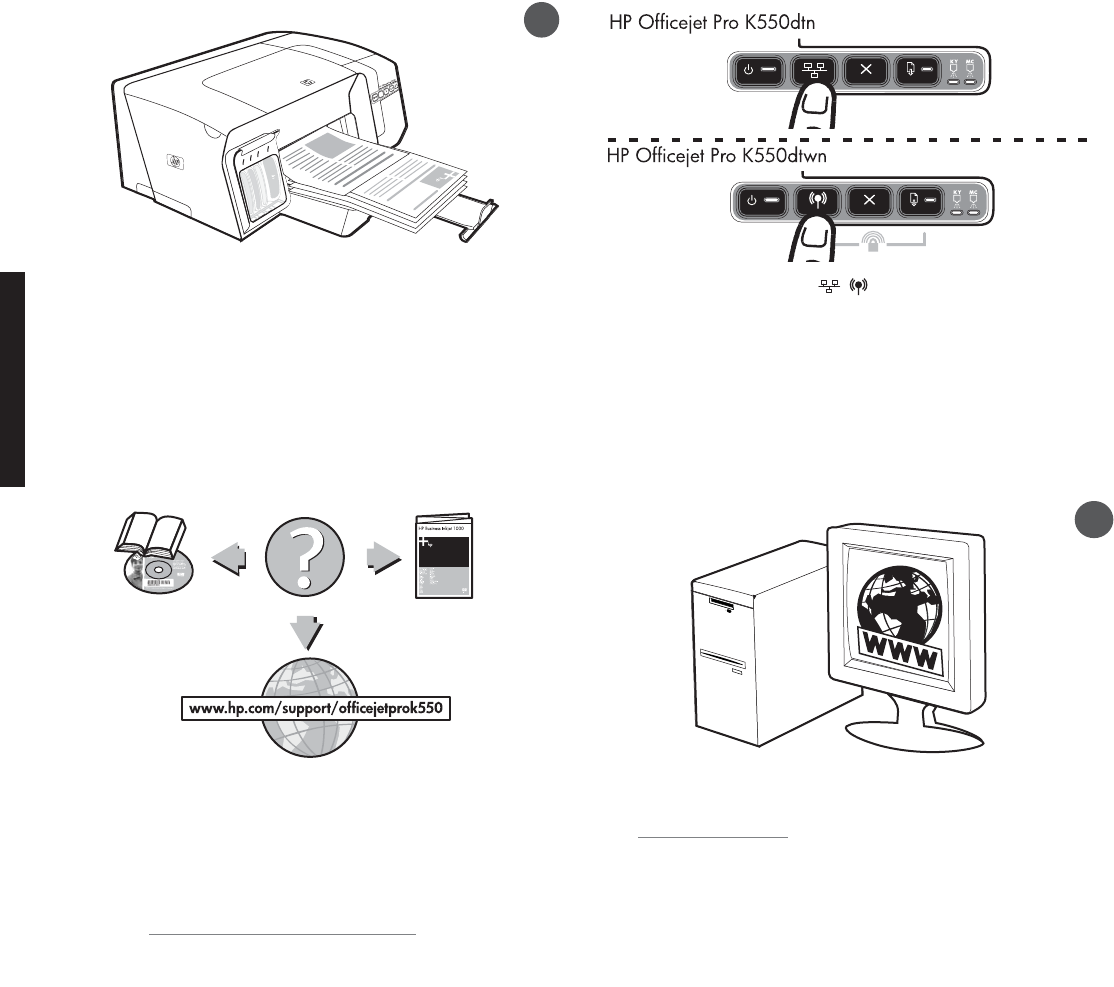
»HôY
7
QR) / ≈∏Y §¨°†dÉH áÄ«¡àdG áëØ°U áYÉÑ£H ºb (4
áÄ«¡àdG áëØ°U
(
(Configuration Page) §¨°VCG ,áéeóªdG áfGƒ£°S’G áªFÉb ≈∏Y (5 .
â«ÑãJ (Rhóæjh)
(Windows) hCG
π¨°ûe â«ÑãJ ∑Ée)
OS
(
(Mac OS)äɪ«∏©àdG ™ÑJGh ,
áÄ«¡àdG áëØ°üH IOƒLƒªdG äÉeƒ∏©ªdG ΩGóîà°SÉH èeGôÑdG â«Ñãàd á°TÉ°ûdG ≈∏Y IOƒLƒªdG
¿GƒæY πãe)IP.(
Ωóîà°ùªdG π«dO ô¶fCG ,áµÑ°ûdG ≈∏Y á©HÉ£dG ácQÉ°ûe øY äÉeƒ∏©ªdG øe ójõŸ
.»fhôàµdE’G
.á©HÉ£dG π«é°ùJ :10 Iƒ£ÿG
á©HÉ£∏d ∂∏«é°ùJ ΩóY ádÉM ‘ .á«æØdG äÉeƒ∏©ªdGh ΩRÓdG ºYódG »≤∏àd á©HÉ£dG π«é°ùàH ºb
. ™bƒªdG ≈∏Y ∂dP ó©H π«é°ùàdG ∂浪j ,èeGÈdG â«ÑãJ AÉæKCG
.á©HÉ£dG èeÉfôH â«ÑãJ QÉÑàNG :9 Iƒ£ÿG
»àdG äÉ≤«Ñ£àdG óMCG øe Gkóæà°ùe ™ÑWG ,ôJƒ«ÑªµdÉH á©HÉ£dG π«°UƒJh èeGÈdG â«ÑãJ ∫ɪàcG ó©H
,™Ñ£J ’ á©HÉ£dG ¿EG ádÉM ‘ .áë«ë°U á≤jô£H áàÑãe èeGÈdG ¿CG øe ócCÉà∏d IôãµH É¡eóîà°ùJ
.11 áëØ°üdG ‘ ''áÄ«¡àdG äGhOCGh É¡MÓ°UEGh AÉ£NC’G ±É°ûµà°SG'' ô¶fCG
.äÉeƒ∏©ªdG øe ójõe ≈∏Y ∫ƒ°üë∏d
AÉ£NC’G ±É°ûµà°SGh á©HÉ£dG ΩGóîà°SG øY äÉeƒ∏©e ≈∏Y ∫ƒ°üë∏d .ΩGóîà°SÓd IõgÉL ∂à©HÉW
,É¡MÓ°UEGhô¶fG ,¿Éª°†dG øY äÉeƒ∏©e ≈dEG áaÉ°VE’ÉH:á«dÉàdG OQGƒªdG ≈dEG
● 𫨰ûàdG áfGƒ£°SCG ≈∏Y »fCGôbCG ∞∏e h »fhôàµdE’G Ωóîà°ùªdG π«dO(Starter CD)
●ºYOHP Instant Support ÖjƒdG ΩOÉNh …QƒØdGWebΩóîà°ùªdG π«dO ô¶fCG) øª°†ªdG (ÊhεdC’G
●≈∏Y èàæªdG ºYO ™bƒe
9
10
www.hp.com/support/officejetprok550
www.register.hp.com
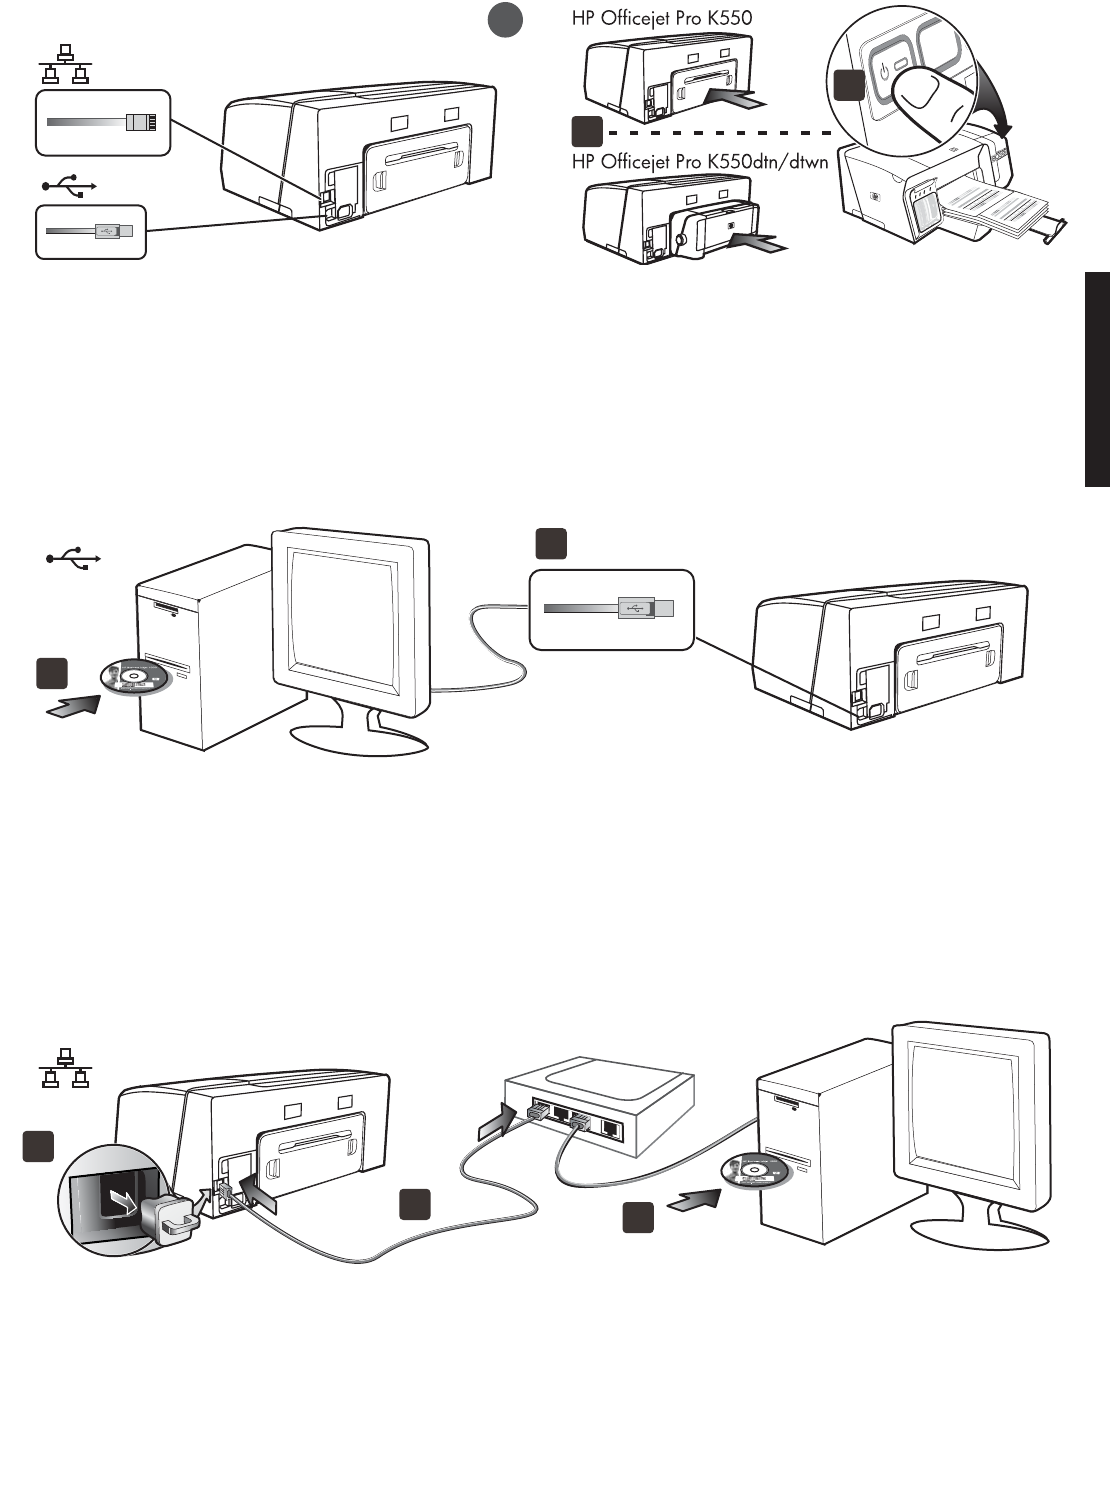
»HôY
6
.á©HÉ£dG π«°UƒàH ºb :8 Iƒ£ÿG
) ∂H á°UÉîdG á∏°UƒdG ´ƒæd á«dÉàdG äɪ«∏©àdG ô¶fCGUSB .(᫵∏°ùdG áµÑ°ûdG hCG …RGƒàe , á©HÉ£d »µ∏°SÓdG ∫É°üJ’G OGóYE’HP Officejet Pro K550dtwn∫É°üJ’G OGóYEG'' ô¶fG , á©HÉ£∏d »µ∏°SÓdG(HP Officejet Pro K550dtwn).12 áëØ°U »a ''
(2áéeóªdG áfGƒ£°S’G áªFÉb ≈∏Y
,
§¨°VCG
â«ÑãJ(Rhóæjh)
(Windows) hCG
π¨°ûe â«ÑãJ ∑Ée)
OS
(
(Mac OS).èeGôÑdG â«ÑãJ ∫ɪµà°S’ á°TÉ°ûdG ≈∏Y ô¡¶à°S »àdG äɪ«∏©àdG ™ÑJGh , `dG πHÉc π°UƒH ºbUSB.áLÉ◊G óæY
áfGƒ£°SG ≈∏Y »fhôàµdC’G Ωóîà°ùªdG π«dO ô¶fG ,èeGôÑdG â«ÑãJ øY äÉeƒ∏©ªdG øe ójõªd
𫨰ûàdG(Starter CD).
:á¶MÓe
¢ùØf ≈∏Y IOƒLƒe É¡eóîà°ùJ »àdG ôJƒ«ÑªµdG Iõ¡LCGh á©HÉ£dG ¿ƒµJ ¿CÉH ≈°Uƒj
πcÉ°ûe'' ô¶fCG .π¨°ûe ô«Z áµÑ°ûdG π°Uƒe Aƒ°V ¿EG ádÉM »a Iƒ£îdG IOÉYEÉH ºb .áµÑ°ûdG ´Éæb
.»fhôàµdE’G Ωóîà°ùªdG π«dO »a ''áµÑ°ûdÉH ∫É°üJ’G
(3 𫨰ûàdG áfGƒ£°SG πNOG(Starter CD) áfGƒ£°S’G π¨°ûe πNGO(CD drive)AóÑJ ød . áfGƒ£°S’G áªFÉb(CD menu)áfGƒ£°SG »a OGóYE’G áfƒ≤jCG ≈∏Y ø«Jôe ô≤ædÉH ºb ,É«FÉ≤∏J 𫨰ûàdG(Starter CD).
á«Ø∏îdG ∫ƒ°UƒdG áMƒd Ö«côJ ºJ ¬fCG øe ócCÉJ (3(HP Officejet Pro K550)IóMh hCG ø«¡LƒdG ≈∏Y áYÉÑ£dG(HP Officejet Pro K550dtn/K550dtwn) .
ô¶fG ,™Ñ£J ’ IGRÉëªdG äÉëØ°U â∏X GPEG .iôNCG Iôe É¡∏«¨°ûJ ºb ºK ,á©HÉ£dG ¥ÓZEÉH ºb (4
.10 áëØ°U »a ''IGPÉëªdG áëØ°U áYÉÑW πcÉ°ûe''
.á©HÉ£dG π°UhCG
á∏°Uh
USB
:
(1𫨰ûàdG áfGƒ£°SCG ∫ÉNOEÉH ºbh á∏¨°ûe äÉ≤«Ñ£J …CG ¥ÓZEÉH ºb
(Starter CD) áéeóªdG äÉfGƒ£°S’G π¨°ûe πNGO(CD drive)áªFÉb CGóÑJ ºd GPEG . áfGƒ£°S’G áfGƒ£°SCG(CD menu)OGóYE’G õeQ ¥ƒa ÉkLhOõe Gkô≤f ô≤fÉa ,É«FÉ≤∏J •ƒ¨°†ŸG ¢Uô≤dÉH.AóÑdG
:᫵∏°ùdG áµÑ°ûdG
(1(2 .á©HÉ£dG áµÑ°T π°Uƒe øe »bGƒdG AÉ£¨dG ´õfGáµÑ°ûdG πHÉc π°UƒH ºb
.»µ∏°S’G ¬LƒªdG hG ìÉàتdG ,áµÑ°ûdG Qƒëe »a ìÉàªdG òØæªdGh π°Uƒª∏d
:¬«ÑæJ
πHÉc π°üØJ ’ ¬«∏Y ´ƒ°VƒªdG òØæªdG øe áµÑ°ûdGWAN ,Uplink¬LƒªdG hG ìÉàتdG ,QƒëªdG »a âfôàf’G hCG .»µ∏°S’G
™e Iôaƒàe) ™WÉ≤àªdG πHɵdG π°UƒJ ’HP Officejet Pro K550dtwn(Qƒëe πNGO .»µ∏°ùdG QƒëªdG hCG ,ìÉàتdG ,áµÑ°ûdG
8
3
4
1
2
1
23
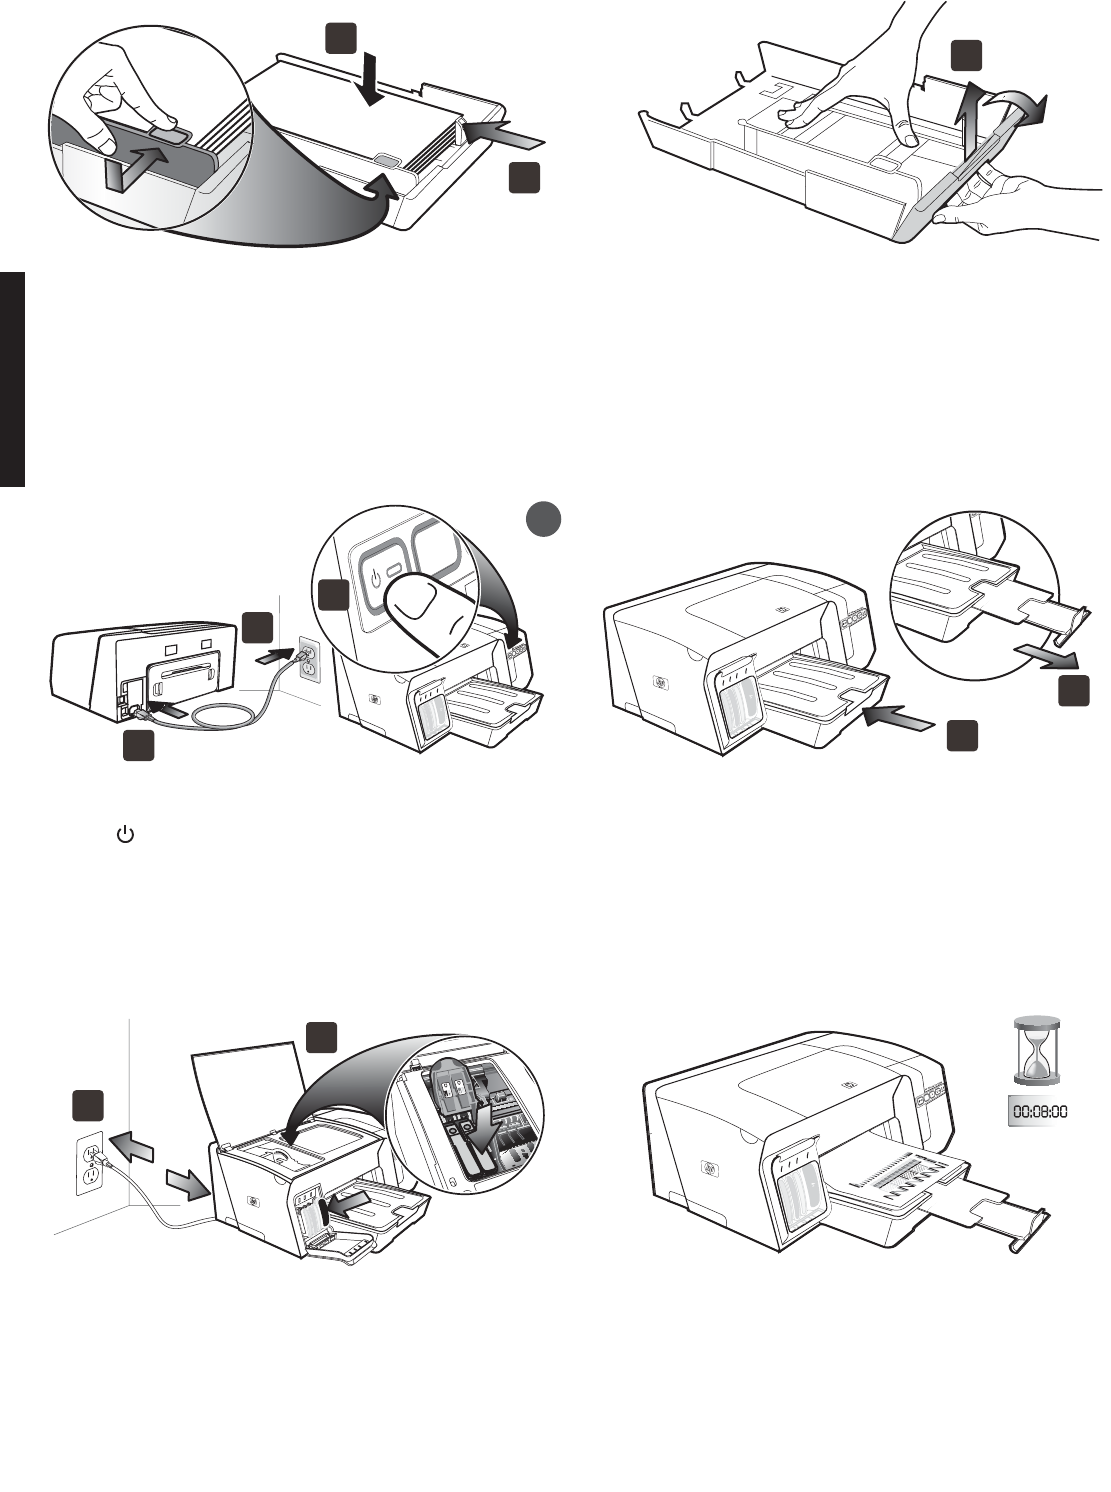
»HôY
5
AõédG ô¶fG) êQó∏d »eÉeC’G AÉ£¨dG ™aQG ,(ºe 279) á°UƒH 11 øe ôÑcC’G ¥Qƒ∏d áÑ°ùædÉH (2
.êQódG á¡LGh ¢†ØNGh (êQódG øe π∏¶ªdG
.êGôNE’G êQO »a OƒLƒªdG OGóàe’G Öë°SG (6 .∞£∏H iôNCG Iôe êQódG πNOG (5
¢ShDhQ …PÉëJh πª©dG »a á©HÉ£dG CGóÑJ ,áYÉÑ£∏d IOƒL π°†aCG ≈∏Y ∫ƒ°üëdG øe ócCÉà∏d
.äÉeƒ∏©ªdG áëØ°U ™Ñ£J á©HÉ£dGh ¢†eƒJ ábÉ£dG AGƒ°VCG ,IGPÉëªdG AGôLEG ájGóH »a .áYÉÑ£dG
AGôLE’G Gòg òNCÉj .(áfƒ∏ªdG äÉëØ°üdG) IGPÉëªdG äÉëØ°U áYÉÑ£H á©HÉ£dG Ωƒ≤J ,𫨰ûàdG AÉæKG
.ÉÑjô≤J ≥FÉbO 8
¬¡Lh ¿ƒµj å«ëH ,2 êQódG πNGO 350 ≈àM hCG 1 êQódG πNGO ábQh 250 ≈àM πNOG (3
.êQó∏d ø«ª«dG áaÉë∏d ÓHÉ≤e πØ°SC’ áYÉÑ£dG ¬«∏Y ºàà°S …òdG ábQƒdG
áeÓ©dG §N RhÉéàJ ’h ,êQódG ±GƒM ∞∏Nh ø«ªj ™e ájRGƒàe ¥QƒdG áYƒªée ¿CG ócCÉJ
.êQódG πNGO OƒLƒªdG
:á¶MÓe
êQódG πNGO ¥QƒdG äÉ¡Lƒe ∑ôM (4 .§≤a …OÉ©dG ¥QƒdÉH 2 êôdG π«ªëJ øµªj
.¬∏«ªëàH âªb …òdG ¢SÉ≤ªdÉH º¡£Ñ°†d
.á©HÉ£dG 𫨰ûàH ºb ºK QÉ«àdG ∂∏°S π°U :7 Iƒ£ÿG
(1 .á©HÉ£∏d QÉ«àdG Qó°üe π«°UƒàH ºb (2òØæªH ábÉ£dG ∂∏°S øe iôNC’G ájÉ¡ædG π«°UƒàH ºb OΟG »FÉHô¡µdG QÉ«àdG(AC). (3§¨°VG ,É«FÉ≤∏J á©HÉ£dG 𫨰ûJ ºàj ºd GPEG) QR
(ábÉ£dG
)Power(.á©HÉ£dG 𫨰ûàd.
:á¶MÓe
ìô°T'' ô¶fG ,áYÉÑ£dG ¢ShDhQ IGRÉëe AGôLEG AÉæKCG iôNC’G á©HÉ£dG AGƒ°VCG äAÉ°VCG GPEG
√òg ™ÑJG ,IGRÉëªdG äÉëØ°U áYÉÑW ºàj ºd GPEG .8 áëØ°U »a ''ºµëàdG áMƒd AGƒ°VCG »fÉ©e
á©HÉ£dG ¢ShDhQ ¿CG øe ócCÉJ (2 .kGó«L ∫ƒ°Uƒe ábÉ£dG ∂∏°S ¿CG øe ócCÉJ (1 .äGƒ£îdG
.áë«ë°U á≤jô£H áÑcôe ôÑëdG ¢û«WGôNh
7
2
3
4
5
6
1
2
3
1
2

4
6x
»HôY
(3Ö≤ãdG »a á°TƒWôN πc πNOCG ºK ,É¡H ¢UÉîdG ¿ƒ∏dG Oƒc Ö≤K ™e á°TƒWôN πc IGPÉëªH ºb
»a Ghô≤à°ùj ≈àM äÉÑãH º¡«∏Y §¨°VG ,º«∏°S ƒëf ≈∏Y ¢û«WGôîdG ∫É°üJG ¿Éª°†∏ .É¡H ¢UÉîdG
.º¡fɵe
:áßMÓe
.á©HÉ£dG πª©J ≈àM í«ë°U ƒëf ≈∏Y É¡©«ªL á©HQC’G ôÑëdG ¢û«WGôN Ö«côJ ø«©àj (4.ôÑëdG á°TƒWôN AÉ£Z ≥∏ZCG
.ôÑëdG ¢û«WGôN Ö«côJ :4 Iƒ£ÿG
(1.∞£∏H ôÑëdG á°TƒWôN AÉ£Z íàaG (2.É¡JƒÑY øe ôÑM á°TƒWôN πc êôNCG
πc øe »bGƒdG »dÉ≤JôÑdG AÉ£¨dG ´õfG ºK ,É¡JƒÑY øe áYÉÑ£dG ¢ShDhQ øe ¢SCGQ πc êôNCG (4
.É¡æe§¨°VG ºK ,¬d Ö°SÉæªdG ¿ƒ∏dÉH Iõ«ªªdG áëàØdG »a áYÉÑ£dG ¢ShDhQ øe ¢SCGQ πc πNOCG
.í«ë°U ƒëf ≈∏Y É¡dÉ°üJG ¿Éª°†d äÉÑãH ¢SCGQ πc ≈∏Y
.ôÑëdG ¢û«WGôN Ö«côJ :5 Iƒ£ÿG
(1.…ƒ∏©dG AÉ£¨dG íàaG (2.áYÉÑ£dG ¢SCGQ ê’õe ™aQCG
(5
.êQGOC’G πNGO ¥QƒdG π«ªëJ :6 Iƒ£ÿG
(1
.êQódG á¡LGh âëJ á©HÉ£dG êQÉN êQódG Öë°SG π«°UƒJ ºJ ¬fCG ócCÉà∏d πØ°SC’ §¨°VGh ΩÉeCÓd áaÉ°ùªdG ôNBG ≈àM áYÉÑ£dG ¢SCGQ ê’õe Öë°SG (
.áë«ë°U á≤jô£H ê’õªdG
:á¶MÓe
6
.¬∏«°Uƒàd ê’õªdG ≈∏Y ôãcCG §¨°†dG ≈dEG êÉàëJ ɪHQ.…ƒ∏©dG AÉ£¨dG ≥∏ZCG
(7
4
1
2
4
3
1
25
43
5
1
6
6
7
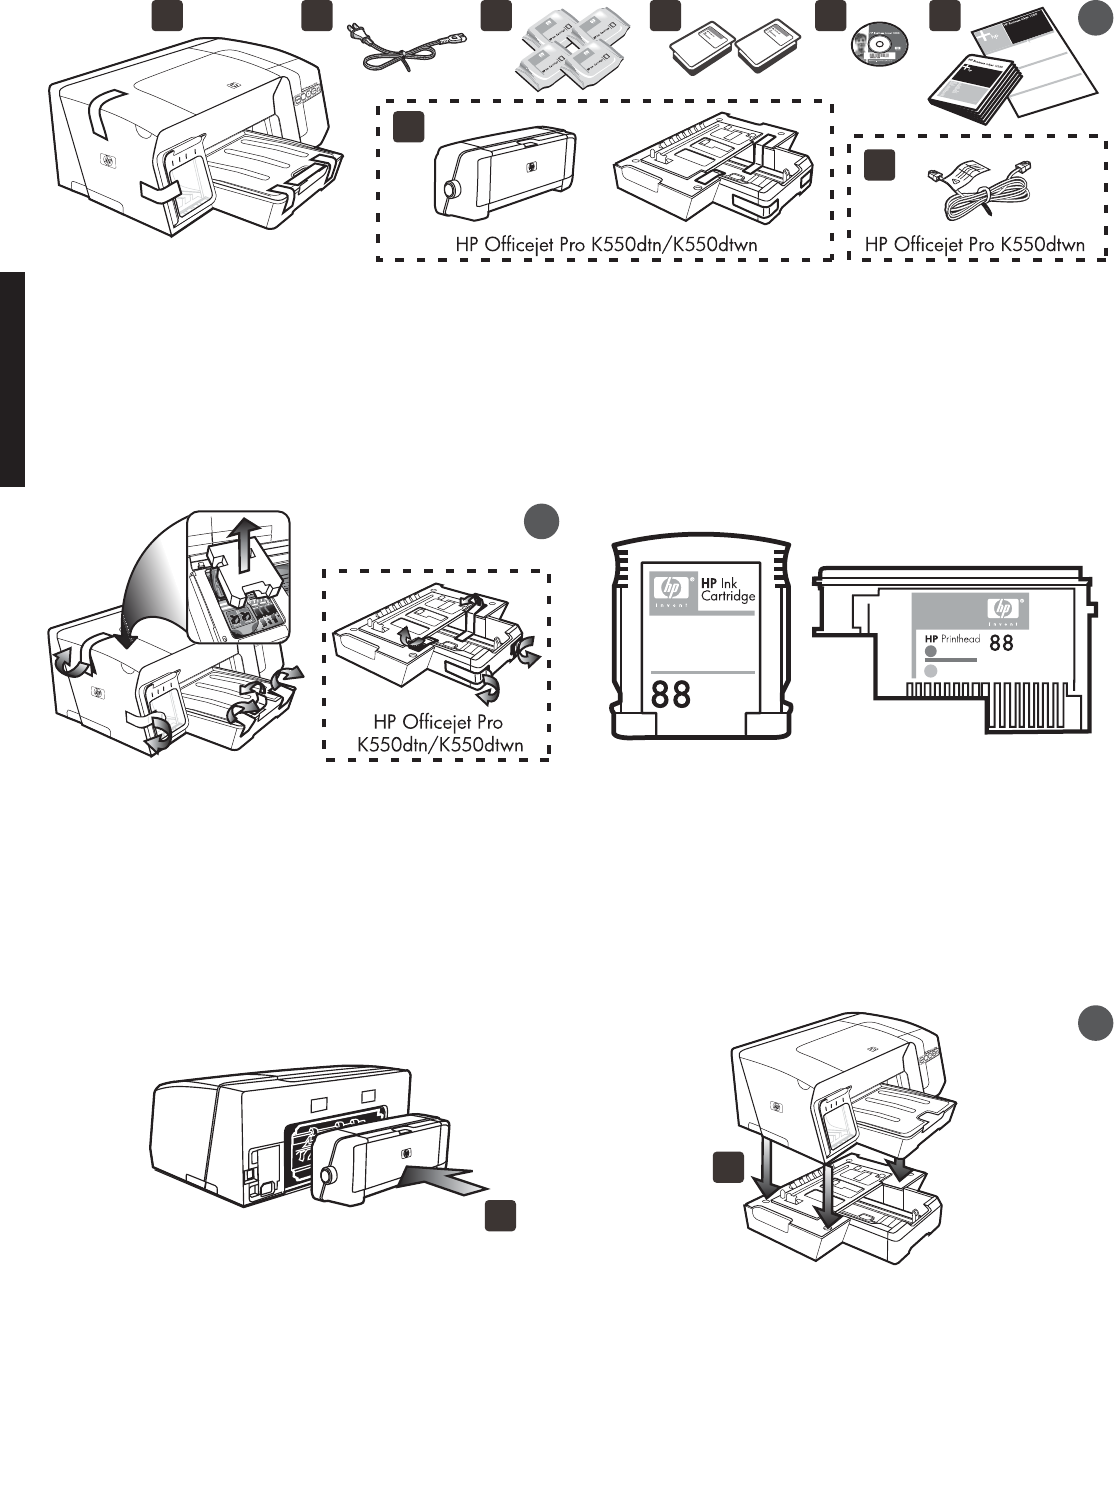
»HôY
3
.IƒÑ©dG äÉjƒàëe ¢üëa
,Oƒ°SCG ,ôØ°UCG ,»fGƒLQG ,øcGO ¥QRCG :ôÑM ¢û«WGôN ™HQCG (3 ,ábÉW ∂∏°S (2 ,á©HÉW (1
,(»fhôàµdE’G Ωóîà°ùªdG π«dOh èeGôÑdG) 𫨰ûàdG áfGƒ£°SCG (5 ,áYÉÑW ¢ShDhQ 2 (4
,áYƒÑ£e ≥FÉKh (6
:á¶MÓe
:á«dÉàdG áYÉÑ£dG äÉeõ∏à°ùe áYÉÑ£dG ºFÉYO
●
:ôÑëdG ¢û«WGôN
HP 88,Oƒ°SCGHP 88 ,øcGO ¥QRCGHP 88 ,»fGƒLQGHP 88,ôØ°UG
HP 88L ,Oƒ°SCGHP 88L ,øcGO ¥QRCGHP 88L h »fGƒLQGHP 88L .ôØ°UCG
●
:áYÉÑ£dG ¢ShDhQ
HP 88 h ,ôØ°UCGh Oƒ°SCGHP 88 .øcGO ¥QRCGh »fGƒLQG
ø«¡LƒdG ≈∏Y áYÉÑ£dG ≥ë∏eh 2 êQO âÑK :3 Iƒ£ÿG
(HP Officejet Pro K550dtn/K550dtwn)
.™°V (1.2 êQódG ≈∏YCG á©HÉ£dG !ôjòëJ
.á©HÉ£dG πØ°SCG ∂jójh ∂©HÉ°UCG ™°Vh ΩóY ≈∏Y Ék°üjôM øc
™e áMÉàe) 2 êQO h (áLhOõªdG IóMƒdG) ø«¡LƒdG ≈∏Y á«FÉ≤∏àdG áYÉÑ£dG ≥ë∏e (7
HP Officejet Pro K550dtn/K550dtwn™WÉ≤àªdG πHɵdG (8 ,( )HP Officejet Pro K550dtwn.(
.∞«∏¨àdG OGƒeh áWô°TCG ádGREG :2 Iƒ£ÿG
¿Éµe »ah mƒà°ùeh âHÉK í£°S ≈∏Y á©HÉ£dG ™°Vh Öéj .õ¡éªdG ¿ÉµªdG ≈dEG á©HÉ£dG ∑ôM (1
.ájƒ¡à∏d (¿Éà°UƒH) º∏e 50 πª°ûJ ,á©HÉ£dG ∫ƒM á«aÉc áMÉ°ùe ∑ôJG .ájƒ¡àdG ó«L
∞«∏¨àdG OGƒe hCG ΩƒØdG ´õfG h …ƒ∏©dG AÉ£¨dG íàaG .á©HÉ£dG øe ∞«∏¨àdG áWô°TCG ™«ªL ´õfG (2
.á©HÉ£dG πNGO øe
áYÉÑ£dG IóMh πNOG ,á©HÉ£dG IôNDƒe »a .áLhOõªdG áYÉÑ£dG IóMh øe ∞«∏¨àdG áWô°TCG ∫RCG (2
.≥à≤£J ≈àM áLhOõªdG
1
2
1 2 3 4 5 6
7
8
1
3
2

¿ÉeB’G äÉeƒ∏©e
áeó°üdÉH áHÉ°UE’G QÉ£NBG π«∏≤àd èàæŸG Gòg ΩGóîà°SG óæY á«°SÉ°SC’G áeÓ°ùdG äGôjò– kɪFGO ™ÑJG
.á«FÉHô¡µdG
1
.á©HÉ£dG RÉ¡éH ≥ë∏ŸG óæà°ùŸG Gòg ‘ äɪ«∏©àdG ™«ªL º¡aCGh AGôbCG
2
‘ .á«Hô¡µdG ábÉ£dG Qó°üà èàæŸG Gòg π«°UƒJ óæY á°VQDƒŸG á«Hô¡µdG ¢ùHÉ≤ŸG iƒ°S Ωóîà°ùJ ’
.¿CÉ°ûdG Gò¡H AÉHô¡c »æa ™LGQ ,¢VQDƒŸG QÉ«àdG ¢ùÑ≤e áaô©e ΩóY ádÉM
3
.èàæŸG ≈∏Y áHƒàµŸG äɪ«∏©àdGh äGQɶfE’G ™«ªL ≥ÑW
4
.É¡Ø«¶æJ πÑb §FÉ◊G êôfl øe á©HÉ£dG ¢ùHÉb π°üaEG
5
.πàÑe âæc hCG ,AÉŸG QGƒéH á©HÉ£dG √òg Ωóîà°ùJ hCG ÖcôJ ’
6
.¿RGƒàe í£°S ≈∏Y ¿ÉeCÉH á©HÉ£dG ÖcQ
7
≈àMh ,AÉHô¡µdGπ«°UƒJ πÑc ≈∏Y ¢üî°T …BG »°ûÁ hCG ƒ£îj ’ ≈àM »ªfi ¿Éµe ‘ á©HÉ£dG ÖcQ
.AÉHô¡µdG πÑc ∞∏àj ’
8
π«dO ‘ ''É¡MÓ°UEGh AÉ£NC’G ±É°ûµà°SGh áfÉ«°üdG'' ô¶fG ,…OÉY πµ°ûH èàæŸG πª©j ⁄ GPG
≈∏Y .á°TÉ°ûdG ≈∏Y ô¡¶j …òdG Ωóîà°ùŸG 𫨰ûàdG áfGƒ£°SG
(Starter CD).
9
π°üJCG áfÉ«°üdG ¤EG áLÉ◊G óæY .Ωóîà°ùŸG ᣰSGƒH É¡àfÉ«°U ºàj AGõLG á©HÉ£dG πNGóH óLƒj ’
.áfÉ«°üdG ∫ɪYEÉH ΩÉ«≤∏d Ú∏gDƒŸG OGôa’ÉH
ô°ûædG ≥M äÉeƒ∏©e
2005 Hewlett-Packard Development Company, L.P.©
2005/6 ,1 ºbQ ô°ûædG
¬H íª°ùJ Ée OhóM ‘ ’EG ,»HÉàc ¿PEG ¿hóH π«dódG Gòg áªLôJ hCG πjó©J hCG êÉàfEG IOÉYEG ô£îj
.áXƒØfi ¥ƒ≤◊G ™«ªL .ô°ûædG ¥ƒ≤M ÚfGƒb
.≥Ñ°ùe QÉ£NEG ¿hóH Ò«¨à∏d óæà°ùŸG Gòg ‘ á∏é°ùŸG äÉeƒ∏©ŸG ™°†îJ
äÉeóNh äÉéàæŸ ó«MƒdG ¿Éª°†dG
HPäÉéàæŸG ∂∏J ™e ≥aôŸG ¿Éª°†dG ¿É«H ‘ Qƒcòe
ácô°T ¿ƒµJ ’ .‘É°VEG ¿Éª°V OƒLh ∂dP øe º¡Øj ’ .äÉeóÿGh
HPhCG á«æØdG AÉ£NC’G øY ádDƒ°ùe .Éæg OQGƒdG ±ò◊G hCG ájôjôëàdG
ájQÉéàdG äÉeÓ©dG ¿É«H
ó``````©J
®
Microsoft ácô°ûd á∏é°ùe ᫵jôeCG ájQÉŒ äÉeÓYMicrosoft¿ƒµJ ób .
Aɪ°SCÉH á∏é°ùe ájQÉéJ äÉeÓY ,óæà°ùªdG Gòg ÖLƒªH ÉgôcP OQh »àdG iôNC’G äÉéàæªdG áaÉc
.á°UÉîdG É¡JÉcô°T
áeÓY »g ácô°ûd á∏é°ùe ᫵jôeCG ájQÉŒ
Microsoft.
®
Novell h
®
NetWareáeÓY »g ácô°ûd á∏é°ùe ᫵jôeCG ájQÉŒNovell.
®
PentiumáeÓY »g ácô°ûd á∏é°ùe ᫵jôeCG ájQÉŒIntel.
®
Adobe h
®
AcrobatáeÓY »g ácô°ûd á∏é°ùe ᫵jôeCG ájQÉŒAdobe Systems Incorporate.
áeÓY »g ácô°ûd á∏é°ùe ᫵jôeCG ájQÉŒHP ácô°ûdhBroadcom ácô°ûdhLinkSys.
Windows®
Windows Connect NowTM
SecureEasySetupTM

© 2005 Hewlett-Packard Development Company, L.P.
Printed in Germany
Imprimé en Allemagne
Stampato in Germania
www.hp.com/support/officejetprok550
Printed on
recycled paper
Imprimé sur
le Papier Recyclé
*C8157-90014*
*C8157-90014*
C8157-90014
