HP Hydra Designjet 500Plus Printer User's Guide C00749371
User Manual: HP HP Designjet 500Plus Printer - User's Guide
Open the PDF directly: View PDF ![]() .
.
Page Count: 216 [warning: Documents this large are best viewed by clicking the View PDF Link!]
- Introduction
- Media & Ink
- Media Choice
- Roll Media
- Sheet Media
- Ink System
- Ink Cartridges
- Printheads
- Solutions
- Solving Problems
- Image Quality Problems
- Ink Supply Problems
- Media Problems
- Image Error
- Other Problems
- Getting Help
- Front Panel
- Printer Options
- Page Format
- Setting Page Size in the Front Panel
- Image Appearance
- Print Management
- Printer Configuration
- Other
- Index

Introduction
This User’s Reference Guide explains how to use your D/A1 size or A0+/E+ size HP Designjet 500 Plus Printer.
The Introduction Tab contains these topics:
•Introducing the Documentation
Introduces your printer’s documentation.
•Introducing Your HP Designjet 500 Plus Printer
Contains a brief overview of the printer. It contains information about the printer’s features and what is
included with the printer.
•Front View of Printer
Contains a view of the front of the printer showing the location of the printer’s consumable items.
•Printer Connections
Shows all the connections to the printer: power, parallel interface, USB and optional network interface.
Introducing the Documentation
You have the following resources to help you in using your HP Designjet 500 Plus printer.
•The Assembly and Set-up Poster comes with your printer and shows step-by-step information on how to
prepare your printer for use.
•This User’s Reference Guide explains the
details of using your printer. For more day-to-day
guidance you can refer to the Pocket Guide.
•The Pocket Guide can be found in a slot on the
right-hand side of the printer (as shown). It gives
information that you are most likely to need for
printer operation on a daily basis, such as
loading paper or replacing ink supplies.
• You can also visit us on our Web page:
www.hp.com/go/designjet.Pocket Guide location

Introducing Your HP Designjet 500 Plus Printer
•Your Printer’s Main Features
A general overview of the major features of your printer.
•HP Ink Supplies
A description of the HP Ink Supplies required for your printer.
•Print Resolution
Specifications of the print resolution for your printer.
•Media
A description of the different types of media available for your printer.
•User Interface
A description of the printer’s user interface.
•Memory
Details of internal memory and memory options available with your printer.
•Drivers
Details of the drivers delivered with your printer.

Your Printer’s Main Features
The HP Designjet 500 Plus printing system is specially designed for individuals or small work-groups in
Architecture, Engineering and Construction (AEC) and mechanical CAD design.
For the complete printing solution, HP also offers a wide range of media including HP Heavyweight Coated Paper
with fade-resistant photo-quality output and HP High-Gloss Photo Paper for high-quality long-lasting prints that
produce a professional look and feel. And with the HP Complementary Media Program, HP provides users with a
wide spectrum of choice and flexibility in their media selection.
The HP Designjet 500 Plus printer comes in two sizes: A0+/E+ size (42 inches/1066.8 mm) and D/A1 size
(24 inches/609.6 mm) models. Both models have roll-feed capabilities and come with an HP-GL/2 Accessory
Card. The A0+/E+ size model also includes legs and a media bin.
• Ultimate Photo Image Quality and Excellent Line Quality: The HP Designjet 500 Plus printer delivers ultimate
line quality with a true resolution of 1200×600-dpi, using HP’s color layering technology, which layers multiple
color ink drops on a single drop, on coated paper. This excellent line quality is achieved due to the fact that
each one-half inch/12.7mm printhead contains 304 nozzles, producing miniscule 18-picoliter black pigmented
ink drops and four picoliter color dye-based drops, that are idea for engineering and architectural applications.
In addition, the HP Designjet 500 Plus printer delivers excellent photo quality for renders and photographs,
providing continuous tones and smooth transitions.
• Unattendedness: The HP Designjet 500 Plus printing system includes a modular ink delivery system, with
69-cc cartridge capacity, and long life printheads which last, on average, through ten black ink cartridges and
six color ink cartridges, depending on use. This modular system allows users to replace individual ink supplies
separately, as needed and also provide automatic alignment and cutting and stacking of finished prints in the
media bin, enabling continuous and unattended printing. In addition, the HP Designjet 500 Plus printer
includes smart chips that are embedded into each individual printhead and ink cartridge that alert the user if it
time to replace the printhead and continuously monitor ink levels.
• Ease-of-use: The HP Designjet 500 Plus printing system is a true out-of the box solution and provides the
user with everything he or she needs to install and use the printer. The HP Designjet 500 Plus printer
includes a control-display panel for simple navigation, straightforward media loading and easy-to-install
drivers.
More…

• HP Premium Printing Material: The HP Designjet 500 Plus A0+/E+ size and D/A1 size printing systems
accept a wide range of roll and sheet media from 24 inches/609.6 mm (D/A1 size) to 42 inches/1066.8 mm
(A0+/E+ size) wide including HP Satin Poster Paper, HP High-Gloss Photo Paper and HP Heavyweight
Coated Paper. In addition, the HP Designjet 500 Plus printer accepts a wide range of media for technical
applications.
• Complementary Media Program (CMP): The CMP helps HP customers grow their businesses by referencing
third-party printing material choices to ensure maximum HP Designjet printer flexibility and printing solutions.

HP Ink Supplies
HP Ink Supplies for your printer contain two components: printheads and ink cartridges. Your HP Designjet 500
Plus printer uses the following HP Ink Supplies:
• Black Ink Cartridges are HP No 10 Supplies.
• Cyan, Magenta and Yellow Cartridges are HP No 82 Supplies.
• All Printheads are HP No 11 Supplies.
Each 600-dpi thermal inkjet printhead applies thousands of ink droplets onto the paper. The printer automatically
refills the printhead as it prints, enabling continuous uninterrupted printing. The ink is supplied to each printhead
from a separate large capacity ink cartridge.
There is more information available in a pamphlet which comes with the printheads and in Print Times for a
Selected Print Quality.
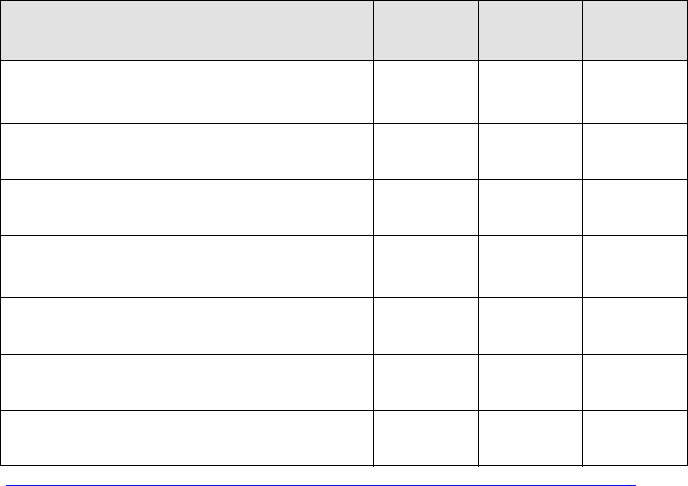
Print Resolution
Your HP Designjet 500 Plus printer provides two different print modes that change the print resolutions of each of
the print quality modes. These different print modes are optimized for: Line Drawings/Text or Images.
You can then choose between three levels of print quality for each of the print modes: Best, Normal or Fast from
your software or from the printer's front panel.
With the best mode selected you have an additional selection available to provide maximum detail for your printed
image by increasing the resolution of your job above the default resolution.
Use Fast to get draft copies of your prints at maximum throughput. Normal is optimized so that you get the best
line quality with the fastest throughput. Select Best if you want to get the best quality for images and renderings.
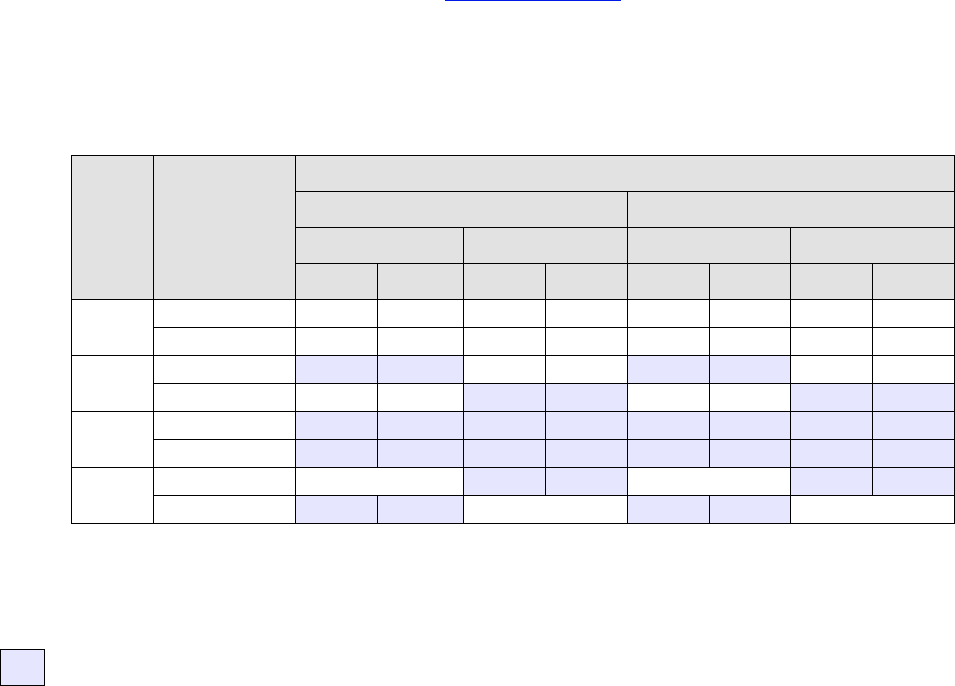
Print Quality Setting Optimized for Line Drawing/Text Optimized for Images
Resolution in dpi Resolution in dpi
Re0×nder Halftone Render Halftone
Fast 300×300 600×300 150×150 600×300
Normal 600×600 600×600 300×300 600×600
Best (default) 600×600 600×600 600×600 600×600
Best (maximum detail) 600×600 1200×600 600×600 1200×600

Media
You can print on roll media or sheet media up to 42 inches (1066.8 mm) wide with the A0+/E+ size HP Designjet
500 Plus printer and up to 24 inches (609.6 mm) with the D/A1 size model.
The following media types are supported on the HP Designjet 500 Plus printer:
•HP Bright White Inkjet Paper (Bond) •HP Paper-Based Semi-Gloss
•HP Vellum •HP Clear film
•HP Natural Tracing Paper •HP Translucent bond
•HP Coated Paper •HP Studio Canvas
•HP Heavyweight Coated Paper •HP Satin Poster Paper
•HP Matte film •HP Banners with Tyvek®
•HP High-Gloss Photo Paper •HP Colorfast Adhesive Vinyl
•HP Semi-Gloss Photo Paper

Memory
The D/A1 size and A0+/E+ size HP Designjet 500 Plus printers come with 32 MB of internal Random Access
Memory (RAM). Additional memory can be added to the HP-GL/2 Accessory card that came with your printer. You
can add 64 MB (part number C2387A) or 128 MB (part number C2388A) of memory for large file processing and
improved printing.

Drivers
Always use the right driver (configured correctly) for the combination of your application software and your printer
to ensure that your printer prints exactly what you were expecting in terms of: size, position, orientation, color and
quality.
NOTE: Many software applications include their own drivers.
Your HP Designjet 500 Plus printer comes supplied with:
• Windows drivers
• Mac OS X drivers
• AutoCAD drivers for Windows
NOTE: If AutoCAD drivers are available for the specific AutoCAD release you are using, it is strongly
recommended that you install them to print from AutoCAD.
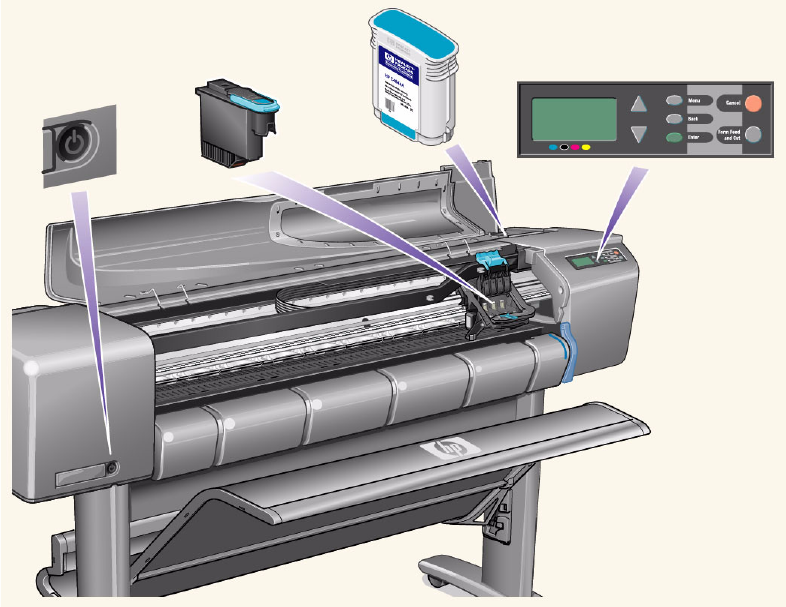
Front View of Printer
Power
Switch/Indicator
Printhead
Ink Cartridge
Front Panel
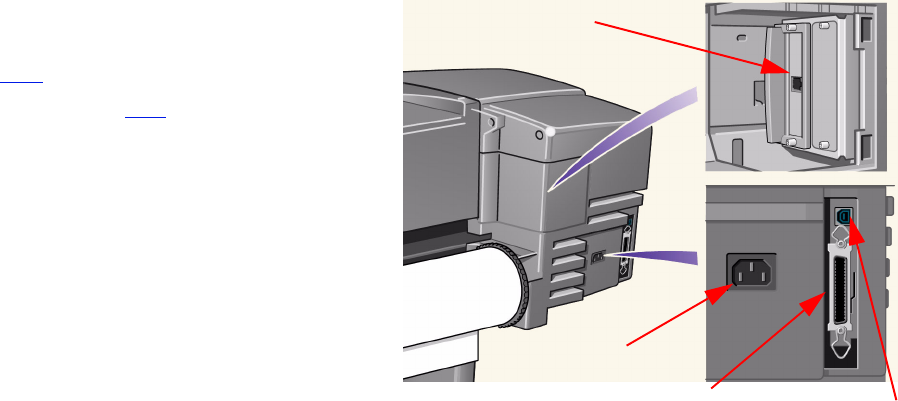
Printer Connections
Your HP Designjet 500 Plus printer can be
connected directly to your computer via the
traditional parallel interface or through the Universal
Serial Bus (USB) port.
For Local Area Network (LAN) connection your
printer can be fitted with an optional HP JetDirect
Print Server Fast Ethernet 10/100 base TX network
interface card.
See the Assembly and Set-up Poster for information
on connecting your printer to a computer or network.
Connection
Power socket
Parallel Port USB Connection

Media & Ink
The D/A1 size and A0+/E+ size format HP Designjet 500 Plus Printers use a variety of media. The
recommended media are engineered to use with your printer and your printer’s ink system to give you the best
results.
The Media & Ink Tab contains these topics:
•Media Choice explains how to choose the correct media type. Choosing the correct paper type for your
needs is an essential step in ensuring good image quality.
•Roll Media details the procedures used for loading and unloading your roll media.
•Sheet Media details the procedures used for loading and unloading your sheet media.
•Ink System gives you an overview of the printer’s ink system, with some warnings and precautions for its
optimum use.
•Ink Cartridges details the procedures used for: obtaining information, interpreting errors, checking levels and
replacing ink cartridges.
•Printheads details the procedures used for: obtaining information, interpreting errors, replacing printheads
and aligning printheads.

Media Choice
•Choosing Paper or Other Media
Your printer supports several types of paper. Choosing the best paper type for your needs is an essential
step in ensuring good image quality. These topics help you to select the best media for your particular
printing task.
•Paper Types
Detailed information concerning the different types of media available for your printer. This includes
information on: the types of paper supported, their physical characteristics, quality selection, handling and
how to obtain information.
•Print Times for a Selected Print Quality
Typical Printing Times for color and black lines and images on different types of paper.
•Printable Area
The dimensions for all the printable areas for all paper and other types of media formats.

Choosing Paper or Other Media
For best printing results, use only genuine Hewlett-Packard paper or other type of media, whose reliability and
performance have been developed and thoroughly tested. All Hewlett-Packard printing components (printer, ink
system, and paper/other media) have been designed to work together to give trouble-free performance and optimal
image quality. For detailed information on Hewlett-Packard paper, see Paper Types.
You should also take note of some important points about paper and other types of media:
• This printer supports many types of paper. However, the quality of some images may be reduced if you do not
use the correct paper for your application. For example, images with large regions of intense color, where
many ink drops are needed to fully saturate the color, will not print well on HP Bright White InkJet Paper. On
HP Coated paper, the same images might cause the paper to wrinkle and then come into contact with the
printheads, smearing your print and risking damage to the printhead. See Combinations of Media Type and
Print Quality Selection.
• Whenever you load a roll or a sheet, the printer’s front-panel display prompts you to specify the paper type
you are loading. It is absolutely essential to specify this correctly for good image quality. The Physical Charac-
teristics of Paper Types table gives you all the information you need. If paper is already loaded and you are
unsure which paper type was specified, go to the Paper Menu and press Enter; see Obtaining Roll or Sheet
Paper Information.
• Make sure the appropriate print-quality setting (Best, Normal or Fast) is selected. You can set the print qual-
ity either from your software or from the printer’s front panel (software driver settings override any print-quality
settings made on the front panel). The combination of paper type and print-quality settings tells the printer
how to place the ink on the paper—for example, the ink density, dithering method, and number of passes of
the printheads. For more details, see Combinations of Media Type and Print Quality Selection.
• Included with this printer is the Hewlett-Packard Printing Materials catalog which gives ordering details for
Hewlett-Packard paper supplies. To get the latest version of this document, contact your local Hewlett-Pack-
ard Sales and Support office.

Paper Types
The following topics address the various types of media available, their particular use and how to obtain
information about them.
•Physical Characteristics of Paper Types
Details the physical characteristics of each of the supported paper types.
•Combinations of Media Type and Print Quality Selection
Gives guidelines for selecting the correct Print Quality selection for the type of paper or other type of media
you are using.
•Handling Your Paper or Type of Media
Explains the precautions to take when handling paper or other type of media.
•Obtaining Roll or Sheet Paper Information
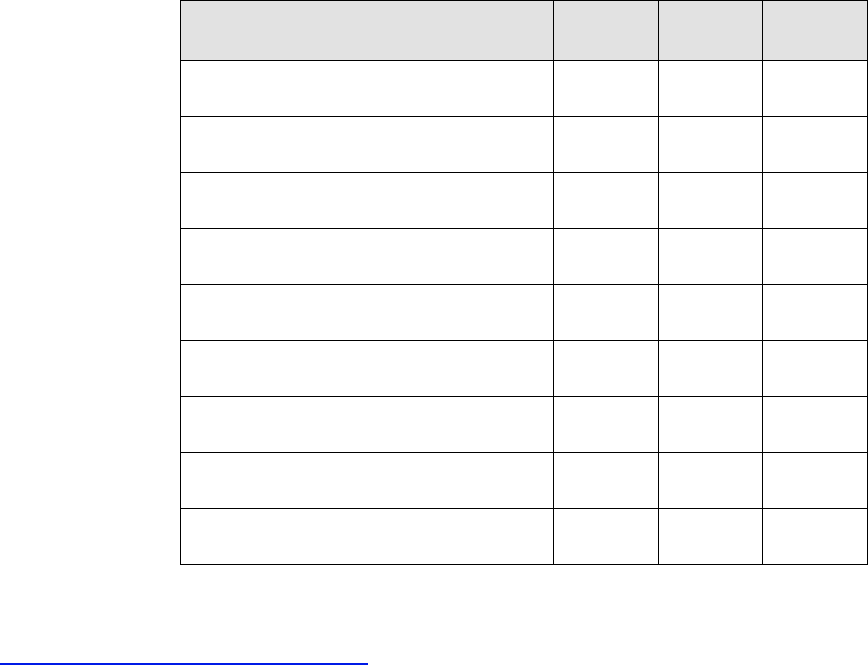
Physical Characteristics of Paper Types
The following table lists the physical characteristics and selection numbers of supported HP Premium Printing
Material. Always print on the image side with the special coating. Image side faces outward on roll products from
Hewlett-Packard.
Physical Characteristics of Paper and Other Media
HP Premium Printing Material 24 inch
610 mm
36 inch
914 mm
42 inch
1067 mm
HP Bright White Inkjet Paper (Bond) C1860Aa
C6035Ab
C1861Aa
C6036Ab
24 lb. (90g/m2) - 150 ft. (45m)
HP Vellum C3862A C3861A
3 mil (75g/m2) - 150 ft. (45m)
HP Natural Tracing Paper C3869A C3868A
3 mil (90g/m2) - 150 ft. (45m)
HP Coated Paper C6019B C6020B C6559Ba
C6567Bb
26 lb. (98g/m2) - 150 ft. (45m)
HP Heavyweight Coated Paper C6029C C6030C C6569C
35 lb. (130g/m2) - 100 ft. (30m)
HP Matte film 51642A 51642B
5 mil (198g/m2) - 120 ft. (36m)
HP High-Gloss Photo Paper C6813A C6814A
8 mil (207g/m2) - 100 ft. (30m)
Click on the Next Page Icon to see more Paper and Other Media Types
Additional Information About Paper Types
HP High-Gloss Photo Paper C3882A C3881A
6 mil (158g/m2) - 100 ft. (30m)
HP Semi-Gloss Photo Paper C3884A C3883A
6 mil (158g/m2) - 100 ft. (30m)
HP Paper-Based Semi-Gloss C6782A C6783A
6 mil (158g/m2) - 100 ft. (30m)
HP Clear film C3876A C3875A
4 mil (174g/m2) - 75 ft. (22m)
HP Translucent bond C3860A C3859A
3 mil (67g/m2) - 75 ft. (45m)
HP Studio Canvas C6771A
20 mil (368g/m2) - 35 ft. (10m)
HP Satin Poster Paper C7011A
5.5 mil (162g/m2) - 100 ft. (30m)
HP Banners with Tyvek® C6786A C6787A
10 mil (140g/m2) - 50 ft. (15m)
HP Colorfast Adhesive Vinyl C6775A
10 mil (140g/m2) - 50 ft. (15m)
a. Available in United States, Canada and Latin America
b. Available in Europe, Asia and Japan
Physical Characteristics of Paper and Other Media (Continued)
HP Premium Printing Material 24 inch
610 mm
36 inch
914 mm
42 inch
1067 mm

Additional Information About Paper Types
The following HP Premium Printing Material can be used to perform the printhead alignment, see Printhead
Alignment.
• HP Bright White Inkjet Paper (Bond)
• HP Coated Paper
• HP Heavyweight Coated Paper
• HP High-Gloss Photo Paper
• HP Satin Poster Paper
You can also use Plain Paper in addition to the above.
To order any of the HP Premium Printing Material, see the pamphlet Hewlett-Packard Printing Materials.
From time to time, new paper types may become available. For up-to-date information, please contact your
Hewlett-Packard dealer, local Hewlett-Packard Sales and Support Office or the Designjet Online Web site.

Combinations of Media Type and Print Quality Selection
Use the following tables, given by application, to guide you when choosing your paper and selecting the print
quality setting (Fast, Normal, Best).
•CAD Drawings—Mono
•CAD Drawings and GIS—Color (Lines and low density)
•CAD Rendering, GIS and Images—Color and CAD (high ink density).
As a general guide:
•Fast is best for draft copies of your prints at maximum throughput
•Normal is optimized so that you get the best line quality with the fastest throughput
•Best is for when you want to get the best quality for images and renderings.
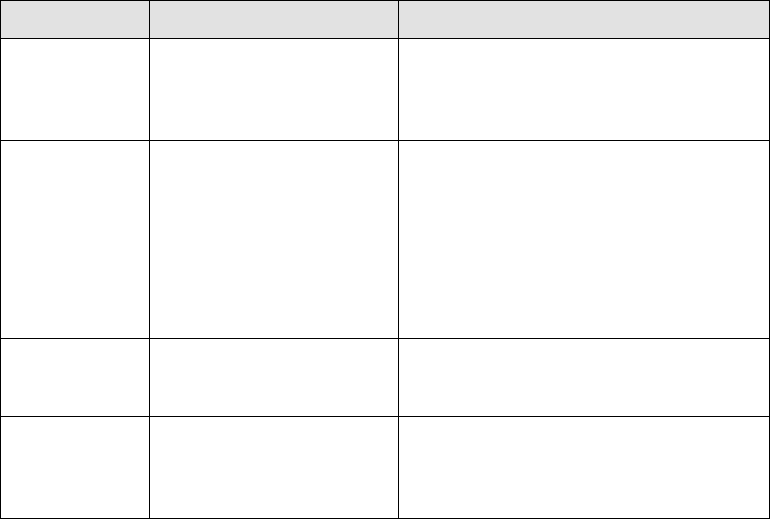
CAD Drawings—Mono
The following table lists the recommended print quality settings for specific usage with typical media.
Supported Paper Types—Mono
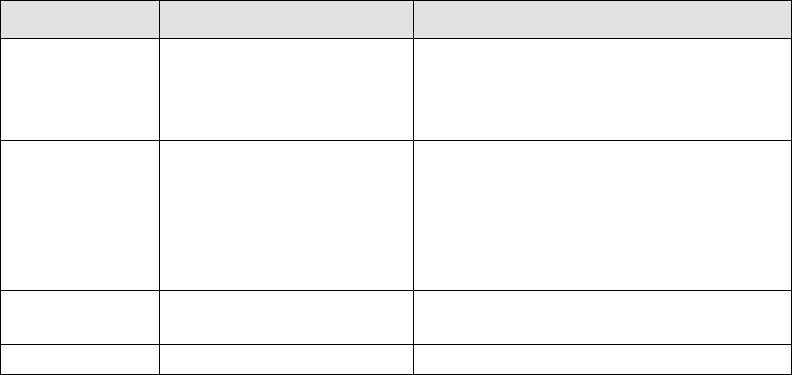
Usage Typical Media Selection Recommended Print Quality Setting
Drafts Plain Paper
Bright Inkjet Paper
Natural Tracing Paper
Translucent Bond
Fast or normal
Final Versions Plain Paper
Bright Inkjet Paper
Natural Tracing Paper
Translucent Bond
Coated paper
Heavy Coated Paper
Matte Film
Clear film
Normal or Best
Archives Vellum
Matte Film
Clear Film
Best
Diazo Translucent Bond
Natural Tracing Paper
Vellum
Matte Film
Normal or Best
CAD Drawings and GIS—Color (Lines and low density)
The following table lists the recommended print quality settings for specific usage with typical media.
Supported Paper Types—Color
Usage Typical Media Selection Recommended Print Quality Setting
Drafts Plain Paper
Bright Inkjet Paper
Natural Tracing Paper
Translucent Bond
Fast or Normal
Final Versions Plain Paper
Bright Inkjet Paper
Coated paper
Heavy Coated Paper
Matte Film
Clear film
Normal or Best
Archives Matte Film
Clear Film
Best
Transparencies Clear Film Normal or Best

CAD Rendering, GIS and Images—Color and CAD (high ink density)
The following table lists the recommended print quality settings for specific usage with typical media.
Supported Paper Types—Color and CAD
Usage Typical Media Selection Recommended Print Quality Setting
Matte Paper Heavy Coated Paper Normal or Best
Glossy High Gloss Photo Paper Normal or Best
Transparencies Clear Film Best
Handling Your Paper or Type of Media
Take the following precautions when handling paper or other type of media:
• Handle film and glossy paper by the edges or wear cotton gloves. Skin oils can interact with the ink and cause
it to smear.
• Although the ink systems supplied with this printer have good light fastness, colors will eventually fade or
change if exposed to sunlight over a long period of time.
• Rewrap partially used rolls if they are not being used and do not stack rolls.
• Always keep unused rolls in their plastic wrappings to prevent discoloration.
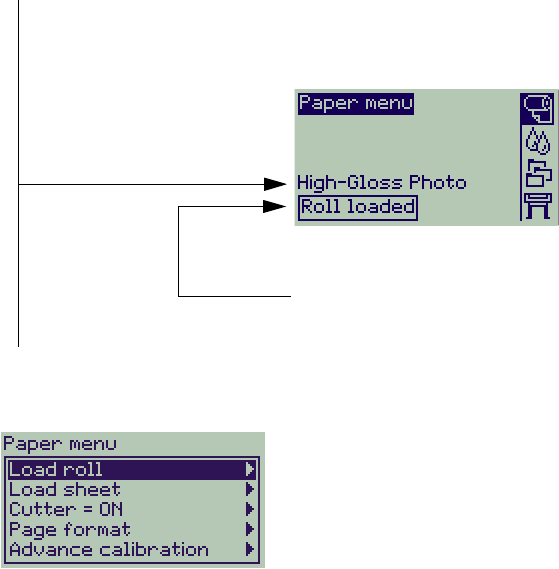
Obtaining Roll or Sheet Paper Information
If roll media or sheet media is loaded, the type of media is displayed when you select the Paper menu on the front
panel.
If there is no paper loaded the front panel display shows the following message and you will need to load roll or
sheet media.
Bright White Inkjet Paper
Plain Paper
Vellum
Natural Tracing Paper
Translucent Bond
Clear Film
Matte Film
Coated Paper
Heavy Coated Paper
High-Gloss Photo
Canvas
Poster Paper
Roll or Sheet
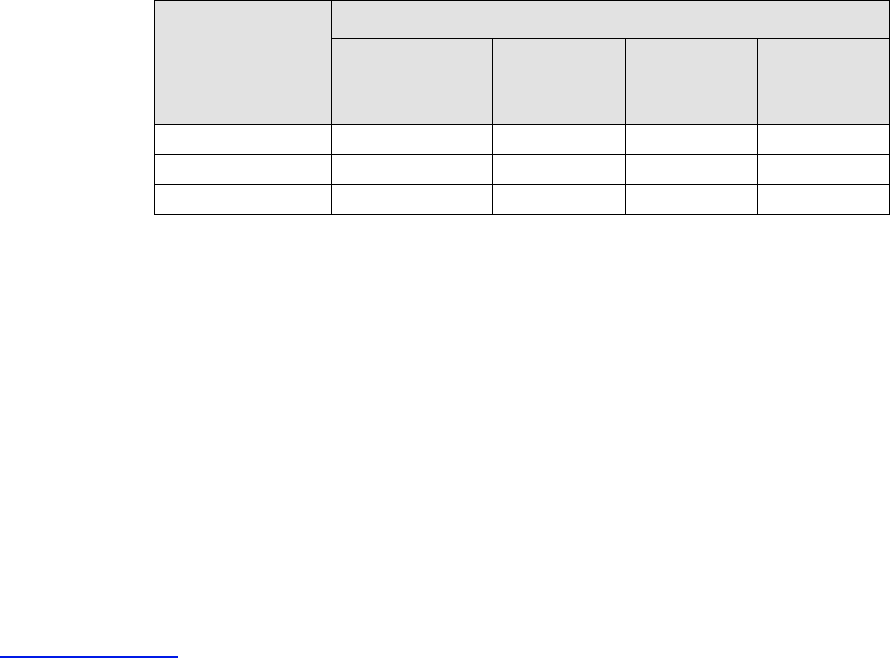
Print Times for a Selected Print Quality
The following table lists some typical printing times for D/A1 size paper.
Typical Printing Times
Print Quality Time (in seconds)
Mono Lines
on Bond
Color Lines
on Coated
Paper
Images
on Coated
Paper
Images
on Glossy
Paper
Fast 96 96 234 480
Normal 216 216 550 690
Best 360 285 940 990
More Printing Times

Printable Area
The following topics detail the printable areas for each of the different paper size systems:
•ANSI Paper
The American National Standards Institute imperial paper sizing system.
•Architectural Paper
The Architectural paper sizing system.
•ISO Paper
The International Standards Organization metric paper sizing system, which is the size system commonly
used in Europe.
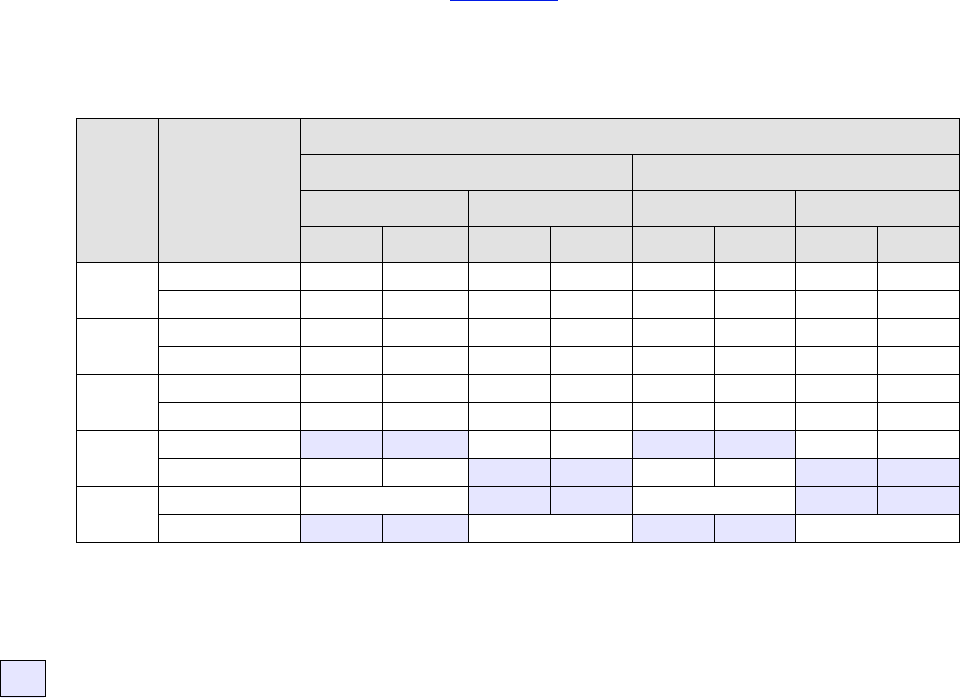
ANSI Paper
The following table lists the printable area for the ANSI paper size system. The left and right margins are
0.2 inches (5 mm) and the leading and trailing edge margins are 0.7 inches (17 mm).
Where:
Printable Areas for ANSI paper
Paper
size
Orientation of
paper in
printer
Printable area (width × height) by Image Orientation
Inches Millimeters
Landscape Portrait Landscape Portrait
Width Height Width Height Width Height Width Height
A Portrait 9.7 8.1 8.1 9.7 245 206 206 245
Landscape 7.2 10.6 10.6 7.2 182 269 269 182
B Portrait 15.7 10.6 10.6 15.7 398 269 269 398
Landscape 9.7 16.6 16.6 9.7 245 422 422 245
C Portrait 20.7 16.6 16.6 20.7 525 422 422 525
Landscape 15.7 21.6 21.6 15.7 398 549 549 398
D Portrait 32.7 21.6 21.6 32.7 830 549 549 830
Landscape 20.7 33.6 33.6 20.7 525 854 854 525
E Portrait N/A 33.6 42.7 N/A 854 1084
Landscape 32.7 43.6 N/A 830 1108 N/A
Printable area Paper Size Margins–=
Indicates this printable area is only available if you are using the A0+/E+ size format
HP Designjet 500 Plus printer
Architectural Paper
The following table lists the printable area for the Architectural paper size system.
The left and right margins are 0.2 inches (5 mm) and the leading and trailing edge margins are 0.7 inches
(17 mm).
Where: .
Printable Areas for Architectural paper
Paper
size
Orientation of
paper in
printer
Printable area (width × height) by Image Orientation
Inches Millimeters
Landscape Portrait Landscape Portrait
Width Height Width Height Width Height Width Height
C Portrait 22.7 17.6 17.6 22.7 576 447 447 576
Landscape 16.7 23.6 23.6 16.7 423 600 600 423
D Portrait 34.7 23.6 23.6 34.7 880 600 600 880
Landscape 22.7 35.6 35.6 22.7 576 904 904 576
E1 Portrait 40.7 29.6 29.6 40.7 1033 752 752 1033
Landscape 28.7 41.6 41.6 28.7 728 1057 1057 728
E Portrait N/A 35.6 46.7 N/A 904 1185
Landscape 34.7 47.6 N/A 880 1209 N/A
Printable area Paper Size Margins–=
Indicates this printable area is only available if you are using the A0+/E+ size format
HP Designjet 500 Plus printer
ISO Paper
The following table lists the printable area for the ISO paper size system.
The left and right margins are 0.2 inches (5 mm) and the leading and trailing edge margins are 0.7 inches
(17 mm).
Where:
Printable Areas for ISO paper
Paper
size
Orientation of
paper in
printer
Printable area (width × height) by Image Orientation
Inches Millimeters
Landscape Portrait Landscape Portrait
Width Height Width Height Width Height Width Height
A4 Portrait 10.4 7.9 7.9 10.4 263 200 200 263
Landscape 6.9 11.3 11.3 6.9 176 287 287 176
A3 Portrait 15.2 11.3 11.3 15.2 386 287 287 386
Landscape 10.4 16.1 16.1 10.4 263 410 410 263
A2 Portrait 22.0 16.1 16.1 22.0 560 410 410 560
Landscape 15.2 23.0 23.0 15.2 386 584 584 386
A1 Portrait 31.7 23.0 23.0 31.7 806 584 584 806
Landscape 22.0 32.7 32.7 22.0 560 830 830 560
A0 Portrait N/A 32.7 45.4 N/A 830 1154
Printable area Paper Size Margins–=
Indicates this printable area is only available if you are using the A0+/E+ size format
HP Designjet 500 Plus printer

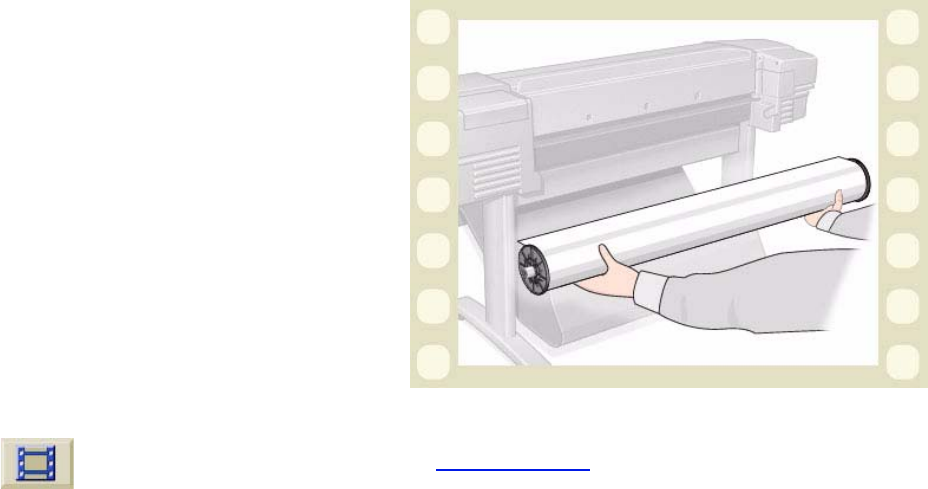
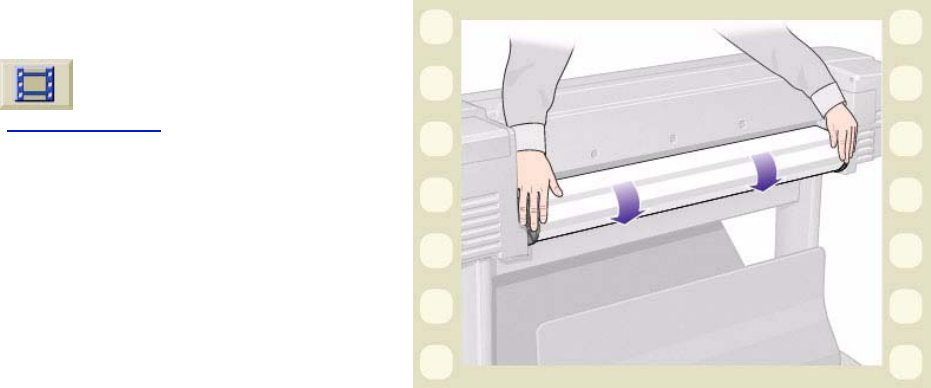
Installing a New Roll on the Printer
The animation sequence shows how to install a new roll
of paper on the printer.
CAUTION: Make sure the printer wheels are locked
(the brake lever on each wheel is
pressed Down) to prevent the printer
from moving.
If you are a regular user of different types of roll paper,
you can change the paper quicker if you have more
than one spindle. This allows you to do the following:
1. Pre-load the different types of paper onto the spin-
dles.
2. Remove and replace the spindle with the new type
of paper.
NOTE: Additional spindles are available from
Hewlett Packard as accessories.
Click on this icon to run the animation sequence. A printable version of the sequence is also available so
that you can take the key illustrations to the printer, if it is remote from your computer.
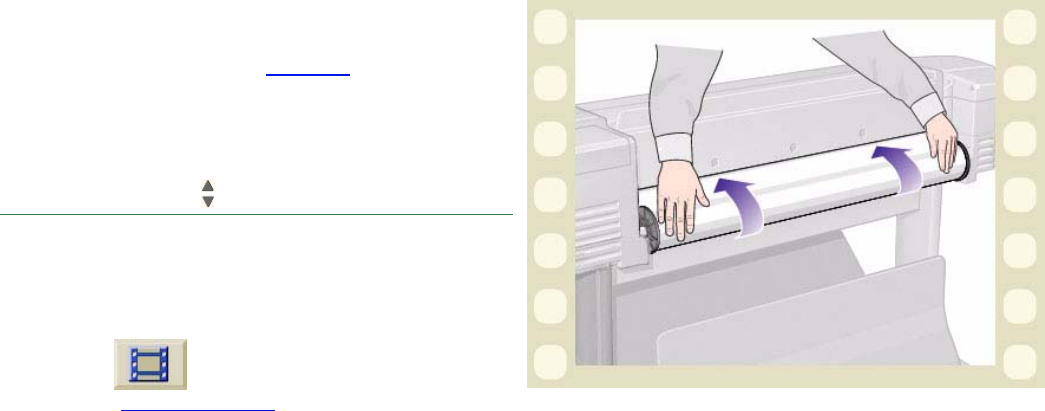
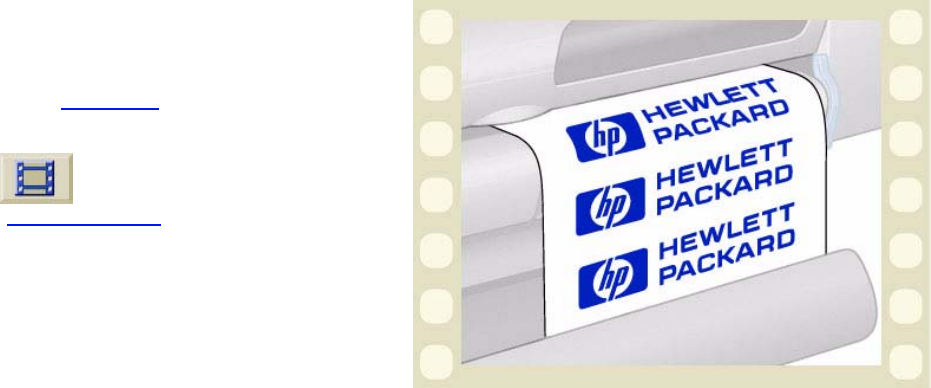
Loading Roll Media
The animation sequence shows how to load a new roll
of paper on the printer.
NOTE: You must have installed a new roll of
paper on the printer before you can load
it.
The front-panel menu items are:
Click on the icon to run the animation
sequence. A printable version of the sequence is also
available so that you can take the key illustrations to the printer, if it is remote from your computer.
Select (using the keys) Then Press:
1. Paper Enter
2. Load Roll Enter
3. Select Roll Type Enter
Unloading Roll Media
The animation sequence shows how to unload a roll of
paper from the printer.
Click on the icon to run the animation
sequence. A printable version of the sequence is also
available so that you can take the key illustrations to the
printer, if it is remote from your computer.
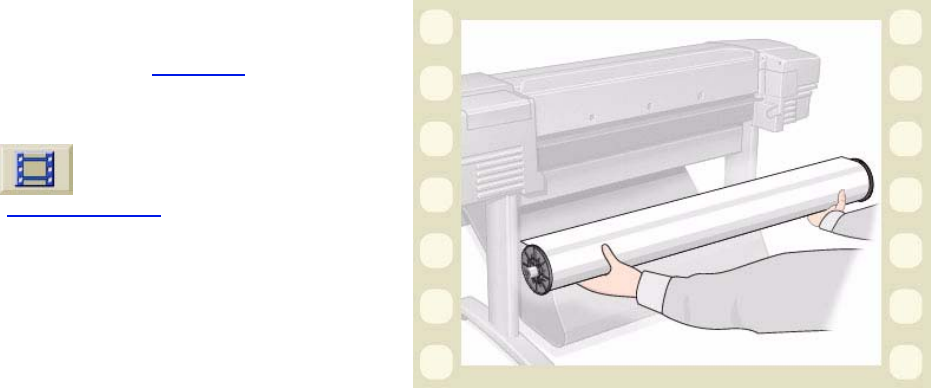
Removing Roll Media from the Printer
The animation sequence shows how to remove a roll of
paper from the printer.
NOTE: You must have unloaded the roll of
paper from the printer before you can
remove it.
Click on the icon to run the animation
sequence. A printable version of the sequence is also
available so that you can take the key illustrations to the
printer, if it's remote from your computer.
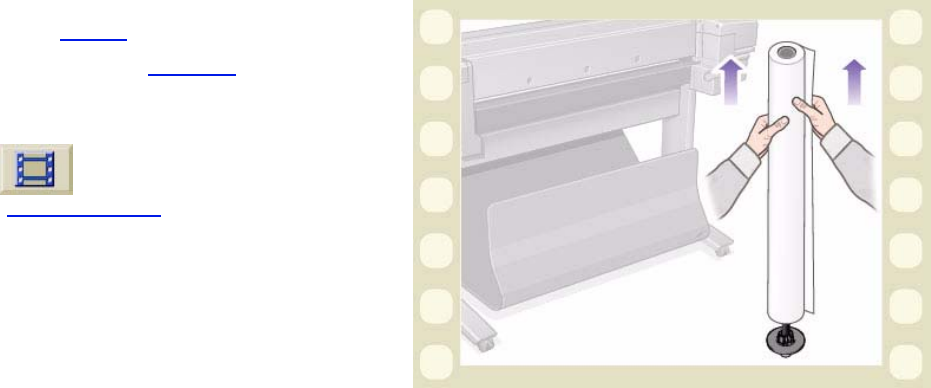
Removing Roll Media from the Spindle
The animation sequence shows how to remove a roll of
paper from the roll spindle.
NOTE: You must have removed the roll of paper
from the printer before you can remove it
from the spindle.
Click on the icon to run the animation
sequence. A printable version of the sequence is also
available so that you can take the key illustrations to the
printer, if it is remote from your computer.

Cutter Replacement
The animation sequence shows the complete
procedure for the replacement of the paper cutter in
your printer.
Prerequisites
Before attempting to replace the cutter you must
contact your local HP Customer Care center to:
• Order the replacement cutter.
• Receive instructions on how to access the Front
Panel Service Menu.
Important Information
• The cutter unit is attached to the printer by a black
cutter holder that runs along the metal guide rail,
and is hooked onto the edge of the platen at the
front of the printer.
• The cutting wheel is inside the cutter unit.
• Do not remove the cutter holder.
• When inserting the new cutter, with the cutter holder raised to about 45 degrees, partially insert the cutter so it
rests in the cutter holder, but do NOT clip it in at this stage.
CAUTION: Be very careful when replacing the cutter because you can easily break the cutter holder if you
apply too much force.
Click on the icon to run the animation sequence. A printable version of the sequence is also available so
that you can take the key illustrations to the printer, if it is remote from your computer.

Sheet Media
•Which Side Up?
Instructs you how to identify which side of the sheet media should be printed on.
•Which Edge First?
Explains which edge of the sheet should be loaded first (short edge or long edge).
•Loading Sheet Media
Details the sheet media loading procedure.
•Unloading Sheet Media
Details the sheet media unloading procedure.
Which Side Up?
The printer prints on the side of the paper that faces up. It may be important to load the sheet with the correct side
facing up. See the table below.
Print Side for Media Types
Media Type Matte or Glossy
HP Bright White Inkjet Paper (Bond) Both sides are the same. If sheet
is curled, load with curl down.
HP Vellum
Natural Tracing Paper
Coated Paper Load with the coated side up.
Heavy Coated Paper
Matte Film Load with the matte side up.
High-Gloss Photo Load with the glossy side up.
Clear Film
Translucent Bond Both sides are the same. If sheet
is curled, load with curl down.
Canvas
Poster Paper
Plain Paper Both sides are the same. If sheet
is curled, load with curl down.
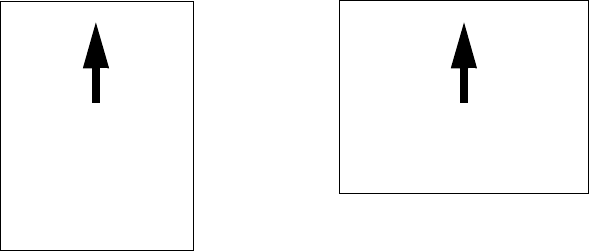
Which Edge First?
You can load sheet paper in either portrait or landscape orientation. Unless you are using the Rotate option,
always load the sheet in the same orientation as you have specified in your software.
Portrait (short edge first)
Landscape (long edge first)
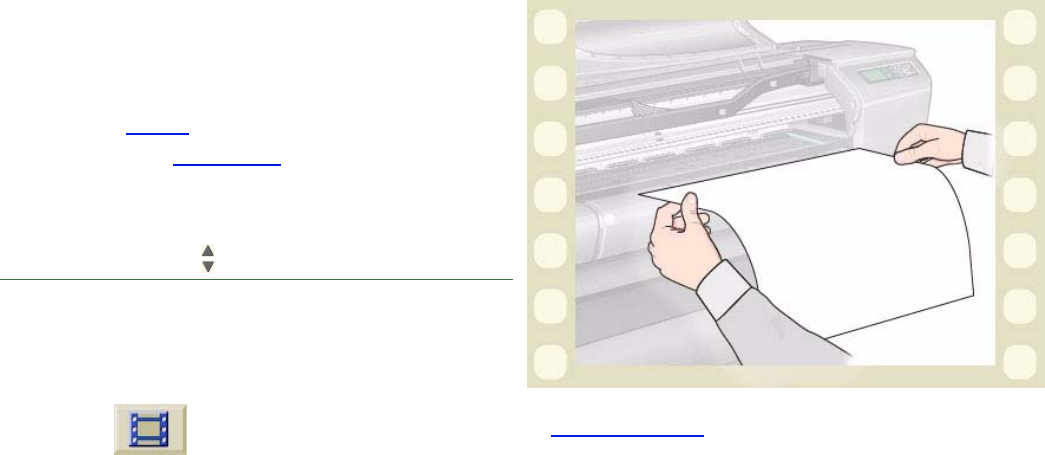
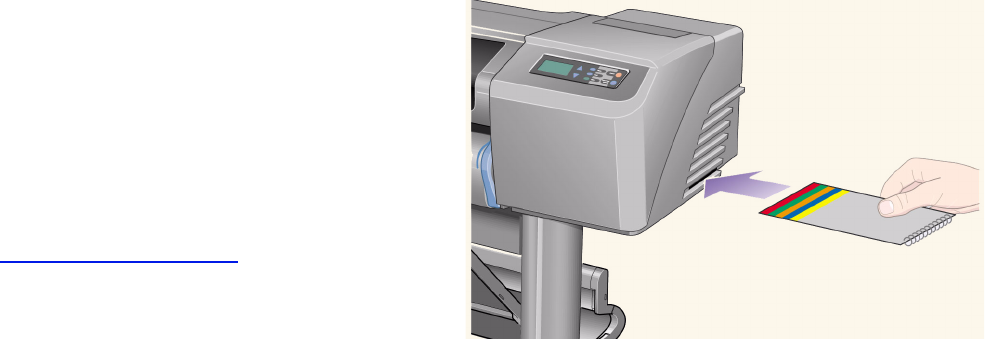
Loading Sheet Media
The animation sequence shows how to load a new
sheet of paper on the printer.
Important
• If you have a roll of paper loaded on the printer you
must first unload it from the printer.
• Make sure the correct side of the sheet is facing up
when you load it.
The front panel menu selections are:
Click on the icon to run the animation sequence. A printable version of the sequence is also available so
that you can take the key illustrations to the printer, if it's remote from your computer.
Select (using the keys) Then Press:
1. Paper Enter
2. Load sheet Enter
3. Select Sheet Type Enter
Unloading Sheet Media
The animation sequence shows how to unload a sheet
of paper from the printer.
Important
• To give the ink time to dry the printer holds the
paper for some time.
Click on the icon to run the animation
sequence. A printable version of the sequence is also
available so that you can take the key illustrations to the
printer, if it is remote from your computer.

Ink System
These topics cover the various elements of the Ink System.
•What are HP Ink Supplies?
Details the elements of the HP Ink Supplies supplies.
•Component identification
Shows you where to find the various elements of the Ink System.
•Ink Supply Guidelines
Explains how to obtain the best results from your Ink System.
•Precautions
Details the specific precautions you must take to avoid damaging the components of your Ink System.
•Color Calibration
Explains how to calibrate the ink system for the type of media loaded
•Drying Time
Explains drying time function and details how to use it to ensure you obtain the highest quality print under all
conditions.

What are HP Ink Supplies?
For each of the four ink colors used in the printer, there are two separate components, the printhead and the
ink cartridge. These components are called the HP Ink Supplies and are coded with a Hewlett-Packard No.
selection number to help you reorder the correct replacement. Your HP Designjet 500 Plus printer uses the
following HP Ink Supplies:
• Black Ink Cartridges are HP No 10 Supplies.
• Cyan, Magenta and Yellow Cartridges are HP No 82 Supplies.
• All Printheads are HP No 11 Supplies.
Ink Cartridges
The Hewlett-Packard ink cartridges for your printer require no maintenance or cleaning. As long as each ink
cartridge is inserted correctly into its slot, the ink will flow to the printheads. Because the printheads control the
amount of ink transferred to the page, you will continue to see high-quality printing results, even when the ink
levels are getting low.
The front panel notifies you when an ink cartridge’s ink level is low. You can also check the ink levels of all the ink
cartridges to determine if an ink cartridge needs to be replaced, see Ink Cartridge Information.
If the ink cartridge is empty, the printer stops printing. See Ink Cartridge Replacement.
Printheads
The Hewlett-Packard printheads are extremely durable and do not need to be replaced every time an ink cartridge
is replaced. They are independent of the ink cartridges and will continue giving excellent image quality results
even if the ink cartridges are low in ink.
If you notice a decline in print quality such as lines or dots missing from text or graphics, see Stepped Lines.
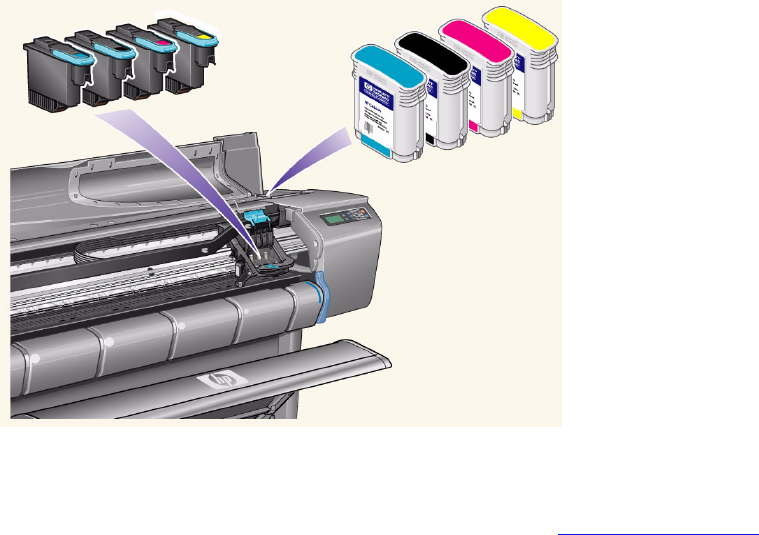
Component identification
The following illustration will help you identify the components of the HP Ink Supplies.
The Hewlett-Packard selection number on the ink cartridges and printheads makes it easy for you to find the
correct HP Ink Supplies for your printer. Determine the color of the printhead or ink cartridge you need, then make
sure you purchase or order the correct Hewlett-Packard printhead or ink cartridge. Each ink cartridge and
printhead can be purchased separately from your usual Hewlett-Packard retailer. See Ordering Accessories.
Ink Cartridges
Printheads

Ink Supply Guidelines
For optimum results from your printer and the ink system, always follow these guidelines when handling HP Ink
Supplies:
• Always install the ink cartridges and printheads before the expiry date, which is on the packaging.
• Install ink cartridges and printheads in their color-coded slots.
• Follow the instructions on the front panel during installation.
• Avoid unnecessary removal of the ink cartridges and printheads.
• When turning off your printer, always use the power-off button on the front panel. The printheads are then
parked correctly which prevents them from drying out.
• The ink cartridges should never be removed while the printer is printing. They should only be removed when
the printer is ready for you to replace them. The front panel will guide you through the removal and installation
procedure. See When to Replace HP Ink Supplies.
CAUTION: When you first received your printer it was supplied with a set of four setup printheads installed
in the printhead carriage. These setup printheads are used for the priming of the tubes in the
modular ink delivery system. Do not remove the setup printheads from the carriage without
following the procedures in the Assembly and Set-up Poster.
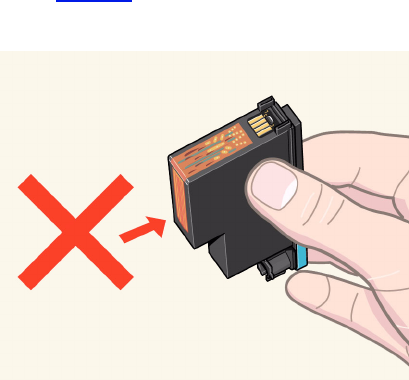
Precautions
Handle HP Ink Supplies with care. In particular, the printhead, which is a high-precision device, must be handled
carefully.
CAUTION: Do not touch, wipe or attempt to clean the printhead nozzles. This can damage the printhead.
• Do not put the printhead down on the nozzles.
• Do not be rough when handling the printheads.
Always set them down gently.
• Do not drop the printheads. Proper handling will
assure optimum performance throughout the print-
head life.
• Do not touch the end of the ink cartridge which is
inserted into the printer as there may be a small
amount of ink on the connection.
• Avoid storing partly used ink cartridges on their
ends.

Color Calibration
You can calibrate the ink system for the specific media loaded in your printer. Doing this ensures the printed
output matches the colors of the original image as closely as possible. The printer stores the calibration data for
each type of media you have calibrated it for since it was powered up. Once the printer has been powered down,
the next time you use it only the last calibration made will be available and it will print using this calibration data.
To color calibrate your printer, first make sure you have the correct type of media loaded and then make the
following front-panel selections:
The printer prints a calibration pattern and scans it to create the calibration data for the type of media loaded.
If you want to check the color calibration status of your printer, make the following front-panel selections:
The front panel display shows what types of media the ink system is currently calibrated for.
To remove all the calibrations and reset the printer to its factory values choose
Color calibration > Reset from the Ink menu.
Select (using the keys) Then Press:
1. Ink Enter
2. Color calibration Enter
3. Calibrate Paper Enter
Select (using the keys) Then Press:
1. Ink Enter
2. Color calibration Enter
3. Status Enter

Drying Time
The following topics detail the drying time function and how to use it to ensure you obtain the highest quality print
under all conditions.
•Drying Time Settings
Describes how to set the required drying times from the front panel.
•Typical Drying Times
Lists typical drying times for Hewlett-Packard tested paper at approximately 25°C with 50% relative humidity.
•Drying Procedure
Details how the drying procedure operates.

Drying Time Settings
With some paper types and environmental conditions the ink needs time to dry before the paper is unloaded. The
printer has three settings which you can choose through the front panel. See Navigation Example for more help.
Manual
The printer holds in place paper which has a specific drying time, and displays a “drying time to go” countdown on
the front panel. You can change this time from one minute to 99 minutes in one minute increments.
Automatic
The printer automatically determines the appropriate drying time, based on the type of paper you have selected
and the current temperature. If there is any drying time the printer displays a “drying time to go” countdown on the
front panel.
None
With this setting, when the printer has finished printing an image, the paper will fall into the paper bin under the
printer.
CAUTION: Changing the drying time to speed up the printer could result in damage to your printed image
or reduce the quality of your print.
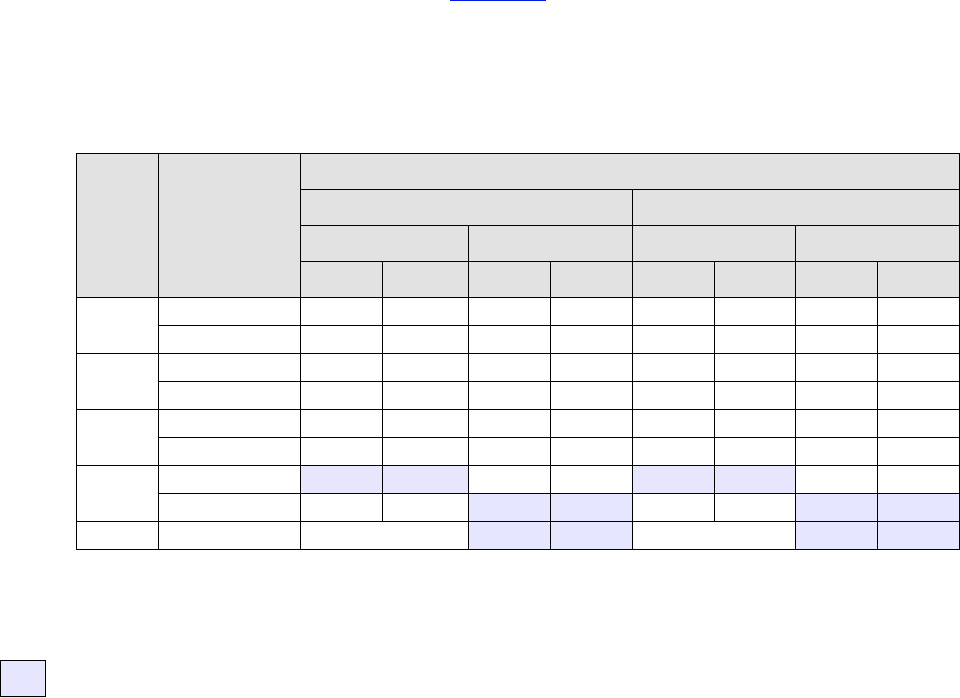
Typical Drying Times
The following table shows the typical drying times for Hewlett-Packard tested paper at approximately 25°C with
50% relative humidity.
Drying Times by Paper Types
Hewlett Packard Tested Paper
Type
Drying Time (seconds)
Fast Normal Best
HP Bright White Inkjet Paper (Bond) 0 25
HP Vellum 60 120 180
HP Natural Tracing Paper
HP Coated Paper 0 60
HP Heavyweight Coated Paper 0 60
HP Matte film 60 180
HP High-Gloss Photo Paper 120
HP Semi-Gloss Photo Paper
HP Paper-Based Semi-Gloss
HP Clear film 60
HP Translucent bond 60 120 180
HP Studio Canvas 6000
HP Satin Poster Paper 60
HP Banners with Tyvek®
HP Colorfast Adhesive Vinyl
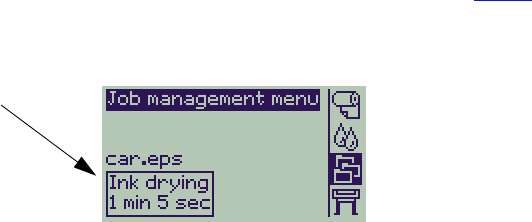
Drying Procedure
The drying procedure operates as follows:
1. The printed image emerges from beneath the printer window and a vacuum holds it on the platen of the
printer.
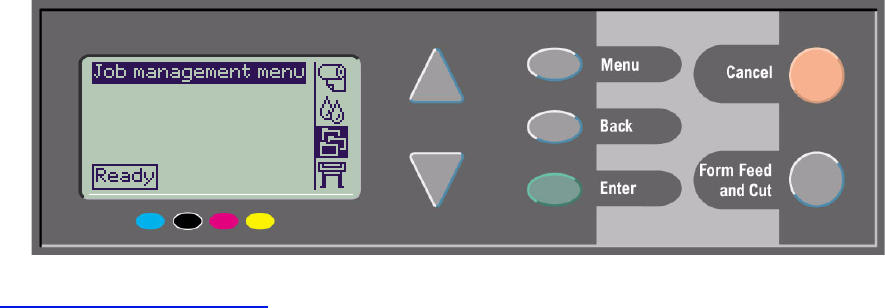
2. The front panel displays:
3. You can press the Cancel or the Form Feed & Cut key to cancel the drying time and release the paper.
4. After the drying time has elapsed:
For roll media the printer cuts the media and turns off the vacuum so the printed image can drop into the
printer bin.
For sheet media the vacuum is turned off and the printed image drops into the printer bin.
The countdown
timer indicates
how much
drying time
remains

Ink Cartridges
•Ink Cartridge Errors
Details the error messages that could be displayed on the front panel for the Ink Cartridges.
•Ink Cartridge Levels
Details the information about levels that can be displayed on the front panel for the Ink Cartridges.
•Ink Cartridge Information
Shows you how to display the current status of the Ink Cartridges on the front-panel display.
•Ink Cartridge Replacement
Details the Ink Cartridge replacement procedure.
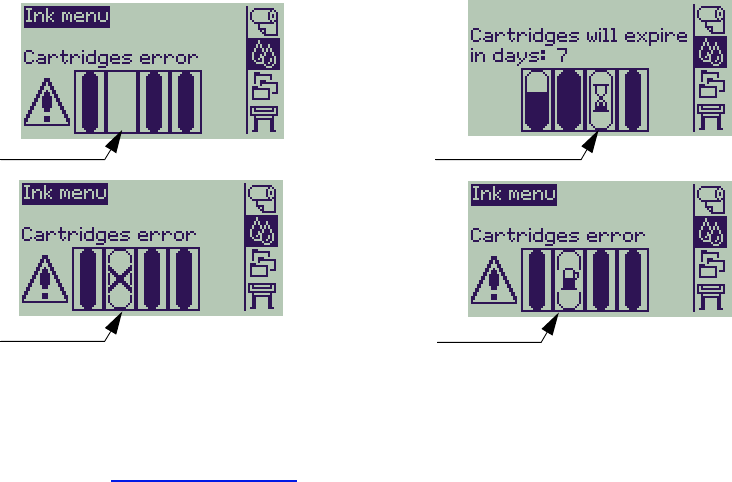
Ink Cartridge Errors
The Front Panel can display the following error messages for the ink cartridges:
NOTE: If a cartridge has actually passed its expiry date, it will be shown as a faulty cartridge and will
have to be replaced.
The printer will also display the Ink Cartridge Levels.
Cartridge
Missing
Faulty
Cartridge
Cartridge
Nearly
Reached
End of Life
Cartridge
Empty
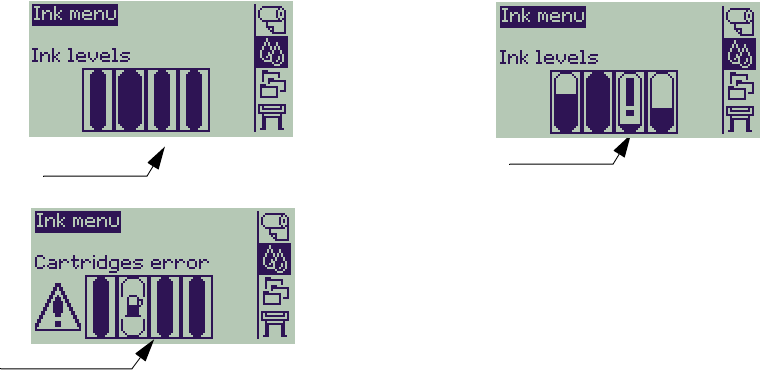
Ink Cartridge Levels
The Front Panel will tell you when your ink supply is low, very low or empty. This means you know current status
of your HP Ink Supplies all the time:
NOTE: Depending on type of print jobs, a cartridge with a Low Ink Warning may in fact last quite a long
time (for example, with line drawings).
NOTE: The Ink Cartridges levels information can also be selected with
Ink menu > Information > Ink Cartridges > Ink Levels if it is not automatically shown in the Ink
menu.
Cartridge
Full Low Ink
Warning
Cartridge
Empty

Ink Cartridge Information
Use the following procedure to display the Ink Cartridge Information screen on the front panel.
The front-panel menu items are:
The front panel displays the following information for the selected ink cartridge:
• Color: Cyan, Magenta, Yellow or Black.
• Model: Hewlett-Packard No 82 (Cyan, Magenta and Yellow) or Hewlett-Packard No 10 (Black).
• Status: inserted, low on ink, out of ink, missing, expired and faulty.
• Expiration date.
• Serial Number.
• Ink Level: in cc and % used.
Select (using the keys) Then Press:
1. Ink Enter
2. Information Enter
3. Ink Cartridges Enter
4. Cyan, Magenta, Yellow or Black
Ink cartridge
Enter
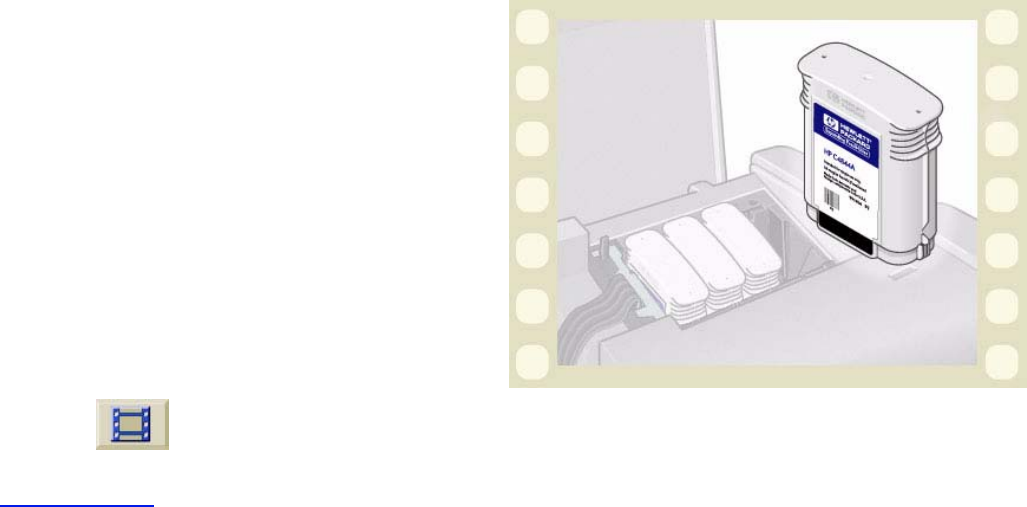
Ink Cartridge Replacement
The animation sequence opposite shows how to
replace an Ink Cartridge.
WARNING: Make sure the printer wheels are locked
(the brake lever is pressed down) to
prevent the printer from moving.
CAUTION: Only remove an ink cartridge if you are
replacing it.
CAUTION: Do not replace cartridges while the
printer is printing because doing this will
cancel the current print job.
You would need to change cartridges either if prompted
to do so on the Front Panel because the printer has
detected a cartridge is out of ink or the cartridge is low
and you want to replace it before it runs out.
Click on the icon to run the animation
sequence.
A printable version of the sequence is also available so that you can take the key illustrations to the printer, if it is
remote from your computer.

Printheads
•Printhead Errors
Details the different error messages that could be displayed on the front panel for the Printheads.
•Printhead Information
Shows you how to display the current status of the Printheads on the front panel display.
•Printhead Replacement
Details the Printhead Replacement procedure.
•Printhead Alignment
Details the Printhead Alignment procedure.
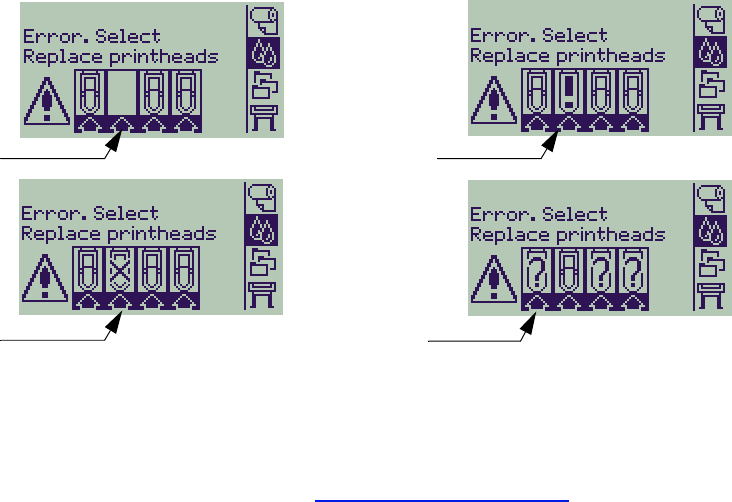
Printhead Errors
The Front Panel can display the following error messages for the printheads:
NOTE: An unknown error is displayed when one of the printheads is causing a problem but the system
cannot detect which one it is. Refer to Unknown Printhead Error to solve this problem.
Printhead
Missing
Faulty
Printhead
Printhead
Worn Out
Unknown
Error

Printhead Information
Use the following procedure to display the Printheads Information screen on the front panel.
The front panel menu selections are:
The front panel displays the following information for the selected printhead:
• Color: Cyan, Magenta, Yellow or Black
• Model: Hewlett-Packard No 11 and Warranty (In warranty or Out of warranty)
• Status: inserted, missing, faulty worn-out and unknown.
If there is a problem the system displays an action: missing -> insert, unknown -> troubleshoot,
faulty, worn out -> replace.
• Expiration date.
• Serial Number.
• Ink Used: in cc and % used.
• Paper Jams.
• If the printheads are aligned and color calibrated.
Select (using the keys) Then Press:
1. Ink Enter
2. Information Enter
3. Printhead Enter
4. Cyan, Magenta, Yellow or Black
printhead Enter
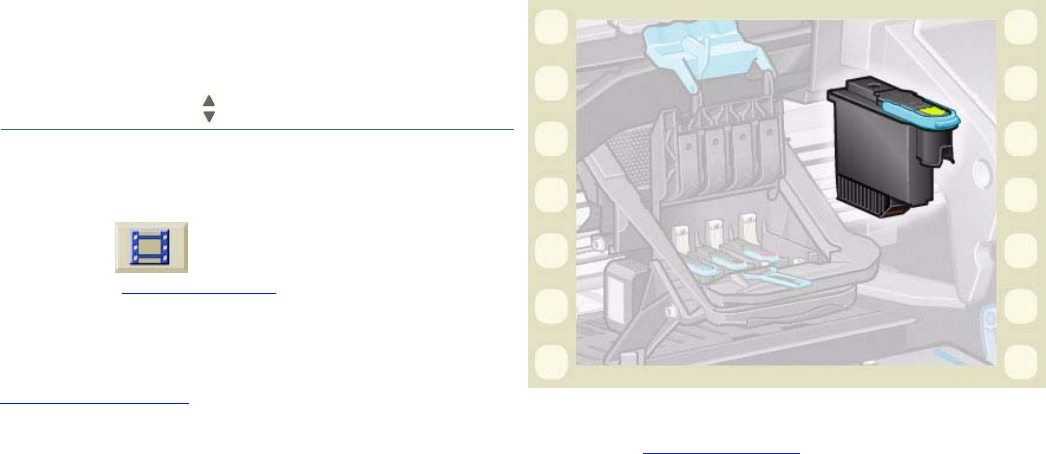
Printhead Replacement
The animation sequence shows how to replace a
printhead in the printer.
The front-panel menu selections are:
Click on the icon to run the animation
sequence. A printable version of the sequence is also
available.
Once you have replaced the printhead, if you have
media loaded, the printer prompts you to start the
Printhead Alignment procedure. If no media is loaded
the printer prompts you to load paper and then automatically starts the alignment. The alignment takes several
minutes to complete and then printer will then prompts you to run the Color Calibration procedure.
Select (using the keys) Then Press:
1. Ink Enter
2. Replace Printheads Enter

Printhead Alignment
You should have one of the following types of paper loaded before attempting to align the printheads: HP Bright
White Inkjet Paper (Bond), HP Coated Paper, HP Heavyweight Coated Paper, HP High-Gloss Photo Paper, HP
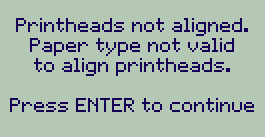
Satin Poster Paper or Plain Paper. If you try to do this with any other type of paper loaded, the printer will prompt
you to load a different type of paper before letting you align the printheads.
From time to time you may be required to align the printheads to ensure maximum print quality. To select
Printhead Alignment manually, make sure you have the correct type of roll or sheet media loaded.
There are two types of alignment: Standard which will take about 4½ minutes; and Special which takes about
11 minutes. Standard alignment is recommended for normal use and requires paper of at least A4/Letter-size,
loaded in landscape mode. Special alignment should be used to correct pen to paper spacing variations which
would be show by variations in vertical line quality, particularly in wide plots and fast print modes. Special
alignment requires paper of at least A3/B-size, loaded in landscape mode. Two separate prints are made.
Then use the following front panel menu selections to start the alignment:
Once you have made this selection the printer starts the alignment process which then takes several minutes.
The printer will also automatically use the standard alignment process to align its printheads after
Printhead Replacement. When the alignment procedure completes after a printhead replacement, the printer
prompts you to ask if you want to run the Color Calibration procedure.
Select (using the keys) Then Press:
1. Ink Enter
2. Align Printheads Enter
3. Standard (4.5 minutes)
Special (11 minutes)
Enter

Solutions
These topics guide you through the different procedures required to troubleshoot and find the solutions to various
problems you could encounter while using your printer.
The Solutions Tab contains these topics:
•Solving Problems helps you to quickly troubleshoot your specific problem; it also contains instructions on
where you can get further information.
•Image Quality Problems helps you to solve any image quality problems you may be experiencing. It takes
you through the troubleshooting procedure step-by-step.
•Ink Supply Problems guides you when you have problems installing the consumable ink items: the ink
cartridges and printheads.
•Media Problems contains information on what to do if you have image smears or marks on your media, and
also what to do if you have a media jam.
•Image Error contains information on what to do if the image that your printer printed is incorrect, or not what
you expected.
•Other Problems covers miscellaneous problems you could face.
•Getting Help explains what to do if you cannot solve the problem you are having. It also provides full details
of the steps to take to contact the Hewlett-Packard Customer Care Center.

Solving Problems
• To find the meaning of front-panel messages, see Message Descriptions.
• If you know the problem is related to a certain task, first check the relevant section in this manual, for step-by-
step procedures. Use this manual’s index or table of contents to find the section. For example, if you are hav-
ing difficulty with page formatting, refer to Page Format.
• If the problem is directly related to the quality of your printed images, refer first to Image Quality Problems.
• Refer to the appropriate topic:
– Ink Supply Problems
– Media Problems
– Communication Problems
– Image Error
– Other Problems
• If the problem could be related to your software driver, and you are using an HP driver, refer to the driver’s
troubleshooting documentation and the on-line help in your application software.
• If the problem has no obvious cause, refer to Finding the Source of Your Problem.
• If you still cannot solve the problem, see Getting Help.

Finding the Source of Your Problem
1. Look at the front-panel display for messages. See Message Descriptions for a full explanation of front-panel
messages.
2. Test the printer.
– Switch the printer off on the front of the printer. Make sure that the power cord is firmly inserted in the
printer and plugged in to an outlet that you know works.
– Switch the printer on and make sure the front-panel display shows the HP welcome screen followed by
Main Menu after a short initialization period.
3. Test your computer hardware and interface.
– Make sure that you have the correct interface cable between the computer and the printer and that it is
firmly connected to the correct ports (see the Assembly and Set-up Poster).

Image Quality Problems
Your HP Designjet 500 Plus printer provides a full troubleshooting utility to ensure you can always quickly
overcome any image problems you encounter. You should use this utility whenever you (and not the printer)
perceive a problem with print quality.
Often what you believe to be a print quality problem is in fact caused by incorrect configuration of the printer for
the type of image you are trying to print. Always check Configuration Correction as your first diagnostic task to find
the cause of your problem.
If a message, such as “PRINTHEADS not functional” appears on the front-panel of your printer, follow the
instructions given for the particular message (see Message Descriptions).
The types of problems you could possibly encounter are:
•Stepped Lines
•Incomplete Lines
•Color Accuracy
•Horizontal Banding
•Color Alignment
Whenever you see any of these problems work through the Troubleshooting Procedure replying to the questions
displayed on the front panel. This will lead you to correct remedial action required to solve your image quality
problem.

Configuration Correction
Before attempting the image quality diagnostic procedures contained in this section, you should first check that
the printer is correctly configured to print what you want. Many problems concerned with image quality can be
solved by correcting the way the printer is configured.
1. To achieve the best performance from your printer, only use genuine HP accessories and supplies, whose
reliability and performance have been thoroughly tested to give trouble-free performance and best-quality
prints. For details of HP media, see Paper Types.
2. Make sure that the Type of paper selected in the front panel is the same type of paper loaded into the printer.
To check this go to the Roll or Sheet menu in the front panel and press Enter.
3. To ensure the maximum print quality use HP certified media only. For details of HP media see Physical
Characteristics of Paper Types. You can also look at the Web page http://www.hp.com/go/designJet for the
most up-to-date information.
4. Make sure that the Print quality (Fast, Normal, Best) used for your printer is correct. This is set in the Print
Setup dialog box of the printer driver or in the front panel from the Set-up menu. The printer driver setting
overrides the front panel setting.
5. Select Best print mode for maximum print quality.
6. For Non-HP drivers, set front panel media settings to match the media type loaded in the printer. The
documentation that came with your software should provide information about media type/print quality
settings.
7. If your image quality problem is color accuracy related, go to Color Accuracy for further configuration help.
Troubleshooting Procedure
Working through the Troubleshooting procedure should always be your first action when you encounter image
quality problems. Refer to the Troubleshooting Flow Chart for a description of the sequence of processes used to
complete troubleshooting procedure.
It is important that the paper loaded for this procedure is exactly that used when you encountered image quality
problems, type (for example, glossy paper) and size. If you use a different kind of paper or a different size, you
stand less likelihood of resolving the problem.
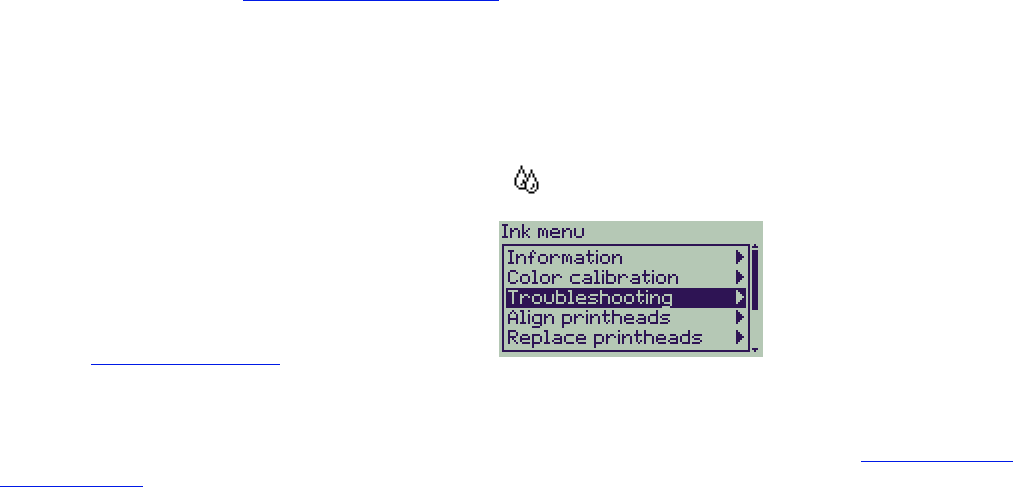
Running the Troubleshooting Utility
1. From the main front-panel menu, select the Ink menu ( ) and press Enter.
2. Select Troubleshooting and press Enter.
3. The printer first checks to see whether the
printheads are aligned. Misalignment of the
printheads is a common cause of image quality
problems. If they are not aligned, you are prompted
to accept Printhead Alignment. This procedure
requires a few centimeters of paper loaded and takes several minutes to perform.
NOTE: Note that you do not have to interpret the patterns printed by the Printhead Alignment routine.
4. If the printheads do not seem to require alignment, the printer prints Diagnostic Print A. See Diagnostic Print
A Interpretation for full details of how to use this diagnostic print.
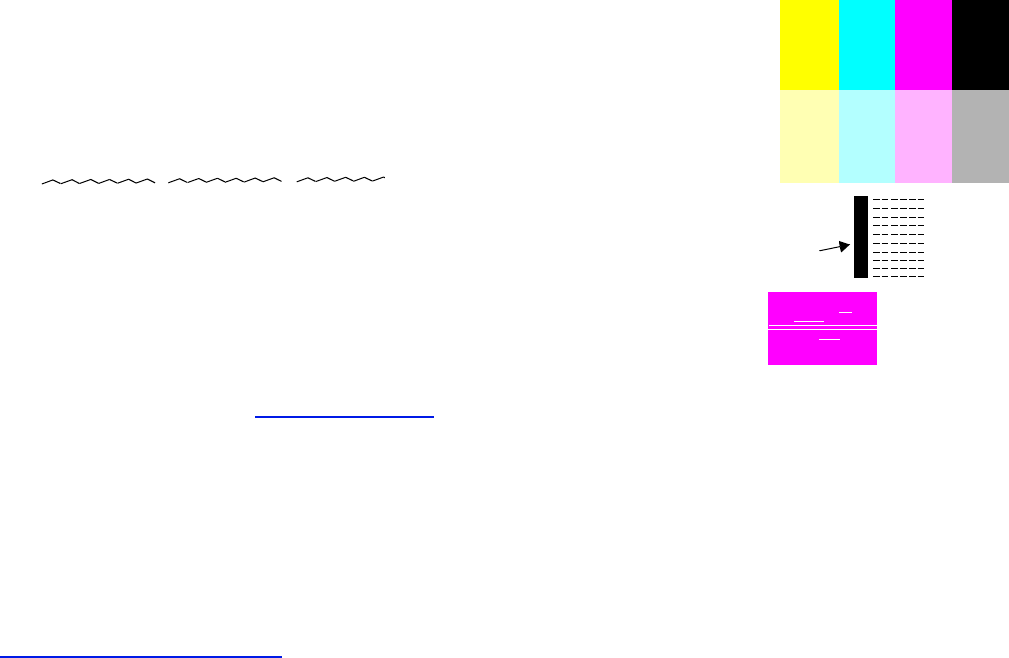
Diagnostic Print A Interpretation
Diagnostic Print A contains several blocks of color and a block of thin black
broken lines (the lines are actually very much closer than those represented
here).
1. Examine the broken lines in Diagnostic Print A carefully and indicate whether
there are problems with them. The sorts of problems to look for here are:
• Jaggedness or serrations in the thin lines, like this:
; the thin lines should be straight,
though not necessarily perfectly aligned. The irregularities that are significant
extend along the whole of the length of the lines. Shorter irregularities,
arranged in columns, can be ignored at this stage.
2. Examine the blocks of color in Diagnostic Print A carefully and indicate whether
there are problems with them. The sorts of problems to look for here are:
• White streaks or bands in the solid blocks.
3. If you indicate that there is a problem with the dashed lines in Diagnostic Print A,
you are prompted to use the Advance Calibration routine; your printer will be at step 3 of the routine (if you don’t
want to continue with calibration, press the Cancel key).
4. If there are problems in the blocks of color in Diagnostic Print A, for example white streaks or bands, the printer will
try to clean the printheads that have the problem. A printhead can be cleaned up to three times this way; after that
it cannot be cleaned and you will be told; the Troubleshooting routine will finish. In that case we recommend that
you try to reprint your print, and then, if necessary, start the Troubleshooting routine again.
After cleaning the printheads, the printer reprints the blocks of color (but not the black lines) in Diagnostic Print A,
and asks you to examine it again (as in step 1).
5. If there are no problems the first time you print Diagnostic Print A, the printer prints Diagnostic Print B. See
Diagnostic Print B Interpretation for full details of how to use this diagnostic print.
Diagnostic Print A
Ignore this
black bar
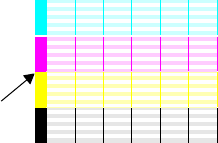
Diagnostic Print B Interpretation
1. For each color in the pattern in Diagnostic Print B, you are asked about the
quality—look for missing lines. If you answer that a color is defective, the
printer tries to clean that printhead.
If the printhead cleaning process completes, Diagnostic Print B is printed
again and you are asked the same questions again.
2. Afterwards, if problems with images remain, use the Troubleshooting
procedure again.
If none of the patterns or blocks in the two Diagnostic Prints shows any problem, it could be that your image
quality problem is caused by a wrong setting in your software, or perhaps the job should have been printed with
the Print quality set to Best instead of Normal or Draft.
If the Troubleshooting routine didn’t indicate that printhead alignment was necessary, you can select Align
printheads in the Ink menu to try to solve any further image quality problems.
Diagnostic Print B
Ignore these
solid bars
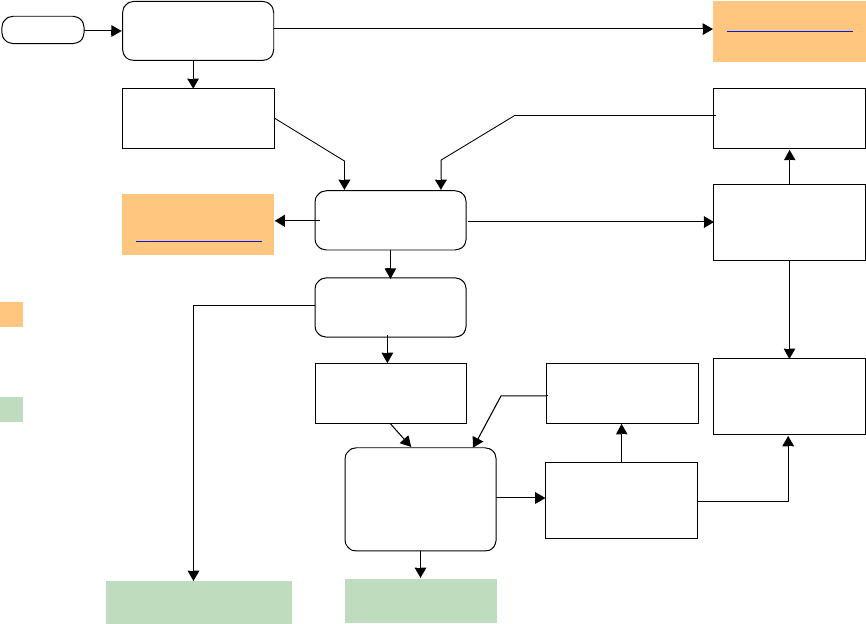
Troubleshooting Flow Chart
The following diagram shows the flow of the troubleshooting procedure.
Printer checks
whether Printhead
Alignment is required
Printer recommends
Printhead Alignment
(Standard or Special)
Printer prints
Diagnostic Print A
including black lines
Printer asks questions
about Diagnostic
Print A
Wrong paper advance.
Printer recommends
Advance Calibration
Printheads need
cleaning. If possible
printer tries to clean
printheads
Printer prints
Diagnostic Print A
without black lines
If printheads have
been cleaned three
time Troubleshooting
finishes
Printer prints
Diagnostic Print B
without black lines
Printer asks if Cyan,
Magenta, Yellow and
Black Patterns in
Diagnostic Print B are
OK
If possible printer tries
to clean printheads
No problems detected
Start
Printheads are OK
after first printing of
Diagnostic Print A
Troubleshooting
completed successfully
Yes
No
Yes
Yes
No
No
Printer prints
Diagnostic Print B
Indicates that
troubleshooting has
completed but further
procedures are required
to solve the problem
Indicates that
troubleshooting has
completed successfully
and there no problems
Advance Calibration
It is important that the paper loaded for this calibration is exactly that used for normal printing, both in quality (for
example, glossy paper) and in width (for example, A0 or 36-inch). Either roll or sheet paper can be used.
The routine prints a pattern and then cuts the roll (the cutter must be set to On—see Controlling the Cutter) or
ejects the sheet; it requires paper that is at least 65 cm/25.5 inches long and at least 50 cm/19.7 inches wide. You
must then reload that piece of paper as a sheet, so that the printer can accurately measure the pattern, and make
whatever adjustments are appropriate to the amount it advances between printing swaths of data. (See Loading
Sheet Media)
The pattern printed is solely for the use of the printer; you are not expected to relate any of its characteristics to the
quality of your images.
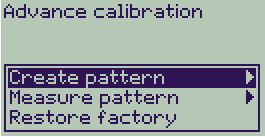
1. From the main front-panel menu, with the correct paper loaded, select the Paper menu ( ) and press Enter.
2. Select Advance calibration and press Enter.
3. Select Create pattern and press Enter.
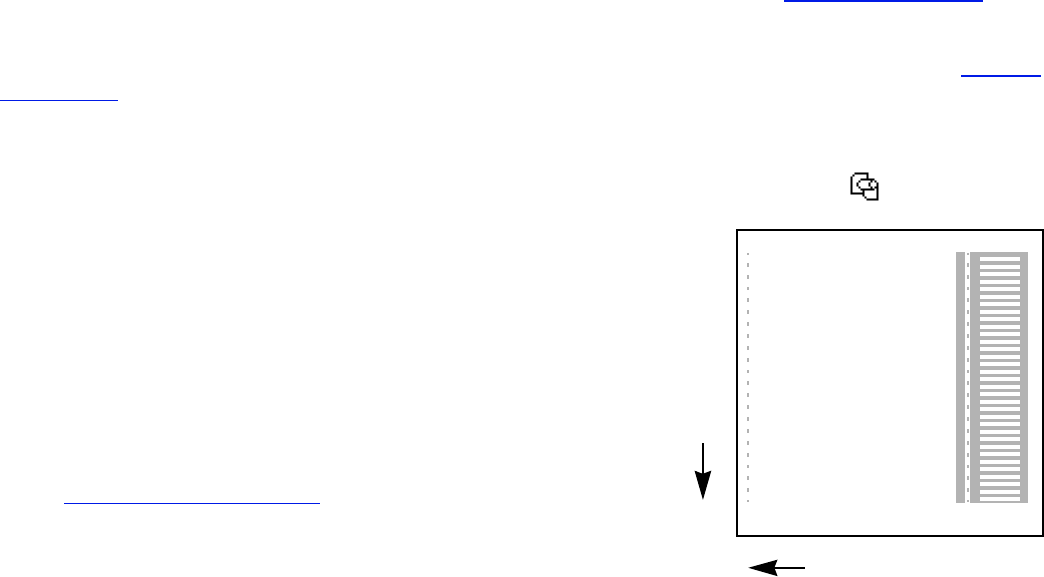
The printer prints its calibration pattern (as represented here) and
cuts or ejects the paper.
4. Load the sheet printed side up with the dotted line at the top (that is,
rotated 90º).
5. Now select Measure pattern and press Enter.
The printer reads the calibration pattern and makes the appropriate
internal adjustments.
These Advance Calibration Values are used whenever you print on the
same type of media until you have used the Advance calibration twice
more with different types of media.
Direction of paper while
printing (creating pattern)
Direction of paper when
loading (measuring pattern)
Advance Calibration Values
The printer stores the advance calibration values of the last two
different types of media used for the calibration. When you print the
printer ties to match the media you have selected to the stored
values. If there is a match the printer applies the stored Advance
calibration values.
If the type of media you are using has not been used for either of the
last two Advance calibrations the printer uses a set default values for
your media.
The Restore factory option of the Advance calibration menu erases any stored advance calibration values from
the printer memory. This means that until you run the advance calibration again the printer will use the factory
default values for all types of media.
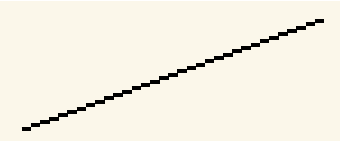
Stepped Lines
When you look at the image you have printed there are ‘stepped lines’ in the borders of arrows and diagonal
lines. The lines should be straight with no stepping.
The following is an example of what you might see if you have problems with stepped lines.
To solve this problem:
1. Increase the dpi setting by changing the print quality to Best in the front panel and driver software.
2. The problems may be inherent in the image you are trying to print. Try to improve the image with the
application that generated the file.

Incomplete Lines
When you look at the image you have printed there are:
• Missing or faint lines.
• Printed characters having missing parts to them.
The following is an example of what you might see if you have problems with incomplete lines.
See the Troubleshooting Procedure for instructions on how to solve this problem.
Missing parts of text; this
should say TEST
TEST
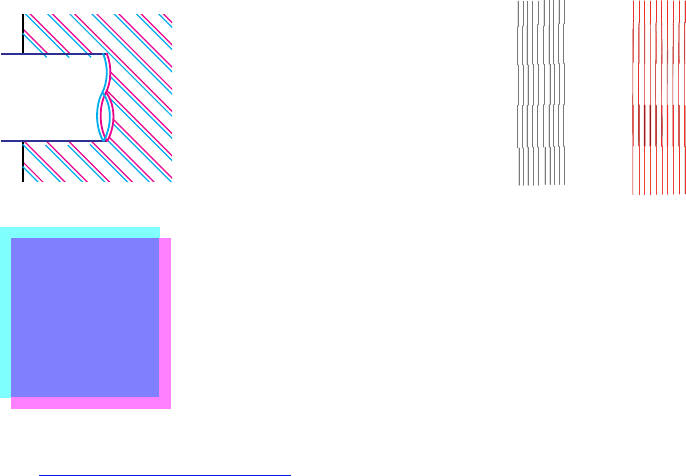
Color Alignment
When you look at the image you have printed:
See the Troubleshooting Procedure for instructions on how to solve this problem.
The colored lines are printed
double and they are the wrong
colors
Vertical lines are misaligned or
fuzzy (not smooth)
The borders of colored blocks
are overlapped and the
overlapping areas have
different colors in them.

Horizontal Banding
When you look at the image you have printed there are light or dark lines on the image, these are particularly
highlighted in high density ink areas. This problem is known as banding.
IMPORTANT Banding can occur to a certain degree in Fast and Normal mode when printing high
density prints. To obtain the best image always print in Best Mode.
The following is an example of what you might see if you have problems with banding.
See the Troubleshooting Procedure for instructions on how to solve this problem.
80
80
Ink cartridge
80
Ink erov Caps
Ironk
Pojfdjop ernk aure
Pojfdjop ernk Chorme
kheuhg sfrfefg
kheuhg sfrfefg
Expanding Possibilities
Expanding Possibilities
80
80
Pojfdjop ernk aure

Color Accuracy
These are the areas you should review when troubleshooting a color accuracy problem:
Media
Ensure the media loaded is genuine HP media and the correct media type selected on the front panel and in the
driver.
Related Topics
•Color Consistency problems
•Long Term Color Bleeding (Glossy Papers)
•Color Accuracy Configuration
•Additional Color Accuracy Information
Color Consistency problems
• Some media may discolor or change with age. Check that your media is fresh and has been stored correctly.
• If the environmental conditions you are printing in change rapidly, you may see changes in the color consis-
tency. By reducing the time the print stays in extreme environmental conditions after being printed (especially
very high humidity) you can reduce the color consistency problems.
• There may be color changes between images printed on your HP Designjet 500 Plus and other types HP
Designjet printers. This is quite normal because the other printers use different ink.
Long Term Color Bleeding (Glossy Papers)
High ambient humidity at your location could cause the colors to bleed into the paper making the lines fuzzy and
bleary.
• Change the paper that you are printing with or remove the printer from the high humidity conditions.

Color Accuracy Configuration
The configurations of the printer defines how ink is applied to each type of media. Use the information in the
following table to configure your printer and software for best color accuracy.
Location of
Setting
Setting Description Selection
Ink Menu Color Calibration > Calibrate
Paper
Set to match the media type loaded in the printer.
See Paper Types.
Additional Color Accuracy Information
The means of accurately managing the colors printed by your printer vary with the software application and driver
being used. Refer to the following documentation:
• On-line documentation in the drivers shipped with your printer.
• If you cannot find any reason for the discrepancy, before getting help, find out for which CMYK printer inks the
colors have been specified.

Ink Supply Problems
Most of the problems that you could encounter when working with HP Ink Supplies are solved with guidance from
the front panel. The only exception to this is the Unknown Printhead Error. A full list of front messages are
supplied in Message Descriptions.
Printhead Problems after Replacement
If, after replacing the printheads, the printer complains about wrong or missing printheads, perform the following
steps:
• Check that you have removed the protective tape from the printhead.
• Insert the printhead into the carriage assembly, but this time close the cover using the latch.
• Replace the printhead with a new one, see Printhead Replacement.
Problems Inserting the Ink Cartridge
1. Make sure that you have the correct HP Ink Supplies ink cartridge.
2. Make sure that the cartridge is the correct color for that slot.
3. Make sure the cartridge is in the correct orientation, with the color coded label at the top.
CAUTION: Never clean inside the ink cartridge slots.
Problems Inserting the Printhead
1. Make sure that you have the correct HP Ink Supplies printhead.
2. Make sure that the printhead is the correct color for that slot.
3. Make sure that the printhead is the correct orientation.
See Printhead Replacement for further details.
Unknown Printhead Error
An unknown printhead error occurs when the one of the printheads is causing a
problem but the system cannot detect which one it is. Whenever this happens the
front panel displays this error message. The number of printheads with unknown
errors will either be all the color printheads or all the printheads.
Use the following procedure to isolate the faulty printhead.
1. Select Replace Printheads from the front panel.
2. Open the carriage cover and remove ALL the printheads.
3. Reinsert the Cyan printhead only and close the carriage cover and the window.
4. Check the front panel—if the status of the Cyan printhead is X or ?, the conclusion is that the Cyan printhead
is faulty and must be replaced. If the status of the Cyan printhead is OK, the conclusion is that the Cyan
printhead is working correctly. Repeat the process from step 1 for the other color printheads to identify which
one is failing.

Media Problems
•Media
Details the general rules to follow to avoid media problems.
•Clearing a Media Jam
Describes how to clear a media jam.
•Ink Marks on the Media
Details the way to solve ink mark problems: warped lines, blurred lines, marks or scratches on glossy paper.
•Media Loading Problems
Explains what to do when the front panel keeps indicating that media is misaligned or incorrectly positioned.
•Media Output Problems
Explains what to do when the prints fall on the floor or do not stack correctly in the media bin.

Media
Always make sure that you are using the appropriate media for your image and that it is consistent with your
software application. To ensure color accuracy and print-quality performance of the printer, use only media types
that have been certified for your printer.
Use of non-HP media or HP media not certified for your printer may significantly reduce the color and print quality
of your images. For details of HP media, see Paper Types.
Clearing a Media Jam
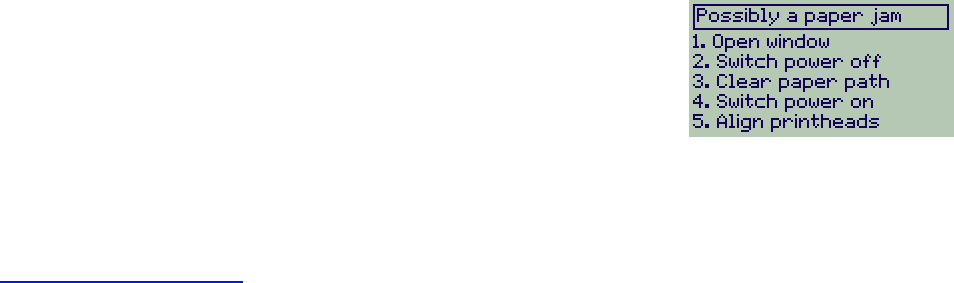
If the front panel displays this message:
There is probably paper jammed in the printer. Paper jams can have
various causes:
• The paper is too thick or too thin for the printer, or is otherwise not
supported.
• The paper is creased or misaligned or is bubbled.
• Too much ink is being placed on the paper causing it to cockle or bubble.
• The end of the roll of paper is glued to the core and won’t advance further.
• Pieces of paper or paper powder are clogging up the cutter guide or other moving parts.
See Removing Jammed Paper for full instructions on how to clear jammed paper.
Removing Jammed Paper
1. Open the window.
2. Switch the printer off at the front.
3. If necessary, carefully move the printhead carriage out of the way—if possible all the way to the enclosed area
on the left or the right. Which way you are able to move it depends on where the paper is jammed.
CAUTION: When moving the printhead carriage, touch only the black plastic parts.
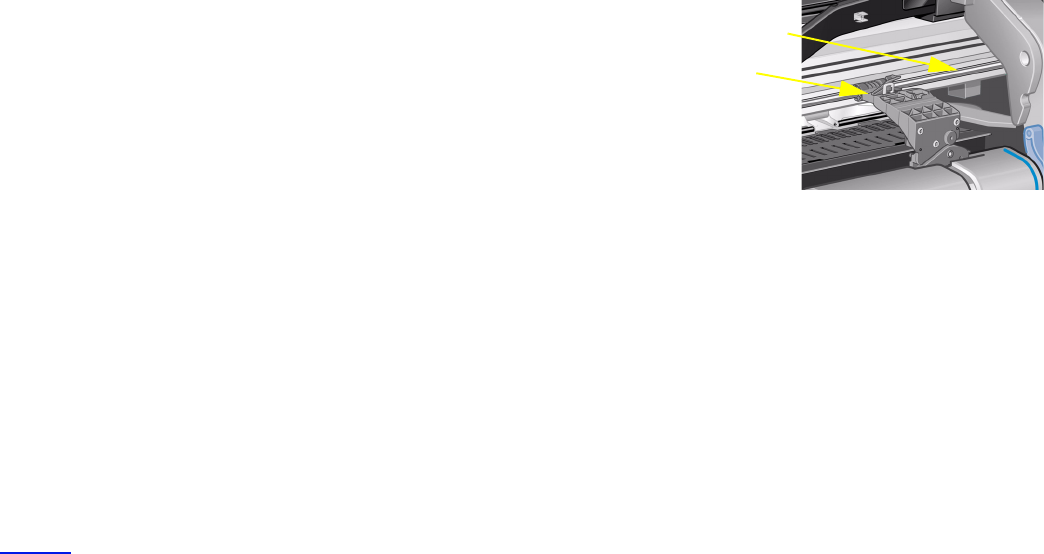
4. If necessary, carefully move the paper cutter out of the way to the left,
or to the right depending on where the paper is jammed (though if
moved right it may block the paper path).
CAUTION: The cutter is easily moved by holding it as close as
possible to the guide running across the width of the
printer. Be careful not to touch the metal slider bar that
runs across the printer.
5. If necessary, lift the blue paper lever, to release any trapped paper.
Remember to lower it again when you have finished.
6. Carefully remove any of the jammed paper which you can easily lift up and out from the top of the printer.
7. Carefully pull the rest of the roll or sheet down and out of the printer. You may need to cut the edge of the roll
with scissors.
8. Check that the printing zone, including the cutter guide, the paper path, and the area where the printhead
carriage is parked, is clear and clean; remove any paper powder by brushing it away or with a vacuum
cleaner.
More …
Slider bar
Guide

Removing Jammed Paper (continued)
CAUTION: The area where the printhead carriage is parked can get quite dirty; be careful not to get ink on
your hands.
9. Close the window and switch on the printer.
10. Wait for the printer to finish initializing.
11. Press the Form Feed and Cut key on the front panel to eject any small pieces of paper that are still in the
paper path.
12. Reload the paper as normal (see Loading Roll Media or Loading Sheet Media). If you are using roll paper you
may need to trim the edge first, to ensure that it is straight.
NOTE: If there is still paper left in the paper path, try loading a sheet of stiff or rigid paper into the
printer, such as heavy coated or matte film; this will help to force out any paper jammed in the
paper path.
13. If the cutter seems to be causing the problem, check in Paper Types that the type of paper is supported by the
printer. Try disabling the cutter from the front panel; use → Cutter → Off.
You are strongly recommended to align the printheads (see Printhead Alignment) after clearing a paper jam, as
the problem may have caused the printheads to be misaligned.
Back …


Warped Lines
• The media itself may be warped. This can happen if it has been used or not been stored in the correct envi-
ronmental conditions.
• For all environmental specifications, see Enviromental Specifications.
Blurred Lines (Ink “Bleeds” from Lines)
• Perhaps you have adjusted the drying time in the front-panel menu to speed up the printer output. Set “Drying
time” to “Automatic”.
For details of drying time adjustments, see Ink System.
Marks or Scratches on Glossy Paper after Printing
Glossy paper may be extremely sensitive to the bin or anything that it comes into contact with directly after
printing. This will depend on the amount of ink printed and the environmental conditions that are present at the
time of printing. Avoid any contact with the paper and handle the print with care until quite some time has elapsed.
NOTE: Included with HP media is a book “Printer Tips” that includes a section on troubleshooting
paper problems.
Smears or Scratching on Your Printed Media
This problem can appear on paper-based coated media if a lot of ink is printed quickly. The media cannot absorb
the ink quickly enough and becomes distorted. As the printheads move over the media, the printheads and the
media come into contact with each other and the printed image is smeared.
1. Press the Cancel key on the front panel; if you continue to print, the paper may damage the printheads.
2. Cancel the print job from your computer application.
3. In order to obtain better results perform the following:
• Use HP recommended media. If the image you are printing has intense color, use HP Heavy Coated
Paper.
• Try to increase the print margins by relocating the image in the page from your software applications.
If the above fails to solve the problem of smears and scratching, change the media you are using to a non-paper
based media such as HP Clear film.

Media Loading Problems
The front panel keeps indicating that media is misaligned or incorrectly positioned.
Roll media
• The roll media may be loaded the wrong way. The paper should load over the roll towards you, see Loading
Roll Media.
• The paper may be skewed. The right-hand edge must be parallel to the blue line on the front media deflector.
• Ensure that the paper is wrapped tightly on the roll.
• Check that the paper is correctly loaded onto the spindle, see Installing a New Roll on the Printer.
Sheet media
• The sheet media must be loaded with the right-hand edge against the blue line on the printer platen and the
front edge against the blue line just after the pinch rollers, see Loading Sheet Media.
• The media may be crumpled or warped or may have irregular edges.
• If you are using hand-cut media, the edges may not form a right-angle or they may be rough. Do not use
hand-cut media. Use only purchased sheet media.
• If the media is curled with the curl up it will be very difficult to load. It is easier to load it with the curl down
Media Output Problems
Prints Fall on the Floor After Being Cut
• Make sure the media bin is open.
• Do not let more than twenty prints accumulate in the bin.
• Make sure roll media is loaded correctly. If the paper is loaded incorrectly, the natural curl of the media may
cause it to miss the bin and fall to the floor.
Prints Do Not Stack Properly in the Media Bin
• The printer may be too close to the end of the roll. The natural curl near the end of the roll can cause stacking
problems. Load a new roll or remove prints manually as they are completed.
• If you are mixing prints or nesting sets of several different sizes, you may have stacking problems because of
the different sizes of media in the bin.

Image Error
•Image is Incomplete
Details the actions to take when the print is: Blank, Partial or has suffered clipping.
•Printed Image Incorrect
Explains why the image is:
- In one portion of the printing area.
- Unexpectedly rotated.
- Mirrored.
- Distorted or unintelligible.
- Overlaid with another image.
- Does not obey Page Format and Rotate commands.
•Other Sources of Information
Lists others sources of information for image problems.

Image is Incomplete
•Output Contains Only a Partial Print
•Image is Clipped
•Long-Axis Print Is Clipped
Output Contains Only a Partial Print
• Did you press Cancel or Form Feed and Cut before all the data was received by the printer?
If so, you have ended the data transmission and will have to print the page again (you normally don’t need to
press Form Feed and Cut to unload the print).
• The I/O Setup > I/O Timeout setting may be too short. From the front-panel menu you can increase the
I/O Timeout setting to a longer period and then send the print again.
• The file may be too large for the printer’s memory.
You can install extra memory on the HP-GL/2 Accessory Card in your printer, see Memory.
• There may be a communications problem between your computer and the printer.
Check your interface cable.
• Check to make sure that your software settings are correct for your current page size (for example, long-axis
prints).

Image is Clipped
• This normally indicates a discrepancy between the actual printing area on the loaded media and the printing
area as understood by your software. For general advice on printing areas and page size, see Printable Area.
• Check the actual printing area for the media size you have loaded (printing area = media size – margins). For
media size and margins, see Printable Area.
• Check what your software understands to be the printing area (which it may call “printable area” or “imagable
area”). For example, some software applications assume standard printing areas that are larger than those
used in this printer.
• You may have asked to rotate the page from portrait to landscape on media that is not wide enough, for
example a D/A1-size page rotated on a D/A1-size roll.
• If necessary, change the printing area in your software.
• The file may be too large for the printer’s memory.
Long-Axis Print Is Clipped
• Does your software support long-axis prints?
• Have you specified an appropriate media size in your software?
• There may not be sufficient memory.


Image is in One Portion of the Printing Area
• Is the page size configured in the software too small?
• Are you sure that your software doesn’t believe the image to be in one quadrant of the page?
• Otherwise, this indicates an incompatibility between the software and the printer:
• Is your software configured for this printer? For general advice, see the Assmebly and Set-up Poster. For
advice specific to your software, see the documentation supplied with the driver.
Image is Unexpectedly Rotated
• Check the front-panel Paper > Page format > Rotate setting.
• For an explanation of image rotation, see Rotating an Image.
Print is Distorted or Unintelligible
• The interface cable between your computer and the printer could be faulty. Try another cable to see if the
problem is corrected.
• If you have connected your computer to the parallel port on the printer, make sure you are using a genuine HP
parallel interface cable.
• Depending on the software, drivers and RIPs you are using with your printer, there will be different solutions to
solving this problem. Refer to the Vendor’s User Documentation for details.
One Image Overlays Another on the Same Sheet
• The I/O Setup / I/O Timeout setting may be too long. From the front-panel menu decrease the setting and print
again.
Other Sources of Information
If you don’t find the solution to the problem here, other sources of help are:
• The documentation supplied with the driver that you are using to manage the output from your software appli-
cation to the printer.


Communication Problems
Symptoms are:
• The front-panel display does not show Processing when you are sending a print to the printer.
• Your computer displays an error message when you are trying to print.
• Your computer or printer “hangs” (stays idle) while communication is taking place. However, note that large
prints can take a correspondingly long time to print.
• Your printed output shows random or inexplicable errors (misplaced lines, partial graphics etc.)
How to solve the problem:
• Have you selected the correct printer in your software?
• Does the printer work correctly when printing from other software?
• If the printer is connected to a network, try using it when connected directly to your computer through parallel
or USB ports.
• If your printer is connected to your computer through any other intermediate devices, such as switch boxes,
buffer boxes, cable adapters, cable converters, etc., try using it when connected directly to your computer.
• Try another interface cable. For details of supported cables, see Connection Specifications.
File Size and Memory
There is no direct relationship between file size on your computer and memory used in the printer to print that file.
In fact, because of file compression (and general complexity) it is often impossible to estimate how much memory
will be used. This means that some large prints will work fine, but some smaller prints may not and you will have
to add more memory to your printer.

Printer Does not Print
• You may have a power problem. If there is no activity at all from the printer, and power on indicator in the
power switch on the front of the printer is off, check that the power cable is connected correctly and that there
is power available at the socket.
• You may have a problem with your application driver. Is your software configured for this printer? For general
advice, see the Assembly and Set-up Poster. For advice specific to your software, see the documentation
supplied with the driver.
• The file may be too large for the printer’s memory. This is the case if the front panel displays “Out of memory–
data was lost”. Look on your computer screen for any error message; some drivers allow you to choose a dif-
ferent printing mode and try to send the file again.
• If you continue to have problems, see Getting Help.

Printer Seems Too Slow
• Did you specify Best print quality level on the front panel?
Best quality mode prints take longer to print.
• Did you specify the right media type when loading the media? For details of front-panel media types, see
Paper Types. To find out the printer’s current media type setting, see Obtaining Roll or Sheet Paper Informa-
tion.
• The printhead may need replacing; see Printhead Replacement
• Did you specify a Manual Dry Time in the front panel? Change the dry time to Automatic see Ink System.
• If the printer is in Fast mode and the file it is printing contains high density inked areas, the printer may need
to slow down to compensate.


HP Customer Care
As your strategic support partner, we make it our business to help keep your business running smoothly. HP
Customer Care offers award-winning support to ensure you get the most from your HP Designjet.
The contact details for your local HP Customer Care Center are provided in the Hewlett-Packard Customer Care
booklet supplied with your printer.
HP Customer Care provides comprehensive, proven support expertise and leverages new technologies to give
customers unique end-to-end support. Services include setup and installation, troubleshooting tools, warranty
upgrades, repair and exchange services, phone and Web support, software updates, and self-maintenance
services.
To find out more about HP Customer Care, please visit us at: www.hp.com/go/support.

What to Do Before You Call
1. Review the troubleshooting suggestions in this section:
– In the relevant driver documentation supplied with this printer (for users sending PostScript files or those
using Microsoft Windows).
– If you have installed third party software drivers and RIPs refer to that user documentation.
2. If the problem appears to be related to your software application, first contact your software vendor.
3. If you still have difficulty, refer to the HP Support Services booklet shipped with this printer. This document
contains a comprehensive list of various support services available to help solve printer problems.
4. If you do call one of the Hewlett-Packard offices, please have the following information available to help us
answer your questions more quickly:
– The printer you are using (the product number and the serial number, found on the label at the back of the
printer).
– The computer you are using.
– Any special equipment or software you are using (for example, spoolers, networks, switch-boxes,
modems, or special software drivers).
– The cable you are using (by part number) and where you purchased it.
– The type of interface used on your printer (parallel, or network).
– The software name and version you are currently using.
– If the problem is a system error it will have a error number; record the error number and have it ready. See
Printer Does not Print.

HP Designjet Online
Direct access to HP and the information you want, when you need it. Register now!
www.hp.com/go/designjet
HP Designjet Online is a free, Web-based “user club” exclusive to HP Designjet users. Having registered, the
user has unrestricted access to a range of useful services, the emphasis being on “useful”, as this is definitely not
a sales-oriented site.
Communication from HP to users includes:
• a quarterly newsletter focussing on usage tips, technical briefings and examples of HP Designjet applications
around the world;
• full information on worldwide HP Customer Care contacts;
• an on-line HP Designjet Diagnosis troubleshooting tool;
• a calendar of HP Designjet-related events and programs;
• on-line access to training videos and selected user documents;
• and immediate information on new products.
Communication from the users to HP includes:
• feedback on HP Designjet features;
• automatic contact with HP Customer Care from the troubleshooting tool, for HP to follow up;
• and the chance to ask technical questions on large-format printing to industry experts.
And finally, communication from user to user includes the chance to win prizes by submitting HP Designjet
success stories, as well as a user-to-user discussion forum where users can share best practices and ask for
advice from their fellow professionals.
HP Designjet Online is available in English, German, French, Italian, Spanish and Portuguese.

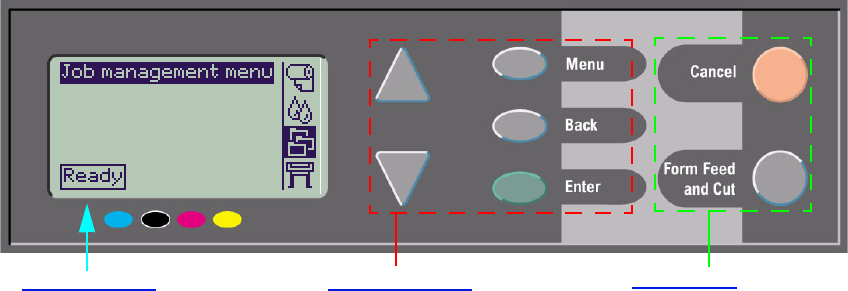
The Front Panel
The panel on the front of your printer is the principal way of changing the behavior of the printer, apart from any
software driven controls that may be provided through the application in use. The front panel of the printer
contains the following functional areas:
Display Screen Navigation Keys Action Keys
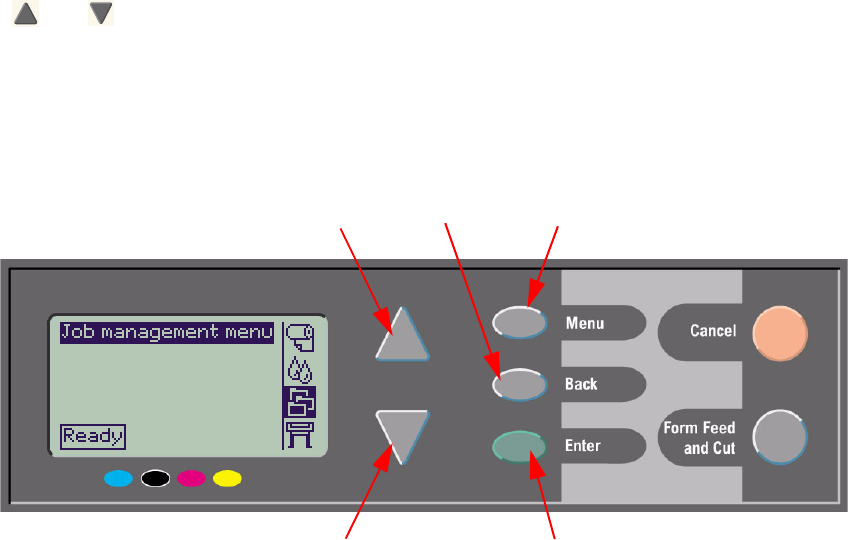
Navigation Keys
The display section of the front panel consists of an LCD display and the following five navigation keys, provided
to navigate through the menus displayed on the screen:
• The Up and Down keys let you scroll through the various items in a menu list.
• The Menu key takes you to the main screen. It cancels any choices that have not yet been selected by press-
ing the Enter key.
• The Back key takes you to the previous screen.
• The Enter key selects the item in the menu list and makes it current. If there are sub-selections to be made,
this key takes you to them; otherwise it takes you back a screen.
.
Up
Down
Back Menu
Enter
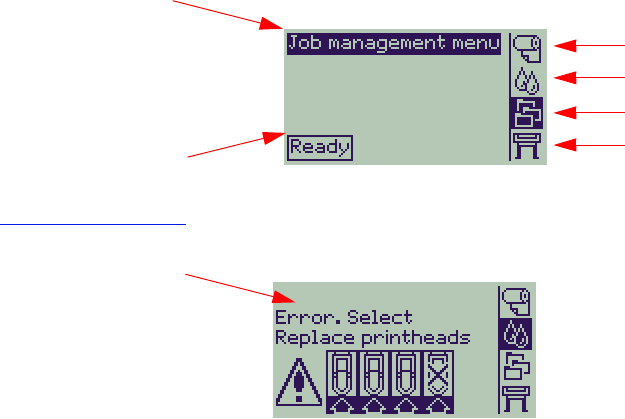
Display Screen
The display screen of the front panel shows the main menu (the words displayed may vary).
NOTE: You can always reach the main menu by pressing the Menu key.
After a short time-out, the display will always revert to the main menu with the Job Management menu active.
The Navigation Example is given from the Job Management menu.
Paper Menu Icon
Ink Menu Icon
Job Management Menu Icon (Active)
Setup Menu Icon
Active menu
Information
message
Error
Message
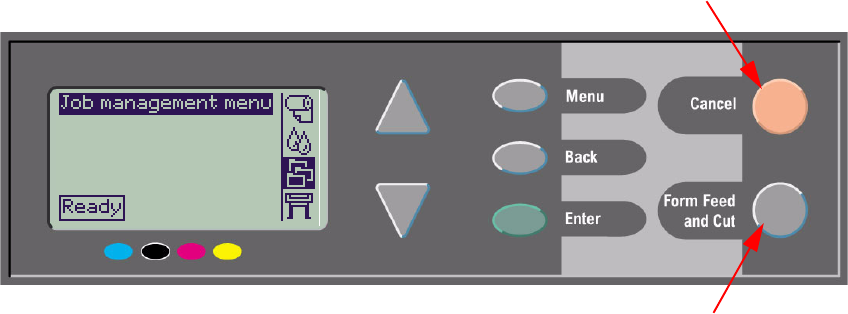
Action Keys
The Cancel key cancels the current printer operation (printing or preparing for printing). It will also cancel the
current menu selection and return to the main menu if a menu option is highlighted.
The Form Feed and Cut key causes a sheet to be ejected or the roll to be advanced and cut.
Cancel
Form Feed
and Cut Key
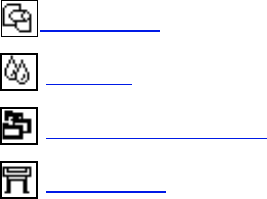
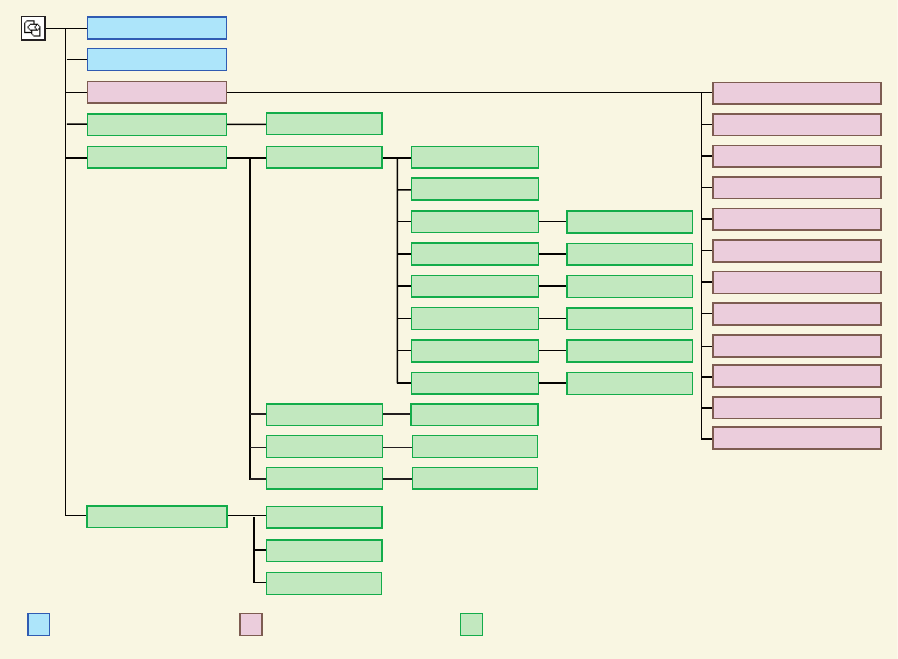
Paper Menu
Pa p e r
I n ked a r e a
Aut o m a ti c
Si z e Page F orm a t
ANS I B es t ANS I A … E
IS O B es t IS O … A 0
JI S B es t J I S … B 1
ARC H B es t ARCH … E 1
Ov e rsi z e O v e r A 2 , O v e r A 1
Ext r a 1 00c m × 1 4 0c m, …
Rotat e 0 , 90 , 18 0 , 2 7 0
Mir r o r in g
Shown only if paper is loaded Items alway s s h ow n
M e nu i te m de p ends on th e
t y pe of paper loaded
O n /of f
Small margins O n /of f
L o a d/Unl o a d Sh e e t
S e lec t pa p er t y p e
Cut t e r On/off
L oa d /U n lo a d Rol l
Ad v an c e Cali b r a ti o n
Rest o re fac t or y
Cre a t e pa t te r n
Measu r e p att e r n
Pl a i n P a pe r
V e ll u m
Nat u r a l T r a cin g P a pe r
T ra n s lu c e n t Bo n d
Cle a r fil m
M at t e fil m
Coa t ed Pa pe r
Hea v y Coa t e d P ape r
Hig h - G lo ss P h ot o
P os te r P a pe r
Can v a s
B r i g h t W h i te I nkje t P a pe r
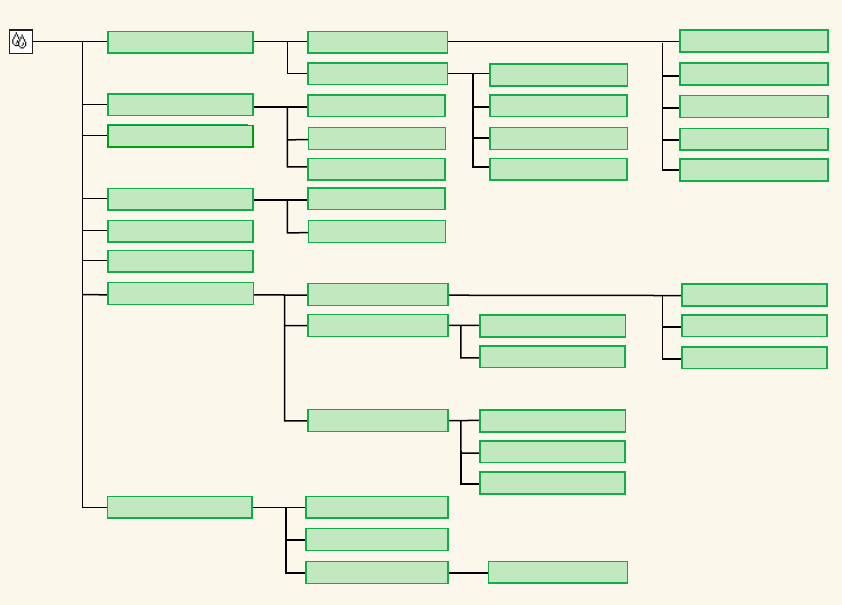
Ink Menu
Ink
Color calibration
Information
Printheads
Ink Cartridges
Troubleshooting
Align Print Heads
Replace Print Heads
Replace Ink Cartridges
Color settings Color
Grayscale
True Black
Color/monochrome
Cyan Printhead
Magenta Printhead
Black Printhead
Yellow Printhead
Status
Reset
Calibrate Paper
Standard (4.5 min.)
Special (11 min.)
Cyan Ink Cartridge
Ink Levels
Magenta Ink Cartridge
Yellow Ink Cartridge
Black Ink Cartridge
Drying time Automatic
None
Manual 1, 2 … , 99 min.
Native
sRGB
RGB
Perceptual
Saturation
Colorimetric
Rendering Intent
Job Management Menu
The HP-GL/2 Accessory Card provides a Reprint menu.
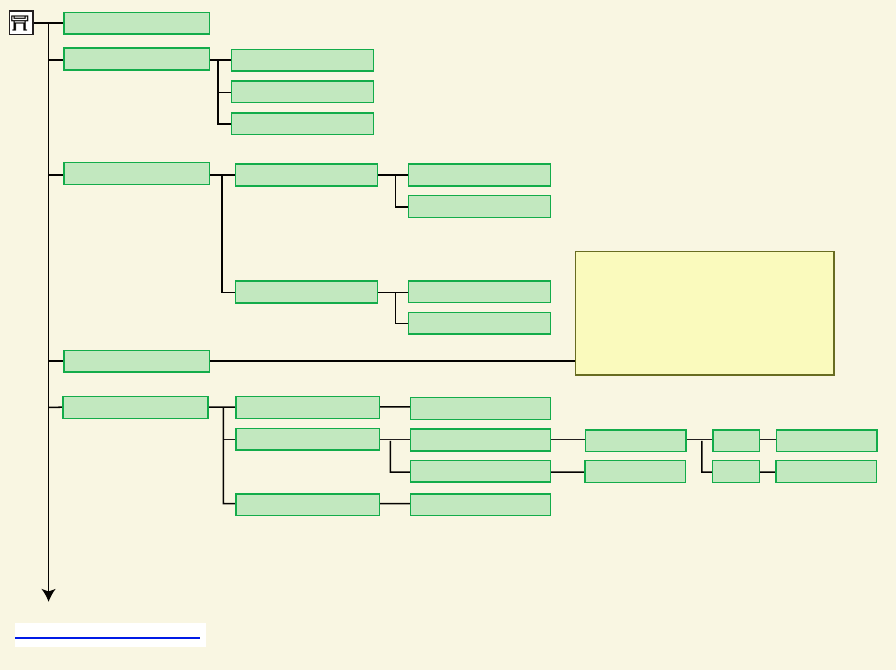
Set-up Menu
Help
Print quality
Printer Information
Model number, Serial number, Service ID,
Firmware rev, Accessory rev, Paper used,
Ink used (c, m, y, k), Scan axis usage,
Paper axis usage, Service station usage,
Spittoon usage, Pinch-lift usage, Cutter
usage, Ink usage.
Normal
Fast
Best
Advanced Options
Best Quality Settings
Optimize for
Images
Line drawings / text
Maximum detail
Default
Define Palette Pen no. 0 … 15
Pen no. 0 … 15
0.13 ... 12.0mm
0.13 ... 12.0mm
Width
Width
Palette
HPGL/2 settings
Merge
Palette A, Palette B
Factory
Software, Factory, Palette A, B
On/Off
More menu options
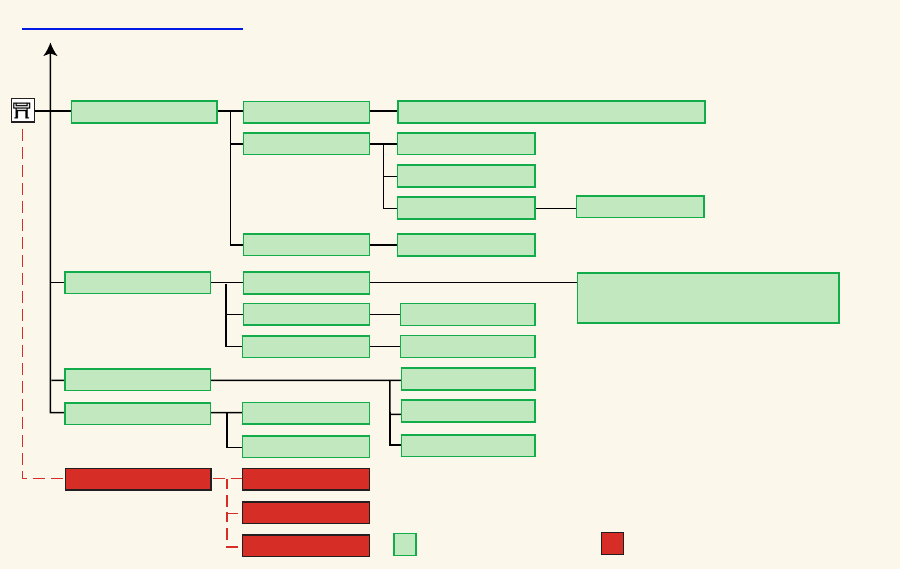
Set-up Menu (continued)
Items always shown
Buzzer
Contrast
Front Panel
Altitude
Language English, German, Spanish, French, Italian,
Japenese, Portuguese, Korean, Chinese,
Taiwanese, …
Log Printheads
Errors
Service tests
Service calibrations
Service utilities
0-1000m
1000m - 2000m
>2000m
ON/OFF
0%, 5%, … , 100%
Service tools
Hidden items that can only be accessed
from the Set-up menu through a
certain combination of keys
Card setup
I/O Timeout
No I/O Cards present
Reset Card
No I/O Cards present / Contents provided by card
Configuration
Advanced
30 sec, … , 30 min
I/O setup Card ID
Previous menu options
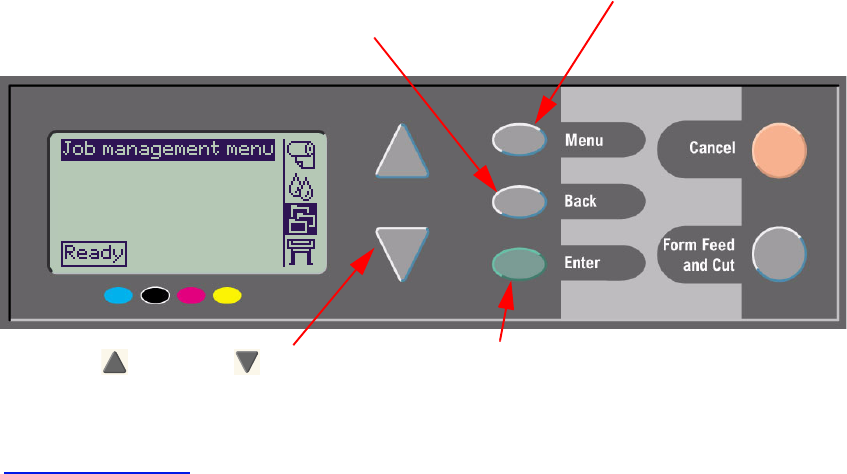
Navigating the Menu System
From the top level of the menu system, you can navigate through the menus using the display keys. Any menu
item followed by a greater-than symbol (>), indicates that a further level of menu items is available.
See Navigation Example for a brief overview of the menu system.
Press the Up and Down keys to scroll
up and down though the menus or menu
options.
Press Menu to return to the top level
without changing any menu selections.
This will bring you to the four menu icons.
Press Back to return to the previous menu
level without changing any menu selections.
Press Enter to:
• Select a menu and move to the next menu level.
• Change the value of the selected menu item.
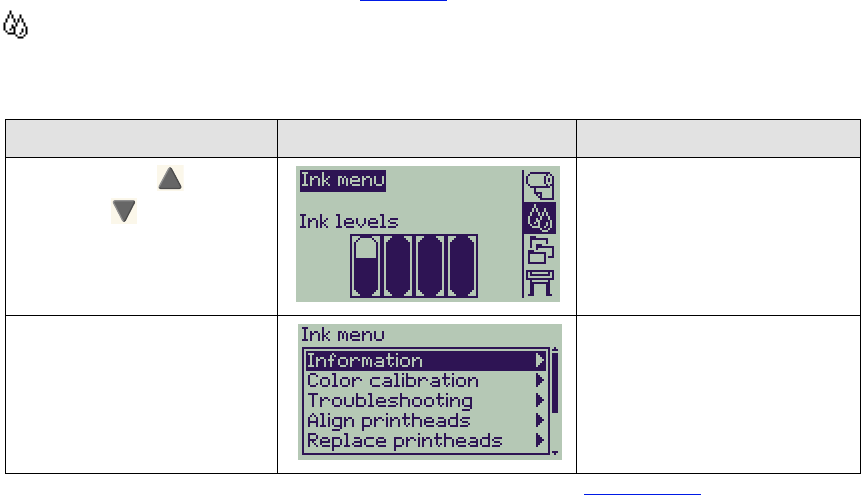
Navigation Example
This section provides a typical example of how to navigate through the menus to configure a specific print option.
How to Set the Ink-drying Time to Two Minutes
The Front Panel Menu Structure diagram for the Ink Menu shows that the path to the Drying time option is:
Ink menu → Drying time
Use the following procedure to set the ink-drying time to two minutes.
Setting Drying Time Navigation Example
Key Action Display Result
1. Use the Up and
Down keys to high-
light the Ink menu icon.
The Ink menu icon is
highlighted to allow you to
select the Ink menu options.
2. Press the Enter key to
enter the printer Ink
menu.
The display shows the Ink
menu to allow you to select
Drying Time.
Continued …
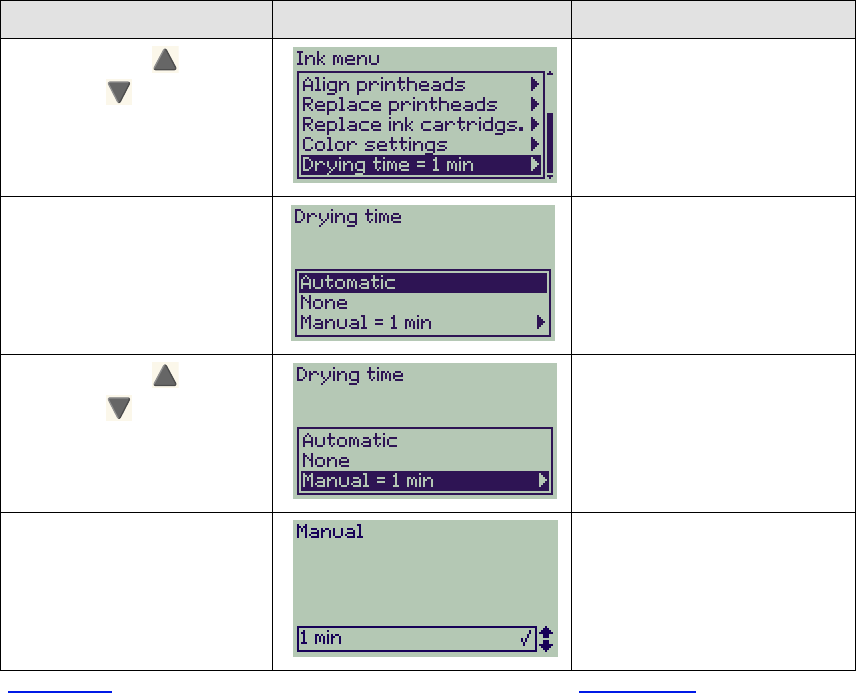
3. Use the Up and
Down keys to
highlight the Drying
time menu option.
The display shows the Drying
time option highlighted.
4. Press the Enter key to
enter the Drying time
menu.
The display shows the Drying
time menu to allow you to
select the type of drying time
you require.
5. Use the Up and
Down keys to
highlight the Manual
menu option.
The display shows the
Manual option highlighted.
6. Press the Enter key to
enter the Manual drying
time setting menu.
The display shows the
Manual drying time setting
menu to allow you to select
the drying time you require.
Previous … Continued …
Setting Drying Time Navigation Example (continued)
Key Action Display Result
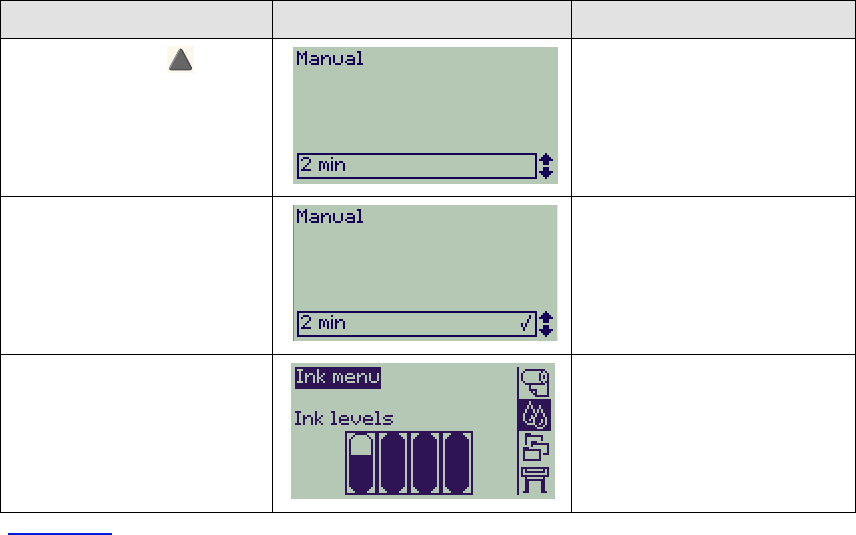
7. Press the Up key
once to select two
minutes.
The display shows the
Manual drying time setting
menu with two minutes
selected.
8. Press the Enter key to
set the drying time to two
minutes.
If the front-panel Buzzer is set
ON, there will be a short
‘beep’ to confirm the change.
A tick mark (√) in the right side
of the field confirms the value.
9. Press the Top key to
return to the top level
menu.
The display shows the Ink
menu.
Previous …
Setting Drying Time Navigation Example (continued)
Key Action Display Result

Message Descriptions
This is a list of the error messages in the front-panel display. If an action is needed, it is shown in italics in the
Explanation and Action column. The messages are listed in alphabetical order. Other front-panel messages,
such as prompts, are included in the descriptions of the relevant procedures elsewhere in this document.
Front Panel Messages
Message Explanation and Action
Alignment error due to
printheads.
Press ENTER to see faulty
printheads
The printer was aligning its printheads, but encountered an error
due to some printheads not printing properly. Alignment has
stopped.
Press the Enter key.
Alignment error
Press ENTER to continue
The printer was aligning its printheads, but encountered an error.
Alignment has stopped.
Press the Enter key.
Cartridges will expire in days:
nn
One or more of the cartridges are about to expire. nn is the number
of days until expiry date of the cartridge that will expire first. The
cartridges that are about to expire are indicated below this message.
For an explanation of the replacement procedure, see Ink Cartridge
Replacement.
Color calibration error
Press ENTER to continue
The printer was performing a calibration of its color system, but
encountered an error.
Press the Enter key.
For more Messages, click on the Next Page button
Error
Select Replace Printheads
The printer has detected that one or more of the printheads is
missing or has an error, as indicated by flashing crosses. The four
icons refer from left to right to the Cyan (•), Black (•), Magenta (•)
and Yellow (•) printheads.
For an explanation of the replacement procedure, see
Printhead Replacement.
HP is not responsible for
damage from use of non-HP
ink.
Replace
Continue
The printer has determined that one or more of the ink cartridges is
not an HP product. Your product warranty only applies when you
use HP ink. Any damage caused to your printer resulting from the
use of non-HP ink cartridges is not the responsibility of Hewlett-
Packard.
If you want to replace the non-HP ink cartridges, select Replace and
press the Enter key. Otherwise, select Continue and press Enter to
continue.
HP is not responsible for
damage from use of non-HP
printheads.
Replace
Continue
The printer has determined that one or more of the printheads is not
an HP product. Your product warranty only applies when you use
HP printheads. Any damage caused to your printer resulting from
the use of non-HP printheads is not the responsibility of Hewlett-
Packard.
If you want to replace the non-HP printheads, select Replace and
press the Enter key. Otherwise, select Continue and press Enter to
continue.
Front Panel Messages (continued)
Message Explanation and Action
For more Messages, click on the Next Page button
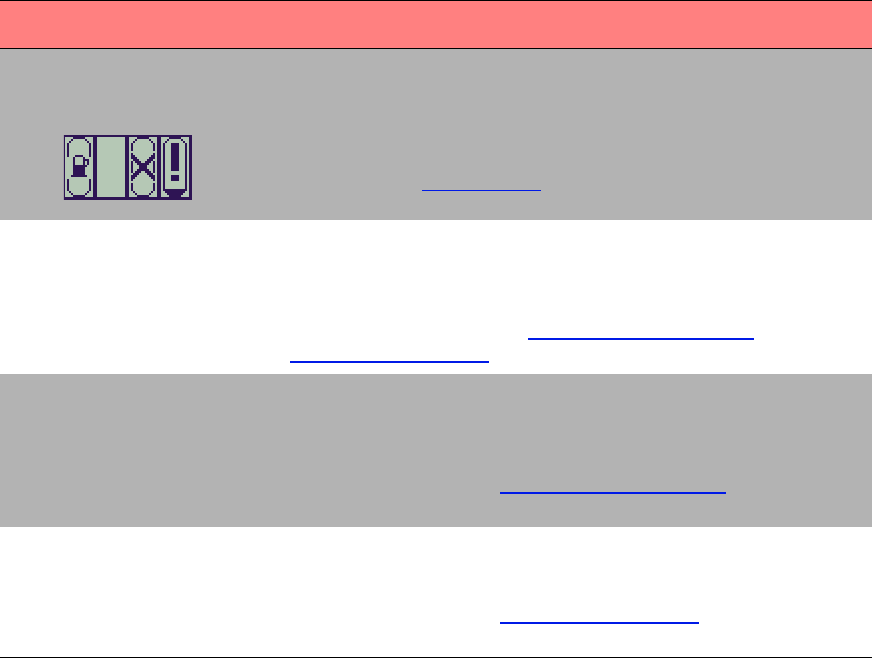
Ink cartridge replacement
required
The printer has detected that one or more of the ink cartridges is
missing or has an error, as indicated by flashing crosses. The four
icons refer from left to right to the Cyan (•), Black (•), Magenta (•)
and Yellow (•) cartridges.
For an explanation of the icons and details of the replacement
procedure, see Ink Cartridges.
INK CARTRIDGES need to be
functional.
Replace before replacing
printheads
You have attempted to replace printheads, but the printer has
detected that there are ink cartridges that are wrong. The ink
cartridges must be replaced before the printheads can be replaced.
First replace the faulty, empty or missing ink cartridges and then
replace the printheads. See Ink Cartridge Replacement and
Printhead Replacement.
Install missing cartridges and
replace empty cartridges
before replacing printheads
You are replacing printheads, but the printer has detected that some
cartridges are empty and some are missing. The empty cartridges
must be replaced and the missing ones inserted before the
printheads are replaced.
Follow the procedure for Ink Cartridge Replacement. Press the Enter
or Cancel key to continue.
Install missing cartridges
before replacing printheads
You are replacing printheads, but the printer has detected that one
or more cartridges are missing. The missing cartridges must be
installed before the printheads are replaced.
Follow the procedure for Printhead Replacement. Press the Enter or
Cancel key to continue.
Front Panel Messages (continued)
Message Explanation and Action
For more Messages, click on the Next Page button
Open window and check
printhead cover is properly
closed
You have replaced one or more printheads and the printer’s check
has found that the printhead cover is not securely closed.
Open the window and check the printhead cover. The procedure is
described in the Printhead Replacement procedure.
Note: This message may also appear following a paper jam, as the
printer cannot detect the exact reason for the problem. In this case
you may have to resort to powering off the printer or even removing
the power cable from the machine, in order to recover from the
problem. See Clearing a Media Jam.
Open window and check
proper installation of setup
printheads
During system start-up, which occurs when you first install the
printer, you need to install the setup printheads. These special
printheads cannot be used for printing, but must be used when the
printer has been powered off. The printer has detected that the
setup printheads have not been installed correctly.
Open the window and follow subsequent instructions to reinstall or
relocate the setup printheads. Contact HP for advice if the setup
printheads are missing or cannot be installed correctly.
Option not available now You have selected an option in the menu that is not available at the
moment. (The printer may be busy, out of ink, out of paper, etc.)
Out of paper The printer ran out of paper while printing the calibration pattern.
Load a sheet or roll that is at least 65 cm (25 inches) long and 50 cm
(20 inches) wide.
Front Panel Messages (continued)
Message Explanation and Action
For more Messages, click on the Next Page button
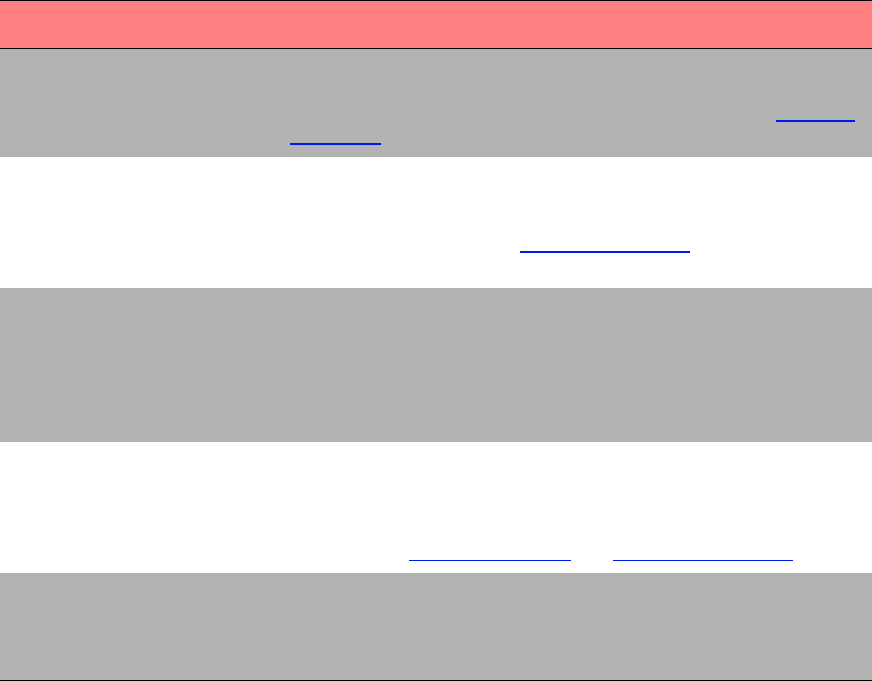
Paper advance calibration is
recommended.
Press ENTER to calibrate
You are recommended to perform the Advance calibration routine,
to ensure the optimum print quality.
Press the Enter key to create the calibration pattern. See Advance
Calibration.
Paper advance calibration is
recommended. Load paper
and select Paper advance
calibration.
Press ENTER to finish
You are recommended to perform the Advance calibration routine,
to ensure the optimum print quality.
Load a sheet or roll of paper and then select Advance calibration
from the Paper menu. See Advance Calibration.
Paper loaded with too much
skew
Press ENTER to retry
Press CANCEL to abort
During the loading of paper, the printer has detected that the paper
is skewed too much, that is, it has not been loaded straight enough.
(‘Skew’ is the angle between the actual paper edge and the correct
line.)
Either: Press the Enter key to restart the loading procedure;
Or: Press the Cancel key to cancel paper loading.
Paper mispositioned The paper is not properly positioned in the printer. Either it is out of
the load line margins or it has moved too much from its previous
position.
Reload the paper following the normal procedure, to solve this
problem. See Loading Roll Media and Loading Sheet Media.
Paper not found
Press ENTER to retry
Press CANCEL to abort
During the loading of paper, the printer has detected that no paper
has been loaded.
Either: Press the Enter key to restart the loading procedure;
Or: Press the Cancel key to cancel paper loading.
Front Panel Messages (continued)
Message Explanation and Action
For more Messages, click on the Next Page button
Paper not present.
Load paper to print calibration
pattern
The paper axis calibration routine has been triggered with out
having paper loaded.
Load paper; see Advance Calibration for details of the routine.
Paper too big to scan the
pattern after printing it
During the paper loading for the Calibration routine, the printer has
detected that the it will not be able to load the later when it will be
needed for scanning. The minimum size required for the print is
65 cm (25 inches) long and 50 cm (20 inches) wide.
Load a smaller sheet that satisfies this minimum requirement.
Paper too big
Press ENTER to retry
Press CANCEL to abort
While loading paper into the printer (roll or sheet), the printer has
found that it is either too wide or too long (only for sheet) to be
loaded properly.
Press the Enter key to load smaller paper, or the Cancel key to stop
the load.
Paper too small for a
diagnostic print
The Troubleshooting utility has found that the single sheet loaded in
the printer is too small for a Diagnostic Print.
Load a roll of paper, or a sheet that is A3-size or larger.
Paper too small
to align printheads
Load bigger size to
align
Press ENTER to continue
The paper loaded is not big enough to contain the alignment pattern.
Unload the paper (select Unload roll or Unload sheet from the
Paper menu) and then load paper that is large enough—at least A4/
Letter-size in landscape mode for Standard alignment, or A3/B size
in landscape mode for Special alignment.
Front Panel Messages (continued)
Message Explanation and Action
For more Messages, click on the Next Page button

Paper too small to print the
pattern
The paper loaded is not big enough to contain the paper axis
calibration pattern.
Load a roll or sheet that is at least 65 cm (25 inches) long and 50 cm
(20 inches) wide.
Paper too small
Press ENTER to retry
Press CANCEL to abort
While loading paper into the printer (roll or sheet), the printer has
found that it is either too narrow or too short (only for sheet) to be
loaded properly.
Press the Enter key to load larger paper, or the Cancel key to stop
the load process.
Paper type not valid
to align printheads
Change paper type to
align
Press ENTER to continue
You have requested the printer to align paper but it has detected
that the paper loaded is not the right type to use to align the
printheads. The paper loaded is not big enough to contain the
alignment pattern.
Unload the paper (select Unload roll or Unload sheet from the
Paper menu) and then load paper that is the right type for the
alignment. See Printhead Alignment.
Pattern not found
Reload it again, please
The printer is trying to perform a scan of the calibration pattern, but
the pattern was not found.
Reload the sheet that was printed by the Create pattern part of the
calibration routine.
Front Panel Messages (continued)
Message Explanation and Action
For more Messages, click on the Next Page button
Possibly a paper jam
1. Open window
2. Switch power off
3. Clear paper path
4. Switch power on
5. Align printheads
There may be paper jammed in the printer. (The printer has
detected that a motor is blocked and the likely cause is a paper jam;
however, it may be due to some other cause.)
Follow these steps to check the paper path, as described in Clearing
a Media Jam. When the jammed paper has been cleared, you are
strongly recommended to align the printheads, as they are quite
likely to have become misaligned as a result of the paper jam.
Printhead replacement not
available now. Cancel print
jobs before replacement
You have requested the printer to replace one or more printheads,
but the printer is busy printing a job and cannot honor the request
now.
Either: press the Cancel key to cancel the job that is currently
printing, and then again select Replace Printheads (from the Ink
system menu).
Or: wait until the job has finished printing (and there are no more
jobs in the print queue), and then again select Replace Printheads
(from the Ink system menu).
Printhead warning
Poor print quality
A problem has occurred with one or more printheads. The
printheads are still functional. The problem was detected either
during printhead alignment or during troubleshooting. If you have
completed the routine, the system was unable to clean the
printheads fully.
You should use the Troubleshooting Procedure to correct any image
quality problems that may be apparent; alternatively, you should
replace the printheads (see Printhead Replacement).
Front Panel Messages (continued)
Message Explanation and Action
For more Messages, click on the Next Page button
Printheads not aligned
Paper type not valid
to align printheads
Press ENTER to continue
You have replaced one or more printheads but the printer has
detected that you do not have the right type of paper loaded for the
alignment process.
Press the Enter key to load the correct type of paper, or the Cancel
key to stop the load process.
Printheads not aligned
Paper too small
to align printheads
Press ENTER to continue
You have replaced one or more printheads but the printer has
detected that you do not have wide enough paper loaded for the
alignment process.
Press the Enter key to load larger paper, or the Cancel key to stop
the load process.
PRINTHEADS not functional
Replace printheads
Cancel print
The printer is attempting to print a job, but finds that there is a
problem with the printheads. You may either replace the printheads
at this stage or cancel the print.
Select the required option and press the Enter key. If you decide to
replace them, you will be told which ones are failing or missing.
Printheads require alignment.
Load paper and select Align
printheads.
Press ENTER to finish
The printer has detected that the printheads need to be aligned.
Press the Enter key to continue. Load a sheet or roll of paper, and
select Align printheads from the Ink menu. See Printhead
Alignment.
Printheads require alignment.
Press ENTER to align
The printer has detected that the printheads need to be aligned.
Press the Enter key to align them. See Printhead Alignment.
Front Panel Messages (continued)
Message Explanation and Action
For more Messages, click on the Next Page button
Problem found during
calibration
A general problem was found during the Advance Calibration
routine.
Respond to any other messages that appear on the front panel,
indicating ink or paper problems, and then retry the Advance
calibration routine.
Problems detected in INK
CARTRIDGES.
Continue process and replace
them.
Press ENTER to continue
There is an error with the ink cartridges during the preparation of the
ink system.
Press the Enter key and then follow the instructions to replace the
faulty ink cartridges.
Reload paper There is an error in the paper, as shown in another message.
Use the normal procedure to reload the paper.
Replace empty cartridges
before replacing printheads
You have requested the printer to permit the replacement of
printheads, but the printer has detected that one or more cartridges
are empty. The empty cartridges must be replaced before the
printheads are replaced.
Press the Enter key and follow the procedure for replacing empty
cartridges, described in Ink Cartridge Replacement.
Right edge of roll too far from
load line
Press ENTER to retry
Press CANCEL to abort
The paper is out of the load line margins—too far from the line
where it should be loaded.
Either: Press the Enter key to restart the loading procedure;
Or: Press the Cancel key to cancel paper loading.
Front Panel Messages (continued)
Message Explanation and Action
For more Messages, click on the Next Page button

Right edge of sheet too far
from load line
Press ENTER to retry
Press CANCEL to abort
During the loading of a sheet of paper, the printer has detected that
the paper is too far to the left; it should be aligned close to the blue
line painted on the right side of the platen.
Either: Press the Enter key to restart the loading procedure;
Or: Press the Cancel key to cancel paper loading.
Roll edge not found
Please check roll edges are
non-clear
Press ENTER to retry
Press CANCEL to abort
During the loading of a roll, the printer cannot detect the side edge
of the paper. A possible cause is that the media is transparent
(clear); only non-clear media are supported.
Either: Press the Enter key to restart the loading procedure;
Or: Press the Cancel key to cancel paper loading.
Roll right edge too far from
load line
Press ENTER to retry
Press CANCEL to abort
During the loading of a roll of paper, the printer has detected that the
paper is too far to the left; it should be aligned with the blue line
painted on the right side of the platen.
Either: Press the Enter key to restart the loading procedure;
Or: Press the Cancel key to cancel paper loading.
Sheet edge not found
Please check sheet edges are
non-clear
Press ENTER to retry
Press CANCEL to abort
During the loading of a sheet, the printer cannot detect the side
edge of the paper. A possible cause is that the media is transparent
(clear); only non-clear media are supported.
Either: Press the Enter key to restart the loading procedure;
Or: Press the Cancel key to cancel paper loading.
Sheet not loaded
Load sheet with printed
pattern
The printer is trying to perform a scan of the calibration pattern, but
no sheet was found.
Load the sheet that was printed by the Create pattern part of the
calibration routine.
Front Panel Messages (continued)
Message Explanation and Action
For more Messages, click on the Next Page button

Sheet too long
Please check it is not a roll
Press ENTER to retry
Press CANCEL to abort
You have requested the printer to load a sheet of paper, but the
sheet appears to be too long.
Check that the paper is not a roll.
Either: Press the Enter key to try to load the sheet again;
Or: Press the Cancel key to stop the process. If the paper is on a
roll, follow the instructions in Loading Roll Media.
Troubleshooting finished
Resume normal printing
If problem persists select
Troubleshooting again
Press ENTER to continue
The printer has finished the Troubleshooting routine and will not at
this stage perform further cleaning on the printheads because this
could damage the other ones. However, according to the evaluation
you have given, the printheads require cleaning because there are
defects in the Diagnostic Print.
Press the Enter key. Then resume your normal printing activities. If
the problem recurs, try using the Troubleshooting routine again, or
select Replace Printheads from the front panel (in the Ink System
menu) to replace the printheads that are faulty.
Troubleshooting requires
paper for a diagnostic print.
The Troubleshooting utility has found that there is no paper loaded
in the printer.
Load a roll of paper.
Unable to initialize ink system.
Call HP representative.
The system cannot successfully complete the startup.
Call HP for service.
Unable to prepare ink system.
Open window to check
SETUP printheads
During ink system start-up, the purge of the ink system has failed
and the system is asking you if the preparation has completed.
Check the setup printheads and then follow the instructions in the
front panel and respond to further questions.
Front Panel Messages (continued)
Message Explanation and Action
For more Messages, click on the Next Page button

Unknown ink cartridges.
Press ENTER to continue.
The ink cartridges are not recognized by the printer as ink cartridges
approved by HP, and there is at least one that is new.
Press the Enter key.
Unknown paper format
Reload paper
The format (roll or sheet) of the paper loaded in the printer is
unknown.
Reload the paper following the normal procedure, to solve this
problem. See Loading Roll Media or Loading Sheet Media.
Unknown paper type
Select paper type
The type of the paper loaded in the printer is unknown to the printer.
Select a known paper type from the printer menu.
Unknown printheads.
Press ENTER to continue.
The printheads are not recognized by the printer as printheads
approved by HP, though the printer can still use them.
Press the Enter key.
Front Panel Messages (continued)
Message Explanation and Action
For more Messages, click on the Next Page button

Front Panel Messages (continued)
Message Explanation and Action
Warning!
Machine calibrations need to
be performed. Refer to guide
for instructions.
The color calibrations for the paper that is loaded have been lost.
Follow the procedure described in Advance Calibration.
Warning: color calibration not
done on this paper type
The printer has detected that the color calibrations have not been
performed on this paper type, and the system is configured to do
them.
To calibrate color for the current paper type, select Ink menu →
Color calibration → Calibrate paper.
Warning: printheads not
aligned
The printer has detected that the printheads have not been aligned
since the last replacement.
You should align the printheads by selecting Align printheads from
the Ink menu.

Printer Options
The printer has many options that you can use to ensure that the image you print has the look and appearance
you want. You can select printer settings either from the front panel or from the driver you have for the printer. In
most cases the driver settings override the front panel settings.
The Print Options Tab contains these topics:
•Page Format deals with the formatting of the image and how to use the settings to obtain the formatting that
you want. It also explains how to control the orientation of the image on the media.
•Setting Page Size in the Front Panel explains how to set the page size from the front panel.
•Image Appearance describes how to control the overall appearance of your prints.
•Print Management describes how to efficiently manage your printing.
•Printer Configuration details how to set specific configuration parameters of your printer.

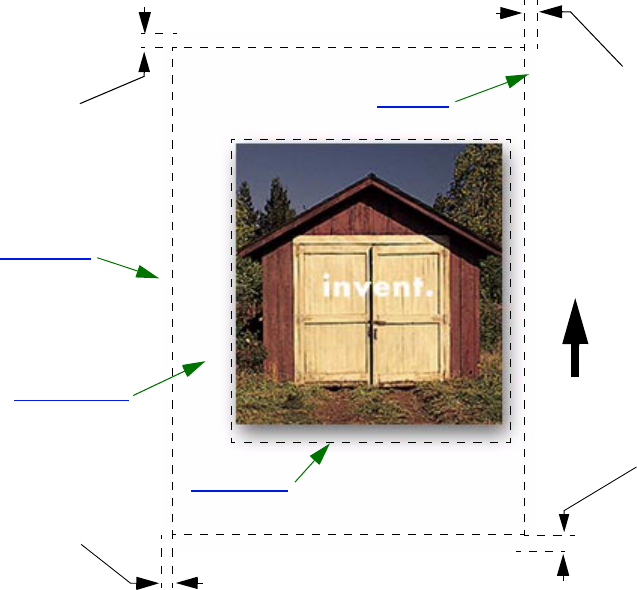

Page Size
Page size can be specified from the front panel or in the software, where it may be called “Page Size”, “Media
Size”, “Paper Size”, etc., and where the options include, for example, ISO A3, ANSI Letter, Custom. If your
software does not define the page size in the print file, the front-panel setting is used. Otherwise, the software
setting overrides the front-panel setting.
Margins
The margins are set to ensure the maximum printable area on your paper. The two side margins are 5 mm. The
margin settings for the leading and trailing edges are 17 mm.
However, if you are using roll paper and you select small margins, the margins are 5 mm on all four sides.
Printing Area
The printing area is the page size minus the margins. For a table showing the printing areas for standard paper
sizes, see Printable Area.
Inked Area
Inked area is the smallest rectangle that contains the entire image.

Rotating an Image
These topics detail all aspects of job rotation:
•Job Rotation (HP-GL/2)
•Page Size and the Rotation
•What is Rotated?
Job Rotation (HP-GL/2)
If the software in the driver does not specify the rotation setting, it can be specified in the front panel
(Paper > Page Format > Rotate).
Page Size and the Rotation
Note that when you rotate a job the page size is enlarged to avoid clipping, because the trailing and leading
margins are not the same size as the side margins.
What is Rotated?
With roll paper, both the image and the page orientation are rotated.
Notice that the narrow margins are always at the left and right sides, regardless of the orientation. The page size
is adjusted to maintain the printing area, preventing clipping.
With sheet paper, the image is rotated, but the page orientation specified in your software is retained. (You should
always load sheet paper in the orientation you have specified in the software.)
0º90º
A
A
0º90º
A
A
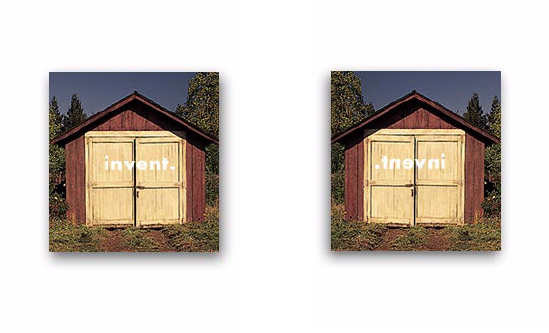
Printing a Mirror Image
If you are using clear imaging paper, sometimes called ‘backlit’, you may want to print a mirror image of your print,
so that when the paper is lit from behind it is in the correct orientation. This can be done from the front panel,
without changing the image in your software.
Mirror Off Mirror On

Setting Page Size in the Front Panel
•Adjusting the Page Size in the Front Panel
Details how and why you would adjust the Page Size from the Front Panel.
•Page Size
Describes the various methods of controlling the page size.
•Page Size and Clipped Images
Explains what happens if you choose a larger page size than the current media loaded in your printer.

Adjusting the Page Size in the Front Panel
You do not normally need to adjust the page size through the front panel, because the page size you have
selected in your HP driver overrides the page size selected in the printer. However, some of the circumstances in
which you may want to change the default setting are:
• When you want to save paper by printing only the inked area of your print, plus the margins. In this case set
Page Format > Size > Inked area.
Depending on the driver you are using, you may not need to change the page size in the front panel. The default
Size setting (Software) in the Page Format menu causes the printer to look for the page size information in the print
file: if it is there, the printer uses it.
However, some of the circumstances in which you may want to change the default setting are:
• If you want to print the inked area only, but the driver you are using does not specify “Inked Area”.
In this case, set the Size setting in the Page Format menu to Inked area.
If you can select Inked area from your driver, any selection you have made in the front-panel menu will be
overridden by the settings in the driver.
• When the prints you are creating need to be of a specific standard (for example, ISO or ANSI), but the actual
size within that standard is not important. For example, your page size may need to conform to a standard
ISO page size, but it does not matter whether the final page size is ISO A4 or ISO A3.
In this case, set Page Format > Size to ISO > Best... or ANSI > Best... etc. The printer uses the smallest standard
size into which the inked area will fit.
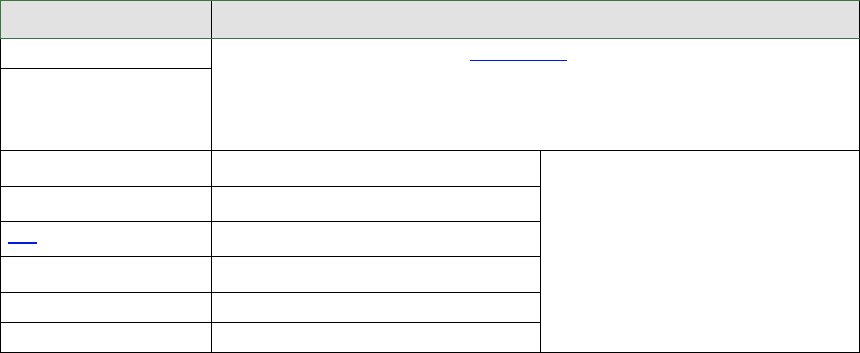
Page Size
The Page Size option lets you select the page size of your print. The options are described in the following table. If
you need to adjust the page size from the front panel, do so before sending the file from your computer. The
printer determines the size of a print at the time it is received from your application.
NOTE: Settings will be overridden by your driver or application.
Page format Available Sizes
Inked Area The printed page size is the Inked Area plus margins.
The printer looks to the print you have sent for a page size instruction. If
it is present the printer uses this. If not, the printed page size is the
inked area plus margins.
Automatic
ISO Besta ISO A, ISO A0/A1/A2/A3/A4
a. The printer chooses the smallest page size from the corresponding discrete options
that will hold the inked area of the print. For example, if Best ISO A is selected and the
inked area of the print is between A3 and A4,the printer chooses A3 as the page size.
The printed page size is exactly
the size you specify. The largest
discrete page size you can specify
is E/A0
ANSI Besta ANSI, ANSI E/D/C/B/A
JIS Besta JIS B, JIS B1/B2/B3/B4
ARCH Besta ARCH, ARCH E1/E/D/C/B/A
Oversize Over A1/A2
Extra 100 cm x 140 cm, 42 in x 59 in
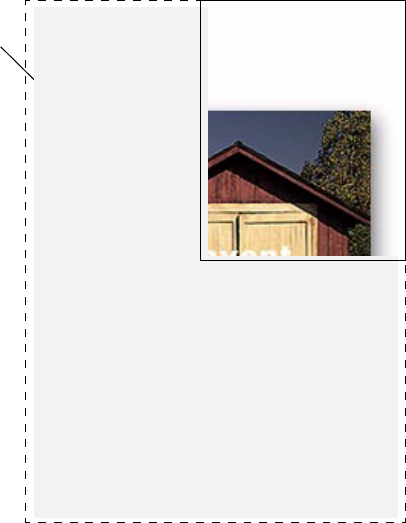
Page Size and Clipped Images
If you specify in your software a page size that is larger than the paper size loaded in the printer, the printer will
still print what it can, but may clip your image.
A2 paper in printer
Clipped
Area
A1 page size in software or front panel

Image Appearance
These topics explain how you can control the overall appearance of your prints.
•Front Panel Image Options
explains how to change the HP-GL/2 color palettes.
•Printing Images in Grayscale
describes how to print color images in grayscale.
•Print Speeds and Print Quality
lists typical printing times by output quality.
•Print Quality
describes the different print modes that are available with your printer.
•Advanced Options
describes the various optimization and quality enhancement methods available.

Front Panel Image Options
These topics deal with the ways you can control the overall appearance of your prints from the front panel in
terms of:
•Pen Widths and Colors in the Internal Palettes
•Changing the Treatment of Overlapping Lines (Merge)
Some front-panel selections affect the next file you send from your computer, not pages already in the printer’s
queue. If this is the case, it is stated in the relevant topic.
Some of the controls are available using the front-panel menus (for example) pen width, pen color, overlapping
lines). Print mode options are controlled from the front-panel.
Why Use the Front Panel?
By default, the printer looks to your software to provide information on all the above attributes. However, your
driver or application may not provide these controls or you may want to experiment with various effects, or try a
temporary change, without the need to change your images or your driver settings.
Some of these settings do not affect the output generated when printing from most of the applications under
Windows when using a HP-GL/2 driver.

Pen Widths and Colors in the Internal Palettes
The “pens” discussed throughout these topics are the conceptual pens in a software palette, rather than the
printer’s physical printheads.
The printer has three pen palettes:
•Factory
• Palette A
• Palette B.
The factory palette cannot be changed. You can, however, change the line width and color settings for each pen
in the remaining two palettes (palette A and palette B). Initially, all three palettes are identical. Each palette has 16
pens which can include pens of different widths and any combination of the printer’s predefined 256 colors.
Related Information
•To Select a P a l ette
•Change the Palette Settings
•How to Define Palette A

To Select a Palette
To select a palette through the front-panel menu, go to the Define Palette selection under HP-GL/2 Settings and
choose the palette you want. See Set-up Menu.
The following table describes the palette choices.
Palette Comments
Software The printer looks to your software for pen settings and ignores all three internal palettes.
Palette A The printer assigns the attributes defined in Palette A to the pens defined in your software
as 0 through 15.
Palette B The printer assigns the attributes defined in Palette B to the pens defined in your software
as 0 through 15.
Factory The printer assigns the attributes defined in the Factory Palette to the pens defined in your
software as 0 through 15.

Change the Palette Settings
You cannot change the Factory palette, but you can define Palettes A and B to be whatever you choose. The
defaults are Palette, width:
How to Define Palette A
Item Available Options Defaults
Palettes Factory, A, B. Factory
Pens 0 through 15.
Widths (mm) 0.13, 0.18, 0.25, 0.35, 0.50, 0.65, 0.70, 0.80, 0.90, 1.00,
1.40, 2.00, 3.00, 5.00, 8.00, 12.00.
Note that 0.13 mm is a one-pixel line width at 300 dpi
and three-pixels line width at 600 dpi.
0.13 mm
Colors 0 through 255. As specified on the Palette
Print.

How to Define Palette A
The following steps explain how to define Palette A.
Repeat this procedure to define each of the other pens.
NOTE: The palette you have just defined will take effect only when you select it to be the current
palette, as explained in To Select a Palette.
Instructions Select (using the keys) Then Press:
1.
Select Palette A
Set-up menu Enter
2. HP-GL/2 Enter
3. Define palette Enter
4. Palette A Enter
5. Select pen to change (in this example 3). Pen 3 Enter
6. The current width assigned to this pen is
displayed, for example Width=0.13mm. Width = 0.13mm Enter
7. Scroll to the width you want. 0.35mm Enter > Back
8. Scroll to Color. The current color
assigned to the pen is displayed (in this
example 4)
Color = 4 Enter
9. Scroll to the color you want. Color = 110 Enter > Back
10. If both width and color are correct (for
Pen 3), press Back four times Pen 3 To p

Changing the Treatment of Overlapping Lines (Merge)
The Merge setting controls the overlapping lines in an image. There are two settings, Off and On. The following
illustration shows the effect of each setting.
You can set the merge setting from your software in some applications. Settings in your software override the
front-panel settings.
Merge onMerge off (Default)
A subsequent line hides a
previous line where they
overlap.
Overlapping lines and area
fills are merged.
Printing Images in Grayscale
There are times when you may want to print a color image in grayscale because it is faster. Examples of this are:
• You want a draft where color is not important, for example to check that the image is not going to be clipped.
• You want a version for photocopying in black and white.
When you choose the Ink menu Color settings > Grayscale option, the printer renders colors as Grayscale rather.
If you only want to use black ink to print in grayscale, you should select the Ink menu Color settings >True black
option.
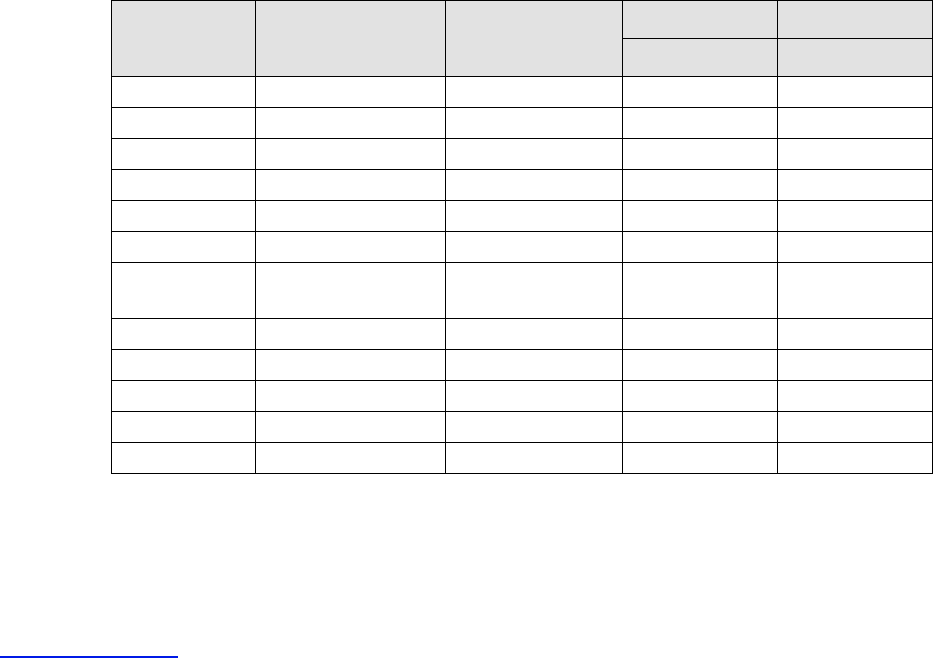
Print Speeds and Print Quality
The following table lists some Typical Printing Times (line drawings @ 20-25ºC and 30-60% relative humidity).
Typical Printing Times
Paper Color/Grayscale Quality
ANSI-D size ANSI-E size
Time (in secs) Time (in secs)
Bright White Color Best 235 440
Normal 120 225
Draft 45 85
Grayscale Best 135 250
Normal 80 150
Draft 45 80
Coated
Paper
Color Best 490 980
Normal 120 225
Draft 85 160
Grayscale Best 325 625
Normal 135 250
Draft 45 80
More Printing Times
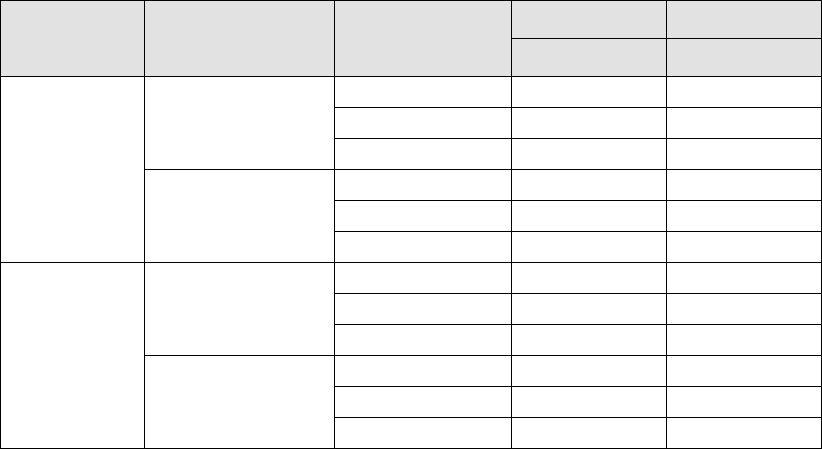
Heavy
Coated
Paper
Color Best 490 980
Normal 120 225
Draft 85 160
Grayscale Best 435 870
Normal 135 250
Draft 45 80
Glossy Paper Color Best 630 1200
Normal 435 830
Draft 325 620
Grayscale Best 630 1200
Normal 435 830
Draft 325 620
Typical Printing Times (continued)
Paper Color/Grayscale Quality
ANSI-D size ANSI-E size
Time (in secs) Time (in secs)

Print Quality
You can set the overall print quality from the front panel (Set-Up > Print Quality).
In general choose:
•Fast for maximum productivity. Ideal for checking prints, when print quality is not the most important.
•Normal to get a good combination of print quality and productivity. Ideal for line drawings with good print
quality and at speed.
•Best to get the high image quality. You can increase the resolution of the Best setting with the Best Quality
Settings.
You can print images in different settings to see which gives the best combination of throughput and quality for
your application.
See Print Resolution for information on what resolution is used with each print quality setting.

Improving Line Quality and Graphics Details
The Set-up menu Optimize for option allows you the select the correct mode for the type of job you are printing.
Two modes are provided: Line drawings/text and Images.
Selecting the Line drawings/text option smooths the fine graduations along the angles and curves of the printed
image to refine the overall print quality. This enhancement produces:
• Crisper lines.
• Finer detail.
• Line drawings with a ‘sharp’ appearance.
The Line drawings/text option only affects prints that have color content.
Selecting Line drawings/text (the default setting) ensures you will always get the best quality color prints, except
when printing the following files:
• Mixed lines and scanned color images.
• Mixed lines and color photographs.
For these files it is recommended that you select Optimize for > Images.

Best Quality Settings
If you have selected the Best option as the Print Quality setting for you print session but require an even higher
resolution for your print job, you will need to change the Best quality setting.
The Best Print quality option provides 600×600 dpi resolution in normal mode and 1200×600 dpi in maximum
detail mode.
NOTE: Using the maximum detail mode will improve resolution but will reduce printing speed and
increase memory requirements.

Print Management
These topics describe the best methods of managing the work that the printer is doing.
•Cancelling a Page that is Printing
Shows you how to cancel a page that is currently being printed.
•Cancelling the Drying Time
Shows you how release a page from the printer before the drying time has finished.
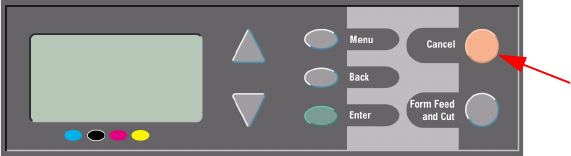
Cancelling a Page that is Printing
Use the following procedure to cancel a page that is currently being printed.
1. Press the Cancel key on the front panel.
The printer advances the paper as though the print were finished. A multi-page job or a big file may take
longer to stop printing than other files.
Cancel Key
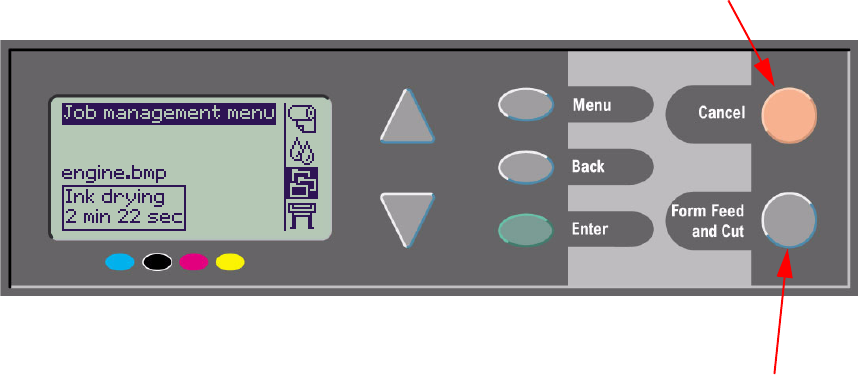
Cancelling the Drying Time
CAUTION: Use caution when performing this procedure as an image which has had insufficient time to dry
could get damaged.
Use the following procedure to cancel the drying time for a job that is waiting for the end of drying time.
1. Press Cancel or Form Feed & Cut on the front panel.
The printer will release the printer and it will fall into the paper bin.
Cancel Key
Form Feed & Cut Key

Printer Information
Your HP Designjet 500 Plus printer provides an information display on the front panel that shows the current
configuration of the system. You can also print out this information directly on your printer.
Select Set-up > Printer information to view the information.
The printer information screen shows the following information about your printer:
• Model Number • Scan Axis Usage
• Serial Number • Paper Axis Usage
• Service ID • Service Station Usage
• Firmware Rev. • Spittoon Usage
• Accessory Rev. • Pinch Lift Usage
• Paper Used • Cutter usage
• Ink used (C, M, Y, K) • Ink Usage

Menu and Message Language
The following languages can be used for all menus and messages shown on the front panel of your HP Designjet
500 Plus printer:
• English
•German
• Spanish
• Catalan
•French
•Italian
• Japanese
• Portuguese
• Korean
• Simplified Chinese
• Traditional Chinese
To change the language:
1. Select the Front Panel > Language option from the Set-up menu.
2. To scroll to the language you require and press Enter.
Alert Buzzer
Your HP Designjet 500 Plus printer is equipped with an alert buzzer that is used to warn you when:
• A task has completed.
• An error has been detected.
• You change a parameter from the front panel.
To enable or disable the buzzer:
1. Select the Front Panel > Buzzer option from the Set-up menu.
2. Highlight Buzzer = On or Buzzer = Off (whichever is displayed) and press Enter.
3. Scroll to the option you require, On or Off, and press Enter.
Screen Contrast
You can adjust the screen contrast of the front panel to best suit the ambient lighting conditions at your location.
The contrast can be varied from 0% to 100% in 5% increments. The default setting is 50% and is suitable for most
situations.
To adjust the screen contrast:
1. Select the Front Panel > Contrast option from the Set-up menu.
NOTE: Any value below 20% shows a blank screen and any value over 80% shows a black screen.
2. Scroll to the required value and press Enter.
Altitude Setting
Your HP Designjet 500 Plus printer contains a vacuum pump which is used to hold the media onto the platen.
The altitude of your location effects the efficiency of this pump so you need to specify the altitude to ensure the
pump operates correctly.
To set the altitude:
1. Select the Altitude option from the Set-up menu.
2. Scroll to the required value (0 - 1000m, 1000m to 2000m, or > 2000m) and press Enter.
The following table shows the corresponding altitude values in feet.
Meters Feet
0 -1000 0 - 3300
1000 - 2000 3300 - 6600
> 2000 >6600

Graphics Language and Networks
For System Administrators
If you are using the printer with a network spooler, consider having your system administrator modify the spooler
to insert automatically the PJL language-switching commands at the beginning and end of each file. This allows
the printer to switch automatically into the correct graphics language for your current print and returns the printer
to the front-panel graphics language setting for subsequent prints.
For information on ordering PJL reference information, see Ordering Accessories.
Setting up the I/O Card
Network
With a network interface (such as the HP JetDirect Print Server), refer to your network interface documentation for
advice on any front-panel configuration. The front-panel menu is I/O Setup > Card Set-up.
To Change the I/O Time-out Setting
Some software applications do not write a file terminator at the end of a file. In this case, the printer does not know
when the file is complete and will wait for more data until the end of the “I/O Time-out” period. By default, this
period is 30 minutes. You can change the time-out setting in the front-panel menu
(Set-Up > I/O setup > I/O Timeout) to as little as 30 seconds.

Controlling the Cutter
With roll media loaded, when any print job you have send to the printer completes, the roll is automatically cut and
the print job falls into the media bin. There may be a delay before the roll is cut due to the drying time you have
programmed or the printer has automatically selected.
In some situations you may not wish to cut the roll after each print job. Use the following procedure to control the
cutter. The front panel menu selections are:
Select (using the keys) Then Press:
1. Paper menu Enter
2. Cutter Enter
3. ON or OFF Enter

Upgrading Your Printer
System Software
“System Software” is the name given to a type of software which runs the functions in your printer.
System Software downloading
From time to time there will be system software upgrades available from Hewlett-Packard. System software
upgrades increase your printers functionality and enhances the features that your printer already possesses.
System software can be downloaded from the Internet.
For the latest upgrades, go to http//www.hp.com/go/designjet. Follow the on-screen directions.

Color Settings
Your printer can emulate the color behavior of offset printing presses, allowing you to use your printer for color
proofing. To get accurate colors for your proof, select the color emulation mode that matches your offset printing
standards from the Ink menu Color settings option. The selections are:
Color/monochrome
Refer to Printing Images in Grayscale for further details
• Color—the printer prints in color
• Grayscale—the printer prints the color image in grey shades.
• True black—the printer prints the color image in grey shades using black ink only.
RGB
• Native/Device RGB—No ink emulation
• sRGB—Standard RGB
Rendering Intent
• Perceptual
• Saturation
• Colorimetric
Logs
Your HP Designjet 500 Plus printer keeps a log for the printheads and an error log. These logs are normally used
by service engineers.
Printhead Log
The printhead log contains a list of the last five printheads of each color along with information about the usage of
the printhead.
Error Log
Lists the last errors detected the printer has detected along with the date the error occurred and a unique error
code for the type of error detected.

Other
The Other tab provides miscellaneous procedures and information that may be required to ensure your printer
remains in a fully operational condition at all times.
The Other tab contains these sections:
•Care of the Printer
•Installing Expansion Cards
•Specifications
•Ordering Accessories
•Glossary

Cleaning the Printer
WARNING: To avoid an electric shock, make sure that the printer is switched OFF and disconnected from
the mains supply before you clean it. Do not let water get inside the printer.
CAUTION: Do not use abrasive cleaners on the printer.
NOTE: Any maintenance or repairs beyond those described in this chapter should be done by a
qualified service technician.
Cleaning the Printer Exterior
Clean the outside of the printer as required with a damp sponge or a soft cloth and a mild household cleaner such
as non-abrasive liquid soap.

Storing and Moving Your Printer
If you need to move your printer or store it for an extended period of time, you need to prepare your printer
properly to avoid possible damage to the printer. To prepare your printer, follow the instructions given below:
CAUTION: It is important that you do not remove the Ink Cartridges and Printheads before moving or
storing the printer.
1. Switch the power off at the On/Off power switch on the front of the printer.
2. Disconnect any cables connected to the printer; parallel interface, LAN connection.
3. Repack the printer in its original packaging. Refer to Assembly/Repacking Instructions available on the HP
Web site (www.hp.com/go/designjet) for details.
4. If you have to move your printer you will need the original packaging. If necessary you can order a kit of the
packaging materials. Contact HP support and they will supply it to you. If necessary they will repackage the
printer for you.

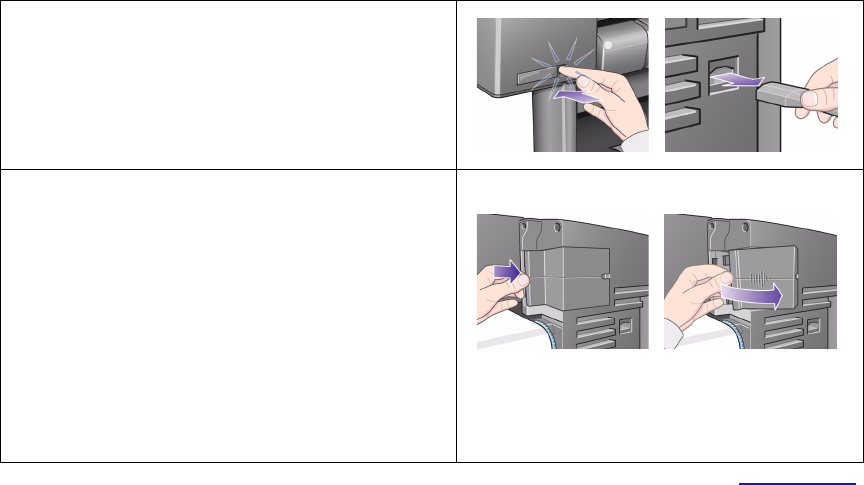
Network Card Installation
HP JetDirect Network Card Installation
1. Before installing a card, switch off the
printer and unplug it from the mains elec-
tricity supply.
2. Carefully remove the plastic cover from the
left-hand back of the printer by unclipping it.
This cover gives access to the two slots for
an Accessory card and a LAN card.
• Press in the thumb-tab on the side fur-
thest from the edge that has the cable-
hole.
• Ease the cover out in the direction of
the embossed arrow, pivoting it by the
hinge clips on the side that has the
edge cable-hole.
Continued …
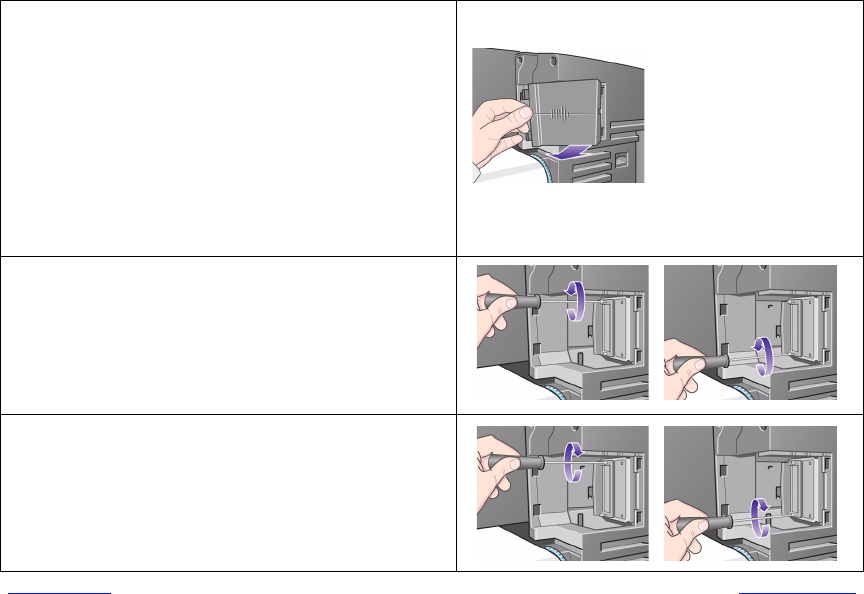
3. Remove the cover completely Inside the
compartment there are two slots for a LAN
card or an Accessory card.
You can use either slot for either card, but
we recommend putting a LAN card on the
left (nearer to the front of the printer) and an
Accessory card on the right. In this way the
cable from the LAN card can easily pass
through the slot in the door.
4. To insert a LAN card (or an Accessory
card), remove the metal cover from the
appropriate slot by unscrewing its two
screws. You can use a screwdriver or do it
manually.
5. When you have inserted the card, screw it
into place, using its two screws (at the top
and bottom of the card). Again, this can be
done with a screwdriver or manually.
Previous … Continued …
HP JetDirect Network Card Installation (Continued)
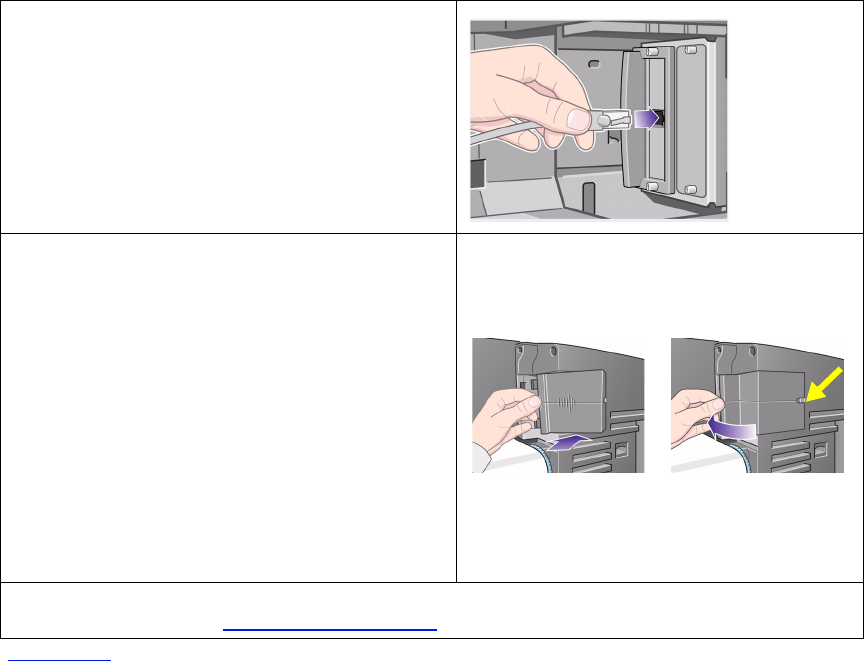
6. Insert the LAN cable into the LAN card. It is
simply pushed into place and clicks when
locked.
7. Carefully replace the plastic cover by
clipping it back into place:
• Put the two hinge clips on the side that
has the edge cable-hole into their slots.
• Swivel the cover in the direction oppo-
site to the embossed arrow and clip the
other two tabs on the opposite side into
their slots. Ensure that the LAN cable
passes correctly through the edge
cable-hole (shown by the yellow arrow).
• Take care to carefully route the LAN
cable so it does not interfere with the
spindle or roll.
8. Once you have completed the physical installation of the card you will have to configure
it for you LAN, see Setting up the I/O Card.
Previous …
HP JetDirect Network Card Installation (Continued)

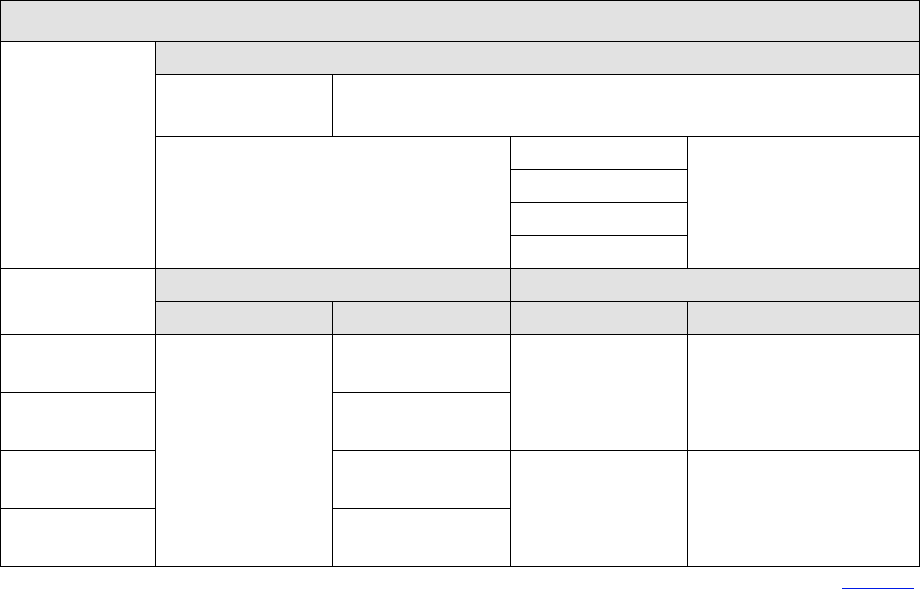
Functional Specifications
HP Designjet 500 Plus Functional Specifications
Functional Specifications
HP Ink
Supplies
Supplies
Four colors: cyan, magenta, yellow and black.
Printheads: 600 dpi, 36 kHz (Cyan, Magenta, Yellow).
36 kHz (Black).
Ink Cartridges contents:
Cyan
69 ml
Magenta
Yellow
Black
Paper sizes Width (carriage axis) Length (paper axis)
Minimum Maximum Minimum Maximum
Roll - D/A1 size
printer
140 mm
5.5 inches
625 mm
25 inches 1000 mm
40 inches
100 mm
4 inches
roll external
diameter
Roll - A0+/
E+ size printer
1071.8 mm
42.2 inches
Sheet -D/
A1 size printer
625 mm
25 inches 140 mm
5.5 inches
1897 mm
74.7 inches
Sheet -A0+/
E+ size printer
1071.8 mm
42.2 inches
More …
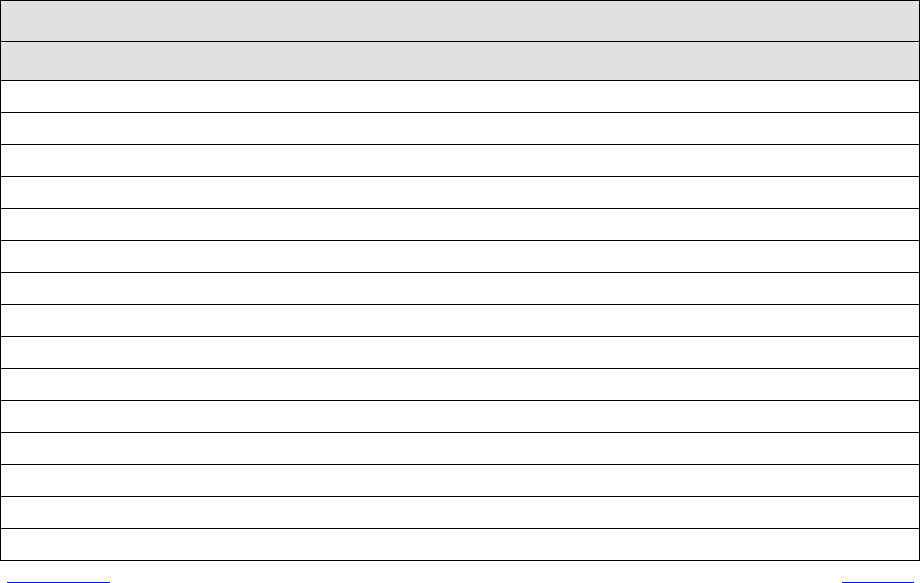
HP Supported Mediaa
HP Bright White Inkjet Paper (Bond)
HP Vellum
HP Natural Tracing Paper
HP Coated Paper
HP Heavyweight Coated Paper
HP Matte film
HP High-Gloss Photo Paper
HP Semi-Gloss Photo Paper
HP Paper-Based Semi-Gloss
HP Clear film
HP Translucent bond
HP Studio Canvas
HP Satin Poster Paper
HP Banners with Tyvek®
HP Colorfast Adhesive Vinyl
Previous … More …
HP Designjet 500 Plus Functional Specifications (Continued)
Functional Specifications
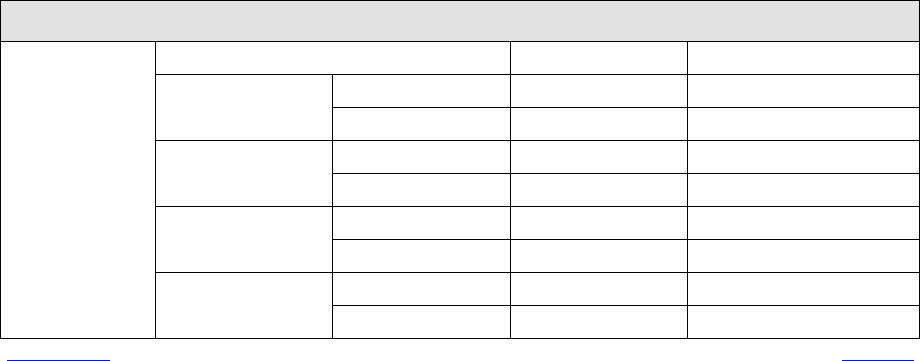
Resolution Print Mode Line drawing/text Image
Fast Render 300×300dpi 150×150 dpi
Halftone 600×300 dpi 600×300 dpi
Normal Render 600×600 dpi 300×300 dpi
Halftone 600×600 dpi 600×300 dpi
Best (default) Render 600×600 dpi 600×600 dpi
Halftone 600×600 dpi 600×600 dpi
Best
(maximum detail)
Render 600×600 dpi 600×600 dpi
Halftone 1200×600 dpi 1200×600 dpi
Previous … More …
HP Designjet 500 Plus Functional Specifications (Continued)
Functional Specifications
Margins Roll and sheet (normal) Roll (small)
Side Margins 5 mm
Leading Edge Margin 17 mm
Trailing Edge Margin 17 mm
All Margins 5 mm
Graphics
languages
supported
HP-GL/2
HP-RTL
CALRASTER
Accuracy 0.2% of the specified vector length at 23º (73ºF), 50-60% Relative Humidity, on
HP special polyester film.
Previous …
a. From time to time, new paper types may become available. For up-to-date information, please
contact your HP dealer or our Web site www.hp.com/go/designjet.
HP Designjet 500 Plus Functional Specifications (Continued)
Functional Specifications
Physical Specifications
Physical Specifications
Type Weight Width Depth Height
D/A1 size printer 38.5 kg
85 lb
1253 mm
49 inches
470 mm
19 inches
349 mm
14 inches
A0+/E+ size
printer
45 kg
99 lb
1690 mm
67 inches
674 mm
27 inches
1100 mm
43 inches

Memory Specifications
Memory Specifications
Internal RAM 32 MB
Can be upgraded to: 96MB or 160MB

Printer Power Specifications
Printer Power Specifications
Source 100-240 V AC ±10% auto-ranging
Frequency 50/60 Hz
Current 3 amp maximum
Consumption 150 watts maximum
Ecological Specifications
Ecological Specifications
Energy efficiency Compliant with Energy Star Program EPA (US).
Manufacturing
process
Free of ozone-depleting chemicals (Montreal Protocol).
Plastics Free of brominated flame retardants (PBB and PBDE).
All housing parts made of the same material: ABS.
Parts marked according to ISO 11469 standard.
Metals Enclosures made of electro-galvanized steel sheet.
Packaging Cardboard (non-chlorine-bleached) and foam are 100%
recyclable.
Inks used for printing do not contain heavy metals.
User
Documentation
Majority provided in Adobe Acrobat PDF format on CD-ROM
Batteries Not used.
Recyclablility Modular construction, screws easy to find and disassembly done
using universal tools.

Enviromental Specifications
NOTE: At altitudes greater then 3000m the printer may have operational problems.
Environmental Specifications
Operating Ranges Printing: 15°C to 35°C (59° F to 95° F) RH 20% to
70%.
Optimal print quality for HP
glossy media:
15°C to 30°C (59° F to 86° F) RH 20% to
80%.
Optimal print quality for other
HP media:
15°C to 35°C (59° F to 95° F) RH 20% to
70%.
Non Operating
Ranges
Printer: -40°C to 70°C (-40° F to 158° F)
Packed consumable items
and system:
-40°C to 60°C (-40° F to 140° F)
Acoustic Specifications
Acoustic Specifications
Operating sound pressure 54 dB (From a one-meter bystander position)
Idle sound pressure <30dB (A) (From a one-meter bystander
position)
Operating sound power 6.5 Bels (A)
Idle sound power <4.3 Bels (A)

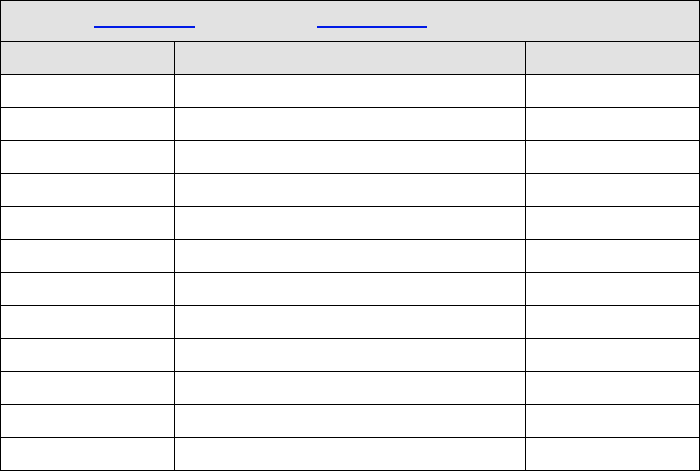
Cable Specification
The connector on the printer is 36-pin female connector. Most existing parallel cables support IEEE-1284
compatible communication, but for use with this printer, the cable must meet the specifications in the following
table:
Parallel (IEEE-1284 compatible/Centronics) Interface
Pin Wire/Signal Name Source
1 Strobe computer
2 … 9 D0 … D7 (data lines) both
10 Ack printer
11 Busy printer
12 PError printer
13 Select (SelectOut) printer
14 AutoFd computer
16 GND
19 … 30 GND
31 Init computer
32 Fault printer
36 SelectIn computer
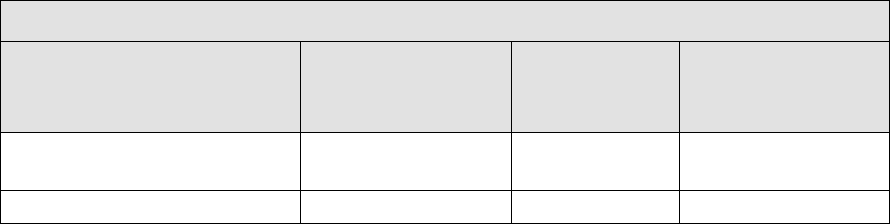
Recommended Cables
The following cable is recommended for optimum performance and electromagnetic compatibility:
Recommended Cable
Interface type (Computer) HP part number Cable length Connector type at
computer end of
cable
IEEE compatible/Centronics
Interface (All)
C2951A 3.0 m 25-pin male
USB C2392A 5.0 m USB plug

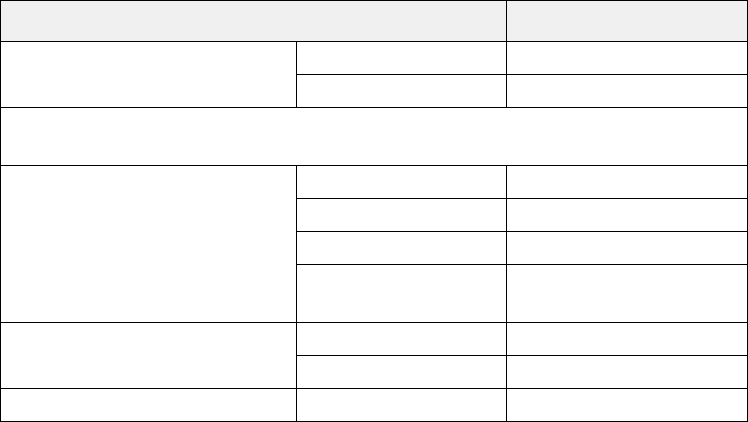
Hardware
Item HP Part Number
Memory Modules 64 MB C2387A
128 MB C2388A
All memory expansion modules are: SODIMM 168pin x 64 EDO 50 nanoseconds,
3.3V
JetDirect EIO Network Cards 10Base-T J3110A
10 Base2, 10-T J3111A
LocalTalk J3112A
Token Ring
10/100Base-TX
J4169A
Spindle 610 mm - 24 inch C2388A
1067 mm - 42 inch C2389A
Stand 610 mm - 24 inch GR C7781A
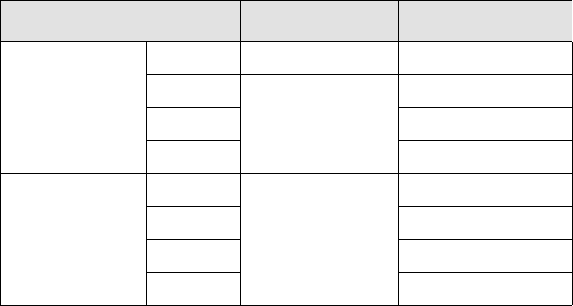
Consumable Items
To achieve the best performance from your printer, we recommend you only use genuine Hewlett-Packard
accessories and supplies, whose reliability and performance have been thoroughly tested to give trouble-free
performance.
Item Color HP Supply No. HP Part Number
Ink
Cartridges
Black 10 C4844A
Cyan
82
C4911A
Yellow C4913A
Magenta C4912A
Printheads Black
11
C4810A
Cyan C4811A
Yellow C4813A
Magenta C4812A

Glossary
Term Meaning
ANSI paper An American standard paper size; e.g. D, E.
Architectural
paper
The Architectural paper sizing system.
application The software you use to create your drawings.
Centronics A standard for the parallel interface between computer and device.
clipping Losing part of a drawing at the edges.
CMP Complementary Media Program that helps HP customers grow their
businesses by referencing third-party printing material choices to ensure
maximum HP Designjet printer flexibility and printing solutions.
CMYK Cyan, magenta, yellow and black. The colors of the printer’s four inks, and
also a standard color model.
Coated
paper
Paper coated on one side for inkjet printing.
default A value or condition that is assumed if no other value or condition is
specified.
device An external item connected to the computer: printer, tape drive, etc. Your HP
Designjet is a device.
dpi Dots per inch, a measure of print resolution.
drivers Software that controls the communication between a computer and a device.
front panel The control panel on the front right of the printer.
For More Terms, click on the Next Page Icon

front panel
menus
The structure of options in the front-panel display.
graphics
language
A programming language telling a print device how to output graphic data.
grayscale Shades of gray to represent colors.
high-gloss
photo
A glossy, opaque photographic paper.
HP-GL/2 One of Hewlett-Packard’s standard graphics languages for plotters and
printers. Produces vector data.
I/O Input/
output
The transmission of data between a computer and a device.
IEEE-1284 A standard issued by the Institute of Electrical and Electronics Engineers
(IEEE) as the Standard Signaling Method for a Bi-directional Parallel
Peripheral Interface for Personal Computers
ink cartridge The part of the HP Ink Supplies which contains all the ink used in the printer.
They are installed into the printer on the right side.
inked area The smallest rectangle that contains all the content of the drawing, while
maintaining its relative dimensions.
ISO paper An international standard paper size; e.g. A1, A2, etc.
JIS A Japanese standard paper size.
LAN Local area network.
Term Meaning
For More Terms, click on the Next Page Icon

long-axis
printing
Printing a page when the length is longer than a standard page size.
margin The space around the page added by the printer to separate one page from
another and to avoid printing right to the edge of the paper.
Nesting Placing two or more pages side-by-side on roll paper to avoid waste.
nozzles Located underneath the printhead. The nozzles direct the ink onto the page.
palette A set of logical pens defined by color and width.
PJL Printer Job Language. A programming language that controls jobs going to a
printer.
parallel
interface
A type of interface between computer and device. Generally faster than a
serial interface.
PANTONE The PANTONE MATCHING SYSTEM® is an international standard for color
communication in the graphics art industry.
pen Even though the printer has no physical pens, the lines it draws match the
attributes of a pen.
platen The exterior part of the printer on which the paper rests before going into the
printer.
printhead The printhead is installed into the carriage assembly. It is the part which
prints the ink onto the paper.
printing area Page size minus margins.
Term Meaning
For More Terms, click on the Next Page Icon

PostScript Adobe PostScript is a computer language that describes the appearance of a
page, including elements such as text, graphics, and scanned images, to a
printer or other output device.
queueing Placing each print received by the device into memory for processing with
other prints.
raster A method for defining an image, in terms of dots rather than lines. Raster
data typically needs more memory than vector data.
Rendering
Intent
Rendering intent is a concept defined by ICC Spec ICC.1:1998-09, “File
Format for Color Profiles”.
From the specification: “Rendering intent specifies the style of reproduction
to be used during the evaluation of this profile in a sequence of profiles. It
applies specifically to that profile in the sequence and not to the entire
sequence. Typically, the user or application will set the rendering intent
dynamically at runtime or embedding time.”
RGB Red, green and blue. A standard color model.
RIP Raster Image Processor.
RTL Raster Transfer Language is one of Hewlett-Packard’s standard graphics
languages for plotters and printers. Produces raster data.
Term Meaning
For More Terms, click on the Next Page Icon

Term Meaning
spindle The rod which holds the roll of paper.
paper-axis The vertical axis, as you look at the printer from the front in which the paper
feed moves.
scan-axis The horizontal axis, as you look at the printer from the front in which the print
carriage moves.
service
station
The part of the printer which services the printheads. It keeps the printheads
clean and stops them from drying out.
USB Universal Serial Bus.
Index
A
acoustic specifications ☞
Action Keys ☞
adjusting page size ☞
non-PostScript files ☞
Adusting the Page Size in the Front Panel ☞
Advanced Calibration ☞
Aligning Printhead ☞
ANSI Paper ☞
Architectural Paper ☞
B
Back Key ☞
Banding ☞
Best ☞
Print Resolution ☞
Blurred Lines ☞
bright white inkjet paper ☞
C
cable specifications ☞
cables
interface ☞
parallel ☞
Calibration ☞
Cancel Key ☞
Cancel Print ☞
Cancelling Drying Time ☞
cancelling the drying time ☞
canvas ☞
choosing media ☞
clear film ☞
Clearing Media Jam ☞
Clipped Images ☞
clipped images ☞
coated paper ☞
Color Accuracy
Configuration ☞
Additional Information ☞
Settings ☞
Media ☞
Color Alignment Problems ☞
Color Consistency Problems ☞
color settings ☞
colors
internal palettes ☞
Communications Problems ☞
Component Identification ☞
connection secifications ☞
Correcting the Printer Configuration ☞
Cutter Replacement ☞
D
Display Screen ☞
Dots per inch
Fast ☞
Down Key ☞
drivers ☞
Drying Time ☞
Cancelling ☞
Procedure ☞
Settings
Automatic ☞
Manual ☞
None ☞
Typical ☞
E
ecological specifications ☞
Enter Key ☞
environmental specifications ☞
F
Fast
Print Resolution ☞
Finding the Source of a Problem ☞
Form Feed & Cut Key ☞
Front Panel
Action Keys ☞
Display Screen ☞
Introduction ☞
Menu Structure ☞
Navigation Keys ☞
Page Size Setting ☞
functional specifications ☞
G
graphics language and networks ☞
H
Handling Media ☞
heavy coated paper ☞
high-gloss photo ☞
HP Ink Supplies ☞
HP No 10 ☞
HP No 11 ☞
HP No 82 ☞
Ink cartridges ☞
ink cartridges ☞
Printheads ☞
printheads ☞
I
I/O time-out setting
changing ☞
Identifying Components ☞
Image Appearance ☞
Image Clipping ☞
Image Error
Image is Clipped ☞
Long-Axis Image is Clipped ☞
Output Contains Only a Partial Print ☞
Image is Clipped ☞
Image is Unexpectedly Rotated ☞
Image Quality
Problems ☞
Image Rotation ☞
Page Size ☞
What is Rotated ☞
Incomplete Lines Problems ☞
Information
Roll Media ☞
Sheet Media ☞
Ink ☞
System
Precautions ☞
Ink Bleeds ☞
Ink Cartridge
Problem Inserting ☞
Replacement ☞
Statistics ☞
Ink cartridges
HP Ink Supplies ☞
ink cartridges
HP Ink Supplies ☞
ink emulation mode
selecting ☞
Ink Menu ☞
Ink Supplies. See HP Ink Supplies
Ink Supply Problems ☞
Ink System
Cartridge
Replacement ☞
Statistics ☞
Drying Time ☞
Automatic ☞
Manual ☞
None ☞
Printhead
Alignment ☞
Replacement ☞
Statistics ☞
Inked Area ☞
inked area ☞
Installing
Roll Media ☞
interface cables ☞
interfaces
Fast Ethernet 10/100 base TX ☞
parallel ☞
USB ☞
internal palettes ☞
ISO Paper ☞
J
Job Management Menu ☞
K
Keys
Action ☞
Cancel ☞
Form Feed & Cut ☞
Navigation ☞
Back ☞
Down ☞
Enter ☞
Menu ☞
Up ☞
L
Loading
Roll Media ☞
Sheet Media ☞
Loading Roll Media Problems ☞
Loading Sheet Media Problems ☞
Long-Axis Image is Clipped ☞
M
Margins ☞
margins ☞
margins specifications ☞
Marks or Scratches on Glossy Paper ☞
matte film ☞
Media
Cutter ☞
Handling ☞
Media Types
Additional Information ☞
Combinations ☞
Print Quality Selection ☞
Roll
Installing ☞
Loading ☞
Removing from Printer ☞
Removing from Spindle ☞
Unloading ☞
Sheet
Loading ☞
Unloading ☞
Which Edge First ☞
Which Side Up ☞
media ☞
choice ☞
media types
bright white inkjet paper ☞
canvas ☞
clear film ☞
coated paper ☞
heavy coated paper ☞
high-gloss photo ☞
matte film ☞
natural tracing paper ☞
plain paper ☞
poster paper ☞
supported ☞
translucent bond ☞
vellum ☞
Media Problems
Blurred Lines ☞
Clearing Jam ☞
General Rules ☞
Ink Bleeds ☞
Loading
Roll Media ☞
Sheetl Media ☞
Marks or Scratches ☞
Output ☞
Warped Lines ☞
media sizes specifications ☞
media types ☞
Memory ☞
memory ☞
memory specifications ☞
Menu
Ink ☞
Job Mananagement ☞
Paper ☞
Menu Key ☞
Menu Set-up ☞
Menu Structure ☞
merge ☞
Mirror Image ☞
N
natural tracing paper ☞
Navigating the Menu System ☞
Navigation
Example ☞
Navigation Keys ☞
network interface
changing settings ☞
networks and graphics language ☞
non-PostScript files
adjusting page size ☞
Normal ☞
Print Resolution ☞
O
Obtaining Roll Media Information ☞
Obtaining Sheet Media Information ☞
One Image Overlays Another on Same Sheet ☞
Other Sources of Information for Incorrect Printed Image ☞
Output Contains Only a Partial Print ☞
overlapping lines
changing treatment of ☞
P
Page Description ☞
Page Format
Inked Area ☞
Margins ☞
Printing Area ☞
Size ☞
page format
inked area ☞
margins ☞
page size ☞
Page Size ☞
page size ☞
adjusting ☞
and clipped images ☞
Palette ☞
palettes
changing colors ☞
changing pen width ☞
internal ☞
viewing current settings ☞
paper
important points ☞
Paper Menu ☞
parallel (Bi-Tronics/Centronics) interface specifications ☞
parallel interface ☞
pen widths
changing ☞
Pens ☞
physical specifications ☞
plain paper ☞
Pocket Guide ☞
poster paper ☞
PostScript Upgrade ☞
power specifications ☞
print appearance
controlling ☞
Print Cancel ☞
Print Distorted or Unintelligible ☞
Print Quality ☞
print quality
printing speeds and print quality ☞
settings ☞
Print Resolution
Best ☞
Fast ☞
Normal ☞
print resolution ☞
Printable Area
ArchitecturaI Paper ☞
ISO Paper ☞
Printed Image Incorrect
Image is in One Portion of the Printing Area ☞
Image is Unexpectedly Rotated ☞
One Image Overlays Another on Same Sheet ☞
Other Sources of Information ☞
Print Distorted or Unintelligible ☞
Printer does not Print ☞
Printer Seems Too Slow ☞
Printhead
Alignment ☞
Problem Inserting ☞
Problems after replacement ☞
Replacement ☞
Statistics ☞
Printheads
HP Ink Supplies ☞
printheads
HP Ink Supplies ☞
Printing Area ☞
printing area ☞
Problems
Banding ☞
Color Alignment ☞
Color Consistency ☞
Configuration Correction ☞
Finding the Source ☞
Image Quality ☞
Incomplete Lines ☞
Ink Supply
After replacement of Printhead ☞
Inserting the Ink Cartridge ☞
Inserting the Printhead ☞
Solutions ☞
Solving ☞
Stepped Lines ☞
Troubleshooting ☞
R
Removing
Roll Media
from Printer ☞
from Spindle ☞
Replacing
Cutter ☞
Ink Cartridge ☞
Printhead ☞
resolution specifications ☞
resolution. See print resolution
Roll Media
Information ☞
Installing ☞
Loading ☞
Removing from Printer ☞
Removing from Spindle ☞
Unloading ☞
Rotating an Image ☞
S
Set-up Menu ☞
Setup Poster ☞
Sheet Media
Information ☞
Loading ☞
Unloading ☞
Which Edge First ☞
Which Side Up ☞
software applications ☞
Solutions to Problems ☞
specifications
accuracy ☞
acoustic ☞
cables ☞
connection ☞
ecological ☞
environmental ☞
functional ☞
graphics languages supported ☞
margins ☞
media sizes ☞
memory ☞
parallel (Bi-Tronics/Centronics) interface ☞
physical ☞
power ☞
resolution ☞
Speed and Print Quality ☞
Stepped Lines Problems ☞
supported media types ☞
system software upgrades ☞
T
translucent bond ☞
Troubleshooting
Procedure ☞
types of media ☞
Typical Drying Times ☞
Typical Printing Times ☞
U
Universal Serial Bus ☞
Unloading
Roll Media ☞
Sheet Media ☞
Up Key ☞
upgrading system software ☞
USB ☞
user interface ☞
User’s Reference Guide ☞
V
vellum ☞
W
Warped Lines ☞
Web Page ☞
