HP UPD System Administrator's Guide C03633736
User Manual: HP HP UPD - System Administrator's Guide
Open the PDF directly: View PDF ![]() .
.
Page Count: 251 [warning: Documents this large are best viewed by clicking the View PDF Link!]

1
SYSTEM ADMINISTRATOR’S GUIDE
For HP V3 UNIVERSAL PRINT DRIVER (PCL 6/PS)
and HP Print Administrator's Resource Kit (PARK)
November 2017
2

3
SYSTEM ADMINISTRATOR'S GUIDE
For HP V3 Universal Print Driver (PCL 6/PS)
and HP Print Administrator's Resource Kit (PARK)
November 2017
4
Copyright and license
© 2017 Copyright HP Development Company, L.P.
Reproduction, adaptation or translation
without prior written permission is prohibited,
except as allowed under the copyright laws.
The information contained herein is subject to
change without notice.
The only warranties for HP products and
services are set forth in the express warranty
statements accompanying such products and
services. Nothing herein should be construed
as constituting an additional warranty. HP shall
not be liable for technical or editorial errors or
omissions contained herein.
Edition 14, November, 2017
Trademark credits
Adobe®, PostScript®, and the Acrobat logo® are
trademarks of Adobe Systems Incorporated.
Java is a registered trademark of Oracle and/or
its affiliates.
Microsoft, Windows, Windows 7, Windows 8, Windows 8.1, Windows
10, Windows Server 2008R2, Windows Server 2012, Windows Server
2012R2 and Windows Server 2016 are U.S. registered trademarks of
Microsoft Corporation in the United States and/or other countries.
UNIX® is a registered trademark of The Open Group.

5
Table of Contents
1 Purpose and scope ........................................................................................................................................ 17
Introduction .......................................................................................................................................... 17
Conventions used in this guide ........................................................................................................... 19
Devices Supported .............................................................................................................................. 19
2 Software description...................................................................................................................................... 21
Introduction .......................................................................................................................................... 21
Easy management tools help meet your unique needs ......................................................... 21
Helps reduce paper use and save money .............................................................................. 22
Helps increase productivity, reduce support calls .................................................................. 22
System requirements ........................................................................................................................... 22
Supported Operating Systems ............................................................................................... 22
Port Monitor ............................................................................................................................ 22
Print Processor ....................................................................................................................... 23
Internet Printing Protocol (IPP) ............................................................................................... 23
Software availability ............................................................................................................................. 24
3 Planning an HP UPD deployment ................................................................................................................. 25
Introduction .......................................................................................................................................... 25
The five steps to a successful deployment .......................................................................................... 25
Initiation and planning .......................................................................................................................... 26
Understand your printing requirements and environment ...................................................... 26
Determine deployment objectives ............................................................................. 26
Print servers or Direct IP ........................................................................................... 26
Identify stakeholders.................................................................................................. 26
Make an inventory ..................................................................................................... 26
Consider PDL needs ................................................................................................. 26
Driver considerations ................................................................................................. 27
Pre-configuration, policy and access requirements .................................................. 27
Environment and network compatibility ..................................................................... 27
Baseline the system .................................................................................................. 27
Risk management...................................................................................................... 27
Key deployment decisions ...................................................................................................... 27
Create a list of required drivers ................................................................................. 27
Choose an installation method .................................................................................. 28
Determine Driver Pre-Configuration needs ............................................................... 28
Choose traditional and dynamic mode ...................................................................... 28
Decide whether to manage the HP UPD with Active Directory Group Policy ........... 29
Estimate time requirements ....................................................................................... 29
6
Communication and training ................................................................................................................ 29
Training ................................................................................................................................... 29
Conduct a pilot test environment ......................................................................................................... 29
Testing and Evaluation ........................................................................................................................ 29
Deploy to production ............................................................................................................................ 30
Closing the project ............................................................................................................................... 30
4 Pre-configuring default settings and print policy for HP UPD .................................................................. 31
Introduction .......................................................................................................................................... 31
HP Print Administrator Resource Kit (HP PARK) ................................................................................ 32
Supported tools ...................................................................................................................... 32
Unsupported Tools ................................................................................................................. 33
Configure HP UPD default settings using INSTALL.EXE during driver installation ............................ 34
Configure HP UPD default settings and/or print policy using Group Policy Objects in Active Directory
............................................................................................................................................................. 35
You-Tube Video ...................................................................................................................... 35
Pre-configure HP UPD default settings using the HP Driver Configuration Utility .............................. 36
Pre-configure the HP UPD using HP DCU ............................................................................. 36
You-Tube Video ...................................................................................................................... 38
Pre-configure HP UPD default settings using HP Driver Deployment Utility ...................................... 38
Pre-configure the HP UPD using HP DDU ............................................................................. 39
Configure HP UPD default settings after driver installation in driver preferences ............................... 41
Manage printer default settings .............................................................................................. 41
Manage default settings with Active Directory Group Policy for HP UPD in dynamic or
traditional mode ...................................................................................................................... 41
You-Tube Video ......................................................................................................... 41
Overview of configurable functions and pre-configuration utilities ...................................................... 42
5 Installing and uninstalling the HP UPD........................................................................................................ 45
Introduction .......................................................................................................................................... 45
Supported modifications of the HP Universal Print Driver ...................................................... 46
Install HP UPD v5.1 and later .............................................................................................................. 46
Determine the HP UPD version installed ............................................................................... 46
Microsoft Windows Driver Architecture .................................................................................. 46
HP UPD installation methods ................................................................................................. 47
Explanation of the driver name ............................................................................................... 48
HP UPD name selection ............................................................................................ 49
Identify the driver name for the HP UPD printer ........................................................ 50
Download and unzip the HP UPD installation files .............................................................................. 50
Installation methods and environments ............................................................................................... 50
Method 1: Windows client/server: Use Add Printer wizard .................................................... 51
Method 2: Windows client/server: Use INSTALL.EXE wizard................................................ 52
7
Method 3: Windows client/server: Use command prompt (INSTALL.EXE with switches) ..... 53
Manage printer default settings after installation ....................................................... 54
Default settings and changes are not managed ........................................... 54
Manage default settings with Active Directory Administrator Templates ..... 54
Available options when installing by command prompt ............................................. 54
Method 4: Windows client/server: Use Point and Print .......................................................... 57
Method 5: Windows client/server: Use HP Web Jetadmin Print Queue Creation .................. 58
Method 6: Create a driver instance with plug and play .......................................................... 58
Software first (unattended) installation – recommended ........................................... 58
Pre-configure and install the HP UPD for use with software first installation
...................................................................................................................... 59
Driver selection when multiple drivers are pre-loaded ................................. 59
Hardware first installation .......................................................................................... 59
USB connectivity ....................................................................................................... 59
Disabling HP Smart Install (if present) ......................................................... 59
How to disable HP Smart Install ................................................................... 60
Disable obtaining driver software from Windows Update by default (optional)
...................................................................................................................... 60
Pre installing the HP UPD Using Install.exe .............................................................. 61
You-Tube Video............................................................................................ 64
Pre installing the HP UPD using pnputil .................................................................... 64
Pre-installing using the HP Smart Device Agent Base for USB Plug and Play ........ 66
To install the HP Smart Device Agent Base for USB Plug and Play ............ 66
To Uninstall the HP Smart Device Agent Base Service ............................... 68
Method 7: Other supported Microsoft driver installation methods .......................................... 69
Environment A: Windows Cluster server environment ........................................................... 69
Alternative install with printer automatic configuration disabled ................................ 70
Environment B: Windows Terminal Server/Citrix XenApp environments ............................... 71
Supported environments ........................................................................................... 71
Traditional Mode ........................................................................................................ 71
Dynamic Mode ........................................................................................................... 71
Comparing HP and Citrix UPD Drivers...................................................................... 71
Environment C: Novell / Micro Focus ..................................................................................... 71
Install the HP UPD in a Novell environment .............................................................. 72
Novell Distributed Print Services (NDPS).................................................................. 73
Uninstall the HP UPD .......................................................................................................................... 73
6 Upgrading the HP UPD .................................................................................................................................. 75
Introduction .......................................................................................................................................... 75
Best practices—upgrade ..................................................................................................................... 76
8
Reasons to upgrade ............................................................................................................... 76
Predictable upgrades ................................................................................................ 76
Changing PDLs ...................................................................................................................... 76
Testing .................................................................................................................................... 76
Printer name should be different than the driver name .......................................................... 76
Benefit of using HP UPD version specific driver name installation ........................................ 77
Modify existing HP UPD printer with INSTALL.EXE .............................................................. 77
Upgrade steps ..................................................................................................................................... 77
Settings retention .................................................................................................................... 77
Upgrade steps ........................................................................................................................ 78
Delete and recreate queues with AUTOUPGRADEUPD.EXE (traditional mode only) ....................... 79
Usage ..................................................................................................................................... 79
You-Tube Video ...................................................................................................................... 80
7 Using the HP UPD .......................................................................................................................................... 81
Introduction .......................................................................................................................................... 81
Using the HP UPD—traditional mode only .......................................................................................... 81
HP UPD traditional mode ....................................................................................................... 81
Print using the HP UPD in traditional mode ........................................................................... 81
Using the HP UPD — dynamic mode only .......................................................................................... 82
HP UPD dynamic mode.......................................................................................................... 82
Print using the HP UPD in dynamic mode.............................................................................. 82
Dynamic mode options—Default configuration ......................................................... 83
Using dynamic mode ................................................................................................. 83
Selecting a recently used printer .................................................................. 83
Additional options: ........................................................................................ 84
Configure HP UPD dynamic mode settings ........................................................................... 84
Find a printer in dynamic mode .............................................................................................. 86
Enter a print address (dynamic mode) ...................................................................... 86
Search for network printers (dynamic mode) ............................................................ 88
Search for print shares (dynamic mode) ................................................................... 89
Add a printer to the Devices and Printers folder (dynamic mode) ......................................... 89
Add a printer to the Printers folder using the dynamic mode user interface. ............ 89
Add a printer to Devices and Printers folder from within the Devices and Printers
folder (dynamic mode) ............................................................................................... 90
Organize the Recently Used Printers list (dynamic mode)........................................ 91
Using the HP UPD features (traditional mode and dynamic mode) .................................................... 91
Change Print Driver Settings .................................................................................................. 91
Device mode versus Capabilities mode ................................................................................. 91
Printing Preferences Tab Set ................................................................................................. 92
9
Advanced Tab Features ......................................................................................................... 93
Printing Shortcuts Tab Features ............................................................................................. 96
Use defined printing shortcuts ................................................................................... 97
Create a custom printing shortcut ............................................................................. 97
Paper/Quality Tab Features ................................................................................................... 97
Add custom paper sizes .......................................................................................... 101
To specify Special pages for the Covers or other pages ........................................ 102
Effects Tab Features ............................................................................................................ 103
To create a new watermark ..................................................................................... 106
Default watermark settings ...................................................................................... 108
Finishing Tab Features ......................................................................................................... 108
Book and Booklet Printing .................................................................................................... 111
Configuring Booklet Printing .................................................................................... 112
Output Tab Features ............................................................................................................ 112
Output Options ........................................................................................................ 113
Output Bin Options .................................................................................................. 113
Job Storage Tab Features .................................................................................................... 114
How the HP UPD works with job storage ................................................................ 115
To use HP Secure Encrypted Print ......................................................................... 115
Setup and configuration ............................................................................. 116
To use Job Storage features when printing ............................................................ 117
Release a job-storage print job ............................................................................... 118
Delete a job-storage print job .................................................................................. 118
Pre-configure job storage capabilities ..................................................................... 119
Color Tab Features ............................................................................................................... 120
Services Tab Features ......................................................................................................... 125
Internet Services ...................................................................................................... 125
Change HP UPD properties (for all jobs or per job) ............................................................. 125
All jobs — from the Devices and Printers folder ...................................................... 125
Per job — when printing from an application .......................................................... 126
Incompatible Print Settings messages .................................................................... 126
Device Settings Tab Features .............................................................................................. 127
Mopier mode and collation ......................................................................... 132
Printer Automatic Configuration ........................................................................................... 132
Automatic Printer Configuration status ....................................................... 133
Traditional Mode About status. ................................................................... 133
User interface ............................................................................................. 134
Command line interface ............................................................................. 135
Disable Printer Automatic Configuration ................................................................. 140
10
Benefits comparison ................................................................................................ 140
Automatic configuration enabled ................................................................ 141
Automatic configuration disabled ............................................................... 141
Default capabilities without automatic configuration .................................. 141
Steps to disable the Printer Automatic Configuration ................................ 142
Communication protocols ........................................................................................ 143
Printer Automatic Configuration services ................................................................ 143
Steps to Disable ......................................................................................... 143
Steps to Remove ........................................................................................ 143
Symptoms when Printer Automatic Configuration fails ........................................... 144
Printing from a specified tray ................................................................................................ 144
Known issue with redirected printers ................................................................................................. 145
Troubleshooting ................................................................................................................................. 145
1. Can the HP UPD print to the target device? .................................................................... 145
2. Is the HP UPD printer defined with Printer Auto Configuration enabled? ........................ 145
3. After running "Update Now" were the expected results returned? ................................... 145
4. What is the physical connection method between the HP UPD installed printer and the
target printing device? .......................................................................................................... 146
5. Troubleshoot network connection/port ............................................................................. 146
6. Distinguish if target product is communicating bidirectional for printer auto configuration
via HTTP or SNMP? ............................................................................................................. 147
HTTP ....................................................................................................................... 147
SNMP ...................................................................................................................... 147
7. Install and test a new print queue? ................................................................................... 147
8. Is the network congested? ............................................................................................... 147
Frequently Asked Questions ............................................................................................................. 148
8 Managing the HP UPD with Active Directory Group Policy ..................................................................... 153
Introduction ........................................................................................................................................ 153
Supported HP UPD versions ............................................................................................................. 153
You-Tube Video ................................................................................................................................. 153
Use HP Active Directory Group Policy to manage HP UPD policies ................................................ 154
HP UPD Active Directory Group Policy ............................................................................................. 154
Introduction ........................................................................................................................... 154
Install and use the ADM template using Microsoft Group Policy Management Console
(GPMC) ................................................................................................................................ 155
Install and use the ADMX/ADML template using Microsoft Group Policy Management
Console (GPMC) .................................................................................................................. 155
Remove the HP UPD AD Administrator template ................................................................ 156
Upgrade the HP UPD AD Administrator template ................................................................ 156
11
Enable Active Directory Group Policy for HP UPD for a new or existing HP UPD installation
.............................................................................................................................................. 156
For new installations of the HP UPD when an HP Active Directory Administrator
Template is installed ................................................................................................ 156
For existing installations of the HP UPD ................................................................. 156
Configure policies with the HP UPD Active Directory Administrator template ..................... 157
UseMode Settings: General Settings ...................................................................... 157
UseMode Settings: User Interaction Settings ......................................................... 158
UseMode Settings: Enabled Services tab ............................................................... 158
Default Print Settings ............................................................................................... 158
Color Access Control: Application Filtering ............................................................. 160
Color Access Control: Time of Day Restriction ....................................................... 160
User Search Capabilities ......................................................................................... 160
Status Notification Pop-ups ..................................................................................... 160
Job Accounting ........................................................................................................ 160
Job Delivery ............................................................................................................. 161
MPP Information Settings ........................................................................................ 161
Managed Printer List settings .................................................................................. 161
Implement Managed Printer Lists (MPLs) within the HP UPD Active Directory Administrator
Template file ......................................................................................................................... 161
Verification and troubleshooting ........................................................................................... 162
Functional test ......................................................................................................... 162
Registry population .................................................................................................. 162
Final test .................................................................................................................. 162
How HP AD policies get applied to the driver.................................................................................... 163
9 Using Managed Printer Lists ...................................................................................................................... 165
Introduction ........................................................................................................................................ 165
Who should use MPLs? ..................................................................................................................... 165
Exporting a new MPL from HP Web Jetadmin ..................................................................... 166
The Exported WJA Managed Printer List XML File Format .............................................................. 169
Implement Managed Printer Lists (MPLs) within the HP UPD Active Directory Administrator Template
file ...................................................................................................................................................... 169
Use the Active Directory Administrator Template ................................................................ 170
View results .......................................................................................................................... 171
Implement Managed Printer Lists (MPLs) within the HP UPD using Install.exe ............................... 172
Troubleshooting ................................................................................................................................. 172
Problem: ............................................................................................................................... 172
A HP UPD new features and OS support changes ....................................................................................... 173
Introduction ........................................................................................................................................ 173
New Features in HP UPD 6.5.0 ......................................................................................................... 174
12
HP PARK tools support changes ......................................................................................... 174
DCU 1.650.1.32821 ................................................................................................. 174
AD Template 4.5.0................................................................................................... 174
New HP UPD Features......................................................................................................... 174
HP UPD 6.5.0 with version 4.5 firmware and Capabilities mode ......................................... 175
Capabilities mode added to older products ............................................................. 176
Differences in the Control Panel U/I ........................................................................ 177
Changes to the Device Settings tab ........................................................................ 178
Changes to the Print Quality Settings ..................................................................... 179
Changes to the Output tab settings ......................................................................... 181
Fast Booklet mode on HP MFP S900 printers ..................................................................... 182
Deprecated Features ............................................................................................................ 183
New Features in HP UPD v6.4.1 ....................................................................................................... 183
OS support changes ............................................................................................................. 183
HP PARK tools support changes ......................................................................................... 183
New Features ....................................................................................................................... 183
Print Quality Settings ............................................................................................... 184
Output Device Settings ............................................................................................ 185
Group Watermarks .................................................................................................. 187
Changes for Black Only or High Quality CMYK Grayscale dropdown .................... 187
New features in HP UPD v6.3.0 ........................................................................................................ 188
New Features ....................................................................................................................... 188
New features in HP UPD v6.2.1 ........................................................................................................ 188
New Features ....................................................................................................................... 188
New features in HP UPD v6.2.0 ........................................................................................................ 188
PDL support change ............................................................................................................. 188
New Features ....................................................................................................................... 188
New features in HP UPD v6.1.0 ........................................................................................................ 189
OS support change ............................................................................................................... 189
New Features ....................................................................................................................... 189
New features in HP UPD v6.0.0 ........................................................................................................ 189
OS support change ............................................................................................................... 189
New Features ....................................................................................................................... 189
New features in HP UPD v5.9.0 ........................................................................................................ 190
New Features ....................................................................................................................... 190
New features in HP UPD v5.8.0 ........................................................................................................ 190
New Features ....................................................................................................................... 190
New features in HP UPD v5.7.0 ........................................................................................................ 190
New Features ....................................................................................................................... 190
13
New features in HP UPD v5.6.5 ........................................................................................................ 191
PDL Change ......................................................................................................................... 191
New Features ....................................................................................................................... 191
Driver Versioning ..................................................................................................... 191
New HP UPD Installer ............................................................................................. 192
New features in HP UPD v5.6.0 ........................................................................................................ 193
OS support change ............................................................................................................... 193
New Features ....................................................................................................................... 193
New driver initialization ............................................................................................ 193
Policy settings enforced for printing defaults ........................................................... 193
USB DOT4 driver for Windows 8/8.1 and Windows Server 2012/2012R2 ............. 193
New features in HP UPD v5.4 ........................................................................................................... 194
New Features ....................................................................................................................... 194
Automatic Configuration Disabled status ................................................................ 194
Request for PIN print for every new print job .......................................................... 194
B Known issues ............................................................................................................................................... 195
High resolution TIFF files not printing correctly with HP UPD PCL 6 ................................................ 195
Steps to Resolve the issue ................................................................................................... 195
HP Laserjet 400 Color M451dw installed as imaging device ............................................................ 196
Method to delete the HP PNP Scan Null driver .................................................................... 197
To reinstall the scan null driver: ............................................................................................ 197
Alternative method for Windows 7: ....................................................................................... 198
HP UPD Null Scan driver ................................................................................................................... 198
Introduction ........................................................................................................................... 198
Install a Scan driver with and without HP UPD pre-installed................................................ 199
Replace the HP PNP Scan Null driver with a product-specific Scan driver ......................... 199
Issues after upgrade from HP UPD v5.2.x ........................................................................................ 200
Introduction ........................................................................................................................... 200
Symptoms ............................................................................................................................. 201
Steps to avoid the HP UPD v5.2 upgrade issue .................................................................. 201
Steps to resolve the v5.2 upgrade issue .............................................................................. 202
Steps to delete a printer .......................................................................................... 202
Steps to delete the print driver (optional) ................................................................ 203
Steps to create the printer with same name ............................................................ 203
Point and print ......................................................................................................... 203
Automating the steps ............................................................................................... 203
Settings issues after upgrading HP UPD .......................................................................................... 204
C Third-party articles and Windows printing information ........................................................................... 205
D Frequently asked questions ....................................................................................................................... 209
14
Introduction ........................................................................................................................................ 209
HP UPD installation and configuration .............................................................................................. 209
HP UPD policy ................................................................................................................................... 212
Operating system .............................................................................................................................. 213
E HP UPD deployment worksheet ................................................................................................................. 215
Introduction ........................................................................................................................................ 215
General information ........................................................................................................................... 215
Port and protocol information ............................................................................................... 216
Print server environment ................................................................................................................... 217
Print server information ........................................................................................................ 217
Goals .................................................................................................................................... 217
Set up new server that has new queue names ....................................................... 218
Upgrade print queues on an existing server to the HP UPD ................................................ 218
Point and Print Client Information ......................................................................................... 219
Direct IP printing ................................................................................................................................ 220
General client information .................................................................................................... 220
Goal ...................................................................................................................................... 220
Upgrade-Drivers: .................................................................................................................. 220
Upgrade-Settings configuration ............................................................................................ 221
HP UPD/AD customized options .......................................................................................... 221
F HP UPD deployment flowcharts ................................................................................................................. 223
Introduction ........................................................................................................................................ 223
Start ................................................................................................................................................... 224
Choose PDL (PCL 6 or PS) .................................................................................................. 224
Citrix environment ................................................................................................................. 224
Novell environment ............................................................................................................... 225
Microsoft Windows Print Server ........................................................................................... 225
Direct IP printing ................................................................................................................... 225
Client driver deployment and software distribution systems ................................................ 226
Update server/replace server ............................................................................................................ 227
Update server ....................................................................................................................... 227
Create a test server? ............................................................................................... 227
Replace server–clean start ...................................................................................... 228
Replace server, import drivers and queues from the old server ............................. 228
Client printing ..................................................................................................................................... 229
Replace client, clean start .................................................................................................... 229
Replace client, import drivers and queues from old client.................................................... 229
Update client ......................................................................................................................... 230
Policy ................................................................................................................................................. 230
15
Policy/MPLs per machine? ................................................................................................... 231
Policy/MPLs per user or group? ........................................................................................... 231
Use Active Directory? ........................................................................................................... 231
Add/new queues ................................................................................................................................ 232
Add queues .......................................................................................................................... 232
New queues .......................................................................................................................... 233
Prepare list of printers, queue and port names, and port settings. ......................... 233
Prepare list of drivers required for printer models. .................................................. 233
Print server? ......................................................................................................................... 233
Create queues ................................................................................................................................... 234
Will drivers other than the HP UPD be installed? ................................................................. 234
Cluster Server? ..................................................................................................................... 234
HP DCU only settings? ......................................................................................................... 235
Install.exe setting only? ........................................................................................................ 235
HP DCU and INSTALL.EXE settings? .................................................................... 235
Notes .......................................................................................................... 235
Ports and protocols ............................................................................................................................ 236
Port Monitor? ........................................................................................................................ 237
Replace drivers .................................................................................................................................. 237
Versioning of print driver shared files ................................................................................................ 238
Basic Printing ........................................................................................................................ 238
Complex Print Environments ................................................................................................ 239
Solution ................................................................................................................................. 240
Automate the process through scripting ............................................................................................ 240
Get queue and port information from old server or client ..................................................... 240
Creating print queues and ports ........................................................................................... 240
Other scripting examples ...................................................................................................... 240
G Support information to collect .................................................................................................................... 241
Introduction ........................................................................................................................................ 241
Symptoms .......................................................................................................................................... 241
Print driver ......................................................................................................................................... 241
Determine the HP UPD driver version .................................................................................. 241
Determine the installation details ......................................................................................... 242
Is Printer Automatic Configuration enabled (default)? ......................................................... 242
What is the “Configuration Status” provided on the About tab? ........................................... 242
Management Tools ............................................................................................................... 242
Environment specifications ................................................................................................................ 243
Version of Microsoft operating system (print server and print client) ................................... 243
Microsoft Event log (spooler errors, etc)? ............................................................................ 243
16
Printer connectivity ............................................................................................................... 243
Citrix...................................................................................................................................... 243
Microsoft Terminal Services ................................................................................................. 244
Novell .................................................................................................................................... 244
Printer information ............................................................................................................................. 244
Application ......................................................................................................................................... 244
Files to collect .................................................................................................................................... 245
H Glossary of terms......................................................................................................................................... 247

17
1 Purpose and scope
Introduction
This system administrator's guide provides information about the HP V3 Universal Print Driver (HP UPD) and the
available HP UPD tools, HP Printer Administrators Resource Kit (HP PARK). For each output format (PCL 6 and PS),
a separate downloadable driver exists. Because the core code and functionality are the same for all formats, this
documentation refers to HP UPD without specifying the output format.
NOTE: The information in this document is based on the latest information available at writing. Always refer to
www.hp.com/go/upd for the most current information. Information on this site supersedes information in this
document.
Generally, procedures in this document represent the steps required when using Microsoft Windows 7. The steps for
other Windows operating systems may differ slightly.
This guide is distributed in an electronic format to serve as a quick-reference tool for information technology
administrators, customer-care agents, support engineers, system administrators, management information systems
personnel, and printer users.
NOTE: Send suggestions for improvements, comments, and questions about the HP UPD or questions about the
unsupported tools from the HP Printer Administrators Resource Kit (HP PARK) to UPD_PARK@hp.com.
This guide includes the following information:
Procedures for installing and uninstalling software components, including command line configuration and
installation of the HP UPD.
Descriptions of the HP Universal Print Driver (HP UPD), and the features, benefits, use and management of the
HP UPD.
Descriptions of the HP Active Directory Administrator Template used to manage the HP UPD. Used by
administrators to configure and manage the HP UPD.
Descriptions of the HP Driver Configuration Utility (HP DCU) and an introduction to the features, benefits, and
use.
Descriptions of the HP Driver Deployment Utility (HP DDU) and an introduction to the features, benefits, and use.
The following table describes the structure of this HP System Administrator's Guide. For more information about the
location of information within these chapters, see the table of contents.

18
Table 1-1 HP Universal Print Driver System Administrator's Guide Overview
Chapter
Content
Purpose and scope (Chapter 1)
Describes the focus and intent of this guide, including the conventions used,
and the hardware to which this guide pertains
Software description (Chapter 2)
Describes the HP UPD software, including the software requirements for
installing the HP UPD and software availability. In addition, this chapter
describes the different driver page description languages (PDLs), HP PCL 6
and HP PS emulation, their specific purposes, and the modes for installing
these HP UPD versions.
Planning an HP UPD deployment (Chapter 3)
Provides information for planning and deploying the HP UPD in your
environment
Pre-configuring default settings and print policy
for HP UPD (Chapter 4)
Includes information about the methods for pre-configuring the HP UPD
including the following methods:
Using INSTALL.EXE
Using the Group Policy Objects in Active Directory
Using the HP Driver Configuration Utility (HP DCU)
Using the HP Driver Deployment Utility (HP DDU)
Installing and uninstalling the HP UPD (Chapter
5)
Provides instructions for the installation and uninstall of the HP UPD in
traditional mode and dynamic mode
Upgrading the HP UPD (Chapter 6)
Provides instructions for upgrading the HP UPD
Using the HP UPD (Chapter 7)
Includes information about using the HP UPD in traditional mode and
dynamic mode including:
Printing using the HP UPD
Finding a printer in dynamic mode
Adding a printer to the Devices and Printers folder
Configuring the HP UPD settings and properties
Adding custom paper sizes
Using job storage
Using HP Secure Encrypted Print
Making changes to HP UPD settings and properties
Known issues with redirected printers
Printer Automatic Configuration
Troubleshooting Help
Managing the HP UPD with Active Directory
Group Policy (Chapter 8)
Manage Active Directory Group Policy with the HP UPD using HP Active
Directory Administrator Templates
Using Managed Printer Lists (Chapter 9)
Provides information on using managed printer lists to specify the products
that users can use for printing.
HP UPD new features and OS support changes
(Appendix A)
Describes new configuration features for different releases of the HP UPD
Known issues (Appendix B)
Provides information and steps for resolving known issues in the HP UPD
Third-party articles and Windows printing
information (Appendix C)
Lists important Microsoft® Knowledge Base articles
Frequently asked questions (Appendix D)
Answers common questions regarding the HP UPD
HP UPD deployment worksheet (Appendix E)
Provides a worksheet containing HP UPD deployment line items
HP UPD deployment flowcharts (Appendix F)
Contains flowcharts describing deployment options for the HP UPD
Support information to collect (Appendix G)
Contains a list of support related questions for troubleshooting the HP UPD
issues
Glossary of terms
Contains explanations of commonly used terms in reference to the HP UPD

19
Conventions used in this guide
This guide uses the following conventions:
Keyboard keys display in bold type. For example, Press the Shift key.
File names and file extensions appear in uppercase.
For example, Find the SAMPLE.TXT file in the C:\Temp directory.
Menu names, field names, and options to select display in bold type.
For example, On the File menu, click New.
Windows®, screens, and panels display in bold type.
For example, the Job Manager dialog box displays.
References to other sections in this guide appear in colored font.
For example, for more information, see Software description.
Devices Supported
For a list of the current supported HP devices, see Supported products at www.hp.com/go/upd
20

21
2 Software description
Introduction
This chapter contains the following sections:
System requirements
Software availability
The HP Universal Print Driver (UPD) helps eliminate driver chaos in your print environment by dramatically reducing
the number of print drivers needed. Broad compatibility ensures the HP UPD works with many HP print products,
often reducing print driver use to a single driver. For each output format, there is a separate downloadable driver.
The PCL 6 and PS HP Universal Print Driver works well with a broad range of networked and direct-connected
HP LaserJet and HP Business Inkjet/OfficeJet print products. HP products share state-of-the-art technology,
allowing the HP UPD to support complex capabilities across many HP products, making them easier to use,
support, certify and deploy.
Install the HP UPD in traditional or dynamic mode.
o Traditional mode — Behaves like a product specific driver, creating a permanent instance of the driver.
Use in point and print environments or with direct IP printing.
o Dynamic mode — Allows the most flexibility. A user can find and print to any supported HP product
within most network or print environments without installing a product-specific driver. The HP UPD
discovers the product capabilities so that users can print using most of them, including advanced printing
options such as watermarks and booklet printing.
Local language drivers are available in 35 spoken languages.
Easy management tools help meet your unique needs
HP provides tools and services to customize and manage drivers and printers, so you can choose driver capabilities
that best suit your unique environment, from managing print queues and color use, to ensuring secure printing for
sensitive documents.
Using the HP Driver Configuration Utility (HP DCU), you can pre-configure the driver, which allows you to use the
standard Windows driver installation procedure.
The HP Driver Deployment Utility creates a single executable file for an HP UPD installation with customized pre-
configured driver settings.
Using the Active Directory Group Policy, you can define print policies for the HP UPD when installed in traditional
or dynamic mode.
HP Web Jetadmin allows you to create print queues and update drivers on remote systems from one location.
For more information on HP Web Jetadmin, see www.hp.com/go/wja.

22
Helps reduce paper use and save money
The HP Universal Print Driver's EcoSMART Settings short cut has two-sided printing enabled, making it easier to
reduce paper use.
The HP Active Directory Administrator Templates support a variety of policy controls that can help your company
lessen its impact on the environment and save money via your HP LaserJet print products. The Duplex Default
setting reduces paper use.
Helps increase productivity, reduce support calls
The HP Universal Print Driver enables advanced functions on all the printers it supports, from two-sided printing
and stapling to Private (PIN) Printing and color themes, so users are not held up or held back by a lack of
advanced print features.
NOTE: For Windows 8/8.1 and later Windows operating systems, Dynamic mode is only supported in Windows
desktop applications.
The HP Universal Print Driver supports PCL 6 and postscript emulation printer languages.
By providing real-time print job and print product information, the HP Universal Print Driver empowers you to
resolve common problems and place fewer calls to the help desk. This can mean faster problem resolution,
improved printer uptime, and increased productivity.
System requirements
Supported Operating Systems
For information on supported client and server operating systems, see Specifications at www.hp.com/go/upd or the
current HP UPD release notes at www.hp.com/go/upd under Documents and whitepapers.
Port Monitor
The port monitor that the HP UPD uses and recommends is the Microsoft standard port monitor (Standard TCP/IP
Port Monitor). The standard port monitor was introduced in Microsoft Windows 2000 and uses the Simple Network
Management Protocol (SNMP) to read the configuration of the target print device and to determine the device's
detailed status. Additionally, the standard port monitor offers more accurate error reporting than the limited print error
messages that might be enabled by other port monitors, such as the LPR port monitor.
The HP UPD Port monitor is used only to provide a print path to UNC paths or shares, send print settings to a local
printer, and send jobs to a defined HTTP location for job tracking.
23
Print Processor
The HP print processor (hpcppxyz where “xyz” is based on the driver version such as hpcppp190 for UPD 6.3.0)
provides additional functionality for numerous page manipulation features when compared to the standard print
processor (winprint) available with Windows. The HP print processor is used in the Unidriv-based drivers, and is one
of the essential components in HP driver architecture providing functionality such as collation, booklet making,
scaling, watermarks, and N-UP ordering of pages.
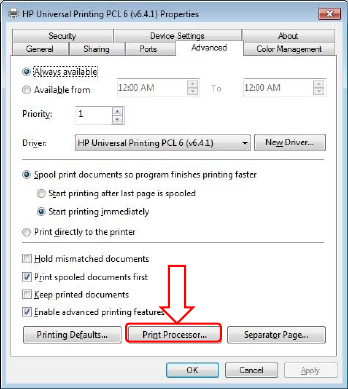
The print processor can be selected in the Advanced tab of Printer properties by clicking Print Processor.
Figure 2-1 Print Processor button on the Advanced tab
The HP print processor is the HP tested configuration for the HP UPD. Non-HP print processors are not supported.
Internet Printing Protocol (IPP)
HP UPD supports Internet Printing Protocol for Traditional Mode Print Queues
HP UPD Dynamic mode is not supported
HP UPD uses SNMP to communicate device status and capabilities to the printer driver
IPP does not support SNMP. Instead, the protocol defines a feature request/reply SOAP packet pair. However,
HP UPD does use SNMP queries to complement the list of features in addition to the method defined by the IPP
protocol. SNMP is done during queue creation even with an IPP port.
HP recommends utilizing the HP Driver Configuration Utility to define the print device features for use with the HP
UPD
24
Software availability
The HP Universal Print Driver (HP UPD) is available in the following languages:
Table 2-1 HP UPD supported languages
Arabic
Bulgarian
Catalan
Croatian
Czech
Danish
Dutch
English
Estonian
Finnish
French
German
Greek
Hebrew
Hungarian
Italian
Japanese
Korean
Latvian
Lithuanian
Norwegian
Polish
Portuguese (Brazilian)
Romanian
Russian
Serbian (Latin)
Simplified Chinese
Slovak
Slovenian
Spanish
Swedish
Thai
Traditional Chinese
Turkish
Ukrainian
NOTE: If the HP UPD is used to print to an unsupported product, HP recommends using the HP UPD PS for best
print results.

25
3 Planning an HP UPD deployment
Introduction
This chapter is designed to help you make strategic deployment decisions as you integrate the HP UPD into your
printing environment. The deployment of the HP UPD in your printing environment will be unique based upon your
specific objectives and current IT infrastructure. This chapter assumes that you have a basic understanding of the
functionality of print drivers and the Windows printing architecture.
This chapter provides you with options and recommendations to customize your deployment experience based on
your current printing environment and your printing goals and objectives. Although your environment will vary slightly
from the installation models below, you should be able to use the recommendations in this document so that your HP
UPD deployment will be smooth and have the least impact to your printing environment. In some cases you will use
more than one solution provided in the information below.
This chapter contains the following sections:
The five steps to a successful deployment
Initiation and planning
Communication and training
Conduct a pilot test environment
Testing and Evaluation
Deploy to production
The five steps to a successful deployment
1. Initiation and planning
Fully understand your printing requirements and environment
Make decisions
2. Communication and training
Executive sponsorship
Training
3. Conducting a pilot
4. Test and evaluation
5. Roll out to production

26
Initiation and planning
To gain the maximum benefit from the HP UPD:
Fully understand your printing requirements and environment.
Develop an HP UPD deployment strategy.
NOTE: An HP UPD deployment requires major changes to your IT environment and should be treated accordingly.
Make sure you back up your print servers and print queues before beginning any installation.
Understand your printing requirements and environment
Determine deployment objectives
This is a description of the objectives of the deployment. The intent is to get a clear and detailed picture of what the
end result will be after the migration or upgrade. See HP UPD deployment worksheet in Appendix E for details
Print servers or Direct IP
With improvements in desktop computing power, available printing management tools, and the growing concerns
around reducing printing management costs, some enterprise customers are starting to question whether they should
move to Direct IP printing or continue with client-server printing.
For additional information on whether direct IP printing is right for you refer to Direct IP Printing with the HP Universal
Print Driver available on www.hp.com/go/upd . HP UPD supports either environment.
Identify stakeholders
The stakeholders are anyone impacted by the plan, and can include, but are not limited to the following groups.
End users
o Will there be downtime, what will change?
IT staff
o How much time and resources?
Help Desk
o What do they need to know?
Make an inventory
You must inventory all printing products, print servers, print queue names, printer drivers, IP addresses, and page
description languages (PDLs) that you are using. If you have print servers, you also need to determine if all of the
print queues are still active.
Consider PDL needs
Some business applications rely on a specific version of Printer Command Language (PCL) or require Adobe®
PostScript®. As a result, test that the applications and solutions you are using are compatible with the HP UPD
versions of PCL and postscript emulation.
If your testing proves that some applications or solutions are not compatible with the HP UPD versions of PCL and
postscript emulation, you should retain the current drivers and queues for the non-compatible applications and
solutions. Some possibilities include the following:
Specialty products
Specific business applications, such as ERP
The use of certified drivers, such as SAP
Line printers
Large format printing products
HP products that feature edge-to-edge printing, which require product-specific drivers

27
Driver considerations
Please consider the following to determine if the HP UPD is the correct solution for your printing environment.
The HP UPD is supported and tested on HP printers only. For non-HP products, HP recommends using the driver
supplied by the product manufacturer.
Not all HP printers are supported by the HP UPD. The HP UPD supports most workgroup class HP LaserJet
printers and MFPs, and a number of business Inkjet and Officejet printers. Some personal HP LaserJet and Inkjet
printers are not supported. For the most current list of HP UPD supported products, see Supported products on
the following Web site www.hp.com/go/upd.
Pre-configuration, policy and access requirements
If you plan on setting up custom default settings, or restricting access to printers or printer capabilities like color
printing, now is the time to make a list of all those requirements.
Environment and network compatibility
Validate that the HP UPD is compatible with your current environment and network communication protocols. Make
sure that the SNMP and mDNS protocols are not being filtered or blocked. The HP UPD requires these protocols for
discovery and communication with products. See HP UPD deployment worksheet in Appendix E to make sure the HP
UPD will work in your environment
Baseline the system
Test that all your applications (shrink wrapped and home-grown) are compatible with the HP UPD. Run performance
and printing tests using “typical” documents.
Risk management
As with most projects, there are risks involved. Spend some time identifying these and how to mitigate any that might
be serious. Some suggestions are:
Make a backup of all systems before making any modifications.
Thoroughly test before going into production.
Plan your activities for a time of low print server usage to minimize user impact.
When migrating to a new server, keep the old server operational for a period of time just in case you need to fall
back to it.
Do initial testing on a test server before moving to a production server.
Key deployment decisions
Create a list of required drivers
Choose an installation method
Determine Driver Pre-Configuration needs
Choose traditional and dynamic mode
Decide whether to manage the HP UPD with Active Directory Group Policy
Estimate time requirements
Create a list of required drivers
HP UPD PDLs
Product specific drivers
Non-HP products
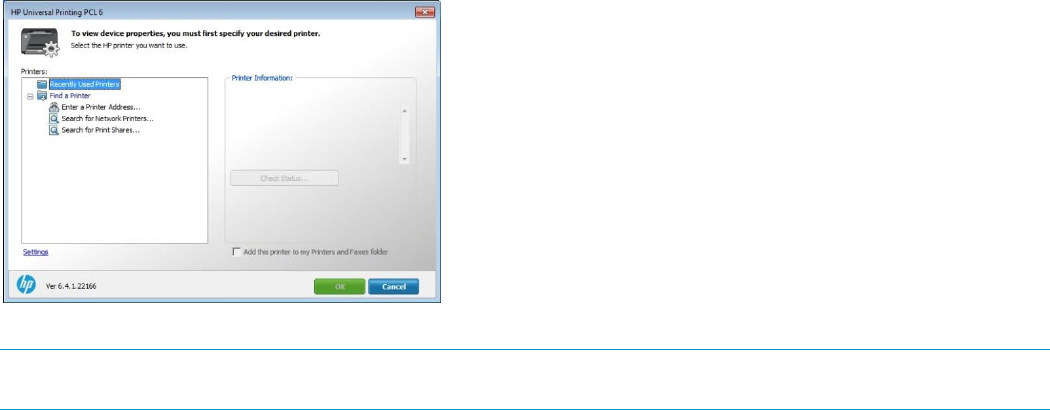
28
Choose an installation method
HP UPD can be installed using multiple methods including:
Add Printer Wizard
INSTALL.EXE
HP Web Jetadmin
Microsoft Print Management Console
Custom scripts using Microsoft-approved tools
HP PARK tools
Note that there are pre-configuration implications.
See HP UPD deployment flowcharts in Appendix F for additional guidance on which installation option is best for your
environment.
Determine Driver Pre-Configuration needs
The default settings of the HP UPD can be changed to suit specific needs. For example, the administrator might want
to set duplex printing, and print in grayscale as the defaults. This can be done on a per installation, per user, per
group, or per site basis. For more information, see Managing the HP UPD with Active Directory Group Policy (chapter
8), the HP Driver Configuration Utility documentation, or by referring to the list of installation options in Installation
methods and environments in chapter 5.
Choose traditional and dynamic mode
The HP Universal Print Driver (HP UPD) can operate in two different modes, traditional or dynamic.
Traditional mode functions like the product-specific drivers. When installed in traditional mode, the HP UPD is
associated with a specific printing product, which can then be selected from the application print menu. Once
selected, the HP UPD user interface is similar in appearance to a traditional, product specific driver.
Dynamic mode allows the user to find printers on a network. This is ideal when traveling or printing to a new
product in the office. An easy-to-use interface helps users connect to HP printing products on their own. There are
four methods for finding printers in dynamic mode: recently used printers, manually enter printer address,
managed printer lists, or search options.
Figure 3-1 Dynamic Mode Print Interface
NOTE: For Windows 8/8.1 and later Windows operating systems, Dynamic mode is only supported in Windows
desktop applications.
Dynamic mode and traditional mode are not mutually-exclusive. You can deploy print queues using traditional mode
and also deploy the HP UPD using dynamic mode for mobile users.
For more information about traditional and dynamic mode, see Installation methods and environments in chapter 5.
29
Decide whether to manage the HP UPD with Active Directory Group Policy
Active Directory Administrator Templates provides options for managing the HP UPD in your environment. The HP
UPD has capabilities and features that can be managed and controlled on a per-user or group level. This means that
features like Use Mode settings, Color Access Control, Search Capabilities, and more can be managed down to the
user level, or at a group level.
For more information about the Active Directory Administrator Templates, see the chapter on Managing the HP UPD
with Active Directory Group Policy (chapter 8).
Estimate time requirements
Make sure that you allow sufficient time to complete all of the steps. The following are some things to consider.
Planning
Performing System Backups
Gathering tools and/or write scripts
Server Installation
Client Installation
Testing
The amount of time it will take to install the HP UPD depends on a number of factors including the number of drivers,
the number of print queues on the server, and the number of host clients receiving the installation either PnP vended
or through HP UPD INSTALL.EXE or Add Printer Wizard. The installation of any driver can be significantly slower if
there are other printer drivers on the system.
The amount of time to create a print queue using an existing driver depends on processor speed, etc. However, if you
have 1000 print queues to create, this could easily add up to between 8 and 16 hours.
Communication and training
HP strongly suggests having a communication plan in place prior to beginning your deployment of the HP UPD. This
helps overcome objections and ease the fears of end-users who might be worried about losing some of their printing
functionality. Make sure your end-users and the IT staff members understand the benefits gained by using the HP
UPD.
Training
Develop training reference materials and identify resources to help your end-users successfully transition to the HP
UPD from standard product drivers. For example, a change from the traditional mode printing user interface to the
dynamic mode interface requires planning and in some cases simple training. Include information about how to
identify products through the HP UPD. Employ a survey to gauge customer satisfaction.
Conduct a pilot test environment
HP recommends that you create a test environment during your HP UPD implementation. Select a part of your
printing environment that will not affect many users to test the implementation prior to deploying to the entire printing
environment. Make sure this test environment (applications and printers) is representative of the overall printing
environment.
Testing and Evaluation
Measure against the performance baselines
Determine variances and if they warrant corrective action or a change
Make any necessary entries into the configuration management log
30
Deploy to production
HP strongly recommends a phased approach to deploying the HP UPD.
Deploying in a phased manner across the IT environments helps to:
Minimize issues and provide valuable information about each type of environment.
Uncover issues that could be documented and considered prior to the next phase.
Increase the confidence of end-users and sponsors in the project.
Closing the project
Confirm work is done to requirements
Gain formal acceptance of the product
Hand off the completed product

31
4 Pre-configuring default settings and
print policy for HP UPD
Introduction
This chapter outlines several options for configuring the default behavior of the HP UPD. The options vary based on
the installation method selected. Review each option to determine which method is right for your environment. You
can pre-configure the HP UPD default settings before, during, or after driver installation.
NOTE: In order to prevent any network traffic from a HP UPD driver to the LDAP server, printer status notification
must be disabled. Printer status notification is no longer available starting with the release of HP UPD 6.5.0.
The table at the end of this chapter, Configurable functions and pre-configuration utilities, lists the available settings
for each pre-configuration utility and installation method. This chapter provides some representative examples, but is
not a comprehensive list of available settings. The information in this chapter will help you select an option that best
meets your needs.
In addition to the default driver settings, you can also create a print policy using the available tools to limit access to
certain print features such as restricting printing after a specific time or not allowing color printing.
The following sections explain the methods available for configuring the HP UPD default settings and creating a print
policy:
HP Print Administrator's Resource Kit (HP PARK)
Configure HP UPD default settings using INSTALL.EXE during driver installation
Configure HP UPD default settings and/or print policy using Group Policy Objects in Active Directory
Pre-configure HP UPD default settings using HP Driver Configuration Utility
Pre-configure HP UPD default settings using HP Driver Deployment Utility
Configure HP UPD default settings after driver installation in driver preferences
Overview of configurable functions and pre-configuration utilities

32
HP Print Administrator Resource Kit (HP PARK)
The HP Printer Administrator Resource Kit (HP PARK) is a collection of tools, scripts and documentation to help print
administrators install, deploy, configure and manage the HP Universal Print Driver (UPD). In the single file download,
the HP PARK contains both supported and unsupported software tools, scripts and documentation.
Supported tools
The following tools provided within the HP Print Administrators Resource Kit are eligible for HP technical support.
Active Directory Administrator Template for UPD: Allows administrators to manage the HP Universal Print
Driver user policies and printer lists from within the Active Directory infrastructure. Add this AD Administrator
Template into an existing Group Policy Object and assign the GPO to a user, group, or organizational unit to
manage the HP UPD Managed Print Policies and Managed Printer Lists.
o For more information on using AD templates, see Managing the HP UPD with Active Directory Group
Policy (chapter 8).
o Also see the You-Tube video “Using HP Active Directory Administrator Templates” at:
http://youtu.be/UUN2sEggnuc.
NOTE: When using an AD template, if you open an application’s print dialog after initially connecting to the queue
and without ever opening printing preferences or printer properties, the application’s print dialog may not reflect the
policy depending on how the application is accessing devmode and which devmode it is accessing. However, it
should print correctly based on the policy. To update the application's print dialog, you need to access the print driver
by opening printer properties or printing preferences through the application or printers folder.
AutoUpgradeUPD: Simplifies the process of creating clean print queues on a print server. This is useful when
upgrading the HP UPD driver version, upgrading an older non-UPD print queue to use the HP UPD, or resetting
existing print queues to factory or preconfigured installation defaults. This tool prevents existing queues from
carrying forward unknown, incompatible and unstable configurations during driver upgrade.
NOTE: There are separate versions of AutoUpgradeUPD for 32-bit and 64-bit operating systems.
AutoUpgradeUPD.exe is for 32-bit operating systems and AutoUpgradeUPD64.exe is for 64-bit operating
systems.
o For more information on using HP AutoUpgradeUPD, see Delete and recreate queues with
AutoUpgradeUPD.exe in chapter 6.
o Also see the You-Tube video “HP AutoUpgradeUPD” at: http://youtu.be/mYCVx1RBp9w.
Driver Configuration Utility (DCU): Is a small Windows application used to edit the configuration file associated
with a particular driver. The configuration file defines the default printer settings for the driver applied at the time of
installation. The settings defined within the DCU take effect when the printer is installed.
NOTE: The HP DCU works with HP printer drivers that are configured using a .cfg file such as the HP v3 UPD.
o For more information on using DCU, see Pre-configure HP UPD default settings using HP Driver
Configuration Utility (HP DCU) in this chapter.
o Also see the You-Tube video “Pre-configuring HP UPD using the HP DCU at:
http://youtu.be/4jx1jBXrVUU.
Driver Deployment Utility: Is a Windows application that packages the driver files and code needed to deploy
them into an *.EXE and *.CAB file. These files are run on a client PC to copy the driver files to the Windows driver
store, and for network packages, to install the printer.
NOTE: The HP DDU works with HP printer drivers that can be installed by an .INF file that supports only a single
platform (32-bit or 64-bit) such as the HP v3 UPD.

33
o For more information on using DDU, see Pre-configure HP UPD default settings using HP Driver
Deployment Utility in this chapter.
PRNCON.EXE: Is a console application for removing and adding an HP network printer’s point-and-print
connection between a Windows client workstation and a print server.
Unsupported Tools
The following tools provided within the HP Print Administrators Resource Kit are not HP supported. These are
provided as a resource to customers. If you have any questions, comments, or enhancement requests regarding
these unsupported tools, email HP at UPD_PARK@hp.com. Responses will be at HP’s discretion, and response
times are not under a service level agreement and may vary. Documentation available from the download site for the
software contains additional information related to support.
Add Print Model to Comments Field: This script is used to add the device model name to the comments field
for any print queue that is using the HP Universal Print Driver (HP UPD).
HPPRLOG: Captures print registry information to *.xml and *.hiv files. Run hpprlog*.exe on the print server, the
active node of a print cluster, or a Citrix server.
Migrate Server Tools: A set of scripts and other tools to assist in automating the migration of print queues from
an old server to a new server or to upgrade the print queues on a server.
UpdateNow: A command line utility designed to trigger the automatic configuration functionality in HP printer
drivers. This enables print administrators to script the automatic configuration of devices using a single command
that will be consistent across multiple versions of HP printer drivers.
RemovePlugPlayDrivers: This utility searches for HP plug and play printer driver files in the Windows driver
store and provides an option to remove these staged printer driver files. Currently installed printers are unaffected
by this utility. The benefit provided is version control of the HP print driver utilized for software first USB Plug and
Play installation of newly created HP UPD printers in the Devices and Printers folder.
o For more information, see the You-Tube video Staging Drivers for PNP using HP RemovePNPDrivers
Utility http://youtu.be/XZ2SvUuR_3c
See the release notes for each tool for the latest information on the tool and steps for using it.
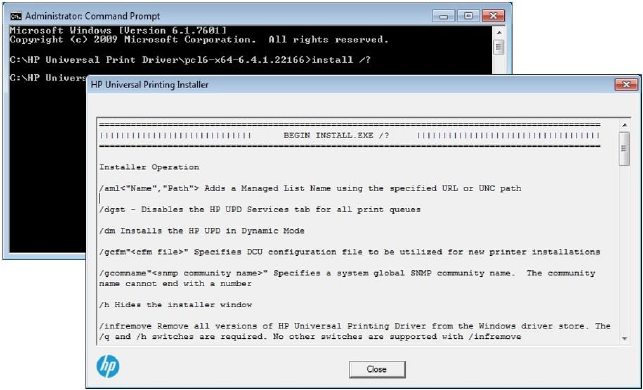
34
Configure HP UPD default settings using INSTALL.EXE
during driver installation
The HP UPD installer allows some driver default settings to be modified via command line options. Some of these
switches will change the system-wide behavior of the HP UPD, while other changes are specific to a single print
queue.
A list of the available options for the INSTALL.EXE utility can be displayed by entering install /? from the command
prompt in the HP UPD driver folder.
Figure 4-1 Install.exe Help Dialog
The screen that displays is a comprehensive list of the available configuration options that are available during
installation of the HP UPD. Some of the more popular install switches include the following:
/q – Quiet mode, no prompt
/h – Hides the HP install dialogue
/sm – Creates a static printer instance (i.e. Traditional Mode) and port
/n – Creates the printer with the defined printer name
Multiple switches can be combined to create a command-line installation that is customized to meet your
requirements.
For additional information, see Method 3: Windows client/server: Use command prompt (INSTALL.EXE with switches)
in chapter 5.
The default settings are changed to reflect the chosen options in each of the printers installed using these switches.

35
Configure HP UPD default settings and/or print policy using
Group Policy Objects in Active Directory
The changes made within Group Policy Objects control the global HP UPD user capabilities. An HP UPD
Administrator Template can be added to create a Group Policy Object to manage the user HP UPD capabilities. The
settings apply to any queue that uses the HP UPD. Care should be taken when locking configuration settings. The
user is unable to change a locked setting. As an example, if duplex is enabled and locked, the user will be unable to
override this to print transparencies.
The HP UPD Administrator Template is included with the HP Printer Administrators Resource Kit (HP PARK). To
download the HP PARK, go to www.hp.com/go/upd and click Download now. Verify your language, and then select
your operating system. Expand Software – Universal Print Driver. To the right of HP Printer Administrator
Resource Kit, click Download. Save the file and then click the folder and click Extract all files.
NOTE: See Managing the HP UPD with Active Directory Group Policy in chapter 8 for detailed information on
installing and using the Active Directory Administrator Template.
The following are typical settings available for pre-configuration and are located in the Default Print Settings section
of the HP UPD AD Administrator Templates:
Duplex
Grayscale
Economode
Job Storage
Edgeline QAC
Print Quality
The HP UPD policy management capabilities are disabled by default. To take advantage of the management
capabilities through the Group Policy Objects on new and existing queues, the HP UPD management capabilities
must be enabled.
NOTE: When using an AD template, if you open an application’s print dialog after initially connecting to the queue
and without ever opening printing preferences or printer properties, the application’s print dialog may not reflect the
policy depending on how the application is accessing devmode and which devmode it is accessing. However, it
should print correctly based on the policy. To update the application's print dialog, you need to access the print driver
by opening printer properties or printing preferences through the application or printers folder.
You-Tube Video
For more information on using AD templates, see the You-Tube video “Using HP Active Directory Administrator
Templates” at http://youtu.be/UUN2sEggnuc.

36
Pre-configure HP UPD default settings using the HP Driver
Configuration Utility
The HP Driver Configuration Utility (HP DCU) is a Windows application used to edit the configuration file associated
with a particular print driver. The configuration file controls the print driver settings and takes effect when the driver is
installed.
NOTE: Windows requires a user to have Administrator rights to install a printer driver.
The HP DCU does not handle any part of the deployment or installation of the driver. Rather, the default configuration
file is modified and saved back to the same driver directory in which it was opened (hpcpu*.cf*) or saved to the local
host's directory (filename.cfm). The HP Driver Configuration Editor is intended for use in environments where there is
an established process for deploying drivers.
CAUTION: Changing the configuration file of the driver with this utility and saving it as a ".cfg" file will invalidate the
digital signature (WHQL) if the ".cfg" file in the driver is replaced with this customized ".cfg" file. Instead, save the file
as a ".cfm" file. Saving the changes as a ".cfm" file will maintain the digital signature.
On Windows 7, if you attempt to install a version of the HP UPD with an invalidate digital signature (WHQL) and a
version of the HP UPD is already installed with a valid digital signature, Windows 7 may ignore the invalid driver, and
use the current valid driver instead. Since the pre-configuration settings are tied to the new driver, the settings are not
updated.
Network administrators can use HP DCU to pre-configure a print driver before deploying and installing. It is most
beneficial when configuring print drivers for multiple workstations or print servers for print queues that share the same
configuration. Since the driver is not pointing to a specific device at this point, the available settings in HP DCU are
based on settings available in the driver and not a specific device. If you are pre-configuring the HP UPD, additional
trays may be shown, as well as color-related settings such as Grayscale. If the actual device does not support a
specific setting in HP DCU, the setting is ignored. For example, if you enable Grayscale and then connect to a
monochrome printer, the Grayscale setting is ignored.
NOTE: The HP DCU works with HP printer drivers that are configured using a .cfg file such as the HP v3 UPD.
Pre-configure the HP UPD using HP DCU
The process of configuring drivers and other software occurs before installation. This allows the driver to be
configured once and installed on any number of server or client systems.
Use the following steps to pre-configure the HP UPD:
1. Open the directory for the HP Driver Configuration Utility (HP DCU) in the HP PARK directory.
NOTE: The HP DCU is included with the HP Printer Administrators Resource Kit (HP PARK). To download the
HP PARK, go to www.hp.com/go/upd and click Download now. Verify your language and select your product’s
operating system (such as Microsoft Windows 7 32-bit or 64-bit). Expand Software – Universal Print Driver. To
the right of HP Printer Administrator Resource Kit, click Download. Save the file and then click the folder and
click Extract all files.
HP DCU is supported on both 32-bit and 64-bit systems.
2. Double-click HPBCFGAP.EXE to run the HP Driver Configuration Utility ..
NOTE: The application automatically opens in the language specified within Region and Languages.
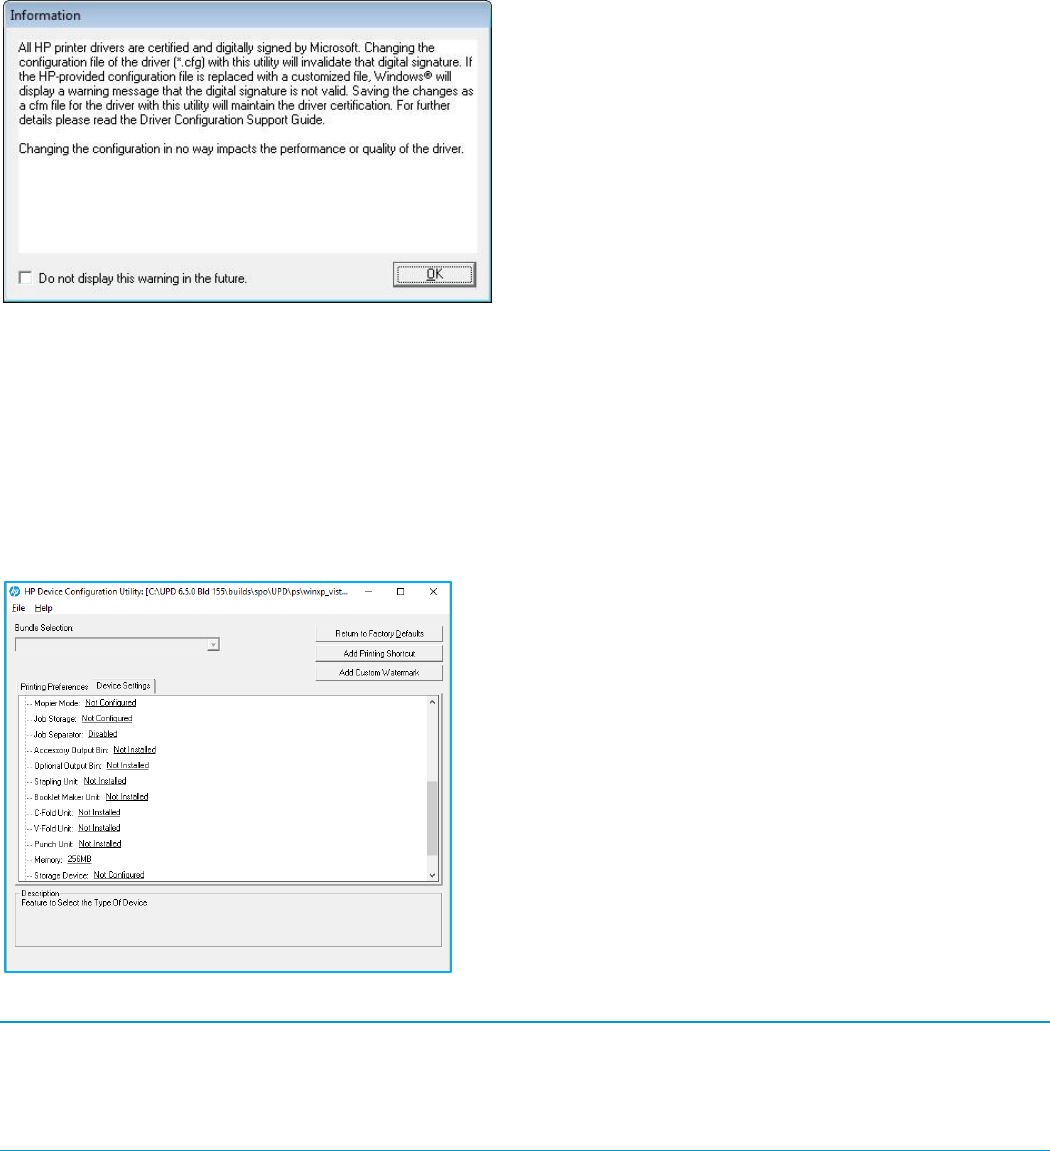
37
Figure 4-2 Digital Signature Not Found dialog box
The Information dialog box appears warning users that, depending on how the driver is installed, a Windows
Hardware Quality Labs (WHQL) Digital Signature Warning will appear. Changing the configuration of the driver does
not impact the performance or quality of the driver. Changing the configuration may invalidate the driver's digital
signature and triggers the appearance of this dialog box.
3. Click OK
4. Click File and then Open
5. Open a driver configuration file (cfg) or an existing cfm file (such as HPCPU210.CFG for the HP UPD 6.5.0 PCL 6
driver)
Figure 4-3 HP Driver Configuration Utility (DCU)
NOTE: With DCU 1.650.1.32821/UPD 6.5.0 and later, Mopier Mode, Job Storage and Storage Device settings are
now set to Not Configured so that if set to Installed, these settings are set in the registry. In the past, Mopier Mode,
Job Storage and Storage Device defaulted to Installed. Since they did not change if left to Installed, the cfm file from
DCU did not set these settings. Prior to this change, if the queue is not pointing at an actual device with Bidi enabled,
settings such as Mopier would be disabled.
6. Modify settings to your requirements.
7. Save the changes.

38
File-Save As: Allows you to select the file name and extension. If only a file name is entered, the application
saves the file as (filename).cfg to the defined directory. In order to save the file as a cfm, you must type the
extension .cfm after the file name.
NOTE: File-Save: Saves the file to the same filename from where it was opened, which may impact the digital
signature. To not impact the digital signature, HP recommends using File-Save As and saving the file as a .cfm
file.
8. Copy the cfm file to the ..\3 folder.
64 bit Windows- C:\Windows\system32\spool\drivers\x64\3
32 bit Windows- C:\Windows\system\spool\drivers\w32x86\3
NOTE: When copying the cfm file to the local machine driver directory, the cfm file name must have the format
hpcpuxxx.cfm, where xxx matches the number of the cfg file. For example, hpcpu195.cfg would be named
hpcpu195.cfm.
When using UPD 5.5.0 or later, you can use any file name, as long as it uses the extension .cfm, and the
install.exe is used with the /gcfm option to install the printer. For example:
install.exe /gcfm”c:\temp\duplex.cfm” /n”PrinterName” /sm”HostName”
9. Install the driver using the supported method of deployment.
HP DCU provides the most comprehensive list of configurable options and settings, but it does not include all of the
available options. In some cases, the HP DCU is the only method to configure a specific driver setting. It might
become necessary to combine some of the pre-configuration tools to get a completely configured driver for your
environment. Please refer to the Driver Configuration Support Guide for additional information on using the HP DCU.
For more information on the HP PARK in this document, see HP Print Administrator's Resource Kit (PARK) in this
chapter.
You-Tube Video
For more information on using DCU, see the You-Tube video “Pre-configuring HP UPD using the HP DCU” at:
http://youtu.be/4jx1jBXrVUU.
Pre-configure HP UPD default settings using HP Driver
Deployment Utility
The HP Driver Deployment Utility (HP DDU) simplifies the deployment of printer drivers on client computers. It is a
simple utility that packages the driver files and the code needed to deploy them into an *.EXE and *.CAB file. These
files are run on the client PC to copy the driver files to the Windows Driver Store and for network packages, to install
the printer.
NOTE: Windows requires a user to have administrator rights to install a printer driver.
The HP Driver Deployment Utility works with printer drivers that can be installed using an .INF file, supporting only
traditional mode installation (dynamic mode is not supported). It is designed to work with printer drivers that have their
files contained in one directory structure. Because this utility is generic, it does not have knowledge of how specific
drivers are packaged. It packages all files in the directory (and subdirectories) where the driver INF file was found.
The driver must be expanded so that the HP DDU can process the INF files. If you download an .exe with the driver
files, you need to run it first to unpack all of the files. Then run the HP DDU to package the files for deployment on the
client system.
NOTE: The HP DDU works with HP printer drivers that can be installed using an .INF file that supports only a single
platform (32-bit or 64-bit) such as the HP v3 UPD.
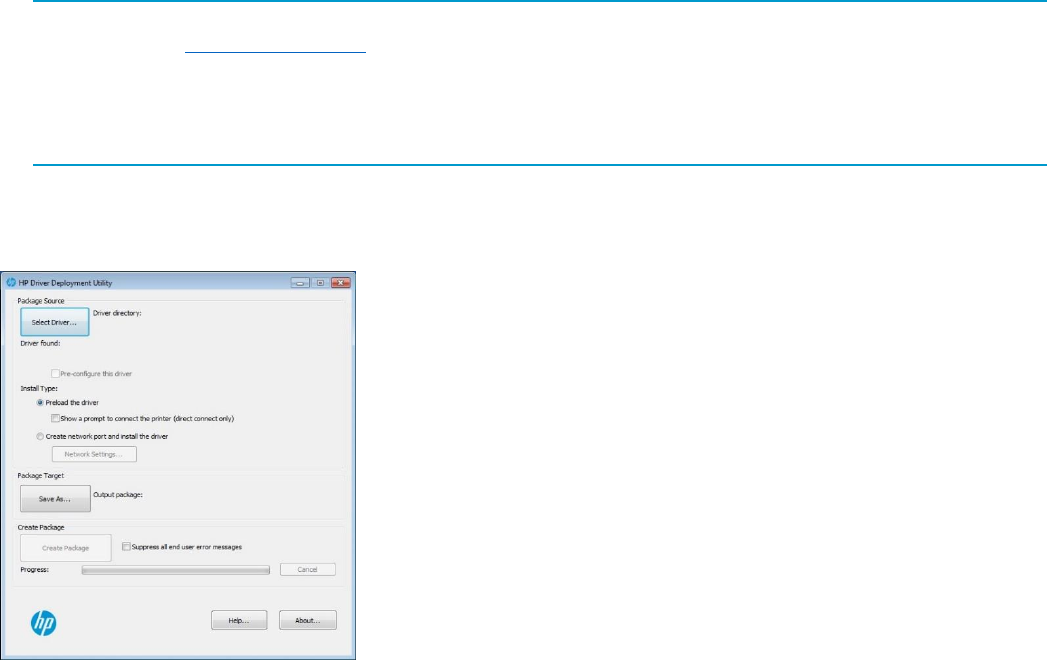
39
The HP DDU is used to pre-configure a print driver for deployment. When the package is run on the client computer,
the new configuration file configures the print driver after it is installed, and does not interfere with WHQL certification.
The HP DDU contains the standalone HP DCU utility inside the package and is launched when Pre-configure driver
is selected from the HP DDU tool.
Pre-configure the HP UPD using HP DDU
1. Open the directory for the Driver Deployment Utility in the HP PARK directory.
NOTE: The HP DDU is included with the HP Printer Administrators Resource Kit (HP PARK). To download the
HP PARK, go to www.hp.com/go/upd and click Download now. Verify your language and select your product’s
operating system (such as Microsoft Windows 7 32-bit or 64-bit). Scroll down and click Software – Universal
Print Driver. Click Download for the HP Printer Administrator Resource Kit. Save the file and then double-click
the file and click Extract all files.
HP DDU is supported on both 32-bit and 64-bit systems.
2. Copy the contents of the Driver Deployment Utility directory to the desired directory on the hard drive of the client
computer where HP UPD and/or device-specific print drivers will be preconfigured.
3. Double click HPBDDU.EXE to create the package.
Figure 4-4 HP Driver Deployment Utility (DDU)
4. From Package Source section, click Select Driver… and select the driver to package by browsing to an INF file in
the driver directory.
5. Select the Pre-configure this driver checkbox. This checkbox is enabled only for drivers that support pre-
configuration.
6. When the dialog appears to “Select the corresponding CFG to the selected driver,” click OK
7. Select the CFG file (for example, hpcpu210.cfg for the HP UPD 6.5.0 PCL 6 driver) and click Open
8. For direct connect, select Preload the driver
Select the Show a prompt to connect the printer checkbox if you want to prompt the user after the files are
copied
9. When deploying network printers, select Create network port and install the driver.
Click Network Settings… to enter the network settings.
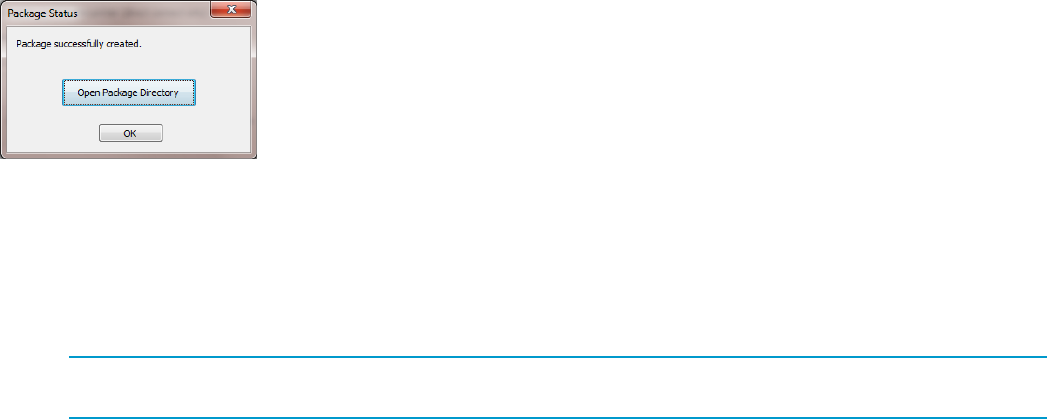
40
From the Required Settings section, enter at least one way of identifying the printer (IP address, Hardware
address, or Hostname).
Make any changes to the Additional Settings section (port name, printer name, default printer, sharing and
share name). You can leave the default settings if you don’t need to make changes.
Click OK.
10. From Package Target section, click Save As…
11. Select a location where you want the files saved and click Save
Three files will be written here: an .exe, a .cab and an .xml with information about the package created
12. If you want to suppress any error messages, from the Create Package section, select the Suppress all end user
error messages checkbox .
13. Click Create Package. The Driver Configuration dialog opens.
14. Configure the driver as needed.
15. When you are finished configuring the driver, click OK. After accepting the configuration changes, the package
will be created.
Figure 4-5 Package Status
16. Click OK.
17. Run the new .exe from the client machine. You must have administrator rights to run the exe because it will be
copying files into the Windows driver store.
For direct connect, the driver files are on the system and any user can connect a printer to trigger the plug
and play event. The printer object is not created until the printer is connected.
NOTE: If you load multiple pdls for one printer, the OS will determine which one satisfies the Plug and Play
event. The OS will create one printer object for that pdl.
For network printers, a port and printer object will be created with the information provided above.
For more information on the HP PARK in this document, see HP Print Administrator's Resource Kit (PARK) in this
chapter.

41
Configure HP UPD default settings after driver installation in
driver preferences
Table 4-1 Configurable functions and pre-configuration utilities lists which utility or utilities to use to configure
commonly used printer driver features.
Manage printer default settings
When a printer gets installed, certain default settings are automatically set based on what capabilities are available
from the product. These default settings include items such as default paper size and type, simplex (single sided
printing), and portrait or landscape printing.
In many printing environments it is common for printing administrators to change the default settings. Some of the
more common changes are to enable printing on both sides of the paper (duplex) and to print in grayscale. There are
many ways to change or preconfigure these default settings and some are discussed in other chapters of this HP
System Administrator's Guide.
This section primarily discusses how these new default settings are deployed and how to manage or provide firmer
controls on changes allowed to these default settings. Default settings and changes are not managed.
Other sections in this chapter describe the use and procedures for changing the default settings in both Point and
Print and Direct IP Printing environments. Please refer to the sections on HP DCU, HP DDU, and INSTALL.EXE for
specific instructions on how to use these tools.
It is important to understand that changes to the printing default settings are at most temporary and basically not
managed. Users have the ability in both Direct IP Printing and Point and Print environments to change the default
settings on their printers through the Printing preferences. In some cases, depending on company policies, a
centralized management approach is necessary to ensure that the default settings are not changed.
Manage default settings with Active Directory Group Policy for HP UPD in
dynamic or traditional mode
The HP Active Directory Group Policy offers another way to ensure that the default settings are maintained and
managed. HP’s solution for printer policy settings using an existing Active Directory environment is to use the Active
Directory group policy objects. This allows an administrator to set defaults for settings such as duplex, and grayscale
printing. These policies are pushed locally into the users registry and referred to during printing. This has the effect of
constantly refreshing the user’s default settings so each time a user prints, the correct default settings are present.
Policies are pushed to the client PCs. This has the effect of refreshing the default printer settings automatically.
Please refer to the sections on using Active Directory Administrator Templates for further information (chapter 8).
NOTE: When using an AD template, if you open an application’s print dialog after initially connecting to the queue
and without ever opening printing preferences or printer properties, the application’s print dialog may not reflect the
policy depending on how the application is accessing devmode and which devmode it is accessing. However, it
should print correctly based on the policy. To update the application's print dialog, you need to access the print driver
by opening printer properties or printing preferences through the application or printers folder.
You-Tube Video
For more information on using AD templates, see the You-Tube video “Using HP Active Directory Administrator
Templates” at http://youtu.be/UUN2sEggnuc.

42
Overview of configurable functions and pre-configuration
utilities
The table below shows which utility or utilities can be used to configure several commonly-used driver features. In
some cases, more than one method will need to be used depending on the combination of settings that are to be
changed. For example, to enable policy management and set the Watermarks to Username, use the INSTALL.EXE
utility to enable policy management and the HP DCU tool to set the default Watermark option.
Table 4-1 Configurable functions and pre-configuration utilities
Function
INSTALL.EXE
AD
HP DCU
HP DDU
Print on Both Sides
(Duplex) (lock)
X
X
X
Orientation
X
X
Print in Grayscale (lock)
X
X
X
Print Quality
X
X
X
Color Options (lock)
X
X
EconoMode (lock)
X
X
X
Paper Size
X
X
Media Type (lock)
X
X
Paper Source (lock)
X
X
Job Storage Mode
(lock)
X
X
X
Punching
X
X
Fold *
X
X
Stapling / Folding
X
X
Output Bin
X
X
Services Tab
X
X
X
X
Printing Shortcuts
X
X
TrueType Font
X
X
HPEasyColor
X
X
Pages per Sheet
X
X
Booklet Printing
X
X
Send True Type As
Bitmap
X
X
Print all Text as Black
X
X
Raster Compression
X
X
Print Document On
X
X
Scale to Fit
X
X
Percent of Normal Size
X
X
Watermarks (lock)
X
X
Copies
X
X
Collate
X
X
Mirror Output
X
X
PostScript Language
Level
X
X
Device Type (lock)
X
X
Tray 1-10
X
X

43
Function
INSTALL.EXE
AD
HP DCU
HP DDU
Mopier Mode
X
X
Job Storage
X
X
Job Separator
X
X
Accessory Output Bin
X
X
C-Fold Unit *
X
X
V-Fold Unit *
X
X
Memory
X
X
Optional Output Bin *
X
X
Storage Device
X
X
Automatic Configuration
X
X
Edgeline QAC
X
Color Access Control
X
Enable Policy mgmt
X
* Requires DCU v1.640.1.32746 or later, or DDU 2.0.0.32755 or later, with HP UPD 6.4.1 or later
44

45
5 Installing and uninstalling the HP
UPD
Introduction
This chapter contains the following sections:
Install HP UPD v5.1 and later
Download and unzip the HP UPD installation files
Installation methods and environments
Uninstall the HP UPD
The mode used to install the HP UPD determines the HP UPD user experience and also influences the extent of HP
UPD management.
Traditional mode
An HP UPD installed in Traditional mode behaves like a product specific driver. During installation, the driver is
associated to a specific printer, creating a permanent instance of the driver.
Dynamic mode
An HP UPD installed in Dynamic mode allows the most flexibility. A user can find and print to any supported HP
product within any network or print environment without installing a product-specific driver. The HP UPD discovers
the product capabilities so that users can print using most product capabilities, including advanced printing
options such as watermarks and booklet printing.
NOTE: For Windows 8/8.1 and later Windows operating systems, Dynamic mode is only supported in Windows
desktop applications.
Creating a permanent instance makes the printer appear (in the UI) more like a traditional print driver but its
features can still be updated dynamically. This also reduces the number of mouse clicks a user goes through
when selecting a printer that is used often.
The following information provides detailed instructions for installing the HP UPD in either traditional or dynamic
mode, along with instructions on how to remove the HP UPD.
46
Supported modifications of the HP Universal Print Driver
The HP UPD must be installed exactly as it was received from HP, with no modifications except as provided by
HP-supplied utilities such as HP DCU, HP DDU, or HP Web Jetadmin. No other driver modifications are
supported.
The HP UPD must be installed using the HP-supplied installer (INSTALL.EXE) or using Microsoft recommended
and HP-approved tools and/or process listed in Installation methods and environments in this chapter. The use of
any other tool or method must be approved by HP in writing to be considered a supported installation method.
Any modifications to any HP UPD driver files (.INF, .MSI , etc.), making registry edits after installation, or manually
copying or deleting files, except when explicitly instructed to do so by HP in writing, will result in an unsupported
configuration.
The HP UPD should be deleted using only Microsoft-supplied tools and procedures. Manual deleting of registry
entries and/or driver files is not recommended and not supported. See Uninstall the HP UPD in this chapter for
more information.
Install HP UPD v5.1 and later
Use this section to install or upgrade HP UPD v5.1 or later.
Determine the HP UPD version installed
To determine if the HP UPD is already installed, open the Printers folders using one of the following methods:
Command Line: From a command prompt (Start→Run, type cmd, and then press Enter) type the following
command to open the Printers folder: control printers
User Interface: This is dependent on the operating system version. For Windows 7, click Start and then click
Devices and Printers.
Right mouse click on the printer (print queue) and then select Printer properties.
For an HP UPD dynamic mode installation, the HP UPD version displays on the lower left.
o To see the unidrv.dll or pscript5.dll versions, select a printer in the dynamic U/I, click OK and select the
About tab. The HP UPD version displays at the top. The unidrv.dll and pscript5.dll versions are listed
under Driver Files.
For an HP UPD traditional mode installation, select the About tab. The HP UPD version displays at the top. The
unidrv.dll and pscript5.dll versions are listed under Driver Files.
Microsoft Windows Driver Architecture
The HP UPD PCL 6 driver is dependent on the Microsoft Windows Unidriver (unidrv.dll) architecture. The HP UPD PS
driver is dependent on the Microsoft pscript5.dll. The HP UPD release notes provide the unidrv.dll and pscript5.dll
version used by HP for internal testing and subsequently qualified by Microsoft’s WHQL test process. The Microsoft
WHQL certification gives the HP UPD the Certified for Windows logotype. The HP UPD is supported by HP for all
versions releases of unidrv.dll and pscript5.dll.that remain under Microsoft’s standard support. It is the expectation
that Microsoft’s updates and changes to unidrv.dll or pscript5.dll will be backward compatible in support of the
Microsoft Windows® universal print driver architecture. Any unexpected behavior resulting from the dependency on
the Microsoft unidrv.dll or pscript5.dll requiring code change to the HP UPD would become a candidate for fix in the
next release of the HP UPD, and/or investigated with Microsoft, as required. The HP UPD installer is one of several
possible distribution mechanisms for the shared unidrv.dll and pscript5.dll files.
The HP UPD includes the unidrv.dll and pscript5.dll. This means that the HP UPD installation package might update
the unidrv.dll and pscript5.dll as necessary during install.

47
Before installation, it is advised to review this guide and the following Microsoft articles:
KB829766 — Mailbox and other printer specific settings are saved with an Excel file
(http://support.microsoft.com/kb/829766).
See Third-party articles and Windows printing information in appendix C for additional articles.
Enterprise environments that have a unidrv.dll or pscript5.dll version earlier than the version packaged in the HP UPD
might experience the symptoms defined in the Microsoft articles. Administrators should identify the unidrv.dll or
pscript5.dll version installed on the target host's \windows\system32\spool\drivers\*\3 directory, compare it to the HP
UPD Version History table in the HP UPD release notes, and create appropriate testing and deployment plans specific
to their installation environment.
NOTE: To see what version of unidrv.dll and pscript5.dll files are on the system and compare them against the
version you are about to install, see Determine the HP UPD version installed in this chapter.
HP UPD installation methods
HP UPD supports the following methods for new printer installation and driver upgrade. All methods support pre-
configuration of the driver's settings using the HP Driver Configuration Utility (HP DCU) functionality.
HP UPD's INSTALL.EXE: This method can be used for traditional mode and dynamic mode installation. It is
launched from the command line or a script and supports optional configuration switches executed during the
installation process. Enter install.exe /? at the command prompt for a list of available options.
Microsoft Operating System: These methods can be used for installation in traditional mode. HP supports the
following Microsoft methods for print driver install or upgrade of the HP UPD:
Add Print Wizard: Accessible from Printers folder by selecting Add a printer — wizard based installation for
new printer install.
Add Driver Wizard: From the Printers folder select a printer name, select the Print server properties (Windows
7, Server 2008R2, Windows 8/8.1, Windows 10, Server 2012/2012R2, and Server 2016) and then select the
Drivers tab. Methods available include:
o Add: New driver installation, creating a new printer and adds driver version to the Microsoft driver store.
Print Management Console: For Windows 7, Server 2008R2, Windows 8/8.1, Windows 10, Server
2012/2012R2, and Server 2016. From the Control Panel select Administrative Tools and then select Print
Management. The Print Management Console enables you to install, view, and manage all of the printers in your
organization. See Microsoft’s documentation for more information.
PrintUI—Allows common print administration tasks from a command prompt or script, including adding a new
printer, delete existing printers, add or remove host connections.
pnputil—Add or remove HP UPD from the driver store (use with Windows 7, Windows 8/8.1, Windows 10,
Windows 2008 R2, Windows Server 2012/2012R2, and Windows Server 2016). Allows the addition of the driver
to the driver store, but does not install the driver or create a printer. The advantage of adding the HP UPD to the
driver store is to make it available for Plug and Play, USB connected devices, and enables users without
administrator rights to create traditional print queues.
HP Driver Deployment Utility—This method can be used for installation in traditional mode. This utility packages
pre-configured HP UPD installation files and the code needed to deploy them into an *.EXE and a *.CAB file. These
files are run on the client PC to copy the driver files to the Windows driver store, and optionally, install the printer.
HP Web Jetadmin—This method can be used for installation in traditional mode. Administrators can create, edit, and
delete printers and install or update print drivers by using the Print Management features in HP Web Jetadmin (see
www.hp.com/go/wja for more information).
Point and Print—This method can be used for installation in traditional mode. The HP UPD can be vended from a
server to clients connected to a shared printer, performing either a new printer install or driver upgrade.

48
NOTE: HP UPD also supports USB Plug and Play, which is not an installation method for the driver, but instead a
method for an already installed print driver to create a new printer instance in the printer's folder.
Explanation of the driver name
During a new driver install, or when changing the driver version of an installed HP UPD printer, you can select either
the version-specific option (for example HP Universal Printing PCL 6 (v6.3.0)), or the non-version-specific option (for
example, HP Universal Printing PCL 6). These two choices are defined by HP and read directly from the driver
hpcuxxxx.inf file. Selecting either option installs the same set of capabilities. The version-specific option is available so
that you can install different driver versions on the same server (a v6.3.0 driver can coexist with a v5.9.0 driver). With
HP UPD v5.5.0 and higher, you can also install different minor release versions. With earlier versions, this is not
possible. For example, you cannot install a v5.2.5 driver and v5.2.6 driver on the same server, because these are the
same major and minor release version (v5.2).
NOTE: Starting with HP UPD v5.5.0, the driver supports a major.minor.subminor release version. For HP UPD 5.4
and previous releases, a customer will not benefit from this change. With this change, you can install a HP UPD 6.2.0
driver and HP UPD 6.2.1 driver on the same server.
The installation option to select the version specific HP UPD driver name applies only to traditional mode installations.
Implementation options include the following:
install.exe /tm — Installs the non-version-specific driver.
install.exe /m “<UPD specific version>”/sm <port> — Installs the specific version.
For example: install.exe /m”HP Universal Printing PCL 6 (v5.2)”/sm”LPT1”
NOTE: HP UPD v5.2.6 and earlier require that the full name and version are provided with the /m switch, as in the
above example (“HP Universal Printing PCL 6 (v5.2)”). HP UPD v5.3 and later does not require the full name or
version when using the /m switch.
Add Printer Wizard — After selecting the HP UPD inf file, the GUI offers the choice between version specific the
HP UPD and non-version-specific HP UPD.
printUI—For example:
C:\rundll32 printui.dll, PrintUIEntry /if /b"printer1" /f hpcu190c.inf /r"lpt1:"
/m"HP Universal Printing PCL 6"
C:\rundll32 printui.dll, PrintUIEntry /if /b"printer2" /f hpcu190c.inf /r"lpt1:"
/m"HP Universal Printing PCL 6 (v6.3.0)"
The first command installs a printer with the name printer 1 using the non-version-specific PCL 6 driver. The second
command installs a printer called printer 2 using the version-specific PCL 6 driver.
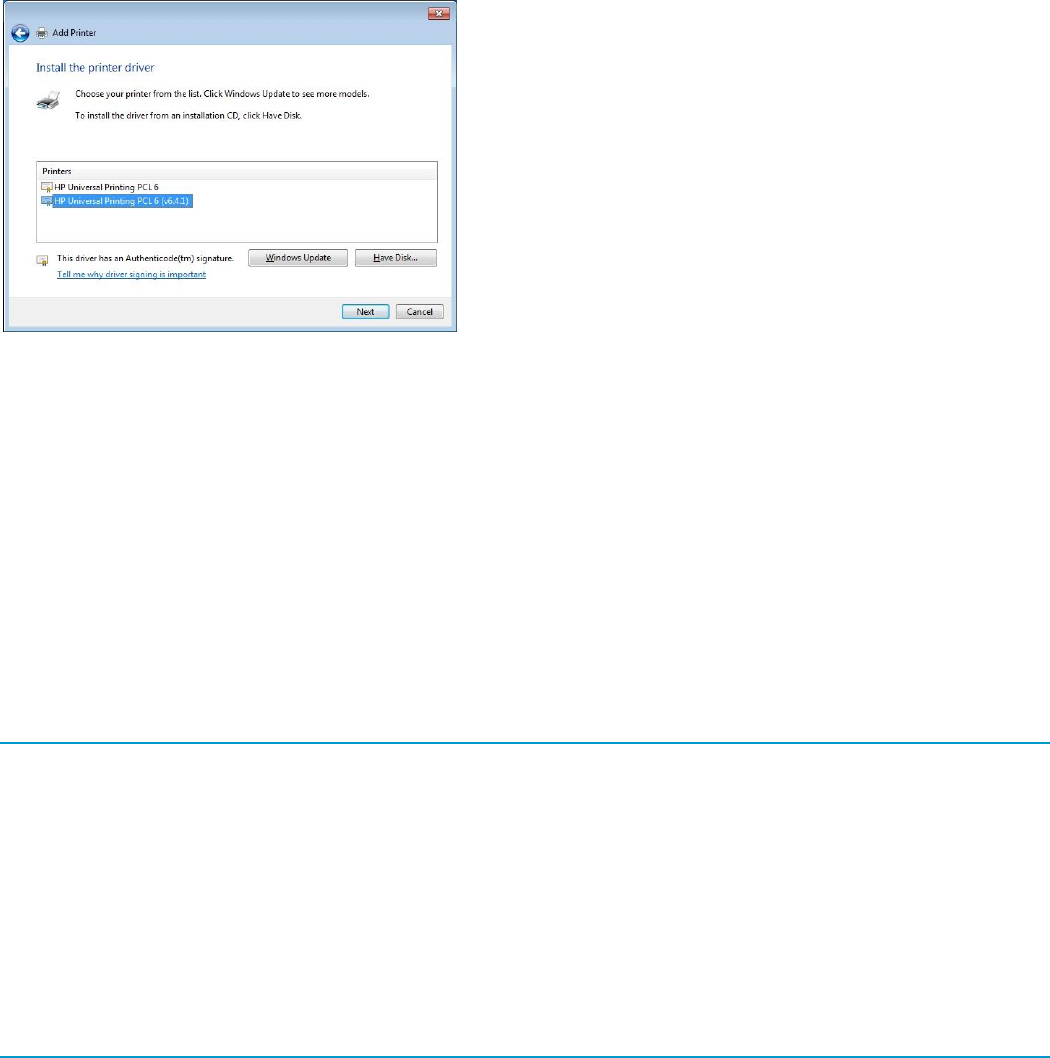
49
HP UPD name selection
Figure 5-1 Selecting version specific driver in Add Printer Wizard
The first option, "HP Universal Printing PCL 6," refers to the non-version-specific HP UPD. Installing this option will
install or upgrade all printers using the generic (non-version) of the HP UPD to the driver version being installed. For
example, if HP UPD v5.8.0 is installed on the system as "HP Universal Printing PCL 6" and the administrator installs
the HP UPD v5.9.0 PCL 6 selecting the non-version HP UPD during install, every printer using the driver name "HP
Universal Printing PCL 6" will be upgraded.
The second option, "HP Universal Printing PCL 6 (vX.Y.Z)", referred to as the version-specific HP UPD, creates a
version-specific driver name instance of the HP UPD. Selecting the version-specific driver name of the HP UPD does
not upgrade the HP UPD printers that have a different driver version assigned to the printer. This allows a print server
to have multiple driver versions of the HP UPD on a single system. For example, the following driver names could all
be on the same host:
HP Universal Printing PCL 6 (v6.3.0)
HP Universal Printing PCL 6 (v5.8.0)
HP Universal Printing PS (6.0.0)
HP Universal Printing PS
NOTE: Maintenance releases — HP UPD v5.4 and earlier only display Major.Minor version numbers in the MODEL
field, which becomes the printer model name. For example, “HP Universal Printing PCL 6 (v5.1)” displays in the
MODEL field for v5.1.x of the HP UPD. If v5.1.0 is installed followed by an installation of v5.1.1, all printers on the print
server using driver v5.1.0 would upgrade to v5.1.1. HP UPD v5.5.0 and later display Major.Minor.Subminor version
numbers in the MODEL field, which becomes the print model name. For example, HP Universal Printing PCL 6
(v5.4.0). With this change, you can install a UPD 5.6.0 driver and UPD 5.6.5 driver on the same server.
After the installation of different driver versions, all installed drivers will use the same version of unidrv.dll and
pscript5.dll (the latest version).
Printer name matches driver name—By default, the printer name will match the driver name defined in the
hpcuxxxx.inf file. For example, both the driver name and the printer name of the HP UPD are "HP Universal Printing
PCL 6 (v6.0.0)". HP recommends that administrator's change the printer's name to be different than the default
installed driver name.

50
Identify the driver name for the HP UPD printer
Follow these steps to view the driver name for an installed printer:
1. From a command prompt (Start→Run, type cmd, and press enter). Then type the following command: control
printers, and then press Enter.
2. Within the Printers folder, select the installed print queue, right mouse click, and then select either Printer
properties.
For an HP UPD dynamic mode installation, select a printer, select OK, and then go to the Advanced tab. See
the field to the right of "Driver:" for the installed driver's name.
For an HP UPD traditional mode installation, select the Advanced tab, see the field to the right of "Driver:" for
the installed driver's name.
Download and unzip the HP UPD installation files
Before you begin the installation procedure, use the following steps to download and unzip the HP UPD installation
files:
1. Go to the following Web site: www.hp.com/go/upd
2. Click Download now
3. Select the language, and then select your operating system.
4. Scroll down, click “+” to expand the list Driver – Universal Printer Driver.
5. Find the driver PDL you need in the table and then click Download and download the driver.
6. Click Download to the right of the HP UPD PDL you want to download the driver
7. Click Save
8. Unzip the HP UPD download file.
a. Double-click the downloaded file or click Run
b. Uncheck the box to the left of When done unzipping open: \install.exe.
c. Click the Unzip button.
d. When the unzip process completes, click OK, and then click Close.
Installation methods and environments
NOTE: Generally, procedures in this document represent the steps required when using Microsoft Windows 7. The
steps for other Windows operating systems may differ slightly.
Install the HP UPD driver and create a printer instance by using one of the following methods:
Method 1: Windows client/server: Use Add Printer wizard
Method 2: Windows client/server: Use INSTALL.EXE wizard
Method 3: Windows client/server: Use command prompt (INSTALL.EXE with switches)
Method 4: Windows client/server: Use Point and Print
Method 5: Windows client/server: Use HP Web Jetadmin Print Queue Creation
Method 6: Create a driver instance with plug and play
Method 7: Other supported Microsoft driver installation methods

51
Environment A: Windows Cluster server environment
Environment B: Windows Terminal Server/Citrix XenApp environments
Environment C: Novell
NOTE: You must have Print Administrator rights to install a print driver.
Method 1: Windows client/server: Use Add Printer wizard
Follow these steps to install the HP UPD in Traditional mode with the Windows Add Printer Wizard.
NOTE: The Windows Add Printer Wizard does not provide any custom options. If you install the HP UPD by using
this method, the driver installs so that the user has common printing functionality.
1. Select Start and then Devices and Printers.
2. Select Add a printer.
NOTE: The steps listed here are for Windows 7. The screens of the wizard may vary slightly between operating
systems. For example, in Windows 8/8.1 and later Windows operating systems, the first dialog searches for the
printer. Select The printer that I want isn't listed to move to the next screen. On the next screen, select Add a
printer using a TCP/IP address or hostname and then click Next.
3. Select Add a local printer.
NOTE: If you are using an existing port, or if you are specifying the Port Name instead of using the default, make
sure that the name you use does not contain the colon ‘:’ character. This character is not allowed, and will cause
configuration and status communication problems with the printer.
4. Select Create a new port, select Standard TCP/IP Port and then select Next.
5. Deselect Query the printer and automatically select the driver to use.
6. In the Hostname or IP address field, type the DNS or WINS host name or IP Address.
NOTE: For Windows Server 2008R2, if the DNS host name is used for the port, click the “Always print to this
device, even if its IP address changes” check box.
7. Select Next.
NOTE: If the Additional Port Information Required dialog box opens, it means the printer is not connected.
Under these circumstances it is best to cancel out of the installation, connect and turn on the product, and then
start over. If you must continue the installation, then under Device Type, select Standard, and then select
Hewlett Packard JetDirect from the menu. Then select Next.
NOTE: Installing the HP UPD with the product disconnected or offline prevents the HP UPD from receiving the
product configuration, which results in using default settings (monochrome, no job storage, etc.). Following the
complete install of the HP UPD, to update the HP UPD product configuration, right-click the printer, select Printer
properties, select the Device Settings tab, scroll down to Automatic Configuration and select Update Now.
8. The Install the printer driver dialog box opens.
9. Select Have Disk.
10. Browse to the folder in which the unzipped HP UPD download file is saved.
11. In the unzipped HP UPD file, select any .inf file, select Open and then select OK.

52
12. Select either the generic name or a version specific HP Universal Printing driver.
NOTE: HP recommends using the versioned driver on print servers.
13. Select Next.
14. Enter a printer name or use the default printer name.
NOTE: The name specified In the Printer name: field is the name of the installed printer that displays in the
Devices and Printers folder. The default printer name for the non-versioned PCL 6 driver is “HP Universal
Printing PCL 6” for the first installation. However, this increments to “HP Universal Printing PCL 6 (copy1)” and so
on for subsequent installs.
HP recommends renaming the printer to better identify the printer.
15. Click Next.
16. After the installation is complete, the Printer Sharing dialog opens. Select Do not share this printer, or enter a
Share name: to share the printer.
17. Click Next.
18. Select or deselect Set as the default printer and if you want to print a test page, click Print a test page. Once
the test page prints, click Finish.
Method 2: Windows client/server: Use INSTALL.EXE wizard
Follow these steps to install the HP UPD by using the HP Universal Printing Install.exe wizard.
1. If you have not downloaded the HP UPD installation files, see Download and unzip the HP UPD installation files in
this chapter.
2. Navigate to the HP UPD folder.
3. Scroll down and double-click Install.exe.
4. If a message dialog displays asking if you want to allow the following program to make changes to this computer,
click Yes.
5. When the Universal Printing Installer wizard opens, read the software license agreement, and then click Yes to
continue.
6. When the Installation Mode dialog box opens, select Traditional mode and click Next.
NOTE: Only traditional mode queues are supported on print servers. Do not create and share dynamic mode queues
on any print server.
7. Click Add a local printer and then click Next.
8. To add a new port, select Create a new port, select Standard TCP/IP Port in the drop down list, and then click
Next.
9. Deselect Query the printer and automatically select the driver to use.
10. Type in the IP address or hostname, and then click Next.
11. Select the versioned HP UPD driver from the list and then click Next.
NOTE: HP recommends using the versioned driver on print servers.
12. If an HP UPD is currently installed, select Replace existing driver and then click Next.

53
13. When the Type a printer name dialog opens, rename the printer to better identify the printer, and then click Next.
NOTE: The name specified in the Printer name: field is the name of the installed printer that displays in the Devices
and Printers folder. The default printer name is HP Universal Printing PCL 6 (v6.x.x) for the first installation.
However, this increments to HP Universal Printing PCL 6 (v6.x.x) (copy1) and so on for subsequent installs.
14. When the Printer Sharing dialog opens, select Do not share this printer, or enter a Share name: to share the
printer.
15. Click Next.
16. Select or deselect Set as the default printer and if you want to print a test page, click Print a test page. Once
the test page prints, click Finish.
17. Click Finish.
Method 3: Windows client/server: Use command prompt (INSTALL.EXE with
switches)
1. To access the command prompt, click Start, All Programs, Accessories, and then right click Command
Prompt and select Run as administrator. If prompted, “Do you want to allow the following program to make
changes to this printer?” click Yes.
NOTE: Windows requires a user to have Administrator rights to install a printer driver.
2. At the command prompt, change to the directory where the HP UPD is located (for example, C:\HP Universal
Print Driver\pcl6-x64-6.3.0.21178)
3. Type install.exe /option and select Enter, where option is the command option. For a list of available command
options, see Available options when installing by command prompt in this chapter. Use the command options
to control the installation and the behavior of the HP UPD after installation.
NOTE: To view a complete list of installer options, type the following at the command prompt:
c:\folder\install /?
For example, to make the installation silent by making it available through an .EXE-based administration tool
(such as SMS), type the following syntax at the command prompt:
install.exe /q /h
o The /h switch hides the HP install dialogue.
Or, to install the driver in dynamic mode, type the following:
install.exe /dm
NOTE: In an enterprise environment, a login script may be used to install the HP UPD on a client.
For more information about the command options, see the following sections:
Manage printer default settings after installation
Available options when installing by command prompt

54
Manage printer default settings after installation
When a printer gets installed, certain default settings are automatically set based on what capabilities are available
from the product. These default settings include items such as default paper size and type, simplex (single side
printing), and portrait or landscape printing. In many printing environments it is common for printing administrators to
change the default settings. Some of the more common changes are to enable printing on both sides of the paper
(duplex) and to print in grayscale.
There are many ways to change or pre-configure these default settings and some are discussed in other chapters of
this System Administrator's Guide. This section primarily discusses how these new default settings are deployed and
how to manage or provide firmer controls on changes allowed to these default settings.
Default settings and changes are not managed
Other sections in this document describe the use and procedures for changing the default settings in both a Point and
Print and Direct IP Printing environments. Please refer to the sections on HP DCU, HP DDU, and INSTALL.EXE for
specific instructions on how to use these tools in Chapter 4.
It is important to understand that changes to the printing default settings are at most temporary and basically not
managed. Users have the ability in both Direct IP Printing and Point and Print environments to change the default
settings on their printers through the Printing preferences tab. In some cases, depending on company policies, a
centralized management approach is necessary to ensure that the default settings are not changed.
Manage default settings with Active Directory Administrator Templates
HP’s solution for printer policy settings using an existing Active Directory environment is to use the Active Directory
administrator templates inside each of the group policy objects. This template also allows an administrator to set
defaults for duplex and grayscale printing. These policies are pushed locally into the users registry and referred to
during printing. This has the effect of constantly refreshing the users default settings so that each time a user prints,
the correct default settings are present. Policies are pushed to the client PCs.
Please refer to the sections on using Active Directory Administrator Templates for further information (chapter 8).
For more information on using AD templates, see the You-Tube video “Using HP Active Directory Administrator
Templates” at http://youtu.be/UUN2sEggnuc.
Available options when installing by command prompt
To view these options, enter the following at the command prompt:
C:\Driver-Folder\Install.exe /?
where
Driver-Folder is the location of the INSTALL.EXE file.
/ is a forward slash. Do not add any spaces between the forward slash and the command option.
The command options are explained in the following table.
Table 5-1 Command options
Command option
Definition
Description
/aml
Adds a new managed printer list name
using the specified URL (dynamic mode
only). For example:
/aml"My Server",http://mywebserver
Or:
/aml"My Printers","\\myprinters
\printerlist\printerlist.xml"
Use this option to specify a location
where the target system can look for the
managed printer list.

55
Command option
Definition
Description
/dgst
Disables the Services tab globally on the
HP UPD for all print queues.
Use this option to completely disable and
hide the Services tab when accessing the
printer property pages.
/dm
Installs the printer in dynamic mode
Use this option to force the HP UPD to
install in dynamic mode.
/gcfm
The new install switch copies the driver
pre-configuration file (hpcpu*.CFM) to the
client %systemroot% \..\..\3 directory. For
example:
install.exe /tm /gcfm”c:
\driverpackage\duplex.cfm
Beginning with HP UPD v5.2.5, you can
use the /gcfm option when installing from
the command line using INSTALL.EXE to
copy the .CFM file, which was created
with the HP DCU.
/gcomname”name”
Specifies a system-global SNMP
community name
/h
Hides the install dialog box; must be used
with Quiet mode (/q)
Use this option to hide the primary HP
installation dialog box and produce a
silent installation.
/infremove
Remove all versions of the HP Universal
Printing Driver from the Windows driver
store. The /q and /h switches are
required. No other switches are
supported with /infremove.
/infstage
Stage driver files to the Windows driver
store for printer plug and play software
first installation. The /q and /h switches
are required. No other switches are
supported with /infstage.
/m
Provides the ability to specify the driver
version name allowing multiple versions
of HP UPD to be installed onto one
system. This command option is only
available in traditional mode.
The /sm is required when /m is used. It
cannot be used with /sm\server\printer.
The /n is optional.
Syntax example
/m"HP Universal Printing PCL 6 (v5.0)"
/sm10.1.3.2
If a syntax error exists in the command
line switch, installation proceeds without
implementing the /m version-specific
installation of the HP UPD.
NOTE: HP UPD v5.2.6 and earlier
require that the full name and version are
provided with the /m switch, as in the
above syntax example (“HP Universal
Printing PCL 6 (v5.0)”). HP UPD v5.3 and
forward does not require the full name or
version when using the /m switch.
/n”Printer Name”
Uses the specified name as the name of
the printer, for example:
/n”HP LaserJet P4515”
This option uses the specified name as
the name of the printer (for example, HP
Color LaserJet M750).
This option is helpful when using the
traditional mode (/sm) option, but can be
used for common printing as well.

56
Command option
Definition
Description
/nd
Does not set the printer as the default.
This option does not change the current
default printer on the client system. By
default, the installer sets the newly
installed or updated common printer as
the default printer.
/ni
Does not perform the printer install, only
processes other install options
Use this option to process the specified
install options without creating a printer in
the Printers folder.
You can then create subsequent
instances of the HP UPD that show only
the configured options that are not queue
specific.
/npf
Do not open the Printers folder on
completion.
The default behavior of the installer is to
open the Printers folder on completion.
This option disables that functionality.
/pqdads
Disables ADS policy checking for the
current print queue (logical windows
printer) no matter who uses it.
/q
Quiet mode, no prompts
Use this option to install the driver and
present only a single progress dialog box
to the user. All other HP installer related
warnings and confirmations are hidden,
and default actions occur in cases where
user input would otherwise be expected.
/qcomname”name”
Specifies a queue-specific SNMP
community name
/ru
Restricted user mode only displays HP
Managed Printer Lists (dynamic mode
only)
Use this option to configure the driver so
that users can only print to the products
that you specified in the managed printer
lists. The Printer Selection dialog box is
replaced with a dialog box that lists the
printers in the managed printer list. For
more information, see Use Managed
Printer Lists (MPLs) in chapter 9.
/s
Provides the ability to specify the virtual
node for cluster installation. Available
with HP UPD v5.3 forward.
Install the HP UPD from one of the
cluster nodes on the virtual node. (HP
recommends running this command from
the active node.)
Syntax example:
install /s\\VirtualServerName
NOTE: There is no space between “\\”
and “VirtualServerName”.
/sc
Simple confirmation (dynamic mode only)
Use this option to install the driver so that
location profiles are disabled in the
Printer Selection dialog in dynamic mode.

57
Command option
Definition
Description
/sm<port>
Creates a traditional printer instance
bound to a specific <port>. The syntax is:
/sm\\servername\sharename
Or:
/smPrinterHostname
For example: /sm15.65.98.111
NOTE: This option implies the driver is
installed in traditional mode. The /tm
should not be used in combination with
the /sm option.
Use this option to create a statically
bound printer that points to the specified
port (local, TCP/IP, IPX/SPX, Hostname,
UNC). If the port already exists, the
existing port is used. If it does not exist,
then a new port is created. The printer
operates as a normal queue.
NOTE: If the HP Universal Print Driver is
installed in traditional mode, the static
mode printer does not allow the user to
use the universal printing functionality or
change the destination address of the
static mode printer.
/snptm=0
Disables the Special Offers program
pop–ups.
/tm
Installs the printer in traditional mode
NOTE: Cannot be used with the /sm
option.
Use this option to force the HP UPD to
install in traditional mode. This routine
launches the Add Printer Wizard, and
prompts the user to select a printer port
to complete the process.
Do not use this option when using the
/sm option.
/u
Use the existing print driver if it is already
installed
Use this option to remove the dialog box
asking the user to “Use existing driver” or
to “Replace existing driver.” To reduce
installation time, use this option if you
must install several printers using the
same driver.
Method 4: Windows client/server: Use Point and Print
To use the HP UPD and Point and Print, install the driver on the print server in Traditional mode. After the driver
installs on the Windows server, it behaves as any other installed driver. The user prints to a statically bound port
established on the server.
When a client PC connects to a shared printer, the HP UPD automatically downloads to the client PC through Point
and Print.
Vending of 32-bit drivers is supported from all 64-bit server OSs. Vending of 64-bit drivers is supported from all 32-bit
OSs that support 64-bit alternate drivers. To vend a driver from a 64-bit server to a 32-bit client, the server must have
the 32-bit driver installed. To vend a driver from a 32-bit server to a 64-bit client, the server must have the 64-bit driver
installed.
Configuring a 64-Bit Server for 32-Bit Clients
If you are supporting 32-bit clients on a 64-bit server, you must also install the 32-bit version of the driver on the
server with exactly the same name and version.
1. Download the 32-bit driver to the server, unselect “When done unzipping open: .\install.exe,” and then unzip the
driver.
2. In the Printers dialog of the server, highlight a print queue, and then select Print server properties.
3. Select the Drivers tab, and select Add.
4. In the Add Printer Driver Wizard. click Next.

58
5. Select x86 (32 bit) and deselect x64 (64-bit).
6. Click Next.
7. Click Have Disk and then browse to the location where you downloaded and unzipped the 32-bit driver.
8. Click Open, click OK, and then select the 32-bit driver with the same name as the 64-bit driver installed on the
server.
NOTE: HP recommends using the versioned driver on print servers. For example, if you installed the HP
Universal Printing PCL 6 (v6.3.0) 64-bit driver on the server, select the HP Universal Printing PCL 6 (v6.3.0) 32-bit
driver.
9. Click Next, and then click Finish.
10. Verify the 32-bit driver (x86) is listed with the same name as the 64-bit driver, and then click Close.
Method 5: Windows client/server: Use HP Web Jetadmin Print Queue Creation
The HP UPD can also be installed on some operating systems via HP Web Jetadmin Print Queue Creation. For more
information, go to the following Web site:
www.hp.com/go/wja
Method 6: Create a driver instance with plug and play
The HP UPD can be installed for use with plug and play products as either a software first or a hardware first
installation.
Software first (unattended) installation – recommended
Hardware first installation
NOTE: The “HP LaserJet USB (DOT4) communication driver…” must be installed on Windows 8 / 8.1, Windows 10,
Windows Server 2012 / 2012R2 and Windows Server 2016 systems prior to connecting the device. This component is
available for download at http://www.hp.com/go/upd.
Software first (unattended) installation – recommended
In a software first installation, the HP UPD is pre-staged on the PC in the Windows driver store, and will be found and
used by the operating system when the new product is connected. This method does not require any interaction by
the current user, and does not require the user to have administrator privileges.
NOTE: Starting with UPD 5.6.5, new options in install.exe for Windows 7 and later Windows operating systems add
the ability to select USB mode for Plug and Play with options to remove all versions of HP Universal Printing Driver
from Windows driver store, or to add the HP Universal Printing Driver to Windows driver store.
Using these options only impact the Windows driver store. No HP UPD printer is installed, no printer driver is removed
and no existing print queues are impacted. Only the HP UPD is only added to the driver store. No non-HP UPD
drivers are impacted.
As an alternative, on Microsoft Windows 7 and later Windows operating systems, you can use the pnputil utility to pre-
stage the required drivers. To ensure that all the required components are added to the driver store, HP recommends
pre-staging all HP UPD delivered *.inf files with pnputil, using the command: pnputil –a *.inf. For more information, see
USB connectivity.

59
Pre-configure and install the HP UPD for use with software first installation
To pre-configure the HP UPD for a Software first, plug and play installation, use the HP Driver Deployment Utility (HP
DDU) (available as part of the HP Print Administrators Resource Kit), and select the Preload the Driver option. This
method creates a package with a setup.exe utility that is easy to deploy interactively or via scripting. See Pre-
configure the HP UPD default settings using HP Driver Deployment Utility in chapter 4 for more information.
NOTE: For Windows 7 and later windows versions, this works for DOT4 devices, but not for LEDM devices. LEDM
devices require the usage of pnputil.
Driver selection when multiple drivers are pre-loaded
It is possible that multiple versions of the HP UPD might be pre-staged at the time of initiating a Plug-and Play event.
When the operating system detects multiple compatible drivers, it uses the following criteria for selecting the driver to
use:
1. A WHQL certified driver has priority over all other drivers. If all available drivers are WHQL certified, the operating
system considers the next criteria.
2. Microsoft 7 and later operating systems evaluate the driver based on available features where the driver with the
most features is selected. If all drivers are deemed equal, the operating system considers the next criteria.
3. Finally, the operating system selects the driver with the most current date.
To remove older versions of the HP UPD, select the install.exe option “Remove all versions of the HP Universal
Printing Driver from Windows driver store”
NOTE: The Remove Plug and Play Drivers utility in HP PARK can also be used to search for HP plug and play printer
driver files in the Windows driver store, and provides an option to remove these staged printer driver files. Currently
installed printers are unaffected by this utility.
Only the default location for staged driver files on Windows (%SYSTEMROOT%\inf) will be searched for driver files.
For more information on the HP PARK, see HP Print Administrator's Resource Kit (HP PARK) in chapter 4.
In addition, see the video “Staging Drivers for PNP using HP RemovePNPDrivers Utility” at
http://youtu.be/XZ2SvUuR_3c.
Hardware first installation
In a hardware first installation, a USB cable is connected to the PC first and then the HP UPD is installed. When the
operating system detects that no driver is installed for the connected product, it will prompt for a disk or a location
from which to install the driver. This method requires that the user be logged onto an account with administrator
privileges.
If you have not downloaded the HP UPD installation files, see Download and unzip the HP UPD installation files in
this chapter.
Plug in the product USB cable.
When prompted, browse to the location where the HP UPD was downloaded and unzipped.
NOTE: It is possible for the system to not prompt for a disk in cases where the system finds a compatible driver in the
driver store and/or on Windows Update.
USB connectivity
Disabling HP Smart Install (if present)
Several low-end HP LaserJet models have HP Smart Install enabled by default. If the HP UPD driver should be used
during a plug and play event, HP Smart Install must be disabled at the control panel before starting the install process.
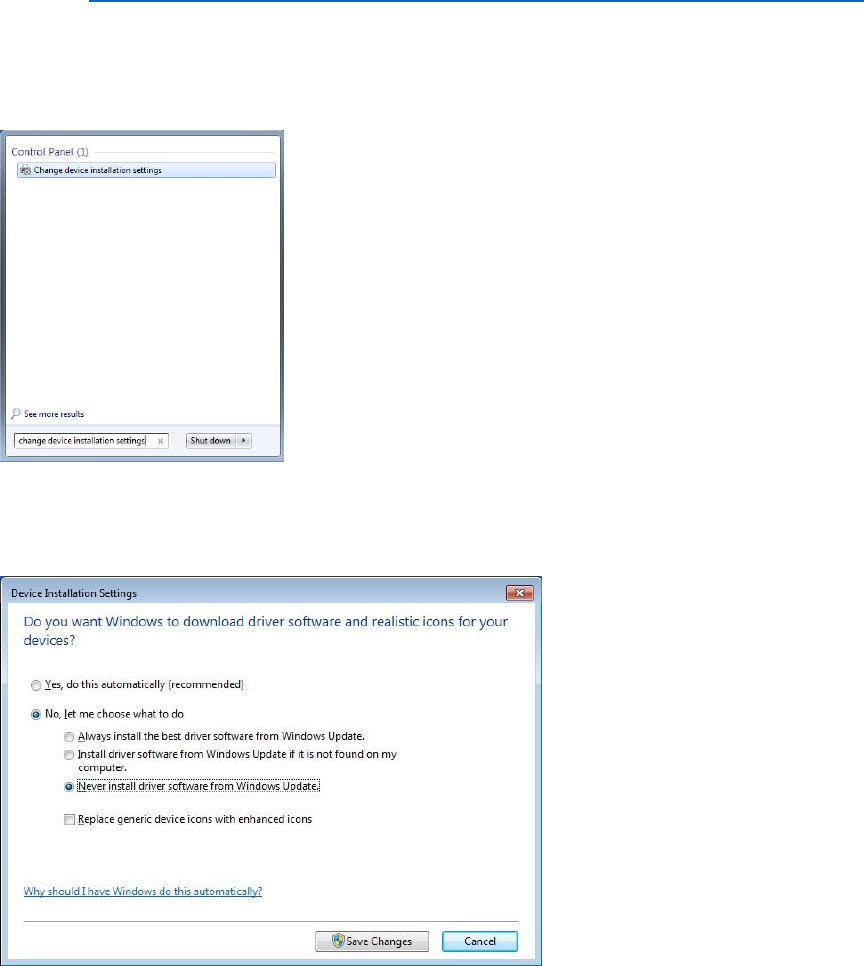
60
How to disable HP Smart Install
On products with an LCD display (2 line display), use the right arrow to scroll to and select the Services menu,
scroll down to HP Smart Install, and then change the setting to Off.
On products with a touch screen, touch the tools icon, touch the Services menu, scroll down to HP Smart Install,
and then change the setting to Off.
You can also disable HP Smart Install using the HP Embedded Web Server of the product (from the HP Smart Install
tab) or with the HP Smart Install Utility (SIUtility.exe and SIUtility64.exe). However, this requires the printer to be
connected to the network prior to using the USB connection.
See also: www.hp.com/hpinfo/newsroom/press_kits/2010/plugandprint/pdf/Smart_Install_FAQ.pdf
Disable obtaining driver software from Windows Update by default (optional)
When a USB device is connected, Windows always searches for Windows Update. It is possible to disable this
feature and only use previously installed drivers when connecting a USB device. This will speed up the installation
time.
Figure 5-2 Start Menu
1. From the Start menu, type “change device installation settings”. The option displays in the Programs list.
2. Click the icon for Change device installation settings
Figure 5-3 Device Installation Settings
3. Change the setting from Yes to No, let me choose what to do
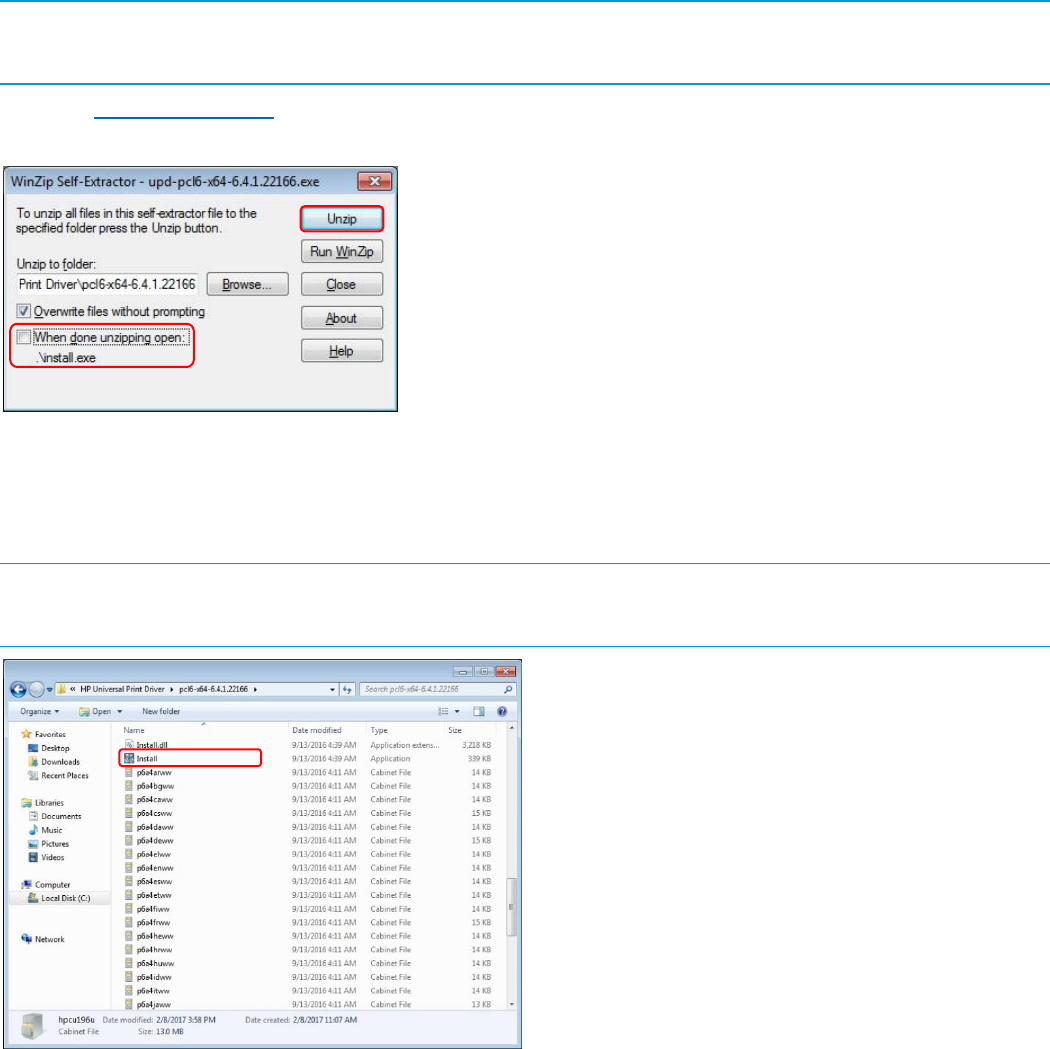
61
4. Click Never install driver software from Windows Update
5. Click Save Changes
Pre installing the HP UPD Using Install.exe
Starting with UPD 5.6.5, new options in install.exe add the ability to select USB mode for USB Plug and Play with
options to remove all versions of HP Universal Printing Driver from Windows driver store, or to add the HP Universal
Printing Driver to Windows driver store.
NOTE: These settings only impact the Windows driver store. No HP UPD printer is installed, no printer driver is
removed and no existing print queues are impacted. Only the HP UPD is only added to the driver store. No non-HP
UPD drivers are impacted.
1. Go to www.hp.com/go/upd and download the HP UPD
2. Save the file, and then double-click the executable. The WinZip Self Extractor screen displays.
Figure 5-4 WinZip Self Extractor screen
3. Uncheck When done unzipping open:.\install.exe.
4. Click the Unzip button. The driver is extracted (by default to c:\HP Universal Print Driver<driver version>).
5. Click the Close button.
NOTE: In a plug and play, Windows 7 and later Windows operating systems, check Windows Update first during a
plug and play install. To prevent inadvertently downloading a device specific driver, disable Windows Update
temporarily.
Figure 5-5 UPD driver directory
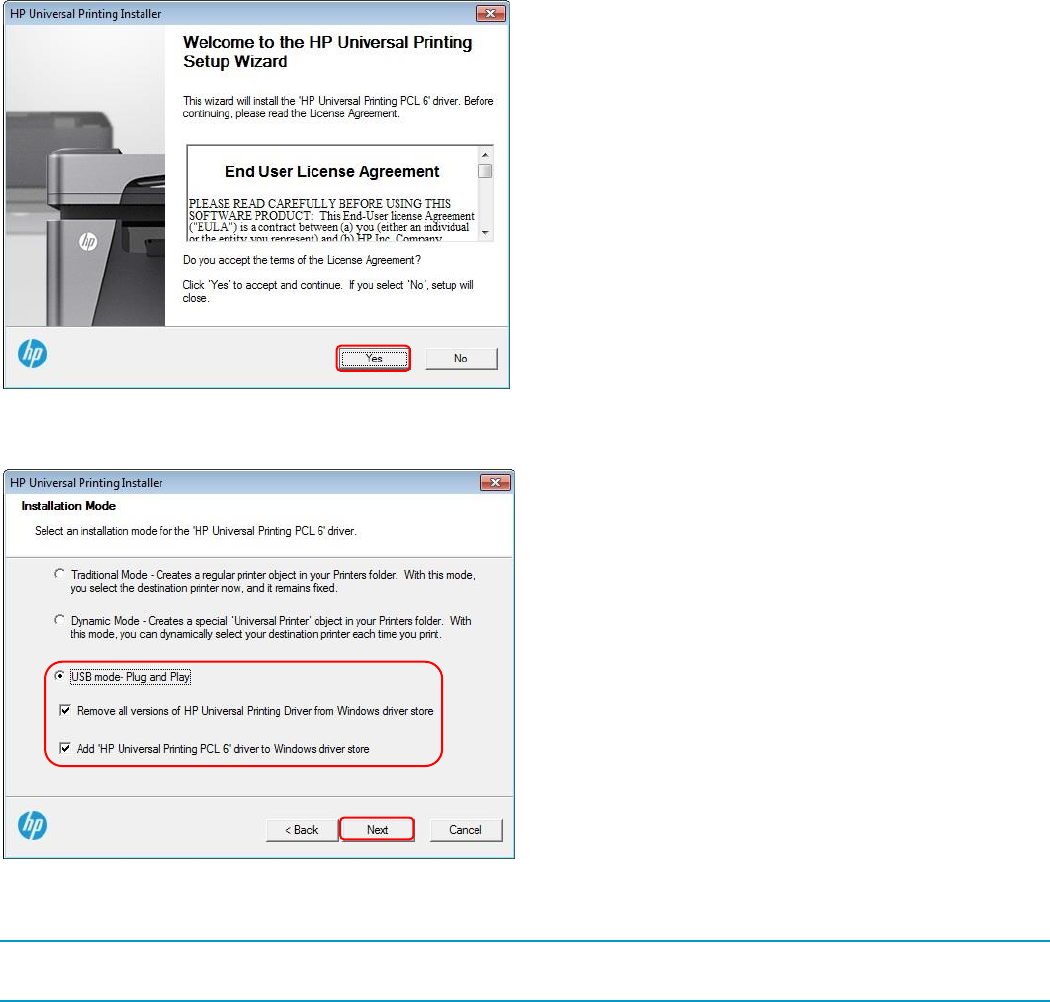
62
6. Open the directory for the HP Universal Printing Driver
7. Double click Install.exe
Figure 5-6 End User License
8. When the license dialog appears, read the license agreement and then click Yes.
Figure 5-7 Installation Mode
9. Select USB mode- Plug and Play.
NOTE: By default, Remove all versions of HP Universal Printing Driver from Windows driver store and Add ‘HP
Universal Printing PCL 6' driver to Windows driver store is selected.
When Add ‘HP Universal Printing PCL 6' driver to Windows driver store is selected, INF files for the following are
added:
HP EWS UPD inf
HP PNP EWS Null inf
HP PNP Fax Null inf
Dot 4 inf files for various HP products
HP Printer LEDM inf
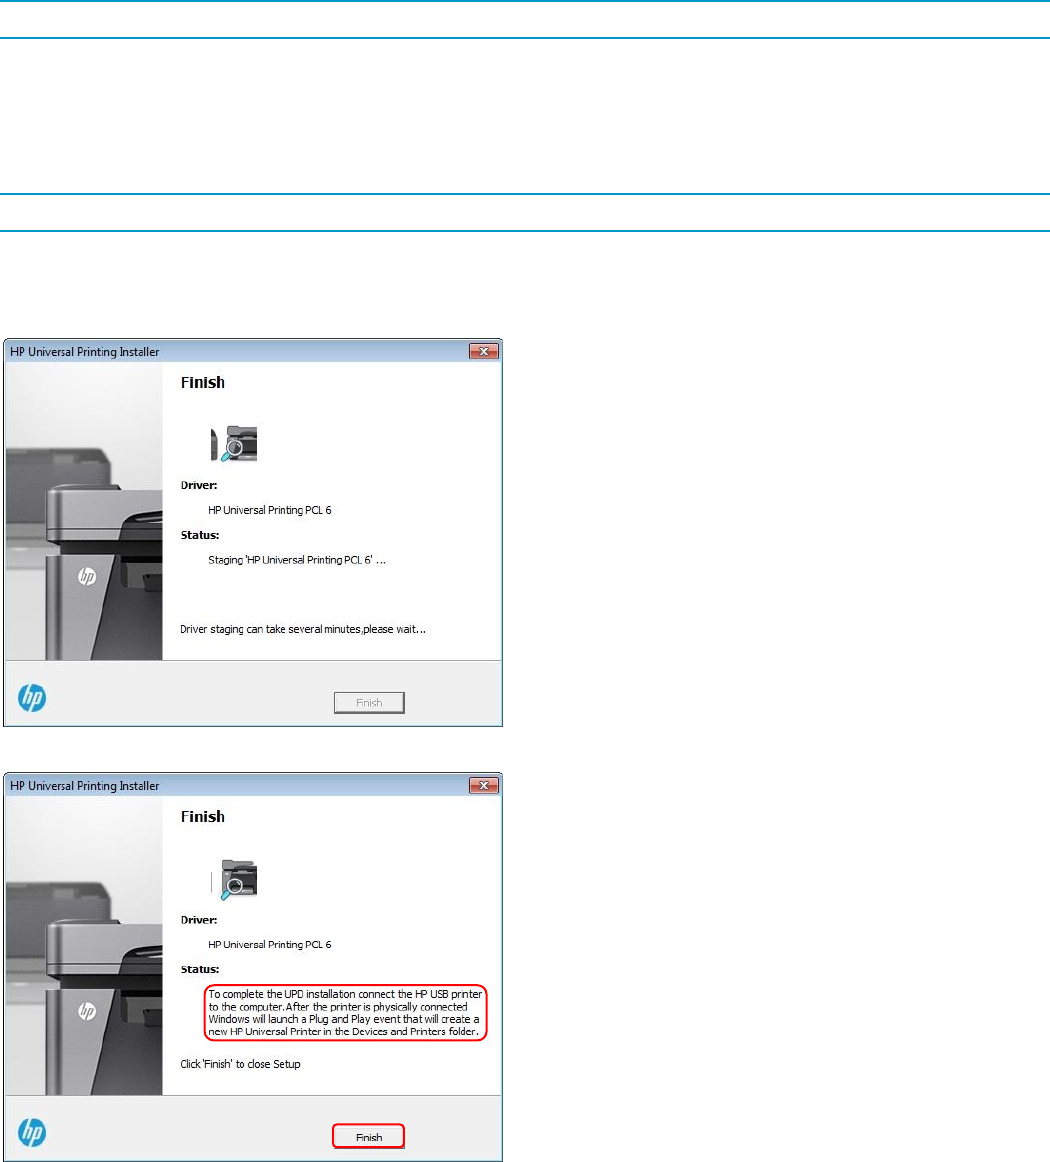
63
NOTE: Dot4 and LEDM are communication protocols used with USB connected HP PNP Scan Null inf printers.
To add the HP UPD to Windows driver store and not remove any inf files for previous versions of the HP UPD,
uncheck Remove all versions of HP Universal Printing Driver from Windows driver store and leave the other
option checked
If you only want the HP UPD inf files removed and no inf files added, uncheck Add ‘HP Universal Printing PCL
6' driver to Windows driver store and leave the other option checked.
NOTE: This option is useful if you plan to utilize a device specific driver for plug and play installations.
To add the HP UPD to Windows driver store and remove any inf files for previous versions of the HP UPD, verify
both options are checked.
10. Click the Next button.
Figure 5-8 Staging driver screen
Figure 5-9 Message to connect the USB printer
11. Click the Finish button to close the installer dialog.
12. Verify the product is turned on and in the Ready state.
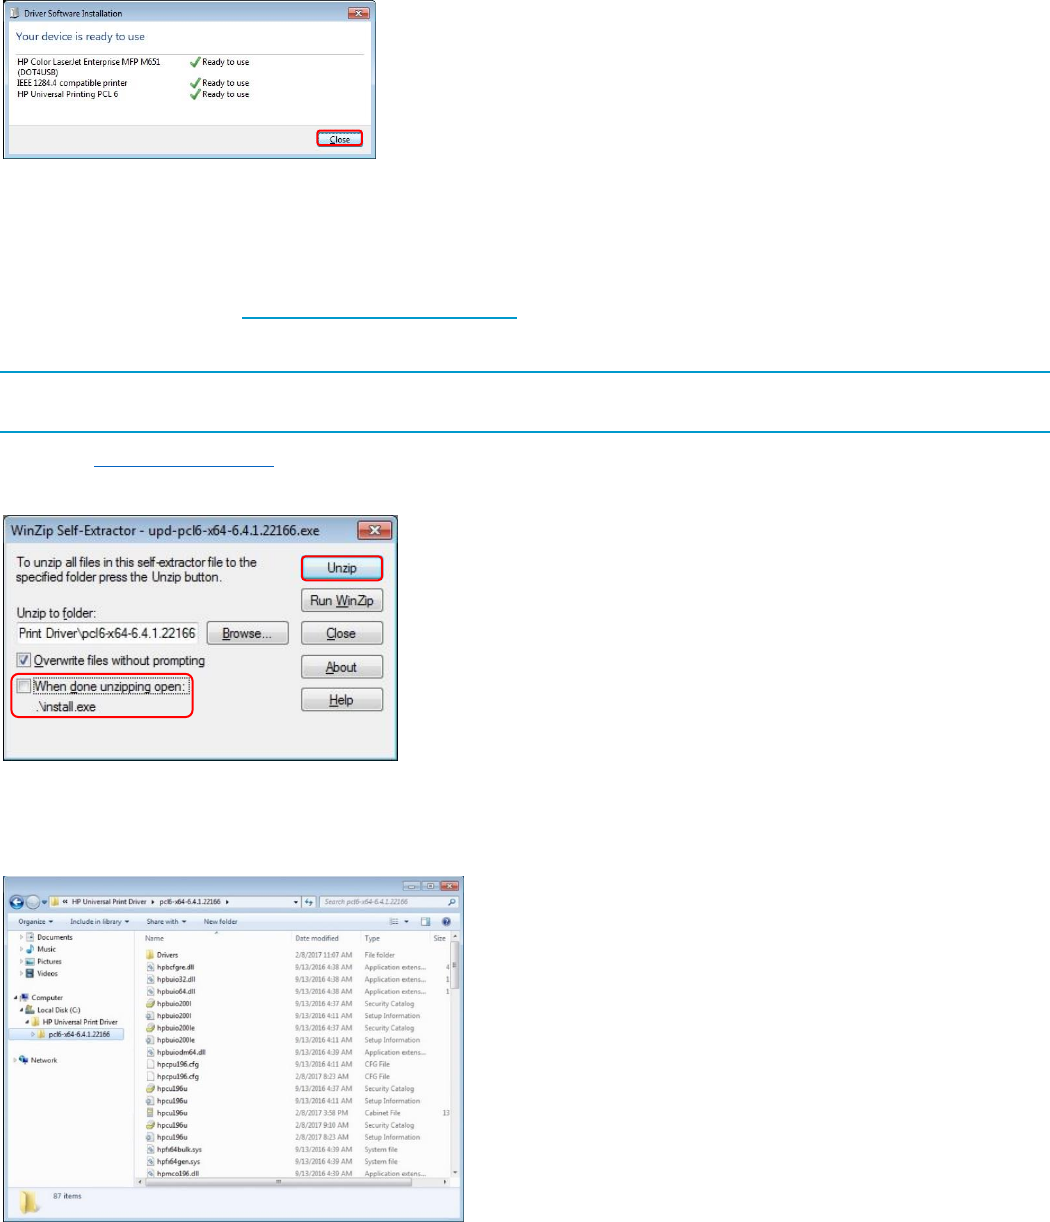
64
13. Connect a USB cable between the product and the computer.
Figure 5-10 Driver Software Installation
14. When the Plug and Play event finishes, click Close.
You-Tube Video
For more information on pre installing the HP UPD Using Install.exe, see the You-Tube video “New HP UPD Installer
for USB Plug and Play” at: http://youtu.be/fn4r6gxQZSM.
Pre installing the HP UPD using pnputil
NOTE: The steps below use the Microsoft pnputil to stage the driver. HP DDU can also be used to stage the driver.
The HP DDU is included with the HP Printer Administrator´s Resource Kit (HP PARK).
1. Go to www.hp.com/go/upd, and then download the HP UPD driver (PCL 6 or PS).
2. Save the file, and then double-click the executable. The WinZip Self Extractor screen displays.
Figure 5-11 WinZip Self Extractor screen
3. Click When done unzipping open:.\install.exe to remove the check mark.
4. Click Unzip.
Figure 5-12 HP UPD directory
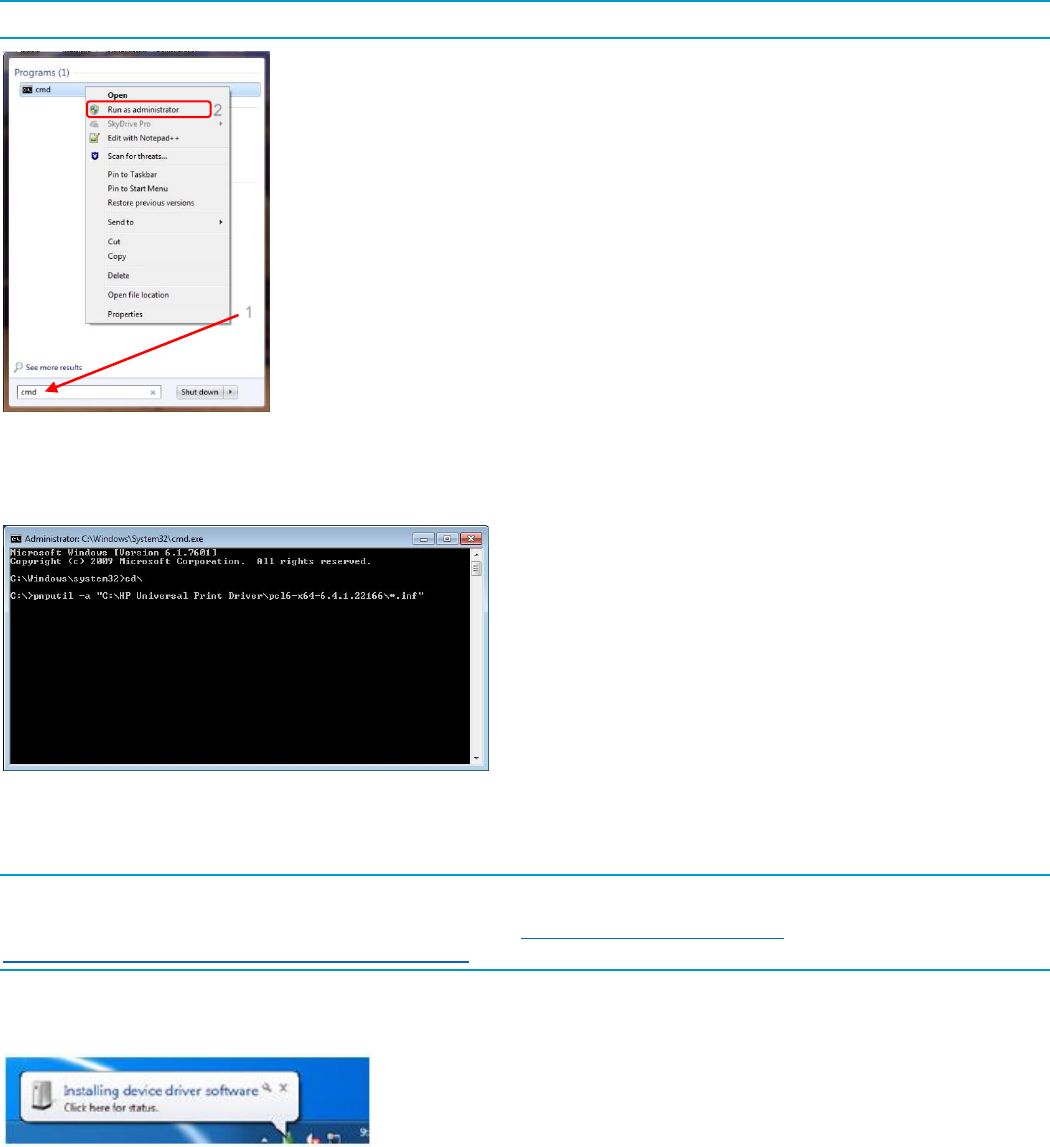
65
NOTE: The driver is extracted (by default to c:\HP Universal Print Driver\<driver version>).
Figure 5-13 Start screen
5. Click Start, and then type cmd in the Search programs and files search box.
6. Right-click the cmd.exe program, and then click Run as administrator.
Figure 5-14 Command Prompt
7. Pre- install all drivers (such as the printer driver, LEDM driver, DOT4 driver, etc.). After the C:\ prompt, type:
pnputil -a “C:\HP Universal Print Driver\<driver version>\*.inf”
NOTE: <driver version> should be replaced with the actual driver version.
NOTE: For more information on pnputil, refer to Microsoft: www.msdn.microsoft.com/en-
us/library/windows/hardware/ff550419(v=vs.85).aspx
8. Close the cmd line window.
9. Connect the product to the computer using a USB cable.
Figure 5-15 Installing device
10. A window displays in the lower right-hand corner that indicates the software is installing.
11. The product will be identified in the Devices and Printers folder.
1
2

66
NOTE: Microsoft uses a ranking process when selecting a driver during a PNP USB install.
If there is a conflict where a different driver may be installed, the RemovePNPDrivers utility can be used to search for
HP plug and play printer driver files in the Windows driver store, and provides an option to remove these staged
printer driver files. Currently installed printers are unaffected by this utility. The RemovePNPDrivers utility is included
with the HP Printer Administrator´s Resource Kit (HP PARK). For more information on the HP PARK in this document,
see HP Print Administrator's Resource Kit (PARK) in chapter 4.
For more information on using the RemovePNPDrivers utility, see the video “Staging Drivers for PNP using HP
RemovePNPDrivers Utility” at http://youtu.be/XZ2SvUuR_3c.
Only the default location for staged driver files on Windows (%SYSTEMROOT%\inf) will be searched for driver files.
Pre-installing using the HP Smart Device Agent Base for USB Plug and Play
NOTE: This section explains how to install the HP Smart Device Agent Base for USB Plug and Play included with HP
UPD 6.4.1 and later releases. For the latest information on installing using the HP Smart Device Agent Base, see the
white paper: “Pre-installing using the HP Smart Device Agent Base for USB Plug and Play.”
Pre-installing using the HP Smart Device Agent Base for USB Plug and Play software:
Integrates an SDA “base” component for USB connected printers
Enables customers to move from self-managed to MPS with ease
Installs the Windows Local Service HPSmartDeviceAgentBase
Installs silently (no UI) by executing a separate msi as a step in the USB driver install
Simple and secure
NOTE: The HP Smart Device Agent Base does not collect any data from the PC or from connected printers or mfps.
The service does not communicate with the cloud or listen on any ports. It cannot be used by anything except a
verified JetAdvantage Management Connector (JAMc) instance.
During the install process, the HP Smart Device Agent Base software performs the following items:
Installs the HP Smart Device Agent Base
Pre-stages the HP UPD in the Windows driver store
Once installed:
The HP Smart Device Agent Base searches for USB connected printers. If none are found, the service goes into
sleep mode for one hour and then checks again, repeating this sequence.
If the service determines that a USB-connected printer is present, the service does a DNS query to see if JAMc is
available. If it does not find JAMc, the service checks to see if JAMc is available through a UDP multicast over
ports 49001-49008.
If no JAMc is found, the service does not check again until the computer is rebooted.
To install the HP Smart Device Agent Base for USB Plug and Play
NOTE: To pre-configure the HP Smart Device Agent Base for USB for a Software first, plug and play installation, use
the HP Driver Deployment Utility (HP DDU) available as part of the HP PARK tools, and select the Preload the Driver
option. This method creates a package with a setup.exe utility that is easy to deploy interactively or via scripting. See
Pre-configure the HP UPD default settings using HP Driver Deployment Utility in chapter 4 for more information.
1. Go to www.hp.com/go/upd and click Download now. Verify your language, and then click your operating system.
Expand the section Driver – Universal Print Driver for Managed Services and click Download to the right of
one of the following packages:
HP Universal Print Driver for Windows PCL6 (32-bit) for USB connected printers
HP Universal Print Driver for Windows PCL6 (64-bit) for USB connected printers
HP Universal Print Driver for Windows PostScript (32-bit) for USB connected printers
HP Universal Print Driver for Windows PostScript (64-bit) for USB connected printers

67
NOTE: The actual HP UPD version number may vary.
2. Click Save
3. Unzip the HP UPD download file.
a. Double-click the downloaded file or click Run
b. Uncheck the box to the left of When done unzipping open: \install.exe.
c. Click the Unzip button.
d. When the unzip process completes, click OK, and then click Close.
4. To install using the default settings, open the directory C:\HP Universal Printer Driver
a. Open one of the following folders:
pcl6-usb-setup-x32-6.5.0.22695
pcl6-usb-setup-x64-6.5.0.22695
ps-usb-setup-x32-6.5.0.22695
ps-usb-setup-x64-6.5.0.22695
NOTE: This software installation requires .NET 4.5 or higher to install.
b. Double click Setup
c. If a prompt appears asking, “Do you want to allow the following program from an unknown publisher to
make changes to this computer?”, click Yes
NOTE: This removes the existing UPD packages in driver store, performs the HP UPD driver staging with
notification, and installs the HP Smart Device Agent Base.
d. When the message “Removal Completed…” appears, click OK
e. When the message “Driver Pre-Staging Completed Successfully” is displayed, click OK.
Microsoft Services will list HPSmartDeviceAgentBase as running in Services.msc
A driver prestaging log and service execution log is saved and available in the package directory
o For example, c:\HP Universal Print Driver\pcl6-usb-setup-x64-
6.5.0.22695\Installer\ExecutionLogs
5. To install from the command prompt, click Start, All Programs, Accessories, and then right click Command
Prompt and select Run as administrator.
NOTE: If you do not run the command prompt as administrator, a popup requesting the admin password might be
displayed. If you do not enter the password, “Access is denied.” is listed after the command prompt.
a. If prompted, “Do you want to allow the following program to make changes to this computer?” click Yes.
b. Change to the directory where you extracted the files. For example, C:\HP Universal Print Driver\pcl6-
usb-setup-x64-6.5.0.22695.
c. Type Setup –m help and press Enter to view the available install options. The following options are
available:
stgn – Stages the driver with notification
stgq – Stages the driver in quiet mode
remstgn – Removes the existing UPD packages in driver store and stages the driver with notification
renstgq -- Removes the existing UPD packages in driver store and stages the driver in quiet mode
remn – Removes the existing UPD packages in driver store with notification
remq – Removes the existing UPD packages in driver store in quiet mode

68
To install using one of the optional methods, type Setup –m <optionName>.
NOTE: By default, Setup removes the existing UPD packages in driver store and performs driver staging
with notification.
d. Type Setup with the appropriate options. For example, to remove the existing UPD packages in driver
store and perform driver staging with notification type Setup –m remstgn.
e. Press Enter to start the install process.
If notification is enabled, a message appears stating “Driver Pre-Staging Initiated…”
f. If the message “Removal Completed…” appears, click OK
g. When the message “Driver Pre-Staging Completed Successfully” is displayed, click OK.
NOTE: If you are running in quiet mode, Driver Pre-Staging Completed Successfully appears in the
command prompt.
Microsoft Services will list HPSmartDeviceAgentBase as running in Services.msc
A driver prestaging log and service execution log is saved and available in the package directory
o For example, c:\HP Universal Print Driver\pcl6-usb-setup-x64-
6.5.0.22695\Installer\ExecutionLogs
6. Verify the product is turned on and in the Ready state.
7. Connect a USB cable between the product and the computer.
8. Click the window in the lower right-hand corner that indicates the software is installing.
9. When the Plug and Play event finishes, click Close.
To Uninstall the HP Smart Device Agent Base Service
1. Click Start and then Control Panel.
2. In Category view, click Uninstall a program.
3. Select HPSmartDeviceAgentBase.
4. Click Uninstall.
5. Click Yes.
6. If prompted, “Do you want to allow the following program to update software on this computer?” click Yes.
7. Close the Programs and Features dialog.

69
Method 7: Other supported Microsoft driver installation methods
You can use the following Microsoft installation methods to install the HP UPD driver:
Microsoft Print Management — This is a snap-in for the Microsoft Management Console. Use it to install the HP
UPD driver and create a printer instance.
Printui.dll — This Microsoft executable (rundll32 printui.dll PrintUIEntry [options]) contains command line options
for installing printer drivers, such as the HP UPD driver.
NOTE: For information about using these methods, see the appropriate Microsoft documentation.
Environment A: Windows Cluster server environment
The HP UPD installs with automatic configuration enabled by default and requires a specific installation procedure.
This requires that certain COM objects be registered and initialized in order to perform the automatic configuration of
the products during setup. The following instructions provide information on installing the HP UPD in a Windows
Server 2008R2 Cluster server environment. For Windows Server 2012 and beyond, Microsoft redesigned its
clustering technology to use their Hyper-V technology, and this additional step is no longer necessary.
NOTE: HP UPD v4.7 introduced the capability to disable Printer Automatic Configuration communications (when
using traditional mode). This capability is useful if the HP UPD cannot be installed on each physical node, as
recommended by HP.
The HP UPD must be installed and initialized on every physical node that makes up the cluster environment before
creating queues on the virtual servers. HP recommends installing the HP UPD in traditional mode using the LPT1 port
on each physical node. After the printer is created, it can be deleted from the physical node’s Devices and Printers
folder if desired. This will leave the HP UPD driver intact and properly initialized.
Only traditional mode printer queues can be shared from any of the Microsoft based print servers. Sharing of dynamic
mode queues is not supported on any print servers using the HP UPD.
Repeat Step 1 on each physical node before proceeding.
1. Install the driver on each physical node in the cluster, for example by using the Add Printer Driver Wizard.
a. If you have not downloaded the HP UPD installation files, see Download and unzip the HP UPD installation
files in this chapter.
b. Log into or remotely connect to one of the physical nodes.
c. Open the Printers folder.
d. Click Add Printer.
e. Select Local printer attached to this computer and click Next.
f. Click Use the following port and select LPT1: (Recommended) Printer Port.
g. Click Next.
h. Browse to your HP UPD Installation files and click Next.
i. Follow the rest of the Add Printer Wizard procedure to complete the installation. See Method 1: Windows
client/server: Use Add Printer wizard in this chapter for more information.
2. Install the HP UPD on the virtual print server.
Installing the HP UPD on the virtual server is similar to installing the HP UPD on any print server. Install the
traditional mode of the driver, using the Add Printer Wizard of the virtual server.

70
If you use HP UPD 5.3 or later, you can use the /s option to install on the virtual node. (HP recommends running
this command from the active node.) Use the following steps:
a. Log into the active node of the cluster. You can log in while at the machine or remotely.
b. Run INSTALL.EXE using the /s option with the following syntax:
install /s"\\VirtualServerName"
NOTE: There are no spaces between “\\” and “VirtualServerName”.
NOTE: If prompted to use Existing Driver, select Replace Driver.
Alternative install with printer automatic configuration disabled
If the HP UPD cannot be installed on every physical node in your cluster, you can follow the steps below to disable
Printer automatic configuration when installing the HP UPD.
See Disable Printer Automatic Configuration in chapter 7. These steps assume that you will be using the HP DCU
utility to disable the printer automatic configuration. Save the configuration file as .CFM to retain the digital signature
driver files.
Use the HP DCU (Driver Configuration Utility) tool to disable the printer automatic configuration setting and preset
other default settings as needed. Once the .CFM file has been created, it resides in the HP UPD driver folder where
the files are located. Copy this .CFM file to the virtual server w32x86\3 folder before installing printer queues using HP
UPD.
NOTE: Beginning with HP UPD v5.2.5, you can use the /gcfm option when installing from the command line using
INSTALL.EXE and the .CFM file, which was created with the HP DCU.
Use the following steps to copy the .CFM file to the proper folder prior to creating printer queues on the virtual server.
1. Browse to the print$ share of the virtual server. Enter \\virtualserver\print$ to access the Printers folder
for the Physical node that is hosting the virtual server. You will see a few folders representing both the printing
environment for the Physical Node as well as the GUID folder which represents the virtual server printing
environment. The print$ folder will appear with the following folders:
\BIDI
\color
\e7776de2-fbd9-4644-9jdt-0jsy —Virtual Server printing folder
\w32x86–Physical node printing folder (\x64 for 64-bit)
2. Browse to the folder with the long GUID as the file name. Your GUID name will be different. This is the print
environment for the virtual server.
3. Browse to the \Drivers\w32x86\3 directory of the GUID folder
4. Copy the .CFM file previously created by the HP DCU utility here.
5. Use the Microsoft recommended method to create printers using the Add Printer Wizard.
NOTE: For more information, see the white paper Using Printer Drivers in Microsoft Cluster Environments available at
www.hp.com/go/upd.
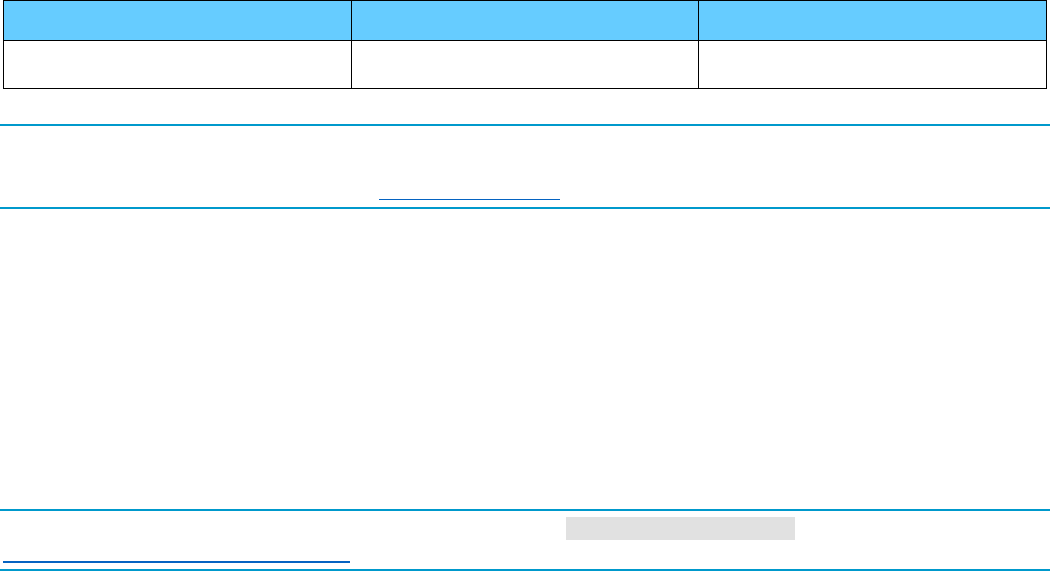
71
Environment B: Windows Terminal Server/Citrix XenApp environments
Supported environments
The HP UPD is supported by HP in Citrix XenApp and Windows Terminal Server environments. HP has tested the HP
Universal Printing Driver in Citrix XenApp environments.
Traditional Mode
The HP UPD can be installed in Traditional Mode on the Citrix XenApp server and will perform as a print driver for all
compatible auto-created printers or redirected printers.
Dynamic Mode
Installing the HP UPD in Dynamic Mode on the Citrix XenApp server is not supported in a multi-user environment.
Because the Windows operating system limits a print queue to one port at a time, multiple users would compete for
the single port bound to the HP UPD queue if installed in Dynamic Mode.
Comparing HP and Citrix UPD Drivers
The HP UPD works well for mapping to any HP PCL or PS client print driver for auto-created client printers. It works
well for any client, including thin clients with embedded operating systems.
The Citrix UPD has the ability to provide all printer configurations and user settings from the client printer (such as
print-on-both sides as default) to the auto-created printer within the Citrix user session.
Table 5-3 Comparing HP and Citrix UPD Drivers
Platform
Citrix UPD
HP UPD
XenApp 5.x/6.x/7.x
Better choice for Windows clients
Better choice for non-Windows clients or
thin clients
NOTE: Before beginning any new deployment or upgrade involving a Citrix XenApp or Terminal Server environment,
HP recommends reading and following the instructions outlined in the HP whitepaper HP Printers Supported in Citrix
XenApp Server Environments available at www.hp.com/go/upd.
Environment C: Novell / Micro Focus
Micro Focus iPrint is available with Open Enterprise Server (OES) and also as a Standalone version (iPrint
Appliance).
Micro Focus iPrint offers a single, scalable solution for managing all of your printing across multiple office locations
from any device. It lets your users print quickly, easily, and more securely.
Micro Focus iPrint provides secured enterprise print services for your desktops, laptops, and mobile devices. Micro
Focus’s iPrint solution integrates with your existing corporate printers, regardless of the printing vendor or brand
allowing you to deliver self-service printer provisioning to your device users. It even works with your current users in
Microsoft Active Directory or eDirectory.
NOTE: Novell iPrint has been rebranded to Micro Focus iPrint. For more information see:
https://www.novell.com/products/iprint/.
For Novell, HP UPD is supported in traditional mode only. Dynamic mode is not supported.
Pre-configuration of the driver using the HP Driver Configuration Utility (HP DCU) is supported so that administrators
can define defaults before driver installation.
The iPrint clients are now available with iPrint server and not as a separate download. You should install the iPrint
client from the Welcome page of the iPrint server or iPrint Appliance.

72
For information on how UPD works in Print environment, see Using Printer Driver Profiles in the OES 2015 SP1: iPrint
Administration Guide or Using Printer Driver Profiles in the iPrint Appliance 2.1 Administration Guide.
Install the HP UPD in a Novell environment
NOTE: Use Novell's most current iPrint client. It is required that the client be installed even if all you are doing is
uploading the driver to the Novell server. Novell has posted the iPrint client at the iPrint: Novell Open Enterprise
Server 2 Web site. Click here to go to the iPrint: Novell Open Enterprise Server 2 Web site (www.novell.com/iprint).
HP UPD for Novell only supports static mode and not dynamic mode.
This has been tested with both User and Workstation printer setups.
To add the HP UPD driver and create the printer on the server, go to a computer that has the iPrint client
installed.
Make sure that you have created a Print Manager object and Broker object.
1. If you have not downloaded the HP UPD installation files, see Download and unzip the HP UPD installation files in
this chapter.
2. Upload the driver to the Novell server by using the Novell iManager Web page.
a. Select the Manage Broker task.
b. Click the RMS Drivers tab.
c. Click the Add from file button.
d. Select the HP UPD .INF file, and click OK.
The driver will begin to upload to the server. This process can take several minutes. Do not touch the Internet
Explorer (IE) window while it is doing this.
e. When it is done, you should see the HP UPD driver in the driver list.
NOTE: You can only upload drivers for the operating system you are currently working on. For example, if
you open a browser on a Microsoft Windows 7 64-bit system, you can only download the Windows 7 64-bit
driver.
3. Create an HP UPD printer on the server by using the Novell iManager Web page.
a. Open the Novell iManager Web page and login using your Novell credentials.
b. Select iPrint from the left pane.
c. Select Create Printer.
d. Type a printer name and browse to the container where the printer is to be installed.
e. Select the Print Manager name and click Next.
f. Type the IP address or Hostname of the printer and click Next.
g. Select the HP UPD driver in the Microsoft Windows driver drop-down menu.
h. Click Next or OK to create the printer.
To use the newly created printer on a PC.
1. Close any browser windows that you have open.
2. Install the iPrint client on the PC.
3. Go to the IPP printer page on the Novell server: http://foo.example.com/ipp.

73
4. Click the newly created printer.
You will get a message stating that the printer needs to be installed.
5. Click OK .
The driver will download and install. This will take a few minutes.
The printer is now installed on the local PC and will route print jobs to the Novell server.
If you use Microsoft Windows 7 with iPrint, then you have to install two Microsoft hotfixes (kb2511290 and
kb2546651). See Novell TID 7001400 (www.novell.com/support/kb/doc.php?id=7001400).
NOTE: Verify that the ShortInstallName is set to its default value in the iprint.ini file. The default location for this
file is: /var/opt/novell/iprint/htdocs/iprint.ini
Novell Distributed Print Services (NDPS)
The HP UPD will function with limited capabilities in the Novell NDPS environment. This is due to the HP UPD not
being able to communicate with the product directly, therefore losing the ability to gather product specific information
from the printer. HP UPD only makes the default settings available to the user. The HP UPD PCL driver defaults to
black and white (PCL 6), no extra trays, no product specific paper handling, etc.
The HP UPD can only be used in traditional mode in the NDPS environment. In this mode, the HP UPD operates the
same as a product-specific driver.
The latest patches for iPrint and Winspool must be applied to get the advanced printing features supported (such as
N-up and Watermarks).
Uninstall the HP UPD
HP recommends using Microsoft operating system utilities to remove the HP Universal Print Driver from the Microsoft
Windows operating system. This is the safest method to uninstall print drivers. HP does not recommend manually
editing the Windows Registry or manually deleting driver files. This can destabilize the printing environment and is not
supported.
HP recommends the following procedure to remove the HP UPD.
1. Delete all printers that use the HP UPD.
2. In the Printers dialog, highlight a print queue, and then select Print server properties.
3. Select the Drivers tab.
4. Select the HP UPD driver(s) to be uninstalled and click Remove.
NOTE: If Windows displays an error message that the driver is in use, stop and restart the print spooler using one of
the following methods.
From a command prompt, type net stop spooler and then press Enter to stop the print spooler. Type net start spooler
and then press Enter to restart the print spooler.
-or-
Open the Services applet in Control Panel (Start→Run→services.msc), select Print Spooler, and then click
Restart.
Once the print spooler has been restarted, repeat the steps above to remove the print driver.
74

75
6 Upgrading the HP UPD
Introduction
This chapter contains the following sections:
Best practices—upgrade
Upgrade steps
Delete and recreate queues with AUTOUPGRADEUPD.EXE (traditional mode only)
HP supports upgrading from one version of the HP UPD to a newer version of the HP UPD using the same PDL (for
example PS), starting with v4.5. Upgrading from a non-HP Universal Print Driver to the HP Universal Print Driver,
regardless of version or vendor, is not supported and requires deletion/recreation of queues.
Table 6-1 Upgrade versions and method
Current HP UPD version
Upgrade version
Methods
Additional comments
v4.7.x/ v5.0.x/ v5.1
v5.4 or later
Regular upgrade procedure
Delete and recreate queues
(manually or with
AUTOUPGRADEUPD.EXE)
Do not upgrade to HP UPD
v5.2
Version v5.1 and higher, use
the newer unidrv version.
Please test to verify the driver
updated correctly.
v5.1
v5.4 or later
Regular upgrade procedure
Delete and recreate queues
(manually or with
AUTOUPGRADEUPD.EXE)
Do not upgrade to HP UPD
v5.2
v5.2.x
v5.4 or later
Delete and recreate queues
(manually or with
AUTOUPGRADEUPD.EXE)
See Appendix B: Issues after
upgrade from HP UPD v5.2.x
v5.3/ v5.4.x/ v5.5.x/ v5.6.x
Any later version
Regular upgrade procedure
Delete and recreate queues
(manually or with
AUTOUPGRADEUPD.EXE)
v5.7.x/ v5.8.x/ v5.9.x/ v6.0.x/
v6.1.x/ v6.2.x/ v6.3.x/v6.4.x
Any later version
Regular upgrade procedure
Delete and recreate queues
(manually or with
AUTOUPGRADEUPD.EXE)

76
Best practices—upgrade
Reasons to upgrade
Upgrading to the current HP UPD is advised for customers that:
Need new print driver features introduced in the release.
Require new product device support.
Are experiencing symptoms from resolved defects documented in the release notes.
Require support for recent Microsoft operating system releases. For example, Windows 7 support was added to
the HP UPD v5.0; Windows Server 2008R2 support was added in HP UPD v5.1. Windows 8/8.1 and Windows
Server 2012/2012R2 support was added in v5.6.0. Windows 10 support was added in UPD 6.1.0 for PCL 6 and
PS. Windows Server 2016 support was added in HP UPD 6.4.1.
Predictable upgrades
The most consistent and reliable method to obtain predictable results is creation of new printers using the new driver
version, forcing all settings to installation defaults. This can be automated with AUTOUPGRADEUPD.EXE. In addition
to the AUTOUPGRADEUPD.EXE, HP has provided several tools in the HP Printer Administrators Resource Kit (HP
PARK) to enable deployment and administration. To download the HP PARK, go to www.hp.com/go/upd and click
Download now. Verify your language, and then click your operating system. Expand Software – Universal Print
Driver. To the right of HP Printer Administrator Resource Kit, click Download. Save the file and then click the
folder and click Extract all files.
NOTE: For more information on using the HP AutoUpgradeUPD utility, see http://youtu.be/mYCVx1RBp9w.
There are separate versions of AutoUpgradeUPD for 32-bit and 64-bit operating systems. AutoUpgradeUPD.exe is for
32-bit operating systems and AutoUpgradeUPD64.exe is for 64-bit operating systems.
Changing PDLs
Do not switch PDLs during the upgrade process. This may result in unpredictable results. If you need to switch PDLs,
the best practice is to delete and recreate the printer. For those that choose to switch PDLs during upgrade, PS to
PCL 6, or PCL 6 to PS, HP strongly recommends that you delete and recreate the printer.
Testing
HP performs upgrade testing using typical operating systems. Your environment is may be different from our test
environments, so HP recommends performing your own upgrade testing in a test environment.
Printer name should be different than the driver name
The printer name is an arbitrary name assigned to identify a print queue. By default, the HP UPD install sets the HP
UPD printer name to be the same as the driver name (i.e. "HP Universal Printing PCL 6"). The printer name can be
changed without affecting the driver name. HP recommends administrators change the default printer name to not
match the driver name. The printer can be viewed, defined, or changed from several access points:
During installation, such as Add Printer Wizard, the name can be specified, or the HP UPD installation default of
"HP Universal Printing [PDL]" or "HP Universal Printing [PDL] (vX.Y.Z)" will be applied. If a printer with the default
name exists on the system, "(Copy 1)" will be appended to the HP UPD default name.
After installation, the printer name can be viewed or changed in the Printer's folder by selecting the printer and
right mouse clicking Printer properties. The Name field is located at the top of the General tab.

77
Benefit of using HP UPD version specific driver name installation
For share printers (i.e. print servers) HP recommends implementation of the version specific driver name. The version
specific model selection during HP UPD installation allows control over the upgrade and migration strategies. Multiple
versions of the HP UPD could exist on the same system. For example v5.9.0, v6.0.0 and v6.3.0 could all co-exist on
the same system assuming each was installed choosing the version specific driver name. This benefit allows
customers to upgrade drivers for newly released HP devices without having to re-test or re-certify legacy devices for
every new release of the driver. For instance, assume a print server has 100 existing printers installed all bound to the
v5.9.0 version of HP Universal Printing PCL 6. Further, assume that new HP printers have been purchased and only
support v6.3.0 of the HP UPD. The administrator can create new printers using the HP UPD v6.3.0 version specific
install without affecting existing printers that use a previous version of the HP Universal Print Driver.
Modify existing HP UPD printer with INSTALL.EXE
The HP UPD install.exe /ni switch processes only the options specified on the installation command line without
installing a new HP UPD printer.
Upgrade steps
This section assumes the reader has an understanding of the following:
Microsoft Windows Driver Architecture
HP UPD installation methods
Explanation of driver name
Best practices—upgrade
Settings retention
The defined settings retained during an upgrade are dependent upon how the driver was first installed. If the HP UPD
was installed in dynamic mode, or traditional mode with the generic printer name "HP Universal Printing PDL," driver
settings will be retained during upgrade. If the HP UPD was installed using traditional mode with the version-specific
printer name "HP Universal Printing PDL (vX.Y.Z)" settings will not be retained during the upgrade. Those settings not
retained will assume defaults of the newly installed driver.
Table 6-2 HP UPD settings retained during upgrade from a non-version specific HP UPD
Shortcuts
PINtoprint
InputBin
HPColorSmart
PrintColorAsGray
Duplex
Orientation
DuplexEdge
NUpChoice
NUpPageOrderChoice
Copies
NUpBordersChoice
MirrorPrint
BookletPrintingChoice
PaperSize
FitToOtherSizeChoice
JobRetentionModeChoice
ScalePageChoice
RequirePINtoprint
Watermarks
78
Upgrade steps
HP recommends the following steps to upgrade the HP UPD on print servers. These steps complete a sequence of
events to ensure the administrator’s personal print settings are not applied to the printer during the driver version
upgrade, that settings applied become the default settings of the shared printer and Point and Print clients, and all file
changes as a result of driver upgrade are completely registered to the system. The steps are not scriptable using
supported methods, and dependent upon environment size, which should be accounted for in project planning.
1. Login in using an account with "Manage Printers" permission to the print server (i.e.- the Administrator account, or
an account from the Administrator's or Power Users group).
2. From command prompt (Start-Run, type cmd, and press Enter).
3. Type the following command at the prompt: control printers and then press Enter.
4. In the Printers folder, select the installed printer, right mouse click, and then select either Properties or Printer
Properties.
5. Select the Advanced tab.
6. Click Printing Defaults…
7. Click the Printing Shortcuts tab. Remove all personal shortcuts. If you require custom shortcuts for Point and
Print clients, use the HP Driver Configuration Utility (DCU).
8. Within each tab, validate that the defined print settings are the intended defaults for clients receiving point and
print vended drivers from this server.
9. Click the Effects tab and check the watermarks. Click Edit to remove any unwanted watermarks, again validating
settings defined will become the default for clients receiving the point and print vended drivers from this server.
10. When the settings have been validated, click the OK button, which saves the settings to be used as default
settings on the client systems.
11. Log out from Windows, and then log back in with the same account.
12. Stop and restart the spooler. From command line type:
net stop spooler && net start spooler
13. Launch the HP UPD driver installation package. This step only needs to be performed one time for each PDL,
regardless of the number of current printers utilizing earlier versions of the HP UPD, either version-specific or
non-version-specific driver name.
Result:
A new printer is created in the printers folder
The new driver version of the HP UPD has be installed on the system
Shared dependencies on Unidrv.dll or pscript.dll are updated as determined by the install (see Microsoft
Windows Driver Architecture in chapter 5)
14. Reboot the system to force replacement of locked files shared by the Microsoft print system.
15. Assign the newly installed driver version to the existing HP UPD printers.
Example steps provided: From the Printers folder, select Printer Properties for the HP UPD printer, and click the
Advanced tab. Change the driver to the newly installed HP UPD version. For example, if the printer name is
currently set to "Building 1- Sales Dept", change the Driver selection to "HP Universal Printing PCL 6 (v6.0.0)"
and click OK to assign the printer name to the new driver version.
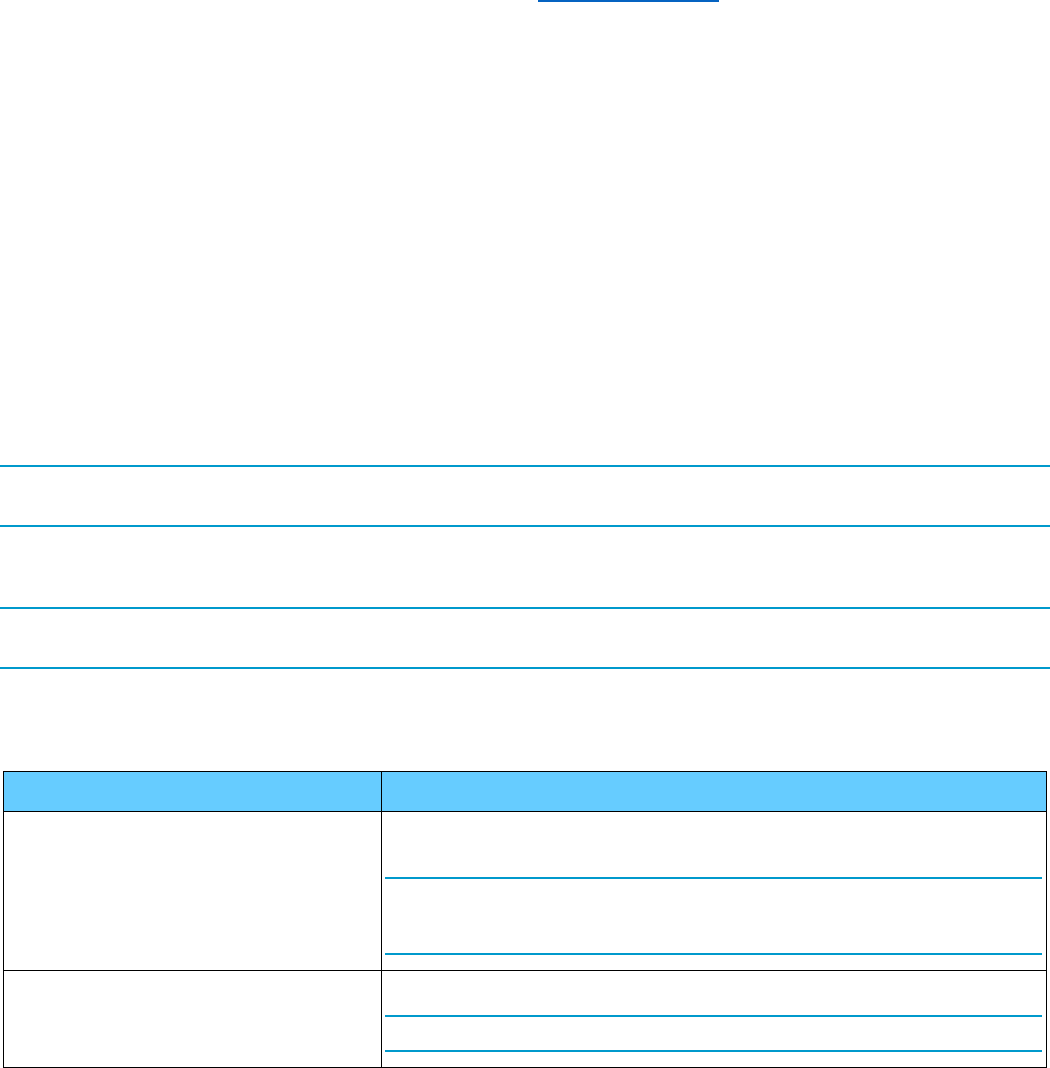
79
Delete and recreate queues with AUTOUPGRADEUPD.EXE
(traditional mode only)
The delete and recreate queues utility (AUTOUPGRADEUPD.EXE) is included with the HP Printer Administrators
Resource Kit (HP PARK). To download the HP PARK, go to www.hp.com/go/upd and click Download now. Verify
your language and then click your operating system. Expand Software – Universal Print Driver. To the right of HP
Printer Administrator Resource Kit, click Download. Save the file and then click the folder and click Extract all
files.
For more information, see the HP AUTOUPGRADEUPD.EXE Release Notes included in the HP PARK. For more
information on the HP PARK in this document, see HP Print Administrator's Resource Kit (PARK) in chapter 4.
The purpose of this tool is to simplify the process of creating clean print queues on a print server. This is useful when
upgrading the HP UPD driver version, upgrading an earlier non-HP UPD print queue to use HP UPD, or resetting
existing print queues to factory or pre-configured installation defaults. The problem this tool resolves is preventing
existing queues from carrying forward unknown, incompatible, and unstable configurations during driver upgrade. The
utility accomplishes this by deleting the existing print queue and creates a new print queue using the same printer
name, comments, location, and assigned port while applying the specified new driver.
During the print queue delete and recreate process completed by the tool, only the print queue name, port, location,
comments, share name, and share state will be retained. All the other settings on the new print queues will be set to
factory defaults. If you want to have the new print queues pre-configured to specific settings (e.g. duplex or
grayscale), use the HP Driver Configuration Utility (DCU) to pre-configure the driver and create a test queue with the
pre-configured settings. Verify that the settings on the test print queue are correct. Upgrade the rest of the print
queues using the AUTOUPGRADEUPD.EXE utility, which is designed to use the settings in this test print queue for all
the print queues that it re-creates.
NOTE: There are separate versions of AutoUpgradeUPD for 32-bit and 64-bit operating systems.
AutoUpgradeUPD.exe is for 32-bit operating systems and AutoUpgradeUPD64.exe is for 64-bit operating systems.
Usage
CAUTION: This utility modifies your system. You are strongly advised to make a system backup before using this
utility. In the unlikely event that the upgrade should fail, having a backup will allow you to return to a stable state.
AutoUpgradeUPD -o "<old-driver>" -n "<new-driver>" -f "<inf file>" [-s "<server-
name>"]
Table 6-3 HP AutoUpgradeUPD options
Setting
Description
-s <server_name>
Specifies the name of the failover cluster virtual node that you want to upgrade. If
you do not specify a server, the local computer is upgraded.
NOTE: This option is not designed for specifying remote servers. The utility is
designed to be run directly from the print server, or in the case of a failover
cluster, from one of the physical nodes.
-o <old driver>
Utility will attempt to upgrade all print queues that are using this driver.
NOTE: Driver names are case sensitive.
80
Setting
Description
-n <new driver>
Name of the new driver. It is recommended that this driver be pre-installed and
tested.
NOTE: If the name of the new driver is the same as the name of the old driver, for
example HP Universal Printing PCL 6, the new driver must be installed prior to
running this utility.
-f <inf file>
Full path to the new driver .inf file
-v
Verbose mode— Displays the printui commands, and other information useful for
diagnostic purposes.
-q
Quiet mode—When this option is enabled, error and status dialog boxes are not
displayed.
NOTE: In some cases, the use of this option will cause the Microsoft printui.dll
commands that are used by this utility to fail unexpectedly. If these failures occur,
try re-running the utility without this option.
-test
Enumerates printers and outputs messages, but does not perform the upgrade.
-?
Displays help.
Example:
AutoUpgradeUPD.exe -o "HP Universal Printing PCL 6 (v5.8.0)" -n "HP Universal Printing PCL 6 (v6.0.0)" -f "E:\UPD
Drivers\5.3.1\PCL 6\32\hpcu115c.inf" > Upgrade.log
This example will upgrade all the printers that are using HP Universal Printing PCL 6 v5.8.0 to HP Universal Printing
PCL 6 v6.0.0, and will log all messages and results into the file upgrade.log
You-Tube Video
For more information on using HP AutoUpgradeUPD, see the You-Tube video “HP AutoUpgradeUPD” at:
http://youtu.be/mYCVx1RBp9w.

81
7 Using the HP UPD
Introduction
The HP Universal Print Driver (HP UPD) provides a general-purpose print driver. The look and feel of the HP UPD
varies depending on whether it has been installed in dynamic or traditional mode. For more information about
installing the HP UPD in these modes, see Installing and uninstalling the HP UPD in chapter 5.
The following sections describe how to use the HP UPD and its features.
Use the HP UPD—traditional mode only
Use the HP UPD — dynamic mode only
Use the HP UPD — features (traditional mode and dynamic mode)
Known issues with redirected printers
Troubleshooting
Frequently Asked Questions
Using the HP UPD—traditional mode only
HP UPD traditional mode
When installed in traditional mode, the HP UPD behaves as a product-specific driver, associated to a specific printer
with a permanent instance of the driver in the Printers folder. You can install traditional mode printers in various
ways, including using the Add Printer Wizard in the Printers folder or by using INSTALL.EXE.
Print using the HP UPD in traditional mode
Printing using the HP UPD depends on the installation mode of the HP UPD.
An HP UPD installed in traditional mode behaves similar to a product-specific driver. The HP UPD behaves according
to the driver features available for the product to which the driver is attached.
1. In the application, click File, and then click Print.
2. The application’s Print dialog box opens. Select the printer from the list of available printers.
3. Click Properties and modify the driver features as needed. (For example, select the Finishing tab and select
Print on both sides.)
Click OK when you are finished modifying settings.
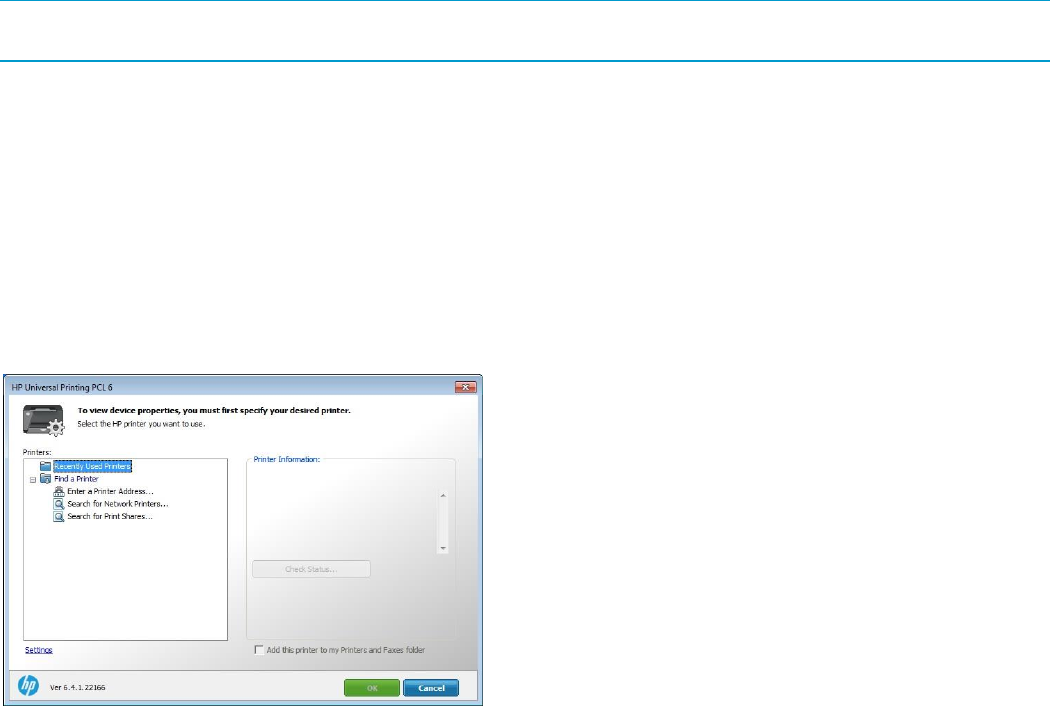
82
4. Click Print.
Using the HP UPD — dynamic mode only
HP UPD dynamic mode
When installed in dynamic mode, the HP UPD can print to any supported HP printer within any network print
environment without installing several product-specific drivers. An HP UPD installed in dynamic mode allows the most
flexibility. The HP UPD discovers the product capabilities so that users can print using most product capabilities,
including advanced printing options such as watermarks and booklet printing.
After discovering a printer with the HP UPD in dynamic mode, it is possible to create a permanent instance of the
discovered printer. This creates a new print queue and makes the newly created print queue display in the U/I like a
traditional print driver. You can install the HP UPD in dynamic mode by using INSTALL.EXE.
NOTE: Dynamic mode is not supported in point and print operations or terminal server sessions. In Windows 8 and
later Windows operating systems, dynamic mode is only supported in desktop applications.
Dynamic mode offers a unique, easy-to-use user interface that steps the user through the printer discovery and
selection process. By default, the user can find a printer by the printer address (IP address or hostname), by
searching for a network printer, or searching for printer shares. Printers which have been used before will be
displayed in the Recently Used Printers list. Administrators can add a pre-defined printer list for the HP UPD in
dynamic mode.
The HP UPD in dynamic mode requires user interaction with every print job because it presents the user with a dialog
box for the selection of the printer. This interaction can be minimized by changing the settings for dynamic mode (see
Configure HP UPD dynamic mode settings in this chapter).
Advanced features available for the HP UPD allow an administrator to offer pre-defined printer lists and control of the
available search options using the HP Active Directory Administrator Template.
The following information describes the driver in dynamic mode unless otherwise stated.
Figure 7-1 HP UPD Dynamic Mode dialog box
Print using the HP UPD in dynamic mode
Printing using the HP UPD depends on the installation mode of the HP UPD.
HP UPD installed in dynamic mode functions within the constraints established by the administrator to manage the
printer. If a feature does not behave normally, the administrator might have limited the functionality.

83
When the HP UPD is installed in dynamic mode, it displays as a typical printer in the user's Printers folder. Dynamic
mode provides a unique interface to users allowing them to instantly locate and connect to printers on the fly.
Search for printers using any of these methods:
Enter a printer address.
Search the local subnet for printers.
Enter the name of a print share.
The next section details each of the dynamic mode options. Printers found via dynamic mode are temporary
connections and do not appear individually in the Printers folder. Dynamic mode installation of the HP UPD does not
require the user to have any elevated rights or printing permissions, allowing the existing user permissions to remain
intact.
NOTE: Dynamic mode is supported in Direct IP and local printing only and is not supported as shared printers on print
servers at any time. . In Windows 8 and later Windows operating systems, dynamic mode is only supported in
desktop applications.
Dynamic mode options—Default configuration
By default, the name of the dynamic mode print queue created is the same as the name of the driver. In the case of
PCL 6, the default queue name is HP Universal Printing PCL 6. This name can be changed during installation, or
renamed to something more descriptive like “Search for a Printer”.
NOTE: The printer name can be changed in the printers folder after the driver is installed.
Using dynamic mode
1. From an application, click File and then Print.
2. In the application’s Print dialog box, select the Dynamic print queue (HP Universal Printing PCL 6 or HP
Universal Printing PS) and click Print. The HP Universal Printing dialog box opens.
3. For the quickest way to print, select a printer from the Recently Used Printers list, and then click Print.
If no printer is available in the Recently Used Printers list, or if you prefer to find a different printer, you can find a
printer immediately by using one of the options under Find a printer.
Selecting a recently used printer
The Recently Used Printers list contains all the products to which the HP Universal Print driver has recently printed.
After you have selected which recently used printer to use, click Print.
Figure 7-2 HP UPD Dynamic Mode dialog box with a Recently Used Printer
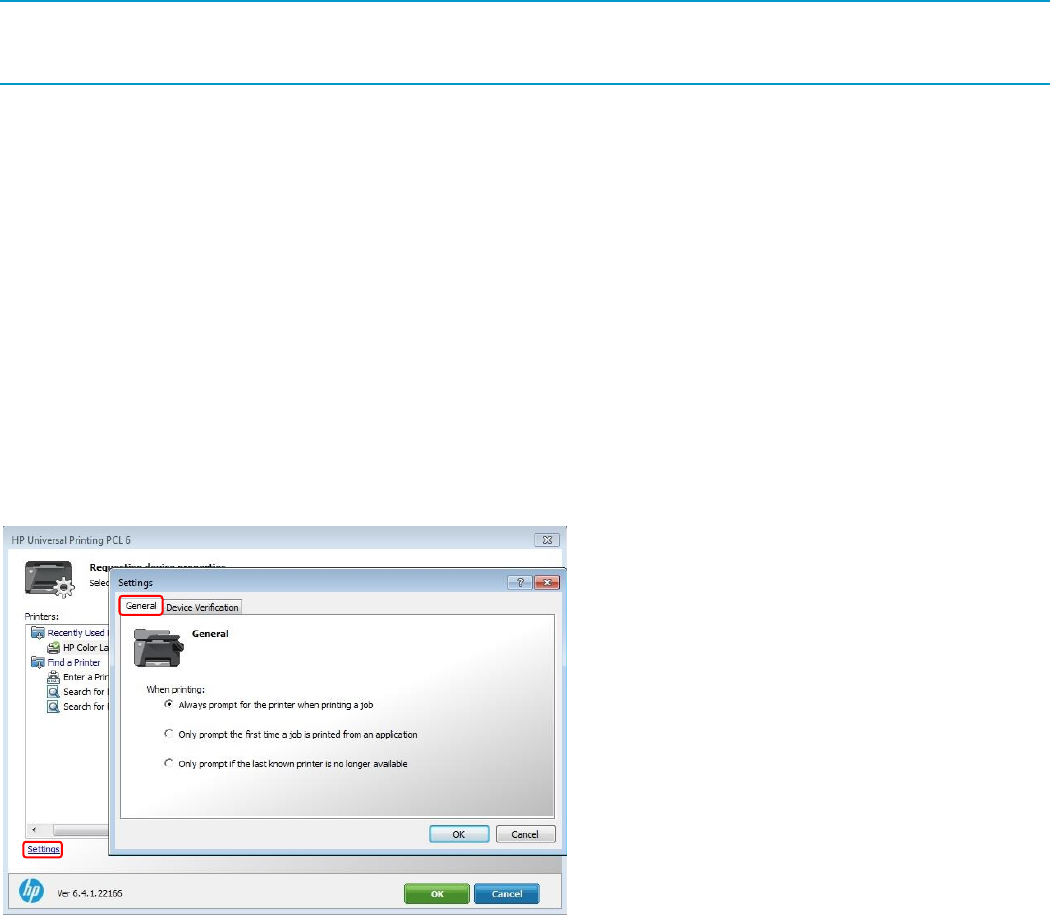
84
Additional options:
To verify whether this printer contains the necessary supplies for the print job before printing, click the Check Status
button.
To add a recently used printer to the Printers folder, select the Add this printer to my Printers and Faxes folder
option. This option allows you to print directly to this printer rather than accessing it through the HP UPD Dynamic
mode dialog box.
NOTE: Beginning with HP UPD v4.7, elevated rights are not required to create a permanent instance of the selected
printer. Restricted or “locked down” users can create traditional mode queues from within the dynamic mode user
interface.
Configure HP UPD dynamic mode settings
The processes for entering the Dynamic mode U/I and changing the default behavior is outlined below.
1. To gain access to the settings of the HP UPD in dynamic mode, do the following:
When using the Printers folder:
a. Click Start and then Devices and Printers.
b. In the Print dialog box, right click the Dynamic print queue (HP Universal Printing PCL 6 or HP Universal
Printing PS).
c. Click Printer properties or Printing preferences. The HP UPD Dynamic mode dialog box displays.
When printing from an application:
a. In the Print dialog box, select the Dynamic print queue (HP Universal Printing PCL 6 or HP Universal
Printing PS).
b. Click Properties or Printer Properties. The HP UPD Dynamic mode dialog box displays.
Figure 7-3 HP UPD Dynamic Mode dialog box Settings General tab
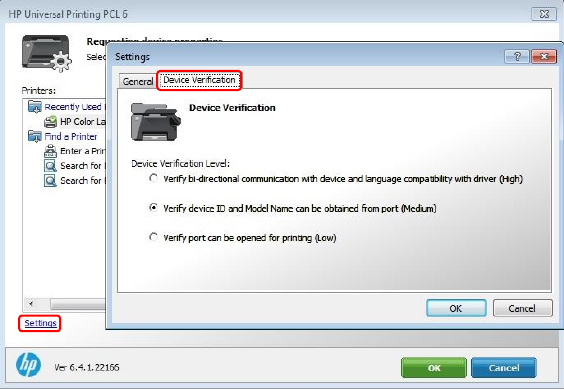
85
2. Click Settings. There are two tabs in the settings screen: General and Device Verification tabs.
General tab—To specify if and when you will receive the HP UPD Dynamic mode dialog box when you are
printing, select one of the following options:
Always prompt for the printer when printing a job.
The HP UPD Dynamic mode dialog box displays every time HP Universal Printing is the selected printer.
You can select a destination printer in this dialog box.
Only prompt the first time a job is printed from an application.
The HP UPD Dynamic mode dialog box displays the first time HP Universal Printing is selected as the printer
from an application. This option is helpful if other print jobs from that application are sent to the same printer
by reducing the number of key clicks required by the user.
Only prompt if the last known printer is no longer available.
The HP UPD Dynamic mode dialog box displays if the last used printer is no longer available.
Figure 7-4 HP UPD Dynamic Mode dialog box Device Verification tab
Device Verification tab—To set the level of verification required to allow printing, select one of the following in
the Device Verification tab:
Verify bidirectional communication with device and language compatibility with driver (High) to block printing if
bidirectional communication and language compatibility cannot be verified.
Verify if Device ID and Model Name can be obtained from port (Medium) to block printing if the Product ID
and Model Name cannot be verified. Medium is the default setting.
Verify port can be opened for printing (Low) to allow printing (but issue a warning message) if the port can be
opened for printing.
3. Click OK.
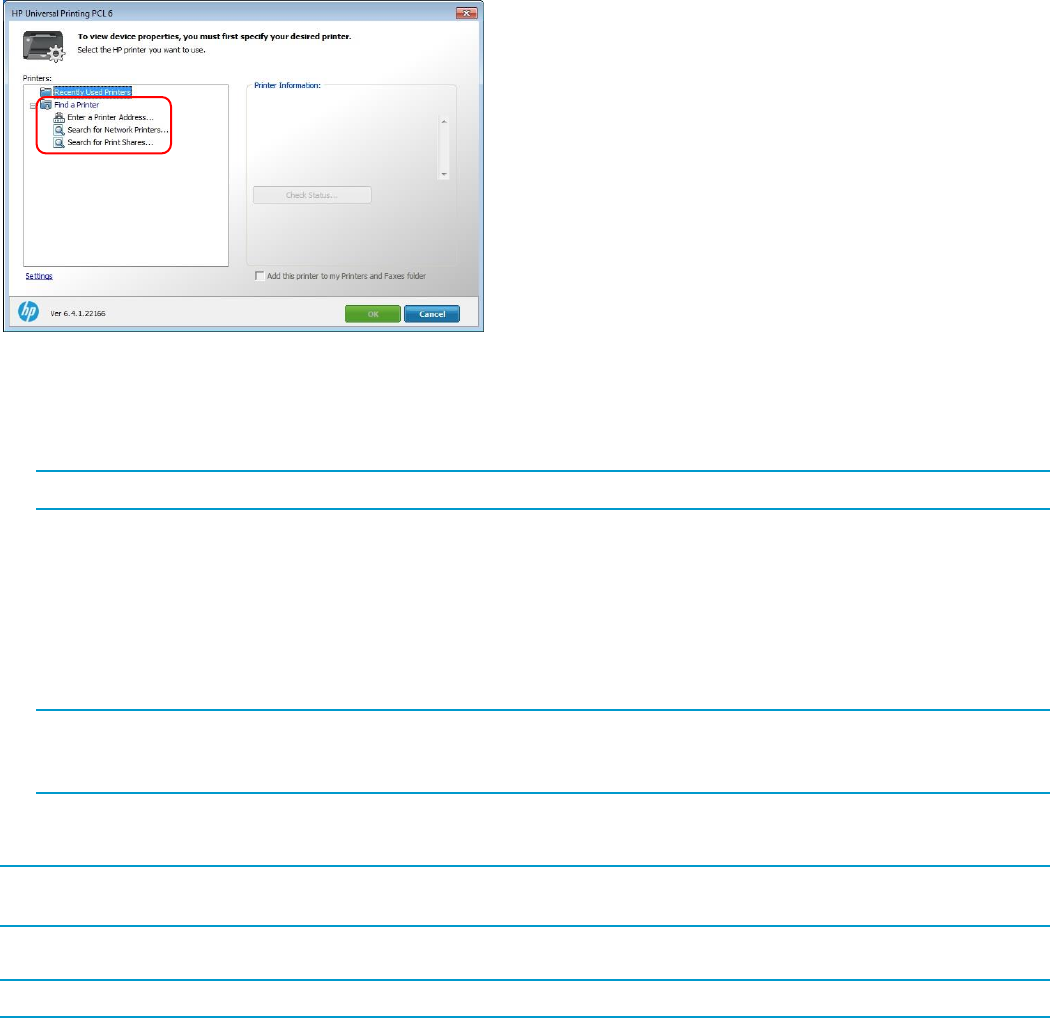
86
Find a printer in dynamic mode
From the HP UPD Dynamic mode dialog box, you can find a printer locally or on the network and print to it.
Figure 7-5 HP UPD Dynamic Mode dialog box Find a Printer
The following methods for locating and connecting to a printer are available:
Enter a printer address—Recommended if the IP address, host name or UNC path is known or if you want to
use a printer that is outside your local subnet.
NOTE: To determine the printer address, print a configuration page from the printer.
Search for network printers—Recommended if you do not have the printer address for a printer or if you want to
see what products are available on your subnet. This feature uses a local subnet broadcast known as Multicast
DNS (mDNS) and is similar to the Bonjour or Rendezvous protocol.
For Devices to show up in the Network Printers list, the following requirements must be met:
o The printer must be on the same subnet as the PC running dynamic mode.
o mDNS, TCP/IP v4 protocol, and port 9100 printing must be enabled.
NOTE: The printer list returned represents the list of printers available on the local subnet. The information for
each printer by default represents the mDNS service name and is a text field that can be changed to provide more
descriptive information for the users.
Search for print shares—Recommended if you want to view shared printers on the network or products that use
a print server.
NOTE: The above are all default options. Other options might be available depending on the print policies created by
your system administrator. Contact your system administrator for more information about these options.
Enter a print address (dynamic mode)
NOTE: To determine the printer address, print a configuration page from the printer.
1. From your application, select File and then Print.
2. In the Print dialog box, select the Dynamic print queue (HP Universal Printing PCL 6 or HP Universal Printing
PS) and click Print. The HP UPD Dynamic mode dialog box opens.
3. Click Enter a printer address.
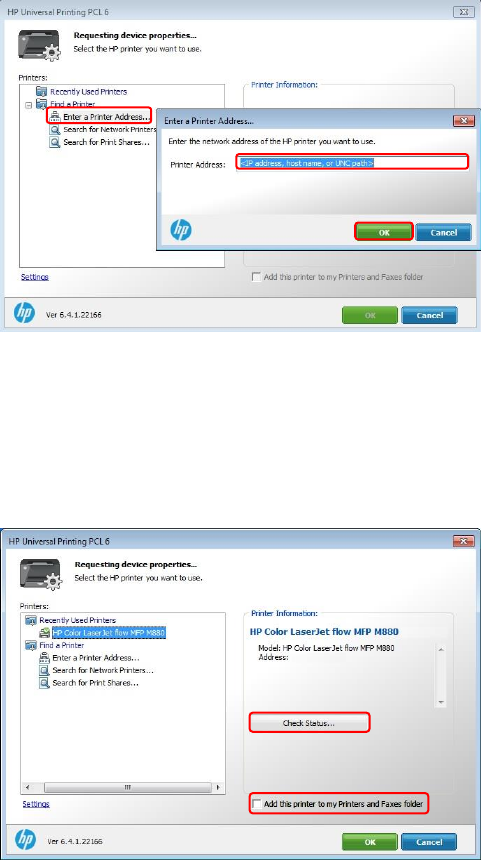
87
Figure 7-6 HP UPD Dynamic Mode dialog box Enter a Printer Address
4. Type the printer address (IP address, host name, or UNC path) and click OK.
If the printer address is found, the printer is displayed under the Printer Information pane on the right side of
the dialog box.
5. To verify the status of the printer or whether the printer contains the necessary supplies for the print job before
printing, click the Check Status button.
Figure 7-7 HP UPD Dynamic mode dialog box
6. To add the currently selected printer to the Printers folder as a traditional mode print queue, select the Add this
printer to my Printers and Faxes folder option (see Figure 7-7 HP UPD Dynamic mode dialog box).
This option allows you to print directly to this printer rather than accessing it through the HP UPD Dynamic
mode dialog box. Adding a traditional mode printer via dynamic mode does not require the user to have
elevated rights.
7. Click Print
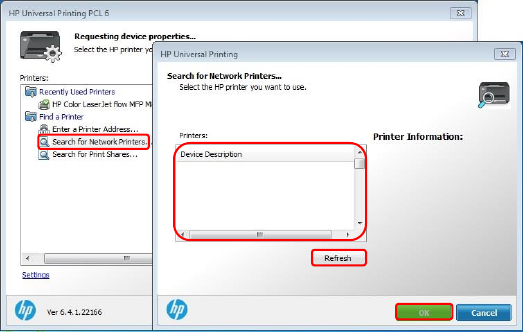
88
Search for network printers (dynamic mode)
When selecting Search for Network Printers, the HP UPD uses the mDNS protocol to discover products on the local
subnet only. This means that only products on the same subnet as the HP UPD will be displayed in the list. mDNS, or
Multicast DNS is also known as the Bonjour protocol.
1. From your application, select File and then Print.
2. In the Print dialog box, select the Dynamic print queue (HP Universal Printing PCL 6 or HP Universal Printing
PS) and click Print. The HP UPD Dynamic mode dialog box opens.
3. Click Search for network printers. The available printers appear under Printers in the Search for network
printers dialog box.
If necessary, click Refresh to update the list.
Figure 7-8 HP UPD Dynamic mode dialog box
4. Select the desired printer in the Printers: list. The selected printer is displayed under the Printer Information
dialog box.
5. Click OK to return to the main dynamic mode dialog box. The selected printer also displays on the right side of the
pane under Printer Information.
6. To verify whether this printer contains the necessary supplies for the print job before printing, click the Check
Status button as shown in figure 7-7.
7. To add a recently used printer to the Printers folder, select the Add this printer to my Printers folder option as
shown in figure 7-7.
This option allows you to print directly to this printer rather than accessing it through the HP UPD Dynamic
mode dialog box.
8. Click Print
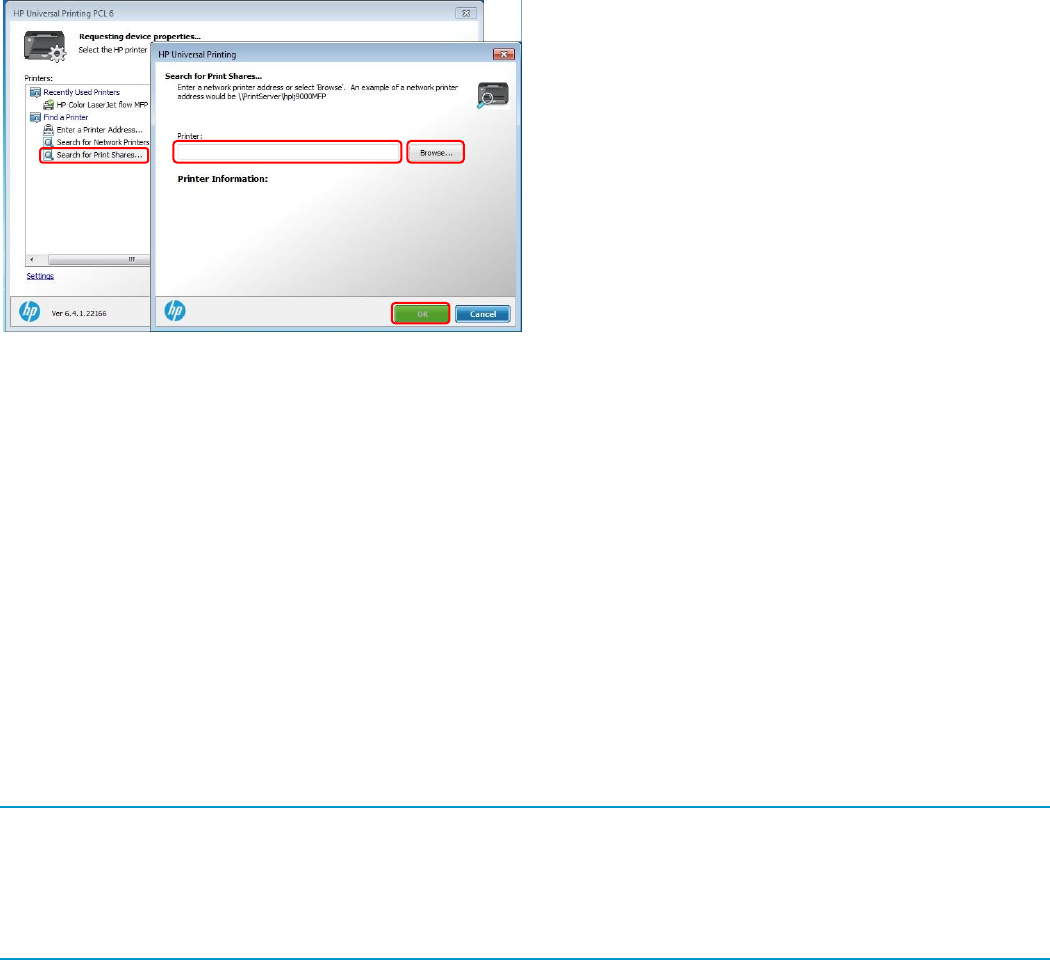
89
Search for print shares (dynamic mode)
1. From your application, select File and then Print.
2. In the Print dialog box, select the Dynamic print queue (HP Universal Printing PCL 6 or HP Universal Printing
PS) and click Print. The HP UPD Dynamic mode dialog box opens.
3. Click Search for print shares.
Figure 7-9 HP UPD Dynamic mode dialog box
4. Enter the network printer address, example \\servername\sharename or click Browse to browse the network for
shared printer resources, a print share, or a shared printer.
5. Click OK. The printer displays under the Search for print shares option.
6. To verify whether this printer contains the necessary supplies for the print job before printing, click the Check
Status button as shown in figure 7-7.
7. To add a recently used printer to the Printers folder, select the Add this printer to my Printers folder option as
shown in figure 7-7.
This option allows you to print directly to this printer rather than accessing it through the HP Universal Printing
dialog box.
8. Click Print.
Add a printer to the Devices and Printers folder (dynamic mode)
Use the HP UPD Dynamic mode dialog box to add a printer to the Printers folder while printing from a program or
from within the Printers folder.
NOTE: When a printer is created using the Add Printer Wizard, or from within the dynamic mode U/I screen, a
traditional mode version of the HP UPD is created for the printer. This means that both traditional mode and dynamic
mode queues can be used on the same system. Also, when a printer is created from dynamic mode, the new
traditional mode print queue takes on the same driver PDL: version as the dynamic mode queue. This means that if
PCL 6 is used for the dynamic mode queue, then the traditional mode print queues created from this will also be using
the PCL 6 version of the driver.
Add a printer to the Printers folder using the dynamic mode user interface.
1. In the software program, click File and Print.
2. In the Print dialog box, select the Dynamic print queue (HP Universal Printing PCL 6 or HP Universal Printing
PS) and click Print. The HP UPD Dynamic mode dialog box opens.
3. To add a previously used printer, select one of the printers in the Recently Used Printers list.

90
4. To discover a printer to add, select one of the following options under Find a printer:
Enter a printer address. Type the IP address, host name, or UNC path, and click OK.
NOTE: To find the printer address of a printer, print a configuration page.
Search for network printers. Select one of the printers listed and click OK.
Search for print shares. Type the network printer address or click Browse to browse to the printer. Click
OK.
Figure 7-10 HP UPD Dynamic mode dialog box
5. Select Add this printer to my Printers and Faxes folder.
6. Click OK.
Add a printer to Devices and Printers folder from within the Devices and Printers folder
(dynamic mode)
1. In the Printers folder, right-click the Dynamic print queue (HP Universal Printing PCL 6 or HP Universal
Printing PS) and select Properties or Printing Preferences. The HP UPD Dynamic mode dialog box opens.
2. To add a previously used printer, select one of the printers from the Recently Used Printers list.
3. To discover a printer to add, select one of the following options under Find a printer:
Enter a printer address. Type the IP address, host name, or UNC path, and then click OK.
NOTE: To find the printer address of a printer, print a configuration page.
Search for network printers. Select one of the printers listed and click OK.
Search for print shares. Type the network printer address or click Browse to browse to the printer. Click
OK.
4. Select Add this printer to my Printers and Faxes folder as shown in figure 7.10.
5. Click OK.

91
Organize the Recently Used Printers list (dynamic mode)
The products listed under the Recently Used Printers list can be organized by deleting products, moving products
into folders, and creating new folders.
NOTE: By default, no folders are listed under the Recently Used Printers list.
Add a new folder
1. Right-click Recently Used Printers and select New Folder.
2. In the New Folder dialog box, type a name for the folder, and click OK. The folder displays under Recently Used
Printers.
Move devices into folders
Drag and drop the printers you want to move into the desired folder.
Right-click the printer to move, select Move to Folder, and select the desired folder.
To delete a printer or a folder, right-click the printer or folder and click Delete.
Using the HP UPD features (traditional mode and dynamic
mode)
Change Print Driver Settings
To gain access to printer driver settings from within most software applications, click File, click Print, and then click
Properties or Preferences. The appearance and names of the driver tabs that appear can vary depending on the
operating system, specific printer, and paper handling options. These settings apply only while the software
application is open.
You can also control the driver directly from the Printers folder. These settings change the default settings for all
software applications.
1. Click the Windows icon in the lower-left corner of the screen, and then click Devices and Printers to open the
Printers folder.
2. Right-click the print queue for the printer.
3. Click Printing preferences to gain access to the same set of driver tabs that the software application controls.
Device mode versus Capabilities mode
Up until recently, the HP UPD would query the printer and the printer would return device information about the printer
such as the model number of the printer and the model number of input and output devices, as well as other
accessories. The driver would then map the device information to settings in the driver. Starting with HP UPD 6.4.1
and the HP LaserJet MFP E725xx, E825xx, E778xx and E876xx printers releasing in spring 2017, the printer returns
the capabilities of the device to the print driver versus the device information.
One way to think of this is to look at it as two modes, Capabilities mode and Device mode, to differentiate between
how releases of the firmware and HP UPD communicate device features. Device mode is how prior releases of the
firmware shared device information with HP UPD such as printer part numbers and model numbers with the HP UPD
mapping the device information to settings in the driver. Capabilities mode, which was introduced in HP UPD 6.4.1
and the HP LaserJet MFP E725xx, E825xx, E778xx and E876xx printers, enables firmware on supported devices to
share the capabilities of the device and input/output devices with the HP UPD to configure settings directly in the HP
UPD.

92
NOTE: Whether the firmware and driver use Device mode versus Capabilities mode is dependent on the printer
firmware and version of the HP UPD. If Capabilities mode is supported by the firmware, HP UPD 6.4.1 and later will
use Capabilities mode to configure the driver. To verify which mode is supported, open the Device Settings tab in
Printer Properties and see whether Accessory Output Bin or Optional Output Bin is listed. If Accessory Output
Bin is displayed, the driver is using Device mode. If Optional Output Bin is displayed, the driver is using Capabilities
mode.
By standardizing the capabilities, the Capabilities mode sends the capabilities of the printer and input/output devices,
reducing the dependency on Hardware IDs.
If Capabilities mode is not available, device information is shared between firmware and the HP UPD, and the HP
UPD maps the device information to capabilities or settings in the HP UPD. If Capabilities mode is available, the
capabilities information is shared between firmware and the HP UPD without the need to map device information to
settings.
NOTE: With Bidi disabled (such as SNMP disabled), or not pointing at an actual device, even with HP UPD 6.5.0 or
later, and printer Capabilities mode, the print queue has no way to determine the type of device or available features.
With Bidi disabled (and/or not pointing at an actual device) using DCU or a reference device to configure the queue,
the print queue only knows the features based on the DCU settings or reference device connected originally. The
queue has no way of knowing which product or type of product it is actually printing to.
NOTE: AD templates, DCU and DDU are designed for the HP V3 UPD such as HP UPD 6.5.0 and do not support
newer discrete (printer specific) drivers for Windows 7 and later operating systems.
Printing Preferences Tab Set
The Printing preferences tabs contain options for formatting documents for the printer. Gain access to the Printing
Preferences tabs either through the software program or through the Windows Printers folder.
The following tabs may be included in Printing Preferences tab set depending on capabilities and accessories in the
currently selected printer:
Advanced
Printing Shortcuts
Paper/Quality
Effects
Finishing
Output
Job Storage
Color
Services
NOTE: The Color tab is only available for printers that support color. Settings on the Output tab vary depending on
which paper handling options are installed.
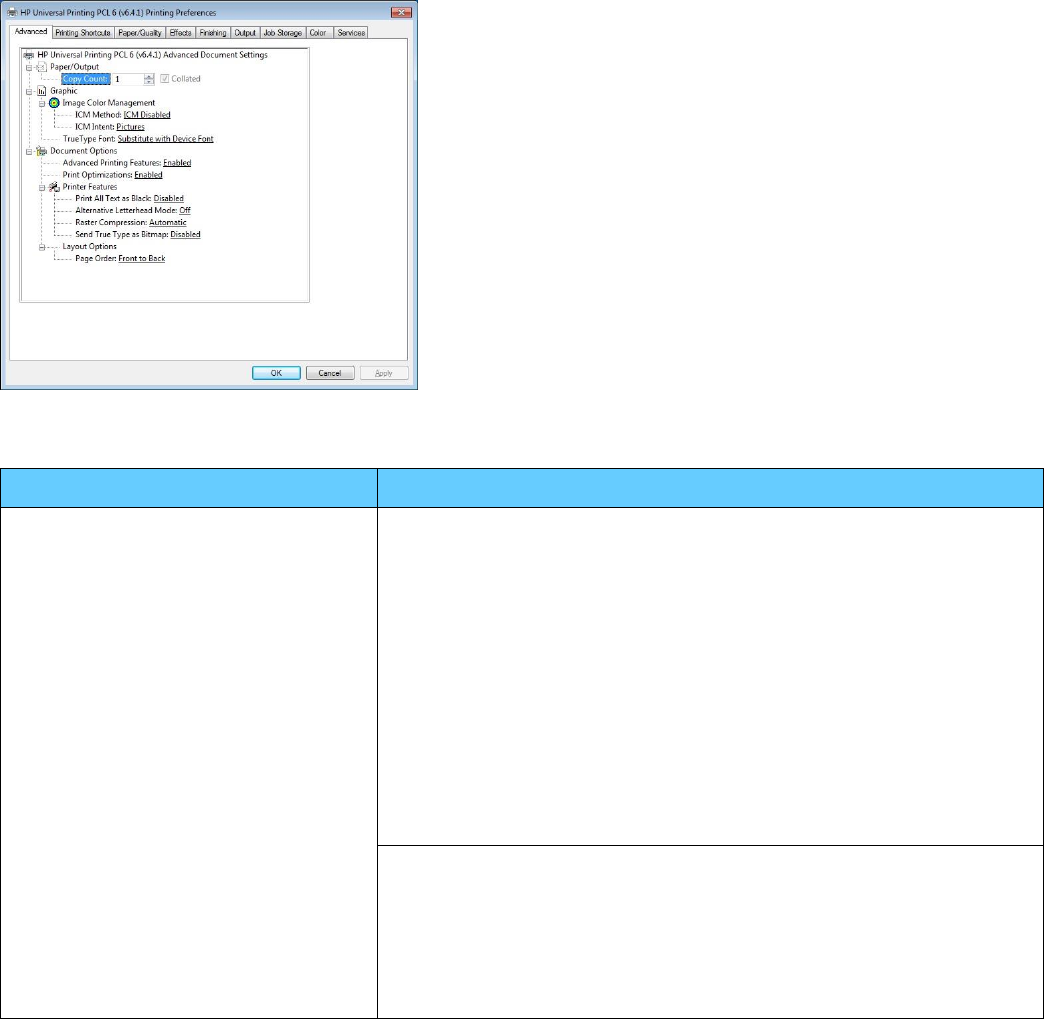
93
Advanced Tab Features
Use the Advanced tab to change the layout of printed pages, and configure special controls that are not commonly
used, as well as to control features such as collating and copies in the driver.
Figure 7-11 Advanced Tab for PCL
Table 7-1 Advanced Tab Features
Feature
Function
Paper/Output
Copy Count -- Specifies the number of copies to print.
This driver setting is useful for software programs that do not provide a copy
count. If a copy count is available in the software program, set the copy count in
the software program.
Valid entries are numbers from 1 to 9999. When you click another group box or
leave the Advanced tab, invalid entries are changed to the last valid value that
appeared in the text box. The default number of copies is 1.
In most cases, the software program and the driver communicate, so that the
number of copies set in one location (such as the program) will appear in the
other (such as the driver). For some programs, this communication does not take
place, and the copies values are treated independently. For these programs,
setting 10 copies in the program and then setting 10 copies in the driver will result
in 100 copies (10 x 10) being printed.
Collated – When the Copy Count option is set to more than 1, the Collated
check box becomes available.
Select this check box when you want the printer to collate (collect and combine in
proper order) the printed copies.
Most current software programs support the collating feature in the print dialog
box or through the page settings in the software program.

94
Feature
Function
Graphic
Image Color Management -- (ICM) options are used for printing color graphics.
The ICM options make it possible for programs to adjust colors before printing so
that the color of images on the screen more closely matches the color of printed
images. The following options are available:
ICM Method – This setting specifies how to print color graphics. The default
setting for ICM Method is ICM Disabled. Additional options on the ICM Method
drop-down menu include:
ICM Handled by Host System -- Click this option to perform calculations for
color matching on the host computer before sending the document to the
printer.
ICM Handled by Printer. Click this option to perform calculations for color
matching on the printer. A set of rules for mapping the colors is created and
downloaded to the printer (which must be PostScript language level 2 or
higher). The printer uses these rules to adjust colors in the document.
ICM Intent -- This setting specifies how color images are created to produce the
best-looking image on the printed page.
If printing a chart or using fully saturated, bright colors, click Graphics to
achieve the best quality.
For photographs or pictures where the colors blend together, click Pictures
to maximize the contrast (default).
If the document uses a color that you need to match exactly, and you are
sending the document to a printer that has that specific color of ink, click
Proof.
To preview the color settings from another printer, click Match.
True Type Font -- Use Substitute with Device Font (the default setting) to print
documents that contain TrueType fonts by using equivalent printer based fonts.
This permits faster printing; however, you might lose special characters that the
equivalent printer based font does not support.
Select Download as Soft font to download TrueType fonts for printing instead of
using printer based fonts.
Document Options
Advanced Printing Features -- When this setting is Enabled, metafile spooling
is turned on and Finishing tab options such as Page Order, Booklet Layout, and
Pages per Sheet are available, depending on your printer.
Enhanced metafile spooling is used to greatly reduce the amount of time that
elapses between a request to print (initiated by an application) and the return of
control to the application by the operating system.
For normal printing, leave the Advanced Printing Features setting at the default
(Enabled). If compatibility problems occur, you can disable the feature. However,
some advanced printing features might still appear in the print driver, even though
they have been disabled. If you select an advanced printing feature in the print
driver that has been disabled on the Advanced tab, the feature is automatically
re-enabled.
Print Optimizations -- When this feature is Enabled (default setting) and your
document contains overlapping text and graphics, the text that is placed on top of
a graphic might not print correctly. If the printed output is not correct, you can
disable this feature.
When this feature is disabled, print optimization-features, such as substituting
device fonts for TrueType fonts and scanning for horizontal and vertical rules are
turned off.

95
Feature
Function
Printer Features: Print All Text as Black -- The feature is Disabled by default.
When Enabled, the driver prints all text as black regardless of the original
document text color.
Color text is printed as black, except for white text, which remains white. (White
text is a reliable method of printing reverse typeface against a dark background.)
This setting does not affect graphic images on the page or any text that is part of
a graphic.
Printer Features: Alternative Letterhead Mode -- When selected, this option
eliminates the need to flip or reload letterhead or preprinted paper in a tray,
whether you are printing on one or both sides of the sheet.
Load the paper as you would for printing on both sides. If the printer tray has an
icon that indicates whether to load paper either face-up or face-down, load the
paper in opposite orientation of what is shown.
NOTE: Alternative Letterhead Mode is available only if the printer is equipped
with an automatic duplexing unit.
Printer Features: Raster Compression (PCL) -- This option is used for
compressing graphics.
Automatic -- The default setting. When this option is selected, the printer
driver determines the best compression method to use.
Best Quality -- Forces the driver to use a compression method that results
in no loss of data during compression.
Maximum Compression -- Where applicable, requires the printer driver to
use a compression method that maximizes compression. This setting can
result in a loss of quality in the printed output.
Printer Features: Send True Type as Bitmap (PCL) -- Provides an alternative
for software programs that have trouble using TrueType fonts for special graphic
aspects such as shading, rotation, or slanting.
Enabled -- TrueType fonts are converted to bitmap soft fonts before
downloading.
Disabled -- TrueType fonts are sent to the printer as outlines, which retains
the standard format (outline) of the fonts. Disabled (off) is the default.
Layout Options: Page Order -- Specifies the order in which the pages of your
document are printed.
Front to Back prints the document so that page 1 prints first (default).
Back to Front prints the document so that page 1 prints last.
NOTE: The page-ordering operation works on whole sheets of paper rather than
on individual logical pages. Accordingly, if you set Pages per Sheet (on the
Finishing tab) to be greater than one, the ordering of logical pages on a physical
sheet of paper does not change.
Document Options: Postscript Options
PostScript Output Option -- Specifies the output format for PS files.
Generally, use the default setting, Optimize for Speed, to print the
documents.
Optimize for Portability -- To create a file that conforms to the Adobe
Document Structuring Conventions (ADSC). Each page of the document will
be a self-contained object. This is useful when creating a PS file and printing
it on a different product.
Encapsulated PostScript (EPS) -- To include the file as an image in
another document that is printed from a different software program.
Archive Format – To create a PS file that can be used later.
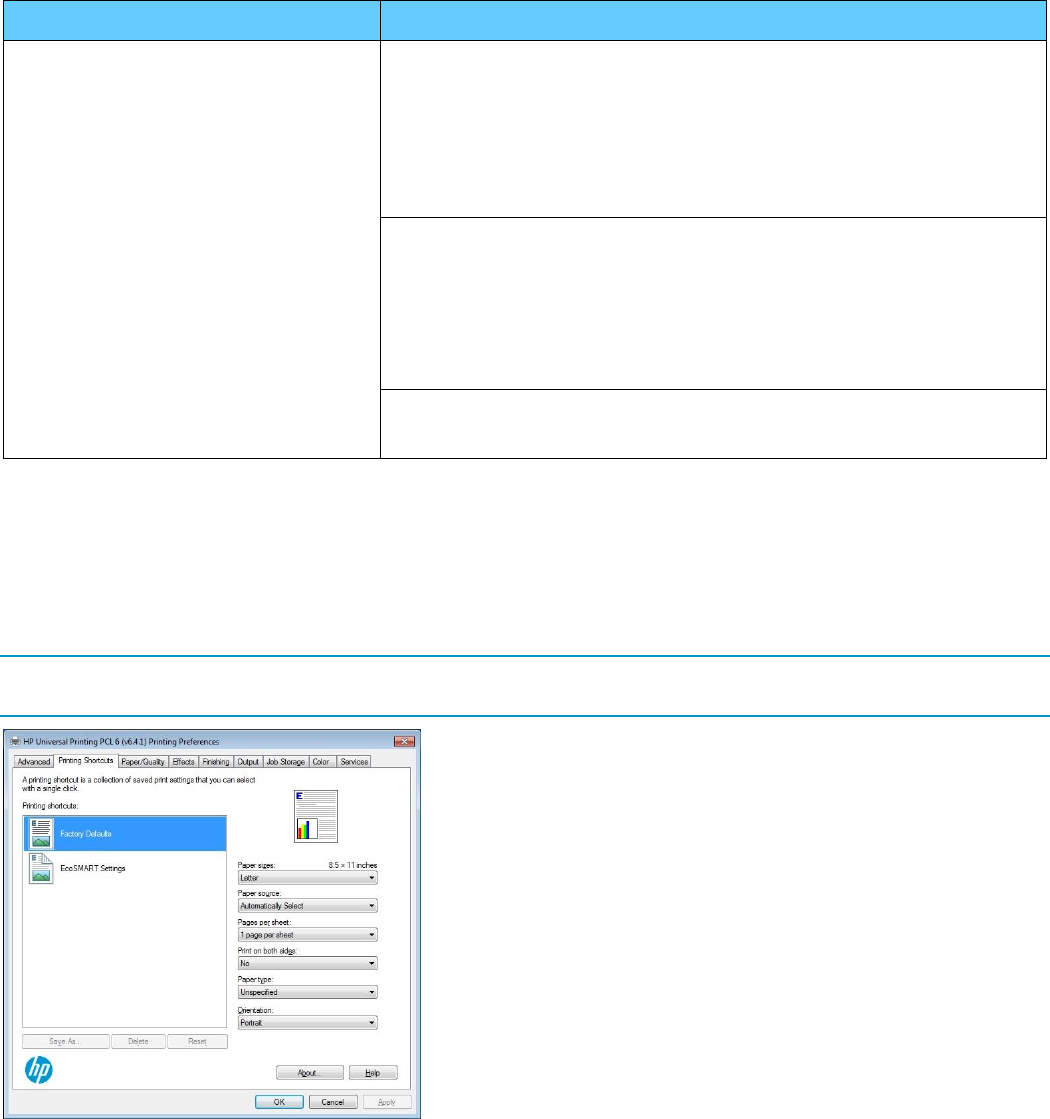
96
Feature
Function
TrueType Font Download Option -- Specifies how TrueType fonts are
downloaded.
Automatic (Default Setting) -- Allows HP UPD PS to decide which format is
best.
Outline -- Downloads the TrueType font as a scalable outline font.
Bitmap -- Downloads the TrueType font as a bitmap font.
Native TrueType -- If the product is a TrueType rasterizer printer, select this
setting to download the TrueType font as an outline font.
PostScript Language Level -- Specifies which PS language level to use, from 1
to 3. The highest level supported by current HP LaserJet printers is 3. Some
products support multiple levels.
It is usually best to select the highest number available, because a higher
language level provides more features. In some instances level 1 should be used,
such as when printing a file to disk where that file will be printed by someone who
uses a level-1 product.
Send PostScript Error Handler -- specifies whether a PS error-handler
message is sent. To get the product to print an error page when an error occurs
in the print job, click Yes. The default setting is Yes.
Printing Shortcuts Tab Features
Printing Shortcuts saves commonly used driver settings under a shortcut name.
Shortcuts created from the application level against the applied Unlocked policy will show the saved settings only from
the application level. From the Devices and Printers folder, those newly created shortcuts will always show the
settings applied via policy.
NOTE: The number of options shown (Paper sizes, Paper source, etc.) changes depending on the selected shortcut
and device capabilities.
Figure 7-12 Printing Shortcuts Tab
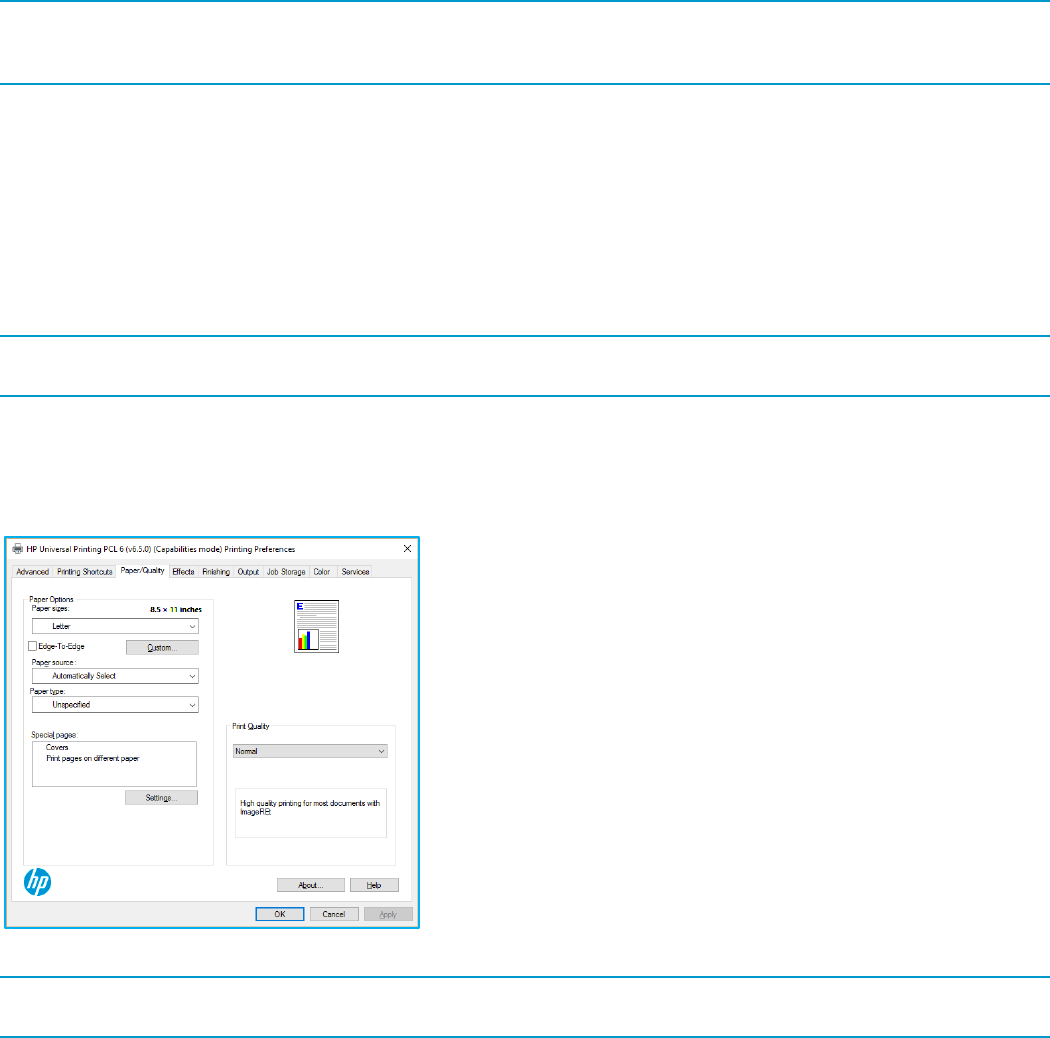
97
Use defined printing shortcuts
The following defined printing shortcuts are available:
Factory Defaults – Select this option to return to the factory default settings.
EcoSMART Settings -- Select this option to print using typical settings for duplex printing.
NOTE: If you change any of the settings for a defined printing shortcut, the Save As... and Reset buttons become
active. Click Save As... to save the new settings as a custom printing shortcut. Click Reset to return to the default
options for all features of the selected shortcut.
Create a custom printing shortcut
1. Select Factory Defaults as a base.
2. Select the appropriate print settings on the Printing Shortcuts tab.
3. On the Printing Shortcuts tab, click Save As.... The Printing Shortcuts dialog box appears.
4. Type a name for the custom printing shortcut, and then click OK. The custom printing shortcut appears in the
Printing Shortcuts list.
5. To delete a custom printing shortcut, click the custom shortcut, and then click the Delete button.
NOTE: Predefined shortcuts are designed for using as-is, or as bases for custom printing shortcuts, and cannot be
deleted.
Paper/Quality Tab Features
Use the Paper/Quality tab to specify paper size, type, and source, as well as to specify different paper selections for
the front cover, first page, last page, and back cover of the document.
Figure 7-13 Paper/Quality Tab
NOTE: Gloss Level is not supported with Capabilities mode. Edge-To-Edge is only supported on printers that support
both Edge-To-Edge and Capabilities mode.

98
Table 7-2 Paper/Quality Tab Features
Feature
Function
Paper Options
Paper sizes -- A drop-down menu that lists all of the supported paper sizes for a
specific printer.
When you move the mouse over the dimensions label, the mouse cursor changes
from an arrow to a gloved hand. Click the dimensions label to toggle between
English and metric units.
Paper-size settings in most software programs override driver settings. Use the
driver to set paper size only when you are printing from software programs that
do not include a paper-size setting, such as NotePad, or when you are producing
a book or a booklet.
NOTE: Certain software programs can override the size command and specify
different paper sizes within a single document.
If you change the print-driver setting to a paper size that is not currently loaded in
the printer, a control-panel message appears that prompts you to load the paper
size or select another tray.
Paper Options: Custom
The Custom Paper Size dialog box appears
when you click Custom… on the
Paper/Quality tab.
NOTE: Adding custom paper sizes requires
administrator privileges on the operating
system.
Name -- Type in a new name for a custom paper size. When you change the
name to something other than Custom, the Save and OK buttons become active.
The name that appears in the Name text box depends on the following
conditions:
If a saved custom paper size has been selected from the drop-down menu
on the Paper/Quality tab, then the Name text box shows the name of the
selected custom paper size.
If a standard paper size has been selected on the Paper/Quality tab, then the
Name text box shows the default name of Custom.
If a new name has been typed into the Name text box for the purpose of
saving a new size or renaming an existing size, then that new name will
remain in the text box until the new size is saved or the dialog box is closed.
If you type a new name into the Name text box, but then do not click Save, you
can change the width and height values without losing the name. However, if you
close the dialog box without clicking Save, any unsaved name or size values are
lost.
Paper size -- The width and length values can be changed by typing numeric
strings into the edit boxes in the Paper Size group box.
NOTE: The range of supported custom paper sizes varies between printer
models. See the user documentation for your printer for the supported range of
custom paper sizes.
Any entry that is greater than the maximum limits of the width and length control
is rounded down to the maximum valid entry. Any entry that is smaller than the
minimum limits of the width and length control is rounded up to the minimum valid
entry.
If units are in millimeters, the custom paper-size range minimum is the limit
rounded up to the nearest whole millimeter. The custom paper-size range
maximum is the limit rounded down to the nearest whole millimeter.
Any non-numerical entry reverts to the minimum value.
The resolution of each control is 1 millimeter or 1/10 of an inch, depending on the
current measurement units.

99
Feature
Function
Units -- To change measurement units, click one of the options in the Units group
box (Inches or Millimeters).
Paper Options: Edge-To-Edge
Edge-To-Edge – Select this option to print a document with 2 mm margins on
supported devices. If this option is not selected, the document will be printed with
standard margins.
This feature is auto configurable in the Printer Properties Device Settings tab. By
default it is set to automatic.
NOTE: Edge-To-Edge is only supported on printers that support both Edge-To-
Edge and Capabilities mode.
Paper Options: Paper source
Paper source -- Specifies the source tray to use for printing a document. The list
of source trays depends on the printer model and accessories that are installed.
Any optional source trays that are installed through the Device Settings tab also
appear here.
The Paper source drop-down menu can contain the following options, depending
on what has been installed on the printer:
Automatically Select
Printer auto select
Manual Feed
Tray 1 through Tray 4
The default setting is Automatically Select. When this setting is selected, the
printer uses the source tray that supports the paper size that you have selected.
If you select a source tray other than Automatically Select, make sure that the
correct paper size is loaded in the source tray.
Paper Options: Paper type
Paper type -- This drop-down menu shows Unspecified and an entry for More.
Clicking More opens the Type is dialog box. Expand Type Is and its
subcategories to view all of the paper types that the printer supports. The default
setting is Unspecified.
If you select a setting other than the default, make sure that the correct paper
type is loaded in the tray that you selected in the Paper source setting.
When you change the print-driver setting to a paper type that is not currently
loaded in the printer, a control-panel message appears prompting you to load the
paper type or select another tray.
NOTE: No mechanism exists for manually adding custom paper types through
the driver.

100
Paper Options: Special Pages
NOTE: The selections for special pages may
vary between printer models. See the user
documentation for your printer for the
supported range of custom paper sizes.
Settings – Click Settings to access the Special Pages dialog box.
Covers -- Includes a blank or preprinted cover on a document, or includes a front/
back cover from a source tray that is different from the one used for the
remainder of the document. The following options are available:
Add a blank or preprinted cover: Select which cover is customized: Front,
Back, or Both.
Paper source: Specifies the source tray to use for adding a front and/or back
cover to the document. The list of source trays depends on the accessories
that are installed. Any optional trays that are installed through the Device
Settings tab also appear here.
Paper type: Specifies the paper type to use for front and/or back covers.
Changes made to the Paper type setting here override any previous Paper
type settings using the same paper source.
NOTE: The same size of paper will be used for the entire print job.
When you change the type and source of the paper and covers, the settings
remain configured until you close the software program.
Print pages on different paper -- Select an alternative paper type or source for
the first or last pages of a document. The following options are available:
Pages in document -- Select which pages are customized: the First page or
the Last page.
Paper source -- Specifies the source tray to use for printing a document. The
list of source trays depends on the accessories that are installed. Any
optional trays that are installed through the Device Settings tab also appear
here.
Paper type -- Drop-down menu showing all of the paper types that the
printer supports.
NOTE: The same size of paper is used for the entire print job.
When you change the type and source of the paper and covers, the settings
remain configured until you close the software program.
Print Quality
The selections for Print Quality may vary between printer models. See the user
documentation for your printer for the supported print quality settings.
NOTE: Starting with UPD 6.4.1 and the HP LaserJet MFP E725xx, E825xx,
E778xx and E876xx printers releasing in spring 2017, the print quality settings
change to be more consistent across products. For more information, see Tables
7-3 and 7-4.
NOTE: Gloss Level is not supported with Capabilities mode.
With the release of HP UPD 6.4.1, print quality settings have been updated for most products releasing in the first half
of 2017 and later.
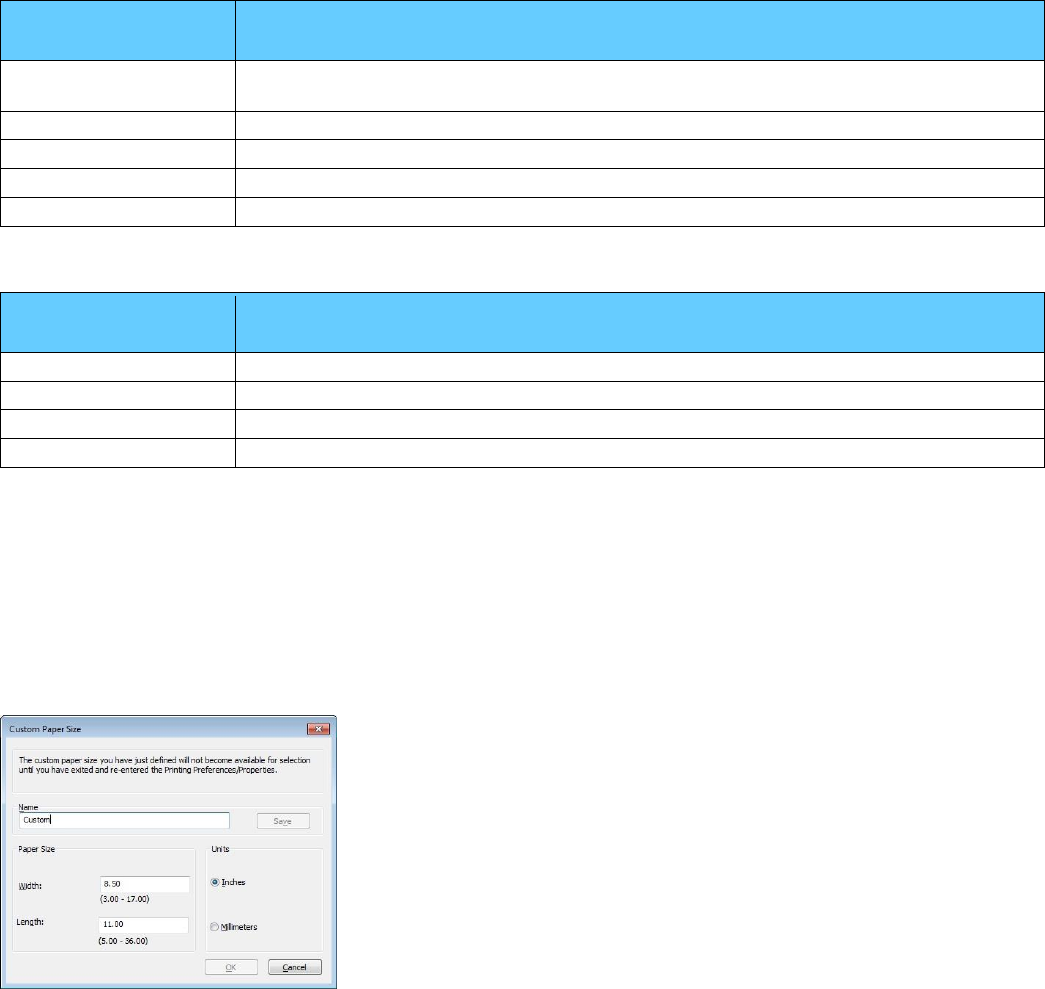
101
Table 7-3 HP UPD Print Quality Settings for New HP Laser-Based Products
HP Laser Print Quality
Setting *
Description
Normal (default)
(Color) High quality printing for most documents with ImageREt
(Mono) High quality printing for most documents with FastRes
Enhanced
(Color Only) Enhanced quality for photos, presentations and brochures
Fine Lines
(Color/Mono) 1200x1200 for line art, architectural drawings, finger prints
Quick View
(Color/Mono) Fast preview of documents, lower resolution
Economode
(Color/Mono) Lowest cost printing, lowest resolution
* New settings for products releasing the first half of 2017 and later. Specific settings may not be available on all products.
Table 7-4 HP UPD Print Quality Settings for HP Ink-Based Products
HP Ink Print Quality
Setting *
Description (Color Printers)
Professional
High quality printing for most documents
Presentation
Enhanced quality for presentations and brochures
Maximum dpi
Slower print with premium quality intended for photo media
General Office
Fastest print speed at lower resolutions
* Specific settings may not be available on all products.
Add custom paper sizes
1. Click Start and then Devices and Printers
2. Right-click the print queue in the Printers folder.
3. Click Printing preferences.
4. Click the Paper/Quality tab.
5. Click Custom under Paper Options.
Figure 7-14 Custom Paper Size Dialog Box
6. Provide a name for the custom paper size and enter the dimensions in Inches or Millimeters.
7. Click Save.
8. Click OK.

102
To specify Special pages for the Covers or other pages
1. Click the Settings button under Special Pages on the Paper/Quality tab.
2. Select Covers.
Figure 7-15 Special Pages Dialog for Covers
3. Specify where you want a blank or preprinted cover added (Front, Back or Both).
4. Select the Paper source and Paper type.
5. Click Add
6. Select Print pages on different paper.
Figure 7-16 Print Pages on Different Paper
7. Select which pages in the document you want to print on different paper (First or Last).
8. Select the Paper source and Paper type.
9. Click Add.
10. Click OK.
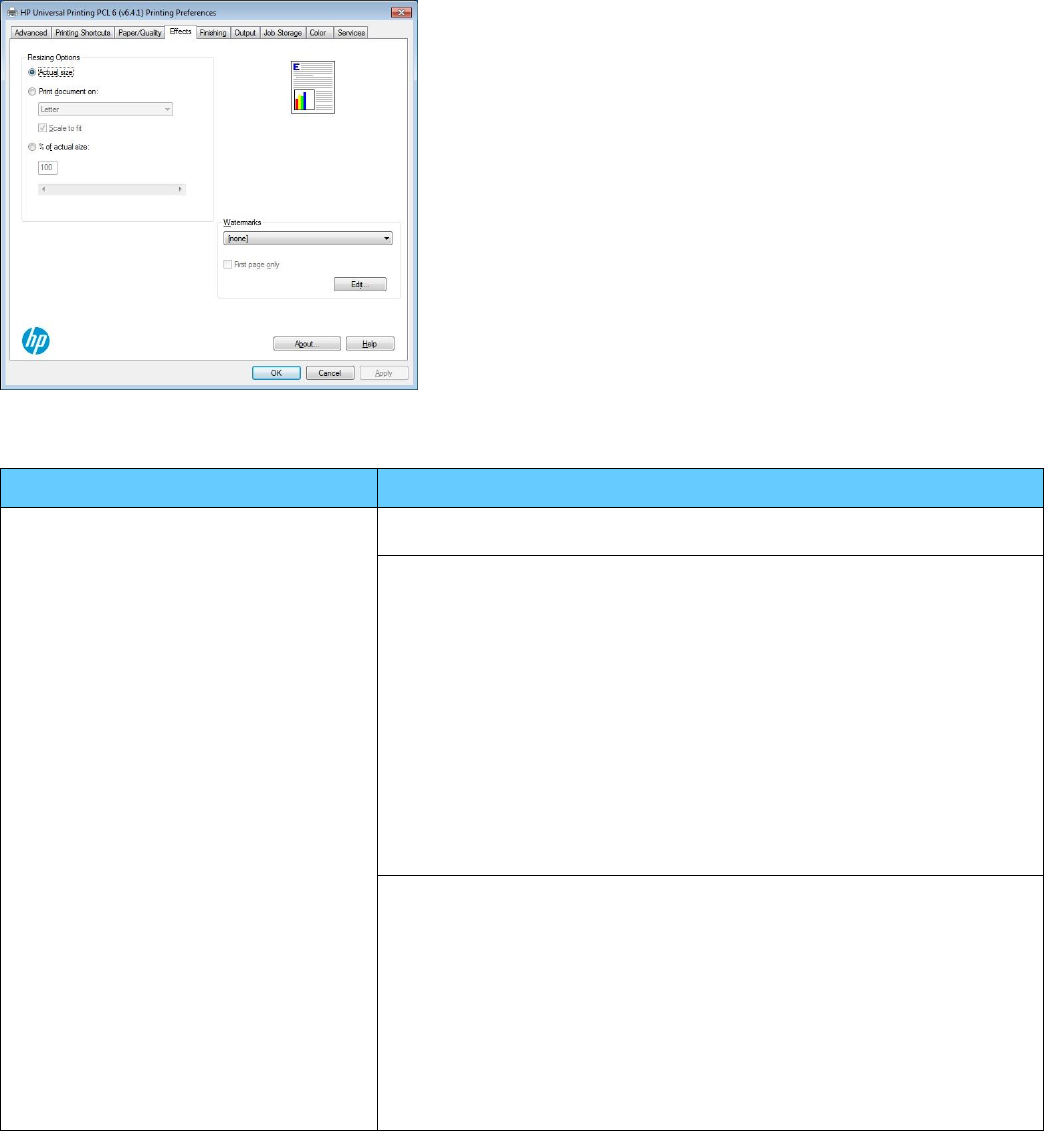
103
Effects Tab Features
Use the Effects tab to create unique paper effects such as scaling and watermarks.
Figure 7-17 Effects Tab
Table 7-5 Effects Tab Features
Feature
Function
Resizing Options
Actual size -- The default setting which prints the document without changing the
document size.
Print document on -- Click this option to format the document for one paper size
and then print the document on a different paper size, with or without scaling the
image to fit the new paper size.
This option is disabled by either of the following conditions:
The % of actual size value is not 100.
The Pages per sheet value (on the Finishing tab) is not 1.
When Print document on is selected, the drop-down menu shows the available
paper sizes. The list contains all of the standard paper sizes that the selected
paper source supports and any custom sizes that you have created.
When Print document on is selected, Scale to fit is available. Clear this check box
if you do not want your document reduced or enlarged to fit on the selected
paper.
Scale to fit -- Specifies whether each formatted document page image is scaled
to fit the target paper size.
Scale to fit is available when Print document on is selected. If the setting is
unchecked, then the document page images will not be scaled, and are instead
centered at full size on the target paper. If the document size is larger than the
target paper size, then the document image is clipped. If it is smaller, then it is
centered within the target paper. Figure 7-18 shows preview images for a
document formatted for Legal-size paper with the Print document on check box
selected, and the target size specified as Letter. The preview image uses a
dashed gray line to show the boundaries of the logical page in relation to the
target paper size.

104
Feature
Function
% of actual size -- Provides a slider bar and input box to use for scaling the
percentage setting. The default setting in the entry box is 100% of actual size.
Actual size is defined as the paper size that is selected within the driver or what
the driver receives from the software program (if the software program does not
negotiate the paper size with the driver). The driver scales the page by the
appropriate factor and sends it to the printer.
The following settings disable % of actual size:
Print document on (on the Effects tab) is selected
Pages per sheet (on the Finishing tab) is not 1
The limits of the range are from 25% to 400%. Any values outside the range are
adjusted to those limits as soon as another tab is selected or another control is
selected.
Any change to the scale also changes the page preview, which increases or
decreases from the upper left corner of the preview.
Watermarks
Watermarks -- Use this feature to select a watermark, create a new watermark
(text only), or edit an existing watermark.
Watermarks are applied to logical pages. For example, when Pages per sheet is
set to "4" and First page only is unchecked, four watermarks appear on the
physical page (one on each logical page).
The Watermarks feature can be configured using the Driver Configuration Utility
in the HP PARK.
Drop-down menu -- shows alphabetically sorted watermarks that are currently
available on the system, plus the string "(none)," which indicates that no
watermark is selected which is the default setting. Any watermark that is selected
from this list appears in the preview image.
If the [Username] watermark is selected, the driver will use the network username
of the logged in user for the watermark.
First page only -- When this check box is selected, the watermark is printed only
on the first page of the document. The First page only check box is disabled
when the current watermark selection is "(none).”
Edit -- To view the Watermark Details for configuring custom watermarks.
Watermark Details
Click Edit to access the Watermarks Details
dialog box
Current Watermarks – Lists the available watermarks, both predefined
watermarks that are available in the driver and any new watermarks that you
have created.
Watermark Message -- The name that identifies the watermark in the Current
Watermarks list, except when more than one watermark has the same message.
For example, you might want several different watermarks with the message
DRAFT, each with a different typeface or font size. When this occurs, the string is
appended with a space, a pound sign, and a number (for example, Draft #2).
When a number is added, the number two is used first, but if the resulting name
is also in the list, then the number increases until the name is unique (Draft #3,
Draft #4, and so on).
Group Watermark -- Combine multiple dynamic watermarks together and
position them to the Top Right or Center of the page.

105
Feature
Function
Message Angle -- Use these controls to print the watermark in different
orientations on the page. All settings center the watermark string within the page.
The selection of a particular setting affects only the angle of the string placement.
The following settings are available:
Diagonal -- Places the text along a line that spans the lower-left to upper-
right corners of the page. The default setting.
Horizontal -- Places the text along a line that spans the mid-left to mid-right
edges of the page.
Angle -- Places the text at the specified angle across the page. Use the
numeric spin box to select the angle.
Font Attributes: Name – Specifies the font to use for the watermark. The
dropdown lists the fonts that are currently installed on the system. The default is
language-dependent.
Font Attributes: Color -- Specifies the color to use for the watermark. The
dropdown lists the colors available.
Font Attributes: Shading -- The default Shading setting for new and preset
watermarks is Very Light. The following range of shades is available from the
Shading drop-down menu:
Lightest
Very Light (default)
Light
Medium Light
Medium
Medium Dark
Dark
Very Dark
Darkest
These values represent the intensity of the color that is used. Select Light to
produce a lightly saturated watermark. Select Lightest to produce the lightest
shade of watermark. Select Darkest to produce a fully saturated watermark (black
if gray is selected).
Font Attributes: Size -- Specifies the font size to use for the watermark. 1 to
999 points are available. The default point size is language-dependent.
Font Attributes: Style -- Specifies the style to use for the watermark. The
following settings are available:
Regular
Bold
Italic
Bold Italic
The default Style setting for new and preset watermarks is Regular.
OK and Cancel buttons -- Click OK to accept all of the changes that are made in
the Watermark Details dialog box.
However, clicking Cancel does not cancel all of the changes. If you make
changes to a watermark and then select a different watermark or click New, all of
the changes are saved, and only the current, unsaved changes can be canceled.
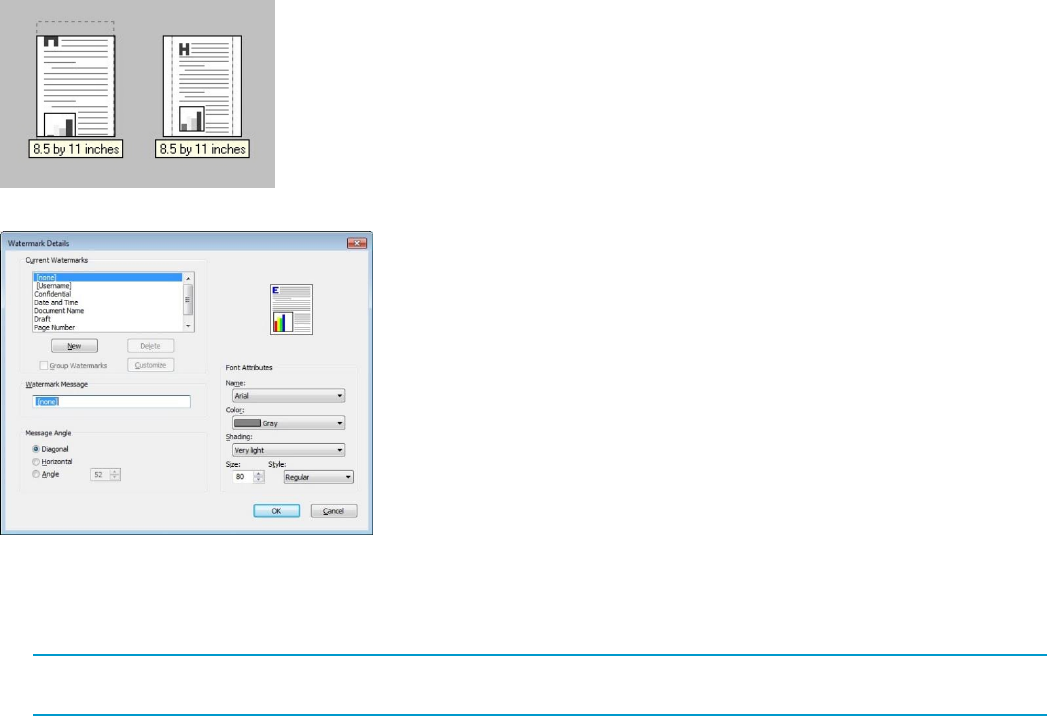
106
Figure 7-18 Preview Images: Legal on Letter; Scale to Fit Off (Left) and On (Right)
Figure 7-19 Watermark Details dialog box
To create a new watermark
1 Under Watermarks on the Effects tab of Printing preferences, click Edit.
NOTE: A maximum of 30 watermarks can be saved in the Current Watermarks list at one time. When you reach
the limit of 30 watermarks, the New button is disabled.
2 To create a new watermark, click New.
The new watermark appears in the Current Watermarks list and in the Watermark Message edit box as
"Untitled".
To edit an existing watermark, select the watermark in the Current Watermarks list.
If you change the Watermark Message for that watermark, you are, in effect, creating a new watermark.
To delete a watermark, select the watermark in the Current Watermarks list, and then click Delete.
A warning appears asking whether you are sure you want to delete the selected item. Click Cancel if you
want to keep the watermark. Click OK to delete the selected watermark.
3 Type the name for the watermark in the Watermark Message field.
The name that you type in the Watermark Message field appears in the Current Watermarks group box in the
Watermark Details dialog box and in the Watermarks group box on the Effects tab.
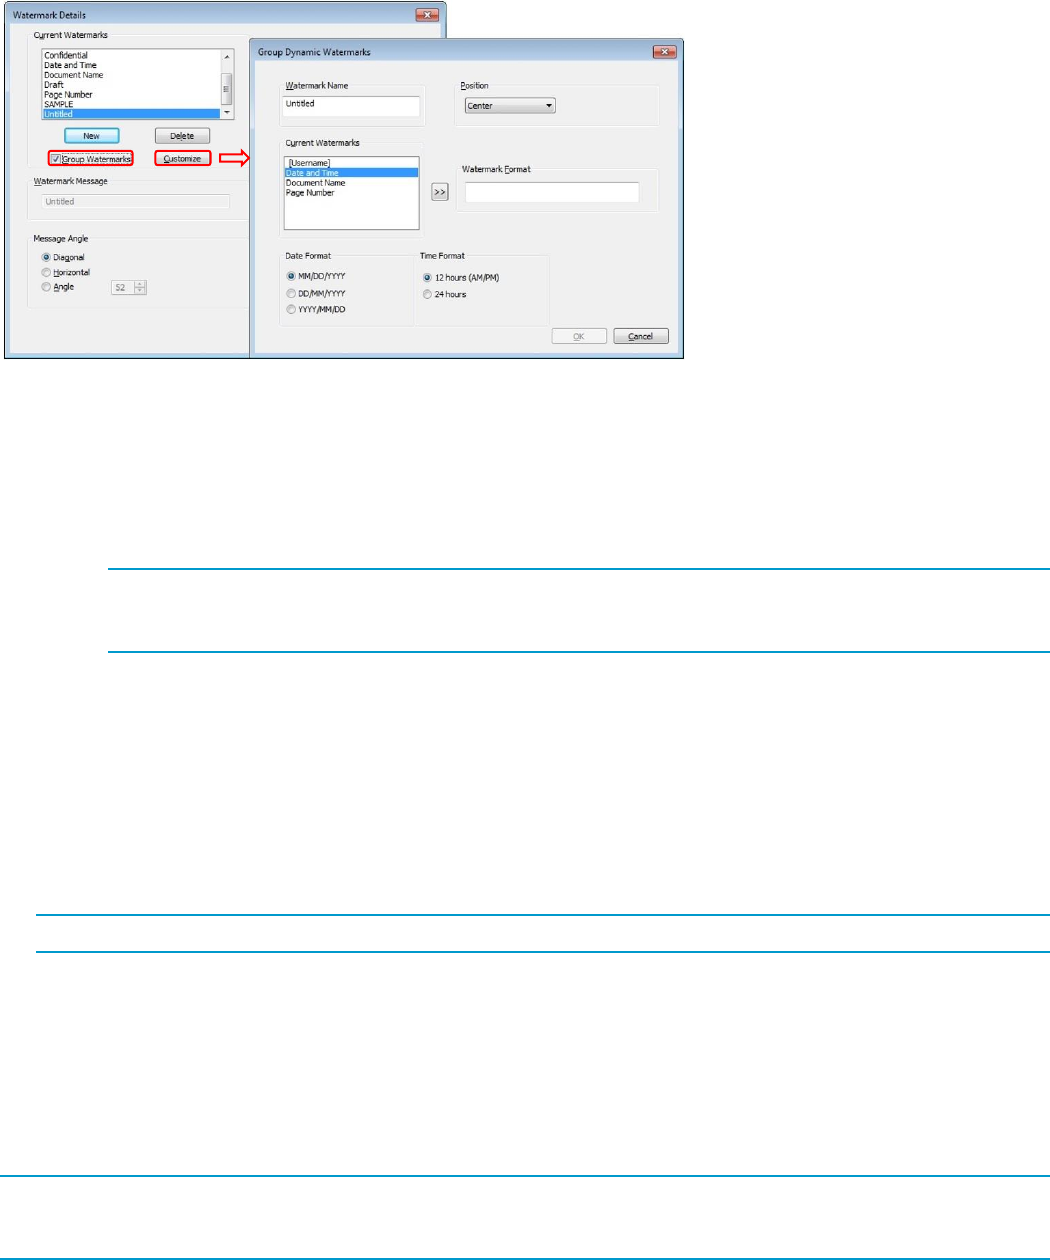
107
Figure 7-20 Group Dynamic Watermarks dialog box
4 If you want to create a group watermark, perform the following steps:
a. Select the Group Watermarks check box.
b. Click Customize
c. If you want Date and Time in the group watermark, select Date and Time, select the Date Format and
Time Format and click the “>>” button.
NOTE: The order in which you select the watermarks you want grouped is the order they will be
displayed. For example, if you want Document Name first and then Date and Time, select Document
Name and click the “>>” button prior to selecting Date and Time.
d. Select each of the other watermarks you want grouped and click the “>>” button.
e. Select the drop menu for Position and click Center or Top Right.
f. Click OK
5 Under Message Angle, select how you want the watermark positioned on the page.
Diagonal -- Places the text along a line that spans the lower-left to upper-right corners of the page.
Horizontal -- Places the text along a line that spans the mid-left to mid-right edges of the page.
Angle -- Places the text at the specified angle across the page. Use the numeric spin box to select the angle.
NOTE: Message Angle is not available for Group Watermarks positioned to the Top Right.
6 Select the name of the font you want to use.
7 Select the font color.
8 Select the level of shading for the new watermark.
9 Select the font size.
10 Select the style for the characters for the watermark, Regular, Bold, Italic or Bold Italic
11 Click OK to accept all of the changes.
NOTE: Clicking Cancel does not cancel all of the changes. If you make changes to a watermark and then select a
different watermark or click New, all of the changes are saved, and only the current, unsaved changes can be
canceled.
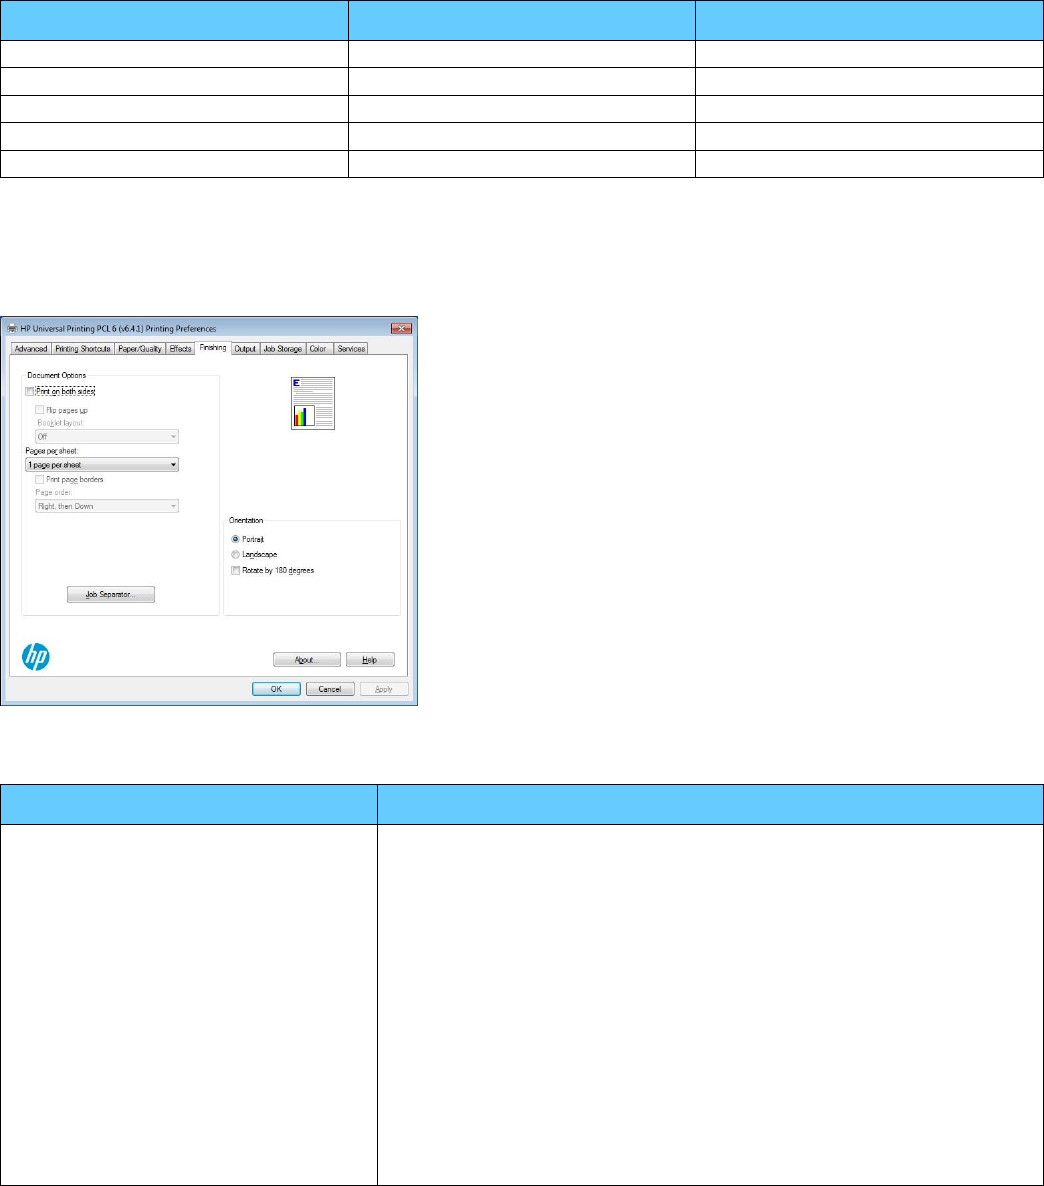
108
Default watermark settings
The following table shows the default Font Attribute settings for new and preset watermarks.
Table 7-6 Font Attribute Settings for New and Preset Watermarks
Setting
New watermark
Preset watermark
Name
Arial
Varies by language
Color
Gray
Gray
Shading
Very Light
Very Light
Size
80
Varies by language
Style
Regular
Bold
Finishing Tab Features
Use the Finishing tab to print booklets and control paper output.
Figure 7-21 Finishing Tab
Table 7-7 Finishing Tab Features
Feature
Function
Document Options
Print on both sides – Enables printing on two sides of a sheet of paper. The
default is off (not selected). Print on both sides is available when the following
conditions exist:
Paper type on the Paper/Quality tab is set to any paper type except for the
following types:
o Labels
o Monochrome Laser Transparency
o Envelopes
Paper sizes is set to any paper size except for the following sizes:
o Statement
o 3x5
o 4x6
o 5x7
o 5x8
o A6
o B6
o 10x15cm

109
Feature
Function
o Envelope #10
o Japanese Postcard
o Envelope #9
o Envelope Monarch
o Envelope B5
o Envelope C5
o Envelope C6
o Envelope DL
Most printer models that support Print on both sides (duplexing) support smart
duplexing. This increases printing performance by preventing one-page print jobs
or single-sided pages of a duplexed print job from going through the duplexing
unit even when the duplexing feature has been selected in the driver.
Smart duplexing is not supported on paper types that cannot be printed on both
sides (such as labels, transparencies, envelopes, pre-punched, preprinted,
letterhead or cardstock).
When the paper type is set to Unspecified, the smart duplexing feature is
disabled.
Flip pages up -- Specifies the duplex-binding option. By default, the Flip pages
up check box is not available. It is available only when Print on both sides is
selected.
Table 7-8 shows how orientation impacts this setting.
With Portrait selected, short-side binding is for print jobs with pages that read by
flipping over like the pages of a calendar.
With Portrait selected, long-side binding is for print jobs with pages that read by
turning like the pages of a book.
Booklet layout drop-down menu – Available when Print on both sides is
selected, provides options based on the current paper size. The default is Off.
Selecting Left binding or Right binding automatically changes to pages per
sheet to 2 pages per sheet.
Changing the Pages per sheet setting manually to 4, 6, 9, or 16 pages per sheet
disables the booklet setting.
Pages per sheet -- Selects the number of pages that you want to print on a
single sheet of paper. If you choose to print more than one page per sheet, the
pages appear smaller and are arranged on the sheet in the order that they would
otherwise be printed. The Pages per sheet dropdown menu provides six
settings:
1 page per sheet (the default)
2 pages per sheet
4 pages per sheet
6 pages per sheet
9 pages per sheet
16 pages per sheet
NOTE: When you select an option other than 2 pages per sheet, booklet printing
is not available.
Related controls indented beneath Pages per sheet are Print page borders and
Page order, which become active when Pages per sheet is greater than 1.
Figures 7-22 and 7-23 shows preview images of how Page order impacts Pages
per sheet.
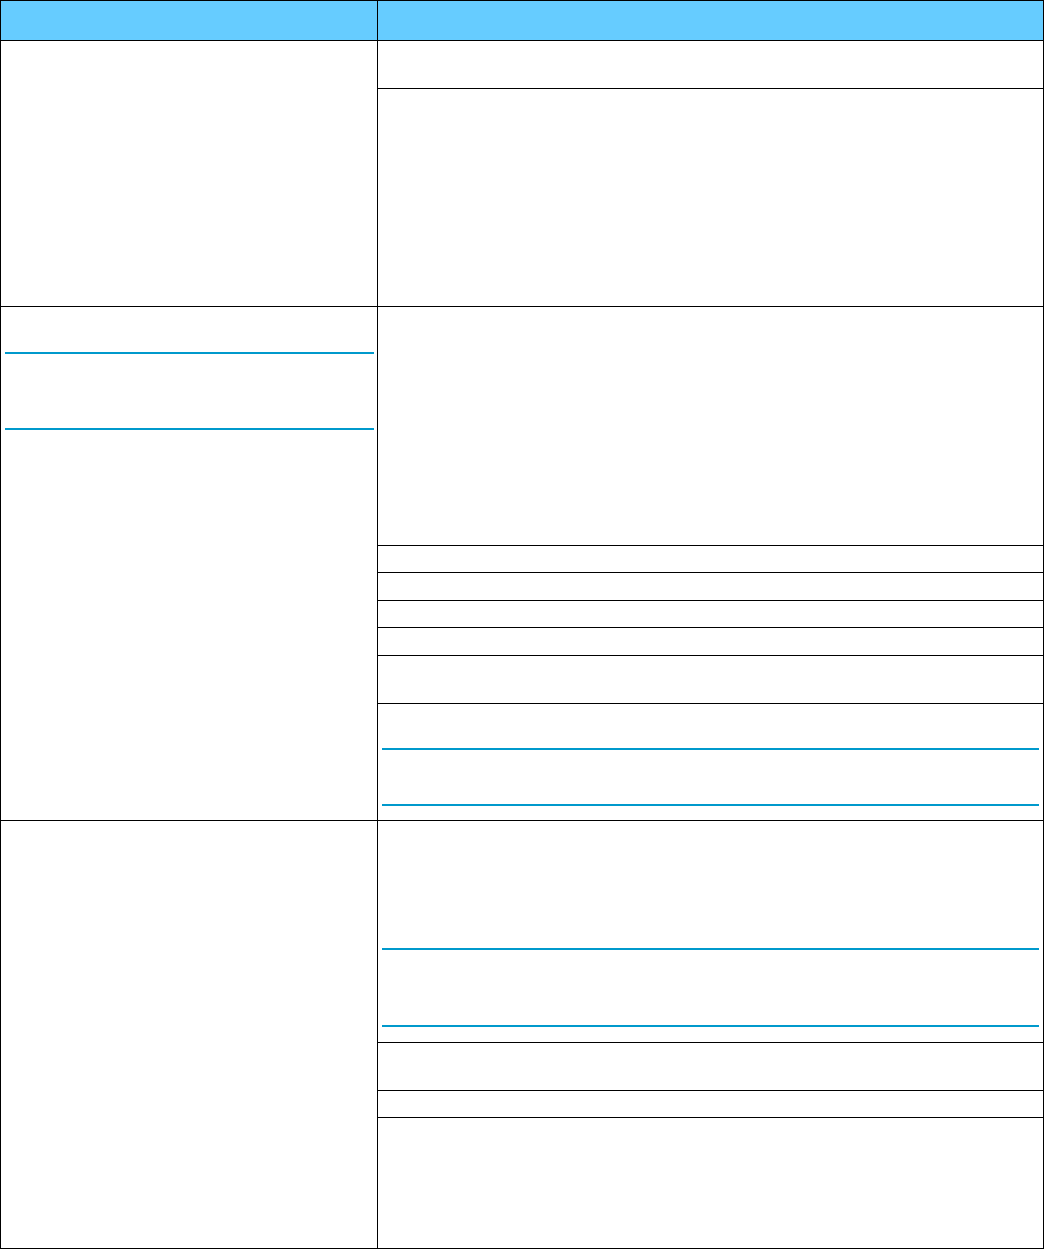
110
Feature
Function
Print page borders – Places a line around each page image on a printed sheet
to help visually define the borders of each logical page.
Page order drop-down menu – Selects the order and placement of pages on a
sheet when you print more than one page per sheet. The following selections are
available:
Right, then Down
Down, then Right
Left, then Down
Down, then Left
Figures 7-22 and 7-23 shows preview images of how Page order impacts Pages
per sheet.
Job Separator
NOTE: Job Separator must be enabled in the
Device Settings tab in Printer properties to
use this feature.
Job Separator Mode – Inserts a separator page (a divider page) at the start of
the print job and between any print jobs.
Off
Separator page – Prints a separator page for each job. For multiple print
jobs, each job will print a separator page.
Separator Page (Alternate) – Prints one separator page for the entire job.
For multiple copy print jobs, only the first job prints a separator page.
o Paper Source and Paper Type will use the same paper source and
type for all printed pages including the separator pages.
o If Job Storage is enabled, the print job will be stored and the
separator page will be printed without the job.
User Name – Prints a Windows user name on the separator page.
File name -- Print the file name on the separator page.
Application name -- Prints the application name on the separator page.
Date and time -- Prints the date and time of the print job on the separator page.
Source is: -- Specifies the paper source tray to use for printing the separator
page.
Type is: -- Specifies the paper type to use for printing the separator page.
NOTE: Source and Type is not available in the Separator Page (Alternate)
mode.
Orientation
Orientation -- Refers to the layout of the image on the page, and does not affect
the way that paper feeds into the printer.
You can toggle orientation between Portrait and Landscape by clicking the
document preview image.
NOTE: Nearly all software programs establish the orientation for the printed
page. The page orientation in the driver is useful only for the few software
programs that do not set an orientation.
Portrait -- The top edge of the document is the shorter edge of the paper (the
default orientation).
Landscape -- The top edge of the document is the longer edge of the paper.
Rotate by 180 degrees -- This creates a landscape or portrait orientation in
which the image is rotated 180°. This setting is useful for printing pre-punched
paper.
If you select the Rotate by 180 degrees check box, no change occurs in the
document preview image.
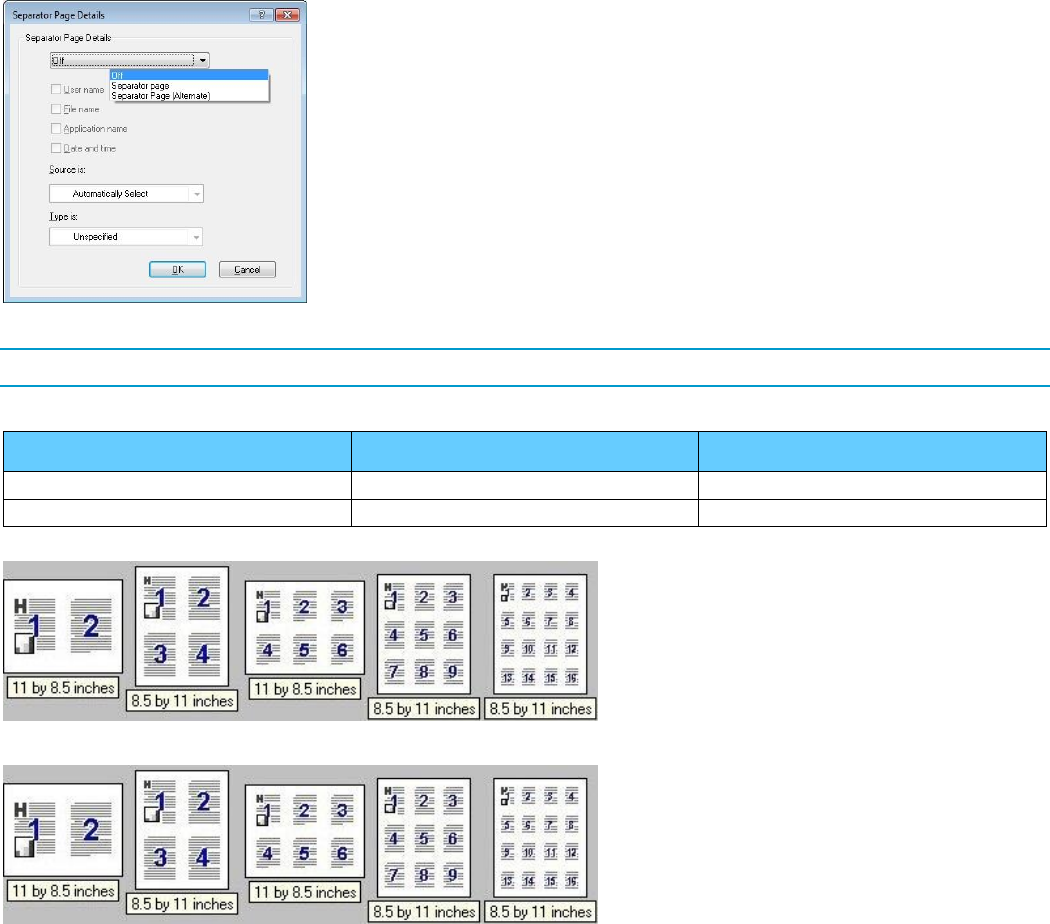
111
Figure 7-22 Job Separator dialog box
NOTE: Job Separator must be enabled in the Device Settings tab in Printer properties to use this feature.
Table 7-8 Page Orientation
Orientation (Finishing tab)
Flip Pages Up selected
Flip Pages Up not selected
Portrait
Short-edge binding
Long-edge binding
Landscape
Long-edge binding
Short-edge binding
Figure 7-23 Pages per Sheet Preview Images
Figure 7-24 Pages per Sheet Preview Images with Right, then Down Page Order
Book and Booklet Printing
A book is a print job consisting of at least two pages. It can have a different paper type for the front cover, first page,
other pages, last page, or back cover. Use the Covers and Print pages on different paper settings on the
Paper/Quality tab to select different paper for the front cover, first page, other pages, and back cover.
A booklet is a print job that places two pages on each side of a sheet that can then be folded into a booklet that is half
the size of the paper. Use the Booklet layout drop-down menu on the Finishing tab to control booklet settings.
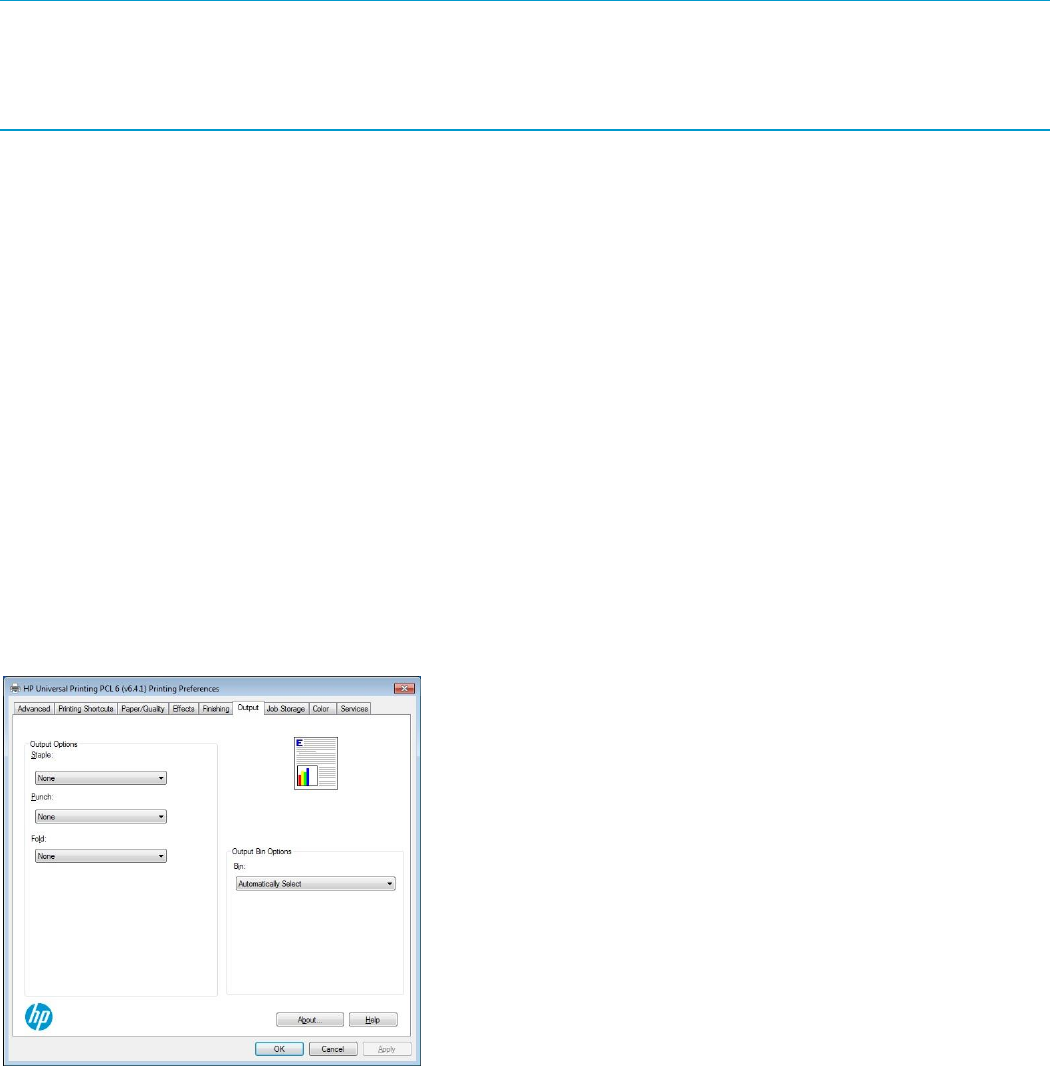
112
Configuring Booklet Printing
The following shows general steps for how to configure the HP UPD for booklet making. In reality, settings in the
application generally overwrite settings in the print driver which may overwrite settings in the printing device
depending on the supported features of the physical printing device and output and finishing devices.
NOTE: In some cases, there is an interaction between the applications and print driver that may result in incorrect
output. For example, when printing a booklet in Publisher 2003, before selecting File, Print, it is recommended to
select File, Page Setup, Full page instead of Booklet, and click OK. This forces the Booklet mode off in Publisher
2003 while keeping the booklet format. If this is not set, the pages may print out of order because both the application
and the driver are reordering the pages.
In the following example, we are printing a 20 page PDF document. The original document is letter size portrait. We
are printing the document as a booklet on 11x17 media. These steps assume the printer has a duplex unit and
supports the Fold and Stitch output option.
1. In the application, select File and then Print
2. Select the printer you want to use
3. Click Properties
4. Click the Printing Shortcuts tab
5. Click Factory Defaults and then click Apply to set the print driver to a known state
6. Click the Paper/Quality tab and select the paper size for each printed page (Letter in this example)
7. Click the Finishing tab, select Print on both sides, Left Binding, 2 pages per sheet, and Portrait
8. Click the Effects tab, select Print document on: and select 11 x17 in the drop down box
9. Click the Output tab and under the Staple options, select Fold and Stitch
10. Click OK and then click Print
Output Tab Features
Use the Output tab to specify the output bin in which you want to send the print job.
Figure 7-25 Output Tab
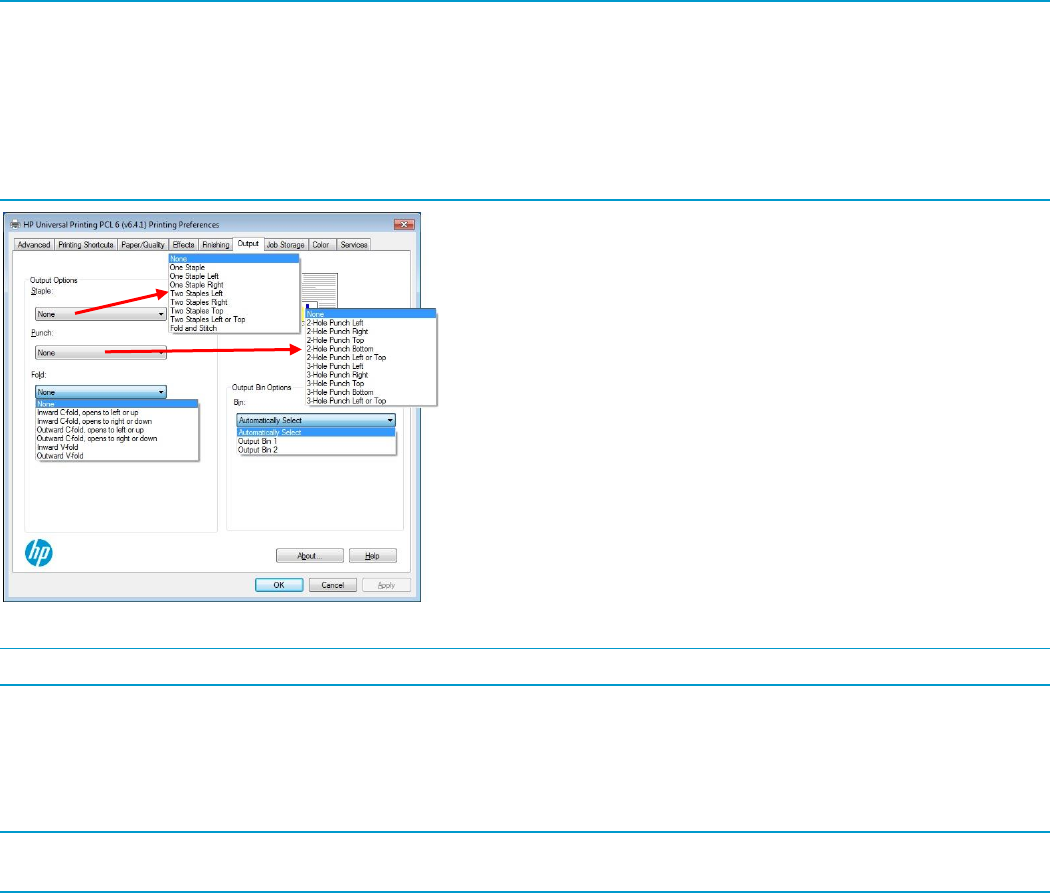
113
Output Options
Depending on the printer model and accessories, the Output Options group contains the following options:
Staple.
Punch
Fold
NOTE: Depending on the printer and output accessories, two new fold options have been added: V-fold and C-fold.
For V-fold (Bi-fold), the sheet is folded into two equal sections with a single fold, creating four separate panels or
pages to be printed on. Often used for bulletins, menus, programs, greeting cards, technical instructions, booklet
pages
C-fold (Tri-fold) uses two folds with the sheet folded into three nearly equal sections, with one panel serving as a
cover, creating six panels for printed content. Often used for self-mailing brochures or pamphlets, letters, statements,
invoices, bulletins, any letter size sheet (8.5" x 11") requiring insertion into a standard #10 or #9 envelope.
Figure 7-26 HP UPD Available Output Device Settings with Capabilities mode
NOTE: Available settings will vary depending on the printer and optional output device
Output Bin Options
The Output Bin Options are dependent on the printer model and accessories as well as the current mode setting for
the output device, such as Mailbox or Stacker mode.
For more information, see the user documentation for your printer.
NOTE: With Capabilities mode, the Booklet Maker bin is no longer listed under Output Bin Options. Select Fold and
Stitch under the Staple options to select the Booklet Maker.
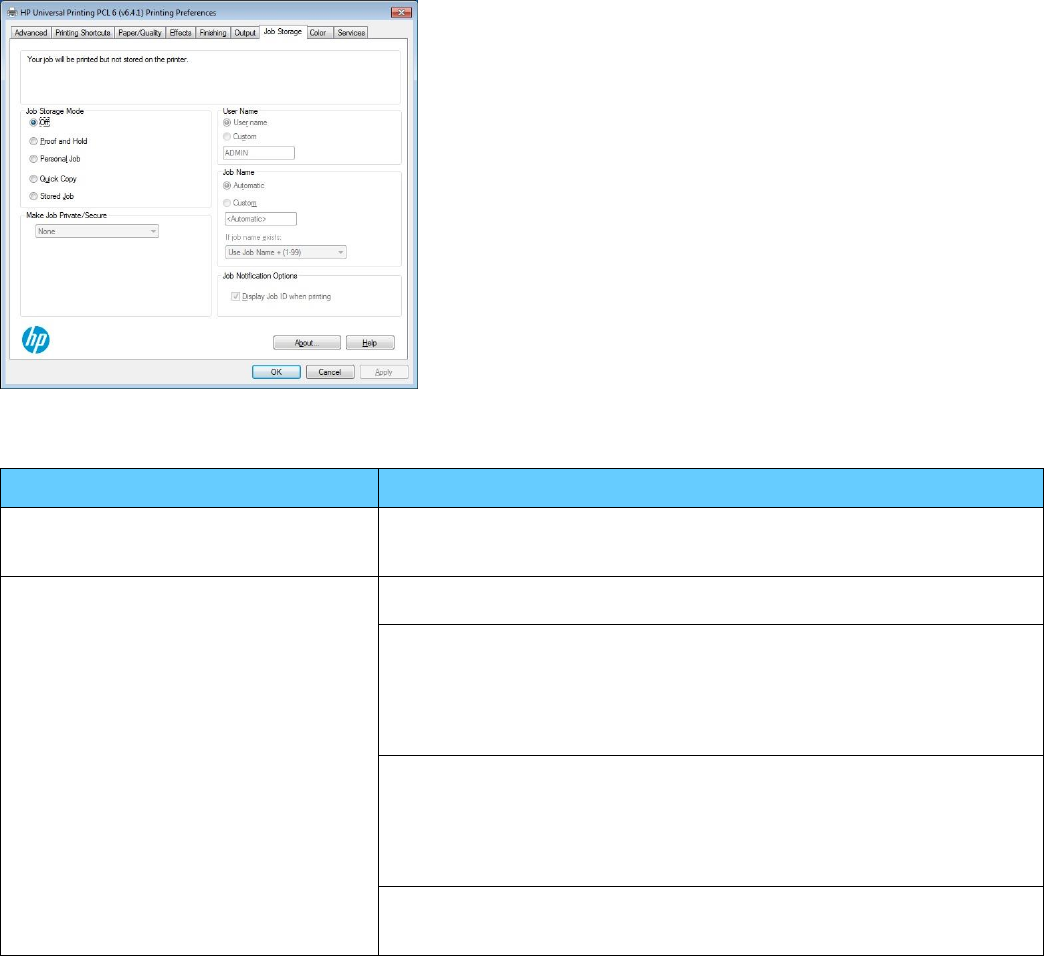
114
Job Storage Tab Features
Job Storage provides the capability of a printer to store a print job on the target product's hard drive or in its memory.
This feature allows a print job to be stored and printed at the user's convenience. Job storage also provides features
for making a print job a personal or stored job with a personal identification number (PIN) as well as the ability to proof
a print job.
The Job Storage tab appears among the driver tabs only if the Job Storage feature is enabled on the Device
Settings tab of Printer Properties.
Figure 7-27 Job Storage Tab
Table 7-9 Job Storage tab features
Feature
Function
Status group box
The unlabeled group box at the top of the Job Storage tab contains a status
message about the destination of a print job. The status information changes
depending on the selections that are made on the Job Storage tab.
Job Storage Mode
Off -- Turns the Job Storage feature off. The print job will not be stored in the
printer.
Proof and Hold – Allows users to print the first page of a multi-page print job and
verify their print displays as designed. After the first page is proofed, users print
the remaining pages at the printer control panel.
After it is released for printing, the proof-and-hold job is immediately deleted from
the product.
Personal Job – A user's print job is stored on the printer, but not printed until the
print job is printed at the control panel.
After the job is printed, it is automatically removed from the printer’s job storage.
Personal jobs can be secured with a PIN or encrypted.
Quick Copy – Allows users to print a job through the print driver and store the
print job on the printer’s hard drive for printing at a later time, without the need to
re-access the print job at their PC.
115
Feature
Function
Stored Job – Allows users to send a print job to a printer's hard drive or RAM
disk and store the print job. The stored job can be printed at any time from the
printer’s control panel, eliminating the need to send commonly printed jobs or
forms from a user PC each time they are printed.
Stored jobs can be secured with a PIN or encrypted.
User Name
Defines how a job is stored and identified on the printer. By default, a job is
stored under a user name. Selecting the Custom option allows a user to create a
new identifier for stored jobs.
Make Job Private/Secured
Personal jobs and Stored jobs can be made private by selecting PIN to print and
entering a 4-digit PIN. The PIN must be entered at the control panel to print the
personal or stored job. This setting can be pre-configured using INSTALL.EXE,
AD group policy, HP DCU, or HP DDU.
NOTE: If a print job is made private and no PIN is entered, the PIN defaults to
“0000”.
For HP FutureSmart devices that provide print job storage functionality, HP UPD
v5.3 introduced the Secure Encrypted Print feature (Encrypt job). Users can
encrypt their print job with a print job password for either personal jobs or stored
jobs on the printer.
Job Name
Allows a user to identify the stored job by a custom name. The default settings
are increased in numerical value as they are stored on the printers.
If job name exists:
Allows the user to make a decision regarding same name print jobs that are being
stored on the printer.
Job Notification Options
Allows the user to decide if the job storage message and job name are displayed
on the user's screen when the job is sent to the printer.
How the HP UPD works with job storage
During installation, the HP UPD queries the products for installed options and additional equipment using Printer
Automatic Configuration. When job storage capabilities are detected, the HP UPD enables the job storage feature and
mopier features. To override these settings, set Mopier mode to Disabled in Device Settings of Printer Properties.
This disables job storage as well as product based collation. Because printer drivers do not perform capacity checks
before attempting to store print jobs, the job storage area might become full. If this occurs, an Unable to store job at
printer error message will display.
NOTE: If the HP UPD detects the presence of a hard drive or RAM disk on a printer, the Job Storage tab is displayed
and job storage is enabled by default.
If a RAM disk is used, jobs stored on this product are lost when the product is turned off and then turned back on.
To use HP Secure Encrypted Print
HP Secure Encrypted Print (SEP) is the perfect solution for printing sensitive documents. The HP UPD provides true
symmetric AES256 print-job encryption and decryption from the client to the page based on a user-defined password
using a FIPS-140-validated cryptographic module from Microsoft®. Both the key and the job are stored in the
encrypted format on the printer with HP FutureSmart firmware until they are released by the user.
NOTE: For more details, see csrc.nist.gov/groups/STM/cmvp/documents/ 140-1/1401val2007.htm#825.
For HP FutureSmart devices that provide print-job storage functionality, HP UPD v5.3 introduced the Secure
Encrypted Print feature. It is available from the Job Storage tab of the default installation of the HP UPD. Users can
encrypt their print job and print-job password for either personal jobs or stored jobs on the printer. With HP UPD v5.4
and later versions, IT departments can configure the driver to require either a PIN or HP SEP (HP Secure Encrypted
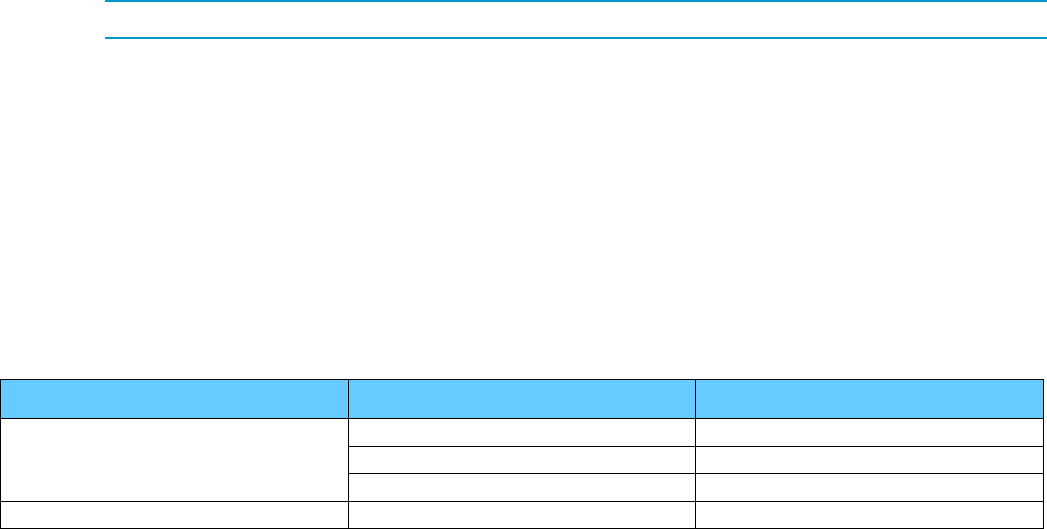
116
Print) password on every job. This balances the need for security in certain departments with the user-print
experience.
Setup and configuration
Follow these steps to configure the HP UPD for secure print:
1. Install the HP UPD in either traditional or dynamic mode.
2. Point the HP UPD port to an HP FutureSmart printer with available job storage functionality.
The printer must be running HP FutureSmart v11.2 or higher. Follow these steps to determine if the HP
FutureSmart firmware on your product is v11.2 or higher:
a. From the Home screen on the product control panel, scroll to and touch the Administration button.
NOTE: On printers releasing the first half of 2017 and later, scroll to the left to view the Reports icon
b. Open the following menus:
Reports
Configuration/Status Pages
Configuration Page
c. Touch the View button to view the information on the control panel, or touch the Print button to print the
pages.
d. Locate the firmware Date Code in the Device Information section of the configuration page. Date Codes
are displayed in a YYYYMMDD format.
e. Compare the Date Code to the following table:
Table 7-10 Date Codes
HP FutureSmart version
Product
Datecode
v11.2
HP CLJ Enterprise CP5525
20110630
HP CLJ Enterprise CM4540 MFP
20110604
HP LJ M4555 MFP
20110604
v11.3 or later
All products
20111217 or later
The HP UPD will detect the capabilities of the target print product and display the Secure Encrypted Print options in
the HP UPD interface.
The HP UPD interface will only display the Encrypt Job (with password) option when the target product is an HP
FutureSmart printer with firmware v11.2 or higher. Printers that do not support encrypted print will only display the
Make Job Private option. The Encrypt Job (with password) option is only available for Personal and Stored Jobs.
Personal jobs are deleted from the printer storage drive after the user provides their password. Stored jobs remain on
the printer storage drive, allowing repeat retrieval of the job with the print password.
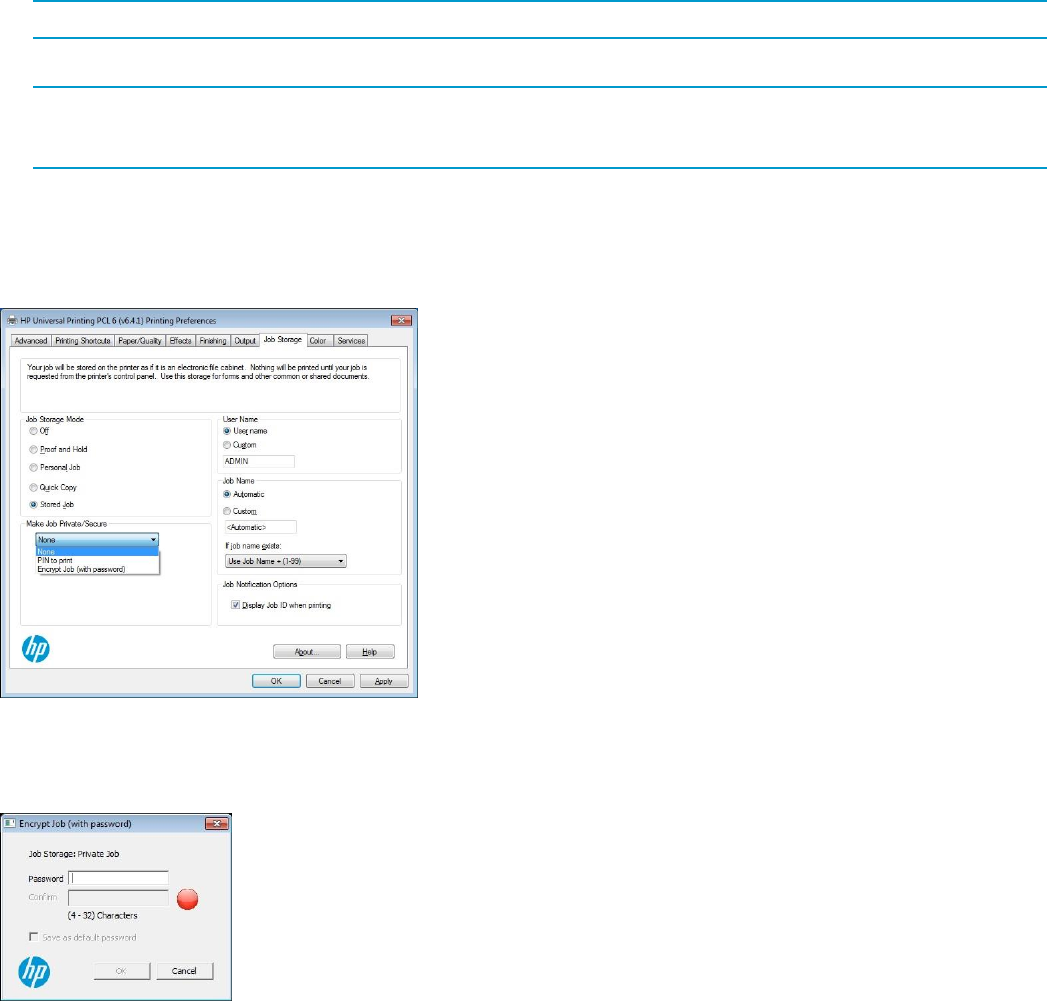
117
To use Job Storage features when printing
To use Job Storage features when printing, follow these steps:
1. Click File, and then click Print from the software program. The Print dialog box appears.
NOTE: Clicking the print icon in the software program toolbar prints the job without using job storage features.
2. Click Properties or Preferences. The Printing Preferences tabs appear.
NOTE: The label for the button that opens the Printer Preferences dialog box varies between software
programs. For example, in Adobe Acrobat on Windows 7 the button is labeled Properties. In Internet Explorer 11
the button is labeled Preferences.
3. Click the Job Storage tab.
4. Select the Job Storage options by clicking the appropriate option button, and then complete any required fields.
5. If you want to make the job private or secure and you selected Personal Job or Stored Job, select the drop
down field for Make Private/Secure
Figure 7-28 Job Storage tab showing the Make Job Private/Secure options
6. If you selected PIN to print, enter a four-digit numeric password
7. Click OK and then click Print.
Figure 7-29 Encrypt Job dialog for entering and confirming the password
8. If you selected Encrypt Job (with password) from your application, a dialog appears. Enter and confirm your
password and then select OK.
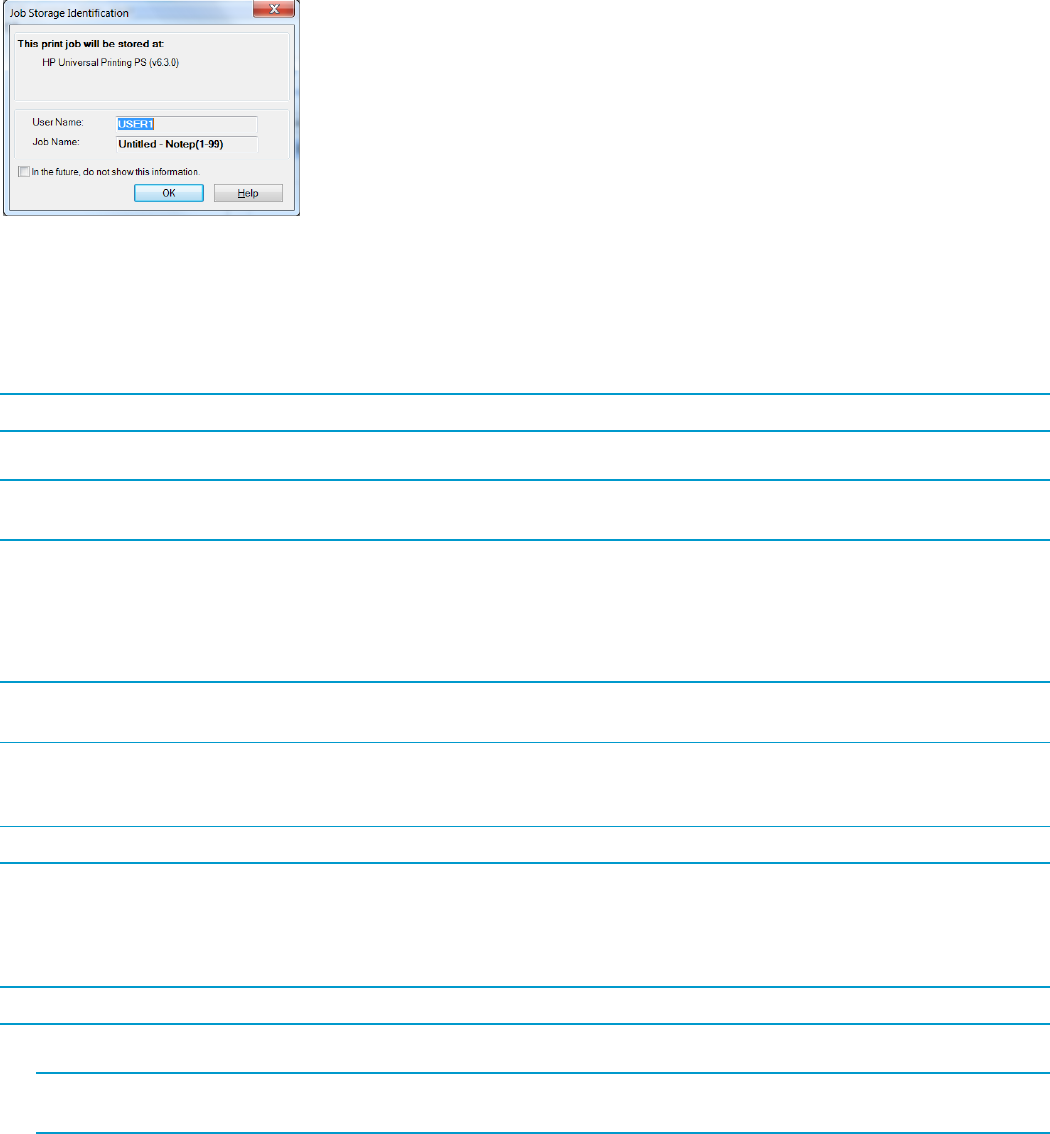
118
Figure 7-30 Job Storage Identification dialog
9. If a Job Storage Identification dialog appears, select OK.
Release a job-storage print job
After you send a print job that uses the job-storage feature, you can release the job to print from the printer front
panel.
NOTE: These steps may vary slightly depending on the specific product you are using.
1. Select Retrieve from Device Memory on the Home page of the printer front panel
NOTE: On printers releasing the first half of 2017 and later, select Print on the Home page of the printer front panel,
select Print from Job Storage, and then select Choose.
2. Select the folder to display the current files
3. Select the file you want to print
4. If the file is password protected, a dialog for entering the password is displayed. Enter the password or PIN for
the file and select OK.
NOTE: On printers releasing the first half of 2017 and later, select the Select button, a dialog for entering the
password is displayed. Enter the password or PIN for the file and select OK.
5. Select the number of copies
6. Select Retrieve from Device Memory to print the file.
NOTE: On printers releasing the first half of 2017 and later, select Print.
7. If the Status dialog is displayed, select OK.
Delete a job-storage print job
Sometimes it is necessary to delete a print job from the printer hard disk. You can do this from the printer front panel.
NOTE: These steps may vary slightly depending on the specific product you are using.
1. Select Retrieve from Device Memory on the Home page of the printer front panel
NOTE: On printers releasing the first half of 2017 and later, select Print on the Home page of the printer front
panel, select Print from Job Storage, and then select Choose.
2. Select the folder to display the current files
3. Select the file you want to delete

119
4. If the file is password protected, a dialog for entering the password is displayed. Enter the password or PIN for
the file and select OK.
NOTE: On printers releasing the first half of 2017 and later, select the Select button, a dialog for entering the
password is displayed. Enter the password or PIN for the file and select OK.
5. Select Delete and select OK
NOTE: On printers releasing the first half of 2017 and later, select the trash can icon in the lower left corner and
select Delete Jobs.
Pre-configure job storage capabilities
The job storage feature can be pre-configured and, if desired, locked during printing. For security purposes, a
company might decide to force every print job to be stored on the printer and retrieved by a user, so no documents
reside on the output tray unattended. The following section describes the different methods for pre-configuring the job
storage feature.
Table 7-11 Pre-configuration methods
Pre-configuration method
Notes
HP Driver Configuration Utility (DCU)
Job storage (Job Storage Mode), can be enabled and locked prior to driver
deployment. Use the pull down menu to select the proper method of job storage
desired. Put a check mark in the Lock section if you want to force the Job storage
mode.
If Personal Job or Stored Job is selected, an additional pull down menu is created to
allow for the setting of custom PIN numbers. Make a selection from this menu to
encrypt the job. See the HP DCU release notes for additional information.
NOTE: HP DCU is available for traditional mode installations only.
HP Driver Deployment Utility (DDU)
Utilizes the HP DCU to allow an administrator to pre-configure the driver settings
prior to creating the driver package. See the Readme notes accompanying the HP
DDU tool for additional details.
NOTE: The HP DDU is available for traditional mode installations only.
HP UPD Active Directory Administrator
Template
The Default Print Settings section is used to enable and configure the job storage
feature. Enable the feature and choose the job storage option. See Managing the HP
UPD with Active Directory Group Policy (chapter 8) for more details.
NOTE: The HP UPD Active Directory Administrator Template is available for both
dynamic and traditional mode installations.
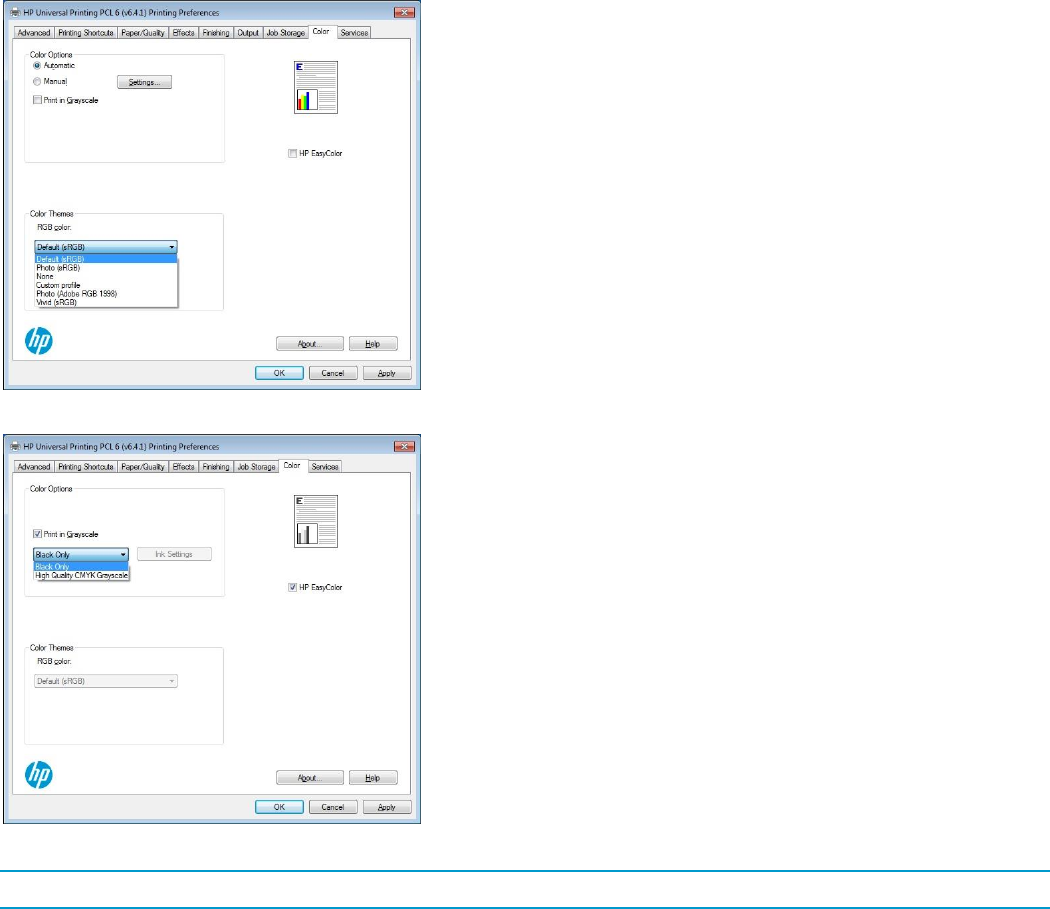
120
Color Tab Features
Use the Color tab to specify predefined color-option settings or to fine-tune the color. Color output can also be
converted to grayscale.
Figure 7-31 PCL 6 (Laser) Color Tab with RGB color dropdown menu
Figure 7-32 PCL 6 (Ink) Color Tab with Print in Grayscale and HP Easy Color selected
NOTE: Selecting Print in Grayscale and Black Only prints the document as a Monochrome (Black Only) document.

121
Table 7-12 Color Tab Features
Feature
Function
Color Options
Print in Grayscale – Select this option to configure the HP UPD to print in black
and white on color devices.
When Print in Grayscale is selected for HP Ink-based printers, a dropdown
menu is displayed to select Black Only or High Quality CMYK Grayscale
printing.
NOTE: HP UPD 6.4.1 decoupled the dropdown to select Black Only or High
Quality CMYK Grayscale and HP EasyColor so that the dropdown settings can
be selected when Print in Grayscale and HP EasyColor is selected. Black Ink
Only was changed to Black Only and High Quality was changed to High
Quality CMYK Grayscale. This dropdown has also been added to most HP
LaserJet printers introducing in the first half of 2017 and later.
This option can be manually specified and can also be preconfigured using the
HP Driver Configuration Utility (HP DCU) in the HP Printer Administrators
Resource Kit (HP PARK) (See Pre-configure the HP UPD default settings using
HP Driver Configuration Utility in chapter 4.)
NOTE: HP UPD 6.3.0 decoupled Print in Grayscale and HP EasyColor for so
that Print in Grayscale can be selected when HP EasyColor is selected.
Automatic/Manual -- Use the Manual color adjustment option to adjust the
neutral-gray color treatment, halftones, and edge enhancements for text,
graphics, and photographs.
HP LaserJet Settings – These settings are available on HP LaserJet printers
when HP EasyColor is not selected.
Edge Control determines how edges are rendered. Edge control has three
components: adaptive halftoning, Resolution Enhancement Technology (REt),
and trapping. Adaptive halftoning increases the edge sharpness. Trapping
reduces the effect of incorrect color alignment by slightly overlapping the edges of
adjacent objects. The color REt option smooths the edges.
NOTE: If you notice white gaps between objects, or if you notice areas that have
a slight shadow of cyan, magenta, or yellow at the edge, choose an edge-control
setting that increases the trapping level.
Four levels of edge control are available:
Off turns off trapping, adaptive halftoning, and color REt.
Light sets trapping at a minimal level. Adaptive halftoning and color REt
settings are on.
Normal is the default trapping setting. Trapping is at a medium level.
Adaptive halftoning and color REt settings are on.
Maximum is the most aggressive trapping setting. Adaptive halftoning and
color REt settings are on.
Halftone options affect the resolution and clarity of your color output. You can
select halftone settings independently for text, graphics, and photographs. The
two halftone options are Smooth and Detail.
The Smooth option provides better results for large, solid-filled print areas. It
also enhances photographs by smoothing out fine color gradations. Select
this option when uniform and smooth area fills are the top priority.
The Detail option is useful for text and graphics that require sharp
distinctions among lines or colors, or for images that contain a pattern or a

122
Feature
Function
high level of detail. Select this option when sharp edges and details are the
top priority.
Neutral Grays determines the method for creating gray colors used in text,
graphics, and photographs.
Black Only generates neutral colors (grays and black) by using only black
toner. This guarantees neutral colors without a color cast. This setting is best
for documents and grayscale viewgraphs.
4-Color generates neutral colors (grays and black) by combining all four
toner colors. This method produces smoother gradients and transitions to
other colors, and it produces the darkest black.
NOTE: Some software programs convert text or graphics to raster images. In
these cases, the Photographs settings also control text and graphics.
Ink Settings – These settings are available on HP ink-based printers when HP
EasyColor is not selected.
Selecting Ink Settings displays a dialog for setting the Dry Time, Saturation and
Black Ink Spread.
Increasing Dry Time will slow down throughput but may reduce ink smearing.
Decreasing Saturation may make prints look faded. Increasing Saturation may
make plots look more vibrant. Decreasing Black Ink Spread will improve areas
where black and color are adjacent if the black is spreading into the colors.
Color Themes – RGB Color
To change Color Themes when using PCL6,
first de-select the HP EasyColor option.
NOTE: These settings may vary depending
on the features of specific printers. See the
user documentation for your printer for more
information.
Default (sRGB) -- Instructs the product to interpret RGB color as sRGB, which is
the accepted standard of Microsoft and the World Wide Web Consortium (W3C).
Colors are matched to optimize the RGB colors on the screen and to provide vivid
images and graphics.
Photo (sRGB) -- Enhances documents in which the content is mainly bitmap
images, such as .GIF or .eps files. This setting instructs the product to use the
best color matching for rendering sRGB bitmap images.
This setting only affects raster data. It has no effect on text or vector-based
graphics.
Using glossy paper in combination with this setting provides the maximum
enhancement.
Photo (AdobeRGB 1998) -- For documents that use the AdobeRGB color space
rather than sRGB.
For example, some digital cameras capture images in Adobe RBG, and
documents that are produced with Adobe PhotoShop use the Adobe RGB color
space.
When printing from a professional software program that uses Adobe RGB, it is
important that you turn off the color management in the software program and
allow the product software to manage the color space.
Vivid (sRGB) -- instructs the printer to increase the color saturation in the
midtones. Less colorful objects are rendered more colorfully.
This is recommended for printing business graphics.
None -- Instructs the printer to print RGB data in raw device mode.
To render documents properly when this option is selected, you must manage
color in the program in which you are working or in the operating system.
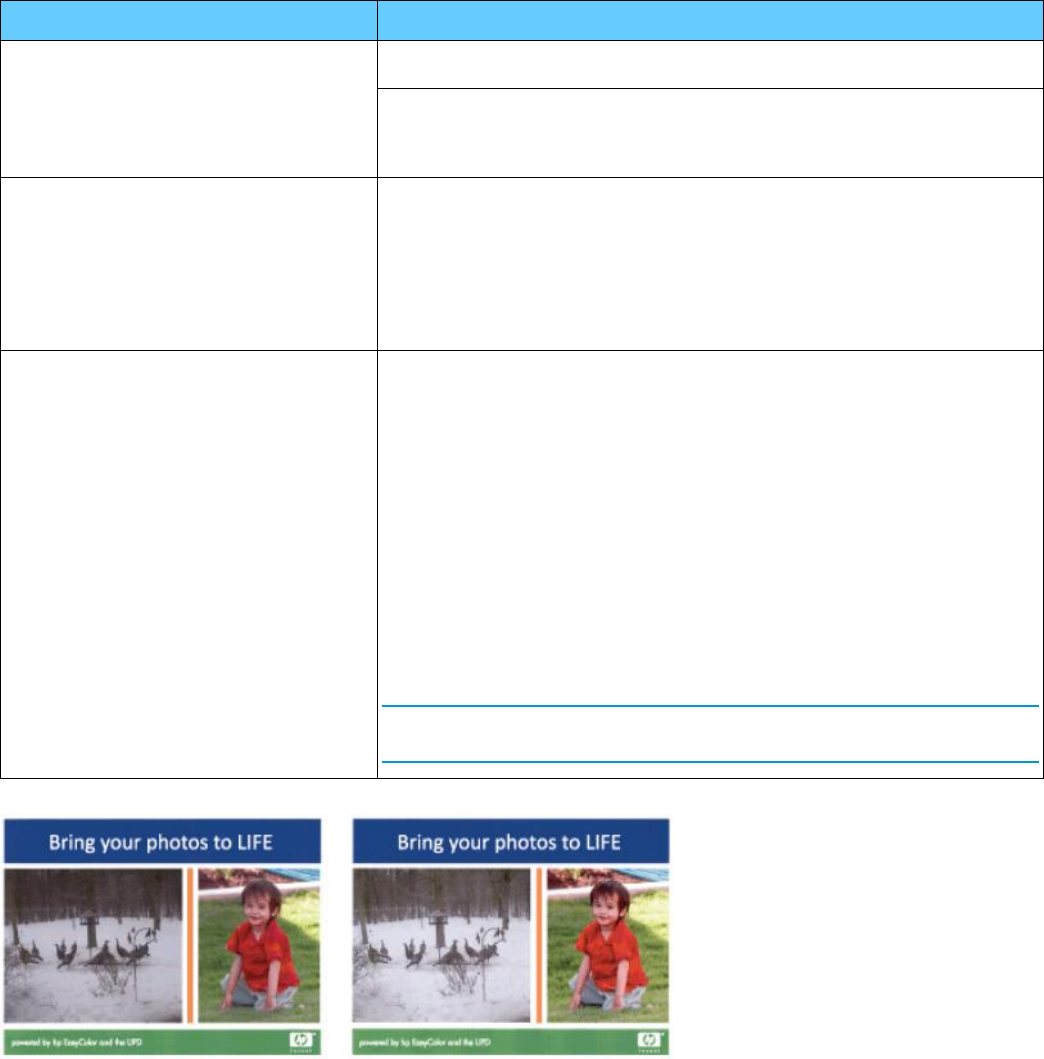
123
Feature
Function
CAUTION: Use this option only if you are familiar with the procedures for
managing color in the software program or in the operating system.
Custom Profile – Instructs the product to use a custom profile to emulate color
output from another product by modifying how color is rendered.
You can download custom profiles from the following Web site: www.hp.com
Color Themes – CMYK Color (PS Only)
By default, the printer interprets CMYK data according to the Standard Web
Offset Press (SWOP) standard. This standard defines how a particular set of
CMYK ink colors should behave. The printer performs a SWOP color map and
internal halftones to emulate a SWOP CMYK press.
Emulation for Dainippon Press (DIC) and Euro-standard CMYK inks used in the
Far East and Europe are also available and can be selected from the printer
driver.
HP EasyColor
Automatically improves mixed-content documents that are printed from Microsoft
Office programs. This technology scans documents and automatically adjusts
photographic images in .JPEG or .PNG format.
HP EasyColor technology enhances the entire image at one time, rather than
dividing it into several pieces. This results in improved color consistency, sharper
details, and faster printing.
In figure 7-30, the images on the left were created without using the HP
EasyColor option. The images on the right show the enhancements that result
from using the HP EasyColor option.
The HP EasyColor option is enabled by default in the HP PCL 6 print driver, so
you do not need to make manual color adjustments. To disable the option so you
can manually adjust the color settings, open the Color tab and click the HP
EasyColor check box to clear it.
NOTE: HP UPD 6.3.0 decoupled Print in Grayscale and HP EasyColor so that
Print in Grayscale can be selected when HP Easy Color is selected.
Figure 7-33 HP EasyColor Examples (HP EasyColor Enabled on the right)
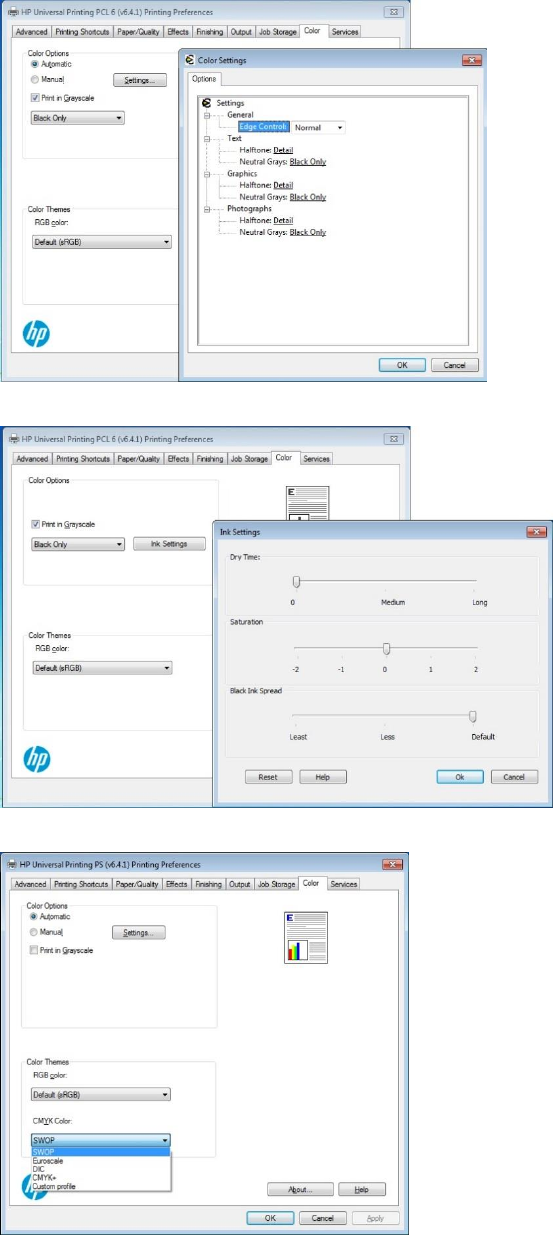
124
Figure 7-34 Color Settings for HP Laser Printers
Figure 7-35 Ink Settings for HP ink-based printers
Figure 7-36 PS CMYK Color dropdown menu
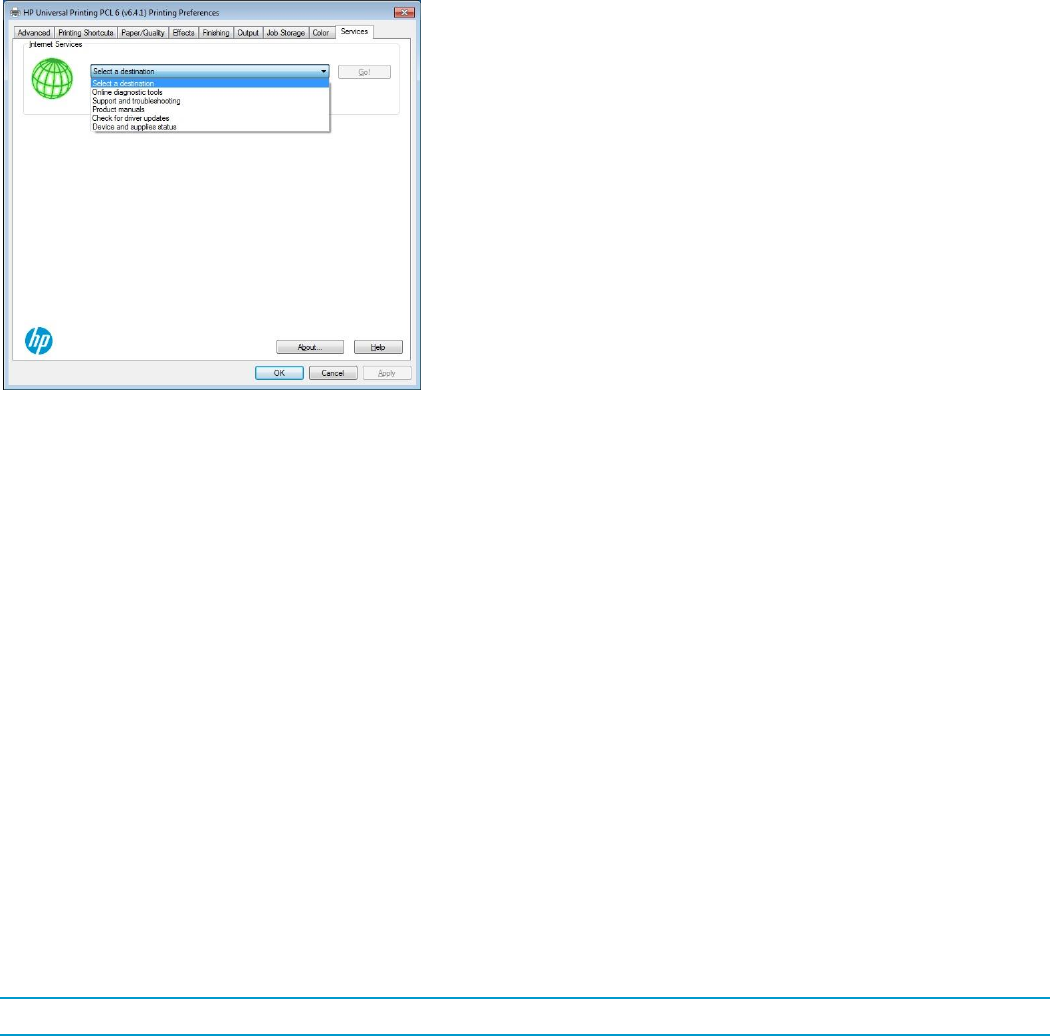
125
Services Tab Features
Figure 7-37 Services Tab
Internet Services
The Internet Services group box on the Services tab contains the Select a destination drop-down menu with the
following selections:
Online diagnostic tools -- This is the HP Instant Support Web site, where you can find interactive tools and
contacts for troubleshooting.
Support and troubleshooting -- This is the main Web site for printer support.
Product manuals -- View or download printer manuals.
Check for driver updates -- Automatically check your print drivers to see whether the correct and most up-to-
date print drivers are installed.
Device and supplies status – View the current status of supplies in the printer.
If you have Internet access, select any of these items and then click Go! to open the corresponding HP Web page.
Change HP UPD properties (for all jobs or per job)
There are two ways to gain access to the HP UPD properties (print job preferences):
All jobs — From the Devices and Printers folder—Recommended to change the default print settings for all
applications that use this driver.
Per job — When printing from an application— Recommended to change the print settings for a single print
job or for print jobs during a single session in an application.
All jobs — from the Devices and Printers folder
NOTE: The changed settings apply as default settings for all print jobs in any application that uses this driver.
To gain access to the settings of the HP UPD, do the following:
1. Click Start and then click Devices and Printers.
2. In the Printers dialog box, right-click the print queue.

126
3. Click Printer Properties.
o When using the HP UPD in traditional mode, Printer properties display on screen.
o When using the HP UPD in dynamic mode, select a printer from the Recently Used Printers list, or find a
printer, and then click OK.
4. Click the Advanced tab and then click Printing Defaults.
5. After making changes to the driver settings, click OK.
Per job — when printing from an application
NOTE: The changed settings apply only to the current print job or only to print jobs sent within the same session in
that application.
When printing from an application:
1. In the application, select File and then Print.
2. In the Print dialog box, select the appropriate HP Universal Printing PCL 6 or PS printer.
3. Click Properties.
NOTE: The label for the button that opens the Printer Preferences dialog box varies between software
programs. For example, in Adobe Acrobat on Windows 7 the button is labeled Properties. In Internet Explorer 11
the button is labeled Preferences.
When using the HP UPD in traditional mode, you can now change the settings.
When using the HP UPD in dynamic mode, select a printer from the Recently Used Printers list, or find a
printer, and click OK.
4. After making changes to the driver settings, click OK. The Print dialog box returns.
5. Click Print to print the job according to the changed settings.
Incompatible Print Settings messages
Incompatible Print Settings (constraints) messages are unsolicited messages that appear in response to specific
print-driver selections. These messages alert you to selections that are illogical or impossible given the printer
capabilities or the current settings of other controls.
NOTE: Constraint messages are limited, and the underlying software architecture might accept some settings that are
illogical or impossible for the printer to perform. Sending a job with incompatible settings can lead to unexpected
results. If print jobs do not print as expected, check the printer documentation for the printer capabilities.
In supported Windows operating environments, some technically invalid print-driver configurations may result in
warning messages. Duplexing, for example, is not possible when the Transparency paper type is selected. The
following figure shows an Incompatible Print Settings message.
Figure 7-38 Incompatible Print Settings Message
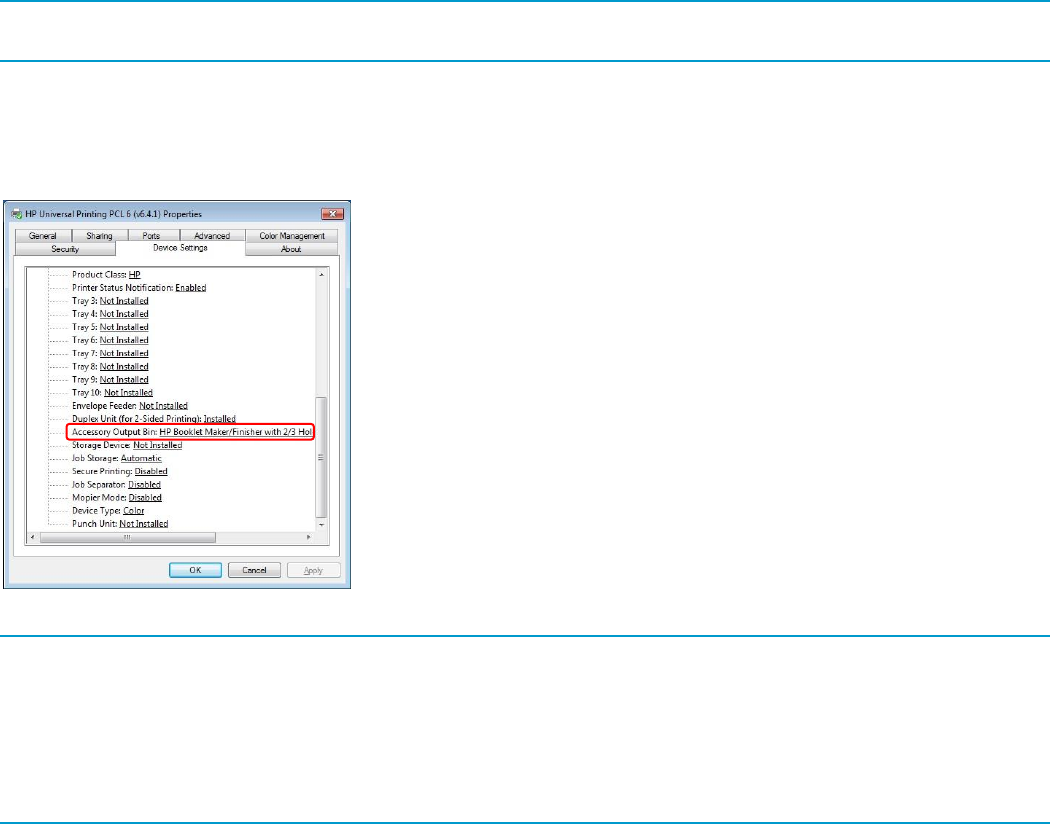
127
To resolve the conflicting settings, click Restore my previous settings and then click OK. The driver resets the
conflicting control back to its previous state.
If you want to keep the conflicting setting, click Keep this setting, and I will change it later, and then click OK.
NOTE: In this example, the conflict can be resolved manually. If the conflict is not resolved when the driver is closed,
then the same dialog may appear again when a print job is sent to the printer.
Device Settings Tab Features
The Device Settings tab contains controls for paper-handling devices and for managing the printer. Available options
vary depending on the specific product and feature.
Figure 7-39 Device Settings Tab with Accessory Output Bin selected
NOTE: With HP UPD 6.4.1 and later, on most HP LaserJet printers introduced in the first half of 2017 and later,
Accessory Output Bin is replaced with Optional Output Bin, listing the type of bin instead of the model number.
Additional functions are added to the Device Settings tab in Printer properties to select the type of stapling and punch
unit installed and whether a booklet maker, C-fold, or V-fold unit is installed, (see figure 7-40.)
NOTE: If an Accessory Output Bin is selected, settings for the Optional Output Bin, Stapling, Booklet Maker, C-Fold
Unit, V-Fold Unit and Punch Unit are not displayed. If an Optional Output Bin is selected, Accessory Output Bin is not
displayed.
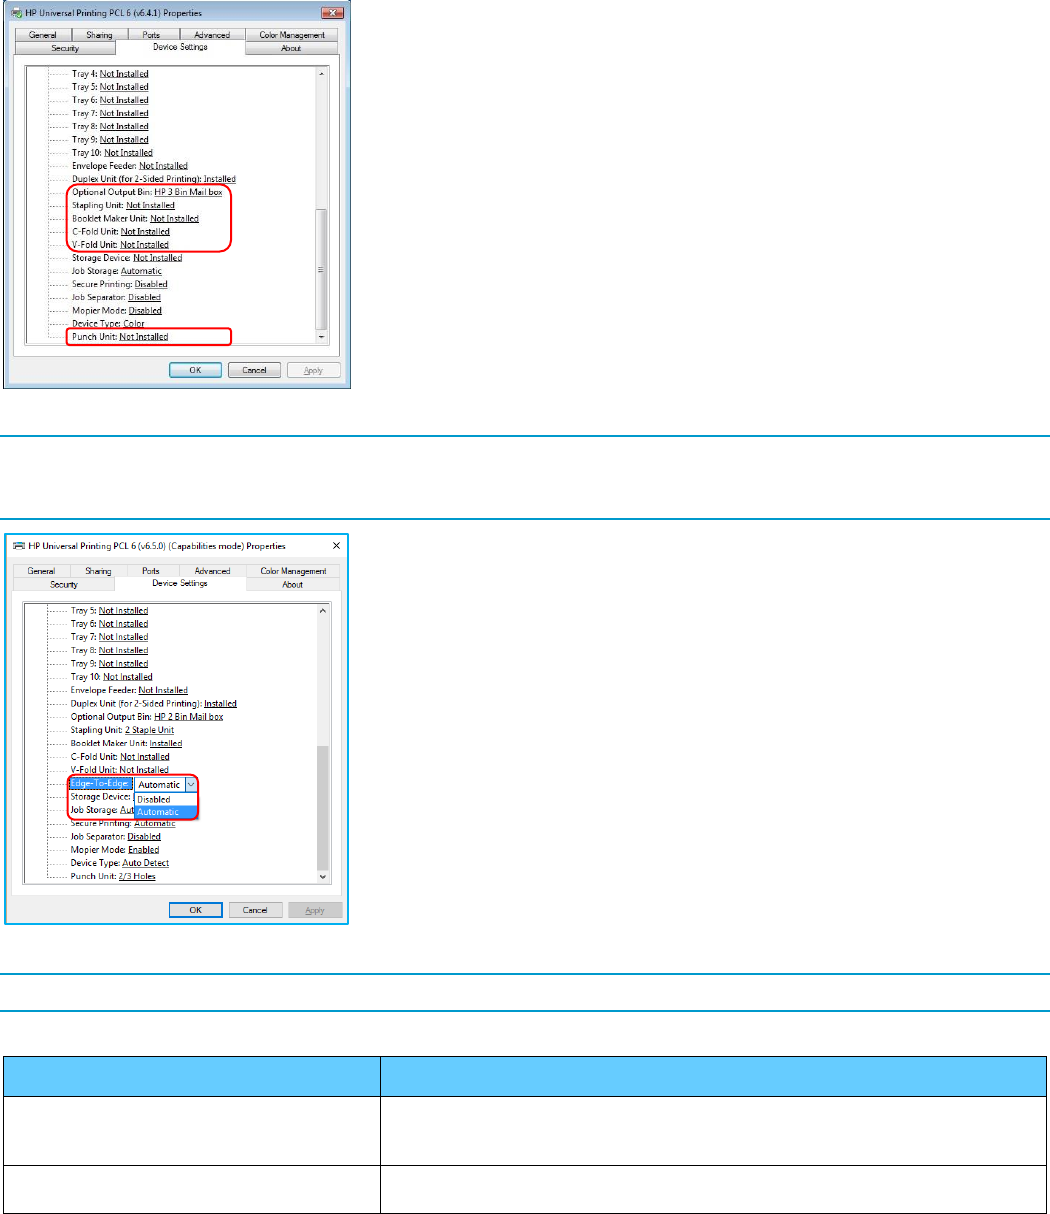
128
Figure 7-40 Device Settings Tab with Optional Output Bin selected (Capabilities mode)
NOTE: To verify which mode is supported, open the Device Settings tab in Printer Properties and see whether
Accessory Output Bin or Optional Output Bin is listed. If Accessory Output Bin is displayed, the driver is using Device
mode. If Optional Output Bin is displayed, the driver is using Capabilities mode.
Figure 7-41 Device Settings Tab with Edge-To-Edge (HP UPD 6.5.0 and later)
NOTE: Edge-To-Edge is only supported on printers that support both Edge-To-Edge and Capabilities mode.
Table 7-13 Device Settings Tab
Feature
Function
Form to Tray Assignment
Legacy feature. Instead of using this legacy feature, set the paper size and type
from the printer front panel and select the paper size and type in the driver when
the document is printed.
Font Substitution Table
Legacy feature. The font handling capabilities within the latest Windows operating
systems render these settings obsolete.
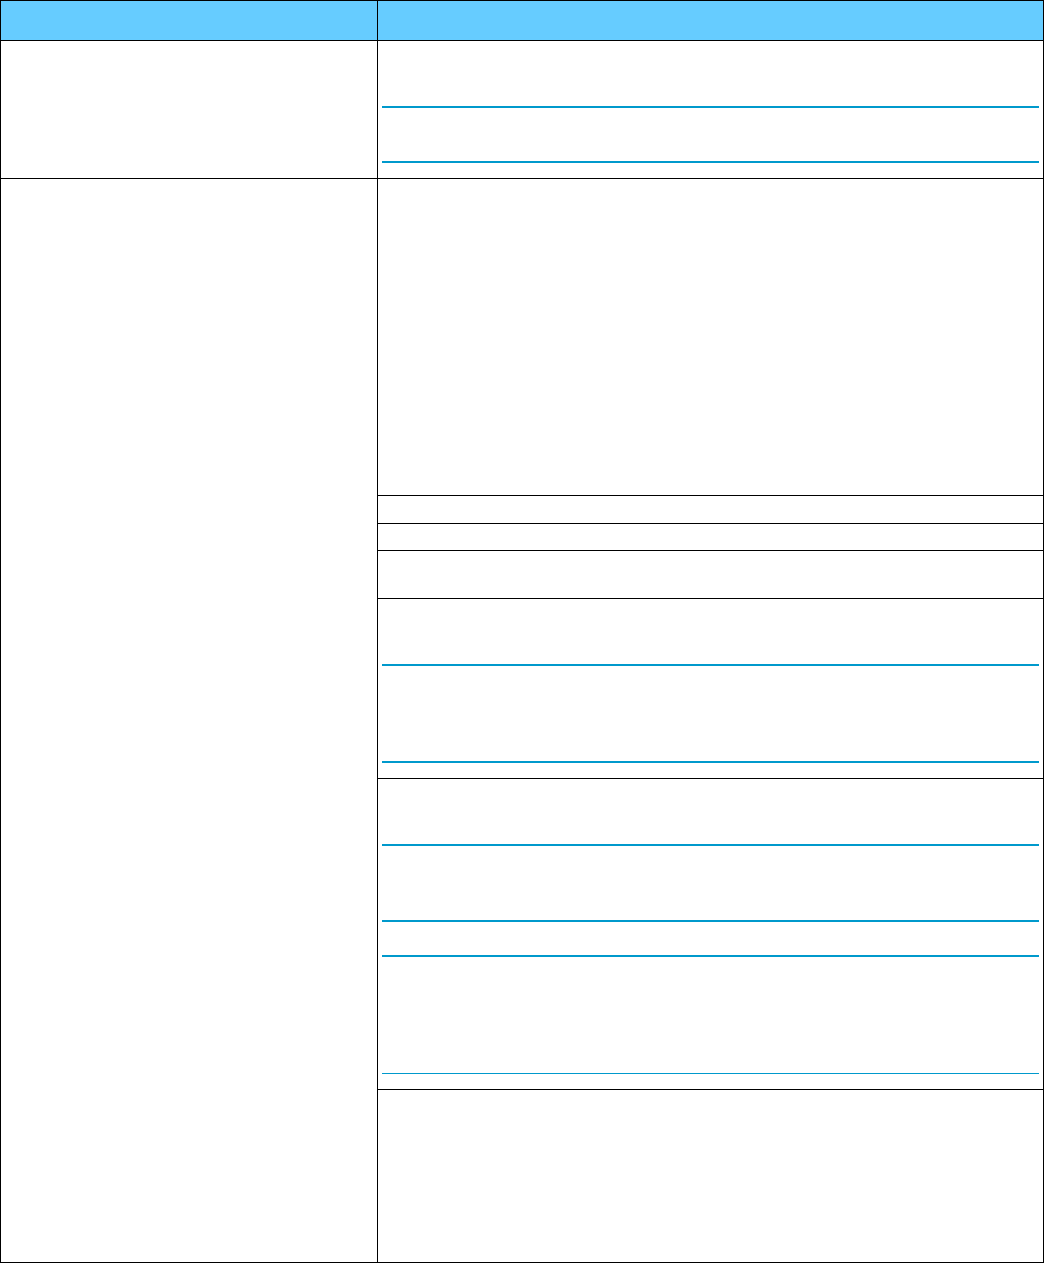
129
Feature
Function
External Fonts
Installs and removes external fonts for the printer. External fonts can be soft fonts
or DIMM fonts.
NOTE: The External Fonts is a legacy feature. The font handling capabilities
within the latest Windows operating systems manage fonts for the user.
Installable Options
Automatic Configuration -- Use the Device Settings tab to tell the driver about
the hardware configuration of the printer. If bidirectional communication is
enabled in a supported environment, update this tab by selecting the Update
Now setting in the Automatic Configuration setting. The default setting is Off.
After changes are made through an automatic configuration, the setting returns to
Off.
If your environment does not support bidirectional communication, the Update
Now setting is not available, so you must manually configure the options on this
tab.
If you have more than one driver installed for the printer (for example, the HP
PCL 6 UPD and the HP PS UPD), the Update Now feature works automatically
only on the driver on which it is activated. The other driver will not be updated,
and might show the default settings for the specific printer model.
Product Class -- Lists the printer class of the device.
Tray 3 - X -- Specifies whether optional trays are installed on the product
Envelope Feeder -- Specifies whether an optional envelope feeder is installed on
the product
Duplex Unit (for 2-Sided Printing) -- Specifies whether you have Duplex Unit
installed on the printer.
NOTE: For printers that support smart duplexing, the printer uses the smart
duplexing feature to detect whether there is information on both sides of the print
job pages and only runs the pages through the duplexing unit if printable
information appears on the second side of the page.
Accessory output bin -- Specifies whether there is an optional Output Bin
installed on the printer and the model number of the device.
NOTE: Additional paper handling devices may be listed depending on the
features of specific printers. See the user documentation for your printer for more
information.
NOTE: With HP UPD 6.4.1 and later, on most HP LaserJet printers introduced in
the first half of 2017 and later, Accessory Output Bin is replaced with Optional
Output Bin, listing the type of bin instead of the model number. Additional
functions are added to the list including stapling unit, booklet maker, etc. (see
figure 7-40.)
Allow Manual Duplexing – If available, select Allow Manual Duplexing to print
on both sides of any supported size and most types of paper (except
transparencies, envelopes, and labels).
To use this feature, you must reinsert the paper stack into the input tray to print
the second side. The product pauses while you make this adjustment.
This setting is enabled by default.
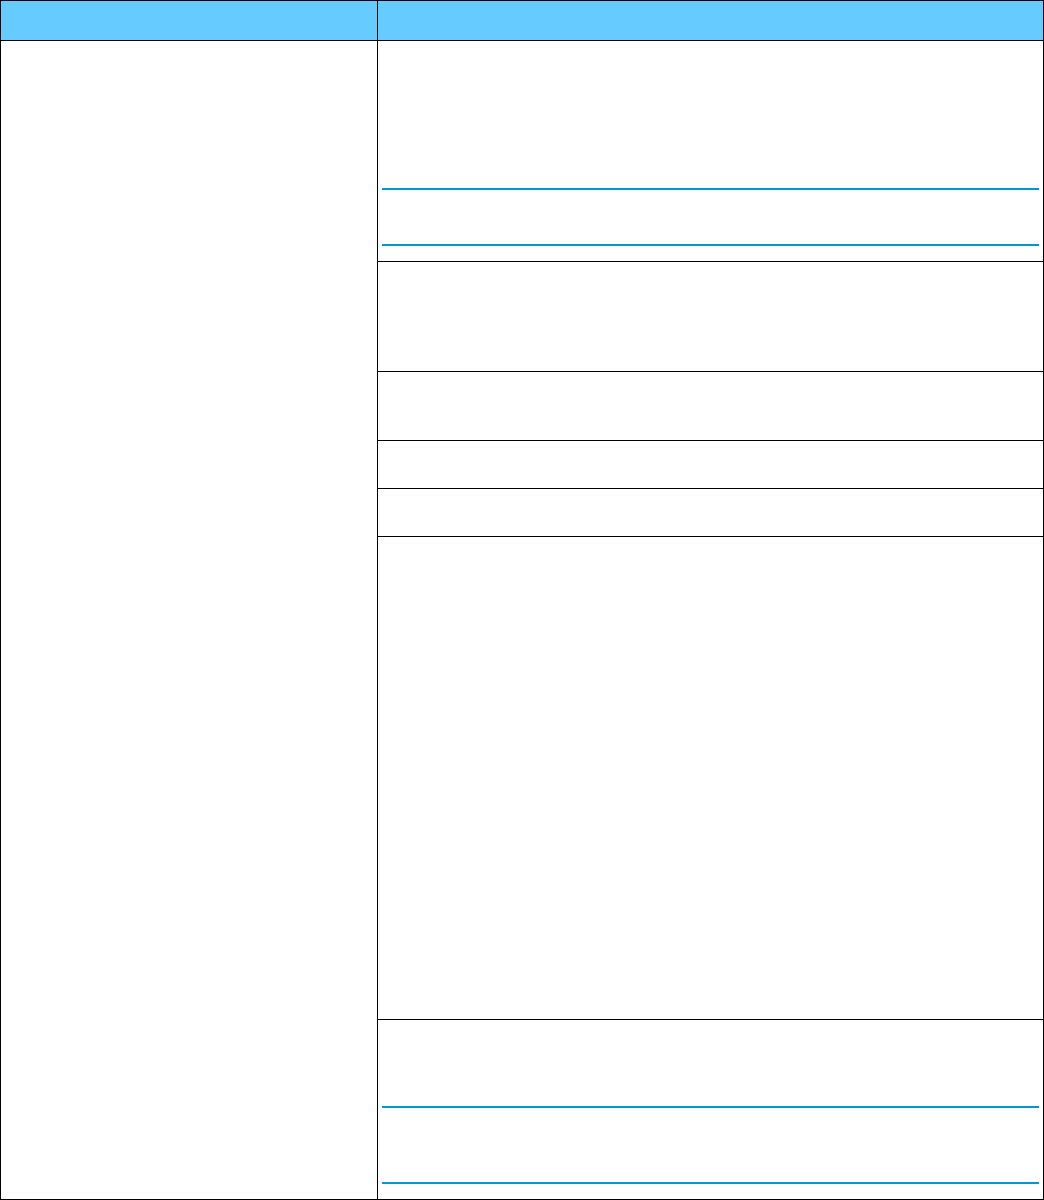
130
Feature
Function
Edge-To-Edge – When this option is set to automatic and the printer supports
edge-to-edge, select the Edge-To-Edge option in the Paper/Quality tab of Printing
Preferences to print a document with 2 mm margins on supported devices. If this
option is not selected, the document will be printed with standard margins.
This feature is auto configurable in the Printer Properties Device Settings tab. By
default it is set to automatic.
NOTE: Edge-To-Edge is only supported on printers that support both Edge-To-
Edge and Capabilities mode.
Storage Device -- When this option is installed, the Job Storage option and the
Mopier Mode are enabled in the print driver. Use the Job Storage option to store
print jobs and then print them later from the printer front panel. The multiple-
original print (mopy) function is an HP-designed feature that produces multiple,
collated copies from a single print job.
Job Storage -- When Job Storage is enabled (Automatic), the printer can store
print jobs so that you can gain access to those print jobs later at the printer front
panel
Secure Printing -- When enabled (Automatic), HP Secure Encrypted Printing
(SEP) is available for Personal and Stored Jobs.
Job Separator -- Specifies whether a print job identifier page should be printed
between print jobs.
Mopier Mode -- The multiple-original print (mopy) function is an HP-designed
feature that produces multiple, collated copies from a single print job. This feature
increases performance and reduces network traffic by transmitting the job to the
printer once, and then storing it in memory or on the hard disk. The remainder of
the copies are printed at the fastest speed. All documents that are printed in
mopier mode can be created, controlled, managed, and finished from the
computer, which eliminates the extra step of using a photocopier.
The printer supports the transmit-once mopying feature when the Mopier Mode
setting on the Device Settings tab is Enabled.
When you use the HP UPD, mopying is performed in one of two ways: either
through the software or through the printer hardware. When mopier mode is
enabled, mopying takes place through the printer hardware. One copy of a
multiple-page print job is transmitted once through the network to the printer,
together with a printer job language (PJL) command directing the printer to make
the specified number of copies.
When you disable mopier mode, you are not necessarily disabling multiple
collated copies, which the driver can still perform through the software. Only the
printer hardware path is disabled. However, a multiple-copy print job that is sent
when the mopier is disabled loses the advantage of transmitting the print job
once. The job is sent through the network for each collated copy.
Device Type – Set by default to Auto Detect. If bidi is not working, you can
specify a color device by selecting Color or select Monochrome to disable the
Color tab.
NOTE: Even with a device type of Monochrome, the HP UPD might still send
color data to the product. In some cases, the best print quality can be achieved
by sending color data to a monochrome product.

131
NOTE: Status Notification Pop-ups (SNP) are no longer available starting with the release of UPD 6.5.0. On HP UPD
v4.7 through UPD v6.4.1, SNP can be enabled or disabled from the Device Settings tab of the driver. Before HP UPD
v4.7, SNP could only be disabled from the SNP dialog box.
With HP UPD 6.4.1 and later, on most HP LaserJet printers introduced in the first half of 2017 and later, Accessory
Output Bin is replaced with Optional Output Bin, listing the type of bin instead of the model number. Additional
functions are added to the list including stapling unit, booklet maker, etc.
Table 7-14 HP UPD 6.4.1 and later Output Devices Selected by Capabilities versus Model Number on New Printers
Feature
Available Settings*
Optional Output Bin
With HP UPD 6.4.1 and later, on most HP LaserJet printers
introduced in the first half of 2017 and later, Accessory Output
Bin is replaced with Optional Output Bin, listing the type of bin
instead of the model number.
Not Installed
HP 2 Bin Mail box
HP 3 Bin Mail box
HP 5 Bin Mail box
HP 8 Bin Mail box
HP Stacker Bin
HP Collator Bin
HP Job Separation Bin
Optional Alternate Bin
Stapling Unit
Specifies whether an optional stapling unit is installed on the
product including the type of stapling unit.
Not Installed
1 Staple Unit
2 Staple Unit
3 Staple Unit
Booklet Maker Unit
Specifies whether an optional booklet maker is installed on the
product.
Not Installed
Installed
C-Fold Unit
Specifies whether an optional C-fold unit is installed on the
product.
Not Installed
Installed
C-fold uses two folds with the sheet folded into three nearly
equal sections, with one panel serving as a cover, creating six
panels for printed content. Often used for self-mailing
brochures or pamphlets, letters, statements, invoices, bulletins,
any letter size sheet (8.5" x 11") requiring insertion into a
standard #10 or #9 envelope.
V-Fold Unit
Specifies whether an optional V-fold unit is installed on the
product.
Not Installed
Installed
For V-fold, the sheet is folded into two equal sections with a
single fold, creating four separate panels or pages to be printed
on. Often used for Bulletins, menus, programs, greeting cards,
technical instructions, booklet pages.
132
Feature
Available Settings*
Punch Unit
Specifies whether an optional punch unit is installed on the
product including the type of punch unit.
Not Installed
2/3 Holes
2/4 Holes
4 Holes-Swedish
* Available settings will vary depending on the printer and optional output device
Mopier mode and collation
Mopying and collating print jobs are independent but closely related functions. Mopying, the ability to send original
print jobs to the printer, is performed by the print driver. Collating can be controlled by either the print driver or the
document software program. The mopying mode is selected by default in the driver, and can be disabled by changing
the Mopier Mode setting on the Device Settings tab in the Printer properties to Disabled.
Control collation through the print driver by selecting or clearing the Collated check box on the Advanced tab in
Printing preferences. Click Copy Count under the Paper/Output setting. You can clear the check box, which is
available only when the Copy Count option is set to more than 1 copy, to allow the software program to control
collation.
To receive uncollated multiple copies of a print job, you must clear the Collated check box and make sure that the
software program collation feature is not selected.
The following table shows the relation between mopier mode settings and collation settings in the software program
and the driver. The first three columns show the settings; the last column, "Expected result", shows how a 3-page
print job would appear.
Table 7-15 Driver Mopier Mode and Collation Settings
Mopier Mode
Application Collation
Driver Collation
Expected Result
Disabled
Not Selected
Not Selected
3 copies uncollated
Disabled
Not Selected
Selected
3 copies uncollated
Disabled
Selected
Not Selected
3 copies collated
Disabled
Selected
Selected
3 copies collated
Enabled
Not Selected
Not Selected
3 copies uncollated
Enabled
Not Selected
Selected
3 copies uncollated
Enabled
Selected
Not Selected
3 copies collated
Enabled
Selected
Selected
3 copies collated
Printer Automatic Configuration
Automatic Configuration enables the HP UPD driver user interface to reflect the supported capabilities of the target
print device. Automatic configuration occurs through bidirectional communication between the product and a HP UPD.
This communication can occur over the network or a USB direct connection. When the user installs the driver, the
default printer model options will be base model. Successful implementation requires the HP UPD installed
bidirectional services (Net Driver HPZ12 and Pml Driver HPZ12) are loaded, the correct port settings are set, and the
target product is available for direct connect to the host or over the network. If the communication is successful, the
printer options will be updated in the driver user interface.
This process of the HP UPD sending request and accepting responses directly between the driver and the device is
referred as 'bidi' for bidirectional communication. The HP UPD user interface options will change to enable features of
the target device based on the result of the response query (installable trays, Duplexer, Accessory Output Bin, HP
EasyColor, etc.). If the communication is unsuccessful, the driver will still have base model functionality presented in
the HP UPD user interface. Extended options will not be displayed or available for use during File-Print.
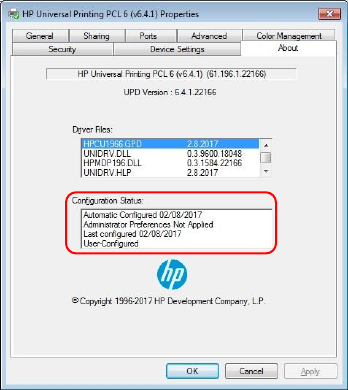
133
The benefit of Printer Auto-Configuration is enabling the driver to query the printer and recognize the product’s
capabilities with a level of automation and accuracy.
Printer Automatic Configuration can only be launched in the following methods:
HP UPD driver installation (automatic update to all queues utilizing the HP UPD)
Dynamic mode—Each time Print is selected from the HP UPD client.
Update Now GUI—Traditional mode installations can manually launch through the HP UPD driver User Interface:
Printer Properties, Device Settings tab, Installable Options, Automatic Configuration, Update Now.
UPDATE COMMAND LINE—Traditional mode installations can execute a command line using Microsoft's
Rundll32.dll allowing change updates to occur through scripting. (see Command line interface).
Automatic Printer Configuration status
Dynamic mode—Invoke Printer Automatic Configuration each time the HP UPD user interface is invoked (print
properties for FILE-PRINT from the application).
Traditional mode—Printer Automatic Configuration Status can be determined by checking the About tab of the HP
UPD available through the HP UPD Printer Properties.
Figure 7-42 Printer Automatic Configuration status
Traditional Mode About status.
The About tab provides detailed information about driver component versions. It contains an overall build version
number (in parentheses after the model name) together with specific information about each of the components. The
information varies according to the printer model number, driver, date, and versions. The About tab is shown in the
figure above.
If the first line displays — Automatic Configured MM/DD/YYYY: Automatic configuration through the Printer
Automatic Configuration successfully executed and updated the printer's configuration. Status of Last
Configured xx/yy/zzzz displays date of the last attempted automatic configuration. The last line will display
Automatic Configured or User-Configured if the original automatic configuration failed and running Update
Now is successful.
If the first line displays — Auto-Configuration Not Attempted: Automatic configuration could not update the
configuration (i.e., unable to communicate with the printer). Status of Last Configured xx/yy/zzzz (third line)
displays the date of the last attempted automatic configuration. The last line will display Default Configuration.
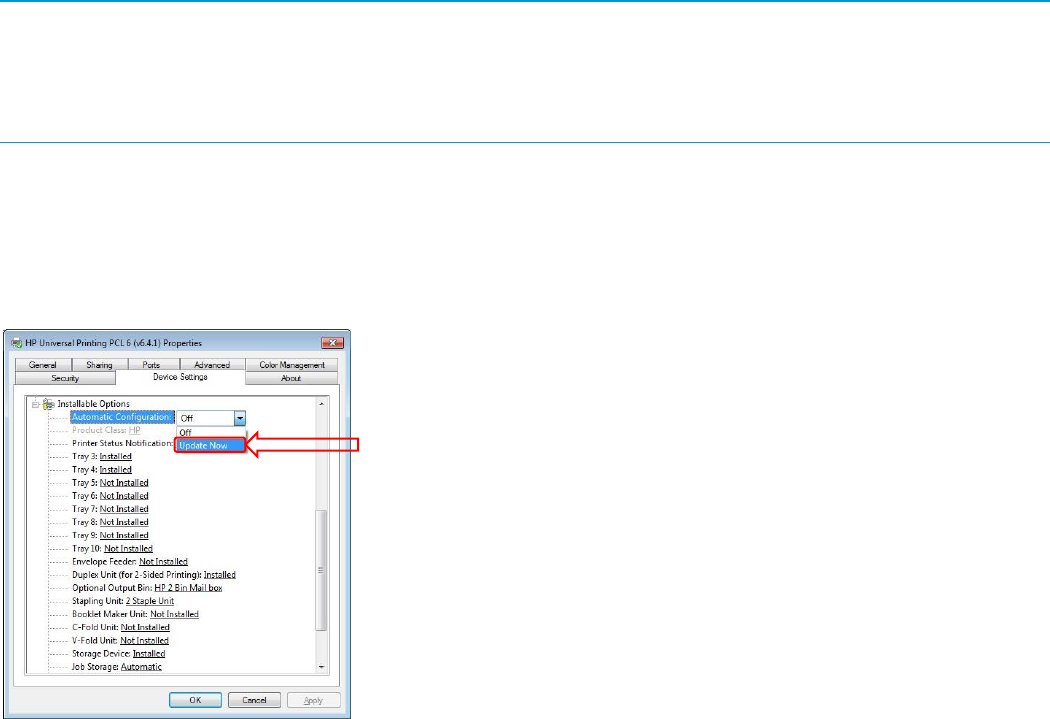
134
If the first line displays — Auto-Configuration Not Attempted: Automatic Configuration is enabled, but Printer
Automatic Configuration did not run. This would occur if the driver's Printer Automatic Configuration is enabled,
but registering of the automatic configuration services (Net Driver HPZ12 and Pml Driver HPZ12) failed loading a
DLL. The last line will display Default Configuration.
NOTE: If the Printer Auto-Configuration options have been disabled via driver pre-configuration, the Configuration
Status box will show:
Administrator Preferences Not Applied
Last Configured xx/yy/zzzz (which is the date of install)
Default Configuration
The About button is also available on most driver screens. The About button provides a driver version number.
User interface
Traditional mode installations —The printer Automatic Configuration is automatically executed at the end of the
installation routine. When the printer’s capabilities have changed the Update Now process can be launched from the
driver user interface to allow the HP UPD to query the target device: Printer Properties, Device Settings tab,
Installable Options, Automatic Configuration, Update Now as shown below.
Figure 7-43 Selecting Update Now for Automatic Configuration through the Printer properties user interface
Automatic configuration selectable options
Automatic Configuration:= Off: The update now bidirectional communication is not currently in progress
Automatic Configuration:= Update Now: The driver is in process of communicating with the target product.
This process can take several minutes depending upon the environment and configuration. When finished, the
status will change to Off.
Dynamic mode installations—The Printer Automatic Configuration happens automatically using the following
methods:
Hitting Print.
After Enter a Printer Address.
Selecting Check Status... of an existing printer.
Searching for products on the network subnet.
The configuration is automatically updated each time the client connects to the printer via the Dynamic mode
connection.

135
Command line interface
Starting with HP UPD v4.0, administrators can script the Update Now process from a command line for traditional
mode installations of the HP UPD driver. This applies only to HP UPD traditional mode installation. The files used and
file location required for the configuration entry point are different with each printer Automatic Configuration release
and are therefore Microsoft platform and HP UPD version specific.
Table 7-16 Platform specific commands for scripting the Update Now process
HP UPD version
Platform
Example command line
HP UPD v6.5.0
32-bit
rundll32
%systemroot%\system32\spool\drivers
\w32x86\3\HP UPD 6.5.0:
hpmux210.dll,UpdateStaticModePrinter "printer
name here" /q
64-bit
rundll32
%systemroot%\system32\spool\drivers \x64\3\UPD
6.5.0: hpmux210.dll,UpdateStaticModePrinter
"printer name here" /q
HP UPD v6.4.1
32-bit
rundll32
%systemroot%\system32\spool\drivers
\w32x86\3\HP UPD 6.4.1:
hpmux196.dll,UpdateStaticModePrinter "printer
name here" /q
64-bit
rundll32
%systemroot%\system32\spool\drivers \x64\3\UPD
6.4.1: hpmux196.dll,UpdateStaticModePrinter
"printer name here" /q
HP UPD v6.3.0
32-bit
rundll32
%systemroot%\system32\spool\drivers
\w32x86\3\UPD 6.3.0:
hpmux190.dll,UpdateStaticModePrinter "printer
name here" /q
64-bit
rundll32
%systemroot%\system32\spool\drivers \x64\3\UPD
6.3.0: hpmux190.dll,UpdateStaticModePrinter
"printer name here" /q
HP UPD v6.2.1
32-bit
rundll32
%systemroot%\system32\spool\drivers
\w32x86\3\UPD 6.2.1:
hpmux186.dll,UpdateStaticModePrinter "printer
name here" /q
64-bit
rundll32
%systemroot%\system32\spool\drivers \x64\3\UPD
6.2.1: hpmux186.dll,UpdateStaticModePrinter
"printer name here" /q

136
HP UPD version
Platform
Example command line
HP UPD v6.2.0
32-bit
rundll32
%systemroot%\system32\spool\drivers
\w32x86\3\UPD 6.2.0:
hpmux185.dll,UpdateStaticModePrinter "printer
name here" /q
64-bit
rundll32
%systemroot%\system32\spool\drivers \x64\3\UPD
6.2.0: hpmux185.dll,UpdateStaticModePrinter
"printer name here" /q
HP UPD v6.1.0
32-bit
rundll32
%systemroot%\system32\spool\drivers
\w32x86\3\UPD 6.1.0:
hpmux180.dll,UpdateStaticModePrinter "printer
name here" /q
64-bit
rundll32
%systemroot%\system32\spool\drivers \x64\3\UPD
6.1.0: hpmux180.dll,UpdateStaticModePrinter
"printer name here" /q
HP UPD v6.0.0
32-bit
rundll32
%systemroot%\system32\spool\drivers
\w32x86\3\UPD 6.0.0:
hpmux175.dll,UpdateStaticModePrinter "printer
name here" /q
64-bit
rundll32
%systemroot%\system32\spool\drivers \x64\3\UPD
6.0.0: hpmux175.dll,UpdateStaticModePrinter
"printer name here" /q
HP UPD v5.9.0
32-bit
rundll32
%systemroot%\system32\spool\drivers
\w32x86\3\UPD 5.9.0:
hpmux170.dll,UpdateStaticModePrinter "printer
name here" /q
64-bit
rundll32
%systemroot%\system32\spool\drivers \x64\3\UPD
5.9.0: hpmux170.dll,UpdateStaticModePrinter
"printer name here" /q
HP UPD v5.8.0
32-bit
rundll32
%systemroot%\system32\spool\drivers
\w32x86\3\UPD 5.8.0:
hpmux160.dll,UpdateStaticModePrinter "printer
name here" /q
64-bit
rundll32
%systemroot%\system32\spool\drivers \x64\3\UPD
5.8.0: hpmux160.dll,UpdateStaticModePrinter
"printer name here" /q

137
HP UPD version
Platform
Example command line
HP UPD v5.7.0
32-bit
rundll32
%systemroot%\system32\spool\drivers
\w32x86\3\UPD 5.7.0:
hpmux155.dll,UpdateStaticModePrinter "printer
name here" /q
64-bit
rundll32
%systemroot%\system32\spool\drivers \x64\3\UPD
5.7.0: hpmux155.dll,UpdateStaticModePrinter
"printer name here" /q
HP UPD v5.6.5
32-bit
rundll32
%systemroot%\system32\spool\drivers
\w32x86\3\UPD 5.6.5:
hpmux145.dll,UpdateStaticModePrinter "printer
name here" /q
64-bit
rundll32
%systemroot%\system32\spool\drivers \x64\3\UPD
5.6.5: hpmux145.dll,UpdateStaticModePrinter
"printer name here" /q
HP UPD v5.6.1
32-bit
rundll32
%systemroot%\system32\spool\drivers
\w32x86\3\UPD 5.6.1:
hpmux141.dll,UpdateStaticModePrinter "printer
name here" /q
64-bit
rundll32
%systemroot%\system32\spool\drivers \x64\3\UPD
5.6.1: hpmux141.dll,UpdateStaticModePrinter
"printer name here" /q
HP UPD 5.6.0
32-bit
rundll32
%systemroot%\system32\spool\drivers
\w32x86\3\UPD 5.6.0:
hpmux140.dll,UpdateStaticModePrinter "printer
name here" /q
64-bit
rundll32
%systemroot%\system32\spool\drivers \x64\3\UPD
5.6.0: hpmux140.dll,UpdateStaticModePrinter
"printer name here" /q
HP UPD v5.5
32-bit
rundll32
%systemroot%\system32\spool\drivers
\w32x86\3\hpmux130.dll,UpdateStaticModePrinter
"printer name here" /q
64-bit
rundll32
%systemroot%\system32\spool\drivers
\x64\3\hpmux130.dll,UpdateStaticModePrinter
"printer name here" /q

138
HP UPD version
Platform
Example command line
HP UPD v5.4
32-bit
rundll32
%systemroot%\system32\spool\drivers
\w32x86\3\hpmux118.dll,UpdateStaticModePrinter
"printer name here" /q
64-bit
rundll32
%systemroot%\system32\spool\drivers
\x64\3\hpmux118.dll,UpdateStaticModePrinter
"printer name here" /q
HP UPD v5.3.1
32-bit
rundll32
%systemroot%\system32\spool\drivers
\w32x86\3\hpmux115.dll,UpdateStaticModePrinter
"printer name here" /q
64-bit
rundll32
%systemroot%\system32\spool\drivers
\x64\3\hpmux115.dll,UpdateStaticModePrinter
"printer name here" /q
HP UPD v5.2.6
32-bit
rundll32
%systemroot%\system32\spool\drivers
\w32x86\3\hpmux112.dll,UpdateStaticModePrinter
"printer name here" /q
64-bit
rundll32
%systemroot%\system32\spool\drivers
\x64\3\hpmux112.dll,UpdateStaticModePrinter
"printer name here" /q
HP UPD v5.2.5
32-bit
rundll32
%systemroot%\system32\spool\drivers
\w32x86\3\hpmux111.dll,UpdateStaticModePrinter
"printer name here" /q
64-bit
rundll32
%systemroot%\system32\spool\drivers
\x64\3\hpmux111.dll,UpdateStaticModePrinter
"printer name here" /q
HP UPD v5.2
32-bit
rundll32
%systemroot%\system32\spool\drivers
\w32x86\3\hpmux109.dll,UpdateStaticModePrinter
"printer name here" /q
64-bit
rundll32
%systemroot%\system32\spool\drivers
\x64\3\hpmux109.dll,UpdateStaticModePrinter
"printer name here" /q
HP UPD v5.1
32-bit
rundll32
%systemroot%\system32\spool\drivers
\w32x86\3\hpmux104.dll,UpdateStaticModePrinter
"printer name here" /q

139
HP UPD version
Platform
Example command line
64-bit
rundll32
%systemroot%\system32\spool\drivers
\x64\3\hpmux104.dll,UpdateStaticModePrinter
"printer name here" /q
HP UPD v5.0.3
32-bit
rundll32
%systemroot%\system32\spool\drivers
\w32x86\3\hpmux094.dll,UpdateStaticModePrinter
"printer name here" /q
64-bit
rundll32
%systemroot%\system32\spool\drivers
\x64\3\hpmux094.dll,UpdateStaticModePrinter
"printer name here" /q
HP UPD v5.0
Or HP UPD v5.0.1
32-bit
rundll32
%systemroot%\system32\spool\drivers
\w32x86\3\hpmux091.dll,UpdateStaticModePrinter
"printer name here" /q
64-bit
rundll32
%systemroot%\system32\spool\drivers
\x64\3\hpmux091.dll,UpdateStaticModePrinter
"printer name here" /q
HP UPD v4.7.2
32-bit
rundll32
%systemroot%\system32\spool\drivers
\w32x86\3\hpmux084.dll,UpdateStaticModePrinter
"printer name here" /q
64-bit
rundll32
%systemroot%\system32\spool\drivers
\x64\3\hpmux084.dll,UpdateStaticModePrinter
"printer name here" /q
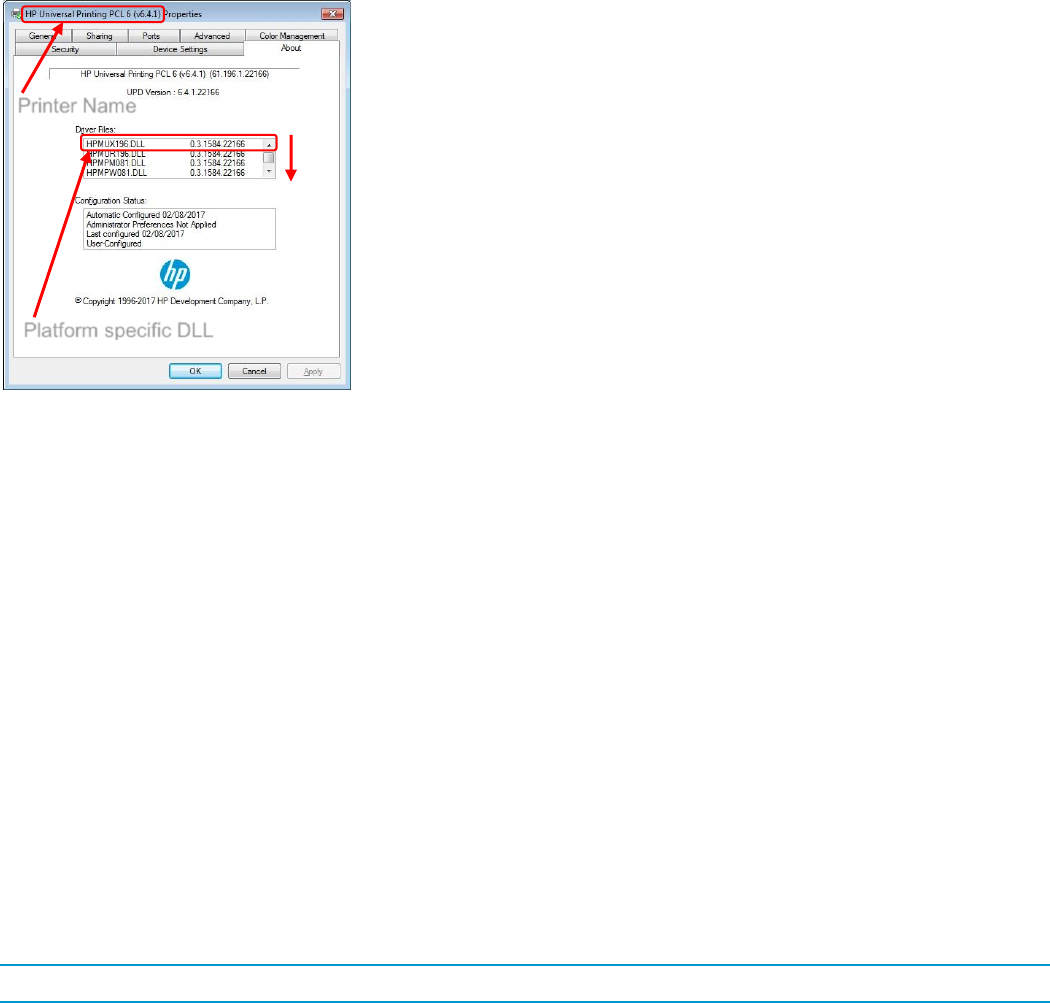
140
Example steps to initiate Printer Automatic Configuration via command line
1. From the system's Devices and Printers folder, right mouse on the printer name and select Printer properties,
About to locate the installed driver name instance and the HPMUX*.DLL (scroll down).
Note the Printer Name and Platform Specific DLL of the installed HP UPD.
Figure 7-44 Locate the platform specific DLL
2. Open a command prompt: Click START, click RUN, type CMD.EXE and press Enter
C:\> rundll32
%systemroot%\system32\spool\drivers\w32x86\3\hpmux195.dll,UpdateStaticModePrinter
"HP Universal Printing PCL 6 (v6.4.0)" /q
User dialogue box opens stating, “Getting printer information… Establishing Communication with printer…
Finishing printer validation”
3. Open the HP UPD Printer Properties About tab and check the Configuration Status box.
The status should display the current system date for Last configured xx/yy/zzzz and default options for the
printer, or HP UPD pre-configurations of the driver will be displayed in the HP UPD user interface.
Disable Printer Automatic Configuration
UPD installed services provide bi-directional I/O capability outside the context of the user, application, or print job.
Most printing functions will work without the driver to device communication, and print quality and speed are not
affected by the services enablement. HP UPD 4.7 added support for manual configuration of the driver to both enable
and configure device capabilities without requiring Automatic Update to be enabled. The Installable Options section of
the UPD’s Device Settings tab can be manually defined using Driver Configuration Utility or the Driver Deployment
Utility.
Benefits comparison
NOTE: HP strongly recommends using Printer Automatic Configuration.
Printer Name
Platform specific DLL
141
Automatic configuration enabled
Accuracy in Device capabilities: Capabilities of the target device can change without end user awareness.
Automatic configuration allows the UPD to accurately reflect the capabilities of the target device.
Staged deployment: If the printers are not yet available, printer automatic configuration is a good option. The
INSTALL.EXE utility will still create the port. The only consequence of not having the printer connected is that
they would get the defaults for the printers, but a simple update now (user interface or command line) after the
device is added to the host or network synchronizes the UPD driver to device capabilities.
Manual configuration of every setting for every device connection introduces additional management overhead
defining settings or correcting misconfigurations.
Manual configuration requires managing multiple Driver Configuration Utility settings files (*.cf_ or *.cfm).
If bidirectional communication is successful followed by bidirectional communication failing on successive attempts,
the driver user interface options will utilize cached settings of the last successful printer Automatic Configuration.
Automatic configuration disabled
Administrators can disable printer automatic configuration to control which device capabilities are presented
through the print user interface. For example, if a device supports a particular feature that does not comply with
standard fleet deployment, the features enablement can be centrally controlled.
Pre-Installed queues: Administrators can manually configure device capabilities regardless of the device’s status
on the network. For example, an administrator could define duplex printing in the driver without the device having
to be on the network at the time of pre-configuration (the driver does not have to confirm the targeted device
capabilities).
The device is hooked up over an NDPS queue on a Novell Server.
Default capabilities without automatic configuration
Printer Automatic Configuration can be disabled through pre-configuration of the HP UPD driver. If the Automatic
Update feature is disabled using the Driver Configuration Utility tool prior to the HP UPD’s installation, standard
printing defaults or cached settings will be utilized by the HP UPD.
If a capability is enabled though pre-configuration of the driver that the target device does not support, printing failures
or unexpected results will occur. For example, setting duplex for a device that only prints simplex will output simplex.
Table 7-17 Defaults applied when the printer Automatic Configuration fails attempted communication
PLC 6
Postscript
Trays
1,2
1,2
Manual Feed
Tray 1
Tray 1
Envelope Feeder
Not installed
Not installed
Duplex
Installed
Installed
Accessory Output Bin
(Optional Output Bin)
Not installed
Not installed
Storage Device
Installed
Installed
Device Type
Monochrome (1)
Color (2)
NOTE: Device type can be changed to Color by reconfiguring the Device Type on the Printer properties, Device
Settings tab. Some monochrome PCL 6 devices cannot handle color data. If color data is sent, the device will either
generate an error or unexpected print output may occur.
NOTE: The Postscript driver always sends color regardless of device type. Monochrome devices are able to handle
the color data properly. However, the driver Color tab might not display.
142
Steps to disable the Printer Automatic Configuration
Disabling the Printer Automatic Configuration is accomplished through pre-configuration of the UPD driver before
installation onto the client or server. The Driver Configuration Utility is included in HP PARK which is available for
download from the HP public Web site: www.hp.com/go/upd
NOTE: DCU is included with the HP Printer Administrators Resource Kit (HP PARK). To download the HP PARK,
which includes the HP DCU software and the HP Driver Configuration Support Guide, go to www.hp.com/go/upd and
click Download now. Verify your language, and then click your operating system (DCU is supported on both 32-bit
and 64-bit systems). Expand Software – Universal Print Driver. To the right of HP Printer Administrator Resource
Kit, click Download. Save the file and then click the folder and click Extract all files.
1. Open the directory for the HP Driver Configuration Utility (HP DCU) in the HP PARK directory.
2. Double-click HPBCFGAP.EXE to run the HP Driver Configuration Utility.
NOTE: The application automatically opens in the language specified within Region and Languages.
3. When the Information dialog box, click OK.
4. Click File and then Open.
5. Locate the HP UPD driver files and open the *.CFG file. If you have previously modified the driver, open the
*.CFM file.
6. From the Device Settings tab, scroll down and select the Automatic Configuration drop down menu.
a. Disabled
Printer Automatic Configuration will not run at install time
Auto Configuration will be grayed out/disabled in the Printer Properties tab
This setting will not apply to dynamic mode
Help About in the Configuration Status box will display
o Administrator Preferences Not Applied
o Last Configured xx/yy/zzzz
o Default Configuration
b. Enabled (Device Settings Takes Priority)
The default for AUTOMATIC CONFIGURATION.
c. Enabled (Driver Pre-Configuration Takes Priority)
The current Processing order for DMC / PRINTER AUTOMATIC CONFIGURATION
d. Enabled (Limited Feature From Device)
Similar to the UPD generic configuration with job storage disabled and no color tab
7. Modify any additional settings to your requirements.
8. Save the changes.
File-Save As: Allows you to select the file name and extension. If only a file name is entered, the application
saves the file as (filename).cfg to the defined directory. In order to save the file as a cfm, you must type the
extension .cfm after the file name.
NOTE: File-Save: Saves the file to the same filename from where it was opened, which may impact the digital
signature. To not impact the digital signature, HP recommends using File-Save As and saving the file as a .cfm
file.

143
9. Copy the cfm file to the ..\3 folder.
For 64 bit Windows- C:\Windows\system32\spool\drivers\x64\3
For 32 bit Windows- C:\Windows\system\spool\drivers\w32x86\3
NOTE: When copying the cfm file to the local machine driver directory, the cfm file name must have the format
hpcpuxxx.cfm, where xxx matches the number of the cfg file. For example, hpcpu195.cfg would be named
hpcpu195.cfm.
When using UPD 5.5.0 or later, you can use any file name, as long as it uses the extension .cfm, and the
install.exe is used with the /gcfm option to install the printer. For example:
install.exe /gcfm”c:\temp\duplex.cfm” /n”PrinterName” /sm”HostName”
10. Install the driver using the supported method of deployment.
Communication protocols
Bidirectional communication between the HP UPD and the target device occurs directly (USB or parallel connection)
or over the network:
SNMP over the network—UDP ports 161 (snmp sets/gets).
HTTP over the network (Job Capabilities Ticket)— a compressed file that can be sent to the UPD over http
that defines specifications for the target device. JCT implementation in UPD v5 only includes paper sizes, paper
type and HP EasyColor. Devices supporting JCT will also communicate SNMP information during bidirectional
communication, therefore JCT supported devices might display more capabilities compared to non JCT supported
devices.
PML over DOT4—DOT4 is based on the IEEE 1284.4 protocol. For direct connect, DOT4 over USB or DOT4
over LPT is used for most devices. Many composite devices do not support DOT4 and might support an alternate
directional mechanism.
Low end device model (LEDM) over Composite USB—Beginning with UPD v4.7, the HP UPD can query low
end laser models directly to get device configuration, status and alerts over composite USB. If the low end device
is also networked, HP UPD printer automatic configuration will use the network.
Printer Automatic Configuration services
HP UPD installs two services that enable Printer Automatic Configuration to function. In combination these services
allow the HP UPD to retrieve device configuration after installation, using UPDATE NOW, or via command line using
RUNDLL32.
Net Driver HPZ12—Provides channelized data transfers over the network for scan and fax
Pml Driver HPZ12—For USB connected devices that support PML or for network SNMP, provides the ability to
determine what features a device has using printer automatic configuration and device status.
Steps to Disable
By default, two UPD installed services are set to load Automatic. If the UPD is pre-configured prior to installation to
disable Printer Automatic Configuration using the Driver Configuration Utility or HP Driver Deployment Utility, and the
system installing UPD does not already have the HP UPD or other HP driver utilizing bidirectional communications,
the HP UPD services will not be registered to the system.
If the “PML Driver HPZ12” is stopped and set to Manual, the service will restart when HP UPD Update Process is
launched. If it is set to Disable, when the HP UPD Update Process is launched an error might be generated.
Steps to Remove
See Uninstall the HP UPD in chapter 5

144
Symptoms when Printer Automatic Configuration fails
When the HP UPD Printer Automatic Configuration services cannot communicate directly with the target printing
device, the exact capabilities of the target device will be unknown to the installed HP UPD printer. Symptoms or
observable changes to the HP UPD installed driver can include the following.
Error message displays: This command could not be completed because a printer communication error occurred.
No special device features or device attachments available for selection.
Black and white printing only (even to color devices).
No color tab.
No duplex unit.
No hard drive (no Job Storage tab).
Printing from a specified tray
HP products can select a paper by paper size and paper type. If multiple trays are loaded/configured for the same
paper size, it is still possible to select a specific tray by using the paper type selection. Configure the paper types for
the trays directly on the product or through the product’s HP Embedded Web Server. Example of printer configuration:
Tray1: Size=Any Size; Type=Any Type
Tray2: Size=Letter; Type=Letterhead
Tray3: Size= Any Size; Type=Any Type or Plain
To assign tray 2 as the default in HP UPD:
Use the Driver Configuration Utility (found within the Print Administrator Resource Kit (PARK)) and pre-configure
the HP UPD with the following settings before installing the HP UPD:
o Media Type: Unspecified
o Paper Source: Tray 2
Create a queue with the above settings.
If the HP UPD has already been installed, go to the Devices and Printers folder, right click the HP UPD queue,
click Printer Properties, Advanced, Printing Defaults, Printing Shortcuts, select shortcut Factory Defaults
→ Paper Source, select Tray 2 as the Paper Source, select OK, Apply.
Clients connecting using Point and Print will mirror the driver settings applied to the shared printer.
NOTE: Do not use Form to Tray Assignment accessible from the installed HP UPD's Device Settings tab for tray
selection.

145
Known issue with redirected printers
Before making a remote desktop connection with a terminal server, you can specify if the local devices (such as
printers) and resources should be visible in the remote session. If this option is used, then the locally installed printers
with the HP UPD driver will be displayed as a redirected printer and can be used in the remote desktop session.
When you open the redirected printers in the remote session, all redirected printers will not show the Color tab, even
when the locally installed printers have color printing capabilities and a Color tab. Additionally, job storage will be
displayed and extra trays are visible in paper source drop-down list in printing shortcuts while the paper source drop-
down box in the Print Quality tab and in the special pages dialog box will only contain the Automatic selection.
NOTE: In windows 2008R2, a redirected printer will be visible in the Devices and Printers folder as “PrinterName
(redirected #), where PrinterName is the name of the Printer on the local windows PC from which the terminal session
was started, and the # is the connection number to the terminal server.
Troubleshooting
Printer Automatic Configuration communication can fail with the device because of issues in the communication path.
The client or network configuration might prevent communication, or the feature may have been disabled by the print
administrator at install via driver pre-configuration. Take the following steps to isolate issues when Auto Configuration
is not successful.
1. Can the HP UPD print to the target device?
No, then bidirectional communication might also fail because of connection issues between the HP UPD and the
target print device.
2. Is the HP UPD printer defined with Printer Auto Configuration enabled?
Check the Printer properties, Device Settings tab. Under Installable Options, is Automatic-Configuration grayed
out?
a. No, run Update Now to check bidirectional communication
b. Yes, then Auto-Configuration has been disabled either through driver configuration or by disabling the
bidirectional communication services. Suggested steps:
o Are the Net Driver HPZ12 and PML Driver HPZ12 services installed (My Computer- Manage-Services or
by NET START at the command line)?
o Reinstall the driver after confirming the source *.cfg file or *.cfm file has not been pre-configured to
disable Printer Auto Configuration. If unsure, download the source driver package from
www.hp.com/go/upd and perform a default installation without using the HP Driver Configuration Utility
(DCU).
3. After running "Update Now" were the expected results returned?
a. Check the Printer Properties, About tab and verify "Last Configured xx/yy/zzzz" date matches the Microsoft
OS system date (confirmed by typing START -> RUN -> cmd /k date). If not, then Auto Configuration did not
succeed.
b. Was an error message returned, such as "This command could not be completed because a printer
communication error occurred"?
Check for the correct port, port address, physical and logical connection to the target device.
c. Paper types supported by the target device are not in the HP UPD user interface?
146
1. For some older devices, the HP UPD might not retrieve the full list of supported paper types. Instead, the
HP UPD presents a subset of paper types, a generic list believed to be supported by most printers. Refer
to the user guide for your product model if you have questions on supported paper types for your device.
2. Changes to the device's paper settings, such as paper size or paper type, using the HP Embedded Web
Server, HP Web Jetadmin, or the control panel will not change or update the HP UPD driver display
options. To change these so that they appear in the HP UPD driver user interface:
a) The end user must go to Printer properties, Advanced tab, Printing Defaults and manually
change the settings.
b) Point and Print vended clients will see the defined setting under Printing Preferences
c) Pre-configuration of the HP UPD driver with the HP Driver Configuration Utility or the HP Driver
Deployment Utility prior to install or reinstallation of the driver.
4. What is the physical connection method between the HP UPD installed
printer and the target printing device?
Bidirectional communication between the HP UPD driver and the target device is possible through direct connection to
the device or over the network by means of UDP. To confirm your connection method, right click the HP UPD in
Printers folder, click Print Properties, and select the Port tab. Is the selected port defined correctly?
No, set to the correct port type or port address (TCP/IP address or DNS name) and click Apply. Run Update
Now under Device Settings to update the printer configuration in the driver.
Yes, proceed to next steps.
5. Troubleshoot network connection/port
a. Can you ping the target print product by the TCP/IP address? By host name?
b. Can you ping the print server by the TCP/IP address? By host name?
c. Is the HP UPD’s target port defined by hostname or IP address?
d. If by host name fails, is the hostname registered in DNS? nslookup dns_name_of_device
e. Is the HP UPD installed client traversing network subnets to the target print server or printing device? If yes, is
http and snmp traffic allowed through these connection paths? To define the segments in the network path,
run the following from the HP UPD install client: tracert print_device_ipaddress
f. Is the localhost or the target print server running an internet firewall? Are ports 160 and/or 80 open?
g. Can the HP UPD client host gain access to the device's HP Embedded Web Server? http://device_ip_address
or https://device_ip_address
h. Are there network issues such as denial-of-service at the print server or printing device, network service
interruption, or unauthorized and privileged access to the target print device or print server?
i. Is the TCP filter enabled? TCPIP, Advanced, Options tab, Properties (types of traffic allowed to pass to the
TCP protocol)?

147
6. Distinguish if target product is communicating bidirectional for printer auto
configuration via HTTP or SNMP?
Bidirectional communication over the network could occur via HTTP and SNMP dependent upon target device. Errors
specific to the protocol:
HTTP
a. Does the device support hp job capabilities ticket? To determine,
http://device_ip_address/hp/device/JobCapabilities/JobCapabilitiesTicket.zip
b. Is HTTP port 80/tcp enabled in the \ % SystemRoot %\System32\Drivers\Etc\services file?
c. Does the HP UPD installed host firewall allow HTTP traffic?
d. If the target product is on a separate subnet, does the network route HTTP traffic?
SNMP
a. Do community names of the installed HP UPD host match the community name of target print product?
b. Does the HP UPD installed host firewall allow SNMP traffic?
c. If the HP UPD installed host is on a separate subnet, does the network route SNMP traffic?
d. Is SNMP routing disabled? Wireless network security often disables SNMP routing as a security measure.
7. Install and test a new print queue?
Reducing complexity to isolate variables. A simple test is to install the HP UPD driver downloaded from
www.hp.com/go/upd using the default installation options onto a clean system. This ensures the driver has not been
pre-configured before installation, that upgrade from one version to the next in a contaminated environment is
reduced, and the print queue itself is new and self-managed. During installation, create a new print queue targeted to
a device with an address on the test machine’s subnet.
8. Is the network congested?
HP UPD bidi uses the SNMP protocol, which is carried on the network using the HP UPD protocol. HP UPD packets
are low priority, and can be discarded if the network is congested.
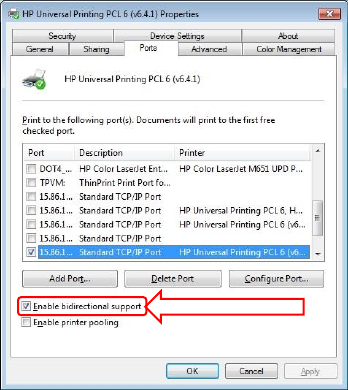
148
Frequently Asked Questions
1. For non-permanent instance installations of the HP UPD, will the printer be queried every time?
For cases where a user has chosen to create a permanent instance of a printer, settings are permanently saved
to the local registry (like any other print driver) and the user would continue to print to that permanently created
instance. For cases where a user has not chosen to create a permanent instance of a driver, registry entries are
saved in a .CREG file (cached registry). Initially the driver will attempt to save the CREG files to the "C:\Program
Files\Hewlett-Packard\HP Universal Printing" directory. If that directory is not available or is locked, the driver will
attempt to cache settings in the %TEMP% then %TMP% directories. If neither of these directories are available
then the HP UPD will query the printer every time for non-permanent instances.
2. How does enabling or disabling the Microsoft port Enable bidirectional support impact the HP UPD's
bidirectional communication?
Figure 7-45 Enabling bidirectional support
The HP UPD uses the MS port’s bidirectional communication for basic status level related to print spooler
operations such as Printer Online and Paper Out. However, for product configuration and capabilities, the HP
UPD uses its own installed services for bidirectional communication between the HP UPD and the target product
(NET DRIVER HPZ12 and PML DRIVER HPZ12).
3. Does HP UPD Printer Auto configuration bidirectional communication cause slow print performance?
No, the traffic send/receive response is very small (SNMP around 65 kilobytes) and infrequent. For traditional
mode installation, the HP UPD only queries for printer information at time of installation, when executed through
Update Now or RUNDLL32 at the HP UPD installed client, and for a simple change id at the beginning of Printer
Automatic Configuration job to verify that the configuration has not changed.
4. After the PRINTER AUTOMATIC CONFIGURATION has completed a successful bidirectional update, several
device features appear in the HP UPD driver user interface that my device does not support. For example, why
does the DEVICE SETTINGS tab show "Tray X: Not Installed" for several trays (where “X” is the tray number)?
The settings are place holders for the HP UPD. Because the HP UPD does not know before an Automatic or Pre-
configuration of the driver's exact configuration, the HP UPD UI structure must remain capable of displaying
settings beyond the standard default settings in the HP UPD UI design. By preserving the setting locations, after
completing the Printer Automatic Configuration update, the user interface can dynamically update the "Not
Installed" settings to the current configuration when a change has occurred to configuration of the device.
5. Print Properties-Device Settings-Installable Options, the Automatic Configuration option is grayed out and
unavailable for selection. What could be the cause?

149
There are two possibilities that are dependent upon how the driver was installed onto the host.
a. Point and Print connection, the driver is a printing client to print server connection. Updates would be centrally
controlled from the print server and not the client. Therefore the print client would not initiate the Printer Auto
Configuration between the print queue and the target printing product. However, printing clients can check
their Printer Properties, About tab to display the server's last update status between the print server and
printing target product:
Auto-Configured MM/DD/YYYY
Not Auto-Configured
Auto-Configuration Not Attempted
b. Printing Automatic Configuration might be disabled by pre-configuration of the driver before the HP UPD was
installed. This can be confirmed by checking the Printer Properties, About tab. The following will display if
disabled by your Administrator:
Auto-Configured MM/DD/YYYY
Not Auto-Configured
Auto-Configuration Not Attempted
6. Is there a good method for testing Printer Automatic Configuration?
a. Install HP UPD with default options (do not utilize switches on the INSTALL.EXE command line) using an HP
default driver package downloaded from www.hp.com/go/upd. This step ensures the driver has not been pre-
configured.
b. During installation, create a new printer port with an invalid TCP/IP address. During the HP UPD installation,
the Automatic Configuration will attempt to communicate with the invalid device IP address. Install will
complete without error and provide default options. For example, the Color tab will not display because
automatic configuration could not validate a color printer at the defined TCP/IP address.
c. For the newly installed HP UPD printer, check Printer Automatic Configuration is enabled (Printer
Properties, Device Settings tab, Installable Options, Automatic Configuration, Update Now)
d. Check the Printer Properties, About tab and note the "Last Configured xx/yy/zzzz" which identifies if Printer
Automatic Configuration has communicated with the target device.
e. Change the HP UPD install printer TCP/IP port address to a valid device IP address.
f. Run the HP UPD's Printer Automatic Configuration through the HP UPD user interface or the command line
specific to the installed UPD version (see Command line interface).
g. Check the device capabilities updated from the default settings.
7. Does the following message, "Windows Security Alert: Spooler Subsystem App" generated during the installation
relate to the HP UPD's installed bidirectional communication services over the network?
The HP UPD installation can make calls over the network utilizing different ports and communication protocols for
configuration, device capabilities, and status. For example, ports 160 and 80 might all be utilized in the Printer
Automatic Configuration process when the HP UPD communicates bidirectional over the network to the target
device. If the ports used by the print spooler are not open, the firewall might need to be configured.
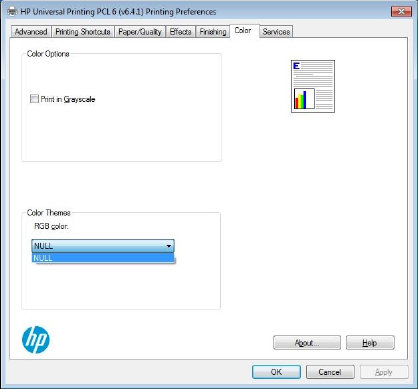
150
8. Is there a tool or steps to test SNMP port access required by the HP UPD printer automatic configuration?
The SNMP port utilization by HP UPD will not be active until traffic is being sent or received during the Update
Now process. Full diagnosis involves checking port access at all connection points of the network between the HP
UPD printing client and target device (gateway/routers/switches/server and host firewalls). Utilities to help
troubleshoot connection path access can include Net Print, netstat, tracert, and pathping to identify network
device access. The SNMP port utilization by HP UPD will not be active until traffic is being sent or received during
the Update Now process making a network sniffer one of the best tools for diagnostics during the update process.
9. Why does RGB color from the Color tab only have a NULL option?
The Color Themes from the Color tab in the HP UPD properties is device dependent. The HP UPD configures
the settings based on the model name. If the Device Type is set to Color in the Device Settings tab (DCU or
manually) and if there is no bidi communication with the color product, then the HP UPD displays NULL. When
using the PCL 6 driver, the HP EasyColor option is not available either.
Figure 7-46 Null Option
10. Does the HP UPD support SNMP v3?
SNMP v3 is not supported by the UPD, therefore SNMP v3 enabled or disabled at the HP printer has no impact
on UPD SNMP v1/2 print, status or configuration. The HP UPD supports SNMP v1/2. All HP devices supported by
the HP UPD are v2 compatible.
11. Is SNMP required by the HP UPD for printing?
No, the SNMP stack installed by the HP UPD is only used for returning printer configuration and printer status
back to the printer driver. However, if the Microsoft SNMP stack utilized between the Microsoft spooler and printer
are incorrectly configured (i.e. SNMP name mismatch, or enabled on one side but not the other) the HP UPD
printer object may show the status “Offline.”

151
12. What steps should be taken to confirm SNMP v2 community name alignment exists between the printer, the HP
UPD SNMP stack, and MS SNMP stack?
The HP UPD SNMP community name defaults to ‘public’. Use any of the following methods to modify the SNMP
v2 community name:
Modify the SNMP v2 community name during installation
Use the following install switch:
/qcomname (defined queue) or /gcomname (global)
For example: Install.exe /q /h /npf /tm /n”printer name” /nd /ni /qcomname”newame”
for Microsoft’s SNMP spooler community name
Modify the SNMP v2 community name for an existing print queue
1. From the Start menu, select Devices and Printers.
2. Right click on the printer and then select Printer Properties.
3. Click on the Ports tab and then click the Configure Ports button.
4. Select SNMP Status Enabled and then enter the SNMP v2 community name in the Community
Name: field.
5. Click OK.
Modify the SNMP v2 community name using the EWS
1. Open a web browser and then navigate to the product's EWS by using the product's IP address.
2. In the product EWS, click the Network tab.
3. Click the Network Settings link in left navigation panel.
4. Select Enable SNMPv1/v2 read-write access, and then enter the SNMP v2 community name in the
Community Name: field. Enter the same SNMP v2 community name in the Confirm Set Community
Name: field, and then click the Apply button.
NOTE: SNMP community name cannot be blank, or end in a numeric (characters 0 through 9 are reserved for
multiport jet direct box functionality).
13. How is SNMP utilized in the HP UPD?
The HP UPD’s SNMP stack provides Automatic Configuration between the HP UPD print object and the HP print
device, the Status Notification Popup after a new printer install and FILE-PRINT to HP UPD printer, and the status
message prompt for a manual duplex print job.
NOTE: Status Notification Pop-ups (SNP) are no longer available starting with the release of UPD 6.5.0.
GET operations are used by the HP UPD (requestor) and the device (responder) over TCP/IP or DOT4
connections. SET is not utilized by the HP UPD.
The HP UPD SNMP v2 functionality requires that the SNMP community name match between the HP UPD SNMP
stack, the Microsoft SNMP stack, and that the print device SNMP settings align the Community Name in three
places: in the HP UPD printer object, the Microsoft operating system spooler, and the HP print device.
14. For point and print connected clients, is there SNMP v2 activity initiated from the client?
On the point and print client, settings on the Device Settings tab are greyed out, including UpdateNow. The client
receives automatic configuration settings and changes from the print server, not directly from the print device.
152

153
8 Managing the HP UPD with Active
Directory Group Policy
Introduction
Active Directory Group Policy and the HP UPD Active Directory Administrator template allow complete management
of the HP UPD printing experience within your Active Directory infrastructure.
You can use the HP UPD Active Directory Administrator Template to add policies to an existing Group Policy Object
or create new, custom HP UPD Group Policy Objects for each user, group, or Organizational Unit.
In addition to creating policies for the HP UPD, you can also enter the location of Managed Printer Lists by exporting
printer groups from your HP Web Jetadmin database in XML format.
This chapter covers the following topics:
Supported HP UPD versions
You-Tube Video
Use HP Active Directory Group Policy to manage HP UPD policies
HP UPD Active Directory Group Policy
Supported HP UPD versions
The HP UPD Active Directory Group Policy version 4.3.6 and higher is supported with HP UPD version 5.4.0 and
higher, and is available for download at www.hp.com/go/upd.
For more information about each release, see the HP UPD Active Directory Administrator Template release notes.
NOTE: When using an AD template, if you open an application’s print dialog after initially connecting to the queue
and without ever opening printing preferences or printer properties, the application’s print dialog may not reflect the
policy depending on how the application is accessing devmode and which devmode it is accessing. However, it
should print correctly based on the policy. To update the application's print dialog, you need to access the print driver
by opening printer properties or printing preferences through the application or printers folder.
You-Tube Video
For more information on using AD templates, see the You-Tube video “Using HP Active Directory Administrator
Templates” at http://youtu.be/UUN2sEggnuc.
154
Use HP Active Directory Group Policy to manage HP UPD
policies
The decision to use HP Active Directory Group Policy to manage the HP UPD depends on the size of your business
and the current software infrastructure within your business.
In an enterprise business, use Active Directory Group Policy when your enterprise environment requires user and
Organizational Unit (OU) level HP UPD configuration settings that might be based on how the users are currently
configured in your Active Directory. The HP UPD Active Directory Administrator template integrates into an existing
Active Directory infrastructure and allows for creation of group Policy Objects to be linked to user groups and OUs. An
experienced Active Directory administrator will be able to easily integrate the HP UPD Group Policy objects in large
enterprise environments.
HP UPD Active Directory Group Policy
Introduction
There are two HP UPD Active Directory Administrator Templates, ADM template and ADMX/ADML templates. On
newer operating systems, such as Windows Server 2008R2, you can use ADM templates or ADMX/ADML templates.
Further details on ADMX templates can be found on: technet.microsoft.com/en-
us/library/cc709647%28v=ws.10%29.aspx
Background information:
Unlike ADM files, ADMX files are not stored in individual GPOs. For domain-based enterprises, administrators can
create a central store location of ADMX files that is accessible by anyone with permission to create or edit GPOs.
The following sections provide installation instructions for both types of templates and additional template information:
Install and use the ADM template using Microsoft Group Policy Management Console (GPMC)
Install and use the ADMX/ADML template using Microsoft Group Policy Management Console (GPMC)
Remove the HP UPD Administrator template
Upgrade the HP UPD Administrator template
Enable Active Directory Group Policy for HP UPD for a new or existing HP UPD installation
Configure policies with the HP UPD Active Directory Administrator template
Implement Managed Printer Lists (MPLs) within the HP UPD Active Directory Administrator Template file
Verification and troubleshooting

155
Install and use the ADM template using Microsoft Group Policy Management
Console (GPMC)
The following procedure provides details for creating and linking group policy objects using Microsoft Group Policy
Management Console (GPMC). The following example creates a group policy object and sets it as the default policy
for the entire domain, which in this case is named test.local. The procedure is similar for creating and linking group
policy objects for organizational units and groups.
1. Download the HP UPD Active Directory Administrator Template as part of the HP Printer Administrators Resource
Kit (HP PARK). Go to www.hp.com/go/upd and click Download now. Verify your language, and then click your
operating system. Expand Software – Universal Print Driver. To the right of HP Printer Administrator
Resource Kit, click Download. Save the file and then click the folder and click Extract all files.
2. Extract the contents of the HP PARK zip file to your hard drive.
3. Locate the folder where you extracted the HP PARK zip file and browse to the active directory administrator
template folder.
4. Copy the template (HP_MPP_*.adm) to the \windows\inf directory on the domain controller server.
5. Open the Microsoft Group Policy Management Console.
6. Right-click the server name test.local.
7. Click Create and Link a GPO here.
8. Give the new GPO a name and click OK.
9. Right-click the new Group Policy object in the right-most window pane.
10. Click Edit. The Microsoft Group Policy Management Editor opens (gpedit.msc).
11. Select User Configuration, select Policies, select and right-click Administrative Templates, and then select
Add/Remove Templates.
12. Browse to and select the HP UPD Active Directory Administrator Template (for example, HP_MPP_4.4.9.adm).
Install and use the ADMX/ADML template using Microsoft Group Policy
Management Console (GPMC)
The following procedure provides details for creating and linking group policy objects using Microsoft Group Policy
Management Console (GPMC). The following example creates a group policy object and sets it as the default policy
for the entire domain, which in this case is named test.local. The procedure is similar for creating and linking group
policy objects for organizational units and groups.
1. Download the HP UPD Active Directory Administrator Template as part of the HP Printer Administrators Resource
Kit (HP PARK). Go to www.hp.com/go/upd and click Download now. Verify your language, and then click your
operating system. Expand Software – Universal Print Driver. To the right of HP Printer Administrator
Resource Kit, click Download. Save the file and then click the folder and click Extract all files.
2. Extract the contents of the HP PARK zip file to your hard drive.
3. Locate the folder where you extracted the HP PARK zip file and browse to the active directory administrator
template folder.
4. When using the Local GPO: Copy the ADMX template (HP_MPP_*.admx) to %systemroot%\PolicyDefinitions\
and copy the ADML file (HP_MPP_*.adml) to %systemroot%\PolicyDefinitions\en-US
When using the Domain based GPO with a central store: First create a Central store, see
technet.microsoft.com/en-us/library/cc748955%28v=ws.10%29.aspx. Copy the ADMX template
(HP_MPP_*.admx) to %systemroot% \sysvol\domain\policies\PolicyDefinitions and copy the ADML file
(HP_MPP_*.adml) to %systemroot% \sysvol\domain\policies\PolicyDefinitions\EN-US

156
5. Open the Microsoft Group Policy Console.
6. Right-click the server name test.local.
7. Click Create and Link a GPO here.
8. Give the new GPO a name and click OK.
9. Right-click the new Group Policy object in the right-most window pane.
10. Click Edit. The Microsoft Group Policy Object Editor opens (gpedit.msc).
11. Select User Configuration, click Policies, select Administrative Templates, and then select HP Managed
Print Policies x.y.z.
Remove the HP UPD AD Administrator template
1. Open the Microsoft Group Policy Editor.
2. Click User Configuration, click Policies, click Administrative Templates, and then click HP Managed Print
Policies.
3. Set each of the policies to Not configured.
4. Click Administrative Templates, and select Add/Remove Templates.
NOTE: Failure to set all the template settings to Not configured before removing the template will leave registry
settings that are no longer associated with an administrator template, resulting in errors when the Group Policy
Modeling Wizard is run.
Upgrade the HP UPD AD Administrator template
To upgrade the HP UPD AD Administrator template, follow the steps to remove the old template in Remove the HP
UPD AD Administrator template in this chapter, then follow the steps to install the new template in HP UPD Active
Directory Group Policy in this chapter.
Enable Active Directory Group Policy for HP UPD for a new or existing HP
UPD installation
For new installations of the HP UPD when an HP Active Directory Administrator Template
is installed
NOTE: When using HP UPD 5.X.X or later and the latest version of the HP Active Directory Administrator template
(version 4.4.5 or later), the policy can be enabled directly from the template settings, so no special installation
switches are required.
For existing installations of the HP UPD
To enable your existing installations of the HP UPD to recognize the Active Directory group policies, use the following
procedure for every HP UPD GPO that you create.
1. Open the Microsoft Group Policy Management Editor (gpedit.msc)
2. Select User Configuration, Policies, Administrative Templates, HP Managed Print Policies, UseMode
Settings.
3. Open General Settings, click Enabled, and check Enable Policy for all users, and then click OK.

157
Configure policies with the HP UPD Active Directory Administrator template
To manage and configure the HP UPD Policies settings, open the Microsoft Group Policy Management editor and
select User Configuration, Policies, Administrative Templates, and then HP Managed Print Policies.
Figure 8-1 Microsoft Group Policy Management editor
NOTE: When configuring policies with the HP UPD Active Directory Administrator template, make sure to enable the
General Settings under UseMode Settings and select Enable Policy for all users. This setting allows the
administrator to configure the HP UPD to enable AD policy without having to configure every installed instance of the
HP UPD.
Configuring the policies for the HP UPD is similar to configuring any other Group Policy within the Active Directory
Group Policy environment.
The following are policies that are part of the HP UPD Active Directory Administrator Template.
UseMode Settings: General Settings
Table 8-1 UseMode Settings: General Settings
Option
Description
Not Configured
Enabled
Select this option button to make the following options
available:
Disable Color
Show device address
Enable Policy for all users. This setting allows the
administrator to configure the HP UPD to enable AD policy
without having to configure every installed instance of the
HP UPD.
Disabled
NOTE: When configuring policies with the HP UPD Active Directory Administrator template, make sure to enable the
General Settings under UseMode Settings and select Enable Policy for all users. This setting allows the
administrator to configure the HP UPD to enable AD policy without having to configure every installed instance of the
HP UPD.
158
UseMode Settings: User Interaction Settings
Table 8-2 User Interaction settings
Option
Description
Not Configured
Enabled
Select this option button to make the following options
available:
Restricted Mode check box
Show UPD dialog settings window check box
Allow user to group printers by location check box
Allow user to add printers to OS Printers folder check box
Device verify level drop down.
o (Do not specify)
o Verify communication and compatibility with driver
(High)
o Verify device ID and Model Name can be
obtained (Medium)
o Verify port can be opened for printing (Low)
When printing.
o (Do not specify)
o Always prompt for the destination when printing a
job
o Only prompt if the last known destination is no
longer available
o Only prompt the first time a job is printed from an
application
Disabled
UseMode Settings: Enabled Services tab
Table 8-3 UseMode Settings Enabled services tab
Option
Description
Not Configured
Enabled
Select this option button to make the following options
available:
Enable online diagnostics
Enable driver updates
Enable online support
Enable supply ordering
Enable product manuals
Disabled
Default Print Settings
NOTE: When the Default Print Settings Properties window is set for Not Configured, the HP UPD uses the driver
defaults for the settings.

159
Table 8-4 Default Print Settings
Option
Description
Not Configured
Enabled
Select this option button to make the following options
available:
Duplex drop down
o Driver Default
o Print on both sides
o Print on both sides–Flip pages up
o Print on both sides–Flip pages up–Lock
o Print on both sides Lock
Grayscale Default drop down
o Off
o On
o On - Locked
Economode drop down
o Driver Default
o Economode On
o Economode On–Locked
Job Storage drop down
o Driver Default (Off)
o Personal Job with Secure Print
o Personal Job with Secure Print Locked
o Private Job
o Private Job - Lock
o Private Job (requires PIN)
o Private Job (requires PIN) - Lock
o Proof and Hold
o Proof and Hold - Lock
o Quick Copy
o Quick Copy–Lock
o Stored Job (requires PIN)
o Stored Job (requires PIN) - Lock
o Stored Job with Secure Print
o Stored Job with Secure Print Locked
Private Print Pin
Secure Print password
Edgeline QAC.
o Driver Default
o Professional
o General Office
o Black and White
o Professional - Lock
o General Office - Lock
o Black and White - Lock
Print Quality drop down
o Driver Default
o Draft/General Office
o Normal/Professional
o Draft/General Office – Lock
o Normal/Professional – Lock
Allow users to permanently change settings from the
user’s Devices and Printers folder
Disabled
160
Color Access Control: Application Filtering
Table 8-5 Color Access Control: Application Filtering
Option
Description
Not Configured
Enabled
Select this option button to make the following options
available.
Exclude these Applications check box
o Name: field(s)
Disabled
Color Access Control: Time of Day Restriction
Table 8-6 Color Access Control: Time of Day Restriction
Option
Description
Not Configured
Enabled
Select this option button to make the following options
available:
[Day] drop-down menu.
o Specify time
o Allow Color all day
o Restrict Color all day
Hour On: field
Hour Off: field
Disabled
User Search Capabilities
Table 8-7 User Search Capabilities
Option
Description
Not Configured
Enabled
Select this option button to make the following options
available:
Network print shares check box
o Allow users to browse for and use printer shares
on the network.
Network printers check box
o Allow users to search for and use TCP/IP printers
connected to the network.
Disabled
Status Notification Pop-ups
NOTE: Status Notification Pop-ups (SNP) are no longer available starting with the release of UPD 6.5.0. On HP UPD
v4.7 through UPD v6.4.1, SNP can be enabled or disabled from the Device Settings tab of the driver. Before HP UPD
v4.7, SNP could only be disabled from the SNP dialog box.
Job Accounting
NOTE: Job accounting and Job delivery are no longer supported in HP Active Directory Administrator template.
161
Job Delivery
NOTE: Job accounting and Job delivery are no longer supported in HP Active Directory Administrator template.
MPP Information Settings
Table 8-9 MPP Information settings
Option
Description
Not Configured
Enabled
Select this option button to make the following options
available:
Info Link Name: field
Info Link URL: field
Disabled
Managed Printer List settings
Table 8-10 Managed Printer List settings
Option
Description
Not Configured
Enabled
Select this option button to make the following options
available:
Custom MPL Count: selection box
HP MPL Only check box
Custom MPL [#]:—(up to 40)
o Name: field
o Path: field
o Type drop-down menu
Standard UPD MPL
Web JetAdmin XML MPL
Disabled
Implement Managed Printer Lists (MPLs) within the HP UPD Active Directory
Administrator Template file
Printer lists for use in the Active Directory Group Policy environment are created outside the Active Directory Group
Policy object, and linked to the HP UPD Active Directory Administrator template within each Group Policy Object.
Create Managed Printer Lists by exporting printer lists from HP Web Jetadmin. For each policy created, up to 40
Managed Printer Lists can be selected.
Custom MPL Count. This number must match the number of printer lists entered.
HP MPL Only. Uncheck this. Check this if the printer lists have been created by, and exported from, the HP MPA
software tool.
NOTE: HP MPA is no longer supported.
Name. This is the name displayed for each group.
Path. The information in the Path field depends on the type of MPL and the location of the data. In these
examples, the data is on an http Web server.
NOTE: The path string consists of a prefix like http, and a folder or subfolders separated by a colon(‘:’).

162
o If the data is XML (exported from HP Web Jetadmin), the prefix is http.
Type. Choose the correct type of printer list being selected.
o Web JetAdmin XML MPL for printer lists exported by HP Web Jetadmin
Verification and troubleshooting
Use this section to verify that the users are obtaining the HP UPD policies correctly. In addition, use this section as a
guide to see where to apply settings.
Functional test
1. Use the group Policy Modeling tool to run simulations on specific users or groups and specific machines.
NOTE: The GPMC is a Microsoft supplied tool and is an optional component on server versions that can be
downloaded from the Microsoft Web site.
2. Run the modeling wizard to verify your settings.
3. Right-click Group Policy Modeling.
4. Click Group Policy Modeling Wizard.
5. Enter the user that you want to model.
6. Select the Skip to the final page check box.
Registry population
Use this test to verify that the settings in the group policy object populate in the registry of the client computer.
1. Verify that the current user is logged into the domain.
2. Run regedit.exe and verify that the registry populates correctly. The registry path is
HKCU/Software/Policies/Hewlett-Packard/HP Print Settings/ADSPrintPolicy.
3. Verify the Binary Registry key "UPDADS" exists at registry path HKCU/Software/Hewlett-Packard/HP Print
Settings.
NOTE: Active Directory does not refresh settings immediately after you make a change to the Group Policy object. To
refresh the settings on the client, you must log out and then log back in, or you can use the gpupdate utility with the
/Force option run from a command window to force Active Directory to update the settings.
Example: c:/> gpupdate /Force
Final test
Install the latest version of the HP UPD and verify that the screens and final print reflect the policy settings entered in
the Group Policy Editor (gpedit.msc).
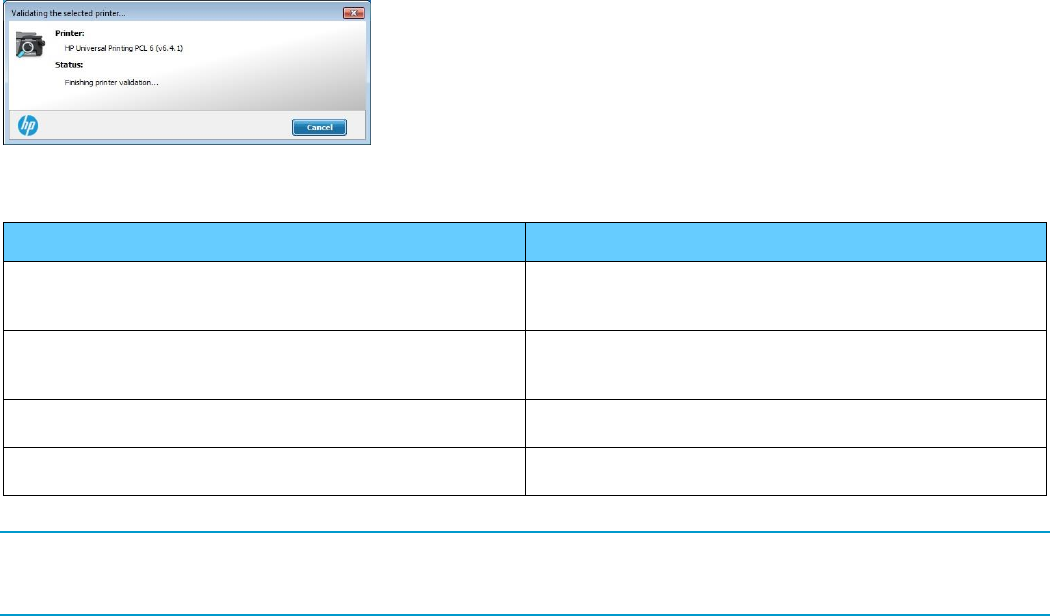
163
How HP AD policies get applied to the driver
Unlike DCU configured drivers, AD policies are dynamic policies. After the driver installation, the administrator can
change the policies from the server, and those changes get applied to all the clients. The drivers on the clients will
reflect the new policy.
For this to work, the HP UPD driver keeps on monitoring for policy changes, whenever a user tries to open the
Printing Preference or Printer Properties, or when the user tries to print. In these scenarios, if the HP UPD detects that
there is a policy change, it applies the new policy to the printer queues, and during this policy application process, the
HP UPD briefly opens up a dialog which shows the progress of the policy application.
<content.unit><para></para></content.unit>
The policy application status window looks similar to this:
Figure 8-2 Policy application status window
Table 8-11 When policies will be applied to queues
Scenario
Action
The driver is installed with static mode and is in an AD
environment where there was no policy, but after the driver
installation, the administrator set a policy.
The dynamic policy application will take place.
The driver was installed after the policy was set on the server.
The policy will be applied during installation, and the dynamic
policy application will not take place until further policy
changes.
The driver was installed after the policy was set, but after
installation, the policies were changed from the server.
The dynamic policy application will take place.
The driver is installed in Dynamic mode.
The policies are always applied when trying to open the
Printing preference depending upon the refresh policy.
NOTE: The dialog that is coming up when opening the printing preferences for the first time, is actually an expected
behavior. The driver is applying the policies, and once the policies are applied, the driver does not try to apply it again
unless there is a change in the policies.
164

165
9 Using Managed Printer Lists
Introduction
Managed Printer Lists (MPLs) are XML documents that provide the information required for print jobs to use printing
products. These centrally managed XML documents contain the printer details to assist users in finding supported
printers for printing with the HP UPD for Windows. MPLs provide administrators with the ability to specify the products
that users can use for printing.
MPLs create a reliable and seamless way of discovering and connecting to products in the office or to public printing
venues.
MPLs allow users to select a printer with a descriptive name from a predefined list. Users do not need to know about
network print shares, TCP/IP addresses, printer host names, user access permissions, or other printer connection
details. Instead, users select a printer from the list dialog box and print.
Who should use MPLs?
MPLs can simplify printing for users and improve administrator control over the environment. Costs savings in
productivity, security, support, and supplies frequently justify the effort of implementing MPLs. HP Universal Print
Driver offers two methods to install the UPD, Traditional and Dynamic mode. MPLs are only supported when UPD is
installed in Dynamic mode.
Any business with a supported Microsoft Windows printing environment can benefit from the flexibility and ease of use
that MPLs provide. For example,
Hotels that offer printing to their guests who log in to their private network can use the HP UPD with MPLs to
quickly connect to in-room or centrally located printers.
Restaurants, coffee shops, and other printing hot spots that provide Internet access can also define HP MPLs to
allow guests to quickly connect to printers on their premises.
Enterprise environments with large campuses or offices spread across countries/regions can greatly benefit from
MPLs, especially the mobile users who travel from site to site or building to building.
MPLs support administrative personnel responsible for managing printers and printing within their environment.
Depending on the configuration of the HP UPD on the client machine, MPLs can either simplify printer discovery for
users or restrict printing to a defined set of printers within the environment.
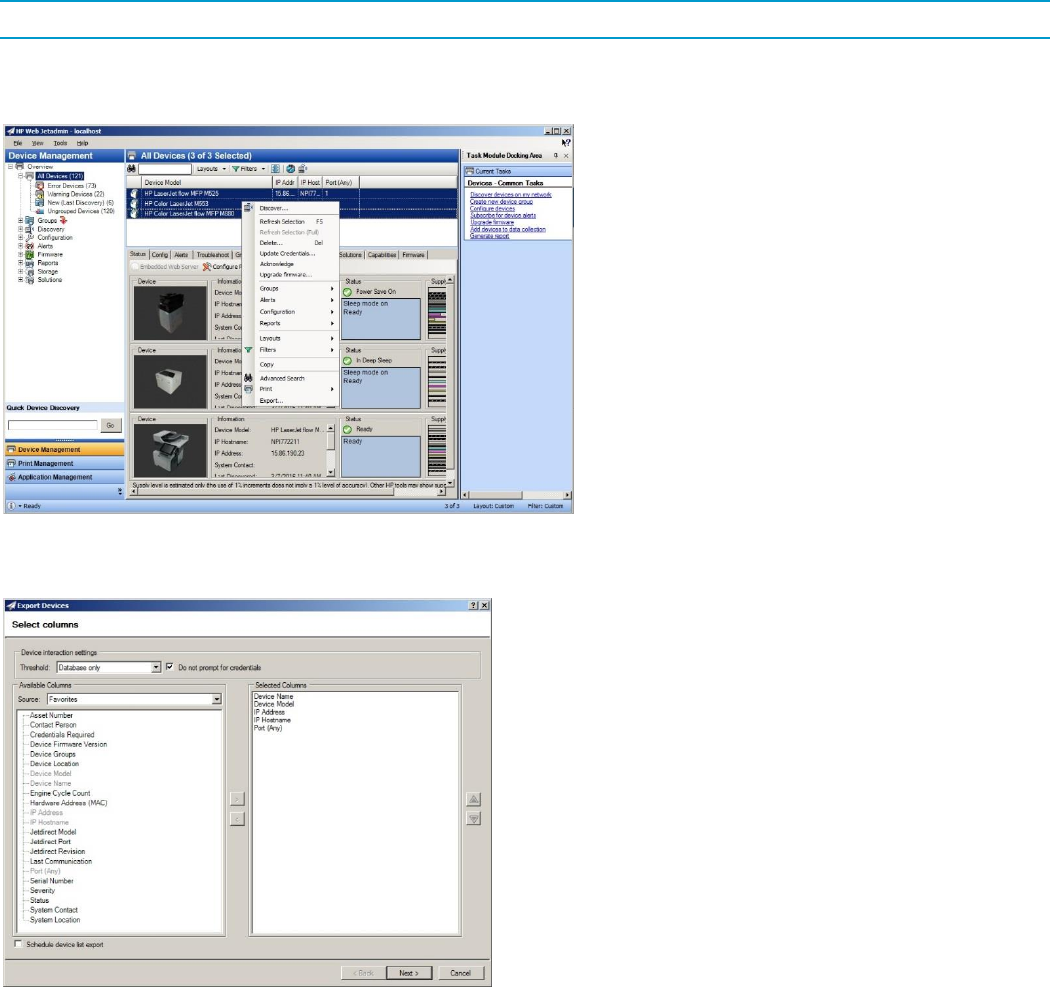
166
Exporting a new MPL from HP Web Jetadmin
HP UPD’s Managed Printer List requires a properly formed XML document. HP recommends utilizing HP Web
Jetadmin to create a properly formed XLM document for use with HP UPD.
NOTE: For information on using HP Web Jetadmin, see the documentation and online help for HP Web Jetadmin.
1. From HP Web Jetadmin 10.4, access the device list you want to Export
2. Highlight the printers you want to export
Figure 9-1 Exporting Printers from Web Jetadmin
3. Right-click anywhere on the list and select Export
Figure 9-2 Specifying Export Settings
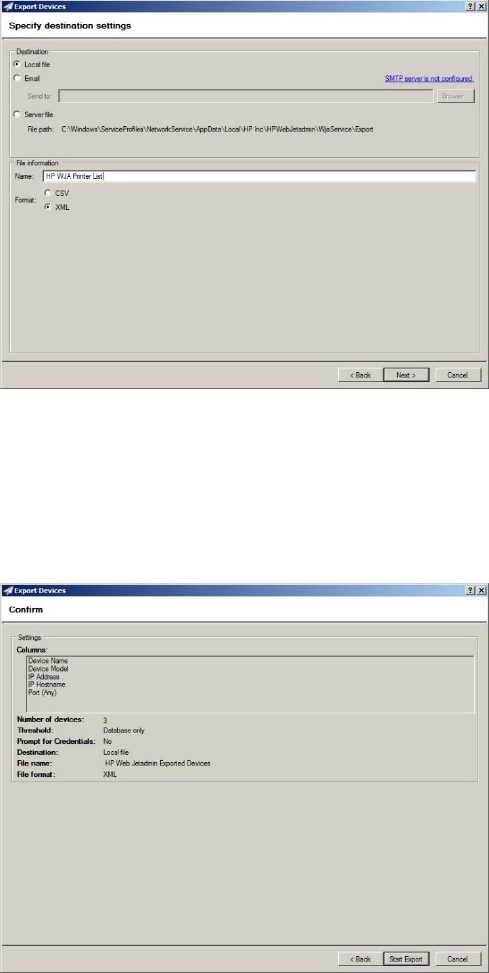
167
4. Specify the type of data to export (selected columns) including Device Name, Device Model and IP Address
The following columns are required:
o Device Name – Configured in device
o Device Model – Not user configurable, referred to as Display Name in XML
o IP Address or IP Hostname
5. Click Next
Figure 9-3 Specify Destination Settings
6. Enter a Name for the file (For example, HP WJA Printer List)
7. Select Local as the destination for the file
8. Select XML as the Format
9. Click Next
Figure 9-4 Confirm Settings
10. Click Start Export
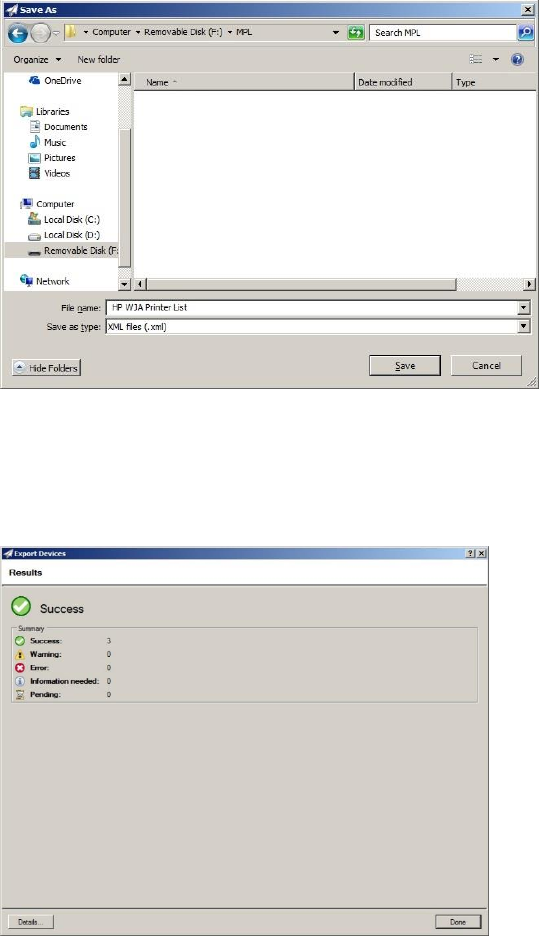
168
Figure 9-5 Save to File
11. Select the destination for the .xml file (For example, C:\MPL)
12. Enter the File name
13. Click Save
Figure 9-6 Export Results
14. Click Done
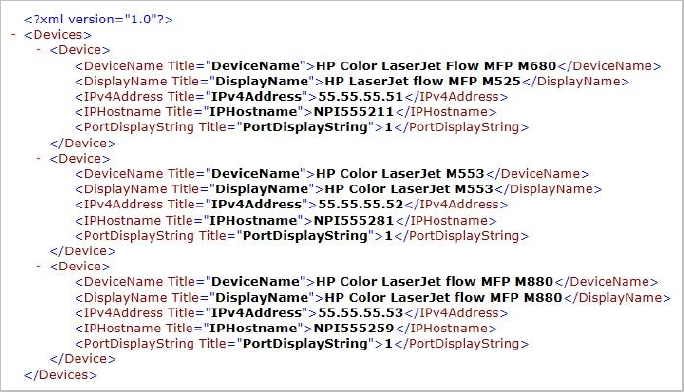
169
The Exported WJA Managed Printer List XML File Format
When exported from HP Web Jetadmin v10.4, the basic MPL XML file has the following format:
Figure 9-7 WJA MPL XML File Format
Implement Managed Printer Lists (MPLs) within the HP UPD
Active Directory Administrator Template file
Printer lists for use in the Active Directory Group Policy environment are created outside the Active Directory Group
Policy object, and linked to the HP UPD Active Directory Administrator template within each Group Policy Object.
Create Managed Printer Lists by exporting printer lists from HP Web Jetadmin. For each policy created, up to 40
Managed Printer Lists can be selected.
Custom MPL Count. This number must match the number of printer lists entered.
HP MPL Only. Uncheck this.
Name. This is the name displayed for each group.
Path. The information in the Path field depends on the type of MPL and the location of the data.
Type. Choose the correct type of printer list being selected.
o Web JetAdmin XML MPL for printer lists exported by HP Web Jetadmin
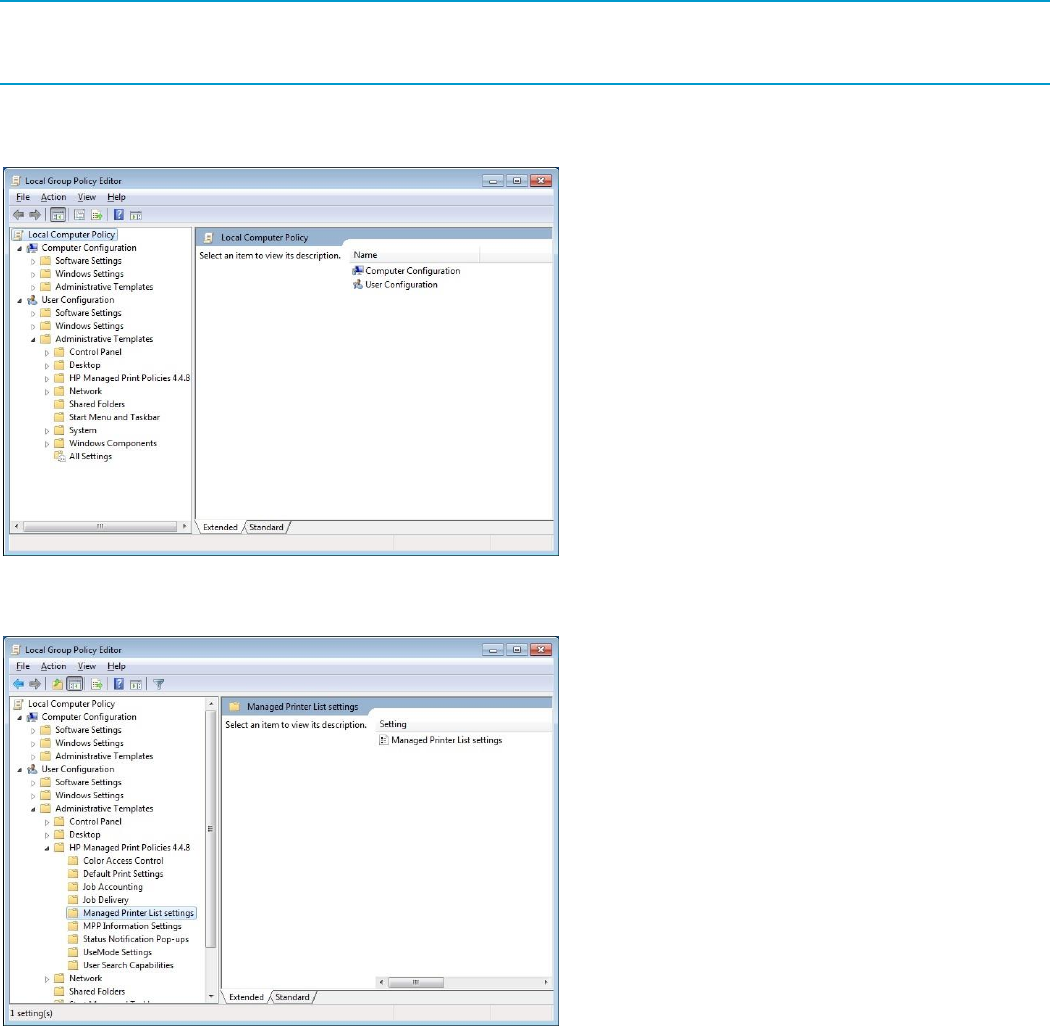
170
Use the Active Directory Administrator Template
Use the following steps to distribute the mpl using the Microsoft Group Policy Editor:
NOTE: These steps assume you are currently using the HP AD Administrator template. For information on using the
HP UPD Active Directory Administrator template, see the chapter “Managing the HP UPD with Active Directory Group
Policy.”
1. With HP AD Templates installed, run the Microsoft Group Policy Editor (gpedit.msc)
2. From the left panel under User Configuration, expand the Administrative Templates
Figure 9-8 Managed Print Policies
3. Expand HP Managed Print Policies
Figure 9-9 Managed Printer List Settings
4. Click Managed Printer List settings
5. On the right panel, double click Managed Printer List Settings in . The following screen is displayed:
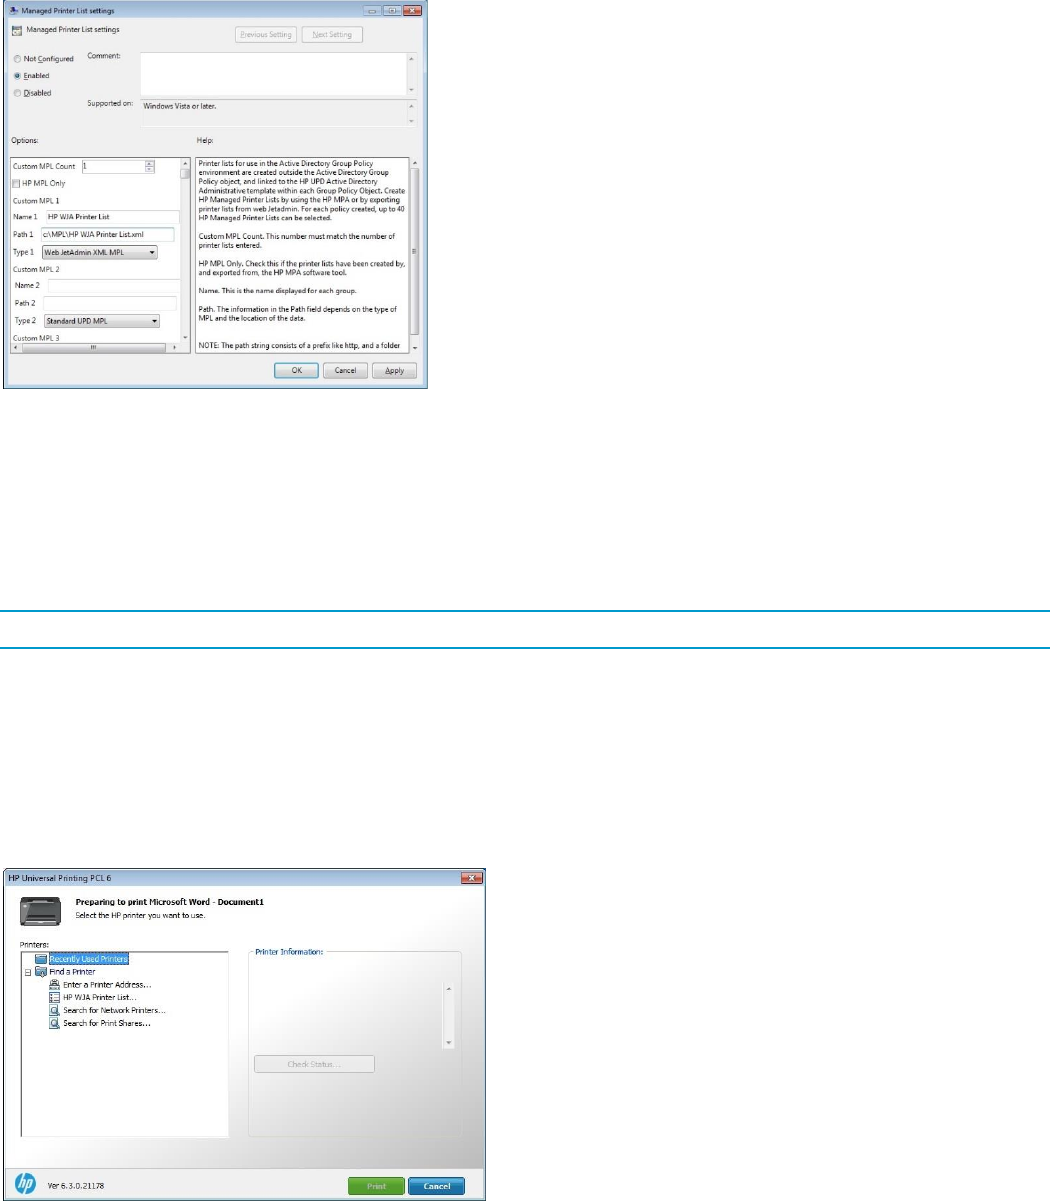
171
Figure 9-10 Managed Printer List settings
6. Click Enabled
7. Select one (1) for the Custom MPL Count field.
8. Uncheck HP MPL Only
9. Enter the name of the MPL to be displayed to the user in the Name field (for example, HP WJA Printer List)
10. Enter the path for the xml file in the Path field (for example, C:\MPL\HP WJA Printer List.xml
NOTE: The path can be in the following formats: \\networkpath\printerlist.xml or c:\path\printerlist.xml
11. Select Web JetAdmin XML MPL for the Type field.
12. Click Apply
13. Click OK to exit
View results
The following HP UPD panels show the result of the entries.
Figure 9-11 Dynamic mode U/I

172
Figure 9-12 Managed Printer List
Implement Managed Printer Lists (MPLs) within the HP UPD
using Install.exe
Use the following to have HP UPD read the Managed Printer List XML file from a shared or local directory. Before
installing HP UPD, place the MPL XML file into a directory accessible from the HP UPD client host. Utilize HP UPD’s
command line switches to define the HP UPD to be installed in Dynamic mode, and define the location and filename
of the MPL XML file. Two switches are required
/dm Installs the HP UPD in Dynamic Mode
/aml<"Name","Path"> Adds a Managed List Name using the specified URL or UNC path.
Troubleshooting
Problem:
Printer list is empty.
Searching for and using Network Printers may be disabled in the Group Policy. Verify that Network Printers in User
Search Capabilities Properties in the administrative template is checked.
Figure 9-13 Troubleshooting

173
A HP UPD new features and OS
support changes
Introduction
This chapter contains the following sections about new features in various HP UPD releases.
New Features in HP UPD v6.5.0
New Features in HP UPD v6.4.1
New Features in HP UPD v6.3.0
New Features in HP UPD v6.2.1
New Features in HP UPD v6.1.0
New features in HP UPD v6.0.0
New features in HP UPD v5.9.0
New features in HP UPD v5.8.0
New features in HP UPD v5.7.0
New features in HP UPD v5.6.5
New features in HP UPD v5.6.0
New features in HP UPD v5.4
NOTE: For the latest information on new releases of the HP UPD, see the release notes with the print drivers on
www.hp.com/go/upd.
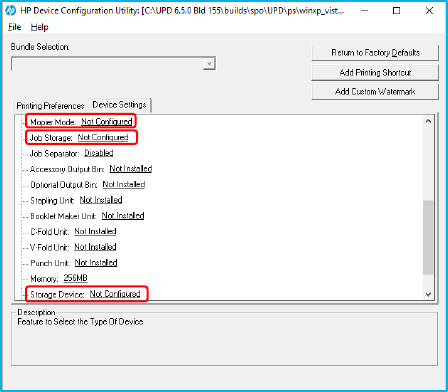
174
New Features in HP UPD 6.5.0
HP PARK tools support changes
DCU 1.650.1.32821
Add support for Color Settings for Capabilities mode
Print Quality Support for Ink devices through Capabilities mode
Remove support for Status Notification Pop-ups (SNPs)
Mopier Mode, Job Storage and Storage Device settings now set to Not Configured so that if set to Installed, these
settings are set in the registry.
o In the past, Mopier Mode, Job Storage and Storage Device defaulted to Installed.
o Since they did not change if left to Installed, the cfm file from DCU did not set these settings.
o If not pointing at an actual device with Bidi enabled, settings such as Mopier would be disabled.
Figure A-1 DCU settings
AD Template 4.5.0
Remove support for Status Notification Pop-ups (SNPs)
New HP UPD Features
Added support for new products introducing in the second half of 2017
Expanded support for Capabilities mode including Paper Sizes, Color and Ink Settings, Ink Print Quality Settings,
and Secure Encryption
HP UPD implementation of Compatible IDs
o A Compatible ID is a vendor-defined identification string that Windows uses to match a device to an INF
file if a HW ID is not available.
o A device can have associated with it a list of Compatible IDs, such as Laser, Ink, MFP, Color, etc.
Expanded support for “new” printers in future releases supporting Capabilities mode
Edge to edge support in compatibilities mode for printers supporting edge-to-edge
o Select this option to print a document with 2 mm margins on supported devices. If this option is not
selected, the document will be printed with standard margins.
o This feature is auto configurable in the Printer Properties Device Settings tab. By default it is set to
automatic.
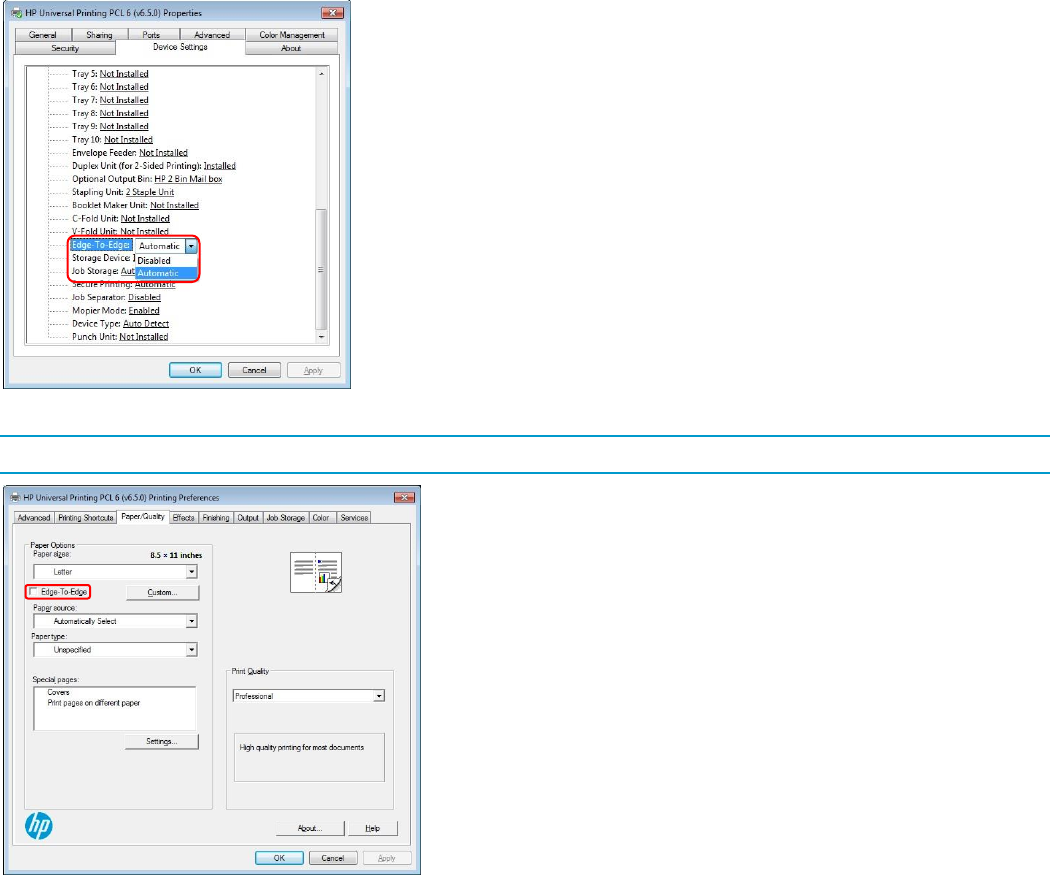
175
Figure A-2 Edge-to-edge settings on the Device Settings tab
NOTE: Edge-To-Edge is only supported on printers that support both Edge-To-Edge and Capabilities mode.
Figure A-3 Edge-to-edge setting on the Print Quality tab
HP UPD 6.5.0 with version 4.5 firmware and Capabilities mode
Up until recently, the HP UPD would query the printer and the printer would return device information about the printer
such as the model number of the printer and the model number of input and output devices, as well as other
accessories. The driver would then map the device information to settings in the driver. Starting with HP UPD 6.4.1
and the HP LaserJet MFP E725xx, E825xx, E778xx and E876xx printers releasing in spring 2017, the printer returns
the capabilities of the device to the print driver versus the device information.
One way to think of this is to look at it as two modes, Capabilities mode and Device mode, to differentiate between
how releases of the firmware and HP UPD communicate device features. Device mode is how prior releases of the
firmware shared device information with HP UPD such as printer part numbers and model numbers with the HP UPD
mapping the device information to settings in the driver. Capabilities mode, which was introduced in HP UPD 6.4.1
and the HP LaserJet MFP E725xx, E825xx, E778xx and E876xx printers, enables firmware on supported devices to
share the capabilities of the device and input/output devices with the HP UPD to configure settings directly in the HP
UPD.
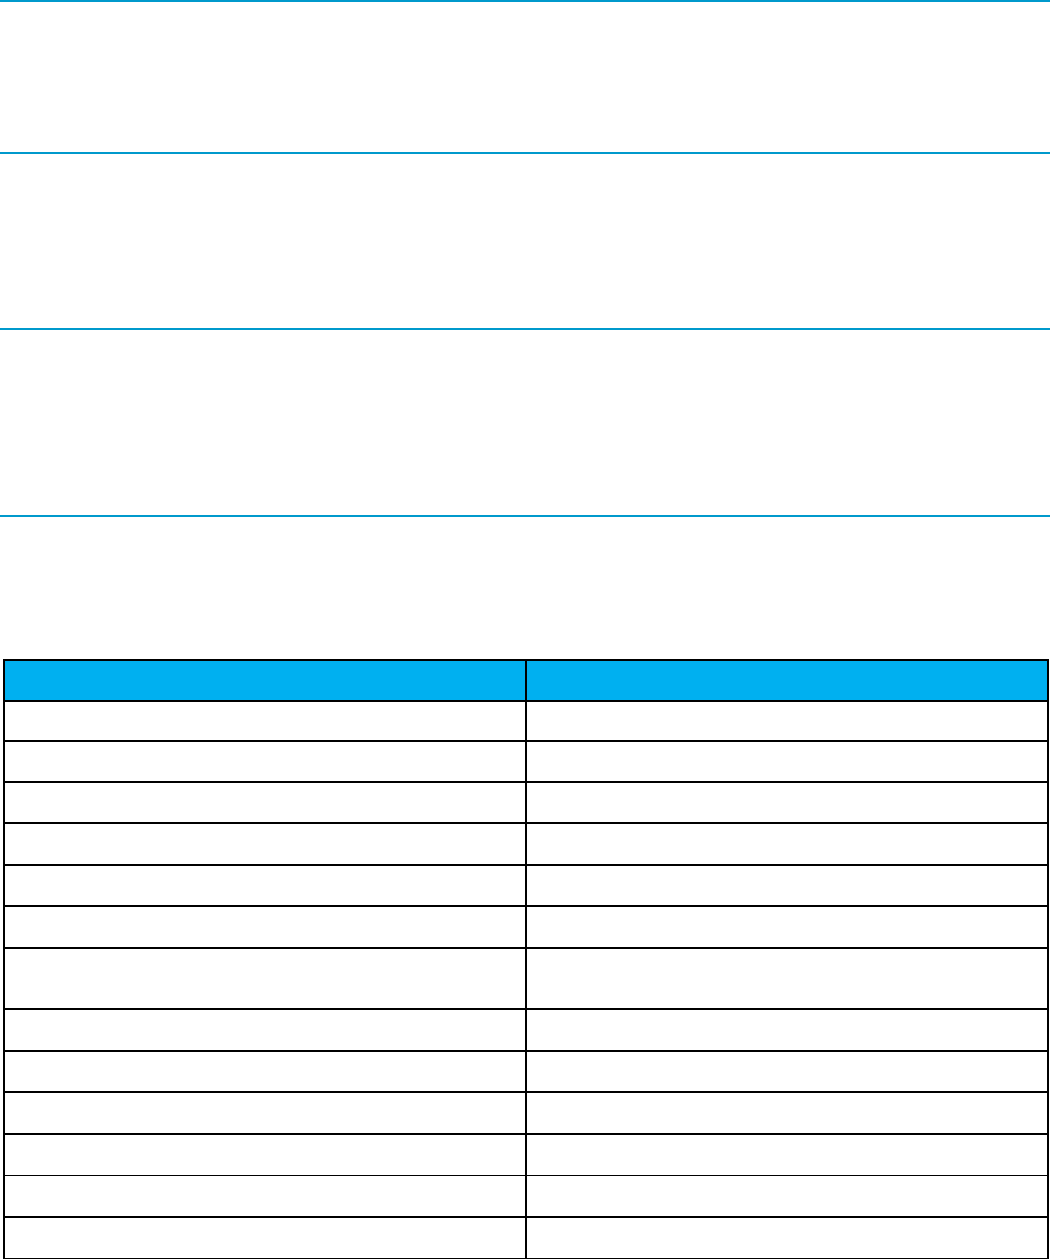
176
NOTE: Whether the firmware and driver use Device mode versus Capabilities mode is dependent on the printer
firmware and version of the HP UPD. If Capabilities mode is supported by the firmware, HP UPD 6.4.1 and later will
use Capabilities mode to configure the driver. To verify which mode is supported, open the Device Settings tab in
Printer Properties and see whether Accessory Output Bin or Optional Output Bin is listed. If Accessory Output
Bin is displayed, the driver is using Device mode. If Optional Output Bin is displayed, the driver is using Capabilities
mode.
By standardizing the capabilities, the Capabilities mode sends the capabilities of the printer and input/output devices,
reducing the dependency on Hardware IDs.
If Capabilities mode is not available, device information is shared between firmware and the HP UPD, and the HP
UPD maps the device information to capabilities or settings in the HP UPD. If Capabilities mode is available, the
capabilities information is shared between firmware and the HP UPD without the need to map device information to
settings.
NOTE: With Bidi disabled (such as SNMP disabled), or not pointing at an actual device, even with HP UPD 6.5.0 or
later, and printer Capabilities mode, the print queue has no way to determine the type of device or available features.
With Bidi disabled (and/or not pointing at an actual device) using DCU or a reference device to configure the queue,
the print queue only knows the features based on the DCU settings or reference device connected originally. The
queue has no way of knowing which product or type of product it is actually printing to.
NOTE: AD templates, DCU and DDU are designed for the HP V3 UPD such as HP UPD 6.5.0 and do not support
newer discrete (printer specific) drivers for Windows 7 and later operating systems.
Capabilities mode added to older products
With the release of FutureSmart Firmware Bundle Version 4.5, Capabilities mode has been added to the following
printers.
Table A-1 Printers with Capabilities added with new releases of firmware
HP Printer
HP Managed Printer
HP LaserJet Enterprise M506x (graphical display only)
HP LaserJet Managed M506x (graphical display only)
HP Color LaserJet Enterprise M553x (graphical display only)
HP Color LaserJet Managed M553x (graphical display only)
HP OfficeJet Enterprise Color X555
HP OfficeJet Enterprise Color MFP X585
HP PageWide Enterprise Color MFP 586
HP PageWide Managed Color MFP E58650
HP PageWide Enterprise Color 556
HP PageWide Managed Color E55650
HP LaserJet Enterprise M605x, M605xm, M606x (graphical
display only)
HP LaserJet Enterprise M607/M608/M609
HP LaserJet Managed E60055/E60065/E60075
HP Color LaserJet Enterprise M651
HP Color LaserJet Managed M651
HP Color LaserJet Enterprise M652/M653
HP Color LaserJet Managed E65050/E65060
HP LaserJet Enterprise M806
HP Color LaserJet Enterprise M855
HP LaserJet Enterprise 500 MFP M525*
HP LaserJet Managed MFP M525*
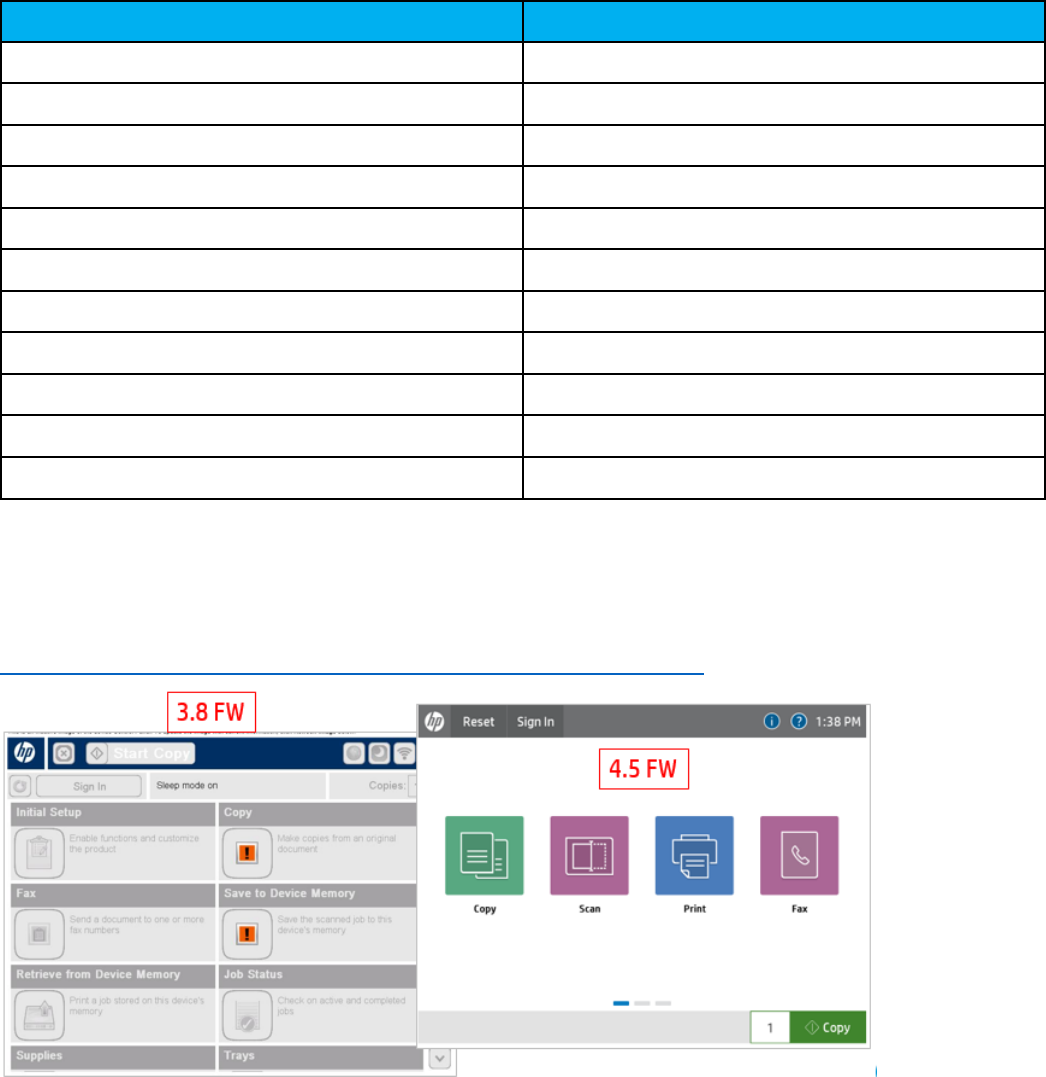
177
HP Printer
HP Managed Printer
HP LaserJet Enterprise MFP M527*
HP LaserJet Managed MFP M527*
HP LaserJet Enterprise 500 Color MFP M575*
HP Color LaserJet Managed MFP M575*
HP Color LaserJet Enterprise MFP M577*
HP Color LaserJet Managed MFP M577*
HP LaserJet Enterprise MFP M630*
HP LaserJet Managed MFP M630*
HP LaserJet Enterprise MFP M631/M632/M633
HP LaserJet Managed MFP E62555/E62565/E62575
HP Color LaserJet Enterprise MFP M680*
HP Color LaserJet Managed MFP M680*
HP Color LaserJet Enterprise MFP M681/M682
HP Color LaserJet Managed MFP E67550/E67560
HP LaserJet Enterprise MFP M725*
HP LaserJet Managed MFP 725*
HP LaserJet Enterprise 700 Color MFP M775*
HP Color LaserJet Managed MFP M775*
HP LaserJet Enterprise Flow MFP M830*
HP LaserJet Managed MFP M830*
HP Color LaserJet Enterprise Flow MFP M880*
HP Color LaserJet Managed MFP M880*
* Support for Capabilities mode added in FutureSmart Firmware Bundle Version 4.4
Differences in the Control Panel U/I
Upgrading firmware to support Capabilities mode updates the Control Panel U/I on products running firmware prior to
version 4.
For more information on the new control panel user interface see,
http://h20195.www2.hp.com/v2/GetDocument.aspx?docname=4AA6-9365ENW
Figure A-4 Comparison of Control Panel U/I
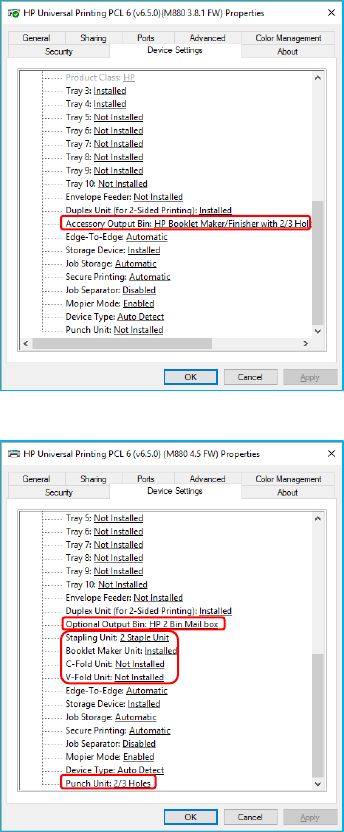
178
Changes to the Device Settings tab
With version 4.5 firmware, Accessory Output Bin is replaced with Optional Output Bin, listing the type of bin
instead of the model number.
Additional functions are added to select the type of stapling and punch unit installed and whether a booklet maker,
c-fold, or v-fold unit is installed.
Figure A-5 Device Settings for M880 with 3.8.1 firmware
Figure A-6 Device Settings for M880 with 4.5 firmware
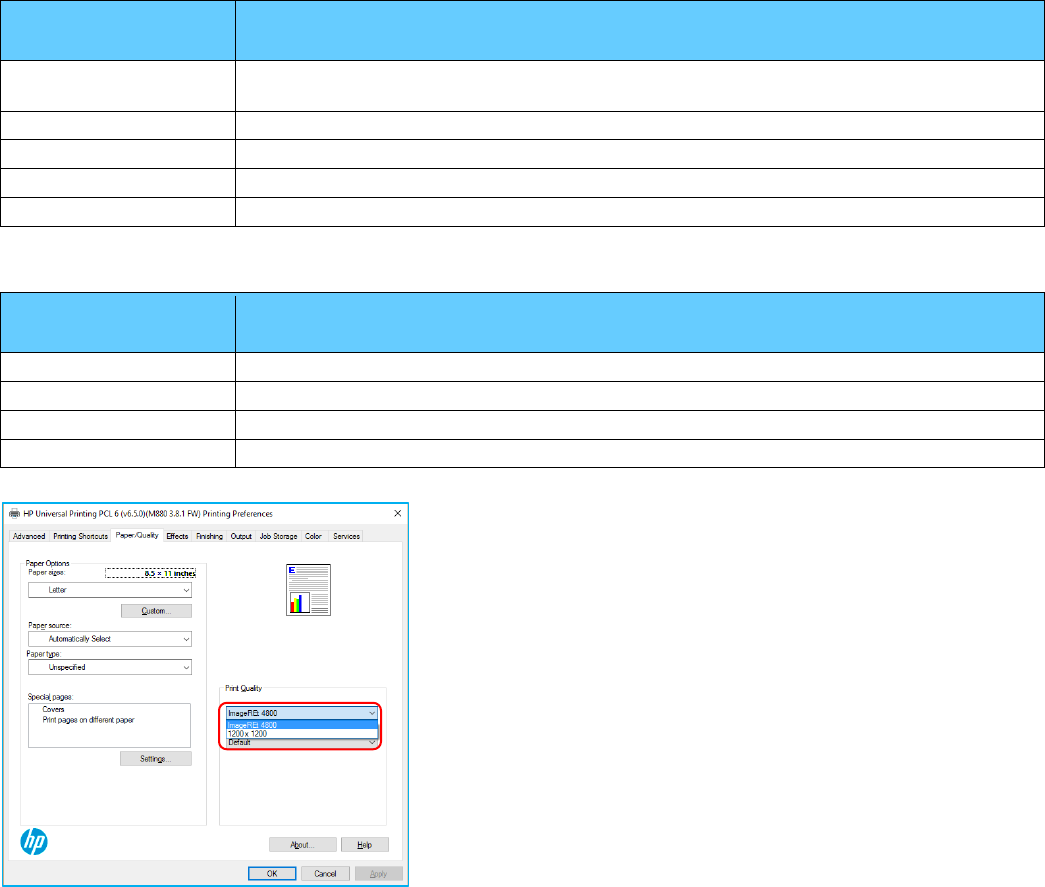
179
Changes to the Print Quality Settings
Updated print quality settings to be more consistent across new product families
Gloss Level settings are no longer available with Capabilities mode
Table A-2 New Print Quality Settings for HP Laser-Based Products
HP Laser Print Quality
Setting
Description
Normal (default)
(Color) High quality printing for most documents with ImageREt
(Mono) High quality printing for most documents with FastRes
Enhanced
(Color Only) Enhanced quality for photos, presentations and brochures
Fine Lines
(Color/Mono) 1200x1200 for line art, architectural drawings, finger prints
Quick View
(Color/Mono) Fast preview of documents, lower resolution
Economode
(Color/Mono) Lowest cost printing, lowest resolution
Table A-3 Print Quality Settings for HP Ink-Based Products
HP Ink Print Quality
Setting *
Description (Color Printers)
Professional
High quality printing for most documents
Presentation
Enhanced quality for presentations and brochures
Maximum dpi
Slower print with premium quality intended for photo media
General Office
Fastest print speed at lower resolutions
Figure A-7 Print Quality settings for M880 with 3.8.1 firmware
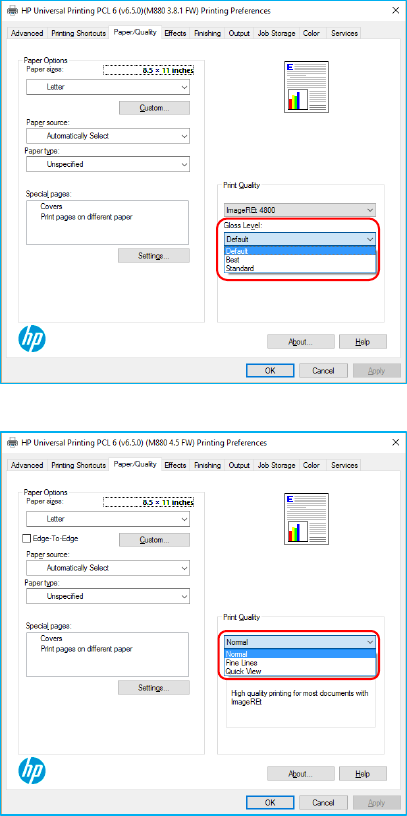
180
Figure A-8 Print Quality settings for M880 with 3.8.1 firmware
Figure A-9 Print Quality settings for M880 with 4.5 firmware
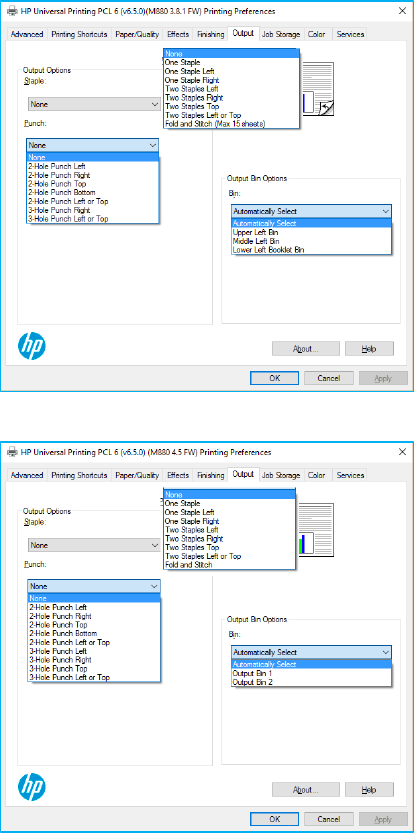
181
Changes to the Output tab settings
The Booklet Maker bin is no longer listed under Output Bin Options. Select Fold and Stitch under the Staple
options to select the Booklet Maker.
Figure A-10 Output tab for M880 with 3.8.1 firmware
Figure A-11 Output tab for M880 with 4.5 firmware
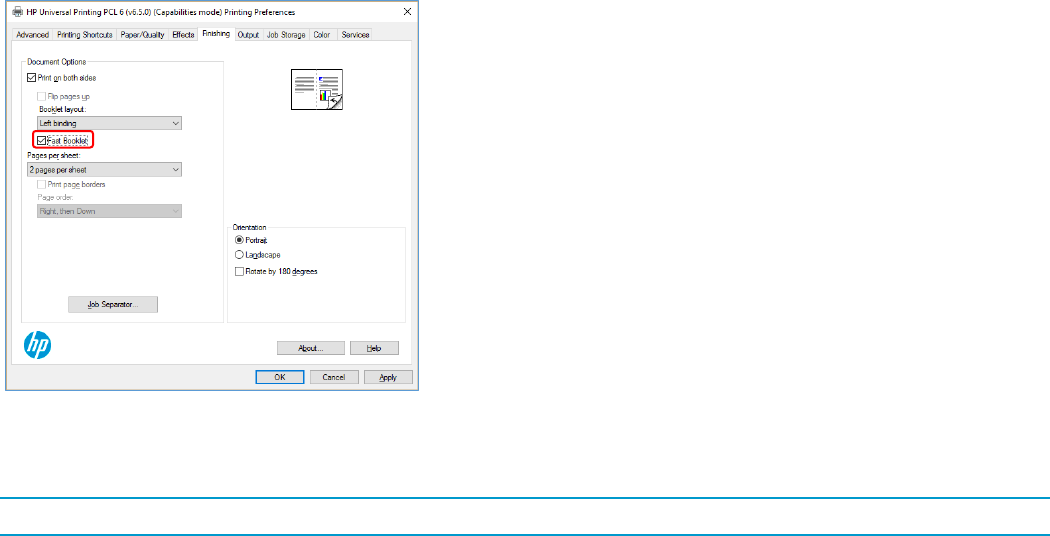
182
Fast Booklet mode on HP MFP S900 printers
Figure A-12 Fast Booklet mode on HP MFP S900 printers
Fast Booklet mode is only available on HP MFP S900 printers. For some documents, this may increase performance
when printing booklets.
NOTE: Fast Booklet mode is an additional mode to the standard way for printing booklets.
To print a booklet on 11x17 media using Fast Booklet mode, perform the following steps:
1. Select File and then Print in the application
2. Click Properties
3. Click the Finishing tab
4. Select Print on both sides
5. Select the Booklet Layout (such as Left Binding)
6. Select Fast Booklet
7. Select 2 pages per sheet
8. Click the Output tab
9. Select Fold and Stitch under the Stapling options
10. Click the Paper/Quality tab
11. Select the input tray that has 11x17 or A3 paper
12. Click OK and then click Print

183
Deprecated Features
Status Notification Pop-ups (SNP) are no longer available starting with the release of HP UPD 6.5.0. HP UPD v6.4.1
is the last release of the HP UPD supporting Status Notification Pop-ups (SNPs).
Figure A-13 Status Notification Popup
NOTE: On HP UPD v4.7 through UPD v6.4.1, SNP can be enabled or disabled from the Device Settings tab of the
driver. Before HP UPD v4.7, SNP could only be disabled from the SNP dialog box.
New Features in HP UPD v6.4.1
OS support changes
Removed: Support for Windows Server 2008 x32 and x64 (does not impact Windows Server 2008R2)
Added: Support for Microsoft Windows Server 2016 for PCL 6 and PS
HP PARK tools support changes
Removed: Support for HP Managed Print Administrator (MPA)
New Features
Added support for new products introducing in the first half of 2017
Print Quality Settings
Output Device Settings
Group Watermarks
Changes for Black Only or High Quality CMYK Grayscale dropdown
NOTE: UPD 6.4.1 requires a minimum of SP1 on Windows 7 and Server 2008R2.
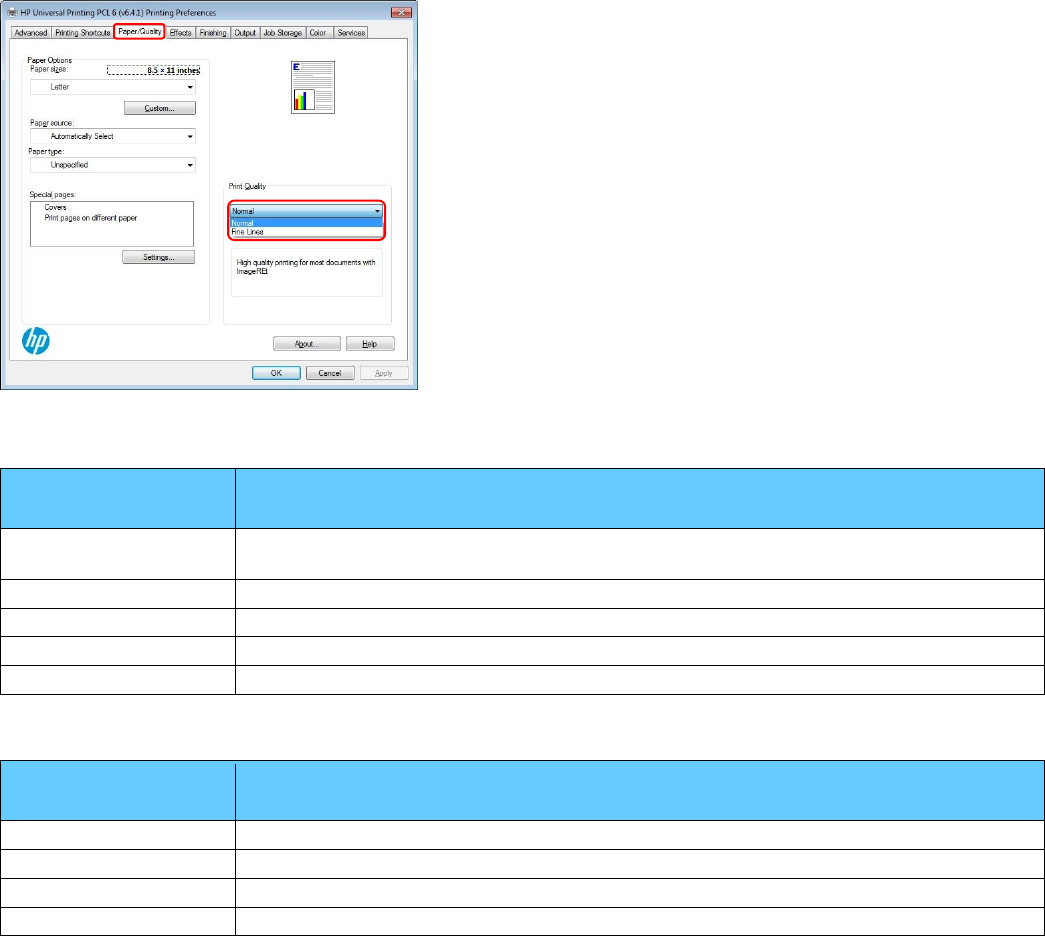
184
Print Quality Settings
With the release of HP UPD 6.4.1, the naming for print quality settings have been updated for most products releasing
in the first half of 2017 and later as shown in the following tables.
Figure A-14 HP UPD 6.4.1 Print Quality Settings for New Products
Table A-4 HP UPD 6.4.1 Print Quality Settings for New HP Laser-Based Products
HP Laser Print Quality
Setting *
Description
Normal (default)
(Color) High quality printing for most documents with ImageREt
(Mono) High quality printing for most documents with FastRes
Enhanced
(Color Only) Enhanced quality for photos, presentations and brochures
Fine Lines
(Color/Mono) 1200x1200 for line art, architectural drawings, finger prints
Quick View
(Color/Mono) Fast preview of documents, lower resolution
Economode
(Color/Mono) Lowest cost printing, lowest resolution
* New settings for products releasing the first half of 2017 and later. Specific settings may not be available on all products.
Table A-5 HP UPD 6.4.1 Print Quality Settings for HP Ink-Based Products
HP Ink Print Quality
Setting *
Description (Color Printers)
Professional
High quality printing for most documents
Presentation
Enhanced quality for presentations and brochures
Maximum dpi
Slower print with premium quality intended for photo media
General Office
Fastest print speed at lower resolutions
* Specific settings may not be available on all products.
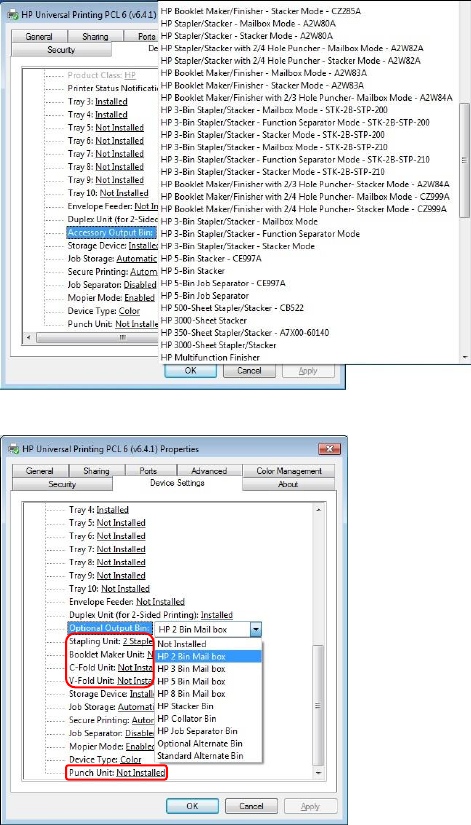
185
Output Device Settings
With HP UPD 6.4.1 and later, on most HP LaserJet printers introduced in the first half of 2017 and later, Accessory
Output Bin is replaced with Optional Output Bin, listing the type of bin instead of the model number. Additional
functions are added to the list including stapling unit, booklet maker, etc. See the following table for more information.
Figure A-15 Accessory Output Bin Options on Legacy Printers
Figure A-16 HP UPD 6.4.1 Output Devices Selected by Features versus Model Number on New Printers

186
Table A-6 HP UPD 6.4.1 Output Devices Selected by Features versus Model Number on New Printers
Feature
Available Settings*
Optional Output Bin
With HP UPD 6.4.1 and later, on most HP LaserJet printers
introduced in the first half of 2017 and later, Accessory Output
Bin is replaced with Optional Output Bin, listing the type of bin
instead of the model number.
Not Installed
HP 2 Bin Mail box
HP 3 Bin Mail box
HP 5 Bin Mail box
HP 8 Bin Mail box
HP Stacker Bin
HP Collator Bin
HP Job Separation Bin
Optional Alternate Bin
Stapling Unit
Specifies whether an optional stapling unit is installed on the
product including the type of stapling unit.
Not Installed
1 Staple Unit
2 Staple Unit
3 Staple Unit
Booklet Maker Unit
Specifies whether an optional booklet maker is installed on the
product.
Not Installed
Installed
C-Fold Unit
Specifies whether an optional C-fold unit is installed on the
product.
Not Installed
Installed
C-fold (Tri-fold) uses two folds with the sheet folded into three
nearly equal sections, with one panel serving as a cover,
creating six panels for printed content. Often used for self-
mailing brochures or pamphlets, letters, statements, invoices,
bulletins, any letter size sheet (8.5" x 11") requiring insertion
into a standard #10 or #9 envelope.
V-Fold Unit
Specifies whether an optional V-fold unit is installed on the
product.
Not Installed
Installed
For V-fold (Bi-fold), the sheet is folded into two equal sections
with a single fold, creating four separate panels or pages to be
printed on. Often used for Bulletins, menus, programs,
greeting cards, technical instructions, booklet pages.
Punch Unit
Specifies whether an optional punch unit is installed on the
product including the type of punch unit.
Not Installed
2/3 Holes
2/4 Holes
4 Holes-Swedish
* Available settings will vary depending on the printer and optional output device
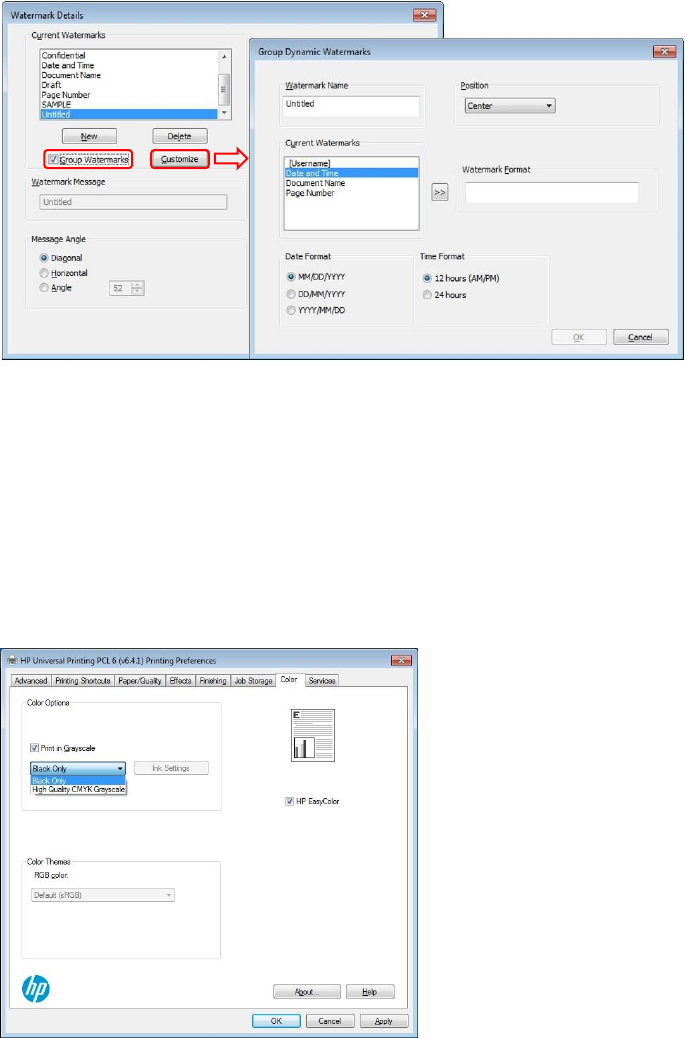
187
Group Watermarks
HP UPD 6.4.1 added a new watermark feature called Group Watermarks under the Edit Watermark options as
shown below. This features enables you to combine multiple dynamic watermarks together and position them to the
Top Right or Center of the page.
Figure A-17 Group Dynamic Watermarks dialog box
Changes for Black Only or High Quality CMYK Grayscale dropdown
For ink-based printers, HP UPD 6.4.1 decoupled the dropdown to select Black Only or High Quality CMYK
Grayscale and HP EasyColor on the Color tab
o Dropdown settings can now be selected when Print in Grayscale and HP EasyColor is selected.
Black Ink Only was changed to Black Only
High Quality was changed to High Quality CMYK Grayscale
This dropdown has also been added to most HP LaserJet printers introducing in the first half of 2017 and later
Figure A-18 PCL 6 (Ink) Color Tab with Print in Grayscale and HP Easy Color selected

188
New features in HP UPD v6.3.0
New Features
Includes PCL 6 and PS page description languages
Added support for new products introducing in Fall 2016
Added Print in Grayscale (Black Ink Only) for PS
Decoupled Print in Grayscale and HP EasyColor so that Print in Grayscale can be selected when HP EasyColor
is selected.
NOTE: UPD 6.3.0 requires a minimum of SP1 on Windows 7 and Server 2008R2.
New features in HP UPD v6.2.1
New Features
Includes PCL 6 and PS page description languages
Added support for new products introducing in Spring 2016
NOTE: UPD 6.2.1 requires a minimum of SP1 on Windows 7 and Server 2008R2.
New features in HP UPD v6.2.0
PDL support change
Removed: Support for PCL 5
NOTE: HP UPD v6.1.0 is the last version of the UPD to support PCL 5. PCL 5 is not supported on Windows 10
New Features
Includes PCL 6 and PS page description languages
Added support for new products introducing in Spring 2016
Added support for XenApp 7.6 UPS
Added support for Dynamic Watermarks - Document Name and Page Numbers
Added support for a watermark image having near white pixels printing - PCL6 ONLY
Updated Hewlett-Packard references for new company
New signing process
NOTE: UPD 6.2.0 requires a minimum of SP1 on Windows 7 and Server 2008R2.

189
New features in HP UPD v6.1.0
OS support change
Removed: Support for Windows XP and Windows Vista
Added: Support for Microsoft Windows 10 for PCL 6 and PS
NOTE: PCL 5 is not supported on Windows 10
New Features
Includes PCL 6, PCL 5 and PS page description languages
Added support for new products introducing in Fall 2015
Added option to lock paper sizes in DCU
Added support for HP Ink-based products for Grayscale Options (Black Ink Only, High Quality) in UPD PCL6
New features in HP UPD v6.0.0
OS support change
Removed: Support for Windows Server 2003 / 2003 R2
New Features
Added support for new products introducing in Spring 2015
Added support for the separator page on the HP MFP S900 printers
Includes PCL 6 and PS page description languages, available in both 32-bit and 64-bit packages
o HP UPD PCL 5 driver is not part of this release and is only updated once a year
Added support for using printui.dll switches /Ss and /Sr
Added support for Citrix XenApp and XenDesktop v7.5
Added support for Internet Printing Protocol for Traditional Mode Print Queues
o HP UPD Dynamic mode is not supported
o HP UPD uses SNMP to communicate device status and capabilities to the printer driver
o IPP does not support SNMP, therefore HP UPD’s bidirectional communication (Update Now feature) is not
supported for IPP connected printers
o HP recommends utilizing the HP Driver Configuration Utility to define the print device features for use with the
HP UPD
When using install.exe /SM and specifying an LPT port, the port name must be in all capital letters and contain a
colon (i.e. LPT1:)
o Lower-case port names without a colon are no longer valid resulting in failure to create the port or creation of
a port name not tied to the system’s LPT port.

190
New features in HP UPD v5.9.0
New Features
Includes PCL 5, PCL 6 and PS page description languages, available in both 32-bit and 64-bit packages
Added support for new products introducing in Spring 2014
New graphics displayed on the UPD installer and Automatic Configuration screens
New Separator Page (Alternate)
o Prints one separator page for the entire print job
o Not available on Windows XP, Windows Vista or Windows Server 2003
Change CMYK Color default setting to "SWOP for PS only
Add ability to LOCK Watermark setting in DCU
Install.exe help contents updated to communicate that /q and /h are required switches when used with /infstage
and /infremove
Improved error messaging when HP UPD fails to "Add Permanent instance printer..." in dynamic mode.
Services tab now supports Mozilla and Chrome browsers
NOTE: HP UPD v5.9.0 is the last version of the HP UPD PCL5 to support Microsoft Windows XP and Vista.
New features in HP UPD v5.8.0
New Features
Includes PCL 6 and PS page description languages, available in both 32-bit and 64-bit packages
o HP UPD PCL 5 driver is not part of this release and is only updated once a year
Added support for new products introducing in Fall 2013
Added Install.exe help contents to communicate that /q and /h are required switches when used with /infstage and
/infremove
Support for the HP MFP S900 series printers
New features in HP UPD v5.7.0
New Features
Includes PCL 5, PCL 6 and PS page description languages, available in both 32-bit and 64-bit packages
Added support for new products introducing in Fall 2014
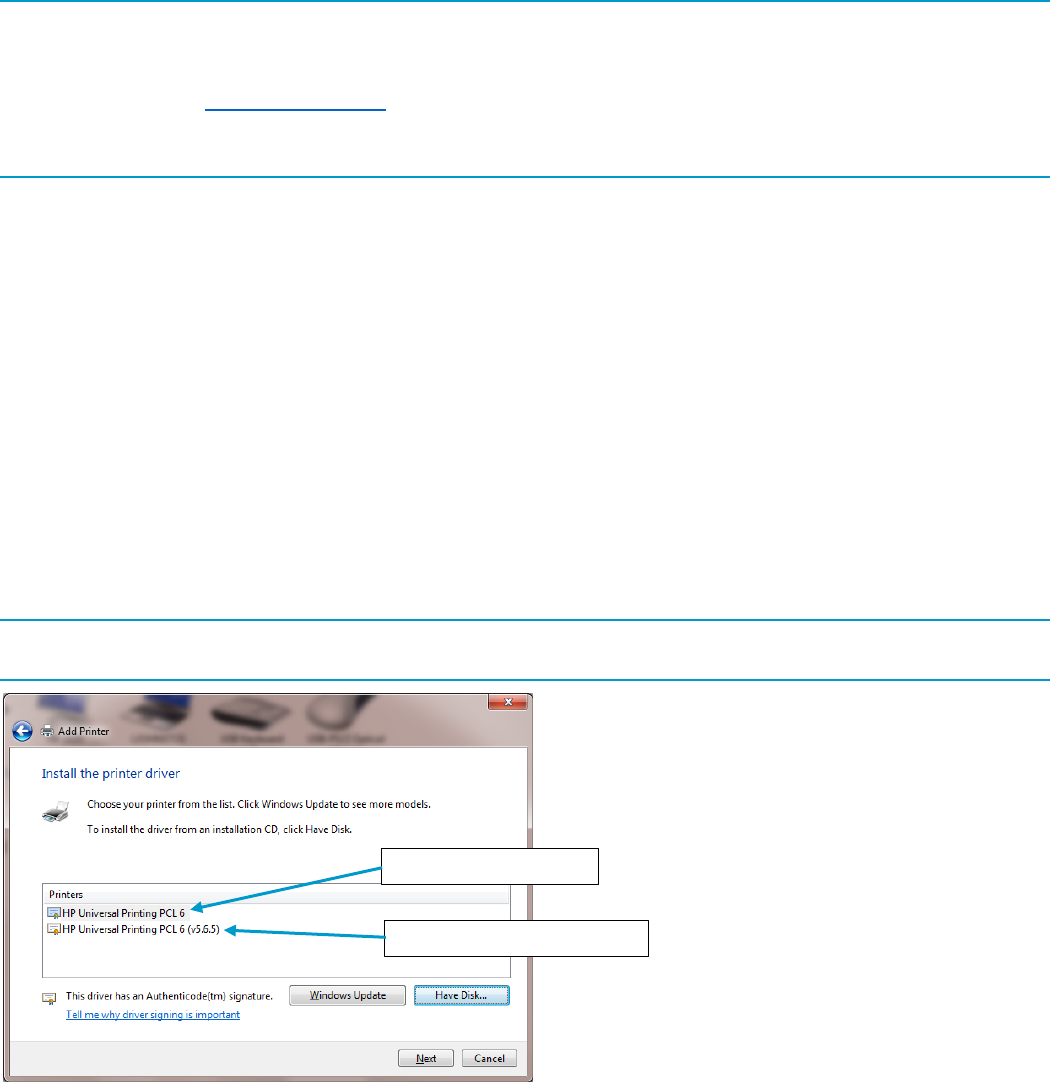
191
New features in HP UPD v5.6.5
PDL Change
NOTE: UPD v5.6.0 and UPD v5.6.5 do not contain an HP UPD PCL 5 release.
Beginning with UPD v5.5.0, PCL 5 began a yearly update release cycle, therefore the most current version of HP
UPD PCL 5 may not match the version number release for UPD PCL 6 and PS. The most current HP UPD PCL 5
version is available on www.hp.com/go/upd.
The HP UPD PCL 5 driver is only updated once a year and may not include support for the latest features and
devices.
New Features
Added support for new products introducing in Fall 2014
Driver Versioning
New HP UPD Installer
Driver Versioning
Starting with HP UPD v5.5.0, the driver supports a major.minor.subminor release version.
As with previous versions of UPD, two driver name options will be offered during installation.
Default driver name: HP Universal Printing PCL 6
Versioned driver name : HP Universal Printing PCL 6 (v5.5.0)
With this change, you can install an HP UPD 5.6.5 driver and an HP UPD 5.6.0 driver on the same server
For UPD 5.4 and previous releases, a customer will not benefit from this change.
NOTE: You cannot install a 5.2.5 driver and 5.2.6 driver on the same server, since these are the same major.minor
release version (5.2) and major.minor.subminor is not supported until UPD 5.5.0.
Figure A-19 Driver Versioning
Default driver name
Versioned driver name

192
New HP UPD Installer
Starting with UPD 5.6.5, new options in install.exe for Windows Vista and later Windows operating systems add the
ability to select USB mode for USB Plug and Play with options to remove all versions of HP Universal Printing Driver
from Windows driver store, or to add the HP Universal Printing Driver to Windows driver store.
Figure A-20 USB Plug and Play options
NOTE: These settings only impact the Windows driver store. No HP UPD printer is installed, no printer driver is
removed and no existing print queues are impacted. Only the HP UPD is added to the driver store. No non-HP UPD
drivers are impacted.
For more information, see USB connectivity.

193
New features in HP UPD v5.6.0
OS support change
Added: Support for Windows 8/8.1 and Windows Server 2012/2012R2
NOTE: UPD Dynamic Mode printing and Job Storage PIN and Encryption are only supported for desktop applications.
New Features
Added support for new products
New driver initialization
Policy settings enforced for printing defaults
USB DOT4 driver for Windows 8/8.1 and Windows Server 2012/2012R2
New driver initialization
New driver initialization routine to prevent interactive services detection (Session 0) messages.
Policy settings enforced for printing defaults
MPA, HP UPD AD template, or client side XML policy settings are enforced for printing defaults, and can only be
overridden on a per-job basis.
NOTE: The locked policy settings may not be changed at any time by users.
USB DOT4 driver for Windows 8/8.1 and Windows Server 2012/2012R2
Support for USB DOT4 Direct Connect is not included in Windows 8/8.1 and Windows Server 2012/2012R2 by
default. This only impacts DOT4 printers, which include most current HP mid-range and high-end HP LaserJet
printers. Composite USB and LEDM USB printers are not impacted (low-end HP LaserJet printers).
NOTE: DOT4 and LEDM are communication protocols used with USB connected printers. DOT4 support is available
by default on Windows operating systems prior to Windows 8/8.1 and Windows Server 2012/2012R2, such as
Windows 7.
To resolve this issue, HP has developed the “HP LaserJet USB (DOT4) communications driver for Windows 8/8.1 and
Server 2012/2012R2” which includes a Dot4x32.msi for 32 bit and Dot4x64.msi for 64 bit installations.
The MSI installs the DOT4 components into the driver store. This is the same effect as downloading it from Windows
Update except that it is installed before the hardware is connected. The directory c:\windows\inf\driverstore lists an
oemXX directory that contains the DOT4 components.
NOTE: If two print queues are created for the printer during plug and play and a print queue is connected to USB001,
delete this queue. If there are two queues for the printer and both are connected to the DOT4 port, delete one of the
queues. Only one queue is required for printing.
The HP LaserJet USB (DOT4) communications driver for Windows 8/8.1 and Server 2012/2012R2 is available
through Windows Update. If the customer has automatic updates enabled, it will be downloaded when a DOT4 printer
is installed. HP recommends downloading the latest driver from www.hp.com so the customer has the latest fixes and
updates.
1. In the Windows 8/8.1 default user interface, click Desktop. Server 2012/2012R2 should boot up to the desktop.
2. Open your internet browser and go to www.hp.com.
3. Click Support & Drivers at the top of the screen.

194
4. Click Drivers and Software.
5. Type your product name and model number in the Enter a product name/number search box and then click the
Search button or press Enter.
6. Scroll down and click your printer, multifunction printer, or all-in-one model from the search results.
7. Select your language from the Choose your software/driver language: drop-down list.
8. Select your operating system including x32 or x64 (such as Windows 8/8.1 (32-bit)).
9. Locate the “HP LaserJet USB (DOT4) communications driver for Windows 8/8.1 and Server 2012/2012R2” file
and then click the Download button.
NOTE: The HP Dot4.msi only supports HP printers.
10. Click the Save button.
11. Go to the location where you downloaded the file and click Run or double click the Dot4x32.msi for 32 bit or
Dot4x64.msi for 64 bit installations, and then wait for the process to finish.
NOTE: You only need to install the HP DOT4.msi on each system one time. The only time you need to reinstall it is if
you remove it from your system or need to install a newer version.
New features in HP UPD v5.4
New Features
Added support for new products
Automatic Configuration Disabled status
Request for PIN print for every new print job
Automatic Configuration Disabled status
The status Automatic Configuration Disabled displays on the driver Properties Status-About tab when the driver
installation default Print Auto-Configuration is set to Disabled using the HP Driver Configuration Utility or the HP
Driver Deployment Utility.
Request for PIN print for every new print job
Request PIN print for every new print job when driver installation default Request PIN (while printing) is set using
the HP Driver Configuration Utility or the HP Driver Deployment Utility.

195
B Known issues
The following sections provide information and steps for resolving known issues in the HP UPD.
High resolution TIFF files not printing correctly with HP UPD PCL 6
HP Laserjet 400 Color M451dw installed as imaging device
HP UPD Null Scan driver
Issues after upgrade from HP UPD v5.2.x
Settings issues after upgrading HP UPD
High resolution TIFF files not printing correctly with HP UPD
PCL 6
High resolution TIFF files with fine lines may not print correctly with the HP UPD PCL 6 driver. The same file prints
correctly with PS.
Steps to Resolve the issue
This resolution can be made when printing, set as a printing default or pre-configured prior to installing the HP UPD
using the HP Driver Configuration Utility (HP DCU).
1. From your application, click File.
2. Click Print
3. Click Printer Properties
4. Click the Advanced tab
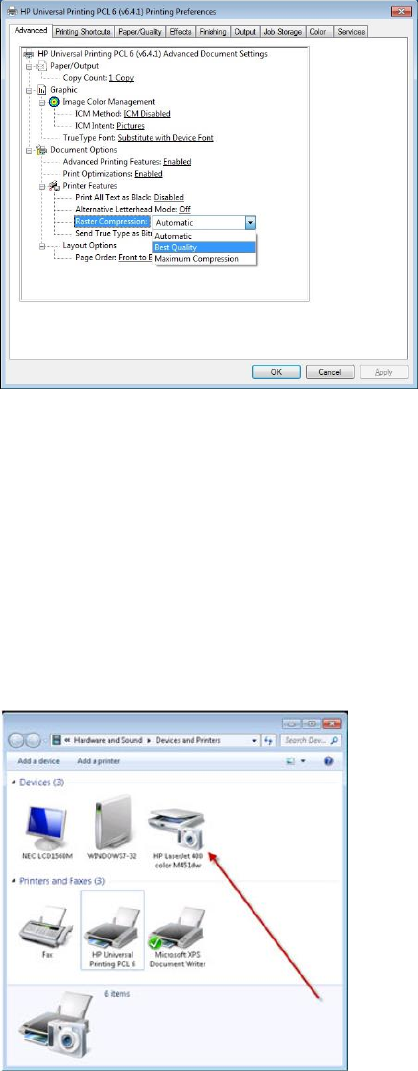
196
Figure B-1 Raster Compression Settings
5. Click the dropdown arrow for Raster Compression
6. Click Best Quality
7. Click OK
8. Click Print
HP Laserjet 400 Color M451dw installed as imaging device
HP Laserjet 400 Color M451dw installed as an imaging device instead of a printer after plug and play event on
Windows 7.
Figure B-2 Printer installed as a device
UPD 5.5 or later needs to be pre-installed before performing the following steps in this section.
For Windows 7, this can be done using pnputil –a *.inf.
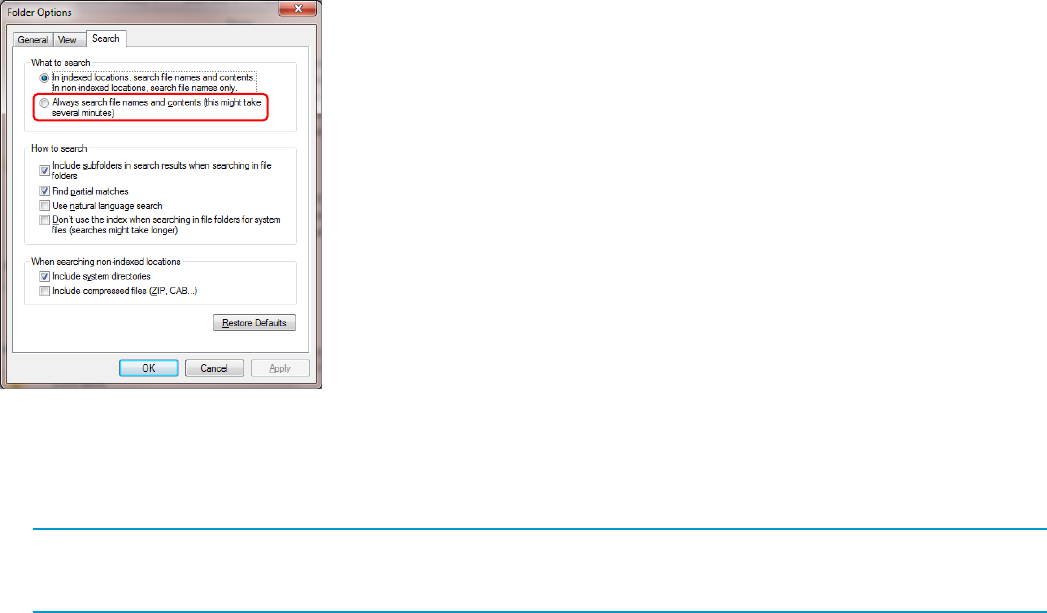
197
Method to delete the HP PNP Scan Null driver
In Windows 7:
1. Open Windows Explorer.
2. Go to windows\inf directory.
For Windows 7, the following steps are required:
a. Open the Organize folder, and then click Folder and search options.
b. Click the Search tab.
c. Select the option to Always search file names and contents...
d. Click OK
Figure B-3 Field Options Search tab
3. Search for hppscnd (within the files). If present, the search result will show one or more oemxxx.inf files.
4. Go to a command prompt (run as administrator) and type pnputil –d oemxxx.inf. Remove all scan null drivers
found in the previous step.
NOTE: If the file is in use, it means that other printers are using the same file, which have to be deleted before the
hppscnd files can be removed. These printers will have to be reinstalled/recreated after the HP LaserJet 400 color
M451dw product has been installed correctly.
After following the above steps, all scan null drivers have been uninstalled/removed.
To reinstall the scan null driver:
For Windows 7, you can reinstall the HP UPD 5.5 including the scan null driver with the command pnputil –a *.inf.
Then disconnect and reconnect the USB cable to restart the Plug and Play installation process.
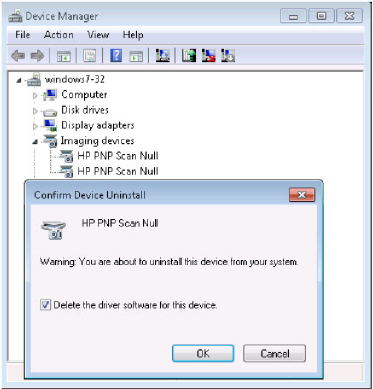
198
Alternative method for Windows 7:
1. Open Device Manager, and then click Imaging Devices. You will see one or more HP PNP Scan Null drivers.
2. Right-click the first listed HP PNP Scan Null driver, and then select Uninstall. In the Confirm Device Uninstall
window, select Delete the driver software for this device.
Figure B-4 Confirm Device Uninstall
Windows will now automatically try to reinstall the printer.
If two HP PNP Scan Null drivers were displayed under Imaging Devices, no further action is required.
If there are two old HP PNP Scan Null drivers installed, you will have to repeat the action in Device Manager.
If only one HP PNP Scan Null driver was installed, you will have to reinstall HP UPD 5.5. Use pnputil-*.inf (drivers
which are already installed will not get changed).
Then disconnect and reconnect the USB cable to restart the Plug and Play installation process.
HP UPD Null Scan driver
Introduction
The scan driver cannot be used for HP MFP products that are supported by the HP UPD when HP UPD v5.2.x or
earlier is installed.
This section contains the following:
Install a Scan driver with and without HP UPD pre-installed
Replace the HP PNP Scan Null driver with a product-specific Scan driver
199
Install a Scan driver with and without HP UPD pre-installed
If you want to install a scan driver for an HP MFP product which is supported by the HP UPD using a plug and play
event, you need to make sure that your system is pre-configured correctly before connecting to the printer using USB.
The following approaches are possible:
No HP UPD driver is installed on your Windows PC and the device specific scan driver is pre-installed on the
Windows PC.
HP UPD v5.3.1 or later is installed and the product-specific scan driver is pre-installed.
After connecting to the product using USB, the Scan driver is installed.
In order to be able to install a product-specific Scan driver after a plug and play event which did not install a scan
driver, HP UPD v5.3.1 and later installs an HP PNP Scan Null driver if one or more of the of the following is true:
There is no other scan driver installed on the system that provides a hardware ID match. This might happen if the
driver is on the product CD and the device is connected before the driver is installed from the product CD.
The driver(s) installed on the system that provide a hardware ID match are unsigned.
The driver(s) installed on the system provide a compatible ID match and are older than the HP UPD.
An earlier version (v5.2.x or earlier) is installed on the system.
How to identify if the HP PNP Scan Null driver has been installed:
1. Click Start.
2. Right-click Computer and select Properties.
3. Click Device Manager.
4. Click Imaging devices.
If the device is listed as HP PNP Scan Null, then the HP Null Scan driver is installed.
Replace the HP PNP Scan Null driver with a product-specific Scan driver
1. Click Start.
2. Right-click Computer, and then select Properties.
3. Click Device Manager.
4. Click Imaging devices.
5. Right-click HP PNP Scan Null, and select Update Driver Software….
6. Select Browse my computer for driver software.
7. Select Let me pick from a list of device drivers on my computer.
8. Select Imaging Devices and click Next.
9. If you have a product CD with the correct scan driver, select Have Disk. Otherwise, select Hewlett-Packard from
the Manufacturer list, and the device model in the Model list. Click Next.
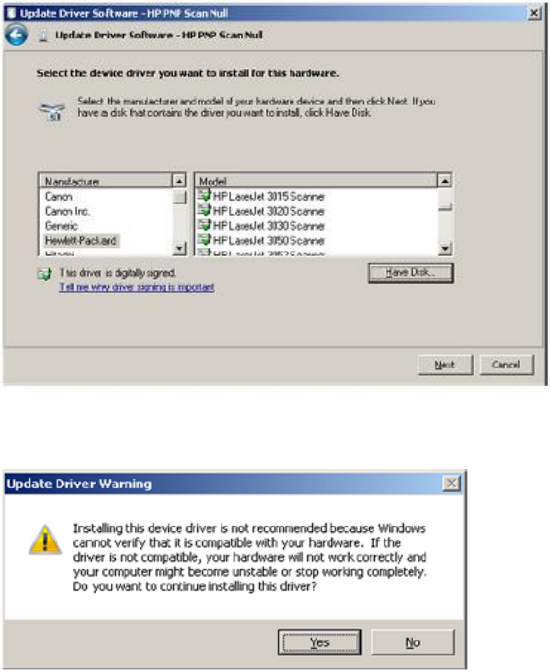
200
Figure B-5 Selecting printer model
10. If you receive the Update Driver Warning message, click Yes to install the driver.
Figure B-6 Update Driver Warning
11. Verify a scan operation works correctly.
Issues after upgrade from HP UPD v5.2.x
Introduction
A change was made in HP UPD v5.2.x that impacts printers that are upgraded to HP UPD v5.3.x or higher. The issue
is isolated to environments that have installed HP UPD v5.2.x, followed by installation or printer upgrade to HP UPD
v5.3.x or later releases. Symptoms appear after completing the driver upgrade.
This section contains the following for how to avoid and resolve this issue:
Symptoms
Steps to avoid the v5.2 upgrade issue
Steps to resolve the v5.2 upgrade issue
The following three HP UPD releases create the issue described in this section:
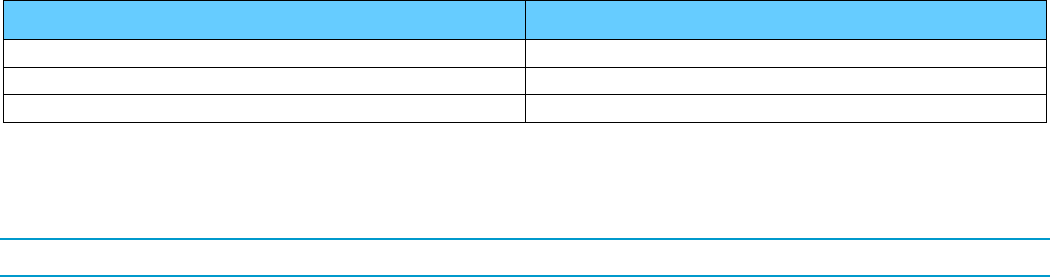
201
Table B-1 UPD versions
UPD version release
Driver version
v5.2.0.8874
v61.109.9.8874
v5.2.5.9108
v61.111.1.9108
v5.2.6.9321
v61.112.01.9321
Symptoms
After upgrading a printer from HP UPD v5.2 to HP UPD v5.3 or later, symptoms could include the following:
NOTE: Actual symptoms depend upon the HP UPD v5.2 driver settings, client, and server installation.
On the HP UPD Effects tab, % of actual size is set to 1%. Located on the Shortcuts tab, the display of the
document preview icon in the upper left will display scaled to 1%. Print job output is scaled accordingly, resulting
in unreadable output.
The % of actual size changes from 1% to 25% when moving between the Printing Shortcuts tab and the
Effects tab after clicking the Reset option on the Shortcuts tab.
On the HP UPD Printing Shortcuts tab, default shortcuts setting might change without user input. The Save As
and Reset buttons may be enabled when no changes have been made by the user.
On the HP UPD Effects tab, the Watermark pull down displays the string [None] and [None] (a space before
[None]) which might cause the string ”[None]” to be printed on the output page.
On print products with a duplexer, the HP UPD Finishing tab displays Print on both sides (manually), and
printing causes a PCL-XL error with Simplex and Duplex jobs.
On the HP UPD job Storage tab, job storage settings change after the HP UPD upgrade, such as Pin is no longer
selected, blank Custom username, and Job Name change from Custom to Automatic.
Garbage or garbled print on the output page.
Point and print clients connecting through the server are impacted with symptoms described above.
Incorrect print settings described above might persist in Excel application files after upgrade from HP UPD v5.2.x
to v5.3 (Microsoft’s KB829766).
Steps to avoid the HP UPD v5.2 upgrade issue
Systems that have not had HP UPD v5.2 installed are not impacted. Systems that have HP UPD v4x, v5.0.x, or v5.1.x
can upgrade to HP UPD v5.3.x or higher without introducing or encountering the issue addressed in this advisory.
The best path to avoid this issue is to not install v5.2.x. If v5.2 is already installed, follow the upgrade guidelines
below.
HP recommends HP UPD upgrade from v5.2 to v5.3 or later when:
New print driver features introduced in HP UPD v5.3 or later is required
Issues resolution delivered in HP UPD v5.3 or higher is required
Driver support for recent Microsoft operating system releases is required (for example, Windows 8/8.1 and
Windows Server 2012/2012R2 support introduced in HP UPD v5.6.0)
If a reason for upgrade does not exist, HP’s recommendation is to keep printers/print queues on v5.2.x.
For systems that currently have HP UPD v5.2.x installed, and a reason exists to upgrade a printer/queue using HP
UPD v5.2 to v5.3 or higher release, or a new printer/queue must be added to the system that requires v5.3 or higher,
the following steps can be taken to avoid the v5.2 upgrade issue:

202
1. Backup—Before performing any driver upgrade, create a system backup.
2. Adding a New Printer—During the installation steps of HP UPD v5.3.x or higher, select the HP UPD version
specific option within Add Printer Wizard or specify the /m switch if using HP UPD INSTALL.EXE. This step allows
for installation of a newer version of HP UPD onto the system without causing existing HP UPD v5.2 printers on
the same system to upgrade to v5.3 or higher. For example, select “HP Universal Printing PCL 6 (v5.3)” and not
“HP Universal Printing PCL 6.” Failure to install following this recommendation would result in all printer names
assigned the non-version-specific HP UPD driver name “HP Universal Printing [PCL 6/PS]” to be upgraded. For
additional explanation of HP UPD driver names, see Glossary of terms.
Choosing this avoidance path requires that all future installations of the HP UPD must also use the HP UPD
version specific installation to prevent the upgrade of existing v5.2 printers.
3. Upgrading an existing Printer—Please refer to Steps to resolve the v5.2 upgrade issue.
Steps to resolve the v5.2 upgrade issue
Upgrading a printer/print queue retains the printer’s name, assigned port, and print settings as the new print driver
version is applied to the existing printer. The issue introduced in v5.2 prevents a printer’s settings from being properly
retained following upgrade of the driver version. The resolution is to delete the printer name assigned driver versions
released with HP UPD, and create a new printer using HP UPD v5.3 or higher.
For HP UPD v5.2 printers that must be upgraded to v5.3 or higher, or printers that have been upgraded from v5.2 and
are experiencing the v5.2 upgrade symptoms, the most predictable and reliable resolution is to delete and create a
new printer with the same name using the HP UPD v5.3 or higher. The new printer created will use the HP UPD
installation defaults. It is not necessary to delete existing ports. In addition, the HP UPD v5.2 driver can remain in the
Windows driver store after HP UPD v5.3 has been installed.
WARNING! From the Device and Printers folder or Print Management Console, do not use the Advance tab from
Printer Properties to change an existing printer assigned HP UPD v5.2 version driver to an HP UPD v5.3 or higher
version driver. This action would upgrade the selected printer from driver v5.2 to the driver version selected in the pull-
down menu creating the v5.2 upgrade issue discussed in this section. The following steps will instruct how to delete
the printer, and then add a new printer using HP UPD v5.3 or higher.
Steps to delete a printer
The steps below assume the version specific release of HP UPD v5.3 or higher has already been installed on the
system. To delete an HP UPD print object assigned the HP UPD v5.2 driver version that will be upgraded, or for a
printer that was upgraded from v5.2 to v5.3 or later, perform the following steps:
1. From the Device and Printers folder, select the printer name using the HP UPD v5.2 driver version that you wish
to upgrade to v5.3 or higher.
2. Understanding the symptoms described in this section, record the correct settings for the printer. This list will be
used to help re-create the new printer with the same settings. For example:
Printer Name: PCL 6-COLOR
Port: 10.0.0.150
Duplex: On
Custom Shortcuts: Name and settings
3. Select the printer, right-click, and then select Remove Device or Delete. Confirm Yes to delete the printer. This
action deletes the printer, but it does not delete the print driver from the Windows driver store.
203
Steps to delete the print driver (optional)
The following steps are optional and not required to resolve the symptoms. This step would prevent introduction of
this issue for any newly created printers. Steps to delete a driver from the system:
1. In the Printers folder, select a print queue, click Print server properties at the top of the dialog and then select
the Drivers tab.
2. Select the HP UPD driver(s) to be uninstalled, and then click Remove. If Windows displays an error message that
the driver is in use, stop and restart the print spooler at the command prompt using Administrator privilege with
the following command, and then repeat the steps:
net stop spooler && net start spooler
Steps to create the printer with same name
Utilize one of the supported HP UPD methods to add a new HP UPD printer.
1. Add Printer Wizard or HP UPD INSTALL.EXE.
2. Assign the previously used port to the newly created printer.
3. Specify the HP UPD v5.3 or higher version-specific driver version to the new printer (for example, HP Universal
Printing PCL 6 (v5.3)).
4. Rename the printer to its original printer name (for example, PCL 6-COLOR).
5. Apply any custom settings to the printer (duplex, shortcuts, etc).
Point and print
If the printer queue was shared, point and print clients might need to reset their connection to the print server following
the server’s delete and recreate event of the shared printer name. This can be accomplished using the PRNCON tool
available in the HP PARK. For more information on the HP PARK in this document, see HP Print Administrator's
Resource Kit (PARK) in chapter 4.
Automating the steps
For large scale environments, HP recommends using the AutoUpgradeUPD tool available in the HP PARK. This utility
deletes the defined print queue(s) and creates a new print queue(s) using the same printer name, comments, location,
and assigned port while applying the specified new driver version. During the print queue delete and recreate process
that is completed by the tool, only the print queue name, port, location, comments, share name, and share state will
be retained. All the other settings on the new print queue will be set to HP UPD factory defaults. Administrators can
define custom default settings for the newly created queues (for example, duplex or grayscale) used by the
AutoUpdateUPD by incorporating the Driver Configuration Utility into the solution, also available in the HP PARK.
Please reference the HP PARK for complete instructions, or for more information on the HP PARK in this document,
see HP Print Administrator's Resource Kit (PARK) in chapter 4.

204
Settings issues after upgrading HP UPD
When switching from earlier HP printer drivers, many customers have noticed that the paper type has changed from
Unspecified to Plain or Heavy Media (others types are also reported). For example, this could be seen in an
upgrade from HP UPD v4.1 to v5.0. The paper type change is caused by a mismatch in the way settings are stored in
the old driver and the new driver. For this reason, upgrading is not supported. To work around this issue, first delete
the existing printer and driver, install a later driver, and then create a new printer.
Environments that experience these symptoms will need to reset the settings. Assuming HP UPD v4.5 or higher
installation on a server or client, the solution is to delete the old HP printer name and the existing HP printer and driver
on both the server and all connecting clients (see Uninstall the HP UPD in chapter 5). Next, recreate the printer on the
server. Point and print clients will need to delete the printer and reestablish the connection to the print server. When
the printer is recreated, Windows will create new settings that match the architecture for the new printer. There is no
need to delete and replace the ports associated with the deleted printer.
For enterprise deployments requiring tools support of this process, please reference the HP Printer Administrators
Resource Kit (HP PARK) to test with the PRNCON tool (see the Release Notes for this HP unsupported tool). For
more information on the HP PARK in this document, see HP Print Administrator's Resource Kit (PARK) in chapter 4.
To download the HP PARK, go to www.hp.com/go/upd and click Download now. Verify your language, and then click
your operating system. Expand Software – Universal Print Driver. To the right of HP Printer Administrator
Resource Kit, click Download. Save the file and then click the folder and click Extract all files.

205
C Third-party articles and Windows
printing information
This appendix contains a list of useful articles. In addition, some background information about printing on Windows
systems is also provided.
The Microsoft articles listed in this appendix can be found on the Microsoft Knowledge Base Web site using the
following URL format: http://support.microsoft.com/kb/<article number>
The following table lists the articles.
Table C-1 Important MS articles
Category
Microsoft Knowledge
Base Article Number
Description
Performance
2666508
Intermittent High CPU and Increased Disk I/O with
SPOOLSV.EXE When Mapping TS User Session Printers on
Windows Server 2008R2.
2526028
Printing performance decreases in Windows 7 or in Windows
Server 2008R2
2295825
Poor printing performance in Windows 7 or in Windows Server
2008R2 compared to the performance in Windows Vista or in
Windows Server 2008
955560
Handle leaks and memory leaks occur on the Printer Spooler
service when a Windows Vista SP1-based computer or a
Windows Server 2008-based computer installs and uninstalls
network printers.
Update rollup for the printing
core components that are
included in Windows 7 and in
Windows Server 2008R2
2647753
Update rollup: Resolves printing issues in Windows 7 and
Windows Server 2008R2 that are described in the following
Microsoft Knowledge Base (KB) articles:
942914, 976571, 979241, 979681, 981620, 982728, 2295825,
2388142, 2457866, 2461108, 2480118, 2526028, 2532459,
2546651, and 2620656.
Generic Windows behavior
(printer installations)
2511290
A computer that is running Windows 7, Windows Vista,
Windows Server 2008 or Windows Server 2008R2 continues to
use the original print driver after you update or replace the print
driver.
2004234
After upgrading a print driver on any Microsoft Operating
system later than Windows XP and Server 2003, the old driver
files are still being used.
983401
A long delay occurs when you print a large file on a Windows 7
or Windows Server 2008R2-based computer

206
Category
Microsoft Knowledge
Base Article Number
Description
982728
“Windows cannot connect to printer" error message when you
try to create a Point and Print connection to a remote printer
from a Windows 7 or Windows Server 2008R2-based client
computer.
829766
Mailbox and other printer-specific settings are saved with an
Excel file (excel hot fix available)
Microsoft Office issues
2746927
Transparent circles print as squares in Booklet mode
937496
Description of the Word 2007 hotfix package: May 22, 2007
815001
The transparent objects cannot be printed correctly in
PowerPoint
312250
Objects with transparency are printed as opaque to printer or to
file in PowerPoint for Mac.
Miscellaneous
3201130
Printing preferences from the print server don't synchronize in
Windows 10 version 1607
3057039
Printing from Adobe in booklet format results in large black
squares
3001232
Print jobs fail in Windows 7 and Windows Server 2008R2. This
problem occurs when the DependentFiles registry key for the
driver that is used by the printer is overwritten by a NULL
string.
2900635
GetOption or SetOptions method of IPrintCoreHelper interface
does not update print device settings in Windows. This is a
pre-requisite for proper device settings update during an
upgrade to any device using a newer driver than UPD 5.6.0.
2871131
The size of the "HKEY_USERS\.DEFAULT" registry hive
continuously increases on a Windows Server-based server
2796647
Memory leak occurs in the Spoolsv.exe process after you run
an application that performs WMI queries in Windows 7 or
Windows Server 2008R2
2793718
You experience Print Spooler error messages after installing or
upgrading a Third-Party print driver.
2762101
Not able to print with Type 4 or Type 3 XPS printer drivers after
a Windows Server is promoted to a Domain Controller.
2746927
Transparent circles print as squares in Booklet mode.
2666508
Intermittent High CPU and Increased Disk I/O with
SPOOLSV.EXE When Mapping TS User Session Printers on
Windows Server 2008R2
2647753
Update rollup: Fix printing problems in Windows 7 and in
Windows Server 2008R2 that are described in the following
Microsoft Knowledge Base (KB) articles:
942914, 976571, 979241, 979681, 981620, 982728, 2295825,
2388142, 2457866, 2461108, 2480118, 2526028, 2532459,
2546651, and 2620656
2620656
Invalid redirected printers may be available in a Remote
Desktop Services session that connects to a RD Session Host
server that is running Windows Server 2008 or Windows Server
2008R2.
2511290
A computer that is running Windows 7, Windows Vista,
Windows Server 2008 or Windows Server 2008R2 continues to
use the original printer driver after you update or replace the
printer driver.
2480910
Wrong printer forms for network printers are used in Windows
Server 2008 or in Windows Vista
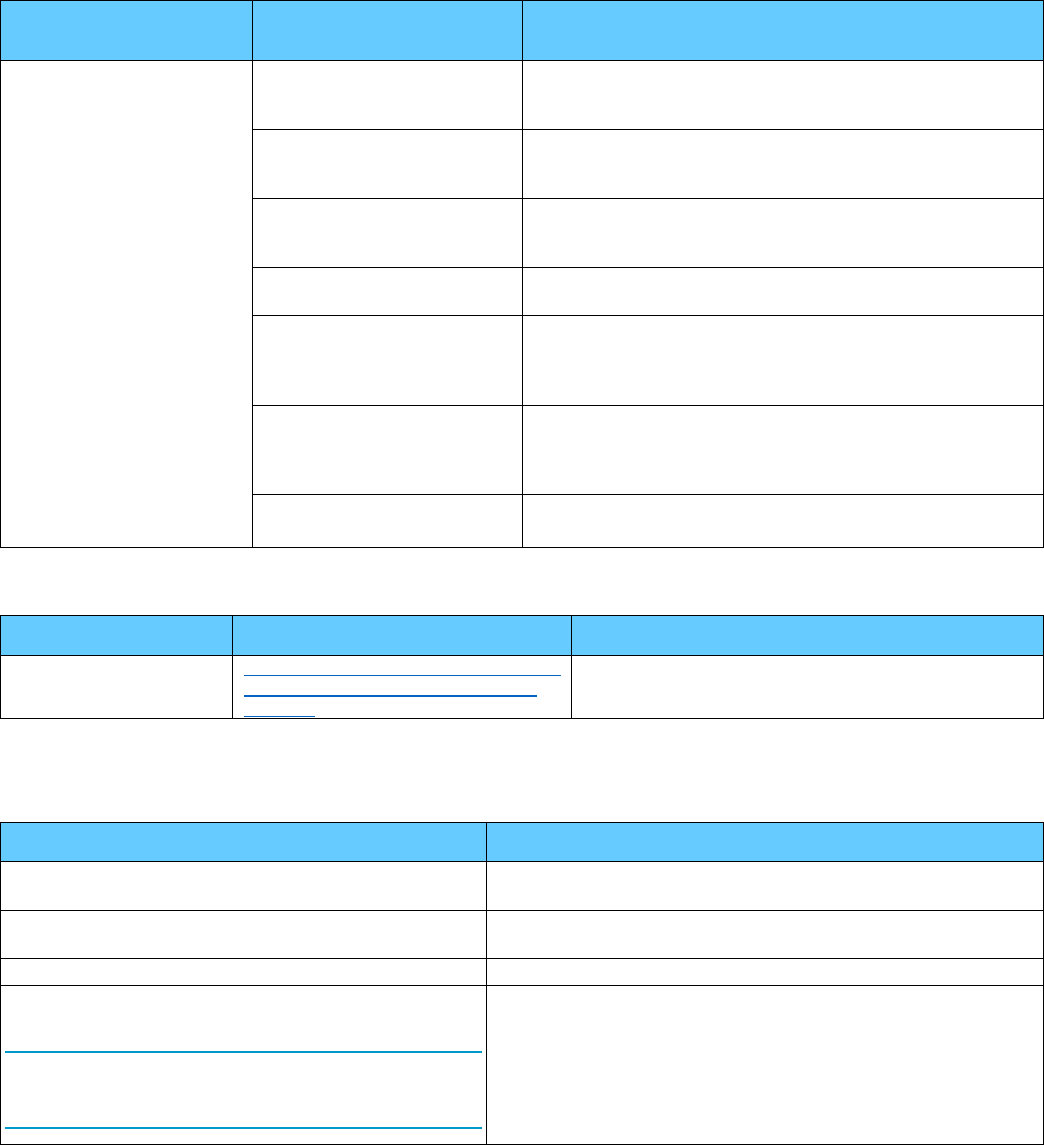
207
Category
Microsoft Knowledge
Base Article Number
Description
2388142
A computer that is running Windows 7 or Windows Server
2008R2 intermittently cannot use a shared network printer to
print.
2004234
After upgrading a printer driver on any Microsoft Operating
system later than Windows XP and Server 2003, the old driver
files are still being used.
979681
FIX: A legacy HP printer driver may crash when you run a 32-
bit application on a computer that is running a 64-bit version of
Windows 7 or of Windows Server 2008R2.
976571
Stability update for Windows Server 2008R2 Failover Print
Clusters.
972616
You cannot use the "runas" command to print from different
user accounts in a single session from a 32-bit program on a
computer that is running 64-bit version of Windows Server
2008 or Windows Vista
972026
Some print jobs fail together with the Event 6161 when the
"Print to File" option is used on a multiprocessor computer that
is running Windows Server 2008 or Windows Vista and that is
under heavy stress
919543
The size of the EMF spool file might become very large when
you print a document that contains lots of raster data.
Table C-2 Important Adobe articles
Category
Adobe Article URL
Description
Miscellaneous
https://helpx.adobe.com/acrobat/kb/prn-
files-using-pcl-printing-increases-file-
size.html
Slow PCL printing if a PDF file has a non-system font
embedded
The following table provides a list of URLs that contains miscellaneous background information.
Table C-3 Background information
Category
Article URL
Updating Windows 8 for General Availability
http://blogs.msdn.com/b/b8/archive/2012/10/09/updating-windows-
8-for-general-availability.aspx
Background information about driver store and /inf
directory
http://msdn.microsoft.com/en-
us/library/ff545861%28VS.85%29.aspx
Microsoft Driver Store and /inf Directory
msdn.microsoft.com/en-us/library/ff545861%28VS.85%29.aspx
Windows Print Cluster Best Practices (Windows Server
2003 to Windows Server 2008R2)
NOTE: The listed article explains why HP UPD must be
installed on the physical nodes and virtual node in a
cluster.
blogs.technet.com/b/askperf/archive/2010/11/12/windowsprint-
cluster-best-practices-for-windows-server-2003-towindows-server-
2008-r2.aspx
208

209
D Frequently asked questions
Introduction
This appendix contains the following sections:
HP UPD installation and configuration
HP UPD policy
Operating system
HP UPD installation and configuration
Use this section to find answers to common installation and configuration questions.
1. Can I pre-configure the HP UPD using HP Web Jetadmin and the HP Driver Configuration Utility?
Yes. The HP UPD supports pre-configuration through HP Web Jetadmin and the HP Driver Configuration Utility.
2. Is the printer queried every time it is printed to?
For traditional mode queues, no. The printer is queried once and the settings are cached. In dynamic mode where
a user has chosen to create a permanent instance of the printer, or is printing to one of the printers in the recently
used list, settings are also cached. The only time the printer would be queried every time it is printed to is in
dynamic mode if for some reason the settings could not be cached due to folder write restrictions in the user’s
%TEMP% and %TMP% folders.
When the Status Notification Pop-ups (SNP) are enabled, the HP UPD sends a few packets to the printer to
gather printer status information.
NOTE: Status Notification Pop-ups (SNP) are no longer available starting with the release of UPD 6.5.0.
3. Are traditional mode queues updated with a new driver, too?
Yes. The Microsoft operating system will update all instances because the driver name is the same (with different
registry entries) for permanent instances. All queues sharing the same driver name will update.
4. How can I have permanent instances re-query a product?
As with other HP drivers, there is the ability to select an Update Now button or use the command line option. See
Printer Automatic Configuration in chapter 7.

210
5. Which port monitor is used with the HP UPD?
By default, the HP UPD uses the standard TCP/IP port monitor. For cases where the HP UPD is pointed to an
existing print queue shared out from a print server instead of a printer itself, the “HP UNC Port” monitor is used.
For cases where locally installed products are selected, the LPTX, USB00X, or DOT4
port will be used. This depends on the USB protocol that is negotiated between the HP UPD and the product.
HP has its own version of the TCP/IP port monitor for communicating with network products. It is not part of the
installer package of the HP UPD.
6. Is it possible to suppress the HP UPD Status Notification Pop-ups (SNPs) on the client machine installed from a
print server?
NOTE: Status Notification Pop-ups (SNP) are no longer available starting with the release of UPD 6.5.0. On HP
UPD v4.7 through UPD v6.4.1, SNP can be enabled or disabled from the Device Settings tab of the driver.
Before HP UPD v4.7, SNP could only be disabled from the SNP dialog box.
7. How do I set defaults for the driver on the server so all installs have the same defaults?
Configure the driver using the HP Driver Configuration Utility (DCU).
8. How does the static mode install command line switch work?
The static mode install command line switch, in versions 3.0 and newer, uses the port name specified by the /sm
switch if the specified port exists. If that port does not exists, the HP UPD install creates a new port. In the normal
operation of printing with the HP UPD, once the printer binds to a port, the job is delivered to that port (and
associated port monitor) no matter what the port is named.
9. If my product can be discovered by the HP UPD via mDNS but cannot communicate via SNMP, what is the
issue?
If the product can be discovered by way of mDNS but cannot communicate by way of SNMP, it is possible that
the Jetdirect is configured so that SNMP is disabled. It is also possible that SNMP is disabled or might be using a
non-default SNMP community name.
10. Can the HP UPD installation change the target port's SNMP community name (i.e. can it replace the current name
and with a different SNMP community name)?
Yes, you can set or change the community name in the port using INSTALL.EXE. The installer switch was put
there to set the community name at the time the port is created. Example: /gcomname”name”.
11. What version did the HP UPD begin using unique file names?
Starting with HP UPD v4.5, driver file names for each release are uniquely named to prevent overwriting existing
files that might have shared dependency. Beginning with HP UPD v4.7, more than one version can be installed
when using HP UPD in traditional mode onto the host, if during the installation process the model specific version
of the HP UPD was selected through the Add Printer Wizard and, beginning with HP UPD v5.0, using the /m
switch with INSTALL.EXE.
NOTE: HP UPD v5.2.6 and earlier require that the full name and version are provided with the /m switch, for
example “HP Universal Printing PCL 6 (v5.2)”. HP UPD v5.3 and later does not require the full name or version
when using the /m switch.
12. Any tips for using Microsoft's PrintMig?
Testing has found limitations using the PrintMig tool with both HP and non HP drivers. For the HP UPD, install the
HP UPD first on the target host to register all files and COM objects, then perform the PrintMig restore onto the
host. PrintMig tool has been placed on end of life by Microsoft.

211
13. What is the first step during upgrade?
Avoiding unintended issues resulting in a change to the shared UNIDRV and postscript files has been an issue.
Updates to these files come unannounced and unplanned through update services, installation of service packs,
.NET framework, or a hot fix from Microsoft that might negatively impact driver upgrades dependent upon
UNIDRV and PSCRIPT version.
Upgrade has several steps that should be followed. To see what version of UNIDRV and PSCRIPT files are on
the system and compare against the version you are about to install, see Versioning of print driver shared files in
Appendix F. If the versions are different, this might increase the scope of testing required for an uneventful
upgrade. For the HP recommended upgrade steps, see Upgrading the HP UPD in chapter 6.
14. Is there a tool or method available to force clients to disconnect their print connection to the print server and re-
establish the connection?
A tool for this function can be found in the HP Printer Administrators Resource Kit (HP PARK). To download the
HP PARK, go to www.hp.com/go/upd and click Download now. Verify your language, and then click your
operating system. Expand Software – Universal Print Driver. To the right of HP Printer Administrator
Resource Kit, click Download. Save the file and then click the folder and click Extract all files.
15. HP UPD displays "HP Universal Printing PDL**" in the Printers folder. How can I make the HP UPD display the
printer model name instead?
A tool for this function can be found in the HP Printer Administrators Resource Kit (HP PARK). To download the
HP PARK, go to www.hp.com/go/upd and click Download now. Verify your language, and then click your
operating system. Expand Software – Universal Print Driver. To the right of HP Printer Administrator
Resource Kit, click Download. Save the file and then click the folder and click Extract all files.
16. Are there thresholds or guidance limiters to scaling the HP UPD on a single print server?
HP UPD does not have a bounded limit to scale of installation. The recommendation of how many queues to
install on a single server is entirely site dependent. Questions such as this are best answered by IT administrator
policy placing criteria on status and monitoring, server disk/CPU/network IO utilization rates, print job throughput,
peak load times, etc. Some very well managed sites with resources can run 1000 print queues on the right server
with redundancy and high availability requirements satisfied.
17. What does WHQL look at when it breaks: file byte size, date of file, etc?
When the driver is signed, part of the process is creating a hash of the contents of all the files that are part of the
driver, including the .cfg or .cf_ file. If you alter even one bit in any file, the hash breaks.
18. Why am I unable to delete the HP UPD print driver?
The print spooler must be stopped to release the HP UPD print driver. Perform the following on the command line:
C:\NET STOP SPOOLER && NET START SPOOLER.
19. How can I select the version specific driver in Windows 2008 R2 and Windows 7 when using INSTALL.EXE and
creating a new port during the installation?
When you use INSTALL.EXE to install HP UPD in traditional mode, you can select Add a local printer. When
selected, you can create a new port using the Standard TCP/IP Port, you can select Query the printer and
automatically select the driver to use in the screen titled Type the printer hostname or IP address. By
default this query option is enabled. In order to see the driver specific version you have to disable the query
option.

212
20. When I delete a printer that is using the HP UPD print driver, is the standard TCP/IP port also deleted?
This depends. On Windows 7, Windows 2008, and Windows 2008 R2, the printer is deleted and the port
associated with the printer is deleted (providing the port is not in use by another printer).
21. The datestamp for hp upd *.CFG files (such as HPCPU118.CFG) is always 3/12/1990. Is this an error?
No, this is done on purpose in order to get predictable configuration settings in different environments.
22. In some applications it is possible to select a different paper source per page in the document. Is this supported
with the HP UPD?
The HP UPD supports different tray numbers per page of the document and one paper type per document.
23. After installing the HP UPD and creating a printer queue which is printing to a monochrome product, the Color tab
is still visible in the properties of the printer queue (and not in printing preferences or printing defaults). How can
this Color tab get removed in the properties screen?
This behavior is controlled by the operating system, not by the HP UPD and cannot be changed by a HP UPD
setting.
HP UPD policy
Use this section to find answers to common questions regarding use of the HP UPD with Active Directory.
1. If I have the HP UPD Active Directory Group Policy running simultaneously, which set of policies take priority?
The HP UPD Active Directory Group Policy takes precedence over default settings.
2. How can I set up printer lists for each user?
Printer lists can be created by exporting printer lists from HP Web Jetadmin into XML format.
3. Are both modes of the HP UPD (traditional and dynamic) managed through Active Directory Group Policy?
Both operating modes of the HP UPD are manageable through the Active Directory Group Policy.
4. What versions of the HP UPD support the Active Directory Group Policy?
HP UPD v4.0 and newer.
5. How much does the HP UPD Active Directory Administrator Template cost?
The HP UPD Active Directory Administrator Template file is available for download at no charge from
www.hp.com/go/upd as part of HP PARK.
6. Are both modes of the HP UPD (traditional and dynamic) managed through the HP UPD Active Directory
Administrator Group Policy?
Yes, both operating modes of the HP UPD are manageable through the Active Directory Group Policy.
NOTE: HP UPD Active Directory Administrator Group Policy does not work in a Point-and-Print configuration.
213
Operating system
Use this section to find answers to common questions regarding use of the HP UPD with various operating systems.
1. What about use in an Apple Macintosh Environment?
There are no plans for a Macintosh version of the driver. HP drivers can be used, however, with the Apple
Bonjour™ (formerly Rendezvous™) discovery mechanism. Bonjour behaves the same way the HP UPD does
when looking for products on the local subnet (using mDNS).
2. Does the HP UPD support XPS print paths?
XPS print path requires a product that consumes native XPS, an application that sends native XPS and an XPS
print driver to send XPS data to the an XPS print product. If each step in the path is not native XPS, it requires
conversion of the print content. HP UPD does offer an HP XPS print driver. Please contact HP support for
download location and documentation.
3. What is the HP Port Monitor?
The port monitor that the HP UPD uses is the standard TCP/IP port monitor that is part of the operating system.
There is an HP UPD Port monitor that is installed, but it is used only to provide a print path to UNCpaths or
shares, send print settings to a local printer, and send jobs to a defined HTTP location for job tracking.
4. Can HP UPD be used with direct IPP printing?
Yes. HP UPD can print via IPP. When you use Add Printer Wizard, you can select A network printer, or a
printer attached to another computer. For IPP printing specify: http://<Printer IP>/ipp or https://<Printer IP>/ipp
5. Can the HP UPD be used to print via IPP to a print server?
Yes, client/server printing with HP UPD over IPP is possible. See the Windows Server documentation for
instructions on how to install the Internet Printing role and install printers on client systems.
6. Can the HP UPD be used with Web Services Delivery (WSD) port?
Yes, HP UPD can print via WSD. One way to use Web Services Delivery in Windows 2008 and Windows 7 is with
print manager. Install a new printer with print manager with Type of Device set to Web Services Printer. If HP
UPD was preinstalled, the HP UPD driver is automatically selected during printer creation and the HP UPD will
use a WSD port for printing.
214

215
E HP UPD deployment worksheet
Introduction
Use this worksheet to guide your HP UPD deployment.
This appendix contains the following sections:
General information
Print server environment
Direct IP printing
General information
Do you primarily print in color or black and white?
Would your company prefer that all users print in grayscale, with the option to manually select color?
Are users defaulted to print in simplex (single-sided) or duplex (double-sided)?
Would your company prefer that all users or user groups print in simplex or duplex?
Are all users in your Windows environment Local Administrators to their PC?
If not, please specify the default capabilities for the user.
Are there any government or industrial regulations or restrictions regarding the process of print jobs?
Are all printer log files retained? What is your process for retaining printer log files?
Is there a preferred driver language (PCL 6 or PS) for printing?
Do users have any special production or operational environments (non-application print) which require specialized
drivers or non-standard printer drivers?
Do any groups or users use PIN printing? If so, please specify the groups or users that use PIN printing.
Do any groups or users use encrypted printing? If so, please specify the groups or users that use encrypted printing.

216
Port and protocol information
Port Monitor
Standard TCP/IP Port?
HP Standard Port Monitor?
RAW or LPR?
How are IP addresses distributed to your printers?
If static IP addresses are distributed, how are they reserved (DNS, DHCP reservation, BOOTP)?
Are printers set to DHCP, BOOTP, or Manual when configuring the IP address?
Ports and protocols
Is SNMP enabled in your environment across all subnets?
o If not, please describe the subnets where SNMP is disabled and if it is possible to enable SNMP.
What versions of SNMP (SNMP v1, v2, v3, other) are enabled in your network infrastructure?
Verify that "Get Community" names values are consistent.
o Bi-directional communication between the HP UPD and printer is required to gather product specific
configuration information.
Make sure mDNS broadcasts and IP multicast services are allowed on the network for the HP UPD to discover
products.
o In dynamic mode, the HP UPD will only discover products within the same subnet when Search for
network printers is selected.
Activate the mDNS protocol on the printer/product using the HP Embedded Web Server (EWS).
Make sure a firewall or router is properly configured to allow the HP UPD to communicate over the necessary
network ports.
Table E-1 Network Ports used by the HP UPD
Port
Type
Service
Used by
161
udp
SNMP
HP UPD
53
tcp
DNS query
HP UPD
5353, 5354
udp
Multicast DNS
HP UPD
80
tcp
HTTP
HP UPD, HP EWS
9100
tcp
Print Data
HP UPD, Printer
217
Print server environment
Please fill out this section for each server to be migrated.
Print server information
How many current print servers are in production in your current environment?
Is there a print server for each location or are there regional print servers?
If the answer is more than one, a checklist needs to be filled out for each of the servers that are to be created or
migrated.
Server Name____________________________________
Operating system
Version______________________
32-bit or 64-bit?______________________
Cluster environment? _______________
Active-Active or Active-Passive?_______
Names of Physical Nodes_______
Is this print server dedicated, or does this server have other server roles (file/printer, DNS/print, etc)?
Total number of print queues on the server? ____________
Print queue settings
Pre-configuration settings
o ______________________
o ______________________
o ______________________
Are there any security settings such as Access Control Lists (ACLs) that you want configured for products at the
printer or queue level?
Goals
New—Set up new server that has new queue names?
Replace—Set up new server to replace an existing server that has the same queue names as the existing
server?
Upgrade—Upgrading print queues on an existing server to the HP UPD?

218
Set up new server that has new queue names
Print queues and drivers:
Prepare a list of the following information.
o Queue name
o HP printer model
o Port name and/or IP address
Driver List:
Not all HP printer models are supported by HP UPD. Compare this newly created list to the list of products
supported by HP UPD. A list of supported products is available at www.hp.com/go/upd.
Mark a list to indicate which queues will use HP UPD, and which queues will require a product specific driver.
Upgrade print queues on an existing server to the HP UPD
How will be server be backed up before the migration begins?
Use the Microsoft Print Migrator 3.1 tool or the Server 2008/Vista PrintBrm.exe utility to back up the print servers.
Will the backup be verified? _____
Test server available? ____________
Attempting to upgrade drivers to the HP UPD on a running production server is NOT RECOMMENDED.
Will the test server become the new production server, or will the production server need to also be
updated? __________
Microsoft file version information:
UNIDRV.DLL File Version? ________________
PSCRIPT5.DLL File Version? ________________
Print queues and drivers:
Prepare a list of list of the following information.
o Queue name
o HP Driver name or HP printer model
o Driver version
o Port name and IP address
o Kernel or user mode driver?
You can create this list automatically by running the prnmngr.vbs script on the server.
Driver Mapping
Not all of the hp drivers on the existing system can be migrated to the HP UPD. Compare this newly created list to
the list of products supported by HP UPD to develop a list of potential migration candidates.
Decide what you want to migrate?
o Everything that is supported by the HP UPD to the HP UPD
o Only HP kernel mode drivers
o Install the HP UPD for new products only
219
Mark the list to indicate which queues will use the HP UPD, and which queues will require a “native” driver.
Print queue settings
Pre-configuration settings
o ______________________
o ______________________
o ______________________
Are there any security settings such as Access Control Lists (ACLs) that you want configured for products at the
printer or queue level?
Point and Print Client Information
Citrix, or Terminal Services? _______
Citrix version? _______
How many clients?
Windows 7 32-bit _______
Windows 7 64-bit _______
Windows 8/8.1 32-bit _______
Windows 8/8.1 64-bit _______
Windows 10 32-bit _______
Windows 10 64-bit _______
Does the capability exist to run software or adjust client settings via login scripts or AD Group Policy?
____________
220
Direct IP printing
General client information
Citrix, or Terminal Services? _______
Citrix version? _______
How many clients?
Windows 7 32-bit _______
Windows 7 64-bit _______
Windows 8/8.1 32-bit _______
Windows 8/8.1 64-bit _______
Windows 10 32-bit _______
Windows 10 64-bit _______
Does the capability exist to run software or adjust client settings via login scripts or AD Group Policy?
____________
Are the client PC’s typically used exclusively by one user or shared by many users?
How many current drivers are stored in the print driver repository/library (if applicable)?
Is there a default driver language (PCL 6 or PS) for end-user printing?
Can users request an alternate Driver language from the default (i.e., prefers PS over PCL 6 for .PDF files?)
Total number of printers on a typical client? ____________
Printer settings
Pre-configuration settings
o ______________________
o ______________________
o ______________________
Goal
New—Set up new printers on a client using the HP UPD in traditional mode.
Dynamic—Install the HP UPD in dynamic mode.
Upgrade—Upgrade existing printers on the client to the HP UPD traditional mode.
Upgrade-Drivers:
Run the prnmngr.vbs script on the client to create a list of the HP drivers currently on the client.
If you create this list yourself, please include the following information:
o Driver name or printer model supported
o Version
o Kernel or user mode?

221
Not all of the HP drivers on the client can be upgraded to the HP UPD. Compare the newly created list with the list
of products supported by the HP UPD to develop a list of potential migration candidates. A list of supported
products is available at www.hp.com/go/upd.
Upgrade-Settings configuration
Existing printer settings. Do you want to:
Keep current queue settings? __________
Pre-configure settings in addition to migrating current settings? __________
Pre-configuration settings
o ______________________
o ______________________
o ______________________
Pre-configure the queues that cannot have settings migrated? __________
Pre-configuration settings
o ______________________
o ______________________
o ______________________
Are any security settings such as Access Control Lists (ACLs) configured for products at the printer or queue level?
HP UPD/AD customized options
Would you like policy or access control restrictions to be set based on user ID?
Would you like Color access control to be set configured with Time of Day restrictions (days/hours)?
Is there a preference to allow or disable specific applications (WINWORD.EXE, EXCEL.EXE, etc) to print in Color?
Is there a preference as to how users can search for printers (see below)?
On the user’s local subnet
Using Managed printer lists
How would you prefer users view the list of printers (see below)
A default view (list of printer names)
Through a list showing customized groups (i.e., MFP, Color, B/W)
A clickable image (possibly a floor layout in .jpg, .bmp or html format) that might be uploaded
Would you like your users to receive a pop-up status message for their print job?
Which message pop-ups are preferred? Select to show all, some, or none from the following:
o Job Completion
o Supplies Details link
o Shop for Supplies link
o HP Support link for product specific online help
o Other
222

223
F HP UPD deployment flowcharts
Introduction
The HP UPD can be installed and configured many ways. The following flowcharts contain green lines which outline
the recommended deployment paths. These configurations allow for the simplest deployment and implement the full
functionality of the HP UPD. All of the paths outlined on the flowcharts are supported, but following some of the paths
might involve extra steps or limit the functionality of the HP UPD. There are valid technical and business reasons for
using the alternate paths, but when in doubt, follow the green line.
This appendix contains the following sections:
Start
Update server/replace server
Client printing
Policy
Add/new queues
Create queues
Ports and protocols
Replace drivers
Versioning of print driver shared files
Automate the process through scripting
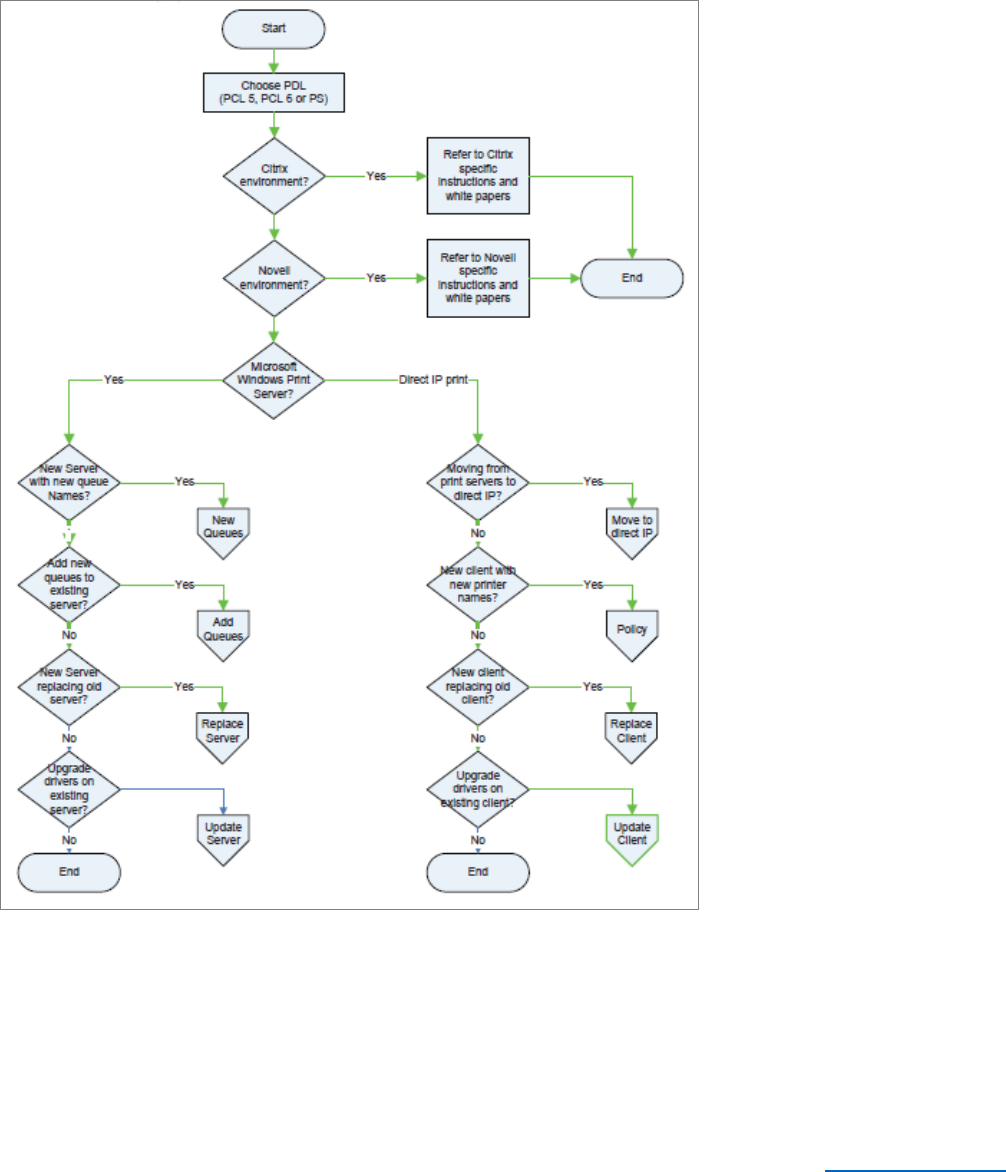
224
Start
Figure F-1 HP UPD deployment start
Choose PDL (PCL 6 or PS)
The first step is to decide which HP UPD PDLs (Page Description Language) to install. The HP UPD offers a choice of
postscript and PCL 6.
Citrix environment
See the HP white paper HP Printers Supported in Citrix Presentation Server Environments at www.hp.com/go/upd for
more information.
225
Novell environment
See Environment C: Novell in chapter 5 for more information.
Microsoft Windows Print Server
In a print server environment, there are four possible ways to deploy the HP UPD.
1. New server with new queue names.
In this scenario the administrator sets up a new print server and assigns new names to all the print queues.
2. Add new queues to existing server.
In this scenario the administrator adds the HP UPD to an existing print server and creates additional queues using
the HP UPD.
3. A new server replacing an old server.
In this scenario the administrator sets up a new print server that replaces an existing print server. This scenario
differs from scenario #1 because the administrator wants this server to have the same queue names as the server
it replaces to minimize impact on existing traditional mode installed client connections.
4. Upgrade drivers on existing server
In this scenario the administrator upgrades the existing HP drivers on an existing print server to the latest version
of the HP UPD.
Direct IP printing
Direct IP printing is an environment where the Windows client prints directly to the product, either network connected
or directly connected with a USB or LPT port. In the Direct IP Printing environment there are four possible ways to
deploy the HP UPD.
1. Moving from print servers to direct IP printing.
In this scenario the administrator moves from a print server environment to direct IP printing.
2. New client with new printer names
In this scenario the administrator installs new client PC’s and uses the HP UPD.
3. New client replacing old client.
In this scenario the administrator replaces or upgrades client PC hardware or operating systems and uses the HP
UPD. The administrator wants the new PC to have the same list of printers with the same names as the old PC to
minimize impact on the users, or the users might not have administrator rights and cannot add printers.
4. Upgrade drivers on existing client.
In this scenario the administrator upgrades the existing HP drivers on an existing client to the latest version of the
HP UPD.
226
Client driver deployment and software distribution systems
Print driver installation must be done through an account that has administrator rights on the client PC. This is how the
Windows operating system is designed, and it is for good security reasons.
If all the client users have administrator rights, the HP UPD can be deployed with the following methods.
Create a login script that will perform the installation.
Put the HP UPD on local file system or a file share that is accessible to all users.
If the client users do not have administrator rights, then the installations need to be done either by someone that has
administrator rights, or by a software distribution system.
Details about specific software distribution systems (SDS) are beyond the scope of this document, however some
general guidelines can be offered. The steps in this document should be compatible with any SDS that has the
following capabilities.
Create a package that contains a program (INSTALL.EXE) and the driver.
Deploy the package to the client(s).
Log on as an administrator, and run the program (INSTALL.EXE) with HP UPD's command line options.
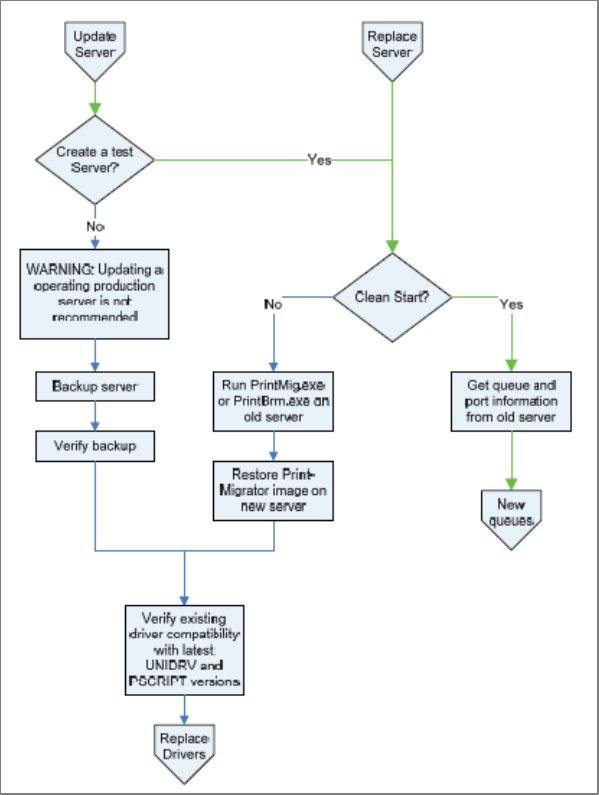
227
Update server/replace server
This section applies to print server deployments only.
Figure F-2 Print server deployments
Update server
When considering an update to an operating production server, it is strongly advised to set up a test server and
perform the initial upgrade and testing on the test server.
Create a test server?
The procedure for a clean start is similar to replacing an existing server.

228
Replace server–clean start
Get queue and port information from the old server.
The Microsoft tools prnmngr.vbs and prnport.vbs simplify the task of gathering information such as queue names,
driver names, port names, and IP addresses from the old server. This information can be used later to create the new
queues manually, or to automate the process by scripting. See Automate the process through scripting in this chapter
for more information about automation and scripting.
Replace server, import drivers and queues from the old server
Run PrintMig.exe or PrintBrm.exe on old server.
Restore Print-Migrator image on new server.
If the test server requires the same configuration as the old server, the Microsoft tools PrintMig.exe or PrintBrm.exe
can be used to import the configuration from the old server to the test server.
NOTE: Not all drivers are compatible with PintMig.exe, so the error log must be inspected after the restore. The
PrintBrm.exe tool is only available on later version Microsoft operating systems such as Windows 7 and Server 2008.
PrintBrm.exe can import from a down level OS, but it might not be able to restore to a down level OS.
Verify existing driver compatibility with the latest UNIDRV and PSCRIPT versions.
HP does not recommend updating drivers on an operating production server. Besides the obvious interruption of
printing while the drivers are being replaced, there are other unforeseen problems that can occur due to
incompatibilities between versions of shared files currently on the system and the versions of the shared files about to
be installed. See Versioning of print driver shared files in this appendix. If this is the only option, then HP recommends
that a full backup of the server be made before any changes are done, so that in the event of a problem there is a
fallback plan.
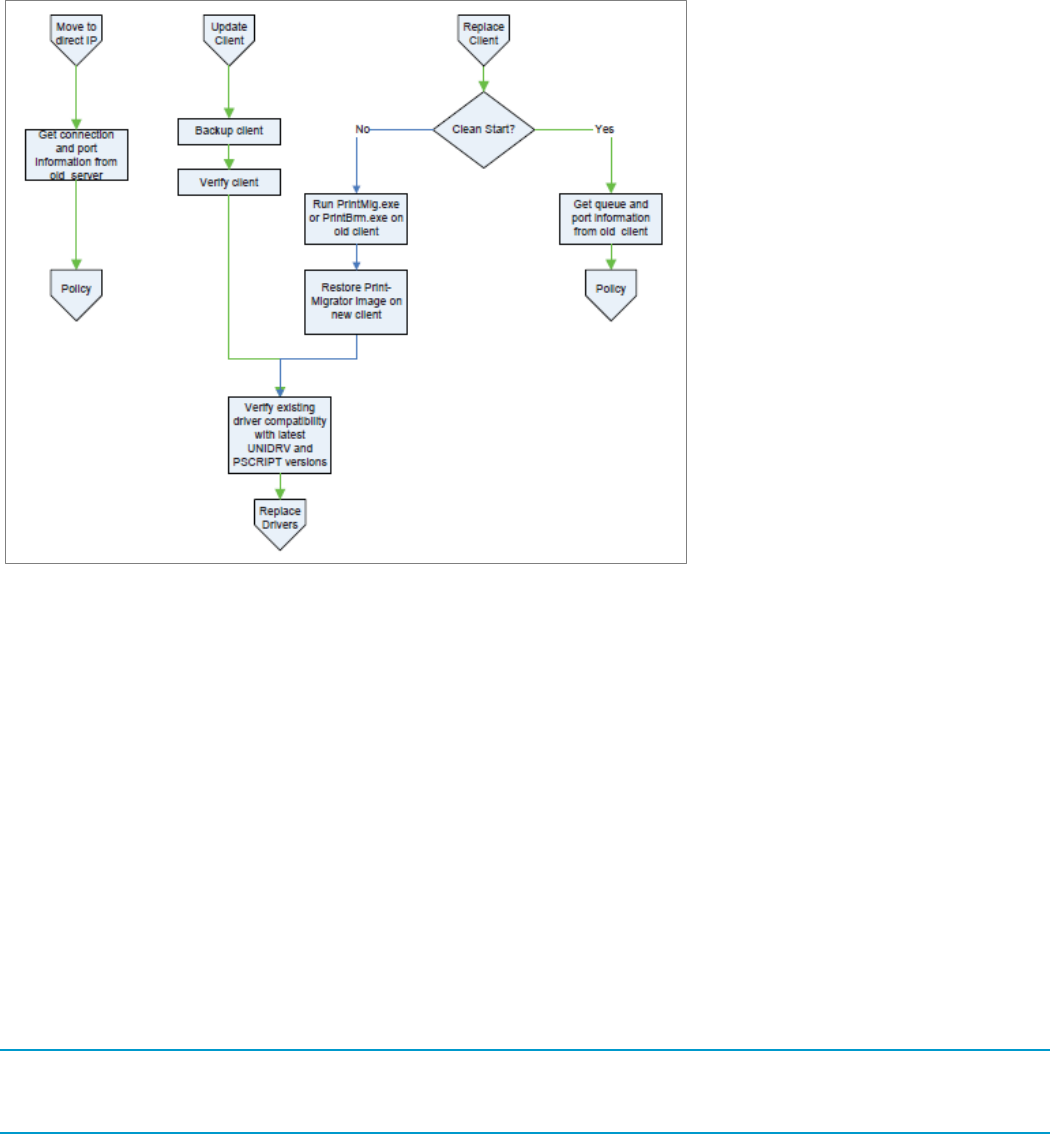
229
Client printing
This section applies to direct IP print deployments only.
Figure F-3 Client printing
Replace client, clean start
Get queue and port information from old client.
The Microsoft tools prnmngr.vbs and prnport.vbs simplify the task of gathering information such as queue names,
driver names, port names, and IP addresses from the old server. This information can be used later to create the new
queues manually, or to automate the process by scripting. See Automate the process through scripting in this
appendix for more information about automation and scripting.
Proceed to the section on Policy.
Replace client, import drivers and queues from old client
Run PrintMig.exe or PrintBrm.exe on old client.
Restore Print-Migrator image on new client.
The Microsoft tools PrintMig.exe or PrintBrm.exe can be used to import the configuration from the old client to the test
client.
NOTE: Not all drivers are compatible with PintMig.exe, so the error log must be inspected after the restore. Also, the
PrintBrm.exe tool is only available on later version Microsoft operating systems such as Windows 7 and Server 2008.
PrintBrm.exe can import from a down level OS, but it might not be able to restore to a down level OS.
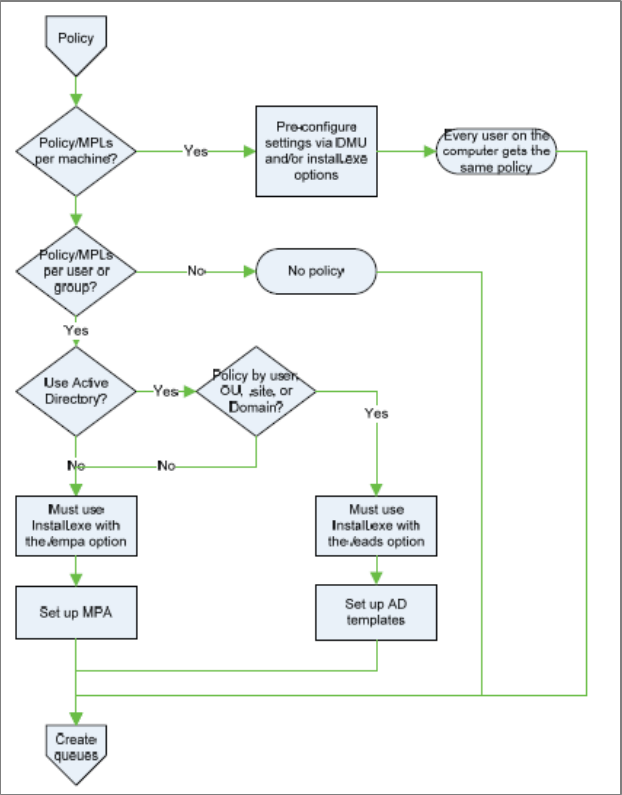
230
Update client
When updating a client, it is strongly advised to set up a test client and perform the initial upgrade and testing on the
test client. See Versioning of print driver shared files in this appendix for more information on versioning print driver
shared files.
Verify existing driver compatibility with latest UNIDRV and PSCRIPT versions.
Policy
This section applies to direct IP print deployments only.
Policy means choosing settings other than the HP UPD defaults and applying them during or after the deployment.
These settings can include who can print in color, setting grayscale or duplex to be the default setting, or assigning
printers to users based on department, floor, etc.
Figure F-4 Policy
231
Policy/MPLs per machine?
If an administrator wants to assign settings to one or more computers and wants the settings to apply to anyone that
uses those computers, then the best way to set up those policies is to configure them at the time the driver is
installed. If this is the case, refer to Create queues.
Policy/MPLs per user or group?
If the administrator wants to assign settings or printers based on who is using the computer, the choice is whether to
use Active Directory (AD).
Use Active Directory?
The decision to use Active Directory depends first on whether there is an Active Directory domain available, and the
granularity of policy desired.
To set up Active Directory Policy, the administrator defines the policy settings in a Group Policy Object (GPO) and
then assigns that GPO to the domain, site, one or more Organizational Units (OU) or users. Group Policy Objects
cannot be assigned to security groups. If the administrator wants to set up domain wide or site wide policy with
overrides for specific individuals, then AD is a viable choice. On the other hand, if the administrator wants finer
grained policy than the OU structure can provide, the options are to restructure the AD structure.
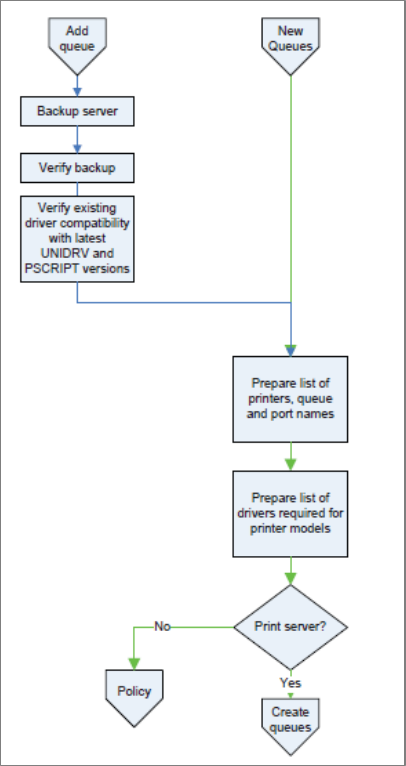
232
Add/new queues
This section applies to both server deployments and direct IP print deployments.
Figure F-5 Add queues
Add queues
When you add a new driver (HP UPD) and new print queues to an existing server, you might encounter change
management issues similar to upgrading drivers. Besides the problems that can occur from increasing the load on an
existing server, there can be unforeseen problems that occur due to incompatibles between versions of shared files
currently on the system and the versions of the shared files about to be installed. See Versioning of print driver shared
files in this appendix for more information on versioning print driver shared files. If this is the only option, then HP
recommends that a full backup of the server be made before any changes are done, so that in the event of a problem
there is a fallback plan.

233
New queues
Prepare list of printers, queue and port names, and port settings.
To create new queues on a new server or client, make a list of all the printers that are to be connected. Include the
printer IP address or hostname. You might want to also decide on a printer naming convention, location information,
and port name convention if you decide not to use default port naming.
Prepare list of drivers required for printer models.
Once you have a list of all the printers, the next step is to decide what drivers to use. For the most current list of HP
UPD supported products, see the following Web site www.hp.com/go/upd. For those products that are not supported
by the HP UPD, download the appropriate driver(s) from the manufacture’s Web site.
Print server?
The HP UPD in the Direct IP print mode supports the application of policy in a user by user basis. If this type of
configuration is desired, proceed to the Policy section.
If no per-user policy is desired, or if the HP UPD deployment is on a print server, proceed to Create queues.
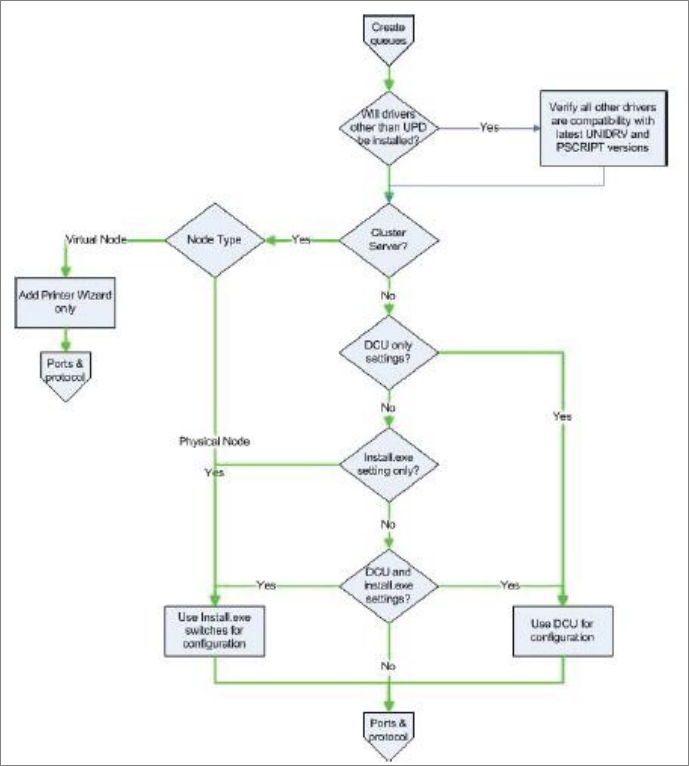
234
Create queues
This section applies to both server deployments and direct IP print deployments.
Figure F-6 Create queues
Will drivers other than the HP UPD be installed?
The HP UPD ships with a current version of the Microsoft UNIDRV and PSCRIPT5 files. If drivers other than the HP
UPD will be installed, follow these steps to verify that all drivers you plan to install are compatible.
1. Verify the other drivers are compatible with the HP UPD provided unidrv/postscript version.
2. Verify the other drivers are compatible with Microsoft's latest unidrv/postscript version.
3. Verify the HP UPD is compatible with Microsoft's latest unidrv/postscript version.
Cluster Server?
In a Microsoft Cluster server environment there are significant restrictions placed on the installation and configuration
of the HP UPD. Refer to Environment A: Windows Cluster server environment in chapter 5 for more information.

235
HP DCU only settings?
See HP DCU and INSTALL.EXE settings?
Install.exe setting only?
See HP DCU and INSTALL.EXE settings?
HP DCU and INSTALL.EXE settings?
The HP DCU is included with the HP Printer Administrators Resource Kit (HP PARK). To download the HP PARK, go
to www.hp.com/go/upd and click Download now. Verify your language, and then click your operating system. Expand
Software – Universal Print Driver. To the right of HP Printer Administrator Resource Kit, click Download. Save
the file and then click the folder and click Extract all files.
The HP DCU is available for both 32-bit and 64-bit systems, and allows an administrator to pre-configure the HP UPD
before installation. All of the queues created from this pre-configured driver have the same default settings. The HP
UPD INSTALL.EXE utility also offers the administrator a number of configuration options. To get the list, run
install.exe /? However, some of the options that are available from INSTALL.EXE are not available from HP DCU, and
vice versa. Refer to Table 4-1 Configurable functions and pre-configuration utilities for specific details. If all the options
you want are available from HP DCU, you can use HP DCU to pre-configure the driver and then use INSTALL.EXE,
or the Add Printer Wizard, to install the driver and create print queues. Or you can use INSTALL.EXE alone if it has all
the desired options.
Table F-1 HP DCU options
Features
Install
APW
APW cluster
HP DCU
AD
Alternate driver name
Y
Y
Y
Alternate Job Delivery
Y
Color Access Control (CAC)
Y
Bidi enable and disable
Y
Duplex
1
Y
Y
Dynamic mode
Y
Economode
1
Y
Y
Edgeline Quality Access Control
(QAC)
Y
Enable AD policy
Y
Grayscale as default
Y
Y
Job tracking
Y
Private Printing / Job storage
1
Y
Y
Private Print default PIN
Y
Y
Restricted mode, MPL display
only
Y
Y
Services Tab
Y
1
Y
Y
SNMP Community Name
Y3
2
Managed Printer List
Y
Y
1 HP DCU can be used with INSTALL.EXE, or APW, and must be run on the driver first.
2 Option must be specified when INSTALL.EXE is run on all physical nodes.
3 These INSTALL.EXE options apply to all queues and all users. Otherwise, the settings apply only to the current user.
Notes
HP DCU options apply to the driver and all print queues created with that driver.
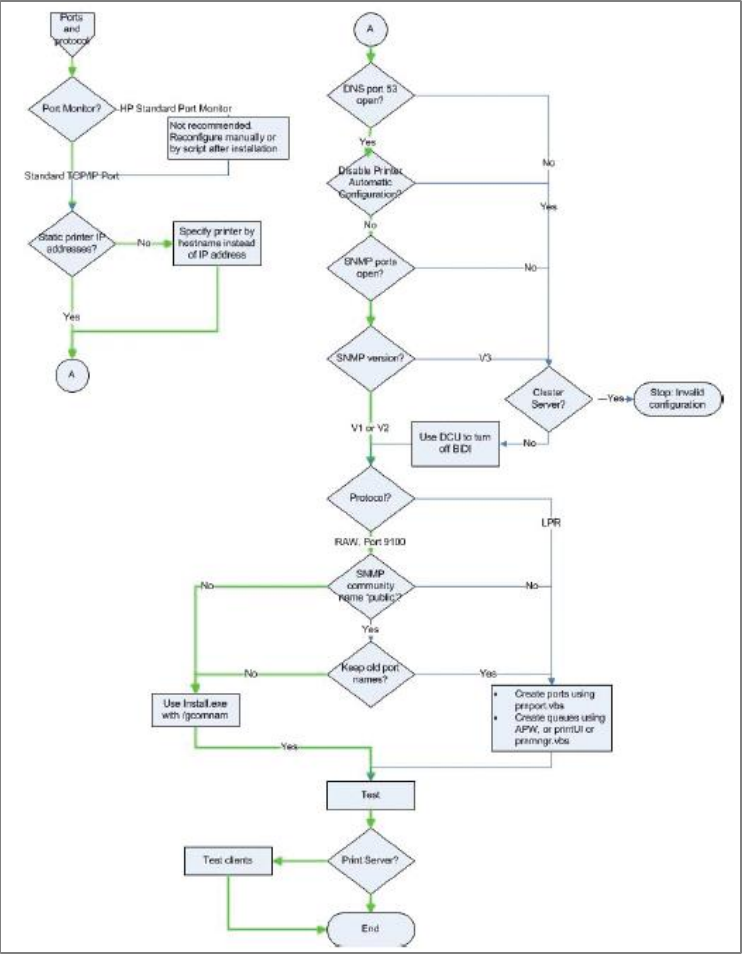
236
Only INSTALL.EXE and the Add Printer Wizard actually install the driver and create print queues. HP DCU is
used to configure the driver prior to installation; AD configures the driver at print time.
Ports and protocols
This section applies to both server deployments and direct IP print deployments.
Figure F-7 Ports and protocols
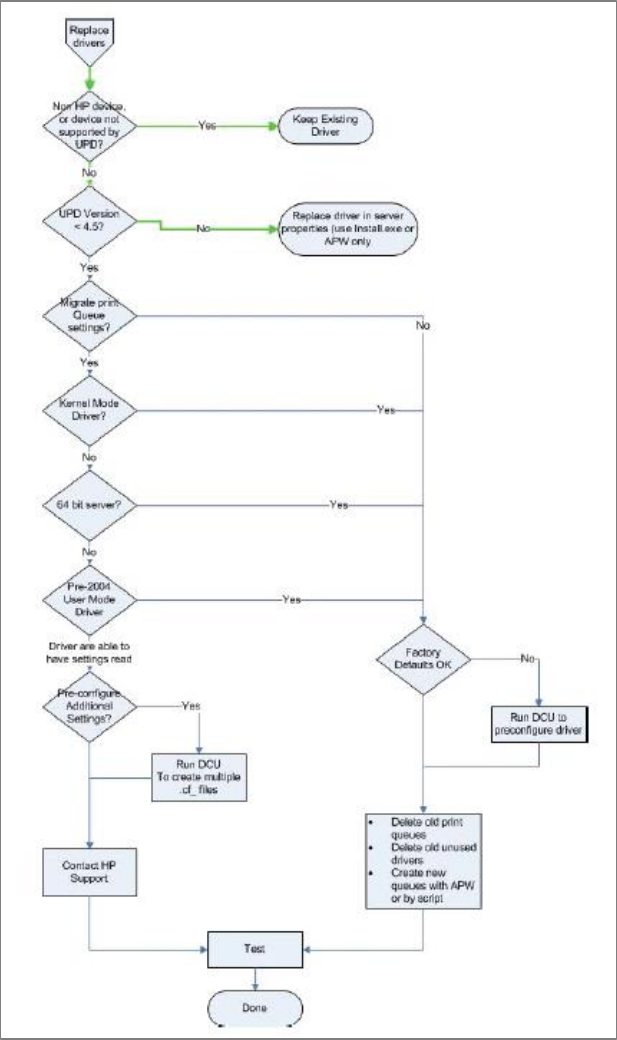
237
Port Monitor?
By default, the HP UPD uses, and HP recommends the use of, the Microsoft supplied Standard TCP/IP port monitor
for all network communications. If it is necessary to use the HP Standard Port Monitor, create and configure all the
network ports before HP UPD print queue creation, or reconfigure the ports after installation.
Replace drivers
Figure F-8 Replace drivers
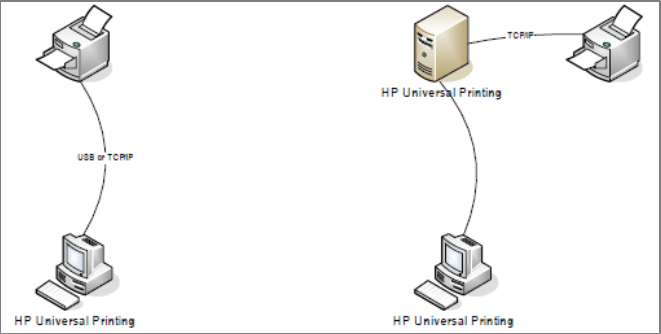
238
Versioning of print driver shared files
All of the files for all the printer drivers on Windows operating systems are located in one folder:
%WINDIR%\system32\spool\drivers\, where <environment> can be W32X86 for 32-bit processors, x64 for 64-bit
processors, etc.
The HP UPD consists of HP specific files and shared Microsoft files. The shared files are part of the UNIDRV or
postscript architectures. These files are shared by other HP drivers, and printer drivers from other manufacturers.
They can be upgraded at any time by installing a new print driver from HP or other manufacturer, or by installing a
service pack, .NET framework, or hot fix from Microsoft. For that reason, it is important to know the current version of
these files on your system, and if the installations of a driver, service pack, etc, will cause an upgrade. When an
upgrade takes place, all drivers that use those shared files will be impacted, so steps must be taken to verify that all
the drivers that use these shared files work with the latest versions. HP does not support upgrading from .5 to .6
versioning.
To determine the current version of these shared files, use the following methods.
1. Open the Devices and Printers folder, select a printer, click the Print server properties option, and then select
the Drivers tab.
2. To get the currently installed version of UNIDRV.DLL or PSCRIPT5.DLL, select an HP PS or PCL 6 driver.
3. Click Properties.
4. Scroll down until you see driver file UNIDRV.DLL, or driver File PSCRIPT5.DLL and click Properties.
5. If UNIDRV.DLL or PSCRIPT5.DLL do not appear in the list, the driver you selected is an old, “monolithic” driver
that does not use the shared Microsoft components. Select another driver and try again.
6. Select the Details tab.
7. In the Property column, see File version.
The problem described in this section is not unique to the HP UPD. It applies to all print drivers, including Product
Specific drivers and drivers from competitors of HP. It applies to both monolithic and UNIDRV / postscript based
drivers. The HP UPD, however, is the only driver that has the capability to efficiently address this problem.
In the enterprise, the goal is to standardize on a particular version of the driver, deploy it throughout the enterprise,
and stay with that version until business need dictates the need to upgrade. However, due to many legitimate
reasons, different versions of a particular driver will be deployed at any given time. It is in these situations that care
must be taken in how the different versions are deployed to avoid potential problems and unwanted side effects.
Basic Printing
Figure F-9 Basic Printing
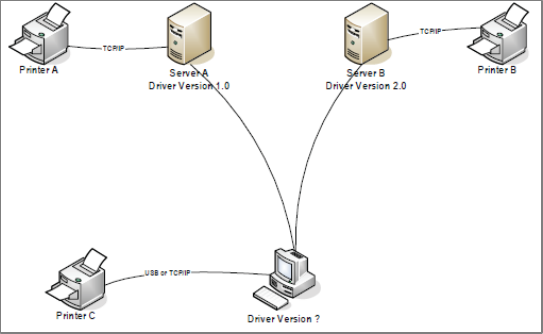
239
In both of the two topologies described in the diagram above, the version of the driver does not matter as long as it is
compatible with the printing products. On the left, only one driver needs to be installed on the client in order to print to
one or more products. On the right there is depicted a simple point and print configuration, in which only one driver
needs to be vended down from the server to the client for printing. On a print server, HP recommends using the
version specific name for the HP UPD.
Complex Print Environments
Figure F-10 Complex Print Environments
The diagram above depicts a more typical enterprise printing environment, where a client can be connected to more
than one print server and might also have directly connected products. It is in these situations that careful driver
version management is critical.
Consider the following scenario in the diagram above: The client first Plugs and Plays with printer C, causing the pre-
loaded print driver v3.0 to be installed. Next, the client connects and prints to server A. Microsoft Point and Print
recognizes that the driver version on the client (v3.0) does not match the driver version on the server (v1.0), so the
server installs driver v1.0 on the client.
Then the client connects to and prints to server B. Again Point and Print recognizes the driver version difference and
installs driver v2.0 onto the client.
The net result is that every time the client switches from one print server to another, a driver installation takes place.
For the client Plug and Play connection to printer C, the driver is also changed from the original v3.0 to either v1.0 or
v2.0.
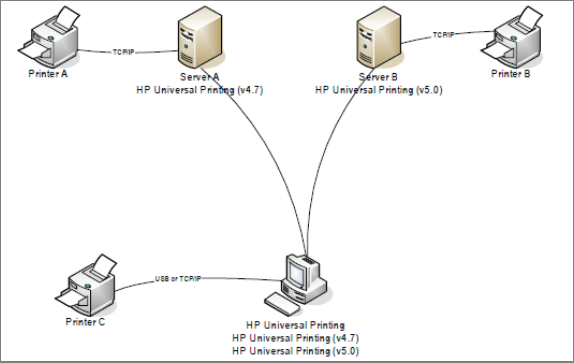
240
Solution
Figure F-11 Solution
There are two solutions to this problem: One is to make sure that every client and every server in the enterprise is
using the same version of driver. However, given the size of most networks, this solution is impractical. The other is to
use the version management feature of the HP UPD.
Starting with v4.7, HP UPD has the ability to be installed either using a generic name, (HP Universal Printing), or a
version specific name, (HP Universal Printing (v4.7)). The recommended practice is to install HP UPD on servers
using the version specific name. The diagram above describes this. Printer C Plugs and Plays with the driver named
HP Universal Printing. This driver can be v4.7, v5.x, or even v4.5. Server A downloads HP Universal Printing (v4.7)
and Server B downloads HP Universal Printing (v5.0). The net result is that there are now 3 drivers installed on the
client, and no unintended driver upgrades/downgrades taking place.
When Server A is upgraded to HP UPD 5.X, it will see that HP UPD v5.x is already installed on the client (from the
connection to Server B) and use it.
Automate the process through scripting
Get queue and port information from old server or client
The Microsoft tools prnmngr.vbs and prnport.vbs can simplify the task of gathering information such as queue names,
driver names, port names, IP addresses, etc. from the old server. This information can be used later to create the new
queues either manually or to automate the process by scripting.
Creating print queues and ports
The Microsoft tools prnport.vbs, prnmngr.vbs and printUI.dll can simplify the task of creating print queues and printer
ports.
Other scripting examples
There is a wealth of information and scripting examples available in the Microsoft Script Repository: Printing on the
Microsoft Web site at gallery.technet.microsoft.com/scriptcenter.

241
G Support information to collect
Introduction
Efficient troubleshooting leading to issue resolution requires collection of basic and extended information related to
the reported incident. Use this worksheet as the first step to contacting technical support.
This appendix contains the following sections:
Symptoms
Print driver
Environment specifications
Printer information
Application
Files to collect
Symptoms
1 What is the reported issue?
2 What are the symptoms?
3 Location of the issue (client, server, printer)?
4 Provide error messages and location source?
5 How often does problem occur?
6 Exact steps that produced the reported issue?
Print driver
Determine the HP UPD driver version
1. In the Printers folder, right-click the HP UPD driver/queue and then select Printer properties.
For a traditional mode installation, select the About tab. The version displays at the top.
For a dynamic mode installation, the version displays on the lower left.
2. Test the latest version of the HP UPD available from www.hp.com/go/upd.
Does the error occur with the latest version of the driver from hp.com?
242
Determine the installation details
1. What is the printer description language, PS or PCL 6?
2. Is this a new installation of the HP UPD, or an upgrade of an existing HP UPD installation?
3. Is the installation of the HP UPD onto the server, the print client, or vended from print server to client (PnP)?
4. What is the method of installation? Does each method produce the same result?
Add Printer Wizard
INSTALL.EXE
o Dynamic mode or traditional mode?
o Optional switches?
Point and Print vended from Microsoft Print Server
Other
o Printers folder- Printer properties - Advanced - New Driver
o Printers folder- Server Properties- Drivers tab - Add or Reinstall
o Custom printUI.dll.
5. Determine which port is in use (TCP, USB, etc.). Open the Printers folder, right-click the printer name, select
Printer properties and then click the Ports tab. Which Port is selected? What settings are defined, if applicable,
for the port (select Configure Port)?
6. Determine which print processor is in use. Open the Printers folder, right-click the printer name, select Printer
properties, select the Advanced tab, and then click the Print Processor button. Which Print processor is
highlighted/selected?
7. Was the driver pre-configured before the HP UPD installation?
a. HP Driver Configuration Utility. What settings were altered compared to the HP default *.cfg.
b. HP Driver Deployment Utility. What settings were altered compared to the HP default.
Is Printer Automatic Configuration enabled (default)?
Printer Properties→Device Settings tab→Installable Options→Automatic Configuration→Update Now.
What is the “Configuration Status” provided on the About tab?
Printer Properties→About, see “Configuration Status.”
Management Tools
1. Driver Configuration Utility version? Select Help | About in the HP Driver Configuration Utility.
2. AD Template? Version is part of the template’s file name.
3. HP DDU version? Select the About button.

243
Environment specifications
Version of Microsoft operating system (print server and print client)
To obtain system information, use any of the following methods.
Brief–click Start, click Run, and then type WINVER.EXE
Extended–click Start, click Run, and then type cmd.exe to open the command prompt dialog box. Type /k
systeminfo.exe at the command prompt.
Complete–click Start, click Run, and then type MSINFO32.
Microsoft Event log (spooler errors, etc)?
Click Start, click Run, and then type Eventvwr.msc.
Printer connectivity
1. Is the printer direct connected? If so, how is it connected, USB or Parallel?
2. Network and connectivity settings
a. IP addresses
1 Printer server
2 Print client
3 Print product
b. Print path network availability (client/server/printer). Execute the following commands:
1 ping ip_address
2 telnet ip_address
3 Tracert ip_address
4 http://device_ip_address
https://device_ip_address
c. Is SNMP enabled?
1 Is it able to be routed in your network?
2 SNMP Community Name. prnport -l
Citrix
1. Server–Citrix server version
2. Client–operating system and Citrix client version
2. Auto created printers configuration
a. Client printers or session printers?
b. If client printers, what driver is mapped to the client for auto-creation (Citrix UPD; HP UPD; HP model specific
driver)?
244
Microsoft Terminal Services
1. Version of the Terminal Server.
2. RDP client version.
3. Operating system version of client.
4. What driver is mapped to be redirected to the printer?
5. Does the same issue exist outside of a Terminal Server session?
Novell
1. Version of Novell print server.
2. Installation method of print queue on server (i.e.- iManager).
3. Version of iPrint client.
4. Does same issue exist printing to a non-Novell print queue?
Printer information
1. Printer model name
2. Printer model firmware. Methods to obtain:
Printer control panel (print a configuration page).
HP Embedded Web Server (http://ip_of_print_device). See Device Configuration “Firmware Datecode.”
HP Web Jetadmin.
3. Error information displayed or printed out from the product
a. Error message content
b. Event log
Displayed from the control panel or HP Embedded Web Server.
Printed on the configuration page (last 3 items).
Printed from the control panel or HP Embedded Web Server (entire log).
4. Device configuration page. The product configuration can be obtained by using either of the following methods.
Printing at the printer control panel.
By printing a test page. Open the Printers folder, right-click the printer name, select Printer properties, and
then click the Print Test Page button.
Application
Application(s) affected and application version number. Open the Help menu in the application and select About
to find the application version number.
Test documents specific to reproducing the issue.

245
Files to collect
The following list contains information that might be requested to continue troubleshooting for the purpose of
debugging, analyzing and creating reproducible test cases.
1. MSINFO32: Click Start, click Run, and then type MSINFO32.exe. Save the *.NFO file to disk.
2. System Information: From a command prompt, pipe the output to file: C:\>systeminfo.exe >systeminfo.txt.
3. Microsoft Support Diagnostics Toolkit (MSDT): For details and information refer to Microsoft Support Diagnostics
Self-Help Portal: https://home.diagnostics.support.microsoft.com/SelfHelp
4. Microsoft Event Viewer Logs: Click Start, click Run, and then type Eventvwr.msc. Select the tree node, and from
the Action menu select Save Log File As... to save the log file.
5. PRN file: Application dependent. Example: Click Start, click Run, and then type WRITE.EXE, select File and then
Print, select Print To File and save to FILENAME.PRN
6. Application file: Provide a sample file from the application which created the reported issue.
7. Print a test page: Open the Printers folder, right-click the printer name, select Printer properties, and then click
the Print Test Page button. Scan the output page to a distributable computer file format. Options to create the
page include the following.
Device Configuration Page: Print from the printer control panel.
Printers folder→Printer properties→Print Test Page.
5. Scan of printed document: After printing a page, use a colored pen to mark up and identify the issue with the
printed output. Scan the marked up page back to a distributable computer file format.
6. Driver Configuration Utility (HP DCU): Provide the pre-configuration files *.cfg or *.cfm
7. Device Network Settings: Methods available to capture information
Telnet to the product, output all information to console, select upper left icon and right mouse, EDIT-SELECT-
ALL. Repeat right mouse, EDIT-COPY. Paste into file and save.
Use HP Web Jetadmin views to create an export file
HP Embedded Web Server to printer: http://ip_of_printdevice
8. Screen shots: Error dialogs, user interface, etc.
9. Microsoft crash dump file
Server 2008: support.microsoft.com/kb/254649 (dump files, when enabled, are stored by default in
%SystemRoot%\Minidump folder).
Windows 7: support.microsoft.com/kb/931673 (dump files, when enabled, are stored by default in
Drive:\Users\UserName\AppData\Local\Temp)
NOTE: If a process hangs or is very slow, starting with Windows 7, the task manager has the ability to take a
process memory dump file that can be useful to the lab to determine what the system is doing or waiting for. To
create a dump file:
1. Start Task manager
2. Go to the processes tab.
3. Select the process that is hanging. A good place to start is spoolsrv.exe
4. Right click, and select Create Dump File.
5. Make a note of the location where the system stored the dump file. The location is not user selectable.
246
10. Directory file listing:
C:\>DIR %SYSTEMROOT\system32\spool\drivers /s >C:\w32x86.tx
11. SetupAPI.log: Located in %SYSTEMROOT%
12. Screen shots: Error dialogs, user interface, etc.
13. Registry exports (three targets)
regedit.exe /e c:\updreg1.txt
"HKEY_LOCAL_MACHINE\SOFTWARE\Hewlett-Packard\HP Print Settings"
“HKEY_LOCAL_MACHINE\SOFTWARE\Hewlett-Packard\HP SSNP”
“HKEY_CURRENT_USER\Software\Hewlett-Packard\HP Print Settings”
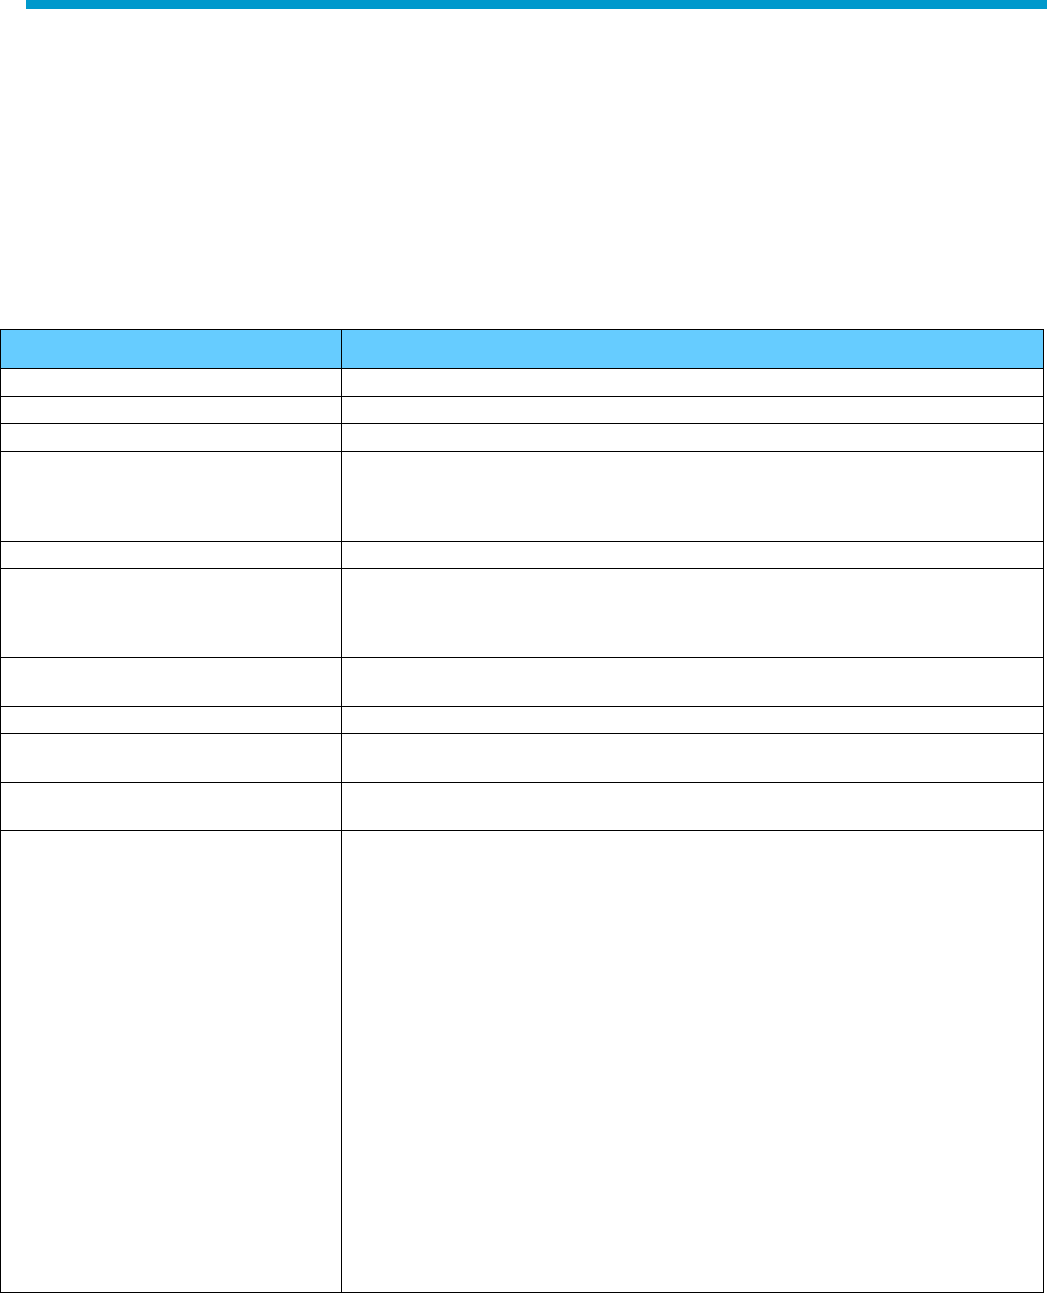
247
H Glossary of terms
Term
Definition as related to the HP UPD
Bidirectional Communication (bidi)
See printer automatic configuration
hpcpuXXX.cf_ file
Driver Configuration Utility file used for pre-configuration of the HP UPD driver
hpcpuXXX.cfm file
Driver Configuration Utility file used for pre-configuration of the HP UPD driver
Capabilities mode
Capabilities mode is a generic term to describe how settings are shared between the
firmware and driver. Starting in UPD HP UPD 6.4.1, firmware on supported devices
can share the capabilities of the device and input/output devices with the HP UPD to
configure settings directly in the HP UPD.
Device
The physical output device at the end of the print connection (i.e. a printer or MFP).
Device mode
Device mode is a generic term to describe how settings are shared between the
firmware and driver. Device mode is how prior releases of the firmware shared device
information with HP UPD such as part numbers and model numbers with the HP UPD
mapping the device information to settings in the driver.
Driver Deployment Utility (HP DDU)
Enables print administrators to create driver packages that include the print driver files
and code needed for deployment to run on a client computer.
Product–specific driver
The driver is specific to a particular model of print product and not universal.
Driver Configuration Utility (HP DCU)
Used to edit the configuration file associated with a particular driver. The configuration
file controls the print driver settings and takes effect when the driver is installed.
DOT4
DOT4 is based on the IEEE 1284.4 protocol that allows a multi-communication
through single port; often associated with USB ports.
Driver Name
By default, the HP UPD installation sets the printer name to match the driver name for
the first installed printer. The driver name is defined by the vendor and read by the
Microsoft operating system from the driver's *.INF file. To view the "Driver" name, from
the Printer's folder, select an installed printer, right mouse click and select Properties
or Printer Properties, go to the Advanced Tab, and locate the field name "Driver."
During the HP UPD installation using Add Printer Wizard, the option exists to install
the HP UPD as either non-version specific or version specific. Selecting either option
provides the same set of driver features.
The version specific option allows installation of two or more HP UPD driver versions
on to the same system. The HP UPD version-specific driver name examples:
HP Universal Printing PCL 6 (v6.3.0)
HP Universal Printing PCL 6 (v6.1.0)
HP Universal Printing PS (v6.0.0)
With the non-version specific option, all printer names will use the same driver version
of the installed HP UPD. The HP UPD non-version-specific driver names are defined
below:

248
Term
Definition as related to the HP UPD
HP Universal Printing PCL 6
HP Universal Printing PS
As a best practice, HP recommends installing the HP UPD in version specific mode to
best support control of driver version upgrades, and new product introductions. This
benefit allows multiple versions of the HP UPD to be installed onto the same system.
Administrators can create new print queues for new print products without the need to
recertify/retest existing deployed products to the new driver version.
Version specific and non-version specific HP UPD installations can exist on the same
system. The same HP UPD version can be installed two times onto the same system
using the HP UPD version specific install, followed by the HP UPD non-version
specific install option. The result is two different driver names, both using the same
driver version.
HP Universal Printing PCL 6
HP Universal Printing PCL 6 (v6.3.0)
Driver Store
After a print driver has been installed onto the system, the print driver is added to the
Windows driver store. The driver store facilitates installation of a new printer without
requiring the user to specify the driver file location using "Browse" , "Have Disk" or
other Microsoft supported methods.
Duplex
Printing on both sides of a single sheet; opposite of the terms Simplex or Single Side.
Dynamic mode
Selected during installation of the HP UPD and opposite of traditional mode. Dynamic
mode locates network printers within your subnet or by providing the printer name or
address on any subnet of the network. Dynamic mode is not directly tied to one
product connection.
Enterprise Auto Configuration (EAC)
See printer automatic configuration.
HP Embedded Web Server (EWS)
HP Embedded Web Server in the HP printing product accessible by a browser over
HTTPS that allows status and configuration access to the product.
Graphics Device Interface (GDI)
The Microsoft® Windows® graphics device interface (GDI) enables applications to
use graphics and formatted text on both the video display and the printer. Windows-
based applications do not gain access to the graphics hardware directly. Instead, GDI
interacts with product drivers on behalf of applications. msdn.microsoft.com/en-
us/library/dd145203(VS.85).aspx
Generic Printer Description (GPD)
Microsoft's Generic Printer Description that uses Microsoft Unidrv architecture to
present printer features in the user interface allowing configuration of the printer. The
GPD also contains the commands that allow UNIDRV to generate printer data for
output from Windows based applications.
Group Policy Management Console
(GPMC)
Microsoft tool used for management of group policy objects in an Active Directory.
hpcuXYZc.inf
Driver information file for HP UPD 32 Bit PCL 6
hpcuXYZd.inf
Driver information file for HP UPD 32 Bit PS
hpcuXYZu.inf
Driver information file for HP UPD 64 Bit PCL 6
hpcuXYZv.inf
Driver information file for HP UPD 64 Bit PS
In Box Driver
HP provided print drivers distributed with the Microsoft operating system.
[filename].inf
Driver information file designed within required Microsoft operating system
specifications used during installation of the Windows print driver.
msdn.microsoft.com/ en-us/library/ff560914.aspx
Job Capability Ticket (JCT)
A file that defines specifications for the target product.
LEDM
Low End Device Model

249
Term
Definition as related to the HP UPD
Multicast Domain Name Service (mDNS)
Multicast DNS (aka Zeroconf, aka Apple Rendezvous, aka Apple Bonjour), effectively
allowing name resolution by common Unix®/Linux programs in the ad-hoc mDNS
domain.local. Used by the HP UPD to discover printers in dynamic mode and by the
Managed Print Administrator tool.
HP Managed Print Administrator (HP
MPA)
Separate standalone utility used for managing HP UPD policies and created printer
lists (no longer supported).
Managed Printer List (MPL)
Printer list created within HP MPA for printer discovery in HP UPD dynamic mode.
Manage Print Policy (MPP)
Created in HP MPA, user based policies that control HP UPD functionality.
Model
Windows XP, Windows Server 2008, and Windows Vista printer folders display a
"Model" field for installed printer names. The "Model" field is the same as the "Driver"
name assigned to the printer. Starting with Windows 7 and Windows Server 2008R2,
Microsoft removed the "Model" field from display within the Printer's folder and Print
Management Console.
Net Driver HPZ12 service
HP UPD installed service that provides bi-directional I/O for the HP UPD, outside the
context of the user, application, or print job.
PCL
Printer Control Language
PML Driver HPZ12 service
HP UPD installed service that provides bi-directional I/O for the HP UPD outside the
context of the user, application, or print job.
PNG Portable Network Graphics
PnP Point and Print. Context dependent, sometimes used to refer to as Plug and
Play.
Port Monitor
The port monitor uses Simple Network Management Protocol (SNMP) to read the
configuration of the target print product and to determine the product's detailed status.
PPD
Postscript Printer Description
Printer automatic configuration
Executed at installation or using the feature Update Now within the HP UPD driver
user interface from the Device Settings tab. The HP UPD will communicate with the
device to retrieve device capabilities directly from the device. Information passed
between the device and HP UPD can be in the form of a Job Capability Ticket over
HTTP, SNMP response over the HP UPD, Dot4 or LEDM.
Printers Folder
The Windows folder that contains a listing of all installed printers, providing access to
administrator functions to define a printer's settings, install new printers, or delete
installed printers. Printer objects (printer names) exist in the Printers folder, which are
also accessible from the Microsoft Print Management Console (PMC).
Printer (Print Name, Printer Object)
An arbitrary name assigned to identify a print queue; also known as the printer object.
During an application FILE-Print operation, end users select the printer name to define
the output device for their print job. By default, the HP UPD install sets the HP UPD
printer name to be the same as the driver name. For example, the printer name would
be “HP Universal Printing PCL 6.” If the UPD version specific install method is
selected, the printer name would be “HP Universal Printing PCL 6 (v6.3.0).” For any
installed printer, the Microsoft default printer will have a check mark next to the
printer's "Name."
Print Queue
The print queue refers to an instance of an installed printer name with a driver name
and printer port assigned. The terms Print Queue and Printer are often used
interchangeably.
PSCRIPT5.DLL
Microsoft postscript specific print driver file used for Universal Print driver functionality.
SAG
System Administrator’s Guide
Share Name
An installed printer name that is shared on the network for connecting clients for Point
and Print connectivity.
Simplex
Single sided printing, opposite of the term duplex.
SNP
Status Notification Pop-up.
Traditional Mode/Static Mode
Selected at the time of HP UPD installation and opposite of dynamic mode, traditional
mode (sometimes referred to as Static mode) behaves like a product-specific driver.
During installation, the driver is associated with a specific printer, creating a
permanent instance of the driver.
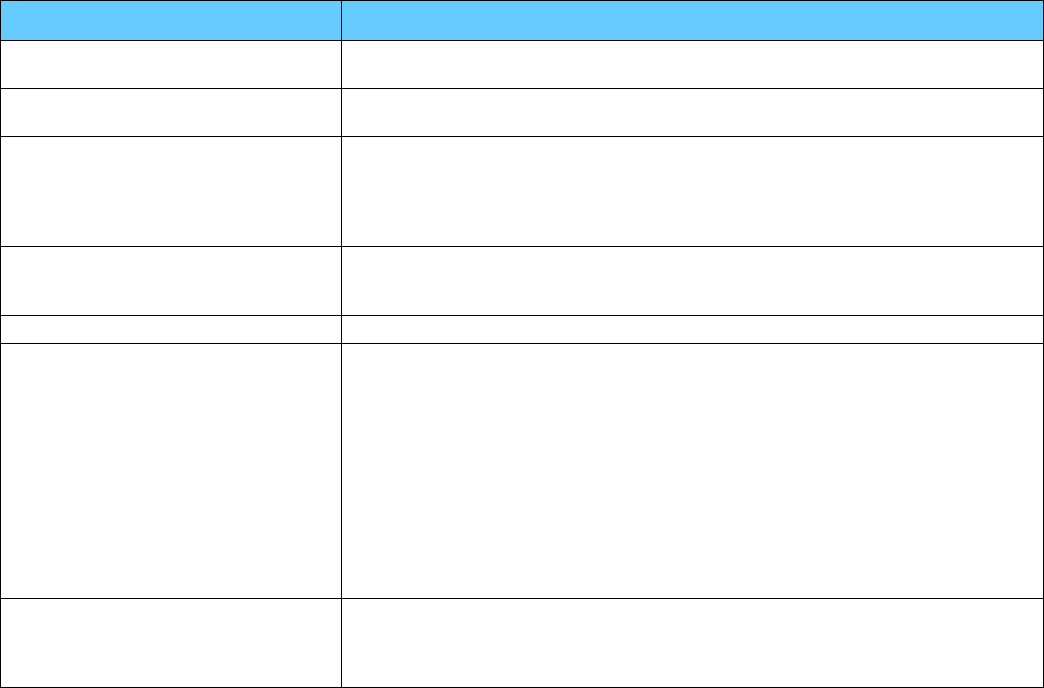
250
Term
Definition as related to the HP UPD
Unidrv
The Universal Print Driver (Unidrv) is the Microsoft Corporation's standard print driver
for non-PostScript printers
UPD Version
A product version number assigned to each release of the HP Universal Print Driver.
Examples include version number 5.9.0, 6.1.0, 6.3.0.
UPD Version Specific
HP installed universal print driver that contains the HP UPD's release version as part
of the "Driver" name string. For example, "HP Universal Printing PCL 6 (v6.3.0)".
Using the version specific driver name allows more than one version of the HP UPD to
be installed onto the same system. The features of the driver are the same as the HP
UPD Non-Version Specific.
UPD Non-Version Specific
HP installed universal print driver that does not contain the HP UPD's release version
as part of the driver name string. For example, "HP Universal Printing PCL 6". The
features of the driver are the same as the HP UPD Version Specific.
Update Now
See Printer automatic configuration
WHQL
Windows Hardware Quality Lab is a testing process required to receive the "Certified
for Windows" logotype. This certifies the HP UPD driver has completed testing by
Microsoft before HP released the driver. Drivers that do not have WHQL certification
at time of installation will prompt “The software you are installing for this hardware
[DEVICE] has not passed Windows Logo testing... Continue Anyway / Stop
Installation.”
On Windows 8/8.1 64-bit and later Windows operating systems, the user gets the
error “Printer was not installed”. If you need to install a non-WHQL’d driver, you will
need to reboot selecting F8 to go into a troubleshooting mode, select Disable Driver
Signature Enforcement and then install the driver. After installing, you will need to
reboot again to get out of the troubleshooting mode.
WJA
HP Web Jetadmin software is a print and imaging peripheral management software
tool that helps optimize product utilization, control color costs, secure products, and
streamline supplies management by enabling remote configuration, proactive
monitoring, security, troubleshooting, and reporting of printing and imaging products.

251
© 2017 HP Development Company, L.P.
www.hp.com
