HP Digital Sender Flow 8500, ScanJet Enterprise N9120 Hardware Installation Guide 8500 Fn2 Capture Workstation, Scan Jet Scanner 설치 설명서 C05556161
User Manual: HP HP Digital Sender Flow 8500 fn2 Capture Workstation, HP ScanJet Enterprise Flow N9120 fn2 Scanner - 설치 설명서
Open the PDF directly: View PDF ![]() .
.
Page Count: 8
N9120 fn28500 fn2
EN Installation Guide
ZHCN 安装指南
KO 설치 설명서
ZHTW 安裝指南
ID Panduan Pemasangan
TH คู่มือติดตั้ง
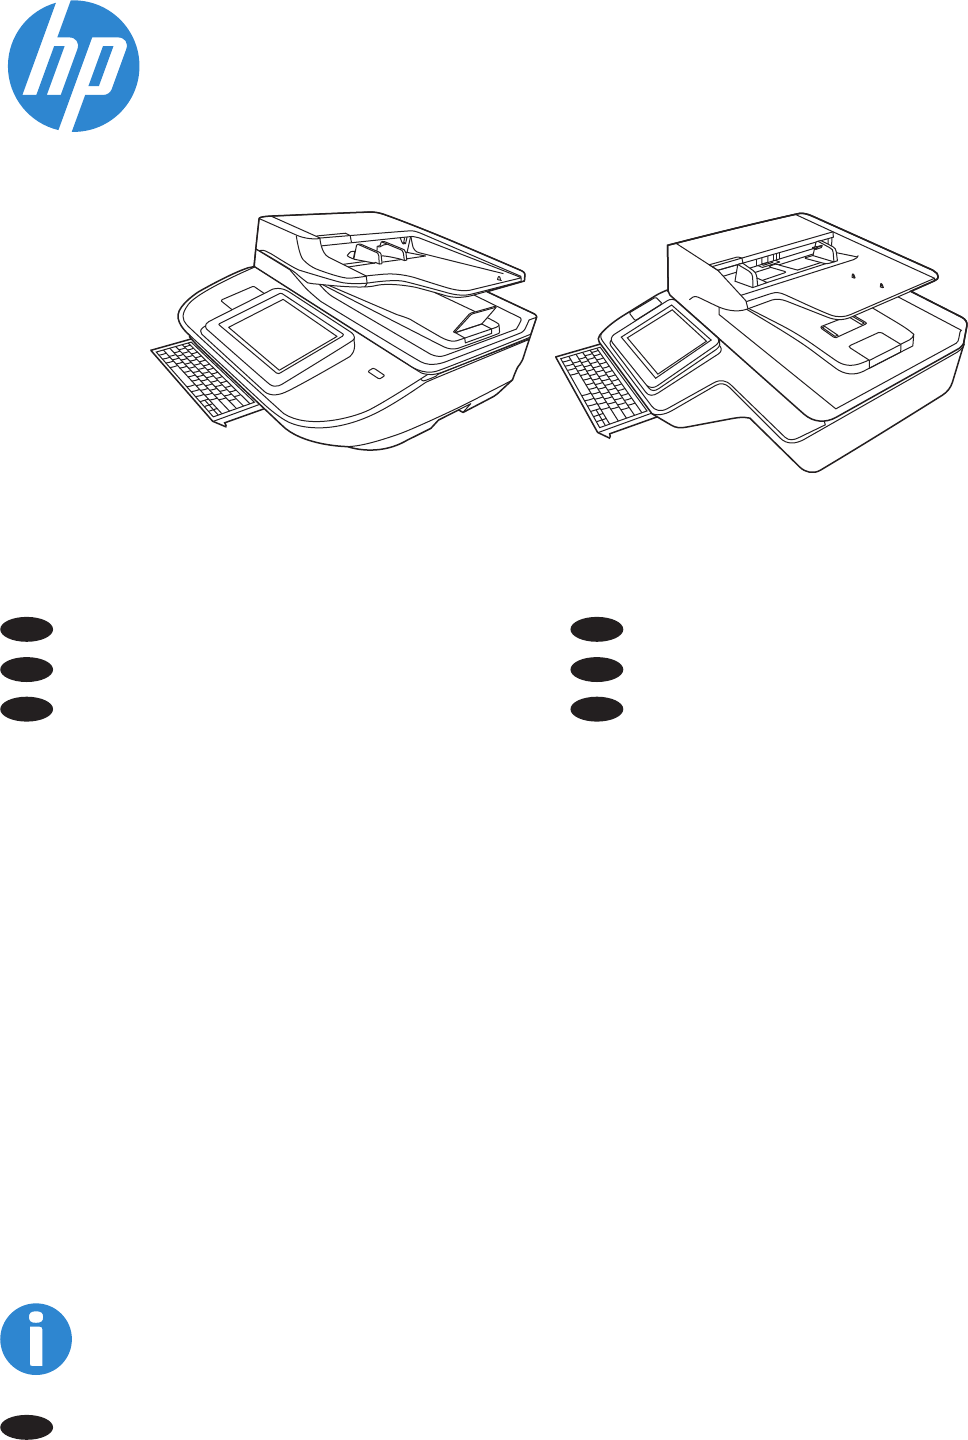
HP Digital Sender Flow 8500 fn2 Document Capture Workstation,
HP ScanJet Enterprise Flow N9120 fn2 Document Scanner
www.hp.com/support
www.register.hp.com
ES Lea esto primero
2
1
2
2013 Hewlett-Packard Development Company, L.P.
HP COLOR LASERJET ENTERPRISE
FLOW MFP XXXX
www.hp.com
2017 Hewlett-Packard Development Company, L.P.
HP COLOR LASERJET ENTERPRISE
FLOW MFP XXXX
www.hp.com
2013 Hewlett-Packard Development Company, L.P.
HP COLOR LASERJET ENTERPRISE
FLOW MFP XXXX
www.hp.com
2017 Hewlett-Packard Development Company, L.P.
HP COLOR LASERJET ENTERPRISE
FLOW MFP XXXX
www.hp.com
8500 fn2 N9120 fn2
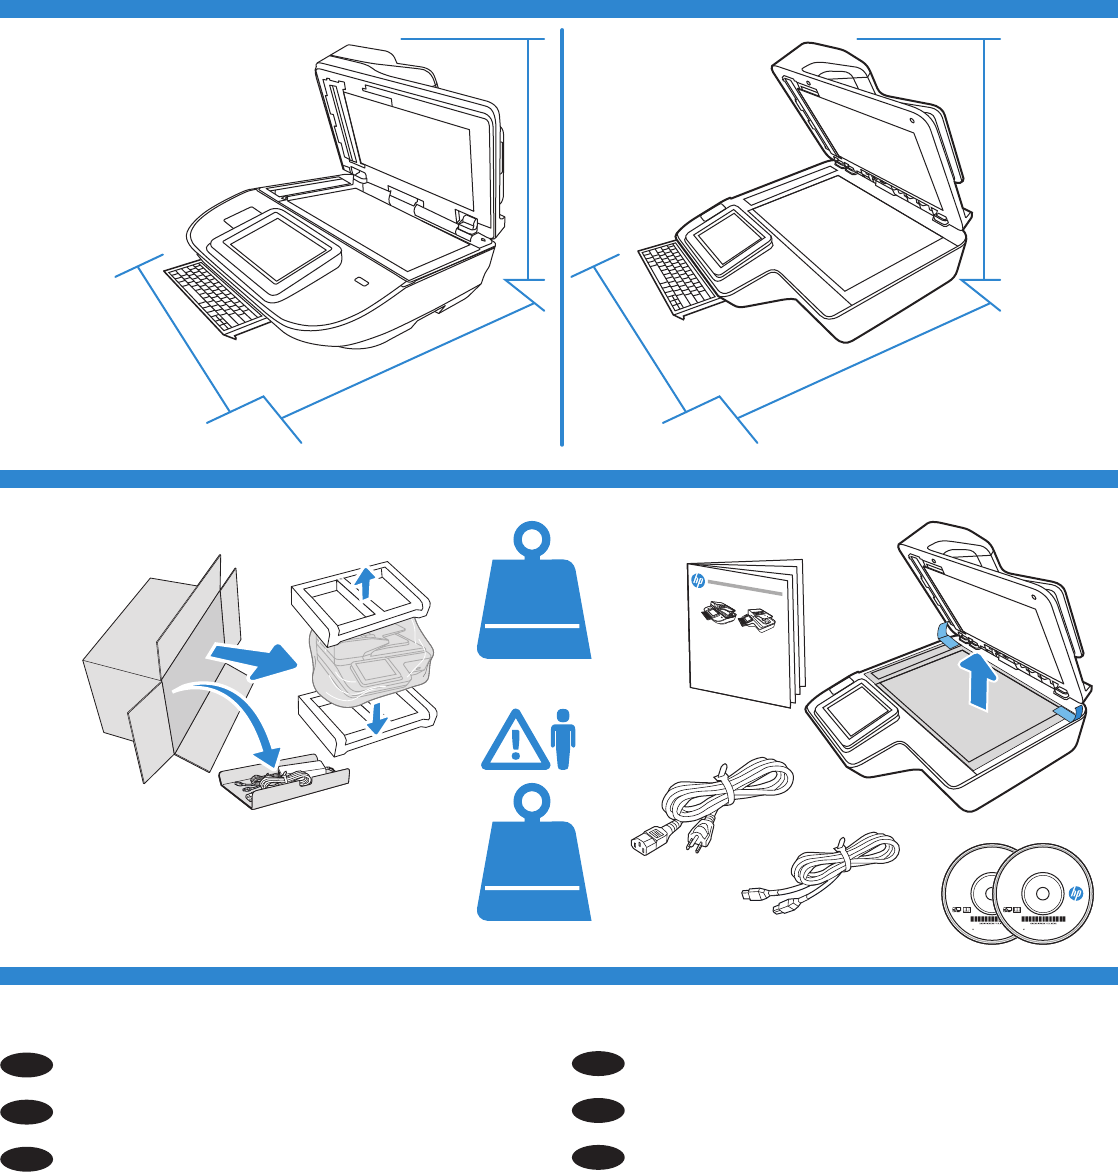
622.3 mm
(24.5 in)
601.98 mm
(23.7 in)
754.38 mm
(29.7 in)
515 mm
(20.28 in)
717 mm
(28.23 in)
512 mm
(20.2 in)
17.46kg
38.5 lb
8500fn2
21.4 kg
47.2 lb
N9120fn2
EN Remove all tape and packing material from the scanner.
ZHCN 从扫描仪外部取下所有胶带和包装材料。
KO 스캐너를 포장한 테이프와 포장재를 모두 제거합니다
ZHTW 請取下掃描器的所有膠帶與包裝材料。
ID Lepas semua perekat dan bahan kemasan dari pemindai.
TH แกะเทปและวัสดุบรรจุภัณฑ์ทั้งหมดออกจากสแกนเนอร์
3
3
4.1 4.2
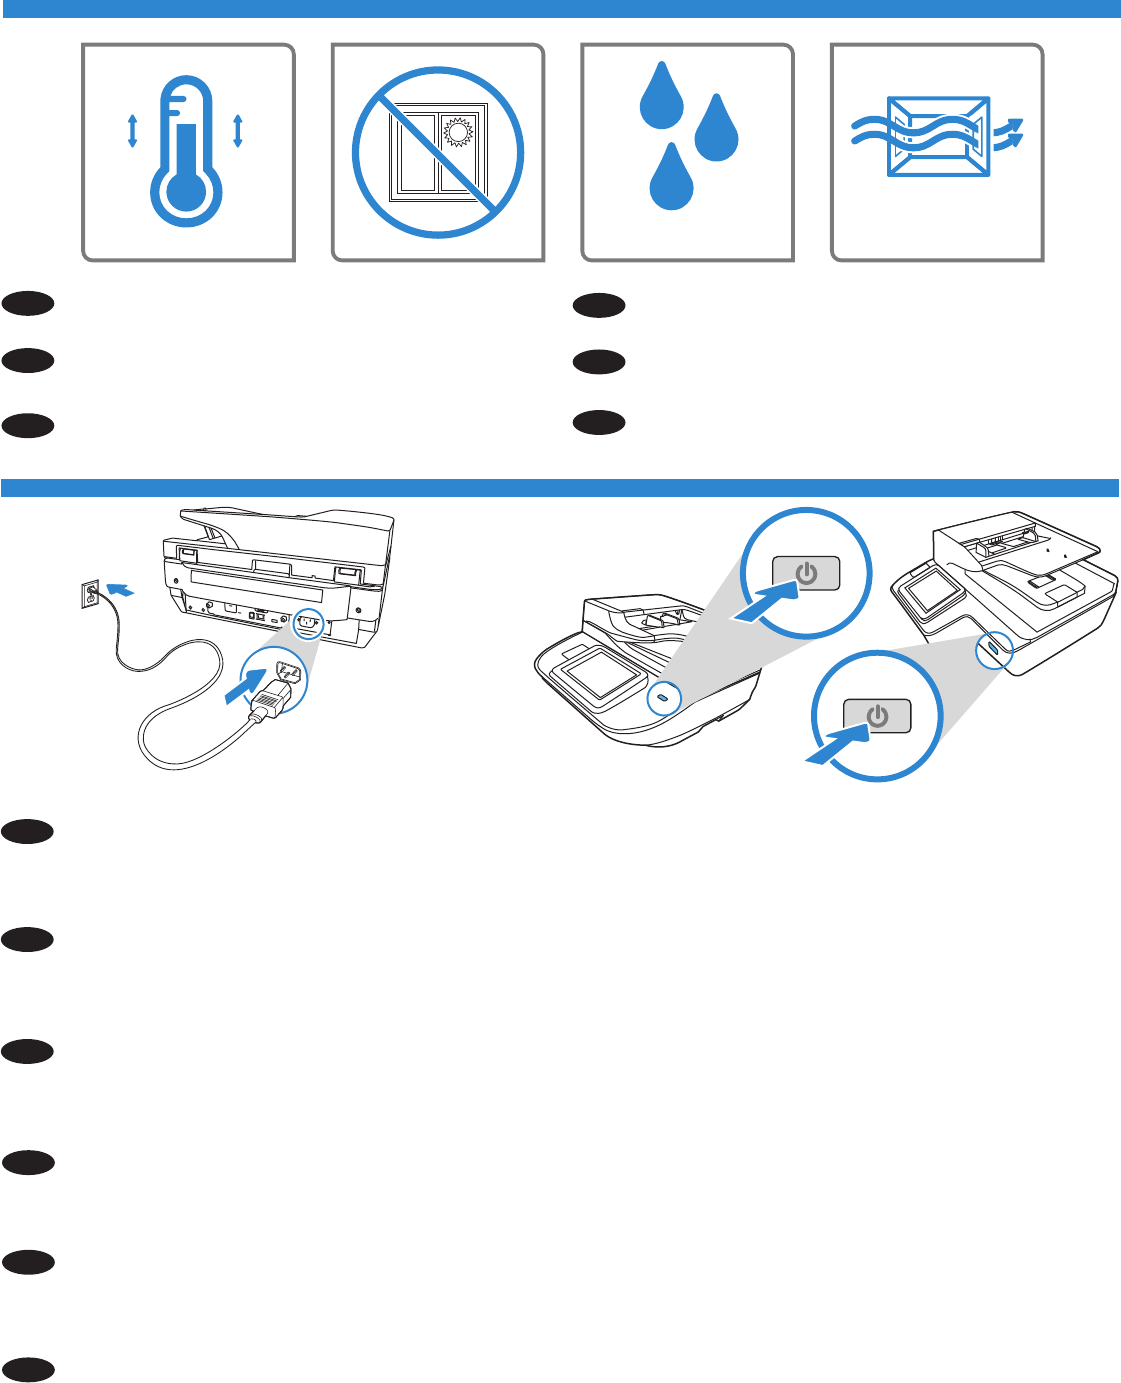
30% - 70%
30°C
15°C
86°F
59°F
EN Select a sturdy, well-ventilated, dust-free area, away from direct
sunlight to position the scanner.
4.1 Connect the power cable between the scanner and a grounded AC outlet.
4.2 Turn on the scanner. On the control panel, set the language, the date/time format, and the time zone.
CAUTION: To prevent damage to the scanner, use only the power cable that is provided.
EN
ZHCN 选择一个稳固、通风良好、无尘且远离日光直射
的区域放置扫描仪。
4.1 用电源线将扫描仪连接到接地的交流电源插座。
4.2 打开扫描仪。 在控制面板上,设置语言、日期/时间格式和时区。
注意:为防止损坏扫描仪,请仅使用扫描仪附带的电源线。
ZHCN
KO 직사광선을 피해 바닥이 단단하고 환기가 잘 되며 먼지가 없는
장소를 선택하여 스캐너를 내려 놓습니다
4.1 전원 케이블을 스캐너와 접지된 콘센트 사이에 연결합니다
4.2 스캐너를 켭니다 제어판에서 언어 날짜시간 형식 및 시간대를 설정합니다
주의 스캐너의 손상을 방지하려면 제공된 전원 케이블만 사용하십시오
KO
ZHTW 請選擇一個平整穩固、通風良好且沒有灰塵的區域放置本掃描
器,並避免陽光直射。
4.1 使用電源線連接掃描器及接地的 AC 插座。
4.2 開啟掃描器。 在控制面板上設定語言、日期/時間格式與時區。
注意:為了避免掃描器損壞,請僅使用隨附的電源線。
ZHTW
ID Untuk meletakkan pemindai, pilih tempat yang kokoh, berventilasi
baik, bebas debu, dan jauh dari sinar matahari langsung.
4.1 Sambungkan kabel daya antara pemindai dan stopkontak AC yang diarde.
4.2 Hidupkan pemindai. Pada panel kontrol, atur bahasa, format tanggal/waktu, dan zona waktu.
PERHATIAN: Untuk mencegah kerusakan pada pemindai, gunakan hanya kabel daya yang disertakan.
ID
TH วางเครื่องพิมพ์บนพื้นผิวเรียบ อากาศถ่ายเทสะดวก ปราศจากฝุ
่น
และไม่โดนแสงแดดโดยตรง
4.1 เชื่อมต่อสายไฟจากเครื่องสแกนเข้ากับเต้าเสียบ AC ที่มีการต่อสายดินไว
4.2 เปิดเครื่องสแกน บนแผงควบคุม ให้ตั้งค่าภาษา รูปแบบวันที่/เวลา และโซนเวลา
ข้อควรระวัง: ในการป้องกันไม่ให้เกิดความเสียหายต่อเครื่องสแกน ใช้สายไฟที่ให้มาพร้อมกันเท่าน
ั้น
TH
4
5
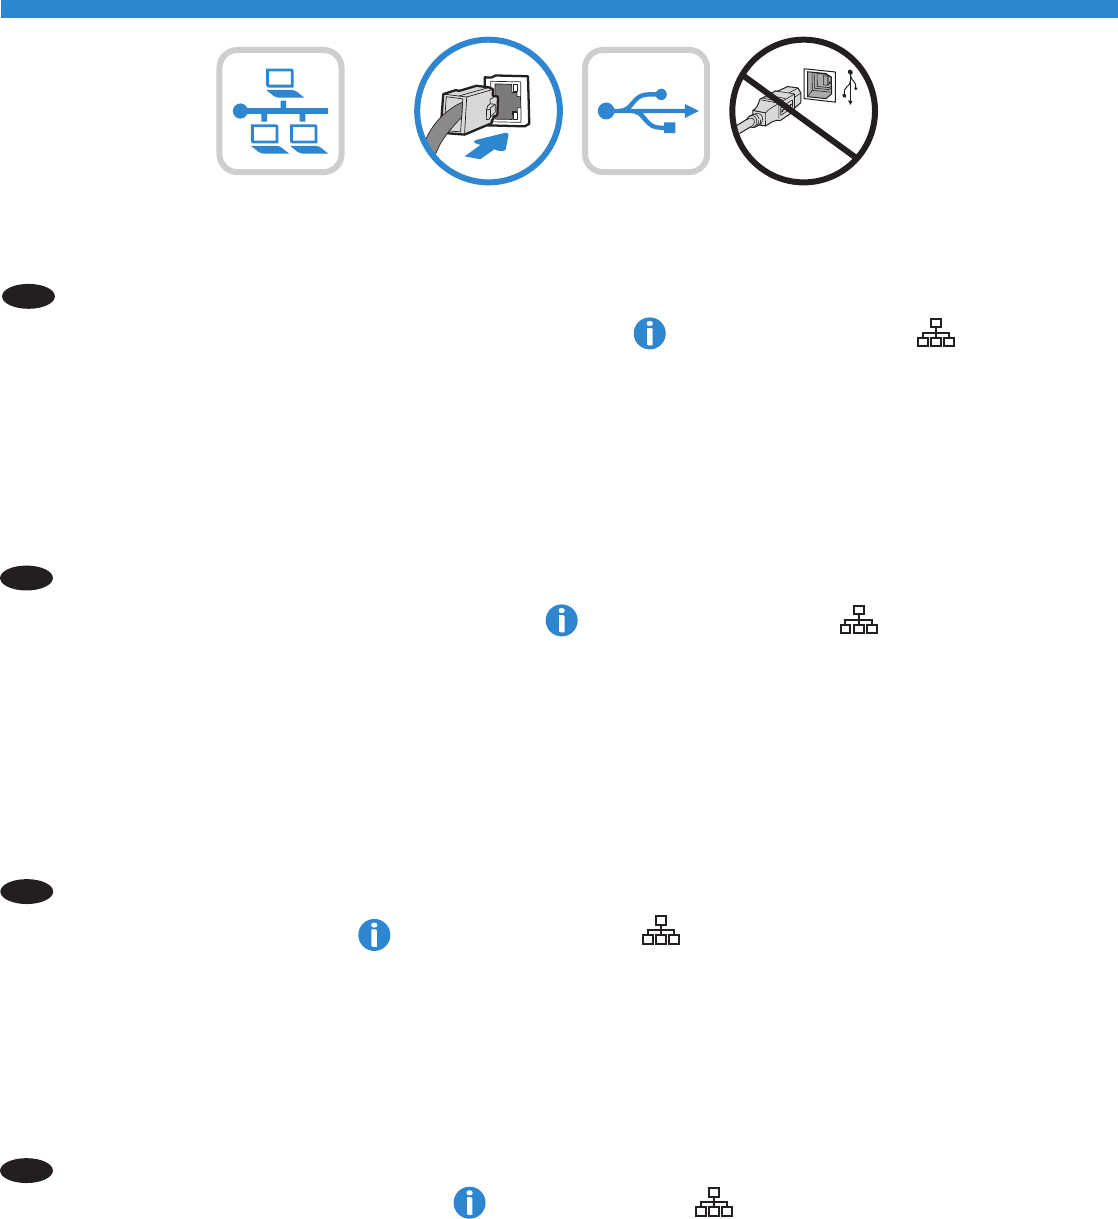
EN 5.1 If you are connecting to a network, connect the network cable now.
CAUTION: Do not connect the USB cable now.
5.2 From the Home screen on the scanner control panel, select the Information icon, and then select the Network icon to display the IP
address. Open a web browser, and in the address line, type the IP address exactly as it displays on the scanner control panel. Press the Enter key on
the computer keyboard. The EWS opens.
NOTE: For advanced confi guration of the network connection, see the User Guide on the product CD or go to www.hp.com/go/DSFlow8500fn2 or
www.hp.com/support/sjfl owN9120fn2.
5.3 To initiate scanning from a computer, download the Network TWAIN Driver from www.hp.com/go/DSFlow8500fn2 or
www.hp.com/support/sjfl owN9120fn2.
5.4 To scan using USB, download the USB TWAIN driver from www.hp.com/go/DSFlow8500fn2 or
www.hp.com/support/sjfl owN9120fn2.
5.1 如果要连接到网络,则现在连接网络电缆。
注意:现在请勿连接 USB 电缆。
5.2 从扫描仪控制面板的主屏幕中,选择“信息” 图标,然后选择“网络” 图标以显示 IP 地址。
打开 Web 浏览器,然后在地址行中,按照在扫描仪控制面板上显示的那样键入 IP 地址。 按下计算机键盘上
的 Enter 键。 随后将打开 EWS。
注意:要对网络连接进行高级配置,请参阅产品 CD 上的《用户指南》或访问 www.hp.com/go/DSFlow8500fn2 或
www.hp.com/support/sjfl owN9120fn2。
5.3 要从计算机启动扫描,请下载网络 TWAIN 驱动程序,网址为: www.hp.com/go/DSFlow8500fn2 或
www.hp.com/support/sjfl owN9120fn2.
5.4 要使用 USB 进行扫描,请下载 USB TWAIN 驱动程序,网址为: www.hp.com/go/DSFlow8500fn2 或
www.hp.com/support/sjfl owN9120fn2.
ZHCN
5.1 네트워크에 연결 중인 경우 바로 네트워크 케이블을 연결합니다
주의 아직 케이블을 연결하지 마십시오
5.2 프린터 제어판의 홈 화면에서 정보 아이콘을 선택한 다음 네트워크 아이콘을 선택하여 IP 주소를 표시합니다 웹 브라우저를
열고 주소 표시줄에 스캐너 제어판에 표시되는 IP 주소를 정확히 입력합니다 컴퓨터 키보드에서 Enter 키를 누릅니다 EWS가 열립니다
참고 네트워크 연결의 고급 구성에 대해서는 제품 CD의 사용 설명서를 참조하거나 www.hp.com/go/DSFlow8500fn2 또는 www.hp.com/
support/sjfl owN9120fn2로 이동하십시오
5.3 컴퓨터에서 스캔을 시작하려면 네트워크 TWAIN 드라이버를 www.hp.com/go/DSFlow8500fn2 또는
www.hp.com/support/sjfl owN9120fn2에서 다운로드합니다
5.4 USB를 사용하여 스캔하려면 , USB TWAIN 드라이버를 www.hp.com/go/DSFlow8500fn2 또는
www.hp.com/support/sjfl owN9120fn2에서 다운로드합니다
KO
5.1 如果您要連接至網路,請立即連接網路線。
注意:請勿現在連接 USB 纜線。
5.2 在掃描器控制面板的主畫面中,選擇「資訊」 圖示,然後選擇「網路」 圖示以顯示 IP 位址。 開啟 Web 瀏覽器,然後在
位址列輸入掃描器控制面板上所顯示的 IP 位址。 按下電腦鍵盤上的 Enter 鍵。 EWS 隨即開啟。
注意: 如需網路連線的進階設定,請參閱產品光碟中的《使用指南》或前往 www.hp.com/go/DSFlow8500fn2 或 www.hp.com/support/
sjfl owN9120fn2。
5.3 若要從電腦初始化掃描,請從 www.hp.com/go/DSFlow8500fn2 或 www.hp.com/support/sjfl owN9120fn2 下載網路 TWAIN 驅動程式。
5.4 若要使用 USB 進行掃描,請從 www.hp.com/go/DSFlow8500fn2 或 www.hp.com/support/sjfl owN9120fn2 下載 USB TWAIN 驅動程式。
ZHTW
5
EN For more information, refer to the scanner User Guide, or visit
www.hp.com/support.
ZHCN 有关详细信息,请参阅扫描仪《用户指南》,或
访问 www.hp.com/support.
KO 자세한 내용은 스캐너 사용 설명서를 참조하거나 www.hp.com/
support를 방문하십시오.
ZHTW 如需詳細資訊,請參閱掃描器的《使用指南》,或者造訪
www.hp.com/support.
5.1 Jika Anda menghubungkan ke jaringan, sambungkan kabel jaringan sekarang.
PERHATIAN : Jangan sambungkan kabel USB sekarang.
5.2 Dari layar Home (Depan) pada panel kontrol pemindai, pilih ikon Information (Informasi), lalu pilih ikon Network (Jaringan) untuk
menampilkan alamat IP. Buka browser web, dan di baris alamat, masukkan alamat IP persis seperti yang ditampilkan pada panel kontrol pemindai.
Tekan tombol Enter di keyboard komputer. EWS akan terbuka.
CATATAN: Untuk konfi gurasi lanjutan koneksi jaringan, lihat Panduan Pengguna pada CD produk atau buka www.hp.com/go/DSFlow8500fn2 atau
www.hp.com/support/sjfl owN9120fn2.
5.3 Untuk memulai pemindaian dari komputer, unduh Driver TWAIN Jaringan dari www.hp.com/go/DSFlow8500fn2 atau
www.hp.com/support/sjfl owN9120fn2.
5.4 Untuk memindai dengan USB, unduh driver TWAIN USB dari www.hp.com/go/DSFlow8500fn2 atau
www.hp.com/support/sjfl owN9120fn2.
ID
ID Untuk informasi selengkapnya, lihat Panduan Pengguna pemindai,
atau kunjungi www.hp.com/support.
5.1 หากคุณกําลังเชื่อมต่อเข้าเครือข่าย ให้เชื่อมต่อสายเครือข่ายได้ในทันที
ข้อควรระวัง: ห้ามเชื่อมต่อสายเคเบิล USB ในขั้นตอนนี้
5.2 จากหน้าจอหลักบนแผงควบคุมเครื่องสแกน ให้เลือกไอคอนข้อมูล และจากน
ั้นเลือกไอคอนเครือข่าย เพื่อแสดงผลที่อยู่ IP เปิดเว็บเบ
ราว์เซอร์ และในบรรทัดที่อยู่ ให้พิมพ์ที่อยู่ IP ให้ตรงตามที่แสดงบนแผงควบคุมของเครื่องสแกน กดปุ่ม Enter บนแป้นพิมพ์คอมพิวเตอร์ EWS จะเปิด
ขึ้น
หมายเหต: สําหรับการกําหนดค่าขั้นสูงของการเชื่อมต่อเครือข่าย ให้ดูคู่มือผู้ใช้ในแผ่นซีดีสําหรับผลิคภัณฑ ์ หรือไปท www.hp.com/go/
DSFlow8500fn2 หรือ www.hp.com/support/sjfl owN9120fn2
5.3 หากต้องการเริ่มต้นการสแกนจากคอมพิวเตอร์ ให้ดาวน์โหลดไดรเวอร์ TWAIN สําหรับเครือข่ายจาก www.hp.com/go/DSFlow8500fn2 หรือ www.
hp.com/support/sjfl owN9120fn2
5.4 หากต้องการสแกนโดยใช้ USB ให้ดาวน์โหลดไดรเวอร์ TWAIN สําหรับ USB จาก www.hp.com/go/DSFlow8500fn2 หรือ
www.hp.com/support/sjfl owN9120fn2
TH
TH สําหรับข้อมูลเพิ่มเติม โปรดดูคู่มือผู้ใช้เครื่องสแกน หรือเข้าไปที่
www.hp.com/support.
6
6
7

www.hp.com
*L2762-90009*
*L2762-90009*
L2762-90009
版权与许可
© 版权所有 2017 HP Development Company, L.P.
未经事先书面许可,严禁进行任何形式的复制、改编
或翻译,除非版权法另行允许。
此处包含的信息如有更改,恕不另行通知。
HP 产品和服务的专用保修事项已在产品和服务所附带
的保修声明中列出。 本文档中的任何内容均不应理解
为构成 任何额外保证。 HP 对本文档中出现的技术错
误、编辑 错误或遗漏之处概不负责。
版本 1,10/2017
FCC 规定
本设备经测试,确认符合 FCC 规则第 15 部分有关 A 类数
字设备的限制规定。 这些限制旨在针对住宅安装中的
有害干扰提供合理的保护。 本设备会产生、使用并可
能辐射射频能量;如果不按照说明手册进行安装和使
用,可能会对无线电通信造成有害干扰。 在住宅区使
用本设备可能会产生有害干扰,排除此类干扰所需的
费用应由用户自行承担。
注: 未经 HP 公司的明确同意而擅自更改或改装本打印
机,用户将失去操作此设备的权力。 根据 FCC 规则第 15
部分的 A 类设备的限制规定,用户必须使用屏蔽的接口
电缆。
商标说明
Windows®、Windows® 7、Windows® 8、Windows® 10 和 Windows
Server® 是 Microsoft 公司集团的商标。
Apple 和 Apple 徽标是 Apple Inc. 在美国和其他国家/地区的
注册商标。
OS X 是 Apple Inc. 在美国和其他国家/地区的注册商标。
AirPrint 是 Apple Inc. 在美国和其他国家/地区的注册商标。
Copyright and license
© Copyright 2017 HP Development Company, L.P.
Reproduction, adaptation or translation without prior written permission is
prohibited, except as allowed under the copyright laws.
The information contained herein is subject to change without notice.
The only warranties for HP products and services are set forth in the
express warranty statements accompanying such products and services.
Nothing herein should be construed as constituting an
additional warranty. HP shall not be liable for technical or editorial
errors or omissions contained herein.
Edition 1, 10/2017
FCC Regulations
This equipment has been tested and found to comply with the limits for a
Class A digital device, pursuant to Part 15 of the FCC rules. These limits are
designed to provide reasonable protection against harmful interference
in a residential installation. This equipment generates, uses, and can
radiate radio frequency energy, and if not installed and used in accordance
with the instruction manual, may cause harmful interference to radio
communications. Operation of this equipment in a residential area is likely
to cause harmful interference in which case the user will be required to
correct the interference at his own expense.
NOTE: Any changes or modifications to the printer that are not
expressly approved by HP could void the user’s authority to operate
this equipment. Use of a shielded interface cable is required to
comply with the Class A limits of Part 15 of FCC rules.
Trademark Credits
Windows®, Windows® 7, Windows® 8, Windows® 10, and Windows Server®
are trademarks of the Microsoft Group of companies.
Apple and the Apple logo are trademarks of Apple Inc., registered in the
U.S. and other countries.
OS X is a trademark of Apple Inc., registered in the U.S. and other countries.
AirPrint is a trademark of Apple Inc., registered in the U.S. and other
countries.
