HP Digital Sender Flow 8500 Fn2 Capture Workstation, ScanJet Enterprise N9120 Scanner User Guide Scan Jet C05556173
User Manual: HP HP Digital Sender Flow 8500 fn2 Capture Workstation, HP ScanJet Enterprise Flow N9120 fn2 Scanner - User Guide
Open the PDF directly: View PDF ![]() .
.
Page Count: 142 [warning: Documents this large are best viewed by clicking the View PDF Link!]
- Product overview
- Product views (HP Digital Sender Flow 8500 fn2 Document Capture Workstation)
- Product views (HP ScanJet Enterprise Flow N9120 fn2 Document Scanner)
- Product specifications
- Supported operating systems (HP Digital Sender Flow 8500 fn2 Document Capture Workstation)
- Supported operating systems (HP ScanJet Enterprise Flow N9120 fn2 Document Scanner)
- Product dimensions (HP Digital Sender Flow 8500 fn2 Document Capture Workstation)
- Product dimensions (HP ScanJet Enterprise Flow N9120 fn2 Document Scanner)
- Power consumption, electrical specifications and acoustic emissions
- Operating environment range (HP Digital Sender Flow 8500 fn2 Document Capture Workstation)
- Operating environment range (HP ScanJet Enterprise Flow N9120 fn2 Document Scanner)
- Product hardware setup and software installation
- Scanner software (Windows)
- Sleep Mode and auto-off settings
- Use the scanner
- Set up the scanner
- Set up Scan to Email
- Set up Scan to Fax
- Set up Scan to Network Folder
- Introduction
- Before you begin
- Step one: Access the HP Embedded Web Server
- Step two: Set up Scan to Network Folder
- Method one: Use the Scan to Network Folder Wizard
- Method two: Use Scan to Network Folder Setup
- Step one: Begin the configuration
- Step two: Configure the Scan to Network Folder settings
- Step three: Complete the configuration
- Set up Scan to USB Drive
- Set up Scan to SharePoint®
- Create a Quick Set
- Load originals
- Perform a scan task
- Use the scanning software (Windows)
- Use the scanning software (OS X)
- Mobile scanning
- Scanning tips
- Set up the scanner
- Care and maintenance
- Manage the scanner
- Solve problems
- Additional troubleshooting
- Restore factory settings
- Scanner installation problems
- Power issues
- Scanner does not pick up paper or misfeeds
- Clear paper jams
- Improve scan image quality
- Solve wired network problems
- Introduction
- Poor physical connection
- The computer is unable to communicate with the product
- The product is using incorrect link and duplex settings for the network
- New software programs might be causing compatibility problems
- The computer or workstation might be set up incorrectly
- The product is disabled, or other network settings are incorrect
- Index
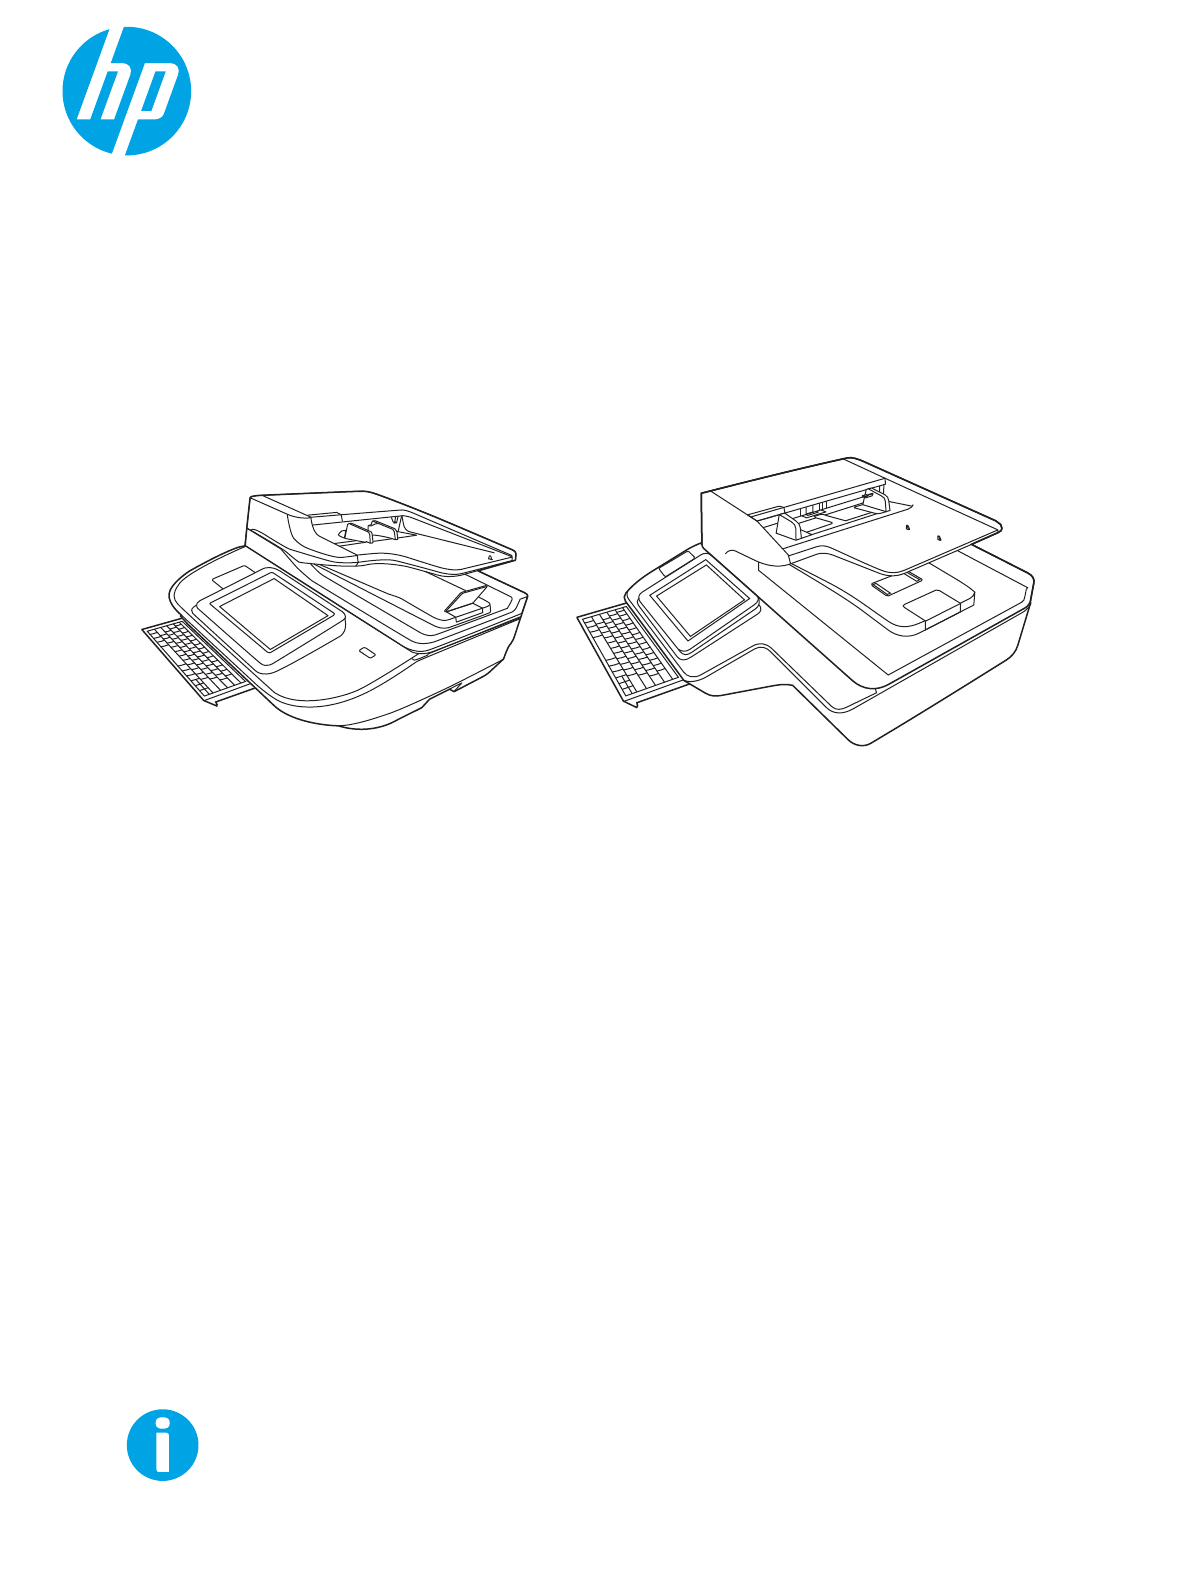
HP Digital Sender Flow 8500 fn2 Document Capture Workstation,
HP ScanJet Enterprise Flow N9120 fn2 Document Scanner
www.hp.com/go/DSFlow8500fn2
www.hp.com/support/sjflowN9120fn2
N9120 fn2
User Guide
8500 fn2

HP Digital Sender Flow 8500 fn2 Document
Capture Workstation, HP ScanJet Enterprise
Flow N9120 fn2 Document Scanner
User Guide
Copyright and license
© 2017 Copyright HP Development Company,
L.P.
Reproduction, adaptation or translation without
prior written permission is prohibited, except as
allowed under the copyright laws.
The information contained herein is subject to
change without notice.
The only warranties for HP products and
services are set forth in the express warranty
statements accompanying such products and
services. Nothing herein should be construed as
constituting an additional warranty. HP shall not
be liable for technical or editorial errors or
omissions contained herein.
Trademark credits
Adobe®, Adobe Photoshop®, Acrobat®, and
PostScript® are trademarks of Adobe Systems
Incorporated.
Apple and the Apple logo are trademarks of
Apple Inc., registered in the U.S. and other
countries.
OS X is a trademark of Apple Inc., registered in
the U.S. and other countries.
AirPrint is a trademark of Apple Inc., registered in
the U.S. and other countries.
Google™ is a trademark of Google Inc.
Microsoft® and Windows® are U.S. registered
trademarks of Microsoft Corporation.
UNIX® is a registered trademark of The Open
Group.
Edition 2, 10/2017

Table of contents
1 Product overview ...................................................................................................................................................................................... 1
Product views (HP Digital Sender Flow 8500 fn2 Document Capture Workstation) ..................................................... 1
Front view .............................................................................................................................................................. 1
Back view ............................................................................................................................................................... 2
Control-panel view ............................................................................................................................................... 3
How to use the control panel ........................................................................................................ 5
Product views (HP ScanJet Enterprise Flow N9120 fn2 Document Scanner) ................................................................ 5
Front view .............................................................................................................................................................. 5
Back view ............................................................................................................................................................... 6
Control-panel view ............................................................................................................................................... 7
How to use the control panel ........................................................................................................ 9
Product specications ........................................................................................................................................................... 10
Supported operating systems (HP Digital Sender Flow 8500 fn2 Document Capture
Workstation) ....................................................................................................................................................... 10
Supported operating systems (HP ScanJet Enterprise Flow N9120 fn2 Document Scanner) ............. 10
Product dimensions (HP Digital Sender Flow 8500 fn2 Document Capture Workstation) ................... 11
Product dimensions (HP ScanJet Enterprise Flow N9120 fn2 Document Scanner) ............................... 11
Power consumption, electrical specications and acoustic emissions ..................................................... 12
Operating environment range (HP Digital Sender Flow 8500 fn2 Document Capture
Workstation) ....................................................................................................................................................... 12
Operating environment range (HP ScanJet Enterprise Flow N9120 fn2 Document Scanner) ............. 12
Product hardware setup and software installation .......................................................................................................... 14
Hardware setup ................................................................................................................................................. 14
How to get software updates .......................................................................................................................... 14
Scanner software (Windows) ............................................................................................................................................... 15
HP Scan software .............................................................................................................................................. 15
HP TWAIN ............................................................................................................................................................ 15
ISIS ....................................................................................................................................................................... 15
WIA ....................................................................................................................................................................... 15
Sleep Mode and auto-o settings ....................................................................................................................................... 15
ENWW iii
2 Use the scanner ...................................................................................................................................................................................... 17
Set up the scanner ................................................................................................................................................................. 18
Set up Scan to Email ......................................................................................................................................... 19
Introduction ................................................................................................................................... 19
Before you begin ........................................................................................................................... 19
Step one: Access the HP Embedded Web Server (EWS) ......................................................... 20
Step two: Congure the Network Identication settings ........................................................ 20
Step three: Congure the Send to Email feature ..................................................................... 21
Method one: Basic conguration using the Email Setup Wizard ...................... 21
Method two: Advanced conguration using the Email Setup ........................... 24
Step four: Congure the Quick Sets (optional) ......................................................................... 28
Step ve: Set up Send to Email to use Oice 365 Outlook (optional) .................................. 29
Introduction ............................................................................................................... 29
Congure the outgoing email server (SMTP) to send an email from an
Oice 365 Outlook account .................................................................................... 29
Set up Scan to Fax ............................................................................................................................................. 32
Step one: Access the HP Embedded Web Server ..................................................................... 32
Step two: Set up Scan to Fax ....................................................................................................... 32
Set up Scan to Network Folder ........................................................................................................................ 33
Introduction ................................................................................................................................... 33
Before you begin ........................................................................................................................... 33
Step one: Access the HP Embedded Web Server ..................................................................... 33
Step two: Set up Scan to Network Folder ................................................................................. 34
Method one: Use the Scan to Network Folder Wizard ........................................ 34
Method two: Use Scan to Network Folder Setup ................................................ 35
Set up Scan to USB Drive .................................................................................................................................. 43
Introduction ................................................................................................................................... 43
Step one: Access the HP Embedded Web Server ..................................................................... 43
Step two: Enable Scan to USB Drive ........................................................................................... 44
Step three: Congure the Quick Sets (optional) ....................................................................... 44
Default scan settings for Scan to USB Drive setup .................................................................. 45
Default le settings for Save to USB Setup .............................................................................. 46
Set up Scan to SharePoint® ............................................................................................................................. 46
Introduction ................................................................................................................................... 47
Before you begin ........................................................................................................................... 47
Step one: Access the HP Embedded Web Server (EWS) ......................................................... 47
Step two: Enable Scan to SharePoint® and create a Scan to SharePoint Quick Set ........... 48
Scan and save a le directly to a Microsoft® SharePoint site ................................................. 49
Quick set scan settings and options for Save to SharePoint® ............................................... 50
Create a Quick Set .............................................................................................................................................. 52
Introduction ................................................................................................................................... 52
iv ENWW
Step one: Access the HP Embedded Web Server (EWS) ......................................................... 52
Step two: Add and manage Quick Sets ...................................................................................... 53
Add a Quick Set ......................................................................................................... 53
Edit a Quick Set ......................................................................................................... 54
Copy a Quick Set ....................................................................................................... 54
Remove a Quick Set ................................................................................................. 55
Quick Set settings and options .............................................................................. 55
Load originals ......................................................................................................................................................................... 58
Document loading tips ...................................................................................................................................... 58
Supported paper types and sizes ................................................................................................................... 61
Load paper in the Automatic Document Feeder (ADF) input tray .............................................................. 63
Introduction ................................................................................................................................... 63
Required guidelines before loading documents ...................................................................... 63
Method to load documents ......................................................................................................... 64
Load same-sized documents ..................................................................................................... 64
Load documents on the scanner glass .......................................................................................................... 65
Perform a scan task ............................................................................................................................................................... 66
Send a scanned document to one or more email addresses ..................................................................... 66
Introduction ................................................................................................................................... 66
Scan and send a document to email ......................................................................................... 66
Scan to Fax ......................................................................................................................................................... 67
Introduction ................................................................................................................................... 67
Scan to Fax ..................................................................................................................................... 68
Scan and send to network folder .................................................................................................................... 69
Introduction ................................................................................................................................... 69
Scan and save the document to a network folder .................................................................. 69
Scan and send to USB Flash Drive .................................................................................................................. 70
Introduction ................................................................................................................................... 70
Scan and save the document to a USB ash drive .................................................................. 70
Additional options when scanning .................................................................................................................. 72
HP JetAdvantage business solutions ............................................................................................................. 74
Additional scan tasks ........................................................................................................................................ 74
Use the scanning software (Windows) ............................................................................................................................... 75
Scan to a picture ................................................................................................................................................ 75
Scan to a PDF ..................................................................................................................................................... 76
Scan text for editing (OCR) ............................................................................................................................... 76
Scan to email ...................................................................................................................................................... 76
Send to cloud ...................................................................................................................................................... 76
Scan long or extra-long documents ............................................................................................................... 77
Detect multi-feeds ............................................................................................................................................ 77
Everyday Scan .................................................................................................................................................... 77
ENWW v
Filter out color from a document (color dropout) ......................................................................................... 77
Automatically detect color ............................................................................................................................... 78
Automatically straighten scanned images .................................................................................................... 78
Scan by using other scan software ................................................................................................................. 78
Use the scanning software (OS X) ....................................................................................................................................... 79
Mobile scanning ...................................................................................................................................................................... 80
Scanning tips ........................................................................................................................................................................... 80
Optimize scanning and task speeds ............................................................................................................... 80
3 Care and maintenance ........................................................................................................................................................................... 81
Clean the product ................................................................................................................................................................... 82
Clean the scanning strips ................................................................................................................................. 82
Clean the rollers ................................................................................................................................................. 82
Introduction ................................................................................................................................... 82
Clean the rollers ............................................................................................................................ 83
Install an accessory into the hardware integration pocket .............................................................................................. 85
Replace parts .......................................................................................................................................................................... 87
Replace the separation rollers and cover ...................................................................................................... 87
Order maintenance and scanning supplies ........................................................................................................................ 89
Order parts and accessories ............................................................................................................................ 89
Customer self-repair parts ............................................................................................................................... 89
4 Manage the scanner ............................................................................................................................................................................... 93
Advanced conguration with the HP Embedded Web Server (EWS) ............................................................................. 93
Introduction ........................................................................................................................................................ 93
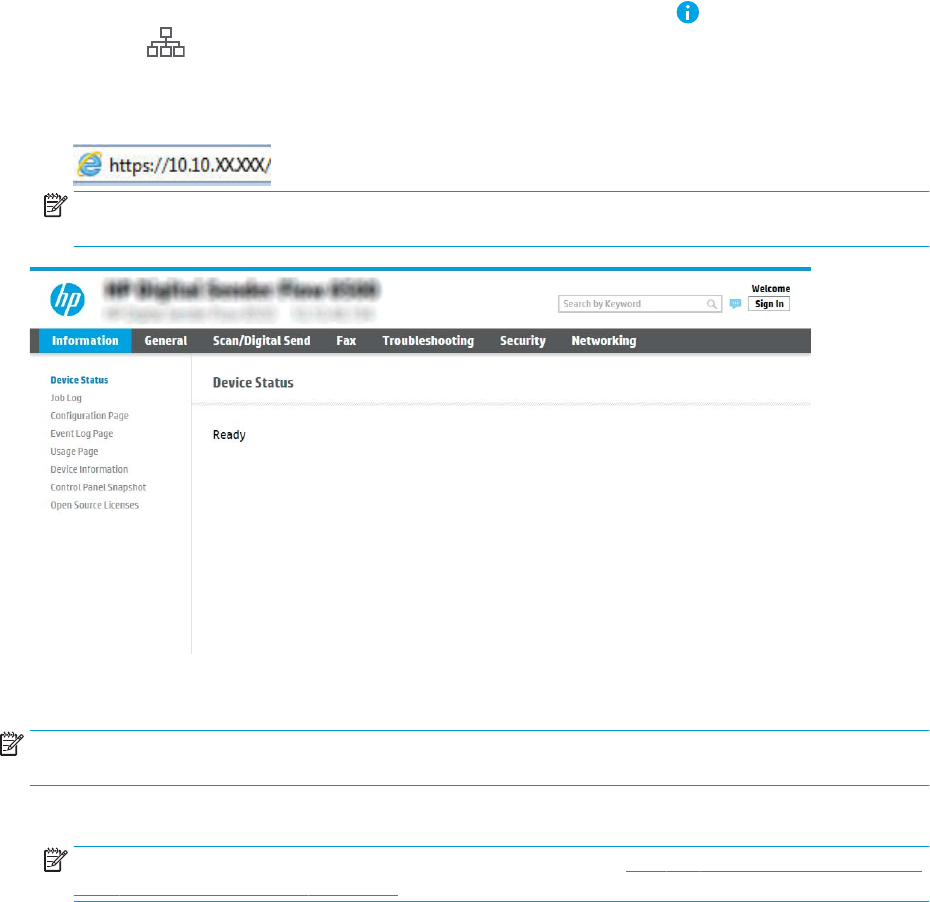
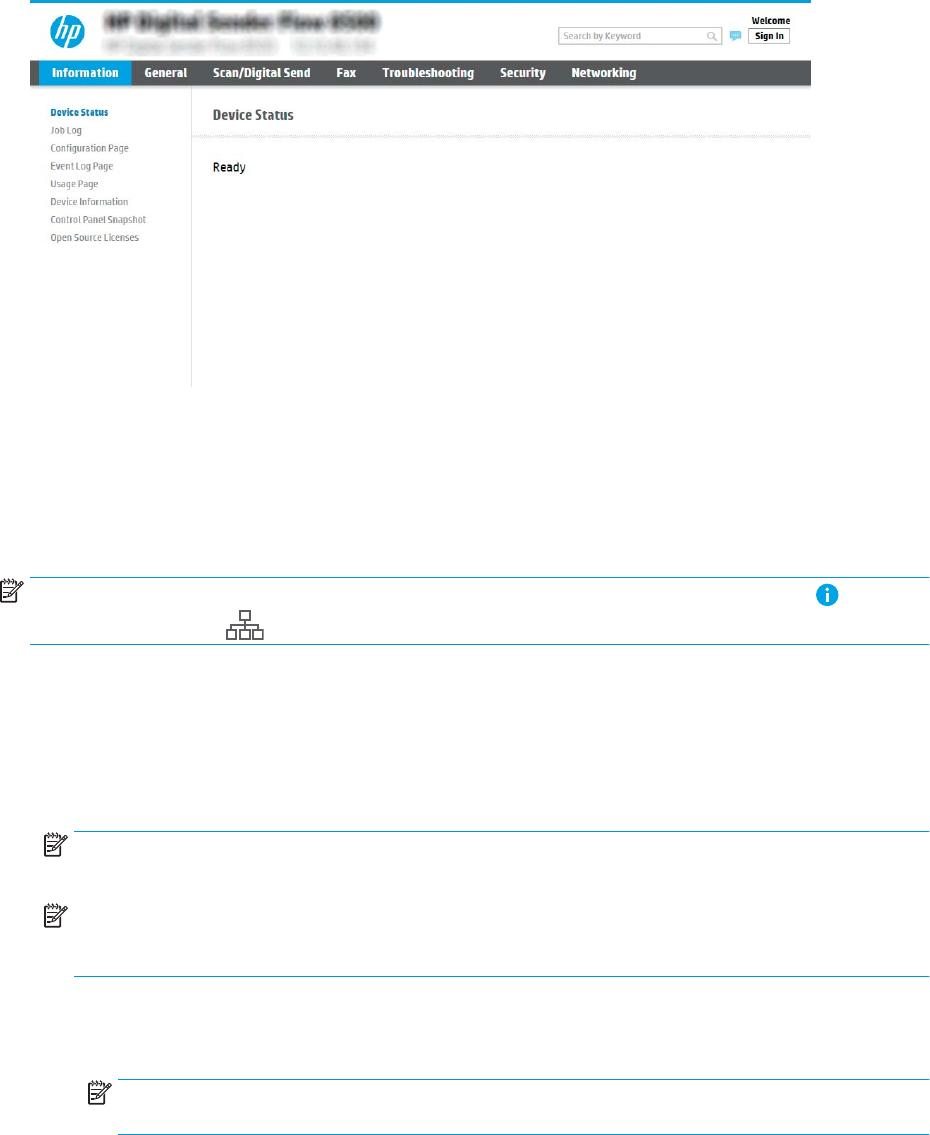
How to access the HP Embedded Web Server (EWS) .................................................................................. 93
HP Embedded Web Server features ............................................................................................................... 94
Information tab ............................................................................................................................. 94
General tab .................................................................................................................................... 95
Scan/Digital Send tab ................................................................................................................... 96
Fax tab ............................................................................................................................................ 96
Troubleshooting tab ..................................................................................................................... 97
Security tab .................................................................................................................................... 97
HP Web Services tab ..................................................................................................................... 98
Networking tab .............................................................................................................................. 98
Congure IP network settings ........................................................................................................................................... 100
Scanner sharing disclaimer ........................................................................................................................... 100
View or change network settings ................................................................................................................. 100
Rename the scanner on a network .............................................................................................................. 100
Manually congure IPv4 TCP/IP parameters from the control panel ..................................................... 101
Manually congure IPv6 TCP/IP parameters from the control panel ..................................................... 101
vi ENWW
Link speed and duplex settings .................................................................................................................... 102
Scanner security features ................................................................................................................................................... 103
Introduction ...................................................................................................................................................... 103
Security statements ....................................................................................................................................... 103
IP Security ......................................................................................................................................................... 103
Assign an administrator password ............................................................................................................... 103
Encryption support: HP High Performance Secure Hard Disks ................................................................ 104
Lock the formatter .......................................................................................................................................... 104
Energy-conservation settings ........................................................................................................................................... 105
Introduction ...................................................................................................................................................... 105
Set the sleep timer and congure the scanner to use 2 watts or less of power .................................. 105
Set the sleep schedule ................................................................................................................................... 105
HP Web Jetadmin ................................................................................................................................................................. 107
HP Digital Sending Software (HP DSS) ............................................................................................................................. 107
Upgrade the rmware ......................................................................................................................................................... 108
5 Solve problems ..................................................................................................................................................................................... 109
Additional troubleshooting ................................................................................................................................................. 110
Restore factory settings ..................................................................................................................................................... 111
Introduction ...................................................................................................................................................... 111
Method one: Restore factory settings from the scanner control panel ................................................. 111
Method two: Restore factory settings from the HP Embedded Web Server (network-connected
products only) .................................................................................................................................................. 111
Scanner installation problems ........................................................................................................................................... 112
Check the cables .............................................................................................................................................. 112
Uninstall and then reinstall the HP ScanJet drivers and tools (Windows) ............................................. 112
Power issues ......................................................................................................................................................................... 114
Scanner will not turn on ................................................................................................................................. 114
The scanner has paused or shut down ....................................................................................................... 114
Scanner keeps turning o .............................................................................................................................. 115
Scanner does not pick up paper or misfeeds .................................................................................................................. 116
Introduction ...................................................................................................................................................... 116
The scanner does not pick up paper ............................................................................................................ 116
The scanner picks up multiple sheets of paper ......................................................................................... 116
The document feeder jams, skews, or picks up multiple sheets of paper ............................................ 117
Clear paper jams .................................................................................................................................................................. 118
Introduction ...................................................................................................................................................... 118
Experiencing frequent or recurring paper jams? ....................................................................................... 118
Clear paper jams in the Automatic Document Feeder (ADF) .................................................................... 119
Improve scan image quality ............................................................................................................................................... 121
Check the scanner glass for dirt and smudges .......................................................................................... 121
ENWW vii
Check the resolution settings ....................................................................................................................... 122
Check the color settings ................................................................................................................................. 122
Check the image-adjustment settings ........................................................................................................ 123
Optimize scan quality for text or pictures ................................................................................................... 123
Check the output-quality settings ................................................................................................................ 124
Clean the pickup rollers and separation pad in the Automatic Document Feeder (ADF) ..................... 124
Solve wired network problems .......................................................................................................................................... 127
Introduction ...................................................................................................................................................... 127
Poor physical connection ............................................................................................................................... 127
The computer is unable to communicate with the product ..................................................................... 127
The product is using incorrect link and duplex settings for the network ............................................... 128
New software programs might be causing compatibility problems ....................................................... 128
The computer or workstation might be set up incorrectly ....................................................................... 128
The product is disabled, or other network settings are incorrect ........................................................... 128
Index ........................................................................................................................................................................................................... 129
viii ENWW

1 Product overview
This User Guide covers important information about the HP Digital Sender Flow 8500 fn2 Document Capture
Workstation and HP ScanJet Flow N9120 fn2 document scanner.
●Product views (HP Digital Sender Flow 8500 fn2 Document Capture Workstation)
●Product views (HP ScanJet Enterprise Flow N9120 fn2 Document Scanner)
●Product specications
●Product hardware setup and software installation
●Scanner software (Windows)
●Sleep Mode and auto-o settings
For more information, go to www.hp.com/support/. Click Troubleshooting. Enter the scanner name (HP Digital
Sender Flow 8500 fn2 Document Capture Workstation or HP ScanJet Flow N9120 fn2 document scanner), and
then click Search.
HP’s all-inclusive help for this product includes the following:
●Install and congure
●Learn and use
●Solve problems
●Download software updates
●Join support forums
●Find warranty and regulatory information
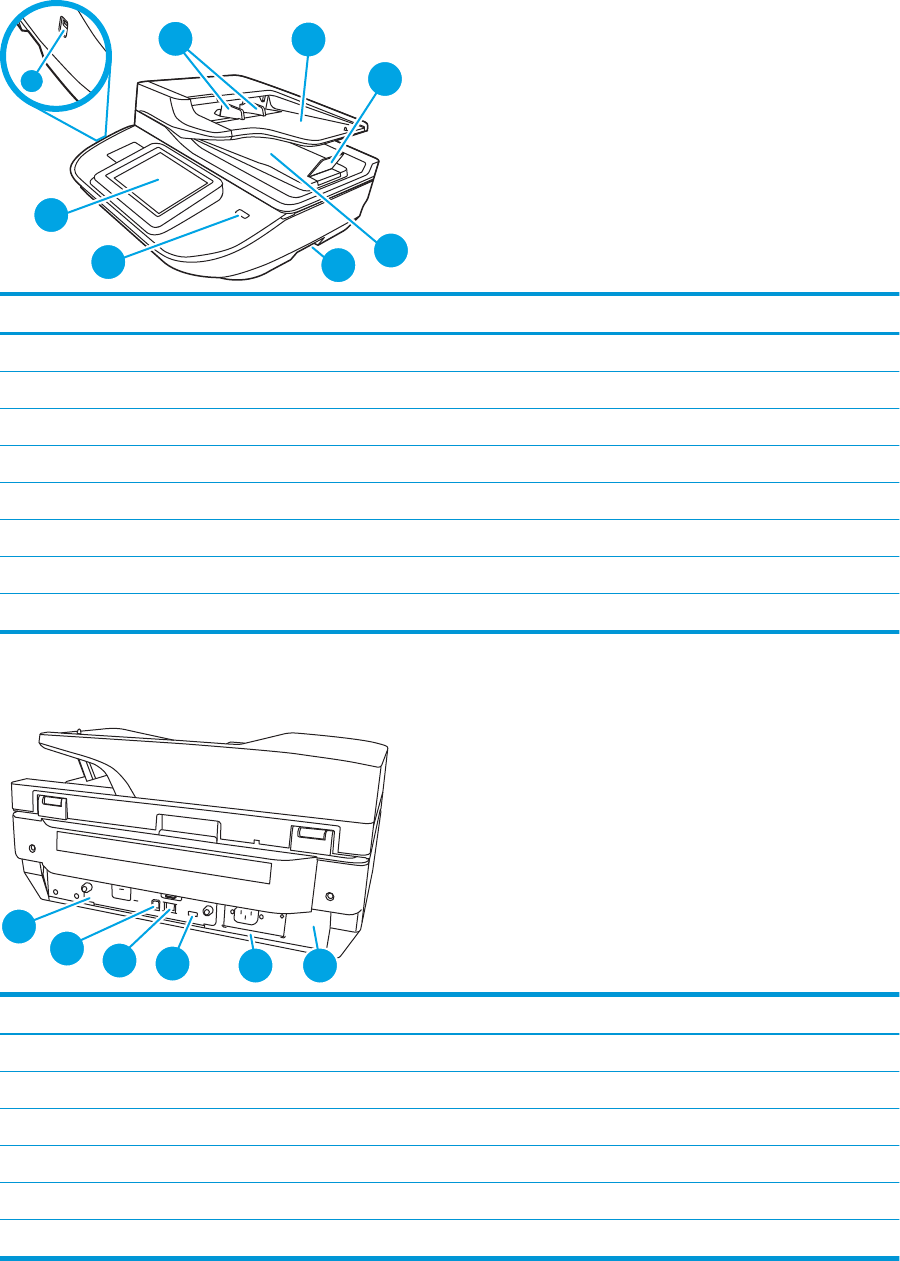
Product views (HP Digital Sender Flow 8500 fn2 Document Capture
Workstation)
This section describes the physical components of the HP Digital Sender Flow 8500 fn2 Document Capture
Workstation.
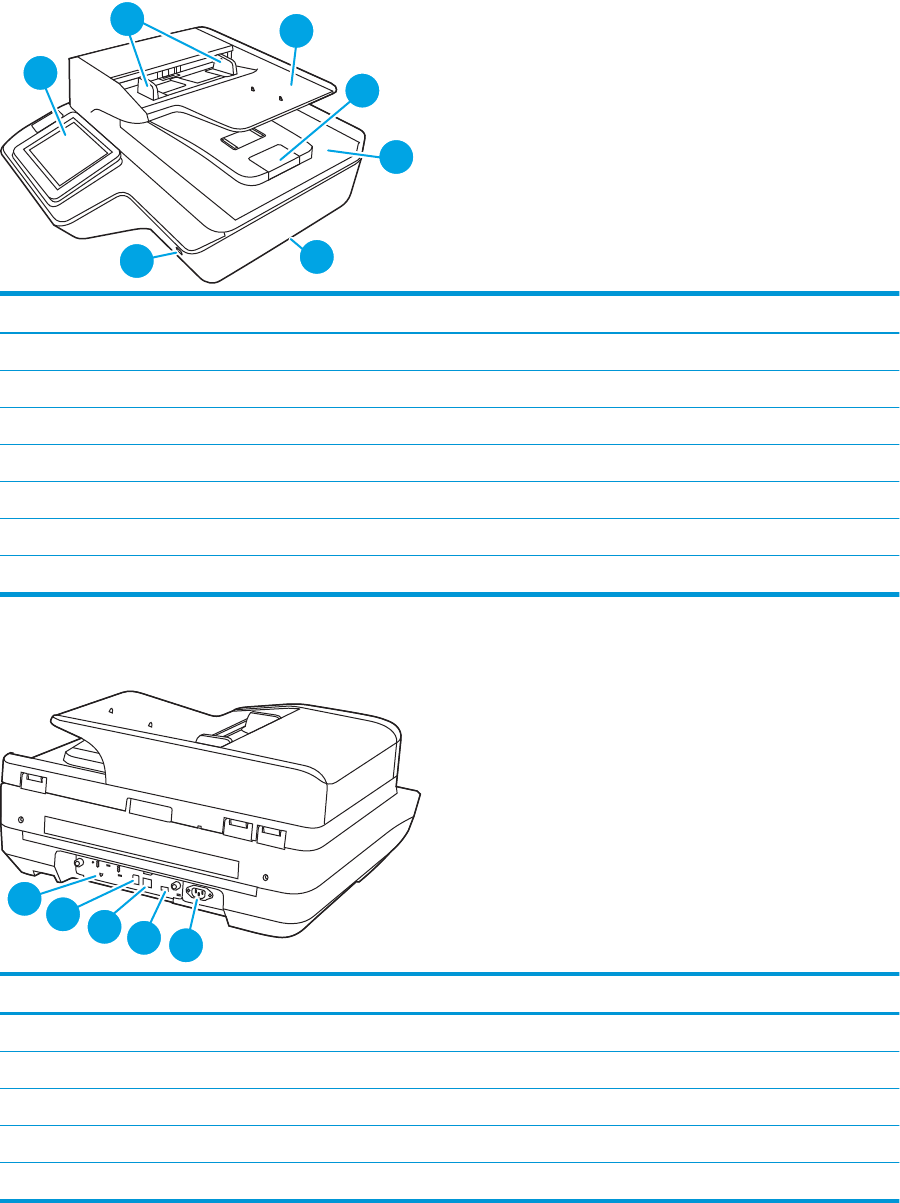
Front view
CAUTION: Always lift the product from the handles. Do not lift the product from the keyboard or Automatic
Document Feeder (ADF).
ENWW Product views (HP Digital Sender Flow 8500 fn2 Document Capture Workstation) 1
12
3
64
5
8
7
Callout Description
1 Paper guides
2 Document input tray
3 Output stopper
4 Document output tray
5 Handles
6 Power button
7 Control panel
8 Walk-up USB
Back view
2
1
3456
Callout Description
1 Formatter LED
2 Device USB port
3 LAN port
4 Host USB port
5 Power connector
6 Serial and product number location
2 Chapter 1 Product overview ENWW
Control-panel view
The Home screen provides access to the product features and indicates the current status of the product.
Return to the Home screen at any time by selecting Home.
NOTE: The features that appear on the Home screen can vary, depending on the product conguration.
11
10
8
1
0
7
6
5
123
4
9
1Home Select Home to return to the Home screen.
2 Applications area Select the scan icon to open the application. Swipe the screen sideways to access more applications.
NOTE: The available applications vary by product. The administrator can congure which applications
appear and the order in which they appear.
3Reset Select the Reset option to clear changes, release the product from a paused state, display hidden
errors, and restore the default settings (including the language and keyboard layout).
4Sign In or Sign Out Select Sign In to access secured features.
Select Sign Out to sign out of the product. The product restores all options to the default settings.
NOTE: This option displays only if the administrator has congured the product to require permission
for access to features.
5Information Select the information option to access a screen that provides access to several types of product
information. Select the options at the bottom of the screen for the following information:
●Display Language: Change the language setting for the current user session.
●Sleep Mode: Place the product into sleep mode.
●Ethernet: View or change Ethernet connection settings.
●HP Web Services
6Help Select Help to open the embedded help system or HP Web Services.
7 Current time Displays the current time.
8 Keyboard The product includes a retractable keyboard. The keys are mapped to a language in the same way the
virtual keyboard on the product touchscreen is mapped. Whenever the keyboard layout for the virtual
keyboard changes, the keys on the physical keyboard are remapped to match the new settings.
NOTE: In some locations, the product comes with adhesive keyboard overlays to customize the keys
for dierent languages.
9 Home-screen page
indicator
Indicates the number of pages on the Home screen or in an application. The current page is highlighted.
Swipe the screen sideways to scroll between pages.
ENWW Product views (HP Digital Sender Flow 8500 fn2 Document Capture Workstation) 3

10 Hardware integration
pocket (HIP)
NOTE: An administrator must enable this port before using for scan features. A rmware upgrade
does not require that the port be enabled.
For connecting accessory and third-party devices.
11 Easy-access USB port Insert a USB ash drive for scanning without a computer or to update the product rmware.
4 Chapter 1 Product overview ENWW
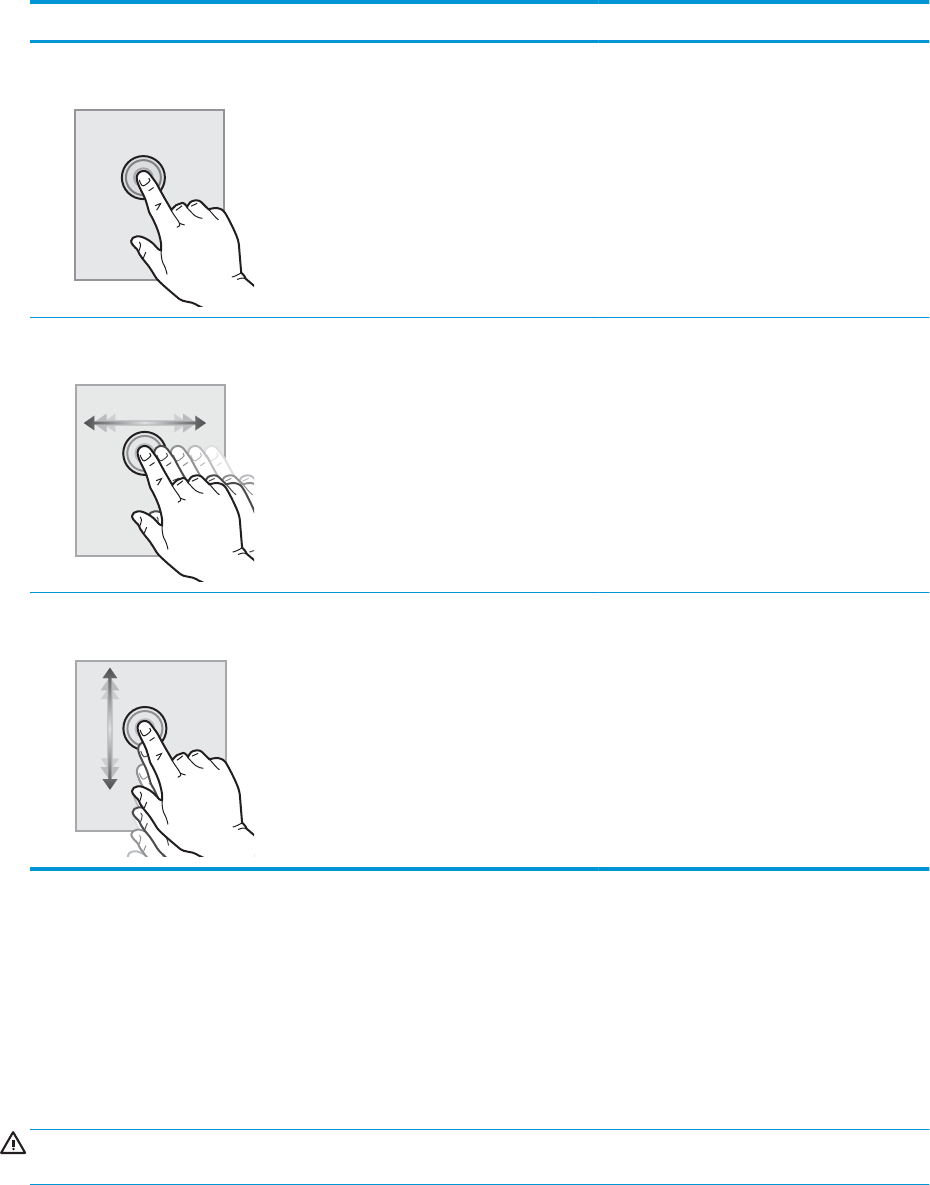
How to use the control panel
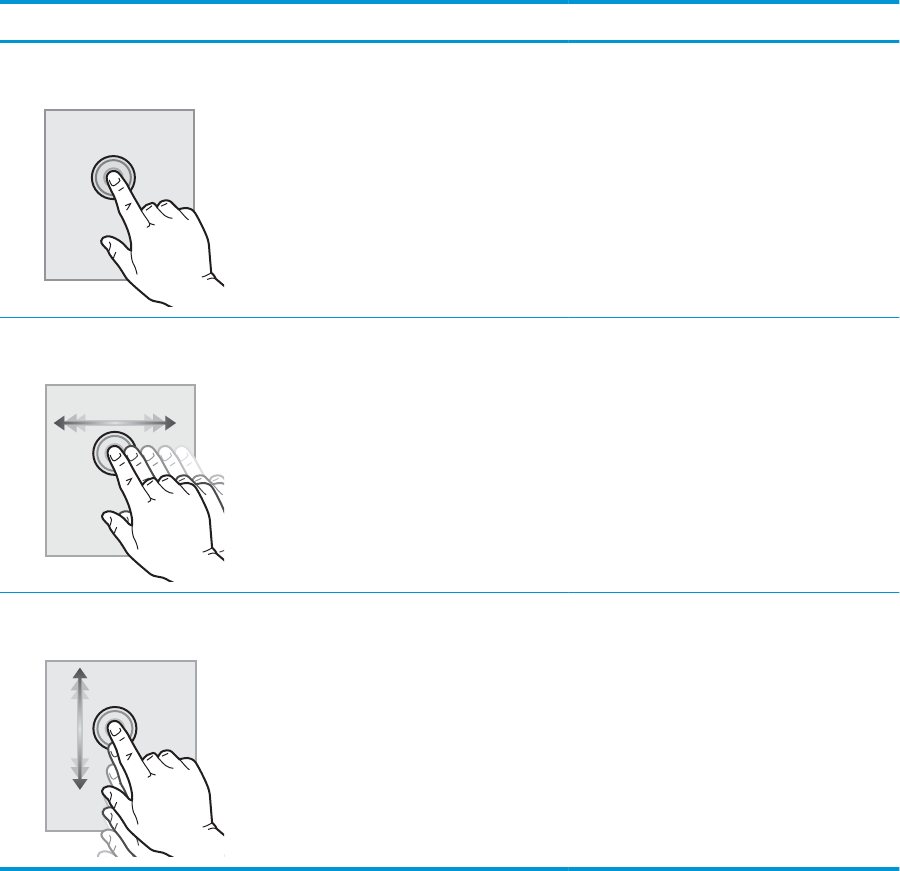
Use the following actions to use the product touchscreen control panel.
Action Description Example
Touch Select an item on the screen to select that item
or open that menu. Also, when scrolling through
menus, briey touch the screen to stop the
scrolling.
Select the Settings icon to open the Settings app.
Swipe Touch the screen and then move your nger
horizontally to scroll the screen sideways.
Swipe until the Settings app displays.
Scroll Touch the screen and then move your nger
vertically to scroll the screen up and down. When
scrolling through menus, briey touch the screen
to stop the scrolling.
Scroll through the Settings app.
Product views (HP ScanJet Enterprise Flow N9120 fn2 Document
Scanner)
This section describes the physical components of the HP ScanJet Enterprise Flow N9120 fn2 Document
Scanner.
Front view
CAUTION: Always lift the product from the base. Do not lift the product from the keyboard or Automatic
Document Feeder (ADF).
ENWW Product views (HP ScanJet Enterprise Flow N9120 fn2 Document Scanner) 5
23
4
5
7
1
6
Callout Description
1 Control panel
2 Paper guides
3 Document input tray
4 Output stopper
5 Document output tray
6 Handles
7 Power button
Back view
12345
Callout Description
1 Formatter LED
2 Device USB port
3 LAN port
4 Host USB port
5 Power connector/serial and product number location
6 Chapter 1 Product overview ENWW
Control-panel view
The Home screen provides access to the product features and indicates the current status of the product.
Return to the Home screen at any time by selecting Home.
NOTE: The features that appear on the Home screen can vary, depending on the product conguration.
11
9
6
7
5
123
4
10
8
1Home Select Home to return to the Home screen.
2 Applications area Select the scan icon to open the application. Swipe the screen sideways to access more applications.
NOTE: The available applications vary by product. The administrator can congure which applications
appear and the order in which they appear.
3Reset Select Reset to clear changes, release the product from a paused state, display hidden errors, and
restore the default settings (including the language and keyboard layout).
4Sign In or Sign Out Select Sign In to access secured features.
Select Sign Out to sign out of the product. The product restores all options to the default settings.
NOTE: This option displays only if the administrator has congured the product to require permission
for access to features.
5Information Select Information to access a screen that provides access to several types of product information.
Select the options at the bottom of the screen for the following information:
●Display Language: Change the language setting for the current user session.
●Sleep Mode: Place the product into sleep mode.
●Ethernet: View or change Ethernet connection settings.
●HP Web Services
6Help Select Help to open the embedded help system or HP Web Services.
7 Current time Displays the current time.
8 Keyboard The product includes a retractable keyboard. The keys are mapped to a language in the same way the
virtual keyboard on the product touchscreen is mapped. Whenever the keyboard layout for the virtual
keyboard changes, the keys on the physical keyboard are remapped to match the new settings.
NOTE: In some locations, the product comes with adhesive keyboard overlays to customize the keys
for dierent languages.
9 Home-screen page
indicator
Indicates the number of pages on the Home screen or in an application. The current page is highlighted.
Swipe the screen sideways to scroll between pages.
ENWW Product views (HP ScanJet Enterprise Flow N9120 fn2 Document Scanner) 7

10 Hardware integration
pocket (HIP)
NOTE: An administrator must enable this port before using for scan features. A rmware upgrade
does not require that the port be enabled.
For connecting accessory and third-party devices.
11 Easy-access USB port Insert a USB ash drive for scanning without a computer or to update the product rmware.
8 Chapter 1 Product overview ENWW
How to use the control panel
Use the following actions to use the product touchscreen control panel.
Action Description Example
Touch Select an item on the screen to select that item
or open that menu. Also, when scrolling through
menus, briey touch the screen to stop the
scrolling.
Select the Settings icon to open the Settings app.
Swipe Touch the screen and then move your nger
horizontally to scroll the screen sideways.
Swipe until the Settings app displays.
Scroll Touch the screen and then move your nger
vertically to scroll the screen up and down. When
scrolling through menus, briey touch the screen
to stop the scrolling.
Scroll through the Settings app.
ENWW Product views (HP ScanJet Enterprise Flow N9120 fn2 Document Scanner) 9

Product specications
Supported operating systems (HP Digital Sender Flow 8500 fn2 Document Capture
Workstation)
Supported operating systems Windows 7
Windows 8
Windows 8.1
Windows 10
OS X 10.10 Yosemite
OS X 10.11 El Capitan
OS X 10.12 Sierra
Supported operating systems (HP ScanJet Enterprise Flow N9120 fn2 Document
Scanner)
Supported operating systems Windows 7
Windows 8
Windows 8.1
Windows 10
OS X 10.10 Yosemite
OS X 10.11 El Capitan
OS X 10.12 Sierra
10 Chapter 1 Product overview ENWW
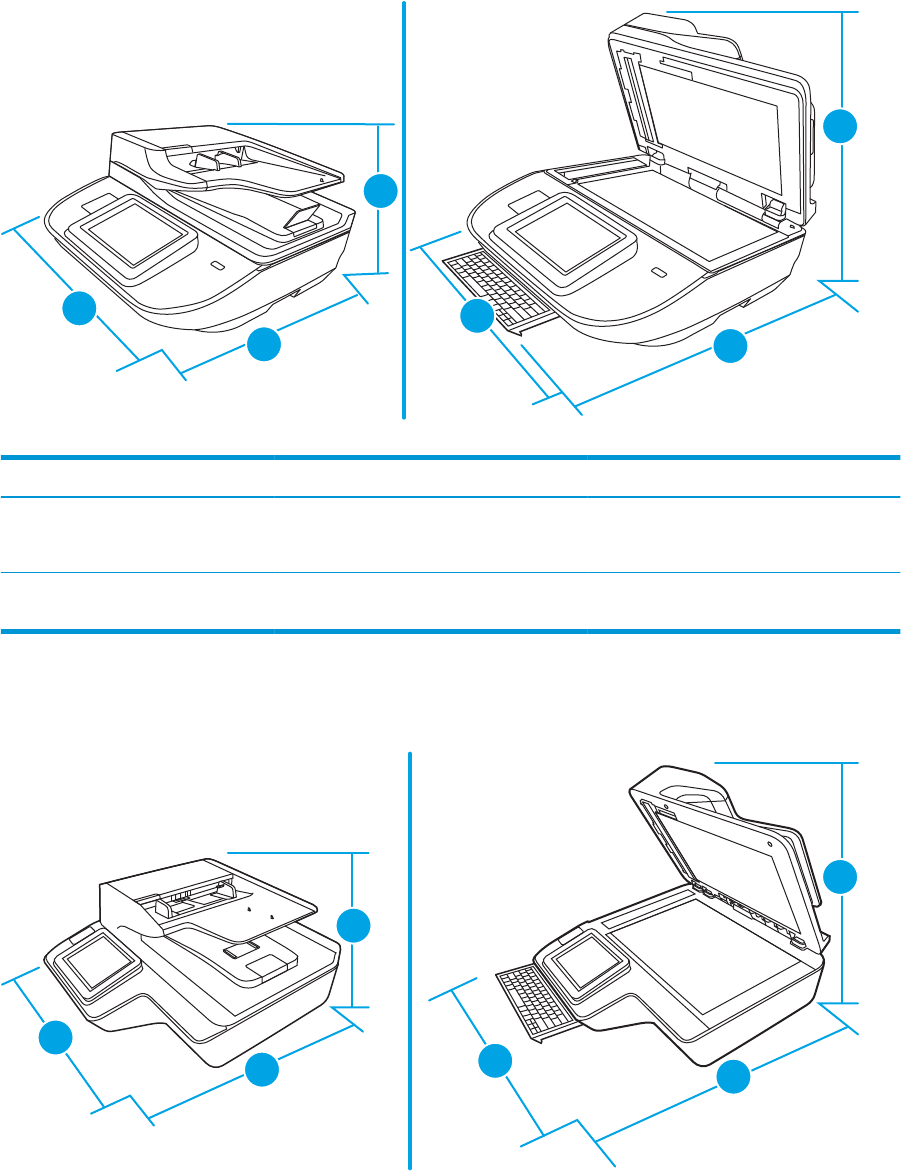
Product dimensions (HP Digital Sender Flow 8500 fn2 Document Capture Workstation)
Figure 1-1 Product dimensions
3
2
1
3
1
2
Table 1-1 Product dimensions
Product Width Depth Height Weight
HP Digital Sender Flow 8500 fn2
Document Capture Workstation (closed)
512 mm (20.2 in) 585.3 mm (23.04 in) 263.4 mm (10.4 in) 17.46 kg (38.5 lb)
HP Digital Sender Flow 8500 fn2
Document Capture Workstation (open)
512 mm (20.2 in) 717 mm (28.23 in) 515 mm (20.28 in) 17.46 kg (38.5 lb)
Product dimensions (HP ScanJet Enterprise Flow N9120 fn2 Document Scanner)
Figure 1-2 Product dimensions
2
3
1
3
2
1
ENWW Product specications 11

Table 1-2 Product dimensions
Product Width Depth Height Weight
HP ScanJet Enterprise Flow N9120 fn2
Document Scanner (closed)
601.98 mm (23.7 in) 635 mm (25 in) 287.02 mm (11.3 in) 21.4 kg (47.18 lb)
HP ScanJet Enterprise Flow N9120 fn2
Document Scanner (open)
601.98 mm (23.7 in) 754.38 mm (29.7 in) 622.3 mm (24.5 in) 21.4 kg (47.18 lb)
Power consumption, electrical specications and acoustic emissions
Power usage drops signicantly while in Ready or Sleep mode, which saves natural resources and saves money
without aecting the high performance of this product.
AC power FB scan Duplex ADF scan
300 dpi 600 dpi 300 dpi 600 dpi
AC110V < 30 W < 30 W < 60 W < 50 W
AC230V < 30 W < 30 W < 60 W < 50 W
Power Sleep mode O
AC110V < 2 W < 0.2 W
AC230V < 2 W < 0.2 W
Operating environment range (HP Digital Sender Flow 8500 fn2 Document Capture
Workstation)
This product is intended to be supplied by a Listed Power Unit, marked with LPS or Limited Power Source. The
power supply is rated 100–240V~, and has a DC output of 32 Vdc, 1.56 A, 50 W.
Name Description
Temperature Operating the scanner: 10° to 35° C (50° to 95° F)
Storage: -40° to 60° C (-40° to 140° F)
Relative humidity Operating the scanner: 15% to 80% non-condensing 10° to 35° C (50° to 95° F)
Storage: up to 90% at 30° to 60° C (86° to 149° F)
Operating environment range (HP ScanJet Enterprise Flow N9120 fn2 Document
Scanner)
This product is intended to be supplied by a Listed Power Unit, marked with LPS or Limited Power Source. The
power supply is rated 100–240V~, and has a DC output of 32 Vdc, 1.56 A, 50 W.
12 Chapter 1 Product overview ENWW

Name Description
Temperature Operating the scanner: 10° to 35° C (50° to 95° F)
Storage: -40° to 60° C (-40° to 140° F)
Relative humidity Operating the scanner: 15% to 80% non-condensing 10° to 35° C (50° to 95° F)
Storage: up to 90% at 30° to 60° C (86° to 149° F)
ENWW Product specications 13

Product hardware setup and software installation
Hardware setup
For basic setup instructions, see the Installation Guide that came with the scanner. For additional instructions, go
to HP support on the Web.
Go to www.hp.com/support for HP's all-inclusive help for the scanner. Find the following support:
●Install and congure
●Learn and use
●Solve problems
●Download software updates
●Join support forums
●Find warranty and regulatory information
How to get software updates
For the latest software updates, see www.hp.com/support, select your location, click Software and Drivers, and
then search on your product name or number.
14 Chapter 1 Product overview ENWW

Scanner software (Windows)
The scanner comes with a variety of Windows scanning software and drivers, including HP Scan.
●HP Scan software
●HP TWAIN
●ISIS
●WIA
HP Scan software
Use the HP Scan software to complete the following tasks:
●Scan to a PDF
●Scan to a JPEG
●Email as a PDF
●Email as a JPEG
●Scan text for editing (OCR)
●Scan to cloud
●Everyday scan
HP TWAIN
HP TWAIN provides a software interface between imaging/scanning hardware and TWAIN-compliant software
applications. Not all TWAIN-compliant software works in the same way, so consult the software documentation
for details on how to acquire scans.
ISIS
ISIS (Image and Scanner Interface Specication) provides a software interface between imaging/scanning
hardware and software applications. ISIS drivers provide a consistent interaction with all ISIS-compliant scanners.
WIA
WIA provides a software interface between imaging/scanning hardware and WIA-compliant software
applications. Not all WIA-compliant software works in the same way, so consult the software documentation for
details on how to acquire scans.
Sleep Mode and auto-o settings
By default, the scanner will enter Sleep Mode after 10 minutes of inactivity.
Windows: To change the default auto-o settings, use the control panel or Embedded Web Server.
ENWW Scanner software (Windows) 15
16 Chapter 1 Product overview ENWW

2 Use the scanner
The following topics describe how to load and scan originals.
ENWW 17

Set up Scan to Email
●Introduction
●Before you begin
●Step one: Access the HP Embedded Web Server (EWS)
●Step two: Congure the Network Identication settings
●Step three: Congure the Send to Email feature
●Step four: Congure the Quick Sets (optional)
●Step ve: Set up Send to Email to use Oice 365 Outlook (optional)
Introduction
The product has a feature that enables it to scan a document and send it to one or more email addresses. To use
this scan feature, the product must be connected to a network; however, the feature is not available until it has
been congured. There are two methods for conguring Scan to Email, the Scan to Email Setup Wizard for basic
and Email Setup for advanced. Use the following information to set up the Scan to Email feature.
Before you begin
To set up the Scan to Email feature, the product must have an active network connection.
Administrators need the following information before beginning the conguration process.
●Administrative access to the product
●DNS suix (e.g., companyname.com)
●SMTP server (e.g., smtp.mycompany.com)
NOTE: If you do not know the SMTP server name, SMTP port number, or authentication information,
contact the email/Internet service provider or system administrator for the information. SMTP server
names and port names are typically found by doing an Internet search. For example, use terms like "Gmail
smtp server name" or "Yahoo smtp server name" to search.
●SMTP server authentication requirements for outgoing email messages, including the user name and
password used for authentication, if applicable.
NOTE: Consult your email service provider's documentation for information on digital sending limits for your
email account. Some providers may temporarily lock your account if you exceed your sending limit.
ENWW Set up the scanner 19
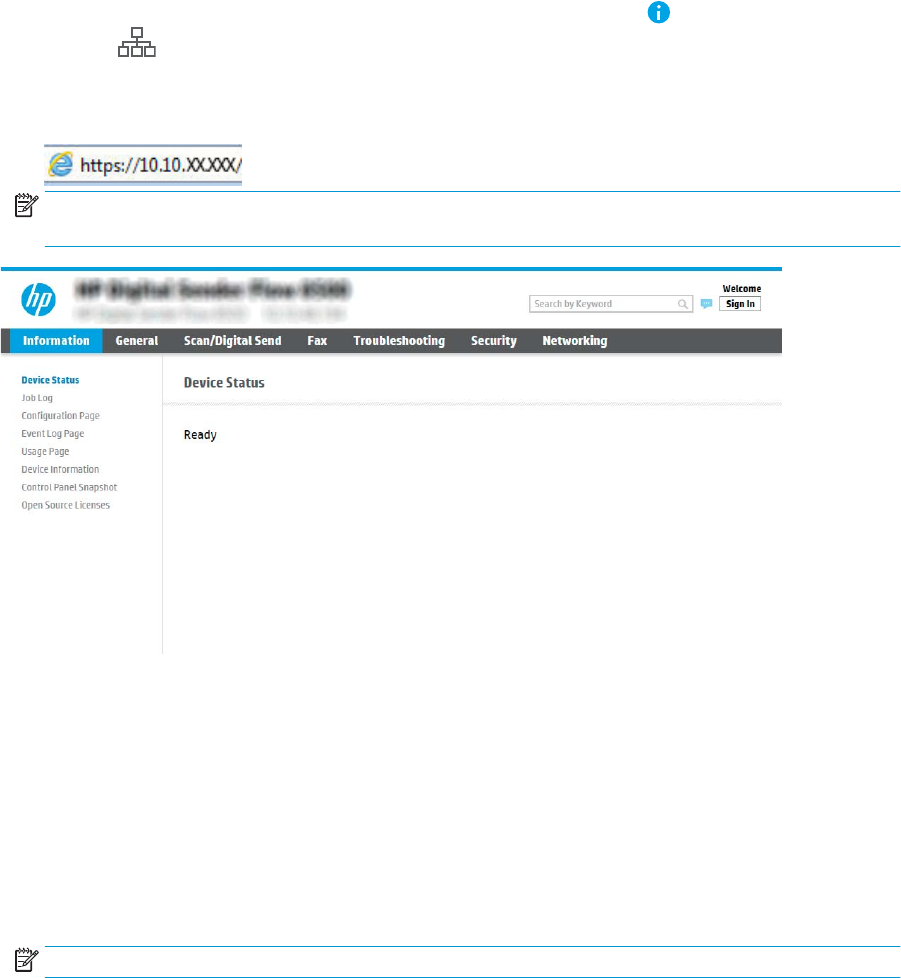
Step one: Access the HP Embedded Web Server (EWS)
1. From the Home screen on the product control panel, select the Information icon, and then select the
Network icon to display the IP address or host name.
2. Open a web browser, and in the address line, type the IP address or host name exactly as it displays on the
product control panel. Press the Enter key on the computer keyboard. The EWS opens.
NOTE: If the web browser displays a message indicating that accessing the website might not be safe,
select the option to continue to the website. Accessing this website will not harm the computer.
Step two: Congure the Network Identication settings
NOTE: Conguring email setup on the Networking tab is an advanced process and might require the assistance
of a system administrator.
1. Using the EWS top navigation tabs, click Networking.
NOTE: For conguring the network settings for use with Oice 365, Step ve: Set up Send to Email to use
Oice 365 Outlook (optional) on page 29
2. On the TCP/IP Settings dialog, click the Network Identication tab.
20 Chapter 2 Use the scanner ENWW
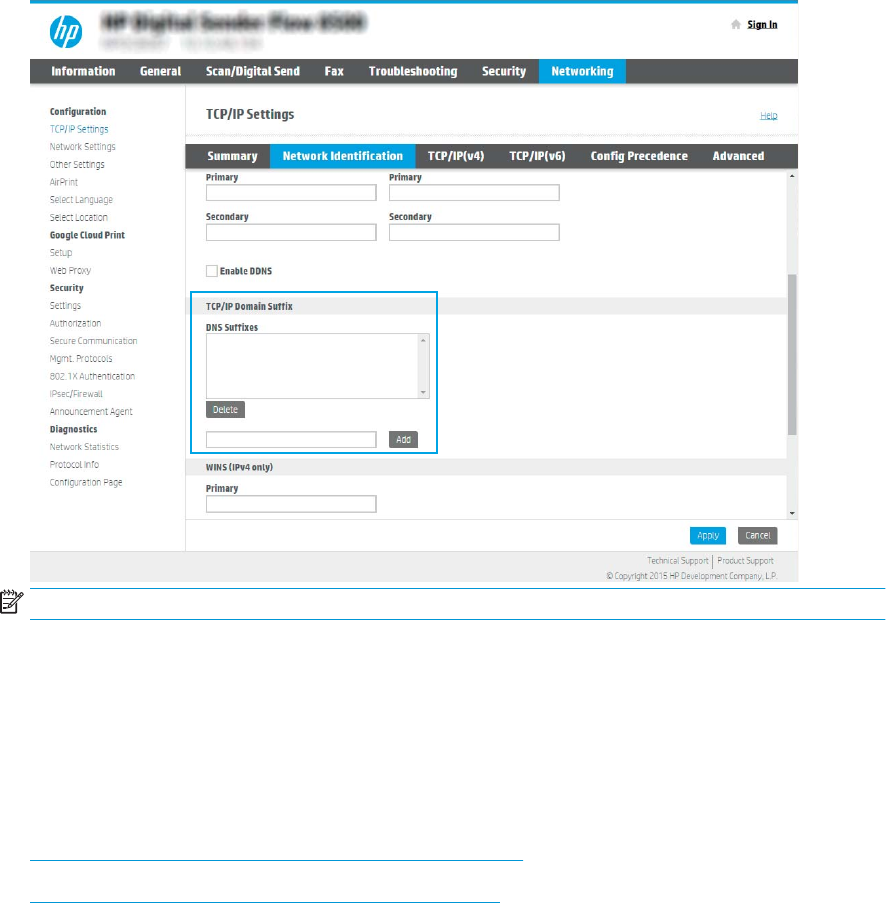
3. If DNS is required on the network, in the TCP/IP Domain Suix area, verify that the DNS suix for the email
client being used is listed. DNS suixes have this format: companyname.com, gmail.com, etc.
NOTE: If the Domain Name suix is not set up, use the IP address.
4. Click Apply.
5. Click OK.
Step three: Congure the Send to Email feature
The two options for conguring Send to Email are the Email Setup Wizard for basic conguration and Email
Setup for advanced conguration. Use the following options to congure the Send to Email feature:
●Method one: Basic conguration using the Email Setup Wizard
●Method two: Advanced conguration using the Email Setup
Method one: Basic conguration using the Email Setup Wizard
This option opens the Email Setup Wizard in the HP Embedded Web Server (EWS) for basic conguration.
1. Using the EWS top navigation tabs, click Scan/Digital Send.
2. In the left-navigation pane, click Email and Scan to Network Folder Quick Setup Wizards.
ENWW Set up the scanner 21
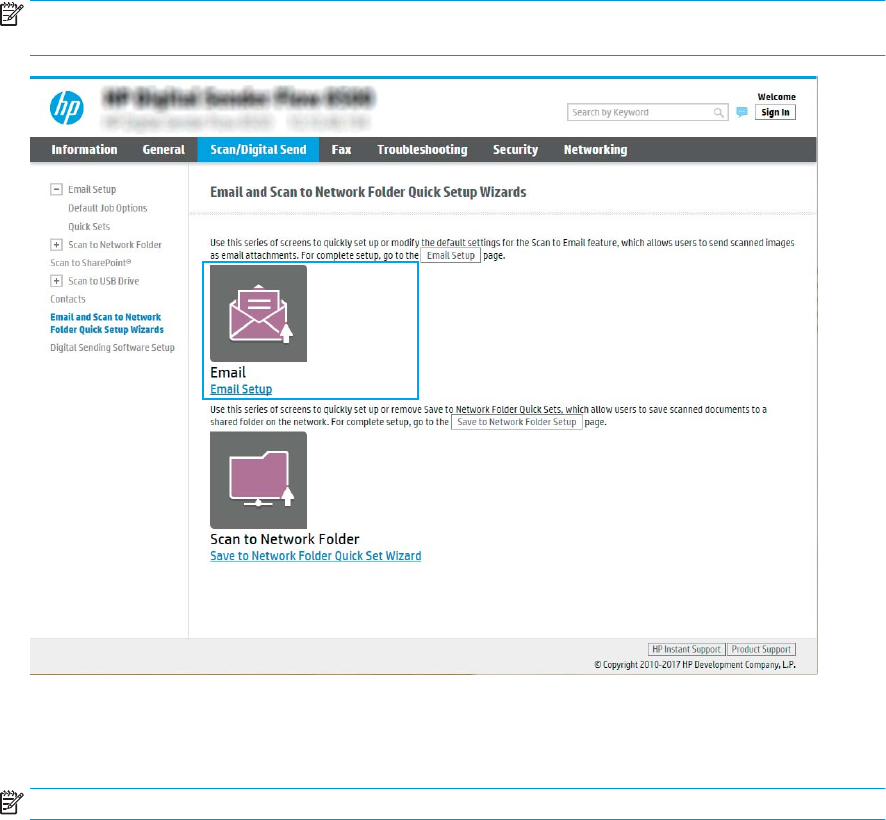
3. In the Email and Scan to Network Folder Quick Setup Wizards dialog, click the Email Setup link.
NOTE: If a message displays indicating that the Scan to Email feature is disabled, click Continue to
proceed with the conguration and enable the Scan to Email feature upon completion.
4. On the Congure Email Servers (SMTP) dialog, select one of the following options and complete the steps:
Search network for outgoing email server
NOTE: This option nds outgoing SMTP servers inside your rewall only.
a. Select Search network for outgoing email server, and then click Next.
b. Select the appropriate server from the Congure Email Server (SMTP) list, and then click Next.
c. Select the option that describes the server’s authentication requirements:
–Server does not require authentication: Select Server does not require authentication, and then
click Next.
-OR-
–Server requires authentication: From the drop-down list, select an authentication option:
○Use credentials of user to connect after Sign In at the control panel: Select Use credentials
of user to connect after Sign In at the control panel, and then click Next.
-OR-
○Always use these credentials: Select Always use these credentials, enter the User name
and Password, and then click Next.
22 Chapter 2 Use the scanner ENWW

Option three: Add SMTP server
a. Select Add SMTP server
b. Enter the Server Name and Port Number, and then click Next.
NOTE: In most cases, the default port number does not need to be changed.
NOTE: If you are using a hosted SMTP service such as Gmail, verify the SMTP address, port number,
and SSL settings from the service provider’s website or other sources. Typically, for Gmail, the SMTP
address is smtp.gmail.com, port number 465, and the SSL should be enabled.
Please refer to online sources to conrm these server settings are current and valid at the time of
conguration.
c. Select the appropriate server authentication option:
–Server does not require authentication: Select Server does not require authentication, and then
click Next.
-OR-
–Server requires authentication: Select an option from the Server requires authentication drop-
down list:
○Use credentials of user to connect after Sign In at the control panel: Select Use credentials
of user to connect after Sign In at the control panel, and then click Next.
-OR-
○Always use these credentials: Select Always use these credentials, enter the User name
and Password, and then click Next.
NOTE: When setting up the From, Subject, and Message elds, if the User editable check box is
unchecked, users will not be able to edit those elds at the product control panel when sending an email.
Option Description
From
(Required)
Select one of the following options from the From drop-down list:
●User’s address (sign-in required)
●Default From: Enter a default email address and display name in the Default From Email
Address and Default Display Name elds
NOTE: Create an email account for the product, and use this address for the default
email address.
NOTE: Congure the email feature so that users must sign in before using it. This
prevents users from sending an email from an address that is not their own.
Subject
(Optional)
Provide a default subject line for the email messages.
Message
(Optional)
Create a custom message.
To use this message for all emails sent from the product, clear the User editable check box
for Message.
5. In the Congure File Scan Settings area, set the default scanning preferences, and then click Next.
ENWW Set up the scanner 23

Option Description
File Type Select the default le type for the scanned document:
●PDF
●JPEG
●TIFF
●MTIFF
●XPS
●PDF/A
Color/Black Select the default color setting for the scanned document:
●Color
●Gray
●Halftone
●Black/White
●Auto Detect Color
Quality and File Size Select the default output quality for the scanned document:
●Low (small le)
●Medium
●High (large le)
Resolution Select the default scan resolution for the scanned document:
●75 dpi
●150 dpi
●200 dpi
●300 dpi
●400 dpi
●600 dpi
6. Review the Summary area, and then click Finish to complete the setup.
Method two: Advanced conguration using the Email Setup
1. Using the EWS top navigation tabs, click Scan/Digital Send, and then click Email Setup in the left navigation
pane.
NOTE: By default, the Email Setup page displays the basic settings for Scan to Email setup. To access
additional settings, click Advanced Settings at the bottom of the page.
24 Chapter 2 Use the scanner ENWW
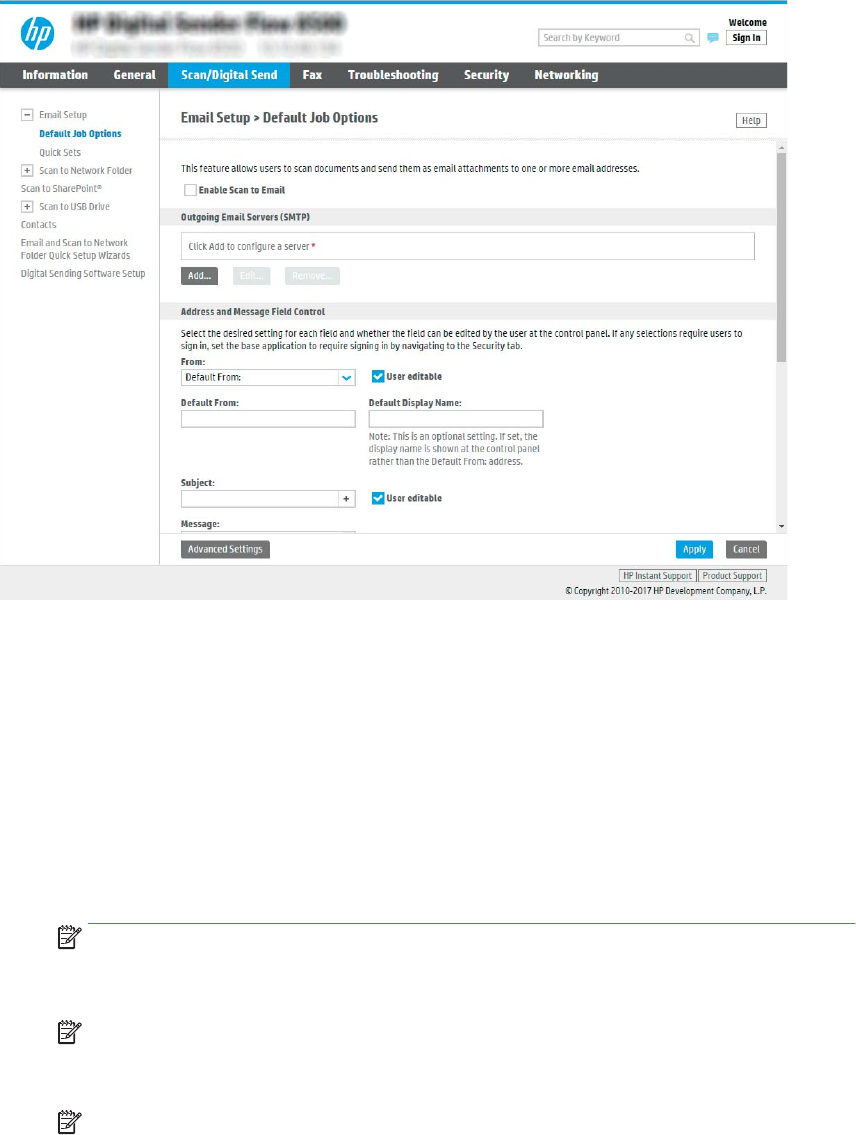
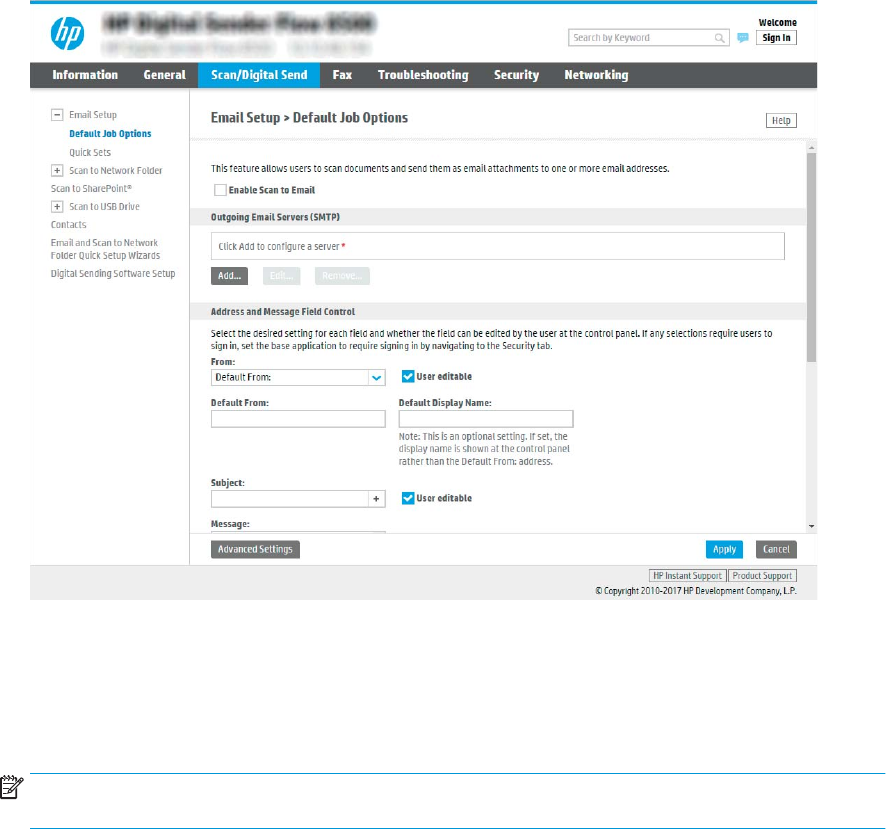
2. On the Email Setup dialog, select the Enable Send to Email check box. If this check box is not selected, the
feature is unavailable at the product control panel.
3. In the Outgoing Email Servers (SMTP) area, complete the steps for one of the following options:
●Select one of the displayed servers
●Click Add to start the SMTP wizard.
▲In the SMTP wizard, select one of the following options:
○Option one: I know my SMTP server address or host name: Enter the address of an SMTP
server, and then click Next
○Option two: If you do not know the address of the SMTP server, select Search network for
outgoing email server, and then click Next. Select the server, and then click Next.
NOTE: If an SMTP server was already created for another product function, the Use a server
already in use by another function option displays. Select this option, and then congure it to be
used for the email function.
NOTE: Some servers have problems sending or receiving emails that are larger than 5
megabytes (MB). These problems can be prevented by entering a number in Split emails if larger
than (MB).
NOTE: In most cases, the default port number does not need to be changed. However, when
using the Enable SMTP SSL Protocol option, port 587 must be used.
ENWW Set up the scanner 25

NOTE: If you are using Google™ Gmail for email service, select the Enable SMTP SSL Protocol
check box. Typically, for gmail, the SMTP address is smtp.gmail.com, port number 465, and the
SSL should be enabled.
Please refer to online sources to conrm these server settings are current and valid at the time
of conguration.
4. In the Address and Message Field Control area, enter a From: setting and any of the other optional settings.
Address and Message Field Control settings:
Feature Description
Address Field Restrictions1Specify whether users must select an email address from an address book or whether users are
allowed to enter in an email address manually.
CAUTION: If Users must select from address book is selected, and any of the address elds are
also set as User editable, changes to those editable elds also change the corresponding values in
the address book.
To prevent users from changing contacts in the Address Book at the product control panel, go to
the Access Control page on the Security tab, and deny Device Guest access to address book
modications.
Allow invalid email address
formats1
Select to allow an invalid email address format.
User editable To use the Default From address and Default Display Name for all emails sent from this product
(unless a user is signed in), do not select the User editable check box.
When setting up the address elds, if the User editable check box is unchecked, users will not be
able to edit those elds at the product control panel when sending an email. For send-to-me
functionality, clear the User editable check boxes for all of the address elds, including the From:
To: CC:, and BCC: elds, and then set that user's send email From: their own email address and To:
their own email address.
Default From: and Default
Display Name:
Provide an email address and name to use for the From: address for the email message.
NOTE: Create an email account for the product, and use this address for the default email
address.
NOTE: Congure the email feature so that users must sign in before using it. This prevents users
from sending an email from an address that is not their own.
To:1Provide a To (recipient) email address for emails.
CC:1Provide a CC email address for emails.
BCC:1Provide a BCC email address for emails.
Subject: Provide a default subject line for the email messages.
Message: Create a custom message. To use this message for all emails sent from the product, clear or do
not select the User editable check box for Message:.
1This setting is available only on the Advanced Settings page.
5. In the Signing and Encryption area, set the signing and encryption preferences.
NOTE: These settings are available only on the Advanced Settings page.
Signing and Encryption settings:
26 Chapter 2 Use the scanner ENWW

Feature Description
Signing Select whether to sign the security certicate.
Select the User editable check box to make this setting editable at the product control panel.
Hashing Algorithm Select the algorithm to use for signing the certicate.
Encryption Select whether to encrypt the email.
Select the User editable check box to make this setting editable at the product control panel.
Encryption Algorithm Select the algorithm to use for encrypting the email.
Attribute for Recipient Public
Key
Enter which attribute to use to retrieve the recipient’s public key certicate from LDAP.
Use the recipient public key
certicate to verify the
recipient
Select this setting to use the recipient’s public key certicate to verify the recipient.
6. In the Notication Settings area, select when users will receive notications about sent emails. The default
setting is using the signed in user's email address. If the recipient email address is blank, no notication is
sent.
7. In the Scan Settings area, set the default scanning preferences.
NOTE: These settings are available only on the Advanced Settings page.
Scan settings:
Feature Description
Original Size Select the page size of the original document.
Original Sides Select whether the original document is single-sided or double-sided.
Optimize Text/Picture Select to optimize for the output of a particular type of content.
Content Orientation Select the way the content of the original document is placed on the page: Portrait or Landscape.
Background Cleanup Select a value to remove faint images from the background or to remove a light background color.
Darkness Select a value to adjust the darkness of the le.
Contrast Select a value to adjust the contrast of the le.
Sharpness Select a value to adjust the sharpness of the le.
Image Preview Select whether to require or make optional a displayed preview of the job or to disable a preview.
Cropping Options Select whether or not to allow a job to be cropped and the type of cropping option.
Erase Edges Select this setting to specify the width of edge margins to be erased, in either inches or
millimeters, for the front side and back side of a job.
8. In the File Settings area, set the default le settings preferences.
File settings:
Feature Description
File Name Prex1Set the default le name prex used for les saved to a network folder.
ENWW Set up the scanner 27

Feature Description
File Name Default le name for the le to be saved.
Select the User editable check box to make this setting editable at the product control panel.
File Name Suix1Set the default le name suix used for les saved to a network folder.
Duplicate lename suix default [lename]_YYYYMMDDT
File Name Preview1Enter a le name, and then click Update Preview.
File Numbering Format1Select a le name format for when the job is divided into multiple les.
Add numbering when job has
just one le (ex. _1–1)1
Select this setting to add numbering to a le name when the job is only one le instead of multiple
les.
File Type Select the le format for the saved le.
Select the User editable check box to make this setting editable at the product control panel.
High Compression (smaller
le)1
Select this setting to compress the scanned le, which reduces the le size. However, the scanning
process for a High compression le might take longer than for a Normal compression le.
PDF encryption1If the le type is PDF, then this option encrypts the output PDF le. A password must be specied
as part of the encryption. The same password must be used to open the le. The user will be
prompted to enter a password prior to scanning their job if one has not been set prior to pressing
start.
Resolution Set the resolution for the le. Higher resolution images have more dots per inch (dpi), so they
show more detail. Lower resolution images have fewer dots per inch and show less detail, but the
le size is smaller.
Quality and File Size Select the quality for the le. Higher-quality images require a larger le size than lower-quality
images, and they take more time to send.
Color/Black Specify whether copies are to be scanned in color, black and gray, or black only.
Suppress blank pages1If the Suppress blank pages option is enabled, blank pages will be ignored.
Create Multiple Files1Select this setting to scan pages into separate les based on a predetermined maximum number
of pages per le.
1This setting is available only on the Advanced Settings page.
9. Review the selected options to verify that they are accurate, and then click Apply to complete the setup.
Step four: Congure the Quick Sets (optional)
Quick Sets are optional short-cut jobs that can be accessed on the main Home screen or within the Quick Sets
application at the product.
1. In the Email Setup area of the left navigation pane, click Quick Sets.
2. Select one of the following options:
●Select an existing Quick Set under Quick Sets Application in the table.
-OR-
●Click Add to start the Quick Set Wizard.
3. If you selected Add, the Quick Sets Setup page opens. Complete the following information:
28 Chapter 2 Use the scanner ENWW

●Quick Set Name: Enter a title for the new Quick Set.
●Quick Set Description: Enter a description of the Quick Set.
●Quick Set Start Option: To set how the Quick Set starts, click either Enter application, then user
presses Start or Start instantly when selected from the Home Screen.
4. Dene the following settings for the Quick Set: Address and Message Field Control, Signing and Encryption,
Notication Settings, Scan Settings, File Settings.
5. Click Finish to save the Quick Set.
Step ve: Set up Send to Email to use Oice 365 Outlook (optional)
Introduction
Microsoft Oice 365 Outlook is a cloud-based email system provided by Microsoft which uses Microsoft's Simple
Mail Transfer Protocol (SMTP) server to send or receive emails. Complete the following to enable the product to
send an email with an Oice 365 Outlook account from the control panel.
NOTE: You must have an email address account with Oice 365 Outlook to congure the settings in the EWS.
Congure the outgoing email server (SMTP) to send an email from an Oice 365 Outlook account
1. Using the EWS top navigation tabs, click Networking.
2. In the left navigation pane, click TCP/IP Settings.
3. In the TCP/IP Settings area, click the Network Identication tab.
ENWW Set up the scanner 29
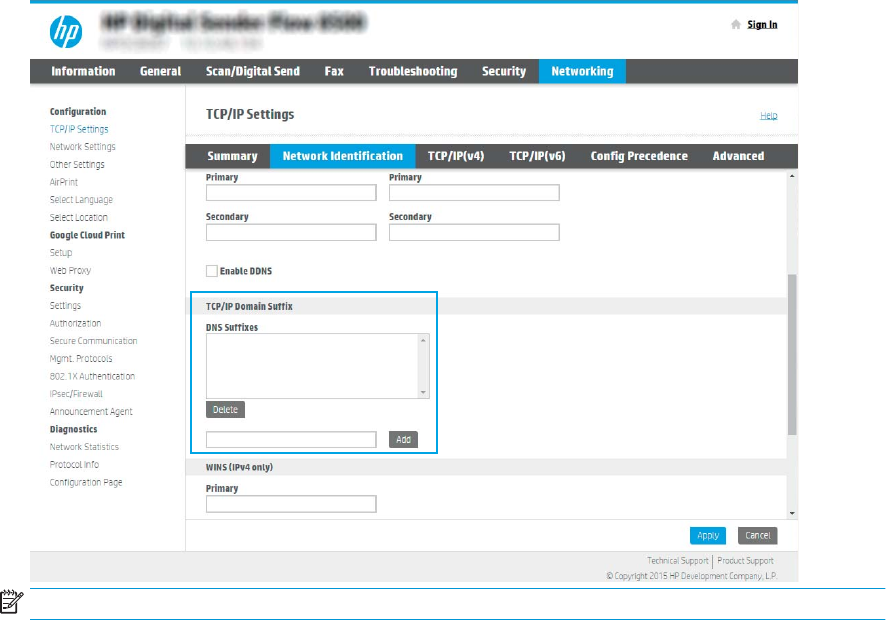
4. If DNS is required on the network, in the TCP/IP Domain Suix area, verify that the DNS suix for the email
client being used is listed. DNS suixes have this format: companyname.com, Gmail.com, etc.
NOTE: If the Domain Name suix is not set up, use the IP address.
5. Click Apply.
6. Click the Scan/Digital Send tab.
7. On the left navigation pane, click Email Setup.
30 Chapter 2 Use the scanner ENWW
8. On the Email Setup page, select the Enable Send to Email check box. If this check box is not available, the
feature is unavailable at the product control panel.
9. In the Outgoing Email Servers (SMTP) area, click Add to start the SMTP wizard.
10. In the I know my SMTP server address or host name eld, type smtp.onoice.com, and then click Next.
11. On the Set the basic information necessary to connect to the server dialog, in the Port Number eld, type
587.
NOTE: Some servers have problems sending or receiving emails that are larger than 5 megabytes (MB).
These problems can be prevented by entering a number in Split emails if larger than (MB).
12. Select the Enable SMTP SSL Protocol check box, and then click Next.
13. On the Server Authentication Requirements dialog, complete the following information:
a. Select Server requires authentication.
b. From the drop-down list, select Always use these credentials
c. In the Username eld, type the Oice 365 Outlook email address.
d. In the Password eld, type the Oice 365 Outlook account password, and then click Next.
14. On the Server Usage dialog, choose the product functions that will send email through this SMTP server,
and then click Next.
ENWW Set up the scanner 31
15. On the Summary and Test dialog, enter a valid email address in the Send a test email to: eld, and then click
Test.
16. Verify that all of the settings are correct, and then click Finish to complete the outgoing email server set up.
Set up Scan to Fax
Step one: Access the HP Embedded Web Server
1. From the Home screen on the product control panel, select the Information icon, and then select the
Network icon to display the IP address or host name.
2. Open a web browser, and in the address line, type the IP address or host name exactly as it displays on the
product control panel. Press the Enter key on the computer keyboard. The EWS opens.
NOTE: If the web browser displays a message indicating that accessing the website might not be safe,
select the option to continue to the website. Accessing this website will not harm the computer.
Step two: Set up Scan to Fax
Method one: LAN Fax Setup
1. Using the EWS top navigation tabs, click the Fax tab.
2. Navigate to LAN Fax Setup.
3. Select the Enable Fax Send checkbox.
4. Fill out appropriate Folder Settings information.
NOTE: You may need to set up the network share folder prior to LAN fax set up.
32 Chapter 2 Use the scanner ENWW
Method two: Internet Fax Setup
1. Using the EWS top navigation tabs, click the Fax tab.
2. Navigate to Internet Fax Setup.
3. Select the Enable Fax Send checkbox.
4. In the Outgoing Email Servers (SMTP) section, click Add to add an outgoing email server.
5. In the Internet Fax Service Settings section, click Add to add an Internet Fax Provider Domain.
6. Enter the appropriate information for all following elds, and then click Apply.
Set up Scan to Network Folder
●Introduction
●Before you begin
●Step one: Access the HP Embedded Web Server
●Step two: Set up Scan to Network Folder
Introduction
This document explains how to enable and congure the Scan to Network Folder function. The product has a
feature that enables it to scan a document and save it to a network folder. To use this scan feature, the product
must be connected to a network; however, the feature is not available until it has been congured. There are two
methods for conguring Scan to Network Folder, the Save to Network Folder Setup Wizard for basic setup and
Save to Network Folder Setup for advanced setup.
Before you begin
NOTE: To set up the Scan to Network Folder feature, the product must have an active network connection.
Administrators need the following items before beginning the conguration process.
●Administrative access to the product
●The fully-qualied domain name (FQDN) (e.g., \\servername.us.companyname.net\scans) of the
destination folder OR the IP address of the server (e.g., \\16.88.20.20\scans).
NOTE: The use of the term "server" in this context refers to the computer where the shared folder resides.
Step one: Access the HP Embedded Web Server
1. From the Home screen on the product control panel, select the Information icon, and then select the
Network icon to display the IP address or host name.
2. Open a web browser, and in the address line, type the IP address or host name exactly as it displays on the
product control panel. Press the Enter key on the computer keyboard. The EWS opens.
NOTE: If the web browser displays a message indicating that accessing the website might not be safe,
select the option to continue to the website. Accessing this website will not harm the computer.
ENWW Set up the scanner 33
Step two: Set up Scan to Network Folder
Method one: Use the Scan to Network Folder Wizard
This option opens the setup wizard that is in the HP Embedded Web Server (EWS) for the product. The setup
wizard includes the options for basic conguration.
NOTE: Before you begin: To display the product's IP address or host name, select the Information icon, and
then select the Network icon on the product's control panel.
1.Using the EWS top navigation tabs, click Scan/Digital Send tab.
2. In the left-navigation pane, click Email and Scan to Network Folder Quick Setup Wizards.
3. Click the Save to Network Folder Quick Set Wizard link.
4. On the Add or Remove a Save to Network Folder Quick Set dialog, click Add.
NOTE: Quick Sets are short-cut jobs that can be accessed on the product Home screen or within the Quick
Sets application.
NOTE: The Save to Network Folder feature can be minimally congured without creating a quick set.
However, without the quick set, users must enter the destination folder information at the control panel for
each scan job. A quick set is required to include Save to Network Folder metadata.
5. On the Add Folder Quick Set dialog, complete the following information:
a. In the Quick Set Title eld, type a title.
NOTE: Name the Quick Set something that users can understand quickly (e.g., "Scan and save to a
folder").
b. In the Quick Set Description eld, type a description explaining what the Quick Set will save.
c. Click Next.
6. On the Congure Destination Folder dialog, complete the following information:
34 Chapter 2 Use the scanner ENWW
a. In the UNC Folder Path eld, type a folder path where the scan will go.
The folder path can either be the fully-qualied domain name (FQDN) (e.g., \
\servername.us.companyname.net\scans) or the IP address of the server (e.g., \\16.88.20.20\scans).
Be sure that the folder path (e.g., \scans) follows the FQDN or IP address.
NOTE: The FQDN can be more reliable than the IP address. If the server gets its IP address via DHCP,
the IP address can change. However, the connection with an IP address might be faster because the
product does not need to use DNS to nd the destination server.
b. From the Authentication Settings drop-down, select one of the following options:
●Use credentials of user to connect after Sign In at the control panel
●Always use these credentials
NOTE: If Always use these credentials is selected, a user name and password must be entered
in the corresponding elds, and the product’s access to the folder must be veried by clicking
Verify Access.
c. In the Windows Domain eld, type the Windows domain.
TIP: To nd the Windows domain in Windows 7, click Start, click Control Panel, click System.
To nd the Windows domain in Windows 8, click Search, enter System in the search box, and then click
System.
The domain is listed under Computer name, domain, and workgroup settings.
d. Click Next.
7. On the Congure File Scan Settings dialog, set the default scanning preferences for the Quick Set, and then
click Next.
8. Review the Summary dialog, and then click Finish.
Method two: Use Scan to Network Folder Setup
This option enables advanced conguration of the Save to Network Folder feature using the HP Embedded Web
Server (EWS) for the product.
NOTE: Before you begin: To display the product's IP address or host name, select the Information icon, and
then select the Network icon on the product's control panel.
Step one: Begin the conguration
1. Click the Scan/Digital Send tab.
2. On the left navigation menu, click the Scan to Network Folder Setup link.
Step two: Congure the Scan to Network Folder settings
1. On the Scan to Network Folder Setup page, select the Enable Scan to Network Folder check box. If this box
is not selected, the feature is unavailable at the product control panel.
2. In the Scan to Network Folder area of the left navigation pane, click Quick Sets. Click Add to open the Quick
Sets Setup dialog.
ENWW Set up the scanner 35

NOTE: Quick Sets are short-cut jobs that can be accessed on the product Home screen or within the Quick
Sets application.
NOTE: The Scan to Network Folder feature can be minimally congured without creating a quick set.
However, without the quick set, users must enter the destination folder information at the control panel for
each scan job. A quick set is required to include Scan to Network Folder metadata.
Complete all of the settings in the Quick Set Setup to fully congure the Scan to Network Folder feature.
Dialog one: Set the Quick Set name, description, and options for user interaction at the control panel
Use the Set the location for the Quick Set and options for user interaction at the control panel dialog to congure
where Quick Set will display on the product control panel and to congure the level of user interaction at the
product control panel.
1. In the Quick Set Name eld, type a title.
NOTE: Name the Quick Set something that users can understand quickly (e.g., "Scan and save to a
folder").
2. In the Quick Set Description eld, type a description explaining what the Quick Set will save.
3. From the Quick Set Start Option list, select one of the following options:
●Option one: Enter application, then user presses Start
●Option two: Start instantly upon selection
Select one of the following prompt options :
○Prompt for original sides
○Prompt for additional pages
○Require Preview
NOTE: If Start instantly upon selection is selected, the destination folder must be entered in the next
step.
4. Click Next.
Dialog two: Folder Settings
Use the Folder Settings dialog to congure the types of folders where the scanned documents are sent.
There are two types of destination folders to select from:
●Shared folders or FTP folders
●Personal shared folders
There are two types of folder permissions to select from:
●Read and write access
●Write access only
The following information describes how to congure the folder settings.
36 Chapter 2 Use the scanner ENWW
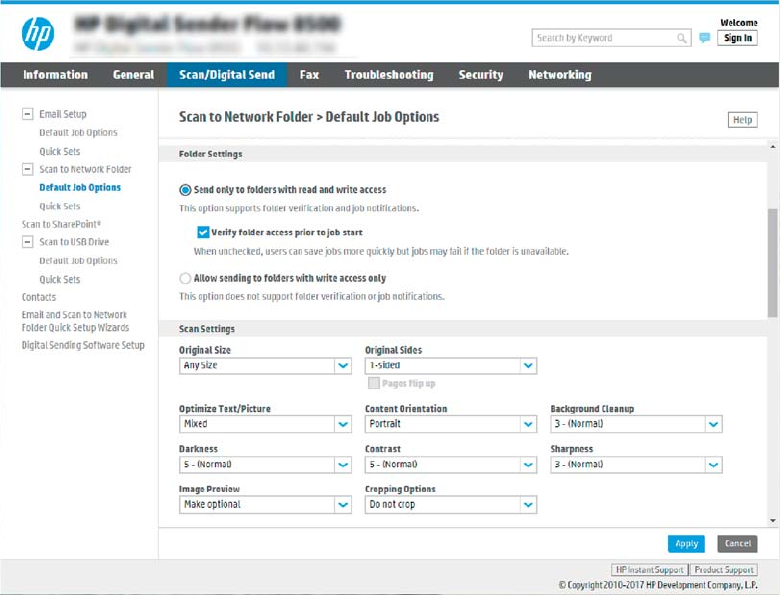
Congure the destination folder for scanned documents
Option 1: Shared folders or FTP folders
To save scanned documents to a standard shared folder or an FTP folder, complete the following steps:
1. If it is not already selected, select Save to shared folders or FTP folders.
2. Click Add.... The Add Network Folder Path dialog opens.
3. On the Add Network Folder Path dialog, select one of the following options:
●Option one: Save to a standard shared network folder
ENWW Set up the scanner 37
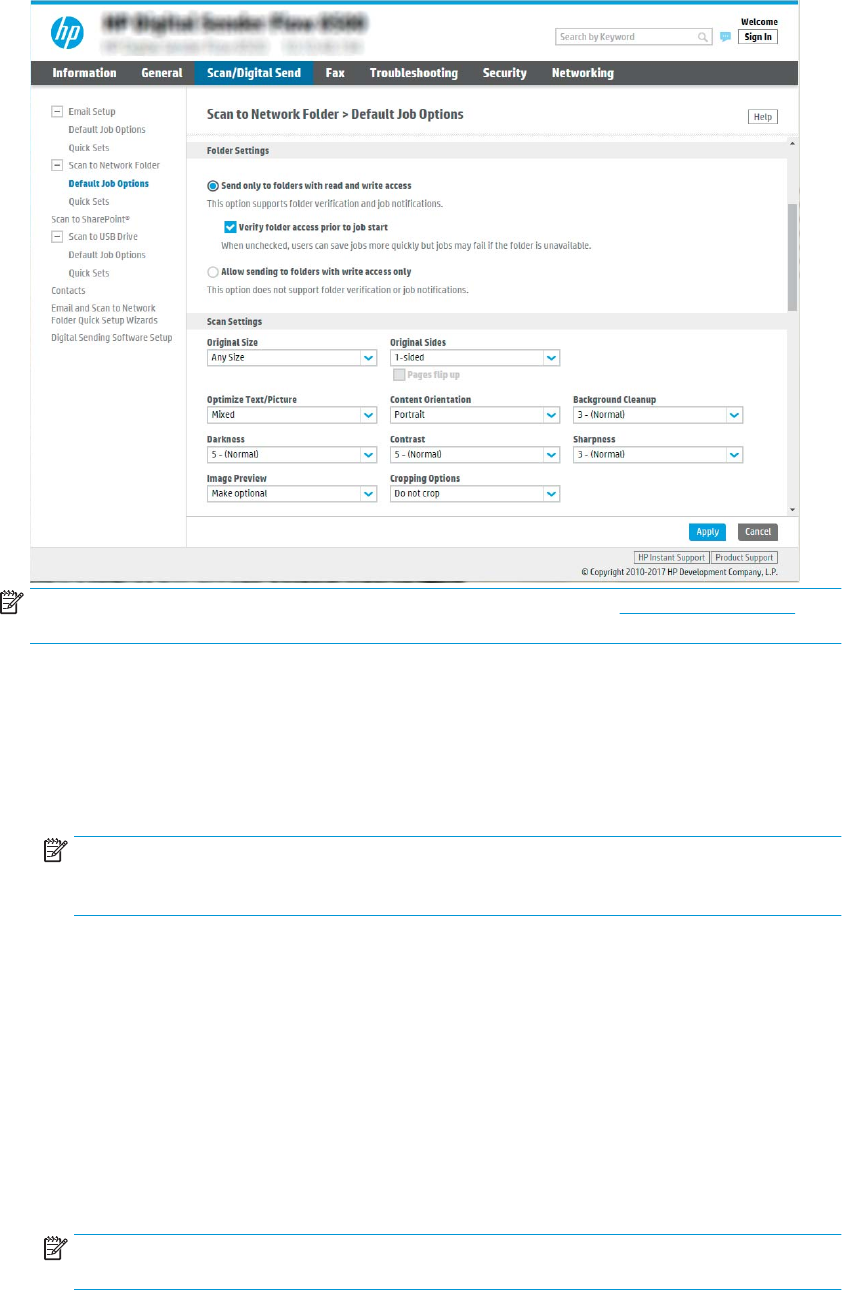
NOTE: For more information about creating shared network folders, see Set up a shared folder
(c04431534).
1. If it is not already selected, select Save to a standard shared network folder.
2. In the UNC Folder Path eld, type a folder path.
The folder path can either be the fully-qualied domain name (FQDN) (e.g., \
\servername.us.companyname.net\scans) or the IP address of the server (e.g., \
\16.88.20.20\scans). Be sure that the folder path (e.g., \scans) follows the FQDN or IP address.
NOTE: The FQDN can be more reliable than the IP address. If the server gets its IP address via
DHCP, the IP address can change. However, the connection with an IP address might be faster
because the product does not need to use DNS to nd the destination server.
3. To automatically create a subfolder for scanned documents in the destination folder, select a
format for the subfolder name from the Custom Subfolder list.
To restrict the subfolder access to the user who creates the scan job, select Restrict subfolder
access to user.
4. To view the complete folder path for scanned documents, click Update Preview.
5. From the Authentication Settings list, select one of the following options:
○Use credentials of user to connect after Sign In at the control panel
○Always use these credentials
NOTE: If Always use these credentials is selected, a user name and password must be entered
in the corresponding elds.
38 Chapter 2 Use the scanner ENWW
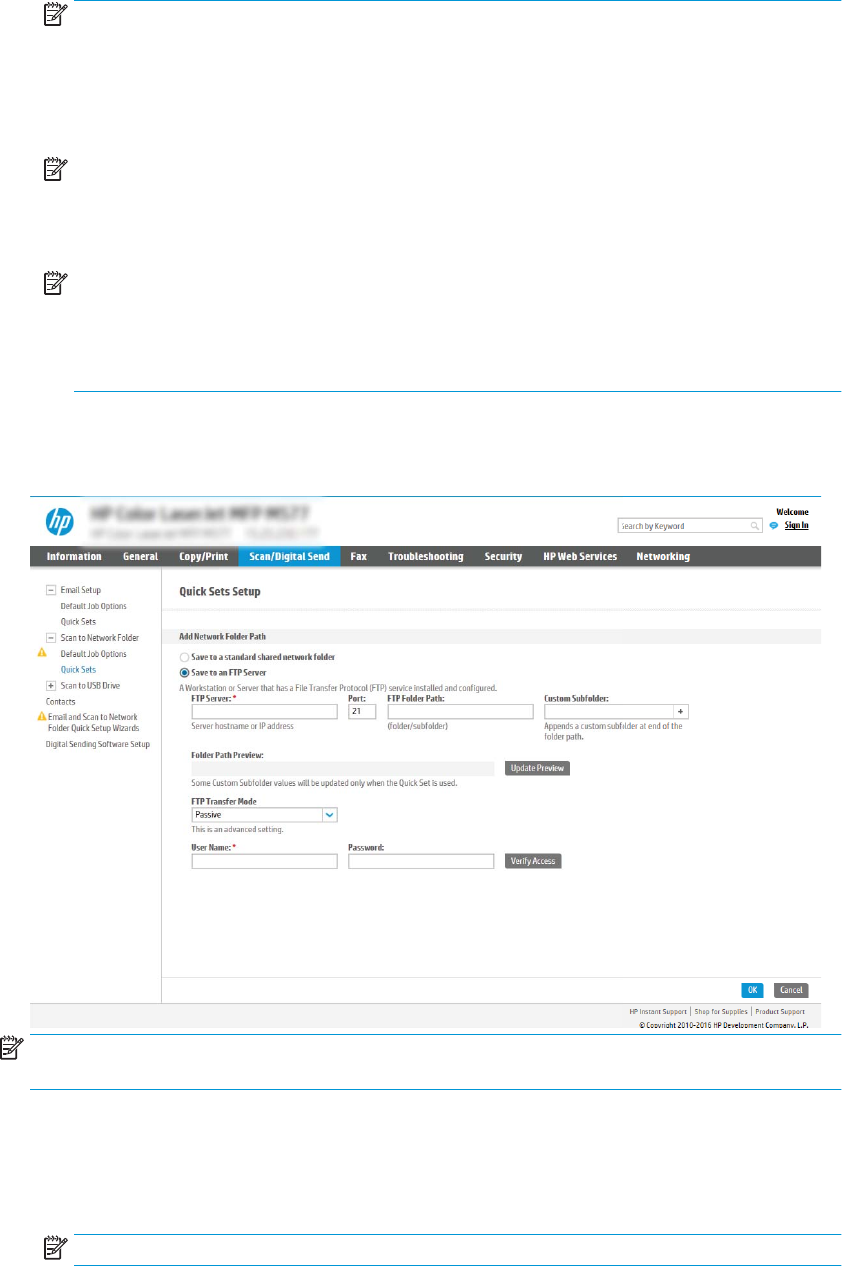
6. In the Windows Domain eld, type the Windows domain.
NOTE: To nd the Windows domain in Windows 7, click Start, click Control Panel, click System.
To nd the Windows domain in Windows 8, click Search, enter System in the search box, and
then click System.
The domain is listed under Computer name, domain, and workgroup settings.
NOTE: If a shared folder is set to be accessed by everyone, values for a workgroup name
(default is “Workgroup”), a user name and password must be entered in the corresponding
elds. However, if the folder is within a particular user’s folders and not Public, the user name
and password of that user must be used.
NOTE: An IP address might be necessary instead of a computer name. Many home routers do
not handle computer names well, and there is no Domain Name Server (DNS). In this case, it is
best to set up a static IP address on the shared PC to alleviate the problem of DHCP assigning a
new IP address. On a typical home router, this is done by setting a static IP address that is on the
same subnet, but outside the DHCP address range.
7. Click OK.
●Option two: Save to an FTP Server
NOTE: If an FTP site is outside the rewall, a proxy server must be specied under the network
settings These settings are located in the EWS Networking tab, under the Advanced options.
1. Select Save to an FTP Server.
2. In the FTP Server eld, type the FTP server name or IP address.
3. In the Port eld, type the port number.
NOTE: In most cases, the default port number does not need to be changed.
ENWW Set up the scanner 39

4. To automatically create a subfolder for scanned documents in the destination folder, select a
format for the subfolder name from the Custom Subfolder list.
5. To view the complete folder path for scanned documents, click Update Preview.
6. From the FTP Transfer Mode list, select one of the following options:
○Passive
○Active
7. In the Username eld, type the user name.
8. In the Password eld, type the password.
9. Click Verify Access to conrm the destination can be accessed.
10. Click OK.
Option 2: Personal shared folders
To save scanned documents to a personal shared folder, complete the following steps:
NOTE: This option is used in domain environments where the administrator congures a shared folder for each
user. If the Save to a personal shared folder feature is congured, users will be required to sign in at the product
control panel using Windows credentials or LDAP authentication.
1. Select Save to a personal shared folder.
2. In the Retrieve the device user’s home folder using this attribute eld, type the user’s home folder in the
Microsoft Active Directory.
NOTE: Verify that the user knows where this home folder is located on the network.
3. To add a user name subfolder at the end of the folder path, select Create subfolder based on user name.
To restrict the subfolder access to the user who creates the scan job, select Restrict subfolder access to
user.
Select the destination folder permissions
Option 1: Read and write access
To send scanned documents to a folder congured for read and write access, complete the following steps:
NOTE: Send only to folders with read and write access supports folder verication and job notication
1. If it is not already selected, select Send only to folders with read and write access.
2. To require the product to verify folder access before starting a scan job, select Verify folder access prior to
job start.
NOTE: Scan jobs can complete more quickly if Verify folder access prior to job start is not selected;
however, if the folder is unavailable, the scan job will fail.
3. Click Next.
Option 2: Write access only
40 Chapter 2 Use the scanner ENWW

To send scanned documents to a folder congured for write access only, complete the following steps:
NOTE: Allow sending to folders with write access only does not support folder verication or job notication
NOTE: If this option is selected, the product cannot increment the scan lename. It sends the same lename for
all scans.
Select a time-related lename prex or suix for the scan lename, so that each scan is saved as a unique le,
and does not overwrite a previous le. This lename is determined by the information in the File Settings dialog
in the Quick Set Wizard.
1. Select Allow sending to folders with write access only.
2. Click Next.
Dialog three: Notication settings
▲On the Notication Settings dialog, complete one of the following tasks:
NOTE: In order to send notication emails, the product must be set up to use an SMTP server for sending
email jobs. For more information about setting up the SMTP server for sending emails see Set up Scan to
Email (c05173714).
●Option one: Do not notify
1. Select Do not notify.
2. To prompt the user to review their notication settings, select Prompt user prior to job start, and
then click Next.
●Option two: Notify when job completes
1. Select Notify when job completes.
2. Select the method for delivering the notication from the Method Used to Deliver Notication
list.
If the method of notication selected is Email, type the email address in the Notication Email
Address eld.
3. To include a thumbnail of the rst scanned page in the notication, select Include Thumbnail.
4. To prompt the user to review their notication settings, select Prompt user prior to job start, and
then click Next.
●Option three: Notify only if job fails
1. Select Notify only if job fails.
2. Select the method for delivering the notication from the Method Used to Deliver Notication
list.
If the method of notication selected is Email, type the email address in the Notication Email
Address eld.
3. To include a thumbnail of the rst scanned page in the notication, select Include Thumbnail.
4. To prompt the user to review their notication settings, select Prompt user prior to job start, and
then click Next.
ENWW Set up the scanner 41

Dialog four: Scan Settings
On the Scan Settings dialog, set the default scanning preferences for the Quick Set, and then click Next.
Scan settings:
Feature Description
Original Size Select the page size of the original document.
Original Sides Select whether the original document is single-sided or double-sided.
Optimize Text/Picture Select to optimize for the output of a particular type of content.
Content Orientation Select the way the content of the original document is placed on the page: Portrait or Landscape.
Background Cleanup Select a value to remove faint images from the background or to remove a light background color.
Darkness Select a value to adjust the darkness of the le.
Contrast Select a value to adjust the contrast of the le.
Sharpness Select a value to adjust the sharpness of the le.
Image Preview Select whether to require or make optional a displayed preview of the job or to disable a preview.
Cropping Options Select whether or not to allow a job to be cropped and the type of cropping option.
Erase Edges Select this setting to specify the width of edge margins to be erased, in either inches or millimeters, for
the front side and back side of a job.
Dialog ve: File Settings
On the File Settings dialog, set the default le settings for the Quick Set, and then click Next.
File settings:
Feature Description
File Name Prex Set the default le name prex used for les saved to a network folder.
File Name Default le name for the le to be saved.
Select the User editable check box to make this setting editable at the product control panel.
File Name Suix Set the default le name suix used for les saved to a network folder.
File Name Preview Enter a le name, and then click Update Preview.
File Numbering Format Select a le name format for when the job is divided into multiple les.
Add numbering when job has
just one le (ex. _1–1)
Select this setting to add numbering to a le name when the job is only one le instead of multiple les.
File Type Select the le format for the saved le.
Select the User editable check box to make this setting editable at the product control panel.
High Compression (smaller le) Select this setting to compress the scanned le, which reduces the le size. However, the scanning
process for a High compression le might take longer than for a Normal compression le.
PDF encryption If the le type is PDF, then this option encrypts the output PDF le. A password must be specied as
part of the encryption. The same password must be used to open the le. The user will be prompted to
enter a password prior to scanning their job if one has not been set prior to pressing start.
42 Chapter 2 Use the scanner ENWW

Feature Description
Resolution Set the resolution for the le. Higher resolution images have more dots per inch (dpi), so they show
more detail. Lower resolution images have fewer dots per inch and show less detail, but the le size is
smaller.
Quality and File Size Select the quality for the le. Higher-quality images require a larger le size than lower-quality images,
and they take more time to send.
Color/Black Specify whether copies are to be scanned in color, black and gray, or black only.
Suppress blank pages If the Suppress blank pages option is enabled, blank pages will be ignored.
Meta Data File Format Use the drop-down list to select the le format for meta-data information.
Create Multiple Files Select this setting to scan pages into separate les based on a predetermined maximum number of
pages per le.
Dialog six: Summary
On the Summary dialog, review the Summary dialog, and then click Finish.
Step three: Complete the conguration
1. In the left-navigation pane, click Scan to Network Folder.
2. On the Scan to Network Folder page, review the selected settings, and then click Apply to complete the
setup.
Set up Scan to USB Drive
●Introduction
●Step one: Access the HP Embedded Web Server
●Step two: Enable Scan to USB Drive
●Step three: Congure the Quick Sets (optional)
●Default scan settings for Scan to USB Drive setup
●Default le settings for Save to USB Setup
Introduction
The product has a feature that enables it to scan a document and save it to a USB ash drive. The feature is not
available until it has been congured through the HP Embedded Web Server (EWS).
Step one: Access the HP Embedded Web Server
1. From the Home screen on the product control panel, select the Information icon, and then select the
Network icon to display the IP address or host name.
ENWW Set up the scanner 43

2. Open a web browser, and in the address line, type the IP address or host name exactly as it displays on the
product control panel. Press the Enter key on the computer keyboard. The EWS opens.
NOTE: If the web browser displays a message indicating that accessing the website might not be safe,
select the option to continue to the website. Accessing this website will not harm the computer.
Step two: Enable Scan to USB Drive
1. Select the Security tab.
2. Scroll to Hardware Ports and make sure that Enable Host USB plug and play is enabled.
3. Select the Scan/Digital Send tab and the select Default Job Options from the left menu.
4. Select the Enable Scan to USB check box.
NOTE: Most devices ship with Hard disk drives (HDDs) already installed. In some cases, additional storage
devices can be added via USB. Verify whether the Save to USB feature needs to be expanded to USB and Hard
drive
Step three: Congure the Quick Sets (optional)
NOTE: Quick Sets are short-cut jobs that can be accessed on the product Home screen or within the Quick Sets
application.
1. In the Scan to USB Drive area of the left navigation pane, click Quick Sets.
2. Select one of the following options:
●Select an existing Quick Set under Quick Sets Application in the table.
-OR-
●Click Add to start the Quick Set Wizard.
3. If you selected Add, the Quick Sets Setup page opens. Complete the following information:
44 Chapter 2 Use the scanner ENWW

●Quick Set Name: Enter a title for the new Quick Set.
●Quick Set Description: Enter a description of the Quick Set.
●Quick Set Start Option: To set how the Quick Set starts, click either Enter application, then user
presses Start or Start instantly when selected from the Home Screen.
4. Select a default location where scanned les are saved on USB storage devices inserted into the USB port
near the control panel, and then click Next. The default location options are:
●Save at root directory of the USB storage device
●Create or place in this folder on the USB Storage Device — The path to the folder on the USB storage
device must be specied when using this le location option. A backslash \ must be used to separate
folder\subfolder names in the path.
5. Select an option from the Condition on Which to Notify: drop-down list, and then click Next.
This setting determines if, or how, users are notied when a Save To USB Quick Set job completes or fails.
The options for the Condition on Which to Notify: setting are:
●Do not notify
●Notify when job completes
●Notify only if job fails
6. Choose the Scan Settings for the Quick Set, and then click Next.
NOTE: For more information on the available scan settings, see Default scan settings for Scan to USB
Drive setup on page 45
7. Choose the File Settings for the Quick Set, and then click Next.
NOTE: For more information on the available le settings, see Default scan settings for Scan to USB Drive
setup on page 45
8. Review the summary of settings, and then click Finish to save the Quick Set, or click Previous to edit the
settings.
Default scan settings for Scan to USB Drive setup
Table 2-1 Scan settings for Scan to USB Drive Setup:
Feature Description
Original Size Select the page size of the original document.
Original Sides Select whether the original document is single-sided or double-sided.
Optimize Text/Picture Select to optimize for the output of a particular type of content.
Content Orientation Select the way the content of the original document is placed on the page: Portrait or Landscape.
Background Cleanup Select a value to remove faint images from the background or to remove a light background color.
Darkness Select a value to adjust the darkness of the le.
Contrast Select a value to adjust the contrast of the le.
Sharpness Select a value to adjust the sharpness of the le.
ENWW Set up the scanner 45

Table 2-1 Scan settings for Scan to USB Drive Setup: (continued)
Feature Description
Image Preview Select whether to require or make optional a displayed preview of the job or to disable a preview.
Cropping Options Select whether or not to allow a job to be cropped and the type of cropping option.
Erase Edges Select this setting to specify the width of edge margins to be erased, in either inches or millimeters, for
the front side and back side of a job.
Default le settings for Save to USB Setup
Table 2-2 File settings for Save to USB Setup:
Option name Description
File Name Prex Set the default le name prex used for les saved to a network folder.
File Name Default le name for the le to be saved.
Select the User editable check box to make this setting editable at the product control panel.
File Name Suix Set the default le name suix used for les saved to a network folder.
Duplicate lename suix default [lename]_YYYYMMDDT
File Name Preview Enter a le name, and then click Update Preview.
File Numbering Format Select a le name format for when the job is divided into multiple les.
Add numbering when job has
just one le (ex. _1–1)
Select this setting to add numbering to a le name when the job is only one le instead of multiple les.
File Type Select the le format for the saved le.
Select the User editable check box to make this setting editable at the product control panel.
High Compression (smaller le) Select this setting to compress the scanned le, which reduces the le size. However, the scanning
process for a High compression le might take longer than for a Normal compression le.
PDF encryption If the le type is PDF, then this option encrypts the output PDF le. A password must be specied as
part of the encryption. The same password must be used to open the le. The user will be prompted to
enter a password prior to scanning their job if one has not been set prior to pressing start.
Resolution Set the resolution for the le. Higher resolution images have more dots per inch (dpi), so they show
more detail. Lower resolution images have fewer dots per inch and show less detail, but the le size is
smaller.
Quality and File Size Select the quality for the le. Higher-quality images require a larger le size than lower-quality images,
and they take more time to send.
Color/Black Specify whether copies are to be scanned in color, black and gray, or black only.
Suppress blank pages If the Suppress blank pages option is enabled, blank pages will be ignored.
Create Multiple Files Select this setting to scan pages into separate les based on a predetermined maximum number of
pages per le.
Set up Scan to SharePoint®
●Introduction
●Before you begin
46 Chapter 2 Use the scanner ENWW
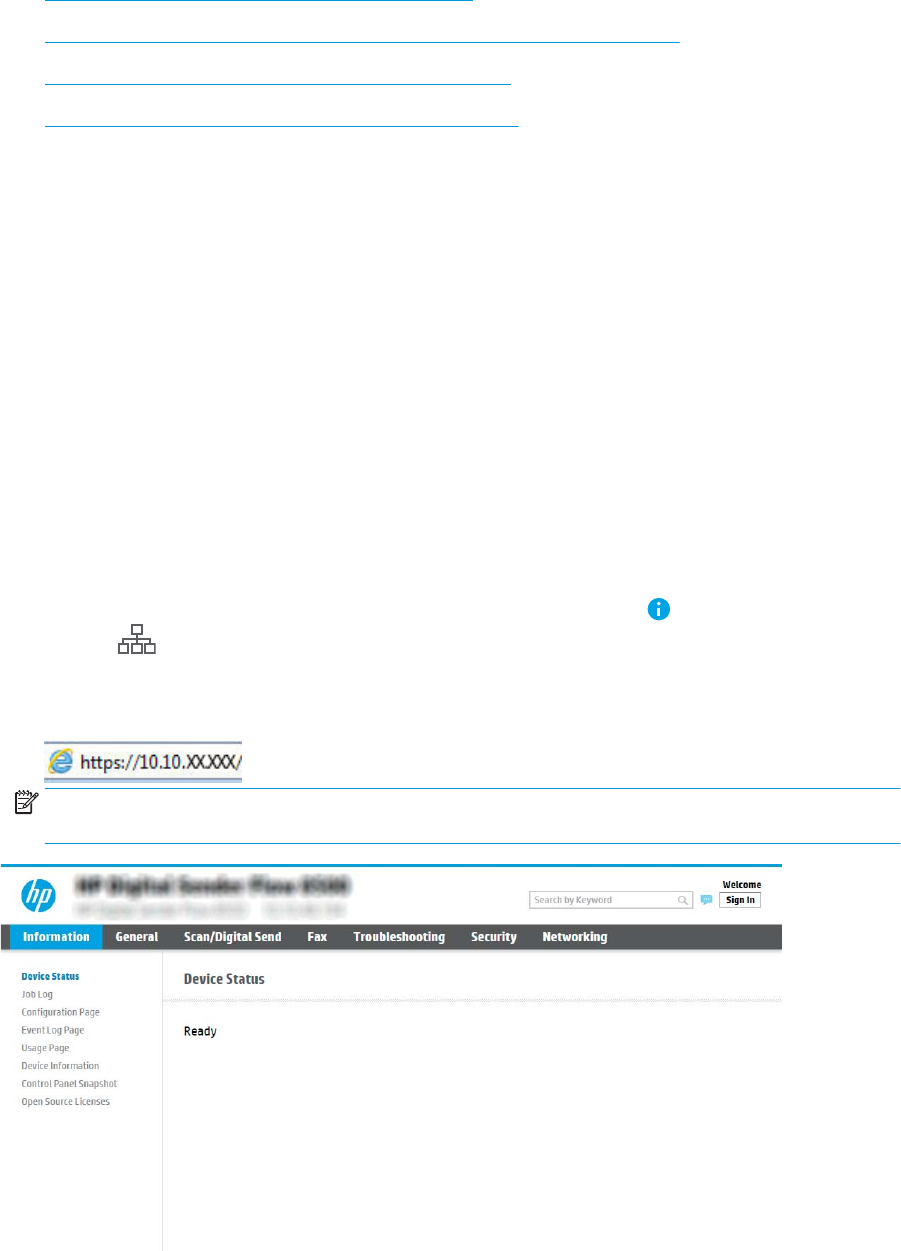
●Step one: Access the HP Embedded Web Server (EWS)
●Step two: Enable Scan to SharePoint® and create a Scan to SharePoint Quick Set
●Scan and save a le directly to a Microsoft® SharePoint site
●Quick set scan settings and options for Save to SharePoint®
Introduction
Use Save the SharePoint® to scan documents directly to a Microsoft® SharePoint site. This feature eliminates the
need to scan the documents to a network folder, USB ash drive, or email message, and then manually upload
the les to the SharePoint site.
Save to SharePoint® supports all scanning options, including the ability to scan documents as images or use the
OCR features to create text les or searchable PDFs.
The feature is disabled by default. Enable Save to Sharepoint® in the HP Embedded Web Server (EWS).
Before you begin
Before this procedure can be completed, the destination folder that the scanned les will be saved to must exist
on the SharePoint site, and write access must be enabled to the destination folder. Save to SharePoint® is
disabled by default.
Step one: Access the HP Embedded Web Server (EWS)
1. From the Home screen on the product control panel, select the Information icon, and then select the
Network icon to display the IP address or host name.
2. Open a web browser, and in the address line, type the IP address or host name exactly as it displays on the
product control panel. Press the Enter key on the computer keyboard. The EWS opens.
NOTE: If the web browser displays a message indicating that accessing the website might not be safe,
select the option to continue to the website. Accessing this website will not harm the computer.
ENWW Set up the scanner 47

Step two: Enable Scan to SharePoint® and create a Scan to SharePoint Quick Set
Follow these steps to enable the feature Scan to SharePoint feature and create a Save to SharePoint Quick Set:
1. Using the top navigation tabs, click Scan/Digital Send.
2. In the left navigation pane, click Scan to SharePoint®.
NOTE: Quick Sets are short-cut jobs that can be accessed on the product Home screen or within the Quick
Sets application.
3. Select Enable Scan to SharePoint®, and then click Apply.
4. In the Quick Sets List area, click Add to launch the Quick Set Wizard.
5. Enter a Quick Set Name (for example, “Scan to Sharepoint”) and a Quick Set Description.
6. Select a Quick Set Start Option to determine what occurs after selecting a Quick Set on the product control
panel, and then click Next.
7. Use the following steps to add the path to the SharePoint folder.
a. Click Add on the SharePoint® Settings page to open the Add SharePoint® Path page.
b. Open another browser window, navigate to the SharePoint folder to use, and then copy the folder
path for the SharePoint folder from that browser window.
c. Paste the SharePoint folder path into the SharePoint® Path: eld.
d. By default, the product overwrites an existing le that has the same le name as the new le. Clear
Overwrite existing les so that a new le with the same name as an existing le is given an updated
time/date stamp.
e. Select an option from the Authentication Settings drop-down menu. Select whether it is necessary to
sign in to the SharePoint site with credentials, or store the credentials within the Quick Set.
NOTE: Use credentials of user to connect after Sign In at the control panel is selected in the
Authentication Settings drop-down menu, the logged-in user must have permissions to write to the
specied SharePoint site.
NOTE: For security purposes, the product does not display credentials entered in the Quick Set
Wizard.
f. Click OK to complete the SharePoint path setup and navigate back to the SharePoint Destination
Settings page.
8. Select Verify folder access prior to job start to ensure that the SharePoint folder specied as the destination
folder is accessible each time the Quick Set is used. If this option is not selected, jobs can be saved to the
SharePoint folder more quickly. However, if this option is not selected and the SharePoint folder is
inaccessible the job will fail.
9. Click Next.
10. Set a Condition on Which to Notify: on the Notication Settings page. This setting congures the Quick Set
to either not notify, or to send email messages if a job either completes successfully or fails. Select one of
the following options from the Condition on Which to Notify: drop-down menu:
48 Chapter 2 Use the scanner ENWW

●Select Do not notify for the Quick Set to not perform any notication action when a job completes
successfully or fails.
●Select Notify when job completes for the Quick Set to send a notication when a job completes
successfully.
●Select Notify only if job fails for the Quick Set to send a notication only when a job fails.
Selecting either Notify when job completes or Notify only if job fails requires the Method Used to Deliver
Notication: to be set. Select from the following options:
●Email: Use this option to send an email when the selected notication condition occurs. This option
requires a valid email address in the Notication Email Address: eld.
NOTE: To use the email notication feature, rst congure the email feature on the product.
NOTE: Select Include Thumbnail for either notication option to include a thumbnail image of the rst
page of the scanned page of the job.
11. Click Next.
12. Select options from the Scan Settings page, and then click Next. For more information, see Table 2-3 Scan
settings for Save to SharePoint® on page 50.
13. Select options from the File Settings page, and then click Next. For more information, see Table 2-4 File
settings for Save to SharePoint on page 51.
14. Review the summary of settings, and then click Finish to save the Quick Set, or click Previous to edit the
settings.
Scan and save a le directly to a Microsoft® SharePoint site
1. Place the document face-down on the scanner glass, or place it face-up in the document feeder and adjust
the paper guides to t the size of the document.
2. From the Home screen on the product control panel, select Scan, and then select Scan to SharePoint®.
NOTE: It might be necessary to sign in to the product to use this feature.
3. To select a Quick Set, in the Quick Sets and Defaults area select Load. Select a Quick Set, and then select
Load.
4. Select the File Name: text eld to open a keyboard, and then type the name for the le using either the on-
screen keyboard or the physical keyboard. Select Enter .
5. Select Options to view and congure settings for the document.
6. Select the right pane of the screen to preview the document. In the preview screen, use the options on the
right of the screen to adjust the preview options and to rearrange, rotate, insert, or remove pages.
Use these options to toggle between single-page view and thumbnail view. More options are
available in thumbnail view than in single-page view.
ENWW Set up the scanner 49
Use these options to zoom in or out on the selected page.
NOTE: Select only one page at a time to use these options.
Use this option to rotate the page 180 degrees.
NOTE: This option is available only in the thumbnail view.
Use this option to delete the selected pages.
NOTE: This option is available only in the thumbnail view.
Use these options to rearrange the pages within the document. Select one or more pages and
move them to the left or right.
NOTE: These options are available only in the thumbnail view.
Use this option to add a page to the document. The product prompts to scan additional pages.
Use this option to clear the changes made in the preview and start over.
Select this option to collapse the preview screen and return to the Copy screen.
7. Select Start to save the le.
Quick set scan settings and options for Save to SharePoint®
The following tables list the settings and options available in the Quick Set Wizard when adding, editing, or
copying a Save to SharePoint® Quick Set.
Table 2-3 Scan settings for Save to SharePoint®
Feature Description
Original Size Select the page size of the original document.
Original Sides Select whether the original document is single-sided or double-sided.
Optimize Text/Picture Select to optimize for the output of a particular type of content.
Content Orientation Select the way the content of the original document is placed on the page: Portrait or Landscape.
50 Chapter 2 Use the scanner ENWW

Table 2-3 Scan settings for Save to SharePoint® (continued)
Feature Description
Background Cleanup Select a value to remove faint images from the background or to remove a light background color.
Darkness Select a value to adjust the darkness of the le.
Contrast Select a value to adjust the contrast of the le.
Sharpness Select a value to adjust the sharpness of the le.
Image Preview Select whether to require or make optional a displayed preview of the job or to disable a preview.
Cropping Options Select whether or not to allow a job to be cropped and the type of cropping option.
Erase Edges Select this setting to specify the width of edge margins to be erased, in either inches or millimeters, for
the front side and back side of a job.
Table 2-4 File settings for Save to SharePoint
Feature Description
File Name Prex Set the default le name prex used for les saved to a network folder.
File Name Default le name for the le to be saved.
Select the User editable check box to make this setting editable at the product control panel.
File Name Suix Set the default le name suix used for les saved to a network folder.
Duplicate lename suix default [lename]_YYYYMMDDT
File Name Preview Enter a le name, and then click Update Preview.
File Numbering Format Select a le name format for when the job is divided into multiple les.
Add numbering when job has
just one le (ex. _1–1)
Select this setting to add numbering to a le name when the job is only one le instead of multiple les.
File Type Select the le format for the saved le.
Select the User editable check box to make this setting editable at the product control panel.
High Compression (smaller le) Select this setting to compress the scanned le, which reduces the le size. However, the scanning
process for a High compression le might take longer than for a Normal compression le.
PDF encryption If the le type is PDF, then this option encrypts the output PDF le. A password must be specied as
part of the encryption. The same password must be used to open the le. The user will be prompted to
enter a password prior to scanning their job if one has not been set prior to pressing start.
Resolution Set the resolution for the le. Higher resolution images have more dots per inch (dpi), so they show
more detail. Lower resolution images have fewer dots per inch and show less detail, but the le size is
smaller.
Quality and File Size Select the quality for the le. Higher-quality images require a larger le size than lower-quality images,
and they take more time to send.
Color/Black Specify whether copies are to be scanned in color, black and gray, or black only
Suppress blank pages If the Suppress blank pages option is enabled, blank pages will be ignored.
Create Multiple Files Select this setting to scan pages into separate les based on a predetermined maximum number of
pages per le.
ENWW Set up the scanner 51
Create a Quick Set
●Introduction
●Step one: Access the HP Embedded Web Server (EWS)
●Step two: Add and manage Quick Sets
Introduction
Quick Sets are short-cut jobs that are available from the Home screen or within the Quick Sets feature on the
product control panel and do not impact the defaults set for the base application. To use a Quick Set on the
product control panel, enable the base application.
Create Quick Sets for the following base applications to improve job accuracy and decrease the time to complete
a job:
●Email — Use email Quick Sets to congure and save commonly used settings for sending jobs from the
product via email as email attachments.
●Scan to Network Folder — Use Save to Network Folder Quick Sets to congure and save commonly used
settings for saving jobs to a network folder.
●Scan to USB — Use Save to USB Quick Sets to congure and save commonly used settings for saving jobs
to a USB device.
●Scan to SharePoint® — Use Save to SharePoint Quick Sets to congure and save commonly used settings
for saving jobs to a SharePoint site.
Select from various job options, such as starting a job immediately upon selection of a quick set or requiring an
image preview before starting a job.
Step one: Access the HP Embedded Web Server (EWS)
1. From the Home screen on the product control panel, select the Information icon, and then select the
Network icon to display the IP address or host name.
2. Open a web browser, and in the address line, type the IP address or host name exactly as it displays on the
product control panel. Press the Enter key on the computer keyboard. The EWS opens.
NOTE: If the web browser displays a message indicating that accessing the website might not be safe,
select the option to continue to the website. Accessing this website will not harm the computer.
52 Chapter 2 Use the scanner ENWW
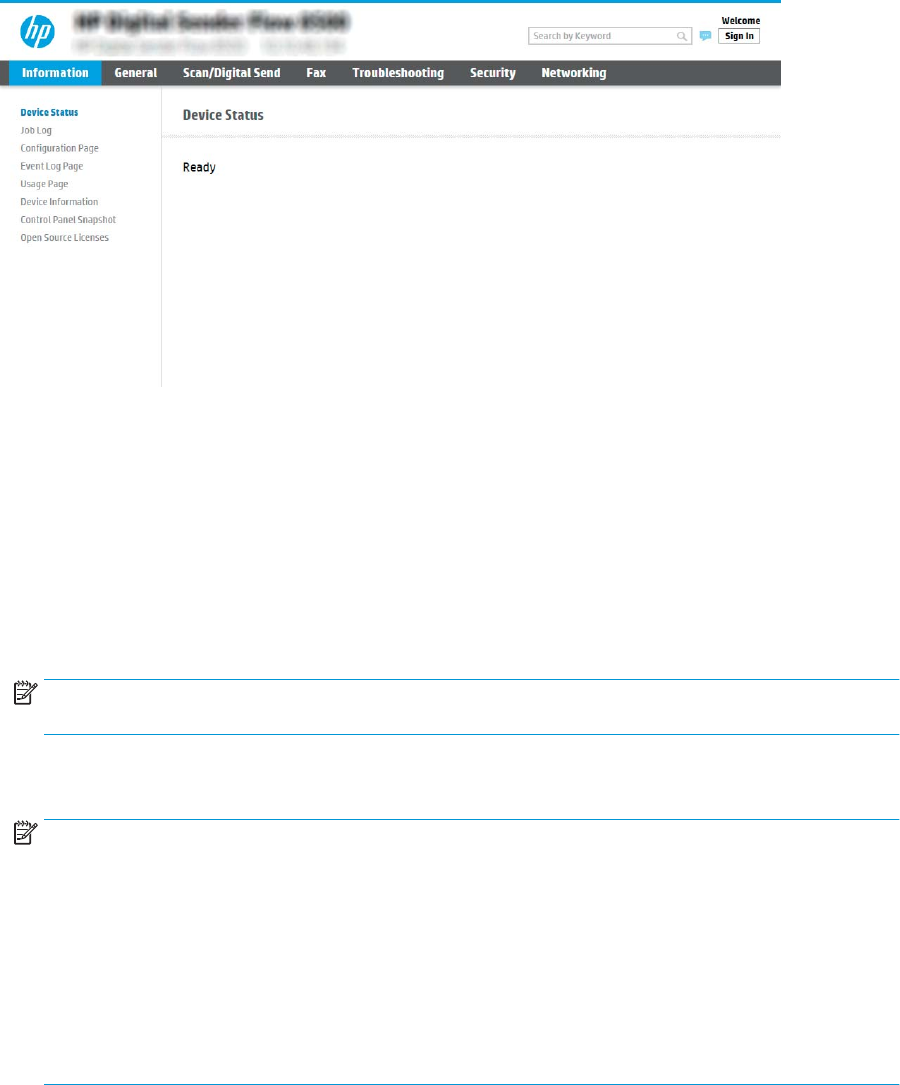
Step two: Add and manage Quick Sets
Add a Quick Set
Use the following steps to add a new Quick Set.
1. Using the top navigation tabs, click General.
2. In the left navigation pane, click Quick Sets.
3. Click Add. The Quick Sets Setup page opens.
NOTE: Click Cancel on any page of Quick Sets Setup to cancel the current changes, exit Quick Sets Setup,
and return to the Quick Sets page.
4. Select a Quick Set Type, and then click Next. The following Quick Set types are available for selection,
depending on your product:
NOTE: A Quick Set Type only needs to be determined when a quick set is created by using the General
EWS tab.
●Scan to Email
●Scan to Fax
●Scan to Network Folder
●Scan to USB Drive
●Scan to SharePoint®
5. Enter a title for the Quick Set in the Quick Set Name (required) eld.
6. Enter a description of the Quick Set in the Quick Set Description eld.
7. Select a Quick Set Start Option to determine what occurs after selecting a Quick Set on the product control
panel, and then click Next.
8. Select settings and complete tasks in Quick Sets Setup. Click Next to proceed to the next page of available
options until reaching the Summary page.
ENWW Set up the scanner 53

NOTE: The settings available in Quick Sets Setup vary by the type of Quick Set being added. Refer to the
tables in Quick Set settings and options on page 55 to see the available settings and options for each
type of Quick Set.
9. Review the summary of settings, and then click Finish to save the Quick Set, or click Previous to edit the
settings.
Edit a Quick Set
Use the following steps to edit the settings of an existing Quick Set.
1. Using the top navigation tabs, click General.
2. In the left navigation pane, click Quick Sets.
3. In the Quick Sets List area, click the check box next to the appropriate Quick Set, and then click Edit. The
Quick Sets Setup page opens.
NOTE: Click Cancel on any page of Quick Sets Setup to cancel the current changes, exit Quick Sets Setup,
and return to the Quick Sets page.
4. If necessary, modify the following settings, and then click Next:
●Quick Set Name
●Quick Set Description
●Quick Set Start Option
5. Select settings and complete tasks in Quick Sets Setup. Click Next to proceed to the next page of available
options until reaching the Summary page.
NOTE: The settings available in Quick Sets Setup vary by the type of Quick Set being edited. Refer to the
tables in Quick Set settings and options on page 55 to see the available settings and options for each
type of Quick Set.
6. Review the Summary page, and then click Finish to save changes made to the Quick Set.
Copy a Quick Set
1. Using the top navigation tabs, click General.
2. In the left navigation pane, click Quick Sets.
3. In the Quick Sets List area, click the check box next to the appropriate Quick Set, and then click Copy. The
Quick Sets Setup page opens.
NOTE: Click Cancel on any page of Quick Sets Setup to cancel the current changes, exit Quick Sets Setup,
and return to the Quick Sets page.
4. If necessary, modify the following settings, and then click Next:
●Quick Set Name
●Quick Set Description
●Quick Set Start Option
54 Chapter 2 Use the scanner ENWW

5. Select settings and complete tasks in Quick Sets Setup. Click Next to proceed to the next page of available
options until reaching the Summary page.
NOTE: The settings available in Quick Sets Setup vary by the type of Quick Set being copied. Refer to the
tables in Quick Set settings and options on page 55 to see the available settings and options for each
type of Quick Set.
6. Review the Summary page, and then click Finish to save the Quick Set.
Remove a Quick Set
Use the following steps to remove a Quick Set.
1. Using the top navigation tabs, click General.
2. In the left navigation pane, click Quick Sets.
3. In the Quick Sets List area, click the check box next to the appropriate Quick Set, and then click Remove.
4. When the Conrmation Page opens, click Remove to nish removing the Quick Set.
Quick Set settings and options
The following tables list the settings and options available in the Quick Set Wizard when adding, editing, or
copying a Quick Set.
Table 2-5 Address and Message Field Control — Scan to Email Quick Sets
Option Description
Address Field Restrictions Use the Address Field Restrictions drop-down list to specify whether users can type an email address
or select an email address from an address book
From: Use the From: drop-down list to set the email address that displays in the From: eld of the email.
If Default From: is selected, the email address listed in the Default From: eld is used.
If User's address (sign-in required) is selected, the user is required to sign in to the product with their
email address when using the Quick Set.
This eld can be set to be user-editable.
Default From: The Default From: eld is used to dene the email address used when Default From: is selected in the
From: drop-down list.
Default Display Name: Use this eld to set the name displayed on the product's control panel. If this eld is not set, the value
in the Default From: displays on the product's control panel.
This eld is optional.
To:
CC:
BCC:
Use these drop-down lists to set the email recipient, CC (carbon copy) and BCC (blind carbon copy)
values.
The options for each of these elds are:
●User's address (sign-in required)
●Blank
●Specify address
These elds can be set to be user-editable
ENWW Set up the scanner 55

Table 2-5 Address and Message Field Control — Scan to Email Quick Sets (continued)
Option Description
Subject: Use this eld to set the value that appears in the subject line of the email.
This eld can be set to be user-editable.
Message: Use this eld to set the value for the body of the email.
This eld can be set to be user-editable.
Table 2-6 Signing and Encryption — Scan to Email Quick Sets
Option Description
Signing Use the Signing drop-down list to specify whether the email sent using the Quick Set is digitally signed.
This eld can be set to be user-editable.
Hashing Algorithm Use the Hashing Algorithm drop-down list to set the type hashing algorithm used with signed emails.
The following hashing algorithms are available:
●SHA-1
●SHA-256 (recommended)
●SHA-384
●SHA-512
Encryption Use the Encryption drop-down list to specify whether the email sent using the Quick Set is encrypted.
This eld can be set to be user-editable.
Encryption Algorithm Use the Encryption Algorithm drop-down list to set the encryption algorithm used for encrypted emails
sent using the Quick Set.
Attribute for Recipient Public Key The Attribute for Recipient Public Key eld is used to set the attribute used for retrieving the email
recipient's public key from LDAP for signed or encrypted emails.
Use the recipient public key
certicate to verify the recipient
Select this setting to use the recipient’s public key certicate to verify the recipient.
Table 2-7 Scan settings — Scan to Email, Scan to Fax, Scan to Network Folder, Scan to SharePoint®, and Scan to USB Quick
Sets
Option Description
Original Size Specify the size for the original document.
Original Sides Select whether the original document is single-sided or double-sided.
56 Chapter 2 Use the scanner ENWW

Table 2-7 Scan settings — Scan to Email, Scan to Fax, Scan to Network Folder, Scan to SharePoint®, and Scan to USB Quick
Sets (continued)
Option Description
Optimize Text/Picture Optimize the job for the type of image being scanned: text, graphics, or photos.
Select from the following options:
●Text: Use for documents that contain mostly text
●Mixed: Use for documents with a mix of text and pictures
●Printed picture: Use for line drawings and preprinted images, such as magazine clippings or pages
from books
NOTE: If bands of irregular intensity print on the copies, try selecting Printed picture to improve
the quality.
●Photograph: Use for photographic prints
Content Orientation Select the way the content of the original document is placed on the page:
●Portrait: The short edge of the page is along the top.
●Landscape: The long edge of the page is along the top.
Background Cleanup Select a value to remove faint images from the background or to remove a light background color.
Darkness Select a value to adjust the darkness of the le.
Contrast Select a value to adjust the contrast of the le.
Sharpness Select a value to adjust the sharpness of the le.
Image Preview Select whether to require or make optional a displayed preview of the job or to disable a preview.
Cropping options (not available
for Scan to Fax)
Select whether or not to allow a job to be cropped and the type of cropping option.
Erase Edges (not available for
Scan to Fax)
Select this setting to specify the width of edge margins to be erased, in either inches or millimeters, for
the front side and back side of a job.
Resolution (Scan to Fax only) Set the resolution for the le. Higher resolution images have more dots per inch (dpi), so they show
more detail. Lower resolution images have fewer dots per inch and show less detail, but the le size is
smaller.
Suppress blank pages (Scan to
Fax only)
If the Suppress blank pages option is enabled, blank pages will be ignored.
Table 2-8 File settings — Scan to Email, Scan to Network Folder, Scan to SharePoint®, and Scan to USB Quick Sets
Feature Description
File Name Prex Set the default le name prex used for les saved to a network folder.
File Name Default le name for the le to be saved.
Select the User editable check box to make this setting editable at the product control panel.
File Name Suix Set the default le name suix used for les saved to a network folder.
Duplicate lename suix default [lename]_YYYYMMDDT
File Name Preview Enter a le name, and then click Update Preview.
ENWW Set up the scanner 57

Table 2-8 File settings — Scan to Email, Scan to Network Folder, Scan to SharePoint®, and Scan to USB Quick Sets (continued)
Feature Description
File Numbering Format Select a le name format for when the job is divided into multiple les.
Add numbering when job has
just one le (ex. _1–1)
Select this setting to add numbering to a le name when the job is only one le instead of multiple les.
File Type Select the le format for the saved le.
Select the User editable check box to make this setting editable at the product control panel.
High Compression (smaller le) Select this setting to compress the scanned le, which reduces the le size. However, the scanning
process for a High compression le might take longer than for a Normal compression le.
PDF encryption If the le type is PDF, then this option encrypts the output PDF le. A password must be specied as
part of the encryption. The same password must be used to open the le. The user will be prompted to
enter a password prior to scanning their job if one has not been set prior to pressing start.
Resolution Set the resolution for the le. Higher resolution images have more dots per inch (dpi), so they show
more detail. Lower resolution images have fewer dots per inch and show less detail, but the le size is
smaller.
Quality and File Size Select the quality for the le. Higher-quality images require a larger le size than lower-quality images,
and they take more time to send.
Color/Black Specify whether copies are to be scanned in color, black and gray, or black only.
Suppress blank pages If the Suppress blank pages option is enabled, blank pages will be ignored.
Meta Data File Format ( Scan to
Network Folder Quick Sets only)
Use the drop-down list to select the le format for meta-data information.
The options for this eld are:
●None
●XML
●HPS
Create Multiple Files Select this setting to scan pages into separate les based on a predetermined maximum number of
pages per le.
Load originals
The following topics describe how to load originals into the document feeder and on the scanner glass.
Document loading tips
●The maximum capacity of the input tray is 150 sheets of 75 g/m2 (20 lb) paper for the HP Digital Sender
Flow 8500 fn2 Document Capture Workstation and 200 sheets of 75 g/m2 (20 lb) for the HP ScanJet
Enterprise Flow N9120 fn2 Document Scanner. When using heavier paper, the maximum capacity is
decreased.
TIP: Use the lines on the input tray paper guides to help you to not exceed the input tray capacity.
●Be sure that original documents are within these guidelines:
Table 2-9 HP Digital Sender Flow 8500 fn2 Document Capture Workstation
Width: 68 to 216 mm (2.6 to 8.5 in)
58 Chapter 2 Use the scanner ENWW
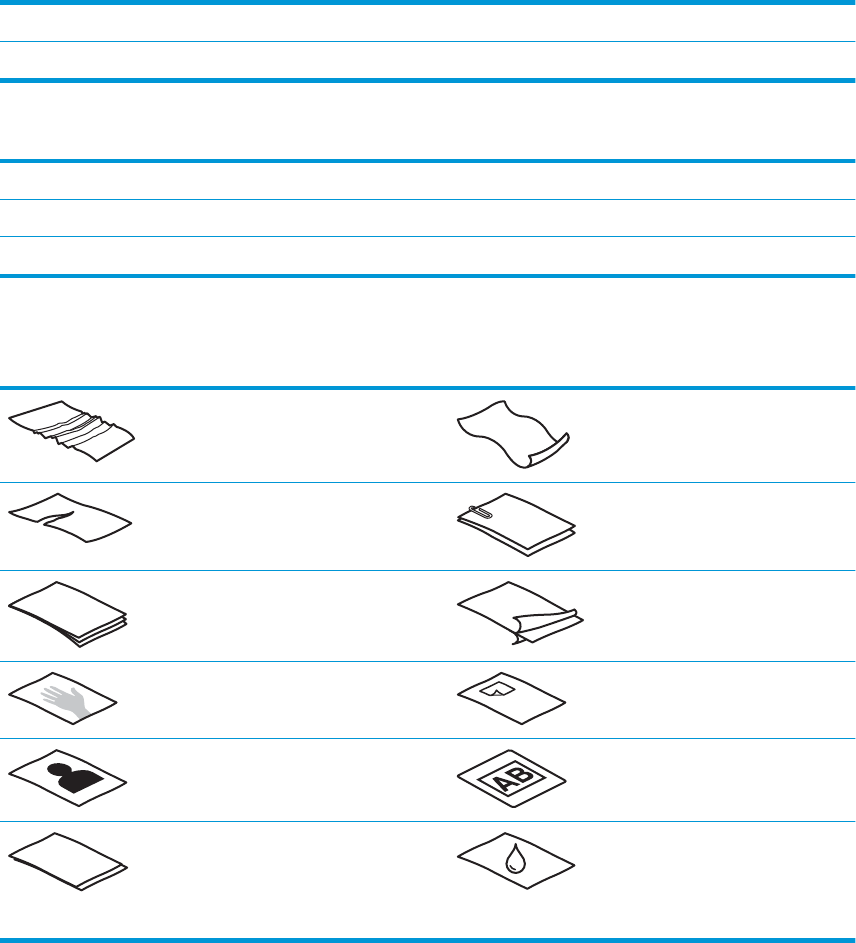
Table 2-9 HP Digital Sender Flow 8500 fn2 Document Capture Workstation (continued)
Length: 147 to 863.6 mm (5.79 to 34 in)
Weight: 40 g/m2 (10.7 lb) to 413 g/m2 (110 lb)
Table 2-10 HP ScanJet Enterprise Flow N9120 fn2 Document Scanner
Width: 68 to 297 mm (2.7 to 11.7 in)
Length: 127 to 864 mm (5 to 34 in)
Weight: 40 g/m2 (10.7 lb) to 413 g/m2 (110 lb)
●Scanning the following types of documents might result in paper jams or damage to the documents.
Wrinkled or creased documents Curled documents
Torn documents Documents with paper
clips or staples
Carbon paper Coated paper
Extremely thin, translucent paper Paper with adhesive
notes or ags attached
Photos Overhead
transparencies
Papers that are stuck together Paper where the toner
has not fully dried, or
with wet substances
such as glue or
correction uid
●Smooth out any folds or curls in your documents before placing them into the feeder. If the leading edge of
a document is curled or folded, it might cause a paper jam.
●Make sure that the document feeder hatch is securely latched. To properly close the hatch, press rmly on
both sides of the hatch.
●Adjust the paper guides to the width of the documents. Make sure that the paper guides touch the edges of
the original. If there is any clearance between the paper guides and the edges of the documents, the
scanned image might be skewed.
ENWW Load originals 59
●When placing a stack of documents into the feeder, gently set the stack in the input tray. Do not drop the
stack into the tray and do not tap the top edge of the stack after you have placed the stack in the input tray.
●Clean the scan rollers if the rollers are visibly dirty or after scanning a document written with or written on
with pencil.
60 Chapter 2 Use the scanner ENWW

Supported paper types and sizes
Supported paper types and sizes for the product are shown below.
Size and dimensions
Automatic Document Feeder
(ADF) supported Flatbed supported
U.S.-Letter: 215.9 x 279.4 mm (8.5 x 11 in)
Mixed Letter/Legal
U.S.-Legal: 215.9 x 355.6 mm (8.5 x 14 in)
U.S.-Executive: 184.2 x 266.7 mm (7.25 x 10.5 in)
Statement 215.9 x 139.7 mm (8.5 x 5.5 in)
Ocio 215.9 x 330.2 mm (8.5 x 13 in)
101 x 152 mm (4 x 6 in)
127 x 177 mm (5 x 7 in)
127 x 203 mm (5 x 8 in)
A4: 210 x 297 mm (8.3 x 11.7 in)
A3 (HP ScanJet Enterprise Flow N9120 fn2 Document Scanner) 297 x
420 mm (11.7 x 16.5 in)
JIS B5: 182 x 257 mm (7.2 x 10.1 in)
ISO A5: 148 x 210 mm (5.8 x 8.3 in)
A6: 105 x 148 mm (4.1 x 5.8 in)
RA4 215 x 305 mm (8.5 x 12 in)
JIS B6 128 x 182 mm (5 x 7.2 in)
101 x 152 mm (10 x 15 in)
16K 184 x 260 mm (7.2 x 10.2 in)
16K 195 x 270 mm (7.7 x 10.6 in)
16K 197 x 273 mm (7.5 x 10.7 in)
JIS Postcard 100 x 148 mm (3.9 x 5.8 in)
JIS Dpostcard 148 x 200 mm (5.8 x 7.9 in)
Envelope #9 98 x 225 mm (3.9 x 8.9 in)
Envelope #10 104 x 241 mm (4.1 x 9.5 in)
Envelope Monarch 98 x 190 mm (3.9 x 7.5 in)
Envelope B5 176 x 250 mm (6.9 x 9.8 in)
Envelope C5 162 x 229 mm (6.4 x 9 in)
Envelope C6 114 x 162 mm (4.5 x 6.4 in)
Envelope DL 110 x 220 mm (4.3 x 8.6 in)
ENWW Load originals 61

Size and dimensions
Automatic Document Feeder
(ADF) supported Flatbed supported
Custom (HP Digital Sender Flow 8500 fn2 Document Capture
Workstation)
Minimum: 68 x 147 mm (2.7 x
5.8 in)
Maximum: 215.9 x 863.6 mm
(8.5 x 34 in)
Minimum: n/a
Maximum: 217 x 358 mm
(8.5 x 14 in)
Custom (HP ScanJet Enterprise Flow N9120 fn2 Document Scanner) Minimum: 68 x 127 mm (2.6 x
5 in)
Maximum: 297 x 864 mm
(11.7 x 34 in)
Minimum: n/a
Maximum: 297 x 432 mm
(11.7 x 17 in)
62 Chapter 2 Use the scanner ENWW

Load paper in the Automatic Document Feeder (ADF) input tray
●Introduction
●Required guidelines before loading documents
●Method to load documents
●Load same-sized documents
Introduction
This document provides instructions on how to load same-sized and mixed-sized documents into the Automatic
Document Feeder (ADF) input tray of an HP ScanJet atbed scanner.
●Documents with the same paper size and width are same-sized documents.
●Documents with dierent paper width or length are mixed sized documents, for example, legal size, letter
size, and a check.
Required guidelines before loading documents
Before loading the documents in the ADF input tray, make sure to follow these guidelines:
●Use the recommended paper type and size in the ADF input tray. Refer to the Supported paper types
section for paper capacities and capabilities.
●Smooth any folds or curls in the pages to avoid paper jams.
●Fan through the pages to remove any staples, paper clips, or sticky notes.
Figure 2-1 Fan the pages of the document
Load originals 63
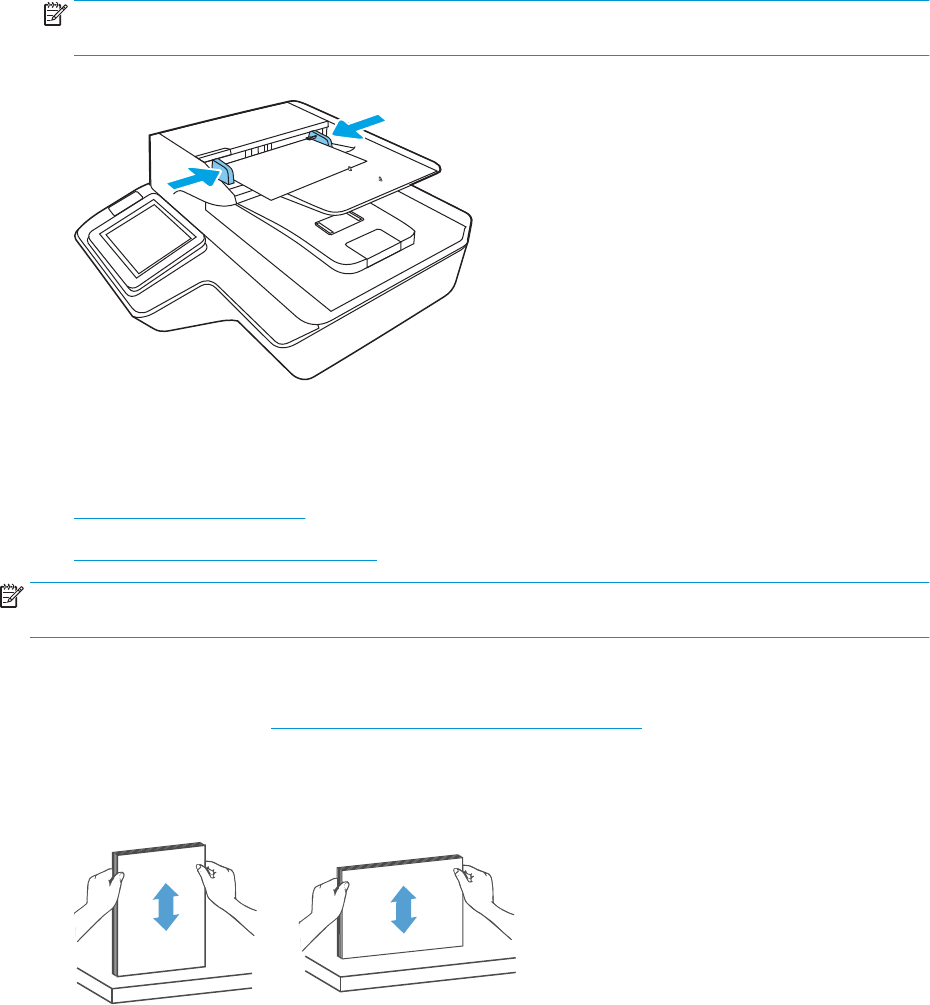
●Slide the paper guides to t the width of the document. If there is any gap between the paper guides and
the edges of the documents, the scanned image might be skewed.
NOTE: When loading small documents like checks, place the longest edge parallel to the paper width
guides.
Figure 2-2 Adjust paper guides
Method to load documents
Determine the type of documents to load in the ADF input tray, and then use one of the following methods:
●Load same-sized documents
●Load documents on the scanner glass
NOTE: To scan fragile documents (such as photos or documents on wrinkled or very light paper), place the
document face down on the scanning glass.
Load same-sized documents
Make sure to refer the section Required guidelines before loading documents, and then follow the following
steps to load same-sized documents in the ADF input tray:
1. Tap the long edge of the pages on a at surface, then rotate and tap the top edge of the document pages
to align the edges of the document pages.
64 Chapter 2 Use the scanner
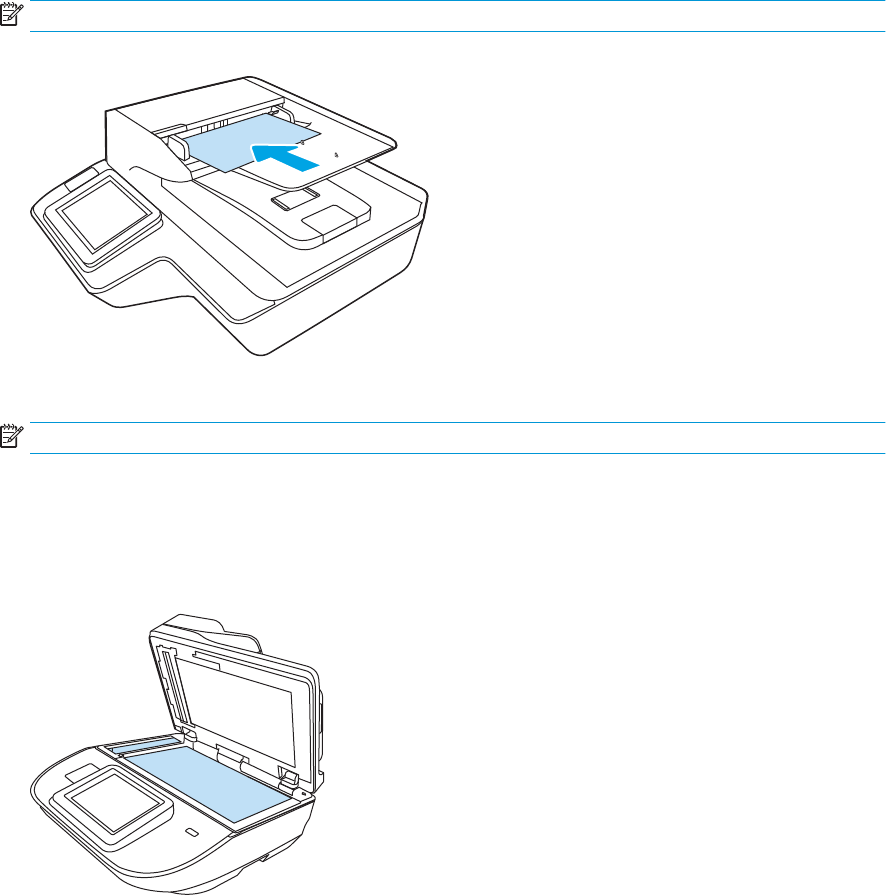
2. Load the pages with the face up and the top edge of the pages into the ADF input tray.
NOTE: Do not tap the edge of the document stack or drop the paper stack into the ADF input tray.
Figure 2-3 Load same-sized pages in the ADF input tray
3. Adjust the paper guides to the width of the document.
NOTE: Make sure not to push the paper guides so tightly as they bend the documents.
The documents are now ready to be scanned.
Load documents on the scanner glass
1. Open scanner lid.
2. Load the document on the scanner glass face down according to the indicators on the product.
3. Close the scanner lid. The document is now ready to scan.
ENWW Load originals 65

Perform a scan task
Send a scanned document to one or more email addresses
Introduction
The product has a feature that enables it to scan a document and send it to one or more email addresses. Before
using this feature, use the HP Embedded Web Server to enable it and set it up.
Scan and send a document to email
1. Place the document face-down on the scanner glass, or place it face-up in the document feeder and adjust
the paper guides to t the size of the document.
2. From the Home screen on the product control panel select Scan to Email.
NOTE: If prompted, type your user name and password.
3. Select the To eld to open a keyboard, or pull out the physical keyboard.
NOTE: If you are signed in to the product, your user name or other default information might appear in
the From eld. If so, you might not be able to change it.
4. Specify the recipients by using one of these methods:
Enter addresses manually
▲Enter the address in the To eld. To send to multiple addresses, separate the addresses with a
semicolon, or select Enter on the touchscreen keyboard after typing each address.
Enter addresses from the Contacts list
a. Select Contacts next to the To eld to open the Contacts screen.
b. Select the appropriate contact list.
c. Select a name or names from the list of contacts to add the name to the recipients list, and then
select Add.
5. Complete the Subject, and File Name elds by selecting the eld and using the touchscreen keyboard to
enter information.
6. To congure settings for the document, select Options. For example:
●Select File Type and Resolution to specify the type of le to create, the resolution, and the output
quality.
●If the original document is printed on both sides, select Original Sides, and then select 2 Sided.
7. Set options marked with a yellow triangle before using the preview feature.
NOTE: After the preview scan, these options are removed from the main Options list and are summarized
in the Pre-scan Options list. To change any of these options, discard the preview and start over.
Using the preview feature is optional.
66 Chapter 2 Use the scanner ENWW
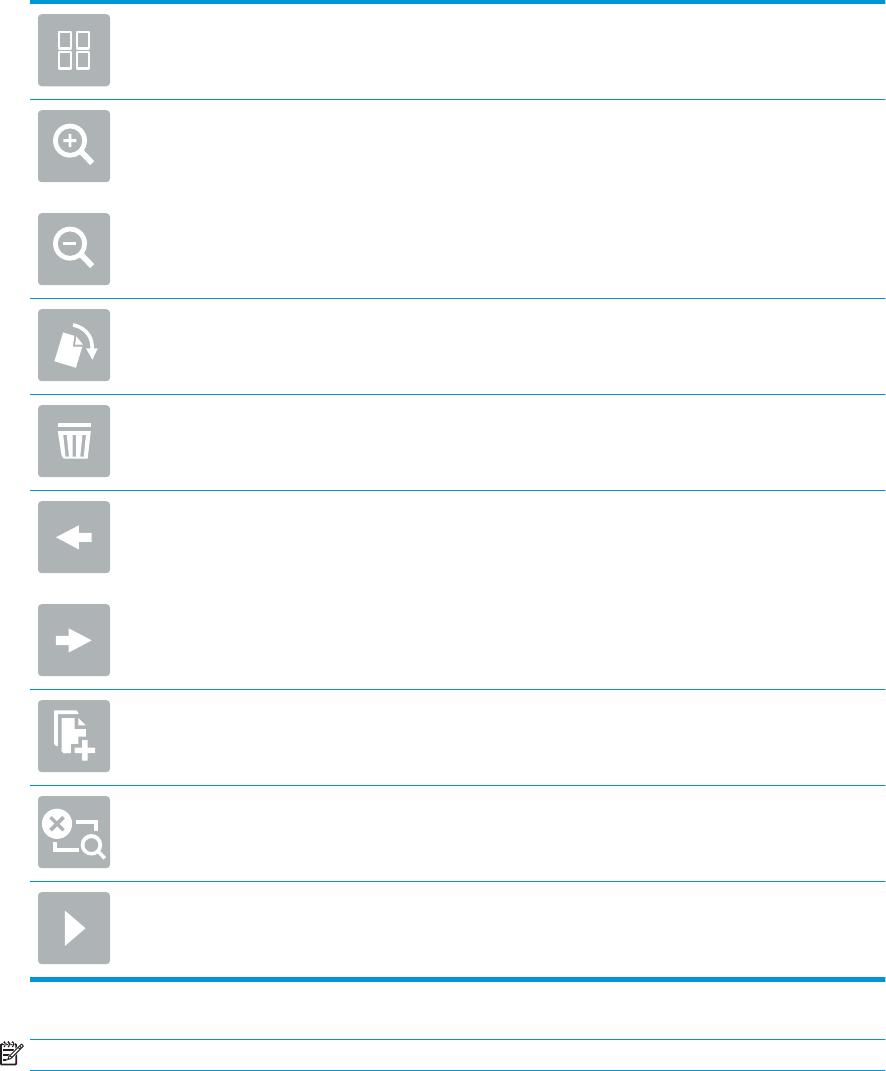
8. Select the right pane of the screen to preview the document. In the preview screen, use the options on the
right of the screen to adjust the preview options and to rearrange, rotate, insert, or remove pages.
Use these options to toggle between single-page view and thumbnail view. More options are
available in thumbnail view than in single-page view.
Use these options to zoom in or out on the selected page.
NOTE: Select only one page at a time to use these options.
Use this option to rotate the page 180 degrees.
NOTE: This option is available only in the thumbnail view.
Use this option to delete the selected pages.
NOTE: This option is available only in the thumbnail view.
Use these options to rearrange the pages within the document. Select one or more pages and
move them to the left or right.
NOTE: These options are available only in the thumbnail view.
Use this option to add a page to the document.
Use this option to clear the changes made in the preview and start over.
Select this option to collapse the preview screen.
9. When the document is ready, select Send.
NOTE: The product might prompt you to add the email address to the contact list.
Scan to Fax
Introduction
The product can scan a le and send it as a fax using the HP Embedded Web Server (EWS). Before using this
feature, use the HP Embedded Web server to enable the feature and congure the settings.
ENWW Perform a scan task 67
Scan to Fax
1. Place the document face-down on the scanner glass, or place it face-up in the document feeder and adjust
the paper guides to t the size of the document.
2. From the Home screen on the product control panel, select Scan, and then select Scan to Fax.
3. To congure the settings for the document, select Options.
4. Select the right pane of the screen to preview the document. In the preview screen, use the options on the
right of the screen to adjust the preview options and to rearrange, rotate, insert, or remove pages.
Use these options to toggle between single-page view and thumbnail view. More options are
available in thumbnail view than in single-page view.
Use these options to zoom in or out on the selected page.
NOTE: Select only one page at a time to use these options.
Use this option to rotate the page 180 degrees.
NOTE: This option is available only in the thumbnail view.
Use this option to delete the selected pages.
NOTE: This option is available only in the thumbnail view.
Use these options to rearrange the pages within the document. Select one or more pages and
move them to the left or right.
NOTE: These options are available only in the thumbnail view.
Use this option to add a page to the document.
Use this option to clear the changes made in the preview and start over.
Select this option to collapse the preview screen.
5. When the document is ready, select Scan to send the fax.
68 Chapter 2 Use the scanner ENWW

Scan and send to network folder
Introduction
The product can scan a le and save it in a shared folder on the network. Before using this feature, use the HP
Embedded Web server to enable the feature and congure the shared folders. The system administrator can
congure pre-dened Quick Sets folders; otherwise it is necessary to specify the folder path for each job.
Scan and save the document to a network folder
NOTE: You might be required to sign in to the product to use this feature.
1. Place the document face-down on the scanner glass, or place it face-up in the document feeder and adjust
the paper guides to t the size of the document.
2. From the Home screen on the product control panel select Scan to Network Folder.
3. To specify a path for this job only, select the Folder Paths text eld to open a keyboard, type the path to the
folder, and then select Enter . Use this format for the path:
\\server\folder, where “server” is the name of the server that hosts the shared folder, and “folder” is
the name of the shared folder. If the folder is nested inside other folders, complete all necessary segments
of the path to reach the folder. For example: \\server\folder\folder
Or, select Load below the Folder Paths eld to select a pre-dened Quick Sets path or a path associated
with a Contact.
NOTE: The Folder Paths eld might have a pre-dened path, and it might not be editable. In this situation,
the administrator has congured this folder for common access.
4. Select the File Name text eld to open a keyboard, and then type the name for the le, and then select
Enter .
5. To congure settings for the document, select Options. For example:
●Select File Type and Resolution to specify the type of le to create, the resolution, and the output
quality.
●If the original document is printed on both sides, select Original Sides, and then select 2 Sided.
6. Set options marked with a yellow triangle before using the preview feature.
NOTE: After the preview scan, these options are removed from the main Options list and are summarized
in the Pre-scan Options list. To change any of these options, discard the preview and start over.
Using the preview feature is optional.
7. Select the right pane of the screen to preview the document. In the preview screen, use the options on the
right of the screen to adjust the preview options and to rearrange, rotate, insert, or remove pages.
Use these options to toggle between single-page view and thumbnail view. More options are
available in thumbnail view than in single-page view.
ENWW Perform a scan task 69
Use these options to zoom in or out on the selected page.
NOTE: Select only one page at a time to use these options.
Use this option to rotate the page 180 degrees.
NOTE: This option is available only in the thumbnail view.
Use this option to delete the selected pages.
NOTE: This option is available only in the thumbnail view.
Use these options to rearrange the pages within the document. Select one or more pages and
move them to the left or right.
NOTE: These options are available only in the thumbnail view.
Use this option to add a page to the document.
Use this option to clear the changes made in the preview and start over.
Select this option to collapse the preview screen.
8. When the document is ready, select Save to save the le.
Scan and send to USB Flash Drive
Introduction
The product can scan a le and save it on a USB ash drive. Before using this feature, use the HP Embedded Web
server to enable and congure it.
Scan and save the document to a USB ash drive
NOTE: You might be required to sign in to the product to use this feature.
1. Place the document face-down on the scanner glass, or place it face-up in the document feeder and adjust
the paper guides to t the size of the document.
2. Insert the USB ash drive into the USB port.
70 Chapter 2 Use the scanner ENWW

3. From the Home screen on the product control panel and select Scan to USB Drive.
4. Select Choose and select the ash drive. Save the le on the root of the USB ash drive, or save it in an
existing folder.
5. Select the Job Name text eld to open a keyboard, then type the name for the le, and then select Enter
.
6. To congure settings for the document, select Options. For example:
●Select File Type and Resolution to specify the type of le to create, the resolution, and the output
quality.
●If the original document is printed on both sides, select Original Sides, and then select 2 Sided.
7. Set options marked with a yellow triangle before using the preview feature.
NOTE: After the preview scan, these options are removed from the main Options list and are summarized
in the Pre-scan Options list. To change any of these options, discard the preview and start over.
Using the preview feature is optional.
8. Select the right pane of the screen to preview the document. In the preview screen, use the options on the
right of the screen to adjust the preview options and to rearrange, rotate, insert, or remove pages.
Use these options to toggle between single-page view and thumbnail view. More options are
available in thumbnail view than in single-page view.
Use these options to zoom in or out on the selected page.
NOTE: Select only one page at a time to use these options.
Use this option to rotate the page 180 degrees.
NOTE: This option is available only in the thumbnail view.
Use this option to delete the selected pages.
NOTE: This option is available only in the thumbnail view.
Use these options to rearrange the pages within the document. Select one or more pages and
move them to the left or right.
NOTE: These options are available only in the thumbnail view.
ENWW Perform a scan task 71
Use this option to add a page to the document.
Use this option to clear the previously scanned pages and start over.
9. When the document is ready, select Send to save the le.
Additional options when scanning
The following settings are available in the Options list when scanning.
NOTE: The following list contains the master set of options available for HP Digital Sender ow and HP ScanJet
Enterprise ow products. Some options are not available on all products.
72 Chapter 2 Use the scanner ENWW

File Type and Resolution Save a scanned document as one of several types of les.
The following standard le types are available:
●PDF: This le type provides the best overall image and text quality. PDF les require Adobe®
Acrobat® Reader software for viewing.
●JPEG: This le type is a good choice for most graphics. Most computers have a browser that can
view .JPEG les. This le type produces one le per page.
●TIFF: This is a standard le type that many graphics programs support. This le type produces
one le per page.
●MTIFF: MTIFF stands for multi-page TIFF. This le type saves multiple scanned pages in a single
le.
●XPS: XPS (XML Paper Specication) creates an XAML le that preserves the original formatting of
the document and supports color graphics and embedded fonts.
●PDF/A: PDF/A is a type of PDF designed for long-term archival of electronic documents. All format
information in the document is self-contained.
The following OCR le types are also supported:
●Text (OCR): Text (OCR) creates a text le by using optical character recognition (OCR) to scan the
original. A text le can be opened in any word processing program. The formatting of the original
will not be saved using this option.
●Unicode Text (OCR): Unicode Text (OCR) is an industry standard used to consistently represent and
manipulate text. This le type is useful for internationalization and localization.
●RTF (OCR): RTF (OCR) creates a rich text format (RTF) le by using optical character recognition
(OCR) to scan the original. RTF is an alternative text format that can be opened by most word
processing programs. Some of the formatting of the original will be saved using this option.
●Searchable PDF (OCR): Searchable PDF (OCR) creates a searchable PDF le by using optical
character recognition (OCR) to scan the original. When a document is scanned in this way, use
Adobe Acrobat® Reader's search tools to search for specic words or phrases within the PDF.
●Searchable PDF/A (OCR): Searchable PDF/A (OCR) is a type of PDF/A le that includes information
about the document structure, which allows content to be searched.
●HTML (OCR): HTML (OCR) creates a Hypertext Markup Language (HTML) le containing the
contents of the original document. HTML is used to display les on Web sites.
●CSV (OCR): CSV (OCR) is common text le format that contains comma-separated values. This
type of le can be opened by most word processing, spreadsheet, or database programs.
Resolution: Specify the resolution of scanned images. Select a higher resolution to increase the clarity
of the image. However, as the resolution increases, the le size also increases.
Original Sides Specify whether the original document is printed on one side or both sides.
Color/Black Specify whether the scanned image will be in color, black and gray, or black only.
Original Size Specify the paper size for the original document.
Content Orientation Specify whether the original document is printed in Portrait or Landscape orientation.
ENWW Perform a scan task 73

Image Adjustment Sharpness: Clarify or soften the image. For example, increasing the sharpness could make text appear
crisper, but decreasing it could make photos appear smoother.
Darkness: Increase or decrease the amount of white and black used in colors in scanned images.
Contrast: Increase or decrease the dierence between the lightest and the darkest color on the page.
Background Cleanup: Remove faint colors from the background of scanned images. For example, if the
original document is printed on colored paper, use this feature to lighten the background without
aecting the darkness of the image.
Optimize Text/Picture Optimize the job for the type of image being scanned: text, graphics, or photos.
Erase Edges Remove blemishes, such as dark borders or staple marks, by cleaning the edges of the scanned image.
Cropping Options Crop to original size: Crop the image to match the paper size of the original document.
Crop to content: Crop the image to the size of the detectable content in the original document.
Automatically Straighten Automatically straighten a scanned image.
Blank Page Suppression Exclude blank pages in the original document from scanned images. This feature is useful for scanning
pages printed on both sides to eliminate blank pages in the resulting scanned document.
Multi-feed Detection Enable or disable multi-feed detection. When enabled, scanning stops when the product detects more
than one page at a time being fed in the document feeder. When disabled, scanning continues when a
multi-feed is detected, to allow scanning pages that are stuck together, originals with self-adhesive
notes on them, or thick paper.
Create Multiple Files Divide a larger scan job into several smaller output les.
Notication Select whether to send notications of the status of scan jobs. The product can send the notication in
an email.
Signing and Encryption
NOTE: This feature is
supported for scan to email
only.
Sign: Send an email with a digital signature.
Encrypt: Send an email as an encrypted le.
HP JetAdvantage business solutions
HP JetAdvantage solutions are workow solutions that are easy-to-use, and both network and cloud-based. HP
JetAdvantage solutions are designed to help businesses of all types, including healthcare, nancial services,
manufacturing, and public sector, manage a eet of products and scanners.
HP JetAdvantage Solutions include:
●HP JetAdvantage Security solutions
●HP JetAdvantage Management solutions
●HP JetAdvantage Workow solutions
●HP JetAdvantage Mobile solutions
For more information about HP JetAdvantage business workow solutions, go to www.hp.com/go/
PrintSolutions.
Additional scan tasks
Go to www.hp.com/go/DSFlow8500fn2 or www.hp.com/support/sjowN9120fn2 .
74 Chapter 2 Use the scanner ENWW

Instructions are available for performing specic scan tasks, such as the following:
●Scan pages from books or other bound documents
●Send a scanned document to a folder in the product memory
●Scan both sides of an identication card
●Scan a document into a booklet format
Use the scanning software (Windows)
The following topics describe how to use the scanning software.
●Scan to a picture
●Scan to a PDF
●Scan text for editing (OCR)
●Scan to email
●Send to cloud
●Scan long or extra-long documents
●Detect multi-feeds
●Everyday Scan
●Filter out color from a document (color dropout)
●Automatically detect color
●Automatically straighten scanned images
●Scan by using other scan software
Scan to a picture
1. Load the document into the input tray.
2. Open the HP Scan software.
3. Select Save as JPEG or Email as JPEG, and then click Scan.
-or-
Choose any other scan shortcut, change the Item Type to Photo, select a picture le from the File Type drop
down list, and then click Scan.
ENWW Use the scanning software (Windows) 75

Scan to a PDF
1. Load the document into the input tray.
2. Open the HP Scan software.
3. Select Save as PDF or Email as PDF, and then click Scan.
-or-
Choose any other scan shortcut and select PDF from the File Type drop down list, and then click Scan.
Scan text for editing (OCR)
The HP scanner software uses optical character recognition (OCR) to convert text on a page to text that can be
edited on a computer. The OCR software comes with the ReadIris Pro software. For information about using the
OCR software, see scan text for editing in the online Help.
Scan to email
NOTE: To scan to email, make sure there is an Internet connection.
1. Load the document into the input tray.
2. Open the HP Scan software.
3. Select Email as PDF or Email as JPEG, and then click Scan.
-or-
Choose any other scan shortcut and select Email from the Send To drop down list, and then click Scan.
Send to cloud
NOTE: To scan to the cloud, make sure there is an Internet connection.
1. Load the document into the input tray.
2. Open the HP Scan software.
3. Select Send to Cloud, and then select the le destination, such as Google Drive or DropBox.
4. Select Scan.
76 Chapter 2 Use the scanner ENWW

Scan long or extra-long documents
By default, the scanner automatically detects page size using the Detect Size selection for page lengths less than
or equal to 356 mm (14 in).
For long or extra-long documents, select Long (8.5 x 34 in) or Extra Long (8.5 x 122 in) from the page size drop-
down list in the scan shortcut settings.
NOTE: Only one page at a time can be scanned when using a long or extra-long page setting.
If the scanner is set to scan long or extra-long pages, it will scan one page at a time. Using this setting to scan
regular pages will slow down the process and should only be used to scan pages longer than 356 mm (14 in).
Detect multi-feeds
The multi-feed detection feature stops the scan process if it senses that multiple pages are fed into the scanner
at one time. This feature is enabled by default.
Disabling this feature might be helpful when scanning:
●Multipart forms (a use that HP does not recommend).
●Documents which have labels or sticky notes attached to them.
NOTE: Use the ISIS or WIA user interface to enable multi-feed detection when scanning from non-HP software.
Everyday Scan
The Everyday Scan shortcut allows users to dene and save a scan shortcut for their everyday needs. The
following Scan Shortcut Settings are customizable when the Everyday Scan shortcut is selected:
●Item Type
●Page Sides
●Page Size
●Color Mode
●Destination/File Type
Filter out color from a document (color dropout)
You can lter out a color channel (red, green, or blue) or up to three individual colors. For specic colors, the
sensitivity setting controls how closely a scanned color must approximate the specied color.
Removing colors from the scan might reduce the scan le size and improve optical character recognition (OCR)
results.
To select colors to eliminate from a scan in HP Scan software, follow these steps:
1. Open the HP Scan software.
2. Scan a sample page, which has the colors to be dropped, into the viewer.
ENWW Use the scanning software (Windows) 77

3. Click the More button, and then click the Image tab and select the Color Dropout feature.
4. Enable a color to drop and select the color from the preview using the eyedropper tool. Be sure to save the
colors.
Only the color dropout options available for your scanner are selectable.
For information about the color dropout settings, see the online help for the scanning software that you are
using.
Automatically detect color
Use this feature to reduce the size of the scanned le by only saving pages that contain color as color scans, and
saving all other pages as black and white.
To automatically detect color in a scanned image, follow these steps:
1. Open the HP Scan software.
2. Select a scan shortcut.
3. To adjust the Auto Detect Color sensitivity and output mode settings, click More, select Image, and then
click the Auto Detect Color drop-down box.
4. Click on the Color Mode drop-down box, and then select Auto Detect Color.
NOTE: For information about the automatic color detection settings, see the online help for the scanning
software that you are using.
Use the ISIS or WIA user interface to automatically detect color when scanning from non-HP scanning software.
Automatically straighten scanned images
Windows: Use the Auto-Straighten feature to straighten content that is skewed relative to the page dimensions
in the source document. Use the Detect Size feature to deskew page images that might have become skewed
during the scanning process.
1. Open the HP Scan software.
2. Select a scan shortcut.
3. Click More, select the Document tab, and then select Straighten Content.
Scan by using other scan software
The following third-party applications are also supported by the scanner:
●Readiris Pro: OCR application.
●Cardiris: Business card application.
●PaperPort: Personal document management application.
●Third-party applications that support Kofax (available Spring 2018), TWAIN, ISIS, and WIA.
78 Chapter 2 Use the scanner ENWW

Use the scanning software (OS X)
For more information, go to www.hp.com/go/DSFlow8500fn2 or www.hp.com/support/sjowN9120fn2 .
ENWW Use the scanning software (OS X) 79

Mobile scanning
HP oers multiple mobile solutions to enable easy scanning to an HP scanner from a tablet, smart phone, or
other mobile device. For more information, go to www.hp.com/go/DSFlow8500fn2 or www.hp.com/support/
sjowN9120fn2 .
NOTE: Purchase the optional wireless accessory (part number J8031A) from HP.com in order to enable mobile
scanning. Follow the installation guide to install the Wi-Fi accessory.
Scanning tips
●Optimize scanning and task speeds
Optimize scanning and task speeds
Several settings inuence the total time for a scanning job. To optimize scanning performance, consider the
following information.
●To optimize performance, make sure the computer meets the recommended system requirements. To view
minimum and recommended system requirements, see www.hp.com, and then search for the scanner
model plus the word specications.
●Saving a scanned image to a searchable format (for example, searchable PDF) takes more time than saving
to an image format because the scanned image is analyzed using optical character recognition (OCR). Verify
the need for a searchable output le before selecting a searchable scan format.
●Scanning at a higher resolution than necessary increases scanning time and creates a larger le with no
additional benet. If scanning at a high resolution, set the resolution to a lower level to increase scanning
speed.
80 Chapter 2 Use the scanner ENWW

3 Care and maintenance
This section presents information about how to care for and maintain the scanner. For the latest maintenance
information, see www.hp.com/support.
●Clean the product
●Install an accessory into the hardware integration pocket
●Replace parts
●Order maintenance and scanning supplies
ENWW 81
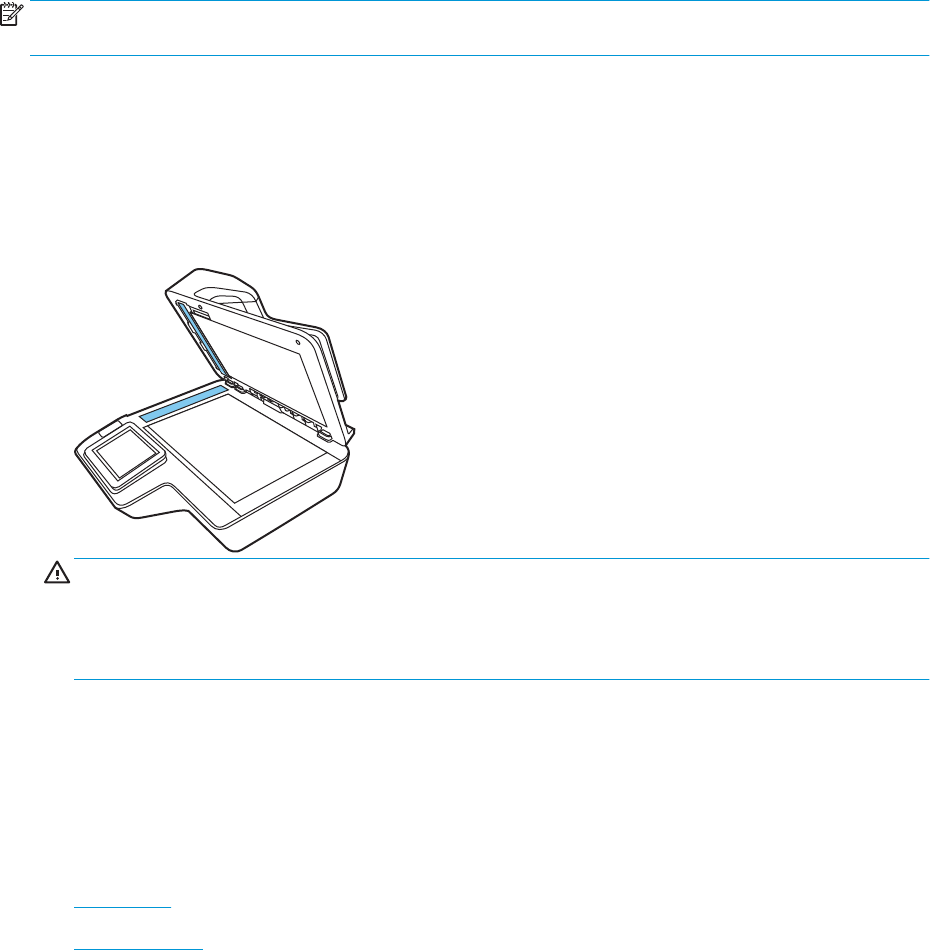
Clean the product
Occasional cleaning of the scanner helps ensure high-quality scans. The amount of care necessary depends on
several factors, including the amount of use and the environment. Perform routine cleaning as necessary.
Clean the scanning strips
NOTE: The HP ScanJet Enterprise Flow N9120 fn2 Document Scanner is shown in this procedure, however, the
instructions are also correct for the HP Digital Sender Flow 8500 fn2 Document Capture Workstation.
To clean the scanning strip components, follow these steps:
1. Press the Power button to turn o the scanner, and then disconnect the power cable and other cables from
the scanner.
2. Lift up the automatic document feeder (ADF).
3. Clean the scanning strips with a soft, lint-free cloth that has been sprayed with a mild glass cleaner.
CAUTION: Use only glass cleaner to clean the scanning strips. Avoid cleaners that contain abrasives,
acetone, benzene, and carbon tetrachloride, all of which can damage the scanning strips. Avoid isopropyl
alcohol because it can leave streaks on the scanning strips.
Do not spray the glass cleaner directly on the scanning strips.
4. Dry the scanning strips with a dry, soft, lint-free cloth. Wipe the strips of gray, reective material on each
strip.
5. Close the ADF, reconnect the USB cable and power supply to the scanner, and then press the Power button
to turn on the scanner. The scanner is now ready to use.
Clean the rollers
●Introduction
●Clean the rollers
Introduction
The rollers may need to be cleaned under the following conditions:
82 Chapter 3 Care and maintenance ENWW
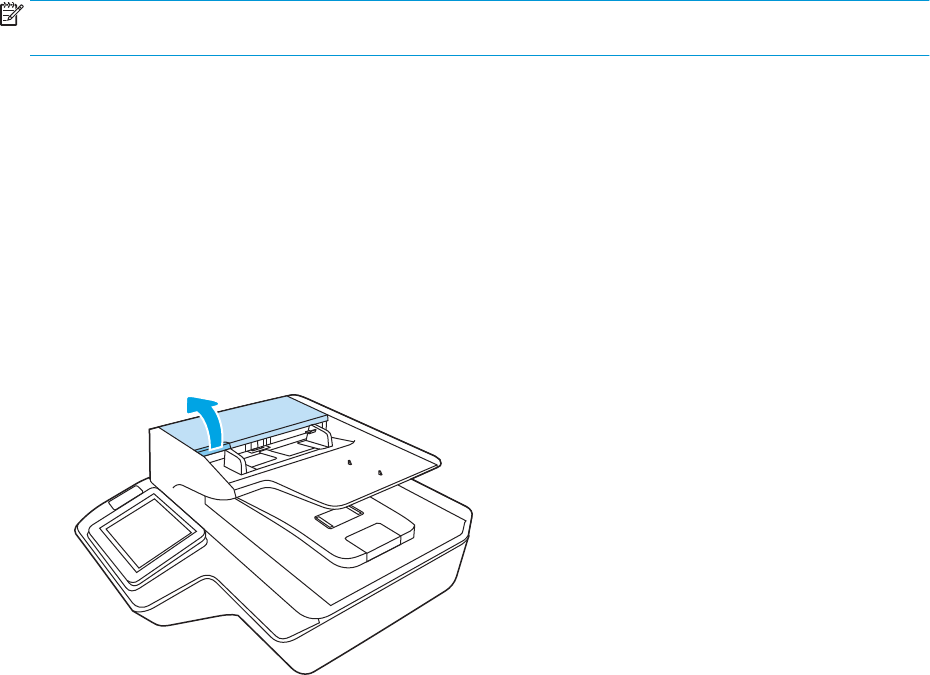
●The scanner jams repeatedly or multiple sheets are being scanned at the same time.
●If the following types of paper are frequently scanned: coated paper, chemically treated documents such as
carbonless paper, documents with a large amount of calcium carbonate, documents written on with pencil,
documents printed by Inkjet printers, or documents on which the toner has not been fused.
Clean the rollers
NOTE: The HP ScanJet Enterprise Flow N9120 fn2 Document Scanner is shown in this procedure, however, the
instructions are also correct for the HP Digital Sender Flow 8500 fn2 Document Capture Workstation.
To clean the separation and feed rollers, follow these steps:
1. From the control panel, select Support Tools and open the following menus:
●Maintenance
●Calibration/Cleaning
●Clean Automatic Document Feeder (ADF) Rollers
2. Press the Power button to turn o the scanner, and then disconnect the power cable and other cables from
the scanner.
3. Open the ADF hatch.
4. Using a clean, lint-free cloth moistened with distilled or clean tap water, wipe the separation roller from
right to left. Rotate the roller a full 360 degrees to ensure the entire roller surface is cleaned.
Clean the product 83
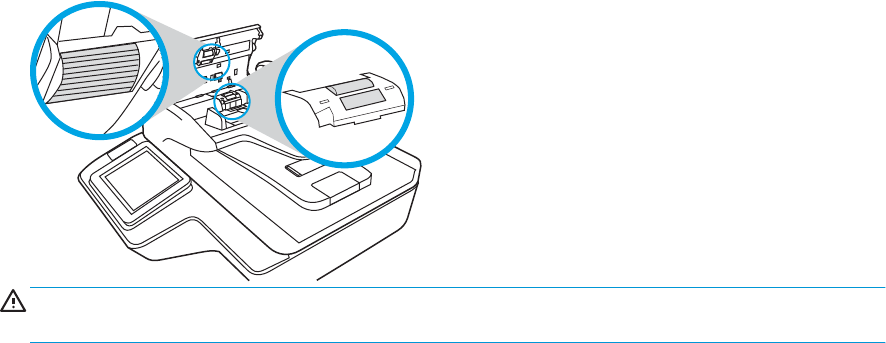
5. Wipe the feed rollers from right to left. Rotate the rollers a full 360 degrees to ensure the entire roller
surface is cleaned.
CAUTION: Wait at least two minutes for the rollers to dry before loading documents into the document
input tray.
6. Close the ADF hatch, and then reconnect the USB cable and power supply to the scanner.
7. Press the Power button to turn on the scanner.
84 Chapter 3 Care and maintenance
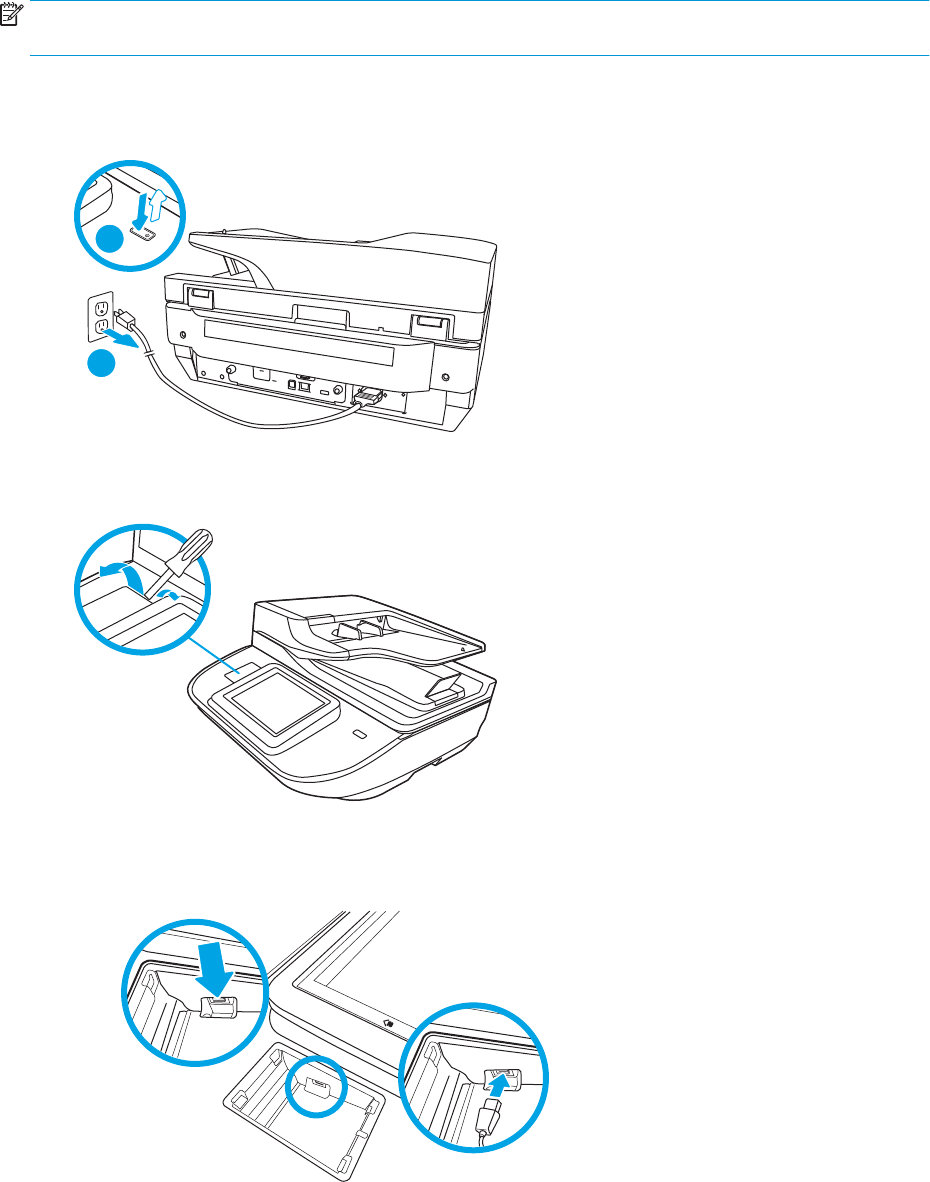
Install an accessory into the hardware integration pocket
You can install a separately-purchaseable HP accessory (for example, a proximity reader, ngerprint reader, or
magnetic-swipe reader) into the integrated hardware integration pocket (HIP).
NOTE: This procedure describes installing a proximity card reader. Steps identied as if applicable might not
apply to other HIP accessories. Always refer to the installation instructions that came with your accessory.
To install an accessory into the HIP, follow these steps:
1. Press the Power button to turn o the product (1), and then disconnect the power cable (2).
2
1
2. Insert a at head screw driver into the groove at the top of the HIP cover and gently pry the cover free; set
the cover aside.
3. Remove the HIP accessory from its packaging and install the accessory into the HIP.
a. Connect the accessory's USB cable into the connector on the left side of the HIP enclosure.
ENWW Install an accessory into the hardware integration pocket 85

b. Connect the USB cable to the cable connector on the accessory (1), and then connect the grounding
connector to the grounding strip on the accessory, if applicable (2).
2
1
NOTE: The connectors shown are for a proximity card reader. The cable connector for your
accessory might be slightly dierent, and might not include a ground connector.
c. Align the pegs on the underside of the accessory with the connectors in the HIP and insert the
accessory into the HIP.
4. Connect the power cable, and then press the Power button to turn on the product.
86 Chapter 3 Care and maintenance ENWW
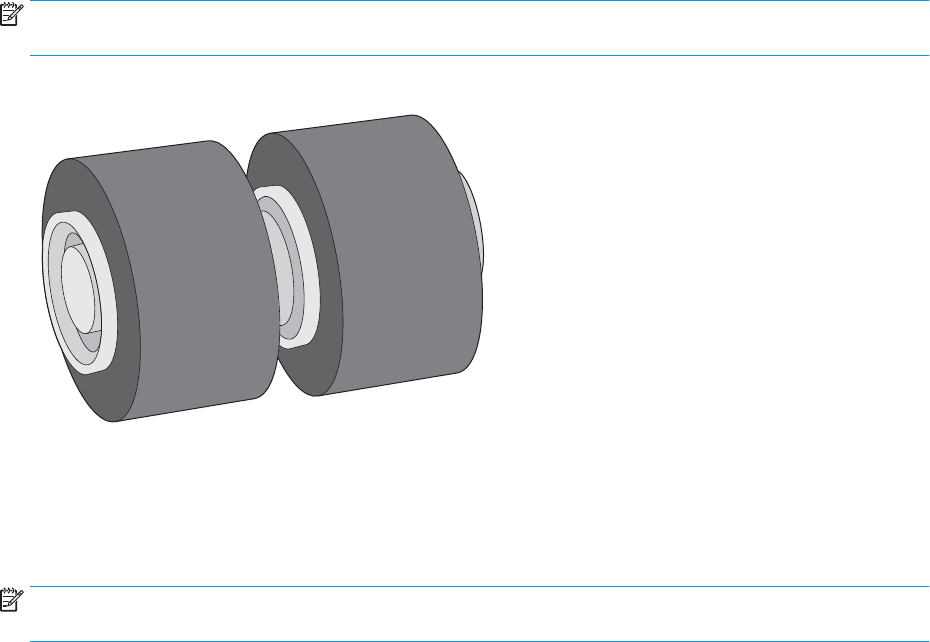
Replace parts
Replacing parts when necessary helps ensure high-quality scans. Parts might need to be replaced when
indicated by the Embedded Web Server or control panel, or if the scanner is not working correctly. The HP Digital
Sender Flow 8500 fn2 Document Capture Workstation and HP ScanJet Enterprise Flow N9120 fn2 Document
Scanner ADF Roller Replacement Kit includes the following replacement parts:
●Roller cover
●Separation rollers
●Pickup roller module
The replacement kit also includes detailed instructions for replacing each of these parts.
Replace the separation rollers and cover
NOTE: The HP ScanJet Enterprise Flow N9120 fn2 Document Scanner is shown in this procedure, however, the
instructions are also correct for the HP Digital Sender Flow 8500 fn2 Document Capture Workstation.
Replace the separation rollers under the following conditions:
●Windows: When the Maintenance Recommended dialog indicates they are due for maintenance.
●If the scanner experiences repeated document jams.
NOTE: The roller replacement kit is a consumable and is not covered under warranty or standard service
agreements.
To replace the separation rollers, follow these steps:
1. Press the Power button to turn o the scanner, and then disconnect the USB cable and power supply from
the scanner.
ENWW Replace parts 87
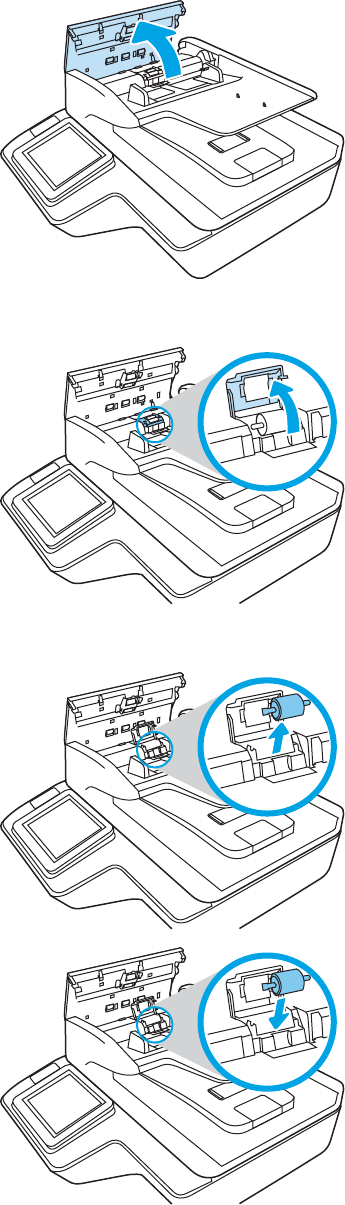
2. Open the ADF hatch.
3. Squeeze the tabs on the sides of the roller cover, and then lift up the roller cover to remove.
4. Remove and replace the rollers as described in the instructions included with the replacement kit.
5. Replace the roller cover, and then continue with replacing the pick up roller module.
88 Chapter 3 Care and maintenance ENWW
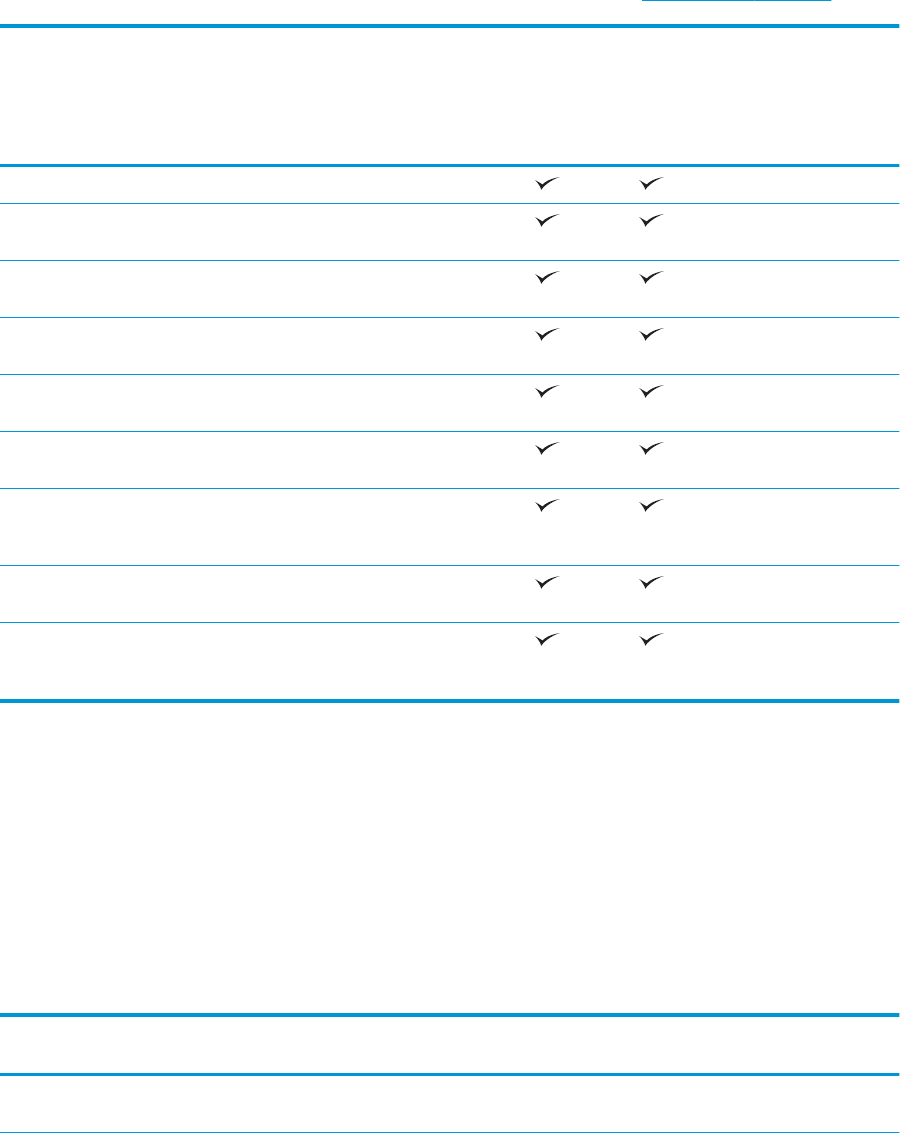
Order maintenance and scanning supplies
Order parts and accessories
To order maintenance parts for the scanner, see the HP scanner parts website at www.hp.com/buy/parts.
Item Description
HP Digital
Sender Flow
8500 fn2
Document
Capture
Workstation
HP ScanJet
Enterprise
Flow N9120
fn2
Document
Scanner Part number
ADF Maintenance Kit Maintenance kit for the ADF J8J95A
HP 1GB DDR3x32 144-Pin
800MHzSODIMM Accy
Optional DIMM for expanding the memory E5K48A
HP Jetdirect 2900nw Print
Server
USB wireless print server accessory J8031A
HP Smartcard US Govt
Niprnet Solution
HP Access Control solutions (US Gov only) CC543A
HP Universal USB Proximity
Card Reader
HP Access Control solutions X3D03A
HP LaserJet Swedish
Overlay Keyboard
Language-specic, adhesive overlay for the
physical keyboard (EMEA)
A7W14A
HP LaserJet Danish/
French/German Overlays
Keybrd
Language-specic, adhesive overlay for the
physical keyboard (EMEA)
A7W13A
HP Internal USB Ports Two internal USB ports for connecting third-party
devices
B5L28A
HP Secure High
Performance Hard Disk
Drive
Replacement hard disk drive B5L29A
Customer self-repair parts
The following parts are available for the product.
●Parts listed as Mandatory self-replacement are to be installed by customers, unless you are willing to pay
HP service personnel to perform the repair. For these parts, on-site or return-to-depot support is not
provided under the HP product warranty.
●Parts listed as Optional self-replacement can be installed by HP service personnel at your request for no
additional charge during the product warranty period.
Item Description
Self-replacement
options Part number
HP Secure High Performance Hard Disk Drive
FIPS Drive
Replacement secure hard drive Mandatory L2762-60035
ENWW Order maintenance and scanning supplies 89

Item Description
Self-replacement
options Part number
Scanner White Backing Replacement white plastic backing for the
scanner
Mandatory 8500: 5851-7206
N9120:
J7Z09-67926
Control Panel Assembly Kit Replacement touchscreen control panel Mandatory J7Z09-67928
HIP 2 Cover Replacement HIP 2 cover Mandatory B5L46-40021
Keyboard Overlay Kit
French, Italian, Russian, German, Spanish,
Ukrainian
Replacement keyboard overlay (Flow
models)
Mandatory 5851-6019
Keyboard Overlay Kit
Canadian French, Latin American Spanish, U.S.
Spanish
Replacement keyboard overlay (Flow
models)
Mandatory 5851-6020
Keyboard Overlay Kit
Swiss French, Swiss German, Danish
Replacement keyboard overlay (Flow
models)
Mandatory 5851-6021
Keyboard Overlay Kit
Simplied Chinese, Traditional Chinese
Replacement keyboard overlay (Flow
models)
Mandatory 5851-6022
Keyboard Overlay Kit
Spanish, Portuguese
Replacement keyboard overlay (Flow
models)
Mandatory 5851-6023
Keyboard Overlay Kit
Japanese (KG and KT)
Replacement keyboard overlay (Flow
models)
Mandatory 5851-6024
Overlay-Keyboard Chinese Replacement keyboard overlay (Flow
models)
Mandatory A7W12-67901
Overlay-Keyboard Sweden Replacement keyboard overlay (Flow
models)
Mandatory A7W14-67901
CORD, PWR, AC LINE, C13-DENMARK, 1.5m Replacement power cable Mandatory 130627-010
CORD, PWR, AC LINE, C13-ITALY, 1.5m Replacement power cable Mandatory 109197-010
CORD, PWR, AC LINE, C13-INDIA, 1.5m Replacement power cable Mandatory 403440-003
CORD, PWR, AC LINE, C13-THAILAND, 1.5m Replacement power cable Mandatory 285052-009
CORD, PWR, AC LINE, C13-EUROPE, 1.5m Replacement power cable Mandatory 100614-011
CORD, PWR, AC LINE, C13-AUSTRALIA, 1.5m Replacement power cable Mandatory 100661-016
CORD, PWR, AC LINE, C13-UK, 1.5m) Replacement power cable Mandatory 100613-016
CORD, PWR, AC LINE, C13-CHINA, 1.5m Replacement power cable Mandatory 286496-017
CORD, PWR, AC LINE, C13-TAIWAN, 1.5m Replacement power cable Mandatory 393312-005
CORD, PWR, AC LINE, C13-ARGENTINA, 1.5m Replacement power cable Mandatory 401328-016
CORD, PWR, AC LINE, C13-SWISS, 1.5m Replacement power cable Mandatory 150304-010
CORD, PWR, AC LINE, C13-NEMA, 1.5m Replacement power cable Mandatory 121565-016
CORD, PWR, AC LINE, C13-S. AFRICA, 1.5m Replacement power cable Mandatory 187487-008
90 Chapter 3 Care and maintenance ENWW

Item Description
Self-replacement
options Part number
CORD, PWR, AC LINE, C13-ISRAEL, 1.5m Replacement power cable Mandatory 398062-007
CORD, PWR, AC LINE, C13-BRAZIL, 1.5m Replacement power cable Mandatory 438723-005
ISA Dashboard (8500 fn2 only) Replacement front cosmetic cover Mandatory L2762-40003
Cover, Front Dashboard Left (N9120 fn2 only) Replacement front cosmetic cover Mandatory J7Z09-40007
ENWW Order maintenance and scanning supplies 91
92 Chapter 3 Care and maintenance ENWW

4 Manage the scanner
Advanced conguration with the HP Embedded Web Server (EWS)
●Introduction
●How to access the HP Embedded Web Server (EWS)
●HP Embedded Web Server features
Introduction
Use the HP Embedded Web Server to manage scanning functions from a computer instead of the scanner
control panel.
●View scanner status information
●Determine the remaining life for all supplies and order new ones
●View and change tray congurations
●View and change the scanner control-panel menu conguration
●View and scan internal pages
●Receive notication of scanner and supplies events
●View and change network conguration
The HP Embedded Web Server works when the scanner is connected to an IP-based network. The HP Embedded
Web Server does not support IPX-based scanner connections. Internet access is not needed to open and use the
HP Embedded Web Server.
When the scanner is connected to the network, the HP Embedded Web Server is automatically available.
NOTE: The HP Embedded Web Server is not accessible beyond the network rewall.
How to access the HP Embedded Web Server (EWS)
1. From the Home screen on the scanner control panel, select the Information icon, and then select the
Network icon to display the IP address or host name.
ENWW Advanced conguration with the HP Embedded Web Server (EWS) 93

2. Open a web browser, and in the address line, type the IP address or host name exactly as it displays on the
scanner control panel. Press the Enter key on the computer keyboard. The EWS opens.
NOTE: If the web browser displays a message indicating that accessing the website might not be safe,
select the option to continue to the website. Accessing this website will not harm the computer.
To use the HP Embedded Web Server, the browser must meet the following requirements:
Windows® 7
●Internet Explorer (version 8.x or greater)
●Google Chrome (version 34.x or greater)
●Firefox (version 20.x or greater)
Windows® 8 or greater
●Internet Explorer (version 9.x or greater)
●Google Chrome (version 34.x or greater)
●Firefox (version 20.x or greater)
Linux
●Google Chrome (version 34.x or greater)
●Firefox (version 20.x or greater)
HP Embedded Web Server features
●Information tab
●General tab
●Scan/Digital Send tab
●Fax tab
●Troubleshooting tab
●Security tab
●HP Web Services tab
●Networking tab
Information tab
Table 4-1 HP Embedded Web Server Information tab
Menu Description
Device Status Shows the scanner status and shows the estimated life remaining of HP supplies. The page
also shows the type and size of paper set for each tray. To change the default settings, click
the Change Settings link.
94 Chapter 4 Manage the scanner ENWW

Table 4-1 HP Embedded Web Server Information tab (continued)
Menu Description
Conguration Page Shows the information found on the conguration page.
Event Log Page Shows a list of all scanner events and errors. Use the HP Instant Support link (in the page
footer on all HP Embedded Web Server pages) to connect to a set of dynamic Web pages
that help solve problems. These pages also show additional services available for the
scanner.
Usage Page Shows a summary of the number of pages the scanner has scanned.
Device Information Shows the scanner network name, address, and model information. To customize these
entries, click the Device Information menu on the General tab.
Control Panel Snapshot Shows an image of the current screen on the control panel display.
Open Source Licenses Shows a summary of the licenses for open source software programs that can be used with
the scanner.
General tab
Table 4-2 HP Embedded Web Server General tab
Menu Description
Quick Sets Congure jobs that are available in the Quick Sets area of the Home screen on the scanner
control panel.
Alerts Setup email alerts for various scanner and supplies events.
Control Panel Settings App Shows the Settings app options that are available on the scanner control panel.
AutoSend Congure the scanner to send automated emails regarding scanner conguration and
supplies to specic email addresses.
Edit Other Links Add or customize a link to another Web site. This link displays in the footer area on all
HP Embedded Web Server pages.
Device Information Name the scanner and assign an asset number to it. Enter the name of the primary contact
who will receive information about the scanner.
Language Set the language in which to display the HP Embedded Web Server information.
Date/Time Settings Set the date and time or synchronize with a network time server.
Energy Settings Set or edit sleep settings for business and non-business hours and wake, sleep, and holiday
events for the scanner.
Set which interactions with the scanner cause it to wake from sleep mode.
Back up and Restore Create a backup le that contains scanner and user data. If necessary, use this le to restore
data to the scanner.
Reset Factory Settings Restore scanner settings to the factory defaults.
Solution Installer Install third-party software packages that extend or modify the functionality of the
scanner.
Firmware Upgrade Download and install scanner rmware upgrade les.
Quota and Statistics Services Provides connection information about third-party job-statistics services.
ENWW Advanced conguration with the HP Embedded Web Server (EWS) 95

Scan/Digital Send tab
Table 4-3 HP Embedded Web Server Scan/Digital Send tab
Menu Description
Email Setup Congure the default email settings for digital sending, including the following:
●Default Job Options
●Quick Sets
Scan to Network Folder Congure the network folder settings for digital sending, including the following:
●Default Job Options
●Quick Sets
Scan to SharePoint® Congure the Microsoft SharePoint® settings for digital sending, including the following:
●Settings for Quick Sets jobs saved in a document library on the SharePoint® site
●Default settings for jobs saved in a document library on the SharePoint® site
Scan to USB Drive Congure the USB settings for digital sending, including the following:
●Settings for Quick Sets jobs saved on a USB ash drive
●Settings for notications
●Default scan settings for jobs saved on a USB ash drive
●Default le settings for jobs saved on a USB ash drive
Contacts Manage contacts, including the following:
●Add email addresses into the scanner one at a time.
●Import a large list of frequently-used email addresses on to the scanner all at once,
rather than adding them one at a time.
●Export contacts from the scanner into a .CSV le on the computer to use as a data
backup, or import the records onto another HP scanner.
●Edit email addresses that have already been saved in the scanner.
Email and Save to Network Folder Quick
Setup Wizards
Congure the scanner to send scanned images as email attachments.
Congure the scanner to save scanned images to network-folder Quick Sets. Quicks Sets
provide easy access to les saved on the network.
Digital Sending Software Setup Congure settings related to using optional Digital Sending software.
Fax tab
Table 4-4 HP Embedded Web Server Fax tab
Menu Description
Fax Send Setup Congure settings for sending faxes, including the following:
●Default Job Options
96 Chapter 4 Manage the scanner ENWW

Table 4-4 HP Embedded Web Server Fax tab (continued)
Menu Description
–Common Job Settings
–LAN Fax Setup
–Internet Fax Setup
●Quick Sets
Fax Speed Dials Manage speed dials
Troubleshooting tab
Table 4-5 HP Embedded Web Server Troubleshooting tab
Menu Description
General Troubleshooting Select from a variety of reports and tests to help solve problems with the scanner.
Congure settings for Fax, OXPd, and Auto Recovery.
Online Help Link to HP cloud-based online help to assist in troubleshooting issues.
Firmware Upgrade Download and install scanner rmware upgrade les.
Reset Factory Settings Reset scanner settings to factory defaults.
Security tab
Table 4-6 HP Embedded Web Server Security tab
Menu Description
General Security Settings for general security, including the following:
●Congure an administrator password to restrict access to certain features on the
scanner.
●Set PJL password for processing PJL commands.
●Set le system access and rmware upgrade security.
●Enable or disable the Host USB port on the control panel or the USB connectivity port
on the formatter for scanning and saving a document to a USB ash drive.
●View the status of all security settings.
Account Policy Enable administrator account settings.
Access Control Congure access to scanner functions for specic individuals or groups, and select the
method individuals use to sign in to the scanner.
Protect Stored Data Congure and manage the internal hard drive for the scanner. This scanner includes an
encrypted hard drive for maximum security.
Congure settings for jobs that are stored on the scanner hard drive.
Certicate Management Install and manage security certicates for access to the scanner and the network.
ENWW Advanced conguration with the HP Embedded Web Server (EWS) 97

Table 4-6 HP Embedded Web Server Security tab (continued)
Menu Description
Web Service Security Allow resources on this scanner to be accessed by web pages from dierent domains. If no
sites are added to the list, then all sites are trusted.
Self Test Verify that the security functions are running according to expected system parameters.
HP Web Services tab
Table 4-7 HP Embedded Web Server HP Web Services tab
Menu Description
Conguration
Web Proxy Congure a proxy server if there are issues enabling HP Web Services or connecting the
device to the internet.
HP JetAdvantage Congure HP JetAdvantage.
Networking tab
Use the Networking tab to congure and secure network settings for the scanner when it is connected to an IP-
based network. This tab does not display if the scanner is connected to other types of networks.
Table 4-8 HP Embedded Web Server Networking tab
Menu Description
Conguration
TCP/IP Setting Congure TCP/IP settings for IPv4 and IPv6 networks.
Network Settings Congure IPX/SPX, AppleTalk, DLC/LLC, and SNMP settings.
Other Settings Includes rmware update, LPD queues, USB settings, support information, and refresh rate.
AirPrint Enable, set up, or disable network printing from Apple supported products.
Select Language Change the language displayed by the HP Embedded Web Server. This page displays if the
Web pages support multiple languages. Optionally, select supported languages through
language-preference settings in the browser.
Select Location Choose a location where the HP Embedded Web Server and product are being used.
Google Cloud With Google Cloud, you can use a computer or mobile device to print documents or photos
directly to a web-connected printer.
Setup Click Print Claim Sheet to send printer capabilities and model number to Google.
Registration instructions from Google will be printed. Make sure the product is connected to
a network with Internet access.
Web Proxy Congure a proxy server if there are issues enabling HP Web Services or connecting the
device to the Internet. If you are unsure of proxy settings, nd the proxy conguration area
within the tools or preferences of your web browser.
Security Allows you to congure general security, access control, and stored data protection options,
as well as to manage certicates.
98 Chapter 4 Manage the scanner ENWW

Table 4-8 HP Embedded Web Server Networking tab (continued)
Menu Description
Settings View and restore current security settings to factory-default values.
Congure security settings using the Security Conguration Wizard.
NOTE: Do not use the Security Conguration Wizard to congure security settings using
network-management applications, such as HP Web Jetadmin.
Authorization Control conguration management and use of this scanner, including the following:
●Set or change the administrator password to control access to conguration
parameters.
●Request, install, and manage digital certicates on the HP Jetdirect print server.
●Limit host access to this scanner through an Access Control List (ACL).
Secure Communication Congure security settings.
Mgmt. Protocols Congure and manage security protocols for this scanner, including the following:
●Set the security management level for the HP Embedded Web Server, and control
traic over HTTP and HTTPS.
●Congure the SNMP (Simple Network Management Protocol) operation. Enable or
disable the SNMP v1/v2c or SNMP v3 agents on the server.
802.1X Authentication Congure 802.1X authentication settings on the Jetdirect print server as required for client
authentication on the network, and reset the 802.1X authentication settings to factory-
default values.
CAUTION: When changing the 802.1X authentication settings; the scanner might lose its
connection. To reconnect, it might be necessary to reset the server to a factory-default
state and reinstall the scanner.
IPsec/Firewall View or congure a Firewall policy or an IPsec/Firewall policy (for selected HP Jetdirect
models only).
Announcement Agent Enable or disable the HP Device Announcement Agent, set the conguration server, and
congure mutual authentication using certicates.
Diagnostics
Network Statistics Display network statistics that are collected and stored on the HP Jetdirect print server.
Protocol Info View a list of network-conguration settings on the HP Jetdirect print server for each
protocol.
Conguration Page View the HP Jetdirect conguration page, which contains status and conguration
information.
ENWW Advanced conguration with the HP Embedded Web Server (EWS) 99

Congure IP network settings
●Scanner sharing disclaimer
●View or change network settings
●Rename the scanner on a network
●Manually congure IPv4 TCP/IP parameters from the control panel
●Manually congure IPv6 TCP/IP parameters from the control panel
●Link speed and duplex settings
Scanner sharing disclaimer
HP does not support peer-to-peer networking, as the feature is a function of Microsoft operating systems and
not of the HP scanner drivers. Go to Microsoft at www.microsoft.com.
View or change network settings
Use the HP Embedded Web Server to view or change IP conguration settings.
1. Open the HP Embedded Web Server (EWS):
a. From the Home screen on the scanner control panel, select the Information icon, and then select
the Network icon to display the IP address or host name.
b. Open a Web browser, and in the address line, type the IP address or host name exactly as it displays
on the product control panel. Press the Enter key on the computer keyboard. The EWS opens.
NOTE: If the Web browser displays a message indicating that accessing the website might not be
safe, select the option to continue to the website. Accessing this website will not harm the computer.
2. Click the Networking tab and then click TCP/IP(v4) to obtain network information. Change settings as
needed.
Rename the scanner on a network
To rename the scanner on a network so that it can be uniquely identied, use the HP Embedded Web Server.
1. Open the HP Embedded Web Server (EWS):
a. From the Home screen on the scanner control panel, select the Information icon, and then select
the Network icon to display the IP address or host name.
100 Chapter 4 Manage the scanner ENWW

b. Open a Web browser, and in the address line, type the IP address or host name exactly as it displays
on the product control panel. Press the Enter key on the computer keyboard. The EWS opens.
NOTE: If the Web browser displays a message indicating that accessing the website might not be
safe, select the option to continue to the website. Accessing this website will not harm the computer.
2. Open the General tab.
3. On the Device Information page, the default product name is in the Device Name eld. You can change this
name to uniquely identify this product.
NOTE: Completing the other elds on this page is optional.
4. Click Apply to save the changes.
Manually congure IPv4 TCP/IP parameters from the control panel
Use the control-panel Settings menus to manually set an IPv4 address, subnet mask, and default gateway.
1. From the Home screen on the product control panel, select Settings.
2. Open the following menus:
●Networking
●Ethernet
●TCP/IP
●IPV 4 Settings
●Cong Method
3. Select the Manual option, and then select OK.
4. Open the Manual Settings menu.
5. Select the IP Address, Subnet Mask, or Default Gateway option.
6. Select the rst eld to open a keypad. Enter the correct digits for the eld, and then select OK.
Repeat the process for each eld to be congured.
Manually congure IPv6 TCP/IP parameters from the control panel
Use the control-panel Settings menus to manually set an IPv6 address.
1. From the Home screen on the product control panel, select Settings.
2. To enable manual conguration, open the following menus:
●Networking
●Ethernet
ENWW Congure IP network settings 101

●TCP/IP
●IPV6 Settings
3. Select Enable, select On, and then select OK.
4. To congure the address, open the Manual Settings menu, and then select Address.
5. Use the keypad to enter the address, and then select OK.
Link speed and duplex settings
NOTE: This information applies only to Ethernet networks. It does not apply to wireless networks.
The link speed and communication mode of the scan server must match the network hub. For most situations,
leave the product in automatic mode. Incorrect changes to the link speed and duplex settings might prevent the
product from communicating with other network devices. To make changes, use the product control panel.
NOTE: The product setting must match the setting for the network device (a network hub, switch, gateway,
router, or computer).
NOTE: Making changes to these settings causes the product to turn o and then on. Make changes only when
the product is idle.
1. From the Home screen on the product control panel, swipe until the Settings menu displays. Touch the
Settings icon to open the menu.
2. Open the following menus:
●Networking
●Ethernet
●Link Speed
3. Select one of the following options:
●Auto: The scan server automatically congures itself for the highest link speed and communication
mode allowed on the network.
●10T Half: 10 megabytes per second (Mbps), half-duplex operation
●10T Full: 10 Mbps, full-duplex operation
●10T Auto: 10 Mbps, automatic-duplex operation
●100TX Half: 100 Mbps, half-duplex operation
●100TX Full: 100 Mbps, full-duplex operation
●100TX Auto: 100 Mbps, automatic-duplex operation
●1000T Full: 1000 Mbps, full-duplex operation
4. Select OK.
102 Chapter 4 Manage the scanner ENWW
Scanner security features
Introduction
The product includes several security features to restrict who has access to conguration settings, to secure
data, and to prevent access to valuable hardware components.
●Security statements
●IP Security
●Assign an administrator password
●Encryption support: HP High Performance Secure Hard Disks
●Lock the formatter
Security statements
The product supports security standards and recommended protocols that help you keep the product secure,
protect critical information on your network, and simplify the way you monitor and maintain the product.
IP Security
IP Security (IPsec) is a set of protocols that control IP-based network traic to and from the product. IPsec
provides host-to-host authentication, data integrity, and encryption of network communications.
For products that are connected to the network, congure IPsec by using the Networking tab in the
HP Embedded Web Server.
Assign an administrator password
Assign an administrator password for access to the product and the HP Embedded Web Server so that
unauthorized users cannot change the product settings.
1. Open the HP Embedded Web Server (EWS):
a. From the Home screen on the product control panel, select the Information icon, and then select
the Network icon to display the IP address or host name.
b. Open a web browser, and in the address line, type the IP address or host name exactly as it displays
on the product control panel. Press the Enter key on the computer keyboard. The EWS opens.
NOTE: If the web browser displays a message indicating that accessing the website might not be
safe, select the option to continue to the website. Accessing this website will not harm the computer.
2. Click the Security tab.
3. Open the General Security menu.
4. In the area labeled Set the Local Administrator Password, enter the name to associate with the password in
the Username eld.
5. Enter the password in the New Password eld, and then enter it again in the Verify Password eld.
ENWW Scanner security features 103

NOTE: To change an existing password, rst enter the existing password in the Old Password eld.
6. Click Apply.
NOTE: Make note of the password and store it in a safe place. The administrator password cannot be
recovered. If the administrator password is lost or forgotten, contact HP Support at support.hp.com for the
assistance required to completely reset the product.
Some features on the product control panel can be secured so that unauthorized people cannot use them. When
a feature is secured, the product prompts you to sign in before you can use it. You can also sign in without
waiting for a prompt by selecting Sign In from the product control panel.
Typically, the credentials for signing in to the product are the same as for signing in to the network. Consult the
network administrator for this product if you have questions about which credentials to use.
1. From the Home screen on the product control panel, select Sign In.
2. Follow the prompts to enter the credentials.
NOTE: To maintain security for the product, select Sign Out when you have nished using the product.
Encryption support: HP High Performance Secure Hard Disks
The hard disk provides hardware-based encryption so you can securely store sensitive data without impacting
product performance. This hard disk uses the latest Advanced Encryption Standard (AES) and has versatile time-
saving features and robust functionality.
Use the Security menu in the HP Embedded Web Server to congure the disk.
Lock the formatter
The formatter has a slot that you can use to attach a security cable. Locking the formatter prevents someone
from removing valuable components from it.
104 Chapter 4 Manage the scanner ENWW

Energy-conservation settings
Introduction
●Set the sleep timer and congure the scanner to use 2 watts or less of power
●Set the sleep schedule
Congure sleep settings to reduce power usage when the product is idle.
Set the sleep timer and congure the scanner to use 2 watts or less of power
The sleep settings aect how much power the product uses, the wake/sleep time, how quickly the product
enters sleep mode, and how quickly the product wakes up from sleep mode.
To congure the product to use 2 watt or less of power while in sleep mode, enter times for both the Sleep after
Inactivity and Auto O after sleep settings.
1. From the Home screen on the product control panel, select Settings.
2. Open the following menus:
●General
●Energy Settings
●Sleep Settings
3. Select Sleep after Inactivity to specify the number of minutes the product is inactive before it enters sleep
mode. Enter the appropriate time period.
4. Select Auto O after sleep to put the product into a deeper power save mode after a period of sleep. Enter
the appropriate time period.
NOTE: By default, the product will wake from Auto O in response to any activity other than USB or Wi-Fi.
For greater energy settings, you can set it to wake only to the power button by selecting Shut down (wake
on power button only).
5. Select Done to save the settings.
Set the sleep schedule
Use the Sleep Schedule feature to congure the product to automatically wake or go into Sleep mode at specic
times on specic days of the week.
1. From the Home screen on the product control panel, select Settings.
2. Open the following menus:
●General
●Energy Settings
●Sleep Schedule
ENWW Energy-conservation settings 105
3. Select the New Event option, and then select the type of event to schedule: Wake Event or Sleep Event.
4. For a wake or sleep event, congure the time and the days of the week for the event. Select Save to save
the setting.
106 Chapter 4 Manage the scanner ENWW

HP Web Jetadmin
HP Web Jetadmin is an award-winning, industry-leading tool for eiciently managing a wide variety of networked
HP products, including printers, multifunction printers, and digital senders. This single solution allows you to
remotely install, monitor, maintain, troubleshoot, and secure your printing and imaging environment —
ultimately increasing business productivity by helping you save time, control costs, and protect your investment.
HP Web Jetadmin upgrades are periodically made available to provide support for specic product features. Go to
www.hp.com/go/webjetadmin for more information.
HP Digital Sending Software (HP DSS)
You can install the optional HP Digital Sending Software. This software runs as a service on a network server and
allows multiple products to send jobs through the server. It is not necessary to install any software or drivers on
individual users' computers.
ENWW HP Web Jetadmin 107

Upgrade the rmware
1. From the Home screen on the control panel, select the Reports option, and then select the Conguration/
Status Pages option.
2. Select the Conguration Page option, and then select View. The report lists the current rmware revision
number.
3. See www.hp.com/support, search for your product, and then look for a link to downloads to see if there is a
newer version of rmware available.
4. Copy the new rmware le to a USB storage device, and then plug the USB device into the USB port beside
the control panel.
CAUTION: Make sure to leave the USB storage device plugged into the USB connector until all upgrades
are installed, the product has rebooted, and the Home screen is displayed on the control panel.
5. From the Home screen, select the Support Tools option, select Maintenance, and then select the USB
Firmware Upgrade option.
6. Select Firmware Upgrade Bundle, and then select Install.
The upgrade process can take a few minutes. Starting the product after a rmware upgrade might take up
to 20 minutes.
7. If necessary, repeat the previous two steps to install a second upgrade.
NOTE: You can also upgrade rmware using the HP Embedded Web Server (EWS). Start the EWS, select the
General tab, select Firmware Upgrade in the left navigation pane, and then follow the onscreen instructions to
download a rmware upgrade directly to the product.
108 Chapter 4 Manage the scanner ENWW

5 Solve problems
This section contains solutions for common problems with the scanner.
For additional troubleshooting, see the Help for the HP scanning program being used.
ENWW 109

Additional troubleshooting
Get telephone support for your country/region
Have the product name, serial number, date of purchase, and
problem description ready.
Country/region phone numbers are on the yer that was in the box
with the product or at www.hp.com/support/.
Get 24-hour Internet support, and download software utilities,
drivers, and electronic information
www.hp.com/go/DSFlow8500fn2 or www.hp.com/support/
sjowN9120fn2
Order additional HP service or maintenance agreements www.hp.com/support/
110 Chapter 5 Solve problems ENWW
Restore factory settings
Introduction
Use one of the following methods to restore the scanner to the original settings from the factory.
NOTE: Restoring factory settings sets most of the scanner settings to their factory defaults. However, some
settings are not changed, such as language, date, time, and some network conguration settings.
Method one: Restore factory settings from the scanner control panel
1. From the Home screen on the scanner control panel, swipe until the Settings menu displays. Select the
Settings icon to open the menu.
2. Open the following menus:
●General
●Reset Factory Settings
3. Select Reset.
A verication message advises that completing the reset function might result in loss of data.
4. Select Reset to complete the process.
NOTE: The scanner restarts automatically after the reset operation completes.
Method two: Restore factory settings from the HP Embedded Web Server (network-
connected products only)
1. Open the HP Embedded Web Server (EWS):
a. From the Home screen on the scanner control panel, select the Information icon, and then select
the Network icon to display the IP address or host name.
b. Open a web browser, and in the address line, type the IP address or host name exactly as it displays
on the scanner control panel. Press the Enter key on the computer keyboard. The EWS opens.
NOTE: If the web browser displays a message indicating that accessing the website might not be
safe, select the option to continue to the website. Accessing this website will not harm the computer.
2. Open the General tab.
3. On the left side of the screen, click Reset Factory Settings.
4. Click the Reset option.
NOTE: The scanner restarts automatically after the reset operation completes.
ENWW Restore factory settings 111

Scanner installation problems
●Check the cables
●Uninstall and then reinstall the HP ScanJet drivers and tools (Windows)
Check the cables
Cable type Action
Power cable The power cable is connected between the scanner and a power outlet.
●Ensure that the power cable is securely connected between the scanner and a live electrical outlet
or surge protector.
●If the power cable is connected to a surge protector, ensure that the surge protector is plugged
into an outlet and turned on.
●Press the Power button to turn o the scanner, and then turn o the computer. After 30 seconds,
turn on the scanner and then turn on the computer, in that order.
USB cable The USB cable is connected between the scanner and the computer.
●Use the cable that was included with the scanner. Another USB cable might not be compatible
with the scanner.
●Ensure that the USB cable is securely connected between the scanner and the computer.
●If the USB cable is connected to a USB port on the front of the computer, move it to a USB port on
the back of the computer.
For additional USB troubleshooting information, see www.hp.com/go/DSFlow8500fn2 or
www.hp.com/support/sjowN9120fn2 , select your country/region, and then use the search tool to
nd USB troubleshooting topics.
Ethernet cable The Ethernet cable is connected between the scanner and the network port.
Ensure that the Ethernet cable is securely connected between the scanner and your network port.
Make sure the Orange LED light on scanner network port is blinking. This will ensure there is
communication within your local network and device.
For additional Ethernet troubleshooting information, see www.hp.com/support, select your country/
region, and then use the search tool to nd Ethernet troubleshooting topics.
Uninstall and then reinstall the HP ScanJet drivers and tools (Windows)
If checking the scanner cable connections did not solve the problem, the problem might have occurred because
of an incomplete installation. Try uninstalling and then reinstalling the HP ScanJet drivers and tools.
1. Press the Power button to turn o the scanner, and then disconnect the USB cable and power cable from
the scanner.
2. On the computer, open Control Panel and use the Add/Remove tool (in Windows 7, Windows 8, Windows
8.1, and Windows 10 use the Programs and Features tool) to uninstall the applications.
3. Restart the computer.
4. Reinstall the HP ScanJet Drivers and Tools.
112 Chapter 5 Solve problems ENWW

●Turn o the scanner, wait 30 seconds, and then turn on the scanner.
●Download the software from www.hp.com/go/DSFlow8500fn2 or www.hp.com/support/
sjowN9120fn2 , and then install.
5. Reconnect the USB cable and power cable to the scanner, and then press the Power button to turn on the
scanner.
ENWW Scanner installation problems 113

Power issues
●Scanner will not turn on
●The scanner has paused or shut down
●Scanner keeps turning o
Scanner will not turn on
If the scanner will not turn on after pressing the Power button, check the following:
●The scanner might have been unplugged. Check to see that the power cable has not become disconnected
from the scanner or unplugged from the power source.
●The power supply might not be working.
–Check that the Power LED on the control panel is on.
–If the Power LED is not on, ensure that power is available to the power outlet or surge protector that
the power supply is plugged into.
–If power is available to the power outlet or surge protector but the Power LED is still not on, the power
supply might be defective. Go to www.hp.com/go/DSFlow8500fn2 or www.hp.com/support/
sjowN9120fn2 for assistance.
The scanner has paused or shut down
If the scanner stops scanning, follow these steps. After each step, start a scan to see if the scanner is working. If
the problem persists, proceed with the next step.
1. A cable might be loose. Ensure that both the USB cable and power supply are properly connected.
Use the cable that was included with the scanner. Another USB cable might not be compatible with the
scanner.
2. Ensure that the scanner is receiving power.
a. Check that the Power LED on the control panel is on.
b. If the Power LED is not on, ensure that power is available to the power outlet or surge protector that
the power supply is plugged into.
c. If power is available to the power outlet or surge protector but the Power LED is still not on, unplug
the power cable from the power source, wait 30 seconds, and then plug it back in.
d. If the issue is not xed, the power supply might be defective. Go to www.hp.com/go/DSFlow8500fn2
or www.hp.com/support/sjowN9120fn2 for assistance.
3. Restart your computer.
4. Windows: On the computer, open Control Panel and use the Add/Remove tool (in Windows 7, and Windows
8, the Programs and Features tool) to uninstall the following applications:
●HP Scan or HP Scan TWAIN
●HP ScanJet ISIS Driver
5. Reinstall the applications by doing one of the following.
114 Chapter 5 Solve problems ENWW

●Reconnect the USB cable and power supply to the scanner, and then press the Power button to turn
on the scanner. Reinstall the HP Digital Sender Flow 8500 fn2 Document Capture Workstation or HP
ScanJet Enterprise Flow N9120 fn2 Document Scanner software and drivers.
●Reinstall the applications by downloading the software from www.hp.com/go/DSFlow8500fn2 or
www.hp.com/support/sjowN9120fn2 .
Scanner keeps turning o
By default, the scanner will enter Sleep Mode prior to 10 minutes of inactivity.
Windows: To change the defaults, complete these steps:
1. Access the HP Embedded Web Server (EWS).
2. Click the General tab, and then select Energy Settings from the left navigation menu.
3. Choose Sleep Mode and Auto O settings:
●Sleep after inactivity: To specify the period of inactivity after which the scanner goes into Sleep Mode,
enter any value between 0–118 minutes..
●Auto O after sleep:To specify the period of inactivity after which the scanner enters Auto-O or shut
down mode, enter any value between 0–118 minutes.
●To stop the scanner from automatically turning o, select HP Auto O/Auto On (Wake on most events)
instead of Shut down (Wake on power button only).
ENWW Power issues 115
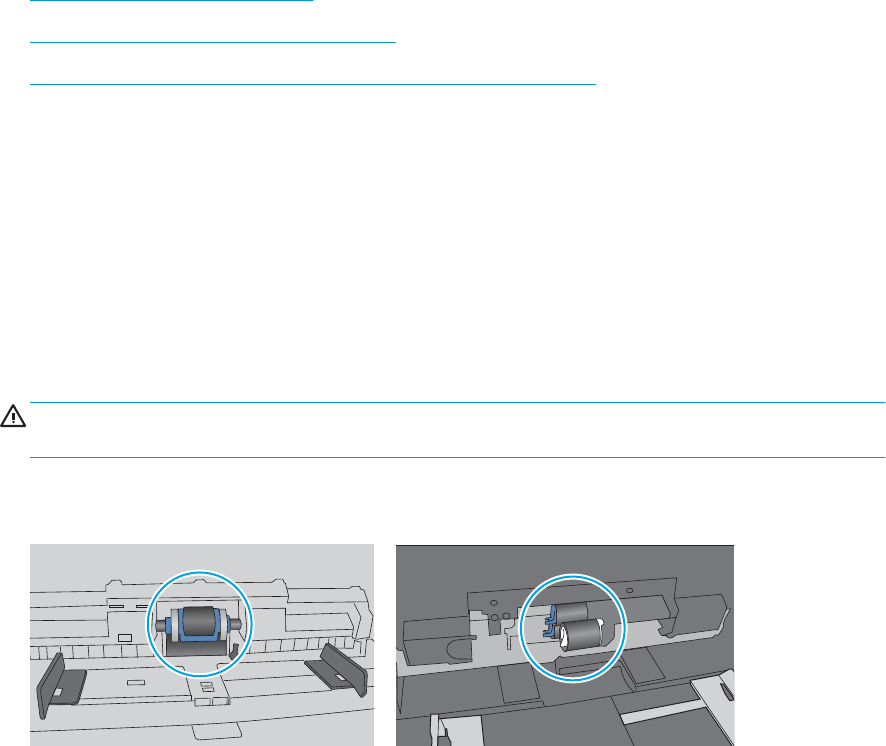
Scanner does not pick up paper or misfeeds
Introduction
The following solutions can help solve problems if the product is not picking up paper from the tray or is picking
up multiple sheets of paper at one time. Either of these situations can result in paper jams.
●The scanner does not pick up paper
●The scanner picks up multiple sheets of paper
●The document feeder jams, skews, or picks up multiple sheets of paper
The scanner does not pick up paper
If the scanner does not pick up paper, try these solutions.
1. Open the scanner and remove any jammed sheets of paper. Verify that no torn remnants of paper remain
inside the scanner.
2. Verify that the humidity in the room is within specications for this scanner and that paper is being stored
in unopened packages. Most reams of paper are sold in moisture-proof wrapping to keep paper dry.
3. The rollers might be contaminated. Clean the rollers with a lint-free cloth dampened with warm water. Use
distilled water, if it is available.
CAUTION: Do not spray water directly on to the scanner. Instead, spray water on the cloth or dab the cloth
in water and wring it out before cleaning the rollers.
The following image shows examples of the roller location for various scanners.
Figure 5-1 Roller locations
The scanner picks up multiple sheets of paper
If the product picks up multiple sheets of paper from the tray, try these solutions.
1. Use only paper that meets HP specications for this product.
2. Use paper that is not wrinkled, folded, or damaged. If necessary, use paper from a dierent package.
3. Make sure the scanning environment is within recommended specications.
116 Chapter 5 Solve problems ENWW
The document feeder jams, skews, or picks up multiple sheets of paper
●The original might have something on it, such as staples or self-adhesive notes, that must be removed.
●Check that all rollers are in place and that the roller-access cover inside the document feeder is closed.
●Make sure that the top document-feeder cover is closed.
●The pages might not be placed correctly. Straighten the pages and adjust the paper guides to center the
stack.
●The paper guides must be touching the sides of the paper stack to work correctly. Make sure that the paper
stack is straight and the guides are against the paper stack.
●The document feeder input tray might contain more than the maximum number of pages. Make sure the
paper stack ts below the guides in the input tray.
●Verify that there are no pieces of paper, staples, paper clips, or other debris in the paper path.
●Clean the document-feeder rollers and the separation pad. Use compressed air or a clean, lint-free cloth
moistened with warm water. If misfeeds still occur, replace the rollers.
ENWW Scanner does not pick up paper or misfeeds 117

Clear paper jams
Introduction
The following information includes instructions for clearing paper jams from the scanner.
●Experiencing frequent or recurring paper jams?
●Clear paper jams in the Automatic Document Feeder (ADF)
Experiencing frequent or recurring paper jams?
To reduce the number of paper jams, try these solutions.
NOTE: To see a video that demonstrates how to load paper in a way that reduces the number of paper jams,
click here.
1. Use only paper that meets HP specications for this product.
2. Use paper that is not wrinkled, folded, or damaged. If necessary, use paper from a dierent package.
3. Make sure the paper guides in the tray are adjusted correctly for the size of paper. Adjust the guides so they
are touching the paper stack without bending it.
4. If you are scanning heavy, embossed, or perforated paper, use the manual feed feature and feed sheets
one at a time.
5. Make sure the scanning environment is within recommended specications.
118 Chapter 5 Solve problems ENWW
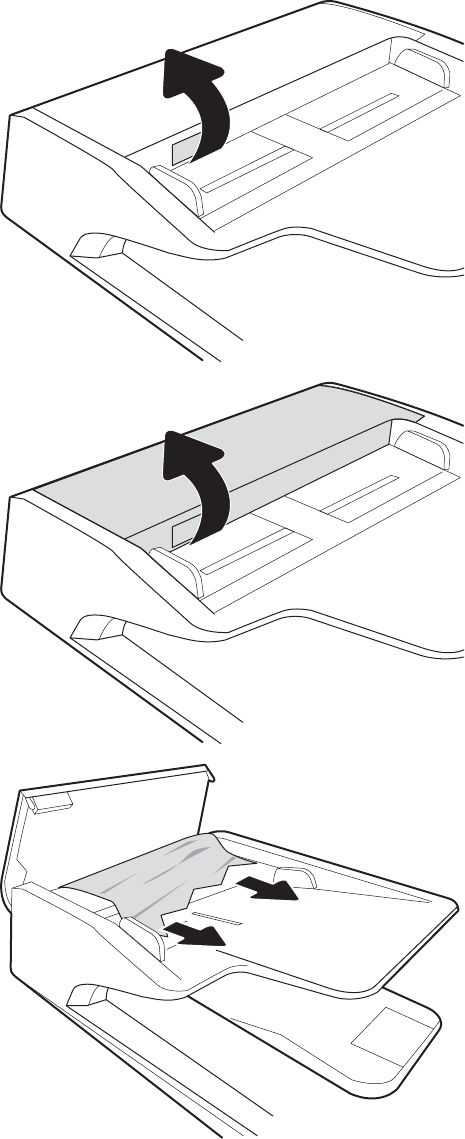
Clear paper jams in the Automatic Document Feeder (ADF)
The following information describes how to clear paper jams in the ADF. When a jam occurs, the control panel
displays the following message and an animation that assists in clearing the jam.
●31.15.XX Jam in Document Feeder
1. Lift the latch to release the ADF cover.
2. Open the ADF cover.
3. Remove any jammed paper.
ENWW Clear paper jams 119
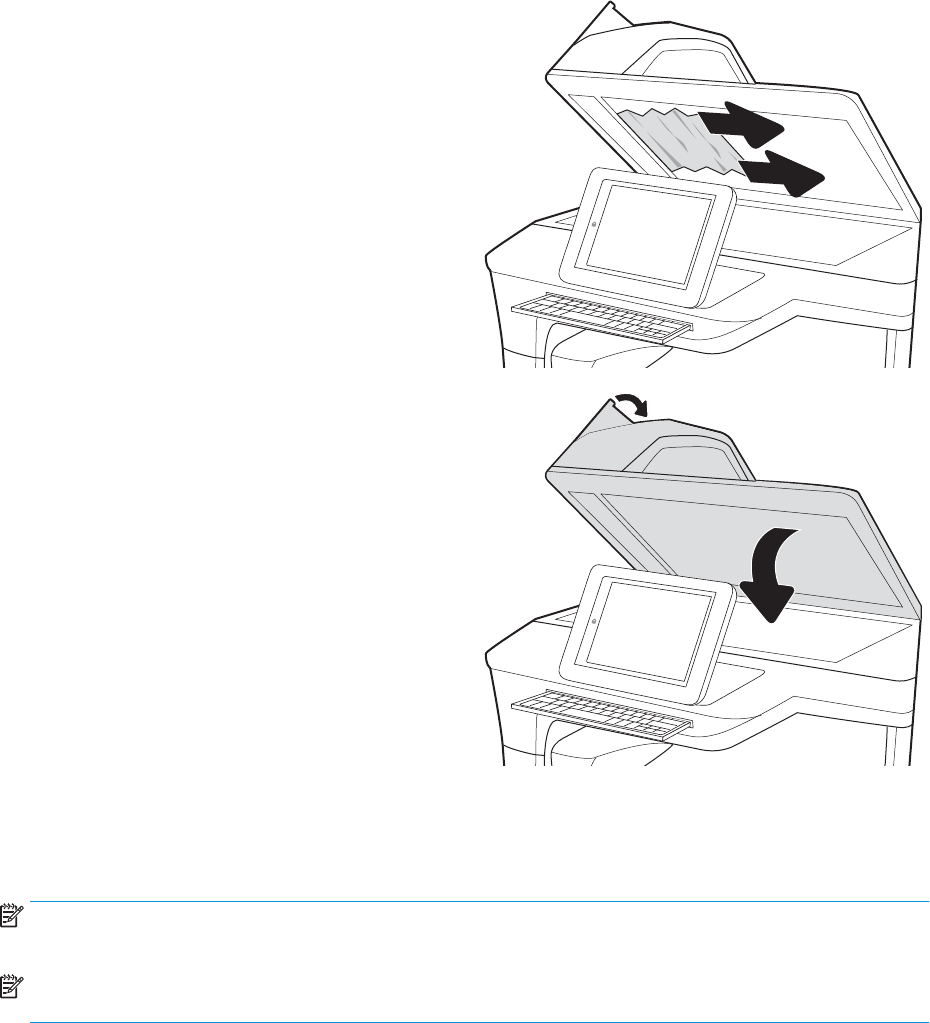
4. Lift the scanner lid and remove any jammed paper
from the bottom of the scanner lid.
5. Close the scanner lid and the ADF cover.
6. If there are remaining pages still in the product,
instructions on how to clear the remaining pages
will display on the control panel.
NOTE: To avoid jams, make sure the guides in the document-feeder input tray are adjusted tightly against the
document. Remove all staples and paper clips from original documents.
NOTE: Original documents that are printed on heavy, glossy paper can jam more frequently than originals that
are printed on plain paper.
120 Chapter 5 Solve problems ENWW
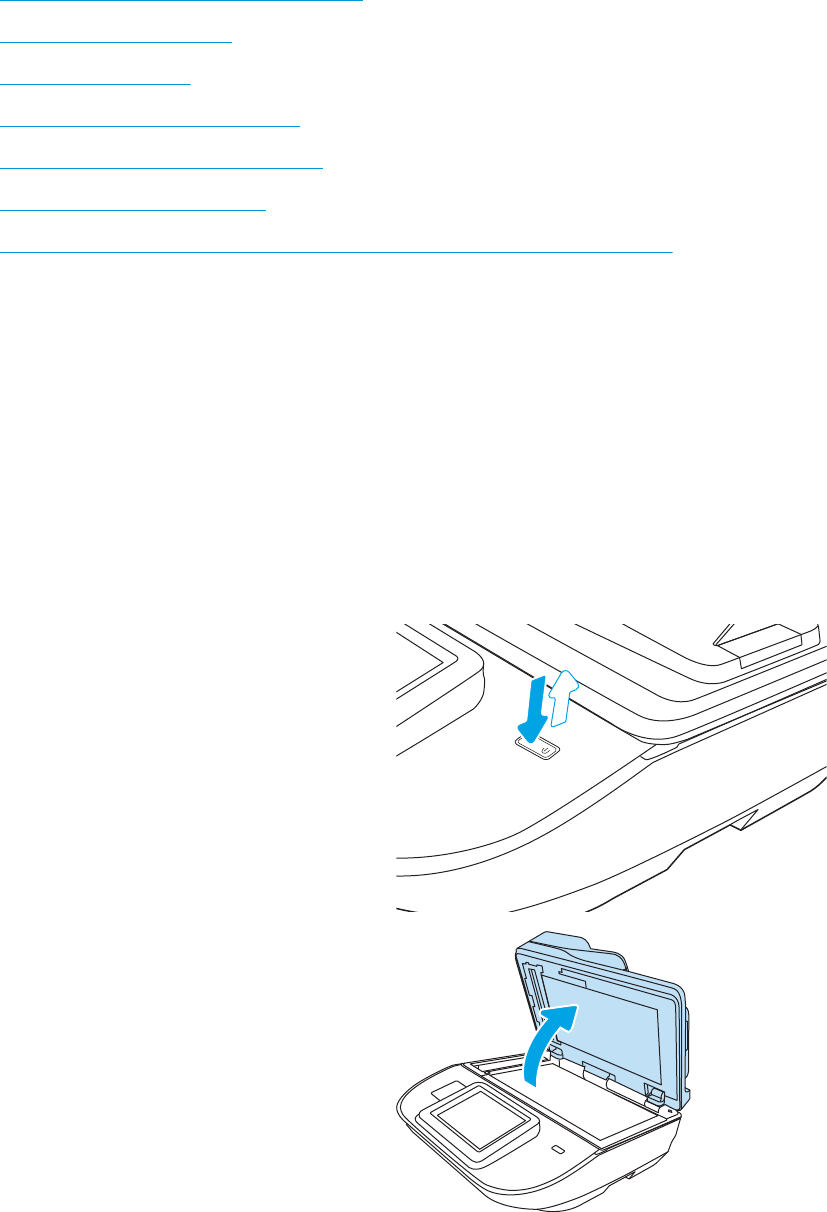
Improve scan image quality
●Check the scanner glass for dirt and smudges
●Check the resolution settings
●Check the color settings
●Check the image-adjustment settings
●Optimize scan quality for text or pictures
●Check the output-quality settings
●Clean the pickup rollers and separation pad in the Automatic Document Feeder (ADF)
Try these few simple steps rst:
●Use the atbed scanner rather than the Automatic Document Feeder (ADF).
●Use high-quality originals.
●When using the document feeder, load the original document into the feeder correctly, using the paper
guides, to avoid unclear or skewed images.
Check the scanner glass for dirt and smudges
Over time, specks of debris might collect on the scanner glass and white plastic backing, which can aect
performance. Use the following procedure to clean the scanner if the scanned pages have streaks, unwanted
lines, black dots, poor print quality, or unclear text.
1. Press the Power button to turn the product o, and
then disconnect the power cable from the electrical
outlet.
2. Open the scanner lid.
ENWW Improve scan image quality 121
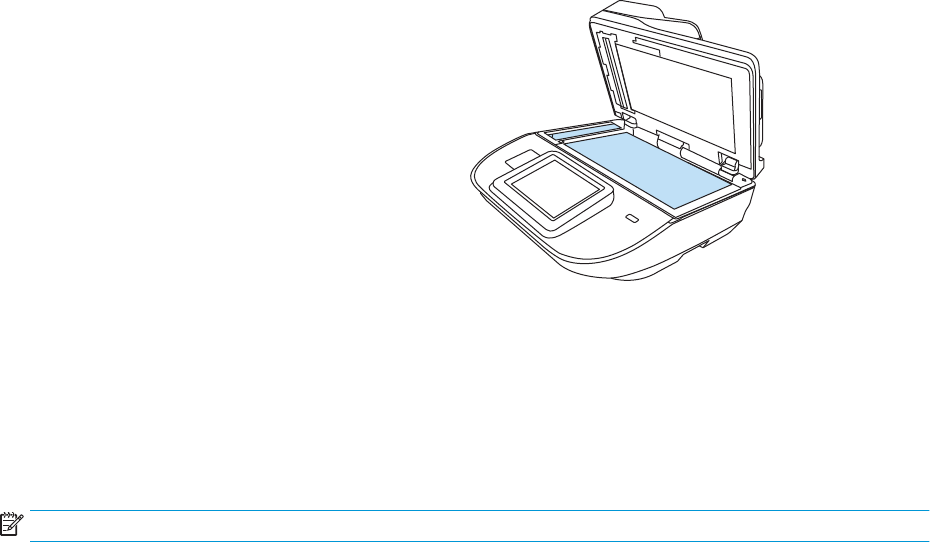
3. Clean the scanner glass and the document feeder
strips with a soft cloth or sponge that has been
moistened with nonabrasive glass cleaner.
CAUTION: Do not use abrasives, acetone,
benzene, ammonia, ethyl alcohol, or carbon
tetrachloride on any part of the product; these can
damage the product. Do not place liquids directly
on the glass or platen. They might seep and
damage the product.
NOTE: If you are having trouble with streaks on
copies when you are using the document feeder,
be sure to clean the small strip of glass on the left
side of the scanner.
4. Dry the glass and white plastic parts with a
chamois or a cellulose sponge to prevent spotting.
5. Connect the power cable to an outlet, and then
press the Power button to turn on the scanner.
Check the resolution settings
NOTE: Setting the resolution to a high value increases the le size and the scan time.
Follow these steps to adjust the resolution setting:
1. From the Home screen on the product control panel, select Scan.
2. Select one of the following Scan features:
●Scan to Email
●Fax
●Scan to Network Folder
●Scan to USB Drive
●Scan to SharePoint®
3. Select Options, and then select File Type and Resolution or Resolution.
4. Select one of the predened Resolution options, and then select Done.
5. Select Send or Save to start the scan.
Check the color settings
Follow these steps to adjust the color setting:
1. From the Home screen on the product control panel, select Scan.
2. Select one of the following Scan features:
●Fax
●Scan to E-mail
●Scan to Network Folder
122 Chapter 5 Solve problems ENWW

●Scan to USB Drive
●Scan to SharePoint®
3. Select Options.
4. In the Options pane, scroll to and select Color/Black.
5. Select one of the predened options.
6. Select the Send option.
Check the image-adjustment settings
Adjust these additional settings to improve scan quality:
●Sharpness: Clarify or soften the image. For example, increasing the sharpness could make text appear
crisper, but decreasing it could make photos appear smoother.
●Darkness: Increase or decrease the amount of white and black used in colors in scanned images.
●Contrast: Increase or decrease the dierence between the lightest and the darkest color on the page.
●Background Cleanup: Remove faint colors from the background of scanned images. For example, if the
original document is printed on colored paper, use this feature to lighten the background without aecting
the darkness of the image.
●Tone: The product automatically adjusts the Darkness, Contrast, and Background Cleanup settings to the
most appropriate for the scanned document.
1. From the Home screen on the product control panel, select Scan.
2. Select one of the following Scan features:
●Scan to E-mail
●Scan to Network Folder
●Fax
●Scan to USB Drive
●Scan to SharePoint®
3. Select Options, and then select Image Adjustment.
4. Adjust the sliders to set the levels, and then select Done.
5. Select Send or Save to start the scan.
NOTE: These settings are temporary. After you have nished the job, the product returns to the default
settings.
Optimize scan quality for text or pictures
Optimize the scan job for the type of image being scanned: text, graphics, or photos.
1. From the Home screen on the product control panel, select Scan.
2. Select one of the following Scan features:
ENWW Improve scan image quality 123

●Scan to E-mail
●Fax
●Scan to Network Folder
●Scan to USB Drive
●Scan to SharePoint®
3. Select Options, and then select Optimize Text/Picture.
4. Select one of the predened options.
5. Select Send or Save to start the scan.
NOTE: These settings are temporary. After you have nished the job, the product returns to the default
settings.
Check the output-quality settings
This setting adjusts the level of compression when saving the le. For the highest quality, select the highest
setting.
1. From the Home screen on the product control panel, select Scan.
2. Select one of the following Scan features:
●Scan to Email
●Fax
●Scan to Network Folder
●Scan to USB Drive
●Scan to SharePoint®
3. Select Options, and then select File Type and Resolution.
4. Select one of the predened Quality and File Size options, and then select Done.
5. Select Send or Save to start the scan.
Clean the pickup rollers and separation pad in the Automatic Document Feeder (ADF)
Follow these steps if the ADF does not pick up pages correctly or produces skewed output.
124 Chapter 5 Solve problems ENWW
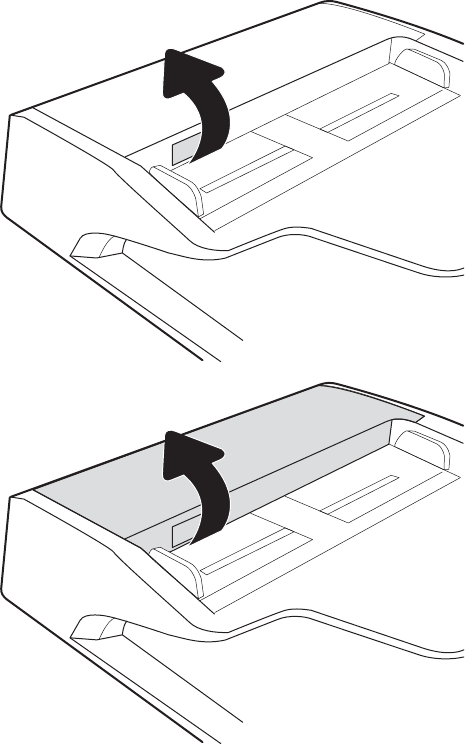
1. Lift the latch to release the ADF cover.
2. Open the ADF cover.
ENWW Improve scan image quality 125
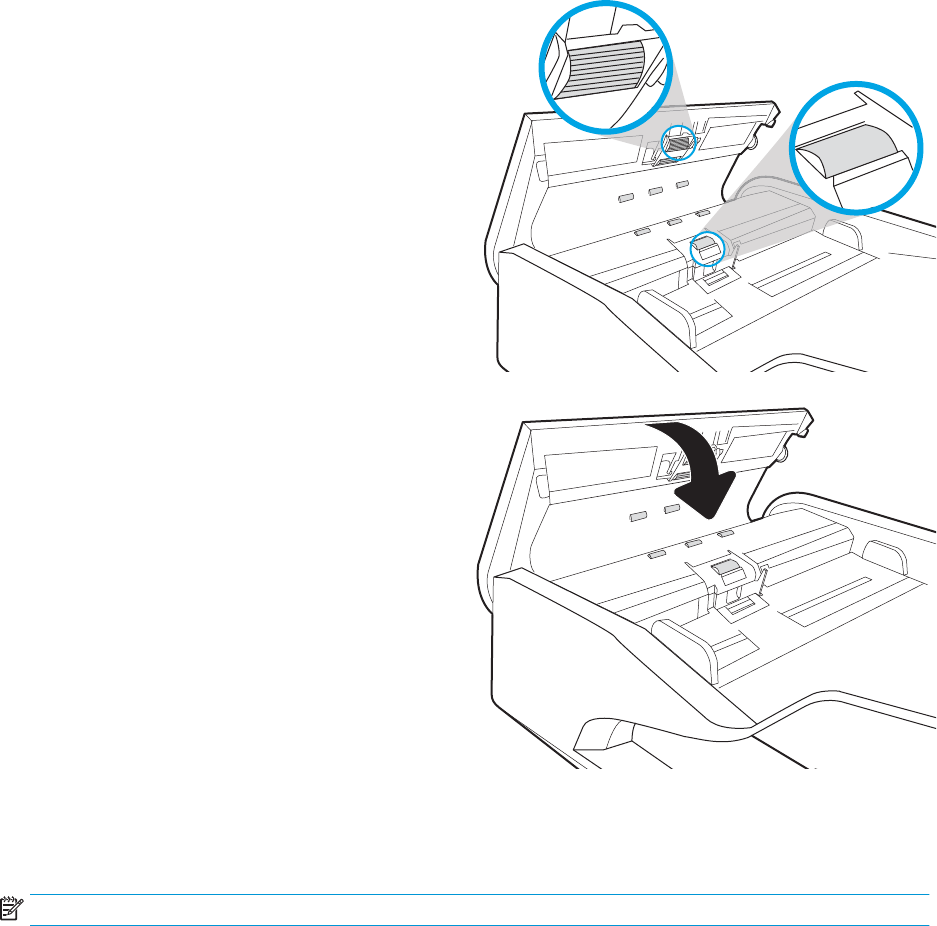
3. Remove any visible lint or dust from each of the
feed rollers and the separation pad using
compressed air or a clean lint-free cloth moistened
with warm water.
4. Close the document-feeder cover.
NOTE: Verify that the latch on the top of the
document-feeder cover is completely closed.
If the problem persists, check the document feeder separation pad and rollers for damage or wear, and replace
them if necessary.
NOTE: New rollers have a rough surface. As rollers wear, they become smooth.
126 Chapter 5 Solve problems ENWW

Solve wired network problems
Introduction
Certain types of problems can indicate there is a network communication problem. These problems include the
following issues:
●The periodic loss of ability to communicate with the product
●The product cannot be found during software installation
●A periodic failure to scan
NOTE: If you have been experiencing intermittent loss of network connectivity, rst update the product
rmware. For instructions on how to update the product rmware, go to http://support.hp.com, search for your
product, and then search on “update the rmware.”
Check the following items to verify that the product is communicating with the network. Before beginning,
display a conguration page from the product control panel and locate the product IP address that is listed on
this page.
●Poor physical connection
●The computer is unable to communicate with the product
●The product is using incorrect link and duplex settings for the network
●New software programs might be causing compatibility problems
●The computer or workstation might be set up incorrectly
●The product is disabled, or other network settings are incorrect
NOTE: HP does not support peer-to-peer networking, as the feature is a function of Microsoft operating
systems and not of the HP scan drivers. For more information, go to Microsoft at www.microsoft.com.
Poor physical connection
1. Verify that the product is attached to the correct network port using a cable of the correct length.
2. Verify that cable connections are secure.
3. Look at the network port connection on the back of the product, and verify that the amber activity light
ashes indicating network traic, and the green link-status light is continuously lit indicating a network link.
4. If the problem continues, try a dierent cable or port on the hub.
The computer is unable to communicate with the product
1. Test network communication by pinging the network.
a. Open a command-line prompt on your computer.
ENWW Solve wired network problems 127
●For Windows, click Start, click Run, type cmd, and then press Enter.
b. Type ping followed by the IP address for your product.
c. If the window displays round-trip times, the network is working.
2. If the ping command failed, verify that the network hubs are on, and then verify that the network settings,
the product, and the computer are all congured for the same network (also known as subnet).
The product is using incorrect link and duplex settings for the network
HP recommends leaving these settings in automatic mode (the default setting). If you change these settings, you
must also change them for your network.
New software programs might be causing compatibility problems
Verify that any new software programs are correctly installed and that they use the correct scan driver.
The computer or workstation might be set up incorrectly
1. Check the network drivers, scan drivers, and the network redirection settings.
2. Verify that the operating system is congured correctly.
The product is disabled, or other network settings are incorrect
1. Review the product’s conguration/networking pages to check the status of the network settings and
protocols.
2. Recongure the network settings if necessary.
128 Chapter 5 Solve problems ENWW

Index
A
Auto color detect 78
B
Bonjour
identifying 93
browser requirements
HP embedded Web Server 93
C
cables
troubleshoot 112
cleaning
glass 121
cloud, scan to 76
control panel
locating features 3, 7
customer support
online 110
D
default gateway, setting 101
detect multi-feeds 77
digital send settings
HP Embedded Web Server 96
digital sending
folders 69
sending documents 66
USB 70
document feeder
cleaning 124
jams 119
load documents 65
paper-feeding problems 117
document feeder rollers
cleaning 124
drivers
paper sizes 61
E
email
sending documents 66
Embedded Web Server
changing network settings 100
changing product name 100
opening 100
Embedded Web Server (EWS)
assigning passwords 103
features 93
network connection 93
energy use, optimizing 105
Explorer, versions supported
HP Embedded Web Server 93
extra-long-page support 77
F
fax tools
HP Embedded Web Server 96
features
auto color detect 78
extra-long-page support 77
long-page support 77
multi-feed detection 77
rmware, upgrading 108
folders
sending to 69
G
gateway, setting default 101
general conguration
HP Embedded Web Server 95
glass, cleaning 121
H
hard disks
encrypted 104
hardware integration pocket 85
Help button
locating 3, 7
Home button
locating 3, 7
HP Customer Care 110
HP Digital Sending Software
(HP DSS) 107
HP Embedded Web Server
changing network settings 100
changing product name 100
digital send settings 96
fax tools 96
general conguration 95
information pages 94
network settings 98
opening 100
scan settings 96
security settings 97
troubleshooting tools 97
HP Embedded Web Server (EWS)
features 93
network connection 93
HP JetAdvantage business solutions
74
HP Scan Extended software
about 15
HP TWAIN 15
HP Web Jetadmin 107
I
information pages
HP Embedded Web Server 94
input and output trays
locating 1, 5
input tray
tips on loading 58
install software
troubleshoot 112
ENWW Index 129
Internet Explorer, versions supported
HP Embedded Web Server 93
IP Security 103
IPsec 103
IPv4 address 101
IPv6 address 101
ISIS 15
J
jams
causes of 118
document feeder 119
Jetadmin, HP Web 107
JetAdvantage 74
L
lock
formatter 104
long-page support 77
M
maintenance kits
part numbers 89
manage power settings 115
managing network 100
multi-feed detection 77
N
Netscape Navigator, versions
supported
HP embedded Web Server 93
network
printer name, changing 100
settings, changing 100
settings, viewing 100
network duplex settings, changing
102
Network Folder, scan to 69
network link speed settings,
changing 102
network settings
HP Embedded Web Server 98
networks
default gateway 101
HP Web Jetadmin 107
IPv4 address 101
IPv6 address 101
subnet mask 101
O
on/o button, locating 1, 5
online support 110
optimize scanned images 123
order
roller replacement kit 87
supplies 89
output tray
locating 1, 5
P
paper
jams 118
supported sizes 61
paper guides, locating 1, 5
paper jams
document feeder 119
paper pickup problems
solving 116
part numbers
replacement parts 89
staple cartridges 89
parts
order 87
power button, locating 1, 5
power management 115
power supply
troubleshoot cable 112
power usage
2 watts or less 105
product
auto-o 15
Sleep Mode 15
product info 1
R
replace roller 87
replacement parts
part numbers 89
restore factory settings 111
roller
replace 87
rollers
cleaning, document feeder 124
S
scan
originals 65
scan settings
HP Embedded Web Server 96
scan to cloud 76
Scan to Network Folder 69
initial setup 33
Scan to USB Drive 70
enabling 43
scanner
glass cleaning 121
scanner software
Windows 15
scanning
optimize for text or pictures 123
scanning to email
sending documents 66
scanning to folder 69
scanning to USB 70
secuity settings
HP Embedded Web Server 97
security
encrypted hard disk 104
sending to email
sending documents 66
settings
restore factory 111
Sign In button
locating 3, 7
Sign Out button
locating 3, 7
Sleep Mode 15
sleep mode 105
software
HP Digital Sending Software
(HP DSS) 107
troubleshoot installation 112
uninstall and reinstall 112, 114
Windows 15
speed, optimizing 105
speed, troubleshoot 80
Start Copy button
locating 3, 7
subnet mask 101
supplies
order 89
part numbers 89
support
online 110
system requirements
HP Embedded Web Server 93
130 Index ENWW
T
TCP/IP
manually conguring IPv4
parameters 101
manually conguring IPv6
parameters 101
technical support
online 110
touch panel 1, 5
locating 1, 5
touchscreen
locating features 3, 7
troubleshoot
cables 112
installation 112
power 114
speed 80
stops working 114
uninstall and reinstall software
112, 114
troubleshooting
jams 118
network problems 127
paper feed problems 116
wired network 127
troubleshooting tools
HP Embedded Web Server 97
turn on scanner
troubleshoot 114
TWAIN 15
U
uninstall and reinstall software 112,
114
upgrading rmware 108
USB
sending to 70
USB cable
troubleshoot 112
W
Web browser requirements
HP Embedded Web Server 93
Web sites
HP Web Jetadmin, downloading
107
order supplies 89
replacement parts 87
websites
customer support 110
order supplies 89
Windows software 15
ENWW Index 131
132 Index ENWW
