HSJC High tech JC850-XXX Interactive Whiteboard User Manual
Shanghai HSJC High-tech Co., Ltd. Interactive Whiteboard Users Manual
Users manual
Version No. 2.8.5
HSJC
Technology Makes Educate More Brilliant
HSJC Interactive Whiteboard
User Manual of JC850 Series
Shanghai HSJC High-Tech Development Co., Ltd.

HSJC
Table of Contents
I. Statement ············································································································· 1
II. Product Introduction ······························································································· 1
III. Engineering Installation ·························································································· 2
· Installation Condition ······························································································· 2
· Installation Method ·································································································· 2
· Installation Person ··································································································· 2
· Warning ··············································································································· 2
IV. Whiteboard Hardware Driver and Software Program Installation ········································· 2
V. Whiteboard Start-up and Positioning ············································································ 4
VI. Whiteboard On-Line Upgrade Function ······································································· 4
VII. Function Rapid Access ·························································································· 5
VIII. Whiteboard Software Function Description ································································ 6
· Whiteboard Hide Mode ····························································································· 6
· Operation Interface Display ························································································ 7
· Icon Function Introduction ························································································· 8
· Public Menu Function ······························································································ 11
IX. Right Click Function ····························································································· 13
X. Electric Eraser ······································································································ 14
XI. FAQ ················································································································· 15
XII. Friendly Reminder ······························································································· 16
XIII. JSHC Interactive Whiteboard Product ······································································· 17

1
HSJC
User Manual of HSJC Interactive E-Whiteboard
I. Statement
This product must be used according to specific operation description of the user manual to ensure that you
can correctly use it before the installation after carefully reading the user manual.
This device complies with part 15 of the FCC Rules. Operation is subject to the following two conditions:
(1) This device may not cause harmful interference, and (2) this device must accept any interference
received, including interference that may cause undesired operation.
Changes or modifications not expressly approved by the party responsible for compliance could void the
user’s authority to operate the equipment.
NOTE: This equipment has been tested and found to comply with the limits for a Class B digital device,
pursuant to part 15 of the FCC Rules. These limits are designed to provide reasonable protection against
harmful interference in a residential installation.
This equipment generates, uses and can radiate
radio frequency energy and, if not installed
and used in accordance with the instructions,
may cause harmful interference to radio communications. However, there is no guarantee that interference
will not occur in a particular installation. If this equipment does cause harmful interference to
radio or television reception, which can be
determined by turning the equipment off and
on, the user is encouraged to try to correct
the interference by one or more of the following
measures:
—Reorient or relocate the receiving antenna.
—Increase the separation between the equipment
and receiver.
—Connect the equipment into an outlet on a
circuit different from that to which the receiver
is connected.
—Consult the dealer or an experienced radio/
TV technician for help.
Special statement:
Use of shielded cable with ferrite cores is required to comply with Class B limits in Subpart B of Part 15 of
the FCC rules.
2
II. Product Introduction
The Interactive E-Whiteboard has been introduced into the classroom and play a great role in optimizing
the classroom teaching mode, so it is not only the blackboard of new era, but superior to the blackboard. It
has made great contribution on improving the teaching efficiency of the classroom, enhancing cooperative
interaction between teachers and students, effectively solving key and difficulty points in classroom
teaching and making the classroom teaching more lively and vivid, and is adopted as a platform to increase
the learning interest of the students and integrate abundant teaching resources.
HSJC Interactive E-Whiteboard adopts electromagnetic induction technology with precise positioning and
communicates the information through the computer. Connect E-Whiteboard to the computer and use the
projector to project the contents on the computer on the screen of the E-Whiteboard and create an
interactive collaboration conference or teaching environment in large screen. Use specific positioning pen
to replace the mouse to operate on the whiteboard and use any application programs to edit, annotate and
save the documents that are realized by the keyboard and mouse.

3
III. Engineering Installation
Installation Condition:
The installation of the Interactive E-Whiteboard is required to submit the Data Investigation Form to our
company for confirming whether the installation conditions are met, and then it is to select supporting
installation method and the customer provides relevant support for the changes on on-site environment
according the needs of the installation.
Installation Method:
Wall Mounting Type: be applicable for the installation under various conditions and adopt hooking method
to directly fix on the wall;
Combination Type: be applicable for wide space and be equipped with combined blackboard.
Scaffolding Type: be applicable for the customers with small on-site installation space and convenient to
move.
Our company can provide different installation methods as movable track and fixed support according to
on-site conditions.
Installation Person:
The installation shall be made by the installation person designated by our company or relevant guidance is
provided for the installation, and the installation shall meet the requirements of “Installation Specification”.
Equipment Installation:
The Interactive E-Whiteboard, projector and other equipments are installed and fixed with the expansion
bolt on required positions, and then it is to finish the connection of equipment signal line and power line.
Equipment Debugging:
Adjust the image size to reasonable range and apply the E-Whiteboard software on a trial run to confirm
normal running of all software and hardware.
Warning:
Forbid to drill the holes and hammer the nails on the whiteboard!
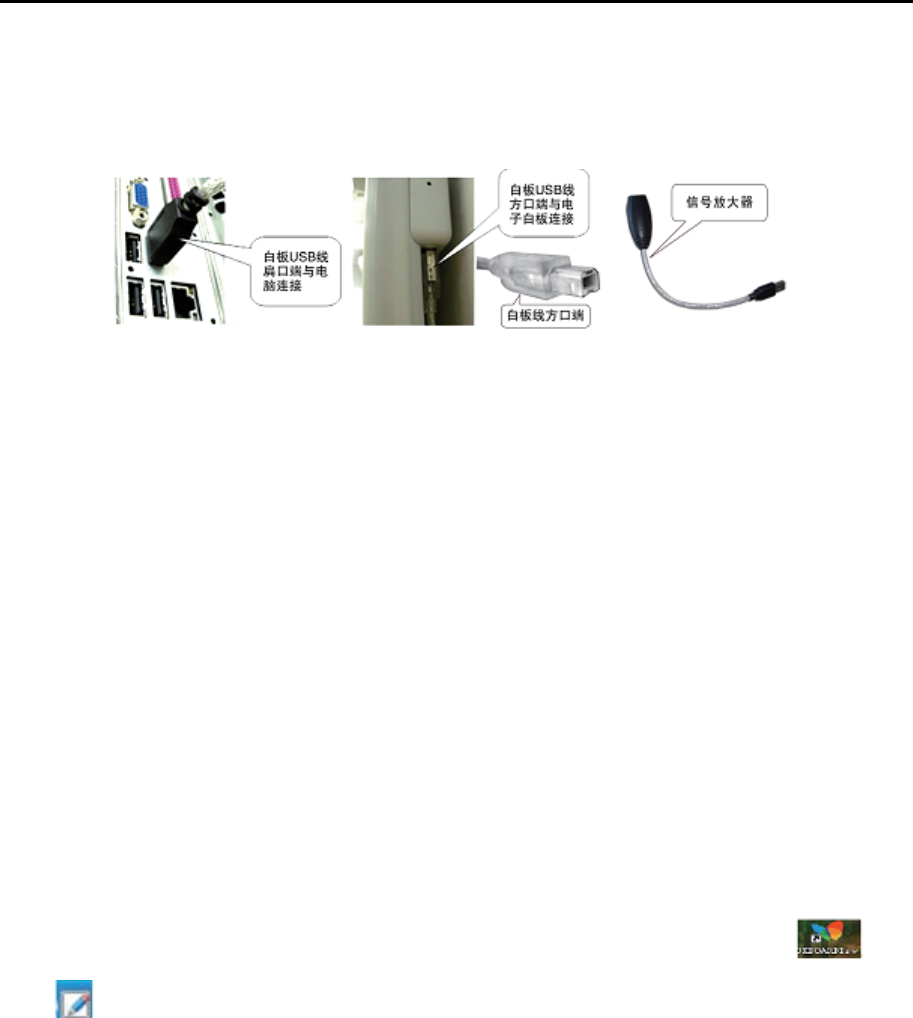
IV. Whiteboard Hardware Driver and Software Program Installation
Ensure the following documents and folders existed in installation directory:
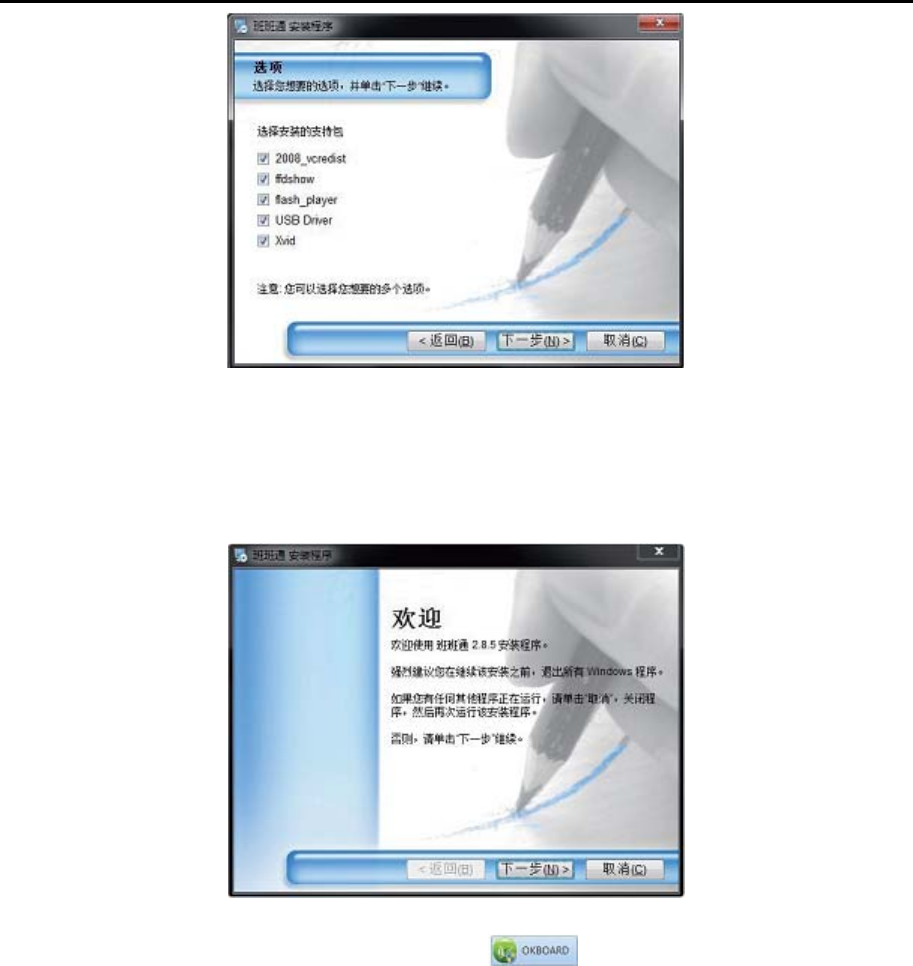
Step 1: Click the execution program of , continue to click the Next button until enter into the
interface as follows:
4
HSJC
Select the installation support package on this interface, if you first install this new system, please choose
the installation in all steps. When completing the installation of the plug-in of 2008_vcredist, ffdshow,
flash_player, USB Driver and Xvid, continue to install them until the completion of final installation. If the
whiteboard software is installed for the second time, don’t check and then directly enter into next step of
the installation
Restart the computer after completing the steps above and start the toolbars in windows to find the icon of
HSJC Interactive Whiteboard Software. As it is shown in , click the icon and run the software.
5
V. Whiteboard Start-up and Positioning
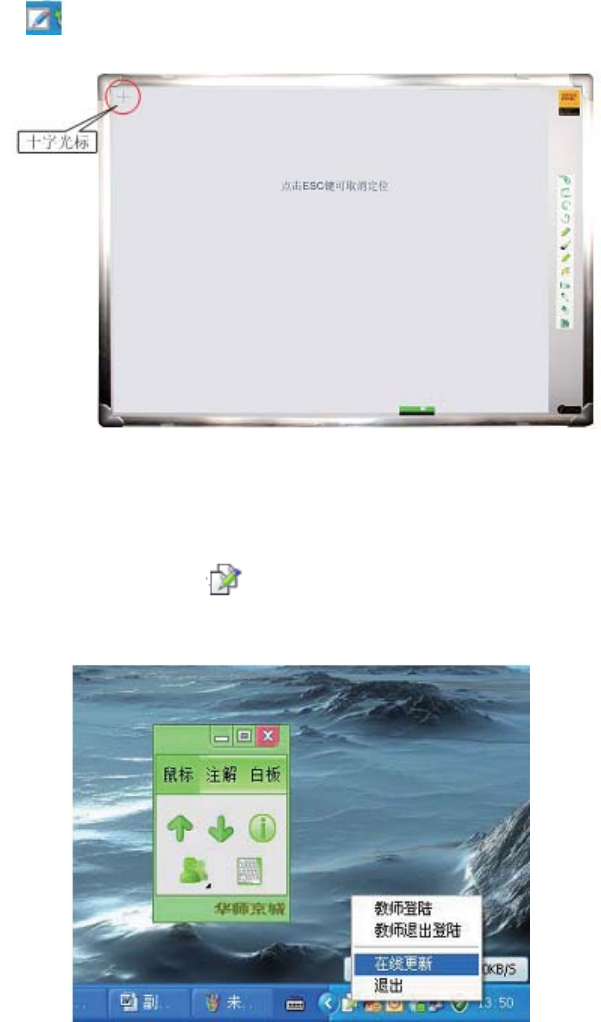
After starting the computer, the E-Whiteboard Communication Software (Positioning) is automatic start-up
by default. The icon is in the tray in the left corner of the desktop, open it and select the positioning,
and then enter into the E-Whiteboard Status as it is shown in the following picture.
Align the nib of the electronic pen to the center position of cross cursor on the positioning interface and
click it, and then finish the positioning after click 7 cross cursors occurred in proper sequence.
VI. Whiteboard On-Line Upgrade Function
Open the Whiteboard Software, the icon is in the tray in the left corner of the desktop, take the
right-click to open it and then select on-line Upgrade, that is, connect Remote Server to start upgrade
function.
6
HLSJC
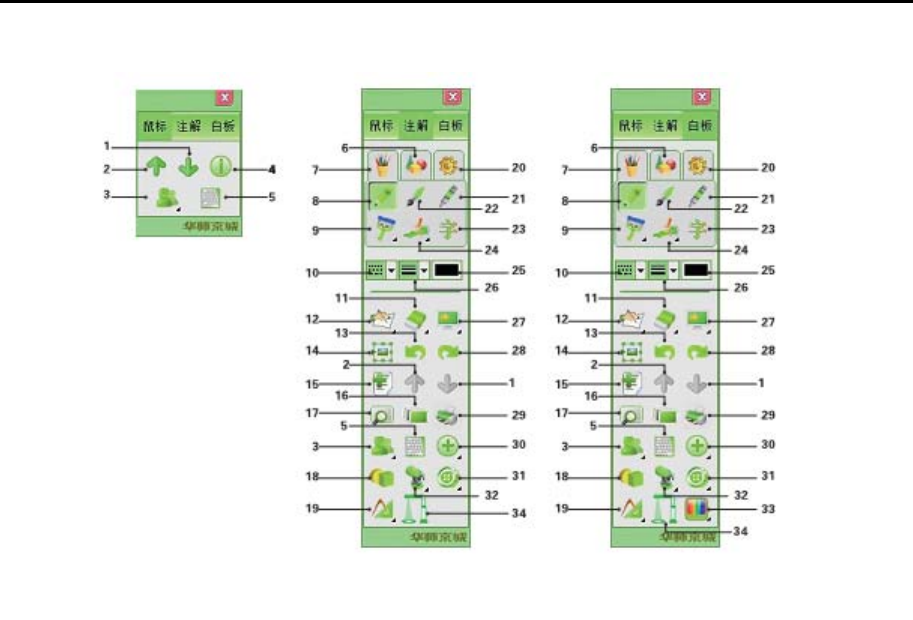
VII. Function Rapid Access
Mouse Mode Annotation Mode Whiteboard Mode
1. Next Page 11. Eraser 21. Highlight Pen 31. Screen Record
2. Previous Page 12. Hand Input 22. Paint Brush 32. Recording
3. Interaction between
Teachers and Students
13. Cancellation 23. Input Text 33. Background Color
4. Version Information 14. Edit 24. Paint 34. Exhibition Platform
5. Soft Keyboard 15. New Page 25. Color Select
6. Image 16. Resource Library 26. Line Width
7. Input 17. Page View 27. Screen Move
8. Pencil 18. 3D Image 28. Reset
9. Row Brush 19. Geometrical Tools 29. Printer
10. Line Type 20. Tools 30. Others

7
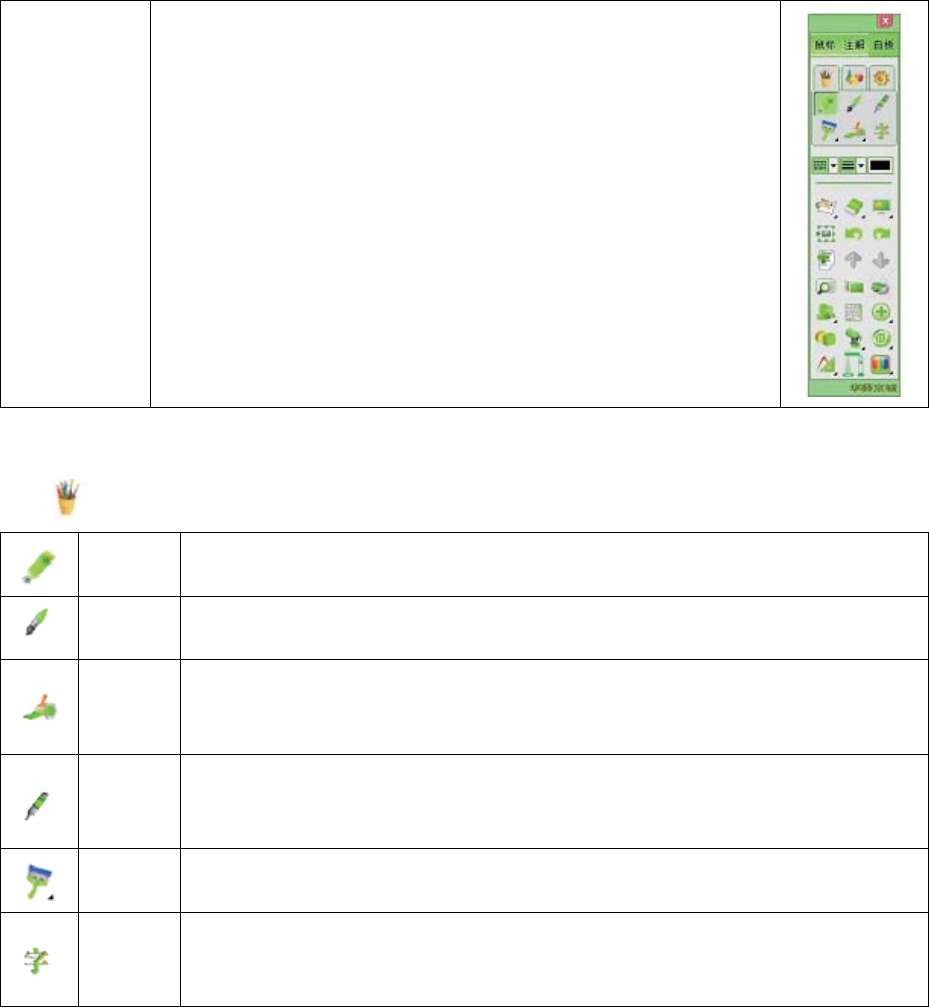
VIII. Whiteboard Software Function Description
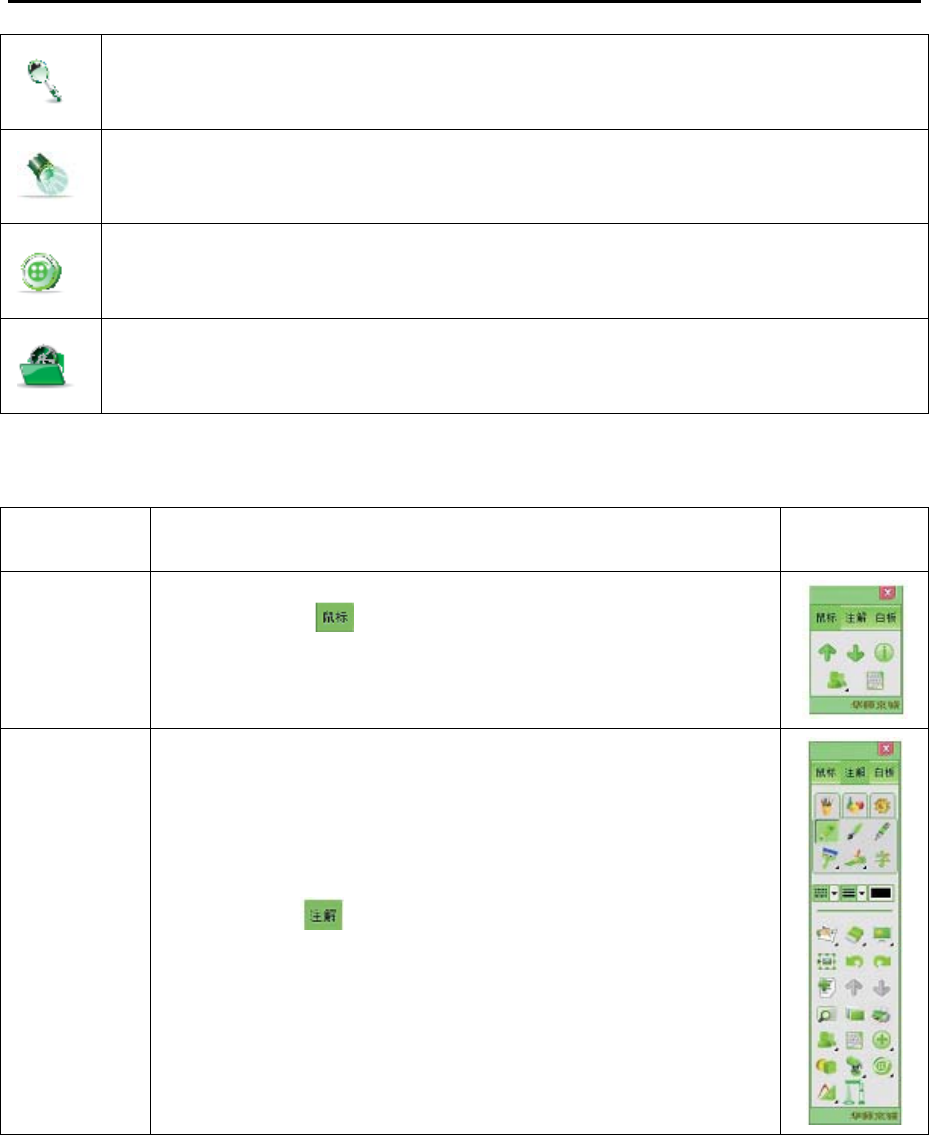
Open the E-Whiteboard Software, double click the desktop or the icon “ ” in Start-Up Program and
appear the dialogue box, click the “Cancel” and enter into Whiteboard Software Interface.
· Whiteboard Hide Mode
Mouse: click this key when the panel is under hiding condition, the system enters into the mouse
mode, the use method is the same with the mouse mode when the panel is under displaying
condition;
Panel: click this key when the panel is under hiding condition, the panel displays as the mouse
mode;
Previous Page: the application method refers to the instruction under “Mouse Mode” and
“Annotation Mode”;
Next Page: the application method refers to the instruction under “ Mouse Mode” and
“Annotation Mode”;
Pencil: when the panel is under hiding condition, click this key and enter into pencil writing
status, and the line shape and line thickness are the default values; when the panel is under
displaying condition, click this key and position the cursor to the button on the panel, that is,
selected status;
Paint Brush: when the panel is under hiding condition, click this key and enter into brush
writing status, and the line shape and line thickness are the default values; when the panel is
under displaying condition, click this key and position the cursor to the button on the panel, that
is, selected status;
Highlight Pen: when the panel is under hiding condition, click this key and the system enters
into highlight pen writing status, and the line shape and line thickness are the default values, and
the transparency is not adjustable; when the panel is under displaying condition, click this key
and position the cursor to the button on the panel, that is, selected status;
Object Color Settings: when the panel is under hiding condition, click this key and bring up the
Color Setting Window from the system to amend the object color ; when the panel is under
displaying condition, click this key and position the cursor to the button on the panel and bring
up the Color Setting Window;
Eraser: when the panel is under hiding condition, click this key and the system enters into any
erasing status of the eraser, the size is set as default and cannot be amended, and then erase the
contents on the interface; click this key and position the cursor to the button on the panel and
bring up the next menu for option;
8
HSJC
Magnifier: when the panel is under hiding condition, click this key and enter into the magnifier
function, the application method is the same as the description of the magnifier in “Tools”
under “Annotation Mode” for the magnifier in the panel;
Spotlight: when the panel is under hiding condition, click this key and bring up the spotlight,
the light brightness shall be the brightness used by the panel for the last time, or it is set as
default.
Screen Record: when the panel is under hiding condition, click this key and pop up the save
name interface for the documents intended to be recorded, confirm after input the name and
enter into screen recording status to record all operations and sounds on the screen;
Open File: when the panel is under hiding condition, click this key and bring up the dialogue
box, and then select the file in dialogue box and click Open button, the system plays the
selected Multimedia Files and supports various formats, e.g. avi, wav, mp4, vsh, etc.
· Operation Interface Display
Mode Description
Presentation
Figure
Mouse Mode
Click the icon into Mouse Mode, equivalent to computer
operation, electronic pen completely replaces the mouse featured with
convenient operation and simple understanding
Annotation
Mode
Click the icon into Annotation Mode to directly annotate the
contents on the screen and then input and paint on new page.
9
Whiteboard
Mode
Click the icon “Whiteboard” into white background to operate, be easy
to bring up the resources of Photo Gallery, the users can define and
manage the background colors by themselves.
· Icon Function Introduction
· Input: click the icon “Input”, the following input functions will appear:
Pencil The pencil line track from the input of the electronic pen and end the input when
putting the electronic pen up.
Paint
Brush
The paint brush line track from the input of the electronic pen and end the input when
putting the electronic pen up.
Paint
The operation implemented under this mode is applied for filling in the color to the
closure area with the same color levels. Two functions of spraying and sprayer are
included.
Highlight
Pen
The pencil line track from the input of the highlight pen and end the input when
putting the electronic pen up. Adjust the scroll bar on the interface and the
transparency of the colors of the highlight pen.
Row
Brush
The row brush and pen line track from the input of the electronic pen and end the
input when putting the electronic pen up.
Input
Text
The input box appears when the electronic pen contacts the whiteboard, after input the
contents, press the Enter to confirm the input, that is, transfer the input contents into
standard font.
10
HSJC
· Icon Function Introduction
· Figure: click the icon “Figure”, the following drawing functions will appear:
Straight
Line
Straight Line
Quadrilateral
Oblong
Rectangle
Straight Line with
Single Arrow Quadrate
Straight Line with
Left and Right Arrow Rhombus
Round
Standard Round Trapezoid
Ellipse
Parallelogram
Hollow Round
Solid Round
Hollow
Quadrilateral
Triangle
Right Triangle
Solid
Quadrilateral
Equilateral Triangle
Polygon
Regular
Pentagon
Isosceles Triangle
Regular
Hexagon
Ordinary Triangle Free Polygon
Hollow Triangle
Hollow
Polygon
Solid Triangle
Solid
Polygon
3D Figure
Quadrihedron Circle
Cube
Color
Circular Cylinder Edit
Circular Cone Object Delete
Sphere
All Delete
Annotation
Draw up a straight
line with size
annotation
Draw up a angle line
with size annotation
11
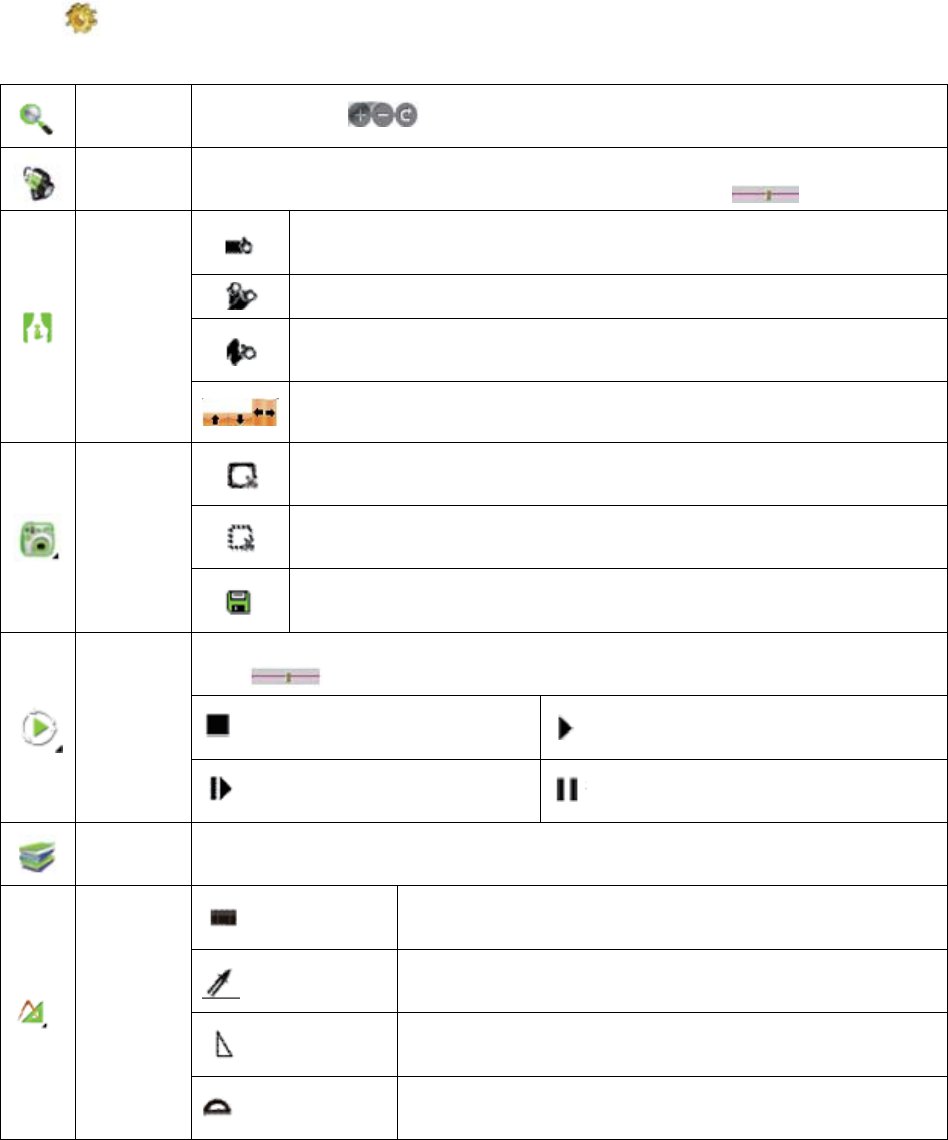
· Tool: click the icon “Tool”, the following tools will appear:
Magnifier Click the button to set the size of the magnifying area
Spotlight Show highlighted contents, other area of the screen become dark light. The size of the
spotlight and background color can be adjusted by two sliders
Screen
Shield the contents in a direction in the screen and write when select single
direction
Shield the contents from top to the bottom and the left to the right
Shield any area of the screen from top to the bottom and the left to the right
Drag a button from top to the bottom and the left to the right
Camera
After click, take a photo to current interface
After click, select the required scope and take a photo
After taking a photo, save the photos
Replay
Replay the previous operations and control the replay speed through the
slider .
STOP Start
Continue Suspend
Dictionary English-Chinese Dictionary/ Simplified Chinese - English Dictionary, and other
dictionaries available to be downloaded.
Geometrical
Tools
Ruler
Measure the length of the straight line and can be optionally
extended
Compass Draw a defined circle through this function
Triangular Rule Measure the length of figure and can be optionally extended
Protractor Measure the angle
12
HSJC
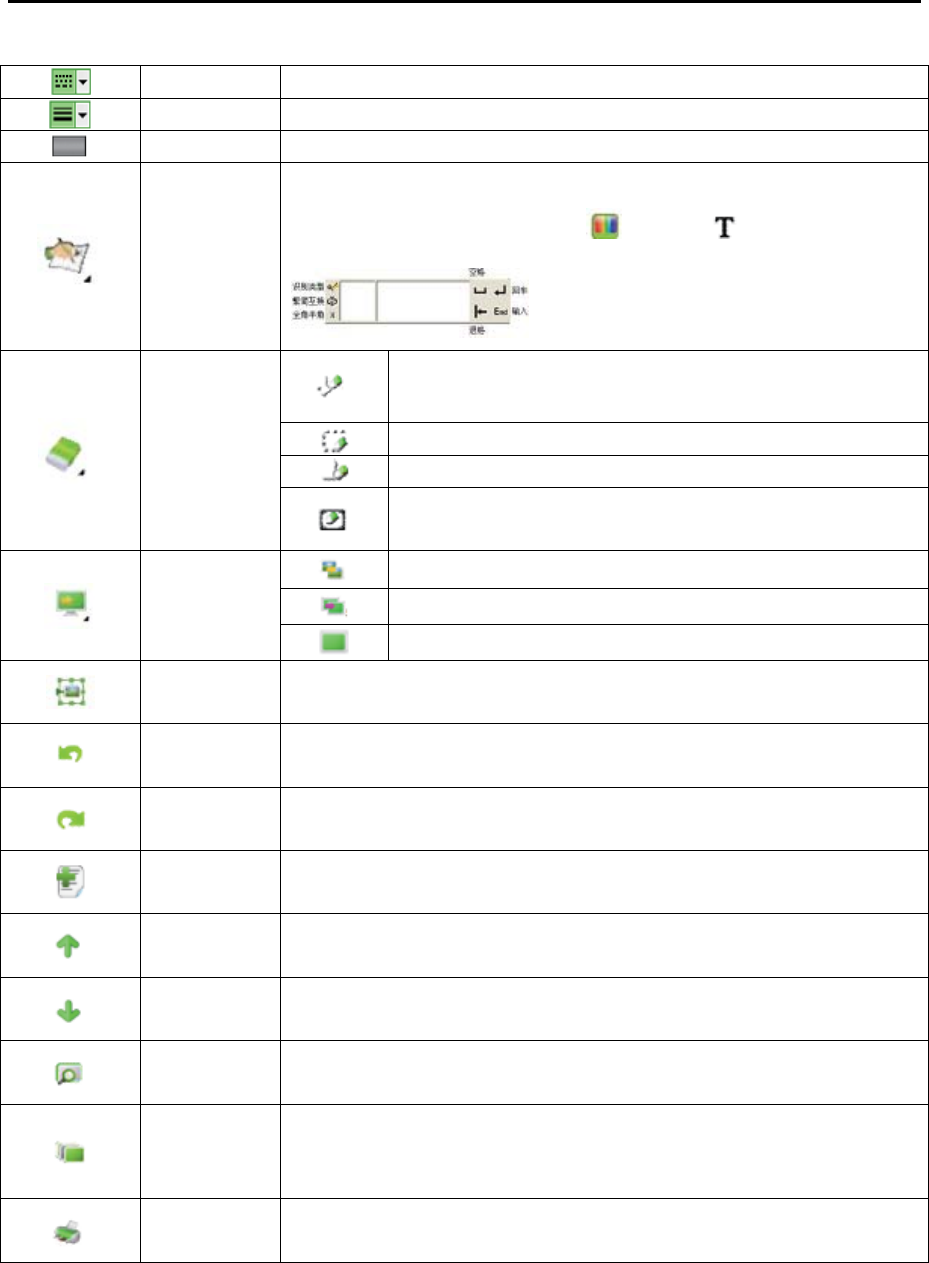
· Public Menu Function
Line Type Select the line shape required to be drawn
Line Width Select the line thickness required to be drawn
Color Option Select the picture or font color required to be drawn
Hand Input
Transfer the Handwriting Chinese, English and number to standard fonts,
and set the fonts according to color and font
Eraser
Randomly erase current input of the picture or font
set the size of eraser that is erased randomly
Delete the words in selected area
Delete certain object
Delete the contents in current page
Screen Move
Move the pictures under operation
Move whole screen
Reset the dragged screen to original position
Edit Click the Edit icon to edit the selected objects, such as rotation, clone,
copy, paste and other dozens of operations
Cancel Cancel one or more steps of previous operations
Reset Reset the steps that have been canceled
New Page Set up a new page
Previous
Page Display the contents of previous page in saved page review
Next Page Display the contents of next page in saved page review
Page Review Review all operated pages
Resource
Library
The software library provides the resources of educational pictures the
external pictures to be reviewed and various audio formats, e.g.
avi.wav.mp3,wma. exe, etc.
Printer Print current page

13
Interaction
between
Teachers and
Students
After successful connection to the server, the teacher send the files to the students
After successful connection to the server, the students receive the files from the
teachers
After successful connection to the server, send the information to the students
After successful connection to the server, relay the defined desktops of the
students
After successful connection to the server, display answer box in the desktops of
the students
After successful connection to the server, lock the screens of the students
After successful connection to the server, click the Close button to close
computers of all on-line students.
Soft
Keyboard The software interface appears to simulate the operation of the keyboard
Others
Open the file
Save the file
Create new file
Countdown clock appears after click
Clock displays after click
Computer
Vers io n
Information Provide software version No. that are currently applied and relevant information
Recording Record the writing on whiteboard
Screen
Record Record the desktop operation and sounds
Background
Color
Set the background color of the whiteboard under whiteboard mode, press one key to
change the background color to white font on black base or black font on white base
Exhibition
Platform
Change paper files of current teaching scene or teaching resources to e-file as the
resources for the teachers

14
HSJC
IX. Right Click Function
The Right Click Function can be used to edit the objects of current interface under any editing status, that is,
use the electronic pen to point at the objects requiring the right-click function and press the button of the
nib, pop up the right-click function menu.
Cut (Ctrl+X): temporarily hide the objects that are currently edited and wait for copying them in
designated locations;
Copy (Ctrl+C): copy and keep current objects;
Paste (Ctrl+V): place the cut or copied objects on designated locations; Note: when using this function,
don’t use the electronic pen to contact the whiteboard and point at the locations detected by the whiteboard,
and press the right key to select this function;
Clone (Ctrl+P): clone the selected objects and put them around current selected objects
Top (Ctrl+T): select this function for the object under edited status and this object is at the very top;
Delete (Ctrl+D): delete the editing object
Lock/Unlock (Ctrl+K): lock/unlock current option, after locking the objects, all functions in the right click
cannot be used;
Display/Hidden Circle (Ctrl+S): select this to display or hide the circle;
Geometric Zoom/Free Zoom: change the object between Geometric Zoom/Free Zoom. The center point
of the Geometric Zoom is not changed, and the image is diffused to all directions. When the top left corner
or bottom right corner is not changed for the free zoom, the image is changed towards the opposite
direction;
Combination/ Combination Removal (Ctrl+B): when many objects are formed into a new image to
realize joint operation as rotation, moving and zooming. When dragging the mouse to select more than one
object, there is no any other combination on those objects, but they are able to move, so they cannot be
zoomed and rotated as a whole;
Multi-Word Identification (Ctrl+R): use the pencil (or paint brush, highlight pen, row brush and pen) to
write one or more than one character (s), under the editing status, click the right key and appear the
function menu to select Multi-Word Identification to identify one character, one word or one sentence.
Left Justify (Ctrl+G): select this function under the editing status, the location of this object can be
projected into the at the extreme left of the same line in the projecting area;
Center Justify (Ctrl+M): select this function under the editing status, the location of this object can be
projected into the at middle of the same line in the projecting area;
Right Justify (Ctrl+H): select this function under the editing status, the location of this object can be
projected into the at the extreme right of the same line in the projecting area;
Transparency Increase (Ctrl+ “+”): select this function under the editing status, the color of this object
becomes dark;
Transparency Decrease (Ctrl+ “-”): select this function under the editing status, the color of this object
becomes light;
Re-edit Text (Shift+ Ctrl+E): re-edit the objects produced from handwriting identification or text input;
Super-link (Shift+ Ctrl+S): set the link designated to the text object. Select this function, this system pops
up the following dialogue box:
15
Select “Link to File or Website” to link external documents; select “Link Page” Table to choose the page
intended to be linked in current file and provide drop-down lists for page option.
Stroke Replay (Shift+Ctrl+R): demonstrate the stroke and character of the text. Click the maximized
window in the top right corner in the interface to full-screen window;
Reverse Search (Shift+Ctrl+C): search the designated text in the dictionary;
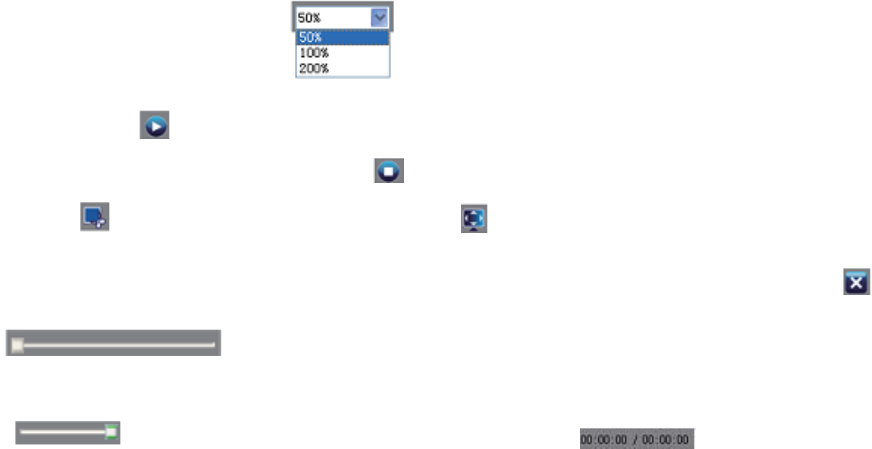
Play (Shift+Ctrl+P): broadcast the Audio and Visual Object. The interface is as follows:
Custom Key: Extended function and use after upgrade.
When the system broadcasts the files, the window size is set as default and under the best play status, and it
is to set the resolution and click for option.
When clicking , if current file is under play status, it is to click this button to suspend the play, whereas
start the play. Sop the play when clicking and the conduct the Screenshot in playing the files when
clicking ; realize full-screen play when clicking in the process of playing the file and return to
non-full-screen status when clicking the screen in any places; log out the play status when clicking .
refers to play progress bar, use the electronic pen to click onto sliding block and
drag it to adjust the play progress;
indicates the volume adjusted for current play file; means time progress of
current play file/ total consumption time of the play files.
X. Electric Eraser Function
1. Press on/off on the side of the eraser, start Electric Eraser and erase any part.
2. Simultaneously press on/off key on the side of the eraser and mode key on the top of the eraser to
erase full screen, that is, all contents on the interface disappear.
16
HSJC
XI. FAQ
Q1: Whether the whiteboard software is available?
A1: The whiteboard software can be used only when the computer and the whiteboard software start
correctly.
Q2: What shall I do if the Prompt Dialog Box of “fail to communicate with the whiteboard software,
please check whether the whiteboard correctly connects with the computer” after starting the
computer?
A2: 1. Please check the connection of the whiteboard at first to confirm whether it is normal, the short
line with the signal magnifier is connected correctly, the signal light of the magnifier is right and
the indicator lamp at the back of the whiteboard is on;
2. Under normal connection, please check whether the USB Driver is installed well (right click to
“My Computer”, select “Property”, and then select Device Manager under hardware menu in the
system property, “?” in USB Controller means non-installation of USB Driver, please reinstall it).
3. After confirming that the above-mentioned two items are right, please restart the Whiteboard
Driver (Start→Program→Class Access→OKBOARDDrv). If the connections above fail, please
change USB Driver and reconnect.
Q3: Jumping and Breaking Conditions in the Whiteboard
A3: Uninstall the software and reinstall the whiteboard software.
Q4: What shall I do if the position of nib or fingertip deviates from the position of cursor when
operating or inputting on the Interactive E-Whiteboard?
A4: click (1) start menu (2) program (3) class access (4) butterfly icon OKBOARDDrv, and then
click to select the positioning and reposition.
17
Q5: The keypad in the E-Whiteboard Software is not available
A5: Uninstall the whiteboard software and reinstall it.
Q6: When an empty folder appears in Class Access and the software is unable to open, and the
positioning is unable to be made after reinstalling the software
A6: 1) Reinstall the software after confirming the computer is not attacked by a virus infection
2) The failure of installation caused by the error message in the process of reinstalling the software
may be for a part of system files damaged, so it is required to restore the damaged system or
reinstall the computer system.
Q7: the failure condition of the electronic pen occurs in the process of using the whiteboard from
time to time
A7: 1. Confirm normal connection of the whiteboard at first and then change the electronic pen to test it;
2. If no solution can be reached, please change USB Interface to test it;
3. If no solution can be reached again after changing the electronic pen, please uninstall the software and
reinstall it;
4. If no solution can be reached again, it is possible caused by the computer virus, please scan and kill
the virus or change a computer to test it.
XII. Friendly Reminder
1. Suggest the users to carefully read the instruction before use it;
2. Forbid to use oil pen in that it will leave the track unable to be cleaned.
3. If the panel is required to clean, use wet cotton cloth without dropping water to wipe it, and then use
dry cloth to wipe it.
4. Forbid to use corrosive cleaning agents, soap or crude oil products to wipe the panel;
5. Forbid to use hard tool to knock on interactive whiteboard, avoid from long-term moisture and direct
sunshine;
6. Use proper force to use the electronic pen of the interactive whiteboard to input;
7. Please keep the electronic pen in proper way when it is not used;
8. When facing the students, stand on the side of the interactive whiteboard, and don’t directly look at the
projector to avoid the eyes from injuring;
9. When the students use the interactive whiteboard, please instruct them to correctly use it;
10. When using the support of the whiteboard, please timely adjust it;
11. When installing the drivers and application software, attention shall be paid to Computer OS and
memory space, and the reinstall corresponding application software;
12. When installing the software, please make sure the USB connection between CCU (Central Controller
Unit) and computer, then open the switch on the power of CCU (Central Controller Unit), or the
hardware driver cannot be installed.
18
HSJC
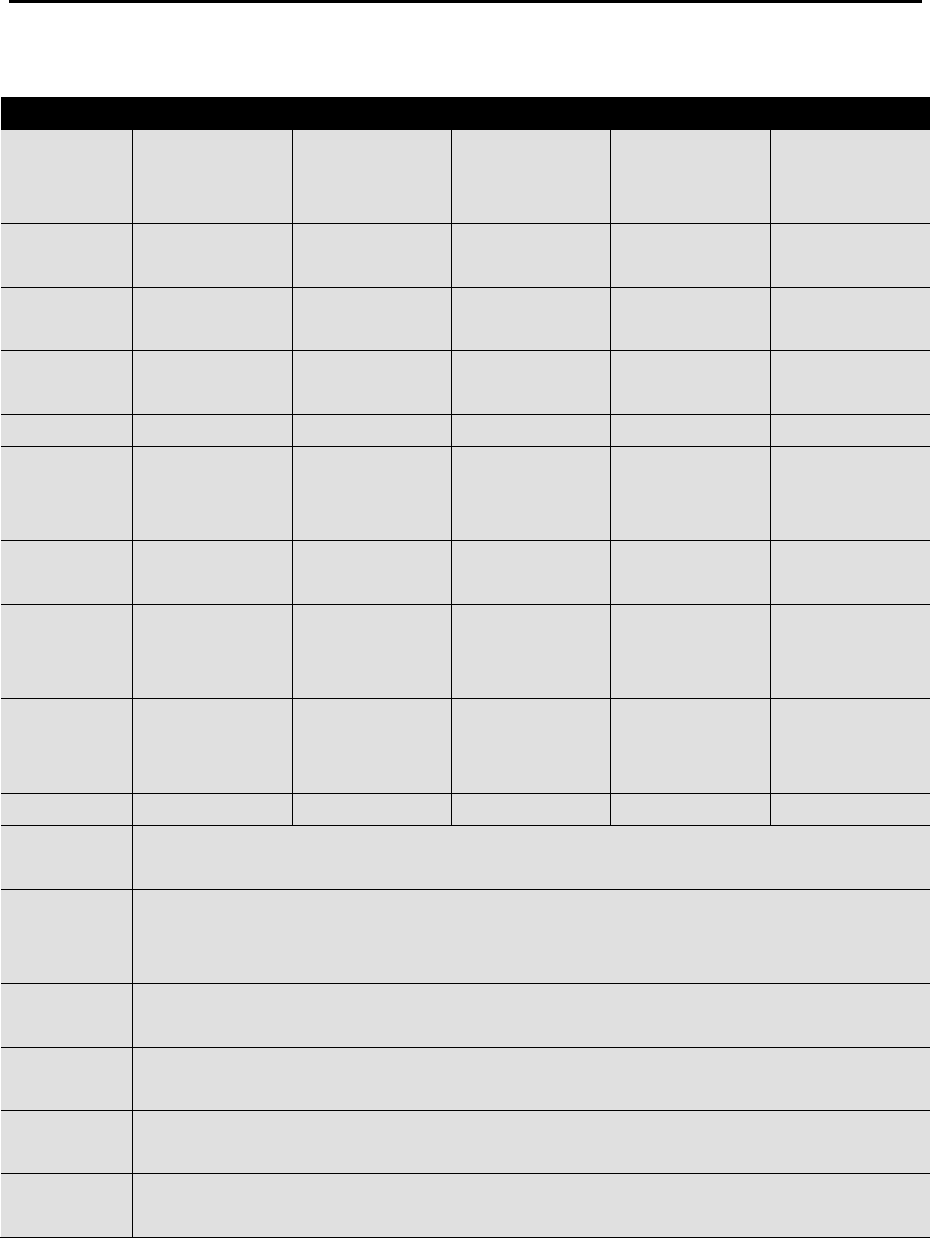
XIII. JSHC Interactive Whiteboard Product
Type JC-850-G JC-850-60 JC-850-88 JC-850-99 JC-850-100
Valid
Operation
Area
1520*1120(mm
)
1650*1190(mm
)
1650*1075(mm
)
1650*1190(mm
)
2045*1240(mm
)
External
Boarder Size
1730*1235(mm
)
1745*1275(mm
)
1650*1175(mm
)
1745*1275(mm
)
2135*1330(mm
)
Induction
Technology
Electromagnetic
induction
Electromagnetic
induction
Electromagnetic
induction
Electromagnetic
induction
Electromagnetic
induction
Shortcut
Key
Right side Right side Right side Right side Right side
Resolution 9300*9300 14300*9718 13208*8918 14300*9718 17784*10192
Positioning
of Input
Accuracy
1 (mm) 1 (mm) 1 (mm) 1 (mm) 1 (mm)
Screen Ratio 4:3, but support
16:9 projector
4:3, but support
16:9 projector
4:3, but support
16:9 projector
4:3, but support
16:9 projector
4:3, but support
16:9 projector
Transmissio
n Mode
USB
Transmission
for 15m
USB
Transmission
for 15m
USB
Transmission
for 15m
USB
Transmission
for 15m
USB
Transmission
for 15m
Data
Transmissio
n Rate
19200 Baud
Rate
19200 Baud
Rate
19200 Baud
Rate
19200 Baud
Rate
19200 Baud
Rate
Power <0.6W <0.6W <0.6W <0.6W <0.6W
Operation
System
Windows2000/XP/vista/win7
Computer
Working
Mode
Mouse Mode/Annotation Mode/Whiteboard Mode/Hide Mode
Electronic
Pen
With laser indicator lamp and automatic sleep mode, easy to assembly or disassemble
Running
Environment
Temperature: -15℃ to +40 ;℃Humidity: 0% to 95%
Storage
Environment
Temperature:-40℃ to +60 ;℃ Humidity: 0% to 95%
Electronic
Eraser
Option
Note: the parameters of product specification are subject to change without prior notice
HSJC®
Technology Makes
Educate More Brilliant
Shanghai HSJC High-Tech Development Co., Ltd.
Add: 2nd Floor, No.2 Hong Building, State-Level Science and Technology Park, East China Normal
School, No.155, Jinshajiang Rd, Putuo District, Shanghai
Tel.: 021-52826660 Postal code: 200062
Customer Service Hotline: 400-880-6056 Office Time: 9:00-18:00 (Except Public Holidays)
Website: ww.hsjc.com.cn