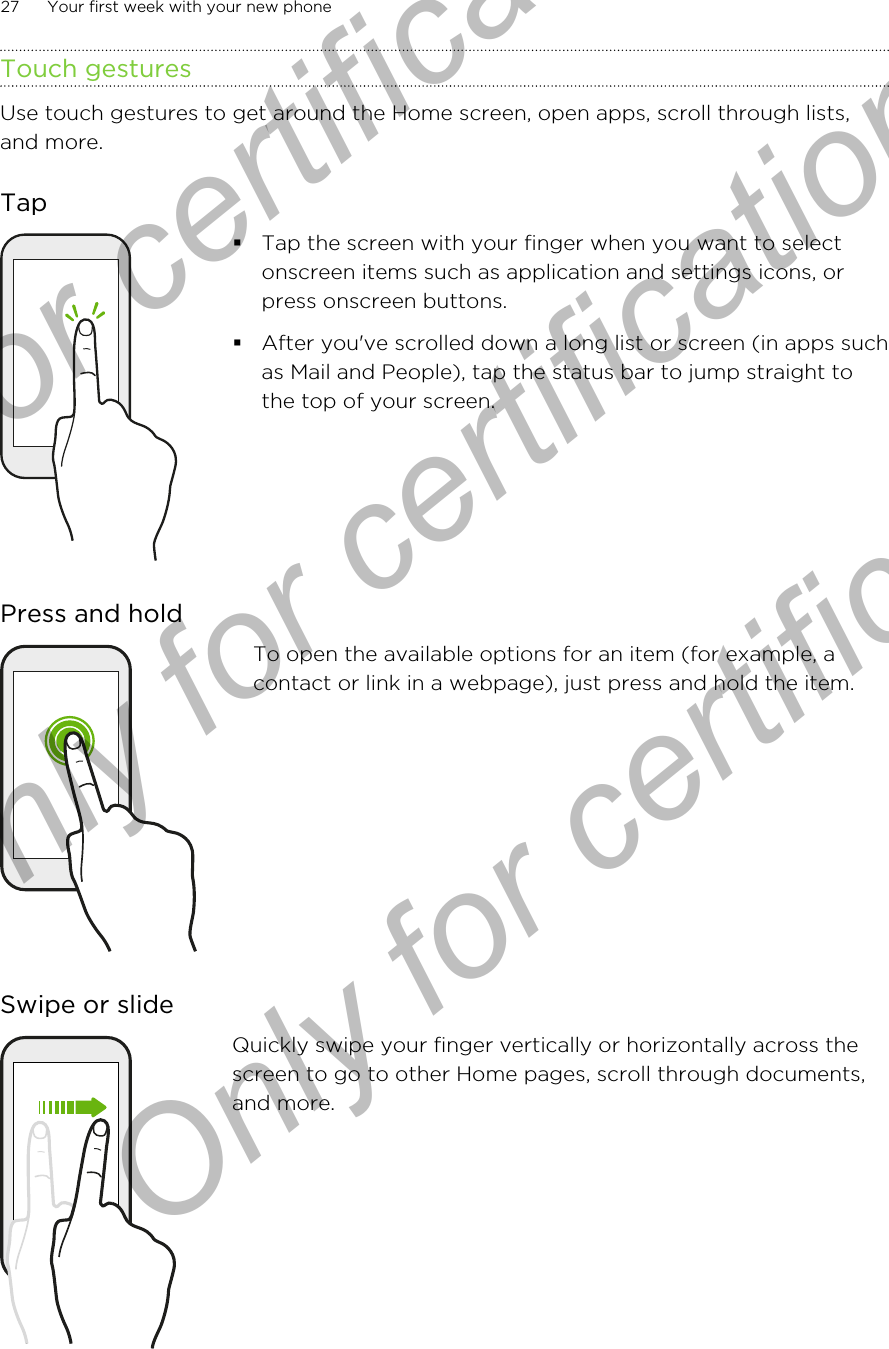
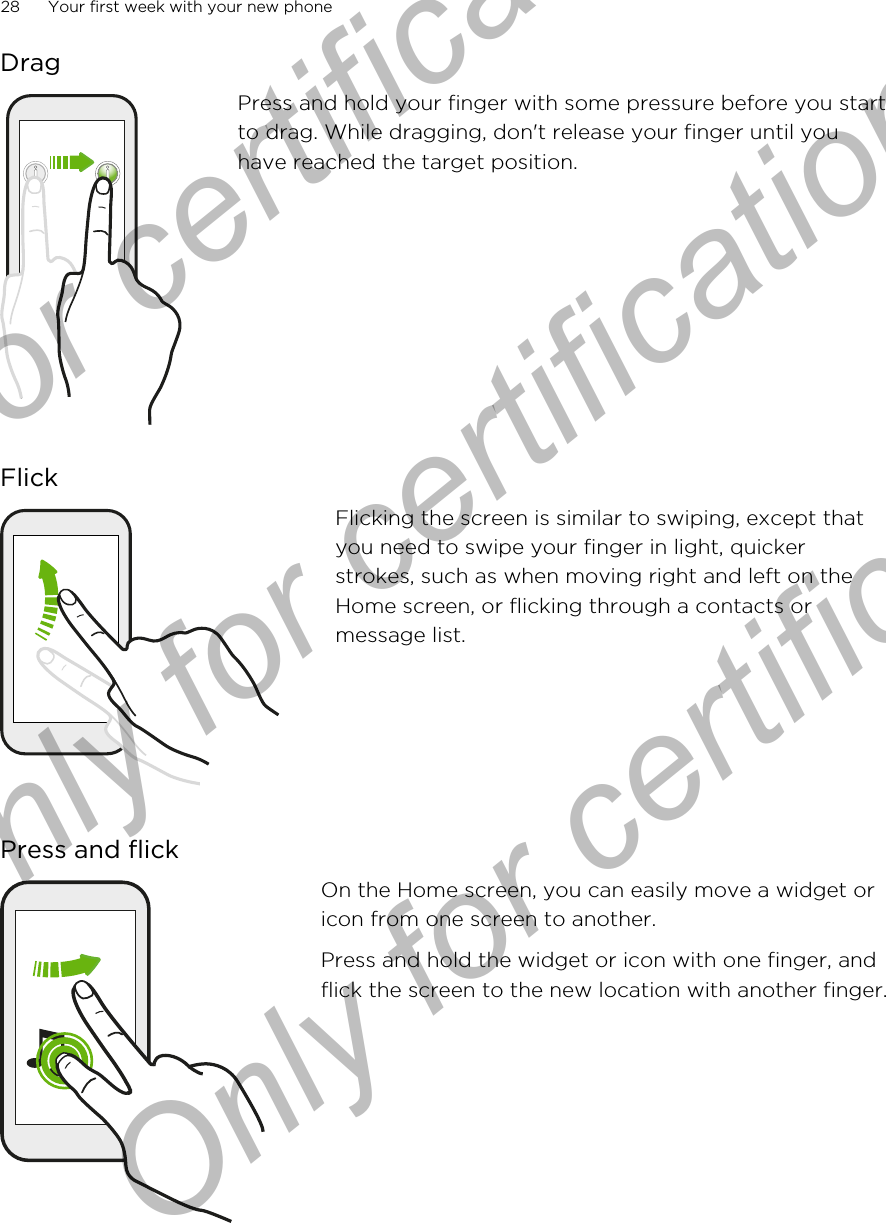
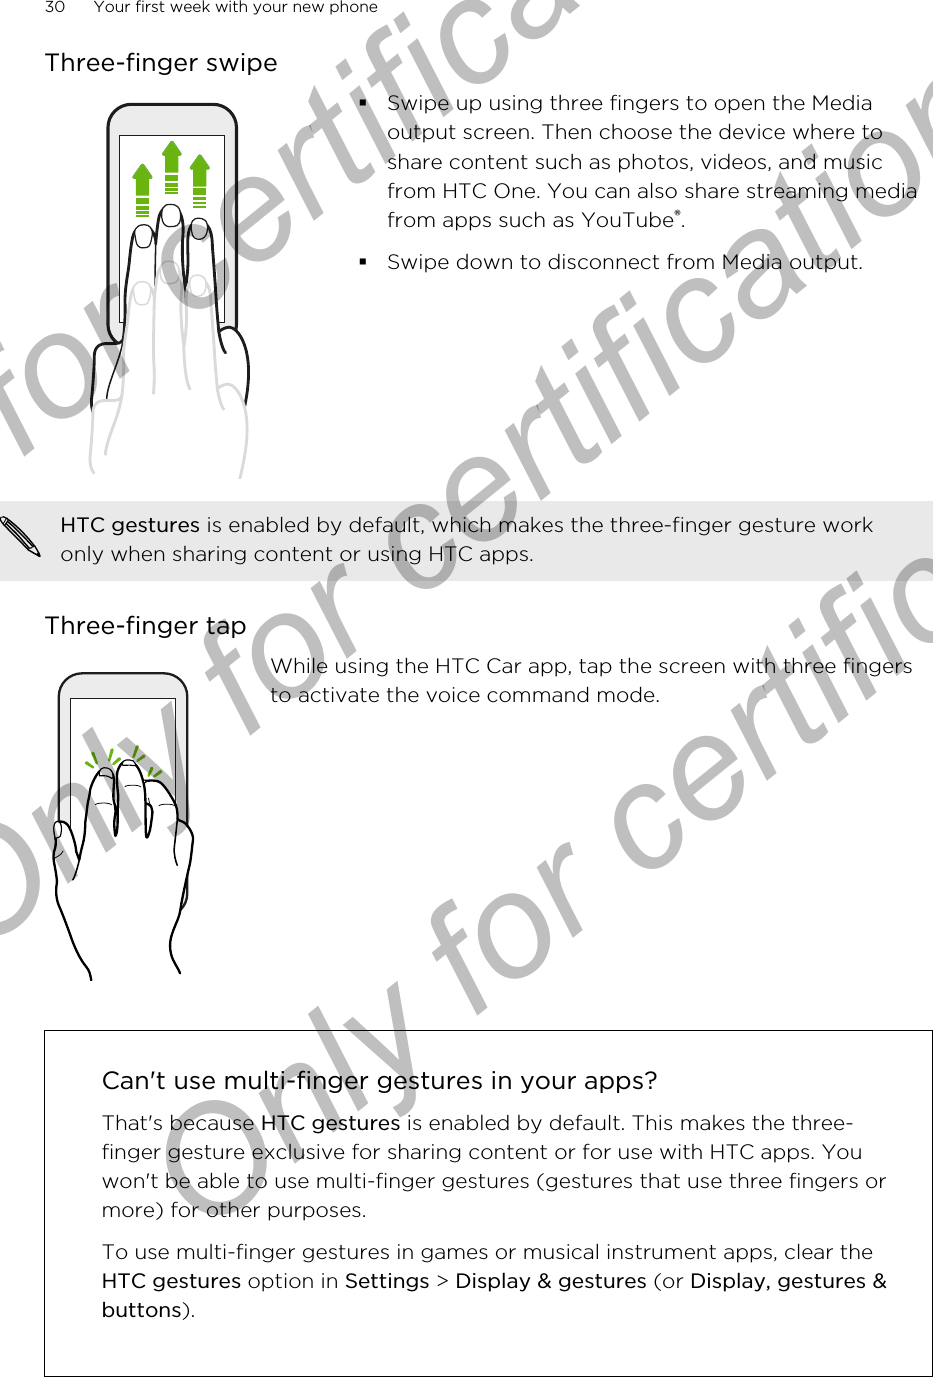
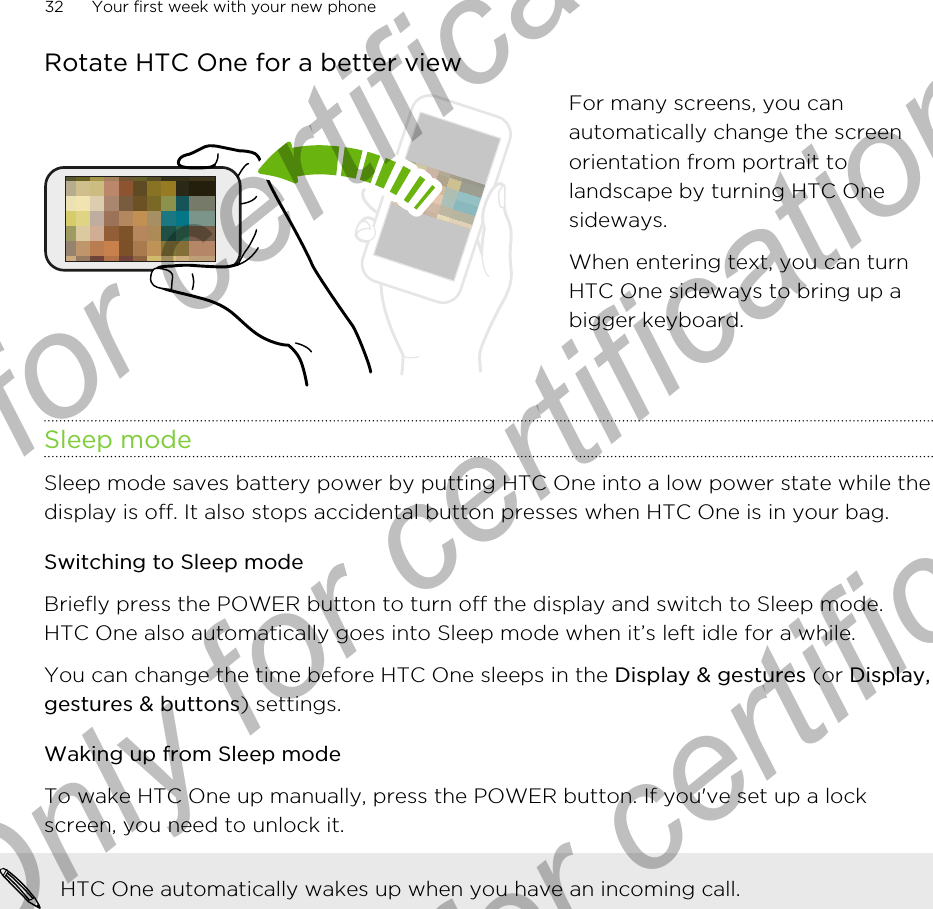
HTC 0P6B700 Smartphone User Manual Your HTC One
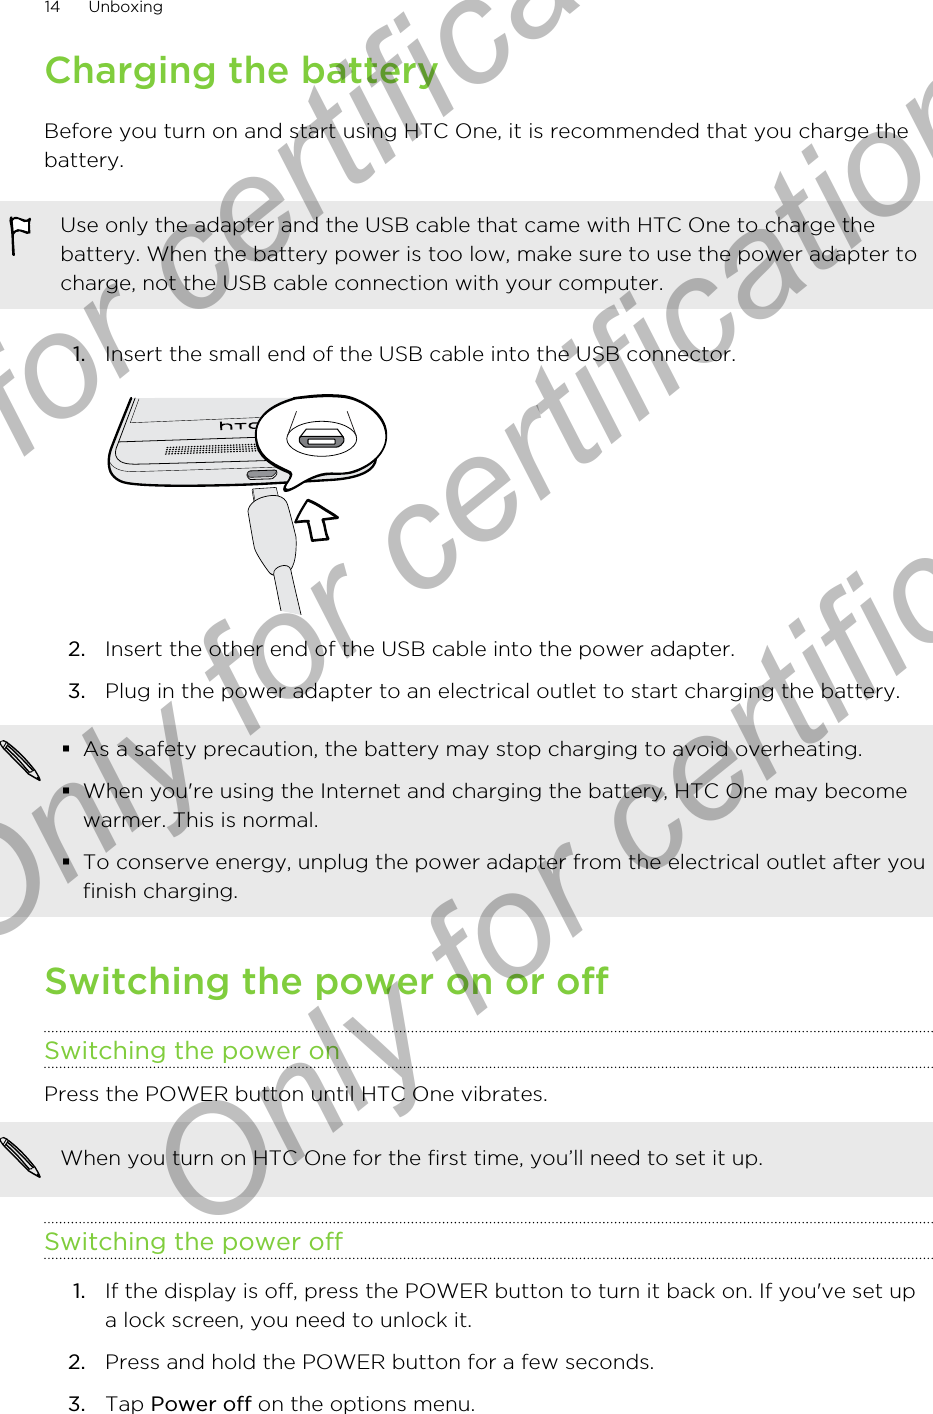
HTC Corporation Smartphone Your HTC One
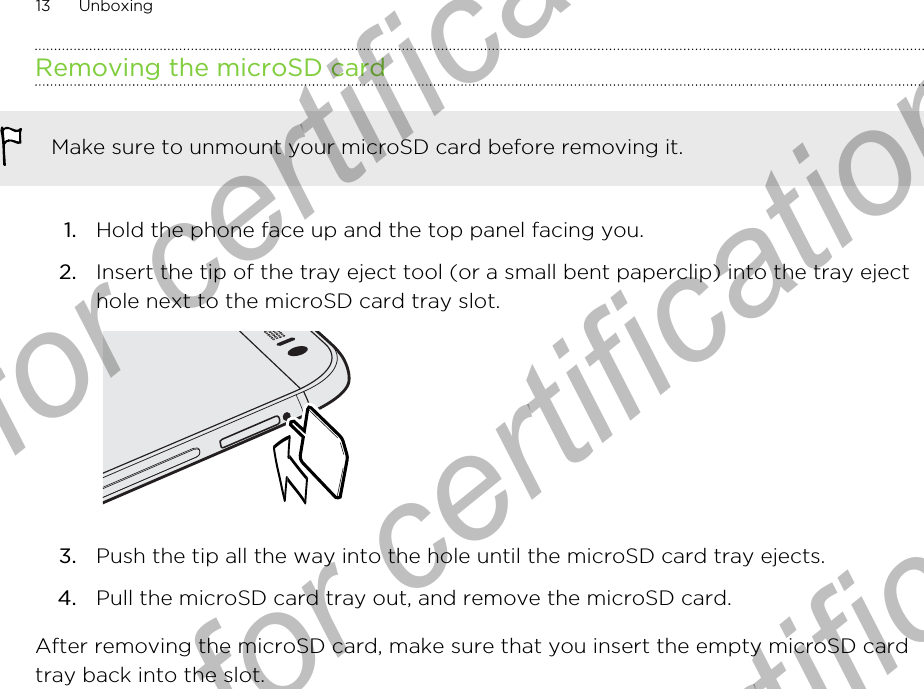
UserManual.wiki
>
HTC
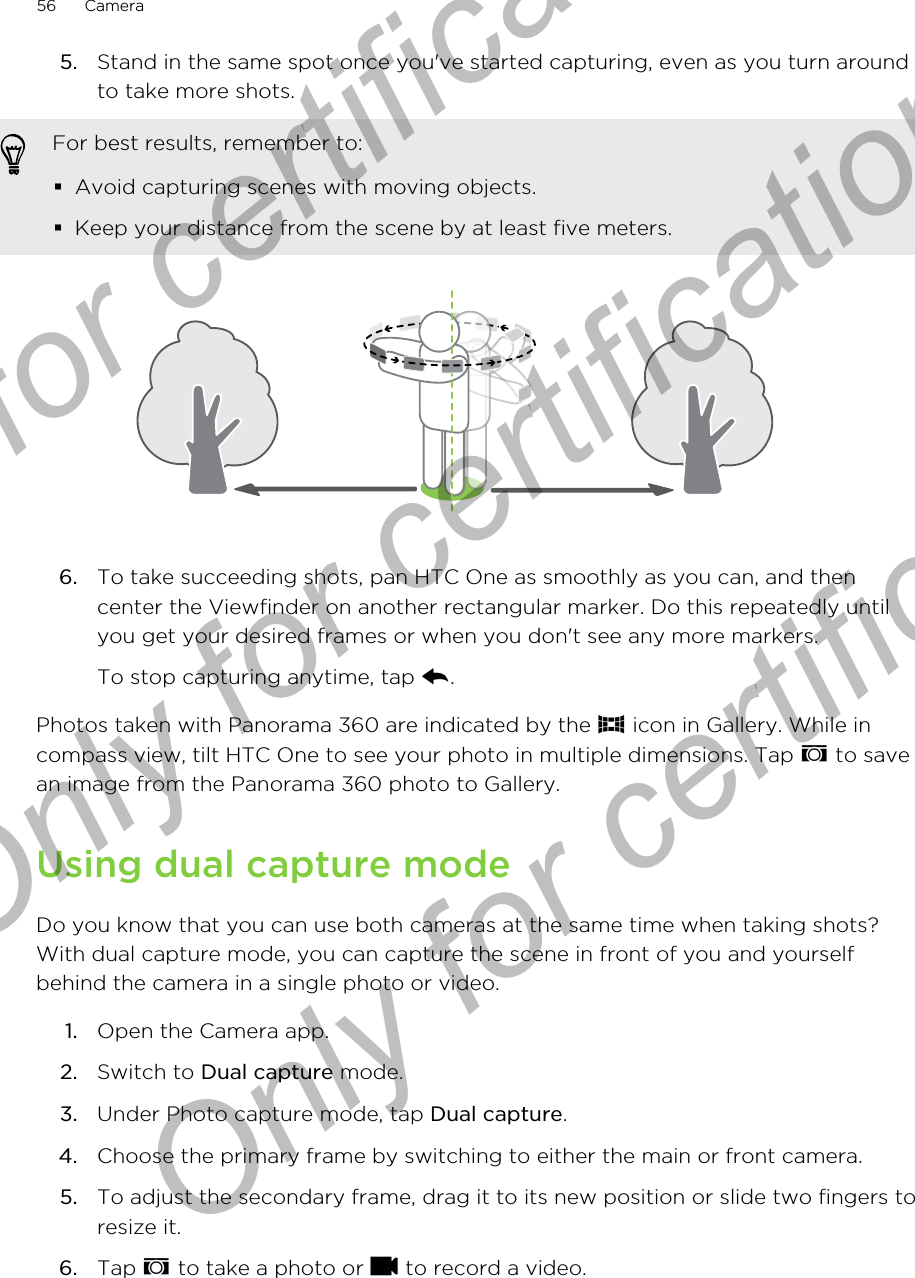
>
0P6B700 User Manual
>
Users Manual.pdf
Contents
1.
Users Manual (Statement).PDF
2.
Users Manual.pdf
Users Manual.pdf
Navigation menu
Upload a User Manual
Namespaces
Wiki Guide
HTML
PDF
Info
Views
User Manual
Discussion / Help
Navigation


![Selecting feedsDiscover stories and articles on HTC BlinkFeed based on your interests, favoritecategories, and popular news channels or websites.1. On HTC BlinkFeed, swipe left to right to open the slideout menu.2. Tap > Add content.3. Choose a category. Or, if it's your first time to add content on HTC BlinkFeed, tap the tile that saysGet automatic recommendations from BlinkFeed. Sign in to your social networkaccount to get recommendations.4. Select one or more feed sources. You can tap a name first to check out a particular feed, and then tap [_] to addit to HTC BlinkFeed.Adding topics of interestLooking for a more specific topic? Search for and select topics of interest to displaythem on HTC BlinkFeed.1. On HTC BlinkFeed, swipe left to right to open the slideout menu.2. Tap Search for content, and then enter the topic you're looking for.3. Tap a result, and then tap [_] to add it under Custom topics.Subscribing to localized editionsWant to keep up to date on current events in more than one locale? You can showone or more localized editions of your choice on HTC BlinkFeed.1. On HTC BlinkFeed, swipe left to right to open the slideout menu.2. Tap > Add content.3. Tap , and then select a locale or region.Subscribing to an RSS feedDon't want to miss out on news and updates from your favorite blog or website? Addcustom RSS feeds on HTC BlinkFeed.1. Open the Internet app.2. Go to the RSS feed URL of the blog or website you want to subscribe to.3. Tap [_] to add it to HTC BlinkFeed.37 Your first week with your new phoneOnly for certification Only for certification Only for certification](https://usermanual.wiki/HTC/0P6B700.Users-Manual-pdf/User-Guide-2195236-Page-37.png)

![Choosing a capture modeHTC One gives you a variety of capture modes to enjoy, from the basic ones fortaking photos and recording videos to advanced modes such as Zoe Camera and[Pan 360].On the Viewfinder screen, tap , and then select a capture mode to use.Zooming§Before taking a photo or video, slide two fingers apart to zoom in or together tozoom out.§When you see the zoom bar, slide your finger on the zoom bar to zoom in orout.§When you're recording video, you can freely zoom in or out while recording.Switching between the front and main cameraOn the Viewfinder screen, do any of the following:§Pull from the top or bottom edge in landscape view.§Pull from the left or right edge in portrait view.§Tap , and then tap Selfie or Camera.Some camera features are not available when you’re using the front camera, suchas zooming.Applying a filterUse the available filters to make your photos and videos look like they’ve been takenthrough special lenses.Some camera modes may not support filters.1. On the Viewfinder screen, tap to show the camera options.2. Tap .3. Scroll through the available filters, and then tap one that you like.Setting the video resolution1. Switch to Video mode.2. On the Viewfinder screen, tap to show the camera options.3. Tap .4. Under Settings, tap Video Quality, and then choose a video resolution.51 CameraOnly for certification Only for certification Only for certification](https://usermanual.wiki/HTC/0P6B700.Users-Manual-pdf/User-Guide-2195236-Page-51.png)
![Using Zoe CameraDon’t let the best moments just pass by. When timing is everything, capture the exactmoment with HTC One and get more than just a still photo.Zoe Camera removes the fuss of having to switch between Camera and Video modes.Depending on how long you press the integrated button, you can:§Take a photo§Capture a combo of burst shots and a three-second video clip for advancedediting features in Gallery, see [Gallery] for details§Continue recording a longer videoSome camera features are not available when you’re using Zoe Camera, such aszooming.1. Open the Camera app.2. Switch to Zoe camera mode.3. Do any of the following:§Tap once to take a photo.§Press and hold for three seconds to capture a burst shot and a 3-second video clip.§If you want to continue recording a video, press and hold until you seethe Locked status right above .Taking selfiesNo one around to take your photo?1. Switch to Selfie mode. Or, switch to the front camera by swiping from the left orright edge of your phone's screen.2. Tap anywhere on the screen to start the timer. The camera takes a photo afterthe countdown.Improving portrait shotsIf you'd like your family or friends to look their best in your photos, make sure to usethe portrait scene. It smoothens the skin in your shots.1. On the Viewfinder screen, tap to show the camera options.2. Tap .3. Tap [_].4. When you're ready to take the photo, tap .54 CameraOnly for certification Only for certification Only for certification](https://usermanual.wiki/HTC/0P6B700.Users-Manual-pdf/User-Guide-2195236-Page-54.png)
![Taking a panoramic photoGet a wider shot of natural or urban landscapes in one sweep.Some camera features are not available when you’re in this mode, such as zooming.1. On the Viewfinder screen, tap to show the camera options.2. Tap , and then tap [_].3. When you're ready to take the shot, tap .4. Pan left or right in either landscape or portrait view. Hold HTC One as smoothlyas you can to automatically capture frames.You can also tap to stop capturing anytime.The camera stitches the frames into a single photo.Taking a 360 degree panoramic photoThe world isn't flat and your photos shouldn't be either. Take a 360-degree panoramaof what's around you.Some camera features are not available when you’re in this mode, such as zooming.1. On the Viewfinder screen, tap .2. Under Photo capture mode, tap Panorama 360.3. Hold HTC One at face level so you'll have more room to capture scenes aboveor below you.4. When you're ready to take the first shot, tap , and then center the Viewfinderon the rectangular marker.55 CameraOnly for certification Only for certification Only for certification](https://usermanual.wiki/HTC/0P6B700.Users-Manual-pdf/User-Guide-2195236-Page-55.png)
![Using HDRWhen shooting portraits against a bright background, use HDR, short for HighDynamic Range, to capture your subjects clearly. HDR brings out the details of boththe highlights and shadows, even in high contrast lighting.HDR works best when your subject is steady. The camera takes multiple shots atdifferent exposure levels and combines them into one enhanced photo.1. Open the Camera app.2. Switch to Camera mode. To capture an HDR video, switch to Video mode.3. Tap , and then tap [_]. For an HDR video, tap beside the menu button, and then tap [_].4. To take an HDR photo, tap . Tap to start recording.Recording videos in slow motionRelive high speed action bit by bit and add a touch of suspense to your videos.Audio is not captured when you're in this scene.1. Open the Camera app.2. Switch to Video mode.3. Tap .4. Tap [_].5. Tap to start recording.6. To stop recording, tap .After recording your slow motion video, you can change the playback speed ofselected sections when you edit the video in Gallery.57 CameraOnly for certification Only for certification Only for certification](https://usermanual.wiki/HTC/0P6B700.Users-Manual-pdf/User-Guide-2195236-Page-57.png)
![Manually adjusting your camera settingsWant to take more command of your camera settings for different environments orlighting conditions. You can manually increase or decrease the values for settings likewhite balance, exposure, ISO, and more.1. Open the Camera app.2. Switch to Camera mode.3. On the Viewfinder screen, tap to show the camera options.4. Tap [_].5. Tap an item at the bottom of the Viewfinder screen, and then drag its slider upor down to adjust the setting.6. When done, tap to show or hide the manual settings.7. Tap to take a photo.If you want to save the your customized settings, tap > Save as camera.Saving your settings as a camera modeSave a scene or settings as a new camera mode so you can conveniently use itanytime you need it.1. Open the Camera app.2. Switch to the camera mode to start with. Some camera modes may not support modifying the camera settings.3. On the Viewfinder screen, tap to show the camera options.4. Modify the settings to get the desired effect or action.5. When done, tap > Save as camera.6. Enter a camera name, and then tap Save.7. Tap , and then slide up the screen to check or switch to the newly createdcamera mode.Modifying a camera mode you've created1. Switch to this camera mode that you've created.2. Modify the scene or settings.3. Tap > Save as camera.4. Tap Yes to save changes to the existing mode.58 CameraOnly for certification Only for certification Only for certification](https://usermanual.wiki/HTC/0P6B700.Users-Manual-pdf/User-Guide-2195236-Page-58.png)
![Photo tips when using the Duo CameraWith HTC One, take and edit professional-looking photos with ease. You don't have toworry about turning on different settings to achieve effects that you usually get fromDSLR cameras such as bokeh and parrallax.Just launch the Camera app to take photos right away, and then apply the effects inGallery afterwards.Before taking and editing photos, here are some things you need to remember:Composition§Match your subject with an interesting background. Positioning your subjectwith some lights or a garden in the background will add color and distinction toyour photo, especially if you'll use the UFocus™ feature in Gallery.§Post-processing effects for Duo Camera may not work if your subject andbackground are too close or when you're taking a close-up shot. So, mind thedistance between your subject and your background, as well as the distancebetween the camera and your subject.§Duo Camera doesn't support zooming.Lighting§Use Duo Camera in an environment where there is a good light source. Post-processing effects for Duo Camera do not work for low-light photos or whenthe flash was turned on.§If lighting is uneven, like when the the background is a little bit under oroverexposed, tap [_] to adjust the exposure settings.§Hold HTC One in such a way that you don't block the second camera lens.61 CameraOnly for certification Only for certification Only for certification](https://usermanual.wiki/HTC/0P6B700.Users-Manual-pdf/User-Guide-2195236-Page-61.png)


![HTC CarOn the road with HTC CarNow when you drive, you can easily use HTC One to reach your destination, keep youentertained, and help you stay in touch with the people that matter to you. Accessmusic, phone calls, maps, and more with HTC Car.1. HTC Car instantly launches when you mount HTC One in HTC Car Kit.2. Swipe up or down to see what you can do in HTC Car.When using HTC Car, return to the main screen from any other screen by pressing.When you remove HTC One from HTC Car Kit, HTC Car will automatically exit.You can also manually close HTC Car by pressing from the main screen.Using voice commands in HTC CarUse your voice to control HTC Car.1. In HTC Car, tap the screen with three fingers to activate the voice commandmode. You can also activate speak by:§Tapping Speak on the main screen in HTC Car.§Pressing the answer button on supported Bluetooth headsets.2. Do one of the following:Call someone Say "Call [person's name in phonebook]"Play music Say "Play [song title, album, artist name,or genre]"Play the radio Say "Listen to [song title, artist name, orgenre]"Find something on themapSay "Find [name of place, address, type ofplace]"160 Travel and mapsOnly for certification Only for certification Only for certification](https://usermanual.wiki/HTC/0P6B700.Users-Manual-pdf/User-Guide-2195236-Page-160.png)