Contents
- 1. Users Manual (statement)
- 2. Users Manual
Users Manual
ΑΝΌΌϕϔόϏϊϋϔϚϏχϒ
όϕϘΌϋϘϚϏόϏωχϚϏϕϔ
ΑΝΌΌϕϔόϏϊϋϔϚϏχϒ
όϕϘΌϋϘϚϏόϏωχϚϏϕϔ
ΑΝΌΌϕϔόϏϊϋϔϚϏχϒ
όϕϘΌϋϘϚϏόϏωχϚϏϕϔ
ΑΝΌΌϕϔόϏϊϋϔϚϏ
ƫƫƫƫ
ƫƫƫƫƫƫƫƫƫƫƫƫƫƫƫƫƫƫĀāāĀĀƫĥƫćāĀ
ƫƫƫƫ

Contents
Discover
Introducing RE 4
RE app 6
Storage card 8
Battery 10
Waterproof protection 12
Set up
Setting up your RE for the first time 16
Pairing your RE and iPhone for the first time 17
Pairing your RE and Android phone for the first time 19
Connecting your RE and phone 20
Exploring basic and advanced settings 20
Checking for firmware updates 21
Disconnecting your RE and phone 22
Attaching the wrist lanyard 22
Take photos and videos
Getting to know the live viewfinder 24
Taking a photo 25
2 Contents
ΑΝΌΌϕϔόϏϊϋϔϚϏχϒ
er
ϔόϏ
ϕϔ
ducing REucing RE
apppp
Storage cStorage
BatterBatter
WaW
όϕϘΌϋϘϚϏόϏωχϚϏϕϔ
Ϗϕ
χϚϏ
f protectiorotect
upp
Ό
Ϙ
Setting up Setting up
Pairing
Pairing
ri
ri
ΑΝΌΌϕϔόϏϊϋϔϚϏχϒ
χϒ
ϚϏχ
Όϕϔ
Όϕ
for the firfor the fir
and iPhonand iPho
RE and AnRE and A
ng your REg your RE
basic abasic
όϕϘΌϋϘϚϏόϏωχϚϏϕϔ
χϚ
όϏωχ
e first timeirst time
hone for tne for t
oneone
anced setted set
e updatespd
ur RE and
r RE and
t lanya
lanya
ΑΝΌΌϕϔόϏϊϋϔϚϏχϒ
1
1212
ϚϏχ
ϔϚ
imee
eos
eos
ΑΝ
Α
find
ind
όϕϘΌϋϘϚϏόϏωχϚϏϕϔ
7
199
2020
202
ΌϋϘ
Ό
ΑΝΌΌϕϔόϏϊϋϔϚϏ
2222
ϔό
ϕϔ

Recording a video 26
Recording slow motion videos 27
Turning Ultra-wide angle on or off 28
Setting up Time lapse 29
View, edit, and share
Viewing photos and videos 31
Removing fisheye effect 32
Downloading a photo or video to your phone 33
Sharing a photo and video 34
Copying media files from your RE to your computer 35
Deleting photos and videos on your camera 36
Back up and reset
Backing up photos and videos to your phone 37
Backing up photos and videos to your online storage 38
Formatting your storage card 39
Resetting your RE 39
Trademarks and copyrights
Contents 3
ΑΝΌΌϕϔόϏϊϋϔϚϏχϒ
motion vidmotion vid
wide anglwide angl
Time lapsme lap
ew, edit, w, edit,
ϕϔ
Όϕ
Viewing pwing p
Removm
DowDow
S
όϕϘΌϋϘϚϏόϏωχϚϏϕϔ
off
harere
χϚ
Ϗωχ
d videos videos
ye effecte effect
g a photo photo
a photo anphoto an
ng media g media
leting phong pho
BackBack
όϕ
ό
ΑΝΌΌϕϔόϏϊϋϔϚϏχϒ
ϚϏχ
ϔϚ
o to your pto your p
m your REour RE
videos onideos on
d resetd reset
ΌΌ
ΝΌ
p photos a photos
g up photo
up photo
ng yog yo
όϕϘΌϋϘϚϏόϏωχϚϏϕϔ
computermputer
meramera
ϏόϏ
ϘϚϏ
os to yourto your
deos to yodeos to y
ge cardard
nd c
dc
όϕ
ΑΝΌΌϕϔόϏϊϋϔϚϏχϒ
3434
33
ϊϋ
όϏϊ
e storagetorage
ghtsghts
Ό
ΝΌ
όϕϘΌϋϘϚϏόϏωχϚϏϕϔ
ϕϔ
3737
383
ϚϏό
ϘϚ
ΑΝΌΌϕϔόϏϊϋϔϚϏ
Ϗϊϋ
όϏ
Discover
Introducing RE
There's a new way to capture life's priceless moments—and that's with RE.
With it, you can step out from behind the scene and live life in full view.
Here are the parts and features that you need to know about your
remarkable little camera.
4 Discover
ΑΝΌΌϕϔόϏϊϋϔϚϏχϒ
ucing REing RE
ere's a newe's a new
With it, youWith it, you
Here arHere a
remaema
όϕϘΌϋϘϚϏόϏωχϚϏϕϔ
capture licapture l
p out fromout from
rts and fea and fe
ttle camercamer
Όϋ
Ό
όϕϘΌ
όϕϘΌ
όϕϘΌ
ϕϘ
ϕϘ
ϕ
ΝΌΌϕϔόϏϊϋϔϚϏχϒ
eless momss mom
the scenethe scene
hat you neat you ne
ΝΌ
ϔ
ϔ
ϕϔ
ϕϔ
ϕ
ϕ
όϕϘΌϋϘϚϏόϏωχϚϏϕϔ
e
ow abou
abou
ό
ϋϘϚϏόϏωχϚ
ϚϏόϏ
ϚϏόϏ
ΑΝΌΌϕϔόϏϊϋϔϚϏχϒ
Ν
ΝΌΌϕ
όϕϘΌϋϘϚϏόϏωχϚϏϕϔ
όϏω
όϏω
όϏωχ
όϏω
Ϗό
Ϗό
ϚϏό
ϚϏό
Ϛ
ΑΝΌΌϕϔόϏϊϋϔϚϏ
ϕϔόϏ
ϕϔόϏ
ϕϔόϏ
ϔό
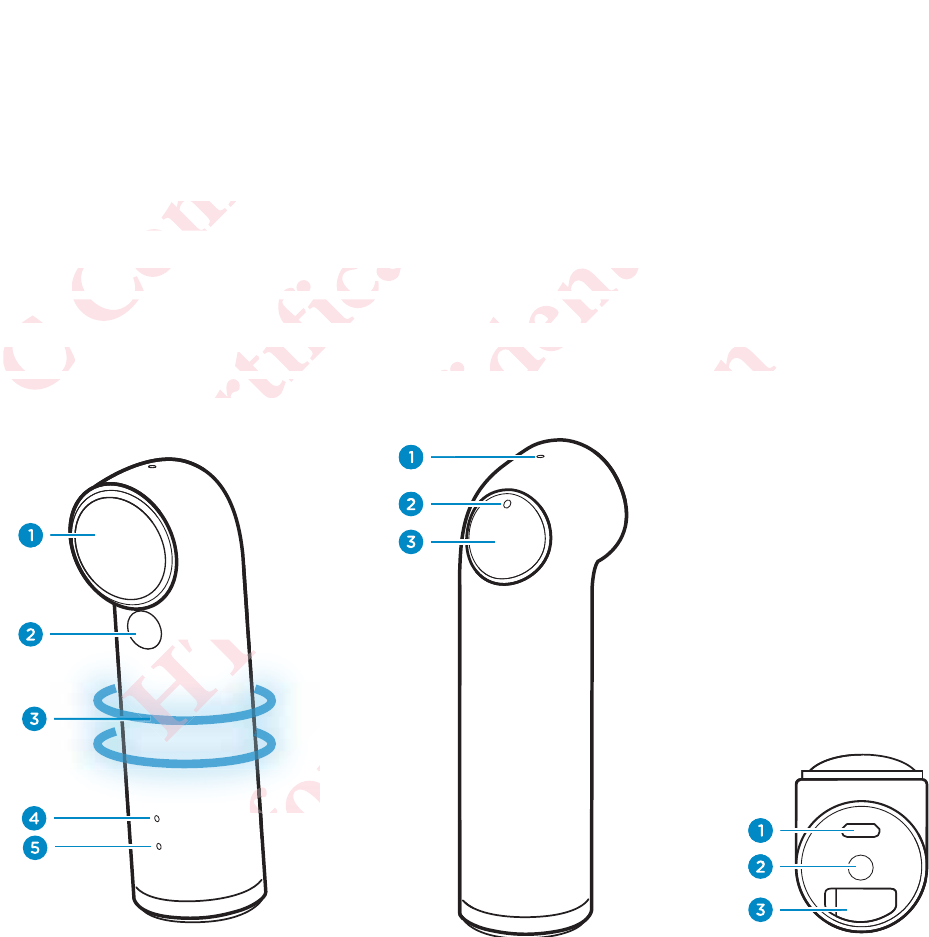
Front Back Bottom
1Lens Mic Micro USB port
2Slow motion mode switch Indicator LED Tripod socket
3Grip sensor Shutter button microSD™ card slot
4Indicator LED
5Speaker
Key features at a glance
Instant On
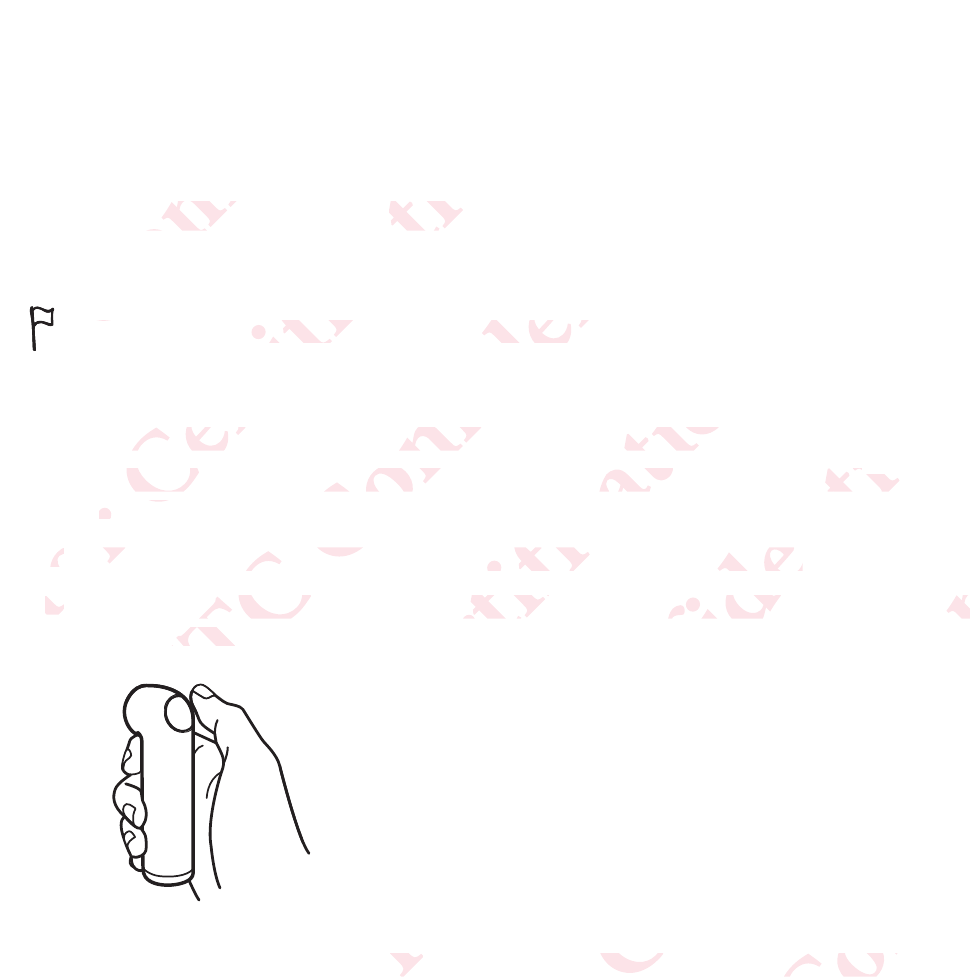
RE is always ready for your next big moment. After your first-
time setup, you only have to hold it by the grip sensor and it is
automatically switched on..
Slow motion recording
Add a cinematic flair to your action videos. Switch to Slow
motion mode and record slow motion videos on the fly.
Ultra-wide angle
Stop framing a moment in small boxes. Capture an Ultra-wide
angle view of what's in front of you.
7%'
Time lapse
Beautiful night sky? Switch to Time lapse mode, customize
your camera settings, and let your RE take sequential shots of
the night sky for an extended period of time.
Discover 5
ΑΝΌΌϕϔόϏϊϋϔϚϏχϒ
ϋϔϚ
otion modion mod
sensornsor
ndicator Ldicator L
5
SpeakeSpeak
ϋϔ
Ϗϊϋ
όϏ
ϔ
ΌΌ
Όϕ
ΌΌ
Key Key
Ό
ΝΌ
όϕϘΌϋϘ
ϘΌ
Ϙ
Ϙ
InstanInstan
RERE
Ό
ϋϘϚϏόϏωχϚϏϕϔ
Mic
IndicIndic
SS
ϔ
ϕ
Ϗϕ
ϕϔ
ϚϏ
ωχ
όϏω
es at a glaat a gla
ϚϏό
ϘϚ
ΌϋϘ
όϕ
Α
U
U
ΑΝΌ
ow motionow motio
Add a ciAdd a c
motiomotio
ΌΌϕϔό
ys ready fos ready fo
up, you on you on
matically swatically sw
ϔόϏϊϋϔϚϏχϒ
D
utton m
on m
ϒ
Ϗχ
ϔϚϏ
ϊϋϔ
ϊϋ
όϏϊ
ϔό
Ό
Α
Α
Α
ό
όϕϘΌ
e anglengle
raming a mraming a
view of
view of
ΌϋϘϚϏό
ing
flair to yor to yo
and recordnd record
ϚϏόϏωχϚϏϕ
ext big mt big m
to hold it bo hold it b
on..n..
Ϗϕϔ
ϔ
ϕϔ
Ϗϕ
ϚϏό
Ό
ό
ΑΝΌ
sky? Switsky? Swit
ettings,
ettings,
an
n
ΝΌΌϕϔ
n small bon small bo
n front of yfront o
ΌϕϔόϏϊϋ
n videos. Sdeos. S
otion videon vide
ϊϋϔϚϏχϒ
After your r your
rip sensor sensor
χϒ
ϒ
χϒ
ϊϋ
Όϕϔ
ΝΌ
όϕϘΌϋϘϚϏ
me lapse mme lapse m
your RE tar RE t
d period operiod o
ϚϏόϏωχϚ
pture an Uure an U
χϚϏϕϔ
SlowSlow
he fly.ly.
ϔ
ϔ
χϚ
ϚϏ
Ϙ
ΑΝΌΌϕϔόϏϊϋϔϚϏ
ee
stomizemize
ential shotntial shot
όϏϊ
Ό
Waterproof
Take RE to your next snorkeling adventure for snapshots of
what you see underwater.
Just don't forget to prepare it before you soak it. See
Waterproof protection on page 12 for details about
waterproof protection.
Easy pairing with iPhone® or Android™
Enjoy the RE experience on your phone, too. See RE app on
page 6 to learn more about it.
RE app
Download the RE app on your phone and explore exciting features you can
do with your RE. The RE app is available on the App Store and
Google Play™.
What you can do with it:
View and take photos and videos via the live viewfinder.
View, edit, and share photos and videos.
Set up and capture Time lapse.
Customize the settings for your RE.
Check firmware updates for your RE.
And more!
6 Discover
ΑΝΌΌϕ
ΝΌΌ
ΌΌ
ΌΌ
ΌΌ
EaE
ΌϕϔόϏϊϋϔϚϏχϒ
of
RE to your E to your
t you see t you see
ust don't t don't
WaterprWaterpr
waterwater
ϔϚϏ
Όϕ
Όϕ
ΝΌ
Όϕ
RR
όϕϘΌϋϘϚϏόϏωχ
ng with iPng with iP
the RE expe RE exp
e 6 to learto lear
ωχϚϏϕϔ
orkel
ater..
o prepare prepare
ectionction
on on
otection.ection.
ωχ
ϘϚ
p
wnload theoad the
o with youo with yo
Google P
Google P
What
hat
ΑΝΌΌϕϔόϏϊϋϔϚϏ
Androidndroid
™™
on your pon your p
about it.about it.
ϔϚϏχϒ
you soou s
for details
or details
ϔϚϏ
όϏϊ
on your pon your p
e RE app e RE app
do with itdo with it
w and takew and tak
iew, edit,
iew, edit
up
p
όϕϘΌϋϘϚϏόϏωχϚϏϕϔ
o. S
ϕϔ
d explore d explore
ble on thee on the
and videod vide
re photose photos
pture Timere Time
the setting
the settin
ware u
ware u
ΑΝΌΌϕϔόϏϊϋϔϚϏχϒ
ϒ
features yatures y
ore andore and
e live viewe view
eos.s.
our RE.ur RE.
for your Ror your R
όϕϘΌϋϘϚϏόϏωχϚϏϕϔ
ΑΝΌΌϕϔόϏϊϋϔϚϏ
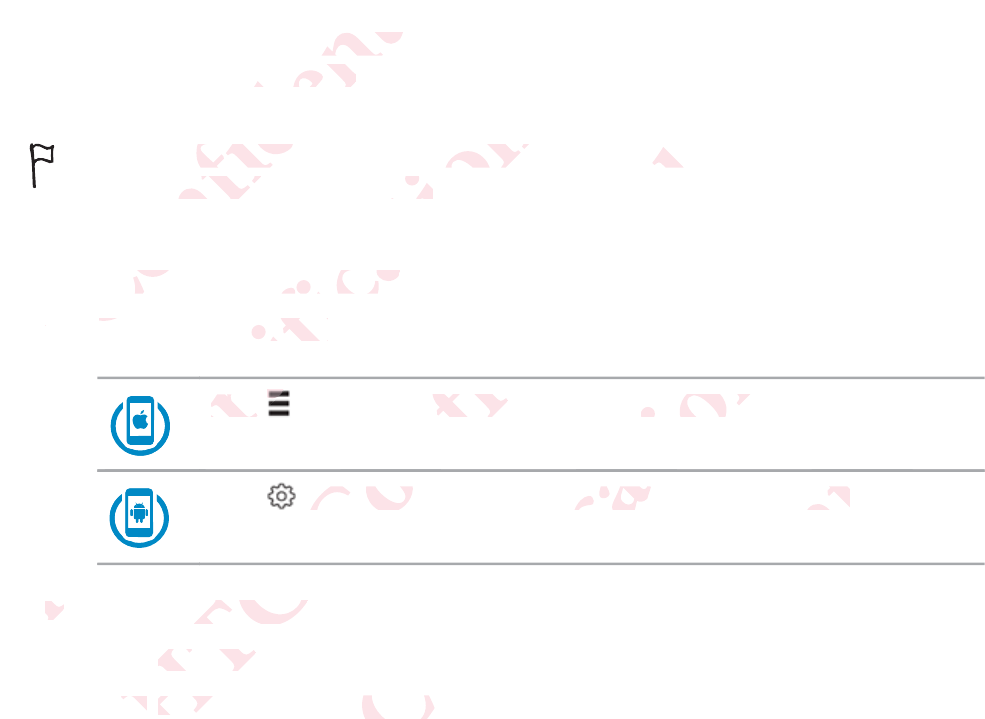
Downloading the RE app on your iPhone
Before downloading the RE app, please make sure that your phone
meets the minimum system requirements indicated in the RE app's
download page from the App Store.
1. On your phone, open the App Store.
2. Search for the RE app.
3. Tap FREE > INSTALL to download and install the RE app.
After successfully installing RE app on your iPhone, tap the RE app
icon on your Home screen.
Now, you are ready to pair and connect your iPhone and your RE. See
Pairing your RE and iPhone for the first time on page 17 to check out
how.
Downloading the RE app on your Android phone
Before downloading the RE app, please make sure that your phone
meets the minimum system requirements indicated in the RE app's
download page from Google Play.
1. On your phone, open the Play Store app.
2. Search for the RE app.
3. Tap Install to download and install the RE app.
Discover 7
ΑΝΌΌϕϔόϏϊϋϔϚϏχϒ
e RE app E app
ϔϚ
ϋϔ
e downloadownloa
ets the minthe mi
ownload pnload
1.1.
OnOn
2.2
όϕϘΌϋϘϚϏόϏωχϚϏϕϔ
RE app, p
E app, p
ystem reqstem req
m the Appthe App
one, openone, open
for the REor the RE
FREEEE
>>
INI
After succAfter succ
icon co
Now, you a, yo
Pairing yPairing y
how.how.
ΑΝΌΌϕϔόϏϊϋϔϚϏχϒ
ak
ak
ts indicindic
p Store.tore.
to downlodownlo
nstalling Ralling R
Home screme scr
y to pair ano pair a
and iPhonnd iPhon
oading thoading th
ΑΝ
Α
όϕϘΌϋϘϚϏόϏωχϚϏϕϔ
nstall the nstall the
n your iPhyour iPh
ect your iPct your
first timefirst time
pp on youpp on you
ϋϘ
Όϋ
loading thdin
minimum
minimum
page fr
page fr
ΑΝΌΌϕϔόϏϊϋϔϚϏχϒ
p the RE a
the RE a
d your REyour R
17 to che17 to che
oid phond phon
όϏ
ϕϔ
p, please mplease
requiremeequireme
gle Play.gle Play.
pen the Pl
pen the Pl
pp.
p.
όϕϘΌϋϘϚϏόϏωχϚϏϕϔ
Ϗϕ
ϚϏ
re that youe that you
cated in thated in th
app.app
install the install the
ΑΝΌΌϕϔόϏϊϋϔϚϏ
p'sp's
4. Tap Accept.
After successfully installing the RE app on your phone, tap the RE
app icon on your Home screen or Apps screen.
Now, you are ready to pair and connect your Android phone and your RE.
See Pairing your RE and Android phone for the first time on page 19 to
check out how.
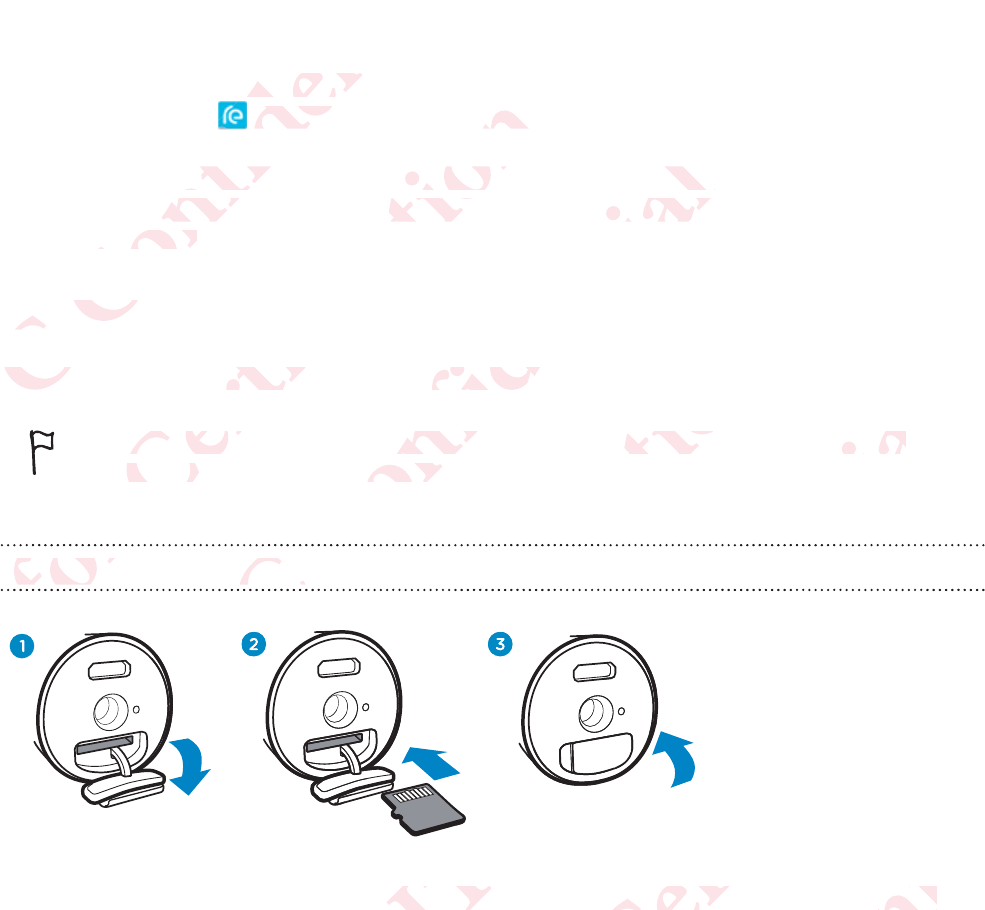
Storage card
RE may already have a microSD card preinstalled.
RE will not operate without a microSD card. Check and be sure
that a microSD card is inserted.
Inserting the microSD card
1. Open the microSD card slot cover located at the bottom of your
RE.
8 Discover
ΑΝΌΌϕϔόϏϊϋϔϚϏχϒ
essfully insssfully ins
on youon yo
re ready tready t
ng your Ryour R
out how.out how.
Storage Storage
RE maRE m
όϕϘΌϋϘϚϏόϏωχϚϏϕϔ
he
screen
reen
nd connec connec
ndroid phooid pho
dy have a have a
E will not owill not o
that a mict a mi
Inserting
nserting
ϕϘ
όϕ
ΑΝΌΌϕϔόϏϊϋϔϚϏχϒ
ndroid poid p
he first time first tim
card preicard prei
without a mout a m
rd is insertd is inser
icroSD cacroSD
ΌΌ
Ό
Α
Α
Α
Α
Α
ΝΌ
ΝΌ
όϕϘΌϋϘϚϏόϏωχϚϏϕϔ
card. Cherd. Che
όϏω
ϚϏό
ϕϘΌ
ϕϘΌ
ϘΌ
ϘΌ
Ϙ
ϘΌ
ϘΌ
Ϙ
ϘΌ
ϘΌ
ϕϘ Ό
ϕϘ Ό
όϕϘ
ϕϘ
ϕϘ
ϕϘ
Ό
Ό
Ό
ϘϚ
ϘϚ
ΑΝΌΌϕϔόϏϊϋϔϚϏχϒ
be suree sure
ϋϔ
Ϗϊϋ
Ό
Ό
ΌΌϕϔό
ΌΌϕϔό
Ό
Όϕ
Όϕ
Όϕ
Όϕ
Όϕ
Όϕ
Όϕ
Ό
Ό
ard slot cord slot co
όϕϘΌϋϘϚϏόϏωχϚϏϕϔ
ϔ
ted at the ted at the
ΑΝΌΌϕϔόϏϊϋϔϚϏ
of youryour

2. Insert a microSD card with the gold-plated side facing the same
direction as the lens.
The card will make a slight clicking sound when it’s securely
inserted.
3. Close the slot cover by pressing down to lock it in place.
Please be sure to securely close the slot cover to prevent damage
from water and dust.
Removing the microSD card
Open the microSD card slot cover, and then push the card in to eject it.
Discover 9
ΑΝΌΌϕϔόϏϊϋϔϚϏχϒ
oSD card D card
s the lenss the lens
rd will makd will mak
ted.ed.
Close the sse the s
Ό
Ό
Ό
Ό
Ό
Ό
Ό
Please Please
fromo
RemRem
ΝΌ
Ν
όϕϘΌϋϘϚϏόϏωχϚϏϕϔ
ht clickin
click
r by pressby press
to securelsecure
nd dust.nd dust.
the micre micr
ϚϏ
ϋϘϚ
he microSDe microS
ΑΝΌΌϕϔόϏϊϋϔϚϏχϒ
n to lock
n to lock
he slot coslot co
rdd
Ϗϊ
όϏ
ot cover, cover,
όϕϘΌϋϘϚϏόϏωχϚϏϕϔ
ϔ
Ϗϕ
n push the ush the
ΑΝΌΌϕϔόϏϊϋϔϚϏχϒ
ϒ
to eject it.o eject it.
όϕϘΌϋϘϚϏόϏωχϚϏϕϔ
ΑΝΌΌϕϔόϏϊϋϔϚϏ
Battery
Your RE comes with a non-removable battery. To efficiently manage
battery consumption, RE automatically powers on when you hold it by the
grip sensor and enters standby mode when you leave it idle for certain
period of time.
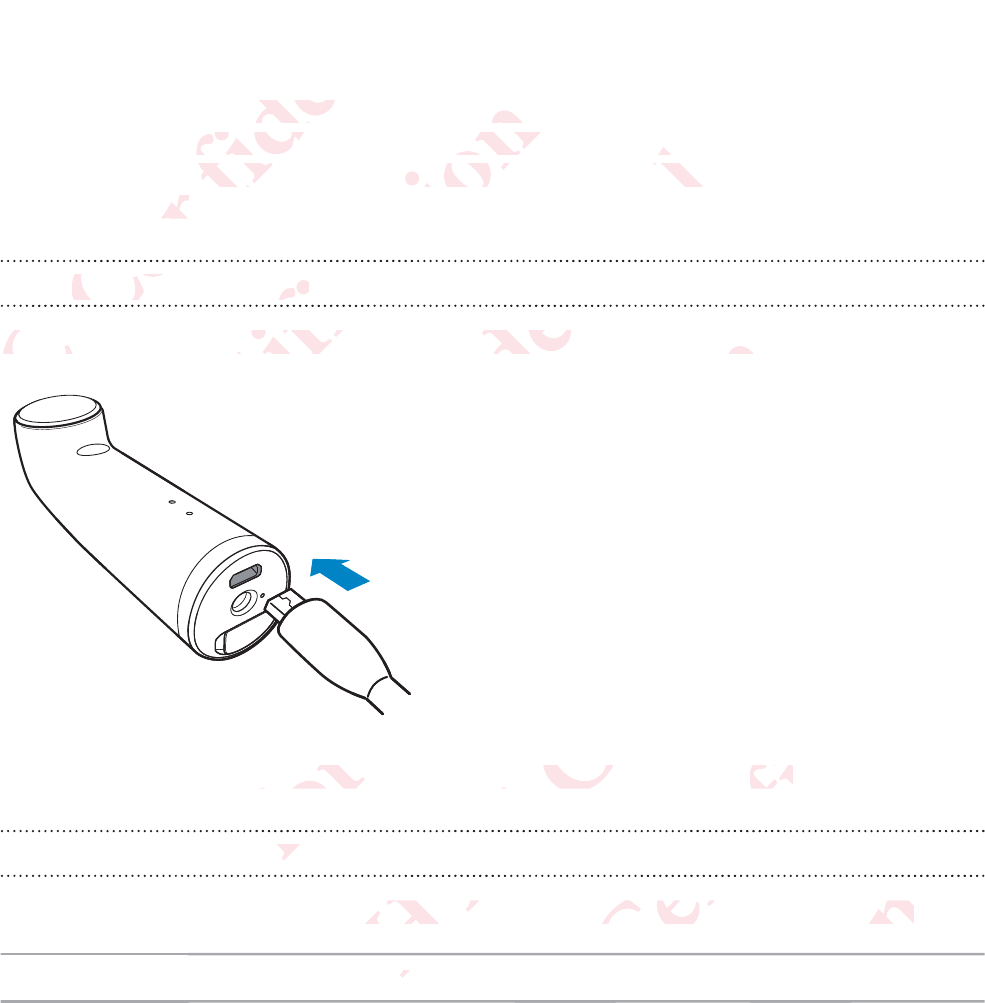
Charging the battery
Connect your RE to a power source using the supplied micro USB cable.
The indicator LED turns green when your RE is fully charged.
Checking the battery status
Hold your RE to check the battery status. The indicator LED will show:
Green Battery level is above 50%.
10 Discover
ΑΝΌΌϕϔόϏϊϋϔϚϏχϒ
with a nonh a non
mption, Rmption, R
and enterd enter
time.me.
harging thging th
Όϕ
Ό
ConnectConne
Ν
Ν
ΝΌ
ΝΌ
όϕϘΌϋϘϚϏόϏωχϚϏϕϔ
able ba
e ba
atically po
cally po
by mode w mode w
eryery
ωχ
όϏω
E to a powto a pow
όϕϘ
Όϋ
Ό
ΑΝΌΌϕϔόϏϊϋϔϚϏχϒ
w
w
leave iave
ϔϚϏ
ϋϔ
e using thusing th
Ό
ΝΌ
Ό
Ό
ΑΝΌ
Ό
Ν
ΑΝΌ
ΑΝΌ
Ό
Ό
Ό
ΝΌ
ΝΌ
ΝΌ
ΝΌ
ΑΝΌ
ΝΌ
ΝΌ
ΑΝ
Ό
ΌΌ
ΌΌ
όϕϘΌϋϘϚϏόϏωχϚϏϕϔ
ed mic
mi
Ό
Ό
Ό
Ό
urns greenurns gree
ery
ery
όϕ
ΑΝΌΌϕϔόϏϊϋϔϚϏχϒ
your RE is our RE is
ΝΌ
ΝΌ
battery stabattery st
a
a
Α
όϕϘΌϋϘϚϏόϏωχϚϏϕϔ
rged.ged.
ϚϏό
ϘϚ
e indicatorindicator
%.
Ό
Ϙ
ΑΝΌΌϕϔόϏϊϋϔϚϏ
Ϗϊ
όϏ
l show:ow:
Όϕϔ
Ό
Orange Battery level is between 25% to 50%.
Red Battery level is below 25%.
If you’re already holding your RE and you want to check the battery status,
please set it down for 30 seconds. When you pick it up again, you’ll see the
battery indicator LED.
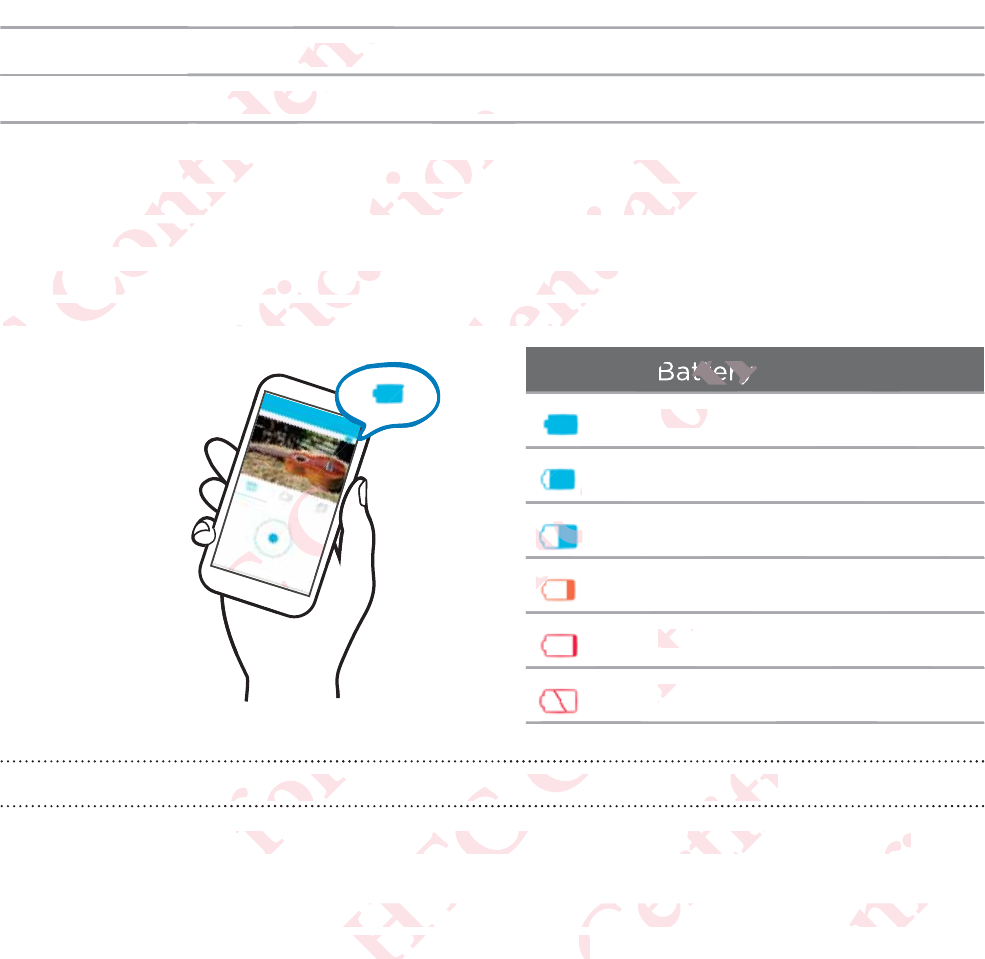
You can also check the battery status of your RE from the RE app. The
battery status icon is shown above the live viewfinder.
Battery level
100%
75%
50%
25%
8%
0%
Is there a way to power off while I'm holding my RE?
Yes, you can do this by setting your RE to Airplane mode from the RE
app's Camera settings.
To exit Airplane mode, though, you will need to press and hold the Shutter
button for two seconds to power on your RE.
Discover 11
ΑΝΌΌϕϔόϏϊϋϔϚϏχϒ
ery level ilevel i
Battery levattery lev
ϔϚϏ
ϊϋϔ
Ϗϊϋ
ready holddy hol
et it downt down
ry indicatoy indicato
ou can alscan als
battery sbattery s
όϕϘΌϋϘϚϏόϏωχϚϏϕϔ
ow 25
ϔ
r RE and yRE and y
seconds. Wconds. W
the batterthe batter
n is shownn is shown
ϚϏ
ϚϏ
ϋ
Ϛ
ΑΝΌΌϕϔόϏϊϋϔϚϏχϒ
t to cheo ch
u pick it u
pick it u
of your Ryour R
the live viethe live vi
ΝΌΌϕ
ΝΌΌϕ
Όϕ
Όϕ
ΝΌ
Όϕ
Όϕ
ΌΌϕ
ϔόϏ
ϔόϏ
ϊϋ
όϕϘΌϋϘϚϏόϏωχϚϏϕϔ
Ό
ϕϔ
ttery
100%100%
7
ϕϔ
ϚϏ
ϚϏ
ωχ
ϚϏ
ωχ
ϏόϏϏόϏ
o power
o power
Ϙ
όϕ
his byhis b
ΑΝΌΌϕϔόϏϊϋϔϚϏχϒ
ϒ
25%%
8%8%
0%0%
ϒ
Ϗχ
ϔϚ
ϊϋϔ
όϏϊ
ϔό
ϔό
Όϕ
ϔό
le I'm hole I'm hol
Ό
ΌΌ
your RE tyour RE t
ough, you
ough, you
o powerpower
όϕϘΌϋϘϚϏόϏωχϚϏϕϔ
ϕϔ
ϚϏϕ
χϚ
y RE?y RE?
όϏω
ϏόϏ
ne mode frmode f
d to press to press
r RE.E.
ΑΝΌΌϕϔόϏϊϋϔϚϏ
ϊϋ
RERE
d the Shuthe Shut

Waterproof protection
RE has IPX7 waterproof capabilities. This means that you can safely use it
when immersed in water under the following conditions:
Fresh water or Sea water only
Maximum water depth: 1 meter (3.2 feet)
Maximum time underwater: 30 minutes
Water temperature: 15°C - 35°C ( 59°F - 95°F)
This rating does not ensure the waterproof performance of RE or
that RE will be free from damage or trouble under all conditions.
Waterproof precautions
7%'
Tightly close the microSD card slot cover.
7%'
Keep the microSD card dry.
7%'
Fasten a waterproof cap (sold separately) if you're going
beyond 1 meter of water.
12 Discover
ΑΝΌΌϕϔόϏϊϋϔϚϏχϒ
ectiontion
erproof caproof c
ed in wated in wate
esh water h water
MaximumMaximum
Maxiax
W
ΝΌ
ΝΌ
Ν
ΝΌ
ΝΌ
Ν
Ν
Ν
ΝΌ
όϕϘΌϋϘϚϏόϏωχϚϏϕϔ
s. This
This
the follow
follow
water onlyter only
depth:pth:
1 m 1 m
e underwe underw
mperatureperature
rating doeng do
at RE will t RE will
WaterprooWaterpro
ϘΌ
όϕϘ
ό
όϕ
ΑΝΌΌϕϔόϏϊϋϔϚϏχϒ
itio
it
2 feet)eet)
minutesnutes
35°C ( 59°°C ( 59
sure the wre the w
rom damam dama
autionsautions
Όϕ
ΌΌ
htly close ttly close
ee
ee
Ό
Α
όϕϘΌϋϘϚϏόϏωχϚϏϕϔ
)
of performf perform
ouble undeble und
Ϗωχ
ϏόϏ
oSD card sD card
croSD caroSD car
ϚϏό
Ό
ό
ΝΌΌϕϔόϏϊϋϔϚϏχϒ
RE orE or
nditions.ditions.
ϔϚ
ϊϋϔ
er.r.
f cap (soldcap (s
f water.wate
ϊϋ
Όϕϔ
ΝΌ
ΑΝ
Α
όϕϘΌϋϘϚϏόϏωχϚϏϕϔ
ely) if you) if you
ϔ
χϚ
ϚϏ
ΌϋϘ
ϘΌ
ΑΝΌΌϕ
g
όϏϊ
ΌϕϔόϏϊϋϔϚϏ
Όϕ
7%'
Securely hold your RE while underwater by attaching the
supplied lanyard and wearing it on your wrist. See Attaching the
wrist lanyard on page 22 for more details.
Things to avoid
7%'
Avoid immersing RE or letting the USB port come into contact
with liquid chemicals such as liquid soap or detergent.
7%'
Never immerse RE in hot springs, or any liquid besides water
(such as alcohol, drinks, etc.).
7%'
Do not jump into water with RE or subject it to high water
pressure conditions such as rapids or waterfalls. Subjecting RE
to excessive shock, vibration or pressure by dropping or hitting
it, may affect waterproof performance.
7%'
Keep away from dust and sand.
7%'
Do not charge RE underwater.
Discover 13
ΑΝΌΌϕϔόϏϊϋϔϚϏχϒ
hold your d your
ed lanyardd lanyard
t lanyardlanyard
oo
ϔϚϏ
όϏϊ
s to avoido avoi
ϔό
ϕϔ
ΌΌ
7%'
A
Όϕ
ΝΌ
Όϕ
ΝΌ
όϕϘΌϋϘϚϏόϏωχϚϏϕϔ
arin
22 for m
for m
ϕϔ
ϚϏϕ
χϚ
mersing Rmersing
quid chemuid chem
Ό
'
Never imNever im
(such uch
όϕϘ
7%'7%'
ωχ
ϘϚ
Ϙ
ΑΝ
Keep Keep
ΑΝΌΌϕϔόϏϊϋϔϚϏχϒ
ϒ
χϒ
ϚϏχ
ing the USg the U
ch as liquidh as liquid
RE in hot sn hot s
ol, drinks, drinks,
jump intojump into
sure condsure con
excessiveexcessive
it, may afft, may a
ϔϚ
όϏϊ
Ό
Α
ΑΝ
όϕ
t charge
charge
όϕϘΌϋϘ
om dust anm dust an
ΌϋϘϚϏόϏωχϚϏϕϔ
r de
r any liquiany liqu
with RE or ith RE or
ch as rapidh as rapi
vibration oration o
erproof peroof p
ϕϔ
όϏω
ΌϋϘ
όϕϘ
ΑΝΌΌϕϔόϏϊϋϔϚϏχϒ
es waterwater
t to high wt to high w
terfalls. Suerfalls. Su
re by droe by dro
ce.
ϒ
ϔ
ϔό
ΌΌ
ΑΝΌΌ
erwater.erwater.
Α
όϕϘΌϋϘϚϏόϏωχϚϏϕϔ
RE
E
hittingtting
ϚϏϕ
ϏόϏ
ΌϋϘϚϏόϏ
Όϋ
ΑΝΌΌϕϔ
ϊϋ
ϔόϏϊϋϔϚϏ
ϕϔ
7%'
Do not open the microSD card slot cover underwater or in areas
exposed to water spray, high winds, dust or sand. Also, do not
insert a wet microSD card in RE.
7%'
RE does not float in water. Do not drop RE into water.
Cleaning and drying after exposing RE to water
Always clean your RE after using underwater. Some water, especially salt
water, is corrosive to electronics and can result in damage to your RE.
It is recommended to clean your RE within 60 minutes of
underwater use.
In case the USB port has had contact with salt water or liquid
chemicals, rinse using fresh water. These contaminants may
damage the connector pins.
Make sure to let the USB port dry completely before using the
port.
1. Immerse your RE in fresh water, with its microSD card slot cover
tightly sealed.
2. Leave your RE submerged in a basin for about 10 minutes.
3. Shake off the water caught in the USB port.
14 Discover
ΑΝΌΌϕϔόϏϊϋϔϚϏχϒ
en the miche mic
d to water to water
a wet mica wet mic
Ό
RE does nodoes n
ϔϚϏ
Όϕ
όϏϊ
Όϕ
CleaninClean
ΌΌ
ΝΌ
AlwA
ww
όϕϘΌϋϘϚϏόϏωχϚϏϕϔ
gh
rd in RE
n R
n water. Dwater. D
ϕϔ
όϏωχ
drying aftying af
ϏόϏ
ϚϏ
n your REyour RE
corrosive torrosive t
όϕ
It is
uu
ΑΝΌΌϕϔόϏϊϋϔϚϏχϒ
op RE in
RE in
ϒ
ϔϚ
osing RE osing RE
ϊϋϔ
όϏϊ
ing underwunder
onics and cs and
mended to nded to
er use.er use.
e the USBe the USB
micals, rinmicals, rin
amage thamage th
Make suMake s
ort
rt
όϕϘΌϋϘϚϏόϏωχϚϏϕϔ
er
ϔ
ome waterme wate
lt in damain dama
our RE withur RE wit
s had contad cont
fresh watesh wat
ctor pins.ctor pins.
t the USB e USB
our RE
ur RE
ΑΝΌΌϕϔόϏϊϋϔϚϏχϒ
ally salty sa
our RE.ur RE.
inutes oftes of
salt watesalt wate
e contamicontami
completecomplete
water, witwater, w
merged in
merged in
caughaug
όϕϘΌϋϘϚϏόϏωχϚϏϕϔ
d
ay
e using thesing the
roSD cardSD card
or about 1or about 1
USB port.port.
ΑΝΌΌϕϔόϏϊϋϔϚϏ
verver
es.

4. Wipe off water droplets with a soft cloth and dry your RE in a well-
ventilated place.
Discover 15
ΑΝΌΌϕϔόϏϊϋϔϚϏχϒ
ter dropletdrople
place.place.
όϕϘΌϋϘϚϏόϏωχϚϏϕϔ
ΑΝΌΌϕϔόϏϊϋϔϚϏχϒ
όϕϘΌϋϘϚϏόϏωχϚϏϕϔ
ΑΝΌΌϕϔόϏϊϋϔϚϏχϒ
όϕϘΌϋϘϚϏόϏωχϚϏϕϔ
ΑΝΌΌϕϔόϏϊϋϔϚϏ
Set up
Setting up your RE for the first time
RE will not operate without a microSD card.
1. Confirm that there is a microSD card inserted in your RE.
If you need to insert a card, see Inserting the microSD card on page
8 for details.
2. Fully charge the battery using the supplied USB cable.
3. Press and hold the Shutter button for two seconds to power on for
the first time.
For subsequent use, simply hold your RE by the grip sensor and it will
instantly power on.
16 Set up
ΑΝΌΌϕϔόϏϊϋϔϚϏχϒ
g up youup you
Ό
Ό
RERE
όϕϘΌϋϘϚϏόϏωχϚϏϕϔ
or the firthe fi
operate wperate w
onfirm thaonfirm tha
If you neyou ne
8 for d8 for d
2.2.
FuFu
3.3.
ΑΝΌΌϕϔόϏϊϋϔϚϏχϒ
e
microSD microSD
s a microSmicroS
sert a cardert a card
ge the batte the batt
nd hold thnd hold th
rst time. rst tim
Α
Α
ΑΝ
Α
Α
ΑΝ
ΑΝ
όϕϘΌϋϘϚϏόϏωχϚϏϕϔ
nserted in erted in
erting the ng the
g the supp the sup
er button fbutton f
όϕ
ΑΝΌΌϕϔόϏϊϋϔϚϏχϒ
.
D cardard
on on
B cable.B cable.
econds toeconds to
hold old
όϕϘΌϋϘϚϏόϏωχϚϏϕϔ
on foror
by the grihe gri
ΑΝΌΌϕϔόϏϊϋϔϚϏ
r and it wiland it wi

Pairing your RE and iPhone for the first time
Before pairing, be sure that:
The RE app should be installed on your iPhone.
Both your devices are charged.
A microSD card is installed in RE.
Your RE is not connected to another phone.
You won't be able to connect to the Internet while you're
connected to the Wi-Fi® network of your RE.
1. On your iPhone, go to Settings > Bluetooth, and then tap the
Bluetooth® switch to turn it on.
2. Press the Home button, and then tap the RE app icon.
3. Hold your RE by the grip sensor.
4. When you see a prompt to turn on push notifications from the RE
app, tap OK.
5. Tap Next.
Your iPhone scans nearby devices.
Set up 17
ΑΝΌΌϕϔόϏϊϋϔϚϏχϒ
and iPhnd iPh
be sure tbe sure t
The RE ape RE ap
Ό
Ό
Ό
BothBot
Ό
Ό
Ό
όϏϊ
Όϕ
Όϕ
Όϕϔ
ΌΌ
Ν
όϕϘΌϋϘϚϏόϏωχϚϏϕϔ
be installbe instal
evices areevices are
roSD cardSD card
Your RE iYour RE
ϕϔ
χϚ
ϏόϏ
Ό
ϋϘ
Ό
όϕ
όϕ
όϕ
όϕ
όϕ
όϕ
όϕ
όϕ
ϕ
όϕ
όϕ
όϕ
YoYo
ΑΝΌΌϕϔόϏϊϋϔϚϏχϒ
our iPhon
iPhon
d.
ed in RE.ed in RE.
nnected toected t
ϒ
ϚϏχ
ϊϋϔ
όϏ
Όϕ
be able tobe able to
ed to the ed to th
On your i
On your i
Bluetoouetoo
όϕϘΌϋϘϚϏόϏωχϚϏϕϔ
er phone.phone.
Ϗϕ
ωχ
ct to the Int to the I
etwork of work of
o to o to
SettiSett
ch to turnto turn
ome buttoe bu
r RE by t
RE by
ee
ee
ΑΝΌΌϕϔόϏϊϋϔϚϏχϒ
ϒ
ϔϚϏ
while you'rhile you'r
uetoothooth
, a, a
hen tap thn tap t
sensor.ensor.
pt to turn pt to turn
ea
a
όϕϘΌϋϘϚϏόϏωχϚϏϕϔ
tap the the
p icon. icon.
notificatiotificatio
ces.
ΑΝΌΌϕϔόϏϊϋϔϚϏ
the REhe RE

6. Select the name of your RE from the list of detected devices.
7. Set a password, and then tap OK.
You'll see the screen that prompts you to connect to your iPhone
to the Wi-Fi network of your RE camera. The name and password
you'vee set is also displayed on screen.
8. Press Home button of your iPhone, and then tap Settings > Wi-Fi.
9. Be sure that Wi-Fi is on, then select the name of your RE from the
list.
10. Enter the password you've set for RE, and then tap Join.
11. Press Home button of your iPhone, and then tap the RE app icon
to start using the app with your RE camera.
Pairing devices is done only once. The next time you use your RE and your
phone, you only have to connect them. See Connecting your RE and phone
on page 20 to know how.
18 Set up
ΑΝΌΌϕϔόϏϊϋϔϚϏχϒ
me of yourof your
word, andword, and
ee the scree the scr
e Wi-Fi neWi-Fi ne
u'vee set ee set
Press HoPress Ho
9.
Be sue s
listlist
10.10.
όϕϘΌϋϘϚϏόϏωχϚϏϕϔ
p
O
prompts
ompts
f your RE your RE
splayed oplayed o
on of yourof you
Wi-Fi is onWi-Fi is on
he passwopasswo
ss Home bss Home
o start usistart us
ing deviceg devic
hone, youhone, yo
on page
on page
ΑΝΌΌϕϔόϏϊϋϔϚϏχϒ
The nhe
and then nd then
elect the nt the n
ve set for Re set for
f your iPhoour iPho
pp with yowith yo
e only onconly onc
ve to connve to conn
ow how.ow how
όϕϘΌϋϘϚϏόϏωχϚϏϕϔ
hen tap tap
J
J
then tap then tap
amera.era
ext time yext time y
m. See See
ConCon
ΑΝΌΌϕϔόϏϊϋϔϚϏχϒ
pp icon icon
your RE anr RE an
your RE ayour RE a
όϕϘΌϋϘϚϏόϏωχϚϏϕϔ
ΑΝΌΌϕϔόϏϊϋϔϚϏ

Pairing your RE and Android phone for the first time
Before pairing:
The RE app should be installed on your Android phone.
Both your devices are charged.
A microSD card is installed in RE.
Your RE is not connected to another phone.
1. Open the RE app.
2. Hold your RE by the grip sensor.
3. Tap Get Started.
4. Tap Next.
Your phone scans nearby devices.
5. Select the name of your RE from the list of detected devices.
6. Set a password, and then tap OK.
7. Start using the app with your RE camera.
Pairing devices is done only once. The next time you use your RE and your
phone, you only have to connect them. See Connecting your RE and phone
on page 20 to know how.
Set up 19
ΑΝΌΌϕϔόϏϊϋϔϚϏχϒ
and Annd An
he RE appRE app
Ό
Ό
Ό
Both Both
Ό
Ό
Ό
όϏϊ
Ό
Όϕϔ
Ό
ΌΌ
Ό
Ν
όϕϘΌϋϘ
Your RE isYour RE is
ϋϘϚϏόϏ
oSD card iD card
ϏόϏωχϚϏϕϔ
be installeinstalle
vices are cvices are c
ϕϔ
χϚ
ϏόϏ
ϋϘϚ
Ό
1.1
OO
22
ΑΝΌΌϕϔόϏ
nected to cted to
όϏϊϋϔ
d in RE.n RE.
ϊϋϔϚϏχϒ
ur Andro
Andro
ϒ
ϚϏχ
ϊϋϔ
όϏ
Όϕ
e RE app.RE app.
your RE byour RE b
ap p
Get StaGet St
Tap Tap
Nexex
ur
όϕϘΌϋϘϚϏόϏωχϚϏϕ
phone.hone.
Ϗϕϔ
Ϗϕ
ωχ
p sensor.ensor.
scans nearns
e name of
name of
wordword
ΑΝΌΌϕϔόϏϊϋϔϚϏχϒ
ϒ
ϚϏ
ces.s
from the from the
en tap n tap
OKOK
with your with your
y oncey once
ne
ne
όϕϘΌϋϘϚϏόϏωχϚϏϕϔ
etected deected de
era.ra
xt time yotime y
. See ee
Con
ΑΝΌΌϕϔόϏϊϋϔϚϏ
our RE andur RE and
your RE anour RE an

Connecting your RE and phone
The RE app remembers the RE camera you've paired.
Before connecting, be sure that:
You've successfully paired your devices.
Your RE is not connected to another device.
Bluetooth is turned on.
For iPhone users: You've connected your iPhone to the Wi-Fi
network of your RE.
1. Hold your RE by the grip sensor.
2. Open the RE app.
You'll see the live viewfinder in action or your photos and video thumbnails
in your gallery once you have connected your devices.
Exploring basic and advanced settings
The RE give you options to customize the photos and videos you with the
RE camera. Go to settings and check out the settings you can customize.
1. Connect your phone and your RE.
20 Set up
ΑΝΌΌϕϔόϏϊϋϔϚϏχϒ
r RE and E and
embers thbers th
ecting, be ting, be
You've suc've suc
Ό
ΌΌ
ΌΌ
YourYou
ΝΌ
Ν
ϔό
Ό
Ό
ΝΌ
Όϕ
ΝΌ
όϕϘΌϋ
For iPhonr iPhon
networnetwor
ΌϋϘϚϏ
oth is turn is tur
ϚϏόϏωχ
ot connectconnec
ϏωχϚϏϕϔ
mera yo
ra y
t:
y paired yoaired yo
ϚϏϕ
όϏωχ
ϚϏ
Όϋ
Ϙ
1.1.
ΑΝΌΌϕϔ
You've coYou've co
r RE.RE
ϔόϏϊϋϔϚ
other devother dev
ϔϚϏχϒ
ces.s
Ϗχϒ
ϔϚ
όϏϊ
ϔ
Ό
our RE byour RE by
en the REen the RE
the livhe liv
όϕϘΌϋϘϚϏόϏωχϚϏ
your iPhour iPho
ϚϏϕϔ
ϔ
ϚϏ
όϏω
p sensor.ensor.
nder in acr in ac
you have cha
ic and
c and
ΑΝΌΌϕϔόϏϊϋϔϚϏχ
e Wi-FiWi-Fi
Ϗχϒ
Ϗχ
ϋϔ
your photoour photo
d your deyour de
ced settced se
ustomize ustomize
and check
and chec
nd
d
όϕϘΌϋϘϚϏόϏωχϚϏϕϔ
deo thumbo thum
tos and vidos and vi
e settings ysettings
E.
ΑΝΌΌϕϔόϏϊϋϔϚϏ
u with theith the
customizeomize
2. To go to Settings:
Tap while your phone is in portrait orientation.
Tap while your phone is in portrait orientation.
Checking for firmware updates
A firmware update for your RE includes improved features and bug fixes.
Always remember to keep your RE up-to-date.
Before installing firmware updates:
Check that your phone and your RE have approximately 50%
battery power.
A microSD card is inserted in your RE.
1. Connect your phone and your RE.
2. To go to Settings:
Tap while your phone is in portrait orientation.
Set up 21
ΑΝΌΌϕϔόϏϊϋϔϚϏχϒ
tings:gs:
ό
Tap ap
ww
Όϕϔ
Όϕϔ
Όϕϔ
Όϕϔ
ϕϔ
ϕϔ
ϕϔ
TT
ϊϋϔ
ϔό
ϔό
Όϕ
ϔό
Chece
A
όϕϘΌϋϘϚϏόϏωχϚϏϕϔ
ur phone
hone
hile your pe your
Ϗϕ
Ϗωχ
or firmwfirmw
re update e update
rememberememb
ore installnstall
όϕ
όϕϘ
όϕ
CC
ϕϘ
ϕϘ
ό
ΑΝΌΌϕϔόϏϊϋϔϚϏχϒ
in portraitn portrait
χϒ
ϔϚ
datesdates
RE includE includ
p your RE our RE
ware updaare upd
t your phot your ph
power.pow
microSD caicroSD c
Ό
ΝΌ
Α
όϕϘΌϋϘϚϏόϏωχϚϏϕϔ
oved featued featu
ate..
your RE hour RE h
erted in yoed in y
όϏω
ϘϚ
Ό
our phoneour phon
Setting
etting
ΑΝΌΌϕϔόϏϊϋϔϚϏχϒ
bug fixe
g fixe
roximatelyoximately
ϋϔ
όϏϊ
ϕϔ
ur RE.ur RE.
ile your phle your ph
ΑΝ
Α
όϕϘΌϋϘϚϏόϏωχϚϏϕϔ
ϕϔ
χϚ
n portrait oportrait
ϋϘϚ
Ό
ΑΝΌΌϕϔόϏϊϋϔϚϏ
on.
όϏ
Όϕ
Tap while your phone is in portrait orientation.
3. Tap Advanced settings.
4. Tap Check for updates.
5. If there's an available firmware update, tap Update now.
6. Wait until the firmware update is complete.
Disconnecting your RE and phone
1. Open the Notification center on an iPhone or your Notification
panel on an Android phone.
You'll see a notification the RE is connected.
2. Tap to disconnect.
Attaching the wrist lanyard
1. Hook the end of the supplied wrist lanyard into the tripod screw
that also came in the box.
22 Set up
ΑΝΌΌϕϔόϏϊϋϔϚϏχϒ
while ywhile y
ϔϚϏ
Ϗϊϋ
Advancedvance
Tap
CheckCheck
If thereIf there
6.
WaWa
DiscDisc
όϕϘΌϋϘϚϏόϏωχϚϏϕϔ
ϔ
s
.
atess
..
ailable firmble firm
he firmwarfirmwar
ting young you
Open thepen the
panel opanel o
YouYo
2.2.
ΑΝΌΌϕϔόϏϊϋϔϚϏχϒ
pdate, tap te, tap
e is comple is comp
nd phond phon
tion centen cente
droid phoroid pho
notificatioficatio
o disconno discon
ng the wng the w
kt
k
όϕϘΌϋϘϚϏόϏωχϚϏϕϔ
Phone or one or
is connecs connec
nyardnyard
of the supthe sup
me in the bin the
ΑΝΌΌϕϔόϏϊϋϔϚϏχϒ
tificationication
st lanyardt lanyard
Α
Α
Α
Α
ΑΝ
Α
Α
Α
Α
Α
Α
ΑΝ
Α
Α
όϕϘΌϋϘϚϏόϏωχϚϏϕϔ
e tripod sctripod sc
ΑΝΌΌϕϔόϏϊϋϔϚϏ

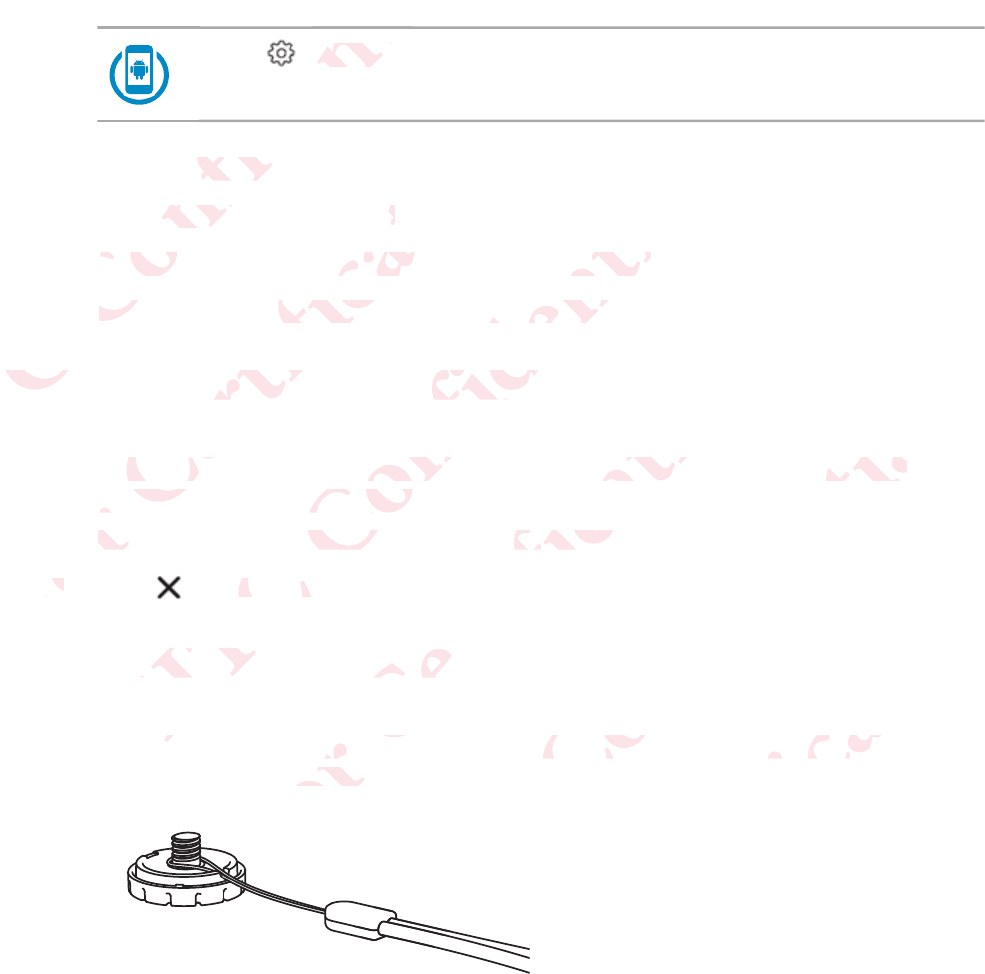
2. Align the lanyard into the small groove of the tripod screw.
3. Tightly fasten the tripod screw to your RE.
Set up 23
ΑΝΌΌϕϔόϏϊϋϔϚϏχϒ
yard into td into
asten the tsten the t
όϕϘΌϋϘϚϏόϏωχϚϏϕϔ
rew
ΑΝΌΌϕϔόϏϊϋϔϚϏχϒ
όϕϘΌϋϘϚϏόϏωχϚϏϕϔ
ΑΝΌΌϕϔόϏϊϋϔϚϏχϒ
όϕϘΌϋϘϚϏόϏωχϚϏϕϔ
ΑΝΌΌϕϔόϏϊϋϔϚϏ
Take photos and videos
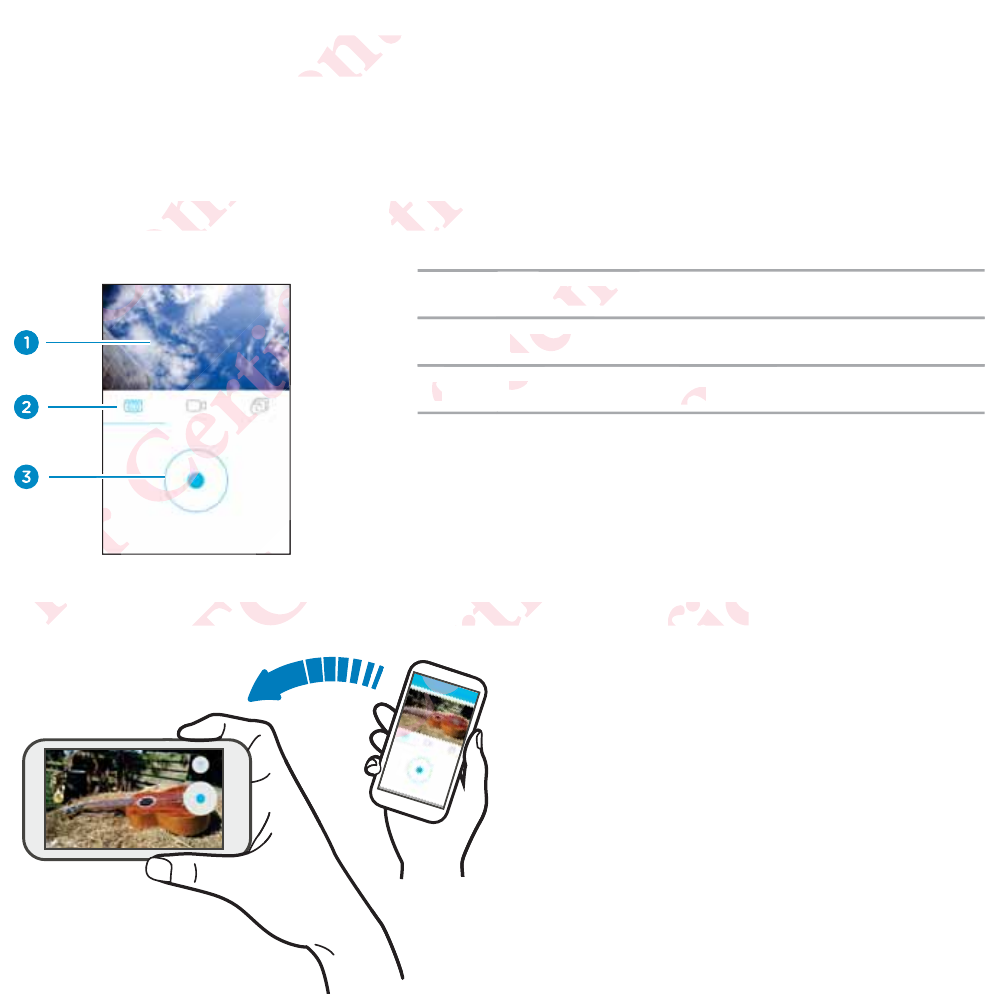
Getting to know the live viewfinder
1Live viewfinder
2Modes
3Capture button
Turn your phone sideways to see a bigger live viewfinder.
24 Take photos and videos
ΑΝΌΌϕϔόϏϊϋϔϚϏχϒ
s and vand v
g to knoto kno
Όϕ
Ό
Ό
Ό
Ό
ΝΌ
ΝΌ
όϕϘΌϋϘϚϏόϏωχϚϏϕϔ
live viewe vie
ϕϘΌϋϘϚϏόϏ
Ό
Ό
urn y
rn
ΑΝΌΌϕϔόϏϊϋϔϚϏχϒ
r
Ό
Live viewe view
ModeMode
33
CaCa
ϔϚ
ϊ
ϊ
ϊϋϔ
Ϗϊ
όϏϊ
ϔόϏ
Ϗϊ
Ϗ
one sidewane sidewa
Α
Α
Α
όϕϘΌϋϘϚϏόϏωχϚϏϕϔ
uttonon
ϔ
Ϗϕ
e a bigger bigger
ό
ό
όϕϘ
ό
ΌϋϘ
ΌϋϘ
Όϋ
Ϙ
ϘΌ
Ϙ
Ϙ
Ϙ
Όϋ
Ό
Ό
Ό
Ό
Ό
Ό
Ό
ΑΝΌΌϕϔόϏϊϋϔϚϏχϒ
ϒ
wfinder.finder.
Α
ΝΌ
όϕϘΌϋϘϚϏόϏωχϚϏϕϔ
ΑΝΌΌϕϔόϏϊϋϔϚϏ
Turn your phone to portrait orientation again, and then tap to see the
gallery of the photos and videos you've taken with your RE.
Taking a photo
1. Hold your RE by the grip sensor.
2. Point your RE at what you want to capture.
3. Press the Shutter button.
The indicator LED flashes and your RE clicks when a photo is taken.
On the RE app
1. Connect your phone and your RE.
2. Tap to go to the live viewfinder, if you're not yet in this view.
3. While your phone is in portrait orientation, check that you are in
Photo mode.
Or, while holding your phone sideways, tap the button above ,
and then tap .
4. Position your RE on a leveled surface, mount, or tripod.
5. Tap to take a photo.
The indicator LED flashes and your RE clicks when a photo is taken.
To change the photo resolution, go to Camera settings > Photo
resolution.
Take photos and videos 25
ΑΝΌΌϕϔόϏϊϋϔϚϏχϒ
portrait orrtrait o
tos and vitos and vi
photohoto
Hold yoHold yo
2.2.
Poinoin
3.
PP
όϕϘΌϋϘϚϏόϏωχϚϏϕϔ
u
the grip se grip s
E at what E at what
Shutter bShutter b
ndicator LEcator LE
the RE aphe RE a
ΌϋϘ
Ό
1.
Conn
2.2
TT
33
ΑΝΌΌϕϔόϏϊϋϔϚϏχϒ
nt to captuo captu
es and youes and yo
ϔό
ϕϔ
r phone aphone a
o go to tho go to th
e your phoyour pho
oto mode.to mod
Or, while
Or, while
and thend the
όϕϘΌϋϘϚϏόϏωχϚϏϕϔ
cks when
when
Ϗϕ
χϚ
RE.RE
ewfinder, iwfinder,
portrait ortrait or
your phonour pho
.
ur RE on aE o
o take a p
take a p
or L
or L
ΑΝΌΌϕϔόϏϊϋϔϚϏχϒ
χϒ
ϚϏχ
not yet in ot yet in
n, check th check th
ays, tap thtap th
surface, mrface,
es and yoes and yo
to resolu
to resolu
όϕϘΌϋϘϚϏόϏωχϚϏϕϔ
w.
re inn
n above bove
tripod.tripod.
cks when s when
to o
CameraCamera
ΑΝΌΌϕϔόϏϊϋϔϚϏ
is taken.s taken.
s
>
PhotoPhoto

Recording a video
1. Hold your RE by the grip sensor.
2. Point your RE at what you want to capture.
3. Press and hold the Shutter button until recording starts.
The indicator LED will turn red and your RE will beep.
4. Press the Shutter button to stop recording.
The indicator LED turns off and your RE beeps again.
On the RE app
1. Connect your phone and your RE.
2. Tap to go to the live viewfinder, if you're not yet in this view.
3. While your phone is in portrait orientation, tap to switch to
Video mode.
Or, while holding your phone sideways, tap the button above ,
and then tap Video.
4. Position your RE on a leveled surface, mount, or tripod.
5. Tap to record a video.
The indicator LED turns red and your RE beeps.
6. Tap to stop recording.
The indicator LED turns off and your RE beeps again.
26 Take photos and videos
ΑΝΌΌϕϔόϏϊϋϔϚϏχϒ
eo
our RE by ur RE by
nt your REyour RE
Press and ess and
The indThe in
4.4
PrePre
Ν
όϕϘΌϋϘϚϏόϏωχϚϏϕϔ
sensor.sor.
you wantyou want
e Shutter bhutter b
ED will tuED will tu
hutter buthutter but
cator LEDtor LED
e RE appe RE app
ϋϘ
Όϋ
.
ConnecConnec
2.2.
TapTa
3.3.
ΑΝΌΌϕϔόϏϊϋϔϚϏχϒ
ure.
ntil recordil record
nd your REyour RE
top recordop record
f and youf and you
όϏ
ϕϔ
phone andhone and
go to the lgo to the l
our phoneour phon
o mode. mode.
r, while ho while ho
nd then
nd then
i
i
όϕϘΌϋϘϚϏόϏωχϚϏϕϔ
ps again
again
Ϗϕ
ϚϏ
E.
finder, if yinder, if y
rtrait orienait orien
ur phone sur phone s
o.
RE on a leon
record a v
ecord a v
or LEDor LED
ΑΝΌΌϕϔόϏϊϋϔϚϏχϒ
ϒ
Ϗχ
t yet in thit yet in th
ap ap
to to
s, tap the bap the b
rface, mouace, mou
ed and yoed and yo
ing. ng.
urns off a
urns off
όϕϘΌϋϘϚϏόϏωχϚϏϕϔ
o
bove ove
,
ipod.ipod.
eeps.s.
RE beepsRE beeps
ΑΝΌΌϕϔόϏϊϋϔϚϏ
To change the video resolution, go to Camera settings > Video
resolution.
Recording slow motion videos
1. Hold your RE by the grip sensor.
2. Press the Slow motion mode switch until the indicator LED turns
blue.
3. Press and hold the Shutter button until recording starts.
The indicator LED will turn red and your RE will beep.
4. Press the Shutter button to stop recording.
The indicator LED turns off and your RE beeps again.
On the RE app
1. Connect your phone and your RE.
2. Tap to go to the live viewfinder, if you're not yet in this view.
3. While your phone is in portrait orientation, tap to switch to
Video mode.
Or, while holding your phone sideways, tap the button above ,
and then tap .
4. Tap to switch to Slow motion mode.
5. Position your RE on a leveled surface, mount, or tripod.
Take photos and videos 27
ΑΝΌΌϕϔόϏϊϋϔϚϏχϒ
he video rvideo r
.
ding slowng slow
1.1.
HoldHold
2.
P
όϕϘΌϋϘϚϏόϏωχϚϏϕϔ
on videon video
E by the gE by the g
Slow moSlow mo
ess and hoand ho
The indicaThe indic
4.
Press Press
ThT
O
O
όϕ
ΑΝΌΌϕϔόϏϊϋϔϚϏχϒ
or.
e switch ue switch
hutter butter but
D will turn l turn
tter buttonter butto
or LED tuLED tu
RE appRE app
Ό
ΝΌ
Connect y
Connect y
ap p
όϕϘΌϋϘϚϏόϏωχϚϏϕϔ
indi
recordingecording
your RE wur RE w
p recordingcordin
nd your Rd your R
ϚϏό
ϘϚ
one and yone and y
to the livethe live
r phone is r phone is
ode.
de
oldin
ldi
ΑΝΌΌϕϔόϏϊϋϔϚϏχϒ
again.ain.
Ϗϊϋ
όϏ
der, if youer, if you
ait orientatit orienta
phone sidephone side
to Slow
to Slow
ale
l
όϕϘΌϋϘϚϏόϏωχϚϏϕϔ
ϔ
Ϗϕϔ
et in this vn this
to sw to sw
ap the butthe but
mode.od
urface, moace, mo
ΑΝΌΌϕϔόϏϊϋϔϚϏ
ve e
,,
ripod.po
6. Tap to record a video.
The indicator LED turns red and your RE beeps.
7. Tap to stop recording.
The indicator LED turns off and your RE beeps again.
Turning Ultra-wide angle on or off
1. Connect your phone and your RE.
2. To go to Settings:
Tap while your phone is in portrait orientation.
Tap while your phone is in portrait orientation.
3. Tap Camera settings.
4. Turn the Ultra-wide angle switch on or off.
28 Take photos and videos
ΑΝΌΌϕϔόϏϊϋϔϚϏχϒ
ord a videoa vide
or LED tuor LED tu
to stop reto stop re
indicator icator
rning Ultning Ult
1..
όϕϘΌϋϘϚϏόϏωχϚϏϕϔ
and
ns off and off and
de anglede angle
t your phoour pho
go to Settito Setti
ϘΌ
ϘΌ
ϘΌ
ϘΌ
ϘΌ
Ό
Όϋ
ϕϘ
Όϋ
ϕϘ
ΑΝΌΌ
Tap ap
wh
Ό ΌϕϔόϏϊϋϔϚϏχϒ
beeps eeps
offf
your RE.your RE.
while your while your
ϕϔ
Ν
ΌΌ
Ν
ap
ap
CameCame
nth
th
όϕϘΌϋϘϚϏόϏω
phone is inhone is in
όϏωχϚϏϕϔ
s in portraportra
ϚϏ
όϏω
ϋϘϚ
gss
..
wide anglede angle
ΑΝΌΌϕϔόϏϊϋϔ
t orientatioorientat
ϊϋϔϚϏχϒ
ation.n.
Ϗχ
ϊϋϔ
όϏ
on or off.on or off.
όϕϘΌϋϘϚϏόϏωχϚϏϕϔ
Ϗϕ
ΑΝΌΌϕϔόϏϊϋϔϚϏ
Setting up Time lapse
Capture the motion of objects and scenes that slowly unfold before the
human eyes. Think of the sunsets or blossoming flowers.
You can do that with Time lapse. It's a mode that automatically takes a
series of photos at intervals within a period of time. These photos then
become frames of your Time lapse video and you'll see movements play
much faster.
Before you begin, be sure to:
Both your devices are charged.
Your microSD has enough space available.
You can only set and capture Time lapse from the RE app.
1. Connect your phone and your RE.
2. Tap to go to the live viewfinder, if you're not yet in this view.
3. While your phone is in portrait orientation, tap to switch to Time
lapse mode.
Or, while holding your phone sideways, tap the button above ,
and then tap .
4. Tap , and then customize your Time lapse settings.
Take photos and videos 29
ΑΝΌΌϕϔόϏϊϋϔϚϏχϒ
e lapseapse
otion of obon of o
Think of tThink of t
do that withat wi
of photos hotos
ome frameme frame
uch fasterch faster
Before yBefore y
Ό
ΝΌ
όϕϘΌϋϘϚϏόϏωχϚϏϕϔ
d scen
cen
ets or blos
or blos
apse. It's apse. It's
als within within
r Time lapme lap
n, be sure be sure
oth your dyour d
Your Your
ϚϏ
Ό
Ό
ϕϘ
Όϋ
Ϙ
όϕ
όϕ
όϕ
όϕ
όϕ
όϕ
όϕ
όϕ
όϕ
ΑΝΌΌϕϔόϏϊϋϔϚϏχϒ
flo
flo
that auto
t auto
of time. Tf time. T
and you'ld you'
re chargedcharge
D has enouhas enou
όϏϊ
ϔ
Ό
an only sean only se
Conneonne
όϕϘΌϋϘϚϏόϏωχϚϏϕϔ
e availablevailabl
ϔ
ϚϏ
όϏω
pture Timure Tim
phone andne and
go to the lto the
ur phone
r phon
e
ΑΝΌΌϕϔόϏϊϋϔϚϏχϒ
Ϗχ
ϋϔ
rom the Rom the R
E.
finder, if yder, if y
rtrait orienrait or
ur phone sur phone
stom
tom
όϕϘΌϋϘϚϏόϏωχϚϏϕϔ
t yet in thyet in th
ap p
to sto s
s, tap the b, tap the
r Time lapime lap
ΑΝΌΌϕϔόϏϊϋϔϚϏ
Timeime
bove ve
,,
gs.gs.

5. Tap Set or OK.
6. Position your RE on a leveled surface, mount, or tripod.
7. Tap .
You can tap if you need to pause capturing.
8. If you didn't select Stop recording automatically in Time lapse
settings, tap to manually stop your Time lapse.
30 Take photos and videos
ΑΝΌΌϕϔόϏϊϋϔϚϏχϒ
our RE on ur RE on
.
can tap an tap
If you didnyou did
settingssetting
όϕϘΌϋϘϚϏόϏωχϚϏϕϔ
d su
need to peed to p
Stop recotop rec
to manuamanua
ΑΝΌΌϕϔόϏϊϋϔϚϏχϒ
pturing.ring.
utomaticatomatica
your Time ur Time
όϕϘΌϋϘϚϏόϏωχϚϏϕϔ
ΑΝΌΌϕϔόϏϊϋϔϚϏχϒ
όϕϘΌϋϘϚϏόϏωχϚϏϕϔ
ΑΝΌΌϕϔόϏϊϋϔϚϏ
View, edit, and share
Viewing photos and videos
1. Connect your phone and your RE.
2. Tap to go your gallery, if you're not yet in this view.
3. Swipe up and down the screen to more thumbnails of photos and
videos captured by your RE.
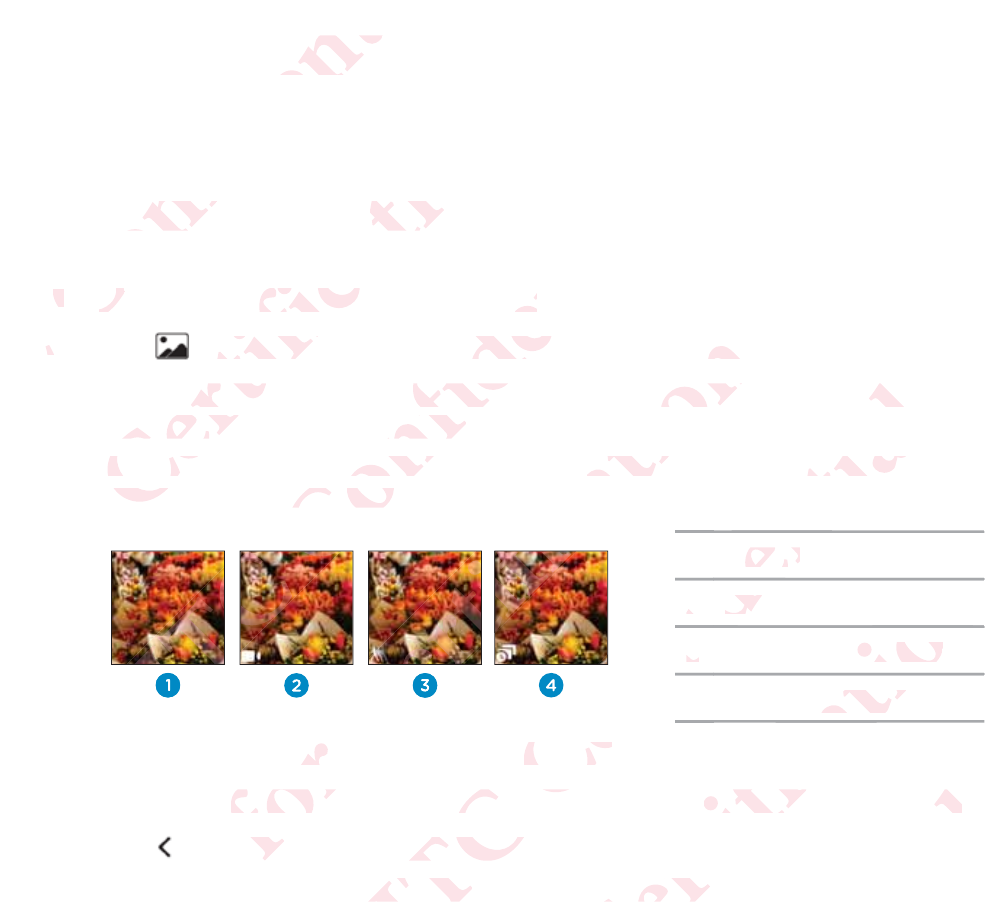
Notice that some thumbnails have small icons at their bottom left.
These are media file indicators.
1Photo
2Video
3Slow motion video
4Time lapse video
4. Tap a thumbnail to view it in full screen.
5. If you opened a video, tap the screen to see the playback controls.
6. Tap to go back to your gallery.
Or, swipe right or left to go to the next or previous item.
View, edit, and share 31
ΑΝΌΌϕϔόϏϊϋϔϚϏχϒ
and shnd sh
ing photg phot
1.1.
CoCo
2.2
όϕϘΌϋϘϚϏόϏωχϚϏϕϔ
d videosideos
our phone ur phone
to go youo go you
pe up andup and
deos captdeos cap
Notice tNotice t
Thesehese
ΑΝΌΌϕϔόϏϊϋϔϚϏχϒ
r RE.E.
, if you're you're
he screen screen
your RE. our RE.
e thumbnahumbna
dia file india file ind
ΑΝΌ
ΝΌΌ
ΑΝ
ΑΝ
όϕϘΌϋϘϚϏόϏωχϚϏϕϔ
n this v
his
thumbnaihumbnai
small iconmall icon
ΌϋϘϚϏό
ϚϏόϏω
Όϋ
Όϋ
bnail to viel t
ened a vid
ned a vid
o ba
o b
ΑΝΌΌϕϔόϏϊϋϔϚϏχϒ
tos aos
r bottom bottom
Photohoto
22
VidVid
33
ϔ
ϊ
ϊ
όϏϊ
ϊϋ
Ϗϊ
όϏϊ
ϔό
Ϗϊ
ϔό
ull screen.screen.
the screenhe screen
our galleryur gallery
ft to go tot to go to
όϕϘΌϋϘϚϏόϏωχϚϏϕ
e lapse vidpse vid
ϚϏϕϔ
tion videoon vide
ϕϔ
ϔ
ϕϔ
ϚϏϕ
χϚ
the playbae playba
t or previoor previ
ΑΝΌΌϕϔόϏϊϋϔϚϏ
rols.ols.
Sorting media by type
Easily locate a photo or video by filtering your gallery to display a
particular media type.
From RE app's gallery, you can:
Tap the buttons bellow the screen to go to see thumbnails of the
same media type.
Tap , and then select a media type to show.
Removing fisheye effect
With Ultra-wide angle switched on, your captured photos or videos may
appear like they were taken from a fisheye lens. This is because your RE is
taking a wider a wider field of view.
You can easily "defish" a photo or video in RE app.
1. Connect your phone and your RE.
2. Tap to go your gallery, if you're not yet in this view.
3. Tap the thumbnail of the photo or video to defish.
4. Tap .
32 View, edit, and share
ΑΝΌΌ
ΝΌ
ΝΌ
ΝΌ
Ό
Ό
Ό
Ό
ΌΌϕϔ
Ό
Ό
Ό
Tap theTap the
samem
ϕϔόϏϊϋϔϚϏχϒ
typee
ϔϚ
ϋϔ
hoto or vidto or vi
dia type.a type.
pp's gallers galler
T
ϕϔ
Ό
ΌΌ
Ν
Ό
όϕϘΌϋϘϚϏόϏωχϚ
s bellow thellow t
ype.ype.
χϚϏϕϔ
ltering
ring
an::
and then sd then s
χϚ
ϏόϏ
ϋϘ
moving fving f
With Ultra
With Ultr
appear
ppear
kin
n
ΑΝΌΌϕϔόϏϊϋϔϚϏχ
n to go to o go to
ϚϏχϒ
media typemedia type
ϚϏχ
ϊϋϔ
ϔόϏ
e effecteffect
ngle switcngle switc
y were tak were ta
er a wider r a wider
easily "defiasily "def
nnec
nec
όϕϘΌϋϘϚϏόϏωχϚϏϕϔ
w.
Ϗϕ
your captour capt
a fisheye fisheye
view.w.
oto or vidoto or vid
hone and and
o your gao your ga
umbnail
mbnai
ΑΝΌΌϕϔόϏϊϋϔϚϏχϒ
χϒ
otos or vidtos or vid
s is becauss is becau
app.p.
ou're not you're not y
photo or vihoto or
όϕϘΌϋϘϚϏόϏωχϚϏϕϔ
y
RE isis
s view.view.
defish.fish.
ΑΝΌΌϕϔόϏϊϋϔϚϏ
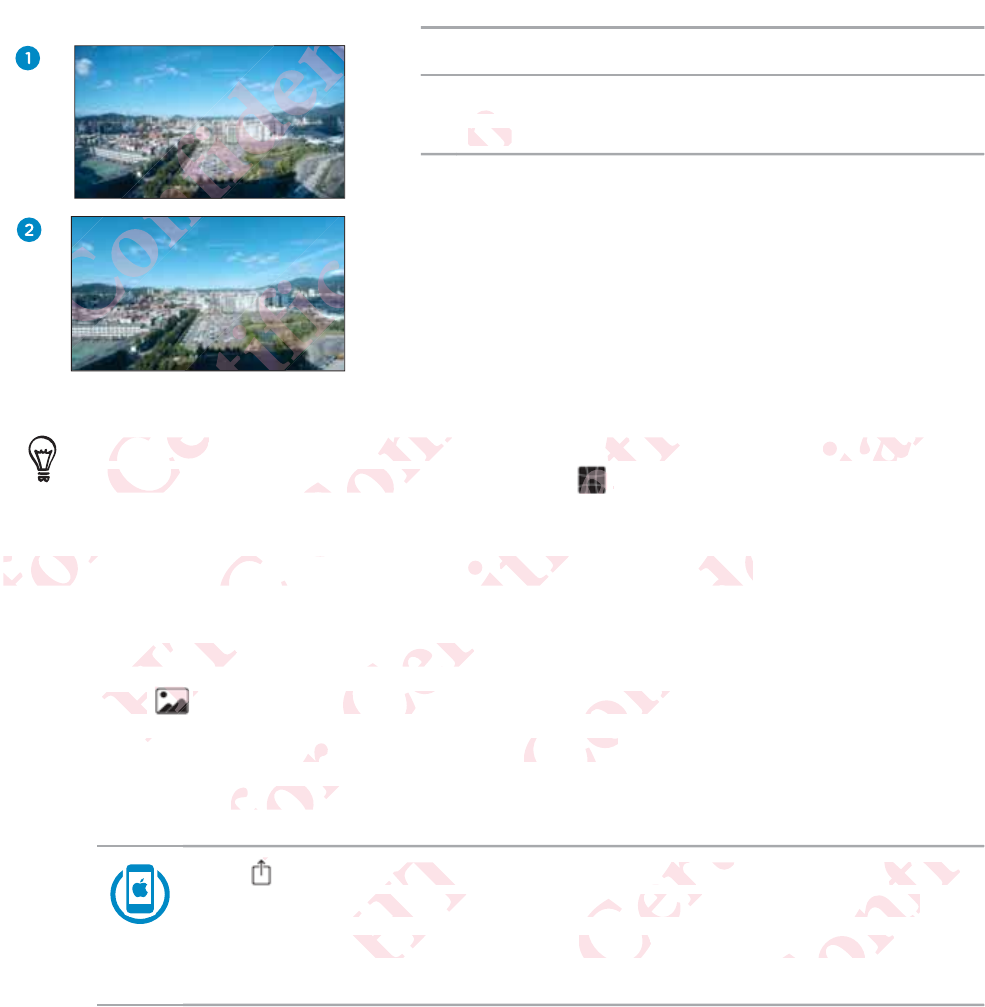
1Ultra-wide angle photo
2Ultra-wide angle photo after de-fish
eye
To change the photo or video back to Ultra-wide angle, open the
thumbnail in full screen, and then tap .
Downloading a photo or video to your phone
1. Connect your phone and your RE.
2. Tap to go your gallery, if you're not yet in this view.
3. Tap a thumbnail to open it in full screen.
4. Do one of the following:
Tap > Save Image to download. Tap OK when prompted
to grant the RE app access to your phone's Photos app.
When done, check the photo or video from your phone's
Photos app.
View, edit, and share 33
ΑΝΌΌϕϔόϏϊϋϔϚϏχϒ
ϔόϏϊϋϔϚ
Όϕϔ
όϕϘΌϋϘϚϏόϏωχϚϏϕϔ
ϚϏόϏωχ
Ult
eyeeye
ϕϔ
ϕϔ
To changeo chang
thumbnhumbn
DownlDown
ΑΝΌΌϕϔόϏϊϋϔϚϏχϒ
ϒ
oto or videor vide
screen, anscreen, an
g a phot a pho
onnect yoonnect yo
Tap
Tap
όϕϘΌϋϘϚϏόϏωχϚϏϕϔ
o Ultra-wiUltra-w
ap
..
ideo to yeo to y
e and yourand you
ur gallery,gallery,
nail to opel t
f the follow
the follo
ό
ΑΝΌΌϕϔόϏϊϋϔϚϏχϒ
e, open theopen the
honeone
e not yet inot yet in
ull screen.screen.
Imagemage
to
e RE app aRE app a
e, checke, check
ΝΌ
όϕϘΌϋϘϚϏόϏωχϚϏϕϔ
w.
ad. Tap Tap
OKOK
your phoyour pho
oto or videor vid
ϚϏ
Ϙ
ΑΝΌΌϕϔόϏϊϋϔϚϏ
promptedmpted
tos app.s app.
your phonour phon
όϏϊ
Ό
Tap to download. When done, check the photo or video
from your phone's media gallery app.
Downloading multiple items to your phone
From RE app's gallery, you can:
Tap , and then select the files to download. Tap > Save Image
to download. Tap OK when prompted to grant the RE app access
to your phone'sPhotos app.
When done, check the downloaded files from your phone's Photos
app.
Tap > Save to phone. Select the items to download, and then tap
Next to begin. When done, check the downloaded files from your
phone's your phone's media gallery app.
Sharing a photo and video
1. Connect your phone and your RE.
2. Tap to go your gallery, if you're not yet in this view.
3. Tap a thumbnail to open it in full screen.
34 View, edit, and share
ΑΝΌΌ
ΝΌ Ό
ΝΌ Ό
ΝΌ Ό
Ό
Ό
Ό
Ta
ΌϕϔόϏϊϋϔϚϏχϒ
to downo down
m your phm your ph
ϔϚϏ
Ϗϊϋ
ading mung mu
όϏ
ϕϔ
RE app's RE app's
Ό
Ό
όϕϘΌ
όϕ
όϕ
όϕ
όϕ
ϕ
ϕ
ΌϋϘϚϏόϏω
d then sethen se
nload. Tapad. Tap
ur phone'sphone'
hen done,hen done
app.pp
όϏωχϚϏϕϔ
edia
ϔ
ems to yoms to yo
Ϗϕ
ϚϏ
you can:u can:
Tap T
NeNe
όϏω
ό
Ό
ΑΝΌΌϕ
to phonephone
gin. When gin. When
your phonyour pho
ΌϕϔόϏϊϋϔ
files to dowes to do
en prompten promp
app.p.
he downlodownlo
ϋϔϚϏχϒ
onene
ϒ
Ϗχ
ϋϔ
Όϕ
ΝΌ
g a phot
g a phot
όϕϘΌϋϘϚϏόϏωχ
he items the items t
heck the deck the d
a gallery agallery a
ωχϚϏϕϔ
Tap
ant the R
the R
es from yofrom yo
ωχ
ϚϏ
videovideo
ur phone aphone
go your
go your
ΑΝΌΌϕϔόϏϊϋϔϚϏ
oad, and td, and t
ded files fred files fr
ϔϚϏχϒ
e's Photos
e's Photos
ϔϚϏ
όϏϊ
RE.
if you're nf you're
n it in full n it in full
όϕϘΌϋϘϚϏόϏωχϚϏϕϔ
ϔ
this viewhis view
ΑΝΌΌϕϔόϏϊϋϔϚϏ

4. You can:
Tap , and then select where you want to share it. Share
the photo or video as you normally would on your selected
platform.
Tap , and then select where you want to share it. Share
the photo or video as you normally would on your selected
platform.
Sharing multiple items
From RE app's gallery, you can:
Tap , and then select the files to share. Tap > Save Image to
download.
Tap > Share. Select the items to share, and then tap Next. Share
the photos or videos as you normally would on your selected
platform.
Copying media files from your RE to your computer
1. Connect RE to the computer using the supplied USB cable.
You'll see options for viewing or importing files on the computer
screen.
2. Choose to view files.
View, edit, and share 35
ΑΝΌΌϕϔόϏϊϋϔϚϏχϒ
ό
Tap Tap
, an, an
the phothe pho
platfplatf
Όϕϔ
Όϕϔ
Όϕϔ
Όϕϔ
Όϕϔ
ϕϔ
ϕϔ
TT
ϊϋϔ
ϔό
ϔό
Ό
ϔό
ShSh
ΝΌ
Ν
όϕϘΌ
όϕϘ
όϕϘ
όϕ
όϕ
όϕ
Tap
dd
ό
ό
ό
ό
ΌϋϘϚϏόϏωχϚϏϕϔ
elect wh
ct w
deo as youo as yo
nd then sethen se
oto or vido or vid
form.orm.
ϚϏϕ
όϏω
multiple iteiple ite
ϚϏ
ϋϘ
RE app's gE app's g
όϕ
Ό
όϕ
ΑΝΌΌϕ
then selecen sele
.
ΌϕϔόϏϊϋϔϚϏχϒ
ly w
y w
ere you we you w
u normallyormally
Ϗχϒ
ϊϋϔ
όϏϊ
ϔόϏ
ou can:an:
> >
ShareShare
e photos oe photos
platform.
platform.
Όϕ
Ό
Α
όϕϘΌϋϘϚϏόϏωχ
es to shares to share
ωχϚϏϕϔ
ϔ
Ϗϕ
he items titems t
s as you noyou n
ωχ
ϚϏό
Όϋ
ia files fr
a files f
t
t
ΑΝΌΌϕϔόϏϊϋϔϚ
>
Save Imave Im
ϔϚϏχϒ
χϒ
and then nd then
would on yuld on y
ϔϚϏ
Ϗϊϋ
ϕϔ
our RE toour RE to
mputer usmputer us
for viewingor viewin
όϕϘΌϋϘϚϏόϏωχϚϏϕϔ
. Sharehare
ctedted
ϔ
χϚ
computcomput
supplied Uplied U
orting filesorting file
ΑΝΌΌϕϔόϏϊϋϔϚϏ
e.
computermputer
3. Copy the files from yourRE to your computer.
4. After copying the files, safely disconnect RE from the computer.
Deleting photos and videos on your camera
1. Connect your phone and your RE.
2. Tap to go your gallery, if you're not yet in this view.
3. To delete a single photo or video, tap a thumbnail, then tap .
4. To delete multiple photos and videos, you can:
Tap , and then select the files to delete. Tap .
Tap > Delete. Select the items to share, and then tap
Next.
36 View, edit, and share
ΑΝΌΌϕϔόϏϊϋϔϚϏχϒ
from yourm you
ying the fileng the fil
photos aotos a
ConnectConnect
2.
Tap Tap
3.
T
44
όϕϘΌϋϘϚϏόϏωχϚϏϕϔ
y dis
deos on yeos on
hone and ye and y
o your gallyour ga
e a single pa single p
lete multie multi
ϘΌ
ϘΌ
ϘΌ
Ό
Ό
Ό
TaTa
Ϙ
Όϋ
Ϙ
Όϋ
Ϙ
ΑΝΌ
Ν
Όϕϔό
d then selhen sel
ϔόϏϊϋϔϚϏχϒ
amerme
ou're not ye not y
video, tapdeo, tap
os and vid and vid
ϔό
Ό
ΝΌΌ
p
>
DeleDele
Nextext
.
ΝΌ
όϕϘΌϋϘϚϏόϏωχϚϏϕ
iles to deles to del
ϚϏϕϔ
bnail, t
ail,
can:n:
ϚϏϕ
όϏω
ϘϚϏόϏω
t the itemthe item
ϘϚ
ΑΝΌΌϕϔόϏϊϋϔϚϏχϒ
.
Ϗχϒ
Ϗχϒ
ϔ
όϏϊϋϔ
re, and thee, and the
όϏϊ
όϕϘΌϋϘϚϏόϏωχϚϏϕϔ
ϕϔ
ΑΝΌΌϕϔόϏϊϋϔϚϏ

Back up and reset
Backing up photos and videos to your phone
1. Hold your RE, and then open the RE app on your phone.
2. To go to Settings:
Tap while your phone is in portrait orientation.
Tap while your phone is in portrait orientation.
3. Tap Backup.
4. Tap Auto backup to.
5. Tap This phone.
Back up and reset 37
ΑΝΌΌϕϔόϏϊϋϔϚϏχϒ
nd resed rese
ng up pg up p
1.1.
HoHo
2.2
όϕϘΌϋϘϚ
Όϋ
Όϋ
Ό
Ό
Ό
Ό
TaTa
ϘΌ
Ό
Ό
Ό
ϘϚϏόϏωχϚϏϕϔ
and vided vid
RE, and thE, and th
o SettingsSettings
Ϙ
Ό
ϘϚ
Ό
ΑΝΌΌϕϔόϏϊ
e your phour ph
όϏϊϋϔϚϏχϒ
your phoour ph
the RE ape RE ap
while y while y
όϏϊ
Όϕ
Ό
BackupBackup
.
Tap
Tap
Auto Auto
ap p
ThT
όϕϘΌϋϘϚϏόϏωχϚϏϕϔ
portrait oportrait o
ϕϔ
ne is in pone is in po
ϕϔ
χϚ
ϚϏό
too
.
e
.
ΑΝΌΌϕϔόϏϊϋϔϚϏχϒ
n.
ϒ
ientation.tation.
ϒ
ϚϏ
ϊϋ
όϕϘΌϋϘϚϏόϏωχϚϏϕϔ
ϔ
ΑΝΌΌϕϔόϏϊϋϔϚϏ
Backing up photos and videos to your online storage
You need to set up your Dropbox™ or Google Drive™ account on
your phone.
1. Hold your RE, and then open the RE app on your phone.
2. To go to Settings:
Tap while your phone is in portrait orientation.
Tap while your phone is in portrait orientation.
3. Tap Backup.
4. Tap Auto backup to.
5. Choose an online storage.
6. Follow the onscreen instructions to set up and link your account.
38 Back up and reset
ΑΝΌΌϕϔόϏϊϋϔϚϏχϒ
os and vand v
eed to set d to set
phone.hone.
1.
Hold yld y
2.2
ToTo
όϕϘΌ
ϘΌ
ϘΌ
ϘΌ
ϘΌ
ϘΌ
ϘΌ
Ό
ΌϋϘϚϏ
Ό
Ό
Ό
Ό
Tap Tap
ϚϏόϏωχϚϏϕϔ
Dropboxopbox
™™
and then oand then o
ettings:ttings:
ϚϏ
Όϋ
Όϋ
ϕϘ
Όϋ
3.3.
ΑΝΌΌϕϔόϏϊ
our phoner phone
όϏϊϋϔϚϏχϒ
gle D
le
e RE app oE app o
while youwhile you
όϏϊ
ϕϔ
ΌΌ
ckupckup
..
p
Auto bacAuto ba
hoose a
hoose a
όϕϘΌϋϘϚϏόϏωχϚϏϕϔ
rtrait orientrait orien
ϔ
is in portrn port
ϔ
χϚ
ϏόϏ
storage.orage.
screen instee
ΑΝΌΌϕϔόϏϊϋϔϚϏχϒ
tation.on.
ϚϏχ
ϊϋϔ
to set upo set up
όϕϘΌϋϘϚϏόϏωχϚϏϕϔ
your accoyour acc
ΑΝΌΌϕϔόϏϊϋϔϚϏ
Formatting your storage card
Formatting your storage card permanently erase all data from
your phone, including personal information.
1. Connect your phone and your RE.
2. To go to Settings:
Tap while your phone is in portrait orientation.
Tap while your phone is in portrait orientation.
3. Tap Advanced settings.
4. Tap Format SD card.
Resetting your RE
If RE has a persistent problem that cannot be solved, you can perform a
factory reset (also called a hard reset or master reset). A factory reset
Back up and reset 39
ΑΝΌΌϕϔόϏϊϋϔϚϏχϒ
r storagtorag
atting youtting you
ur phone, phone,
1.1.
ConnConn
2.
TT
όϕϘΌϋϘϚϏ
Όϋ
Όϋ
Ό
Ό
Ό
Tap Tap
ϘΌ
Ό
Ό
Ό
Ό
Ό
Ό
ϚϏόϏωχϚϏϕϔ
e card perard pe
g personalpersona
r phone anr phone an
Settings:ettings:
Όϋ
ϚϏ
Όϋ
Ϙ
33
ΑΝΌΌϕϔόϏϊ
your phonur phon
όϏϊϋϔϚϏχϒ
y e
y e
tion.n.
RE.
while yo while yo
όϏϊ
ϕϔ
ΌΌ
Advanced dvanced
ap p
FormatForma
ng y
ng
όϕϘΌϋϘϚϏόϏωχϚϏϕϔ
ortrait orieortrait orie
ϔ
e is in port in po
ϔ
χϚ
ϏόϏ
.
E
stent prob
tent prob
o called
o called
ΑΝΌΌϕϔόϏϊϋϔϚϏχϒ
ntation.tion.
ϚϏχ
ϊϋϔ
cannot bcannot b
reset or mreset or
όϕϘΌϋϘϚϏόϏωχϚϏϕϔ
, you can pyou can
set). A fact). A fac
ΑΝΌΌϕϔόϏϊϋϔϚϏ
aa
etet
reverts the phone back to its initial state — the state before you turned on
the phone for the first time.
This action removes all data and settings you have for your RE and
the RE app on your phone.
1. Connect your phone and your RE.
2. To go to Settings:
Tap while your phone is in portrait orientation.
Tap while your phone is in portrait orientation.
3. Tap Advanced settings.
4. Tap Factory Reset.
5. Tap Reset to confirm your action.
40 Back up and reset
ΑΝΌΌϕϔόϏϊϋϔϚϏχϒ
ck to its ino its in
rst time.rst time.
ction remoon remo
RE app onapp on
1.
Connenne
2.2
ToT
όϕϘΌ
ϘΌ
ϘΌ
ϘΌ
ϘΌ
ϘΌ
ϘΌ
ϘΌ
ΌϋϘϚϏ
Ό
Ό
Ό
Ό
Tap Tap
ϘϚϏόϏωχϚϏϕϔ
ata and sea and s
hone.one.
phone anphone an
ettings:ttings:
ϘϚϏ
Ό
Ό
ϕϘ
Ό
3.3.
ΑΝΌΌϕϔόϏϊ
our phoner phon
όϏϊϋϔϚϏχϒ
ou h
ou
E.
while youwhile yo
όϏϊ
ϕϔ
ΌΌ
dvanced svanced s
p
Factory Factory
ap
ap
ReseRese
όϕϘΌϋϘϚϏόϏωχϚϏϕϔ
rtrait orientrait orie
ϔ
is in portrn port
ϕϔ
χϚ
ϏόϏ
firm your am your
ΑΝΌΌϕϔόϏϊϋϔϚϏχϒ
tation.ion.
ϒ
ϚϏχ
ϊϋϔ
όϕϘΌϋϘϚϏόϏωχϚϏϕϔ
ΑΝΌΌϕϔόϏϊϋϔϚϏ

Trademarks and copyrights
©2014 HTC Corporation. All Rights Reserved.
RE, the RE Logo, and any other HTC product and service names are the
trademarks of HTC Corporation and its affiliates.
Android and Google Play are trademarks of Google Inc.
Apple and the Apple logo are trademarks of Apple Inc., registered in the
U.S. and other countries. App Store is a service mark of Apple Inc.
The
Bluetooth
® word mark and logos are registered trademarks owned by
Bluetooth SIG, Inc.
Wi-Fi® is a registered trademark of the Wireless Fidelity Alliance, Inc.
microSD is a trademark of SD-3C LLC.
All other trademarks and service marks mentioned herein, including
company names, product names, service names and logos, are the
property of their respective owners and their use herein does not indicate
an affiliation with, association with, or endorsement of or by HTC
Corporation. Not all marks listed necessarily appear in this User Guide.
RE is a product from HTC Corporation. The product is protected by
copyright, patent, and other intellectual property rights, laws, and treaties.
To use the product you will need an Android/iOS device and you will need
to download software provided by HTC Corporation and its licensors. The
software is not sold, it is licensed to you. The software is subject to a
license agreement that you must accept before you use the software. By
using the software, you agree with HTC Corporation to be bound by the
license agreement. A copy of the license is available at
www.recamera.com.
Trademarks and copyrights 41
ΑΝΌΌϕϔόϏϊϋϔϚϏχϒ
ks and and
C CorporaCorpora
e RE LogoRE Logo
demarks ofemarks o
Android android a
Apple aApp
U.S. aU.S.
T
όϕϘΌϋϘϚϏόϏωχϚϏϕϔ
Rights Reights R
y other HTother HT
orporationoratio
le Play aree Play ar
Apple logopple logo
er countrieountrie
oothth
® wor® wo
h
oth SIG, Incth SIG, In
Fi® is a reg a reg
microSD isoS
All otheAll othe
compcomp
ΑΝΌΌϕϔόϏϊϋϔϚϏχϒ
uct and sect and se
affiliates.liates.
arks of Goks of Go
demarks omarks o
tore is a store is a s
and logos logos
rademark rademark
mark of SDrk of S
marks and arks a
mes, produes, prod
f their resptheir res
tion with, ion with,
ation. No
ation. No
odu
du
όϕϘΌϋϘϚϏόϏωχϚϏϕϔ
nc., re
., r
ark of Ap
of Ap
tered tradered trad
Wireless Fideless Fi
C..
marks menarks men
s, service service
owners anders an
on with, oon with, o
ks listed n listed n
HTC CorpC Corp
and other d othe
uct you w
ct you w
ware p
ware p
i
ΑΝΌΌϕϔόϏϊϋϔϚϏχϒ
owned ned
iance, Incce, Inc
herein, inclrein, incl
nd logos, nd logos,
se herein dherein d
ement of ment of
ly appear appear
The produThe prod
ual properprope
an Androidn Android
by HTC Cby HTC
sed to yoused to you
u must accmust acc
gree with
gree wit
of thof th
όϕϘΌϋϘϚϏόϏωχϚϏϕϔ
indicateindicate
TCC
ser Guide.Guide.
otected bycted b
s, laws, andlaws, an
vice and yce and y
on and itsand its
ftware is sware is
ore you usre you us
orporation poration
e is availabvailab
ΑΝΌΌϕϔόϏϊϋϔϚϏ
s.
needeed
s. Thes. The
o aa
ftware. Byare. By
ound by thnd by th

Screen images contained herein are simulated. HTC shall not be liable for
technical or editorial errors or omissions contained herein, nor for
incidental or consequential damages resulting from furnishing this material.
The information is provided “as is” without warranty of any kind and is
subject to change without notice. HTC also reserves the right to revise the
content of this document at any time without prior notice.
No part of this document may be reproduced or transmitted in any form or
by any means, electronic or mechanical, including photocopying, recording
or storing in a retrieval system, or translated into any language in any form
without prior written permission of HTC.
42 Trademarks and copyrights
ΑΝΌΌϕϔόϏϊϋϔϚϏχϒ
ned hereind herei
al errors oal errors o
sequentiaquentia
on is providn is provi
hange witnge wit
of this dochis doc
rt of this drt of this d
any meansy means
r storing ir storing i
without pwitho
s
όϕϘΌϋϘϚϏόϏωχϚϏϕϔ
on
es resu
res
s” withou
withou
tice. HTC ace. HTC a
t any timeny time
t may be ay be
nic or mecnic or mec
eval systemal system
tten permen perm
ΑΝΌΌϕϔόϏϊϋϔϚϏχϒ
ty
y
rves thes t
prior noti
prior not
ced or trand or tran
including cluding
nslated intnslated int
HTC.TC.
όϕϘΌϋϘϚϏόϏωχϚϏϕϔ
ΑΝΌΌϕϔόϏϊϋϔϚϏχϒ
όϕϘΌϋϘϚϏόϏωχϚϏϕϔ
ΑΝΌΌϕϔόϏϊϋϔϚϏ