Contents
Users Manual

User guide
Confidential
For certification only

Contents
Unboxing
HTC Desire 526 7
Back cover 8
Battery 9
nano UIM card 11
Storage card 13
Switching the power on or off 14
Phone setup and transfer
Activating your phone 15
Setting up HTC Desire 526 for the first time 15
Restoring your backup from your cloud storage 16
Transferring content from an Android phone 17
Ways of transferring content from an iPhone 18
Transferring iPhone content through iCloud 18
Transferring contacts from your old phone through Bluetooth 18
Other ways of getting contacts and other content 19
Transferring photos, videos, and music between your phone and computer 20
Using Quick Settings 20
Getting to know your settings 21
Updating your phone's software 22
Getting apps from Google Play 24
Downloading apps from the web 25
Uninstalling an app 25
Your first week with your new phone
Basics 26
HTC Sense Home widget 35
Lock screen 37
Notifications 40
Working with text 41
Personalizing
Themes 46
More ways to personalize 49
Phone calls
Making a call with Smart dial 56
Dialing an extension number 56
Returning a missed call 56
Speed dial 57
Calling a number in a message, email, or calendar event 57
Making an emergency call 57
2 Contents
Confidential
For certification only

Receiving calls 58
What can I do during a call 58
Setting up a three-way call 59
Call History 59
Switching between silent, vibrate, and normal modes 60
Power and storage management
Battery 61
Phone storage 64
File Manager 66
Sync, backup, and reset
Online sync 68
Backup 69
HTC Sync Manager 71
Reset 73
Internet connections
Turning the data connection on or off 75
Managing your data usage 75
Wi-Fi connection 77
Connecting to VPN 77
Wireless sharing
Bluetooth 79
Settings and security
Turning location services on or off 82
Airplane mode 82
Scheduling when to turn data connection off 83
Automatic screen rotation 83
Setting when to turn off the screen 83
Screen brightness 83
Touch sounds and vibration 84
Changing the display language 84
Installing a digital certificate 85
Pinning the current screen 85
Disabling an app 86
Assigning a PIN to a nano UIM card 86
Accessibility features 86
Accessibility settings 87
Turning Magnification gestures on or off 87
Navigating HTC Desire 526 with TalkBack 88
Trademarks and copyrights
Index
3 Contents
Confidential
For certification only
About this guide
In this user guide, we use the following symbols to indicate useful and important information:
This is a note. A note often gives additional information, such as what happens when you choose
to do or not to do a certain action. A note also provides information that may only be applicable
to some situations.
This is a tip. A tip gives you an alternative way to do a particular step or procedure, or lets you
know of an option that you may find helpful.
This indicates important information that you need in order to accomplish a certain task or to
get a feature to work properly.
This provides safety precaution information, that is, information that you need to be careful
about to prevent potential problems.
Some apps may not be available in all regions or with your mobile operator.
4 About this guide
Confidential
For certification only

Important RF Notice
This device was tested for compliance with the applicable FCC and Industry Canada
specific absorption rate (SAR) limits for radio frequency (RF) exposure during typical
body-worn operations. To ensure that RF exposure levels remain at or below the tested
levels, use a belt-clip, holster, or similar accessory that maintains a minimum separation
distance of 1.0 cm between your body and the device, with either the front or back of the
device facing towards your body. Such accessories should not contain any metallic
components. Body-worn accessories that do not meet these specifications may not ensure
compliance with applicable SAR limits and their use should be avoided.
5 Important RF Notice
Confidential
For certification only

Important note on recoverable data
Files and other data that have been deleted, cleared, removed, or erased from your device
may still be recoverable by third-party data recovery software. Even a factory reset may not
permanently erase all data from your phone, including personal information.
6 Important note on recoverable data
Confidential
For certification only
Unboxing
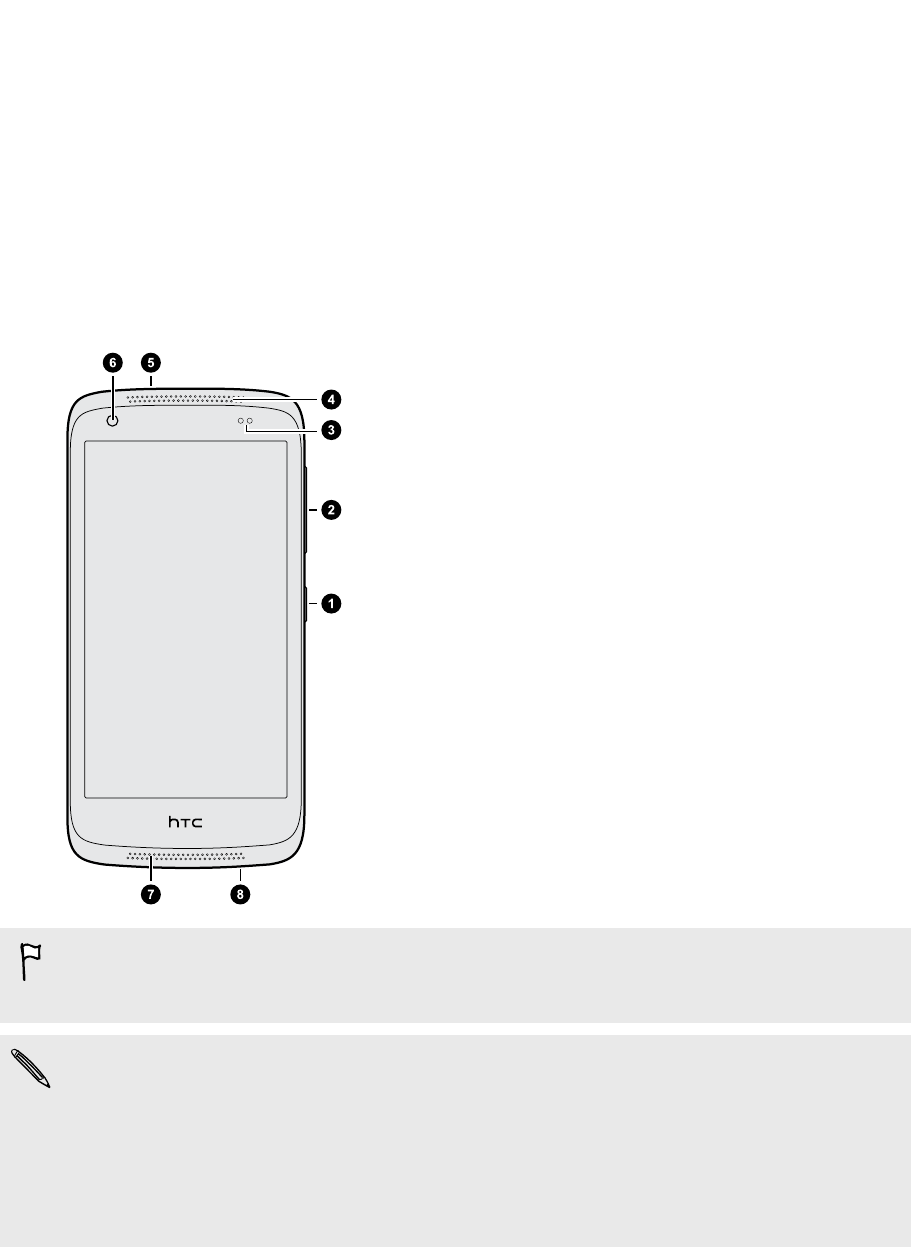
HTC Desire 526
Familiarize yourself with the parts of the phone before use.
1. POWER button
2. VOLUME control
3. Proximity sensor
4. Receiver
5. 3.5mm headset jack
6. Front camera
7. Speaker
8. USB connector
You need a 4G/LTE™ plan to use your operator's 4G/LTE network for voice calls and data
services. Check with your operator for details.
§If you want to use a case or screen protector, don’t cover and block the proximity sensor.
Purchase a case or screen protector designed for HTC Desire 526.
§Avoid liquid or dust from entering the microphone hole to prevent damage to the microphone.
§Avoid connecting third-party headsets or accessories with metallic charms that dangle near the
headset jack. Using these may affect signal reception.
7 Unboxing
Confidential
For certification only
Back cover
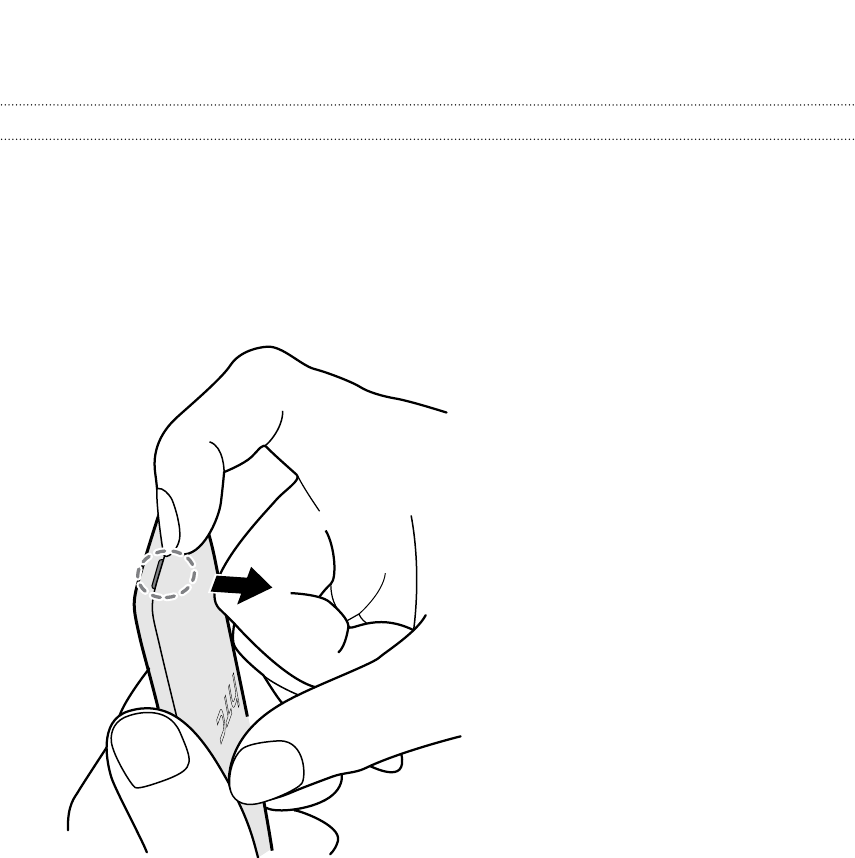
Removing the back cover
1. With one hand, securely hold HTC Desire 526 with the bottom edge facing up and the back
facing you.
2. With your other hand, press your thumb on the back cover and use your finger to open a
small gap from the opening at the bottom. Then continue to lift the cover open from the
bottom and the sides.
8 Unboxing
Confidential
For certification only
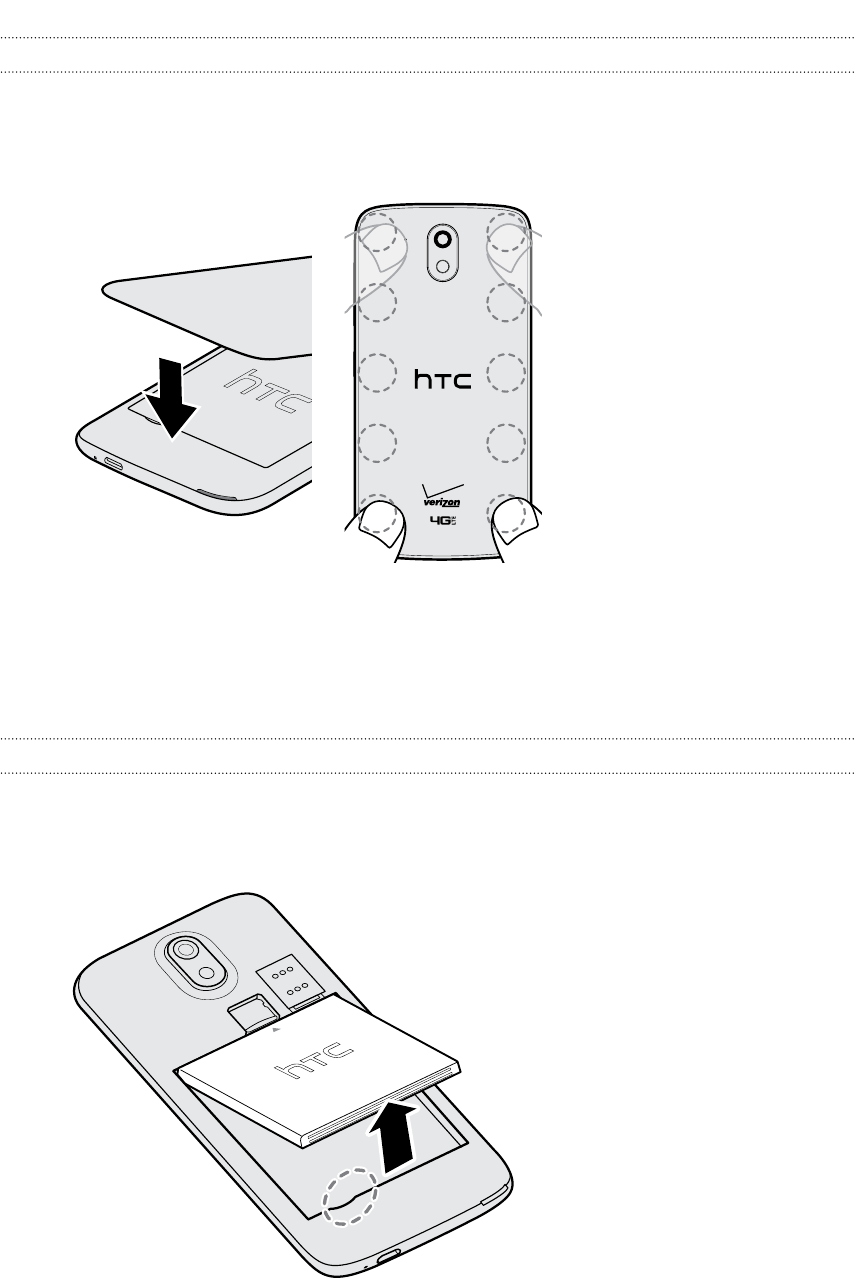
Replacing the back cover
1. Align the back cover onto the top part of HTC Desire 526.
2. Press the sides and the lower part down from top to bottom to lock the cover into place.
You will hear a click when the back cover is locked in place.
Battery
Removing the battery
1. Take the back cover off.
2. With your thumb or finger, lift the battery from the battery compartment.
9 Unboxing
Confidential
For certification only
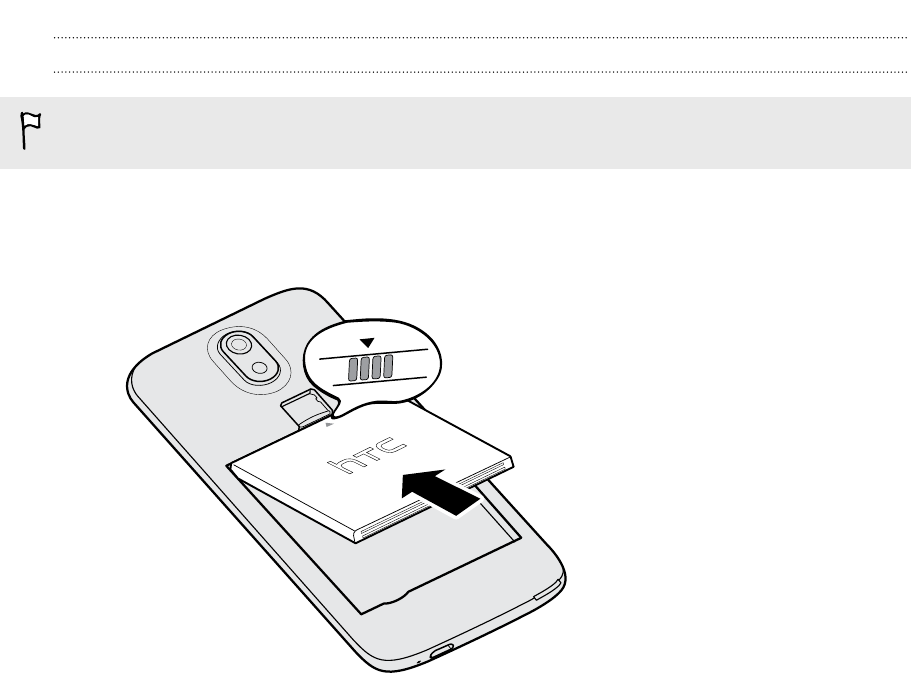
Inserting the battery
Use only original batteries that came in the box or replacements that we recommend.
1. Take the back cover off.
2. Insert the battery (with its exposed copper contacts first) into the battery compartment.
10 Unboxing
Confidential
For certification only
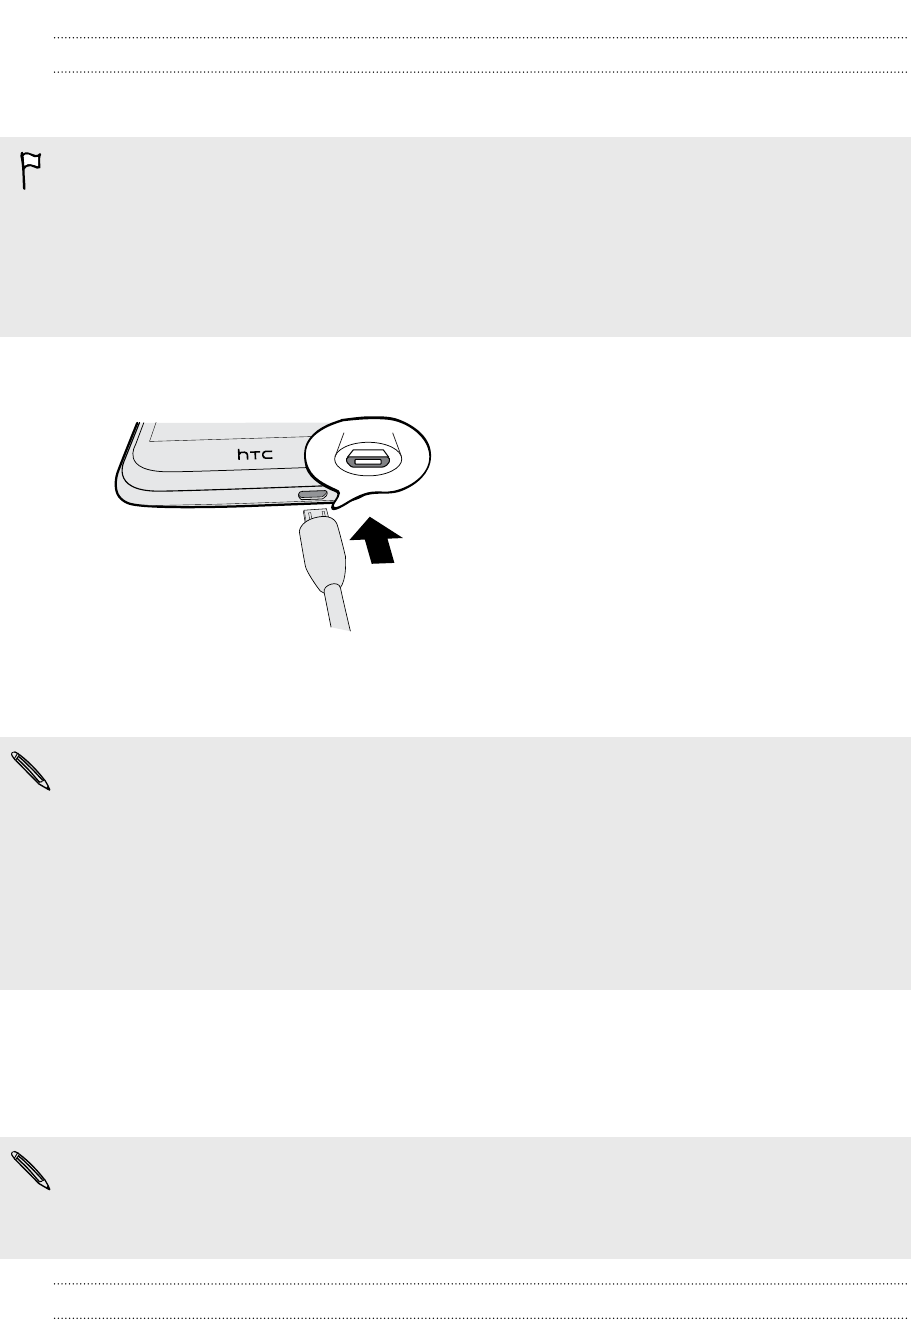
Charging the battery
Before you turn on and start using HTC Desire 526, it is recommended that you charge the battery.
§If the battery has been discharged for several days, you may need to charge HTC Desire 526 for
several minutes before powering it on.
§Use only the adapter and the USB cable that came with HTC Desire 526 to charge the battery.
When the battery power is too low, make sure to use the power adapter to charge, not the USB
cable connection with your computer.
1. Insert the small end of the USB cable into the USB connector.
2. Insert the other end of the USB cable into the power adapter.
3. Plug in the power adapter to an electrical outlet to start charging the battery.
§As a safety precaution, the battery may stop charging to avoid overheating.
§Avoid charging the battery in hot environments.
§When you're using the web browser and charging the battery, HTC Desire 526 may become
warmer. This is normal.
§To conserve energy, unplug the power adapter from the electrical outlet after you finish
charging.
nano UIM card
HTC Desire 526 uses a nano UIM card.
Use a standard nano UIM card only. Do not cut a regular SIM and insert it into the nano UIM
slot, since the card may get stuck in the slot. If you’re using a nano SIM card with a card adapter,
never insert the adapter when it’s empty. This may damage the card slot.
Inserting a nano UIM card
1. Take the back cover off.
2. Remove the battery.
11 Unboxing
Confidential
For certification only
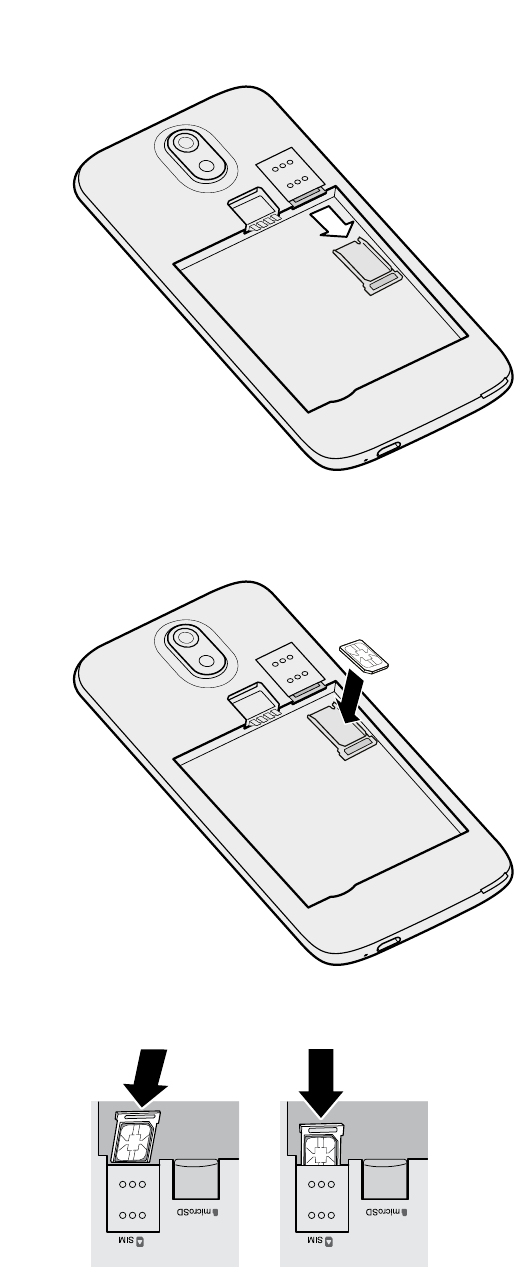
3. Remove the tray.
4. With the nano UIM card's gold contacts facing up and its cut-off corner facing out, insert the
card into the tray.
5. Position the tray at the edge of the slot at an angle. Then carefully slide the tray into the slot.
12 Unboxing
Confidential
For certification only
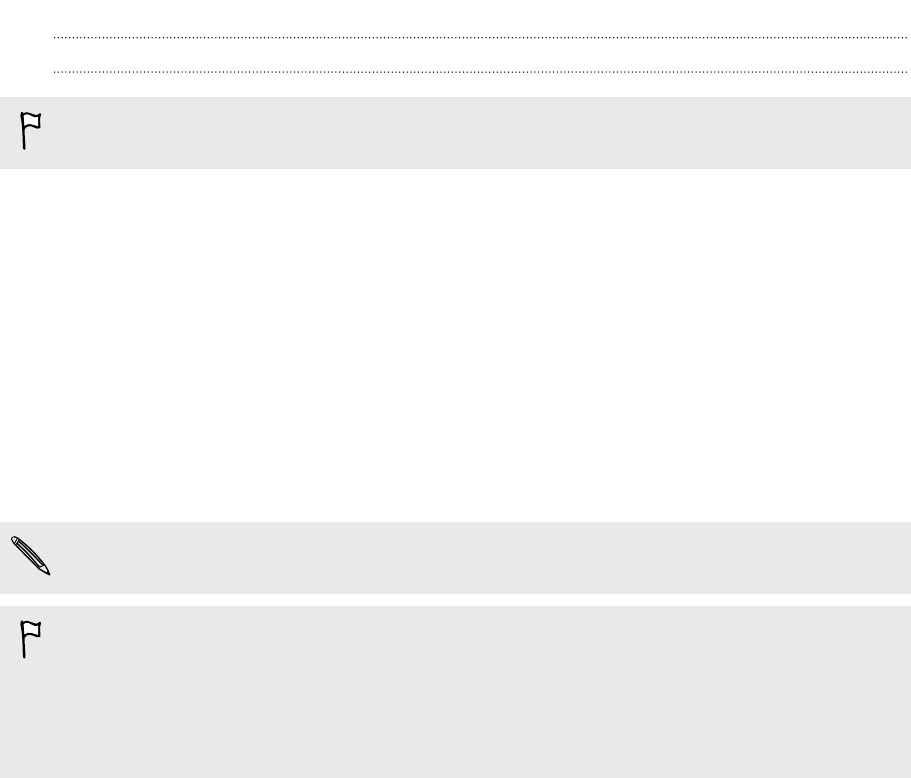
Removing a nano UIM card
Make sure to switch off HTC Desire 526 before removing the card.
1. Take the back cover off.
2. Remove the battery.
3. Remove the tray.
4. Remove the nano UIM card from the tray.
Storage card
Use a storage card to store your photos, videos, and music. When you need to free up phone storage
space, you can also move certain apps to the storage card, if the apps support this feature.
The storage card is optional and sold separately.
§Moving apps to the storage card doesn't back up the apps. If you do a factory reset, your phone
loses the apps. You'll need to reinstall them.
§When you remove the storage card and insert it in another phone, the apps on the storage card
won't be installed automatically to the other phone. You'll need to reinstall them.
13 Unboxing
Confidential
For certification only
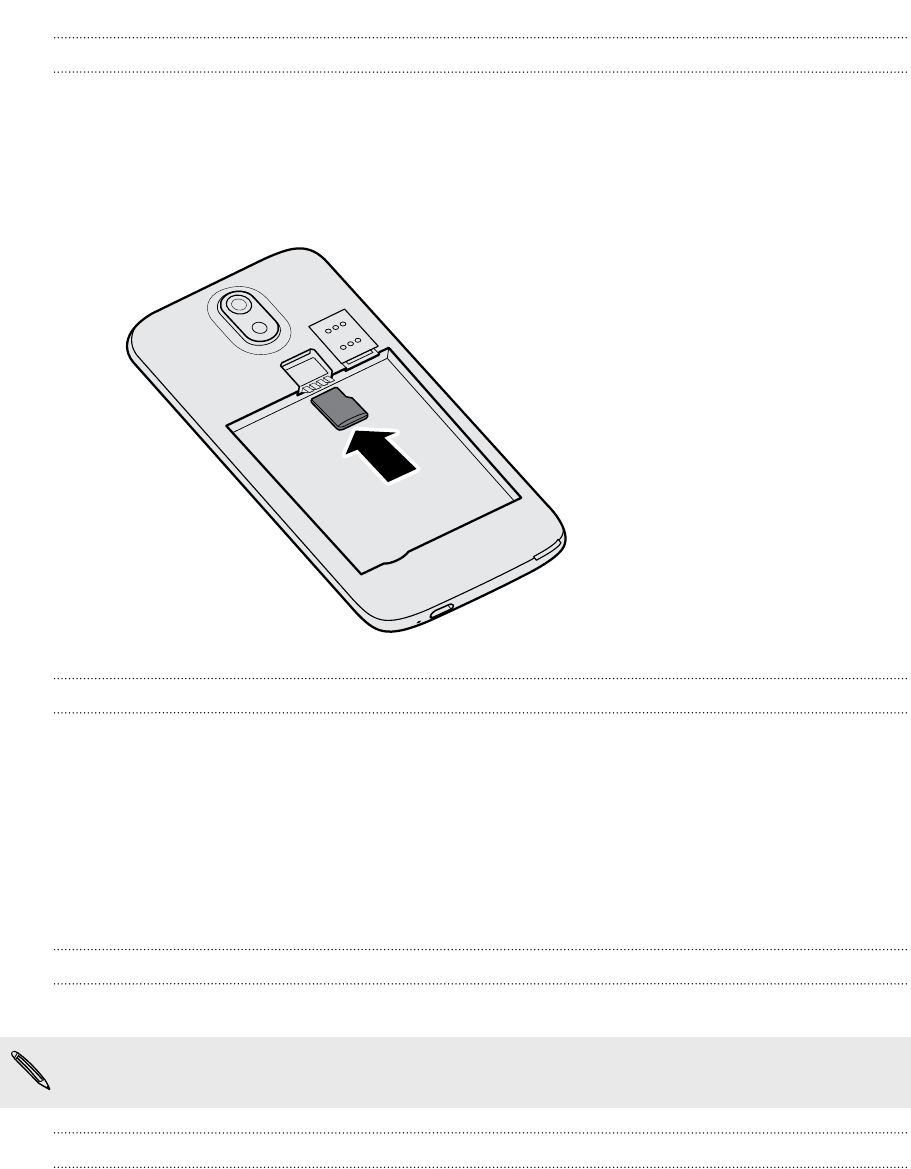
Inserting the storage card
1. Take the back cover off.
2. Remove the battery.
3. Insert the microSD™ card into the storage card slot with its gold contacts facing down and
push it all the way in.
Removing the storage card
1. Take the back cover off.
2. Remove the battery.
3. Slide the microSD card out from its slot.
Switching the power on or off
Switching the power on
Press the POWER button until HTC Desire 526 vibrates.
When you turn on HTC Desire 526 for the first time, you’ll need to set it up.
Switching the power off
1. If the display is off, press the POWER button to turn it back on.
2. Press and hold the POWER button for a few seconds.
3. Tap Power off on the options menu.
14 Unboxing
Confidential
For certification only
Phone setup and transfer
Activating your phone
Before you start using your HTC Desire 526, you should activate it so you can access the Verizon
network.
Follow the instructions in the Activation and Service Guide.
Setting up HTC Desire 526 for the first time
When you switch on HTC Desire 526 for the first time, you’ll be asked to set it up.
You can enable TalkBack to navigate by voice feedback before selecting the language. Press and
hold two fingers on the screen until you hear a message saying that accessibility mode is enabled.
Walk through the on-device setup to choose your Internet connection, sign in to your accounts, set
up your screen lock, and more.
§Use Google® backup if you've used it to back up your old phone before and you only need to
restore apps and no other types of content. On the Get your apps & data screen, choose your
old phone and the apps you want to restore to HTC Desire 526.
If you have other types of content to transfer or restore from your old phone, tap Restore
from this backup, and then select Set up as new device.
§If you have content from another phone that you want to transfer, whether it's from an
Android®, iPhone®, or other phone, tap Transfer content on the Transfer or restore content
screen.
Depending on the type of old phone that you have, see the following for more details:
Transferring content from an Android phone on page 17
Ways of transferring content from an iPhone on page 18
Transferring contacts from your old phone through Bluetooth on page 18
Some features that need to connect to the Internet such as location-based services and auto-sync
of your online accounts may incur extra data fees. To avoid incurring data fees, disable these
features under Settings. For more information on location services, see Turning location
services on or off on page 82.
15 Phone setup and transfer
Confidential
For certification only

Restoring your backup from your cloud storage
If you used HTC Backup before, you can restore a previous backup when you turn HTC Desire 526
on for the first time or after a factory reset.
Depending on the amount of content, restoring a backup to HTC Desire 526 through your data
connection may incur additional data costs and take a long time. Using a Wi-Fi® connection is
recommended.
1. From the Add your account screen, sign in to your Google Account.
2. If you see the Get your apps & data screen, tap Restore from this backup, and then select Set
up as new device.
You'll see this screen when you've previously backed up an old phone using Google backup. Do
not restore anything from Google backup when you want to restore a backup from HTC Backup.
3. On the HTC Uh-Oh Protection screen, sign in with the account credentials that you used as
your HTC Account.
Or if you skipped this screen, tap Restore from HTC Backup on the Transfer or restore
content screen, and then sign in with the account credentials that you used as your HTC
Account.
4. Choose the backup that you want to restore to HTC Desire 526.
5. If prompted, choose whether to use your mobile data or Wi-Fi connection for restoring your
backup.
6. Follow the onscreen instructions to restore your backup and to continue setting up your
phone.
7. Slide open the Notifications panel to check if there's any notification to finish setting up your
phone.
Free apps from Google Play™ will be restored in the background, and you can track the progress via a
notification in the status bar. To restore paid apps, you need to download and install them from
Google Play.
Your apps will appear on the Apps screen as they are installed. The Apps and Home screen shortcuts
will be reorganized as in your backup after all of your apps have been installed. You may continue
using HTC Desire 526 while apps are being restored.
16 Phone setup and transfer
Confidential
For certification only

Transferring content from an Android phone
On your old Android phone, download the HTC Transfer Tool and use it to transfer your content to
HTC Desire 526.
The types of locally stored content on your old phone that the HTC Transfer Tool can transfer
include contacts, messages, calendar events, music, photos, videos, and some settings. More types of
data such as call histories, email accounts, and some HTC app settings can be transferred from HTC
phones that have HTC Sense® 5.5 or higher.
§You need Android version 2.2 or later to use the HTC Transfer Tool on your old phone.
§If your old phone has Android version 2.1 or an earlier version, you need to use Bluetooth®
transfer. For details, see Transferring contacts from your old phone through Bluetooth on page
18.
1. From the Home screen, tap > Settings > Get content from another phone.
2. Choose whether to transfer from an HTC Android phone or other Android phone.
3. Tap Full transfer, and then tap Next.
4. Follow the steps shown on HTC Desire 526 to download the HTC Transfer Tool from
Google Play to your old phone, install it, and open the tool.
5. When you see a PIN on your old phone, make sure the same PIN also appears on
HTC Desire 526 before you continue.
If the PIN code doesn't appear, tap Retry on your old phone. If it still won't appear, this may
mean that your old phone is unable to connect to HTC Desire 526. When this happens, try
another transfer method.
6. Tap Confirm on your old phone.
7. On your old phone, choose the types of content you want to transfer, tap Transfer, and then
tap Yes.
8. On your old phone, read the onscreen message, and then tap Yes.
9. Wait for the transfer to finish.
10. Tap Done on both phones.
17 Phone setup and transfer
Confidential
For certification only

Ways of transferring content from an iPhone
If you have an iPhone, there are 3 easy ways to transfer your contacts, messages, and other content
to HTC Desire 526.
§Back up and restore iPhone content through iCloud®. To find out how, see Transferring
iPhone content through iCloud on page 18.
§Back up iPhone content using iTunes® on your computer, and then use HTC Sync Manager to
transfer the content to HTC Desire 526. For details, see Transferring iPhone content and
apps to your HTC phone on page 73.
§If you only need to copy your contacts, you can use Bluetooth transfer. For details, see
Transferring contacts from your old phone through Bluetooth on page 18.
Transferring iPhone content through iCloud
If you have an iCloud account, sync iPhone content to your iCloud storage, and then transfer the
content to HTC Desire 526. You can transfer the following types of content from iCloud: contacts,
bookmarks, text messages, messages from iMessage®, calendar events, and photos.
1. From the Home screen, tap > Settings > Get content from another phone.
2. Tap iPhone > Import from iCloud backup.
3. Follow the steps shown onscreen to back up your iPhone content to your iCloud storage.
4. Enter your iCloud email address and password, and then tap Sign in.
5. Choose the iPhone backup that you want to transfer to HTC Desire 526, and then tap Next.
6. Choose the types of content you want to transfer, and then tap Import.
7. Wait for the transfer to finish, and then tap Done.
Only some contact details can be transferred, such as the contact name, photo, postal address,
email address, birthdate, anniversary date, and notes.
Transferring contacts from your old phone through
Bluetooth
Use Bluetooth if you only need to transfer contacts from an iPhone, a phone that has Android
version 2.1 (or earlier version), or other types of phones.
1. From the Home screen, tap > Settings > Get content from another phone.
2. Choose whether to transfer from an Android phone, iPhone, or other phone types.
3. If you chose to transfer from an Android phone, tap Quick transfer.
Or to transfer from iPhone, tap Transfer contacts over Bluetooth.
18 Phone setup and transfer
Confidential
For certification only
4. On your old phone, turn Bluetooth on.
5. Follow the onscreen instructions on your old and new phones to pair them and start the data
transfer.
§Depending on the capabilities of your old phone, you may be able to transfer not only contacts
but also other data such as calendar events and text messages through Bluetooth.
§Use your iCloud storage or HTC Sync Manager to transfer more types of content from an
iPhone.
Other ways of getting contacts and other content
There are different ways you can individually add contacts and other content to HTC Desire 526.
Sync with your
computer Use HTC Sync Manager to sync contacts, documents, playlists, and more
between HTC Desire 526 and your computer running a Windows® or OS X®
operating system.
You can also use it to transfer your iTunes backup that contains contacts,
messages, and other content from an iPhone from your computer to
HTC Desire 526.
Google Account Google contacts are imported to HTC Desire 526 after you sign in to your
Google Account. You can also create more Google contacts right from
HTC Desire 526.
Social network
accounts Log in to your favorite social networks to sync contact information from
them.
Microsoft® Exchange
ActiveSync®HTC Desire 526 syncs your work contacts from the Microsoft Exchange
ActiveSync Server in your workplace.
Outlook.com
account Sync personal contacts from your Microsoft Outlook.com account.
Phone contacts You can create contacts locally on HTC Desire 526, if you don't prefer to
store them on your online accounts.
nano UIM card Copy all your nano UIM contacts to HTC Desire 526.
19 Phone setup and transfer
Confidential
For certification only

Transferring photos, videos, and music between your
phone and computer
Here are ways you can transfer your media from or to your computer.
§Connect HTC Desire 526 to your computer. Your computer will recognize it just like any
removable USB drive, and you can copy your media between them.
§Download and use the HTC Sync Manager software on your computer. You can set it up to
automatically get music, photos, and videos off HTC Desire 526 to your computer. You can
also sync playlists from your computer to the phone.
If you have an iPhone, you can also connect it and transfer camera roll photos to your
computer using HTC Sync Manager. Then reconnect HTC Desire 526 and copy them over.
§Use cloud storage services to put your media in one place so you can manage them anywhere
—on your computer, HTC Desire 526, and other mobile devices.
Using Quick Settings
In the Quick Settings panel, easily turn settings such as Wi-Fi and Bluetooth on or off.
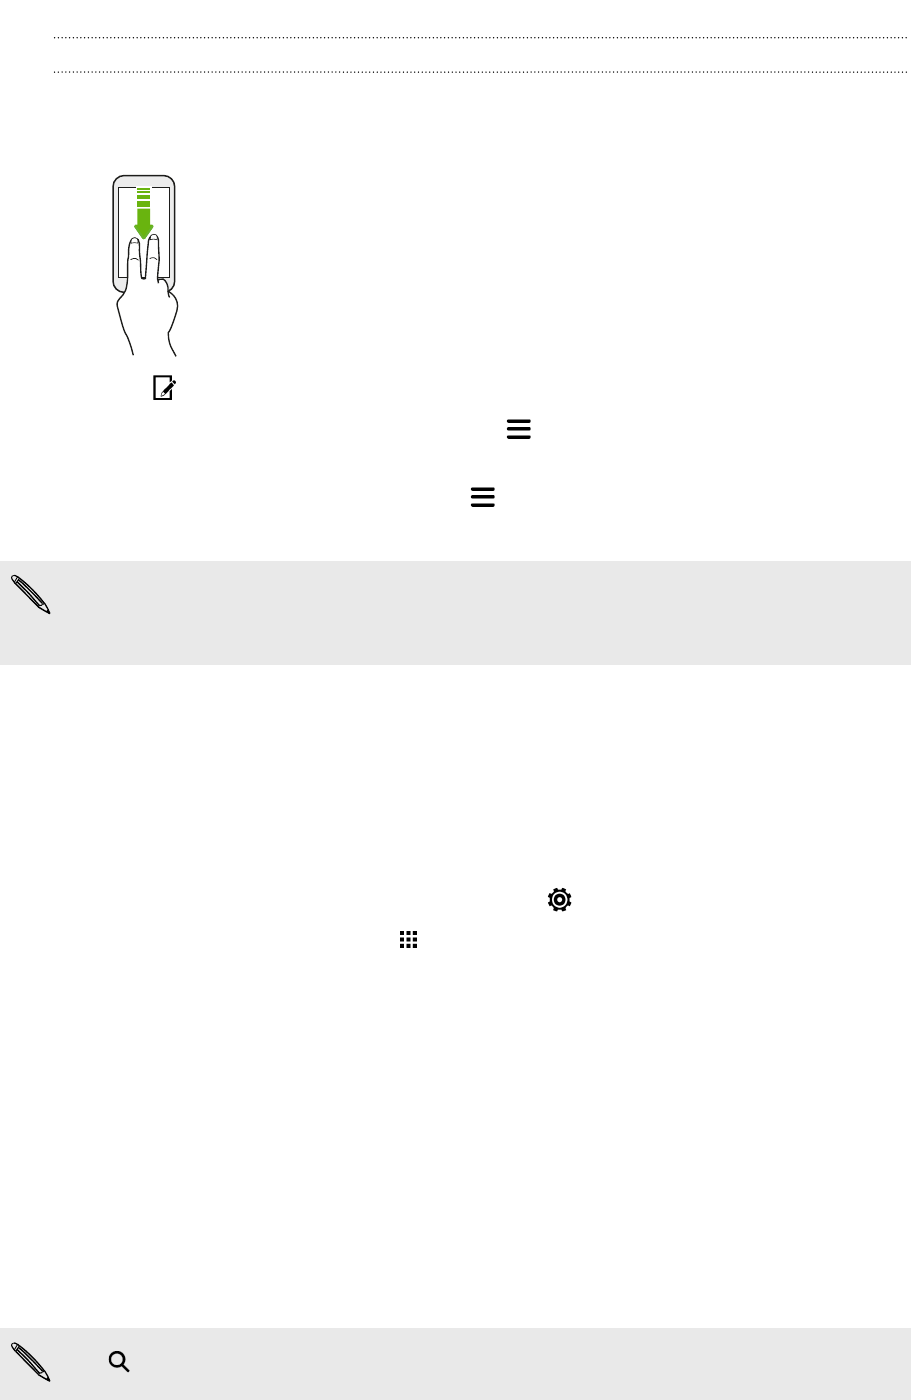
1. Do any of the following:
§With two fingers, swipe down from the status bar.
§Swipe down twice from the status bar.
2. To turn a setting on or off, just tap its tile.
3. To change the options for a setting, press and hold its tile. Or tap .
20 Phone setup and transfer
Confidential
For certification only
Customizing Quick Settings
You can remove, replace, or rearrange the tiles in Quick Settings.
1. With two fingers, swipe down from the top of the screen to open Quick Settings.
2. Tap and do one of the following:
§In the Quick Settings list, press and hold next to the item you want to move and drag
it to rearrange the list.
§Under Hidden items, press and hold and drag it up to make it available in Quick
Settings.
There is a limit to the number of tiles that can be shown in Quick Settings. You may need to
remove an existing item to make space for another one. To remove an item, drag it below Hidden
items.
Getting to know your settings
Want to change the ringtone, set up a Wi-Fi connection, or add your accounts? Do this and more in
Settings.
1. Open Settings either from the Quick Settings panel or the Apps screen.
§Swipe down from the status bar, and then tap .
§From the Home screen, tap to switch to the Apps screen, and then tap Settings.
2. Here are some of the basic settings you can change:
§Tap the On/Off switch next to an item such as Wi-Fi to turn it on or off. Tap the item
itself to configure its settings.
§Tap Sound & notification to set a ringtone, choose a sound profile, and configure
incoming call sound settings.
§Tap Personalize to change the wallpaper, add apps and widgets to the Home screen,
and more.
§Tap Accounts & sync to add and sign in to your different accounts, such as email, social
networks, and more.
§Tap Security to help secure HTC Desire 526, for example with a screen lock.
Tap in Settings to quickly find options and settings.
21 Phone setup and transfer
Confidential
For certification only
Updating your phone's software
HTC Desire 526 can check and notify you if there’s a new update available. You can also choose to
automatically download updates or manually check if there's an available update.
Visit www.htc.com/us/go/htc-software-updates/ for news and details about your phone's
software updates.
Checking your system software version
Before installing a system software update, you can check first what Android and HTC Sense
versions you have on your phone.
1. From the Home screen, tap > Settings > About.
2. Tap Software information.
Enabling automatic updates
You can choose to automatically download and install software updates for HTC or mobile operator
apps.
1. From the Home screen, tap > Settings > About.
2. Tap Software updates.
3. To save on data usage, you can choose to update through Wi-Fi only.
4. Choose whether to auto-download system updates, app updates, or both.
App updates are installed automatically. You'll still need to confirm when to install system
software updates.
Installing a software update
When HTC Desire 526 is connected to the Internet and there's a new software update available, the
update notification icon appears in the status bar.
1. Slide the Notifications panel open, and then tap the system update notification.
2. If you don't want to download the update using your data connection, select Update over
Wi-Fi only.
3. Tap Download.
4. When download is complete, select Install now, and then tap OK.
After updating, HTC Desire 526 will restart.
22 Phone setup and transfer
Confidential
For certification only
Installing an application update
When Internet connection is on and there's an available update for your HTC or mobile operator
apps, the update notification icon appears in the status bar.
1. Slide the Notifications panel open, and then tap the update notification.
The Updates screen opens with the list of application updates to be installed.
2. Tap an item to view its details, and then tap .
3. When you're done reviewing the updates, tap Install. You'll be asked to restart
HTC Desire 526 if needed.
Installing app updates from Google Play
Some HTC apps and third-party apps get updated with improvements and bug fixes through
Google Play. You can manually update apps or set your phone to automatically download and install
app updates when available.
1. From the Home screen, tap , and then find and tap Play Store.
2. Tap to open the slideout menu.
3. Tap My apps.
You'll see a list of apps installed on your phone.
4. Under Updates, tap an app.
5. Tap Update.
6. Tap Accept.
In Play Store, tap > Settings > Auto-update apps to choose how you want Google Play to
update your apps.
Checking for updates manually
1. From the Home screen, tap > Settings > About.
2. Tap Software updates. HTC Desire 526 checks if updates are available.
If you don't have Internet connection, you'll be prompted to turn on mobile data or connect to a
Wi-Fi network. Once connected, tap Check now to check for updates.
23 Phone setup and transfer
Confidential
For certification only
Getting apps from Google Play
Google Play is the place to go to find new apps for HTC Desire 526. Choose from a wide variety of
free and paid apps ranging from productivity apps, entertainment, to games.
You need a Google Wallet™ account to buy paid apps or to make in-app purchases. If you already
have a Google Account, just add Google Wallet by signing in with your existing username and
password at wallet.google.com.
Finding and installing an app
When you install apps and use them on HTC Desire 526, they may require access to your personal
information or access to certain functions or settings. Download and install only apps that you trust.
Be cautious when downloading apps that have access to functions or a significant amount of your
data on HTC Desire 526. You’re responsible for the results of using downloaded apps.
1. From the Home screen, tap , and then find and tap Play Store.
2. Browse or search for an app.
3. When you find the app that you like, tap it and read its description and user reviews.
4. To download or purchase the app, tap Install (for free apps) or the price button (for paid
apps).
5. Tap Accept.
Apps sometimes get updated with improvements or bug fixes. To automatically download
updates, after installing the app, tap > Auto-update.
To open the app, go to the Apps screen and tap the app.
Restoring apps from Google Play
Upgraded to a new phone, replaced a lost one, or performed a factory reset? Restore apps that you
previously downloaded.
1. From the Home screen, tap , and then find and tap Play Store.
2. Tap to open the slideout menu.
3. Tap My apps, swipe to the All tab, and then tap the app you want to restore.
4. Install the app.
For more details, refer to the Google Play help.
24 Phone setup and transfer
Confidential
For certification only
Downloading apps from the web
You can download apps directly from websites.
§Apps downloaded from websites can be from unknown sources. To help protect HTC Desire 526
and your personal data, we strongly recommend that you only download from websites you
trust.
§Before you can install the downloaded app, make sure that you've set HTC Desire 526 to allow
installation of third-party apps in Settings > Security > Unknown sources.
1. Open the browser, and then go to the website where you can download the app you want.
2. Follow the website's download instructions for the app.
After installing the app, make sure to go back to Settings > Security and clear the Unknown
sources option.
Uninstalling an app
If you no longer need an app that you've downloaded and installed, you can uninstall it.
Most of the preloaded apps cannot be uninstalled.
From the Apps screen, press and hold the app you want to remove, and then drag it to Uninstall.
If you purchased an app in Play Store, you can uninstall it for a refund within a limited time. To
know more about the refund policy for paid apps, refer to the Google Play help.
25 Phone setup and transfer
Confidential
For certification only
Your first week with your
new phone
Basics
HTC Sense Home
After you've turned on and set up HTC Desire 526 for the first time, you'll see the Home screen.
§Set up the HTC Sense Home widget to experience the convenience of a Home screen that
automatically adjusts when you're at home, work, or outdoors. See What is the HTC Sense
Home widget? on page 35.
§Swipe right and you'll find HTC BlinkFeed®. You can customize HTC BlinkFeed to show
posts from your social networks, headlines from your favorite news media, and more. For
details, see .
§Swipe left and you’ll discover space for adding your favorite widgets, apps, and more so
they’re just a tap away. You can also add panels. For details, see Adding or removing a widget
panel on page 52.
§You can change the apps on the launch bar at the bottom of the Home screen. See Launch bar
on page 50.
While you're in another screen or app, press to return to the last Home screen you visited.
Onscreen navigation buttons
HTC Desire 526 has onscreen navigation buttons at the bottom of the screen which rotate when you
change the orientation.
Standard navigation buttons
Back
Home
Recent apps
26 Your first week with your new phone
Confidential
For certification only
Fourth navigation button options
Hide navigation bar
Turn off screen
Auto rotate
Notifications
Quick settings
See Adding a fourth navigation button on page 27.
Adding a fourth navigation button
You can add a fourth navigation button to make it easier to turn the display off, toggle auto-rotate,
and more.
1. From the Home screen, tap > Settings > Personalize.
2. Tap Change navigation buttons.
3. Tap a fourth navigation button to add it. To have only three navigation buttons, make sure
none of the fourth button options are selected.
4. Tap Done to save and apply your customization.
Rearranging the navigation buttons
Right-handed or left-handed? Customize the placement of the navigation buttons to fit what's most
comfortable for you.
1. From the Home screen, tap > Settings > Personalize.
2. Tap Change navigation buttons.
3. Rearrange the navigation buttons by dragging next to the button names. The resulting
order from top to bottom in the list will be the corresponding order from left to right on the
navigation bar.
4. Tap Done to save and apply your customization.
27 Your first week with your new phone
Confidential
For certification only
Sleep mode
Sleep mode saves battery power by putting HTC Desire 526 into a low power state while the display
is off. It also stops accidental button presses when HTC Desire 526 is in your bag.
Switching to Sleep mode
To turn off the display and switch to Sleep mode, you can:
§Briefly press the POWER button.
§Double-tap the lock screen.
HTC Desire 526 also automatically goes into Sleep mode when it’s left idle for a while. You can
change the time before HTC Desire 526 sleeps by setting the screen timeout. For details, see Setting
when to turn off the screen on page 83.
Waking up from Sleep mode
Press the POWER button.
Unlocking the screen
Swipe up to unlock the screen.
If you've set up a screen lock, you'll be asked to provide your credentials before HTC Desire 526
unlocks.
If you've set an event reminder or an alarm, you can snooze or dismiss the event or alarm right
from the lock screen. Just drag or up.
Motion gestures
Use motion gestures to mute HTC Desire 526, lower the ring volume, and more.
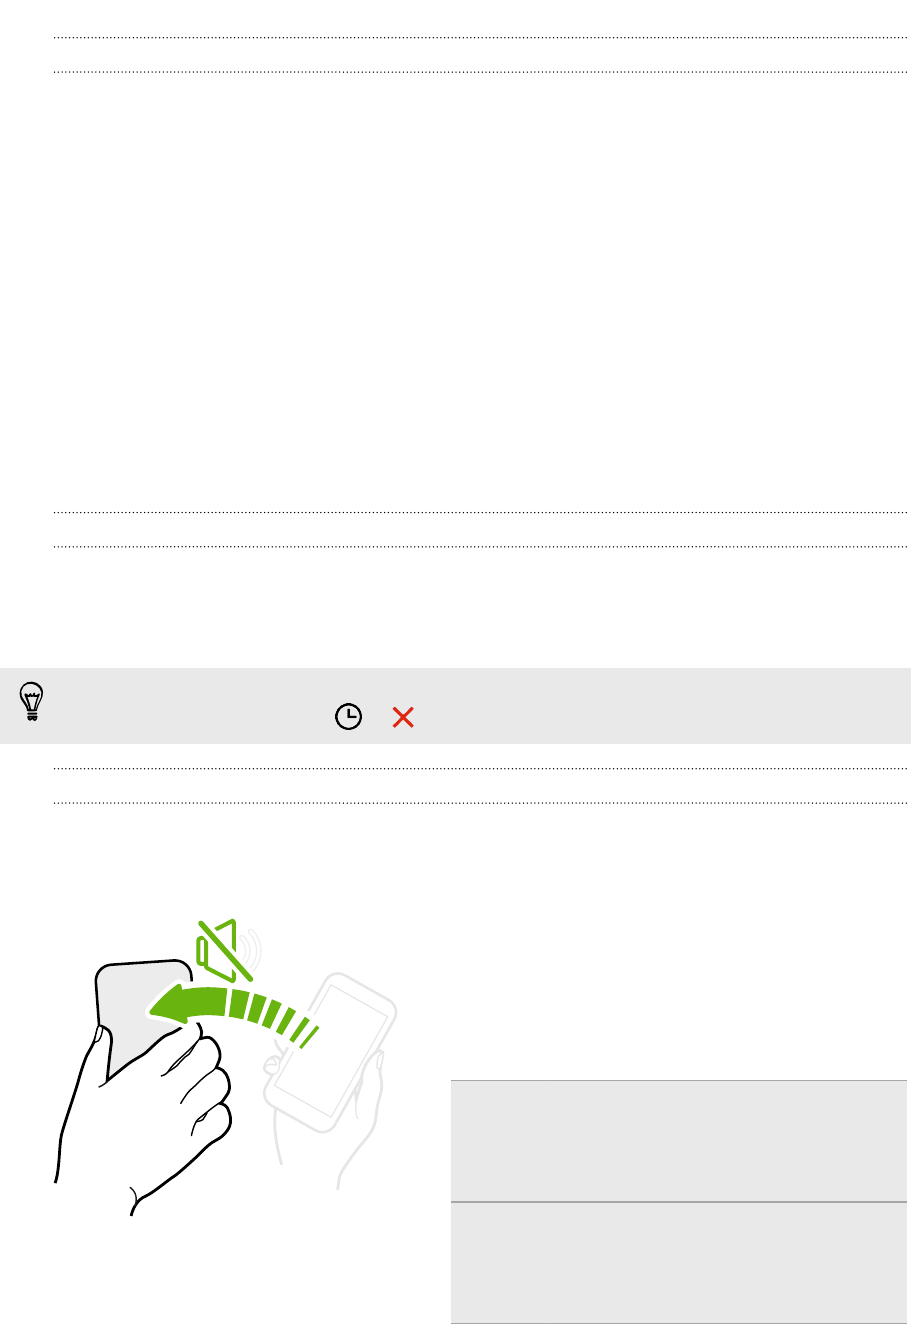
Flip to mute
If your phone is facing up when a call comes in, turn
the phone over to mute it.
If you go to Settings and then tap Sound &
notification > Flip to mute, you can set your phone
to:
Mute
once Mute only once after flipping the phone.
While the phone is still facing down, it
will ring again when there are other
incoming calls.
Mute
always After flipping the phone to mute a call,
keep it always muted while it's still
facing down when there are other
incoming calls.
28 Your first week with your new phone
Confidential
For certification only
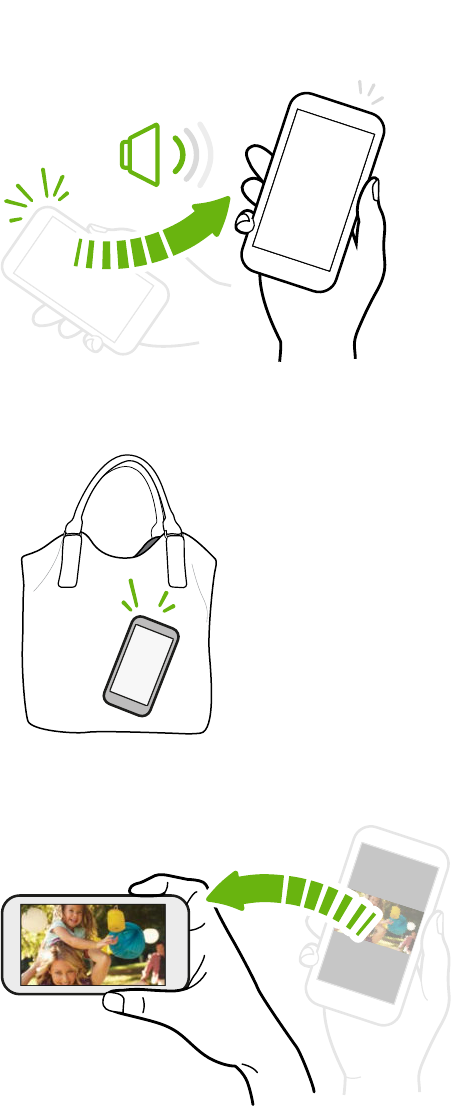
Pick up to lower volume
In a business meeting or restaurant, pick
HTC Desire 526 up when a call comes in to
lower the ring volume automatically.
You can turn this feature on or off. Go to
Settings, tap Sound & notification, and then
select or clear Quiet ring on pickup.
Increase ring volume automatically while phone is in your pocket or bag
Pocket mode makes HTC Desire 526 recognize when your phone
is in your bag or pocket and raise the ring volume so that you can
hear it in noisy environments.
You can turn this feature on or off. Go to Settings, tap Sound &
notification, and then select or clear Pocket mode.
Rotate HTC Desire 526 for a better view
For many screens, you can automatically
change the screen orientation from
portrait to landscape by turning
HTC Desire 526 sideways.
When entering text, you can turn
HTC Desire 526 sideways to bring up a
bigger keyboard.
29 Your first week with your new phone
Confidential
For certification only
Touch gestures
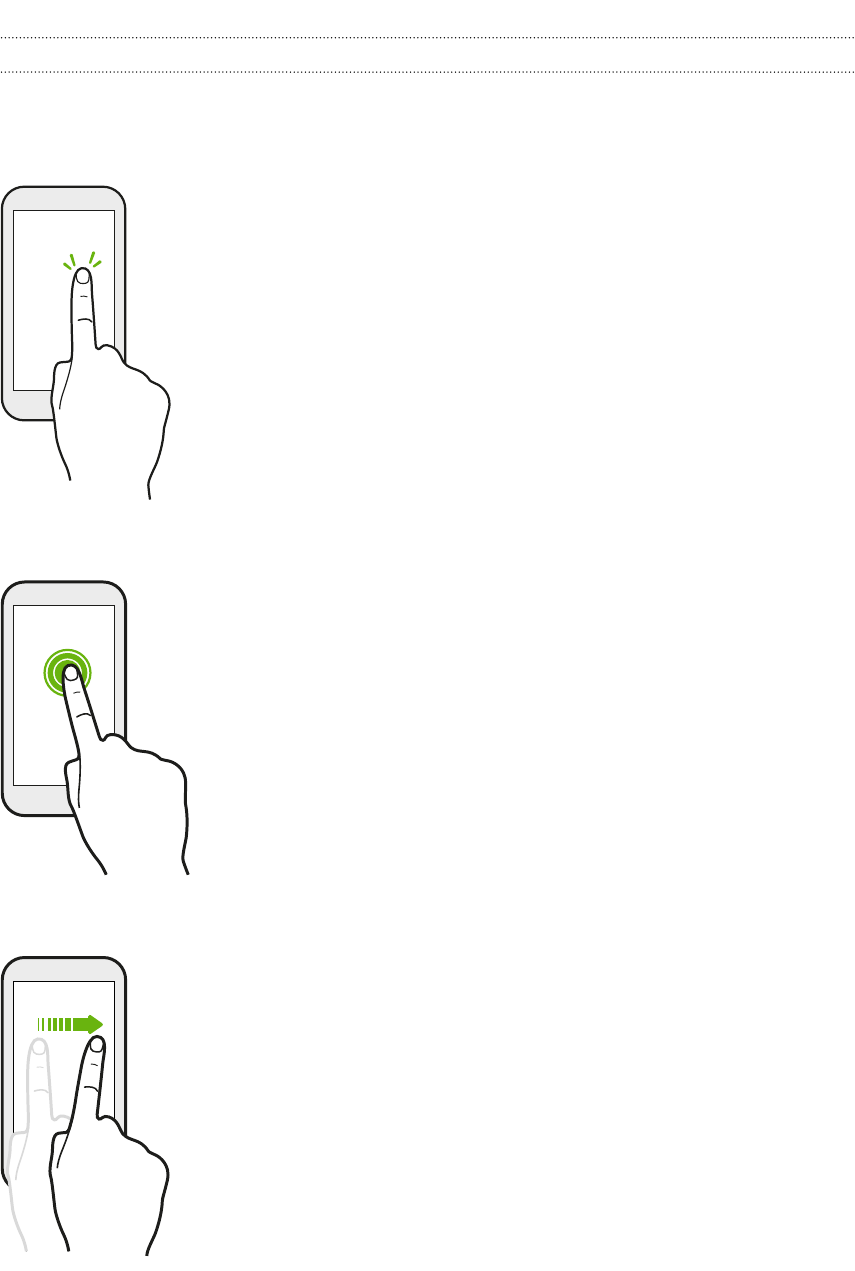
Use touch gestures to get around the Home screen, open apps, scroll through lists, and more.
Tap
§Tap the screen with your finger when you want to select onscreen
items such as application and settings icons, or press onscreen
buttons.
§After you've scrolled down a long list or screen (in apps such as Mail
and People), tap the status bar to jump straight to the top of your
screen.
Press and hold
To open the available options for an item (for example, a contact or link
in a webpage), just press and hold the item.
Swipe or slide
Quickly swipe your finger horizontally across the screen to go to other
Home screen panels. Swipe vertically to scroll through a list, document,
and more.
30 Your first week with your new phone
Confidential
For certification only

Drag
Press and hold your finger with some pressure before you start to drag.
While dragging, don't release your finger until you have reached the
target position.
Flick
Flicking the screen is similar to swiping, except that you need
to swipe your finger in light, quicker strokes, such as when
moving right and left on the Home screen, or flicking through
a contacts or message list.
Press and flick
On the Home screen, you can easily move a widget or icon from
one screen to another.
Press and hold the widget or icon with one finger, and flick the
screen to the new location with another finger.
31 Your first week with your new phone
Confidential
For certification only

Slide with two fingers
In some apps, like Gallery, Messages, Mail, or
the web browser, slide two fingers apart to zoom
in when viewing a picture or text.
Slide two fingers together to zoom out of the picture or text.
Two-finger swipe
Swipe down from the status bar using two fingers to access Quick Settings.
32 Your first week with your new phone
Confidential
For certification only
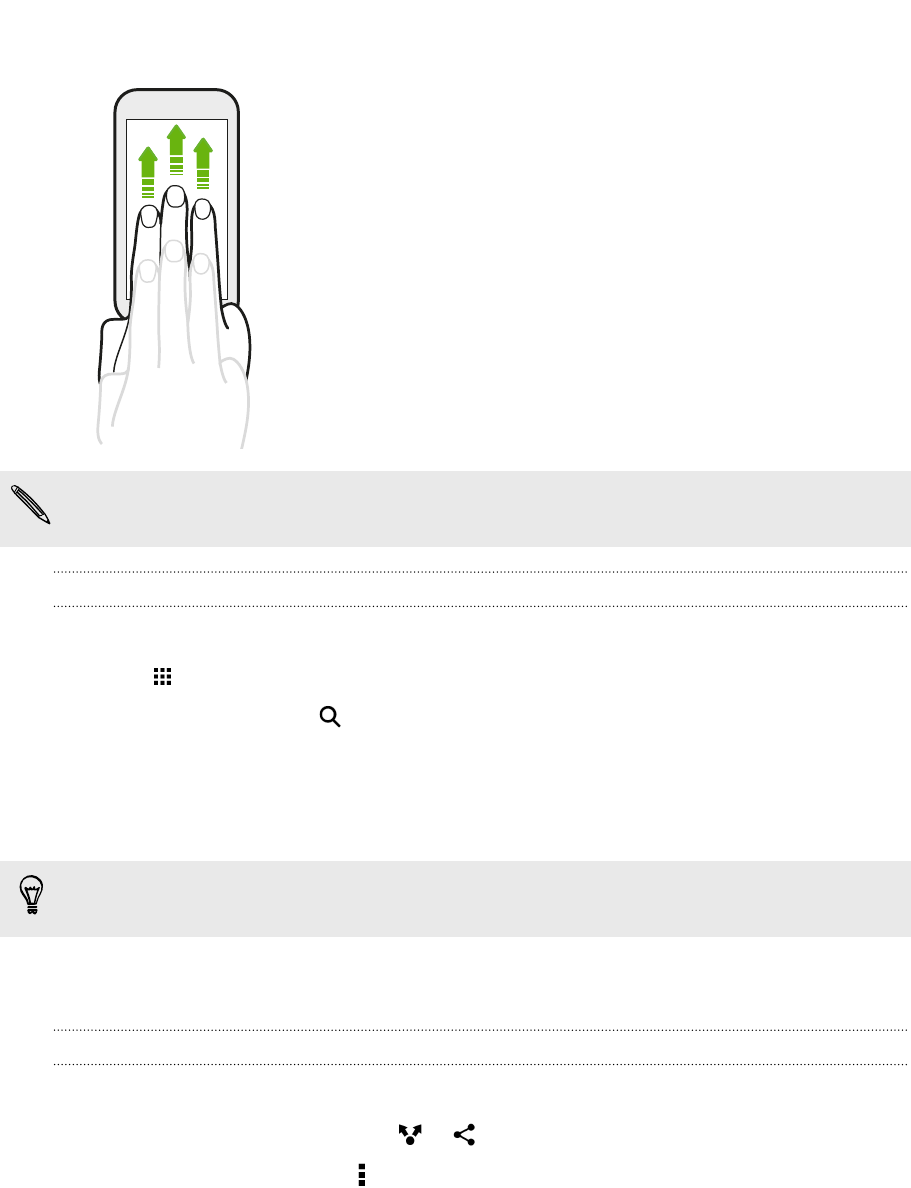
Three-finger swipe
§Swipe up the screen with three fingers and HTC Connect®
streams music or video from HTC Desire 526 to your
speakers or TV respectively. You can also share streaming
media from apps such as YouTube®.
§Swipe down to disconnect from your speakers or TV.
Media gesture is turned on in Settings by default, which makes the three-finger gesture work for
sharing media.
Opening an app
§Tap an app on the launch bar at the bottom of the Home screen.
§Tap to go to the Apps screen, and then tap the app you want to use.
§On the Apps screen, tap , and then enter the name of the app you're looking for.
Opening an app or folder from the lock screen
On the lock screen, drag an app or folder icon up to unlock the screen and directly go to the app or
folder.
The shortcuts on the lock screen are the same ones on your Home screen's launch bar. To change
the lock screen shortcuts, replace the apps or folders on the launch bar.
If you've set up another security layer like a screen lock pattern or PIN, you'll be asked to provide
your credentials first before HTC Desire 526 opens the app or folder.
Sharing content
Have something to share, such as a photo or video?
§In an app, just tap the share icon: or .
§If you don't see the icon, tap > Share.
33 Your first week with your new phone
Confidential
For certification only
Switching between recently opened apps
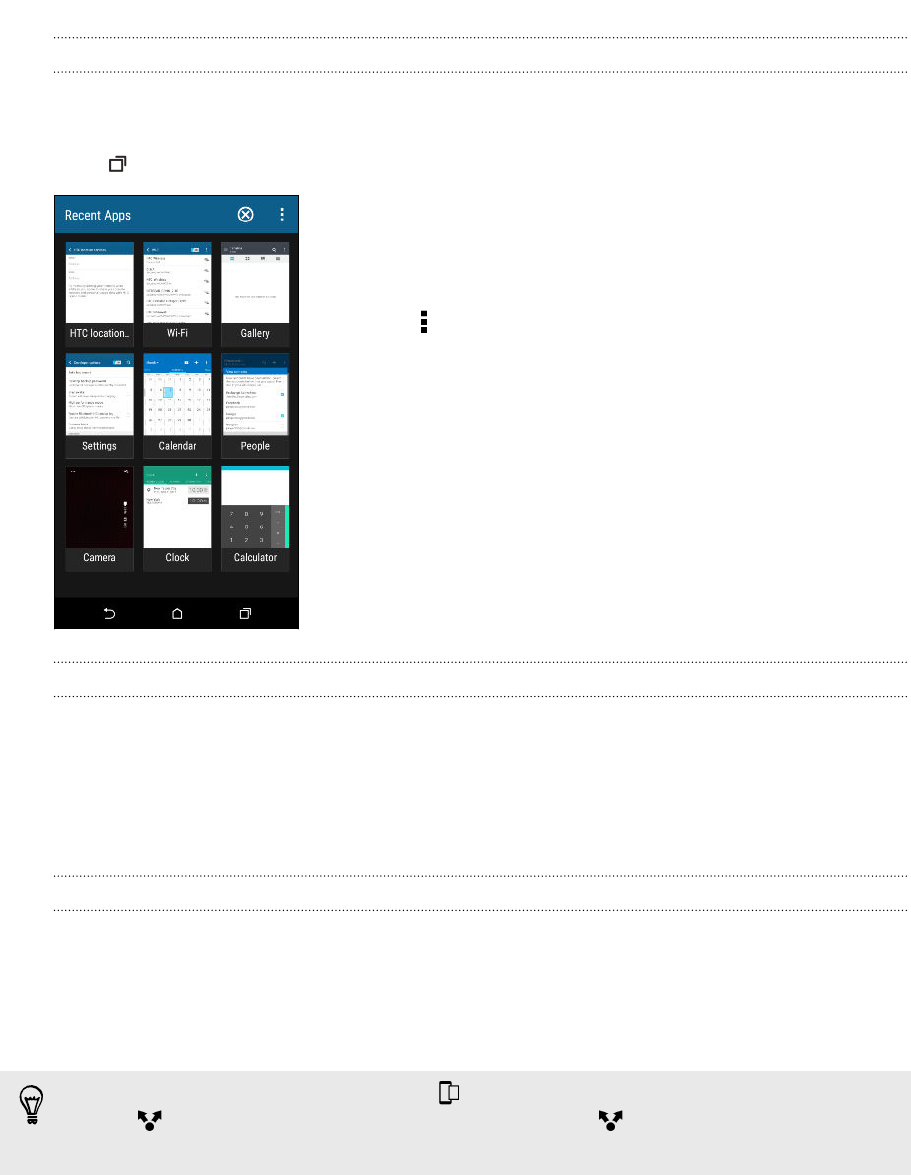
When you're multitasking and using different apps on HTC Desire 526, you can easily switch
between the apps you've recently opened.
Press to see recently-opened apps.
§To switch back to an app, just tap it.
§To remove an app from the list in grid view, drag it up.
If you're using the card view, drag it left or right.
§Tap > Settings > Layout, and then choose between card or
grid view.
Refreshing content
In some apps, you can easily refresh content that's synced or downloaded from the Web with a
simple finger gesture.
1. While viewing content such as weather or Mail inbox, scroll to the top of the screen.
2. Pull down with your finger, and then release to refresh.
Capturing your phone's screen
Want to show off your high game score or write a blog post about HTC Desire 526 features? It's easy
to take a picture of the screen and share it from Gallery.
Press and hold POWER and VOLUME DOWN at the same time.
The image is saved in the Screenshots album in Gallery.
You can also share the image when you see in the status bar. Open the Notifications panel
and tap under the screenshot notification. If you don't see , slide two fingers apart on the
screenshot notification.
34 Your first week with your new phone
Confidential
For certification only
HTC Sense Home widget
What is the HTC Sense Home widget?
Get quick access to apps, shortcuts and folders you use most frequently based on where you are.
With the HTC Sense Home widget, HTC Desire 526 continually adapts to how you use it. For
example, apps you use most frequently for work, will show up when you're at your office. The
HTC Sense Home widget changes depending on whether you're at home, work, or somewhere else.
Setting up the HTC Sense Home widget
Setting up the HTC Sense Home widget is quick and easy.
§If you don't see the HTC Sense Home widget, add it to your Home screen. See Adding Home
screen widgets on page 51.
§Make sure you turn on location services in your phone settings. See Turning location services on
or off on page 82.
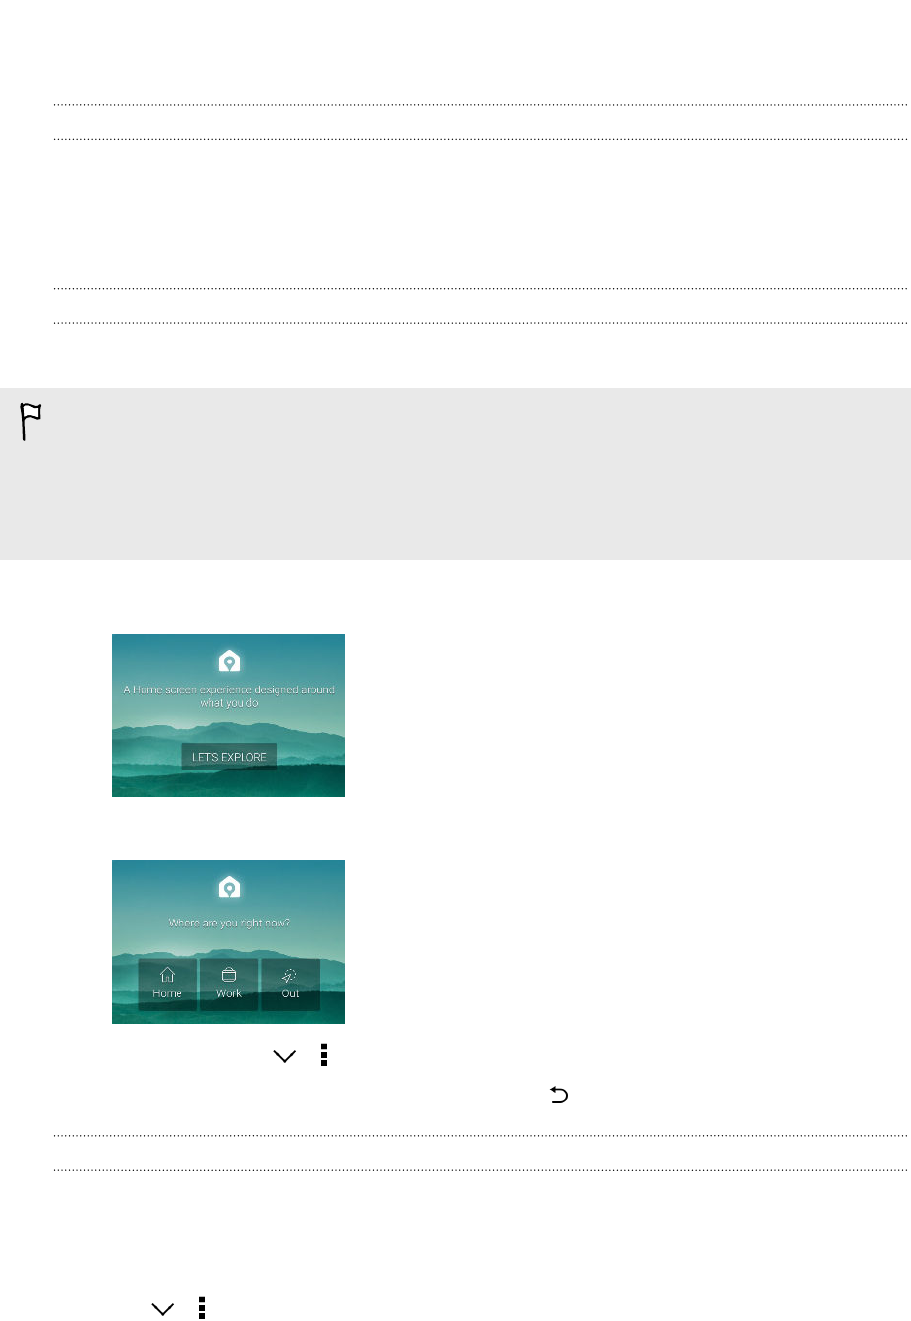
1. On the setup screen of the HTC Sense Home widget, tap Tap to personalize > Let's explore.
2. Tap where you are to finish setting up the widget.
3. On the widget, tap > > Personalize HTC Sense Home.
4. Select all the options on the screen, and then press .
Setting your home and work locations
You can change the address for your home and work locations if you ever move to a new home or
change your job.
1. On the Home screen, swipe right or left until you see the HTC Sense Home widget.
2. Tap > > Set locations.
3. Tap the address area to search for the address you want to set.
4. When you've found the address on the map, tap Done.
35 Your first week with your new phone
Confidential
For certification only

Manually switching locations
The HTC Sense Home widget automatically changes locations based on where you are. You can also
manually change the location in the HTC Sense Home widget.
For the HTC Sense Home widget to change locations automatically, you need to make sure that
location services is turned on. See Turning location services on or off on page 82.
1. On your Home screen, slide right or left until you see the HTC Sense Home widget.
2. Tap , and then tap the location you want.
Pinning and unpinning apps
Pinning apps, shortcuts, or folders to the HTC Sense Home widget ensures they stay on the widget.
Items in the HTC Sense Home widget will have one of two states: pinned or unpinned. Unpinned
items will be automatically changed to more frequently used items.
1. On the Home screen, swipe right or left until you see the HTC Sense Home widget.
2. Do one of the following:
§To pin an item, press and hold it until you see .
§To unpin an item, press and hold it until the unpinning progress bar has completed.
Adding apps to the HTC Sense Home widget
Add your favorite apps, shortcuts, or folders to the HTC Sense Home widget.
1. From the Home screen, tap .
2. Press and hold the app, shortcut, or folder you want to add to the widget.
3. Drag the item to where you want in the HTC Sense Home widget.
The app, shortcut or folder will be added to the HTC Sense Home widget and pinned in place.
Turning smart folders on and off
Smart folders are folders in the HTC Sense Home widget that dynamically change contents
depending on the apps you download and use. If you don't want to see recently downloaded or
recommended apps, you can turn off the smart folders.
1. On the Home screen, swipe right or left until you see the HTC Sense Home widget.
2. Tap , and then tap > Show/hide smart folders.
36 Your first week with your new phone
Confidential
For certification only
3. Select the smart folders you want to show or hide.
4. Tap OK.
Lock screen
Setting a screen lock
Help protect your personal information and help prevent others from using HTC Desire 526
without your permission.
Choose to set a screen lock pattern, numeric PIN, or other means of securing your phone. You'll be
asked to unlock the screen every time HTC Desire 526 is turned on or when it’s idle for a certain
period of time.
1. From the Home screen, tap > Settings > Security.
2. Tap Screen lock.
3. Select a screen lock option and set up the screen lock.
4. Tap Lock phone after, then specify the idle time before the screen is locked.
You can also clear Make pattern visible or Make passwords visible if you don’t want your
screen lock to display as you enter it onscreen.
Setting up Smart Lock
Set up your phone to detect your face or another trusted device before you can unlock the screen.
1. From the Home screen, tap > Settings > Security.
2. Tap Screen lock, and then select and set up a screen lock.
This will be your backup screen lock method.
3. On the Security screen, tap Smart Lock.
4. Confirm your screen lock.
5. Choose what you want your phone to detect before it unlocks.
6. Follow the onscreen instructions.
7. Tap Lock phone after, and then specify the idle time before the screen is locked.
To help make Smart Lock more reliable and more secure, you can train HTC Desire 526 to recognize
your face in different situations, such as when you're wearing glasses or sporting a beard.
Tap Smart Lock, confirm your screen lock, then tap Trusted face > Improve face matching. Follow
the onscreen instructions.
37 Your first week with your new phone
Confidential
For certification only
Turning lock screen notifications on or off
You can choose to turn lock screen notifications on or off.
1. From the Home screen, tap > Settings > Sound & notification.
2. Tap When device is locked > Don't show notifications at all.
If you change your mind later, you can tap Show all notification content to turn lock screen
notifications on.
Interacting with lock screen notifications
Besides seeing notifications on the lock screen, you can also interact with them.
1. Tap twice on a notification to go directly to the related app.
2. To see the entire list of notifications on the lock screen, swipe down on the lock screen. You
can tap on a blank area of the screen to return to the lock screen.
3. Swipe left or right on the notification to remove it.
4. Press and hold a notification to see more related information.
5. Tap to prioritize or block notifications from the related app.
HTC BlinkFeed Notifications
From time to time, you'll see HTC BlinkFeed notifications, such as a suggestion for a nearby
restaurant or a recommended article.
1. Double-tap the notification to see the full notification.
For restaurant recommendations, tap or the notification text.
2. Tap the notification again to get more information about the restaurant recommendation or
to read the article in HTC BlinkFeed.
If you don't want to see restaurant recommendations on your lock screen, go to HTC BlinkFeed,
and then tap > > Settings > Notification on lock screen. Then clear the Meal time bundle
option.
Changing lock screen shortcuts
To change apps (or other shortcuts) on the lock screen, change the ones on the launch bar. To find
out how, see Launch bar on page 50.
38 Your first week with your new phone
Confidential
For certification only

Changing the lock screen wallpaper
Use the home wallpaper, or use any photo you've taken with the camera as the lock screen
wallpaper.
1. From the Home screen, tap > Settings > Personalize.
2. Under Lock screen, tap Change wallpaper.
3. In the pop-up menu, tap Use home screen wallpaper or tap Use custom wallpaper to select
a photo from Gallery.
Turning the lock screen off
Rather not have to unlock your phone every time you wake it up? You can turn the lock screen off in
Settings.
1. From the Home screen, tap > Settings > Security.
2. Tap Screen lock > No lock screen.
To turn the lock screen on again, in Security settings, tap Screen lock > Lock screen.
39 Your first week with your new phone
Confidential
For certification only
Notifications
Notifications panel
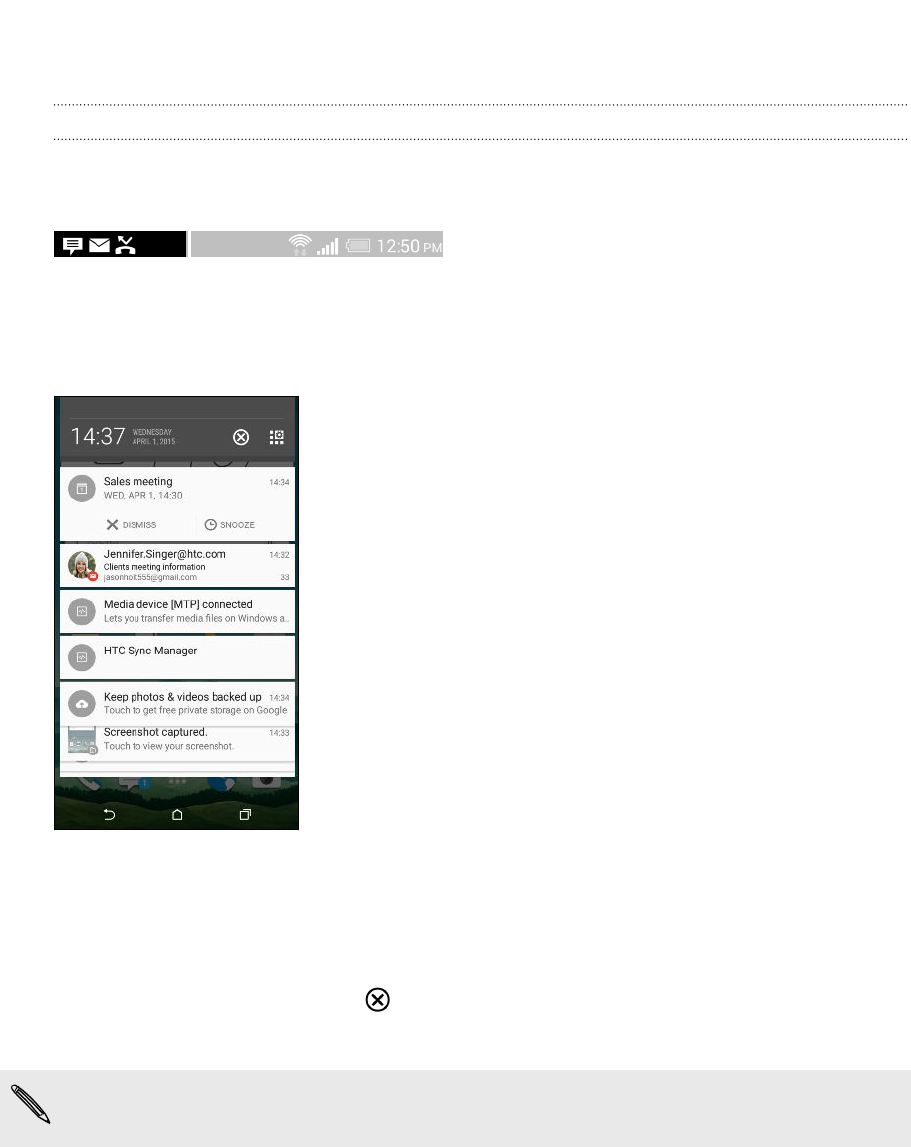
Notification icons inform you of new messages, calendar events, alarms, and activities in progress
such as files downloading.
When you see notification icons, open the Notifications panel to check out details of the
notifications that you've received.
To open the Notifications panel, slide down from the top of the screen.
§Some notifications allow you to take immediate action. For example, tap a missed call
notification to return the call or reply with a text message.
§Tap the notification icon on the left to open the corresponding app.
§To dismiss just one notification in the list, drag it left or right. To dismiss all notifications and
close the Notifications panel, tap .
If you have several notifications, scroll through the list screen to see them all.
You can change what app notifications you want to receive. See Managing app notifications on
page 41.
40 Your first week with your new phone
Confidential
For certification only
Managing app notifications
You can set the priority of app notifications or completely block notifications for apps you don't
want to be notified about.
1. From the Home screen, tap > Settings > Sound & notification.
2. Tap App notifications, and then tap the app you want manage.
You can also press and hold a notification in the notifications panel, and then tap .
3. Tap the On/Off switch next to Block or Priority depending on what you want to do.
Settings for app notifications are applied to notifications in the Notifications panel and the lock
screen.
Working with text
Selecting, copying, and pasting text
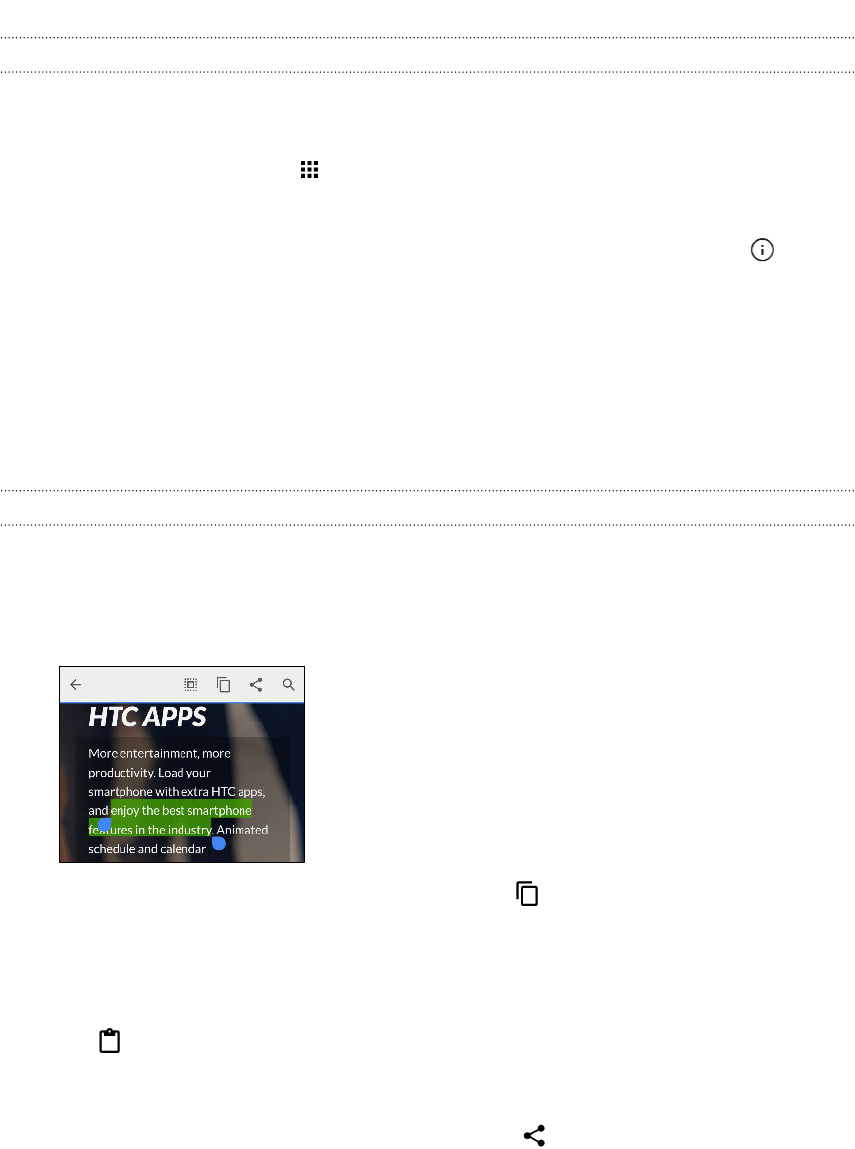
In HTC apps such as Mail and Messages, you can select and copy text, and then paste or share it.
1. Press and hold on a word.
2. Drag the start and end anchors to highlight the surrounding text you want to select.
3. After you have selected the text you want to copy, tap .
The selected text is then copied to the clipboard.
4. In a text entry field (for example while composing an email), press and hold at the point
where you want to paste the text.
5. Tap or Paste.
Sharing text
1. After you have selected the text you want to share, tap .
2. Choose where to paste and share the selected text, such as in an email message or social
network status update.
41 Your first week with your new phone
Confidential
For certification only
The HTC Sense keyboard
Typing is fast and accurate with the HTC Sense keyboard.
§Word prediction also saves typing time. As you type, you'll see word suggestions that you can
choose from. You can even add words to the word prediction dictionary. See Entering text
with word prediction on page 43.
§You can type words by just speaking. See Entering text by speaking on page 45.
§Turn on the Trace keyboard so you can type words by just sliding your finger from one letter
to another. See Using the Trace keyboard on page 44.
§Just swipe right to access the numeric and symbol keyboard. Or swipe left to switch between
languages.
§The keys have secondary numbers, punctuation symbols, or other characters that you can
insert without having to switch to the numeric and symbol keyboard.
For example, just press and hold a key on the first row to insert a number.
§Choose from a wide selection of emoji.
§Show or hide navigational arrow keys on the keyboard. If you enable the arrow keys in
Settings, they'll only appear on the portrait keyboard.
Entering text
The onscreen keyboard becomes available when you tap a text field in an app.
Tap the keys on the onscreen keyboard to enter letters and numbers, as well as punctuation marks
and symbols.
§Tap to enter an uppercase letter. Tap twice to turn on caps lock.
§Press and hold keys with gray characters at the top to enter numbers, symbols, or accented
letters. Some keys have multiple characters or accents associated with them.
§Swipe right to show number and symbol keys. To return to the main keyboard, swipe left.
§Press to close the onscreen keyboard.
To open the keyboard settings, press and hold the comma key if you see above the key. Or go
to Settings > Language & keyboard > HTC Sense Input.
Selecting a keyboard layout
Choose a keyboard layout that suits your typing style.
1. Go to Settings, and then tap Language & keyboard > HTC Sense Input.
2. Tap Keyboard selection > Keyboard types.
3. Select the keyboard layout that you want to use.
42 Your first week with your new phone
Confidential
For certification only
Choosing and switching between keyboard languages
If multiple keyboard languages are available on HTC Desire 526, you can choose which languages to
enable in the onscreen keyboard.
1. Go to Settings, and then tap Language & keyboard > HTC Sense Input.
2. Tap Keyboard selection, and then choose the languages you want.
To change the keyboard language, do any of the following:
§Swipe left on the onscreen keyboard (not available if you're using trace keyboard).
§Tap the language key, for example, , until you see the keyboard language you want to use.
§Press and hold the language key, and then drag your finger to the keyboard language you
want to use.
Entering text with word prediction
Ever started typing something you weren't sure how to spell? With word prediction, you'll see
suggested words displayed just above the keyboard.
Word prediction and next word prediction are enabled by default.
To enter text in word prediction mode, do any of the following:
§Tap the space bar to insert a highlighted word in the suggestion list.
§Tap a word from the suggestion list.
§Tap the arrow next to the suggestion list to see more choices.
In some keyboard languages such as English and Spanish, if you've accidentally chosen a wrong
word from the suggestion list, you can go back and change it by tapping the word and selecting
another suggestion.
Setting a second language for word prediction
You can set the word prediction to be bilingual. As you type, you’ll get word suggestions in the
languages that you’ve selected.
This feature is available only for Latin-based languages.
1. Go to Settings, and then tap Language & keyboard > HTC Sense Input.
2. Tap Keyboard selection > Bilingual prediction, and then choose the language you want.
43 Your first week with your new phone
Confidential
For certification only
Adding words to the dictionary
For certain keyboard languages such as English and Spanish, you can add frequently-used names
and acronyms to the word prediction dictionary to easily find them in the suggestion list.
This feature is available only for Latin-based languages.
1. Go to Settings, and then tap Language & keyboard > HTC Sense Input.
2. Tap Personal dictionary > .
3. Enter a word.
4. Tap OK.
While you're entering text using the Standard keyboard layout, tapping a suggested word that’s
not in the dictionary (usually the first word shown in the suggestion list) automatically stores it.
Editing or deleting words in the dictionary
1. Go to Settings, and then tap Language & keyboard > HTC Sense Input.
2. Tap Personal dictionary.
§To edit a word, tap the item in the list.
§To delete items from the dictionary, tap > Delete. Select the words you want to
remove, and then tap Delete.
Using the Trace keyboard
Instead of tapping the keys on the onscreen keyboard, you can "trace" to type words.
This feature is available only for Latin-based languages.
1. Turn on the Trace keyboard in Settings > Language & keyboard > HTC Sense Input.
2. On the onscreen keyboard, slide your finger from one letter to the next to enter a word.
3. Lift your finger when the word is completed.
4. If you want to continue entering text, slide your finger over the letters again to enter the next
word.
If the word that appears after you traced isn't the one you want, you can:
§Tap a word from the suggestion list.
§Tap the arrow next to the suggestion list to see more choices.
44 Your first week with your new phone
Confidential
For certification only

Entering text by speaking
No time to type? Try speaking the words to enter them.
1. Tap an area where you want to enter text.
2. On the onscreen keyboard, press and hold .
3. When you see the animated microphone button and the words "Speak now", say the words
you want to enter.
To set the voice input language, tap the language bar above the microphone button. You can
choose one or more languages. Available languages may vary.
4. If a word doesn't match what you've spoken and it's underlined, tap the underlined word to
delete it or to see more choices.
5. Enter punctuation marks by saying the name (for example, say "comma").
45 Your first week with your new phone
Confidential
For certification only

Personalizing
Themes
What is the Themes app?
Themes brings a quick and easy way for you to customize HTC Desire 526 with wallpapers, sounds,
icons, and more.
Log in with your HTC account to browse from the available themes in the Themes store, or make
your own.
Downloading themes
Find and download pre-made themes that make it easy for you to personalize your HTC Desire 526.
1. From the Home screen, tap , and then find and tap Themes.
2. Tap Get Started.
3. Sign in with your preferred account.
4. On the Recommended screen, swipe left or right under each category to browse
recommended items.
5. To see all available items for a category, swipe left and tap See all.
6. Tap an item to see the details screen.
7. Tap Download.
To apply the theme after it has finished downloading, tap Apply. If your theme has custom sounds,
all of your ringtones and alert tones will also change.
Bookmarking themes
While browsing themes, you can bookmark them you so that you can easily find them later.
1. From the Home screen, tap , and then find and tap Themes.
2. Browse the categories to find something you like.
3. Tap the item and then tap . You'll find the bookmark in My themes. See Finding your
themes on page 48.
You can remove the bookmark by tapping again.
46 Personalizing
Confidential
For certification only

Creating your own theme from scratch
You can create and customize your own theme and even share it for others to download.
1. From the Home screen, tap , and then find and tap Themes.
2. Tap > Choose Home image to set the main wallpaper for your theme.
3. Select an image from Gallery or take a photo with Camera.
4. Move or enlarge the crop box to the area of the image you want to include and tap Done.
5. Tap Next.
6. Swipe up or down to the pre-defined style to select for your theme.
If you don't want to customize your theme further, tap Next to save your theme.
7. Tap Edit, then tap any of the categories you want to customize, and experiment with the
settings until you're satisfied.
8. When you're ready, tap Preview to see what your theme will look like.
9. Tap Finish, then name your theme and tap OK to save your theme.
To apply the theme right away, make sure you select the Apply this theme now option.
Editing a theme
After creating a theme, you can still edit it.
1. From the Home screen, tap , and then find and tap Themes.
2. Tap > My themes > My current theme.
3. Make the changes you want to the theme.
4. Tap Save to update the current theme.
Mixing and matching themes
After selecting a theme, you can mix and match parts from other themes such as sounds, icons,
wallpapers. and more.
To mix and match themes, you need to first download theme components from the catalog.
1. From the Home screen, tap , and then find and tap Themes.
2. Tap > My themes > My current theme.
3. Tap Color and select a color scheme.
4. Tap any of the other categories you want to change.
5. Tap an item in the category. If the category is empty, tap and choose one of the
collections to select from.
6. Tap Apply to apply the change to your current theme.
47 Personalizing
Confidential
For certification only
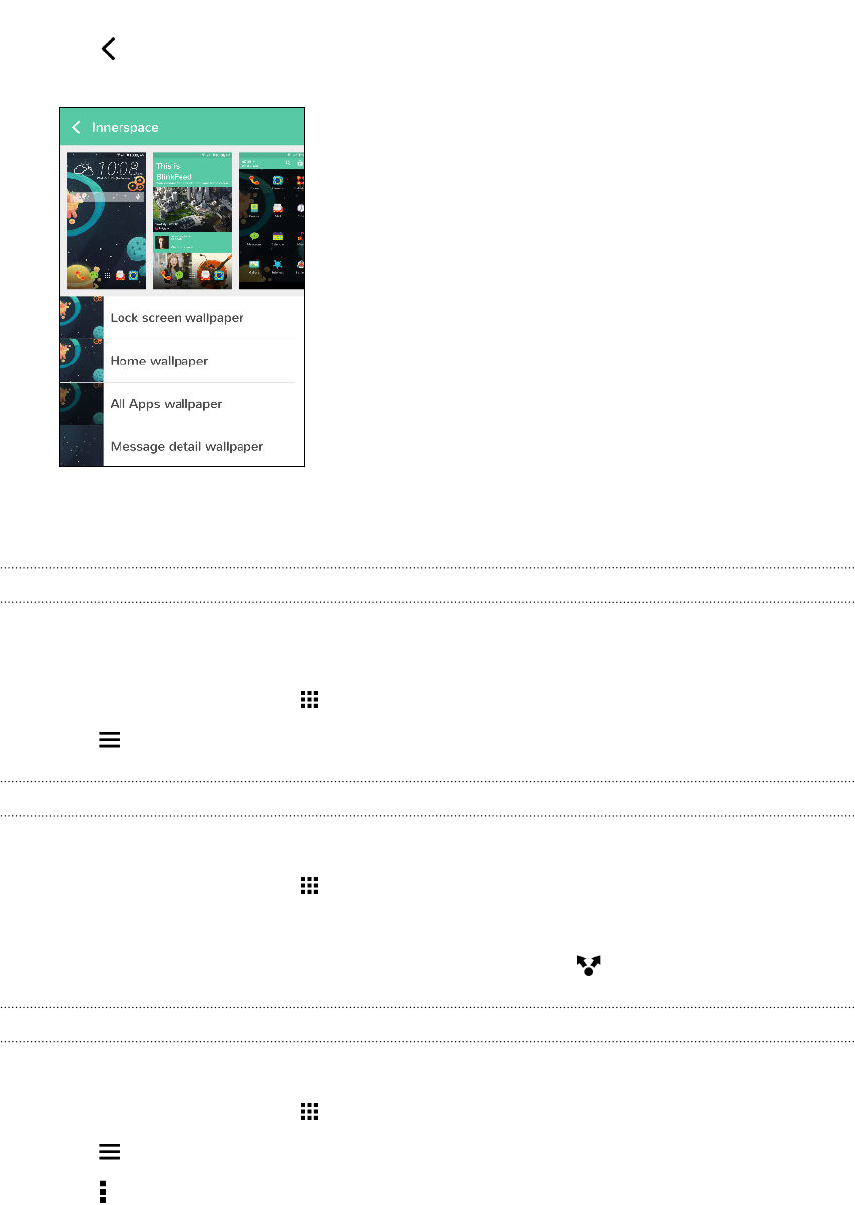
7. Tap until you see the mix and match screen. Continue making changes until you're
satisfied with the result.
8. Tap Save copy to save your new theme, or if you're editing a theme that you copied tap Save
to save the changes.
Finding your themes
Themes you created or downloaded can be found in your theme collection. You'll also find the
themes you bookmarked.
1. From the Home screen, tap , and then find and tap Themes.
2. Tap > My themes.
Sharing themes
Share themes, wallpapers, icons, and more with friends and family.
1. From the Home screen, tap , and then find and tap Themes.
2. Browse to the theme you want to share and tap it to view the details.
3. While viewing the details page of any item in the catalog, tap to share.
Deleting a theme
You can delete a theme if you no longer want to keep it on your phone.
1. From the Home screen, tap , and then find and tap Themes.
2. Tap > My themes, and then swipe to the My collection tab.
3. Tap > Remove.
4. Tap the themes you want to remove from your collection.
5. Tap Delete.
If the theme you deleted is currently applied, it will still be applied to HTC Desire 526 until another
theme is applied.
48 Personalizing
Confidential
For certification only

More ways to personalize
Personalization settings
Aside from using Themes, you can also make HTC Desire 526 look and sound the way you want in
Settings.
§Choose a ringtone and other sounds that you like to use. See Ringtones, notification sounds,
and alarms on page 49.
§Personalize your Home screen with a different wallpaper. See Home wallpaper on page 49.
§For the lock screen, you can use the same wallpaper as your Home screen or choose a
different wallpaper. See Changing the lock screen wallpaper on page 39.
§Change the fonts. See Changing the display font on page 50.
§Change the apps on the launch bar. See Launch bar on page 50.
§Populate your Home screen with widgets and shortcuts. See Adding Home screen widgets on
page 51 and Adding Home screen shortcuts on page 51.
§Need another widget panel? See Adding or removing a widget panel on page 52.
§Set HTC BlinkFeed or a widget panel as your main Home screen. See Changing your main
Home screen on page 53.
§Organize your apps. See Arranging apps on page 54.
Ringtones, notification sounds, and alarms
1. From the Home screen, tap > Settings > Personalize.
2. Under Sound, choose different sounds for your ringtone, system notification, and alarm.
Go to the Messages, Mail, and Calendar apps to choose sounds for new messages, email, and
event reminders respectively.
Want alarms to ring louder but notifications to be more discreet? In Settings, tap Sound &
notification > Volumes and set the volume levels for each sound type.
Home wallpaper
Choose from the available wallpapers, or use any photo you've taken with the camera.
1. Press and hold an empty space on a widget panel.
2. In the pop-up menu, tap Change Home screen wallpaper.
3. Choose from where you want to select a wallpaper.
To use a photo you captured with the camera, tap Gallery, choose and crop a photo, and then
tap Done.
49 Personalizing
Confidential
For certification only
Changing the display font
You can change the font style and size of the display font or you can download new fonts online.
1. From the Home screen, tap > Settings > Personalize.
2. Under Font, tap Font style and choose one of the built-in fonts or tap to go online and
download new fonts.
3. Tap Font size to choose the size of the font.
Downloading fonts
You must be logged on to your HTC Account to download fonts.
1. From the Home screen, tap > Settings > Personalize.
2. Under Font, tap Font style and then tap .
3. Tap to select a category.
4. Select a font style, and then tap Download.
5. Tap Apply.
Launch bar
The launch bar gives you one-touch access to commonly used apps (and other shortcuts). You can
replace the apps on the launch bar with the ones you often use.
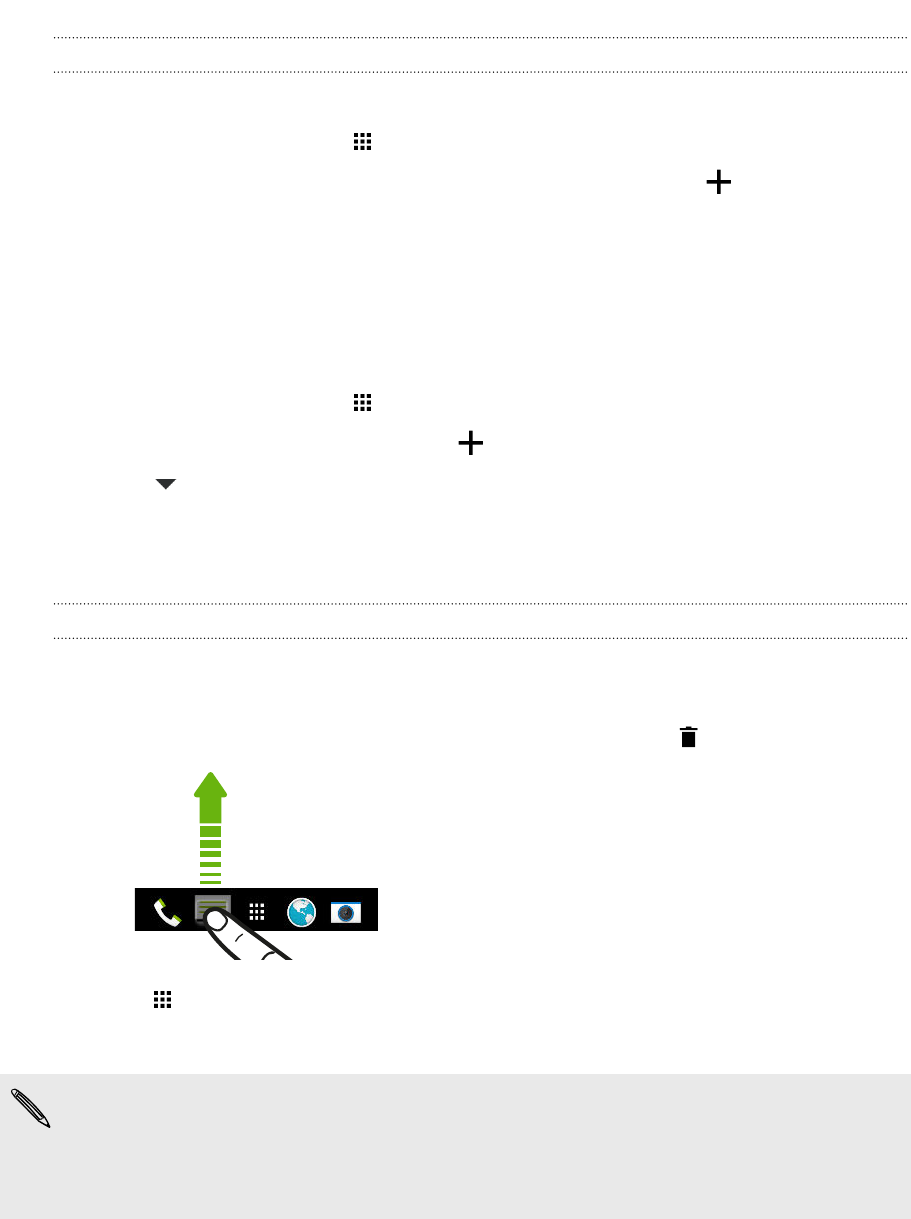
1. Press and hold the app you want to replace, and then drag it out to .
2. Tap to go to the Apps screen.
3. Press and hold an app, and then drag it to the empty slot on the launch bar.
§You can also group apps on the launch bar into a folder. See Grouping apps on the widget panel
and launch bar on page 54.
§The apps (or other shortcuts) on the lock screen are the same as the ones on the launch bar.
50 Personalizing
Confidential
For certification only
Adding Home screen widgets
Widgets make at-a-glance important information and media content easily available. Choose from a
selection of widgets and add the most useful ones to your Home screen.
1. Press and hold an empty space on a widget panel.
2. In the pop-menu, tap Add apps and widgets.
3. Tap > Widgets.
4. Scroll through the widgets, or tap to search for a specific widget.
Some widgets are available in different styles and sizes.
5. Press and hold and then drag the widget to a widget panel you want to add it to.
You can also add widgets that allow you to quickly switch on or off certain settings such as Wi-Fi and
Bluetooth.
Changing the settings of a widget
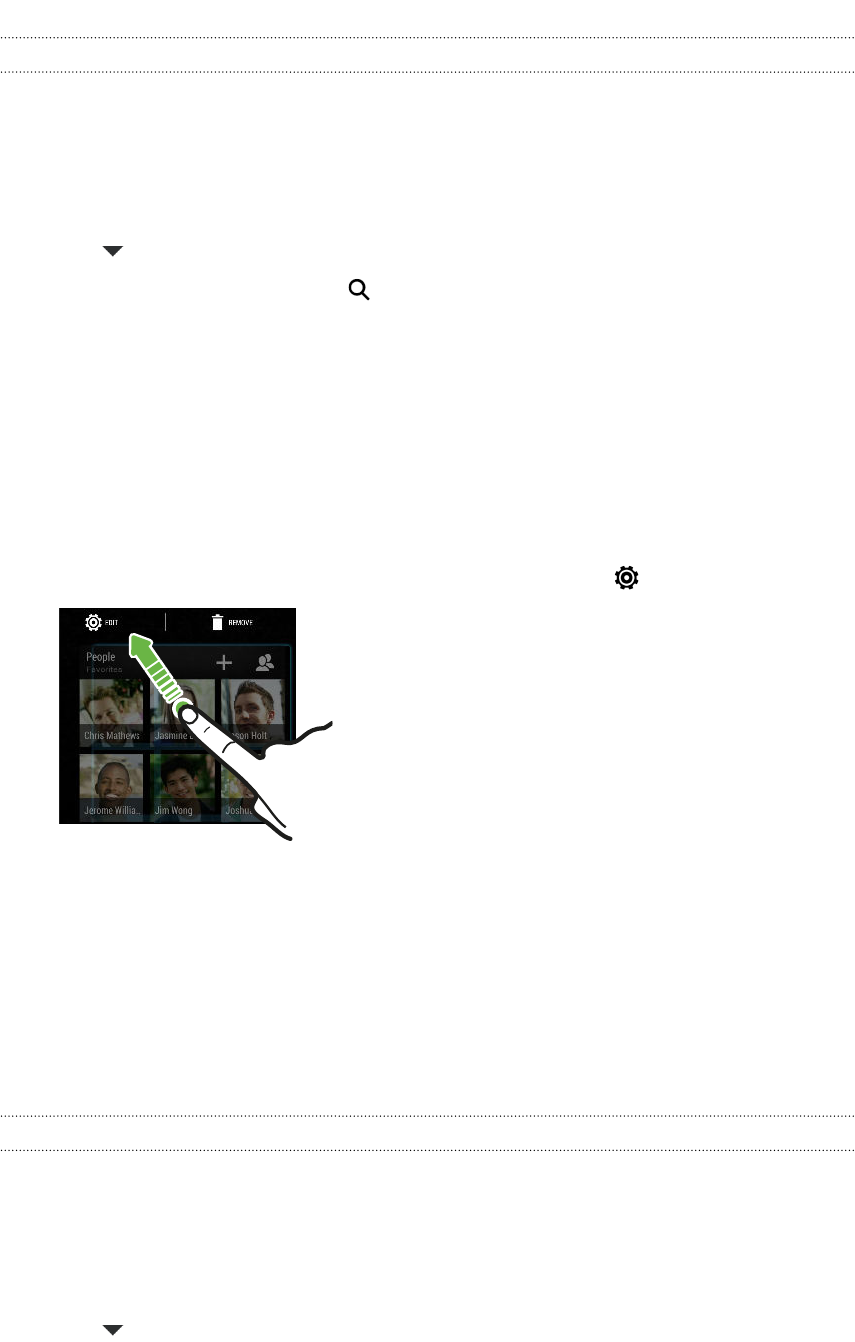
You can modify basic settings of some widgets (for example, the People widget).
1. Press and hold a widget on your Home screen, and then drag it to .
2. Customize the widget settings.
Resizing a widget
Some widgets can be resized after you've added them to your Home screen.
1. Press and hold a widget on the Home screen, and then release your finger. If a border
appears, that means the widget is resizable.
2. Drag the sides of the border to enlarge or shrink the widget size.
Adding Home screen shortcuts
Place apps you often use on any widget panel of your Home screen. You can also add shortcuts to
frequently used settings, bookmarked webpages, and more.
1. Press and hold an empty space on a widget panel.
2. In the pop-up menu, tap Add apps and widgets.
3. Tap > Apps or Shortcuts.
51 Personalizing
Confidential
For certification only
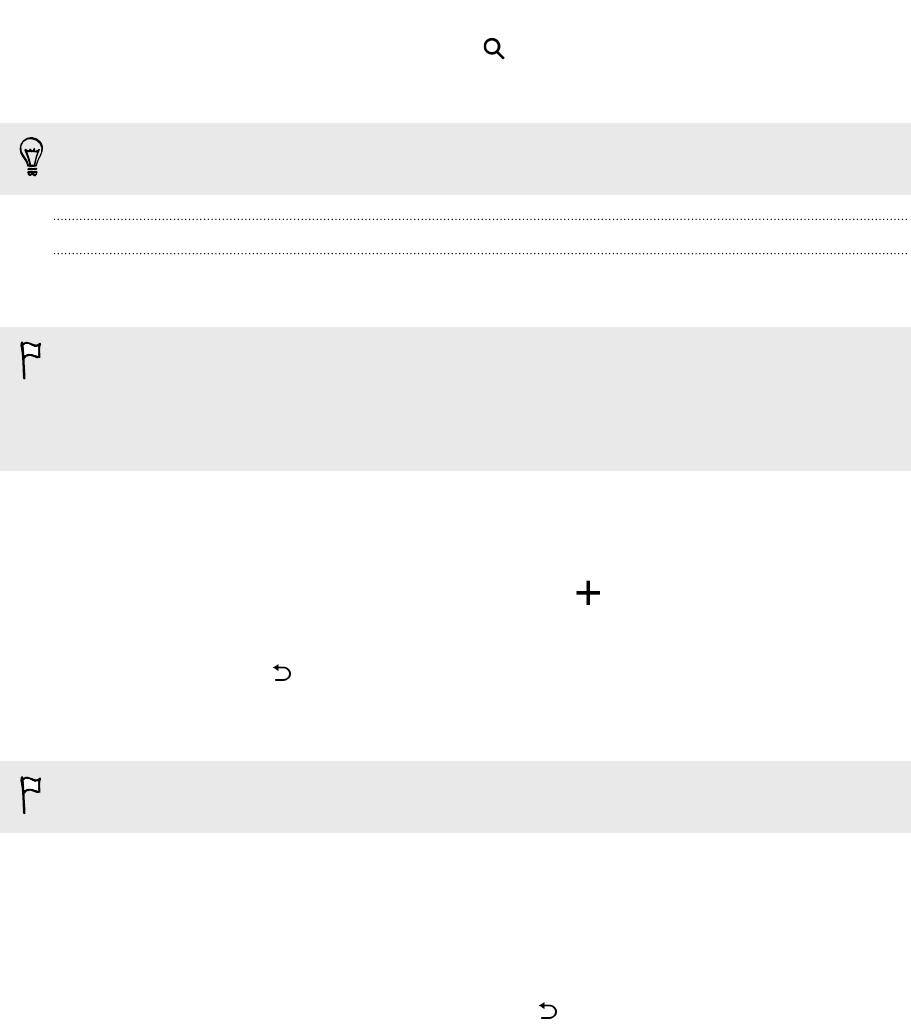
4. Scroll through the apps or shortcuts, or tap to search for one.
5. Press and hold and then drag an app or a shortcut to a widget panel you want to add it to.
To add an app from the Apps screen, press and hold the app, and then drag it to a widget panel.
Editing Home screen panels
Adding or removing a widget panel
§You won't be able to add a new widget panel if you've already reached the maximum limit.
§HTC BlinkFeed always appears as the first panel (if it's not removed). A widget panel cannot be
added before HTC BlinkFeed.
1. Press and hold an empty space on a widget panel.
2. In the pop-up menu, tap Manage home screen pages.
3. To add a new widget panel, swipe left until you see the icon, and then tap it.
4. To remove a widget panel, swipe left or right until you see the panel, and then tap Remove.
5. When done, press .
Arranging widget panels
A widget panel cannot be moved and inserted before HTC BlinkFeed.
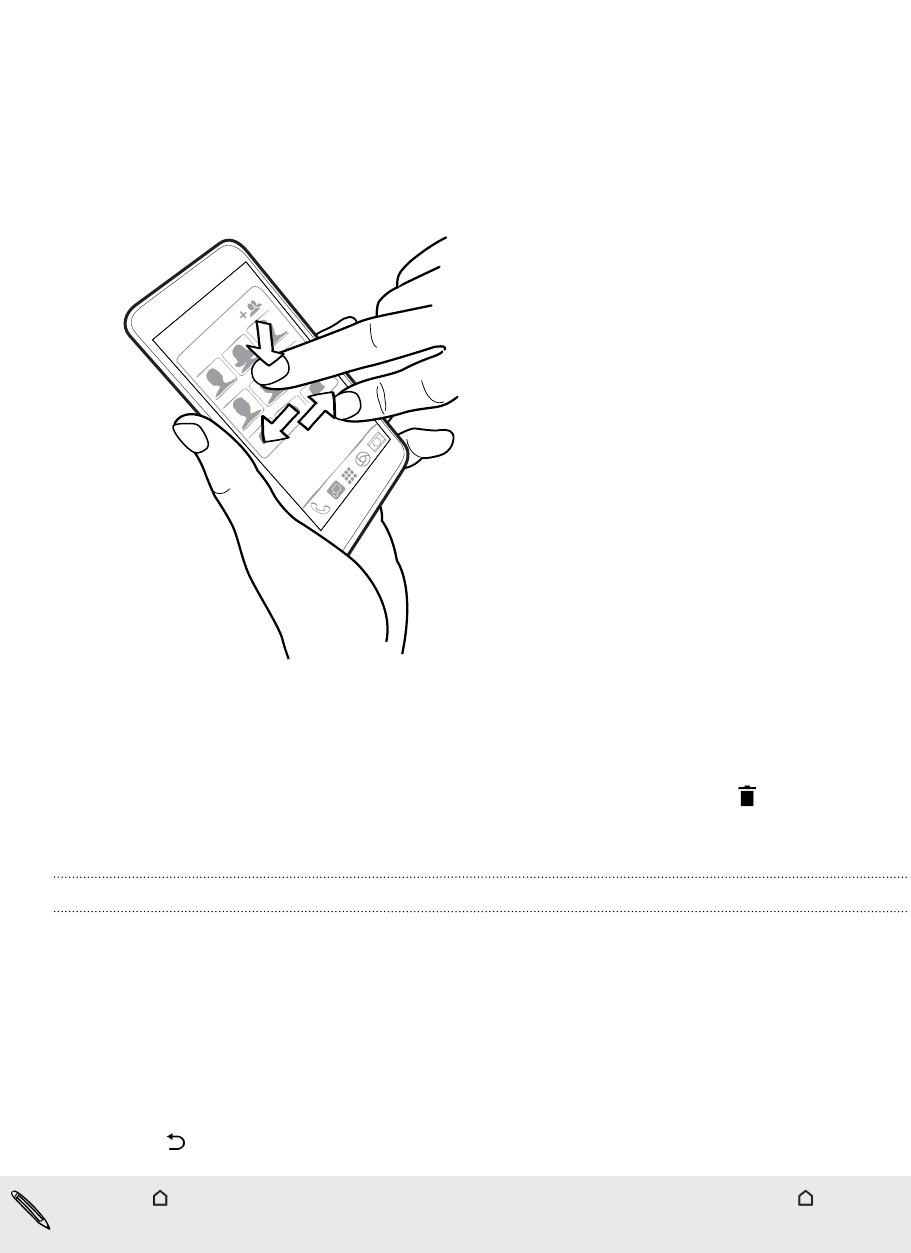
1. On HTC BlinkFeed or any widget panel, slide two fingers together to customize the Home
screen.
2. Press and hold a widget panel thumbnail, and then drag it left or right to the position that you
want.
3. When you're done arranging widget panels, press .
52 Personalizing
Confidential
For certification only
Moving a widget or icon
You can easily move a widget or icon from one widget panel to another.
1. Press and hold the widget or icon with one finger.
2. With another finger, flick left or right to rotate the screen to another widget panel.
3. Release the widget or icon.
Removing a widget or icon
1. Press and hold the widget or icon you want to remove, and then drag it to .
2. When the widget or icon turns red, lift your finger.
Changing your main Home screen
Set HTC BlinkFeed or a widget panel as your main Home screen.
1. Press and hold an empty space on a widget panel.
2. In the pop-up menu, tap Manage home screen pages.
3. Swipe left or right until you see the panel that you want to use as your main Home screen.
4. Tap Set as home.
5. Press .
Pressing from an app will first return you to the last panel you were in. Just press again to
go to your main Home screen.
53 Personalizing
Confidential
For certification only
Grouping apps on the widget panel and launch bar
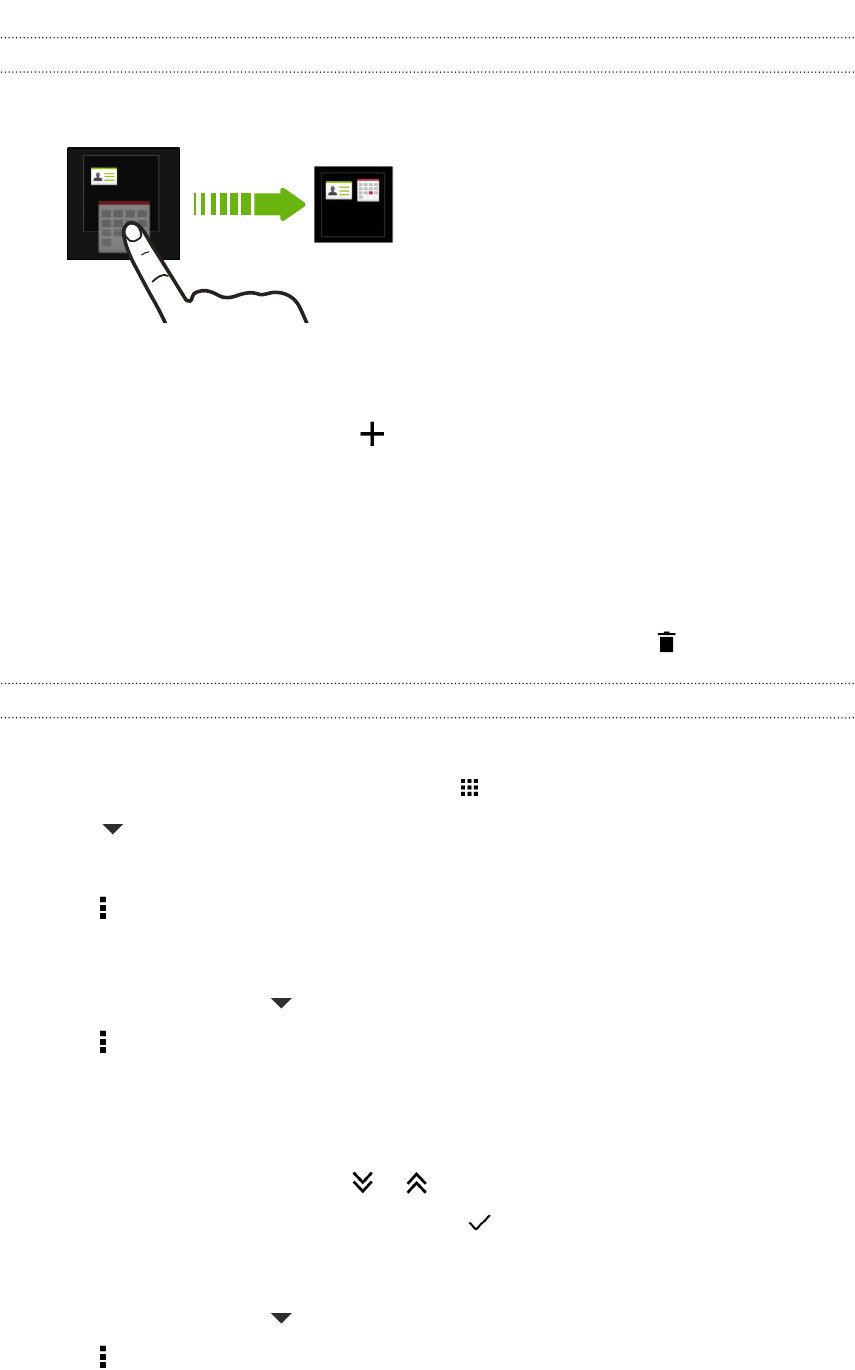
1. Press and hold an app, and then drag it over to another app to automatically create a folder.
2. Tap the folder to open it.
3. Tap the folder window’s title bar, and then enter a new folder name.
4. Add more apps into the folder. Tap , select your apps, and then tap Done.
You can also add shortcuts to settings or information to a folder. Add a shortcut first to a widget
panel, and then drag it over to the folder.
Removing items from a folder
1. On the launch bar or widget panel, tap a folder to open it.
2. Press and hold an app or shortcut in the folder, and then drag it out to .
Arranging apps
On the Apps screen, you can rearrange the apps and change the layout.
1. From HTC BlinkFeed or any widget panel, tap .
2. Tap , and then choose how to arrange apps, such as alphabetically.
If you want to group apps into folders or rearrange them, select Custom.
3. Tap > Grid size to choose whether to display more or fewer apps per page.
Moving apps and folders
1. On the Apps screen, tap > Custom.
2. Tap > Rearrange apps.
3. Press and hold an app or folder, and then do one of the following:
§Drag the app or folder to another position on the same page. Wait until you see the
occupying icon move away before releasing your finger.
§Drag the app or folder to the or arrow to move it to another page.
4. When you're done moving apps and folders, tap .
Grouping apps into a folder
1. On the Apps screen, tap > Custom.
2. Tap > Rearrange apps.
54 Personalizing
Confidential
For certification only

3. Press and hold an app, and then drag it over to another app to automatically create a folder.
4. To add more apps, drag each app over to the folder.
5. To name the folder, open the folder, tap its title bar, and then enter a folder name.
6. When done, tap .
Removing apps from a folder
1. On the Apps screen, tap > Custom.
2. Tap > Rearrange apps.
3. Tap the folder to open it.
4. Press and hold an app, and then drag it out to the Apps screen. Wait until you see the
occupying icon move away before releasing your finger.
5. When you're done removing apps, tap .
Hiding or unhiding apps
1. On the Apps screen, tap > Hide/Unhide apps.
2. Select the apps you want to hide, or clear their check boxes to unhide them.
3. Tap Done.
55 Personalizing
Confidential
For certification only
Phone calls
Making a call with Smart dial
You can either dial a number directly, or use Smart dial to quickly place a call. Smart dial searches
and calls a stored/synced contact or a number from your call history.
1. On the Home screen, tap the phone icon to open the Phone app.
2. Enter the phone number or first few letters of the contact’s name to see the top matching
contact.
3. If there are a number of matches found (for example, 8 matches), tap the number to see all
the matches.
4. Tap the contact you want to call.
§To check other phone numbers associated with the contact, tap beside the contact name.
§If the phone number has an extension, tap after connecting to the main line and then dial
the extension number.
Dialing an extension number
To skip voice prompts when dialing an extension number, do one of the following:
§After dialing the main number, press and hold * . A comma (,) is added to the number you are
dialing. Enter the extension number, and then tap the call button. You will be connected to
the mainline and then to the extension number.
§After dialing the main number, press and hold # to add a semicolon (;). Enter the extension
number after the semicolon , and then tap the call button. After connecting to the main line,
tap Send to dial the extension number.
You can save phone numbers with an extension in the People app.
Returning a missed call
You'll see the missed call icon in the status bar when you miss a call.
1. Slide the Notifications panel open to check who the caller is.
2. To return the call, tap Call back.
If you have multiple missed calls, tap the missed calls notification to open the Call History tab.
56 Phone calls
Confidential
For certification only
Speed dial
Use Speed dial to call a phone number with a single tap.
1. On the Home screen, tap the phone icon to open the Phone app.
2. Tap > Speed dial > . You can also press and hold an unassigned key on the dialpad, and
then tap Yes.
3. Select a contact from the list.
4. On the Speed dial screen, choose the phone number of the contact to use, and a speed dial key
to assign.
5. Tap Save.
To use Speed dial, press and hold the speed dial number you want to call.
Calling a number in a message, email, or calendar event
When you receive a text message, email, or calendar event that has a phone number in it, you can
just tap the number to place a call.
Making an emergency call
In some regions, you can make emergency calls from HTC Desire 526 even if the nano UIM card has
been blocked or if you don't have one installed.
If you don't have a network signal, you won't be able to make an emergency call.
1. On the Home screen, tap the phone icon to open the Phone app.
2. Dial the emergency number for your locale, and then tap Call.
If you've enabled but forgotten your lock password or lock pattern, you can still make emergency
calls by tapping Emergency call on the screen.
57 Phone calls
Confidential
For certification only
Receiving calls
When you receive a phone call from a contact, the Incoming call screen appears.
HTC Desire 526 will automatically adjust the ringtone volume when you use the polite ringer
and pocket mode features.
Answering or rejecting a call
Do one of the following:
§Tap Answer or Decline.
§If you've set up a lock screen, drag or upwards.
§Press the POWER button twice to reject a call.
Muting the ringing sound without rejecting the call
Do one of the following:
§Press the VOLUME DOWN or VOLUME UP button.
§Press the POWER button.
§Place HTC Desire 526 face down on a level surface.
If Flip to mute option in Sound & notification settings is set to Mute once, HTC Desire 526 will
still ring when there are subsequent incoming calls.
What can I do during a call
When a call is in progress, use the buttons onscreen to mute or unmute the microphone or to turn
the speakerphone on or off.
Turning the speakerphone on or off during a call
To decrease potential damage to your hearing, do not hold HTC Desire 526 to your ear when the
speakerphone is on.
§On the call screen, tap . The speakerphone icon appears in the status bar.
§To turn the speakerphone off, tap .
Muting the microphone during a call
On the call screen, tap to toggle between turning the microphone on or off. When the
microphone is turned off, the mute icon appears in the status bar.
58 Phone calls
Confidential
For certification only
Ending a call
Do one of the following to end the call:
§On the call screen, tap End Call.
§Slide the Notifications panel open, then tap End Call.
Setting up a three-way call
Three-way calling with your friends, family, or co-workers is easy. Make the first call, and then dial
another number to add it to the call.
1. Make a call to the first participant.
2. When connected, tap > Add call, and then dial the number of the second participant. The
first participant is put on hold when you dial the second participant.
3. When connected to the second participant, tap .
4. To end the call, tap End call.
Call History
Use Call History to check missed calls, your dialed numbers, and received calls.
1. On the Home screen, tap the phone icon to open the Phone app.
2. Swipe to view the Call History tab.
3. Do one of the following:
§Tap a name or number in the list to call.
§Press and hold a name or number in the list to display the options menu.
§Tap to display just a particular type of call such as missed calls or outgoing calls.
Adding a new phone number to your contacts from Call History
1. On the Call History tab, tap next to the new phone number.
2. Choose whether to create a new contact or save the number to an existing contact.
Clearing the Call History list
1. On the Call History tab, tap > Remove call history.
2. Select the items you want to delete, or tap > Select all.
3. Tap Delete.
59 Phone calls
Confidential
For certification only

Blocking a caller
When you block a phone number or a contact, all calls from the phone number or contact will be
declined automatically.
On the Call History tab, press and hold the contact or phone number you want to block, and then tap
Block caller.
You can always remove a caller from your blocked list. On the Call History tab, tap > Blocked
contacts. In the All tab, press and hold a contact, and then tap Unblock contacts.
Switching between silent, vibrate, and normal modes
Do one of the following:
§To change from silent to normal mode, press the VOLUME UP button.
§To change from vibrate to normal mode, press the VOLUME UP button twice.
§Go to Settings, and then tap Sound & notification > Sound profile.
60 Phone calls
Confidential
For certification only
Power and storage
management
Battery
Displaying the battery percentage
You can check the percentage of remaining battery power right from the status bar.
1. From the Home screen, tap > Settings > Power.
2. Select Show battery level.
Checking battery usage
See a ranking list of apps that are using the battery. You can also see how much and how long the
battery has been used for each app.
1. From the Home screen, tap > Settings > Power.
2. Tap Battery usage, and then tap an app to check how it's using the battery. You'll see how
much battery power is used by resources such as the CPU for the app and other use details.
If you see buttons while viewing an app's battery use details, you can tap them to adjust settings
that affect battery usage, stop the app, and more.
Checking battery history
Check how long you've been using HTC Desire 526 since the last charge. You can also see a chart
that shows how long the screen has been on, and how long you've been using connections like the
mobile network or Wi-Fi.
1. From the Home screen, tap > Settings > Power.
2. Tap History to view battery usage over time.
61 Power and storage management
Confidential
For certification only
Using power saver mode
Power saver mode helps to increase battery life. It reduces the usage of phone features that drain
the battery such as the display and data connection.
1. From the Home screen, tap > Settings > Power.
2. Tap the Power saver On/Off switch to turn power saver mode on or off.
If you want to choose which phone features to conserve power for, tap Power saver.
If power saver mode's Data connection option is selected, HTC Desire 526 automatically
disconnects from the mobile network after 15 minutes when the screen is off and the data
connection is idle (no download activity, streaming, or data usage). It reconnects and then
disconnects periodically when the data connection is idle to save battery power.
Keep in mind though that the Sleep mode option for the data connection in Settings > Power,
when enabled, overrides power saver mode.
Extreme power saving mode
In times when you don't need to use much of your phone, turn Extreme power saving mode on to
extend battery life longer. In this mode, standby time can last longer than usual, and you can only
use the most basic functions such as phone calls, text messaging, and email.
1. From the Home screen, tap > Settings > Power.
2. Tap the Extreme power saving mode On/Off switch to turn extreme power saving mode on
or off.
If you want to set when to automatically switch this mode on, tap Extreme power saving
mode and select a battery level.
Tips for extending battery life
How long the battery can last before it needs recharging depends on how you use HTC Desire 526.
HTC Desire 526 power management helps to increase battery life.
If you like more control by tweaking settings on your own, try out some of these battery saving tips.
Check your battery usage
Monitoring your battery usage helps you identify what's using the most power so you can choose
what to do about it. For details, see Checking battery usage on page 61.
Manage your connections
§Turn off wireless connections such as mobile data, Wi-Fi, or Bluetooth when not in use.
§Turn GPS on only when a precise location is needed, such as while using navigation or
location-based apps. See Turning location services on or off on page 82.
62 Power and storage management
Confidential
For certification only

§If the Sleep mode option in Settings > Power is enabled, at low peak times, your phone will
turn off the data connection after the screen has been off for 15 minutes and there's no
network activity (no downloads, streaming, or data usage). The data connection resumes
when you switch the screen back on.
§Turn on Airplane mode when you don't need any wireless connections and you don't want to
receive calls or messages.
Manage your display
Lowering the brightness, letting the display sleep when not in use, and keeping it simple helps save
battery power.
§Use automatic brightness (the default), or manually lower the brightness.
§Set the screen timeout to a shorter time.
§Don't use a live wallpaper for your Home screen. Animation effects are nice to show off to
other people but they drain your battery.
Changing your wallpaper to a plain, black background can also help a little. The less color is
displayed, the less battery is used.
For more details, see Settings and security on page 82 and Personalizing on page 46.
Manage your apps
§Install the latest software and application updates. Updates sometimes include battery
performance improvements.
§Uninstall or disable apps that you never use.
Many apps run processes or sync data in the background even when you're not using them. If
there are apps that you don't need anymore, uninstall them.
If an app came preloaded and can't be uninstalled, disabling the app can still prevent it from
continuously running or syncing data. See Disabling an app on page 86.
Limit background data and sync
Background data and sync can use a lot of battery power if you have many apps syncing data in the
background. It’s recommended not to let apps sync data too often. Determine which apps can be set
with longer sync times, or sync manually.
§In Settings, tap Accounts & sync and check what types of data are being synced in your
online accounts. When the battery is starting to run low, temporarily disable syncing some
data.
§If you have many email accounts, consider prolonging the sync time of some accounts.
In the Mail app, select an account, tap > Settings > Sync, Send & Receive, and then adjust
the settings under Sync schedule.
§When you’re not traveling from one place to another, sync weather updates of only your
current location, rather than in all of your named cities. Open the Weather app, and then tap
to edit and remove unneeded cities.
63 Power and storage management
Confidential
For certification only

§Choose widgets wisely.
Some widgets constantly sync data. Consider removing the ones that are not important from
your Home screen.
§In Play Store, tap > Settings, and then clear Add icon to Home screen to avoid
automatically adding Home screen app shortcuts whenever you've installed new apps. Also
tap Auto-update apps > Do not auto-update apps if you're fine with updating apps from
Play Store manually.
Other tips
To squeeze in a little bit more battery power, try these tips:
§Tone down the ringtone and media volume.
§Minimize the use of vibration or sound feedback. In Settings, tap Sound & notification and
choose which ones you don't need and can disable.
§Check your apps’ settings as you may find more options to optimize the battery.
Phone storage
Types of storage
Want to know what types of storage you can use for your apps, data, and files?
HTC Desire 526 has these storage types:
Phone
storage This storage combines both the internal storage, where apps, email, data, and text
messages are stored, and the file storage, where photos, videos, and music files are
kept.
If you are running out of phone storage, see Making more storage space on page 65
for some tips on how to free up space.
Storage
card Use a storage card for storing more files. You can also set some apps to store data or
files directly to the card.
USB
storage When you plug in an external USB storage device (such as a USB flash drive or an SD
card reader), you can view photos and videos stored on the device right from Gallery
and play songs stored on the device in Music. You can also open PDFs and edit Office
documents.
You need a special cable to connect HTC Desire 526 and a USB storage device.
HTC Desire 526 supports USB storage devices (except portable hard drives) up to 128
GB.
§Moving apps to the storage card doesn't back up the apps. If you do a factory reset, your phone
loses the apps. You'll need to reinstall them.
§When you remove the storage card and insert it in another phone, the apps on the storage card
won't be installed automatically to the other phone. You'll need to reinstall them.
64 Power and storage management
Confidential
For certification only
Copying files to or from HTC Desire 526
You can copy your music, photos, and other files to HTC Desire 526.
Save and close your files before copying them from your computer to HTC Desire 526, or vice
versa.
1. Connect HTC Desire 526 to the computer using the supplied USB cable. You'll see options
for viewing or importing files on the computer screen.
2. Choose to view files.
3. Copy the files from your computer to HTC Desire 526, or vice versa.
4. After copying the files, disconnect HTC Desire 526 from the computer.
Making more storage space
As you use HTC Desire 526, you'll accumulate data and fill its storage capacity over time. Here are
some tips on how to increase storage space.
Run the storage wizard
Free up space in the storage by uninstalling apps and deleting files you no longer want to keep. In
Settings, tap Storage > Make more space.
Manage photos and videos
§After taking continuous camera shots, keep only the best shot. Discard the rest, if you don't
need them.
§After editing a photo or trimming a video, the original file is kept. Delete original files or
move them elsewhere, such as to your computer.
§If you're only sending videos through MMS, use a lower resolution. Hi-res video takes up
more space. In Camera settings, tap Video Quality to change the resolution.
Remove unused themes
Themes can quickly consume up storage space because themes can include images, sounds and
icons. Remove themes you're not using. See Deleting a theme on page 48.
Back up data and files
Keep only the most recent data in your apps and files that you often need to use. You can back up
your other data and files. For some tips, see Ways of backing up files, data, and settings on page 69.
Disable some apps
See Disabling an app on page 86.
65 Power and storage management
Confidential
For certification only
Move some apps to the storage card
Some third-party apps can be moved from the phone storage to the storage card. Go to Settings >
Apps > On SD card to see which apps can be moved. To move, tap an app, and then tap Move.
§Moving apps to the storage card doesn't back up the apps. If you do a factory reset, your phone
loses the apps. You'll need to reinstall them.
§When you remove the storage card and insert it in another phone, the apps on the storage card
won't be installed automatically to the other phone. You'll need to reinstall them.
File Manager
About File Manager
Use the File Manager app to browse and organize your files and folders on your phone storage and
storage card.
You can also browse for files and folders on your external USB storage device when you have it
connected to your phone. For details, see Types of storage on page 64.
Switching between storage types
1. From the Home screen, tap , and then find and tap File Manager.
2. Swipe left or right to switch to a file storage where you want to browse or organize your files.
Searching for files
1. In File Manager, tap .
2. In the search box, enter a few characters of the filename. Matching filenames from the root
and subfolders are then displayed.
3. Tap a file to open it.
Sorting your files
1. In File Manager, tap > Sort.
2. Choose how you want to sort your files and folders.
Copying or moving files
1. In File Manager, browse for the file or folder.
2. Select items to copy or move.
3. Tap Copy or Move to.
4. Press , and then browse for the folder where you want to copy or move the files.
Or tap > Create folder to create a new folder.
5. Tap Paste.
66 Power and storage management
Confidential
For certification only

Favoriting files
1. In File Manager, browse for the file or folder.
2. Select items to favorite.
3. Tap .
To remove an item from the Favorites tab, select the item and tap Remove from favorites.
Deleting files or folders
1. In File Manager, browse for the file or folder.
2. Select items to delete.
3. Tap Delete.
67 Power and storage management
Confidential
For certification only
Sync, backup, and reset
Online sync
Adding your social networks, email accounts, and more
You can sync contacts, calendars, and other information from your social networks, email accounts,
and online services on HTC Desire 526. Depending on the account type, signing in to your online
accounts lets you sync updates between HTC Desire 526 and the Web.
1. From the Home screen, tap > Settings > Accounts & sync.
2. Tap .
3. Tap the account type you want to add.
4. Follow the onscreen instructions to enter your account information.
§In Settings > Accounts & sync, tap the Auto sync On/Off switch to turn automatic sync of all
your accounts.
§You can add several Google Accounts.
Syncing your accounts
1. From the Home screen, tap > Settings > Accounts & sync.
2. Tap the Auto sync On/Off switch to turn automatic sync of all your accounts on or off.
3. To manually sync individual accounts, tap an account type, and then do one of the following:
§Tap next to the account you want to sync, and then tap Sync now.
§Tap > Sync now on the Account settings screen.
On the Account settings screen, you can also change the sync settings for an account.
Removing an account
Remove accounts from HTC Desire 526 if you no longer use them. Removing an account does not
remove accounts and information from the online service itself.
1. From the Home screen, tap > Settings > Accounts & sync.
2. Tap an account type.
68 Sync, backup, and reset
Confidential
For certification only
3. Tap next to the account you want to remove.
Or if you're on the Account settings screen, tap .
4. Tap Remove.
Some personal data may be retained by the third-party app after you have removed the account
from HTC Desire 526.
Backup
Ways of backing up files, data, and settings
Worried that you might lose important stuff on HTC Desire 526? Back up HTC Desire 526 before
you erase the storage, do a factory reset, or upgrade to a new phone.
HTC Sync Manager
Use HTC Sync Manager to import music, photos, and videos from HTC Desire 526 to your
computer. You can also sync locally stored contacts, calendar events, bookmarks, and playlists
between HTC Desire 526 and your computer.
Likewise, HTC Sync Manager is a good alternative if you don't want to back up your accounts,
settings, and other personal content to the cloud. You can use it to create backups of
HTC Desire 526 on your computer.
Other backup options
If you want, you can separately back up your data or files.
Some apps allow you to back up data to the phone storage or storage card so you can easily restore
them after a factory reset. Just make sure not to erase the phone storage or storage card when you
do a factory reset.
§Moving apps to the storage card doesn't back up the apps. If you do a factory reset, your phone
loses the apps. You'll need to reinstall them.
§When you remove the storage card and insert it in another phone, the apps on the storage card
won't be installed automatically to the other phone. You'll need to reinstall them.
Messages Back up your text messages to the phone storage or storage card, or save them as an
email attachment.
Contacts §Save contacts and other personal data to your online accounts so you can just sync
them when switching to another phone.
§If you have locally stored contacts in the People app, export them to the phone
storage or storage card.
69 Sync, backup, and reset
Confidential
For certification only

Files Manually copy and paste files by connecting HTC Desire 526 to your computer as a
disk drive.
Other data Check other apps to see if they support exporting data to the phone storage or storage
card.
Backing up your data locally
If you want to separately back up your content such as contacts and text messages on
HTC Desire 526, here are some tips on how to export or import your data.
Backing up your contacts
1. From the Home screen, tap , and then find and tap People.
2. On the People tab, tap > Manage contacts.
3. Tap Import/Export contacts > Export to phone storage or Export to SD card.
4. Select an account or type of contacts to export.
5. To help protect your data, tap Yes, and then set a password for this backup. Be sure to
remember this password. You'll need to enter it again when importing contacts.
If you don't need a password, tap No.
6. Tap OK.
Restoring contacts
1. On the People tab, tap > Manage contacts.
2. Tap Import/Export contacts > Import from phone storage or Import from SD card.
3. If you have more than one account set up, tap the type for the imported contacts.
4. If you have multiple backups available, select the backup you want to import, and then tap
OK.
5. Enter the password you've set for this backup, and then tap OK.
Backing up your text messages
Keep important text messages by backing them up to the phone storage. You can easily restore
backed up text messages after you've deleted them from your message list.
Text messages in the secure box and blocked messages will not be backed up. To include such
messages to your backup, move them first to the general message box.
1. From the Home screen, tap , and then find and tap Messages.
2. Tap > Back up/Restore SMS > Back up > Back up SMS.
3. To help protect your data, set a password for your backup. Be sure to remember this
password. You'll need to enter it again when restoring messages.
If you don't need a password, select Do not password protect this backup.
4. Enter a name for your backup file, and then tap OK.
70 Sync, backup, and reset
Confidential
For certification only

Backing up text messages by email
You need to set up your email account in the Mail app.
1. From the Home screen, tap , and then find and tap Messages.
2. Tap > Back up/Restore SMS.
3. Tap Back up > Back up SMS via mail.
4. To help protect your data, set a password for your backup. Be sure to remember this
password. You'll need to enter it again when restoring messages.
If you don't need a password, select Do not password protect this backup.
5. Enter your email address.
6. Compose your email message, and then send it.
Restoring text messages
1. From the Home screen, tap , and then find and tap Messages.
2. Tap > Back up/Restore SMS > Restore.
3. Choose how you want to restore the messages, and tap Next.
4. Tap the backup to import.
5. Enter the password you've set for this backup. If you didn't set a password, select This
backup file is not password protected.
6. Tap OK.
To restore text messages that were backed up via email, open the email message with the backup file
attachment from the Mail app. Tap the attachment to download it first, and then tap it again to open
the backup file to import. Enter the password you've set for this backup or select This backup file is
not password protected.
HTC Sync Manager
About HTC Sync Manager
HTC Sync Manager supports a computer running a Windows or OS X operating system.
Here's what you can do with HTC Sync Manager.
View and manage media on your computer and phone
§Browse and manage music, photos, and videos that are on your computer and your phone.
§Import iTunes and Windows Media® Player playlists from your computer to HTC Sync
Manager.
§Play music, videos, and playlists using the built-in player.
71 Sync, backup, and reset
Confidential
For certification only

Transfer content
§Transfer iPhone photos, text messages, contacts, and more to your HTC phone. You can also
find and install the same apps that you were using on your iPhone.
§Import all music, photos, and videos from your HTC phone to your computer.
§Copy selected music, photos, or videos from your computer to your phone.
§Import documents from your computer to your phone.
Back up and restore
Back up your HTC phone to your computer so you can easily restore your backup to the same phone
or to another HTC phone.
Sync playlists and data
Sync music playlists and data such as contacts and calendar between your phone and your
computer.
Installing HTC Sync Manager on your computer
§You can install HTC Sync Manager on Windows XP or later versions. To install it on a Mac®
computer, you need OS X 10.6 or later versions.
§If you have problem in installing HTC Sync Manager, close all your running programs and
reinstall. If the problem persists, temporarily disable your anti-virus program and try installing
again.
1. Download the HTC Sync Manager installer from the HTC support site: htc.com/hsm/.
2. Launch the installer and follow the onscreen instructions.
3. Connect your phone to your computer using the supplied USB cable. HTC Sync Manager
opens.
If you disabled your anti-virus program, make sure to turn it back on after installing HTC Sync
Manager.
72 Sync, backup, and reset
Confidential
For certification only
Transferring iPhone content and apps to your HTC phone
With HTC Sync Manager, easily transfer iPhone content such as contacts, messages, wallpaper,
camera photos, and more to your HTC phone. If you're using an HTC phone that has HTC Sense 6,
HTC Sync Manager also enables your phone to find and install the same apps that you were using on
your iPhone.
You need to use iTunes 9.0 or later to back up your iPhone content first to your computer.
1. Connect your iPhone and your HTC phone to your computer.
2. In HTC Sync Manager, click Home > Transfer & Backup.
3. Click the Get Started button.
4. If you haven't used iTunes to back up your iPhone content to your computer, please do so
before proceeding.
5. Select your iPhone backup file, and then click OK.
6. Select the types of content you want to transfer to your HTC phone.
You can choose whether to replace the content on your HTC phone with the iPhone content.
7. Click Start. Wait for HTC Sync Manager to finish transferring content.
8. When done, slide the Notifications panel open on your HTC phone, and then tap .
Choose which apps you were using on iPhone you want to find in Google Play and download
to your HTC phone.
Getting help
To find out more about using HTC Sync Manager, download the user guide PDF from the HTC
support site (htc.com/hsm/). Or open the Help that comes with the software.
On Windows, click in HTC Sync Manager, and then click Help.
Reset
Restarting HTC Desire 526 (Soft reset)
If HTC Desire 526 is running slower than normal, is unresponsive, or has an app that is not
performing properly, try rebooting and see if that helps solve the problem.
1. If the display is off, press the POWER button to turn it back on.
2. Press and hold the POWER button, and then tap Restart.
3. When asked to confirm, tap Restart.
73 Sync, backup, and reset
Confidential
For certification only
HTC Desire 526 not responding?
If HTC Desire 526 does not respond when you touch the screen or press the buttons, you
can still restart it.
Press and hold the POWER and VOLUME UP buttons for at least 10 seconds.
HTC Desire 526 then restarts.
Resetting HTC Desire 526 (Hard reset)
If HTC Desire 526 has a persistent problem that cannot be solved, you can perform a factory reset
(also called a hard reset or master reset). A factory reset reverts the phone back to its initial state —
the state before you turned on the phone for the first time.
Factory reset will remove all data on your phone storage, including apps you've downloaded and
installed, your accounts, your files, as well as system and app data and settings. Be sure to back up
any data and files you want to keep before you do a factory reset.
A factory reset may not permanently erase all data from your phone, including personal
information.
Performing a factory reset from settings
1. From the Home screen, tap > Settings > Backup & reset.
2. Tap Reset phone.
To also delete media and other data from your storage card, select Erase SD card.
3. Tap OK.
74 Sync, backup, and reset
Confidential
For certification only
Internet connections
Turning the data connection on or off
Turning your data connection off saves battery life and money on data charges.
You need a 4G/LTE plan to use your operator's 4G/LTE network for voice calls and data services.
Check with your operator for details.
1. From the Home screen, tap , and then find and tap Settings.
2. Tap the Mobile data On/Off switch to turn the data connection on and off.
If you don’t have the data connection turned on and you’re also not connected to a Wi-Fi
network, you won’t receive automatic updates to your email, social network accounts, and other
synced information.
Managing your data usage
If you're on a limited data allowance, it's important to keep track of the activities and apps that
usually send and receive data, such as browsing the web, syncing online accounts, and sending email
or sharing status updates.
Here are some other examples:
§Streaming web videos and music
§Playing online games
§Downloading apps, maps, and files
§Refreshing apps to update info and feeds
§Uploading and backing up your files to your online storage account
§Using HTC Desire 526 as a Wi-Fi hotspot
§Sharing your mobile data connection by USB tethering
To help you save on data usage, connect to a Wi-Fi network whenever possible and set your online
accounts and emails to sync less frequently.
75 Internet connections
Confidential
For certification only
Turning data roaming on or off
Connect to your mobile operator’s partner networks and access data services when you’re out of
your mobile operator’s coverage area.
Using data services while roaming may be costly. Check with your mobile operator for data
roaming rates before you use data roaming.
1. From the Home screen, tap , and then find and tap Settings.
2. Tap Mobile data.
3. Select or clear the Data roaming option.
Keeping track of your data usage
Monitor your data usage to help prevent going over your monthly data allowance.
Data usage measured by HTC Desire 526 may differ from, and be less than, your actual data
usage.
1. From the Home screen, tap , and then find and tap Settings.
2. Under Wireless & Networks, tap More.
3. Tap Data usage.
4. On the Mobile tab, select Limit mobile data usage and tap OK to automatically disable your
data connection when you reach the set limit.
5. Drag the upper LIMIT line to set your monthly data limit.
6. Select Alert me about data usage, and then drag the lower ALERT line to set an alert before
you reach your monthly data limit.
7. Tap Reset data usage, and then set the day of the month when your usage cycle resets. This
date is usually the start of your monthly billing cycle.
If you're connecting HTC Desire 526 to another portable Wi-Fi hotspot, tap > Mobile hotspots
to restrict background data from downloading that may incur extra data fees.
Viewing the data usage of apps
1. From the Home screen, tap , and then find and tap Settings.
2. Under Wireless & Networks, tap More.
3. Tap Data usage.
4. Scroll down the screen to see a list of apps and their data usage info.
5. Tap an app to see more details.
76 Internet connections
Confidential
For certification only
Wi-Fi connection
To use Wi-Fi, you need access to a wireless access point or “hotspot”.
The availability and strength of a Wi-Fi signal varies depending on objects the Wi-Fi signal has to
pass through (such as buildings or a wall between rooms).
Turning Wi-Fi on or off
1. From the Home screen, tap , and then find and tap Settings.
2. Tap the Wi-Fi On/Off switch to turn Wi-Fi on or off.
3. Tap Wi-Fi to see a list of detected wireless networks.
§To manually scan for Wi-Fi networks, tap > Scan.
§If the wireless network that you want is not listed, tap > Add network to manually add it.
Connecting to a Wi-Fi network
1. Turn Wi-Fi on, and check the list of detected Wi-Fi networks.
See Turning Wi-Fi on or off on page 77.
2. Tap a Wi-Fi network you want to connect to.
3. If you selected a secured network, enter the network key or password.
4. Tap Connect. You'll see the Wi-Fi icon in the status bar when connected.
Connecting to a Wi-Fi network via WPS
If you're using a Wi-Fi router with Wi-Fi Protected Setup (WPS), you can connect HTC Desire 526
easily.
1. Turn Wi-Fi on, and check the list of detected Wi-Fi networks.
See Turning Wi-Fi on or off on page 77.
2. Tap > WPS Push, and then press the WPS button on your Wi-Fi router.
To use the Wi-Fi Protected Setup (WPS) PIN method, tap > WPS Pin Entry.
Connecting to VPN
Add virtual private networks (VPNs) so you can connect and access resources inside a local network,
such as your corporate or home network.
Before you can connect HTC Desire 526 to your local network, you may be asked to:
77 Internet connections
Confidential
For certification only
§Install security certificates.
§Enter your login credentials.
§Download and install a required VPN app, if you're connecting to a secured enterprise
network. Contact your network administrator for details.
Also, HTC Desire 526 must first establish a Wi-Fi or data connection before you can start a VPN
connection.
Adding a VPN connection
You must first set a lock screen PIN or password before you can use credential storage and set up
the VPN.
1. From the Home screen, tap , and then find and tap Settings.
2. Under Wireless & Networks, tap More.
3. Tap VPN > > Add VPN profile.
4. Enter the VPN settings and set them up according to the security details your network
administrator gave you.
5. Tap Save.
Connecting to a VPN
1. From the Home screen, tap , and then find and tap Settings.
2. Under Wireless & Networks, tap More.
3. Tap VPN.
4. Tap the VPN that you want to connect to.
5. Enter your log in credentials, and then tap Connect. When you’re connected, the VPN
connected icon appears in the notification area of the status bar.
You can then open the web browser to access resources such as your corporate network intranet.
Disconnecting from a VPN
§In Settings, tap More > VPN. Tap the VPN connection, and then tap Disconnect.
§Slide the Notifications panel open. If you see the VPN notification, tap it, and then tap
Disconnect.
78 Internet connections
Confidential
For certification only
Wireless sharing
Bluetooth
Turning Bluetooth on or off
1. From the Home screen, tap , and then find and tap Settings.
2. Tap the Bluetooth On/Off switch to turn the Bluetooth connection on and off.
3. Tap Bluetooth to see a list of available devices.
Turn off Bluetooth when not in use to save battery power, or in places where using a wireless
device is prohibited, such as on board an aircraft and in hospitals.
Connecting a Bluetooth headset
You can listen to music over a Bluetooth A2DP stereo headset, or have hands-free conversations
using a compatible Bluetooth headset.
Before you connect your headset, make it discoverable so HTC Desire 526 can find it. Refer to
your headset manual for details.
1. Turn Bluetooth on and check the list of available devices.
See Turning Bluetooth on or off on page 79.
2. If you don't see your headset listed, tap Scan for devices to refresh the list.
3. Tap the name of your headset in the Available Devices section. HTC Desire 526 pairs with the
headset and the headset connection status is displayed in the Paired Devices section.
4. If prompted to enter a passcode, try 0000 or 1234, or consult the headset documentation to
find the passcode.
When the Bluetooth headset is connected, you'll see in the status bar.
79 Wireless sharing
Confidential
For certification only

Reconnecting a Bluetooth headset
Normally, you can easily reconnect your headset by switching on Bluetooth on HTC Desire 526, and
then turning on the headset.
However, you might have to connect manually if your headset has been used with another Bluetooth
device.
1. Turn Bluetooth on and check the list of paired devices.
See Turning Bluetooth on or off on page 79.
2. Tap the headset’s name in the Paired Devices section.
3. If prompted to enter a passcode, try 0000 or 1234, or consult the headset documentation to
find the passcode.
If you still cannot reconnect to the headset, follow the instructions in Unpairing from a Bluetooth
device on page 80, and then follow the steps under Connecting a Bluetooth headset on page 79.
Unpairing from a Bluetooth device
1. Turn Bluetooth on and check the list of paired devices.
See Turning Bluetooth on or off on page 79.
2. In the Paired devices section, tap next to the device to unpair.
3. Tap Unpair.
Receiving files using Bluetooth
HTC Desire 526 lets you receive various files with Bluetooth, including photos, music tracks,
contact info, calendar events, and documents such as PDFs.
Refer to the device’s documentation for instructions on sending information over Bluetooth.
1. Turn Bluetooth on.
See Turning Bluetooth on or off on page 79.
2. On the sending device, send one or more files to HTC Desire 526.
3. If asked, accept the pairing request on HTC Desire 526 and on the sending device. You may
also be prompted to enter the same passcode or confirm the auto-generated passcode on
both devices.
You'll then get a Bluetooth authorization request.
4. Tap Pair.
5. When HTC Desire 526 receives a file transfer request notification, slide the Notifications
panel down, tap the incoming file notification, and then tap Accept.
80 Wireless sharing
Confidential
For certification only

6. When a file is transferred, a notification is displayed. Slide the Notifications panel down, and
then tap the relevant notification to view the file.
7. You can also tap > Show received files to view files received via Bluetooth.
81 Wireless sharing
Confidential
For certification only

Settings and security
Turning location services on or off
In order to find your location on HTC Desire 526, you need to enable location sources.
1. From the Home screen, tap > Settings > Location.
2. Tap the On/Off switch to turn location services on and off.
3. Under Location sources, select the location mode you want. For example, for a better
estimate of your location, choose High accuracy. To save battery power, choose Battery
saving.
Turning off a location source (for example GPS) means no applications on HTC Desire 526 will
collect your location data through that location source. However, third party applications may
collect — and HTC Desire 526 may continue to provide — location data through other sources,
including through Wi-Fi and signal triangulation.
Airplane mode
When you enable Airplane (Flight) mode, all wireless radios on HTC Desire 526 are turned off,
including the call function, data services, Bluetooth, and Wi-Fi.
When you disable Airplane mode, the call function is turned back on and the previous state of
Bluetooth and Wi-Fi is restored.
§You can manually turn Bluetooth and Wi-Fi back on after enabling Airplane mode.
§If USB tethering is turned on, enabling Airplane mode turns it off. You need to manually turn
USB tethering on after you disable Airplane mode.
Do any of the following to turn Airplane mode on or off:
§Press and hold POWER, and then tap Airplane mode.
§With two fingers, swipe down from the status bar to open the Quick Settings panel. Tap the
Airplane mode tile to turn airplane mode on or off.
When enabled, the Airplane mode icon is displayed in the status bar.
82 Settings and security
Confidential
For certification only

Scheduling when to turn data connection off
To help conserve power and data usage, you can set a time period when the data connection will
automatically turn off during low peak times. This takes effect after the screen has been off for 15
minutes and there's no network activity (no downloads, streaming, or data usage).
1. From the Home screen, tap > Settings > Power.
2. Tap Sleep mode.
3. To manually change the settings, clear Learn sleep time automatically if it's selected.
4. Under Sleep time, choose the start and end time when data connection is disabled.
5. Tap the Sleep mode On/Off switch to turn it on.
The data connection resumes when you switch the screen back on.
Automatic screen rotation
Automatic rotation is not supported in all applications.
1. From the Home screen, tap > Settings > Display & gestures or Display, gestures &
buttons.
2. Select or clear the Auto-rotate screen option to turn it on or off.
Setting when to turn off the screen
After a period of inactivity, the screen turns off to conserve battery power. You can set the idle time
before the screen turns off.
1. From the Home screen, tap > Settings > Display & gestures or Display, gestures &
buttons.
2. Tap Screen timeout, and then tap the time before the screen turns off.
Screen brightness
1. From the Home screen, tap > Settings > Display & gestures or Display, gestures &
buttons.
2. Tap Brightness level.
3. With the Automatic brightness option selected, drag the slider to set the maximum
brightness level. This sets a limit on how bright the screen will be when Automatic
brightness is selected.
4. To set the brightness manually, clear the Automatic brightness option, and then drag the
brightness slider to the left to decrease or to the right to increase the screen brightness.
83 Settings and security
Confidential
For certification only
Touch sounds and vibration
Some people like the sound or vibration feedback they get when touching the screen, and some
don't. You can turn on or off various types of touch sounds and vibration on HTC Desire 526.
§Touch tones when tapping the phone dial pad
§Touch sounds when tapping onscreen items
§Screen lock sounds
§Pull-to-refresh sounds
§Vibration when pressing hardware buttons
§Touch sound and vibration when tapping the HTC Sense keyboard
Turning touch sounds and vibration on and off
1. From the Home screen, tap > Settings > Sound & notification.
2. Under System, select the option you want to turn on or off.
Turning off keyboard sounds and vibration
1. From the Home screen, tap > Settings > Language & keyboard.
2. Tap HTC Sense Input.
3. Tap Sound feedback and then select None to turn off keyboard sounds.
4. Clear the Vibration feedback option to turn off keyboard vibration.
Changing the display language
Changing the language adjusts the keyboard layout, date and time formatting, and more.
1. From the Home screen, tap > Settings > Language & keyboard.
2. Tap Language, and then choose the language you want to use.
84 Settings and security
Confidential
For certification only
Installing a digital certificate
Use client and Certificate Authority (CA) digital certificates to enable HTC Desire 526 to access
VPN or secured Wi-FI networks, and also to provide authentication to online secure servers. You
can get a certificate from your system administrator or download it from sites that require
authentication.
§You must set a lock screen PIN or password before installing a digital certificate.
§Some apps such as your browser or email client let you install certificates directly in the app. See
the app's help for details.
1. Save the certificate file in the root folder on HTC Desire 526.
2. From the Home screen, tap > Settings > Security.
3. Tap Install from storage.
4. Browse to the certificate and select it.
5. Enter a name for the certificate and select how it will be used.
6. Tap OK.
Pinning the current screen
For added security when showing your phone to someone else, use the screen pinning option to lock
the display on the current app.
1. From the Home screen, tap > Settings > Security.
2. Under Advanced, tap Screen pinning, and then tap the On/Off switch to turn it on.
3. On the Apps screen, open the app that you want.
4. Press , and then tap on the app thumbnail.
If you're using the card view, press and hold the thumbnail of the latest app you opened, and
then drag it up a little bit to see the icon.
5. When prompted, tap Start.
If you're using a lock screen, select the Ask for unlock pattern before unpinning option for
added security.
6. To unpin the screen, press and hold and at the same.
85 Settings and security
Confidential
For certification only
Disabling an app
Apps, even if not used often, may be running in the background and downloading data. If an app
cannot be uninstalled, you can disable it.
1. From the Home screen, tap > Settings > Apps.
2. Swipe to the All tab.
3. Tap the app, and then tap Disable.
Assigning a PIN to a nano UIM card
You can help to protect the nano UIM card by assigning a Personal Identification Number (PIN).
Make sure you have the default PIN provided by your mobile operator before continuing.
1. From the Home screen, tap > Settings > Security.
2. Tap Set up SIM card lock.
3. Choose to lock the card, enter the default PIN of the card, and then tap OK.
4. To change the card PIN, tap Change SIM PIN.
Restoring a nano UIM card that has been locked out
If you enter the wrong PIN more times than the maximum number of attempts allowed, the card
will become “PUK-locked.”
You need a Pin Unlock Key (PUK) code to restore access to HTC Desire 526. Contact your mobile
operator for this code.
1. On the Phone dialer screen, enter the PUK code, and then tap Next.
2. Enter the new PIN you want to use, and then tap Next.
3. Enter the new PIN again, and then tap OK.
Accessibility features
HTC Desire 526 comes with features and settings that allow easy access and use of apps and
functions.
Improve screen readability
If you have low vision, take advantage of these features to help improve screen readability.
86 Settings and security
Confidential
For certification only

§Increase the font size, use color inversion, or enable high-contrast text using the
Accessibility settings. See Accessibility settings on page 87.
§Turn magnification gestures on. See Turning Magnification gestures on or off on page 87.
§Turn on automatic screen rotation. See Automatic screen rotation on page 83.
Get audible feedback
Use TalkBack to hear audible feedback on what you do on your phone. See Navigating
HTC Desire 526 with TalkBack on page 88.
Use your voice
You can use your voice to enter text on HTC Desire 526. See Entering text by speaking on page 45.
Accessibility settings
Use these settings to turn accessibility functions or services on or off. When you’ve downloaded and
installed an accessibility tool, such as a screen reader that provides voice feedback, you can also
control them using these settings.
1. From the Home screen, tap > Settings > Accessibility.
2. Tap or select the settings you want.
Turning Magnification gestures on or off
If you have low vision or would like to get a closer view of what's on the screen, use finger gestures to
magnify portions of your phone's screen.
1. From the Home screen, tap > Settings > Accessibility.
2. Tap Magnification gestures and read the instructions on how to use it.
3. Tap the On/Off switch to turn Magnification gestures on or off.
87 Settings and security
Confidential
For certification only
Navigating HTC Desire 526 with TalkBack
Use TalkBack if you need to navigate HTC Desire 526 by spoken feedback. When you touch the
screen, HTC Desire 526 vibrates and gives you an audible response so you know what you are
touching.
Not all languages are supported.
Turning TalkBack on
1. From the Home screen, tap > Settings > Accessibility.
2. Tap TalkBack, and then tap the On/Off switch.
3. Read the TalkBack disclaimer and then tap OK.
A short tutorial explaining how to use TalkBack will begin playing after you turn on TalkBack.
TalkBack works best if you turn off automatic screen rotation.
Turning Explore by touch on or off
Explore by touch allows HTC Desire 526 to respond to shortcut gestures and screen touches with
audible feedback. While Explore by touch is enabled when you turn on TalkBack, you can turn it off.
1. From the Home screen, tap > Settings > Accessibility.
2. Tap TalkBack, and then tap > Settings.
3. Under Touch exploration, clear the Explore by touch option.
You will no longer hear audible feedback from HTC Desire 526.
Using TalkBack gestures
When TalkBack is turned on and the Explore by touch setting is selected, the regular touch gestures
are replaced by the TalkBack gestures.
Media gestures such as 3-finger swiping may not be available when TalkBack gestures are
enabled.
Do one of the following:
Open an item 1. Drag your finger on the screen to find and select the item.
2. Double-tap anywhere on the screen to open the item.
Move an item 1. Drag your finger on the screen to find the item.
2. Double-tap anywhere on the screen, but don't lift your finger on the
second tap.
3. Drag the item to a new spot and then lift your finger.
88 Settings and security
Confidential
For certification only
Scroll through a screen Use two fingers to swipe up, down, left or right.
Unlock the lock screen Use two fingers to swipe up from the bottom of the screen.
Open the Notifications
panel Use two fingers to swipe down from the top of the screen.
Assigning TalkBack shortcuts
TalkBack has customizable gestures that can be used to open the Notifications panel, view recent
apps, access TalkBack controls, and more.
The steps below are described using the regular gestures. Use the corresponding TalkBack
gestures if you already have TalkBack turned on.
1. From the Home screen, tap > Settings > Accessibility.
2. Tap TalkBack, and then tap > Settings > Manage gestures.
3. Tap any of the shortcut gestures, and then select an action.
Using TalkBack context menus
TalkBack has context menus for controlling continuous reading and global TalkBack controls.
These menus can be accessed using TalkBack shortcut gestures.
1. Turn TalkBack on.
2. Do one of the following:
§To open the continuous reading menu, use one finger to swipe up and right in one
continuous movement.
§To open the global context menu, use one finger to swipe down and right in one
continuous movement.
If you already changed the TalkBack shortcut gestures, check your TalkBack settings for the
appropriate gesture.
3. Press and hold anywhere on the screen.
4. Drag your finger around the screen to explore the options.
To cancel an action, drag your finger to your starting position.
89 Settings and security
Confidential
For certification only
Changing the TalkBack reading speed
The steps below are described using the regular gestures. Use the corresponding TalkBack
gestures if you already have TalkBack turned on.
1. From the Home screen, tap > Settings > Accessibility.
2. Tap Text-to-speech output > Speech rate.
3. Select a speech rate.
You can test the speech rate by tapping Listen to an example.
TalkBack language settings
1. From the Home screen, tap > Settings > Accessibility.
2. Tap Text-to-speech output > Google Text-to-speech Engine, and do one of the following:
Select a different
language Tap Language.
Install a voice Tap Install voice data, and then tap the language. Tap next to
the voice data you want to install. When installation is completed,
press twice and tap Language.
3. Select the language you want to use.
Not all languages are supported.
90 Settings and security
Confidential
For certification only

Trademarks and copyrights
©2015 HTC Corporation. All Rights Reserved.
Dolby Audio manufactured under license from Dolby Laboratories. Dolby and Dolby Audio are
trademarks of Dolby Laboratories.
HTC, the HTC logo, HTC Desire, HTC BlinkFeed, HTC Connect, HTC Dot View, HTC Sense,
VideoPic, and all other HTC product and feature names are trademarks or registered trademarks in
the U.S. and/or other countries of HTC Corporation and its affiliates. Zoodles and Kid Mode are
trademarks of Inquisitive Minds, Inc.
Google, Android, Android Beam, Google Chrome, Google Drive, Google Maps, Google Now, Google
Play, Google Voice Search, Google Wallet, and YouTube are trademarks of Google Inc.
Microsoft, Windows, ActiveSync, PowerPoint, Outlook.com, and Windows Media are either
registered trademarks or trademarks of Microsoft Corporation in the United States and/or other
countries.
The Bluetooth® word mark and logos are registered trademarks owned by Bluetooth SIG, Inc.
Wi-Fi® and Miracast are registered trademarks of the Wireless Fidelity Alliance, Inc.
LTE is a trademark of European Telecommunications Standards Institute (ETSI).
DLNA is a trademark or registered trademark of Digital Living Network Alliance. All rights
reserved. Unauthorized use is strictly prohibited.
Qualcomm is a trademark of Qualcomm Incorporated, registered in the United States, and other
countries and used with permission. AllPlay is a trademark of Qualcomm Connected Experiences,
Inc., and used with permission.
BLACKFIRE RESEARCH™ is a Registered Trademark (No. 3,898,359) of BLACKFIRE RESEARCH
CORP.
Dropbox is a trademark of Dropbox, Inc.
iCloud, iPhone, iTunes, and Mac OS are trademarks of Apple Inc. registered in the U.S. and other
countries.
microSD is a trademark of SD-3C LLC.
Foursquare is a trademark of Foursquare Labs, Inc.
Facebook is a trademark of Facebook, Inc.
FLICKR is a trademark of Yahoo! Inc.
All other trademarks and service marks mentioned herein, including company names, product
names, service names and logos, are the property of their respective owners and their use herein
does not indicate an affiliation with, association with, or endorsement of or by HTC Corporation.
Not all marks listed necessarily appear in this User Guide.
The HTC Sync Manager software can be used with materials that you own or are lawfully authorized
to use and/or duplicate. Unauthorized use and/or duplication of copyrighted material may be a
91 Trademarks and copyrights
Confidential
For certification only

violation of copyright law in the United States and/or other countries/regions. Violation of U.S. and
international copyright laws may subject you to significant civil and/or criminal penalties. HTC
Corporation shall not be held responsible for any damages or losses (direct or indirect) that you may
incur as a result of using this software.
Screen images contained herein are simulated. HTC shall not be liable for technical or editorial
errors or omissions contained herein, nor for incidental or consequential damages resulting from
furnishing this material. The information is provided “as is” without warranty of any kind and is
subject to change without notice. HTC also reserves the right to revise the content of this document
at any time without prior notice.
No part of this document may be reproduced or transmitted in any form or by any means, electronic
or mechanical, including photocopying, recording or storing in a retrieval system, or translated into
any language in any form without prior written permission of HTC.
92 Trademarks and copyrights
Confidential
For certification only

Index
A
Accounts
- syncing 68
Airplane mode 82
Apps
- arranging 54
- grouping into a folder 54
- hiding or unhiding 55
- icons on Home screen 51
- installing 25
- installing from Google Play 24
- installing from the web 25
- on Home screen 51
- restoring 24
- uninstalling 25
- updating 23
B
Backup
- about 69
- HTC Sync Manager 71
- options 69
- restoring backed up apps 24
Battery
- charging 11
- checking usage 61
- saving battery power 62
Bluetooth
- connecting a Bluetooth headset 79
- receiving information 80
C
Call history 59
Capture screen 34
Change phone language 84
Conference call 59
Contacts
- copying contacts 19
- importing contacts 19
- transferring contacts 19
Copy
- files 65
Copying
- text 41
D
Data connection
- data roaming 76
- turning on or off 75
- usage 75
Data transferiPhone
- from iCloud 18
Data transfer
- from Android phone 17
- from iPhone 18
- through Bluetooth 18
- transferring contacts 19
Display
- changing the time before the screen turns
off 83
- screen brightness 83
- screen rotation 83
- Sleep mode 28
E
expanded storage 64
F
Face unlock 37
Factory reset 74
Files
- copying 65
Finger gestures 30
Firmware
See Software update
Folder
- grouping apps 54
- removing items 54, 55
FOTA
See Software update
93 Index
Confidential
For certification only

G
Gestures
- motion gestures 28
- touch gestures 30
Google Play
- installing apps 24
- refund 25
GPS (Global Positioning System)
See Location settings
H
Hands free 79
Hard reset
See Factory reset
Headphones
See Bluetooth
Home screen
- adding or removing widget panel 52
- apps 51
- arranging widget panels 52
- changing your main Home screen 53
- folder 54
- launch bar 50
- rearranging widgets and icons 52
- removing widgets and icons 52
- shortcuts 51
- wallpaper 49
- widget panel 26
- widgets 51
HTC Sense version 22
HTC Sync Manager 71
I
Idle screen
See Lock screen
Internet connection
- VPN 77
- Wi-Fi 77
K
Keyboard
- dictionary 44
- entering text 42
- entering text by speaking 45
- HTC Sense keyboard 42
- layout 42
- multi-language keyboard 43
- predictive text 43
- shortcuts 44
- speech recognition 45
L
Language
- system language 84
Location settings 82
Lock screen
- answering a call 58
- dismissing an alarm 28
- opening an app 33
- rejecting a call 58
- unlocking 28
Low battery 62
Low storage 65
M
Making calls
- calling 56
Master reset
See Factory reset
microSD card 13
Music
- transferring from iPhone 73
N
Notifications
- panel 40
O
Online accounts
- adding accounts 68
- removing accounts 68
- syncing manually 68
- what can you sync with 68
P
Pair a Bluetooth headset 79
People
- copying contacts 19
- importing contacts 19
- transferring contacts 19
94 Index
Confidential
For certification only

Phone calls
- blocking a call 60
- call history 59
- calling 56
- conference call 59
- emergency call 57
- extension number 56
- missed calls 56
- muting the microphone 58
- receiving calls 58
- Smart Dial 56
- speakerphone 58
- speed dial 57
Phone information 22
Phone settings
See Settings
Phone updates 22
Photos
- transferring from computer 20
- transferring from iPhone 73
Power
- charging the battery 11
- checking battery usage 61
- saving power 62
- sleep mode 28
Print screen
See Capture screen
PUK (PIN Unblock Key) 86
Q
Quick settings 20
R
Recent apps 34
Reset 73, 74
S
Screen 28, 34, 83
- adjusting brightness 83
- capture 34
- changing the time before the screen turns
off 83
- idle screen 28
- rotation 83
- Sleep mode settings 83
Screen lock 37
Screen shot
See Capture screen
SD card 13
Security
- protecting phone with screen lock 37
- security certificates 77
Sense Home
- adding apps to widget 36
- changing addresses 35
- manually switching locations 36
- pinning apps in widget 36
- setting up widget 35
- smart folders in widget 36
- unpinning apps in widget 36
- widget 35
Settings
- About 22
- Accessibility 87
- display language 84
- Storage 64
Setup
- contacts from old phone 19
- first-time setup 15
- photos, music, videos from old phone 20
- restoring backup from cloud storage 16
Sharing
- text 41
Shortcuts 33
Sleep mode 28
Soft reset 73
Software update 22
Sound
- ringtone, notifications, and alarm 49
- switching profiles 60
Speakerphone 58
Speed dial 57
Storage 64
Sync
- HTC Sync Manager 71
T
Themes 46–48
- bookmarking 46
- creating 47
- deleting 48
- downloading 46
- editing 47
- finding 48
95 Index
Confidential
For certification only

- mix and match 47
- sharing 48
U
Upgrade
See Software update
V
Videos
- transferring from computer 20
Voice input 45
VPN 77, 78
- adding a connection 78
- connecting 78
- disconnecting 78
W
Waking up phone
- through power button 28
Wallpaper
- changing 49
Wi-Fi 77
- connecting via WPS 77
- turning on 77
Widgets
- adding 51
- changing settings 51
- rearranging 52
- removing 52, 53
- resizing 51
Word prediction 43
- bilingual prediction 43
96 Index
Confidential
For certification only