Contents
User Manual 2
83 Gallery
To view these favorite photos, open the My favorites album.
To remove a photo from the My favorites album, press and hold the thumbnail
and then tap Remove.
Showing or hiding albums
Have too many albums cluttering up Gallery?
You can choose to show or hide albums.
1. In Gallery, tap > Timeline or Albums.
2. Tap > Show/hide albums.
3. Choose which albums you'd like to show or hide.
Renaming an album
If you have created albums to organize photos, you can rename these albums.
1. In Gallery, tap > Albums.
2. Press and hold the album that you want to rename.
3. Tap Rename.
Some albums, such as Camera shots and Screenshots, cannot be renamed.
Adding photos or videos to an album
1. From the Home screen, tap , and then find and tap Gallery.
2. Tap , and then choose how you want to view your photos and videos.
3. Open a group of photos and videos, such as an event in Timeline view or an
album.
4. Tap > Add to album.
5. Select the photos or videos you want to add, and then tap Next.
6. Create an album or select an album that you've already created in Gallery. To
create a new album to move or copy to, tap .
To add a single photo or video to an album, press and hold the photo or video.
Tap Add to album, and then select the destination album or create a new
album.
Copying or moving photos or videos between
albums
1. From the Home screen, tap , and then find and tap Gallery.
2. Tap > Albums.
3. Tap a tile to open an album.
4. Tap > Move to or Copy to.
HTC Confidential
NCC/CE/FCC certification
HTC Confidential
NCC/CE/FCC certification
HTC Confidential
NCC/CE/FCC certification
HTC Confidential
NCC/CE/FCC certification
HTC Confidential
NCC/CE/FCC certification
84 Gallery
5. Select the photos or videos you want to move or copy and then tap Next.
6. Select an album to move or copy the photos or videos to. To create a new album
to move or copy to, tap .
Searching for photos and videos
You can search the Gallery using photo locations and specific dates.
1. From the Home screen, tap , and then find and tap Gallery.
2. Tap .
3. In the search field, type:
A location associated with the photo or video you're looking for.
A specific date. You must use the same date format as that set in Settings >
Date & time, such as 01/13/2015.
4. Tap .
5. Select what you want from the results.
Trimming a video
1. In Gallery, open the video you want to play in full screen.
2. Tap the onscreen controls to pause or resume playback, adjust the volume, and
more.
Tap to share the video on your home network.
3. To trim the video, tap > Edit.
4. Drag the trim sliders to the part where you want the video to begin and end.
5. Tap to preview your trimmed video.
6. Tap .
The trimmed video is saved as a copy. The original video remains unedited.
Viewing, editing, and saving a Zoe highlight
When you view a group of photos and videos such as in an album, Gallery
automatically composes a Zoe™ highlight.
A Zoe highlight is a collection of clips—which can be photos, videos, or both—that
Gallery has preselected, with added background music and special effects.
You can edit the Zoe highlight, and then save it as a video.
1. From the Home screen, tap , and then find and tap Gallery.
2. Tap , and then choose how you want to view your photos and videos.
If you are in Timeline view, you need to go to the Events or Year tab.
HTC Confidential
NCC/CE/FCC certification
HTC Confidential
NCC/CE/FCC certification
HTC Confidential
NCC/CE/FCC certification
HTC Confidential
NCC/CE/FCC certification
HTC Confidential
NCC/CE/FCC certification

85 Gallery
3. Tap a tile to open a group of photos and videos. You'll then see a preview of the
Zoe highlight play automatically.
4. Tap to edit the Zoe highlight.
You can add, change, or rearrange the clips, choose a theme, or change the
background music.
5. When you're done editing the Zoe highlight, tap to save it as a video.
You'll find the saved video in the Zoe Highlights album.
HTC Confidential
NCC/CE/FCC certification
HTC Confidential
NCC/CE/FCC certification
HTC Confidential
NCC/CE/FCC certification
HTC Confidential
NCC/CE/FCC certification
HTC Confidential
NCC/CE/FCC certification

86 Photo Editor
Photo Editor
Basics
Choosing a photo to edit
You can select photos to edit from Photo Editor or Gallery.
1. From the Home screen, tap , and then find and tap Photo Editor.
2. Tap Gallery to open an existing photo on your phone, and then browse for the
item to edit.
Or, tap Camera if you want to take a new photo to edit.
You can also tap while viewing a photo in full screen from the Gallery app.
Adjusting your photos
Use the available adjustment tools to crop, rotate, flip, or straighten photos.
1. From Photo Editor, choose the photo you want to edit.
See Choosing a photo to edit to find out how.
2. Tap to open the slideout menu.
3. In the slideout menu that opens, tap Essentials > .
4. Choose to rotate, crop, flip, or straighten the photo.
5. Tap and make more adjustments, if needed.
6. Press to return to the Essentials screen.
7. Tap to save changes.
Except for when applying rotation, edited photos are saved as new photos. The
original remains unedited.
Drawing on a photo
Scribble on your photos for fun or to highlight an interesting part.
1. From Photo Editor, choose the photo you want to edit.
See Choosing a photo to edit to find out how.
2. Tap to open the slideout menu.
3. In the slideout menu that opens, tap Flair > .
4. Drag the stroke slider to adjust the stroke thickness.
HTC Confidential
NCC/CE/FCC certification
HTC Confidential
NCC/CE/FCC certification
HTC Confidential
NCC/CE/FCC certification
HTC Confidential
NCC/CE/FCC certification
HTC Confidential
NCC/CE/FCC certification
87 Photo Editor
5. Tap to open the toolbar, choose a pen type, and then tap to hide the
toolbar.
6. Choose a pen color from the color bar.
7. Draw on the photo.
You can tap to switch to full screen view.
8. To undo or redo an action, open the toolbar, and then tap or .
Or, you can use the eraser from the toolbar to remove specific parts of your drawing.
9. Tap .
10. Tap , and then tap to toggle between the before and after photos.
11. Tap to save changes.
The edited photo is saved as a new photo. The original photo remains unedited.
Applying photo filters
1. From Photo Editor, choose the photo you want to edit.
See Choosing a photo to edit to find out how.
2. Tap to open the slideout menu.
3. In the slideout menu that opens, tap Essentials.
4. Tap , and then choose one of the available filters.
5. Tap .
6. Tap , and then tap to toggle between the before and after photos.
7. Tap to save changes.
The edited photo is saved as a new photo. The original photo remains unedited.
Creating and applying a custom filter
1. From Photo Editor, choose the photo you want to edit.
See Choosing a photo to edit to find out how.
2. Tap to open the slideout menu.
3. In the slideout menu that opens, tap Essentials.
4. Tap , and then scroll to the end of the predefined filters bar.
5. Tap Custom.
6. Make changes to the filter by adjusting the controls on exposure, saturation,
white balance, and more.
7. If you need to rearrange the order of your settings to achieve a particular effect,
you can press and hold a setting and drag it to a new position.
Rearranging the settings may reset values to the default.
8. Tap .
9. Press to return to the Essentials screen.
HTC Confidential
NCC/CE/FCC certification
HTC Confidential
NCC/CE/FCC certification
HTC Confidential
NCC/CE/FCC certification
HTC Confidential
NCC/CE/FCC certification
HTC Confidential
NCC/CE/FCC certification
88 Photo Editor
10. Tap to save changes.
The edited photo is saved as a new photo. The original photo remains unedited.
Retouching photos of people
1. From Photo Editor, choose the photo you want to edit.
See Choosing a photo to edit to find out how.
2. Tap to open the slideout menu.
3. In the slideout menu that opens, tap Touch up.
4. Choose a facial touch-up to apply, and then customize its settings.
5. Tap .
6. Tap , and then tap to toggle between the before and after photos.
7. Tap to save changes.
The edited photo is saved as a new photo. The original photo remains unedited.
Fixing red eye in photos
1. From Photo Editor, choose the photo you want to edit.
See Choosing a photo to edit to find out how.
2. Tap to open the slideout menu.
3. In the slideout menu that opens, tap Essentials.
4. Tap , and then tap .
5. Tap to save changes.
The edited photo is saved as a new photo. The original photo remains unedited.
Creative effects
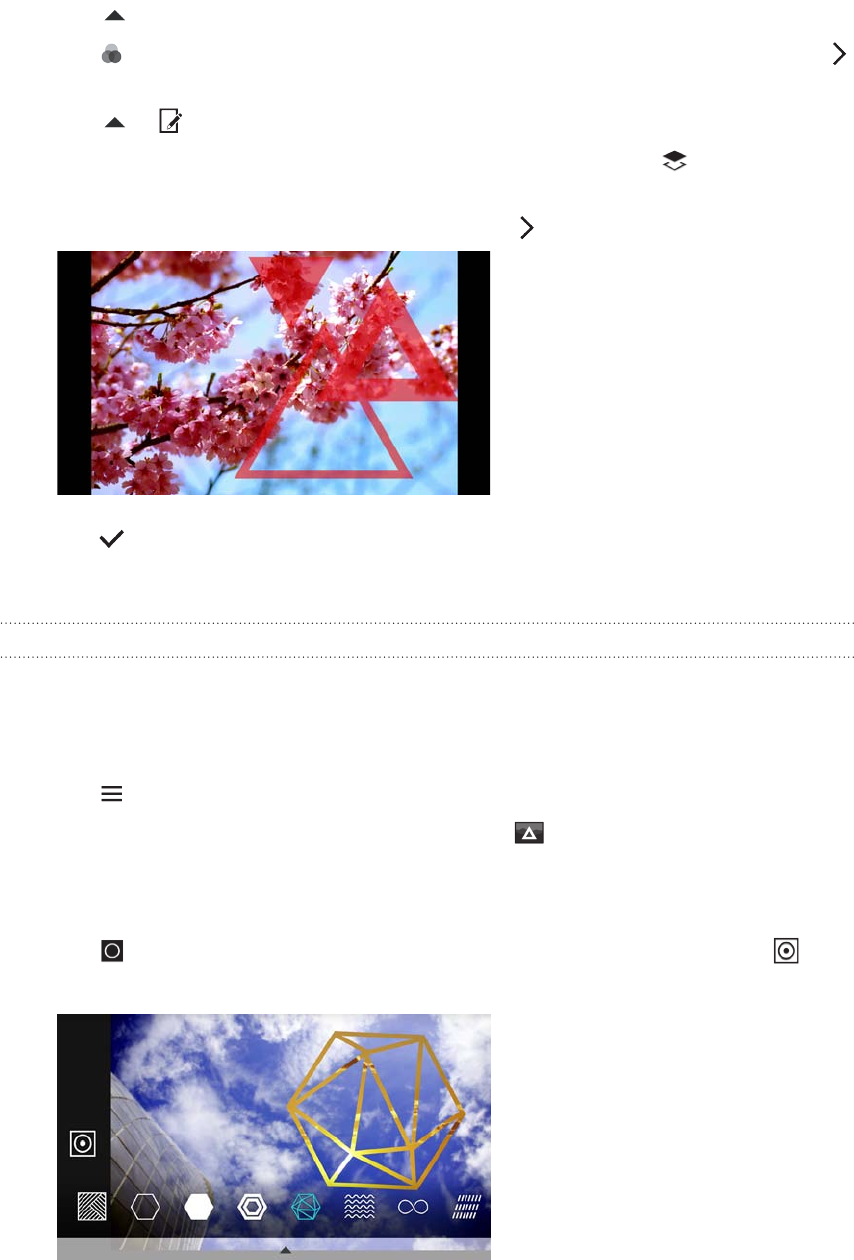
Shapes
Add some pattern to your photo by adding and blending shapes.
1. From Photo Editor, choose the photo you want to edit.
See Choosing a photo to edit to find out how.
2. Tap to open the slideout menu.
3. In the slideout menu that opens, tap Effects > .
4. Choose a shape to add to your photo.
5. Select a shape color by dragging the color slider.
6. Drag the shape to move it.
7. Drag your fingers apart or together on the shape to adjust its size.
8. Press and hold the shape with two fingers and then drag your fingers in a
circular motion to rotate it.
HTC Confidential
NCC/CE/FCC certification
HTC Confidential
NCC/CE/FCC certification
HTC Confidential
NCC/CE/FCC certification
HTC Confidential
NCC/CE/FCC certification
HTC Confidential
NCC/CE/FCC certification
89 Photo Editor
9. Tap to open the toolbar.
10. Tap , choose a different blending option for the selected layer, and then tap
.
11. Tap > , and then drag the slider to adjust the shape's opacity.
12. If you want to adjust your photo to blend with the shape, tap to switch from
the shape layer to the photo layer.
13. Tap a setting to adjust its values, and then tap .
14. Tap to save changes.
The edited photo is saved as a new photo. The original photo remains unedited.
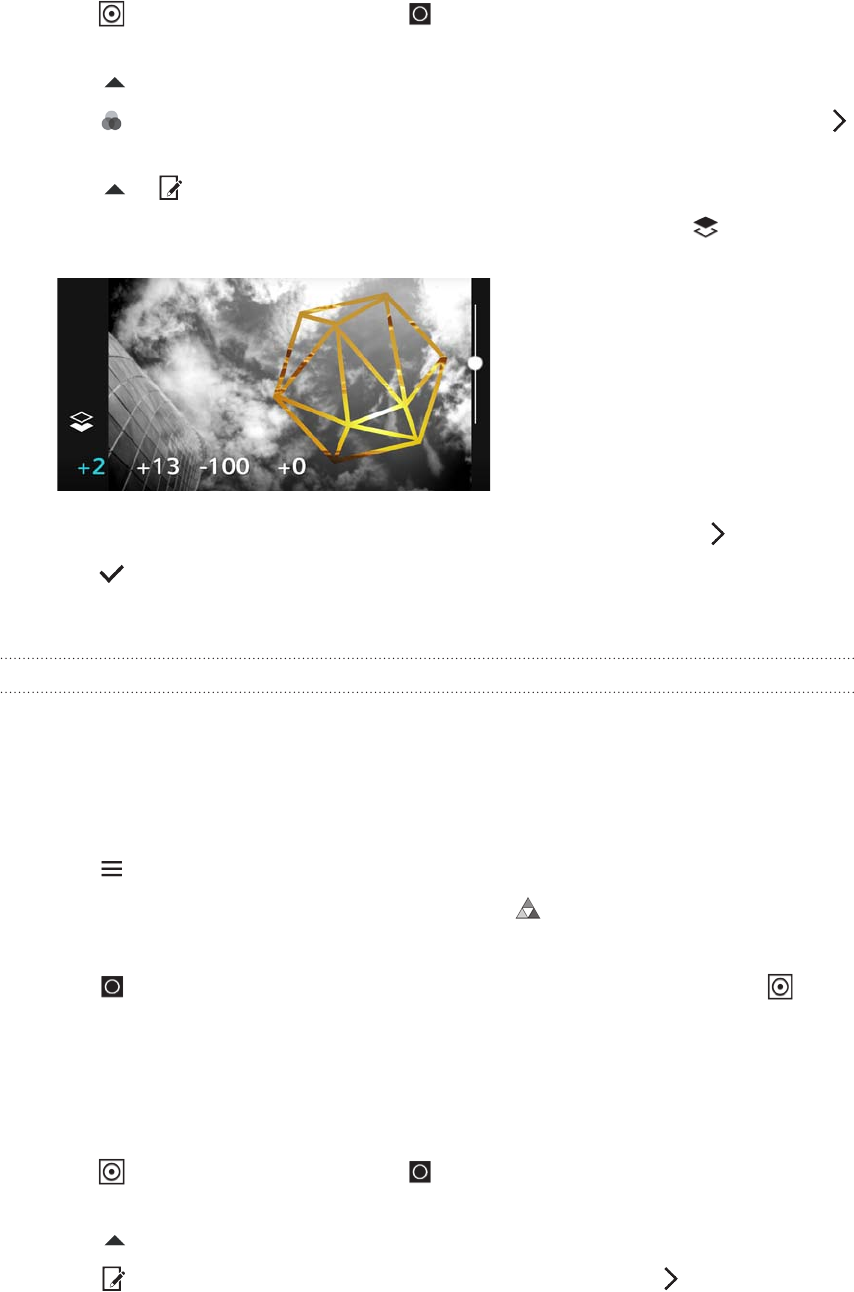
Photo Shapes
Photo Shapes lets you add a shape to your image and fill it with another photo.
1. From Photo Editor, choose the photo you want to edit.
See Choosing a photo to edit to find out how.
2. Tap to open the slideout menu.
3. In the slideout menu that opens, tap Effects > .
4. Choose a second image to be the fill for your selected shape.
5. Choose a shape to add to your photo.
6. Tap to switch to the shape layer. You should see the shape layer icon .
7. Drag the shape mask to move it.
8. Drag your fingers apart or together on the shape mask to adjust its size.
9. Press and hold the shape mask with two fingers, and then drag your fingers in a
HTC Confidential
NCC/CE/FCC certification
HTC Confidential
NCC/CE/FCC certification
HTC Confidential
NCC/CE/FCC certification
HTC Confidential
NCC/CE/FCC certification
HTC Confidential
NCC/CE/FCC certification
90 Photo Editor
circular motion to rotate it.
10. Tap to return to the image layer , and then drag your fingers apart or
together on the image to adjust the image size inside the mask.
11. Tap to open the toolbar.
12. Tap , choose a different blending option for the selected layer, and then tap
.
13. Tap > , and then tap a setting to adjust its values.
14. If you want to adjust your photo to blend with the image fill, tap to switch
from the image fill layer to the photo layer.
15. Tap a setting and drag the slider to adjust its values, and then tap .
16. Tap to save changes.
The edited photo is saved as a new photo. The original photo remains unedited.
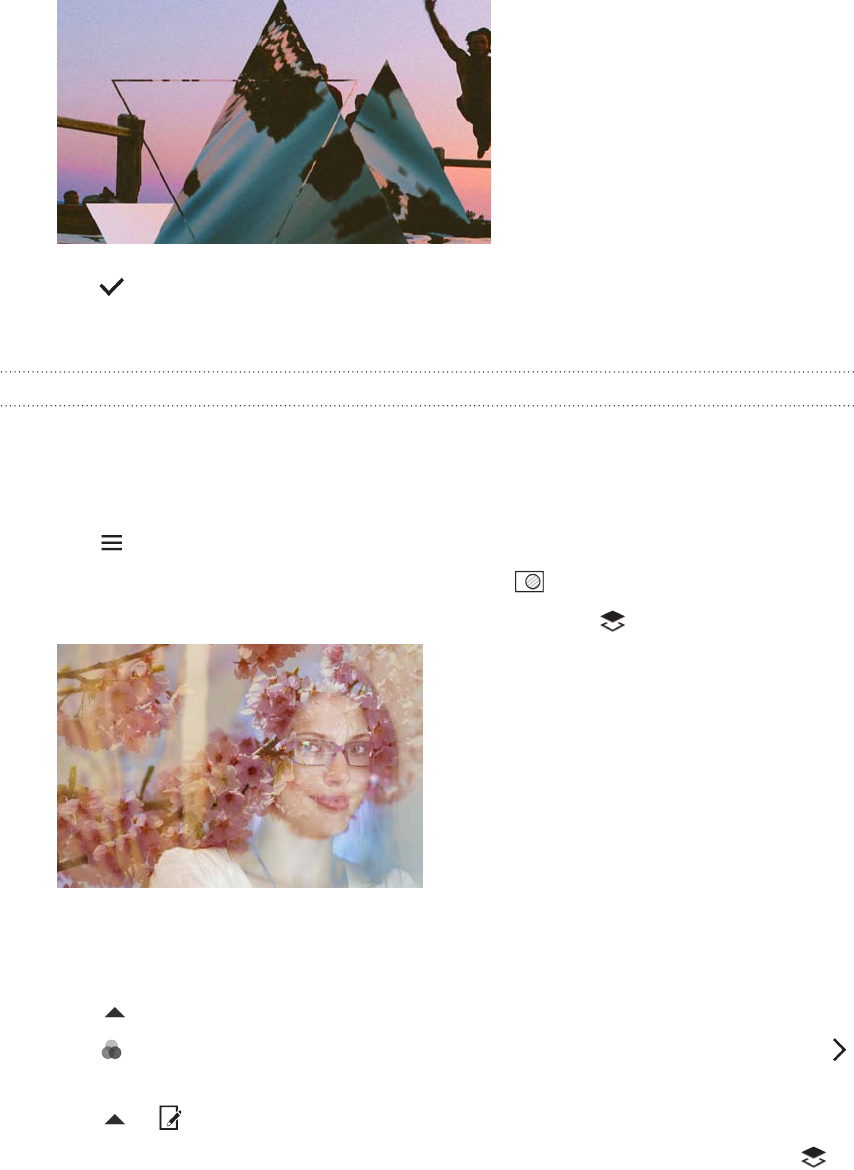
Prismatic
Got a bright and colorful image?
Use Prismatic effect for fresh crystal prism patterns.
1. From Photo Editor, choose the photo you want to edit.
See Choosing a photo to edit to find out how.
2. Tap to open the slideout menu.
3. In the slideout menu that opens, tap Effects > .
4. Choose a prismatic pattern to apply to your photo.
5. Tap to switch to the shape layer. You should see the shape layer icon .
6. Drag the shape to move it.
7. Drag your fingers apart or together on the shape to adjust its size.
8. Press and hold the shape with two fingers, and then drag your fingers in a
circular motion to rotate it.
9. Tap to return to the image layer , and then drag your fingers apart or
together on the image to adjust its size.
10. Tap to open the toolbar.
11. Tap , adjust the settings for your photo layer, and then tap .
HTC Confidential
NCC/CE/FCC certification
HTC Confidential
NCC/CE/FCC certification
HTC Confidential
NCC/CE/FCC certification
HTC Confidential
NCC/CE/FCC certification
HTC Confidential
NCC/CE/FCC certification
91 Photo Editor
12. Tap to save changes.
The edited photo is saved as a new photo. The original photo remains unedited.
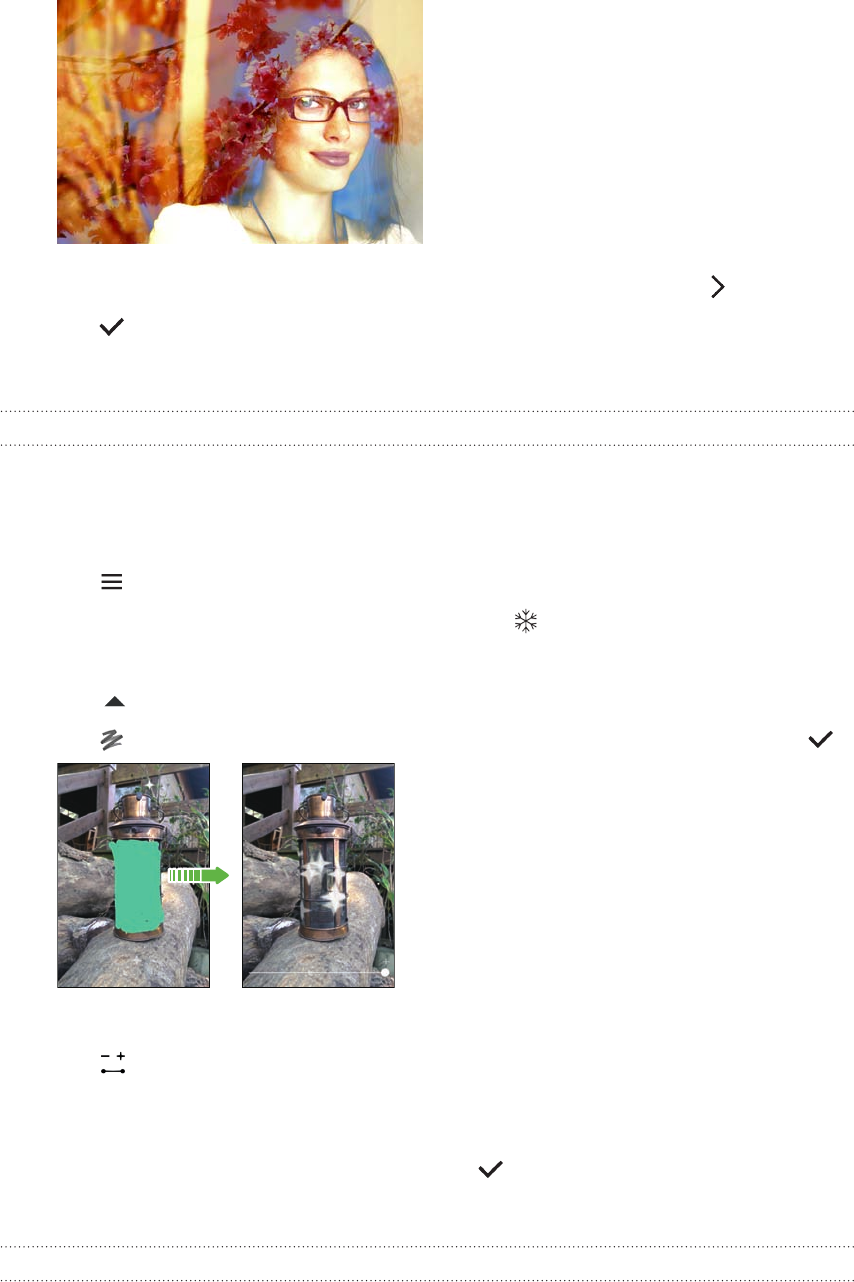
Double Exposure
With Double Exposure, combine and blend two photos and create something surreal.
1. From Photo Editor, choose the photo you want to edit.
See Choosing a photo to edit to find out how.
2. Tap to open the slideout menu.
3. In the slideout menu that opens, tap Effects > .
4. Choose your second image. This will be your top layer .
5. Drag the layer to move it.
6. Drag your fingers apart or together on the layer to adjust its size.
7. Tap to open the toolbar.
8. Tap , choose a different blending option for the selected layer, and then tap
.
9. Tap > , tap a setting, and then drag the slider to adjust its values.
10. If you want to adjust your background layer to blend with the top layer, tap to
switch to the background layer.
HTC Confidential
NCC/CE/FCC certification
HTC Confidential
NCC/CE/FCC certification
HTC Confidential
NCC/CE/FCC certification
HTC Confidential
NCC/CE/FCC certification
HTC Confidential
NCC/CE/FCC certification
92 Photo Editor
11. Tap a setting and drag the slider to adjust its values, and then tap .
12. Tap to save changes.
The edited photo is saved as a new photo. The original photo remains unedited.
Elements
Add animated elements to your photo.
1. From Photo Editor, choose the photo you want to edit.
See Choosing a photo to edit to find out how.
2. Tap to open the slideout menu.
3. In the slideout menu that opens, tap Effects > .
4. Tap an element type to apply to your photo.
5. Tap to open the toolbar.
6. Tap , draw an animation path or area for the selected effect, and then tap .
7. Tap to adjust the animation speed and intensity.
8. Press and hold an area with two fingers, and then drag your fingers in a circular
motion to rotate the animation.
9. When you are satisfied with the result, tap and choose to save as a photo or
video.
Face Fusion
Wonder what you would like if you shared the same features as another person?
Face Fusion uses a person’s photo and a target face to merge the two photos into
HTC Confidential
NCC/CE/FCC certification
HTC Confidential
NCC/CE/FCC certification
HTC Confidential
NCC/CE/FCC certification
HTC Confidential
NCC/CE/FCC certification
HTC Confidential
NCC/CE/FCC certification
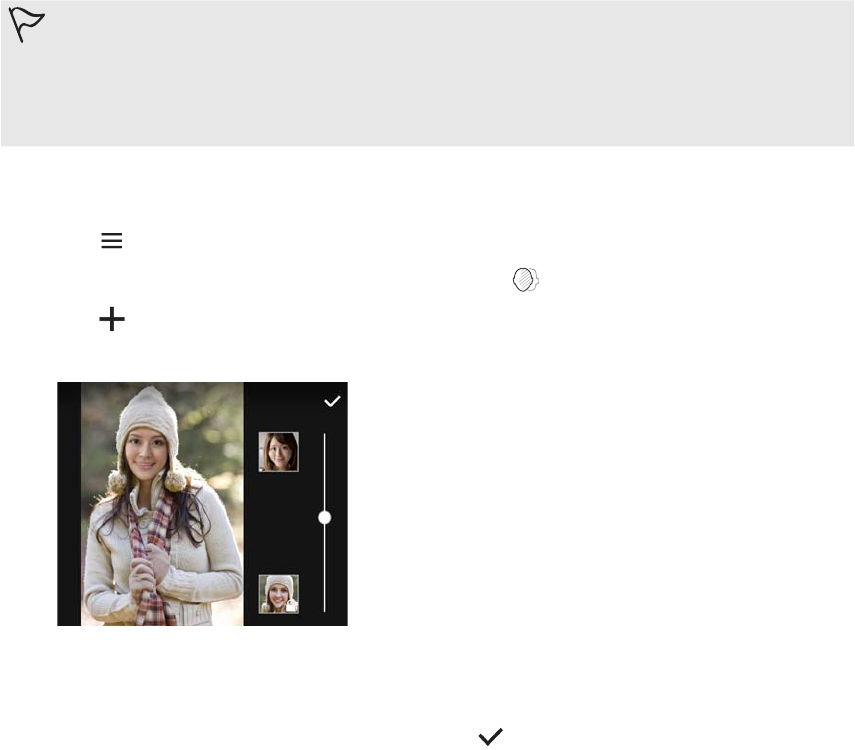
93 Photo Editor
one.
To use Face Fusion, be sure that: The faces in each photo have to be 100 x
100 pixels or larger in size.
Facial shots are without glasses and are not covered by hair, a hat, or any
other item.
Subjects should look towards the camera for best results.
1. From Photo Editor, choose the photo you want to edit.
See Choosing a photo to edit to find out how.
2. Tap to open the slideout menu.
3. In the slideout menu that opens, tap Effects > .
4. Tap and then browse to the photo that you want to merge with.
5. Drag the slider to apply Face Fusion to the image.
To choose another target face, just tap the thumbnail of the target person and browse
to a new photo.
6. When you are satisfied with the result, tap and choose to save as a photo or
video.
HTC Confidential
NCC/CE/FCC certification
HTC Confidential
NCC/CE/FCC certification
HTC Confidential
NCC/CE/FCC certification
HTC Confidential
NCC/CE/FCC certification
HTC Confidential
NCC/CE/FCC certification
94 Phone calls
Phone calls
Phone calls
Making a call with Smart dial
You can either dial a number directly, or use Smart dial to quickly place a call.
Smart dial searches and calls a stored/synced contact or a number from your call
history.
1. On the Home screen, tap the phone icon to open the Phone app.
2. Enter the phone number or first few letters of the contact’s name to see the top
matching contact.
3. If there are a number of matches found (for example, 8 matches), tap the
number to see all the matches.
4. Tap the contact you want to call.
To check other phone numbers associated with the contact, tap beside
the contact name.
If the phone number has an extension, tap after connecting to the main
line and then dial the extension number.
Making a call with your voice
Call a contact hands-free using your voice.
1. On the Home screen, tap the phone icon to open the Phone app.
2. Tap .
3. Say the name of contact you want to call. For example, say "Call [person's
name in phonebook]."
4. Follow screen instructions to make the call.
Dialing an extension number
To skip voice prompts when dialing an extension number, do one of the following:
After dialing the main number, press and hold * . A comma (,) is added to the
number you are dialing. Enter the extension number, and then tap the call
button. You will be connected to the mainline and then to the extension number.
After dialing the main number, press and hold # to add a semicolon (;). Enter
the extension number after the semicolon , and then tap the call button. After
connecting to the main line, tap Send to dial the extension number.
HTC Confidential
NCC/CE/FCC certification
HTC Confidential
NCC/CE/FCC certification
HTC Confidential
NCC/CE/FCC certification
HTC Confidential
NCC/CE/FCC certification
HTC Confidential
NCC/CE/FCC certification
95 Phone calls
You can save phone numbers with an extension in the People app.
Returning a missed call
You'll see the missed call icon in the status bar when you miss a call.
1. Slide the Notifications panel open to check who the caller is.
2. To return the call, tap Call back.
If you have multiple missed calls, tap the missed calls notification to open the Call
History tab.
Speed dial
Use Speed dial to call a phone number with a single tap.
1. On the Home screen, tap the phone icon to open the Phone app.
2. Tap > Speed dial > . You can also press and hold an unassigned key on
the dialpad, and then tap Yes.
3. Select a contact from the list.
4. On the Speed dial screen, choose the phone number of the contact to use, and a
speed dial key to assign.
5. Tap Save.
To use Speed dial, press and hold the speed dial number you want to call.
Calling a number in a message, email, or calendar event
When you receive a text message, email, or calendar event that has a phone number in
it, you can just tap the number to place a call.
Making an emergency call
In some regions, you can make emergency calls from HTC Desire 650 even if the nano
SIM card has been blocked or if you don't have one installed.
If you don't have a network signal, you won't be able to make an emergency
call.
1. On the Home screen, tap the phone icon to open the Phone app.
2. Dial the emergency number for your locale, and then tap Call.
If you've enabled but forgotten your lock password or lock pattern, you can still
make emergency calls by tapping Emergency call on the screen.
Receiving calls
When you receive a phone call from a contact, the Incoming call screen appears.
HTC Desire 650 will automatically adjust the ringtone volume when you use the
polite ringer and pocket mode features.
Answering or rejecting a call
HTC Confidential
NCC/CE/FCC certification
HTC Confidential
NCC/CE/FCC certification
HTC Confidential
NCC/CE/FCC certification
HTC Confidential
NCC/CE/FCC certification
HTC Confidential
NCC/CE/FCC certification
96 Phone calls
Do one of the following:
Tap Answer or Decline.
If you've set up a lock screen, drag or upwards.
Muting the ringing sound without rejecting the call
Do one of the following:
Press the VOLUME DOWN or VOLUME UP button.
Press the POWER button.
Place HTC Desire 650 face down on a level surface.
What can I do during a call?
When a call is in progress, you can turn the speakerphone on, place the call on hold,
and more.
Putting a call on hold
To put the call on hold, tap > Hold. The status bar then displays the hold call icon
.
To resume the call, tap > Unhold.
Switching between calls
If you’re already in a call and you accept another call, you can switch between the two
calls.
1. When you receive another call, tap Answer to accept the second call and put the
first call on hold.
2. To switch between the calls, tap the person you want to talk to on the screen.
Turning the speakerphone on or off during a call
To decrease potential damage to your hearing, do not hold HTC Desire 650 to
your ear when the speakerphone is on.
On the call screen, tap . The speakerphone icon appears in the status bar.
To turn the speakerphone off, tap .
Muting the microphone during a call
On the call screen, tap to toggle between turning the microphone on or off. When
the microphone is turned off, the mute icon appears in the status bar.
Ending a call
Do one of the following to end the call:
On the call screen, tap End Call.
Slide the Notifications panel open, then tap End Call.
HTC Confidential
NCC/CE/FCC certification
HTC Confidential
NCC/CE/FCC certification
HTC Confidential
NCC/CE/FCC certification
HTC Confidential
NCC/CE/FCC certification
HTC Confidential
NCC/CE/FCC certification
97 Phone calls
Setting up a conference call
Conference calling with your friends, family, or co-workers is easy. Make or accept a
call, and then simply dial each subsequent call to add it to the conference.
Make sure that you have conference calling service activated. Contact your
mobile operator for details.
1. Make a call to the first conference call participant.
2. When connected, tap > Add call, and then dial the number of the second
participant. The first participant is put on hold.
3. When connected to the second participant, tap .
4. To add another participant, tap , and then dial the number of the contact.
5. When connected, tap to add the participant to the conference call. Tap to
access options such as ending the call with a participant.
6. To end the conference call, tap End Call.
Call History
Use Call History to check missed calls, your dialed numbers, and received calls.
1. On the Home screen, tap the phone icon to open the Phone app.
2. Swipe to view the Call History tab.
3. Do one of the following:
Tap a name or number in the list to call.
Press and hold a name or number in the list to display the options menu.
Tap to display just a particular type of call such as missed calls or
outgoing calls.
Adding a new phone number to your contacts from Call History
1. On the Call History tab, tap next to the new phone number.
2. Choose whether to create a new contact or save the number to an existing
contact.
Clearing the Call History list
1. On the Call History tab, tap > Remove call history.
2. Select the items you want to delete, or tap > Select all.
3. Tap Delete.
Blocking a caller
When you block a phone number or a contact, all calls from the phone number or
contact will be declined automatically.
On the Call History tab, press and hold the contact or phone number you want to
block, and then tap Block contact.
HTC Confidential
NCC/CE/FCC certification
HTC Confidential
NCC/CE/FCC certification
HTC Confidential
NCC/CE/FCC certification
HTC Confidential
NCC/CE/FCC certification
HTC Confidential
NCC/CE/FCC certification
98 Phone calls
You can always remove a caller from your blocked list. On the Call History tab,
tap > Blocked contacts. In the All tab, press and hold a contact, and then tap
Unblock contacts.
Switching between silent, vibrate, and normal modes
Do one of the following:
To change from silent to normal mode, press the VOLUME UP button twice.
To change from vibrate to normal mode, press the VOLUME UP button.
Go to Settings, and then tap Sound & notification > Sound profile.
Home dialing
When you're on a trip abroad, it's easy to dial friends and family from home.
Your home country code is automatically added when you call your contacts while
roaming. But when manually entering a phone number to call, you need to enter a plus
(+) sign and country code before the number.
Using a roaming service may incur additional charges. Check with your mobile
operator for rates before using a roaming service.
Changing the default country code for Home dialing
1. From the Home screen, tap , and then tap Settings > Call.
2. Tap Home dialing settings.
3. Select a country, and then tap OK.
Turning off Home dialing
If you prefer to manually enter complete phone numbers to call while roaming, you
can turn off Home dialing.
1. From the Home screen, tap , and then tap Settings > Call.
2. Clear the Home dialing option.
HTC Confidential
NCC/CE/FCC certification
HTC Confidential
NCC/CE/FCC certification
HTC Confidential
NCC/CE/FCC certification
HTC Confidential
NCC/CE/FCC certification
HTC Confidential
NCC/CE/FCC certification
99 Messages
Messages
Sending a text message (SMS)
1. From the Home screen, tap , and then find and tap Messages.
2. Tap .
3. Enter a contact name or mobile number in the To field.
4. Tap the area that says Add text, and then enter your message.
5. Tap , or press to save the message as a draft.
There is a limit on the number of characters for a single text message
(displayed above ). If you exceed the limit, your text message will be
delivered as one but will be billed as more than one message.
Your text message automatically becomes a multimedia message if you enter
an email address as the recipient, attach an item, or compose a very long
message.
Sending a multimedia message (MMS)
Before attaching and sending a high-resolution video, compress it first so that
the file size doesn't exceed the message size limit.
1. From the Home screen, tap , and then find and tap Messages.
2. Tap .
3. Enter a contact name, mobile number, or email address in the To field.
4. Tap the area that says Add text, and then enter your message.
5. Tap , and then choose an attachment type.
6. Select or browse for the item to attach.
7. After adding an attachment, tap to see options for replacing, viewing or
removing your attachment.
8. Tap , or press to save the message as a draft.
Sending a group message
Group messaging makes it easy to send a message to multiple contacts all at once.
You can choose to send a group SMS or group MMS.
HTC Confidential
NCC/CE/FCC certification
HTC Confidential
NCC/CE/FCC certification
HTC Confidential
NCC/CE/FCC certification
HTC Confidential
NCC/CE/FCC certification
HTC Confidential
NCC/CE/FCC certification
100 Messages
Group MMS may incur extra data fees.
1. From the Home screen, tap , and then find and tap Messages.
2. Tap .
3. Tap , and then select multiple recipients.
4. To send a group SMS, tap , and then select Send as individual. Clear this
option to send your message as a group MMS.
Group SMS Your message will be sent to the recipients as a text message and
you will be charged by your mobile operator for each message sent.
Replies of your recipients are sorted separately.
Group MMS Similar to a group chat, sending a group MMS lets your recipients join
the conversation you've started. HTC Desire 650 also organizes mes-
sage replies in a single conversation thread. If this is your first time to
send a group MMS, you may need to enter your mobile phone num-
ber.
5. Tap the area that says Add text, then enter your message.
6. Tap .
Resuming a draft message
If you switch to another app or if you receive an incoming call while composing a text
message, the message is automatically saved as a draft.
1. From the Home screen, tap , and then find and tap Messages.
2. Tap a draft message, and then edit the message.
To see all draft messages in one place, tap , and then tap Filter > Drafts.
3. Tap .
Replying to a message
1. From the Home screen, tap , and then find and tap Messages.
2. Tap a contact (or phone number) to display the exchange of messages with that
contact.
3. Tap the area that says Add text, and then enter your message.
4. Tap .
Replying to a contact's other phone number
When a contact has multiple phone numbers stored on HTC Desire 650, you can select
which phone number to reply to.
Keep in mind that if you don't select another number, your response will be sent to the
phone number that your contact used to send the last message.
HTC Confidential
NCC/CE/FCC certification
HTC Confidential
NCC/CE/FCC certification
HTC Confidential
NCC/CE/FCC certification
HTC Confidential
NCC/CE/FCC certification
HTC Confidential
NCC/CE/FCC certification
101 Messages
1. While viewing the exchange of messages with a contact, tap > Recipient
phone number and select which phone number you want to reply to.
2. Tap the area that says Add text, then enter your reply message.
3. Tap .
Forwarding a message
1. From the Home screen, tap , and then find and tap Messages.
2. Tap a contact (or phone number) to view the exchange of messages with that
contact.
3. Tap a message, and then tap Forward.
Moving messages to the secure box
You can move private messages to the secure box. You will need to enter a password
to read these messages.
The secure box does not encrypt messages.
Messages stored on a nano SIM card cannot be moved to the secure box.
1. From the Home screen, tap , and then find and tap Messages.
2. Tap a contact (or phone number) to display the exchange of messages with that
contact.
3. Tap > Move to secure box.
4. Select the messages, and then tap Move.
To move all the messages from a contact, on the Messages screen, press and
hold the contact and tap Move to secure box.
To read messages in the secure box, on the Messages screen, tap > Secure. If
it is your first time to use the secure box, set a password.
To remove messages or contacts from the secure box, press and hold the
contact (or phone number) and tap Move to general box.
Blocking unwanted messages
Declutter your Messages screen by moving spam messages from contacts to the block
box. If you have blocked a contact, that contact's text or picture messages will also be
in the block box.
Open the Messages app, press and hold a contact (or phone number) and tap
Block contact.
To block multiple contacts, tap > Block contacts, select the contacts, and tap
Block.
When the contact sends you messages, you will not see them in the Messages screen
or receive notifications and calls.
HTC Confidential
NCC/CE/FCC certification
HTC Confidential
NCC/CE/FCC certification
HTC Confidential
NCC/CE/FCC certification
HTC Confidential
NCC/CE/FCC certification
HTC Confidential
NCC/CE/FCC certification

102 Messages
To read messages in the block box, on the Messages screen, tap > Block.
To remove messages or contacts from the block box, press and hold the
contact (or phone number) and tap Unblock.
To completely discard future messages from blocked contacts, tap >
Settings > General, and then clear the Save block message option.
Copying a text message to the nano SIM card
1. From the Home screen, tap , and then find and tap Messages.
2. Tap a contact (or phone number) to display the exchange of messages with that
contact.
3. Tap the message, and then tap Copy to SIM. The icon is displayed.
Deleting messages and conversations
Open the Messages app and do any of the following:
Delete a message Open the conversation thread with a contact, tap the mes-
sage, and then tap Delete message. To delete multiple mes-
sages within a conversation, tap > Delete messages >
Delete by selection, and then select the messages to delete.
Delete a conversation Press and hold a contact (or phone number), and then tap
Delete. To delete multiple conversations, tap > Delete
threads, and then select the conversations to delete.
In the Messages settings, tap General > Delete old messages to auto delete old
messages.
Preventing a message from being deleted
You can lock a message to prevent it from being deleted even if you delete the other
messages in the conversation.
1. Open the Messages app.
2. Tap a contact (or phone number) to display the exchange of messages with that
contact.
3. Tap the message that you want to lock.
4. Tap Lock message on the options menu. A lock icon is displayed.
HTC Confidential
NCC/CE/FCC certification
HTC Confidential
NCC/CE/FCC certification
HTC Confidential
NCC/CE/FCC certification
HTC Confidential
NCC/CE/FCC certification
HTC Confidential
NCC/CE/FCC certification
103 Power and storage management
Power and storage
management
Battery
Displaying the battery percentage
You can check the percentage of remaining battery power right from the status bar.
1. From the Home screen, tap , and then find and tap Settings.
2. Tap Power.
3. Select Show battery level.
Checking battery usage
See how the system and apps are using the battery and how much power is being
used.
1. From the Home screen, tap , and then find and tap Settings.
2. Tap Power.
3. Tap Battery usage, and then tap an item to check how it's using the battery.
4. If you see the Adjust power use section while viewing battery use details, you
can tap the option underneath it to adjust settings that affect battery usage.
Another way to check the battery usage per app is to go to Settings, and then tap
Apps. Tap the app you want to check, and then tap Battery.
If the Battery option on the App info screen is grayed out, it means the app is
currently not using the battery.
Checking battery history
Check how long you've been using HTC Desire 650 since the last charge.
You can also see a chart that shows how long the screen has been on, and how long
you've been using connections like the mobile network or Wi-Fi.
1. From the Home screen, tap , and then find and tap Settings.
2. Tap Power.
3. Tap History to view battery usage over time.
HTC Confidential
NCC/CE/FCC certification
HTC Confidential
NCC/CE/FCC certification
HTC Confidential
NCC/CE/FCC certification
HTC Confidential
NCC/CE/FCC certification
HTC Confidential
NCC/CE/FCC certification
104 Power and storage management
Battery optimization for apps
When you have connections such as Wi-Fi on while the phone is in sleep mode, some
apps may still continue to use the battery.
Starting from Android 6.0, battery optimization is enabled for all apps by default
which helps prolong battery standby time when you're not using the phone.
The phone needs to be sitting idle for an extended period of time before battery
optimization takes effect.
Turning battery optimization off in apps
If there are apps that you don't want battery optimization enabled, you can turn the
feature off in those apps.
1. From the Home screen, tap , and then find and tap Settings.
2. Tap Power.
3. Tap Battery optimization.
4. Tap Not optimized > All apps to see the complete list of apps.
5. To turn off battery optimization in an app, tap the app name, and then tap Don't
optimize > Done.
Repeat this process to turn off optimization in other apps.
To filter the list and see which apps have battery optimization disabled, tap All apps >
Not optimized.
Using power saver mode
Power saver mode helps to increase battery life.
It reduces the usage of phone features that drain the battery such as location services
and mobile data.
1. From the Home screen, tap , and then find and tap Settings.
2. Tap Power.
3. Tap the Power saver On/Off switch to turn power saver mode on or off.
To set when to automatically switch this mode on, tap Power saver > Turn on
automatically, and then select a battery level.
Extreme power saving mode
In times when you don't need to use much of your phone, turn Extreme power saving
mode on to extend battery life longer.
In this mode, standby time can last longer than usual, and you can only use the most
basic functions such as phone calls, text messaging, and email.
1. From the Home screen, tap , and then find and tap Settings.
2. Tap Power.
3. Tap the Extreme power saving mode On/Off switch to turn extreme power
saving mode on or off.
HTC Confidential
NCC/CE/FCC certification
HTC Confidential
NCC/CE/FCC certification
HTC Confidential
NCC/CE/FCC certification
HTC Confidential
NCC/CE/FCC certification
HTC Confidential
NCC/CE/FCC certification

105 Power and storage management
If you want to set when to automatically switch this mode on, tap Extreme power
saving mode and select a battery level.
Tips for extending battery life
How long the battery can last before it needs recharging depends on how you use
HTC Desire 650.
Try out some of these tips to help increase battery life.
Use the power management features
Turn Power saver mode and Extreme power saver mode on in Settings.
Monitoring your battery usage helps identify what's using the most power so
you can choose what to do about it. For details, see Checking battery usage.
Manage your connections
Turn off wireless connections such as mobile data, Wi-Fi, or Bluetooth when not
in use.
Turn GPS on only when a precise location is needed, such as while using
navigation or location-based apps. See Turning location services on or off.
Turn on Airplane mode when you don't need any wireless connections and you
don't want to receive calls or messages.
Manage your display
Lowering the brightness, letting the display sleep when not in use, and keeping it
simple helps save battery power.
Use automatic brightness (the default), or manually lower the brightness.
Set the screen timeout to a shorter time.
Don't use a live wallpaper for your Home screen. Animation effects are nice to
show off to other people but they drain your battery.
Changing your wallpaper to a plain, black background can also help a little. The less
color is displayed, the less battery is used.
For more details, see Settings and security and Personalizing.
Manage your apps
Battery optimization helps extend battery standby time. See Battery
optimization for apps.
Install the latest software and application updates. Updates sometimes include
battery performance improvements.
Uninstall or disable apps that you never use.
Many apps run processes or sync data in the background even when you're not using
them. If there are apps that you don't need anymore, uninstall them.
HTC Confidential
NCC/CE/FCC certification
HTC Confidential
NCC/CE/FCC certification
HTC Confidential
NCC/CE/FCC certification
HTC Confidential
NCC/CE/FCC certification
HTC Confidential
NCC/CE/FCC certification
106 Power and storage management
If an app came preloaded and can't be uninstalled, disabling the app can still prevent it
from continuously running or syncing data. See Disabling an app.
Limit background data and sync
Background data and sync can use a lot of battery power if you have many apps
syncing data in the background. It’s recommended not to let apps sync data too often.
Determine which apps can be set with longer sync times, or sync manually.
In Settings, tap Accounts & sync and check what types of data are being synced
in your online accounts. When the battery is starting to run low, temporarily
disable syncing some data.
If you have many email accounts, consider prolonging the sync time of some
accounts.
In the Mail app, select an account, tap > Settings > Sync, Send & Receive, and then
adjust the settings under Sync schedule.
When you’re not traveling from one place to another, sync weather updates
of only your current location, rather than in all of your named cities. Open the
Weather app, and then tap to edit and remove unneeded cities.
Choose widgets wisely.
Some widgets constantly sync data. Consider removing the ones that are not
important from your Home screen.
In Play Store, tap > Settings, and then clear Add icon to Home screen
to avoid automatically adding Home screen app shortcuts whenever you've
installed new apps. Also tap Auto-update apps > Do not auto-update apps if
you're fine with updating apps from Play Store manually.
Other tips
To squeeze in a little bit more battery power, try these tips:
Tone down the ringtone and media volume.
Minimize the use of vibration or sound feedback. In Settings, tap Sound &
notification and choose which ones you don't need and can disable.
Check your apps’ settings as you may find more options to optimize the battery.
Storage
Types of storage
Starting from Android 6.0, there have been some changes on how and where
downloaded apps and their data can be stored.
Phone storage
This is the internal storage which contains the Android system, preinstalled apps,
email, text messages, and cached data from the apps. You can also install apps that
HTC Confidential
NCC/CE/FCC certification
HTC Confidential
NCC/CE/FCC certification
HTC Confidential
NCC/CE/FCC certification
HTC Confidential
NCC/CE/FCC certification
HTC Confidential
NCC/CE/FCC certification
107 Power and storage management
you've downloaded and capture photos, videos, and screenshots to this storage.
Storage card
Use your storage card as a removable storage to store and access your media and
other files on HTC Desire 650 or any Android phone, or set it up as an extension of the
internal storage. See Should I use the storage card as removable or internal storage?.
Should I use the storage card as removable or internal storage?
Use your storage card as removable storage when there's already content such as your
media and other files so that you don't lose these content.
If you have a brand new storage card, choose whether to use it as removable storage
or set it up as an extension of the internal storage.
Removable storage
Use a new storage card as removable storage to be able to insert and use the card on
HTC Desire 650 and other Android phones.
Internal storage
Set up a new storage card as internal storage for more privacy and secure use. This
encrypts and formats the storage card to work just like the internal storage.
This also expands the internal storage space since:
Captured screenshots, camera shots, media, and other files will be stored on the
storage card.
Third-party apps that you installed and their data can be moved between the
phone storage and storage card.
After setting up the storage card as internal storage, the card can only be used
on HTC Desire 650 where it has been formatted.
Setting up your storage card as internal storage
When you insert a storage card that has not been used on HTC Desire 650 before, the
card will be mounted as removable storage by default.
If the storage card is new or doesn't have content you want to keep, you can format
the storage card to use it as internal storage for HTC Desire 650.
See Should I use the storage card as removable or internal storage? to find
out the differences between using the storage card as removable storage or
internal storage.
If there are still files on the storage card, back up the files first before you
format the card.
1. From the Home screen, tap > Settings > Storage & USB.
2. Under Removable storage, tap the storage card name.
3. Tap > Settings.
HTC Confidential
NCC/CE/FCC certification
HTC Confidential
NCC/CE/FCC certification
HTC Confidential
NCC/CE/FCC certification
HTC Confidential
NCC/CE/FCC certification
HTC Confidential
NCC/CE/FCC certification

108 Power and storage management
4. Tap Format as internal.
5. Tap Erase & format.
6. Tap Format.
7. Follow the onscreen instructions to move your installed apps and their data from
the phone storage to the storage card.
If you no longer want to use your storage card as internal storage, you can
reformat the card as removable storage. Before you do so, make sure to move
all the apps and data from the card back to the phone storage. See Moving
apps and data between the phone storage and storage card.
Moving apps and data between the phone storage and storage card
If you've set up your storage card as internal storage, you can move third-party apps
that you installed and their data such as photos, media, and downloaded files to the
storage card to free up phone storage space.
If you no longer want to use your storage card as internal storage, make sure to move
all the apps and data from the card back to the phone storage.
1. From the Home screen, tap > Settings > Storage & USB.
2. Tap the name of your storage card if you're moving app data from the phone
storage to the card, or tap Phone storage if you're moving data from the storage
card back to the phone storage.
3. Tap > Migrate data.
4. Tap Move.
Screenshots will also be migrated.
When you take new photos or videos, capture new screenshots, or download
new files after the migration, they will be saved to the new storage location.
Moving an app to the storage card
When you're running out of phone storage space, you can move your downloaded
apps to the storage card if the card has been set up as internal storage.
Preinstalled apps cannot be moved.
1. From the Home screen, tap > Settings > Storage & USB.
2. Tap Phone storage > Apps.
3. Tap the app you want to move.
4. Tap Change, and then tap the storage card name.
5. Tap Move.
You can also move an app from the storage card back to the phone storage.
HTC Confidential
NCC/CE/FCC certification
HTC Confidential
NCC/CE/FCC certification
HTC Confidential
NCC/CE/FCC certification
HTC Confidential
NCC/CE/FCC certification
HTC Confidential
NCC/CE/FCC certification

109 Power and storage management
Viewing and managing files on the storage
Starting from Android 6.0, you can go to Settings to view and manage files on the
phone storage and storage card.
1. From the Home screen, tap > Settings > Storage & USB.
2. Tap Phone storage or the storage card name.
3. Tap Explore to view internal storage content—whether it's phone storage
content or internal storage content on the storage card.
4. To select or deselect files:
Press and hold a file to select it. To select more files, tap each file.
Tap a file to deselect it.
To select all files, press and hold a file first, and then tap > Select all.
5. Do one of the following:
To delete, tap .
To paste, tap > Copy to. In the Save to slideout menu, choose where to
paste to, and then tap Copy.
Copying files between HTC Desire 650 and your computer
You can copy your music, photos, and other files to HTC Desire 650.
Save and close your files before copying them from your computer to HTC
Desire 650, or vice versa.
If you're using your storage card as internal storage, your computer will only
show storage card content.
1. Connect HTC Desire 650 to the computer using the supplied USB cable.
2. On HTC Desire 650, unlock the screen if it's locked.
3. On the pop-up message that asks whether to use USB for file transfers, tap Yes.
If you don't see this message, slide the Notifications panel open, tap the Use USB for
notification, and then tap File transfers.
You'll then see options for viewing or importing files on the computer screen.
4. Choose to view files.
5. Copy the files from your computer to HTC Desire 650, or vice versa.
6. After copying the files, disconnect HTC Desire 650 from the computer.
Freeing up storage space
As you use HTC Desire 650, you'll accumulate data and fill its storage capacity over
time.
Here are some tips on how to free up phone storage space.
HTC Confidential
NCC/CE/FCC certification
HTC Confidential
NCC/CE/FCC certification
HTC Confidential
NCC/CE/FCC certification
HTC Confidential
NCC/CE/FCC certification
HTC Confidential
NCC/CE/FCC certification

110 Power and storage management
Manage photos and videos
After taking continuous camera shots, keep only the best shot. Discard the rest,
if you don't need them.
After editing a photo or trimming a video, the original file is kept. Delete original
files or move them elsewhere, such as to your computer.
If you're only sending videos through MMS, use a lower resolution. Hi-res video
takes up more space. In Camera settings, tap Video Quality to change the
resolution.
Remove unused themes
Themes can quickly consume up storage space because themes can include images,
sounds and icons. Remove themes you're not using. See Deleting a theme.
Back up data and files
Keep only the most recent data in your apps and files that you often need to use. You
can back up your other data and files. For some tips, see Ways of backing up files,
data, and settings.
Remove or disable apps
Uninstall apps that you've downloaded if no longer need them. Preinstalled apps can
be disabled when you're not using them. See Disabling an app.
Move apps to the storage card
Third-party apps that you've downloaded and installed can be moved to the storage
card if you've set up the card as internal storage. See Moving apps and data between
the phone storage and storage card and Moving an app to the storage card.
Unmounting the storage card
When you need to remove the storage card while HTC Desire 650 is on, unmount the
storage card first to prevent corrupting or damaging the files in the storage card.
If your storage card is used as internal storage and there are apps that were
moved to the card, you will not be able to open these apps after unmounting
the card.
1. From the Home screen, tap > Settings > Storage & USB.
2. Do one of the following:
If your storage card appears under Removable storage, tap > Eject next
to the card name.
If your storage card appears under Internal storage, tap the card name, and
then tap Eject.
File Manager
HTC Confidential
NCC/CE/FCC certification
HTC Confidential
NCC/CE/FCC certification
HTC Confidential
NCC/CE/FCC certification
HTC Confidential
NCC/CE/FCC certification
HTC Confidential
NCC/CE/FCC certification
111 Power and storage management
About File Manager
Use the File Manager app to browse and organize your files and folders on your phone
storage and storage card.
Switching between storage types
1. From the Home screen, tap , and then find and tap File Manager.
2. Swipe left or right to switch to a file storage where you want to browse or
organize your files.
Searching for files
1. In File Manager, tap .
2. In the search box, enter a few characters of the filename, and then tap the Enter
key . Matching filenames from the root and subfolders are then displayed.
3. Tap a file to open it.
Sorting your files
1. In File Manager, tap > Sort.
2. Choose how you want to sort your files and folders.
Copying or moving files
1. In File Manager, browse for the file or folder.
2. Select items to copy or move.
3. Tap Copy or Move to.
4. Press , and then browse for the folder where you want to copy or move the
files.
Or tap > Create folder to create a new folder.
5. Tap Paste.
Favoriting files
1. In File Manager, browse for the file or folder.
2. Select items to favorite.
3. Tap .
To remove an item from the Favorites tab, select the item and tap Remove from
favorites.
Deleting files or folders
1. In File Manager, browse for the file or folder.
2. Select items to delete.
3. Tap Delete.
HTC Confidential
NCC/CE/FCC certification
HTC Confidential
NCC/CE/FCC certification
HTC Confidential
NCC/CE/FCC certification
HTC Confidential
NCC/CE/FCC certification
HTC Confidential
NCC/CE/FCC certification
112 Sync, backup, and reset
Sync, backup, and reset
Online sync
Adding your social networks, email accounts, and more
You can sync contacts, calendars, and other information from your social networks,
email accounts, and online services on HTC Desire 650.
Depending on the account type, signing in to your online accounts lets you sync
updates between HTC Desire 650 and the Web.
1. From the Home screen, tap > Settings > Accounts & sync.
2. Tap .
3. Tap the account type you want to add.
4. Follow the onscreen instructions to enter your account information.
In Settings > Accounts & sync, tap the Auto sync On/Off switch to turn
automatic sync of all your accounts.
You can add several Google Accounts.
Syncing your accounts
1. From the Home screen, tap > Settings > Accounts & sync.
2. Tap the Auto syncOn/Off switch to turn automatic sync of all your accounts on
or off.
3. To manually sync individual accounts, tap an account type, and then do one of
the following:
Tap next to the account you want to sync, and then tap Sync now.
Tap > Sync now on the Account settings screen.
On the Account settings screen, you can also change the sync settings for an
account.
Removing an account
Remove accounts from HTC Desire 650 if you no longer use them.
Removing an account does not remove accounts and information from the online
service itself.
1. From the Home screen, tap > Settings > Accounts & sync.
2. Tap an account type.
3. Tap next to the account you want to remove.
HTC Confidential
NCC/CE/FCC certification
HTC Confidential
NCC/CE/FCC certification
HTC Confidential
NCC/CE/FCC certification
HTC Confidential
NCC/CE/FCC certification
HTC Confidential
NCC/CE/FCC certification
113 Sync, backup, and reset
Or if you're on the Account settings screen, tap .
4. Tap Remove.
Some personal data may be retained by the third-party app after you have
removed the account from HTC Desire 650.
Backup
Ways of backing up files, data, and settings
Worried that you might lose important stuff on HTC Desire 650?
Back up HTC Desire 650 before you remove content from the storage, do a factory
reset, or upgrade to a new phone.
Android Backup Service
Use your Google Account to automatically back up app data and settings including
Wi-Fi passwords and files stored by certain apps.
HTC Sync Manager
Use HTC Sync Manager to import music, photos, and videos from HTC Desire 650
to your computer. You can also sync locally stored contacts, calendar events, and
playlists between HTC Desire 650 and your computer.
Likewise, HTC Sync Manager is a good alternative if you don't want to back up your
accounts, settings, and other personal content to the cloud. You can use it to create
backups of HTC Desire 650 on your computer.
Other backup options
If you want, you can separately back up your data or files.
Some apps allow you to back up data to the phone storage or storage card so you
can easily restore them after a factory reset. Just make sure not to erase the phone
storage or storage card when you do a factory reset.
Messages Back up your text messages to the phone storage or storage card, or
save them as an email attachment.
Contacts Save contacts and other personal data to your online accounts so you
can just sync them when switching to another phone.
If you have locally stored contacts in the People app, export them to
the phone storage or storage card.
Files Manually copy and paste files by connecting HTC Desire 650 to your
computer as a disk drive.
Other data Check other apps to see if they support exporting data to the phone
storage or storage card.
HTC Confidential
NCC/CE/FCC certification
HTC Confidential
NCC/CE/FCC certification
HTC Confidential
NCC/CE/FCC certification
HTC Confidential
NCC/CE/FCC certification
HTC Confidential
NCC/CE/FCC certification
114 Sync, backup, and reset
Using Android Backup Service
Starting from Android 6.0, use the Android Backup Service to back up your HTC
phone to Google Drive™.
This service can back up and restore the following:
Personalized HTC Sense
Home
These include widgets, wallpaper, Home screen layout,
ringtones, and grid size and sort order on the Apps screen.
App data In HTC apps, app data includes contacts stored on
HTC Desire 650, text messages, call history, Clock and
Weather city list, and email accounts.
Data from third-party apps may also be saved in the
backup, depending on the app developer settings.
Settings These include Wi-Fi networks and passwords and some
device settings.
When auto backup is enabled, the Android Backup Service periodically backs up your
phone to a private folder in Google Drive. Auto backup occurs every 24 hours when
the phone is idle, charging, and connected to a Wi-Fi network.
Backup data will not count towards your Google Drive storage quota. Large files or
files that app developers have chosen to exclude from the service will not be backed
up.
Backing up HTC Desire 650
Automatically back up HTC Desire 650 to Google Drive so you can restore content
such as app data and settings when needed.
1. From the Home screen, tap > Settings > Backup & reset.
2. Tap Back up my data.
3. Tap the On/Off switch to turn it on, and then tap .
4. Make sure Automatic restore is turned on.
This allows an app's data and settings saved through the Android Backup Service to
be restored when you reinstall the app on HTC Desire 650.
To select a backup account other than your primary Google Account, tap
Backup account and then select another Google Account. You can also tap Add
account to add a new Google Account for your backup.
Backing up your data locally
If you want to separately back up your content such as contacts and text messages on
HTC Desire 650, here are some tips on how to export or import your data.
Backing up your contacts
1. From the Home screen, tap , and then find and tap People.
2. On the People tab, tap > Manage contacts.
3. Tap Import/Export contacts > Export to phone storage or Export to SD card.
4. Select an account or type of contacts to export.
HTC Confidential
NCC/CE/FCC certification
HTC Confidential
NCC/CE/FCC certification
HTC Confidential
NCC/CE/FCC certification
HTC Confidential
NCC/CE/FCC certification
HTC Confidential
NCC/CE/FCC certification

115 Sync, backup, and reset
5. To help protect your data, tap Ye s, and then set a password for this backup. Be
sure to remember this password. You'll need to enter it again when importing
contacts.
If you don't need a password, tap No.
6. Tap OK.
Restoring contacts
1. On the People tab, tap > Manage contacts.
2. Tap Import/Export contacts > Import from phone storage or Import from SD
card.
3. If you have more than one account set up, tap the type for the imported
contacts.
4. If you have multiple backups available, select the backup you want to import,
and then tap OK.
5. Enter the password you've set for this backup, and then tap OK.
Backing up your text messages
Keep important text messages by backing them up so you can restore them to the
HTC Messages app, if needed.
The Messages app backs up either to the phone storage or to your storage card if you
have one inserted.
Text messages in the secure box and blocked messages will not be backed
up. To include such messages to your backup, move them first to the general
message box.
1. From the Home screen, tap , and then find and tap Messages.
2. Tap > Back up/Restore SMS > Back up > Back up SMS.
3. To help protect your data, set a password for your backup. Be sure to remember
this password. You'll need to enter it again when restoring messages.
If you don't need a password, select Do not password protect this backup.
4. Enter a name for your backup file, and then tap OK.
Backing up text messages by email
You need to set up your email account in the HTC Mail app.
Text messages in the secure box and blocked messages will not be backed
up. To include such messages to your backup, move them first to the general
message box.
1. From the Home screen, tap , and then find and tap Messages.
2. Tap > Back up/Restore SMS.
3. Tap Back up > Back up SMS via mail.
4. To help protect your data, set a password for your backup. Be sure to remember
this password. You'll need to enter it again when restoring messages.
HTC Confidential
NCC/CE/FCC certification
HTC Confidential
NCC/CE/FCC certification
HTC Confidential
NCC/CE/FCC certification
HTC Confidential
NCC/CE/FCC certification
HTC Confidential
NCC/CE/FCC certification

116 Sync, backup, and reset
If you don't need a password, select Do not password protect this backup.
5. Enter your email address.
6. Compose your email message, and then send it.
Restoring text messages
1. From the Home screen, tap , and then find and tap Messages.
2. Tap > Back up/Restore SMS > Restore.
3. Choose how you want to restore the messages, and tap Next.
4. Tap the backup to import.
5. Enter the password you've set for this backup. If you didn't set a password,
select This backup file is not password protected.
6. Tap OK.
To restore text messages that were backed up via email, open the email message with
the backup file attachment from the Mail app. Tap the attachment to download it first,
and then tap it again to open the backup file to import. Enter the password you've set
for this backup or select This backup file is not password protected.
HTC Sync Manager
About HTC Sync Manager
HTC Sync Manager supports a computer running a Windows or OS X operating
system.
Here's what you can do with HTC Sync Manager.
View and manage media on your computer and phone
Browse and manage music, photos, and videos that are on your computer and
your phone.
Import iTunes and Windows Media® Player playlists from your computer to HTC
Sync Manager.
Create playlists from music on your phone or your computer and then sync
these playlists to both devices.
Play music and videos using the built-in player.
Transfer content
Transfer iPhone photos, text messages, contacts, and more to your HTC phone.
You can also find and install the same apps that you were using on your iPhone.
Import all music, photos, and videos from your HTC phone to your computer.
Copy selected music, photos, or videos from your computer to your phone.
Import documents from your computer to your phone.
HTC Confidential
NCC/CE/FCC certification
HTC Confidential
NCC/CE/FCC certification
HTC Confidential
NCC/CE/FCC certification
HTC Confidential
NCC/CE/FCC certification
HTC Confidential
NCC/CE/FCC certification
117 Sync, backup, and reset
Back up and restore
Back up your HTC phone to your computer so you can easily restore your backup to
the same phone or to another HTC phone.
Sync data
Sync data such as contacts and calendar between your phone and your computer.
Installing HTC Sync Manager on your computer
You can install HTC Sync Manager on Windows XP or later versions. To install
it on a Mac computer, you need OS X 10.6 or later versions.
If you have problem in installing HTC Sync Manager, close all your running
programs and reinstall. If the problem persists, temporarily disable your anti-
virus program and try installing again.
1. Download the HTC Sync Manager installer from the HTC support site:
htc.com/hsm/.
2. Launch the installer and follow the onscreen instructions.
3. Connect your phone to your computer using the supplied USB cable. HTC Sync
Manager opens.
If you disabled your anti-virus program, make sure to turn it back on after
installing HTC Sync Manager.
Transferring iPhone content and apps to your HTC phone
With HTC Sync Manager, easily transfer iPhone content such as contacts, messages,
wallpaper, camera photos, and more to your HTC phone.
If you're using an HTC phone that has HTC Sense 6, HTC Sync Manager also enables
your phone to find and install the same apps that you were using on your iPhone.
You need to use iTunes 9.0 or later to back up your iPhone content first to your
computer.
1. Connect your iPhone and your HTC phone to your computer.
2. In HTC Sync Manager, click Home > Transfer & Backup.
3. Click the Get Started button.
4. If you haven't used iTunes to back up your iPhone content to your computer,
please do so before proceeding.
5. Select your iPhone backup file, and then click OK.
6. Select the types of content you want to transfer to your HTC phone.
You can choose whether to replace the content on your HTC phone with the iPhone
content.
7. Click Start. Wait for HTC Sync Manager to finish transferring content.
8. When done, slide the Notifications panel open on your HTC phone, and then tap
.
HTC Confidential
NCC/CE/FCC certification
HTC Confidential
NCC/CE/FCC certification
HTC Confidential
NCC/CE/FCC certification
HTC Confidential
NCC/CE/FCC certification
HTC Confidential
NCC/CE/FCC certification
118 Sync, backup, and reset
Choose which apps you were using on iPhone you want to find in Google Play and
download to your HTC phone.
Getting help
To find out more about using HTC Sync Manager, download the user guide PDF from
the HTC support site (htc.com/hsm/). Or open the Help that comes with the software.
On Windows, click in HTC Sync Manager, and then click Help.
Reset
Restarting HTC Desire 650 (Soft reset)
If HTC Desire 650 is running slower than normal, is unresponsive, or has an app that is
not performing properly, try rebooting and see if that helps solve the problem.
1. If the display is off, press the POWER button to turn it back on.
2. Press and hold the POWER button, and then tap Restart.
3. When asked to confirm, tap Restart.
HTC Desire 650 not responding?
If HTC Desire 650 does not respond when you touch the screen or press the buttons,
you can still restart it.
Press and hold the POWER and VOLUME UP buttons for at least 12 seconds. HTC
Desire 650 then restarts.
Resetting network settings
Reset the network settings when you're having problems connecting HTC Desire 650
to your mobile data or Wi-Fi network and Bluetooth devices.
1. From the Home screen, tap > Settings > Backup & reset.
2. Tap Network settings reset.
3. Tap Reset settings.
4. Tap Reset settings.
Resetting HTC Desire 650 (Hard reset)
If HTC Desire 650 has a persistent problem that cannot be solved, you can perform a
factory reset (also called a hard reset or master reset).
A factory reset reverts the phone back to its initial state—the state before you turned
on the phone for the first time.
HTC Confidential
NCC/CE/FCC certification
HTC Confidential
NCC/CE/FCC certification
HTC Confidential
NCC/CE/FCC certification
HTC Confidential
NCC/CE/FCC certification
HTC Confidential
NCC/CE/FCC certification
119 Sync, backup, and reset
Factory reset will remove all data on your phone storage, including apps you've
downloaded and installed, your accounts, your files, as well as system and
app data and settings. Be sure to back up any data and files you want to keep
before you do a factory reset.
1. From the Home screen, tap > Settings > Backup & reset.
2. Tap Reset phone.
To also delete media and other data from your storage card, select Erase SD card.
3. Tap OK.
A factory reset may not permanently erase all data from your phone, including
personal information.
HTC Confidential
NCC/CE/FCC certification
HTC Confidential
NCC/CE/FCC certification
HTC Confidential
NCC/CE/FCC certification
HTC Confidential
NCC/CE/FCC certification
HTC Confidential
NCC/CE/FCC certification
120 People
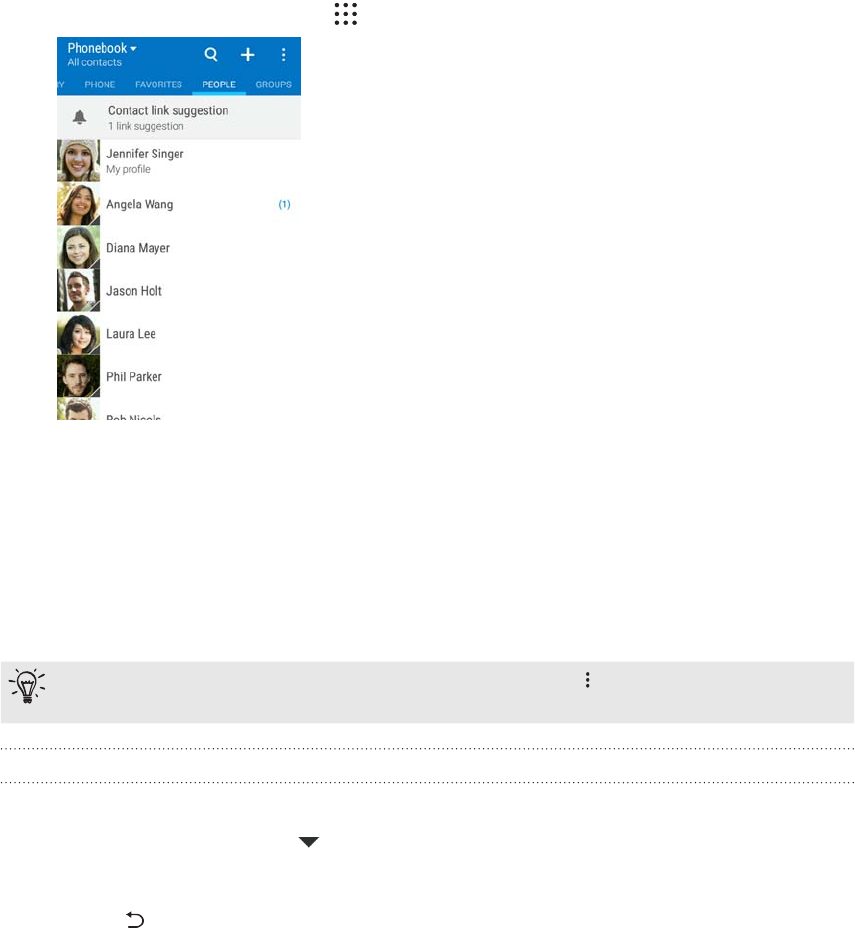
People
Your contacts list
The People app lists all contacts you've stored on HTC Desire 650 and from online
accounts you're logged in to.
Use the People app to easily manage communications with people that matter to you.
1. From the Home screen, tap , and then find and tap People.
2. On your contacts list, you can:
View your profile and edit your contact information.
Create, edit, find, or send contacts.
Tap a contact photo to find ways to quickly connect with the contact.
See when a contact has sent you new messages.
To sort your contacts by their first or last name, tap > Settings > Sort
contacts by.
Filtering your contacts list
When your contacts list gets long, you can choose which contact accounts to show.
1. On the People tab, tap .
2. Choose the accounts that contain the contacts you want to display.
3. Press .
HTC Confidential
NCC/CE/FCC certification
HTC Confidential
NCC/CE/FCC certification
HTC Confidential
NCC/CE/FCC certification
HTC Confidential
NCC/CE/FCC certification
HTC Confidential
NCC/CE/FCC certification
121 People
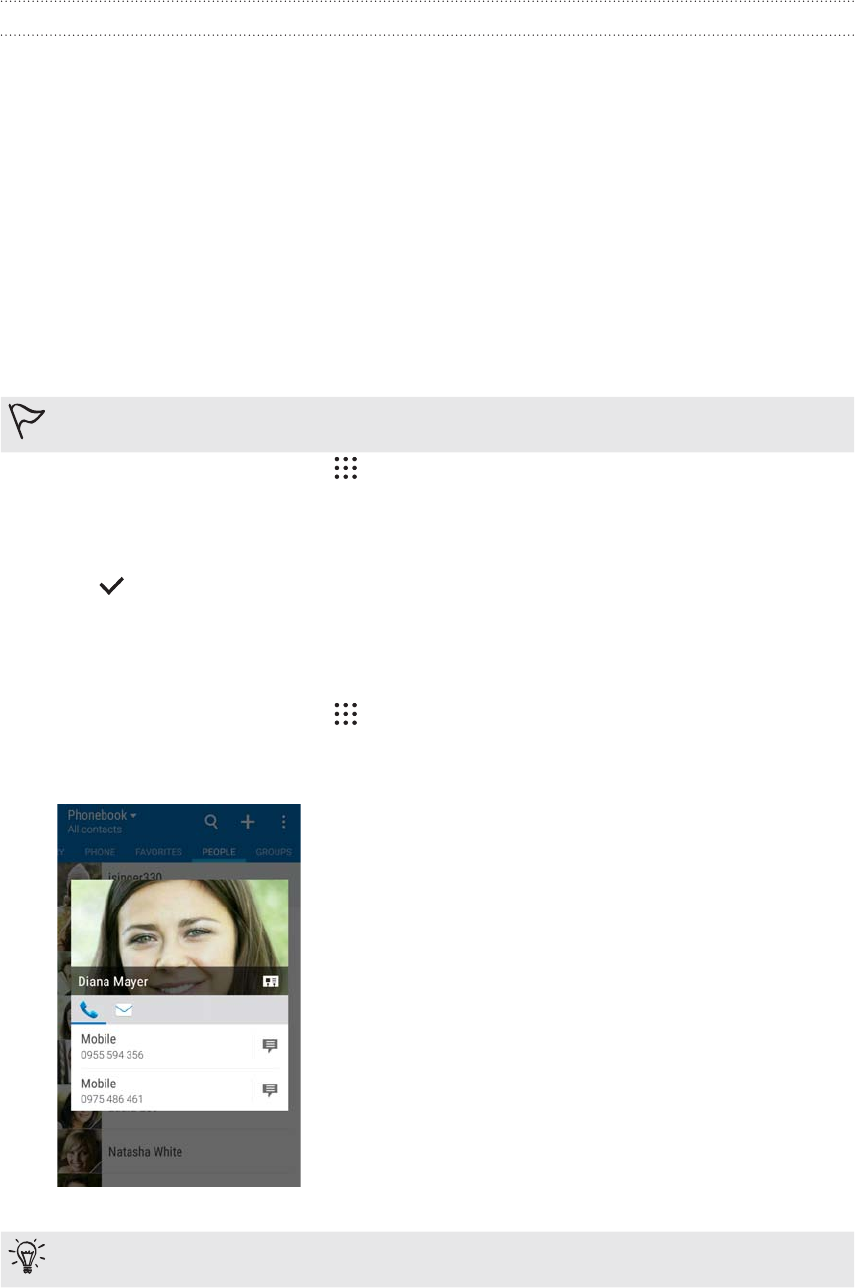
Finding people
Search for contacts stored on HTC Desire 650, your company directory if you have an
Exchange ActiveSync account, or social networks you've signed into.
1. From the Home screen, tap , and then find and tap People.
2. On the People tab, you can:
Find people in your contacts list. Tap , and then enter the first few letters
of the contact name in the Search people box.
Find people on your company directory. Tap , enter the first few letters of
the contact name in the Search people box, and then tap Search contacts in
your Company Directory.
Aside from searching for a contact by name, you can search using a contact's
email address or company name. On the People tab, tap > Settings > Search
contacts by, and then choose a search criteria.
Setting up your profile
Store your personal contact information to easily send it to other people.
1. From the Home screen, tap , and then find and tap People.
2. Tap My profile.
3. Tap Edit my contact card.
4. Enter or edit your name and contact details.
5. Tap or the current photo to change your contact photo.
6. Tap .
Aside from your contact details, swipe to the Updates tab to see updates you've
posted on your social networks.
Adding a new contact
1. From the Home screen, tap , and then find and tap People.
2. On the People tab, tap .
3. Tap the Name field, and then enter the contact name. Tap to separately enter
the contact's given, middle, or family name and name suffix, such as Jr.
4. Select the Contact type. This determines which account the contact will sync
with.
5. Enter the contact information in the fields provided.
6. Tap .
When you tap the added contact in your contacts list, you'll see the contact
information and your exchange of messages and calls. Depending on the contact type,
you may also see the person's social network updates or events.
HTC Confidential
NCC/CE/FCC certification
HTC Confidential
NCC/CE/FCC certification
HTC Confidential
NCC/CE/FCC certification
HTC Confidential
NCC/CE/FCC certification
HTC Confidential
NCC/CE/FCC certification
122 People
How do I add an extension number to a contact number?
While creating a new contact or editing a contact's details in People, you can add an
extension number to their number so you can skip the voice prompts when calling.
1. After entering the number of the main line, do one of the following:
Tap P(,) to insert a pause before the phone dials the extension number. To
insert a longer pause, enter P(,) several times.
Tap W(;) to be prompted to confirm the extension number.
2. Enter the extension number.
Editing a contact’s information
Social network contacts cannot be edited.
1. From the Home screen, tap , and then find and tap People.
2. On the People tab, press and hold the contact, and then tap Edit contact.
3. Enter the new information.
4. Tap .
Getting in touch with a contact
1. From the Home screen, tap , and then find and tap People.
2. Tap a contact's photo (not the name), and then choose how you want to get in
touch with that contact.
For more ways of getting in touch with your contact, tap an icon below the
contact photo.
Importing or copying contacts
HTC Confidential
NCC/CE/FCC certification
HTC Confidential
NCC/CE/FCC certification
HTC Confidential
NCC/CE/FCC certification
HTC Confidential
NCC/CE/FCC certification
HTC Confidential
NCC/CE/FCC certification

123 People
Importing contacts from your nano SIM card
1. From the Home screen, tap , and then find and tap People.
2. On the People tab, tap > Manage contacts.
3. Tap Import/Export contacts > Import from SIM card.
4. If prompted, select which account you'd like to import your contacts to.
5. Select the contacts you want to import.
6. Tap Save.
Importing a contact from an Exchange ActiveSync account
1. On the People tab, tap and enter the contact's name or email address in the
search box.
2. Tap Search contacts in your Company Directory.
3. Tap the name of the contact you want copied to HTC Desire 650.
4. Tap to import the contact.
Copying contacts from one account to another
Contacts from social networks may not be able to be copied.
1. On the People tab, tap > Manage contacts.
2. Tap Copy contacts, and then choose a contact type or online account to copy
from.
3. Select a contact type or account you want to save to.
Merging contact information
Avoid duplicate entries by merging contact information from different sources, such as
your social network accounts, into one contact.
Accepting contact link suggestions
When HTC Desire 650 finds contacts that can be merged, you’ll see a link notification
when you open the People app.
1. From the Home screen, tap , and then find and tap People.
2. On the People tab, tap the Contact link suggestion notification when available.
You'll see a list of suggested contacts to merge.
3. Tap next to the contact you want to merge. Otherwise, tap to dismiss the
link suggestion.
If you don't want to receive contact link suggestions, on the People tab, tap
> Settings. Clear the Suggest contact link option.
HTC Confidential
NCC/CE/FCC certification
HTC Confidential
NCC/CE/FCC certification
HTC Confidential
NCC/CE/FCC certification
HTC Confidential
NCC/CE/FCC certification
HTC Confidential
NCC/CE/FCC certification
124 People
Manually merging contact information
1. On the People tab, tap the name of the contact (not the icon or photo) you want
to link.
2. Tap > Link.
3. You can:
Under Suggest links, link the contact to an account.
Under Add contact, tap one of the options to link to another contact.
Breaking the link
1. On the People tab, tap the name of the contact (not the icon or photo) whose
link you want to break.
2. Tap > Link.
3. Under the Linked contacts section, tap beside an account to break the link.
Sending contact information
1. From the Home screen, tap , and then find and tap People.
2. On the People tab, do one of the following:
To send Do this
Someone's contact informa-
tion
Press and hold the name of the contact (not the icon
or photo), and then tap Send contact as vCard.
Your contact information Press and hold My profile, and then tap Send my pro-
file.
3. Choose how you want to send the vCard.
4. Select the type of information you want to send.
5. Tap Send.
Sending multiple contact cards
1. On the People tab, tap > Send contacts.
2. Select the contacts whose contact information you want to share
3. Tap Send.
4. Choose how you want to send the contact cards.
Contact groups
Organize your friends, family, and colleagues into groups so you can quickly send a
message or email to everyone in the group.
We’ve also set up the Frequent group to automatically add the contacts you dial or
get calls from the most.
HTC Confidential
NCC/CE/FCC certification
HTC Confidential
NCC/CE/FCC certification
HTC Confidential
NCC/CE/FCC certification
HTC Confidential
NCC/CE/FCC certification
HTC Confidential
NCC/CE/FCC certification

125 People
HTC Desire 650 also syncs with groups you've created in your Google Account.
Creating a group
1. From the Home screen, tap , and then find and tap People.
2. On the Groups tab, tap .
3. Enter a name for the group, and then tap > Add contact to group.
4. Select the contacts you want to add, and then tap Save.
5. When your group is complete, tap Save.
Sending a message or email to a group
You will be charged for each text message sent. For example, if you send a
message to a group of five people, you will be charged for five messages.
1. On the Groups tab, tap the group you want to send a message or email to.
2. Go to the Group action tab.
3. Choose if you want to send a group message or group email.
Editing a group
1. On the Groups tab, press and hold the group, and then tap Edit group.
2. You can:
Change the group name. You can only change the name for groups that you
have created.
Add more contacts to the group. Tap > Add contact to group.
Select the contacts you want to remove from the group.
3. Tap Save.
Removing contact groups
1. On the Groups tab, tap > Edit groups.
2. Select the contact groups you want to remove.
3. Tap Save.
Private contacts
If you don't want to show a contact's name and photo on the lock screen when you
have an incoming call, add the contact to your private contacts list.
Adding a contact to the private contacts list
Contacts must have a phone number before they can be added to the private
contacts list.
1. From the Home screen, tap , and then find and tap People.
HTC Confidential
NCC/CE/FCC certification
HTC Confidential
NCC/CE/FCC certification
HTC Confidential
NCC/CE/FCC certification
HTC Confidential
NCC/CE/FCC certification
HTC Confidential
NCC/CE/FCC certification

126 People
2. On the People tab, press and hold the contact, and then tap Add to private
contacts.
To view your private contacts list, on the People tab, tap > Manage contacts >
Private contacts.
Organizing your private contacts
1. On the People tab, tap > Manage contacts > Private contacts.
2. To add contacts to the private contacts list, tap , select the contacts you want
to add, and then tap Save.
3. To remove private contacts from the list, tap > Remove private contact, select
the contacts you want to remove, and then tap Remove.
HTC Confidential
NCC/CE/FCC certification
HTC Confidential
NCC/CE/FCC certification
HTC Confidential
NCC/CE/FCC certification
HTC Confidential
NCC/CE/FCC certification
HTC Confidential
NCC/CE/FCC certification
127 Calendar and Email
Calendar and Email
Calendar
Viewing the Calendar
Use the Calendar app to view your events, meetings, and appointments.
If you've signed into your online accounts, related events will also appear in Calendar.
1. From the Home screen, tap , and then find and tap Calendar.
2. Tap , and then choose a calendar view.
If you see the current date icon, tap it to return to the current date.
Month view
In month view, you will see markers on days that have events.
Upcoming events for the day are also shown at the bottom of the screen.
Swipe left or right across the screen to view succeeding or previous months.
Tap a day to view the events for that day.
Press and hold a day to see more options.
Day and agenda views
Day view shows your day's schedule and weather forecast for the next few days, while
agenda view gives a quick glance of all your day's events.
Swipe left or right across the screen to view succeeding or previous days.
Tap an event to view its details.
If the event is a contact's birthday or anniversary, tap it to send a greeting.
Need to see the event time in another time zone? In Day view, tap > Select
2nd time zone > Choose location, and then enter the city name.
Week view
Week view displays a chart of the events of one week.
Swipe left or right across the screen to view succeeding or previous weeks.
Tap an event (shown as colored blocks) to view its details.
Check the week number in the upper left corner of the chart.
Select the day you start a week by tapping > Settings > First day of week.
HTC Confidential
NCC/CE/FCC certification
HTC Confidential
NCC/CE/FCC certification
HTC Confidential
NCC/CE/FCC certification
HTC Confidential
NCC/CE/FCC certification
HTC Confidential
NCC/CE/FCC certification
128 Calendar and Email
Scheduling or editing an event
You can create or edit events on HTC Desire 650, and also sync events with your
Exchange ActiveSync calendar. You can also create, modify, and sync events with your
Google calendar.
Editing events is not supported for all accounts.
1. From the Home screen, tap , and then find and tap Calendar.
2. On any Calendar view, do one of the following:
Create an event Tap . Tap , and then select the calendar you will
add the event to.
Edit an event View an event, and then tap .
3. Enter and set the event details. Aside from setting the event name, date, time,
and location, you can:
Invite contacts from your
Exchange ActiveSync or
Google account
Tap , and select the contacts you want to invite.
Set the event to repeat Tap the Does not repeat button, and then select a
repeat schedule. You can then set the repeat frequency
and end date.
Create an event note While viewing the event details, tap Create note.
4. Tap Save.
If you've invited people to the event, tap Send or Send update.
Checking your schedule for an event
Avoid juggling multiple meetings at the same time.
In Calendar, you can check your appointments to see if a new event would conflict
with your schedule.
1. When creating or editing an event, tap Check calendar.
2. Press and hold the event box, and then drag it to an available time slot.
3. Drag the top and bottom nodes to adjust the event's time duration. You'll see a
message if there are conflicts with other scheduled events.
4. Tap Done to return to the event screen, and then save your event.
Choosing which calendars to show
1. From the Home screen, tap , and then find and tap Calendar.
2. Tap > Accounts (All calendars) or Accounts (Multi-calendar).
3. Select or clear an account you wish to show or hide.
If you have multiple calendars under an online account, tap to select the items to
include.
4. Tap Save.
HTC Confidential
NCC/CE/FCC certification
HTC Confidential
NCC/CE/FCC certification
HTC Confidential
NCC/CE/FCC certification
HTC Confidential
NCC/CE/FCC certification
HTC Confidential
NCC/CE/FCC certification
129 Calendar and Email
Calendars are synced on HTC Desire 650, even if they are hidden.
Sharing an event
You can share a calendar event as a vCalendar using Bluetooth or by sending it as a
file attachment with your email or message.
1. From the Home screen, tap , and then find and tap Calendar.
2. Do one of the following:
While viewing an event, tap > Share via.
In day, agenda or week view, press and hold an event and then tap Share
via.
3. Choose how you want to send the event.
You can also forward accepted meeting invitations from your Exchange
ActiveSync calendar. While viewing an event, tap > Forward. Compose your
email message, and then send it.
Accepting or declining a meeting invitation
Switch to Invites view to see meeting invitations which you have not yet accepted or
declined.
You must set up an Exchange ActiveSync account to receive meeting
invitations in Calendar.
1. From the Home screen, tap , and then find and tap Calendar.
2. Tap > Invites, and then tap a meeting invitation.
3. Accept, decline, or tentatively accept the invitation, or propose a new time.
Tap to choose from more options, such as moving the invitation to a folder.
If you need to cancel an accepted meeting invitation or propose a new time, view the
event details in Calendar, and then tap Response.
Dismissing or snoozing event reminders
If you have set at least one reminder for an event, the upcoming event icon will
appear in the notifications area of the status bar to remind you.
1. Slide the Notifications panel open.
2. If the notification shows that there are multiple reminders, tap it to see all the
reminders. You can then choose to snooze or dismiss them.
3. If you see a single event notification, spread your two fingers on the notification
to expand it. You can then:
Tap Snooze or Dismiss. Or drag the notification left or right to dismiss it.
Tap Send mail to send a quick response to the meeting attendees.
HTC Confidential
NCC/CE/FCC certification
HTC Confidential
NCC/CE/FCC certification
HTC Confidential
NCC/CE/FCC certification
HTC Confidential
NCC/CE/FCC certification
HTC Confidential
NCC/CE/FCC certification
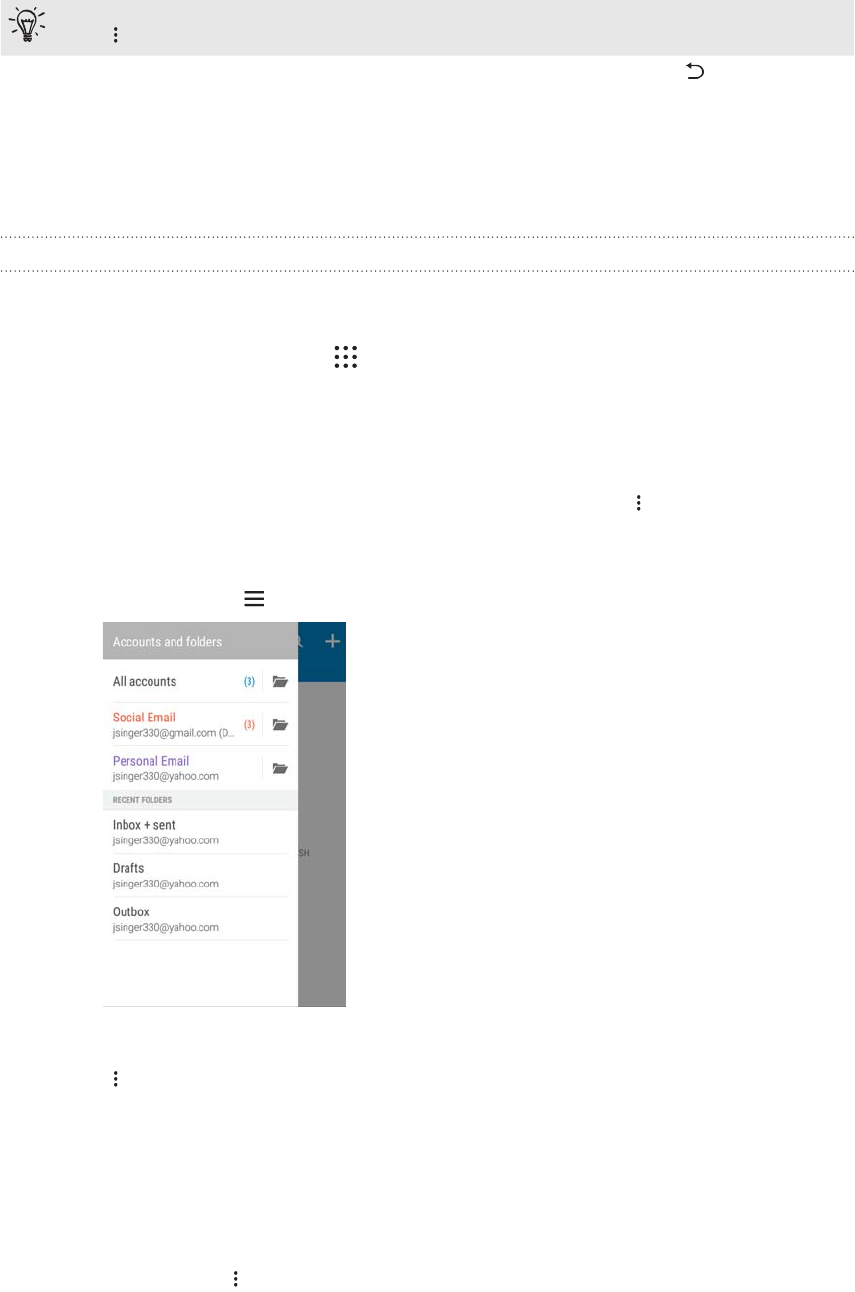
130 Calendar and Email
To edit the preset quick responses or add your own, open Calendar, and then
tap > Settings > Quick response.
If you don't want to dismiss or snooze the calendar reminders, press from the
Notifications panel to keep them pending in the notifications area of the status bar.
Mail
Checking your mail
The Mail app is where you read, send, and organize email messages from one or more
email accounts that you’ve set up on HTC Desire 650.
1. From the Home screen, tap , and then find and tap Mail. The inbox of one of
your email accounts appears.
2. Do any of the following:
Tap an email message to read.
To display email messages in another mail folder, tap > Folder, and then
tap the folder you want to view.
To switch between email accounts or view email messages from all your
accounts, tap .
To change an email account's settings, select the account first and then tap
> Settings.
Organizing your inbox
Do you have a big pile of email messages in your inbox?
Organize your email messages into tabs and quickly find the messages you want.
1. Switch to the email account that you want to use.
2. In the inbox, tap > Edit tabs.
3. Select the tabs you want to add to the inbox.
HTC Confidential
NCC/CE/FCC certification
HTC Confidential
NCC/CE/FCC certification
HTC Confidential
NCC/CE/FCC certification
HTC Confidential
NCC/CE/FCC certification
HTC Confidential
NCC/CE/FCC certification
131 Calendar and Email
4. To arrange the tabs, drag , and then move the tab to its new location.
5. Tap Done.
6. Swipe to the added tab to check your email messages.
Sending an email message
1. From the Home screen, tap , and then find and tap Mail.
2. Switch to the email account that you want to use.
3. Tap .
4. Fill in one or more recipients.
Want to loop in more recipients in a carbon copy (Cc) or blind carbon copy
(Bcc) of the email message? Tap > Show Cc/Bcc.
5. Enter the subject, and then compose your message.
6. Do any of the following:
Add an attachment. Tap and then choose what you want to attach.
Set the priority for an important message. Tap > Set priority.
7. Tap .
To save the email as draft and send it later, tap > Save. Or press .
Resuming a draft email message
1. In an email account inbox, tap > Folder > Drafts.
2. Tap the message.
3. When you finish editing the message, tap .
Reading and replying to an email message
1. From the Home screen, tap , and then find and tap Mail.
2. Switch to the email account you want to use.
3. In the email account inbox, tap the email message or conversation you want to
read.
If you want to read a particular message inside an email conversation, tap to
expand the conversation, and then tap the email message.
4. Tap Reply or Reply All.
Tap for more actions for the email.
Quickly replying to an email message
You can quickly respond to a new email message from the Home screen or lock
screen.
1. When you receive a new email message notification, slide the Notifications panel
HTC Confidential
NCC/CE/FCC certification
HTC Confidential
NCC/CE/FCC certification
HTC Confidential
NCC/CE/FCC certification
HTC Confidential
NCC/CE/FCC certification
HTC Confidential
NCC/CE/FCC certification
132 Calendar and Email
down.
2. On the email preview, tap Reply all.
If you have several notifications and you don't see the email options, expand the email
preview by sliding two fingers apart on the notification.
3. Compose your reply message and tap .
Saving an image in an email message
Depending on your mail size limit settings, you may need to tap Display
images to see images that are embedded in an email.
Inline images may not display correctly when using certain mail accounts.
While viewing an email message, press and hold an embedded image, and then tap
Save image. You'll find the saved image in the All downloads album in Gallery.
You can also copy the image to the clipboard or set it as your wallpaper.
Managing email messages
The Mail app provides easy ways to sort, move, or delete your email messages.
Sorting email messages
Customize how you sort your email messages.
In an email account inbox, tap > Sort, and select from the sorting options.
Moving email messages to another folder
1. Switch to the email account you want to use.
2. Select the email messages you want to move.
To select all, select one email message first, and then tap > Select all.
3. Tap Move to, and then select a folder.
Deleting email messages
1. Switch to the email account you want to use.
2. Select the email messages you want to delete.
To select all, select one email message first, and then tap > Select all.
3. Tap Delete.
Searching email messages
1. From the Home screen, tap , and then find and tap Mail.
2. Tap .
3. If you want to narrow the scope for your search, tap , check the search
options, and then tap OK. For example, you can focus the search on the email
content, or filter email messages that have attachments or are tagged as high
HTC Confidential
NCC/CE/FCC certification
HTC Confidential
NCC/CE/FCC certification
HTC Confidential
NCC/CE/FCC certification
HTC Confidential
NCC/CE/FCC certification
HTC Confidential
NCC/CE/FCC certification

133 Calendar and Email
priority.
4. In the search box, enter the words you want to search for.
5. Tap a result to open the email message.
Searching for emails from a contact
Do you remember the sender, but can't find a particular email from him or her?
1. Switch to the email account you want to use.
2. Press and hold an email message from a contact.
3. Tap Show all mail from sender. A list of email messages from that contact
appears.
Working with Exchange ActiveSync email
Enjoy the powerful email features of Microsoft Exchange ActiveSync right on HTC
Desire 650.
Flag important email messages, set your out of the office reply, or send invites to your
next team meeting while you're on the go.
Flagging an email
1. From the Home screen, tap , and then find and tap Mail.
2. Switch to your Exchange ActiveSync account.
3. While viewing the inbox, tap the flag icon that appears beside an email message
or conversation.
To flag an email message inside a conversation, tap to expand the
conversation, and then tap the flag icon of the email message.
Setting your Out of the office status
1. Switch to your Exchange ActiveSync account.
2. Tap > Out of the office.
3. Tap your current office status, and then select Out of the office.
4. Set the dates and times.
5. Enter the auto-reply message.
6. If you want a different auto-reply message for recipients outside your
organization, tap the Send replies to external senders option, and then enter the
auto-reply message in the box.
7. Tap Save.
Sending a meeting request
1. Switch to your Exchange ActiveSync account.
2. Tap > New meeting invitation.
3. Enter the meeting details.
4. Tap Save. Or tap Send if you've invited people to the meeting.
HTC Confidential
NCC/CE/FCC certification
HTC Confidential
NCC/CE/FCC certification
HTC Confidential
NCC/CE/FCC certification
HTC Confidential
NCC/CE/FCC certification
HTC Confidential
NCC/CE/FCC certification
134 Calendar and Email
Adding an email account
Set up additional email accounts such as another Microsoft Exchange ActiveSync
account or an account from a Web-based email service or email provider.
If you're adding a Microsoft Exchange ActiveSync or a POP3/IMAP email
account, ask your network administrator or email service provider for additional
email settings that you may need.
1. From the Home screen, tap , and then find and tap Mail.
2. Tap > Add account.
3. Select an email account type from the list of email providers. Otherwise, tap
Other (POP3/IMAP).
4. Enter the email address and password for your email account, and then tap Next.
Some email accounts allow you to set the sync schedule. By default, HTC Desire
650 uses Smart Sync to save battery power. See What is Smart Sync?.
5. Enter a name for your email account, and then tap Finish setup.
What is Smart Sync?
Smart Sync automatically extends the sync time the longer the Mail app is inactive.
Set your email account to Smart Sync when you don't need to check new email
messages frequently. Smart Sync helps save battery power.
If you want to receive email messages as they arrive, select another Peak time sync
and Off-peak sync schedule in the email account's Sync, Send & Receive settings.
HTC Confidential
NCC/CE/FCC certification
HTC Confidential
NCC/CE/FCC certification
HTC Confidential
NCC/CE/FCC certification
HTC Confidential
NCC/CE/FCC certification
HTC Confidential
NCC/CE/FCC certification
135 Google Search and apps
Google Search and apps
Google Now
Getting instant information with Google Now
Do you want to check the weather or your morning commute time before you start
your day?
Google Now™ delivers quick and up-to-date information that matters to you—all
without the search.
Depending on your location, time of day, and previous Google searches, Google Now
displays information cards that include:
The day's weather and the weather forecast for upcoming days.
The traffic conditions on your way to work or your commute back home.
The directions and travel time to your next appointment.
The next train or bus arriving at your platform or bus stop.
Your favorite team's score and stats while you enjoy the game.
Open the Google Search app to use Google Now. From the Home screen, tap , and
then find and tap Google. Or tap the Google search bar widget when available.
Setting up Google Now
Before setting up Google Now: Make sure that you're signed in to your
Google account.
Turn location services on and make sure that you have an Internet
connection.
1. From the Home screen, tap , and then find and tap Google.
2. Tap Get started. Or if you've previously set up Google Now on HTC Desire 650
and turned it off, tap Get Now cards > Set up.
3. Read the information screen and then tap Yes, I'm in. Google Now information
cards will start to appear on the Google search screen.
4. Swipe up the screen to see all available information cards.
5. To dismiss a card, swipe it right.
Depending on the information that you've allowed to share, more information cards
will appear on the Google search screen as you use HTC Desire 650 to search the
Web, create appointments, set reminders, and more.
Changing card settings
You can easily customize the settings of Google Now cards to suit your information
HTC Confidential
NCC/CE/FCC certification
HTC Confidential
NCC/CE/FCC certification
HTC Confidential
NCC/CE/FCC certification
HTC Confidential
NCC/CE/FCC certification
HTC Confidential
NCC/CE/FCC certification