Contents
Users Manual

User guide
HTC Desire® 555
Confidential
For certification only

Contents
Features you'll enjoy
What's new and special with Camera 10
The best from HTC and Google Photos 11
What's different with the onscreen keyboard 11
Sound 12
Truly personal 12
Boost+ 14
Android 6.0 Marshmallow 14
Software and app updates 15
Unboxing
HTC Desire 555 overview 16
nano SIM card 17
Storage card 18
Charging the battery 20
Switching the power on or off 20
Phone setup and transfer
Setting up HTC Desire 555 for the first time 22
Restoring from your previous HTC phone 22
Transferring content from an Android phone 23
Ways of transferring content from an iPhone 24
Transferring iPhone content through iCloud 24
Other ways of getting contacts and other content 24
Transferring photos, videos, and music between your phone and computer 25
Using Quick Settings 25
Getting to know your settings 26
Setting a screen lock 26
Setting up Smart Lock 27
Turning the lock screen off 27
Updating your phone's software 27
Getting apps from Google Play 29
Downloading apps from the web 30
Uninstalling an app 31
Your first week with your new phone
HTC Sense Home 32
Sleep mode 32
Unlocking the screen 33
Motion gestures 33
Touch gestures 34
Opening an app 38
Sharing content 38
Switching between recently opened apps 38
2 Contents
Confidential
For certification only

Refreshing content 39
Capturing your phone's screen 39
Travel mode 39
What is the HTC Sense Home widget? 40
Notifications 42
Selecting, copying, and pasting text 43
Entering text 43
How can I type faster? 44
Getting help and troubleshooting 46
Personalizing
Ringtones, notification sounds, and alarms 47
What is HTC Themes? 47
Choosing a Home screen layout 50
Setting your Home wallpaper 50
Multiple wallpapers 51
Time-based wallpaper 51
Lock screen wallpaper 52
Adding or removing a widget panel 52
Arranging widget panels 52
Changing your main Home screen 53
Launch bar 53
Adding Home screen widgets 54
Adding Home screen shortcuts 54
Using stickers as app shortcuts 55
Grouping apps on the widget panel and launch bar 55
Moving a Home screen item 56
Removing a Home screen item 56
Arranging apps 56
Taking photos and videos
Camera screen 58
Choosing a capture mode 59
Taking a photo 60
Tips for capturing better photos 61
Recording video 62
Taking continuous camera shots 62
Using HDR 63
Selfies 63
Taking a panoramic photo 65
Google Photos
What you can do on Google Photos 66
Viewing photos and videos 66
Editing your photos 67
Trimming a video 67
Web search
Getting instant information with the Google app 68
Screen search 70
Searching HTC Desire 555 and the Web 71
3 Contents
Confidential
For certification only

Power and storage management
About Boost+ 72
Tips for extending battery life 74
Using power saver mode 76
Extreme power saving mode 77
Displaying the battery percentage 77
Checking battery usage 77
Checking battery history 78
Battery optimization for apps 78
Types of storage 78
Should I use the storage card as removable or internal storage? 79
Setting up your storage card as internal storage 79
Moving apps and data between the phone storage and storage card 80
Moving an app to the storage card 80
Viewing and managing files on the storage 81
Copying files between HTC Desire 555 and your computer 81
Freeing up storage space 82
Unmounting the storage card 83
Sync, backup, and reset
Adding your social networks, email accounts, and more 84
Syncing your accounts 84
Removing an account 85
Ways of backing up files, data, and settings 85
Using Android Backup Service 86
Backing up your data locally 87
About HTC Sync Manager 88
Installing HTC Sync Manager on your computer 89
Transferring iPhone content and apps to your HTC phone 90
Restarting HTC Desire 555 (Soft reset) 90
Resetting network settings 91
Resetting HTC Desire 555 (Hard reset) 91
HTC BlinkFeed
What is HTC BlinkFeed? 92
Turning HTC BlinkFeed on or off 93
Restaurant recommendations 93
Ways of adding content on HTC BlinkFeed 94
Customizing the Highlights feed 95
Playing videos on HTC BlinkFeed 95
Posting to your social networks 96
Removing content from HTC BlinkFeed 96
Phone calls
Making a call with Smart dial 97
Making a call with your voice 97
Dialing an extension number 98
Returning a missed call 98
Speed dial 98
Calling a number in a message, email, or calendar event 98
Receiving calls 99
4 Contents
Confidential
For certification only

Making an emergency call 99
What can I do during a call? 99
Setting up a conference call 100
Call History 101
Switching between silent, vibrate, and normal modes 101
Home dialing 102
Messages
Sending a text message (SMS) 103
Sending a multimedia message (MMS) 103
Sending a group message 104
Resuming a draft message 104
Replying to a message 104
Forwarding a message 105
Moving messages to the secure box 105
Blocking unwanted messages 106
Copying a text message to the nano SIM card 106
Deleting messages and conversations 106
People
Your contacts list 108
Setting up your profile 109
Adding a new contact 109
Editing a contact’s information 110
Getting in touch with a contact 110
Importing or copying contacts 111
Merging contact information 112
Sending contact information 112
Contact groups 113
Private contacts 114
Email
Checking your mail 115
Sending an email message 116
Reading and replying to an email message 116
Managing email messages 117
Searching email messages 117
Working with Exchange ActiveSync email 118
Adding an email account 119
What is Smart Sync? 119
Other apps
Using the Clock 120
Checking Weather 121
Recording voice clips 121
Listening to FM Radio 121
Google apps 122
Internet connections
Turning the data connection on or off 124
5 Contents
Confidential
For certification only

Managing your data usage 124
Wi-Fi connection 126
Connecting to VPN 127
Using HTC Desire 555 as a Wi-Fi hotspot 128
Sharing your phone's Internet connection by USB tethering 129
Wireless sharing
What is HTC Connect? 130
Using HTC Connect to share your media 131
Streaming music to Blackfire compliant speakers 132
Streaming music to speakers powered by the Qualcomm AllPlay smart media platform 133
Turning Bluetooth on or off 133
Connecting a Bluetooth headset 133
Unpairing from a Bluetooth device 134
Receiving files using Bluetooth 134
Settings and security
HTC BoomSound profile 136
Turning location services on or off 136
Do not disturb mode 136
Controlling app permissions 138
Setting default apps 138
Setting up app links 138
Disabling an app 139
Touch sounds and vibration 139
Setting when to turn off the screen 140
Changing the display language 140
Airplane mode 140
Screen brightness 140
Automatic screen rotation 141
Installing a digital certificate 141
Assigning a PIN to a nano SIM card 142
Accessibility features 142
Accessibility settings 143
Turning Magnification gestures on or off 143
Navigating HTC Desire 555 with TalkBack 144
Trademarks and copyrights
Index
6 Contents
Confidential
For certification only

About this guide
In this user guide, we use the following symbols to indicate useful and important information:
This is a note. A note often gives additional information, such as what happens when you choose
to do or not to do a certain action. A note also provides information that may only be applicable
to some situations.
This is a tip. A tip gives you an alternative way to do a particular step or procedure, or lets you
know of an option that you may find helpful.
This indicates important information that you need in order to accomplish a certain task or to
get a feature to work properly.
This provides safety precaution information, that is, information that you need to be careful
about to prevent potential problems.
Some apps may not be available in all regions or with your mobile operator.
7 About this guide
Confidential
For certification only

Important RF Notice
This device was tested for compliance with the applicable FCC and Industry Canada
specific absorption rate (SAR) limits for radio frequency (RF) exposure during typical
body-worn operations. To ensure that RF exposure levels remain at or below the tested
levels, use a belt-clip, holster, or similar accessory that maintains a minimum separation
distance of 1.0 cm between your body and the device, with either the front or back of the
device facing towards your body. Such accessories should not contain any metallic
components. Body-worn accessories that do not meet these specifications may not ensure
compliance with applicable SAR limits and their use should be avoided.
8 Important RF Notice
Confidential
For certification only

Important note on recoverable data
Files and other data that have been deleted, cleared, removed, or erased from your device
may still be recoverable by third-party data recovery software. Even a factory reset may not
permanently erase all data from your mobile device, including personal information.
9 Important note on recoverable data
Confidential
For certification only
Features you'll enjoy
What's new and special with Camera
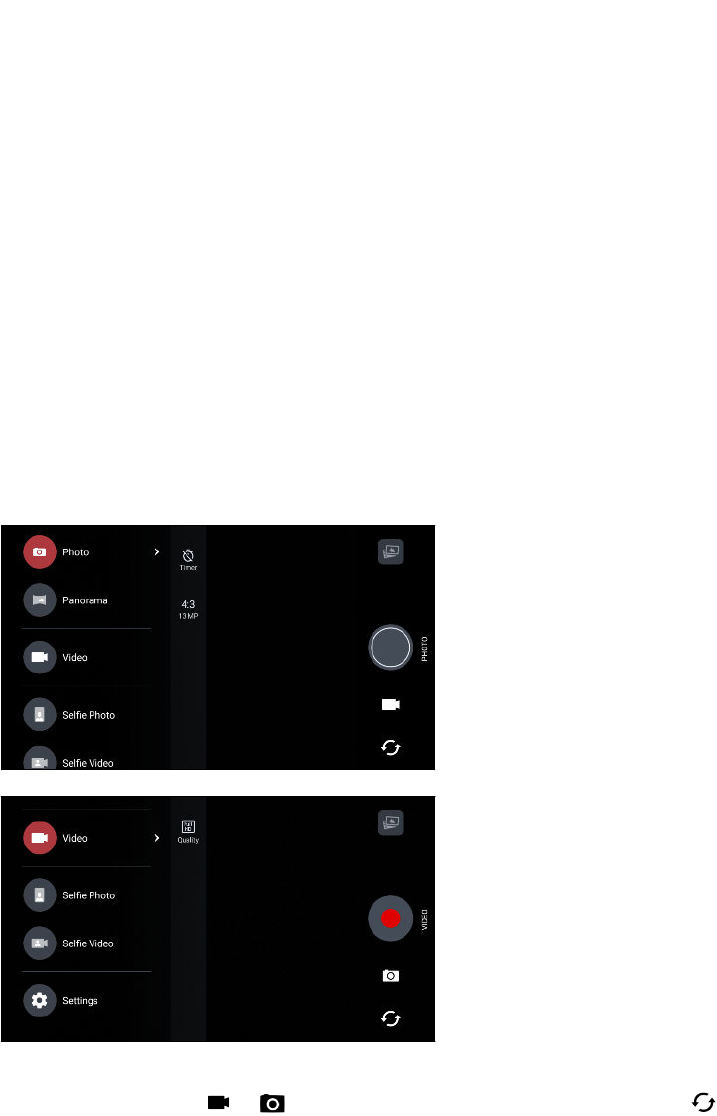
Enjoy taking great camera shots on HTC Desire 555. The camera interface has a fresh new look,
neatly organized to make it faster for you to switch modes and change your settings.
Leaner, cleaner, camera interface
The new camera interface groups related capture modes together—such as photo capture modes—
so that you can quickly find the mode you want, and puts modes and their settings side by side for
easy access.
Without having to open the slideout menu, you can easily switch back to Photo or Video mode from
other modes by tapping or below the shutter button. You can also just tap to quickly
switch between the front and main camera.
See Taking photos and videos on page 58.
10 Features you'll enjoy
Confidential
For certification only

Quickly adjust image brightness and focus
Easily adjust the focus and brightness—or
exposure value—before taking a shot.
Just tap the screen to set the focus, and
then drag your finger up or down.
See Taking a photo on page 60.
Selfies
§Live Makeup – Before taking your selfie, use Live Makeup to smoothen your skin. See
Applying skin touch-ups with Live Makeup on page 63.
§Instant selfie shots – Flash a smile, and the camera instantly captures your smiling face. Or,
just say "Cheese!" See Taking selfies automatically on page 63 and Taking selfies with voice
commands on page 64.
The best from HTC and Google Photos
To give you the best experience from HTC and Google® apps yet still provide optimal storage out of
the box, HTC is starting to minimize preloading duplicate apps. By focusing on the best, HTC Desire
555 gives you an even better imaging experience through the HTC Camera app and Google Photos™.
With Google Photos, manage your photos and videos, back them up to your cloud storage, and enjoy
all of its cool features. For details, see What you can do on Google Photos on page 66.
What's different with the onscreen keyboard
HTC is using TouchPal as the onscreen keyboard for HTC Desire 555 due to its popularity and
extensive features.
Here are some of the features you'll enjoy with the TouchPal keyboard:
11 Features you'll enjoy
Confidential
For certification only
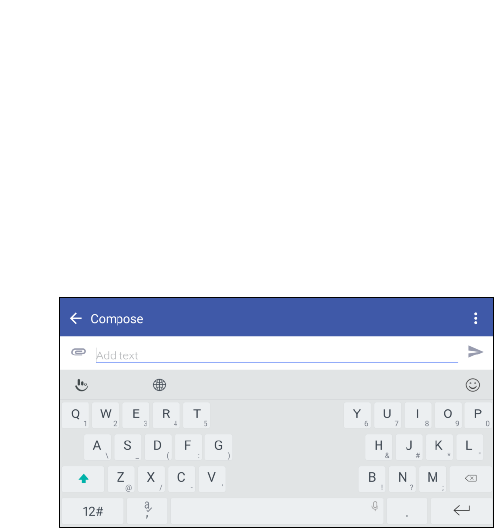
§Download keyboard themes to personalize the keyboard background.
§Choose from a variety of emoji art to add fun to your messages and social updates.
§Back up and sync your personal dictionaries as well as input patterns and data to TouchPal
Cloud.
§Keyboard is resizable. You can also reposition the keyboard.
§When you’re typing in landscape, you can split the keyboard so it’s easier and faster for you to
type with just your thumbs.
To learn the basics of using the keyboard, see Entering text on page 43.
Sound
Plug in headphones and discover audio bliss on HTC Desire 555. Easily connect wireless speakers to
your phone.
HTC BoomSound
Hear what you've been missing. HTC BoomSound™ gives you a rich, authentic sound experience,
whether you’re listening to music, watching a video, or playing a game. See HTC BoomSound profile
on page 136.
HTC Connect
Simply swipe up the screen with three fingers to stream music or video from HTC Desire 555 to
your speakers or TV. Control the volume and playback with your phone! You can even enjoy your
favorite music on multiple speakers. See What is HTC Connect? on page 130.
Truly personal
Designed with you in mind, HTC Desire 555 is filled with innovations that help it to adapt to your
life.
Themes
Make HTC Desire 555 more personal by customizing how it looks with your own photos and then
mix and match with different sets of icons, sounds, color schemes, and more.
12 Features you'll enjoy
Confidential
For certification only
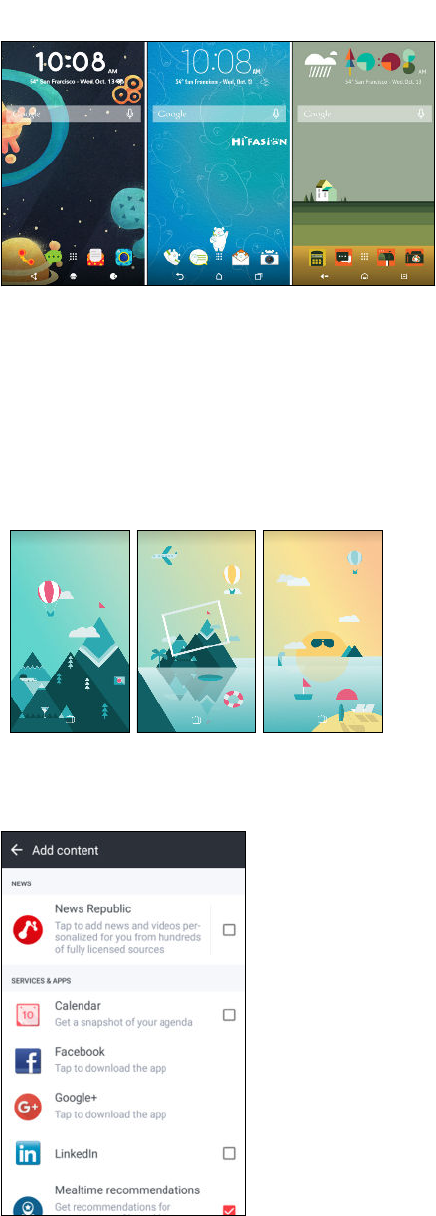
More wallpaper types, such as Multiple wallpapers and Apps screen wallpapers, are also in store!
See What is HTC Themes? on page 47 for more details.
Freestyle home screen
If you want to take designing your Home screen to the next level, try the Freestyle home screen
layout for zero-grid limitations and fun stickers to replace your app icons.
HTC BlinkFeed
Get your favorite topics, news, social media, and more
conveniently delivered to one place on your phone. Even get
suggestions for places to eat! You can also play embedded videos
right on HTC BlinkFeed®. See What is HTC BlinkFeed? on page
92.
13 Features you'll enjoy
Confidential
For certification only

Boost+
Use the Boost+ app to help you optimize your phone's performance by allocating resources,
removing junk files, stopping irregular app activities, and uninstalling the apps you don't use.
You can also set this app to help extend battery life while you're playing your favorite game on
HTC Desire 555.
See About Boost+ on page 72.
Android 6.0 Marshmallow
Android® 6.0 Marshmallow brings new features that make your mobile life more convenient.
Screen search
Screen search intuitively searches and delivers related information right in the app. This means that
you'll never have to leave the conversation or the website you're browsing to search for information.
Just press and hold and Screen search displays related information, apps, and actions. See
Screen search on page 70.
Manage phone memory
Use Memory in Settings to monitor the average memory use and performance of HTC Desire 555.
You can also use this setting to check which apps use the most memory.
Major change to how you use storage cards
If you have an existing storage card with media and other files, use it as removable storage so you
can insert the card and access your files on any Android phone.
If you have a brand new storage card, you can use the card to expand the internal storage. See
Should I use the storage card as removable or internal storage? on page 79 and Setting up your
storage card as internal storage on page 79.
Network settings reset
Quickly reset all network settings when HTC Desire 555 has a hard time connecting to the mobile
data or Wi-Fi® network or Bluetooth® device. See Resetting network settings on page 91.
Google settings
Easily manage settings for Google apps and features on HTC Desire 555. Tap Google in Settings and
change your preferences.
Smarter app linking
Android 6.0 Marshmallow automatically opens the correct app for links that you tap in a text or
email message or website. With smarter app linking, there's no more guessing which app can handle
the links you tap.
14 Features you'll enjoy
Confidential
For certification only

In Settings, you can change the default apps to link to. For details, see Setting default apps on page
138 and Setting up app links on page 138.
App permissions
To help protect your phone and privacy, Android 6.0 Marshmallow has improved the way apps are
given access to certain data or features, such as contacts or the microphone. For details, see
Controlling app permissions on page 138.
Software and app updates
On HTC Desire 555, get software updates for the latest performance enhancements, bug fixes, and
security improvements as soon as they're available.
Also download and install the latest updates of HTC and other apps from Google Play™ to enjoy the
new and improved features. Some HTC apps that are not preloaded in certain phones can also be
downloaded from Google Play.
The information in this guide may not be most up-to-date if there are more recent software or
app updates available.
15 Features you'll enjoy
Confidential
For certification only
Unboxing
HTC Desire 555 overview
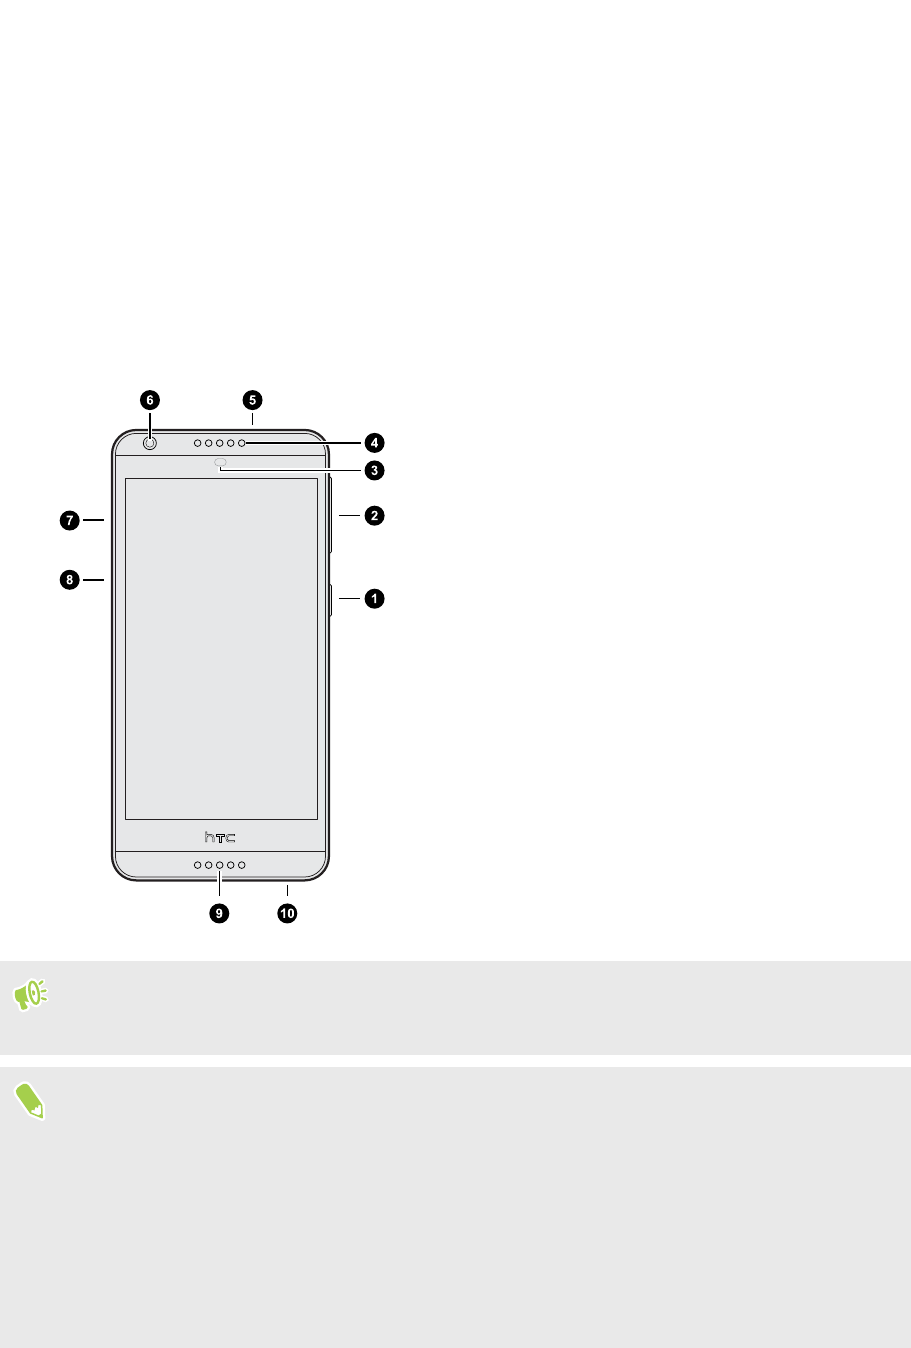
After taking HTC Desire 555 out of the box, familiarize yourself first with the location of the card
slots and the different button controls.
1. POWER
2. VOLUME buttons
3. Proximity sensor
4. Earpiece
5. 3.5mm headset jack
6. Front camera
7. nano SIM card slot
8. microSD™ card slot
9. Speaker
10. USB connector
You need a 4G/LTE™ plan to use your operator's 4G/LTE network for voice calls and data
services. Check with your operator for details.
§If you want to use a case or screen protector, don’t cover and block the proximity sensor.
Purchase a case or screen protector designed for HTC Desire 555.
§Avoid liquid or dust from entering the microphone hole to prevent damage to the microphone.
§Avoid connecting third-party headsets or accessories with metallic charms that dangle near the
headset jack. Using these may affect signal reception.
§Don’t disassemble any part of the phone. Don’t try to open the phone or remove the battery by
force. This may damage the phone or its electronics and will invalidate the warranty.
16 Unboxing
Confidential
For certification only
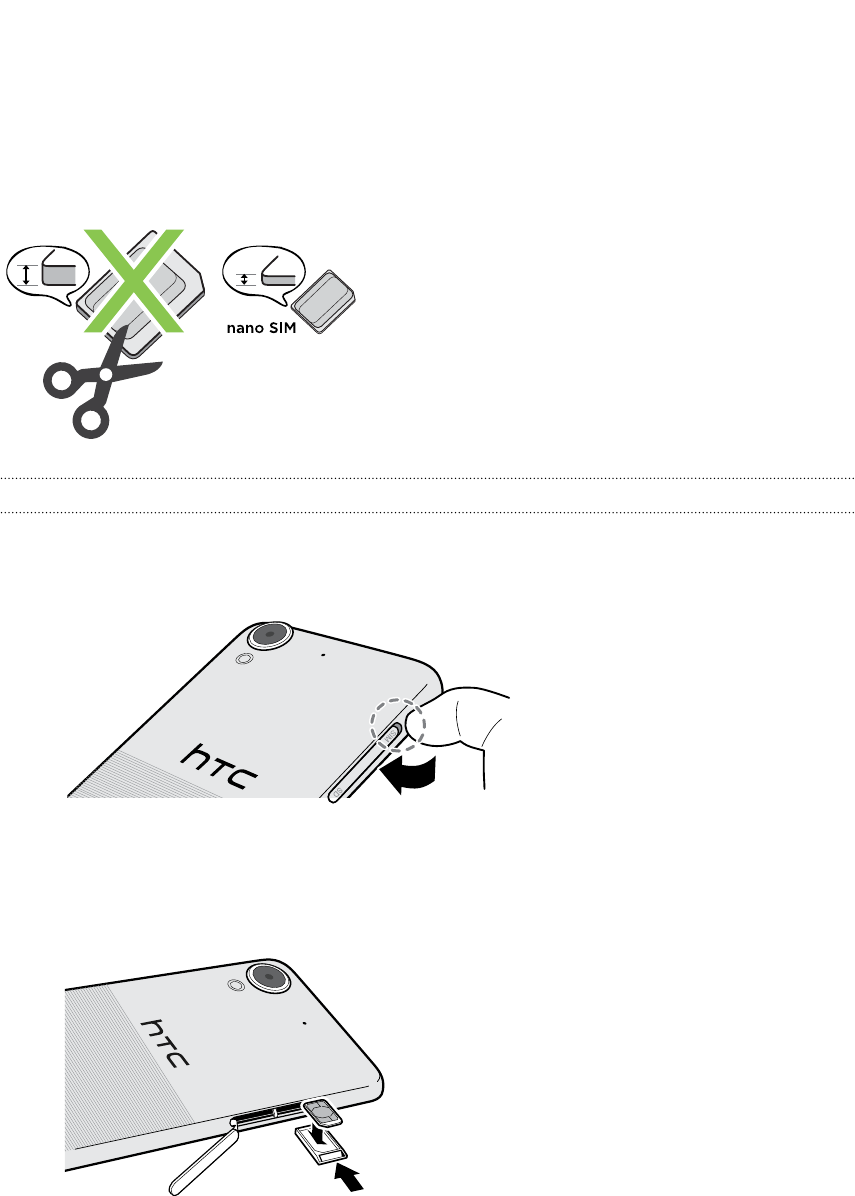
nano SIM card
HTC Desire 555 uses a nano SIM card.
Use a standard nano SIM card only. Inserting a modified card that is thicker than the standard
nano SIM card may cause the card to not fit properly or damage the card slot.
Inserting a nano SIM card
1. Make sure HTC Desire 555 is off and hold it securely with the front facing down.
2. Open the slot cover with your thumb or finger.
3. Pull the tray out from the nano SIM slot.
4. Place a nano SIM card into the tray with the card's gold contacts facing up and its cut-off
corner facing out.
5. When reinserting the tray, make sure it is facing up so that the nano SIM card doesn’t fall out.
Slide the tray all the way into the slot.
6. Close the slot cover. Press from the bottom to the top of the slot cover to lock it in place.
17 Unboxing
Confidential
For certification only
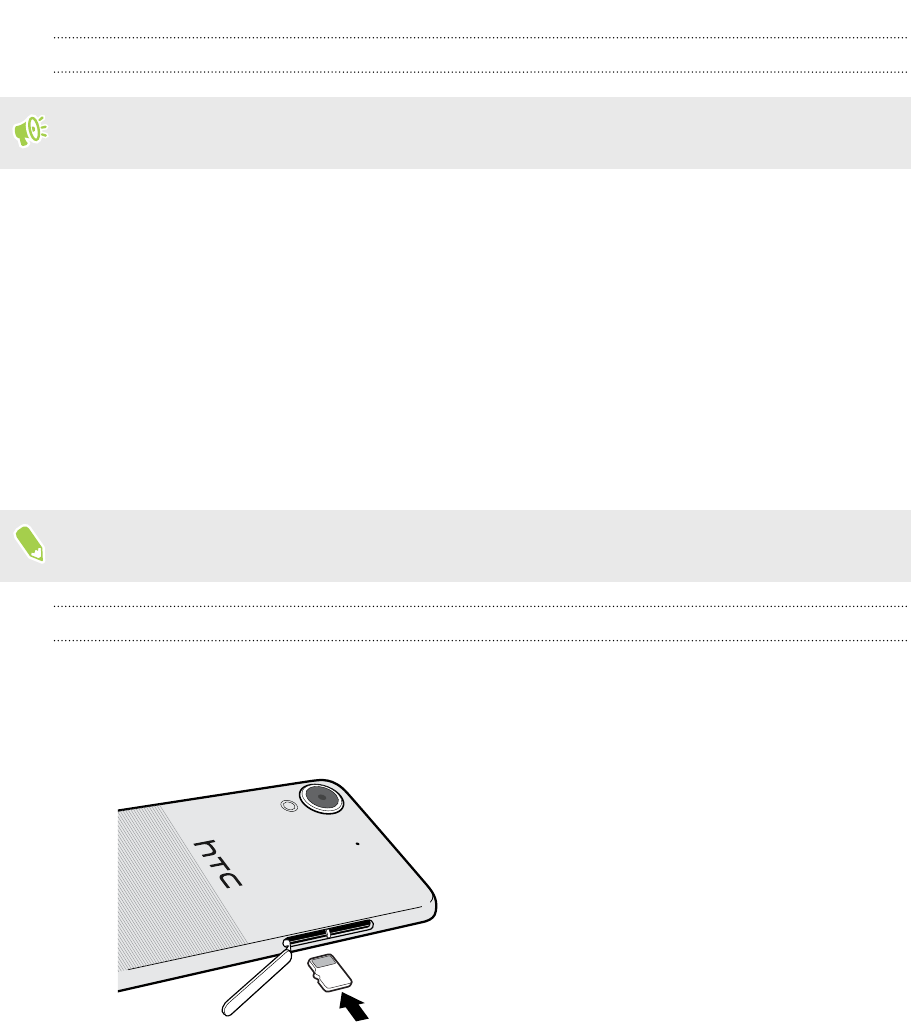
Removing a nano SIM card
Make sure to switch off HTC Desire 555 before removing the card.
1. Open the slot cover with your thumb or finger.
2. Pull the tray out from the nano SIM slot, and remove the nano SIM card.
3. Push the plastic hinge into the side of the phone, and then press from the top to the bottom of
the slot cover to lock it in place.
Storage card
Use a storage card to store your photos, videos, and music. When you need to free up phone storage
space, you can also move certain apps to the storage card, if the apps support this feature.
The storage card is optional and sold separately.
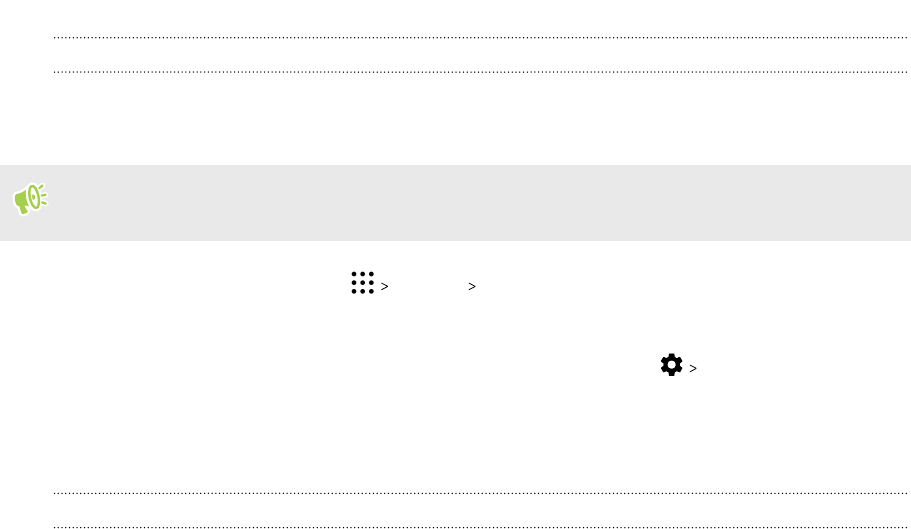
Inserting the storage card
1. Open the slot cover with your thumb or finger.
2. With HTC Desire 555 facing down, insert a microSD into the storage card slot, with its gold
contacts facing up and towards the slot.
3. To close the slot cover, slide the plastic hinge into the side and press the cover until it clicks
into place.
18 Unboxing
Confidential
For certification only
Unmounting the storage card
When you need to remove the storage card while HTC Desire 555 is on, unmount the storage card
first to prevent corrupting or damaging the files in the storage card.
If your storage card is used as internal storage and there are apps that were moved to the card,
you will not be able to open these apps after unmounting the card.
1. From the Home screen, tap Settings Storage.
2. Do one of the following:
§If your storage card appears under Removable storage, tap Eject next to the card
name.
§If your storage card appears under Internal storage, tap the card name, and then tap
Eject.
Removing the storage card
1. Open the slot cover with your thumb or finger.
2. Push the storage card in to eject it from its slot.
3. To close the slot cover, slide the plastic hinge into the side and press the cover until it clicks
into place.
19 Unboxing
Confidential
For certification only
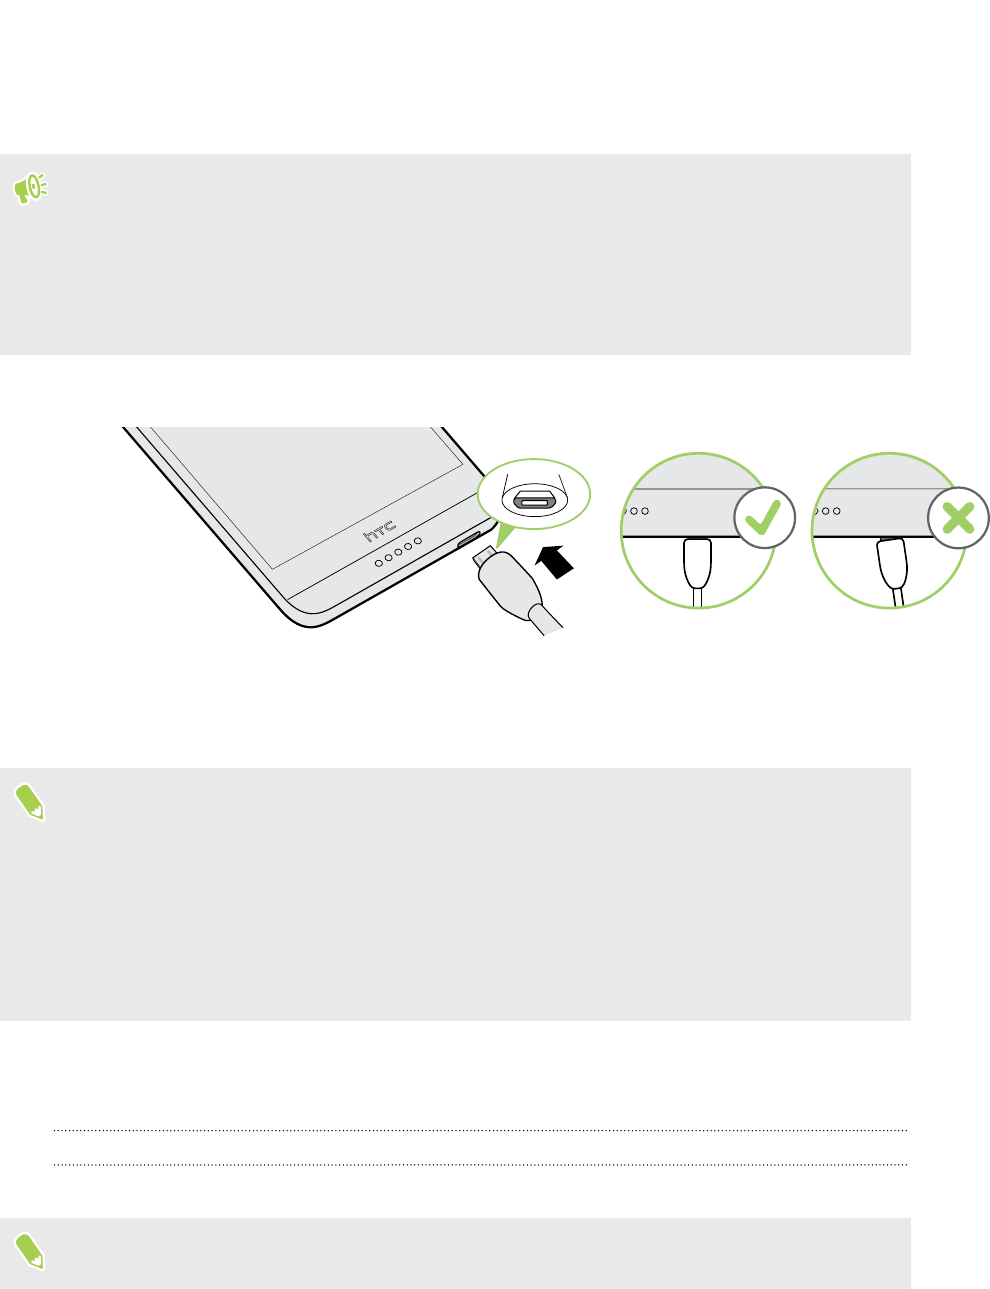
Charging the battery
Before you turn on and start using HTC Desire 555, it is recommended that you charge the battery.
§If the battery has been discharged for several days, you may need to charge HTC Desire 555 for
several minutes before powering it on.
§Use only the adapter and the USB cable that came with HTC Desire 555 to charge the battery.
When the battery power is too low, make sure to use the power adapter to charge, not the USB
cable connection with your computer.
1. Insert the small end of the USB cable into the USB connector.
2. Insert the other end of the USB cable into the power adapter.
3. Plug in the power adapter to an electrical outlet to start charging the battery.
§As a safety precaution, the battery may stop charging to avoid overheating.
§Avoid charging the battery in hot environments.
§When you're using the web browser and charging the battery, HTC Desire 555 may become
warmer. This is normal.
§To conserve energy, unplug the power adapter from the electrical outlet after you finish
charging.
Switching the power on or off
Switching the power on
Press the POWER button until HTC Desire 555 vibrates.
When you turn on HTC Desire 555 for the first time, you’ll need to set it up.
20 Unboxing
Confidential
For certification only

Switching the power off
1. If the display is off, press the POWER button to turn it back on.
2. Press and hold the POWER button for a few seconds.
3. Tap Power off on the options menu.
21 Unboxing
Confidential
For certification only
Phone setup and transfer
Setting up HTC Desire 555 for the first time
When you switch on HTC Desire 555 for the first time—or after you've done a factory reset—you’ll
be asked to set it up.
You can enable TalkBack to navigate by voice feedback before selecting the language. Press and
hold two fingers on the screen until you hear a message saying that accessibility mode is enabled.
Walk through the on-device setup to choose your Internet connection, sign in to your Google
Account, set up device protection for HTC Desire 555, and more.
Use Android Backup Service if you've used it to back up your old phone before. On the screen that
asks you which device to restore from, tap the name of your old phone model. Tap to choose the
type of items you want to restore, and then tap Restore to proceed.
Otherwise, tap Don't restore.
Some features that need to connect to the Internet such as location-based services and auto-sync
of your online accounts may incur extra data fees. To avoid incurring data fees, disable these
features under Settings. For more information on location services, see Turning location
services on or off on page 136.
Restoring from your previous HTC phone
If you were using HTC Backup on your previous HTC phone, you need to download and use the
HTC Restore app on HTC Desire 555 to restore your backup.
Depending on the amount of content, restoring a backup to HTC Desire 555 through your data
connection may incur additional data costs and take a long time. Using a Wi-Fi connection is
recommended.
1. After you've finished setting up HTC Desire 555, slide the Notifications panel open, and then
tap the Transfer or restore your content notification.
2. Tap Restore from HTC backup.
If the HTC Restore app is not installed on the phone, you'll be prompted to download and
install HTC Restore.
3. Tap Restore from HTC backup.
4. Sign in with the account you used to back up your old phone.
22 Phone setup and transfer
Confidential
For certification only

5. Choose the backup to restore to HTC Desire 555.
6. If prompted, choose whether to use a mobile data or Wi-Fi connection for restoring your
backup.
7. Follow the onscreen instructions to restore your backup.
8. Slide open the Notifications panel to check if there's any notification to finish restoring your
backup.
Free apps from Google Play will be restored in the background, and you can track the progress via a
notification in the status bar. To restore paid apps, you need to download and install them from
Google Play.
Your apps will appear on the Apps screen as they are installed. The Apps and Home screen shortcuts
will be reorganized as in your backup after all of your apps have been installed. You can continue
using HTC Desire 555 while apps are being restored.
Transferring content from an Android phone
On your old Android phone, download the HTC Transfer Tool and use it to transfer your content to
HTC Desire 555.
The types of locally stored content on your old phone that the HTC Transfer Tool can transfer
include contacts, messages, music, photos, videos, and some settings. More types of data such as call
histories, email accounts, and some HTC app settings can be transferred from HTC phones that
have HTC Sense® 5.5 or higher.
You need Android version 2.2 or later to use the HTC Transfer Tool on your old phone.
1. From the Home screen, tap Settings Get content from another phone.
2. Choose whether to transfer from an HTC Android phone or other Android phone.
3. On the Get content from another phone screen, tap Next.
4. Follow the steps shown on HTC Desire 555 to download the HTC Transfer Tool from
Google Play to your old phone, install it, and open the tool.
5. When you see a PIN on your old phone, make sure the same PIN also appears on HTC Desire
555 before you continue.
If the PIN code doesn't appear, tap Retry on your old phone. If it still won't appear, this may
mean that your old phone is unable to connect to HTC Desire 555. When this happens, try
another transfer method.
6. Tap Confirm on your old phone.
7. On your old phone, choose the types of content you want to transfer, tap Transfer, and then
tap Yes.
8. Wait for the transfer to finish.
9. Tap Done on both phones.
23 Phone setup and transfer
Confidential
For certification only
Ways of transferring content from an iPhone
If you have an iPhone®, there are easy ways to transfer your contacts, messages, and other content to
HTC Desire 555.
§Back up and restore iPhone content through iCloud®. To find out how, see Transferring
iPhone content through iCloud on page 24.
§Back up iPhone content using iTunes® on your computer, and then use HTC Sync Manager to
transfer the content to HTC Desire 555. For details, see Transferring iPhone content and
apps to your HTC phone on page 90.
Transferring iPhone content through iCloud
If you have an iCloud account, sync iPhone content to your iCloud storage, and then transfer
content such as contacts or photos to HTC Desire 555.
1. From the Home screen, tap Settings Get content from another phone.
2. Tap iPhone Import from iCloud backup.
3. Follow the steps shown onscreen to back up your iPhone content to your iCloud storage.
4. Enter your iCloud email address and password, and then tap Sign in.
5. Choose the iPhone backup that you want to transfer to HTC Desire 555, and then tap Next.
6. Choose the types of content you want to transfer, and then tap Import.
7. Wait for the transfer to finish, and then tap Done.
Only some contact details can be transferred, such as the contact name, photo, postal address,
email address, birthdate, anniversary date, and notes.
Other ways of getting contacts and other content
There are different ways you can individually add contacts and other content to HTC Desire 555.
Sync with your
computer Use HTC Sync Manager to sync contacts, documents, playlists, and more
between HTC Desire 555 and your computer running a Windows® or OS
X® operating system.
You can also use it to transfer your iTunes backup that contains contacts,
messages, and other content from an iPhone from your computer to
HTC Desire 555.
Google Account Google contacts are imported to HTC Desire 555 after you sign in to your
Google Account. You can also create more Google contacts right from
HTC Desire 555.
Social network
accounts Log in to your favorite social networks to sync contact information from
them.
24 Phone setup and transfer
Confidential
For certification only

Microsoft® Exchange
ActiveSync®HTC Desire 555 syncs your work contacts from the Microsoft Exchange
ActiveSync Server in your workplace.
Outlook.com account Sync personal contacts from your Microsoft Outlook.com account.
Phone contacts You can create contacts locally on HTC Desire 555, if you don't prefer to
store them on your online accounts.
nano SIM card Copy all your nano SIM contacts to HTC Desire 555.
Transferring photos, videos, and music between your
phone and computer
Here are ways you can transfer your media from or to your computer.
§Connect HTC Desire 555 to your computer. Your computer will recognize it just like any
removable USB drive, and you can copy your media between them. See Copying files between
HTC Desire 555 and your computer on page 81.
§Download and use the HTC Sync Manager software on your computer. You can set it up to
automatically get music, photos, and videos off HTC Desire 555 to your computer. You can
also sync playlists from your computer to the phone.
If you have an iPhone, you can also connect it and transfer camera roll photos to your
computer using HTC Sync Manager. Then reconnect HTC Desire 555 and copy them over.
See About HTC Sync Manager on page 88.
§Use cloud storage services to put your media in one place so you can manage them anywhere
—on your computer, HTC Desire 555, and other mobile devices.
Using Quick Settings
In the Quick Settings panel, easily turn settings such as Wi-Fi and Bluetooth on or off.
1. Do any of the following:
§With two fingers, swipe down from the status bar.
§Swipe down twice from the status bar.
2. To turn a setting on or off, just tap its tile.
3. If there are available options for a setting, tap to choose from the options.
25 Phone setup and transfer
Confidential
For certification only
Getting to know your settings
Want to change the ringtone, set up a Wi-Fi connection, or add your accounts? Do this and more in
Settings.
1. Open Settings from the Apps screen, Notifications panel, or Quick Settings panel.
§From the Home screen, tap to switch to the Apps screen, and then tap Settings.
§Swipe down from the top of the screen to open the Notifications panel, and then tap .
§With two fingers, swipe down from the top of the screen to open Quick Settings, and
then tap .
2. Here are some of the basic settings you can change:
§Tap the On/Off switch next to an item such as Wi-Fi to turn it on or off. Tap the item
itself to configure its settings.
§Tap Sound & notification to set a ringtone, choose a sound profile, and configure
notification settings.
§Tap Personalize to change the wallpaper, add apps and widgets to the Home screen,
and more.
§Tap Accounts & sync to add and sign in to your different accounts, such as email, social
networks, and more.
§Tap Security to help secure HTC Desire 555, for example with a screen lock.
Tap in Settings to quickly find options and settings.
Setting a screen lock
Help protect your personal information and help prevent others from using HTC Desire 555
without your permission.
Choose to set a screen lock pattern, numeric PIN, or other means of locking your phone. You'll be
asked to unlock the screen every time HTC Desire 555 is turned on or when it’s idle for a certain
period of time.
1. From the Home screen, tap Settings Security.
2. Tap Screen lock.
3. Select a screen lock option and set up the screen lock.
4. Tap Automatically lock phone, then specify the idle time before the screen is locked.
You can also clear Make pattern visible or Make passwords visible if you don’t want your
screen lock to display as you enter it onscreen.
26 Phone setup and transfer
Confidential
For certification only

Setting up Smart Lock
Set up your phone to detect your face or another trusted device before you can unlock the screen.
1. From the Home screen, tap Settings Security.
2. Tap Screen lock, and then select and set up a screen lock.
This will be your backup screen lock method.
3. On the Security screen, tap Smart Lock.
4. Confirm your screen lock.
5. Choose what you want your phone to detect before it unlocks.
6. Follow the onscreen instructions, and then press to return to the Security screen.
7. Tap Automatically lock phone, and then specify the idle time before the screen is locked.
To help make Smart Lock more reliable and more secure, you can train HTC Desire 555 to recognize
your face in different situations, such as when you're wearing glasses or sporting a beard.
Tap Smart Lock, confirm your screen lock, then tap Trusted face Improve face matching. Follow
the onscreen instructions.
Turning the lock screen off
Rather not have to unlock your phone every time you wake it up? You can turn the lock screen off in
Settings.
1. From the Home screen, tap Settings Security.
2. Tap Screen lock None.
To turn the lock screen on again, in Security settings, tap Screen lock Swipe.
Updating your phone's software
HTC Desire 555 can check and notify you if there’s a new update available.
Updates for some HTC apps and features, such as HTC Sense Home, may be downloaded and
installed from Google Play. See Installing app updates from Google Play on page 28 for details.
Visit www.htc.com/us/go/htc-software-updates/ for news and details about your phone's
software updates.
Checking your system software version
Before installing a system software update, you can check first what Android version you have on
your phone.
1. From the Home screen, tap Settings About.
2. Tap Software information.
27 Phone setup and transfer
Confidential
For certification only

Enabling automatic updates
You can choose to automatically download and install software updates for HTC or mobile operator
apps.
1. From the Home screen, tap , and then find and tap Settings.
2. Tap About Software updates.
3. To save on data usage, you can choose to update through Wi-Fi only.
4. Choose whether to auto-download system updates, app updates, or both.
App updates are installed automatically. You'll still need to confirm when to install system
software updates.
Installing a software update
When HTC Desire 555 is connected to the Internet and there's a new software update available, the
update notification icon appears in the status bar.
1. Slide the Notifications panel open, and then tap the system update notification.
2. If you don't want to download the update using your data connection, select Update over
Wi-Fi only.
3. Tap Download.
4. When download is complete, select Install now, and then tap OK.
After updating, HTC Desire 555 will restart.
Installing an application update
When Internet connection is on and there's an available update for your HTC or mobile operator
apps, the update notification icon appears in the status bar.
1. Slide the Notifications panel open, and then tap the update notification.
The Updates screen opens with the list of application updates to be installed.
2. Tap an item to view its details, and then tap .
3. When you're done reviewing the updates, tap Install. You'll be asked to restart HTC Desire
555 if needed.
Installing app updates from Google Play
Some HTC apps and third-party apps get updated with improvements and bug fixes through
Google Play. You can manually update apps or set your phone to automatically download and install
app updates when available.
1. From the Home screen, tap , and then find and tap Play Store.
2. Tap to open the slideout menu.
28 Phone setup and transfer
Confidential
For certification only
3. Tap My apps & games.
You'll see a list of apps installed on your phone.
4. Under Updates, tap an app.
5. Tap Update.
6. If prompted, tap Accept.
In Play Store, tap Settings Auto-update apps to choose how you want Google Play to
update your apps.
Checking for updates manually
Turn on mobile data or connect HTC Desire 555 to a Wi-Fi network before you check for
updates.
1. From the Home screen, tap , and then find and tap Settings.
2. Tap About Software updates. HTC Desire 555 checks if updates are available.
Getting apps from Google Play
Google Play is the place to go to find new apps for HTC Desire 555. Choose from a wide variety of
free and paid apps ranging from productivity apps, entertainment, to games.
You need a Google Wallet™ account to buy paid apps or to make in-app purchases. If you already
have a Google Account, just add Google Wallet by signing in with your existing username and
password at wallet.google.com.
Finding and installing an app
When you install apps and use them on HTC Desire 555, they may require access to your personal
information or access to certain functions or settings. Download and install only apps that you trust.
Be cautious when downloading apps that have access to functions or a significant amount of your
data on HTC Desire 555. You’re responsible for the results of using downloaded apps.
1. From the Home screen, tap , and then find and tap Play Store.
2. Browse or search for an app.
3. When you find the app that you like, tap it and read its description and user reviews.
29 Phone setup and transfer
Confidential
For certification only
4. To download or purchase the app, tap Install (for free apps) or the price button (for paid
apps).
5. Tap Accept.
Apps sometimes get updated with improvements or bug fixes. To automatically download
updates, after installing the app, tap Auto-update.
To open the app, go to the Apps screen and tap the app.
Restoring apps from Google Play
Upgraded to a new phone, replaced a lost one, or performed a factory reset? Restore apps that you
previously downloaded.
1. From the Home screen, tap , and then find and tap Play Store.
2. Tap to open the slideout menu.
3. Tap My apps & games, swipe to the All tab, and then tap the app you want to restore.
4. Install the app.
For more details, refer to the Google Play help.
Downloading apps from the web
You can download apps directly from websites.
Apps downloaded from websites can be from unknown sources. To help protect HTC Desire 555
and your personal data, we strongly recommend that you only download from websites you trust.
1. Open the browser, and then go to the website where you can download the app you want.
2. If prompted, change the security settings to allow installation from “Unknown sources”.
3. Follow the website's download instructions for the app.
4. After installing the app, make sure to go back to Settings Security and clear the Unknown
sources option.
30 Phone setup and transfer
Confidential
For certification only

Uninstalling an app
If you no longer need an app that you've downloaded and installed, you can uninstall it.
Most of the preloaded apps cannot be uninstalled.
From the Apps screen, press and hold the app you want to remove, and then drag it to Uninstall.
If you purchased an app in Play Store, you can uninstall it for a refund within a limited time. To
know more about the refund policy for paid apps, refer to the Google Play help.
31 Phone setup and transfer
Confidential
For certification only

Your first week with your
new phone
HTC Sense Home
After you've turned on and set up HTC Desire 555 for the first time, you'll see the Home screen.
§Set up the HTC Sense Home widget to experience the convenience of a Home screen that
automatically adjusts when you're at home, work, or outdoors. See What is the HTC Sense
Home widget? on page 40.
§Swipe right and you'll find HTC BlinkFeed. You can customize HTC BlinkFeed to show posts
from your social networks, headlines from your favorite news media, and more. For details,
see What is HTC BlinkFeed? on page 92.
§Swipe left and you’ll discover space for adding your favorite widgets, apps, and more so
they’re just a tap away. You can also add panels. For details, see Adding or removing a widget
panel on page 52.
§You can change the apps on the launch bar at the bottom of the Home screen. See Launch bar
on page 53.
While you're in another screen or app, press to return to the last Home screen you visited.
Sleep mode
Sleep mode saves battery power by putting HTC Desire 555 into a low power state while the display
is off. It also stops accidental button presses when HTC Desire 555 is in your bag.
Switching to Sleep mode
To turn off the display and switch to Sleep mode, briefly press the POWER button.
HTC Desire 555 also automatically goes into Sleep mode when it’s left idle for a while. You can
change the time before HTC Desire 555 sleeps by setting the screen timeout. For details, see Setting
when to turn off the screen on page 140.
Waking up from Sleep mode
Press the POWER button.
32 Your first week with your new phone
Confidential
For certification only
Unlocking the screen
Swipe up to unlock the screen.
If you've set up a screen lock, you'll be asked to provide your credentials before HTC Desire 555
unlocks.
If you've set an event reminder or an alarm, you can snooze or dismiss the event or alarm right
from the lock screen. Just drag or up.
Motion gestures
Use motion gestures to mute HTC Desire 555, lower the ring volume, and more.
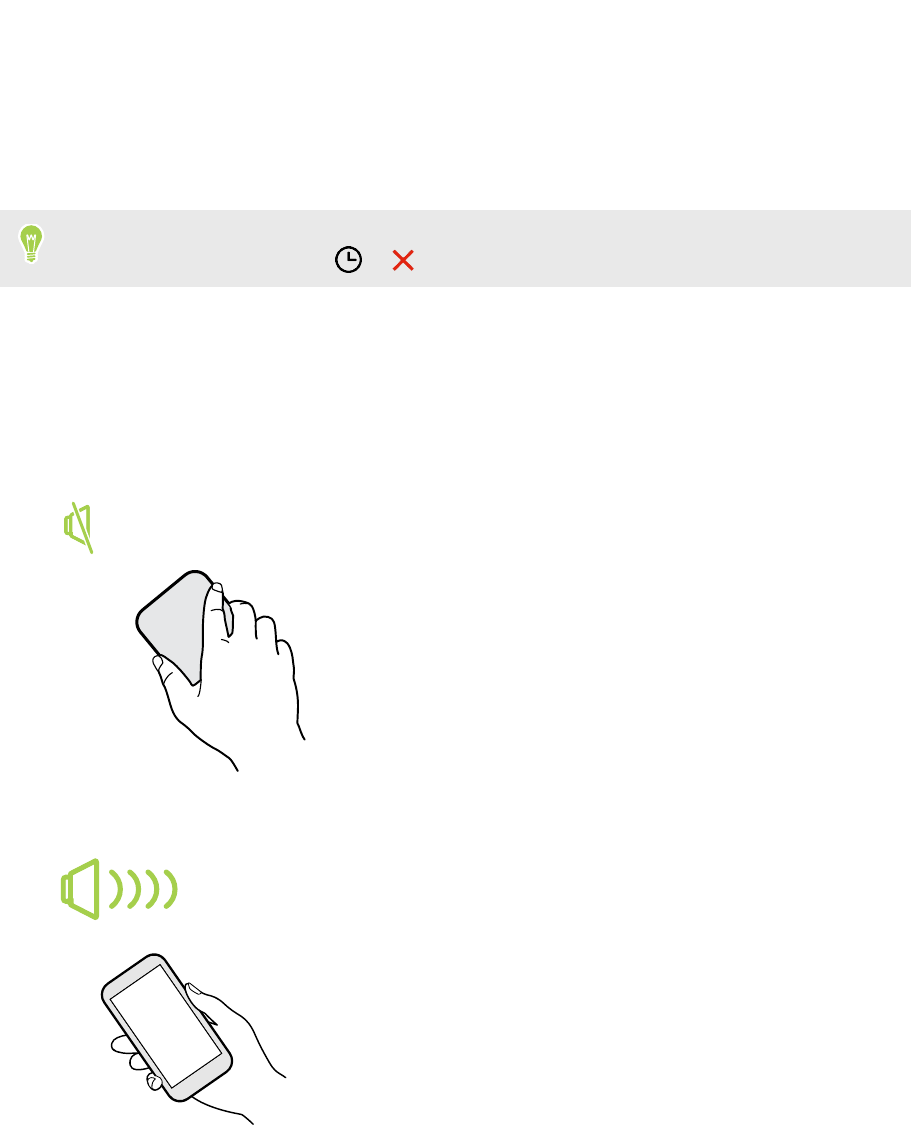
Flip to mute
If your phone is facing up when a call comes in, turn
the phone over to mute it.
Pick up to lower volume
In a business meeting or restaurant, pick HTC Desire 555
up when a call comes in to lower the ring volume
automatically.
You can turn this feature on or off. Go to Settings, tap
Sound & notification, and then select or clear Quiet ring
on pickup.
33 Your first week with your new phone
Confidential
For certification only

Increase ring volume automatically while phone is in your pocket or bag
Pocket mode makes HTC Desire 555 recognize when your phone
is in your bag or pocket and raise the ring volume so that you can
hear it in noisy environments.
You can turn this feature on or off. Go to Settings, tap Sound &
notification, and then select or clear Pocket mode.
Rotate HTC Desire 555 for a better view
For many screens, you can automatically change the
screen orientation from portrait to landscape by turning
HTC Desire 555 sideways.
When entering text, you can turn HTC Desire 555
sideways to bring up a bigger keyboard.
Touch gestures
Use touch gestures to get around the Home screen, open apps, scroll through lists, and more.
Tap
Tap the screen with your finger when you want to select onscreen items
such as application and settings icons, or press onscreen buttons.
34 Your first week with your new phone
Confidential
For certification only

Press and hold
To open the available options for an item (for example, a contact or
link in a webpage), just press and hold the item.
Swipe or slide
Quickly swipe your finger horizontally across the screen to go to
other Home screen panels. Swipe vertically to scroll through a list,
document, and more.
Drag
Press and hold your finger with some pressure before you start to
drag. While dragging, don't release your finger until you have
reached the target position.
35 Your first week with your new phone
Confidential
For certification only

Flick
Flicking the screen is similar to swiping, except that you need
to swipe your finger in light, quicker strokes, such as when
moving right and left on the Home screen, or flicking through
a contacts or message list.
Press and flick
On the Home screen, you can easily move a widget or icon
from one screen to another.
Press and hold the widget or icon with one finger, and flick the
screen to the new location with another finger.
Slide with two fingers
In some apps, slide two fingers apart to zoom in when
viewing a picture or text.
36 Your first week with your new phone
Confidential
For certification only
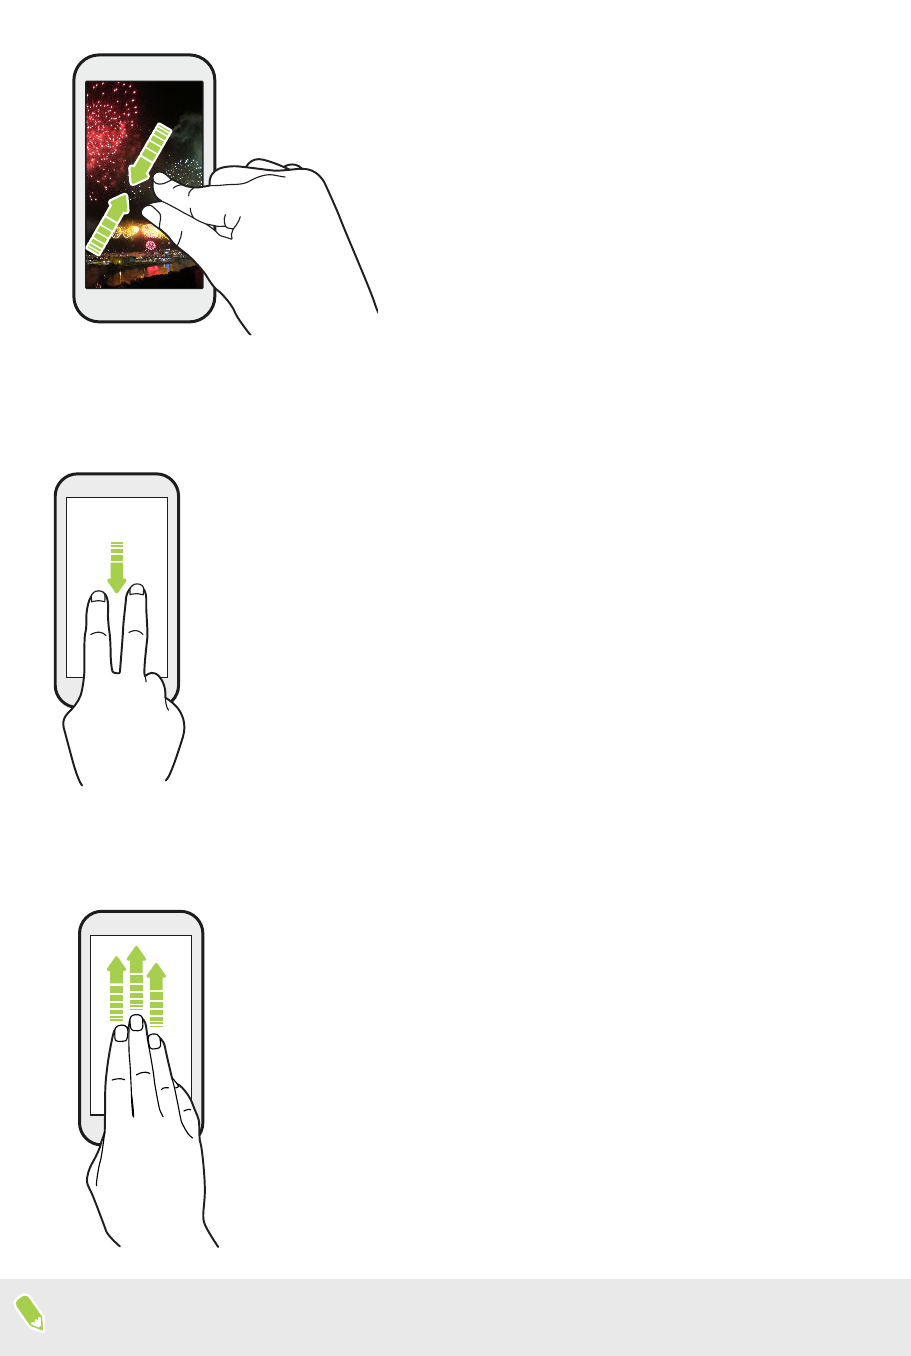
Slide two fingers together to zoom out of the picture
or text.
Two-finger swipe
Swipe down from the status bar using two fingers to access Quick Settings.
Three-finger swipe
§Swipe up the screen with three fingers and HTC Connect® streams
music or video from HTC Desire 555 to your speakers or TV
respectively. You can also share streaming media from apps such as
YouTube®.
§Swipe down to disconnect from your speakers or TV.
Media gesture is turned on in Settings by default, which makes the three-finger gesture work for
sharing media.
37 Your first week with your new phone
Confidential
For certification only
Opening an app
§Tap an app on the launch bar at the bottom of the Home screen.
§Tap to go to the Apps screen, and then tap the app you want to use.
§On the Apps screen, tap , and then enter the name of the app you're looking for.
Opening an app or folder from the lock screen
On the lock screen, drag an app or folder icon up to unlock the screen and directly go to the app or
folder.
The shortcuts on the lock screen are the same ones on your Home screen's launch bar. To change
the lock screen shortcuts, replace the apps or folders on the launch bar.
If you've set up another security layer like a screen lock pattern or PIN, you'll be asked to provide
your credentials first before HTC Desire 555 opens the app or folder.
Sharing content
Have something to share, such as a photo or video?
§In an app, just tap the share icon: or .
§If you don't see the icon, tap Share.
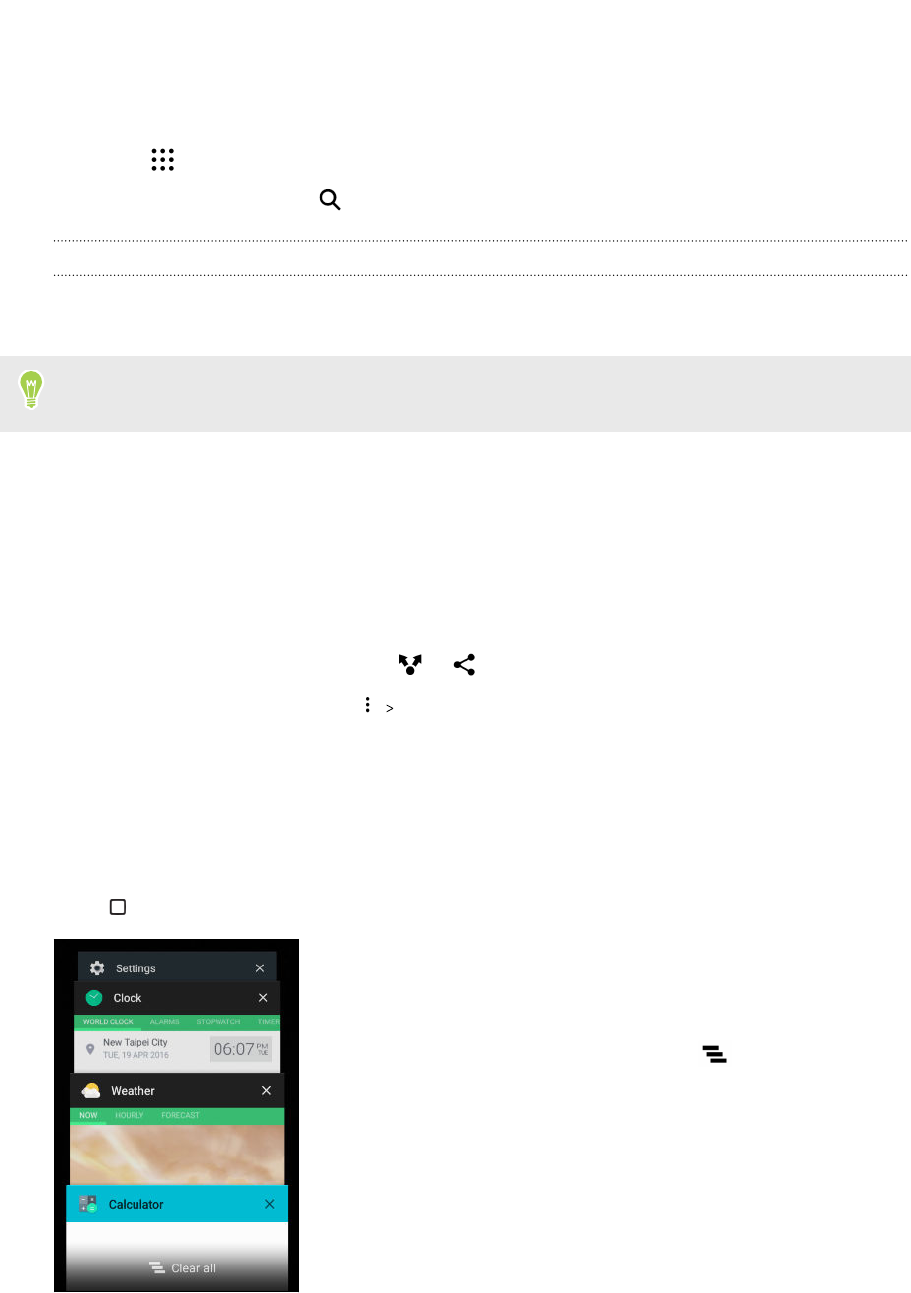
Switching between recently opened apps
When you're multitasking and using different apps on HTC Desire 555, you can easily switch
between the apps you've recently opened.
Press to see recently-opened apps.
§To switch back to an app, flip through the cards to find the
app and tap it.
§To remove an app from the list, drag it left or right.
§To remove all of the apps at once, tap .
38 Your first week with your new phone
Confidential
For certification only

Refreshing content
In some apps, you can easily refresh content that's synced or downloaded from the Web with a
simple finger gesture.
1. While viewing content such as weather or Mail inbox, scroll to the top of the screen.
2. Pull down with your finger, and then release to refresh.
Capturing your phone's screen
Want to show off your high game score or write a blog post about HTC Desire 555 features? It's easy
to take a picture of the screen to share.
1. Press and hold POWER and VOLUME DOWN at the same time.
2. Open the Notifications panel and tap under the Screenshot captured notification.
If you don't see , slide two fingers apart on the screenshot notification.
Travel mode
Do you often travel across time zones? Turn on Travel mode in Settings to see a dual clock on the
Home screen and lock screen that shows both your home and current time zones.
§Make sure you turn on location services in your phone settings.
§Set your home time zone first in the Clock app.
1. From the Home screen, tap Settings Date & time.
2. Tap the Travel mode On/Off switch to turn travel mode on or off.
You'll see a dual clock of your home and current locations once your phone detects a different time
zone from the home time zone you've set.
39 Your first week with your new phone
Confidential
For certification only
What is the HTC Sense Home widget?
Get quick access to apps, shortcuts and folders you use most frequently based on where you are.
With the HTC Sense Home widget, HTC Desire 555 continually adapts to how you use it. For
example, apps you use most frequently for work, will show up when you're at your office. The
HTC Sense Home widget changes depending on whether you're at home, work, or somewhere else.
Setting up the HTC Sense Home widget
Setting up the HTC Sense Home widget is quick and easy.
§If you don't see the HTC Sense Home widget, add it to your Home screen. See Adding Home
screen widgets on page 54.
§Make sure you turn on location services in your phone settings. See Turning location services on
or off on page 136.
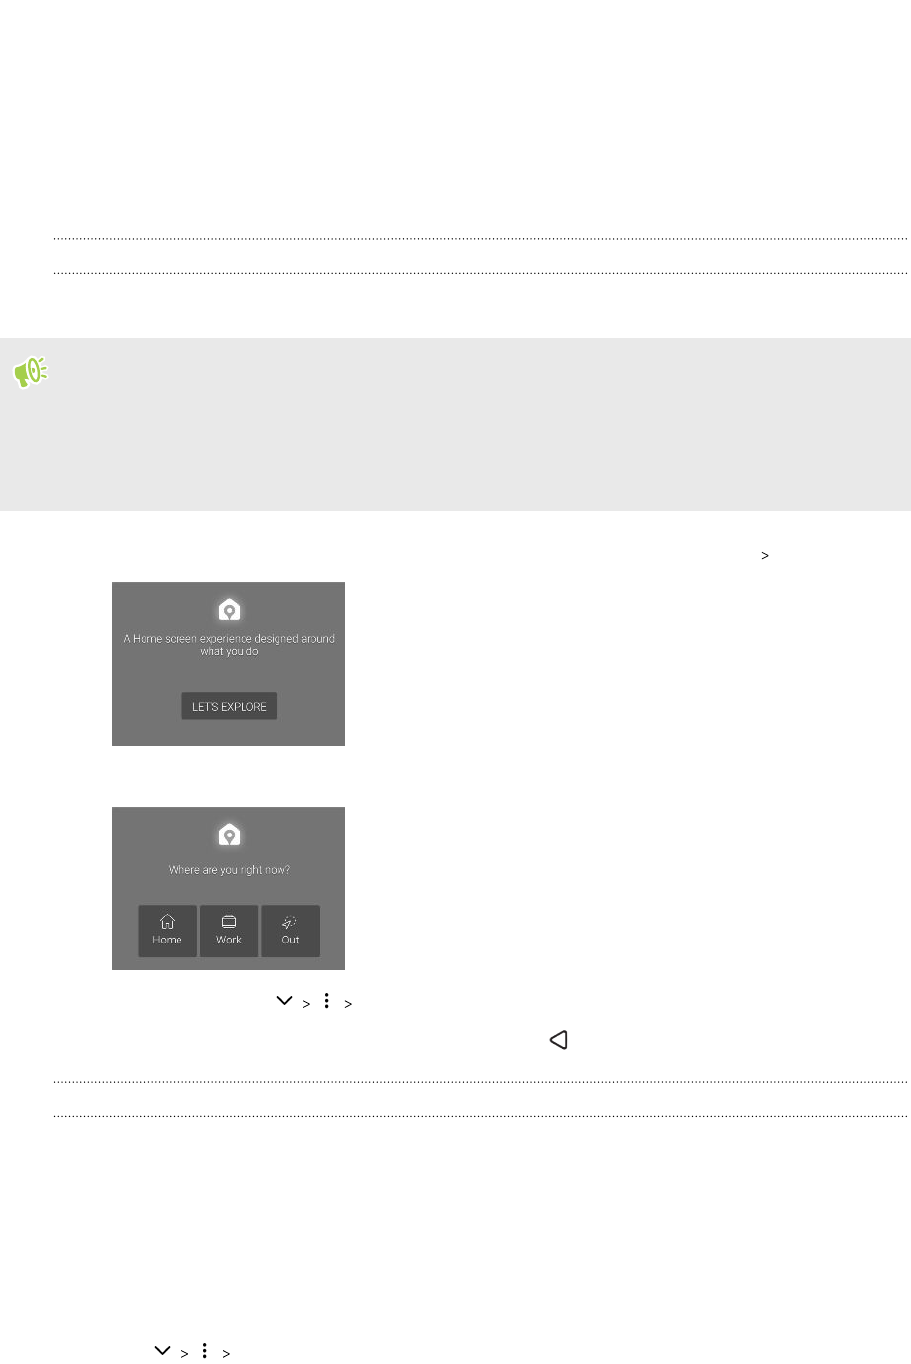
1. On the setup screen of the HTC Sense Home widget, tap Tap to personalize Let's explore.
2. Tap where you are to finish setting up the widget.
3. On the widget, tap Personalize HTC Sense Home.
4. Select all the options on the screen, and then press .
Setting your home and work locations
In the HTC Sense Home widget, set your home and work locations based on your address, Wi-Fi
network, or both.
You can associate multiple addresses and Wi-Fi networks to each of these locations. Using your set
addresses or Wi-Fi networks, the HTC Sense Home widget will be able to determine where you are
and display the appropriate apps.
1. On the Home screen, swipe right or left until you see the HTC Sense Home widget.
2. Tap Set locations.
40 Your first week with your new phone
Confidential
For certification only
3. Choose the location you want to set.
4. Tap and do one of the following:
§Tap Address and then enter your street address or select it on the map.
§Tap Wi-Fi network and select one or more Wi-Fi networks you want to associate with
the location.
5. When you've finished setting your home and work locations, press .
Manually switching locations
The HTC Sense Home widget automatically changes locations based on where you are. You can also
manually change the location in the HTC Sense Home widget.
For the HTC Sense Home widget to change locations automatically, you need to make sure that
location services is turned on. See Turning location services on or off on page 136.
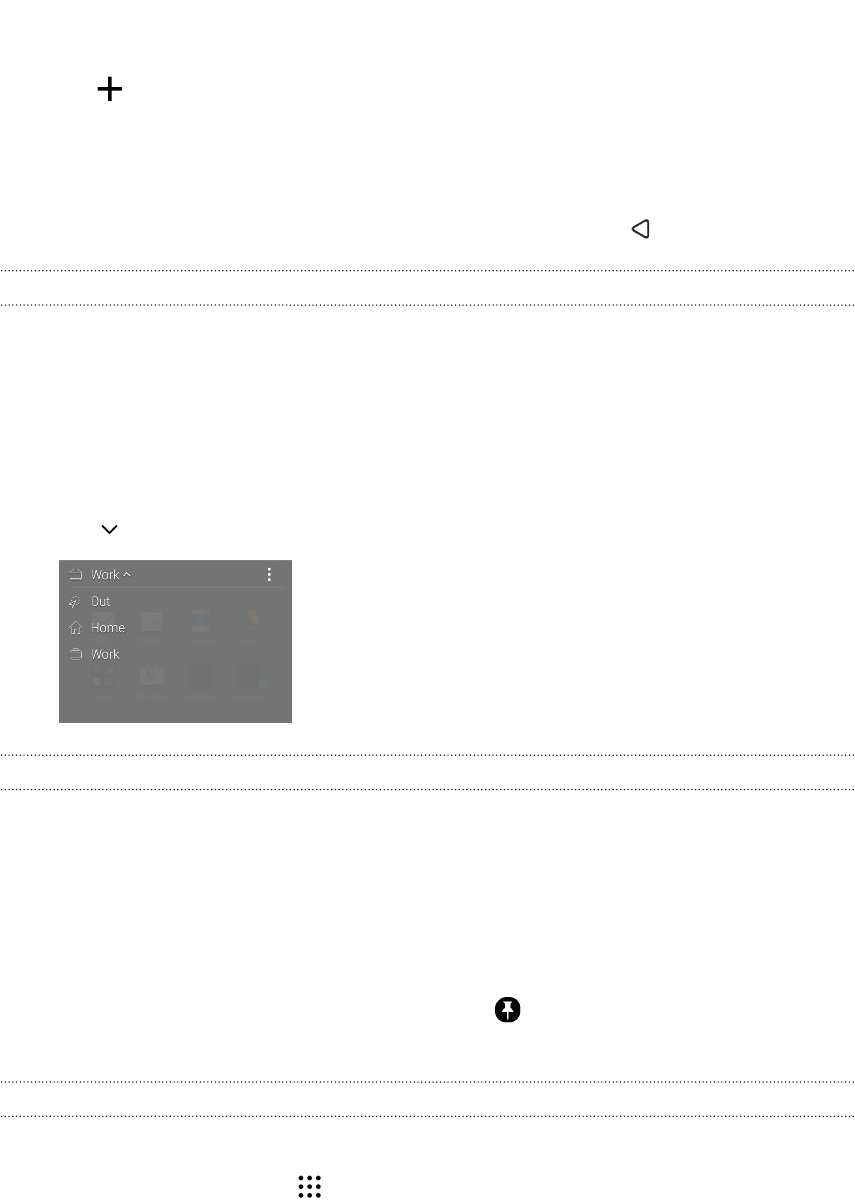
1. On your Home screen, slide right or left until you see the HTC Sense Home widget.
2. Tap , and then tap the location you want.
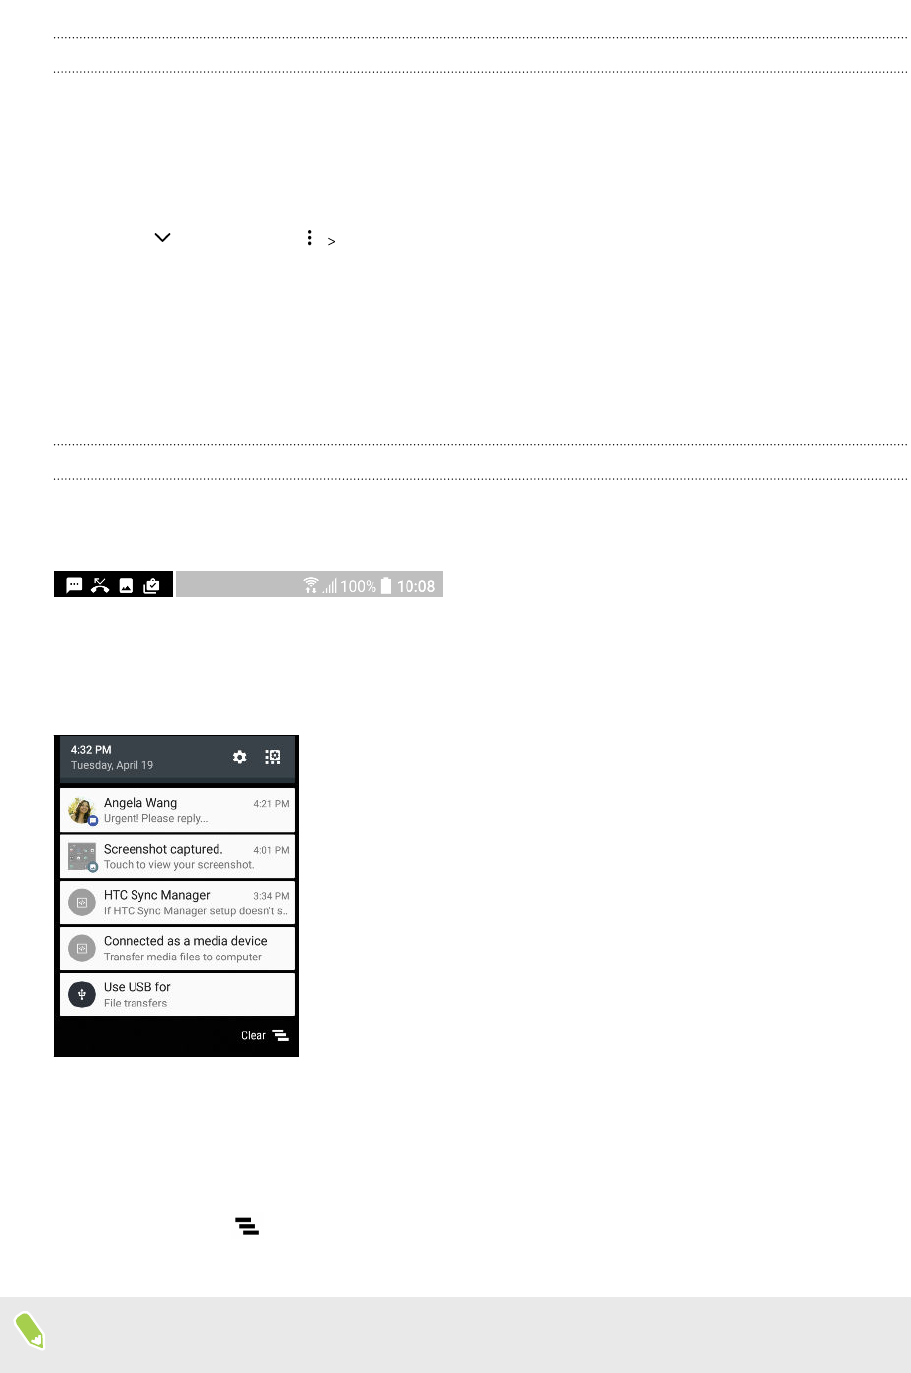
Pinning and unpinning apps
Pinning apps, shortcuts, or folders to the HTC Sense Home widget ensures they stay on the widget.
Items in the HTC Sense Home widget will have one of two states: pinned or unpinned. Unpinned
items will be automatically changed to more frequently used items.
1. On the Home screen, swipe right or left until you see the HTC Sense Home widget.
2. Do one of the following:
§To pin an item, press and hold it until you see .
§To unpin an item, press and hold it until the unpinning progress bar has completed.
Adding apps to the HTC Sense Home widget
Add your favorite apps, shortcuts, or folders to the HTC Sense Home widget.
1. From the Home screen, tap .
2. Press and hold the app, shortcut, or folder you want to add to the widget.
3. Drag the item to where you want in the HTC Sense Home widget.
The app, shortcut or folder will be added to the HTC Sense Home widget and pinned in place.
41 Your first week with your new phone
Confidential
For certification only
Turning the Suggestions folder on and off
The Suggestions folder is a smart folder in the HTC Sense Home widget that dynamically change
contents depending on your usage. You can turn the Suggestions folder off if you don't want it to
appear in the widget.
1. On the Home screen, swipe right or left until you see the HTC Sense Home widget.
2. Tap , and then tap Show/hide smart folders.
3. Select or clear Show Suggestions folder.
4. Tap OK.
Notifications
Notifications panel
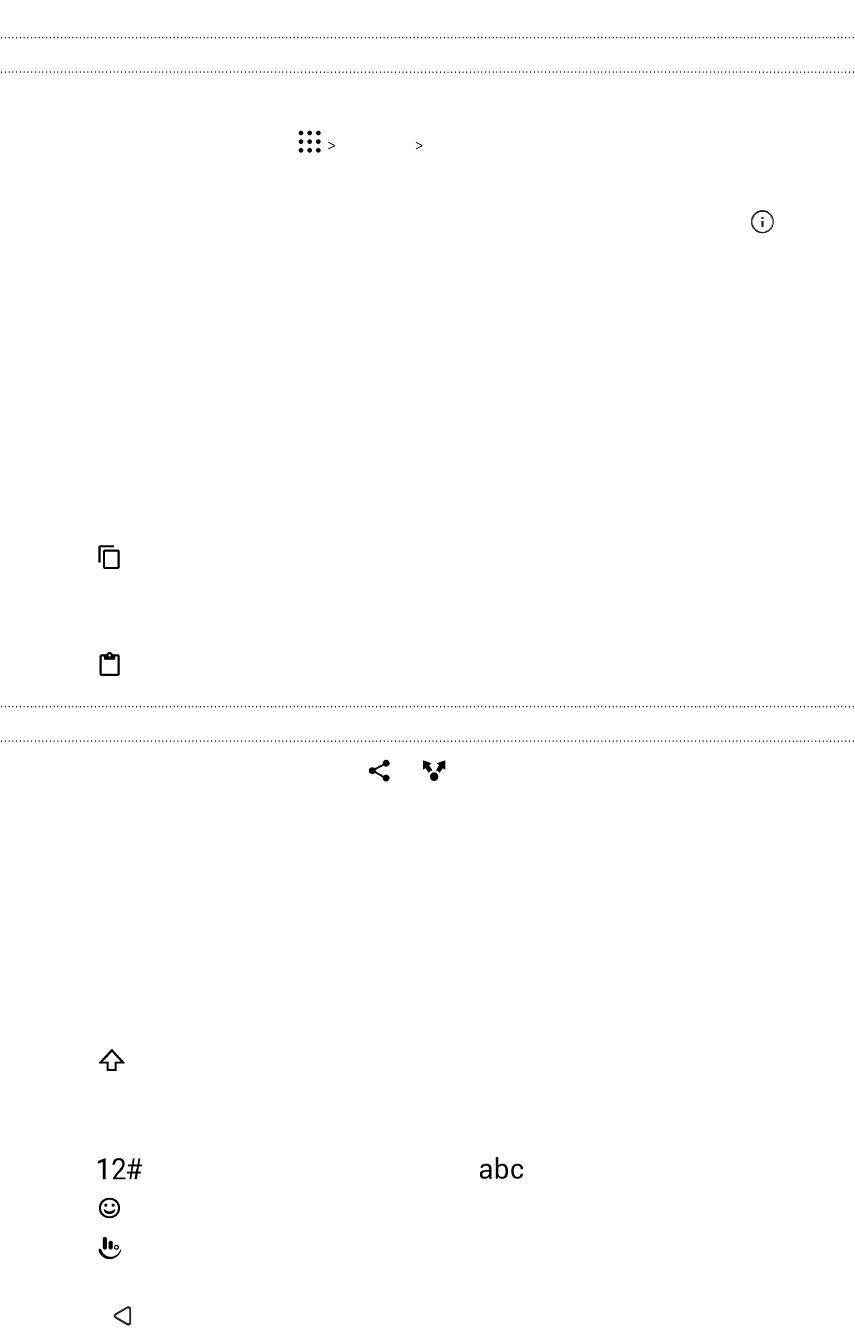
Notification icons inform you of new messages, calendar events, alarms, and activities in progress
such as files downloading.
When you see notification icons, open the Notifications panel to check out details of the
notifications that you've received.
To open the Notifications panel, slide down from the top of the screen.
§Some notifications allow you to take immediate action. For example, tap a missed call
notification to return the call or reply with a text message.
§Tap the notification icon on the left to open the corresponding app.
§To dismiss just one notification in the list, drag it left or right. To dismiss all non-persistent
notifications, tap .
If you have several notifications, scroll through the list screen to see them all.
You can change what app notifications you want to receive. See Managing app notifications on
page 43.
42 Your first week with your new phone
Confidential
For certification only
Managing app notifications
You can set the priority, sensitivity, and more.
1. From the Home screen, tap Settings Sound & notification.
2. Tap Manage app notifications, and then tap the app to set.
You can also press and hold a notification in the notifications panel, and then tap .
3. Tap the On/Off switch next to option you want to toggle.
Settings for app notifications are applied to notifications in the Notifications panel and the lock
screen.
Selecting, copying, and pasting text
1. Press and hold on a word.
2. Drag the start and end anchors to highlight the text you want to select.
3. Tap or Copy.
4. In a text entry field (for example, while composing an email), press and hold at the point
where you want to paste the text.
5. Tap or Paste.
Sharing text
1. After you have selected the text, tap or or Share.
2. Choose where to share the selected text.
Entering text
The keyboard becomes available when you tap a text field in an app.
§Tap the keys on the onscreen keyboard to enter letters and numbers, as well as punctuation
marks and symbols.
§Tap to enter an uppercase letter. Tap twice to turn on caps lock.
§Press and hold keys with gray characters at the top or bottom to enter numbers, symbols, or
accented letters. Some keys have multiple characters or accents associated with them.
§Tap to show number and symbol keys. Tap to return to the main keyboard.
§Tap to choose from a wide selection of emojis.
§Tap to check out more features, options, and settings.You can resize the keyboard space,
change the layout and design, download dictionaries, and more.
§Press to close the onscreen keyboard.
43 Your first week with your new phone
Confidential
For certification only
Entering text by speaking
1. Tap an area where you want to enter text.
2. On the onscreen keyboard, press and hold .
3. When you see the microphone button and the words "Speak now", say the words you want to
enter.
4. Enter punctuation marks by saying the name. For example, say "comma".
Enabling smart keyboard options
Turn on the keyboard's advanced features to help you type faster, such as contextual prediction,
auto-correction, and more.
1. From the Home screen, tap , and then find and tap Settings.
2. Tap Language & keyboard TouchPal - HTC Sense Version Smart input.
3. Select the options to enable.
How can I type faster?
The onscreen keyboard of your phone is highly customizable. You can modify its settings and
options to enhance your typing experience.
Here are some tips that you could try:
§Show the numeric keys on the top row of the keyboard. Go to Settings, and then tap
Language & keyboard. Tap Touchpal - HTC Sense Version General settings. Select
Number Row.
§Turn on Contextual prediction.Go to Settings, and then tap Language & keyboard. Tap
TouchPal - HTC Sense Version Smart input, and then make sure that Contextual
prediction is selected. This option enables next word prediction and will also allow the
keyboard to learn from the usual word patterns you type for better word suggestions.
44 Your first week with your new phone
Confidential
For certification only
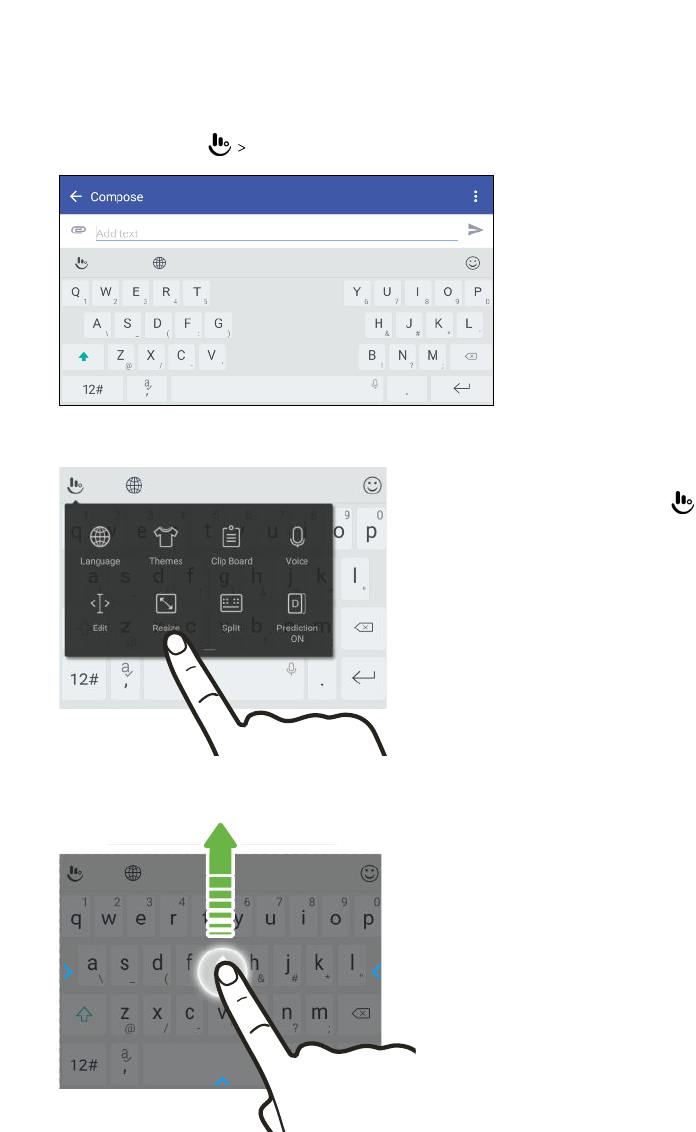
§Switch to landscape mode.With two fingers, swipe down from the status bar and check if
Auto rotate is turned on. Open the app you need, and then tap a text field to show the
keyboard. Turn your phone sideways to bring up a bigger keyboard.
You can then tap Split.
§Resize or reposition the keyboard.
Open the app you need, and then tap a text field
to show the keyboard. Tap , and then tap
Resize. Drag any of the border arrows to resize
your keyboard.
To move the keyboard up, drag the center button up.
45 Your first week with your new phone
Confidential
For certification only
Getting help and troubleshooting
Want some quick guidance on your phone?
Check out the friendly walkthroughs and the FAQs in the Help app to learn how to use your phone.
§When you see a Help tile in HTC BlinkFeed, just tap the tile to know more about the tip.
§From the Home screen, tap , and then find and tap Help.
You can then tap Search help articles & videos, and enter what you're looking for. Or you
can tap to browse how-tos, FAQs, and more.
If HTC Help is not preinstalled on your phone, you can download it from Google Play.
Having hardware or connection problems?
Before calling for support, you can first use the Help app to troubleshoot or perform diagnostics on
your phone. This helps you in finding the problem cause, and in determining whether you can
resolve the problem or you need to call for support.
1. From the Home screen, tap , and then find and tap Help.
2. On the Help screen, tap and then tap Troubleshooting or Diagnostics tools to use a
troubleshooting wizard to check the basic hardware functions.
3. You can also tap Software updates to check for new software updates if available.Software
updates may contain bug fixes and feature improvements.
46 Your first week with your new phone
Confidential
For certification only
Personalizing
Ringtones, notification sounds, and alarms
1. From the Home screen, tap , and then find and tap Settings.
2. Tap Sound & notification.
3. Tap an item to modify, and then choose different sounds for your ringtone, system
notification, and alarm.
Go to the settings of specific apps to choose sounds for new messages, email, and event
reminders respectively.
4. Tap Volumes to set the volume levels for each sound type.
To browse for more sounds in Themes, go to Settings Personalize Edit current theme, and then
tap Ringtone, Notification, or Alarm.
What is HTC Themes?
Themes brings a quick and easy way for you to customize your phone with elements such as
wallpapers, sounds, and icons.
You need to log in with your preferred account to download themes, icons, fonts, and more from the
Themes store.
Themes is a part of the HTC Sense Home app. To get the latest features of Themes, make sure
you've downloaded the newest version of HTC Sense Home.
Downloading themes or individual elements
Find and download themes and elements that make it easy for you to personalize your phone.
1. Press and hold on an empty space on your Home screen.
2. Tap Theme.
3. If it's your first time to use Themes, tap Get Started, and then sign in with your preferred
account.
4. On the Recommended screen, swipe up and down to see different themes and theme
elements, and tap next to each category to browse recommended items.
47 Personalizing
Confidential
For certification only

5. Tap a thumbnail to see the details screen.
6. Tap Download.
If you don't want to download the theme or any element right away, you can tap to bookmark
it first.
To apply the theme after it has finished downloading, tap Apply. If your chosen theme includes
sounds, your ringtone, notification sound, and alert sound will also change.
Creating your own theme
You can create and customize your own theme and even share it for others to download.
1. Press and hold on an empty space on your Home screen.
2. Tap Theme.
3. Tap Change wallpaper to set the main wallpaper for your theme.
4. Select an image from your phone or take a photo with Camera.
5. Move or enlarge the crop box to the area of the image you want to include.
6. Crop and save the image.
7. Tap Next.
8. Swipe up or down to select a style for your theme.
9. Tap Edit to customize the style elements such as colors and icons.
Or tap Next if you don't want to customize your theme.
10. After you've finished customizing your theme, tap Preview to see what your theme will look
like.
11. Tap Finish, name your theme, and then tap OK to save your theme.
To apply the theme after saving it, make sure you select the Apply this theme now option.
Finding your themes
Themes you've downloaded, bookmarked, or created can be found in your theme collection.
1. Press and hold on an empty space on your Home screen.
2. Tap Theme.
3. Tap My themes.
48 Personalizing
Confidential
For certification only
Editing your theme
After creating and applying a theme, you can mix and match parts from other themes such as
sounds, icons, wallpapers.
To mix and match themes, you need to first download theme elements from the Themes store.
1. Press and hold on an empty space on your Home screen.
2. Tap Theme.
3. Tap Edit current theme.
4. Tap any of the theme elements you want to change. If the theme element list is empty, tap
beside the theme element name, and then choose one of the collections to select from.
5. Do one of the following:
§Tap an item in the theme element list to apply the change directly.
§Tap Download to get the content if necessary, and then tap Apply to apply the change
to your current theme.
6. Press until you see the Edit current theme screen. Continue making changes until you're
satisfied with the result.
7. Tap Save copy to save your new theme, or if you're editing a theme that you copied tap Save
to save the changes.
Deleting a theme
You can delete a theme if you no longer want to keep it on your phone.
1. Press and hold on an empty space on your Home screen.
2. Tap Theme.
3. Tap My themes or My designs.
4. Find and tap an item to delete.
5. Tap Remove.
If the item is currently applied, it will still be applied to your phone until another theme is
applied.
49 Personalizing
Confidential
For certification only
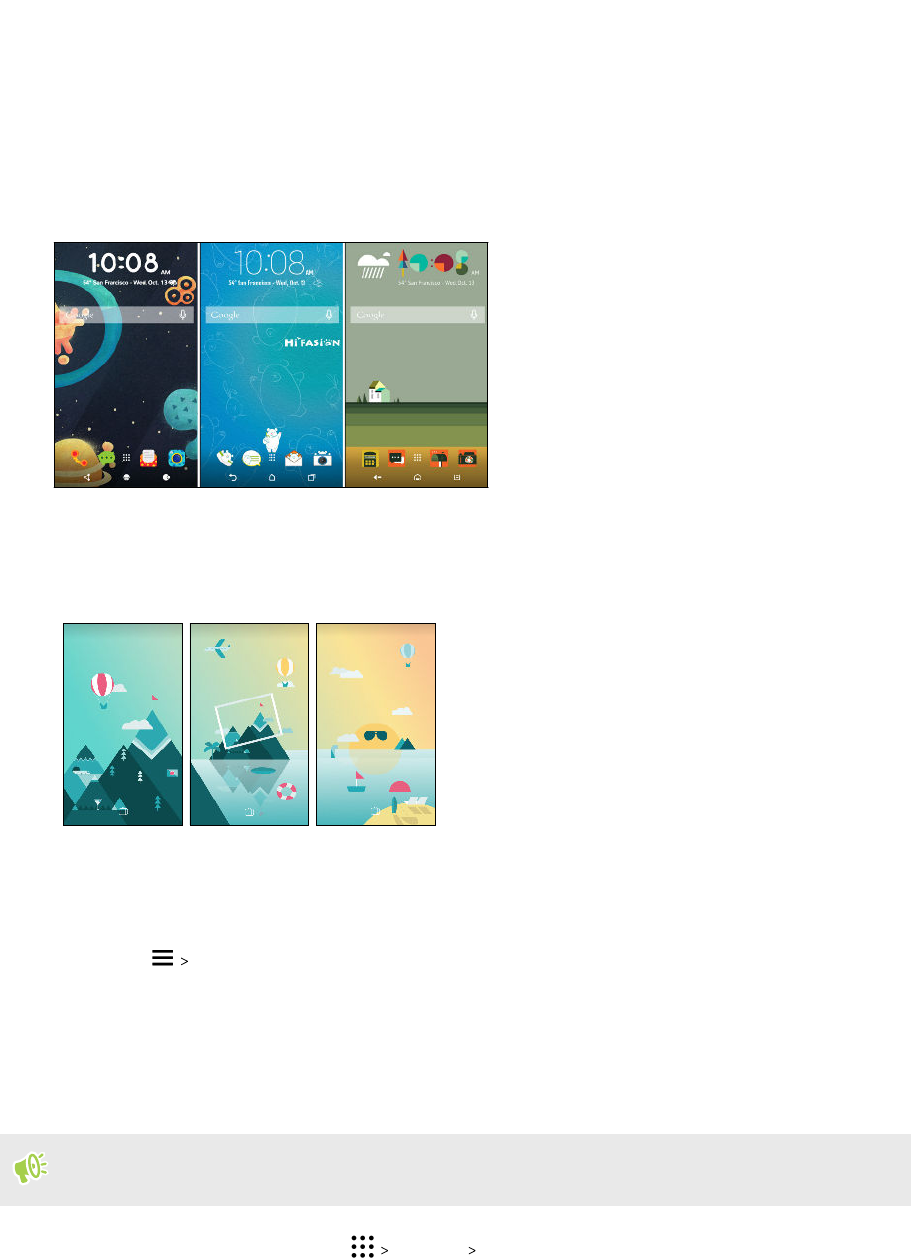
Choosing a Home screen layout
You can choose between two Home screen layouts.
The Classic layout allows you to add traditional app shortcuts and widgets on your Home screen. By
design, this layout will follow and fit what you've added on the Home screen according to an
invisible grid.
The Freestyle Home screen layout frees you from grid constraints and allows you to place your
icons and widgets anywhere you want them on the Home screen. You can use custom stickers as app
shortcuts, too!
1. Press and hold on an empty space on your Home screen.
2. Tap Theme.
3. Tap Classic layout themes or Freestyle layout themes.
Setting your Home wallpaper
Choose from the available wallpapers, or use any photo you've taken with the camera.
You can only change the wallpaper while in Classic home screen layout.
1. From the Home screen, tap Settings Personalize.
2. Tap Change wallpaper.
3. Choose from where you want to select a wallpaper.
4. Tap Apply or Set wallpaper.
50 Personalizing
Confidential
For certification only
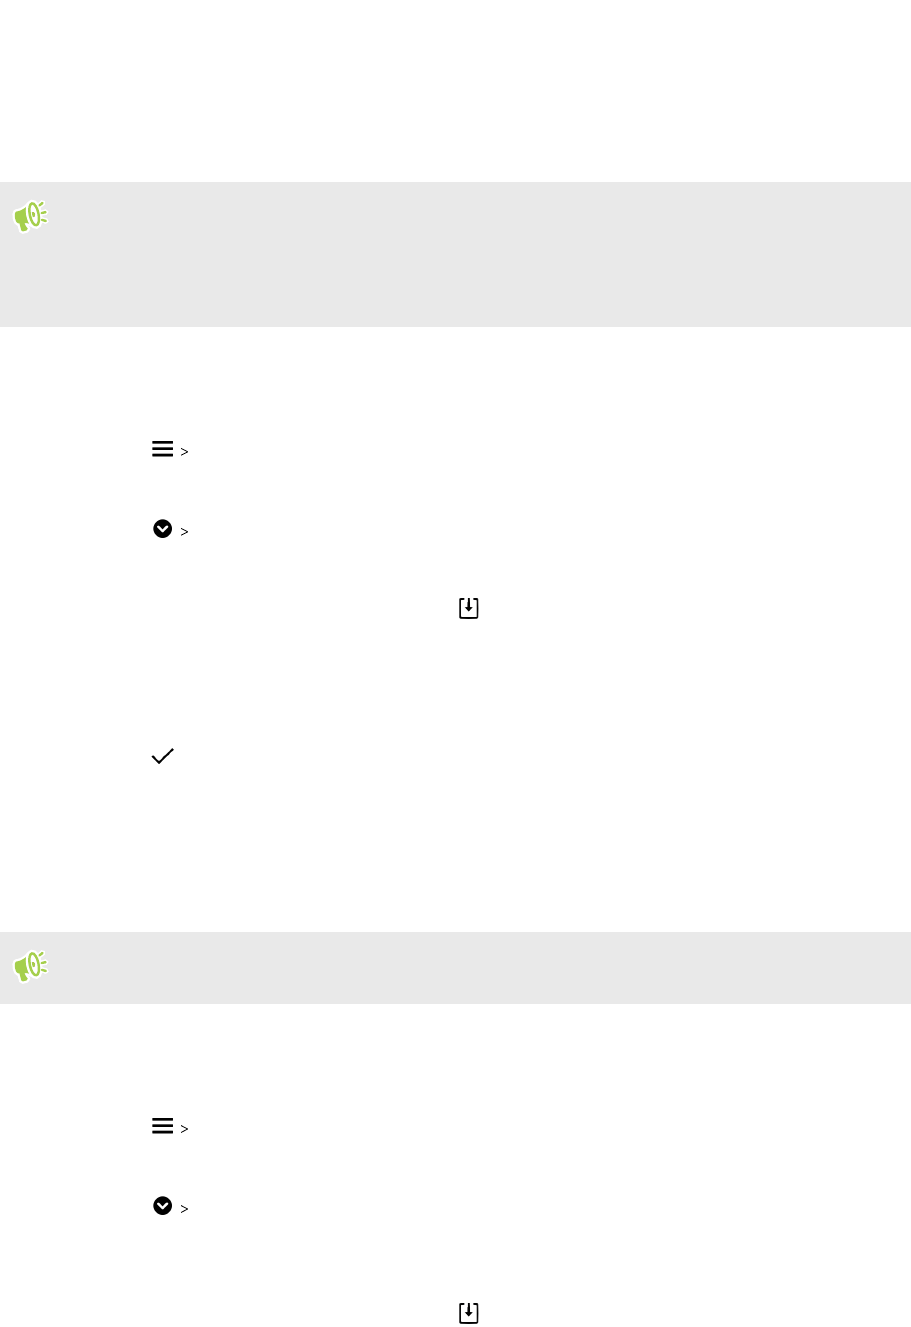
Multiple wallpapers
You can split a panorama photo into three parts so that it extends to three Home screen panels as
one photo. Or, you can choose to set three different wallpapers for each widget panel.
§You can only apply Multiple wallpapers while in Classic home screen layout.
§You can only set the Multiple wallpapers for three widget panels. The right-most photo will be
used as the wallpaper for any additional panels.
1. Press and hold on an empty space on your Home screen.
2. Tap Theme.
3. Tap Edit current theme.
4. Tap Home wallpaper.
5. Tap Multiple.You'll then see three page thumbnails.
6. Tap Change wallpaper under the first page thumbnail.
7. Select from the preset wallpapers or tap to choose from your photos.
If you've selected a panorama photo, you need to crop it starting from the area that will fit the
left widget panel of the Home screen.
8. Repeat steps 4 and 5 to change the wallpaper for the second and third widget panels.
9. Tap .
Time-based wallpaper
Set your home wallpaper to automatically change during the day and night.
You can only use a Time-based wallpaper while in Classic home screen layout.
1. Press and hold on an empty space on your Home screen.
2. Tap Theme.
3. Tap Edit current theme.
4. Tap Home wallpaper.
5. Tap Time-based. You'll then see two page thumbnails.
6. Tap Change wallpaper under the Day thumbnail to choose the wallpaper you want to display
during the day.
7. Select from the preset wallpapers or tap to choose from your photos.
51 Personalizing
Confidential
For certification only

8. Tap Change wallpaper under the Night thumbnail to choose the wallpaper you want to
display during the night.
9. Tap .
Lock screen wallpaper
Instead of using the home wallpaper, you can set a different wallpaper for your lock screen.
1. Press and hold on an empty space on your Home screen.
2. Tap Theme.
3. Tap Edit current theme.
4. Tap Lock screen wallpaper.
5. Select from the thumbnails or tap to choose from your photos.
6. Tap Apply or Save.
Adding or removing a widget panel
§You won't be able to add a new widget panel if you've already reached the maximum limit.
§HTC BlinkFeed always appears as the first panel (if it's not removed). A widget panel cannot be
added before HTC BlinkFeed.
1. Press and hold an empty space on a widget panel.
2. Tap Edit page.
3. To add a new widget panel, swipe left until you see the icon, and then tap it.
4. To remove a widget panel, swipe left or right until you see the panel, and then tap Remove.
5. When done, press .
Arranging widget panels
A widget panel cannot be moved and inserted before HTC BlinkFeed.
1. On HTC BlinkFeed or any widget panel, slide two fingers together to customize the Home
screen.
2. Press and hold a widget panel thumbnail, and then drag it left or right to the position that you
want.
3. When you're done arranging widget panels, press .
52 Personalizing
Confidential
For certification only
Changing your main Home screen
Set HTC BlinkFeed or a widget panel as your main Home screen.
1. Press and hold an empty space on a widget panel.
2. Tap Edit page.
3. Swipe left or right until you see the panel that you want to use as your main Home screen.
4. Tap Set as home.
5. Press .
Pressing from an app will first return you to the last panel you were in. Just press again to
go to your main Home screen.
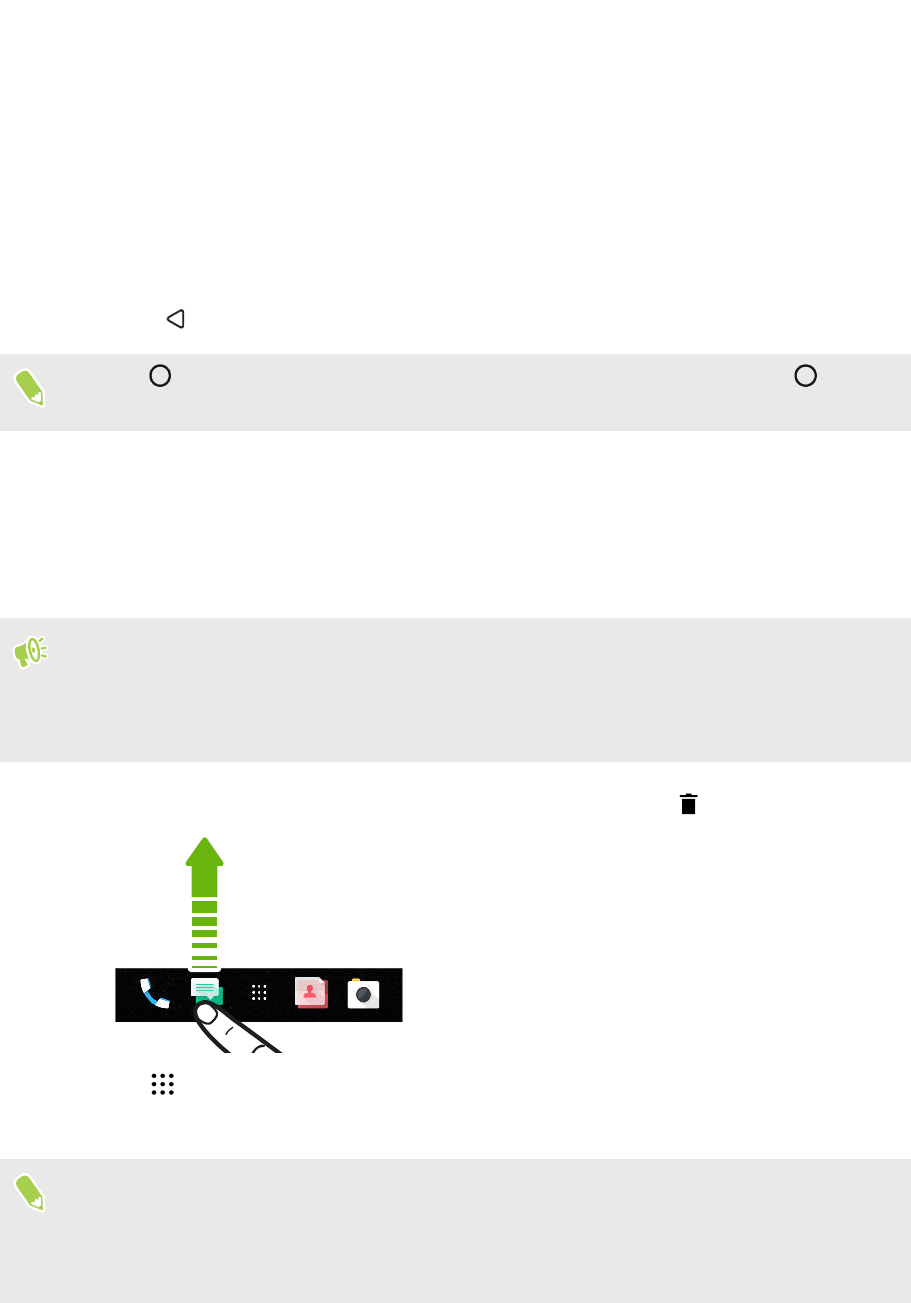
Launch bar
The launch bar gives you one-touch access to commonly used apps and other shortcuts. You can
replace the apps on the launch bar with the ones you often use.
§You can only customize the launch bar while in Classic layout.
§If you're using the Freestyle layout, you will only see the launch bar on the lock screen. Icons
displayed will be the same ones you have in the Classic layout.
1. Press and hold the app you want to replace, and then drag it out to .
2. Tap to go to the Apps screen.
3. Press and hold an app, and then drag it to the empty slot on the launch bar.
§You can also group apps on the launch bar into a folder. See Grouping apps on the widget panel
and launch bar on page 55.
§The apps or other shortcuts on the lock screen are the same as the ones on the launch bar.
53 Personalizing
Confidential
For certification only

Adding Home screen widgets
Widgets make at-a-glance important information and media content readily available.
1. Press and hold an empty space on a widget panel.
2. In the pop-menu, tap Add apps and widgets.
3. Tap Widgets.
4. Scroll through the widgets, or tap to search for a specific widget.
5. Press and hold a widget, and then drag it to a widget panel you want to add it to.
Changing the widget settings
You can modify basic settings of some widgets.
1. Press and hold a widget on your Home screen, and then drag it to .
2. Customize the widget settings.
Resizing a widget
Some widgets can be resized after you've added them to your Home screen.
1. Press and hold a widget on the Home screen, and then release your finger. If a border
appears, that means the widget is resizable.
2. Drag the sides of the border to enlarge or shrink the widget size.
Adding Home screen shortcuts
Place apps you often use on any widget panel of your Home screen. You can also add shortcuts to
frequently used settings, bookmarked webpages, and more.
1. Press and hold an empty space on a widget panel.
2. In the pop-up menu, tap Add apps and widgets.
3. Tap Apps or Shortcuts.
4. Scroll through the apps or shortcuts, or tap to search for one.
5. Press and hold an app or shortcut, and then drag it to a widget panel you want to add it to.
To add an app from the Apps screen, press and hold the app, and then drag it to a widget panel.
54 Personalizing
Confidential
For certification only
Using stickers as app shortcuts
Replace the usual app shortcuts with stickers to blend with your home wallpaper design. You can
link individual stickers to different apps.
1. Switch to Freestyle layout.
To find out how, see Choosing a Home screen layout on page 50.
2. Press and hold on an empty space on your Home screen.
3. Tap Add stickers.
4. Scroll through the stickers, and then drag a sticker to a widget panel you want to add it to.
5. Tap the newly added sticker, and then tap an app to link to the sticker.
If you need to link the sticker to a different app, press and hold it on the widget panel, and then
drag it to Relink.
6. To show or hide the name of the app it's linked to, press and hold the sticker on the widget
panel, and then drag it to Show label or Hide label.
You can choose to show or hide labels for all stickers on the Home screen. Press and hold an
empty space on a widget panel, and then tap Show/hide label.
Grouping apps on the widget panel and launch bar
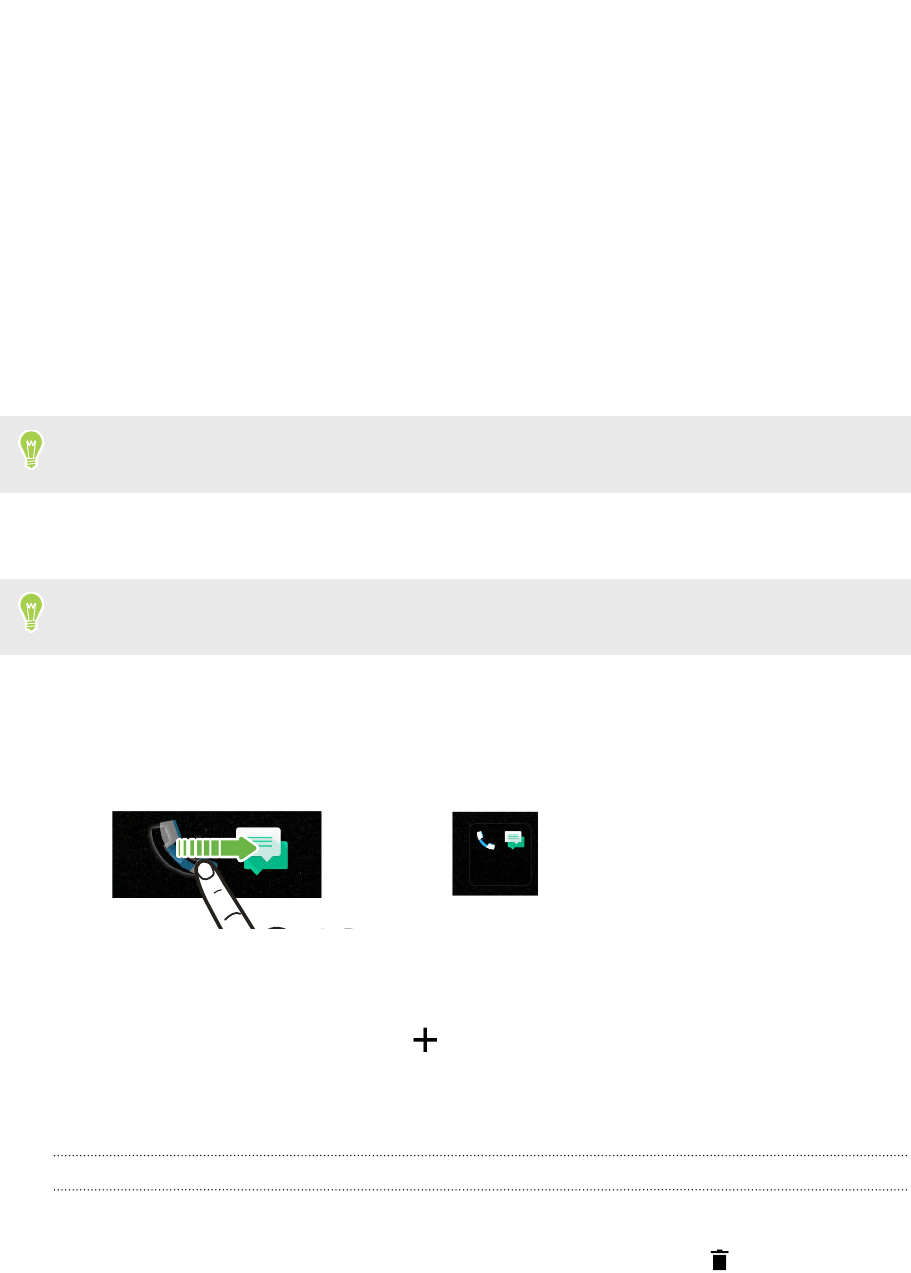
1. Press and hold an app, and then drag it over to another app to automatically create a folder.
2. Tap the folder to open it.
3. Tap the folder window’s title bar, and then enter a new folder name.
4. Add more apps into the folder. Tap , select your apps, and then tap Done.
You can also add shortcuts to settings or information to a folder. Add a shortcut first to a widget
panel, and then drag it over to the folder.
Removing items from a folder
1. On the launch bar or widget panel, tap a folder to open it.
2. Press and hold an app or shortcut in the folder, and then drag it out to .
55 Personalizing
Confidential
For certification only
Moving a Home screen item
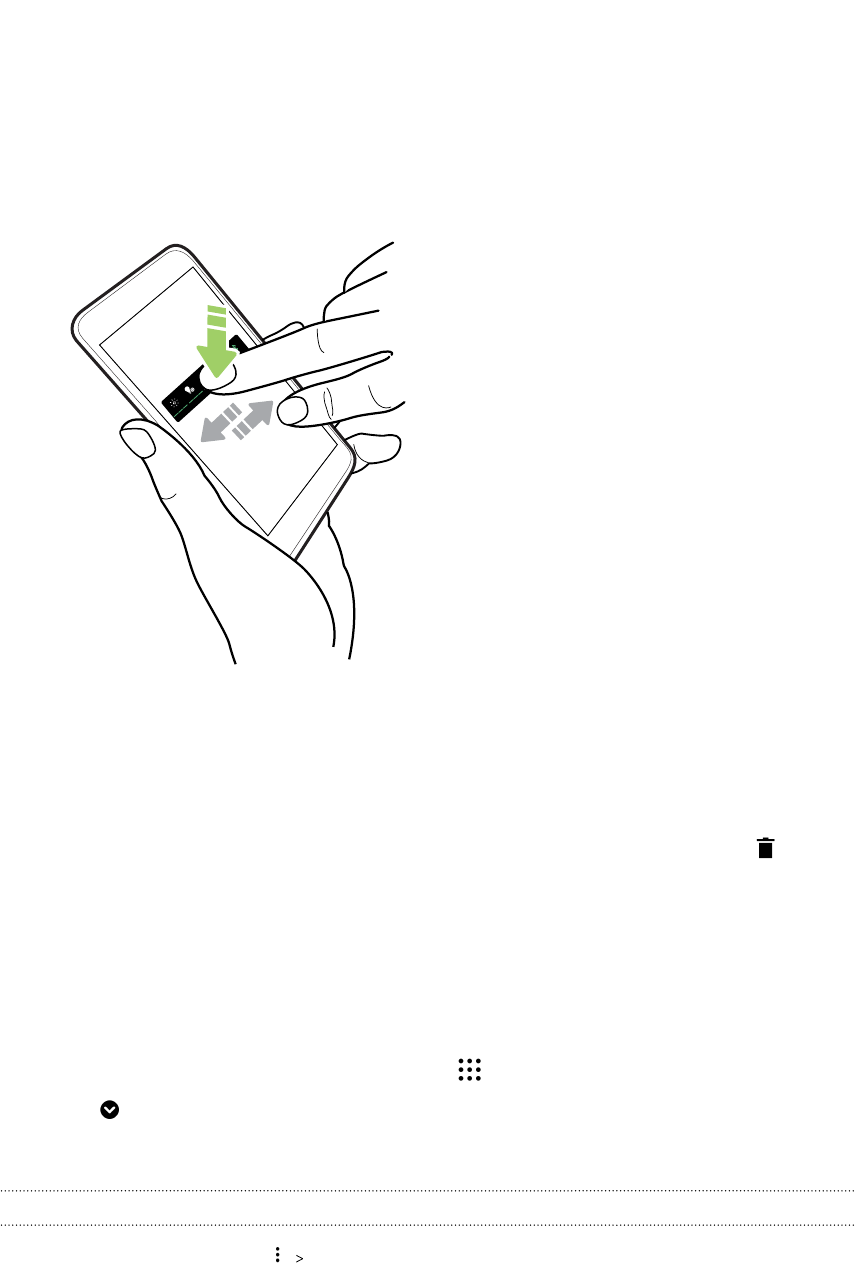
You can easily move a widget, icon, or sticker from one widget panel to another.
1. Press and hold a Home screen item with one finger.
2. With another finger, flick left or right to rotate the screen to another widget panel.
3. Release the item to where you want to move it.
Removing a Home screen item
1. Press and hold the widget, icon, or sticker you want to remove, and then drag it to .
2. When the item turns red, lift your finger.
Arranging apps
You can arrange and rearrange the apps on the Apps screen
1. From HTC BlinkFeed or any widget panel, tap .
2. Tap , and then choose how to arrange apps, such as alphabetically.
3. Select Custom if you want to rearrange or group apps into folders.
Showing or hiding apps in the Apps screen
1. On the Apps screen, tap Show/hide apps.
2. Select the apps you want to hide, or clear their check boxes to unhide them.
3. Tap Done.
56 Personalizing
Confidential
For certification only

Grouping apps into a folder
1. On the Apps screen, tap Custom.
2. Tap Rearrange apps.
3. Press and hold an app, and then drag it over to another app to automatically create a folder.
4. To add more apps, drag each app over to the folder.
5. To name the folder, open the folder, tap its title bar, and then enter a folder name.
6. When done, tap .
Moving apps and folders
1. On the Apps screen, tap Custom.
2. Tap Rearrange apps.
3. Press and hold an app or folder, and then do one of the following:
§Drag the app or folder to another position on the same page. Wait until you see the
occupying icon move away before releasing your finger.
§Drag the app or folder to the or arrow to move it to another page.
4. When you're done moving apps and folders, tap .
Removing apps from a folder
1. On the Apps screen, tap Custom.
2. Tap Rearrange apps.
3. Tap the folder to open it.
4. Press and hold an app, and then drag it out to the Apps screen. Wait until you see the
occupying icon move away before releasing your finger.
5. When you're done removing apps, tap .
57 Personalizing
Confidential
For certification only
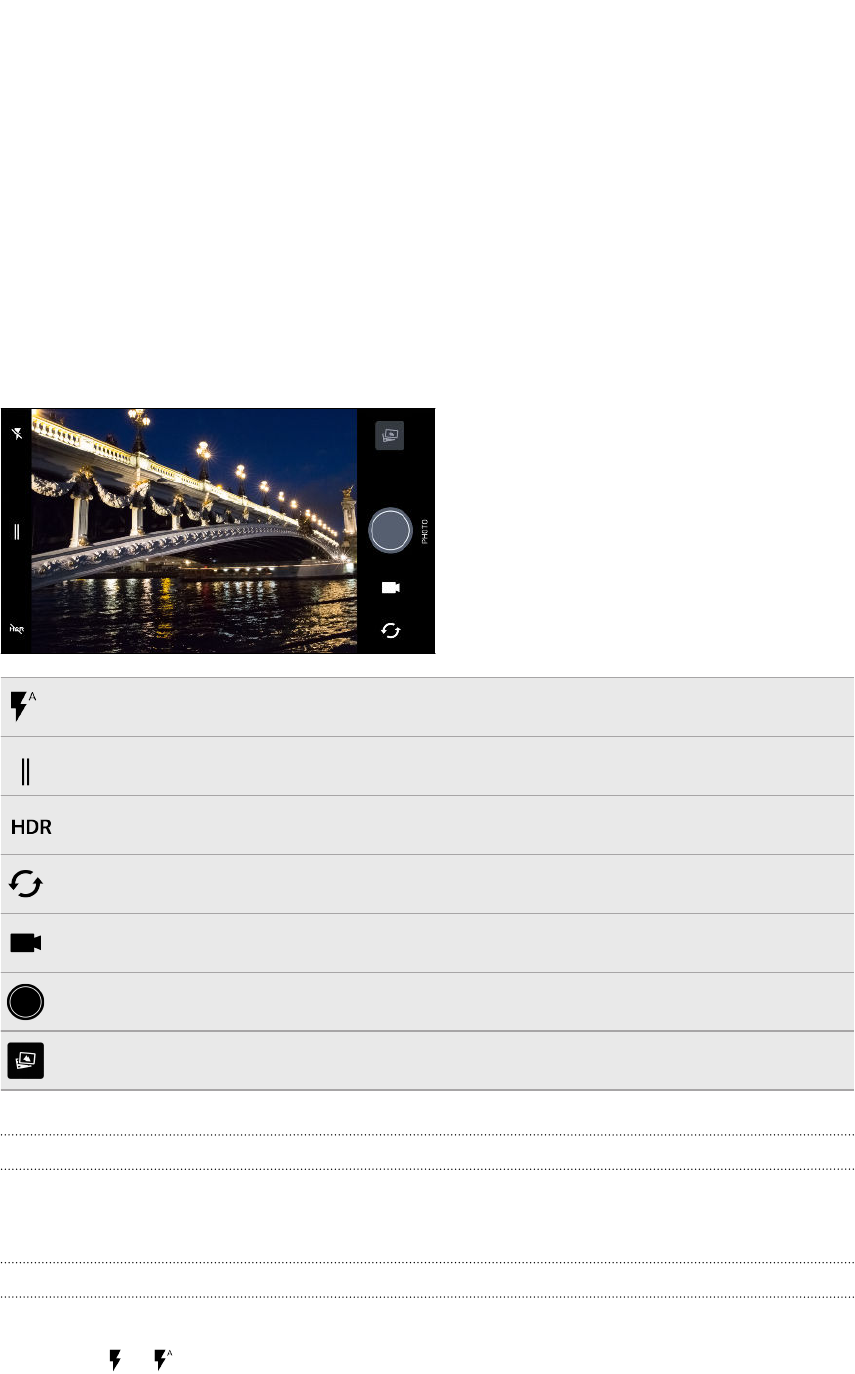
Taking photos and videos
Camera screen
Take great photos and videos with the camera.
On the Home screen, tap the camera icon to open the Camera app. You'll see Photo mode, which is
the default capture mode.
Switch between flash modes.
Open the slideout menu to select a capture mode and choose camera settings.
Toggle between photo HDR modes.
Switch between the front camera and main camera.
Switch between Video and Photo modes.
Capture a photo.
View the last photo or video taken.
Zooming
Before taking a regular photo or video, slide two fingers apart to zoom in or together to zoom out.
You can also freely zoom in or out while recording.
Turning the camera flash on or off
Tap the flash icon to choose a flash setting.
When using or , the camera intelligently sets the best flash brightness for your photo.
58 Taking photos and videos
Confidential
For certification only
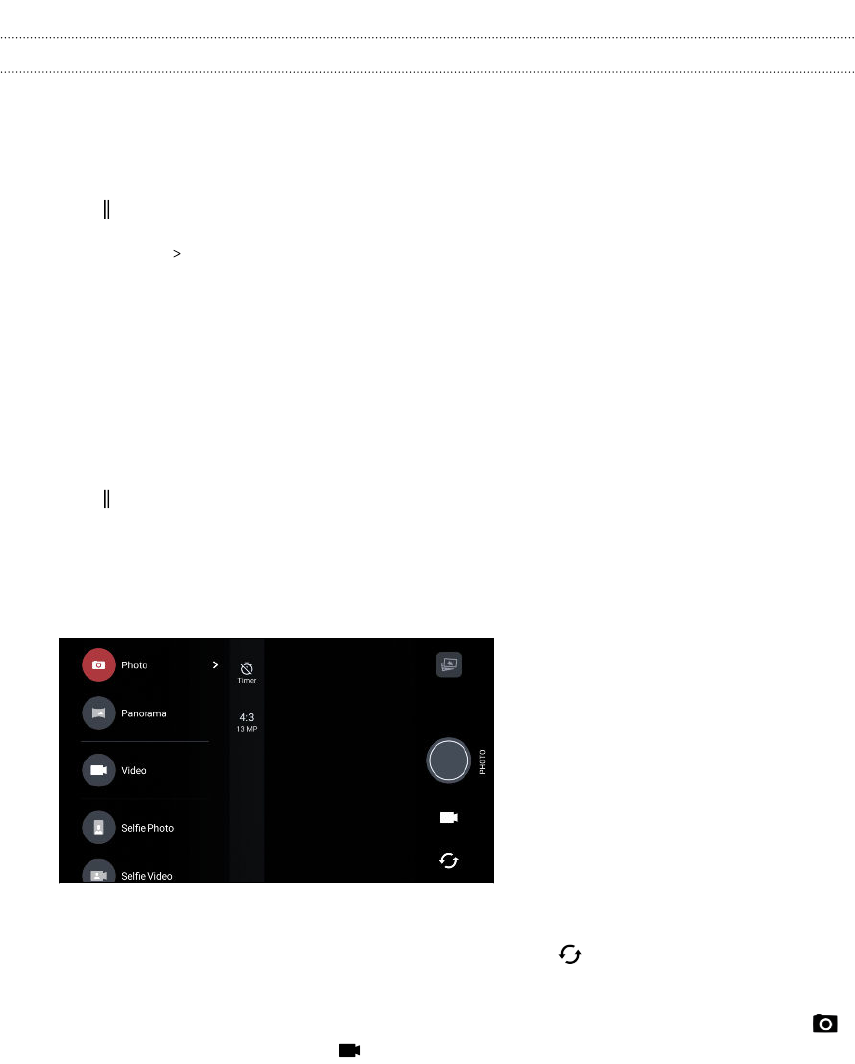
Using the volume buttons for taking photos and videos
In the Camera app, you can set the VOLUME buttons to function as the shutter release or zoom
controls.
1. On the Home screen, tap the camera icon to open the Camera app.
2. Tap to open the slideout menu.
3. Tap Settings Volume button options.
4. Choose how you want to use the volume buttons when you're in the Camera app.
Choosing a capture mode
Switch to a capture mode to use for taking photos or videos. The camera on HTC Desire 555
separates capture modes into categories so that you can quickly find which mode you want.
1. Tap to open the slideout menu.
You can also swipe right from the left edge in landscape orientation or swipe down from the
top edge in portrait orientation.
2. Scroll through the menu to see the available capture modes.
3. Tap the capture mode you want to use.
4. To quickly switch between the front and main camera, tap on the Viewfinder screen.
5. You can quickly switch back to either Photo or Video mode when you're in other capture
modes without opening the slideout menu.Right below the main shutter button, just tap
to switch back to Photo mode or to switch back to Video mode.
59 Taking photos and videos
Confidential
For certification only
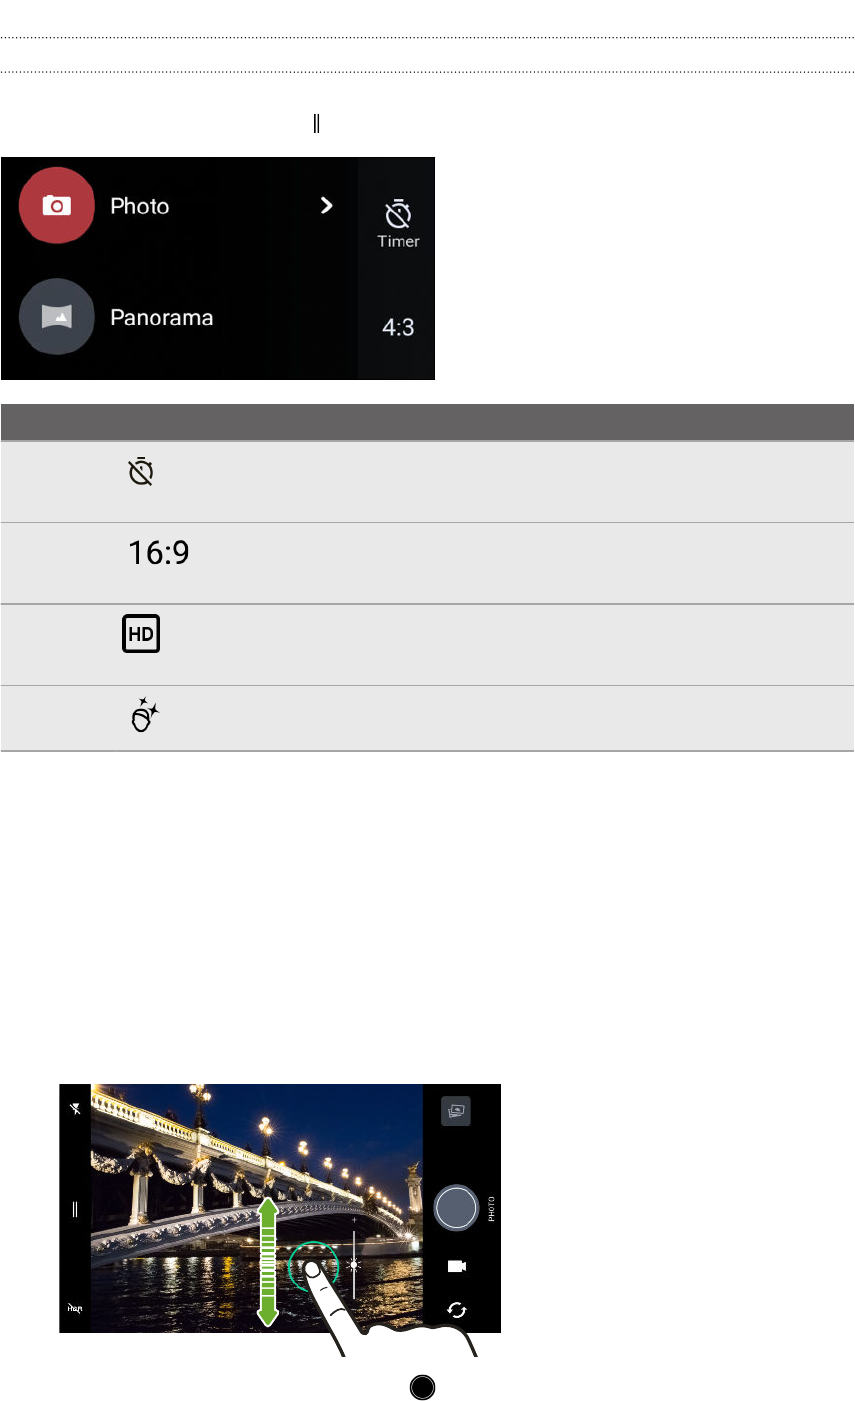
Capture mode settings
You can change the settings for some of the capture modes such as Photo or Video mode. To change
settings, select a mode and then tap to view and choose the available settings for the mode.
Mode Setting Description
Photo
Selfie Photo
Toggle between the time settings to set the self-timer or turn off the self-
timer. See Taking photos with the self-timer on page 64 for details.
Photo
Selfie Photo
Set the photo quality and aspect ratio. See Setting the photo quality and
size on page 61 for details.
Video
Selfie Video
Set the video quality. See Setting the video resolution on page 62 for
details.
Selfie Photo Turn Live Makeup on and off. See Applying skin touch-ups with Live
Makeup on page 63 for details.
Taking a photo
1. On the Home screen, tap the camera icon to open the Camera app.
2. Switch to Photo mode, if you're not in this mode. See Choosing a capture mode on page 59 for
details.
3. Point the camera at what you want to capture. The camera adjusts the focus automatically as
you move it. You can also tap the screen to change the focus to a different subject.
4. To adjust the exposure, tap the screen, and then drag your finger up and down.
5. When you're ready to take the photo, tap .
60 Taking photos and videos
Confidential
For certification only

Setting the photo quality and size
1. Switch to Photo or Selfie Photo mode.
2. Tap to open the slideout menu.
3. Tap the current setting—for example — to change the photo quality and size, or aspect
ratio.
Tips for capturing better photos
To get better captures with the Camera app, here are some tips on what to do while taking your
shots.
Before capturing
§Make sure that the camera and flash lenses are clean and without fingerprints. Use a soft,
clean, microfiber cloth to wipe them.
§Hold the phone so that your fingers aren't blocking the camera and flash lenses.
For clear, sharp shots
§HTC Desire 555 has auto features that make taking photos easy. The Photo mode in the
Camera app gives you a quick and reliable way to take photos.
For more creative shots, HTC Desire 555 also features a quick way of adjusting the exposure
level or brightness in real time. Just tap to focus, and then slide upwards repeatedly to make
the subject brighter to bring out additional details or downwards to make it darker and
richer.
§Tapping the screen to focus uses the image contrast to dynamically readjust, which is
sometimes desirable if you wish to take a macro to get an off-center bokeh effect or take
photos while you're moving.
§If the subject is moving, on the Viewfinder, press and hold the subject to lock the focus.
§If there are parts of the image that are in shadows and others are in highlights, use HDR to
capture multiple shots of different exposures and combine them into one shot. Keep
HTC Desire 555 steady or place it on a level surface when using HDR.
§When taking a panoramic photo, consider the whole scene and focus on an object that has a
neutral tone to help keep the exposure balanced in the composite image.
§Make sure you're not moving the camera when taking a photo, especially in low light
conditions.
Other tips
§In Camera settings, tap Grid to help frame the subject better or improve the composition.
§After capturing, you can enhance the photo in the Google Photos app.
61 Taking photos and videos
Confidential
For certification only
Recording video
1. On the Home screen, tap the camera icon to open the Camera app.
2. Switch to Video mode. See Choosing a capture mode on page 59 for details.
3. When you're ready to start recording, tap .
4. Change focus to a different subject or area by just tapping it on the Viewfinder screen. You
can also change the exposure after tapping by dragging up and down on the screen.
5. Tap the flash icon to turn the flash on or off.
6. Tap to pause the recording, and then tap to resume.
7. To stop recording, tap .
Setting the video resolution
1. Switch to Video mode.
2. Tap to open the slideout menu.
3. Tap Quality to change the video resolution.
Taking a photo while recording a video—VideoPic
1. On the Home screen, tap the camera icon to open the Camera app.
2. Switch to Video mode. See Choosing a capture mode on page 59 for details.
3. Tap to start recording.
4. While recording, tap whenever you want to capture a still shot.
5. Tap to stop recording.
Taking continuous camera shots
Do you want to take photos of moving subjects? Whether it’s your kid's football game or a car race,
you can capture the action.
1. On the Home screen, tap the camera icon to open the Camera app.
2. Switch to Photo mode. See Choosing a capture mode on page 59 for details.
3. Press and hold the onscreen shutter button .
The camera takes consecutive shots of your subject.
62 Taking photos and videos
Confidential
For certification only
Using HDR
When shooting portraits against a bright background, use HDR, short for High Dynamic Range, to
capture your subjects clearly. HDR brings out the details of both the highlights and shadows, even in
high contrast lighting.
HDR works best when your subject is steady. The camera takes multiple shots at different
exposure levels and combines them into one enhanced photo.
1. On the Home screen, tap the camera icon to open the Camera app.
2. Switch to Photo mode. See Choosing a capture mode on page 59 for details.
3. Make sure that is selected. If not, tap to turn HDR on.
4. Tap .
Selfies
Applying skin touch-ups with Live Makeup
Touch up your skin before taking your selfie. Live Makeup smoothens your skin in real time.
Live Makeup is disabled when HDR is on.
1. On the Home screen, tap the camera icon to open the Camera app.
2. Switch to Selfie Photo mode. See Choosing a capture mode on page 59 for details.
3. If you don't see the Live Makeup adjustment bar on the Viewfinder screen, tap to open the
slideout menu, and then tap .
4. To change the skin smoothing level, drag the adjustment bar slider.
Next time you want to take selfies without using Live Makeup, tap to open the slideout menu,
and then tap to turn Live Makeup off.
Taking selfies automatically
Keep still to take an auto selfie—or just smile! You just need to turn this feature on in the camera
settings.
1. On the Home screen, tap the camera icon to open the Camera app.
2. Switch to Selfie Photo mode. See Choosing a capture mode on page 59 for details.
3. Tap to open the slideout menu.
4. Tap Settings Camera options.
5. Select the Auto selfie capture option, and then tap outside the slideout menu to close it.
63 Taking photos and videos
Confidential
For certification only
6. Pose and frame yourself on the Viewfinder screen.
7. To take your selfie automatically, look at the front camera, and then:
§Stay still until the white box turns green on the Viewfinder screen.
§Or smile at the camera. Hold your smile for a few seconds until your shot is taken.
Taking selfies with voice commands
You can easily take photo or video selfies using simple voice commands. You just need to turn this
feature on in the camera settings.
This feature may not be available in all languages.
1. On the Home screen, tap the camera icon to open the Camera app.
2. Switch to Selfie Photo or Selfie Video mode. See Choosing a capture mode on page 59 for
details.
3. Tap to open the slideout menu.
4. Tap Settings Camera options.
5. Select the Voice capture option, and then tap outside the slideout menu to close it.
6. Pose and frame yourself on the Viewfinder screen.
7. Look at the front camera, and then:
§Say Cheese or Capture to take a photo selfie.
§Say Action or Rolling to record a video selfie.
You can also use voice commands with the main camera. Switch to Photo mode, and then select
the Voice capture option in the camera settings.
Taking photos with the self-timer
When you use the self-timer, the Camera app counts down before taking the shot. You can set the
countdown time.
1. On the Home screen, tap the camera icon to open the Camera app.
2. Choose the capture mode you want to use. See Choosing a capture mode on page 59 for
details.
3. Tap to open the slideout menu.
4. Tap Timer to set the countdown time.
5. To start the timer, tap . The camera takes the photo after the countdown.
64 Taking photos and videos
Confidential
For certification only

Flipping the angle of selfies
Do you want the angle of your shots to look exactly the same as how you see yourself on the
Viewfinder screen?
1. Switch to Selfie mode. To find out how to switch between capture modes, see Choosing a
capture mode on page 59.
2. Tap to open the slideout menu.
3. Tap Camera options.
4. Select the Save mirrored selfies option.
Taking a panoramic photo
Get a wider shot of landscapes in one sweep.
Some camera features are not available when you’re in Sweep panorama mode, such as zooming.
1. On the Home screen, tap the camera icon to open the Camera app.
2. Switch to Panorama mode. See Choosing a capture mode on page 59 for details.
3. When you're ready to take the shot, tap .
4. Pan left or right in either landscape or portrait view. Hold HTC Desire 555 as steadily as you
can to automatically capture frames.
You can also tap to stop capturing anytime.
The camera stitches the frames into a single photo.
65 Taking photos and videos
Confidential
For certification only
Google Photos
What you can do on Google Photos
Here are some of the things you can do when using Google Photos on HTC Desire 555.
§View, edit, and share the photos and videos you've taken on HTC Desire 555. You can also
access the media files previously backed up to your Google Account.
If you see or on a thumbnail, it means that the media file is only stored on the phone
and not yet backed up to your Google Account. Without this icon means that the photo or
video is already backed up to your account.
§To select photos and videos, press and hold a thumbnail to select one. Tap a date to select all
the media files under it. Or, press and hold a thumbnail as your first selection, and then drag
your finger to the last item you want to select.
To learn more about Google Photos, tap Help. Or, you can visit support.google.com/photos.
Viewing photos and videos
When you open Google Photos for the first time, sign in to your Google Account, if prompted, and
choose whether to turn backup and sync on or off.
1. From the Home screen, tap Photos.
You'll see your local and synced photos and videos organized by date. If you see or on
a thumbnail, it means that the media file is only stored on the phone and not yet backed up to
your account.
2. To switch to another view, tap , and then choose how you want to view your media files.
3. Tap a thumbnail to view it in full screen.
4. To view only the photos and videos saved on the phone storage and storage card, tap to
open the slideout menu, and then tap Device folders.
Or, if you see tabs at the bottom of the screen, tap the Albums tab, swipe across the collection
thumbnails, and then tap Device folders.
66 Google Photos
Confidential
For certification only

Editing your photos
1. From the Home screen, tap Photos.
2. Tap a photo thumbnail to view it in full screen.
3. Tap , and then do any of the following:
§Tap to adjust the brightness, color, and more.
§Tap to apply a filter to the photo.
§Tap to rotate or crop the photo.
4. While you're editing, press and hold the photo to compare your changes to the original.
5. After making your adjustment, tap .
6. Tap Save.
Trimming a video
1. From the Home screen, tap Photos.
2. Tap a video thumbnail to view it in full screen.
3. Tap , and then drag the trim sliders to the part where you want the video to begin and end.
4. Tap to preview your trimmed video.
5. Tap Save.
The trimmed video is saved as a copy. The original video remains unedited.
67 Google Photos
Confidential
For certification only

Web search
Getting instant information with the Google app
Do you want to check the weather or your morning commute time before you start your day? The
Google app delivers quick and up-to-date information that matters to you—all without the search.
Depending on your location, time of day, and previous Google searches, the Google app displays
information cards that include:
§The day's weather and the weather forecast for upcoming days.
§The traffic conditions on your way to work or your commute back home.
§The directions and travel time to your next appointment.
§The next train or bus arriving at your platform or bus stop.
§Your favorite team's score and stats while you enjoy the game.
§Time or location based reminders that you can set.
To open the Google app from the Home screen, tap , and then find and tap Google. Or tap the
Google search bar widget when available.
Get the latest update from Google Play to enjoy Google app's new and improved features.
Setting up the Google app
Before setting up the Google app:
§Make sure that you're signed in to your Google account.
§Turn location services on and make sure that you have an Internet connection.
1. From the Home screen, tap , and then find and tap Google.
2. Tap Get started. Or if you've previously set up the Google app on HTC Desire 555 and turned
it off, tap Get started Set up.
68 Web search
Confidential
For certification only

3. Read the information screen and then tap Yes, I'm in. Google app's information cards will
start to appear on the Google search screen.
4. Swipe up the screen to see all available information cards.
5. To dismiss a card, swipe it right.
Depending on the information that you've allowed to share, more information cards will appear on
the Google search screen as you use HTC Desire 555 to search the Web, create appointments, set
reminders, and more.
Changing card settings
You can easily customize the settings of the Google app cards to suit your information needs. For
example, you can change the weather units in the Weather card or your transportation mode in the
Traffic card.
1. From the Home screen, tap , and then find and tap Google.
2. Do any of the following:
§To change the settings of a specific card, tap and then tap an action.
§To change specific information such as your work address, sports teams, or stocks you
follow, tap , and then tap Customize the Feed. Choose the information you want to
change.
Setting reminders in the Google app
Creating reminders in Google app is an easy way to keep tab of things to do. You can set time or
location-based reminders. When the reminder time is up or when you've arrived at the specified
location, the Google app displays the Reminder card in the Google search screen and sounds a
notification to alert you.
This feature may not be available in all languages.
1. From the Home screen, tap , and then find and tap Google.
2. Tap , and then tap Reminders.
3. Tap .
4. Enter the reminder title, such as the task you want to be reminded of.
5. Select Time to set a time-based reminder or Place to set a location-based reminder.
6. Set the reminder time or location details.
7. Tap .
When the reminder time is due or when you've arrived at the location, the Reminder card will
appear in the Google search screen. You can then dismiss or snooze the reminder.
69 Web search
Confidential
For certification only
Turning off Google app's card feed
1. From the Home screen, tap Settings Google.
2. Tap Search & Now Your feed.
3. Tap the switch next to Turn off the feed, and then tap Turn off.
Screen search
Use Screen search to search information while viewing emails and websites, listening to music, or
even while exchanging text messages. Screen search lets you look for information about the screen
you're on so you don't have to leave the app. Just press and hold and Screen search shows you
related information, apps, and actions.
This feature may not be available in all languages.
Turning on Screen search
Before turning on Screen search:
§Make sure that you're signed in to your Google Account and have set up the Google app.
§Turn location services on and make sure that you have an Internet connection.
1. From the Home screen, tap , and then find and tap Google.
2. Tap Settings Screen search.
3. Tap the Screen search On/Off switch.
Searching with Screen search
1. On the current app you're in, press and hold . Screen search analyzes the screen and
shows a card with information, apps, or actions related to the searched item or location.
2. Tap an item on the card to view more information or perform an action. You can also say,
"OK, Google" and say what you want to know about the searched item or location. For
example, if Screen search searched for a restaurant, you can say "OK, Google. Take me
to that restaurant" to get directions to that location.
3. To hide the information cards and return to the screen, press .
Turning off Screen search
1. From the Home screen, tap , and then find and tap Google.
2. Tap Search & Now Screen search.
3. Tap the Screen search On/Off switch.
70 Web search
Confidential
For certification only
Searching HTC Desire 555 and the Web
You can search for information on HTC Desire 555 and on the Web. In the Google Search app, start
your search by entering a keyword or by using Google Voice Search™.
To open Google Search, from the Home screen, tap , and then find and tap Google. Or tap the
Google search bar widget when available.
Some apps, such as People or Mail, have their own search function, which you can use to search
only within those apps.
Performing searches on the Web and HTC Desire 555
1. From the Home screen, tap , and then find and tap Google.
If you've already set up a Google account on HTC Desire 555, you will be given the option to
sign in to access other features of the Google app.
2. In the search box, enter what you want to search for. As you type, matching items on
HTC Desire 555 and suggestions from Google web search are shown.
3. If what you’re searching for is in the list of suggestions, tap the item to search for it or open it
in its compatible app.
You can also filter web search results by tapping any of the categories on the filter bar below the
search bar.
Searching the Web with your voice
Use Google Voice Search to find information on the Web by speaking to HTC Desire 555.
This feature may not be available in all languages.
1. From the Home screen, tap , and then find and tap Google.
2. Say "OK, Google," and then say what you want to search for. After speaking, matching
items from Google web search are shown.
3. If what you’re searching for is in the list, tap the item to open it in its compatible app.
Otherwise, say "OK, Google" to search again.
Setting search options
1. From the Home screen, tap Settings Google.
2. Tap Search & Now.
3. Tap the search option you want to set.
To get help or provide feedback, tap .
71 Web search
Confidential
For certification only
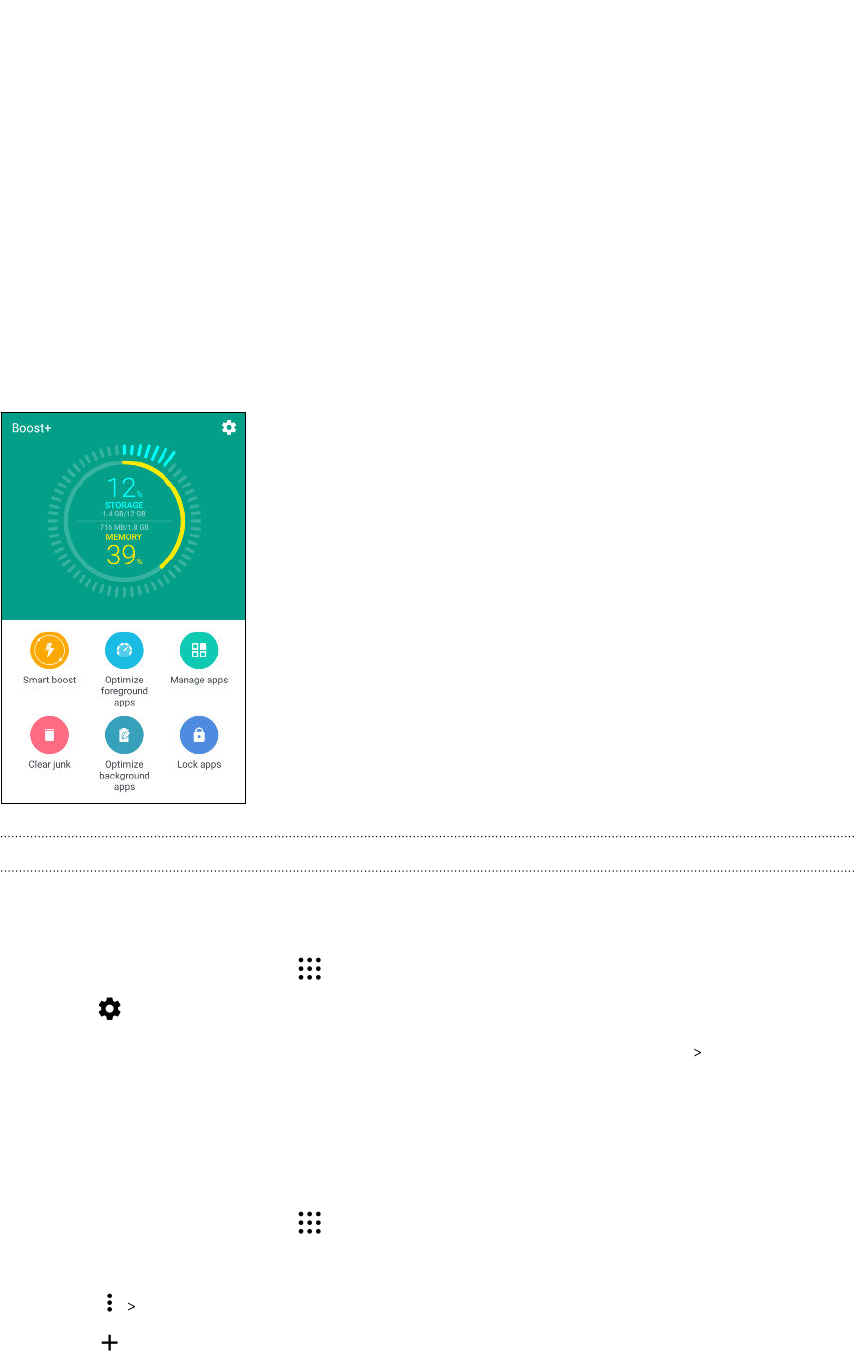
Power and storage
management
About Boost+
Here are some of the things you can do when using the Boost+ app.
§Monitor your phone storage space and memory usage.
§Delete cache, app installers, and temporary files on your
phone.
§Optimize system resources to extend battery life while you're
using apps and playing your favorite games.
§Manage irregular app activities, stop unused apps from
running in the background, lock apps with sensitive content,
or uninstall apps you don't use.
Turning Smart Boost on or off
The Smart Boost feature allows the Boost+ app to automatically free up memory space on your
phone.
1. From the Home screen, tap , and then find and tap Boost+.
2. Tap , and then select or clear the Smart boost option.
3. When prompted to set up the system permission for Boost+, tap Continue Boost+
4. Tap the Permit usage access On/Off switch.
Adding apps to the Smart Boost exception list
You can choose to set the Boost+ app to skip some apps when it runs its Smart Boost checks.
1. From the Home screen, tap , and then find and tap Boost+.
2. Tap Smart boost.
3. Tap Manage skipped apps.
4. Tap , and then select the apps to skip.
5. Tap Add.
72 Power and storage management
Confidential
For certification only
Manually clearing junk files
Regularly remove junk files that clutter your storage space or slow down the phone's performance.
1. From the Home screen, tap , and then find and tap Boost+.
2. Tap Clear junk.
The Boost+ app will show you how much storage space is being used up by different junk files,
such as cache files, ad files, temporary files, and app installers.
3. Select or clear the junk file types you want to delete.
You can tap next to a category to view the files under it.
4. Tap to clear junk files.
In the Boost+ app settings, you can also choose to get notified when your junk files exceed a set
limit or when an app is unused over a period of time.
Optimizing apps running in the foreground
When you enable an app in the Optimize foreground apps list, your phone automatically optimizes
system resources while you're using it. This helps extend your phone's battery life.
This feature may not be available on all phones.
1. From the Home screen, tap , and then find and tap Boost+.
2. Tap Optimize foreground apps.
3. On the Optimize foreground apps screen, tap the On/Off switch next to an app to turn it on.
Managing irregular activities of downloaded apps
The Boost+ app can check for irregular activities from a downloaded app that may affect your
phone's performance. When an irregular activity is detected, you can choose to stop the activity. Or,
you can also uninstall the downloaded app via the Boost+ app.
You can only uninstall the apps you've downloaded.
1. From the Home screen, tap , and then find and tap Boost+.
2. Tap Manage apps.
3. Do any of the following:
§To uninstall apps you don't need, select one or more apps under the Apps tab, and then
tap .
§Go to the Irregular activities tab to see if there are irregular activities detected. If
there's one, tap it and choose an action.
73 Power and storage management
Confidential
For certification only
Managing apps running in the background
You can set the Boost+ app to automatically stop unused apps from running in the background. This
helps save battery power.
1. From the Home screen, tap , and then find and tap Boost+.
2. Tap Optimize background apps.
3. Make sure the Optimize background apps On/Off switch is turned on.
Boost+ lists down unused apps that are running in the background.
4. Tap an app under Auto stop to choose whether to always stop the app from running, stop
when the app isn't running for a certain period of time, or always allow the app to run in the
background.
To auto stop an app after a period of inactivity, tap Schedule auto stop, and then choose
how long an app is unused before it's automatically stopped.
Creating an unlock pattern for some apps
Add a security pattern to some installed apps that you treat as private. Lock these apps to require an
unlock pattern whenever the app is opened, avoiding others to access it without your permission.
1. From the Home screen, tap , and then find and tap Boost+.
2. Tap Lock apps.
3. Draw your desired unlock pattern.
4. You can sign in to your Google Account or answer a security question. This will only serve as
your authentication method to reset the unlock pattern.
5. Tap the On/Off switch next to an app to require an unlock pattern to open it.
6. Press .
To change the app unlock pattern, tap Lock apps, and then draw your unlock pattern. Tap
Change pattern.
Tips for extending battery life
How long the battery can last before it needs recharging depends on how you use HTC Desire 555.
Try out some of these tips to help increase battery life.
Use the power management features
§Turn Power saver mode and Extreme power saver mode on in Settings.
§Monitoring your battery usage helps identify what's using the most power so you can choose
what to do about it. For details, see Checking battery usage on page 77.
74 Power and storage management
Confidential
For certification only

Manage your connections
§Turn off wireless connections such as mobile data, Wi-Fi, or Bluetooth when not in use.
§Turn GPS on only when a precise location is needed, such as while using navigation or
location-based apps. See Turning location services on or off on page 136.
§Turn on Airplane mode when you don't need any wireless connections and you don't want to
receive calls or messages.
Manage your display
Lowering the brightness, letting the display sleep when not in use, and keeping it simple helps save
battery power.
§Use automatic brightness (the default), or manually lower the brightness.
§Set the screen timeout to a shorter time.
§Don't use a live wallpaper for your Home screen. Animation effects are nice to show off to
other people but they drain your battery.
Changing your wallpaper to a plain, black background can also help a little. The less color is
displayed, the less battery is used.
For more details, see Settings and security on page 136 and Personalizing on page 47.
Manage your apps
§Battery optimization helps extend battery standby time. See Battery optimization for apps
on page 78.
§Install the latest software and application updates. Updates sometimes include battery
performance improvements.
§Uninstall or disable apps that you never use.
Many apps run processes or sync data in the background even when you're not using them. If
there are apps that you don't need anymore, uninstall them.
If an app came preloaded and can't be uninstalled, disabling the app can still prevent it from
continuously running or syncing data. See Disabling an app on page 139.
Limit background data and sync
Background data and sync can use a lot of battery power if you have many apps syncing data in the
background. It’s recommended not to let apps sync data too often. Determine which apps can be set
with longer sync times, or sync manually.
§In Settings, tap Accounts & sync and check what types of data are being synced in your
online accounts. When the battery is starting to run low, temporarily disable syncing some
data.
§If you have many email accounts, consider prolonging the sync time of some accounts.
In the Mail app, select an account, tap Settings Sync, Send & Receive, and then adjust
the settings under Sync schedule.
75 Power and storage management
Confidential
For certification only

§When you’re not traveling from one place to another, sync weather updates of only your
current location, rather than in all of your named cities. Open the Weather app, and then tap
to edit and remove unneeded cities.
§Choose widgets wisely.
Some widgets constantly sync data. Consider removing the ones that are not important from
your Home screen.
§In Play Store, tap Settings, and then clear Add icon to Home screen to avoid
automatically adding Home screen app shortcuts whenever you've installed new apps. Also
tap Auto-update apps Do not auto-update apps if you're fine with updating apps from Play
Store manually.
Other tips
To squeeze in a little bit more battery power, try these tips:
§Tone down the ringtone and media volume.
§Minimize the use of vibration or sound feedback. In Settings, tap Sound & notification and
choose which ones you don't need and can disable.
§Check your apps’ settings as you may find more options to optimize the battery.
Using power saver mode
Power saver mode helps to increase battery life. It reduces the usage of phone features that drain
the battery such as location services and mobile data.
1. From the Home screen, tap , and then find and tap Settings.
2. Tap Power.
3. Tap the Power saver On/Off switch to turn power saver mode on or off.
To set when to automatically switch this mode on, tap Power saver, select the Automatically
turn on power saver option, and then select a battery level.
76 Power and storage management
Confidential
For certification only

Extreme power saving mode
In times when you don't need to use much of your phone, turn Extreme power saving mode on to
extend battery life longer. In this mode, standby time can last longer than usual, and you can only
use the most basic functions such as phone calls, text messaging, and email.
1. From the Home screen, tap , and then find and tap Settings.
2. Tap Power.
3. Tap the Extreme power saving mode On/Off switch to turn extreme power saving mode on
or off.
If you want to set when to automatically switch this mode on, tap Extreme power saving
mode, select the Automatically turn on extreme power saving mode option, and select a
battery level.
Under More information, tap Learn more for details on how Extreme power saving mode
maximizes battery life.
Displaying the battery percentage
You can check the percentage of remaining battery power right from the status bar.
1. From the Home screen, tap , and then find and tap Settings.
2. Tap Power.
3. Select Show battery level.
Checking battery usage
See how the system and apps are using the battery and how much power is being used.
1. From the Home screen, tap , and then find and tap Settings.
2. Tap Power.
3. Tap Battery usage, and then tap an item to check how it's using the battery.
4. If you see the Adjust power use section while viewing battery use details, you can tap the
option underneath it to adjust settings that affect battery usage.
Another way to check the battery usage per app is to go to Settings, and then tap Apps. Tap the app
you want to check, and then tap Battery.
If the Battery option on the App info screen is grayed out, it means the app is currently not using
the battery.
77 Power and storage management
Confidential
For certification only

Checking battery history
Check how long you've been using HTC Desire 555 since the last charge. You can also see a chart
that shows how long the screen has been on, and how long you've been using connections like the
mobile network or Wi-Fi.
1. From the Home screen, tap , and then find and tap Settings.
2. Tap Power.
3. Tap History to view battery usage over time.
Battery optimization for apps
When you have connections such as Wi-Fi on while the phone is in sleep mode, some apps may still
continue to use the battery. Starting from Android 6.0, battery optimization is enabled for all apps
by default which helps prolong battery standby time when you're not using the phone.
The phone needs to be sitting idle for an extended period of time before battery optimization takes
effect.
Turning battery optimization off in apps
If there are apps that you don't want battery optimization enabled, you can turn the feature off in
those apps.
1. From the Home screen, tap , and then find and tap Settings.
2. Tap Power.
3. Tap Battery optimization.
4. Tap Not optimized All apps to see the complete list of apps.
5. To turn off battery optimization in an app, tap the app name, and then tap Don't optimize
Done.
Repeat this process to turn off optimization in other apps.
To filter the list and see which apps have battery optimization disabled, tap All apps Not
optimized.
Types of storage
Starting from Android 6.0, there have been some changes on how and where downloaded apps and
their data can be stored.
Phone storage
This is the internal storage which contains the Android system, preinstalled apps, email, text
messages, and cached data from the apps. You can also install apps that you've downloaded and
capture photos, videos, and screenshots to this storage.
78 Power and storage management
Confidential
For certification only

Storage card
Use your storage card as a removable storage to store and access your media and other files on
HTC Desire 555 or any Android phone, or set it up as an extension of the internal storage. See
Should I use the storage card as removable or internal storage? on page 79.
Should I use the storage card as removable or internal
storage?
Use your storage card as removable storage when there's already content such as your media and
other files so that you don't lose these content. If you have a brand new storage card, choose
whether to use it as removable storage or set it up as an extension of the internal storage.
Removable storage
Use a new storage card as removable storage to be able to insert and use the card on HTC Desire 555
and other Android phones.
Internal storage
Set up a new storage card as internal storage for more privacy and secure use. This encrypts and
formats the storage card to work just like the internal storage.
This also expands the internal storage space since:
§Captured screenshots, camera shots, media, and other files will be stored on the storage card.
§Third-party apps that you installed and their data can be moved between the phone storage
and storage card.
After setting up the storage card as internal storage, the card can only be used on HTC Desire 555
where it has been formatted.
Setting up your storage card as internal storage
When you insert a storage card that has not been used on HTC Desire 555 before, the card will be
mounted as removable storage by default.
If the storage card is new or doesn't have content you want to keep, you can format the storage card
to use it as internal storage for HTC Desire 555.
§See Should I use the storage card as removable or internal storage? on page 79 to find out the
differences between using the storage card as removable storage or internal storage.
§If there are still files on the storage card, back up the files first before you format the card.
1. From the Home screen, tap Settings Storage.
2. Under Removable storage, tap next to the storage card name.
79 Power and storage management
Confidential
For certification only

3. Tap Format as internal Erase & format Format.
4. Follow the onscreen instructions to move your installed apps and their data from the phone
storage to the storage card.
If you no longer want to use your storage card as internal storage, you can reformat the card as
removable storage. Before you do so, make sure to move all the apps and data from the card back
to the phone storage. See Moving apps and data between the phone storage and storage card on
page 80.
Moving apps and data between the phone storage and
storage card
If you've set up your storage card as internal storage, you can move third-party apps that you
installed and their data such as photos, media, and downloaded files to the storage card to free up
phone storage space.
If you no longer want to use your storage card as internal storage, make sure to move all the apps
and data from the card back to the phone storage.
1. From the Home screen, tap Settings Storage.
2. Tap the name of your storage card if you're moving app data from the phone storage to the
card, or tap Phone storage if you're moving data from the storage card back to the phone
storage.
3. Tap Migrate data.
4. Tap Move.
§Screenshots will also be migrated.
§When you take new photos or videos, capture new screenshots, or download new files after the
migration, they will be saved to the new storage location.
Moving an app to the storage card
When you're running out of phone storage space, you can move your downloaded apps to the
storage card if the card has been set up as internal storage.
Preinstalled apps cannot be moved.
1. From the Home screen, tap Settings Storage.
2. Tap Phone storage Apps.
3. Tap the app you want to move.
80 Power and storage management
Confidential
For certification only

4. Tap Change, and then tap the storage card name.
5. Tap Move.
You can also move an app from the storage card back to the phone storage.
Viewing and managing files on the storage
Starting from Android 6.0, you can go to Settings to view and manage files on the phone storage and
storage card.
1. From the Home screen, tap Settings Storage.
2. Tap Phone storage or the storage card name.
3. Tap Explore to view internal storage content—whether it's phone storage content or internal
storage content on the storage card.
4. To select or deselect files:
§Press and hold a file to select it. To select more files, tap each file.
§Tap a file to deselect it.
§To select all files, press and hold a file first, and then tap Select all.
5. Do one of the following:
§To delete, tap .
§To paste, tap Copy to. In the Save to slideout menu, choose where to paste to, and
then tap Copy.
Copying files between HTC Desire 555 and your
computer
You can copy your music, photos, and other files to HTC Desire 555.
§Save and close your files before copying them from your computer to HTC Desire 555, or vice
versa.
§If you're using your storage card as internal storage, your computer will only show storage card
content.
1. Connect HTC Desire 555 to the computer using the supplied USB cable.
2. On HTC Desire 555, unlock the screen if it's locked.
81 Power and storage management
Confidential
For certification only

3. On the pop-up message that asks whether to use USB for file transfers, tap Yes.
If you don't see this message, slide the Notifications panel open, tap the Use USB for
notification, and then tap File transfers.
You'll then see options for viewing or importing files on the computer screen.
4. Choose to view files.
5. Copy the files from your computer to HTC Desire 555, or vice versa.
6. After copying the files, disconnect HTC Desire 555 from the computer.
Freeing up storage space
As you use HTC Desire 555, you'll accumulate data and fill its storage capacity over time. Here are
some tips on how to free up phone storage space.
Manage photos and videos
§After taking continuous camera shots, keep only the best shot. Discard the rest, if you don't
need them.
§After editing a photo or trimming a video, the original file is kept. Delete original files or
move them elsewhere, such as to your computer.
§If you're only sending videos through MMS, use a lower resolution. Hi-res video takes up
more space.
Remove unused themes
Themes can quickly consume up storage space because themes can include images, sounds and
icons. Remove themes you're not using. See Deleting a theme on page 49.
Back up data and files
Keep only the most recent data in your apps and files that you often need to use. You can back up
your other data and files. For some tips, see Ways of backing up files, data, and settings on page 85.
Remove or disable apps
Uninstall apps that you've downloaded if no longer need them. See Uninstalling an app on page 31.
Preinstalled apps can be disabled when you're not using them. See Disabling an app on page 139.
Move apps to the storage card
Third-party apps that you've downloaded and installed can be moved to the storage card if you've
set up the card as internal storage. See Moving apps and data between the phone storage and storage
card on page 80 and Moving an app to the storage card on page 80.
82 Power and storage management
Confidential
For certification only

Unmounting the storage card
When you need to remove the storage card while HTC Desire 555 is on, unmount the storage card
first to prevent corrupting or damaging the files in the storage card.
If your storage card is used as internal storage and there are apps that were moved to the card,
you will not be able to open these apps after unmounting the card.
1. From the Home screen, tap Settings Storage.
2. Do one of the following:
§If your storage card appears under Removable storage, tap Eject next to the card
name.
§If your storage card appears under Internal storage, tap the card name, and then tap
Eject.
83 Power and storage management
Confidential
For certification only
Sync, backup, and reset
Adding your social networks, email accounts, and more
You can sync contacts, calendars, and other information from your social networks, email accounts,
and online services on HTC Desire 555. Depending on the account type, signing in to your online
accounts lets you sync updates between HTC Desire 555 and the Web.
1. From the Home screen, tap Settings Accounts & sync.
2. Tap .
3. Tap the account type you want to add.
4. Follow the onscreen instructions to enter your account information.
§In Settings Accounts & sync, tap the Auto sync On/Off switch to turn automatic sync of all
your accounts.
§You can add several Google Accounts.
Syncing your accounts
1. From the Home screen, tap Settings Accounts & sync.
2. Tap the Auto sync On/Off switch to turn automatic sync of all your accounts on or off.
3. To manually sync individual accounts, tap an account type, and then tap Sync now on
the Account settings screen.
On the Account settings screen, you can also change the sync settings for an account.
84 Sync, backup, and reset
Confidential
For certification only

Removing an account
Remove accounts from HTC Desire 555 if you no longer use them. Removing an account does not
remove accounts and information from the online service itself.
1. From the Home screen, tap Settings Accounts & sync.
2. Tap an account type.
If you've signed into multiple accounts under an account type, tap the account to remove.
3. Tap Remove account.
Some personal data may be retained by the third-party app after you have removed the account
from HTC Desire 555.
Ways of backing up files, data, and settings
Worried that you might lose important stuff on HTC Desire 555? Back up HTC Desire 555 before
you remove content from the storage, do a factory reset, or upgrade to a new phone.
Android Backup Service
Use your Google Account to automatically back up app data and settings including Wi-Fi passwords
and files stored by certain apps.
HTC Sync Manager
Use HTC Sync Manager to import music, photos, and videos from HTC Desire 555 to your
computer. You can also sync locally stored contacts and playlists between HTC Desire 555 and your
computer.
Likewise, HTC Sync Manager is a good alternative if you don't want to back up your accounts,
settings, and other personal content to the cloud. You can use it to create backups of HTC Desire
555 on your computer.
Other backup options
If you want, you can separately back up your data or files.
Some apps allow you to back up data to the phone storage or storage card so you can easily restore
them after a factory reset. Just make sure not to erase the phone storage or storage card when you
do a factory reset.
Messages Back up your text messages to the phone storage or storage card, or save them as an
email attachment.
Contacts §Save contacts and other personal data to your online accounts so you can just sync
them when switching to another phone.
§If you have locally stored contacts in the People app, export them to the phone
storage or storage card.
85 Sync, backup, and reset
Confidential
For certification only
Files Manually copy and paste files by connecting HTC Desire 555 to your computer as a
disk drive.
Other data Check other apps to see if they support exporting data to the phone storage or storage
card.
Using Android Backup Service
Starting from Android 6.0, use the Android Backup Service to back up your HTC phone to
Google Drive™.
This service can back up and restore the following:
App data §In HTC apps, app data includes contacts stored on HTC Desire 555, call history, Clock
and Weather city list, and email accounts.
§Data from third-party apps may also be saved in the backup, depending on the app
developer settings.
Settings These include ringtones, grid size and sort order on theApps screen, Wi-Fi networks and
passwords and some device settings.
When auto backup is enabled, the Android Backup Service periodically backs up your phone to a
private folder in Google Drive. Auto backup occurs every 24 hours when the phone is idle, charging,
and connected to a Wi-Fi network.
Backup data will not count towards your Google Drive storage quota. Large files or files that app
developers have chosen to exclude from the service will not be backed up.
Restoring your wallpaper from your old phone may depend on screen resolution compatibility of
both your old phone and HTC Desire 555.
Backing up HTC Desire 555
Automatically back up HTC Desire 555 to Google Drive so you can restore content such as app data
and settings when needed.
1. From the Home screen, tap Settings Backup & reset.
2. Tap Back up my data.
3. Tap the On/Off switch to turn it on, and then press .
4. Make sure Automatic restore is turned on.
This allows an app's data and settings saved through the Android Backup Service to be
restored when you reinstall the app on HTC Desire 555.
To select a backup account other than your primary Google Account, tap Backup account and
then select another Google Account. You can also tap Add account to add a new Google Account
for your backup.
86 Sync, backup, and reset
Confidential
For certification only

Backing up your data locally
If you want to separately back up your content such as contacts and text messages on HTC Desire
555, here are some tips on how to export or import your data.
Backing up your contacts
1. From the Home screen, tap , and then find and tap People.
2. On the People tab, tap Manage contacts.
3. Tap Import/Export contacts Export to phone storage or Export to SD card.
4. Select an account or type of contacts to export.
5. To help protect your data, tap Yes, and then set a password for this backup. Be sure to
remember this password. You'll need to enter it again when importing contacts.
If you don't need a password, tap No.
6. Tap OK.
Restoring contacts
1. On the People tab, tap Manage contacts.
2. Tap Import/Export contacts Import from phone storage or Import from SD card.
3. If you have more than one account set up, tap the type for the imported contacts.
4. If you have multiple backups available, select the backup you want to import, and then tap
OK.
5. Enter the password you've set for this backup, and then tap OK.
Backing up your text messages
Keep important text messages by backing them up so you can restore them to the HTC Messages
app, if needed. The Messages app backs up either to the phone storage or to your storage card if you
have one inserted.
Text messages in the secure box and blocked messages will not be backed up. To include such
messages to your backup, move them first to the general message box.
1. From the Home screen, tap , and then find and tap Messages.
2. Tap Back up/Restore SMS Back up Back up SMS.
3. To help protect your data, set a password for your backup. Be sure to remember this
password. You'll need to enter it again when restoring messages.
If you don't need a password, select Do not password protect this backup.
4. Enter a name for your backup file, and then tap OK.
87 Sync, backup, and reset
Confidential
For certification only
Backing up text messages by email
§You need to set up your email account in the HTC Mail app.
§Text messages in the secure box and blocked messages will not be backed up. To include such
messages to your backup, move them first to the general message box.
1. From the Home screen, tap , and then find and tap Messages.
2. Tap Back up/Restore SMS.
3. Tap Back up Back up SMS via mail.
4. To help protect your data, set a password for your backup. Be sure to remember this
password. You'll need to enter it again when restoring messages.
If you don't need a password, select Do not password protect this backup.
5. Enter your email address.
6. Compose your email message, and then send it.
Restoring text messages
1. From the Home screen, tap , and then find and tap Messages.
2. Tap Back up/Restore SMS Restore.
3. Choose how you want to restore the messages, and tap Next.
4. Tap the backup to import.
5. Enter the password you've set for this backup. If you didn't set a password, select This
backup file is not password protected.
6. Tap OK.
To restore text messages that were backed up via email, open the email message with the backup file
attachment from the Mail app. Tap the attachment to download it first, and then tap it again to open
the backup file to import. Enter the password you've set for this backup or select This backup file is
not password protected.
About HTC Sync Manager
HTC Sync Manager supports a computer running a Windows or OS X operating system.
Here's what you can do with HTC Sync Manager.
View and manage media on your computer and phone
§Browse and manage music, photos, and videos that are on your computer and your phone.
§Import iTunes and Windows Media® Player playlists from your computer to HTC Sync
Manager.
88 Sync, backup, and reset
Confidential
For certification only
§Create playlists from music on your phone or your computer and then sync these playlists to
both devices.
§Play music and videos using the built-in player.
Transfer content
§Transfer iPhone photos, text messages, contacts, and more to your HTC phone. You can also
find and install the same apps that you were using on your iPhone.
§Import all music, photos, and videos from your HTC phone to your computer.
§Copy selected music, photos, or videos from your computer to your phone.
§Import documents from your computer to your phone.
Back up and restore
Back up your HTC phone to your computer so you can easily restore your backup to the same phone
or to another HTC phone.
Sync data
Sync data between your phone and your computer.
Getting help
To find out more about using HTC Sync Manager, download the user guide PDF from the HTC
support site (htc.com/hsm/). Or open the Help that comes with the software.
On Windows, click in HTC Sync Manager, and then click Help.
Installing HTC Sync Manager on your computer
§You can install HTC Sync Manager on Windows XP or later versions. To install it on a Mac®
computer, you need OS X 10.6 or later versions.
§If you have problem in installing HTC Sync Manager, close all your running programs and
reinstall. If the problem persists, temporarily disable your anti-virus program and try installing
again.
1. Download the HTC Sync Manager installer from the HTC support site: htc.com/hsm/.
2. Launch the installer and follow the onscreen instructions.
3. Connect your phone to your computer using the supplied USB cable. HTC Sync Manager
opens.
If you disabled your anti-virus program, make sure to turn it back on after installing HTC Sync
Manager.
89 Sync, backup, and reset
Confidential
For certification only

Transferring iPhone content and apps to your HTC
phone
With HTC Sync Manager, easily transfer iPhone content such as contacts, messages, wallpaper,
camera photos, and more to your HTC phone. If you're using an HTC phone that has HTC Sense 6,
HTC Sync Manager also enables your phone to find and install the same apps that you were using on
your iPhone.
You need to use iTunes 9.0 or later to back up your iPhone content first to your computer.
1. Connect your iPhone and your HTC phone to your computer.
2. In HTC Sync Manager, click Home Transfer & Backup.
3. Click the Get Started button.
4. If you haven't used iTunes to back up your iPhone content to your computer, please do so
before proceeding.
5. Select your iPhone backup file, and then click OK.
6. Select the types of content you want to transfer to your HTC phone.
You can choose whether to replace the content on your HTC phone with the iPhone content.
7. Click Start. Wait for HTC Sync Manager to finish transferring content.
8. When done, slide the Notifications panel open on your HTC phone, and then tap .
Choose which apps you were using on iPhone you want to find in Google Play and download
to your HTC phone.
Restarting HTC Desire 555 (Soft reset)
If HTC Desire 555 is running slower than normal, is unresponsive, or has an app that is not
performing properly, try rebooting and see if that helps solve the problem.
1. If the display is off, press the POWER button to turn it back on.
2. Press and hold the POWER button, and then tap Restart.
HTC Desire 555 not responding?
If HTC Desire 555 does not respond when you touch the screen or press the buttons, you
can still restart it.
Press and hold the POWER and VOLUME DOWN buttons for at least 12 seconds.
HTC Desire 555 then restarts.
90 Sync, backup, and reset
Confidential
For certification only

Resetting network settings
Reset the network settings when you're having problems connecting HTC Desire 555 to your mobile
data or Wi-Fi network and Bluetooth devices.
1. From the Home screen, tap Settings Backup & reset.
2. Tap Network settings reset.
3. Tap Reset settings.
4. Tap Reset settings.
Resetting HTC Desire 555 (Hard reset)
If HTC Desire 555 has a persistent problem that cannot be solved, you can perform a factory reset
(also called a hard reset or master reset). A factory reset reverts the phone back to its initial state—
the state before you turned on the phone for the first time.
Factory reset will remove all data on your phone storage, including apps you've downloaded and
installed, your accounts, your files, as well as system and app data and settings. Be sure to back up
any data and files you want to keep before you do a factory reset.
1. From the Home screen, tap Settings Backup & reset.
2. Tap Factory data reset.
To also delete media and other data from your storage card, select Erase SD card.
3. Tap Reset phone.
4. Tap OK.
A factory reset may not permanently erase all data from your phone, including personal
information.
91 Sync, backup, and reset
Confidential
For certification only
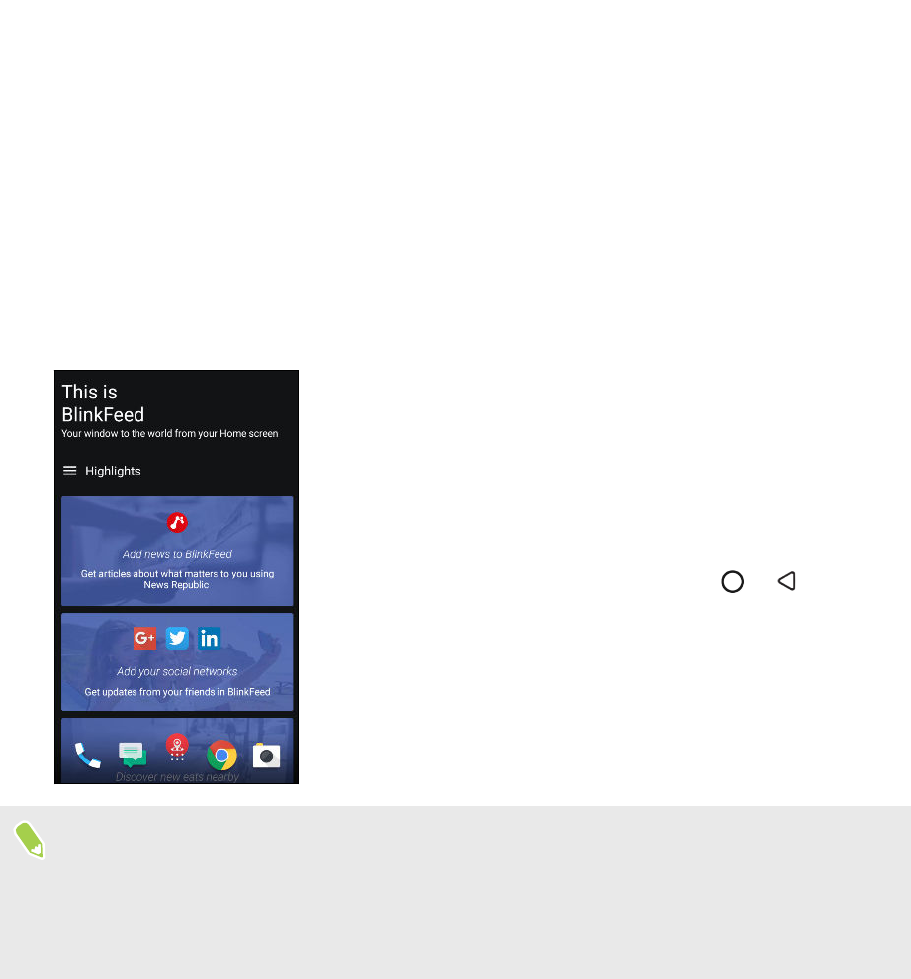
HTC BlinkFeed
What is HTC BlinkFeed?
Get the latest news about your interests or status updates from your friends right on
HTC BlinkFeed. Set up which social networks, news sources, and more will appear.
§Swipe up or down to browse stories on HTC BlinkFeed.
§Tap a tile to view the content. If it's a video tile, you can watch
the video in full screen, hear the audio, and control the
playback.
§While viewing a news article, swipe left or right to see more
stories.
§While in HTC BlinkFeed, you can press or to scroll to
the top.
§Scroll to the top and pull down on the screen to manually
refresh the stream.
§Swipe right on HTC BlinkFeed to open the slideout menu
where you can choose the type of feeds or add your custom
topics to display.
§You'll see the clock widget on HTC BlinkFeed if you've set HTC BlinkFeed as the main Home
screen.
§HTC BlinkFeed is a part of the HTC Sense Home app. To get the latest features of
HTC BlinkFeed, make sure you've downloaded the newest version of HTC Sense Home.
92 HTC BlinkFeed
Confidential
For certification only
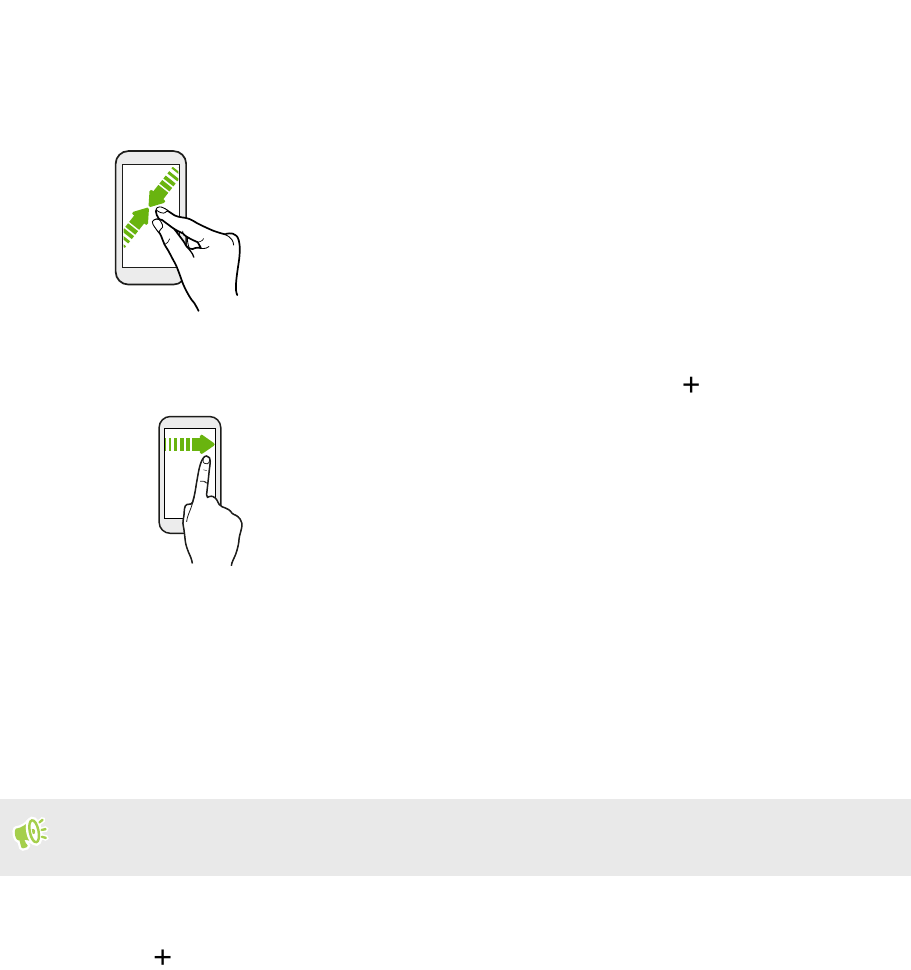
Turning HTC BlinkFeed on or off
1. On the Home screen, slide two fingers together.
2. Do one of the following:
§To turn on HTC BlinkFeed, swipe right on the thumbnails to , then tap it.
§To turn off HTC BlinkFeed, tap the thumbnail to select it, press and hold the thumbnail
and drag it to Remove.
Restaurant recommendations
Can't think of what to eat? Get recommendations for restaurants nearby in HTC BlinkFeed.
Make sure you've added personalized content to HTC BlinkFeed. See Ways of adding content on
HTC BlinkFeed on page 94.
1. On HTC BlinkFeed, swipe right to open the slideout menu.
2. Tap and make sure Mealtime recommendations is selected. If prompted, give
HTC Sense Home permission to access your location and personal usage data.
To get restaurant recommendations, you'll need to actively use HTC BlinkFeed daily. Restaurant
recommendations will show up as a tile in HTC BlinkFeed and may also show up on your lock
screen.
93 HTC BlinkFeed
Confidential
For certification only

Viewing restaurant recommendations
View photos of the restaurant, get directions to the restaurant, and more.
1. When you see a restaurant recommendation tile, tap it to view more information.
2. You can do the following:
§Tap the photo tile or View Photos to browse photos of the restaurant.
§Tap the map icon or address to see the location and get directions to the restaurant.
§If you see a phone number, tap the phone number to call the restaurant.
§If available, tap the dots at the bottom to see more options.
Ways of adding content on HTC BlinkFeed
Personalize HTC BlinkFeed to show articles and status updates from your favorite news sources
and apps.
Adding sources to HTC BlinkFeed
Add news sources such as News Republic® to select from a wide variety of news services.
1. On HTC BlinkFeed, swipe right to open the slideout menu.
2. Tap , and then select the sources you want to add.
Selecting feeds
Discover stories and articles on HTC BlinkFeed.
You need to add a news source before you can select feeds.
1. On HTC BlinkFeed, swipe right to open the slideout menu.
2. Next to News Republic, tap .
3. Swipe across the screen to browse the categories.
4. Select one or more feeds.
94 HTC BlinkFeed
Confidential
For certification only
Showing content from your apps and social networks
See your friends' posts in social networks or show content from your HTC apps right on
HTC BlinkFeed.
§You need to sign in to your social networks before you can post a status update from
HTC BlinkFeed.
§When adding a social network to HTC BlinkFeed, you need to give HTC Sense permission to
access it.
1. On HTC BlinkFeed, swipe right to open the slideout menu.
2. Tap , and then select the apps and social networks you like.
Searching and adding a topic of interest
Looking for a more specific topic? Search for and select topics of interest to display them on
HTC BlinkFeed.
1. On HTC BlinkFeed, swipe right to open the slideout menu.
2. Next to News Republic, tap .
3. Tap , and then tap Search topics and enter keywords of what you're looking for.
4. Tap a result to add it to My topics in the News Republic app.
Customizing the Highlights feed
The Highlights feed displays a mix of top trending articles and status updates from the feed sources
you added. You can set the Highlights feed to only show items from your favorite news sources and
apps.
1. On HTC BlinkFeed, swipe right to open the slideout menu.
2. Tap Settings Choose Highlights topics.
3. Select the feed sources you want to appear in Highlights.
Playing videos on HTC BlinkFeed
If you're connected to Wi-Fi and there's a news or social media post that contains a video, the video
plays automatically on the tile.
§Tap a video tile to play it in full screen. Tap the title of the video tile to open its article page.
§While the video is playing, tap the screen to see the playback controls.
§To turn off autoplay or if you want to autoplay videos while on mobile data, tap to open
the slideout menu, and then tap Settings Videos play automatically. Tap the option
you want.
95 HTC BlinkFeed
Confidential
For certification only

Posting to your social networks
You can easily post a status update from HTC BlinkFeed.
§You need to sign in to your social networks before you can post a status update from
HTC BlinkFeed.
§When adding a social network to HTC BlinkFeed, you need to give HTC Sense permission to
access it.
1. On HTC BlinkFeed, swipe right to open the slideout menu.
2. Tap Compose, and then choose a social network.
3. Compose your status update and post it on your social network.
Removing content from HTC BlinkFeed
Whether it's a tile or an entire feed, you can remove content you don't want to see on
HTC BlinkFeed.
§To remove a tile, press and hold the tile you want to remove, and then tap Remove.
§To remove a feed source, in the slideout menu, next to News Republic tap . Then tap
any tile marked with to remove it.
§To remove social networks or apps from HTC BlinkFeed, in the slideout menu, tap . Then
uncheck the social networks or apps you want to hide from HTC BlinkFeed.
96 HTC BlinkFeed
Confidential
For certification only

Phone calls
Making a call with Smart dial
You can either dial a number directly, or use Smart dial to quickly place a call. Smart dial searches
and calls a stored/synced contact or a number from your call history.
1. On the Home screen, tap the phone icon to open the Phone app.
2. Enter the phone number or first few letters of the contact’s name to see the top matching
contact.
3. If there are a number of matches found (for example, 8 matches), tap the number to see all
the matches.
4. Tap the contact you want to call.
§To check other phone numbers associated with the contact, tap beside the contact name.
§If the phone number has an extension, tap after connecting to the main line and then dial
the extension number.
Making a call with your voice
Call a contact hands-free using your voice.
1. On the Home screen, tap the phone icon to open the Phone app.
2. Tap .
3. Say the name of contact you want to call. For example, say "Call [person's name in
phonebook]."
4. Follow screen instructions to make the call.
97 Phone calls
Confidential
For certification only

Dialing an extension number
To skip voice prompts when dialing an extension number, do one of the following:
§After dialing the main number, press and hold * . A comma (,) is added to the number you are
dialing. Enter the extension number, and then tap the call button. You will be connected to
the mainline and then to the extension number.
§After dialing the main number, press and hold # to add a semicolon (;). Enter the extension
number after the semicolon , and then tap the call button. After connecting to the main line,
tap Send to dial the extension number.
You can save phone numbers with an extension in the People app.
Returning a missed call
You'll see the missed call icon in the status bar when you miss a call.
1. Slide the Notifications panel open to check who the caller is.
2. To return the call, tap Call back.
If you have multiple missed calls, tap the missed calls notification to open the Call History tab.
Speed dial
Use Speed dial to call a phone number with a single tap.
1. On the Home screen, tap the phone icon to open the Phone app.
2. Tap Speed dial . You can also press and hold an unassigned key on the dialpad, and
then tap Yes.
3. Select a contact from the list.
4. On the Speed dial screen, choose the phone number of the contact to use, and a speed dial key
to assign.
5. Tap Save.
To use Speed dial, press and hold the speed dial number you want to call.
Calling a number in a message, email, or calendar event
When you receive a text message, email, or calendar event that has a phone number in it, you can
just tap the number to place a call.
98 Phone calls
Confidential
For certification only
Receiving calls
When you receive a phone call from a contact, the Incoming call screen appears.
HTC Desire 555 will automatically adjust the ringtone volume when you use the polite ringer
and pocket mode features.
Answering or rejecting a call
Do one of the following:
§Tap Answer or Decline.
§If you've set up a lock screen, drag or upwards.
Muting the ringing sound without rejecting the call
Do one of the following:
§Press the VOLUME DOWN or VOLUME UP button.
§Press the POWER button.
§Place HTC Desire 555 face down on a level surface.
Making an emergency call
In some regions, you can make emergency calls from HTC Desire 555 even if the nano SIM card has
been blocked or if you don't have one installed.
If you don't have a network signal, you won't be able to make an emergency call.
1. On the Home screen, tap the phone icon to open the Phone app.
2. Dial the emergency number for your locale, and then tap Call.
If you've enabled but forgotten your lock password or lock pattern, you can still make emergency
calls by tapping Emergency call on the screen.
What can I do during a call?
When a call is in progress, you can turn the speakerphone on, place the call on hold, and more.
Putting a call on hold
To put the call on hold, tap Hold. The status bar then displays the hold call icon .
To resume the call, tap Unhold.
99 Phone calls
Confidential
For certification only
Switching between calls
If you’re already in a call and you accept another call, you can switch between the two calls.
1. When you receive another call, tap Answer to accept the second call and put the first call on
hold.
2. To switch between the calls, tap the person you want to talk to on the screen.
Turning the speakerphone on or off during a call
To decrease potential damage to your hearing, do not hold HTC Desire 555 to your ear when the
speakerphone is on.
§On the call screen, tap . The speakerphone icon appears in the status bar.
§To turn the speakerphone off, tap .
Muting the microphone during a call
On the call screen, tap to toggle between turning the microphone on or off. When the
microphone is turned off, the mute icon appears in the status bar.
Ending a call
Do one of the following to end the call:
§On the call screen, tap End Call.
§Slide the Notifications panel open, then tap End Call.
Setting up a conference call
Conference calling with your friends, family, or co-workers is easy. Make or accept a call, and then
simply dial each subsequent call to add it to the conference.
Make sure that you have conference calling service activated. Contact your mobile operator for
details.
1. Make a call to the first conference call participant.
2. When connected, tap Add call, and then dial the number of the second participant. The
first participant is put on hold.
3. When connected to the second participant, tap .
4. To add another participant, tap , and then dial the number of the contact.
5. When connected, tap to add the participant to the conference call. Tap to access
options such as ending the call with a participant.
6. To end the conference call, tap End Call.
100 Phone calls
Confidential
For certification only
Call History
Use Call History to check missed calls, your dialed numbers, and received calls.
1. On the Home screen, tap the phone icon to open the Phone app.
2. Swipe to view the Call History tab.
3. Do one of the following:
§Tap a name or number in the list to call.
§Press and hold a name or number in the list to display the options menu.
§Tap to display just a particular type of call such as missed calls or outgoing calls.
Adding a new phone number to your contacts from Call History
1. On the Call History tab, tap next to the new phone number.
2. Choose whether to create a new contact or save the number to an existing contact.
Clearing the Call History list
1. On the Call History tab, tap Remove call history.
2. Select the items you want to delete, or tap Select all.
3. Tap Delete.
Blocking a caller
When you block a phone number or a contact, all calls from the phone number or contact will be
declined automatically.
On the Call History tab, press and hold the contact or phone number you want to block, and then tap
Block contact.
You can always remove a caller from your blocked list. On the Call History tab, tap Blocked
contacts. In the All tab, press and hold a contact, and then tap Unblock contacts.
Switching between silent, vibrate, and normal modes
Do one of the following:
§To change from silent to normal mode, press the VOLUME UP button twice.
§To change from vibrate to normal mode, press the VOLUME UP button.
§Go to Settings, and then tap Sound & notification Sound profile.
101 Phone calls
Confidential
For certification only
Home dialing
When you're on a trip abroad, it's easy to dial friends and family from home.
Your home country code is automatically added when you call your contacts while roaming. But
when manually entering a phone number to call, you need to enter a plus (+) sign and country code
before the number.
Using a roaming service may incur additional charges. Check with your mobile operator for rates
before using a roaming service.
Changing the default country code for Home dialing
1. From the Home screen, tap , and then tap Settings Call.
2. Tap Home dialing settings.
3. Select a country, and then tap OK.
Turning off Home dialing
If you prefer to manually enter complete phone numbers to call while roaming, you can turn off
Home dialing.
1. From the Home screen, tap , and then tap Settings Call.
2. Clear the Home dialing option.
102 Phone calls
Confidential
For certification only
Messages
Sending a text message (SMS)
1. From the Home screen, tap , and then find and tap Messages.
2. Tap .
3. Enter a contact name or mobile number in the To field.
4. Tap the area that says Add text, and then enter your message.
5. Tap , or press to save the message as a draft.
§There is a limit on the number of characters for a single text message (displayed above ). If
you exceed the limit, your text message will be delivered as one but will be billed as more than
one message.
§Your text message automatically becomes a multimedia message if you enter an email address
as the recipient, attach an item, or compose a very long message.
Sending a multimedia message (MMS)
Before attaching and sending a high-resolution video, compress it first so that the file size
doesn't exceed the message size limit.
1. From the Home screen, tap , and then find and tap Messages.
2. Tap .
3. Enter a contact name, mobile number, or email address in the To field.
4. Tap the area that says Add text, and then enter your message.
5. Tap , and then choose an attachment type.
6. Select or browse for the item to attach.
7. After adding an attachment, tap to see options for replacing, viewing or removing your
attachment.
8. Tap , or press to save the message as a draft.
103 Messages
Confidential
For certification only
Sending a group message
Group messaging makes it easy to send a message to multiple contacts all at once. You can choose to
send a group SMS or group MMS.
Group MMS may incur extra data fees.
1. From the Home screen, tap , and then find and tap Messages.
2. Tap .
3. Tap , and then select multiple recipients.
4. To send a group SMS, tap , and then select Send as individual. Clear this option to send
your message as a group MMS.
Group
SMS Your message will be sent to the recipients as a text message and you will be
charged by your mobile operator for each message sent. Replies of your
recipients are sorted separately.
Group
MMS Similar to a group chat, sending a group MMS lets your recipients join the
conversation you've started.
HTC Desire 555 also organizes message replies in a single conversation thread.
If this is your first time to send a group MMS, you may need to enter your
mobile phone number.
5. Tap the area that says Add text, then enter your message.
6. Tap .
Resuming a draft message
If you switch to another app or if you receive an incoming call while composing a text message, the
message is automatically saved as a draft.
1. From the Home screen, tap , and then find and tap Messages.
2. Tap a draft message, and then edit the message.
To see all draft messages in one place, tap , and then tap Filter Drafts.
3. Tap .
Replying to a message
1. From the Home screen, tap , and then find and tap Messages.
2. Tap a contact (or phone number) to display the exchange of messages with that contact.
104 Messages
Confidential
For certification only
3. Tap the area that says Add text, and then enter your message.
4. Tap .
Replying to a contact's other phone number
When a contact has multiple phone numbers stored on HTC Desire 555, you can select which phone
number to reply to.
Keep in mind that if you don't select another number, your response will be sent to the phone
number that your contact used to send the last message.
1. While viewing the exchange of messages with a contact, tap Recipient phone number
and select which phone number you want to reply to.
2. Tap the area that says Add text, then enter your reply message.
3. Tap .
Forwarding a message
1. From the Home screen, tap , and then find and tap Messages.
2. Tap a contact (or phone number) to view the exchange of messages with that contact.
3. Tap a message, and then tap Forward.
Moving messages to the secure box
You can move private messages to the secure box. You will need to enter a password to read these
messages.
§The secure box does not encrypt messages.
§Messages stored on a nano SIM card cannot be moved to the secure box.
1. From the Home screen, tap , and then find and tap Messages.
2. Tap a contact (or phone number) to display the exchange of messages with that contact.
3. Tap Move to secure box.
4. Select the messages, and then tap Move.
To move all the messages from a contact, on the Messages screen, press and hold the contact and
tap Move to secure box.
§To read messages in the secure box, on the Messages screen, tap Secure. If it is your first
time to use the secure box, set a password.
§To remove messages or contacts from the secure box, press and hold the contact (or phone
number) and tap Move to general box.
105 Messages
Confidential
For certification only
Blocking unwanted messages
Declutter your Messages screen by moving spam messages from contacts to the block box. If you
have blocked a contact, that contact's text or picture messages will also be in the block box.
§Open the Messages app, press and hold a contact (or phone number) and tap Block contact.
§To block multiple contacts, tap Block contacts, select the contacts, and tap Block.
When the contact sends you messages, you will not see them in the Messages screen or receive
notifications and calls.
To read messages in the block box, on the Messages screen, tap Block.
§To remove messages or contacts from the block box, press and hold the contact (or phone
number) and tap Unblock.
§To completely discard future messages from blocked contacts, tap Settings General, and
then clear the Save block message option.
Copying a text message to the nano SIM card
1. From the Home screen, tap , and then find and tap Messages.
2. Tap a contact (or phone number) to display the exchange of messages with that contact.
3. Tap the message, and then tap Copy to SIM. The nano SIM card icon is displayed.
Deleting messages and conversations
Open the Messages app and do any of the following:
Delete a message Open the conversation thread with a contact, tap the message, and then tap
Delete message.
To delete multiple messages within a conversation, tap Delete messages
Delete by selection, and then select the messages to delete.
Delete a
conversation Press and hold a contact (or phone number), and then tap Delete.
To delete multiple conversations, tap Delete threads, and then select
the conversations to delete.
In the Messages settings, tap General Delete old messages to auto delete old messages.
106 Messages
Confidential
For certification only

Preventing a message from being deleted
You can lock a message to prevent it from being deleted even if you delete the other messages in the
conversation.
1. Open the Messages app.
2. Tap a contact (or phone number) to display the exchange of messages with that contact.
3. Tap the message that you want to lock.
4. Tap Lock message on the options menu. You'll then see a lock icon for locked messages.
107 Messages
Confidential
For certification only
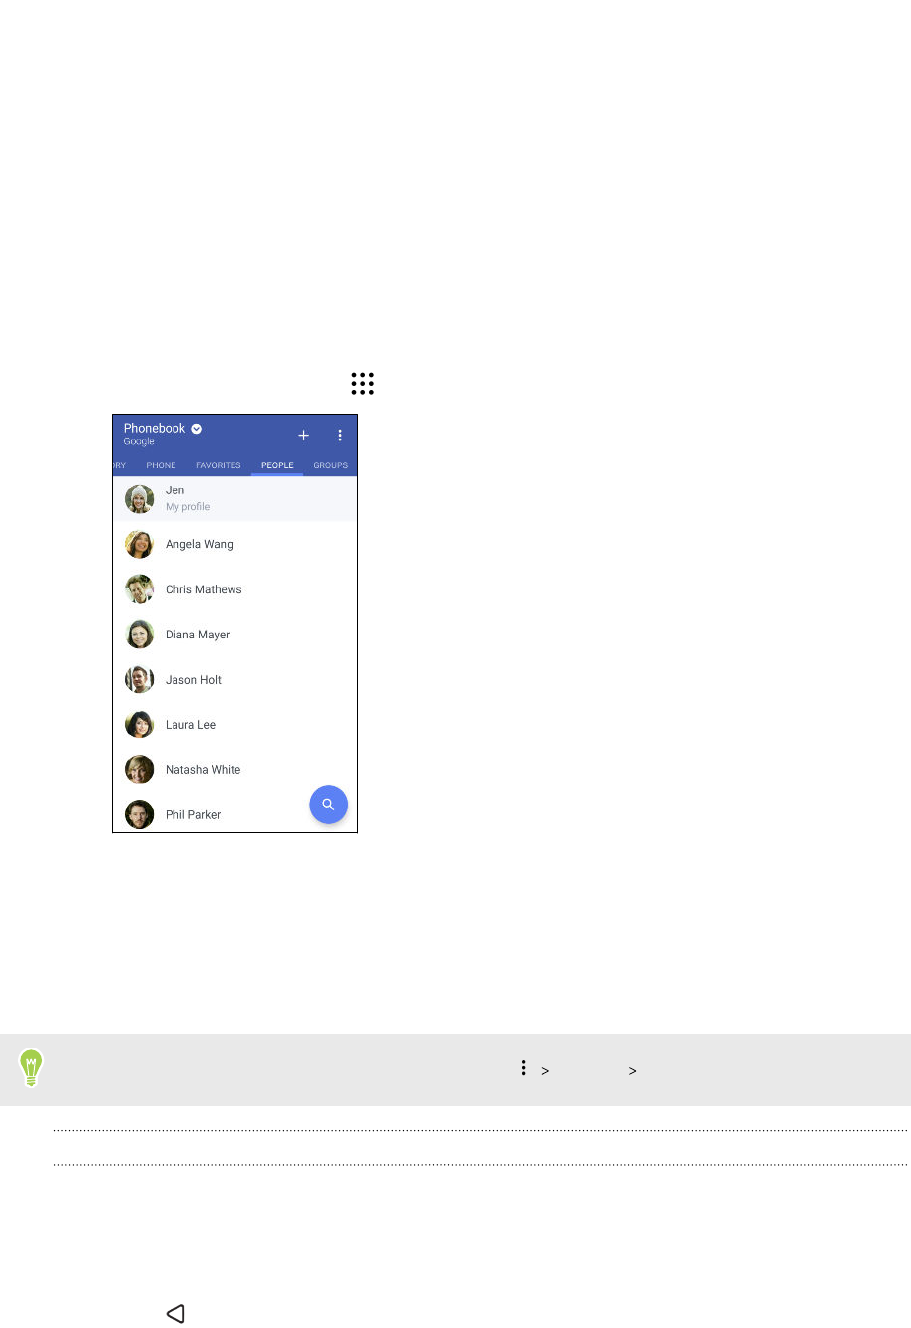
People
Your contacts list
The People app lists all contacts you've stored on HTC Desire 555 and from online accounts you're
logged in to. Use the People app to easily manage communications with people that matter to you.
1. From the Home screen, tap , and then find and tap People.
2. On your contacts list, you can:
§View your profile and edit your contact information.
§Create, edit, find, or send contacts.
§Tap a contact photo to find ways to quickly connect with the contact.
§See when a contact has sent you new messages.
To sort your contacts by their first or last name, tap Settings Sort contacts by.
Filtering your contacts list
When your contacts list gets long, you can choose which contact accounts to show.
1. On the People tab, tap Phonebook.
2. Choose the accounts that contain the contacts you want to display.
3. Press .
108 People
Confidential
For certification only
Finding people
Search for contacts stored on HTC Desire 555, your company directory if you have an Exchange
ActiveSync account, or social networks you've signed into.
1. From the Home screen, tap , and then find and tap People.
2. On the People tab, you can:
§Find people in your contacts list. Tap , and then enter the first few letters of the
contact name in the Search people box.
§Find people on your company directory. Tap , enter the first few letters of the
contact name in the Search people box, and then tap Search contacts in your Company
Directory.
Aside from searching for a contact by name, you can search using a contact's email address or
company name. On the People tab, tap Settings Search contacts by, and then choose a
search criteria.
Setting up your profile
Store your personal contact information to easily send it to other people.
1. From the Home screen, tap , and then find and tap People.
2. Tap My profile.
3. Tap Edit my contact card.
4. Enter or edit your name and contact details.
5. Tap or the current photo to change your contact photo.
6. Tap .
Adding a new contact
1. From the Home screen, tap , and then find and tap People.
2. On the People tab, tap .
3. Tap the Name field, and then enter the contact name. Tap to separately enter the
contact's given, middle, or family name and name suffix, such as Jr.
4. Select the Contact type. This determines which account the contact will sync with.
5. Enter the contact information in the fields provided.
6. Tap .
When you tap the added contact in your contacts list, you'll see the contact information and your
exchange of messages and calls.
109 People
Confidential
For certification only
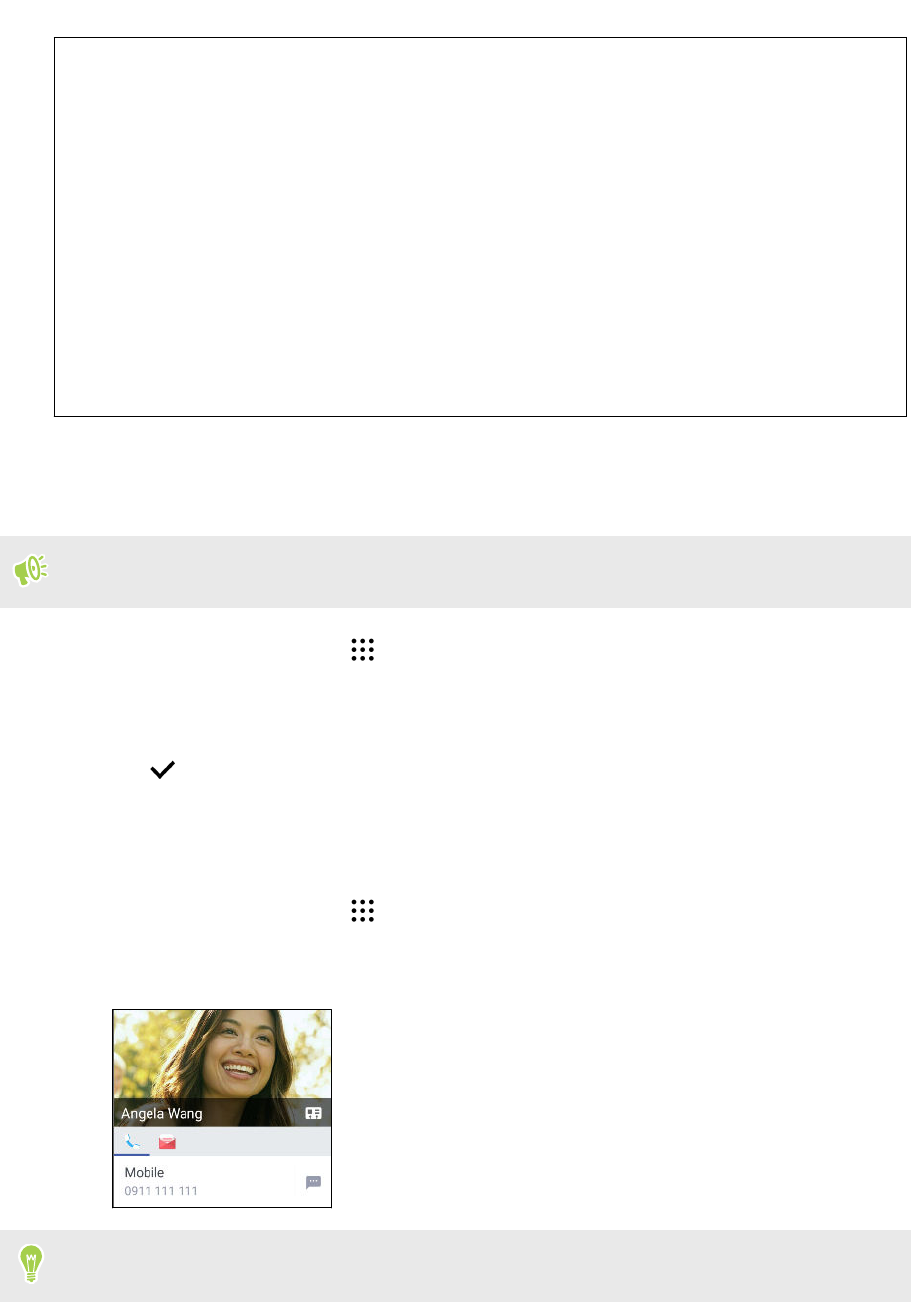
How do I add an extension number to a contact number?
While creating a new contact or editing a contact's details in People, you can add an
extension number to their number so you can skip the voice prompts when calling.
1. After entering the number of the main line, do one of the following:
§Tap P to insert a pause before the phone dials the extension number. To insert a
longer pause, enter P several times.
§Tap W to be prompted to confirm the extension number.
2. Enter the extension number.
Editing a contact’s information
Social network contacts cannot be edited.
1. From the Home screen, tap , and then find and tap People.
2. On the People tab, press and hold the contact, and then tap Edit contact.
3. Enter the new information.
4. Tap .
Getting in touch with a contact
1. From the Home screen, tap , and then find and tap People.
2. Tap a contact's photo (not the name), and then choose how you want to get in touch with that
contact.
For more ways of getting in touch with your contact, tap an icon below the contact photo.
110 People
Confidential
For certification only
Importing or copying contacts
Importing contacts from your nano SIM card
1. From the Home screen, tap , and then find and tap People.
2. On the People tab, tap Manage contacts.
3. Tap Import/Export contacts Import from SIM card.
4. If prompted, select which account you'd like to import your contacts to.
5. Select the contacts you want to import.
6. Tap Save.
Importing a contact from an Exchange ActiveSync account
1. On the People tab, tap and enter the contact's name or email address in the search box.
2. Tap Search contacts in your Company Directory.
3. Tap the name of the contact you want copied to HTC Desire 555.
4. Tap to import the contact.
Copying contacts from one account to another
Contacts from social networks may not be able to be copied.
1. On the People tab, tap Manage contacts.
2. Tap Copy contacts, and then choose a contact type or online account to copy from.
3. Select a contact type or account you want to save to.
111 People
Confidential
For certification only
Merging contact information
Avoid duplicate entries by merging contact information from different sources, such as your social
network accounts, into one contact.
Accepting contact link suggestions
When HTC Desire 555 finds contacts that can be merged, you’ll see a link notification when you
open the People app.
1. From the Home screen, tap , and then find and tap People.
2. On the People tab, tap the Contact link suggestion notification when available. You'll see a
list of suggested contacts to merge.
3. Tap next to the contact you want to merge. Otherwise, tap to dismiss the link
suggestion.
If you don't want to receive contact link suggestions, on the People tab, tap Settings. Clear
the Suggest contact link option.
Manually merging contact information
1. On the People tab, tap the name of the contact (not the icon or photo) you want to link.
2. Tap Link.
3. You can:
§Under Suggest links, link the contact to an account.
§Under Add contact, tap one of the options to link to another contact.
Breaking the link
1. On the People tab, tap the name of the contact (not the icon or photo) whose link you want to
break.
2. Tap Link.
3. Under the Linked contacts section, tap beside an account to break the link.
Sending contact information
1. From the Home screen, tap , and then find and tap People.
2. On the People tab, do one of the following:
To send Do this
Someone's contact
information Press and hold the name of the contact (not the icon or photo),
and then tap Send contact as vCard.
Your contact information Press and hold My profile, and then tap Send my profile.
112 People
Confidential
For certification only

3. Choose how you want to send the vCard.
4. Select the type of information you want to send.
5. Tap Send.
Sending multiple contact cards
1. On the People tab, tap Send contacts.
2. Select the contacts whose contact information you want to share
3. Tap Send.
4. Choose how you want to send the contact cards.
Contact groups
Organize your friends, family, and colleagues into groups so you can quickly send a message or email
to everyone in the group. We’ve also set up the Frequent group to automatically add the contacts
you dial or get calls from the most.
HTC Desire 555 also syncs with groups you've created in your Google Account.
Creating a group
1. From the Home screen, tap , and then find and tap People.
2. On the Groups tab, tap .
3. Enter a name for the group, and then tap Add contact to group.
4. Select the contacts you want to add, and then tap Save.
5. When your group is complete, tap Save.
Sending a message or email to a group
You will be charged for each text message sent. For example, if you send a message to a group of
five people, you will be charged for five messages.
1. On the Groups tab, tap the group you want to send a message or email to.
2. Go to the Group action tab.
3. Choose if you want to send a group message or group email.
113 People
Confidential
For certification only

Editing a group
1. On the Groups tab, press and hold the group, and then tap Edit group.
2. You can:
§Change the group name. You can only change the name for groups that you have
created.
§Add more contacts to the group. Tap Add contact to group.
§Select the contacts you want to remove from the group.
3. Tap Save.
Removing contact groups
1. On the Groups tab, tap Edit groups.
2. Select the contact groups you want to remove.
3. Tap Save.
Private contacts
If you don't want to show a contact's name and photo on the lock screen when you have an incoming
call, add the contact to your private contacts list.
Adding a contact to the private contacts list
Contacts must have a phone number before they can be added to the private contacts list.
1. From the Home screen, tap , and then find and tap People.
2. On the People tab, press and hold the contact, and then tap Add to private contacts.
To view your private contacts list, on the People tab, tap Manage contacts Private contacts.
Organizing your private contacts
1. On the People tab, tap Manage contacts Private contacts.
2. To add contacts to the private contacts list, tap , select the contacts you want to add, and
then tap Save.
3. To remove private contacts from the list, tap Remove private contact, select the
contacts you want to remove, and then tap Remove.
114 People
Confidential
For certification only
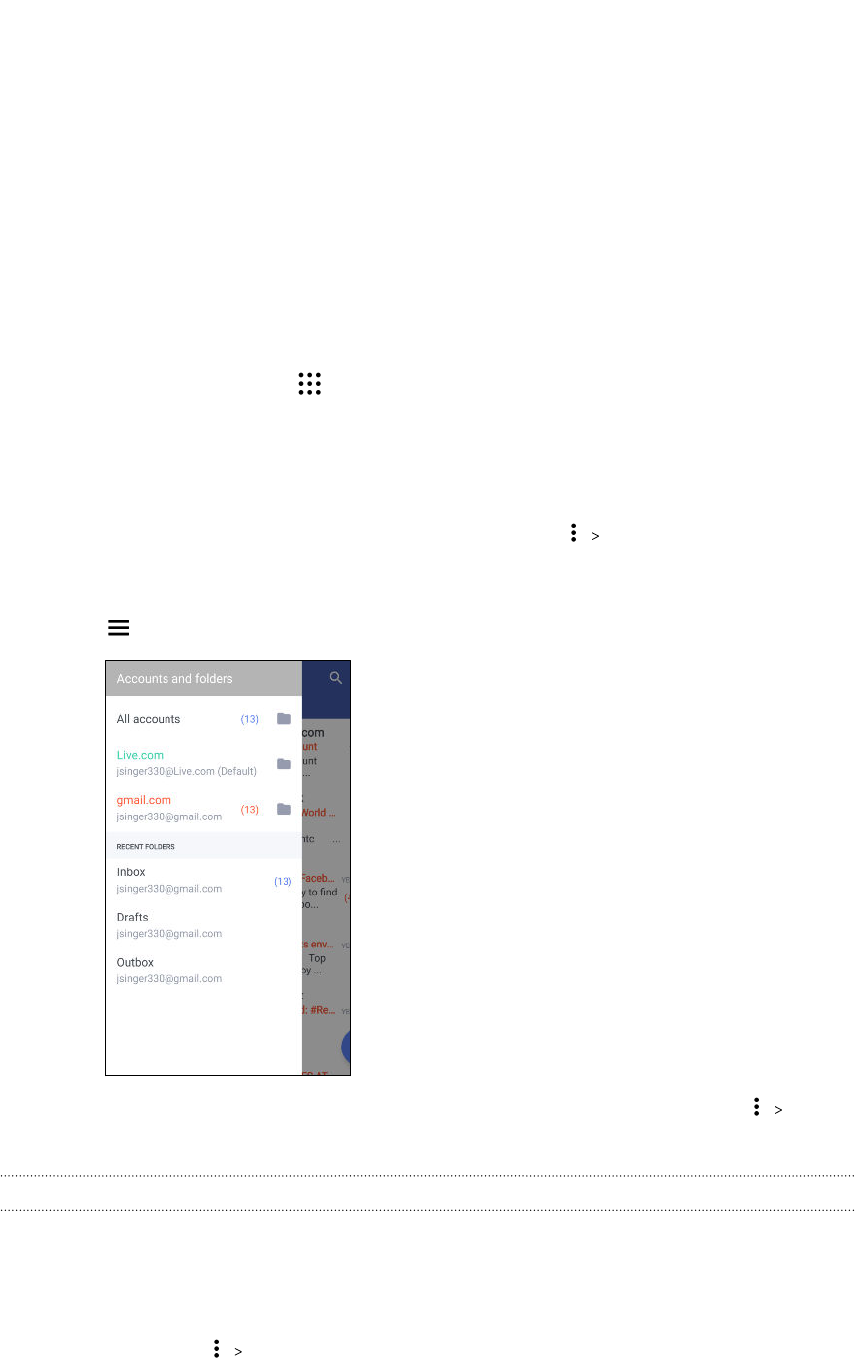
Email
Checking your mail
The Mail app is where you read, send, and organize email messages from one or more email
accounts that you’ve set up on your phone.
1. From the Home screen, tap , and then find and tap Mail. The inbox of one of your email
accounts appears.
2. Do any of the following:
§Tap an email message to read.
§To display email messages in another mail folder, tap Folder, and then tap the
folder you want to view.
§To switch between email accounts or view email messages from all your accounts, tap
.
§To change an email account's settings, select the account first and then tap
Settings.
Organizing your inbox
Do you have a big pile of email messages in your inbox? Organize your email messages into tabs and
quickly find the messages you want.
1. Switch to the email account that you want to use.
2. In the inbox, tap Edit tabs.
3. Select the tabs you want to add to the inbox.
115 Email
Confidential
For certification only
4. To arrange the tabs, drag , and then move the tab to its new location.
5. Tap Done.
6. Swipe to the added tab to check your email messages.
Sending an email message
1. From the Home screen, tap , and then find and tap Mail.
2. Switch to the email account that you want to use.
3. Tap .
4. Fill in one or more recipients.
Want to loop in more recipients in a carbon copy (Cc) or blind carbon copy (Bcc) of the email
message? Tap Show Cc/Bcc.
5. Enter the subject, and then compose your message.
6. Do any of the following:
§Add an attachment. Tap and then choose what you want to attach.
§Set the priority for an important message. Tap Set priority.
7. Tap .
To save the email as draft and send it later, tap Save. Or press .
Resuming a draft email message
1. In an email account inbox, tap Folder Drafts.
2. Tap the message.
3. When you finish editing the message, tap .
Reading and replying to an email message
1. From the Home screen, tap , and then find and tap Mail.
2. Switch to the email account you want to use.
3. In the email account inbox, tap the email message or conversation you want to read.
If you want to read a particular message inside an email conversation, tap to expand the
conversation, and then tap the email message.
4. Tap Reply or Reply All.
Tap for more actions for the email.
116 Email
Confidential
For certification only
Quickly replying to an email message
You can quickly respond to a new email message from the Home screen or lock screen.
1. When you receive a new email message notification, slide the Notifications panel down.
2. On the email preview, tap Reply all.
If you have several notifications and you don't see the email options, expand the email
preview by sliding two fingers apart on the notification.
3. Compose your reply message and tap .
Managing email messages
The Mail app provides easy ways to sort, move, or delete your email messages.
Sorting email messages
Customize how you sort your email messages.
In an email account inbox, tap Sort, and select from the sorting options.
Moving email messages to another folder
1. Switch to the email account you want to use.
2. Select the email messages you want to move.
To select all, select one email message first, and then tap Select all.
3. Tap Move to, and then select a folder.
Deleting email messages
1. Switch to the email account you want to use.
2. Select the email messages you want to delete.
To select all, select one email message first, and then tap Select all.
3. Tap Delete.
Searching email messages
1. From the Home screen, tap , and then find and tap Mail.
2. Tap .
3. If you want to narrow the scope for your search, tap , check the search options, and then
tap OK.
117 Email
Confidential
For certification only
4. In the search box, enter the words you want to search for.
5. Tap a result to open the email message.
Searching for emails from a contact
Do you remember the sender, but can't find a particular email from him or her?
1. Switch to the email account you want to use.
2. Press and hold an email message from a contact.
3. Tap Show all mail from sender. A list of email messages from that contact appears.
Working with Exchange ActiveSync email
With your Microsoft Exchange ActiveSync account, you can flag important email messages or set
your out of the office reply right on your phone.
Flagging an email
1. From the Home screen, tap , and then find and tap Mail.
2. Switch to your Exchange ActiveSync account.
3. While viewing the inbox, tap the flag icon that appears beside an email message or
conversation.
To flag an email message inside a conversation, tap to expand the conversation, and then tap
the flag icon of the email message.
Setting your Out of the office status
1. Switch to your Exchange ActiveSync account.
2. Tap Out of the office.
3. Tap your current office status, and then select Out of the office.
4. Set the dates and times.
5. Enter the auto-reply message.
6. If you want a different auto-reply message for recipients outside your organization, tap the
Send replies to external senders option, and then enter the auto-reply message in the box.
7. Tap Save.
118 Email
Confidential
For certification only
Adding an email account
Set up additional email accounts such as another Microsoft Exchange ActiveSync account or an
account from a Web-based email service or email provider.
If you're adding a Microsoft Exchange ActiveSync or a POP3/IMAP email account, ask your
network administrator or email service provider for additional email settings that you may need.
1. From the Home screen, tap , and then find and tap Mail.
2. Tap Add account.
3. Select an email account type from the list of email providers. Otherwise, tap Other (POP3/
IMAP).
4. Enter the email address and password for your email account, and then tap Next.
Some email accounts allow you to set the sync schedule.
5. Enter a name for your email account, and then tap Finish setup.
What is Smart Sync?
Smart Sync automatically extends the sync time the longer the Mail app is inactive. Set your email
account to Smart Sync when you don't need to check new email messages frequently. Smart Sync
helps save battery power.
If you want to receive email messages as they arrive, select another Peak time sync and Off-peak
sync schedule in the email account's Sync, Send & Receive settings.
119 Email
Confidential
For certification only
Other apps
Using the Clock
Get more from the Clock app than just the regular date and time. Use HTC Desire 555 as a world
clock to see the date and time in cities across the globe. You can also set alarms or track your time
using the stopwatch or timer.
Setting an alarm
You can set up one or more alarms.
1. From the Home screen, tap , and then find and tap Clock.
2. On the Alarms tab, select the check box of an alarm and then tap that alarm.
3. Under Set alarm, use the scroll wheels to set the alarm time.
4. If you want the alarm for multiple days, tap Repeat.
5. Tap Done.
§To turn off an alarm, clear the check box of that alarm.
§If you need to set more than three alarms, tap .
Setting the date and time manually
1. From the Home screen, tap , and then find and tap Clock.
2. On the World Clock tab, tap Set date & time.
3. Clear Automatic date & time and Automatic time zone, and then set the time zone, date,
and time as required.
To display military time, choose the Use 24-hour format option.
120 Other apps
Confidential
For certification only
Checking Weather
Use the Weather app and widget to check the current weather and weather forecasts for the next
few days. In addition to your current location, you can view weather forecasts for other cities
around the globe.
1. From the Home screen, tap , and then find and tap Weather. You'll see the weather for
different cities, including where you are.
2. Tap a city to view weather information.
3. Swipe to the Hourly and Forecast tabs to view the forecast in your selected location.
4. To check the weather in other cities, tap , and then select the city you want.
5. To add more cities, tap and then enter the location.
6. To change the temperature scale, update schedule, and more, tap Settings.
Your settings in the Weather app also control the weather information that is shown in the Clock.
Recording voice clips
Use Voice Recorder to capture information during lectures, interviews, or even to create your own
audio log.
1. From the Home screen, tap , and then find and tap Voice Recorder.
2. Hold the microphone near the sound source.
3. Tap to start recording a voice clip.
Voice Recorder can run in the background while you do other things on HTC Desire 555, except
when you open other apps that also use audio functions.
4. Tap to stop recording.
To play back the voice clip, tap .
To see your recorded voice clips, tap . Press and hold a voice clip to see options for sharing,
setting it as a ringtone, and more.
Listening to FM Radio
Listen to your favorite radio stations using the FM Radio app.
You need to connect a headset first to the audio jack of HTC Desire 555 to use FM Radio. FM
Radio uses the stereo headset as the FM radio antenna.
1. From the Home screen, tap , and then find and tap FM Radio.
2. If this is your first time to open FM Radio, it will automatically scan for local FM stations.
When it finishes scanning, scroll through the list and tap a station you want to listen to.
121 Other apps
Confidential
For certification only

3. While you're listening to an FM station, you can:
§Tap or to go to the next or previous station.
§Drag the slider to tune in to a frequency on the FM band. To fine tune the radio
frequency, tap or .
§Tap to mark a radio station as a favorite. To see your other favorites and preset
stations, tap .
4. To turn off FM Radio, tap .
To turn it back on while you're still in the app, tap .
Google apps
Count on the suite of Google apps on HTC Desire 555 to help you get productive, surf the Internet,
be entertained, and more.
Gmail
Send and receive emails from your Google Accounts or from other email accounts.
Gmail now also lets you add your Microsoft Exchange ActiveSync work email.
Google Calendar
Schedule events, meetings, and appointments. Google Calendar™ syncs with your Google Account
so your calendar events and reminders go with you.
Google Chrome
Surf the Internet, search the Web, and bookmark your favorite websites.
Google Drive
Store your photos, documents, and other files on Google Drive to access them on HTC Desire 555,
computer, and other devices. In addition to the default storage that you get from Google Drive, you
may be eligible to receive additional online storage for free. Sign in to your Google Account on
HTC Desire 555—and not from your computer or other non-HTC phones—to claim this offer.
Google Maps
Track your current location, view real-time traffic situations, and receive detailed directions to your
destination.
It also provides a search tool where you can locate places of interest or an address on a map, or view
locations at street level.
Google Play Music
Create your own music library, play your favorite tracks, and purchase albums or songs.
122 Other apps
Confidential
For certification only

YouTube
Share your videos or check out the latest viral videos.
123 Other apps
Confidential
For certification only
Internet connections
Turning the data connection on or off
Turning your data connection off saves battery life and money on data charges.
You need a 4G/LTE plan to use your operator's 4G/LTE network for voice calls and data services.
Check with your operator for details.
1. From the Home screen, tap , and then find and tap Settings.
2. Tap the Mobile data On/Off switch to turn the data connection on and off.
If you don’t have the data connection turned on and you’re also not connected to a Wi-Fi
network, you won’t receive automatic updates to your email, social network accounts, and other
synced information.
Managing your data usage
If you're on a limited data allowance, it's important to keep track of the activities and apps that
usually send and receive data, such as browsing the web, syncing online accounts, and sending email
or sharing status updates.
Here are some other examples:
§Streaming web videos and music
§Playing online games
§Downloading apps, maps, and files
§Refreshing apps to update info and feeds
§Uploading and backing up your files to your online storage account
§Using HTC Desire 555 as a Wi-Fi hotspot
§Sharing your mobile data connection by USB tethering
To help you save on data usage, connect to a Wi-Fi network whenever possible and set your online
accounts and emails to sync less frequently.
124 Internet connections
Confidential
For certification only
Turning data roaming on or off
Connect to your mobile operator’s partner networks and access data services when you’re out of
your mobile operator’s coverage area.
Using data services while roaming may be costly. Check with your mobile operator for data
roaming rates before you use data roaming.
1. From the Home screen, tap , and then find and tap Settings.
2. Tap Mobile data.
3. Select or clear the Data roaming option.
Keeping track of your data usage
Monitor your data usage to help prevent going over your monthly data allowance.
Data usage measured by HTC Desire 555 may differ from, and be less than, your actual data
usage.
1. From the Home screen, tap , and then find and tap Settings.
2. Under Wireless & networks, tap More Data usage.
3. Select Limit mobile data usage and tap OK to automatically disable your data connection
when you reach the set limit.
4. Drag the upper LIMIT line to set your monthly data limit.
5. Select Alert me about data usage, and then drag the lower ALERT line to set an alert before
you reach your monthly data limit.
6. Tap Reset data usage, and then set the day of the month when your usage cycle resets. This
date is usually the start of your monthly billing cycle.
If you're connecting HTC Desire 555 to another portable Wi-Fi hotspot, tap Mobile
hotspots to restrict background data from downloading that may incur extra data fees.
Viewing the data usage of apps
1. From the Home screen, tap , and then find and tap Settings.
2. Under Wireless & networks, tap More Data usage.
3. Scroll down the screen to see a list of apps and their data usage info.
4. Tap an app to see more details.
125 Internet connections
Confidential
For certification only
Wi-Fi connection
To use Wi-Fi, you need access to a wireless access point or “hotspot”.
The availability and strength of a Wi-Fi signal varies depending on objects the Wi-Fi signal has to
pass through (such as buildings or a wall between rooms).
Turning Wi-Fi on or off
1. From the Home screen, tap , and then find and tap Settings.
2. Tap the Wi-Fi On/Off switch to turn Wi-Fi on or off.
3. Tap Wi-Fi to see a list of detected wireless networks.
§To manually scan for Wi-Fi networks, tap Scan.
§If the wireless network that you want is not listed, tap Add network to manually add it.
Connecting to a Wi-Fi network
1. Turn Wi-Fi on, and check the list of detected Wi-Fi networks.
See Turning Wi-Fi on or off on page 126.
2. Tap a Wi-Fi network you want to connect to.
3. If you selected a secured network, enter the network key or password.
4. Tap Connect. You'll see the Wi-Fi icon in the status bar when connected.
Connecting to a Wi-Fi network via WPS
If you're using a Wi-Fi router with Wi-Fi Protected Setup (WPS), you can connect HTC Desire 555
easily.
1. Turn Wi-Fi on, and check the list of detected Wi-Fi networks.
See Turning Wi-Fi on or off on page 126.
2. Tap WPS Push, and then press the WPS button on your Wi-Fi router.
To use the Wi-Fi Protected Setup (WPS) PIN method, tap WPS Pin Entry.
126 Internet connections
Confidential
For certification only
Logging into a public Wi-Fi network automatically (WISPr)
You can set HTC Desire 555 to automatically log into a public Wi-Fi network that you regularly use.
This saves you the trouble of going through the Wi-Fi provider's web authentication every time you
connect to their Wi-Fi network. Just add your login credentials to the WISPr (Wireless Internet
Service Provider roaming) settings.
The access point of the Wi-Fi network needs to support the WISPr web portal. Consult the Wi-Fi
provider for details.
1. From the Home screen, tap , and then find and tap Settings.
2. If Wi-Fi connection is off, tap the Wi-Fi On/Off switch to turn it on.
3. Tap Wi-Fi.
4. Tap Advanced.
5. Under WISPr settings, select Auto login and then tap WISPr account settings Add a new
account.
6. Enter the service provider name, your login name (the full domain name), and password.
7. Tap Save
8. Connect to the public Wi-Fi network.
§If you have access to several public Wi-Fi networks, you can add up to five sets of login
credentials to the WISPr accounts list.
§In the WISPr accounts list, press and hold an account to remove or edit it.
Connecting to VPN
Add virtual private networks (VPNs) so you can connect and access resources inside a local network,
such as your corporate or home network.
Before you can connect HTC Desire 555 to your local network, you may be asked to:
§Install security certificates.
§Enter your login credentials.
§Download and install a required VPN app, if you're connecting to a secured enterprise
network. Contact your network administrator for details.
Also, HTC Desire 555 must first establish a Wi-Fi or data connection before you can start a VPN
connection.
127 Internet connections
Confidential
For certification only
Adding a VPN connection
You must first set a lock screen PIN, password, or pattern before you can use credential storage
and set up the VPN.
1. From the Home screen, tap , and then find and tap Settings.
2. Under Wireless & networks, tap More.
3. Tap VPN Add VPN profile.
4. Enter the VPN settings and set them up according to the security details your network
administrator gave you.
5. Tap Save.
Connecting to a VPN
1. From the Home screen, tap , and then find and tap Settings.
2. Under Wireless & networks, tap More.
3. Tap VPN.
4. Tap the VPN that you want to connect to.
5. Enter your log in credentials, and then tap Connect. When you’re connected, the VPN
connected icon appears in the notification area of the status bar.
You can then open the web browser to access resources such as your corporate network intranet.
Disconnecting from a VPN
§In Settings, tap More VPN. Tap the VPN connection, and then tap Disconnect.
§Slide the Notifications panel open. If you see the VPN notification, tap it, and then tap
Disconnect.
Using HTC Desire 555 as a Wi-Fi hotspot
Share your data connection with other devices by turning HTC Desire 555 into a Wi-Fi hotspot.
§Make sure the data connection is turned on.
§You must have an approved data plan associated with your account from your mobile service
provider to use this service. Devices connected to your Wi-Fi hotspot use data from your
subscribed data plan.
1. From the Home screen, tap , and then find and tap Settings.
2. Under Wireless & Networks, tap More.
128 Internet connections
Confidential
For certification only

3. Tap Mobile network sharing Portable Wi-Fi Hotspot.
The first time you turn on the Wi-Fi hotspot, you'll need to set it up.
4. Enter a hotspot name or use the default.
5. Enter a password or use the default.
The password is the key other people need to enter on their device so they can connect and
use HTC Desire 555 as a wireless router.
6. To help make your Wi-Fi hotspot more secure, tap Advanced.
Choose from the available settings, and then press .
7. Tap the Portable Wi-Fi Hotspot On/Off switch to turn it on.
HTC Desire 555 is ready to be used as a Wi-Fi hotspot when you see on the status bar.
To help minimize security risks, use the default security settings and set a strong and unique
password.
Sharing your phone's Internet connection by USB
tethering
No Internet connection available for your computer? No problem. Use the data connection of
HTC Desire 555 to connect to the Internet.
§To make sure that the USB drivers for HTC Desire 555 are up-to-date, install the latest version
of HTC Sync Manager on your computer.
§You may need to have USB tethering added to your data plan, and it may incur additional cost.
Contact your mobile service provider for details.
§Make sure that mobile data is turned on.
1. Connect HTC Desire 555 to your computer using the provided USB cable.
2. From the Home screen, tap , and then find and tap Settings.
3. Under Wireless & networks, tap Mobile network sharing USB tethering.
129 Internet connections
Confidential
For certification only

Wireless sharing
What is HTC Connect?
With HTC Connect, wirelessly stream music or video from your phone to your speakers or TV by
just swiping up the screen with 3 fingers.
You can stream media to any of the following types of devices:
§Blackfire® compliant multi-room speakers
§Multi-room speakers that support the Qualcomm® AllPlay™ smart media platform
§DLNA® compatible speakers and TV
§Miracast™ compatible display devices
§Chromecast™ compatible display devices.
§Bluetooth speakers
§HTC certified consumer electronic devices or accessories that have the HTC Connect logo:
Some devices may need to be paired before you can share to them.
To see a list of supported devices or accessories, go to https://connect.htc.com/certified-
devices.html. For more information about HTC Connect, see https://connect.htc.com/index.html.
130 Wireless sharing
Confidential
For certification only

Using HTC Connect to share your media
Before you start, make sure you have set up your speakers, TV, or appliance to connect to your Wi-Fi
network. Refer to its documentation on how to set it up.
1. Open and play any music or other media content that you want to share from your phone.
2. Swipe up with three fingers on the screen.
3. Choose the device you want to connect to.
4. Once connected, use your phone to control the volume, pause or resume playback, and more.
5. To stop wireless media sharing and disconnect from the device, swipe down with three
fingers on the screen.
131 Wireless sharing
Confidential
For certification only

Streaming music to Blackfire compliant speakers
BLACKFIRE
RESEARCH
Play music simultaneously to multiple Blackfire compliant speakers from your
phone.
Before you start, make sure your speakers are connected to your Wi-Fi network. Refer to the
documentation that comes with your speakers to set up and connect them to your Wi-Fi network.
1. After connecting your speakers to your Wi-Fi network, open a music app on your phone.
2. Swipe up with three fingers on the screen.
Your phone then turns Wi-Fi on automatically and scans for media devices on your Wi-Fi
network. You'll see the available speakers listed.
3. Tap the speaker you want to connect to.
4. In the music app, start playing music. You'll then hear the music play from the speaker you've
selected.
5. To switch between speakers or to group them, swipe up the screen again with three fingers.
§To stream music to another speaker, just tap it.
§To group speakers so that music plays through them at the same time, tap the Group
button next to a speaker name, select the other speakers you want to group it with, and
then tap OK.
Renaming the speakers
You can rename your Blackfire compliant speakers in Settings.
1. Make sure the speakers are connected to your Wi-Fi network.
2. From the Home screen, tap Settings HTC Connect.
Your phone then turns Wi-Fi on automatically and scans for media devices on your Wi-Fi
network. You'll then see the available Blackfire speakers listed.
3. Tap next to a speaker name.
4. Enter the new speaker name, and then tap Done.
132 Wireless sharing
Confidential
For certification only

Streaming music to speakers powered by the
Qualcomm AllPlay smart media platform
Before you start, make sure your speakers are connected to your Wi-Fi network. Refer to the
documentation that comes with your speakers to set up and connect them to your Wi-Fi network.
1. After connecting your speakers to your Wi-Fi network, open a music app on your phone.
2. Swipe up with three fingers on the screen.
Your phone then turns Wi-Fi on automatically and scans for media devices on your Wi-Fi
network. You'll then see the available speakers listed.
3. Tap the speaker you want to connect to.
4. In the music app that you're using, start playing music. You'll then hear the music play from
the speaker you've selected.
5. To switch between speakers or to group them, swipe up the screen again with three fingers.
§Just tap another speaker to stream music to it.
§To group speakers so that music plays through them at the same time, tap the Group
button next to a speaker name, select the other speakers you want to group it with, and
then tap OK.
Turning Bluetooth on or off
1. From the Home screen, tap , and then find and tap Settings.
2. Tap the Bluetooth On/Off switch to turn the Bluetooth connection on and off.
3. Tap Bluetooth to see a list of available devices.
Turn off Bluetooth when not in use to save battery power, or in places where using a wireless
device is prohibited, such as on board an aircraft and in hospitals.
Connecting a Bluetooth headset
You can listen to music over a Bluetooth A2DP stereo headset, or have hands-free conversations
using a compatible Bluetooth headset.
Before you connect your headset, make it discoverable so HTC Desire 555 can find it. Refer to
your headset manual for details.
1. Turn Bluetooth on and check the list of available devices.
See Turning Bluetooth on or off on page 133.
2. If you don't see your headset listed, tap Scan for devices to refresh the list.
133 Wireless sharing
Confidential
For certification only

3. Tap the name of your headset in the Available Devices section. HTC Desire 555 pairs with the
headset and the headset connection status is displayed in the Paired Devices section.
4. If prompted to enter a passcode, try 0000 or 1234, or consult the headset documentation to
find the passcode.
When the Bluetooth headset is connected, you'll see in the status bar.
Reconnecting a Bluetooth headset
Normally, you can easily reconnect your headset by switching on Bluetooth on HTC Desire 555, and
then turning on the headset.
However, you might have to connect manually if your headset has been used with another Bluetooth
device.
1. Turn Bluetooth on and check the list of paired devices.
See Turning Bluetooth on or off on page 133.
2. Tap the headset’s name in the Paired Devices section.
3. If prompted to enter a passcode, try 0000 or 1234, or consult the headset documentation to
find the passcode.
If you still cannot reconnect to the headset, follow the instructions in Unpairing from a Bluetooth
device on page 134, and then follow the steps under Connecting a Bluetooth headset on page 133.
Unpairing from a Bluetooth device
1. Turn Bluetooth on and check the list of paired devices.
See Turning Bluetooth on or off on page 133.
2. In the Paired devices section, tap next to the device to unpair.
3. Tap Unpair.
Receiving files using Bluetooth
HTC Desire 555 lets you receive various files with Bluetooth including photos, contact info, and
documents such as PDFs.
Refer to the device’s documentation for instructions on sending information over Bluetooth.
1. Turn Bluetooth on.
See Turning Bluetooth on or off on page 133.
2. On the sending device, send one or more files to HTC Desire 555.
134 Wireless sharing
Confidential
For certification only

3. If asked, accept the pairing request on HTC Desire 555 and on the sending device. You may
also be prompted to enter the same passcode or confirm the auto-generated passcode on
both devices.
You'll then get a Bluetooth authorization request.
4. Tap Pair.
5. When HTC Desire 555 receives a file transfer request notification, slide the Notifications
panel down, tap the incoming file notification, and then tap Accept.
6. When a file is transferred, a notification is displayed. Slide the Notifications panel down, and
then tap the relevant notification.
7. Tap the received file to view it.
135 Wireless sharing
Confidential
For certification only

Settings and security
HTC BoomSound profile
With the HTC BoomSound profile turned on, you'll enjoy enhanced audio quality when you plug in
a headset. Listen to stronger bass, clearer vocals, and finer details in songs and videos.
To turn the HTC BoomSound profile on or off, go to Settings, and then tap the HTC BoomSound
On/Off switch.
Turning location services on or off
In order to find your location on HTC Desire 555, you need to enable location sources.
1. From the Home screen, tap Settings Location.
2. Tap the On/Off switch to turn location services on and off.
3. Under Location sources, select the location mode you want. For example, for a better
estimate of your location, choose High accuracy. To save battery power, choose Battery
saving.
Turning off a location source (for example GPS) means no applications on HTC Desire 555 will
collect your location data through that location source. However, third party applications may
collect — and HTC Desire 555 may continue to provide — location data through other sources,
including through Wi-Fi and signal triangulation.
Do not disturb mode
Use Do not disturb mode to reject calls, and silence audible alerts and notifications, but still keep a
data connection available.
1. With two fingers, swipe down from the top of the screen to open Quick Settings.
2. Tap .
3. Tap Total silence, Alarms only, or Priority only depending on if you want to allow
exceptions. When Priority only is selected, you can receive messages or calls from contacts
in your exceptions list.
136 Settings and security
Confidential
For certification only
4. Tap Until you turn this off if you want to turn off Do not disturb by yourself or tap or
to set the number of hours before Do not disturb turns off automatically.
5. Tap Done to activate it.
The Do not disturb icon will appear in the status bar.
When the screen is on, press VOLUME and then tap End now to turn off Do not disturb mode
quickly.
Allowing notifications and contacts to bypass Do not disturb mode
Add important contacts to an exceptions list so you can still receive their calls and messages even
when Do not disturb mode is on.
1. From the Home screen, tap Settings Sound & notification.
2. Tap Do Not Disturb Priority only allows.
3. Tap the On/Off switch next to the items you wish to allow.
4. Tap Messages from or Calls from to select who can contact you.
5. Tap Manage approved contacts, and then tap to add contacts to your exceptions list.
To remove contacts or numbers from the list, tap Remove contacts.
Setting a Do not disturb schedule
Schedule Do not disturb to turn on automatically and how long will it last. For example, you can set
it to turn on during a weekly meeting.
1. From the Home screen, tap Settings Sound & notification.
2. Tap Do Not Disturb Schedules.
3. Tap Add rule.
4. Enter a name for the rule, and then select whether to base it on time or an event.
Time rule §Set the days.
§Set the start and end times.
§Select a Do not disturb level.
Event rule §Select a calendar you want to make the rule for.
§Set a condition for the type of reply.
§Select a Do not disturb level.
You can turn a schedule on or off by tapping the On/Off switch when viewing the details of the
schedule.
137 Settings and security
Confidential
For certification only

Controlling app permissions
When you open apps the first time, you'll be prompted to grant them permissions to access certain
data or features, such as contacts or the microphone. This gives you more control over which apps
have authorized access.
§If you suspect a certain app of being malicious or requesting unnecessary permissions, you
should choose Deny to protect your phone.
§If you choose Deny in a trusted app, you may not be able to use the app or access its full
functionality. When this happens, go to Settings to change the app permissions.
1. From the Home screen, tap , and then find and tap Settings.
2. Tap Apps.
3. Tap the app you want to configure, and then tap Permissions.
4. Choose which permissions you want to turn on.
Setting default apps
In Settings, you can choose default apps for web browsing, text messaging, and more.
1. From the Home screen, tap , and then find and tap Settings.
2. Tap Apps.
3. Tap Configure apps Default apps.
4. Choose your default assist and voice input, web browser, phone, and text messaging apps.
Setting up app links
If there's more than one app that can be opened when you tap a link—such as a shared social post or
media link—you may be prompted to choose the app you want to use. When you're prompted after
you've tapped a link, select an app, and then tap Always to set that app as the default app to use.
You can also go to Settings to see how app links have been set up for different apps and change them.
1. From the Home screen, tap , and then find and tap Settings.
2. Tap Apps.
3. Tap Configure apps App links.
4. Tap the app you want to configure, and then tap Open supported links.
5. Select Open in this app to always open the app without being prompted when you tap a link.
You can also choose whether to always be prompted to choose the app or never use the app
for opening links.
138 Settings and security
Confidential
For certification only

Disabling an app
Apps, even if not used often, may be running in the background and downloading data. If an app
cannot be uninstalled, you can disable it.
1. From the Home screen, tap , and then find and tap Settings.
2. Tap Apps.
3. Tap the app, and then tap Disable.
Touch sounds and vibration
Some people like the sound or vibration feedback they get when touching the screen, and some
don't. You can turn on or off various types of touch sounds and vibration on HTC Desire 555.
§Touch tones when tapping the phone dial pad
§Touch sounds when tapping onscreen items
§Screen lock sounds
§Pull-to-refresh sounds
§Vibration when pressing hardware buttons
§Touch sound and vibration when tapping the keyboard
Turning touch sounds and vibration on and off
1. From the Home screen, tap Settings Sound & notification.
2. Under System, select the option you want to turn on or off.
Turning off keyboard sounds and vibration
1. From the Home screen, tap , and then find and tap Settings.
2. Tap Language & keyboard TouchPal General settings.
3. On the General settings screen, do one of the following:
§Tap Keypress sound, clear System Volume, and then drag the slider all the way to the
left to turn off keyboard sounds.
§Tap Keypress vibration, clear System default, and then drag the slider all the way to
the left to turn off keyboard vibration.
4. Tap OK.
139 Settings and security
Confidential
For certification only

Setting when to turn off the screen
After a period of inactivity, the screen turns off to conserve battery power. You can set the idle time
before the screen turns off.
1. From the Home screen, tap Settings Display & gestures or Display, gestures &
buttons.
2. Tap Screen timeout, and then tap the time before the screen turns off.
Changing the display language
Changing the language adjusts the keyboard layout, date and time formatting, and more.
1. From the Home screen, tap Settings Language & keyboard.
2. Tap Language, and then choose the language you want to use.
Airplane mode
When you enable Airplane (Flight) mode, all wireless radios on HTC Desire 555 are turned off,
including the call function, data services, Bluetooth, and Wi-Fi.
When you disable Airplane mode, the call function is turned back on and the previous state of
Bluetooth and Wi-Fi is restored.
§You can manually turn Bluetooth and Wi-Fi back on after enabling Airplane mode.
§If USB tethering is turned on, enabling Airplane mode turns it off. You need to manually turn
USB tethering on after you disable Airplane mode.
Do any of the following to turn Airplane mode on or off:
§Press and hold POWER, and then tap Airplane mode.
§With two fingers, swipe down from the status bar to open the Quick Settings panel. Tap the
Airplane mode tile to turn airplane mode on or off.
When enabled, the Airplane mode icon is displayed in the status bar.
Screen brightness
1. From the Home screen, tap Settings Display & gestures or Display, gestures &
buttons.
2. Tap Brightness level.
140 Settings and security
Confidential
For certification only
3. With the Automatic brightness option selected, drag the slider to set the maximum
brightness level. This sets a limit on how bright the screen will be when Automatic
brightness is selected.
4. To set the brightness manually, clear the Automatic brightness option, and then drag the
brightness slider to the left to decrease or to the right to increase the screen brightness.
Automatic screen rotation
Automatic rotation is not supported in all applications.
1. From the Home screen, tap Settings Display & gestures or Display, gestures &
buttons.
2. Select or clear the Auto rotate screen option to turn it on or off.
Installing a digital certificate
Use client and Certificate Authority (CA) digital certificates to enable HTC Desire 555 to access
VPN or secured Wi-FI networks, and also to provide authentication to online secure servers. You
can get a certificate from your system administrator or download it from sites that require
authentication.
§You must set a lock screen PIN or password before installing a digital certificate.
§Some apps such as your browser or email client let you install certificates directly in the app. See
the app's help for details.
1. Save the certificate file in the root folder on HTC Desire 555.
2. From the Home screen, tap Settings Security.
3. Do one of the following:
§Tap Install from storage if your storage card is set up as removable storage.
§Tap Install from phone storage if your storage card is formatted and set as internal
storage.
4. Browse to the certificate and select it.
5. Enter a name for the certificate and select how it will be used.
6. Tap OK.
141 Settings and security
Confidential
For certification only

Assigning a PIN to a nano SIM card
You can help to protect the nano SIM card by assigning a Personal Identification Number (PIN).
Make sure you have the default PIN provided by your mobile operator before continuing.
1. From the Home screen, tap Settings Security.
2. Tap Set up SIM card lock.
3. Choose to lock the card, enter the default PIN of the card, and then tap OK.
4. To change the card PIN, tap Change SIM PIN.
Restoring a nano SIM card that has been locked out
If you enter the wrong PIN more times than the maximum number of attempts allowed, the card
will become “PUK-locked.”
You need a Pin Unlock Key (PUK) code to restore access to HTC Desire 555. Contact your mobile
operator for this code.
1. On the Phone dialer screen, enter the PUK code, and then tap Next.
2. Enter the new PIN you want to use, and then tap Next.
3. Enter the new PIN again, and then tap OK.
Accessibility features
HTC Desire 555 comes with features and settings that allow easy access and use of apps and
functions.
Improve screen readability
If you have low vision, take advantage of these features to help improve screen readability.
§Increase the font size, use color inversion, or enable high-contrast text using the
Accessibility settings. See Accessibility settings on page 143.
§Turn magnification gestures on. See Turning Magnification gestures on or off on page 143.
§Turn on automatic screen rotation. See Automatic screen rotation on page 141.
Get audible feedback when using the phone
Use TalkBack to hear audible feedback on what you do on your phone. See Navigating HTC Desire
555 with TalkBack on page 144.
Enable hearing aids and sidetone
If you wear a hearing aid or are hearing impaired, you can enable these options in Settings Call:
142 Settings and security
Confidential
For certification only

§Select Hearing aids to enable hearing aid compatibility that amplifies your phone's in-call
volume
§Select Sidetone to receive controlled feedback through the phone's earpiece, helping you
modulate your voice so that it's neither too loud nor too soft.
Use your voice
You can use your voice to perform an action on HTC Desire 555.
§Call a contact using your voice. See Making a call with your voice on page 97.
§Search for information on the Web using Google Voice Search. See Searching the Web with
your voice on page 71.
§Enter text with your voice. See Entering text by speaking on page 44.
Accessibility settings
Use these settings to turn accessibility functions or services on or off. When you’ve downloaded and
installed an accessibility tool, such as a screen reader that provides voice feedback, you can also
control them using these settings.
1. From the Home screen, tap Settings Accessibility.
2. Tap or select the settings you want.
Turning Magnification gestures on or off
If you have low vision or would like to get a closer view of what's on the screen, use finger gestures to
magnify portions of your phone's screen.
1. From the Home screen, tap Settings Accessibility.
2. Tap Magnification gestures and read the instructions on how to use it.
3. Tap the On/Off switch to turn Magnification gestures on or off.
143 Settings and security
Confidential
For certification only
Navigating HTC Desire 555 with TalkBack
Use TalkBack if you need to navigate HTC Desire 555 by spoken feedback. When you touch the
screen, HTC Desire 555 vibrates and gives you an audible response so you know what you are
touching.
Not all languages are supported.
Turning TalkBack on
1. From the Home screen, tap Settings Accessibility.
2. Tap TalkBack, and then tap the On/Off switch.
3. Read the TalkBack disclaimer and then tap OK.
A short tutorial explaining how to use TalkBack will begin playing after you turn on TalkBack.
TalkBack works best if you turn off automatic screen rotation.
Turning Explore by touch on or off
Explore by touch allows HTC Desire 555 to respond to shortcut gestures and screen touches with
audible feedback. While Explore by touch is enabled when you turn on TalkBack, you can turn it off.
1. From the Home screen, tap Settings Accessibility.
2. Tap TalkBack, and then tap Settings.
3. Under Touch exploration, clear the Explore by touch option.
You will no longer hear audible feedback from HTC Desire 555.
Using TalkBack gestures
When TalkBack is turned on and the Explore by touch setting is selected, the regular touch gestures
are replaced by the TalkBack gestures.
Media gestures such as 3-finger swiping may not be available when TalkBack gestures are
enabled.
Do one of the following:
Open an item 1. Drag your finger on the screen to find and select the item.
2. Double-tap anywhere on the screen to open the item.
Move an item 1. Drag your finger on the screen to find the item.
2. Double-tap anywhere on the screen, but don't lift your finger on the
second tap.
3. Drag the item to a new spot and then lift your finger.
144 Settings and security
Confidential
For certification only
Scroll through a screen Use two fingers to swipe up, down, left or right.
Unlock the lock screen Use two fingers to swipe up from the bottom of the screen.
Open the Notifications
panel Use two fingers to swipe down from the top of the screen.
Assigning TalkBack shortcuts
TalkBack has customizable gestures that can be used to open the Notifications panel, view recent
apps, access TalkBack controls, and more.
The steps below are described using the regular gestures. Use the corresponding TalkBack
gestures if you already have TalkBack turned on.
1. From the Home screen, tap Settings Accessibility.
2. Tap TalkBack, and then tap Settings Manage gestures.
3. Tap any of the shortcut gestures, and then select an action.
Using TalkBack context menus
TalkBack has context menus for controlling continuous reading and global TalkBack controls.
These menus can be accessed using TalkBack shortcut gestures.
1. Turn TalkBack on.
2. Do one of the following:
§To open the continuous reading menu, use one finger to swipe up and right in one
continuous movement.
§To open the global context menu, use one finger to swipe down and right in one
continuous movement.
If you already changed the TalkBack shortcut gestures, check your TalkBack settings for the
appropriate gesture.
3. Press and hold anywhere on the screen.
4. Drag your finger around the screen to explore the options.
To cancel an action, drag your finger to your starting position.
145 Settings and security
Confidential
For certification only
Changing the TalkBack reading speed
The steps below are described using the regular gestures. Use the corresponding TalkBack
gestures if you already have TalkBack turned on.
1. From the Home screen, tap Settings Accessibility.
2. Tap Text-to-speech output Speech rate.
3. Select a speech rate.
You can test the speech rate by tapping Listen to an example.
TalkBack language settings
1. From the Home screen, tap Settings Accessibility.
2. Tap Text-to-speech output Google Text-to-speech Engine, and do one of the following:
Select a different
language Tap Language.
Install a voice Tap Install voice data, and then tap the language. Tap next to
the voice data you want to install. When installation is completed,
press twice and tap Language.
3. Select the language you want to use.
Not all languages are supported.
146 Settings and security
Confidential
For certification only

Trademarks and copyrights
©2016 HTC Corporation. All Rights Reserved.
HTC, the HTC logo, HTC Desire, HTC BlinkFeed, HTC Connect, HTC Sense, VideoPic, and all other
HTC product and feature names are trademarks or registered trademarks in the U.S. and/or other
countries of HTC Corporation and its affiliates.
Google, Android, Google Chrome, Google Drive, Google Maps, Google Now, Google Play, Google
Voice Search, Google Wallet, and YouTube are trademarks of Google Inc.
Microsoft, Windows, ActiveSync, PowerPoint, Outlook.com, and Windows Media are either
registered trademarks or trademarks of Microsoft Corporation in the United States and/or other
countries.
The Bluetooth® word mark and logos are registered trademarks owned by Bluetooth SIG, Inc.
Wi-Fi® and Miracast are registered trademarks of the Wireless Fidelity Alliance, Inc.
LTE is a trademark of European Telecommunications Standards Institute (ETSI).
DLNA is a trademark or registered trademark of Digital Living Network Alliance. All rights
reserved. Unauthorized use is strictly prohibited.
Qualcomm is a trademark of Qualcomm Incorporated, registered in the United States, and other
countries and used with permission. AllPlay is a trademark of Qualcomm Connected Experiences,
Inc., and used with permission.
BLACKFIRE RESEARCH™ is a Registered Trademark (No. 3,898,359) of BLACKFIRE RESEARCH
CORP.
AirPlay, Apple TV, iCloud, iPhone, iTunes, Mac, and Mac OS are trademarks of Apple Inc. registered
in the U.S. and other countries.
microSD is a trademark of SD-3C LLC.
All other trademarks and service marks mentioned herein, including company names, product
names, service names and logos, are the property of their respective owners and their use herein
does not indicate an affiliation with, association with, or endorsement of or by HTC Corporation.
Not all marks listed necessarily appear in this User Guide.
The HTC Sync Manager software can be used with materials that you own or are lawfully authorized
to use and/or duplicate. Unauthorized use and/or duplication of copyrighted material may be a
violation of copyright law in the United States and/or other countries/regions. Violation of U.S. and
international copyright laws may subject you to significant civil and/or criminal penalties. HTC
Corporation shall not be held responsible for any damages or losses (direct or indirect) that you may
incur as a result of using this software.
Screen images contained herein are simulated. HTC shall not be liable for technical or editorial
errors or omissions contained herein, nor for incidental or consequential damages resulting from
furnishing this material. The information is provided “as is” without warranty of any kind and is
147 Trademarks and copyrights
Confidential
For certification only

subject to change without notice. HTC also reserves the right to revise the content of this document
at any time without prior notice.
No part of this document may be reproduced or transmitted in any form or by any means, electronic
or mechanical, including photocopying, recording or storing in a retrieval system, or translated into
any language in any form without prior written permission of HTC.
148 Trademarks and copyrights
Confidential
For certification only

Index
A
Accounts
- syncing 84
Airplane mode 140
Alarms
- setting 120
Apps
- arranging 56
- grouping into a folder 55, 57
- hiding or unhiding 56
- icons on Home screen 54
- installing 30
- installing from Google Play 29
- installing from the web 30
- on Home screen 54
- restoring 30
- uninstalling 31
- updating 28
Auto Selfie 63
B
Backup
- about 85
- HTC Sync Manager 88
- options 85
- restoring backed up apps 30
Battery
- charging 20
- checking usage 77
- saving battery power 74
BlinkFeed
See HTC BlinkFeed
Bluetooth
- connecting a Bluetooth headset 133
- receiving information 134
Boost+
- about 72
- clearing junk files 73
- Game Battery Booster 73
- Smart Boost 72
Burst mode 62
C
Call history 101
Camera
- basics 58, 60, 62
- capture modes 59
- continuous shooting 62
- flash 58
- HDR 63
- recording a video 62
- selfie 63, 64
- standby 58
- sweep panorama 65
- taking a photo 60
- taking photo while recording 62
- using volume buttons as controls 59
- video resolution 62
- zooming 58
Capture modes
- switching to 59
Capture screen 39
Change phone language 140
Clock 120
- alarm 120
- setting date and time 120
Conference call 100
Contacts
- adding 109
- contact link suggestions 112
- copying 24, 111
- editing 110
- filtering 108
- groups 113
- importing 24, 111
- merging contact information 112
- sending contact information 112
- transferring 24, 111
Continuous shooting 62
Copy
- files 81
Copying
- text 43
149 Index
Confidential
For certification only

D
Data connection
- data roaming 125
- sharing 129
- turning on or off 124
- usage 124
Data transferiPhone
- from iCloud 24
Data transfer
- from Android phone 23
- from iPhone 24
- transferring contacts 24
Display
- changing the time before the screen turns
off 140
- screen brightness 140
- screen rotation 141
- Sleep mode 32
E
Email
See Mail
Exchange ActiveSync
- flagging an email 118
- Out of office 118
expanded storage 78
F
Face unlock 27
Factory reset 91
Files
- copying 81
Finger gestures 34
Firmware
See Software update
FM Radio 121
- using 121
Folder
- grouping apps 55
- removing items 55, 57
FOTA
See Software update
Freestyle layout 50
G
Game Battery Booster 73
Gestures
- motion gestures 33
- touch gestures 34
Gmail 122
Google apps 122
Google Chrome
- Google Drive 122
Google Maps 122
Google Play
- installing apps 29
- refund 31
Google Voice Search 71
GPS (Global Positioning System)
See Location settings
Group messaging 104
H
Hands free 133
Hard reset
See Factory reset
HDR 63
Headphones
See Bluetooth
hearing impaired
- hearing aids 143
- sidetone 143
Home screen
- adding or removing widget panel 52
- apps 54
- arranging widget panels 52
- changing your main Home screen 53
- classic layout 50
- feeds 92
- folder 55
- freestyle layout 50
- launch bar 53
- shortcuts 54
- wallpaper 50
- widget panel 32
- widgets 54
Hotspot
See Wireless router
HTC BlinkFeed
- about 92
- deleting items 96
- posting to social networks 96
- selecting feeds 94
- setting up custom topics 95
150 Index
Confidential
For certification only

- showing social network and app feeds 95
- turning on or off 93
HTC Clock 120
- setting an alarm 120
HTC Connect
- about 130
- streaming music to speakers 132, 133
- streaming music, videos, or photos to media
devices 131
HTC Sense version 27
HTC Sync Manager 88
I
Idle screen
See Lock screen
Internet connection
- VPN 127
- Wi-Fi 126
- wireless router 128
K
Keyboard
- entering text 43
- entering text by speaking 44
- speech recognition 44
L
Language
- system language 140
Live Makeup 63
Location settings 136
Lock screen
- answering a call 99
- dismissing an alarm 33
- locking apps 74
- opening an app 38
- rejecting a call 99
- unlocking 33
Low battery 74
Low storage 82
M
Mail
- attachments 116
- carbon copy, blind copy (cc, bcc) 116
- deleting 117
- draft 116
- replying 116
- searching 117
- sending 116
- sorting 117
Mail folders
- moving email messages 117
Master reset
See Factory reset
Media streaming
See HTC Connect
Messages
- block box 106
- deleting a conversation 106
- draft message 103, 104
- forwarding 105
- group SMS 104
- locking 107
- replying 104
- secure box 105
- sending 103
microSD card 18
MMS
See Multimedia message
Multimedia message
- attachment 103
- group MMS 104
- sending 103
Google PlayMusic 122
Music
- BoomSound profile 136
- transferring from iPhone 90
N
Notifications
- panel 42
O
Online accounts
- adding accounts 84
- removing accounts 85
- syncing manually 84
- what can you sync with 84
P
Pair a Bluetooth headset 133
151 Index
Confidential
For certification only

Phone calls
- blocking a call 101
- call history 101
- calling 97
- conference call 100
- emergency call 99
- extension number 98
- missed calls 98
- muting the microphone 100
- putting a call on hold 99
- receiving calls 99
- Smart Dial 97
- speakerphone 100
- speed dial 98
Phone information 27
Phone settings
See Settings
Phone updates 27
Photos
- transferring from computer 25
- transferring from iPhone 90
Power
- charging the battery 20
- checking battery usage 77
- saving power 74
- sleep mode 32
Print screen
See Capture screen
PUK (PIN Unblock Key) 142
Q
Quick settings 25
R
Radio
See FM Radio
Recent apps 38
Recording your voice 121
Reset 90, 91
Router
See Wireless router
S
Screen 32, 33, 39, 140, 141
- adjusting brightness 140
- capture 39
- changing the time before the screen turns
off 140
- idle screen 33
- rotation 141
- Sleep mode settings 140
Screen lock 26
Screen shot
See Capture screen
SD card 18
Search
- searching phone and Web 71
- voice search 71
Security
- protecting phone with screen lock 26
- security certificates 127
self-timer 64
selfie
- Auto Selfie 63
- Live Makeup 63
- self-timer 64
- Voice Selfie 64
Sense Home
- adding apps to widget 41
- changing addresses 40
- manually switching locations 41
- pinning apps in widget 41
- setting up widget 40
- smart folders in widget 42
- unpinning apps in widget 41
- widget 40
Settings
- About 27
- Accessibility 143
- display language 140
- Storage 78
Setup
- contacts from old phone 24
- first-time setup 22
- photos, music, videos from old phone 25
- restoring backup from cloud storage 22
Sharing
- text 43
Shortcuts 38
sidetone 143
Sleep mode 32
Smart Boost 72
Smart network sharing 129
152 Index
Confidential
For certification only

SMS
See Messages
Soft reset 90
Software update 27
Sound
- ringtone, notifications, and alarm 47
- switching profiles 101
Speakerphone 100
Speed dial 98
Storage 73, 78
- clearing junk files 73
- uninstalling apps 73
Sweep panorama 65
Sync
- HTC Sync Manager 88
T
Tethering
See USB Tethering
Text message 103
Themes 47–49
- creating 48
- deleting 49
- downloading 47
- finding 48
- mix and match 49
U
Upgrade
See Software update
USB Tethering 129
V
VideoPic 62
Videos
- recording 62
- taking photo while recording 62
- transferring from computer 25
Voice input 44
Voice Recorder 121
Voice search 71
Voice Selfie 64
VPN 127, 128
- adding a connection 128
- connecting 128
- disconnecting 128
W
Waking up phone
- through power button 32
Wallpaper
- changing 50
Weather
- checking weather 121
Wi-Fi 126
- connecting via WPS 126
- turning on 126
Widgets
- adding 54
- changing settings 54
- removing 56
- resizing 54
Wireless media sharing
See HTC Connect
Wireless router 128
Y
YouTube 122
153 Index
Confidential
For certification only