HTC ATHE100 Pocket PC Phone User Manual Athena HTC English Manual indb
HTC Corporation Pocket PC Phone Athena HTC English Manual indb
HTC >
Users Manual

PDA
User Manual

2
Please Read Before Proceeding
THE BATTERY IS NOT FULLY CHARGED WHEN YOU TAKE IT OUT OF THE BOX.
DO NOT REMOVE THE BATTERY PACK WHEN THE DEVICE IS CHARGING.
YOUR WARRANTY IS INVALIDATED IF YOU OPEN OR TAMPER WITH THE
DEVICE’S OUTER CASING.
PRIVACY RESTRICTIONS
Some countries require full disclosure of recorded telephone conversations, and
stipulate that you must inform the person with whom you are speaking that the
conversation is being recorded. Always obey the relevant laws and regulations of
your country when using the recording feature of your Pocket PC Phone.
COPYRIGHT INFORMATION
Copyright © 2006 High Tech Computer Corp. All Rights Reserved.
, , , ExtUSB and VueFLO are trademarks and/or service
marks of High Tech Computer Corp.
Microsoft, MS-DOS, Windows, Windows NT, Windows Server, Windows Mobile,
Windows XP, Windows Vista, ActiveSync, Windows Mobile Device Center, Internet
Explorer, Windows Live, MSN, Hotmail, Outlook, Excel, PowerPoint, Word, and
Windows Media are either registered trademarks or trademarks of Microsoft
Corporation in the United States and/or other countries.
Bluetooth and the Bluetooth logo are trademarks owned by Bluetooth SIG, Inc.
Wi-Fi is a registered trademark of the Wireless Fidelity Alliance, Inc.
miniSD is a trademark of SD Card Association.
Java, J2ME and all other Java-based marks are trademarks or registered
trademarks of Sun Microsystems, Inc. in the United States and other countries.
Copyright © 2006, Adobe Systems Incorporated.
Copyright © 2006, Macromedia Netherlands, B.V.
3
Opera® Browser from Opera Software ASA. Copyright 1995-2006 Opera Software
ASA. All Rights Reserved.
Macromedia, Flash, Macromedia Flash, Macromedia Flash Lite and Reader are
trademarks and/or registered trademarks of Macromedia Netherlands, B.V. or
Adobe Systems Incorporated.
Copyright © 2006, JATAAYU SOFTWARE (P) LTD. All Rights Reserved.
Copyright © 2006, Dilithium Networks, Inc. All Rights Reserved.
ArcSoft MMS Composer™ Copyright © 2003-2006, ArcSoft, Inc. and its licensors.
All Rights Reserved. ArcSoft and the ArcSoft logo are registered trademarks of
ArcSoft, Inc. in the United States and/or other countries.
Sprite Backup is a trademark or service mark of Sprite Software.
Licensed by QUALCOMM Incorporated under one or more of the following
patents:
4,901,307 ; 5,490,165 ; 5,056,109 ; 5,504,773 ; 5,101,501 ; 5,778,338 ; 5,506,865
5,109,390 ; 5,511,073 ; 5,228,054 ; 5,535,239 ; 5,710,784 ; 5,267,261 ; 5,544,196
5,267,262 ; 5,568,483 ; 5,337,338 ; 5,659,569 5,600,754 ; 5,414,796 ; 5,657,420
5,416,797
All other company, product and service names mentioned herein are trademarks,
registered trademarks or service marks of their respective owners.
HTC shall not be liable for technical or editorial errors or omissions contained
herein, nor for incidental or consequential damages resulting from furnishing this
material. The information is provided “as is” without warranty of any kind and is
subject to change without notice. HTC also reserves the right to revise the content
of this document at any time without prior notice.
No part of this document may be reproduced or transmitted in any form or by any
means, electronic or mechanical, including photocopying, recording or storing
in a retrieval system, or translated into any language in any form without prior
written permission of HTC.
4
Important Health Information and Safety
Precautions
When using this product, the safety precautions below must be taken to
avoid possible legal liabilities and damages. Retain and follow all product
safety and operating instructions. Observe all warnings in the operating
instructions on the product.
To reduce the risk of bodily injury, electric shock, fire, and damage to the
equipment, observe the following precautions.
ELECTRICAL SAFETY
This product is intended for use when supplied with power from the
designated battery or power supply unit. Other usage may be dangerous
and will invalidate any approval given to this product.
SAFETY PRECAUTIONS FOR PROPER GROUNDING INSTALLATION
CAUTION: Connecting to an improperly grounded equipment can result in
an electric shock to your device.
This product equipped with a USB Cable for connecting with desk-top or
notebook computer. Be sure your computer is properly grounded (earthed)
before connecting this product to the computer. The power supply cord of
a desktop or notebook computer has an equipment-grounding conductor
and a grounding plug. The plug must be plugged into an appropriate outlet
which is properly installed and grounded in accordance with all local codes
and ordinances.
SAFETY PRECAUTIONS FOR POWER SUPPLY UNIT
• Use the correct external power source
A product should be operated only from the type of power source
indicated on the electrical ratings label. If you are not sure of the type
of power source required, consult your authorised service provider or
local power company. For a product that operates from battery power
or other sources, refer to the operating instructions that are included
with the product.
This product should be operated only with the following designated
power supply unit(s):

5
1. Delta, Model ADP-5FH X
2. Phihong, Models PSAA05X-050 and PSC05R-050
Car Adapter
1. Phihong, Model CLM10D-050
2. Hwa Ying, Model AP-03
• Handle battery packs carefully
This product contains a Li-ion battery. There is a risk of fire and burns
if the battery pack is handled improperly. Do not attempt to open or
service the battery pack. Do not disassemble, crush, puncture, short
external contacts or circuits, dispose of in fire or water, or expose a
battery pack to temperatures higher than 60˚C (140˚F).
WARNING: DANGER OF EXPLOSION IF BATTERY IS INCORRECTLY
REPLACED. TO REDUCE RISK OF FIRE OR BURNS, DO NOT
DISASSEMBLE, CRUSH, PUNCTURE, SHORT EXTERNAL CONTACTS,
EXPOSE TO TEMPERATURE ABOVE 60˚C (140˚F), OR DISPOSE OF IN
FIRE OR WATER. REPLACE ONLY WITH SPECIFIED BATTERIES. RECYCLE
OR DISPOSE OF USED BATTERIES ACCORDING TO THE LOCAL
REGULATIONS OR REFERENCE GUIDE SUPPLIED WITH YOUR PRODUCT.
SAFETY PRECAUTIONS FOR DIRECT SUNLIGHT
Keep this product away from excessive moisture and extreme temperatures.
Do not leave the product or its battery inside a vehicle or in places where
the temperature may exceed 60°C (140°F), such as on a car dashboard,
window sill, or behind a glass that is exposed to direct sunlight or strong
ultraviolet light for extended periods of time. This may damage the product,
overheat the battery, or pose a risk to the vehicle.

6
PREVENTION OF HEARING LOSS
CAUTION: Permanent hearing loss may occur if
earphones or headphones are used at high volume for
prolonged periods of time.
NOTE: For France, mobile headphones, earphones, and wired remote
controllers (listed below) for this device have been tested to comply with
the Sound Pressure Level requirement laid down in NF EN 50332-1:2000 and
NF EN 50332-2:2000 standards as required by French Article L. 5232-1.
1. Earphone, manufactured by HTC or Cotron, Models CHM-60STV07004,
CH-60ST006 and CH-60ST007.
2. Wired Remote Controller, manufactured by HTC, Model RC W100.
SAFETY IN AIRCRAFTS
Due to the possible interference caused by this product to an aircraft’s
navigation system and its communications network, using this device’s
phone function on board an airplane is against the law in most countries. If
you want to use this device when on board an aircraft, remember to turn off
the phone by switching to Flight Mode.
ENVIRONMENT RESTRICTIONS
Do not use this product in gas stations, fuel depots, chemical plants or
where blasting operations are in progress, or in potentially explosive
atmospheres such as fuelling areas, fuel storehouses, below deck on
boats, fuel or chemical transfer or storage facilities, and areas where the
air contains chemicals or particles, such as grain, dust, or metal powders.
Please be aware that sparks in such areas could cause an explosion or fire
resulting in bodily injury or even death.
EXPLOSIVE ATMOSPHERES
When in any area with a potentially explosive atmosphere or where
flammable materials exist, the product should be turned off and the user
should obey all signs and instructions. Sparks in such areas could cause an
explosion or fire resulting in bodily injury or even death. Users are advised
not to use the equipment at refueling points such as service or gas stations,
and are reminded of the need to observe restrictions on the use of radio
equipment in fuel depots, chemical plants, or where blasting operations
7
are in progress. Areas with a potentially explosive atmosphere are often,
but not always, clearly marked. These include fueling areas, below deck on
boats, fuel or chemical transfer or storage facilities, and areas where the air
contains chemicals or particles, such as grain, dust, or metal powders.
ROAD SAFETY
Vehicle drivers in motion are not permitted to use telephony services with
handheld devices, except in the case of emergency. In some countries,
using hands-free devices as an alternative is allowed.
SAFETY PRECAUTIONS FOR RF EXPOSURE
• Avoid using your device near metal structures (for example, the steel
frame of a building).
• Avoid using your device near strong electromagnetic sources, such as
microwave ovens, sound speakers, TV and radio.
• Use only original manufacturer-approved accessories, or accessories
that do not contain any metal.
• Use of non-original manufacturer-approved accessories may violate
your local RF exposure guidelines and should be avoided.
INTERFERENCE WITH MEDICAL EQUIPMENT FUNCTIONS
This product may cause medical equipment to malfunction. The use of this
device is forbidden in most hospitals and medical clinics.
If you use any other personal medical device, consult the manufacturer
of your device to determine if it is adequately shielded from external
RF energy. Your physician may be able to assist you in obtaining this
information.
Turn the phone OFF in health care facilities when any regulations posted in
these areas instruct you to do so. Hospitals or health care facilities may be
using equipment that could be sensitive to external RF energy.
HEARING AIDS
Some digital wireless phones may interfere with some hearing aids. In the
event of such interference, you may want to consult your service provider,
or call the customer service line to discuss alternatives.
8
NONIONIZING RADIATION
This product should be operated in the suggested normal condition only
to ensure the radiative performance and safety of the interference. As
with other mobile radio transmitting equipment, users are advised that for
satisfactory operation of the equipment and for the safety of personnel, it
is recommended that no part of the human body be allowed to come too
close to the antenna during operation of the equipment.
General Precautions
• Heed service markings
Except as explained elsewhere in the Operating or Service
documentation, do not service any product yourself. Service needed
on components inside these compartments should be done by an
authorized service technician or provider.
• Damage requiring service
Unplug the product from the electrical outlet and refer servicing to
an authorized service technician or provider under the following
conditions:
• Liquid has been spilled or an object has fallen into the product.
• The product has been exposed to rain or water.
• The product has been dropped or damaged.
• There are noticeable signs of overheating.
• The product does not operate normally when you follow the
operating instructions.
• Avoid hot areas
The product should be placed away from heat sources such as
radiators, heat registers, stoves, or other products (including, but
limited to, amplifiers) that produce heat.
• Avoid wet areas
Never use the product in a wet location.
9
• Avoid using your device after a dramatic change in temperature
When you move your device between environments with very
different temperature and/or humidity ranges, condensation may
form on or within the device. To avoid damaging the device, allow
sufficient time for the moisture to evaporate before using the device.
NOTE: When taking the device from low-temperature conditions into a
warmer environment or from high-temperature conditions into
a cooler environment, allow the device to acclimate to room
temperature before turning on the power.
• Avoid pushing objects into product
Never push objects of any kind into cabinet slots or other openings
in the product. Slots and openings are provided for ventilation. These
openings must not be blocked or covered.
• Mounting Accessories
Do not use the product on an unstable table, cart, stand, tripod,
or bracket. Any mounting of the product should follow the
manufacturer’s instructions, and should use a mounting accessory
recommended by the manufacturer.
• Avoid unstable mounting
Do not place the product with an unstable base.
• Use product with approved equipment
This product should be used only with personal computers and
options identified as suitable for use with your equipment.
• Adjust the volume
Turn down the volume before using headphones or other audio
devices.
• Cleaning
Unplug the product from the wall outlet before cleaning. Do not use
liquid cleaners or aerosol cleaners. Use a damp cloth for cleaning, but
NEVER use water to clean the LCD screen.

10
• For magnetic devices
Please avoid putting any media that contains magnets,
e.g. magnetic card, credit cards, bank cards, audio/video
tape or magnetic memory devices, directly on the
device or keyboard without any distance.
It is highly recommended to put the media containing
magnets in a security distance of at least 5 cm. If you
carry your wallet or billfold which contains magnetic
cards next to the device or its keyboard, information
stored on these cards could be destroyed.
Please make sure that there is an adequate distance
from the device or its keyboard other magnetic
sensitive devices, e.g., a mechanical watch or measure
instruments
• For pacemakers
The functionality of pacemakers can be interfered by
the device and its keyboard. Always keep the device and
its keyboard in a fair distance to your pacemaker, which
at least will be 5 cm. In any case, please do not carry the
device and/or its keyboard in the front pockets of your
shirt or coat.
For information about other medical active implants,
please contact the producer or a doctor to ensure such
active implants will not be interfered by magnetic field.
11
12
Contents
Chapter 1 Getting Started 17
1.1 Getting to Know Your Device and Its Accessories .......... 18
1.2 About the USIM/SIM Card and Battery ........................... 23
1.3 Starting Up ........................................................................ 25
1.4 The Today Screen .............................................................. 27
1.5 The Subdisplay ................................................................. 31
1.6 Using the Programs .......................................................... 32
1.7 Device Settings ................................................................. 34
Chapter 2 Entering and Searching for
Information 39
2.1 Using the Hardware Keyboard ........................................ 40
2.2 Entering Information ....................................................... 42
2.3 Using the On-screen Keyboard ....................................... 43
2.4 Using Letter Recognizer ................................................... 43
2.5 Using Block Recognizer ................................................... 44
2.6 Using Transcriber .............................................................. 44
2.7 Using Symbol Pad ............................................................. 46
2.8 Using Notes to Draw, Write, and Record Voice Notes .... 47
2.9 Searching for Information ............................................... 47
13
Chapter 3 Using Phone Features 49
3.1 Using the Phone ............................................................... 50
3.2 Making a Call .................................................................... 51
3.3 Receiving a Call ................................................................. 54
3.4 Making a Video Call .......................................................... 54
3.5 Receiving a Video Call ...................................................... 57
3.6 Smart Dialing .................................................................... 58
3.7 In-call Options .................................................................. 61
3.8 Additional Dialing Information ....................................... 62
3.9 Setting Up Bluetooth SIM Access for Car Kit Phones ..... 62
Chapter 4 Synchronizing Information and
Setting Up E-mail Security 65
4.1 Setting Up ActiveSync ...................................................... 66
4.2 Synchronizing Information ............................................. 70
4.3 Synchronizing via Bluetooth ........................................... 75
4.4 Synchronizing Music, Video, and Pictures ...................... 75
4.5 Setting Up E-mail Security ............................................... 77
Chapter 5 Managing Your Pocket PC Phone 79
5.1 Personalizing Your Pocket PC Phone .............................. 80
5.2 Adding and Removing Programs .................................... 89
5.3 Managing Memory ........................................................... 90
5.4 Copying Files ..................................................................... 91
14
5.5 Backing Up Data ............................................................... 93
5.6 Protecting Your Pocket PC Phone ................................... 96
5.7 Resetting Your Pocket PC Phone ..................................... 98
Chapter 6 Getting Connected 101
6.1 Connecting to the Internet ............................................ 102
6.2 Using VueFLO .................................................................. 105
6.3 Internet Explorer Mobile ............................................... 106
6.4 Opera Browser ................................................................ 108
6.5 Using Comm Manager .................................................... 110
6.6 Using Bluetooth .............................................................. 111
6.7 Using Wi-Fi ...................................................................... 121
6.8 Using Internet Sharing ................................................... 124
6.9 Using Terminal Services Client ...................................... 125
Chapter 7 Exchanging Messages and
Using Outlook 127
7.1 E-mail and Text Messages .............................................. 128
7.2 MMS Messages ............................................................... 137
7.3 Pocket MSN ..................................................................... 142
7.4 Calendar .......................................................................... 144
7.5 Contacts .......................................................................... 145
7.6 Tasks ................................................................................ 150
7.7 Notes ............................................................................... 151
7.8 Voice Recorder ................................................................ 154
15
Chapter 8 Using GPS 157
8.1 Guidelines and Preparation for Using GPS ................... 158
8.2 Downloading Satellite Data via QuickGPS ................... 159
8.3 Using GPS Software ........................................................ 161
8.4 GPS Controls ................................................................... 161
Chapter 9 Experiencing Multimedia 163
9.1 Using Camera .................................................................. 164
9.2 Using Pictures & Videos ................................................. 178
9.3 Using Windows Media Player Mobile ............................ 183
9.4 Using Audio Manager .................................................... 190
9.5 Using Streaming Media ................................................. 196
Chapter 10 Using Other Applications 199
10.1 Word Mobile ................................................................... 200
10.2 Excel Mobile .................................................................... 201
10.3 Viewing Slide Shows with PowerPoint Mobile ............. 201
10.4 Using Adobe Reader LE .................................................. 202
10.5 Using MIDlet Manager ................................................... 205
10.6 Using ZIP ......................................................................... 208
10.7 Using Voice Speed Dial .................................................. 210
10.8 Using JETCET Print ......................................................... 212

18 Getting Started
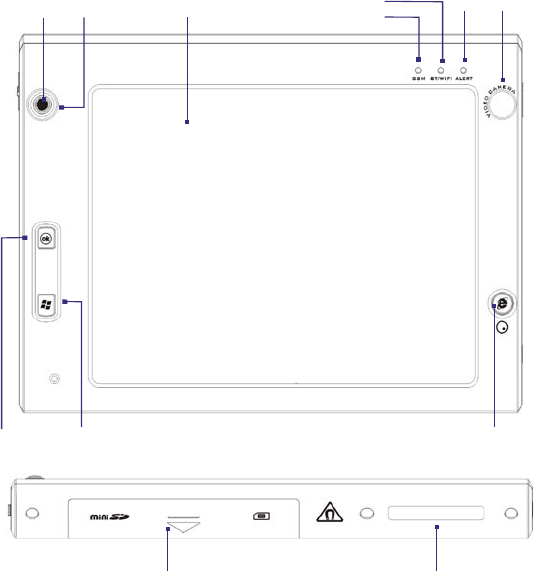
1.1 Getting to Know Your Device and Its
Accessories
3
4
1
10
57
89
6
2
11 12

Getting Started 19
No. Item Function
1 Navigation Control/
CENTER OK button
Press this multi-directional control up, down,
left, or right to move through menus and
program instructions; carry out the selection by
pressing the CENTER OK button.
2 Notification LED 1 This LED shows battery charging status.
3 Touch Screen Tap the screen with the stylus to write, draw, or
make a selection.
4 Notification LED 2 This LED shows the GSM/UMTS standby/
network status (Green). and GPS indicator
(amber)
5 Notification LED 3 This LED shows the following:
• A flashing Blue light for Bluetooth system
notification of powered-up and ready to
transmit radio frequency signal.
• A flashing Green light for Wi-Fi status.
• When both Bluetooth and Wi-Fi are enabled,
their lights flash alternately.
6 Notification LED 4 This LED shows messages and notifications.
7 Second Camera Use this camera for video call conversations or
to take self landscape photos.
8 OK Button Press to confirm your data entries, or to exit the
program in use.
9 START Button Press to open the Start menu.
10 Web Browser/VueFLO
Button
Press to launch the Interner Exolorer Mobile
or Opera Browser and automatically go to the
home page selected by default.
Depending on the Web browser selected in
VueFLO settings, press this button to activate
VueFLO when browsing the Web.
11 Battery Compartment Open this compartment to insert the SIM/USIM
card, miniSD™ card and battery.
12 Keyboard Copper
Connector
Attach the copper part of the keyboard to this
to be able to use the keyboard. See "Using the
Hardware Keyboard" in chapter 2 to learn how
to attach the keyboard to the main unit.
20 Getting Started
15
16
20
21
13
17
18
19
14
24 25
23
22 26

Getting Started 21
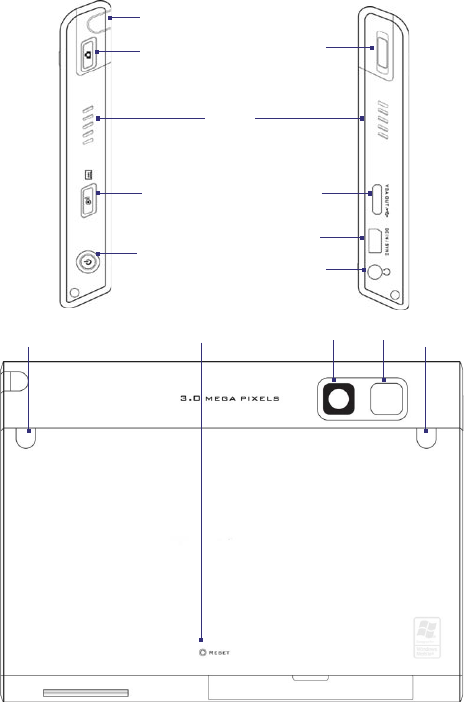
No. Item Function
13 Stylus Use the stylus to write, draw, or select items on the touch
screen.
14 CAMERA Button Press to launch the Camera; press again to take a photo or
video clip, depending on the specified capture mode.
15 Speaker Listen to audio files and voice calls here.
16 COMM MANAGER/
VOICE RECORDER
button
Press to open Comm Manager. Press and hold to open the
Voice Notes program.
17 POWER Button • Press to turn off the display temporarily. This switches
your device to Sleep mode. You can still receive calls and
messages when your device is in Sleep mode.
• Press and hold (for about 5 seconds) to turn off the
power completely. All functions including the phone will
be unavailable for use.
18 Volume Slider • Slide up or down to adjust the speaker volume.
• During a call, slide up or down to adjust the earpiece
volume.
19 VGA Out/USB port Use this connection to output the contents on the screen to
an external device using the provided VGA out cable. This
also acts as a USB 1.1 host to connect USB peripherals.
20 HTC ExtUSB™ port Use this connector to synchronize data by connecting the
provided USB Sync cable or to recharge the battery via the
provided AC adapter. You can also connect the provided
USB stereo headset for hands-free conversation or for
listening to audio media.
21 3.5 mm Earphone
Jack
Lets you listen to audio media, use a hand-free kit or plug in
a microphone.
22 Car Antenna
Connector
Connect your device to the car antenna while in a car to
have better reception quality.
23 RESET Button With the stylus, press the RESET button to soft-reset your
device.
24 Camera Use the camera to take still photos and record video clips.
25 Flash Light When turned on, it illuminates your subject and allows
you to capture clear photos or video even in a dark
environment. It also flashes when a photo is taken.
26 GPS Antenna
Connector
If you need better GPS signal reception, you can connect an
external GPS antenna.
22 Getting Started
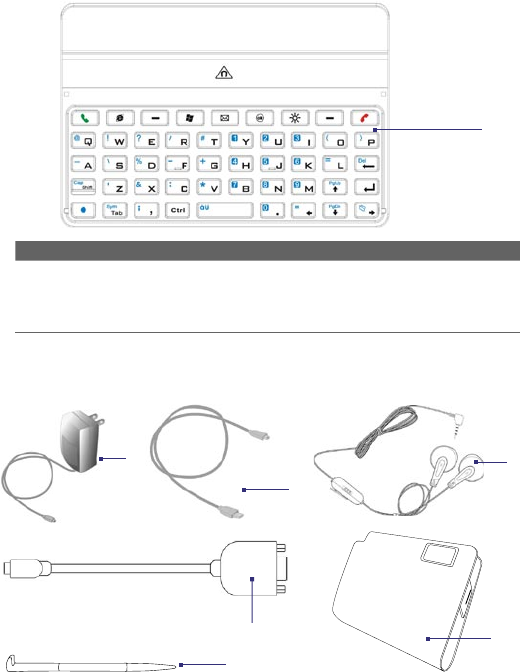
No. Item Function
27 QWERTY keyboard This is similar to a standard PC keyboard.
Connect to the device to use the keyboard
(Please see chapter 2). This also acts as a
protective cover for the device screen.
Accessories
2
1
3
4
5
6
27

Getting Started 23
No. Accessory Function
1 AC adapter Recharges the battery.
2 USB Sync cable Connects your device to a PC and synchronizes data.
3 Stereo headset Provides a volume control slider and a Send/End
button. Press the Send/End button to pick up a call or
put a call on hold; press and hold the button to end
the call.
4 VGA Out cable Connects your device to an external viewing device.
You can output the contents on the device's screen to
an external viewing device.
5 Carrying Case Acts as a protective carrying case for your Athena.
6 Extra Stylus Use to tap items onscreen.
1.2 About the USIM/SIM Card and Battery
Always turn off your device before installing/replacing the battery and
USIM/SIM card. Follow the instructions in the Quick Start Guide to install
a 3G USIM (Universal Subscriber Identity Module) or a SIM (Subscriber
Identity Module) card provided by your local network service provider and
to install the battery.
The USIM/SIM card contains your phone number, service details, and
phonebook/message memory. Your device supports both 1.8V and 3V
USIM/SIM cards. Some legacy SIM cards will not function with your device.
You should consult with your service provider for a replacement SIM card.
There may be fees for this service.
Your device contains a rechargeable Li-ion polymer battery. This device
is designed to use only manufacturer-specified original batteries and
accessories. Battery performance depends on many factors, including
your wireless service provider’s network configuration, signal strength, the
temperature of the environment in which you operate your device, the
features and/or settings you select and use, items attached to connecting
ports, and your voice, data, and other program usage patterns.
24 Getting Started
Battery life estimates (approximations):
• Standby time: Up to 300 hours for GSM
Up to 300 hours for UMTS.
• Talk time (Screen off): Up to 5.5 hours for GSM
Up to 4.5 hours for UMTS.
Warning! To reduce risk of fire or burns:
• Do not attempt to open, disassemble, or service the battery pack.
• Do not crush, puncture, short external contacts, or dispose of in fire
or water.
• Do not expose to temperatures above 60oC (140oF).
• Replace only with the battery pack designated for this product.
• Recycle or dispose of used battery as stipulated by local regulation.
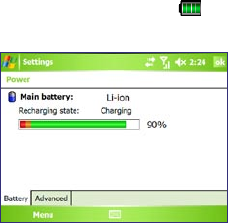
To check the battery power
Do one of the following:
• Tap the battery level icon ( ) on the Today screen.
• Alternatively, tap Start > Settings > Systems tab > Power.
Battery power information
Charge the battery
The battery in the box is shipped partially charged. Before you start using
your device, it is recommended that you install and charge the battery.
Some batteries perform best after several full charge/discharge cycles. You
can charge the battery in two ways:
Getting Started 25
•
Charging the device’s battery by using the power adapter.
• Connecting your device to a PC via the provided USB Sync cable.
Warning! • Do not remove the battery from the device while you are charging it
using the AC or car adapter.
• As a safety precaution, the battery stops charging when it overheats.
Your device will use the power from the AC or car adapter to
function.
Low battery
When the low-battery warning appears, do the following:
• Immediately save your current data.
• Connect the power adapter to charge the battery.
• Turn off your device.
1.3 Starting Up
Turn your device on and off
To turn on your device, press and hold the POWER button. When you turn
on your device for the first time, a Quick Start Wizard will guide you through
the calibration process and the setup of regional settings, date and time,
password, Outlook e-mail, and POP3/IMAP4 e-mail accounts. For more
information about touch screen calibration, see “Calibrate the device”.
For information about setting up Outlook e-mail and POP3/IMAP4 e-mail
accounts, see Chapter 7.
To turn off your device, press and hold the POWER button for a few seconds.
A message will then be displayed, prompting you whether or not to turn off
the device completely.
Switching your device to Sleep mode
Quickly pressing the POWER button turns off the display temporarily and
switches your device to Sleep mode. Sleep mode suspends your device to a
low power state while the display is off in order to save battery power.
Your device also automatically goes into Sleep mode when you leave the
device idle after a certain amount of time.
26 Getting Started
When the keyboard is attached to the LCD screen, pressing the POWER
button toggles between turning on and off the subdisplay screen.
To specify the timeout period before your device goes into Sleep mode
1. Tap Start > Settings > System tab > Power > Advanced tab.
2. Under On battery power, make sure the Turn off device if not used
for check box is selected.
3. Select the battery timeout period, then tap OK.
You will still be able to receive messages and calls while your device is in
Sleep mode. Pressing the POWER button again or new incoming calls/
messages will wake up your device.
Calibrate the device
Calibrating the device screen involves tapping the center of a cross with the
stylus as the cross moves around the screen. This process ensures that when
you tap the screen with your stylus, the tapped item is activated.
If your device does not accurately respond to screen taps, follow these steps
to re-calibrate it:
1. Tap Start > Settings > System tab > Screen.
2. On the General tab, tap Align Screen, then follow the on-screen
instructions to complete the calibration.
Manage screen settings
The device’s display has two orientation modes: Landscape and Portrait.
Portrait mode allows you to get a better view or a better operation of
certain programs, while Landscape mode may be optimal for viewing
lengthy files.
• To change the orientation, tap Start > Settings > System tab >
Screen, and select the orientation you want.
• To smooth the edges of screen fonts for many programs, on the
ClearType tab, select the Enable ClearType check box.
• To increase the readability or to see more content on the screen, on
the Text Size tab, adjust the text size by moving the slider.
Getting Started 27
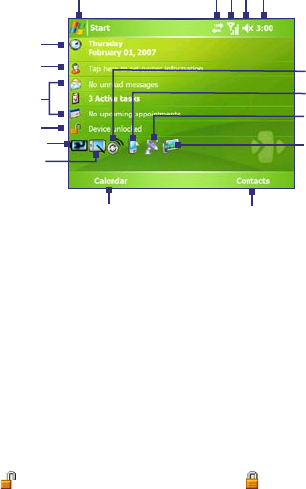
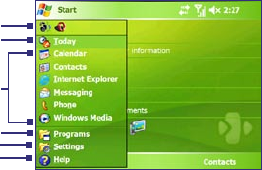
1.4 The Today Screen
The Today screen displays important information, such as upcoming
appointments and status indicators. You can tap a section on the screen to
open the associated program.
• To access the Today screen, tap Start > Today.
• To customize the Today screen display, including the background
image, tap Start > Settings > Personal tab > Today.
1
6
15
7
8
9
2 3 4 5
16
12
10
11
13
14
1Tap to open the Start menu.
2Tap to view connectivity status.
3Indicates the radio signal strength. Tap to configure the phone settings.
4Tap to adjust device/ringer volume.
5Displays the current time. Tap to check the current date and upcoming
appointments. Tap and hold to change the clock mode to Analog or Digital.
6Displays the current date and time. Tap to set up date, time, alarm, and more.
7Tap to set owner information.
8Your day at a glance with reminders. Tap to open the related program: messages,
tasks, and appointments.
9Tap to lock the device. The icon changes to .
Tap Unlock on the Today screen to ulock again.
17
28 Getting Started
10 Indicates the battery status. Tap to open the Power Settings screen.
11 Tap to toggle the screen between portrait and landscape orientation.
12 Tap to open Calendar.
13 Tap to open Contacts.
14 Tap to open Comm Manager.
15 Tap to open the Backlight Settings screen.
16 Tap to open QuickGPS
17 Tap to open and configure TV Out settings.
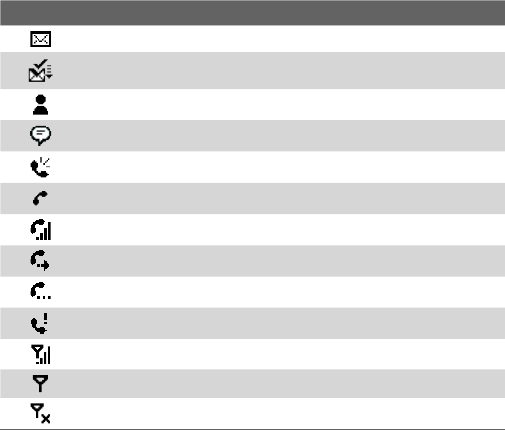
Indicators
The following are some of the status icons that you may see on the device.
Icon Description
New e-mail or text messages; SMS notification of voice mail
New multimedia (MMS) message
New MSN message
There are more notifications. Tap the icon to view all.
Speakerphone on
Dialing while no USIM/SIM card is inserted
Voice call in progress
Calls are forwarded
Call on hold
Missed call
Maximum signal strength
No signal
Phone is turned off
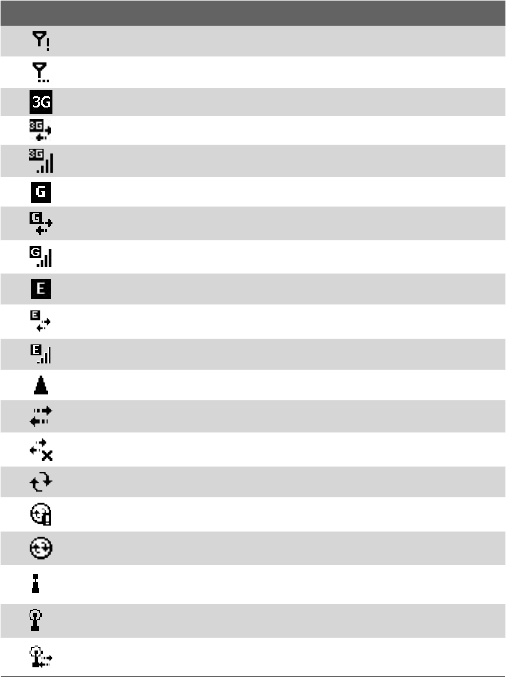
Getting Started 29
Icon Description
No phone service
Searching for phone service
3G UMTS network available
UMTS connecting
UMTS in use
GPRS available
GPRS connecting
GPRS in use
EDGE available
EDGE connecting
EDGE in use
Roaming
Connection is active
Connection is not active
Synchronization in progress
Synchronization error
ActiveSync notification
Wi-Fi function enabled, but device not connected to a wireless
network yet
Wireless network(s) detected
Connecting to wireless network (arrows moving);
Connected to wireless network
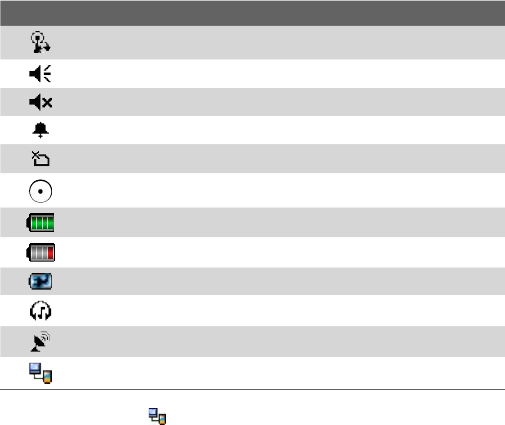
30 Getting Started
Icon Description
Synchronizing via Wi-Fi
Sound on
Sound off
Alarm
No USIM/SIM card inserted
VueFLO activated
Battery is fully charged
Battery power is very low
Battery charging
Bluetooth headset detected
QuickGPS update notification
Serial USB connection active
Note The USB to PC ( ) icon appears on the Today Screen when your device
is connected to your computer and you enable a serial USB connection
between them. For more information about USB to PC, see “Device Settings”
later in this chapter.
The Start menu
The Start menu, located at the top left corner of the Today screen, displays a
list of programs. You can start a program by scrolling through the programs
list and then pressing the CENTER OK button, or by tapping a program with
the stylus.
Getting Started 31
1Tap to start a recently-used program.
2Tap to switch to the Today screen.
3Tap to start a program. The items displayed in the Start menu can be customized
by tapping Start > Settings > Personal tab > Menus.
4Tap to view and select more programs that are installed on your device.
5Tap to change device settings.
6Tap to see a Help topic for the current screen.
1
2
5
4
6
3
1.5 The Subdisplay
The Subdisplay lets you view notifications, music info, weather, temperature
and time on a designated area on the LCD screen when the keyboard is
attached to the LCD screen of the main unit. The Subdisplay is automatically
activated when the keyboard is pressed against the LCD screen.
Note Weather, world time and temperature information are only available if the
WorldMate® software is installed.
For more information regarding the Subdisplay, please refer to the Quick
Start Guide.
32 Getting Started
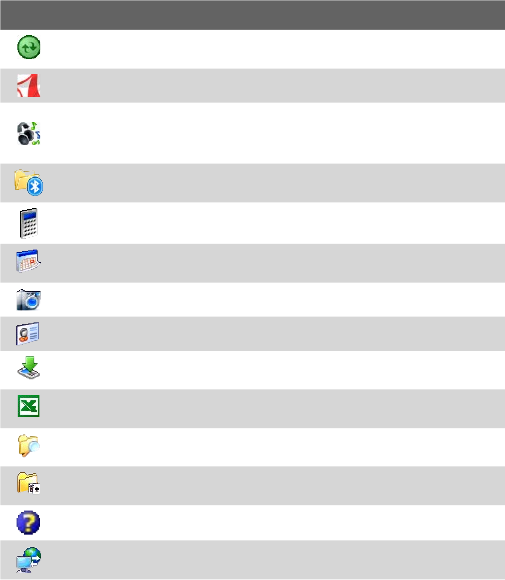
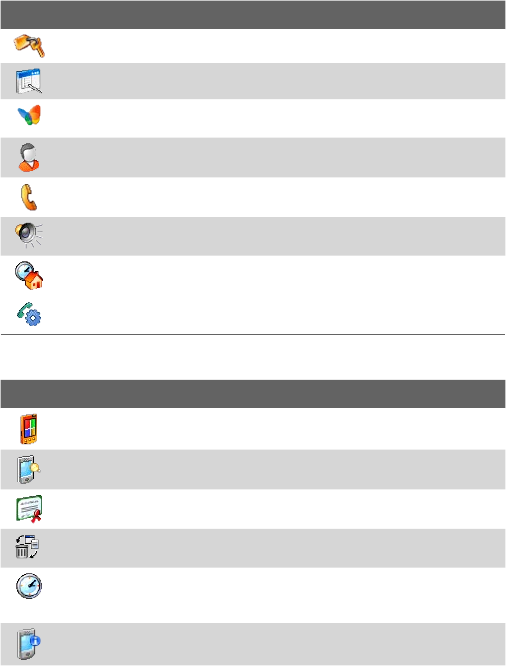
1.6 Using the Programs
The following are some of the programs that are already installed on your
device.
Icon Description
ActiveSync Synchronizes information between your device and a PC or
the Exchange Server.
Adobe Reader LE Allows you to view PDF files.
Audio Manager Allows you to easily browse for music files by
organizing music files into categories such as artists, album, etc. It has an
integrated Music Player that lets you play back music files.
Bluetooth Explorer Searches for other Bluetooth devices that have file
sharing enabled and allows you to access their Bluetooth shared folder.
Calculator Lets you perform basic arithmetic and calculations, such as
addition, subtraction, multiplication, and division.
Calendar Allows you to keep track of your appointments and create
meeting requests.
Camera Snaps photos or shoots video clips with accompanying audio.
Contacts Allows you to keep track of your friends and colleagues.
Download Agent Provides information about the download status and
the downloaded content from the Internet.
Excel Mobile Creates new workbooks or lets you view and edit Excel
workbooks.
File Explorer Enables you to organize and manage files on your device.
Games Lets you play two pre-installed games: Bubble Breaker and
Solitaire.
Help Enables you to see Help topics for a program on your device.
Internet Sharing Allows you to connect your notebook computer to the
Internet using your device's data connection.
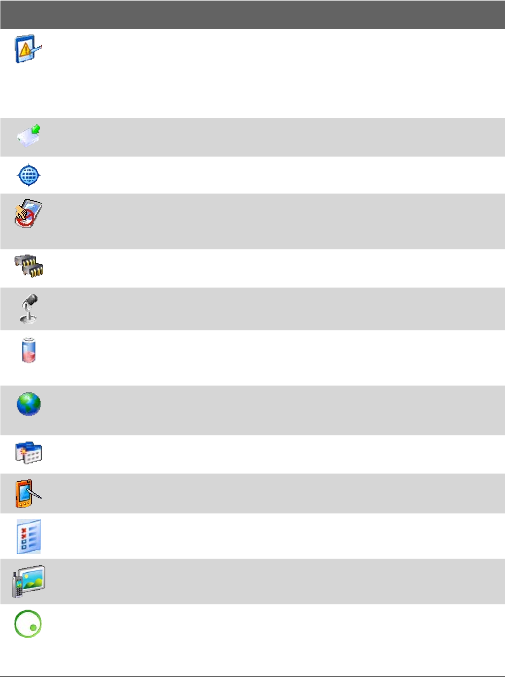
Getting Started 33
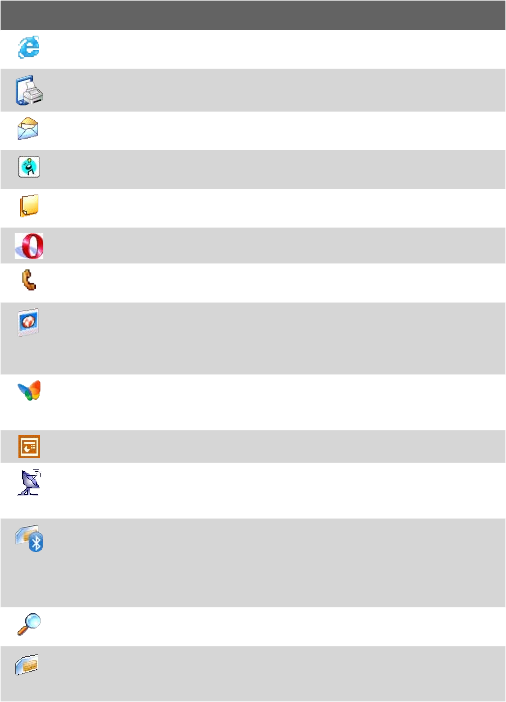
Icon Description
Internet Explorer Mobile Allows you to browse Web and WAP sites as
well as download new programs and files from the Internet.
JETCET Print Allows you to print documents, image files, emails, Web
pages and more from your Ameo.
Messaging Allows you to send and receive e-mail, MMS, and text
messages.
MIDlet Manager Enables you to download and install Java applications,
such as games and tools, on your device.
Notes Allows you to create handwritten or typed notes, drawings, and
recordings.
Opera Browser Lets you browse Web sites.
Phone Lets you make and receive calls, switch between calls, and set up
conference calling.
Pictures & Videos Lets you view, organize, and sort picture and video
files on your device or a storage card. Captured photos are stored in the
My Pictures folder, and video clips are saved in the My Videos folder of
your device.
Pocket MSN Lets you send and receive instant messages with your MSN
Messenger contacts, as well as access your hotmail account, if you have
one.
PowerPoint Mobile Lets you view PowerPoint slides and presentations.
QuickGPS Downloads satellite data over the Internet via ActiveSync,
Wi-Fi or GPRS to speed up the time for determining your current GPS
position.
SAPSettings Enables Bluetooth Remote SIM access on your device. This
allows you to use a car kit phone that supports the SIM Access Profile
(SAP) to access the SIM card on your device via Bluetooth and make
or receive phone calls. You can also download SIM contacts from your
device onto the car kit phone.
Search Enables you to search contacts, data, and other information on
your device.
SIM Manager Allows you to manage the contacts that are stored on
your SIM card. You can also use this program to copy SIM contents to
Contacts on your device.
34 Getting Started
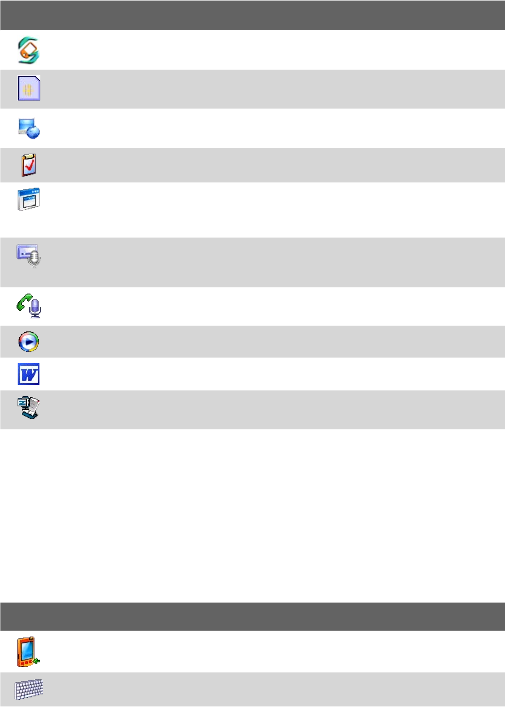
Icon Description
Sprite Backup Provides you with a quick and easy way to make backups
of your data.
STK (SIM Tool Kit) Service Allows you to access information and other
services offered by your wireless service provider.
Streaming Media Allows you to stream live or on-demand video.
Tasks Allows you to keep track of your tasks.
Terminal Services Client Allows you to log on a PC running Terminal
Services or Remote Desktop, and use all of the programs available on
that PC from your mobile device.
Voice Recorder Allows you to record a voice clip and quickly send it
through MMS or e-mail, beam it or set it as a ringtone.
Voice Speed Dial Allows you to record voice tags so that you can dial a
phone number or launch programs simply by speaking a word.
Windows Media Player Mobile Lets you play back video and audio files.
Word Mobile Lets you create, view, and edit Word documents.
ZIP Enables you to save memory and free up storage space on your
device by compressing files in the conventional ZIP format.
1.7 Device Settings
You can adjust the device settings to suit the way you work. To see all
available settings, tap Start > Settings, then tap the Personal, System, and
Connections tabs located at the bottom of the screen.
Personal tab
Icon Description
Buttons Assigns a program or function to a hardware button.
Input Sets options for each of the input methods.
Getting Started 35
Icon Description
Lock Sets a password for your device.
Menus Sets what programs will appear in the Start menu.
MSN Options Allows you to customize settings for the applications
included in Pocket MSN such as MSN Hotmail and MSN Messenger.
Owner Information Allows you to enter your personal information on
your device.
Phone Allows you to customize phone settings such as ring tone, set a
PIN number for your SIM card, and more.
Sounds & Notifications Enables sounds for events, notifications, and
more, and allows you to set the type of notification for different events.
Today Allows you to customize the appearance and the information to
be displayed on the Today screen.
Voice Speed Dial Allows you to create voice tags for voice dialing
contacts and SIM contacts as well as for launching programs.
System tab
Icon Description
About Allows you to specify a name for your device. Also shows the
Windows Mobile version and copyright information.
Backlight Sets the backlight timeout and brightness.
Certificates Shows information about certificates that are installed on
your device.
Clear Storage Removes all your data and files from the memory and
resets your device to factory default settings.
Clock & Alarms Switches the device clock to the date and time of your
locale or to a visiting time zone when you're traveling. Alarms can also be
set at specified days and times of a week.
Device Information Shows information about the firmware version,
hardware, identity, and the duration of calls made on your device.
36 Getting Started
Icon Description
Error Reporting Enables or disables the device's error reporting
function. When this function is enabled and a program error occurs,
technical data about the state of the program and your computer will be
logged in a text file and delivered to Microsoft's technical support if you
choose to send it.
Format Microdrive Lets you erase all data and quickly format the
Microdrive in your device.
GPS Configures GPS connection settings.
Key Lock Locks the buttons on your device except for the POWER
button when the device is in Sleep mode. This ensures you will not
switch the device on by accident and consume unnecessary power.
Memory Shows the device memory allocation status and memory card
information. Also allows you to stop currently running programs.
Microphone AGC Adjusts the volume of your voice automatically when
you are recording.
Power Shows the current battery level. Also allows you to set the
timeout for turning off the display (switching device to Sleep mode) to
conserve battery power.
Regional Settings Sets the regional language to use and the format for
displaying numbers, currency, date, and time on your device.
Remove Programs Lets you remove programs that you installed on
your device.
Screen Allows you to change the screen orientation, re-calibrate the
screen, and change the screen text size.
Task Manager Enables the “X” button to end running programs.
TV Out Allows you to output the contents you are viewing on the device
screen to an external display device.
VueFLO Opens the VueFLO settings where you can adjust the sensitivity
level of VueFLO and choose the Web browser where VueFLO can be
enabled. VueFLO lets you scroll through Web pages by simply tilting your
device. In VueFLO, tap Tutorial to learn how to use VueFLO.
Getting Started 37
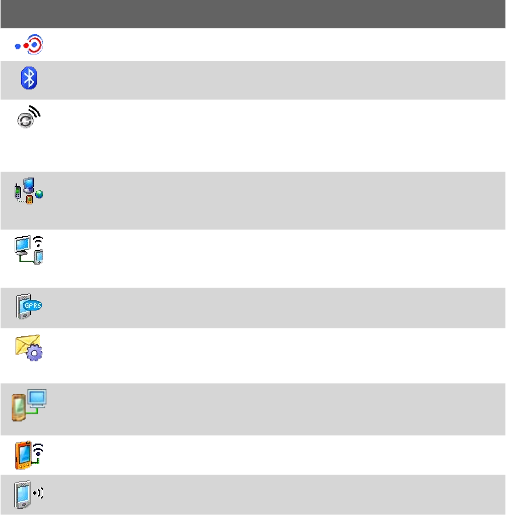
Connections tab
Icon Description
Beam Enables your device to receive incoming Bluetooth beams.
Bluetooth Turns Bluetooth on, sets your device to visible mode, and
allows you to scan for other Bluetooth devices.
Comm Manager Allows you to manage the device’s connection
(including Wi-Fi, Bluetooth, and ActiveSync), disconnect data services
(such as GPRS), turn the phone on or off, and enable or disable the Direct
Push function.
Connections Sets up one or more types of modem connections for your
device, such as phone dial-up, GPRS, Bluetooth, and more, so that your
device can connect to the Internet or a private local network.
CSD Line Type Sets the line type to use when making a circuit switch
data (CSD) connection. Normally, you do not need to change the setting
unless you encounter a problem on establishing a connection.
GPRS Setting Sets the GPRS authentication method. Consult your
wireless service provider first before changing this setting.
SMS Service Enables sending of SMS text messages via a data
connection, such as GPRS or a circuit-switched connection. This can be
used only if your wireless service provider supports this service.
USB to PC Sets the USB connection between your device and PC, and
helps with problems connecting ActiveSync.
Wi-Fi Allows your device to scan for available wireless networks.
Wireless LAN Shows information about the active wireless network, and
allows you to customize Wi-Fi settings.
38 Getting Started

Chapter 2
Entering and Searching
for Information
2.1 Using the Hardware Keyboard
2.2 Entering Information
2.3 Using the On-screen Keyboard
2.4 Using Letter Recognizer
2.5 Using Block Recognizer
2.6 Using Transcriber
2.7 Using Symbol Pad
2.8 Using Notes to Draw, Write, and
Record Voice Notes
2.9 Searching for Information
40 Entering and Searching for Information
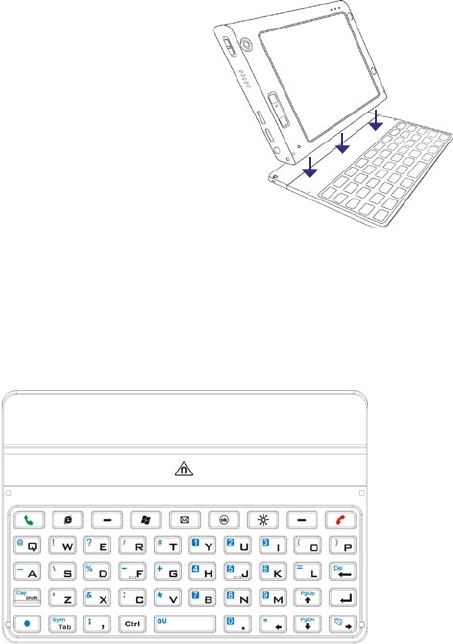
2.1 Using the Hardware Keyboard
Your device provides you with
a QWERTY keyboard, which is
similar to a standard keyboard
on your PC. To use the QWERTY
keyboard, attach the main unit
to the keyboard (as shown in the
image). The main unit securely
attaches itself to the keyboard
through a magnet.
To separate the main unit from the
keyboard, simply pull them apart.
Note When separating the keyboard from the main unit, please do so in a gentle
way.
Warning! Please avoid placing credit cards, diskettes, audio or video cassettes or any
other form of magnetic data carriers near the device or the keyboard as this
could otherwise lead to loss of data stored on such objects. Other magnetic
sensitive devices like a mechanical wristwatch should also not be placed
near the device or keyboard.
Entering and Searching for Information 41
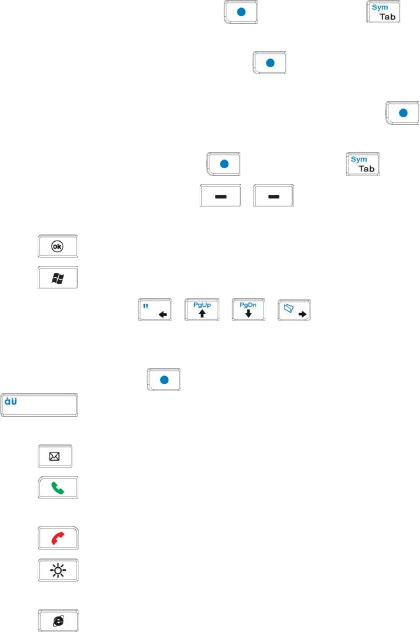
You can do the following with the QWERTY keyboard:
• To type lowercase letters, press the keys using your thumbs or fingers.
• To use all uppercase letters, press first, then press . To
change back to all lowercase letters, press these buttons again.
• To use a single uppercase letter, press and then press the
corresponding key.
• To enter a number or symbol (labeled in blue color), press and
then press the corresponding key.
• To open the Symbol Pad, press and then press .
• Press the Left/Right SOFT KEY / to perform the
command shown in the label above the key.
• Press to verify your data entries or exit the program in use.
• Press to open the Start menu.
• Press the arrow keys / / / for directional
movement.
• To type accented characters (like á, ã, ç, ê, í, ó,
ü, etc), press the letter
key first and then, hold
and at the same time press the space bar
several times until you find the correct character you
need.
• Press to open the Messaging program.
• Press to answer a call, make a call or send a message. Press and
hold to toggle between enabling and disabling the speakerphone.
• Press to end a call or cancel a message.
• Press to turn the screen back on if the device is set to sleep
mode..
• Press to open the Internet Explorer Mobile Browser.
42 Entering and Searching for Information
2.2 Entering Information
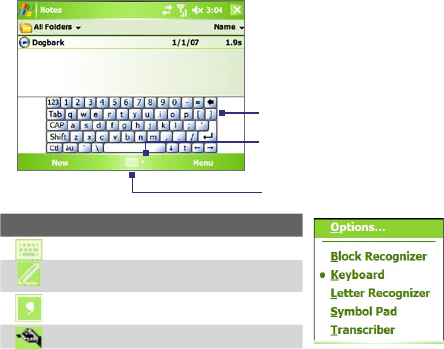
When you start a program or select a field that requires text or numbers, the
Input Panel icon becomes available on the menu bar.
Tap the Input Selector arrow (that appears next to the Input Panel icon)
to open a menu where you can select a text input method and customize
input options. After selecting a text input method, the corresponding Input
Panel is then displayed and you can use it to enter text. To toggle between
showing and hiding the Input Panel, simply tap the Input Panel icon.
Input Panel
(Keyboard)
Input Selector
arrow
Input Panel icon
Icon Input method
On-screen keyboard
Letter Recognizer or Block Recognizer
Symbol Pad
Transcriber
Note Some text input methods may not be available in certain language versions
of the device.
Entering and Searching for Information 43
2.3 Using the On-screen Keyboard
The on-screen Keyboard is available when text entry is possible. You
can enter text by tapping keys on the keyboard that are displayed on the
screen.
To enter text using the on-screen Keyboard
1. In a program, tap the Input Selector arrow, and tap Keyboard.
2. Enter text by tapping keys on the on-screen Keyboard.
To enlarge the on-screen Keyboard
1. Tap the Input Selector arrow, then tap Options.
2. In the Input method list, select Keyboard.
3. Tap Large keys.
2.4 Using Letter Recognizer
With Letter Recognizer, you can write individual letters, numbers, and
punctuation, which are then converted into typed text.
To use Letter Recognizer
1. From a program, tap the Input Selector arrow, and tap Letter
Recognizer.
2. Write characters, numbers, and symbols in the designated writing
area.
• Enter capital letters by writing in the ABC (left) area of the box.
• Enter lower case letters by writing in the abc (middle) area of the
box.
• Enter numbers by writing in the 123 (right) area of the box.
• Enter punctuation and symbols by tapping in either area of the
box and then writing the desired character.
Note Letter Recognizer is available when text entry is possible.
Tip For help with writing characters, tap the question mark near the writing area.
44 Entering and Searching for Information
2.5 Using Block Recognizer
With Block Recognizer, you use a single stroke to write letters, numbers,
symbols, and punctuation, which are then converted into typed text.
To use Block Recognizer
1. From a program, tap the Input Selector arrow, and tap Block
Recognizer.
2. Write characters, numbers, and symbols in the designated writing
area.
• Enter letters by writing in the abc (left) area of the box.
• Enter numbers by writing in the 123 (right) area of the box.
• Enter symbols and punctuation by tapping in either area of the
box and then writing the desired character.
Note Block Recognizer is available when text entry is possible.
Tip For help with writing characters with Block Recognizer, tap the question
mark near the writing area.
2.6 Using Transcriber
Transcriber is a handwriting recognition program that allows you to write
in cursive, print, or a combination of both. Transcriber works transparently
in the background of programs, recognizing words with its integrated
dictionary. When Transcriber is turned on, it interprets stylus movement
anywhere on the screen as handwriting input. For more information about
using Transcriber, see Help on your device.
To start Transcriber
1. Start a program that accepts user input, such as Word Mobile.
2. Tap the Input Selector arrow, and tap Transcriber. The Transcriber
introductory screen appears.
To write using Transcriber
1. In a program, position the cursor where you want text to appear.
2. Use the stylus to write anywhere on the screen. The handwriting will
be converted to text shortly after you lift the stylus from the screen.

Entering and Searching for Information 45
To enter punctuation and symbols
Transcriber comes with an on-screen keyboard that provides an easy way to
add punctuation or a special symbol to existing text.
• From a program, tap on the Transcriber toolbar.
The keyboard remains visible until you tap the button again.
Tips • To reposition the keyboard, tap and hold the title bar, then drag to the
desired location.
• When no text is selected, you can also open the keyboard by doing the
gesture. For more information about using Transcriber gestures, see Help
on your device.
To edit text
1. In a program, draw a line across the text you want to edit.
2. After you lift the stylus from the screen, the line will disappear and the
selected text will be highlighted.
3. Do either of the following:
• Rewrite the text.
• Use gestures to capitalize letters, insert a space, and so on. For
information about using Transcriber gestures, see Help on your
device.
46 Entering and Searching for Information
2.7 Using Symbol Pad
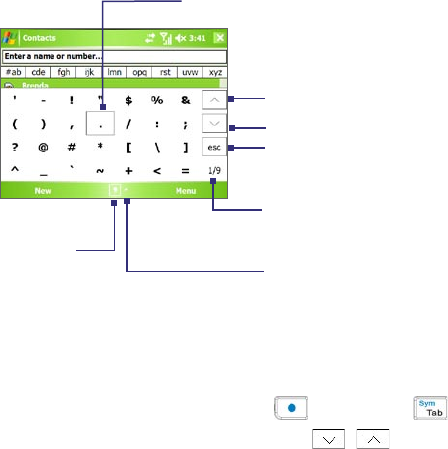
Symbol Pad provides a comprehensive list of common symbols such as
parentheses, brackets, currency signs, and more, as well as punctuation
marks and special characters.
Tap to display the previous page
of symbols.
Tap to display the next page of
symbols.
Input Selector arrow
Tap a symbol to select it.
When using the Navigation Control or the
hardware keyboard, press UP, DOWN, LEFT,
or RIGHT to navigate through the available
symbols on-screen, then press ENTER to select
a symbol.
Tap to close the Symbol Pad
without selecting any symbol.
Symbol Pad icon
This indicates the current page
and the total number of symbol
pages.
To open the Symbol Pad and select a symbol
1. Create or open a document, such as a Word document.
2. To open the Symbol Pad:
• Tap the Input Selector arrow, then tap Symbol Pad; or
• Using the hardware keyboard, press and then press .
3. To browse through the pages of symbols, tap / on the
Symbol Pad screen.
4. Tap a symbol to select it and close the Symbol Pad. The selected
symbol will then be inserted in your document.

Entering and Searching for Information 47
2.8 Using Notes to Draw, Write, and Record Voice
Notes
Using Notes, you can draw directly on the screen, or write on the screen
and save notes in your own handwriting. You can also create a stand-alone
recording (voice note) or you can add a recording to a note.
For more information on what you can do with Notes, see “Notes” in
Chapter 7.
2.9 Searching for Information
You can search for files and other items stored in My Documents folder or
on an installed storage card of your device. You can search by file name
or by words located in the item. For example, you can search in e-mail
messages, notes, appointments, contacts, and tasks, as well as in online
Help.
To search for a file or an item
1. Tap Start > Programs > Search.
2. In the Search for field, you can:
• Enter the file name, word, or other information you want to search
for.
• Tap the down arrow icon ( ), and from the list, select one item
that you have looked for before.
3. In the Type field, you can tap the down arrow icon ( ) and select a
data type from the list to help narrow your search.
4. Tap Search. The system start searching the matched files in My
Documents folder and subfolders.
5. In the Results list, tap the item you want to open.
Note The symbol is displayed next to the names of files saved on a storage
card or the Microdrive.
48 Entering and Searching for Information


50 Using Phone Features
3.1 Using the Phone
Like a standard mobile phone, you can use your device to make, receive,
and keep track of calls and send SMS/MMS messages. You can also dial
directly from Contacts, and easily copy phonebook entries from your SIM
card to Contacts on your device.
The Phone screen
From the Phone screen, you can access Call History, Speed Dial, and Phone
settings. To open the Phone screen, tap Start > Phone.
Enter your PIN
Most SIM cards are preset with a PIN (personal identification number) that
is provided by your wireless service provider. You need to enter the PIN
whenever you use your device.
1. Enter the preset PIN assigned by your wireless service provider.
2. Tap Enter.
Note If your PIN is entered incorrectly three times, the SIM card will be blocked. If
this happens, you can unblock it with the PUK (PIN Unblocking Key) obtained
from your wireless service provider.
Turn the phone function on and off
In many countries, you are required by law to turn off your phone while on
board an aircraft.
To turn off the phone function, do one of the following:
• Tap the Comm Manager icon ( ) on the Today screen. On the
Comm Manager screen, tap the Phone button to turn off the phone
function.
To resume call function, turn on the phone function by tapping the
Phone button again on the Comm Manager screen.
• Tap the Flight Mode button in Comm Manager. This disables all
wireless radios on your device, which include the phone function,
Bluetooth, and Wi-Fi.
To resume call function, tap the Flight Mode button again in Comm
Manager. This also restores the previous state of Bluetooth, but keeps
Wi-Fi disabled..
Using Phone Features 51
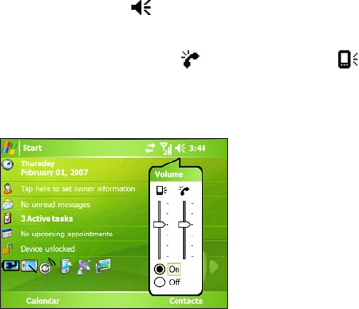
Adjust the device volume
1. Tap the Speaker icon ( ).
2. Under Volume, do the following:
• Adjust the phone volume ( ) or device volume ( ) by moving
the slider to the desired volume level.
• Tap On or Off to change both the system and ringer volume
settings.
Volume adjustment
Note
To adjust the conversation phone volume, you must do it during a call.
Adjusting the volume at another time will affect the ring, notification, and
MP3 sound levels.
3.2 Making a Call
With your device, you can make a call from Phone, Contacts, Speed Dial,
Call History, and SIM Manager.
IMPORTANT You need to have a wired or Bluetooth headset connected to
your device to talk to or to hear the other party.
Make a call from Phone
1. Tap Start > Phone.
2. On the Phone screen, tap the desired phone number, and tap Talk.
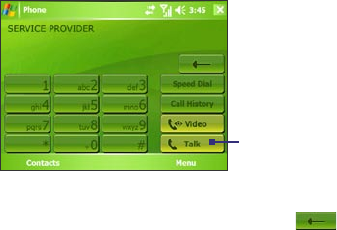
52 Using Phone Features
Talk button
Phone screen
Tip If you tap a wrong number, tap the Back arrow ( ) to erase each
subsequent digit of a number. To erase the entire number, tap and hold the
Back arrow.
Make a call from Contacts
Tap Start > Contacts, then do one of the following:
• Tap the desired contact in the contacts list, and tap the phone
number that you want to call.
• Tap and hold the desired contact, and on the shortcut menu, tap Call
Work, Call Home, or Call Mobile.
To choose one of the numbers of a contact to dial
By default, the mobile telephone number (m) of a contact is dialed when
you make a call from Contacts. However, you can specify that a different
phone number is dialed instead.
1. Tap Start > Contacts.
2. Use the NAVIGATION CONTROL to select a contact.
2. Press NAVIGATION right or left. The letters representing the number
will change as you scroll through them.
Make a call from Call History
1. On the Phone screen, tap Call History.
2. You can either scroll through all calls in Call History, or tap Menu >
Filter and select from a category of call types.
3. Scroll to the desired contact or phone number, and tap Call.

Using Phone Features 53
Make a call from Speed Dial
Use Speed Dial to call frequently-used numbers with a single tap. For
example, if you assign a contact to the location 2 in Speed Dial, you can
simply tap and hold on the Phone screen to dial the contact’s
number. Before you can create a Speed Dial entry, the number must already
exist in Contacts.
To create a Speed Dial entry
1. On the Phone screen, tap Speed Dial.
2. Tap Menu > New.
3. Tap a contact. Select the phone number that you want to add to
Speed Dial.
4. In the Location box, select an available location for the new Speed
Dial entry.
Note Location 1 is generally reserved for your voice mail, and Speed Dial will
designate the next available location by default. If you want to place a phone
number in a position that is already occupied, the new number will replace
the number that is already there.
Tips •
To create a Speed Dial entry from Contacts, tap and hold the contact
name, tap Add to Speed Dial, then select the phone number for which to
create a Speed Dial and an available location for the new Speed Dial entry.
•
To delete a Speed Dial entry, in the Speed Dial list, tap and hold the
desired entry, and tap Delete.
Make a call from SIM Manager
SIM Manager allows you to view the contents of your SIM card, transfer SIM
phonebook entries to Contacts on your device, and make a call from your
SIM card.
To call a SIM contact
1. Tap Start > Programs > SIM Manager. Wait for your SIM card
contents to load.
2. Tap and hold the name or phone number of the person you want to
call, and tap Call.

54 Using Phone Features
3.3 Receiving a Call
When you receive a phone call, a message will appear, giving you the
option to either answer or ignore the incoming call.
IMPORTANT You need to have a wired or Bluetooth headset connected to
your device to talk to or to hear the other party.
To answer or reject an incoming call
• To answer the call, tap Answer.
• To reject the call, tap Ignore.
To end a call
Once an incoming or outgoing call is in progress, you can tap End on the
device to hang up.
3.4 Making a Video Call
Your device allows you to make video calls when you are within a 3G
network coverage area. You need to use a 3G enable SIM card to make video
calls.
IMPORTANT You need to have a wired or Bluetooth headset connected to
your device to talk to or to hear the other party.
To make a video call
• On the Phone keypad, tap the phone number to call, then tap
to start a video call.
• From Contacts, tap and hold the desired contact, and tap Video Call.
• From Call History, tap and hold the desired phone number or contact,
and tap Video Call.
Note The other party’s image will appear on the screen about 3 to 5 seconds after
a connection is established, depending on the signal strength. The streaming
images quality may also be influenced by the signal.
Using Phone Features 55
When the video call is unsuccessful, a message pops up asking you if you
want to try again, make a voice call instead, or send an SMS/MMS message.
Change Video Call settings
While on a video call, you can change certain settings such as the size of the
image, brightness of the image, the camera to use, and more.
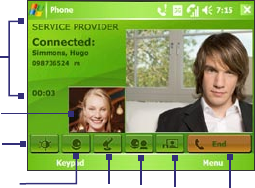
The following shows the Video Call screen and control buttons during an
ongoing call.
2
3
45678
1
1Status area. Displays your service provider name, the other party's
information, and call timer.
2Image display area. Displays your image and the other party's image,
depending on the selected Swap Image setting.
3Brightness Control. Tap to adjust the camera’s brightness.
4Camera On/Off. Tap to toggle between turning on/off the camera. When the
camera is turned off, the image displayed depends on the Video Call options
you have set. See “Set up Video Call Options” for details.
5Audio Mute/Unmute. Tap to mute/unmute audio.
6Main/Second camera. Tap to toggle between using the Main (back) and
Second (front) camera.
7Swap Image. Tap continuously to cycle through the available image display
options.
8End. Tap to end the video call.
56 Using Phone Features
Swap Image options
Both parties
(My video small)
The other party's image is large while your
image is small. This is the default setting.
Both parties
(My video large)
The other party's image is small while your
image is large.
Both parties (equal) Both your image and the other party appear
the same size.
Other party only Only the other party's image is displayed.
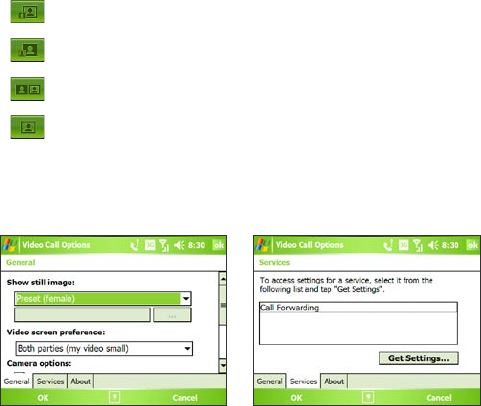
Set up video call options
On the Phone screen, or on the screen of the ongoing video call, tap Menu
>
Video Call Options. You can set the following options:
Video Call Options: General tab Video Call Options: Services tab
General tab
• Show still image. Select the image you want to display when you
turn off the camera.
• Preset (female). Displays a female picture provided by your
service provider.
• Preset (male). Displays a male picture provided by your service
provider.
• Custom image. Lets you use an image from file as your display
picture. When this option is selected, the File Name box and the
Browse button will be enabled, allowing you to select an image
file.
Using Phone Features 57
• Last video frame. Uses the last video frame before you stopped
the camera as your display image.
• Video screen preference. To change how your image and the other
party’s image are displayed on the screen, select your preference from
the Video screen preference list or tap the Swap Image button on
the Video Call screen.
• Camera options:
• Flip the 2nd camera video. Select this check box if you are going
to show a text document to the other party using the second
camera.
• Switch camera off when answering video call. Select this check
box to not send a video feed of yourself to the other party. Instead,
the option you selected in Show still image will be displayed.
• Display info:
• Show call timer. Select this check box to display the call period in
the status area.
• Show phone number and name. Select this check box to display
the other party’s phone number and name in the status area.
Services tab
To set up further calling options for Video Call, tap the Services tab. On
the Services screen, select the desired service from the list, then tap Get
Settings to access its settings.
3.5 Receiving a Video Call
To answer or reject an incoming video call
• To answer the video call, tap Answer.
• To reject the video call, tap Ignore.
To end a video call
Once an incoming or outgoing video call is in progress, you can tap End to
hang up.
58 Using Phone Features
3.6 Smart Dialing
Smart Dialing is a program that makes it easy for you to dial a phone
number. When you start entering numbers or characters, Smart Dialing
will automatically search and sort the contact entries on the SIM card, in
Contacts, and the phone numbers in Call History (including incoming,
outgoing, and missed calls). You can then select the desired number or
contact from the filtered list to dial.
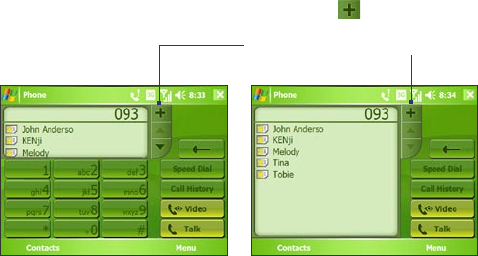
Start Smart Dialing
Open the Phone screen, then tap the keys on the Phone keypad that
correspond to the phone number or contact you want to call.
When you start entering a number or letter, the Smart Dialing panel will
appear automatically on the Phone screen. You can change the panel size
according to your needs by tapping the arrow icon .
Portrait view with minimized
Smart Dialing panel
Landscape view with expanded Smart
Dialing panel
Tap to minimize or expand the
Smart Dialing panel
Tips on using Smart Dialing
Smart Dialing starts looking for numbers or contacts that match the
sequence you have entered. Below are some tips on how to use Smart
Dialing to quickly find a desired phone number or contact.
To find a phone number

Using Phone Features 59
• Simply enter the first one or two digits to find a phone number in Call
History.
• Enter the first three digits or more if you want to find a phone number
from the saved contacts on your device and SIM card.
To find a contact name
You can just enter the first letter of a contact’s first name or surname. Smart
Dialing will search for the letter starting from the first character of a contact
name as well as from the character that appears after a space, dash, or
underscore in a contact name. For example, if you tap number “2” which is
associated with [a, b, c] on the Phone keypad, contact names such as the
following will be considered matches: “Ben Miller”, “George Adams”, “John-
Carter”, “Carter, Ellen”, “Dixon, Allan”, “Thomas_Clark”, “JaneCampbell”.
If the matching list is long and you want to narrow down the search further,
enter another letter. Using the same example above, if you continue to
tap “3” which is associated with [d, e, f], the matching list will be narrowed
down to the following names: “Ben Miller”, “George Adams”, “Carter, Ellen”,
“Dixon, Allan”.
Make a call or send a text message using Smart Dialing
1. Begin entering the first few numbers or characters.
2. In the Smart Dialing panel, browse the list by tapping the arrows
( / ) or pressing NAVIGATION up or down to select the desired
contact or phone number. When a contact is selected, it expands to
also show the corresponding phone number.
3. The highlighted item will move one line when you press NAVIGATION
up or down; the highlighted item will scroll one page when you tap
the arrows.
4. Do one of the following:
• When the correct contact is selected, tap Talk to make a voice call.
• To call a different phone number associated with the selected
contact, tap and hold the selected contact, and tap the phone
number you want to call.
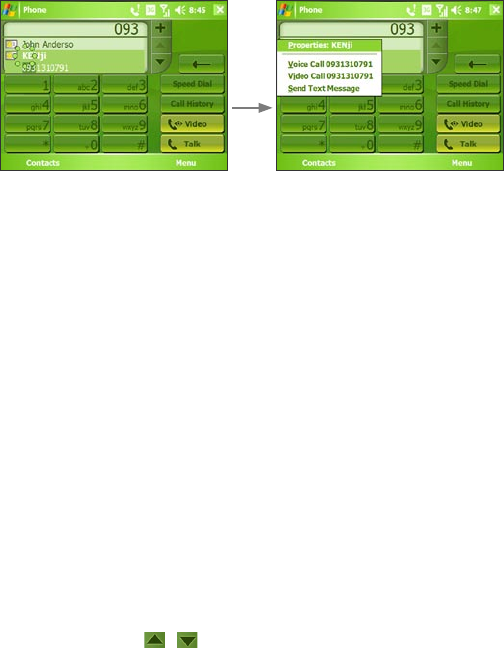
60 Using Phone Features
Tap and hold the contact to pop up the shortcut menu
• To send a text message to the selected contact, tap and hold the
contact, and tap Send Text Message.
Tip
To view or edit information associated with the selected contact, tap the
contact’s name on the shortcut menu (applies only to entries stored in
Contacts on your device).
Set up Smart Dialing
1. On the Phone screen, tap Menu > Smart Dialing Options.
2. On the Options tab, select the Enable Smart Dialing check box.
• Select the Automatically expand selected contact check box to
enable a contact’s name and phone number to be displayed when
the contact is selected in the matching list.
• Select the Enable drag-scroll check box to scroll in the matched
list by dragging.
• Select the Enable double-click for dialing check box to make a
voice call by double-tapping the item in the matched list.
• Select the Expand panel when using hardware keyboard check
box to automatically expand the Smart Dialing panel when you
are using the hardware keyboard to input.
• In Scroll unit, you can set the amount of scrolling when tapping
the arrows ( / ).

Using Phone Features 61
3.7 In-call Options
To put a call on hold
Your device notifies you when you have another incoming call, and gives
you the choice of rejecting or accepting the call. If you are already on a call
and accept the new call, you can choose to switch between the two callers,
or set up a conference call between all three parties.
1. Tap Answer to take the second call, and put the first one on hold.
2. To end the second call and return to the first call, tap End on the
device.
To switch between two calls
• Tap Swap.
To set up a conference call
1. Either put a call on hold, and dial a second number; or, accept a
second incoming call when you already have one in progress.
2. Tap Conference.
Note Not all service providers support conference calling. Contact your service
provider for details.
To mute a call
You can turn off the microphone during a call, so that you can hear the
caller but the caller cannot hear you.
• During a call, tap Mute.
• When the microphone is turned off, the mute icon ( ) appears on
the screen. Tap Unmute to turn on the microphone again.

62 Using Phone Features
3.8 Additional Dialing Information
Make an emergency call
• Enter the international emergency number for your locale, and tap
Talk.
Tip Additional emergency numbers may be included in your SIM card. Contact
your service provider for details.
Make an international call
1. Tap and hold on the Phone keypad until the + sign appears. The
+ replaces the international prefix of the country that you are calling.
2. Enter the full phone number you want to dial, and tap Talk. The full
phone number includes country code, area code (without the leading
zero, if any) and phone number.
3.9 Setting Up Bluetooth SIM Access for Car Kit
Phones
Car kit phones that support the SIM Access Profile (SAP) can connect to your
device and access its SIM card via Bluetooth. Once a SAP connection has
been established, you can download SIM contacts from your device to the
car kit phone. You can also use the car kit phone to answer and make calls
using your device’s SIM card.
Notes • To enable downloading contacts onto the car kit, ensure that all contacts
on the device are stored in the SIM card and not in the device memory.
Configure the car kit to download contacts only from the SIM card.
• Contact your wireless service provider to find out which car kit phone
models are compatible with your device.
1. On your device, make sure that Bluetooth is turned on and set to
visible mode. For information about turning on Bluetooth and
enabling visible mode, see “Bluetooth modes” in Chapter 6.
2. Tap Start > Programs > SAPSettings.
Using Phone Features 63
3. On the BT Remote SIM Access screen, select the Remote SIM Access
check box then tap Done.
4. Connect the car kit phone to your device via Bluetooth. To learn how
to connect, consult your car kit phone’s manual.
5. If this is the first time you are pairing the car kit phone with your
device, enter the car kit’s passcode on your device.
6. A pop-up message should appear on your device saying that a
connection has been established between your device and car kit
phone. Tap OK.
7. On the BT Remote SIM Access screen, tap Done.
Note You will not be able to make/receive calls, send/receive messages or perform
related activities on your device when the SIM Access Profile connection is
active. You’ll be able to do all these from the car kit phone during this time.
After the connection is disconnected, you will be able to use your device as
before.
64 Using Phone Features

4.1 Setting Up ActiveSync
Microsoft ActiveSync synchronizes information on your device with
information on your PC, such as Microsoft Outlook content. ActiveSync
can also synchronize over a wireless or cellular network with Microsoft
Exchange Server, if your company or service provider is running Microsoft
Exchange Server with Exchange ActiveSync.
Specifically, you can use ActiveSync to:
• Synchronize information such as Outlook E-mail, Contacts, Calendar,
or Tasks information, as well as media files such as pictures, video, and
music between your device and your PC.
• Synchronize Outlook E-mail, Contacts, Calendar appointments, and
Tasks on your device directly with Exchange Server so that you can
stay up-to-date even when your PC is turned off.
• Copy files between your device and your PC without synchronizing.
• Select which types of information are synchronized and specify how
much information is synchronized. For example, you can choose how
many weeks of past Calendar appointments to synchronize.
• Add and remove programs on your device. For details, see Chapter 5,
“Adding and Removing Programs.”
To install and set up ActiveSync on the computer
1. Install ActiveSync on your PC, as described in the Getting Started Disc.
2. After ActiveSync is installed, the Synchronization Setup Wizard
automatically starts when you connect your device to the PC. The
wizard will guide you to create a synchronization relationship
between your computer and device. Click Next.
3. Do not select the Synchronize directly with a server running
Microsoft Exchange Server check box if you want to synchronize
your device with a computer. Just click Next, then skip to step 8.
4. If you want to synchronize your device with Exchange Server,
select the Synchronize directly with a server running Microsoft
Exchange Server check box, then click Next.
5. On the Exchange server credentials screen, enter the Exchange server
address, your user name and password, and the domain name.
66 Synchronizing Information and Setting Up E-mail Security
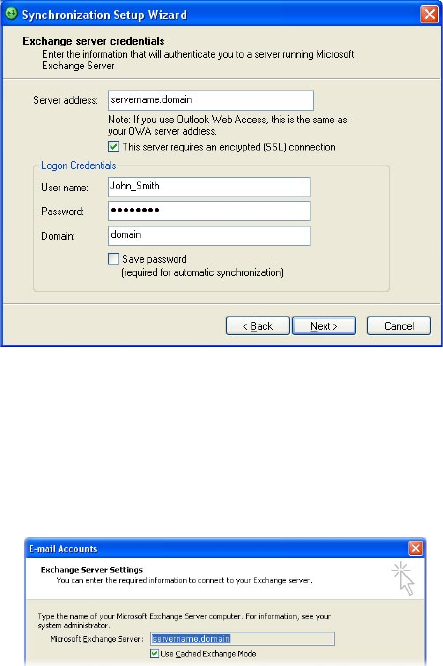
If you do not know the Exchange server address and the domain
name, check with your network administrator, or do the following to
find them in your computer:
a. In Outlook, click Tools > E-mail Accounts.
b. Select View or change existing e-mail accounts.
c. Double-click Microsoft Exchange Server.
d. On the Exchange Server Settings screen, you will see the Exchange
Server name.
Synchronizing Information and Setting Up E-mail Security 67
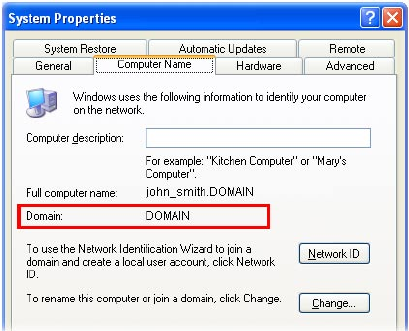
e. To check the domain name, click Start > Settings > Control
Panel, then double-click System.
f. In the System Properties dialog box, click the Computer Name
tab. You will then see the domain name.
6. On your device, you also need to enter the Exchange server settings.
For information about this, see “Synchronize Outlook information with
Exchange Server.”
7. On the Synchronization Setup Wizard, click Next.
8. Select the information types to synchronize between your device and
computer.
If you want to synchronize your device with both your computer and
Exchange Server, do the following:
a. For the Contacts, Calendar, E-mail, and Tasks items, choose
whether to synchronize them with the computer or with the
Exchange Server. These items cannot be synchronized to both.
b. Select the check boxes of the other information types if you want
to synchronize them with your computer.
68 Synchronizing Information and Setting Up E-mail Security
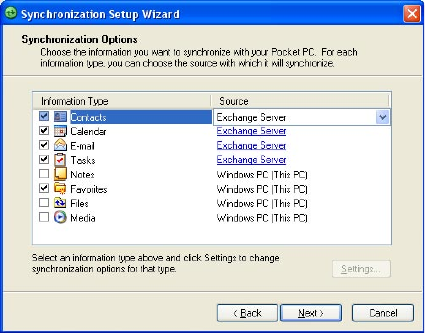
Information types on the PC and Exchange Server
9. Click Next.
10. Click Finish.
When you finish the wizard, ActiveSync synchronizes your device
automatically. Once synchronization completes, you can disconnect your
device from your PC.
Synchronizing Information and Setting Up E-mail Security 69

4.2 Synchronizing Information
When you connect your device to the PC using a USB cable or a Bluetooth
connection, ActiveSync will immediately synchronize. While your device
is connected, ActiveSync synchronizes every time you make a change on
either the PC or your device.
To manually start and stop synchronization
1. Connect your device to the PC:
• To synchronize Outlook information and other local information
on the PC, including media files, connect your device to the PC
using Bluetooth or a USB cable.
• If you are synchronizing directly with Exchange Server, you can
use this connection to the PC to "pass through" to the network, or
you can synchronize without connecting to the PC over a cellular
network.
2. In ActiveSync, tap Sync. To end synchronization before it completes,
tap Stop.
Note ActiveSync 4.x utilizes a network type of connection with Windows Mobile
powered devices, since this allows faster data transfer than a serial USB
connection. When the PC is connected to the Internet or a local network, in
some cases, the PC may disconnect the ActiveSync connection with your
device in favor of the Internet or network connection. If this happens, tap
Start > Settings > Connections tab > USB to PC, then clear the Enable
advanced network functionality check box. This makes ActiveSync utilize a
serial USB connection with your device.
The USB to PC ( ) icon appears on the Today Screen when your device
is connected to your computer and you enable a serial USB connection
between them.
Synchronize Outlook information with the computer
If you have set up a synchronization relationship between your device and
the PC, synchronization keeps Outlook information up-to-date on both your
device and PC.
You can also set up your device to synchronize with more than one PC
or with a combination of one or more PCs and Exchange Server. When
70 Synchronizing Information and Setting Up E-mail Security

synchronizing with multiple computers, the items that you synchronize
will appear on all of the computers with which they are synchronized. For
example, if you have set up synchronization with two PCs (PC1 and PC2),
which have different items, and you synchronize Contacts and Calendar on
your device with both computers, the result is as follows:
Location New state
PC1 All Outlook contacts and calendar appointments that were on PC2
are now also on PC1.
PC2 All Outlook contacts and calendar appointments that were on PC1
are now also on PC2.
Pocket PC
Phone
All Outlook contacts and calendar appointments from both PC1
and PC2 are on your device.
Note Outlook e-mail can be synchronized with only one computer.
To change which information is synchronized
ActiveSync synchronizes a limited amount of information by default to save
storage space on your device. You can change the amount of information
that is synchronized by performing the following steps.
Note Before changing synchronization settings on your device, disconnect it from
your PC.
1. In ActiveSync on your device, tap Menu > Options.
2. Do one or both of the following:
• Select the check box for any items you want to synchronize. If you
cannot select a check box, you might have to clear the check box
for the same information type elsewhere in the list.
• Clear the check box for any items you want to stop synchronizing.
• To stop synchronizing with one PC completely, tap the PC and tap
Delete.
Note To change available synchronization settings, select the type of information
and tap Settings.
Synchronizing Information and Setting Up E-mail Security 71
Synchronize Outlook information with Exchange Server
You can set up synchronization with Exchange Server on your device, if
it is available to you through your company or wireless service provider.
However, you should first gather information, such as Exchange Server
name, domain name, your user name, and password, and then carry on
with the steps. (For information about how to check the Exchange server
name and domain on your PC, see “To install and set up ActiveSync on the
computer.”)
Note Before changing synchronization settings on your device, disconnect it from
your PC.
To synchronize directly with Exchange Server
1. Do one of the following:
• Tap Start > Messaging, then tap Menu > Tools > New Account.
On the E-mail Setup screen, select Outlook E-mail in the Your
e-mail provider list, then tap Next.
• In ActiveSync on your device, tap
Menu > Configure Server. If
you have not yet set up synchronization with Exchange Server, this
appears as Add Server Source.
2. In Server address, enter the name of the server running Exchange
Server, and tap Next.
3. Enter your user name, password, and domain, and tap Next.
To change the rules for resolving synchronization conflicts, tap
Advanced.
4. Select the check boxes for the types of information items that you
want to synchronize with Exchange Server.
5. To change available synchronization settings, select the type of
information, and tap Settings.
6. Tap Finish.
72 Synchronizing Information and Setting Up E-mail Security

Schedule synchronization with Exchange Server
You can schedule information to be synchronized automatically between
your device and the Exchange Server, or schedule synchronization at
regular time intervals. Choose between these two methods, depending on
your e-mail volume and which method you think is more cost-effective.
To receive e-mails and synchronize other information instantly
Direct Push technology (push e-mail feature) enables you to receive new
e-mails on your device as soon as they arrive in your Inbox on the Exchange
Server. With this feature, items such as contacts, calendar and tasks are
also immediately updated onto your device when these items have been
changed or new entries have been added on the Exchange Server. To make
Direct Push work, you need to have a GPRS connection on your device.
The Direct Push feature works for your device only if it is connected to
a private network (corporate network) that is using Microsoft Exchange
Server Service Pack 2 (SP2) with Exchange ActiveSync. You need to perform
a full synchronization between your device and the Exchange Server first
before Direct Push can be enabled.
Using Comm Manager to enable Direct Push
1. On the Today screen, tap the Comm Manager icon ( ).
2. On the Comm Manager screen, tap the Microsoft Direct Push
button. The button will turn to , which indicates that
you will receive e-mails as they arrive.
When the button is in the state, you need to manually retrieve
your e-mails.
Synchronizing Information and Setting Up E-mail Security 73
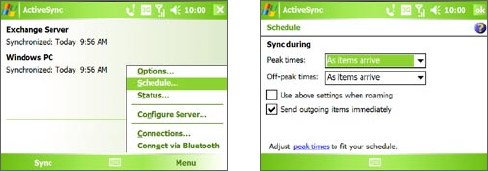
Using ActiveSync to enable Direct Push
1. In ActiveSync on your device, tap Menu > Schedule.
2. Select As items arrive in the Peak times and Off-peak times boxes.
Note When both the GPRS and Wi-Fi connections are turned on at the same time,
the Direct Push feature will always opt for GPRS, for which you could be
charged per your network operator’s service plan.
To schedule synchronization at regular time intervals
You can set how often to synchronize during Peak times (which usually
refer to your working hours) when e-mail volume is high, as well as Off-
peak times when e-mail volume is low.
1. In ActiveSync on your device, tap Menu > Schedule.
2. Select a shorter time interval in the Peak times box for you to be able
to receive e-mails more frequently.
3. Select a longer interval in the Off-peak times box.
Tip To set the days and hours that make up your peak and off-peak times, tap
Adjust peak times to fit your schedule.
74 Synchronizing Information and Setting Up E-mail Security
4.3 Synchronizing via Bluetooth
You can connect and synchronize your device with the PC using Bluetooth.
To synchronize with a computer via Bluetooth
1. Follow the instructions in ActiveSync Help on the computer for
configuring Bluetooth on your computer to support ActiveSync.
2. On your device, tap Start > Programs > ActiveSync.
3. Tap Menu > Connect via Bluetooth. Make sure the Bluetooth
function of both your device and the computer are turned on, and
they are within close range.
4. If this is the first time you have connected to this computer via
Bluetooth, you must first complete the Bluetooth wizard on your
device and set up a Bluetooth partnership between your device
and the computer. For more information about creating a Bluetooth
partnership, see “Bluetooth partnerships” in Chapter 6.
Notes • To preserve battery power, turn off Bluetooth when not in use.
• To connect and synchronize your device with a computer via Bluetooth,
your computer must have a Bluetooth adapter or dongle.
4.4 Synchronizing Music, Video, and Pictures
If you want to carry your music or other digital media along with you
while you travel, ActiveSync works with Windows Media Player Mobile to
synchronize music, video, and pictures with your device.
Other than selecting the Media information type in ActiveSync to be
synchronized, all media synchronization settings must be set in Windows
Media Player Mobile. Before media can be synchronized, you must do the
following:
• Install Windows Media Player Version 10 on the PC. (Windows Media
Player 10 works only in Windows XP or later versions).
• Connect your device to the PC with a USB cable. If your device is
currently connected using Bluetooth, you must end that connection
before media can be synchronized.
Synchronizing Information and Setting Up E-mail Security 75
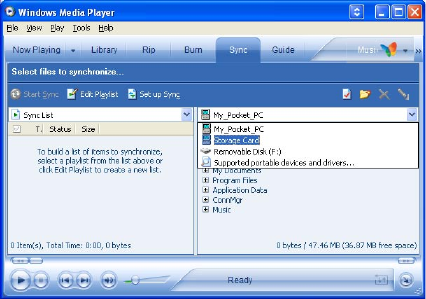
• Insert a storage card into your device (32MB or larger is
recommended).
• Set up a sync partnership between the storage card and Windows
Media Player Mobile.
Change Media synchronization settings
Once you select the Media information type in ActiveSync to be
synchronized, any of your favorite music, video, and picture files in Windows
Media Player playlists can be synchronized. All you have to do is set up
synchronization in Windows Media Player for those media files.
To set up a sync relationship with a storage card
1. On the computer, open Windows Media Player.
2. Click the Sync tab.
3. Select the storage card.
4. Click Set up Sync.
5. Choose whether to synchronize automatically or manually.
For more information about Windows Media Player Mobile on your device,
see “Using Windows Media Player Mobile” in Chapter 9.
76 Synchronizing Information and Setting Up E-mail Security
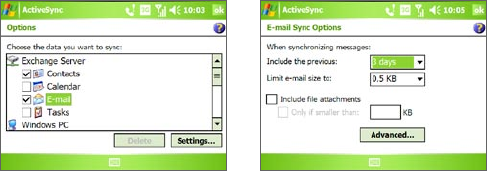
4.5 Setting Up E-mail Security
Windows Mobile on your device protects your Outlook e-mails through
Secure/Multipurpose Internet Mail Extension (S/MIME), which allows you to
digitally sign your messages as well as encrypt them.
Using authorization keys and certificates, S/MIME allows you to digitally
sign your e-mail messages to prove your identity to the recipients.
Authorization keys are also used when encrypting messages to improve
privacy and prevent undue tampering or hacking of your messages. You
can encrypt a message with or without a certificate. However, to read an
encrypted message, you need a valid certificate to decrypt it.
Note S/MIME encryption and digital signatures for Windows Mobile-based devices
are available only with Exchange Server 2003 Service Pack 2 or a later version
that supports S/MIME. If you are not using one of these products, or have not
yet synchronized, these options are unavailable.
Digitally sign and encrypt all messages
ActiveSync allows you to set up S/MIME e-mail encryption and signing.
You must obtain a valid certificate to sign and encrypt e-mail messages
successfully.
1. Tap Start > Programs > ActiveSync.
2. Tap Menu > Options.
3. Select the E-mail information type, and tap Settings. On the E-mail
Sync Options screen, tap Advanced.
Synchronizing Information and Setting Up E-mail Security 77
4. Do one or both of the following:
• To sign all your outgoing e-mail messages so that recipients can
be certain that the messages were sent by you and have not been
altered in any way, select the Sign all outgoing e-mail messages
check box.
• To encrypt all your outgoing e-mail messages so that the
contents of your messages are protected from being viewed by
anyone other than the intended recipients, select the Encrypt all
outgoing e-mail messages check box.
5. Tap Choose Certificate to select a certificate for signing or
encrypting outgoing e-mail messages.
You can select certificates to sign or encrypt e-mail messages
individually if you do not choose to sign or encrypt all outgoing
e-mail. For information about signing and encrypting individual
messages, see “Individually sign and encrypt a message” in Chapter 7.
78 Synchronizing Information and Setting Up E-mail Security

80 Managing Your Pocket PC Phone
5.1 Personalizing Your Pocket PC Phone
Customize the Today screen
The Today screen shows your upcoming appointments, active tasks, and
information about incoming messages. You can customize the Today screen
on your device.
To customize the Today screen
1. Tap Start > Settings > Personal tab > Today.
2. On the Appearance tab, select the desired theme for the background
of the Today screen.
3. On the Items tab, select the items you want to appear on the Today
screen.
Tip To change the order of items displayed on the Today screen, tap the item,
and tap Move Up or Move Down.
To add a custom background image
You can use one of your own pictures as the background image on the
Today screen. Be aware that pictures can affect the readability of text on the
Today screen.
1. Tap Start > Settings > Personal tab > Today.
2. Select the Use this picture as the background check box, and tap
Browse to view a list of your picture files.
3. Tap the file name of the picture you want to use.
4. Tap OK.
To set options for displaying appointments on the Today screen
If you have a large number of appointments, you may want to specify the
kind of appointments that are displayed on the Today screen.
1. Tap Start > Settings > Personal tab > Today.
2. Tap the Items tab.
3. Select Calendar and tap Options.
4. Do any of the following:
Managing Your Pocket PC Phone 81
• Select Next appointment to show only the next appointment
in your schedule, or Upcoming appointments to show multiple
appointments.
• Clear the Display all day events check box if you do not want to
display all-day events.
To set options for displaying tasks on the Today screen
If you have a large number of tasks, you may want to specify the kind of
tasks that are displayed on the Today screen.
1. Tap Start > Settings > Personal tab > Today.
2. Tap the Items tab.
3. Select Tasks and tap Options.
4. Do any of the following:
• Under Display number of, select the type of tasks you want to
appear on the Today screen.
• In the Category list, select whether to display only tasks assigned
to a specific category or to display all tasks.
Customize the Start menu
You can choose which items appear in the Start menu.
1. Tap Start > Settings > Personal tab > Menus.
2. Select the check boxes of the items you want to appear in the Start
menu. You can select up to seven items.
Tip You can also create folders and shortcuts to appear on the Start menu. In
ActiveSync on your PC, click Explore. In the Mobile Device window, double-
click My Windows Mobile-Based Device > Windows > Start Menu, then
create the folders and shortcuts that you want. You will see the added items
after you synchronize.
82 Managing Your Pocket PC Phone
Why is the device name important?
The device name is used to identify the device in the following situations:
• Synchronizing with a PC
• Connecting to a network
• Restoring information from a backup
Note If you synchronize multiple devices with the same PC, each device must have
a unique name.
To change the device name
1. Tap Start > Settings > System tab > About.
2. Tap the Device ID tab.
3. Enter a name.
Note The device name must begin with a letter, consist of letters from A to
Z, numbers from 0 to 9, and cannot contain spaces. Use the underscore
character to separate words.
Set Date / Time / Regional Options
You can set up the correct date, time, and regional settings according to
your use.
To set the time and date
1. Tap Start > Settings > System tab > Clock & Alarms > Time tab.
2. Select the correct time zone and change the date or time.
Note During synchronization, the time on your device is updated with the time on
your PC.
To set an alarm
1. Tap Start > Settings > System tab > Clock & Alarms > Alarms tab.
2. Tap <Description> and enter a name for the alarm.
3. Tap the day of the week for the alarm. You can select multiple days by
tapping each desired day.
4. Tap the time to open a clock and set the time for the alarm.

Managing Your Pocket PC Phone 83
5. Tap the alarm icon ( ) to specify the type of alarm you want. You
can choose a flashing light, a single sound, or a repeating sound,.
6. If you choose to play a sound, tap the list next to the Play sound
check box and tap the sound you want.
To set the time and date for a different location
If you visit or communicate with someone in a particular time zone often,
you can select it as your visiting time zone.
1. Tap Start > Settings > System tab > Clock & Alarms > Time tab.
2. Tap Visiting.
3. Select the correct time zone and change the time or date.
To change regional settings
The style in which numbers, currency, dates, and times are displayed is
specified in regional settings.
1. Tap Start > Settings > System tab > Regional Settings.
2. On the Region tab, select your region from the list.
Note This does not change the Operating System language of your device.
3. The region you select determines which options will be available on
the other tabs.
4. To customize settings further, tap the appropriate tabs and select the
desired options.
Personal and system settings
To format the Microdrive
Your device comes with a built-in 8GB Microdrive® that gives you additional
storage space for your files. Use Format Microdrive to delete all the files in
the Microdrive and to format it.
1. Tap Start > Settings > Systems tab > Format Microdrive.
2. Enter 1234 in the box and tap Continue.
84 Managing Your Pocket PC Phone
To use TV Out
TV Out lets you output the contents you are viewing on the device screen to
an external display device (e.g. projector). This is useful when you are doing
a presentation or when you are sharing your videos or photos with people.
To connect the device to an external display device
1. Turn off the external viewing device and unplug the power cord from
the wall socket.
2. Take out the VGA cable from the box. Connect the external viewing
device’s cable to the bigger end of the VGA cable.
3. Connect the smaller end of the VGA cable to the VGA port on the
device.
4. Plug in the power cable of the external viewing device to a wall
socket and turn it on.
To enable TV Out
1. On the Today screen, tap Start > Settings > System tab > TV Out.
2. On the TV Out Settings screen, choose On on the drop-down menu.
3. Choose the Connection that you are using to output.
• Select VGA-out if you are doing a presentation such as a
Powerpoint presentation and you are outputting it to a projector.
• Select Composite & S-Video if you are going to output a video
to the external viewing device. Choose the Video standard to use
when outputting (e.g. If your video is in the NTSC video standard
and you select PAL, TV Out will convert your video to PAL before
outputting.)
4. Tap OK.
Note Audio output is supported.
To disable TV Out
1. On the Today screen, tap Start > Settings > System tab > TV Out.
2. On the TV Out Settings screen, choose Off on the drop-down menu.

Managing Your Pocket PC Phone 85
3. Turn off the external viewing device and then unplug the power cord.
4. Disconnect the VGA cable’s smaller end from the device and then
disconnect the external viewing device’s cable from the VGA out
cable.
To configure the button using Task Manager
You can configure the button to shut down running programs and free
up the memory space that’s occupied by them.
1. Tap Start > Settings > System tab > Task Manager.
2. On the Button tab, select the Enable the “X” button to end running
programs check box.
3. Choose the action for shutting down programs (by tapping the
button, tapping and holding the button, or both).
4. Tap OK.
Note When the Enable the “X” button to end running programs check box is not
selected, tapping the “X” button will only close a program screen. The program is not
ended and continues to run in the background.
To reassign programs or shortcuts to program buttons
Your device may come with programs already assigned to hardware
buttons. You can customize these buttons to open the programs you
use most, or to perform certain shortcuts such as changing the screen
orientation, opening the Today screen, or opening Input Panel.
1. Tap Start > Settings > Personal tab > Buttons.
2. A list of buttons and their current assignments are displayed on the
Program Buttons tab.
3. Tap the button you want to reassign. To help you identify the buttons,
there are numbers and icons representing the original function of the
button.
4. In the Assign a program box, tap the program or shortcut you want
to assign.
5. Tap OK.

86 Managing Your Pocket PC Phone
To increase or decrease the size of text on the screen
1. Tap Start > Settings > System tab > Screen > Text Size tab.
2. Move the slider to increase or decrease the text size.
To choose how to be notified about events or actions
1. Tap Start > Settings > Personal tab > Sounds & Notifications.
2. On the Sounds tab, choose how you want to be notified by selecting
the appropriate check boxes.
3. On the Notifications tab, in Event, tap an event name and choose
how you want to be notified by selecting the appropriate check
boxes. You can choose from several options, such as a special sound, a
message, or a flashing light.
Tip Turning off sounds and the flashing light helps conserve battery power.
To find the operating system version number
• Tap Start > Settings > System tab > About.
The version of the operating system on your device is shown near the top of
the About screen.
To get detailed device information
• Tap Start > Settings > System tab > About.
The Version tab displays important device information, including the type
of processor and the amount of memory that is installed.
To make the battery last longer
• Tap the battery icon ( ) on the Today screen. On the Advanced
tab of the Power settings screen, you can specify when your device
turns off the display to conserve battery power.
For optimum conservation, specify 3 minutes or less.
• Use the AC adapter to plug your device into external power whenever
possible, especially when using a miniSD™ card or when using a
modem or other peripherals.
• Adjust the backlight settings.

Managing Your Pocket PC Phone 87
To adjust the brightness of the backlight
1. Tap the battery icon ( ) on the Today screen.
2. On the Power settings screen, tap Menu > Backlight.
3. On the Brightness tab, move the slider right to increase the
brightness, or left to decrease the brightness.
To set the backlight to dim after a time delay
1. Tap the battery icon ( ) on the Today screen.
2. On the Power settings screen, tap Menu > Backlight.
3. Tap the Battery power tab, or the External power tab.
4. Select the Turn off backlight if device is not used for check box, and
specify the time delay.
Phone settings
You can customize phone settings, such as the ring type and ring tone to
be used for incoming calls, and the keypad tone to be used when entering
phone numbers. Open the Phone program to customize these settings.
To change the ring tone
1. On the Phone screen, tap Menu > Options > Phone tab.
2. In the Ring tone list, tap the sound you want to use.
Tip To use custom *.wav, *.mid, *.mp3, or *.wma files as ring tones, use
ActiveSync on your PC to copy the files to the /Windows/Rings folder on your
device. Next, select the sound from the Ring tone list. For more information
about copying files to your device, see ActiveSync Help on your PC.
To change the ring type
You can change the way that you are notified of incoming calls.
1. On the Phone screen, tap Menu > Options > Phone tab.
2. In the Ring type list, tap the desired option.
To change the keypad tone
You can change the tone you hear when entering a phone number on the
keypad. If set to Long tones, the tone is heard continuously for as long as
the number on the keypad is pressed. Use this setting if you are having
88 Managing Your Pocket PC Phone
trouble accomplishing tasks that rely on tones from your phone such as
accessing messages from an answering machine. If set to Short tones, the
tone is heard only for one or two seconds. If set to Off, no tone will be heard.
1. From the Phone keypad, tap Menu > Options > Phone tab.
2. In the Keypad list, tap the option you want.
Phone services
Phone services, such as Call Waiting, enable you to choose how to handle all
incoming calls on your device.
To choose the services
1. Tap Start > Settings > Personal tab > Phone > Services tab.
2. Select the service you want to use, then tap Get Settings.
Networks
You can view available mobile phone networks, determine the order
in which your device accesses another network if the current one is
unavailable, and specify whether you want to change networks manually
or automatically. For more information about network settings, see Help on
your device.
To change phone network settings
1. Tap Start > Settings > Personal tab > Phone > Network tab.
2. By default, your device displays the current network as offered
by your service provider. You can customize to set your preferred
network.
To set preferred networks
1. Tap Start > Settings > Personal tab > Phone > Network tab. By
default, the Network selection field is set to Automatic. However,
you can set it to Manual to choose your own network at any point of
time.
2. Tap Set Networks.
3. Select the networks on the Phone: Preferred networks screen and
sort them according to your preference.
4. Tap OK.
Managing Your Pocket PC Phone 89
5.2 Adding and Removing Programs
Before you purchase additional programs for your device, you should note
the model name of your device, the version of Windows Mobile software
running on it, and the type of processor. This information will help you
select a program that is compatible with your device. For more information,
see “To get detailed device information” and “To find the operating system
version number” in this chapter.
Programs available for purchase usually include a Setup program
(commonly named "setup.exe") that you must first run on your PC. You can
then use ActiveSync to add programs to your device, or add a program
directly from the Internet.
To add programs
1. Download the program to your PC (or insert the disc that contains the
program into your PC). You may see a single *.exe file, a *.zip file, a
Setup.exe file, or several versions of files for different device types and
processors. Be sure to select a program designed for your device and
processor type.
2. Read any installation instructions or documentation that comes with
the program. Many programs provide special installation instructions.
3. Connect your device to the PC.
4. Double-click the *.exe file.
• If the executable file is an installation wizard, follow the
instructions on the screen. The wizard will automatically install the
program to your device.
• If an installation wizard does not start, you will see an error
message stating that the program is valid but that it is designed
for a different type of computer. You will need to copy this
program directly to your device. If you cannot find any installation
instructions for the program, use ActiveSync to copy the program
file to the Program Files folder on your device.
90 Managing Your Pocket PC Phone
To remove programs
You can only remove programs that you installed. Programs that come with
your device cannot be removed.
1. Tap Start > Settings > System tab > Remove Programs.
2. In the Programs in storage memory list, select the program you
want to remove, and tap Remove.
3. Tap Yes. If another confirmation message appears, tap Yes again.
5.3 Managing Memory
You may need to stop a program if it becomes unstable or the program
memory is low.
To see how much memory is available
• Tap Start > Settings > System tab > Memory.
• On the Main tab, the amount of memory allocated to file and data
storage versus program storage is displayed, as well as the amount of
memory in use versus the available memory.
To see available storage card or Microdrive memory
You can see how much memory is available on the Microdrive or a miniSD
card that is inserted in your device.
1. Tap Start > Settings > System tab > Memory.
2. Tap the Storage Card tab.
3. Tap the list box and then select the storage media whose information
you want to see.
Try the following to free memory on your device:
• Close programs you are not currently using.
• Move e-mail attachments to a storage card.
• Move files to a storage card. Tap Start > Programs > File Explorer.
Tap and hold the file, and tap Cut. Browse to the storage card folder
and tap Menu > Edit > Paste.

Managing Your Pocket PC Phone 91
• Delete unnecessary files. Tap Start > Programs > File Explorer. Tap
and hold the file, and tap Delete.
• Delete large files. To find your largest files, tap Start > Programs >
Search. In the Type list, tap Larger than 64 KB, and tap Search.
•
In Internet Explorer Mobile, delete temporary Internet files and clear
history information. For more information, see “Internet Explorer
Mobile” in Chapter 6.
• Remove programs you no longer use.
• Reset your device.
To close a program
Tapping the button in a program may just close the program screen.
In this case, the program continues to run in the background. You can end
running programs manually by following these steps:
1. Tap Start > Settings > System tab > Memory > Running Programs
tab.
2. In the Running Programs List, tap the program you want to end, and
tap Stop.
Tips • In most programs, you can also use the keyboard shortcut CTRL+Q to
close the program.
• You can configure the button to directly shut down running programs.
For more information, see “To configure the button to shut down
programs”.
5.4 Copying Files
You can copy files to your PC using ActiveSync, or copy files to a storage
card you insert into your device. Your device has an expansion slot for
inserting a miniSD™ card.
Using ActiveSync, you can copy or move information from the PC to your
device and vice versa. Copying a file results in separate versions of a file on
your device and PC. Because the files are not synchronized, changes made
to one file will not affect the other.
92 Managing Your Pocket PC Phone
Note If you want to automatically update information on both your device and PC,
synchronize the information instead. For more information about copying
and synchronizing files, see ActiveSync Help on your PC.
To copy files to a storage card or Microdrive
1. Make sure a miniSD™ card is properly inserted into your device.
2. Tap Start > Programs > File Explorer and navigate to the
appropriate folder.
3. Tap and hold the file you want to copy, and tap Copy.
4. Tap the folder list (labeled My Documents by default) and tap
Storage Card or Microdrive.
5. Tap Menu > Edit > Paste.
To copy a file between your device and the PC
1. Connect your device to the PC.
2. In ActiveSync, click Explore, which opens the Mobile Device folder of
your device.
3. To copy a file from your device to your PC:
a. In the Mobile Device folder, go to the file that you want to copy.
b. Right-click the file, then click Copy.
c. Locate the destination folder on your PC. Right-click the folder,
then click Paste.
4. To copy a file from your PC to your device:
a. On your PC, navigate to the folder that contains the file you want
to copy.
b. Right-click the file, then click Copy.
c. Right-click the destination folder under Mobile Device, then click
Paste.
To automatically save files on a storage card or Microdrive
In the Word Mobile or Notes programs, you may find it helpful to save all
new documents, notes, and workbooks directly on a storage card.
1. From the program file list, tap Menu > Options or Menu > Tools >
Options.

Managing Your Pocket PC Phone 93
2. In the Save to box, select the storage card or the Microdrive to
automatically save new files on the storage card or Microdrive.
3. Tap OK.
Note In the file or note list, a symbol is displayed next to the names of files
saved on a storage card/Microdrive.
5.5 Backing Up Data
Use Sprite Backup to back up data, which includes settings, files, contacts,
and all other information, to a storage card or to a designated folder on
your device.
This section describes the basics on how to install Sprite Backup and use it
to back up and restore data on your device. For more information about this
program, see Help on your device:
To install Sprite Backup
1. Make sure your device is connected to your computer via a USB cable.
2. Install Sprite Backup on your device from the PC using the Application
Disc. Follow the on-screen instructions on your computer to complete
the installation.
3. After the installation is completed, the Setup Wizard on your
computer will set up Sprite Backup on your device. Follow the on-
screen instructions to complete the setup.
To open Sprite Backup
• On your device, tap Start > Programs > Sprite Backup.
Sprite Backup can operate in two different modes: Basic mode and
Advanced mode. The first time you run Sprite Backup, it will be in Basic
Mode. To switch between the modes, tap Options then select the desired
mode.
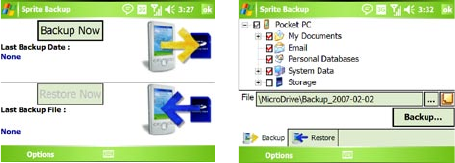
94 Managing Your Pocket PC Phone
Basic mode Advanced mode
Basic mode
Basic mode is the default mode, and allows you to easily back up your entire
Pocket PC with the tap of a button.
Note To change backup options or location, you will need to do it in Advanced
mode.
To back up data in Basic mode
1. On the Basic mode screen, tap Backup Now.
2. Specify a password (between 6 to 15 characters in length) for the
backup file. Enter this password twice, then tap OK.
3. Follow the on-screen instructions to complete the backup.
To restore data in Basic mode
1. On the Basic mode screen, tap Restore Now.
2. Enter the password for the backup file, then tap OK.
3. Follow the on-screen instructions to complete the restoration process.
Advanced mode
Advanced mode is designed for users with more advanced backup
requirements. It provides a tree view of the data on your device from which
you can select what items you want to back up or restore.
To back up data in Advanced mode
1. Tap Options > Switch to Advanced Mode.
2. The Backup tab of the Advanced mode screen shows a tree view of

Managing Your Pocket PC Phone 95
the data and files on your device. Tap the ‘+’ symbol at the left of an
item to view its sub-items. Use the check boxes to select or exclude
items for backup.
3. Tap Backup and follow the on-screen instructions to complete the
backup.
To restore data in Advanced mode
1. On the Advanced mode screen, tap the Restore tab.
2. If there is a most recent backup file, this file will be displayed with its
contents. Otherwise, if you want to use an older backup file, tap
then select the desired file.
If the backup file is password protected, the password must be
entered before the backup file can be displayed in the tree view.
3. In the tree view, select the check boxes of items you want to be
restored.
4. Tap the Restore button and follow the on-screen instructions to
restore.
Note In both the Basic and Advanced modes, Sprite Backup soft resets your device
first before it begins the backup or restoration process. It soft resets again
after the operation is completed.
Backup options
To change the backup location and file name
1. On the Advanced mode screen, tap the Backup tab.
2. Tap then enter the backup file name and choose whether to save
the file to the Storage Card, Microdrive or the My Documents folder
on your device.
3. Tap OK.
To disable automatic file naming
1. Tap Options > Backup Options > General Backup Options.
2. Clear the Name Backup Files Automatically check box, then tap OK.
3. Before you perform a backup, tap then specify a backup file name.

96 Managing Your Pocket PC Phone
To schedule automatic backups
1. Tap Options > Scheduled Backup, then tap Change Scheduling.
2. Select the Enable Scheduled Backup check box, and set the
frequency of backups to perform, date and time, and other options.
3. Tap OK.
To enable remote backups to the computer via ActiveSync
1. Tap Options > Networking.
2. Select the Enable Remote Backup check box.
3. Select Via ActiveSync, then tap OK.
4. Tap then in the Location list, select PC and tap OK.
5.6 Protecting Your Pocket PC Phone
There are two kinds of protection that you can set for your device:
• You can protect your SIM card from unauthorized use by assigning
a PIN (personal identification number). Your first PIN will be given to
you by your wireless service provider; you can change the PIN later.
• Additionally, you can prevent unauthorized access to any part of the
device by using password protection. You can help keep your data
more secure by requiring a password every time the device is turned
on. You create your own password when you begin using your device.
To protect your SIM card with a PIN
1. On the Phone screen, tap Menu > Options > Phone tab.
2. Select the Require PIN when phone is used check box.
3. To change the PIN at any time, tap Change PIN.
Tip Emergency calls can be placed at any time, without requiring a PIN.
To protect your device with a password
1. Tap Start > Settings > Personal tab > Lock.
2. Select the Prompt if device unused for check box, and in the box to
the right, select how long your device must be idle before a password
Managing Your Pocket PC Phone 97
is required. In the Password type box, select the type of password
you would like to use. Enter the password and, if necessary, confirm
the password.
If your device is configured to connect to a network, use an
alphanumeric password for increased security for your device.
3. On the Hint tab, enter a phrase that will help you remember your
password, but does not allow others to guess your password.
The hint will be displayed after the wrong password is entered four
times.
4. Tap OK. The next time the device is turned on, you will be prompted
to enter your password.
Notes •
Each time a wrong password is entered, the device response time gets
longer until the device appears to be not responding.
• If you forget your password, you must follow the instructions in this user
manual to clear the memory before you can access your device.
To change your password
1. Tap Start > Settings > Personal tab > Lock. You will be prompted to
enter your current password.
2. In the Password box, enter your new password.
3. On the Hint tab, enter a phrase that will help you remember your new
password, but does not allow others to guess your password.
The hint will be displayed after the wrong password is entered four
times.
4. Tap OK.
To display owner information on the ‘my info’ screen
Having your contact information displayed on the ‘my info’ screen on
startup allows for easy identification of the device in case it is lost.
1. Tap Start > Settings > Personal tab > Owner Information.
2. On the Options tab, select the Identification information check box.
3. If you want additional text displayed, tap the Notes tab and enter the
text (for instance: Reward if found).
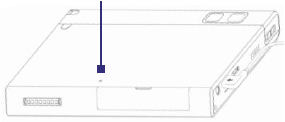
98 Managing Your Pocket PC Phone
4. On the Options tab, select the Notes check box.
5. Tap OK.
Tip To display owner information on the Today screen, tap Start > Settings >
Personal tab > Today. On the Items tab, select the Owner Info check box.
5.7 Resetting Your Pocket PC Phone
Occasionally, you may need to reset your device. A normal (or soft) reset
of your device clears all active program memory and shuts down all
active programs. This can be useful when your device is running slower
than normal, or a program is not performing properly. A soft reset is
also necessary after the installation of some programs. If a soft reset is
performed when programs are running, unsaved work will be lost.
You can also perform a hard reset (also known as a full reset). A hard
reset should be performed only if a normal reset does not solve a system
problem. After a hard reset, the device is restored to its default settings —
the way it was when you first purchased it and turned it on. Any programs
you installed, data you entered, and settings you customized on your
device will be lost. Only Windows Mobile software and other pre-installed
programs will remain.
To perform a soft reset
• Use the stylus to press the RESET button found on the back of the
device. Your device restarts and displays the Today screen.
RESET button
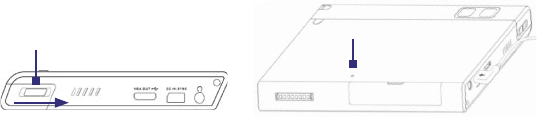
Managing Your Pocket PC Phone 99
To perform a hard reset
Warning! Your device will be set back to factory default settings. Please ensure any
additional installed programs and/or user data have been backed up before
a hard reset is performed.
1. Slide the Volume slider down and at the same time, use the stylus to
press the RESET button at the back of your device.
Volume Slider RESET button
2. After a brief period of time, two choices will appear on-screen. Press
the CENTER OK button to perform the hard reset.
Note If you do not want to perform a hard reset, press the CAMERA button to exit.
3. Press the POWER button.
100 Managing Your Pocket PC Phone

102 Getting Connected
6.1 Connecting to the Internet
Your device is equipped with powerful networking functions that enable
you to connect to the Internet through Wi-Fi, GPRS (General Packet Radio
Service) or the mobile phone network.
Connecting your device to the Internet through a private or free wireless
network is your best choice since this will not incur any cost. Take note,
however, that using Wi-Fi on your device will drain battery power faster.
For more information about setting up a Wi-Fi connection, see “Using Wi-Fi”
later in this chapter.
In times when you are not within the coverage of a wireless network, you
can either use GPRS or phone dial-up to connect your device to the Internet
or your corporate network. Your device has two groups of connection
settings: My ISP (Internet Service Provider) and My Work Network. The My
ISP settings are used to connect to the Internet, while My Work Network
settings can be used to connect to any private, corporate network.
To set up a GPRS connection to the Internet
GPRS is a data service that allows information to be sent and received across
the wireless network. You can use GPRS to connect to the Internet or to
send and receive MMS on your device. You will be billed per KB (Kilobyte)
by your wireless service provider when you are sending or receiving
information via GPRS.
If GPRS settings are not preset on your device, obtain the Access point
name from your wireless service provider. Also, check with your wireless
service provider if a user name and password are required.
1. Tap Start > Settings > Connections tab > Connections.
2. Under My ISP, tap Add a new modem connection.
3. On the Make New Connection screen, enter a name for the
connection.
4. In the Select a modem list, select Cellular Line (GPRS, 3G), then tap
Next.
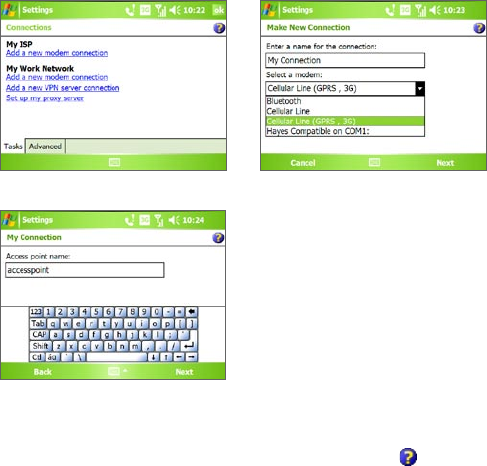
Getting Connected 103
5. Enter the Access point name, then tap Next.
6. Enter the user name and password, only if required.
7. Tap Finish.
Notes •
To view help information for any screen, tap the help icon ( ).
•
To modify your connection settings, tap Manage existing connections
on the Connections screen, and complete the connection wizard.
104 Getting Connected
To set up a dial-up connection to your ISP
When you use your device to dial up to your ISP and connect to the
Internet, you will be billed by the number of minutes that you use.
To establish a dial-up connection on your device, you need the same
settings that you normally use when you dial up from your computer. This
includes the ISP server phone number, your user name and password.
1. Tap Start > Settings > Connections tab > Connections.
2. Under My ISP, tap Add a new modem connection.
3. On the Make New Connection screen, enter a name for the
connection.
4. In the Select a modem list, select Cellular Line, then tap Next.
5. Enter the ISP server phone number, then tap Next.
6. Enter your user name, password, and any other information required
by your ISP.
7. Tap Finish.
To set up a connection to a private network
1. Obtain the following information from your network administrator:
• Server phone number
• User name
• Password
• Domain (and other required settings, such as IP address)
2. Tap Start > Settings > Connections tab > Connections.
3. In My Work Network, follow the instructions for each type of
connection.
4. Complete the connection wizard, then tap Finish.
To start a connection
After setting up a connection such as GPRS or ISP dial-up on your device,
you can now connect your device to the Internet. The connection is started
automatically when you begin using a program that requires an Internet
connection. For example, when you start Opera Browser to browse the
Internet, your device connects automatically.

Getting Connected 105
If you have set up multiple types of connections on your device, you can
manually start a connection.
1. Tap Start > Settings > Connections tab > Connections.
2. Tap Manage existing connections.
3. Tap and hold the name of the desired connection, then tap Connect.
To disconnect the GPRS connection
Tap the Comm Manager icon ( ) on the Today screen, then tap the Data
Connection button ( ).
6.2 Using VueFLO
VueFLO lets you scroll through Web pages by simply tilting your device.
To adjust VueFLO settings
1. Tap Start > Settings > System tab > VueFLO.
2. Select the Browser where VueFLO can be activated.
Note The Browser setting is only available when you have both Internet Explorer
Mobile and Opera Browser in your device.
2. Adjust the Sensitivity level, then tap OK.
Tip: Tap Tutorial to learn how to use VueFLO.
To use VueFLO
1. With the Web broswer opened, press on the device.
2. Tilt the device to the direction you want to scroll to. For example, to
scroll down on a Web page, tilt the top of the device towards you; To
scroll up, tilt the top of the device away from you.
Notes • To deactivate VueFLO, press again.
• You can also press and hold to use VueFLO. Once you let go of the
button, VueFLO will be deactivated.

106 Getting Connected
6.3 Internet Explorer Mobile
Internet Explorer is a full-featured Internet browser, optimized for use on
your device.
To start Internet Explorer
• Tap Start > Internet Explorer.
To set a Home page
1. In the address bar on top of the Internet Explorer screen, enter the
desired Web page address. Tap to open the Web page.
2. Tap Menu > Tools > Options > General tab.
3. Do one of the following:
• To use the displayed page as the Home page, tap Use Current.
• To use the default Home page, tap Use Default.
Tip To go to your Home page, tap Menu > Home.
To transfer favorites from your PC
You can transfer the favorites you have stored on your PC to your device by
synchronizing the Internet Explorer favorites on your PC with your device.
1. In ActiveSync on your PC, on the Tools menu, click Options, and
select Favorites.
2. In Internet Explorer on your PC, click Favorites > Add to Favorites
and save or move favorite links to the Mobile Favorites subfolder in
the Favorites list.
3. Connect your device to your PC. If synchronization does not start
automatically, click Sync.
To add a favorite
1. In Internet Explorer Mobile, go to the page you want to add.
2. Tap and hold the page, and tap Add to Favorites.
3. Confirm or change the name, and select a folder for storing the
favorite.
4. Tap Add.
Getting Connected 107
To delete a favorite or folder
1. In Internet Explorer Mobile, tap Menu > Favorites > Add/Delete tab.
2. Select the item you want to delete, and tap Delete.
To change the size of text on Web pages
• In Internet Explorer Mobile, tap Menu > Zoom, and tap the size you
want.
To change how Web pages fill the screen
1. In Internet Explorer Mobile, tap Menu > View.
2. Tap one of the following:
• One Column. Arranges the content into one column that is as
wide as the screen. This means that you will rarely have to scroll
horizontally.
• Default. Maintains a layout similar to what you see on a desktop
computer, but it makes items smaller and arranges the content so
that you can see most of it without having to scroll horizontally.
• Desktop. Keeps the same layout and size as on a desktop
computer, which will require both horizontal and vertical scrolling.
To clear the History list
1. In Internet Explorer Mobile, tap Menu > Tools > Options > Memory
tab.
2. Tap Clear History.
To save a picture from a Web page
1. In Internet Explorer Mobile, tap and hold the picture, and tap Save
Image.
2. Do one of the following:
• To save the picture in My Pictures on your device, tap Yes.
• To save the picture in another location, such as a storage card, tap
Save As.

108 Getting Connected
To delete temporary Internet files
Your device temporarily stores Web pages that you frequently visit or have
visited recently to speed up the display of these Web pages when you
access them. You may want to delete these files to free storage space.
1. In Internet Explorer Mobile, tap Menu > Tools > Options > Memory
tab.
2. Tap Delete Files. All pages stored on your device, including offline
favorites content, will be deleted.
To set up Internet security settings
Cookies are small files containing information about your identity and
preferences so that a page can tailor information to your needs. The page
sends the file, and it is stored on your device.
1. In Internet Explorer Mobile, tap Menu > Tools > Options > Security
tab.
2. To prevent Internet Explorer Mobile from accepting any cookies, clear
the Allow cookies check box.
3. Select the check boxes for the other security options you want, and
tap OK.
6.4 Opera Browser
Opera Browser is another full-featured Web browser optimized for use on
your device.
To open Opera Browser
• Tap Start > Opera Browser or press on your device.
To use Opera Browser
These are some of the most common tasks that you carry out on the Opera
Browser screen while surfing the Internet.
1. To go to another web site, enter the URL address of the web site in
the address bar at the top of the screen. Tap the down arrow ( ) to
choose one web site from previously entered addresses.
2. Tap ( ) to go to the web address you entered.
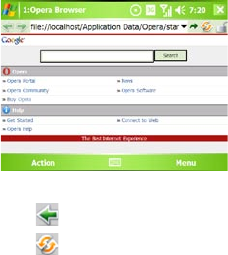
Getting Connected 109
Opera Browser
3. Tap ( ) to go back to the previous page.
4. Tap ( ) to refresh the web page on the screen.
5. Tap Action > Go to homepage to go back to the Home page.
6. Tap Action > Bookmark this page to add the current web page to
the Bookmarks folder. To open a web site from the Bookmarks folder,
tap Action > Go to and then select the web site you want to open
from the Bookmarks folder.
Tips • To open a new browser window, tap Menu > Windows > New window.
• To set browser display preferences, tap Menu > Display.
• To set browser general, history, network, and other options, tap Menu >
Tools > Settings.
• To learn more about how to use the Opera Browser, tap Menu > Tools >
Help.
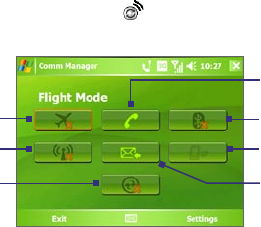
110 Getting Connected
6.5 Using Comm Manager
Comm Manager acts like a central switch that lets you enable or disable
phone features as well as manage your data connections easily.
To open Comm Manager
• Tap the Comm Manager icon ( ) on the Today screen.
Simply tap the corresponding button to enable or disable a feature.
1
2
3
5
6
7
4
1Tap to toggle between turning on or off Flight mode. Turning on Flight mode
turns off the phone, Bluetooth and WLAN functions.
2Tap to toggle between turning on or off Wi-Fi. Tap Settings > Wireless LAN to
configure Wi-Fi on your device. See "Using Wi-Fi" for details.
3Tap to open ActiveSync so you can synchronize the device and computer. For
more information about the configuration settings for ActiveSync,
see Chapter 4.
4Tap to toggle between enabling or disabling the phone. Tap Settings > Phone
to set the ring tone and other phone settings. For more information about
customizing phone settings, see Chapter 5.
5Tap to toggle between turning on or off Bluetooth. Tap Settings > Bluetooth
to configure Bluetooth on your device. See "Using Bluetooth" for details.
6Tap to disconnect active data services (e.g. GPRS). You cannot reconnect data
services in Comm Manager.
7 Tap to toggle between automatically receiving (as items arrive) or
manually retrieving Outlook e-mails. For more information, see "Schedule
synchronization with Exchange Server" in Chapter 4.
Getting Connected 111
6.6 Using Bluetooth
Bluetooth is a short-range wireless communications technology. Devices
with Bluetooth capabilities can exchange information within a distance
of about 10 meters without requiring a physical connection. You can even
beam information to a device in a different room, as long as it is within the
Bluetooth signal coverage range.
Bluetooth can be used in the following ways:
• Beam information, such as files, appointments, tasks, and contact
cards, between devices that have Bluetooth capabilities.
• Synchronize information between your device and computer via
Bluetooth.
• Use a Bluetooth-enabled headset (or other Bluetooth-enabled hands-
free device such as a car kit) with your device for hands-free phone
conversations.
• Use a Bluetooth service. Once you connect to another device or
computer using Bluetooth, you can locate and use any of the services
available on that device.
• Create a connection between your device and another Bluetooth-
enabled phone to use that phone as a modem.
Note Normally, you will need another phone as a modem only if your Pocket PC
device has no integrated phone capability.
Bluetooth modes
Bluetooth on your device operates in three different modes:
• On. Bluetooth is turned on. Your device can detect other Bluetooth-
enabled devices, but not vice versa.
• Off. Bluetooth is turned off. In this mode, you can neither send
nor receive information using Bluetooth. You might want to turn
Bluetooth off at times in order to conserve battery power, or in
situations where using a wireless device is prohibited, such as on
board an aircraft and in hospitals.
• Visible. Bluetooth is turned on, and all other Bluetooth-enabled
devices can detect your device.
112 Getting Connected
Note By default, Bluetooth is turned off. If you turn it on, then turn off your device,
Bluetooth also turns off. When you turn on your device again, Bluetooth
automatically turns on.
To turn Bluetooth on and make your device visible
1. On your device, tap Start > Settings > Connections tab > Bluetooth.
2. Select the Turn on Bluetooth and Make this device visible to other
devices check boxes.
3. Tap OK.
Bluetooth partnerships
A Bluetooth partnership is a relationship that you create between your
device and another Bluetooth-enabled device in order to exchange
information in a secure manner. Creating a partnership between two
devices involves entering the same Bluetooth passcode on both devices.
Creating a partnership between two devices is a one-time process. Once
a partnership is created, the devices can recognize the partnership and
exchange information without entering a passcode again. Make sure that
on the two devices, Bluetooth is turned on and in visible mode.
To create a Bluetooth partnership
1. On your device, tap Start > Settings > Connections tab >
Bluetooth.
2. On the Devices tab, tap Add new device. Your device searches for
other Bluetooth devices and displays them in the box.
3. Tap the desired device name in the box.
4. Tap Next.
5. Specify a passcode to establish a secure connection. The passcode
can be 1 up to 16 characters.
6. Tap Next.
7. Wait for the paired device to accept the partnership. The receiving
party needs to enter the same passcode that you specified.
8. The name of the paired device is then displayed. You may edit and
enter a new name for that device.
Getting Connected 113
9. Select the check boxes of services that you want to use from the
paired device.
10. Tap Finish.
To accept a Bluetooth partnership
1. Ensure that Bluetooth is turned on and in visible mode.
2. Tap Yes when prompted to establish a partnership with the other
device.
3. Enter a passcode (the same passcode that is entered on the device
requesting the partnership) to establish a secure connection. The
passcode must be between 1 and 16 characters.
4. Tap Next.
5. Tap Finish. You can now exchange information with the paired
device.
To rename a Bluetooth partnership
1. Tap Start > Settings > Connections tab > Bluetooth.
2. Tap and hold the partnership on the Devices tab.
3. On the shortcut menu, tap Edit.
4. Enter a new name for the partnership.
5. Tap Save.
To delete a Bluetooth partnership
1. Tap Start > Settings > Connections tab > Bluetooth.
2. Tap and hold the partnership on the Devices tab.
3. Tap Delete.
114 Getting Connected
Connect a Bluetooth hands-free or stereo headset
For hands-free phone conversations, you can use a Bluetooth hands-free
headset such as a car kit with your device.
Your device also supports A2DP (Advanced Audio Distribution Profile)
which is for stereo audio over Bluetooth. This means that you can use
a Bluetooth stereo headset with your device for hands-free phone
conversations as well as for listening to stereo music. Make sure that your
stereo headset also supports A2DP.
Just like when connecting to any Bluetooth device, you also need to enter
a passcode when connecting to a Bluetooth hands-free or stereo headset.
The passcode is fixed and cannot be changed on a Bluetooth headset.
Before you connect it to your device, check for the proper passcode in the
manufacturer’s documentation.
To connect a Bluetooth hands-free or stereo headset
1. Make sure that both your device and the Bluetooth headset are
turned on and within close range, and that the headset is visible.
Refer to the manufacturer’s documentation to find out how to set the
headset in visible mode.
2. Tap Start > Settings > Connections tab.
3. Tap Bluetooth > Devices tab > Add new device. Your device
searches for other Bluetooth-enabled devices and displays them in
the list.
4. Tap the name of the Bluetooth headset, then tap Next.
5. Enter the passcode of the Bluetooth headset, then tap Next.
6. Make sure the Hands Free check box is selected.
If you have a Bluetooth stereo headset, also make sure the Wireless
Stereo check box is selected.
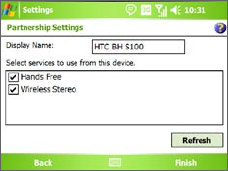
Getting Connected 115
7. Tap Finish.
Note If the Bluetooth stereo headset becomes disconnected, turn the headset on
and repeat steps 1 to 3 above. Tap and hold the name of the Bluetooth stereo
headset and tap Set as Wireless Stereo.
Warning! After pairing the device and the Bluetooth headset or refreshing the
pairing, the headset volume is automatically set to the highest volume. It is
recommended to lower the volume of the headset first before using it.
Beam information using Bluetooth
You can beam information, such as contacts, calendar items, and tasks, as
well as files from your device to your computer or to another Bluetooth-
enabled device.
Note If your computer does not have built-in Bluetooth capability, you need to
connect and use a Bluetooth adapter or dongle on your computer.
To beam information from your device to a computer
1. Turn on Bluetooth on your device, and make your device visible. For
information about this, see “To turn Bluetooth on and make your
device visible”.
2. You also need to set Bluetooth on your computer to visible mode. Do
one of the following:
• If your computer has Windows XP SP2 and your computer’s built-
in or external Bluetooth adapter is supported by Windows XP
SP2, open Bluetooth Devices from the Control Panel. Click the
Options tab, then select the Turn discovery on and the Allow
Bluetooth devices to connect to this computer options.
116 Getting Connected
• If the Bluetooth adapter on your computer was installed using
a third-party provided driver, open the Bluetooth software
that came with the Bluetooth adapter. This software varies
by manufacturer, but in most cases, you will find a Bluetooth
Configuration utility which you can open from the Control Panel.
After Bluetooth Configuration opens, click the Accessibility
tab, then select Let other Bluetooth devices to discover this
computer. Refer to the Bluetooth adapter’s documentation for
more information.
3. Create a Bluetooth partnership between the two devices.
For information about creating a partnership, see “Bluetooth
partnerships”.
After a partnership has been created successfully, your computer is
ready to receive Bluetooth beams.
4. On your device, tap and hold an item to beam. The item can be an
appointment in your calendar, a task, a contact card, or a file.
5. To beam a contact, tap Menu > Send Contact > Beam.
To beam other types of information, tap Menu > Beam [type of
item].
6. Tap the device name to which you want to send the beam.
7. If you beamed an Outlook item and it is not automatically added to
Outlook, select File > Import and Export in Outlook to import it.
To beam information to a Bluetooth-enabled device such as another Pocket
PC, follow steps 3 to 6 in the above procedure.
Note If the computer or device you want to beam to does not appear in your
device's Bluetooth list, make sure that its Bluetooth is turned on and set to
visible mode.

Getting Connected 117
To receive a Bluetooth beam
Your device will not detect and notify you of incoming Bluetooth beams
unless you set it up to do this.
1. Tap Start > Settings > Connections tab > Beam.
2. Select the Receive all incoming beams check box.
3. Make sure your device is turned on, visible, and within close range of
the device that is beaming the information.
4. When prompted to receive an incoming beam, tap Yes to receive the
beamed information.
Bluetooth Explorer and Bluetooth file sharing
Bluetooth Explorer searches for other Bluetooth devices that have file
sharing enabled and lets you access their Bluetooth shared folder. You
can copy files from and to their shared folder, and create subfolders in it.
When you enable Bluetooth file sharing on your device, other Bluetooth-
enabled devices will also be able to access your Bluetooth shared folder.
To enable Bluetooth Explorer and Bluetooth file sharing on your device
1. Tap Start > Settings > Connections tab > Bluetooth > FTP tab.
2. Select the Enable Bluetooth Explorer check box. This makes the
/Bluetooth device folder visible in the File Explorer.
3. Select the Enable File Sharing check box.
You can use the default Bluetooth shared folder, or tap Browse to use
another folder as your shared folder.
To use Bluetooth Explorer
1. Bluetooth Explorer is integrated with the File Explorer program. You
can open it by tapping Start > Programs > Bluetooth Explorer or
by tapping the Down arrow on the upper-left of File Explorer then
tapping Bluetooth .
2. Bluetooth Explorer then scans for other Bluetooth devices that have
file sharing enabled. From the list, tap to select a Bluetooth device you
want to connect to. You may need to enter a passcode in order for you
to connect to the selected device.
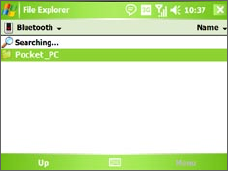
118 Getting Connected
3. If there are files contained in the Bluetooth shared folder on the other
device, you will be able to see them on the Bluetooth Explorer screen.
Select one or more files, then tap Menu > Edit and choose to cut or
copy the files.
4. Tap Up twice.
5. Navigate to the folder where you want to paste the files on your
device, then tap Menu > Edit > Paste.
Use the device as a Bluetooth modem
You can connect your device to a notebook or desktop computer through
Bluetooth and use the device as a modem for the computer.
Note If your computer does not have built-in Bluetooth capability, you need to
connect and use a Bluetooth adapter or dongle on your computer.
For the computer to use the Internet connection of your device, activate
Internet Sharing on your device, then set up a Bluetooth Personal Area
Network (PAN) between the computer and your device.
1. On your device, turn on Bluetooth and set it to visible mode.
2. Initiate a Bluetooth partnership from your device by following the
steps in “To create a Bluetooth partnership.“
Alternatively, you can initiate a Bluetooth partnership from the
computer by following these steps (based on Windows XP SP2):
a. In the Control Panel or System Tray, double-click the Bluetooth
Devices icon.
b. In the Bluetooth Devices window, click Add.
Getting Connected 119
c. The Add Bluetooth Device Wizard opens. Select the My device is
set up and ready to be found check box, then click Next.
d. The wizard then detects your device and displays its name in the
dialog box. Select the device name, then click Next.
e. Select Let me choose my own passkey, then enter a passcode
(1 up to 16 digits) that will serve as an identification number for
establishing a secure connection between your device and the
computer. Click Next.
f. A confirmation message then appears on your device. Tap Yes to
accept the connection, enter the same passcode, then tap Next.
g. On the computer, click Finish to exit the wizard.
h. On your device’s Partnership Settings screen, you can change the
display name for the computer, then tap Finish.
3. Now, open the Internet Sharing program on your device. Tap Start >
Programs > Internet Sharing.
4. Select Bluetooth PAN as the PC Connection.
5. From the Network Connection list, select the name of the
connection that your device uses to connect to the Internet.
6. Tap Connect.
7. On your computer, set up a Bluetooth Personal Area Network (PAN)
with your device:
a. Tap Start > Control Panel > Network Connections.
b. Under Personal Area Network, click the Bluetooth Network
Connection icon.
c. Under Network Tasks, click View Bluetooth network devices.
d. In the Bluetooth Personal Area Network Devices dialog box, select
your device, then click Connect.
8. On the Internet Sharing screen on your device, check if a connected
status is displayed, which indicates that your computer has been
successfully connected to the Internet using your device as a
Bluetooth modem.
120 Getting Connected
Use another Bluetooth phone as a modem
You can use another phone that has Bluetooth as a modem for your device
to browse the Internet or to transfer other information.
To do this, create a Bluetooth modem connection on your device and then
send information to the phone by using Bluetooth. The phone relays the
information over the mobile phone network and then sends back to your
device any information that you had requested over the connection.
Once you create a modem connection to the Bluetooth phone, you can
reuse it whenever you want to use the phone as a modem. Make sure that
Bluetooth is turned on and visible mode is enabled on both your device and
the phone, and that the two are within close range.
Note Normally, you will need another phone as a modem only if your Pocket PC
device has no integrated phone capability.
To use a Bluetooth phone as a modem for your device
1. On your device, tap Start > Settings > Connections tab >
Connections.
2. Tap Add a new modem connection.
3. Enter a name for the connection.
4. In the Select a modem list, tap Bluetooth.
5. Tap Next.
6. If the phone appears in the My Connections list, skip to step 11.
7. If the phone does not appear in the My Connections list, tap Add
new device, and follow the remaining steps.
8. Select the phone from the list and tap Next.
9. Enter a passcode and tap Next.
10. Enter the same passcode on the phone and tap Finish.
11. In the My Connections list on your device, select the phone and tap
Next.
12. Enter the phone number to dial for this connection and tap Next.
13. Enter the required logon information for this connection and tap
Finish.
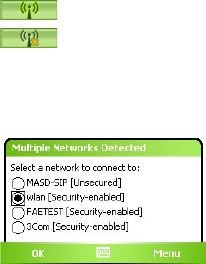
Getting Connected 121
6.7 Using Wi-Fi
Wi-Fi provides wireless Internet access over distances of up to 100 meters.
To use Wi-Fi on your device, you need access to a wireless access point of
your service provider. When you are in public places such as in a coffee shop
or restaurant, you will need access to their public wireless access points
(also referred to as “hotspots”).
Note The availability and range of your device’s Wi-Fi signal depends on the
number, infrastructure, and other objects through which the signal passes.
To connect to a wireless network
1. Open Comm Manager.
2. Tap the WLAN button to turn on/off the wireless function. The WLAN
icon indicates the wireless status.
: Wi-Fi is turned on.
: Wi-Fi is turned off.
3. After Wi-Fi has been turned on, your device then scans for available
wireless networks in your area. The network names of the detected
wireless networks will be displayed on a pop-up message window.
Tap the desired wireless LAN, then tap OK.
4. On the next pop-up message window, tap The Internet if the wireless
LAN connects your device to the Internet. Otherwise, tap Work if the
wireless LAN connects your device to a private network.
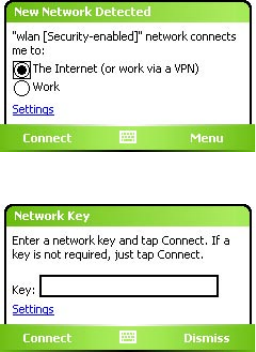
122 Getting Connected
5. If the wireless LAN is secured by a network key, enter this key, then
tap Connect.
Next time you use your device to detect wireless networks, you
will not see the pop-up message windows again, and you will not
be prompted to enter the network key of the previously accessed
wireless network (unless you perform a hard reset which will erase
custom settings on your device).
Note Wi-Fi networks are self-discoverable, which means no additional steps are
required for your device to connect to a Wi-Fi network. It may be necessary
to provide a username and password for certain closed wireless networks,
however.
To save battery power while connected to a wireless network
1. Tap Start > Settings > Connections tab > Wireless LAN to open the
Wireless LAN Settings screen.
2. On the Power Mode tab of the Wireless LAN Settings screen,
move the Power Save Mode slider to a position that optimizes
performance with the least power consumption.
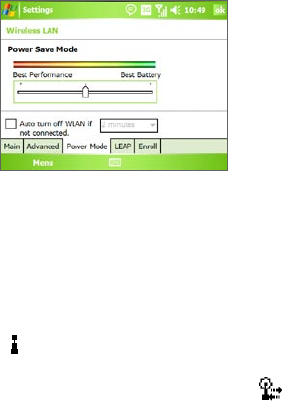
Getting Connected 123
For example, move the slider to the left (Best Performance) to have
the optimal WLAN performance; move to the right (Best Battery) to
obtain the maximum battery usage.
Select Auto turn off WLAN if not connected then set a time to
automatically turn off WLAN if it is not able to connect to a WLAN
network after a set period period of time.
To check the wireless LAN status
You can check the current wireless connection status from the following
three screens of your device:
• Title bar. When you enable Wi-Fi on your device, the Wi-Fi ON icon
( ) will appear on the title bar.
After Wi-Fi is turned on, your device scans for available wireless
networks and the wireless signal icon ( ) appears on the title bar.
The arrows in this icon will move back and forth while your device
is scanning for a wireless LAN signal. Once your device successfully
connects to a wireless LAN, the arrows stop moving.
• Wireless LAN screen - Main tab. Here, it shows the name of the
wireless network that your device is currently connected to. The
configuration and signal quality of the wireless network are also
shown.
• Configure Wireless Networks screen. Tap Start > Settings >
Connections tab > Wi-Fi > Wireless tab. This screen displays the
wireless networks currently available.
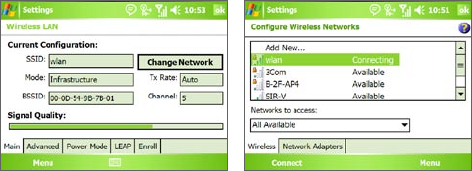
124 Getting Connected
Wi-FI: Wirelss tabWireless LAN: Main tab
• To connect to a wireless network in the list, tap and hold on the
desired network, then tap Connect.
• Tap a wireless network in the list to view or change its connection
settings.
• You can also add new wireless networks, if available, by tapping
Add New.
6.8 Using Internet Sharing
Internet Sharing connects your PC or notebook computer to the Internet
by using your device’s data connection (GPRS or EDGE, for instance). You
can choose to connect via USB or Bluetooth.
Follow the procedure in this section to set up your device as a USB modem.
To learn how to set up your device as a Bluetooth modem, see “Use the
device as a Bluetooth modem” in this chapter.
Notes • Make sure your device has a SIM card installed, and you have set up a
GPRS or phone dial-up modem connection on your device. If your device
has not been set up with a data connection yet, tap Menu > Connection
Settings on the Internet Sharing screen. For more information about
setting up a GPRS connection, see "To set up a GPRS connection to
the Internet". For more information about setting up a phone dial-up
connection, see "To set up a dial-up connection to your ISP".
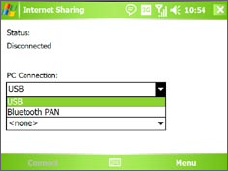
Getting Connected 125
•
If you want to use a USB cable connection, you must first install Microsoft
ActiveSync version 4.2 or later on the computer.
•
Before using Internet Sharing, disable ActiveSync on your computer.
To set up your device as a USB modem
1. On your device, tap Start > Programs > Internet Sharing.
2. In the PC Connection list, select USB.
3. In the Network Connection list, select the name of the connection
that your device uses to connect to the Internet.
4. Plug in the USB cable between your device and the computer.
5. Tap Connect.
To end the Internet connection
• On the Internet Sharing screen, tap Disconnect.
6.9 Using Terminal Services Client
The Terminal Services Client allows you to log on to a PC running Terminal
Services or Remote Desktop, and use all the resources available on that PC.
For example, instead of running Word Mobile on your device, you can run
the PC version of Word and access the .doc files available on that PC.
To connect to a Terminal Server
1. On your device, tap Start > Programs > Terminal Services Client.
2. Enter the server name.
3. You can also select a server name in Recent servers if you have
126 Getting Connected
recently connected to a server.
4. Select the Limit size of server desktop to fit on this screen check
box if you want to use programs that have been specifically sized for
use with your device.
5. Tap Connect.
To navigate within Terminal Services Client
When connected to a remote server, you may notice that the screen is
displaying more than one horizontal and vertical scroll bar. Use these
scroll bars to either scroll the contents on the PC, or to scroll the PC display
through the Terminal Services Client window.
To make sure you are scrolling the PC display through Terminal Services
Client, use the five directional buttons at the bottom of the Terminal
Services Client window. To better fit information on the screen, select the
Limit size of server desktop to fit on this screen check box. For best
results, the programs on your desktop PC should be maximized.
To disconnect without ending a session
1. From the Terminal Services Client screen on your device, tap Start >
Shutdown.
2. Tap Disconnect.
Notes • Do not use the Start menu on your device.
•
If a network administrator has configured Terminal Services Client on
your device to reconnect to disconnected sessions, and you previously
disconnected from a Terminal Server without ending the session, the
Terminal Services Client reconnects to that session.
To disconnect after ending a session
1. From the Terminal Services Client screen on your device, tap Start >
Shutdown.
2. Tap Log Off.

128 Exchanging Messages and Using Outlook
7.1 E-mail and Text Messages
Messaging is where all of your e-mail accounts and your text message
account are located. You can send and receive Outlook e-mail, Internet
e-mail through an Internet service provider (ISP), as well as SMS (Short
Messaging Service) text messages using your mobile phone network. You
can also access e-mail from work using a VPN connection.
E-mail Setup Wizard
Before you can send and receive e-mails, you need to set up your e-mail
account on your device. The E-mail Setup Wizard makes it easy and simple
to set up your Outlook e-mail and POP3/IMAP4 accounts on your device.
To set up e-mail accounts using E-mail Setup Wizard
1. Tap Start > Messaging.
2. Tap Menu > Tools > New Account to access the E-mail Setup Wizard.
3. The E-mail Setup Wizard guides you step-by-step through the setup
process.
For more information on setting up your Outlook e-mail account, see “Set
up Outlook e-mail”. For information on POP3 or IMAP4 setup, see “Set up a
POP3/IMAP4 e-mail account”.
Set up Outlook e-mail
When starting ActiveSync on your computer for the first time, the
Synchronization Setup Wizard prompts you to set up a synchronization
relationship. This allows you to synchronize Outlook e-mail and other
information between your device and your computer or the Exchange
Server. If you have already set up synchronization through the wizard, then
your device is ready to send and receive Outlook e-mail. For information
about the Synchronization Setup Wizard, see “To install and set up
ActiveSync on the computer” in Chapter 4.
If you have not set up a synchronization relationship yet, do the following to
set up your device to synchronize Outlook e-mail:
1. To synchronize remotely, you need to set up and connect to an over-
the-air connection (GPRS or ISP dial-up). For more details, see the
procedures in “Connecting to the Internet” in Chapter 6.
Exchanging Messages and Using Outlook 129
2. Disconnect your device from your computer or LAN. (If you have an
over-the-air connection, there is no need to disconnect).
3. Tap Start > Programs > ActiveSync.
4. If you want to synchronize e-mails directly with the Exchange Server
on a private network such as your corporate network, follow the
steps in “Synchronize Outlook information with Exchange Server” in
Chapter 4.
5. Choose which information types to synchronize. Make sure E-mail is
selected. For details, follow the steps in “To change which information
is synchronized” in Chapter 4.
Everytime you want to manually send or receive Outlook e-mail on your
device, just connect your device to your computer, LAN, or over-the-air
connection, then tap Sync on the ActiveSync screen or tap Menu > Send/
Receive in Outlook on your device.
For details about scheduling automatic synchronization or setting
a synchronization time with the Exchange Server, see “Schedule
synchronization with Exchange Server” in Chapter 4.
Set up a POP3/IMAP4 e-mail account
Set up a POP3 or IMAP4 e-mail account on your device if you have an e-
mail account with an Internet service provider (ISP) or an account that you
access using a VPN server connection (typically a work account).
1. Tap Start > Messaging.
2. Tap Menu > Tools > New Account.
3. On the E-mail Setup screen, select Other (POP3/IMAP) in the Your
e-mail provider list, then tap Next.
4. Enter your e-mail address, then tap Next. Auto configuration
attempts to download necessary e-mail server settings so that you do
not need to enter them manually.
5. Once Auto configuration has finished, tap Next.
6. Enter your name (the name you want displayed when you send e-
mail), user name, and password; tap Next.
Select the Save password check box if you want to save your password so
that you do not need to enter it again.

130 Exchanging Messages and Using Outlook
If Auto configuration was successful, the Your name and User name fields
automatically get populated. Tap Next, then Finish to complete setting
up your account, or tap Options under Server information to access
additional settings. For example:
• Change the time intervals for downloading new messages.
• Limit the amount of messages that are downloaded and
authentication method for outgoing mails.
• Download full messages or parts of messages.
If Auto configuration is unsuccessful or you have an account you access
using a VPN server connection, contact your ISP or network administrator
for the following information and enter it manually:
Setting Description
User name Enter the user name assigned to you by your ISP or network
administrator. This is often the first part of your e-mail address,
which appears before the at sign (@).
Password Choose a strong password. You have the option to save
your password so you do not need to enter it each time you
connect to your e-mail server.
Account type Select POP3 or IMAP4.
Account name Enter a unique name for the account, such as Work or Home.
This name cannot be changed later.
Incoming mail
server
Enter the name of your e-mail server (POP3 or IMAP4).
Outgoing mail
server
Enter the name of your outgoing e-mail server (SMTP).
Domain Not required for an account with an ISP. May be required for a
work account.
Require SSL
connection
Select this to ensure you always receive e-mail for this account
using an SSL connection. This enables you to receive personal
information more securely. Please note that if you select this
and your ISP does not support an SSL connection, you will not
be able to connect to receive e-mail.
Outgoing
mail requires
authentication
Select this if your outgoing e-mail server (SMTP) requires
authentication. Your user name and password from above will
be used.
Use separate
settings
Select this if your outgoing e-mail server requires a different
user name and password than the ones you entered before.

Exchanging Messages and Using Outlook 131
Outgoing server settings:
User name Enter your user name for the outgoing e-mail server.
Password Enter your password for the outgoing e-mail server.
Domain Enter the domain of the outgoing e-mail server.
Require SSL for
outgoing mail
Select this to ensure you always send e-mail from this account
using an SSL connection. This enables you to send personal
information more securely. Note that if you select this and
your ISP does not support an SSL connection, you will not be
able to send e-mail.
Tip You can set up several e-mail accounts in addition to your Outlook e-mail
account.
Send and receive messages
To compose and send a message
1. In the message list, tap Menu > Go To and select an account.
2. Tap New.
3. Enter the e-mail address or mobile phone number of one or more
recipients, separating them with a semicolon. To access addresses and
phone numbers from Contacts, tap To.
4. Enter your message. To quickly add common messages, tap Menu >
My Text and tap a desired message.
5. To check the spelling, tap Menu > Spell Check.
6. Tap Send.
Tips • To enter symbols, tap Shift using the on-screen keyboard.
• To set the priority, tap Menu > Message Options.
•
If you are working offline, e-mail messages are moved to the Outbox
folder and will be sent the next time you connect.
•
If you are sending a text message and want to know if it was received,
before composing the message, tap Menu > Tools > Options. Tap Text
Messages and select the Request delivery notifications check box.
132 Exchanging Messages and Using Outlook
To reply to or forward a message
1. Open the message and tap Reply, or Menu > Reply All, or Menu >
Forward.
2. Enter your response. To quickly add common messages, tap Menu >
My Text and tap a desired message.
3. To check the spelling, tap Menu > Spell Check.
4. Tap Send.
Tips • To see more header information, scroll up.
• To always include the original message, from the list view, tap Menu >
Tools > Options > Message tab, and select the When replying to e-mail,
include body check box.
•
In the Outlook E-mail account, you will send less data if you do not edit
the original message. This may reduce data transfer costs based on your
rate plan.
To exclude your e-mail address when replying to all
When you reply to all the recipients of an e-mail, your own e-mail address
will also be added to the recipient list. You can customize ActiveSync so that
your e-mail address will be excluded from the recipient list.
1. In ActiveSync on your device, tap Menu > Options.
2. Select the E-mail information type and tap Settings.
3. Tap Advanced.
4. In the Primary e-mail address text box, enter your e-mail address.
5. Tap OK.
To add an attachment to a message
1. In a new message, tap Menu > Insert and tap the item you want to
attach: Picture, Voice Note, or File.
2. Select the file you want to attach, or record a voice note.
To receive attachments
An attachment sent with an e-mail message or downloaded from the server
appears below the subject of the message. Tapping the attachment opens
the attachment if it has been fully downloaded, or marks it for download
the next time you send and receive e-mail. You can also download
Exchanging Messages and Using Outlook 133
attachments automatically with your messages if you have an Exchange
Server mail account.
If you have an Outlook e-mail account, do the following:
1. Tap Start > Programs > ActiveSync.
2. Tap Menu > Options.
3. Tap E-mail > Settings, then select Include file attachments.
If you have an IMAP4 e-mail account with an Internet service provider (ISP)
or an account that you access using a VPN server connection (typically a
work account), do the following:
1. Tap Start > Messaging.
2. Tap Menu > Tools > Options.
3. Tap the name of the IMAP4 account.
4. Tap Next until you reach Server information, and tap Options.
5. Tap Next twice, and select Get full copy of messages and When
getting full copy, get attachments.
Tip To store attachments on a storage card rather than on the device, tap
Menu > Tools > Options > Storage tab, and select the Store attachments
on storage card check box.
Download messages
The manner in which you download messages depends on the type of
account you have:
• To send and receive e-mail for an Outlook e-mail account, begin
synchronization through ActiveSync. For more information, see “Set
up Outlook e-mail” in this chapter.
• To send and receive e-mail messages for an e-mail account that you
have with an ISP or that you access using a VPN server connection
(typically a work account), download messages through a remote
e-mail server. For more information, see “To download messages from
the server” later in this chapter.
• Text messages are automatically received when the phone is turned
on. When the phone is turned off, messages are held by your service
provider until the next time the phone is turned on.
134 Exchanging Messages and Using Outlook
To download messages from the server
To send and receive e-mail messages for an e-mail account that you have
with an ISP or that you access using a VPN server connection (typically a
work account), you first need to connect to the Internet or your corporate
network, depending on the account.
1. Tap Menu > Go To and tap the account you want to use.
2. Tap Menu > Send/Receive. The messages on your device and e-mail
server are synchronized: new messages are downloaded to the device
Inbox folder, messages in the device Outbox folder are sent, and
messages that have been deleted from the server are removed from
the device Inbox folder.
Tip If you want to read the entire message, tap Menu > Download Message
while in the message window. If you are in the message list, tap and hold
the message, and tap Download Message. The message will download
the next time you send and receive e-mail. This will also download message
attachments if you selected those options when you set up the e-mail
account.
Copy text messages from and to the SIM card
1. Tap Start > Messaging.
2. Tap Menu > Go To > Text Messages.
3. In the message list, select the text message you want to copy.
4. Do one of the following:
• To copy a text message to the SIM card, tap Menu > Copy to SIM.
• To copy a text message from the SIM card to your device, tap
Menu > Copy to Inbox.
Note Text messages stored on your SIM card are automatically displayed in the
Inbox folder. Copying them to your device results in duplicate messages in
the Inbox folder when your SIM card is in use.
Individually sign and encrypt a message
Encrypting an Outlook e-mail message protects the privacy of the message
by converting it from plain, readable text into cipher (scrambled) text. Only
the recipient who has the authorization key can decipher the message.
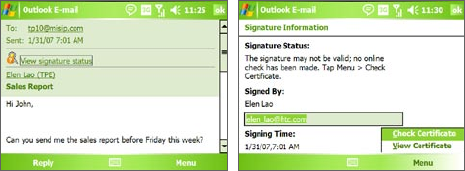
Exchanging Messages and Using Outlook 135
Digitally signing a message applies your certificate with the authorization
key to the message. This proves to the recipient that the message is from
you and not from an imposter or a hacker, and that the message has not
been altered.
To digitally sign and encrypt a new message
1. In the message list, tap Menu > Go To > Outlook E-mail.
2. Tap New.
3. Tap Menu > Message Options.
4. Select the Encrypt message and Sign message check boxes, and tap
OK.
Verify the digital signature on a signed message you
receive
1. Open the Outlook e-mail message that has been digitally signed.
2. At the top of the message, tap View Signature Status.
3. Tap Menu > Check Certificate.
To view the details of the certificate in the message, tap Menu > View
Certificate.
Note There can be several reasons why a digital signature is not valid. For example,
the sender’s certificate may have expired, it may have been revoked by the
certificate authority, or the server that verifies the certificate is unavailable.
Contact the sender to report the problem.
136 Exchanging Messages and Using Outlook
Manage folders
Each Messaging account has its own folder hierarchy with five default
Messaging folders: Inbox, Outbox, Deleted Items, Drafts, and Sent Items.
The messages you receive and send through the account are stored in
these folders. You can also create additional folders within each hierarchy.
The Deleted Items folder contains messages that have been deleted on the
device. The behavior of the Deleted Items and Sent Items folders depends
on the Messaging options you have chosen.
If you use an Outlook e-mail account, e-mail messages in the Inbox folder in
Outlook will be synchronized automatically with your device. You can select
to synchronize additional folders by designating them for synchronization.
The folders you create and the messages you move will then be mirrored
on the e-mail server. For example, if you move two messages from the
Inbox folder to a folder named Family, and you have designated Family for
synchronization, the server creates a copy of the Family folder and copies
the messages to that folder. You can then read the messages while you are
away from your PC.
If you use a text message account, messages are stored in the Inbox folder.
If you use a POP3 account and you move e-mail messages to a folder you
created, the link is broken between the messages on the device and their
copies on the e-mail server. The next time you connect, the e-mail server
will detect that the messages are missing from the Inbox folder on the
device and will delete them from the e-mail server. This prevents having
duplicate copies of a message, but it also means that you will no longer
have access to messages that you move to folders created from anywhere
except the device.
If you use an IMAP4 account, the folders you create and the e-mail
messages you move are mirrored on the e-mail server. Therefore, messages
are available to you anytime you connect to your e-mail server, whether it
is from your device or PC. This synchronization of folders occurs whenever
you connect to your e-mail server, create new folders, or rename/delete
folders when connected. You can also set different download options for
each folder.
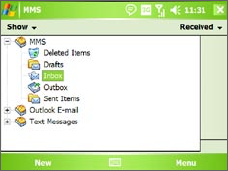
Exchanging Messages and Using Outlook 137
7.2 MMS Messages
Creating and sharing multimedia messages (MMS) with your friends and
family are easy with your device. You can attach pictures or video, and
an audio clip in an MMS. You can even use the device camera to capture
photos and video clips while composing a new MMS message, and send
them along with your message.
Notes •
Please note that MMS is a charged service. In order to use MMS
successfully, this has to be provisioned on your mobile account. Please
contact the wireless service provider to have this provisioned as part of
your calling plan.
•
Please ensure the size of the MMS is within the limits of the wireless
service provider if sending to another mobile phone user or sending to an
e-mail address.
To access MMS
1. Tap Start > Messaging.
2. Tap Menu > Go To > MMS.
MMS message folders
Change MMS settings
When you send an MMS message, an SMS notification message will first be
sent to the recipient, while your MMS message will be temporarily stored
on an MMS server of your wireless service provider. When others send you
an MMS message, similarly, the MMS message will be stored on the MMS
server until you retrieve it. Hence, your device must be configured with
the location of the MMS server for you to be able to send and receive MMS
messages on your device.
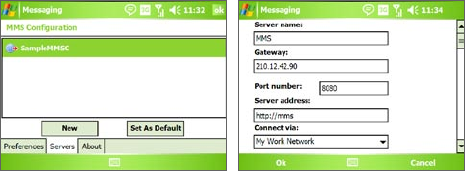
138 Exchanging Messages and Using Outlook
When you purchase your device, it is already preset with your wireless
service provider’s MMS server setings. If you accidentally lost the preset
settings or you changed to another wireless service provider, follow the
steps below to configure MMS settings.
To configure MMS settings
1. Tap Start > Messaging.
2. Tap Menu > Tools > Options.
3. Tap MMS in the accounts list to configure settings. The MMS
Configuration screen appears.
4. In the Preferences tab, select or clear the provided check boxes
according to your needs. You can choose to keep track of your
MMS messages, retrieve messages immediately, accept or reject
messages, and request a delivery or read receipt. You can also specify
a resolution for images you send and message delivery attempts.
5. Tap the Servers tab and check if your device is preset with MMS
server settings.
If there are no preset settings, tap New and enter the following
information, which you can get from your wireless service provider:
• Server name. A descriptive name, such as your wireless service
provider name.
• Gateway. Location of the MMS server, which is usually in the form
of an IP address.
• Port number. HTTP port number used for connecting to the MMS
server and for file transfer.

Exchanging Messages and Using Outlook 139
• Server address. URL address of the MMS server.
• Connect via. Select the connection that your device uses for MMS.
• Sending size limitation. Select the maximum MMS message size
allowed by your wireless service provider.
• WAP version. Select either WAP 1.2 or WAP 2.0, depending on
which one is being used by your wireless service provider.
6. Tap OK.
The MMS server settings will then be added as an entry on the MMS
Configuration screen.
Note If you add several MMS service providers to the MMS Configuration screen,
you can choose one as your default MMS provider. Select the MMS provider's
name in the list then tap Set As Default.
Create and send MMS messages
After configuring the required settings, you can start to compose and send
MMS messages.
To compose an MMS message
You can compose MMS messages in a combination of various slides, where
each slide can consist of a photo, audio or video clip, and/or text.
1. On the MMS screen, tap New.
2. When you see the Choose a MMS screen, tap a preset template, or tap
Custom to open a blank MMS message.
Note If you prefer to always use a blank MMS message, select the Always choose
custom check box.
3. In To, enter the recipient’s phone number or e-mail address directly,
or tap To, Cc, or Bcc to choose a phone number or an e-mail address
from Contacts.
4. Enter a subject for your message.
5. Tap the Insert icon ( ) to select and insert a photo or video clip.
When selecting a photo or video clip, you can:
• Tap to view it first, then tap Select to use the selected photo or
video clip and insert it into the MMS message you are composing.
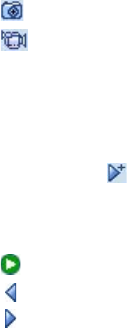
140 Exchanging Messages and Using Outlook
• Tap to take a photo and insert it into the MMS message.
• Tap to record an MMS video clip and insert it into the MMS
message.
• Tap the Exit icon to quit selection and return to the MMS message.
6. Enter text and insert audio clips by tapping the respective areas. See
“To add text to an MMS message” and “To add an audio clip to an
MMS message” for details.
7. To add more slides, tap or tap Menu > Slides > Insert Slide.
Repeat steps 5 and 6 to insert a photo/video, text, and audio into
each slide that you added.
While on a slide, you can:
• Tap to preview the slide.
• Tap to go to the previous slide.
• Tap to go to the next slide.
8. While composing an MMS message, you can also do the following:
• Tap Menu > Options > Background to choose a background
color from the list.
• Tap Menu > Options > Text Layout, then choose whether to
place the text above, below, to the left or right of the photo/video.
• Tap Menu > Options > Send Options to specify the sending time,
validity, priority, class, and other settings for a message.
• Tap Menu > Attachment to include a contacts card, calendar
appointment, or any file as an attachment.
9. Tap Send to send the MMS message.
Notes
You can also send an MMS message directly from the Pictures & Videos or
Camera program. Do one of the following:
• In Pictures & Videos, select a picture from My Pictures, and tap Menu >
Send. In Select an account, tap MMS.
•
Capture a photo or an MMS video clip using the camera, and tap the Send
icon. In the Send File dialog box, tap Send via MMS.

Exchanging Messages and Using Outlook 141
To create an MMS message from a template
• While on an MMS message, tap Menu > Template > New from
Template to compose a message using a predefined template.
Note To save a message as a template, open the message and tap Menu >
Template > Save as Template.
To add text to an MMS message
When entering text into an MMS message, you can do the following:
• Tap inside the text box and enter your own text.
• Choose from common words or phrases. Tap to add a text string
from the My Text list.
• Tap to add an emoticon.
• You can easily include a Web page link. Tap then select a Web page
address from the Internet Favorites list on your device.
Tip To edit or delete a phrase on the My Text list, tap and hold a string, then tap
Edit or Delete from the shortcut menu. To create and add a new phrase to
the list, tap New.
To add an audio clip to an MMS message
You can add audio clips to your MMS message. However, you can add only
one audio clip per slide.
1. Tap Insert audio.
By default, My Documents will be shown. Tap My Music or another
folder that contains audio files. When navigating folders, tap the
Down arrow ( ) to return to the upper folder.
2. Select an audio file. When selected, you can:
• Tap to play the audio clip.
• Tap to pause, or tap to stop playback.
• Tap Select to insert it into your MMS message.
• Tap the Exit icon to quit selection and return to your MMS
message.

142 Exchanging Messages and Using Outlook
• To record a new audio clip and add it to your MMS message, tap
. The Record pop-up window then opens. Tap Record to start
recording, and Stop to end the recording. Tap Play to listen to
the recorded audio clip, then tap Done. The new audio clip is
automatically inserted into your MMS message.
View, and reply to MMS messages
To view an MMS message
• Use the playback controls , , and .
• Tap Objects to see a list of files included in the message. On the
Message Objects screen, you can do the following:
• To save a file, select it, and tap Menu > Save.
• To save the contents of a text file to the My Text list, tap Menu >
Save into “My Text”.
• To associate a photo to one of your contacts, tap Menu > Assign
to Contact.
To reply to an MMS message
• Tap Menu > Reply to reply to the sender of the message, or tap
Menu > Reply All to reply to all persons listed in To, Cc, and Bcc of the
message.
7.3 Pocket MSN
Pocket MSN delivers the features of Hotmail and MSN Messenger to your
device. With MSN Messenger you can do the following:
• Send and receive instant messages.
• See which contacts are online or offline.
• Subscribe to status updates for selected contacts so you know when
they come online.
• Block contacts from seeing your status or sending you messages.

Exchanging Messages and Using Outlook 143
Before you can use MSN Messenger, your device must be connected to
the Internet. For information about setting up an Internet connection, see
“Connecting to the Internet” in Chapter 6.
Note You must have either a Microsoft .NET Passport or Hotmail account to use
MSN Messenger. If you have a Hotmail.com or MSN.com e-mail address,
you already have a Passport. To get a Passport account, go to http://www.
passport.com. To get a Hotmail account, go to http://www.hotmail.com.
To start MSN Messenger
1. Tap Start > Programs > Pocket MSN.
2. Tap MSN Messenger.
To sign in or out
• To sign in, tap anywhere on the MSN Messenger screen. Enter the e-
mail address and password for your Passport or Hotmail account, and
tap Sign In. Signing in may take several minutes, depending on your
connection speed.
• To sign out, tap Menu > Sign Out. Your status changes to Offline.
To add or delete contacts
• To add a contact, tap Menu > Add a Contact, and follow the
instructions on the screen.
• To delete a contact, tap and hold the contact's name, and tap Delete
Contact.
To send an instant message
1. Tap the contact to whom you want to send a message.
2. Enter your message in the text entry area at the bottom of the screen,
and tap Send.
Tip To quickly add common phrases, tap Menu > My Text and select a phrase in
the list.
144 Exchanging Messages and Using Outlook
7.4 Calendar
Use Calendar to schedule appointments, including meetings and other
events. Your appointments for the day can be displayed on the Today
screen. If you use Outlook on your PC, you can synchronize appointments
between your device and PC. You can also set Calendar to remind you of
appointments with a sound or flashing light, for example.
You can look at your appointments in several different views (Day, Week,
Month, Year, and Agenda). To see detailed appointment information in any
view, tap the appointment.
To schedule an appointment
1. Tap Start > Calendar.
2. Tap Menu > New Appointment.
3. Enter a name for the appointment, and enter information such as
start and end times.
4. To schedule an all-day event, in the All Day box, tap Yes.
5. When finished, tap OK to return to the calendar.
Notes •
All-day events do not occupy blocks of time in Calendar; instead, they
appear in banners at the top of the calendar.
• To cancel an appointment, tap the appointment and tap Menu > Delete
Appointment.
Tip To have the time entered automatically in Day view, tap the time slot for the
new appointment, and tap Menu > New Appointment.
To send a meeting request
Use Calendar to schedule meetings via e-mail with contacts who use
Outlook or Outlook Mobile.
1. Tap Start > Calendar.
2. Schedule a new appointment, or open an existing one and tap Edit.
3. Tap Attendees.
4. Tap the name of the contact you want to invite.
5. To invite each additional attendee, tap Add and tap the name.
Exchanging Messages and Using Outlook 145
6. Tap OK.
7. The meeting request will be sent to the attendees the next time you
synchronize your device with your PC.
Note When attendees accept your meeting request, the meeting is automatically
added to their schedules. When their response is sent back to you, your
calendar is updated as well.
To set a default reminder for all new appointments
You can have a reminder automatically turned on for all new appointments
you schedule.
1. Tap Start > Calendar.
2. Tap Menu > Options > Appointments tab.
3. Select the Set reminders for new items check box.
4. Set the time when you want the reminder to alert you.
5. Tap OK to return to the calendar.
7.5 Contacts
Contacts is your address book and information storage for the people and
businesses you communicate with. Store phone numbers, e-mail addresses,
home addresses, and any other information that relates to a contact, such
as a birthday or an anniversary date. You can also add a picture or assign a
ring tone to a contact.
From the contact list, you can quickly communicate with people. Tap a
contact in the list for a summary of contact information. From there, you
can call or send a message.
If you use Outlook on your PC, you can synchronize contacts between your
device and PC.
To create a contact on your device
1. Tap Start > Contacts.
2. Tap New and enter the contact information.
3. When finished, tap OK.
146 Exchanging Messages and Using Outlook
Tips •
If someone who is not in your list of contacts calls you, you can create a
contact from Call History by tapping and holding a phone number and
then tapping Save to Contacts from the shortcut menu.
•
To save a phone number that is contained in a message, tap the phone
number, then tap Menu > Save to Contacts.
•
In the list of contact information, you’ll see where you can add a picture
or assign a ring tone to a contact.
To create a contact on your SIM card
1. Tap Start > Programs > SIM Manager. This opens the SIM Manager
program.
2. Tap New and enter a contact name and phone number.
3. Tap Save to save the information on your SIM card.
To change contact information
1. Tap Start > Contacts.
2. Tap the contact.
3. Tap Menu > Edit and enter the changes.
4. When finished, tap OK.
Tip: To change contact information on your SIM card, tap Start > Programs >
SIM Manager, then tap a SIM contact and edit it. After modifying, tap Save.
To work with the contact list
There are several ways to use and customize the contact list. Here are a few
tips:
1. Tap Start > Contacts.
2. In the contact list, do any of the following:
• In Name view, you can search for a contact by entering a name
or number, or by using the alphabetical index. To switch to Name
view, tap Menu > View By > Name.
• To see a summary of information about a contact, tap the contact.
From there you can also make a call or send a message.
• To see a list of available actions for a contact, tap and hold the
contact.
Exchanging Messages and Using Outlook 147
• To see a list of contacts employed by a specific company, tap
Menu > View By > Company, then tap the company name.
To copy SIM contacts to your device
If you have saved contacts on your SIM card, you can copy them into
Contacts on your device.
1. Tap Start > Programs > SIM Manager.
2. Select the desired item, or select all SIM contacts by tapping Menu >
Select All.
3. Tap Menu > Save to Contacts.
To copy contacts to the SIM card
Only one phone number per contact name can be stored on a SIM card.
When you copy a contact that has several phone numbers to your SIM card,
SIM Manager saves each number under a separate name.
To save each number under a different contact name on the SIM card, SIM
Manager appends an indicator at the end of each name. By default, /M, /W
and /H are appended to indicate mobile, work and home phone numbers
respectively. You can edit this indicator first before you start copying
contacts to your SIM card. Indicators of the other types of phone numbers
are left empty for you to define them.
1. Tap Start > Programs > SIM Manager, then tap Menu > Tools >
Options.
2. On the Options screen, select the check boxes of the types of phone
numbers that you want to be added to the SIM card.
3. Under the Mark column, you can change the indicator that will be
appended to the SIM contact names for each phone number type. To
do so, select a phone type, tap Edit, enter your desired indicator, then
tap Save.
4. After modifying, tap OK.
5. Tap Menu > Contacts to SIM.
6. Select the check boxes of the contact’s phone numbers that you want
to copy to your SIM card, then tap Save.
148 Exchanging Messages and Using Outlook
To find a contact on your device
There are several ways to find a contact when your contact list is long.
1. Tap Start > Contacts.
2. If you are not in Name view, tap Menu > View By > Name.
3. Do one of the following:
• Begin entering a name or phone number in the provided text box
until the contact you want is displayed. To show all contacts again,
tap the text box and clear the text, or tap the arrow to the right of
the text box.
• Use the alphabetical index displayed at the top of the contact list.
• Filter the list by categories. In the contact list, tap Menu > Filter,
then tap a category you’ve assigned to a contact. To show all
contacts again, select All Contacts.
To find a contact online
In addition to having contacts on your device, you can also access contact
information from your organization’s Global Address List (GAL). GAL is
the address book that contains all user, group, and distribution list e-mail
addresses of your organization, and it is stored on the Exchange Server. By
having direct online access to it from your device, it is quick and easy for
you to plan a meeting and e-mail a meeting request immediately to anyone
in your organization.
Access to the GAL is available if your organization is running Microsoft
Exchange Server 2003 SP2 and you have completed your first
synchronization with the Exchange Server.
1. Synchronize with Exchange Server if you have never done so.
2. Tap Start > Contacts > Menu > View By > Name.
3. Do any of the following:
• In Contacts, tap Menu > Find Online.
• In a new message, tap the To box. Tap Menu > Add Recipient >
Menu > Find Online.
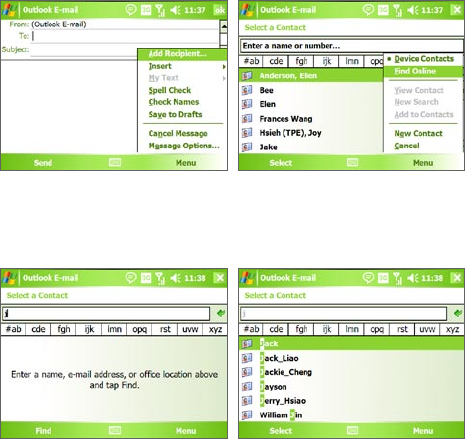
Exchanging Messages and Using Outlook 149
• In a new meeting request using Calendar, tap Attendees and then
tap Menu > Find Online.
4. Enter the part or full contact name and tap Find. Tap Select to choose
the desired contact(s) from the list.
Notes • Your device must be set up with a data connection.
• You can search on the following information as long as that information is
included in your organization’s GAL: First name, Last name, E-mail name,
Display name, E-mail address, or Office location.
To send contact information via text messaging
1. Tap Start > Contacts, then select a contact.
2. Tap Menu > Send Contact > Text Messages.
3. Select the contact information you want to send, then tap Done.
4. In the new text message, enter the mobile phone number of the
recipient, then tap Send.
150 Exchanging Messages and Using Outlook
7.6 Tasks
Use Tasks to keep track of things you need to do. A task can occur once or
repeatedly (recurring). You can set reminders for your tasks and you can
organize them using categories.
Your tasks are displayed in a task list. Overdue tasks are displayed in red.
To create a task
1. Tap Start > Programs > Tasks.
2. Tap Menu > New Task, enter a subject for the task, and fill in
information such as start and due dates, priority, and so on.
3. When finished, tap OK.
Tip You can easily create a short, to-do type task. Simply tap the Tap here to add
a new task box, enter a subject, and tap the Enter button on the on-screen
keyboard. If the task entry box is not available, tap Menu > Options and
select the Show Tasks entry bar check box.
To change the priority of a task
Before you can sort tasks by priority, you need to specify a priority level for
each task.
1. Tap Start > Programs > Tasks.
2. Tap the task you want to change the priority for.
3. Tap Edit, and in the Priority box, tap a priority level.
4. Tap OK to return to the task list.
Note All new tasks are assigned a Normal priority by default.
To set a default reminder for all new tasks
You can have a reminder automatically turned on for all new tasks you
create.
1. Tap Start > Programs > Tasks.
2. Tap Menu > Options.
3. Select the Set reminders for new items check box.
4. Tap OK to return to the task list.
Exchanging Messages and Using Outlook 151
Note The new tasks must have due dates set in order for the reminder to take
effect.
To show start and due dates in the task list
1. Tap Start > Programs > Tasks.
2. Tap Menu > Options.
3. Select the Show start and due dates check box.
4. Tap OK.
To locate a task
When your list of tasks is long, you can display a subset of the tasks or sort
the list to quickly find a specific task.
1. Tap Start > Programs > Tasks.
2. In the task list, do one of the following:
• Sort the list. Tap Menu > Sort By, and tap a sort option.
• Filter the list by category. Tap Menu > Filter, and tap the category
you want displayed.
Tip To filter your tasks further, tap Menu > Filter > Active Tasks or Completed
Tasks.
7.7 Notes
Notes helps you to quickly capture thoughts, questions, reminders, to-do
lists, and meeting notes. You can create handwritten and typed notes,
record voice notes, convert handwritten notes to text for easy reading, and
send notes to others.
Enter information in Notes
There are several ways to enter information in a note. You can enter typed
text by using the on-screen keyboard or handwriting recognition software.
You can use the stylus to write or draw directly on the screen.
152 Exchanging Messages and Using Outlook
To set the default input mode for Notes
If you frequently add drawings to your notes, you may find it helpful to set
Writing as the default input mode. If you prefer typed text, select Typing.
1. Tap Start > Programs > Notes.
2. In the note list, tap Menu > Options.
3. In the Default mode box, tap one of the following:
• Writing if you want to draw or enter handwritten text in a note.
• Typing if you want to create a typed note.
4. Tap OK.
To create a note
1. Tap Start > Programs > Notes. In the note list, tap New.
2. Tap the Input Selector arrow next to the Input Method icon on the
menu bar, tap the input method you want, and enter your text.
3. If the Input Selector arrow is not displayed, tap the Input Method
icon.
4. When finished, tap OK to return to the note list.
Notes •
To select handwritten text, tap and hold next to the writing. As soon as
dots appear, and before they form a complete circle, quickly drag across
the writing.
• If a letter crosses three ruled lines, it is treated as a drawing rather than
text.
To draw in a note
1. Tap Start > Programs > Notes.
2. In the note list, tap New.
3. To draw on the screen, use the stylus like a pen.
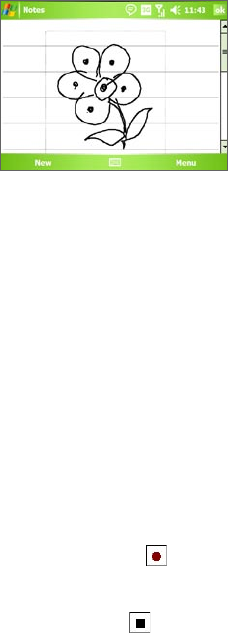
Exchanging Messages and Using Outlook 153
Drawing on the screen
4. A selection box appears around your drawing.
5. When finished, tap OK to return to the note list.
Note To select a drawing (for example, to copy or delete it), tap and hold the
drawing briefly. When you lift the stylus, the drawing is selected.
Record a voice note
You can create a stand-alone recording (voice note) or you can add a
recording to a note.
To create a voice note
1. Tap Start > Programs > Notes.
2. Do one of the following:
• To create a stand-alone recording, record from the note list.
• To add a recording to a note, create or open a note.
3. If you do not see the Recording toolbar, tap Menu > View Recording
Toolbar.
4. Tap the Record icon ( ) to begin recording.
5. Hold your device’s microphone near your mouth or other source of
sound.
6. Tap the Stop icon ( ) when finished recording.
7. If you are adding a recording to a note, tap OK to return to the note
list when finished.
8. If you are recording in an open note, an icon will appear in the note.

154 Exchanging Messages and Using Outlook
9. If you are creating a stand-alone recording, the recording will appear
in the note list.
Tip To quickly create a recording, press and hold the VOICE COMMAND button,
then you can begin to record after a beep sound. Release the button when
you are finished.
To change recording formats
1. Tap Start > Settings > Personal tab > Input.
2. Tap the Options tab, and select the desired format you want in the
Voice recording format list.
3. Tap OK.
Note
You can also change recording formats from within Notes. In the note list, tap
Menu > Options > Global Input Options link (at the bottom of the page),
then tap the Options tab.
7.8 Voice Recorder
Voice Recorder lets you record your voice and then quickly send it via MMS
or e-mail, beam it or set the recorded voice as your ringtone. Voice Recorder
saves the audio file in the AMR-NB format.
To record your voice
1. On the Today screen, tap Start > Programs > Voice Recorder.
2. Hold the device’s microphone near your mouth.
3. Tap Record or to start recording a voice clip. You can tap Pause
to temporarily stop recording. When you want to continue recording,
tap Resume.
4. Tap Stop to stop recording.
All recordings are saved in the My Voices folder by default. You can choose
another folder to save voice recordings by tapping beside the folder
name on the top-left of the screen and then in the menu, choose the folder
where to save future recordings.

Exchanging Messages and Using Outlook 155
To play back a voice recording
1. On the Voice Recorder screen, select the voice recording you want to
play back.
2. Tap . You can also double-tap the voice recording to play it back.
Notes • Tap to increase the volume; Tap to decrease the volume.
• Tap to toggle between muting and unmuting the volume.
To send the voice recording via MMS
1. On the Voice Recorder screen, select the voice recording you want to
send via MMS.
2. Tap Menu > Send via MMS. This automatically opens the MMS
program with the voice recording automatically inserted as the audio
file for the MMS message.
See “MMS Messages” in this chapter to learn how to compose and send
MMS messages.
To send the voice recording via e-mail
1. On the Voice Recorder screen, select the voice recording you want to
send via e-mail.
2. Tap Menu > Send > Outlook E-mail. This automatically opens the
Outlook E-mail with the voice recording automatically inserted as an
attachment for the e-mail.
See “Send and receive messages” in this chapter to learn how to compose
and send e-mails.
To beam the voice recording
1. On the Voice Recorder screen, select the voice recording(s) you want
to beam.
2. Tap Menu > Beam File.
3. Tap the device you want to send the voice recording(s) to.
4. On the other device, accept the file transfer to receive the file.
156 Exchanging Messages and Using Outlook
To set the voice recording as a ring tone
1. On the Voice Recorder screen, select the voice recording you want to
set as your device’s ring tone.
2. Tap Menu > Set as Ringtone.
To rename or move a recording
1. On the Voice Recorder screen, select the voice recording you want to
rename or move to another location.
2. Tap Menu > Rename/Move.
3. Enter the new Name for the voice recording.
4. To move the voice recording, select the new destination Folder and
Location.
5. Tap OK.
Tip If multiple voice recordings are selected, you can only move the files but not
rename them.

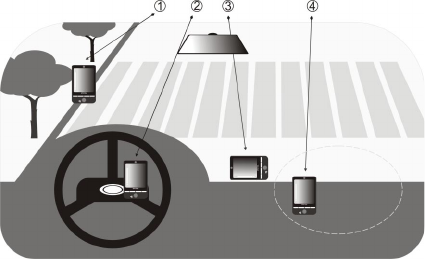
158 Using GPS
8.1 Guidelines and Preparation for Using GPS
• Do not operate the GPS system while driving.
• The plotted GPS route is only for driving references. It should not
affect actual driving behavior.
• Please use the GPS system cautiously. Users shall be liable for any
damages resulting from negligent operation of the system.
• When using inside a vehicle, please utilize the car holder to mount
the Pocket PC securely in place. Please avoid the areas shown in the
following diagram:
1. Do not place where it will block the driver’s vision.
2. Do not place at where the air bags are.
3. Do not place anywhere in the vehicle without securing in the
holder.
4. Do not place where the air bags could deploy.
• The GPS signal cannot pass through solid non-transparent objects.
Signal reception may be affected due to obstructions such as high-
rise buildings, tunnels, bridges, forests, bad weather (rainy or cloudy
days), etc.

Using GPS 159
• Signal reception may be affected by obstructions such as high-rise
buildings, tunnels, bridges, forests, weather (rainy or cloudy days),
etc. If the vehicle’s visor contains metal, it will be difficult for the GPS
signal to pass through. To have better signal reception, try connecting
your device to an external GPS antenna.
• The Global Positioning System (GPS) is built and operated by the US
Defense Department. The Department is responsible for the accuracy
and maintenance of the system. Any changes that the Department
makes may affect the accuracy and function of the GPS system.
• Wireless communication products (such as mobile phones or radar-
detecting devices) may interfere with the satellite signal, resulting in
unstable signal reception.
• Please do not leave your Pocket PC in the vehicle and expose to direct
sunlight to avoid overheating the battery that could pose damage to
the device or risk to the vehicle.
8.2 Downloading Satellite Data via QuickGPS
Before you start to use your device for GPS navigation, open the QuickGPS
program first to download Ephemeris data (current satellite position and
timing information) onto your device. This data is needed to determine the
GPS position of your current location.
QuickGPS downloads Ephemeris data from a Web server, instead of from
the satellites, using the Internet connection on your device, which can
be via ActiveSync, Wi-Fi, or GPRS. This significantly speeds up the time for
determining your GPS position.
To open QuickGPS
• Tap the QuickGPS icon ( ) on the Today screen; or
• Tap Start > Programs > QuickGPS.
To download data
• Tap Download on the QuickGPS screen.
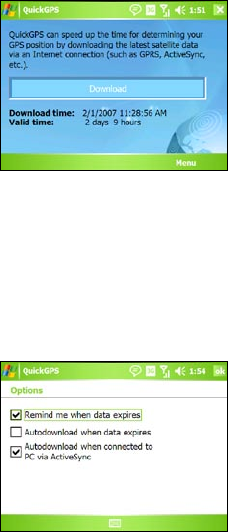
160 Using GPS
On the screen, initially, you will see the Valid time of the downloaded
data to be 3 days. As days and time pass, the remaining days and time
of validity will be shown.
To speed up GPS positioning, download the latest Ephemeris data
when the validity of the data expires.
Download options
To configure download times, tap Menu > Options and choose from the
following options:
• Remind me when data expires. Enables your device to display
a reminder message when the validity of the Ephemeris data has
expired.
When you see the reminder message, tap Menu to dismiss the
reminder or to set the snooze time so that you will be reminded
again. Tap OK to open the QuickGPS program and download the
latest data.
Using GPS 161
• Autodownload when data expires. Allows Ephemeris data to be
automatically updated onto your device when the data has expired.
• Autodownload when connected to PC via ActiveSync. Allows
Ephemeris data to be automatically downloaded via ActiveSync to
your device when your device is connected to your computer. Your
computer must be connected to the Internet in order to download
data.
Note The Ephemeris data are stored on HTC Web servers. QuickGPS is
preconfigured to connect to these servers.
8.3 Using GPS Software
Your device is preinstalled with the GPS software.
To open the GPS software
• Tap Start > Programs then tap its program icon; or
For information about using the GPS software, see Help on your device.
8.4 GPS Controls
When a map or menu is shown on the GPS software, use the following
controls on your device to navigate:
• On the Map Browser screen, press NAVIGATION up to zoom in, press
NAVIGATION down to zoom out on a map.
• Use the NAVIGATION CONTROL to scroll through items in a menu.
Press the CENTER OK button to select a menu item and open the
corresponding screen.
162 Using GPS

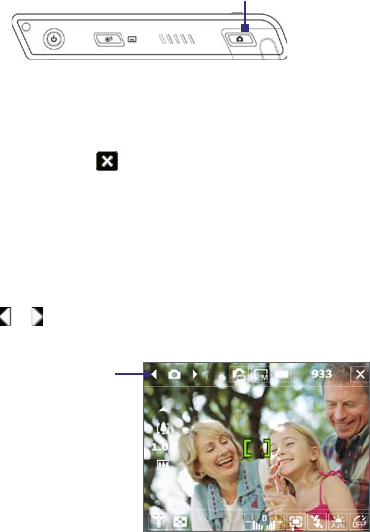
164 Experiencing Multimedia
9.1 Using Camera
Taking photos and recording video clips along with audio are easy with
your device’s built-in camera.
To open the Camera screen
• Press the CAMERA button on your device.
CAMERA button
• Tap Start > Programs > Camera; or
• Tap Start > Programs > Pictures & Videos > Camera icon; or
To exit the Camera
• Tap the Exit icon ( ).
Capture modes
The camera on your device allows you to capture pictures and video clips by
using various built-in modes with flexibility. The Camera mode is set to the
Photo capture mode by default. The upper left corner of the screen displays
the active capture mode. To switch to other capture modes, do any of the
following:
• Tap or on the screen.
• Press NAVIGATION left or right.
Current capture mode

Experiencing Multimedia 165
The available capture modes of the camera are as follows:
• Photo: Captures standard still images.
• Video: Captures video clips, with or without accompanying audio.
• MMS Video: Captures video clips suitable for sending via MMS.
• Contacts Picture: Captures a still image and gives you the option to
immediately assign it as a Photo ID for a contact.
• Picture Theme: Captures still images and places them within frames.
• Panorama: Captures a sequence of still images continuously in one
direction, and allows stitching of all the images to create a panoramic
view of a scenery.
• Sports: Captures a sequence of still images (3, 5, 7, or 10)
automatically.
• Burst: Captures a sequence of still images (maximum 30) as long as
the CAMERA button on the device or the CENTER OK button on the
NAVIGATION CONTROL is kept pressed.
File formats supported
Using the above capture modes, the camera in your device captures files in
the following formats:
Capture type Format
Still image JPEG
Video MPEG-4 (.mp4)
MMS Video H.263 baseline (.3gp), MPEG-4 (.mp4)
Panorama /
Sports / Burst
JPEG
Camera controls
Use the following device buttons and on-screen controls to take photos or
video clips and to modify settings.
The CAMERA and CENTER OK buttons
Press the CAMERA button on the device to open the Camera screen. If
already on the Camera screen, you can use either the CAMERA button or the
CENTER OK button as the shutter release.
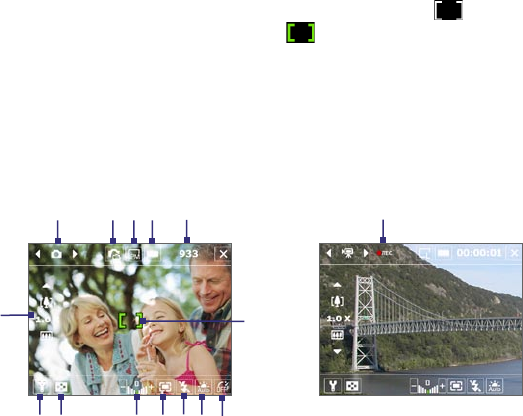
166 Experiencing Multimedia
• Press the CAMERA button or the CENTER OK button to take a photo or
contacts picture.
• Press the CAMERA button or the CENTER OK button to start recording
video; press it again to stop recording.
• Press the CAMERA button or the CENTER OK button each time when
taking photos for a picture theme or panorama.
• To take consecutive shots in Sports mode, press the CAMERA button
or the CENTER OK button shortly, then move your device to follow the
movement of your subject.
• Press and hold the CAMERA button or the CENTER OK button when
taking consecutive shots in Burst mode.
Press the CAMERA button halfway to activate autofocus . Once
focused, the indicator changes to and you will hear two beeping
sounds. Press the CAMERA button all the way to take the shot.
The Navigation Control
• Press NAVIGATION up or down to increase or decrease the zoom level.
• Press NAVIGATION left or right to go to the previous or next
sequential capture mode.
On-screen controls and indicators
Video mode
15
Photo mode
78910 11 12
6
12345
13
14
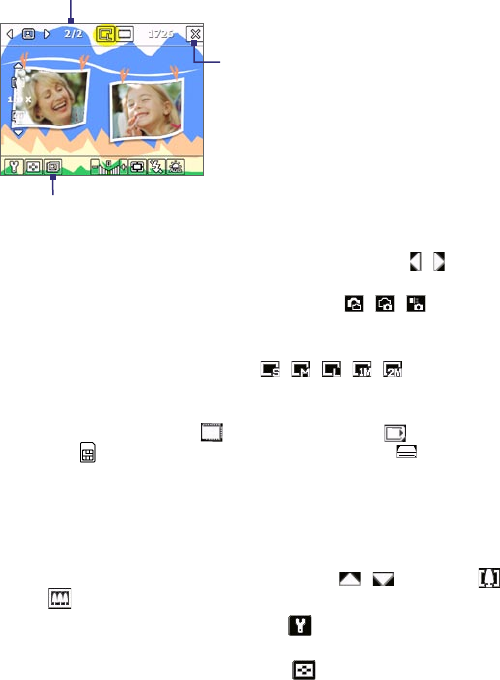
Experiencing Multimedia 167
Picture Theme mode
18
16
17
1 Mode Switching control. Tapping the left/right arrow ( / ) on the
screen allows you to switch the capture mode.
2 Camera Switching control. The camera icon ( / / ) indicates
the current camera being used. Tap to toggle between the different
cameras.
3 Resolution. The resolution icon ( / / / / ) indicates the
current resolution. Tap to toggle among the different resolutions.
4 Storage. Tap to toggle between saving captured photos or video clips
on the device memory ( ), on the memory card ( ), on the SIM
card ( ) (MegaSIM card only), or on the Microdrive ( ) .
5 Remaining information indicator. In Photo, Contacts Picture, Picture
Theme, Panorama, Sports, and Burst modes, this shows the remaining,
available shots of pictures based on current settings. In Video and
MMS Video modes, this shows the remaining duration that can be
recorded. While recording video, this shows the recorded duration.
6 Zoom control. Tapping the up/down arrow ( / ) or tapping
/ on the screen allows you to zoom in or zoom out.
7 Camera Settings. Tap the Tool icon ( ) to open the Camera
Settings screen.
8 Picture Viewer. Tap the Viewer icon ( ) to view the picture or
video in Pictures & Videos.

168 Experiencing Multimedia
9 Brightness. Tapping the minus/plus icon ( / ) decreases or
increases the brightness level.
10 Metering Mode. Tap to toggle the metering mode between Center
Area ( ) and Average ( ).
11 Flash Light. Tap to turn on or off the flash light that is located at the
back of your device. When the flash light is on, the camera gives off a
flash when taking photos.
12 White Balance. Tap to toggle among the different white balance
settings: Auto ( ), Daylight ( ), Night ( ), Incandescent ( ),
and Fluorescent ( ).
13 Self-timer. Tap to set the Self-timer to 2 seconds, 10 seconds, or off
when in the Photo or Contacts Picture mode. When you press the
CENTER OK button or the CAMERA button to capture a still image,
it starts to count down, and then captures a still image after the
assigned time (2 seconds or 10 seconds).
14 Autofocus indicator. Shows when autofocus is activated. When
in Panorama or Picture Theme mode, autofocus will be used for
each shot. When in Sports or Burst mode, only the first shot will use
autofocus.
15 Recording indicator. This shows a red, blinking indicator while video
recording is in progress.
16 Progress indicator. In Picture Theme, Panorama, Sports, and Burst
modes, this shows the total number of consecutive shots.
17 Template Selector icon. In Picture Theme mode, tap to toggle
among the different templates.
18 Exit. Tap the Exit icon ( ) to exit the Camera program.
Still image capture modes
While using Still Image capture modes, such as Photo, Contacts Picture,
Picture Theme, Panorama, Sports, and Burst, you can capture still
image(s) by pressing the CAMERA button on the device or the CENTER OK
button on the NAVIGATION CONTROL. Still images will be saved in JPEG
format.

Experiencing Multimedia 169
While capturing an image in the Picture Theme capture mode, you can
select a preset template. To view and select from different templates, tap
on the Camera screen. Depending on the chosen template, one or more
photos may need to be taken for the template.
Video capture mode
While using the Video capture mode, you can press the CAMERA button or
the CENTER OK button to start recording a video clip (with audio if desired).
To stop recording, press the CAMERA button or the CENTER OK button
again. Your device displays the first frame of the captured video clip by
default on the Review screen.
Before you capture a video clip, you can specify the desired length of
recording in terms of time or file size on the Camera Settings screen.
Video clips will be saved in MPEG-4 format.
MMS Video capture mode
The MMS Video capture mode makes it convenient for you to capture a
video file and then send it via MMS. Press the CENTER OK button or the
CAMERA button to start recording a video clip (with audio if desired). To
stop recording, press the CENTER OK button or the CAMERA button again.
The recording length of MMS video is fixed. Recording automatically
stops when the preset length is reached. However, you can manually stop
recording the video anytime. The time indicator at the upper right side of
the Camera screen indicates the time limit.
You can specify the capture format to be either H.263 or MPEG-4 on the
Camera Settings screen; however, the ideal format for MMS is H.263 (3GPP).
After you capture the video file, tap on the Review screen to send the
file through MMS.
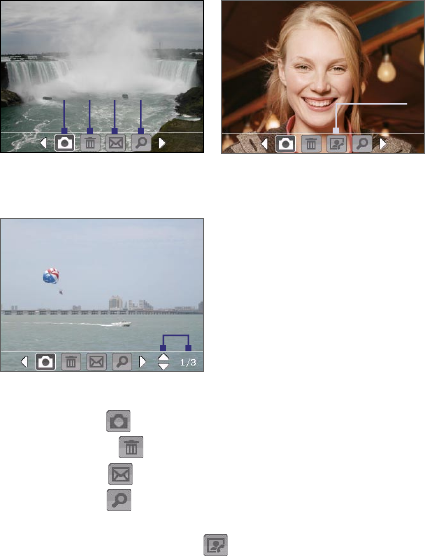
170 Experiencing Multimedia
The Review screen
After taking a still image or recording a video clip, you can view the image
or video clip on the Review screen. In addition, you can tap the icons at the
bottom of the Review screen to delete a captured image or video, send it
via e-mail or MMS, and more.
Review screen icons
Sports and Burst modes
6
Photo, Video, MMS Video,
Panorama, and Picture Theme
modes
Contacts Picture mode
5
123 4
1 Back. Tap to go back to Camera screen.
2 Delete. Tap to remove the captured image or video.
3 Send. Tap to send via e-mail or MMS.
4 View. Tap to view the image in the Pictures & Videos program, or
play the captured video in Windows Media Player Mobile.
5 Assign to Contacts. Tap to associate the photo to a selected
contact.

Experiencing Multimedia 171
6 Browse. After you have taken photos in Sports or Burst mode, the
total number of consecutive shots is shown in the lower right corner
of the Review screen. Tap the up/down arrow ( ) to browse through
the sequence of photos.
To change the display duration of the Review screen
1. Tap to open the Camera Settings screen.
2. On the Camera Settings screen, tap . The Advanced menu then
appears.
3. Tap Review Duration, then tap the desired time length for displaying
captures on the Review screen.
Zooming
While capturing a still image or a video clip by using the camera, you
can zoom in to make the object in focus move closer, and you can zoom
out to make the object move farther away. In all capture modes, press
NAVIGATION up on your device, or tap the triangular Up arrow above the
Zoom Ratio indicator, to zoom in your subject. When the zooming limit is
reached, you will hear a beep. To zoom out, press NAVIGATION down, or
tap the Down arrow. The camera zoom range for a picture or a video clip
depends on the capture mode and capture size. The following is a summary.
Capture mode Capture size setting Zoom range
Photo 3M (2048 x 1536) No zooming available
2M (1600 x 1200) No zooming available
1M (1280 x 1024) No zooming available
Large (640 x 480) 1.0x to 4.0x
Medium (320 x 240) 1.0x to 8.0x
Small (160 x 120) 1.0x to 10.0x
Video CIF (352 x 288) No zooming available
Large (320 x 240) No zooming available
Medium (176 x 144) 1.0x to 2.0x
Small (128 x 96) 1.0x to 2.0x

172 Experiencing Multimedia
Capture mode Capture size setting Zoom range
MMS Video Medium (176 x 144) 1.0x to 2.0x
Small (128 x 96) 1.0x to 2.0x
Contacts
Picture
Large (640 x 480) 1.0x to 4.0x
Medium (320 x 240) 1.0x to 8.0x
Small (160 x 120) 1.0x to 8.0x
Picture Theme Determined by the current
template
Depends on the size of
the template currently
loaded
Panorama Large (640 x 480) 1.0x to 4.0x
Medium (320 x 240) 1.0x to 8.0x
Small (160 x 120) 1.0x to 8.0x
Sports Large (640 x 480) 1.0x to 2.0x
Medium (320 x 240) 1.0x to 8.0x
Burst 1M (1280 x 1024) No zooming available
Large (640 x 480) 1.0x to 2.0x
Medium (320 x 240) 1.0x to 8.0x
Note The capture sizes available for certain capture formats also vary from
one capture mode to another. The zoom range has been calculated
based on the following ratio:
• 1.0x = normal size (no zooming)
• 2.0x = double enlargement
• 4.0x = four times enlargement
• 8.0x = eight times enlargement
• 10.0x = ten times englargement
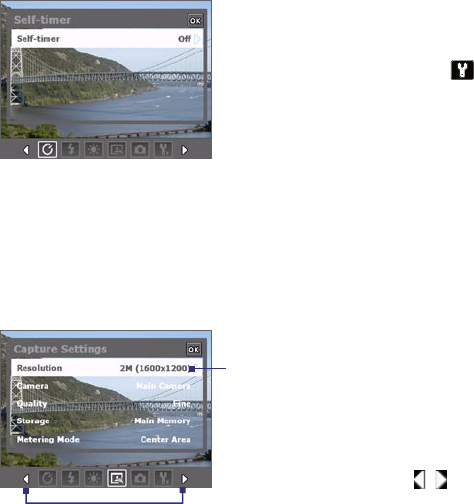
Experiencing Multimedia 173
The Camera Settings screen
Camera Settings screen in Photo mode
While capturing a still image
or video clip using any capture
modes, tap the Tool icon ( )
to access the Camera Settings
screen. The Camera Settings
screen allows you to configure the
capture settings.
When you tap the icons at the bottom of the Camera Settings screen,
different menus will appear. Some menus and options may be available
only in certain capture modes.
To navigate the Camera Settings screen
You can either tap on-screen or press the Navigation Control buttons to
navigate the Camera Settings screen.
1
2
1Tap an icon to display the desired
menu.
Alternatively, when using
the Navigation Control, press
NAVIGATION down first. The
background of the icon bar at the
bottom then changes color. Now,
press NAVIGATION left/right or
tap the left/right arrow ( / ) to
navigate to the icon of the desired
menu. Once the desired menu is
displayed, press NAVIGATION up.
2Tap an option on the menu to open
a submenu of available settings.
Alternatively, press NAVIGATION
up/down to select an option, then
press NAVIGATION right to open its
submenu.
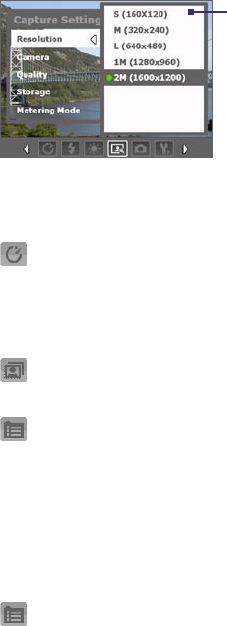
174 Experiencing Multimedia
33Tap or press the CENTER OK
button to select a setting and
close the submenu.
Alternatively, press NAVIGATION
up/down to select a setting, then
press NAVIGATION left to close
the submenu.
For more information about the different menus and settings, see the
succeeding sections.
Self-timer menu
• Self-timer. Select the Self-timer option for capturing images: Off, 2
seconds, or 10 seconds. Selecting 2 seconds or 10 seconds delays the
capturing by the specified time after you press the CAMERA button or
the CENTER OK button.
Template menu
• Template. Select a template (in Picture Theme mode only).
Panorama Settings menu
• Direction. Choose in what direction images will be stitched in a
panorama.
• Stitch Count. Select the desired number of snapshots to be taken and
stitched into a panorama.
• Auto Stitch. When the Auto Stitch is On, the camera automatically
stitches snahpshots into one single file. If Auto Stitch is Off, the
snapshots are saved as separate files.
Sports Settings menu
• Snapshots. Select the number of consecutive shots to capture.

Experiencing Multimedia 175
Flash Light menu
• Flash Light. Set this option to On to turn on the flash light (located at
the back of your device) so that you can shoot photos or video clips in
a dark-lit environment. This also allows the camera to give off a flash
when taking photos. The flash flight is available for use in all capture
modes except in Sports and Burst modes.
Ambience menu
• White Balance. Select a white balance setting type such as
Fluorescent, Night, etc. to suit your lighting environment.
• Effect. Choose a special effect such as Grayscale, Sepia, etc., to apply
to your photos or video clips.
Capture Settings menu
• Resolution. Select the desired image or video size.
• Camera. Select which camera to use. You can choose from Main
Camera, 2nd Camera or 2nd Camera (Flip).
• Quality. Select the JPEG image quality level for all captured still
images. You can choose from Basic, Normal, Fine, and Super
Fine.
• Storage. Select where you want to save your files. You can either
save the files to the main memory or to a storage card.
• Metering Mode. Select a metering mode to allow the camera to
measure the amount of light in the center and around the image
and calculate the best-fit exposure value before capturing. Choose
either Center Area to measure light using the center area of the
image or Average to measure light using the area all around the
image.
Capture Mode menu
• Mode. Switch between different capture modes such as Photo,
Video, Contacts Picture, and more. For more information about
these modes, see “Capture modes” earlier in this chapter.

176 Experiencing Multimedia
Advanced menu
Tap the left/right icon in this bar to switch
between the menu pages in the Advanced
menu.
Alternatively, when using the Navigation
Control buttons, keep pressing down until
this bar is selected (bar changes color). Press
left/right to switch between the menu pages.
• Capture Format. Select the desired file format.
• Shutter Sound. Choose whether or not you want the camera to
make a shutter sound when you press the CENTER OK button or the
CAMERA button to take photos or record video clips.
• Grid. Choose whether or not to show a grid on the Camera screen.
Showing a grid helps you frame and center your subject more easily
and accurately.
Grid
• Keep Backlight. Choose whether to turn the backlight on or off while
using the camera. This overrides your device backlight settings while
you are using the camera.
Experiencing Multimedia 177
• Review Duration. Set a time length for displaying the captured
image/video on the Review screen before automatically saving it and
returning to the live Camera screen. Select No Limit if you do not
want to impose a time limit. Select No Review to immediately return
to the live Camera screen after capturing.
• Flicker Adjustment. When taking indoor shots, flicker on the camera
screen may be caused by inconsistencies between the vertical scan
rate of the camera display and the flicker frequency of fluorescent
lighting. To reduce flicker, you can change the flicker adjustment
setting to Auto or to the proper frequency (50Hz or 60Hz) of the
country where your device is being used.
• Record with Audio. Select On to record audio with the captured
video clips. This is selected by default. If you select Off and then
capture a video clip, it will have no audio.
• Prefix. Specify how to name captured images and video clips. When
Default is selected, the file name of each new captured file is set to
“IMAGE” or “VIDEO” followed by a sequential number, for example:
IMAGE_001.jpg. You may also choose to name files using either the
current Date or Date & Time as the prefix.
• Counter. By default, the newly captured image or video files are
named with a prefix and some sequential numbers, such as 001, 002,
and so on. To reset the numbering to “001” for your captured files, tap
Reset.
• Recording Limit. Specify the maximum time or file size for recording.
• Template Folder (in Picture Theme mode only). By default, templates
are stored in the \My Documents\Templates folder on the device’s
Main Memory. If you transferred some templates to a storage card
(via File Explorer), set this option to Main + Card to specify that
templates are located in both the main memory and the storage card.
• Adjust. This option allows you to adjust the camera display
properties, such as Contrast, Saturation, Hue, and Sharpness.
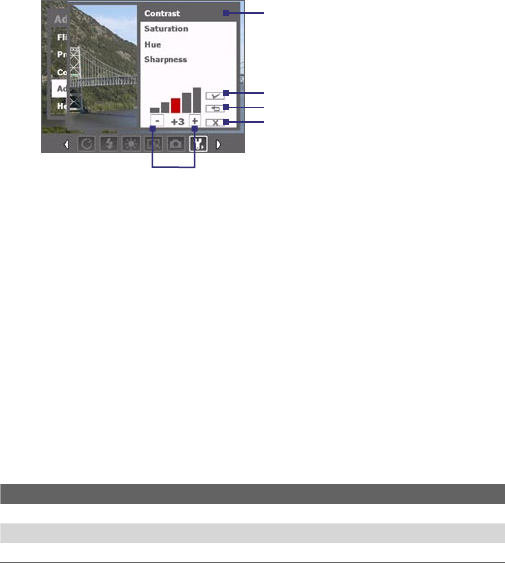
178 Experiencing Multimedia
2
3
4
1
5
1In the submenu, tap one of the properties to adjust.
Alternatively, press NAVIGATION up/down to select a property.
2To increase/decrease the value, tap the plus/minus icon or press NAVIGATION
left/right. The live Camera screen on the background immediately displays the
effect of changes.
3Tap to save the settings and close the submenu.
4Tap to reset all properties to their default.
5Tap to close the submenu without applying and saving the changes.
9.2 Using Pictures & Videos
The Pictures & Videos program collects, organizes, and sorts images and
video clips in the following formats on your device.
File Type File Extensions
Image *.bmp, *.jpg, *.gif
GIF animation *.gif
Video *.avi, *.wmv, *.mp4, *.3gp
You can view the pictures as a slide show, beam them, send them via e-mail,
edit them, or set them as the background on the Today screen.
To copy pictures, GIF animation files, and video clips to your device
You can copy pictures, GIF animation files, and video files from your PC and
view them on your device.
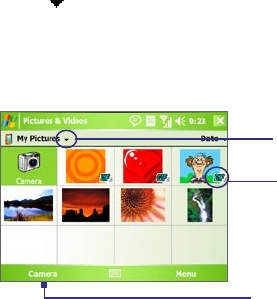
Experiencing Multimedia 179
• Copy the pictures, GIF animation files, and video files from your PC or
a storage card to the My Pictures folder on your device. (You can also
copy video files to the My Videos folder.)
For more information about copying files from your PC to your device, see
ActiveSync Help on your PC.
Note You can also copy pictures, GIF animation files, and video files from your
PC to your device using a memory card. Insert the memory card into the
memory card slot on your device, then copy the files from your PC to the
folder you created on the memory card.
To view pictures
1. Tap Start > Programs > Pictures & Videos. The images in the My
Pictures folder appear as thumbnails by default.
2. Select a picture and tap View. If you cannot find a picture in the
default My Pictures folder, go to another folder by tapping the Down
arrow ( ).
To play GIF animation files
1. Tap Start > Programs > Pictures & Videos.
2. Select a GIF animation file and tap View. The GIF Animation program
then opens and plays the animation.
The down arrow
Tap to view the selected image
GIF animation icon
To play videos with audio
1. Tap Start > Programs > Pictures & Videos. By default, the contents
of the My Pictures folder will be shown.
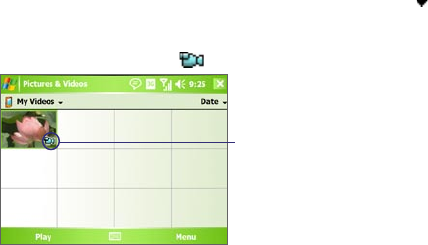
180 Experiencing Multimedia
2. To find the video clips that you captured, tap the down arrow ( )
next to the My Pictures folder and tap My Documents. Next, tap My
Videos. Video clips are displayed as thumbnails by default, which
appear with a media icon ( ).
The media icon
3. Tap to select a video and play it in Windows Media Player Mobile.
To view slide shows
You can view your pictures as a slide show on your device. Pictures are
shown in full-screen view with 5-second intervals between slides.
1. Tap Start > Programs > Pictures & Videos.
2. Tap Menu > Play Slide Show.
Note You can specify how pictures are scaled to optimize their display in a slide
show. Tap Menu > Options, then tap Portrait pictures or Landscape
pictures on the Slide Show tab.
Tap anywhere on the screen to display the Slide Show toolbar, which you
can use to stop or pause the slide show, rotate the view, and more.
To sort pictures and video clips
If you store a large number of pictures or video clips on your device, you
may find it helpful to sort them to quickly find a specific picture or clip. You
can sort by name, date, and size.
1. Tap Start > Programs > Pictures & Videos.
2. Tap the sort list (labeled Date by default), and select the item you
want to sort by (Name, Date, or Size).
Experiencing Multimedia 181
To delete a picture or video clip
Do any of the following to remove a picture or a video clip:
• Select a picture or video clip on the Pictures & Videos screen, and tap
Menu > Delete.
• Tap and hold the thumbnail of the picture you want to delete, then
tap Delete.
Tap Yes to confirm the deletion.
To edit a picture
You can rotate, crop, and adjust the brightness and color contrast of your
pictures.
1. Tap Start > Programs > Pictures & Videos.
2. Tap the picture you want to edit.
3. Tap Menu > Edit, and do any of the following:
• To rotate a picture 90 degrees clockwise, tap Rotate.
• To crop a picture, tap Menu > Crop. Next, tap and drag to select
the area to crop. Tap inside the box to crop, or tap outside the box
to cancel cropping.
• To adjust the brightness and contrast levels of a picture, tap Menu
> Auto Correct.
Note To undo an edit, tap Menu > Undo. To cancel all unsaved edits you made to
the picture, tap Revert to Saved.
To set a picture as the Today screen background
You can use a picture as the background on the Today screen.
1. Tap Start > Programs > Pictures & Videos.
2. Select the picture you want to set as the background.
3. Tap Menu > Set as Today Background.
4. In Transparency level, select a higher percentage for a more
transparent picture, or a lower percentage for a more opaque picture.
5. Tap OK.
182 Experiencing Multimedia
To send pictures and video clips via e-mail
You can send pictures and video clips to other devices via e-mail.
1. First, set up Messaging to send and receive messages.
2. From the program, select the item you want to send.
3. Tap Menu > Send, and select one account (such as Outlook
E-mail or MMS) to send the attached item.
4. A new message is created with the item attached.
5. Enter the recipient name and subject, and tap Send. The message will
be sent the next time you synchronize your device.
Note Pictures and video clips are saved automatically before they are sent.
To assign pictures to contacts
You can assign a picture to a contact so that you can easily identify the
contact at any point of time.
1. Tap Start > Programs > Pictures & Videos.
2. Select the picture you want to assign to a contact.
3. Tap Menu > Save to Contact.
4. Tap the contact, or navigate and tap Select to choose the contact
from your Contacts list.
To customize more image settings
1. Tap Start > Programs > Pictures & Videos.
2. Select the picture for which you want to configure further settings.
3. Tap Menu > Options. The Options screen appears, allowing you to:
• Resize a picture so that it can be sent faster through e-mail.
• Set the direction of rotation for the Rotate function.
• Configure the view settings during slide shows and activate
screensaver options.

Experiencing Multimedia 183
9.3 Using Windows Media Player Mobile
You can use Microsoft Windows Media Player Mobile 10 for Pocket PC to
play digital audio and video files that are stored on your device or on a
network, such as on a Web site.
Using Windows Media Player Mobile, you can play both audio and video
files. These are the following file formats that are supported by this version
of Windows Media Player Mobile.
Video File Formats Supported File Extensions
• Windows Media Video
• MPEG4 Simple Profile
• H.263
• Motion JPEG
• 3GPP2
.wmv, .asf
.mp4
.3gp
.avi
.3g2
Audio File Formats Supported File Extensions
• Windows Media Audio
• MP3
• MIDI
• AMR Narrow Band
• AMR Wide Band
• AAC
• 3GPP2
.wma
.mp3
.mid, .midi, .rmi
.amr
.awb
.m4a
.gcp
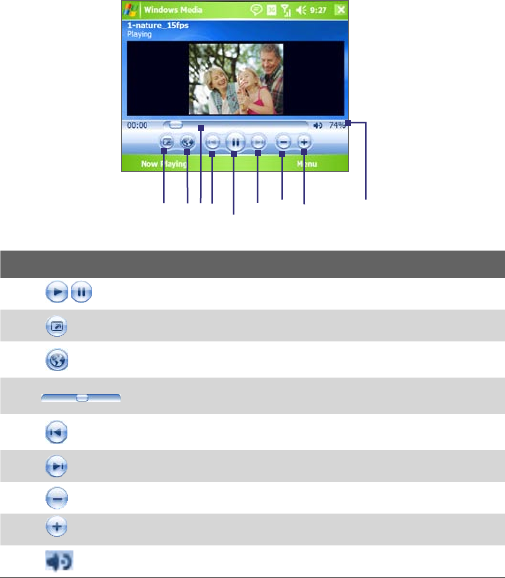
184 Experiencing Multimedia
About the controls
The following are available controls on the Windows Media Player Mobile.
1
235678
49
This control Does this
1 Plays/Pauses a file.
2Displays the video in full screen.
3Displays a Web site where you can find music and videos to
play.
4Adjusts the playback progress of a selected file.
5Skips to the beginning of the current file or to the previous
file.
6Skips to the next file.
7Decreases the volume level.
8Increases the volume level.
9Turns the sound on or off.
Experiencing Multimedia 185
About the screens and menus
Windows Media Player Mobile has three primary screens:
• Playback screen. The default screen that displays the playback
controls (such as Play, Pause, Next, Previous, and Volume) and the
video window. You can change the appearance of this screen by
choosing a different skin.
• Now Playing screen. The screen that displays the Now Playing
playlist. This special playlist indicates the current file being played and
any files that are “queued up” to play next.
• Library screen. The screen that lets you quickly find your audio files,
video files, and playlists. It contains categories such as My Music, My
Videos, My TV, and My Playlists.
At the bottom of each screen, you can open a Menu. The commands on
this menu vary, depending upon which screen you are viewing. For more
information about the commands in these menus, see Help on your device.
About licenses and protected files
Some content (such as digital media files downloaded from the Internet,
CD tracks, and videos) have associated licenses that protect them from
being unlawfully distributed or shared. Licenses are created and managed
by using digital rights management (DRM), which is the technology for
securing content and managing its access rights. Some licenses may
prevent you from playing files that have been copied to your device. Files
that have licenses associated with them are called “protected files.”
If you want to copy a protected file from your PC to your device, use the
desktop Player to synchronize the file to your device (instead of dragging
the file from a folder on your PC to a folder on your device, for example).
This will ensure that the license is copied along with the protected file. For
more information about synchronizing files to your device and other mobile
devices, see desktop Player Help.
Note You can view the protection status for a file by checking its file properties
(tapping Menu > Properties).
186 Experiencing Multimedia
Copy media files to your device
Use the latest version of the desktop Player (Windows Media Player 10 or
later) to synchronize digital media files to your device (instead of dragging a
file from a folder on your PC to a folder on your device, for example). Using
the desktop Player ensures that licenses are copied with protected files.
Always synchronize the files to a storage card that is inserted into your
device. Do not synchronize to a storage card that is inserted into a storage
card reader. In addition, do not synchronize to the internal storage location
(RAM) in your device.
To synchronize content to your device automatically
1. Power off your device. Insert a 32-MB or larger storage card into your
device, and turn the power back on.
2. On your PC, start Windows Media Player.
3. Connect your device to your PC.
4. If you have not set up synchronization between your device and PC,
the Device Setup Wizard opens on your PC.
5. In the wizard, click Automatic, select the Customize the playlists
that will be synchronized check box, and then select the playlists
that you want to synchronize.
6. Click Finish.
7. The files begin synchronizing to your device. The next time you
connect your device to your PC while the desktop version of Windows
Media Player is running, synchronization will start automatically.
To synchronize and copy content manually to your device
1. If you have not set up synchronization between your device and
PC, follow steps 1 to 6 in “To synchronize content to your device
automatically”, except that you should click Manual synchronization.
2. To choose files to synchronize and copy to your device, do the
following:
• Click the Library tab.
• In the rightmost pane, click the drop-down list and select Sync
List.
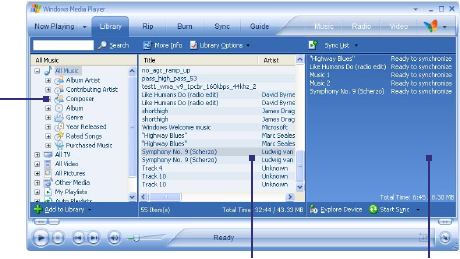
Experiencing Multimedia 187
• In the Playlist which is the leftmost pane, select a desired playlist.
• In the File List which is the middle pane, multi-select desired files
then drag them to the Sync List.
• Click the Start Sync button found at the bottom of the Sync List.
Playlist
File List Sync List
Note Audio files copy faster if the desktop Player is configured to automatically set
the quality level for audio files copied to your device. For more information,
see desktop Player Help on the PC.
Play media
To play items on your device
Use the library on Windows Media Player Mobile to find and play songs,
videos, and playlists that are stored on your device or removable storage
card.
1. If you are not on the Library screen, tap Menu > Library.
2. On the Library screen, tap the Library arrow (near the top of the
screen), then tap the media storage that you want use, for example,
Storage Card.
188 Experiencing Multimedia
3. In most cases, Windows Media Player Mobile automatically updates
the library. However, you can manually update the library to ensure
that it contains new files that you recently copied to your device or
storage card. Tap Menu > Update Library to manually update the
library list.
4. Select a category (for example, My Music or My Playlists).
5. Tap and hold the item that you want to play (such as a song, album, or
artist name), then tap Play.
Note To play a file that is stored on your device but is not in a library, on the Library
screen, tap Menu > Open File. Tap and hold the item that you want to play
(such as a file or a folder), then tap Play.
To play an item on a network
Use the Open URL command to play a song or video that is stored on the
Internet or on a network server.
1. If you are not on the Library screen, tap Menu > Library.
2. Tap Menu > Open URL.
3. Do one of the following:
• In the URL box, enter a network address.
• In the History box, tap a URL that you have previously used.
Note To play an item on a network, you must be connected to a network. For more
information about creating a remote connection between your device and a
network, see Connections Help on your device.
Use playlists
A playlist is a list of digital media files that play in a specified order. By using
playlists, you can group audio and video files together for convenient
playback.
In the desktop Player, you can create a playlist of media files and
synchronize the desktop Player with your device. For more information
about synchronizing media, see “Copy media files to your device” earlier in
this chapter.

Experiencing Multimedia 189
In Windows Media Player Mobile on your device, your playlists are available
in the Library under the My Playlists category. There is also a temporary
playlist, called Now Playing, which lists the currently playing file, as well
as any files that have been queued up to play next. You can create a new
playlist on your device by saving the current Now Playing playlist and by
giving it a new name.
To save a new playlist
1. If you are not on the Library screen, tap Menu > Library.
2. Tap to select a category (for example, My Music or My Playlists).
3. Select a media file that you want, then tap Menu > Queue Up. This
adds the file to the Now Playing list.
Repeat this step until you have added all desired media files to the
Now Playing list.
Note You cannot select multiple files simultaneously.
4. After adding the media files, tap Menu > Now Playing.
5. On the Now Playing screen, tap Menu > Save Playlist.
6. Enter the playlist name then tap Done.
7. To play back the playlist you created, tap My Playlists in the Library,
select your playlist, then tap Play.
Troubleshooting
If you encounter a problem while using the Windows Media Player Mobile, a
number of resources are available to help you troubleshoot the issue.
For more information, see the Troubleshooting Windows Media Player
Mobile page at the Microsoft Web site (http://www.microsoft.com/
windows/windowsmedia/player/windowsmobile/troubleshooting.aspx).
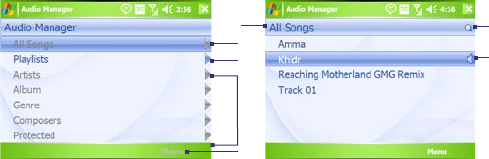
190 Experiencing Multimedia
9.4 Using Audio Manager
Audio Manager is a music browser and player in one. It gives you access
to all the music files on your device, and allows you to easily browse for the
music that you want to play by organizing music into categories such as
title, artist, album, etc. You can also create playlists of your favorite songs
and use the integrated Music Player to play them back.
To launch Audio Manager
• Tap Start > Programs > Audio Manager.
Notes • Audio Manager searches for all music files stored on your device and
memory card that have the following audio formats: MP3, WMA, AAC, and
AAC+.
•
Audio Manager will search for music files in the following locations:
On the device: \My Document (including all subfolders)
\Music (including all subfolders; when there are music files
synchronized between the device and PC)
On the memory card: \Storage Card (including all subfolders)
•
Music files are categorized under Artists, Album, Genre, etc. if such
metadata are found in the files.
Library
On the Audio Manager’s Library screen, an arrow that appears in an item
indicates that there is a submenu available. Tap the item name to open the
submenu. Alternatively, you can use the NAVIGATION Control to select the
item name first then press the ENTER button to open the submenu.
Library: All Songs screen
1
2
3
4
56
7
Library: Main screen
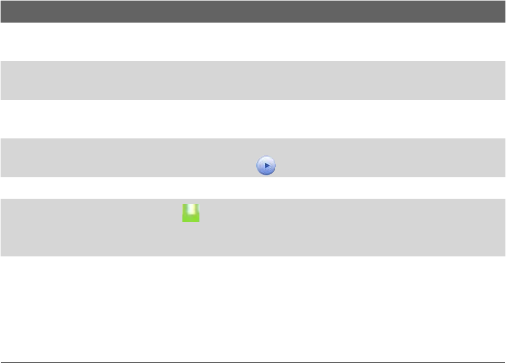
Experiencing Multimedia 191
No. Description
1Opens the All Songs submenu where you can browse music files by file
name or song title.
2Opens the Playlists submenu where you can create playlists and play them
back.
3Opens a submenu where you can browse music files by the selected
category.
4Switches to the Music Player screen. (Music Player does not automatically
start playback. You need to tap the icon).
5Shows the current submenu name. Tap to return to the upper-level menu.
6Shows a Search icon ( ) when the music database in Audio Manager is
being updated. This occurs when music files have been added, renamed, or
removed on your device or memory card.
7Shows the song titles or file names of music files when you are in the All
Songs submenu. Tap or use the NAVIGATION Control to select a music file to
play it in the Music Player.
Shows more submenus when you are in one of the category screens,
such as Artists, Album, etc. Tap or use the NAVIGATION Control to open a
submenu.
When you tap a category on the Library’s Main screen, you will see more
submenus which may have deeper levels of menus. For example, when you
tap Artists, another level of submenus will be listed showing artist names.
When you tap an artist name, more submenus showing album names will
be displayed. Just keep opening the submenus until you reach the level
where song titles can be selected for playback.
Music files that are protected by Digital Rights Management (DRM) will be
listed under the Protected category. A lock icon shown before song titles
indicates that the music files are protected. Select a file then tap Info if you
want to view file information. A cross-marked lock icon shown before song
titles indicates that the rights for the music files have expired, and you will
not be able to play them. Tap Delete if you want to delete these files.
Note Audio Manager keeps track of the last submenu that you accessed. When
you exit Audio Manager and open it again, it will display the last submenu
that you were in. Keep tapping the submenu name at the top of the screen
until you reach the Library’s Main screen.
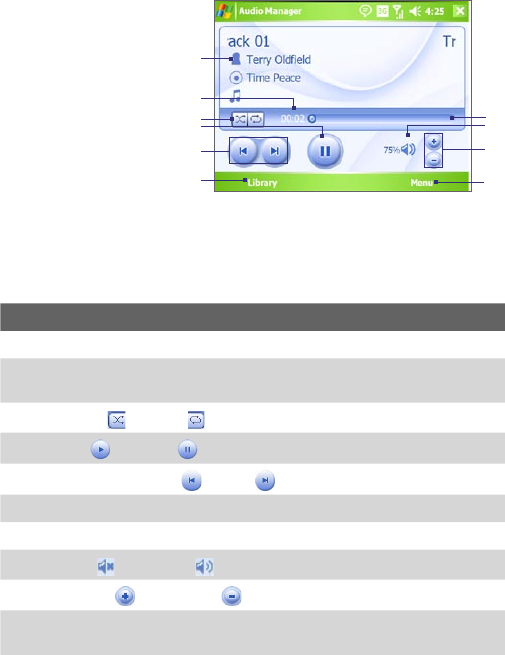
192 Experiencing Multimedia
Music Player
Music Player is
integrated within Audio
Manager, and it lets you
play back music files.
After selecting a song in
the Library, Music Player
opens and automatically
plays it. Use the available
buttons to control the
playback.
1
3
4
5
6
7
8
9
10
2
Note If the last screen you were in was the Music Player when you closed Audio
Manager, next time you launch Audio Manager, it will open Music Player
directly. To switch back to the Library, tap Library.
No. Description
1Shows information about the playing song.
2Shows the playback time. Tap Menu > Time Display to choose the display
format for the playback time (Elapsed time or Remaining time).
3Shuffles ( ) / Loops ( ) songs during playback.
4Plays ( ) / Pauses ( ) the song.
5Goes to the previous ( ) / next ( ) song.
6Returns to the Library screen.
7Drag the slider to move forward or backward in a song.
8Mutes ( ) / Unmutes ( ) the song.
9Increases ( ) / Decreases ( ) the volume.
10 Opens a menu where you can choose to add the current song to a playlist,
set the song as ring tone, and more.
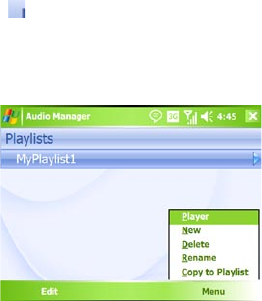
Experiencing Multimedia 193
Playlists
A playlist is a list of music files that play in a sequential order. The Playlists
screen shows the current playlists that are found on your device and
memory card.
There are two types of playlists that will be shown on the Playlists screen:
• Windows Media Player playlists.
These are playlists that are in Windows Media Player Mobile’s
Library (which is synchronized with Windows Media Player on your
computer), and they are indicated by the Windows Media Player icon
( ). They can be played in Audio Manager’s Music Player but cannot
be edited.
• Custom playlists.
These are playlists that are created in Audio Manager and can be
edited.
Notes • Audio Manager will search for playlists in the following locations:
On the device: \Playlists and \Application Data\HTC\AudioManager\
playlists.
On the memory card: \Storage Card\Playlists.
•
If a Windows Media Player playlist contains a combination of music, video
and image files, Audio Manager accesses the music files only and filters
out the other media types.
194 Experiencing Multimedia
To create a playlist
1. On the Library’s Main screen, tap Playlists.
2. On the Playlists screen, tap Menu > New.
3. Enter a Playlist name and tap OK.
4. On the Playlists screen, tap the playlist you have just created and tap
Edit.
5. Tap Menu > Add.
6. Tap the check boxes to select the songs you want to add to the
playlist, then tap OK. Tap Menu to open a list of selection methods.
7. Tap OK twice.
To play a playlist
1. On the Playlists screen, tap to select a playlist.
2. Tap the first song in the selected playlist. Music Player automatically
opens and starts playing the first song. After each song, the next one
in the playlist will be played.
Note The content of playlists is not automatically updated when music files have
been deleted from the device memory or memory card. Music Player will
display a notification message when you play back a playlist and music files
in that playlist cannot be found.
To edit a playlist
1. On the Playlists screen, select a playlist you want to edit.
2. Tap Edit.
3. Tap Menu to open a list of editing options. You can choose to add
more songs, copy or delete songs, and more.
4. After you have finished editing the playlist, tap OK twice.
5. To return to the Playlists screen, tap the playlist name that’s shown at
the top of the screen.
To add a playlist to another playlist
1. On the Playlists screen, use the NAVIGATION Control to scroll to the
playlist that you want to add to another playlist.
2. Tap Menu > Copy to Playlist.
3. Tap the playlist where to copy it to, then tap OK. Tap New Playlist if
you want to add the playlist to a new playlist.
Experiencing Multimedia 195
Set music as ring tone
Audio Manager allows you to select your favorite music and set it as a ring
tone for your device.
1. Use the NAVIGATION Control to select a song in the Library, or tap a
song to play it in Music Player.
2. Tap Menu > Set as Ring Tone.
3. Tap Set as Default Ring Tone.
4. A confirmation message is then displayed. Tap OK.
Tip If you only want to save the song to the ring tone folder for future use, tap
Save to Ring Tone Folder. Later on, you can tap Start > Settings > Personal
tab > Phone to set it as your ring tone.
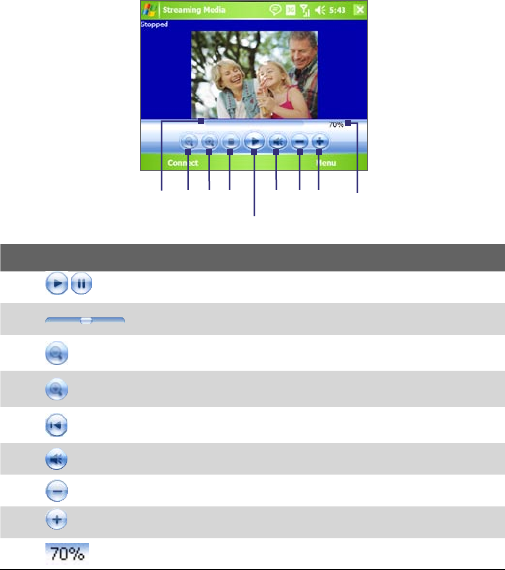
196 Experiencing Multimedia
9.5 Using Streaming Media
The Streaming Media program allows you to stream live broadcasts or
on-demand media content from the Web. You do not have to wait until the
entire media content is completely downloaded before watching the video
or hearing the sound. The media is sent in a continuous stream to your
device and is played as it arrives, along with the audio.
Button control Function
1 Play/Pause
2Jog Bar (for scrubbing video)
3Zoom out
4Zoom in
5Stop
6Mute
7Decrease volume
8Increase volume
9Current volume level
345678
1
29
Experiencing Multimedia 197
The Streaming Media program allows you to play 3GP and MPEG-4 files.
It also supports playback of SDP (Session Description Protocol) files. An
SDP file is a text file that contains the format, broadcast times, media
content, and other information about a live broadcast, or it may contain a
playlist and links to prerecorded media files if you are viewing on-demand
streaming media.
To access streaming content via Internet Explorer
In Internet Explorer, you can open a Web page containing RTSP links to
streaming media content then play the content in the Streaming Media
program.
1. Tap Start > Internet Explorer.
2. In the address bar, enter the URL address of the Web page that
contains the RTSP link to the desired *.3gp, *.mp4, or *.sdp file.
3. On the Web page, tap the RTSP link.
4. Streaming Media then automatically opens and starts playing the file.
During playback, use the button controls to play/pause, zoom in or
out, adjust the sound volume, and more.
To stream media files directly on the Streaming Media
Streaming Media only supports RTSP links when you stream *.3gp and
*.mp4 files directly on the program.
Note Before you launch the Streaming Media program, make sure that you are
connected to the Internet.
1. Tap Start > Programs > Streaming Media.
2. From the program, tap Connect.
3. Enter the URL for the Web site (rtsp://) and the file name.
Alternatively, if you already accessed RTSP links before, you can simply
tap an RTSP link in the History list to play previously viewed content.
4. Tap Connect.
5. Streaming Media then starts playing the file. During playback, use
the button controls to play/pause, zoom in or out, adjust the sound
volume, and more.
198 Experiencing Multimedia
To view streaming video file information
You can view the properties and general information of a streaming video
clip, such as file format, audio codec, dimension, frames, and duration of the
video.
• Tap Menu > Properties from the program.
To configure streaming video connection settings
Tap Menu > Options to configure the following settings:
• Connect via. Choose whether you want to connect to the Internet or
corporate network (intranet) to locate a streaming video clip.
• UDP port range. Specify a range of port numbers to use for
streaming.
• Media buffer. Specify the memory space (in terms of duration) to
allot for storing video and audio data while streaming media.

200 Using Other Applications
10.1 Word Mobile
Word Mobile is a streamlined version of Microsoft Word. Word documents
created on your PC can be opened and edited on your device. You can also
create and edit documents and templates in Word Mobile and save them as
*.doc, *.rtf, *.txt, and *.dot files.
You can have only one document open at a time. When you open a second
document, the first one is saved and closed automatically.
To create a Word file
1. In Word Mobile, tap New. You will see either a blank
document or template, depending on what you have
selected as the default template.
2. Enter text as desired.
3. Tap Menu, then choose whether to set the font,
paragraph alignment and indentation, insert the date,
do a spelling check, and more.
4. When finished, tap OK to save and close the file.
When you close a newly created document, it is automatically named
after the first several words in the document and placed in the Word
Mobile document list. You can easily rename the document with a more
meaningful name and move it to another folder or a storage card.
Note Word Mobile does not fully support some features of Microsoft Word such as
revision marks and password protection. Some data and formatting may be
lost when you save the document on your device. To see a complete list of
features that are not supported in Word Mobile, see Help on your device.
Using Other Applications 201
10.2 Excel Mobile
Excel Mobile makes it easy for you to open and edit Excel workbooks and
templates created on your PC. You can also create new workbooks and
templates on your device.
To create an Excel file
1. In Excel Mobile, tap New. You will see either a blank
worksheet or template, depending on what you’ve
selected as the default template.
2. Tap a cell to select it. Using the on-screen keyboard,
enter your data then tap the Enter key.
3. Tap Menu, then choose whether to insert cells, charts,
symbols or functions, format rows and columns, and
more.
4. When finished, tap OK to save and close the file.
Tips • Work in full-screen mode to see as much of your workbook as possible.
• Tap View > Zoom and select a percentage so that you can easily read the
worksheet.
Note Excel Mobile does not fully support some features such as formulas and
cell comments. Some data and formatting may be lost when you save the
workbook on your device. To see a complete list of features that are not
supported in Word Excel, see Help on your device.
10.3 Viewing Slide Shows with PowerPoint
Mobile
With PowerPoint Mobile, you can open and view slide show presentations
created on your PC. Slide shows in *.ppt and *.pps format created using
PowerPoint '97 and later can be viewed in PowerPoint Mobile.
Many presentation elements built into the slide shows such as slide
transitions and animations will play back on the device. If the presentation
is set up as a timed slide show, one slide will advance to the next
automatically. Links to URLs are also supported.

202 Using Other Applications
Features not supported in PowerPoint Mobile include:
• Notes. Notes written for slides will not be visible.
• Rearranging or editing slides. PowerPoint Mobile is a viewer only.
• Some file formats. Files created in *.ppt format earlier than
PowerPoint '97 and HTML files in *.htm and *.mht formats are not
supported.
To start a slide show presentation
1. Tap Start > Programs > PowerPoint Mobile.
2. In the presentation list, tap the slide show you want to
view.
3. Tap the current slide to advance to the next slide.
4. To navigate between slides, tap > Next or Previous,
or tap Go to Slide and tap the slide you want to view.
If the presentation is set up as a timed slide show, slides will advance
automatically.
Notes • If you have zoomed in to see a slide in more detail, you cannot navigate to
another slide until you zoom out.
•
Tapping Next or Previous may play an animation on a slide rather than
navigate to another slide.
To stop a slide show
• In a PowerPoint Mobile presentation, tap > End Show.
10.4 Using Adobe Reader LE
Adobe Reader LE allows you to open and view Portable Document Format
(PDF) files. These files usually have a *.pdf file extension.
To open a PDF file on your device
1. Tap Start > Programs > Adobe Reader LE.
2. Tap Open.
3. Browse to a folder and tap the PDF file you want to view.
Using Other Applications 203
Note To open another PDF file, tap Menu > Open. Tap Browse, select the desired
file, and tap Open. You can also open a PDF file from File Explorer.
204 Using Other Applications
To navigate through a PDF file
You can do any of the following:
• Tap the Up, Down, Right, and Left arrow keys on the horizontal and
vertical scrollbars to move to the desired direction of the page.
• Press NAVIGATION up, down, right, and left to move up or down a
page or scroll through the pages.
• Tap the space between the arrow keys and the scrollbar with your
stylus to move one screen towards the desired position.
• Tap and drag the scrollbar tab to quickly scroll through pages and
jump to a desired page number.
• Tap Tools > Go To and select an option to go to a specific page in a
multi-page PDF file.
To enlarge or reduce the display size
1. Open a PDF file you want to view.
2. Tap Tools > Zoom.
3. Select In or Out to enlarge or reduce the display size.
Otherwise, select Fit Screen or Fit Width.
4. Select To % to set an arbitrary zoom ratio.
To change page view and orientation
1. Open a PDF file you want to view.
2. Tap Tools > View.
3. Select an option to suit your view.
To find text in a PDF file
1. Open a PDF file you want to view.
2. Tap Tools > Find > Text.
3. Enter the text to be searched.
4. Choose search parameters, such as Match case, Whole
word, Backwards, and tap Find.

Using Other Applications 205
Notes • Adobe Reader LE displays a bookmark pane for the PDF files that contain
bookmarks. You can tap the bookmarks to go to a specific section/page
within the file.
• Adobe Reader LE supports password protected PDF files with up to 128-bit
encryption. When you open a password-protected PDF file, you will be
prompted to enter the password before the file can be opened.
To use the toolbar
You can also use the Adobe Reader LE toolbar to access the most commonly
used functions. The following table lists the toolbar controls.
This Control Does This
Fits the entire page to the screen
Fits the page width to the screen
Displays the first page
Displays the previous page
Displays the next page
Displays the last page
Displays the text search screen
Zooms out
Zooms in
206 Using Other Applications
10.5 Using MIDlet Manager
MIDlets are Java applications that can run on mobile devices. Your device
supports Java™ 2 Micro Edition, J2ME™. The MIDlet Manager allows you to
download Java applications, such as games and tools that are specifically
designed for mobile devices. Although some Java applications and games
have already been installed on your device, the Java MIDlet Manager gives
you the flexibility of installing and managing additional J2ME applications
from the Internet.
To install MIDlets from the Internet
1. Locate the MIDlet/MIDlet suite while connected to the
Internet.
2. Select the MIDlet/MIDlet suite to download.
3. Confirm to start downloading.
4. Run the file(s) to install.
To install MIDlets from a PC
You can install the MIDlets/MIDlet suites on your device from a PC using
the USB sync cable or Bluetooth. MIDlets copied to your device are
automatically saved in the My Documents folder. However, you can copy
the MIDlet file(s) from a PC to any of the following temporary folders on
your device from where MIDlet Manager can install them.
• Device memory: ../My Device/My Documents/My MIDlets
• Storage card/Microdrive: ../My Device/Storage Card or Microdrive
Note If the My MIDlets folder does not exist in My Documents, you can create
one with the same folder name. However, a folder named Storage Card
automatically appears after you insert a storage card into your device.
To install a MIDlet/MIDlet suite
1. Tap Start > Programs > MIDlet Manager > Menu >
Install > Local.
2. From the list, tap the MIDlet/MIDlet suite that you want
to install.
3. Confirm to complete the installation.
Using Other Applications 207
Note To remove a MIDlet file from the temporary folder, tap and hold the file then
tap Delete from the shortcut menu.
208 Using Other Applications
To run MIDlets on your device
1. Tap Start > Programs > MIDlet Manager.
2. Tap a MIDlet to run.
To view the MIDlets currently running
• Tap the down arrow on the top left of the MIDlet Manager screen,
then tap Running.
Note To view the most recently used MIDlets, tap Show > Recent.
To stop running a MIDlet
1. Tap the down arrow on the top left of the MIDlet
Manager screen, then tap Running.
2. Tap and hold a MIDlet on the Running MIDlets screen,
and tap Stop.
Note
To stop all MIDlets currently running on your device, tap Menu > Stop All.
Manage MIDlets/MIDlet suites
You can organize the MIDlets into groups and define custom groups. You
can also change the default settings for a MIDlet.
To associate a MIDlet/MIDlet suite to a group
If you installed several MIDlets/MIDlet suites to your device, you can
categorize them into groups.
1. Tap and hold on a MIDlet/MIDlet suite, then tap Group.
2. Choose a preset group, or tap New if you want to create
a custom group, then tap OK.
After you have assigned MIDlets/MIDlet suites to respective groups, the
group names will appear in the Show menu and you can display them by
group.
To select a sorting order
1. Tap the down arrow on the top right of the MIDlet
Manager screen to open the Sort By menu.
2. Choose to sort by Name or by Size.
Using Other Applications 209
To change the display name of a MIDlet
1. Tap and hold a MIDlet, and tap Rename.
2. Enter a new name for the MIDlet, then tap OK.
Note You cannot change the name of a MIDlet suite.
To uninstall a MIDlet/MIDlet suite
Before you uninstall a MIDlet/MIDlet suite, make sure that it is not running.
1. Tap and hold the MIDlet/MIDlet suite, and tap Uninstall.
2. Tap OK to confirm.
Note You cannot uninstall a single MIDlet from a MIDlet suite; you can uninstall
only the complete MIDlet suite.
To check storage space
• Tap Menu > System Info on the MIDlet Manager screen to see how
much device storage space is used by MIDlets.
To select a type of connection
• Tap Menu > Choose Network Type on the MIDlet Manager screen,
and select the type of connection that you will use for downloading
MIDlets to your device.
To configure MIDlet security
You can adjust security settings for each MIDlet/MIDlet suite.
1. Tap and hold a MIDlet.
2. Tap Security from the shortcut menu.
Note that some features may not be available for all MIDlets/MIDlet suites.
The following are the security options that you can set for a running MIDlet/
MIDlet suite.

210 Using Other Applications
Security Option Description
Net Access Determines whether a MIDlet/MIDlet suite can access the
Internet.
Local Connectivity Enables a MIDlet/MIDlet suite to access services, such as
Bluetooth.
App Auto Run Enables a MIDlet/MIDlet suite to run at specified times, or
any time.
Messaging Determines whether a MIDlet/MIDlet suite can send
and/or receive SMS messages.
Multimedia
Recording
Enables a MIDlet/MIDlet suite to record sounds and
images.
Note For a list of error messages that you may receive while managing and using
MIDlets/MIDlet suites on your device, see Help on your device.
10.6 Using ZIP
This feature allows you to save memory and increase the storage capacity
of your device by compressing files in the conventional ZIP format. You can
view and extract archive files received from various sources. You can also
create new *.zip files on your device.
Start ZIP and Open .zip files
You can use ZIP to either archive files or open an existing archive file on
your device. Each time you start ZIP on your device, it searches for files
that have the .zip file extension, and displays these files on the Archive List
screen.
To start ZIP on your device
• Tap Start > Programs > ZIP.
To open a ZIP file and extract files
1. Open a file using any of the following:
• Select a file and tap File > Open Archive.
Using Other Applications 211
• Tap and hold a file and tap Open Archive.
• Double-tap a file.
Note You cannot select multiple ZIP files.
2. The files contained in the zip file are then displayed.
Select files by doing one of the following:
• Tap to select a file.
• To select several files, tap Menu > Action and make sure Multi-
Select Mode is selected. Select files by tapping each file. (Tap a
selected file to deselect it).
• To select all files, tap Menu > Action > Select All.
3. Tap Menu > Action > Extract.
4. Choose a folder in which files will be extracted to, then
tap Extract.
To create a zip archive
1. Tap New or File > New Archive.
2. On the Save As screen, enter a zip file name and choose
a folder in which to save the zip file. You can also choose
whether the zip file will be saved on the device’s main
memory or a storage card.
3. Tap Save.
4. Tap Menu > Action > Add.
5. Double-tap the folder that contains the files you want to
archive.
6. Select files by doing one of the following:
• Tap to select a file.
• To select several files, tap and hold on the screen, then select
Multi-Select Mode. Select files by tapping each file. (Tap a
selected file to deselect it).
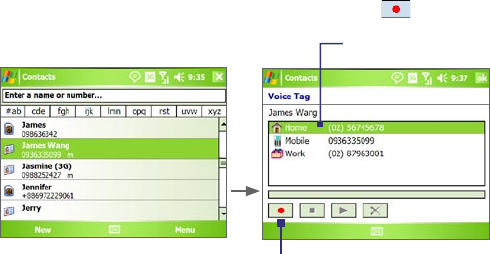
212 Using Other Applications
• To select all files, tap and hold on the screen, then tap Select All.
7. Tap Add.
8. Tap Menu > File > Close Archive.
9. After closing the zip file, you can tap Menu > File > Find
Archive to search for all zip files and display them on
the Archive List screen.
10.7 Using Voice Speed Dial
You can record voice tags so that you can dial a phone number or launch
programs simply by speaking a word.
Create voice tag for a phone number
1. Tap Start > Contacts to open the Contacts list.
2. Do one of the following:
• Tap and hold the desired contact, then tap Add Voice Tag.
• Select the desired contact, then tap Menu > Add Voice Tag.
• Tap the desired contact to open the contact’s detailed screen, then
tap Menu > Add Voice Tag.
3. Select the phone number that you want to create a
voice tag, then tap the Record button ( ).
Select the desired
phone number.
Tap the Record button to
start recording.

Using Other Applications 213
4. When completed, a Voice Tag icon ( ) will be
displayed on the right of the item.
5. When you create a voice tag for the item, you can do
one of the following:
• Tap the Record button ( ) to rebuild the voice tag.
• Tap the Play button ( ) to play the voice tag.
• Tap the Delete button ( ) to delete the voice tag.
Tip To ensure voice recognition accuracy, please record your voice in a quiet
place.
Create voice tag for a program
1. Tap Start > Settings > Personal tab > Voice Speed
Dial.
2. The Application tab displays a list of all installed
programs on your device. The procedure for creating a
voice tag for a program is the same as the procedure for
creating a voice tag for a phone number.
3. After you have created a voice tag for a program, you
can then launch the program by saying the recorded
voice tag after tapping Start > Programs > Voice
Speed Dial.
Make a call or launch programs using voice tags
1. Tap Start > Programs > Voice Speed Dial.
2. After a “beep” sound, say the recorded voice tag that
you have assigned to the phone number you want to
call or the program you want to launch. The system will
repeat the voice tag and then dial out or launch the
program automatically.
Note If the system cannot recognize your voice tag, please speak clearly and
reduce the surrounding noise, then try again.
To view and test the voice tags you have created
1. Tap Start > Settings > Personal tab > Voice Speed
214 Using Other Applications
216 Appendix
A.1 Regulatory Notices
Regulatory Agency Identifications
For regulatory identification purposes, your product is assigned a model
number of ATHE100. FCC ID: NM8ATHE100.
To ensure continued reliable and safe operation of your device, use only the
accessories listed below with your ATHE100.
The Battery Pack has been assigned a model number of ATHE160.
This product is intended for use with a certified Class 2 Limited Power
Source, rated 5 Volts DC, maximum 1 Amp power supply unit.
European Union Notice
Products with CE marking comply with the R&TTE Directive (99/5/EC), the
EMC Directive (89/336/EEC), and the Low Voltage Directive (73/23/EEC)
issued by the Commission of the European Community.
Compliance with these directives implies conformity to the following
European Norms (in parentheses are the equivalent international
standards).
• EN 60950-1 (IEC 60950-1)
Safety of InformationTechnology Equipment.
• ETSI EN 301 511
Global system for mobile communications (GSM); Harmonized EN
for mobile stations in the GSM 900 and GSM 1800 bands, covering
essential requirements of article 3.2 of the R&TTE directive (1995/5/
EC).
• ETSI EN 301 489-1
Electromagnetic compatibility and Radio spectrum Matters (ERM);
ElectroMagnetic Compatibility (EMC) standard for radio equipment
and services; Part 1: Common technical requirements.
• ETSI EN 301 489-7
Electromagnetic compatibility and Radio spectrum Matters (ERM);
ElectroMagnetic Compatibility (EMC) standard for radio equipment
and services; Part 7: Specific conditions for mobile and portable radio
and ancillary equipment of digital cellular radio telecommunications
systems (GSM and DCS).
• ETSI EN 301 489-17
Electromagnetic compatibility and Radio spectrum Matters (ERM);
ElectroMagnetic Compatibility (EMC) standard for radio equipment

Appendix 217
and services; Part 17: Specific conditions for 2.4 GHz wideband
transmission systems and 5 GHz high performance RLAN equipment.
• EN 301 489-24
Electromagnetic compatibility and radio spectrum matters (ERM);
ElectroMagnetic Compatibility (EMC) standard for radio equipment
and services; Part 24: Specific conditions for IMT-2000 CDMA direct
spread (UTRA) for mobile and portable (UE) radio and ancillary
equipment.
• EN 301 908
Electromagnetic compatibility and Radio spectrum Matters (ERM);
Base Stations (BS) and User Equipment (UE) for IMT-2000 third
generation cellular networks.
• ETSI EN 300 328
Electromagnetic compatibility and Radio spectrum Matters (ERM);
Wideband Transmission systems; data transmission equipment
operating in the 2.4 GHz ISM band and using spread spectrum
modulation techniques.
• EN 50360:2001
Product standard to demonstrate the compliance of mobile
phones with the basic restrictions related to human exposure to
electromagnetic fields (300 MHz - 3 GHz).
• EN 50392:2002
Generic standard to demonstrate the compliance of low power
electronic and electrical apparatus with the basic restrictions related
to human exposure to electromagnetic fields (10 MHz - 300 GHz)
- General public.
• EN 300 440-1&-2
Electromagnetic compatibility and Radio spectrum Matters (ERM);
Short range devices; Radio equipment to be used in the 1 GHz to
40 GHz frequency range; Part1: Technical characteristics and test
methods. Part 2: Harmonized EN under article 3.2 of the R&TTE
Directive.
• EN60601-1-2
Medical electrical equipment - Part 1-2: General requirements
for basic safety and essential performance - Collateral standard:
Electromagnetic compatibility - Requirements and tests

218 Appendix
This equipment may be operated in:
AT BE BG CH CY CZ DE DK
EE ES FI FR GB GR HU IE
IT IS LI LT LU LV MT NL
NO PL PT RO SE SI SK TR
Federal Communications Commission Notice
This device complies with part 15 of the FCC Rules. Operation is subject
to the following two conditions: (1) This device may not cause harmful
interference, and (2) this device must accept any interference received,
including interference that may cause undesired operation.
This equipment has been tested and found to comply with the limits for a
Class B digital device, pursuant to Part 15 of the FCC Rules. These limits are
designed to provide reasonable protection against harmful interference in
a residential installation. This equipment generates, uses, and can radiate
radio frequency energy and, if not installed and used in accordance with
the instructions, may cause harmful interference to radio communications.
However, there is no guarantee that interference will not occur in a
particular installation. If this equipment does cause harmful interference to
radio or TV reception, which can be determined by turning the equipment
on and off, the user is encouraged to try to correct the interference by one
or more of the following measures:
• Reorient or relocate the receiving antenna.
• Increase the separation between the equipment and receiver.
• Connect the equipment into an outlet on a circuit different from that
to which the receiver is connected.
• Consult the dealer or an experienced radio or television technician for
help.
Appendix 219
Modifications
The FCC requires the user to be notified that any changes or modifications
made to the device that are not expressly approved by High Tech Computer
Corporation may void the user’s authority to operate the equipment.
Safety Precautions for RF Exposure
Tests for SAR are conducted using standard operating positions specified by
the FCC with the phone transmitting at its highest certified power level in
all tested frequency bands. Although the SAR is determined at the highest
certified power level, the actual SAR level of the phone while operation can
be well below the maximum value. This is because the phone is designed
to operate at multiple power levels so as to use only the power required to
reach the network. In general, the closer you are to a wireless base station
antenna, the lower the power output. Before a phone model is available for
sale to the public, it must be tested and certified to the FCC that it does not
exceed the limit established by the government-adopted requirement for
safe exposure. This phone has been tested and meets the FCC RF exposure
guidelines when used with an accessory that contains no metal and that
positions the handset a minimum of 1.5 cm from the body. For body-worn
operation, to maintain compliance with FCC RF exposure guidelines, use
only High Tech computer, Corp. approved accessories. When carrying the
phone while it is on, use the specific High Tech Computer Corp. supplied or
approved carrying case, holster, or other body-worn accessory.
Use of non High Tech Computer Corp. approved accessories may violate
FCC RF exposure guidelines and should be avoided.
SAR Information
• 0.482 W/Kg@1g (FCC)
220 Appendix
Telecommunications & Internet Association (TIA) safety
information
Pacemakers
The Health Industry Manufacturers Association recommends that a
minimum separation of six inches be maintained between a handheld
wireless phone and a pacemaker to avoid potential interference with the
pacemaker. These recommendations are consistent with the independent
research by and recommendations of Wireless Technology Research.
Persons with pacemakers:
• Should ALWAYS keep the phone more than six inches from their
pacemaker when the phone is turned ON.
• Should not carry the phone in a breast pocket.
• Should use the ear opposite the pacemaker to minimize the potential
for interference. If you have any reason to suspect that interference is
taking place, turn your phone OFF immediately.
Hearing Aids
Some digital wireless phones may interfere with some hearing aids. In the
event of such interference, you may want to consult your service provider,
or call the customer service line to discuss alternatives.
Other Medical Devices
If you use any other personal medical device, consult the manufacturer
of your device to determine if they are adequately shielded from external
RF energy. Your physician may be able to assist you in obtaining this
information.
Turn your phone OFF in health care facilities when any regulations posted
in these areas instruct you to do so. Hospitals or health care facilities may be
using equipment that could be sensitive to external RF energy.
Pacemakers
• Avoid using your phone near metal structures (for example, the steel
frame of a building).
• Avoid using your phone near strong electromagnetic sources, such as
microwave ovens, sound speakers, TV and radio.
• Avoid using your phone after a dramatic change in temperature.

Appendix 221
WEEE Notice
The Directive on Waste Electrical and Electronic Equipment (WEEE), which
entered into force as European law on 13th February 2003, resulted in a
major change in the treatment of electrical equipment at end-of-life.
The purpose of this Directive is, as a first priority, the prevention of WEEE,
and in addition, to promote the reuse, recycling and other forms of recovery
of such wastes so as to reduce disposal.
The WEEE logo (shown at the left) on the product or on its
box indicates that this product must not be disposed of or
dumped with your other household waste. You are liable to
dispose of all your electronic or electrical waste equipment by
relocating over to the specified collection point for recycling
of such hazardous waste. Isolated collection and proper
recovery of your electronic and electrical waste equipment at
the time of disposal will allow us to help conserving natural
resources. Moreover, proper recycling of the electronic and
electrical waste equipment will ensure safety of human health
and environment. For more information about electronic and
electrical waste equipment disposal, recovery, and collection
points, please contact your local city center, household
waste disposal service, shop from where you purchased the
equipment, or manufacturer of the equipment.
RoHS Compliance
This product is in compliance with Directive 2002/95/EC of the European
Parliament and of the Council of 27 January 2003, on the restriction of the
use of certain hazardous substances in electrical and electronic equipment
(RoHS) and its amendments.
222 Appendix
A.2 PC Requirement to Run ActiveSync 4.x
To connect your device to the PC, you must have Microsoft® ActiveSync®
program installed on your PC. ActiveSync 4.x is included in the Getting
Started Disc, which is compatible with the following operating systems
and applications:
• Microsoft® Windows® 2000 Service Pack 4
• Microsoft® Windows Server® 2003 Service Pack 1
• Microsoft® Windows Server® 2003 IA64 Edition Service Pack 1
• Microsoft® Windows Server® 2003 x64 Edition Service Pack 1
• Microsoft® Windows® XP Professional Service Packs 1 and 2
• Microsoft® Windows® XP Home Service Packs 1 and 2
• Microsoft® Windows® XP Tablet PC Edition 2005
• Microsoft® Windows® XP Media Center Edition 2005
• Microsoft® Windows® XP Professional x64 Edition
• Microsoft® Outlook® 98, Microsoft® Outlook® 2000 and Microsoft®
Outlook® XP, and Microsoft® Outlook® 2003 messaging and
collaboration clients
• Microsoft® Office 97, excluding Outlook
• Microsoft® Office 2000
• Microsoft® Office XP
• Microsoft® Office 2003
• Microsoft® Internet Explorer® 4.01 or later (required)
• Microsoft® Systems Management Server 2.0

Appendix 223
A.3 Specifications
System Information
Processor Baseband: QUALCOMM® MSM 6275
CPU: Intel® PXA270 624 MHz with ATi Graphic Chip W2284
Memory - ROM: 128 MB
- RAM: 64 MB SDRAM
(Figures are the total ROM and RAM memory available for use and
storage. Since the memory is shared by the Operating System,
applications, and data, the actual available memory is less than what
is written).
- Microdrive: 8 GB
Operating System Windows Mobile® Version 5.0 for Pocket PC
Power
Battery Rechargeable Lithium-ion polymer battery, 2100 mAh
Charging Time Up to 4 hours
Battery Life
(estimates)
Standby time: Up to 300 hours for GSM
Up to 300 hours for UMTS
Talk time (Screen off): Up to 5.5 hours for GSM
Up to 4.5 hours for UMTS
Video call: Up to 2 hours
AC Adapter Voltage range/Frequency: 100 - 240V AC, 50/60 Hz
DC output: 5V and 1A
Display
LCD Type 5” transmissive TFT-LCD with backlight LEDs, touch-
sensitive screen
Resolution 480 x 640 VGA resolution with 65K colors
Alignment Landscape and Portrait
GPS
Chipset SirF StarIII with Ephemeris Extension support
Internal Antenna Yes
GPS Receiver 20 parallel channels

224 Appendix
Cellular Radio Module
Functionality HSDPA/UMTS (2100 for Europe, 850/1900 for USA)
GSM/GPRS/EDGE (850, 900, 1800, and 1900)
Mode Dual (GSM)
Internal Antenna Yes
Physical
Dimensions 133.1 mm (L) x 97.7 mm (W) x 16 mm (T)
Thickness with keyboard: 20 mm
Weight Less than 350g (with battery)
Camera Module
Type Main camera: 3 megapixels with auto focus and flash light
Second camera: VGA CMOS imaging sensor
Resolution Photo: 2048 x 1536 (QXGA), 1600 x1200 (UXGA),
1280 x1024 (SXGA), 640 x 480 (VGA), 320 x 240 (QVGA),
160 x120 (QQVGA)
Video: 352 x 288 (CIF), 320 x 240 (QVGA), 176 x144 (QCIF),
128 x 96
Digital Zoom Up to 8x
Connections
I/O Port • HTC ExtUSBTM : an 11-pin mini-USB 2.0 and audio jack
in one
(ExtUSB is a proprietary connection interface that is
trademarked by HTC).
• HTC proprietary 16-pin combined port (USB 1.1 host/
VGA and TV Out)
Car Antenna
Connector
Yes
GPS Antenna
Connector
Yes
Audio Stereo earphone/Microphone jack
Wireless
Connections
Bluetooth®, Wi-Fi®

Appendix 225
Controls and Lights
Navigation
Buttons
• 5-way navigation control/Enter button
• Comm Manager/Voice Recorder
• Camera button
• OK button
• Start button
• Internet Explorer/VueFLO control button
• Detachable QWERTY Keyboard
• Volume Slider
• Power button
• Reset button
LEDs Notification LED 1 shows battery charging status.
Notification LED 2 shows the GSM/UMTS standby/
network status (Green) and GPS indicator (amber).
Notification LED 3 shows the following:
• A blinking Blue light for Bluetooth system notification
of powered-up and ready to transmit radio frequency
signal.
• A blinking Green light for Wi-Fi status.
• When both Bluetooth and Wi-Fi are enabled, their lights
blink alternately.
Notification LED 4 shows messages and notifications.
Please see "Getting to Know Your Device and Its
Accessories" in Chapter 1 to know the locations of the
LEDs.
Audio
Audio Controller AGC
Microphone/
Speaker
Built-in/Dual, Hands-free
Headphone AMR/AAC/WAV/WMA/MP3 codec
Expansion Slots
Card Slot miniSD™ (Hot swap and SD 2.0 compatible)
226 Appendix
Index
228 Index
A
A2DP 114
About licenses and protected media
185
ActiveSync
- Comm Manager 110
- copy files 91
- install and set up 66
- overview 32
- synchronize 70
Add and remove programs 89
Add attachment to message 132
Adobe Reader 32, 202
Alarm 82
Answer/end a call 54
Appointment search 47
Assign pictures to contacts 182
Assign programs or shortcuts to
hardware buttons 85
Attachments 132
Audio Manager
- Library 190
- Music Player 192
- Open 190
- Playlists 193
- Set music as ring tone 195
B
Backlight 87
Back up data 93
Battery
- battery information 23
- charge battery 24
- check battery power 24
- save battery power 86, 122
Beam
- via Bluetooth 115
Block Recognizer 44
Bluetooth
- Bluetooth Explorer 32, 117
- Bluetooth file sharing 117
- Bluetooth modem 120
- Bluetooth shared folder 117
- hands-free headset 114
- modes 111
- overview 111
- partnership (pairing) 112
- SIM Access Profile (SAP) 62
- stereo headset 114
- synchronize 75
- turn on and off 110
- visible 111, 112
Bluetooth Explorer 32
Burst capture mode 165
Button controls and LEDs 224
C
Calculator 32
Calendar 32, 144
Calendar search 47
Calibration 26
Camera
- capture modes 164, 165
- controls 165
- file formats 165
- icons 165
- overview 32
- settings 173
- specifications 223
Car kit phones 62
Index 229
Change
- device name 82
- screen text size 86
Clock & Alarms 36, 82
Close program 91
Comm Manager 37, 110
Compose messages 131
Conference call 61
Connect device to Internet
- set up dial-up connection to ISP
104
- set up GPRS connection 102
- start a connection 104
Connect to private network 104
Contacts 32, 145
Contacts Picture capture mode 165
Contacts search 47
Cookies 108
Copy
- contacts to SIM card 147
- files between device and PC 91
- files to Microdrive 92
- files to storage card 91
- media files from PC to device 186
- pictures and video clips from PC to
device 178
- SIM contacts to device 147
Customize
- Start menu 81
- Today screen 80
D
Date 82
Delete pictures and videos 181
Dial-up to ISP 104
Digitally sign messages 77, 134
Digital Rights Management (DRM) 185
Digital signature
- verify 135
Dimensions and weight 223
Direct Push 73, 110
Disconnect data services 110
Download Agent 32
Download messages 133
Draw 152
E
E-mail
- IMAP4 129
- Outlook 128
- POP3 129
- search 47
- security 77
- settings (POP3/IMAP4) 130
- setup wizard 128
Edit picture 181
Emergency call 62
Encrypt messages 77, 134
Excel Mobile 32, 201
Exchange Server
- schedule synchronization 73
- synchronize 72
Exclude e-mail address when replying
to all 132
F
Favorites (Internet Explorer) 106
File Explorer 32
Find
- device information 86
- operating system version number
86
230 Index
Find contact
- online 148
- on device 148
Format Microdrive 36, 83
Forward message 132
G
Games 32
GIF animation 179
GPRS 102
GPS 33, 36, 158, 159
H
Hardware keyboard 40
Hard reset 99
Help 32
Help search 47
Home page (Internet Explorer) 106
I
IMAP4 129
Input methods
- Block Recognizer 44
- Keyboard 43
- Letter Recognizer 43
- Symbol Pad 46
- Transcriber 44
Install and set up ActiveSync 66
International call 62
Internet Explorer Mobile 33, 106
Internet security settings 108
Internet Sharing 124
J
JETCET Print 33, 212
K
Keyboard
- on-screen 43
- QWERTY 40
Keypad tone 87
L
Language 82
Letter Recognizer 43
Library screen (Windows Media Player
Mobile) 185
M
Mail search 47
Make call
- from Call History 52
- from Contacts 52
- from Phone program 51
- from SIM Manager 53
- from Speed Dial 53
Media synchronization settings 76
Memory 90, 222
Message folders 136
Messaging
- IMAP4 129
- MMS 137
- Outlook e-mail 128
- overview 33
- POP3 129
- SMS 131
MIDlet Manager
- configure MIDlet security 207
- install MIDlets from Internet 205
- install MIDlets from PC 205
- manage MIDlets/MIDlet suites 206
Index 231
- overview 33, 205
- uninstall MIDlets/MIDlet suites 207
MMS 137
- add audio clip 141
- add emoticon 141
- add photo/video 139
- add text 141
- add Web page address from
Favorites 141
- create and send 139
- MMS settings 137
- reply message 142
- view message 142
MMS Video capture mode 165, 169
MSN Messenger 142
Mute 61
N
Notes 33, 47, 151
Notes search 47
Now Playing screen (Windows Media
Player Mobile) 185
O
Opera Browser
- Open 108
- Overview 33, 108
- Use 108
Outlook e-mail 128
Owner information 97
P
Panorama capture mode 165
Password 96
Personal and system settings 83
Phone 33, 50, 51
Phone network settings 88
Phone services 88
Phone settings 87
Pictures & Videos
- assign pictures to contacts 182
- delete 181
- edit picture 181
- file formats 178
- overview 33
- play GIF animation 179
- play videos 179
- sort 180
- view pictures 179
- view slideshows 180
Picture Theme capture mode 165
PIN 50, 96
Playback screen (Windows Media
Player Mobile) 185
Playlists 188
Play GIF animation 179
Play media 187
Play videos 179
Pocket MSN 33
POP3 129
PowerPoint Mobile 33, 201
Programs
- ActiveSync 32
- Adobe Reader 32
- Audio Manager 32
- Bluetooth Explorer 32
- Calculator 32
- Calendar 32, 144
- Camera 32, 164
- Comm Manager 37, 110
- Contacts 32, 145
- Download Agent 32
232 Index
- Excel Mobile 32, 201
- File Explorer 32
- Format Microdrive 36
- Games 32
- Help 32
- Internet Explorer Mobile 33, 106
- Internet Sharing 124
- JETCET Print 33
- Messaging 33, 128
- MIDlet Manager 33, 205
- Notes 33, 151
- Opera Browser 33
- Phone 33, 51
- Pictures & Videos 33, 178
- Pocket MSN 33, 142
- PowerPoint Mobile 33, 201
- QuickGPS 33, 159
- SAPSettings 33, 62
- Search 33, 47
- SIM Manager 33, 53, 146
- Sprite Backup 34, 93
- STK (SIM Tool Kit) Service 34
- Streaming Media 34
- Tasks 34, 150
- Terminal Services Client 34, 125
- Voice Recorder 34
- Voice Speed Dial 34, 210
- Windows Media Player Mobile 34,
183
- Word Mobile 34, 200
- ZIP 34, 208
Put call on hold 61
Q
QuickGPS 33, 159
QWERTY keyboard 40
R
Receive call 54
Receive messages 131
Record voice note 153
Regional options 82
Regulatory notices 216
Reply message 132
Reply MMS 142
Reset
- hard reset 98
- soft reset 98
Review screen (Camera) 170
Ring tone 87
Ring type 87
S
SAPSettings 33, 62
Save picture from Web page 107
Search 33, 47
Secure/Multipurpose Internet Mail
Extension (S/MIME) 77
Security settings (Internet Explorer)
108
Send messages 131
Send pictures and videos via e-mail
182
Settings (Connections tab)
- Beam 37
- Bluetooth 37
- Connections 37
- CSD Line Type 37
- GPRS Setting 37
- SMS Service 37
- USB to PC 37
- Wi-Fi 37
- Wireless LAN 37
Index 233
Settings (Personal tab)
- Buttons 35
- Input 35
- Lock 35
- Menus 35
- MSN Options 35
- Owner Information 35
- Phone 35
- Sounds & Notifications 35
- Today 35
- Voice Speed Dial 35
Settings (System tab)
- About 35
- Backlight 35
- Certificates 35
- Clear Storage 36
- Clock & Alarms 36
- Device Information 36
- Error Reporting 36
- GPS 36
- Key Lock 36
- Memory 36
- Microphone AGC 36
- Power 36
- Regional Settings 36
- Remove Programs 36
- Screen 36
- Task Manager 36
Set picture as Today screen
background 181
SIM Access Profile (SAP) 62
SIM card 23
SIM Manager
- copy contacts to SIM card 147
- copy SIM contacts to device 147
- create SIM contact 146
- make call 53
- overview 33
Smart Dialing 58
SMS 131
Soft reset 98
Sounds & Notifications 86
Specifications 222
Speed Dial 53
Sports capture mode 165
Sprite Backup 34, 93
Start menu 81
Still image capture modes 168
STK (SIM Tool Kit) Service 34
Storage card
- check available space 90
- copy files 92
- synchronize 76
Streaming Media 196
Streaming Media Player 34
Subdisplay 31
Swap/switch calls 61
Symbol Pad 46
Synchronize
- ActiveSync 70
- change information types 71
- music, video, and pictures 75
- Outlook information with computer
70
- Outlook information with Exchange
Server 72
- schedule synchronization with
Exchange Server 73
- via Bluetooth 75
- Windows Media Player Mobile 75,
186
Sync Setup Wizard 66
System information 222
234 Index
T
Tasks 34, 150
Tasks search 47
Task Manager 36, 85
Temporary Internet files (Internet
Explorer)
- delete 108
Terminal Services Client 125
Text size
- screen 86
- Web pages 107
Time 82
Today Screen 27
Today screen 80
Transcriber 44
Troubleshoot Windows Media Player
Mobile 189
Turn device on and off 25
Turn phone function on and off 50,
110
TV Out 37, 84
U
USB modem 125
USIM card 23
V
Verify digital signature 135
Video call 54
Video capture mode 169
View
- MMS 142
- photo slideshows 180
- pictures 179
Voice call 51
Voice note 153
Voice Recorder 34, 154
Voice Speed Dial
- create voice tags 210
- overview 34, 210
Voice tags
- create for phone numbers 210
- create for programs 211
- use 211
Volume 51
VueFLO 37, 105
W
Web pages
- layout 107
- text size 107
Wi-Fi 110, 121
Windows Media Player Mobile
- file formats 183
- menus 185
- overview 34
- playlists 188
- troubleshoot 189
Word Mobile 34, 200
Z
ZIP
- create archive 209
- open zip file and extract files 208
- overview 34, 208
Zoom (Camera) 171