HTC CANARY GSM 900 / 1800 / 1900 Phone User Manual 273849
HTC Corporation GSM 900 / 1800 / 1900 Phone 273849
HTC >
Manual
User's Guide
Canary: Windows® Powered
Smartphone 2002
© 2002 Microsoft Corporation. All rights reserved.
ActiveSync, Hotmail, Microsoft, MS-DOS, MSN, Outlook, Passport, Windows, Windows NT, Windows CE,
Windows Media are either registered trademarks or trademarks of Microsoft Corporation in the United States and/or
other countries.
The names of actual companies and products mentioned herein may be the trademarks of their respective owners.
Contents
Chapter 1 Getting Started...............................................................................1
Getting to know your phone ..............................................................................1
Front View .........................................................................................................1
Back, side and base view ...................................................................................3
Status indicators.................................................................................................4
Synchronizing with ActiveSync ........................................................................5
Battery................................................................................................................6
Accessories ........................................................................................................7
Inserting the SIM card .......................................................................................8
Where to find information .................................................................................9
Chapter 2 The Basics.....................................................................................10
Navigation methods .........................................................................................10
Entering text and numbers on your phone .......................................................13
Securing your phone ........................................................................................15
Chapter 3 Phone Calls...................................................................................17
Making a call....................................................................................................17
Receiving a call................................................................................................19
In-call options ..................................................................................................19
Reviewing your calls........................................................................................20
Shortcuts ..........................................................................................................21
Advanced dialing options ................................................................................22
Chapter 4 Settings..........................................................................................24
Viewing and changing settings ........................................................................24
Resetting to factory defaults ............................................................................30
Chapter 5 Messaging Features .....................................................................31
Sending e-mail and SMS messages .................................................................31
Receiving e-mail and SMS messages ..............................................................33
Viewing your message folders.........................................................................34
Managing your Inbox.......................................................................................35
Message notifications.......................................................................................37
SMS messages .................................................................................................37

Chapter 10 3
Communicating with MSN Messenger............................................................38
Chapter 6 Contacts, Calendar, and Tasks...................................................41
Using Contacts.................................................................................................41
Using Calendar.................................................................................................44
Using Tasks......................................................................................................48
Chapter 7 Synchronizing Information.........................................................51
Using ActiveSync ............................................................................................51
Synchronizing information ..............................................................................54
Synchronizing Using an Infrared Connection..................................................55
ActiveSync Errors............................................................................................55
Chapter 8 Internet, Entertainment and More ............................................57
Using Internet Explorer....................................................................................57
Using Media Player..........................................................................................60
Modem Link.....................................................................................................64
Solitaire............................................................................................................65
Calculator.........................................................................................................66
Chapter 9 Appendix C: Regulatory Notices................................................67
Regulatory Agency Identification Numbers ....................................................67
European Union Notice....................................................................................67
Important Safety Information ..........................................................................68
Safety Precautions for RF Exposure................................................................68
Safety Precautions for Power Supply Unit ......................................................69
Chapter 10 Appendix D: Hardware Specifications ....................................70
Chapter 1 Getting Started
Congratulations on the purchase of your new Windows® Powered Smartphone 2002! This chapter will
help you set up your phone, charge your phone’s batteries, and familiarize yourself with the different
components of your phone. You will also find information about installing Microsoft® ActiveSync®,
and where you can find additional help for using your phone.
Warnings – Please Read Before Operating your
Device
THE DEVICE IS NOT CHARGED WHEN YOU TAKE IT OUT OF
THE BOX. 1ST TIME, CHARGE FULLY BEFORE USE.
WHEN YOU INSERT YOUR SIM CARD MAKE SURE IT
CLICKS INTO PLACE.
YOUR WARRANTY IS INVALIATED IF YOU OPEN OR
TAMPER WITH THE DEVICE’S OUTER CASING. (For more
information, see the enclosed warranty card)
Getting to know your phone
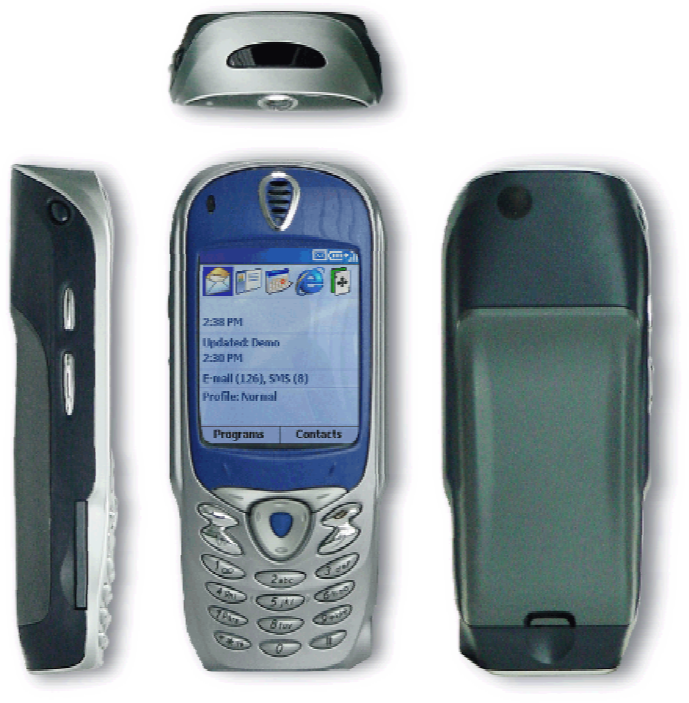
Front View
Display Home screen
LED Indicator Speaker
Left soft key
Talk button/Speakerphone End button/Key lock
Home button Back
5-way navigation pad
Keypad
Pound key
Earphone jack
Asterisk key
Title bar
Right soft key

2 Windows® Powered Smartphone 2002 User’s Guide
Figure 1 Smartphone Components
Display
The screen on your phone that displays information.
The top of the display shows the title bar, where you can see status indicators about your phone’s
current mode, or the name of the current activity or active program.
The center of the display shows the Home screen, as well as e-mail messages, contacts,
appointments, and other types of information.
The bottom of the display shows the soft key commands.
Home screen
Displays the five programs you have most recently used, the name of your service provider, the
current time, your next appointment, the number of messages in Inbox, and your current profile.
LED Indicator
Solid green – battery is fully charged.
Solid amber – battery charging.
Solid red – battery empty.
Flashing green (Blinking every 3 seconds) – Network is attached.
Flashing green (Blinking every second) – Notification
Flashing red – Battery low
Speaker
Outputs voice from calls and sound from music or video.
Right/Left Soft key
Performs the command shown on the screen immediately above the key.
Talk button/Speakerphone
Dials a phone number you entered using the keypad.
Dials a phone number you selected from the Call History list.
Answers an incoming call.
Places a call on hold to answer a second incoming call (call waiting).
Switches between an active call and a call that is on hold.
Press and hold to active/deactivate the speakerphone.
End button/Key Lock
Ends active data calls at any time.
Ends a call when one party is on the line, and ends the active call when multiple parties are
connected.
Chapter 1 Getting Started 3
Press and hold to lock the keyboard.
Home button
Displays the Home screen.
Back button
Navigates to the previous screen, or backspaces over one or more characters when you are in a text
field.
Navigation pad
Press the center to confirm your selection. The Action button’s functionality is similar to pressing
“Enter” on a keyboard, and is sometimes referred to as the “Do It” button.
The directional keys move the selection focus up, down, left, or right, and move the cursor left or
right in text fields.
Keypad
Used to enter numbers and characters.
Asterisk key (*)
Pressing and holding the asterisk key switches between text and numeric input modes.
Pound key (#)
Pressing and holding the pound key displays a list of symbols.
Earphone Jack
Insert the earphone here when listening to music or using the headset.
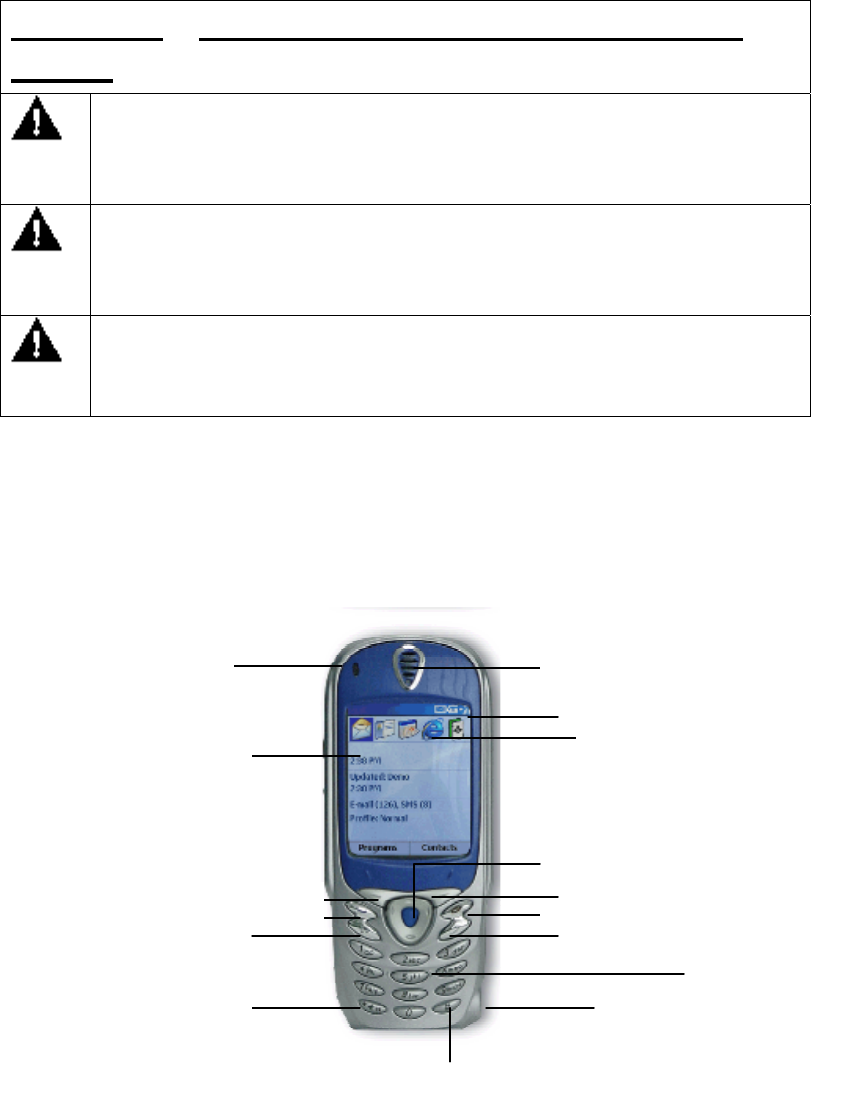
Back, side and base view
Car antenna connector
Power button
Record button
Volume
SD/MMC card slot
Universal connector

4 Windows® Powered Smartphone 2002 User’s Guide
Car antenna connector
If your car supports you can attach your phone to the car antenna to utilize its superior reception
quality.
Power button
Pressing and holding the Power button turns your phone on.
When your phone is on, pressing the Power button accesses the Quick List.
Pressing and holding the Power button turns your phone off.
Record button
Records notes and processes voice attachments.
Volume
Press to turn up and down the volume of a call.
SD/MMC card slot
Insert SD or MMC cards here to increase the capacity of your device’s memory.
Universal connector
Attach the USB/Serial cable here when syncing with your desktop computer or notebook.
Status indicators
Status indicators are displayed in the title bar at the top of the phone’s display. The following table lists
common status indicators and their meanings.
Indicator Meaning
New e-mail
New voice mail
New instant message
Voice call active
Data call active
Call forwarding
Call on hold
Missed call
Line 1
Line 2
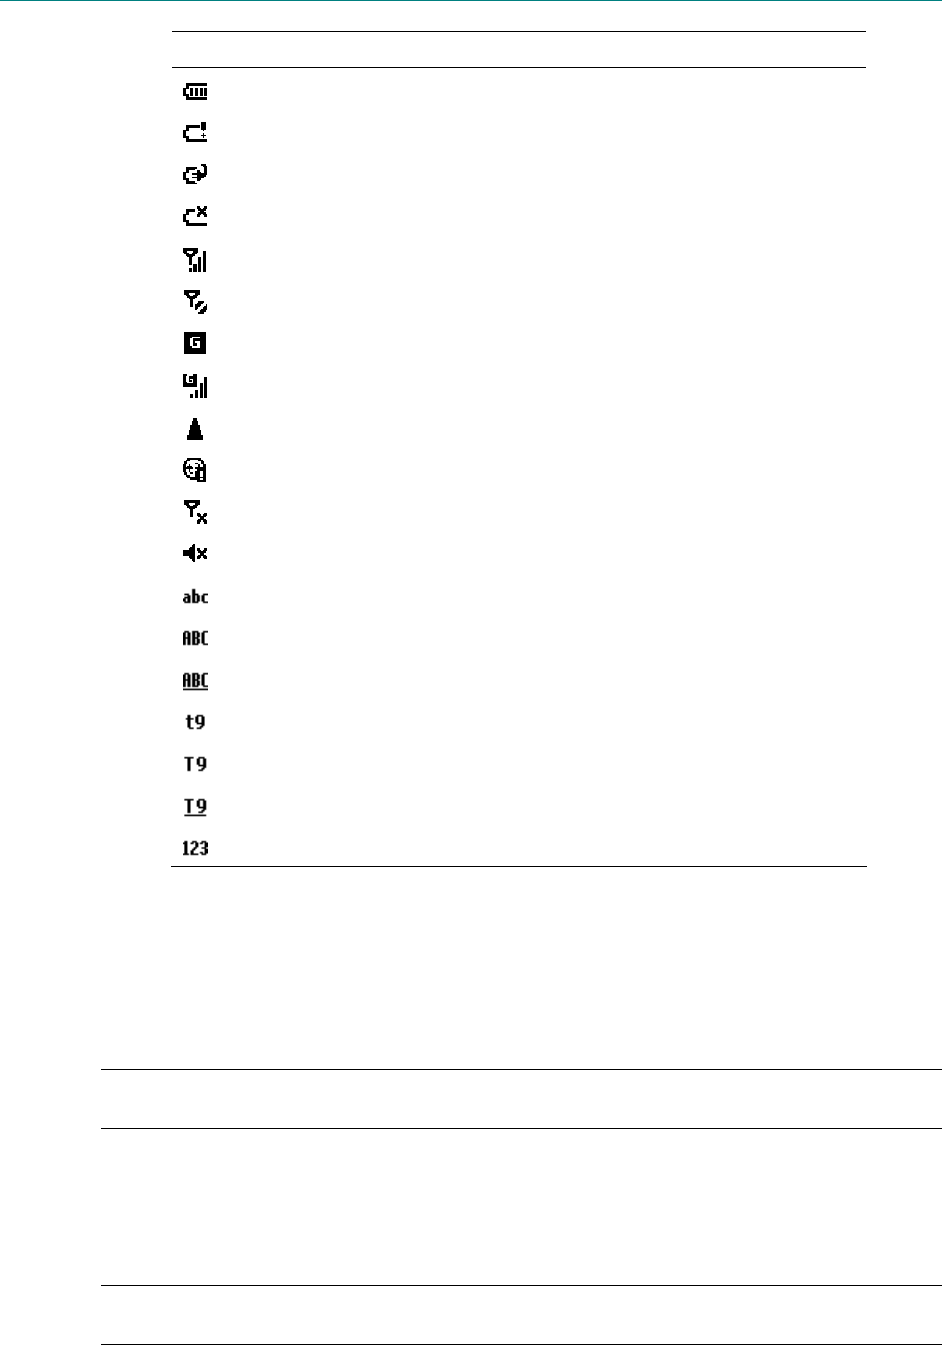
Chapter 1 Getting Started 5
Indicator Meaning
Battery level
Low battery
Battery charging
No battery
Signal strength
No signal
GPRS available
GPRS in use
Roaming
Sync error
Radio off
Ringer off
Multipress text input mode, lowercase
Multipress text input mode, uppercase
Multipress text input mode, caps lock
T9 text input mode, lowercase
T9 text input mode, uppercase
T9 text input mode, caps lock
Numeric input mode
Synchronizing with ActiveSync
You can use Microsoft® ActiveSync® technology to synchronize information on your desktop
computer and/or a Microsoft® Exchange Server with the information on your phone. ActiveSync
compares the information on your phone with the information on your desktop computer and/or the
server and updates all locations, keeping you up-to-date with the most recent information.
Note: You can synchronize information directly with a Microsoft Exchange Server only if your
company is running Microsoft® Mobile Information Server 2002 or later.
Installing ActiveSync
For instructions on installing ActiveSync on your desktop computer, see the Smartphone 2002 Quick
Start Card. ActiveSync is already installed on your phone.
Note: Make sure to install ActiveSync on your desktop PC before connecting your phone to your
desktop PC.

6 Windows® Powered Smartphone 2002 User’s Guide
After your first synchronization, take a look at Calendar, Contacts, and Tasks on your phone. You will
notice that your information has been copied to your phone. Disconnect your phone from your desktop
computer and you are ready to go!
For more information on ActiveSync, see Chapter 7, “Synchronizing Information.”
Battery
Your Smartphone has a removable, rechargeable Lithium ion battery. With continual use and recharging
the battery will after a matter of years become unusable and should be changed through a service center.
While you are using your device the amount of power consumed depends on whether you are talking on
the phone, or on standby. The estimates for battery life – talk-time: 2~3 hours, GPRS mode: 2 hours,
and standby:100 hrs – are based on you only using this function so, as you will be continually
interchanging between these features and functions the estimates will vary.
YOUR POCKET PC CONTAINS A LITHIUM ION BATTERY PACK. THERE IS A
RISK OF FIRE AND BURNS IF THE BATTERY PACK IS HANDLED IMPROPERLY.
DO NOT DISASSEMBLE, CRUSH, PUNCTURE, SHORT EXTERNAL CONTACTS,
OR DISPOSE OF IN FIRE OR WATER. DO NOT ATTEMPT TO OPEN OR SERVICE
THE BATTERY PACK. REPLACE ONLY WITH THE BATTERY PACK
DESIGNATED FOR THIS PRODUCT. DISPOSE OF BATTERIES PROPERLY. DO
N
OT DISPOSE WITH YOUR REGULAR TRASH.
Recharging the Battery
If the battery gets very low, your Smartphone displays a warning message. If this occurs, save any
unsaved data you are working on, perform a synchronization with your PC, then turn off your
Smartphone. Don’t try to restart your Smartphone until you have connected to external power.
You can recharge your device in the following ways:
Place your Smartphone in the cradle
and connect the cradle to an external
power source. The first time you use
it initially charge for three to four
hours. Then, place it in the cradle for
a short time each day to recharge it
to its full capacity.
AC Adapter plugs into the
b
ack of the cradle
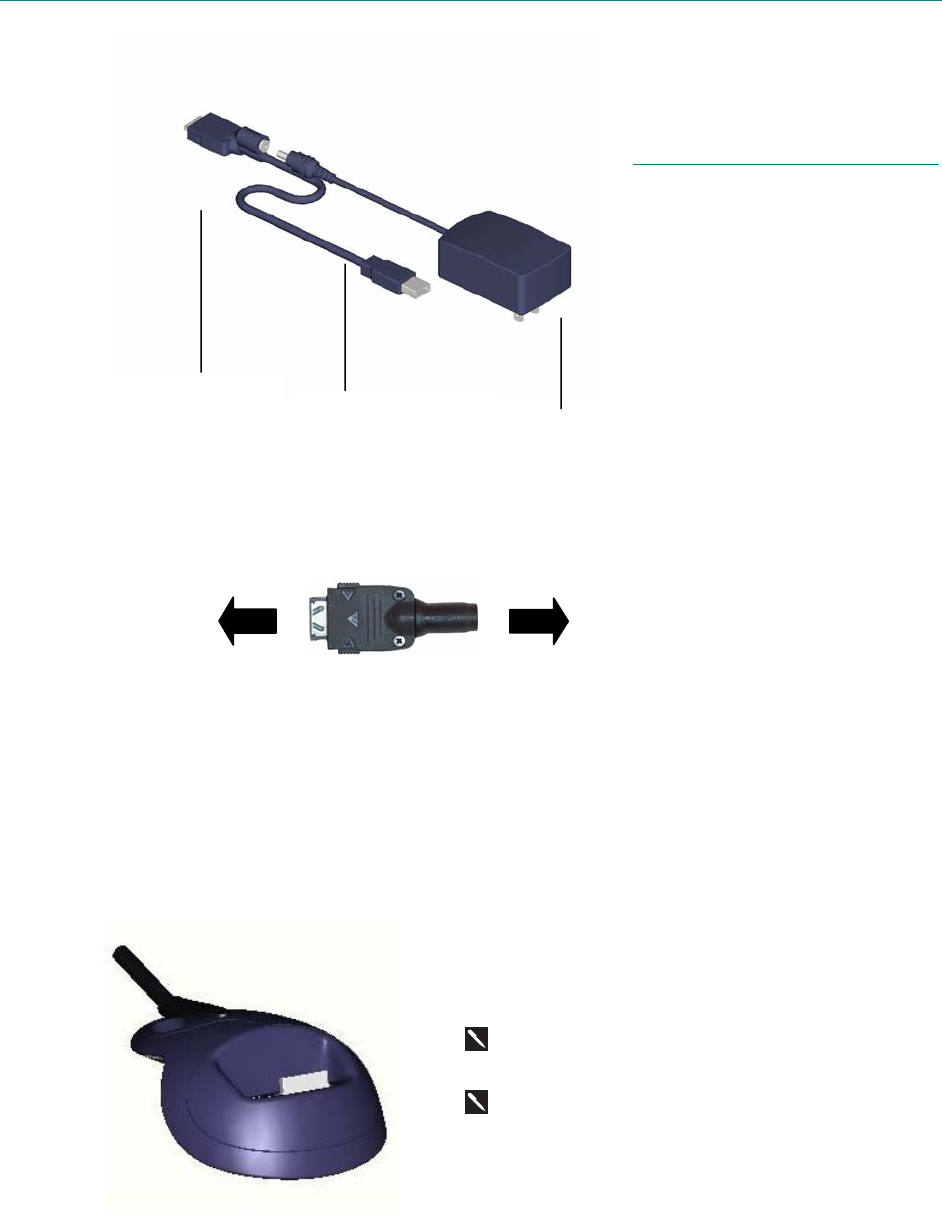
Chapter 1 Getting Started 7
You can plug the AC adapter into the
optional USB/Serial cable head and
then connect your Smartphone
directly to an external power source.
To your Smartphone To AC adapter
You can plug the AC adapter into the
optional DC Converter and then
connect your Smartphone directly to
an external power source.
Accessories
USB Cradle
Your Smartphone comes with a USB cradle. This allows
you to recharge your Smartphone, as well as synchronize
information between your smartphone and a PC using
ActiveSync
GPRS will not work when your device is plugged into
the cradle.
To synchronize the USB Cradle must be plugged into
an available USB port on your PC.
SD and MMC Cards
Your device has an expansion slot compatible with a range of SD and MMC Memory cards, which are
primarily used to backup or transfer files and data.
USB synchronization
cable
To your
Smartphone
Plug the AC adapter
into a socket
8 Windows® Powered Smartphone 2002 User’s Guide
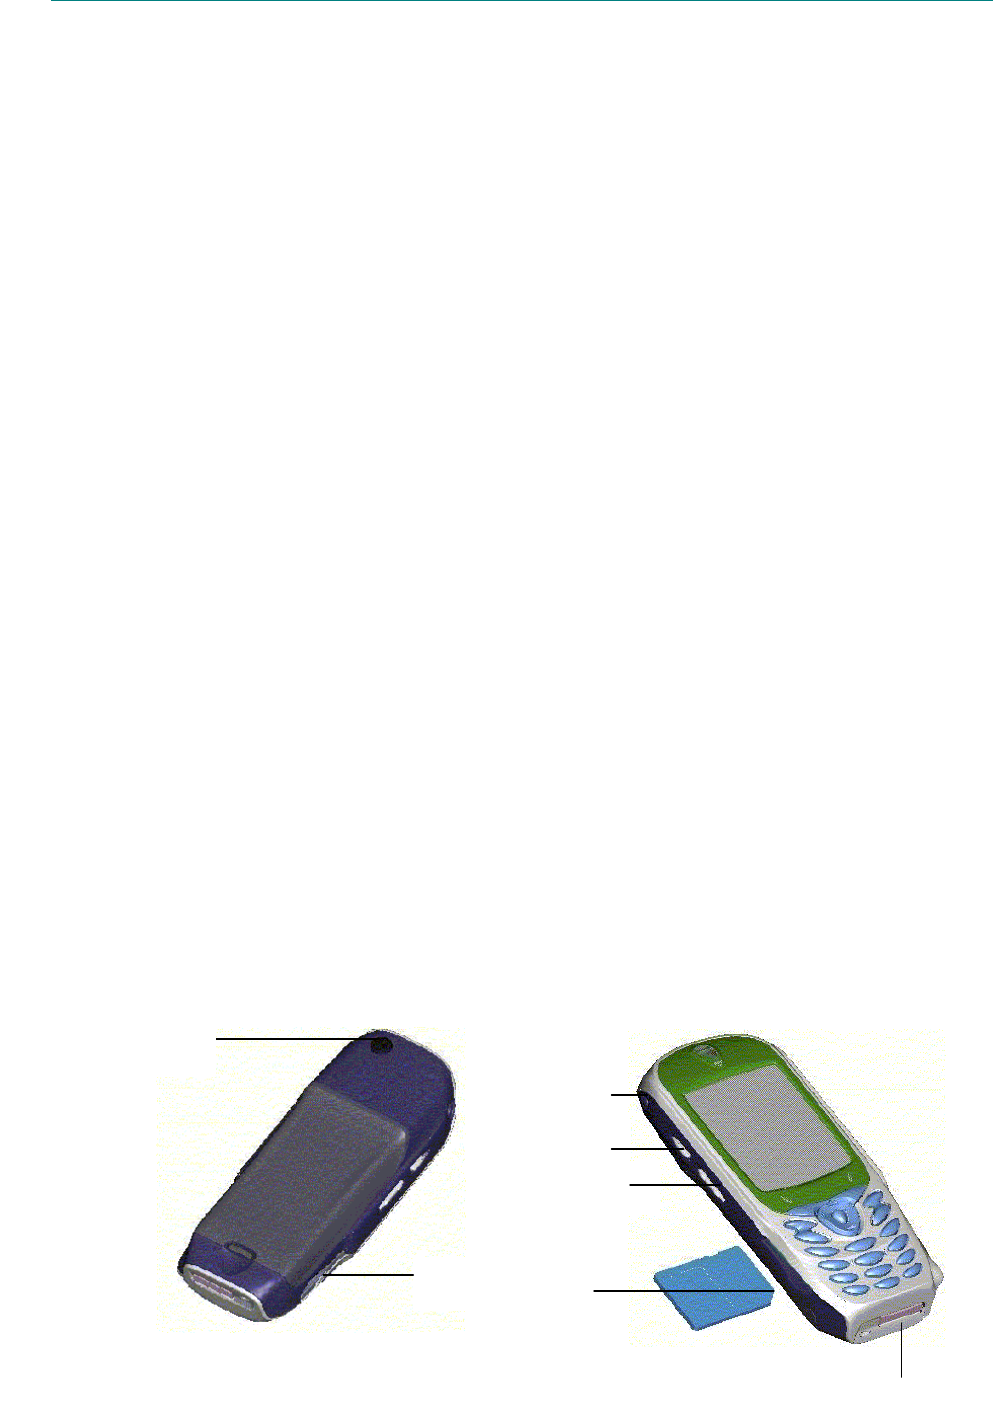
To insert or remove a memory card:
1. Push the memory card into slot (see left) until it
clicks into place. The card is secure when it is
not protruding from the base.
2. To remove the card push it in and then release,
letting the card spring out.
When you receive your device there will be a piece
of plastic in the slot; remove as described in “2” above.
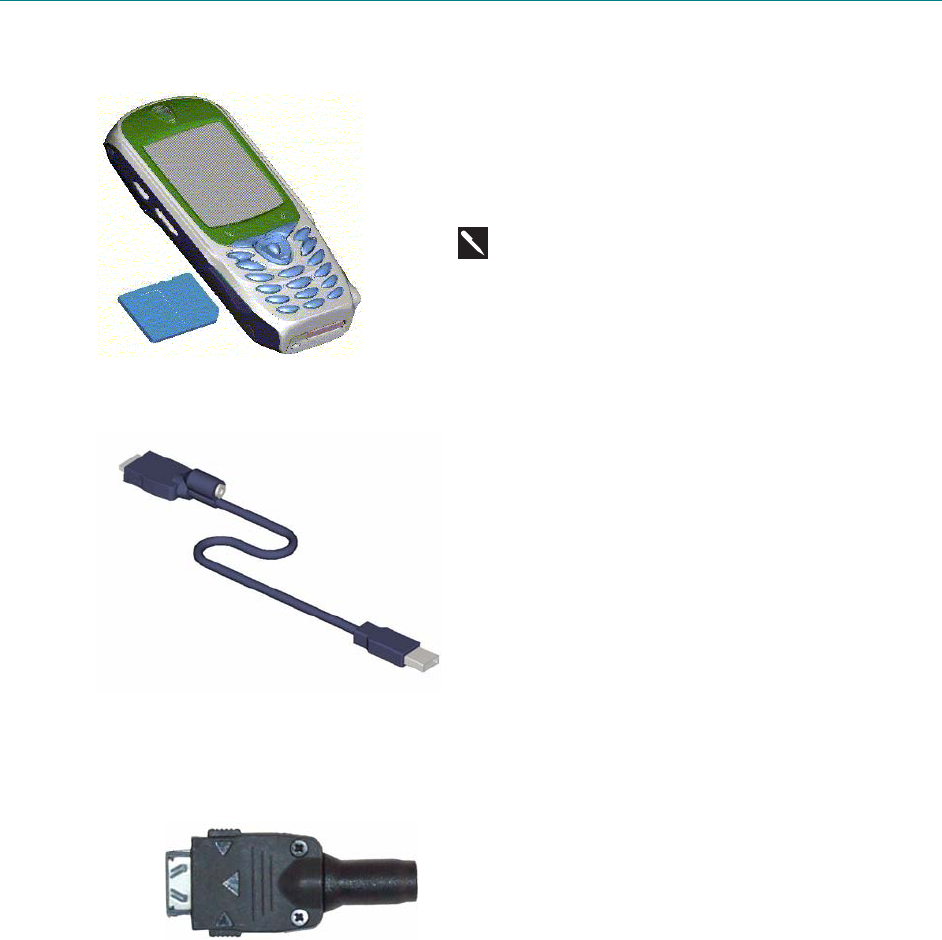
USB cable
The USB cable allows you to synchronize with your
desktop without the cradle. The DC converter in the head
also allows you, in combination with an AC adapter, to
recharge your device.
D) DC Connector
The DC Connector in combination with the AC adapter
allows you to recharge your device without the cradle.
Inserting the SIM card
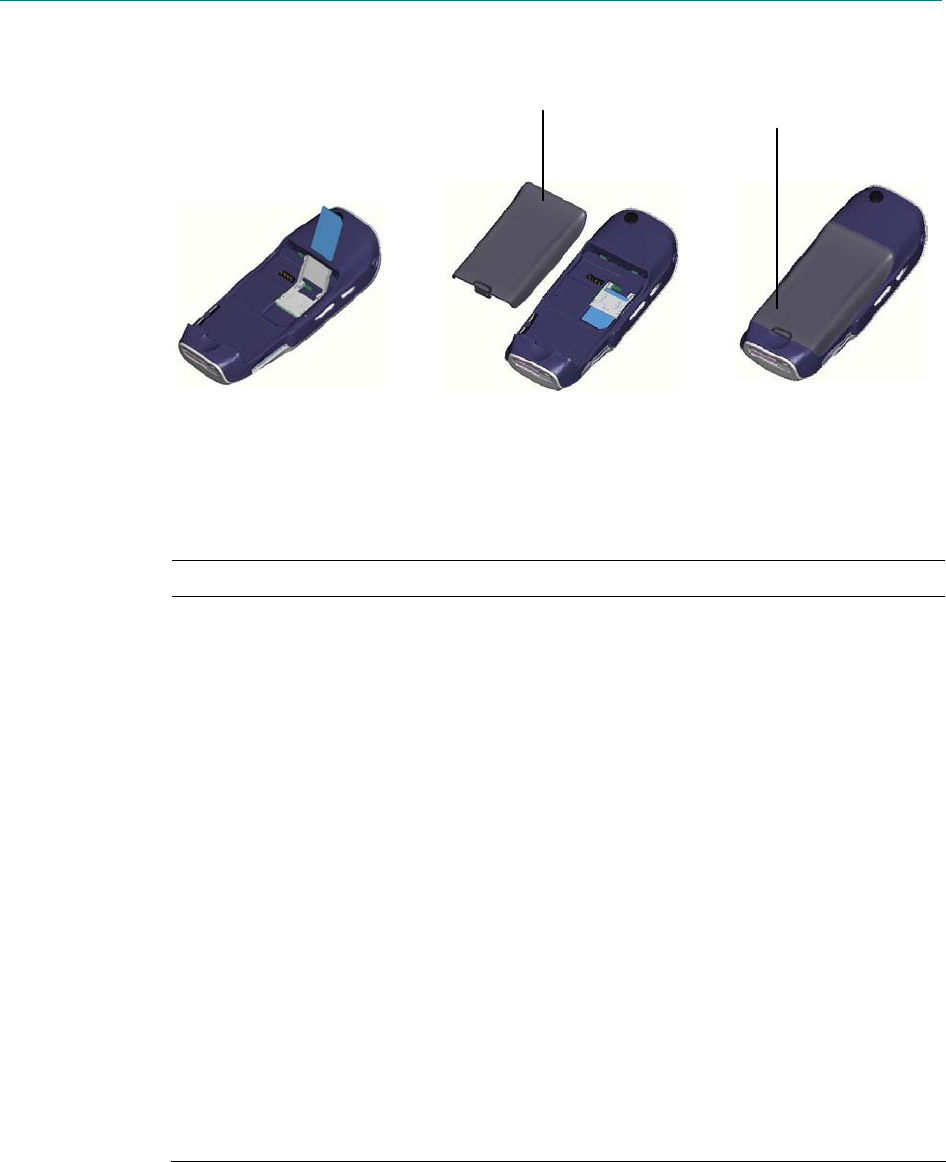
Chapter 1 9
1. Lift up the SIM card case
and insert the SIM. Push
it forward and pull back
to secure the SIM.
2. Replace the back panel by
inserting the top first.
3. Clip it into place it the
bottom.
Where to find information
The following table is a guide to finding information to help you use your phone.
Information about Source
Making a phone call Smartphone 2002 User’s Guide:
Chapter 3, “Phone Calls.”
Programs on the phone Smartphone 2002 User’s Guide
Additional programs that can be
installed on the phone
Smartphone 2002 Companion CD
Connecting to and synchronizing with a
desktop computer and/or a Microsoft
Exchange Server
Smartphone 2002 Quick Start Card
or ActiveSync Help on your
desktop computer
Text entry Smartphone 2002 User’s Guide or
Smartphone 2002 Quick Reference
Card
Last-minute updates and detailed
technical information
Readme files, located in the
Microsoft ActiveSync folder on the
desktop computer.
Up-to-date information on your
Smartphone 2002
http://www.microsoft.com/mobile

Chapter 2 The Basics
This chapter explains basic information about using your phone, such as navigating around your phone,
entering text and numbers on your phone, and securing your phone.
Navigation methods
The following information describes the different methods for navigating around your phone so you can
accomplish tasks quickly and easily.
Using the 5-way Navigation Pad
The navigation pad are used to navigate horizontally and vertically on the screen to move the selection
focus, so you can select the item you want. When you see instructional text about selecting an item, use
the appropriate Direction key to make your selection.
The following table shows the four different actions you can perform with the Direction keys, and how
they help you navigate on the screen.
Direction key action Navigation
Press Up Moves the selection focus upward on the screen.
Press Down Moves the selection focus downward on the screen.
Press Right Moves the selection focus forward on the screen, or moves
the cursor forward through characters in a text field.
Press Left Moves the selection focus backward on the screen, or moves
the cursor backward through characters in a text field,
without deleting characters.
Using the Action button
The Action button located in the center of the navigation pad confirms your selection. You can think of
the Action button as the “Do It” button. In some cases, confirming your selection will take you to a
program or setting.
Using the Home button
The Home button takes you to the Home screen.
Using the Home screen
The Home screen is your starting place for most tasks. You can easily navigate to any program or
setting on your phone from this screen. The top of the Home screen displays the five programs you
have most recently used. Just select the one you want to open, press the Action button, and you are
there. The Home screen also displays the current time, your next appointment, the number of
messages in your Inbox, and your current profile.
Selecting your next appointment and pressing the Action button opens Calendar so you can see all
of your appointments for the day. If you want to view your Inbox, just select the E-mail status
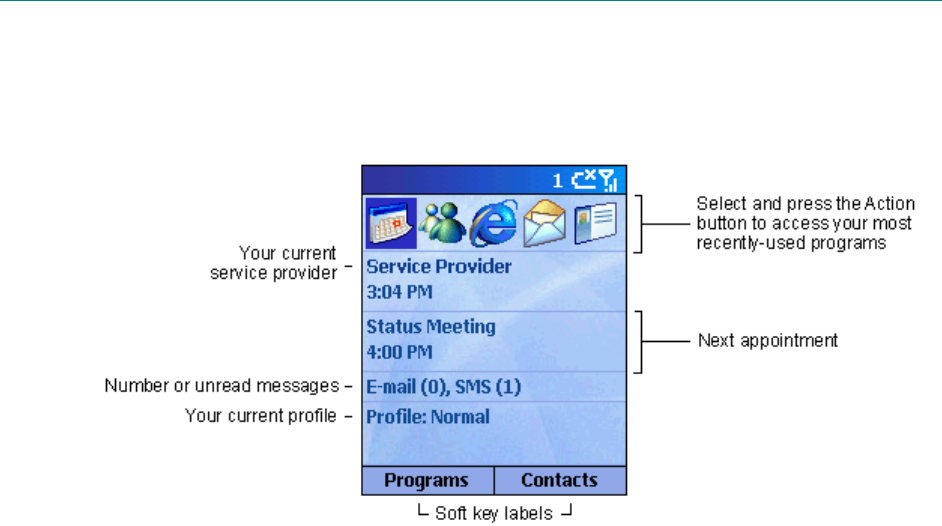
Chapter 2 The Basics 11
showing the number of messages you have, and press the Action button. To view Contacts, press
the Contacts soft key.
The Home screen automatically displays when you turn your phone on or leave your phone idle
when it is on, but you can navigate to it any time by pressing the Home button.
Figure 2 The Home screen
To access the Home screen
Press the Home button.
Navigation options from the Home screen
Select a recently-used program at the top of the screen, and then press the Action button to open the
program.
Select an item in the center of the Home screen, such as your next appointment, your e-mail
information, or your profile type, and then press the Action button to open the program or access
the settings associated with the item selected.
Press the Programs soft key to display the list of programs available on your phone, select the
program you want, and then press the Action button.
Press the Contacts soft key to display the Contacts list, select the contact you want to open, and
then press the Action button.
Using the Back button
Pressing the Back button navigates to the previous screen, or moves the cursor back to delete one or
more characters in a text field, similar to pressing “Backspace” on a keyboard.
To backspace and remove one character in a text field
Press the Back button.
To backspace and remove multiple characters in a text field
Press and hold the Back button.
Using soft keys
There are two soft keys on your phone, located directly below the display screen. Each soft key
performs the command displayed immediately above it on the screen, making it easy to navigate around
your phone and to perform common commands.
12 Windows® Powered Smartphone 2002 User’s Guide
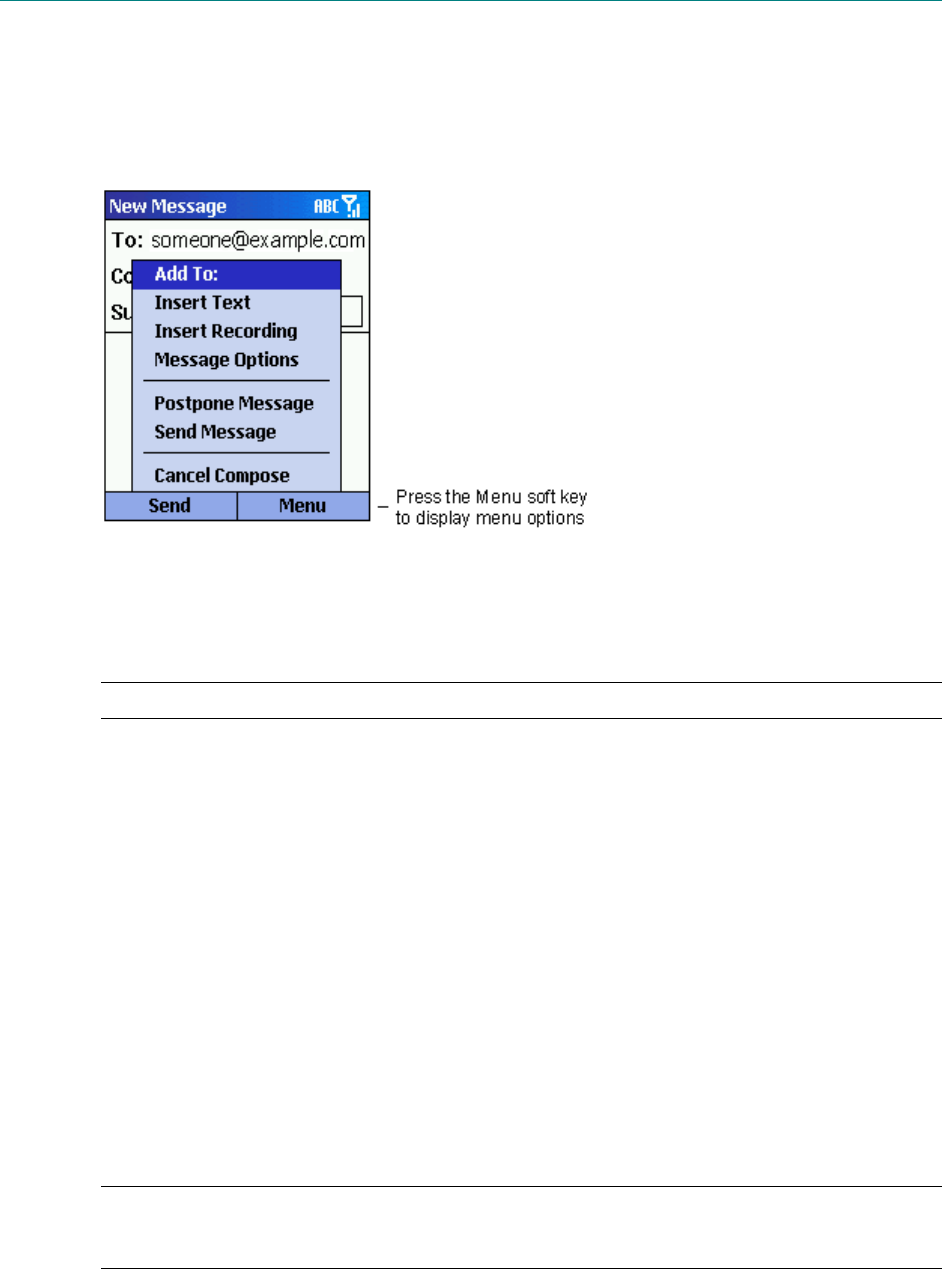
Using menus
On many screens, the right soft key is labeled Menu. The Menu soft key displays a list of menu options
that are relevant to the screen you are viewing. Selecting a menu option will either perform the
command or take you to another part of the user interface where you can perform the command.
Figure 3 New Message Menu screen displayed.
To access menu options
Press the Menu soft key on any screen where it is displayed.
Select the menu option you want, and press the Action button.
Tip: Pressing Up moves the selection focus to the bottom of the menu.
Using the Programs list
Your phone comes pre-installed with many programs that you can start using. To install additional
programs on your phone, refer to the Smartphone 2002 Companion CD that came with your phone. If
your phone provides a SIM toolkit to access programs on your SIM card, the toolkit is added to
Programs.
To navigate to a program
1. On the Home screen, press the Programs soft key.
2. Select the program you want, and press the Action button.
Using numbers
You can also use numbers to quickly navigate to programs and settings on your phone. Just press the
number on the keypad that corresponds to the number shown next to the program or setting you want.
For example, in Programs, press 3 on the keypad to open Calendar.
Tip: For lists where numbers are not visible, such as a menu list, you can still press the number that
corresponds to the item in top-down order. For example, if you want to select Filter in the list of
Contacts menu options, you can press 4 on the keypad because the Filter option is fourth in the list.
Chapter 2 The Basics 13
Using the Quick List
The Quick List displays a list of commands, such as locking your phone, locking the phone’s keypad,
and turning off the radio, as well as the list of available profile types.
To access the Quick List
Press the Power button.
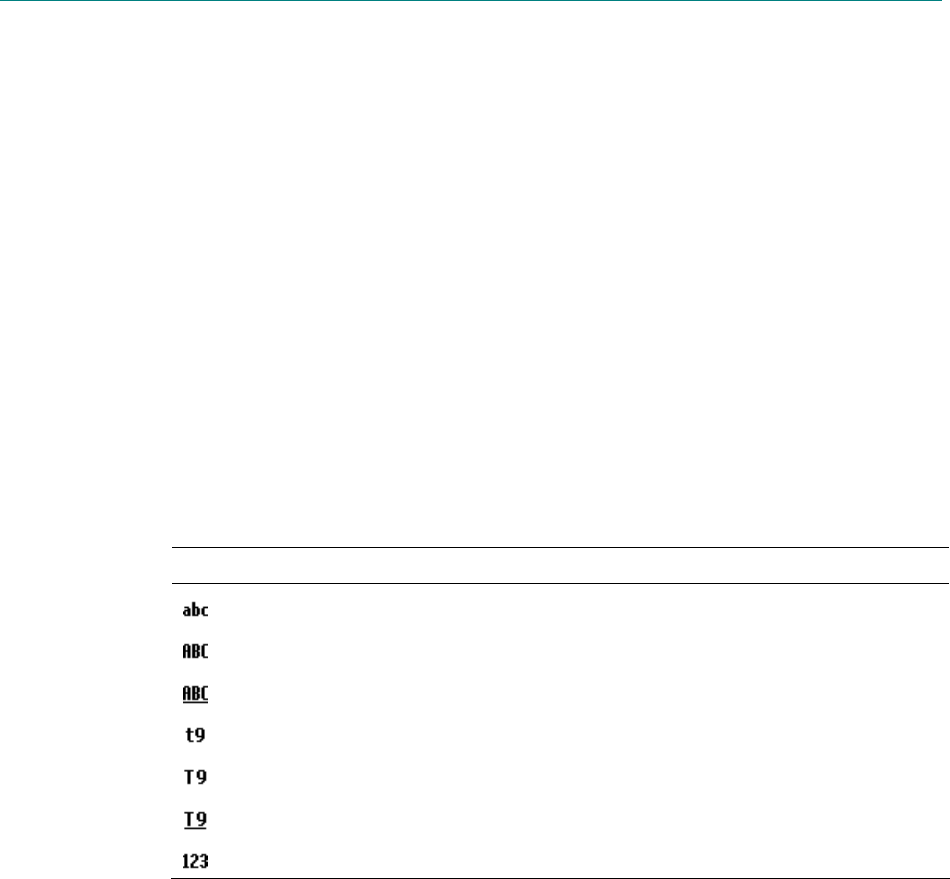
Entering text and numbers on your phone
You can enter text and numbers on your phone using the keypad. Your phone supports three input
modes for entering text and numbers: Multipress, T9, and Numeric. The Multipress and T9 modes are
used for entering text, and the Numeric mode is used for entering numbers. When you select a field that
requires text or numeric entry, the phone will automatically default to the appropriate input mode. The
status indicator on the title bar shows the input mode you are currently using.
To switch input modes
Press and hold the Asterisk (*) key until the status indicator for the input mode you want is
displayed in the title bar.
The following table shows the complete list of input mode status indicators.
Indicator Mode
Multipress text input mode, lowercase
Multipress text input mode, uppercase
Multipress text input mode, caps lock
T9 text input mode, lowercase
T9 text input mode, uppercase
T9 text input mode, caps lock
Numeric input mode
Entering text in Multipress mode
When you are in Multipress mode, you can enter a letter by pressing the number key on which the letter
appears. To enter the first letter on the number key, press the key once, to enter the second letter, press
the key twice, and so on. The letter entered most recently is underlined until you have completed the
keypresses for the letter and moved on to the next letter.
For example:
To enter the letter “s,” press 7777.
To enter the word “hat,” press 44, 2, 8.
When you enter letters that are on the same number key, you must pause after entering the first letter
and wait until the underline disappears before entering the next letter so your phone can process the first
letter. This pause is called the Multipress time out, and you can adjust the length of the pause between
keypresses.
For example:
To enter the word “cat,” press 222, pause, press 2, and then press 8.
To change the Multipress time out
1. On the Home screen, press the Programs soft key, select Settings, and then select Accessibility.

14 Windows® Powered Smartphone 2002 User’s Guide
2. Under Multipress time out, select the time interval you want for the pause between keypresses,
and press the Done soft key.
To enter punctuation in Multipress mode
Press 1 repetitively to cycle through common punctuation.
Entering text in T9 mode
When you are in T9 mode, just press the number keys that contain the letters you want to form a word.
T9 will then analyze your keypresses and attempt to complete the word.
For example:
To enter the word “shoe”, press 7, 4, 6, 3.
To enter text using T9 mode
1. Press and hold the Asterisk (*) key until the T9 indicator appears on the title bar.
2. Enter the numerical sequence that represents the word you want to form.
3. Press the Pound (#) key to accept the word and enter a space after it, or press 0 to scroll through
the available words.
4. If you do not see the correct word, erase the word, and then press and hold the Asterisk (*) key to
switch to Multipress mode, and manually enter the word.
Having trouble entering a word in T9 mode?
T9 cannot always find the word you want in the T9 dictionary; in these cases, switch to Multipress
mode. After you have entered the word in Multipress mode, the word will be added to the T9
dictionary.
To enter punctuation in T9 mode
Press 1, then 0 to cycle through common punctuation.
Entering numbers in Numeric mode
When you are in Numeric mode, just press the number(s) you want to enter on the keypad. If a field
permits a numerical entry only, such as the Work phone field in Contacts, the input mode will
automatically default to Numeric mode.
Miscellaneous input tasks
To enter a space
In Multipress or T9 mode, press the Pound (#) key on the keypad.
To start a new line
Press the Action button.
To change between uppercase and lowercase in text mode
Press the Asterisk (*) key to change between uppercase and lowercase.
Tip: When you are in text mode, the first letter of a sentence is automatically capitalized.
To lock caps
Press the Asterisk (*) key twice. Press the Asterisk (*) key again to return to lowercase.

Chapter 2 The Basics 15
To enter a symbol
Press and hold the Pound (#) key, select the symbol you want, and then press the Done soft key.
To enter a number, an asterisk (*), or a pound sign (#)
Switch to Numeric mode, and press the corresponding key on the keypad.
To delete characters
Press the Back button to backspace over a single character.
Press and hold the Back button to backspace and delete an entire text field.
To enter the plus (+) sign for international calls
Press and hold 0.
Securing your phone
You can customize the level of security you want to have on your phone by locking the keypad, the
entire phone, or the SIM card.
Locking the keypad
The keypad lock turns off the keypad functionality. This is a helpful feature if, for example, your phone
is turned on and in your pocket, and you want to prevent accidental keypresses from dialing a number
etc.
To lock your keypad
On the Home screen, press and hold the End button. The left soft key will display Unlock,
indicating that your phone is locked.
To unlock your keypad
On the Home screen, press the Unlock soft key, and press the Pound (#) key.
Locking your phone
Locking your phone prevents access to personal data. When you enable this feature, your phone will
automatically lock after a specified time of inactivity. A screen will be displayed requiring your phone
lock password before access is granted.
Note: You can still receive calls and make emergency calls when the phone is locked.
To lock your phone
1. Press the Power button to display the Quick List, select Device lock, and then press the OK soft
key.
2. Under Lock phone after, select the amount of time your phone is inactive before the phone
automatically locks.
3. Under Password, enter the password you want to use to access your phone when it is locked.
4. Under Confirm password, enter the password again, and press the Done soft key.
Note: After you have selected the time delay and created a password, you can then quickly lock your
phone from the Quick List, without having to view these settings.

16 Windows® Powered Smartphone 2002 User’s Guide
To unlock your phone
Press the Unlock soft key, enter your password, and then press the Unlock soft key again.
To turn off phone lock
On the Home screen, press the Programs soft key, select Settings, select More, select Security,
select Disable Phone Lock, and then press the Done soft key.
Locking the Subscriber Identity Module (SIM) card
Locking your SIM card prevents you from using the phone, but you can still turn it on and make
emergency calls. When you turn your phone on, you will be prompted for your PIN1 password, which
you must enter correctly before you can use your phone.
To lock the SIM card
1. On the Home screen, press the Programs soft key, select Settings, select More, select Security,
select Enable SIM Lock, and then press the Action button.
2. Enter your PIN1 password, and press the Done soft key.
To unlock the SIM card
1. On the Home screen, press Programs, select Settings, select More, select Security, select
Disable SIM Lock, and then press the Action button.
2. Enter your PIN1 password, and press the Done soft key.
Chapter 3 Phone Calls
This chapter explains how to make and receive phone calls, view Call History, and create shortcuts to
help you manage calls more efficiently.
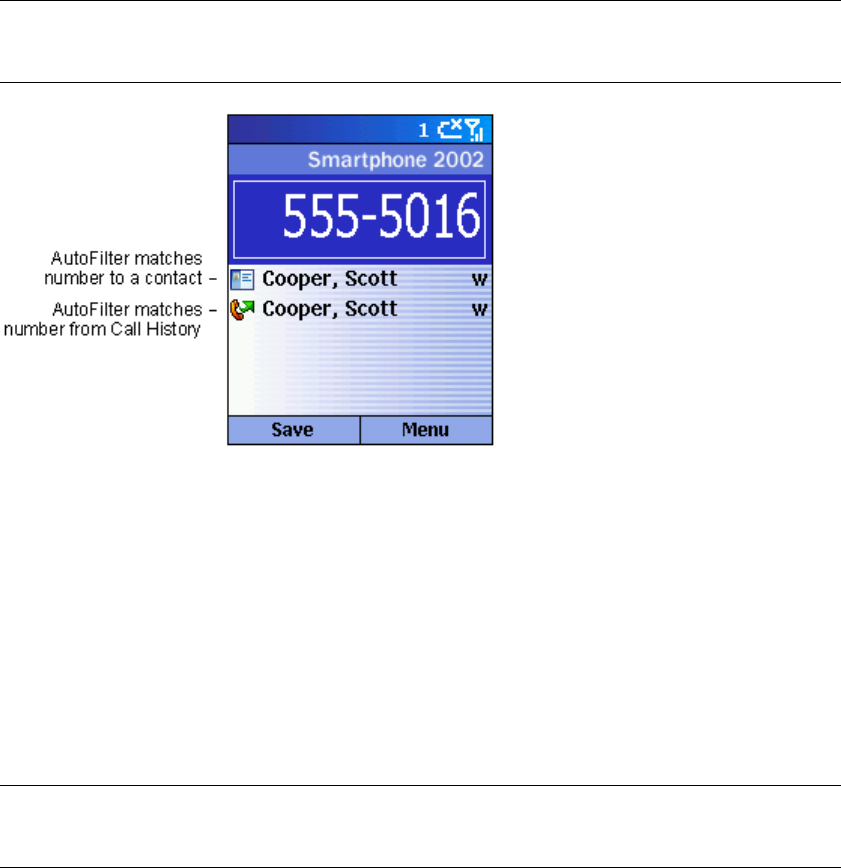
Making a call
There are several ways to make a call. The easiest way is to simply dial a phone number from the Home
screen.
To make a call
On the Home screen, press the numbers on the keypad to enter the phone number, and then press
the Talk button to make the call.
Tip: As you enter a phone number, your phone searches Contacts, Call History, and Speed Dial lists,
and your Subscriber Identity Module (SIM) card to find a matching number. When you see the name of
the person you want to call listed, select it, and press the Talk button.
Figure 4 Call Progress screen for making a call
Making a call from Contacts
To call someone from your Contacts list, just select the person’s name, and press the Talk button.
If you have more than one phone number for a contact, such as a Work phone number, a Home phone
number, and a Fax number, the Work phone number is set as the default number. Pressing the Talk
button will always dial the default number, but you can change the default number at any time.
To make a call by contact name
On the Home screen, press the Programs soft key, select Contacts, and then press the Action button.
Select the contact name to call, and press the Talk button.
Tip: If you have a long list of contacts and you don’t see the contact you want on the screen, you can
enter the first few letters of the contact’s name, and the phone will search through the entire Contacts
list and display the name.

18 Windows® Powered Smartphone 2002 User’s Guide
To change the default number for a contact
1. On the Home screen, press the Programs soft key, select Contacts, and then press the Action
button.
2. Select the contact, and press Left or Right to change the default number.
3. For example: If you change “w” to “m,” the default number changes from Work phone (w) to
Mobile phone (m).
Note: For more information about contact list abbreviations, see Chapter 6, “Contacts, Calendar, and
Tasks.”
To make a call from an open contact
1. On the Home screen, press the Programs soft key, select Contacts, and then press the Action
button.
2. Select the contact to call, and press the Action button.
3. Select the number you want to call, and press the Talk button.
Making a call using a recently-dialed number
You can display a list of phone numbers you have recently dialed and choose a name or number from
the list to call the person again.
To make a call using a recently-dialed phone number
1. On the Home screen, press the Talk button to display a list of recently-dialed phone numbers.
2. Select the number or entry for the person to call, and press the Talk button again.
Making a call from the Call History list
The Call History list displays the last 25 calls you made, received, and missed. Choose a name or
number to call someone from the list.
To make a call from the Call History list
1. On the Home screen, press the Programs soft key, select Call History, and then press the Action
button.
2. Select the number or entry for the person to call, and press the Talk button.
Making a call from a hyperlink
When you see an underlined phone number presented as a hyperlink in an e-mail message, just select
the hyperlink phone number, and press the Action button to make the call.
Making emergency calls
Calls to emergency service numbers can be made under any circumstances, even if you have locked the
SIM card and/or your phone.
To place an emergency call
Dial the emergency number appropriate for your location, and press the Talk button.
Chapter 3 Phone Calls 19
Having problems making a call?
Check to make sure that your phone contains a valid SIM card and that the phone is turned on,
unlocked, and in the service area of the selected service provider’s network.
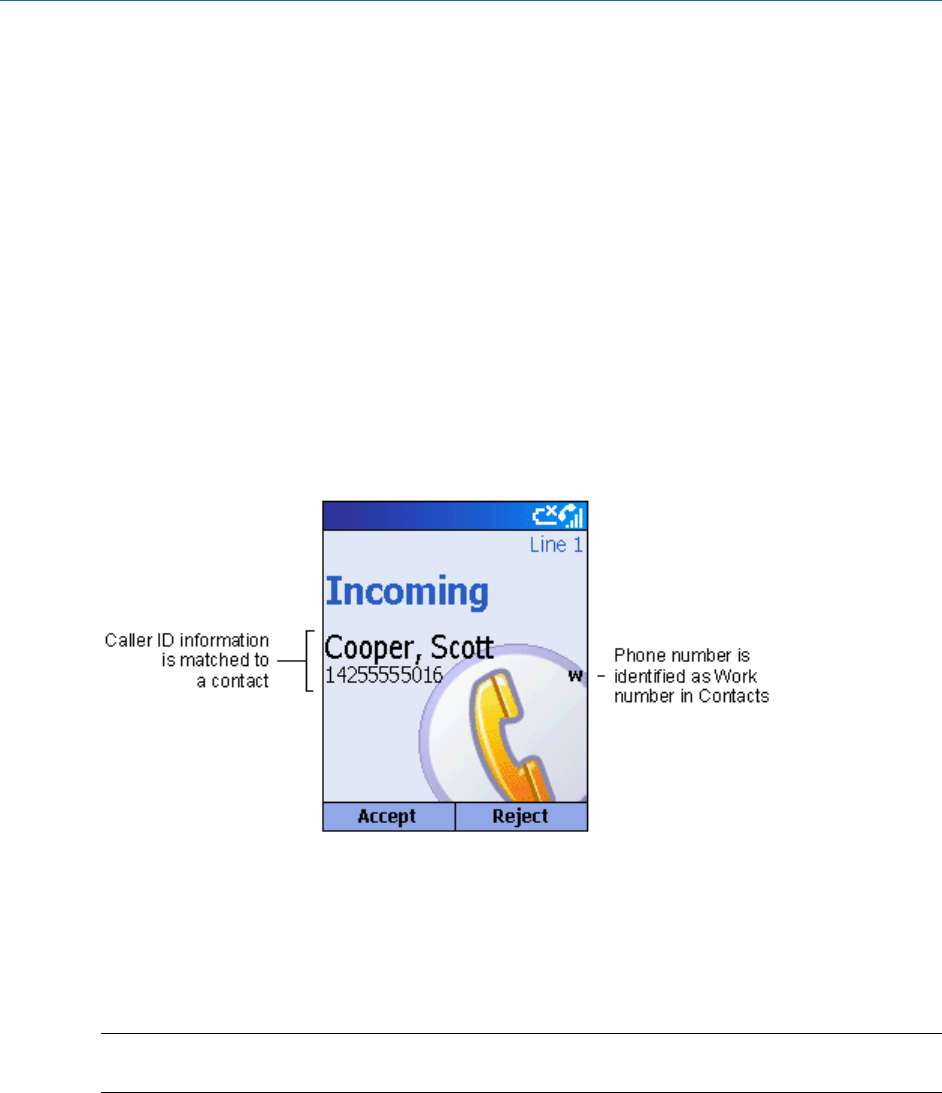
Receiving a call
You can answer a call by pressing the Talk button or the Accept soft key. If don’t want to take the call,
press the Reject soft key.
To answer an incoming call
Press the Talk button or the Accept soft key.
To reject an incoming call
Press the End button or the Reject soft key.
When you receive a call, the name and number of the caller are displayed on the screen. If the name of
the caller is not in your Contacts list, only the caller’s phone number will be displayed.
Figure 5 Call Progress screen for receiving a call
To answer a second call using Call Waiting
If you are already talking on the phone when you receive a call, press the Accept soft key or the
Talk button to place the first call on hold, and answer the second call.
If you want to end the first call before answering the incoming call, press the End button, and then
press the Accept soft key or the Talk button to accept the incoming call.
Note: Call Waiting is available only if you have subscribed to this service. Check with your service
provider.
To reject a Call Waiting call
If you are already talking on the phone when you receive a call and you don’t want to answer it,
press the Reject soft key. This will keep your current call in progress, but will reject the Call
Waiting call.
In-call options
While a call is in progress, you can press the Menu soft key to access menu options for common tasks.
The following table shows the menu options available when a call is in progress. Some of these options
are only available when multiple calls are in progress or during a conference call.

20 Windows® Powered Smartphone 2002 User’s Guide
Menu Option: Function
End Disconnects the call.
Hold Places the active call on hold.
Unhold Activates the call on hold.
Swap Switches between two calls.
Save Contact Creates a contact for the caller.
Conference Joins together all existing calls, if you have subscribed to this service.
Private Breaks one call out of a conference and makes this call active while the
rest of the conference is on hold.
Speakerphone Increases the volume of the earpiece.
Mute Mutes the microphone for the active call. The other party will not hear
anything you say, but you can still hear the other party.
Unmute Turns the microphone back on for the active call.
Miscellaneous call tasks
To place a call on hold
Press the Hold soft key.
To switch between two calls
Press the Swap soft key.
To end a call
Press the End button to disconnect.
To redial the last number called
On the Home screen, press the Talk button twice.
To listen to a voice-mail message
1. On the Home screen, press the Programs soft key. Select Inbox/SMS, and press the Action
button.
2. Select the voice-mail message and press the Voice Mail soft key or the Talk button. Your voice
mail system is then dialed.
Reviewing your calls
Using Call History and Call Timers, you can view information about phone calls you have made and
received, such as who has called you recently and how much time you have spent on your phone.
Call History
Call History displays the last 25 calls you have made, received, and missed. Each entry in Call History
contains the start time of the call, the duration, the caller’s name, if available, and the caller’s number.
The oldest calls are automatically deleted from the list to make room for the newest calls.
Chapter 3 Phone Calls 21
To view Call History
On the Home screen, press Programs, select Call History, and then press the Action button.
Tip: You can filter Missed Calls, Incoming Calls, and Outgoing Calls. Press the Menu soft key, select
Filter, press the Action button, and select the filter you want.
To view contact information from Call History
Select the entry for the contact, press the Menu soft key, select Find Contact, and then press the
Action button.
To send an e-mail message from Call History
Select the contact, press the Menu soft key, select E-mail, and then press the Action button.
To create a new contact from a number in Call History
Select the contact, press the Menu soft key, select Save, and then press the Action button.
To remove an item from Call History
Select the item, press the Menu soft key, select Delete, and then press the Action button.
To remove all items in Call History
Press the Menu soft key, select Delete List, and then press the Action button.
Call Timers
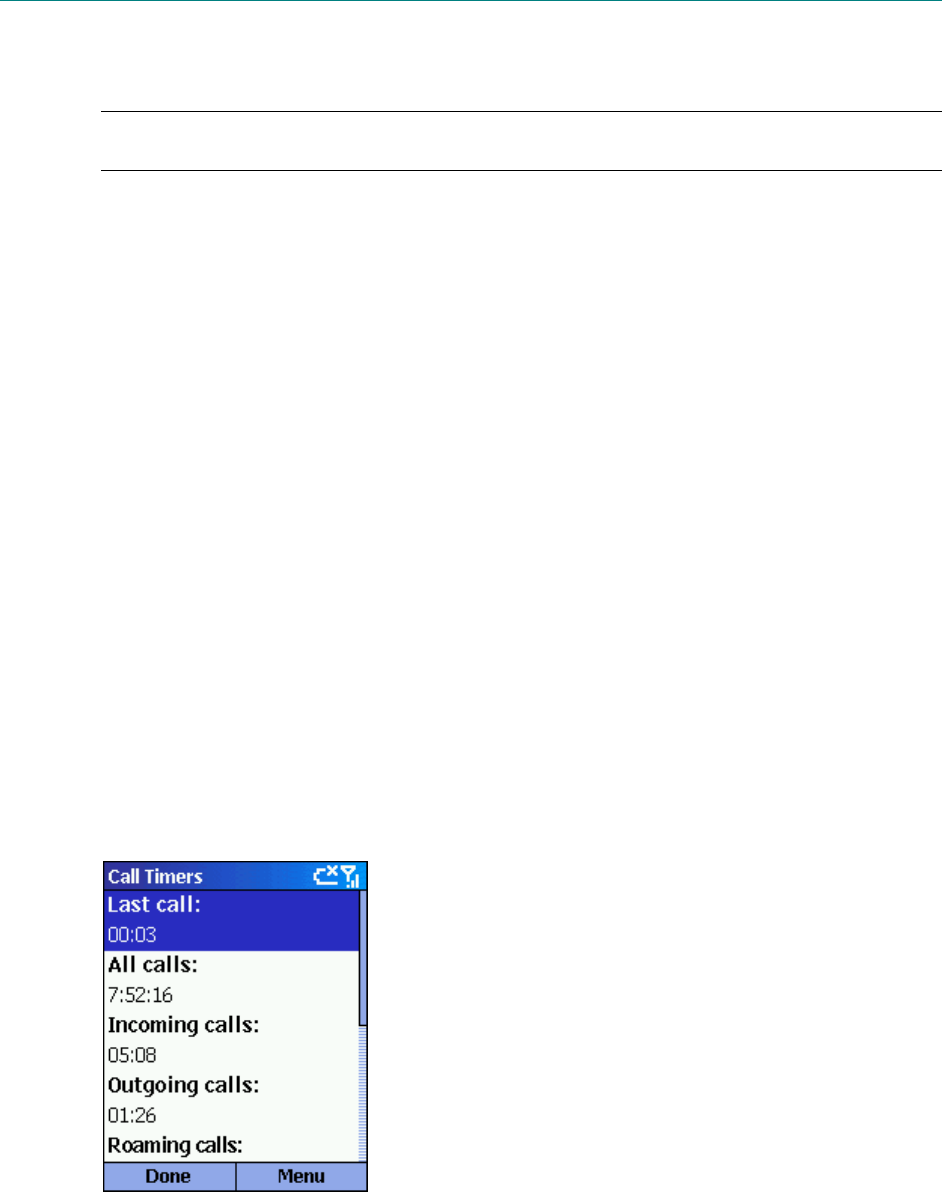
Call Timers contains detailed information regarding the length of your last call, the total number of calls
made and received, calls by type (incoming, outgoing, roaming, and data), and a lifetime counter. Call
Timers is useful when you want to keep track of your calling patterns, for example to determine what
type of calling plan to subscribe to or to help you estimate your monthly billing.
To view Call Timers
On the Home screen, press the Programs soft key, select Call History, press the Menu soft key,
select View Timers, and then press the Action button.
Figure 6 Call Timers
Shortcuts
You can create speed dials as shortcuts to quickly dial frequently-called phone numbers.

22 Windows® Powered Smartphone 2002 User’s Guide
Speed dials
You can create speed dials to dial frequently-called phone numbers by simply pressing and holding one
or two keys. You may choose speed dial entries from 2-99; speed dial 1 is reserved for voice mail
access and the number is configured in your settings.
Note: A speed dial can be created only for phone numbers stored in Contacts.
To create a speed dial for a phone number
1. On the Home screen, press the Programs soft key, select Contacts, and then press the Action
button.
2. Open the contact and select the phone number to set up as a speed dial.
3. Press the Menu soft key, select Add Speed Dial, and then press the Action button.
4. Under Keypad assignment, enter the speed dial number to associate with the phone number, and
press the Done soft key.
Tip: You can also create speed dials for Web addresses and e-mail addresses that are stored in
Contacts.
To make a call using a speed dial
On the Home screen, press and hold the number on the keypad that you have assigned as a speed
dial for a number. If the keypad assignment is two digits, press the first digit and press and hold the
second digit.
To view speed dials you have created
On the Home screen, press the Programs soft key, select More, select Shortcuts, and then press
the Action button.
Viewing and deleting shortcuts
Once you have set up speed dials, you can view or delete all of your shortcuts in the Shortcuts list.
To view shortcuts
On the Home screen, press the Programs soft key, select More, select Shortcuts, and then press
the Action button.
To delete shortcuts
1. On the Home screen, press the Programs soft key, select More, select Shortcuts, and then press
the Action button.
2. Select the shortcut to delete, press the Menu soft key, select Delete, and then press the Action
button.
Advanced dialing options
The following information covers advanced dialing options that may be useful for phone numbers
requiring special dialing instructions.
To insert an international country code
1. International calls require a country code to be included in the phone number. The country code is
separated from the rest of the number sequence by a plus (+) sign.

Chapter 3 23
2. Press and hold 0 until a plus sign (+) appears.
Note: You can insert a plus sign (+) into a contact’s number or dial it directly from the keypad.
To insert a three-second pause in a dialing sequence
1. Some international calls require a three-second pause in the dialing sequence for the call to
process successfully.
2. On the Home screen, press the Programs soft key, select Contacts, and then press the Action
button.
3. Select the contact, press the Action button, and then select the phone number to modify.
4. Press the Edit soft key and press Left or Right to move the cursor between the numbers where
you want to insert a three-second pause.
5. Press the Menu soft key, select Insert Pause, and then press the Action button. The letter “p”
will appear in the number to show where the three-second pause will occur in the dialing
sequence.
6. Press the Done soft key.
To insert a manual pause in a dialing sequence
There may be phone numbers that require a pause longer than three seconds in the dialing sequence. For
these cases, you can pause as long as you want and manually continue the dialing sequence using the
Talk button.
1. On the Home screen, press the Programs soft key, select Contacts, and then press the Action
button.
2. Select the contact, press the Action button, and then select the phone number to modify.
3. Press the Edit soft key, and press Left or Right to move the cursor between the numbers where
you want the dialing sequence to pause before proceeding.
4. Press the Menu soft key, select Insert Wait, and then press the Action button. The letter “w” will
appear in the number to show where the pause will occur in the dialing sequence.
5. Press the Done soft key.
Note: When you make a call using Insert Wait, press the Talk button to continue the dialing sequence.
Chapter 4 Settings
This chapter introduces viewing and changing the settings on your phone and resetting your phone to its
original settings.
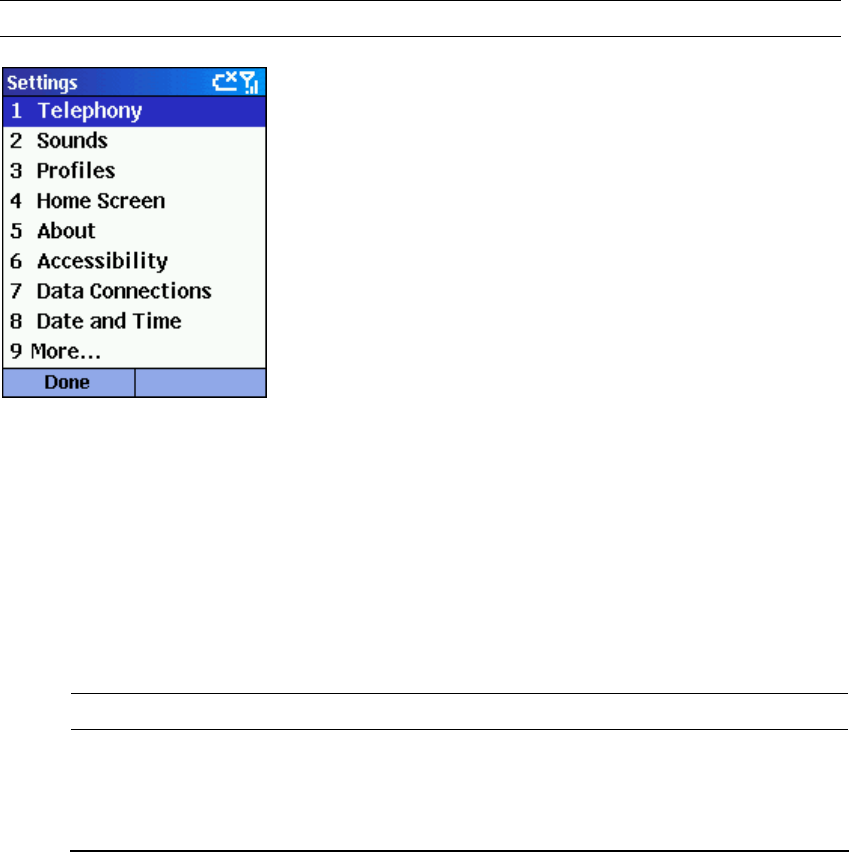
Viewing and changing settings
You can easily view and change settings to personalize your phone for the way you work. For example,
you can change the sounds or use your own sounds for ring tones, notifications, and reminders, use your
own image for the Home screen background, set up Call Forwarding and Call Waiting to manage your
calls more efficiently, and more.
To view Settings
On the Home screen, press the Programs soft key, select Settings, and then press the Action
button.
Note: To view the remaining settings, select More and press the Action button.
Figure 7 The Settings screen
Telephony
Telephony settings are primarily used to set options for calls you receive, such as Call Forwarding, Call
Waiting, and Caller ID.
To view Telephony settings
On the Home screen, press the Programs soft key, select Settings, select Telephony, and then
press the Action button.
The following table lists the telephony settings and their functions.
Telephony setting Function
Call Barring Enables you to block incoming and/or outgoing calls.
Call Forwarding Enables you to forward all or selected calls to another number.

Chapter 4 Settings 25
Telephony setting Function
Call Options Enables you to change phone numbers, such as your voice mail
and SMS service center, answer incoming calls by pressing any
key, and other advanced call options.
Call Waiting Enables you to turn Call Waiting on or off.
Caller ID Enables you to let your identification be known to all callers, only
your contacts, or no callers.
Channels Enables you to configure cell broadcast.
Fixed Dialing Enables you to limit your calling area to one or more specific
phone numbers and/or area codes.
Networks Identifies your current network and changes your network
selection from Automatic to Manual.
Sounds
Sounds settings are used to customize the sounds for ring tones, notifications, and reminders.
To display Sounds settings
On the Home screen, press the Programs soft key, select Settings, select Sounds, and then press
the Action button.
To use your own sound
1. Go to where your sound file is stored on your desktop computer and copy the file.
2. In ActiveSync on your desktop computer, click Explore, double-click IPSM, double-click
Application Data, double-click Sounds, and then paste the sound file into the Sounds folder.
3. On the Home screen on your phone, press the Programs soft key, select Settings, select Sounds,
and then press the Action button.
4. Select the item to customize, press Left or Right to select your sound, and then press the Done
soft key.
Tip: You can also select the sound to use by selecting the item you want to customize, and then
pressing the Action button. This will show the complete list of sounds to choose from.
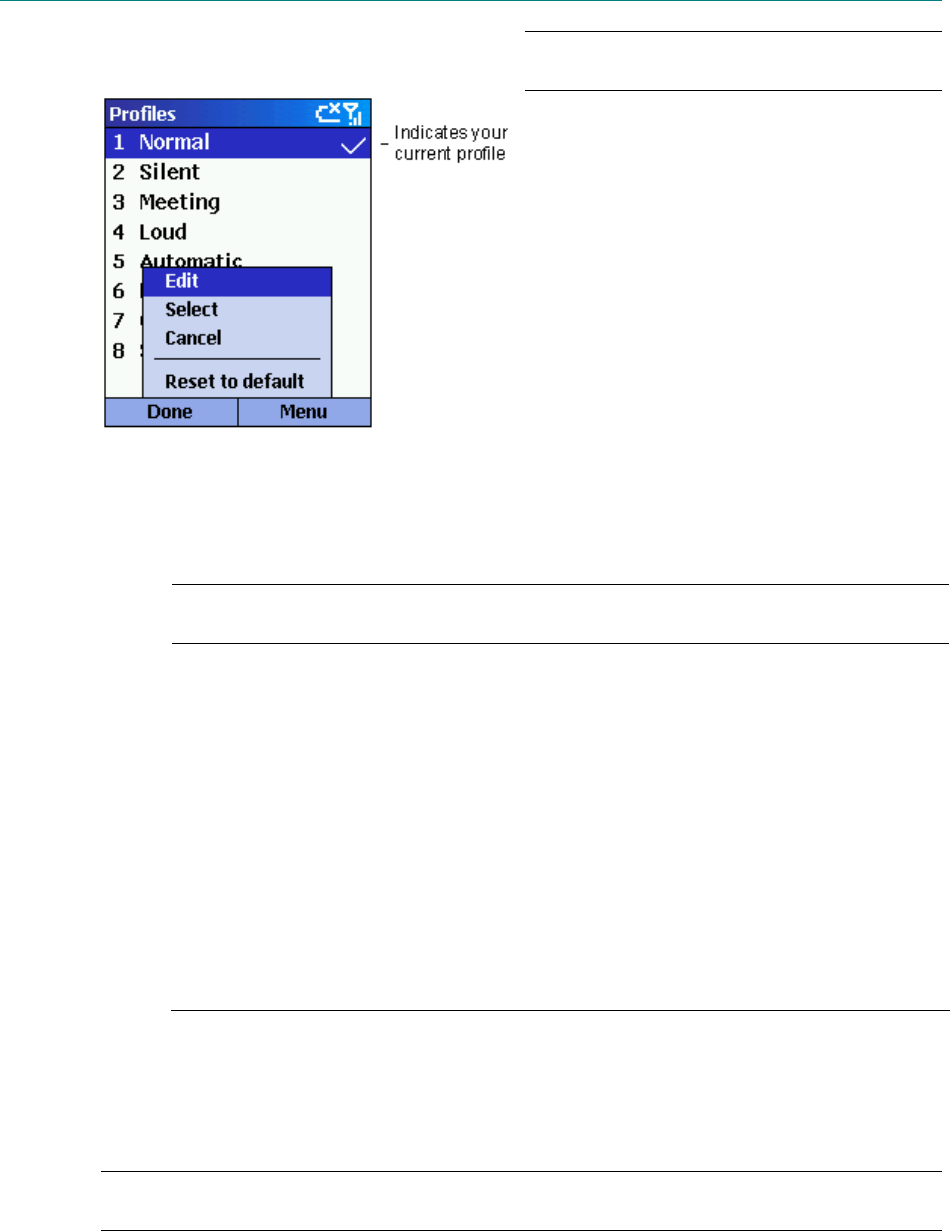
Profiles
Profiles settings are used to configure how your phone notifies you of events such as an incoming call,
an approaching appointment, or an arriving message. You can use Profiles to change quickly how you
receive notifications based on your situation. For example, you may want the phone to ring louder if a
client is calling, or you may not want the phone to ring at all, but want to hear calendar reminders. The
default profile used with your phone is the Normal profile. The name of the current profile is displayed
on the Home screen, and you can rename it.
To view Profiles settings
On the Home screen, press the Programs soft key, select Settings, select Profiles, and then press
the Action button.
26 Windows® Powered Smartphone 2002 User’s Guide
Tip: You can also get to Profiles settings
directly from the Home screen.
Figure 8 Profiles
Preset profiles
The following table shows the list of profiles that come with your phone and their attributes.
Profile
Name
Ring Type Ring
Volume
Notification
Type
Notification
Volume
Feedback
Volume
Normal Ring 3 Play sound 3 3
Silent Vibrate Off Vibrate Off Off
Meeting Vibrate 1 Sound 1 Off
Loud Ring Loud Sound Loud Loud
Automatic Toggles between Normal and Meeting, based on your calendar.
Headset Ring 3 Sound 3 3
Car Ring 4 Sound 4 4
Speaker-
phone
Ring Loud Sound Loud Loud
To use profiles
1. On the Home screen, press Down to select Profile: [Type], and press the Action button.
2. Select the profile, press the Action button to set the profile, and then press the Done soft key.
Tip: You can also select a different profile using the Quick List. Press the Power button, select the
profile, and then press the Action button.
To modify a profile on the Settings menu
1. On the Home screen, press the Programs soft key, select Settings, select Profiles, and then press
the Action button.
2. Select the profile to modify, press the Menu soft key, and then select Edit.

Chapter 4 Settings 27
3. Modify the settings, and press the Done soft key.
Home screen
Home screen settings are used to change the Home screen layout, the color scheme, the background
image, and the time delay before the Home screen appears when your phone is idle.
To view Home screen settings
On the Home screen, press the Programs soft key, select Settings, select Home Screen, and then
press the Action button.
To customize the Home screen with your own image
1. Go to where your image file is stored on your desktop computer, and copy the image file.
2. In ActiveSync on your desktop computer, click Explore, navigate to My Documents, and then
paste the image file into the My Documents folder.
3. On the Home screen on your phone, press the Programs soft key, select Settings, select Home
Screen, and then press the Action button.
4. Select Background image and press Left or Right to select your image.
5. Press the Done soft key.
Tip: You can also select the image you want to use by selecting Background image and pressing the
Action button. This will show you the complete list of images to choose from.
Notes: Make sure that your phone is connected to your desktop computer via USB or Serial before you
open ActiveSync to paste the image file.
For best results, use images with a 176 x 220 screen resolution to fit on the screen.
About
About settings display information about your phone’s operating system, including version numbers
and copyright information.
To view About settings
On the Home screen, press the Programs soft key, select Settings, select About, and then press
the Action button.
Accessibility
Accessibility settings are used to configure your system font size, multipress time-out, confirmation
time-out, and in-call alert volume.
To view Accessibility settings
On the Home screen, press the Programs soft key, select Settings, select Accessibility, and then
press the Action button.

28 Windows® Powered Smartphone 2002 User’s Guide
Data Connections
Data Connections settings enable you to set up Dial-up, Virtual Private Network (VPN), Proxy, and
General Packet Radio Service (GPRS) connections so you can connect to the Internet or your corporate
network. With a data connection, you can browse the Web, download e-mail, chat using MSN®
Messenger, or synchronize wirelessly with the server. Check with your service provider to see if a data
connection has already been set up for you, and if over-the-air configuration is supported.
To view Data Connections Settings
On the Home screen, press the Programs soft key, select Settings, select Data Connections, and
then press the Action button.
Dial-up connection
You need to set up a Dial-up connection to connect directly to the Internet or to your corporate network.
To create a dial-up connection to the Internet
1. On the Home screen, press the Programs soft key, select Settings, select Data Connections, and
then press the Action button.
2. Press the Menu soft key, select Edit Connections, and then press the Action button.
3. Select Dial-up Connections, and press the Action button.
4. Press the Menu soft key, select Add, and then press the Action button.
5. Under Description, enter a name for the connection.
6. Under Connects to, press Left or Right to select The Internet.
7. Enter the appropriate information for the remaining fields, and press the Done soft key.
To create a dial-up connection to your corporate network
1. On the Home screen, press the Programs soft key, select Settings, select Data Connections, and
then press the Action button.
2. Press the Menu soft key, select Edit Connections, and then press the Action button.
3. Select Dial-up Connections, and press the Action button.
4. Press the Menu soft key, select Add, and then press the Action button.
5. Under Description, enter a name for the connection a name.
6. Under Connects to, press Left or Right to select My Corporate Network.
7. Enter the appropriate information for the remaining fields, and press the Done soft key.
VPN connection
A VPN connection is used to access your corporate network using an existing Internet connection.
Proxy connection
A proxy connection is used to access the Internet using an existing connection to your corporate
network.

Chapter 4 Settings 29
GPRS connection
If there is GPRS coverage in your area, you can set up a GPRS connection to access your corporate
network or the Internet, which is faster than a Dial-up connection.
Date and time
Date and Time settings enable you to change your local time zone and the current date and time, and to
set the alarm.
To view Date and Time settings
On the Home screen, press the Programs soft key, select Settings, select Date and Time, and then
press the Action button.
Owner Information
Owner Information settings are used to enter and display personal information, such as your name,
phone number, and e-mail address. This is helpful, for example, in the event that you lose your phone
so that you can be contacted if it is found.
To view Owner Information settings
On the Home screen, press the Programs soft key, select Settings, select More, select Owner
Information, and then press the Action button.
Power Management
Power Management settings are used to display power-saving settings, such as changing the backlight
brightness and the backlight and display timeouts, and to check your battery level.
To view Power Management settings
On the Home screen, press the Programs soft key, select Settings, select More, select Power
Management, and then press the Action button.
Regional Settings
Regional Settings are used to change the phone’s language, date, and time style, as well as number and
currency formatting options.
To view Regional Settings
On the Home screen, press the Programs soft key, select Settings, select More, select Regional
Settings, and then press the Action button.
Remove Programs
Remove Programs settings enable you to remove programs installed on your phone, with the exception
of core programs that came with your phone, such as Contacts, Calendar, and Internet Explorer.
To view Remove Programs Settings
On the Home screen, press the Programs soft key, select Settings, select More, select Remove
Programs, and then press the Action button.
Security
Security settings are used to enable phone lock or SIM lock and to set the phone lock password.

30 Windows® Powered Smartphone 2002 User’s Guide
To view Security Settings
On the Home screen, press the Programs soft key, select Settings, select More, select Security,
and then press the Action button.
Resetting to factory defaults
OEM/service provider note:
Chapter 5 Messaging Features
This chapter introduces basic messaging features, such as sending and receiving e-mail and Short
Message Service (SMS) messages, viewing and managing your message folders, customizing message
notifications, and using MSN® Messenger to communicate with others.
Sending e-mail and SMS messages
There are several ways to send e-mail and SMS messages with your phone. The most common way to
send messages is from Inbox or from a contact card.
For information on text input, see Chapter 2, “The Basics.”
Sending messages from Inbox
You can send e-mail messages by synchronizing, or by connecting directly to an e-mail server through
your Internet service provider (ISP) or a corporate network.
For information on Microsoft ActiveSync, see Chapter 7, ”Synchronizing Information.”
To compose an e-mail or SMS message from Inbox
1. On the Home screen, press the Programs soft key, select Inbox/SMS, and then press the Action
button.
2. Press the New soft key, enter an e-mail address or SMS number in the To field, or select a name
from Contacts by selecting the To field, and then press the Action button.
3. Press Down and enter a subject.
4. Press Down, enter your message, and then press the Send soft key.
Notes: To insert the @ sign for an e-mail address, press the 1 key repeatedly in Multipress mode until
the @ sign appears.
To add multiple recipients, separate each name with a semicolon by repeatedly pressing the 1 key in
Multipress mode until the semicolon appears.
Figure 9 New e-mail

32 Windows® Powered Smartphone 2002 User’s Guide
To request a delivery receipt for a SMS message you are
composing
1. Before you send the SMS message, press the Menu soft key, select Message Options, and then
press the Action button.
2. Select the Request SMS text message delivery notification check box, and then press the Done
soft key.
Sending messages from a Contact
You can send a message quickly to a contact if you have an e-mail address or SMS number included in
the contact.
To compose an e-mail or SMS message from a contact
1. On the Home screen, press the Contacts soft key.
2. Select the contact you want and press the Action button.
3. Select the e-mail address or SMS number and press the Action button.
4. Enter a subject.
5. Press Down, enter your message, and then press the Send soft key.
Inserting predefined text into messages
Save time when composing mail by inserting predefined text into your messages. You can edit the
predefined text to create words or phrases that you frequently use in messages.
To insert predefined text into a message
1. On the Home screen, press the Programs soft key, select Inbox/SMS, and then press the Action
button.
2. Press the New soft key and, in the body text field, press the Menu soft key, select Insert Text,
and then press the Action button.
3. Select the predefined text you want to insert into your message and press the Insert soft key.
To edit your predefined text messages
1. On the Home screen, press the Programs soft key, select Inbox/SMS, and then press the Action
button.
2. Press the Menu soft key, select Options, select Predefined Text, and then press the Action
button.
3. Select and modify the text you want to change and press the Done soft key.
Inserting voice recordings into messages
Inserting a voice recording into a message is easy. Inserting a voice recording is useful when you want
to verbally explain information that is contained in the message.
To insert a voice recording into a message
1. On the Home screen, press the Programs soft key, select Inbox/SMS, and then press the Action
button.

Chapter 5 Messaging Features 33
2. Press the New soft key and, in the body text field, press the Menu soft key, and then select Insert
Recording.
3. Press the Record soft key to start recording and press the Stop soft key to stop recording.
4. Press the Done soft key to insert the recording into your message.
Note: Only one voice recording at a time can be created. A new voice recording will replace the prior
recording.
Receiving e-mail and SMS messages
You can receive e-mail and SMS messages through Inbox synchronization or by connecting to your e-
mail server. You can then view all of the messages in your Inbox. When you connect to the e-mail
server or synchronize your Inbox with your desktop computer, only the first .5 KB of each new message
are downloaded to Inbox on your phone by default. If you are using an IMAP4 or POP3 server, only the
first 1 KB of each new message are downloaded by default. Only small attachments are downloaded
and the original messages remain on the e-mail server or your desktop computer.
Note: For more information on synchronizing your Inbox, see Chapter 7, “Synchronizing Information.”
Opening messages
E-mail and SMS messages that are sent to you are stored in your Inbox.
To open a message
1. On the Home screen, press the Programs soft key, select Inbox/SMS, and then press the Action
button.
2. Select the message to open and press the Action button.
Tip: If you want to create a contact card for the sender, press the Menu soft key, select Add Sender to
Contacts, and then press the Action button.
Receiving meeting requests
When you accept a meeting request that arrives in Inbox, the meeting will immediately appear in
Calendar on your phone, and a message will be sent back to the meeting organizer the next time you
synchronize Inbox.
For more information on synchronizing Calendar, see Chapter 7, “Synchronizing Information.”
To accept a meeting request
1. On the Home screen, press the Programs soft key, select Inbox/SMS, and then press the Action
button.
2. Select the meeting request, press the Action button, and then press the Accept soft key.
Receiving complete messages
You can specify messages to receive in full, instead of receiving only the first .5 KB set by default.
34 Windows® Powered Smartphone 2002 User’s Guide
To receive a complete message
1. On the Home screen, press the Programs soft key, select Inbox/SMS, and then press the Action
button.
2. Select the message to receive in full, press the Menu soft key, select Mark for Download, and
then press the Action button.
3. The complete message will be retrieved the next time you synchronize or connect to your e-mail
server.
Note: When you delete a message on your phone, it is also deleted from the e-mail server the next time
you connect.
Receiving message attachments
You can download message attachments to your phone. Attachments are displayed as a list of
hyperlinks at the bottom of the e-mail message. Each attachment is preceded by an attachment icon.
These attachment hyperlinks are displayed at the bottom of the message. The text of the hyperlink
contains the file name followed by the size of the attachment, thereby helping you to determine whether
you want to download the attachment.
Note: On POP3 messages, the attachment size is omitted.
The attachment icon has the following three states:
Not downloaded
Downloaded
Marked for download
To download an attachment
In an open message containing an attachment for download, select the attachment and press the
Action button.
The attachment will be downloaded when you synchronize or request to send and receive e-mail.
To view a downloaded attachment
In an open message containing a downloaded attachment, select the attachment and press the
Action button.
Note: You can view attachments only for file types that are supported by your phone.
Viewing your message folders
Your phone stores messages in the following folders.
Deleted Items, where messages that you delete are stored until you empty this folder.
Drafts, where messages that you save before sending are stored.
Inbox, where all messages that you receive arrive by default.
Outbox, where sent e-mail messages are stored until you synchronize or connect to your e-mail
server. SMS messages are sent immediately over the network and will appear in your Outbox
folder only for a few seconds.
Sent Items, where copies of e-mail messages that you send are stored.

Chapter 5 Messaging Features 35
To view message folders
1. On the Home screen, press the Programs soft key, select Inbox/SMS, and then press the Action
button.
2. Press the Menu soft key, select Show Folders, and then press the Action button.
Note: If your e-mail account supports folders, you can view multiple folders to reflect the folder
structure that you have created on your e-mail server. Messages you download from the server will then
be placed automatically in the appropriate folders on your phone.
Managing your Inbox
All e-mail and SMS messages are stored in your Inbox. By default, the most recently received messages
are displayed at the top of the Inbox list. Using the menu options, you can quickly compose, delete,
forward, and reply to messages. You can also customize your Inbox settings to control the way you
send, receive, and view messages.
Figure 10 Inbox
To view your Inbox
On the Home screen, press the Programs soft key, select Inbox/SMS, and then press the Action
button.
Using Inbox menu options
It is easy to accomplish common messaging tasks from your Inbox. Press the New soft key to compose
a new message, or press the Menu soft key to forward, delete, and reply to messages, access Inbox
options you can customize, and more.
To view Inbox menu options
On the Home screen, press the Programs soft key, select Inbox/SMS, press the Action button,
and then press the Menu soft key.
The following table lists Inbox menu options and their functions.
Inbox menu option Function
New Message Opens a new message.
Reply Replies to an open or selected message.
Forward Forwards the selected message.

36 Windows® Powered Smartphone 2002 User’s Guide
Inbox menu option Function
Delete Deletes the selected message.
Mark for Download Retrieves the entire e-mail message from the e-mail server the
next time you connect.
Mark as Read Displays the header text of a message in your Inbox in
lightface, indicating that the message has been read.
Mark as Unread Displays the header text of a message in your Inbox in bold,
indicating that the message has not been read.
Options Displays a list of Inbox options that you can customize (see the
following table).
Send/Receive E-mail Connects to your e-mail server to send and receive messages.
Show Folders Displays all message folders.
Customizing Inbox options
You can optimize your Inbox for the way you work. For example, you can change the way your
messages are displayed, specify how you want your messages to be sorted, specify the volume and limit
the size of messages you want to automatically download, change your synchronization schedule, and
more.
To customize Inbox Options
1. On the Home screen, press the Programs soft key, select Inbox/SMS, and then press the Action
button.
2. Press the Menu soft key, select Options, and then press the Action button.
3. Select the option to customize, and press the Action button.
4. Modify the settings to change, and press the Done soft key.
The following table lists the Inbox options and their functions.
Inbox Option Function
Display Enables you to change the message information displayed in your
Inbox.
Sending Enables you to specify whether you want to include an original
copy of the message in your reply, save a copy of your sent
messages, or use Unicode for SMS messages.
Receiving Enables you to specify the volume and limit the size of new
messages that are automatically downloaded.
Predefined Text Enables you to edit the predefined text that you can insert in
messages.
Chapter 5 Messaging Features 37
Inbox Option Function
E-mail Setup Enables you to configure your phone to send and receive e-mail
messages. Your service provider or network administrator will
need to provide you with the necessary information to connect to
your e-mail server.
Automatic
Synchronization
Enables you to set up and change your synchronization schedule.
Import Messages from
SIM
Enables you to import SMS messages from a SIM card to your
Inbox. The messages are not removed from the SIM card after
they are imported.
Transport Options
(IMAP only)
Enables you to select mail transport options. For example,
IMAP4 allows you to download e-mail messages received during
a specified number of days.
Message notifications
Your phone makes a sound to alert you when new messages arrive. The number of unopened messages
is displayed on the Home screen, depending on your Home screen settings and an envelope icon is
displayed in the title bar. You are notified in different ways for the types of messages you receive.
SMS messages: These messages are delivered immediately to your phone. If your phone is turned off
when SMS messages arrive, you are notified the next time you turn your phone on. A closed envelope
icon , indicating an unopened e-mail message, is displayed in the title bar, accompanied by an SMS
sound alert. You can view new SMS messages in your Inbox.
E-mail messages: When you connect to your e-mail server, you are notified of new e-mail messages by
the closed envelope icon displayed in the title bar, accompanied by an e-mail sound alert. You can
view new e-mail messages in your Inbox.
Voice mail messages: You are notified of new voice mail messages available on the voice mail system
by the new voice mail icon displayed in the title bar. You can then listen to your new voice mail
messages by pressing the Voice Mail soft key if it is displayed, or by calling your voice mail service
number.
To modify a sound alert for notifications
1. On the Home screen, press the Programs soft key, select Settings, select Sounds, and then press
the Action button.
2. Select the item to modify, press Left or Right to choose a new sound, and then press the Done
soft key.
SMS messages
You can send and receive SMS messages up to 160 characters in size over the phone network. If an
SMS message is longer, it will automatically be sent in chunks as several small SMS messages, and will
then be unified as one SMS message after all of the small SMS messages have been received.
The advantages of SMS messages include the following:
SMS messages are sent instantly.
SMS messages can be sent or received during a voice or data call.

38 Windows® Powered Smartphone 2002 User’s Guide
Most mobile phones support SMS, so most recipients can read SMS messages you send.
Note: SMS messages are not synchronized, and you cannot use them to send or receive attachments.
To import SMS messages from the SIM card to your Inbox
1. On the Home screen, press the Programs soft key, select Inbox/SMS, and then press the Action
button.
2. Press the Menu soft key, select Options, select Import Messages from SIM, and then press the
Action button.
Notes: You cannot export Inbox from your phone to a SIM card.
SMS messages are not removed from the SIM card after they are imported to Inbox.
Communicating with MSN Messenger
You can use MSN® Messenger on your phone to send instant messages. MSN Messenger on your
phone provides the same chat environment as MSN Messenger on your desktop computer. Features of
this environment include:
Sending and receiving instant messages.
Seeing the status of others in your Messenger contacts list, or changing your own status (e.g.,
available, busy, out to lunch).
Inviting other people to a chat conversation.
Blocking contacts from seeing your status or sending you messages.
Getting started with MSN Messenger
To use MSN Messenger, you need a Microsoft® .NET Passport account unless you already have a
Hotmail account. To set up a Microsoft .NET Passport account, go to: http://www.passport.com. Once
you have this account, you will need:
A connection on your phone, such as a modem or wireless connection, that enables you to connect
to the Internet.
To sign in to MSN Messenger using your Microsoft .NET Passport.
To sign in and out of MSN Messenger
1. On the Home screen, press the Programs soft key, select MSN Messenger, press the Action
button, and then press the Sign In soft key.
2. Enter your sign-in name (Example: name_123@hotmail.com) and password, and then press the
Sign In soft key.
3. To sign out, press the Menu soft key, select Sign out, and then press the Action button.
Note: If you do not sign out of MSN Messenger, you will remain on a data connection. This may result
in additional charges from your service provider.
To send an instant message
1. Sign in to MSN Messenger.
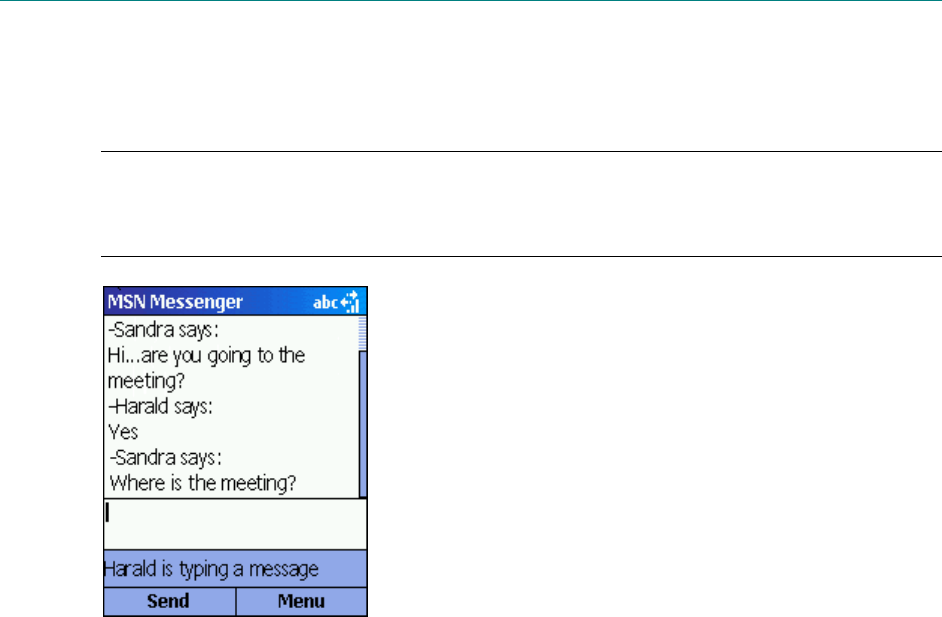
Chapter 5 Messaging Features 39
2. Select the person in MSN Messenger to whom you want to send an instant message, and press the
Send soft key.
3. Enter your message, and press the Send soft key.
Notes: To quickly add common messages, press the Menu soft key, select My Text, and then select the
text you want to use in the message.
For information on text input, see Chapter 2, “The Basics.”
Figure 11 MSN Messenger Options
To invite a contact to an ongoing chat
Press the Menu soft key, select Invite, and then select a contact.
To see who is already chatting, or to switch between chats
Press the Menu soft key, and select Chats.
To accept or switch between chats
Press the Menu soft key, select Chats, and then select the contact to begin chatting.
To add a contact
In the Messenger contacts list, press the Menu soft key, select Add Contact, and then follow the
directions on the screen.
To delete a contact
In the Messenger contacts list, select the contact's name, press the Menu soft key, and then select
Delete Contact.
To block or unblock a contact from seeing your status and sending
you messages
In the Messenger contacts list, select the contact's name, press the Menu soft key, and then select
Block or Unblock.
To change your status
1. In the Messenger contacts list, select your name, and press the Action button.
2. Select a status description, such as Away, and press the Action button.
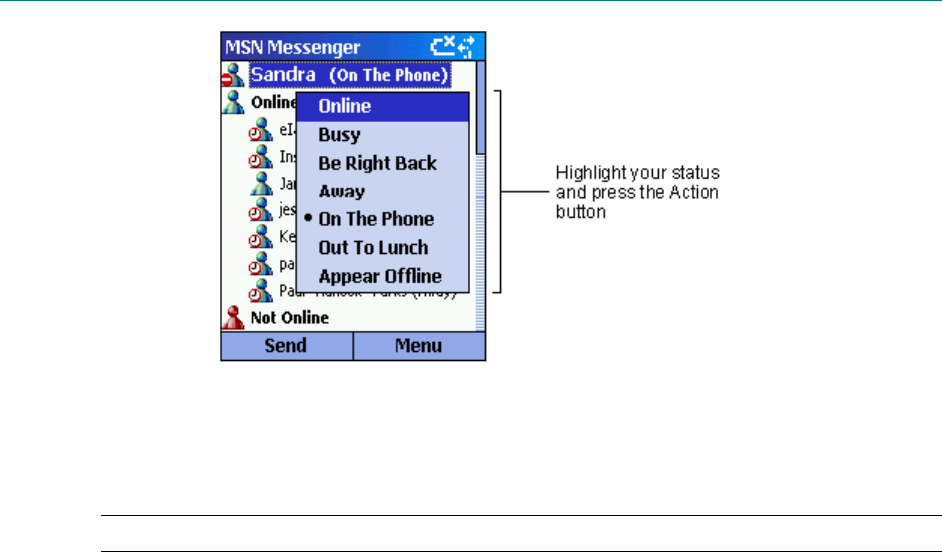
40 Windows® Powered Smartphone 2002 User’s Guide
Figure 12 Changing Status
To change your displayed name
In the Messenger contacts list, press the Menu soft key, select Options, and then select Passport Account.
Enter the name that you want others to see when you send instant messages.
Note: You must be signed in to MSN Messenger to change your displayed name.

Chapter 6 Contacts, Calendar, and
Tasks
This chapter introduces features on your phone that help you manage and keep track of contacts,
appointments, and schedule, and maintain a “things to do” list. This chapter also explains how to send
and receive contact and appointment information between your phone and another mobile device or a
desktop PC (beaming data) by using infrared.
For information on synchronizing Contacts, Calendar, and Tasks, see Chapter 7, “Synchronizing
Information.”
Using Contacts
You can think of Contacts as an online address book, where you can store information about people and
businesses you communicate with in contact cards. For example, you can store multiple phone numbers,
e-mail and street addresses, Web pages, and other information that relates to the contact, such as a
birthday or anniversary date. You can use Contacts to dial phone numbers and compose e-mail and
SMS messages directly from a contact card.
The Contacts list
The Contacts list displays the names of your contacts alphabetically, along with an abbreviation for the
default communication method, such as the person’s work phone number (w) or home phone number
(h). This makes it easy to reach the contact using the method you prefer.
Note: If the contact card includes a work phone number, your phone will automatically set it as the
default number.
To access Contacts
On the Home screen, press the Contacts soft key.
Figure 13 The Contacts list
The following table shows possible abbreviations that might be displayed in the Contacts list and their
meanings.

42 Windows® Powered Smartphone 2002 User’s Guide
Contact list
abbreviation
Meaning
w Work phone
w2 Second work phone
h Home phone
h2 Second home phone
m Mobile phone
pgr Pager
car Car phone
sms SMS address
e E-mail address
e2 Second e-mail address
e3 Third e-mail address
To call a contact using the default number
1. On the Home screen, press the Contacts soft key.
2. Select the contact to call, and press the Talk button.
Tip: If you have a long list of contacts and you don’t see the contact you want to call on the first screen,
enter the first few letters of the contact’s name: the phone will search through the entire Contacts list
and display the name.
To call a contact using a number other than the default number
1. On the Home screen, press the Contacts soft key.
2. Select the contact, press Left or Right to display the abbreviation for the number you want to use,
and then press the Talk button.
Note: Changing the abbreviation changes the default number.
To find a contact by entering a name
1. On the Home screen, press the Contacts soft key.
2. Begin entering the name of the contact you want until the name is displayed.
For example, to find “Sandra,” enter 7, 2, 6, 3, 7, 2 because these numbers correspond with the
letters for that name on the keypad.
To filter contacts
1. On the Home screen, press the Contacts soft key, press the Menu soft key, select Filter, and then
press the Action button.
2. Select a filter (Business, Miscellaneous, or Personal), and press the Action button.
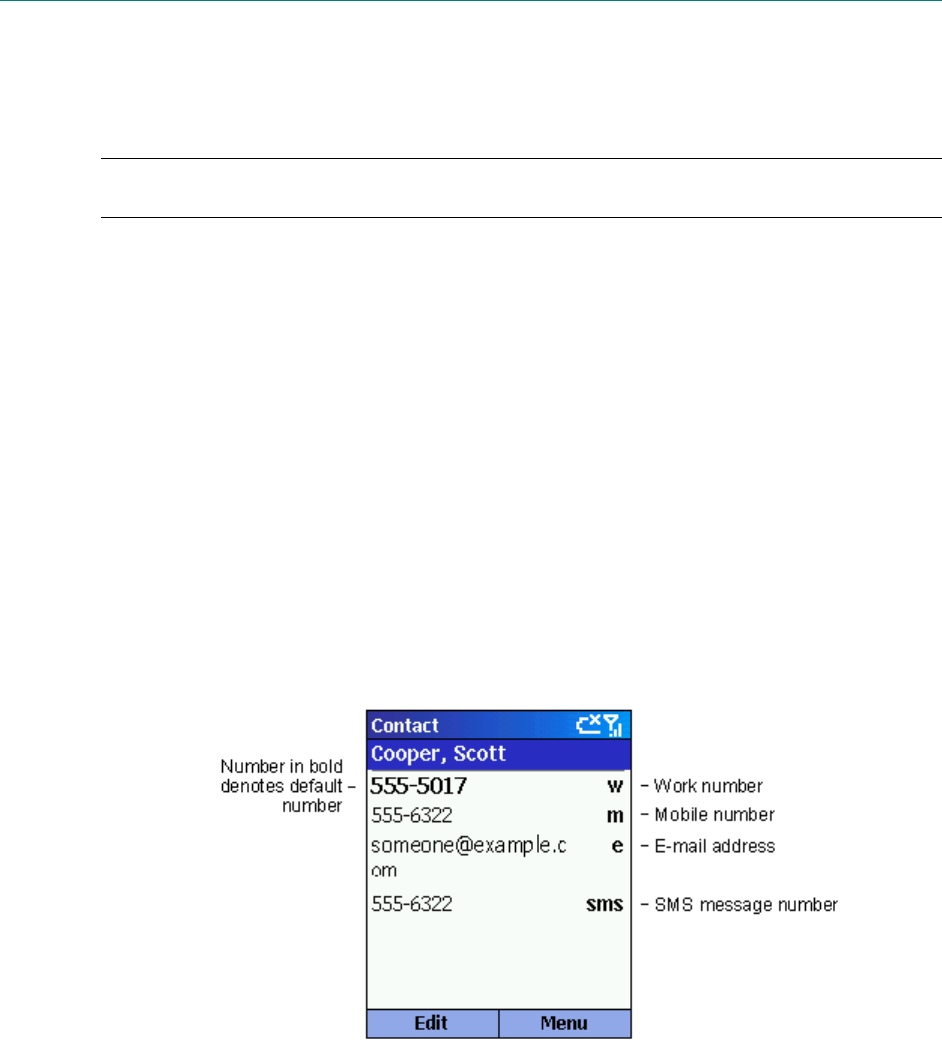
Chapter 6 Contacts, Calendar, and Tasks 43
To create a new contact
1. On the Home screen, press the Contacts soft key, and press the New soft key.
2. Enter the information for the new contact, and press the Done soft key.
Note: When you create a new contact on your phone, you can synchronize Contacts with your desktop
PC or a server to keep your contact information up-to-date in all locations.
To delete a contact
1. On the Home screen, press the Contacts soft key.
2. Select the contact to delete, press the Menu soft key, select Delete, and then press the Action
button.
Contact cards
A contact card displays all of the information that you have entered for the contact, such as name of the
person or business, phone numbers, e-mail addresses, and more. From a contact card, just select a phone
number and press the Talk button to call the number. You can also select an e-mail address and press
the Action button to begin composing a message to the contact.
To view a contact card
1. On the Home screen, press the Contacts soft key.
2. Select the contact to view, and press the Action button.
Figure 14 Contact card
To call a contact from a contact card
1. On the Home screen, press the Contacts soft key.
2. Select the contact, and press the Action button to open the contact card.
3. Select the number to use, and press the Talk button.
To send an e-mail from a contact card
1. On the Home screen, press the Contacts soft key.
2. Select the contact to whom you want to send an e-mail message, and press the Action button to
open the contact card.

44 Windows® Powered Smartphone 2002 User’s Guide
3. Select the e-mail address, and press the Action button.
4. Enter a subject, press Down, and compose your message in the body text field, and then press the
Send soft key.
5. To edit a contact
6. On the Home screen, press the Contacts soft key.
7. Select the contact to edit, and press the Action button to open the contact card.
8. Press the Menu soft key, select Edit, and then press the Action button.
9. Make the changes, and press the Done soft key.
Using contact card menu options
Using the contact card menu options, you can quickly apply a speed dial or voice tag to the contact,
change the default method for communicating with the contact, beam the contact card to another mobile
device or a desktop PC using infrared, delete the entire contact card, or edit the contact card
information.
To view contact card menu options
1. On the Home screen, press the Programs soft key, select Contacts, and then press the Action
button.
2. Select the contact to open, and press the Menu soft key.
The following table lists the contact card menu options and their functions.
Contact card menu
option
Function
Add Speed Dial* Enables you to create a shortcut to a phone number, e-
mail address, or Web URL by assigning one or two
numbers as a speed dial..
Add Voice Tag* Enables you to create a shortcut to a phone number, e-
mail address, or Web URL by assigning a recording.
Set As Default Makes the selected phone number or e-mail address the
default communication method for the contact.
Beam Contact Sends the contact card to another mobile device or a
desktop PC using infrared.
Delete Removes the contact card from the Contacts list.
Edit Enables you to modify information in the contact card.
* For information about creating speed dials, see Chapter 3, “Phone Calls.”
Using Calendar
Calendar is the scheduling component of your phone, where you can create and view appointments, and
view your calendar by day, week, or month.
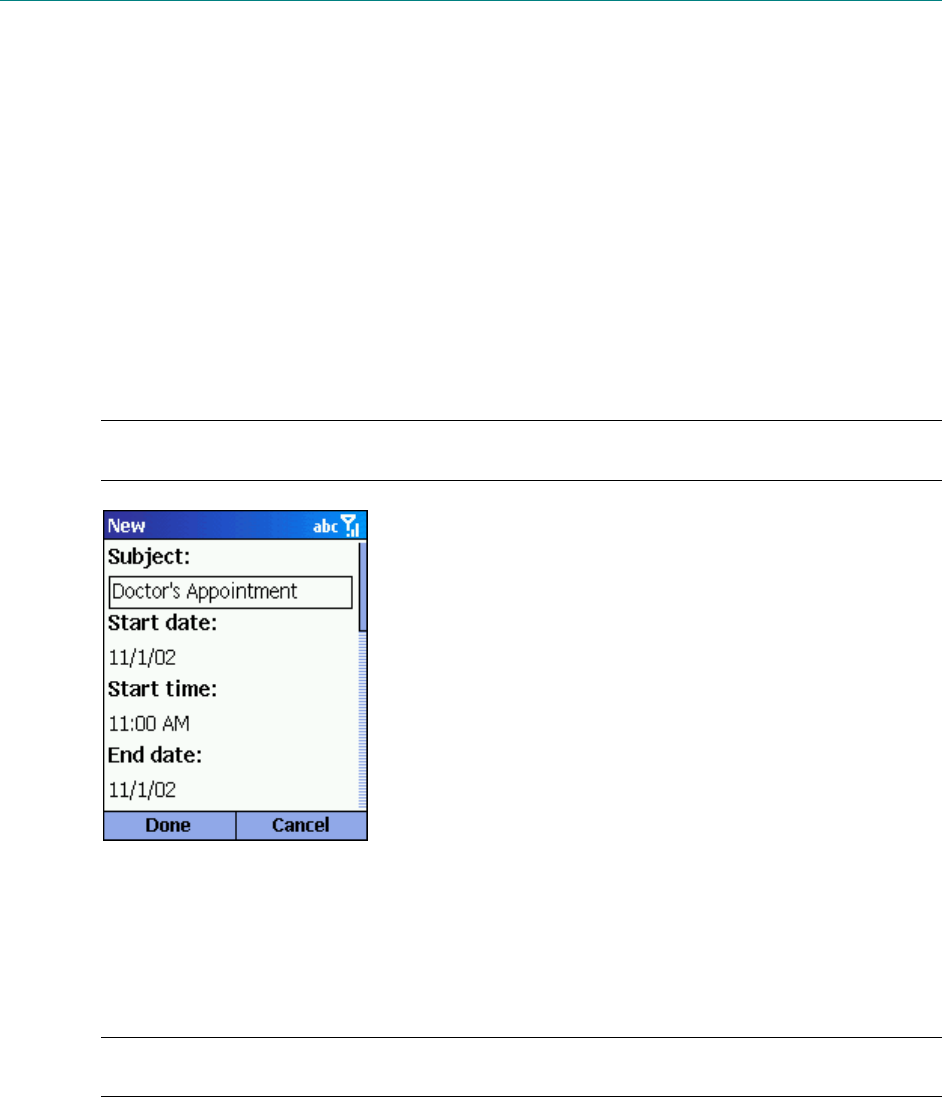
Chapter 6 Contacts, Calendar, and Tasks 45
To access Calendar
On the Home screen, press the Programs soft key, select Calendar, and then press the Action
button.
To create a new appointment
1. On the Home screen, press the Programs soft key, select Calendar, and then press the Action
button.
2. Press the Menu soft key, select New, and then press the Action button.
3. Enter information in the fields displayed.
To set a reminder for the appointment, under Reminder, select the amount of time before the
appointment that you want the reminder to appear.
4. Press the Done soft key.
Note: When you create a new appointment on your phone, you can synchronize Calendar with your
desktop PC or a server to keep your schedule information up-to-date in all locations.
Figure 15 New Appointment
To view an appointment
1. On the Home screen, press the Programs soft key, select Calendar, and then press the Action
button.
2. Select the appointment to open, and press the Action button.
Note: You can view the details of a meeting in Calendar in the same way in which you view details of
an appointment.
To edit an appointment
1. On the Home screen, press the Programs soft key, select Calendar, and then press the Action
button.
2. Select the appointment to edit, press the Action button, and then press the Edit soft key.
3. Make the changes, and press the Done soft key.
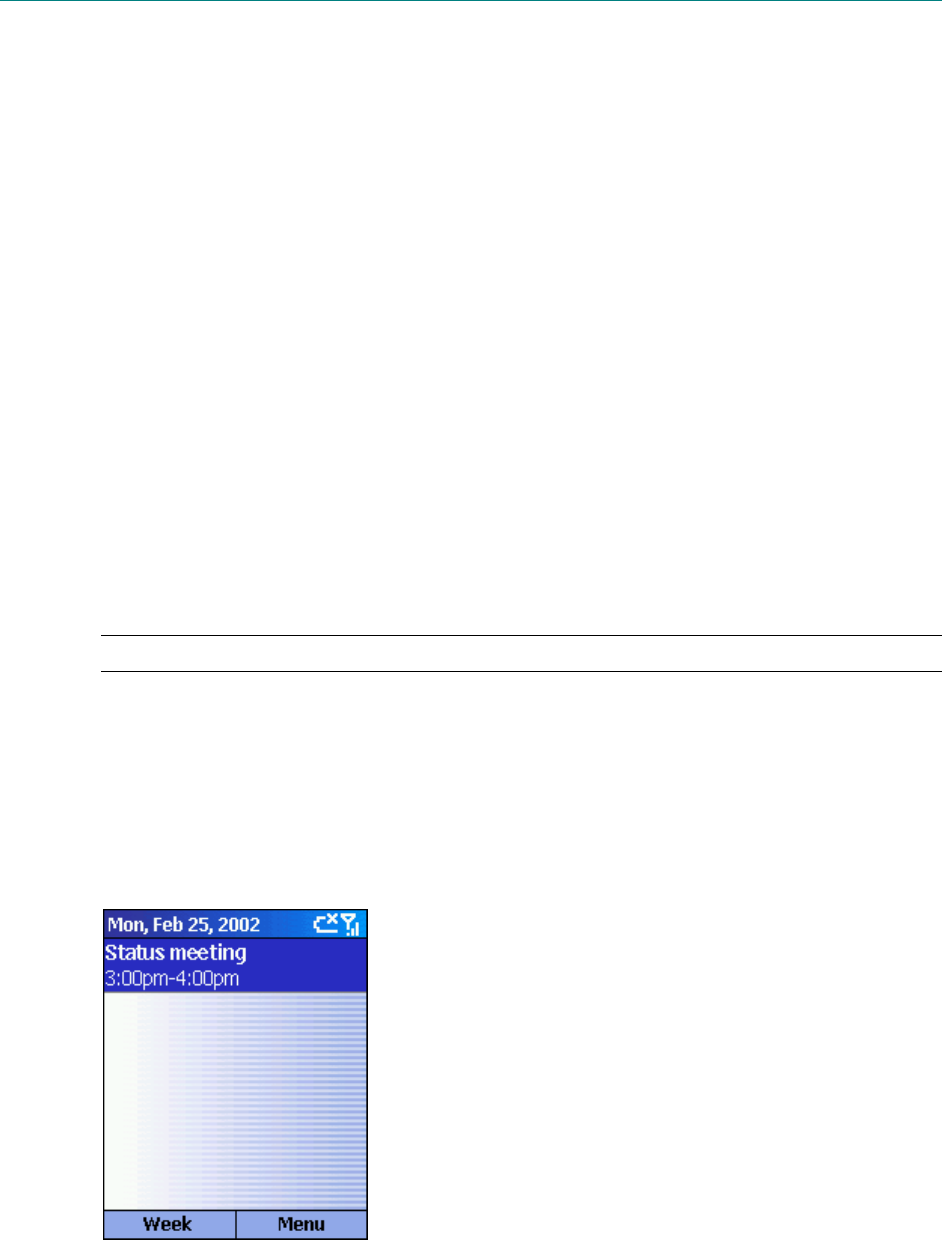
46 Windows® Powered Smartphone 2002 User’s Guide
To delete an appointment
1. On the Home screen, press the Programs soft key, select Calendar, and then press the Action
button.
2. Select the appointment to delete, press the Menu soft key, select Delete, and then press the
Action button.
Viewing your schedule
You can view your schedule using three different views: Agenda, Week, and Month.
Agenda view
The Agenda view in Calendar is the default view for calendar information. This view displays meetings
and appointments scheduled for the current day. The appointments are shown in chronological order
according to start time. All-day appointments are shown as a single line at the top of the Agenda view.
Up to three all-day events will be displayed.
To view your agenda for the current day
On the Home screen, press the Programs soft key, select Calendar, and then press the Action
button.
If you are in Calendar and you are using the Week or Month view, press the Menu soft key, select
Agenda View, and then press the Action button.
Tip: To look at your agenda for previous or approaching dates, press Left or Right.
To view your agenda for a specific date
1. On the Home screen, press the Programs soft key, select Calendar, and then press the Action
button.
2. Select the Menu soft key, select Go to Date, and then press the Action button.
3. Enter the date you want to view, and press the Done soft key.
Figure 16 Agenda View
Week view
The Week view shows your schedule for the specified week. This view allows you to get a quick
indication of your free and busy time, and allows you to create an appointment at a selected time easily.
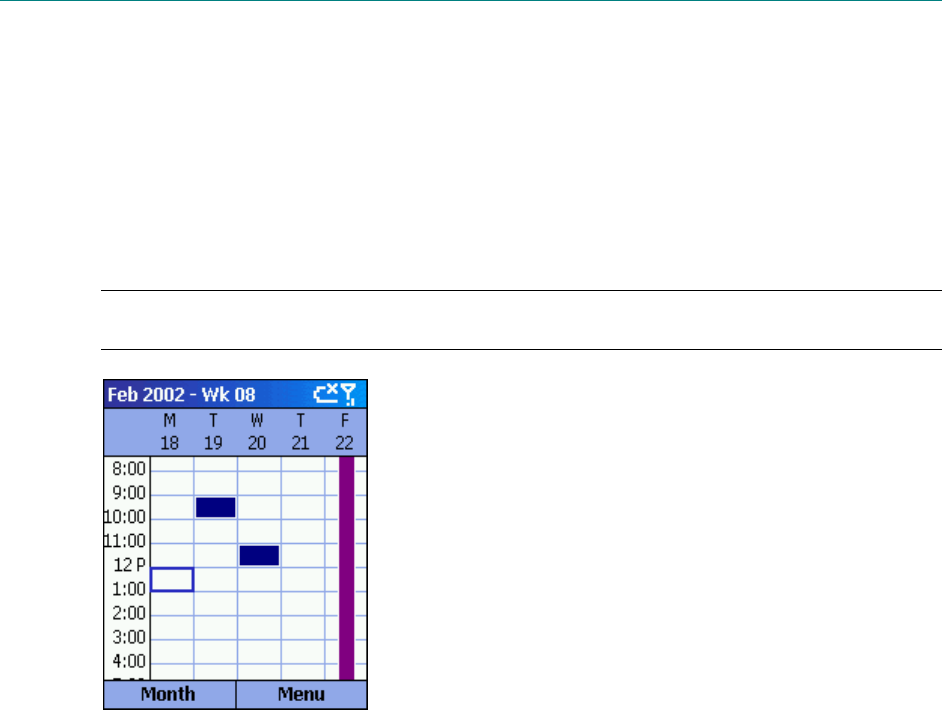
Chapter 6 Contacts, Calendar, and Tasks 47
The Week view displays the hours from 9:00 A.M. to 5:00 P.M. in one-hour increments by default on
the left side of the screen. You can press Up or Down to show the hours before or after those displayed.
If you press Up or Down and leave Week view, the hours last shown will be displayed the next time
you return to Week view.
To view appointments for the week
1. On the Home screen, press the Programs soft key, select Calendar, and then press the Action
button.
2. Press the Menu soft key, select Week View, and then press the Action button.
Note: To change settings for Week View, press the Menu soft key, select Options, and then press the
Action button.
Figure 17 Week View
Month view
The Month view provides an overview of your monthly schedule with arrow indicators for morning and
afternoon appointments. The arrows pointing upward represent morning appointments, and the arrows
pointing downward represent afternoon appointments. An all-day event is indicated by a white box
inside the calendar day. If you have morning and afternoon appointments and an all day event, a red
box will surround that calendar day.
To view your schedule for the month
1. On the Home screen, press the Programs soft key, select Calendar, and then press the Action
button.
2. Press the Menu soft key, select Month View, and then press the Action button.

48 Windows® Powered Smartphone 2002 User’s Guide
Figure 18 Month View
Importing Calendar information
You can import calendar information from another calendar program if it uses the iCal or vCal format.
The calendar information can be imported from attachments in e-mail messages, SMS text messages,
links in Microsoft® Pocket Internet Explorer, or by infrared.
Using Tasks
A task is a personal or work-related project, assignment, or errand to track through completion. A task
can occur once or repeatedly. A recurring task can repeat at regular intervals or repeat based on the date
you mark the task complete. For example, you might want to pay a bill on the last Friday of every
month, or get a haircut when one month has passed since your last haircut.
The task list
The Task list shows your “things to do” list. An item is followed by an exclamation mark if it has been
marked as high priority and a down arrow if it has been marked as low priority. Overdue tasks are
displayed bold and red on color phones. Completed tasks are displayed with the corresponding check
box selected.
Note: If you synchronize Tasks with your desktop PC, completed tasks are removed from your phone
after synchronization. They are then displayed in gray with a strikethrough on your desktop PC.
Figure 19 Task List

Chapter 6 Contacts, Calendar, and Tasks 49
Using the task list
To create a new task
1. On the Home screen, press the Programs soft key, select More, select Tasks, and then press the
Action button.
2. Select the Enter new task here field, enter the task, and then press the Action button.
Notes: When you create a new task on your phone, you can synchronize Tasks with your desktop PC to
keep your Task list up-to-date in both locations.
If you create a new task with a reminder on your desktop PC, you can synchronize Tasks with your
phone to hear the reminder on your phone.
To mark a task as complete
1. On the Home screen, press the Programs soft key, select More, select Tasks, and then press the
Action button.
2. Select the task, and press the Complete soft key.
To mark a completed task as incomplete
1. On the Home screen, press the Programs soft key, select More, select Tasks, and then press the
Action button.
2. Select the task, and press the Activate soft key.
To delete a task from the Task list
1. On the Home screen, press the Programs soft key, select More, select Tasks, and then press the
Action button.
2. Select the task, and press the Delete soft key.
Creating Voice Notes
Voice Notes are used to create short voice recordings. Recordings are included in the All Notes list and
are named consecutively (Recording 1, Recording 2, and so on).
To create a Voice Note
1. Hold the phone’s microphone near your mouth.
2. Press the Record button, and press the Record soft key to begin recording your voice note.
3. Press the Stop soft key to stop recording your voice note.
Note: To listen to a recording, select it from the All Notes list, press the Menu soft key, select Play, and
then press the Action button.
To rename a recording
1. Press the Record button, and select the recording you want to rename.
2. Press the Menu soft key, select Rename, and then press the Action button.
3. Under Name, enter a new name for the recording, and press the Done soft key.

50 Windows® Powered Smartphone 2002 User’s Guide
Beaming information
You can use the infrared port on your phone to send and receive (beam) calendar appointments and
contact cards between your phone and another mobile device or a desktop PC that has an infrared port,
and supports VCards and VCal.
To beam a contact
1. On the Home screen, press the Contacts soft key.
2. Select the contact to beam, press the Menu soft key, select Beam Contact, and then press the
Action button. Align the infrared ports so that they are unobstructed and within close range of
each other, and press the Beam soft key.
Status information will then be displayed, indicating the name of the device your phone is
beaming to, and whether the beaming process is pending, done, or if it has failed.
To beam an appointment
1. On the Home screen, press the Programs soft key, select Calendar, and then press the Action
button.
2. Select the appointment to beam, and press the Action button to open the appointment.
3. Press the Menu soft key, select Beam Appointment, and then press the Action button.
4. Align the infrared ports so that they are unobstructed and within close range of each other, and
press the Beam soft key.
Status information will then be displayed, indicating the name of the device your phone is
beaming to, and whether the beaming process is pending, done, or if it has failed.
To receive beamed information
1. On the Home screen, press the Programs soft key, select More, select Accessories, and then
press the Action button.
2. Select Infrared Receive, and press the Action button.
3. Align the infrared ports so that they are unobstructed and within close rang of each other, and
press the Yes soft key to receive the information.
Note: Your phone can receive beamed files of any type, but some files may need to be copied to your
desktop computer for viewing.

Chapter 7 Synchronizing Information
This chapter introduces basic concepts and features of Microsoft® ActiveSync®, and explains how to
set up Server ActiveSync®, synchronize remotely, and create a synchronization schedule. This chapter
also gives an overview of the different types of Microsoft® Outlook® information you can synchronize.
For more information about ActiveSync, see ActiveSync Help on your desktop computer.
Using ActiveSync
You can synchronize information on your desktop computer and/or a Microsoft® Exchange server with
the information on your phone. ActiveSync compares the information on your phone with the
information on your desktop computer and/or the server and updates all locations with the most recent
information. With ActiveSync, you can:
Keep your Outlook information up-to-date by synchronizing your phone with your desktop
computer.
Choose to synchronize Inbox, Calendar, and Contacts with a server so that you have the latest
information, even when your desktop computer is turned off.
Copy (rather than synchronize) files between your phone and your desktop computer.
Control when synchronization occurs by selecting a synchronization schedule.
Select which information types are synchronized and control how much information is
synchronized. For example, you can choose how many weeks of past appointments to synchronize.
Note: Using Server ActiveSync, you can synchronize information directly with a Microsoft Exchange
Server if your company is running Microsoft® Mobile Information Server 2002 or later.
Installing ActiveSync
Before you begin synchronization, install ActiveSync on your desktop computer from the Smartphone
2002 Companion CD. For more information on installing ActiveSync, see the Quick Start Card.
ActiveSync is already installed on your phone.
Creating a Partnership
After the installation is complete, the New Partnership Wizard helps you set up a partnership between
your phone and your desktop computer and/or a server so that you can start synchronizing information
and customizing your synchronization settings. Your first synchronization process will automatically
begin when you finish using the wizard. After the first synchronization, you will notice that your
Outlook information now appears on your phone.
Warning: To prevent synchronization problems, select Synchronize with Microsoft Mobile
Information Server and/or this desktop computer in the New Partnership Wizard only if you are
certain that your company is running Microsoft Mobile Information Server 2002 or later and you know
the server name. Otherwise, select Synchronize with this desktop computer. For more information,
contact your network administrator or service provider.
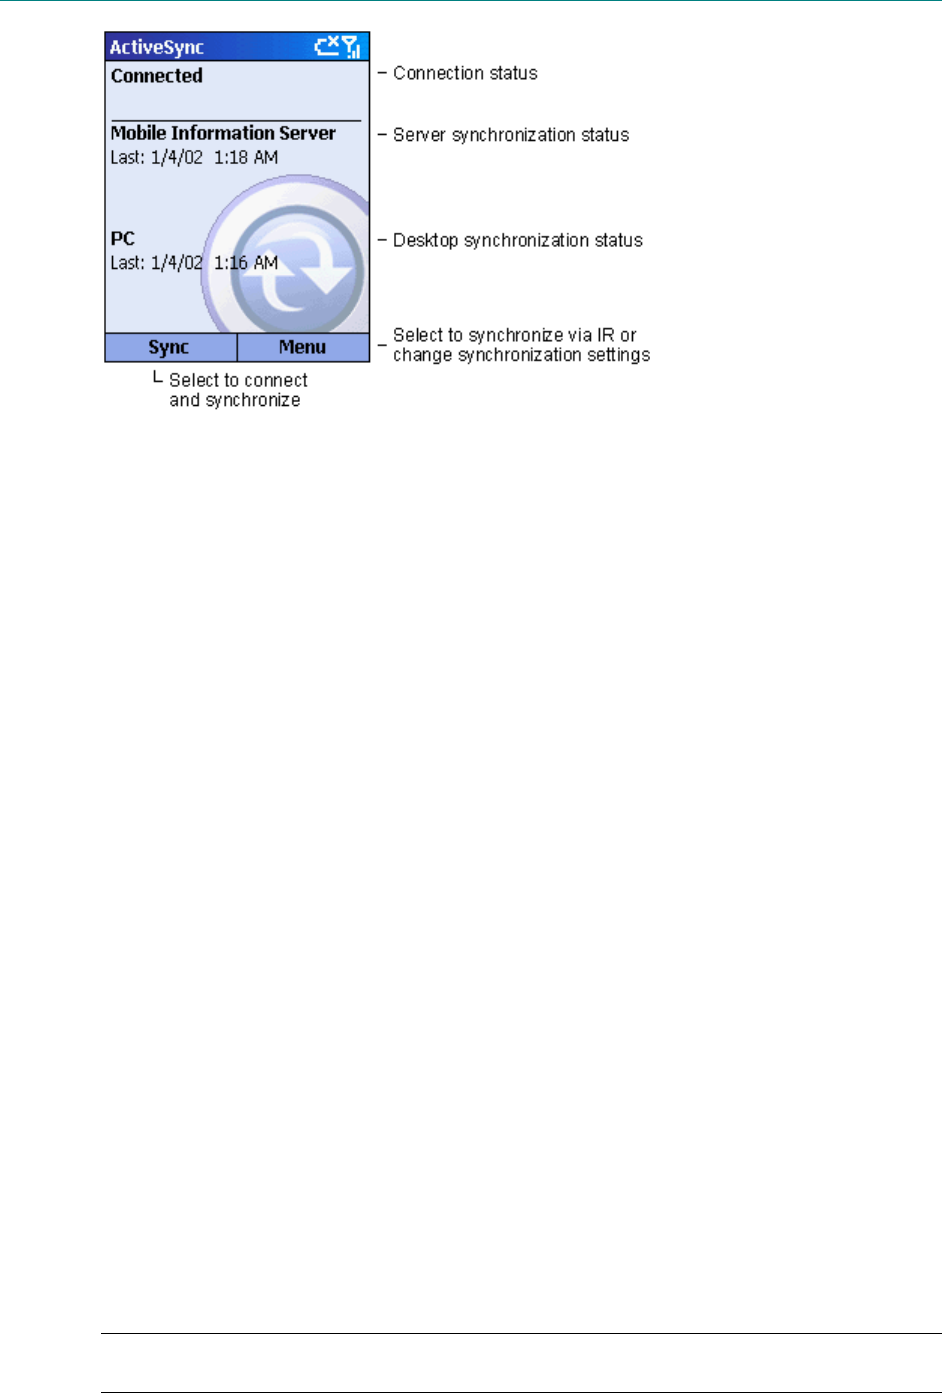
52 Windows® Powered Smartphone 2002 User’s Guide
Figure 20 Synchronization in progress
To start and stop synchronization
1. On the Home screen, press the Programs soft key, select ActiveSync, and then press the Action
button.
2. To start synchronization, press the Sync soft key; to stop synchronization, press the Stop soft key.
Setting up Server ActiveSync
Before you can begin to synchronize information with a server, you may need to request server
configuration information, such as your user name, password, and the name of the Microsoft Mobile
Information Server, either from your service provider or from your corporate network administrator.
This configuration information may have already been set up on your phone, or you may have already
been given this information.
To set up Server ActiveSync
1. On the Home screen, press the Programs soft key, select ActiveSync, and then press the Action
button.
2. Press the Menu soft key, select Options, and then press the Action button.
3. Select Connection, and press the Action button.
4. Under Username, enter your Microsoft Exchange user name.
5. Under Password, enter your Microsoft Exchange password.
6. Under Domain, enter the name of the domain for your Microsoft Exchange Server (if required).
7. Select Save password if you want your phone to save your password so that you need not enter it
repeatedly.
8. In Server name, enter the name of the Microsoft Mobile Information Server to which you want to
connect.
9. Press the Done soft key twice.
10. To begin synchronizing with the server, press the Sync soft key.
Note: You can also set up a connection to synchronize remotely with a server when you first create a
partnership between your phone and desktop computer.
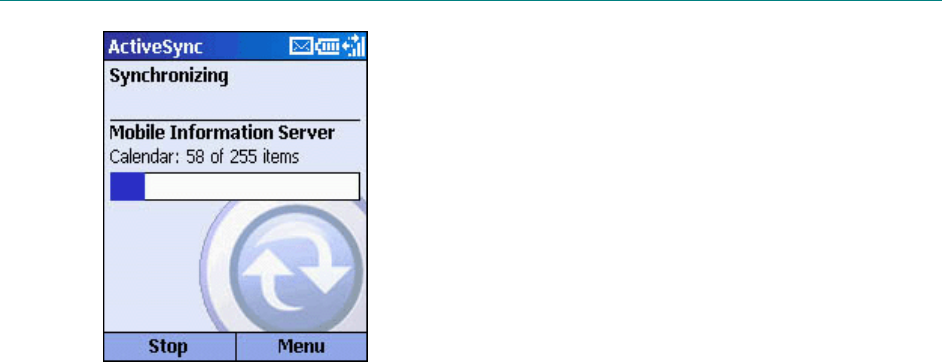
Chapter 7 Synchronizing Information 53
Figure 21 Active Sync Status screen
To stop synchronizing with a server
You can stop synchronizing an information type with a server on your phone. However, to switch to
synchronizing that information type with your desktop computer instead, you will need to change the
synchronization settings on the desktop computer. For more information about synchronization, see
ActiveSync Help on the desktop computer.
1. On the Home screen, press the Programs soft key, select ActiveSync, and then press the Action
button.
2. Press the Menu soft key, select Options, and then select the information type that you no longer
want to synchronize with a server, such as Calendar, Contacts, or Inbox.
3. Clear the check box next to the information type that you no longer want to synchronize with a
server, and press the Done soft key.
Synchronizing Remotely
You can synchronize remotely with your desktop computer or with a server if you have set up Server
ActiveSync.
To synchronize remotely with a desktop computer
1. On the Home screen, press the Programs soft key, select ActiveSync, and then press the Action
button.
2. Press the Menu soft key, select Options , and then press the Action button.
3. Select PC Settings, and then press the Action button.
4. Select Include PC sync remotely when synchronizing, and then press the Action button.
5. Under Connect To, select the appropriate computer name, and press the Done soft key.
6. To start synchronization, press the Sync soft key.
To synchronize remotely with a server
1. On the Home screen, press the Programs soft key, select ActiveSync, and then press the Action
button.
2. Press the Menu soft key, select Options, and then press the Action button.
3. Select the information type to synchronize with the server, press the Action button, select the
Synchronize [Information type] check box, and then press the Done key.

54 Windows® Powered Smartphone 2002 User’s Guide
Creating a server synchronization schedule
You can create a server synchronization schedule so that your information is automatically
synchronized with the server at time intervals that you specify.
To create a schedule to synchronize with a server when your
phone is connected to a desktop computer
1. On the Home screen, press the Programs soft key, select ActiveSync, and then press the Action
button.
2. Press the Menu soft key, select Options, select Schedule, and then press the Action button.
3. Select the When connected to my PC, synchronize with the server every check box, and select
a length of time.
4. Press the Done soft key.
To create a schedule to synchronize with a server when your
phone is not connected to a desktop computer (sync wirelessly)
1. On the Home screen, press the Programs soft key, select ActiveSync, and then press the Action
button.
2. Press the Menu soft key, select Options, select Schedule, and then press the Action button.
3. Select the When not connected to my PC, synchronize with the server every check box and
select a length of time.
4. Press the Done soft key.
Synchronizing information
This section provides an overview of the types of Outlook information you can synchronize. By default,
ActiveSync does not automatically synchronize all types of Outlook information. Use ActiveSync
options to turn synchronization on and off for specific information types.
Synchronizing Inbox
When you select Inbox for synchronization in ActiveSync, e-mail messages are synchronized as part of
the general synchronization process. During synchronization, the following events occur:
Messages are copied from the Outlook Inbox folder on your desktop computer, or from a Microsoft
Exchange Server, to the Inbox folder on your phone.
By default, when synchronizing Inbox information with your desktop computer, you’ll receive only
messages from the last three days and the first 500 bytes of each new message. You can also
choose to download file attachments.
By default, when synchronizing Inbox information with a server, you’ll receive only messages
from the last three days and the first 500 bytes of each new message. You can also choose to
download file attachments.
The messages on your phone and on your desktop computer are linked. When you delete a message
on your phone, it is deleted from your desktop computer the next time you synchronize, and vice
versa.
Messages in subfolders in other e-mail folders in Outlook are synchronized only if the folders have
been selected for synchronization in the Inbox on your phone.

Chapter 7 Synchronizing Information 55
Note: SMS messages are not received in your Inbox through synchronization. Instead, they are sent to
your phone by way of your service provider.
Synchronizing Calendar
Calendar items stored on your phone can be synchronized with calendar items stored on your desktop
computer or on a Microsoft Exchange Server. By default, calendar items from the last two weeks will
be synchronized.
Calendar items created on your phone are copied to your desktop computer and/or server during
synchronization, and vice versa. Similarly, Calendar items that are deleted from your phone are deleted
from your desktop computer and/or server during synchronization, and vice versa. This keeps your
information up-to-date in all locations.
Synchronizing Contacts
Contacts stored on your phone can be synchronized with contacts stored on your desktop computer or
on a Microsoft Exchange Server. By default, all of your contacts will be synchronized.
Contacts created on your phone are copied to your desktop computer and/or server during
synchronization, and vice versa. Similarly, contacts that are deleted from your phone are deleted from
your desktop computer and/or server during synchronization, and vice versa. This keeps your
information up-to-date in all locations.
Synchronizing Tasks
Tasks stored on your phone can be synchronized with tasks stored on your desktop computer. Task
synchronization is automatically selected in ActiveSync. By default, all of your incomplete tasks will be
synchronized.
Tasks created on your phone are copied to your desktop computer during synchronization, and vice
versa. Similarly, tasks that are deleted from your phone are deleted from your desktop computer during
synchronization, and vice versa. This keeps your information up-to-date in all locations.
Note: Tasks can be synchronized only with your desktop computer; they cannot be synchronized with a
server.
Synchronizing Using an Infrared Connection
You can use an infrared connection to create a direct connection between your phone and another
mobile device or desktop computer quickly. This method is ideal for quickly switching between
multiple devices since there are no cables or adapters to change. When creating a partnership, you must
connect using infrared, a cable, or a cradle connection.
For more information about synchronizing using an infrared connection or other connection types, see
ActiveSync Help on your desktop computer.
ActiveSync Errors
Whenever ActiveSync cannot successfully synchronize your information, it displays an error on your
phone.
To view more information about an ActiveSync error
Press the Action button when the error text is displayed. ActiveSync will then display more
information about the error that occurred.

56 Windows® Powered Smartphone 2002 User’s Guide
Note: Some types of errors can interfere with automatic synchronization. If you suspect that a
scheduled automatic synchronization has not occurred, you should attempt to manually synchronize
your information. Successfully completing manual synchronization will reset automatic
synchronization. For more information, see the “Synchronizing Information” section of ActiveSync
Help on your desktop computer.

Chapter 8 Internet, Entertainment
and More
This chapter explains how to browse the Web using Pocket Internet Explorer, play audio and video files
using Windows Media™ Player, set up a modem link, play Solitaire, and use Calculator.
Using Internet Explorer
Using Microsoft® Pocket Internet Explorer, you can browse the Web on your phone. Pocket Internet
Explorer on your phone supports WAP (Wireless Application Protocol), HTML (Hypertext Markup
Language), and cHTML (compact Hypertext Markup Language). The browser supports images and
sounds, but it does not support frames on a Web page.
To access Pocket Internet Explorer
On the Home screen, press the Programs soft key, select Internet Explorer, and then press the
Action button.
To disconnect from the Internet
Press the End button.
Navigating in Pocket Internet Explorer
With Pocket Internet Explorer, the Favorites list is displayed as the main screen instead of a home page.
You can add your own Favorites to this list for quick access to Web sites you frequently visit. You can
access your Favorites list from any Web page by pressing the Favorites soft key.
To view a favorite
1. On the Home screen, press the Programs soft key, select Internet Explorer, and then press the
Action button.
2. Select a favorite to view, and press the Go soft key.
To activate a link
Select a link, and press the Action button.
Note: Scroll vertically or horizontally to see all available links.
To enter the address of a Web site
1. On the Home screen, press the Programs soft key, select Internet Explorer, and then press the
Action button.
2. Press the Menu soft key, select Go To, and then press the Action button.
3. Enter the Web address, and press the Go soft key.
To return to a Web page you previously visited in the same session
1. On the Home screen, press the Programs soft key, select Internet Explorer, and then press the
Action button.
2. Press the Back button.
58 Windows® Powered Smartphone 2002 User’s Guide
To view a list of Web pages you visited most recently
1. On the Home screen, press the Programs soft key, select Internet Explorer, and then press the
Action button.
2. Press the Menu soft key, select Go To, and then press the Action button.
3. Select View History, and press the Go soft key.
To visit a Web page on the History list
1. On the Home screen, press the Programs soft key, select Internet Explorer, and then press the
Action button.
2. Press the Menu soft key, select Go To, and then press the Action button.
3. Select View History, and press the Go soft key.
4. Select the URL for a Web page, and press the Go soft key.
Tip: While you are connected to the Internet, you can switch between Pocket Internet Explorer and
other programs on your phone by pressing the Home button. This will not close your Internet
connection. To return to the page you were viewing, press the Back button.
Using the Favorites list
If you see a Web page you want to visit another time, mark it as a favorite. The next time you want to
visit that Web page, just select it from your Favorites list.
To add a Web page to your Favorites list
1. On the Home screen, press the Programs soft key, select Internet Explorer, and then press the
Action button.
2. Press the Menu soft key, select Go To, and then press the Action button.
3. Enter the Web URL, and press the Go soft key.
4. Press the Menu soft key, select Add Favorite, and then press the Action button.
5. Enter a name for the Web site as you want it to appear on your Favorites list, and press the Add
soft key.
Figure 22 Adding a favorite

Chapter 8 Internet, Entertainment and More 59
To create a new folder in Favorites
1. On the Home screen, press the Programs soft key, select Internet Explorer, and then press the
Action button.
2. Press the Menu soft key, select Add Folder, and then press the Action button.
3. Under Name, enter a name for the folder, and press the Add soft key.
To delete a favorite
1. On the Home screen, press the Programs soft key, select Internet Explorer, and then press the
Action button.
2. Select the favorite to delete, press the Menu soft key, select Delete, and then press the Action
button.
Cached web pages
The phone caches Web pages as they are downloaded to your phone and stores them on your phone
until the cache is full. If you go to a page that is already stored on your phone, you will see the stored
version when you select the page. Choose Refresh from the menu to see the latest Web content for that
page.
To refresh a Web page you have recently visited
1. On the Home screen, press the Programs soft key, select Internet Explorer, and then press the
Action button.
2. Select the Web page to revisit from your Favorites list or History list, and press the Go soft key.
3. Press the Menu soft key, select Refresh, and then press the Action button.
Pocket Internet Explorer options
Use Pocket Internet Explorer options to change the way Web pages are displayed, change the network
you want to connect to, and free space on your phone.
To view Pocket Internet Explorer Options
1. On the Home screen, press the Programs soft key, select Internet Explorer, and then press the
Action button.
2. Press the Menu soft key, select Options, and then press the Action button.
Pocket Internet
Explorer Options
Function
General Enables you to change the way Web pages are
downloaded and displayed. For example, you can
choose to omit displaying images, turn off sound, fit the
Web page to the screen, request a warning before
viewing nonsecure Web pages, allow cookies, or change
the language.
Connections Enables you to change the network to connect to. For
example, change from “The Internet” to “My Corporate
Network.”
60 Windows® Powered Smartphone 2002 User’s Guide
Pocket Internet
Explorer Options
Function
Memory Enables you to clear temporary Internet files, cookies,
and your Web history.
Using Media Player
Using Microsoft Windows Media™ Player 7.0 or later, you can play Windows Media audio and video
files and MP3 audio files on your phone.. You can also copy digital music and video directly from your
desktop computer to your phone by using Media Player or ActiveSync. For more information about
copying files to your phone, see the Media Player Help on your desktop PC.
Media Player is easy to use; the controls are similar to the buttons on a compact disc player.
Figure 23 Local Content Screen
Playing files
You can play audio or video files, skip to another song or video, or increase and decrease the volume.
To play or stop a file
On the Local Content screen, press the Play soft key.
To skip to the beginning of the current file
Press Left.
To skip to the beginning of the previous file
Press Left twice quickly.
To skip to the next file
Press Right.
To adjust the volume
Use the Volume control to increase or decrease the volume.
To play a streaming media file on a network
1. In the Local Content view, press the Menu soft key, select Open URL, and then press the
Action button.
2. Enter the Web URL, and press the Play soft key.
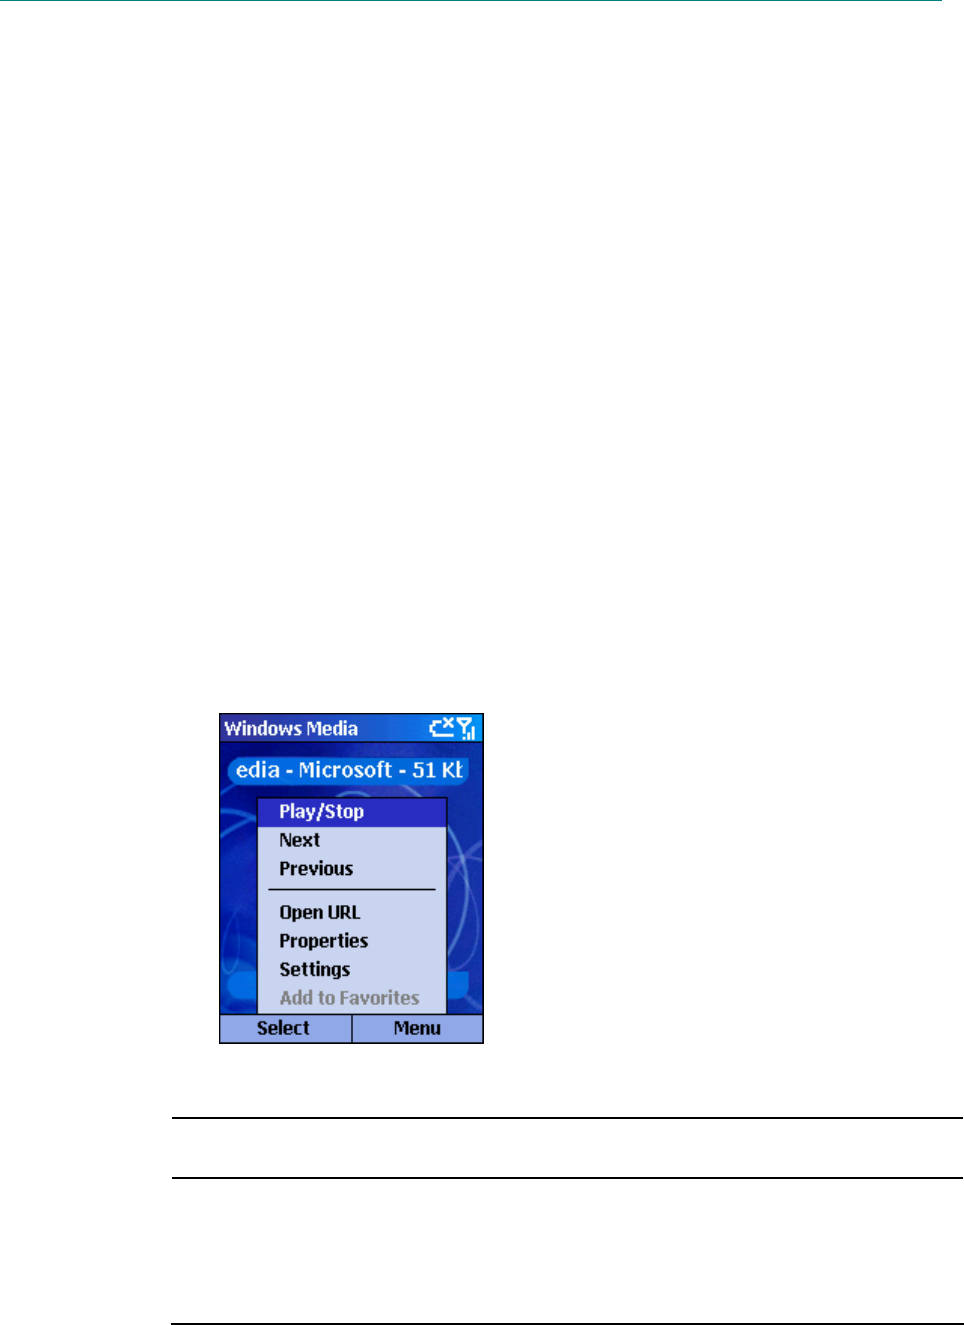
Chapter 8 Internet, Entertainment and More 61
To play files in a random order
1. On the Local Content screen, press the Menu soft key, select Settings, and then press the Action
button.
2. Select the Shuffle check box, and press the Done soft key.
To play files repeatedly
1. On the Local Content screen, press the Menu soft key, select Settings, and then press the Action
button.
2. Select the Repeat check box, and press the Done soft key.
To stop playback while using another program
1. On the Local Content screen, press the Menu soft key, select Settings, and then press the Action
button.
2. Select Background play, and press the Done soft key.
Menu options when playing a file
When you are playing a file, you can use the menu options to start and stop playback, skip to the next or
previous file, display information about a file, configure volume and playback settings, or add files to
your Favorites playlist.
To access menu options when playing a file
Press the Menu soft key.
Figure 24 Playback Controls
The following table lists the menu options and their functions that are available when you play a file.
Menu options when
playing a file
Function
Play/Stop Plays or stops playback of the current file.
Next Skips to the next file on the current playlist. This
command is not available if the last file is the current
selection.

62 Windows® Powered Smartphone 2002 User’s Guide
Menu options when
playing a file
Function
Previous Skips to the beginning of the current file on the current
playlist. If no file is playing, this command skips to the
previous file on the current playlist.
Open URL Plays a streaming media file on a network (for
example, content streamed from an Internet radio
station).
Properties Displays information about the file that is playing.
Settings Displays the Settings options, which enable you to
adjust the volume and various playback options.
Add to Favorites Adds the streaming media file that is playing to the
Favorites playlist.
Local Content screen menu options
By using the menu options from the Local Content screen, you can start and stop playback, add files to
your Favorites playlist, display information about a file, configure volume and playback settings, or
delete a file.
To access Local Content screen menu options
Press the Menu soft key.
To following table lists the Local Content screen menu options and their functions.
Local Content menu
option
Function
Play/Stop Plays or stops playback of the current file.
Local Content Displays the Local Content view playlist.
Favorites Displays the Favorites view playlist.
Open URL Plays a streaming media file on a network (for example,
content streamed from an Internet radio station).
Properties Displays information about the selected file.
Settings Displays the Settings screen, which enables you to
adjust the volume and specify various playback options.
Delete Permanently deletes the selected file from the phone.
Using Media Player favorites
You can connect to your favorite streaming media file and add it to your Favorites. The next time you
want to listen to the streaming media file, just select it from Favorites.

Chapter 8 Internet, Entertainment and More 63
To connect to a streaming media file
1. On the Local Content screen, press the Menu soft key, select Open URL, and then press the
Action button.
2. Enter the URL, and press the Play soft key.
To add a streaming media file to Favorites
1. Connect to a streaming media file on the Internet or other network.
2. Press the Menu soft key, select Add to Favorites, and then press the Action button.
To play a favorite
1. On the Local Content screen, press the Menu soft key, select Favorites, and then press the
Action button.
2. Select an item, and press the Play soft key.
To delete a favorite
1. On the Local Content screen, press the Menu soft key, select Favorites, and then press the
Action button.
2. Select an item, press the Menu soft key, select Delete, and then press the Action button.
Licenses
Some digital media content from the Internet, CD tracks, and videos have associated licenses that
protect them from being unlawfully distributed or shared.
Licenses are managed and created using digital rights management (DRM), which is the technology for
securing content and managing the rights for its access. Some licenses prevent you from playing content
that is copied to your phone.
Note: To ensure that the license is copied with the content, use the Portable Device (or Copy to CD or
Device) feature in Windows Media Player 7 or later on your personal computer to copy content to your
phone. For more information about copying content to your phone and other portable devices, see the
Windows Media Player Help on your personal computer.
Supported File Formats
The Media Player supports the following types of file formats.
Format File name extensions
Windows Media .asf, .asx, .wax, .wm, .wma, .wmv, .wmx, .wvx
Moving Picture Experts Group
(MPEG)
.mp3
Supported Audio and Video Codecs
Media Player can play files that have been compressed by using any of the following audio and video
codecs.
Audio codecs
Microsoft Windows Media Audio codec version 2.0, 7.0, and 8.0

64 Windows® Powered Smartphone 2002 User’s Guide
Fraunhofer IIS-A MPEG-1 Audio Layer-3 codec
Video codecs
Microsoft Windows Media Video codec version 7.0 and 8.0
Microsoft MPEG-4 video codec version 3.0
ISO MPEG-4 video codec version 1.0
Modem Link
Using Modem Link, you can use your phone as an external modem for another device or a computer.
Modem Link allows you to use a serial port, infrared, or USB port for this connection.
To set up an infrared or USB modem connection
1. Make sure that your phone is not connected to another device.
2. On the Home screen, press the Programs soft key, select More, select Accessories, and then
press the Action button.
3. Select Modem Link, and press the Action button.
4. Under Connection, select USB or IrCOMM, and press the Menu soft key, and select Activate.
5. Connect your phone to the device with which you want to use your phone as a modem.
To set up a serial port modem connection
1. Make sure that your phone is not connected to another device.
2. On the Home screen, press the Programs soft key, select More, select Accessories, and then
press the Action button.
3. Select Modem Link, and then press the Action button.
4. Under Connection, select Serial (COM1), and press the Menu soft key, and select Activate.
Note: The default baud rate is set for 115,200. Do not change this default unless the port speed of the
phone or computer requires you to do so.
To activate the Modem Link
1. On the Home screen, press the Programs soft key, select More, select Accessories, and then
press the Action button.
2. Select Modem Link, and then press the Action button.
3. Press the Menu soft key, select Activate, and then press the Action button.
4. Align the phone’s IR port or connect the cable to the device
To deactivate the Modem Link
1. On the Home screen, press the Programs soft key, select More, select Accessories, and then
press the Action button.
2. Select Modem Link, and then press the Action button.
3. Press the Menu soft key, select Deactivate, and then press the Action button.
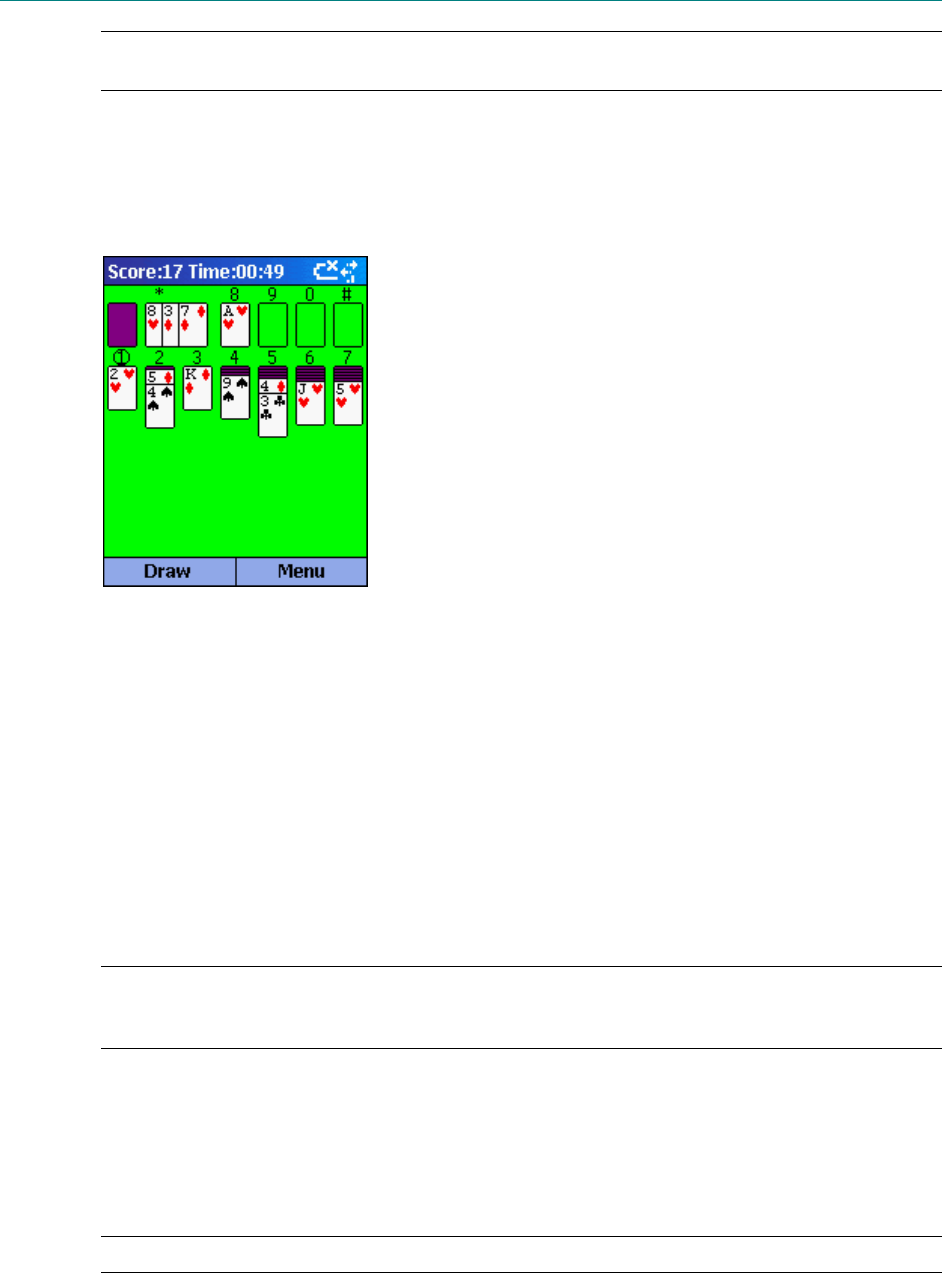
Chapter 8 Internet, Entertainment and More 65
Note: Failing to deactivate the Modem Link when you are finished using it may result in problems with
using ActiveSync in the same session.
Solitaire
The object of Solitaire is to use all the cards in the deck to build up the four suit stacks in ascending
order, beginning with the aces. You win the game when all cards are on the suit stacks.
Figure 25 Solitaire
To start a game of Solitaire
On the Home screen, press the Programs soft key, select More, select Games, select Solitaire,
and then press the Action button.
Playing Solitaire
To start a new game of Solitaire
In Solitaire, press the Menu soft key, and then select New Game.
To move cards in Solitaire
Press the number or character above the card stack displaying the card you want to move, and then
press the number or character above the card stack to which you want to move the card.
Tip: Pressing the Up direction key will move a card to one of the four card stacks on the upper right
corner of the screen if it belongs there. For example, if you have an ace displayed in one of the seven
stacks, press the number above the ace, and then press the Up direction key.
To play Solitaire
1. Move any aces on the seven stacks to the four card spaces at the top of the screen, and then make
any other available plays.
2. When you have made all available plays, press the Draw soft key to turn over cards.
Note: The card that is face up on the deck is always available for play.

66 Windows® Powered Smartphone 2002 User’s Guide
To prevent the Home screen from displaying during a game
1. On the Home screen, press the Programs soft key, select Settings, select Home Screen, and then
press the Action button.
2. Under Time out, press Left or Right to select Never, and then press the Done soft key.
Calculator
You can use Calculator to perform any of the standard operations for which you would normally use a
handheld calculator. Calculator performs basic arithmetic, such as addition, subtraction, multiplication,
and division.
To open Calculator
On the Home screen, press the Programs soft key, select More, select Accessories, select
Calculator, and then press the Action button.
To enter numbers and perform calculations
Use the keypad to enter numbers and perform calculations.
Press the Pound (#) key to cycle through the available mathematical symbols, and press the
Asterisk (*) key to enter a decimal point.
Tip: You can also use the direction keys to display the available mathematical symbols. Press Up for
the plus sign (+), press Down for the minus sign (–), press Left for the division sign (/), and press Right
for the multiplication sign (X).
To clear the current calculation or displayed number
Press the Clear soft key.
To clear the last digit entered in a multiple digit entry
Press the Back button.
Chapter 9 Appendix C: Regulatory Notices 67
Chapter 9 Appendix C: Regulatory
Notices
Regulatory Agency Identification Numbers
For regulatory identification purposes your product is assigned a model number xx.
The following accessories have been evaluated for use with your device. Their assigned model numbers
listed below can identify these approved accessories. To ensure continued reliable and safe operation of
your Smartphone, use only the accessories listed below with your xx.
Accessories Model Number
Smartphone 2002
Cradle
Note 1: The above “x” may be any alphanumeric character or blank denoting external cosmetic
changes.
Note 2:This product is intended for use with certified Class 2, rated 5 V dc, minimum 1A power supply
unit.
European Union Notice
Products with CE marking comply with the R&TTE Directive (99/5/EC), the EMC Directive
(89/336/EEC) and the Low Voltage Directive (73/23/EEC) issued by the Commission of the European
Community.
Compliance with these directives implies conformity to the following European Norms (in brackets are
the equivalent international standards):
EN 60950 (IEC 60950) - Safety of Information Technology Equipment
ETS 300 342-1 (June 1997) - Electromagnetic compatibility and Radio spectrum Matters (ERM);
ElectroMagnetic Compatibility (EMC) for European digital cellular telecommunications system
(GSM 900MHz and GSM 1900MHz); Part 1: Mobile and portable radio and ancillary equipment
GSM11.10
ANSI/IEEE C.95.1-1992- specific absorption rate in mobile phone emission condition for body
health
FCC part 15 and part24
prENV50166-2, 1995 for SAR
SAR: 0.892mW/10g

68 Windows® Powered Smartphone 2002 User’s Guide
Important Safety Information
Retain and follow all product safety and operating instructions. Observe all warnings on the product and
in the operating instructions.
To reduce the risk of bodily injury, electric shock, fire, and damage to the equipment observe the
following precautions.
Safety Precautions for RF Exposure
Tests for SAR are conducted using standard operating positions specified by the FCC with the phone
transmitting at its highest certified power level in all tested frequency bands. Although the SAR is
determined at the highest certified power level, the actual SAR level of the phone while operation can
be well below the maximum value. This is because the phone is designed to operate at multiple power
levels so as to use only the power required to reach the network. In general, the closer you are to a
wireless base station antenna, the lower the power output.
Before a phone model is available for sale to the public, it must be tested and certified to the FCC that it
does not exceed the limit established by the government-adopted requirement for safe exposure. The
tests are performed in positions and locations (e.g., at the ear and worn on the body) as required by the
FCC for each model. (Body-worn measurements may differ among phone models, depending upon
available accessories and FCC requirements). While there may be differences between the SAR levels
of various phones and at various positions, they all meet the government requirement for safe exposure.
For body worn operation, to maintain compliance with FCC RF exposure guidelines, use only High
Tech Computer, Corp. approved accessories. When carrying the phone while it is on, use the specific
High Tech Computer, Corp.-supplied or approved carrying case, holster, or other body-worn
accessory.
Use of non-High Tech Computer, Corp.-approved accessories may violate FCC RF exposure
guidelines and should be avoided.
Health and Safety Information
Exposure to Radio Frequency (RF) Signals
Your wireless phone is a radio transmitter and receiver. It is designed and manufactured not to exceed
the emission limits for exposure to radio frequency (RF) energy set by the Federal Communications
Commission of the U.S. Government. These limits are part of comprehensive guidelines and establish
permitted levels of RF energy for the general population. The guidelines are based on the safety
standards previously set by both U.S. and international standards bodies:
. American National Standards Institute (ANSI) IEEE. C95.1-1992
. National Council on Radiation Protection and Measurement (NCRP). Report 86. 1986
. International Commission on Non-Ionizing Radiation Protection (ICNIRP) 1996
. Ministry of Health (Canada), Safety Code 6. The standards include a substantial safety margin
designed to assure the safety of all persons, regardless of age and health.
The exposure standard for wireless mobile phones employs a unit of measurement known as the
Specific Absorption Rate, or SAR. The SAR limit set by the FCC is 1.6W/kg *.
*In the U.S. and Canada, the SAR limit for mobile phones used by the public is 1.6 watts/kg (W/kg)
averaged over one gram of tissue. The standard incorporates a substantial margin of safety to give
additional protection for the public and to account for any variations in
Caution: The long-term characteristics or the possible physiological effects of Radio Frequency
Electromagnetic fields have not been evaluated by UL.
Caution: Users concerned with the risk of RF exposure may wish to limit the duration of calls and
position the antenna as far away from the body as is practical.

Chapter 9 Appendix C: Regulatory Notices 69
Heed service markings: Except as explained elsewhere in the Operating or Service documentation, do
not service any product yourself. Service needed on components inside these compartments should be
done by an authorized service technicians or provider.
Damage requiring service: Unplug the product from the electrical outlet and refer servicing to an
authorized service technicians or provider under the following conditions:
Liquid has been spilled or an object has fallen into the product.
The product has been exposed to rain or water.
The product has been dropped or damaged.
There are noticeable signs of overheating.
The product does not operate normally when you follow the operating instructions.
Avoid hot areas: The product should be placed away from heat sources such as radiators, heat
registers, stoves, or other products (including amplifiers) that produce heat.
Avoid wet areas: Never use the product in a wet location.
Avoid pushing objects into product: Never push objects of any kind into cabinet slots or other
openings in the product. Slots and openings are provided for ventilation. These openings must not be
blocked or covered.
Mounting Accessories: Do not use the product on an unstable table, cart, stand, tripod, or bracket. Any
mounting of the product should follow the manufacturer’s instructions, and should use a mounting
accessory recommended by the manufacturer.
Avoid unstable mounting: Do not place the product with an unstable base.
Use product with approved equipment: This product should be used only with personal computers
and options identified as suitable for use with your equipment.
Adjust the volume: Turn down the volume before using headphones or other audio devices.
Cleaning: Unplug the product from the wall outlet before cleaning. Do not use liquid cleaners or
aerosol cleaners. Use a damp cloth for cleaning, but NEVER use water to clean an LCD screen.
Safety Precautions for Power Supply Unit
Use the correct external power source: A product should be operated only from the type of power
source indicated on the electrical ratings label. If you are not sure of the type of power source required,
consult your authorized service provider or local power company. For a product that operates from
battery power or other sources, refer to the operating instructions that are included with the product.
Handle battery packs carefully: This product contains a Lithium ion battery. There is a risk of fire
and burns if the battery pack is handled improperly. Do not attempt to open or service the battery pack.
Do not disassemble, crush, puncture, short external contacts or circuits, dispose of in fire or water, or
expose a battery pack to temperatures higher than 60°C (140°F).
DANGER OF EXPLOSION IF BATTERY IS INCORRECTLY REPLACED.
REPLACE ONLY WITH SPECIFIED BATTERIES. DISPOSE OF USED
BATTERIES ACCORDING TO THE LOCAL REGULATIONS OR
REFERENCE GUIDE SUPPLIED WITH YOUR PRODUCT. DO NOT
DISPOSE WITH YOUR REGULAR TRASH.

70 Windows® Powered Smartphone 2002 User’s Guide
Chapter 10 Appendix D: Hardware
Specifications
Feature Component
PDA module:
Processor
Memory
TI OMAP 133MHz processor
24 MB Flash Rom - including 8MBwith Intel iPSM, and
16MB SDRAM
GSM/GPRS
module
Triband 900/1800/1900 MHz.
LCD module 2.2” 176x220 pixels, 65,536 colors reflective TFT-lCD.
Notification Solid green – battery is fully charged.
Solid amber – battery charging.
Solid red – battery empty.
Flashing green (Blinking every 3 seconds) – Network is
attached.
Flashing green (Blinking every second) – Notification
Flashing red – Battery low
Audio Built in Microphone and speaker; one earphone/ microphone
jack with stereo sound; MP3 stereo
Interface Plug in SIM card; feature connector (RS-232, USB and DC
power); infrared IrDA SIR.
Power Rechargeable battery Lithium Ion 1,000MAH; built in
charger.
Accesories AC adapter (input: 100-240Vac, 50-60Hz, 0.2A max; DC
output: 5VDC, 1A)
USB cradle; earphone plug; service kit; protective pouch.