HTC CEDA200 POCKET PC PHONE User Manual Commander English UM Certification
HTC Corporation POCKET PC PHONE Commander English UM Certification
UserManual.wiki
>
HTC
>
CEDA200 User Manual
Users Manual
Navigation menu
Upload a User Manual
Namespaces
Wiki Guide
HTML
PDF
Info
Views
User Manual
Discussion / Help
Navigation


![40 2C. Contacts, Calendar, and ToolsAutomatic Speech Recognition (ASR)Your phone’s built-in ASR lets you make phone calls, open programs, play back music, get calendar information, and more, just by using your voice. It only responds to a set of predefined commands and does not allow you to record your own commands.This section gives a few examples on how to use ASR. For more information, see ASR help on the phone. To access help, press Start (left softkey) > All Programs (left softkey) > Voice Command, and then press Menu (right softkey) > Help.To use ASR:1. Press and hold the Talk key, and a microphone icon ( ) will appear on the title bar.2. Hold your phone a few inches away from your mouth. In a clear voice, say a command.For example, say “Help” to ask for information about using ASR.3. The ASR software may ask you a question to further clarify your request. Say your answer.To place a call:You can call contacts that are stored on your phone, dial a phone number, redial, and place a return call.1. Press and hold the Talk key until the microphone icon ( ) appears on the title bar.2. In a clear voice, say one of the following commands:Ⅲ“Call [contact name]” to call a contact.Ⅲ“Dial [number]” to dial a phone number.Ⅲ“Redial” to repeat the last call made.Ⅲ“Callback” to return the last call received.Ⅲ“Call [contact name] at [location]” to call a contact at a specific number.For example, say:“Call Ann at mobile”“Call Ann at home”“Call Ann at work”3. The ASR software will then confirm with you the contact or number to call. Say “Yes” or “Correct.”If the ASR software is wrong about the contact or number to call, say “No” or “Incorrect” to try again.4. Your phone starts to call the contact or number.To open a program:1. Press and hold the Talk key until the microphone icon ( ) appears on the title bar.2. In a clear voice, say “Start”, “Open”, or “Show” then the program name.To request information from your calendar:1. Press and hold the Talk key until the microphone icon ( ) appears on the title bar.2. In a clear voice, ask for the information you want to retrieve.For example, say:“What’s my next appointment?”“What’s my next meeting?”“What’s my schedule tomorrow?”](https://usermanual.wiki/HTC/CEDA200/User-Guide-1082454-Page-48.png)
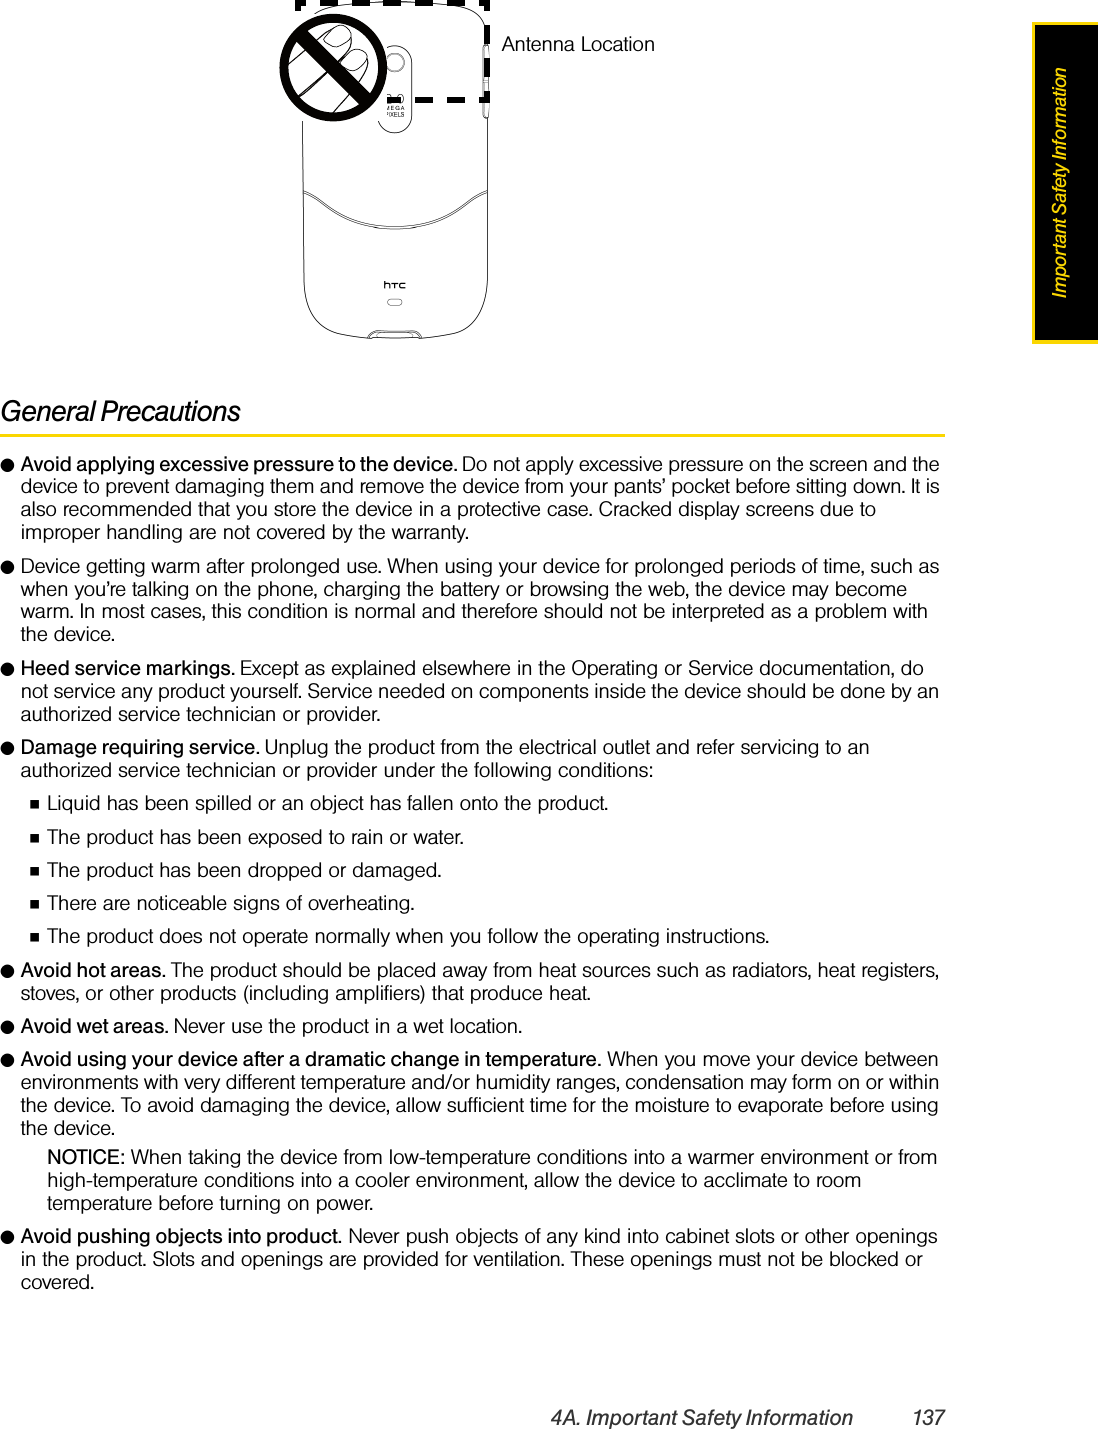
![58 2E. BluetoothConnecting a Bluetooth Hands-free or Stereo HeadsetFor hands-free phone conversations, you can use a Bluetooth hands-free headset such as a car kit with your phone. Your phone also supports A2DP (Advanced Audio Distribution Profile) which allows you to use a Bluetooth stereo headset for hands-free phone conversations and for listening to stereo music.To connect a Bluetooth hands-free or stereo headset:1. Make sure that both your phone and the Bluetooth headset are turned on and within range, and that the headset is visible. Refer to the manufacturer’s documentation to find out how to set the headset in visible mode.2. From the Home panel, press Start (left softkey) > All Programs (left softkey) > Comm Manager > Settings > Bluetooth.3. Click Bluetooth > Add new device.4. Select the name of the Bluetooth headset, and then press Next (left softkey). The phone will automatically pair with the Bluetooth headset.W i n d o w s M o b i l e w i l l a u t o m a t i c a l l y t r y o n e o f t h e p re c o n f i g u re d p a s s c o d e s ( 0 0 0 0 , 1111, 8 8 8 8 , 123 4 ) t o p a i r the Bluetooth headset with the phone. If this fails, you have to enter the passcode delivered with your headset manually.Beaming Information Using BluetoothYou can beam information, such as contacts, calendar items, tasks, and files from your phone to your computer or to another Bluetooth-enabled device.To beam information from your phone to a computer (Windows Vista or Windows XP SP2 [or higher] only):1. Turn on Bluetooth on your phone, and make your phone visible. For information about this, see “To turn on or off Bluetooth on your phone.”2. Set Bluetooth on your computer to visible mode, create a Bluetooth partnership, and then enable your computer to receive Bluetooth beams.3. On your computer, open Bluetooth Devices from the Control Panel, and then click the Options tab on the Bluetooth Devices window.4. For Windows Vista, select Allow Bluetooth devices to find this computer. For Windows XP, select Turn discovery on and Allow Bluetooth devices to connect to this computer.5. Create a Bluetooth partnership between your phone and computer. For information about creating a partnership, see “Bluetooth Partnerships” on page 57.6. In the Options tab of Bluetooth Devices, select Show the Bluetooth icon in the notification area.7. To enable your computer to receive Bluetooth beams, right-click the Bluetooth icon in the notification area at the bottom right corner of your computer screen and select Receive a File. You are now ready to beam.Note If the Bluetooth stereo headset becomes disconnected, turn the headset on and repeat steps 1 to 3 in the previous steps. Select the stereo headset and press Menu (right softkey) > Set as Wireless Stereo. Note If your computer does not have built-in Bluetooth capability, you need to connect and use a Bluetooth adapter or dongle on your computer.Note If the Bluetooth adapter or dongle on your computer was installed using a third-party driver, open the Bluetooth software that came with the Bluetooth adapter or dongle and enable the adapter or dongle to be discovered by other devices. Refer to the Bluetooth adapter’s documentation for more information.](https://usermanual.wiki/HTC/CEDA200/User-Guide-1082454-Page-66.png)
![2E. Bluetooth 59Bluetooth8. On your phone, select an item to beam. The item can be an a task, a contact card, or a file.9. To beam a contact, press Menu (right softkey) > Send Contact > Beam. To beam other types of information, press Menu (right softkey) > Beam [type of item].10. Select the device name to which you want to send the item.11. If you beamed a task, or contact item to your computer and it is not automatically added to Outlook, select File > Import and Export in Outlook to import it.To beam information to a Bluetooth-enabled device such as another Windows Mobile-powered device, follow steps 1 to 10 in the above procedure.Printing Files via BluetoothConnect your phone to a Bluetooth printer to print contact information, appointment details, images, and other file types.Before you start printing, make sure to turn on the Bluetooth printer and to turn on Bluetooth on your phone. To turn on Bluetooth, press Start (left softkey) > All Programs (left softkey) > Comm Manager, highlight Bluetooth and then press the Enter key.Printing Contact Information1. From the Home panel, press Contacts (right softkey) and then select the contact whose information you want to print. 2. Press Menu (right softkey) > Print via Bluetooth.3. Press Menu (right softkey) > Search Devices. Your phone starts to search for Bluetooth devices. 4. Select the Bluetooth printer and press Menu (right softkey) > Send File.5. Set the printing options you want, and then press Print..Printing a Calendar Appointment1. Press Start (left softkey) > All Programs (left softkey) > Calendar, and then select (highlight) the appointment whose details you want to print.2. Follow steps 2 to 4 in “Printing Contact Information.”Printing a JPEG File1. In Pictures & Videos, locate the JPEG file you want to print.2. Press Menu (right softkey) > Print via Bluetooth. 3. Follow steps 3 to 5 in “Printing Contact Information.”Note Not all file types can be sent via Bluetooth.Tips • The default folder on your computer where beamed items are stored may be C:\Documents and Settings\your_username\My Documents in Windows XP or C:\Users\your_username\My Documents in Windows Vista.• For your phone to receive Bluetooth beams, press Start (left softkey) > All Programs (left softkey) > Settings > Connections > Beam and make sure the Receive incoming beams check box is selected.Notes You can print files in the .txt, .jpg, .xhtml, .vcf, .vcs file formats.](https://usermanual.wiki/HTC/CEDA200/User-Guide-1082454-Page-67.png)