HTC CENSUS Handheld Computer User Manual Book Melbourne manual indb
HTC Corporation Handheld Computer Book Melbourne manual indb
HTC >
User manual rev3
User Manual

2 |
Please Read Before Proceeding
THIS DEVICE IS NOT CHARGED WHEN YOU TAKE IT OUT OF THE BOX.
DO NOT REMOVE THE BATTERY PACK WHEN THE DEVICE IS CHARGING.
YOUR WARRANTY IS INVALIDATED IF YOU OPEN OR TAMPER WITH THE DEVICE’S
OUTER CASING.
COPYRIGHT INFORMATION
Microsoft, MS-DOS, Windows, Windows NT, Windows Server, Windows Mobile, ActiveSync,
Excel, Internet Explorer, MSN, Outlook, PowerPoint, and Word are either registered trademarks or
trademarks of Microsoft Corporation in the United States and/or other countries. All trademarks are
the properties of their respective owners.

| 3
Important Health Information and Safety
Precautions
When using this product, the safety precautions below must be taken to avoid possible legal
liabilities and damages.
Retain and follow all product safety and operating instructions. Observe all warnings in the
operating instructions on the product.
To reduce the risk of bodily injury, electric shock, fire, and damage to the equipment, observe the
following precautions.
ELECTRICAL SAFETY
This product is intended for use when supplied with power from the designated battery or power
supply unit.Other usage may be dangerous and will invalidate any approval given to this product.
SAFETY PRECAUTIONS FOR PROPER GROUNDING AND CONNECTION
CAUTION:
Improper grounding when connecting the product to an associated equipment can
result in a risk of electric shock.
This product is equipped with a USB cable for connecting the product to a desktop or notebook
computer. Be sure your computer is properly grounded (earthed) before connecting the product
to the computer. The power supply cord of a desktop or notebook computer has an equipment-
grounding conductor and a grounding plug. The plug must be plugged into an appropriate outlet
which is properly installed and grounded in accordance with all local codes and ordinances.
SAFETY PRECAUTIONS FOR POWER SUPPLY UNIT
• Use the correct external power source
A product should be operated only from the type of power source indicated on the electrical
ratings label. If you are not sure of the type of power source required, consult your authorized
service provider or local power company. For a product that operates from battery power or
other sources, refer to the operating instructions that are included with the product.
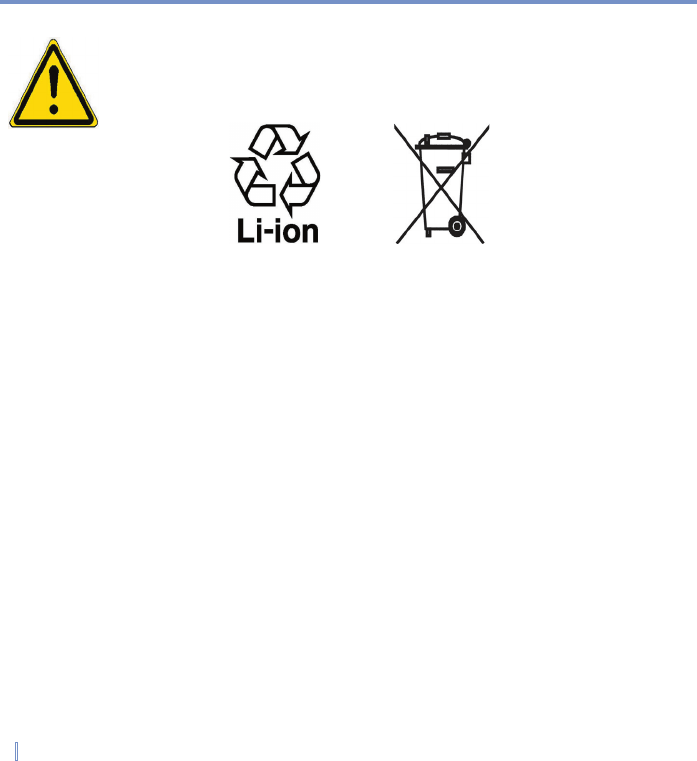
• Handle battery packs carefully
This product contains a Li-ion Polymer battery. There is a risk of fire and burns if the battery
pack is handled improperly. Do not attempt to open or service the battery pack. Do not
disassemble, crush, puncture, short external contacts or circuits, dispose of in fire or water, or
expose a battery pack to temperatures higher than 60˚C (140˚F).
4 |
WARNING! DANGER OF EXPLOSION IF BATTERY IS INCORRECTLY REPLACED. TO REDUCE RISK
OF FIRE OR BURNS, DO NOT DISASSEMBLE, CRUSH, PUNCTURE, SHORT EXTERNAL
CONTACTS, EXPOSE TO TEMPERATURE ABOVE 60˚C (140˚F), OR DISPOSE OF IN FIRE
OR WATER. REPLACE ONLY WITH SPECIFIED BATTERIES. RECYCLE OR DISPOSE OF
USED BATTERIES ACCORDING TO THE LOCAL REGULATIONS OR REFERENCE GUIDE
SUPPLIED WITH YOUR PRODUCT.
SAFETY PRECAUTIONS FOR DIRECT SUNLIGHT
Keep this product away from excessive moisture and extreme temperatures. Do not leave the
product or its battery inside a vehicle or in places where the temperature may exceed 60°C
(140°F), such as on a car dashboard, window sill, or behind a glass that is exposed to direct
sunlight or strong ultraviolet light for extended periods of time. This may damage the product,
overheat the battery, or pose a risk to the vehicle.
ENVIRONMENT RESTRICTIONS
Do not use this product in gas stations, fuel depots, chemical plants or where blasting operations
are in progress, or in potentially explosive atmospheres such as fuelling areas, fuel storehouses,
below deck on boats, fuel or chemical transfer or storage facilities, and areas where the air
contains chemicals or particles, such as grain, dust, or metal powders. Please be aware that
sparks in such areas could cause an explosion or fire resulting in bodily injury or even death.
EXPLOSIVE ATMOSPHERES
When in any area with a potentially explosive atmosphere or where flammable materials exist, the
product should be turned off and the user should obey all signs and instructions. Sparks in such
areas could cause an explosion or fire resulting in bodily injury or even death. Users are advised
not to use the equipment at refueling points such as service or gas stations, and are reminded
of the need to observe restrictions on the use of radio equipment in fuel depots, chemical plants,
or where blasting operations are in progress. Areas with a potentially explosive atmosphere are
often, but not always, clearly marked. These include fueling areas, below deck on boats, fuel or
chemical transfer or storage facilities, and areas where the air contains chemicals or particles,
such as grain, dust, or metal powders.

| 5
ROAD SAFETY
Vehicle drivers in motion are not permitted to use telephony services with handheld devices,
except in the case of emergency. In some countries, using hands-free devices as an alternative is
allowed.
INTERFERENCE WITH MEDICAL EQUIPMENT FUNCTIONS
This product may cause medical equipment to malfunction. The use of this device is forbidden in
most hospitals and medical clinics.
GENERAL PRECAUTIONS
• Heed service markings
Except as explained elsewhere in the Operating or Service documentation, do not service any
product yourself. Service needed on components inside these compartments should be done
by an authorized service technician or provider.
• Damage requiring service
Unplug the product from the electrical outlet and refer servicing to an authorized service
technician or provider under the following conditions:
• Liquid has been spilled or an object has fallen into the product.
• The product has been exposed to rain or water.
• The product has been dropped or damaged.
• There are noticeable signs of overheating.
• The product does not operate normally when you follow the operating instructions.
• Avoid hot areas
The product should be placed away from heat sources such as radiators, heat registers,
stoves, or other products (including amplifiers) that produce heat.
• Avoid wet areas
Never use the product in a wet location.
• Avoid pushing objects into product
Never push objects of any kind into cabinet slots or other openings in the product. Slots and
openings are provided for ventilation. These openings must not be blocked or covered.
• Mounting Accessories
Do not use the product on an unstable table, cart, stand, tripod, or bracket. Any mounting
of the product should follow the manufacturer’s instructions, and should use a mounting
accessory recommended by the manufacturer.

6 |
• Avoid unstable mounting
Do not place the product with an unstable base.
• Use product with approved equipment
This product should be used only with personal computers and options identified as suitable
for use with your equipment.
• Cleaning
Unplug the product from the wall outlet before cleaning. Do not use liquid cleaners or aerosol
cleaners. Use a damp cloth for cleaning, but NEVER use water to clean the LCD screen.

| 7
Contents
Chapter 1 Getting Started
1.1 Getting to Know your Device and its Accessories .................................10
1.2 Starting Up .................................................................................................12
1.3 The Today Screen ......................................................................................15
1.4 Using the Start Menu .................................................................................17
Chapter 2 Entering and Searching Information
2.1 Introduction ................................................................................................20
2.2 Using the Keyboard ..................................................................................21
2.3 Using Letter Recognizer ...........................................................................21
2.4 Using Block Recognizer ...........................................................................22
2.5 Using Transcriber ......................................................................................22
2.6 Drawing and Writing on the Screen .........................................................26
2.7 Searching Information ..............................................................................27
Chapter 3 Synchronizing Information
and Setting Up E-mail Security
3.1 Using ActiveSync ......................................................................................29
3.2 Synchronizing Information .......................................................................31

8 |
Chapter 4 Managing Your Device
4.1 Personalizing Your Device ........................................................................36
4.2 Adding and Removing Programs .............................................................42
4.3 Managing Memory .....................................................................................43
4.4 Backing Up Files .......................................................................................45
4.5 Protecting Your Device .............................................................................46
4.6 Resetting Your Device ...............................................................................48
Chapter 5 Getting Connected
5.1 Connecting to the Internet ........................................................................50
5.2 Internet Explorer Mobile ...........................................................................52
5.3 Using Internet Sharing ..............................................................................54
Appendix
A.1 Regulatory Notices ....................................................................................57
A.2 Specifications ...........................................................................................60

1.1 Getting to Know your Device and its Accessories
1.2 Starting Up
1.3 The Today Screen
1.4 Using the Start Menu
Chapter 1
Getting Started
10 | Getting Started
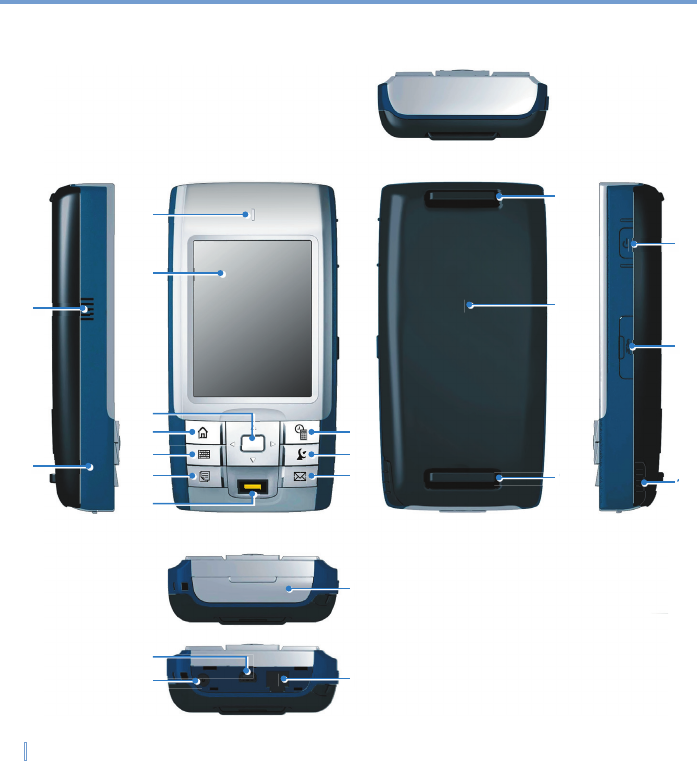
1.1 Getting to Know your Device and its Accessories
1
Bottom view (with I/O cover opened)
2
3
4
5
6
7
8
9
10
11
14
12
13
15
16
15 19
18
17
15
19
20
21
Bottom view
Front viewLeft view Rear view Right view
Top view

Getting Started | 11
1 Notification LED Indicate the battery charging status, notification and CDMA network status.
2 Touch Screen The 3.5” LCM touch screen allows you to write, draw, or make a selection with
the stylus.
3 NAVIGATION Control
Press this multi-directional control up/down/left/right to move through menus
and program instructions; carry out the selection by pressing ENTER (the
center button).
4 Home Button Press to retrun to the Today screen.
5 Keyboard Button Press to open the soft keyboard.
6Notes/Text/Document
Button Press to open the Notes/Text/Document application.
7 Fingerprint Sensor This sensor is used to identify the user’s fingerprint.
8 Time/Expense Button Press to open the Time/Expense application.
9 MAP Button Press to open the MAP application.
10 Message Button Press to open the Message application.
11 I/O Cover The rubber cover protects the I/O on the bottom side of the device.
12 USB Port Connect the provided USB cable to synchronize data with PC.
13 Power Jack Plug the provided AC adapter to this connector to charge the battery.
14 Phone Connector Lets you connect the provided phone cable.
15 Velcro Hook Attach the velcro strap to the hooks, which allows you to hold the device in
your palm safely.
16 Battery Cover Slide out to access the battery compartment.
17 POWER/Backlight
Button
Press and hold to turn your device on or off. Press to turn the backlight on or
off.
18 SD Card Slot Open the rubber cover and insert a storage card (SD card) for storing data.
19 Stylus Use the stylus to write, draw, or select items on the touch screen.
20 Buzzer Provide the system sound for event alert.
21 RESET Button With the stylus, press the Reset button to soft-reset your device.
12 | Getting Started
1.2 Starting Up
About the battery
Your device contains a rechargeable Li-ion polymer battery. Your device is designed to
use only manufacturer-specified original batteries and accessories. Battery performance
depends on many factors, such as the temperature of the environment in which you
operate your device, the features and/or settings you select and use, and items attached
to your device’s connecting ports.
Warning! To reduce risk of fire or burns:
• Do not attempt to open, disassemble, or service the battery pack.
• Do not crush, puncture, short external contacts, or dispose of in fire or water.
• Do not expose to temperatures above 60˚C (140˚F).
• Replace only with the battery pack designated for this product.
• Recycle or dispose of used battery as stipulated by local regulation.
Accessories
AC adapter Connect the device to an outlet to charge the device battery.
Car adapter Use the car adapter to charge the device battery while you are
traveling in a car.
Stylus One spare stylus is provided in the package.
Phone cable Connect the device using the phone cable to use the modem
function on the device.
Velcro strap Attach the velcro strap to hold the device in your palm safely.
Getting Started | 13
Install and charge the battery
Before you can use your device, you need to install and charge the battery.
To install the battery
1.
Slide out to remove the battery cover.
2.
Push the battery latch to the Unlock position (
).
3.
Insert the battery by aligning the exposed copper part of the battery pack with the
protruding copper conductor, and then push down the battery into place.
4.
Push the battery latch to the Lock position (
).
5.
Replace the battery cover.
Low battery
When the low-battery warning appears, do the following:
1.
Immediately save your current data.
2.
Connect your device to the power source.
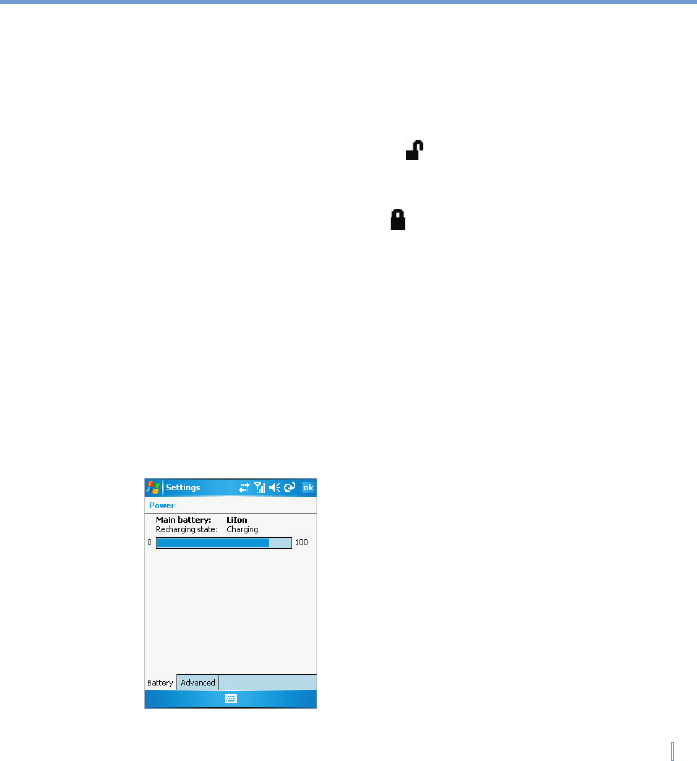
To check the battery power
•
Tap
Start
>
Settings
>
System
tab >
Power
.

14 | Getting Started
Turn the device on and off
Press and hold the POWER button to turn on the device. When you turn on the device for
the first time, you are asked to complete a calibration process. For more information, see
the following section “Calibrate the device”.
To turn off the device, press POWER again.
Calibrate the Device
Calibrating the device screen involves tapping with the stylus the center of a cross as it
moves around the screen. This process ensures that when you tap the screen with your
stylus, the tapped item is activated.
If your device does not accurately respond to screen taps, please follow these steps to
re-calibrate it:
1.
Tap
Start
>
Settings
>
System
tab >
Screen
.
2.
On the
General
tab, tap
Align Screen
, and follow the instructions on the screen.
Manage screen settings
The device touch screen has three orientation modes: Portrait, Landscape (right-handed),
and Landscape (left-handed). Portrait mode allows you to get a better view or a better
operation of certain programs on your device, while Landscape mode may be optimal for
viewing longer text files.
•
To change the orientation, tap
Start
>
Settings
>
System
tab >
Screen
, and select the
orientation you want: Portrait, Landscape (right-handed), or Landscape (left-handed).
Or, you can simply tap the Display Mode icon on Today screen to change the display
mode.
•
To smooth the edges of screen fonts for many programs, on the
ClearType
tab, select
the
Enable ClearType
check box.
•
To increase the readability or to see more content on the screen, on the
Text Size
tab,
adjust the text size by moving the slider.
Getting Started | 15
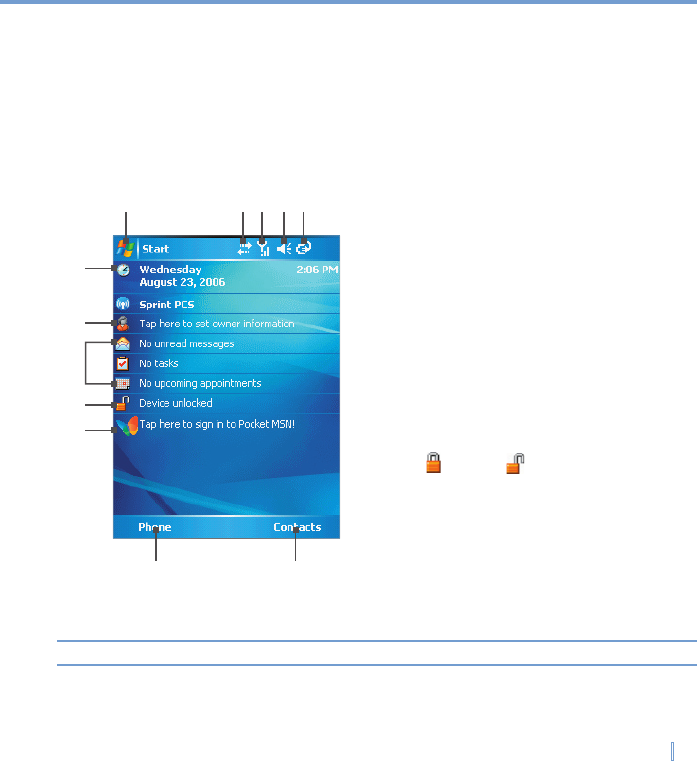
1.3 The Today Screen
The Today screen displays important information, such as upcoming appointments and
status indicators. You can tap a section on the screen to open the associated program.
•
To access the Today screen, tap
Start
>
Today
.
•
To customize the Today screen display, including the background image, tap
Start
>
Settings
>
Personal
tab >
Today
.
1Tap to open the Start menu.
2Tap to view connectivity status.
3Indicates the radio signal strength.
4Tap to adjust device/ringer volume.
5Indicates the battery status. Tap to open
the Power Settings screen.
6Displays the current date. Tap to set up
date, alarm, and more.
7Tap to set owner information.
8Your day at a glance with reminders. Tap
to open the related program: messages,
tasks, and appointments.
9Tap to lock or unlock device.
: locked; : unlocked.
10 Tap to open MSN sign-in screen.
11 Tap to open the Phone screen (data call
only).
12 Tap to open the Contacts screen.
1 2 3 5
6
8
9
11 12
4
7
10
Note You can access the Today screen from anywhere by tapping Start > Today.

16 | Getting Started
Indicators
The following are some of the status icons that you may see on your device.
Icon Description
Indicates the battery is fully charged.
lndicates the battery is very low.
Battery charging.
Sound on.
Sound off.
Ringer in vibration mode.
1x data connection is active.
EVDO data connection is active.
ActiveSync connection is active.
ActiveSync connection is not active.
Synchronization in progress.
Synchronization error.
Indicates maximum signal strength.
No signal.
Flight mode is active. Wireless connection is off.
No service.
Device is locked.
Device is unlocked.
Getting Started | 17
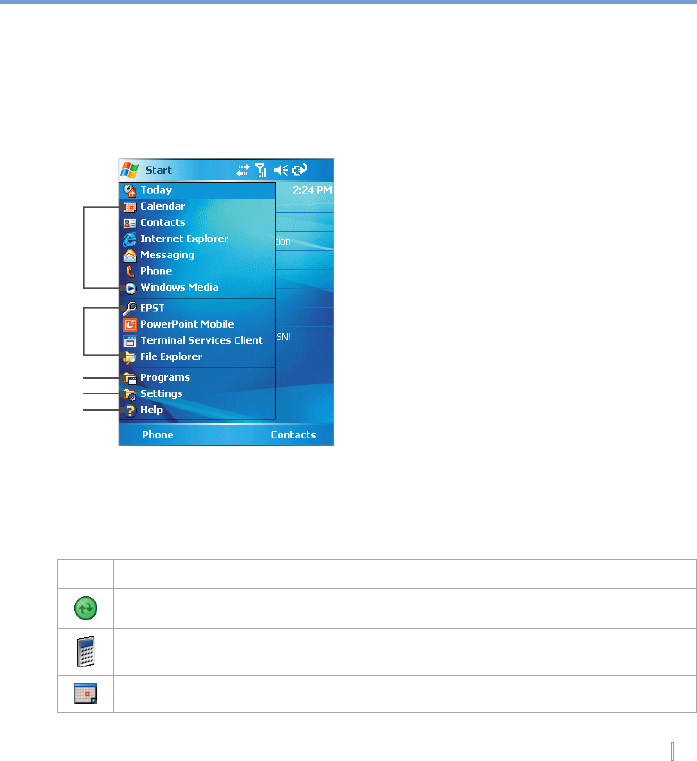
1.4 Using the Start Menu
The Start menu, located at the top left corner of the Today screen, displays a list of
programs. It lets you close a screen and switch from one program to another. You can
start a program by scrolling through the programs list and then pressing ENTER, or by
tapping a program with the stylus.
1Tap to start a program. The items displayed
in Start menu can be customized by
tapping Start > Settings > Personal tab
> Menus.
2Tap to start a recently-used program.
3Tap to view and select more programs that
are installed in your device.
4Tap to change device settings.
5Tap to see a Help topic for the current
screen.
1
2
3
5
4
Indicators
The following are some of the icons for the programs that are already installed on your device.
Icon Description
ActiveSync
Synchronizes information between your device and a PC.
Calculator
Performs basic arithmetic and calculations, such as addition, subtraction,
multiplication, and division.
Calendar
Keeps track of your appointments and creates meeting requests.
18 | Getting Started
Icon Description
Contacts
Keeps track of your friends and colleagues.
Download Agent
Provides information about the download status and the downloaded
content from the Internet.
Excel Mobile
Creates new workbooks or lets you view and edit Excel workbooks.
File Explorer
Enables you to organize and manage files on your device.
Games
Lets you play two pre-installed games: Bubble Breaker and Solitaire.
Help
Enables you to see Help topics for a program on your device.
Internet Explorer
Internet Explorer browses Web and WAP sites, and downloads new
programs and files from the Internet.
Internet Sharing
Allows you to connect your notebook computer to the
Internet using your device’s data connection.
Messaging
Sends and receives e-mail and text messages.
Notes
Creates handwritten or typed notes, drawings, and recordings.
Pictures & Videos
Collects, organizes, and sorts picture and video files in the My
Pictures folder of your device or on a storage card.
Pocket MSN
Sends and receives instant messages with your MSN Messenger contacts.
PowerPoint Mobile
Lets you view and edit PowerPoint slides and presentations.
Search
Enables you to search contacts, data, and other information on your device.
Tasks
Keeps track of your tasks.
Word Mobile
Creates new documents or lets you view and edit Word documents.

2.1 Introduction
2.2 Using the Keyboard
2.3 Using Letter Recognizer
2.4 Using Block Recognizer
2.5 Using Transcriber
2.6 Drawing and Writing on the Screen
2.7 Searching Information
Chapter 2
Entering and Searching Information
20 | Entering and Searching Information
2.1 Introduction
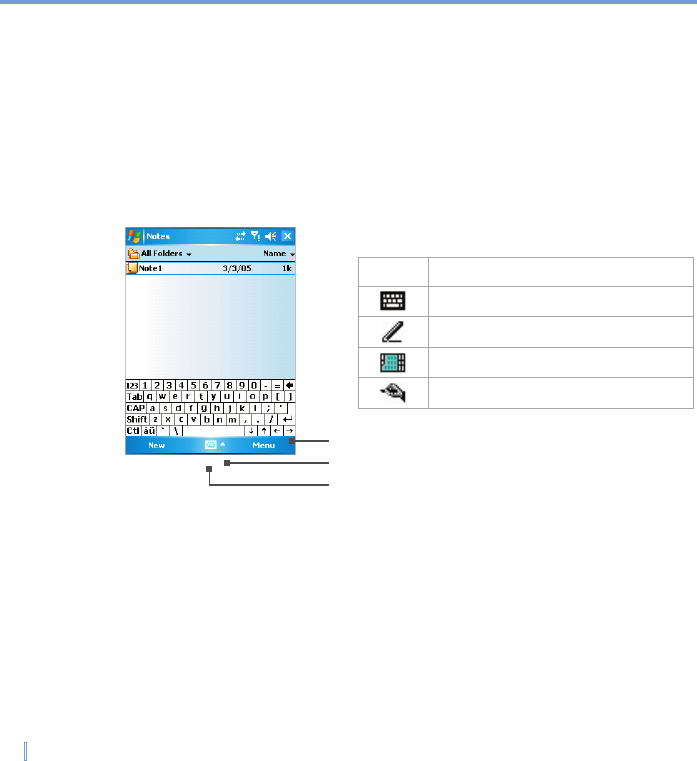
When you start a program or select a field that requires text or numbers, Input Panel
automatically becomes available. Input Panel provides access to the various input
methods available on your device, including
Block Recognizer
,
Keyboard
,
Letter
Recognizer
,
Key Pad
, and
Transcriber
. By default, the Input Panel icon appears on the
menu bar to indicate which input method is currently selected. The Input Selector arrow
(shown at the right side of the Input Panel icon) opens a list of available input methods.
Example:
To show or hide Input Panel
•
Tap the Input Panel icon on the menu bar.
On-screen Keyboard
Input Selector arrow
Input Panel icon
Icon Input method
The on-screen keyboard.
Letter Recognizer or Block Recognizer.
Key Pad
Transcriber

Entering and Searching Information | 21
2.2 Using the Keyboard
Use the on-screen keyboard
The
on-screen
keyboard
is available when text entry is possible. You can enter text by
tapping keys on the keyboard that are displayed on the screen.
To enter text using the on-screen keyboard
1.
In a program, tap the Input Selector arrow, and then tap
Keyboard
.
2.
Enter text by tapping keys on the on-screen keyboard.
To enlarge the on-screen keyboard
1.
Tap the Input Selector arrow, and then tap
Options
.
2.
In the
Input method
list, select
Keyboard
.
3.
Tap
Large Keys
.
2.3 Using Letter Recognizer
With
Letter Recognizer
, you can write individual letters, numbers, and punctuation, which
are then converted into typed text.
To use Letter Recognizer
1.
In a program, tap the Input Selector arrow, and then tap
Letter Recognizer
.
2.
Write characters, numbers, and symbols in the designated writing area.
•
Enter capital letters by writing in the ABC (left) area of the box.
•
Enter lower case letters by writing in the abc (middle) area of the box.
•
Enter numbers by writing in the 123 (right) area of the box.
•
Enter punctuation and symbols by tapping in either area of the box and then writing
the desired character.

22 | Entering and Searching Information
2.4 Using Block Recognizer
With
Block Recognizer
, you use a single stroke to write letters, numbers, symbols, and
punctuation, which are then converted into typed text.
To use Block Recognizer
1.
In a program, tap the Input Selector arrow, and then tap
Block Recognizer
.
2.
Write characters, numbers, and symbols in the designated writing area.
•
Enter letters by writing in the abc (left) area of the box.
•
Enter numbers by writing in the 123 (right) area of the box.
•
Enter symbols and punctuation by tapping in either area of the box and then writing
the desired character.
Note Letter Recognizer and Block Recognizer are available when text entry is possible.
Tip For help with writing characters with Letter Recognizer and Block Recognizer, tap the
question mark near the writing area.
2.5 Using Transcriber
Transcriber
is a handwriting recognition program that allows you to write in cursive, print,
Transcriber is a handwriting recognition program that allows you to write in cursive, print, Transcriber
or a combination of both. Transcriber works transparently in the background of programs,
recognizing words with its integrated dictionary. When Transcriber is turned on, it interprets
stylus movement anywhere on the screen as handwriting input. For more information
about using Transcriber, see Help on your device.
To start Transcriber
1.
Start a program that accepts user input, such as Word Mobile.
2.
Tap the Input Selector arrow, and then tap
Transcriber
. The Transcriber introductory
screen appears.

Entering and Searching Information | 23
To write using Transcriber
1.
In a program, position the cursor where you want text to appear.
2.
Use the stylus to write anywhere on the screen. The handwriting will be converted to
text shortly after you lift the stylus from the screen.
To enter punctuation and symbols
Transcriber comes with an on-screen keyboard that provides an easy way to add
punctuation or a special symbol to existing text.
•
In a program, tap
on the Transcriber toolbar. The keyboard remains visible until
you tap the button again.
Tips To reposition the keyboard, tap and hold the title bar, then drag to the desired location.
When no text is selected, you can also open the keyboard by doing the gesture.
To edit text
1.
In a program, draw a line across the text you want to edit.
2.
After you lift the stylus from the screen, the line will disappear and the selected text will
be highlighted.
3.
Do either of the following:
•
Rewrite the text.
•
Use gestures to capitalize letters, insert a space, and so on. For information about
using gestures, see “Transcriber Gestures” in this chapter.
Transcriber Gestures
Use quick strokes of the stylus to edit your text or to insert returns, spaces, or tabs.
Tip You can also use the Enter, Space, and Backspace buttons on the Transcriber toolbar.
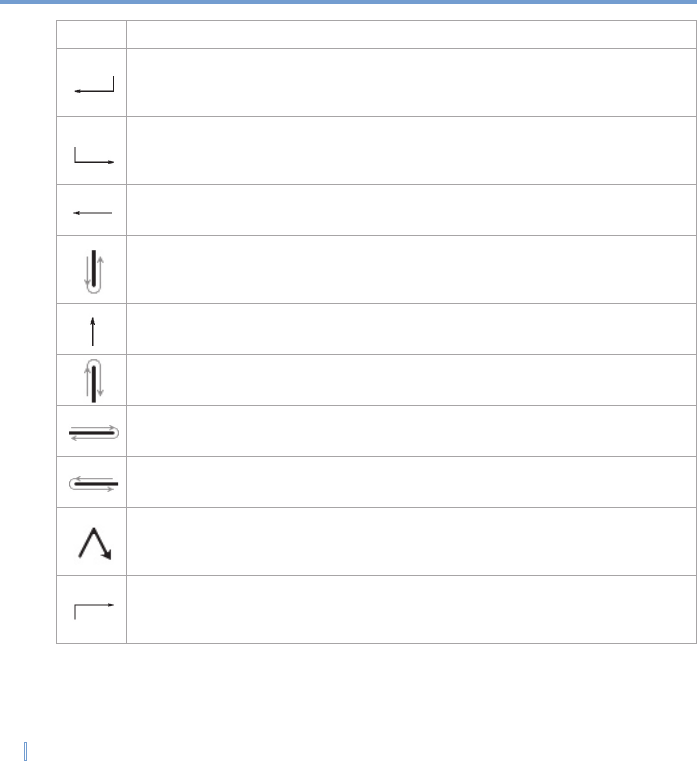
24 | Entering and Searching Information
Do To
Insert a paragraph return at the cursor.
The horizontal portion of the gesture must be at least two times longer than
the vertical portion.
Insert a space at the cursor.
The horizontal portion of the gesture must be at least two times longer than
the vertical portion.
Move the cursor one space back and erase any text.
To do this, draw a line from right to left.
Open the menu of alternate words if a word is selected or the on-screen
Transcriber keyboard if no text is selected.
To do this, draw a line straight down and back up.
Change the capitalization of a selected letter, word, or block of text.
To do this, draw a line straight up.
Undo the last action.
To do this, draw a line straight up and back down.
Copy the selected text.
To do this, draw a line from left to right and back.
Cut the selected text.
To do this, draw a line from right to left and back.
Paste copied or cut text.
To do this, draw a line from the lower left of the screen diagonally up toward
the right and back down to the right.
Insert a tab.
The horizontal portion of the gesture must be at least two times longer than
the vertical portion.
Entering and Searching Information | 25
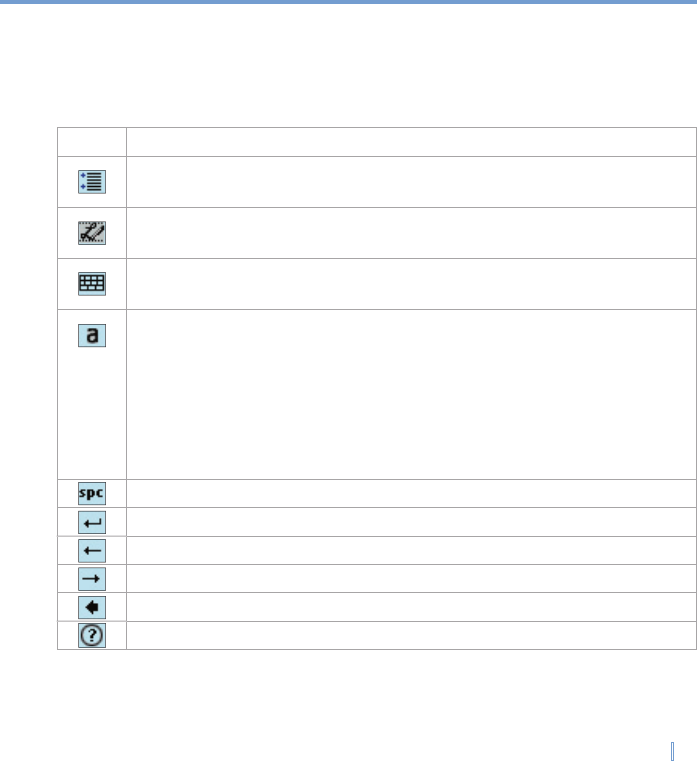
The Transcriber toolbar
The Transcriber toolbar, which appears at the bottom of the screen when Transcriber is
open, provides easy access to several tools, Enter, Space, and Backspace buttons, and
Left and Right arrow buttons.
Tap To
Open the Options dialog box, where you can set options such as writing
direction, text entry, and shorthand.
Open Letter Shapes, where you can set your personal writing styles to
maximize recognition.
Use the onscren keyboard to quickly enter numbers, punctuation, and
other symbols.
Change the character recognition mode.
• a mode. This is the default for optimum handwriting recognition.
• 123 mode. Numbers and some letters are allowed and the calculator is
activated.
• A mode. All letters are automatically capitalized.
If you are in A or 123 mode, recognition returns automatically to the default
mode once you lift the stylus.
Insert a space at the cursor.
Insert a paragraph return at the cursor.
Move the cursor one space to the left.
Move the cursor one space to the right.
Move the cursor one space back and erase any text.
Open Transcriber Help.

26 | Entering and Searching Information
2.6 Drawing and Writing on the Screen
With your device, you can draw directly on the screen, or write on the screen and save
notes in your own
handwriting. To do this, you must set the input mode in Notes to
Writing
. If you prefer to use handwriting or frequently add drawings to your notes, you
may find it helpful to set Writing as the default input mode. If you prefer typed text, set
Typing
as the default input mode.
To set the input mode for Notes
1.
Tap
Start > Programs > Notes
.
2.
In the note list, tap
Menu > Options
.
3.
In the
Default mode
box, tap one of the following:
•
Writing
if you want to draw or enter handwritten text in a note.
•
Typing
if you want to create a typed note.
4.
Tap
OK
.
To write a note
1.
Tap
Start > Programs > Notes
.
2.
In the note list, tap
New
.
3.
Write your text on the screen.
4.
When fi nished, tap
OK
to return to the note list.
Notes To select handwritten text, tap and hold next to the writing. As soon as dots appear, and
before they form a complete circle, quickly drag across the writing.
If a letter crosses three ruled lines, it is treated as a drawing rather than text.
To draw a note
1.
Tap
Start > Programs > Notes
.
2.
In the note list, tap
New
.
3.
Draw on the screen, crossing at least three ruled lines.

Entering and Searching Information | 27
4.
A selection box labeled
Drawing
appears around your drawing.
5.
When fi nished, tap
OK
to return to the note list.
Note To select a drawing (for example, to copy or delete it), tap and hold the drawing briefly.
When you lift the stylus, the drawing is selected.
2.7 Searching Information
You can search for files and other items stored on your device in the My Documents folder
or on a storage card. You can search by file name or by words located in the item. For
example, you can search in e-mail messages, notes, appointments, contacts, and tasks,
as well as in online Help.
To search for a fi le or an item
1.
Tap
Start > Programs > Search
.
2.
In
Search for
, enter the fi le name, word, or other information you want to search for.
3.
If you have looked for this item before, tap the
Search for
arrow and select the item
Search for arrow and select the item Search for
from the list.
4.
In
Type
, select a data type to help narrow your search.
5.
Tap
Search
.
6.
The
My Documents
folder and subfolders are searched.
7.
In the
Results
list, tap the item you want to open.
Note The storage card symbol ( ) is displayed next to the names of files saved on a
storage card.

Chapter 3
Synchronizing Information and
Setting Up E-mail Security
3.1 Using ActiveSync
3.2 Synchronizing Information

Synchronizing Information and Setting Up E-mail Security | 29
3.1 Using ActiveSync
Using
ActiveSync 4.x
or greater synchronizes information on your device with information
on your PC, such as Outlook content. ActiveSync can also synchronize over a wireless or
cellular network with Microsoft Exchange Server, if your company or service provider is
running Microsoft Exchange Server with Exchange ActiveSync. When you synchronize,
ActiveSync compares the information on your device with the information on your PC and/
or Exchange Server and updates all locations with the most recent information.
With ActiveSync, you can:
•
Synchronize information, such as Outlook E-mail, Contacts, Calendar, or Tasks
information on your device with your PC, as well as pictures, video, and music.
•
Synchronize Outlook E-mail, Contacts, Calendar appointments, and Tasks on your
device directly with Exchange Server so that you can stay up to date even when your
PC is turned off.
•
Exchange fi les between your device and your PC without synchronizing.
•
Select which types of information are synchronized and specify how much information
is synchronized. For example, you can choose how many weeks of past Calendar
appointments to synchronize.
Before you can synchronize information with a PC, you must first install ActiveSync on
your PC and create a synchronization relationship between your device and the PC.
You can install ActiveSync from the Getting Started disc that comes with your device.
ActiveSync is already installed on your device.
Once you have installed ActiveSync and set up a synchronization relationship, ActiveSync
on the PC recognizes your device when you connect it, and automatically transfers the
synchronization settings you specified on your device.
You may be able to synchronize your device with Exchange Server through your company
or wireless service provider. If you plan to do so, obtain the name of the Exchange Server,
your user name, password, and domain name from your administrator before starting the
Sync Setup Wizard.

30 | Synchronizing Information and Setting Up E-mail Security
PC Requirement to Run ActiveSync 4.x
To connect your device to the PC, you need to have Microsoft® ActiveSync® program
installed on your PC. ActiveSync 4.x is included in the Installation CD, which is compatible
with the following operating systems and applications:
•
Microsoft® Windows® 2000 Service Pack 4
•
Microsoft® Windows Server® 2003 Service Pack 1
•
Microsoft® Windows Server® 2003 IA64 Edition Service Pack 1
•
Microsoft® Windows Server® 2003 x64 Edition Service Pack 1
•
Microsoft® Windows® XP Professional Service Packs 1 and 2
•
Microsoft® Windows® XP Home Service Packs 1 and 2
•
Microsoft® Windows® XP Tablet PC Edition 2005
•
Microsoft® Windows® XP Media Center Edition 2005
•
Microsoft® Windows® XP Professional x64 Edition
•
Microsoft® Outlook® 98, Microsoft® Outlook® 2000 and Microsoft® Outlook® XP, and
Microsoft® Outlook® 2003 messaging and collaboration clients
•
Microsoft® Offi ce 97, excluding Outlook
•
Microsoft® Offi ce 2000
•
Microsoft® Offi ce XP
•
Microsoft® Offi ce 2003
•
Microsoft® Internet Explorer® 4.01 or later (required)
•
Microsoft® Systems Management Server 2.0
To install and set up ActiveSync
1.
Install ActiveSync on your PC, as described on the Getting Started disc. After Setup
completes, the Sync Setup Wizard automatically starts when you connect your device
to the PC.
2.
Follow the instructions on the screen to complete the wizard. In the Sync Setup Wizard,
do one or both of the following:
•
Create a synchronization relationship between your PC and the device.
•
Confi gure an Exchange Server connection to synchronize directly with Exchange
Server.
3.
Choose information types to synchronize.
Synchronizing Information and Setting Up E-mail Security | 31
Note When you finish the wizard, ActiveSync synchronizes your device automatically. Once
synchronization is complete, you can disconnect your device from your PC.
3.2 Synchronizing Information
When you connect your device to the PC using a USB cable, an infrared connection, or
a Bluetooth connection, ActiveSync will immediately synchronize. While the device is
connected, ActiveSync synchronizes every time you make a change on either the PC or
the device.
Synchronizing Outlook information
If you have set up a synchronization relationship between your device and the PC,
synchronization keeps Outlook information up-to-date on both your device and PC.
ActiveSync synchronizes a limited amount of information by default to save storage space
on your device. You can change the amount of information synchronized for a given
information type in Settings for the information type.
You can set up your device to synchronize with more than one PC or with a combination
of one or more PCs and Exchange Server. When synchronizing with multiple computers,
the items that you synchronize will appear on all of the computers with which they are
synchronized. For example, if you have set up synchronization with two PCs (PC1 and
PC2), which have different items, and you synchronize Contacts and Calendar on the
device with both computers, the result is as follows:
Location New state
PC1 All Outlook contacts and calendar appointments that were on PC2
are now also on PC1.
PC2 All Outlook contacts and calendar appointments that were on PC1
are now also on PC2.
Device All Outlook contacts and calendar appointments from both PC1 and
PC2 are on the device.

32 | Synchronizing Information and Setting Up E-mail Security
Note Outlook e-mail can be synchronized with only one computer.
To start and stop synchronization
•
To synchronize Outlook information and other local information on the PC, connect
your device to the PC using Bluetooth, infrared (IR) or a cable.
•
If you are synchronizing directly with Exchange Server, you can use this connection to
the PC to “pass through” to the network, or you can synchronize without connecting to
the PC over a cellular or Wi-Fi network.
•
In ActiveSync, tap
Sync
. To end synchronization before it completes, tap
Stop
.
To change which information is synchronized
1.
In ActiveSync on the device, tap
Menu > Options
.
2.
Do one or both of the following:
•
Select the check box for any items you want to synchronize. If you cannot select
a check box, you might have to clear the check box for the same information type
elsewhere in the list.
•
Clear the check box for any items you want to stop synchronizing.
3.
To stop synchronizing with one PC completely, tap the PC, and then tap
Delete
.
Notes Outlook e-mail can be synchronized with only one computer.
To change available synchronization settings, select the type of information and tap
Settings.
To synchronize directly with Exchange Server
You can set up synchronization with Exchange Server on your device, if it is available to
you through your company or wireless service provider. However, you should first ask your
administrator for the following information and then carry on with the steps: Exchange
Server name, your user name, password, and domain name.
1.
In ActiveSync on the device, tap
Menu > Confi gure Server
. If you have not yet set up
synchronization with Exchange Server, this will say
Add Server Source
.

Synchronizing Information and Setting Up E-mail Security | 33
2.
In
Server address
, enter the name of the server running Exchange Server, and tap
Next
.
3.
Enter your user name, password, and domain, and tap
Next
. To change the rules for
resolving synchronization confl icts, tap
Advanced
.
4.
Select the check boxes for the types of information items that you want to synchronize
with Exchange Server.
5.
To change available synchronization settings, select the type of information, and tap
Settings
.
6.
Tap
Finish
.
Schedule synchronization with Exchange Server
You can schedule information to be synchronized automatically between your device
and the Exchange Server, or schedule synchronization at regular time intervals. Choose
between these two methods, depending on your e-mail volume and which method you
think is more cost-effective.
To receive e-mails and synchronize other information instantly
The
Direct Push
technology (Push E-Mail feature) enables you to receive new e-mails
on your device as soon as they arrive in your Inbox on the Exchange Server. With this
feature, items such as contacts, calendar and tasks are also immediately updated onto
your device when these items have been changed or new entries have been added on the
Exchange Server. To make Direct Push work, you need to have a 1XRTT or EVDO dial-up
connection on your device.
The Direct Push feature works for your device, if your private network such as your
corporate network is using Microsoft Exchange Server Service Pack 2 (SP2) with
Exchange ActiveSync, and after your first full synchronization with the Exchange Server.
• Using ActiveSync
1.
In ActiveSync on your device, tap
Menu > Schedule
.
2.
Select
As items arrive
in the
Peak times
and
Off-peak times
boxes.
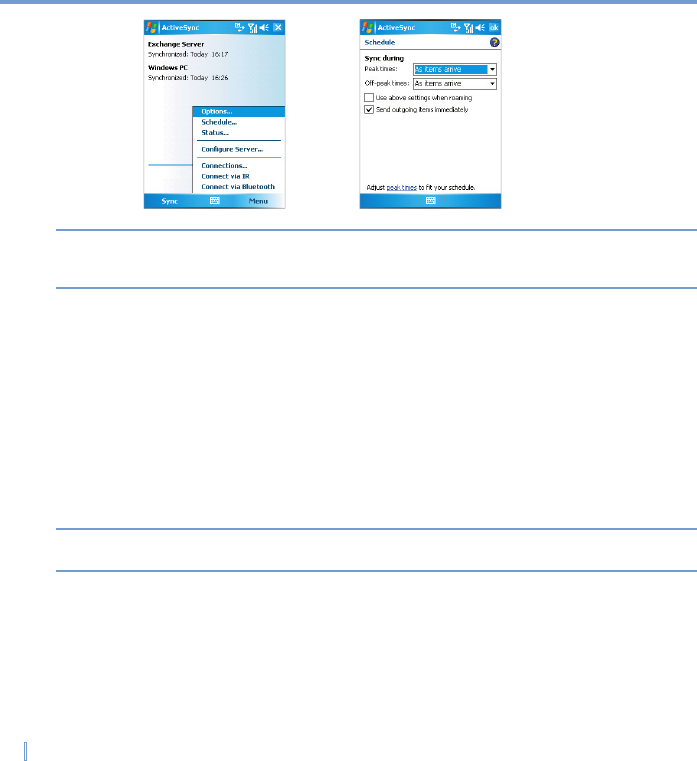
34 | Synchronizing Information and Setting Up E-mail Security
Note When the dial-up and Wi-Fi connections are turned on at the same time, the Direct Push
feature will always go through the dial-up connection, for which you could be charged as
per your network operator’s service plan.
To schedule synchronization at regular time intervals
You can set how often to synchronize during
Peak times
(which usually refer to your
working hours) when e-mail volume is high, as well as
Off-peak times
when e-mail
volume is low.
1.
In ActiveSync on your device, tap
Menu > Schedule
.
2.
Select a shorter time interval in the
Peak times
box for you to be able to receive
e-mails more frequently.
3.
Select a longer interval in the
Off-peak times
box.
Tip To set the days and hours that make up your peak and off-peak times, tap Adjust peak
times to fit your schedule.

Chapter 4
Managing Your Device
4.1 Personalizing Your Device
4.2 Adding and Removing Programs
4.3 Managing Memory
4.4 Backing Up Files
4.5 Protecting Your Device
4.6 Resetting Your Device

36 | Managing Your Device
4.1 Personalizing Your Device
Today screen settings
The Today screen shows your upcoming appointments, active tasks, and information
about e-mail messages. You can customize the Today screen on your device.
To customize the Today screen
1.
Tap
Start > Settings > Personal
tab
> Today
.
2.
On the
Appearance
tab, select the desired theme for the background of the Today
screen.
3.
On the
Items
tab, select the items you want to appear on the Today screen.
Tip To change the order of items displayed on the Today screen, tap the item, and then tap
Move Up or Move Down.
To add a custom background image
You can use one of your own pictures as the background image on the Today screen. Be
aware that pictures can affect the readability of text on the Today screen.
1.
Tap
Start > Settings > Personal
tab
> Today
.
2.
Select the
Use this picture as the background
check box, and tap
Browse
to view a
list of your picture fi les.
3.
Tap the fi le name of the picture you want to use.
4.
Tap
OK
.
To set options for displaying appointments on the Today screen
If you have a large number of appointments, you may want to specify the kind of
appointments that are displayed on the Today screen.
1.
Tap
Start > Settings > Personal
tab
> Today
.
2.
Tap the
Items
tab.
3.
Select
Calendar
, and then tap
Options
.

Managing Your Device | 37
4.
Do any of the following:
•
Select
Next appointment
to show only the next appointment in your schedule, or
Upcoming appointments
to show multiple appointments.
- or -
•
Clear the Display all day events check box if you do not want to display all-day
events.
To set options for displaying tasks on the Today screen
If you have a large number of tasks, you may want to specify the kind of tasks that are
displayed on the Today screen.
1.
Tap
Start > Settings > Personal
tab
> Today
.
2.
Tap the
Items
tab.
3.
Select
Tasks
, and then tap
Options
.
4.
Do any of the following:
•
Under
Display number of
, select the type of tasks you want to appear on the Today
screen.
- or -
•
In the
Category
list, select whether to display only tasks assigned to a specifi c
category or to display all tasks.
Customize the Start menu
You can choose which items appear in the Start menu.
1.
Tap
Start > Settings > Personal
tab
> Menu
.
2.
Select the check boxes of the items you want to appear in the Start menu. You can
select up to seven items.
Tip You can also create folders and shortcuts to appear on the Start menu. In ActiveSync on
your PC, click Explore. In the Mobile Device window, double-click My Windows Mobile-
Based Device > Windows > Start Menu, and then create the folders and shortcuts that
you want. You will see the added items after you synchronize.

38 | Managing Your Device
Set up Date / Time / Language / Regional options
You can set up the correct date, time, language, and regional settings according to your
use.
To set the time and date
1.
Tap
Start > Settings > System
tab
> Clock & Alarms
.
2.
Select the correct time zone and change the date or time.
Note During synchronization, the time on your device is updated with the time on your PC.
To set an alarm
1.
Tap
Start > Settings > System
tab
> Clock & Alarms > Alarms
tab.
2.
Tap
<Description>
and enter a name for the alarm.
3.
Tap the day of the week for the alarm. You can select multiple days by tapping each
desired day.
4.
Tap the time to open a clock and set the time for the alarm.
5.
Tap the alarm icon (
) to specify the type of alarm you want. You can choose a
fl ashing light, a single sound, a repeating sound, or vibration.
6.
If you choose to play a sound, tap the list next to the
Play sound
check box and tap
the sound you want.
To set the time and date for a different location
If you visit or communicate with someone in a particular time zone often, you can select it
as your visiting time zone.
1.
Tap
Start > Settings > System
tab
> Clock & Alarms
.
2.
Tap
Visiting
.
3.
Select the correct time zone and change the time or date.

Managing Your Device | 39
To change language and regional settings
The style in which numbers, currency, dates, and times are displayed is specified in
Regional Settings
.
1.
Tap
Start > Settings > System
tab
> Regional Settings
.
2.
On the
Region
tab, select your region and language.
3.
The region you select determines which options will be available on the other tabs.
4.
To customize settings further, tap the appropriate tabs and select the desired options.
Personal and system settings
Your device may come with programs already assigned to hardware buttons. You can
customize these buttons to open the programs you use most, or to perform certain
shortcuts such as changing the screen orientation, opening the Today screen, or opening
Input Panel.
To reassign programs or shortcuts to program buttons
1.
Tap
Start > Settings > Personal
tab
> Buttons
.
2.
A list of buttons and their current assignments is displayed on the
Program Buttons
tab.
3.
Tap the button you want to reassign. To help you identify the buttons, there are
numbers and icons representing the original function of the button.
4.
In the
Assign a program
box, tap the program or shortcut you want to assign.
5.
Tap
OK
.
To increase or decrease the size of text on the screen
1.
Tap
Start > Settings > System
tab
> Screen > Text Size
.
2.
Move the slider to increase or decrease the text size.
To enter owner information
1.
Tap
Start > Settings > Personal
tab
> Owner Information
.
2.
On the
Identifi cation
tab, enter your personal information.

40 | Managing Your Device
Note Entering and displaying owner information are best practices; they allow someone to
return the device to you in case it is lost.
Tip If owner information is displayed on the Today screen, you can open and edit the
information directly from the Today screen. Just tap that section of the screen.
To choose how to be notifi ed about events or actions
1.
Tap
Start > Settings > Personal
tab
> Sounds & Notifi cations
.
2.
On the
Sounds
tab, choose how you want to be notifi ed by selecting the appropriate
check boxes.
3.
On the
Notifi cations
tab, in
Event
, tap an event name and choose how you want to
be notifi ed by selecting the appropriate check boxes. You can choose from several
options, such as a special sound, a message, or a fl ashing light.
Tip Turning off sounds and the flash light helps conserve battery power.
To adjust the speed for scrolling
Pressing and holding NAVIGATION up or down (Up/Down control) scrolls through the
items in a list.
1.
Tap
Start > Settings > Personal
tab
> Buttons > Up/Down Control
tab.
2.
Do one of the following:
•
Under
Delay before fi rst repeat
, move the slider to shorten or lengthen the time
that elapses before scrolling begins.
- or -
•
To change the time it takes to scroll from one item to the next, under
Repeat rate
,
move the slider to adjust the speed.
To fi nd the operating system version number and detailed device information
•
Tap
Start > Settings > System
tab
> About
.
The
Version
tab displays the operating system information and important device
information, including the type of processor and the amount of memory that is installed.

Managing Your Device | 41
To change the device name
1.
Tap
Start > Settings > System
tab
> About > Device ID
tab.
2.
Enter a name.
The device name must begin with a letter, consist of letters from A to Z, numbers from 0 to
9, and cannot contain spaces. Use the underscore character to separate words.
Why is the device name important?
The device name is used to identify the device in the following situations:
•
Synchronizing with a PC
•
Connecting to a network
•
Restoring information from a backup
Note If you synchronize multiple devices with the same PC, each device must have a unique
name.
To make the battery last longer
The device battery power lasts based on the battery type and how you use your device.
Try the following to help preserve battery life:
•
Tap
Start > Settings > System
tab
> Power
. On the
Advanced
tab, you can specify
when your device turns off to conserve battery power. For optimum conservation,
specify 3 minutes or less.
•
Use the AC adapter to plug your device into external power whenever possible,
especially when using a miniSD card or when using a modem or other peripherals.
•
Adjust the backlight settings.
To adjust the brightness of the backlight
1.
Tap
Start > Settings > System
tab
> Backlight > Brightness
tab.
2.
Move the sliders right to increase and left to decrease the brightness.

42 | Managing Your Device
To set the backlight to dim after a time delay
1.
Tap
Start > Settings > System
tab
> Backlight
.
2.
Tap the
Battery Power
tab or the
Battery Power tab or the Battery Power
External Power
tab.
External Power tab.External Power
3.
Select the
Turn off backlight if device is not used for
check box, and specify the
Turn off backlight if device is not used for check box, and specify the Turn off backlight if device is not used for
time delay.
4.2 Adding and Removing Programs
Before you purchase additional programs for your device, you should note the name
of your device, the version of Windows Mobile software running on it, and the type of
processor. This information will help you select a program that is compatible with your
device. For more information, see “To get detailed device information” and “To find the
operating system version number” in this chapter.
Programs available for purchase usually include a Setup program (commonly named
“setup.exe”) that you must first install on your PC. You can then use ActiveSync to add
programs to your device, or add a program directly from the Internet.
To add programs
1.
Download the program to your PC (or insert the CD or disk that contains the program
into your PC). You may see a single
*.exe
fi le, a
*.zip
fi le, a
Setup.exe
fi le, or several
versions of fi les for different device types and processors. Be sure to select a program
designed for your device and processor type.
2.
Read any installation instructions or documentation that comes with the program. Many
programs provide special installation instructions.
3.
Connect your device and PC.
4.
Double-click the *.exe fi le.
•
If the executable fi le is an installation wizard, follow the instructions on the screen.
Once the program has been installed on your PC, the wizard will automatically
transfer the program to your device.
•
If an installation wizard does not start, you will see an error message stating that the
program is valid but that it is designed for a different type of computer. You will need
to copy this program to your device. If you cannot fi nd any installation instructions
for the program, use ActiveSync to copy the program fi le to the Program Files folder
on your device.

Managing Your Device | 43
To remove programs
You can only remove programs that you installed. Programs that come with your device
cannot be removed.
1.
Tap
Start > Settings > System
tab
> Remove Programs
.
2.
In the
Programs in storage memory
list, select the program you want to remove, and
tap
Remove
.
3.
Tap
Yes
. If another confi rmation message appears, tap
Yes
again.
4.3 Managing Memory
You may need to stop a program if it becomes unstable or the program memory is low.
To see how much memory is available
•
Tap
Start > Settings > System
tab
> Memory
.
On the
Main
tab, the amount of memory allocated to file and data storage versus program
storage is displayed, as well as the amount of memory in use versus the available
memory.
To see available storage card memory
You can see how much memory is available on a storage card that is inserted in your
device.
1.
Tap
Start > Settings > System
tab
> Memory
.
2.
Tap the
Storage Card
tab.
Tip If you have previously inserted more than one storage card, tap the list box and then the
storage card whose information you want to see.

44 | Managing Your Device
To free up program memory
Try the following to free memory on your device:
•
Close programs you are not currently using.
•
Move e-mail attachments to a storage card.
•
Move fi les to a storage card. Tap
Start > Programs > File Explorer
. Tap and hold the
fi le, and then tap
Cut
. Browse to the storage card folder and tap
Edit > Paste
.
•
Delete unnecessary fi les. Tap
Start > Programs > File Explorer
. Tap and hold the fi le,
and then tap
Delete
.
•
Delete large fi les. To fi nd your largest fi les, tap
Start > Programs > Search
. In the
Type
list, tap
Larger than 64 KB
, and then tap
Search
.
•
In Internet Explorer Mobile, delete temporary Internet fi les and clear history information.
For more information, see “Internet Explorer Mobile” in Chapter 6.
•
Remove programs you no longer use.
•
Reset your device.
To close a program
In most cases, programs automatically close to free needed memory, however, you can
close programs manually, if you prefer.
1.
Tap
Start > Settings > System
tab
> Memory > Running Programs
tab.
2.
In the
Running Programs
list, tap the program you want to close, and then tap
Stop
.
Tip In most programs, you can also use the keyboard shortcut CTRL+Q to close the
program.

Managing Your Device | 45
4.4 Backing Up Files
You can back up files to your PC using ActiveSync, or copy files to a storage card you
insert into your device. Your device has an expansion slot compatible with a range of mini
secure digital (miniSD) storage cards.
Using ActiveSync, you can copy or move information from the PC to the device and
vice versa. Changes you make to the information on one computer will not affect the
information on the other computer. If you want to automatically update information on both
your device and PC, synchronize the information instead. For more information about
copying and synchronizing files, see ActiveSync Help on your PC.
To copy fi les to a storage card
1.
Push the storage card into the storage card slot until it clicks into place. The card is
secure when it does not protrude from the base.
2.
Tap
Start > Programs > File Explorer
and navigate to the appropriate folder.
Start > Programs > File Explorer and navigate to the appropriate folder.Start > Programs > File Explorer
3.
Tap and hold the desired fi le, and then tap
Copy
.
4.
Tap the folder list (labeled
My Documents
by default), and then tap
Storage Card
.
5.
Tap
Menu > Edit > Paste
.
To copy a fi le using ActiveSync
Copying a file results in separate versions of a file on your device and PC. Because the
files are not synchronized, changes made to one file will not affect the other.
1.
Connect your device to your PC.
2.
In ActiveSync, click
Explore
to open the Mobile Device window for your device.
3.
In the Mobile Device window, go to the fi le that you want to copy on your device or PC.
4.
Do one of the following:
•
To copy the fi le to your device, right-click the fi le and click
Copy
. Then, right-click
the desired folder under Mobile Device, and click
Paste
.
- or -
•
To copy the fi le to your PC, right-click the fi le and click
Copy
. Then, right-click the
desired folder on your PC, and click
Paste
.

46 | Managing Your Device
To automatically save fi les on a storage card
In the Word Mobile, Excel Mobile, and Notes programs, you may find it helpful to save all
new documents, notes, and workbooks directly on a storage card.
1.
From the program fi le list, tap
Menu > Options
.
2.
With a storage card inserted in the device, in the
Save to
box, tap the appropriate
storage card to automatically save new items on the storage card.
3.
Tap
OK
.
Note In the file or note list, a storage card symbol is displayed next to the names of files saved
on a storage card.
4.5 Protecting Your Device
You can prevent unauthorized access to any part of the device by using password
protection. You create your own password when you begin using your device.
To protect your device with a password
You can help keep your data more secure by requiring a password every time the device
is turned on.
1.
Tap
Start > Settings > Personal
tab
> Lock
.
2.
Select the
Prompt if device unused for
check box, and in the box to the right,
Prompt if device unused for check box, and in the box to the right, Prompt if device unused for
select how long your device must be turned off before a password is required. In the
Password type
box, select the type of password you would like to use. Enter the
password and, if necessary, confi rm the password. If your device is confi gured to
connect to a network, use a strong password to help protect network security.
3.
On the
Hint
tab, enter a phrase that will help you remember your password, but
doesn’t allow others to guess your password. The hint will be displayed after the wrong
password is entered four times.
4.
Tap
OK
.
The next time the device is turned on, you will be prompted to enter your password.

Managing Your Device | 47
Notes Each time a wrong password is entered, the time the device takes to respond will get
longer and longer until the device appears to be not responding.
If you forget your password, you must follow the instructions in this owner’s manual to
clear memory before you can access your device.
To change your password
1.
Tap
Start > Settings > Personal
tab
> Lock
. You will be prompted to enter your
current password.
2.
In the
Password
box, enter your new password.
3.
On the
Hint
tab, enter a phrase that will help you remember your new password, but
doesn’t allow others to guess your password. The hint will be displayed after the wrong
password is entered four times.
4.
Tap
OK
.
To display owner information on the Today screen
Having your contact information displayed on the Today screen on startup allows for easy
identification of the device in case it is lost.
1.
Tap
Start > Settings > Personal
tab
> Owner Information
.
2.
On the
Options
tab, select the
Identifi cation information
check box.
3.
On the
Options
tab, select the
Notes
check box if you want additional text displayed,
such as: Reward if found. When you select the check box, you need to enter the
additional text on the
Notes
tab.
Tip To display owner information on the Today screen, tap Start > Settings > Personal tab >
Today. On the Items tab, select the Owner Info check box.

48 | Managing Your Device
4.6 Resetting Your Device
Occasionally you may need to reset your device. A normal (or soft) reset of your device
clears all active program memory and shuts down all active programs. This can be useful
when the device is running slower than normal, or a program is not performing properly.
A soft reset is also necessary after the installation of some programs. If a soft reset is
performed when programs are running, unsaved work will be lost.
You can also perform a hard reset (also known as a full reset). A hard reset should be
performed only if a normal reset does not solve a system problem. After a hard reset, the
device is restored to its default settings—the way it was when you first purchased it and
turned it on. Any programs you installed, data you entered, and settings you customized
on the device will be lost. Only Windows Mobile software and other pre-installed programs
will remain.
To perform a soft reset
•
Use the stylus to lightly press and hold the RESET button on the left side of your
device. The device restarts, and then displays the Today screen.
Warning! Always turn off your device before performing a soft reset or installing/replacing the
battery.
To perform a hard reset
Press and hold both SOFT KEYS on the device. Keep these keys pressed, and at the
same time, use the stylus to lightly press and hold the RESET button on the left side of
your device. Press either
Y
to restore to factory default or
Y to restore to factory default or Y
N
to exit the hard reset process.

Chapter 5
Getting Connected
5.1 Connecting to the Internet
5.2 Internet Explorer Mobile
5.3 Using Internet Sharing

50 | Getting Connected
5.1 Connecting to the Internet
Your device is equipped with powerful networking functions that enable you to connect
to the Internet. You can set up connections to the Internet or to a corporate network to
browse the Internet, and exchange e-mail or instant messages. Your device has two
groups of connection settings:
My ISP
(Internet Service Provider) and
My Work Network
.
The My ISP settings are used to connect to the Internet, while My Work Network settings
can be used to connect to any private, corporate network.
To connect to the Internet via ISP
1.
Obtain the following information from your ISP:
•
ISP server phone number
•
User name
•
Password
2.
Tap
Start > Settings > Connections
tab
> Connections
.
3.
Tap
Add a new modem connection
.
4.
Enter a name for the connection.
5.
Select a modem from the list.
6.
Tap
Next
.
7.
Complete the connection wizard by entering the required information and tap
Finish
.
Notes To view additional information for any screen, tap Help.
To modify your connection settings, tap Manage existing connections on the
Connections screen, and complete the connection wizard.
To connect to a private network
1.
Obtain the following information from your network administrator:
•
Server phone number
•
User name
•
Password
•
Domain (If provided by an ISP or a network administrator)

Getting Connected | 51
2.
Tap
Start > Settings > Connections
tab
> Connections
.
3.
In
My Work Network
, follow the instructions for each type of connection.
4.
Complete the connection wizard, and then tap
Finish
.
To start browsing the Internet
•
When the connection settings are completed, tap
Start > Programs > Internet
Explorer
.
To reset or modify the network card settings on your device
1.
Tap
Start > Settings > Connections
tab
> Network Cards
.
2.
In the
My network card connects to
list, select the appropriate item:
•
If you want to connect to the Internet using your ISP, select
The Internet
.
•
If you want to connect to a private network, select
Work
.
3.
In
Tap an adapter to modify settings
, tap the appropriate adapter. The fi elds on the
IP Address
tab are populated automatically.
4.
Confi gure the TCP/IP settings (if required). If your ISP or private network does not
use dynamically-assigned IP addresses, tap
Use specifi c IP address
and enter the
requested information. Contact your ISP or network administrator to obtain the IP
address, subnet mask, and/or default gateway (if required).
5.
Confi gure the DNS and WINS settings (if required). If your ISP or private network
does not use dynamically-assigned IP addresses, enter the requested information on
the
Name Servers
tab. Servers that require an assigned IP address may also require
a way to map computer names to IP addresses. DNS and WINS are the resolution
options supported on your device.

52 | Getting Connected
5.2 Internet Explorer Mobile
Internet Explorer Mobile
is a full-featured Internet browser, optimized for use on your
mobile device.
To start Internet Explorer Mobile
•
Tap
Start > Internet Explorer
.
To choose a Home page
1.
In Internet Explorer Mobile, tap
Menu > Tools > Options > General
tab.
2.
Tap
Use Current
to use the displayed page as your Home page or tap
Use Default
to
use the default Home page.
Tip To go to your Home page, tap Menu > Home.
To transfer favorites from your PC
You can transfer the favorites you have stored on your PC to your device by synchronizing
the Internet Explorer favorites on your PC with your device.
1.
In ActiveSync on your PC, click
Options
on the Tools menu, and then select
Favorites
.
2.
In Internet Explorer on your PC, save or move favorite links to the Mobile Favorites
subfolder in the Favorites list.
3.
Connect your mobile device to your PC. If synchronization does not start automatically,
click
Sync
.
Use Internet Explorer Mobile
In Internet Explorer Mobile, you can operate any of the following functions:
To change the size of text on Web pages
•
Tap
Menu > Zoom
, and then tap the size you want.

Getting Connected | 53
To add a favorite
1.
Go to the page you want to add.
2.
Tap and hold the page, and then tap
Add to Favorites
.
3.
Confi rm or change the name, and select a folder for storing the favorite.
To delete a favorite or folder
1.
Tap
Menu > Favorites > Add/Delete
tab.
2.
Select the desired item, and then tap
Delete
.
To change how Web pages fi ll the screen
•
Tap
Menu > View
.
One Column
. Arranges the content into one column that is as wide as the screen. This
means that you will rarely have to scroll horizontally.
Default
. Maintains a layout similar to what you see on a desktop computer, but it
makes items smaller and arranges the content so that you can see most of it without
having to scroll horizontally.
Desktop
. Keeps the same layout and size as on a desktop computer, which will require
both horizontal and vertical scrolling.
To show or hide pictures on Web pages
•
Tap
Menu > View > Show Pictures
. A check mark next to
Show Pictures
indicates
that pictures will be displayed on Web pages.
To save a picture from a Web page
1.
Tap and hold the picture, and then tap
Save Image
.
2.
To save the picture in
My Pictures
on your device, tap
Yes
. To save the picture in
another location, such as a storage card, tap
Save As
.
To clear the History list
1.
Tap
Menu > Tools > Options > Memory
tab.
2.
Tap
Clear History
.

54 | Getting Connected
To change cookies and security settings
Internet Explorer Mobile supports the protocols used by Secure Sockets Layer (SSL). A
connection that uses SSL helps you to send personal information more safely.
Cookies are small files containing information about your identity and preferences so that
a page can tailor information to your needs. The page sends the file, and it is stored on
your mobile device.
1.
Tap
Menu > Tools > Options > Security
tab.
2.
Select the check boxes for the options you want, and then tap
OK
.
Tip To prevent Internet Explorer Mobile from accepting any cookies, clear the Allow cookies
check box.
To delete temporary Internet fi les
Some Web content is stored as you view it to speed up the display of pages you frequently
visit or have already seen. You may want to delete these files to free storage space.
1.
Tap
Menu > Tools > Options > Memory
tab.
2.
Tap
Delete Files
. All pages stored on your device, including offl ine favorites content,
will be deleted.
5.3 Using Internet Sharing
With Internet Sharing, you can use your CENSUS as an external modem for another
device such as a PDA or notebook computer.
Notes • If you want to use a USB cable connection, you must first install Microsoft ActiveSync
version 4.2 or later on the computer.
• Before using Internet Sharing, disable ActiveSync on your computer.

Getting Connected | 55
To set up your device as a USB modem
1.
On your device, tap
Start > Programs > Internet Sharing
.
2.
In the PC Connection list, select
USB
.
3.
In the Network Connection list, select the name of the connection that your device uses
to connect to the Internet.
4.
Plug in the USB cable between your device and the computer.
5.
Tap
Connect
.
To end the Internet connection
•
On the Internet Sharing screen, tap
Disconnect
.

Appendix
A.1 Regulatory Notices
A.2 Specifications

Appendix | 57
A.1 Regulatory Notices
Regulatory Agency IDs
For regulatory identification purposes, your product is assigned a model number of
CENSUS.
To ensure continued reliable and safe operation of your device, use only the accessories
listed below with your CENSUS.
This product is intended for use with a certified Class 2 Limited Power Source, rated 5
Volts DC, maximum 2 Amp power supply unit.
FCC Compliant Statement
•
FCC Part 15.21
Any changes or modifi cations not expressly approved by the party responsible for
compliance could void the user’s authority to operate the equipment.
•
FCC ID: NM8CENSUS
•
FCC Part 15.105 (b)
For a Class B digital device or peripheral, the instructions furnished the user shall
include the following or similar statement, placed in a prominent location in the text
of the manual: This equipment has been tested and found to comply with the limits
for a Class B digital device, pursuant to part 15 of the FCC Rules. These limits are
designed to provide reasonable protection against harmful interference in a residential
installation. This equipment generates, uses and can radiate radio frequency energy
and, if not installed and used in accordance with the instructions, may cause harmful
interference to radio communications. However, there is no guarantee that interference
will not occur in a particular installation. If this equipment does cause harmful
interference to radio or television reception, which can be determined by turning the
equipment off and on, the user is encouraged to try to correct the interference by one
or more of the following measures:
•
Reorient or relocate the receiving antenna.
•
Increase the separation between the equipment and receiver.
•
Connect the equipment into an outlet on a circuit different from that to which the
receiver is connected.
•
Consult the dealer or an experienced radio/TV technician for help.

58 | Appendix
IMPORTANT NOTE
Radiation Exposure Statement:
This equipment complies with FCC radiation exposure
limits set forth for an uncontrolled environment. This equipment should be installed and
operated with minimum distance 20cm between the radiator & your body.
Telecommunications & Internet Association (TIA) safety information
Pacemakers
The Health Industry Manufacturers Association recommends that a minimum separation of
six inches be maintained between a handheld wireless device and a pacemaker to avoid
potential interference with the pacemaker. These recommendations are consistent with
the independent research by and recommendations of Wireless Technology Research.
Persons with pacemakers:
•
Should ALWAYS keep the device more than six inches from their pacemaker when the
device is turned ON.
•
Should not carry the device in a breast pocket.
Other Medical Devices
If you use any other personal medical device, consult the manufacturer of your device to
determine if they are adequately shielded from external RF energy. Your physician may be
able to assist you in obtaining this information.
Turn your device OFF in health care facilities when any regulations posted in these areas
instruct you to do so. Hospitals or health care facilities may be using equipment that could
be sensitive to external RF energy.
Other tips and cautions
•
Avoid using your device near metal structures (for example, the steel frame of a
building).
•
Avoid using your device near strong electromagnetic sources, such as microwave
ovens, sound speakers, TV and radio.
•
Avoid using your device after a dramatic change in temperature.
WEEE Notice
The Directive on Waste Electrical and Electronic Equipment (WEEE), which entered into
force as European law on 13th February 2003, resulted in a major change in the treatment
of electrical equipment at end-of-life.

Appendix | 59
The purpose of this Directive is, as a first priority, the prevention of WEEE, and in addition,
to promote the reuse, recycling and other forms of recovery of such wastes so as to
reduce disposal.
The WEEE logo (shown at the left) on the product or on its box indicates that this
product must not be disposed of or dumped with your other household waste. You are
liable to dispose of all your electronic or electrical waste equipment by relocating over to
the specified collection point for recycling of such hazardous waste. Isolated collection
and proper recovery of your electronic and electrical waste equipment at the time of
disposal will allow us to help conserving natural resources. Moreover, proper recycling
of the electronic and electrical waste equipment will ensure safety of human health and
environment. For more information about electronic and electrical waste equipment
disposal, recovery, and collection points, please contact your local city centre, household
waste disposal service, shop from where you purchased the equipment, or manufacturer
of the equipment.
RoHS Compliance
This product is in compliance with Directive 2002/95/EC of the European Parliament
and of the Council of 27 January 2003, on the restriction of the use of certain hazardous
substances in electrical and electronic equipment (RoHS) and its amendments.

60 | Appendix
A.2 Specifications
System Information
Processor Intel Bulverde 416MHz
Memory - ROM : M-System 128MBytes DOC (Disk On Chip)
- RAM : 64MBytes Mobile SDRAM
Operating System Microsoft Windows Mobile 5.0 Pocket PC Phone Edition
Display
LCD Type 3.5” QVGA with TSP, Sharpe/TF LQ035Q7DH06
Resolution 240 x 320 pixels
Alignment Support Portrait and Landscape
CDMA Module (Dual Band)
Functionality CDMA
Mode Dual band: 850 and 1900 MHz
Embedded Module
Dial-up Feature Built-in modem module
GPS Feature Standalone GPS module
Audio
Buzzer One built-in buzzer without microphone/receiver/speaker support; support
data mode only
Physical
Dimensions 153.9 (L) x 79.0 (W) x 29.2 (T) mm
Weight 350g

Appendix | 61
Expansion Slot
SD card Yes
Control Buttons
Buttons
- One 5-way NAVIGATION Control
- Six AP buttons
- One POWER button
- One RESET button
LED Indicator
LED Indicates the charging status, notification and network status
Power Supply
AC Adapter DC jack with 5V / 2A DC output
Car Adapter DC jack with 5V / 2A DC output
Battery Rechargeable Li-ion polymer battery, 3000mAh
I/O
USB miniUSB port
Phone Connector for connecting the RJ-11 phone cable