HTC DSD Pocket PC User Manual A26391 K151 Z128 1 7619
HTC Corporation Pocket PC A26391 K151 Z128 1 7619
HTC >
Users Manual

Handheld
User Guide
English
Pocket LOOX Software Suite
Are there ...
... any technical problems or other questions which you would like to be clarified?
Please contact:
● our Hotline/Help Desk
(see the included Help Desk list or go to: www.fujitsu-siemens.com/helpdesk)
● your sales partner
● your sales outlet
Further information can be found in the "Safety" and "Warranty" manuals.
The latest information on our products, tips, updates, etc., can be found on the internet under:
www.fujitsu-siemens.com
This manual was produced by
cognitas. Gesellschaft für Technik-Dokumentation mbH – www.cognitas.de
Published by
Fujitsu Siemens Computers GmbH
AG 08/05
Edition 1
Order no.: A26391-K151-Z128-1-7619

Pocket LOOX Software
Suite
Operating instructions
Pocket LOOX Software
Suite
FSC SpeedMenu
CONNECTMOBILITY-
E2C
FSC VoiceRecorder
FSC AudioPath
FSC Panning
FSC KeyLock
FSC Password
FSC Backup
August 2005 edition
Adobe and Acrobat are trademarks of Adobe systems Incorporated and may be protected in
certain countries.
Intel is a registered trademark, XScale is trademark of Intel Corporation, U.S.A.
Microsoft, Windows and ActiveSync are registered trademarks of the Microsoft Corporation.
Windows Mobile is a trademark of Microsoft Corporation.
The SD Logo is a trademark of Secure Digital.
The Bluetooth trademarks are the property of Bluetooth SIG, Inc., U.S.A. licensed for Fujitsu
Siemens Computers GmbH.
All other trademarks referenced are trademarks or registered trademarks of their respective
owners, whose protected rights are acknowledged.
Copyright © Fujitsu Siemens Computers GmbH 2005
All rights, including rights of translation, reproduction by printing, copying or similar methods,
in part or in whole, are reserved.
Offenders will be liable for damages.
All rights, including rights created by patent grant or registration of a utility model or design,
are reserved.
Delivery subject to availability. Right of technical modification reserved.

A26391-K151-Z128-1-7619, edition 1
Contents
Pocket LOOX Software Suite............................................................................................................. 1
Notational conventions ......................................................................................................................... 2
FSC SpeedMenu ................................................................................................................................. 3
Quick-start menu .................................................................................................................................. 3
How can I.............................................................................................................................................. 3
adjusting the menu? ..................................................................................................................... 3
operate the menu with the navigation key?.................................................................................. 3
operate the menu with the scroll key (3-way key)? ...................................................................... 4
operate the menu with the stylus?................................................................................................ 4
Menu structure...................................................................................................................................... 4
Main menu.................................................................................................................................... 4
Quick menu .................................................................................................................................. 4
Adjustment menu.................................................................................................................................. 5
About ............................................................................................................................................ 5
Cut entry....................................................................................................................................... 5
Copy entry .................................................................................................................................... 5
Paste entry ................................................................................................................................... 5
Delete entry .................................................................................................................................. 5
Add submenu entry ...................................................................................................................... 5
Add entry ...................................................................................................................................... 6
Rename entry............................................................................................................................... 6
Edit entry ...................................................................................................................................... 6
Move entry up............................................................................................................................... 6
Move entry down .......................................................................................................................... 6
Sort entries ................................................................................................................................... 6
Frequently asked questions.................................................................................................................. 7
CONNECTMOBILITY-E2C .................................................................................................................. 8
Overview............................................................................................................................................... 8
E2C editions and features .................................................................................................................... 8
Instructions for getting started ............................................................................................................ 10
Example 1: Establishing GPRS Internet connection via BT with your mobile phone ................. 10
Example 2: Establishing WLAN connection with an "open" WLAN Access Point ...................... 11
Example 4: Creating a new WLAN profile .................................................................................. 12
Evaluation period and purchasing a licence....................................................................................... 12
Exiting E2C......................................................................................................................................... 12
Description of E2C dialogues ............................................................................................................. 13
Main dialogue ............................................................................................................................. 13
User data dialogue ..................................................................................................................... 14
GPRS Provider Selection ........................................................................................................... 15
Configuration ...................................................................................................................................... 15
Application bar............................................................................................................................ 15
Setting up and managing E2C profiles....................................................................................... 16
Influence WLAN behaviour......................................................................................................... 21
Influence Bluetooth behaviour.................................................................................................... 21
Software supported .................................................................................................................... 21
Frequently asked questions ....................................................................................................... 21

Contents
A26391-K151-Z128-1-7619, edition 1
FSC VoiceRecorder...........................................................................................................................25
Overview .............................................................................................................................................25
Structure of display .............................................................................................................................25
List of recordings.........................................................................................................................25
Control panel...............................................................................................................................26
Menu bar.....................................................................................................................................26
Operation ............................................................................................................................................26
Operating with the user interface ................................................................................................27
Working in the one-hand mode (for devices with scroll key).......................................................29
Operating with the navigation key...............................................................................................32
Tools ...................................................................................................................................................34
Managing and synchronising recordings.............................................................................................35
FSC AudioPath ..................................................................................................................................36
Overview .............................................................................................................................................36
Tools ...................................................................................................................................................36
Automatic ............................................................................................................................................36
Audio outputs ......................................................................................................................................37
Phone/Freehands mode......................................................................................................................38
FSC Panning......................................................................................................................................39
Overview .............................................................................................................................................39
Operation ............................................................................................................................................39
Preparation .................................................................................................................................39
Application ..................................................................................................................................39
Notes...........................................................................................................................................39
FSC KeyLock .....................................................................................................................................40
FSC Password ...................................................................................................................................41
Protecting the device with a password................................................................................................41
Important notes ...................................................................................................................................41
FSC Backup .......................................................................................................................................42
Overview .............................................................................................................................................42
Starting FSC Backup...........................................................................................................................42
Backing up data ..................................................................................................................................43
Restoring data.....................................................................................................................................44

A26391-K151-Z128-1-7619, edition 1 1
Pocket LOOX Software Suite
The Pocket LOOX Software Suite consists of programs that improve working with the Pocket LOOX,
simplify operation and provide additional functions.
Software Used for
FSC SpeedMenu Quick start menu for simplifying everyday processes.
Adapt the menu to your needs.
Supports one-hand mode.
CONNECTMOBILITY-E2C E2C connection manager for the efficient use and management of
complex Internet and intranet connections.
Automates and minimises customer interactions.
Supports Bluetooth, WLAN, IrDA, CF.
FSC Voice Recorder Provides true Dictaphone© functionality on your Pocket LOOX.
FSC Audio Path Convenient operation of multiple active audio outputs for your Pocket
LOOX.
Is not supported on all devices.
FSC Panning Tired of scrolling in Internet Explorer?
Use FSC Panning to quickly drag the desired window content into view.
Especially useful on large websites.
FSC KeyLock Protects against accidental starting of the Pocket-PC when a key is
pressed.
FSC Password Theft protection - Use permanent passwords and secure your device
against misuse.
Patented solution.
FSC Backup Data backup and restoration.
Is not supported on all devices.

Pocket LOOX Software Suite
2 A26391-K151-Z128-1-7619, edition 1
Notational conventions
The meanings of the symbols and fonts used in this manual are as follows:
!
indicates information which is important for your health or for preventing
physical damage.
i
indicates important information which is required to use the system
properly.
►
Text which follows this symbol describes activities that must be performed
in the order shown.
This font indicates screen outputs.
This font indicates text which must be entered with the keyboard.
This font indicates commands or menu items.
"Quotation marks" indicate names of chapters and terms that are being emphasised.

FSC SpeedMenu
A26391-K151-Z128-1-7619, edition 1 3
FSC SpeedMenu
Quick-start menu
Do you want fast access to programs and are all application keys assigned? Do you always open the
same documents and folders? Do you sometimes miss having an extra hand for using the stylus?
Use FSC SpeedMenu and accelerate daily processes on your Pocket LOOX!
● Create and organise your own list of frequently used documents, programs and folders.
● Open them quickly directly from the menu.
● One-handed or stylus operation as desired.
How can I...
adjusting the menu?
The menu comprises two sections. You can change both as required. The pre-assignment of the
menu is only a suggestion.
To change a menu entry, Press the chosen menu entry for approx. 1 - 2 seconds.
A popup menu is displayed that offers you the possible actions for this entry. Inapplicable actions
appear "greyed-out".
operate the menu with the navigation key?
● Select entry: press the up or down arrow on the navigation key.
● To activate a selected entry: Press the center of the navigation key.
i
Depending on the type of entry, activation starts a program or opens submenus, folders or
documents.
● To open a selected submenu: Press the navigation key in the middle position or the arrow right.
● To exit the submenu: Press the arrow to the left.
If you are already in the main menu, the programme will be terminated.

FSC SpeedMenu
4 A26391-K151-Z128-1-7619, edition 1
operate the menu with the scroll key (3-way key)?
i
Only supported on devices with a scroll key (3-way key).
● Select entry: move the scroll key (3-way key) upward or downward.
● Activate selected entry: press the centre of the scroll key (3-way key).
i
Depending on the type of entry, activation starts a program or opens submenus, folders or
documents.
● To exit the submenu: Press the FSCSpeed button.
If you are already in the main menu, the programme will be terminated.
operate the menu with the stylus?
● To trigger the desired action (activate the entry, select the submenu, display help, terminate the
programme): Press the corresponding menu entry or the corresponding button briefly.
● To return from the submenu to the superior menu: Press the backspace button located on the
menu's header bar.
● To activate the pop-up menu: Press the desired entry a little bit longer. You can edit the menu
structure in the pop-up menu. You will find more information in the popup menu section.
Menu structure
The menu comprises two sections, Main and quick menu. Depending on the size, these are divided
with a bar or an scroll bar.
Main menu
In the main menu you administer the documents and programmes which you often use into folders
and subfolders.
● You can create up to 20 main entries and subentries.
● The menu title bar indicates which submenu is currently open.
● If there is not enough space for all of the entries on the display, move the section displayed.
Press the scroll bar to scroll.
Quick menu
● The quick menu is meant for your favourite programmes and documents i.e. the ones you use
often.
● Your entries in the lower section of the quick menu are always visible and can therefore be
called at any time regardless of which submenu is activated in the main menu.
● You can create up to five entries.

FSC SpeedMenu
A26391-K151-Z128-1-7619, edition 1 5
Adjustment menu
Depending on the type of entry selected, some actions may not be applicable and appear greyed-
out.
About
This function is available on the menu header bar only. You can use this command to display general
information about the programme.
Cut entry
You use this command to remove an entry from the list. You can no longer opt to select a cut entry.
However you can paste the cut entry in a different position using the Paste entry function.
i
When you cut out a submenu entry, all subordinate entries are also cut out.
Copy entry
You use this command to make a copy of the selected entry.
i
When you cut out a submenu entry, all subordinate entries are also cut out.
Paste entry
You use this command to paste a cut or copied entry. The new entry appears in the menu just above
the entry on which you have activated the pop-up menu. If you have activated the pop-up menu on
the arrow button, your new entry will appear at the end of the list in the main menu.
i
As there are no submenus in the quick menu, you cannot paste any cut or copied submenu
entries there.
Delete entry
After displaying a security dialogue, the selected entry is deleted.
Add submenu entry
This function is available for entries in the main menu only.
You use this command to create a new submenu entry. The new entry appears in the menu just
above the entry on which you have activated the pop-up menu. If you have activated the pop-up
menu on the arrow button, your new entry will appear at the end of the list in the main menu.

FSC SpeedMenu
6 A26391-K151-Z128-1-7619, edition 1
Add entry
You use this command to create a new entry. The new entry appears in the menu just above the
entry on which you have activated the pop-up menu. If you have activated the pop-up menu on the
arrow button, your new entry will appear at the end of the list in the main menu.
Rename entry
You use this command to change the title of an entry.
Edit entry
You use this command to edit the title and path of an entry.
Move entry up
You use this command to move the selected entry up one position.
i
If you wish to move the top entry of the quick menu into the main menu, use the Cut entry and
Paste entry commands.
Move entry down
You use this command to move the selected entry down one position.
i
If you wish to move the top entry of the quick menu into the main menu, use the Cut entry and
Paste entry commands.
Sort entries
You use this command to sort the entries of the main menu or the quick menu into alphabetical
order.
i
In the main menu the existing folders are arranged in alphabetical order and the remaining
entries beneath them are also arranged in alphabetical order.

FSC SpeedMenu
A26391-K151-Z128-1-7619, edition 1 7
Frequently asked questions
How can I quickly activate an entry in the quick menu? When I start the FSC SpeedMenu, the
top entry in the main menu is selected - do I have to scroll down from the top to the bottom
entry?
No, you do not have to.
► After having started the program press simply the upper arrow key (arrow up) or the arrow up
on the navigation key and you will arrive immediately at the bottom entry.
How do I paste the first entry into an empty menu?
► Open the pop-up menu of the "Separating bar" or "Foot bar" items. The entry is entered into the
main menu or into the lower section of the quick menu.

CONNECTMOBILITY-E2C
8 A26391-K151-Z128-1-7619, edition 1
CONNECTMOBILITY-E2C
Overview
CONNECTMOBLITY-E2C (E2C for short) is a tool that enables you to establish a connection to the
Internet or to your company's intranet very easily by simply pressing a button.
With a few clicks you can change between your company WLAN, your private WLAN at home or a
WLAN hotspot in a cafe or at the airport. You can connect to BT or IrDA via your GPRS-capable
telephone without having to think about settings and automatically start your preferred application.
Do you need the safest possible access to your company network? E2C supports you with VPN
technology and WLAN-WPA.
Do you want to configure your private WLAN network to be very secure without a lot of effort and
expense? No problem! In addition to WEP encryption, E2C also offers you the recommended WPA
PreSharedKey method here.
E2C editions and features
E2C exists both as a Standard Edition and as a Professional Edition. The following table provides an
overview of which features E2C contains in the respective edition. Some of the features are tied to
certain system requirements. For example, a WLAN or BT connection can only be established if a
WLAN or BT hardware module is installed in your Pocket PC. The same applies for the support of
CF cards. Other features require additionally installed software, such as the RSA-Soft Token.
Feature Standard
Edition
Professional
Edition
General Features:
Creation of separate connection profiles for a WLAN and a
GPRS/GSM target network
9 9
Managing of several WLAN target network profiles and several
GPRS/GSM target network profiles
9
E2C can manage up to six Bluetooth devices for you, enabling you
to change simply and quickly between the devices
9 9
It is possible to configure up to the fifth application including the
parameters for the automatic start after the connection
establishment
9 9
Automatic starting of Internet browser with preconfigured WEB
address
9 9
Context menus for controlling WLAN and BT functions 9 9
WLAN target network features:
Supported authentications: Open, Shared, WPA and WPA-PSK 9 9
WLAN WPA support for EAP-TLS and EAP-PEAP 9
Supported encryption: none, WEP (64-bit and 128-bit), TKIP 9 9

CONNECTMOBILITY-E2C
A26391-K151-Z128-1-7619, edition 1 9
Feature Standard
Edition
Professional
Edition
WLAN Ad-Hoc and Infrastructure Mode 9 9
Hotspot support 9 9
GPRS/GSM target network features:
The connection profile for the GPRS/GSM target network can be
used without change for an external Bluetooth or infrared mobile
phone and for an inserted Fujitsu Siemens Computers GPRS-CF
card
9 9
Support of GSM, GPRS and GPRS-WAP connections 9 9
Manual entry of GPRS connection settings including any
additional modem commands
9 9
One-time automatic detection of the GPRS connection data with
first mobile phone used to establish a connection
9
Automatic detection of the GPRS connection data each time a
connection is established (also possible with several mobile
phones)
9
Establishment of GPRS connection in a foreign country as well 9 9
Supported GPRS authentication protocols: PAP, CHAP, MS
CHAP, MS CHAP 2
9 9
Manual entry of GSM connection settings including any additional
modem commands
9 9
Supported GSM authentications: Password, RSA ID 9 9
Safety-relevant features:
VPN support for Microsoft VPN client 9
RSA Token 9 9
RSA Soft Token 9
Choice of storage of all user names, passwords and personal
identification numbers (PIN) required for establishing a connection
9 9
Network setting features:
TCP/IP: DHCP or static IP address, subnet mask, standard
gateway
– With WLAN: choice of permitting APIPA address
– With GPRS/GSM: choice of permitting SLIP, software
compression and IP header compression
9 9
DNS, WINS: automatic import or static setting of DNS, Alt DNS,
WINS and Alt WINS addresses
9 9
Proxy server can be manually configured and supports: HTTP,
WAP (only with GPRS/GSM), Socks4 and Socks5
9 9
In addition to the features in the Standard Edition, the Professional Edition also offers the following
enhanced features:

CONNECTMOBILITY-E2C
10 A26391-K151-Z128-1-7619, edition 1
Microsoft IPSec VPN
Support for Microsoft VPN client software. With this E2C Professional Edition is capable of automating
the entire procedure for establishing the connection via VPN login and subsequent starting of an
application software.
Automatic determination of the connection parameters for a GPRS connection
With one limitation this is already provided by the Standard Edition. However, this only carries out an
automatic detection up to the first successful connection.
On the other hand, with the E2C Professional Edition it is possible to carry out this detection before
each connection. This makes it possible to change between mobile telephones without difficulties,
even when they used different mobile-communication network operators. It is not necessary to adapt
the configuration of the GPRS/GSM target network.
Support of several target networks
The E2C Professional Edition enables as many target network configurations as desired. As a result, it
is possible to set up various target network configurations, e.g. for the company WLAN network, the
home WLAN network and for a hotspot WLAN network. The connection to these networks is then
established in no time.
Support of the RSA SecureID Soft Token
The E2C Professional Edition also includes direct support for the RSA SecureID Soft Token. If a token
is required for a connection, then it is requested by the E2C Professional Edition directly from the RSA
SecureID Soft Token and passed on. The need for bothersome typing or copying is eliminated.
To use this function, it is necessary to install the soft-token additional software from RSA SecureID.
Instructions for getting started
E2C is supplied with the WLAN profile www-Hotspot and the GPRS/GSM profile www-GPRS as
standard.
Example 1: Establishing GPRS Internet connection via BT with
your mobile phone
Let's assume you want to connect to the Internet with your Bluetooth mobile phone and use GPRS in
the process. We assume the following:
● You are in your home country
● Your mobile phone is switched on
● Your mobile phone is logged on in your provider's network
● You're using E2C for the very first time
To establish the Internet connection with your Pocket PC, proceed as follows:
► Make sure your mobile phone has activated Bluetooth.
► Start E2C on your Pocket PC.

CONNECTMOBILITY-E2C
A26391-K151-Z128-1-7619, edition 1 11
► Press the Bluetooth button in E2C.
There are four buttons located in the lower area of the E2C main dialogue. These have the
following meaning from left to right: WLAN, Bluetooth, CF-GPRS card, IrDA. Depending on
which medium you want to use for an Internet connection, you should briefly touch the
respective button with your Pocket PC stylus. The active button can be recognised from a red
border.
► Then select the GPRS/GSM target network www-GPRS.
You can do this in the top dropdown menu of your main dialogue by clicking on the Arrow
down. Following initial installation of E2C this is the only available profile.
► Now click on the Connect button.
A dialogue appears which informs you that no link to a Bluetooth device exists.
► Confirm the dialogue with OK.
Then a dialogue appears that searches for the available Bluetooth DUN devices, i.e. your Bluetooth
mobile phone. After approx. 10 seconds the search is ended.
The Bluetooth DUN devices found are listed in the upper selection menu.
► Select your mobile phone and click on the Add button.
? Close the dialogue with OK (upper right edge).
Then a Bluetooth authentication process begins, also known as "BT bonding". Your mobile phone
and your Pocket PC ask you for a BT PIN, which you can select as desired.
► Enter the same key on both devices and confirm the dialogue on the Pocket PC with OK.
E2C automatically detects your mobile-communications network provider and automatically sets all
access data required for a GPRS connection on your Pocket PC. After a short time you are
connected to the Internet.
When you want to disconnect the existing connection again, click on the Disconnect button. The
connection is ended after a few seconds.
Example 2: Establishing WLAN connection with an "open"
WLAN Access Point
Let's assume you want to connect to an "open", non-encrypted WLAN Access Point with your Pocket
PC.
i
However, we urgently recommend that you always protect a WLAN Access Point; in a
company environment with WPA or VPN technology, and in the private area at least with
WPA-PSK.
We assume the following:
● You or someone else operates an open, non-encrypted WLAN Access Point in your immediate
vicinity
● You know the name of the WLAN network. For our example the name of the WLAN network
(also called SSID) will be myWLAN.
● The WLAN Access Point operates a DHCP server (or another computer in the network).
To establish the connection to your WLAN Access Point, proceed as follows:
► Start E2C on your Pocket PC.

CONNECTMOBILITY-E2C
12 A26391-K151-Z128-1-7619, edition 1
► Press the WLAN button in E2C.
There are four buttons located in the lower area of the E2C main dialogue. These have the
following meaning from left to right: WLAN, Bluetooth, CF-GPRS card, IrDA. Depending on
which medium you want to use for an Internet connection, you should briefly touch the
respective button with your Pocket PC stylus. The active button can be recognised from a red
border.
► Then select the WLAN target network: www-Hotspot.
You can do this in the top dropdown menu of your main dialogue by clicking on the Arrow
down. Following initial installation of E2C this is the only available profile.
► Now click on the Connect button.
After approx. 5 seconds a dialogue appears listing all WLAN wireless networks found. This list
should also contain a wireless network with the name myWLAN.
► Select this wireless network and confirm the dialogue with OK.
Then E2C connects your Pocket PC to the desired wireless network.
When you want to disconnect the existing connection again, click on the Disconnect button. The
connection is ended after a few seconds.
Example 4: Creating a new WLAN profile
► Start E2C om your Pocket PC to create a new WLAN profile.
► open the item Menu in the menu of the main dialogue.
► Then click on New WLAN Destination and enter all the data for your new WLAN network there on
the respective pages.
Evaluation period and purchasing a licence
E2C Professional Edition is available in a 30-day evaluation version. During this time you can try out all
the features of the E2C PRO version free of charge. After the evaluation time expires, E2C is
automatically blocked. You can then either purchase a licence for the E2C Standard Edition or for the
E2C Professional Edition.
You can obtain a licence for E2C via www.pocketloox-choice.com or via www.mobile2day.de
If E2C is already preinstalled on your Pocket LOOX, you also have a 30-day evaluation version for
the E2C Professional Edition. After 30 days you automatically have a E2C Standard Edition.
i
You can purchase an upgrade to an E2C Professional Edition licence via www.pocketloox-
choice.com or via www.mobile2day.de
Exiting E2C
You have two ways of Exiting E2C:
● with the menu item Exit program in the menu of the E2C main dialogue
or
● by pressing and holding the Connect button with your stylus and then briefly clicking on Exit
program

CONNECTMOBILITY-E2C
A26391-K151-Z128-1-7619, edition 1 13
Description of E2C dialogues
Main dialogue
Selecting interface
By pressing a button in the area WLAN or GPRS/GSM in the lower screen area, you specify which
interface is to be used for the connection establishment. You can choose between the following
interfaces (from left to right):
1. WLAN
2. Bluetooth
3. CF card
4. IrDA
i
You can recognise the interface currently active from the red border. Only one interface
can be active at a time.
The buttons for WLAN and Bluetooth have a function for Influence WLAN behaviour, and for
Influence Bluetooth behaviour. This function appears by pressing and holding the respective button
with the stylus.
WLAN target network
If the button for the WLAN button is selected, the configuration for the WLAN target network is
selected and the name of this target network is displayed in the dropdown menu at the upper screen
edge under the header WLAN Destination.
GPRS/GSM target network
If the Bluetooth, CF card or IrDA button is selected, the configuration for the GPRS/GSM target
network is selected and the name of this target network is displayed in the dropdown menu at the
upper screen edge under the header GPRS/GSM Destination.
Application bar
The application bar is located above the Connect button.
Here abbreviations for up to five applications can be set up.
A command line parameter for each application can also be specified (e.g. the Internet address of
the desired website with the Internet Explorer).
● You can select an application by briefly clicking on one of the program symbols. This is then
started automatically following the connection is established.
● You can deselect the application again by briefly pressing the selected program symbol again.
In this case no program is started after the connection is established.
● By pressing one of the program symbols longer, you open the context menu for this program. It
is possible to run the program immediately here.
● A button with the symbol of a spanner is located at the far right in the application bar. By
pressing this button, you enter a dialogue for the configuration of the application bar. It is
possible to add, change and delete or change the order of individual applications.

CONNECTMOBILITY-E2C
14 A26391-K151-Z128-1-7619, edition 1
Connect button
After you have selected the interface and the target network and have possibly selected the desired
application in the application bar, you can begin the connection establishment by pressing the
Connect button.
Menu bar
The menu bar is located at the very bottom at the edge of the screen.
Items under Menu:
Edit Destination
Opens the configuration of the selected target network. In dependence on the
selected interface, the WLAN or GPRS/GSM target network is concerned.
Delete Current Destination
Deletes the currently selected target network. In dependence on the selected
interface, the WLAN or GPRS/GSM target network is concerned.
New GPRS/GSM Destination
Creates a new GPRS/GSM target network and opens the configuration dialogue with
which the individual values can be set
New WLAN Destination
Creates a new WLAN target network and opens the configurations dialogue with
which the individual values can be set
Exit program
Exits E2C.
Register Register Opens the dialogue for registering the E2C software
Item under RSA ID
Use SW Token
Activates/deactivates the use of the RSA Soft Token. (You require additional software
to use the RSA Soft Token).
(?) Opens the online Help.
(i) Opens the dialogue with program information such as the program version.
User data dialogue
If user data are required for the establishment of the connection to the desired target network, these
are requested after pressing the Connect button and before the actual connection is established.
The following data may be concerned depending on the type of connection:
● User name
● Password
● RSA ID PIN
● RSA ID Token
● CF GPRS PIN
User name
In this field you can select which user name is to be used for this connection. If a connection is
established with this user name (press the Connect button), then the user name is stored in a list by
E2C and can then also be easily selected for other target networks. In addition, E2C also notes which
user name was used for which target network, and automatically selects this for you when
establishing the next connection.

CONNECTMOBILITY-E2C
A26391-K151-Z128-1-7619, edition 1 15
Cancel button
Connection is aborted. You return to the main dialogue.
Remove User Button
The selected user name is removed from the list of saved users.
Connect button
The data from this dialogue are applied and the establishment of the connection begins.
GPRS Provider Selection
If E2C determines while establishing a connection with a GPRS network that you are not in your
home country, E2C attempts to read out the home provider of your mobile phone to establish a
GPRS connection with the related settings. Should E2C be unable to read out the home provider of
your mobile phone, the dialogue GPRS provider selection opens. Here you can provide E2C with the
missing data for the automatic establishment of the GPRS connection. E2C requires information on
the country and the home provider of your mobile phone from you.
Country Please select the home country or your mobile-communications network provider
from the dropdown menu.
Provider After you have selected the country, set your home mobile-communications network
provider.
i
E2C requires the information of your home provider to establish the GPRS connection, as
it cannot read out this information from your mobile phone.
i
E2C cannot guarantee that there is a GPRS roaming agreement between your home
provider and the foreign provider in whose network your mobile phone is currently logged
on.
Configuration
Application bar
A button with the symbol of a spanner is located at the far right in the application bar. By pressing
this button, you enter a dialogue for the configuration of the application bar.
Function of the buttons:
New With this up to 5 applications can be added to the application bar.
Edit Enables the changing of the application and the command line parameters of the
entry selected in the list.
Delete Removes the selected entry from the list.
^ Moves the selected entry in the list upward by one position.
v Moves the selected entry in the list downward by one position.

CONNECTMOBILITY-E2C
16 A26391-K151-Z128-1-7619, edition 1
Setting up and managing E2C profiles
You open the dialogue for editing the configuration of a profile (target network) by selecting the item
Edit Destination under Menu in the menu bar. In dependence on the selected interface, the WLAN or
GPRS/GSM target network is concerned.
► select the item New WLAN Destination under Menu, to create a new WLAN profile (target
network)
► select the item New GPRS/GSM Destination under Menu, to create a new GPRS/GSM profile
(target network)
After you have selected an existing profile for editing, or have created a new profile, E2C
automatically opens the dialogue for the configuration of the current profile. The individual dialogues
and sub-dialogues are described in the following.
GPRS/GSM target network
Destination name
The name for the target network can be entered here. This name is displayed in the
main dialogue in the dropdown menu for the target networks.
Connection type: In this dropdown menu you can choose between a GPRS or GSM connection.
By selecting the button "..." next to this dropdown menu, you enter a sub-dialogue
with the corresponding configuration options.
GPRS sub-dialogue
Detection of GPRS settings
When the option On every connection is selected, E2C checks the provider of the
mobile communications network each time before establishing a connection. The
necessary settings are then automatically taken from the E2C database. In this case
no additional settings are possible in this dialogue.
i
This automatic detection of the GPRS settings is only carried out up to the first successful
connection to a network in the E2C Standard Edition. The E2C Professional Edition enables
the automatic recognition of the GPRS settings for each connection.
Provider The name of the mobile-communication network operator can be entered here.
Phone number Telephone number for dialling into the GPRS network of the mobile-communication
network operator. Typically: *99***1#
GPRS User name
Name for logging on to the GPRS network of the mobile-communication network
operator.
GPRS Password
Password for logging on to the GPRS network of the mobile-communication network
operator.
Authentication options
Pressing the button "..." opens a dialogue in which you can set the authentication
options for GPRS. You can select the following protocols for this purpose: PAP,
CHAP, MS CHAP, or MS CHAP2

CONNECTMOBILITY-E2C
A26391-K151-Z128-1-7619, edition 1 17
APN/additional modem commands
Pressing the button "..." opens a dialogue in which you can directly enter the APN of
your GPRS provider (e.g. "my.Provider.de"), or as an alternative can specify a string
of additional modem commands. Here you can enter additional commands for
modem initialisation. The number of characters is limited to 40. This entry is not
possible when the Entry of APN option described below is selected.
GSM sub-dialogue
Phone number Telephone number of the "Remote Access Server" (e.g. the dial-in number for your
company network).
Additional modem commands
Here you can enter additional commands for modem initialisation. The number of
characters is limited to 40.
Authentication
Opens the authentication sub-dialogue.
Authentication sub-dialogue
Type Option RSA ID:
You will be asked to enter the user name, RSA ID PIN and RSA ID Token before the
connection is established in the user data dialogue.
Option Password
You will be asked to enter the user name and password before the connection is
established in the user data dialogue.
User name In this field you can select which user name is to be used for this connection. If a new
user name is entered, then it is stored in a list by E2C and can then also be easily
selected for other target networks later.
Remove User The selected user name is removed from the list of saved users.
WLAN target network
Destination name
The name for the target network can be entered here. This name is displayed in the
main dialogue in the dropdown menu for the target networks.
Authentication
Specifies which authentication is to be used in the target network.
Option Open:
No authentication.
Option Shared:
A shared key authentication is to be used. A network key is required for this purpose.
To enter the network key, select the option WEP for the encryption and press the WEP
Key button.
Option WPA:
A WLAN connection based on a WPA authentication method. For this purpose you
need a RADIUS server that carries out the authentication. When you select WPA, you
must specify the special authentication method in the EAP dialogue, which can be
reached via the EAP-Type: button. This button is only present if you have selected the
option WPA.

CONNECTMOBILITY-E2C
18 A26391-K151-Z128-1-7619, edition 1
i
Your WLAN Access Point must support WPA!
Option WPA-PSK:
A WLAN connection based on a WPA authentication method. You need a WLAN
Access Point that supports WPA-PSK. When you select WPA-PSK, you must specify
the PreSharedKey in the WPA-PSK authentication dialogue, which can be reached
via the Authentication key button.
i
Your WLAN Access Point must support WPA!
EAP type: /Authentication key
This button changes its meaning dynamically. EAP type: is active when WPA is
selected, and Authentication key is active when WPA-PSK is selected. You can make
additional settings by pressing the active button.
Encryption
Specifies which data encryption is to be used.
Option None
No data encryption.
Option WEP:
A network key is required for this option. To enter the network key, press the WEP key
button.
Option TKIP:
When you select TKIP, the key for encryption between your Pocket PC and the
WLAN Access Point is automatically updated at regular intervals (see the settings of
your WLAN Access Point). Select TKIP only in combination with WPA or WPA-PSK.
WEP-Key Opens a sub-dialogue for entering the WEP key. The WEP Key button is only active if
you have selected WEP as the encryption method.
Any SSID If no fixed SSID is specified for the target network, a network selection dialogue
appears before the connection is established.
Specific SSID
You can specify which radio network is to be connected in the field SSID.
Search By pressing the Scan button you can select the network from the networks currently
available.
Ad-Hoc A computer-to-computer network is to be established.

CONNECTMOBILITY-E2C
A26391-K151-Z128-1-7619, edition 1 19
WEP-Key-dialog
Enter a WEP key here which you want to use for encryption. This WEP key must be identical to that
of your WLAN Access Point. You can choose between a 64-bit and a 128-bit long WEP key. You can
enter the WEP key in hexadecimal or ASCII code. This results in the following combination options:
● 5 ASCII characters with a 64-bit WEP key
or
● 13 hexadecimal characters with a 64-bit WEP key
or
● 13 ASCII characters with a 128-bit WEP key
or
● 26 hexadecimal characters with a 128-bit WEP key
EAP authentication configuration dialogue
EAP-Type Select EAP-PEAP or EAP-TLS in the adjacent dropdown menu.
User name Enter the user name you want to use for the EAP authentication.
Domain Enter the domain you want to use for the EAP authentication.
Select certificate
(only with EAP-TLS)
Select a user certificate you want to use for the EAP-TLS authentication.
i
You must already have installed the user certificate in your certificate memory.
Validate server certificate
Here you can specify whether the certificate of your RADIUS server is to be checked
to ensure that it really is the right RADIUS server.
i
With EAP-TLS the RADIUS server is always checked!
With EAP-PEAP the required password is requested while the connection is being
established.
WPA-PSK authentication dialogue
Enter the PreSharedKey for the WPA-PSK authentication. The entry format is ASCII and the key
must be between 8 and 63 characters long.
VPN
VPN stands for Virtual Private Network and enables you to carry out secure data exchange between
the VPN client and the VPN server. VPN functions both with WLAN and with GPRS/GSM networks.
The VPN software is not part of E2C, but instead E2C controls existing VPN software, and therefore
smoothly integrates the establishment of a VPN tunnels in the establishment of a connection with a
certain profile (target network). Here E2C currently supports the IPSec-based VPN client from
Microsoft, which is contained in the operation system of your Pocket PC
You can choose between the following VPN options for a certain profile/target network:
● "---, if you do not require a VPN client
● microsoftVPN

CONNECTMOBILITY-E2C
20 A26391-K151-Z128-1-7619, edition 1
Setting options for Microsoft VPN client
If you have selected microsoftVPN as your VPN in the dropdown menu, you can make the following
settings:
Host name/IP Specify the IP address of the Microsoft VPN server here which represents the
opposite partner of the VPN tunnel.
User name Specify the user name you want to use to establish the VPN tunnel.
Password Specify the password you want to use to establish the VPN tunnel.
Domain Specify the domain you want to use to establish the VPN tunnel.
Authentication
You can decide whether you want to carry out the authentication via a certificate or
via a PSK (PreSharedKey). The PSK is entered in ASCII.
TCP/IP
IP address assigned by server
After the connection is established, the IP address is automatically obtained from a
DHCP server.
Option for WLAN Destinations:
Allow APIPA address
Specific IP address
The fixed IP address entered here is to be used.
Options for WLAN Destinations
- Subnet Mask
- Standard Gateway
Options for GPRS/GSM Destinations:
- Use SLIP
- Use software compression
- Use IP header compression
Server
Use server-assigned address
After the connection is established, the addresses for DNS and WINS are
automatically obtained.
Use specific address
Enables the entry of specific addresses for DNS and WINS.
Proxy
This network connects to the Internet
Select this option if the desired connection is to connect to the Internet.
Use a proxy server
Select this option if a proxy server is required for the connection to the Internet and
specify the server name and the related port for HTTP, WAP and Socks.
Socks type Type 4 option:
Option Type 5:
Requires the entry of the Socks 5 ID
Socks 5 ID… In this sub-dialogue you can enter the user id and the related password.

CONNECTMOBILITY-E2C
A26391-K151-Z128-1-7619, edition 1 21
Influence WLAN behaviour
Pressing and holding the WLAN button in the main dialogue opens a context menu.
Deactivate WLAN on Disconnect
Pressing this sub-item changes its state. If a checkmark is set, the WLAN module of
your Pocket PC is switched off when a WLAN connection is disconnected. If the
checkmark is not set, the connection is disconnected, however the WLAN module
remains switched on.
Reconnect automatically
Pressing this sub-item changes its state. If a checkmark is set, E2C tries:
- to connect to the WLAN network until it is successful,
- to reconnect a WLAN connection which was interrupted by switching off the device,
- to reconnect a WLAN connection which was interrupted due to the local conditions
(e.g. Pocket PC leaves the WLAN radio area).
Enable built-in WLAN on Reset
If you have set a checkmark for this sub-item, the Microsoft WLAN Connection
Manager is automatically activated when the device is reset.
Influence Bluetooth behaviour
Pressing and holding the Bluetooth button in the main dialogue opens a context menu.
Deactivate BT on Disconnect
Pressing this sub-item changes its state. If a checkmark is set, the Bluetooth module
of your Pocket PC is switched off when a Bluetooth connection is disconnected. If the
checkmark is not set, the connection is disconnected, however the Bluetooth module
remains switched on.
Software supported
For fault-free execution, the operation system Microsoft Windows Mobile 2003, Microsoft Windows
Mobile 2003SE or Windows Mobile 5.0 must be installed on your Pocket PC.
Frequently asked questions
Question 1
I want to establish a connection to the Internet via GPRS with my Bluetooth mobile phone, but E2C
can't find the device! What can I do
Question 2
I want to establish a connection with the profile www-GPRS on my Pocket LOOX 610. When I press
Connect, an error message appears asking me to bond my mobile phone. How does that work with
the Pocket LOOX 610?
Question 3
What does the message Cryptography API: Invalid Signature mean?

CONNECTMOBILITY-E2C
22 A26391-K151-Z128-1-7619, edition 1
Question 4
I get the message BT License expired. What can I do
Question 5
I purchased a licence key, but E2C cannot be activated with it. What could be the reason for that?
Question 6
The Automatic detection of the GPRS connection data feature is not supported by my mobile phone.
What can I do
Question 7
Why doesn't the Automatic detection of the GPRS connection data feature work for me?
Question 8
Welche GPRS/CF-Karte wird von E2C unterstützt?
Question 9
I have a problem connecting via my GPRS/CF card. What can I do
Question 1
I want to establish a connection to the Internet via GPRS with my Bluetooth mobile phone, but
E2C can't find the device! What can I do
Before you can establish a connection with your mobile phone, you must add it to the list of known
Bluetooth devices.
Here's what to do:
► Switch on your mobile phone and activate the Bluetooth interface.
► Open the Bluetooth context menu by pressing the Bluetooth interface button at the lower edge
of the main dialogue screen longer.
► Select the option Add/Remove Devices….
After a brief moment your device appears in the list of available Bluetooth-DUN devices.
► Select your mobile phone and press Add.
► Close the dialogue with OK.
Now you can establish an Internet connection with your Bluetooth mobile phone.
Question 2
I want to establish a connection with the profile "www-GPRS" on my Pocket LOOX 610. When
I press "Connect", a message appears asking me to bond my mobile phone. How does that
work with the Pocket LOOX 610?
The Pocket LOOX 610 does not support automatic bonding of your mobile phone. Therefore, you
have to bond your BT mobile phone manually. Proceed as follows:
► Switch on your mobile phone and activate the Bluetooth interface.
► Start the Pocket Plugfree
If you haven't done so yet, proceed through the Plugfree setup step by step and restart your device.
After the reset please restart Pocket Plugfree.
After Plugfree has carried out an internal initialisation, it searches for existing BT devices and outputs
these in a list. You should now find your BT mobile phone in the list of BT devices found.
► Click on your mobile phone in Plugfree. Then Plugfree indicates all available BT services of this
device.
► Select the Internet service by clicking on it.
► In the dialogues that now follow, please enter a dummy value in each case.

CONNECTMOBILITY-E2C
A26391-K151-Z128-1-7619, edition 1 23
► For the telephone number, select a 1 in each case for the country code, dialling code and
telephone number.
► Confirm with OK.
► Now enter 123 as the user, 123 as the password and 123 as the domain.
► Confirm with OK.
Now the bonding procedure follows. On your mobile phone you are asked to enter a BT PIN
selected by you for bonding.
► Enter the BT PIN and confirm it with OK if necessary.
On your Pocket LOOX you are now asked to enter the same BT PIN to successfully complete the
bonding process.
► Enter the same PIN in this dialogue and confirm the dialogue with OK.
Plugfree attempts to establish a connection with the data entered. You should see a message in
which Plugfree informs you that it is establishing a connection. Cancel this message immediately with
Cancel.
► Exit Plugfree by carrying out a soft reset.
► Start E2C again, and press and hold the BT button.
► Select the sub-item Add/Remove Device....
► Press and hold the BT button again.
Your BT mobile phone is displayed in the menu that now opens and can be used by E2C.
Question 3
What does the message "Cryptography API: Invalid Signature" mean?
You have very probably installed the Microsoft High Encryption Pack. This pack was intended for the
operating systems Pocket PC 2000 and Pocket PC 2002 and may not be installed on Windows Mobile
2003 or later versions, as it is already contained in these operating systems. You will find further
information on this at
www.microsoft.com/windowsmobile/downloads/highencryption.mspx
Question 4
I get the message BT License expired. What can I do
This message only occurs very seldom. In a case like this we recommend using the following
procedure:
► Carry out a soft reset of your device.
► Switch on your BT module manually before you use E2C
► Wait approx. 5 seconds until the BT module is switched on
► Start E2C
► Press the Connect button to connect to your profile via BT.
i
As soon as you have successfully established a connection with BT once, you do not need
to repeat the above procedure.

CONNECTMOBILITY-E2C
24 A26391-K151-Z128-1-7619, edition 1
Question 5
I purchased a licence key, but E2C cannot be activated with it. What could be the reason for
that?
Make sure that the file with the licence key is located on your Pocket PC in the directory \windows. As
soon as you use E2C, i.e. press Connect, this key is read in. If you receive an error message, this can
have the following causes:
● You have made an error when entering the Soft ID
or
● You are attempting to install a licence key of an older E2C version.
Question 6: The "Automatic detection of the GPRS connection data" feature is not supported
by my mobile phone. What can I do
E2C also offers you the option of making the GPRS settings manually.
Question 7
Why doesn't the "Automatic detection of the GPRS connection data" feature work for me?
There are two possible reasons why the Automatic detection of the GPRS connection data feature does
not work.
One possibility is that your mobile phone simply doesn't meet the technical requirements for the
Automatic detection of the GPRS connection data feature. However, this is only true for a small number
of mobile phones.
The other possibility is that in the E2C Standard Edition you can only make the GPRS settings for your
mobile-communications network provider once. The Automatic detection of the GPRS connection data
feature enables you to automatically configure the GPRS settings for your mobile-communications
network provider for the very first connection with a GRPS profile. E2C notes these settings so that
you can use the same mobile phone (including the SIM card) several times.
However, if you want to use E2C with another or with several mobile phones, we recommend that
you use the E2C Professional Edition. This carries out the feature Automatic detection of the GPRS
connection data each time a connection is established.
Question 8
Welche GPRS/CF-Karte wird von E2C unterstützt?
The "Connect 2 Air GPRS G1 CF-card" card has been tested by E2C. This card is the GPRS/CF card
officially approved by Fujitsu Siemens Computers.
Question 9
I have a problem connecting via my GPRS/CF card. What can I do
The GPRS/CF card can occasionally cause problems if it is used inside a building. Coated windows
can also affect smooth wireless traffic.

FSC VoiceRecorder
A26391-K151-Z128-1-7619, edition 1 25
FSC VoiceRecorder
Overview
FSC VoiceRecorder offers you the complete range of functions of a modern digital dictation unit. Not
only can you make and listen to recordings, you can also correct and add to them later if required.
The following convenient operating variants are available to you for using FSC VoiceRecorder:
● Operation using the user interface
● Operating with the navigation key
● Working in the one-hand mode (for devices with scroll key)
The recordings recorded with FSC VoiceRecorder are stored in the WAV format. You can set various
parameters, e.g. the name, the quality of the recordings and the location in which the recordings are
to be stored. The settings are then applied for all further recordings.
Structure of display
The display is divided into three areas:
● List of recordings
● Control panel
● Menu bar
List of recordings
List of recordings In the list of recordings, you see all recordings located in the currently selected
folder. Each recording is displayed with its name, the creation date and the duration of the recording
in seconds.
Select other folder
► Touch the Folder icon in the upper left corner of the display with the stylus and select the
desired folder in the selection list.
If you want to create, rename or delete a new folder, you the standard functions of the operating
system offered in the selection list for this purpose.
Change sorting order
► Touch the arrow in the upper right corner of the display with the stylus and select the
desired sorting order in the selection list.

FSC VoiceRecorder
26 A26391-K151-Z128-1-7619, edition 1
Control panel
In the operating field you first see information on the marked recording:
Play: indicates the current position in the recording.
Total: indicates the total length of the recording.
Both values are displayed in the format Hours:Minutes:Seconds.
On the horizontal line you see the slider, which also displays the current position in the recording.
With the graphic operating elements you control the recordings and their playback.
Menu bar
The menu Tools is located in the lower left corner of the display. The menu has the following entries:
● Options
Here you can define various options for the recordings with FSC VoiceRecorder (see the "Tools"
section)
● About
Here the help function is displayed.
● About
Brief manufacturer information is provided here.
Operation
The following convenient operating variants are available to you for using FSC VoiceRecorder:
● Operating with the user interface
● Operating with the navigation key
● Working in the one-hand mode (for devices with scroll key)
i
An ongoing recording is cancelled when your device is automatically switched off after the
set idling time expires.
If you want to make a longer recording, you must deactivate the automatic switch-off
function of the device. To do this, touch Start - Settings - System - Power - Control and
deactivate the checkbox Turn of device if not used for

FSC VoiceRecorder
A26391-K151-Z128-1-7619, edition 1 27
Operating with the user interface
Recordings and their playback are controlled by touching the following operating elements:
REC STOP PLAY FR FF
Start new recording
To start a new recording, touch REC for approx. 2 seconds.
Pause recording
To pause an ongoing recording, briefly touch REC.
The recording is stopped until you touch REC again.
Continue recording
To continue a recording, briefly touch REC.
The recording is continued from the current position.
End recording/playback
To end a recording or playback, touch STOP.
Play back recording
Mark the recording you want to play with the stylus and touch PLAY.
Navigate in recording
► Touch the slider with the stylus and drag in on the line to the desired position in the recording.
or
The slider jumps forward or back in the recording when these buttons are touched.
If you briefly touch FR, the slider jumps back 10 seconds in the recording.
If you press and hold FR for approx. 2 seconds, the slider jumps to the start of the
recording.
If you briefly touch FF, the slider jumps forward 10 seconds in the recording.
If you press and hold FF for approx. 2 seconds, the slider jumps to the end of the
recording.

FSC VoiceRecorder
28 A26391-K151-Z128-1-7619, edition 1
Change recording and listen to change
You can overwrite individual sections or the remaining recording from any desired position with a
new recording.
Navigate in the recording to the point you want to change with FR or FF or with PLAY.
or
Touch the slider with the stylus and drag in on the line to the desired position in the
recording.
Then briefly touch REC.
The old recording is overwritten at the current position with the new recording.
To end the recording, touch STOP.
To listen to the change, then touch PLAY.
The slider automatically jumps to the position at which the change begins and the
recording is played back from there.
Add to recording
You can add to a completed recording with an additional recording later.
Touch FF for approx. 2 seconds.
The slider jumps to the end of the recording.
or
Touch the slider with the stylus and drag it to the end of the recording.
Then briefly touch REC.
The recording is recorded further from the end of the recording.
To end the recording, touch STOP.
To listen to the change, then touch PLAY.
The slider automatically jumps to the position at which the change begins and the
recording is played back from there.
FSC VoiceRecorder
A26391-K151-Z128-1-7619, edition 1 29
Working in the one-hand mode (for devices with scroll key)
In the one-hand mode you start and stop the recording with any key you have configured.
► To configure a key, touch Start - Settings - Buttons.
► Here you first select the key you want to use to start a recording.
i
You cannot use a long-press key.
► Then assign the program FSC VoiceRecorder to the selected key.
1
The playback of recordings is controlled with the
Scroll key.
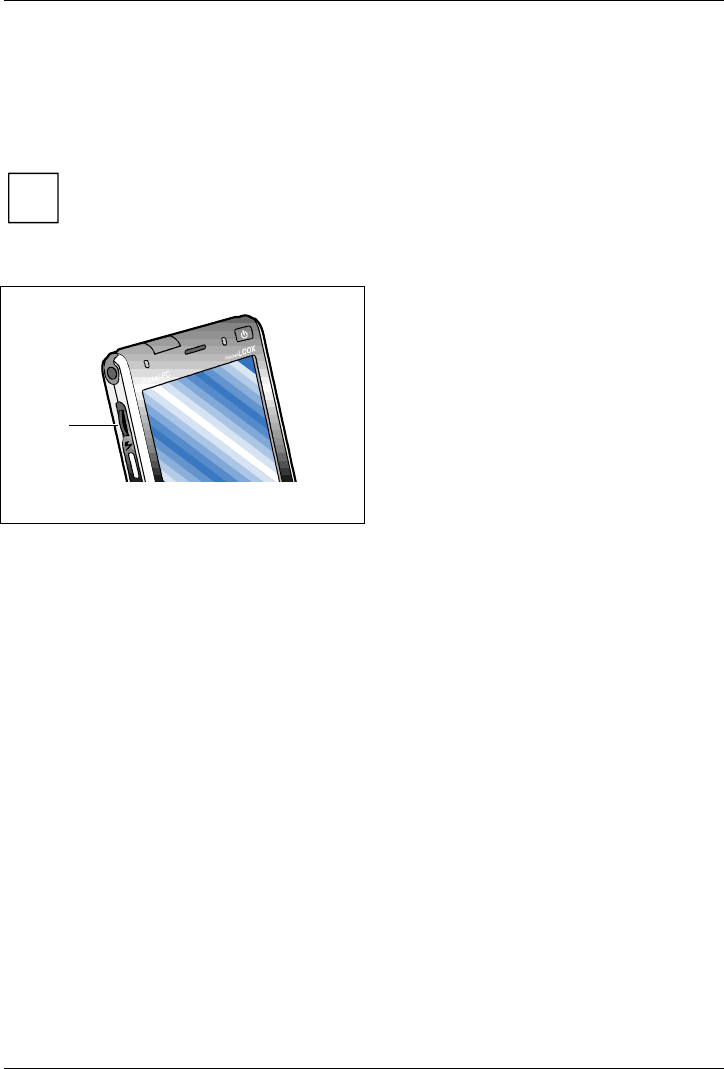
The scroll key (1) is located on the left on the
outside of the device.
Start new recording
► Press the key you have configured for starting a recording for approx. 1 second.
Pause or end recording
► Press the key you have configured for starting a recording.
► To continue the recording, press the key you have configured for starting a recording again.
FSC VoiceRecorder
30 A26391-K151-Z128-1-7619, edition 1
Play back recording
Mark the recording you want to play back in the list of recordings. To do this, press the
scroll key upward or downward.
Then press the scroll key.
The marked recording is played back.
Fast forward (fast playback)
Briefly press the scroll key upward during playback.
The recording is played back at twice the usual speed.
To play back the recording at normal speed again, press the scroll key.
Rewind (reverse playback)
Briefly press the scroll key downward during playback.
The recording is played back in reverse at twice the usual speed.
To play back the recording at normal speed again, press the scroll key.

FSC VoiceRecorder
A26391-K151-Z128-1-7619, edition 1 31
Change recording and listen to change
You can overwrite individual sections or the remaining recording from any desired position with a
new recording.
Navigate in the recording to the position you want to change. To do this, press the scroll
key upward or downward.
Then press on the key you have configured for starting a recording. The old recording is
overwritten at the current position with the new recording.
To end the recording, press the key you have configured for starting a recording again.
To listen to the change, then press the scroll key.
The slider automatically jumps to the position at which the change begins and the
recording is played back from there.
Add to recording
You can add to a completed recording with an additional recording later.
Navigate to the end of the recording. To do this, briefly press the scroll key upward.
When the slider has reached the end of the recording, press the key you have
configured for starting a recording.
The recording is recorded further from the end of the recording.
To end the recording, press the key you have configured for starting a recording again.
To listen to the change, then press the scroll key.
The slider automatically jumps to the position at which the change begins and the
recording is played back from there.

FSC VoiceRecorder
32 A26391-K151-Z128-1-7619, edition 1
Operating with the navigation key
When operating with the navigation key you start and stop the recording with any key you have
configured.
► To configure a key, touch Start - Settings - Buttons.
► Here you first select the key you want to use to start a recording.
i
You cannot use a long-press key.
► Then assign the program FSC VoiceRecorder to the selected key.
1
Playback is controlled by pressing the keys of the
navigation cross.
The navigation cross (1) is located at the bottom
on the front of the device.
Start new recording
► Press the key you have configured for starting a recording.
Pause recording
► To pause an ongoing recording, press the key you have configured for starting a new recording
again.
The recording is stopped until you press this key again or end the recording.
Continue recording
► To continue a recording, press the key you have configured for starting a new recording again.
The recording is continued from the current position.

FSC VoiceRecorder
A26391-K151-Z128-1-7619, edition 1 33
End recording
► To end a recording, press the key you have configured for starting a new recording.
Play back recording
► Mark the recording you want to play back with the keys / and press the key.
► If you want to play back the recording quickly, press the key during playback.
► If you want to rewind the recording, press the key.
► To play back the recording at normal speed again, press the key again.
Navigate in recording
With the key you can play back the recording backward at twice the normal speed.
With the key you can play back the recording forward at twice the normal speed.
With the key you jump forward to the end of the recording.
With the key you jump back to the start of the recording.
End playback
► To end playback, press the key.
Change recording and listen to change
You can overwrite individual sections or the remaining recording from any desired position with a
new recording.
► Navigate with the keys and in the recording to the position you want to change.
► Press the key you have configured for starting a recording.
The old recording is overwritten at the current position with the new recording.
► To end the recording, press the key you have configured for starting a new recording.
► To listen to the change, press the key again.
The slider automatically jumps to the position at which the change begins and the recording is played
back from there.
Add to recording
Add to recording You can add to a completed recording with an additional recording later.
► Navigate to the end of the recording with the key.
► Press the key you have configured for starting a recording.
The recording is recorded further from the end of the recording.
► To end the recording, press the key you have configured for starting a new recording.
► To listen to the change, press the key again.
The slider automatically jumps to the position at which the change begins and the recording is played
back from there.

FSC VoiceRecorder
34 A26391-K151-Z128-1-7619, edition 1
Tools
The settings are accessed via the Tools menu in the lower left corner of the display. Under Options
you can define various parameters for the recordings with FSC VoiceRecorder.
● Record name
● Add time info
● Storage location
● Record/Playback usage
● Recording quality
Record name
Here you determine the first characters of the file name under which the recording is saved. This is,
for example, helpful if you want to assign a special topic to recordings.
Add time info
Here you set whether a time stamp is to be added to the file name.
Storage location
Here you set whether the recordings are to be stored locally on your Pocket PC or externally on a
memory card.
► Select the desired option in the displayed selection list.
i
External memory cards are only shown in the selection list when they are inserted in your
Pocket PC.
Record/Playback usage
Here you select the manner in which you want to record and play back recordings.
● Short range usage
You use this option when you want to speak directly into the microphone of your device to
make a recording and only want the playback of a recording to be audible "in private".
● Normal range usage
You use this option when you want to make a room recording and want to make the playback
of a recording "generally" audible.
Recording quality
Here you select the quality with which the recordings are stored. The higher the quality of a
recording, the higher the required memory capacity.
Recommended value:
8,000 Hz, 8-bit; stereo (16 KB/s)

FSC VoiceRecorder
A26391-K151-Z128-1-7619, edition 1 35
Managing and synchronising recordings
Um die Aufnahmen zu verwalten und zu synchronisieren, stehen Ihnen die Standard-
Betriebsystemfunktionen zur Verfügung.
► To run these functions, touch the recording you want to process for approx. 2 seconds and
select the function from the selection menu.
The following functions are offered:
● Copy recording
● Delete recording
● Send recording by email
● Transfer recording (synchronise)
● Rename/move recording
A detailed description of this function is provided in the documentation of the operating system.
i
During synchronisation via ActiveSync, only those files located in the folder My Device /
My Documents are taken into account.
Files stored on memory cards are not synchronised.

FSC AudioPath
36 A26391-K151-Z128-1-7619, edition 1
FSC AudioPath
Overview
With the FSC AudioPath you set the audio outputs on your device. By activating the desired options,
you specify the connections on which the audio signal is to be output. When making your selection,
you can combine several connections as desired.
In addition, two modes are also available, which can be activated at the press of a button if desired
(see section "Phone/Freehands mode").
Phone mode
The audio signal is output to the receiver, to the BT headset and to the headphones.
This mode is used, for example, to conduct a telephone conversation via VoIP (telephony via the
Internet).
Freehands mode
The audio signal is output to the internal loudspeaker and to the connection for the Car Kit.
Use this mode if you want to enable others to listen along, although the headphones are connected
to your device.
Tools
You will find FSC AudioPath on your device under Start - Settings - System - Audio Path Settings The
following check boxes are available for configuring the settings:
● Automatic
● Audio outputs:
Headphones, Speaker, Receiver, BT Headset, Car Kit
Automatic
When you activate the Automatic check box, the audio signal is automatically routed to the
connection to which a device is connected. If devices are connected to several connections, the
audio signal is routed to the connection with the highest priority.
Prio 1: BT Headset
Prio 2: Headphone
Prio 3: Car Kit
If no device is connected, the audio signal is routed to the internal loudspeaker.
i
When you activate the Automatic check box, all entries in the check boxes to the audio
outputs are automatically deactivated.
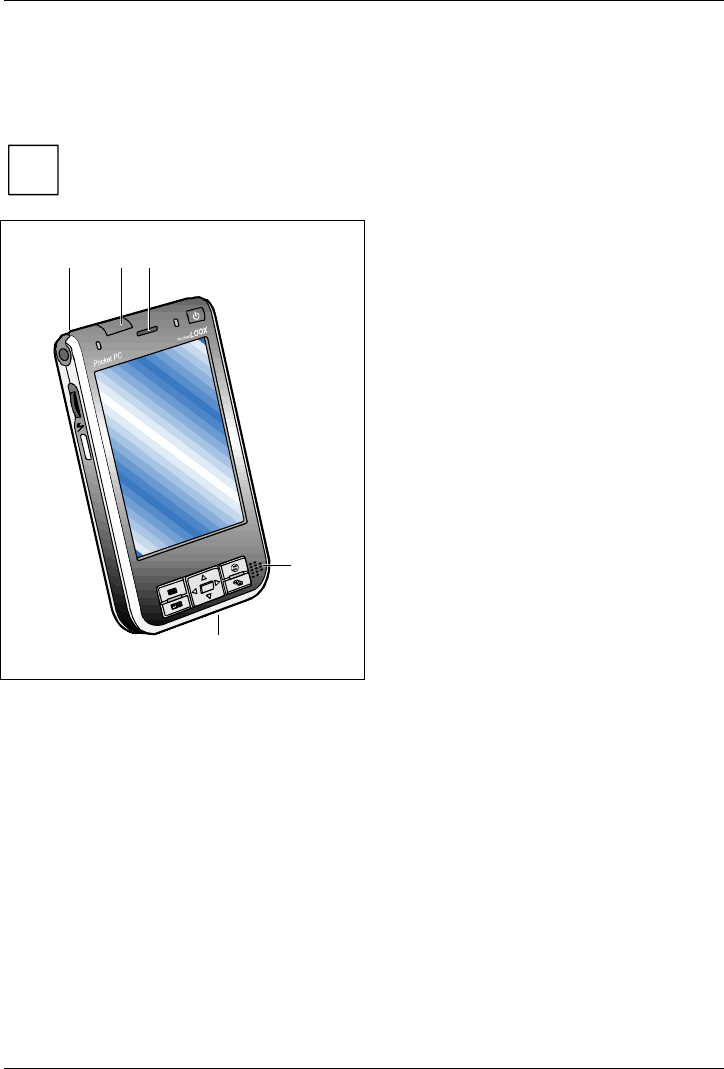
FSC AudioPath
A26391-K151-Z128-1-7619, edition 1 37
Audio outputs
Here you specify the connection to be used to output the audio signal. When making your selection,
you can combine several connections as desired.
i
When you select one or several audio outputs, the Automatic check box is automatically
deactivated.
23
4
1
5
1 = (Headset) Voice
2 = Speaker
(internal loudspeaker of device)
3 = Receiver
(earpiece via the display for the phone
mode)
4 = BT-Headset (= Bluetooth Headset)
5 = Car-Kit
(Connection to your car radio or your home
stereo system)

FSC AudioPath
38 A26391-K151-Z128-1-7619, edition 1
Phone/Freehands mode
It is also possible to change over from the Phone mode to the Freehands mode and vice versa at the
press of a button, e.g. to activate the loudspeaker or the receiver for VoIP (telephony via the
Internet).
● In the Phone mode the audio signal is routed to the connections for the BT headset, the
headphones and the receiver.
● In the Freehands mode the audio signal is routed to the internal loudspeaker and to the
connection for the Car Kit.
There are two programs for changing the mode quickly, which can each be assigned a key.
To configure the buttons, touch Start - Settings - Buttons.
► Select the button you want to use for changing over to the Phone mode.
► Then assign the Phone program to this button.
► Following this, select the button you want to use for changing over to the Freehands mode.
► Then assign the Freehands program to this button.

FSC Panning
A26391-K151-Z128-1-7619, edition 1 39
FSC Panning
Overview
Do you also find scrolling in the Pocket Internet Explorer bothersome? Avoid time-consuming scrolling
with FSC Panning. Display the window contents quickly by simultaneously scrolling in both directions.
This also enables you to view extensive websites quickly and easily. Please note: as long as FSC
Panning is activated, your stylus can only move window content.
Operation
Preparation
► Assign FSC Panning to one of the application buttons.
(Tap Start/Settings/Keys to configurate the buttons.)
If the application button supports short keystrokes as well as long keystrokes you must assign FSC
Panning to the long keystroke.
Application
► Press and hold the relevant application button to activate FSC Panning.
► Move the window content with your stylus in the required direction.
► Release the application button to stop or to interrupt FSC Panning.
Notes
● Moving the stylus diagonally produces vertical and horizontal shifts of the window content.
● Using FSC Panning means moving window contents as you would for example move a large
newspaper. You move the window content up, when you want to read a text at the bottom of
the page. If you want to read a text in the right corner, you move the window content to the left.
That means: The direction of movements is different from that of scrollbars.
● If you want to use the stylus for tapping (e.g. to call up applications) or for writing (e.g. to fill in
website forms) just release the application button.
● Please note: if there is more than one open window, only the content of the window in which
you tap and hold your stylus is moved.

FSC KeyLock
40 A26391-K151-Z128-1-7619, edition 1
FSC KeyLock
Normally, your switched-off Pocket-PC can be started by pressing the application button. In the
process, the application assigned to the respective key is brought into the foreground.
FSC KeyLock will help you change this behaviour.
FSC KeyLock is available either as an entry in the FSC Speedmenu, or via Start - Settings - Private - Keys
- FSC KeyLock.
With FSC KeyLock you can specify whether your Pocket LOOX is really to start when an application
key is pressed.
If your Pocket LOOX is not to start when an application key is pressed, select Application buttons
locked. Even if FSC KeyLock is active, you can switch on your Pocket LOOX at any time by briefly
pressing the Suspend/Resume button.
If your Pocket LOOX is not to start when an application key is pressed, select Application buttons
unlocked.
FSC KeyLock and MS Device Lock complement each other. FSC KeyLock locks the keys in the Standby
mode (switched-off state). MS Device Lock locks the keys and the screen in the active mode.

FSC Password
A26391-K151-Z128-1-7619, edition 1 41
FSC Password
Protecting the device with a password
You can increase the security of your data by having the device ask for a password each time it is
switched on.
If you want to prevent your device from being used if it is lost, you should define a permanent
password. This password can only be removed by you. The normal method for resetting the
password, i.e. Clear Memory is not possible in this case. In addition, the device is also protected
against an unauthorised flash update.
► Touch Start - Settings - Private - Password.
► Activte the Required checkbox if the device is not to be used.
► In the field on the right-hand side, select how long the device is to be switched off before a
password is required.
► Select persistent past clear memory to keep password even after clear memory.
This activates an effective theft protection function. No use and no Flash-Update possible
without entering correct password.
► Select the desired type of password in the field Password type.
► Enter the password and confirm it if necessary.
If the device is configured for a network connection, use a complex password to ensure network
security.
► Enter an expression on the Note tab that will remind you of your password if necessary,
however which does not enable other users to guess your password.
This note is displayed as soon as an incorrect password is entered four times.
► Tap OK.
The next time you switch on the device, you will be asked to enter your password.
Important notes
Each time an incorrect password is entered, the reaction time of the device is extended until the
device no longer appears to react at all.
If you have forgotten your password, follow the instructions in the manual to clear the memory in
order to have access to the device again (This is not possible with a permanent password, see
below).
If you configured device to retain password past clear memory, and you forgot your password, please
contact your service to unlock the device.

FSC Backup
42 A26391-K151-Z128-1-7619, edition 1
FSC Backup
Overview
With FSC Backup you can back up your personal data, even if you are "on the road" and are unable to
synchronise the Pocket LOOX with your PC or server. It enables you to make copies of your system
and restore it if necessary.
As a result, you protect important data from loss due to accidental or intentional deletion. FSC
Backup can back up your data to the internal flash memory of your Pocket LOOX or to CF
(CompactFlash), SD (Secure Digital) or MMC (MultiMediaCard) storage cards.
FSC Backup permits you to select from several options to specify which data you want to back up. As
a result, you can also usually back up your most important data even when the available memory
space is limited.
With the option Back up entire system you can also back up the entire content of your device. This
consist of all files, all databases, all programmes and all personal settings. This option is suitable for
normal backups. However, it also requires the most memory space.
i
The Back up entire system option is not suitable for backing up your data when updating the
system software. Restoration of the data following a system update would lead to
important new or changed system data being overwritten and therefore destroyed.
FSC Backup enables you to back up and restore the data of the connection manager and the data of
your ActiveSync partnership with the Connection/Device Info option. Following a necessary restoration,
you then no longer need to re-enter your connection data, and you can also continue to use the
existing ActiveSync partnership.
To protect your data saved on CF or SD/MMD Cards against unauthorised access, you can provide
your data backup with a password.
Before you start a backup, make sure that sufficient memory space is available on the memory card
or in the device, and that the battery holds a sufficient charge. If the battery charge is low, connect
the mains adapter or charge the battery.
Starting FSC Backup
► Touch Programs in the Start menu.
► Tap the FSC Backup symbol.

FSC Backup
A26391-K151-Z128-1-7619, edition 1 43
Backing up data
With FSC Backup you can back up the entire contents of the memory (all files, all databases, all
programs and settings).
As an alternative, you can:
● Back up your calendar entries, contacts and things to do.
● select whether you also want to store your test or voice notes.
● set a freely selectable folder with files to be saved.
● back up the data necessary to restore your ActiveSync partnership with your PC and your
connection settings.
You can decide yourself where you want to store your data backup, e.g. on a CF or SD/MMC card.
FSC Backup indicates whether the memory space is sufficient for the backup options you select.
FSC Backup creates the data backup in the FSCBackupDir directory in an assigned file. Another
backup overwrites the previous data backup. This permits you to access the respective last data
backup conveniently. Should you wish to save several data backups, then just rename the FSC
Backup file using the file explorer.
Before you start a backup, make sure that sufficient battery power is available. If the battery charge
is low, connect the mains adapter or charge the battery.
► Close all applications on your Pocket LOOX.
► Disconnect any existing dial-up connections and the ActiveSync connection to your
PC/notebook
► Start FSC Backup.
► Select the Backup tab.
► Select with storage card your data are to be backed-up on.
The free space available on your storage card is indicated under Available.
► Select which data you want to back up.
The memory capacity required for the backup is displayed under Required.
► If the backup file is to be protected with a password, mark the option Password required.
► Tap on Backup.
If you have marked the password option, you will now be asked for the password for your data
backup.
► Touch Continue to continue.
Now you will be shown whether a data backup has already been stored on the selected storage card
by FSC Backup, and whether you want to overwrite this data backup. If you select Continue, the data
backup begins. You can cancel with Cancel. Any data backup that exists is retained
When you conduct a backup, you may not carry out any other operating procedure before the backup
has been completed. Do not press any keys, touch the display or remove a memory card.

FSC Backup
44 A26391-K151-Z128-1-7619, edition 1
Restoring data
With FSC Backup you can restore the system state saved with FSC Backup to the same system
version at any time.
If you have carried out an upgrade of the system software in the time following the data backup, then
it is not possible to restore this data backup, as this could lead to data of the new system version
being overwritten. This could result in your device no longer operating stably. For this reason, FSC
Backup does not allow the data to be restored in this case.
If a selective backup has been carried out previously with FSC Backup, you can restore backed-up
calendar, address and things-to-do data, notes and folders. FSC Backup replaces the data present in
the memory of your Pocket LOOX with the data you have selected from the backup file.
In this case you also have the option of only restoring parts of your data backup.
!
If you have changed data in your Pocket LOOX after a data backup with FSC Backup, then
these are lost when you restore the data backup.
Example:
If you have added an address following a data backup, then it is lost when the addresses
from the data backup are restored.
► Close all applications on your Pocket LOOX.
► Disconnect any existing dial-up connections and the ActiveSync connection to your
PC/notebook.
► Start FSC Backup.
► Select the Restore tab.
► Select the storage card on which your data backup is stored.
The backed-up data are offered for selection. Unavailable data are shown in grey.
► Select the desired backup data.
If the backup file has been protected with a password, the Password required field is active and you
must enter the password. If no password was entered during the backup, then this field is shown in
grey.
► Tap on Restore.
FSC Backup points out again that restoring the selected databases will overwrite the corresponding
databases on your Pocket LOOX. Yes starts data restoration. If you touch No, data restoration is
cancelled.

A26391-K151-Z171-1-7619, Edition 2
FCC RF Exposure Information
Body-worn Operation
This device was tested for touched body-worn operations. To comply with FCC RF exposure
requirements, no minimum separation distance is limited between the user’s body and the device.
Third-party belt-clips, holsters, and similar accessories used by this device should not contain any
metallic components. Body-worn accessories that do not meet these requirements may not comply
with FCC RF exposure requirements and should be avoided.
FCC Compliance Statements
FCC RF Radiation Exposure Statement
This equipment complies with FCC RF radiation exposure limits set forth for an uncontrolled
environment. This device and its antenna must not be co-located or operating in conjunction with
any other antenna or transmitter.
Federal Communications Commission Notice
This equipment has been tested and found to comply with the limits for a Class B digital device,
pursuant to Part 15 of the FCC Rules. These limits are designed to provide reasonable protection
against harmful interference in a residential installation. This equipment generates, uses, and can
radiate radio frequency energy and, if not installed and used in accordance with the instructions,
may cause harmful interference to radio communications. However, there is no guarantee that
interference will not occur in a particular installation. If this equipment does cause harmful
interference to radio or television reception, which can be determined by turning the equipment off
and on, the user is encouraged to try to correct the interference by one or more of the following
measures:
● Reorient or relocate the receiving antenna
● Increase the separation between the equipment and receiver
● Connect the equipment into an outlet on a circuit different from that to which the receiver is
connected
● Consult the dealer or an experienced radio or television technician for help
Modifications
The FCC requires the user to be notified that any changes or modifications made to this device that
are not expressly approved by the responsible party for compliance may void the authority to
operate the equipment.
The antenna(s) used for this transmitter must not be co-located or operating in conjunction with any
other antenna or transmitter.
This EUT is incompliance with SAR for general population /uncontrolled exposure limits in
ANSI/IEEE C95.1-1999 and had been tested in accordance with the measurement methods and
procedures specified in OET Bulletin 65 Supplement C.

FCC Compliance Statements Pocket LOOX 700
2 A26391-K151-Z171-1-7619, Edition 2
Declaration of Conformity for products marked with
the FCC logo
This device complies with Part 15 of the FCC Rules. Operation is subject to the following two
conditions: (1) this device may not cause harmful interference, and (2) this device must accept any
interference received, including interference that may cause undesired operation.
● For questions regarding your product, contact www.fujitsu-siemens.com.
● For questions regarding this FCC declaration, contact:
Fujitsu Siemens Computers Inc.
1250 E. Arques Avenue
Sunnyvale, CA 94085
U.S.A.
Bernd Schroettle-Henning
Phone No.: (408) 834-0306
Fax No.: (408) 746-8299
To identify this product, refer to the Part, Series, or Model number found on the product.