HTC PC49120 SMARTPHONE User Manual Quick Start Guide
HTC Corporation SMARTPHONE Quick Start Guide
HTC >
Contents
- 1. Quick Start Guide
- 2. Safety Regulatory Guide
- 3. Users Guide
Quick Start Guide

Your HTC Wildfire
Quick start guide
2 Quick start guide
Before you do anything else, please read this
Charge the battery
The battery in your phone hasn’t been charged yet. While your
phone is charging, it’s important that you do not remove the
battery pack. Doing so can damage your phone. Also, please don’t
try to take your phone apart. (If you do, it may invalidate your
warranty.)
Choose a rate plan wisely
Your phone can use up a lot of Internet bandwidth really quickly.
Before you use your phone, we strongly recommend that you talk
to your mobile operator about data rates. If you’re on a standard
data plan, the costs could really add up. Switching to a flat-rate
plan could be a lot cheaper.
Know about privacy laws
Some countries have strict laws about how and when you can
record phone conversations. For example, you may need to tell the
person you’re speaking to before you start recording. It’s a good
idea to find out what the laws are where you live before you use
your phone’s recording feature.
And finally, a few important words from our legal team
(LIMITATION OF DAMAGES)
To the maximum extent permitted by applicable law, in no event
shall HTC or its affiliates be liable to you, any user, or third party
for any indirect, special, consequential, incidental or punitive
damages of any kind, arising in contract, tort, or otherwise,
including, but not limited to, injury, loss of revenue, loss of
goodwill, loss of business opportunity, loss of data, and/or loss of
profits, regardless of the foreseeability thereof or whether HTC or
its affiliates have been advised of the possibility of such damages.
And in no event shall the total liability of HTC or its affiliates
exceed the amount received from you, regardless of the legal
theory under which the cause of action is brought. The foregoing
does not affect any statutory rights which may not be disclaimed.
Quick start guide 3
This quick start guide will help you get started with
your phone. In this guide, we use the following
symbols to indicate important or useful information:
Notes Important information
Tips Safety precaution
For the complete user guide and other helpful
resources, check out the HTC support website at
www.htc.com/support.
Please also read the Safety and regulatory guide that
is included in the box.
Contents
1. What’s in the box 4
2. Get to know your phone 4
3. Before you turn on your phone 5
4. Set up your phone 7
5. Add your contacts 8
6. HTC Sense 11
7. Connect to the Internet 15
8. Get your messages across 16
9. Stay in touch with friends 18
10. Get files into your phone 19
11. Sync your phone with your computer 19
12. Lock your phone 20
13. Factory resetting 21
14. Troubleshooting tips 22
4 Quick start guide
1. What’s in the box
Here’s what you should find inside the box:
HTC Wildfire
Battery (preinstalled)
microSD™ card (preinstalled)
USB cable
3.5mm stereo headset
•
•
•
•
•
Power adapter
Power plug
This quick start guide
Safety and regulatory
guide
•
•
•
•
Please make sure to copy HTCDriver.exe from your phone’s
microSD card and install it to your computer. See the user
guide for more details.
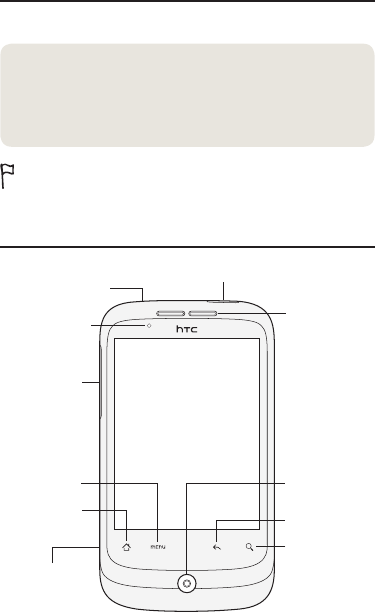
2. Get to know your phone
Notification
LED
Touch screen
HOME
POWER
BACK
Optical
trackball
MENU
Earpiece
SEARCH
3.5 mm
headset jack
Volume
control
USB
connector
Quick start guide 5
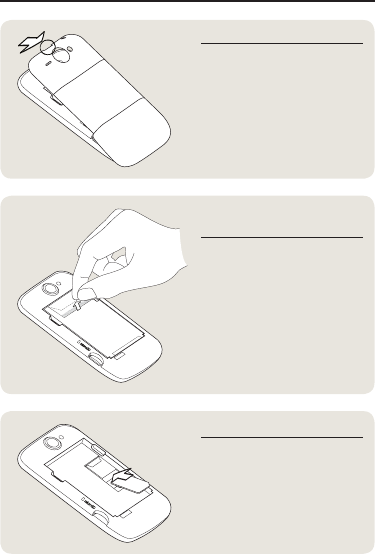
3. Before you turn on your phone
1 Take the back cover off
On the top of your phone,
there’s a narrow opening
where you can use your
finger to lift the back cover
off the phone.
2 Remove the thin film
and battery
Pull the upper flap of the
thin film to release the
battery. Then take the
battery out of the phone
and peel off the thin film.
SIM CARD
3 Put the SIM card in
Insert your SIM card with its
gold contacts facing down
and its cut-off corner facing
out. Then slide your SIM
card all the way in.
6 Quick start guide
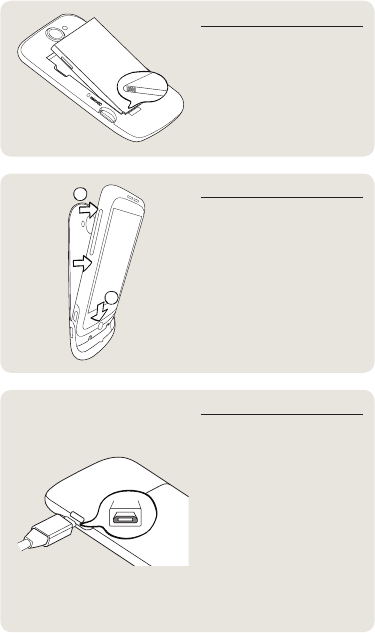
4 Put the battery back in
Line up the battery’s
copper contacts with the
connectors inside the
battery slot. Then gently
push the battery into place.
1
2
6 Put the back cover on
Dock the phone onto the
inside bottom of the back
cover.
To close the back cover,
press the sides and the
top part of the back cover
towards the phone. You’ll
hear a click when the back
cover is locked in place.
1.
2.
7 Charge the battery
Attach the power plug to
the power adapter.
Plug the power adapter
into the USB connector
on the left side of your
phone.
Plug in the power adapter
to an electrical outlet to
start charging the battery.
It will take about three
hours for the battery to be
fully charged.
1.
2.
3.
Quick start guide 7
After installing the SIM card and battery and charging
the battery, you’re now ready to turn your phone on for
the first time. Press the POWER button to turn on your
phone.
4. Set up your phone
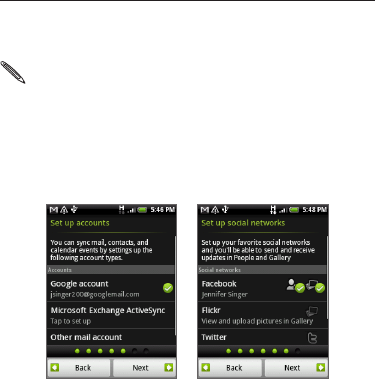
When you switch on your phone for the first time, just
follow the onscreen instructions to set up your phone.
If you haven’t inserted your SIM card, your phone will show
you how to install it. Turn off your phone and insert your
SIM card. Then turn it on again to start the setup.
Be sure to sign in to your Google Account so you can
use Google apps like Gmail™/Google Mail and Android
Market™. You can also set up your other email accounts
and your favorite social networks like Facebook® and
Twitter™.
8 Quick start guide
5. Add your contacts
There are several ways you can add contacts to your
phone.
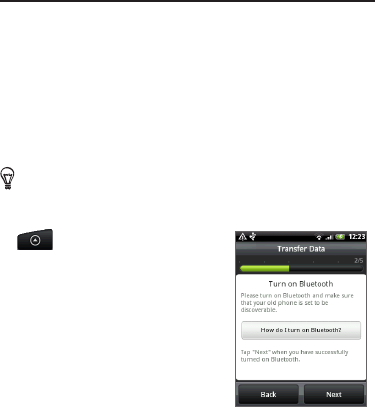
Transferring contacts from your old phone
Easily transfer contacts from your old phone to your
HTC Wildfire through Bluetooth. Depending on your
old phone’s model, HTC Wildfire may also allow you to
transfer other types of data such as calendar events.
Visit our support website (http://www.htc.com/support) to
see a complete list of supported phone models and the types
of data that can be transferred to your HTC Wildfire.
1. On the main Home screen, tap
> Transfer Data.
2. On the Transfer Data screen,
tap Next.
3. On your old phone, turn
Bluetooth on and set it to
discoverable mode.
If you do not know how, tap
How do I turn on Bluetooth?
to see some tips.
4. Tap Next to continue.
HTC Wildfire automatically turns Bluetooth on and
searches for Bluetooth devices.
5. From the device list, select your old phone and then
tap Next.
HTC Wildfire then tries to pair with your old phone
and displays a security passkey.

Quick start guide 9
6. On your old phone, enter this passkey or simply
confirm it.
7. Select the Contacts check box (and other types of
data you want to import), and then tap Next.
8. When HTC Wildfire finishes importing data, tap Done.
Importing all contacts from your SIM card
1. On the Home screen, tap > People.
2. On the All tab, press MENU. Then tap Import/Export >
Import from SIM card.
If you’re using a Google and/or Exchange ActiveSync
account on your phone, you’ll need to tap the type of
contact to categorize the imported contacts.
3. Choose the SIM contacts that you want, or press
MENU and then tap Select all.
4. Tap Save.
Adding a new contact
1. On the Home screen, tap > People.
2. Tap Add contact. Then enter the contact information
in the relevant fields.
3. Scroll to the bottom of the screen, and then tap Save.
Synchronizing contacts from other sources
You can quickly and seamlessly sync your phone
with your contacts in your Google Account, Microsoft
Office Outlook, Outlook Express, Exchange ActiveSync
account, and even Facebook. Take a look at the complete
user guide on our website, www.htc.com/support, to see
how it’s done.
10 Quick start guide
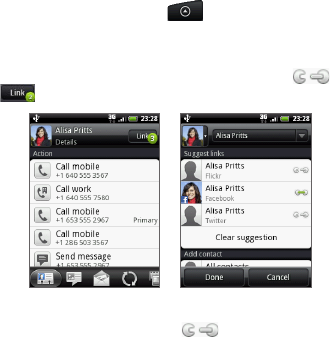
Combining same contacts
If you have the same contacts stored in your phone,
Google, and Facebook accounts, your phone will try to
combine them as one automatically. If it doesn’t, you can
manually combine them.
1. On the Home screen, tap > People.
2. On the All tab, tap the name of the contact (not the
icon or photo) that you want to combine.
3. On the upper-right corner of the screen, tap or
(if there are suggested links.)
4. Do one of the following:
Under Suggest links, tap to link the contact
to an account.
Under Add contact, tap one of the options to link
to another contact.
5. Tap Done.
Quick start guide 11
6. HTC Sense
Discover HTC Sense™ on your phone, an intuitive,
seamless experience built upon three fundamental
principles — make it mine, stay close, and discover the
unexpected.
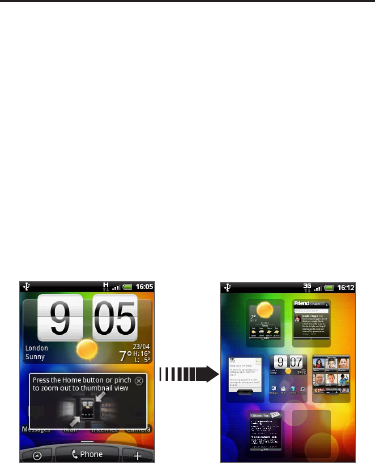
Personalized Home screen
The Home screen is highly customizable and extends
beyond the screen width, giving you lots of room to add
the information that matters most to you and tools or
applications that make your life easier. There are up to
seven Home screens available.
On the Home screen, press HOME or pinch the screen to
zoom out to Leap view. Then tap a screen thumbnail to
directly jump to that screen.
Or, slide your finger left or right to go to the other parts
of the extended Home screen.

12 Quick start guide
Scenes
Can’t decide how to set up your Home screen? Check
out Scenes that we’ve included in the phone. Scenes are
preset Home screen layouts that you can quickly apply.
On the Home screen, press MENU, and then tap Scenes
to check out the presets.
After selecting a preset, you can customize it and save it
as a new scene.
1. Customize the Home screen by changing the
wallpaper. You can also add widgets, shortcuts, and
more.
2. After you’re done customizing, press MENU, and then
tap Scenes.
3. Select Current (unsaved), and then tap Save.
4. Enter the Scene name, and then tap Done.
You can rename or delete a custom scene. From the Home
screen, press MENU and tap Settings > Personalize >
Scenes. Under My scenes, press and hold a scene and make
the change you want.
Widgets
A wide selection of widgets is available on your phone,
or if that’s not enough, you can download more widgets
from the Web to add to the Home screen.
To add widgets to the Home screen, tap , and then
select Widget.
Quick start guide 13
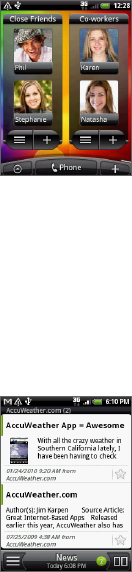
People
Stay in touch with different
circles of friends or colleagues
in your life. You can add several
People widgets on the Home
screen, with a different group of
contacts on each widget.
Your phone organizes all text exchanges, email,
Facebook status, online photo albums and phone logs of
a contact all in one place. In the People application, tap
the name of a contact and you can see all your recent
communications with that person at a glance.
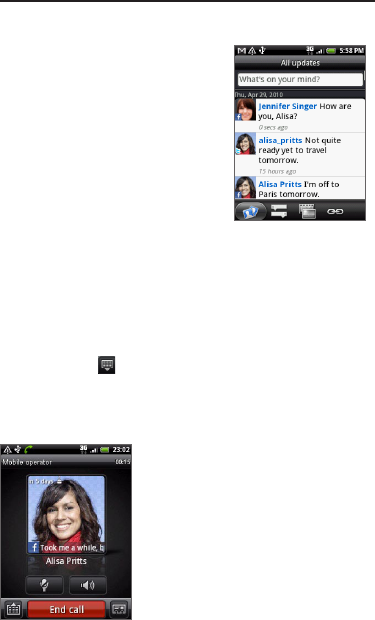
Friend Stream
Streamline your social network accounts through Friend
Stream. To find out what you can do with Friend Stream,
see “Stay in touch with friends”.
News
Subscribe to news feeds to keep
up with the latest buzz on the
Internet. The News application
monitors RSS feeds from your
favorite news sites, blogs and
more, and downloads the most
current updates.
14 Quick start guide
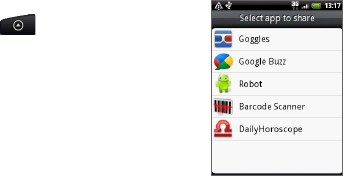
App Sharing
Having fun with a game or application that you
downloaded from Android Market? Share it instantly with
your circle of friends.
It’s simple. On the Home screen,
tap > App Sharing and
then choose the game or
application that you want to tell
your friends about. Share via
Friend Stream so that the link to
the game or application can be
posted to your social networks at
the same time. You can also send
the link by email or text message.
Simply intuitive
Some design features of your phone are better
experienced than explained. Like the ringer volume
level that scales down when the phone detects that you
have picked it up. If your phone rings at an inconvenient
moment, just flip it over to silence the ringer.
There’s also a Flashlight app on your phone that works
just like your regular flashlight.

Quick start guide 15
7. Connect to the Internet
Your phone puts the whole Internet in your pocket. You
can get online using a data connection or Wi-Fi.
Using a data connection
It’s simple. When you turn your phone on for the first
time (with the SIM card inserted), it should connect
automatically to your mobile operator’s data service.
Using Wi-Fi
1. On the Home screen, press MENU, and then tap
Settings > Wireless & networks.
2. Select the Wi-Fi check box to turn Wi-Fi on. The
phone will scan for available wireless networks.
3. Tap Wi-Fi settings. You’ll see the network names and
security settings of any detected Wi-Fi networks.
4. Tap a Wi-Fi network to connect to. If you select an
open network, you’ll be automatically connected. If
you select a secured network, enter the key, and then
tap Connect.
Browsing the Web
Your phone’s Browser makes web browsing easy and fun.
1. On the Home screen, tap > Internet.
2. On the Browser screen, press MENU, and then tap the
URL field on top of the screen.
3. Enter the web address. As you enter the address,
matching web addresses will appear on the screen.
Tap an address to go directly to that webpage, or
continue entering the web address of your choice, and
then tap the Enter key .
16 Quick start guide
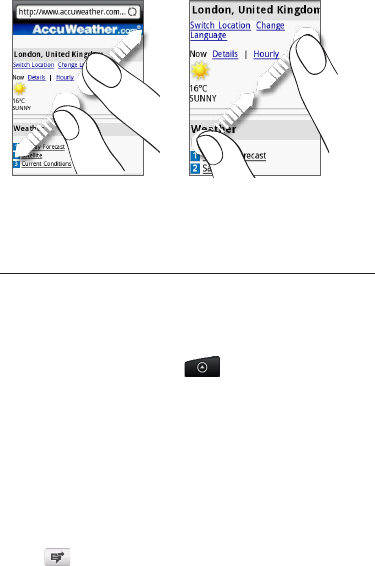
4. On the webpage, use finger gestures to browse the
webpage or to zoom in or out.
Spread your thumb and
index finger across a
webpage to zoom in.
Pinch your thumb and
index finger on a webpage
to zoom out.
8. Get your messages across
Send text messages and access your email accounts
from your phone.
Sending a text message
1. On the Home screen, tap > Messages.
2. On the All messages screen, tap New message.
3. In the To field, enter one or more phone numbers.
Separate phone numbers with a comma.
You can also simply enter the first few letters of a
name to display matching contacts with respective
phone numbers. Then tap the number that you want.
4. Tap the part of the screen that says “Tap to compose”,
and then enter your message.
5. Tap to send your text message.
Quick start guide 17
Adding a POP3/IMAP email account
1. On the Home screen, tap > Mail.
2. On the Choose a mail provider screen, tap Other
(POP3/IMAP).
If you don’t see this screen, tap on the upper-left
side of your screen, and then tap New account >
Other (POP3/IMAP).
If the account type you want to set up isn’t already in
your phone’s database, you’ll be asked to enter a few
more details. Have your incoming/outgoing server
information ready, to save time. Your email provider
can tell you this information if you don’t already
know it.
3. Enter the Email address and Password for the email
account, and then tap Next.
4. Enter the Account name and Your name, and then tap
Finish setup.
Sending an email message
1. On the Home screen, tap > Mail.
2. On the email account Inbox, press MENU and then tap
Compose.
3. Fill in one or more recipients in the To field. You can:
Enter complete email addresses, separating them
with a comma.
Enter the first few letters of a name to display
matching contacts with respective email addresses.
Then tap a contact name or email address.
Tap the icon, and then choose the contacts to
whom you want to send the message. You can also
select a group such as your close friends to send to.
4. Enter the subject, and then enter your message.
5. Tap Send.
18 Quick start guide
9. Stay in touch with friends
Social networking in Friend Stream
Friend Stream gives you
direct access to leading social
networks such as Facebook and
Twitter. With Friend Stream, you
can post what’s on your mind
simultaneously across your social
networks, view status updates
and tweets, and look at photos
in your online albums. It’s all built
in and really easy to use.
Calling your friends
1. On the Home screen, tap Phone.
2. Enter the first few numbers or letters of the friend you
want to call.
As you tap the keys on the Phone dialer, the screen
will display matches found in your contacts list and
call log. Tap to hide the keypad so you can scroll
through the list. Then tap the number or name of your
friend.
HTC Caller ID
While making or receiving a call
and during a call, you’ll see on
the Phone dialer screen your
friend’s latest status update from
social networks like Facebook or
Twitter. You’ll also see a birthday
reminder, if your friend’s birthday
is coming.
To hang up the call, tap End call.

Quick start guide 19
10. Get files into your phone
Bring your files with you wherever you go. With your
phone, you can view Word, Excel, PowerPoint, and PDF
files. You can also listen to music and look at your prized
gallery of photos and videos.
Make sure there’s a microSD card in your phone before you
start copying files.
1. Connect the phone to your computer using the
supplied USB cable.
2. When the Connect to PC dialog box appears, select
Disk drive, and then tap Done.
3. On your computer, the connected phone is recognized
as a removable disk. Go to this removable disk and
open it.
4. Copy the files to the storage card.
5. After copying the files, unmount your phone as
required by your computer’s operating system to
safely remove your phone.
6. Disconnect the phone from the computer.
11. Sync your phone with your computer
You can use HTC Sync to sync contacts, calendar, and
other information between your computer and your
phone.
Download and install the HTC Sync version for HTC
Wildfire from our support website, www.htc.com/
support, when it’s available.
20 Quick start guide
12. Lock your phone
Locking your phone turns the display off and puts your
phone into sleep mode. This helps prevent accidental
presses and saves battery power.
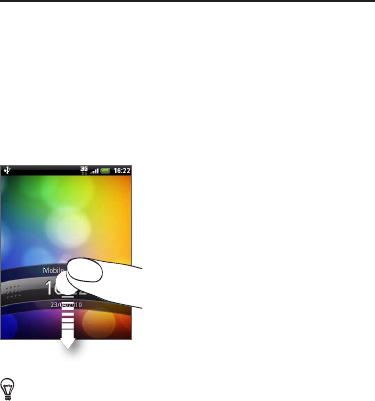
When you’re not using your phone, press the
POWER button to lock your phone. Your phone also
automatically locks when it’s idle for a while.
Unlocking your phone
1. Press the POWER button to
wake up your phone.
2. Press the bar on the lock
screen, and then slide your
finger down to unlock the
screen.
While you’re on any screen except for the lock screen, press
and hold the POWER button to open a menu and choose
whether to turn the phone off, switch to vibrate, silent, or
Airplane mode, or turn the data connection on or off.

Quick start guide 21
13. Factory resetting
Need to start over? If you’re passing your phone on to
someone else or just want a fresh start, you can factory
reset your phone. It’s not a step to be taken lightly.
Factory resetting your phone will delete all your data,
including any applications you’ve downloaded and
installed. It returns the phone to the state it was in before
the first time you turned it on.
Be sure to back up any data that you want to keep before
you factory reset your phone.
Resetting the phone through settings
1. On the Home screen, press MENU, and then tap
Settings > Privacy > Factory data reset.
2. Tap Reset phone, and then tap Erase everything.
Resetting the phone using phone buttons
1. With the phone turned off, press and hold the
VOLUME DOWN button, and then briefly press the
POWER button.
2. Wait for the screen with the 3 Android images to
appear, and then release the VOLUME DOWN button.
3. Press VOLUME DOWN to select CLEAR STORAGE,
and then press POWER.
4. Press VOLUME UP to start the factory reset.
Factory resetting your phone does not delete the
contents in your microSD card.

22 Quick start guide
14. Troubleshooting tips
If you ever have any problems using your phone, here are
some things you can do to set things right again.
Check whether there is enough free space on the
phone to run the application.
To check free space, go to the Home screen, press
MENU, and then tap Settings > SD card & phone
storage.
Clear your data and cache of applications.
To clear the data and cache, go to the Home screen,
press MENU, and then tap Settings > Applications >
Manage applications.
Uninstall any third-party applications.
To uninstall third-party applications, go to the
Home screen, press MENU, and then tap Settings >
Applications > Manage applications.
If you don’t get a data connection automatically, there
are two things to try.
Check that the data connection is turned on.
1. On the Home screen, press MENU, and then tap
Settings.
2. Tap Wireless & networks, and select the Mobile
network check box to turn your connection on.
Check that the right mobile network is selected.
1. On the Home screen, press MENU, and then tap
Settings.
2. Tap Wireless & networks > Mobile networks >
Network operators or Access Point Names.
Quick start guide 23
If your phone becomes unresponsive, remove the
battery, wait for three seconds, then reinsert the
battery and turn the phone on. Or back up your
important data and factory reset the phone.
To factory reset, press HOME > MENU, and then tap
Settings > Privacy > Factory data reset.
Check for additional updates and useful tips on our
website: www.htc.com/support.

91H0xxxx-xxM Rev.A
htc.com