HTC PD26100 Windows Phone User Manual HTC Mondrian Lab Test User Guide
HTC Corporation Windows Phone HTC Mondrian Lab Test User Guide
HTC >
Contents
- 1. User Manual 1 of 2
- 2. user manual 2 of 2
- 3. User Manual 2 of 2
User Manual 1 of 2
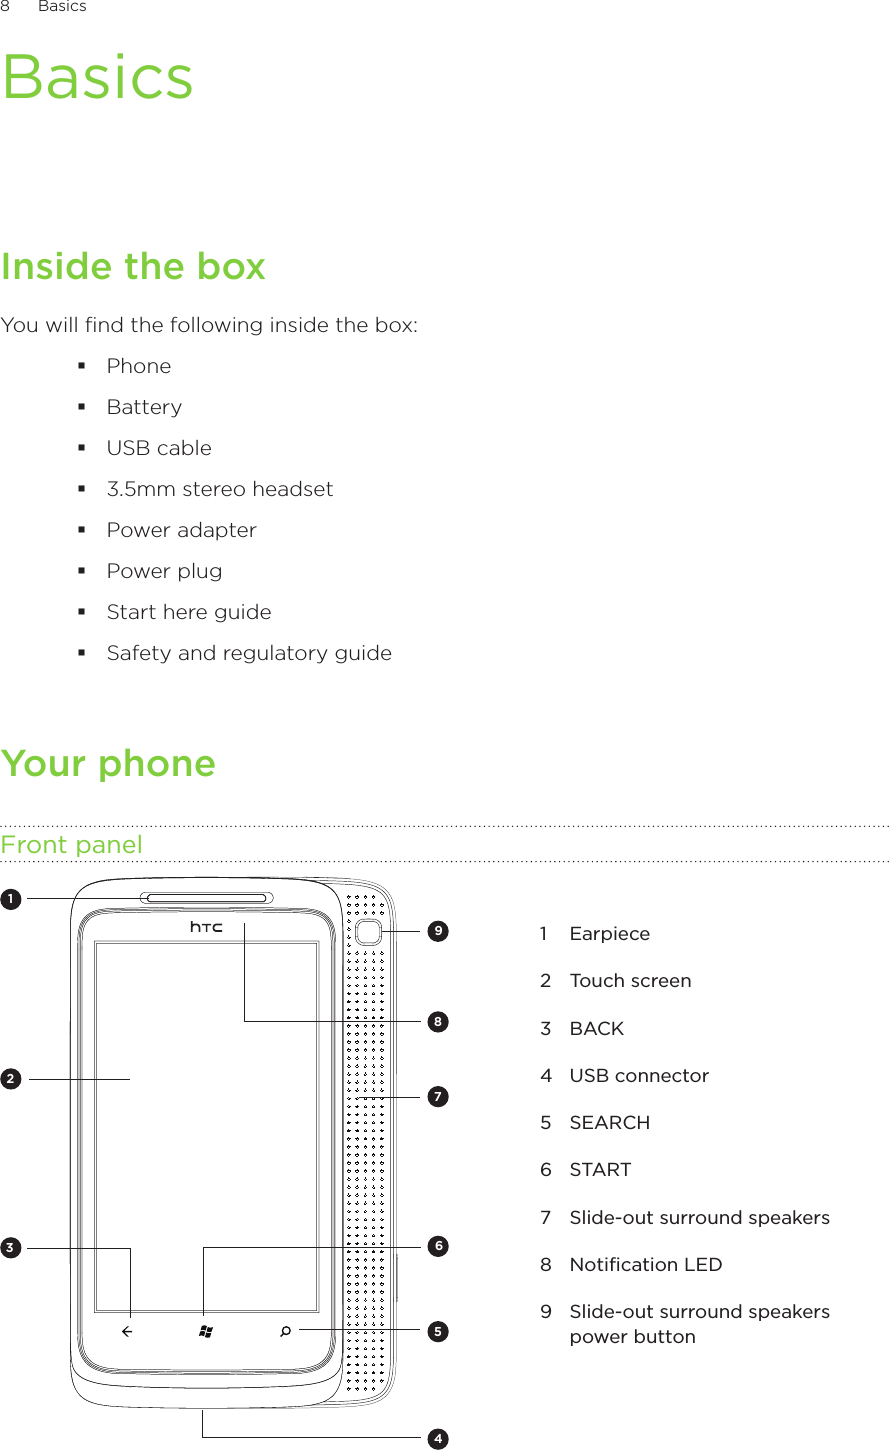
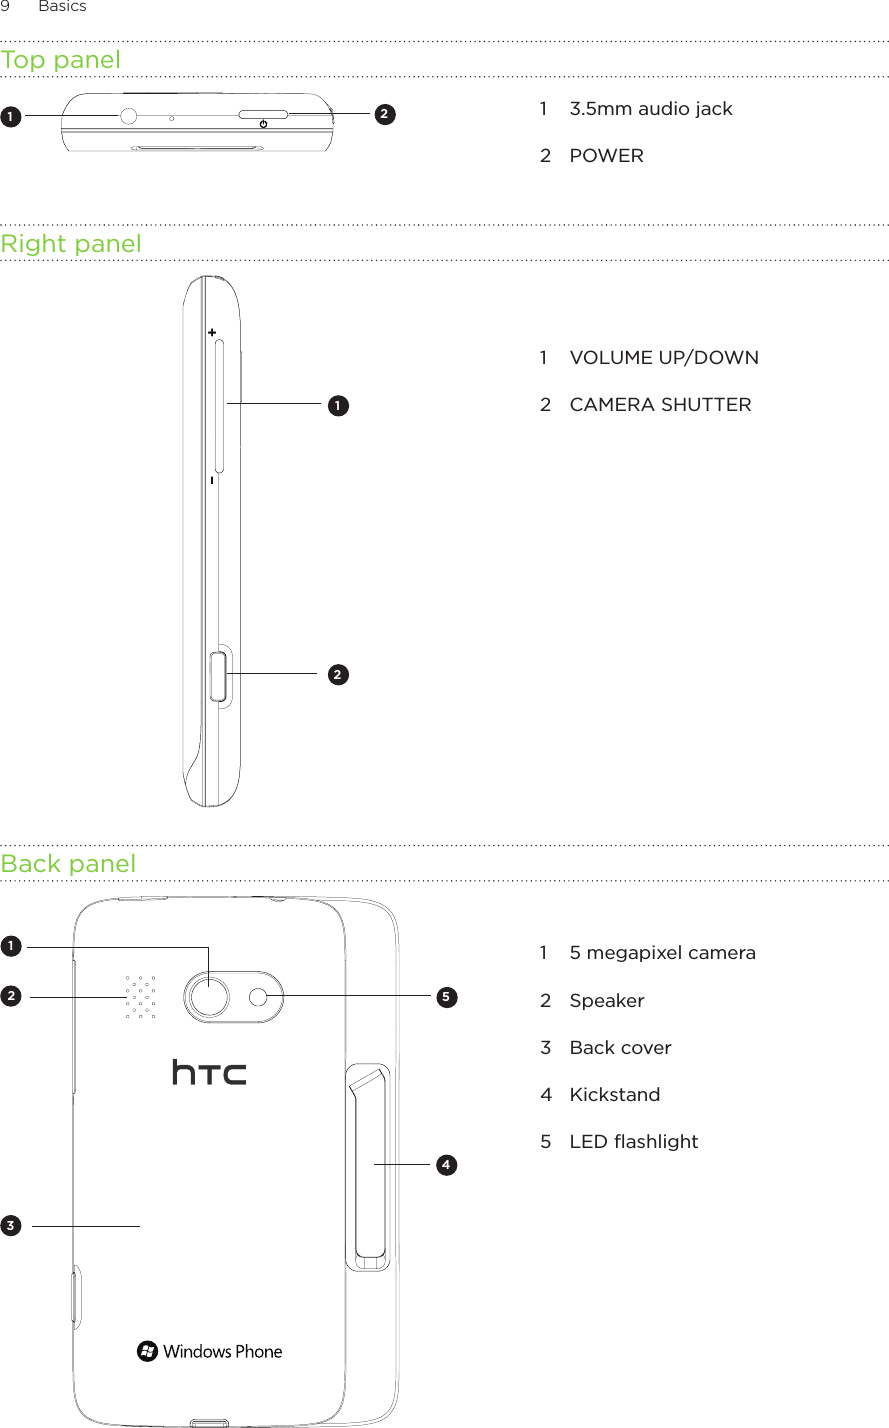
![10 Basics Slide-out surround speakersEnjoy surround sound while watching your video or listening to music. To use the surround speakers, simply slide the front panel of the phone to the left to reveal the surround speakers. You can also flip open the kickstand at the back of the phone so you can place the phone on a table while watching your videos.[IMAGE]Back coverRemoving the back coverRemove the back cover to access the battery compartment and SIM card slot.With the phone turned off, hold your phone securely with the front facing down.With your thumb or finger, lift the back cover off from the small opening at the bottom of your phone.Replacing the back coverSecure the top part of the back cover first by aligning into the opening located at the top part of the back of the phone.Press the sides and the top part of the back cover down to lock the cover into place. You will hear a click when the back cover is locked in place.SIM cardThe SIM card contains your phone number, service details, and phonebook/message memory. Your phone supports both 1.8V and 3 V SIM cards.Some legacy SIM cards may not function with your phone. You should consult with your mobile operator for a replacement SIM card. There may be fees for this service.Inserting the SIM card1. Take the back cover off.See “Removing the back cover.”2. Take out the battery.See “Battery.”3. Insert the SIM card with its gold contacts facing down and its cut-off corner facing out.4. Push the SIM card all the way in.1.2.1.2.](https://usermanual.wiki/HTC/PD26100.User-Manual-1-of-2/User-Guide-1323228-Page-10.png)
![11 Basics Removing the SIM card1. Take the back cover off.See “Removing the back cover.”2. Take out the battery.See “Battery.”3. Push the SIM card out from the back of the slot, and then slide the SIM card out.BatteryYour phone comes with a rechargeable Lithium-ion polymer or Lithium-ion battery and is designed to use only manufacturer-specified original batteries and accessories. Battery performance depends on many factors, including network configuration, signal strength, the temperature of the environment in which you operate your phone, the features and/or settings you select and use, items attached to connecting ports, and your voice, data, and other program usage patterns.Inserting the batteryLine up the battery’s copper contacts with the connectors inside the battery slot. Then, gently push the battery into place.[IMAGE]Removing the batteryLift out the battery from the small opening on the right side of the battery compartment.[IMAGE]Charging the batteryThe battery is partially charged when shipped. Before you turn on and start using your phone, it is recommended that you charge the battery. Some batteries perform best after several full charge/discharge cycles.Only the power adapter and USB sync cable provided with your phone must be used to charge the battery.Do not remove the battery from the phone while you are charging it using the power or car adapter.1. Attach the power plug to the power adapter.2. Plug the power adapter into the USB connector at the bottom of your phone.[IMAGE]3. Plug in the power adapter to an electrical outlet to start charging the battery.](https://usermanual.wiki/HTC/PD26100.User-Manual-1-of-2/User-Guide-1323228-Page-11.png)
![12 Basics As the battery is being charged, the notification LED shows a solid red light when the battery is being charged. The light turns to solid green when the phone is fully charged.When you charge the battery while the phone is on, the charging battery icon [IMAGE] is displayed in the status bar of the Start screen. After the battery has been fully charged, a full battery icon [IMAGE] will be displayed in the status bar of the Start screen.As a safety precaution, the battery stops charging when it overheats. Switching your phone on or offSwitching your phone onPress the POWER button. Easy.When you turn on the phone for the first time, you’ll need to set it up. Go to “Setting up your phone for the first time” and we’ll take you through it. Switching your phone off1. If the display is off, press the POWER button to turn it back on.2. Unlock your phone if the Lock screen is displayed. See “Unlocking the screen” in the Getting started chapter.3. Press and hold the POWER button until you see the word “Goodbye” on the screen.](https://usermanual.wiki/HTC/PD26100.User-Manual-1-of-2/User-Guide-1323228-Page-12.png)
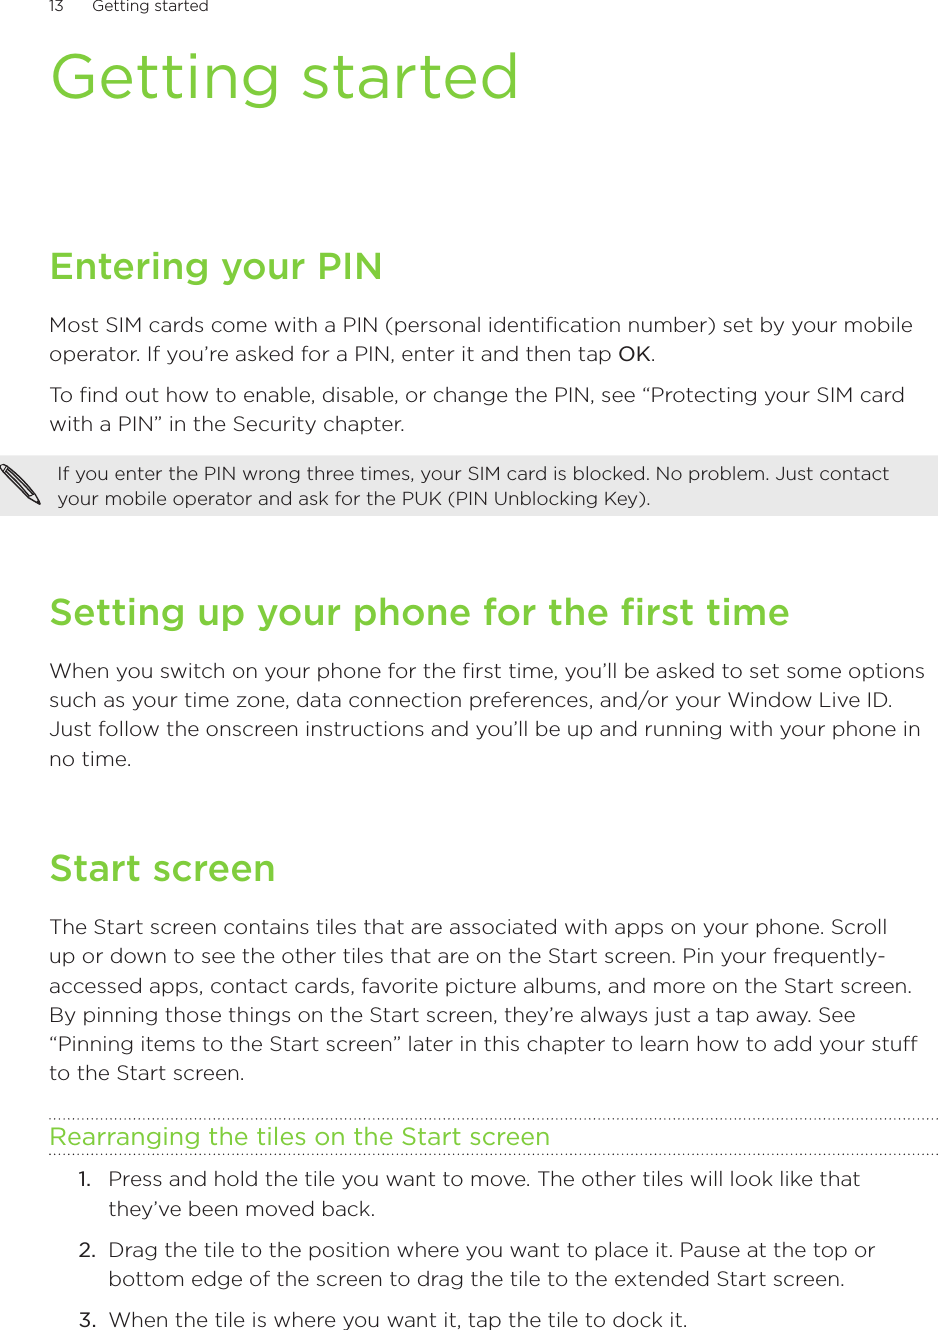
![14 Getting started Apps listAccess all the available apps and settings on your phone. To go to the Apps list, you can:From the Start screen, tap the arrow .From the Start screen, slide your finger left.Sleep modeSleep mode saves battery power by putting your phone into a low power state while the display is off. It also stops accidental button presses when the phone’s in your bag or pocket. You’ll still receive messages and calls though.Switching to Sleep modePress the POWER button to turn off the display and switch your phone to Sleep mode. Your phone also automatically goes into Sleep mode when it’s idle for a while.Waking up from Sleep modeYour phone automatically wakes up when you have an incoming call. To wake it up manually, press the POWER button. You’ll need to unlock the screen.Unlocking the screenWith the lock screen showing, press the bottom of the screen and then slide your finger up to unlock the screen or answer an incoming call.[IMAGE]If you’ve set up a phone password, you’ll need to enter the password to unlock the screen. To find out how to enable the phone password, see “Protecting your phone with a password” in the Security chapter.Status iconsYou can tell a lot about your phone by checking the icons in its status bar. Here’s what each one means:Tap the top of screen to show the status icons. The status icons disappear after a few seconds.[TABLE OF STATUS ICONS]](https://usermanual.wiki/HTC/PD26100.User-Manual-1-of-2/User-Guide-1323228-Page-14.png)
![15 Getting started Finger gesturesTap When you want to type using the keyboard, select items onscreen such as application and settings icons, or press onscreen buttons, simply tap them with your finger. Press and hold To open the available options for an item (e.g. contact or link in a web page), simply press and hold the item.Swipe or slide To swipe or slide means to quickly drag your finger vertically or horizontally across the screen.Drag Press and hold your finger with some pressure before you start to drag. While dragging, do not release your finger until you have reached the target position.Flick Flicking the screen is similar to swiping, except that you need to swipe your finger in light, quicker strokes. This finger gesture is always in a vertical direction, such as when flicking the contacts or message list.Rotate For most screens, you can automatically change the screen orientation from portrait to landscape by turning the phone sideways. When entering text, you can turn the phone sideways to bring up a bigger keyboard.Pinch In some applications, like Pictures or the web browser, you can “pinch” the screen using 2 fingers (for example, thumb and index fingers) to zoom in or zoom out when viewing a picture or a web page. Adjusting the volumePress the VOLUME UP or VOLUME DOWN buttons on the right panel of the phone to adjust the volume to your desired level. The volume bar appears on top of the screen to display the volume level.[IMAGE OF VOLUME BAR]On the volume bar, tap the icon on the right to quickly switch to ring or vibrate. If you want to have silent as an option, you need to turn off vibrate on your phone. See “Changing sound settings” in the Settings chapter to learn how to turn off vibrate.](https://usermanual.wiki/HTC/PD26100.User-Manual-1-of-2/User-Guide-1323228-Page-15.png)
![16 Getting started Pinning items to the Start screenYou can pin just about anything you want to the Start screen: apps, pictures, songs, shortcuts, and even contacts. For example, when you pin a contact to the Start screen, you’ll get all of that person’s updates—feeds, email, text messages, and call notifications—right from that tile.To pin something, let’s say a contact, to the Start screen, press and hold it until the menu appears, and then tap pin to start.Unpinning a tileOn the Start screen, press and hold the tile you want to remove, and then tap .SearchingSearching the WebFrom the Start screen, press SEARCH. The Bing™ search screen opens.Tap the search box, enter your search item, and then tap Enter [image]. A list of matched items are displayed on screen.Tap the category below the search box (for example, local) or swipe left or right on the screen to check the other results for the other categories.Use your voice to do a search by tapping the microphone icon inside the search box. Searching within an appIn some apps like People and Marketplace, you can do a search within those apps. To do a search within the app, simply open the app, and then press SEARCH. Speaking to interact with your phoneFrom anywhere on your phone, press and hold START to bring up Tell Me, which lets you use your voice to call people, start apps, and search the web.To make a phone call, you’d say “Call Jennifer Singer, mobile.”To start an app, like Calendar, say “Open Calendar.”To search for something, just tell the phone what you want, like “Find pizza parlors,” and Bing will look for an answer. If you’re not sure, say “What can I say?”1.2.3.](https://usermanual.wiki/HTC/PD26100.User-Manual-1-of-2/User-Guide-1323228-Page-16.png)
![17 Getting started Setting up an accountYour phone can sync information and receive updates from your Windows Live™, Microsoft® Outlook®, Facebook®, Yahoo!™ accounts, and a host of other accounts. From the Start screen, tap the arrow ( ).Scroll down the screen, and then tap Settings > email & accounts.Tap add an account, and then tap the account you want to set up.Enter your email address and password, and then tap sign in.Changing the ringtoneChoose from the available selections of ringtones on your phone.From the Start screen, tap the arrow ( ).Scroll down the screen, and then tap Settings > ringtones & sounds.Tap the Ringtone box.Preview the ringtone by tapping the play icon beside the name of the ringtone.Tap the name of the ringtone to set it as your ringtone.Changing the themeFeeling a little blue? You can change the theme of your phone to match your mood for the day.From the Start screen, tap the arrow ( ).Scroll down the screen, and then tap Settings > theme.Select the Background and Accent color to fit your mood by tapping their respective boxes.Changing your Lock screen wallpaperBrowse the collection of wallpapers included in your phone or choose from photos that you have taken with the camera.From the Start screen, tap the arrow ( ).Scroll down the screen, and then tap Settings > lock & wallpaper.Tap change wallpaper.Select the photo you want to use as your Lock screen wallpaper.If the photo you selected is bigger than the allowable wallpaper size, drag the area of the image you want to set as the wallpaper inside the box, and then tap the check icon [IMAGE]. 1.2.3.4.1.2.3.4.5.1.2.3.1.2.3.4.5.](https://usermanual.wiki/HTC/PD26100.User-Manual-1-of-2/User-Guide-1323228-Page-17.png)
![18 Phone calls Phone callsMaking callsMost SIM cards come with a PIN (personal identification number) set by your mobile operator. If you’re asked for a PIN, enter it and then tap OK.If you enter the PIN wrong three times, your SIM card is blocked. To unlock your SIM card, see “Restoring a SIM card that has been locked out” in the Security chapter.Making a call on the Phone dialer screenFrom the Start screen, tap the Phone tile [IMAGE].Tap Phone keypad icon [IMAGE].Dial the number you want to call, and then tap call. Making an emergency callYou can make emergency calls from your phone even if you don’t have a SIM card installed or your SIM card has been blocked. After turning on your phone without a SIM card installed, tap emergency call on the screen.If you tapped close on the screen, you can still open the phone dialer by tapping the Phone tile on the Start screen > dialer screen [IMAGE]. 2. Dial the international emergency number for your locale (for example, 000), and then tap call.Additional emergency numbers may be included in your SIM card. Contact your mobile operator for details. If you enabled the phone lock and/or the SIM lock, and you forgot the code or SIM PIN, you can still make emergency calls by tapping emergency call on the screen.Receiving callsWhen you receive a phone call from a contact, the Incoming call screen appears and displays the caller ID icon, name, and phone number of the calling party. When you receive a phone call from someone who is not stored in People, only the default caller ID icon and phone number appear on the Incoming call screen.1.2.3.1.](https://usermanual.wiki/HTC/PD26100.User-Manual-1-of-2/User-Guide-1323228-Page-18.png)
![19 Phone calls Answering or rejecting an incoming call [IMAGE]If To answer the call To reject the callDisplay is on Tap answer. Tap ignore.Display is off When the Lock screen appears, slide up the Lock screen from the bottom of the screen, and then tap answer.When the Lock screen appears, slide up the Lock screen from the bottom of the screen, and then tap ignore.Muting the ringing sound without rejecting the callDo one of the following:Press the VOLUME DOWN or VOLUME UP button.Press the POWER button.Place the phone face down on a leveled surface.If the phone is already facing down, the phone will still ring when there are subsequent incoming calls. Using in-call optionsWhen a call is in progress, use the buttons onscreen to mute or unmute the microphone or to turn on or off the speakerphone. You can also press MENU and choose whether to add a call, place the call on hold, mute the microphone, and more.Putting a call on holdTap the arrow [IMAGE].Tap hold. Tap hold again to resume the call.Switching between callsIf you’re already on a call and accept another call, you can choose to switch between the two calls.1. When you receive another call, tap answer to accept the second call, and to put the first call on hold.2. To switch between the calls, tap the bar at the top of the screen.3. To end the current call and return to the other call, tap end call.1.2.](https://usermanual.wiki/HTC/PD26100.User-Manual-1-of-2/User-Guide-1323228-Page-19.png)
![20 Phone calls Setting up a conference callConference calling with your friends, family, or coworkers is easy. Make the first call (or accept a call), and then simply dial each subsequent call to add to the conference.Make sure your SIM card is enabled with conference calling service. Contact your mobile operator for details.Make a call to the first conference call participant.When connected, tap the arrow [IMAGE], and then tap add call, and then dial the number of the second participant. The first participant is put on hold when you dial the second participant.When connected to the second participant, tap merge calls.To add another participant to the conference call, tap add call, and then dial the number of the contact you want to invite to the conference call. 5. When connected, tap merge calls to add the participant to the conference call. When you want to talk to a person in the conference call in private, tap Private. 6. When finished, tap end call.Turning the speakerphone on or off during a callTap the arrow [IMAGE].Tap speaker. Tap speaker again to turn off the speakerphone.To decrease potential damage to your hearing, do not hold your phone against your ear when the speakerphone is on.Muting the microphone during a callTap the arrow [IMAGE].Tap mute. Tap mute again to turn on the microphone.Ending a call Do one of the following to end the call:On the screen, tap end call.If the phone display is off, press POWER to turn on the screen so you can tap end call. If you are using the provided wired headset, press the button to end the call. 1.2.3.4.1.2.1.2.](https://usermanual.wiki/HTC/PD26100.User-Manual-1-of-2/User-Guide-1323228-Page-20.png)
![21 Phone calls Using call historyUse the call history to check missed calls, your dialed numbers and received calls.Checking calls in the call historyFrom the Start screen, tap the Phone tile.Tap a name or number in the list to go to a screen where you can select to call the number, view the contact information (if the number is stored in your contacts list), save the contact information (if the number is not stored in your contacts list), or send a text message.Adding a new phone number to your contacts from call historyFrom the Start screen, tap the Phone tile [IMAGE].Tap the number you want to save to your contacts.At the bottom of the screen, tap the save icon [IMAGE].Tap new contact.Edit the number if you need to, select the phone number type, and then tap the check icon [IMAGE].Enter the contact name and other information. The phone number is automatically added for you. Tap save icon [IMAGE]..To find out how to add new contacts or edit the contact information, see the People chapter. Clearing the call history listOn the Call history screen, you can do the following:To remove one name or number from the list, press and hold the name or number, and then tap delete item.To clear the entire list, tap ... at the bottom-right corner of the screen, and then tap delete all.1.2.1.2.3.4.5.6.7.](https://usermanual.wiki/HTC/PD26100.User-Manual-1-of-2/User-Guide-1323228-Page-21.png)
![22 Phone calls Call servicesYour phone can directly link to the mobile phone network, and enable you to access and change the settings of various phone services for your phone. Call services may include call forwarding, call waiting, voicemail, and more. Contact your mobile operator to find out about the availability of call services for your phone.To open call services, press Phone [IMAGE] from the Start screen, tap ... at the bottom-right corner of the screen, and then tap call settings.My phone number Displays your phone number. Voicemail number Shows the current voicemail service being used. Tap to change the voicemail number.Show my caller ID to Tap the box to set who can see your phone number when you call.Call forwarding Turn on or off call forwarding. When you turn on call forwarding, enter the phone number to forward your calls to.International assist Turn on or off international assist.SIM security See “Protecting your SIM card with a PIN” in the Security chapter for details.Turning Airplane mode on or off In many countries, you are required by law to turn off the phone while on board an aircraft. A way to turn off the phone function is to switch your phone to Airplane mode. When you enable Airplane mode, all wireless radios on your phone are turned off, including the call function, data services, Bluetooth, and Wi-Fi.From the Start screen, tap the arrow ( ).Scroll down the screen, and then tap Settings > airplane mode.Tap the Radios On switch to turn it on or off.When you disable Airplane mode, the call function is turned back on and the previous state of Bluetooth and Wi-Fi is restored.1.2.3.](https://usermanual.wiki/HTC/PD26100.User-Manual-1-of-2/User-Guide-1323228-Page-22.png)
![24 People People hubEasily manage the people you stay in touch with using People. If you’re the type that have a lot of contacts stored in different accounts, you can consolidate all those contacts in People. If you have a Windows Live account, Yahoo! account, Google Account, and/or Exchange Server, you can synchronize with those accounts to show contacts stored in those accounts in People. You can also synchronize contacts from your Facebook account. By synchronizing with Facebook, you can also check updates of your friends in Facebook. For more information on setting up accounts, see “Setting up an account” in the Getting started chapter.Your contacts listIn All of the People hub, you will see all your contacts, including Windows Live contacts, Exchange ActiveSync contacts, Phone contacts, Google contacts, and Facebook contacts.[IMAGE]If you signed in to your Windows Live account when you first set up the phone, your contacts from those accounts will appear in the contacts list when you first open People.Adding a new contactFrom the Start screen, tap the People [IMAGE] tile.In All of the People hub, tap the plus icon [IMAGE].Select the Account, for example Windows Live. This determines which account the contact will sync with. Enter information by tapping an item.Tap the save icon [IMAGE].Importing contacts from your SIM cardIf you have synchronized with an account, for example, Windows Live, the Import SIM contacts option will not be available. [HAVE TO VERIFY]From the Start screen, tap the People [IMAGE] tile.In All of the People hub, tap import SIM contacts.Select how you want to sort and display the contacts, and then tap import sim contacts.1.2.3.4.5.1.2.3.](https://usermanual.wiki/HTC/PD26100.User-Manual-1-of-2/User-Guide-1323228-Page-24.png)
![25 People Merging contact informationIf you have the same contacts stored in your phone and online accounts such as Windows Live and Facebook, your phone will try to link them as one automatically. If it doesn’t, you can manually link them so that you won’t have duplicated entries in your contacts list.From the Start screen, tap the People [IMAGE] tile.In All of the People hub, tap the name of the contact you want to link.At the bottom of the screen, tap the link icon [IMAGE].4. On the screen, you can:Under suggested links, tap the contact to link to that contact’s account.Tap choose a contact to select a contact from your People list to link to.Breaking the contact information link between contactsFrom the Start screen, tap the People [IMAGE] tile.In All of the People hub, tap the name of the contact whose contact information link you want to break.Tap unlink. Editing a contact’s informationFrom the Start screen, tap the People [IMAGE] tile.In All of the People hub, press and hold the contact, and then tap edit.3. Enter the new information for the contact. If the contact is linked to another account on your phone, you can choose to edit the contact info on the other account by tapping edit [name of account].4. Tap the save icon [IMAGE].Searching for a contactFrom the Start screen, tap the People [IMAGE] tile.Press SEARCH.In the search bar, enter the first few letters of the first or last name of the contact you are looking for. Matching contacts are displayed.4. Tap the contact to open his or her contact details screen. See “Contact information” in this chapter for details.Looking for your contacts that start with the letter M? Tap any letter box [IMAGE] to let you go to a particular letter on your People list. 1.2.3.1.2.3.1.2.1.2.3.](https://usermanual.wiki/HTC/PD26100.User-Manual-1-of-2/User-Guide-1323228-Page-25.png)
![26 People Deleting a contactFrom the Start screen, tap the People [IMAGE] tile.In All of the People hub, press and hold the contact, and then tap delete.Select the contacts you want to delete, and then tap Delete.When prompted, tap OK. The Me tileWhen you sign in to your Windows Live and/or Facebook account, the Me tile is automatically created on the Start screen. Tap the Me tile on the Start screen (or in All of the People hub) and check status updates you have posted, comments you have received, and pics that you have uploaded to your Windows Live and/or Facebook accounts. [Me tile and Me tile screen]While on the Me screen, you can:Tap your status message to the right of your photo to post a new status message.Tap your photo to change it.Tap a photo to view it.Tap an entry to add comments or reply to a comment. Contact informationWhen you tap a contact on the People hub, the contact details screen opens, showing you the information stored for that contact and updates from Windows Live and/or Facebook if you are signed in to your Windows Live and/or Facebook account. Sign in to your Windows Live and Facebook accounts by following the procedure in “Setting up an account” in the Getting started chapter.Call, send a message, or send an email to that contact in the profile page. Slide your finger left to see what’s new with that contact. Again, you’ll only see updates when you are signed in to your Windows Live and/or Facebook account and the particular friend is also your friend in Windows Live and/or Facebook. [Contact info screen and what’s new]1.2.3.4.](https://usermanual.wiki/HTC/PD26100.User-Manual-1-of-2/User-Guide-1323228-Page-26.png)
![27 Keyboard KeyboardUsing the keyboardWhen you start a program or select a box that requires text or numbers, the keyboard becomes available.After entering your text, press BACK to close the keyboard. To open and use it again, tap a text box.Entering textUse the following keys while entering text using the keyboard:Some keys have multiple characters or accents associated with them. Press and hold the key to see the available characters and accents.Shift key. Tap to enter an uppercase letter. The next letter you type will be uppercase. Press and hold to turn on caps lock. Tap to switch to the numeric and symbol keyboard.Enter key. Tap to create a new line.Backspace key. Tap to delete the previous character.Smiley key. Tap to enter smileys.Moving the cursorWhile entering text, press and hold the text box. A floating cursor appears [IMAGE].Drag the cursor to the position that you want, and then release your finger. Changing to the landscape onscreen keyboardWhen entering text, you can choose to use the landscape orientation of the keyboard.Turn your phone sideways to use a larger keyboard that lets you type easily using your thumbs.1.2.](https://usermanual.wiki/HTC/PD26100.User-Manual-1-of-2/User-Guide-1323228-Page-27.png)
![29 Messages MessagesAbout MessagesKeep in touch with important people in your life. Use the Messages application to compose and send text (SMS) and multimedia messages (MMS).From the Start screen, tap the Messaging tile [IMAGE]. On the conversations screen, all your sent and received messages are neatly grouped into conversations, by contact name or phone number. You can:Scroll up or down the list of conversations by swiping your finger on the screen.Tap a contact name or number to view the exchange of messages.Sending a text message (SMS)If you exceed the limit on the number of characters for a single text message, your text message will be delivered as one but will be billed as more than one message. From the Start screen, tap the Messaging tile [IMAGE].On the conversations screen, tap the plus icon [IMAGE]. The Compose screen opens.3. Fill in one or more recipients. You can:Enter complete phone numbers directly in the To field. Use the semi-colon to separate recipients.Enter the first few letters of a contact name or starting digits of a mobile number. As you enter, matching names with phone numbers from your stored contacts are displayed. Tap a name or one of the contact’s number.Tap the plus icon [IMAGE], and then select the phone number of a contact to whom you want to send the message.4. Tap the box that says “type a message”, and then enter your message.5. Tap the send icon [IMAGE] to send the message.Your text message automatically becomes a multimedia message when you attach an item.1.2.](https://usermanual.wiki/HTC/PD26100.User-Manual-1-of-2/User-Guide-1323228-Page-29.png)
![30 Messages Sending a multimedia message (MMS)To compose a multimedia message, start by creating a new text message, and then attach an image to include in your message.From the Start screen, tap the Messaging tile [IMAGE].On the conversations screen, tap the plus icon [IMAGE]. The Compose screen opens.3. Fill in one or more recipients. You can:Enter complete phone numbers or email addresses directly in the To field. Use the semi-colon to separate recipients.Enter the first few letters of a contact name or starting digits of a mobile number. As you enter, matching names with phone numbers and email addresses from your stored contacts are displayed. Tap a contact’s number or email address.Tap the plus icon [IMAGE], and then select the phone number of a contact to whom you want to send the message.4. Tap the paperclip icon [IMAGE] and then select an image you want to send. Tap the camera icon [IMAGE] to take a photo and automatically insert it as the attachment. 5. To change the image to send, tap the minus icon [IMAGE].6. Enter your message.7. Tap the send icon [IMAGE] to send the message. Viewing and replying to a messageWhen you receive a new message the phone plays a ringtone (if set) and displays the message briefly at the top of the screen. [IMAGE OF MESSAGE AT THE TOP OF THE SCREEN]1. To open and read the message, you can:Tap the message bar at the top of the screen.Open the Messaging app to access and read the message.2. Enter your reply, and then tap the send icon [IMAGE].1.2.](https://usermanual.wiki/HTC/PD26100.User-Manual-1-of-2/User-Guide-1323228-Page-30.png)
![32 Email EmailAdding a POP3/IMAP email accountFrom the Start screen, tap the arrow .If you have not set up any accounts on the phone, tap the Email setup tile [IMAGE] on the Start screen, and then go straight to step 3. 2. Scroll down the screen, and then tap Settings > email & accounts > add an account.3. Tap the account you want to set up.If you don’t see the account you want to set up, tap other account or advanced setup. The advanced setup requires you to enter the incoming and outgoing server settings so have them ready if you choose this option.4. Enter the email address and password for the account.5. Tap sign in. Adding a Microsoft Exchange Server accountFrom the Start screen, tap the arrow .If you have not set up any accounts on the phone, tap the Email setup tile [IMAGE] on the Start screen, and then go straight to step 3. 2. Scroll down the screen, and then tap Settings > email & accounts > add an account.3. Tap Outlook. 4. Enter the Exchange ActiveSync account details, and then tap sign in. Your corporate Exchange Server must support auto-detect for the phone to automatically set up the Exchange ActiveSync account. If your corporate Exchange Server does not support auto-detect, you will need to enter your Exchange Server settings. Ask your Exchange Server administrator for details.1.1.](https://usermanual.wiki/HTC/PD26100.User-Manual-1-of-2/User-Guide-1323228-Page-32.png)
![33 Email Checking your Mail inboxWhen you set up an email account, a new tile is created on the Start screen for that email account. To open an email account, tap the tile on the Start screen. If you do not see the tile, you can also open the email account by tapping the arrow on the Start screen, and then tapping the email account on the apps list.Slide your finger left or right to go to the different inbox filters..all Displays email messages as individual items.unread Displays unread messages.flagged Displays all flagged messages.urgent Displays all urgent messages. .Refreshing an email accountWhatever your automatic synchronization settings are, you can also synchronize your sent and received emails manually at any time.While in the account you want to synchronize, tap refresh icon [IMAGE].Managing email messagesDeleting an email message from the inboxOn the email account inbox, press and hold the message you want to delete.On the options menu, tap delete. Moving an email message to another folderOn the email account inbox, press and hold the message you want to move.On the options menu, tap move.Tap the folder where to move the email message.Sending an email messageFrom the Start screen, tap the email tile you want to use to send the email. On the email account inbox, tap the plus icon [IMAGE].Fill in one or more recipients. You can:Enter email addresses directly in the To field. If you’re sending the email to several recipients, separate the email addresses with a semi-colon. As you enter email addresses, any matching addresses from your contacts list are displayed. Tap a match to enter that address directly.Tap the plus icon [IMAGE], and then select a contact to whom you want to send the message. Tap the plus icon [IMAGE] again to add more recipients.If you want to send a carbon copy (Cc) or a blind carbon copy (Bcc) of the email to other recipients, tap ... at the bottom-right corner of the screen, and then tap show Cc/Bcc.1.2.1.2.3.1.2.3.](https://usermanual.wiki/HTC/PD26100.User-Manual-1-of-2/User-Guide-1323228-Page-33.png)
![34 Email 4. Enter the subject, and then compose your message. Tap the space below the subject line to compose your message.5. To add an attachment, tap the paperclip icon [IMAGE]. Only images are allowed as attachments. 6. Tap send icon [IMAGE] to send the message immediately, or tap X icon [IMAGE] > Save to send it later.Resuming a draft email messageIn the email account inbox, tap the folder icon [IMAGE], and then tap drafts.Tap the message.When you finish editing the message, tap the send icon [IMAGE].Reading and replying to an email messageFrom the Start screen, tap the email account tile.On the email account inbox, tap the email you want to read.Tap the respond icon [IMAGE], and then tap reply, reply all, or forward.Setting the priority for an email messageWhile composing the message, tap ... at the bottom-right corner of the screen.Tap priority.Select the priority for the message.If you selected high or low priority, the priority appears below the subject line of the message.Flagging an emailFrom the Start screen, tap the email account tile.On the email account inbox, tap the email you want to flag.On the options menu, tap set flag.After flagging an email, you can choose to remove the flag or mark the flagged email as complete. Press and hold the flagged email, and then tap complete flag or clear flag.Changing email account settingsFrom the Start screen, tap the email account tile.Tap ... at the bottom-right corner of the screen, and then tap settings. Tap sync settings.Set the options you want, and then tap done.Select if you want to append a signature to your emails, and then tap done.1.2.3.1.2.3.1.2.3.1.2.3.1.2.3.4.5.](https://usermanual.wiki/HTC/PD26100.User-Manual-1-of-2/User-Guide-1323228-Page-34.png)

![36 Calendar CalendarAbout CalendarUse your phone’s Calendar to create and manage your events, meetings, and appointments. You can also set up your phone to stay in sync with the following types of calendars:On your phone, sign in to your Windows Live account so you’ll be able to sync your phone’s Calendar with your Windows Live Calendar online. If you have not signed in to your Windows Live account yet, see the Getting started chapter to find out how to sign in.If you have a Microsoft Exchange ActiveSync account and you have added it on your phone, you can sync your phone’s Calendar with your Exchange Server calendar events. See the Email chapter for details.On your phone, sign in to your Google Account so you’ll be able to sync your phone’s Calendar with your Google Calendar online. If you have not signed in to your Google Account yet, see the Getting started chapter to find out how to sign in.Creating a calendar eventYou can create events that appear on your phone only, as well as events that sync with your Windows Live Calendar or Exchange Server calendar.1. From the Start screen, tap the Calendar tile [IMAGE].2. In Agenda/Day view, tap the plus icon [IMAGE].3. If you have more than one calendar, select an Account in which to add the event:4. Enter a details for the calendar event.5. Tap more details to set a reminder, the event occurrence, notes, and more.6. Tap the save icon [IMAGE].The Calendar tile on the Start screen will show you upcoming event.](https://usermanual.wiki/HTC/PD26100.User-Manual-1-of-2/User-Guide-1323228-Page-36.png)
![37 Calendar Inviting guests to your eventIf you want to invite guests to your event, you can use a calendar from an account that you have set up. 1. Open Calendar and create a new event. For the steps, see “Creating a calendar event.”2. Add details about the event, such as date and time, location, and more. Remember to set the Account. This is where the event will be saved.3. Tap more details, scroll down the screen, and then tap add someone.4. Under required or optional, tap add someone. 5. Tap the name of the person you want to invite. You can only invite people that are in your phone.6. Repeat steps 4 to 5 to invite more people.7. Tap the save icon [IMAGE].Changing calendar viewsWhen you open Calendar, it displays the Agenda view by default. You can also display the Calendar in Day or Month view. Month viewIn Month view, you’ll see markers on days that have events. To switch to Month view, tap the month icon [IMAGE].When in Month view:Tap a day to view the events of that day.Slide your finger up or down the screen to view earlier or later months.Day and Agenda viewsDay view displays a list of the events of one day. Agenda view shows a list of all your events in chronological order. The color bars on the right side, in Agenda view, of the events indicate the type of calendar in which the event is part of. To find out what each color represents, tap ... at the bottom-right corner of the screen, and then tap calendars. Change the color by tapping the color box.When in Day view, slide up or down the screen to view earlier or later days.](https://usermanual.wiki/HTC/PD26100.User-Manual-1-of-2/User-Guide-1323228-Page-37.png)
![38 Calendar Viewing, editing or deleting an eventYou can view, edit, or delete events you created. Viewing the details of an event1. From the Start screen, tap the Calendar tile [IMAGE].2. In Agenda or Day view, tap the event.Editing an event1. From the Start screen, tap the Calendar tile [IMAGE].2. In Agenda or Day view, press and hold the event, and then tap edit to open it.3. Make your changes to the event.4. When you’re done editing, tap save icon [IMAGE].Deleting an eventThere are two ways to delete an event.In Agenda or Day view, press and hold an event and then tap delete.When viewing an event, tap the delete icon [IMAGE].If the event repeats, you’ll be asked whether you want to delete just that occurrence or all occurrences in your Calendar.Viewing, dismissing, or snoozing event remindersIf you have set a reminder for an event, the phone will play the ringtone associated with reminders and show you a reminder message to remind you of the upcoming event.On the reminder message, tap snooze to snooze all event reminders or tap dismiss to dismiss all event reminders.](https://usermanual.wiki/HTC/PD26100.User-Manual-1-of-2/User-Guide-1323228-Page-38.png)
![40 Getting connected Getting connectedData connectionCreating a new access pointBefore you add a data connection on your phone, obtain the access point name and settings (including username and password if required) from your mobile operator.From the Start screen, tap the arrow ( ).Scroll down the screen, and then tap Settings > cellular.Tap add apn.Enter the APN, user name, and password. Tap the check icon [IMAGE].Turning the data connection on or offTurning your data connection off can help optimize your battery life. It can also save money on data charges. However, when your data connection is turned off, you may not always receive automatic updates to your email and other synchronized information.From the Start screen, tap the arrow ( ).Scroll down the screen, and then tap Settings > cellular.Tap the data connection On/Off switch.Enabling data roamingData roaming lets you connect to your mobile operator’s partner networks and access data services when you are out of your mobile operator’s coverage area.Accessing data services while roaming may incur significant charges. Inquire about the data roaming tariffs with your mobile operator before enabling data roaming.From the Start screen, tap the arrow ( ).Scroll down the screen, and then tap Settings > cellular.Tap the Data roaming options box, and then tap Roam.1.2.3.4.5.1.2.3.1.2.3.](https://usermanual.wiki/HTC/PD26100.User-Manual-1-of-2/User-Guide-1323228-Page-40.png)
![41 Getting connected Wi-FiWi-Fi provides wireless Internet access over distances of up to 100 meters (300 feet). To use Wi-Fi on your phone, you need access to a wireless access point or “hotspot”. The availability and range of the Wi-Fi signal depends on the number, infrastructure, and other objects through which the signal passes.Turning Wi-Fi on and connecting to a wireless networkFrom the Start screen, tap the arrow ( ).Scroll down the screen, and then tap Settings > Wi-Fi.Tap the Wi-Fi networking On/Off switch to turn it on. The phone then scans for available wireless networks. The network names and security settings of detected Wi-Fi networks are displayed in the Wi-Fi networks section.Tap the Wi-Fi network you want to connect to.If you selected an open network, you will be automatically connected to the network. If you selected a network that is secured with WEP, enter the password and then tap done.Depending on the network type and its security settings, you may also need to enter more information or choose a security certificate.When your phone is connected to a wireless network, the Wi-Fi icon [IMAGE] appears in the status bar. The next time your phone connects to a previously accessed secured wireless network, you will not be prompted to enter the key or other security information again, unless you reset your phone to its factory default settings.Using your phone’s web browserOpen the web browser to start surfing the web. The browser is fully optimized and comes with advanced features that let you enjoy Internet browsing on your phone.You must have an active data connection or Wi-Fi connection to access the Internet.Opening the browserFrom the Start screen, tap the Internet Explorer tile [IMAGE].1.2.3.4.](https://usermanual.wiki/HTC/PD26100.User-Manual-1-of-2/User-Guide-1323228-Page-41.png)
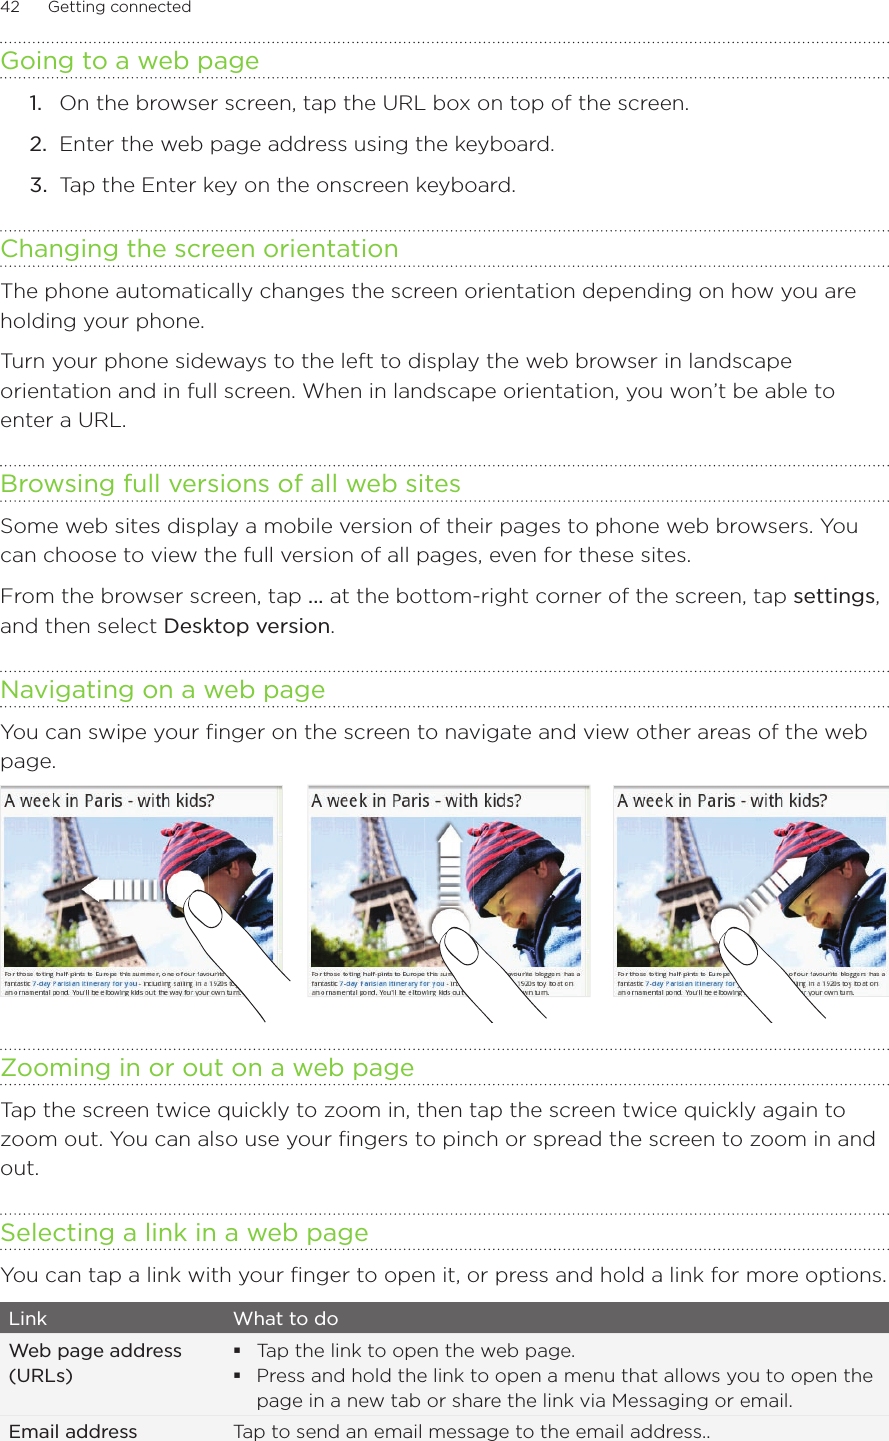
![43 Getting connected Opening a new browser windowOpen multiple browser windows to make it easier for you to switch from one web site to another. You can open up to 6 browser windows.While viewing a web page, tap the window icon [IMAGE]..Tap the plus icon [IMAGE] at the bottom of the screen. A new browser window opens.Switching between browser windowsWhile viewing a web page, tap the window icon [IMAGE]..Select the browser window you want to view by tapping the window you want to open.Finding text within a web pageWhile viewing a web page, tap ... at the bottom-right corner of the screen, and then tap find on page.Enter the search item, and then tap the Enter key on the keyboard. The search item is highlighted if found.Tap left icon [IMAGE] or right icon [IMAGE] to go to the previous or next matching item.You can also access a convenient History list of the sites you have visited, or quickly view the pages that you access most often.Bookmarking a web pageWhile viewing a web page, tap the add bookmark icon [IMAGE].Edit the bookmark name if needed, and then tap ok.Opening a bookmarkWhile viewing a web page, tap the bookmark icon [IMAGE].In favorites, tap the bookmark you want to open.Editing a bookmarkWhile viewing a web page, tap the bookmark icon [IMAGE].In favorites, press and hold the bookmark you want to edit, and then tap edit.Enter your changes, and then tap ok.Viewing a previously visited pageWhile viewing a web page, tap the bookmark icon [IMAGE].Slide your finger left to go to history.Tap the page you want to open.1.2.1.2.1.2.3.1.2.1.2.1.2.3.1.2.3.](https://usermanual.wiki/HTC/PD26100.User-Manual-1-of-2/User-Guide-1323228-Page-43.png)
![44 Getting connected Clearing the list of previously visited pagesWhile viewing a web page, tap the bookmark icon [IMAGE].Slide your finger left to go to history, and then tap the thrash icon [IMAGE].Tap delete. Setting browser optionsCustomize the web browser to suit your browsing lifestyle. Set display, privacy, and security options when using the web browser.From the browser screen, tap ... at the bottom-right corner of the screen, and then tap settings.BluetoothTurning Bluetooth onTurning Bluetooth on also makes the phone discoverable. From the Start screen, tap the arrow ( ).Scroll down the screen, and then tap Settings > Bluetooth.Tap the On/Off switch.Turn off Bluetooth when not in use to conserve battery power, or in places where using a wireless device is prohibited, such as on board an aircraft and in hospitals.Connecting a Bluetooth headset or car kitYou can listen to music over a Bluetooth stereo headset, or have hands-free conversations using a compatible Bluetooth headset or car kit. It’s the same procedure to set up stereo audio and hands-free.The phone supports the following Bluetooth profiles: Handsfree, A2DP, PBAP, and AVRCP.For you to listen to music with your headset or car kit, the headset or car kit must support the A2DP Bluetooth profile.Before you connect your headset, you need to make it discoverable so your phone can find it. You can find out how to do this by referring to your headset manual.Make sure that the headset is discoverable.From the Start screen, tap the arrow ( ).Scroll down the screen, and then tap Settings > Bluetooth.If the Bluetooth switch is off, tap it to turn on Bluetooth. Your phone will start to scan for Bluetooth devices within range.1.2.3.1.2.3.1.2.3.4.](https://usermanual.wiki/HTC/PD26100.User-Manual-1-of-2/User-Guide-1323228-Page-44.png)
![45 Getting connected When you see the name of your headset displayed, tap the name. Your phone then automatically tries to pair with the headset.If automatic pairing fails, enter the passcode supplied with your headset.When the Bluetooth headset or car kit establishes a connection to your phone, the Bluetooth connected icon [IMAGE] is displayed in the status bar for a brief moment. You can check the connection status below the hands-free headset or car kit name. Depending on the type of headset or car kit you have connected, you can then start using the headset or car kit to listen to music and/or make and receive phone calls.Reconnecting a headset or car kitNormally, you can easily reconnect your headset by switching on Bluetooth on your phone, and turning on the headset. However, you might have to connect manually if your headset has been used with another Bluetooth device.Make sure that the headset is discoverable.From the Start screen, tap the arrow ( ).Scroll down the screen, and then tap Settings > Bluetooth.If the Bluetooth switch is off, tap it to turn on Bluetooth. Tap the headset’s name in the Bluetooth devices section.If prompted to enter a passcode, try 0000 or 1234, or consult the headset/car kit documentation to find the passcode.If you still cannot reconnect to the headset or car kit, follow the instructions in “Unpairing from a Bluetooth device”, and then follow the steps under “Connecting a Bluetooth headset or car kit.”Disconnecting or unpairing from a Bluetooth deviceDisconnecting a Bluetooth deviceFrom the Start screen, tap the arrow ( ).Scroll down the screen, and then tap Settings > Bluetooth.On the list of Bluetooth devices, tap the device to disconnect from it. Tap the device again on the list to connect to it. Unpairing from a Bluetooth deviceYou can make your phone forget its pairing connection with another Bluetooth device. To connect to the other device again, you may need to enter or confirm a passcode again.From the Start screen, tap the arrow ( ).Scroll down the screen, and then tap Settings > Bluetooth.On the list of Bluetooth devices, press and hold the device to unpair.Tap Delete.5.6.1.2.3.4.5.6.1.2.3.1.2.3.4.](https://usermanual.wiki/HTC/PD26100.User-Manual-1-of-2/User-Guide-1323228-Page-45.png)
![47 Camera Taking a photoFrom the Start screen, tap the arrow ( ).Tap Camera.Before taking the photo, you can zoom in first on your subject. See “Zooming” to learn how.4. Tap the Settings [IMAGE] button to select a camera flash mode depending on your lighting conditions.5. Frame your subject on the Viewfinder screen.6. Press the CAMERA SHUTTER to take the photo.7. Choose what you want to do with the photo you’ve just taken. See “Captured photo or video options“ for details.Camera flash doesn’t turn on?Using the flash eats up much battery power. To save battery power, the camera disables the flash (even when you have set the camera flash mode to Auto flash or Flash on) when one of the following occurs:You have an incoming callThe flash will be disabled temporarily when you have an incoming call. After the call ends, you’ll be able to use the flash again.If you have set the flash to Flash on, it turns back on after you answer and end the call.Your phone’s battery level reaches 15% or lowerRecharge the battery so that the camera can have enough battery power to use the flash.Cold weather may lower battery performance which affects the flashTo make sure the camera has enough battery life to power up the flash, keep your phone warm. When not in use, put the phone inside your jacket to keep it warm, and try to avoid sudden temperature changes that may affect battery performance.1.2.3.](https://usermanual.wiki/HTC/PD26100.User-Manual-1-of-2/User-Guide-1323228-Page-47.png)
![48 Camera Capturing a videoFrom the Start screen, tap the arrow ( ).Tap Camera.On the Viewfinder screen, tap Video [IMAGE].Before you start capturing, you can zoom in first on your subject. See “Zooming” to learn how.5. Tap the Settings [IMAGE] button to turn on or off the LED flashlight depending on your lighting conditions.6. Frame your subject on the screen.7. Let the camera auto focus on the center of the screen, or you can touch another area on the screen that you want to focus on.8. Press the CAMERA SHUTTER to start capturing video.9. To stop capturing, press the CAMERA SHUTTER again.10. Choose what you want to do with the video you’ve just captured. See “Captured photo or video options“ for details.Camera settingsTo check your camera settings, tap settings [IMAGE] on the Viewfinder screen.BrightnessContrastSaturationSharpnessTap to adjust the brightness, contrast, saturation, and sharpness levels.White balance White balance enables the camera to capture colors more accurately by adjusting to your current lighting environment. White balance settings include: Auto, Incandescent, Fluorescent, Daylight, and Cloudy.Effect Tap to apply a special effect to your captured photos or videos.Resolution Select a photo or video resolution to use for capturing.ISO (photo mode only) You can choose an ISO level or set it back to Auto. Higher ISO numbers are better for taking pictures in low light conditions. Quality (photo mode only)Select the quality level to use for capturing photos.Scenes (photo mode only) Select a scene to use when taking photos [Verify].Flicker adjustment When taking indoor shots under fluorescent lighting, keep this setting on Auto or change it to the proper frequency (50Hz or 60Hz) of the power in your country to reduce flicker.1.2.3.4.](https://usermanual.wiki/HTC/PD26100.User-Manual-1-of-2/User-Guide-1323228-Page-48.png)

![51 Pictures Sending your photosUsing the Pictures app, you can send photos via email or MMS.Sending a photo by emailFrom the Start screen, tap the Pictures tile on the Start screenTap the album where the photo you want to share is in.Press and hold the photo you want to send, and then tap share.Select the email account you want to use to send the photo.Compose your message and then tap Send [IMAGE].Sending a photo by MMSFrom the Start screen, tap the Pictures tile on the Start screenTap the album where the photo you want to share is in.Press and hold the photo you want to send, and then tap share.Tap Messaging. The photo is automatically added into the MMS message.Compose your message and then tap Send [IMAGE]. Sharing your photos on the WebUsing the Pictures app, you can share your photos on Facebook and upload your photos to your SkyDrive.You can also use the camera app to share a photo right after you’ve captured it. See the Camera chapter.Sharing photos on FacebookYou need to be logged in to your Facebook account to be able to upload pictures.From the Start screen, tap the Pictures tile on the Start screenTap the album where the photo you want to share is in.Press and hold the photo you want to send, and then tap upload to Facebook or share > upload to Facebook.If you want to enter a caption, tap the add a caption box, and then enter your caption. After entering the caption, tap send [IMAGE].1.2.3.4.5.1.2.3.4.5.1.2.3.4.5.](https://usermanual.wiki/HTC/PD26100.User-Manual-1-of-2/User-Guide-1323228-Page-51.png)
![52 Pictures Uploading a Photo to your SkyDriveYou need to be logged in to your Windows Live account to be able to upload pictures.From the Start screen, tap the Pictures tile on the Start screenTap the album where the photo you want to share is in.Press and hold the photo you want to send, and then tap upload to SkyDrive or share > upload to SkyDrive.If you want to enter a caption, tap the add a caption box, and then enter your caption. After entering the caption, tap send [IMAGE]. 1.2.3.4.5.](https://usermanual.wiki/HTC/PD26100.User-Manual-1-of-2/User-Guide-1323228-Page-52.png)
![55 Zune Listening to the radioFrom the Start screen, tap the Music + Videos tile.Tap radio.Slide your finger left or right to go to the radio station you want to listen to.Add the radio station to your favorites by tapping star [IMAGE]. Access your favorite radio stations by tapping star [IMAGE]. The radio plays in the background even if you exit the radio app. If you do not want to continue listening to the radio, tap pause [IMAGE] before exiting.1.2.3.4.](https://usermanual.wiki/HTC/PD26100.User-Manual-1-of-2/User-Guide-1323228-Page-55.png)
![56 Maps and location Maps and locationTurning on location servicesIn order to find your location on your phone, you need to enable location sources.From the Start screen, tap the arrow ( ).Scroll down the screen, and then tap Settings > location.Tap the Location services On/Off switch to turn it on. Bing MapsAbout Bing MapsBing Maps lets you track your current location, view real-time traffic situations, and receive detailed directions to your destination. You need an active mobile data or Wi-Fi connection to use Bing Maps.Real-time traffic information is only available in some countries.To find your location with Bing Maps, you need to enable location sources. To learn how, see “Turning on location services” in this chapter.Viewing locations in Bing MapsFinding your locationTo find your location with Bing Maps, you need to enable location sources. To learn how, see “Turning on location services” in this chapter.From the Start screen, tap the arrow ( ).Tap Maps.Tap Me icon [IMAGE].Moving on the mapSwipe your finger on the screen to view other areas of the map.Zooming in or out of a mapYou can:Spread your thumb and index finger across the map to zoom in.Pinch your thumb and index finger on the map to zoom out.1.2.3.1.2.3.](https://usermanual.wiki/HTC/PD26100.User-Manual-1-of-2/User-Guide-1323228-Page-56.png)
![57 Maps and location Getting an address and additional information for a location1. Press and hold a location on the map. A balloon opens over the location with the address. 2. Tap the balloon to see more information.You can get directions to the location, pin the location to the Start screen, share the location via Messaging or email, and more.Clearing the mapAfter you get directions or search on a map, you can clear away the various markers that such activities have drawn on the map.When viewing a map, tap ... at the lower-right corner of the screen, and then tap clear map.Switching to aerial viewView satellite imagery by switching to aerial view. To switch to aerial view, tap ... at the bottom-right corner of the screen while viewing a map, and then tap aerial view on. Searching for locations and placesIn Bing Maps, you can search for a location, such as an address, landmark, name of an establishment, or a city.While viewing a map, press SEARCH.Enter the address, landmark, or city you want to search in the search box. Tap Enter on the keyboard.Viewing search resultsThe search results will be displayed as markers on the map. After tapping the balloon that shows the location that you want, you’ll see its address, rating, nearby places, and reviews, if available.To see the list of results, tap ... at the bottom-right corner of the screen while viewing a map, and then tap results list.Getting directionsGet detailed directions to your destination. Bing Maps can provide directions for travel by foot or car.While viewing a map, tap the directions icon [IMAGE].Use your current location as the starting point, or enter a location from where to start in the first text box. Then, enter your destination in the second text box.Tap Enter on the keyboard.The next screen displays the directions to your destination in a list.Tap person icon [IMAGE] to get directions for walking.1.2.3.1.2.3.4.](https://usermanual.wiki/HTC/PD26100.User-Manual-1-of-2/User-Guide-1323228-Page-57.png)


![61 Security SecurityProtecting your SIM card with a PINYou can protect your SIM card from unauthorized use by assigning a PIN (personal identification number). Make sure you have the default SIM PIN provided by your mobile operator before continuing.From the Start screen, tap the Phone tile [IMAGE].At the lower-right corner of the screen, tap ..., and then tap call settings.Scroll down the screen, and then tap the Sim security On/Off switch.Enter the default SIM card PIN, and then tap enter.To change the SIM card PIN, tap Change SIM PIN.Emergency calls can be placed at any time without requiring a PIN. See “Making an emergency call” in the Phone calls chapter for more details. Restoring a SIM card that has been locked outIf you enter the wrong PIN more times than the maximum number of attempts allowed, your SIM card will become “PUK-locked.” You need a PUK code to restore access to the phone. This code may have been provided by your mobile operator when you received your SIM card.On the Phone dialer screen, enter the PUK code, and then tap enter.Enter the new PIN you want to use, and then tap enter. Enter the new PIN again, and then tap enter.Protecting your phone with a passwordYou can secure your phone by requiring a password every time your phone is turned on or every time it wakes up from sleep mode (screen is off).From the Start screen, tap the arrow ( ).Scroll down the screen, and then tap Settings > lock & wallpaper.Tap the Password On/Off switch.Enter the password in both the New password and Confirm password boxes.Tap Done.1.2.3.4.5.1.2.3.1.2.3.4.5.](https://usermanual.wiki/HTC/PD26100.User-Manual-1-of-2/User-Guide-1323228-Page-61.png)
![63 Settings SettingsSettings on your phoneControl and customize phone settings on the Settings screen.From the Start screen, tap the arrow ( ).Scroll down the screen, and then tap Settings.Slide your finger left or right to access the system or application settingsSystem settingsringtone & sounds Turn on or off ringer and vibrate.Choose sounds to use for your phone ringtone and notifications.Choose which events to play a ringtone.theme Set the background and accent color to use.airplane mode Turn on or off airplane mode.Wi-Fi Configure your Wi-Fi connection.Bluetooth Manage your Bluetooth connections.email & accounts Set up accounts such as Windows Live, Outlook, Facebook, and more. Setting up accounts lets your phone synchronize information with those accounts.lock & wallpaper Change your Lock screen wallpaper, set the screen time-out, and set up a password for your phone. location Choose to allow or prevent apps on your phone from accessing your current location.cellular Turn on or off your data connection, choose data roaming option, and add/edit your data connection APN.date & time Choose to set the date and time automatically or manually and choose how you want the time displayed.brightness Set the screen brightness. keyboard Select the options you want when using the keyboard. region & language Set the regional configuration to use.ease of access Set the TTY/TDD mode.speech Select the options you want when using voice to interact with your phone. find my phone [verify]phone update Set if you want to be notified when there is an update available and how you want to check for updates.about Check information about your phone and reset your phone. 1.2.3.](https://usermanual.wiki/HTC/PD26100.User-Manual-1-of-2/User-Guide-1323228-Page-63.png)
