Contents
- 1. User Manual 1 of 2
- 2. user manual 2 of 2
- 3. user manual 1 of 2
User Manual 1 of 2

User Manual
www.htc.com
User Guide
User Guide
User Guide

2
Before you do anything else, please read this
Charge the battery
The battery in your phone hasn’t been charged yet. While your phone
is charging, it’s important that you do not remove the battery pack.
Doing so can damage your phone. Also, please don’t try to take your
phone apart. (If you do, it may invalidate your warranty.)
Choose a rate plan wisely
Your phone can use up a lot of Internet bandwidth really quickly.
Before you use your phone, we strongly recommend that you talk to
your mobile operator about data rates. If you’re on a standard data
plan, the costs could really add up. Switching to a flat-rate plan could
be a lot cheaper.
Know about privacy laws
Some countries have strict laws about how and when you can record
phone conversations. For example, you may need to tell the person
you’re speaking to before you start recording. It’s a good idea to find
out what the laws are where you live before you use your phone’s
recording feature.

3
And finally, a few important words from our legal team
(LIMITATION OF DAMAGES)
To the maximum extent permitted by applicable law, in no event shall
HTC or its affiliates be liable to you, any user, or third party for any
indirect, special, consequential, incidental or punitive damages of any
kind, arising in contract, tort, or otherwise, including, but not limited
to, injury, loss of revenue, loss of goodwill, loss of business opportunity,
loss of data, and/or loss of profits, regardless of the foreseeability
thereof or whether HTC or its affiliates have been advised of the
possibility of such damages. And in no event shall the total liability of
HTC or its affiliates exceed the amount received from you, regardless
of the legal theory under which the cause of action is brought. The
foregoing does not affect any statutory rights which may not be
disclaimed.
Please also read the Product Safety & Warranty Brochure that is
included in the box for information on the proper usage of your phone
to prevent injuries and to avoid damaging your phone. You can also
refer to this brochure for warranty information about your phone.
Notice
Screen images and icons are simulated. Actual display may vary.
Instructions in this guide may change depending on the software
version on your wireless device.

4
Trademarks and copyrights
Copyright © 2010 HTC Corporation. All Rights Reserved.
The HTC logo, HTC quietly brilliant logo, HTC SENSE and any other
HTC trademarks, tradenames, logos, service marks and images are the
trademarks of HTC Corporation. All other trademarks and logos are
the property of their respective owners and used under license.
Copyright © 2010 Google Inc. Used with permission.
Google, the Google logo, Android, Google Search, Gmail, YouTube,
Android Market, and Google Talk are trademarks of Google Inc.
Google and the Google logo are trademarks of Google, Inc.
Microsoft, Windows, Windows XP, Windows Vista, Active Sync,
Bing, and Outlook are either registered trademarks or trademarks of
Microsoft Corporation in the United States and/or other countries.
Bluetooth and the Bluetooth logo are trademarks owned by Bluetooth
SIG, Inc.
Wi-Fi is a registered trademark of the Wireless Fidelity Alliance, Inc.
microSD is a trademark of SD Card Association.
Java, J2ME and all other Java-based marks are trademarks or
registered trademarks of Sun Microsystems, Inc. in the United States
and other countries.
Facebook is a trademark of Facebook, Inc.
Twitter is a trademark of Twitter, Inc., and is used under license.
Flickr is a trademark of Yahoo! Inc.
5
All other company, product and service names mentioned herein are
trademarks, registered trademarks or service marks of their respective
owners.
HTC shall not be liable for technical or editorial errors or omissions
contained herein, nor for incidental or consequential damages
resulting from furnishing this material. The information is provided
“as is” without warranty of any kind and is subject to change without
notice. HTC also reserves the right to revise the content of this
document at any time without prior notice.
No part of this document may be reproduced or transmitted in
any form or by any means, electronic or mechanical, including
photocopying, recording or storing in a retrieval system, or translated
into any language in any form without prior written permission of HTC.

6
Conventions used in this guide
In this user guide, we use the following symbols to indicate useful and
important information:
This is a note. A note often gives additional information, such as what
happens on your phone when you choose to do or not to do a certain
action. A note also provides information that may only be applicable to
some situations.
This is a tip. A tip gives you an alternative way to do a particular step or
procedure, or lets you know of an option that you may find helpful.
This indicates that something is very important. Important information is
something that you need to do in order to accomplish a certain task or to
get a phone feature to work properly.
This provides safety precaution information, that is, information that you
need to be careful about to prevent potential problems when using your
phone.

7
IMPORTANT CUSTOMER INFORMATION
Please be advised that many services and applications offered
through this unique device are provided by various device, operating
system, software and application developers (e.g. Google, Motorola,
Microsoft, Palm). If you use, link to or download such a service, or an
application such as a non-Verizon Wireless location based GPS-type
service, chat room, marketplace or social network from this device,
you should carefully review the terms of such service or application.
If you use any of these non-Verizon Wireless services or applications,
personal information you submit may be read, collected, or used by
the service or application provider and/or other users of those forums.
Verizon Wireless is not responsible for your use of those applications
or information you choose to submit or share with others. Specific
terms and conditions, terms of use, and privacy policies apply to those
applications and services. Please review carefully any and all terms
and conditions applicable to those applications and services including
those related to any location-based services for any particular privacy
policies, risks or waivers.
Your Verizon Wireless Customer Agreement Terms and Conditions
and certain other specifically identified terms govern your use of any
Verizon Wireless products and services.

8
Contents
Basics 22
Inside the box ......................................................................................................................22
Inside your phone ..............................................................................................................22
Your Phone ...........................................................................................................................23
Front panel ................................................................................................................23
Back panel ..................................................................................................................25
Top panel ....................................................................................................................26
Bottom panel ............................................................................................................26
Left and right panels .............................................................................................27
Before turning on your phone ....................................................................................28
Back cover .................................................................................................................28
Battery .........................................................................................................................29
Getting started ...................................................................................................................32
Turning on your phone.........................................................................................32
Turning off your phone ........................................................................................32
Setting up your phone for the first time .....................................................33
Home screen ........................................................................................................................35
Extended Home screen .......................................................................................35
Navigating the Home screen ............................................................................36
Going around the screen with finger gestures ........................................36
Phone status and notifications ...................................................................................38
Phone status icons .................................................................................................38
Notification icons ....................................................................................................39
Checking notifications.........................................................................................40
Adjusting the volume .......................................................................................................41
Adjusting the ringer volume...............................................................................41
Adjusting the media volume .............................................................................42
9
Sleep mode ..........................................................................................................................42
Connecting your phone to a computer ................................................................. 44
Copying files to and from the storage card ........................................................ 46
Replacing the storage card ...............................................................................47
Removing the storage card while the phone is on ................................47
Searching your phone and the Web ....................................................................... 48
Personalizing 49
Making your phone truly yours .................................................................................. 49
Changing the ringtone ................................................................................................... 49
Personalizing your phone with scenes .................................................................. 50
Using a preset scene ............................................................................................ 50
Customizing and saving a scene ......................................................................51
Renaming or deleting a scene ..........................................................................52
Changing your wallpaper ..............................................................................................52
Personalizing your Home screen with widgets ..................................................53
Adding a widget to your Home screen .......................................................53
Downloading HTC widgets ............................................................................... 54
Adding application icons and other shortcuts on your Home screen ....55
Adding folders on your Home screen .....................................................................56
Creating a new folder and adding items to it ...........................................56
Renaming a folder ..................................................................................................57
Rearranging or removing widgets and icons on your Home screen .......57
Moving a widget or icon .....................................................................................57
Removing a widget or icon ...............................................................................58
Phone calls 59
Making calls ..........................................................................................................................59
Calling somebody using your phone ...........................................................59
Calling a speed dial number ............................................................................. 60
Calling using Voice Dialer ..................................................................................60
10
Calling a phone number in a text message ................................................61
Calling a phone number in an email ...............................................................61
Making an emergency call ..................................................................................62
Receiving calls ....................................................................................................................63
Answering an incoming call ..............................................................................63
Rejecting an incoming call ................................................................................ 64
Rejecting a call and sending a text message ........................................... 64
Using in-call options ........................................................................................................65
Handling multiple calls ........................................................................................ 66
Setting up a conference call............................................................................. 66
Muting the microphone during a call ............................................................67
Turning the speakerphone on or off during a call ..................................67
Ending a call ............................................................................................................67
Using call history .............................................................................................................. 68
Adding a new phone number to your contacts from call history . 69
Checking a missed call ........................................................................................ 69
Clearing the call history list .............................................................................. 70
Calling from abroad ........................................................................................................ 70
Changing the network your phone connects to .................................... 70
Replacing the SIM card .........................................................................................71
Call services..........................................................................................................................72
Using Visual Voice Mail ...................................................................................................74
Setting up Visual Voice Mail ..............................................................................74
Using Visual Voice Mail ........................................................................................75
Turning Airplane mode on or off ..............................................................................76
People 77
About People ......................................................................................................................77
Ways of getting contacts into your phone ...........................................................77
People screen ......................................................................................................................78
Setting up My contact card ...............................................................................79
11
Your contacts list ....................................................................................................79
Adding a new contact ...........................................................................................81
Importing contacts from an Exchange ActiveSync account .............81
Merging contact information ............................................................................82
Editing a contact’s information .......................................................................83
Searching for a contact .......................................................................................83
Backing up your contacts to the storage card ........................................83
Importing contacts from the storage card ............................................... 84
Deleting contacts .................................................................................................. 84
Sending contact information as a vCard via MMS ................................ 84
Sending your contact information as a vCard via MMS ......................85
Contact groups ..................................................................................................................85
Creating a group and adding contacts ........................................................85
Deleting a group .................................................................................................... 86
Adding or removing contacts from a group ............................................ 86
Sending an SMS/MMS message or email to a group ............................87
Contact information and conversations .................................................................87
People widget .................................................................................................................... 89
Adding the People widget ................................................................................ 89
Setting the default communication method ............................................ 89
Changing the default communication method ....................................... 89
Getting in touch with a contact ..................................................................... 90
Keyboard 91
Using the slide-out keyboard .......................................................................................91
Using the Quick key ..............................................................................................93
Using the onscreen keyboard .................................................................................... 94
Using the landscape onscreen keyboard ................................................... 94
Changing the onscreen keyboard layout ....................................................95
Changing the keyboard language ..................................................................95
12
Entering text ............................................................................................................ 96
Entering words with predictive text ..............................................................97
Adjusting touch input settings .................................................................................. 99
Touch Input settings............................................................................................. 99
Text input ................................................................................................................. 100
Messages 102
About Messages ..............................................................................................................102
Sending text and multimedia messages ...................................................103
New message notifications ........................................................................................ 107
Viewing push messages ...............................................................................................108
Managing message conversations ..........................................................................109
Protecting a message from deletion ..............................................................111
Deleting a message thread .................................................................................111
Deleting several message threads...................................................................111
Deleting a single message ................................................................................ 112
Viewing contact details and communicating with a contact .......... 112
Setting text and multimedia message options .................................................. 112
Adding the Messages widget ..................................................................................... 116
Accounts and sync 117
Synchronizing with online accounts ........................................................................117
Adding a social network account .................................................................. 118
Synchronizing with a Google Account ....................................................... 118
Synchronizing with a Microsoft Exchange ActiveSync account .... 119
Managing your accounts .................................................................................... 119
Using HTC Sync ................................................................................................................. 121
Installing HTC Sync .............................................................................................. 122
Setting up HTC Sync to recognize your phone ..................................... 123
Setting up synchronization .............................................................................. 124
Setting up more sync options ........................................................................ 125
13
Synchronizing your phone ............................................................................... 126
Downloading the latest HTC Sync upgrade ............................................ 127
Installing apps from your computer to your phone ............................ 127
Social 129
Facebook for HTC Sense and Facebook for Android application .......... 129
Facebook for HTC Sense .................................................................................. 129
Facebook for Android application ...............................................................130
Differences between Facebook for HTC Sense and
Facebook for Android application ................................................................ 131
Tweeting on your phone .............................................................................................. 132
Peep screen ............................................................................................................. 132
Sending a tweet .................................................................................................... 133
Searching for Twitter users to follow ..........................................................134
Sending a direct message ................................................................................134
Setting Peep options .......................................................................................... 135
Adding the Twitter widget ............................................................................... 136
Twitter
for HTC Sense .......................................................................................... 136
Using Friend Stream ...................................................................................................... 136
Friend Stream screen ......................................................................................... 137
Updating your status ..........................................................................................138
Adding the Friend Stream widget ............................................................... 138
Chatting in Google Talk ................................................................................................139
Signing in to Google Talk ..................................................................................139
Chatting with friends .......................................................................................... 139
Changing your online status and picture ................................................... 141
Managing your Friends list ...............................................................................142
Changing Google Talk settings ......................................................................144
14
Email 146
Using Gmail .......................................................................................................................146
Viewing your Gmail inbox .................................................................................146
Reading your messages ....................................................................................148
Sending a message ............................................................................................... 151
Managing conversations and messages .................................................... 153
Changing Gmail settings ................................................................................... 156
Using Mail ............................................................................................................................ 157
Adding a POP3/IMAP email account .......................................................... 157
Viewing your email inbox ................................................................................. 158
Exchange ActiveSync email ............................................................................. 161
Composing and sending an email message ............................................ 162
Viewing and replying to an email message .............................................164
Editing email account settings.......................................................................164
Deleting an email account ................................................................................165
Adding the Mail widget ..................................................................................... 165
Calendar 166
About Calendar ................................................................................................................166
Creating a calendar event ........................................................................................... 167
Inviting guests to your event (Google Account only) ........................168
Sending a meeting request using Calendar
(Exchange ActiveSync only) ...........................................................................169
Changing calendar views ............................................................................................169
Month view ..............................................................................................................170
Day and Agenda views ....................................................................................... 171
Week view ................................................................................................................ 172
Viewing, editing or deleting an event .................................................................... 173
Viewing and editing an event ......................................................................... 173
Deleting an event .................................................................................................. 174
15
Calendar event reminders ........................................................................................... 174
Viewing, dismissing, or snoozing event reminders .............................. 174
Displaying and synchronizing calendars.............................................................. 175
Showing or hiding calendars .......................................................................... 175
Choosing which Google Calendars are synchronized on
your phone ............................................................................................................... 175
Changing Calendar settings ....................................................................................... 176
Reminder settings ................................................................................................ 176
Calendar view settings ....................................................................................... 177
Sending a vCalendar ...................................................................................................... 178
About the Calendar widget ........................................................................................ 179
Clock and Weather 180
About the HTC Clock widget ....................................................................................180
About the Clock application ....................................................................................... 181
Using Desk Clock ............................................................................................................. 182
Using World Clock ................................................................................................... 184
Setting your home city ......................................................................................184
Setting the time zone, date, and time ....................................................185
Adding a city to the World Clock screen..................................................186
Setting the alarm clock ................................................................................................186
Setting an alarm .................................................................................................... 187
Deleting an alarm ................................................................................................. 187
Changing alarm sound settings ..................................................................... 188
Checking weather ...........................................................................................................189
Adding a city to the Weather screen ..........................................................190
Changing the order of cities on the Weather screen........................... 191
Deleting cities from the Weather screen ................................................... 191
Changing weather options................................................................................ 191
About the Weather widget ........................................................................................ 192
16
Internet 193
Data connection ............................................................................................................... 193
Turning the data connection on or off ....................................................... 193
Enabling data roaming .......................................................................................193
Selecting the network to connect to when roaming ..........................194
Creating a new access point (GSM / UMTS mode only) ...................194
Wi-Fi .................................................................................................................................. 195
Turning Wi-Fi on and connecting to a wireless network .................. 195
Connecting to a Wi-Fi network with EAP-TLS security ....................196
Checking the wireless network status ........................................................ 197
Connecting to another Wi-Fi network ....................................................... 197
Adding the data connection and Wi-Fi widgets .............................................198
Connecting to a virtual private network (VPN) ...............................................199
Preparing your phone for VPN connection .............................................199
Adding a VPN connection.............................................................................. 200
Connecting to a VPN ........................................................................................ 200
Disconnecting from a VPN ............................................................................ 200
Using your phone’s web browser ............................................................................201
Opening the browser ..........................................................................................201
Going to a web page ..........................................................................................201
Setting your home page ..................................................................................202
Changing the screen orientation .................................................................202
Browsing full versions of all web sites .......................................................202
Navigating on a web page ..............................................................................203
Zooming in or out on a web page...............................................................203
Selecting a link in a web page ...................................................................... 204
Opening a new browser window .................................................................205
Switching between browser windows ......................................................206
Finding text within a web page ....................................................................206
Downloading applications from the web .................................................207
17
Copying text, looking up information, and sharing ............................207
Viewing bookmarks and previously visited pages ..............................209
Setting browser options ..................................................................................... 211
Using your phone as a modem (tethering) ........................................................ 212
Installing VZAccess Manager on your computer .................................. 212
Connecting your computer to the Internet ............................................. 212
3G Mobile Hotspot .......................................................................................................... 213
Bluetooth 215
Using Bluetooth ............................................................................................................... 215
Turning Bluetooth on or off ............................................................................. 215
Changing the phone name .............................................................................. 216
Connecting a Bluetooth headset or car kit ........................................................ 216
Reconnecting a headset or car kit ............................................................... 217
Disconnecting or unpairing from a Bluetooth device ................................... 218
Disconnecting a Bluetooth device ............................................................... 218
Unpairing from a Bluetooth device.............................................................. 218
Sending and receiving information using Bluetooth ..................................... 218
Sending information from your phone to another device ................ 219
Receiving information from another device ............................................ 221
Camera 223
Camera basics .................................................................................................................. 223
Viewfinder screen ................................................................................................ 223
Review screen ....................................................................................................... 225
Zooming .............................................................................................................................. 226
Taking a photo ................................................................................................................. 227
Face detection ...................................................................................................... 229
Capturing a video ................................................................................................ 229
Camera settings ..............................................................................................................230
Changing basic settings ...................................................................................230
Changing advanced settings .......................................................................... 231
18
Gallery 235
About the Gallery application .................................................................................. 235
Selecting an album ........................................................................................................ 235
Viewing photos and videos ....................................................................................... 237
Browsing in filmstrip or grid view ................................................................ 237
Viewing a photo in landscape orientation...............................................238
Zooming in or out on a photo .......................................................................239
Watching video .....................................................................................................239
Viewing photos in your social networks .............................................................240
Viewing photos on Facebook ........................................................................240
Viewing photos on Flickr .................................................................................240
Working with photos ..................................................................................................... 241
Rotating and saving a photo .......................................................................... 241
Cropping a photo ................................................................................................. 241
Sharing.................................................................................................................................243
Sending photos or videos by email ............................................................243
Sending a photo or video by MMS..............................................................243
Sending photos or videos using Bluetooth ............................................244
Sharing photos on Facebook ........................................................................244
Sharing photos on Flickr ..................................................................................245
Sharing photos on Picasa ................................................................................245
Sharing videos on YouTube ............................................................................246
Music 247
About the Music application ..................................................................................... 247
Playing music ................................................................................................................... 247
Browsing music in the Library .................................................................................249
Creating a playlist ...........................................................................................................250
Playing the songs in a playlist .......................................................................250
Managing playlists ................................................................................................ 251
19
Setting a song as ringtone ......................................................................................... 252
Checking if the song was added as a ringtone .................................... 252
Sending music using Bluetooth .............................................................................. 253
About the Music widget ............................................................................................. 253
Maps and location 254
Using Bing™ Maps ..........................................................................................................254
Changing the map view ................................................................................... 255
Searching for a location ...................................................................................256
Getting directions ................................................................................................ 258
Using HTC Footprints ...................................................................................................259
Creating a footprint ............................................................................................259
Revisiting a footprint .........................................................................................260
Editing or deleting a footprint ....................................................................... 261
Exporting your footprints ................................................................................. 261
Importing footprints ........................................................................................... 262
Adding the Footprints widget ...................................................................... 262
VZ Navigator®...................................................................................................................263
More apps 264
Watching videos on YouTube ...................................................................................264
Watching videos ..................................................................................................264
Searching for videos ..........................................................................................265
Sharing a video link ........................................................................................... 265
Capturing a video and sharing it on YouTube .......................................266
Viewing a PDF..................................................................................................................266
Viewing documents, presentations, and spreadsheets ............................... 267
Keeping track of your stocks ....................................................................................269
Adding a stock quote or stock market index ........................................270
Changing the stock list order .......................................................................270
Deleting stock quotes and indices ..............................................................270
20
Setting stock information update frequency .......................................... 271
Manually updating stock information ......................................................... 271
Adding the Stocks widget ............................................................................... 271
Listening to the radio ................................................................................................... 272
Listening to an FM station ............................................................................... 273
Adding station names ....................................................................................... 273
Minimizing or turning off FM Radio ............................................................ 274
Adding the FM Radio widget ........................................................................ 274
Recording your voice ................................................................................................... 274
Recording your voice ......................................................................................... 274
Sharing a voice clip ............................................................................................. 275
Setting a voice clip as a ringtone ................................................................ 275
Renaming a voice clip ....................................................................................... 275
Using Flashlight ............................................................................................................... 276
Finding and installing apps from Android Market .......................................... 277
Finding and installing an application ......................................................... 278
Creating a Google Checkout account ....................................................... 279
Requesting a refund for an application ....................................................280
Opening an installed application .................................................................280
Uninstalling an application ............................................................................... 281
Getting help ............................................................................................................. 281
Sharing games and applications ............................................................................. 282
Skype™ mobile .................................................................................................................284
Security 285
Protecting your phone with a screen lock .........................................................285
Setting a screen unlock pattern ...................................................................285
Setting a numeric PIN .......................................................................................286
Setting a password .............................................................................................286
21
Settings 287
Settings on your phone ............................................................................................... 287
Changing display settings ..........................................................................................290
Adjusting the screen brightness manually ..............................................290
Adjusting the time before the screen turns off ....................................290
Preventing automatic screen rotation .......................................................290
Recalibrating the G-sensor .............................................................................. 291
Switching animation effects on or off ........................................................ 291
Keeping the screen on while charging the phone ................................291
Changing sound settings ............................................................................................292
Changing the phone language ................................................................................293
Optimizing your phone’s battery life .................................................................... 293
Checking the power usage of applications ............................................294
Managing memory .........................................................................................................294
Checking how much phone memory is available for use ................294
Checking the available storage card space ............................................294
Clearing application cache and data .........................................................295
Uninstalling third-party applications ..........................................................295
Freeing up more phone memory or storage card space .................295
Checking information about your phone ...........................................................296
Backup, update and reset 297
Backing up your contacts .......................................................................................... 297
Setting up Backup Assistant .......................................................................... 297
Changing the backup schedule .................................................................... 297
Manually backing up your contacts............................................................298
Updating your phone’s system software ............................................................298
Checking for phone system software updates manually .................299
Performing a hard/factory reset .............................................................................299
Index 301

Basics
Inside the box
You will find the following inside the box:
Phone
USB cable
Battery
AC adapter
Tips, Hints & Shortcuts
RF brochure
Product safety and warranty brochure
Inside your phone
You’ll find these already pre-installed on your phone:
Verizon Wireless SIM card
microSD card
Basics 23
Your Phone
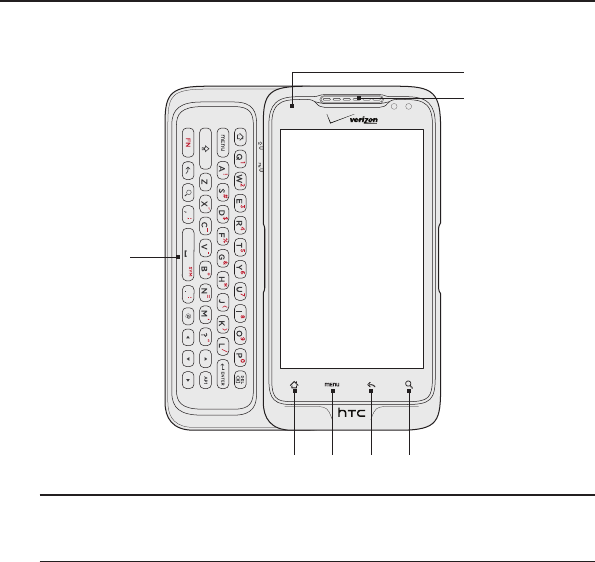
Front panel
32
1
8
7
6
5
4
1 Slide-out keyboard
Slide open the touch screen panel to reveal the slide-out keyboard and
enter text and numbers.

24 Basics
2 HOME
While on any application or screen, press to return to the Home
screen.
While on the main Home screen, press to show a snapshot of the
extended Home screens.
Press and hold to open the recently-used applications window.
3 MENU
Press to open a list of actions that you can do on the current screen.
4 BACK
Press to go back to the previous screen, or to close a dialog box, options
menu, the Notifications panel, or onscreen keyboard.
5 SEARCH
Press to open Google search.
See “Searching your phone and the Web” in this chapter for more details.
6 Touch screen
7 Earpiece
Listen to a phone call from here.
8 Notification LED
This LED shows a:
Solid green light when the phone is connected to the power adapter
or a computer and the battery is fully charged.
Flashing green light when you have a pending notification.
Solid amber light when the battery is being charged.
Flashing amber light when the battery level reaches very low.
Basics 25
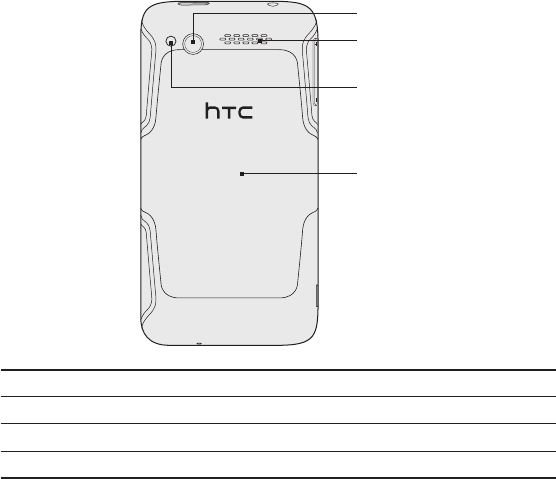
Back panel
9
10
11
12
9 5.0 megapixel camera
10 Speaker
11 LED flashlight
12 Back cover
26 Basics
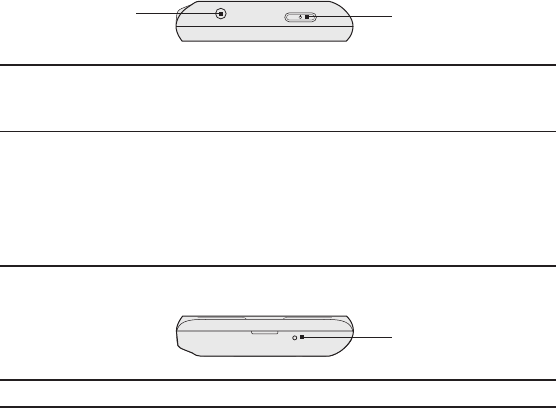
Top panel
13 14
13 3.5mm audio jack
Connect a 3.5mm stereo headset for hands-free conversation or for
listening to music.
14 POWER/LOCK
When the phone is off, press to turn on the phone.
When the phone is on and the screen is unlocked, press to turn the
phone display off or on.
With the screen unlocked, press and hold to open the phone options
menu that lets you turn off the phone, switch your phone to silent mode,
vibration mode, or airplane mode, and turn on/off the data connection.
Bottom panel
15
15 Microphone
Basics 27
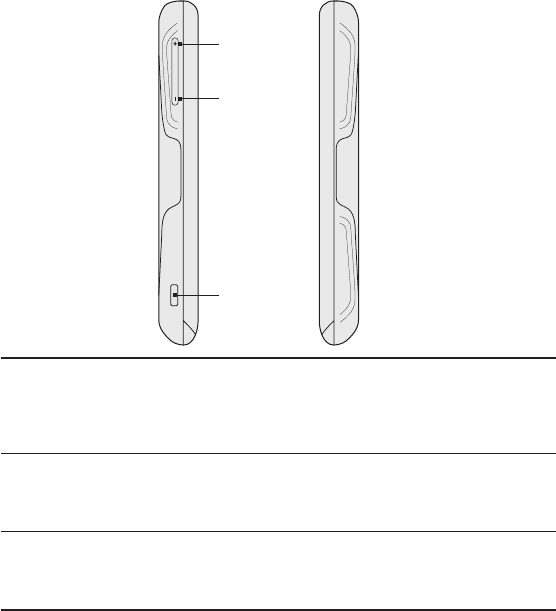
Left and right panels
16
17
18
16 VOLUME UP
While on a call, press to increase earpiece volume.
While not on a call, press to increase the ringer volume.
While watching videos or listening to the FM radio, press to increase
the volume.
17 VOLUME DOWN
While on a call, press to lower the earpiece volume.
While not on a call, press to lower the ringer volume.
While watching videos or listening to the FM radio, press to lower the volume.
18 USB connector
Connect the micro-USB plug of the supplied USB cable to this connector
and then connect the other end to the power adapter to charge the
battery, or to your computer to transfer files.
28 Basics
Before turning on your phone
Back cover
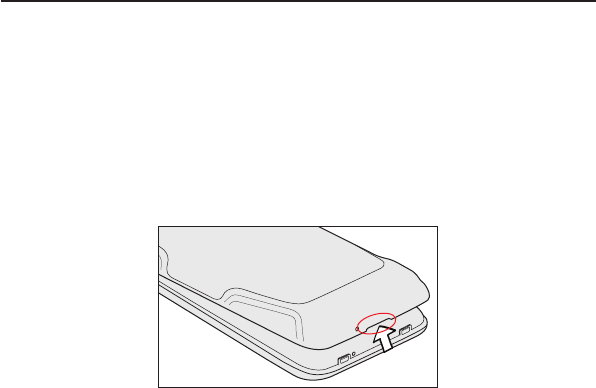
Removing the back cover
Remove the back cover to access the battery compartment, storage
card slot and SIM card slot.
Make sure the wireless device is turned off.
Hold the device securely with the front facing down.
With your thumb or finger, lift up the back cover from the notch
at the bottom of the wireless device
Replacing the back cover
Align and secure the top part of the back cover first.
2. Press the sides and the bottom part of the back cover against
the phone until the back cover clicks into place.
1.
2.
3.
1.
Basics 29
Battery
Your phone uses a rechargeable battery. Please use only original
batteries and accessories that came with your phone or replacements
that we recommend.
How long the battery can last before it needs recharging depends on
how you use your phone. Among these are the phone features and
accessories you use (for example, leaving your Bluetooth connection
always on uses more power). Long phone calls and frequent web
browsing use up much battery. Also, consider your location: poor
signal strength from your mobile network and extreme temperature
make the battery work harder.
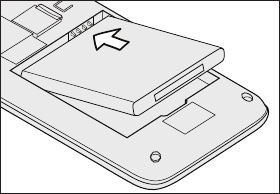
Inserting the battery
Align the battery’s exposed copper contacts with the battery
connectors inside the battery compartment.
Insert the contact side of the battery first, and then gently push
the battery into place.
Replace the back cover.
1.
2.
3.
30 Basics
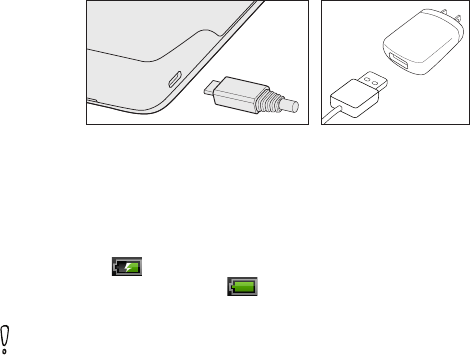
Charging the battery
The battery is partially charged when shipped. Before you turn on
and start using your phone, it is recommended that you charge
the battery. Some batteries perform best after several full charge/
discharge cycles.
Plug in the smaller end of the USB cable to the USB Connector
on the left side of your wireless device.
Plug in the other end of the USB cable to the AC charger.
3. Plug in the AC charger to an electrical outlet to start charging the
battery.
As the battery is being charged, the notification LED shows a solid
amber light when the battery is being charged. The light turns to solid
green when the phone is fully charged.
When you charge the battery while the phone is on, the charging
battery icon ( ) displays in the status bar. When the battery is fully
charged, a full battery icon ( ) displays in the status bar.
Use only an approved charging accessory to charge your phone.
Do not remove the battery from the phone while you are charging it
using the AC or car adapter.
As a safety precaution, the battery stops charging when it overheats.
1.
2.
Basics 31
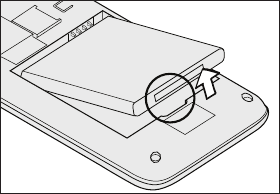
Removing the battery
Remove the back cover. Refer to “Removing the back cover.”
Lift out the battery from the notch near the speaker.
1.
2.

32 Basics
Getting started
Once you’ve installed your battery, you can turn on your phone and
start using it.
Turning on your phone
Press and hold the POWER/LOCK button.
When you turn on the phone for the first time, you will be prompted
to set up your phone. For more information on how to set up your
phone for the first time, see “Setting up your phone for the first time.”
Turning off your phone
If you do not need to use your phone, you can turn the power off to
save battery life.
If the display is off, briefly press the POWER/LOCK button to POWER/LOCK button to button to
turn the display back on.
Unlock the phone screen. See “Unlocking the screen” in this
chapter for details.
Press and hold the POWER/LOCK button for a few seconds.POWER/LOCK button for a few seconds. button for a few seconds.
When the Phone options menu appears, tap Power off.
Tap OK when asked to turn off the phone.
1.
2.
3.
4.
5.

Basics 33
Setting up your phone for the first time
When you turn on your phone for the first time, your phone displays
tutorials and guides you to set up your email accounts and favorite
social networks such as Facebook®, Flickr®, and Twitter™. You can
follow the onscreen instructions to complete the setup, or skip the
setup and do it at another time.
Choose the phone language you want to use, and then tap Next.
Your phone walks you through a tutorial on how to use the
onscreen keyboard. Follow through the tutorial to learn how
to use the onscreen keyboard. Tap Skip to not go through the
tutorial.
On the Internet connection screen, select how you want to
connect to the Internet, and then tap Next.
If there are Wi-Fi networks in range, you will be asked if you want
to connect to a Wi-Fi network. Tap Next and then tap the wireless
network that you want, or clear the Connect to Wi-Fi network
checkbox, and then tap Next to set up your Wi-Fi connection at a
later time.
Some phone features such as Weather and Footprints require
Google’s location service to automatically determine your current
location. On the Location consent screen, you can choose
whether to allow Google’s location service to collect information
about your location. Clear or select the checkbox, and then tap
Next.
This service may incur additional data transfer fees from your
provider. You can enable or disable this service later in your
phone’s location settings.
1.
2.
3.
4.
5.
34 Basics
6. You can back up your phone’s address book to a secure server
with Verizon Wireless’ Backup Assistant. Tap Start to begin
setting up Backup Assistant on your phone.
7. On the Set up accounts screen, choose the type of account you
want to set up and follow the onscreen instructions to complete
the setup. Tap Skip to set up accounts at a later time.
To set up your Google Account, tap Google account > Next >
Sign in, enter your Google Account details, and then tap Sign in.
If you want to add a
Microsoft Exchange ActiveSync or a
POP3/IMAP email account, tap these options
to
set them up
on your phone. To learn how to set up these email accounts,
see the Accounts and sync and Email chapters.
After setting up an account, you will be taken back to the Set up
accounts screen so you can set up more accounts. When you are
done setting up your accounts, tap Next.
8. On the Set up social networks screen, choose the type of social
network account that you want to access from your phone.
Follow the onscreen instructions to log in to your social network
account. Tap Skip to set up social network accounts at a later
time. See the Social chapter for more information about social
networks.
When you are done setting up your accounts, tap Next on the
Set up social networks screen.
9. Tap Finish.
Basics 35
Home screen
The Home screen provides you with a weather clock that shows the
time and weather of your current location. Tap the respective item to
open the associated application.
The Home screen also lets you add the items you want and need
on the Home screen. Add items like application icons, shortcuts,
folders, and widgets to give you instant access to information and
applications. To learn how to personalize your Home screen, see the
Personalizing chapter.
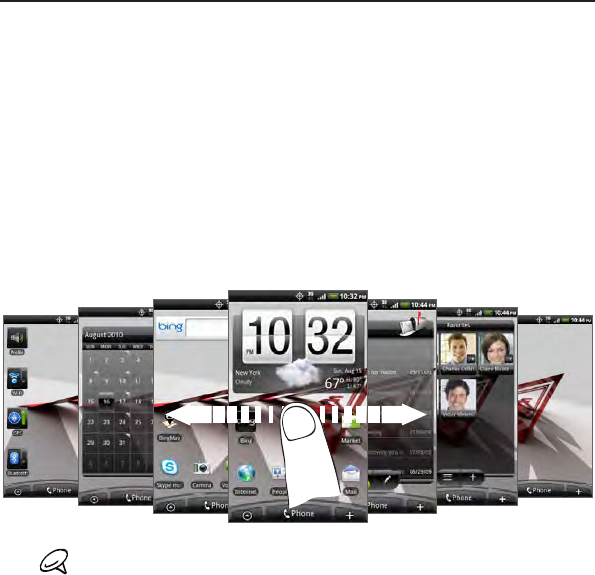
Extended Home screen
The Home screen extends beyond the screen width to provide more
space for adding icons, widgets, and more. There are 6 “additional”
screens apart from the main Home screen.
You cannot add more screens.

36 Basics
Navigating the Home screen
You can go to the extended Home screen by sliding your finger
horizontally across the screen to go to the left or right side of the
Home screen. While on an extended Home screen, press HOME to
return to the main Home screen.
Directly going to a particular screen using Leap view
1. Do any of the following:
While on any Home screen, pinch the screen using two fingers
(for example, thumb and index fingers) to show the Leap view
that shows the screens as thumbnails.
On the main Home screen, you can press HOME to show
the Leap view.
2. Tap the screen you want to open.
Going around the screen with finger gestures
Tap
When you want to type using the onscreen keyboard, select items
onscreen such as application and settings icons, or press onscreen
buttons, simply tap them with your finger.
Press and hold
To open the available options for an item (e.g. contact or link in a web
page), simply press and hold the item.
Swipe or slide
To swipe or slide means to quickly drag your finger vertically or
horizontally across the screen.
Basics 37
Drag
Press and hold your finger with some pressure before you start
to drag. While dragging, do not release your finger until you have
reached the target position.
Flick
Flicking the screen is similar to swiping, except that you need to swipe
your finger in light, quicker strokes. This finger gesture is always in a
vertical direction, such as when flicking the contacts or message list.
Rotate
For most screens, you can automatically change the screen
orientation from portrait to landscape by rotating the phone to the
left. When entering text, you can turn the phone sideways to bring up
a bigger keyboard. Refer to the Settings chapter for more details.
Pinch
For some applications, like Gallery or the web browser, you can “pinch”
the screen using 2 fingers (for example, thumb and index fingers) to
zoom in or zoom out when viewing a picture or a web page.
38 Basics
Phone status and notifications
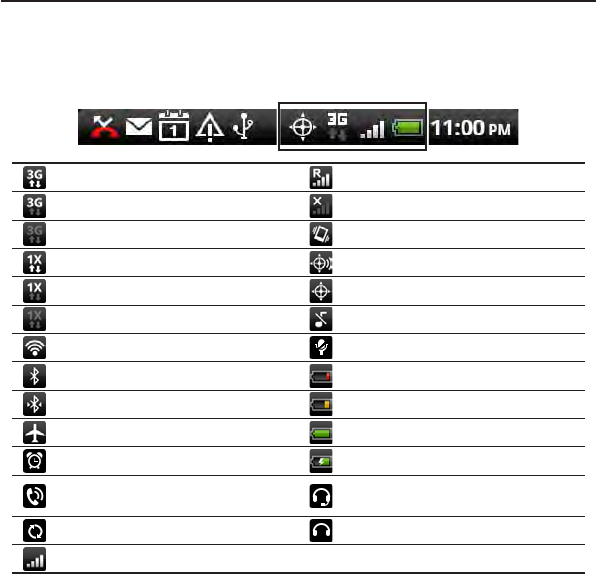
Phone status icons
These are the icons that may appear on the phone status area of the
status bar:
3G data transfer Roaming
3G connected No signal
3G in idle mode Vibrate mode
1xRTT data transfer Location setting on
1xRTT connected Location setting off
1xRTT in idle mode Phone speaker is mute
Connected to a Wi-Fi network Phone microphone is mute
Bluetooth is on Battery is very low (10% remaining)
Connected to a Bluetooth device Battery is low (20% remaining)
Airplane mode Battery is full
Alarm is set Battery is charging
Speakerphone on Wired microphone headset
connected
Data synchronizing Wired headset connected
Signal strength
Basics 39
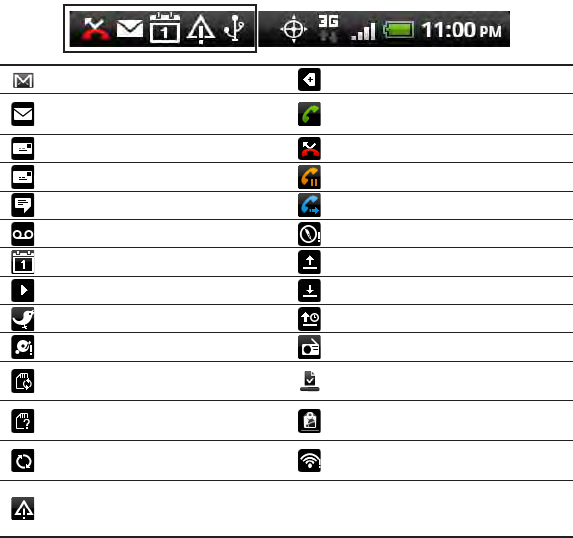
Notification icons
These are the icons that may appear on the notifications area of the
status bar:
New Gmail message More (not displayed) notifications
New Microsoft Exchange
ActiveSync or POP3/IMAP email Call in progress
New SMS/MMS Missed call
Problem with SMS/MMS delivery Call on hold
New Google Talk instant message Call forwarding on
New voicemail Compass needs orientation
Upcoming event Uploading data (animated)
Song is playing Downloading data (animated)
New tweet Waiting to upload
Storage card is low on free space FM Radio is on
Storage card is safe to remove or
storage card is being prepared
Downloaded Android Market
application installed successfully
No storage card installed on the
phone
Update available for an application
downloaded from Android Market
Data synchronizing or connected
to HTC Sync
Wi-Fi is on and wireless networks
are available
General notification (for example,
the phone is connected to the
computer via the USB cable.)
40 Basics
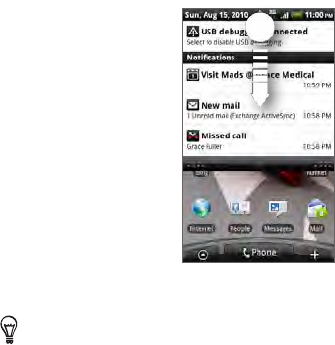
Checking notifications
Notification icons on the status bar report the arrival of new
messages, calendar events, alarms set and ongoing settings such as
when call forwarding is on or the current call status. You can open
the Notifications panel to open the message, reminder, or event
notification and see the mobile operator name.
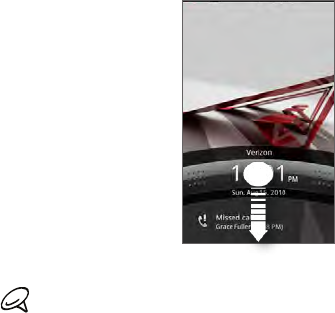
Opening the Notifications panel
When a new notification icon displays in the status bar, press and
hold the status bar, then slide your finger downward to open the
Notifications panel.
If you have several notifications, you can scroll down the screen to
view more notifications.
You can also open the Notifications panel on the Home screen by
pressing MENU and then tapping Notifications.

Basics 41
Closing the Notifications panel
Do one of the following:
Press and hold the bottom bar of the Notifications panel, then
slide your finger up the screen.
Press BACK .
Adjusting the volume
Adjusting the ringer volume changes the volume level of the phone
ringtone, whereas adjusting the media volume changes the volume
level of sound notifications, music or video playback. The ringer
volume and media volume can be separately adjusted.
Adjusting the ringer volume
Press the VOLUME UP or VOLUME DOWN buttons on the left
panel of the phone to adjust the ringer volume to your desired
level. The Ringer volume window appears on the screen to
display the volume levels.
While in the lowest ringer volume level (Silent mode), press
VOLUME DOWN once to set your phone to Vibrate mode. The
phone vibrates and the vibrate mode icon ( ) appears on the
status bar.
While in Vibrate mode, press VOLUME UP once to switch to silent
mode. The speaker mute icon ( ) displays on the status bar.
To quickly switch your phone to silent mode or vibrate mode,
press and hold the POWER/LOCK button, and then tap Silent
mode or Vibrate mode on the options menu.
1.
2.
3.

42 Basics
Adjusting the media volume
When playing music or watching video, press the VOLUME UP or
VOLUME DOWN buttons on the left panel of the phone to adjust the
media volume. The Media volume window appears on the screen to
display the volume level.
You can also adjust the media volume on the Settings screen.
Press HOME > MENU, and then tap Settings > Sound > Volume.
When the Volume window appears, drag the Media slider to the
left to lower the volume or to the right to increase the volume.
Tap OK to close the window.
Sleep mode
Sleep mode suspends your phone to a low power state while the
display is off in order to save battery power. You will still be able to
receive messages and calls while the phone is in Sleep mode.
For information on how to adjust the time before the screen turns off, see
“Adjusting the time before the screen turns off” in the Settings chapter.
Switching to Sleep mode
Briefly press the POWER/LOCK button to turn off the display
temporarily and switch your phone to Sleep mode. Your phone also
automatically goes into Sleep mode when you leave the phone idle
after a certain period of time. Switching to Sleep mode also prevents
accidental button or touch screen presses when the phone is in your
bag or pocket.
1.
2.
3.
Basics 43
Waking up from Sleep mode
Your phone wakes up automatically when you have an incoming call.
To wake up your phone manually, press the POWER/LOCK button.
You will then see that the phone has locked the screen. To find out
how to unlock the screen, see “Unlocking the screen.”
Unlocking the screen
Press the bar on the lock screen and then slide your finger down to
unlock the screen or to answer an incoming call.
If you have set up a screen unlock pattern, pin, or password, you
will be asked to draw the pattern on the screen or enter the PIN
or password before it unlocks. For more information on how to
create and enable the screen unlock pattern, PIN, or password, see
“Protecting your phone with a screen lock” in the Security chapter.

44 Basics
Connecting your phone to a computer
Whenever you connect your phone to a computer using the USB
cable, the Connect to PC dialog box displays and prompts you to
choose the type of USB connection. Select one of the following
choices, and then tap Done:
Charge only
Select this mode if you only want to charge the phone’s battery using
your computer.
HTC Sync
When selected, the phone automatically uses HTC Sync when
connected to your computer and lets you synchronize Outlook and
Windows Address Book (Outlook Express), contacts and calendar
events between your computer and your phone. For more information,
see “Using HTC Sync” in the Accounts and sync chapter.
Disk drive
This mode is available only when you have installed a microSD card on
your phone. Select this mode when you want to use your storage card
as a USB thumb drive, and copy files between your phone’s storage
card and your computer.
When Disk Drive mode is enabled while your phone is connected to
the computer, you will not be able to run applications that use the
storage card, such as Music or Gallery. For more information, see
“Copying files to and from the storage card” in this chapter.

Basics 45
Mobile Broadband Connect
When you do not have Internet connection on your computer, you
can select this mode to share your phone’s mobile data connection
with your computer. For more information, see “Using Your Phone as a
Modem” in the Internet chapter.
Media sync
Select this mode if you want to synchronize pictures, music, and
videos with your computer. You must install V CAST™ Media Manager
on both your phone and computer before you can synchronize media.
To learn more about V CAST™ Media Manager, go to
http://phones.verizonwireless.com/mediamanager/.
If you do not want to show the Connect to PC dialog box everytime
you connect the phone to the computer, select the Don’t ask
me again checkbox in the Connect to PC dialog box. The default
connection type will be used when you connect the phone to the
computer.
To check or change the default connection type and to show or hide
the Connect to PC dialog box, press HOME > MENU, and then tap
Settings > Connect to PC.

46 Basics
Copying files to and from the storage card
Connect the phone to your computer using the supplied USB
cable.
When the Connect to PC dialog box appears, tap Disk drive, and
then tap Done.
On your computer, the connected phone is recognized as a
removable disk. Navigate to this removable disk and open it.
Do one of the following:
Copy the files from the computer to the phone’s storage
card’s root folder.
Copy the files from the phone’s storage card to a folder in
your computer or computer desktop.
5. After copying the files, unmount the removable disk (that is, the
connected phone) as required by your computer’s operating
system to safely remove your phone.
6. Do one of the following:
Disconnect the phone from the computer.
If you want to keep the phone connected to the computer but
want the phone to be able to access the storage card, open
the Notifications panel, tap Disk drive, select an option except
Disk drive, and then tap Done. See “Opening the Notifications
panel” in this chapter to learn how to open the Notifications
panel.
1.
2.
3.
4.
Basics 47
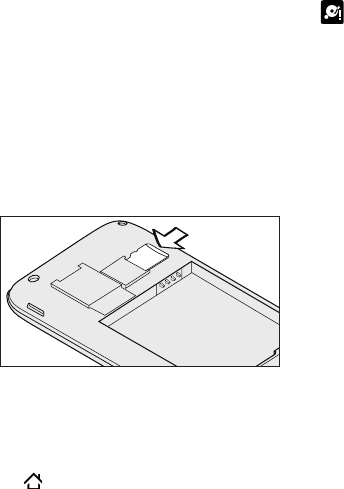
Replacing the storage card
When the storage card is almost full, you’ll see this icon in the
status bar. You can replace the storage card with a new one.
Remove the back cover. Refer to “Removing the back cover.”
Remove the battery. Refer to “Removing the battery.”
Locate the storage card slot lock and then push it down with
your thumb.
Use another finger to slide the storage card out of the slot.
Insert the new microSD card into the slot with its gold contacts
facing down and push it until it is in place.
Removing the storage card while the phone is on
When you need to remove the storage card while the phone is on,
unmount the storage card first to prevent corrupting or damaging the
files in the storage card.
Press HOME > MENU, and then tap Settings.
Scroll down the screen, and then tap SD & phone storage.
Tap Unmount SD card.
Remove the storage card by following the instructions in
“Replacing the storage card.”
1.
2.
3.
4.
5.
1.
2.
3.
4.
48 Basics
Searching your phone and the Web
You can search for information on your phone and on the Web by
using Bing™. Some applications, such as People or Mail, have their own
search box, which you can use to search within those applications (the
application’s icon is at the left of the search box.)
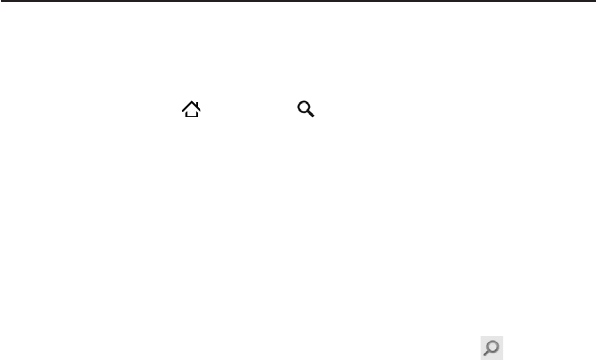
Press HOME > SEARCH .
If this is the first time that you’re doing a search, the Service
agreement screen opens. Read the terms of the agreement, and
then tap Accept. You will then be asked whether you will allow
Bing to find and store your lcoation. Tap the desired option.
Enter the search item in the search box. As you type, matching
items on your phone and suggestions from the web appears
below the search box.
Do one of the following:
If what you’re searching for is in the list, tap it. The item opens
in the appropriate application.
If what you’re searching for is not in the list, tap to search
the web.
1.
2.
3.
4.
Personalizing
Making your phone truly yours
Make your phone look and sound just the way you want it. Personalize
your phone with a different wallpaper, ringtone, and notification sound
for events such as incoming text, email, calendar reminders, and more.
Your phone’s Home screen is highly customizable and extends beyond
the screen width, giving you plenty of space to add the information
that matters most in your daily life and phone features that make
communication quicker and easier. You have up to seven screens that
extend to the left and right sides of your display as your Home screen,
on which you can add elements such as widgets, program icons,
shortcuts to information, and more.
To find out how to set notification sounds for events, see “Changing
sound settings”.
Changing the ringtone
Choose from the available selections of ringtones on your phone.
Press HOME > MENU, and then tap Settings.
Tap Personalize > Default ringtone. The Phone ringtone selection
menu then opens.
Scroll through the available ringtones and tap the ringtone you
want to use. The ringtone briefly plays when selected.
Tap OK.
1.
2.
3.
4.
50 Personalizing
You can also download or copy ringtones or songs to your phone’s
storage card. To find out how you can copy files to your storage card,
see “Copying files to and from the storage card“.
Ringtones or songs downloaded or copied to your storage card are
not automatically added to the ringtone selection menu. You need
to go to the Music application and set a ringtone or song in your
storage card as your ringtone. To find out how to set a ringtone using
the Music application, see “Setting a song as ringtone” in the Music
chapter.
See “Specifications” for a list of audio file formats supported by your
phone.
Personalizing your phone with scenes
Your phone becomes multiple phones in on e when you use scenes.
Scenes are personalized Home screen layouts that you can quickly
apply to your phone. By switching between scenes, you instantly turn
your phone into your perfect weekend phone, travel phone, work
phone, or pure play phone.
Using a preset scene
Your phone features preset scenes, each preconfigured with a
different collection of widgets that reflect different moments in your
life. You can choose a scene that is suitable for work, play, travel, or
your social life.
Press HOME > MENU, and then tap Scenes.
In the Choose a scene menu, select a preset scene and then tap
Done.
1.
2.
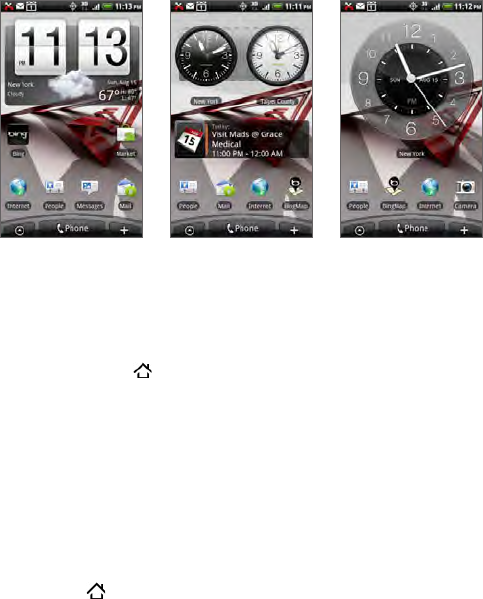
Personalizing 51
Verizon (default) Work Play
Customizing and saving a scene
After selecting a preset scene, you can add widgets and other
elements, arrange the layout, change the wallpaper, and save the
whole Home screen as your personalized scene.
Press HOME > MENU, and then tap Scenes.
In the Choose a scene menu, select a preset scene that already
has some widgets, or select Clean Slate if you want to design
your own Home screen.
Add widgets and other elements that you want.
Arrange the layout of your Home screen according to your
preference.
Change the Home screen wallpaper. You can also change the
lock screen wallpaper.
When you are done designing your Home screen, press
HOME > MENU and then tap Scenes again.
1.
2.
3.
4.
5.
6.

52 Personalizing
Under My scenes, make sure the Current (unsaved) option is
selected and then tap Save.
Enter a new scene name for your Home screen and then tap
Done. Or, if you already created a scene, enter the same scene
name, tap Done and then tap Replace.
Renaming or deleting a scene
You can rename or delete a personalized scene that you created.
Preset scenes cannot be renamed or deleted.
Press HOME > MENU and then tap Settings > Personalize >
Scenes.
Under My scenes, press and hold a scene and choose whether to
rename or delete it.
Changing your wallpaper
Personalizing your Home screen wallpaper with your favorite photo is
a quick and easy way to change the feel of your phone and give it a
fresh look. Browse the collection of wallpapers included in your phone
or choose from photos that you have taken with the camera. You can
also change your Home screen to use an animated wallpaper.
The wallpaper that you choose for the Home screen will also be used
as the lock screen wallpaper.
Press HOME > MENU, and then tap Wallpaper.
Do one of the following:
Tap Live wallpapers to choose from preset animated
wallpapers.
Tap HTC wallpapers to select from preset wallpapers.
7.
8.
1.
2.
1.
2.

Personalizing 53
Tap Gallery to select a photo that you have taken using the
camera or copied to your storage card. Crop the photo and
then tap Save.
After changing the wallpaper, remember to save it to the scene
that you created or save it as a new scene. To find out how to
save a scene, see “Customizing and saving a scene”.
Personalizing your Home screen with widgets
Widgets put at-a-glance important information and media content
up front on your Home screen. Some widgets are already added to
your Home screen for your convenience. You can add more from the
available selections of widgets, or download more widgets.
Adding a widget to your Home screen
A wide selection of widgets is available for you to choose from, such
as Calendar, Music, Photo Album, Friend Stream, Twitter, and more.
Press HOME . Go to the part of the Home screen where there’s
space to add a new widget. To find out how, see “Navigating the
Home screen” in the Basics chapter.
Tap or press and hold on the Home screen to open the Add
to Home options menu.
Tap Widget and then select a widget that you want.
Most HTC widgets are available in a variety of designs and sizes
to suit your needs. Tap the right or left arrow button at the
bottom of the screen to view the different styles, and then tap
Select to choose one.
3.
1.
2.
3.
4.
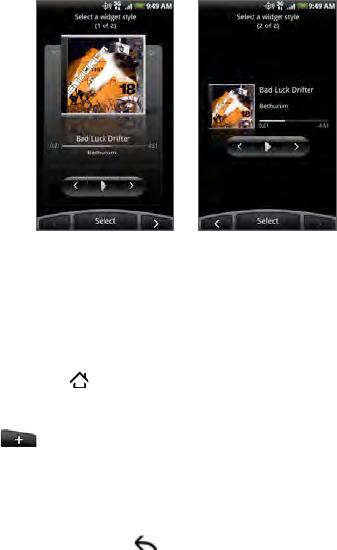
54 Personalizing
You can also add widgets that allow you to quickly switch on or
off certain settings of your phone, such as Wi-Fi, Mobile Network,
Bluetooth, and more. Scroll down the widgets list, tap Settings, and
then tap the widget that you want.
Downloading HTC widgets
A selection of fun and useful HTC widgets are also available for download.
Press HOME . Go to the part of the Home screen where there’s
space to add a new widget. To find out how, see “Navigating the
Home screen” in the Basics chapter.
Tap or press and hold on the Home screen to open the Add
to Home options menu.
Tap Widget and then tap Get more HTC widgets.
Tap to select a widget.
Tap Details to see a short description about the widget. After
reading, press BACK .
When you’re ready to download and add the widget to your
Home screen, tap Download.
1.
2.
3.
4.
5.
6.
Personalizing 55
Adding application icons and other shortcuts on
your Home screen
Place application icons on your Home screen to open applications
quicker. You can also add shortcuts to settings and specific
information such as a bookmarked webpage, someone’s phone
number, a music playlist, route directions, and many other items, to
your Home screen.
The shortcuts available depend on the applications that are installed
on your phone.
Press HOME . Go to the part of the Home screen where there’s
space to add a new shortcut. To find out how, see “Navigating
the Home screen” in the Basics chapter.
Tap or press and hold on the Home screen to open the Add
to Home options menu.
Do one of the following:
To add an application icon, tap App and then select an
application.
To add a shortcut to a setting or information, tap Shortcut and
then select the type of information or setting.
To add an application icon on the Home screen, you can also press
HOME , tap , and then press and hold an application icon.
Without lifting your finger, drag the icon to an empty area on the
Home screen, and then release it.
1.
2.
3.
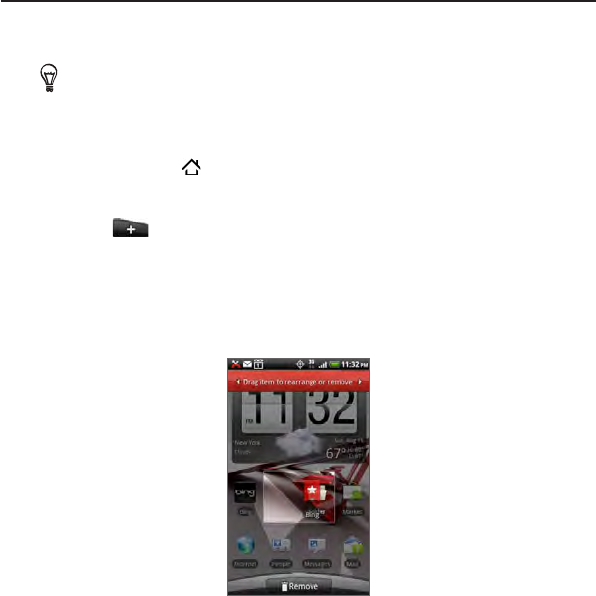
56 Personalizing
Adding folders on your Home screen
Use folders to group related applications and other shortcuts to keep
your Home screen tidy and organized.
You can also add information folders that show up-to-date
information such as Bluetooth received files, your Facebook
phonebook, and more.
Creating a new folder and adding items to it
Press HOME . Go to the part of the Home screen where there’s
space to add a new folder. To find out how, see “Navigating the
Home screen” in the Basics chapter.
Tap or press and hold on the Home screen to open the Add
to Home options menu.
Tap Folder and then tap New Folder.
Press and hold an application icon or a shortcut that you want to
move to the folder. The phone then vibrates. Don’t lift your finger.
Drag the application icon or shortcut and drop it on top of the folder.
1.
2.
3.
4.
5.

Personalizing 57
Simply tap the folder to open it so you can access the applications
and shortcuts inside the folder.
Renaming a folder
Tap the folder to open it.
Press and hold the folder window’s title bar.
Enter a new folder name and then tap OK.
Rearranging or removing widgets and icons on
your Home screen
Rearrange the widgets and icons on your Home screen to give room
for adding more items to the Home screen. You can also remove
widgets and icons that you don’t frequently use.
Moving a widget or icon
Press and hold the widget or icon you want to move.
The phone vibrates and you’ll see a green box around the widget
or icon. Don’t release your finger.
Drag the widget or icon to a new location on the screen.
Pause at the left or right edge of the screen to drag the widget
or icon onto another Home screen panel.
When the widget or icon is where you want it, release your finger.
If you’ve released your finger but a message shows that there’s
no space to place the widget or icon, drag it right or left again to
another Home screen panel.
1.
2.
3.
1.
2.
3.
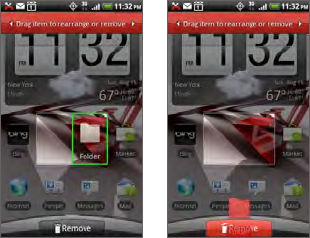
58 Personalizing
Removing a widget or icon
Press and hold the widget or icon you want to remove.
The phone vibrates and you’ll see a green box around the widget
or icon. Don’t release your finger.
Drag the widget or icon to the Phone button. The Phone button
then changes into the Remove button and turns red.
When the widget or icon also turns red, release your finger.
1.
2.
3.
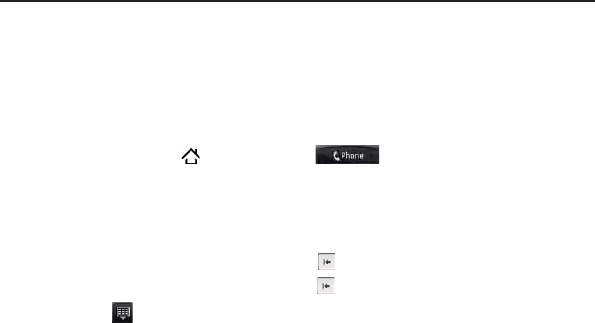
Phone calls
Making calls
There are several convenient methods to make a call from your phone.
Calling somebody using your phone
You can either dial a number directly, or you can use the Smart Dial
(see “Smart Dial”) feature to search and call a contact in your contacts
lit or a number from call history.
Press HOME , and then tap .
Begin entering the first few digits or characters by tapping the
keys on the phone keypad. As you enter digits or letters, the
panel displays numbers and names that match the keys you
tapped.
If you enter a wrong digit, tap to erase that digit. To erase the
entire number, press and hold .
Tap to close the phone keypad and to see if there are more
matching numbers or contacts. To browse through the filtered
list, flick through the list or slide your finger up or down the list
slowly.
To place a call, do one of the following:
If there are no matching contacts in the list, after entering the
number, tap Call.
Tap the phone number or contact from the list.
1.
2.
3.
4.
60 Phone calls
To call a different phone number associated with the contact,
tap at the right side of the contact name. On the contact
details screen, tap the number you want to call.
Smart Dial
The phone dialer’s Smart Dial feature makes it quick and easy for you
to place a call. Simply enter the phone number or first few letters of
the person you want to call. Smart Dial automatically searches and
filters your contacts list stored on your phone, and the phone numbers
from the call history.
Calling a speed dial number
Press HOME , and then tap .
On the phone keypad, press and hold the number that is
associated with the contact you want to call.
The number 1 on the phone keypad is generally reserved for
your voicemail. Press and hold this button to call voicemail and
retrieve your voicemail messages.
Adding a contact to speed dial
Press HOME , and then tap .
Press MENU, and then tap Speed dial > Add new.
Enter the name of the contact you want to add. When the name
comes up in the list, tap the name.
On the Speed dial screen, select the phone number of the
contact to use, and the phone keypad assignment. Tap Save.
Calling using Voice Dialer
Press HOME , and then tap > Voice Dialer.
1.
2.
1.
2.
3.
4.
1.

Phone calls 61
When the Voice Dialer message box appears and you see
“Listening” on the screen, say “Call [name of person]” in a clear
voice into the phone.
The person you want to call should be in your People list.
A confirmation message will pop up asking if the person to call is
correct. Tap OK if the person is correct or tap Cancel to try again.
If the contact has more than one number, or if the Voice Dialer does
not detect your voice accurately, the confirmation message displays
a list of the contact’s phone numbers or suggested results.
You can also use voice Dialer to open programs.
Calling a phone number in a text message
Press HOME , tap Messages, and then tap the message with
the phone number.
In the message thread, tap the message with the phone number.
On the Select link screen, tap the number you want to call.
Edit the phone number if needed, and then tap Call.
To call the message sender, in the All messages list, press and hold
the message, and then tap Call on the options menu.
For more information about text messages, see the Messages chapter.
Calling a phone number in an email
Press HOME , and then tap Mail.
Open the email account where the email with the number is
located.
In the email account’s inbox, tap the email to open it.
2.
3.
1.
2.
3.
4.
1.
2.
3.
62 Phone calls
In the email body, tap the phone number. The phone dialer screen
opens with the phone number already entered.
The phone will recognize a number as a phone number if the number
has a minimum of 5 digits and have at least one of the following:
Numbers preceded by a “+” in front. For example, +1-987-654-
321 or +1987654321.
Numbers enclosed in parenthesis in front. For example,
(02)987654321 or (02)987-654-321.
Numbers separated by dashes. For example, (02)-987-654-321
or 0987-654-321.
Tap Call.
For more information about email, see the Email chapter.
Making an emergency call
On the phone dialer screen, dial the international emergency number
for your locale (for example, 000), and then tap Call.
4.
5.
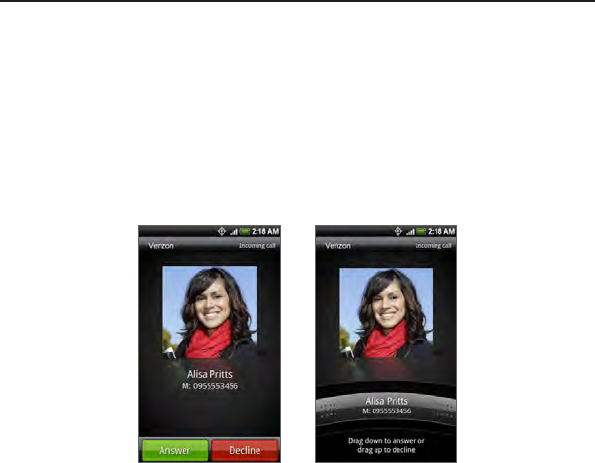
Phone calls 63
Receiving calls
When you receive a phone call from a contact, the Incoming call
screen appears and displays the caller ID icon, name, and phone
number of the calling party. When you receive a phone call from
someone who is not stored in People, only the default caller ID icon
and phone number appear on the Incoming call screen.
Answering an incoming call
If the display is on, tap Answer.
If the display is off, the display will turn on showing the Lock
screen. Drag the bar down to answer the call.
Muting the ringing sound without rejecting the call
Do one of the following:
Press the VOLUME DOWN button.
Place the phone face down on a leveled surface.

64 Phone calls
If the phone is already facing down, the phone will still ring when
there are subsequent incoming calls.
Using the Quiet ring on pick up feature
Your phone is set to automatically scale down the ring volume when
you pick it up to answer calls. To check if this feature is enabled, or to
disable it:
Press HOME > MENU, and then tap Settings > Sound.
Scroll down the screen, and then select or clear the Quiet ring on
pickup check box.
Press BACK .
Rejecting an incoming call
Do any of the following:
If the display is on, tap Decline.
If the display is off, the display will turn on showing the Lock
screen. Drag the bar up.
If the display is off, the display will turn on showing the Lock
screen. Press MENU, and then tap Decline.
The call is rejected and is sent to your voicemail.
Rejecting a call and sending a text message
You can automatically send a default text message to the caller and
reject the incoming call.
To reject and send a message when you receive an incoming call,
press MENU, and then tap Send message.
1.
2.
3.
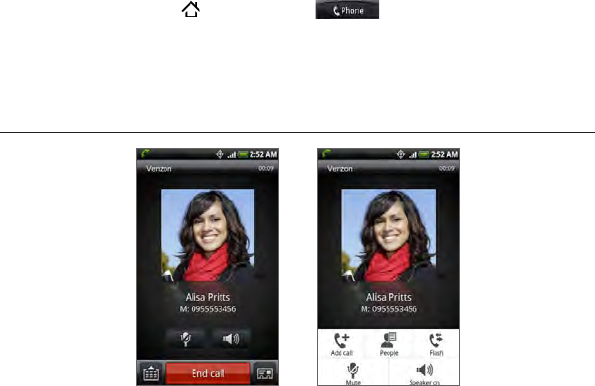
Phone calls 65
Editing the default message
You can change the message that is sent out.
Press HOME , and then tap .
Press MENU, and then tap Phone settings > Edit default message.
Enter the new message, and then tap OK.
Using in-call options
When a call is in progress, use the buttons onscreen to mute or
unmute the microphone or to turn the speakerphone on or off. You
can also press MENU to open the call options to let you add a call,
place the call on hold, mute the microphone, and more.
1.
2.
3.
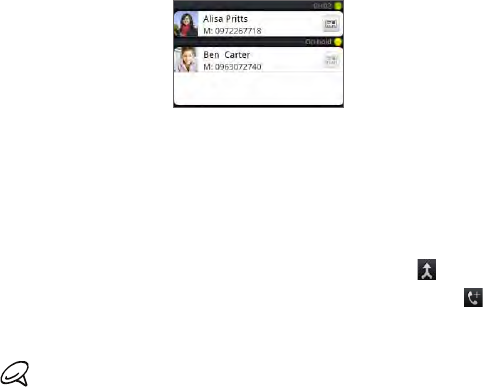
66 Phone calls
Handling multiple calls
Your phone notifies you when you have another incoming call, and
gives you the option of rejecting or accepting the call. If you are
already on a call and accept the new call, you can choose to switch
between the two callers.
When you receive another call, tap Answer to accept the second
call, and to put the first call on hold.
To switch between callers, tap the person you want to talk to on
the screen, or press MENU, and then tap Flash.
To end the current call and return to the other call, tap End call.
Setting up a conference call
Make a call to the first participant.
When connected, press MENU, tap Add call, dial the number of
the second participant, and then tap Call. The first participant is
put on hold when you dial the second participant.
When connected to the second participant, tap (merge).
To add another participant to the conference call, tap , and
then dial the number of the contact you want to invite to the
conference call.
The conference call is put on hold when you call another contact.
When you are connected to the other contact, you can talk to that
party in private.
1.
2.
3.
1.
2.
3.
4.

Phone calls 67
When connected, tap to add the participant to the conference
call.
When finished, tap End call.
Not all mobile networks support conference calling. Contact Verizon
Wireless for details.
Muting the microphone during a call
On the screen, tap to toggle between turning the microphone on
or off. When the microphone is turned off, the Mute icon ( ) appears
in the status bar.
Turning the speakerphone on or off during a call
On the screen, tap to toggle between turning the speakerphone
on or off. The Speakerphone icon ( ) appears in the status bar when
the speakerphone is on.
To avoid damage to your hearing, do not hold your phone against
your ear when the speakerphone is turned on.
Ending a call
On the screen, tap End call.
If the phone display is off, press POWER/LOCK to turn on the screen
so you can tap End call.
If the phone number of the person who called is not in your contacts
list, you can choose to save the number to your contacts list after you
hang up.
5.
6.
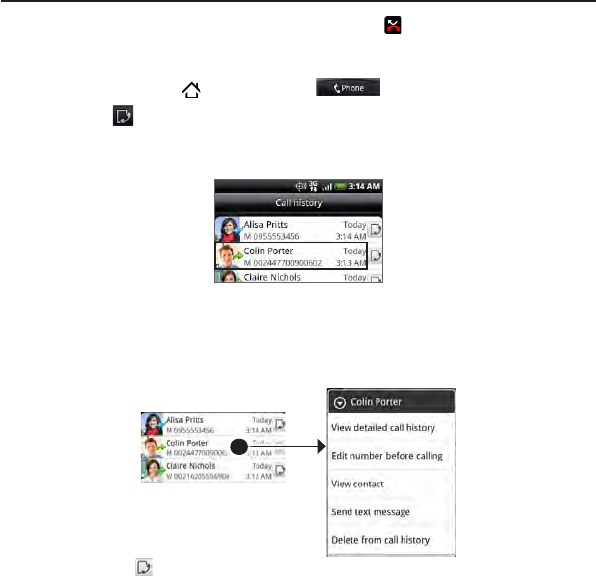
68 Phone calls
Using call history
When you miss a call, the missed call icon ( ) appears in the title
bar. Use the Call history tab in the People application to check who
the caller was or view all your dialed numbers and received calls.
Press HOME , and then tap .
Tap at the bottom-right corner of the screen.
Do one of the following:
Tap the name or number in the list to call.
Press and hold a name or number in the list to display the
options menu where you can select to view the contact
information (if the number is stored in your contacts list), edit
the number before you redial, send a text message, or delete
from call history.
Tap to show the call history for that particular contact.
1.
2.
3.
Phone calls 69
You can also access call history from the People application. See the
People chapter for more information.
Adding a new phone number to your contacts from call
history
Press HOME , and then tap .
Tap at the bottom-right corner of the screen.
Press and hold the received call or number that is not in your
contacts list that you want to save to your contacts list, and then
tap Save to contacts.
In the blank contact record that appears, enter the contact name
and other information. The phone number is automatically added
to the Mobile field in the Phone section.
To store it as another type of number, for example a home
number, tap the Mobile button.
Scroll down the screen and tap Save.
To learn how to add new contacts or edit the contact information, see
the People chapter.
Checking a missed call
You will see the missed call icon in the status bar when you miss a call.
Press HOME , and then tap .
Tap at the bottom-right corner of the screen.
In the call history list, missed calls are indicated by the missed call
icon ( ).
1.
2.
3.
4.
5.
1.
2.
3.
70 Phone calls
You can also press and hold the status bar, and then slide your finger
downward on the screen to open the Notifications panel. The missed
call number or contact name is displayed.
Clearing the call history list
Press HOME , and then tap .
Tap at the bottom-right corner of the screen.
Do one of the following:
To remove one name or number from the list, press and hold
the name or number, and then tap Delete from call history.
To clear the entire list, press MENU, and then tap Delete all.
Calling from abroad
Your phone is a world phone. This means that you can use it anywhere
in the globe as long as you’re connected to a Verizon Wireless partner
network. Because not all networks use the same communications
technology (Verizon Wireless uses CDMA), we’ve installed a Verizon
Wireless SIM card on your phone so you can get connected even
when you’re in a GSM coverage area.
Roaming is a charged service. Contact Verizon Wireless before you
travel to another country.
Changing the network your phone connects to
Your phone is set to Global mode and automatically searches for
the appropriate network in your location (CDMA or GSM) and then
connects to it.
1.
2.
3.

Phone calls 71
When roaming in countries where both CDMA and GSM networks are
present, you can make your connect to a CDMA or a GSM network only.
Press HOME > MENU, and then tap Settings.
Tap Call > Preferred Network, and then select CDMA Mode or
GSM / UMTS Mode.
Replacing the SIM card
When you receive your device, you can only use the Verizon Wireless
SIM card when you’re roaming in a GSM coverage area. If you want to
replace the pre-installed SIM card, contact Verizon Wireless. There is a
fee for this service.
Remove the back cover. Refer to “Removing the back cover” in
the Basics chapter.
Remove the battery. Refer to “Removing the battery” in the
Basics chapter.
Locate the SIM card slot and then pull the SIM card out of the
slot using your finger.
Insert the new SIM card to the slot with the gold contacts facing
down and the cut-off corner facing out the card slot.
5. Replace the back cover.
1.
2.
1.
2.
3.
4.

72 Phone calls
Call services
Your phone can directly link to the mobile phone network, and enable
you to access and change the settings of various phone services for
your phone. Call services may include call forwarding, call waiting,
voicemail, and more. Contact Verizon Wireless to find out about the
availability of call services for your phone.
To open call services, press HOME > MENU, and then tap Settings >
Call.
Voicemail service
Shows the current voicemail service being used.
Voicemail settings
Specify the voicemail number.
Clear voicemail notification
If you have a notification of a new voicemail, you can clear the
notification with this option.
Auto Retry
When enabled, the phone automatically redials a number when the
attempted call fails.
Hearing aids
Turn on the Hearing Aid Compliance feature that reduces interference
to hearing aids.

Phone calls 73
Preferred Network
Let’s you select the type of network your phone connects to so you
can place phone calls and have data connection.
GSM call settings
If you’re using the phone in a GSM coverage area via the Verison
Wireless SIM that is pre-installed on your phone, you can set the
following options:
TTY mode Allow the use of a TTY (teletypewriter) device for
users who are visually or hearing impaired.
Caller ID Enable or disable Caller ID.
Call waiting Enable or disable Call waiting.
Cell broadcast Enable or disable receipt of cell broadcast messages
from your service provider.
Cell broadcast
settings
Configure channels and language for cell broadcast
messages.
CDMA call settings
If you’re using the phone within Verizon Wireless’ coverage area, you
can set the following options:
TTY mode Allow the use of a TTY (teletypewriter) device for
users who are visually or hearing impaired.
NBPCD Set the calling parameters for the current country,
such as country code and IDD prefix.
Voice Privacy Encrypts outgoing voice calls and uses secure
channels when available.

74 Phone calls
Assisted Dialing
Assisted Dialing allows you to easily dial international calls while
roaming in another country. See “Using Assisted Dialing” in this
chapter for details.
Phone settings
Edit the call reject message, choose whether to open the message
editor when you reject a call with a message, and choose whether to
allow automatic saving of an unknown contact number when a call
with that number ends.
Using Visual Voice Mail
Visual Voice Mail allows the management of voice mail directly from the
phone rather than accessing your voice mail via traditional methods.
Visual Voice Mail displays a list of messages and allows the user to
choose which message to listen to or erase, without having to dial into
their mailbox, listen to voice instructions, or listen to prior messages.
You must be a Verizon Wireless subscriber to use Visual Voice Mail.
Setting up Visual Voice Mail
Press HOME , and then tap > Voice Mail > Visual Voice Mail.
When prompted, enter your basic voice mail password.
Read the terms of use statement and then tap Subscribe to
continue.
Tap Exit and wait 5 minutes before using Visual Voice Mail.
1.
2.
3.
4.
Phone calls 75
Using Visual Voice Mail
Press HOME , and then tap > Voice Mail.
The first time you run Visual Voice Mail after setting it up, you are
prompted to read the terms of use statement.
After reading the terms of use statement, scroll down and tap
Accept to continue.
On the Voicemail screen, you can:
Tap Compose voicemail to record and send a voice mail.
View a list of received Visual Voice Mail messages.
Tap Menu and sort and delete voice mails, call your voice mail
box, configure voice mail settings, and more. You can also
synch with the Visual Voice Mail server to refresh the Visual
Voice Mail list.
Visual Voice Mail is only available in the National Enhanced Services
Coverage Area and only on select devices. Specific terms, conditions
and monthly charges apply. Basic Voice Mail and V CAST Coverage
Area are required and V Block must be removed to use Visual Voice
Mail.
Anyone in possession of this device can access voice mail. To limit
unauthorized access to voice mail, consider locking the phone when
not in use.
1.
2.
3.

76 Phone calls
Turning Airplane mode on or off
In many countries, you are required by law to turn off the phone while
on board an aircraft. A way to turn off the phone function is to switch
your phone to Airplane mode. When you enable Airplane mode,
all wireless radios on your phone are turned off, including the call
function, data services, Bluetooth, and Wi-Fi.
Press HOME > MENU, and then tap Settings > Wireless &
networks.
Select or clear the Airplane mode check box to enable or disable
Airplane mode. When enabled, the Airplane mode icon ( ) is
displayed in the status bar.
When you disable Airplane mode, the call function is turned back on
and the previous state of Bluetooth and Wi-Fi is restored.
1.
2.

People
About People
In People, you can easily manage your communications with contacts
via phone, messaging, and email. You can also view updates on their
Facebook, Flickr, and Twitter accounts.
If you are synchronizing contacts with your Google account, with your
PC, and/or with an Exchange Server, any contacts stored in those
accounts are displayed in People. You can also synchronize contacts from
your Facebook account in People. For more information on synchronizing
accounts, see “Ways of getting contacts into your phone” in this chapter.
Ways of getting contacts into your phone
You can add contacts to your phone from:
Gmail contacts Gmail contacts are imported to your phone after
you set up a Google Account. For details, see the “Gmail” in the
Email chapter.
Phone contacts See “Adding a new contact” in this chapter for
details.
Exchange ActiveSync Server See “Synchronizing with a Microsoft
Exchange ActiveSync account” in the Accounts and sync chapter
for details.
Contacts on your computer See “Using HTC Sync” in the
Accounts and sync chapter for details.
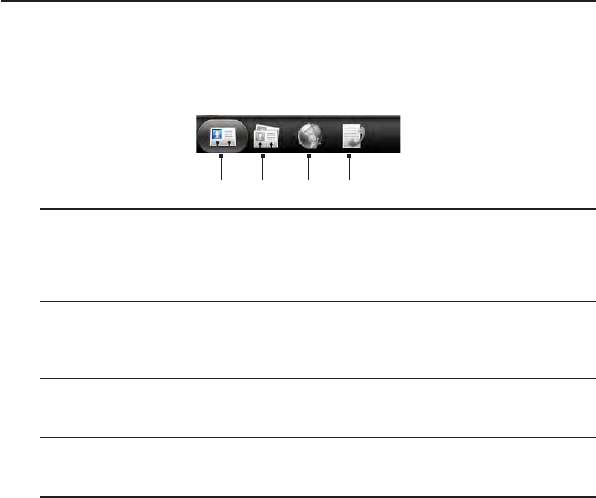
78 People
Facebook See “Adding an account” in the Accounts and sync
chapter for details.
People screen
The People screen gives you easy access to all your contacts, as well
as even faster access to the people and groups of people you contact
most often.
The People screen has the following tabs:
1 2 3 4
1 All tab
Gives you access to all contacts on your phone, including Google
contacts, Exchange ActiveSync contacts, Phone contacts, and Facebook
contacts. You can also use this tab to open or update My contact card.
For more information, see “Setting up My Contact Card” in this chapter.
2 Groups tab
Lets you assign contacts to groups so you can easily send an SMS, MMS,
or email message to a whole group. For more information, see “Contact
groups” in this chapter.
3 Online directories tab
Search for contacts on your online directories such as your Exchange
ActiveSync or Facebook account to copy to your phone.
4 Call history tab
Lists all your dialed numbers and received and missed calls. See “Using
Call History” in the Phone calls chapter.
People 79
Setting up My contact card
My contact card provides a convenient way to store your personal
contact information so that you can easily send it via SMS, MMS, email,
or Bluetooth.
Press HOME , and then tap > People.
On the All tab of the People screen, tap Me, and then tap Tap
here to edit contact.
If you are logged in to your Facebook account through Facebook
for HTC Sense, instead of Me, you will see your the name you use in
Facebook.
Enter your name and contact details.
Tap Save.
Your contacts list
The All tab of the People screen shows all your contacts, including
Google contacts, Exchange ActiveSync contacts, Phone contacts, and
Facebook contacts.
If you signed in to your Google Account and Facebook account when
you first set up the phone, your contacts from those accounts will
appear in the contacts list when you open People.
1.
2.
3.
4.
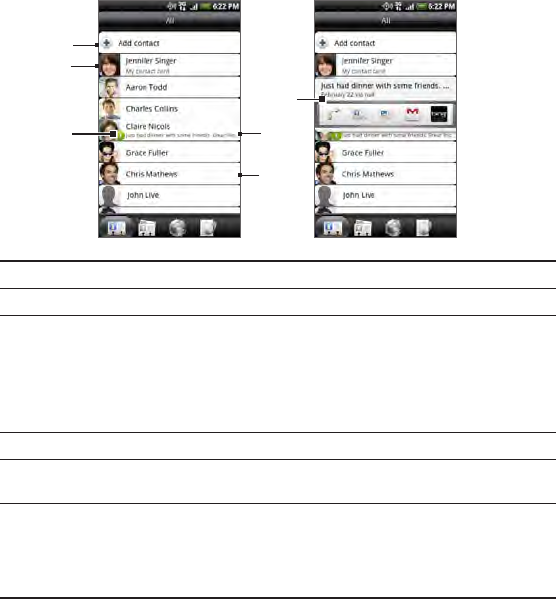
80 People
1
2
3
4
5
6
1 Create a new contact.
2 Tap to edit your My contact card.
3 This icon appears when the contact:
Has sent you a new text or email message, or tried to call you but you
missed the call.
Has updated his or her Facebook profile or has added photos on Flickr
or Facebook.
Has upcoming Facebook events.
4 Tap to open the contact details screen for that contact.
5 This appears when the contact is a Facebook contact or you link the
contact to his or her Facebook account.
6 Tap the photo or icon to open a menu where you can quickly choose how
to communicate with the contact. Depending on the contact information
stored, you can call, send a message or email, see the contact’s Facebook
profile, and map his/her address in Bing Maps. The contact’s Facebook
status is also displayed at the top of the options.
People 81
To view only contacts of a particular type, for example Google
contacts or Facebook contacts, press MENU, tap View, and select the
contact types.
Adding a new contact
Press HOME , and then tap > People.
On the All tab, tap Add contact at the top of the screen.
Select the Contact type, for example Google or Microsoft
Exchange ActiveSync. This determines which account the
contact will sync with. For more information, see “Ways of
getting contacts into your phone” in this chapter.
Tap the Name field, enter the first and last name of the contact,
and choose the order in which to display the names. Tap OK.
Enter the contact information in the fields provided.
Scroll to the bottom of the screen, and then tap Save.
Importing contacts from an Exchange ActiveSync
account
Access contacts from your Exchange ActiveSync account, and then
copy them to the phone. You need to have your Exchange ActiveSync
account set up on your phone.
Press HOME , and then tap > People.
On the Online directories tab, tap Company directory.
Enter the name, and then tap .
In the list, tap the name of the contact you want to copy to your
phone.
Tap Save to People.
1.
2.
3.
4.
5.
6.
1.
2.
3.
4.
5.
82 People
Merging contact information
Merge duplicated contacts on your phone to avoid clutter and
confusion. If you have the same contact appear in your Phone, Google,
and Facebook accounts, you can merge the contact information into
one contact.
The phone automatically merges contacts that it finds to have similar
data. If you need to manually merge contacts or break the link
between contacts, follow the procedures below.
Manually merging contact information
Press HOME , and then tap > People.
On the All tab, tap the name of the contact (not the icon or
photo) you want to merge with another contact on your phone.
At the upper right corner of the screen, tap or (if
there are suggested links.)
On the screen, you can:
If there are suggested links, tap to link the contact to
the selected account.
Tap one of the options available in the Add contact section.
Tap Done.
Breaking the contact information link between contacts
Press HOME , and then tap > People.
On the All tab, tap the name of the contact (not the icon or
photo) whose contact information link you want to break.
On the upper right corner of the screen, tap .
On the Linked contacts section, tap beside the name of the
contact to break the link.
Tap Done.
1.
2.
3.
4.
5.
1.
2.
3.
4.
5.
People 83
Editing a contact’s information
Press HOME , and then tap > People.
On the All tab, press and hold the contact, and then tap Edit
contact.
Enter the new information for the contact.
Scroll to the bottom of the screen, and then tap Save.
Searching for a contact
Press HOME , and then tap > People.
Press the SEARCH button on the phone.
In the search bar, enter the first few letters of the first or last
name of the contact you are looking for. Matching contacts are
displayed.
If the list of matching contacts is long, you can view more results by
tapping to hide the onscreen keyboard.
Tap the contact to open his or her contact details screen. See
“Contact information and conversations” in this chapter for
details.
Backing up your contacts to the storage card
Press HOME , and then tap > People.
Press MENU, and then tap Import/Export > Export to SD card.
When asked to confirm, tap OK.
1.
2.
3.
4.
1.
2.
3.
4.
1.
2.
3.
84 People
Importing contacts from the storage card
You can only import contacts that were exported to the storage card
using the Export to SD card feature on the phone. See “Backing up
your contacts to the storage card.
Press HOME , and then tap > People.
Press MENU, and then tap Import/Export > Import from SD card.
If you have Google or Exchange ActiveSync accounts set up on
your phone, tap the type for the imported contacts.
Press BACK to stop importing contacts from the storage card.
Deleting contacts
Press HOME , and then tap > People.
On the All tab, press MENU, and then tap Delete.
Select the contacts you want to delete, and then tap Delete.
When prompted, tap OK.
To delete a single contact, on the All tab, press and hold the name
of the contact (not the icon or photo) who you want to delete and
select Delete contact from the menu.
Sending contact information as a vCard via MMS
Press HOME , and then tap > People.
On the All tab, press and hold the name of the contact (not the
icon or photo) whose contact information you want to send, and
then tap Send contact as vCard.
Select the type of information you want to send, and then tap Send.
Enter the recipient’s number or email address, and then tap Send.
1.
2.
3.
1.
2.
3.
4.
1.
2.
3.
4.
People 85
You can also send a vCard via Bluetooth. To learn how to send files
through Bluetooth, see the Bluetooth chapter.
Sending your contact information as a vCard via MMS
Press HOME , and then tap > People.
On the All tab, tap [Your name] My contact card.
Press MENU, and then tap Send my contact info.
Select the type of information you want to send, and then tap Send.
Enter the recipient’s number or email address, and then tap Send.
You can also send your contact vCard via Bluetooth. To learn how to
send files through Bluetooth, see the Bluetooth chapter.
Contact groups
On the Groups tab, you can assign contacts to groups so you can
easily send an SMS, MMS, or email message to a whole group. You
can also sync groups on your phone with the groups in your Google
account, accessible via your computer’s web browser.
Creating a group and adding contacts
Press HOME , and then tap > People.
On the Groups tab, at the top of the screen, tap Add group.
Enter a name for the group, and then tap Add contact to group.
Select the contacts you want to add to the group, and then tap
Save.
If your contacts list is long, you can use the search bar to search for
contacts quickly, or tap to hide the onscreen keyboard and scroll
through the list.
1.
2.
3.
4.
5.
1.
2.
3.
4.

86 People
Tap to add a group from photo.
Tap Save.
Deleting a group
Press HOME , and then tap > People.
On the Groups tab, press and hold the group you want to delete,
and then tap Delete group.
You can only delete groups that you have created.
Adding or removing contacts from a group
Press HOME , and then tap > People.
On the Groups tab, press and hold the group, and then tap Edit
group.
You can:
Tap the group name to change the name. You can only change
the name for groups that you have created.
Tap the icon to the left of the group name to change or
remove the group photo.
To add contacts to the group, tap Add contact to group,
select the contacts you want to add, and then tap Save.
To remove a contact from the group, tap at the right side
of the contact name, and then tap Save.
5.
6.
1.
2.
1.
2.
3.
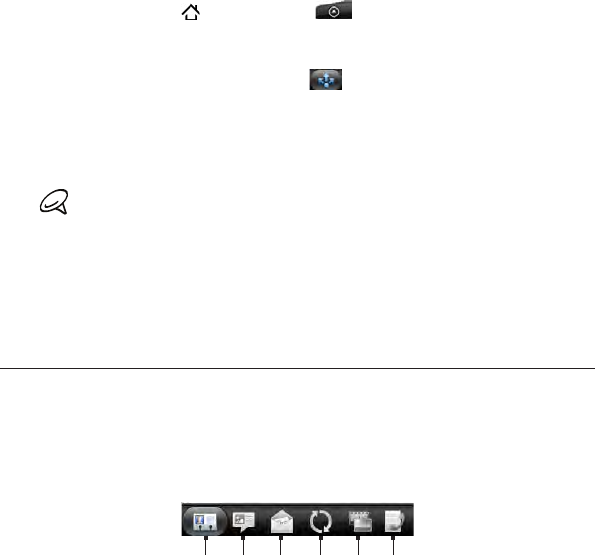
People 87
Sending an SMS/MMS message or email to a group
Press HOME , and then tap > People.
On the Groups tab, tap the group you want to send an SMS/MMS
message or email to.
Go to the Group action tab ( ), and then do one of the
following:
Tap Send group message to send an SMS/MMS message to
the group. For information about composing and sending
messages, see the Messages chapter.
You will be charged by your mobile provider for each message sent.
For example, if you send a message to a group of five people, you will
be charged for five messages.
Tap Send group mail to send an email to the group. For
information on composing and sending email, see the Email
chapter.
Contact information and conversations
When you tap a contact on the People screen, the contact details
screen opens, showing you the information stored for that contact,
exchanged messages and phone calls with that contact, Facebook
notifications, and more.
The contact details screen has the following tabs:
65
4
3
2
1
1.
2.
3.

88 People
1 Details tab
Shows the information you have stored for the contact, and allows you
to get in touch with the contact directly by tapping any of the displayed
methods. For example, if the contact has a stored work phone number,
tap Call Work to call that number.
You can also add one of the contact’s phone numbers as a speed dial
number. For information, see “Adding a contact to speed dial” in the
Phone calls chapter.
2 Messages tab
Shows your exchanged SMS messages with the contact. Tap a message
to view it. To send a new message, tap New message. For more
information about messages, see the Messages chapter.
3 Mail tab
Shows email messages you have received from the contact. Tap an email
message to view it. To send a new email message, tap New mail. For
more information about email, see the Email chapter.
4 Updates and events tab
Shows the contact’s Facebook status, updates, and events, shows when
he or she uploads new photos to Flickr, and shows your contact’s tweets
in Twitter. When there is a notification of the contact’s birthday, you
can tap the notification to call the contact directly or send a message
greeting.
You need to be logged in to your Facebook, Flickr, and Twitter accounts
to see the updates and events.
5 Gallery tab
Shows the contact’s Facebook and Flickr photo albums. Tap an album to
look at the photos in the album.
You need to be logged in to your Facebook and Flickr accounts to see
the photo albums. If you are not logged in, tap Link to Facebook and/or
Link to Flickr.
6 Call history tab
Lists all your incoming, outgoing, and missed calls to and from the
contact. Tap a list item to call the contact using the displayed number.
People 89
People widget
Put the group of people you contact most right on the Home screen
of your phone by adding them as the People widget. Using the People
widget, you can instantly place a call, send a message, or view details
of a favorite contact with a single tap.
Adding the People widget
Slide your finger left or right on the Home screen to find the People
widget. If you do not find the People widget on the Home screen,
follow this procedure to add the widget to the Home screen.
Press HOME , and then tap > Widget > People.
Choose the widget style, and then tap Select.
Select the group you want to add as a widget.
Drag the widget to a blank space on a Home screen, and then
release.
Setting the default communication method
Press HOME , and then go to the People widget.
Tap a contact on the widget.
On the Select default action screen, tap the communication
method you want for the contact.
Changing the default communication method
Tap the contact’s name (not the photo) on the widget.
Press MENU and then tap More > Set widget action.
On the Select default action screen, tap the new communication
method you want for the contact.
1.
2.
3.
4.
1.
2.
3.
1.
2.
3.

90 People
Getting in touch with a contact
Press HOME , and then go to the People widget.
Tap a contact (photo not the name) on the widget. The default
communication method will be performed.
Tap the name of the contact to open the contact details screen for
that contact.
If you have not set a default communication method, the
Select default action screen will open. See “Setting the default
communication method” in this chapter for details.
1.
2.
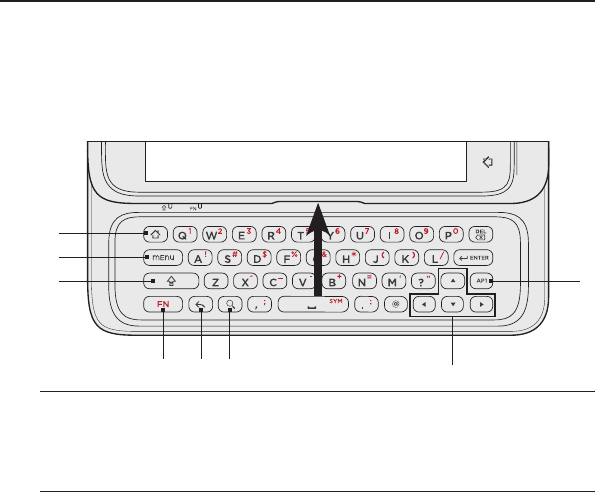
Keyboard
Using the slide-out keyboard
Hold your phone sideways, with the control buttons on the right, and
then push the display up to reveal the slide-out. When you open the
slide-out keyboard your display will always be in landscape and you
will not be able to use the onscreen keyboard.
Open an application that allows text entry, such as Messages, tap a
text box, and then use the slide-out keyboard to enter text.
3
2
65
4
1
7
8
1 Home key
Instead of pressing the HOME button, press this key to return to the Home
screen (when you’re in an application) or show a snapshot of the extended
Home screens (when you’re in the main Home screen). You can also press
and hold this key to open the recently-used applications window.

92 Keyboard
2 Menu key
Instead of pressing the MENU button, press this key to open the available
menu options for the current screen.
3 Shift key
Press once and then press a letter key to type that letter in uppercase.
On number or symbol keys, pressing the Shift key causes the special
character to appear.
Lock the Shift key to type a series of characters by pressing Shift
twice. The cursor shape changes while the key is locked: .
Unlock the Shift key by pressing it once again.
4 Function (FN) key
Press once to type the character shown in color on some of the keys.
For example, if you need to type the dollar sign ($), press the Shift key
and then press the D key (FN, D).
Press twice to lock the ALT key and type a series of characters. The
cursor shape changes while the key is locked: .
Unlock the ALT key by pressing it once again.
5 Back key
Instead of pressing the BACK button, press to go back to the previous
screen, or to close a dialog box, options menu, or the Notifications panel.
6 Search key
Press to open the search box and type anything you want to search.
Press the Enter key to begin the search.
7 Navigation keys
Press these keys to control your direction on the screen, such as when
you’re scrolling up or down on a web page, when you are positioning the
cursor, or when you want to go the next or previous Home screen panel.

Keyboard 93
8 Quick key
This key lets you quickly open an application, a phone setting, or another
items such as a bookmark. To know how to use the Quick key, see “Using
the Quick key.”
Using the Quick key
You can assign the Quick key to open an application or an item on
your phone with a single press.
Press HOME > MENU, and then tap Settings > User assigned key.
Tap User assigned key #1, and then do any of the following:
Tap Application, and then tap the application that you want to
open every time you press the Quick key.
Tap Shortcuts, and then tap the item (such as Bookmark or
Person) that you want to open every time you press the Quick
key. Follow the screen instructions to proceed.
3. Open the slide-out keyboard and then press the Quick key.
The application or item should open.
1.
2.
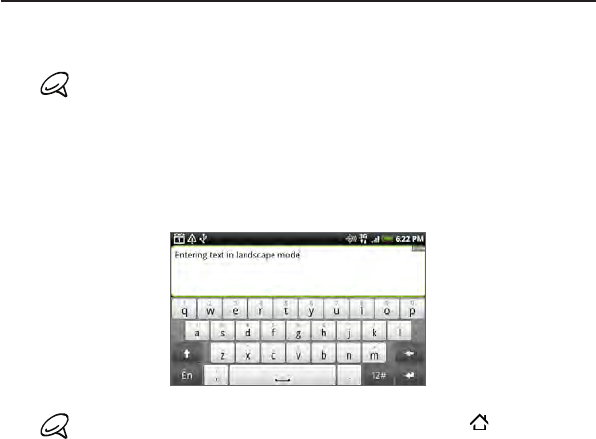
94 Keyboard
Using the onscreen keyboard
When you start a program or select a field that requires text or
numbers, the onscreen keyboard becomes available.
The onscreen keyboard is not available when the slide-out keyboard
is open.
Using the landscape onscreen keyboard
When entering text, you can choose to use the landscape orientation
of the onscreen keyboard. Turn the phone sideways to use a larger
keyboard that lets you type easily using two thumbs.
Select the Auto-rotate screen check box in HOME > MENU >
Settings > Display for the screen orientation to automatically
change.
The landscape orientation keyboard is not supported in all
applications.

Keyboard 95
Changing the onscreen keyboard layout
You can choose from three different keyboard layouts to suit your
typing style. To change the keyboard layout, do the following:
Press HOME > MENU, and then tap Settings > Language &
keyboard.
Tap Touch Input > Keyboard types, and then select the keyboard
layout that you want to use. Choose from the following:
QWERTY. This layout is the same with a desktop computer
keyboard. This is the default keyboard layout.
Phone Keypad. This layout is the same with the traditional
mobile phone keypad.
Compact QWERTY. This layout features two letters on each
key. The key size is slightly bigger than on the Full QWERTY
layout.
Changing the keyboard language
You can change the onscreen keyboard layout to a number of
languages that you frequently use.
Press HOME > MENU, and then tap Settings > Language &
keyboard.
Tap Touch Input > International keyboard.
Select the languages that you want to switch the onscreen
keyboard to.
Press BACK .
Open an application that accepts text input, such as Messages,
and then tap a text box.
1.
2.
1.
2.
3.
4.
5.
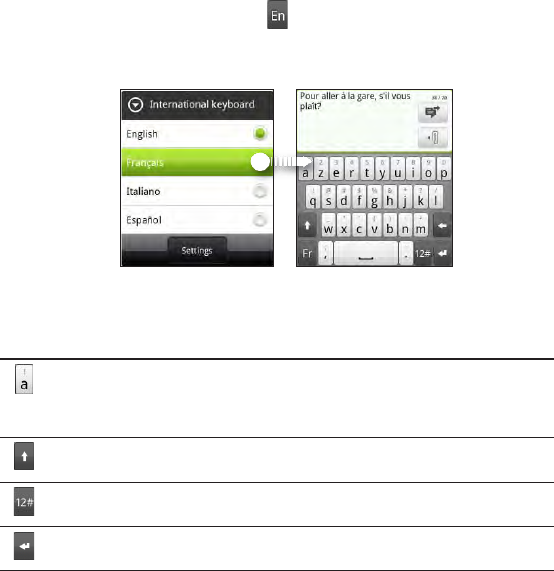
96 Keyboard
Tap the language switch key , and then select the language
that you want to use.
The keyboard layout changes according to your selected
language.
Entering text
Use the following keys while entering text using the onscreen
keyboard:
Press and hold keys with gray characters at the top to enter numbers,
symbols, or accented letters. The gray character displayed on the key
is the character that will be inserted when you press and hold that key.
Some keys have multiple characters or accents associated with them.
This is the Shift key. Tap to enter an uppercase letter. The next letter you
type will be uppercase. Tap twice to turn on caps lock.
Tap to switch to the numeric and symbol keyboard.
This is the Enter key. Tap to create a new line.
6.

Keyboard 97
This is the Backspace key. Tap to delete the previous character.
Tap to change the onscreen keyboard language.
Tap this key, and then tap Settings to open the Touch Input settings
and change the keyboard type, select the languages you want the
keyboard layout to switch to, and adjust other text input settings.
Tap to toggle between Multitap and XT9 predictive modes when using
the Compact QWERTY or Phone keypad layout. For more information,
see “Entering words with predictive text.”
Entering words with predictive text
The onscreen keyboard has predictive text to help you type quickly
and accurately. Predictive text input is enabled by default, and word
suggestions are displayed as you type.
To enter a word in predictive mode, do any of the following:
If you see the word you want highlighted in green or orange, you
can simply tap the space bar to insert the word into your text.
If you see the word you want shown in the suggestions before
you have finished typing the entire word, tap the word to insert it
into your text.
If an arrow is shown to the right of the suggestion list, tap the
arrow to see more suggestions.

98 Keyboard
Adding a word to the predictive text dictionary
Your phone comes with a list of words that it references for predictive
text suggestions. Sometimes you may need to add a word to the
predictive text dictionary, for example a name or a specialized
technical word.
While entering text using the QWERTY keyboard layout, if you tap any
word on the suggestion list, it is automatically added to the predictive
text dictionary if it was not in the dictionary already.
You can also add a word to the list manually:
On the onscreen keyboard, press .
Tap Settings > User Dictionary.
Tap Add new.
Enter the word to add, and then tap OK.
Editing or deleting a word in the user dictionary
You can edit or remove words that you previously added to the
predictive text dictionary.
On the onscreen keyboard, press .
Tap Settings > User Dictionary.
To edit a word, tap the word itself.
To delete a word, tap the X icon to the right of the word.
1.
2.
3.
4.
1.
2.

Keyboard 99
Adjusting touch input settings
Open the Touch Input settings by doing one of the following:
On any of the keyboard layouts, press and hold to open the
Touch Input settings.
Press HOME > MENU, and then tap Settings > Language &
keyboard. > Touch Input.
Touch Input settings
Keyboard types
Tap to select the keyboard layout to use. You can choose from
QWERTY, Phone Keypad, or Compact QWERTY.
International keyboard
Tap to select the language layout of the keyboard.
Text input
Tap to set text input options when entering text, calibrate the
keyboard, and set a sound and/or vibration feedback whenever you
tap a key. See “Text input” for details.
Chinese Text input
Tap to set Chinese text input options. You can enter Chinese
characters using PinYin and Stroke.
Tutorial
Learn how to use the onscreen keyboard with this interactive tutorial.
100 Keyboard
User Dictionary
Add, edit or remove words in the predictive text dictionary. See
“Entering words with predictive text” in this chapter for more
information.
Text input
QWERTY
Prediction
Select to enable the word prediction feature which provides a list of
possible words that reflect the characters of the keys you have tapped
as well as characters of nearby keys.
Spell correction
Select to correct typographical errors by selecting from a list of
possible words that reflect the characters of the keys you have tapped
as well as characters of nearby keys.
Phone keypad & compact QWERTY
Spell correction
Select to correct typographical errors by selecting from a list of
possible words that reflect the characters of the keys you have tapped
as well as characters of nearby keys.
Word completion
When using the Compact QWERTY or Phone keypad, lets you select
from a list of possible combinations based on the characters that
appear on the keys that you tapped.
Keyboard 101
Other settings
Sound feedback
Select to hear a clicking sound whenever you tap a key on the
keyboard.
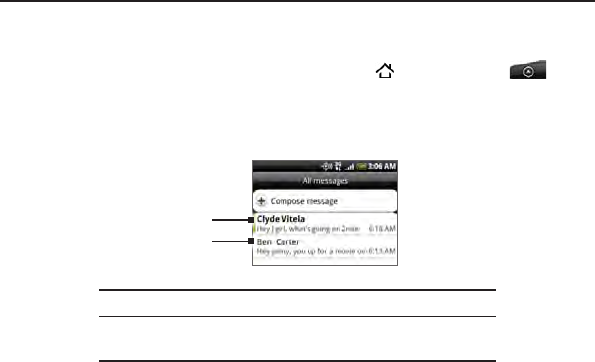
Messages
About Messages
Messages lets you compose and send text (SMS) and multimedia
messages (MMS) to other mobile phones.
To open your message inbox, press HOME , and then tap >
Messages.
If the list of messages does not fit on the screen, you can scroll down
to view more messages by swiping your finger on the screen.
1
2
1 Bold text indicates unread messages in the thread.
2 Tap to open the message or message thread and
read the text or view the picture message.
Messages 103
Sending text and multimedia messages
Send short text messages (SMS) and multimedia messages (MMS)
to other mobile phones. If you exceed the limit on the number of
characters for a single text message, your text message will be
delivered as one but will be billed as more than one message. These
are called concatenated messages.
Multimedia messages can contain text and a picture, a recorded voice,
an audio or video file, a picture slideshow, contact card (vCard), or
appointment (vCalendar).
The Messages application automatically converts a text message into
a multimedia message when you enter an email address in the To
field, add a message subject, attach an item, or compose a very long
message.
Sending a text message
Press HOME , and then tap > Messages.
On the All messages screen, tap New message. The Compose
screen opens.
Fill in one or more recipients. You can:
Enter phone numbers directly in the To field. If you’re sending
the message to several phone numbers, separate the phone
numbers with a comma.
As you enter information, any matching phone numbers from
your contacts list are displayed. Tap a match to enter that
number or address directly.
Tap the icon, and then select the phone numbers of the
contacts to whom you want to send the message. You can
also select contact groups as recipients.
When you have selected all the message recipients, tap Done.
1.
2.
3.
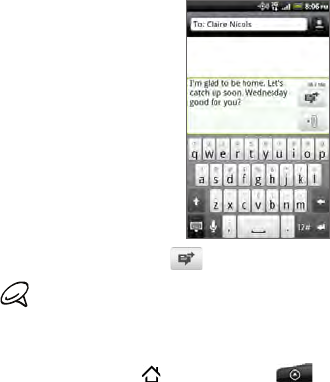
104 Messages
Tap the text box that contains the text “Tap to compose”, and
then start composing your message.
When done, tap to send the text message.
To receive delivery reports and know when a text message is received,
in the All messages screen, press MENU and then tap Settings. In the
SMS settings section, select the Delivery reports check box.
Sending a multimedia (MMS) message
Press HOME , and then tap > Messages.
On the All messages screen, tap New message. The Compose
screen opens.
Fill in one or more recipients. You can:
Enter phone numbers or email addresses directly in the To
field. If you’re sending the message to several recipients,
separate the phone numbers or email addresses with a comma.
As you enter information, any matching phone numbers or
addresses from your contacts list are displayed. Tap a match
to enter that number or address directly.
4.
5.
1.
2.
3.
Messages 105
Tap the icon, and then select the contacts to whom you
want to send the message. You can also select contact
groups as recipients. When you have selected all the message
recipients, tap Done.
You can add a subject line by pressing MENU and then tapping Add
subject.
Tap the text box that contains the text “Tap to compose”, and
then start composing your message.
Press MENU and then tap Attach.
You can also tap on the text box and then tap an icon on the
file bar to attach a file to your MMS message.
On the Attach window, select from the following file attachments:
Picture. Select Camera to take a photo and attach it, or
Pictures to attach a photo from your storage card.
Video. Select Camcorder to capture a video and attach it, or
Videos to attach a video from your storage card.
Audio. Select Voice Recorder to make a voice recording and
attach it, or Music & sounds to attach a music file or voice
recording from your storage card.
App recommendation. Choose an application you’ve installed
from Android Market that you want to share with others. The
URL from which the application can be downloaded will be
inserted to your message.
Location. You can attach location information. Send your
current location (requires GPS to be turned on), a location
stored in Footprints, or a location you pick on a map. For more
information about GPS, maps, and Footprints, see the Maps
and location chapter.
4.
5.
6.
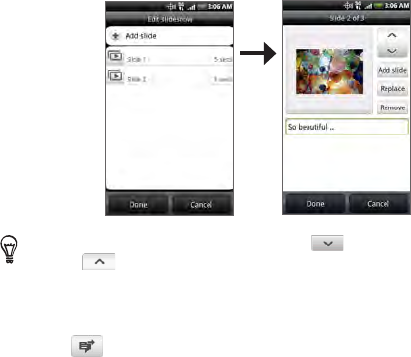
106 Messages
Contact (vCard). Select a contact from your phone, and then
select which contact information you want to attach.
Appointment (vCalendar). Select the calendar event you want
to attach.
Slideshow. Opens the Edit slideshow screen. Tap Add slide to
create a new slide. Tap the created slide (for example, Slide 1),
tap Insert picture, and then select the picture you want to add
to the slide. You can also navigate to the text box and enter a
caption for the picture. When finished, tap Done to attach the
slideshow to your message.
When editing multiple slides, tap to edit the next slide or tap
to return to the previous slide.
While editing the slideshow, press MENU to let you preview the
slideshow, add music or video to a slide, remove a slide, and more.
7. When you have finished composing the multimedia message,
tap .
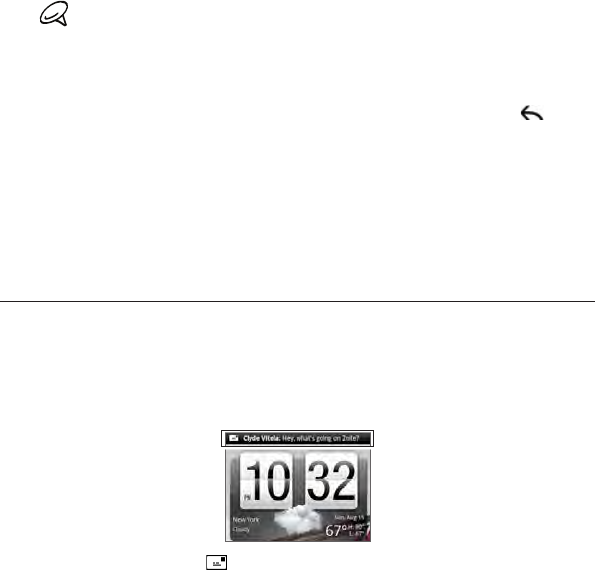
Messages 107
To receive delivery reports and know when a picture message is
received, in the All messages screen, press MENU, and then tap
Settings. Select the Delivery reports check box in the MMS settings
section.
Saving and resuming a draft message
While composing a text or multimedia message, press BACK to
automatically save your message as a draft. To resume composing the
message:
On the All messages screen, press MENU, and then tap Drafts.
Tap the message to resume editing it.
When you finish editing the message, tap Send.
New message notifications
Depending on your notification settings, the phone will play a
ringtone, vibrate, or display the message briefly in the status bar
when you receive a new text or multimedia message. To change the
notification for new text and multimedia messages, see “Setting text
and multimedia message options” later in this chapter.
A new message icon also appears in the notifications area of
the status bar to notify you of a new text or multimedia message.
1.
2.
3.
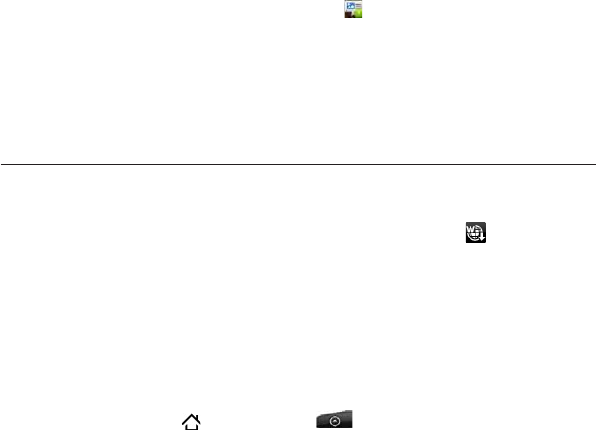
108 Messages
The Messages application icon (if shown on the Home screen) also
displays the number of new messages .
To open the message, press and hold the status bar, and then slide
the status bar down to open the Notifications panel. Tap the new
message to open and read it. For information on reading and replying
to messages see “Managing message conversations” in this chapter.
Viewing push messages
Push messages contain a web link. Often, the link will be to download
a file that you have requested, for example a ringtone.
When you receive a push message, a notification icon is displayed
in the status bar.
Opening the link contained in a push message
Press and hold the status bar, and then slide the status bar down
to open the Notifications panel.
Tap the new message.
Tap Visit website.
Viewing all your push messages
Press HOME , and then tap > Messages.
Press MENU, and then tap Push messages.
1.
2.
3.
1.
2.

Messages 109
Managing message conversations
Text and multimedia messages that are sent to and received from a
contact (or a number) are grouped into conversations or message
threads in the All messages screen. Threaded text or multimedia
messages let you see exchanged messages (similar to a chat program)
with a contact on the screen.
Reading a text message
Do one of the following:
On the All messages screen, tap the text message or message
thread to open and read it.
If you have a new message notification, slide the status bar down
to open the Notifications panel. Tap the new message to open
and read it.
To return to the All messages screen from a text message thread,
press MENU and then tap All messages.
To view the details of a particular message, in the message thread,
press and hold the message to open the options menu, and then
tap View message details.
If a message contains a link to a web page, tap the message and
then tap the link to open it in the web browser.
If a message contains a phone number, tap the message and
then tap the phone number to dial the number or add it to your
contacts.
Viewing a multimedia message
Press HOME , and then tap > Messages.
On the All messages screen, tap a multimedia message or
message thread to open it.
1.
2.
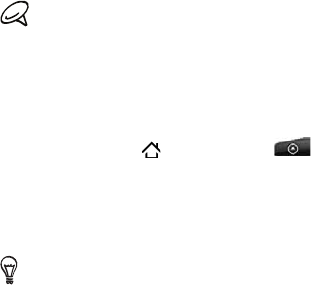
110 Messages
Tap the attachment to open it.
If the attachment is a vCard contact, it is imported to your Phone
contacts list. For information about contacts, see the People
chapter.
If the attachment is a vCalendar file, you can choose the calendar
where you want to save the event. For information on using
Calendar, see the Calendar chapter.
To save the attachment to the storage card, press and hold the
sender’s name or number, and then tap Save [attachment type]
on the options menu.
When Auto-retrieve in MMS settings is disabled, only the message
header is downloaded. To download the entire message, tap the
Download button at the right side of the message. For details, see
“Setting text and multimedia message options” later in this chapter.
If you are concerned about the size of your data downloads, check
the multimedia message size before you download it.
Replying to a text or multimedia message
Press HOME , and then tap > Messages.
On the All messages screen, tap a text or multimedia message
thread to open it.
Tap the text box at the bottom of the screen, enter your reply
message, and then tap Send.
To reply to a text message with a multimedia message, open the text
message, press MENU and then tap More > Add subject, or Attach.
The text message is automatically converted into a multimedia
message.
3.
4.
1.
2.
3.
Messages 111
Protecting a message from deletion
You can lock a message so that it will not be deleted even if you
delete the other messages in the conversation.
Press HOME , and then tap > Messages.
On the All messages screen, tap a message thread.
Press and hold the message that you want to lock
Tap Lock message on the options menu.
A lock icon is displayed at the right hand side of the message.
Deleting a message thread
Press HOME , and then tap > Messages.
On the All messages screen, tap the message thread that you
want to delete.
Press MENU, and then tap Delete.
When prompted to confirm, tap OK.
Any locked messages in the thread will not be deleted unless you
select the Delete locked messages check box.
Deleting several message threads
Press HOME , and then tap > Messages.
On the All messages screen, press MENU, and then tap Delete.
Select the message threads you want to delete.
Tap Delete. Any locked messages will not be deleted.
1.
2.
3.
4.
1.
2.
3.
4.
1.
2.
3.
4.

112 Messages
Deleting a single message
While viewing a message thread,
press and hold the message
that you want to delete.
If the message is locked, tap Unlock message on the options
menu, and then press and hold the message to display the
options menu again.
Tap Delete message on the options menu.
When prompted to confirm, tap OK.
Viewing contact details and communicating with a
contact
When you have received a message from someone in your stored
contacts, you can tap the contact’s photo or icon in the message
thread to open a menu of options. Depending on the stored contact
information, you can view the contact details, phone or send an email
message to the contact, and more.
Setting text and multimedia message options
Press HOME , and then tap > Messages. On the All messages
screen, press MENU and then tap Settings to set the text or
multimedia message options. You can set the following:
Storage settings
Delete old messages
Automatically delete older messages, except for locked messages,
when the set limits are reached.
1.
2.
3.
4.
Messages 113
Text message limit
Choose the maximum number of text messages to store in each
conversation thread (this does not include locked messages).
Multimedia message limit
Choose the maximum number of MMS messages to store in each
conversation thread (this does not include locked messages).
SMS settings
Delivery reports
Select this option to receive a report on the delivery status of your
message.
Priority setting
Set the message priority of SMS messages sent.
Send callback number
Enable your phone to include a number with the text message to
allow the recipient to call you back by pressing the SEND button.
Callback number
Set the callback number.
MMS settings
Delivery reports
Select this option to receive a report on the delivery status of your
message.
114 Messages
Auto-retrieve
Select this option to automatically retrieve all your MMS messages
completely. When selected, the MMS message header plus the
message body and attachments will automatically download to your
phone. If you clear this check box, only the MMS message header will
be retrieved and shown in your All messages screen.
Roaming auto-retrieve
Automatically retrieve all your MMS messages completely when
roaming. This may incur significant phone charges.
Priority setting
Set the message priority of MMS messages sent.
Maximum message size
Set the maximum file size of an MMS message. The MMS message will
not be sent out if it exceeds the file size set here.
Received messages
Received notification
Select this option if you want to receive a notification in the status bar
when a new text or multimedia message arrives.
Play notification sound
If you want the phone to ring when a new message arrives, select this
option.
Notification sound
Select a ringtone that is specific to new text and multimedia
messages. Note that the ringtone briefly plays when selected.
Messages 115
Vibrate
Select this option if you want the phone to vibrate when a new text or
multimedia message arrives.
Sent messages
Sent notification
Select this option if you want to receive a notification in the status bar
when a message is sent successfully.
Failure notification
Select this option if you want to receive a notification in the status bar
when a message failed to send.
Play notification sound
If you want the phone to ring when a sent or failure notification is
received, select this option.
Notification sound
Select a ringtone that is specific to sent or failure notifications. Note
that the ringtone briefly plays when selected.
Vibrate
Select this option if you want the phone to vibrate when a new text or
multimedia message arrives.
Voicemail notification settings
Play notification sound
If you want the phone to ring when you receive a new voicemail
message, select this option.

116 Messages
Notification sound
Select a ringtone that is specific to voicemail messages. Note that the
ringtone briefly plays when selected.
Vibrate
Select this option if you want the phone to vibrate when a new
voicemail message arrives.
Adding the Messages widget
Add the Messages widget to let you read your messages on the Home
screen. To learn how to add widgets, refer to “Adding a widget to your
Home screen” in the Personalizing chapter.

Accounts and sync
Synchronizing with online accounts
Your phone can sync information and receive updates from your
Google™ and Microsoft® Exchange ActiveSync® accounts as well as
popular online services such as Facebook®, Twitter™, and Flickr®.
These are some of the types of information you can sync:
Gmail™ and Exchange ActiveSync email.
Google and Exchange ActiveSync contacts, as well as your
Facebook friends’ contact information. For information on
contacts, see the People chapter.
Calendar events from your primary Google Account and from
Exchange ActiveSync. For information on using Calendar, see the
Calendar chapter.
Status updates and links shared by your friends and yourself on
social networks such as Facebook and Twitter. For details, see
the Social chapter.
Flickr and Facebook photo uploads. For information on viewing
photos, see the Gallery chapter.

118 Accounts and sync
Adding a social network account
You can sync with your accounts on popular online services such as
Facebook, Twitter, and Flickr.
Press HOME > MENU, and then tap Settings > Accounts &
sync.
Tap Add account, and then tap the account type you want to
add.
Follow the onscreen instructions to enter the account
information.
When you have finished, the account is added to the list on the
Accounts & sync screen. Depending on how you configured the
account, the new information may start synchronizing with your
phone.
Synchronizing with a Google Account
Signing in to your Google Account lets you synchronize Gmail and
your Google contacts and calendars between your phone and the
web. You also need to sign in to a Google Account to use Google
applications such as Google Talk™ and Android Market.
You can add more than one Google Account on your phone. However,
subsequent Google Accounts can only synchronize Gmail and
contacts. Other Google services use the first Google Account you
added.
Press HOME > MENU, and then tap Settings > Accounts &
sync.
Tap Add account > Google.
Follow the onscreen instructions to sign in to an account or
create a new account.
1.
2.
3.
1.
2.
3.

Accounts and sync 119
Synchronizing with a Microsoft Exchange ActiveSync
account
You can only add one Microsoft Exchange ActiveSync account on
your phone. You can sync with Microsoft Exchange Server 2003
Service Pack 2 (SP2) or later.
Press HOME > MENU, and then tap Settings > Accounts & sync.
Tap Add account > Exchange ActiveSync.
Enter the Exchange ActiveSync account details, and then tap Next.
Your corporate Exchange Server must support auto-detect for
the phone to automatically set up the Exchange ActiveSync
account. If your corporate Exchange Server does not support
auto-detect, you will need to enter your Exchange Server settings
after you tap Next. Ask your Exchange Server administrator for
details.
Select the types of information you want to synchronize, and
then tap Finish setup.
Managing your accounts
Changing general sync settings
Press HOME > MENU, and then tap Settings > Accounts & sync.
Select or clear the following:
Background data. If this is selected, applications can send
and receive online account information even if you are not
currently using them.
Auto-sync. If this is selected, applications can use the sync
schedule defined in the account settings. If this is cleared, you
will need to sync accounts manually. For instructions on doing
this, see “Synchronizing an account manually”.
1.
2.
3.
4.
1.
2.

120 Accounts and sync
Changing account settings
You can change settings such as the sync frequency and the types of
information synchronized, the kinds of notification you receive, and the
way that account information is displayed.
Press HOME > MENU, and then tap Settings > Accounts & sync.
Tap the account that you want to edit.
Edit the account settings.
Synchronizing an account manually
Press HOME > MENU, and then tap Settings > Accounts & sync.
Tap the account that you want to sync.
Tap Sync now.
Removing an account
You can remove an account to delete it and all information associated
with it from your phone, for example messages, contacts, or settings.
Removing an account does not delete information from the online
service itself.
You cannot remove some accounts, such the first Google Account
you signed into on the phone, except by deleting all personal
information from your phone with a hard reset. For instructions on
doing this, see “Performing a hard/factory reset” in the Backup,
update and reset chapter.
Press HOME > MENU, and then tap Settings > Accounts & sync.
Tap the account that you want to remove.
Tap Remove account, and then confirm that you want to remove
the account.
1.
2.
3.
1.
2.
3.
1.
2.
3.

Accounts and sync 121
Using HTC Sync
Are you using Microsoft Outlook or Outlook Express on your
computer? You can use HTC Sync to synchronize your Outlook
contacts and calendar or your Outlook Express contacts with your
phone. Before you do a factory reset or a software (ROM) upgrade
of your phone, you can also use HTC Sync to back up and sync this
information from your phone back to your computer.
Here’s what you’ll need to do to install, set up, and use HTC Sync on
your computer:
HTC Sync requires USB 2.0 on your computer to connect and
sync with your phone. To see a complete list of the computer
and software requirements, you can check them in the HTC Sync
software download page on the HTC support website:
http://www.htc.com/www/SupportViewNews.aspx?dl_
id=847&news_id=471
Download and install HTC Sync from the HTC support website.
See “Downloading the latest HTC Sync upgrade” for details.
Connect your phone to your computer using the supplied USB
cable and set up HTC Sync to recognize your phone. Follow the
steps in “Setting Up HTC Sync to recognize your phone”.
Choose what information to sync between your computer and
your phone and how you want to sync them.
To easily set up synchronization using HTC Sync’s guided
wizard, follow the steps in “Setting up synchronization”.
To choose from more sync options, see “Setting up more sync
options”.
Sync your computer with your phone automatically or manually.
See “Synchronizing your phone” for details.
1.
2.
2.
3.
4.
122 Accounts and sync
Here’s more you can do with HTC Sync:
If you have third-party applications on your computer (not from
Android Market), you can use HTC Sync to install them from your
computer to your phone. For more information, see “Installing
apps from your computer to your phone”.
Repair contacts and/or calendar data, only if needed.
Installing HTC Sync
Download HTC Sync from the HTC support website. See
“Downloading the latest HTC Sync upgrade” for details.
Quit all running programs on your computer including your anti-
virus program.
Run “HTC Sync.exe” to install it to your PC.
From your PC, launch HTC Sync, and use the USB cable to
connect your phone to the PC (if the phone is not connected to
the PC there will be a sync failure).
On your phone, check Notifications on the status bar for the icon
to confirm if HTC Sync recognizes the phone.
The first time you synchronize the phone, the Synchronization
Settings Wizard will start automatically to help you set up HTC
Sync. (If the Synchronization Settings Wizard does not start, click
Synchronize Now on the HTC Sync screen.)
On your PC, follow the instructions to finish the wizard.on the
HTC Sync screen.
1.
2.
3.
4.
5.
6.
7.
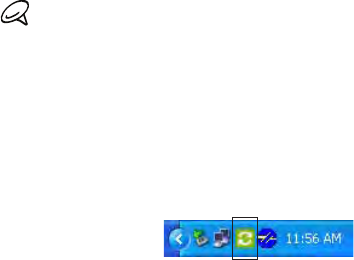
Accounts and sync 123
Setting up HTC Sync to recognize your phone
After installing, set up HTC Sync to recognize your phone.
Connect your phone to the computer with the supplied USB cable.
Or, if your phone is already connected, press and hold the status
bar and drag your finger down to open the Notifications panel.
Then tap the status that shows “Select to change USB connection
type“.
On the Connect to PC screen in your phone., tap HTC Sync and
then tap Done.
Your phone attempts to find HTC Sync on your computer. Wait
for a few seconds for the process to finish.
If your phone displays a message indicating that it’s unable to find
HTC Sync, try disconnecting and reconnecting the USB cable, and
then repeat step 2.
When your phone finds HTC Sync, your computer will display the
Phone Connection Wizard. Click Next.
Enter the name you want for your phone, and then click Finish.
Check the HTC Sync icon at the bottom-right side of your
computer screen. If it appears green in color, that means your
phone has successfully connected with your computer and HTC
Sync recognizes your phone.
1.
2.
3.
4.
5.
6.

124 Accounts and sync
Setting up synchronization
You can set up HTC Sync to synchronize your computer’s Outlook
contacts and calendar events with your phone. If you’re using Outlook
Express on your computer, you can only sync contacts with your
phone.
Before you begin setting up synchronization, make sure you have set up
HTC Sync to recognize your phone. If you have not yet done so, follow
the steps in “Setting up HTC Sync to recognize your phone”.
On your computer, check and make sure the HTC Sync icon
at the bottom-right side of the screen appears in green which
means that your phone is connected to HTC Sync.
Double-click the green HTC Sync icon on your computer to open
HTC Sync.
Click Synchronize Now. (You can also click Sync Manager >
Settings.)
In the Synchronization Settings Wizard, click Next.
In the next few dialog boxes, choose whether to sync Outlook or
Outlook Express, select the type of information to sync (contacts
and/or calendar), and choose to sync them automatically or
manually with your phone.
Click Finish.
HTC Sync then starts to sync your phone and your computer.
Wait for the synchronization to finish.
A summary report is then displayed. Click Close.
1.
2.
3.
4.
5.
6.
7.

Accounts and sync 125
Setting up more sync options
HTC Sync gives you the flexibility to set many options, such as setting
a sync schedule, choosing how to resolve conflicts when the same
items are found on both the phone and the computer, and more.
On your computer, check and make sure the HTC Sync icon
at the bottom-right side of the screen appears in green which
means that your phone is connected to HTC Sync.
If HTC Sync is not open, double-click the green HTC Sync icon to
open it.
Click Sync Manager > Settings.
In the Synchronization Settings Wizard dialog box, click Manual
settings.
From the left side of the Sync Manager Settings dialog box, click
the type of setting you want to change, and then choose from
the available options on the right. Settings that can be changed
include the following:
Contacts or Calendar folder to sync with
Change this only if you have personal folders created in your
Outlook and you need to sync with a personal folder. Click
Contacts or Calendar on the left side of the dialog box, click the
Properties button, and then choose the personal folder to sync
with.
Calendar events to sync with
Choose the number of days of calendar events to sync. Click
Calendar on the left side of the dialog box, click Properties, and
then set the days under Date range.
1.
2.
3.
4.
5.

126 Accounts and sync
Conflict policy
In cases when the same contacts and/or calendar items exist in
both your phone and your computer, choose whose data you
want to keep when a conflict occurs.
When to sync
Click Automatic sync on the left side of the dialog box. Then
choose whether to sync manually, auto sync everytime you
connect your phone to your computer, or sync at a set schedule.
Click Apply to save the sync options you’ve selected, and then
click OK.
Synchronizing your phone
After you’ve installed and set up HTC Sync, you can sync your phone
with your computer.
Synchronizing your phone with your computer automatically
Do the following first to make sure your phone will sync automatically
with your computer:
Press HOME > MENU, and then tap Settings > Applications >
Development.
Make sure the USB debugging check box is selected.
Whenever you connect your phone to your computer, synchronization
starts automatically. Wait for the sync process to finish.
6.
1.
2.

Accounts and sync 127
Synchronizing your phone with your computer manually
Connect your phone to the computer with the supplied USB
cable. Or, if your phone is already connected, press and hold the
status bar and drag your finger down to open the Notifications
panel. Then tap the status that shows “Select to change USB
connection type“.
On the Connect to PC screen in your phone., tap HTC Sync and
then tap Done.
On your computer, check and make sure that the HTC Sync icon
at the bottom-right side of the screen appears in green which
means that your phone is connected to HTC Sync.
On your phone, tap Sync now.
Downloading the latest HTC Sync upgrade
Visit the HTC support website (www.htc.com/support) from time
to time to check for the most recent HTC Sync upgrade so you can
download and install it on your computer.
After installing the latest upgrade, set up HTC Sync again to recognize
and sync with your phone. Follow the steps in “Setting up HTC Sync to
recognize your phone” and “Setting up synchronization”.
Installing apps from your computer to your phone
If you have applications (.apk files) on your computer, you can use
HTC Sync to install them to your phone. We strongly recommend you
install only applications that you trust.
On your phone, press HOME > MENU, tap Settings >
Applications, and then select the Unknown sources check box
to allow applications from your computer to be installed to your
phone.
1.
2.
3.
4.
1.

128 Accounts and sync
You only have to do this step once. You do not need to do this step
again next time you install another application from your computer to
your phone.
Connect your phone to the computer with the supplied USB cable.
Or, if your phone is already connected, press and hold the status
bar and drag your finger down to open the Notifications panel.
Then tap the status that shows “Select to change USB connection
type“.
On the Connect to PC screen in your phone., tap HTC Sync and
then tap Done.
On your computer, double-click the green HTC Sync icon to
open HTC Sync.
In HTC Sync, click Application Installer.
In the Application Installer file types dialog box, make sure that
the Android OS installer file (apk) check box is selected and then
click OK.
This dialog box only appears the first time you use the Application
Installer.
Click Next.
Click Browse, locate the application (.apk) on your computer, and
then click Open.
After selecting the application, click Next.
Click Finish. Check your phone’s screen to see if there are
additional instructions to complete the installation.
2.
3.
4.
5.
6.
7.
8.
9.
10.
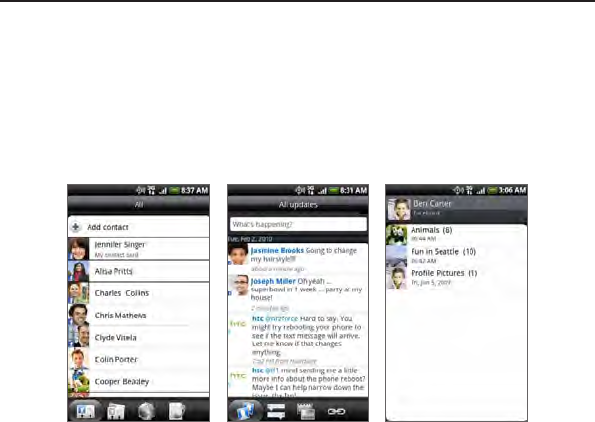
Social
Facebook for HTC Sense and Facebook for
Android application
Facebook for HTC Sense
View your Facebook® updates in supported applications on the phone.
By signing in to Facebook for HTC Sense, your Facebook contacts
and their contact details are downloaded to People, you can browse
through Facebook photo albums in Gallery, and read Facebook status
updates in Friend Stream. To learn how to sign in to Facebook for HTC
Sense, see the Accounts and sync chapter.
People GalleryFriend Stream
130 Social
Facebook for Android application
The Facebook application on your phone lets you keep up and stay
close with your friends in Facebook. It offers most of the features that
you are familiar with when using Facebook on your computer.
If you have more than one Facebook account, you can sign in to the
Facebook application using your other Facebook account.
Using the Facebook application
Press HOME , and then tap > Facebook.
If this is your first time to use Facebook, follow the onscreen
instructions to sign in to your Facebook account.
On the News Feed screen, press MENU, and then tap Home to
access the other functions.
While on the Facebook home screen, press MENU, and then tap
Settings to set refresh and notification options.
On some Facebook screens, you can press and hold an item to
open an options menu.
With the Facebook application, you can:
Share your thoughts and check other people’s status updates.
View your friends list and write on someone’s wall.
Comment on a friend’s post.
View someone’s personal information, including photo albums.
Check your Facebook notifications.
Take a photo and upload it straight to your Facebook account.
Adding the Facebook widget
Add the Facebook widget to the Home screen to let you quickly share
your thoughts and view your friends’ status updates.
1.
2.
3.

Social 131
The widget will only link to the Facebook account that you logged
into on the Facebook application.
Press HOME , and then tap > Widget > Facebook.
Choose the widget style, and then tap Select.
Drag the widget to a blank space on the Home screen, and then
release.
Differences between Facebook for HTC Sense and
Facebook for Android application
Facebook for HTC Sense is not a standalone application. It is
integrated into People, Friend Stream, and Gallery to give you
up-to-date information about your Facebook contacts (their
status updates and new photos) in these applications.
The Facebook for Android application is a standalone application.
Use this application to do most of the things that you would do
when you’re using your computer’s web browser to access your
Facebook account, such as adding a friend and adding captions
to photos you upload.
The two do not share the same login credentials. Signing in to
Facebook for HTC Sense does not sign you in to the Facebook
application and vice versa. If you want to use the same Facebook
account for both, you’ll have to sign in to both using the same
login credentials.
1.
2.
3.
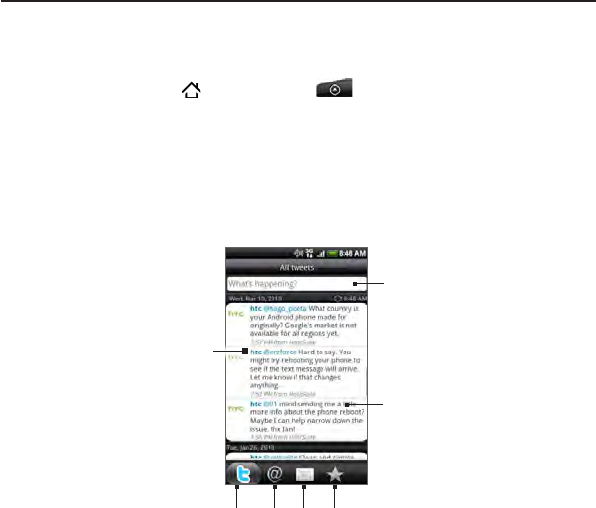
132 Social
Tweeting on your phone
Peep is a Twitter™ client that lets you enjoy “tweeting’’ on your phone.
Send out tweets, read and receive tweets from people, search for new
Twitter users to follow, all from your phone.
Press HOME , and then tap > Peep.
If you did not sign in to your Twitter account when you first
turned on the phone, follow the onscreen instructions to sign in
to your Twitter account.
Peep opens in the All Tweets tab. Slide your finger on the bottom
row to go to the tab you want.
Peep screen
2
3
4
1
5 6 7
1.
2.
3.
Social 133
1 Tap to view the Twitter user’s profile. This also shows you all tweets from
this Twitter user.
2 Tap to enter a tweet to send out.
3 Press and hold to open the options menu to let you reply, send a direct
message, retweet, add to favorite, and view the profile.
4 Shows all the tweets from people you follow and tweets that you have
sent out.
5 Shows all tweets that mentions your username using the “@[your
username]” convention.
6 Shows all private/direct messages that you have received or sent out.
7 Shows tweets that were marked as favorites.
Sending a tweet
Press HOME , and then tap > Peep.
On the All Tweets tab, tap the text field with the words “What’s
happening?”.
Enter your tweet, and then tap Update. Before tapping Update,
you can:
Tap to post a picture from Gallery or Camera to your
default photo hosting site and add the link to the picture into
the tweet.
Tap to insert your location into the tweet. You can choose
to add a map link, insert your location name, or insert your
position coordinates.
1.
2.
3.
134 Social
Searching for Twitter users to follow
Press HOME , and then tap > Peep.
While on the Peep screen, press the SEARCH button.
Tap the text field with the words “Search Twitter”, enter the search
criteria, and then tap .
On the Search result screen, scroll through the list, and then tap
the twitter user you want to follow.
The search results will also list down tweets that contain the search
word.
Press MENU, and then tap Follow.
Unfollowing a Twitter user
Press HOME , and then tap > Peep.
On the All Tweets tab, tap Twitter user you want to stop
following.
Press MENU, and then tap Unfollow.
Sending a direct message
You can only send a direct message to someone who is following you.
Press HOME , and then tap > Peep.
Press MENU, and then tap New message.
You can also send a direct message from the All Tweets or Direct
Message tab. On the All Tweets or Direct Message tab, press and hold
the person you want to send the direct message to, and then tap
Send direct message on the options menu.
1.
2.
3.
4.
5.
1.
2.
3.
1.
2.

Social 135
Tap the To field, and then enter the name. As you enter characters,
the names of the Twitter users that match the characters you enter
will appear. Tap the name when you see it.
Enter your message, and then tap Update.
Setting Peep options
Press HOME , and then tap > Peep.
Press MENU, and then tap More > Settings. You can set these
options:
Account settings
Sign out of your Twitter account.
General settings
Choose whether to show the screen name or the real name of the
people you follow.
Send & receive
Set the frequency to check for new tweets and set the number of
tweets to download.
Services
Set your photo hosting site, photo quality, location options, and URL
shortening host.
Notification settings
Select when to be notified and how you want to be notified.
3.
4.
1.
2.
136 Social
Adding the Twitter widget
Add the Twitter widget to let you send and follow your tweets right
on the Home screen.
Press HOME , and then tap > Widget > Twitter.
Choose the widget style, and then tap Select.
Drag the widget to a blank space on the Home screen, and then
release.
Twitter
for HTC Sense
View your tweets in supported applications on the phone. By signing
in to Twitter (in Peep or Friend Stream), tweets from your contacts
whom you follow in Twitter are downloaded to the Updates and
events tab of the Contact details screen in People.
Using Friend Stream
Streamline your social network accounts through Friend Stream.
Update your status simultaneously, view status updates, and look
through photo updates from your Facebook, Twitter, and other social
network accounts using Friend Stream.
Press HOME , and then tap > Friend Stream.
If you are not signed in to a social network account, press MENU,
tap Settings > Accounts & sync, and then tap the account you
want to sign in to.
Friend Stream opens in the All Updates tab. Slide your finger on
the bottom row to go to the tab you want.
1.
2.
3.
1.
2.
3.
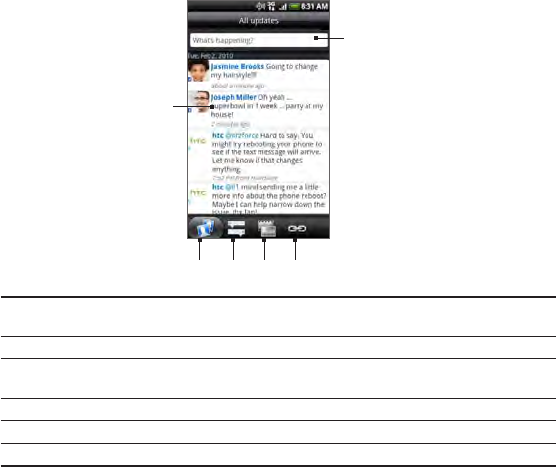
Social 137
Friend Stream screen
Only updates from accounts that you are signed in to will be shown.
You can filter the updates that show in Friend Stream by pressing
MENU, and then tapping Settings > Show updates.
2
3 4 56
1
1 Depending on the type, tap to open Peep, post a Facebook comment,
look at the Flickr album, or open the link in the web browser.
2 Tap to enter and send a status update.
3 Shows all the messages from the social network accounts that you are
signed in to.
4 Shows only status updates from Facebook and Twitter.
5 Shows only photo updates from Facebook and Flickr.
6 Shows only links posted on Facebook.
138 Social
Updating your status
Press HOME , and then tap > Friend Stream.
On the All Updates tab, tap the text field with the words “What’s
on your mind?”.
Tap , and then on the Update Status dialog box, select which
accounts you want the status update to be posted. Tap Done.
Only the accounts that you are signed in to will be shown on the
dialog box.
Enter your status update, and then tap Share.
Adding the Friend Stream widget
Add the Friend Stream widget so you can update your status
simultaneously and view status updates from your social network
accounts right on the Home screen.
Press HOME , and then tap > Widget > Friend Stream.
Choose the widget style, and then tap Select.
Drag the widget to a blank space on the Home screen, and then
release.
1.
2.
3.
4.
1.
2.
3.
Social 139
Chatting in Google Talk
Google Talk is Google’s instant messaging program. It lets you
communicate with other people that also use Google Talk.
Signing in to Google Talk
If you signed in to your Google Account when you first set up the
phone, you are already signed in to Google Talk.
Press HOME , and then tap > Talk > Next > Sign in.
Enter your Google Account username and password, and then
tap Sign in.
When you are signed in to Google Talk, your online status in Google
Talk will also appear in other Google Apps such as Gmail.
Signing out of Google Talk
If you are not going to use Google Talk for an extended period of
time, we recommend that you sign out of Google Talk to save battery
power.
Press HOME , and then tap > Talk.
In the Friends list, press MENU, and then tap More > Sign out.
Chatting with friends
Starting a chat
Press HOME , and then tap > Talk.
Tap a friend in the Friends list.
Chat with your friend by entering text in the text box at the
bottom of the screen.
1.
2.
1.
2.
1.
2.
3.

140 Social
To insert a smiley, press MENU, and then tap More > Insert smiley.
Tap a smiley to insert it into your message.
After entering your message, tap Send.
Accepting an invitation to chat
When a friend sends you a Google Talk message, you receive a
notification. Their entry in the Friends list turns white and displays the
message.
Do one of the following:
In the Friends list, tap the friend who sent you the invitation to
chat.
Open the Notifications panel, and then tap the chat notification.
See “Opening the Notifications panel” in the Basic chapter to
learn how to open the Notifications panel.
Returning to the Friends list
While on a chat screen, press MENU, and then tap Friends list.
Switching between active chats
You can switch between chats if you have more than one chat going.
While on a chat screen, press MENU, and then tap Switch chats.
On the screen that opens, tap the friend you want to chat with.
Inviting a friend to join a group chat
While on a chat screen, press MENU, and then tap Add to chat.
Tap the friend you want to invite. The friend you invited and the
current participants receive an invitation to a group chat. Each
one who accepts the invitation joins the group chat.
4.
1.
2.
1.
2.
Social 141
Chatting on or off the record
Your Google Talk messages are stored, so you can review them later and
even search for them in the Chats folder in Gmail. But, if you’d rather not
store the messages in a chat, you can go off the record.
On a chat screen, press MENU, and then tap Chat off record.
To resume saving the messages in the chat, press MENU, and
then tap Chat on record.
Ending a chat
Do one of the following:
In the Friends list, press and hold the friend you want to stop
chatting with, and then in the menu that opens, tap End chat.
While on a chat screen, press MENU, and then tap End chat.
Changing your online status and picture
Changing your online status
Press HOME , and then tap > Talk.
In the Friends list, tap the online status icon ( ) beside your
name, and then select the status you want on the options menu.
In addition to the standard status settings described in the table, you
can also select a message that you’ve entered previously. Or tap Clear
custom messages to erase them and start over.
Your status and any message appear in your contact’s Friends lists and
in other locations where your status or status message are displayed.
Changing your status message
Press HOME , and then tap > Talk.
In the Friends list, tap the text box to the left of your online
status icon, and then enter your status message.
On the onscreen keyboard, tap .
1.
2.
1.
2.
1.
2.
3.

142 Social
Changing your picture
Press HOME , and then tap > Talk.
In the Friends list, tap the picture to the left of your status
message.
In the Select an album screen, tap the album where the picture
you want to use is located.
Tap the picture you want to use.
Drag the green box to select the portion of the picture to crop,
and then tap Save.
Managing your Friends list
Adding a friend
You can invite anyone with a Google Account to become your friend
in Google Talk, so you can chat with each other and view each others’
online status.
Press HOME , and then tap > Talk.
In the Friends list, press MENU and then tap Add friend.
Enter the Google Talk instant messaging ID or Google email
address of the friend you want to add.
Accepting an invitation to become a friend
When a contact invites you to become a friend in Google Talk, you
receive a notification in the Status bar and the invitation appears in
your Friends list.
Press HOME , and then tap > Talk.
In the Friends list, tap Chat invitation.
1.
2.
3.
4.
5.
1.
2.
3.
1.
2.
Social 143
Do one of the following:
Tap Accept in the menu that opens to accept the invitation.
Tap Cancel if you don’t want to chat with and share your
Google Talk status with the sender.
Viewing the list of pending invitations to friends
Press HOME , and then tap > Talk.
In the Friends list, press MENU, and then tap Invites. All the friends
to whom you’ve extended invitations to become friends on Google
Talk appear in the list until they accept or cancel your invitation.
Tap a pending invitation, and then tap Accept or Decline.
Viewing all friends or only those most popular with you
By default, only the friends that you frequently chat with — the most
popular — are shown in the Friends list. But you can view all friends
instead.
Press HOME , and then tap > Talk.
In the Friends list, press MENU, and then tap All friends. To switch
back to just the friends with whom you chat most frequently, tap
Most popular in the menu.
Making a friend popular
Press HOME , and then tap > Talk.
In the Friends list, press and hold a friend’s name.
If you cannot see the friend, press MENU, and then tap All friends.
In the options menu, tap Always show friend.
3.
1.
2.
3.
1.
2.
1.
2.
3.
144 Social
Blocking a friend
You can block a friend from sending you messages. When blocked,
your friend is also removed from your Friends list.
Press HOME , and then tap > Talk.
In the Friends list, press and hold the friend’s name you want to
block.
If you cannot see the friend, press MENU, and then tap All friends.
In the options menu, tap Block friend. Your friend is removed
from your friends list and is added to the blocked friends list.
To unblock a friend, in the Friends list, press MENU and then tap
Blocked. In the Blocked friends list, tap the name of the friend you
want to unblock, and then tap OK when prompted.
Changing Google Talk settings
Setting notifications for new Google Talk messages
You can set the phone to play a sound, vibrate, or display a
notification icon in the status bar each time you receive a new instant
message.
Press HOME , and then tap > Talk.
In the Friends list, press MENU and then tap More > Settings.
Select the IM notifications check box to receive a notification
( ) in the status bar when a new instant message arrives.
1.
2.
3.
1.
2.
3.
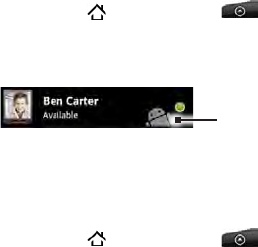
Social 145
Do one of the following:
Tap Select ringtone to select the ringtone to use when a
new instant message arrives. The ringtone briefly plays when
selected. If you don’t want a ringtone to play when you receive
a new Google Talk message, select Silent.
Select the Vibrate check box to vibrate your phone when you
receive a new Google Talk message.
Showing or hiding the mobile indicator to friends
You can check what type of device your friend is using to chat in
Google Talk. In the friends list, check the image that appears to the
right of your friend’s name.
Press HOME , and then tap > Talk.
In the Friends list, press MENU, and then tap More > Settings.
Select the Mobile indicator option.
Indicates that the friend is
using an Android phone.
Setting whether you sign into Google Talk automatically
You can sign in to your Google Talk account automatically every time
you turn on your phone.
Press HOME , and then tap > Talk.
In the Friends list, press MENU, and tap More > Settings.
Select the Automatically sign in check box.
4.
1.
2.
3.
1.
2.
3.

Email
Using Gmail
Gmail is Google’s web-based email service. Gmail is configured when
you first set up your phone. Depending on your synchronization
settings, Gmail on your phone is automatically synchronized with
one or more Gmail accounts on the web. For more information about
synchronization, see “Synchronizing with a Google Account” in the
Accounts and sync chapter.
Viewing your Gmail inbox
The Inbox conversations list is your default Gmail view. All your
received email messages are delivered to your Inbox.
Gmail groups each message you send with all the responses you
receive. This conversation list continues to grow as new replies arrive,
so you can always see your messages in context. A new message
or a change to the subject of a current message will begin a new
conversation.
Press HOME , and then tap > Gmail.
To scroll through the conversation list, swipe your finger up/down
on the screen.
1.
2.
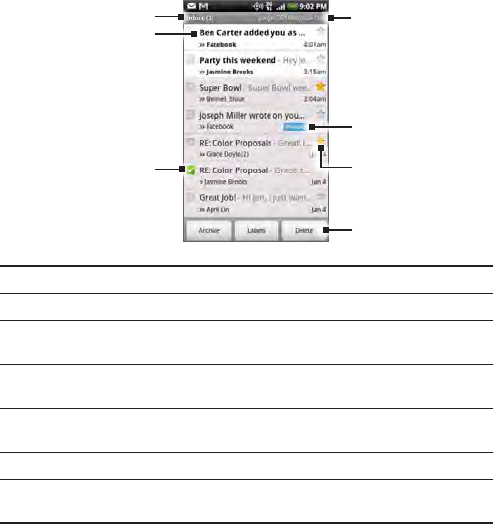
Email 147
6
5
4
7
1
3
2
1 Folder (or Label) and number of unread email messages.
2 Unread messages are displayed in bold.
3 Checked email. Select one or more emails to apply an action.
Note: Batch operations needs to be enabled.
4 Actions for checked email(s). This will not show if there is no
item selected in the inbox.
5 Starred message. Tap to add or remove the star. For more
information, see “Starring a message” in this chapter.
6 Message label
7 The Google Account you are currently viewing. To view another
account, see “Switching to another Google Account”.

148 Email
Switching to another Google Account
If you have set up more than one Google Account on your phone,
you can switch between accounts in Gmail. For more information
on setting up Google Accounts, see “Synchronizing with a Google
Account” in the Accounts and sync chapter.
While viewing the Inbox, clear any checked email messages.
Press MENU, and then tap Accounts.
Tap the account to switch to.
Reading your messages
Depending on your notification settings, the phone plays a ringtone,
vibrates, or displays the email message briefly in the status bar when
you receive a new email. A new email message icon also appears
on the notifications area of the status bar to notify you of a new email.
For more information on email notification settings, refer to “Changing
Gmail settings” later in this chapter.
For information on automatic email synchronization, see “Changing
Gmail synchronization settings” in this chapter.
To refresh your inbox manually, press MENU and then tap Refresh.
1. Do one of the following:
When you receive a new email notification, press and hold the
status bar, and then slide your finger down on the screen to
open the Notifications panel. Tap the new email to view it.
While in the Inbox, tap the unread email or the conversation
with the unread email to view it.
2. To scroll through the messages in the conversation, swipe your
finger up/down on the screen.
1.
2.
3.
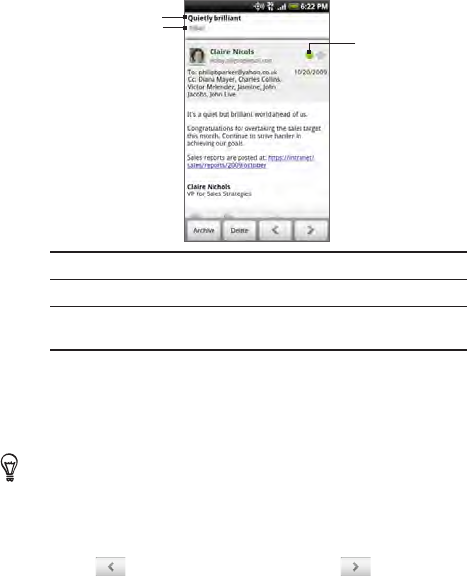
Email 149
3
1
2
1 Message subject.
2 Message label.
3 Online status. Appears when the contact is a Google
Talk friend and you are signed in to Google Talk.
3. To manage the email message or conversation, do any of the
following:
Tap Archive to remove the conversation from your Inbox while
still keeping it stored in your Google Account.
To display your archived messages, in the Inbox, press MENU and
then tap View labels > All Mail.
Tap Delete to delete the conversation from your Google
Account. If you delete the conversation accidentally, you can tap
Undo in the yellow bar at the top of the screen to undelete it.
Tap to see the previous, or tap to see the next
conversation in your Inbox.
Press MENU to see more options.
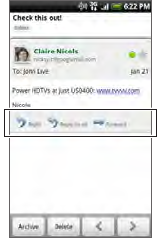
150 Email
Replying to or forwarding an email message
In the message thread, scroll down to the end of the
conversation.
Tap Reply, Reply to all, or Forward.
3. Do one of the following:
If you selected Reply or Reply to all, enter your reply message.
If you selected Forward, specify the message recipients.
4. Tap Send.
Muting a conversation
If you’re part of a long message conversation that isn’t relevant, you can
‘mute’ the conversation to keep all future additions out of your Inbox.
While viewing the message thread, press MENU and then tap More >
Mute.
1.
2.

Email 151
Reporting a conversation as spam
The Gmail webmail service works hard to prevent spam (unwanted
and unsolicited “junk” mail) from reaching your Inbox. But when spam
makes it through, you can help improve the service by reporting the
conversation as spam.
While viewing the message thread, press MENU, and then tap More >
Report spam.
Sending a message
Press HOME , and then tap > Gmail.
In the Inbox, press MENU and then tap Compose.
Enter the message recipient’s email address in the To field. If
you are sending the email to several recipients, separate the
email addresses with a comma. You can add as many message
recipients as you want.
As you enter email addresses, any matching addresses from your
contacts list are displayed. Tap a match to enter that address
directly.
If you want to send a carbon copy (Cc) or a blind carbon copy (Bcc)
of the email to other recipients, press MENU and then tap Add Cc/
Bcc.
Enter the email subject, and then compose your email.
If you want to add a picture attachment, press MENU and then
tap Attach. Navigate to the picture you want to attach, and then
tap the picture.
1.
2.
3.
4.
5.
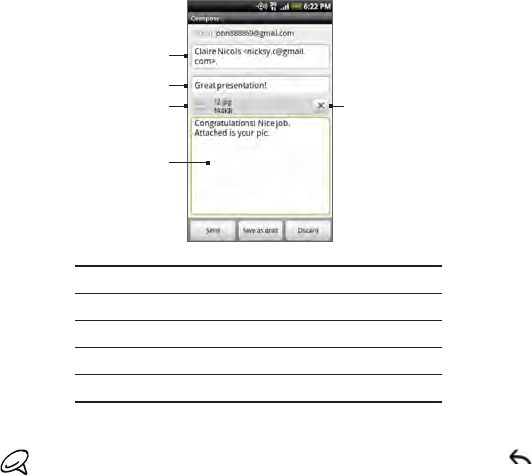
152 Email
4
5
1
2
3
1 Recipient.
2 Subject.
3 Attachment.
4 Enter your message here.
5 Tap to remove the attachment.
After composing your message, tap Send.
While composing the message, tap Save as draft or press BACK
to save it as a draft. To view your draft email messages, in the Inbox,
press MENU and then tap View labels > Drafts.
Adding a signature to your messages
You can add a signature to email messages that you send.
In the Inbox, press MENU and then tap Settings > Signature.
Enter your signature in the text box, and then tap OK.
6.
1.
2.

Email 153
You can create a signature consisting of multiple lines of text. At the
end of each line of text, tap on the onscreen keyboard to create
another line.
Viewing your sent messages
In the Inbox, press MENU and then tap View labels > Sent.
Managing conversations and messages
Searching for messages
You can search for messages that contain one or more words in their
contents or in their addresses, subjects, labels, and so on. When you
search for messages, all of the messages in your Gmail account on the
web are included (except those labeled Trash or Spam), not just those
that you’ve synchronized onto your phone.
In the Inbox, press SEARCH .
Enter the word or words to search for.
Tap , or tap the Enter key on the onscreen keyboard.
A conversation list opens, displaying all of the conversations with
messages that contain the words you searched for. The words
you searched for are displayed in the title bar. You work with the
conversations in this list just as you would with the conversations in
your Inbox or any other conversation list.
Starring a message
You can star an important message so that you can easily find it again.
Conversations with starred messages are displayed with a star in your
Inbox and other conversation lists. To view just conversations with
starred messages, see “Viewing conversations by label” in this chapter.
1.
2.
3.

154 Email
Do one of the following:
While reading a message, touch the star in its header.
When viewing a conversation, touch its star to start the newest
message in the conversation.
To unstar a message, touch its star again. You can also touch a star in
a conversation list to unstar all messages in the conversation.
Labeling a conversation
You can organize conversations by labeling them. Gmail has several
preset labels you can use, and you can also add your own labels, using
Gmail on the web.
While viewing the messages in a conversation, press MENU and
then touch Change labels.
Select the labels that you want to assign to the conversation, and
then tap OK.
Viewing conversations by label
You can view a list of the conversations that have the same label.
When viewing your Inbox or another conversation list, press
MENU, and then touch View labels.
Touch a label to view a list of conversations with that label.
The conversation list resembles your Inbox, but the label replaces
“Inbox” in the title bar. You work with labeled conversations lists in the
same way as with your Inbox.
Changing Gmail synchronization settings
Press HOME , and then tap > Gmail.
Press MENU, and then tap Settings > Labels.
To set the number of days to synchronize, tap Number of days to
sync.
1.
2.
1.
2.
1.
2.
3.
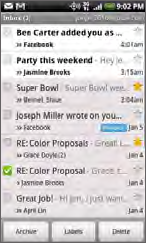
Email 155
To set synchronization for a particular label, tap the label. You
can select to synchronize the default number of days, or you can
sync all or none of the label’s messages.
Working with conversations in batches
You can archive, label, delete, or perform other actions on a batch
of conversations at once, in your Inbox or in another labeled list of
conversations.
In the Inbox or other conversation list, select the check boxes for
the conversations you want to work with as a batch. When you
select a check box, the Archive, Labels, and Delete buttons are
displayed at the bottom of the screen.
Tap the Archive, Labels, or Delete button to perform one of those
actions on the batch of conversations, or press MENU for more
options.
4.
1.
2.

156 Email
Changing Gmail settings
Press HOME , and then tap > Gmail.
In the Inbox, press MENU and then tap Settings.
Set the following options:
Signature. Tap to enter a signature that is appended at the
end of your emails.
Confirm actions. Select the check box to show a confirmation
box when you archive or delete a conversation.
Auto-advance. Set which screen opens when you delete
or archive a conversation you are viewing. You can select
from the messages in the next conversation, the previous
conversation, or the Inbox or other conversation list you’re
working with.
Message text size. Select the size of text in the messages you
read.
Batch operations. When selected, this adds a check box to
the left of each conversation so you can add it to a batch. See
“Working with conversations in batches” above.
Clear search history. Remove the searches you have
performed.
Labels. Tap to select how many days and which Gmail labels
to synchronize.
Email notifications. Select the check box to show a notification
icon on the status bar when you receive a new email.
Tap Select ringtone if you want your phone to play a
notification sound when a new email message arrives. On
1.
2.
3.
Email 157
the ringtone menu, select a ringtone specific to new email
messages. The ringtone plays briefly when selected. If you
don’t want a ringtone to play when you receive a new email
message, tap Silent. To confirm your ringtone selection, tap
OK.
Select Vibrate if you want your phone to vibrate when you
receive a new email message.
Notify once. Select to receive a notification from Gmail only
the first time you have new email since you last read your
messages, rather than each time a new message arrives.
Using Mail
The Mail application lets you send and receive email from your
webmail or other accounts, using POP3 or IMAP.
It also lets you access your Exchange ActiveSync email and other
features on your phone. For information on this, see “Exchange
ActiveSync email” in this chapter.
Adding a POP3/IMAP email account
Press HOME , and then tap > Mail.
Do one of the following:
If this is your first time to add an email account in Mail, tap
Other (POP3/IMAP) on the Choose a mail provider screen.
If you have already added an email account in Mail, tap
on the upper-left corner, and then tap New Account. If the
Choose a mail provider screen is displayed, tap Other (POP3/
IMAP).
1.
2.
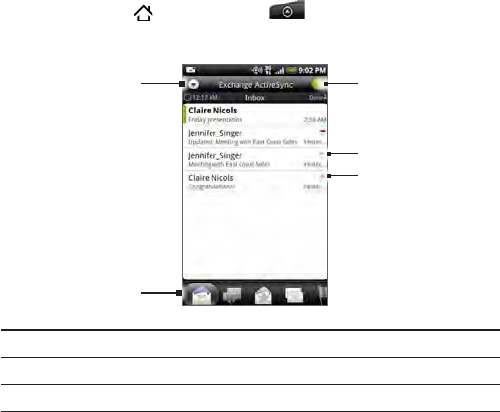
158 Email
Enter the Email address and Password for the email account and
then tap Next.
If the account type you want to set up is not in the phone
database, you will be asked to enter more details.
Enter the Account name and Your name and then tap Finish
setup.
Viewing your email inbox
Press HOME , and then tap > Mail.
Tap a tab at the bottom of the screen to filter the inbox.
1
2
3
5
4
1 Tap to view a different email account or add a new email account.
2 Filter tabs. See “Inbox filter tabs” for details.
3 Marked (Exchange ActiveSync only)
3.
4.
1.
2.
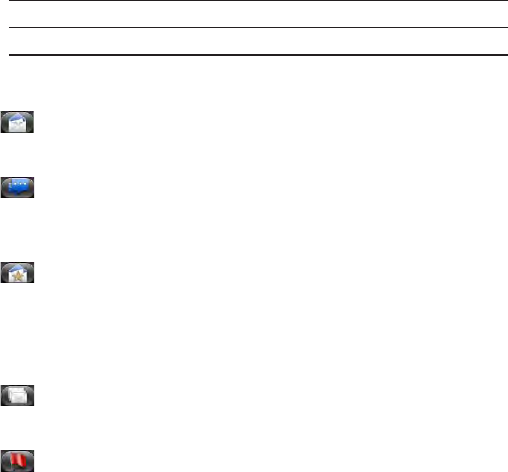
Email 159
4 Meeting invitation (Exchange ActiveSync only)
5 Number of unread email messages.
Inbox filter tabs
Received
Displays email messages as individual items.
Conversations
Displays messages as conversations, grouped according to the subject
line. Tap a subject in the list to show the email conversation.
Favorites
Displays messages from your favorite contacts. To add contacts as
favorites from this tab, tap Add contact to group, select the contacts
you want to add, and then tap Save. For more information on contact
groups, see “Contact groups” in the People chapter.
Unread
Displays unread messages.
Marked (Exchange ActiveSync only)
Displays all flagged messages.

160 Email
Meeting invitations (Exchange ActiveSync only)
Displays meeting invitations which you have not yet accepted or
declined.
Attachments
Displays all messages that have attachments.
Refreshing an email account
Whatever your automatic synchronization settings are, you can also
synchronize your sent and received emails manually at any time.
While in the account you want to synchronize, press MENU, and then
tap Refresh.
Sorting email messages
On the email account Inbox, press MENU, and then tap Sort.
Select from the options to sort email messages by date received,
priority, subject, sender, or size.
Deleting an email message
On the email account Inbox, press and hold the message you
want to delete.
On the options menu, tap Delete.
Deleting multiple email messages
On the email account Inbox, press MENU and then tap Delete.
Select the messages you want to delete, and then tap Delete.
1.
2.
1.
2.
1.
2.

Email 161
Exchange ActiveSync email
If you synchronize your phone with your work Exchange ActiveSync
account, you can read, manage, and send email in the same easy way
as with a POP3/IMAP account. However, you can also access some
powerful Exchange features.
For information on setting up an Exchange ActiveSync account, see
“Synchronizing with a Microsoft Exchange ActiveSync account” in the
Accounts and sync chapter.
Setting out of the office status
You can set your Out of Office status and auto-reply message right
from your phone.
Press HOME , and then tap > Mail.
Switch to the Exchange ActiveSync account.
Press MENU and then tap More > Out of the office.
Tap the field below I am currently, and then select Out of the
office.
Set the dates and times for the period when you will be out of
the office.
Enter the auto-reply message.
Tap Save.
Sending a meeting request
Press HOME , and then tap > Mail.
Switch to the Exchange ActiveSync account.
Press MENU and then tap More > New meeting invitation.
Enter the meeting details, and then tap Send.
1.
2.
3.
4.
5.
6.
7.
1.
2.
3.
4.
162 Email
Setting the priority for an email message
You can set the priority for an email message you send with your
Exchange ActiveSync account.
While composing the message, press MENU.
Tap Set priority.
Select the priority for the message.
If you selected High or Low priority, the priority appears below the
subject line of the message.
Composing and sending an email message
Press HOME , and then tap > Mail.
On the email account Inbox, press MENU and then tap Compose.
Fill in one or more recipients. You can:
Enter email addresses directly in the To field. If you’re sending
the email to several recipients, separate the email addresses
with a comma.
As you enter email addresses, any matching addresses from
your contacts list are displayed. Tap a match to enter that
address directly.
Tap the icon, and then select the contacts to whom you
want to send the message. You can also select contact groups
as recipients, or add contacts from the company directory
if you have set up an Exchange ActiveSync account on your
phone. When you have selected all the message recipients, tap
Done.
If you want to send a carbon copy (Cc) or a blind carbon copy (Bcc)
of the email to other recipients, press MENU, and then tap Show
Cc/Bcc.
1.
2.
3.
1.
2.
3.

Email 163
Enter the subject, and then compose your message.
To add an attachment, press MENU, tap Add attachment, and
choose from the following options:
Picture. Select Camera to take a photo and attach it, or
Pictures to attach a photo from your storage card.
Video. Select Camcorder to capture a video and attach it, or
Videos to attach a video from your storage card.
Audio. Select Voice Recorder to make a voice recording and
attach it, or Files to attach a music file or voice recording from
your storage card.
App recommendation. Choose an application you’ve installed
from Android Market that you want to share with others. The
URL from which the application can be downloaded will be
inserted to your message.
Location. You can attach location information. Send your
current location (requires GPS to be turned on), a location
stored in Footprints, or a location you pick on a map. For more
information about GPS, maps, and Footprints, see the Maps
and location chapter.
Document. Attach a PDF file or an Office document such as a
text file or a spreadsheet.
Tap Send to send the message immediately, or tap Save as draft
if you want to send it later.
To open a draft email, in the email account Inbox, press MENU, and
then tap Folders > Drafts.
4.
5.
6.
164 Email
Viewing and replying to an email message
Press HOME , and then tap > Mail.
On the email account Inbox, tap the email you want to view.
For an Exchange ActiveSync account, you can mark an email. To
mark an email, while viewing an email, tap the white flag on
the upper-right corner of the screen. The flag turns red when
you mark the message.
Tap Reply or Reply all to reply to the email.
You can copy, look up, translate, or share text from an email message.
For information on how to do this, see “Copying text, looking up
information, and sharing” in the Internet chapter.
Editing email account settings
Press HOME , and then tap > Mail.
Switch to the email account you want to edit.
Press MENU and then tap More > Settings.
Select from the following settings:
Account settings
Change the email account settings such as the name, email
address, password, and description.
General settings
Set the font size when reading emails, enable, disable or set the
signature, set the account as the default email account, and set
where to save email attachments.
1.
2.
3.
1.
2.
3.
4.

Email 165
Send & receive
Set the maximum email file size limit when receiving and
frequency to check for new emails and how many to check for.
You can also set to have emails that you send bcc’d to yourself.
Notification settings
Set email notification settings.
Delete account
Tap to delete the email account.
Press BACK to save your changes.
Deleting an email account
Press HOME , and then tap > Mail.
Switch to the email account you want to delete.
Press MENU, and then tap More > Settings > Delete account.
Adding the Mail widget
Add the Mail widget to let you view your POP3/IMAP or Exchange
ActiveSync emails on the Home screen. To learn how to add widgets,
refer to “Adding a widget to your Home screen” in the Personalizing
chapter.
5.
1.
2.
3.

Calendar
About Calendar
Use your phone’s Calendar to create and manage your events,
meetings, and appointments. You can also set up your phone to stay
in sync with the following types of calendars:
On your phone, sign in to your Google Account so you’ll be able
to sync your phone’s Calendar with your Google Calendar online.
If you have not signed in to your Google Account yet, see the
Accounts and sync chapter to find out how to sign in.
You can create multiple Google Calendars only in Google Calendar on
the Web. After creating them in Google Calendar on the Web, you’ll
be able to see them in the Calendar application on your phone.
For more information about creating and managing multiple Google
Calendars, visit the Google website at the following URL:
http://calendar.google.com.
If you’re using Microsoft Outlook on your computer, you can set
up HTC Sync on your computer to sync Outlook Calendar with
your phone’s Calendar. See “Using HTC Sync” for details.
If you have a Microsoft Exchange ActiveSync account and
you have added it on your phone, you can sync your phone’s
Calendar with your Exchange ActiveSync calendar events. See
the Email and Accounts and sync chapters for details.

Calendar 167
Creating a calendar event
You can create events that appear on your phone only, as well as
events that sync with your Google Calendar, your computer’s Outlook
Calendar, or Exchange ActiveSync calendar.
1. Press HOME , then tap , and then tap Calendar.
2. On any Calendar view, press MENU and then tap New event.
When you are in the Month or Agenda view, you can also tap at
the bottom-right of the screen to create a new event.
3. If you have more than one calendar, select a calendar in which to
add the event:
Select My Calendar to create an event that will appear only on
your phone.
Select your Google Account to create a Google Calendar
event. If you have several Google Calendars on the Web, select
one in which to add your event.
Select PC Sync to create an Outlook Calendar event to sync
with your computer.
Select Exchange to create an Exchange ActiveSync calendar
event.
4. Enter a name for the event.
5. To specify the date and time of the event, do one of the
following:
If there is a time frame for the event, tap the From and To date
and time to set them.
If it is a special occasion such as a birthday or a whole-day event,
set the From and To date, then select the All day check box.

168 Calendar
6. Enter the event location and description.
7. Set the reminder time.
You can add another reminder time in a Google Calendar event. Press
MENU and then tap Add reminder.
8. If the event occurs on a regular basis, tap the Repetition box and
then choose how often the event occurs.
9. Scroll to the bottom of the screen and then tap Save.
Inviting guests to your event (Google Account only)
If you want to invite guests to your event, you need to create and add
the event in your Google Calendar. An invitation email will be sent to
your guests using your Google Account.
Open Calendar and create a new event. Tap the Calendar field
and then select your Google Account (or one of your other
Google Calendars). For the steps, see “Creating a calendar
event”.
Add details about the event, such as date and time, location, and
more.
In the Guests field, enter the email addresses of everyone you
want to invite to the event. Separate multiple addresses with
commas ( , ).
If the people to whom you send invitations use Google Calendar,
they’ll receive an invitation in Calendar and by email.
Tap Save to add the event to your Google Calendar.
1.
2.
3.
4.

Calendar 169
Sending a meeting request using Calendar (Exchange
ActiveSync only)
If you have an Exchange ActiveSync account set up on your phone,
you can use Calendar to create a meeting appointment and send
a meeting request email to the people you want to invite to your
meeting.
Open Calendar and create a new event. Tap the Calendar field
and then select Exchange. For the steps, see “Creating a calendar
event”.
Add details about the meeting, such as date and time, location,
and more.
Press MENU and then tap Meeting Invitation.
Tap and choose attendees from your contacts or Company
Directory.
Enter your message and then tap Send.
Tap Save to add the meeting appointment to your Exchange
ActiveSync Calendar.
Changing calendar views
When you open Calendar, it displays the Month view by default.
You can also display the Calendar in Agenda, Day, or Week view. To
change between calendar views, press MENU, and then choose the
type of view that you want.
1.
2.
3.
4.
5.
6.
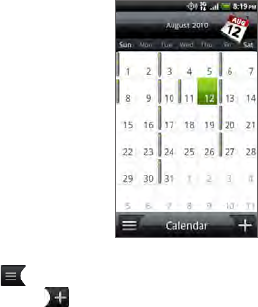
170 Calendar
Month view
In Month view, you’ll see markers on days that have events.
When in Month view:
Tap on the bottom left of the screen to switch to Agenda
view. Tap on the bottom right to create a new event.
Tap a day to view the events of that day.
Press and hold a day to open an options menu from which you
can also choose to create an event or switch to either Day or
Agenda view.
Slide your finger up or down the screen to view earlier or later
months.
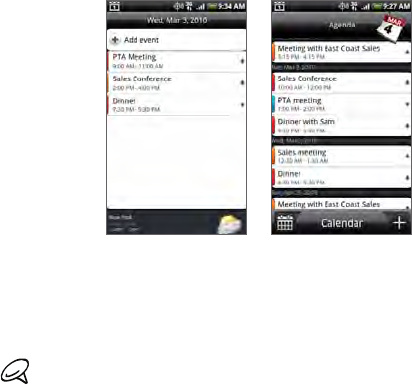
Calendar 171
Day and Agenda views
Day view displays a list of the events of one day and also shows
weather information at the bottom of the screen when you’re viewing
events of the current day. Agenda view shows a list of all your events
in chronological order.
The color bars on the left side of the events indicate the type of
calendar in which the event is part of. To find out what each color
represents, press MENU and then tap More > Calendars.
When in Day view, slide left or right across the screen to view earlier
or later days.
In Day view, the weather information appears only if the event is
within the five-day forecast of the Weather application.
Weather information does not appear in Day view when you
change Day view to display as a time list. See “Changing Calendar
settings” for details.
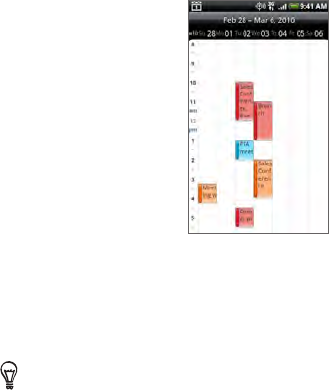
172 Calendar
Week view
Week view displays a chart of the events of one week.
When in Week view:
You can press and hold on a time slot to create a new event at
that time.
Tap an event to view its details.
Slide left or right across the screen to view earlier or later weeks.
In a crowded Week view, it may be easier to select an event by
pressing the navigation keys on the slide-out keyboard. Then press
the Enter key to view details about the selected event.
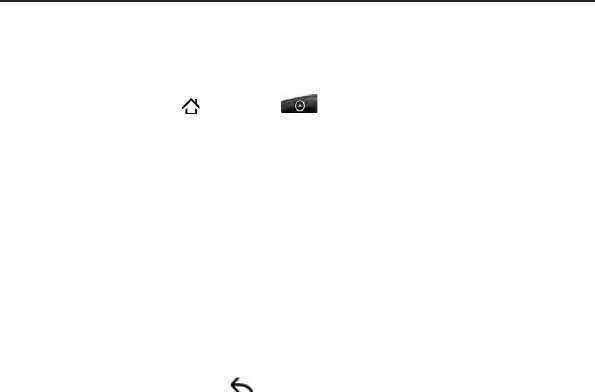
Calendar 173
Viewing, editing or deleting an event
You can view, edit, or delete events you created. You can also view
event invitations that other people sent to you.
Viewing and editing an event
1. Press HOME , then tap , and then tap Calendar.
2. In Month view, tap the day when the event takes place, and then
tap the event to open it.
The Event details screen then opens and shows the summary of
the event.
3. When viewing the event summary, you can do the following:
Find the event’s location in Maps.
If it’s a Google Calendar or Exchange ActiveSync calendar
event, check the participants of the event.
Change the reminder time.
If it’s a Google Calendar event, respond whether you’ll attend
the event.
Press the BACK button on your phone to save changes
you made on the Event details screen.
4. To edit more details about the event, press MENU while you’re on
the Event details screen and then tap Edit event.
5. Make your changes to the event.
6. When you’re done editing, scroll down to the bottom of the
screen and then tap Save.

174 Calendar
Deleting an event
There are a number of ways to delete an event.
While viewing the summary of an event on the Event details
screen, press MENU and then tap Delete event.
In Day, Agenda or Week view, press and hold an event and then
tap Delete event.
When editing an event, scroll down to the bottom of screen and
then tap Delete.
If the event repeats, you’ll be asked whether you want to delete
just that occurrence, this and all future occurrences, or all past
and future occurrences in your Calendar.
Calendar event reminders
If you have set at least one reminder for an event, the upcoming event
icon will appear in the notifications area of the status bar to remind
you of the upcoming event.
Viewing, dismissing, or snoozing event reminders
1. Tap the status bar, then slide your finger down the screen to
open the Notifications panel.
2. Do one of the following:
Tap Clear to dismiss event reminders and all other
notifications. Other types of notifications such as new
messages and missed calls will also be deleted.

Calendar 175
After sliding open the Notifications panel, tap the calendar
event reminder. You’ll then see a list of all pending event
reminders. Tap Snooze all to snooze all event reminders for
five minutes, or tap Dismiss all to dismiss all event reminders.
Press BACK to keep the reminders pending in the
notifications area of the status bar.
Displaying and synchronizing calendars
You can select which calendars to show or hide on your phone’s
Calendar, and which ones to keep synchronized.
Showing or hiding calendars
In any Calendar view, press MENU , tap More > Calendars, and then
select or clear a calendar to show or hide it. Tap All calendars to
display all calendars.
The calendars are kept synchronized on your phone, whether or not
you hide them.
Choosing which Google Calendars are synchronized on
your phone
You can choose which Google Calendars to keep synchronized on
your phone or which ones to stop synchronizing.
Stop synchronizing a Google Calendar
In any Calendar view, press MENU and then tap More >
Calendars.
Press MENU again and then tap Remove calendars.
Select a Google Calendar to remove from your calendars list, and
then tap OK.
1.
2.
3.

176 Calendar
Press BACK to update Calendar with the new changes and
return to the Calendar view you were viewing.
The calendars that you remove from your calendars list will no longer
be synchronized on your phone, but you remain subscribed to them
and can work with them in Google Calendar on the Web.
Adding a Google Calendar to sync with
Only the calendars that you’ve created or subscribed to on the Web,
but previously removed from your calendars list, are shown in the list
of calendars that you can add.
In any Calendar view, press MENU and then tap More > Calendars.
Press MENU again and then tap Add calendars.
Select a Google Calendar to add to your calendars list, and then
tap OK.
Press BACK to update Calendar with the new changes and
return to the Calendar view you were viewing.
Changing Calendar settings
You can change Calendar’s settings to specify how it displays events
and how it notifies you of upcoming events. In any Calendar view, press
MENU and then tap More > Settings to access Calendar’s settings.
Reminder settings
Choose how you want Calendar to issue event reminders when there
are upcoming events.
4.
1.
2.
3.
4.
Calendar 177
All calendars
Select this check box to use the same event reminder settings for all
types of calendars. If you clear this check box, you can set different
reminder settings for each calendar.
Set alerts & notifications
Configure event reminders to open an alert, send you a notification, or
turn off event notifications on your phone.
Default reminder time
Choose how soon before an event you want to be notified.
Select ringtone
Choose a ringtone to sound when you receive an event reminder.
Vibrate
Choose whether you want your phone to vibrate when you receive an
event notification.
Hide declined events
Choose whether to show or hide events to which you’ve declined
invitations.
Calendar view settings
Choose what appears in Calendar when opened and what’s shown in
Day, Week, and Month views.
Start in
Choose the default Calendar view that is displayed when you open
Calendar.

178 Calendar
Day views
Choose whether to display Day view in the form of an event list or
time list.
First day of week
Set the Month and Week views to start on a Sunday or Monday.
Include weather
Make sure this check box is selected so that weather information is
shown in Day view’s event list.
City
By default, Day view displays your current location’s weather. You can
change it to display the weather of another city.
Sending a vCalendar
You can send a calendar event as a vCalendar to someone’s phone
or your computer using Bluetooth. You can also send it as a file
attachment with your message.
Press HOME , tap , and then tap Calendar.
In Month view, tap the day when the event takes place.
Press and hold the calendar event you want to send, and then
tap Share vCalendar.
Choose whether to send the event using Bluetooth or send it by
email or MMS (Message).
1.
2.
3.
4.

Calendar 179
If you chose to send using Bluetooth, in the next few steps, you’ll
be asked to turn on Bluetooth on your phone and connect to the
receiving Bluetooth device so the vCalendar can be sent. Follow
the steps in “Sending information from your phone to another
device” in the Bluetooth chapter.
If you chose to send by email, a new message screen opens and
automatically includes the vCalendar as an attachment. Your
default email account that’s selected in the Mail application will
be used to send. For more information about using the Mail
application, see the Email chapter.
If you chose to send by multimedia message (Message), a new
message screen opens and automatically includes the vCalendar
as an attachment. For more information about sending a
multimedia message, see the Messages chapter.
About the Calendar widget
There’s a Calendar widget available that you can add to your Home
screen, and it comes in different calendar views. Tapping a day or
event on the widget brings you to the Calendar application.
To find out how you can add a widget, see “Personalizing your Home
screen with widgets” in the Personalizing chapter.
5.
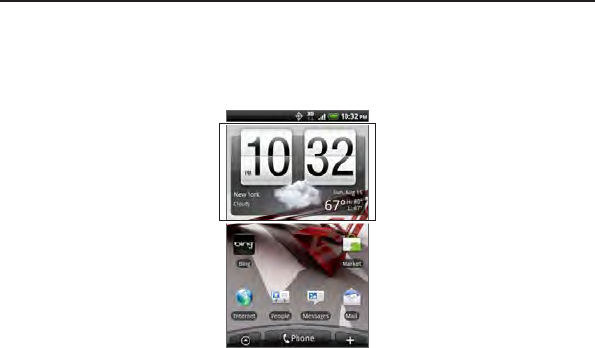
Clock and Weather
About the HTC Clock widget
The HTC Clock widget that’s by default added on the Home screen
shows your current date, time, and location. You can tap the weather
image on this widget to open the Weather application and check for
more weather forecasts. See “Checking weather” for details.
The HTC Clock widget comes in a variety of looks and designs. You
can add another clock widget to the extended Home screen, if you
want to have another clock that shows the time of another city. To find
out how you can add a widget, see “Personalizing your Home screen
with widgets“ in the Personalizing chapter.
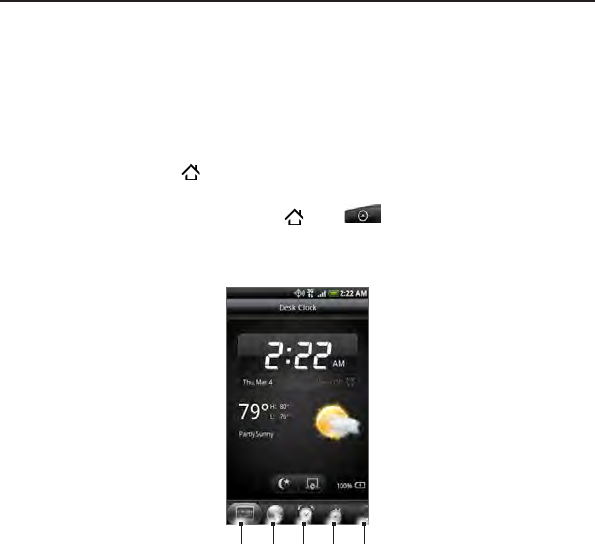
Clock and Weather 181
About the Clock application
The Clock application is more than just a regular date and time clock.
It functions as a desk clock that shows the date, time, and weather
information, and it can turn into a night clock or screensaver. It has a
world clock that shows you the current time in several locations across
the globe. There’s also an alarm clock, stopwatch, and countdown
timer.
To open the Clock application:
Press HOME and then tap the HTC Clock widget on the Home
screen.
You can also press HOME , tap , and then tap Clock.
Tap the tabs at the bottom row or slide your finger across the tabs to
switch between the different functions of the Clock application.
23451
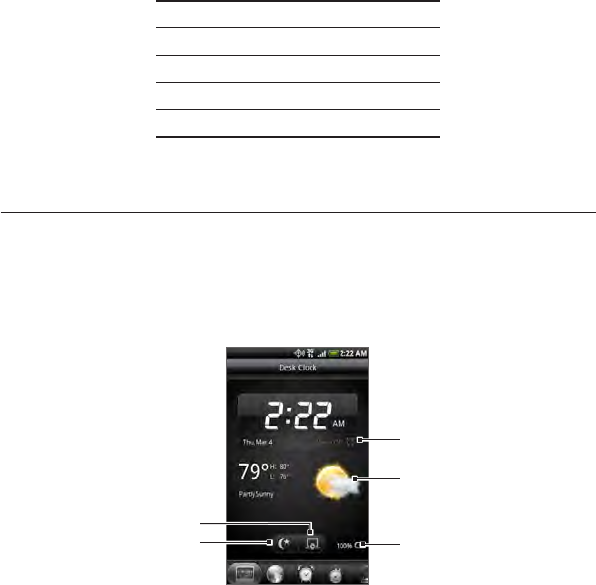
182 Clock and Weather
1 Desk Clock tab
2 World Clock tab
3 Alarm Clock tab
4 Stopwatch tab
5 Timer tab
Using Desk Clock
Opening the Clock application brings you directly to the Desk Clock
screen.
The Desk Clock displays the current date, time, and weather, an alarm
clock indicator, and a battery charging indicator. You can dim the
screen to show only the time and date on the Desk Clock.
43
2
1
5
Clock and Weather 183
1 The alarm clock indicator shows whether the alarm clock is on or off. To
find out how to turn on and set the alarm clock, see “Setting the alarm
clock“.
2 Below the date and time, you’ll see the weather information of your
current location. Tapping the weather information brings you to the
Weather application where you can see weather forecasts of the next few
days. See “Checking weather” for more information about the Weather
application.
3 The battery charging indicator shows the battery charge level. You’ll see it
only when your phone is plugged with the power adapter or connected to
your computer.
4 Tap this button to dim the screen and display only the time and date on
the Desk Clock. To light up the screen again, tap anywhere on the screen
or press the BACK button on your phone.
5 Tap this button to dim the screen and go into screensaver mode. When in
screensaver mode, the time and date will change position on the screen
after every few minutes. To light up the screen again, tap anywhere on the
screen or press the BACK button on your phone.
You can change the Desk Clock screen to display the date and time of
another time zone. To find out how to select a different time zone, see
“Setting the time zone, date, and time”.
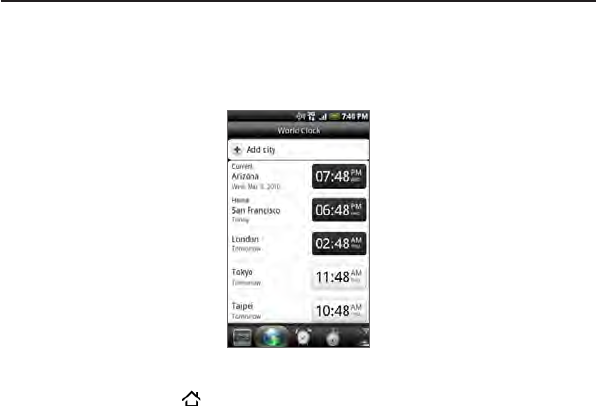
184 Clock and Weather
Using World Clock
Use the Clock application’s World Clock screen to check the current
time in several places around the globe simultaneously. You can
also set your home city, add more cities to the world clock list, and
manually set your time zone, date, and time.
Setting your home city
Press HOME and then tap the HTC Clock widget on the Home
screen.
Tap the World Clock tab.
Press MENU and then tap Home settings.
Enter your home city’s name. As you enter letters, the list is
filtered to show matching cities and countries.
Scroll through the list and tap your home city.
1.
2.
3.
4.
5.

Clock and Weather 185
Setting the time zone, date, and time
To set the time zone, date, and time on your phone manually, you need
to turn off auto time synchronization first.
Press HOME and then tap the HTC Clock widget on the Home
screen.
Tap the World Clock tab.
Press MENU and then tap Local time settings to open the Date &
time settings screen.
Clear the Automatic check box.
Tap Select time zone. Scroll through the list and then tap the
time zone that you want.
To change the date, tap Set date. Adjust the date by rolling the
day, month, and year scroll wheels onscreen and then tap OK.
To change the time, tap Set time. Adjust the time by rolling the
hour and minute scroll wheels onscreen and then tap OK.
Tap the Use 24-hour format check box to toggle between using a
12-hour or a 24-hour time format.
Tap Select date format then select how you want dates to be
displayed. (The selected date format also applies to the date
displayed in the alarm clock.)
You can also press HOME > MENU and then tap Settings > Date &
time to open the Date & time settings screen.
1.
2.
3.
4.
5.
6.
7.
8.
9.
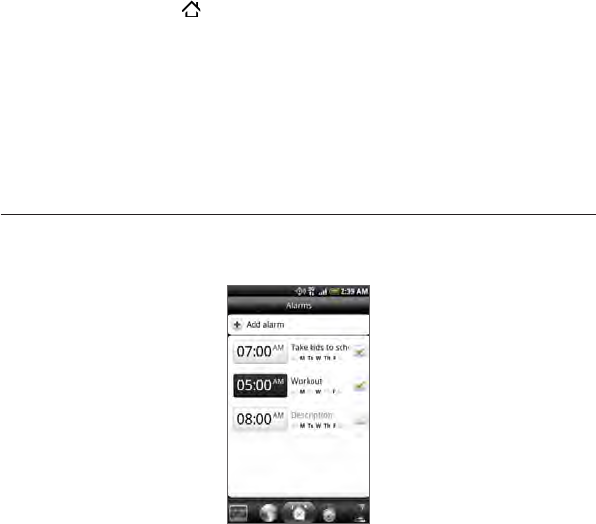
186 Clock and Weather
Adding a city to the World Clock screen
Add more cities to the World Clock screen so you can instantly check
the date and time in these cities. In addition to the current and home
cities, the World Clock screen can display up to 15 cities.
Press HOME and then tap the HTC Clock widget on the Home
screen.
Tap the World Clock tab.
Tap Add city. Enter the city name you want to add. As you enter
letters, the list is filtered to show matching cities and countries.
Scroll through the matching list and tap the city that you want to
add.
Setting the alarm clock
You can use the Clock application’s Alarms screen to set up one or
more wake-up alarms.
1.
2.
3.
4.

Clock and Weather 187
Setting an alarm
Press HOME and then tap the HTC Clock widget on the Home
screen.
Tap the Alarms tab.
Select the check box of an alarm, and then tap that alarm.
On the Set alarm screen, drag your finger up or down to roll the
time scroll wheels and set the alarm time.
Scroll through the Set alarms screen to see all the available alarm
options. You can:
Enter the alarm Description and choose the Alarm sound to
use.
Tap Repeat. Select what days of the week to sound the alarm
and then tap OK.
Select the Vibrate check box if you want your phone to also
vibrate when the alarm goes off.
When you’ve finished setting the alarm, tap Done.
To turn off an alarm, tap to clear the check box of the alarm.
If you need to set more than three alarms, press MENU while you’re
on the Alarms screen and then tap Add alarm.
Deleting an alarm
Press HOME and then tap the HTC Clock widget on the Home
screen.
Tap the Alarms tab.
On the Alarms screen, press MENU and then tap Delete.
Select the alarms you want to delete and then tap Delete.
1.
2.
3.
4.
5.
6.
1.
2.
3.
4.

188 Clock and Weather
Changing alarm sound settings
If you’ve set one or more alarms, you can change their settings such
as the alarm volume, how long to snooze the alarm, and more.
Press HOME and then tap the HTC Clock widget on the Home
screen.
Tap the Alarms tab.
On the Alarms screen, press MENU and then tap Settings. You
can change the following settings:
Alarm in silent mode
This option is selected by default, which allows the alarm to
sound even when your phone’s volume is set to silent mode.
Clear this check box if you want to silence the alarm when the
volume is in silent mode.
Alarm volume
Set the volume level that you want for the alarm.
Snooze duration
Set how long to snooze between alarms.
Side button behavior
Choose what happens to the alarm when pressing the side
button (VOLUME UP/DOWN) of your phone. You can set the
button to snooze, dismiss the alarm, or disable the button.
The side button works only when the phone’s screen is not
locked. While on the lock screen, tap the onscreen Snooze button
to snooze, or slide down the screen to dismiss the alarm.
1.
2.
3.
Clock and Weather 189
Checking weather
If you consented to turn location service on when you were setting
up your phone for the first time, you’ll see the weather of your current
location right on the HTC Clock widget of your Home screen.
You can also use the Weather application to check the current
weather and weather forecasts for the next four days of the week.
In addition to your current location’s weather, this application also
displays the weather forecasts of other cities around the globe.
If you declined to turn location service on during first-time setup of
your phone, turn location service on in your phone’s settings so that
you’ll be able to check your current location’s weather on the HTC
Clock widget, Weather application, and the Weather widget. Press
HOME > MENU, tap Settings > Location, and then select the Use
wireless networks check box.
Connect to the Internet using your phone’s Wi-Fi or data
connection. To find out how, see the Internet chapter.
Press HOME , tap , and then tap Weather.
On the Weather screen, you’ll first see your current location’s
weather. To check the weather in other cities, swipe your finger
up or down the screen.
1.
2.
3.
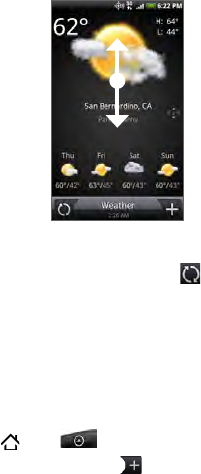
190 Clock and Weather
The Weather application automatically downloads and displays
the latest weather updates. You can also download the most
recent weather anytime by tapping .
To see more weather details on the Web, tap Weather at the
bottom center of the Weather screen.
Adding a city to the Weather screen
Add more cities to the Weather screen so you can instantly check the
weather forecasts in these cities. In addition to your current location,
the Weather screen can display up to 15 cities.
Press HOME , tap , and then tap Weather.
On the Weather screen, tap .
Enter the location you want to add on the text field. As you enter
text, the list is filtered to show the possible locations based on
the letters you entered.
Tap the desired city to select it.
4.
5.
1.
2.
3.
4.
Clock and Weather 191
Changing the order of cities on the Weather screen
Press HOME , tap , and then tap Weather.
On the Weather screen, press MENU and then tap Rearrange.
Press and hold at the end of the item you want to move.
When the row is highlighted in green, drag it to its new position,
then release.
Tap Done.
Deleting cities from the Weather screen
Press HOME , tap , and then tap Weather.
On the Weather screen, press MENU and then tap Delete.
Select the cities you want to remove and then tap Delete.
Changing weather options
Press HOME , tap , and then tap Weather.
On the Weather screen, press MENU and then tap Settings.
You can change the following weather settings:
Select or clear the Update automatically check box,
depending on whether you want your phone to automatically
download weather updates.
To set an auto update schedule, tap Update frequency and
choose a schedule.
Tap Temperature scale to choose whether to display weather
in Celsius or Fahrenheit.
1.
2.
3.
4.
1.
2.
3.
1.
2.
3.

192 Clock and Weather
About the Weather widget
Use the Weather widget to instantly check weather forecasts of your
current location and other cities without having to open the Weather
application.
The Weather widget comes in different looks and styles. You can add
this widget to the Home screen, if it’s not yet added. To find out how
you can add a widget, see “Personalizing your Home screen with
widgets” in the Personalizing chapter.

Internet
Data connection
Settings for connecting to the Verizon data network are already
preconfigured on your device, and your device is ready to connect to
the Internet.
Turning the data connection on or off
Turning your data connection off can help optimize your battery
life. It can also save money on data charges. However, when
your data connection is turned off, you may not always receive
automatic updates to your email, social network accounts, and other
synchronized information.
Press HOME > MENU and then tap Settings > Wireless & networks.
Select the Mobile network check box to turn on the data
connection; clear the check box to turn off the data connection.
Enabling data roaming
Data roaming lets you connect to Verizon Wireless’s partner networks
and access data services when you are out of Verizon Wireless’s
coverage area.
Press HOME > MENU and then tap Settings > Wireless & networks.
Tap Mobile networks and then select the Data roaming check box.
Accessing data services while roaming may incur significant charges.
Inquire about the data roaming tariffs with Verizon Wireless before
enabling data roaming.
1.
2.
1.
2.

194 Internet
Selecting the network to connect to when roaming
Your phone is set to Global mode and we’ve designed it to
automatically search for the appropriate network in your location
(CDMA or GSM) and then connect to it. When roaming in countries
where both CDMA and GSM networks are present, you can choose the
network that you want your phone to connect to.
Press HOME > MENU, and then tap Settings.
Tap Call > Preferred Network, and then select CDMA Mode or
GSM / UMTS Mode.
If you selected GSM / UMTS Mode, you can choose to connect to:
GSM / UMTS Dual. Your phone automatically connects to a 2G
or 3G network, whichever is available.
GSM only. Your phone connects only to the 2G (GPRS or
EDGE) network. Choose this option when you don’t need fast
data connection. Your phone will also use less power if you
choose this option.
UMTS only. Your phone connects only to the 3G network.
Choose this option when you need fast data connection. Your
phone will also use more power if you choose this option.
Creating a new access point (GSM / UMTS mode only)
When roaming on a GSM coverage area, you need to add another datayou need to add another data
connection on your phone by creating a new access point. You need
to set this up to access the network’s data connection services. You
can obtain the access point name and settings (including username
and password if required) from Verizon Wireless’ partner network in
your location.
Press HOME > MENU, and then tap Settings.
Tap Call > Preferred Network, and then select GSM / UMTS Mode.
1.
2.
3.
1.
2.

Internet 195
Select a GSM / UMTS Mode. See “Selecting the network to
connect to when roaming” for more information.
Press BACK and then Wireless & networks> Mobile networks >
GSM/UMTS Options > Access Point Names.
On the APNs screen, press MENU and then tap New APN.
In the Edit access point screen, enter the APN settings. Tap the
APN setting item to edit it.
Press MENU and then tap Save when you finish setting up the
new APN.
Wi-Fi
Wi-Fi provides wireless Internet access over distances of up to 300
feet (100 meters). To use Wi-Fi on your phone, you need access to a
wireless access point or “hotspot”.
The availability and range of the Wi-Fi signal depends on the number,
infrastructure, and other objects through which the signal passes.
Turning Wi-Fi on and connecting to a wireless network
Press HOME > MENU, and then tap Settings > Wireless &
networks.
Select the Wi-Fi check box to turn Wi-Fi on. The phone will scan
for available wireless networks.
Tap Wi-Fi settings. The network names and security settings of
detected Wi-Fi networks are displayed in the Wi-Fi networks
section.
3.
4.
5.
6.
7.
1.
2.
3.
196 Internet
Tap a Wi-Fi network to connect. If you selected an open network,
you will be automatically connected to the network. If you
selected a network that is secured with WEP, enter the key and
then tap Connect.
Depending on the network type and its security settings, you
may also need to enter more information or choose a security
certificate.
When your phone is connected to a wireless network, the Wi-Fi icon
appears in the status bar and tells you the approximate signal strength
(number of bands that light up). If Network notification in Wi-Fi
settings is enabled, this icon appears in the status bar whenever the
phone detects an available wireless network within range.
The next time your phone connects to a previously accessed secured
wireless network, you will not be prompted to enter the key or other
security information again, unless you reset your phone to its factory
default settings.
Connecting to a Wi-Fi network with EAP-TLS security
You may need to install a network certificate (.p12) to your
phone before you can connect to a Wi-Fi network with EAP-TLS
authentication protocol.
Save the certificate file to the root folder of the storage card.
Press HOME > MENU, and then tap Settings > Security.
Tap Install from SD card.
Select the network certificate needed to connect to the EAP-TLS
network.
Follow the steps in the previous section to connect to the Wi-Fi
network.
4.
1.
2.
3.
4.
5.
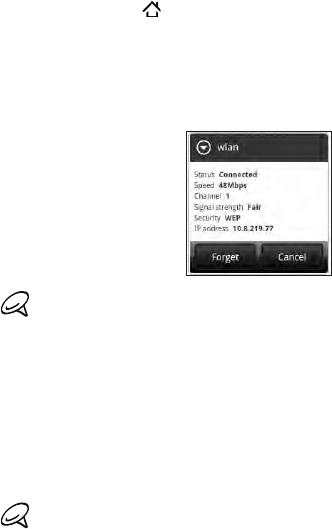
Internet 197
Checking the wireless network status
Press HOME > MENU and then tap Settings > Wireless &
networks.
On the Wireless & networks screen, tap Wi-Fi settings, and then
tap the wireless network that the phone is currently connected to.
A message box is then displayed showing the Wi-Fi network name,
status, speed, signal strength, and more.
If you want to remove the wireless network settings on your phone,
tap Forget on this window. You need to enter the settings again if you
want to connect to this wireless network.
Connecting to another Wi-Fi network
On the Wireless & networks screen, tap Wi-Fi settings. Detected
Wi-Fi networks are displayed in the Wi-Fi networks section. To
manually scan for available Wi-Fi networks, on the Wi-Fi settings
screen, press MENU and then tap Scan.
2. Tap another Wi-Fi network to connect to it.
If the wireless network you want to connect to is not in the list of
detected networks, scroll down the screen, then tap Add Wi-Fi
network. Enter the wireless network settings, and then tap Save.
1.
2.
1.
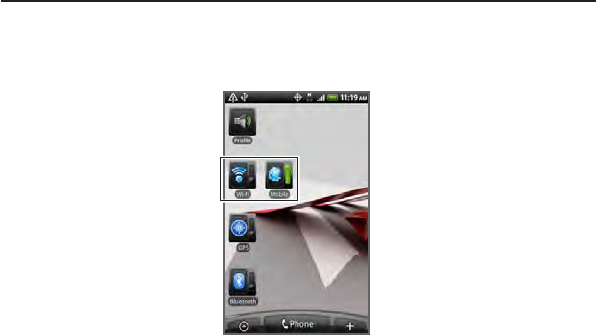
198 Internet
Adding the data connection and Wi-Fi widgets
Add the Data connection and/or Wi-Fi widget to the Home screen
to make it faster for you to turn on or off these connections. Tap the
widget to turn on or off the connection.
To learn how to add widgets, refer to “Adding a widget to your Home
screen” in the Personalizing chapter.

Internet 199
Connecting to a virtual private network (VPN)
From your phone, you can add, set up, and manage virtual private
networks (VPNs) that allow you to connect and access resources
inside a secured local network, such as your corporate network.
Preparing your phone for VPN connection
Depending on the type of VPN you are using at work, you may
be required to enter your login credentials and/or install security
certificates before you can connect to your company’s local network.
You can get this information from your network administrator.
Also, your phone must first establish a Wi-Fi or data connection
before you can initiate a VPN connection. For information about
setting up and using these connections on your phone, see “Data
connection” and “Wi-Fi” in this chapter.
Setting up secure credential storage
If your network administrator instructs you to download and install
security certificates, you must first set up the phone’s secure
credential storage.
Press HOME > MENU, tap Settings > Security, and then tap
Set password.
Enter a new password (at least 8 characters without any spaces)
for the credential storage, scroll down and confirm the password,
and then tap OK.
Select the Use secure credentials check box.
You can then download and install the certificates needed to access your
local network Your network administrator can tell you how to do this.
1.
2.
3.

200 Internet
Adding a VPN connection
Press HOME > MENU, and then tap Settings > Wireless &
networks > VPN settings.
Tap Add VPN, and then tap the type of VPN you want to add.
Tap the VPN settings and set them up according to the security
details you have obtained from your network administrator.
When finished, press MENU, and then tap Save.
The VPN is then added to the VPNs section of the VPN settings screen.
Connecting to a VPN
Press HOME > MENU, and then tap Settings > Wireless &
networks > VPN settings.
In the VPNs section, tap the VPN that you want to connect to.
When prompted, enter your log in credentials, and then tap
Connect.
When you are connected, the VPN connected icon appears in
the notification area of the title bar.
Open the web browser to access resources such as intranet
sites on your corporate network. See “Using your phone’s web
browser” for more information.
Disconnecting from a VPN
Press and hold the title bar, and then slide down your finger to
open the Notifications panel.
Tap the VPN connection to return to the VPN settings screen,
and then tap the VPN connection to disconnect from it.
When your phone has disconnected from the VPN, the VPN
disconnected icon is displayed in the notification area of the title bar.
1.
2.
3.
4.
1.
2.
3.
4.
1.
2.
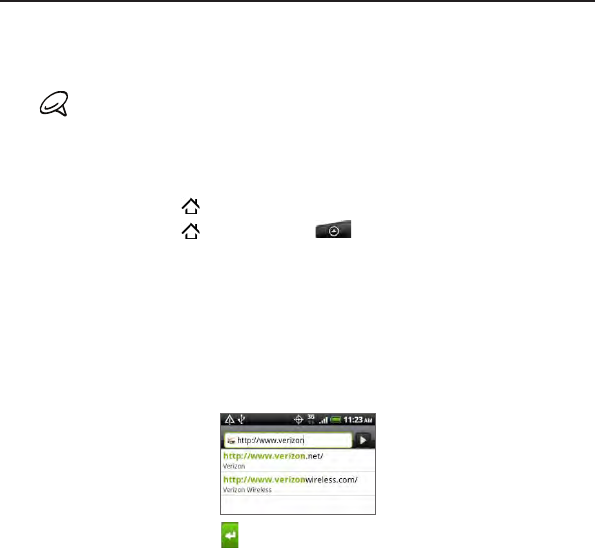
Internet 201
Using your phone’s web browser
Open the web browser to start surfing the web. The browser is fully
optimized and comes with advanced features that let you enjoy
Internet browsing on your phone.
You must have an active data connection or Wi-Fi connection to
access the Internet.
Opening the browser
Do one of the following:
Press HOME , and then tap Internet.
Press HOME , and then tap > Internet.
Going to a web page
On the browser screen, press MENU and then tap the URL field
on top of the screen.
2. Enter the web page address using the keyboard. As you enter the
address, matching web page addresses will appear on the screen.
Tap an address to go directly to that web page or continue
entering the web page address.
3. Tap the Enter key on the onscreen keyboard.
1.
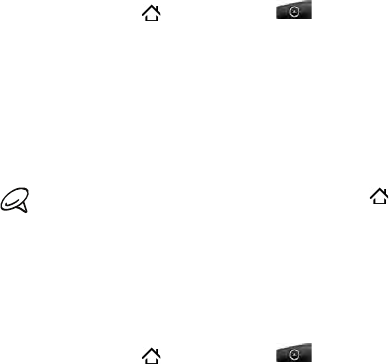
202 Internet
Setting your home page
Press HOME , and then tap, and then tap > Internet.
Press MENU, and then tap More > Settings > Set home page.
On the Set home page screen, select the home page you want to
use.
Changing the screen orientation
The phone automatically changes the screen orientation depending
on how you are holding your phone.
The Auto-rotate screen check box in HOME > MENU > Settings
> Display needs to be selected for the screen orientation to
automatically change.
Browsing full versions of all web sites
Some web sites display a mobile version of their pages to phone web
browsers. You can choose to view the full version of all pages, even for
these sites.
Press HOME , and then tap, and then tap > Internet.
Press MENU, tap More > Settings, and then clear the Mobile view
check box.
1.
2.
3.
1.
2.
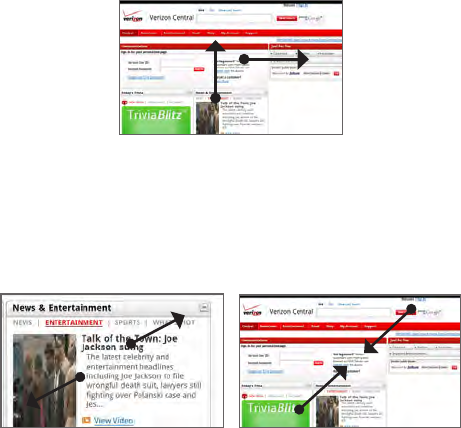
Internet 203
Navigating on a web page
You can swipe your finger on the screen or press the navigation keys
on the slide-out keyboard to navigate and view other areas of the web
page.
Zooming in or out on a web page
Tap the screen twice quickly to zoom in, then tap the screen twice
quickly again to zoom out. You can also use your fingers to pinch or
spread the screen to zoom in and out.
Use your thumb and index fingers to ‘spread’ the web page to zoom in.
Use your thumb and index fingers to ‘pinch’ the web page to zoom out.

204 Internet
Selecting a link in a web page
You can tap a link with your finger to open it, or press and hold a link
for more options.
Link What to do
Web page
address (URLs)
Tap the link to open the web page.
Press and hold the link to open a menu that allows you
to open, bookmark, copy to the clipboard, or share the
link via email.
Email address Tap to send an email message to the email address.
Press and hold, then tap Copy on the menu to copy the
email address to the clipboard. You can paste the email
address later when creating a new contact or sending a
new email message.
The browser also recognizes some phone numbers and addresses that
allow you to call the phone number or locate the address in Bing™
Maps. When you navigate to a recognized phone number or address,
it is highlighted.
Link What to do
Location
address
Tap the address, and then tap Bing to open Bing Maps and
locate the address.
Phone number Tap to open the phone dialer to call the phone number.
You can also navigate to a link on a web page and select it using
the navigation and Enter keys on the slide-out keyboard. This is
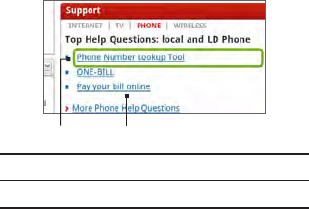
Internet 205
particularly useful when viewing text and links at a small size. Links are
enclosed in a colored box when selected.
1 2
1 Link is selected.
2 Link is not selected.
After selecting a link with the navigation keys, you can press the Enter
key to open the link, or press and hold the link with your finger for
more options.
Opening a new browser window
Open multiple browser windows to make it easier for you to switch
from one web site to another. You can open up to 4 browser windows.
While viewing a web page, press MENU and then tap Windows.
Tap the “+” button.
A new browser window opens and goes to the home page that is set.
1.
2.
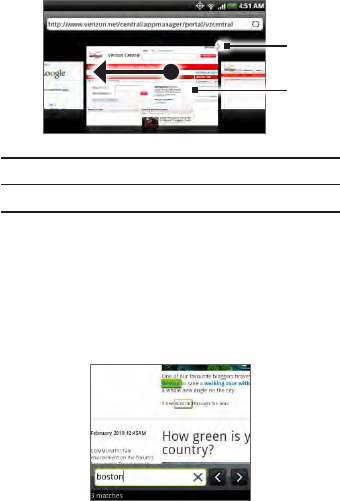
206 Internet
Switching between browser windows
While viewing a web page, press MENU and then tap Windows.
Select the browser window you want to view by sliding your
finger on the screen from right to left.
1
2
1 Tap to close the web page.
2 Tap to display the web page in full screen.
Finding text within a web page
While viewing a web page, press MENU and then tap More > Find
on page.
Enter the search item. As you enter characters, matching
characters will be highlighted. Tap the left or right arrow to go to
the previous or next matching item.
1.
2.
1.
2.

Internet 207
Downloading applications from the web
Before you can download applications from the web, you must first
enable downloading from the phone settings.
Press HOME > MENU, and then tap Settings > Applications.
Select the Unknown sources check box.
When the Attention dialog box opens, tap OK.
All downloaded applications are saved to the storage card. Before
you download an application from the web, make sure that you have
installed a storage card on your phone. For information on how to
install a storage card, refer to the Basics chapter.
Applications downloaded from the web can be from unknown
sources. To protect your phone and personal data, download
applications only from trusted sources such as Android Market. Refer
to “Finding and installing apps from Android Market” in the More apps
chapter for details.
Viewing your downloads
While viewing a web page, press MENU and then tap More >
Downloads.
Copying text, looking up information, and sharing
You can select text and then:
Copy it.
Look it up on Wikipedia or Google Dictionary.
Get a translation of the text from Google Translate.
Share the text in a new email, text, or multimedia message or in
your status update on a social network.
1.
2.
3.
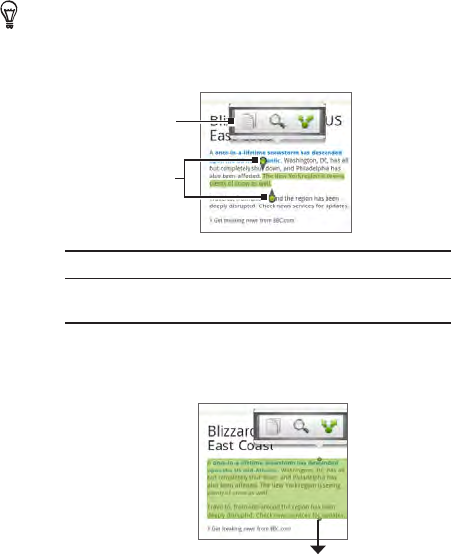
208 Internet
Selecting text
1. Press and hold on a word.
To select text in a link, press and hold the link, and then tap Copy text.
2. Drag the start and end markers to highlight the surrounding text
you want to select.
1
2
1 Tap to copy, search/translate, or share the text.
2 Start and end markers. Drag to increase or
decrease the text selection area.
When you select a larger block of text, the appearance of the
markers changes. You can drag these markers up or down to
select multiple paragraphs of text.

Internet 209
Copying and pasting text
After you have selected the text you want to copy, tap . The
selected text is then copied to the clipboard.
In a text entry field (for example while composing a message),
press and hold at the point where you want to paste the text.
Tap Paste.
Searching or translating text
1. After you have selected the text you want to search or translate,
tap .
2. Tap one of the following tabs:
Wikipedia. Look for related information on Wikipedia, based
on the text that you selected.
Google Translate. Translate the text to another language.
Google Dictionary. Look up the selected text in the
dictionary.
Pasting text in a new message or social network status update
1. After you have selected the text you want to share, tap .
2. Select an option to paste the selected text in a new email, text or
multimedia message or in your status update on a social network
such as Twitter. See the Email, Messages, and Social chapters for
more information on using these features.
Viewing bookmarks and previously visited pages
You can store as many bookmarks as you want on your phone. You
can also access a convenient History list of the sites you have visited,
or quickly view the pages that you access most often.
1.
2.
3.
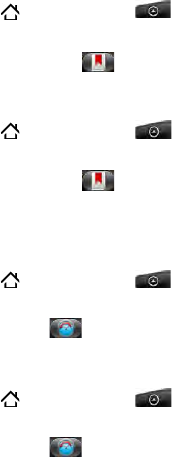
210 Internet
Bookmarking a web page
While viewing a web page, press MENU, and then tap Add
bookmark. The New bookmark screen opens.
Edit the bookmark name if needed, and then tap Done.
Opening a bookmark
Press HOME , and then tap, and then tap > Internet.
Press MENU, and then tap Bookmarks.
On the Bookmarks tab , navigate to the bookmark you want
to open, and then tap it.
Editing a bookmark
Press HOME , and then tap, and then tap > Internet.
Press MENU, and then tap Bookmarks.
On the Bookmarks tab , press MENU and then tap Edit.
Tap the bookmark you want to edit.
Enter your changes, and then tap Done.
Viewing a previously visited page
Press HOME , and then tap, and then tap > Internet.
Press MENU, and then tap Bookmarks.
On the History tab , navigate to the page you want to view
and then tap the page.
Clearing the list of previously visited pages
Press HOME , and then tap, and then tap > Internet.
Press MENU, and then tap Bookmarks.
On the History tab , press MENU, and then tap Clear history.
1.
2.
1.
2.
3.
1.
2.
3.
4.
5.
1.
2.
3.
1.
2.
3.
Internet 211
Viewing a page that you often visit
Press HOME , and then tap, and then tap > Internet.
Press MENU, and then tap Bookmarks.
On the Most Visited tab , navigate to the page you want to
view, and then tap the page.
Clearing the list of most visited pages
Press HOME , and then tap, and then tap > Internet.
Press MENU, and then tap Bookmarks.
On the Most Visited tab , press MENU, and then tap Clear all.
Changing the view of bookmarks or most visited pages
Press HOME , and then tap, and then tap > Internet.
Press MENU, and then tap Bookmarks.
On the Bookmarks tab or the Most visited tab , press
MENU, and then tap Thumbnails, List, or Grid to change the view.
For example, if you are in Thumbnails view and you want to view
bookmarks in a grid, press MENU > List, and then press MENU >
Grid.
Setting browser options
Customize the web browser to suit your browsing lifestyle. Set display,
privacy, and security options when using the web browser.
Press HOME , and then tap, and then tap > Internet.
Press MENU, and then tap More > Settings.
1.
2.
3.
1.
2.
3.
1.
2.
3.
1.
2.

212 Internet
Using your phone as a modem (tethering)
With Mobile Broadband Connect, you can use your device’s data
connection to connect your notebook or desktop computer to the
Internet through a USB cable. This is called “tethering.”
In order to get the full benefits of Mobile Broadband Connect on
your wireless device, make sure to add this optional service when
you subscribe to an Unlimited Wireless Data Plan or Voice and Data
Choice BundleSM.
Installing VZAccess Manager on your computer
Before you can use Mobile Broadband Connect, you need to install
VZAccess® Manager on the computer that you want to connect to the
Internet.
This installation is for Windows® XP. Installation procedures for other
Windows versions may vary. For technical support, go to dts.vzw.com.
To download the latest version of VZAccess Manager, go to vzam.net.
Place the VZAccess Manager installation disc (included in the
phone package) to the optical disc drive of your computer.
Follow the instructions on the screen to complete installation.
Connecting your computer to the Internet
After installing VZAccess Manager on your computer, you can not set
it up to connect it to the Internet using the phone’s data connection
Connect your phone to your computer using the USB cable.
When the Connect to PC screen appears on your phone, tap
Mobile Broadband Connect, and then tap Done.
All network activity on your phone will be disconnected.
1.
2.
1.
2.

Internet 213
On your computer, click Start > All Programs > VZAccess
Manager.
Follow the Setup Wizard to detect your device (you only need to
do this once).
Select Verizon Wireless - VZAccess connection from the
available connections list.
Click Connect WWAN.
When you’re connected, the Connect WWAN button changes
to Disconnect WWAN. Click this if you want to close your
computer’s connection to the Internet.
For optimum performance, the wireless device should be at least 12
inches from your computer while using Mobile Broadband Connect.
3G Mobile Hotspot
Use your phone as a wireless hotspot for up to five Wi-Fi enabled
devices with the 3G Mobile Hotspot app from Verizon Wireless.
Press HOME , and then tap > 3G Mobile Hotspot.
The first time you open 3G Mobile Hotspot, a brief introduction
describing the application is displayed. Tap OK.
Enter a Router name (SSID) to easily identify your phone’s Wi-Fi
network, or use the default name.
SECURITY WARNING: This device allows you to create a 3G Mobile
Hotspot wireless network, which may be accessible by unauthorized
users. It is strongly recommended that you use a password to help
protect your network.
3.
4.
5.
6.
7.
1.
2.
3.
214 Internet
Under Security, select the security protocol you want to use from
the list, or select None to create an unsecured Wi-Fi hotspot.
Enter a WEP key to use to secure the Wi-Fi network, or use the
provided default WEP key. The WEP key must be 10 digits long.
Tap 3G Mobile Hotspot to enable your phone as a wireless router.
The 3G Mobile Hotspot icon ( ) appears in the status bar and
a screen displays instructions for connecting your computer.
Follow the instructions to connect your computer or other device
to your phone’s Wi-Fi hotspot.
You can also enable and configure the 3G Mobile Hotspot in Settings.
Press HOME > MENU, and then tap Settings > Wireless &
networks. Tap 3G Mobile Hotspot to enable or disable your phone as
a Wi-Fi hotspot, or tap 3G Mobile Hotspot settings to configure Wi-Fi
hotspot settings.
3G Mobile Hotspot is subject to activation and additional service
charges.
4.
5.
6.

Bluetooth
Using Bluetooth
Bluetooth is a short-range wireless communications technology that
allows devices to exchange information over a distance of about eight
meters without requiring a physical connection.
Bluetooth on your phone supports the following profiles:
Headset
Handsfree
Stereo
Phonebook Access Profiles
Turn off Bluetooth when not in use to conserve battery power, or in
places where using a wireless device is prohibited, such as on board
an aircraft and in hospitals.
Turning Bluetooth on or off
Press HOME > MENU, and then tap Settings > Wireless &
networks.
Select or clear the Bluetooth check box.
An even easier way to turn Bluetooth on or off is with the Bluetooth
widget on the Home screen. For instructions on adding a widget to
the Home screen, see “Adding a widget to your Home screen” in the
Personalizing chapter.
1.
2.

216 Bluetooth
Changing the phone name
The phone name identifies your phone to other devices.
Press HOME > MENU, and then tap Settings > Wireless &
networks.
If the Bluetooth check box is not selected, select it to turn
Bluetooth on.
Tap Bluetooth settings > Device name.
Enter the name for your phone in the dialog box, and then tap OK.
Connecting a Bluetooth headset or car kit
You can listen to music over an Bluetooth stereo headset, or have
hands-free conversations using a compatible Bluetooth headset or car
kit. It’s the same procedure to set up stereo audio and hands-free.
For you to listen to music with your headset or car kit, the headset or
car kit must support the A2DP Bluetooth profile.
Press HOME > MENU, and then tap Settings > Wireless &
networks > Bluetooth settings.
If Bluetooth is not switched on, tap the Bluetooth check box to
switch it on.
Make sure that the headset is discoverable, so that your phone
can find the headset. Refer to the instructions that came with the
headset to find out how to set it in discoverable mode.
Tap Scan for devices. Your phone will start to scan for Bluetooth
devices within range.
When you see the name of your headset displayed in the
Bluetooth devices section, tap the name. Your phone then
automatically tries to pair with the headset.
1.
2.
3.
4.
1.
2.
3.
4.
5.

Bluetooth 217
If automatic pairing fails, enter the passcode supplied with your
headset.
The pairing and connection status is displayed below the hands-
free headset or car kit name in the Bluetooth devices section. When
the Bluetooth headset or car kit is connected to your phone, the
Bluetooth connected icon is displayed in the status bar. Depending
on the type of headset or car kit you have connected, you can then
start using the headset or car kit to listen to music and/or make and
receive phone calls.
Reconnecting a headset or car kit
When you have paired a headset with your phone, you should be able
to reconnect it automatically by turning on Bluetooth on your phone,
and then turning on the headset. However, sometimes you will need to
reconnect manually, for example if you have been using your headset
with another Bluetooth device.
Press HOME > MENU, and then tap Settings > Wireless &
networks > Bluetooth settings.
If Bluetooth is not switched on, tap the Bluetooth check box to
switch it on.
Make sure that the headset is discoverable.
Tap the headset’s name in the Bluetooth devices section.
If prompted to enter a passcode, try 0000 or 1234, or consult the
headset/car kit documentation to find the passcode.
If you still cannot reconnect to the headset or car kit, follow the
instructions in “Unpairing from a Bluetooth device” in this chapter, and
then follow the instructions under “Connecting a Bluetooth headset or
car kit” above.
6.
1.
2.
3.
4.
5.

218 Bluetooth
Disconnecting or unpairing from a Bluetooth device
Disconnecting a Bluetooth device
Press HOME > MENU, and then tap Settings > Wireless &
networks > Bluetooth settings.
In the Bluetooth devices section, press and hold the device to
disconnect.
Tap Disconnect.
Unpairing from a Bluetooth device
You can make your phone forget its pairing connection with another
Bluetooth device. To connect to the other device again, you may need
to enter or confirm a passcode again.
Press HOME > MENU, and then tap Settings > Wireless &
networks > Bluetooth settings.
In the Bluetooth devices section, press and hold the device to
unpair.
Tap Disconnect & unpair.
Sending and receiving information using Bluetooth
You can use Bluetooth to transfer information between your phone
and another Bluetooth-enabled device such as a phone or notebook
computer. The first time you transfer information between your phone
and another device, you need to enter or confirm a security passcode.
After that, your phone and the other device are paired, and you will
not need to exchange passcodes to transfer information in the future.
1.
2.
3.
1.
2.
3.
Bluetooth 219
Sending information from your phone to another device
You can send the following types of information, depending on the
device you are sending to:
Images and videos
Calendar events
Contacts
Audio files (only unprotected files can be sent)
Set the receiving device to discoverable mode. You may also
need to set it to “Receive Beams” or “Receive Files”. Refer to the
device’s documentation for instructions on receiving information
over Bluetooth.
On the phone, open the application that contains the information
or file you want to send. For example, if you want to transfer a
photo, press HOME , and then tap > Gallery.
Follow the steps for the type of item you want to send:
Photo or video (in Camera). After capturing a photo, on
the preview screen, tap the Share button , and then tap
Bluetooth.
Photos and videos (in Gallery). On the Albums tab , tap
an album. Tap the Share button , tap Bluetooth, select the
items you want to share, and then tap Next.
Calendar event. In the Calendar’s Day view, Agenda view,
or Week view, press and hold the event, and then tap Share
vCalendar > Bluetooth.
Contact. On the People screen’s All tab , press and
hold the contact, and then tap Send contact as vCard. Tap
the down arrow icon, and then select Bluetooth from the
displayed list. Then tap Send.
1.
2.
3.

220 Bluetooth
Music track. With the track displayed on the Now playing
screen, press MENU, and then tap Share > Bluetooth.
Voice recording. On the main Voice Recorder screen, tap the
Share button , and then tap Bluetooth.
If you are prompted to turn on Bluetooth, tap Turn on.
Tap Scan for devices.
Tap the name of the receiving device.
If prompted, accept the connection on the receiving device, and
enter the same passcode on both your phone and the other
device, or confirm the auto-generated passcode.
On the receiving device, accept the file.
The location where the information is saved depends on the type of
informati on and the receiving device:
If you send a calendar event or contact, it is normally added
directly to the corresponding application on the receiving device.
For example, if you send a calendar event to a compatible phone,
the event is shown in that phone’s calendar application.
If you send another file type to a Windows computer, it is
normally saved in the Bluetooth Exchange folder within your
personal document folders. Refer to your Windows computer
operating system’s documentation for more information.
If you send a file to another device, the saved location may
depend on the file type. For example, if you send an image file
to another mobile phone, it may be saved in a folder named
“Images”.
4.
5.
6.
7.
8.

Bluetooth 221
Receiving information from another device
Your device is capable of receiving a wide variety of file types with
Bluetooth, including photos, music tracks, and documents such as PDFs.
To receive files from another device, you need to have an SD card
installed in your phone.
Press HOME > MENU, and then tap Settings > Wireless &
networks > Bluetooth settings.
If Bluetooth is not switched on, tap the Bluetooth check box to
switch it on.
Tap the Discoverable check box.
On the sending device, send one or more files to your phone.
Refer to the device’s documentation for instructions on sending
information over Bluetooth.
If prompted, enter the same passcode on both your phone and
the other device, or confirm the auto-generated passcode. A
Bluetooth authorization request is displayed on your phone.
If you want to automatically receive files from the sending device
in future, select the Always check box.
Tap Accept.
When your phone receives a file transfer request notification,
slide down the notifications panel, and then tap Accept.
When a file is transferred, a notification is displayed. To open the
file immediately, slide down the notifications panel, and then tap
the relevant notification.
1.
2.
3.
4.
5.
6.
7.
8.
9.

222 Bluetooth
When you open a received file, what happens next depends on the file
type:
Media files and documents are usually opened directly in a
compatible application. For example, if you open a music track, it
starts playing in the Music application.
For a vCalendar file, select the calendar where you want to save
the event, and then tap Import. The vCalendar is added to your
Calendar events. For information on using Calendar, see the
Calendar chapter.
For a vCard contact file, if there are multiple vCard files on your
storage card, you can choose to import one, several, or all of
those contacts to your contacts list.
Adding the Bluetooth received folder to the Home screen
You can add a folder to the Home screen that shows all files you have
received with Bluetooth.
Press HOME , and then tap .
On the Add to Home screen, tap Folder > Bluetooth Received.
Press and hold the Bluetooth received folder icon, and drag it to
the Home screen position you want.
To view the folder contents, tap the folder icon. To open a file, tap the
file name.
1.
2.
3.
Camera
Camera basics
Whether traveling for business or fun, enjoy taking photos and videos
of your trip and encounters with your phone’s camera.
Be sure to plug in your microSD card before you use your phone’s
camera. Photos and videos captured with the camera will be stored onto
your microSD card.
If you have not yet inserted your microSD card to your phone, follow the
steps in “Inserting the storage card“ in the Basics chapter to insert it.
To open the camera in photo mode and take photos, press HOME
and then tap Camera.
To open the camera directly in video mode so you can
immediately start capturing videos, press HOME , tap ,
and then tap Camcorder.
Viewfinder screen
When in photo mode, the Viewfinder automatically rotates to match
the direction you’re holding your phone. This lets you easily capture
photos in portrait or landscape orientation.
When in video mode, the Viewfinder displays in landscape view only.
You’ll find the following controls on the Viewfinder screen:
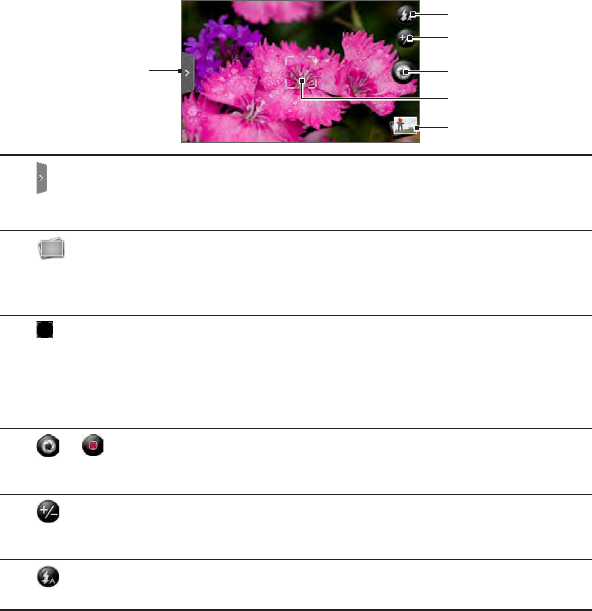
224 Camera
1
5
4
2
6
3
1 Menu tab
Tap to open the menu panel and change camera settings.
See “Changing camera settings” for details.
2 View button
Tap to open the Gallery application so you can browse through and view the
photos and videos in your storage card.
See the Gallery chapter for details.
3 Auto-focus indicator
Whenever you point the camera at a different subject or location, the screen
shows the auto-focus indicator at the center as the camera automatically
focuses on the center of the screen.
When you tap another area on the screen, the indicator will move to where you
tapped and the camera will automatically focus on that area.
4 or Shutter release / Record
Tap this button to take a photo or begin capturing video. Tap it again to stop
capturing video.
5 Zoom button
Tap to display or hide the onscreen zoom bar.
See “Zooming” for details.
6 Flash button
Tap to switch between the different camera flash modes.

Camera 225
Review screen
After capturing a photo or video, the Review screen will display the
photo or the starting image of the video that you have just captured.
You can tap the onscreen buttons to delete the photo or video, view it
in the Gallery application, or share it.
Back
Return to the Viewfinder screen.
Delete
Delete the captured photo or video.
Share
Send the captured photo or video to another phone or your computer
using Bluetooth, send it by email, or select a social network where you
want to upload it to.
View
Open and use the Gallery application to view the captured photo or
video, rotate your captured photo, and more. See the Gallery chapter
for details.
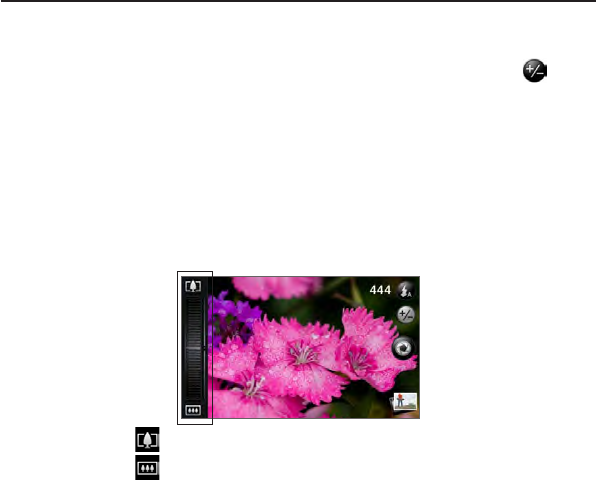
226 Camera
Zooming
Before taking a photo or video, you can first use the onscreen zoom
bar to zoom in or out of your subject.
1. To display the onscreen zoom bar, tap the Zoom button . You
can also slide your finger up or down the Viewfinder screen.
While the zoom bar is shown on the Viewfinder screen, you will
also see the remaining photo shots or remaining video recording
duration on the upper-right side of the screen.
2. You can do the following:
To slowly zoom in or out, slide your finger up or down the
Viewfinder screen. You can also drag your finger across the
zoom bar.
Tap to zoom in to the highest magnification.
Tap to zoom out to the actual size.
3. After you’re done, wait for a few seconds for the zoom bar to
automatically disappear from the screen. You can also tap the
Zoom button again or tap the Viewfinder screen to hide it.

Camera 227
Taking a photo
Press HOME and then tapand then tap Camera.
Before taking the photo, you can zoom in first on your subject.
See “Zooming” to find out how to use the onscreen zoom bar.
On the Viewfinder screen, tap the Flash button repeatedly
to select a camera flash mode depending on your lighting
conditions:
Auto flash
Flash on
Flash off
Frame your subject on the Viewfinder screen.
Let the camera auto focus on the center of the screen, or you can
touch another area on the screen that you want to focus on.
Press to take the photo.
Choose what you want to do with the photo you’ve just taken.
See “Review screen“ for details.
1.
2.
3.
4.
5.
6.
7.

228 Camera
Camera flash doesn’t turn on?
Using the flash eats up much battery power. To save battery power,
the camera disables the flash (even when you have set the camera
flash mode to Auto flash or Flash on) when one of the following
occurs:
You have an incoming call
The flash will be disabled temporarily when you have an incoming
call. After the call ends, you’ll be able to use the flash again.
If you have set the flash to Flash on, it turns back on after you
answer and end the call.
Your phone’s battery level reaches 15% or lower
Recharge the battery so that the camera can have enough battery
power to use the flash.
Cold weather may lower battery performance which
affects the flash
To make sure the camera has enough battery life to power up the
flash, keep your phone warm. When not in use, put the phone
inside your jacket to keep it warm, and try to avoid sudden
temperature changes that may affect battery performance.
3G Mobile Hotspot is turned on
The flash is disabled automatically when you use 3G Mobile
Hotspot to share your phone’s data connection. For more
information about 3G Mobile Hotspot, see “3G Mobile Hotspot” in
the Internet chapter.
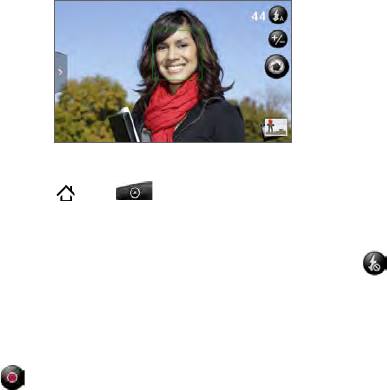
Camera 229
Face detection
When you’re auto focusing the phone’s camera to take photos or
capture videos of people, the camera can automatically recognize
faces and adjust the focus.
Capturing a video
Press HOME , tap , and then tap Camcorder.
Before capturing video, you can zoom in first on your subject.
See “Zooming” to find out how to use the onscreen zoom bar.
If you need additional lighting, tap the Flash button on the
Viewfinder screen to turn on the camcorder flash.
Frame your subject on the screen.
Let the camera auto focus on the center of the screen, or you can
touch another area on the screen that you want to focus on.
Press to start capturing video.
1.
2.
3.
4.
5.
6.
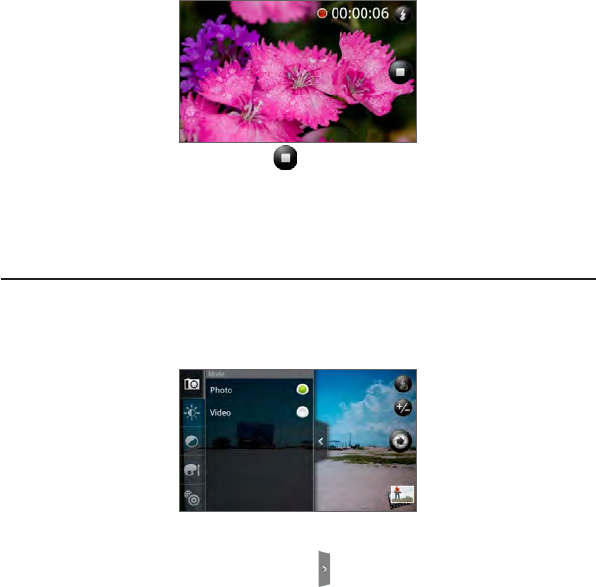
230 Camera
To stop capturing, press .
Choose what you want to do with the video you’ve just captured.
See “Review screen“ for details.
Camera settings
Open the menu panel to change basic camera settings and access
more camera settings. You can also switch between photo and video
modes from the menu panel.
Changing basic settings
On the Viewfinder screen, tap to open the menu panel.
To change basic camera settings, tap one of these icons in the
menu panel:
7.
8.
1.
2.
Camera 231
Exposure
There’s a Brightness bar that allows you to adjust the brightness
level. Slide your finger up or down the Brightness bar to increase
or decrease brightness.
Image properties
Slide your finger across each of the slider bars to adjust the
contrast, saturation, and sharpness.
Effect
You can apply a special effect to photos and videos that you will
capture. Scroll through the Effect menu and choose from effects
such as sepia, solarize, posterize, and more.
Changing advanced settings
On the Viewfinder screen, tap to open the menu panel.
Tap in the menu panel to display the Settings menu and
access more camera settings. The following are settings that you
can change from the Settings menu:
White balance
White balance enables the camera to capture colors more
accurately by adjusting to your current lighting environment.
White balance settings include: Auto, Incandescent, Fluorescent,
Daylight, and Cloudy.
ISO (photo mode only)
You can choose an ISO level or set it back to Auto. Higher ISO
numbers are better for taking pictures in low light conditions.
1.
2.
232 Camera
Resolution
Select a photo or video resolution to use for capturing. If you
want to record high-definition videos, select 720p (1280 x 720).
Widescreen (photo mode only)
When this check box is selected (default), photo resolutions
available for selection are in 5:3 ratio and you can use the entire
Viewfinder screen to frame your subject. When not selected,
photo resolutions available for selection are in standard 4:3 ratio.
Quality (photo mode only)
Select the quality level to use for capturing photos.
Self-timer (photo mode only)
If you need to take a self-portrait or group photo, you can set the
self-timer to either 2 or 10 seconds.
Geo-tag photos (photo mode only)
Select this check box when you want to store GPS location in
your captured photos.
Recording length (video mode only)
Set the maximum duration or file size for capturing video.
Record with audio (video mode only)
Select or clear the check box, depending on whether you want to
record audio when capturing videos.
Camera 233
Metering mode
Set how the camera measures the amount of light to calculate
the best exposure:
Spot metering mode allows the camera to measure light
around the focus point.
Center area mode allows the camera to measure light in the
center.
Average mode allows the camera to measure light in the
whole image.
Review duration
Set the time for a captured photo or video to be displayed on the
Review screen before the camera changes back to the Viewfinder
screen.
Flicker adjustment
When taking indoor shots under fluorescent lighting, keep this
setting on Auto or change it to the proper frequency (50Hz or
60Hz) of the power in your country to reduce flicker.
Auto Focus
This option enables or disables centered auto focus. Auto focus
is enabled by default.
Face detection
This option allows the camera to recognize faces and
automatically adjust the focus. Face detection will be turned off if
you disable Auto Focus
234 Camera
Shutter sound
Select or clear this check box, depending on whether you want
the camera to play a shutter sound when you press the shutter
release.
Time stamp (photo mode only)
Select this check box when you want the date and time to be
added on captured photos.
Grid (photo mode only)
Select this check box when you want to display a grid on the
Viewfinder screen so you can easily frame and center your
subject before taking the photo.
Reset to default
Tap to change the camera back to default settings.
Gallery
About the Gallery application
Using the Gallery application, you can view photos and watch videos
that you’ve taken with your phone’s camera, downloaded, or copied
onto your storage card. You can also take a look at your photos and
your friends’ photos that are on your social networks (Facebook and
Flickr only).
For photos that are in your storage card, you can do basic editing
such as rotate and crop. You can also easily make a photo as your
contact picture or wallpaper and share photos with your friends.
Selecting an album
To open the Gallery application, press HOME , tap , and then
tap Gallery.
The Gallery application opens in the Albums screen where your
photos and videos are organized by albums for easy viewing.
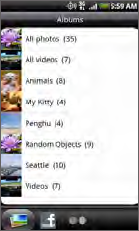
236 Gallery
The following are preset albums:
Camera shots lets you view photos and videos that are stored in
the camera’s folder.
Photos and videos that you set as your favorites will be grouped
under My favorites.
All photos lets you view all photos that are stored in all the
folders on the storage card.
All videos lets you view all videos that are stored in all the folders
on the storage card.
All downloads lets you view photos and videos that you
downloaded.
Folders in your storage card that contain photos and videos will also
be treated as albums and will be listed below the preset albums. The
actual folder names will be used as the album names.
Simply tap an album to view the photos and/or videos in that album.
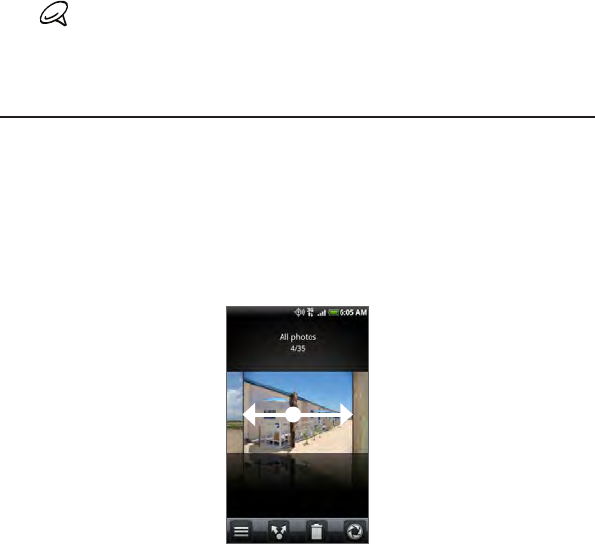
Gallery 237
If there are photos or videos under the root path of your storage card
(that are not contained in folders), they will be grouped under the
Other album.
Viewing photos and videos
After selecting an album from the Gallery application’s Albums screen,
you can browse through the photos and videos of that album either in
filmstrip or grid view. Tap a photo or video to view it in full screen.
Browsing in filmstrip or grid view
By default, photos and videos are presented in a horizontal filmstrip.
Slide your finger left or right across the filmstrip to go through the
photos and videos.
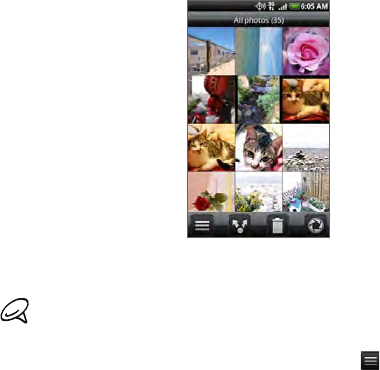
238 Gallery
From the filmstrip view, press MENU and then tap Grid view to browse
photos and videos by thumbnails. Slide your finger up or down to
scroll through the thumbnails.
To change back to displaying photos and videos in a filmstrip, press
MENU and then tap Filmstrip view.
Whether you’re in filmstrip or grid view, you can press and hold on
a photo or video to open a selection menu and choose what to do
with the photo or video.
If you want to select another album, tap to return to the Gallery
application’s Albums screen.
Viewing a photo in landscape orientation
Turn your phone sideways to the left to view the picture in landscape
mode. The picture orientation automatically adjusts to how you hold
the phone.
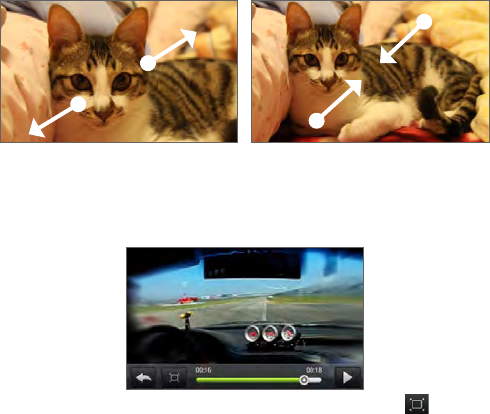
Gallery 239
Zooming in or out on a photo
There are two ways you can zoom in or out of a photo:
Tap the screen twice quickly to zoom in, then tap the screen
twice quickly again to zoom out.
You can also use pinch zooming. Press your thumb and index
finger on the screen and then spread your fingers apart to zoom
in. Pinch your fingers together to zoom out.
Zooming in Zooming out
Watching video
The screen automatically switches to landscape mode when you play
a video. Use the onscreen controls to play, pause, or stop the video.
The video is displayed in full screen size. You can tap to make it
best fit on the screen based on the video size. Tap the button again to
change back to full screen size.
240 Gallery
Viewing photos in your social networks
Using the Gallery application, you can view your photos and your
friends’ photos that are in your social networks (Facebook and Flickr
only).
Viewing photos on Facebook
You need to be logged in to your Facebook account to view Facebook
photos.
Press HOME , tap , and then tap Gallery.
Tap the Facebook tab.
Tap your account name or your friend’s account on the list to
view the pictures in the account.
You can view photos in your online albums the same way as how you
view photos in your storage card.
Viewing photos on Flickr
You need to be logged in to your Flickr account to view Flickr photos.
Press HOME , tap , and then tap Gallery.
Tap the Flickr tab.
You may be asked to give authorization for the application to
connect to the Flickr website. If this happens, you need to give
authorization to access your Flickr account.
Tap your account name or your friend’s account on the list to
view the photos in the account.
You can view photos in your online albums the same way as how you
view photos in your storage card.
1.
2.
3.
1.
2.
3.
Gallery 241
Working with photos
Whether you’re browsing photos in filmstrip or grid view in the Gallery
application, you can press and hold on a photo to open a selection
menu and choose what to do with it. You can choose to delete the
photo, rotate or crop it, and more.
Rotating and saving a photo
Press HOME , tap , and then tap Gallery.
From the Gallery application’s Albums screen, tap an album.
Choose whether to browse photos and videos in the album in
filmstrip or grid view. See “Browsing in filmstrip or grid view” for
details.
Press and hold on the photo that you want to rotate.
In the menu that opens, tap Rotate, and then select either Rotate
left or Rotate right.
You can also rotate a photo while you’re viewing it in full screen. Press
MENU, tap Rotate, and then select either Rotate left or Rotate right.
Cropping a photo
Press HOME , tap , and then tap Gallery.
From the Gallery application’s Albums screen, tap an album.
Choose whether to browse photos and videos in the album in
filmstrip or grid view. See “Browsing in filmstrip or grid view” for
details.
Press and hold on the photo that you want to crop.
In the menu that opens, tap Crop. A crop box then appears on
the photo.
1.
2.
3.
4.
5.
1.
2.
3.
4.
5.
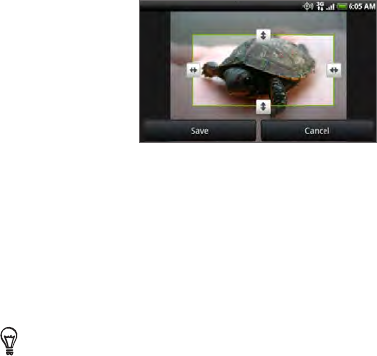
242 Gallery
To adjust the crop box size, press and hold the edge of the box.
When directional arrows appear, drag your finger inward to or
outward to resize the crop box.
To move the crop box to the part of the photo that you want to
crop, drag the crop box to the desired position.
Tap Save to apply the changes to the picture.
The cropped picture is saved in the storage card as a copy. The
original picture remains unedited.
You can also crop a photo while you’re viewing it in full screen. Press
MENU, tap More > Crop, and follow the same cropping steps as
above.
6.
7.
8.
Gallery 243
Sharing
Using the Gallery application, you can send photos and videos via
email or MMS. You can share photos on your social networks (such as
Facebook, Flickr, Picasa, and Twitter) and share videos on YouTube.
You can also send them to another phone or your computer using
Bluetooth.
Sending photos or videos by email
You can send several photos, videos, or both in an email message.
They are added as file attachments in your email.
Press HOME , tap , and then tap Gallery.
Tap the album where the photos or videos you want to share are in.
Tap and then on the Share options menu, tap Gmail or Mail.
Select the photos or videos you want to share and then tap Next.
Compose your message and then tap Send.
If you selected Mail and you have multiple email accounts, the default
email account will be used.
Sending a photo or video by MMS
Although you can send several photos or videos in a multimedia
message, it may be better to just send one at a time, especially if the
files are big in size.
Press HOME , tap , and then tap Gallery.
Tap the album where the photo or video you want to share is in.
Tap and then on the Share options menu, tap Messages.
Tap the photo or video you want to send.
1.
2.
3.
4.
5.
1.
2.
3.
4.
244 Gallery
The photo or video is automatically added into the MMS
message.
Compose your message and then tap Send.
Sending photos or videos using Bluetooth
You can select several photos, videos, or both and send them to
someone’s phone or your computer using Bluetooth.
Press HOME , tap , and then tap Gallery.
Tap the album where the photos or videos you want to share are
in.
Tap and then on the Share options menu, tap Bluetooth.
Select the photos or videos you want to share and then tap Next.
In the next few steps, you’ll be asked to turn on Bluetooth on
your phone and connect to the receiving Bluetooth device so the
files can be sent. Follow the steps in “Sending information from
your phone to another device” in the Bluetooth chapter.
Sharing photos on Facebook
You need to be logged in to your Facebook account to be able to
upload pictures.
Press HOME , tap , and then tap Gallery.
Tap the album where the photos you want to share are in.
Tap and then on the Share options menu, tap Facebook for
HTC Sense.
Select the pictures you want to share and then tap Next.
Select which album to upload to and set privacy settings for the
uploaded pictures. Tap Done.
5.
6.
1.
2.
3.
4.
5.
1.
2.
3.
4.
5.
Gallery 245
Sharing photos on Flickr
You need to be logged in to your Flickr account to be able to upload
pictures.
Press HOME , tap , and then tap Gallery.
Tap the album where the photos you want to share are in.
Tap and then on the Share options menu, tap Flickr.
Select the pictures you want to share and then tap Next.
Select which album to upload to and set privacy settings for the
uploaded pictures. Tap Done.
Sharing photos on Picasa
You need to be signed in to a Google Account to be able to upload
pictures to the Picasa™ photo organizing service.
Press HOME , tap , and then tap Gallery.
Tap the album where the photos you want to share are in.
Tap and then on the Share options menu, tap Picasa.
Select the pictures you want to share and then tap Next.
Select the online album where you want to upload the pictures,
or tap to create a new album.
Tap Upload. You can view the photos online at
http://picasaweb.google.com.
1.
2.
3.
4.
5.
1.
2.
3.
4.
5.
6.

246 Gallery
Sharing videos on YouTube
You can share your videos by uploading them to YouTube™. Before
you do this, you must create a YouTube account and sign in to that
account on your phone.
Press HOME , tap , and then tap Gallery.
Tap the album where the videos you want to share are in.
Tap and then on the Share options menu, tap YouTube.
Select the videos you want to share and then tap Next.
Enter the prompted information, such as description and tags,
and select a privacy option.
Tap Upload.
1.
2.
3.
4.
5.
6.
Music
About the Music application
Enjoy listening to songs and music on your phone using the Music
application. You need to copy music files to your storage card first to
use the Music application to play music. To find out how to copy files,
see “Copying files to and from the storage card” in the Basics chapter.
Playing music
To open the Music application, press HOME , tap , and then tap
Music.
The Music application opens in the Playback screen. Use the onscreen
controls to control music playback, select a song to play, repeat songs,
and more. On the Playback screen, you can also swipe your finger from
right to left or left to right to go to the next or previous music album.
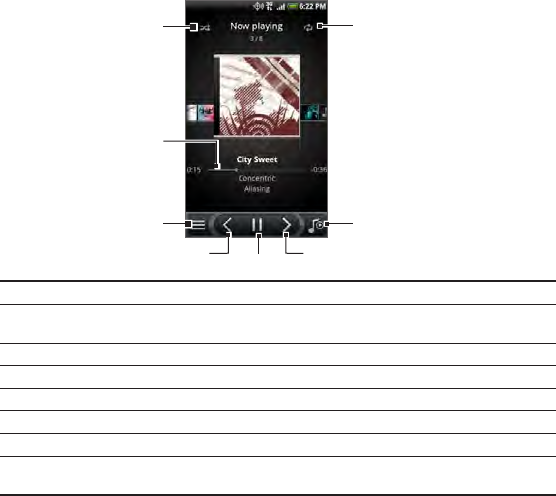
248 Music
2
3
456
7
18
1 Tap to turn shuffle on or off. (Shuffle is off when button is gray.)
2 Press and drag your finger across the progress bar to jump to any part of
the song.
3 Tap to go to the Library.
4 Tap to go to the previous song in the Now playing list.
5 Tap to play, pause, or resume playing the song.
6 Tap to go to the next song in the Now playing list.
7 Tap to toggle between showing the Now playing list and Playback screen.
8 Tap to cycle through the repeat modes: Repeat all songs, Repeat current
song, and Don’t repeat.
When playing music and the screen turns off, you can control the music
playback right from the Lock screen when you “wake up” the phone by
pressing POWER. If you do not see the playback controls on the Lock
screen, tap anywhere on the screen to display the playback controls.
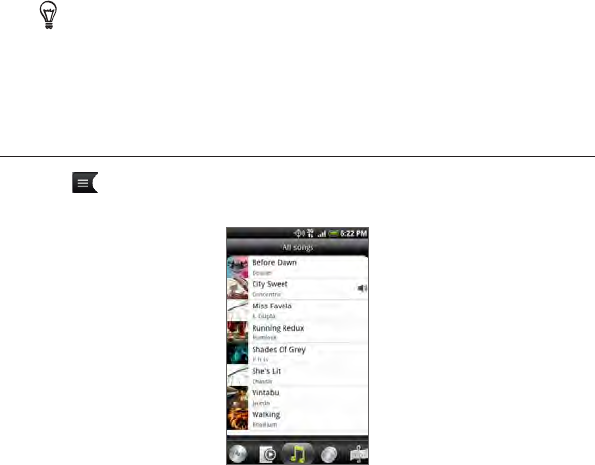
Music 249
Press the VOLUME UP or VOLUME DOWN button to adjust the
playback volume.
If you are using the wired headset to listen to music, press the center
button to toggle between playing and pausing playback. Press the
previous or next button to go to the previous or next song.
Browsing music in the Library
Tap at the bottom-left corner of the Music application’s Playback
screen or Now playing list to go to the Library.
In the Library, your music is organized into different categories such as
Albums, Artists, Genres, Composers, and more. Select a category by
tapping one of the category tabs at the bottom of the screen.
When you tap a song in a category to play it, the Now playing list is
updated with the song list from your selected category.

250 Music
Creating a playlist
Personalize your music experience by creating music playlists. Make
a playlist containing just your favorite songs or create one to match
your mood for the day. You can make as many playlists as you like.
Press HOME , tap , and then tap Music.
Tap at the bottom-left corner of the screen to go to the Library.
In the Library, tap or slide your finger on the bottom row to go to
the Playlists category.
Tap Add playlist.
Enter a playlist name, and then tap Add songs to playlist.
Tap or slide your finger on the bottom row to change among the
different categories. If you go to the Songs category, you can see
a complete list of songs on your storage card.
Select the check boxes of songs you want to add to the playlist
and then tap Add.
Tap Save.
Playing the songs in a playlist
In the Library, tap or slide your finger on the bottom row to go to
the Playlists category.
Tap a playlist to open it.
Tap the first song or any song in the playlist.
When you tap a song in the list to play it, the Now playing list is
updated with the song list from your playlist.
1.
2.
3.
4.
5.
6.
7.
8.
1.
2.
3.

Music 251
Managing playlists
After creating a playlist, you can add more songs to it, rearrange their
order, and more.
Adding more songs to a playlist
In the Library, tap or slide your finger on the bottom row to go to
the Playlists category.
Tap a playlist to open it.
Press MENU and then tap Add songs.
Go to the Songs category or any other category.
5. Select the songs you want to add to the playlist and then tap Add.
While playing back a song, press MENU and then tap Add to playlist
to add the current song to a playlist.
Rearranging songs in a playlist
In the Library, tap or slide your finger on the bottom row to go to
the Playlists category.
Tap a playlist to open it.
Press MENU and then tap Change order.
Press and hold at the end of the song title you want to move.
When the row is highlighted, drag it to its new position, then
release.
Tap Done.
Deleting songs from a playlist
In the Library, tap or slide your finger on the bottom row to go to
the Playlists category.
Tap a playlist to open it.
Press MENU and then tap Remove songs.
Select the songs you want to delete and then tap Remove.
1.
2.
3.
4.
1.
2.
3.
4.
5.
1.
2.
3.
4.

252 Music
Deleting playlists
In the Library, tap or slide your finger on the bottom row to go to
the Playlists category.
Press MENU and then tap Delete playlists.
Select the playlists to delete and then tap Delete.
Setting a song as ringtone
You can select a song from the Music application’s Library and set it
as your phone’s ringtone or a ringtone for a certain contact.
Press HOME , tap , and then tap Music.
Tap at the bottom-left corner of the screen to go to the
Library.
In the Library, select the song that you want to use as ringtone
and then play it back.
On the Playback screen, press MENU and then tap Set as
ringtone.
In the Set as ringtone options menu, tap Phone ringtone or
Contact ringtone.
If you select Contact ringtone, you need to select the contacts
you want to associate the song with in the next screen.
Checking if the song was added as a ringtone
On the Home screen, press MENU and then tap Settings.
On the Settings screen, tap Sound > Phone ringtone. The song
should be in the ringtone list and selected.
1.
2.
3.
1.
2.
3.
4.
5.
1.
2.
Music 253
Sending music using Bluetooth
You can select a song from the Music application’s Library and send
it to someone’s phone or your computer using Bluetooth (only
unprotected files can be sent).
Press HOME , tap , and then tap Music.
Tap at the bottom-left corner of the screen to go to the
Library.
In the Library, select the song that you want to use as ringtone
and then play it back.
On the Playback screen, press MENU and then tap Share >
Bluetooth.
In the next few steps, you’ll be asked to turn on Bluetooth on
your phone and connect to the receiving Bluetooth device so the
music can be sent. Follow the steps in “Sending information from
your phone to another device” in the Bluetooth chapter.
About the Music widget
You can use the Music widget to play music right from your Home
screen. To find out how you can add this widget to your Home
screen, see “Personalizing your Home screen with widgets” in the
Personalizing chapter.
1.
2.
3.
4.
5.

Maps and location
Using Bing™ Maps
Bing Maps tells you your current location, gives you direction to a
destination and lets you keep track of real-time traffic situations.
Coupled with Bing, you can search and locate places of interest or an
address on a road, satellite or hybrid map.
You must have an active mobile data or Wi-Fi connection to use
Bing Maps.
Some Bing Maps features (such as real-time traffic map) are only
available in selected areas.
Finding your location
Press HOME , and then tap > Bing Maps.
Tap on the Bing Maps screen. Your location is shown on the
map as a blue dot.
1.
2.
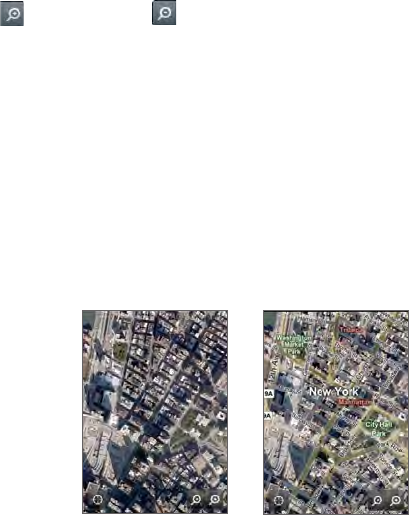
Maps and location 255
Moving on the map
Swipe your finger on the screen or press the navigation keys on the
slide-out keyboard to view other areas of the map.
Zooming in or out of a map
Tap to zoom in; tap to zoom out.
Changing the map view
Bing Maps opens on a road map. You can view the same map in a
satellite, hybrid, or traffic view.
While viewing a map, press MENU, and then tap Map type.
Select any of the following.
Traffic (available only in selected areas). Real-time traffic
conditions are displayed over roads as color-coded lines.
Each color represents how fast the traffic is moving.
Satellite. Bing Maps uses satellite imagery to display the location.
Hybrid. Displays the satellite view of the map plus location
information such as street names, and names of places of
interests.
Satellite Hybrid
1.
2.
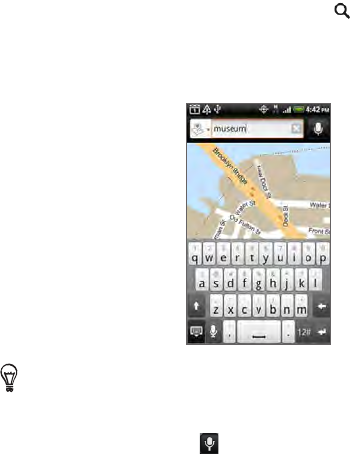
256 Maps and location
Searching for a location
While viewing a map, press SEARCH .
Enter the place you want to search in the search box. You can
enter an address, a city, or type of business or establishment (for
example, museum).
As you enter information, a list of all the places which you have
searched or visited before appears below the search box. You can
also tap an address on this list to search it and show its location on
the map.
You can also tap and (when prompted) speak the name of
the location you are searching for. Search results are instantly
displayed.
Tap the Enter key on the onscreen or slide-out keyboard.
The search results are displayed on the map.
1.
2.
3.
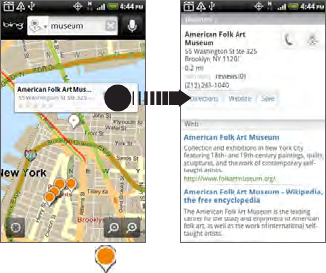
Maps and location 257
4. Do any of the following:
Tap the balloon to show the address, directions to, and the
website of the searched location.
Tap another pin to view information for that search result.
To show the search results as a list, press MENU and then tap
List view.
Clearing the map
After you get directions or search on a map (as described in the other
parts of this section), you can clear away the various markers such
activities drawn on the map.
When viewing a map, press MENU and then touch More > Clear map.
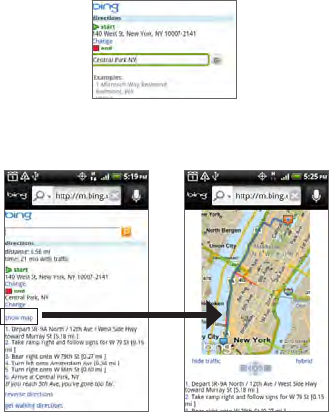
258 Maps and location
Getting directions
You can use Bing Maps to get directions to your destination.
While viewing a map, press MENU and then tap Directions.
Enter your starting point in the start box, and then tap Next.
Enter your destination in the end box.
Tap Go. The directions to your destination appear in a list.
Tap Show map to show the map to your destination.
You can tap the navigation and zoom buttons below the map to view
other parts of the map or to zoom in or out on it.
1.
2.
3.
1.
2.
Maps and location 259
Using HTC Footprints
HTC Footprints™ provides an easy way to record favorite places and
revisit those places. A footprint consists of a photo you take of a
location such as a restaurant, a sightseeing destination, etc., stored
together with a precise GPS position and other information about that
location such as the street address and phone number.
The next time you want to visit the same place, simply access the
footprint. You can then dial the phone number or view the location in
a map.
Creating a footprint
Press HOME , and then tap > Footprints.
Tap New Footprint. If GPS is not on, you are prompted to turn it
on so that your phone can use GPS to find your location.
Point the camera at the scene you want to show the location.
Footprints starts to use GPS to search for your position.
To change brightness and white balance settings before you take
a photo, press MENU, tap Brightness or White balance, and then
choose a setting.
Press to capture the photo. If your GPS position has not
been found yet, you are asked whether to find the position on,
continue the GPS search, or stop the GPS search. You may also be
asked if you want HTC Footprints to automatically determine the
address for the location.
Tap Done.
Before pressing Done, you can press MENU, and then tap Edit to
change the name, category, or address of the footprint, enter the
phone and website, and add a voice memo to the footprint.
1.
2.
3.
4.
5.
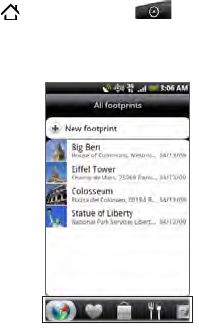
260 Maps and location
Revisiting a footprint
Press HOME , and then tap > Footprints.
At the bottom of the screen, slide your finger to select the
footprint category.
Tap the footprint you want to revisit.
Scroll down to see more information. You can tap the information
fields to view more information about the footprint, call a stored
phone number, and more.
1.
2.
3.
4.
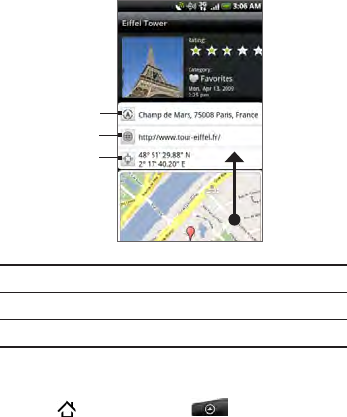
Maps and location 261
2
3
1
1 Search for the address.
2 Open the web page.
3 Show the GPS location in a map.
Editing or deleting a footprint
Press HOME , and then tap > Footprints.
On a category screen, press and hold the footprint you want to
edit or delete, and then tap Edit or Delete on the options menu.
Exporting your footprints
You can back up footprints by exporting them to a storage card. You
can also open exported footprints files in other applications such as
Google Earth on your PC. To transfer files from your storage card to
your computer, see “Copying files to and from the storage card” in the
Basics chapter.
1.
2.
262 Maps and location
Press HOME , tap > Footprints, and then do any of the following:
To export all your footprints, on the All footprints tab , press
MENU and then tap Export.
To export all the footprints from a particular category, while
viewing that category, press MENU and then tap Export.
To export a single footprint, open the footprint, press MENU and
then tap Export.
Exported footprints are saved as .kmz files in the Footprints_Data
folder on your storage card. If you exported multiple footprints at one
time, they are saved together in one .kmz file.
Importing footprints
You can restore footprints you previously backed up to the storage
card. You can also import .kmz files that you saved in other
applications, or use a photo as a footprint.
Press HOME , and then tap > Footprints.
Press MENU, and then tap Import.
Do one of the following:
To import saved footprints or another .kmz file from the storage
card, tap Footprints data, and then tap the file you want to
import. If a footprint on the device is the same as one you want
to import, you are asked whether you want to overwrite it.
To import a photo, tap Picture, navigate to the photo you
want to import, and then tap the photo. You can then add
Footprints information such as location and category.
Adding the Footprints widget
Add the Footprints widget to view and access your footprints on the
Home screen. To learn how to add widgets, refer to “Adding a widget
to your Home screen” in the Personalizing chapter.
1.
2.
3.
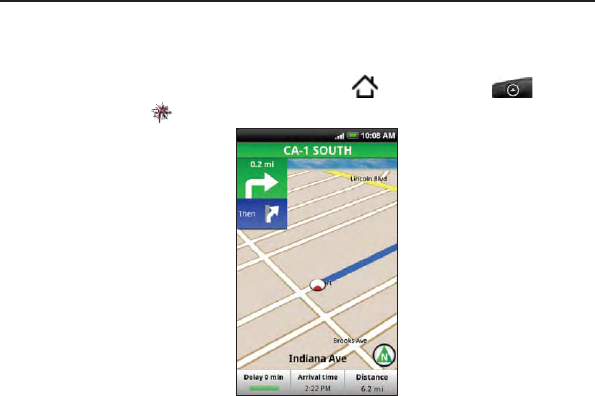
Maps and location 263
VZ Navigator®
Tells you where you are and what's nearby using Bing™ search. VZ
Navigator transforms your phone into a powerful navigation device so
you can discover destinations around town or around the globe.
To open the VZ Navigator, press HOME , and then tap >
VZ Navigator .
For more information about VZ Navigator, visit:
http://www.verizonwireless.com/vznavigator
More apps
Watching videos on YouTube
YouTube is an online video streaming service that allows you to view
videos that have been uploaded by YouTube members.
Press HOME , and then tap > YouTube. YouTube presents the
videos grouped into categories, such as Most viewed, Most discussed,
Most recent, and Top rated.
You do not need a YouTube account to browse and view videos.
However, to use all the features of YouTube (such as sharing a
video), you must create a YouTube account from your computer
and sign in to that account from your phone.
You must have an active Wi-Fi or data connection to access
YouTube.
Watching videos
Press HOME , and then tap > YouTube.
On the YouTube screen, scroll through the list of videos, and then
tap a video to watch it. The screen automatically switches to
landscape view when you play a video.
While watching a video, you can:
Tap the screen to display the playback controls. When the
playback controls are displayed, you can pause, skip forward
or backward, or drag the slider to the point in the video you
want to watch.
1.
2.
3.
More apps 265
Press MENU to rank, comment on, share, flag as inappropriate,
and interact with the video in other ways.
Press BACK to stop playback, and return to the videos list.
Searching for videos
Press HOME , and then tap > YouTube.
On the YouTube screen, press SEARCH .
Enter a search keyword, and then tap .
Tap to enter a search keyword by speaking into the microphone.
The number of search results appears below the status bar. Scroll
through the results and tap a video to watch it.
Clearing the search history
Press HOME , and then tap > YouTube.
Press MENU and then tap Settings.
Tap Clear search history, and then tap OK when prompted.
Sharing a video link
You can share a video by sending its link to your contacts.
Press HOME , and then tap > YouTube.
On the YouTube screen, tap a video to watch from the available
categories.
While watching a video, press MENU, and then tap Share.
Select how you want to share the video link.
4.
1.
2.
3.
4.
1.
2.
3.
1.
2.
3.
4.
266 More apps
Capturing a video and sharing it on YouTube
You need to be signed in to your Google Account to upload your
video to YouTube.
Press HOME , and then tap > YouTube.
Tap .
Press to start capturing video. When you are done capturing,
press . Tap Done.
Enter a title, description, and tags for your video.
Set the privacy level.
Tap Upload.
Viewing a PDF
Use PDF Viewer to view PDF files that you have copied to the phone’s
storage card.
Press HOME , and then tap > PDF Viewer.
On the Open file screen, tap the file you want to view.
Slide your finger on the screen to pan or go through the pages of
the PDF. While viewing a PDF, press MENU, and then tap:
Open to open another PDF file.
Toolbar/Toolbar off to toggle between showing and hiding the
toolbar.
View to view the PDF in normal view or reformatted view.
Choosing Reformatted reflows the text and resizes the images
to fit the width of the screen, depending on the zoom level.
1.
2.
3.
4.
5.
6.
1.
2.
3.

More apps 267
Zoom to change the zoom level to either Fit to screen or Fit
to width. This is not available when Reformatted is selected
for View.
Go to go to a specific page on the PDF.
More to search the PDF and view file properties or information
about the PDF Viewer.
Turn your phone sideways (turn to the left) to view the PDF file
in landscape mode. The screen orientation automatically adjusts
depending on how you hold the phone.
Viewing documents, presentations, and
spreadsheets
Quickoffice lets you view Microsoft Office Word, Microsoft Office
Excel, and Microsoft PowerPoint files on your phone. Quickoffice
supports viewing of Microsoft Office 2003 and 2007 Word (.doc),
Excel (.xls), PowerPoint (.ppt) and text (.txt) files.
Make sure you have copied the files to the phone’s storage card before
you open Quickoffice. See “Copying files to and from the storage card”
in the Basics chapter to learn how to copy files to the storage card.
Press HOME , and then tap > Quickoffice.
On the Open file screen, tap the file you want to open.
In the Open file screen, press MENU and then tap Sort to let you sort the
list by Name or Date.
Slide your finger on the screen to pan or go through the pages of
the file.
While viewing a file, you can:
1.
2.
3.
4.

268 More apps
Pinch the screen to zoom in or out or use the zoom controls
on the screen to zoom in or out.
For Excel files, press MENU, and then tap Worksheet to view
other worksheets on the file.
For Word and PowerPoint files, tap a URL link to open the
web page in the web browser.
When you open Word documents, Quickoffice reformats the
text to make it fit the width of the screen. Double-tap the
screen to switch to normal view so you can view the page
layout.
Quickoffice does not reflow text in tables.
When you view PowerPoint files, after you zoom in on a slide,
you can double-tap the screen to zoom out automatically and
fit the slide to the width of the screen.
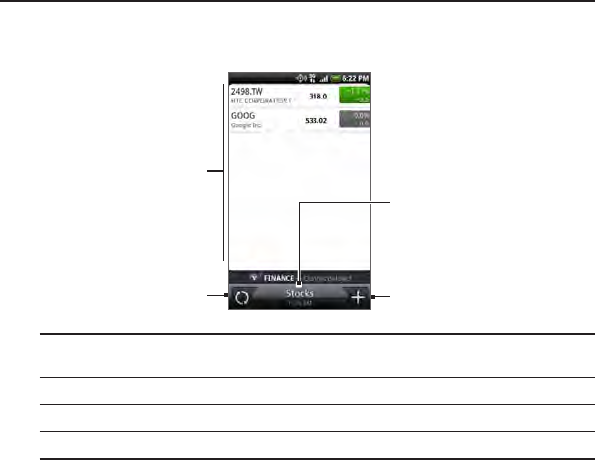
More apps 269
Keeping track of your stocks
Use Stocks to get the latest stock updates for stock quotes and
market indices you follow.
1
23
4
1 List of your stock quotes and stock market indices. Tap an item to view its
intraday chart and other details.
2 Tap to update the stock information.
3 Tap to add a stock quote or stock market index.
4 Shows the time the information was last updated.
270 More apps
Adding a stock quote or stock market index
Press HOME , and then tap > Stocks.
On the Stocks screen, tap at the bottom-right corner of the
screen.
If there are no stock quotes or indices onscreen, tap Tap here to add a
stock or index at the top of the screen.
Enter the stock quote or stock market index on the text field, and
then tap .
On the results list, tap the stock quote or stock market index you
want to add.
Changing the stock list order
Press HOME , and then tap > Stocks.
Press MENU, and then tap Rearrange.
Press and hold at the end of the item you want to move.
When the row is highlighted in green, drag it to its new position,
and then release.
Tap Done.
Deleting stock quotes and indices
Press HOME , and then tap > Stocks.
Press MENU, and then tap Delete.
Select the items you want to delete and then tap Delete.
1.
2.
3.
4.
1.
2.
3.
4.
1.
2.
3.
More apps 271
Setting stock information update frequency
Press HOME , and then tap > Stocks.
Press MENU, and then tap Settings.
Select the Auto-sync data check box.
Downloading stock information automatically may incur additional
fees from Verizon Wireless.
Tap Set download frequency, and then select frequency to check
for updates.
Manually updating stock information
Press HOME , and then tap > Stocks.
Press MENU, and then tap Update.
Adding the Stocks widget
Press HOME , and then tap > Widget > Stocks.
Choose the widget style, and then tap Select.
Drag the widget to a blank space on the Home screen, and then
release.
1.
2.
3.
4.
1.
2.
1.
2.
3.
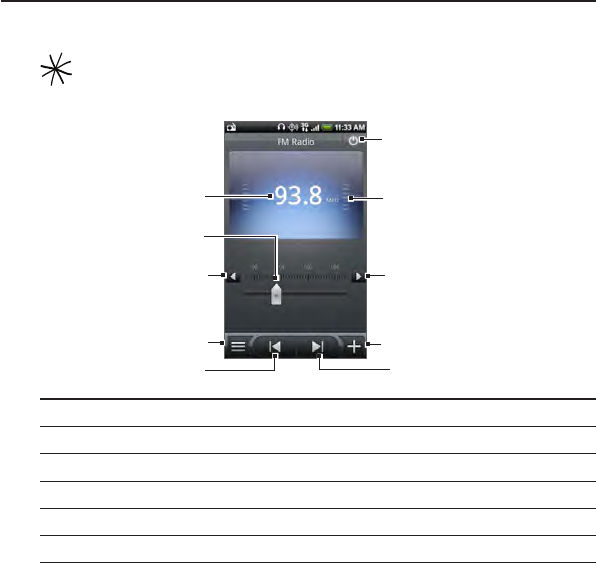
272 More apps
Listening to the radio
FM Radio lets you listen to FM radio stations on your phone.
You need to connect a headset first to the audio jack of your phone
to use FM Radio. FM Radio uses the stereo headset as the FM radio
antenna.
1
2
3
4
56
7
8
9
10
1 FM radio frequency
2 Drag to tune in to a frequency on the FM band.
3 Tap to fine tune the radio frequency by -0.1 MHz.
4 View the All presets list.
5 Tap to search the FM band for the previous FM station.
6 Tap to search the FM band for the next FM station.
More apps 273
7 Tap to change the name of the current station you are tuned into.
8 Tap to fine tune the radio frequency by +0.1 MHz.
9 Radio signal strength
10 Turn FM radio on or off.
Listening to an FM station
Press HOME , and then tap > FM Radio.
The first time you open FM Radio, it automatically scans for
available FM stations, saves them as presets, and plays the first
FM station found.
To repeat scanning and saving of FM stations, press MENU, and
then tap Scan & Save.
Press BACK to stop the auto-scan.
On the FM Radio screen, you can:
Tap and then select a station you want to listen to.
Tap to go to the previous available FM station, or to
go to the next available FM station.
Press the VOLUME UP and VOLUME DOWN buttons on the
side of the phone to adjust the volume.
Press MENU to set more FM Radio options.
Adding station names
Press HOME , and then tap > FM Radio.
Tune in to the desired FM station, and then tap .
Enter a station name for the selected FM station, and then tap
Save.
1.
2.
3.
1.
2.
3.
274 More apps
Minimizing or turning off FM Radio
Do one of the following:
Press BACK to minimize and keep FM Radio running in the
background so you can listen to the radio while going to another
screen.
On the FM Radio screen, tap on the upper-right corner of the
FM Radio screen to turn FM Radio off.
Adding the FM Radio widget
Instantly turn your FM Radio on or off from the Home screen with the
FM Radio widget. The widget also lets you choose which station to
tune into and displays the station name (station-dependent).
Go to an empty Home screen panel, and then press and hold the
screen.
Tap Widget > FM Radio.
Select a widget style, and then tap Select.
Recording your voice
Voice Recorder is useful for quickly recording thoughts. You can also
record your voice and set it as a ringtone.
You need to have a microSD card installed on your phone to use Voice
Recorder.
Recording your voice
Press HOME , and then tap > Voice Recorder.
Hold the device’s microphone near your mouth.
1.
2.
3.
1.
2.
More apps 275
Tap to start recording a voice clip. Tap to stop recording.
Tap to play back the voice recording.
To quickly share the voice recording through Bluetooth, email, or
message, tap .
Sharing a voice clip
Press HOME , and then tap > Voice Recorder.
On the Voice Recorder screen, tap .
On the All recording screen, press and hold the voice recording
you want to share, and then tap Share on the options menu.
On the Share options menu, select how you want to share the
voice recording.
To learn how to send files through Bluetooth, see the Bluetooth
chapter.
Setting a voice clip as a ringtone
Press HOME , and then tap > Voice Recorder.
On the Voice Recorder screen, tap .
On the All recording screen, press and hold the voice recording
you want to set as a ringtone, and then tap Set as ringtone on
the options menu.
Renaming a voice clip
Press HOME , and then tap > Voice Recorder.
On the Voice Recorder screen, tap .
On the All recording screen, press and hold the voice recording
you want to rename, and then tap Rename on the options menu.
Enter the name, and then tap Save.
3.
4.
5.
1.
2.
3.
4.
1.
2.
3.
1.
2.
3.
4.
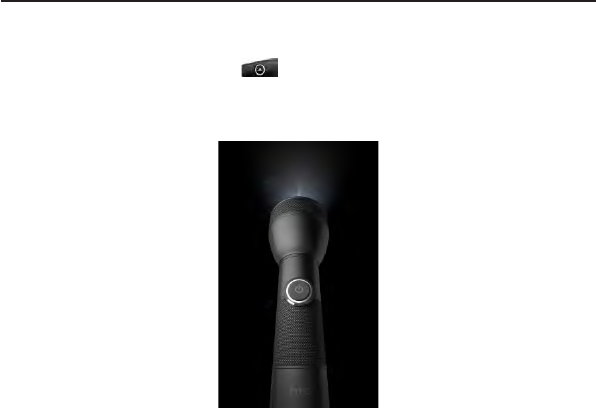
276 More apps
Using Flashlight
Never get caught in the dark again. The Flashlight application turns on
your phone’s LED flashlight to shine a light wherever you need it.
On the Home screen, tap > Flashlight.
Flashlight opens with the light on at the lowest of three brightness
levels.
To increase the light intensity, repeatedly tap the switch on the
flashlight handle. The indicator below the switch shows the
current light level.
To turn the light off, tap the switch when the light is at its
brightest level. Tap the switch again to turn the flashlight back
on.
•
•
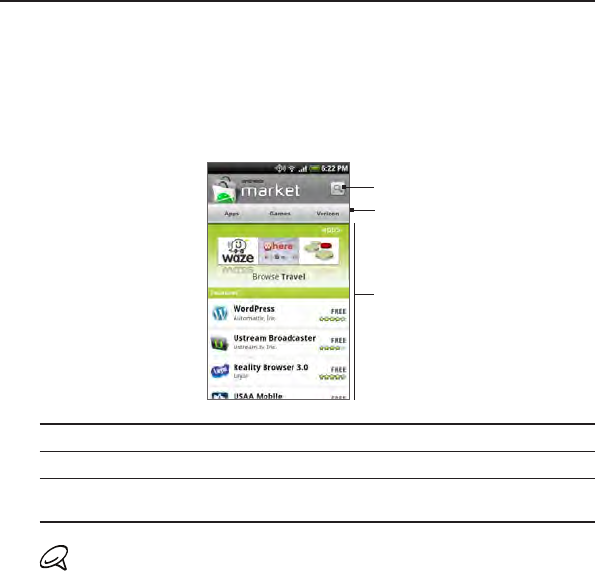
More apps 277
Finding and installing apps from Android Market
Android Market™ is the place to go to find new apps for your phone.
Choose from a wide variety of free and paid apps ranging from
productivity apps, entertainment, to games. When you find an app
you want, you can easily download and install it on your phone with
just a few taps of your finger.
To access Android Market, you must first connect to the Internet using
your phone’s Wi-Fi or data connection and sign in to your Google Account.
1
2
3
1 Tap to search Android Market for apps to install on your phone.
2 Tap to display the available apps or games on Android Market or Verizon.
3 Featured apps list. Tap an app to read a description about the app and
user reviews.
Paid apps are currently only available in certain countries.
278 More apps
Finding and installing an application
When you install apps from Android Market and use them on your
phone, they may require access to your personal information (such as
your location, contact data, and more) or access to certain functions
or settings of your phone. Download and install only apps that you
trust.
Press HOME , and then tap Market or tap > Market.
When you open Android Market for the first time, the Terms of
Service window will appear. Tap Accept to continue.
To find an app in Android Market, you can:
Browse through featured apps. Scroll through the list of
featured apps when you open Android Market.
Browse apps by categories. First, tap Apps or Games and then
tap a category. Under a category, you can filter the apps by
Top paid, Top free or Just in.
Paid apps are currently only available in certain countries.
Search for an app. Tap on the Android Market home screen,
enter the name or type of app you’re looking for, and then tap
to the right of the search box.
Tap an app to read a description about the app and user reviews.
Tap Install (for free applications) or Buy (for paid applications).
You need a Google Checkout account to purchase items on Android
Market. See “Creating a Google Checkout account” to set up a Google
Checkout account if you do not have one.
1.
2.
3.
4.
5.

More apps 279
The subsequent screen notifies you whether the app will
require access to your personal information or access to
certain functions or settings of your phone. If you agree to the
conditions, tap OK to begin downloading and installing the app.
If you selected a paid application, after tapping OK, you’re
redirected to the Google Checkout screen to pay for the
application before it’s downloaded to your phone.
Read it carefully! Be especially cautious with applications that have
access to many functions or a significant amount of your data. Once
you tap OK on this screen, you are responsible for the results of using
this item on your phone.
After installing an app, tap on the upper-left side of the screen to
return to Android Market home. You can also press MENU, and then
tap Home.
Creating a Google Checkout account
You must have a Google Checkout account associated with your
Google Account to purchase items from Android Market.
Do one of the following:
On your computer, go to http://checkout.google.com to create a
Google Checkout account.
The first time you use your phone to buy an item from Android
Market, you’re prompted to enter your billing information to set
up a Google Checkout account.
When you’ve used Google Checkout once to purchase an application
from Android Market, the phone remembers your password, so you
don’t need to enter it the next time. For this reason, you should secure
your phone to prevent others from using it without your permission.
See the Security chapter to learn how to secure your phone.
6.
280 More apps
Requesting a refund for an application
If you are not satisfied with an application, you can ask for a refund
within 24 hours of the purchase. Your credit card is not charged and
the application is uninstalled from your phone.
If you change your mind, you can install the application again, but you
can’t request a refund a second time.
Press HOME , and then tap > Market > Menu > Downloads.
Tap the application to uninstall for a refund. The details screen for
the application opens.
Tap Uninstall & refund. Your application is uninstalled and the
charge is cancelled.
Choose the reason for removing the application, and then tap OK.
Opening an installed application
Do one of the following:
On the status bar, check if you see the icon. If you see the
icon, open the Notifications Panel, and then tap the app to open
it. See “Opening the Notifications panel” in the Basics chapter to
learn how to open the Notifications Panel.
Press HOME , and then tap > Market > Downloads. On
the Download screen, tap the app to open it.
Press HOME , and then tap . On the All programs screen,
locate the app, and then tap it.
1.
2.
3.
4.

More apps 281
Uninstalling an application
You can uninstall any application that you have downloaded and
installed from Android Market.
Press HOME , and then tap > Market > Downloads.
On the Downloads screen, tap the application you want to
uninstall, and then tap Uninstall.
When prompted, tap OK to remove the application on your
phone.
Choose the reason for removing the application, and then tap OK.
Getting help
If you ever need help or have questions about Android Market, press
MENU, and then tap Help. The web browser will take you to the
Android Market Help web page.
1.
2.
3.
4.
282 More apps
Sharing games and applications
Having fun with a game or application that you downloaded from
Android Market? Share it instantly with your circle of friends.
For your friends to link to the game or application and download it
from Android Market, they must be using an Android phone.
From the Home screen, tap .
Tap App Sharing. Or, press MENU and then tap Share.
You’ll then see the list of games and applications that you
downloaded and installed from Android Market.
Tap an application, and then choose how to share it:
Facebook Post the link to Facebook.
See “Facebook for HTC Sense and Facebook for
Android application” in the Social chapter.
Friend Stream Post the link to Facebook and Twitter.
See “Using Friend Stream“ in the Social chapter.
Gmail Send the link using your Gmail account.
See “Using Gmail” in the Email chapter.
Mail Send the link using your POP3/IMAP or Exchange
ActiveSync email account.
See “Mail” in the Email chapter.
Messages Send the link in a text message.
See the Messages chapter
Peep Share the link in Twitter.
To find out how to use Peep, see “Tweeting on your
phone“ in the Social chapter.
1.
2.
3.
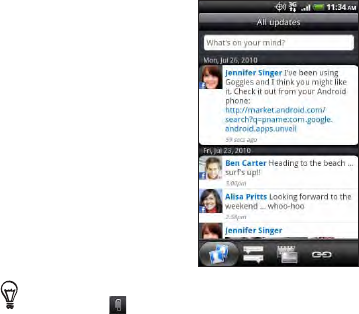
More apps 283
When your friends see the link in your sent text, email, or status
update, they can simply tap the link to go directly to the game or
application in Android Market to download it.
While entering your status update in Friend Stream, you can also
tap to choose from games or applications that you want to
share in your social networks.
If you’ve already created a new text or email message, press MENU
and then tap Attach > App recommendation to choose from your
list of installed games and applications.

284 More apps
Skype™ mobile
Skype mobile allows you to make and receive unlimited Skype-to-
Skype calls or instant messages to anyone on Skype around the world.
With Skype Mobile on your phone you can now talk to your heart’s
content from anywhere.
To open the Skype, press HOME , and then tap >
Skype mobile .
For more information, please visit www.verizonwireless.com/skype.
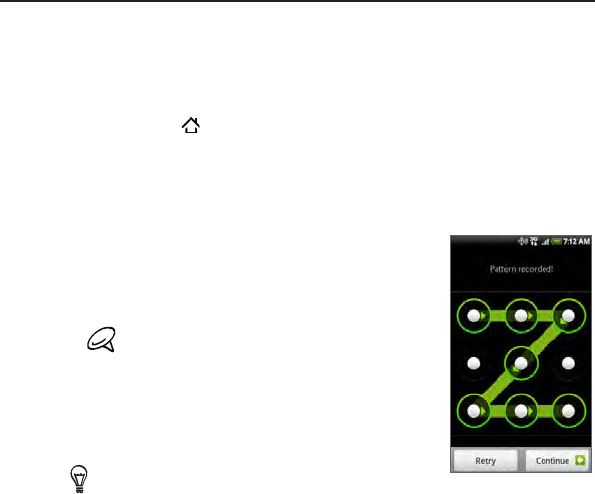
Security
Protecting your phone with a screen lock
You can secure your phone by requiring a screen unlock pattern, a
numeric PIN, or a password every time your phone is turned on or
every time it wakes up from sleep mode (screen is off).
Setting a screen unlock pattern
Press HOME > MENU, and then tap Settings.
Scroll down the screen, and then tap Security > Set up screen
lock > Pattern.
Read the information on the screen, and then tap Next.
Study the example pattern on the screen, and then tap Next.
Draw the screen unlock pattern by
connecting at least four dots in a vertical,
horizontal and/or diagonal direction. Lift your
finger from the screen when finished.
You must slide your finger on the screen to
create the pattern and not tap individual
dots.
The phone records the pattern. Tap Continue.
When prompted, draw the screen unlock
pattern again, and then tap Confirm.
Clear the Use visible pattern check box if you
do not want the unlock pattern to display on
the screen when you unlock it.
5.
6.
7.
1.
2.
3.
4.

286 Security
To change your unlock screen pattern, press HOME > MENU, and
then tap Settings > Security > Change screen lock.
When you fail to draw the correct unlock pattern on the screen after
five attempts, you will be prompted to wait for 30 seconds before you
can try again. If you forgot your screen unlock pattern, tap Forgot
pattern. You will be prompted to sign in using your Google Account
name and password, and create a new screen unlock pattern before
the Home screen displays.
You need to be connected to a data or Wi-Fi connection to be able to
sign in to your Google Account.
Setting a numeric PIN
Press HOME > MENU, and then tap Settings.
Scroll down the screen, and then tap Security > Set up screen
lock > PIN.
Enter a PIN of at least four digits and tap Continue.
Enter your PIN again and tap OK.
Setting a password
Press HOME > MENU, and then tap Settings.
Scroll down the screen, and then tap Security > Set up screen
lock > Password.
Enter a password of at least four characters and tap Continue.
Enter your password again and tap OK.
1.
2.
3.
4.
1.
2.
3.
4.

Settings
Settings on your phone
Control and customize phone settings on the Settings screen.
To open the Settings screen, press HOME > MENU, and then tap
Settings.
Personalize
Select a scene, set the Home screen or Lockscreen wallpaper to use,
and set the default ringtone to use for incoming calls. You can also
rename or delete a custom scene by pressing and holding a custom
scene in Scenes.
Wireless & networks
Configure your phone’s wireless connections, such as Wi-Fi and
Bluetooth, enable the Airplane mode, or set the options for mobile
networks, roaming, 3G Mobile Hotspot, Virtual Private Networks, and
more.
Call
Set up call services such as voicemail, auto retry, TTY mode, and
assisted dialing.
Sound
Adjust the volume, and set the phone ringtone and notification sound.
288 Settings
Display
Turn automatic screen rotation on or off, and set the screen brightness
and screen timeout.
Accounts & sync
Log in or out from your social network accounts, Google Account, and
Exchange ActiveSync account. You can also manage synchronization
and other settings for your accounts. See the Accounts and sync
chapter for details.
Location
Select the services to use when determining your location.
Search
Select items to include when you do a search on your phone and set
Google search options.
Connect to PC
Set the default USB connection type when you connect your phone to
your computer. Select Ask me to always display the connection type
dialog box when the device is connected. See “Connecting your phone
to a computer” in the Basics chapter for details.
Security
Set up a screen lock or manage the phone’s credential storage. See the
Security chapter for details on setting up a screen lock.
Applications
Manage applications and installation of new programs.
Settings 289
SD & phone storage
Check the available storage card and phone memory.
You can also
reset the phone. See the Backup, Update and Reset chapter for more
details.
Date & time
Set the date and time, time zone, and date or time format. To turn off
auto time synchronization and be able to manually change time zone
settings, see “Changing time zone settings” in the Clock and Weather
chapter.
Language & keyboard
Set the operating system language and region. You can also set
onscreen keyboard options.
Accessibility
Enable or disable preset or downloaded accessibility plugins that
respond to user interaction such as receiving sound feedback when a
new browser window is opened.
Voice input & output
Configure Google voice recognition settings. You can also configure
text-to-speech settings If you have installed text-to-speech (voice
data) application.
About phone
Set the system software update method and view the phone status
such as the network type, signal strength, battery power level, and
network name. You can also check the battery use of individual
applications or view the legal information and software version of your
phone. See “Checking information about your phone” in this chapter
for details.

290 Settings
Changing display settings
Adjusting the screen brightness manually
Press HOME > MENU, and then tap Settings > Display >
Brightness.
Clear the Automatic brightness check box.
Drag the brightness slider to the left to decrease or to the right
to increase the screen brightness. Tap OK.
Adjusting the time before the screen turns off
After a period of inactivity, the phone screen turns off to conserve
battery power. You can set the idle time before the screen turns off.
Press HOME > MENU, then tap Settings > Display > Screen
timeout.
Tap the time before the screen turns off.
To quickly turn off the screen, press the POWER button.
Preventing automatic screen rotation
By default, the screen orientation automatically adjusts depending on
how you hold the phone.
Not all application screens support automatic rotation.
Press HOME > MENU, then tap Settings > Display.
Clear the Auto-rotate screen check box.
1.
2.
3.
1.
2.
1.
2.

Settings 291
Recalibrating the G-sensor
Recalibrate the screen if you feel that the screen orientation does not
respond properly to the way you hold the phone.
Press HOME > MENU, then tap Settings > Display.
Scroll down the screen, and then tap G-Sensor calibration.
Place the phone on a flat and level surface, and then tap Calibrate.
After the recalibration process, tap OK.
Switching animation effects on or off
You can turn off the animation or enable only some animations when
switching between screens.
Press HOME > MENU, and then tap Settings > Display >
Animation.
On the options menu, select the animation setting you want.
Keeping the screen on while charging the phone
You can keep the phone screen from turning off while you are
charging the phone.
Press HOME > MENU, then tap Settings.
Scroll down the screen, and then tap Applications > Development.
Select the Stay awake check box.
1.
2.
3.
4.
1.
2.
1.
2.
3.

292 Settings
Changing sound settings
Setting a sound profile
Switch to vibrate or silent mode, or use the normal phone sound settings.
Press HOME > MENU, and then tap Settings > Sound >
Sound profile.
On the Choose a profile options menu, tap the sound profile you
want to use.
Enabling or disabling audible selection
You can choose to play a sound when you are selecting items onscreen.
Press HOME > MENU, and then tap Settings > Sound.
Scroll down the screen, and then select or clear the Audible
selection check box.
Enabling or disabling haptic feedback
When haptic feedback is enabled (default), your wireless device
vibrates every time you press the soft keys on the front panel, or tap
onscreen buttons and other onscreen elements.
Press HOME > MENU, and then tap Settings > Sound.
Scroll down the screen, and then select or clear the Haptic
feedback check box.
Choosing the notification sound
You can select the sound to play when your phone receives new
notifications.
Press HOME > MENU, and then tap Settings > Sound >
Notification sound.
Select your preferred notification sound in the list, and then tap OK.
1.
2.
1.
2.
1.
2.
1.
2.

Settings 293
Changing the phone language
When you turn your phone on for the first time, you are prompted to
select the language you would like to use. You can also change the
language on the fly whenever you like. Changing the language adjusts
the keyboard layout, date and time formatting, and more.
The languages available to choose from may depend on the version of
phone you have.
Press HOME > MENU, and then tap Settings >
Language & keyboard > Select locale.
Tap the language and corresponding region you want to use.
Press HOME to return to the Home screen. You may need to
wait briefly as the new language is applied to your phone.
Optimizing your phone’s battery life
When you’re on the go, it’s not always easy to charge your phone’s
battery as often as you’d like. Follow these tips to extend the time
between charges:
Turn off wireless functions such as Bluetooth, Wi-Fi, and data
connection when you’re not using them. See the Internet and
Bluetooth chapters for details.
Do not use GPS satellites to determine your GPS location. See
the Maps & Location chapter for details.
Lower the screen brightness. See “Adjusting the screen
brightness manually” in this chapter for details.
Switch off screen animations. See “Switching animation effects
on or off” in this chapter for details
1.
2.
3.

294 Settings
Cut down on activities such as Internet browsing. Wireless data
consumes a lot of power.
Avoid making very long phone calls or using the camera for
extended periods of time.
Consider carrying a spare battery for times when you can’t
charge your battery for an extended period.
Batteries gradually lose storage capacity over time. Consider
replacing your battery after eight months to a year, or if you
notice that the battery life is decreasing.
Checking the power usage of applications
Press HOME > MENU, and then tap Settings.
Scroll down the screen, and then tap About phone > Battery >
Battery use.
Managing memory
Checking how much phone memory is available for use
Press HOME > MENU, and then tap Settings.
Scroll down the screen, and then tap SD & phone storage. The
available phone memory is displayed in the Internal phone
storage section.
Checking the available storage card space
Press HOMEHOME > MENU, and then tap > MENU, and then tap Settings.
Scroll down the screen, and then tap SD & phone storage. The
total and available storage card space is displayed in the SD card
section.
1.
2.
1.
2.
1.
2.
Settings 295
Clearing application cache and data
Press HOME > MENU, and then tap Settings.
Scroll down the screen, and then tap Applications > Manage
applications.
On the Manage applications screen, tap the application whose
cache and/or data you want to delete.
Press MENU to bring up sort and filter options.
In the Application info screen, tap Clear data and/or Clear cache.
Uninstalling third-party applications
You cannot uninstall applications that are preinstalled on the phone.
Press HOME > MENU, and then tap Settings.
Scroll down the screen, and then tap Applications > Manage
applications.
Press MENU, and then tap Filter > Downloaded.
On the Manage applications screen, tap the application you want
to uninstall.
On the Application info screen, tap Uninstall.
Freeing up more phone memory or storage card space
If your phone is running low on memory, try the following:
In your web browser, clear all temporary Internet files and history
information. See the Internet chapter for more information.
Uninstall downloaded programs from Android Market you no
longer use. See “Finding and Installing Apps from Android Market
“ in the More apps chapter for details.
1.
2.
3.
4.
1.
2.
3.
4.
5.

296 Settings
Checking information about your phone
Press HOME > MENU, and then tap Settings.
Scroll down the screen, and then tap About phone.
Select one of the following:
System updates
Tap to check for software updates for your phone.
Network
Check information about Verizon Wireless and its service status.
Phone identity
Check information about your phone.
Battery
Check information about the battery such as its current battery level,
status, and what programs are using the battery.
Hardware information
Check the Wi-Fi MAC and Bluetooth addresses.
Software information
Check the version and other information about the Android platform
being used by the phone. You can also check the version of the web
browser.
Legal information
Read legal information from HTC and Google, and licenses used by the
phone.
1.
2.
3.

Backup, update and reset
Backing up your contacts
Your phone features Verizon Backup Assistant, which automatically
backs up your contacts to an online server. You must first create an
account on the Verizon Wireless website.
You can set up the Backup Assistant when you first turn on your
phone. See “Getting started” in the Basics chapter for details.
If you did not set up Backup Assistant when you first turned on your
phone, you can set it up in Settings.
Setting up Backup Assistant
If you didn’t set up Backup Assistant when you first turned on your
phone, you can enable it in Settings.
Press HOME > MENU, and then tap Settings.
Scroll down the screen, and then tap Accounts & sync.
Tap Backup Assistant.
Follow the instructions on the screen to sign in to Backup
Assistant and back up your contacts.
Changing the backup schedule
Press HOME > MENU, and then tap Settings.
Scroll down the screen, and then tap Accounts & sync.
Tap Backup Assistant.
Tap Schedule and select a backup option from the menu.
1.
2.
3.
4.
1.
2.
3.
4.

298 Backup, update and reset
Manually backing up your contacts
Press HOME > MENU, and then tap Settings.
Scroll down the screen, and then tap Accounts & sync.
Tap Backup Assistant.
Tap Sync now.
For more information on how to use Backup Assistant and to create
a Backup Assistant account, go to: https://wbillpay.verizonwireless.
com/vzw/nos/ba_nab/overview_def.jsp
Updating your phone’s system software
From time to time, system software updates for your phone may be
available. Your phone can check and then notify you if an update is
available. You can then download and install the update to your phone.
Depending on the type of update, the update may erase all your
personal data and customized settings, and also remove any programs
you have installed. Make sure that you have backed up the information
and files you want to keep.
Checking and downloading system software updates may incur
additional data transfer fees from Verizon Wireless.
When there is an update available, the Install system software
update dialog box will appear onscreen.
On the dialog box, select Install now, and then tap OK.
Select Install later if you want to install the system update at a later
time. When you are ready to install, open the Notifications panel, and
then tap System update is ready.
1.
2.
3.
4.
1.
2.

Backup, update and reset 299
Wait for the update process to finish. When the update is
finished, the phone will automatically reset.
Checking for phone system software updates manually
Press HOME > MENU, then tap Settings.
Scroll down the screen, and then tap About phone > System
updates.
Your phone checks for system software updates. If no update is
available the message “Your system is currently up to date.” appears.
Performing a hard/factory reset
You can return your phone to its original state, as it was when it left the
factory. This is also called a hard reset. You might want to do this if you
are giving your phone to a friend or relative and you want to remove
all your data first, or if your phone has a persistent problem that is not
solved by powering off the phone and then powering it on again.
A factory reset is a drastic measure. It permanently erases all your
personal data and customized settings, and also removes any
programs you have installed. Make sure that you have backed up the
information and files you want to keep.
If your phone hangs or freezes, we recommend that you do a “soft”
reset instead of a hard/factory reset. To perform a soft reset, remove
the battery, wait for a few seconds, and then re-install it. After re-
installing the battery, turn on the phone.
3.
1.
2.

300 Backup, update and reset
Performing a factory reset via settings
The most convenient way to do a factory reset is via the phone
settings.
Press HOME > MENU, then tap Settings.
Scroll down the screen, and then tap SD & phone storage.
Scroll down the screen, and then tap Factory data reset.
On the Factory data reset screen, tap Reset phone, and then tap
Erase everything.
Performing a factory reset using phone buttons
If you cannot turn on your phone or access the phone settings, you
can still perform a factory reset by using the buttons on the phone.
With the phone turned off, press and hold the VOLUME DOWN
button, and then press and hold the POWER button.
When the screen with Android images appears, release the
buttons.
Press VOLUME DOWN to select FACTORY RESET, and then
press the POWER button.
1.
2.
3.
4.
1.
2.
3.

Index
Symbols
3G 193
A
Adding a city to the
Weather screen 190
Adding a city to the
World Clock screen 186
Adding a new contact 81
Adding application icons and
other shortcuts on your
Home screen 55
Adding a widget to your
Home screen 53
Adding folders on your
Home screen 56
Adjusting the volume 41
Airplane Mode 76
Alarm clock 186
Album (Gallery application) 235
Android Market 277
Answering an incoming call 63
B
Backing up contacts 297
Backing up your contacts to
the storage card 83
Bing Maps 254
- Changing view 255
- Finding your location 254
- Getting directions 258
- Navigating on a map 255
- Searching location 256
- Zooming 255
Bluetooth 215
- connecting headset or car kit 216
- sending and receiving
information 218
- sending photos or videos 244
Bookmarks 209
Browser 201
C
Calendar application 166
Calendar widget 179
Call history 68
Call services 72
Camera 223
Capturing video 229
Changing your wallpaper 52
Checking information about your
phone 296
Checking weather 189
Clock 180
Clock widget (HTC) 180
Conference call 66
302 Index
Connecting your phone to a
computer 43
Copying files to and from the
storage card 46
Creating a calendar event 167
Creating a playlist 250
Cropping a photo 241
Customizing and saving a scene 51
D
Data connection 193
Date and time 185
Deleting a scene 52
Deleting contacts 84
Desk Clock 182
Downloading HTC widgets 54
E
Editing a contact’s information 83
Email 146
- adding a POP3/IMAP account 157
- deleting 149, 160
- sending 151, 162
- sending photos or videos 243
- settings 156, 164
Ending a call 67
Event reminders 174
Exchange ActiveSync 119
Extended Home screen 35
F
Facebook
- sharing photos 244
Facebook for Android 130
Facebook for HTC Sense 129
Factory reset 299
Finger gestures 36
Flash (camera) 227, 229
Flashlight 276
Flickr 245
FM Radio 272
Folders 56
Footprints 259
Friend Stream 136
- Friend Stream widget 138
G
Gallery application 235
Gmail 146
Google Accounts 118
Google Search 48
H
Hard reset 299
Home city 184
Home page 202
Home screen 35
Home screen wallpaper 52
HTC Clock widget 180
HTC Sync 121
I
Importing contacts from the
storage card 84
Internet 193
Inviting guests to your event
(Google Account only) 168
Index 303
K
Keyboard 91
L
Library (Music) 249
Listening to the radio 272
M
Mail 157
Making an emergency call 62
Making Calls 59
Managing memory 294
Meeting request 161, 169
Merging contact information 82
Messages 102
Microsoft Exchange ActiveSync 119
Missed call 69
MMS 102
Mobile network connection 193
Music application 247
Music widget 253
Mute the microphone 67
N
Notification icons 39
Notification ringtone 292
Notifications panel 40
O
Onscreen keyboard 94
Optimizing your phone’s
battery life 293
P
PDF Viewer 266
Peep 132
- widget 136
People 77
- contact groups 85
- contact information and
conversations 87
- People screen 78
- People widget 89
Personalizing 49
Phone status icons 38
Photo capture 227
Picasa 245
Picture message 102
Playing music 247
Playlist 250
Protecting your phone with a
screen lock 285
Push messages 108
Q
Quickoffice 267
R
Rearranging or removing widgets
and icons on your
Home screen 57
Recalibrating the G-sensor 291
Recording your voice 274
Rejecting a call and sending a
text message 64
Rejecting an incoming call 64
304 Index
Removing the back cover 28
Renaming a scene 52
Review screen (Camera) 225
Ringtone 252
Rotating and saving a photo 241
S
Scenes 50
Search 48
Searching for a contact 83
Searching your phone and
the Web 48
Sending a meeting request
using Calendar (Exchange
ActiveSync only) 169
Sending a photo or video
by MMS 243
Sending a vCalendar 178
Sending contact information 84
Sending music using Bluetooth 253
Sending photos or videos
by email 243
Sending photos or videos
using Bluetooth 244
Setting a song as ringtone 252
Settings 287
- alarm sound 188
- calendar 176
- camera 230
- display settings 290
- phone language 293
- sound settings 292
- weather 191
Setting the time zone, date,
and time 185
Setting up My contact card 79
Setting up your phone for the
first time 33
Setting your home city 184
Sharing photos on Facebook 244
Sharing photos on Flickr 245
Sharing photos on Picasa 245
Sharing videos on YouTube 246
Shortcuts 55
Skype 284
Sleep mode 42
SMS 102
Social network accounts 118
Speakerphone 67
Speed dial 60
Stocks 269
Stopwatch 181
Sync with computer 121
Sync with online accounts 117
T
Taking a photo 227
Tethering 212
Text message 102
Timer 181
Time zone 185
Turning off your phone 32
Turning on your phone 32
Twitter 132
Twittering on your phone 132
Index 305
U
Uninstalling third-party
applications 295
Updating your phone’s system
software 298
Using your phone as a modem 212
V
vCalendar 178
Video capture 229
Videos 264
Viewfinder screen (Camera) 223
Viewing a PDF 266
Viewing photos and videos 237
Viewing photos on Facebook 240
Viewing photos on Flickr 240
Visual Voice Mail 74
Voice Recorder 274
VPN 199
VZ Navigator 263
W
Wallpaper 52
Watching video
(Gallery application) 239
Weather 189
Weather widget 192
Web browser 201
Wi-Fi 195
Widgets 53, 57
World Clock 184
Y
Your phone 23
- charging the battery 30
- inserting the battery 29
- removing the battery 31
- replacing the bottom cover 28
- replacing the storage card 47
YouTube 246, 264
Z
Zooming (camera) 226
Zooming in or out on a photo 239
