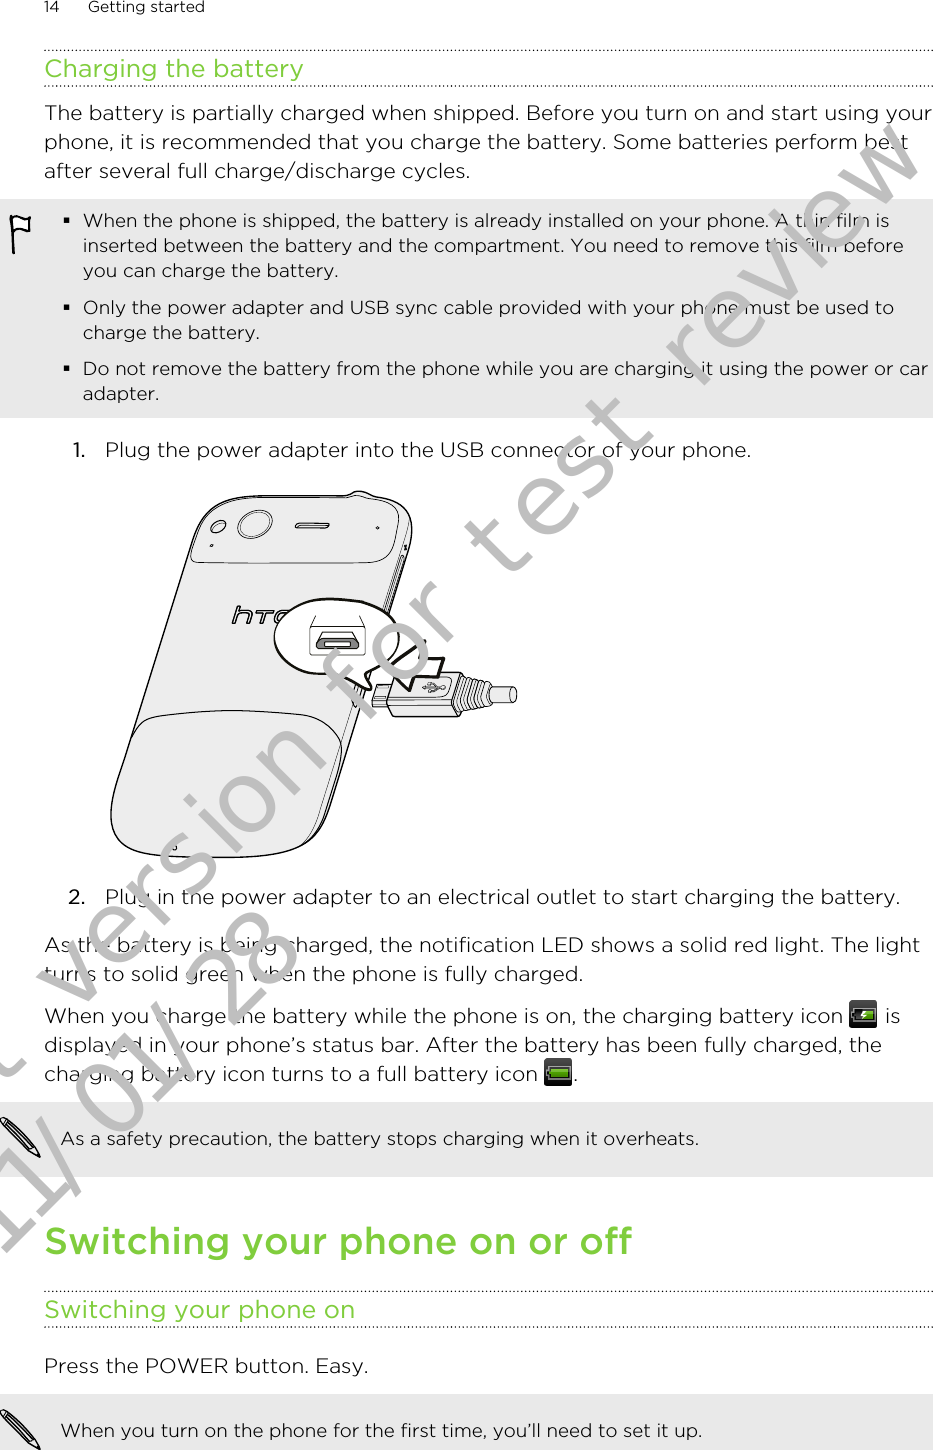
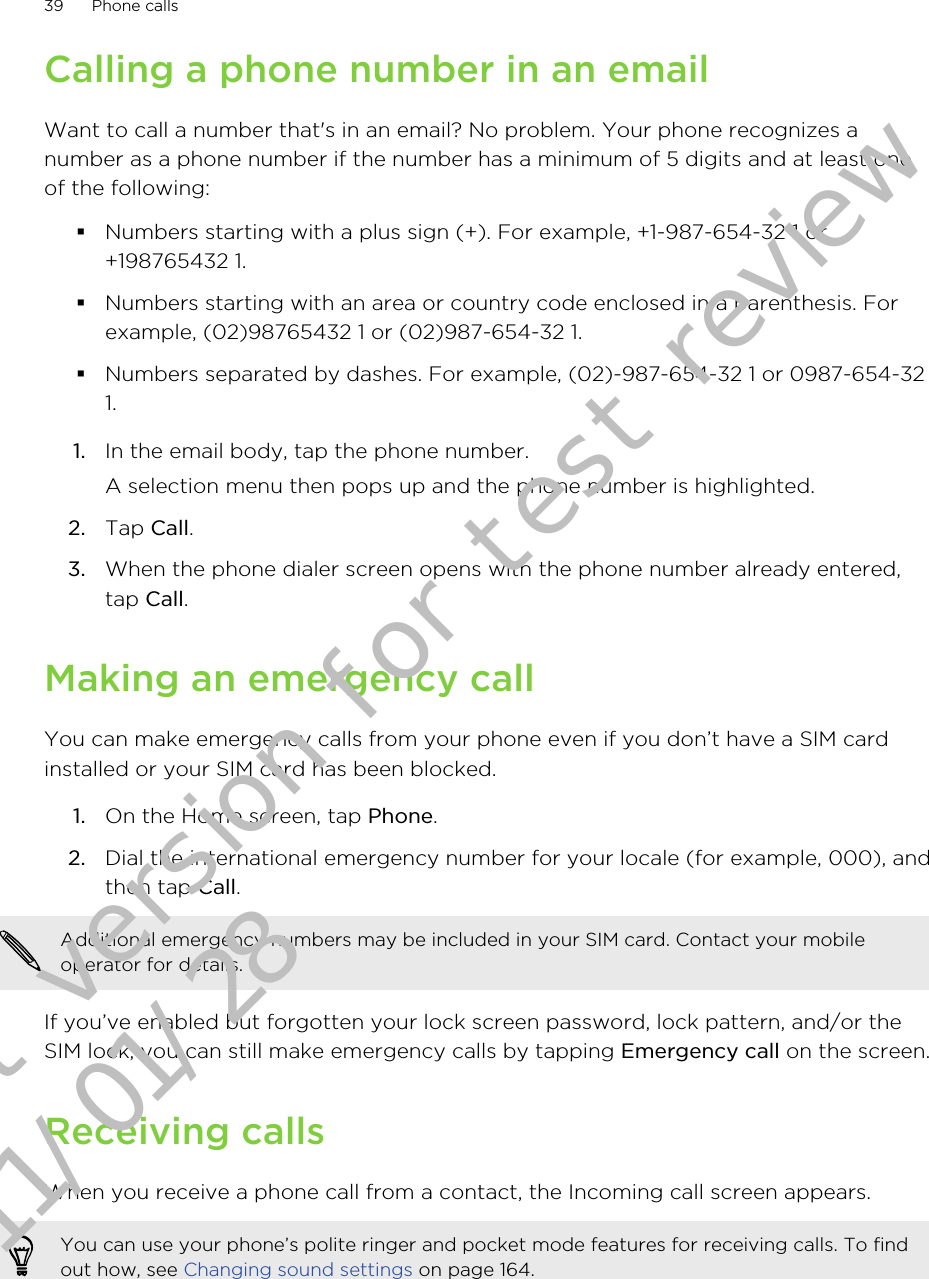
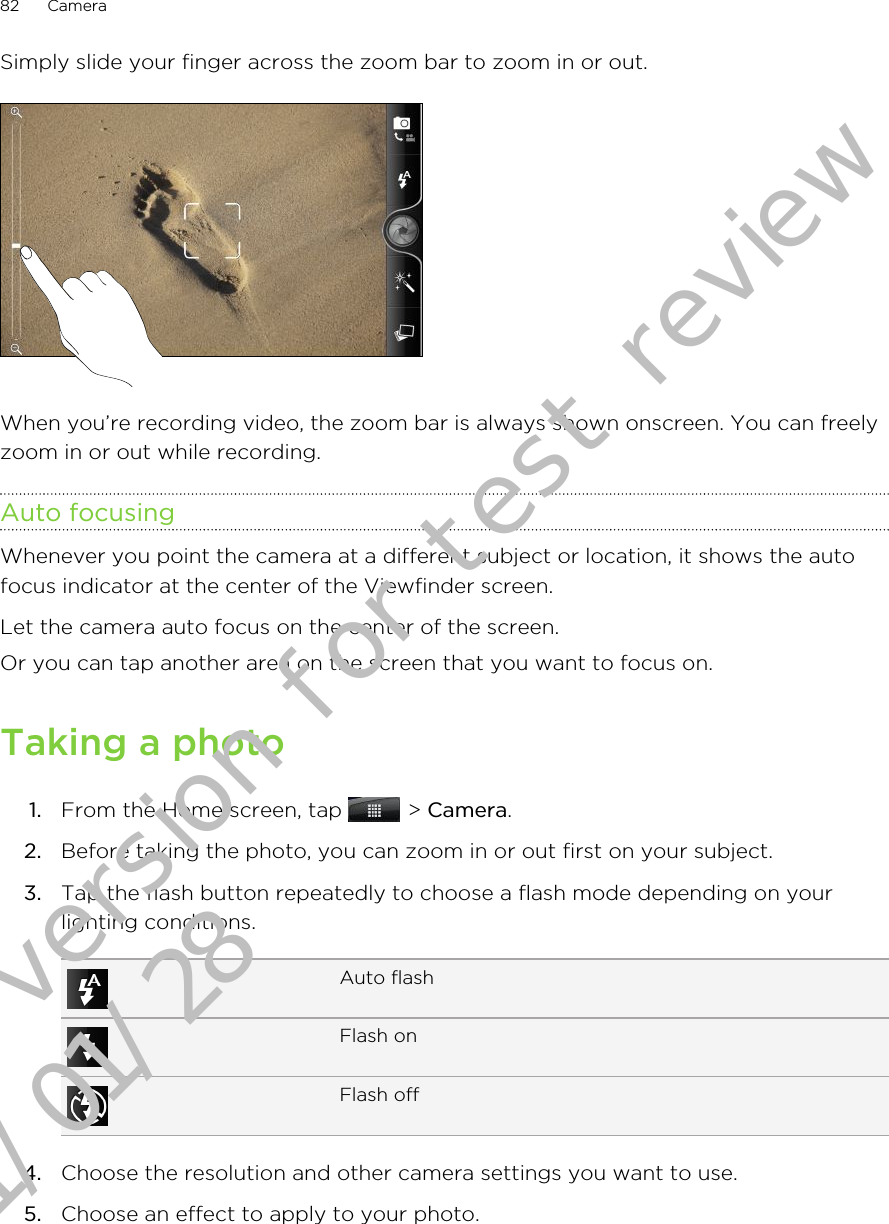
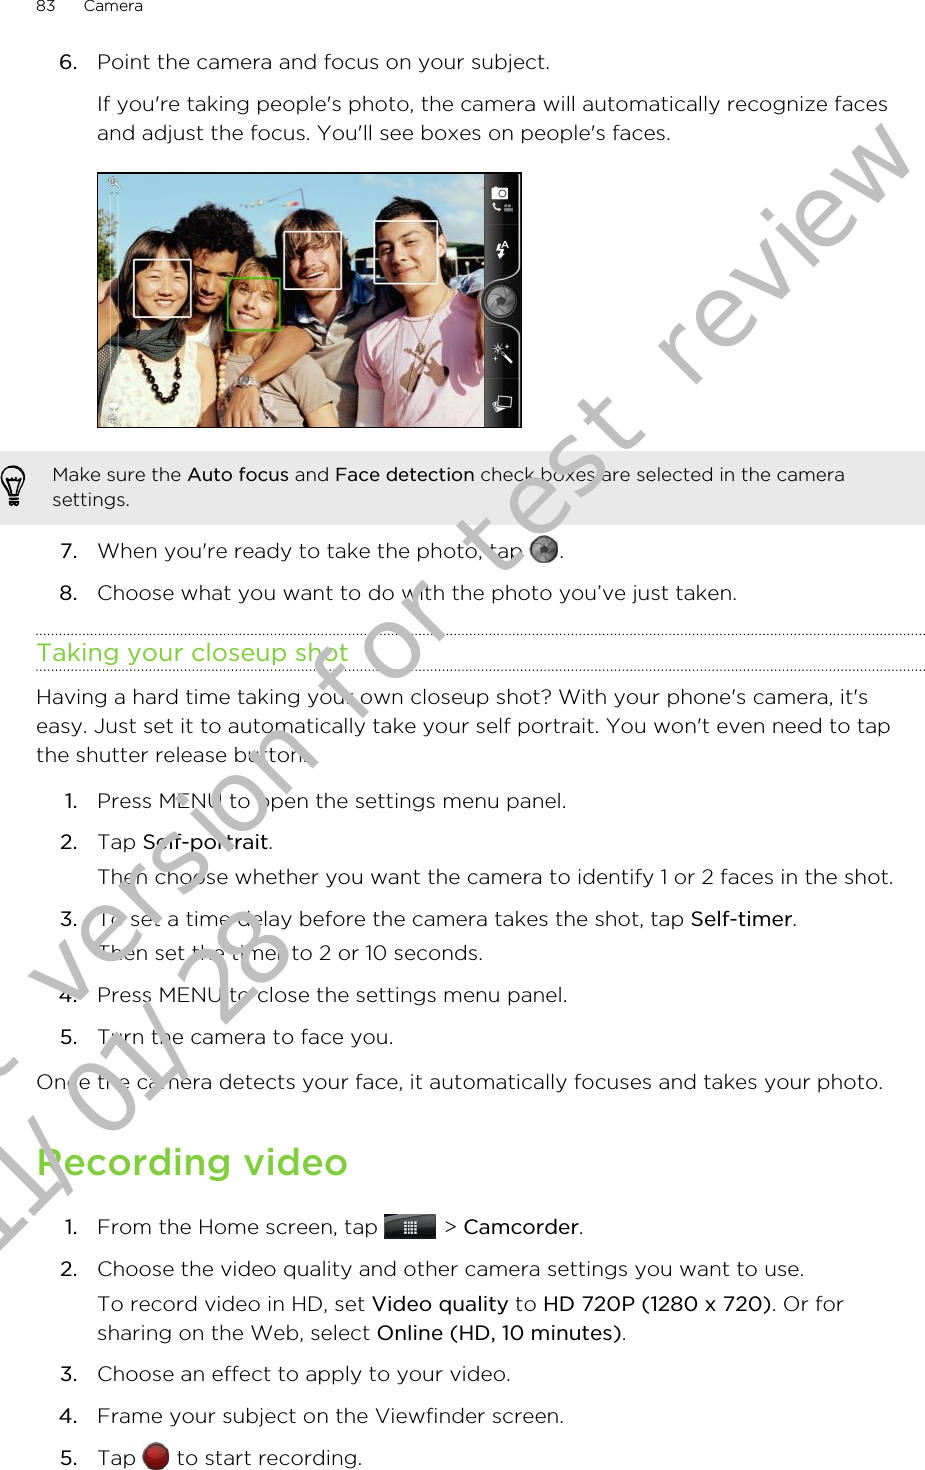
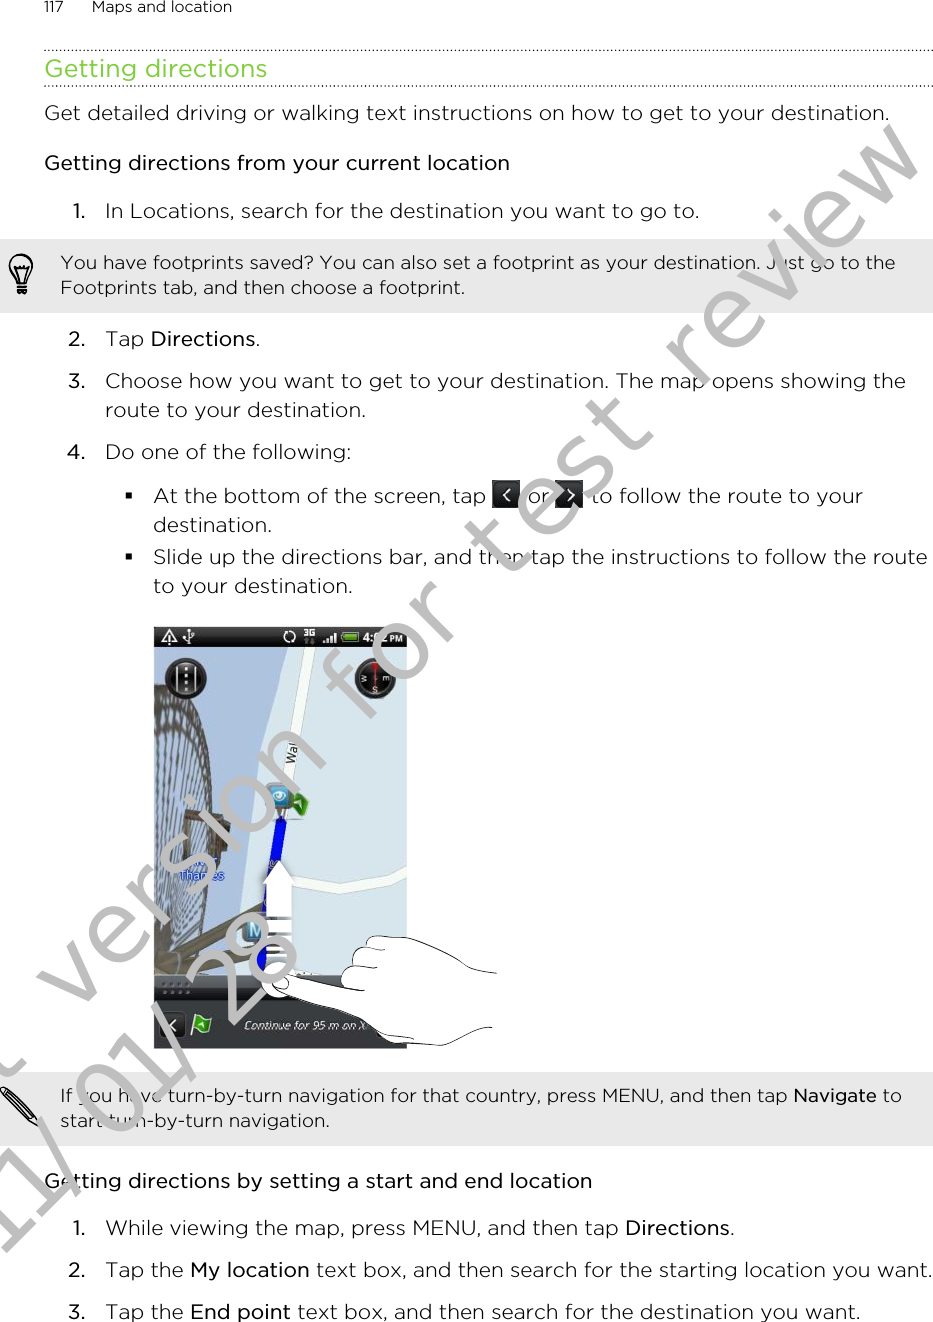
HTC PG88100 Smart phone User Manual 1 of 2

HTC Corporation Smart phone 1 of 2

Contents

user manual 1 of 2

Your HTC XXXUser guideDraft version for test review 2011/01/28
ContentsGetting startedInside the box 6Your phone 6Bottom cover 8Battery compartment door 10SIM card 10Storage card 11Battery 12Switching your phone on or off 14Entering your PIN 15Finger gestures 15Setting up your phone for the first time 15Home screen 16BasicsAdjusting the volume 18Sleep mode 19Status and notifications 19Notifications panel 22Connecting your phone to a computer 23Copying files to or from the storage card 24Searching your phone and the web 24Copying text, looking up information, and sharing 26PersonalizingMaking your phone truly yours 28Personalizing your phone with scenes 28Changing your wallpaper 29Applying a new skin 29Personalizing your Home screen with widgets 30Adding icons and other shortcuts on your Home screen 31Adding folders on your Home screen 32Rearranging or removing widgets and icons on your Home screen 32Rearranging the Home screen 33Using sound sets 33Changing your ringtones and alarms 34Rearranging or hiding application tabs 35Phone callsDifferent ways of making calls 37Making a call on the Phone dialer screen 37Using Speed dial 382 ContentsDraft version for test review 2011/01/28
Calling a phone number in a text message 38Calling a phone number in an email 39Making an emergency call 39Receiving calls 39What can I do during a call? 41Setting up a conference call 42Using Call history 43Blocking callers 44Call services 45Turning Airplane mode on or off 46MessagesOpening Messages 47Sending a text message (SMS) 47Sending a multimedia message (MMS) 48Resuming a draft message 50Viewing and replying to a message 50Viewing and saving an attachment from a multimedia message 51Push messages 51Managing message conversations 52Setting message options 53PeopleWays of getting contacts into your phone 55Transferring contacts from your old phone 55About the People app 56Setting up My contact card 57Importing contacts from your SIM card 57Adding a new contact 58Importing a contact from an Exchange ActiveSync account 58Merging contact information 58Filtering your contacts list 60Backing up your contacts to the storage card 60Contact information and conversations 61Sending contact information as a vCard 62Contact groups 62Adding People widgets 65EmailUsing Gmail 67Using Mail 67CalendarSearch and Web browserUsing your phone’s web browser 76Downloading from the Web 78Viewing bookmarks and previously visited pages 79Setting browser options 80Camera3 ContentsDraft version for test review 2011/01/28
Camera basics 81Taking a photo 82Recording video 83Adding effects 84Photos, videos, and musicGallery 85Music 92Connected Media 97Accounts and syncSynchronizing with online accounts 99SocialFacebook for HTC Sense  101Facebook app 102Tweeting on your phone using Peep 103Using Friend Stream  105Chatting in Google Talk 108Maps and locationLocation settings 111Locations 111Google Maps 121Market and other appsFinding and installing apps from Android Market 122Reading eBooks 125Reading news feeds 127Using Flashlight 129HTC SyncAbout HTC Sync 130Installing HTC Sync that came with the microSD card 130Setting up HTC Sync to recognize your phone  131Getting to know the workspace 131Music sync options 132Gallery sync options 132Calendar sync options 133People sync options 133Bookmarks sync options 133Documents sync options 134Locations sync options 135Synchronizing your phone 136Installing an app from your computer to your phone 136Synchronizing another phone with your computer 137Downloading the latest HTC Sync upgrade 137HTCSense.com4 ContentsDraft version for test review 2011/01/28
Signing up for your HTCSense.com account 138Dashboard 138Deleting your HTCSense.com account 140KeyboardUsing the onscreen keyboard 141Entering words with predictive text 143Entering text by speaking 144Editing text 145Adjusting input settings 146Internet connectionsData connection 147Wi-Fi 148About connection widgets 150Connecting to a virtual private network (VPN)  150Using your phone as a modem (USB tethering) 151Connecting your phone to the Internet through a computer (Internet Pass-through) 152Using your phone as a wireless router 152BluetoothBluetooth basics 153Connecting a Bluetooth headset or car kit 153Disconnecting or unpairing from a Bluetooth device 154Sending information using Bluetooth 155Receiving information using Bluetooth 157SecurityProtecting your SIM card with a PIN 159Protecting your phone with a screen lock pattern, PIN or password 159SettingsSettings on your phone 161Changing display settings 162Changing sound settings 164Changing the phone language 165Optimizing your phone’s battery life 165Managing memory 166Checking information about your phone 167Update and resetPhone software updates 168Restarting your phone 169Resetting your phone 169Index5 ContentsDraft version for test review 2011/01/28
Getting startedInside the boxYou will find the following inside the box:§Phone§Battery (preinstalled)§microSD card (preinstalled)§USB cable§3.5mm stereo headset§Power adapter§Quick start guide§Safety and regulatory guide§Call center card (hotline card)§Warranty cardYour phoneFront panel1. Earpiece2. Notification LED3. Front camera4. Touch screen5. HOME6. MENU7. BACK8. SEARCH6 Getting startedDraft version for test review 2011/01/28
Left panel1. VOLUME UP2. VOLUME DOWN3. USB connectorBack panel1. Speaker2. 5 megapixel camera3. LED flash4. Microphone5. Bottom cover6. MicrophoneTop panel1. 3.5mm headset jack2. POWER7 Getting startedDraft version for test review 2011/01/28
Bottom coverRemoving the bottom coverRemove the bottom cover to access the battery, SIM card slot, and storage card slot.1. With the phone turned off, hold your phone securely with the front facing down.2. With your right and left thumbs, push the bottom cover out to remove it.8 Getting startedDraft version for test review 2011/01/28
Replacing the bottom cover1. Align the two teeth underneath the bottom cover (one on each side) with thetwo notches on the bottom of the phone.2. Place the bottom cover on the phone, gently press down on the cover with yourthumbs, and then push it in until it clicks and locks into place.Your phone’s antenna is placed underneath the bottom cover. We recommend that yousecure the bottom cover to the phone’s back panel to get the best radio reception for yourphone.9 Getting startedDraft version for test review 2011/01/28
Battery compartment doorOpening the battery compartment doorOpen the battery compartment door by flipping it open from the right side.Closing the battery compartment door1. Flip the battery compartment door back into place to close it.2. Gently push the compartment door down until it clicks into place to lock it.SIM cardThe SIM card contains your phone number, service details, and phonebook/messagememory. Your phone supports both 1.8 V and 3 V SIM cards.Some legacy SIM cards may not function with your phone. You should consult with yourmobile operator for a replacement SIM card. There may be fees for this service.10 Getting startedDraft version for test review 2011/01/28
Inserting the SIM card1. Take the bottom cover off.2. Open the battery compartment door.3. With the SIM card’s gold contacts facing down and its cut-off corner facing out,insert the SIM card into the SIM card slot.Removing the SIM cardMake sure to switch off your phone before removing your SIM card. Otherwise, the phonewill automatically turn off when you remove the SIM card.1. Take the bottom cover off.2. Open the battery compartment door.3. With your thumb, slide the SIM card out from the SIM card slot.Storage cardUse the microSD card to store your photos, videos, and music. You’ll find the microSDcard already inserted in your phone.Removing the storage cardIf your phone is on you must first "unmount" the storage card before removing it to preventcorrupting or damaging the files in the storage card.1. Take the bottom cover off.2. Open the battery compartment door.11 Getting startedDraft version for test review 2011/01/28
3. Push the storage card in to eject it from its slot.4. Slide the storage card out from its slot.Unmounting the storage cardWhen you need to remove the storage card while the phone is on, unmount thestorage card first to prevent corrupting or damaging the files in the storage card.1. From the Home screen, press MENU, and then tap Settings.2. Scroll down the screen, and then tap SD & phone storage.3. Tap Unmount SD card.Inserting the storage card1. Take the bottom cover off.2. Open the battery compartment door.3. Insert the microSD card into the storage card slot with its gold contacts facingdown and push it until it clicks into place.BatteryYour phone uses a rechargeable battery. Please use only original batteries andaccessories that came with your phone or replacements that we recommend.How long the battery can last before it needs recharging depends on how you useyour phone. Among these are the phone features and accessories you use (forexample, leaving your Bluetooth connection always on uses more power). Long phonecalls and frequent web browsing uses up a lot of battery power. Also, consider yourlocation: poor signal strength from your mobile network and extreme temperaturemake the battery work harder.12 Getting startedDraft version for test review 2011/01/28
Removing the batteryRight after you take your phone out from the box for the first time, don’t forget to removethe thin film wrapped around the battery that’s inside your phone.1. Take the bottom cover off.2. Open the battery compartment door.3. Slide the battery out.Inserting the battery1. Take the bottom cover off.2. Open the battery compartment door.3. Insert the battery (with its exposed copper contacts first) into the batterycompartment.13 Getting startedDraft version for test review 2011/01/28
Charging the batteryThe battery is partially charged when shipped. Before you turn on and start using yourphone, it is recommended that you charge the battery. Some batteries perform bestafter several full charge/discharge cycles.§When the phone is shipped, the battery is already installed on your phone. A thin film isinserted between the battery and the compartment. You need to remove this film beforeyou can charge the battery.§Only the power adapter and USB sync cable provided with your phone must be used tocharge the battery.§Do not remove the battery from the phone while you are charging it using the power or caradapter.1. Plug the power adapter into the USB connector of your phone.2. Plug in the power adapter to an electrical outlet to start charging the battery.As the battery is being charged, the notification LED shows a solid red light. The lightturns to solid green when the phone is fully charged.When you charge the battery while the phone is on, the charging battery icon   isdisplayed in your phone’s status bar. After the battery has been fully charged, thecharging battery icon turns to a full battery icon  .As a safety precaution, the battery stops charging when it overheats.Switching your phone on or offSwitching your phone onPress the POWER button. Easy.When you turn on the phone for the first time, you’ll need to set it up.14 Getting startedDraft version for test review 2011/01/28
Switching your phone off1. If the display is off, press the POWER button to turn it back on, then unlock thescreen by sliding down the bar on the lock screen.2. Press and hold the POWER button for a few seconds.3. When the Power options menu appears, tap Power off.Entering your PINMost SIM cards come with a PIN (personal identification number) set by your mobileoperator. If you’re asked for a PIN, enter it and then tap OK.If you enter the wrong PIN three times, your SIM card is blocked. No problem. Just contactyour mobile operator and ask for the PUK (PIN Unblocking Key).Finger gesturesTap When you want to type using the keyboard, select items onscreen such asapplication and settings icons, or press onscreen buttons, simply tap them withyour finger.Press andholdTo open the available options for an item (for example, a contact or link in a webpage), simply press and hold the item.Swipe orslideTo swipe or slide means to quickly drag your finger vertically or horizontallyacross the screen.Drag Press and hold your finger with some pressure before you start to drag. Whiledragging, do not release your finger until you have reached the target position.Flick Flicking the screen is similar to swiping, except that you need to swipe your fingerin light, quicker strokes. This finger gesture is always in a vertical direction, suchas when flicking the contacts or message list.Rotate For most screens, you can automatically change the screen orientation fromportrait to landscape by turning the phone sideways. When entering text, you canturn the phone sideways to bring up a bigger keyboard.Pinch In some apps, like Gallery or the web browser, you can “pinch” the screen usingtwo fingers (for example, thumb and index finger) to zoom in or zoom out whenviewing a picture or a web page.Setting up your phone for the first timeWhen you switch on your phone for the first time, you’ll be asked to set up yourphone. You can choose your language, how you want to connect to the Internet, andwhether you want your current location to be automatically detected. If you still havepersonal contacts and calendar events stored on your old phone, you can easilytransfer them to your new phone through Bluetooth as well.15 Getting startedDraft version for test review 2011/01/28
Be sure to sign in to your Google™ Account so you can use Google apps like Gmail™.You can also set up your other email accounts, favorite social networks like Facebook®and Twitter™, and more.Just follow the onscreen instructions and you’ll be up and running with your phone inno time.Some features that need to connect to the Internet such as location-based services andauto-sync of your online accounts may incur extra data fees from your mobile operator.Don’t worry. You can enable or disable them in your phone’s settings as you go along lateron.Home screenYour Home screen is where you make your phone your own. It comes with a weatherclock widget that shows the time and weather in your current location. You can alsoadd your favorite applications, shortcuts, folders and widgets so they’re always just atap away. To find out how, see Personalizing on page 28.Extended Home screenAs you start to do more things with your phone, you might find that one Home screenis not enough. No problem. You can use up to six extra screens. It should be plenty.Slide your finger horizontally to the left or right and you’ll discover more space foradding icons, widgets, and more.Press HOME to return to the main Home screen (that is, the center home screen).Using Leap viewTo jump straight to the screen that you want, press HOME or pinch the screen toshow the Leap view. It reveals all seven Home screens as thumbnails.16 Getting startedDraft version for test review 2011/01/28
Just tap the one you want and you’ll leap right there.17 Getting startedDraft version for test review 2011/01/28
BasicsAdjusting the volumeAdjusting the ringer volume changes the volume level of the phone ringtone, whileadjusting the media volume changes the volume level of sound notifications andmusic or video playback.Adjusting the ringer volume§Press the VOLUME UP or VOLUME DOWN button on the left panel of the phoneto adjust the ringer volume to your desired level. The Ringer volume windowappears on the screen to display the volume levels.§While in the lowest ringer volume level (Silent mode), press VOLUME DOWNonce to set your phone to Vibrate mode. The phone vibrates and the vibratemode icon   appears in the status bar.§While in Vibrate mode, press VOLUME UP once to switch to silent mode. Thespeaker mute icon   displays in the status bar.Adjusting the media volumeWhen playing music or watching video, press the VOLUME UP or VOLUME DOWNbutton on the left panel of the phone to adjust the volume. The Media volume windowappears on the screen to display the volume level.Adjusting the earpiece volume for phone callsDuring a phone call, press the VOLUME UP or VOLUME DOWN button.Adjusting the volume via settings1. From the Home screen, press MENU, and then tap Settings > Sound > Volume.2. Drag the volume sliders to the left or right to adjust the volume levels of yourphone’s ringtone, media playback, alarms, and notifications. Your phone brieflyplays a sample tone with the volume being adjusted as you drag a slider.3. If you want the same volume for your ringtone and notifications, select Useincoming call volume for notifications.4. When you’re done, tap OK.18 BasicsDraft version for test review 2011/01/28
Sleep modeSleep mode saves battery power by putting your phone into a low power state whilethe display is off. It also stops accidental button presses when the phone’s in your bagor pocket. You’ll still receive messages and calls though.Switching to Sleep modeBriefly press the POWER button to turn off the display and switch your phone toSleep mode.Your phone also automatically goes into Sleep mode when it’s idle for a while.Waking up from Sleep modeYour phone automatically wakes up when you have an incoming call.To wake your phone up manually, press the POWER button.You’ll need to unlock the screen.Unlocking the screenPress the bar on the lock screen and then slide your finger down to unlock the screenor answer an incoming call.If you have set up a screen unlock pattern, pin, or password, you will be asked to draw thepattern on the screen or enter the PIN or password before it unlocks.Status and notificationsStatus iconsYou can tell a lot about your phone by checking the icons in its status bar.19 BasicsDraft version for test review 2011/01/28
Here’s what each icon means:Signal strength Battery is fullGPRS connected Battery is chargingGPRS in use Battery is low (20% remaining)EDGE connected Battery is very low (10% remaining)EDGE in use Silent mode3G connected Vibrate mode3G in use Phone microphone is muteHSDPA connected Speakerphone is onHSDPA in use Wired microphone headset connectedRoaming Wired headset connectedNo signal Bluetooth is onNo SIM card installed Connected to a Bluetooth deviceConnected to a Wi-Fi network Airplane modeData synchronizing GPS is onNetwork sharing is on Alarm is setNotification iconsA busy life means a busy phone. Notification icons on the status bar make it easy foryou to keep on top of your messages, calendar events, and alarms.Here’s what each one means:20 BasicsDraft version for test review 2011/01/28
New Gmail message Call in progressNew Microsoft Exchange ActiveSyncor POP3/IMAP email Missed callProblem with email delivery Call on holdNew SMS/MMS Call forwarding onProblem with SMS/MMS delivery Message forwarding onNew Google Talk instant message The phone is connected to a computervia USB cableNew voicemail Wi-Fi is on and wireless networks areavailableUpcoming event Portable Wi-Fi Hotspot is onNew updates from your socialnetworks Uploading data (animated)New tweet Downloading data (animated)Matched contacts suggestion Waiting to uploadNew push message Downloaded Android Market appinstalled successfullyBluetooth pairing request Update available for an appdownloaded from Android MarketPhone software update available Storage card is safe to remove orstorage card is being preparedTV out No storage card installed on thephoneSong is playing Storage card is low on free spaceFM Radio app in use General notification21 BasicsDraft version for test review 2011/01/28
Voice recording is on More (not displayed) notificationsCompass needs orientationNotifications panelWhen you get a new notification, you can open the Notifications panel to see themessage, reminder or event notification. The Notifications panel also lets you switchbetween recently-opened apps as quickly as possible.To open the Notifications panel, press and hold the status bar, then slide your fingerdownward.If you have several notifications, you can scroll down thescreen to see them all.You can also open the Notifications panel on the Home screen by pressing MENU and thentapping Notifications.22 BasicsDraft version for test review 2011/01/28
Switching between recently opened appsOn the Notifications panel, you can easily access up to eight apps you just recentlyopened.1. Press and hold the status bar, then slide your finger downward to open theNotifications panel.2. In the Recent apps section, slide your finger left or right to see recently-openedapps.3. Tap an app to open it.Press and hold HOME to view recently used apps.Closing the Notifications panelPress and hold the bottom bar of the Notifications panel, then slide your finger up thescreen.Or just press BACK.Connecting your phone to a computerWhenever you connect your phone to a computer using the USB cable, the Connectto PC screen opens and lets you choose the type of USB connection.Select one of the following choices, and then tap Done:Charge only Select this option if you only want to charge the battery while your phone isconnected to your computer.HTC Sync Select this option to synchronize contacts, calendar, and other informationbetween your computer and your phone.Disk drive This mode is available only when there’s a microSD card on your phone. Selectthis mode when you want to copy files between your phone’s storage cardand your computer.When Disk drive mode is enabled while your phone is connected to thecomputer, you will not be able to use apps on your phone to access thestorage card.USB tethering When you do not have Internet connection on your computer, you can selectthis mode to share your phone’s mobile data connection with your computer.Internet pass-throughIf you don’t have a data plan for your phone or you don’t have access to a Wi-Fi network, you can select this mode to share your computer’s Internetconnection with your phone.23 BasicsDraft version for test review 2011/01/28
Copying files to or from the storage cardYou can copy your music, photos, and other files to your phone’s storage card.1. Connect your phone to your computer using the supplied USB cable.2. On your phone’s Connect to PC screen, tap Disk drive, and then tap Done. Onyour computer, the connected phone is recognized as a removable disk.3. Navigate to the removable disk and open it.4. Do one of the following:§Copy the files from the computer to the phone’s storage card’s root folder.§Copy the files from the phone’s storage card to a folder in your computer.5. After copying the files, unmount the removable disk (that is, the connectedphone) as required by your computer’s operating system to safely remove yourphone.6. Do one of the following:§Disconnect the phone from the computer.§If you want to keep the phone connected to the computer but want thephone to be able to access the storage card, open the Notifications panel,tap Disk drive, select an option except Disk drive, and then tap Done.Searching your phone and the webFind all types of information on your phone and the Web. Search Anywhere siftsthrough different files, information, and apps on your phone. You can also choose tosearch the Web using your favorite web search service.Simply press SEARCH from the Home screen. Then enter the first few letters of whatyou want to search for. Matching items are shown as you type.§This icon   indicates that your phone will search forall types of information. Tap it if you want to chooseand search only for one type of item, for example,Mail.§Tap this icon   to search the Web for the term youentered.§Tap a result from the list to open the relevant app.§Tap   to see more results for a category.24 BasicsDraft version for test review 2011/01/28
Setting your phone’s search optionsYou can choose the default Web search service to use, or change the type and orderof items searched on your phone.1. From the Home screen, press SEARCH.2. When the search box appears, press MENU, and then tap Settings.3. Tap any of the following:Web searchengineChoose the web search service you want to use.Select areas tosearchChoose the types of items or apps to include in the search. You canalso press and hold  , and arrange items according to searchpriority.Quickly looking up information on the WebQuick Lookup helps you learn about something right on the spot. When you enter anew word or phrase, you can easily look it up in popular websites or search servicessuch as Wikipedia®, Google Search, YouTube™, Google Translate, and GoogleDictionary.1. From the Home screen, tap   > Quick Lookup.2. If the onscreen keyboard is open, press BACK to close it first so you’ll see thebottom tabs.3. Slide across the tabs to pick where you want to look up information. Then in thesearch box, enter what you want to search for.4. Tap  .After looking up the item on one tab, you can slide to other tabs to automatically look up thesame term there.Translating words to other languages1. From the Home screen, tap   > Quick Lookup.2. If the onscreen keyboard is open, press BACK to close it first so you’ll see thebottom tabs.3. Slide to the Google Translate tab.4. Under From language, choose the original language, then enter the word orphrase you want to translate.5. Under To language, choose from the languages available for translation.6. Tap Translate.25 BasicsDraft version for test review 2011/01/28
Copying text, looking up information, andsharingIn applications such as the web browser and Mail, you can select text and choosewhat you want to do with it.After selecting text, you can:§Copy it.§Search for it using Google Search.§Look it up on Wikipedia, YouTube, or Google Dictionary™.§Get a translation of the text from Google Translate™.§Share the text in a new email, text, or multimedia message or in your statusupdate on a social network.Selecting text1. Press and hold on a word.2. Drag the start and end markers to highlight the surrounding text you want toselect.To select text in a link, press and hold the link, and then tap Copy link URL.Copying and pasting text1. After you have selected the text you want to copy, tap  . The selected text is then copied to the clipboard.2. In a text entry field (for example while composing a message), press and hold atthe point where you want to paste the text.3. Tap Paste.26 BasicsDraft version for test review 2011/01/28
Searching or translating text1. After you have selected the text you want to search for or translate, tap  .2. Tap one of the following tabs:WikipediaLook for related information on Wikipedia, based on the text that you selected.Google SearchLook for related information using Google Search, based on the text that youselected.YouTubeLook for videos on YouTube, based on the text that you selected.Google TranslateTranslate the text to another language.Google DictionaryLook up the selected text in the dictionary.Pasting text in a new message or social network status update1. After you have selected the text you want to share, tap  .2. Choose whether to paste the selected text in a new text, multimedia, or emailmessage or in your status update on a social network such as Twitter.27 BasicsDraft version for test review 2011/01/28
PersonalizingMaking your phone truly yoursMake your phone look and sound just the way you want it. Personalize your phonewith a different wallpaper, skin, ringtone, and notification sound for events such asincoming text, email, and calendar reminders.Tap the Personalize button   right on the Home screen to get started.Personalizing your phone with scenesYour phone becomes multiple phones in one when you use scenes. Scenes arepersonalized Home screen layouts that you can quickly apply to your phone. Byswitching between scenes, you instantly turn your phone into your perfect weekendphone, travel phone, work phone, or pure play phone.Everytime you add or modify something on the Home screen, your phone automaticallysaves your changes to the current scene selected.Using a preset sceneYour phone features preset scenes, each preconfigured with a different wallpaper andcollection of widgets that reflect different moments in your life. You can choose ascene that is suitable for work, play, travel, or your social life.1. From the Home screen, tap   > Scene.2. Slide your finger on the screen from right to left to select the scene you want.3. Tap Apply.To download more scenes, tap   > Scene > Get more.Creating a new sceneYou’ll start with an empty Home screen when you create a new scene.1. From the Home screen, tap   > Scene.2. Press MENU, and then tap New.3. Enter a new scene name, then tap Done.4. Personalize the scene by adding widgets and other elements, arranging theHome screen layout, and changing the skin or wallpaper. All of your changes willbe automatically saved to this scene.28 PersonalizingDraft version for test review 2011/01/28
Renaming a scene1. From the Home screen, tap   > Scene.2. Slide your finger on the screen from right to left to select the scene you want torename.3. Press and hold a scene thumbnail, then tap Rename.4. Enter a new scene name, then tap Done.Deleting scenes1. From the Home screen, tap   > Scene.2. Press MENU, and then tap Delete.3. Slide your finger on the screen from right to left to browse through scenes, thentap one or more scenes you want to delete.4. Tap Delete.Changing your wallpaperPersonalizing your wallpaper with your favorite photo is a quick and easy way tochange the feel of your phone and give it a fresh look. Browse the collection ofwallpapers included in your phone or choose from photos that you have taken withthe camera. You can also change your Home screen to use an animated wallpaper.1. From the Home screen, tap   > Wallpaper.2. Tap one of the following:HTC wallpapers Choose a preset wallpaper, then tap Preview > Apply.Live wallpapers Choose from preset animated wallpapers. Tap Preview to view theanimation, and then tap Apply.Gallery Choose a photo that you have taken using the camera or copied toyour storage card. Crop the photo and then tap Save.To download more wallpapers, tap   > Wallpaper > HTC wallpapers > Get more.Applying a new skinPersonalize beyond the Home screen by applying a new skin. Skins are set to give adifferent look and feel to most of your phone’s onscreen buttons, application screens,option menus, and other items.29 PersonalizingDraft version for test review 2011/01/28
1. From the Home screen, tap   > Skin.2. Slide your finger on the screen from right to left to select the skin you want.3. Tap Apply.To download more skins, tap   > Skin > Get more.Personalizing your Home screen with widgetsWidgets put at-a-glance important information and media content up front on yourHome screen. Some widgets are already added to your Home screen for yourconvenience. You can add more from the available selections of widgets, or downloadmore widgets.Adding a widget to your Home screen1. Go to a part of the Home screen where there’s space to add a new widget.2. Tap   > Widget.3. Select a widget that you want.4. Most HTC widgets are available in a variety of designs and sizes to suit yourneeds. Slide your finger on the screen from right to left to view the differentstyles, and then tap Select to choose one.You can also add widgets that allow you to quickly switch on or off certain settings ofyour phone, such as Wi-Fi, Mobile Network, and Bluetooth. Scroll down the widgetslist, tap Settings, and then tap the widget that you want.30 PersonalizingDraft version for test review 2011/01/28
Changing the settings of a widgetYou can modify basic settings of some widgets (for example, the People and Mailwidgets) from the Home screen.1. Press and hold a widget on the Home screen. The phone vibrates and you’ll seea colored box around the widget. Don’t lift your finger just yet.2. Drag the widget to the Edit button (if it’s enabled).The relevant screen where you can change some settings for this widget thenopens.3. Customize the widget settings.Adding icons and other shortcuts on yourHome screenPlace app icons on your Home screen to open apps quicker. You can also addshortcuts to settings and specific information such as a bookmarked webpage,someone’s phone number, a music playlist, route directions, and many other items, toyour Home screen.The shortcuts available depend on the apps that are installed on your phone.1. Go to a part of the Home screen where there’s space to add a new icon orshortcut.2. Tap   and then tap App to add an app icon, or Shortcut to add a shortcut toa setting or information.31 PersonalizingDraft version for test review 2011/01/28
To add an app icon on the Home screen, you can also press HOME, tap  , and thenpress and hold an app icon. Without lifting your finger, drag the icon to an empty area on theHome screen, and then release it.Adding folders on your Home screenUse folders to group related apps and other shortcuts to keep your Home screen tidyand organized. You can also add information folders that show up-to-date informationsuch as Bluetooth received files, your Facebook phonebook, and more.Creating a new folder and adding items to it1. Go to a part of the Home screen where there’s space to add a new folder.2. Tap   > Folder.3. Tap New Folder.4. Press and hold an app icon or a shortcut that you want to move to the folder.The phone then vibrates. Don’t lift your finger just yet.5. Drag the app icon or shortcut and drop it on top of the folder.Simply tap the folder to open it so you can access theapps and shortcuts inside the folder.Renaming a folder1. Tap the folder to open it.2. Press and hold the folder window’s title bar.3. Enter a new folder name and then tap OK.Rearranging or removing widgets and icons onyour Home screenRearrange the widgets and icons on your Home screen to make room for adding moreitems. You can also remove widgets and icons that you don’t frequently use.Moving a widget or icon1. Press and hold the widget or icon you want to move. The phone vibrates andyou’ll see a colored box around the widget or icon. Don’t lift your finger just yet.2. Drag the widget or icon to a new location on the screen.You can pause at the left or right edge of the screen to drag the widget or icononto another Home screen panel.3. When the widget or icon is where you want it, lift your finger.32 PersonalizingDraft version for test review 2011/01/28
Removing a widget or icon1. Press and hold the widget or icon you want to remove. The phone vibrates andyou'll see a colored box around the widget or icon. Don’t lift your finger just yet.2. Drag the widget or icon to the Remove button.3. When the widget or icon also turns red, lift your finger.Rearranging the Home screenReorder your Home screen panels in any way that fits how you use them. Forexample, move the panels with frequently-used widgets, shortcuts, and folders closerto the main Home screen.The center thumbnail in Leap view is always the main Home screen.1. Pinch the Home screen to show the Leap view.2. Press and hold the thumbnail of the home screen you want to move. The phonethen vibrates. Don’t lift your finger just yet.3. Drag the thumbnail to its new position, and then lift your finger.Using sound setsSound sets are different collections of ringtone, notification, and alarm sounds youcan use to personalize the way your phone alerts you. Using sound sets, you caninstantly change from subtle ringtone and notification sounds while you’re in theoffice into something fun when you’re out with friends.33 PersonalizingDraft version for test review 2011/01/28
Choosing a preset sound set1. From the Home screen, tap   > Sound set.2. On the Sound sets screen, tap a sound set name.3. You can tap   to hear samples of the ringtone, notification sounds, and alarmfor that sound set.4. Tap Apply.To download more sound sets, tap   > Sound set > Get more.Customizing a sound setYou can customize a sound set by applying your personal choice of ringtone,notification sounds, and alarms that may be from your phone’s preset selection oryour storage card (except for notification sounds).Be sure to choose the sound set you want before changing the ringtone, notification sounds,and alarm since your phone automatically saves your changes to the current sound setselected.Creating a sound set1. From the Home screen, tap   > Sound set.2. On the Sound sets screen, tap New sound set.3. Enter a new sound set name, and then tap Done.The newly created sound set is then added to your phone’s list of sound sets. You canassign different tones to the sound set to your preference.Deleting sound sets1. From the Home screen, tap   > Sound set.2. Press MENU, and then tap Delete.3. Tap one or more sound sets you want to delete.4. Tap Delete.Changing your ringtones and alarmsChange your ringtones, notification sounds, and alarms to suit your mood or lifestyle.Your changes are saved in the sound set that is currently loaded, overwriting itssettings.34 PersonalizingDraft version for test review 2011/01/28
Changing the ringtone1. From the Home screen, tap   > Ringtone.2. Scroll through the available ringtones and tap the ringtone you want to use. Theringtone briefly plays when selected.3. If the audio file is on your storage card, tap New ringtone, select the item youwant to import to the Ringtones list, then tap OK.4. Tap Apply.Changing notification sounds1. From the Home screen, tap   > Notification sounds.2. Choose the type of notification that you want to change.3. Scroll through the available tones and tap the item you want to use. A sampletone briefly plays when selected.4. Tap Apply.Although you can't import notification sounds from your storage card, you can tap Get moreto download more audio files from HTC Hub.Changing the alarm sound1. From the Home screen, tap   > Alarm.2. Scroll through the available tones and tap the item you want to use. A sampletone briefly plays when selected.3. If the audio file is on your storage card, tap New alarm, select the item you wantto import to the Alarms list, then tap OK.4. Tap Apply.Rearranging or hiding application tabsYou can rearrange the tabs at the bottom of some of your phone’s apps to prioritizethe types of information you frequently use or remove the tabs you don’t really need.1. Open an app that has the usual tabs at the bottom of its screen (for example,the contact details screen in People).2. Press and hold a tab. When the screen changes and shows you an empty area,lift your finger.35 PersonalizingDraft version for test review 2011/01/28
3. Do any of the following:Move a tab Press and hold the tab you want to move, and then drag it to its newposition.Remove a tab Press and hold a tab you want to hide, then drag it up. When you see acolored box, lift your finger. Note that you can't hide the tab if it’sgrayed out.4. When you’re done, press BACK.Adding a tab back1. Open the app from which you previously removed some tabs.2. Press and hold a tab. When the screen changes and shows you some of yourhidden tabs, lift your finger.3. Press and hold the tab you want to show, then drag it down to where you wantto position it again.4. When you’re done, press BACK.36 PersonalizingDraft version for test review 2011/01/28
Phone callsDifferent ways of making callsBesides making calls from the phone dialer screen on your phone, you can tap anumber in a text message or email to call, or press a single number on the phonedialer to quickly call a contact.Most SIM cards come with a PIN (personal identification number) set by your mobileoperator. If you’re asked for a PIN, enter it and then tap OK.If you enter the wrong PIN three times, your SIM card is blocked. No problem. Just contactyour mobile operator and ask for the PUK (PIN Unblocking Key).Making a call on the Phone dialer screenYou can either dial a number directly, or use the Smart dial feature to search and call astored contact or a number from your call history.1. On the Home screen, tap Phone.2. Begin entering the first few digits of a phone number or characters of a contactname on the phone keypad. The Phone dialer screen then displays a list ofmatching numbers and names.If you enter a wrong digit or letter, tap   to delete it. To erase the entire entry, press andhold  .3. Tap   to close the phone keypad and to see if there are more matchingnumbers or contacts.4. To browse through the filtered list, flick through the list or slide your finger up ordown the list slowly.5. To place a call, do one of the following:§Tap a phone number or contact from the list.§After entering a complete number, tap Call.§To call a different phone number associated with the contact, you can tap at the right side of the contact name. On the contact details screen, tapthe number you want to call.While dialing or when the call is in progress, the status bar displays the call in progressicon  .37 Phone callsDraft version for test review 2011/01/28
What is Smart dial?The phone dialer’s Smart dial feature makes it quick and easy for you to place a call.Simply enter the phone number or first few letters of the person’s name you want tocall. Smart dial automatically searches and filters your contacts list (stored on yourphone, SIM card, and online accounts such as Google Account and ExchangeActiveSync®) and the phone numbers from the call history.Using Speed dialUse Speed dial to call a phone number with a single tap. For example, if you assign acontact’s number to the number 2 key, you can just press and hold 2 to dial thenumber.The number 1 key is generally reserved for your voicemail. Press and hold this key to callvoicemail and retrieve your voicemail messages.Assigning a speed dial key1. On the Home screen, tap Phone.2. Press MENU, and then tap Speed dial > Add new.3. Enter the name of the contact you want to add.When the name comes up in the list, tap the name.4. On the Speed dial screen, choose the phone number of the contact to use, and aspeed dial key to assign.5. Tap Save.Calling a phone number in a text message1. Tap the phone number within the message.2. Edit the phone number if needed, and then tap Call.To call the message sender, press and hold the sender or the received message, and then tapCall on the options menu.38 Phone callsDraft version for test review 2011/01/28
Calling a phone number in an emailWant to call a number that's in an email? No problem. Your phone recognizes anumber as a phone number if the number has a minimum of 5 digits and at least oneof the following:§Numbers starting with a plus sign (+). For example, +1-987-654-32 1 or+198765432 1.§Numbers starting with an area or country code enclosed in a parenthesis. Forexample, (02)98765432 1 or (02)987-654-32 1.§Numbers separated by dashes. For example, (02)-987-654-32 1 or 0987-654-321.1. In the email body, tap the phone number.A selection menu then pops up and the phone number is highlighted.2. Tap Call.3. When the phone dialer screen opens with the phone number already entered,tap Call.Making an emergency callYou can make emergency calls from your phone even if you don’t have a SIM cardinstalled or your SIM card has been blocked.1. On the Home screen, tap Phone.2. Dial the international emergency number for your locale (for example, 000), andthen tap Call.Additional emergency numbers may be included in your SIM card. Contact your mobileoperator for details.If you’ve enabled but forgotten your lock screen password, lock pattern, and/or theSIM lock, you can still make emergency calls by tapping Emergency call on the screen.Receiving callsWhen you receive a phone call from a contact, the Incoming call screen appears.You can use your phone’s polite ringer and pocket mode features for receiving calls. To findout how, see Changing sound settings on page 164.39 Phone callsDraft version for test review 2011/01/28
Answering a callTo answer a call:§Tap Answer.§If the display is off when you get a call, the Lock screen appears. Drag the barthat shows the caller name or number downward.Rejecting a callDo one of the following:§Tap Decline.§If the display is off when you get a call, drag the bar upward on the Lock screen,or press MENU and then tap Decline.§To reject the call and send a text message, press MENU, and then tap Sendmessage.You can also Press the POWER button twice to reject a call.Changing the text message to send out for rejected calls1. On the Phone dialer screen, press MENU.2. Tap Settings > Edit default message. 3. Enter the new message, and then tap OK. 40 Phone callsDraft version for test review 2011/01/28
Muting the ringing sound without rejecting the callDo one of the following:§Press the VOLUME DOWN or VOLUME UP button.§Press the POWER button.§Place the phone face down on a level surface.If the phone is already facing down, the phone will still ring when there are subsequentincoming calls.HTC Caller IDEverytime you make a call or your friend gives you a ring, you get to see your friend’slatest status update from social networks like Facebook or Twitter right on the callscreen. You also won’t miss people’s birthdays. You’ll see a birthday reminder, if yourfriend’s birthday will occur sometime within the next seven days.What can I do during a call?When a call is in progress, use the buttons onscreen to mute or unmute themicrophone or to turn the speakerphone on or off. You can also press MENU andchoose whether to add a call, place the call on hold, mute the microphone, and more.Putting a call on hold1. Press MENU and then tap Hold to put the call on hold. When you put a call onhold, the status bar displays the hold call icon  .2. Press MENU, and then tap Unhold to resume the call.Switching between callsIf you’re already on a call and accept another call, you can choose to switch betweenthe two calls.41 Phone callsDraft version for test review 2011/01/28
1. When you receive another call, tap Answer to accept the second call and putthe first call on hold.2. To switch between the calls, tap the person you want to talk to on the screen.3. To end the current call and return to the other call, tap End call.Turning the speakerphone on during a callTo decrease potential damage to your hearing, do not hold your phone against your earwhen the speakerphone is on.Do one of the following:§Flip your phone over during a call (be sure that Flip for speaker is selected inHOME > MENU > Settings > Sound).§On the call screen, tap  .The speakerphone icon   appears in the status bar when the speakerphone is on.To turn the speakerphone off, just flip the phone over again, facing it up. Or tap again.Muting the microphone during a callOn the call screen, tap   to toggle between turning the microphone on or off.When the microphone is turned off, the mute icon   appears in the status bar.Ending a callDo one of the following to end the call:§On the call screen, tap End call.If the phone display is off, press POWER to turn on the screen so you can tap End call.§Slide open the Notifications panel, then tap  .§If you are using the provided wired headset, press the button to end the call.If the phone number of the person who called is not in your contacts list, you canchoose to save the number to your contacts list after you hang up.Setting up a conference callConference calling with your friends, family, or co-workers is easy. Make the first call(or accept a call), and then simply dial each subsequent call to add it to theconference.42 Phone callsDraft version for test review 2011/01/28
Make sure your SIM card is enabled with conference calling service. Contact your mobileoperator for details.1. Make a call to the first conference call participant.2. When connected, press MENU, tap Add call, and then dial the number of thesecond participant. The first participant is put on hold when you dial the secondparticipant.3. When connected to the second participant, tap merge  .4. To add another participant to the conference call, tap   on the conference callscreen, and then dial the number of the contact you want to invite to theconference call.5. When connected, tap   to add the participant to the conference call.6. To talk to a person in the conference call in private, tap   and then selectPrivate call on the options menu.7. When finished, tap End call.Using Call historyUse Call History to check missed calls, your dialed numbers, and received calls.Checking a missed callYou will see the missed call icon   in the status bar when you miss a call.1. Slide open the Notifications panel to check who the caller is.2. To return the call, tap the missed call notification. Then tap the caller’s name ornumber on the Call History screen.Checking calls in the Call HistoryFrom the Home screen, tap   > Call History.You can also tap   on the phone dialer screen.On the Call History screen, you can:§Tap a name or number in the list to call.§Press and hold a name or number in the list to display the options menu.§Tap   to check only the call history of a particular contact.§Press MENU, then tap View to display just a particular type of calls such asmissed calls or outgoing calls.43 Phone callsDraft version for test review 2011/01/28
Adding a new phone number to your contacts from Call History1. On the Call History screen, press and hold the phone number that you want tosave, and then tap Save to People.2. Choose whether to create a new contact or save the number to an existingcontact on your phone.3. Do any of the following:§When creating a new contact, enter the contact name, contact type, andother information in the blank contact record that appears. The phonenumber is automatically added to the mobile field in the phone section. Tostore it as another type of number, for example a home number, tap theMobile button.§When saving the number to an existing contact, tap a contact stored onyour phone, and then select the number type.4. Tap Save.Clearing the Call History listOn the Call History screen, do one of the following:Remove one name or number Press and hold the name or number, and then tap Delete fromcall history.Clear the entire list Press MENU, and then tap Delete all.Blocking callersWhen you block a phone number or a contact from calling you, the blocked calls godirectly to your voicemail.Blocking one or more contacts from calling1. From the Home screen, tap   > Blocked Callers.2. On the Blocked callers tab, tap Add caller.3. Select the contacts you want to block, then tap Save.Checking your blocked call history1. From the Home screen, tap   > Blocked Callers.2. Slide to the Blocked call history tab.3. Press and hold a name or number in the list to display the options menu whereyou can select to check the call history details and more.44 Phone callsDraft version for test review 2011/01/28
Unblocking callers1. From the Home screen, tap   > Blocked Callers.2. On the Blocked callers tab, press MENU, then tap Remove callers.3. Select one or more contacts, then tap Delete.4. When prompted, tap OK.Call servicesYour phone can directly link to the mobile phone network, and enable you to accessand change the settings of various phone services for your phone. Call services mayinclude call forwarding, call waiting, voicemail, and more. Contact your mobileoperator to find out about the availability of call services for your phone.To open call services, press MENU from the Home screen, and then tap Settings >Call.Fixed DialingNumbersRestrict outgoing calls to a fixed set of numbers. To enable this feature,you must know your SIM card’s PIN2 code.Voicemail service Shows the current voicemail service being used.Voicemail settings Specify another voicemail number aside from the voice mail number onyour SIM card.Clear voicemailnotificationIf you have a notification of a new voicemail, you can clear thenotification with this option.Phone settings Edit the call reject message, choose whether to open the messageeditor when you reject a call with a message, and choose whether toallow automatic saving of an unknown contact number when a call withthat number ends.Cell broadcast Enable or disable receipt of cell broadcast messages from your serviceprovider.Cell broadcastsettingsConfigure channels and language for cell broadcast messages.Call forwarding Select how you want your phone to handle busy, unanswered, andunreachable calls. You can also set the call forwarding option for allincoming calls.Call barring settings Choose whether to block various categories of incoming and outgoingcall.Additional callsettingsEnable or disable operator services such as caller ID and call waiting.45 Phone callsDraft version for test review 2011/01/28
Turning Airplane mode on or offIn many countries, you are required by law to turn off the phone while on board anaircraft. A way to turn off the phone function is to switch your phone to Airplanemode.When you enable Airplane mode, all wireless radios on your phone are turned off,including the call function, data services, Bluetooth, and Wi-Fi. When you disableAirplane mode, the call function is turned back on and the previous state of Bluetoothand Wi-Fi is restored.To turn Airplane mode on or off, press and hold POWER, and then tap Airplane mode.When enabled, the Airplane mode icon   is displayed in the status bar.46 Phone callsDraft version for test review 2011/01/28
MessagesOpening MessagesKeep in touch with important people in your life. Use the Messages app to composeand send text (SMS) and multimedia messages (MMS).From the Home screen, tap   > Messages. The All messages screen opens, whereall your sent and received messages are neatly grouped into conversations, bycontact name or phone number.§Scroll up or down the list of conversations byswiping your finger on the screen.§Tap a contact name or number to view the exchangeof messages.You can also view your messages on the Home screen with the Messages widget.Sending a text message (SMS)1. From the Home screen, tap   > Messages.2. Tap Compose message.3. Fill in one or more recipients. You can:§Enter the first few letters of a contact name or starting digits of a mobilenumber. As you type, matching names with phone numbers from yourstored contacts are displayed. Tap a name or one of the contact’s numbers.§Tap  , and then select the phone numbers of the contacts to whom youwant to send the message. You can also select contact groups asrecipients. When you have selected all the message recipients, tap OK.§Enter the complete phone numbers directly in the To field.47 MessagesDraft version for test review 2011/01/28
4. Tap the box that says Tap to add text, and then enter your message.§There is a limit on the number of characters for a single text message (displayed above theSend button). If you exceed the limit, your text message will be delivered as one but will bebilled as more than one message.§Your text message automatically becomes a multimedia message if you enter an emailaddress as the recipient, add a message subject, attach an item, or compose a very longmessage.5. Tap Send, or press BACK to save the message as a draft.Sending a multimedia message (MMS)1. From the Home screen, tap   > Messages.2. Tap Compose message.3. Fill in one or more recipients. You can:§Enter the first few letters of a contact name or starting digits of a mobilenumber. As you type, matching names with phone numbers and emailaddresses from your stored contacts are displayed. Tap a contact’s numberor email address. Email addresses will be displayed when Show emailaddress is selected in Recipient list settings.§Tap  , and then select the phone numbers of the contacts to whom youwant to send the message. You can also select contact groups asrecipients. When you have selected all the message recipients, tap OK.§Enter the complete phone numbers or email address directly in the To field.4. To add a subject line, press MENU and then tap More > Add subject.5. Tap the box that says Tap to add text, and then enter your message.48 MessagesDraft version for test review 2011/01/28
6. Tap   and then choose the type of attachment.Picture Select Camera to take a photo and attach it, or Gallery to attacha photo from your storage card.Video Select Camcorder to capture a video and attach it, or Videos toattach a video from your storage card.Audio Select Voice Recorder to make a voice recording and attach it,or Music & sounds to attach a music file or voice recording fromyour storage card.ApprecommendationChoose an app you’ve installed from Android Market that youwant to share with others. The URL from which the app can bedownloaded will be inserted to your message.Location Add your current location (requires GPS to be turned on), or alocation you pick on a map to your message.Contact (vCard) Select a contact, and then select the information to attach.Appointment(vCalendar)Select the calendar event you want to attach.Slideshow Create a slideshow of pictures with text as your MMS message.7. To make changes to your attachment, tap   or   (depending on the typeof file you’ve attached). You can also press MENU, then tap Remove to startover.8. Tap Send, or press BACK to save the message as a draft.Creating a slideshowIn a multimedia message, you can add slides, each containing a photo, video, or audio.1. In the multimedia message you’re composing, tap   > Slideshow.2. On the Edit slideshow screen, tap Add slide.3. Tap Slide 1.4. To compose your slideshow, do any of the following:Add a picture Tap Insert picture.Add a video Press MENU, and then tap Add video (you cannot addboth a picture and a video on the same slide).Add music or a voice recording Press MENU, and then tap Add audio.Add a caption Tap the box that says Tap to add text.Add a new slide Tap Add slide.View the next or previous slide Tap   or  .Preview your slideshow Press MENU, and then tap Preview.View more options Press MENU, and then tap More.5. When finished, tap Done to attach the slideshow to your message.6. Tap Send, or press BACK to save the message as a draft.49 MessagesDraft version for test review 2011/01/28
Resuming a draft message1. On the All messages screen, press MENU, and then tap Drafts.2. Tap the message and then resume editing it.3. Tap Send.Viewing and replying to a messageDepending on your notification settings, the phone plays a ringtone, vibrates, ordisplays the message briefly in the status bar when you receive a new message. Anew message icon   is also displayed in the status bar.1. To open and read the message, you can:§Press and hold the status bar, and then slide your finger down to open theNotifications panel. Then tap the new message notification.§Open the Messages app to access and read the message.2. While reading the message, you can:Reply with a text message Tap the box that says Tap to add text, enter your replymessage, and then tap Send.Reply with a multimediamessageTap the box that says Tap to add text, enter your replymessage, tap   to choose an attachment for yourmessage, and then tap Send.Call or save a phonenumber contained in themessageTap the phone number. Then choose whether to dial thenumber or add it to your contacts.Open a link in the message Tap the link to open it in the web browser.Send to or save an emailaddress contained in themessageTap the email address. Then choose whether to send anemail, send a multimedia message, or save the emailaddress to your contacts.Forward a message Press and hold the message to open the options menu,and then tap Forward.Check message details Press and hold the message to open the options menu,and then tap View message details.50 MessagesDraft version for test review 2011/01/28
Replying to another phone number of the contactWhen a contact has multiple phone numbers stored on your phone, you’ll see theparticular phone number used within the message. There’s also a bold letter beforethe phone number to indicate the number type (for example, M stands for Mobile).Keep in mind that your response will be sent to the phone number of the latestmessage you’ve received from this contact.1. On the All messages screen, tap a contact (or phone number) to display theexchange of messages with that contact.2. Tap the box that says Tap to add text, then enter your reply message3. Press MENU and then tap More > Recipient phone number.4. Select another phone number of this contact, and then tap OK.Viewing and saving an attachment from amultimedia messageIf you are concerned about the size of your data downloads, check the multimediamessage size first before you download it.When Auto-retrieve in MMS settings is disabled, only the message header is downloaded. Todownload the entire message, tap the Download button at the right side of the message.§If there’s a media attachment such as a photo or video in a received message,tap it to view the content.§If the attachment is a contact (vCard), tap it to view the contact information,then tap Save to add to your contacts.§If the attachment is an appointment or event (vCalendar), tap it to choose thecalendar where to save it, and then tap Import.§To save the attachment to your storage card, press and hold the multimediamessage, and then choose to save the type of attachment from the optionsmenu.Push messagesPush messages contain a web link. Often, the link will be to download a file that youhave requested, for example a ringtone.When you receive a push message, a notification icon   is displayed in the statusbar.51 MessagesDraft version for test review 2011/01/28
Opening and reading a new push message1. Press and hold the status bar, and then slide the status bar down to open theNotifications panel.2. Tap the new message.3. Tap Visit website.Viewing all your push messages1. From the Home screen, tap   > Messages.2. Press MENU, and then tap Push messages.Managing message conversationsProtecting a message from deletionYou can lock a message so that it will not be deleted even if you delete the othermessages in the conversation.1. On the All messages screen, tap a contact (or phone number) to display theexchange of messages with that contact.2. Press and hold the message that you want to lock.3. Tap Lock message on the options menu. A lock icon   is displayed at the righthand side of the message.Copying a message to your SIM card1. On the All messages screen, tap a contact (or phone number) to display theexchange of messages with that contact.2. Press and hold the message, and then tap Copy to SIM. A SIM card icon   isdisplayed at the right hand side of the message.Deleting a single message1. On the All messages screen, tap a contact (or phone number) to display theexchange of messages with that contact.2. Press and hold the message that you want to delete.3. If the message is locked, tap Unlock message on the options menu, and thenpress and hold the message to display the options menu again.4. Tap Delete message on the options menu.5. When prompted to confirm, tap OK.52 MessagesDraft version for test review 2011/01/28
Deleting several messages within a conversation1. On the All messages screen, tap a contact (or phone number) to display theexchange of messages with that contact.2. Press MENU and then tap More > Delete.3. Tap Delete by selection.You can also tap Delete by phone number if the contact used multiple phone numbersthroughout the conversation and you want to delete the messages sent from a particularnumber.4. Select the messages you want to delete and then tap Delete.Deleting a conversation1. Do any of the following:§On the All messages screen, press and hold a contact (or phone number)whose messages you want to delete, and then tap Delete§While looking at the exchange of messages in a conversation, press MENUand then tap More > Delete > Delete thread.Any locked messages in the conversation thread will not be deleted unlessyou select the Delete locked messages check box.2. When prompted to confirm, tap OK to delete the entire thread.Deleting several conversations1. On the All messages screen, press MENU and then tap Delete.2. Select the conversation threads you want to delete.3. Tap Delete. Any locked messages will not be deleted.Setting message optionsOn the All messages screen, press MENU and then tap Settings.ReceivedmessagesReceive a notification in the status bar and set your phone to vibrate or play asound when a message arrives, and choose a notification sound.Sentmessages §Set your phone to vibrate or play a sound when a message arrives, andchoose a notification sound.§Receive a notification in the status bar when a message is not sentsuccessfully.§Allow your phone to show pop-up notifications on the screen whenmessages are sent successfully or not, or disable this option.StoragesettingsChoose the maximum number of text or MMS messages to store in eachconversation thread (excluding locked messages), and enable automaticdeletion of unlocked older messages when set limits are reached.53 MessagesDraft version for test review 2011/01/28
Recipient listsettingsSearch and display the email addresses of stored contacts when you’readding message recipientsMessageforwardingForward received text and MMS messages to another phone number or emailaddress. (This may incur extra fees from your mobile operator.)SMS settings §Receive a report on the delivery status of your message.§View or change the message service center number used. (We recommendthat you don't change the number here as it may cause problems inreceiving and sending messages.)§View or delete text messages stored on your SIM card, or copy SIM cardmessages to your phone's memory.MMS settings §Receive a report on the delivery status of your message.§Receive a report whether each recipient has read the message or deleted itwithout reading.§Automatically download complete MMS messages including the messagebody and attachments to your phone in your service area and whenroaming.§Set the message priority and maximum file size of MMS messages. If theMMS message file size is exceeded, the message won't be sent.54 MessagesDraft version for test review 2011/01/28
PeopleWays of getting contacts into your phoneThere are several ways you can add contacts to your phone. You can sync your phonewith contacts from your Google Account, computer, Facebook, and more.Gmail Google contacts are imported to your phone after you sign in to yourGoogle Account. You can also create more Google contacts right fromyour phone.Facebook Log in to your Facebook account through Facebook for HTC Sense toimport your Facebook friends' contact information.Phone contacts You can choose to create and store contacts in your phone memory ortransfer existing ones from your old phone.SIM card Copy all your SIM contacts to your phone.Microsoft ExchangeActiveSyncYour phone syncs your work contacts from the Microsoft ExchangeActiveSync Server in your workplace.Contacts on yourcomputerUse HTC Sync to sync your phone with your computer's MicrosoftOutlook, Outlook Express or Windows Contacts.Transferring contacts from your old phoneEasily transfer contacts from your old phone to your new HTC phone throughBluetooth. Depending on your old phone’s model, you may also transfer other typesof data such as calendar events and text messages to your new phone.1. From the Home screen, tap   > Transfer Data.2. Tap Next to begin.3. Choose your old phone's name and model.4. On your old phone, turn Bluetooth on and set it to discoverable mode.5. On your new HTC phone, tap Next to continue. Your new phone automaticallyturns Bluetooth on and searches for Bluetooth devices.6. From the device list, choose your old phone and then tap Next. Your new HTCphone then tries to pair with your old phone. You’ll see a security passkey onthe screen.7. On your old phone, enter this passkey or simply confirm it.8. Select the Contacts check box (and other supported types of data you want toimport), and then tap Next.9. When your new HTC phone finishes importing data, tap Done.55 PeopleDraft version for test review 2011/01/28
About the People appWith the People app, easily manage your communications with your contacts viaphone, messaging, and email. You can also link your contacts to their social networkaccounts like Facebook, Twitter, and Flickr™ to see their updates and events fromthese accounts all in one place.And that's not all. If you have the same contacts from different sources, People letsyou merge their contact information so you won't have duplicated entries in yourcontacts list.1. From the Home screen, tap   > People.2. Tap one of the following tabs:AllGives you access to all contacts on your phone, online accounts, and more.GroupsLets you assign contacts to groups so you can easily send an SMS, MMS, oremail message to a whole group.Online directoriesView your friends list in your social network accounts. You can also search forcontacts in your Exchange ActiveSync account to copy to your phone.Call HistoryLists all your dialed numbers and received and missed calls.Your contacts listThe People app's All tab   shows all contacts on your phone and from the onlineaccounts you're logged in to.Your contacts list also display the contacts stored on your SIM card (usually markedwith the SIM card icon  ).56 PeopleDraft version for test review 2011/01/28
From the All tab, you can:§Open or update your contact information.§Create, edit, or find contacts.§View instant status updates when you’ve linkedthe contact to his or her social network account.§Tap the contact's name to open the contactdetails screen for that contact.§See a notification icon   when the contact hassent you a new message, tried to call you,updated his or her social network accounts, orwhen it's the contact's birthday.§Check out who's online in Google Talk™. Onlinestatus icons are displayed if you’re signed in toGoogle Talk on your phone. For example, means the contact is available to chat.Setting up My contact cardMy contact card provides a convenient way to store your personal contactinformation so that you can easily send it to other people.1. From the Home screen, tap   > People.2. On the All tab, tap Me.If you are logged in to your Facebook account through Facebook for HTC Sense, instead ofMe, you'll see the name you use in Facebook. Tap your name, press MENU, then tap Edit.3. Enter your name and contact details.4. Tap Save.Importing contacts from your SIM cardYou can copy all your SIM contacts to your phone. Import them as phone contacts,Google contacts, or Exchange ActiveSync contacts, if you have set up the relevantaccounts.1. From the Home screen, tap   > People.2. On the All tab, press MENU, and then tap Import/Export > Import from SIMcard.3. If you have Google or Exchange ActiveSync accounts set up on your phone, tapthe type for the imported contacts.57 PeopleDraft version for test review 2011/01/28
4. Do one of the following:§Tap one or more SIM contacts you want to import.§To import all contacts, press MENU, and then tap Select all.5. Tap Save.Adding a new contact1. From the Home screen, tap   > People.2. On the All tab, tap Add contact.3. Select the Contact type, for example Google or Microsoft® ExchangeActiveSync. This determines which account the contact will sync with.Some fields may not be supported when you’re adding contacts to your SIM card.4. Tap the Name field, enter the first and last name of the contact, then tap OK.5. Enter the contact information in the fields provided.Press BACK if you want to close the onscreen keyboard first and easily scrollthrough the other fields.6. Tap Save.Importing a contact from an ExchangeActiveSync accountYou can search for a work contact from your Exchange ActiveSync account, and thencopy it to your phone.You need to have your Exchange ActiveSync account set up on your phone first.1. From the Home screen, tap   > People.2. On the Online directories tab, tap Company directory.3. Enter the name, and then tap  .4. In the list, tap the name of the contact you want to copy to your phone.5. Tap Save to People.Merging contact informationIf you have the same contacts on your phone, Google Account, and social networkaccounts such as Facebook and Twitter, your phone will try to combine themautomatically or let you decide which contacts to combine. Combining the samecontacts avoids duplicated entries in your contacts list.58 PeopleDraft version for test review 2011/01/28
Accepting matched contacts suggestionsWhen your phone finds contacts that can be merged, you’ll see a link icon   in thenotifications area of the status bar.1. Slide down the Notifications panel, and then tap Matched contacts suggestion.Your phone displays all suggested contacts that you can merge.2. To merge, tap  .3. Tap OK.If you don’t want to merge any of your contacts, tap Dismiss all.Viewing a list of all your linked contacts1. From the Home screen, tap   > People.2. On the All tab, press MENU, and then tap More > Linked contacts. The All linkedcontacts screen then opens where you can see the account types andinformation merged.3. You can choose to break the link of an account type or relink.4. When you're done, tap OK.Manually merging contact information1. From the Home screen, tap   > People.2. On the All tab, tap the name of the contact (not the icon or photo) you want tolink.3. On the upper-right corner of the screen, tap   or   (if there are suggestedlinks).59 PeopleDraft version for test review 2011/01/28
4. On the screen, you can:§Under Suggest links, tap   to link the contact to an account.§Under Add contact, tap one of the options to link to another contact.5. Tap Done.Breaking the link1. From the Home screen, tap   > People.2. On the All tab, tap the name of the contact (not the icon or photo) whose linkyou want to break.3. On the upper-right corner of the screen, tap  .4. Under the Linked contacts section, tap   beside an account type to breakthe link.5. Tap Done.Filtering your contacts listYou can choose to only display contacts from particular account types (for example,Google contacts or Facebook contacts).1. From the Home screen, tap   > People.2. On the All tab, press MENU, then tap View.3. Select the types of contacts you want to show in your contacts list.You can also choose how you want to display and sort your contacts.4. Tap Done.Searching for a contact1. From the Home screen, tap   > People.2. Press SEARCH, then enter the first few letters of a contact’s first or last name,email, or company name.You can also type in the first few digits of your contact’s phone number.Matching contacts are displayed.3. Tap the contact to open his or her contact details screen.Backing up your contacts to the storage card1. From the Home screen, tap   > People.2. Press MENU, and then tap Import/Export > Export to SD card.3. Select an account or type of contacts to export, then tap OK.60 PeopleDraft version for test review 2011/01/28
Importing contacts from the storage cardYou can only import contacts that were exported to the storage card using theExport to SD card feature on the phone.1. From the Home screen, tap   > People.2. Press MENU, and then tap Import/Export > Import from SD card.3. If you have Google or Exchange ActiveSync accounts set up on your phone, tapthe type for the imported contacts.Contact information and conversationsWhen you tap a contact on the People screen, the contact details screen opens,showing you the information you've stored or linked for that contact.The contact details screen has the following tabs:DetailsShows the information you have stored for the contact. Get in touch with the contactdirectly by tapping any of the displayed methods. For example, if the contact has astored work phone number, tap Call work.MessagesShows your exchanged SMS messages with the contact. You can reply to thecontact’s message directly from this tab.MailShows all the email you have received from the contact. Tap an email to view it.Updates and eventsShows the contact’s updates and events from social network accounts you've linkedlike Facebook, Twitter, and Flickr.GalleryShows the linked contact’s Facebook and Flickr albums and photos.Call HistoryLists all your incoming, outgoing, and missed calls to and from the contact.Editing a contact’s information1. From the Home screen, tap   > People.2. On the All tab, press and hold the contact, and then tap Edit contact.You cannot edit the contact information of a Facebook friend.3. Enter the new information for the contact.4. Tap Save.61 PeopleDraft version for test review 2011/01/28
Deleting contacts1. From the Home screen, tap   > People.2. On the All tab, press MENU, and then tap Delete.3. Select the contacts you want to remove, and then tap Delete.4. When prompted, tap OK.Sending contact information as a vCardEasily share your own contact information or any contact on your phone.1. From the Home screen, tap   > People.2. On the All tab, do the following:To send Do thisSomeone's contactinformationPress and hold the name of the contact (not the icon or photo)whose contact information you want to send, and then tap Sendcontact as vCard.Your contactinformation 1. Tap [Your name] My contact card.2. Press MENU, and then tap Send my contact info.3. Choose how you want to send it.4. Select the type of information you want to send, and then tap Send.Contact groupsAssign contacts to groups so you can easily send a message or email to a wholegroup. You can also sync groups on your phone with the groups in your Googleaccount, accessible via your computer’s web browser. We’ve also added the Frequentgroup as a special group type that automatically stores the contacts you dial or getcalls from the most.62 PeopleDraft version for test review 2011/01/28
Creating a group1. From the Home screen, tap   > People.2. On the Group tab, tap Add group.3. Enter a name for the group, and then tap Add contact to group.4. Select the contacts you want to add to the group, and then tap SaveIf your contacts list is long, you can use the search bar to search for contacts quickly, orpress BACK to hide the onscreen keyboard and scroll through the list.5. Tap   to select a photo for the group.6. Tap Save.Editing a contact group1. From the Home screen, tap   > People.2. On the Group tab, press and hold the group, and then tap Edit group.3. You can:§Tap the group name to change the name. You can only change the namefor groups that you have created.§Tap the icon to the left of the group name to change or remove the groupphoto.§To add contacts to the group, tap Add contact to group, select thecontacts you want to add, and then tap Save.§To remove a contact from the group, tap   at the right side of the contactname.4. Tap Save.Sending a message or email to a groupYou will be charged by your mobile provider for each message sent. For example, if yousend a message to a group of five people, you will be charged for five messages.1. From the Home screen, tap   > People.2. On the Group tab, tap the group you want to send a message or email to.3. Go to the Group action tab, and then do one of the following:§Tap Send group message to send a message to the group.§Tap Send group mail to send an email to the group.Rearranging your contact groups1. From the Home screen, tap   > People.2. On the Groups tab, press MENU, and then tap Rearrange.63 PeopleDraft version for test review 2011/01/28
3. Press and hold   at the end of the group you want to move. When the row ishighlighted, drag it to its new position.4. Tap Save.Rearranging the members of a contact group1. From the Home screen, tap   > People.2. On the Groups tab, tap the group to see its members.3. Press MENU, and then tap Rearrange.4. Press and hold   at the end of the contact’s name you want to move. Whenthe row is highlighted, drag it to its new position.5. Tap Save.Deleting a groupYou can only delete groups that you have created.1. From the Home screen, tap   > People.2. On the Groups tab, press and hold the group you want to delete, and then tapDelete group.64 PeopleDraft version for test review 2011/01/28
Adding People widgetsStay in touch with different circles of friends or colleagues in your life. Using thePeople widget, you can instantly place a call, send a message, view details of afavorite contact, and even check Facebook and Twitter updates. You can add severalPeople widgets on the Home screen, with a different group of contacts on eachwidget.1. From the Home screen, tap   > Widget > People.2. Choose the widget style, and then tap Select.3. Select the group you want to add as a widget.4. Drag the widget to a blank space on a Home screen. When the widget is whereyou want it, lift your finger.5. Repeat the above steps to add another People widget.Setting the default communication method1. On the Home screen, go to the People widget.2. Tap a contact on the widget.3. On the Select default action screen, tap the communication method you wantfor the contact.Changing the default communication method1. On the Home screen, go to the People widget.2. Tap the name of a contact on the widget to open the person’s contact card.3. Press MENU, and then tap More > Set widget action.4. On the Select default action screen, tap the communication method you wantfor the contact.65 PeopleDraft version for test review 2011/01/28
Getting in touch with a contact1. On the Home screen, go to the People widget.2. Tap a contact (photo not the name) on the widget. The default communicationmethod will be performed.Tap the name of the contact to open the contact details screen for that contact.66 PeopleDraft version for test review 2011/01/28
EmailUsing GmailUsing MailAbout the Mail appUse the Mail app to add your webmail and other POP3 or IMAP email accounts. Youcan also set up and use your Exchange ActiveSync email on your phone.You can add the Mail widget to view your POP3/IMAP or Exchange ActiveSync emails onthe Home screen.Adding a POP3/IMAP email account1. From the Home screen, tap   > Mail.2. Do one of the following:§If this is your first time to add an email account in Mail, tap Other (POP3/IMAP) on the Choose a mail provider screen.§If you’ve already added an email account in Mail, press MENU, and then tapMore > New account. If the Choose a mail provider screen is displayed, tapOther (POP3/IMAP).3. Enter the email address and password for your email account and then tapNext.4. If the account type you want to set up is not in the phone database, you’ll beasked to enter more details.5. Enter the account name and your name and then tap Finish setup.Adding a Microsoft Exchange ActiveSync accountYou can add one or more Microsoft Exchange ActiveSync accounts on your phone.You can sync with Microsoft Exchange Server 2003 Service Pack (SP2) or later.You can add up to 15 Exchange ActiveSync accounts on your phone.67 EmailDraft version for test review 2011/01/28
1. From the Home screen, tap   > Mail.2. Do one of the following:§If this is your first time to add an email account in Mail, tap MicrosoftExchange ActiveSync on the Choose a mail provider screen.§If you’ve already added an email account in Mail, press MENU, and then tapMore > New account. If the Choose a mail provider screen is displayed, tapMicrosoft Exchange ActiveSync.3. Enter the Exchange ActiveSync account details, and then tap Next. Yourcorporate Exchange Server must support auto-detect for the phone toautomatically set up the Exchange ActiveSync account. If your corporateExchange Server does not support auto-detect, you’ll need to enter yourExchange Server settings after you tap Next. Ask your Exchange Serveradministrator for details.4. Choose the types of information you want to sync. Also choose how often youwant to update and sync email to your phone, then tap Next.5. Enter the account name, then tap Finish setup.Checking your Mail inboxWhen you open the Mail app, it displays the inbox of one of your email accounts thatyou’ve set up on your phone.To switch between email accounts, tap the bar that shows the current email account,and then tap another account.68 EmailDraft version for test review 2011/01/28
Viewing the unified inbox of all your email accountsYou can view email messages from all your accounts just in one place without havingto switch to different accounts.Just tap the bar that shows the current email account, and then tap All accounts.Email messages are color coded so you can easily distinguish which email accountsthey belong to.Up to 15 email accounts can be shown in the unified inbox.69 EmailDraft version for test review 2011/01/28
Switching between different views of your inboxIf you have lots of email messages, it may take you some time to browse through thelong list and find a single email or related email messages. To skim through your emailmessages easier, tap one of the following tabs to change the view of your inbox:ReceivedDisplays email messages as individual items.ConversationsDisplays email messages as conversations, grouped according to the subject line. Tapa subject in the list to show the email conversation.GroupDisplays all email messages from a contact group. To choose which contact group todisplay, press MENU, tap View, and then select a group.UnreadDisplays unread messages.Marked (Exchange ActiveSync only)Displays all flagged messages.Meeting invitations (Exchange ActiveSync only)Displays meeting invitations which you have not yet accepted or declined.AttachmentsDisplays all messages that have attachments.Refreshing an email accountWhatever your automatic synchronization settings are, you can also synchronize yoursent and received emails manually at any time.§While in the account you want to synchronize, press MENU, and then tapRefresh.§If you have several email accounts, you can refresh them all at the same time.Go to the unified inbox first. Then press MENU and tap Refresh.Sorting email messagesYou can sort email messages by date received, priority, subject, sender, or size.On the inbox, press MENU, tap Sort, and select from the sorting options.Managing email messagesDeleting an email message1. On the inbox, press and hold the message you want to delete.2. On the options menu, tap Delete.70 EmailDraft version for test review 2011/01/28
Selecting several email messages1. Tap the check boxes of email messages to select them.2. Choose what you want to do with the selected messages: Mark unread, Delete,or Move to another folder.You cannot move email messages when you’re in the unified (All accounts) inbox.Moving several email messages to another folder1. Switch to the email account you want to use.2. Go to the Received tab or any other tab (except for the Conversations tab).3. Tap the check boxes of email messages you want to move.4. Tap Move to, and then tap the folder where to move the email messages.Moving an email message after readingIn the open message, press MENU, and then tap More > Move to. Tap the folder whereyou want to move the email message.Deleting all messages1. First tap the check box of any email message.2. Press MENU, and then tap Select all.3. Tap Delete.Switching to other mail folders1. Press MENU, and then tap Folders.2. Tap the mail folder whose messages you want to view.Sending an email message1. From the Home screen, tap   > Mail.2. Switch to the email account that you want to use for sending email.3. On the email account inbox, tap Compose mail.71 EmailDraft version for test review 2011/01/28
4. Fill in one or more recipients. You can:§Enter email addresses directly in the To field, separating them with acomma. As you enter email addresses, any matching addresses from yourcontacts list are displayed. Tap a match to enter that address directly.§Tap the   icon, and then choose the contacts to whom you want to sendthe message. You can also select contact groups as recipients, or searchand add contacts from the company directory if you have set up anExchange ActiveSync account on your phone. When you have selected allthe message recipients, tap OK.If you want to send a carbon copy (Cc) or a blind carbon copy (Bcc) of the email to otherrecipients, press MENU, and then tap Show Cc/Bcc.5. Enter the subject, and then compose your message.6. To add an attachment, press MENU, tap Attach, and choose from the followingoptions:Picture Select Camera to take a photo and attach it, or Gallery to attacha photo from your storage card.Video Select Camcorder to capture a video and attach it, or Videos toattach a video from your storage card.Audio Select Voice Recorder to make a voice recording and attach it,or Files to attach a music file or voice recording from yourstorage card.App recommendation Choose an app you’ve installed from Android Market that youwant to tell other people about. The URL from which the appcan be downloaded will be inserted in your email.Location You can attach location information. Send your current location(requires GPS to be turned on) or a location you pick on a map.Document Attach a PDF file or an Office document such as a text file or aspreadsheet.Contact (vCard) Attach someone’s contact information.Appointment(vCalendar)Attach a calendar event.File Attach any file from your storage card.7. Tap Send to send the message immediately, or tap Save as draft to send it later.If there’s no Wi-Fi or data connection available or Airplane mode is on when you send youremail, the email will be saved to the Outbox folder. Once there’s Wi-Fi or data connectionavailable, the saved email will be sent automatically next time your phone syncs.Resuming a draft email message1. In the email account inbox, press MENU, and then tap Folders > Drafts.2. Tap the message.3. When you finish editing the message, tap Send.72 EmailDraft version for test review 2011/01/28
Reading and replying to an email message1. From the Home screen, tap   > Mail.2. Switch to the email account you want to use.3. On the email account inbox, tap the email you want to read.4. Do any of the following:Reply to the message Tap Reply or Reply all.Forward the message Press MENU, and then tap More > Forward.Delete the message Press MENU, and then tap Delete.Mark the message as unread Press MENU, and then tap Mark unread.Setting the priority for an email messageYou can set the priority for an email message that you send.1. While composing the message, press MENU.2. Tap Set priority.3. Select the priority for the message.If you selected High or Low priority, the priority appears below the subject line of themessage.Working with Exchange ActiveSync emailIf you sync your phone with your work Exchange ActiveSync account, you can read,reply, send, and manage email in the same easy way as with a POP3/IMAP account. Inaddition, you can also use some powerful Exchange features.Flagging an email§While viewing the inbox, tap the white flag icon   that appears on the right ofan email message. The icon turns red   after you flagged the email.§While reading an email, you can also tap the flag icon in the email.Setting out of the office statusYou can set your out of office status and auto-reply message right from your phone.1. Switch to your Exchange ActiveSync account.2. Press MENU and then tap More > Out of the office.3. Tap the box, and then select Out of the office.4. Set the dates and times for the period when you will be out of the office.5. Enter the auto-reply message.6. Tap Save.73 EmailDraft version for test review 2011/01/28
Sending a meeting request1. Switch to your Exchange ActiveSync account.2. Go to the Meeting invitations tab, and then tap New meeting invitation.3. Enter the meeting details.4. Tap Send.Changing email account settings1. Switch to the email account whose settings you want to change.2. Press MENU and then tap More > Settings.3. Select from the following:Account settings Change the email account settings such as the name, emailaddress, password, and description.General settings Set the font size when reading emails, enable, disable or set thesignature, set the account as the default email account, and setwhere to save email attachments.Send & Receive Set the maximum email file size limit when receiving and frequencyto check for new emails and how many to check for. You can alsoset to have emails that you send bcc’d to yourself.NotificationsettingsSet email notification settings.Delete account Tap to delete the email account.4. Press BACK to save your changes.Deleting an email account1. Switch to the email account you want to delete.2. Press MENU, and then tap More > Settings > Delete account.74 EmailDraft version for test review 2011/01/28
Calendar75 CalendarDraft version for test review 2011/01/28
Search and Web browserUsing your phone’s web browserYou must have an active data connection or Wi-Fi connection to access the Internet.Do one of the following to open the web browser and start surfing the Web:§On the Home screen, tap Internet.§From the Home screen, tap   > Internet.Going to a webpage1. From the browser screen, press MENU and then tap the URL field on top of thescreen.2. Enter the webpage address using the keyboard. As you enter the address,matching webpage addresses will appear on the screen.3. Do one of the following:§Tap an address to go directly to that webpage.§Continue typing in the webpage address, then tap  .Changing the screen orientationThe phone automatically changes the screen orientation depending on how you’reholding your phone.Turn your phone sideways to display the web browser in landscape orientation.If the screen orientation doesn’t change automatically, turn on automatic screen orientation.From the Home screen, press MENU, tap Settings > Display, and then select the Auto-rotatescreen check box.Navigating and zooming on a webpage§You can swipe your finger on the screen to navigate and view other areas of thewebpage.§Tap the screen twice quickly to zoom in, then tap the screen twice quickly againto zoom out.You can also use your fingers to spread or pinch the screen to zoom in and out.76 Search and Web browserDraft version for test review 2011/01/28
Selecting a link on a webpageYou can tap a link to open it, or press and hold a link for more options.Link What to doWebpageaddress(URLs)§Tap the link to open the webpage.§Press and hold the link to open a menu that allows you to open, bookmark,copy to the clipboard, or share the link via email or your social networks.Email address §Tap to send an email message to the email address.§Press and hold, then tap Copy on the menu to copy the email address to theclipboard. You can paste the email address later when creating a newcontact or sending a new email message.Selecting an address or phone number on a webpageYou can map an address or call a phone number on a webpage.Link What to doLocation address Tap the address to copy it or map it using Google Maps.Phone number Tap the phone number to copy, call, send a text message to that number,or save the number to a contact in People.Opening a new browser windowOpen multiple browser windows to make it easier for you to switch from one websiteto another.1. While viewing a webpage, press MENU and then tap Windows.2. Tap  .A new browser window opens and goes to your set home page.77 Search and Web browserDraft version for test review 2011/01/28
Switching between browser windows1. While viewing a webpage, do one of the following:§Press MENU and then tap Windows.§Pinch the screen (zoom out) until you see the other browser windows.2. Select the browser window you want to view by sliding your finger on thescreen from right to left.3. Tap a webpage to display it in full screen.Tap   to close a webpage.Downloading from the WebDo more than just browsing the Web. You can download web files such as photos andapps then save them on your storage card.Downloading apps from the WebYou can download apps directly from your favorite websites. Apps downloaded fromthe Web can be from unknown sources. To protect your phone and personal data, westrongly recommend that you download and install only apps you trust.All downloaded files will be saved to your storage card. Before downloading apps from theWeb, be sure that you have your storage card on your phone. The app you want todownload should also be compatible with your phone.1. Open your web browser, then go to the website where you can download theapp you want.2. Follow the website's instructions for downloading the app.Before you can install the downloaded app, you need to set your phone to allowinstallation of third-party apps. From the Home screen, press MENU, then tap Settings> Applications > Unknown sources.78 Search and Web browserDraft version for test review 2011/01/28
Viewing files that you downloadedWhile viewing a webpage, press MENU and then tap More > Downloads.Viewing bookmarks and previously visitedpagesYou can store as many bookmarks as you want on your phone. You can also access aconvenient list of the sites you have visited, or quickly view the pages that you accessmost often.Bookmarking a webpage1. While viewing a webpage, press MENU, and then tap Add bookmark.2. Edit the bookmark name if needed, and then tap Add.Opening a bookmark1. While viewing a webpage, press MENU, and then tap Bookmarks.2. On the Bookmarks tab  , navigate to the bookmark you want to open, andthen tap it.Editing a bookmark1. While viewing a webpage, press MENU, and then tap Bookmarks.2. On the Bookmarks tab  , press MENU and then tap Edit.3. Tap the bookmark you want to edit.4. Enter your changes, and then tap Edit.Viewing a previously visited page1. While viewing a webpage, press MENU, and then tap Bookmarks.2. On the History tab  , navigate to the page you want to view and then tap thepage.Clearing the list of previously visited pages1. While viewing a webpage, press MENU, and then tap Bookmarks.2. On the History tab  , press MENU, and then tap Clear history.Viewing a page that you often visit1. While viewing a webpage, press MENU, and then tap Bookmarks.2. On the Most visited tab  , navigate to the page you want to view, and thentap the page.79 Search and Web browserDraft version for test review 2011/01/28
Clearing the list of most visited pages1. While viewing a webpage, press MENU, and then tap Bookmarks.2. On the Most visited tab  , press MENU, and then tap Clear all.Changing the view of bookmarks or most visited pages1. While viewing a webpage, press MENU, and then tap Bookmarks.2. On the Bookmarks tab   or the Most visited tab  , press MENU, and thentap Thumbnails, List, or Grid to change the view.For example, if you are in Thumbnails view and you want to view bookmarks ina grid, press MENU and tap List, then press MENU and tap Grid.Setting browser optionsCustomize the web browser to suit your browsing lifestyle. Set display, privacy, andsecurity options when using the web browser.From the browser screen, press MENU, and then tap More > Settings.Setting your home page1. From the browser screen, press MENU, and then tap More > Settings > Sethome page.2. Select the home page you want to use.Browsing full versions of all websitesSome websites display a mobile version of their pages on phone web browsers. Youcan choose to view the full version of all pages, even for these sites.From the browser screen, press MENU, tap More > Settings, and then clear the Mobileview check box.Choosing when to show Flash contentChoose which Flash® content you want to see on a webpage, and when you want toview it.1. From the browser screen, press MENU, and then tap More > Settings > Enableplugins.2. Tap On demand.After selecting On demand, you can show the Flash content by tapping   on thewebpage.80 Search and Web browserDraft version for test review 2011/01/28
CameraCamera basicsWhether traveling for business or fun, enjoy taking photos and videos of your trip andencounters with your phone’s camera.Be sure to plug in your microSD card before you use your phone’s camera. Photos andvideos captured with the camera will be stored onto your microSD card.§To open the camera in photo mode and take photos, tap   from the Homescreen, and then tap Camera.§To open the camera directly in video mode so you can immediately startcapturing videos, tap   from the Home screen, and then tap Camcorder.Viewfinder screenWhen you’re in photo mode and you turn your phone left or right, the cameraonscreen controls automatically rotate to how you hold the phone.You’ll find the following onscreen controls on the Viewfinder screen:Zoom barAuto focus indicatorPhoto/Video mode switchFlash buttonShutter release/RecordbuttonEffects buttonGallery buttonZoomingBefore taking a photo or video, you can first use the onscreen zoom bar to zoom in orout of your subject.If you choose 720p HD resolution for video recording, there’s no zooming available.81 CameraDraft version for test review 2011/01/28
Simply slide your finger across the zoom bar to zoom in or out.When you’re recording video, the zoom bar is always shown onscreen. You can freelyzoom in or out while recording.Auto focusingWhenever you point the camera at a different subject or location, it shows the autofocus indicator at the center of the Viewfinder screen.Let the camera auto focus on the center of the screen.Or you can tap another area on the screen that you want to focus on.Taking a photo1. From the Home screen, tap   > Camera.2. Before taking the photo, you can zoom in or out first on your subject.3. Tap the flash button repeatedly to choose a flash mode depending on yourlighting conditions.Auto flashFlash onFlash off4. Choose the resolution and other camera settings you want to use.5. Choose an effect to apply to your photo.82 CameraDraft version for test review 2011/01/28
6. Point the camera and focus on your subject.If you're taking people's photo, the camera will automatically recognize facesand adjust the focus. You'll see boxes on people's faces.Make sure the Auto focus and Face detection check boxes are selected in the camerasettings.7. When you're ready to take the photo, tap  .8. Choose what you want to do with the photo you’ve just taken.Taking your closeup shotHaving a hard time taking your own closeup shot? With your phone's camera, it'seasy. Just set it to automatically take your self portrait. You won't even need to tapthe shutter release button.1. Press MENU to open the settings menu panel.2. Tap Self-portrait.Then choose whether you want the camera to identify 1 or 2 faces in the shot.3. To set a time delay before the camera takes the shot, tap Self-timer.Then set the timer to 2 or 10 seconds.4. Press MENU to close the settings menu panel.5. Turn the camera to face you.Once the camera detects your face, it automatically focuses and takes your photo.Recording video1. From the Home screen, tap   > Camcorder.2. Choose the video quality and other camera settings you want to use.To record video in HD, set Video quality to HD 720P (1280 x 720). Or forsharing on the Web, select Online (HD, 10 minutes).3. Choose an effect to apply to your video.4. Frame your subject on the Viewfinder screen.5. Tap   to start recording.83 CameraDraft version for test review 2011/01/28
6. You can freely zoom in or out while recording video.7. You can change focus to a different subject or area by just tapping it on theViewfinder screen.8. Tap the flash button to switch the camera light on or off during recording.Light onLight off9. To stop recording, tap   again.10. Choose what you want to do with the video you’ve just recorded.Adding effectsWant to make your photos look more interesting? Easy. Use the available cameraeffects to make your photos look like they’ve been taken through special lenses andfilters. You can also add certain effects to videos.Choose an effect first before you start taking a photo or video.1. Tap  .2. Scroll through the available effects and tap one that you like.When you choose certain photo effects such as depth of field, distortion, or vignette,drag the bar that appears on the right side of the screen to adjust the intensity of theeffect.84 CameraDraft version for test review 2011/01/28
Photos, videos, and musicGalleryAbout the Gallery appRelive the fun while viewing photos and videos of your latest travels or your pet’snewest tricks. Get an audience by tagging your Facebook and Flickr friends. You caneven play your media on a TV screen.To start using Gallery, check first if you have photos or videos copied on your storage card.What’s more, you can edit and add effects to your photos. You can also easily use aphoto as your contact icon, location icon, or wallpaper.Selecting an albumFrom the Home screen, tap   > Gallery. The Gallery app opens on the Albumsscreen where your photos and videos are organized by albums for easy viewing.The following are preset albums:§Camera shots lets you view photos and videosthat are stored in the camera’s folder.§My favorites lets you group photos and videosthat you set as your favorites.§All photos lets you view all photos that are storedin all the folders on the storage card.§All videos lets you view all videos that are storedin all the folders on the storage card.§All downloads lets you view photos and videosthat you downloaded.Folders in your storage card that contain photos and videos will also be treated asalbums and will be listed below the preset albums. The actual folder names will beused as the album names.If there are photos or videos under the root path of your storage card (that are notcontained in folders), they will be grouped under the Other album.85 Photos, videos, and musicDraft version for test review 2011/01/28
Viewing photosAfter you’ve selected an album, you can browse through your photos and videos.Depending on how you hold your phone, the screen automatically switches to eithergrid view or filmstrip view:§While in grid view, slide your finger up or down to scroll through the thumbnails.Tap a photo or video to view it in full screen.§While in filmstrip view (when you turn your phone sideways), slide your fingerleft or right across the screen to go through your photos and videos. Tap aphoto or video to view it in full screen.86 Photos, videos, and musicDraft version for test review 2011/01/28
Zooming in or out on a photoThere are two ways you can zoom in or out of a photo.§Tap the screen twice quickly to zoom in, then tap the screen twice quickly againto zoom out.§Press your thumb and index finger on the screen and then spread your fingersapart to zoom in; pinch your fingers together to zoom out.Watching videosVideo is always displayed in landscape mode when you play it.While browsing an album, tap a video to play it.Another way to easily get to your videos is to tap   from the Homescreen, and then tapVideo.§Use the onscreen controls to play, pause, or stop the video.§Tap   to toggle between full and best-fit screens.Editing your photosDo basic editing tasks on your photos such as rotate and crop. You can also enhanceyour photos by applying effects such as high contrast, vintage, and more.Rotating a photo1. On the Gallery app’s Albums screen, tap an album.2. Press and hold on the photo that you want to rotate.3. In the menu that opens, tap Edit, and then tap either Rotate left or Rotate right.87 Photos, videos, and musicDraft version for test review 2011/01/28
Cropping a photo1. On the Gallery app’s Albums screen, tap an album.2. Press and hold on the photo that you want to crop.3. In the menu that opens, tap Edit, and then tap Crop. You’ll see a crop boxaround the photo.4. To adjust the crop box size, press and hold the edge of the box.5. When directional arrows appear, drag your finger inward or outward to resizethe crop box.6. To move the crop box to the part of the photo that you want to crop, drag thecrop box to the desired position.7. Tap Save to keep the changes.The cropped photo is saved in the storage card as a copy. The original photo remainsunedited.Adding effects1. On the Gallery app’s Albums screen, tap an album.2. Press and hold on the photo that you want to add effects to.3. In the menu that opens, tap Edit, and then tap Effects. On the panel that opens,you’ll see options available to you.4. Tap an effect to apply on the photo.5. Tap Save to keep the changes.The enhanced photo is saved in the storage card as a copy. The original photoremains unedited.Sending your photos and videosSend photos and videos via email or MMS or to another phone or your computerusing Bluetooth.Sending photos or videos by emailYou can send several photos, videos, or both in an email message. They are added asfile attachments in your email.88 Photos, videos, and musicDraft version for test review 2011/01/28
1. From the Home screen, tap   > Gallery.2. Tap the album that has the photos or videos you want to share.3. Tap   and then tap Gmail or Mail.4. Select the photos or videos you want to share and then tap Next.5. Compose your message and then tap Send.If you selected Mail and you have multiple email accounts, the default email account will beused.Sending a photo or video by MMS1. From the Home screen, tap   > Gallery.2. Tap the album that has the photos or videos you want to share.3. Tap   and then tap Messages.4. Tap the photo or video you want to send. The photo or video is automaticallyadded into the MMS message.5. To add more photos to your slideshow attachment, tap Add slide and then tapInsert picture.6. Compose your message and then tap Send.Sending photos or videos using BluetoothYou can select several photos, videos, or both and send them to someone’s phone oryour computer using Bluetooth.1. From the Home screen, tap   > Gallery.2. Tap the album that has the photos or videos you want to share.3. Tap   and then tap Bluetooth.4. Select the photos or videos you want to share and then tap Next.In the next few steps, you’ll be asked to turn on Bluetooth on your phone and connectto the receiving Bluetooth device so the files can be sent.Sharing your photos and videos on the WebUsing the Gallery app, you can share photos and videos on your social networks, aswell as post videos on YouTube.You can also use the Camera or Camcorder app to share a photo or video right after you’vecaptured it.Sharing photos or videos on FacebookYou need to be logged in to your account to be able to upload photos or videos.89 Photos, videos, and musicDraft version for test review 2011/01/28
1. From the Home screen, tap   > Gallery.2. Tap the album that has the photos or videos you want to share.3. Tap   and then tap Facebook for HTC Sense.4. Select the photos or videos you want to share and then tap Next.5. Enter a different caption on each photo or video.You can also tag friends on your photos. Tap Tag this photo, and then tap thepart where your friend is. From the list that shows, select who you want to tag.6. Slide to the left to go to the next photo or video.7. Tap Upload.8. Select which album to upload to and set privacy settings for the uploadedphotos or videos.9. Tap Done.Sharing photos and videos on FlickrYou need to be logged in to your Flickr account to be able to upload photos or videos.1. From the Home screen, tap   > Gallery.2. Tap the album that has the photos or videos you want to share.3. Tap   and then tap Flickr.4. Select the photos or videos you want to share and then tap Next.5. Enter a different title and description on each photo or video.You can also tag friends on your photos. Tap Tag this photo, and then tap thepart where your friend is. From the list that shows, select who you want to tag.6. Slide to the left to go to the next photo or video.7. Tap Upload.8. Select which album to upload to and set privacy settings for the uploadedphotos or videos.9. Tap Done.Sharing photos on PicasaYou need to be signed in to a Google Account to be able to upload photos to the Picasaphoto organizing service.1. From the Home screen, tap   > Gallery.2. Tap the album that has the photos you want to share.3. Tap   and then tap Picasa.4. Select the photos or videos you want to share and then tap Next.5. Enter a caption for the photos you're uploading.90 Photos, videos, and musicDraft version for test review 2011/01/28
6. Select the online album where you want to upload the photos, or tap   tocreate a new album.7. Tap Upload.You can view the photos online at http://picasaweb.google.com.Sharing videos on YouTubeYou can share your videos by uploading them to YouTube.1. From the Home screen, tap   > Gallery.2. Tap the album that has the videos you want to share.3. Tap   and then tap YouTube.4. Select the photos or videos you want to share and then tap Next.Sign in to your YouTube or Google Account, if you’re asked to do so.5. Enter a title for the videos you're uploading.6. Tap More details where you can enter information such as description and tags,and select a privacy option.7. Tap Upload.Viewing photos in your social networksRight in the Gallery app, check what you and your friends have uploaded to yoursocial networks (Facebook and Flickr only).Viewing photos on FacebookYou need to be logged in to your Facebook account to view Facebook photos.1. From the Home screen, tap   > Gallery.2. Tap the Facebook tab.3. Tap your account name or your friend’s account on the list to view the photos inthe account.You can view photos in your online albums in the same way as you view photos onyour storage card.Viewing photos on FlickrYou need to be logged in to your Flickr account to view Flickr photos.1. From the Home screen, tap   > Gallery.2. Tap the Flickr tab. You may be asked to give authorization for the app toconnect to the Flickr website. If this happens, you need to give authorization toaccess your Flickr account.3. Tap your account name or your friend’s account on the list to view the photos inthe account.You can view photos in your online albums in the same way as you view photos onyour storage card.91 Photos, videos, and musicDraft version for test review 2011/01/28
Commenting on photos in your social networksAdd comments to your uploaded photos as well as your friends’ photos.1. Do one of the following:§While browsing online albums, press and hold a photo and then tap Addcomment.§While viewing a photo in full screen, tap anywhere on the screen, and thentap  .2. Tap the box that says “Write a comment.”3. Enter your text, and then tap Comment.MusicListening to musicEnjoy listening to songs and music on your phone using the Music app.You need to copy music files to your storage card first to use the Music app to play music.1. From the Home screen, tap   > Music. The Music app opens in the Nowplaying screen.2. Swipe your finger left or right across the screen to go to the next or previousmusic album.3. Tap the onscreen icons to control music playback, select a song to play, repeatsongs, and more.Turn shuffle on or off. (Shuffle is off when buttonis gray.)Press and drag your finger across the progressbar to jump to any part of the song.Tap to check out featured albums fromHTCSense.com. (Availability depends on yourcountry.)Go to the library.Switch between showing the Now playing listand Now playing screen. You can rearrangesongs in the Now playing list.Get that surround sound feeling. Choosebetween Dolby and SRS. Or, if you’re using aheadset, you can also choose from variouspreset equalizer settings.Cycle through the repeat modes: repeat allsongs, repeat current song, and don’t repeat.92 Photos, videos, and musicDraft version for test review 2011/01/28
Playing music from the Lock screenWhen you’re listening to music and the screen turns off, press POWER to turn thescreen back on and control the music playback directly on the Lock screen.If you don’t see the playback controls on the Lock screen, tap anywhere on the screento display them.You can also pause music playback right from the Notifications panel.Browsing albums in landscape viewWhen you turn your phone sideways, you get a wider view of your screen and canskim through your albums easily.§If you have lots of albums, flick left or right across the screen to quickly skimthrough them.§To look at one album at a time, slide your finger left or right.§Tap   to see the song list of the current album.93 Photos, videos, and musicDraft version for test review 2011/01/28
About the Music widgetYou can use the Music widget to play music right from your Home screen.Browsing music in the library1. Tap   on the Music app’s Now playing screen or Now playing list to go to thelibrary.In the library, your music is organized by categories such as Artists and Albums.Choose a category by tapping one of the tabs at the bottom of the screen.2. Tap a song in a category to play it. The Now playing list is updated with thesong list from your selected category.You can add, remove, or rearrange the tabs in the library.Creating a playlistPersonalize your music experience by creating music playlists. Make a playlistcontaining just your favorite songs or create one to match your mood for the day.You can make as many playlists as you like.1. From the Home screen, tap   > Music.2. Tap   to go to the library.3. In the library, tap or slide your finger on the bottom row to go to the Playlistscategory.4. Tap Add playlist.5. Enter a playlist name, and then tap Add songs to playlist.6. Choose a category.7. Select the check boxes of songs you want to add to the playlist and then tapAdd.8. Tap Save.Playing the songs in a playlist1. In the library, tap or slide your finger on the bottom row to go to the Playlistscategory.2. Tap a playlist to open it.3. Tap the first song or any song in the playlist.When you tap a song in the list to play it, the Now playing screen is updated with thesongs from your playlist.94 Photos, videos, and musicDraft version for test review 2011/01/28
Managing playlistsAfter creating a playlist, you can add more songs to it, rearrange their order, andmore.1. In the library, tap or slide your finger on the bottom row to go to the Playlistscategory.2. Tap a playlist to open it.3. Press MENU, and then choose what you want to do:Add more songs to aplaylist 1. Tap Add songs to playlist.2. Go to the Songs category or any other category.3. Select the songs you want to add to the playlist and then tapAdd.Rearrange songs 1. Tap Change order.2. Press and hold   at the end of the song title you want tomove. When the row is highlighted, drag it to its new position,then release.Delete songs from aplaylist 1. Tap Remove songs.2. Select the songs you want to delete and then tap Remove.Change playlistnameTap Rename playlist.Deleting playlists1. In the library, tap or slide your finger on the bottom row to go to the Playlistscategory.2. Press MENU and then tap Delete playlists.3. Select the playlists to delete and then tap Delete.Setting a song as a ringtoneYou can choose a song from the Music app’s library and set it as your phone’sringtone or a ringtone for a certain contact.1. From the Home screen, tap   > Music.2. Tap   to go to the library.3. In the library, choose the song that you want to use as ringtone and then play itback.4. On the Now playing screen, press MENU and then tap More > Set as ringtone.95 Photos, videos, and musicDraft version for test review 2011/01/28
5. If you chose an MP3 song, you can trim it first and set the part that you trimmedas the ringtone.6. In the Set as ringtone options menu, tap Phone ringtone or Contact ringtone.If you select Contact ringtone, you need to choose the contacts you want toassociate the song with in the next screen.Trimming an MP3 ringtoneThe Music app has a built-in ringtone trimmer. You can trim an MP3 song and set apart of it as your ringtone.1. On the Now playing screen, press MENU, and then tap More > Set as ringtone >Trim the ringtone.2. Use the onscreen controls to trim your ringtone.Drag the two trim slidersapproximately to the part where youwant the ringtone to begin and end.Tap the left and right arrow buttonsto more precisely set the start andend points of the ringtone.The markers show where theringtone starts and ends.3. After you’ve finished trimming, tap Set as. Then choose whether to set thetrimmed song as your Phone ringtone or Contact ringtone.Checking if the song was added as a ringtone1. From the Home screen, press MENU, and then tap Settings.2. On the Settings screen, tap Sound > Phone ringtone.The song should be in the ringtone list and selected.Sharing music using BluetoothYou can choose a song from the Music app’s library and send it to someone’s phoneor your computer using Bluetooth.1. From the Home screen, tap   > Music.2. Tap   to go to the library.3. On the Now playing screen, press MENU and then tap Share > Bluetooth.96 Photos, videos, and musicDraft version for test review 2011/01/28
In the next few steps, you’ll be asked to turn on Bluetooth on your phone and connectto the receiving Bluetooth device so the music can be sent.Finding music videos on YouTubeYou can find music videos of the song you’re listening to on YouTube. It’s simple. Onthe Now playing screen, just press MENU and then tap Find videos.Connected MediaSharing media on your home networkSharing photos, videos, and music with a bigger circle of friends is easy on your homenetwork. Simply connect your phone to the network and instantly show your capturedphotos and videos on a big TV, or start streaming your favorite music tracks on hi-fispeakers — all via DLNA®. For more information about DLNA, visit www.dlna.org.Before you share media through the network:§Connect your phone to the network via Wi-Fi. To find out how to connect to aWi-Fi network, see the Internet chapter.§Connect the TV or speakers to the network. Check the documentation thatcame with your TV or speakers to know how.1. Open the Gallery or Music app.2. Locate the media that you want to share, and then tap it.3. While viewing the photo or playing the video or music, press MENU, and thentap Select player.97 Photos, videos, and musicDraft version for test review 2011/01/28
4. Choose the device on your network where you want to play the media.5. Once connected to the other device, your phone opens up the Controller screenwhere you can tap:Controls ToPlay the media on the other device.Pause the music or video playback.Play the previous photo or music track.Play the next photo or music track.Shuffle your music playlist.Select a repeat mode for photos or music tracks.Show available media that you can share.View the media information such as the file name, title, and duration.Connect to another photo/video player on the network.Connect to another music player on the network. Adjust the volume of the video or music you’re playing on the other device.You can also drag the volume slider to adjust the volume.Disconnect your phone from the other device and stop sharing media.§While playing a media on another device, you can press BACK and do other things on yourphone. To return to the Controller screen, slide open the Notifications panel, and then tapthe device you’re connected to.§Until you disconnect the phone from the other device, other media that you open from theGallery or Music app are shared on the other device.98 Photos, videos, and musicDraft version for test review 2011/01/28
Accounts and syncSynchronizing with online accountsAbout online accountsYour phone can sync with various online social networking and email accounts.These are some of the types of information your phone can sync with your onlineaccounts:§Gmail and Exchange ActiveSync email.§Google and Exchange ActiveSync contacts, as well as your friends’ contactinformation in Facebook and their Twitter profiles.§Calendar events from your primary Google Account, from ExchangeActiveSync, and from your Facebook account.§Status updates and links shared by your friends and yourself on social networkssuch as Facebook and Twitter.§Flickr and Facebook photo uploads.You can set up an Exchange ActiveSync account on your phone either in the Mail app or theAccounts & sync settings.Synchronizing with a Google AccountSigning in to your Google Account lets you sync Gmail and your Google contacts andcalendars between your phone and the Web. You also need to sign in to a GoogleAccount to use Google apps such as Google Talk and Android Market™.If you skipped signing in to a Google Account when you first set up your phone, you mayencounter problems when using some Google apps. If these problems persist, you may needto factory reset your phone and enter your Google Account details when you set up thephone again.Adding more Google AccountsYou can add more than one Google Account on your phone. However, subsequentGoogle Accounts can only sync contacts, emails, and calendar events. Other Googleservices use the first Google Account you added.1. From the Home screen, press MENU, and then tap Settings > Accounts & sync.2. Tap Add account > Google.3. Follow the onscreen instructions to sign in to an account or create a newaccount.99 Accounts and syncDraft version for test review 2011/01/28
Forgot your Google Account password?You need your Google Account password to sync Gmail, Calendar, and Googlecontacts to your phone You also need this password to use Google Talk anddownload apps from Android Market. If you have forgotten your GoogleAccount password, you can try to recover it by going to the Google website.1. On your phone or computer, open your web browser and go to https://www.google.com/accounts/ForgotPasswd.2. Enter the email address or username that you use to sign in to yourGoogle Account and click Submit.3. Follow the instructions on the screen to reset your password.If you don’t have an alternate email address or cannot access the emailaccount you used to create your Google Account, you can reset your GoogleAccount after 24 hours by answering the security question for passwordrecovery.Adding a social network accountIf you skipped setting up your social network account (such as Facebook, Twitter, orFlickr) when you first turned on and set up your phone, you can still sign in to theseaccounts through your phone’s settings.1. From the Home screen, press MENU, and then tap Settings > Accounts & sync.2. Tap Add account, and then tap the account type you want to add.3. Follow the onscreen instructions to enter the account information.Your social network account is then added to the list on the Accounts & sync screen.Depending on how you configured the account, the new information may startsynchronizing with your phone.100 Accounts and syncDraft version for test review 2011/01/28
SocialFacebook for HTC SenseIf you signed in to your Facebook account when you turned on and set up your phonefor the first time, that means your Facebook account is linked to Facebook for HTCSense on your phone.With Facebook for HTC Sense, you can:§See all your Facebook contacts and their instant status updates in People.When you tap a contact on the All tab, slide tothe Updates and events tab to see updates suchas posted status messages, uploads, and profilechanges.When there is a notification of the contact’sbirthday, you can tap the notification to call thecontact directly or send a message greeting.§See Facebook photos right on the Gallery app.You can also upload one or more photos fromyour storage card to Facebook, then tag and addcaptions that go with it.When you’re viewing the albums of a Facebookfriend, you can also share a link to a particularalbum, or comment on the album photos.101 SocialDraft version for test review 2011/01/28
§Check your friends’ Facebook status updates in Friend Stream.§Add your Facebook events and your friends’ birthdays to the Calendar app.What’s the difference between Facebook app and Facebook for HTCSense?§Facebook for HTC Sense is not a standalone app. It is integrated in People,Friend Stream, Gallery, and Calendar to give you up-to-date information aboutyour Facebook contacts (their status updates, shared links, and photos) in theseapps.§The Facebook app is a standalone app. Use this app to do most of the thingsthat you would do when you’re using your computer’s web browser to accessyour Facebook account, such as adding a friend and sending Facebookmessages.§The two do not share the same login credentials. Signing in to Facebook forHTC Sense does not sign you in to the Facebook app and vice versa. If you wantto use the same Facebook account for both, you’ll have to sign in to both usingthe same login credentials.If you have more than one Facebook account, you may sign in to the Facebook app usingyour second account, since the Facebook app does not share the same login credentials asFacebook for HTC Sense.Facebook appThe Facebook app on your phone lets you keep up and stay close with your friends inFacebook. It offers most of the features that you are familiar with when usingFacebook on your computer.With the Facebook app, you can:§Share your thoughts and check other people’s status updates.§View your friends list and write on someone’s wall.§Comment on and like a friend’s post.§View someone’s personal information, including photo albums.§Check your Facebook notifications.§Take a photo and upload it straight to your Facebook account.Using the Facebook app1. From the Home screen, tap   > Facebook.2. If this is your first time to use Facebook, follow the onscreen instructions to signin to your Facebook account.3. On the News Feed screen, tap   to access the other functions.102 SocialDraft version for test review 2011/01/28
§While on the Facebook home screen, press MENU, and then tap Settings to set refresh andnotification options.§On some Facebook screens, you can press and hold an item to open an options menu.Adding the Facebook widgetAdd the Facebook widget to the Home screen so you can easily post updates andcheck status updates of your friends.The widget will only link to the Facebook account that you logged into on the Facebookapp.Tweeting on your phone using PeepYou can post and read tweets, send and receive direct messages, search for newTwitter users to follow using the Peep app. Peep is a Twitter client that lets you enjoy“tweeting” on your phone. You can also link your contacts in People to their Twitterprofiles (if you’re following them).If you did not sign in to your Twitter account when you first turned on the phone, youcan do one of the following:§Sign in to your Twitter account from Peep. From the Home screen, tap   >Peep, then follow the onscreen instructions.§Add the Twitter for HTC Sense account in Settings > Accounts & sync.Twitter for HTC Sense and Peep share the same login credentials. This means that when youuse Peep on your phone for tweeting, you can also link your contacts to their Twitter profilesvia Twitter for HTC Sense.From the Home screen, tap   > Peep. Peep opens in the All tweets tab.103 SocialDraft version for test review 2011/01/28
Tap to compose and send a tweet.Tap a person’s name to check profile detailsand all of his or her tweets.If you have linked the contact in People, tapthe photo or icon to open a menu whereyou can quickly choose how tocommunicate with the contact.Press and hold a tweet to open an optionsmenu to reply, send a direct message,retweet, and more.View all the tweets from people you followand tweets that you have posted.View all tweets that mention your usernameusing the “@[your username]” convention.View all private/direct messages that youhave received or sent.View tweets that you have marked asfavorites.Sending a tweet1. On the All tweets tab, tap the text box that says What's happening?.2. Type your tweet.3. Add a picture or location to your tweet.§Tap   to post a picture from Gallery or Camera to your default photohosting site and add the link to the picture in your tweet.§Tap   to insert your location into the tweet. You can choose to add a maplink, insert your location name, or insert your position coordinates.4. Tap Update.Sending a direct messageYou can only send a direct message to someone who is following you.1. In any of the tabs in Peep, press MENU, and then tap New message.2. Tap the text box at the top of the screen, and then enter the name.As you enter characters, the names of the Twitter users that match thecharacters you enter will appear. Tap the name when you see it.3. Enter your message, and then tap Update.You can also send a direct message when you press and hold a tweet of the personyou want to send the direct message to, and then tap Send direct message on theoptions menu.104 SocialDraft version for test review 2011/01/28
Setting Peep optionsIn any of the tabs in Peep, press MENU, and then tap More > Settings.You can set these options:Account settings Sign out of your Twitter account.General settings Choose whether to show the screen name or the real name of thepeople you follow.Send & receive Set the frequency to check for new tweets and set the number of tweetsto download.Services Set your photo hosting site, photo quality, location options, and URLshortening host.Notification settings Select when and how you want to be notified.Searching for Twitter users to follow1. In any of the tabs in Peep, press the SEARCH button.2. Type a Twitter name in the search box.You can also narrow down the search when you tap   > Users.3. Tap  .4. In the list of search results, tap the Twitter user you want to follow.5. Press MENU, and then tap Follow.Unfollowing a Twitter user1. On the All tweets tab, tap the Twitter user you want to stop following.2. Press MENU, and then tap Unfollow.Using Friend StreamFriend Stream connects you to your social networks. Share and get updates fromfriends in popular networks like Facebook and Twitter in a single feed. With FriendStream, you can easily track your friends’ status messages, photo uploads,notifications, and more — or comment and post your own.§You must be signed in to at least one social network account to use FriendStream.§To use your Facebook account on Friend Stream, you need to be signed in viaFacebook for HTC Sense.From the Home screen, tap   > Friend Stream. Friend Stream opens on the Allupdates tab.105 SocialDraft version for test review 2011/01/28
When you tap someone’s status update, you can:§Open Peep and view all tweets.§Write a comment. Like or unlike someone’sFacebook posts.§Look at someone’s album photos.When you tap someone’s photo or name, you can:§Check the person’s profile details.§Look at the person’s Facebook wall.§Check the person’s posted tweets.Slide to the other tabs to view social network updatesgrouped as status updates only, photo uploads, links,updates from members of your Facebook list, or socialnetwork notifications.Updating your statusYou can update your status simultaneously on all the social network accounts you aresigned in to.1. From the Home screen, tap   > Friend Stream.2. On the All updates tab, tap the text box that says What's on your mind?.3. Enter your status update.4. If you do not want to send the status update to all your social networkaccounts, tap   and clear the check boxes of the social networks to exclude.5. Tap   and then choose what you want to attach to your tweet or statusupdate.ApprecommendationChoose an app you’ve installed from Android Market that youwant to share with others. The URL from which the app can bedownloaded will be inserted to your status.Picture Select From Camera to take a photo and attach it or FromGallery to attach a photo from your storage card.Location Add your current location or a location you pick on a map.6. Tap Share.106 SocialDraft version for test review 2011/01/28
Commenting on and liking Facebook postsTap someone’s status update on the All updates tab, and do any of the following:§Tap a photo or the album name shown in the statusupdate to view and comment on the album photosusing the Gallery app.§Tap Like or Unlike to like or unlike the person’s statusupdate.§Tap the text box that says Write a comment..., andthen enter what you think about the person’s statusupdate.Checking notifications from your social networksSlide to the Notifications tab to easily see a single feed of your notifications fromdifferent social networks.It can be a comment on your Facebook post, a mention or direct message in Twitter, atagged photo of you, and more.About the Friend Stream widgetUse the Friend Stream widget so you can easily update your status and view otherpeople’s status updates right on the Home screen.107 SocialDraft version for test review 2011/01/28
Chatting in Google TalkGoogle Talk is Google’s instant messaging program. It lets you communicate withother people that also use Google Talk. If you signed in to your Google Account whenyou first set up the phone, you are already signed in to Google Talk.Chatting with a friend1. From the Home screen, tap   > Talk.2. Tap a friend in the Friends list.3. Enter your message in the text box.You can also insert a smiley by pressing MENU, and then tapping More > Insertsmiley.4. Tap Send.5. While chatting, press MENU and then tap any of these options:Chat off record Your Google Talk messages are stored in the Chats folder of yourGmail account. Tap this option if you don’t want to store your chatmessages.Switch chats If you have more than one chat going, tap to switch chat with anotherfriend.Friends list Return to the Friends list.Add to chat Add another friend to your chat. The friend you invited and the friendyou're currently chatting will receive an invitation to a group chat. Eachone who accepts the invitation joins the group chat.End chat End your current chat.More Clear the chat history, insert a smiley or view your friend’s contactdetails.Accepting a chat invitationWhen a friend sends you a Google Talk message, you receive a notification. Theirentry in the Friends list displays the message.Do one of the following:§In the Friends list, tap the friend who sent you the invitation to chat.§Open the Notifications panel, and then tap the chat notification.Changing your online status and picture1. From the Home screen, tap   > Talk.2. In the Friends list, tap your name to open the Set Status screen.3. Enter your new status message.Or press BACK to choose a custom status from the list.4. Tap the online status beside your picture, and then select the status you wanton the menu.108 SocialDraft version for test review 2011/01/28
5. Tap your picture, and then do one of the following:§Tap Remove to remove your photo.§Tap Change to select another picture on the storage card.6. Tap Done.Your online status, message, and picture appear in your contacts' Friends list and inother apps where your Google Talk status are displayed.Adding and managing friendsThe Friends list is where you add and manage your friends in Google Talk.To open Google Talk, from the Home screen, tap   > Talk.Inviting a friend1. In the Friends list, press MENU, and then tap Add friend.2. Enter the Google Talk instant messaging ID or Gmail address of the friend youwant to add.3. Tap Send invitation.Viewing all friendsInitially, only those friends that you often chat with — the most popular — are shownin the Friends list.In the Friends list, do one of the following:§To view all your friends, press MENU, and then tap All friends.§To view only friends that you often chat with, press MENU, and then tap Mostpopular.Making a friend popular1. In the Friends list, press MENU, and then tap All friends.2. Press and hold a friend’s name, and then tap Always show friend.Blocking a friendYou can block a friend from sending you messages. When blocked, your friend isremoved from the Friends list and is added to the Blocked friends list.1. In the Friends list, press MENU, and then tap All friends.2. Press and hold a friend’s name, and then tap Block friend.Unblocking a friend1. In the Friends list, press MENU and then tap More > Blocked.2. Tap the name of the blocked friend, and then tap OK.Viewing all invited friendsIn the Friends list, press MENU, and then tap More > Invites.109 SocialDraft version for test review 2011/01/28
Friends who have not yet accepted your invitation are listed in the screen.Changing settings or signing out1. From the Home screen, tap   > Talk.2. In the Friends list, press MENU and then tap:§Settings to change the app and notification settings.§Sign out to sign out.110 SocialDraft version for test review 2011/01/28
Maps and locationLocation settingsTurning on location servicesIn order to find your location on your phone, you need to enable location sources.1. From the Home screen, press MENU and then tap Settings > Location.2. Select one or both of the following:Use wirelessnetworksUses Wi-Fi or your mobile data connection to find yourapproximate location.Use GPS satellites Finds your exact GPS location. This requires a clear view of thesky and more battery power.LocationsAbout LocationsSearch for places of interest, get directions to places you want to go to, and driveusing turn-by-turn GPS navigation with Locations. Locations is also your perfect travelcompanion, whether you’re at home or when you’re in a different country. WithLocations, you can download maps to your phone beforehand so you don’t have toworry about having an Internet connection while on the road or costly data roamingcharges when abroad. Have your map ready before you start your journey.If you are in an area where there are a lot of surrounding buildings, Locations may have ahard time pinpointing your location.Your phone comes with a map installed. The map on your phone will depend on thecountry where you bought your phone. Don’t worry, you can download other mapswhen you need them.111 Maps and locationDraft version for test review 2011/01/28
Finding your location and what’s around you1. From the Home screen, tap   > Locations.You can see your current location right below the tab name.2. Press MENU, and then tap My location to update your current location or tapMap to show your current location on the map.3. Select a category that you’re interested in to see the places that are close by.The places are listed according to the distance from your current location.Searching for a place of interestYou can search using a name of an establishment, street, or city. As you enter theplace to look for, suggested matches from the database, footprints, and previouslysearched items are displayed.1. From the Home screen, tap   > Locations.2. Press the SEARCH button.3. Enter the place you want to search in the search box. Matching establishmentsare shown sorted by the distance from your current location.4. If you don’t see what you are looking for, keep entering characters to narrowdown the search.§Search is done in your current country. If you want to do a search on a different country onyour phone, tap Current search region.§Tap   if you don’t see any suggestions or if you don’t see the place you are looking for inthe list.5. Tap an establishment to get directions, call them, add it as a footprint, andmore.112 Maps and locationDraft version for test review 2011/01/28
Searching for an addressEnter the street or city name you want to find (you don't need to enter the completeaddress). A list of suggestions will appear to guide you to what you're looking for.For example, to find “321, Church Street, London, UK”, just enter “Church” or “London”to start your search.You can also search by entering a zip code. To search using a zip code, enter the zip code,and then tap  .Viewing mapsIn Locations, press MENU, and then tap Map.Tap to switch between 2D and 3D views.Point of interest. Tap to see details, call, getdirections, or share.Your current location.Tap to use or not use the compass.Tap the screen to show the zoom buttons and My location   button.113 Maps and locationDraft version for test review 2011/01/28
Using the compassShould I turn left or right? By using the compass, the map adjusts depending onwhere you’re facing so you know where to go.Moving around the mapSwipe your finger on the screen to view other areas of the map.Zooming in or out of a mapDo one of the following:§Spread your thumb and index finger across the map to zoom in.§Pinch your thumb and index finger on the map to zoom out.§Double-tap a location on the map to zoom in to that location.Choosing which places of interest to show on the map1. While viewing a map, press MENU, and then tap View.2. Choose the points of interest you want or don’t want to see when you’reviewing a map.You can also choose to show or not show footprints and 3D buildings on the map.3. Tap Done.Pinning a location on the mapPin a favorite location on the map and add it as a footprint, get directions to it, orshare it with friends. Sharing is a great way to let your friends know about that littleplace you found that has the best sandwiches in town.1. While viewing a map, press and hold an area on the map that you want to pin.2. Tap   and then choose if you want to add the location as a footprint, getdirections to it, or share it.To remove all the pins on the map, while viewing a map, press MENU, and then tap More >Clear pin.Changing the language of street names and places of interest1. From the Home screen, tap   > Locations.2. On the Nearby tab, press MENU, and then tap Settings > Map language.3. Choose one of the following.Use native maplanguageUse this if you want to use the local language of the map. Forexample, if you are looking at a map of Japan, it will use Japanesecharacters.Use language thatfits bestUse this if you want to use the language of your phone. This maynot be available for all maps.114 Maps and locationDraft version for test review 2011/01/28
Recording favorite places as footprintsA footprint consists of a photo of a location such as a restaurant, a sightseeingdestination, etc., stored together with a precise GPS position and other informationabout that location such as the street address and phone number.The next time you want to visit the same place, just open the footprint. You can thendial the phone number or view the location in the map.Adding a location as a footprint1. In Locations, search for the destination you want to go to.2. Tap Save to Footprints.3. You can:§Tap   to take a picture and add it as a photo for the footprint.§Tap   to fine tune the position of the footprint on the map.§Tap the image to change the name, category, or address of the footprint,enter the phone or website, add a voice memo, and more.4. Tap Done.Setting a footprint as your home locationSave your home address as a footprint to make it easier to set it as your destination.1. While at your home location, open Locations, and then go to the Footprints tab.2. Tap Save to Footprints.The address shown should be your current location. If it doesn’t show your home address,press MENU, and then tap My location.3. Tap Done.4. Tap My home, select your home address from the list, and then tap Done.To change your home address at any time, tap  .Revisiting a footprint1. On the Footprints tab, tap a category.2. Tap the footprint you want to revisit.3. Tap the information fields to get directions, share the footprint, call a storedphone number, and more.Editing or deleting a footprint1. On the Footprints tab, tap a category.2. Press and hold the footprint you want to edit or delete.3. Tap Edit or Delete on the options menu.115 Maps and locationDraft version for test review 2011/01/28
Sharing your footprints1. Create a footprint.2. On the Footprints tab, tap the footprint that you have just created.3. Tap Share, and then choose how you want to share the footprint.Deleting multiple footprints1. On the Footprints tab, tap a category.2. Press MENU, and then tap Delete.3. Select the footprints you want to delete, and then tap Delete.Exporting your footprintsBack up footprints by exporting them to the storage card. You can also openexported footprints files in other applications such as Google Earth™ on your PC.1. On the Footprints tab, tap a category.2. Press MENU, and then tap Export.Press MENU and then tap Deselect all to deselect all the footprints.Exported footprints are saved as .kmz files in the Footprints folder on your storagecard. If you exported multiple footprints at one time, they are saved together inone .kmz file.Importing footprintsBring back footprints you previously backed up to the storage card to your phone.You can also import .kmz files that you saved in other applications, or use a photo as afootprint.1. On the Footprints tab, press MENU, and then tap Import.2. Do one of the following:§To import a saved footprint or another .kmz file from the storage card, tapFootprints data, and then tap the file you want to import. If a footprint onyour phone is the same as the one you want to import, you’re askedwhether you want to overwrite it.§To import a photo, tap Photos, navigate to the photo you want to import,and then tap the photo. You can then add Footprints information such aslocation and category.116 Maps and locationDraft version for test review 2011/01/28
Getting directionsGet detailed driving or walking text instructions on how to get to your destination.Getting directions from your current location1. In Locations, search for the destination you want to go to.You have footprints saved? You can also set a footprint as your destination. Just go to theFootprints tab, and then choose a footprint.2. Tap Directions.3. Choose how you want to get to your destination. The map opens showing theroute to your destination.4. Do one of the following:§At the bottom of the screen, tap   or   to follow the route to yourdestination.§Slide up the directions bar, and then tap the instructions to follow the routeto your destination.If you have turn-by-turn navigation for that country, press MENU, and then tap Navigate tostart turn-by-turn navigation.Getting directions by setting a start and end location1. While viewing the map, press MENU, and then tap Directions.2. Tap the My location text box, and then search for the starting location you want.3. Tap the End point text box, and then search for the destination you want.117 Maps and locationDraft version for test review 2011/01/28
4. Tap Driving or Walking depending on how you want to get to your destination.5. Do one of the following:§At the bottom of the screen, tap   or   to follow the route to yourdestination.§Slide up the directions bar, and then tap the instructions to follow the routeto your destination.If you have turn-by-turn navigation for that country, press MENU, and then tap Navigate tostart turn-by-turn navigation.Using turn-by-turn navigation (Premium navigation)§To use turn-by-turn navigation, the Use GPS Satellites option in Locationsources needs to be selected.§Check if you have the turn-by-turn navigation for the country or region you’reusing. To find out if the phone has turn-by-turn navigation for the country orregion, see Managing Locations services on page 120.Using Locations to navigate to a destination1. In Locations, search for the destination you want to go to.You have footprints stored? You can also set a footprint as your destination. Just go to theFootprints tab, and then choose a footprint.2. Tap Premium navigation.While navigating, you can tap the screen to see what other options are available.Setting navigation preferencesChoose how you want Locations to map your route. You can tell Locations to avoidhighways or toll roads, show lane information, choose your route preference, andmore.1. While using turn-by-turn navigation, tap the screen.2. Tap More > Settings > Navigator.3. Set your preferences by selecting or tapping an item.Turning off speed and safety camera alertsIf you have the safety camera service, you can choose to turn this service offtemporarily.1. While using turn-by-turn navigation, tap the screen.2. Tap More > Settings > Warnings3. Clear the Speed warning and Safety camera warning check boxes.118 Maps and locationDraft version for test review 2011/01/28
Answering a call while using navigationWhen a call comes in, the whole map nudges up a bit so you can see the incoming calland answer it. Don’t worry, you’ll still be able to use navigation as we made sure thatthe call screen just occupies as little space as possible at the bottom of the screen.Using Car PanelEasily access footprints, points of interest, and places nearby with Car Panel, and thenstart navigation to show you how to get there.From the Home screen, tap   > Car Panel.Search for a destination to go to.Select a footprint to set as a destination.Check the places you’ve search before, and thenchoose one to set as your destination.Set Car Panel options.Check places of interest that are close to your currentlocation, and then choose one to set as yourdestination.Make a phone call.Car Panel keeps opening by itself when you’re using a mini-to-micro USB converter?If you connect a mini-USB power adapter or car charger to your phonethrough a mini-to-micro USB converter, your phone may misinterpret this tobe a car kit connection (due to the different connector PIN assignment on themini-USB power adapter or car charger) and automatically display the CarPanel.You can prevent Car Panel from automatically opening by:1. From the Home screen, press MENU, and then tap Settings.2. Tap Dock, and then clear the Auto-launch check box.Using your phone with the car kitIf you purchased the dedicated car kit for your phone, you can use the included in-carholder to mount your phone securely inside your car and use your phone on the road.119 Maps and locationDraft version for test review 2011/01/28
Refer to the car kit guide for instructions on how to install the in-car holder andproperly mount your phone to the holder.When you mount your phone on the car kit, the Car Panel automatically opens.When your phone is in the holder and is not connected to a Bluetooth car kit or headset, thephone’s speakerphone is automatically turned on when you make or answer a phone call.Automatically connecting to a Bluetooth car kit or headsetYou can set your phone to connect to your Bluetooth car kit or Bluetooth headsetautomatically, if one is paired with your phone, whenever you mount the phone on thein-car holder.1. In Car Panel, tap Settings > Car kit.2. Select the Auto-connect check box.3. If you have more than one Bluetooth car kit or headset paired with your phone,tap Default device to choose the Bluetooth car kit or headset to use.Before mounting your phone on the in-car holder, make sure that Bluetooth on yourphone and the paired Bluetooth car kit or headset is turned on.Managing Locations servicesCheck the maps, navigation, safety camera information, and voices for turn-by-turnvoice instructions that are already on your phone.1. From the Home screen, tap   > Locations.2. Press MENU, and then tap Upgrade. In the Manage licenses & content tab, you’llsee a list of services that are already on your phone.Downloading maps or purchasing servicesGoing to a different country for vacation? You can download the map of the countryyou’re going to for free. You can also download or purchase additional services suchas navigation, safety camera, and turn-by-turn voice instructions.You need a data or Wi-Fi connection to download or purchase maps and services.1. From the Home screen, tap   > Locations.2. Press MENU, and then tap Upgrade.3. Slide to the tab of the item or service that you want to download.4. Depending on what you selected, tap Download or Purchase.Depending on the country where you bought your phone, you may only need to entera voucher code to activate turn-by-turn navigation. If you have a voucher code, enterit by tapping Voucher code at the top of the Purchase navigation tab.120 Maps and locationDraft version for test review 2011/01/28
Adding navigation widgetsAdd a favorite destination and places of interest that are nearby and your footprintsas widgets on your Home screen. Add the Navigate widget to start turn-by-turnnavigation to your favorite destination. Add the Locations widget to let you browseplaces of interest and your footprints right on the Home screen.Google Maps121 Maps and locationDraft version for test review 2011/01/28
Market and other appsFinding and installing apps from AndroidMarketAndroid Market is the place to go to find new apps for your phone. Choose from awide variety of free and paid apps ranging from productivity apps, entertainment, togames. When you find an app you want, you can easily download and install it on yourphone with just a few taps.To access Android Market, you must first connect to the Internet using your phone’sWi-Fi or data connection and sign in to your Google Account.Paid apps are currently only available in certain countries.Finding and installing an appWhen you install apps and use them on your phone, they may require access to yourpersonal information or access to certain functions or settings of your phone.Download and install only apps that you trust.Be cautious when downloading apps that have access to your phone’s functions or asignificant amount of your data. You’re responsible for the results of using downloaded appson your phone.You need a Google Checkout account to purchase items on Android Market.122 Market and other appsDraft version for test review 2011/01/28
1. From the Home screen, tap   > Market .When you open Android Market for the first time, the Terms of Service windowwill appear. Tap Accept to continue.2. Do any of the following to find an app:To Do thisBrowse featuredappsScroll through the list of featured apps.Browse apps bycategoriesTap Apps or Games, and then tap a category. Under a category,you can filter the apps by Top paid, Top free or Just in.Search for an app Tap   on the Android Market home screen, enter the name ortype of app you’re looking for, and then tap   to the right ofthe search box.3. When you find the app that you like, tap it and read its description and usercomments.4. Tap Install (for free apps) or Buy (for paid apps).The subsequent screen notifies you whether the app will require access to yourpersonal information or access to certain functions or settings of your phone.5. If you agree to the conditions, tap OK to begin downloading and installing theapp.If you selected a paid app, after tapping OK, you will be redirected to theGoogle Checkout screen to pay for the app before it’s downloaded to yourphone.Creating a Google Checkout accountYou must have a Google Checkout account associated with your Google Account topurchase items from Android Market.123 Market and other appsDraft version for test review 2011/01/28
To create a Google Checkout account, do one of the following:§On your computer, go to http://checkout.google.com.§The first time you use your phone to buy an app from Android Market, follow theprompts onscreen to enter your billing information.When you’ve used Google Checkout once to purchase an app from Android Market, thephone remembers your password, so you don’t need to enter it the next time. For thisreason, you should secure your phone to prevent others from using it without yourpermission.Requesting a refund for a paid appIf you are not satisfied with an app, you can ask for a refund within 24 hours of thepurchase. Your credit card will not be charged and the app will be removed from yourphone.If you change your mind, you can install the app again, but you can’t request a refunda second time.1. From the Home screen, tap   > Market > Downloads.2. Tap the app you want to uninstall for a refund. The details screen for the appopens.3. Tap Uninstall & refund. Your app is uninstalled and the charge is cancelled.4. Choose the reason for removing the app, and then tap OK.Opening an installed appDo one of the following:§If you see this icon (   ) on the status bar, open the Notifications panel, and thentap the app.§From the Home screen, tap   > Market > Downloads. On the Downloadsscreen, tap the app, and then tap Open.§From the Home screen, tap  . On the All apps screen, locate the app, andthen tap it.Uninstalling an appYou can uninstall any app that you have downloaded and installed from AndroidMarket.1. From the Home screen, tap   > Market > Downloads.2. Tap the app you want to uninstall, and then tap Uninstall.3. When asked, tap OK.4. Choose the reason for removing the app, and then tap OK.Getting helpIf you need help or have questions about Android Market, press MENU, and then tapHelp. The web browser will take you to the Android Market Help web page.124 Market and other appsDraft version for test review 2011/01/28
Reading eBooksStart your own library of bestsellers and literary classics right on your phone. Use theReader app to read and download eBooks from Kobo, an online bookstore.We’ve included some eBooks for you to try. To browse for more titles from Kobo, youneed to be connected to the Internet.1. From the Home screen, tap   > Reader. On the Reader main screen, you’llfind thumbnails of your recently read and downloaded eBooks.2. Slide your finger left or right across the screen to browse through the availableeBooks.You can also tap   to browse through these eBooks in the Library.3. Tap an eBook to open it.4. Slide your finger left or right to flip through pages in the eBook.5. To zoom in or out, spread or pinch your thumb and index fingers across thepage.6. To view in landscape, turn your phone sideways.7. Tap anywhere on the screen to use these controls:Quickly jump betweenchapters by dragging theslider.View the table of contentsand your bookmarkedpages. You can also seethe notes and highlightsthat you've marked in theeBook.Add a bookmark.Change the font size.Recommend the eBook toyour friends. You canshare the book title inyour social networks, orsend it by text or email.8. When you're done reading, press BACK to close the eBook.When you reopen an eBook, it will take you to the page that you last viewed.Searching inside an eBook1. While reading an eBook, press SEARCH.2. Type the word or words you want to search for.125 Market and other appsDraft version for test review 2011/01/28
3. Tap  . You’ll see a list of chapters that contain the matches.4. Tap a chapter to preview where the matches appear.5. Tap a match to go to the page that contains the text you're looking for.Want to take your search further to the web? Simply select the text and then tap QuickLookup.Adding a note or highlighting selected textSpotted an interesting quote or a less-known fact? Take note or highlight it.1. Press and hold on a word, and then drag the start and end markers to select thesurrounding text. 2. On the popup bar:Tap ToHighlight Mark the selected text with your choice of color.New note Add a short comment or remark.Viewing notes and highlights you've created1. Tap anywhere in the eBook you're reading, and then tap  .2. Go to the Notes tab or Highlights tab to view the information that you want.Downloading an eBookBrowse the bookstore and choose from hundreds of available titles to download.You need to have:§a microSD card on your phone§an active Wi-Fi or data connection§a Kobo account and an Adobe® ID account. If you don’t have these accounts yet,either sign up from your phone or from your computer’s web browser. (On yourcomputer, go to: www.kobobooks.com/signup.html and www.adobe.com/cfusion/membership/index.cfm.)1. If you have not yet logged in to Kobo and Adobe ID accounts, press MENU, andthen tap Accounts to sign in.2. On the Reader main screen, tap  .126 Market and other appsDraft version for test review 2011/01/28
3. In the eBooks by Kobo tab, do any of the following to find a book:§Tap a category to see available book titles.§View more categories. Press MENU, and then tap either Browse orDiscover.§Press SEARCH to find a specific book title or author.4. Tap the eBook you want to download. You’ll then see information such as the eBook’s price, its summary and ratings.5. Tap   to place your order6. Provide your purchase details, and then tap Buy.7. Tap   to download the eBook. When downloading is complete, you'll find theeBook in your library.§After you’ve used Kobo once to purchase an eBook, your phone remembers your billingdetails so you don’t need to enter them the next time.§If you've previously bought eBooks from Kobo using your computer, go to the Available fordownload tab in Reader to download them to your phone.About the My Shelf widgetUse the My Shelf widget to easily open your eBooks for reading right from your Homescreen.Reading news feedsDon’t get left behind with yesterday’s stories. Use the News app to subscribe to newsfeeds that cover breaking news, sports, top blogs, and more. You can also getupdates based on specific keywords.Subscribing to news channels1. From the Home screen, tap   > News.2. On the Subscriptions tab, tap Add feeds.3. Do one of the following:§Tap a category such as Blogs or Entertainment to choose from popularnews feeds.§Tap Search more to search for a specific keyword or feed URL.4. After selecting the channel or channels to subscribe to, tap Add. To manually update news stories on your channels, press MENU, and then tap Refresh.127 Market and other appsDraft version for test review 2011/01/28
Adding a keywordEasily find stories that interest you by entering a search keyword. Stories that containthe same keyword are grouped together on the Keywords tab.1. From the Home screen, tap   > News.2. On the My Items tab, tap Keywords > Add keywords.3. Enter the keyword, and then tap Add. Your new keyword is displayed on theKeywords tab. Tap the keyword to show the stories that contain that keyword.Reading a story1. From the Home screen, tap   > News.2. On the Subscriptions tab, tap a channel.3. Tap a story to read it. While reading the story, you can:Tap ToStar the story as a favorite.Share a link to the story from the available options.Go to the web page where the story is published. Go to the next or previous story in the channel.4. If you want to read the whole story, tap Read full article. This opens the story inthe web browser.Changing update schedule and content settingsWhile on the News app, press MENU > Settings, and then tap any of the following:Accounts & sync Manage sync options and general News settings.Update whenopenedUpdate the content of the channels you’ve subscribed to every time youopen the News app.Update schedule Choose a time interval when the channels you’ve subscribed to areupdated. Select Manual to refresh the content only when you like.News content Choose how to read news stories by default: whether as a summary oras a full web page article.Mobile view Choose to display web page articles optimized for mobile viewing, whenavailable.About the News widgetUse the News widget to read snippets of stories that you've subscribed to right fromyour Home screen.128 Market and other appsDraft version for test review 2011/01/28
Using FlashlightNever get caught in the dark again. The Flashlight app turns on your phone’s LEDflashlight to shine a light wherever you need it.1. From the Home screen, tap   > Flashlight.2. To adjust the brightness of the light, simply tap the onscreen power button onthe flashlight handle.To close the flashlight, press BACK.129 Market and other appsDraft version for test review 2011/01/28
HTC SyncAbout HTC SyncYou have your new vacation photos on your phone while your business calendar is onyour computer. Why not make these types of files and information available on bothdevices?With HTC Sync, you can:§Sync your contacts between your Microsoft Outlook, Outlook Express orWindows Contacts on your computer and your phone.§Sync your calendar events between the Outlook or Windows Calendar on yourcomputer and your phone.§Bring your photos, videos, documents, songs, and playlists to your phone andenjoy them on the go.§Easily import your captured photos and videos from your phone to yourcomputer.§Store the same bookmarks on both your computer and phone's web browsers.§Use your computer's Internet connection to download maps and useful add-onservices for your phone's Locations app.§Install third-party mobile phone apps (not downloaded from Android Market)from your computer.§You need a storage card inserted into your phone to be able to sync multimedia files, maps,and documents.§The available categories and options depend on the phone you've connected to yourcomputer.Installing HTC Sync that came with themicroSD cardCopy the HTC Sync installer from the microSD card to your computer and use it toinstall.§The HTC Sync version in the microSD card that came with your phone can be installed on acomputer running Windows 7, Windows Vista, or Windows XP.§HTC Sync requires USB 2.0 on your computer to connect and sync with your phone.§For trouble-free installation, first quit all running programs and temporarily exit from youranti-virus program before you start installing HTC Sync.130 HTC SyncDraft version for test review 2011/01/28
1. Connect your phone to your computer using the supplied USB cable.2. On your phone’s Connect to PC screen, tap Disk drive, and then tap Done. Onyour computer, the connected phone is recognized as a removable disk.3. Navigate to the removable disk and open it.4. Copy HTCSync.exe to your computer.5. After copying, unmount the removable disk (that is, the connected phone) asrequired by your computer’s operating system to safely remove your phone.6. On your computer, double-click HTCSync.exe and follow the onscreeninstructions to install HTC Sync.After installing HTC Sync, the HTC Sync icon   is added to your computer’s systemtray (check the bottom-right side of your computer screen). You can double-click thisicon to open HTC Sync.Setting up HTC Sync to recognize your phone1. Connect your phone to your computer using the USB cable that came with yourphone.2. When your phone prompts you to choose a type of USB connection, tap HTCSync, and then tap Done. Wait for HTC Sync to recognize your phone.3. On the Device setup screen, enter a name for your phone.4. Click Save. The Device panel then opens.To change the name of your phone later, click Overview > Device setup.Getting to know the workspaceOn the Device panel, you can set your sync options, see your phone's generalinformation, check the used and available space on your storage card, and beginsynchronization.The available categories and options depend on the phone you've connected to yourcomputer. For example, Locations appears in the Device panel when you have the Locationsapp on your phone.131 HTC SyncDraft version for test review 2011/01/28
§Click a category of items to see its sync options on the right side of the Devicepanel.You can also click Overview to see your phone's basic software information andstorage card usage, change the phone name, or install third-party applicationsto your phone.§Click Sync now to start synchronizing the categories and options you'veselected.§The estimated storage usage bar beside the Sync now button shows you theestimated storage card space that will be used when there are new items to besynchronized and added to your phone.Music sync optionsBring the music tracks and songs you play on your computer to your phone. If youhave playlists created in iTunes® or Windows Media® Player, you can sync these tooand enjoy them on the go.You can sync audio files in these formats: *.aac, *.amr, *.m4a, *.mid, *.midi, *.mp3, *.wav,*.wma1. On the Device panel, click Music, and then click the On button. Turning Musicsync on means you want this category included every time you sync yourcomputer and phone.2. Select Sync music files from, and then click Add.3. Choose a folder that contains your audio files, and then click OK.4. Select Sync music files from iTunes and Windows Media Player if you're usingiTunes or Windows Media Player on your computer, then choose the playlistsyou want to sync on your phone.Gallery sync optionsYou can automatically sync photos and videos between your phone and computer.You can sync audio files in these formats:§Photos: *.bmp, *.gif, *.jpeg, *.jpg, *.png§Videos: *.3gp, *.3g2, *.mp4, *.wmv1. On the Device panel, click Gallery, and then click the On button. Turning Gallerysync on means you want this category included every time you sync yourcomputer and phone.2. To automatically import your camera shots to your computer duringsynchronization, select Copy device Camera Shots to PC. Photos and videosfrom your storage card will be saved to the \My Photos\Device Camera Shotsfolder on your computer.132 HTC SyncDraft version for test review 2011/01/28
3. Select Sync PC photos & videos from, and then click Add.4. Choose a folder that contains your multimedia files, and then click OK. Allsupported image and video files added to this folder will be copied to yourphone's storage card during synchronization.Calendar sync optionsYour phone can sync appointments and events with your calendar in Outlook(Outlook XP, Outlook 2003 or Outlook 2007) or Windows Calendar.1. On the Device panel, click Calendar, and then click the On button. TurningCalendar sync on means you want this category included every time you syncyour computer and phone.2. Select the application you want to sync calendar events with.3. Choose from which point you want to start synchronizing your calendar events.4. In cases when conflicting information is found on both the phone and computer,choose which information you want to keep.Only the calendar fields supported on your phone will be synchronized.People sync optionsSync your phone contacts with your Outlook (Outlook XP, Outlook 2003 or Outlook2007), Outlook Express, or Windows Contacts.If you have contacts to sync from your SIM card, you have to import these first toyour phone storage.1. On the Device panel, click People, and then click the On button. Turning Peoplesync on means you want this category included every time you sync yourcomputer and phone.2. Choose the application you want to sync your contacts with.3. In cases when conflicting information is found on both the phone and computer,choose which information you want to keep.Only the contact fields supported on your phone will be synchronized.Bookmarks sync optionsSync web browser bookmarks between your phone and computer.133 HTC SyncDraft version for test review 2011/01/28
If you are using Google Chrome or Firefox Internet browser and have selected it to sync withyour phone, make sure to close all browser windows before you begin synchronization.1. Using your favorite web browser on your computer, create a favorites foldernamed HTC bookmarks.Make sure to save your favorite bookmarks in this folder to be able to sync themwith your phone.2. On HTC Sync's Device panel, click Bookmarks, and then click the On button.Turning Bookmarks sync on means you want this category included every timeyou sync your computer and phone.3. Choose the web browser that stores the bookmarks to sync with your phone.When conflicting information is found on both the phone and computer, HTC Sync keeps theinformation from your computer.Documents sync optionsYou can sync files and documents from your computer to your phone. You can alsosync email attachments that you stored on your phone's storage card to yourcomputer.§To open a document on your phone, you'll need a compatible app. Usually, your phone canopen and view these file types: Microsoft Office 2003 and 2007 Word (*.doc), Excel (*.xls),and PowerPoint (*.ppt), PDF files (*.pdf), text files (*.txt).§To sync email attachments stored on your phone's storage card to your computer, youmust set up an Exchange ActiveSync or POP3/IMAP email account from the Mail app onyour phone.1. On the Device panel, click Documents, and then click the On button. TurningDocuments sync on means you want this category included every time you syncyour computer and phone.2. To sync email attachments that you've stored on your phone's storage card,select Copy all download Mail documents to PC.3. Select Sync PC documents from, and then click Add.4. Choose a folder that contains the documents you want to sync on your phone,and then click OK.Email attachments from your phone's storage card will be saved to the \MyDocuments\Device documents\ folder on your computer. Documents from yourcomputer will be saved to the \My Documents\Device documents\ folder on yourstorage card.134 HTC SyncDraft version for test review 2011/01/28
Locations sync optionsBefore going on a trip to another city or country, you can download the maps youneed using HTC Sync on your computer, then sync them to your phone. You can alsopurchase licenses for other useful data such as driving and walking navigation, safetycameras alerts, and more.1. On the Device panel, click Locations, and then click the On button. TurningLocations sync on means you want this category included every time you syncyour computer and phone.2. Select and download maps and additional map features.3. After you're done downloading items on your computer, you'll see these itemsin the Locations content list. You can then choose whether you want to sync allmaps and licenses or just the items you select.Downloading maps or purchasing servicesYou can download maps for free or purchase premium services such as navigation,safety cameras, and turn-by-turn voice instructions.1. On the Device panel, click Locations, and then click the On button.2. Click Get more Maps and Licenses.3. On the left side of the Navigation store window, click the type of content youwant to download, and then select a country.4. Under the Additional map features section, you can choose one or morenavigation products you want to download or purchase.When purchasing navigation products, you also need to consider the licenseduration for using the downloaded content.5. Click Add to Shopping cart  .Checking out products or licenses1. Click Add to Shopping cart   beside Navigation store to view your shoppingcart.2. Review the items you've selected and the total amount of purchase.3. Click Check out.135 HTC SyncDraft version for test review 2011/01/28
4. Enter your email address and your billing information (if you selected a premiumnavigation product).5. Please take time to review the agreement, and then click I agree to the termsand agreement to continue.6. Click Review purchase to see a list of items you've selected, your email address,and the billing information you've provided.7. When everything is correct, click Confirm and download. The downloadprogress of your selected maps will then display in the Device panel.Synchronizing your phoneCheck the estimated usage bar beside the Sync now button for the estimated file sizeof new items to sync on your phone.When there's not enough space left on your storage card, you'll see a warning icon and youwon't be able to sync.1. After selecting and customizing the categories you want to sync, click Syncnow.2. After synchronization is complete, click Disconnect.3. Safely remove your phone as required by your computer's operating system.The next time you connect your phone to your computer, synchronizationautomatically begins based on your sync settings.Installing an app from your computer to yourphoneIf you have application files (*.apk) on your computer, you can use HTC Sync to installthem to your phone. We strongly recommend you install only applications that youtrust.Before you begin, make sure that your phone is set to allow applications from your computerto be installed to your phone. To do this, press MENU while on the Home screen, tap Settings> Applications, and then select the Unknown sources check box.1. On the Device panel, click Overview.2. Click Application installer.3. Browse for the application file on your computer, and then click Open. Theinstallation process starts on your phone.4. Check your phone's screen to see if there are additional instructions tocomplete the installation.5. After installation is complete, you can click Disconnect.6. Safely remove your phone as required by your computer's operating system.136 HTC SyncDraft version for test review 2011/01/28
Synchronizing another phone with yourcomputerYou can switch from one phone to another, if you have more than one device to sync.1. Connect another phone to your computer, then set up HTC Sync to recognizethis phone.2. Click the phone you want to set up or begin synchronization. The Device panelthen opens, where you can separately customize your sync settings for thisphone.To switch to another phone to sync, click Devices, and then click the phone's name orimage.Downloading the latest HTC Sync upgradeVisit the HTC support website (www.htc.com/support/) from time to time to checkfor the most recent HTC Sync upgrade so you can download and install it on yourcomputer.After installing the latest upgrade, set up HTC Sync again to recognize and sync withyour phone.137 HTC SyncDraft version for test review 2011/01/28
HTCSense.comSigning up for your HTCSense.com accountYou can sign up for your HTCSense.com account through your phone or yourcomputer’s web browser.Signing up from your phoneIf you skipped signing up to your HTCSense.com account when you first turned onand set up your phone, you can still sign up.1. From the Home screen, press MENU, and then tap Settings > Accounts & sync.2. Tap Add account > HTC Sense.3. Follow the onscreen instructions to sign up for your HTCSense.com account.Signing up from your computerMake sure you have your phone close by. You’ll need it to complete the sign-upprocess.1. On your computer, open your web browser.2. Go to www.htcsense.com.3. Follow the onscreen instructions to sign up for your HTCSense.com account.After signing up to HTCSense.com on the Web, you have to sign in using the sameaccount credentials on your phone.Updating your HTCSense.com account details1. On your computer, open your web browser and sign in to your HTCSense.comaccount.2. On the upper-right corner, click Account.3. Update your account details, and then click Save Changes.DashboardForgot your phone at home or you can’t find it? Or worse, it slipped out of yourpocket while riding the train. Use Dashboard to communicate with your phone so youcan forward calls and messages to a different number, make your phone ring, lockyour phone, and even erase the contents of your phone.138 HTCSense.comDraft version for test review 2011/01/28
Turning on Phone finderMost features of Dashboard require that the Phone finder option on your phone isselected.1. On your phone, from the Home screen, press MENU, and then tap Settings.2. Tap Location.3. Select the Phone finder check box.Forwarding calls and messagesYou can forward calls and messages to another phone if you don’t have your phonewith you.1. On your computer, open your web browser and sign in to your HTCSense.comaccount.2. Click Dashboard.3. Click the Forward calls and/or Forward messages On/Off switch.Making your phone ringYou know your phone is somewhere in your home but you just can’t find it. Make yourphone ring, even if it’s on mute, so you can find it. Hopefully, it’s just buried undersome clothes in the hamper.1. On your computer, open your web browser and sign in to your HTCSense.comaccount.2. Click Dashboard.3. Click Ring.Locating your phoneLeft your phone somewhere while doing your errands? You can use the Dashboard tofind the approximate location of your phone.You must have the Phone finder option selected on your phone for this feature to work.1. On your computer, open your web browser and sign in to your HTCSense.comaccount.2. Click Dashboard.3. Check the map to see where your phone is. Click Refresh location to refresh themap.139 HTCSense.comDraft version for test review 2011/01/28
Locking your phoneLost your phone? Lock your phone and show a message onscreen so if somebodyfinds it, they can contact you.1. On your computer, open your web browser and sign in to your HTCSense.comaccount.2. Click Dashboard.3. Click Lock phone.4. Enter a PIN, an alternate phone number to call if somebody finds your phone,and a short message to show onscreen.The alternate number is shown on your phone’s screen. If somebody happens to find yourphone, that person can simply tap it to call that number using your phone.5. Click Save.Erasing your phone contentsIf there’s no chance of getting your phone back, you can erase the contents of thephone and the installed storage card so no one sees sensitive information on yourphone.There’s no way to recover your phone and storage card data after you erase the contents sobe absolutely sure before you proceed.1. On your computer, open your web browser and sign in to your HTCSense.comaccount.2. Click Dashboard.3. Click Erase phone.4. When asked to confirm, click Erase phone.Deleting your HTCSense.com account1. On your computer, open your web browser and sign in to your HTCSense.comaccount.2. On the upper-right corner, click Account.3. Click Click here to delete your HTCSense account.Deleting your HTCSense.com account will also delete your data on HTCSense.comservers.140 HTCSense.comDraft version for test review 2011/01/28
KeyboardUsing the onscreen keyboardWhen you start an app or select a field that requires text or numbers, the onscreenkeyboard becomes available. After entering your text, you can tap   or press BACKto close the onscreen keyboard.Selecting a keyboard layoutYou can choose from three different keyboard layouts to suit your typing style.1. From the Home screen, press MENU, and then tap Settings > Language &keyboard > Touch Input.2. Tap Keyboard types, and then select the keyboard layout that you want to use.Choose one from the following:QWERTY This layout is similar to a desktop computer keyboard. This is thedefault keyboard layout.Phone Keypad This layout resembles the traditional mobile phone keypad.CompactQWERTYThis layout features two letters on each key. The key size is slightlybigger than on the full QWERTY layout.141 KeyboardDraft version for test review 2011/01/28
Entering textUse the following keys while entering text using the onscreen keyboard:Press and hold keys with gray characters at the top to enter numbers, symbols, oraccented letters. The gray character displayed on the key is the character that will beinserted when you press and hold that key. Some keys have multiple characters oraccents associated with them.Shift key. Tap to enter an uppercase letter. Tap twice to turn on caps lock.Tap to switch to the numeric and symbol keyboard.Enter key. Tap to create a new line.Backspace key. Tap to delete the previous character.Language key. The key you see depends on the keyboard language you are currentlyusing. Tap to switch to another keyboard language. You can also access onscreenkeyboard settings.Tap to toggle between Multitap and XT9 predictive modes when using the CompactQWERTY or Phone keypad layout.Tap to hide the onscreen keyboard.Enabling multiple keyboard languagesIf there are multiple keyboard languages available on your phone, you can choosewhich languages to enable in the onscreen keyboard so that you can switch to theselanguages and use them to enter text.1. From the Home screen, press MENU, and then tap Settings > Language &keyboard > Touch Input.2. Tap International keyboard.3. Choose the languages you want.Available languages depend on the region where you purchased the phone.Changing to the landscape onscreen keyboardWhen entering text, you can choose to use the landscape orientation of the onscreenkeyboard. Turn your phone sideways to use a larger keyboard for easy typing.§Select the Auto-rotate screen check box in HOME > MENU > Settings > Display to allow thescreen orientation to automatically change.§The landscape orientation keyboard is not supported in all apps.142 KeyboardDraft version for test review 2011/01/28
Entering words with predictive textThe onscreen keyboard has predictive text to help you type quickly and accurately.Predictive text input is enabled by default, and word suggestions are displayed as youtype.To enter a word in predictive mode, do any of the following:§If you see the word you want highlighted in green or orange, just tap the spacebar to insert the word into your text.§If you see the word you want shown in the suggestions before you have finishedtyping the entire word, tap the word to insert it into your text.§If an arrow is shown to the right of the suggestion list, tap the arrow to see moresuggestions.Setting a second language for the keyboardAside from the keyboard language you are currently using, you can set the predictivetext to be bilingual. As you type, you’ll get word suggestions in two languages thatyou’ve selected.1. From the Home screen, press MENU, and then tap Settings > Language &keyboard > Touch Input.2. Tap Bilingual prediction, and then choose the language you want.Adding a word to the predictive text dictionaryYour phone comes with a list of words that it references for predictive textsuggestions. While entering text using the QWERTY keyboard layout, if you tap anyword on the suggestion list, it is automatically added to the predictive text dictionaryif it was not in the dictionary already.You can also add a word to the list manually.1. From the Home screen, press MENU, and then tap Settings > Language &keyboard > Touch Input.2. Tap Personal dictionary > Edit personal dictionary > Add new3. Enter the word to add, and then tap OK.Editing or deleting a word in the predictive text dictionaryYou can edit or remove words that you previously added to the predictive textdictionary.143 KeyboardDraft version for test review 2011/01/28
1. From the Home screen, press MENU, and then tap Settings > Language &keyboard > Touch Input.2. Tap Personal dictionary > Edit personal dictionary§To edit a word, tap the word itself.§To delete words from the dictionary, press MENU and tap Delete. Thenchoose the words to remove and tap OK.Backing up your personal dictionary to your storage cardYou can use your storage card to back up the new words you’ve added to thepredictive text dictionary.1. From the Home screen, press MENU, and then tap Settings > Language &keyboard > Touch Input.2. Tap Personal dictionary > Sync personal dictionary > Copy to storage card3. When prompted, tap OK.Importing your personal dictionary from your storage card1. From the Home screen, press MENU, and then tap Settings > Language &keyboard > Touch Input.2. Tap Personal dictionary > Sync personal dictionary > Restore from storage card3. When prompted, tap OK.Entering text by speakingNo time to type? Try speaking the words to enter it in most text fields that let you usethe onscreen keyboard.§First make sure to select the language you’ll be using in the Voice input & output settings.§Since your phone uses Google’s speech-recognition service, you need to be connected tothe Internet to enter text by speaking.1. Press and hold the language key. Your phone cues you to speak.2. Tell your phone what you want to be typed in.Setting the voice input language1. From the Home screen, press MENU, then tap Settings > Voice input & output >Voice recognizer settings.2. Tap Language, then choose the language you want.Available languages depend on the voice input languages supported by Google.144 KeyboardDraft version for test review 2011/01/28
Editing textIt's easy to cut, copy, and paste text using the keyboard.Some apps may offer their own way of selecting or copying text.Selecting textHighlight the text that you want to copy or cut.1. Press and hold the text field that contains the text to select until the magnifierappears.2. Drag your finger to move the text cursor to a letter within the text that youwant to select.3. After positioning the text cursor, lift your finger. The text selection menu thenpops up.4. Do one of the following:§Tap Select text. When the word where you’ve placed the text cursor ishighlighted, drag the start and end markers to select the text you want.§Tap Select all to select everything in the text field.Copying and pasting text1. After you have selected the text you want to copy, tap Copy or Cut. Theselected text is then copied to the clipboard.2. Press and hold a text field in the same or other app until the magnifier appears.3. Drag your finger to move the text cursor to where you want to paste the text.4. After positioning the text cursor, lift your finger. The text selection menu thenpops up.5. Tap Paste.145 KeyboardDraft version for test review 2011/01/28
Adjusting input settingsOpen the Touch Input settings by doing one of the following:§On the onscreen keyboard, tap the language key (for example, tap   if you’recurrently using the English onscreen keyboard). Then on the Internationalkeyboard options menu, tap Settings.§From the Home screen, press MENU, and then tap Settings > Language &keyboard > Touch Input.Keyboard types Select the keyboard layout to use. You can choose from QWERTY,Phone Keypad, or Compact QWERTY.InternationalkeyboardAdd or remove languages from the onscreen keyboard language list.Bilingual prediction Select a secondary keyboard language to use.Text input §Turn on or off predictive text, spell correction, and word completion.§Enable audible or vibration feedback when typing.§Calibrate the touch keyboard accuracy.Tutorial Learn how to use the onscreen keyboard with this interactive tutorial.Personal dictionary Add, edit or remove words in the predictive text dictionary.146 KeyboardDraft version for test review 2011/01/28
Internet connectionsData connectionYour phone will be automatically set up to use your mobile operator’s data connectionwhen you turn on your phone (if the SIM card is inserted) for the first time.Checking the data connection you're using1. From the Home screen, press MENU, and then tap Settings > Wireless &networks.2. Tap Mobile networks > Network operators or Access Point Names.Turning the data connection on or offTurning your data connection off can help save battery life and save money on datacharges. However, if you don’t have data connection turned on and you’re also notconnected to a Wi-Fi network, you won’t receive automatic updates to your email,social network accounts, and other synchronized information.1. From the Home screen, press MENU, and then tap Settings > Wireless &networks.2. Select the Mobile network check box to turn on the data connection; clear thecheck box to turn off the data connection.Adding a new access pointBefore you add another data connection on your phone, have the access point nameand settings (including username and password if required) from your mobileoperator ready.1. From the Home screen, press MENU, and then tap Settings > Wireless &networks.2. Tap Mobile networks > Access Point Names.3. On the APNs screen, press MENU and then tap New APN.4. On the Edit access point screen, enter the APN settings. Tap an APN settingitem to edit it.5. Press MENU and then tap Save.147 Internet connectionsDraft version for test review 2011/01/28
Enabling data roamingConnect to your mobile operator’s partner networks and access data services whenyou’re out of your mobile operator’s coverage area.Using data services while roaming will be costly. Check with your mobile operator for dataroaming rates before you use data roaming.1. From the Home screen, press MENU, and then tap Settings > Wireless &networks.2. Tap Mobile networks, and then select the Data roaming check box.Select the Data roaming sound check box if you’d like your phone to play a sound soyou’ll know when it’s connecting to a roaming network.Wi-FiTo use Wi-Fi on your phone, you need access to a wireless access point or “hotspot”.The availability and strength of the Wi-Fi signal will vary depending on objects, suchas buildings or simply a wall between rooms, the Wi-Fi signal has to pass through.Turning Wi-Fi on and connecting to a wireless network1. From the Home screen, press MENU, and then tap Settings > Wireless &networks.2. Select the Wi-Fi check box to turn Wi-Fi on. The phone then scans for availablewireless networks.3. Tap Wi-Fi settings. The network names and security settings of detected Wi-Finetworks are displayed in the Wi-Fi networks section.4. If the wireless network you want to connect to is not in the list of detectednetworks, scroll down the screen, and then tap Add Wi-Fi network. Enter thewireless network settings, and then tap Save.5. Tap the Wi-Fi network you want to connect to. If you selected an open network,you will be automatically connected to the network.6. If you selected a network that is secured with WEP, enter the key and then tapConnect.When your phone is connected to the wireless network, the Wi-Fi icon   appears inthe status bar and tells you the approximate signal strength (number of bands thatlight up).The next time your phone connects to a previously accessed secured wirelessnetwork, you won’t be asked to enter the key or other security information again,unless you reset your phone to its factory default settings.148 Internet connectionsDraft version for test review 2011/01/28
Connecting to a Wi-Fi network with EAP-TLS securityYou may need to install a network certificate (*.p12) to your phone before you canconnect to a Wi-Fi network with EAP-TLS authentication protocol.1. Save the certificate file to the root folder of the storage card.2. From the Home screen, press MENU, and then tap Settings > Security.3. Tap Install from SD card.4. Select the network certificate needed to connect to the EAP-TLS network.5. Follow the steps in Turning Wi-Fi on and connecting to a wireless network onpage 148 to connect to the Wi-Fi network.Checking the wireless network status1. From the Home screen, press MENU, and then tap Settings > Wireless &networks.2. On the Wireless & networks screen, tap Wi-Fi settings, and then tap the wirelessnetwork that the phone is currently connected to.A message box is then displayed showing the Wi-Fi network name, status, speed,signal strength, and more.If you want to remove the settings for this network from your phone, tap Forget. If you wantto reconnect to a wireless network that you have removed, you'll need to choose thewireless network from the list of available Wi-Fi networks again. If it is a secured wirelessnetwork, you'll need to enter the wireless network credentials again.Connecting to another Wi-Fi network1. From the Home screen, press MENU, and then tap Settings > Wireless &networks.2. Tap Wi-Fi settings. Detected Wi-Fi networks are displayed in the Wi-Finetworks section.3. To manually scan for available Wi-Fi networks, on the Wi-Fi screen, press MENU,and then tap Scan.4. Tap another Wi-Fi network to connect to it.149 Internet connectionsDraft version for test review 2011/01/28
About connection widgetsAdd the Mobile Network and Wi-Fi widgets or the Data dashboard widget to theHome screen to make it faster for you to turn on or off these connections. Tap thewidget or icon on the dashboard to turn on or off the connection.Connecting to a virtual private network (VPN)Add, set up, and manage virtual private networks (VPNs) so you can connect andaccess resources inside a secured local network, such as your corporate network.Depending on the type of VPN you’re using at work, you may be asked to enter yourlogin credentials and install security certificates before you can connect to yourcompany’s local network. You can get this information from your networkadministrator.Also, your phone must first establish a Wi-Fi or data connection before you can start aVPN connection.Setting up secure credential storageIf your network administrator tells you to download and install security certificates,you must first set up the phone’s secure credential storage.1. From the Home screen, press MENU, and then tap Settings > Security.2. Tap Set password.3. Enter a new password for the credential storage.4. Scroll down and confirm the password, and then tap OK.5. Select the Use secure credentials check box.You can then download and install the certificates needed to access your localnetwork. Your network administrator can tell you how to do this.150 Internet connectionsDraft version for test review 2011/01/28
Adding a VPN connection1. From the Home screen, press MENU, and then tap Settings > Wireless &networks.2. Tap VPN settings > Add VPN, and then tap the type of VPN you want to add.3. Tap the VPN settings and set them up according to the security details yournetwork administrator gave you.4. Press MENU, and then tap Save.The VPN is then added to the VPNs section of the VPN settings screen.Connecting to a VPN1. From the Home screen, press MENU, and then tap Settings > Wireless &networks.2. Tap VPN settings.3. In the VPNs section, tap the VPN that you want to connect to.4. When asked, enter your log in credentials, and then tap Connect. When you’reconnected, the VPN connected icon   appears in the notification area of thetitle bar.You can then open the web browser to access resources such as your corporatenetwork intranet.Disconnecting from a VPN1. Press and hold the title bar, and then slide down your finger to open theNotifications panel.2. Tap the VPN connection to return to the VPN settings screen, and then tap theVPN connection to disconnect from it.When your phone has disconnected from the VPN, the VPN disconnected icon   isdisplayed in the notification area of the title bar.Using your phone as a modem (USB tethering)No Internet connection available for your computer? No problem. Use your phone’sdata connection to connect to the Internet using your computer.You need your SIM card inserted on your phone to use the data connection.Before you can use your phone as a modem, be sure to install HTC Sync on yourcomputer first.1. Make sure your phone’s data connection is turned on.2. Connect the phone to the computer using the provided USB cable.3. On the Connect to PC screen, select USB tethering, and then tap Done.151 Internet connectionsDraft version for test review 2011/01/28
Connecting your phone to the Internetthrough a computer (Internet Pass-through)If you don’t have a data plan for your phone or you don’t have access to a Wi-Finetwork, you can still go online on your phone by using your computer’s Internetconnection.Before you can use your computer as a modem, be sure to install HTC Sync on yourcomputer first.1. Make sure your computer is connected to the Internet.Two things to check for your computer’s Internet connection. One, we recommend that youturn off your local network’s firewall. Two, if your computer connects to the Internet via PPP(e.g. Dial UP, xDSL, or VPN), Internet Pass-through will only support TCP protocol.2. Connect the phone to the computer using the provided USB cable.3. On the Connect to PC screen, select Internet pass-through, and then tap Done.Using your phone as a wireless routerShare your data connection with other devices by turning your phone into a wirelessrouter.Make sure your phone’s data connection is turned on before you use it as a wirelessrouter.1. From the Home screen, press MENU, and then tap Settings > Wireless &networks.2. Tap Portable Wi-Fi hotspot settings.3. Enter a router name or use the default router name.4. Choose the type of Security and set the password (key) for your wireless router.If you selected None in Security, you don’t need to enter a password.The password is the key other people need to enter on their device so they can connect anduse your phone as a wireless router.5. Select the Portable Wi-Fi hotspot check box to turn on your phone’s wirelessrouter.Your phone is ready to be used as a wireless router when you see   on the statusbar.152 Internet connectionsDraft version for test review 2011/01/28
BluetoothBluetooth basicsTurning Bluetooth on or off1. From the Home screen, press MENU, and then tap Settings > Wireless &networks.2. Select or clear the Bluetooth check box.An even easier way to turn Bluetooth on or off is with the Bluetooth widget on theHome screen.Turn off Bluetooth when not in use to save battery power, or in places where using a wirelessdevice is prohibited, such as on board an aircraft and in hospitals.Changing the phone nameThe phone name identifies your phone to other devices.1. From the Home screen, press MENU, and then tap Settings > Wireless &networks.2. Tap Bluetooth settings.3. If the Bluetooth check box is not selected, select it to turn Bluetooth on.4. Tap Device name.5. Enter the name for your phone in the dialog box, and then tap OK.Connecting a Bluetooth headset or car kitYou can listen to music over a Bluetooth stereo headset, or have hands-freeconversations using a compatible Bluetooth headset or car kit. It’s the sameprocedure to set up stereo audio and hands-free.§For you to listen to music with your headset or car kit, the headset or car kitmust support the A2DP Bluetooth profile.§Before you connect your headset, you need to make it discoverable so yourphone can find it. You can find out how to do this by referring to your headsetmanual.1. From the Home screen, press MENU, and then tap Settings > Wireless &networks.2. Tap Bluetooth settings.153 BluetoothDraft version for test review 2011/01/28
3. If the Bluetooth check box is not selected, select it to turn Bluetooth on.4. Make sure that the headset is discoverable.5. Tap Scan for devices. Your phone will start to scan for Bluetooth devices withinrange.6. When you see the name of your headset displayed in the Bluetooth devicessection, tap the name. Your phone then automatically tries to pair with theheadset.7. If automatic pairing fails, enter the passcode supplied with your headset.The pairing and connection status is displayed below the hands-free headset or car kitname in the Bluetooth devices section. When the Bluetooth headset or car kit isconnected to your phone, the Bluetooth connected icon   is displayed in the statusbar. Depending on the type of headset or car kit you have connected, you can thenstart using the headset or car kit to listen to music and/or make and receive phonecalls.Reconnecting a headset or car kitNormally, you can easily reconnect your headset by switching on Bluetooth on yourphone, and then turning on the headset. However, you might have to connectmanually if your headset has been used with another Bluetooth device.1. From the Home screen, press MENU, and then tap Settings > Wireless &networks.2. Tap Bluetooth settings.3. If the Bluetooth check box is not selected, select it to turn Bluetooth on.4. Make sure that the headset is discoverable.5. Tap the headset’s name in the Bluetooth devices section.6. If prompted to enter a passcode, try 0000 or 1234, or consult the headset/carkit documentation to find the passcode.If you still cannot reconnect to the headset or car kit, follow the instructions in Unpairing from a Bluetooth device on page 155, and then follow the steps under Connecting a Bluetooth headset or car kit on page 153.Disconnecting or unpairing from a BluetoothdeviceDisconnecting a Bluetooth device1. From the Home screen, press MENU, and then tap Settings > Wireless &networks.2. Tap Bluetooth settings.154 BluetoothDraft version for test review 2011/01/28
3. In the Bluetooth devices section, press and hold the device to disconnect.4. Tap Disconnect.Unpairing from a Bluetooth deviceYou can make your phone forget its pairing connection with another Bluetoothdevice. To connect to the other device again, you may need to enter or confirm apasscode again.1. From the Home screen, press MENU, and then tap Settings > Wireless &networks.2. Tap Bluetooth settings.3. In the Bluetooth devices section, press and hold the device to unpair.4. Tap Disconnect & unpair, or tap Unpair if the Bluetooth device is currently notconnected to your phone.Sending information using BluetoothYou can use Bluetooth to send information from your phone to another Bluetoothenabled device such as a phone or notebook computer. You can send the followingtypes of information, depending on the device you are sending to:§Images and videos§Calendar events§Contacts§Audio filesBefore you begin, set the receiving device to discoverable mode. You may also needto set it to “Receive Beams” or “Receive Files”. Refer to the device’s documentationfor instructions on receiving information over Bluetooth.The first time you transfer information between your phone and another device, youneed to enter or confirm a security passcode. After that, your phone and the otherdevice are paired, and you will not need to exchange passcodes to transferinformation in the future.155 BluetoothDraft version for test review 2011/01/28
1. On your phone, open the application that contains the information or file youwant to send.2. Follow the steps for the type of item you want to send:Captured photo orvideoAfter capturing, on the Camera preview screen, tap  , and thentap Bluetooth.Photos or videos 1. On the Albums tab   of the Gallery app, choose an album.2. Tap  , and then tap Bluetooth.3. Choose the photos and videos you want to share, and then tapNext.Contact 1. On the All tab   of the People app, press and hold a contact,and then tap Send contact as vCard.2. Tap the down arrow icon, and then select Bluetooth from thedisplayed list.Calendarappointment oreventIn Day view, Agenda view, or Week view, press and hold theevent, and then tap Share > Bluetooth.Music track With the track displayed on the Music app’s Now playing screen,press MENU, and then tap Share > Bluetooth.Voice recording On the main Voice Recorder screen, tap  , and then tapBluetooth.3. Turn on Bluetooth if you’re asked to do so.4. If you haven't paired with the receiving device before, tap Scan for devices.5. Tap the name of the receiving device.6. If prompted, accept the pairing request on your phone and the receiving device.Also enter the same passcode on both your phone and the other device, orconfirm the auto-generated passcode.7. On the receiving device, accept the file.Where sent information is savedWhen you send information from your phone using Bluetooth, the location where it'ssaved depends on the type of information and the receiving device.If you send a calendar event or contact, it is normally added directly to thecorresponding application on the receiving device. For example, if you send acalendar event to a compatible phone, the event is shown in that phone’s calendarapplication.If you send another file type to a Windows computer, it is normally saved in theBluetooth Exchange folder within your personal document folders.156 BluetoothDraft version for test review 2011/01/28
§On Windows XP, the path may be: C:\Documents and Settings\[yourusername]\My Documents\Bluetooth Exchange§On Windows Vista, the path may be: C:\Users\[your username]\Documents§On Windows 7, the path may be: C:\Users\[your username]\My Documents\Bluetooth Exchange FolderIf you send a file to another device, the saved location may depend on the file type.For example, if you send an image file to another mobile phone, it may be saved in afolder named “Images”.Receiving information using BluetoothYour phone is capable of receiving a wide variety of file types with Bluetooth,including photos, music tracks, and documents such as PDFs.To receive files using Bluetooth, you need to have a microSD card on your phone.The first time you transfer information between your phone and another device, youneed to enter or confirm a security passcode. After that, your phone and the otherdevice are paired, and you will not need to exchange passcodes to transferinformation in the future.1. From the Home screen, press MENU, and then tap Settings > Wireless &networks.2. Tap Bluetooth settings.3. If the Bluetooth check box is not selected, select it to turn Bluetooth on.4. Select the Discoverable check box.5. On the sending device, send one or more files to your phone. Refer to thedevice’s documentation for instructions on sending information over Bluetooth.6. If asked, accept the pairing request on your phone and the receiving device.Also enter the same passcode on both your phone and the other device, orconfirm the auto-generated passcode.A Bluetooth authorization request is then displayed on your phone.7. If you want to automatically receive files from the sending device in future,select the Always check box.8. Tap Accept or OK.157 BluetoothDraft version for test review 2011/01/28
9. When your phone receives a file transfer request notification, slide down theNotifications panel, tap the incoming file notification, and then tap Accept.10. When a file is transferred, a notification is displayed. To open the fileimmediately, slide down the Notifications panel, and then tap the relevantnotification. When you open a received file, what happens next depends on the file type:§Media files and documents are usually opened directly in a compatible app.For example, if you open a music track, it starts playing in the Music app.§For a vCalendar file, choose the calendar where you want to save the event,and then tap Import. The vCalendar is added to your Calendar events.§For a vCard contact file, if there are multiple vCard files on your storagecard, you can choose to import one, several, or all of those contacts to yourcontacts list.Adding the Bluetooth received folder to the Home screenYou can add a folder to the Home screen that shows all files you have received withBluetooth.1. From the Home screen, tap  .2. On the Personalize screen, tap Folder > Bluetooth received.3. Press and hold the Bluetooth received folder icon, and drag it to the Homescreen position you want.To view the folder contents, tap the folder icon. To open a file, tap the file name.158 BluetoothDraft version for test review 2011/01/28
SecurityProtecting your SIM card with a PINAdd another layer of security for your phone by assigning a PIN (personalidentification number) to your SIM.Make sure you have the default SIM PIN provided by your mobile operator beforecontinuing.1. From the Home screen, press MENU, and then tap Settings > Security.2. Tap Set up SIM card lock, then select Lock SIM card.3. Enter the default SIM card PIN, and then tap OK.4. To change the SIM card PIN, tap Change SIM PIN.Emergency calls can be placed at any time without requiring a PIN.Restoring a SIM card that has been locked outIf you enter the wrong PIN more times than the maximum number of attemptsallowed, your SIM card will become “PUK-locked.”You need a PUK code to restore access to the phone. This code may have beenprovided by your mobile operator when you received your SIM card.1. On the Phone dialer screen, enter the PUK code, and then tap Next.2. Enter the new PIN you want to use, and then tap Next.3. Enter the new PIN again, and then tap Next.Protecting your phone with a screen lockpattern, PIN or passwordProtect your personal information and prevent others from using your phone withoutyour permission by setting a screen lock pattern, PIN or password.Your screen lock will be asked every time your phone is turned on or when it’s idle fora certain period of time.1. From the Home screen, press MENU, and then tap Settings > Security.2. Tap Set up screen lock.159 SecurityDraft version for test review 2011/01/28
3. Tap one of the following:None Disable the screen lock you’ve previously created.Pattern Set a screen lock pattern by following the onscreen instructions.PIN Set a numeric password of at least four digits.Password Set an alpha-numeric password.4. On the Security screen, tap Lock phone after, then specify the idle time you canallow before the screen is locked.You can also clear the Use visible pattern on the Security screen if you don’t want yourscreen lock pattern to display as you draw it onscreen.Changing your screen lock1. From the Home screen, press MENU, and then tap Settings > Security.2. Tap Change screen lock.3. Enter your current screen lock to confirm that you want to change it.4. Choose a different screen lock type, then enter your new pattern, PIN, orpassword. Or tap None if you don’t want to use a screen lock.Forgot your screen lock pattern?If you’ve forgotten your screen lock pattern, you have up to five attempts totry and unlock your phone.If this fails, you can unlock your phone by entering your Google Account username and password.1. On the unlock screen, enter your lock pattern.2. After the fifth attempt, when you’re asked to wait for 30 seconds, tapOK.3. If the display goes off, press the POWER button to turn the display backon, and then press the bar on the lock screen and slide your finger downto unlock the screen.4. Tap the Forgot pattern? button in the lower right corner when itappears.5. Enter your Google Account name and password, and then tap Sign in.You’ll then be asked to create a new screen lock pattern. If you nolonger want to do so, tap Cancel.160 SecurityDraft version for test review 2011/01/28
SettingsSettings on your phoneControl and customize phone settings on the Settings screen.From the Home screen, press MENU, and then tap Settings.Personalize Make your phone truly yours with the various personalization optionsavailable.Wireless &networksSet up your phone’s wireless connections, such as Wi-Fi, data connection,and Bluetooth, enable Airplane mode, and more.Call Set up call services such as voicemail, call forwarding, call waiting, andcaller ID.Sound §Choose sounds to use for your phone ringtone and notifications.§Adjust media playback volume.§Set to lower the ring volume when you move the phone when it’s ringing,make the phone ring louder when inside a bag or pocket, and turn on thespeakerphone when you flip over the phone.Display Set up display settings such as automatic screen orientation, brightness,screen timeout, and more.Accounts & sync Log in or out of your social network accounts, Google Account, ExchangeActiveSync account, and HTCSense.com account. You can also managesynchronization and other settings for your accounts.Location Select the sources to use when determining your location. Select Phonefinder so you can use HTCSense.com to locate your phone.Search Select items to include when you do a search on your phone and setGoogle search options.Privacy Choose to automatically back up some settings on the phone (e.g. Wi-Fipasswords or Bookmarks) to Google servers using your Google Accountso you can restore them when needed.Connect to PC §Set the default USB connection type to use whenever you connect yourphone to your computer.§Or, select the Ask me check box to set your phone to always display thescreen for selecting the USB connection type.Security Set a screen lock, enable the SIM card lock, or manage the phone’scredential storage.Dock If you purchased the car kit, choose the behavior when you mount yourphone to the car kit.Power saver Turn on power saver to automatically switch to power saving mode whenthe battery level goes down to the level that you set.161 SettingsDraft version for test review 2011/01/28
Applications Manage running applications, move applications to or from the storagecard, and install or uninstall programs.SD & phonestorage §Check the available storage card and phone memory.§From this screen, be sure to unmount your storage card before youremove it from your phone.§You can also do a factory reset.Date & time Set the date and time, time zone, and date or time format.Language &keyboardSet the operating system language and region. You can also set onscreenkeyboard options.Accessibility This option appears only after you’ve downloaded and installed anaccessibility tool, such as a screen reader that provides voice feedback.You can turn accessibility functions or services on or off.Voice input &outputSet up the voice input options of your phone. Also, if you’ve installed atext-to-speech (voice data) application, use this to set the text-to-speechsettings.About phone §Turn on or off scheduled checks for system software updates, ormanually check for updates.§View different information about your phone, such as the mobile networktype, signal strength, battery level, and more.Changing display settingsAdjusting the screen brightness manually1. From the Home screen, press MENU, and then tap Settings.2. Tap Display > Brightness3. Clear the Automatic brightness check box.4. Drag the brightness slider to the left to decrease or to the right to increase thescreen brightness.5. Tap OK.Adjusting the time before the screen turns offAfter a period of inactivity, the phone screen turns off to conserve battery power. Youcan set the idle time before the screen turns off.1. From the Home screen, press MENU, and then tap Settings.2. Tap Display > Screen timeout.3. Tap the time before the screen turns off.162 SettingsDraft version for test review 2011/01/28
Turning automatic screen rotation offBy default, the screen orientation automatically adjusts depending on how you holdthe phone.Automatic rotation is not supported in all application screens.1. From the Home screen, press MENU, and then tap Settings.2. Tap Display.3. Clear the Auto-rotate screen check box.Recalibrating the G-sensorRecalibrate the screen if you feel that the screen orientation does not respondproperly to the way you hold the phone.1. From the Home screen, press MENU, and then tap Settings.2. Tap Display > G-Sensor calibration.3. Place the phone on a flat and level surface, and then tap Calibrate.4. After the recalibration process, tap OK.Keeping the screen on while charging the phoneYou can keep the phone screen from turning off while you’re charging the phone.1. From the Home screen, press MENU, and then tap Settings.2. Tap Applications > Development.3. Select the Stay awake check box.Switching animation effects on or offYou can turn off the animation or enable only some animations when switchingbetween screens.1. From the Home screen, press MENU, and then tap Settings.2. Tap Display > Animation.3. On the options menu, select the animation setting you want.163 SettingsDraft version for test review 2011/01/28
Changing sound settingsSwitching between silent, vibration, and normal modesDo one of the following:§To change back from silent to normal mode, simply press the VOLUME UPbutton.§To change back from vibration to normal mode, press the VOLUME UP buttontwice.§From the Home screen, press MENU, and then tap Settings > Sound > Soundprofile.§You can also add the Profile widget to your Home screen.Enabling or disabling audible selectionYou can choose to play a sound when you’re selecting items onscreen.1. From the Home screen, press MENU, and then tap Settings.2. Tap Sound.3. Select the Audible selection check box.Choosing the notification soundYou can choose a default sound for your phone to play whenever there are newnotifications.1. From the Home screen, press MENU, and then tap Settings.2. Tap Sound > Notification sound.3. Select your preferred notification sound in the list.4. Tap OKTo use different sounds for different types of notifications, set the notification soundsin the respective applications. For example, to set different sounds for received andsent text messages, open Messages, then press MENU and tap Settings.Lowering the ring volume automaticallyYour phone has a quiet ring feature that automatically lowers the ring volume whenyou move your phone.1. From the Home screen, press MENU, and then tap Settings.2. Tap Sound.3. Select or clear the Quiet ring on pickup check box.164 SettingsDraft version for test review 2011/01/28
Making your phone ring louder with Pocket modeTo help avoid missing incoming calls when your phone is in your pocket or bag, thepocket mode feature gradually increases the ring volume and vibrates when youreceive a call. When not in your pocket or bag, the phone will ring at the normalvolume you set.1. From the Home screen, press MENU, and then tap Settings.2. Tap Sound.3. Select or clear the Pocket mode check box.Switching to speakerphone automaticallyYou can switch to speakerphone by simply flipping over your phone.1. From the Home screen, press MENU, and then tap Settings.2. Tap Sound.3. Select or clear the Flip for speaker check box.Changing the phone languageWhen you turn your phone on for the first time, you’re asked to choose the languageyou want to use for your phone. If you want, you can still change the phone languageafter you set up your phone. Changing the language adjusts the keyboard layout, dateand time formatting, and more.The languages available to choose from may depend on the version of phone youhave.1. From the Home screen, press MENU, and then tap Settings.2. Tap Language & keyboard > Select language.3. Tap the language and corresponding region you want to use.4. Press HOME to return to the Home screen. The new language will be appliedafter a few seconds.Optimizing your phone’s battery lifeYou can set the phone to automatically switch to power saving mode when thebattery level reaches a certain level.1. From the Home screen, press MENU, and then tap Settings.2. Tap Power saver.3. Select the Enable power saver check box.165 SettingsDraft version for test review 2011/01/28
4. Tap Turn power saver on at, and then select when to switch to power savermode.5. In the Power saver settings section, set and select the phone behavior when thephone switches to power saving mode.Using the GSM network of your mobile operatorSwitch to using the GSM network of your mobile operator if you’re not using a dataconnection to connect to the Internet. Connecting to your mobile operator’s GSMnetwork consumes less battery power.1. From the Home screen, press MENU, and then tap Settings.2. Tap Wireless & networks > Mobile networks > Network Mode.3. Tap GSM only.Checking the power usage of applications1. From the Home screen, press MENU, and then tap Settings.2. Tap About phone > Battery > Battery use.Managing memoryChecking how much phone memory is available for use1. From the Home screen, press MENU, and then tap Settings.2. Tap SD & phone storage. The available phone memory is displayed in theInternal phone storage section.Checking the available storage card space1. From the Home screen, press MENU, and then tap Settings.2. Tap SD & phone storage. The total and available storage card space is displayedin the SD card section.Clearing application cache and data1. From the Home screen, press MENU, and then tap Settings.2. Tap Applications > Manage applications.3. On the Manage applications screen, switch to the Running tab, and then tap anapplication.4. In the Application info screen, tap Clear data and/or Clear cache.Uninstalling third-party applicationsYou cannot uninstall applications that are preinstalled on the phone.166 SettingsDraft version for test review 2011/01/28
1. From the Home screen, press MENU, and then tap Settings.2. Tap Applications > Manage applications.3. On the Downloaded tab, tap the application you want to uninstall.4. On the Application info screen, tap Uninstall.Moving applications to or from the storage cardMove applications that you’ve downloaded to the phone to the storage card if yourphone’s memory is getting low. Or, if your storage card is getting full, you can alsomove applications that are on your storage card to the phone.You can only move applications that are not preinstalled on your phone.1. From the Home screen, press MENU, and then tap Settings.2. Tap Applications > Manage applications.3. On the Downloaded tab, tap the application you want to move.4. On the Application info screen, tap Move to SD card or Move to phone.Checking information about your phone1. From the Home screen, press MENU, and then tap Settings.2. Tap About phone.3. Select one of the following:System softwareupdatesEnable or disable the automatic check feature for software updatesfor your phone. You can also tap Check now to manually check forsoftware updates.Network Check information about your mobile operator and its servicestatus.Phone identity Check information about your phone and the SIM card you’reusing.Battery Check information about the battery such as its current batterylevel, status, and what programs are using the battery.HardwareinformationCheck the Wi-Fi MAC and Bluetooth addresses.SoftwareinformationCheck the version and other information about the Androidplatform being used by the phone. You can also check the versionof the web browser.Legal information Read legal information from HTC and Google, and licenses used bythe phone.167 SettingsDraft version for test review 2011/01/28
Update and resetPhone software updatesFrom time to time, software updates for your phone may be available. Your phonecan check and then notify you if there’s a new update. You can then download andinstall the software update using your phone’s Wi-Fi or data connection. You can alsomanually check if there's an available software update for your phone.Depending on the type of update, the update may erase all your personal data andcustomized settings, and also remove any applications you’ve installed. Make sure thatyou’ve backed up the information and files you want to keep.Checking and downloading phone software updates may incur additional data transfer feesfrom your mobile operator.Installing a phone system software updateMake sure your phone has a microSD card inserted. The update will be downloaded tothe microSD card.1. Do any of the following after your phone receives a software update:§If the phone display is on and you're not using any application, the Installsystem software update dialog box appears on screen. Select Install now,and then tap OK.§If you're in a call, the update notification icon appears in the status bar.After the call, slide open the Notifications panel, and then tap the updatenotification.2. Wait for the update to download and install on your phone. When the update isfinished, the phone will automatically restart.Checking for phone system software updates manually1. From the Home screen, press MENU, and then tap Settings.2. Tap About phone > System software updates.3. Tap Check now.168 Update and resetDraft version for test review 2011/01/28
Restarting your phoneIf your phone is running slower than normal, an application is not performing properly,or your phone becomes unresponsive, try restarting your phone and see if that helpssolve the problem.1. If the display is off, press the POWER button to turn it back on.2. Unlock the phone display.3. Press and hold the POWER button, and then tap Restart.4. When asked to confirm, tap Restart.If these steps don't work, you can remove and replace the battery, and then turn the phoneon to restart it.Resetting your phoneDo a factory reset to return your phone to its original state before the first time youturned it on.If you’re passing your phone on to someone else or your phone has a persistentproblem that cannot be solved, you can perform a factory reset (also called a hardreset). Factory reset is not a step to be taken lightly. It’ll permanently delete all yourdata and customized settings, and will remove any applications you’ve downloadedand installed. Be sure to back up any data and files you want to keep before you do afactory reset.Performing a factory reset via settingsThe most convenient way to do a factory reset is via the phone settings.1. From the Home screen, press MENU, and then tap Settings.2. Tap SD & phone storage > Factory data reset.3. Tap Reset phone, and then tap Erase everything.Performing a factory reset using the phone buttonsIf you can’t turn on your phone or access the phone settings, you can still perform afactory reset by using the buttons on the phone.1. With the phone turned off, press and hold the VOLUME DOWN button, and thenbriefly press the POWER button.2. Wait for the screen with the three Android images to appear, and then releasethe VOLUME DOWN button.3. Press VOLUME DOWN to select FACTORY RESET, and then press the POWERbutton.169 Update and resetDraft version for test review 2011/01/28
IndexHHome screen- adding widgets  30- rearranging items  32- rearranging the home panels  33NNotifications panel  22WWidgets- adding  30- changing settings  31170 IndexDraft version for test review 2011/01/28

Navigation menu