HTC SN PDA with integrated PCS phone User Manual Manual part1
HTC Corporation PDA with integrated PCS phone Manual part1
HTC >
Contents
- 1. Manual part1
- 2. Manual part 2
Manual part1
Page 1
Page 2
Table of Contents
Chapter 1: Getting Started ................................................................................... 8
Welcome ....................................................................................................................................8
Where to Find Information.....................................................................................................8
Chapter 2: Hardware Features ............................................................................ 9
Front Panel Components.........................................................................................................9
Back Panel Components........................................................................................................10
Bottom Edge Components .....................................................................................................11
USB Cradle .............................................................................................................................11
Temperature and Battery Life ..............................................................................................11
Recharging the Battery......................................................................................................12
When Your Battery Is Low ...............................................................................................13
Optional Accessories..............................................................................................................13
SD and MMC Cards ..........................................................................................................13
Inserting or removing a memory card...............................................................................13
External Battery.................................................................................................................13
Attaching the External Battery..........................................................................................14
To view the current charge of the external battery............................................................14
USB Cable.........................................................................................................................15
Serial Cable.......................................................................................................................15
DC Connector....................................................................................................................15
Chapter 3: Knowing Your Pocket PC Phone .......................................................16
Resetting the Pocket PC Phone and Clearing Memory......................................................16
To perform a soft reset ......................................................................................................16
To perform a full reset.......................................................................................................16
Backing Up Files.....................................................................................................................17
To save Word or Excel files to a memory card.................................................................17
Back up or restore your system using SD Backup............................................................18
Screen Tapping Calibration and Recalibration ..................................................................18
To recalibrate the screen...................................................................................................18
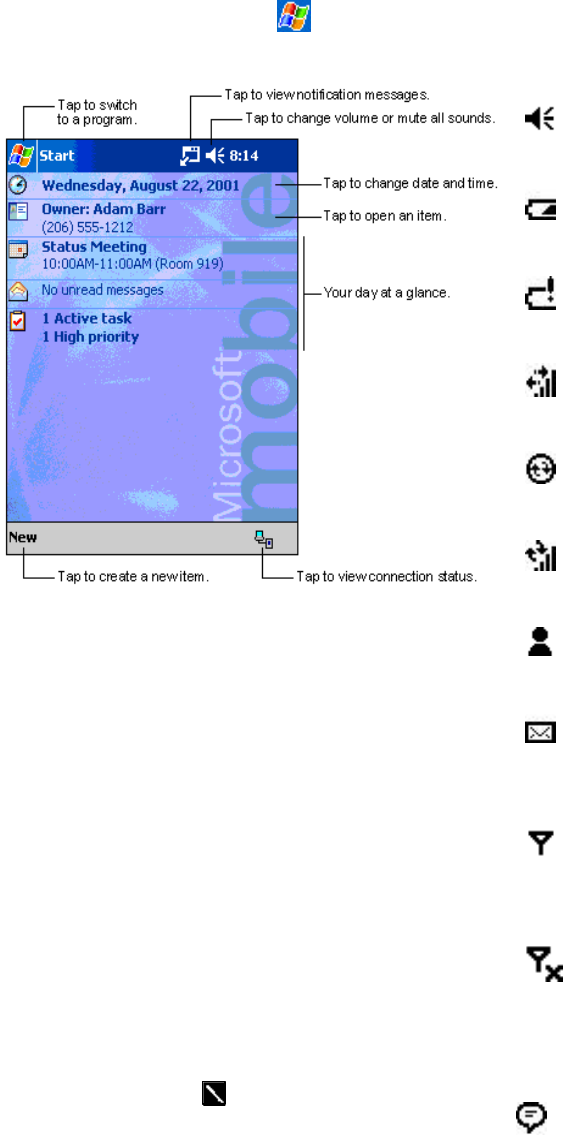
Today Screen..........................................................................................................................19
Programs .................................................................................................................................20
Navigation Bar and Command Bar......................................................................................21
Pop-up Menus .........................................................................................................................21
Notifications ............................................................................................................................21
Entering Information on Your Pocket PC Phone ...............................................................22
Entering Text Using the Input Panel.................................................................................22
To type with the soft keyboard..........................................................................................23
To use Letter Recognizer ..................................................................................................23
To use Block Recognizer ..................................................................................................24
To switch to Transcriber ...................................................................................................24
To punctuate in Transcriber ..............................................................................................25
To see how to write a letter in Transcriber........................................................................25
To select typed text ...........................................................................................................26
To edit text........................................................................................................................26
Writing on the Screen............................................................................................................26
To write on the screen.......................................................................................................26
Page 3
To select writing................................................................................................................27
To convert writing to text..................................................................................................27
Tips for getting good recognition......................................................................................27
Drawing on the Screen...........................................................................................................28
To create a drawing...........................................................................................................28
To select a drawing ...........................................................................................................28
Recording a Message..............................................................................................................29
To create a recording.........................................................................................................29
Using My Text ..................................................................................................................29
Finding and Organizing Information...................................................................................30
Managing Memory.................................................................................................................31
To view memory allocation and availability.....................................................................31
Finding Space in Storage Memory....................................................................................31
To make available storage memory..................................................................................31
Customizing Your Pocket PC Phone ....................................................................................32
Customizing the Today Screen.........................................................................................32
To change the background................................................................................................32
Adjusting Settings .............................................................................................................33
Changing the Default Button Settings..................................................................................33
To change the default buttons ...........................................................................................34
Adding or Removing Programs ............................................................................................34
To add programs using ActiveSync ..................................................................................34
To add a program directly from the Internet.....................................................................35
To add a program to the Start menu..................................................................................35
To remove programs .........................................................................................................35
Chapter 4: Phone Features .................................................................................36
About Your Phone..................................................................................................................36
Installing the Smart Card...................................................................................................36
Removing the Smart Card.................................................................................................36
About The Dialer Screen...................................................................................................37
The Navigation Pad and Dialing.......................................................................................38
Entering Your PIN ............................................................................................................38
Checking You Are Connected...........................................................................................39
Turning The Phone On and Off.........................................................................................39
To turn off the phone.........................................................................................................39
To turn on the phone .........................................................................................................39
Adjusting the Phone Volume ............................................................................................40
Back Spacing and Deleting...............................................................................................40
To back space over numbers .............................................................................................40
To delete the number.........................................................................................................40
Basic Dialing Features ...........................................................................................................41
Making a call.....................................................................................................................41
To make a call from the Dialer..........................................................................................41
To make a call from Contacts ...........................................................................................42
To make a call from Speed Dial (A).................................................................................43
To make a call from Speed Dial (B) .................................................................................43
To make a call from the Call Log .....................................................................................44
To make a call from Phone Book......................................................................................44
To send SMS in phone dialer ............................................................................................45
Enabling the Speakerphone Mode.....................................................................................46
Page 4
Answering or Rejecting a Call ..........................................................................................46
Ending a Call.....................................................................................................................47
Managing More Than One Call ........................................................................................47
Putting a Call on Hold .......................................................................................................47
To swap between calls.......................................................................................................48
To set up conference calling..............................................................................................48
Making a Note...................................................................................................................49
To make a note ..................................................................................................................49
To view a note...................................................................................................................50
Call Related Features.............................................................................................................50
Checking Your Voice Mail ...............................................................................................50
To retrieve your voice mail ...............................................................................................50
Adding and Transferring Contact Information..................................................................50
Places where contacts can enter your Pocket PC Phone and be stored.............................50
Why transfer numbers? .....................................................................................................51
Microsoft Contacts: Adding and transferring contacts .....................................................51
Phone Book: Adding and transferring contacts.................................................................52
To create a Smart Card contact.........................................................................................52
To transfer contacts from Smart Card to Microsoft Contacts ...........................................52
To transfer a number to Speed Dial ..................................................................................53
To add a record to Microsoft Contacts from Call Log......................................................53
Managing Your Call Log ..................................................................................................54
Viewing details of calls .....................................................................................................54
To view duration of call ....................................................................................................54
To delete individual calls from Call Log ..........................................................................55
To delete all calls from Call Log.......................................................................................55
To set limits on the size of your Call Log.........................................................................55
Customizing Your Phone.......................................................................................................55
To select ring type and tone, and keypad sounds ..............................................................55
Downloading Ring Tones..................................................................................................56
To enable the PIN..............................................................................................................56
To change the PIN .............................................................................................................56
To enable Caller ID...........................................................................................................56
Call Forwarding.................................................................................................................57
To activate or deactivate Call Forwarding........................................................................57
Call Waiting ......................................................................................................................57
To activate or deactivate Call Waiting..............................................................................58
Voice Mail and SMS.........................................................................................................58
To view your voice mail and SMS access numbers..........................................................58
To find a network..............................................................................................................59
To select a network...........................................................................................................59
To set preferred networks..................................................................................................60
To select automatic pickup................................................................................................60
Using Key Lock................................................................................................................61
To enable Key Lock..........................................................................................................61
Enabling Broadcast Channels............................................................................................61
To enable Broadcast Channels ..........................................................................................61
Additional Dialing Information ............................................................................................62
To make an emergency call...............................................................................................62
To make an international call............................................................................................62

Page 5
Chapter 5: Getting Connected.............................................................................63
Getting Help on Connecting ..................................................................................................63
Chapter 6: Wireless Data Programs ....................................................................64
Pocket Internet Explorer: Browsing Web and WAP pages.......................................64
Using Pocket Internet Explorer.........................................................................................65
To view Mobile Favorites and Channels...........................................................................65
To browse the Internet.......................................................................................................65
The Mobile Favorites Folder.............................................................................................66
Favorite Links ...................................................................................................................66
Mobile Favorites ...............................................................................................................66
To create a Mobile Favorite ..............................................................................................66
Saving Pocket PC Phone Memory....................................................................................66
To browse the Internet.......................................................................................................67
Using AvantGo Channels..................................................................................................67
To sign up for AvantGo ....................................................................................................67
MSN Messenger: Instant Messaging............................................................................67
To switch to MSN Messenger...........................................................................................67
Setting Up An Account.....................................................................................................68
Working with Contacts......................................................................................................68
Chatting with Contacts......................................................................................................69
Inbox: Sending and Receiving E-mail or SMS............................................................69
Synchronizing E-mail Messages .......................................................................................70
Connecting Directly to an E-mail Server ..........................................................................70
Using the Message List.....................................................................................................70
Creating an SMS text message or E-mail..........................................................................72
Managing Messages and Folders ......................................................................................72
Folder behavior with a direct connection to an e-mail server...........................................72
Transferring Items Using Infrared.....................................................................................73
To send information ..........................................................................................................73
To receive information ......................................................................................................73
Terminal Services Client ..............................................................................................73
To connect to a Terminal Server.......................................................................................73
To disconnect without ending a session............................................................................74
To disconnect and end a session .......................................................................................74
To navigate within Terminal Services Client....................................................................74
To improve display performance ......................................................................................74
To improve browser performance.....................................................................................74
Chapter 7 : Microsoft ActiveSync........................................................................75
Synchronizing Files................................................................................................................76
To synchronize files..........................................................................................................76
Chapter 8: Microsoft Pocket Outlook ..................................................................77
Calendar: Scheduling Appointments and Meetings ....................................................77
To create an appointment ..................................................................................................78

Page 6
Using the Summary Screen...............................................................................................78
Creating Meeting Requests ...............................................................................................78
To schedule a meeting.......................................................................................................79
Contacts: Tracking Friends and Colleagues...............................................................79
To create a contact.............................................................................................................80
To find a contact................................................................................................................80
Using the Summary Screen...............................................................................................81
Tasks: Keeping a To Do List........................................................................................81
To create a task..................................................................................................................82
Using the Summary Screen...............................................................................................82
Notes: Capturing Thoughts and Ideas ........................................................................83
To create a note.................................................................................................................83
Chapter 9: Companion Programs .......................................................................84
Pocket Word..................................................................................................................84
Typing Mode.....................................................................................................................85
Writing Mode ....................................................................................................................85
Drawing Mode...................................................................................................................86
Recording Mode................................................................................................................86
Pocket Excel...................................................................................................................86
Tips for Working in Pocket Excel.....................................................................................87
Windows Media Player for Pocket PC Phone...........................................................87
Microsoft Reader..........................................................................................................88
Getting Books on Your Pocket PC Phone.........................................................................89
Using the Library ..............................................................................................................89
Reading a Book.................................................................................................................90
Using Reader Features ......................................................................................................90
Removing a Book..............................................................................................................91
Image Viewer...............................................................................................................91
Transferring Images to your Pocket PC Phone .................................................................91
Changing your Image List Layout ....................................................................................91
Viewing Images.................................................................................................................92
Deleting an Image .............................................................................................................92
Refreshing All Images.......................................................................................................92
Arranging Order................................................................................................................92
Appendix A: Character Recognizer.....................................................................93
Appendix B: Troubleshooting .............................................................................94
Resetting the Pocket PC Phone and Clearing Memory......................................................94
To perform a soft reset ......................................................................................................94
To perform a full reset.......................................................................................................94
Battery loses power................................................................................................................94
Page 7
Use external power whenever possible .............................................................................95
Shorten auto suspend time.................................................................................................95
To turn off sounds you do not need...................................................................................95
To turn off notification light..............................................................................................95
If you forget your password ..................................................................................................95
If you run out of phone memory...........................................................................................95
Finding Space in Storage Memory....................................................................................95
Finding Space in Program Memory..................................................................................96
Screen freezes or responds slowly.........................................................................................96
Screen is blank........................................................................................................................96
Screen is dark .........................................................................................................................96
Screen is hard to read ............................................................................................................96
Inaccurate response to stylus taps ........................................................................................96
Slow or no response................................................................................................................97
Infrared (IR) connection problems.......................................................................................97
Phone connection problems ...................................................................................................97
Internet connection problems ...............................................................................................97
Network connection problems...............................................................................................97
Cable and cradle connection problems ................................................................................97
Appendix C: Regulatory Notices .........................................................................99
Regulatory Agency Identification Numbers ........................................................................99
European Union Notice..........................................................................................................99
Important Safety Information.............................................................................................100
General Precautions.............................................................................................................100
Safety Precautions for Power Supply Unit ........................................................................100
Appendix D: Hardware Specifications ..............................................................101
Appendix E: Icons ............................................................................................102
Phone .....................................................................................................................................102
Pocket PC..............................................................................................................................103
Statement according FCC part 15.19 ..................................................................................105
RF eposure ............................................................................................................................106
Copyright Information
Microsoft, ActiveSync, Outlook, Pocket Outlook, Windows, Windows NT, and the Windows logo are either registered
trademarks or trademarks of Microsoft Corporation in the United States and/or other countries. Microsoft products are licensed to
OEMs by Microsoft Licensing, Inc., a wholly owned subsidiary of Microsoft Corporation.

Page 8
Chapter 1: Getting Started
Welcome
Congratulations on purchasing a Pocket PC Phone. The integrated wireless voice and data capabilities mean that as well as
keeping your important Personal Information Manager (PIM) information up-to-date and close at hand, you can make calls, send
and receive e-mail, and look up valuable information from the Internet or your company’s network anytime, anywhere. Also,
with Microsoft ActiveSync, the power of your Pocket PC Phone is increased by allowing you to synchronize the information on
your PC with your Pocket PC Phone. Picture yourself in the following situations:
?? While walking with a colleague, your Pocket PC Phone rings. You look at the caller ID and see your manager is calling. She
asks if you two are free this afternoon for an emergency meeting. While your colleague fumbles through his paper organizer,
you press a button on your Pocket PC Phone and instantly see a list of today’s appointments and meetings. You are quickly
able to tell your manager your available times, and make a note of the new meeting while on the call. You hang up and send
e-mail with a meeting request for the three of you at the desired location.
?? You are meeting your friends tonight for dinner and a movie. You download the latest movie information from the Internet to
your PC, and then synchronize it with your Pocket PC Phone. At dinner, you pull out your Pocket PC Phone and review your
movie options with your friends. A Calendar reminder alerts you that it is time to see the movie. You grab your Pocket PC
Phone, check driving directions and head towards the theater.
?? Because ActiveSync keeps the information on your Pocket PC Phone up-to-date, you can leisurely review your current task
list, make notes on the new books and DVDs you want to buy, and read and respond to e-mail messages quickly and
conveniently. When you get back to the office, ActiveSync transfers any task changes you made - new notes, responses to
e-mails, etc. – directly to your PC.
Where to Find Information
This User Manual describes your Pocket PC Phone hardware, provides an overview of the programs on your Pocket PC Phone,
and explains how to connect your Pocket PC Phone to a PC, to a network or to the Internet. For instructions on setting up your
Pocket PC Phone, see the Quick Start Guide, the Welcome Guide and the Product Tour video on the enclosed Pocket PC
Phone Companion CD. The following table is a guide to additional information to help you use your Pocket PC Phone.
For information on: See this source:
Pro grams on your Pocket PC Phone This User Manual and Pocket PC Phone Help. To
view Help, tap and then Help.
Additional programs that can be installed on the
Pocket PC Phone The Pocket PC Phone Companion CD.
Connecting to and synchronizing with a PC The Quick Start Guide or ActiveSync Help on your
Pocket PC Phone. To view ActiveSync Help, click
Help and then Connections.
Last-minute updates and detailed technical
information
The Read Me files, located in the Microsoft
ActiveSync folder on the PC and on the Pocket PC
Phone Companion CD.
Up -to-date information on your Pocket PC Phone http://www.pocketpc.com

Page 9
Chapter 2: Hardware Features
Your Pocket PC Phone has hardware buttons and a stylus for selecting items and entering information.
Front Panel Components
1
Volume. Press to adjust the volume of your Pocket PC Phone.
2
Infrared Port. Enables you to exchange file(s) or data with other Pocket PC Phones without cables/wires.
3
Power Button. Press to turn on/off your Pocket PC Phone.
Backlight. Press and hold to turn the backlight on/off.
4
Contacts. Press for quick access to your Contacts.
5
Speaker. Listen to audio media or a phone call from here.
6
Notification LED:
a) Flashing Green (Every 3 seconds) – GSM Network Signal.
b) Flashing Green (Every second) – Notification Alarm Reminder.
c) Steady Red – Battery empty.
d) Flashing Red – Low battery.
e) Steady Amber – Battery charging.
f) Steady Green – Fully charged.
7
Calendar. Press to quickly access the Calendar.
8
End. Press to end a call.
Phone On/Off. Press and hold to turn on/off your Pocket PC Phone’s phone.
1.
2.
3
.
8.
10.
9.
4.
7.
6
.
11.
12.
Page 10
9
Navigation Pad:
Allows you to move up/down and left/right through any of the drop-down menus or program instructions; select by pressing
in the center.
Left: When in the Dialer screen, press once to access the Speed Dial feature.
Right: When in the Dialer screen, press once to access the Call Log feature.
10
Microphone. Speak into the microphone when receiving/making a phone call or voice recording.
11
Take Call. Press to take an incoming call.
Dialer Screen. Press to activate the dialer screen.
Speakerphone. Press and hold to turn on/off the speakerphone.
Dial. Press to dial a number.
12
Touch Screen. Use the touch screen to write, draw or make a selection with the stylus.
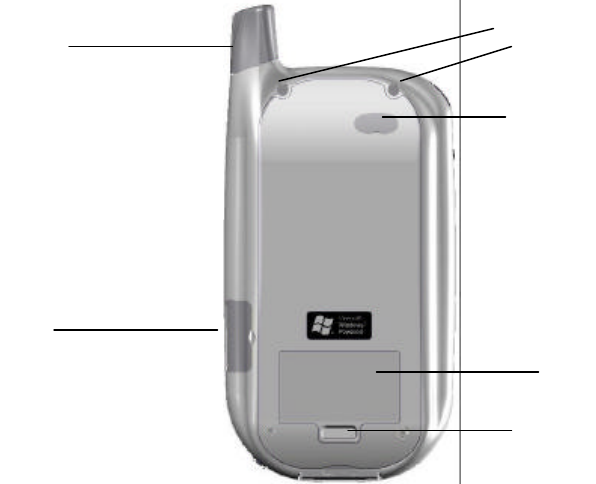
Back Panel Components
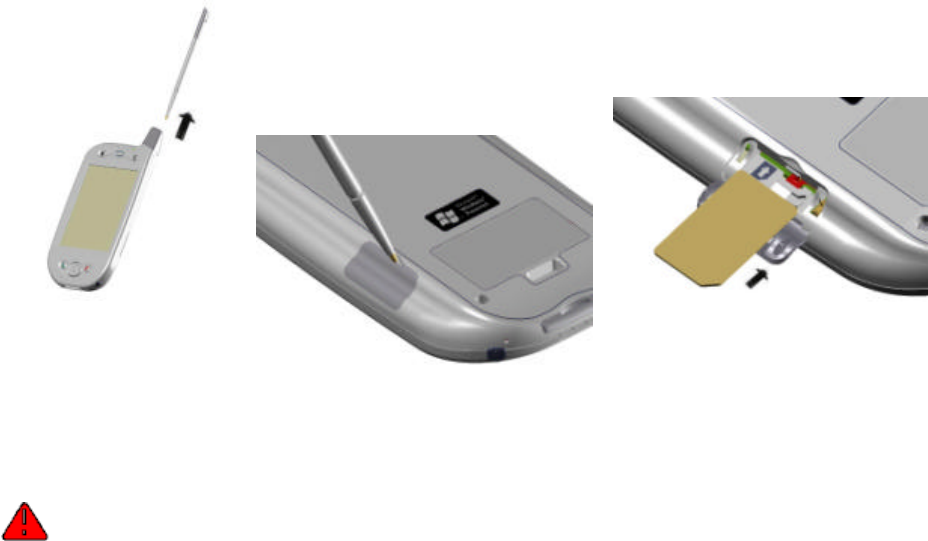
1. Smart Card Door. Open the rubber door to insert the Smart Card.
2. Stylus Slot and Stylus. The antenna has a neatly hidden slot for housing the stylus.
3. To Secure External Battery. The optional External Battery should be fastened here. (See the section, Attaching the
External Battery)
4. External Battery Connector Cover. Remove this to uncover the connection between your Pocket PC Phone and the
optional External Battery.
5. Main Battery Unit. The main battery is housed permanently inside the Pocket PC Phone – it should only be changed
through an authorized sales center.
6. External Battery Clip. Before screwing the External Battery into position, secure the clip on the bottom into this hole.
2.
3.
4.
5.
6.
1
.
Page 11
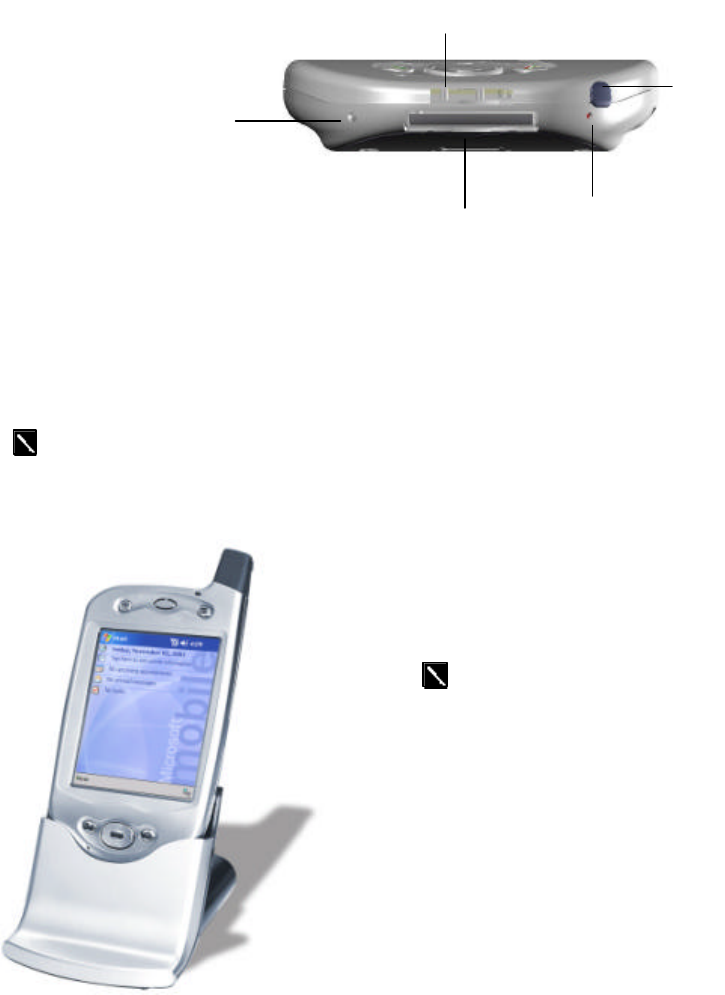
Bottom Edge Components
1
Soft Reset. Press into the hole with the end of your stylus to reset your Pocket PC Phone.
2
Sync Connector. Use this connector when synchronizing/transmitting data or when recharging.
3
Earphone Jack. Use the earphone jack or the phone’s hands-free kit to listen to audio media.
4
Battery On/Off Switch. Press into the hole with the end of the top-half of your stylus to return the Pocket PC Phone to
factory settings.
CAUTION: Battery Off will wipe all the data from your Pocket PC Phone!
5
MMC And SD Card Slot. Insert either MMC or SD cards in this slot.
USB Cradle
?? Your Pocket PC Phone comes with a USB cradle. This allows you to
recharge your Pocket PC Phone, as well as synchronize information
between your Pocket PC Phone and a PC using ActiveSync.
To synchronize, plug the USB cradle into an available USB port
on your PC.
Temperature and Battery Life
Your Pocket PC Phone contains a rechargeable Lithium Polymer battery, which is housed permanently in your Pocket PC Phone.
After a few years of continual use and recharging the battery will become unusable and should be changed through a service
center. While you are using your Pocket PC Phone the amount of power consumed depends on whether you are talking on the
phone, using the PIM and Internet functions or the Pocket PC Phone is on standby. The estimates for battery life (talk time: 4~5
hours, PIM: 15-17 hours and standby: 150 -170 hours) are based on only using one function. Since you will be continually
swapping between functions, these estimates will vary.
3.
5.
1.
4.
2.
Page 12
Your Pocket PC Phone contains a Lithium Polymer battery pack. There is a risk of fire and burns if the
battery pack is handled improperly. Do not disassemble, crush, puncture, short external contacts, or dispose
of in fire or water. Do not attempt to open or service the battery pack. Replace only with the battery pack
designated for this product. Dispose of batteries properly.
Recharging the Battery
Remembering to charge your battery is extremely important, as your Pocket PC Phone does not have a hard drive. All your data
and any new programs you install are stored in Random Access Memory (RAM). In the event that the battery loses all its power,
personal data and newly installed software programs will be wiped off. Only the default programs installed when you bought the
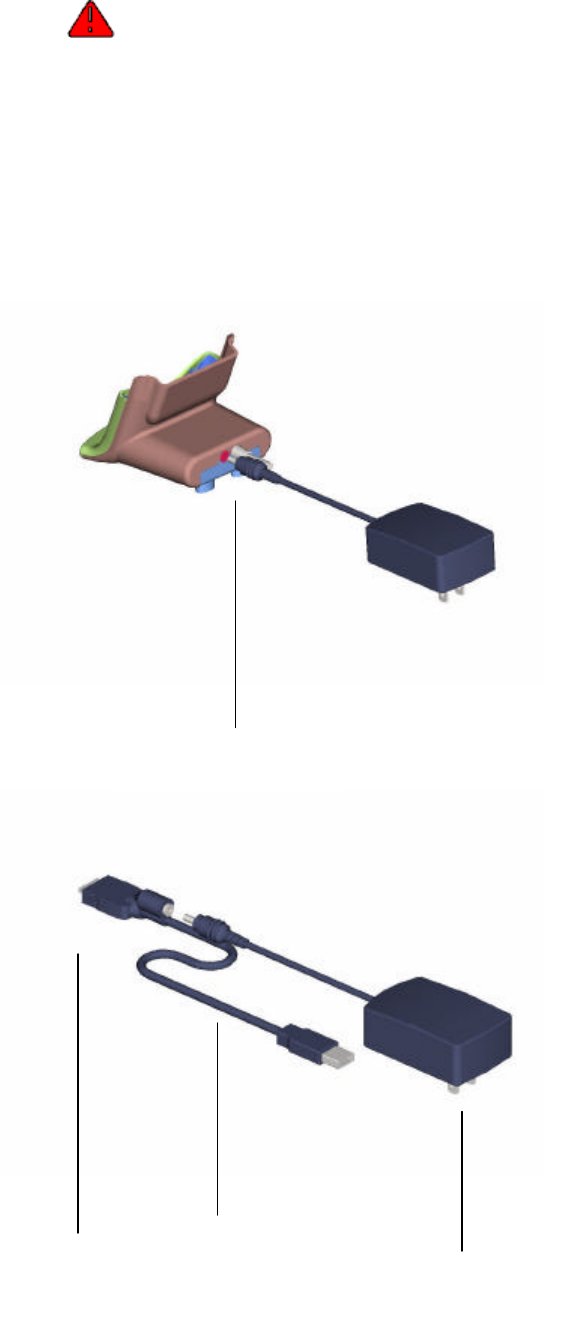
Pocket PC Phone will remain. You can recharge your Pocket PC Phone in the following ways:
?? Place your Pocket PC Phone in the
cradle and connect the cradle to an
external power source. The first time
you use it initially charge for three to
four hours. Then place your Pocket PC
Phone in the cradle for a short time each
day to recharge to its full capacity.
?? You can plug the AC adapter into the
optional USB/Serial cable head and then
connect your Pocket PC Phone directly
to an external power source.
USB synchronization
cable
To your Pocket
PC Phone Plug the AC adapter
into a socket
AC adapter plugs into the
back of the cradle
Page 13
To your Pocket PC Phone To AC adapter
?? You can plug the AC adapter
into the optional DC Converter
and then connect your Pocket
PC Phone directly to an external
power source.
When Your Battery Is Low
Your Pocket PC Phone has only one battery; however, a portion of that battery is saved as backup. If the battery gets very low,
your Pocket PC Phone displays a warning message. If this occurs, save any unsaved data you are working on, perform
synchronization with your PC and then turn off your Pocket PC Phone. Do not try to restart your Pocket PC Phone until you have
connected to external power. If your Pocket PC Phone does shut down, the backup portion of your battery will protect your data
for approximately 72 hours.
Optional Accessories
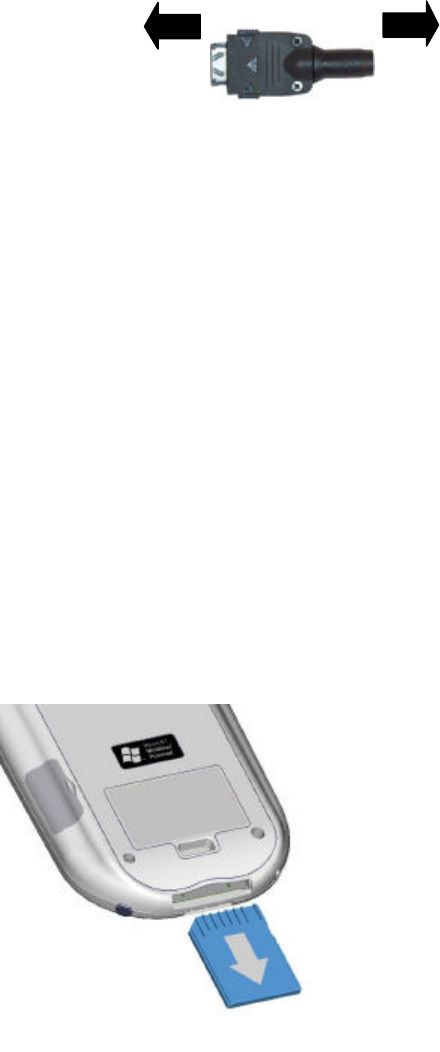
SD and MMC Cards
Your Pocket PC Phone has an expansion slot compatible with a range of SD and MMC memory cards, which are primarily used
to back up or transfer files and data.
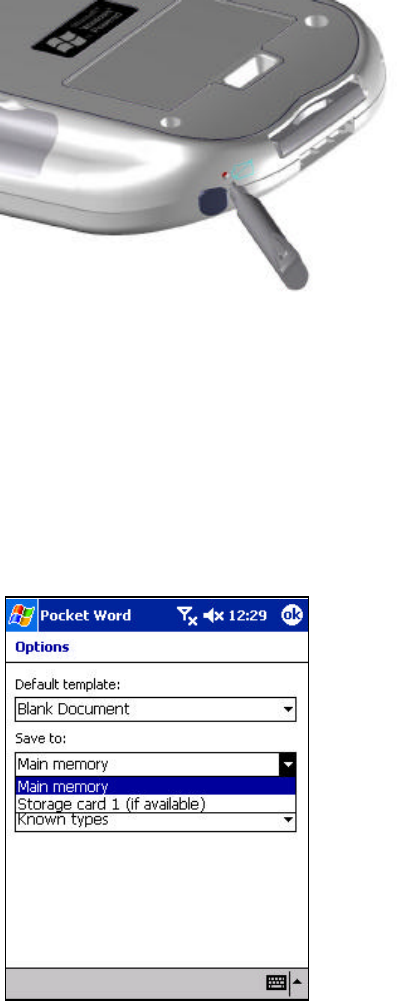
Inserting or removing a memory card
1. Push the memory card into the bottom slot until it clicks into place
.
The card is secure when it is not protruding from the base.
External Battery
You can purchase an optional External Battery to increase the battery life of your Pocket PC Phone by up to another 4 hours, and
standby time by another 150 hours. The External Battery can be charged with either your Pocket PC Phone or with an External
Battery charger. Charging with the External Battery charger should take about two and a half hours; when it is attached to the
Pocket PC Phone, total charging for the External Battery and Pocket PC Phone should be approximately five hours.
Page 14
Attaching the External Battery
1. Remove the rubber cap protecting the Pocket PC Phone
connector for the External Battery. The cap is situated just
below the right screw on the back of the Pocket PC Phone.
2. Hook the External Battery into the embedded slot near the
base of the back of your Pocket PC Phone (see picture to the
left).
3. Tighten the screws at the top of the External Battery into
your Pocket PC Phone.
To view the current charge of the external battery
When you attach the External Battery an extra indicator will be
added to the Power screen.
To view this indicator tap Start, Settings, System and then
Power.
Your Pocket PC Phone contains a Lithium Polymer battery pack. There is a risk of fire and burns if the
battery pack is handled improperly. Do not disassemble, crush, puncture, short external contacts, or dispose
of in fire or water. Do not attempt to open or service the battery pack. Replace only with the battery pack
designated for this product. Dispose of batteries properly.
External Battery Screws
Page 15
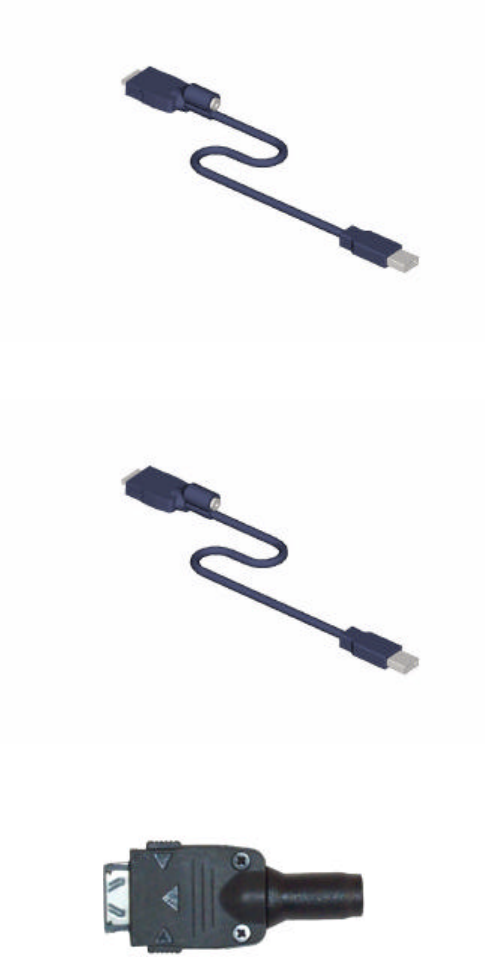
USB Cable
?? The USB cable allows you to synchronize with your
desktop PC without the cradle. The DC converter in the
head also allows you, in combination with an AC
adapter, to recharge your Pocket PC Phone.
Serial Cable
?? The Serial cable allows you to synchronize with your
desktop PC without the cradle. The DC converter in the
head also allows you, in combination with an AC
adapter, to recharge your Pocket PC Phone.
DC Connector
??
The DC connector, in combination with the AC
adapter, allows you to recharge your Pocket PC
Phone without the cradle.
Page 16
Chapter 3: Knowing Your Pocket PC Phone
Resetting the Pocket PC Phone and Clearing Memory
You can perform a soft reset or a full reset – a soft reset restarts your Pocket PC Phone and a full reset switches the battery off. The
result of a soft reset is that some data may be lost in programs that are open. The result of a full reset is wiping all the data and
new programs you have added - and returning the Pocket PC Phone to factory settings – which will only have the software that
was present when you bought it. Therefore, it is important not to think about a full reset as you would restarting, shutting down or
even switching off your desktop PC, but rather like a complete crash requiring you to wipe your operating system (OS). The
importance of backing up data to an SD card or your computer cannot be stressed enough - in the event you have to perform a full
reset your data will not be lost.
To perform a soft reset
If your Pocket PC Phone responds slowly, stops responding or freezes, try soft resetting it. A soft reset causes the Pocket PC
Phone to restart and re-adjust memory allocation. Unsaved data in open windows may be lost.
?? Use the stylus to press and hold the Reset button for about two seconds. (For details on finding soft reset, see “Chapter 2,
Bottom Edge Components.”)
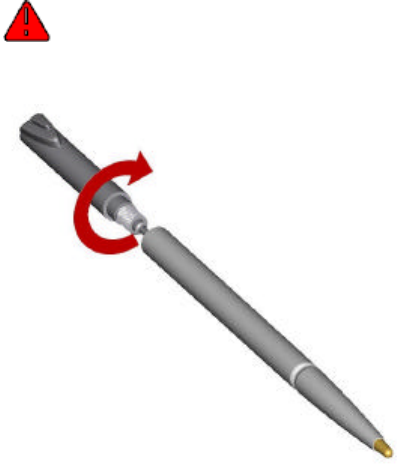
To perform a full reset
Clearing memory deletes all data and restores the Pocket PC Phone to its default settings. Programs installed at the
factory remain, while data you have created and programs you have installed are erased.
1. Unscrew the stylus and use the smaller point of the top-
half.
Page 17
2. Press the battery switch once to turn it off, and then once
more to turn it back on.
Backing Up Files
Because any new programs or data are stored in RAM and will be lost if you have to perform a full reset, or your Pocket PC Phone
loses all power for any other reason, it is absolutely paramo unt that you back up files to your computer or a memory card. When
you are at your desktop PC you can synchronize with your computer to back up files. However, if you are unable to access your
desktop PC, you will need to back up files to a SD or MMC card. In this case, you can back up individual files in Word or Excel
or all files in SD backup.
To save Word or Excel files to a memory card
1. In application programs (e.g. Pocket Word or Excel) press Tools,
Options.
2. Tap the drop-down menu box under Save To and select Storage Card
.
Page 18
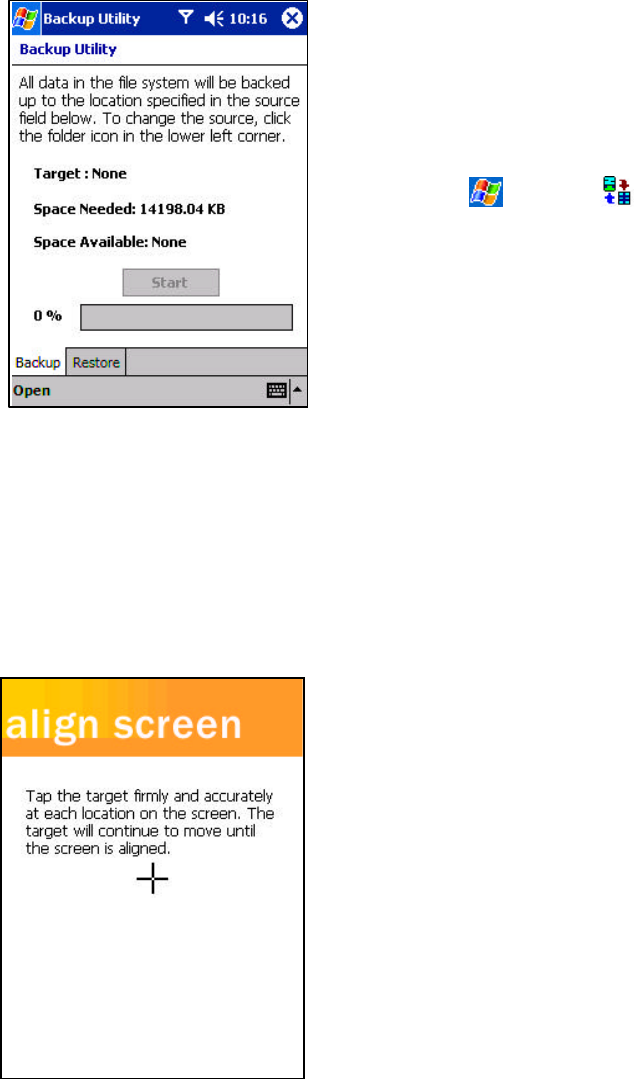
Back up or restore your system using SD Backup
1. Push the memory card into the slot until it clicks into place (see
Chapter 2, “Inserting or removing a memory card”). The card is
secure when it is not protruding from the b ase.
2. Tap , Programs , (SD Backup) then the Backup or Restore
tab.
3. Tap Open, Storage Card.
4. Make sure there are no application programs running in the
background, and then tap Start.
Screen Tapping Calibration and Recalibration
When you first start up your Pocket PC Phone, you will be asked to calibrate the screen by tapping the center of a cross with your
stylus as it moves around the screen. This process ensures when you tap the screen with your stylus the item tapped is activated.
If you are using your Pocket PC Phone and you discover tapping an item does not bring up the appropriate response, your Pocket
PC Phone has lost its calibration.
To recalibrate the screen
?? Tap Settings, System and then Screen.
?? As described above, tap the center of the cross to with your
stylus as it moves around the screen.
?? Tap. Touch the screen once with the stylus to open items and
select options.
?? Drag
. Hold the stylus on the screen and drag across the screen
to select text and images. Drag in a list to select multiple items.
?? Tap and hold
. Tap and hold the stylus on an item to see a list of
actions available for that item. On the pop-up menu that
appears, tap the action you want to perform.
Page 19
Today Screen
When you turn on your Pocket PC Phone for the first time each day (or after 4 hours of inactivity), you will see the Today screen.
You can also display it by tapping and then Today. On the Today screen, you can see at glance important information for the
day. Following are some of the status icons you may see.
Turns all sounds on and off
Main battery low
Main battery very low
Connection is active
Synchronization is beginning or ending
Synchronization is in progress
Notification that one or more instant messages were received
Notification that one or more e-mail/SMS messages were
received
Shows the connection to your mobile phone service provider
is on and the strength of the signal
Indicates your phone is switched off
If more notification icons need to be displayed than there is room to
display them, the Notification icon will display. Tap this icon to view
all notification icons.

Page 20
Programs
You can switch from one program to another by selecting it from the menu. You can customize which programs you see on
this menu. For information, see “Adjusting Settings” later in this chapter. To access some programs, you will need to tap ,
Programs , and then the program name.
You can also switch to some programs by pressing a program button. Your Pocket PC Phone has one or more program buttons
located on the front or side of the Pocket PC Phone. The icons on the buttons identify the programs they switch to.
Some programs have abbreviated labels for check boxes and drop-down
me nus. To see the full spelling of an abbreviated label, tap and hold the
stylus on the label. Drag the stylus off the label so that the command is not
carried out.
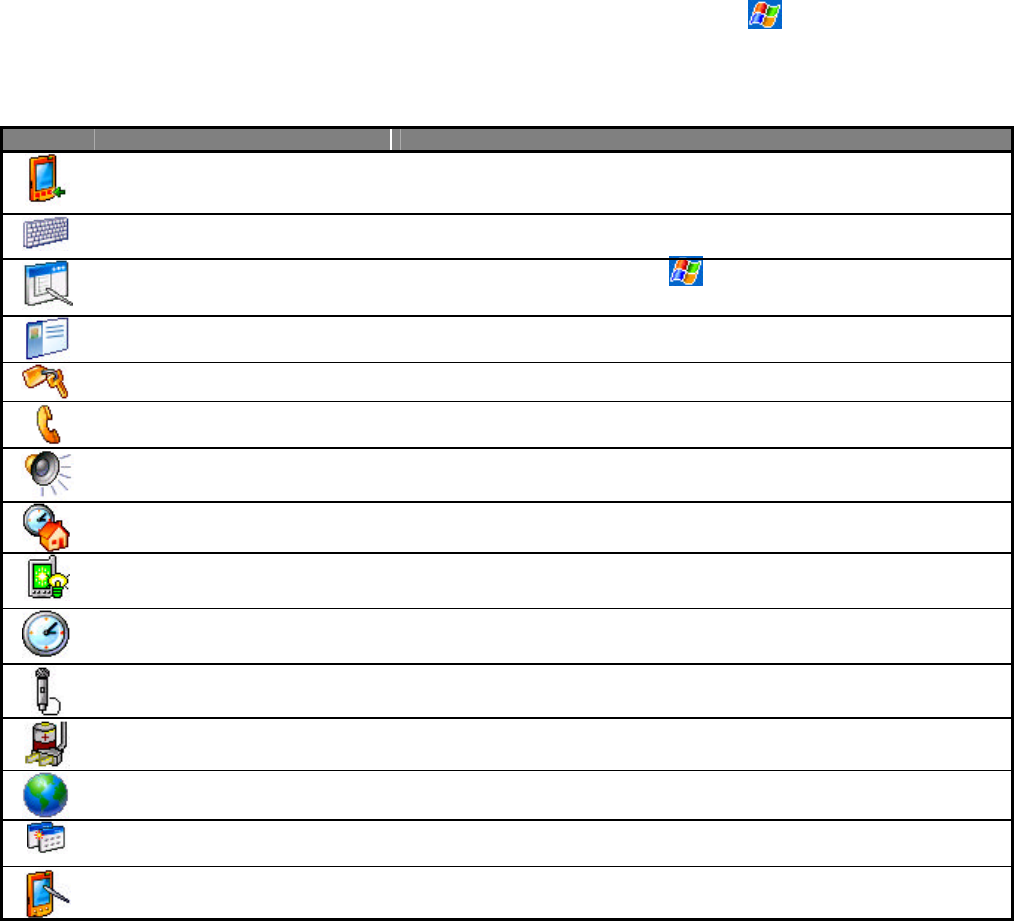
The following table contains a partial list of programs that are on your Pocket PC Phone. Look on the Pocket PC Phone
Companion CD for additional programs that you can install on your Pocket PC Phone.
Icon Program Description
ActiveSync Synchronize information between your Pocket PC Phone and PC.
Calendar Keep track of your appointments and create meeting requests.
Contacts Keep track of your friends and colleagues.
Inbox Send and receive e-mail/SMS messages.
Pocket Internet Explorer Browse Web and WAP sites, and download new programs and files from the Internet.
Notes Create handwritten or typed notes, drawings, and recordings.
Tasks Keep track of your tasks.
Pocket Excel Create new workbooks or view and edit Excel workbooks.
MSN Messenger Send and receive instant messages with your MSN Messenger contacts.
Pocket Word Create new documents or view and edit MS-Word documents.
Phone Make and receive calls, swap between calls and set up conference calling.
SD Backup Back up your Pocket PC Phone files to a SD card.
Phone Book Loads contents of your Smart Card to your Pocket PC Phone and allows you to
transfer to Contacts.
Windows Media Player To enable the multimedia function on your Pocket PC Phone.

Page 21
Navigation Bar and Command Bar
?? The navigation bar is located at the top of the screen. It
displays the active program and current time, and allows you
to switch to programs and close screens.
?? Use the command bar at the bottom of the screen to perform
tasks in programs. The command bar includes menu names,
buttons, and the Input Panel button. To create a new item in
the current program, tap New. To see the name of a button,
tap and hold the stylus on the button. Drag the stylus off the
button so that the command is not carried out.
Pop-up Menus
?? With pop-up menus, you can quickly choose an action
for an item. For example, you can use the pop-up menu
in the contact list to quickly delete a contact, make a
copy of a contact, or send an e-mail message to a
contact. The actions in the pop-up menus vary from
program to program. To access a pop-up menu, tap and
hold the stylus on the item name that you want to
perform the action on. When the menu appears, lift the
stylus and tap the action you want to perform. Or tap
anywhere outside the menu to close the menu without
performing an action.
Notifications
Your Pocket PC Phone reminds you in a variety of ways when you have something to do or you receive an SMS. For example, if
you have set up an appointment in Calendar, a task with a due date in Tasks, or an alarm in Clock, you will be notified in any of
the following ways:
?? A message box appears on the screen.
?? A sound, which you can specify, is played.
Page 22
?? A light flashes on your Pocket PC Phone.
?? The Pocket PC Phone vibrates.
To choose reminder types and sounds for your Pocket PC Phone, tap and then Settings. In the Personal tab, tap Sounds &
Notifications. The options you choose here apply throughout the Pocket PC Phone.
Entering Information on Your Pocket PC Phone
You have several options for entering new information:
?? Use the input panel to enter typed text, either by using the soft keyboard or other input method.
?? Write directly on the screen.
?? Draw pictures on the screen.
?? Speak into your Pocket PC Phone microphone to record a message.
?? Use Microsoft ActiveSync to synchronize or copy information from your PC to your Pocket PC Phone. For more
information on ActiveSync, see ActiveSync Help on your desktop PC.
Entering Text Using the Input Panel
?? Use the input panel to enter information in any program on
your Pocket PC Phone. You can either type using the soft
keyboard or write using Letter Recognizer, Block
Recognizer, or Transcriber. In all cases, the charact
ers appear
as typed text on the screen.
?? To show or hide the input panel, tap the Input Panel button.
Tap the arrow next to the Input Panel button to see your
choices.
?? When you use the input panel, your Pocket PC Phone
anticipates the word you are typing or writing
and displays it
above the input panel. When you tap the displayed word, it is
inserted into your text at the insertion point. The more you
use your Pocket PC Phone, the more words it learns to
anticipate.
Page 23
To type with the soft keyboard
1. Tap the arrow next to the Input Panel button and then Keyboard.
2. On the soft keyboard that is displayed, tap the key with your stylus.
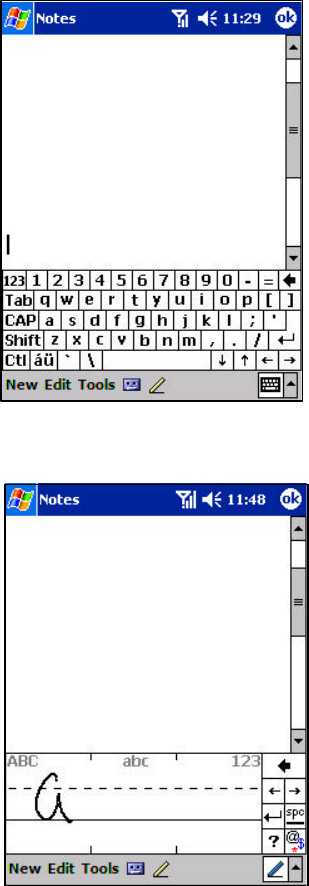
To use Letter Recognizer
With Letter Recognizer you can write letters using the stylus just as you wo
uld on
paper.
1. Tap the arrow next to the Input Panel button and then Letter Recognizer.
2. Write a letter in the box.
When you write a letter, it is converted to typed text that appears on the screen. For
specific instructions on using Letter Recognizer, with Letter Recognizer open, tap
the question mark next to the writing area.
Page 24
To use Block Recognizer
With Block Recognizer you can input character strokes using the stylus that are
similar to those used on other Pocket PC Phones.
1. Tap the arrow next to the Input Panel button and then Block Recognizer.
2. Write a letter in the box.
When you write a letter, it is converted to typed text that appears on the screen. For
specific instructions on using Block Recognizer, with Block Recognizer open, tap
the question mark next to the writing area.
To switch to Transcriber
With Transcriber you can write anywhere on the screen using the stylus just as you
would on paper. Unlike Letter Recognizer and Block Recognizer, you can write a
sentence or more of information. Then, pause and let Transcriber change the
written characters to typed characters.
1. Tap the arrow next to the Input Panel button and then Transcriber.
2. Write anywhere on the screen.
For specific instructions on using Transcriber, with Transcriber open, tap the
question mark in the lower right hand corner of the screen.
Page 25
To punctuate in Transcriber
1. Tap the keyboard on the toolbar.
2. Tap OK to hide the keyboard.
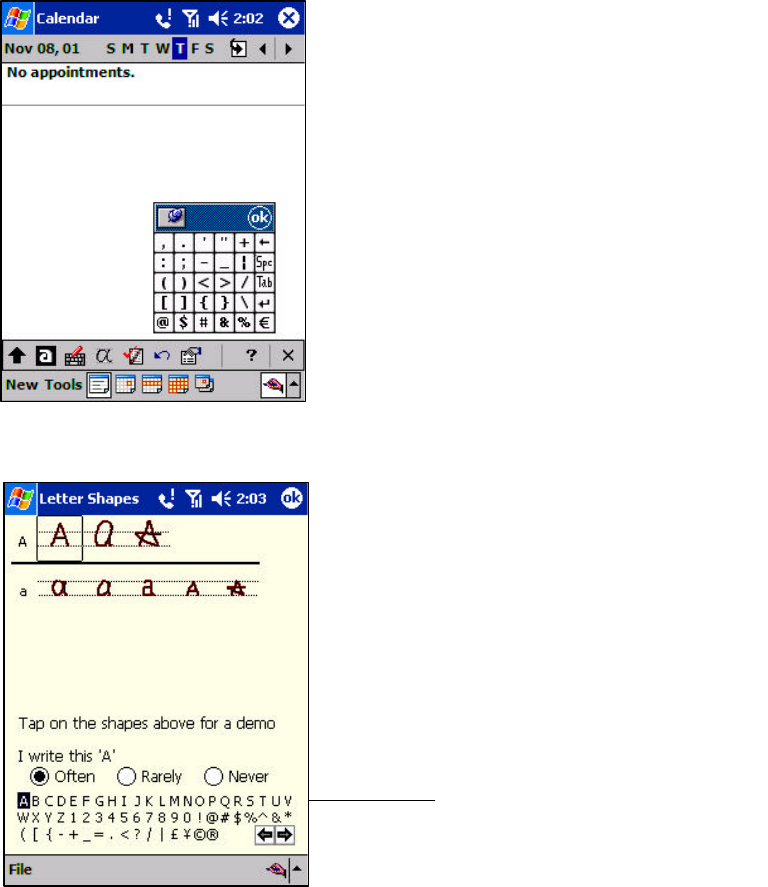
To see how to write a letter in Transcriber
1. Tap “a” on the toolbar.
2. In the screen that ap
pears, select the letter you want to learn about, and then tap
on one of the examples given above.
For specific instructions on using Transcriber, with Transcriber open, tap the
question mark in the lower right hand corner of the screen.
Click on a letter for a demonstration.
Click on a letter for a demonstration
Page 26
To select typed text
If you want to edit or format typed text, you must select it first. To do so:
??
Drag the stylus across the text you want to select. You can cut, copy, and paste
text by tapping and holding the selected words and then tapping an editing
command on the pop-up menu, or by tapping the command on the Edit menu.
To change word suggestion options, such as the number of words suggested at one time, tap
, Settings, Personal tab, Input, and then the Word Completion tab.
To edit text
Each input program provides cursor keys to move through text and backspace so that you can correct spelling, grammar or insert
additional information. You can also use your stylus to make an insert. After you have made an insert, you can use any of the
input methods described above to add additional text at the insertion point.
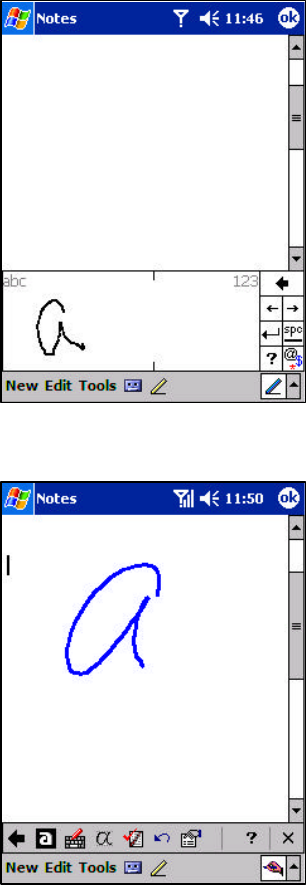
Writing on the Screen
In any program that accepts writing, such as the Notes program, and in the Notes tab in Calendar, Contacts, and Tasks, you can
use your stylus to write directly on the screen. Write the way you do on paper. You can edit and format what you have written and
convert the information to text at a later time.
To write on the screen
?? Tap the Pen button to switch to writing mode. Th
is action displays lines on
the screen to help you write.
Page 27
Some programs that accept writing may not have the Pen button. See the documentation for that
program to find out how to switch to writing mode.
To select writing
If you want to edit or format writing, you must select it first.
1.
Tap and hold the stylus next to the text you want to select until the insertion
point appears.
2. Without lifting, drag the stylus across the text you want to select.
If you accidentally write on the screen, tap Tools, then Undo and try again. You
can also select text by tapping the Pen button to deselect it and then dragging the
stylus across the screen.
You can cut, copy and paste written text in the same way you work with typed
text : tap and hold the selected words and then tap an editing command on the
pop-up menu, or tap the command on the Edit menu.
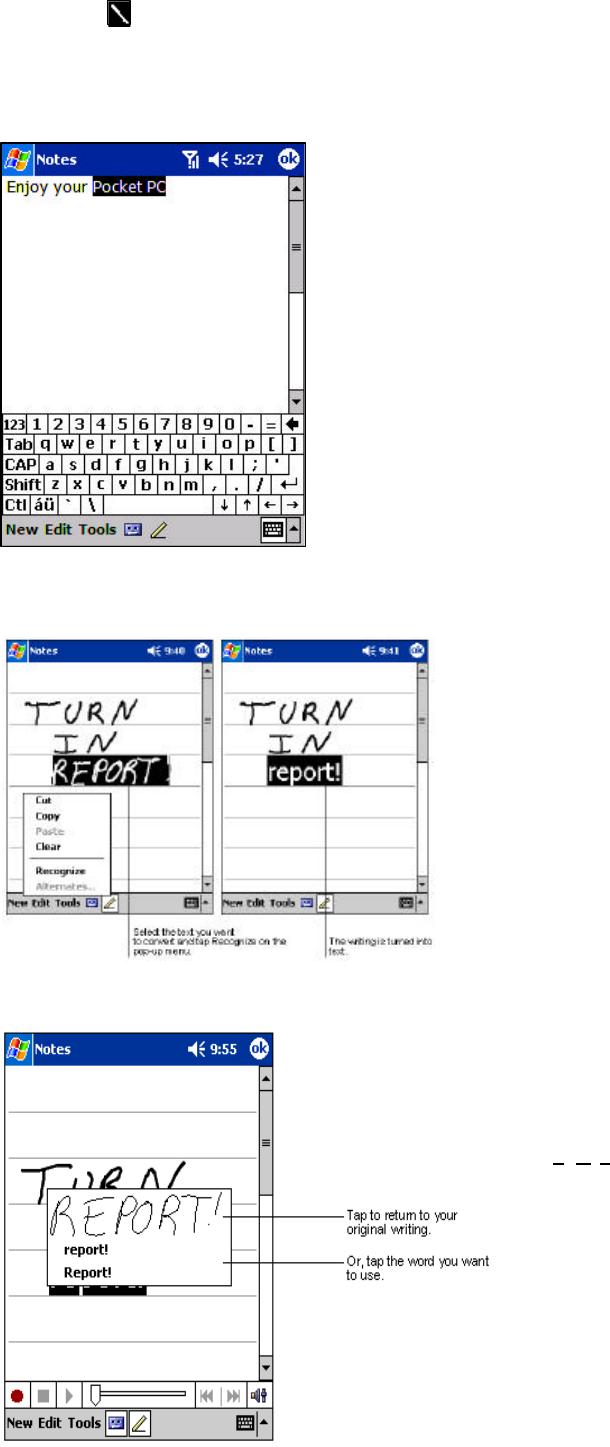
To convert writing to text
1. Tap Tools and then Recognize.
2. If you want to convert only certain words, select them
before tapping Recognize on the Tools menu (or tap and
hold the selected words and then tap Recognize on the
pop-up menu). If a word is not recognized, it is left as
writing.
3. If the conversion is incorrect, you can select different
words from a list of alternates or return to the original
writing. To do s
o, tap and hold the incorrect word (tap one
word at a time). On the pop-up menu, tap Alternates. A
menu with a list of alternate words appears. Tap the word
you want to use, or tap the writing at the top of the menu to
return to the original writing.
Tips for getting good recognition
1. Write neatly.
2. Write on the lines and draw the end of lowercase letters
(y , g , p) below the line. Write the cross of the “t” and
apostrophes below the top line so that they are not
confused with the word above. Write peri
ods and commas
above the line.
3. For better recognition, try increasing the zoom level to
300% using the Tools menu.
4. Write the letters of a word closely and leave big gaps
between words so that the Pocket PC Phone can easily tell
where words begin and end.
Page 28
where words begin and end.
5. Hyphenated words, foreign words that use special
characters such as accents, and some punctuation cannot
be converted.
6.
If you change a word or number (such as changing a “3” to
an “8”) after you attempt to recognize it, the writing you
add will not be included if you attempt to recognize the
writing again.
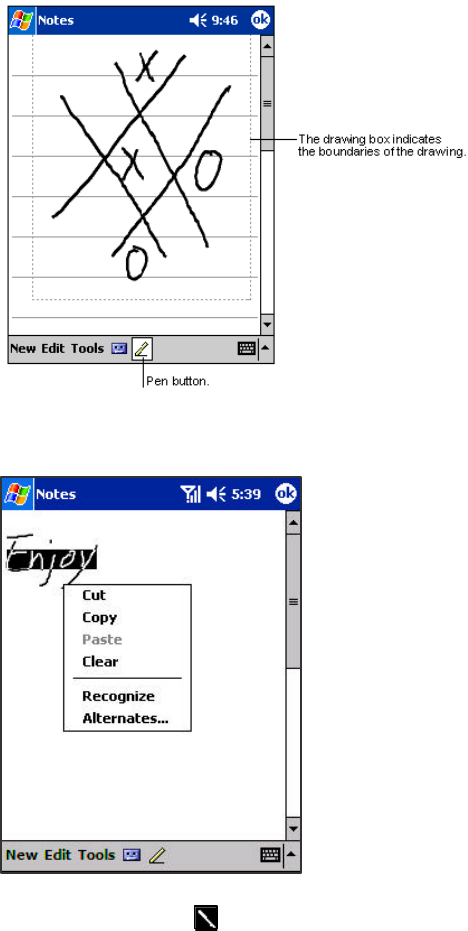
Drawing on the Screen
You can draw on the screen in the same way that you write on the screen. The difference between writing and drawing on the
screen is how you select items and how they can be edited. For example, selected drawings can be resized, while writing cannot.
To create a drawing
?? Cross three ruled lines on your first stroke. A drawing box
appears. Subsequent strokes in or touching the drawing box
become part of the drawing. Drawings that do
not cross three
ruled lines will be treated as writing.
To select a drawing
If you want to edit or format a drawing, you must select it first.
?? Tap and hold the stylus on the drawing until the selection
handle appears. To select multiple dr
awings, deselect the Pen
button and then drag to select the drawings you want.
??
You can cut, copy and paste selected drawings by tapping and
holding the selected drawing and then tapping an editing
command on the pop-up menu, or by tapping the command
on the Edit menu. To resize a drawing, make sure the Pen
button is not selected, and drag a selection handle.
You may want to change the zoom level so that you can more easily work
on or view your drawing. Tap Tools and then a zoom level.
Page 29
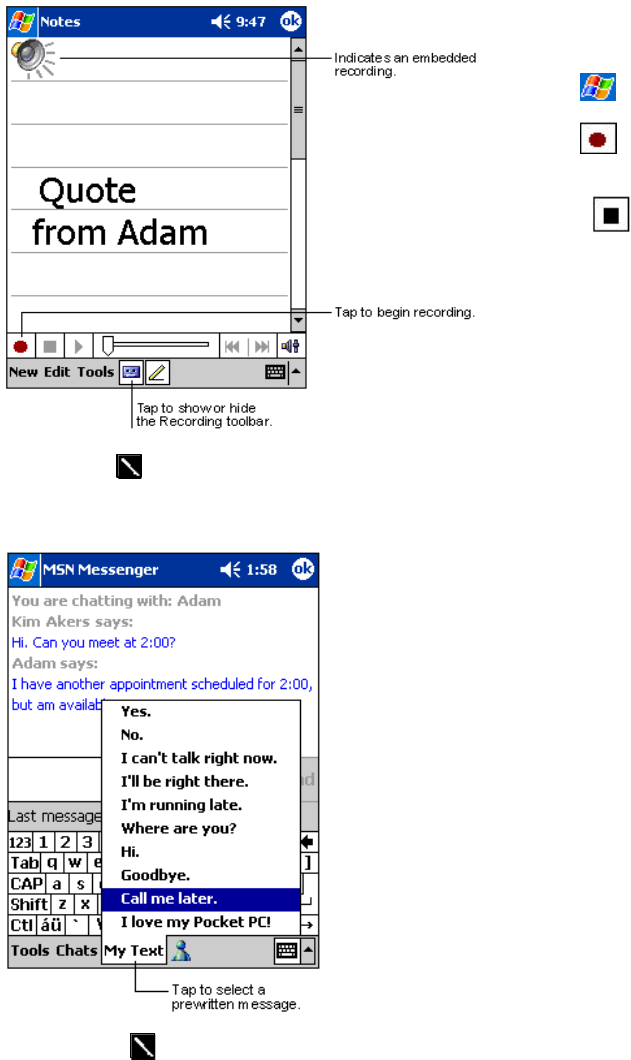
Recording a Message
In any program where you can write or draw on the s creen, you can also quickly capture thoughts, reminders, and phone numbers
by recording a message. In Calendar, Tasks, and Contacts, you can include a recording in the Notes tab. In the Notes program,
you can either create a stand-alone recording or include a recording in a written note. If you want to include the recording in a
note, open the note first. In the Inbox program, you can add a recording to an e-mail message.
To create a recording
1.
Hold your Pocket PC Phone’s microphone near your mouth
or other source of sound.
2. Tap , and then Notes.
3. Tap
to make your recording. A beep will sound in the
beginning of the recording.
4. Tap to stop recording. Two beeps will sound. The
new recording appears in the note list or as an embedded icon.
You can also make a recording by tapping the Record button on the Recording toolbar.
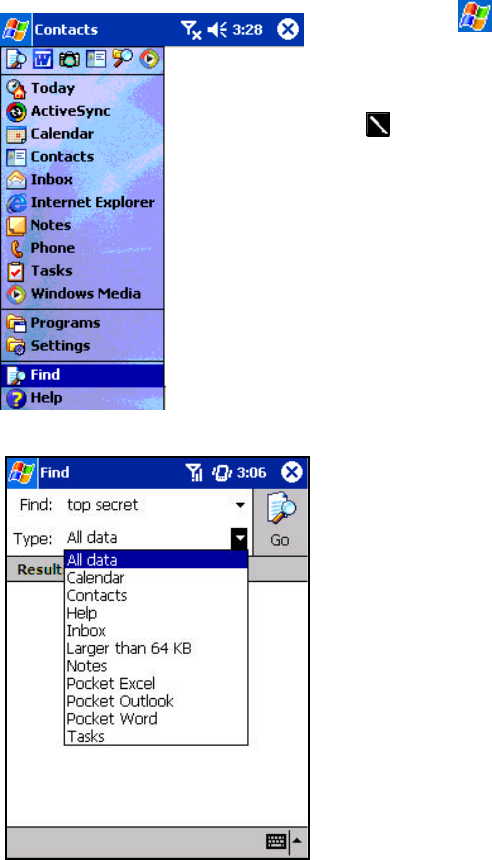
Using My Text
?? When using Inbox or MSN Messenger, use My Text to
quickly insert preset or frequently used messages into the
text entry area. To insert a message, tap My Text and tap a
message.
?? To edit a My Text message, in the Tools menu, tap Edit
and
then tap My Text Messages. Select the message you wish
to edit and make desired changes.
You can add text to a My Text message after inserting it.
Page 30
Finding and Organizing Information
The Find feature on your Pocket PC Phone helps you quickly locate information.
?? On the menu, tap Find. Enter the text you want to find, select a data
Type, and then tap Go to start the search.
To quickly find information that is taking up storage space on your Pocket PC
Phone, select Larger than 64 KB in Type.
?? Tap in a file name, select a file type and press Go.
?? The name of the file will appear in the box entitled Results.
Page 31
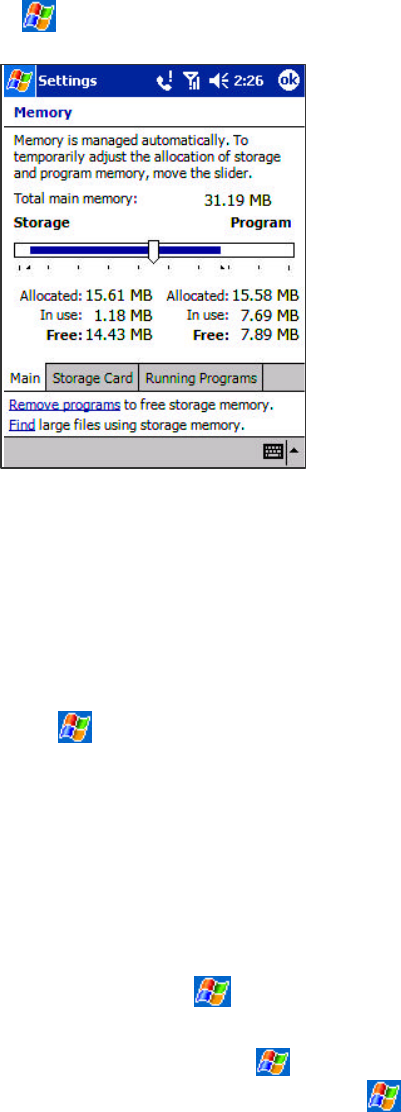
Managing Memory
Memory on your Pocket PC Phone is shared between storage memory and program memory. Storage memory is used to store the
information you create and programs you install. Program memory is used to run programs on your Pocket PC Phone. The Pocket
PC Phone automatically manages the allocation between storage and program memory.
To view memory allocation and availability
Tap , Settings, System and then Memory.
Finding Space in Storage Memory
In some situations, such as when memory is low, your Pocket PC Phone may not be able to automatically adjust the allocation. If
you receive a message stating that storage or program memory is unavailable, try the following solutions.
To make available storage memory
1. Move data to a SD storage card.
2. Tap , Programs, and then File Explorer. Tap and hold the file you want to move, and tap Cut. Go to the My Documents
folder in the storage card folder, tap Edit, and then tap Paste. Files stored in folders other than My Documents or stored in
folders within subfolders in My Documents may not show up in the list view of some programs. When using Notes, Pocket
Word, or Pocket Excel, you can also move files by opening the item and tapping Tools or Edit and then Rename/Move.
3. Move e-mail attachments. In Inbox, tap Tools and then Options. On the Storage tab, select Store attachments on storage
card. All attachments are moved to the storage card, and new attachments are automatically stored on the storage card.
4. Set programs such as Notes, Pocket Word, and Pocket Excel to automatically save new items on the storage card. In the
program, tap Tools and then Options.
5. If you are copying files from your PC or another Pocket PC Phone to your Pocket PC Phone, try adjusting the slider in the
Memory setting. Tap and then Settings. On the System tab, tap Memory and check whether the slider can be adjusted
manually before copying files.
6. Delete unnecessary files. Tap , Programs, and then File Explorer. Tap and hold the file, and then tap Delete on the
pop-up menu. To find your largest files, tap and then Find. In the Type list, tap Larger than 64 KB, and then tap Go.
Page 32
7. In Internet Explorer options, delete all files and clear history. In Internet Explorer, tap Tools and then Options. Tap
Delete Files and Clear History.
Customizing Your Pocket PC Phone
You can customize your Pocket PC Phone by adjusting Pocket PC Phone settings and installing additional software.
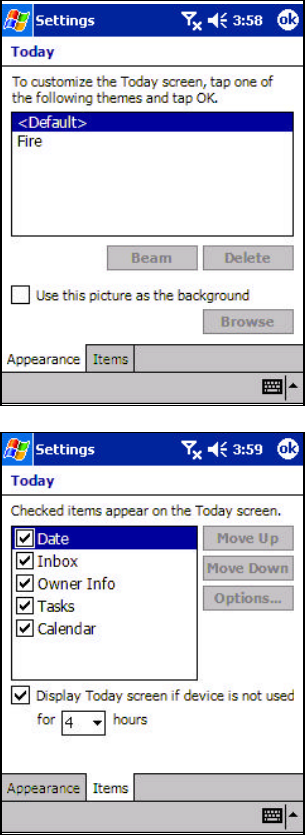
Customizing the Today Screen
You can customize the Today screen in the following ways: change the background picture, select the information you want
displayed and in what order, and further customize to show future appointments.
To change the background
1. Tap Start, Settings, Personal and then Today.
2. On the Appearance tab, select the desired theme for the
background and then tap OK. To use your own
background, select Use this picture as the background
and tap Browse to locate the desired file.
3. Choose a Folder and Type and then tap Find.
4. Tap the picture you want to use and then tap OK.
To customize the information you want displayed:
1. Tap Start, Settings, Personal and then Today.
2. On the Items tab:
?? Uncheck a box to remove its information.
?? Select an item and tap Move Up or Move Down to
change its position.
?? Select or deselect Display Today screen if device is
not used for, and then select a number of hours from
the box.
To customize Tasks or Calendar:
1. Select Tasks or Calendar, Tools and then Options to
further customize.
Page 33
Adjusting Settings
You can adjust Pocket PC Phone settings to suit the way you work. To see available options, tap , Settings, then the Personal
or System tab located at the bottom of the screen.
?? You might want to adjust the following:
Icon Program Description
Buttons To assign application programs to hardware buttons.
Input To set up the input methods of your Pocket PC Phone.
Menu To customize what appears on the menu, and to enable a pop-up menu
from the New button.
Owner Information To enter your personal contact information.
Password To limit access to your Pocket PC Phone.
Phone To set up the phone function of your wireless feature.
Sounds & Notification To set the notification type, event and volume.
Today To customize the look and the information that is displayed on the Today
screen.
Backlight To customize the backlight brightness and automatic turnoff for power saving
purposes.
Clock To change the time and date or to set alarms.
Microphone AGC To enable/disable the microphone Automatic Gain Control (AGC).
Power To maximize battery life and control external power.
Regional Settings To customize language, number format, currency, time and date display.
Remove Programs To save the limited memory you may use this function to remove some
application programs not used frequently.
Screen To recalibrate screen tapping and enable/disable the Clear Type feature.
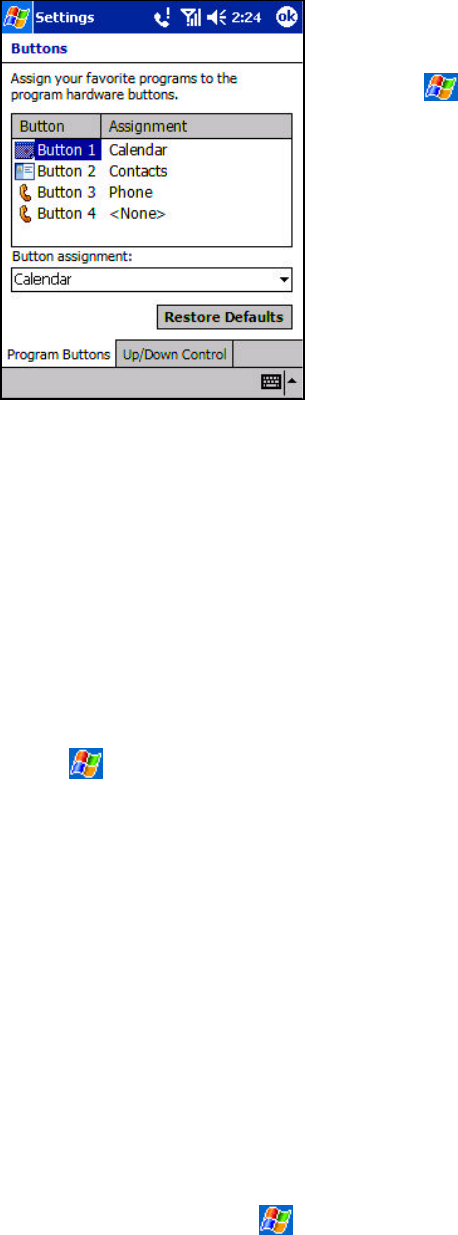
Changing the Default Button Settings
The hardware buttons on your Pocket PC Phone are default set for Calendar, Contacts and Phone. The phone buttons cannot be
changed; however, you can change the Calendar and Contacts buttons to open other programs.
Page 34
To change the default buttons
1. Tap , Settings, Personal and then Buttons.
2. Highlight a button, select a program in Button assignment, and then tap OK
.
Adding or Removing Programs
Programs added to your Pocket PC Phone at the factory are stored in ROM (read-only memory). You cannot remove this software,
and you will never accidentally lose ROM contents. ROM programs can be updated using special installation programs with a
*.xip extension. All other programs and data files added to your Pocket PC Phone after factory installations are stored in RAM
(random access memory).
You can install any program created for your Pocket PC Phone as long as your Pocket PC Phone has enough memory. The most
popular place to find software for your Pocket PC Phone is on the Pocket PC web site
(http://www.microsoft.com/mobile/pocketpc).
To add programs using ActiveSync
You will need to install the appropriate Pocket PC Phone software on your PC before installing it on your Pocket PC Phone.
1. Determine your Pocket PC Phone and processor type so you know which version of the software to install.
Tap and then Settings. On the System tab, tap About. In the Version tab, make a note of the information in Processor.
2. Download the program to your PC (or insert the CD or disk that contains the program into your PC). You may see a single
*.xip, *.exe, or *.zip file, a Setup.exe file, or several versions of files for different Pocket PC Phone types and processors. Be
sure to select the program designed for the Pocket PC Phone and your Pocket PC Phone processor type.
3. Read any installation instructions, Read Me files, or documentation that comes with the program. Many programs provide
special installation instructions.
4. Connect your Pocket PC Phone and PC.
5. Double click the *.exe file.
?? If the file is an installer, the installation wizard will begin. Follow the directions on the screen. Once the software has
been installed on your PC, the installer will automatically transfer the software to your Pocket PC Phone.
?? If the file is not an installer, you will see an error message stating that the program is valid but it is designed for a
different type of PC. You will need to move this file to your Pocket PC Phone. If you cannot find any installation
instructions for the program in the Read Me file or documentation, use ActiveSync Explore to copy the program file to
the Program Files folder on your Pocket PC Phone. For more information on copying files using ActiveSync, see
ActiveSync Help.
Once installation is complete, tap , Programs, and then the program icon to switch to it.
Page 35
To add a program directly from the Internet
1. Determine your Pocket PC Phone and processor type so that you know which version of the software to install.
Tap and then Settings. On the System tab, tap About. In the Version tab, make a note of the information in Processor.
2. Download the program to your Pocket PC Phone straight from the Internet using Pocket Internet Explorer. You may see a
single *.xip, *.exe or *.zip file, a Setup.exe file, or several versions of files for different Pocket PC Phone types and
processors. Be sure to select the program designed for the Pocket PC Phone and your Pocket PC Phone processor type.
4.3. Read any installation instructions, Read Me files, or documentation that comes with the program. Many programs provide
special installation instructions.
4. Tap the file, such as a *.xip or *.exe file. The installation wizard will begin. Follow the directions on the screen.
To add a program to the Start menu
1. Tap , Settings, Menus, the Start Menu tab, and then the check box for the program. If you do not see the program listed,
you can either use File Explorer on the Pocket PC Phone to move the program to the Start Menu folder, or use ActiveSync on the
PC to create a shortcut to the program and place the shortcut in the Start Menu folder.
2. Using File Explorer on the Pocket PC Phone: Tap , Programs, File Explorer, and locate the program (tap the folder
list, labeled My Documents by default, and then My Pocket PC Phone to see a list of all folders on the Pocket PC Phone). Tap
and hold the program and tap Copy on the pop-up menu. Open the Start Menu folder located in the Windows folder, tap and
hold a blank area of the window, and tap Paste on the pop-up menu.
3. The program will now appear on the menu. For more information on using File Explorer, see “Finding and Organizing
Information” earlier in this chapter.
4. Using ActiveSync on the PC: Use the Explorer in ActiveSync to explore your Pocket PC Phone files and locate the program.
Right click the program, and then click Create Shortcut. Move the shortcut to the Start Menu folder in the Windows folder. The
shortcut now appears on the menu. For more information, see ActiveSync Help.
To remove programs
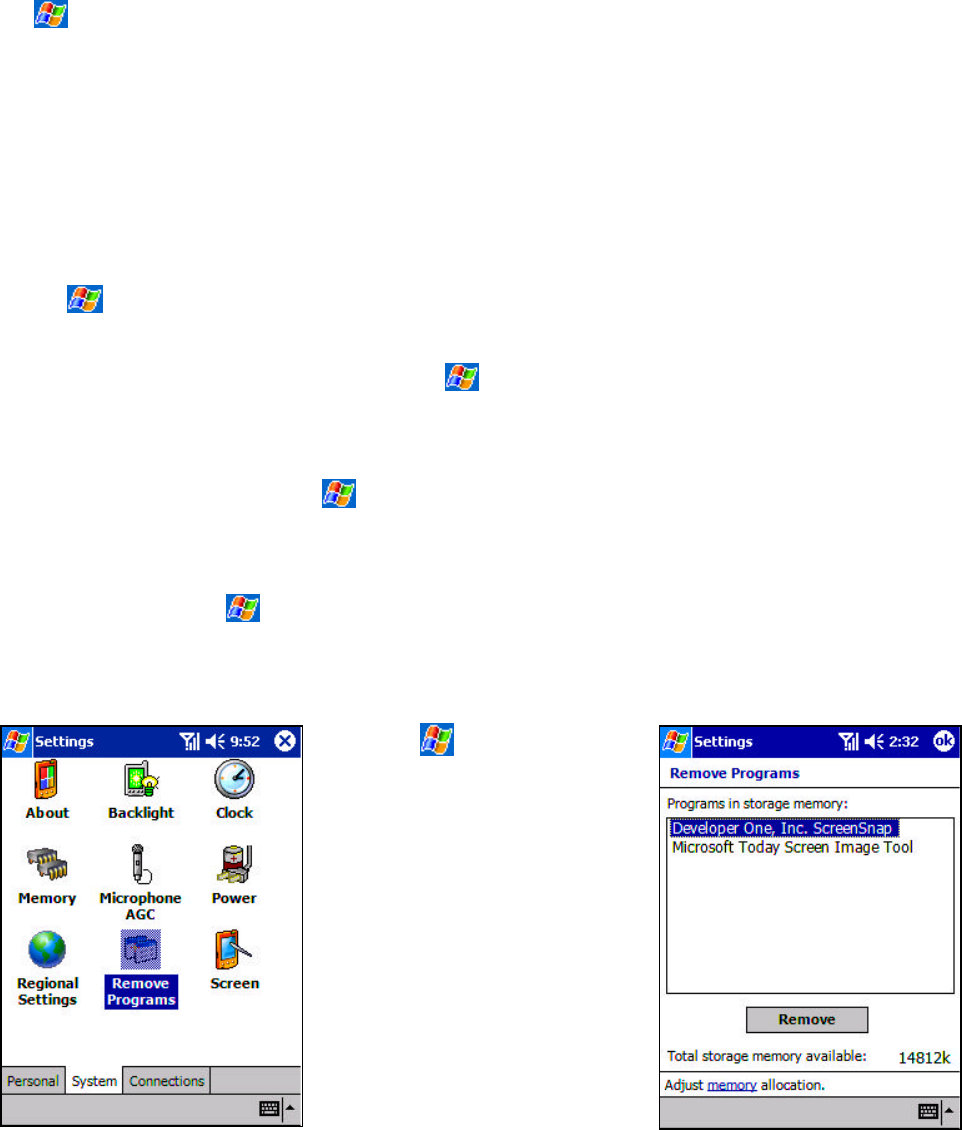
?? Tap and then Settings.
On the System tab, tap
Remove Programs .
??
If the program does not appear
in the list of installed
programs, use File Explorer on
your Pocket PC Phone to
locate the program, tap and
hold the program, and then
tap
Delete on the pop-up menu.
Page 36
Chapter 4: Phone Features
About Your Phone
As well all the standard features of a mobile phone - such as mailbox and call log – there are several dialing features unique to
your Pocket PC Phone. For example, you can take notes while talking, dial directly from Microsoft Contacts and easily transfer
contacts between your Smart Card and the RAM of your Pocket PC Phone.
Additionally, like with a conventional mobile phone, you easily use one hand to access and navigate through the important
features of your Pocket PC Phone and make calls.
Installing the Smart Card
? ? Remove the stylus. ? ? Turn over your Pocket PC Phone and
open the Smart Card door with the
stylus.
? ? Slide the Smart Card into the slot until it clicks
into place. The Smart Card should be inserted
exactly as the picture shows.
Removing the Smart Card
Make sure you have saved any data in open programs; opening the Smart Card door will turn your Pocket PC Phone off.
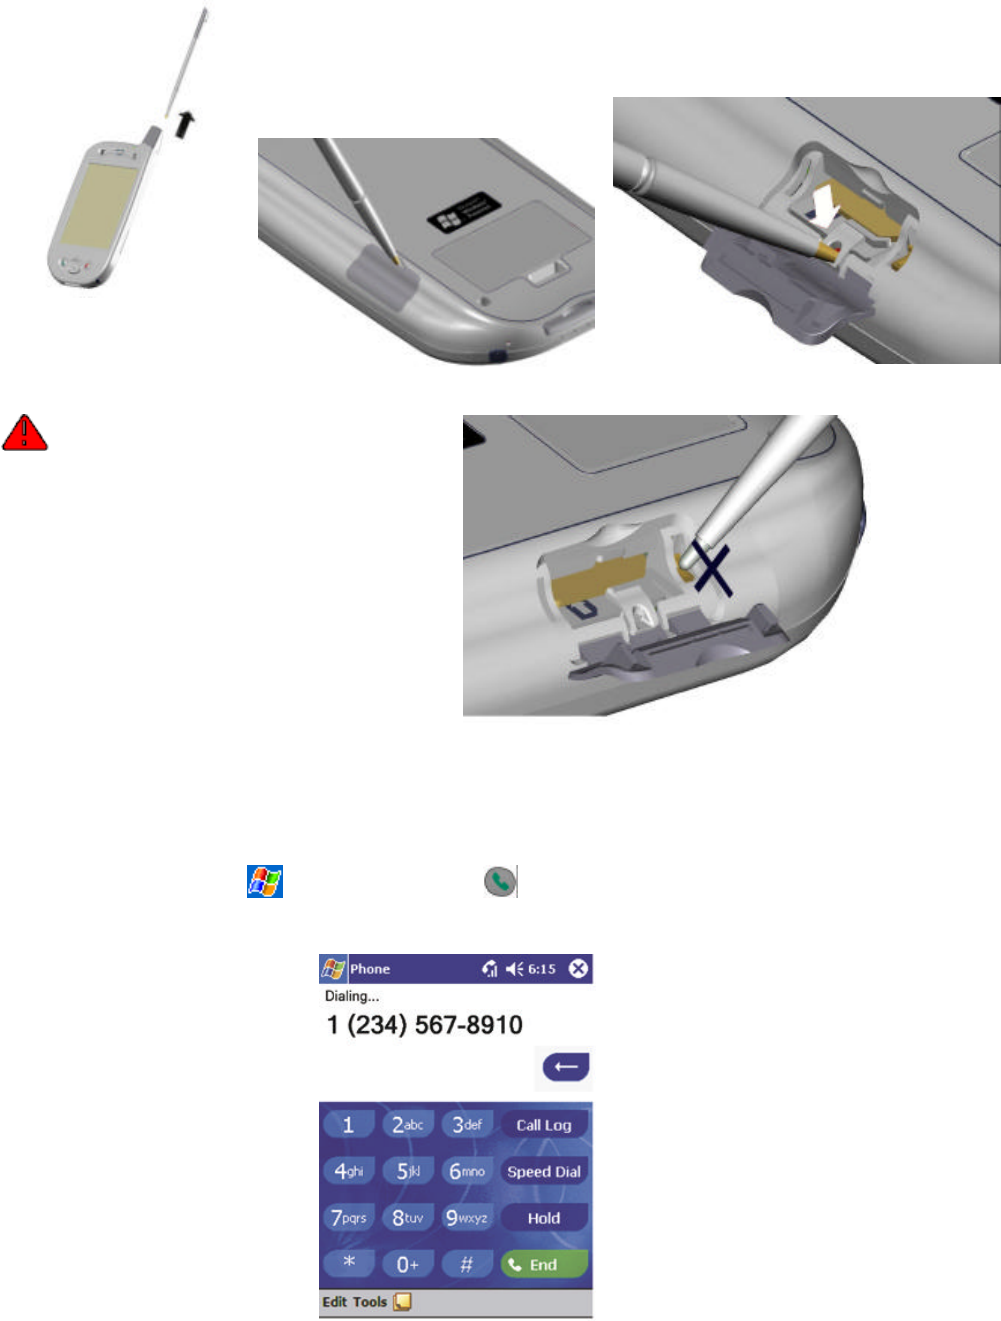
Page 37
? ? Remove the stylus. ? ? Turn over your Pocket PC Phone and
open the Smart Card door with the
stylus.
Press the point of your stylus into the hole until
the Smart Card springs out; then use your fingers
to finish removing.
Please pay particular attention to the
stylus positions in the picture above related to
removing the Smart Card, and the picture to the
right. Do not put the stylus in the hole in the
picture to the right; it will permanently damage
your Pocket PC Phone.
About The Dialer Screen
To access the Dialer Screen, tap and then Phone, or press . From the dialer screen you can make calls, access Call Log,
Speed Dial and Phone Settings. You can also find signal status information and important icons that tell you about your call.
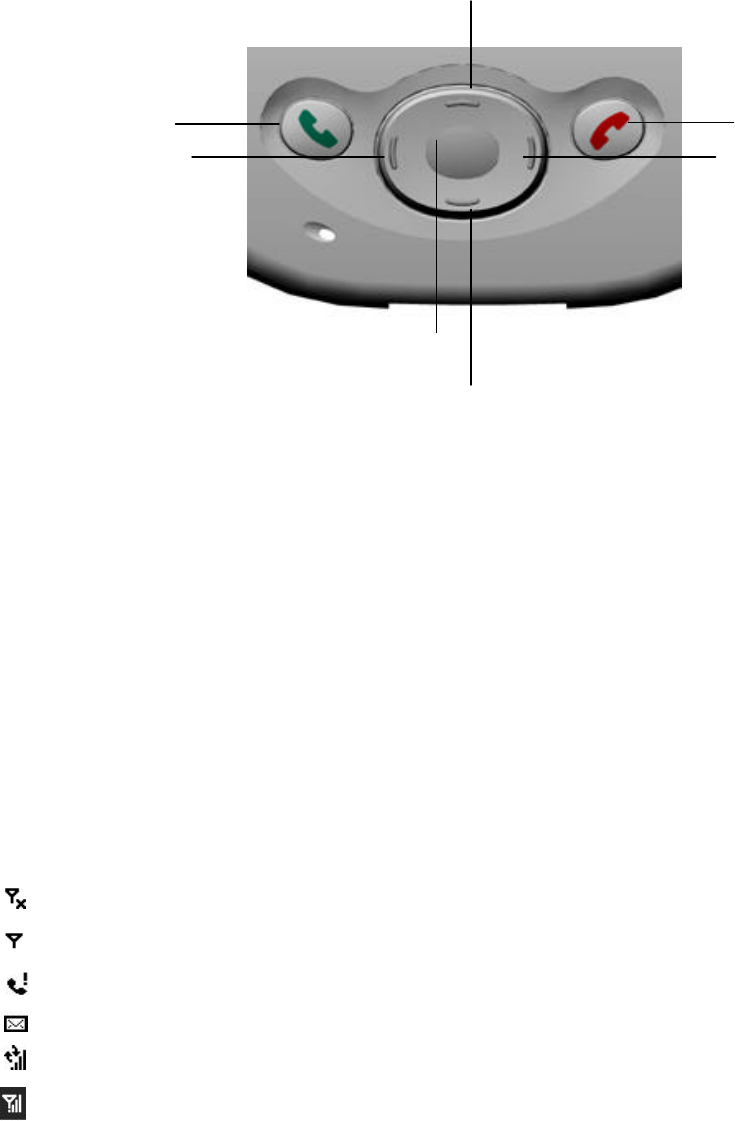
Page 38
The Navigation Pad and Dialing
1. Take Call – Press to take an incoming call.
Dialer Screen – Press to activate the dialer screen.
Speakerphone – Press and hold to turn on/off the speakerphone.
Dial – Press to dial a number.
2. Scroll Up – Press to scroll up through a list.
3. End Call – Press to end a call.
Phone Signal - Press and hold to turn on/off your phone.
4. Call Log – After launching the dialer screen, press to enter the Call Log feature.
5. Scroll Down – Press to scroll down through a list.
6. Center – Press to select.
7. Speed Dial – After launching the dialer screen, press to enter the Speed Dial feature.
The icons listed below may be seen in the top bar of the screen:
- Phone off or out of network service - tap this icon to turn on the phone.
- In network service - tap this icon to turn off the phone.
- Call Missed - tap this icon to view the call(s) you missed.
- Unread E-mail or SMS - tap the icon to view unread SMS or E-mail.
- Connecting in progress - the icon will disappear when you are connected to your ISP.
- Shows your connection is at full strength
Entering Your PIN
Most Smart Cards are preset with a PIN (Personal Identity Number), provided by your mobile service provider, which you need
to enter whenever you use your Pocket PC Phone. If you are required to enter a PIN, try 1234 as your default.
1.
2.
3.
4.
5.
6.
7.

Page 39
1.
Enter the preset PIN from your mobile phone service provider (please contact
your mobile service provider).
2. Tap Enter.
If your PIN is entered incorrectly three times, the Smart Card will be
blocked. If this happens, you can unblock it with the PIN Unblocking Key
from your mobile phone service provider.
3. To change your default PIN go to Settings, tap Phone and then tap Change
PIN.
Checking You Are Connected
The default settings for your Pocket PC Phone are programmed to assume you want to use your phone so, providing you have
inserted a Smart Card, your Pocket PC Phone will turn on your mobile phone connection to your service provider’s network.
The icon indicates that you are connected to the network of your mobile phone operator. Thereafter a full strength signal is
indicated by , and as the strength of the signal diminishes so will the number of vertical bars in the icon, with no bars
indicating no signal.
If you have turned the phone off, removed and then reinserted the Smart Card, your Pocket PC Phone will not
automatically turn the phone on. In this event, turn it on as described below in Turning the Phone On and Off.
Turning The Phone On and Off
As indicated above your Pocket PC Phone will turn on your phone when you insert a Smart Card. However, you can choose to
turn off your phone and just use the Pocket PC features at any time – and then turn the phone back on when you want.
To turn off the phone
Press and hold the button until appears in the navigation bar.
To turn on the phone
Press and hold until appears in the top toolbar.
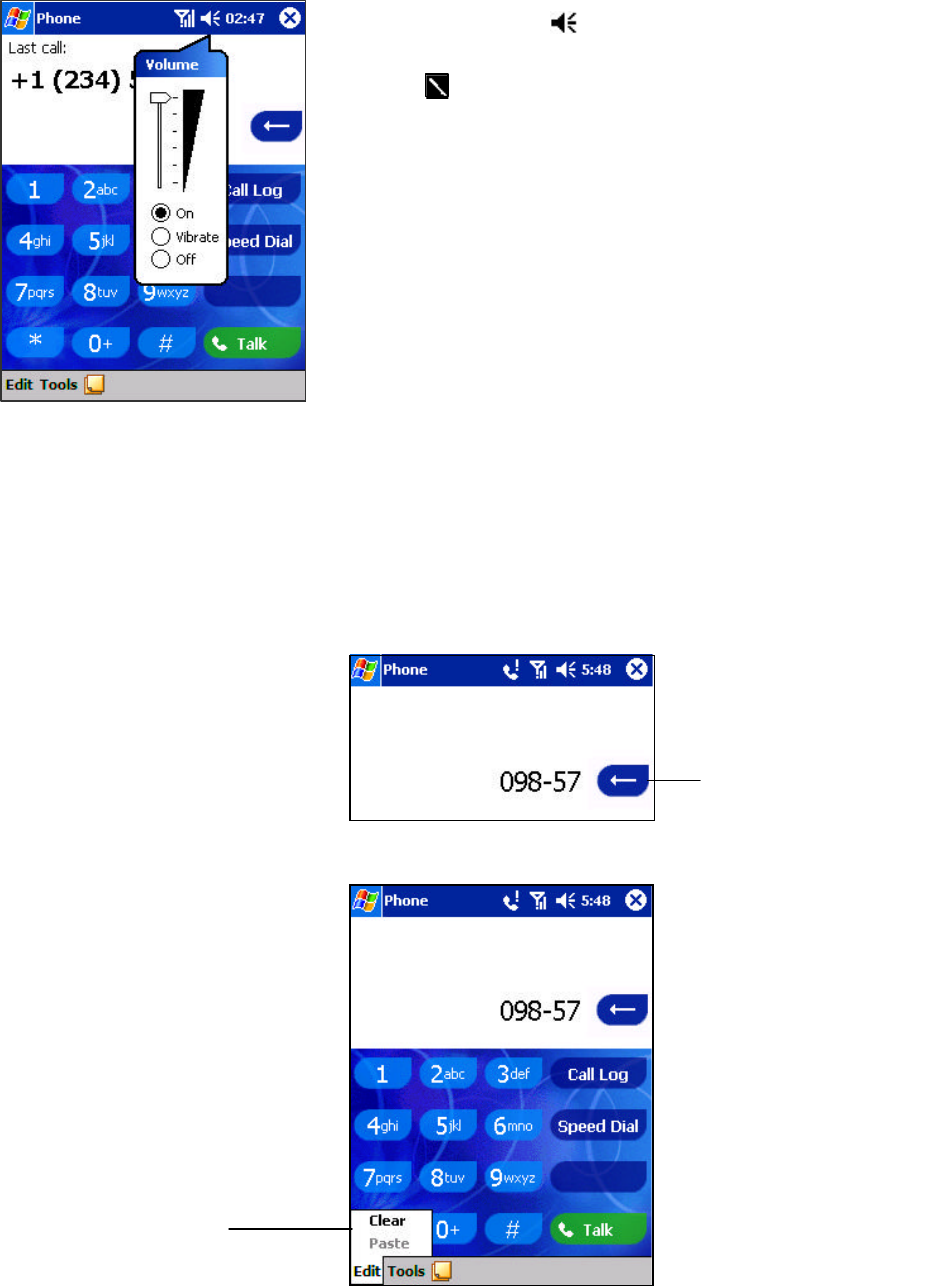
Page 40
Adjusting the Phone Volume
1. Yo
u can tap the icon or press the volume on the side bar of your Pocket
PC Phone during a call.
To adjust the conversation phone volume, you must do it during a
call. If you adjust the volume at another time it will affect the ring and
notification levels, and MP3.
Back Spacing and Deleting
If you tap a wrong number when you are keying in, you can back space to erase individual numbers one at a time or you can delete
all the numbers in the window.
To back space over numbers
To delete the number
Tap here to back space and
erase numbers individually.
Tapping Clear will
erase 098-57
, or you
can hold down the
backspace key.
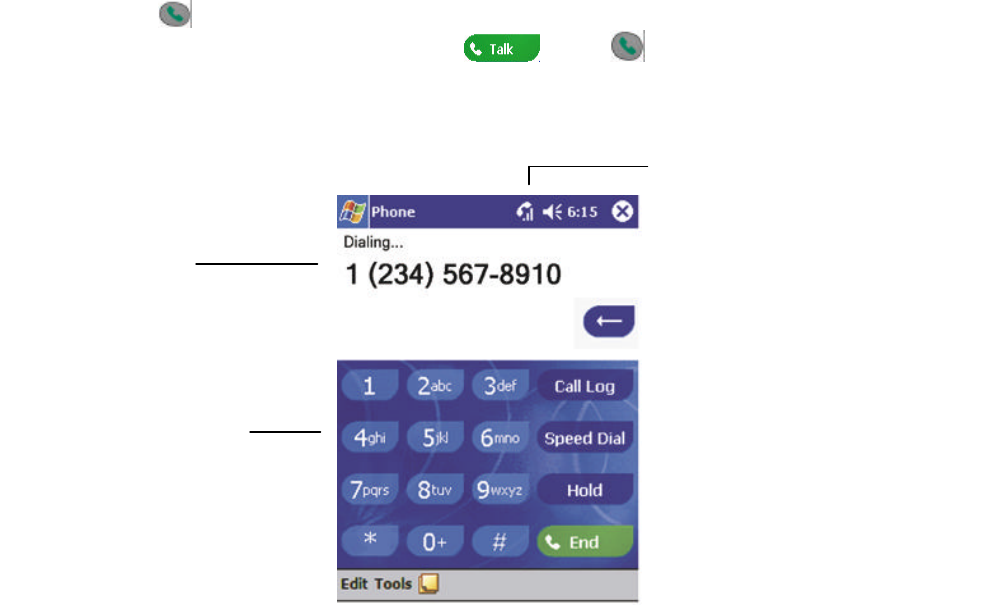
Page 41
Basic Dialing Features
In this section you can find information on the basic features of your phone: making or answering a call, using the speakerphone,
making notes during a call, putting a call on hold, and using the conferencing facility. You can also send SMS from the Dialer
screen.
Making a call
With your Pocket PC Phone, you can make a call from the Dialer, Speed Dial, Call Log, Contacts and Phone Book.
To make a call from the Dialer
1. Press to bring up the dialer screen.
2. Tap the number into the keypad and then tap or press button.
Tap the number you wish
to dial here.
The number will appear
here.
The signal icon
will change when you
are making a call.
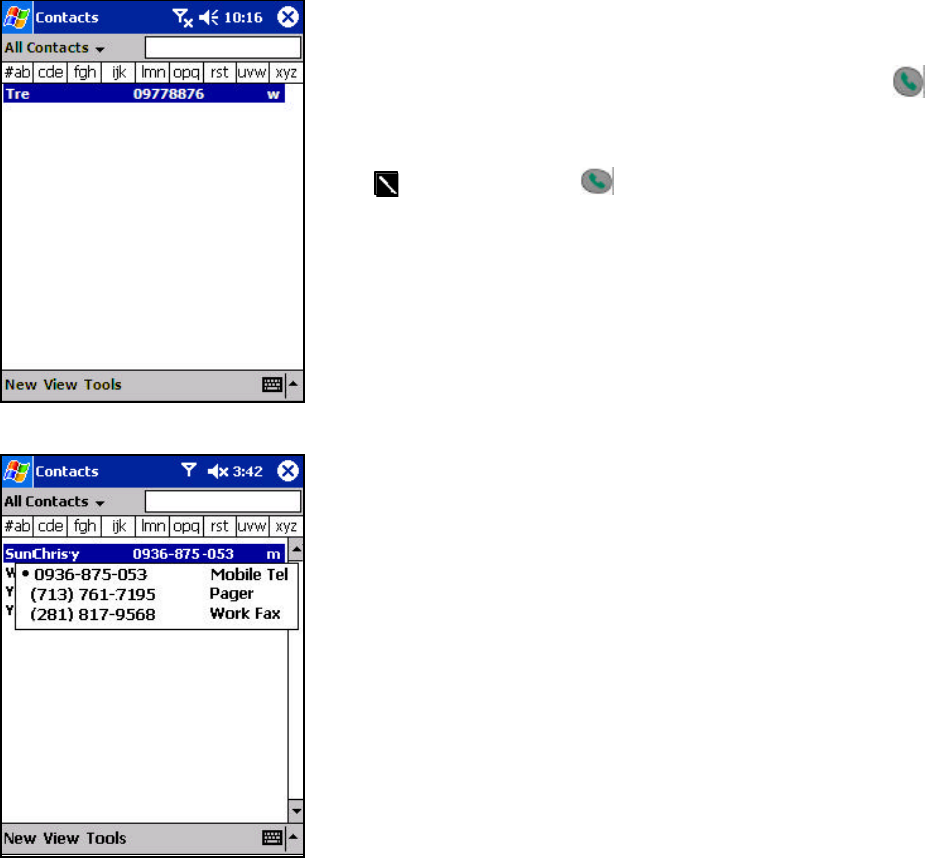
Page 42
To make a call from Contacts
You can make a call from Contacts in the following way:
1. Press the Microsoft Contacts Button, find the contact and then tap twice –
once to send to the dialer screen and once to call.
The pop-up menu and button will by default display Call Work Tel.
However, you can customize so that the mobile number or e-mail is displayed
instead:
Either:
1. Select a contact in the contact list and then press left or right on the navigation
pad – the number on the screen will change.
Or:
1.
In the contacts list tap the “w” in the right column next to the contact you want to
customize. A pop-up menu will display the phone numbers and e-mail add
resses
for this contact with a dot next to the priority number.
2. In the pop-
up menu select a priority. If you selected mobile number, “m” should
now be in the right column next to the contact.
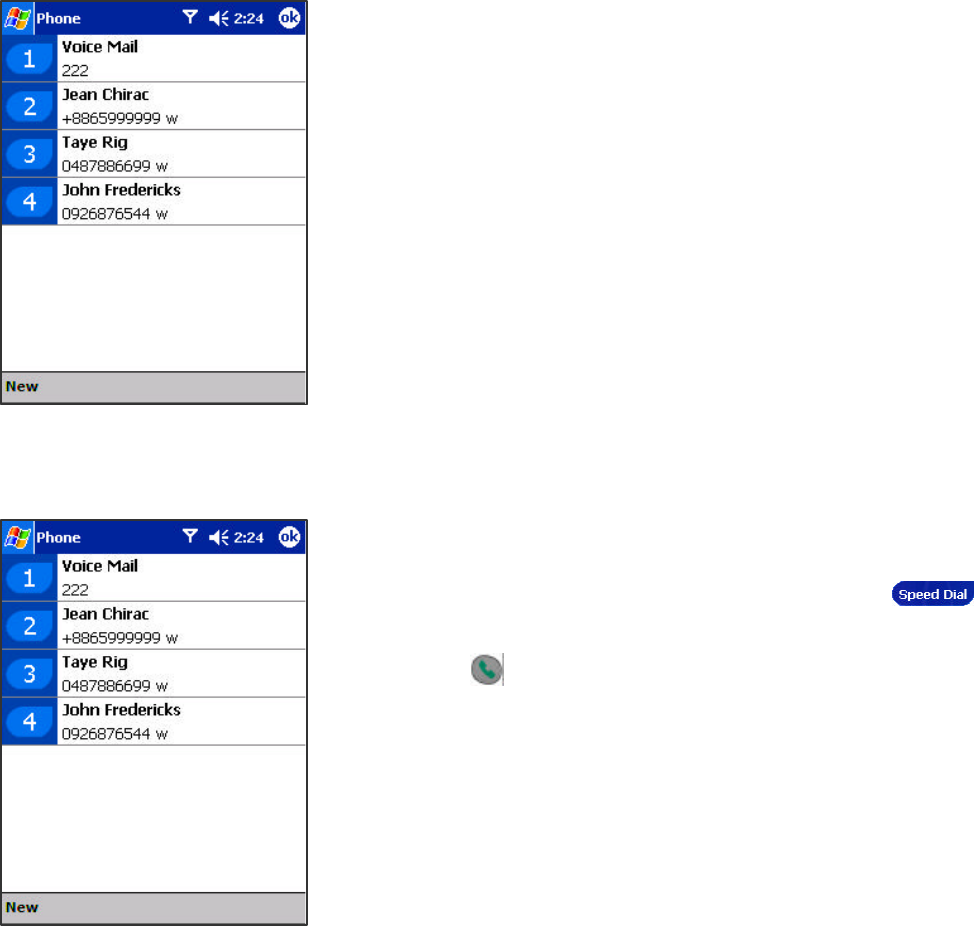
Page 43
To make a call from Speed Dial (A)
Speed dial is a list you can create of often-dialed numbers. Information on adding a
number to Speed Dial is detailed later in this chapter.
By memorizing the position of a number in the Speed Dial list, you can dial the
number by entering its position number. For example:
In the picture on the left John Fredericks is at position 4. To dial his number
simply tap and hold “4” on the dialer keypad. If the number holds a position of
10 or more tap the first number “1”, and then tap and hold the second number
“0” to dial.
Another
way to speed dial a number is to simply tap on the position number next to
the entry.
To make a call from Speed Dial (B)
Alternatively, if you do not remember the position of a number in the Speed Dial
list use the method below:
1. Go to Phone, press once on the left side of navigation pad, or tap .
2. In Speed Dial use the navigation pad to find the number you want to dial, and
then press .
Page 44
To make a call from the Call Log
1. Go to Phone and press the right side of the navigation pad or tap .
2. Find the call details by first selecting the category it is filed under. For
example, if it is in All calls select All calls from the drop-down menu in the
top-left corner.
3. Use the navigation pad to find the number and then tap
or the icon to the
left of the number you wish to call.
Icon is for incoming calls; icon
is for outgoing calls and icon
is for missed calls.
To make a call from Phone Book
1. Tap , Programs , and then tap Phone Book – wait for your Smart Card
contents to load.
2. Tap and hold the name or phone number of the person you wish to call, and
then select Call from the pop-up menu.
Or
3. Tap the name or phone number of the person you wish to call, tap Tools
and
then tap Call.
Page 45
To send SMS in phone dialer
1. Tap Tools, and then Send SMS.
2. The screen below will appear.
3. Tap New.
4. In the To field, enter either e-mail address or SMS
number of
one or more recipients, separating them with a
semicolon, or select a name from the contact list by
tapping the Address Book button. All e-mail addresses
entered in the e-mail fields in Contacts appear in the
Address Book.
5. Compose your message. To enter pr
eset or frequently used
messages, tap My Text and select a message.
6. Tap Send when
7. finished the message. If you are working offline, the
message is moved to the Outbox folder and will be sent the
next time you connect.
1. Whether you want to send or read E-mail or a SMS, you
can swap by tapping Services then choose what service
you want.
2.
If you are sending an SMS message and want to know if it
was received, tap Edit, Options, and select
Request SMS
text message delivery notification before sending the
message.
Page 46
Enabling the Speakerphone Mode
Your Pocket PC Phone has a speakerphone that allows you to talk hands-free and/or let other people to listen to the caller.
1. Wait until the phone is ringing.
2. Hold down the button until the speakerphone comes on and the icon
appears in the top toolbar.
3. To turn off the speakerphone hold down the button again.
Do not leave the phone in speakerphone mode and hold it to your ear;
the sound may damage your ear.
Answering or Rejecting a Call
?? Tap Answer, or press on your Pocket PC Phone.
?? Tap Ignore or press to reject the call.
If you reject a call the busy tone will be sent out, or the call will go to voice
mail.
Page 47
Ending a Call
?? Once an incoming or outgoing call is proceeding, you can press or tap
to end the call.
Managing More Than One Call
Your Pocket PC Phone will notify you when you have another caller - you have the choice of rejecting or accepting the incoming
call. If you accept you can then choose to swap between this caller and the original, or set up a conference call between all 3
parties. You can, of course, also initiate the situation above – with conference calling you can create a conversation between up to
6 people.
Putting a Call on Hold
1.
1. If another person is trying to call you when you are talking on the phone,
the
screen to the left will pop up.
2. Tap Answer to the take the 2nd call and put the 1st call on hold.
3. To end the 2nd call and go back to the 1st, tap End or .
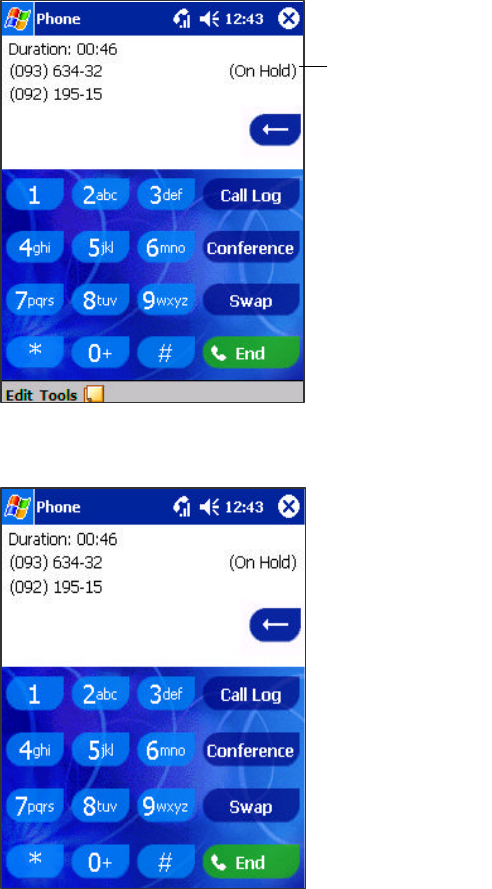
Page 48
To swap between calls
?? You can choose to swap between 2 calls by pressing Swap
.
To set up conference calling
1. Either put a call on hold, dial a 2nd
number and wait for it to be picked up. Or, accept
a 2nd incoming call when you already have one in progress.
2. In the screen that appears tap Conference.
To change to
the other
caller tap here
Indicates which
number is on
hold
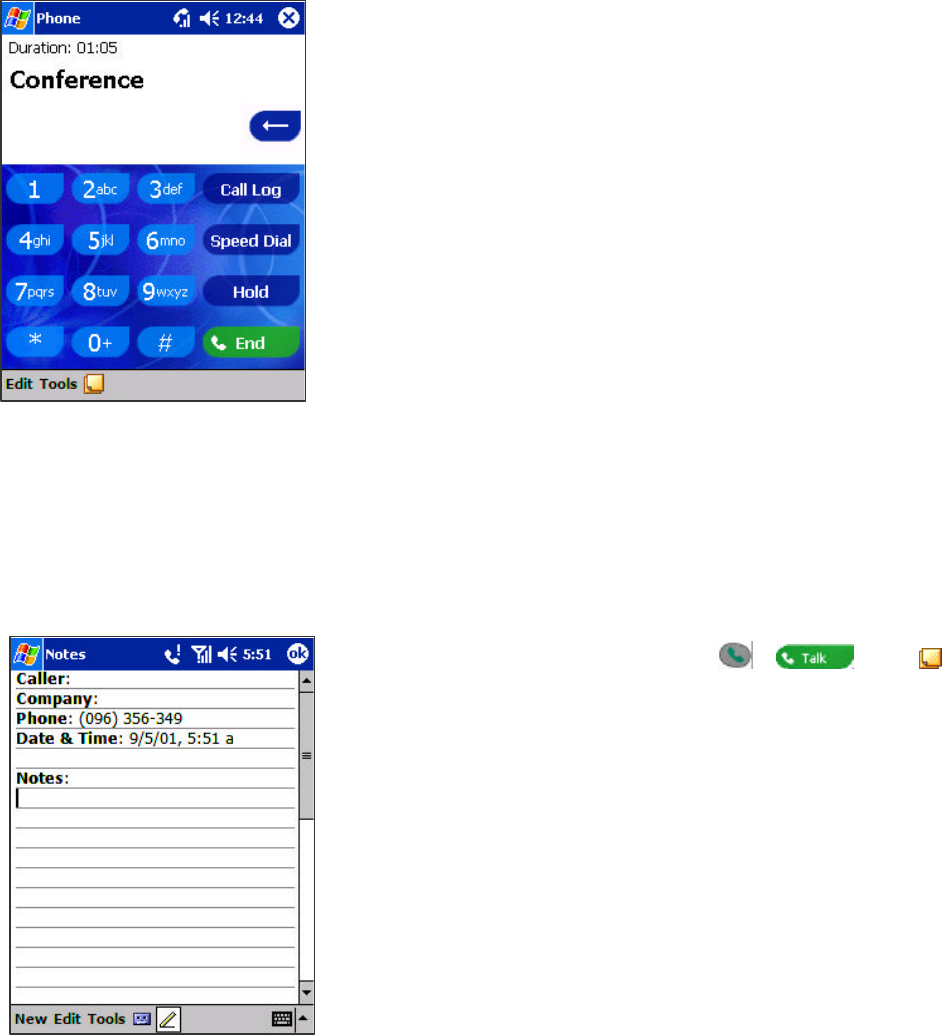
Page 49
3. If the conference connection is successful, the screen at left will appear.
4. To add additional people to your conference call tap Hold, key in the number, and
then Resume to return and continue.
Making a Note
Regardless of whether you call from the Dialer, Contacts, Call Log, Speed Dial or Phone Book, you can take a note during a call.
After you have finished the note it will be saved as an attachment to your call in one of the Call Log folders.
To make a note
1. After you have entered a number and tapped or , tap the icon
situated at the bottom of the screen.
2. Use any of the input methods to record your note and then tap OK
. You can finish
your note during or after the call.

Page 50
To view a note
1. Press the right side of the navigation pad or tap , tap and hold the call,
and then from the pop-up menu tap View Note. (The icon indicates a note).
2. Or go to Notes, and then tap the name of the file from the list.
If you decide to create a contact for this caller – see “Adding and T
ransferring
Contact Information” –
the call and file names will be amended to the name of the
new contact and the file will be unaffected.
Call Related Features
Checking Your Voice Mail
?? The first speed dial location defaults as your voice mailbox. When you insert
your Smart Card into your Pocket PC Phone, it will automatically detect and set
as default the voice mailbox number of your mobile service provider.
To retrieve your voice mail
?? Press , the left side of the navigation pad, select Voice Mail and then
press .
Adding and Transferring Contact Information
Since there are a numb er of ways to enter and store telephone numbers and contacts on your Pocket PC Phone and a number of
ways to make a phone call, it is important to be able transfer those contacts between the programs used to make a call.
Places where contacts can enter your Pocket PC Phone and be stored
? ? Your Smart Card - You interchange your Smart Card between your Pocket PC Phone and another Pocket PC Phone; while
using the other Pocket PC Phone you create one or more new contacts on the Smart Card.
? ? Microsoft Contacts.
? ? Call Log – New contact numbers can be found in incoming or missed calls.
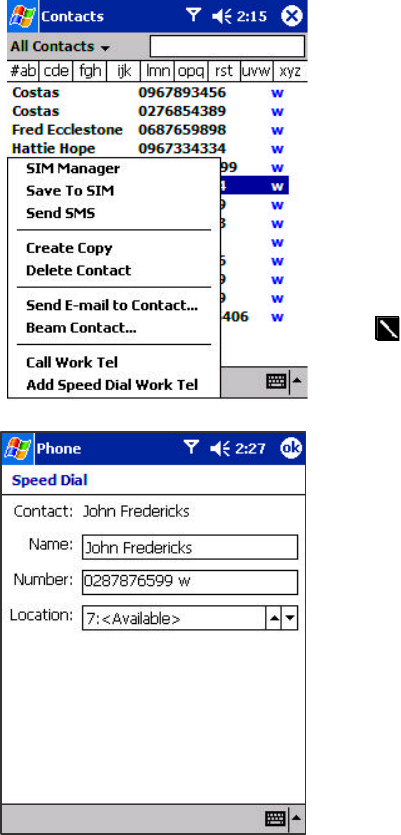
Page 51
Why transfer numbers?
? ? In the event you lose your Smart Card while using it with another Pocket PC Phone, your Smart Card numbers will be backed
up to your Pocket PC Phone.
? ? If you want to transfer a number to Speed Dial it must be in Contacts, not on the Smart Card.
? ? If you are using your Smart Card with another Pocket PC Phone, you may need the numbers stored in Microsoft Contacts.
? ? Transferring numbers to Microsoft Contacts allows you to create a more detailed record.
Microsoft Contacts: Adding and transferring contacts
1. To create a contact, see creating a contact in Chapter 8.
2. To transfer a contact to your Smart Card, press and hold the center of the
navigation pad - or tap and hold the contact - and then select Save to SIM from
the pop-up menu.
3. To transfer a contact to Speed Dial, press and hold the center of the navigation
pad – or tap and hold the contact - and then select Add Speed Dial Work Tel
from the pop-up menu.
4. In the next screen add the contact details, select a location and tap OK.
By default the Location
function will give you the next available position
in the Speed Dial list. If you want to put a number in a position that is already
occupied, the new number will replace the number already there.
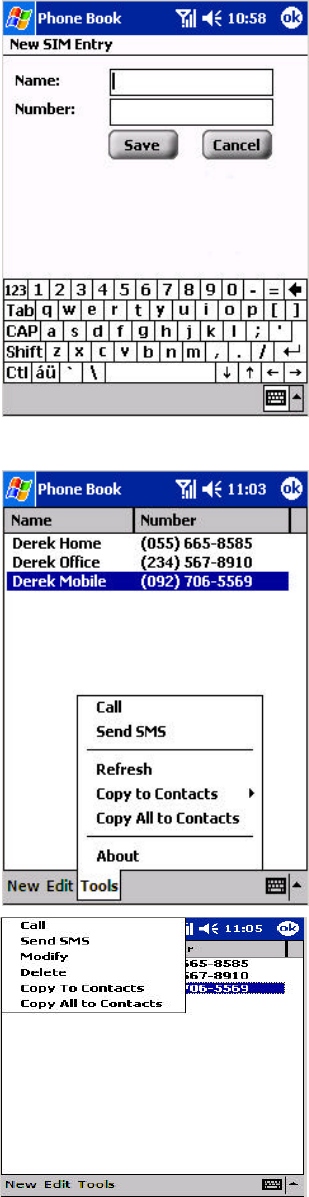
Page 52
Phone Book: Adding and transferring contacts
To create a Smart Card contact
1. Tap Phone Book (wait for Smart Card contents to load), then New.
2. Fill in the Name and Number details and tap Save .
To transfer contacts from Smart Card to Microsoft Contacts
1. Tap Phone Book (wait for Smart Card contents to load), then
Either:
Tap Tools, then Copy All to Contacts.
Or:
Press and hold the center of the navigation pad –
or tap and hold a contact from
the list - and then select Copy to Contacts from the pop-up menu.
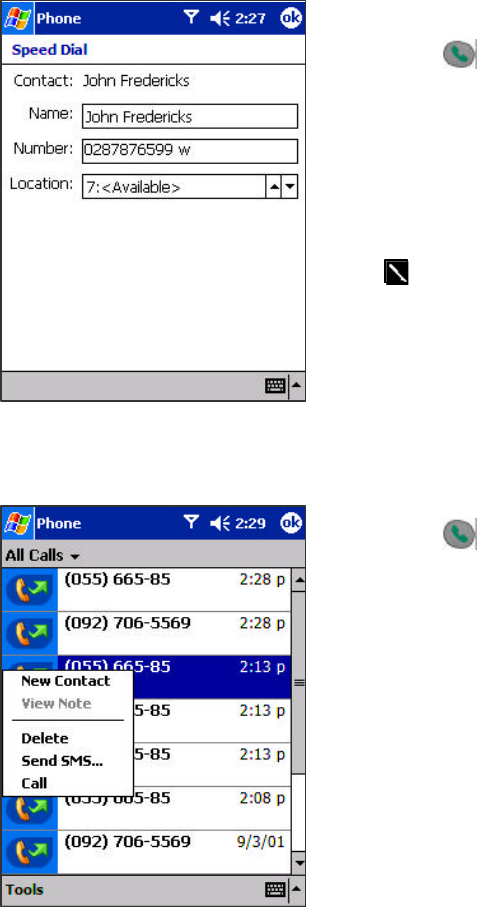
Page 53
To transfer a number to Speed Dial
1. Press , either the left side of the navigation pad or Speed Dial, and then
New.
2. Find the contact you want to add, and then press the navigation pad center.
3. When the contact name and number appears in the screen, s
elect an available
location using the arrow keys.
By default the Location function will give you the next available position
in the Speed Dial list. If you want to put a number in a position that is already
occupied, the new number will replace the number already there.
To add a record to Microsoft Contacts from Call Log
1. Press and then the right side of the navigation pad.
2. Find the call details by first selecting the category it is filed under. For
example, if it is a missed call select Missed from the drop-down menu in the
top-left corner.
3. Press and hold the navigation pad center; in the pop-up menu that appears
select New Contact.
4. In the New Contact screen add additional contact details and press the
navigation pad center or tap OK.
5. The call details in the Call Log
will then be amended and displayed under the
name of the contact, not the telephone number.