HUBSAN INTELLIGENT FPV1TX FPV Transmitter User Manual
SHENZHEN HUBSAN INTELLIGENT COMPANY LIMITED FPV Transmitter Users Manual
UserManual.wiki
>
HUBSAN INTELLIGENT
>
FPV1TX User Manual
>
User manual part 1
Contents
1.
User manual part 1
2.
User manual part 2
User manual part 1
Navigation menu
Upload a User Manual
Namespaces
Wiki Guide
HTML
PDF
Info
Views
User Manual
Discussion / Help
Navigation
![05 ©2015 HubsanֻӰ೨ሙNjྠిਫ਼దACCESSORIES INCLUDED[Propeller][Brushless motor][1 axis gimbal][1080P camera][Parachute][Battery compartment][Undercarriage][Terrestrial magnetism][non-slip mat][LED light]11 Micro-USB cable 1PC12 4PCS2. INTRODUCTION13 1PC1080P camera HD camera moduleTo read the camera dataDisclaimerHubsan X4 Pro Instruction ManualCamera Instruction ManualParachute Instruction ManualUser Manuals The Hubsan X4 Pro system consists of the quadcopter, camera, gimbal, parachute, propellerguard, power system, flight control system, and radio transmission system.Transmitter equipment: dual data transmission, map and track display, waypoints set/auto-flight, FPV transmitter operates video and picture shootingX4 Pro equipment: 3-axis gimbal, camera, power system(brushless motors and propellers), parachute, propeller guardX4 Pro working Mode: Altitude Hold Mode, Position-hold Mode, Waypoint Mode, RTH Mode, Headless Mode14 1PCTransmitter Antenna 5.8 GHz Transmitter Antenna15 1PCVideo glassesVideo glasses (Not included. Purchase this optional accessory from Hubsan)16 Parachute 1PCStand-alone system, can helpprovide some safety after a loss ofcontrol. (Not included. Purchase thisoptional accessory from Hubsan)](https://usermanual.wiki/HUBSAN-INTELLIGENT/FPV1TX.User-manual-part-1/User-Guide-2648679-Page-5.png)
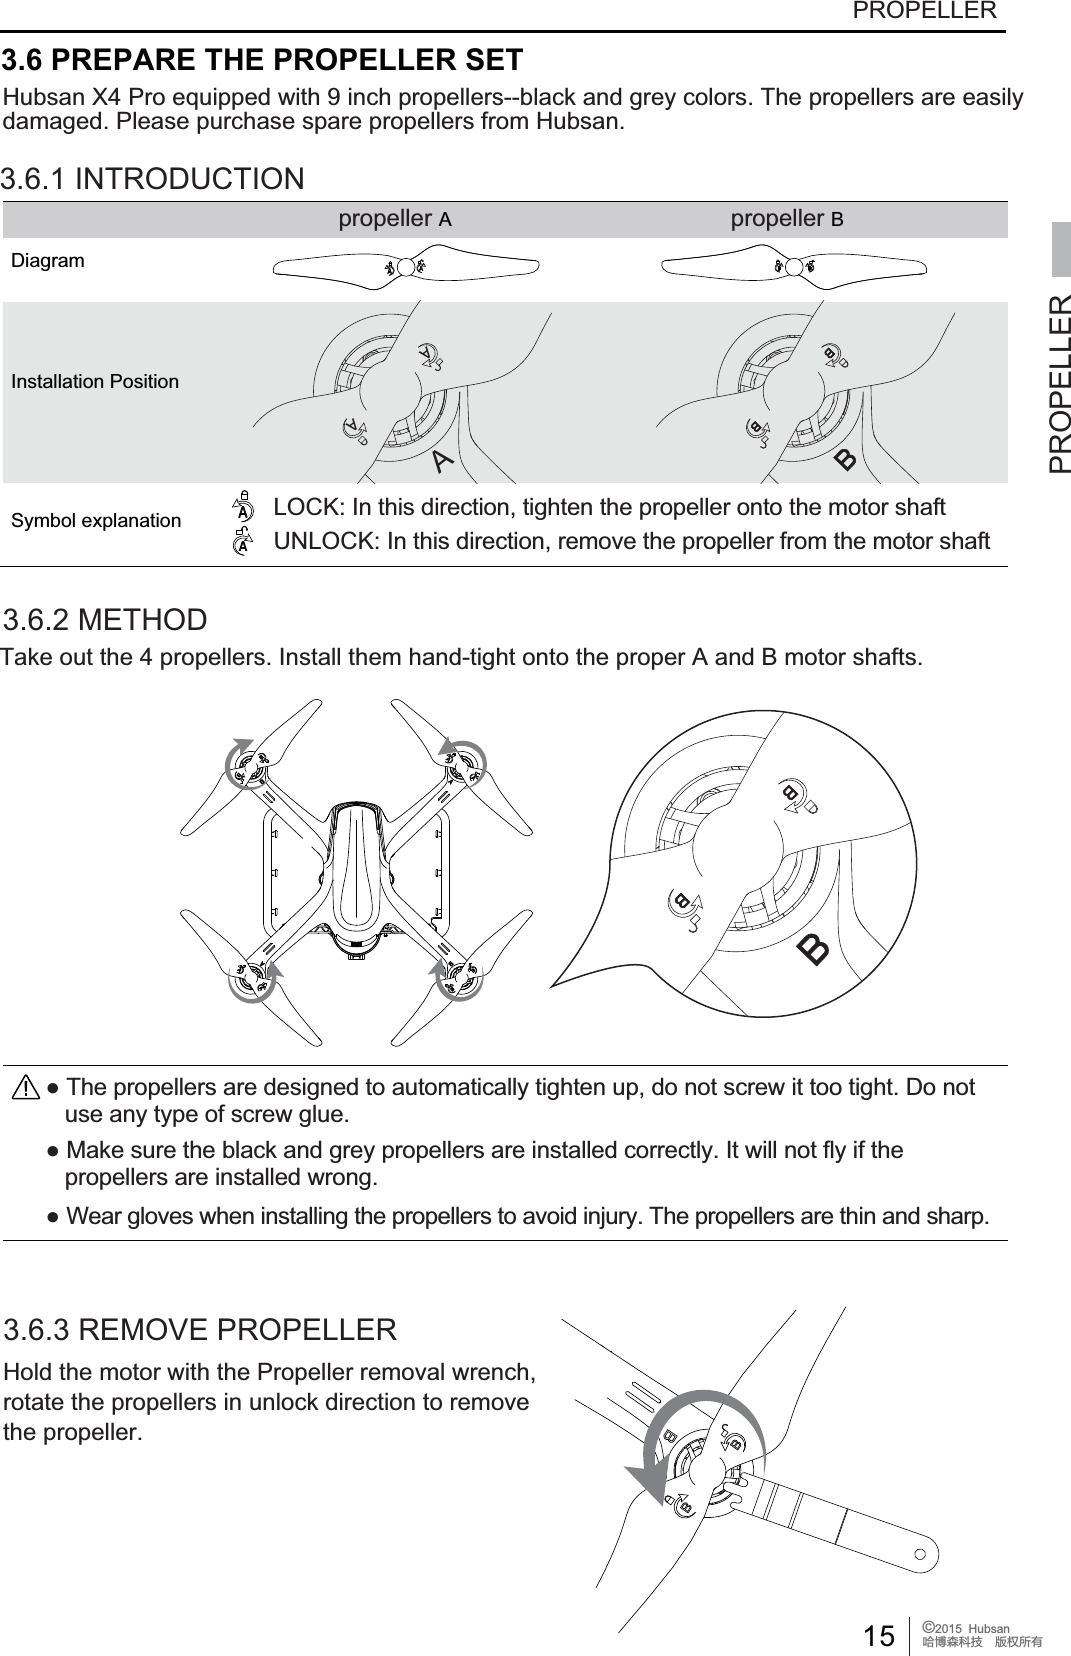
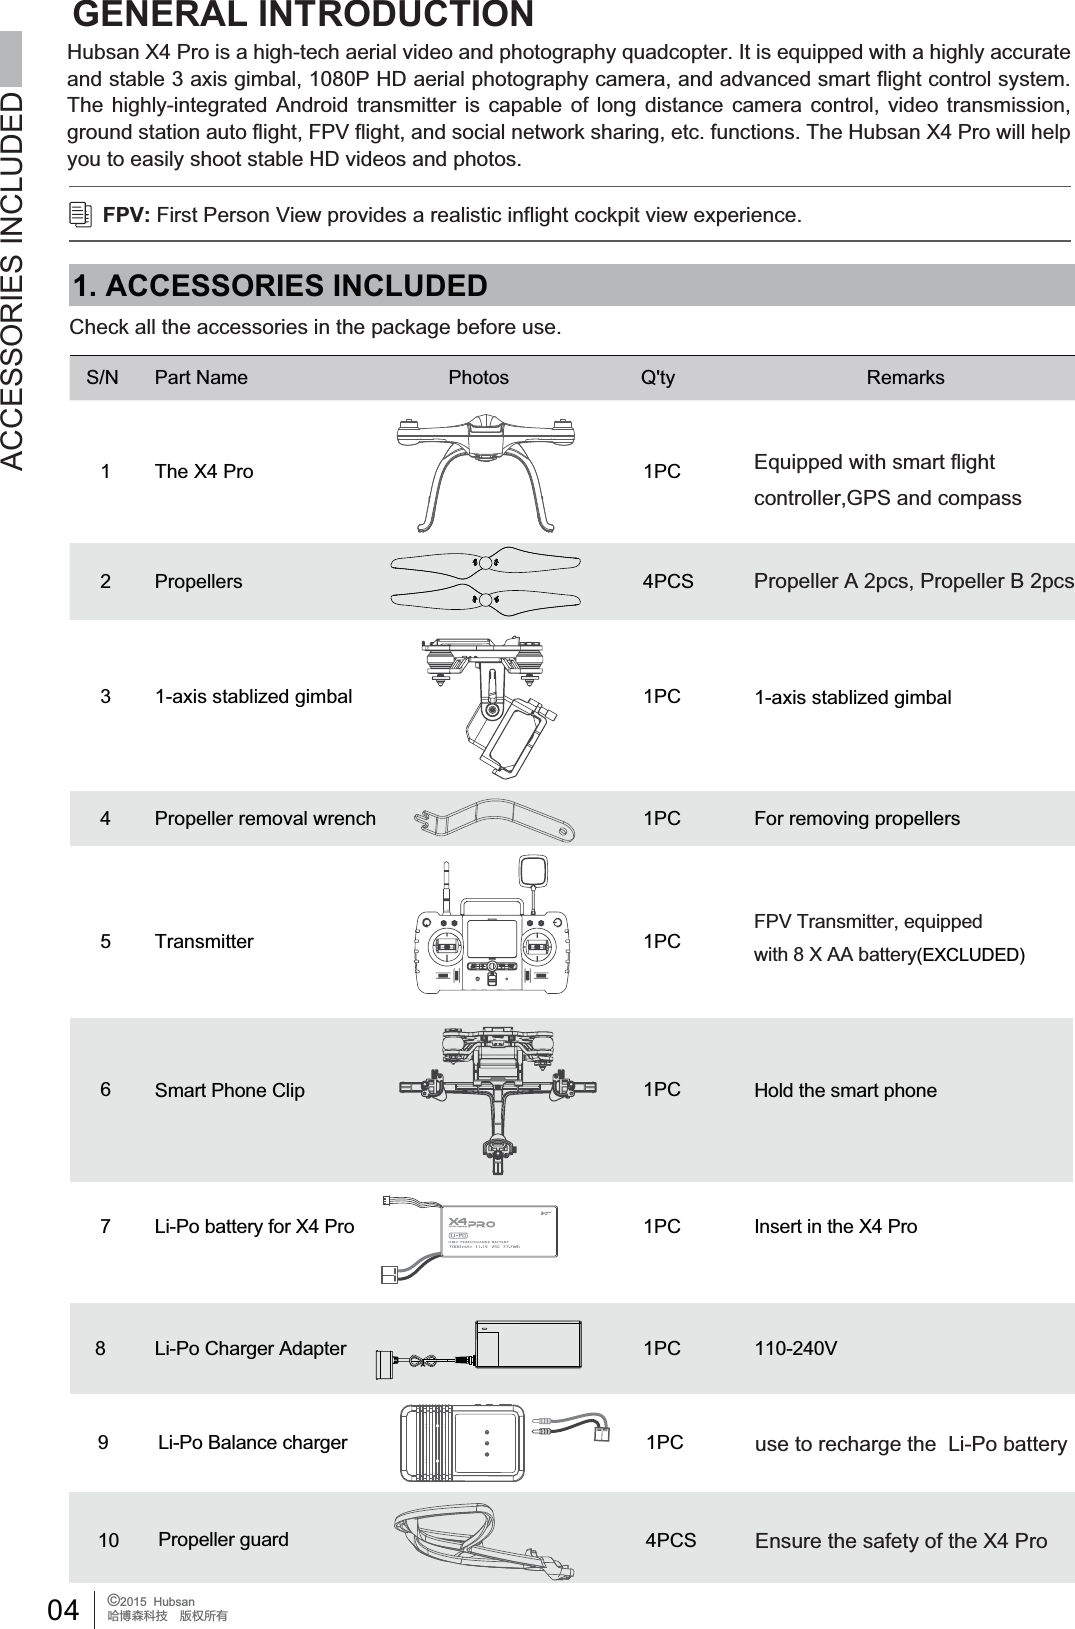
![09 ©2015 HubsanֻӰ೨ሙNjྠిਫ਼ద 3 PREPARE THE X4 PRO PREPARE THE X4 PRO 3.1 INTRODUCTION THE X4 PRO [1] Propeller [2] Brushless motor [3] LED light [4] Shock resistance equipment [5] 1-axis gimbal [6] 1080P camera [7] Undercarriage [8] Terrestrial magnetism [9] Battery compartment[10] External interface[11] Parachute[12] non-slip mat[1][3][4][5][6][7][8][9][10][11][12][2]3.2 PREPARE THE CAMERA3.1.1 FLIGHT CONTROL SYSTEM INTRODUCTIONModules on flight control system FunctionMain control Module CPU of the flight control system, connects to all the modules forcentral control processes.IMU Module Includes inertial sensor, stabilizes flight; includes a barometer tomeasure the flight altitude.GPS & Compass Module Position hold and Navigation.LED indicating lights Indicating the flight control system's condition.Insert battery into the camera and attach the camera onto the gimbal. Power on thecamera. You can press the buttons on the camera to record pictures and videos. You canalso use H7000 transmitter for recording and playing the videos.Hubsan X4 Pro is easy to operate and very stable, it supports moving forward/backward,left/right, ascending and descending, basic flight performance, and also supports lost control protection, power alarming and IOC functions.](https://usermanual.wiki/HUBSAN-INTELLIGENT/FPV1TX.User-manual-part-1/User-Guide-2648679-Page-9.png)
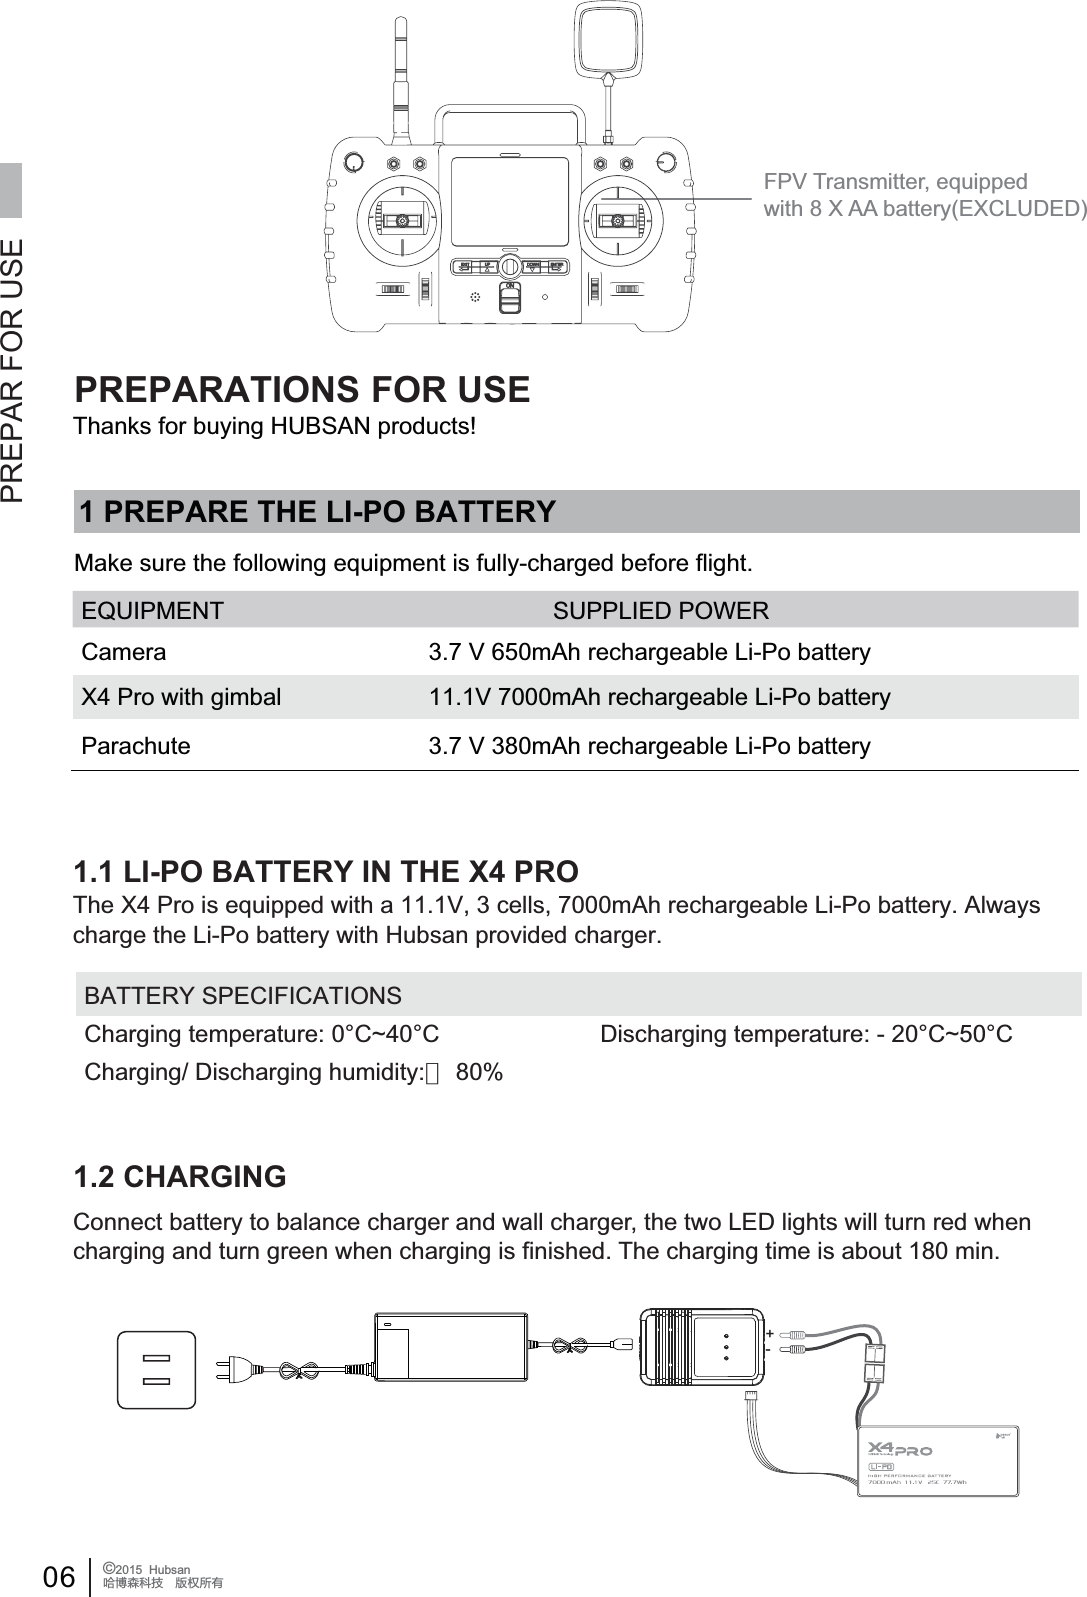
![10 ©2015 HubsanֻӰ೨ሙNjྠిਫ਼దCamera specificationsRecording resolutionRecording frame rateVideo formatImage SensorImage pixelLens formatLens FOVBatteryWorking temperatureWorking humidityWorking powerStandby powerStorage temperatureStorage humidity1920*1080 Full HD30FPSMOV3 million pixel MJPG2048*1536 pixel1/3”170 ᶮMAXᶯ1.9W1.33W- 40Ḅ+125Ć30%-90%3.7VNj650mAh10Ḅ+70Ć30%Ḅ80%CAMERAPower on/off: Press the power button(<2sec), power on; Hold down the power button(2sec ), power off.Video shooting: Press the video button(<2sec), start recording; Hold down the video button(2sec), recording stops.3.2.2 MICRO-SD CARD3.2.3 READING DATA AND CHARGING THE CAMERA[108&3][3FDPSEJOH][$BNFSBDBQ][*OEJDBUJOHMJHIU][.JDSPQIPOF]Ɣ'RQRWLQVHUWUHPRYHWKH0LFUR6'FDUGZKHQWKHFDPHUDLV powered on. Doing so can corrupt the SD card and files.USBInsert the Micro-SD card into the camera before shooting as the picture shows, always insert/remove the Micro-SD card after power off.The Micro-SD card is not included. You must source and format a name brand Micro-SD card. The camera supports using a 4-32GB Class 4-6 Micro-SD card. You must format the Micro-SD card before use.Use the Micro-USB cable to connect to the PC when the camera is powered on. This willallow you to copy the pictures/videos from the camera and charge the camera at the sametime.Reading data and Charging the camera......3.2.1 CAMERA BUTTONS INSTRUCTIONƔ)RUPDWWKH6'FDUGRQWKHFRPSXWHUILUVW<RXQHHGWRVHOHFW 32KB for the size of the allocation unit, or the card will not work in the camera.](https://usermanual.wiki/HUBSAN-INTELLIGENT/FPV1TX.User-manual-part-1/User-Guide-2648679-Page-10.png)
![12 ©2015 HubsanֻӰ೨ሙNjྠిਫ਼ద3.3 PREPARE THE 1-AXIS STABLE GIMBALPREPARE THE 1 AXIS STABLE GIMBALFeatures of the gimbalControl accuracy ±0.03°Control range Pitch angle:+90°~~ -90°Stabilized design Rotate automatically when the X4 Pro tilted to ensure stable shooting3.3.1 INSTALL THE 1-AXIS GIMBALStep 1: Take out the 1-axis gimbal from the box, position and connect the vibration damperwith its mate.Step 2: Insert the gimbal signal wire into the right slot.Step 3: Insert the camera signal plug into the left slot.After the installation, power on the X4 Pro on a level surface. The 1-axis gimbal will power onand adjust automatically. The Transmitter's side rotary switch will control the gimbal rotation.Gimbal signal wireCamera image transmission wireƔ$EQRUPDOJLPEDORSHUDWLRQFDQEHFDXVHGE\LQLWLDOL]LQJWKHSRZHURQDQXQOHYHOVXUIDFH an impact, or from a crash. Put the X4 Pro on a level surface before powering on and flight. Do not cause impact to, or immobilize the gimbal after it is powered on.Ɣ)O\LQJLQIRJRUFORXGVZLOOFDXVHGHZIRUPDWLRQZKLFKFDQFDXVHIDXOW\JLPEDORSHUDWLRQ The gimbal will operate normally again after it is dry.3.3.2 GIMBAL INSPECTION AND ABNORMAL OPERATION](https://usermanual.wiki/HUBSAN-INTELLIGENT/FPV1TX.User-manual-part-1/User-Guide-2648679-Page-12.png)
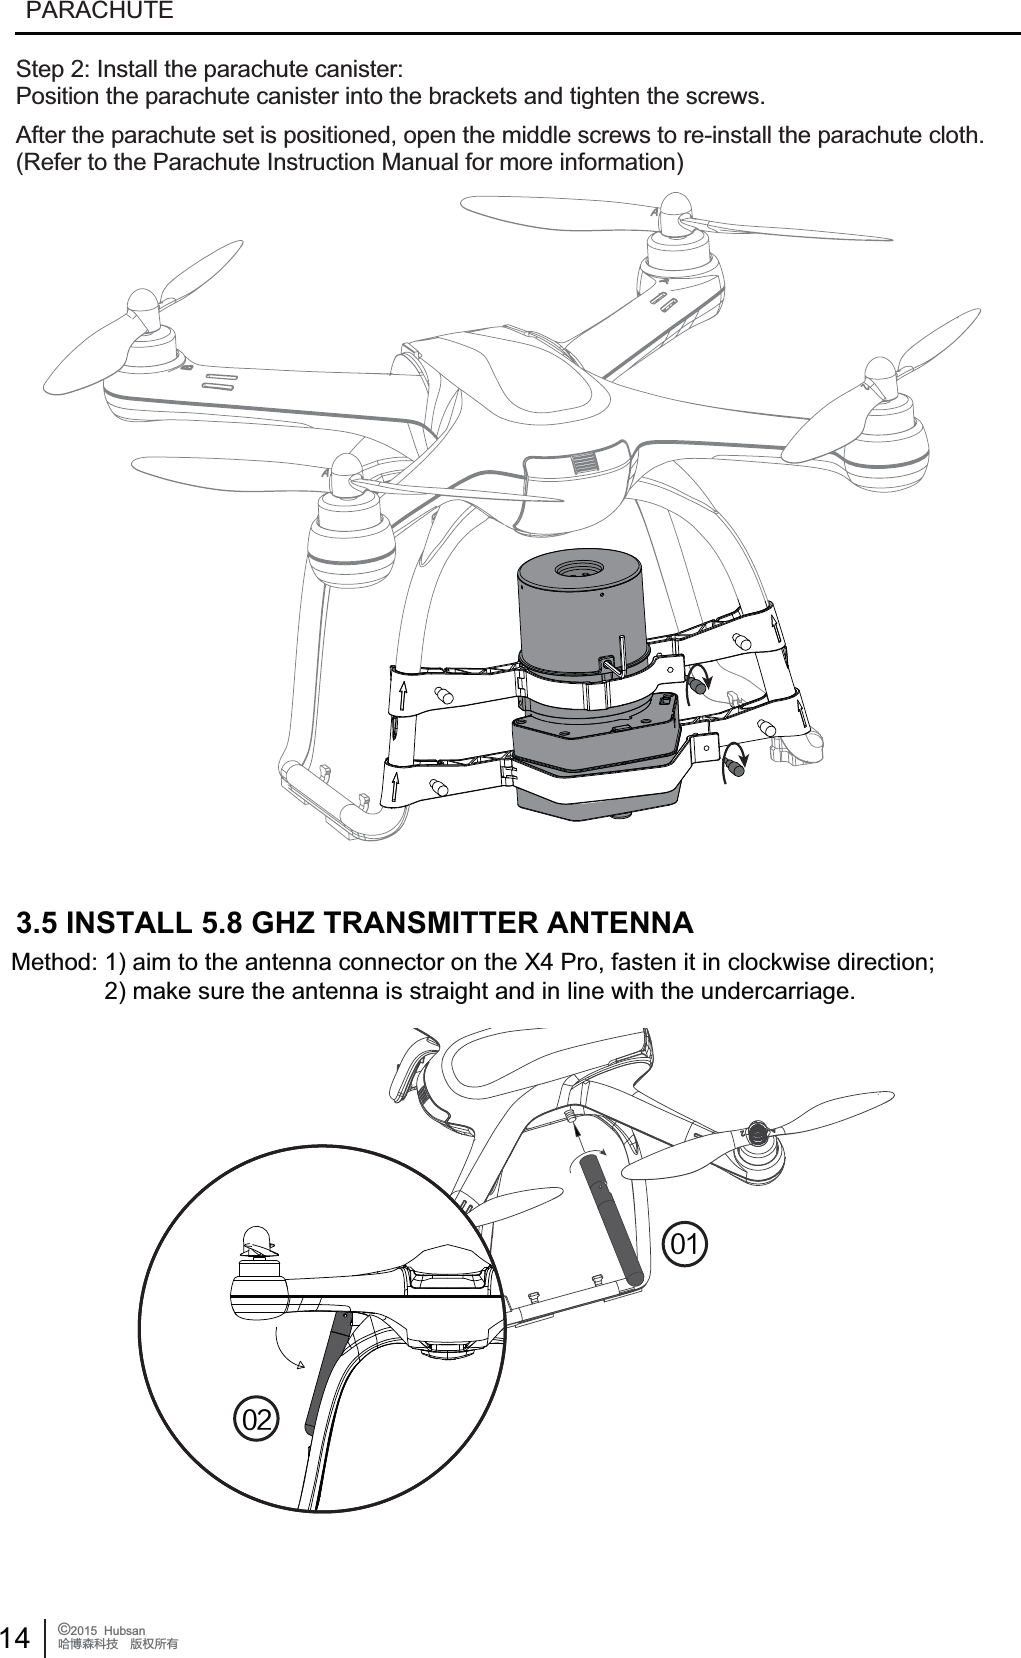
![13 ©2015 HubsanֻӰ೨ሙNjྠిਫ਼దPARACHUTE[turn buckle][screw][slot][direction arrow]3.4 PREPARE THE PARACHUTERefer to THE PARACHUTE INSTRUCTION MANUALThe Hubsan X4 Pro has an optional automatic parachute system. The parachute is self-powered which means even when the X4 Pro Li-Po battery power is low, the parachute will still work. There is a sensor inside the parachute system that detects when the X4 Pro goes into an abnormal attitude and then immediately commands the parachute to open. Potentially the X4 Pro can then land safely and avoid causing damages.Step 1: Install the bracket:Take the parachute set from the box, remove the screws from the bracket and open the buckle.Make sure the direction of the bracket is up as the arrows show. Put the bracket onto the landinggear until it is positioned in the slot. Tighten the screws to the brackets as the picture shows.3.4.1 INSTALL THE PARACHUTE SYSTEM (OPTIONAL PURCHASE FROM HUBSAN)Ɣ3D\DWWHQWLRQWRWKHGLUHFWLRQRIEUDFNHWV'RQRWLQVWDOOWKHPLQFRUUHFWO\7KHDUURZRQWKH brackets should be up!Ɣ0DNHVXUHWKHEUDFNHWVDUHLQWKHVORWSRVLWLRQEHIRUHWLJKWHQLQJWKHVFUHZVRUWKH parachute system will be unstable during flight.](https://usermanual.wiki/HUBSAN-INTELLIGENT/FPV1TX.User-manual-part-1/User-Guide-2648679-Page-13.png)