HUIZHOU FORYOU GENERAL ELECTRONICS NV17 Car Audio PLAYER User Manual
HUIZHOU FORYOU GENERAL ELECTRONICS CO.,LTD. Car Audio PLAYER
User Manual
Operating Instructions
DVD | CD | MP3 | MP4 | SD | USB | BLUETOOTH | SMARTLINK | NAVIGATION
In-Dash
Double Din
Navigation System
NV17
Warnings
Do not change the fuse on the power
cord without professional guidance. Using
an improper fuse may cause damage to
this unit or even cause re.
Please contact your nearest dealer if one
of the following is experienced:
(a) Water or other objects enter the unit.
(b) There is smoke.
(c) Peculiar smell.
Do not stick any screen membrane to the
touch screen.
To ensure safe driving, please adjust the
volume to a safe and comfortable level in
case of emergency situations.
Thank you for purchasing this product.
Please read through these operating
instructions so you will know how to
operate your model properly. Please keep
this manual in a safe place for future
reference.
Only connect the unit to a 12-volt power
supply with negative grounding.
Never install this unit where operating it
may impair safe driving conditions.
Never use the front video display function
when driving, so as to prevent violating
trafc regulations or causing an accident.
Never expose this unit, amplifier, and
speakers to moisture or water to prevent
electric sparks or re.

Precautions
1. Never disassemble or adjust the unit
without any professional guidance.
For details, please consult any professional
car shop / dealer for inquiry.
2. If the front panel or TFT monitor is dirty,
please use a clean silicone cloth and
neutral detergent to wipe off the spot. Using
a rough cloth and non-neutral detergent
such as alcohol for cleaning may result in
scratching or decoloration to the monitor.
3. If any abnormal behavior of the unit is
found, please refer to trouble shooting
guide of this manual. If no relevant
information is found, please press the
[RESET] key on the front panel to resume
factory default.
4. If you have parked the car in hot or cold
weather for a long time, please wait until
the temperature in the car becomes normal
before operating the unit.
5. Using the car heater in low temperature
environment may result in moisture inside
the unit, DO NOT use the unit in this
situation. Eject the disc and wipe off the
moisture on the disc. If the unit still doesn't
work after a few hours, please contact the
service center.
6. Do not impact the LCD monitor which could
cause damage.
7. To prevent damage to the screen, avoid
touching it with sharp objects.
8. To provide a clear demonstration and an
alternative for easy understanding to the
operation of this unit, graphic illustrations
are used.
However, some illustrations are different
from the actual images displayed on the
screen.
9. Operate the unit correctly according to this
manual to prevent unnecessary problem.
The guarantee won't be valid if the problem
is caused by inappropriate operation.
FCC Statement
1. This device complies with Part 15 of the
FCC Rules.
Operation is subject to the following two
conditions:
1) This device may not cause harmful
interference.
(2) This device must accept any interference
received, including interference that may
cause undesired operation.
2. Changes or modifi cations not expressly
approved by the party responsible for
compliance could void the user’s authority to
operate the equipment.
NOTE: This equipment has been tested and
found to comply with the limits for a Class
B digital device, pursuant to Part 15 of the
FCC Rules. These limits are designed to
provide reasonable protection against harmful
interference in a residential installation.
This equipment generates uses and can
radiate radio frequency energy and, if not
installed and used in accordance with the
instructions, may cause harmful interference
to radio communications. However, there is
no guarantee that interference will not occur
in a particular installation.
If this equipment does cause harmful
interference to radio or television reception,
which can be determined by turning the
equipment off and on, the user is encouraged
to try to correct the interference by one or
more of the following measures:
• Reorientorrelocatethereceivingantenna.
• Increasetheseparationbetweenthe
equipment and receiver.
• Connecttheequipment into anoutlet on
a circuit different from that to which the
receiver is connected.
• Consultthedealeroranexperiencedradio/
TV technician for help.
FCC Radiation Exposure Statement
This equipment complies with FCC radiation
exposure limits set forth for an uncontrolled
environment. This equipment should be
installed and operated with minimum distance
of 20 centimeters between the radiator and
your body.

Contents
Before using ................................................ 1
Front Panel ............................................. 1
Basic operations......................................... 2
Power on / off ......................................... 2
Parking Brake Inhibit .............................. 2
Mute ....................................................... 2
Audiblebeepconrmation ...................... 2
Open SOURCE MENU .......................... 2
Playing source selection ........................ 2
Volume adjustment ................................. 2
EQ Menu ................................................ 2
System reset .......................................... 2
Set Date /Time ....................................... 2
Radio mode ................................................. 3
Tuner Menu ............................................ 3
Select Radio as Playing Source ............. 3
Select One Radio Band .......................... 3
Tune ....................................................... 3
RBDS ..................................................... 4
Preset Station ......................................... 4
Local Seeking ......................................... 4
EQ Selection .......................................... 4
Bluetooth mode .......................................... 5
Pairing Bluetooth Enabled Devices ........ 5
Disconnecting a Bluetooth Device ......... 6
Making a Call ......................................... 6
Receiving a Call ..................................... 6
Adjust Bluetooth Settings ....................... 7
Music Mode ............................................ 7
Playback ...................................................... 8
Load a Disc ............................................ 8
Eject the disc .......................................... 8
Touch screen controls ............................ 8
Controlling playback ............................... 8
Connect an USB device ......................... 8
Insert a MicroSD card ............................ 8
Play/Pause ............................................. 8
Previous/Next ......................................... 8
Search for a Folder ................................ 8
Repeat .................................................... 9
Repeat A-B ............................................. 9
Shufe(Random)Play ........................... 9
Select Audio Mode ................................. 9
Select Subtitle Language ....................... 9
Playback Information ............................ 10
Direct Track Entry ................................. 10
Rotate Pictures ..................................... 10
Zoom .................................................... 10
iPod/iPhone Operations ........................... 11
Accessing iPod mode ............................11
Pausing play ..........................................11
Selecting a track ....................................11
Fast forward/Fast backward ..................11
Repeat play ...........................................11
Random play .........................................11
Search function .....................................11
File List ..................................................11
SmartLink .................................................. 12
About SmartLink ................................... 12
Connect with Android Phone ................ 12
Connect with iPhone ............................ 12
Limitations ............................................ 12
SiriusXM Satellite Radio Operations ...... 13
SiriusXM® RADIO OPERATION .......... 13
Activating SiriusXM® Radio ................. 13
SiriusXM® User Interface..................... 13
Switching to SiriusXM® Radio ............. 14
Selecting the SiriusXM® Band ............. 14
Seek Tuning ......................................... 14
Direct Tuning ........................................ 14
Using Preset Channels ........................ 14
Searching for a Channel ...................... 14
Locking SXM Mature Channels ............ 15
Locking Individual SXM Channels ........ 15
Change Lock Password ....................... 15
Other modes ............................................. 16
Listen to other devices ......................... 16
Reset .................................................... 16
Replace a Fuse .................................... 16
GPS ...................................................... 16
Steering Wheel Control Programming . 16
Setup .......................................................... 17
Display system ..................................... 17
Adjust general settings ......................... 17
Adjust video settings ............................ 18
Adjust time settings .............................. 18
Adjust DVD rating ................................. 18
Adjust bluetooth settings ...................... 18
Adjust sound settings ........................... 19
Adjust volume settings ......................... 19
Adjust system settings ......................... 19
EQ .............................................................. 20
Select preset equalizer ......................... 20
Adjust EQ Parameters ......................... 20
Adjust FAD BAL .................................. 20
Troubleshooting ....................................... 21
Device connections .................................. 22
Notes of connection ........................... 22
Parking brake cable connections ....... 23
Reverse driving cable connections ...... 23
Specications ........................................... 24
Wiring diagram ......................................... 25
EN - 1
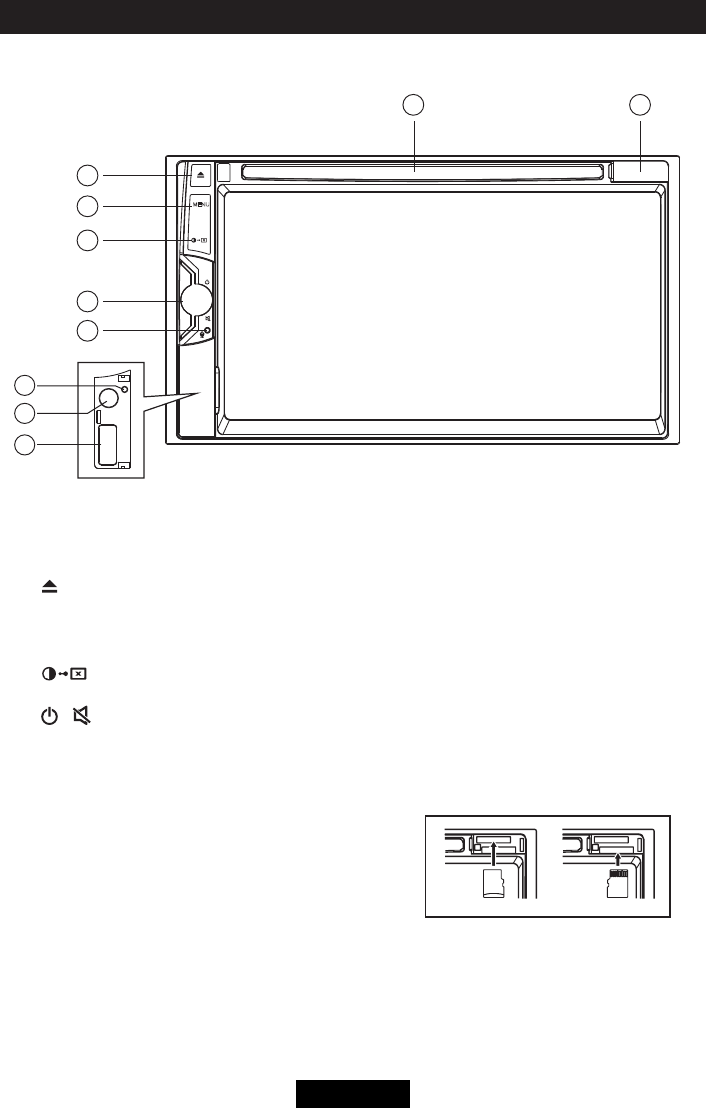
MENU
2
10
1
4
3
5
7
6
8
9
Before using
1. [ ] Button
Press to eject a disc.
2. [MENU] Button
Press to display the main menu
3. [ ] Button
Adjust the brightness of screen.
4. [ / ] Power/Volume knob
Rotate to adjust volume.
PressbrieytoactivatetheMUTEfunction.Pressagaintoresumenormalsound.
Press and hold to turn the unit OFF.
5. Microphone
6. Reset Hole
7. A/V IN Socket
8. USB Socket
9. MicroSD card reader for media / map
10. Disc slot
Notice:
The graphics in this manual are for reference purposes
only and may differ somewhat from the actual unit.
Front Panel
MEDIAMAP
EN - 2
Basic operations
Power on / off
Press the [ / ] knob to turn the unit on.
The buttons on the front of the unit light up
for a moment and the current mode status
appears on the LCD. Press and hold the [
/ ] knob more than 2 seconds to power off
the unit.
Parking Brake Inhibit
• Whenthe“BRAKE”cableisconnectedto
the brake switch, the video playback will
be controlled by driving status, system
setup and input video sources.
• Parkingbrakefunctionisoverriddenwhen
the video source is set to REVERSE.
• When the car ismovingahead,ifvideo
is played, the screen appears WARNING
information and blank screen to prevent
the driver watching images.
Mute
When on, press the [ / ] knob on the
front panel shortly to mute the volume from
the unit.
To resume the volume, press the knob shortly
again.
Audible beep conrmation
Anaudiblebeeptoneconrmseachfunction
selection. The Beep tone can be disabled
through the Setup menu.
Open SOURCE MENU
Press [MENU] button on the front panel or
touch the [ ] icon on the top left of the
screen to open the SOURCE MENU.
Press [MENU] button again to return to the
previous source.
Playing source selection
Touch [ ] or [ ] on the source menu
to view the previous or next page of playing
sources, and then select the source you
desired.
Volume adjustment
Volume Increase/Decrease
To increase or decrease the volume level,
turn the rotary encoder on the front panel.
The volume range is from "0" to "50". After
adjust, the TFT screen displays the volume
level for 3 seconds.
EQ Menu
The Audio Control feature allows you to
easily adjust your audio system to meet the
acoustical characteristics of your vehicle,
which vary depending on the type of vehicle
and its measurements. Proper setting of the
Fader and Balance boosts the effects of the
cabin equalizer.
To enter EQ setting menu, touch [Custom] on
the bottom of source menu.
System reset
To correct a system halt or other illegal
operation, use the tip of a pen to press the
[RESET] key located on the panel. After a
system reset, the unit restores all factory
default settings.
Set Date /Time
1. Touch [ ] icon on the playing source
menu.
2. Touch [ Clock ].
The date/time setup menu is displayed.
Set Date
1. Touch [ Date ].
2. Touch the date information on the screen .
A submenu is displayed.
3. Touch [ ] or [ ] to set year, month and
day.
Set Clock Mode
1. Touch [Clock mode].
2. Touch [12Hr] or [24Hr] to switch clock
mode.
Set Time
1. Touch [ Time ].
2. Touch the time on the screen, a submenu
is displayed.
3. Touch [ ] or [ ] to set hour and
minute.
Tip:
When date/time is set, touch [ Save ] to
conrmor[Cancel]toexit.
EN - 3
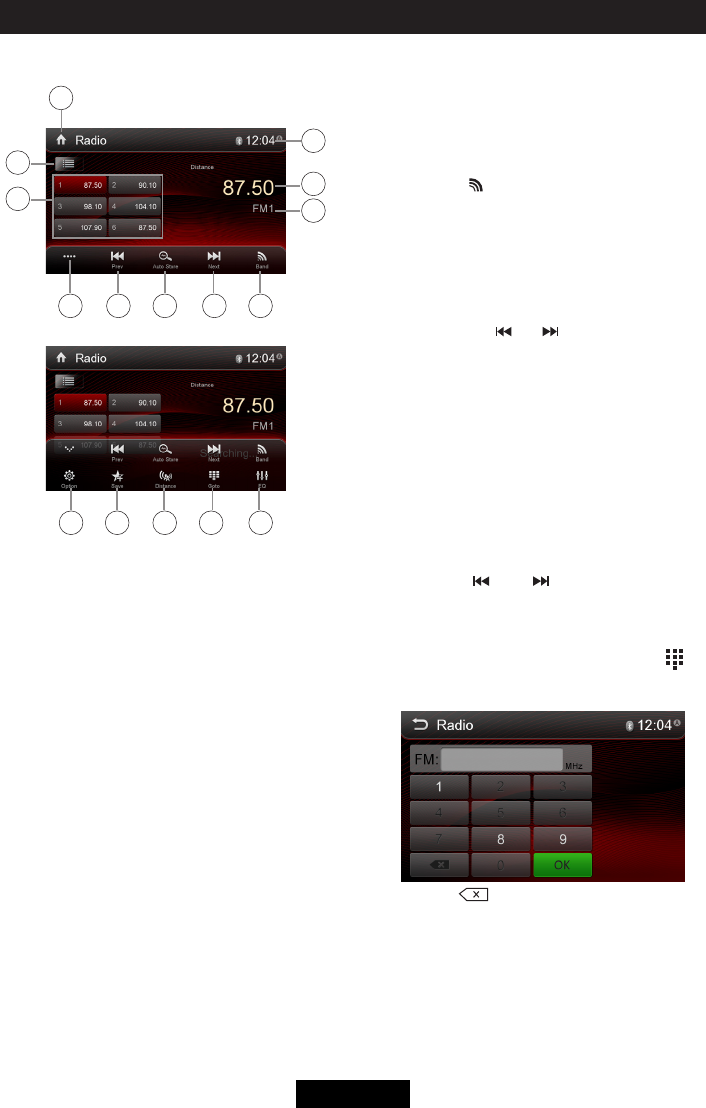
Radio mode
Tuner Menu
14 15 161312
1
3
2
87 9 10 11
4
5
6
1. Touch to view the SOURCE MENU.
2. To view all the stored stations
3. Preset stations list of current band
4. Clock
5. Current station frequency
6. Current radio band
7. Touch to view more buttons
8. Tune backward(short press)
Seek backward(long press, then short
pressbriey)
9. Search stations automatically
10. Tune forward(short press)
Seek forward(long press, then short press
briey)
11. Touch to change band
12. Show RDS options
13. Save the desired radio station
14. Touch to receive Local or Distant stations
15. Enter frequency directly
16. Touch to access Equalizer settings menu
Select Radio as Playing Source
Touch [Radio] on the main source menu.
Select One Radio Band
Touch the [ ] icon on the user interface
to select one radio band among FM1, FM2,
FM3, AM1 and AM2.
Tune
Auto Tuning
Press and hold [ ] / [ ] icon on the user
interface more than 1 second to seek a higher
/ lower station.
To stop searching, repeat the operation above
or press other keys having radio functions.
Note:
When a station is received, searching stops
and the station is played.
Manual Tuning
Method 1:
During manual tuning, the frequency will be
changed in steps.
Touch the [ ] / [ ] icon on the user
interface to tune in a higher / lower station.
Method 2:
1. Touch the numeric keypad icon [ ].
Numeric keyboard is displayed, touch
numbers to input frequency.
2. Touch [ ] to delete the input numbers
step by step.
3. Touch[OK]toenter.
EN - 4
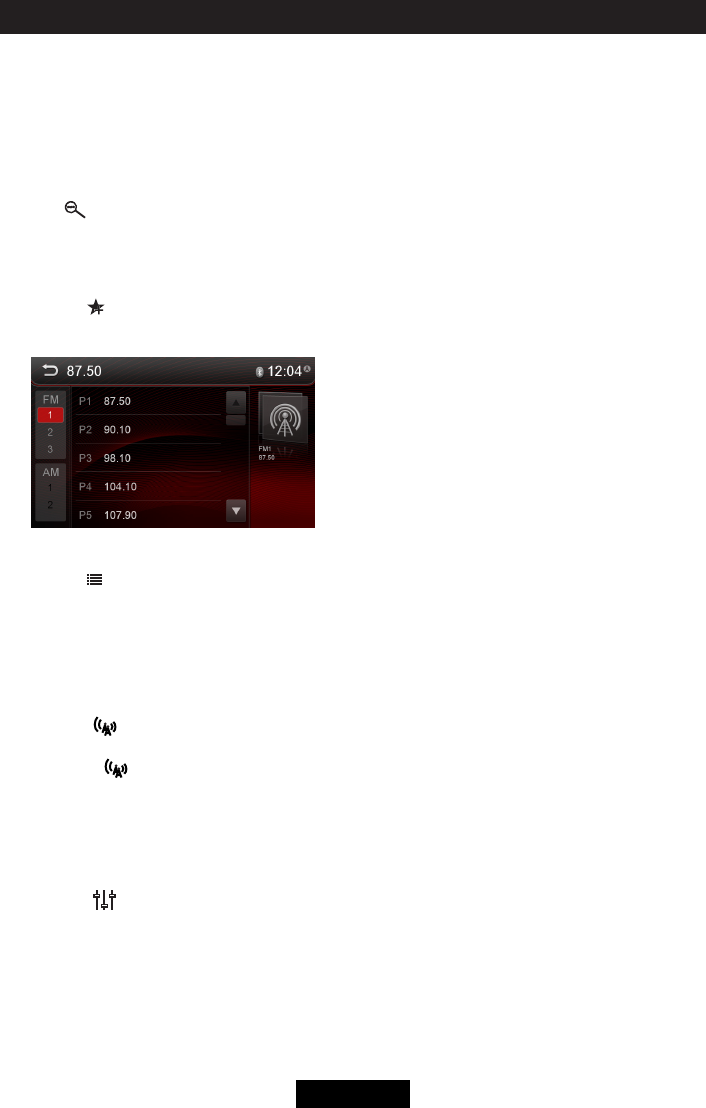
Preset Station
The unit has 5 bands, such as FM1, FM2,
FM3, AM1, AM2, and each band can store 6
stations; hence the unit can store 30 stations
in total.
Search Stations Automatically
Touch [ ] to search and store 6 strongest
stations in current band automatically.
Manual Store
1. Tune to a station manually.
2. Touch [ ].
3. Touch one of the channels P1 to P6 to
save the select station.
Tune to a Preset Station
1. Touch [ ].
2. Select the desired band.
3. Touch one of the preset channels (P1 to
P6) on the screen.
Local Seeking
Touch the [ ] icon and choose the Radio
Local or Distance.
When the [ ] icon turns bright, only
stations with a strong signal strength will be
detected.Defaultis“Distance”.
EQ Selection
Press the [ ] icon to enter the EQ setup
menu.
(See“EQ”chapterfordetails.)
Radio mode
RBDS
RBDS (Radio Broadcast Data System)
transmits data to the radio which displays
information such as station identification,
song artist, and song title.
RBDS service availability varies with areas.
If RBDS service is not available in your area,
the following service is not available.
CT (Clock Time)
Some stations broadcast the time and date
within the encoded RBDS signal. The clock
time is automatically adjusted when ‘CT’ is
set to ‘ON’.
NOTE:
Stations broadcasting close to time zones
may not broadcast the correct time in your
particular area. In this case, turn CT Off and
manually set the time.
PTY Function
PTY is the abbreviation for Program Type
whichisacodedeningthetypeofprogram
being broadcast (e.g. News or Rock).
Then PTY options will display on the screen.
To view more PTY options, touch the scroll
bar and arrows on the screen.
When one PTY option is touched (e.g.
News), auto search for next available PTY
by increasing tuning frequency until the PTY
of the next station matches the current. If no
matched PTY has been found, the unit will
return to the original radio frequency.

EN - 5
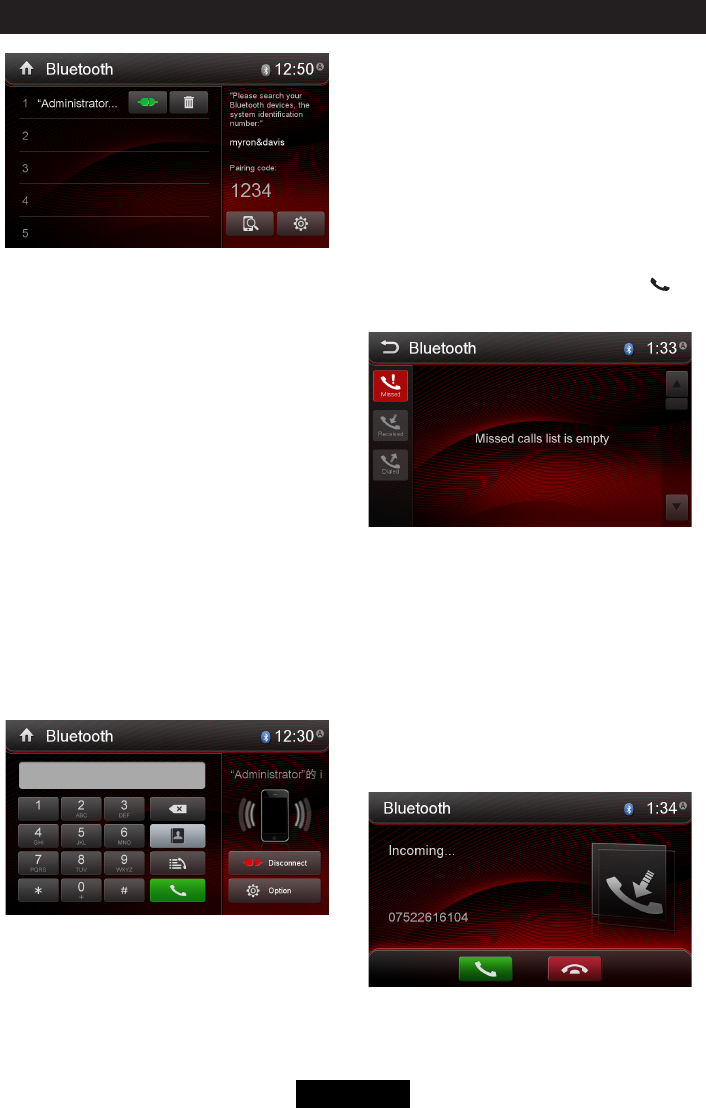
Bluetooth mode
Bluetooth technology has the capability
to wirelessly synchronize and transfer
data among devices. The Bluetooth audio
capabilities can be used for mobile phones
hands free applications. Bluetooth has many
prolesandtheunitiscompatiblewithmost
Bluetooth enabled mobile phones. Before
attempting to use the Bluetooth functions on
the unit, please make sure your mobile phone
supports Bluetooth functions.
Note:
The line-of-sight distance between this unit
and your mobile phone must be 8 feet (2.4
meters) or less for sending and receiving
voice and data via Bluetooth wireless
technology.
Please make sure your mobile phone
supports Bluetooth functions (Headset or
Handsfree profiles or both). Adhere to the
following guidelines for successful operation.
• BeforeusingBluetoothfunctions,you
must pair your mobile phone to the unit
(see“PairingtheBluetoothSystemwith
YourMobilePhoneandUnit”).To ensure
the best reception for pairing and re-
connection, please make sure the mobile
phone battery is fully charged before you
begin.
• Trytoperformpairingwithinafewminutes
of the mobile phone being turned on.
• Oncetheunithasbeenpairedwiththe
mobile phone, the unit’s Bluetooth model
number will be displayed on the mobile
phone.
• Toachievethebestperformance,always
keep the mobile phone within 10 feet (3
meters) of the unit.
• Alwayskeepaclearpathbetweenthe
mobile phone and the unit. Never place
a metal object or any other obstacle
between the mobile phone and the unit.
• Somemobilephonesmayhavea“Power
SavingMode”option.PLEASEDONOT
use the power saving mode with the unit.
• Beforeacceptingormakingacall,make
sureyourmobilephone’s“Bluetooth
function”isturnedon.
• Toensurethebestconversation quality/
performance, stay within 3 feet (1 meter)
of the units microphone when talking.
• Tomanuallydisconnectthemobile
phonefromtheunit,touchthe“Chain
Link”iconontheBluetoothuserinterface
(next to the mobile phone name) and the
Bluetoothdevicewillbe“disconnected”,
but still paired.
The user can make or receive phone calls
with Bluetooth enabled phones through the
unit. The user can also listen to music from a
Bluetooth enabled device.
Pairing Bluetooth Enabled
Devices
To connect your Bluetooth phone to the unit,
the user needs to pair the phone to the unit.
Pairing needs only to be done once. The
usercanpairuptovephones.Theusercan
search for Bluetooth head units by mobile
phone.
1. Turn ON the Bluetooth function of the car
device.
2. Search for Bluetooth devices by mobile
phone.
3. Select the Bluetooth device ID in the
pairing list.
4. Enter the password displayed on the right
of the screen.
Notes:
• Theoperationalrangebetweenthisunit
and a Bluetooth device is approximately 5
meters.
• BeforeyouconnectaBluetoothdevice
to this unit, familiarize yourself with the
Bluetooth capabilities of the device.
• CompatibilitywithallBluetoothdeviceis
not guaranteed.
• Anyobstaclebetweenthisunitand
a Bluetooth device can reduce the
operational range.
• Keepthisunitawayfromanyother
electronic device that may cause
interference.
EN - 6
Bluetooth mode
Disconnecting a Bluetooth
Device
To disconnect one device, touch [Disconnect]
icon. After "Disconnect"
, the radio will display
a screen listing paired devices. Pressing the
Green "Plug" icon will reconnect a previously
paired phone to the BT radio. Pressing the
"Wastebin" icon next to a device's name will
unpair the phone from the radio.
Notes:
•Thedevicewillbedisconnectedwhenthe
device is moved beyond the operational
range.
•Ifyouwanttoreconnectthedevicetothe
unit, place it within the operational range.
•Ifyoudonotwanttoreconnectthedevice
to the unit automatically, touch [Options],
thenset[Autoconnect]to[OFF].Fordetails,
seethe“AdjustBluetoothSettings”section.
Making a Call
1. Select Bluetooth function in the home
menu.
2. On Option page, see the "Phone Synch"
item, and press "Synch" to synchronize the
phone book with the BT. If you have many
contacts, this may take up to 3-4 minutes.
3. Search for phone number from [Phone
Book] or [Call Log].
Or touch the number pad directly to input the
numbers, then touch the green icon [ ] to
dial.
Receiving a Call
1. If there is an incoming call, the screen will
display“Incoming...”.
2. Touch the screen to select [hang up]
or [Answer]. Speak into the Bluetooth
microphone.
Tip
• Youcanselecttoreceivecallsautomatically
by setting [Auto answer] to [On].
EN - 7
Bluetooth mode
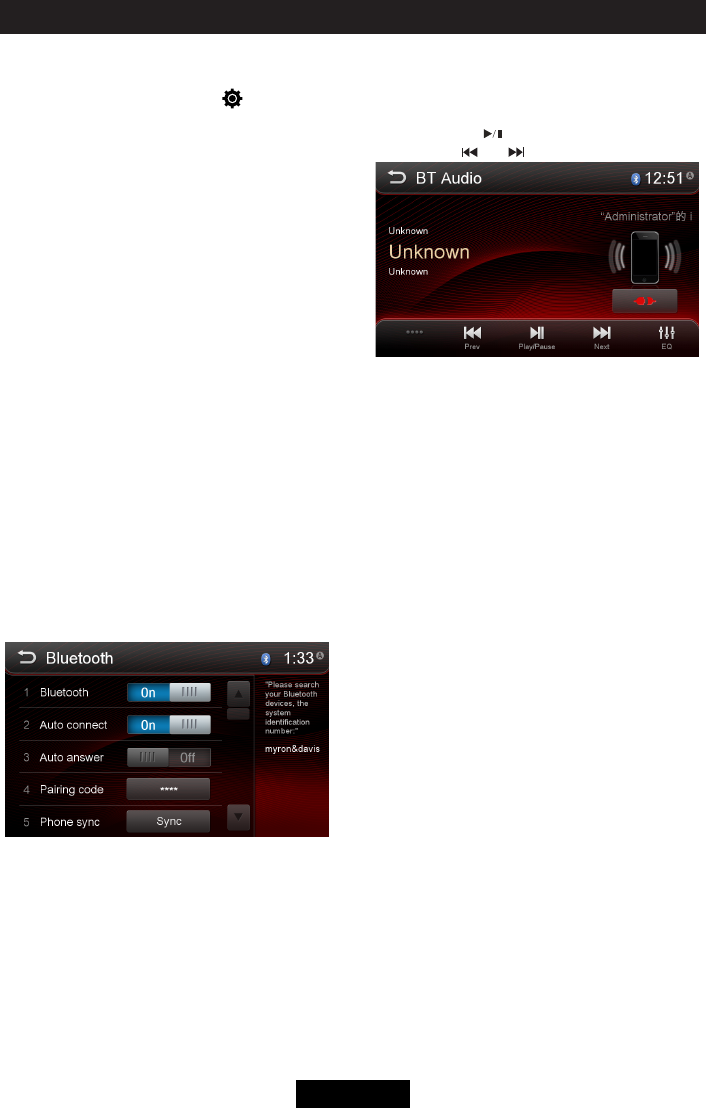
Adjust Bluetooth Settings
1. In Bluetooth menu, touch [ Options ].
The option menu is displayed.
2. Touch on the selected option to change
the setting.
• [Bluetooth]:
Toturnthe“Bluetooth” function ON or
OFF.
• [Auto connect]:
Toturnthe“AutoConnect”functionONor
OFF .
• [Auto answer]:
Toturnthe“AutoAnswer”functionONor
OFF .
• [Pairing code]:
To set the paring code.
• [Phone synch]:
Tosynchronizephonebook,touch[OK ]
on the sub-menu Phonebook Synch may
take several minutes to load on initial
setup.
Note:
•YoucanalsoadjustBluetoothsettingsin
the“Settings”menu.
Music Mode
1. Pair your mobile phone to the unit.
2. Touch [BT Audio] on the main menu.
3. Touch the [ ] to start playback.
Touch [ ] / [ ] to select track.
A2DP
A2DP is short for Advanced Audio Distribution
Profile. The mobile phones supporting this
function can transmit stereo audio, whereas
the ones not supporting this function can
transmit mono audio only.
AVRCP
AVRCP is short for Audio/Video Remote
ControlProle.Themobilephonessupporting
this function can control the playback of a
Bluetooth audio player.
In the mode of the music player working, if
you want to make a phone call, you can press
the number keys on the mobile phone.
At the same time the music player will stop.
TheTFTscreenwilldisplay “Calling”, after
the call received, the voice will be transferred
to the unit. When the call ends, the screen will
display music playing menu.
If there is an incoming phone call, the music
player will stop, and the screen will display
“Incoming”.Whenthecallends,thescreen
will display music playing menu.
EN - 8
Playback
Load a Disc
You can play video, audio or images stored
on the following discs:
•DVDVideo,DVD-R,DVD-RW
•VCD
•AudioCD,CD-R,CD-RW
Note:
Ensure that the disc contains playable
content.
Eject the disc
Press the [ ] key on the front panel to eject
the disc. When the disc is ejected, the unit
switches to the previous source.
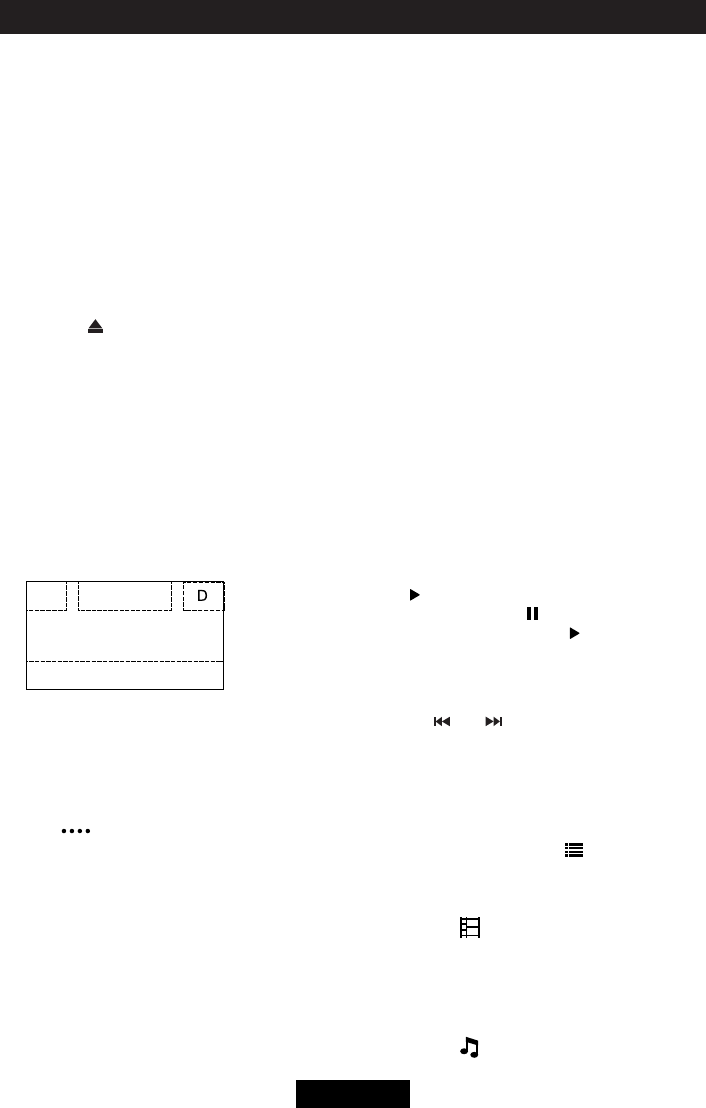
Touch screen controls
The touch key areas for DVD playback are
outlined below:
A: Return to the main menu
B: Play the video and display playback
information
C: Display onscreen control menu
D: Time display
B
C
A
Controlling playback
To access the on-screen controls, touch the
screen anywhere except for the upper left
corner and touch again to cancel display.
Touch [ ] to view hiden function icons.
Connect an USB device
1. Open the USB door on the bottom left of
the front panel.
2. Connect an USB device into the USB
connector. Play starts automatically.
Insert a MicroSD card
1. Open the SD card door on the top right of
the front panel.
2. Insert a MicroSD card into the lower card
slot. Play starts automatically.
Notes:
1.Ifthereareaudiofilessupportedinthe
USBstick/SDcard,thesystemwillenter
theaudiolesmenuautomatically.
Iftherearenoaudiofiles,butthereare
videolessupportedintheUSBstick/SD
card, the system will enter the video files
menu automatically.
Iftherearenoaudioorvideofiles,but
therearepicturelessupportedintheUSB
stick/SDcard,thesystemwillenterthe
picturelesmenuautomatically.
Iftherenoaboveaudio/video/pictureles
supportedintheUSBstick/SDcard,the
screenwilldisplay:Therearenoaudio/
video/picturelessupported.
2. NotallkindsofUSBdevices/SDcardare
compatible with the unit.
Play/Pause
1. Once a disc, USB or MicroSD card is
inserted, play starts automatically.
For DVD movie, if a menu appears, press
[ ] to start play.
2. To pause, touch [ ].
To resume play, touch [ ].
Previous/Next
Touch [ ] / [ ] key on the screen to skip
to previous / next track / chapter.
Search for a Folder
Search for a Folder
When playback, touch [ ] icon to show
folder/lelist.
For Video Files
1. Touch [ ] to display all available video
folders.
2. Touchafolder,thentouchthedesiredle.
3. Touchtheleagaintostartplay.
For Audio Files
1. Touch [ ] to display all available audio
folders.
EN - 9
Playback
2. Selectafolder,thentouchthedesiredle.
3. Touchtheleagaintostartplay.
For Picture Files
1. Touch [ ] to display all available picture
folders.
2. Selectafolder,thentouchthedesiredle.
3. Touchtheleagaintostartplay.
For Folder Control
1. Touch [ ] to display all available folders.
2. Selectafolder,thentouchthedesiredle.
3. Touchtheleagaintostartplay.
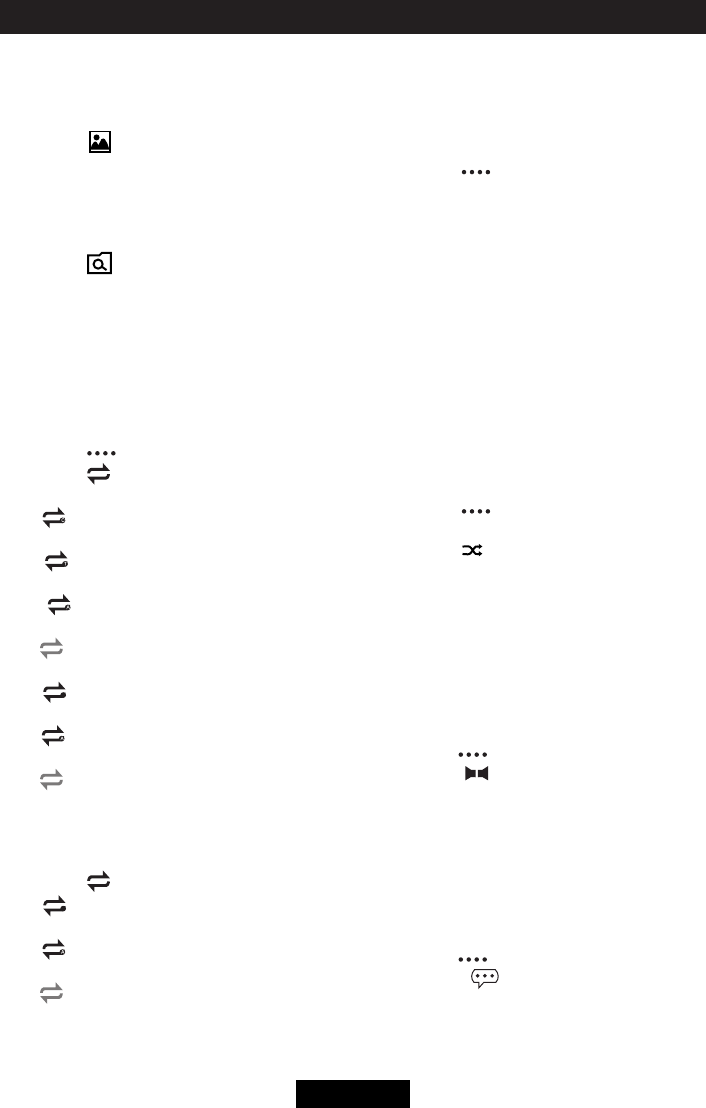
Repeat
For DVD/VCD movie disc:
1. Touch bottom half of the screen to display
menu on the screen, if necessary.
2. Touch [ ] to display the 2nd menu.
3. Touch [ ] repeatedly to select:
DVD
[ ] Repeat chapter: Play the current
chapter repeatedly.
[ ] Repeat title: Play all chapters in the
title repeatedly.
[ ] Repeat all: Play all in the disc
repeatedly.
[ ] Repeat off: Cancel repeat play.
VCD
[ 1 ] Repeat single: Play the current
single chapter repeatedly.
[ ] Repeat all: Play all chapters in the
disc repeatedly.
[ ] Repeat off: cancel repeat play.
For CD/MP3 les:
1. Touch anywhere except the upper left
corner to display menu on the screen, if
necessary.
2. Touch [ ] repeatedly:
[ 1 ] Repeat single: Play the current
single track repeatedly.
[ ] Repeat all: Play all in the disc or
storage repeatedly.
[ ] Repeat off: Cancel repeat play.
Repeat A-B
Youcanrepeataspecicofvideole(repeat
A-B).
1. Touch the screen to display control menu,
if necessary.
2. Touch [ ] to display the 2nd menu, if
necessary.
3. Touch [ A-B ] repeatedly to mark:
Repeat A-: the start of the section to
repeat.
Repeat A-B: the end of the section to
repeat.
The selected section plays repeatedly.
4. To exit A-B repeat mode, touch A-B
repeatedly, [Repeat A-B off] is displayed.
Shufe (Random) Play
You can play audio tracks/files in random
order.
1. Touch the screen to display control menu,
if necessary.
2. Touch [ ] to display the 2nd menu, if
necessary.
3. Touch [ ] on the screen repeatedly to
turn random play on or off.
Select Audio Mode
When you play VCDs, you can select an
audio mode (R/L/Stereo).
1. During play, touch bottom half of the
screen to display menu on the screen, if
necessary.
2. Touch [ ] to display the 2nd menu.
Touch [ ] repeatedly until the audio
mode is selected.
Select Subtitle Language
For DVD or Divx discs that contain two or
more subtitle languages.
1. During play, touch the screen to display
menu on the screen, if necessary.
2. Touch [ ] to display the 2nd menu.
3. Touch [ ] repeatedly to select a
language.
The selected language is displayed.
EN - 10
Playback
Playback Information
Touch the screen when playing back DVD
and VCD discs and the
playback information will be displayed on the
top area of the TFT.
For DVD
12 3
DVD T:01/08 C:005/012
1. Disc type.
2. DVDTitleinformation.“01/08”indicates
that this DVD has 8 titles and the title
playingbacknowisthersttitle.
3. DVDChapterinformation.“005/012”
indicates that current title has 12 chapters
and the chapter playing back now is the
fthchapter.
For VCD
12
VCD Track:01/08
1. Disc type.
2. VCDTrackinformation.“01/08”indicates
that this VCD has 8 tracks and the track
playingbacknowisthersttitle.
Elapsed Time
12
00:01:20 00:30:17
1. Elapsed time of the current track.
2. Total time of the current track.
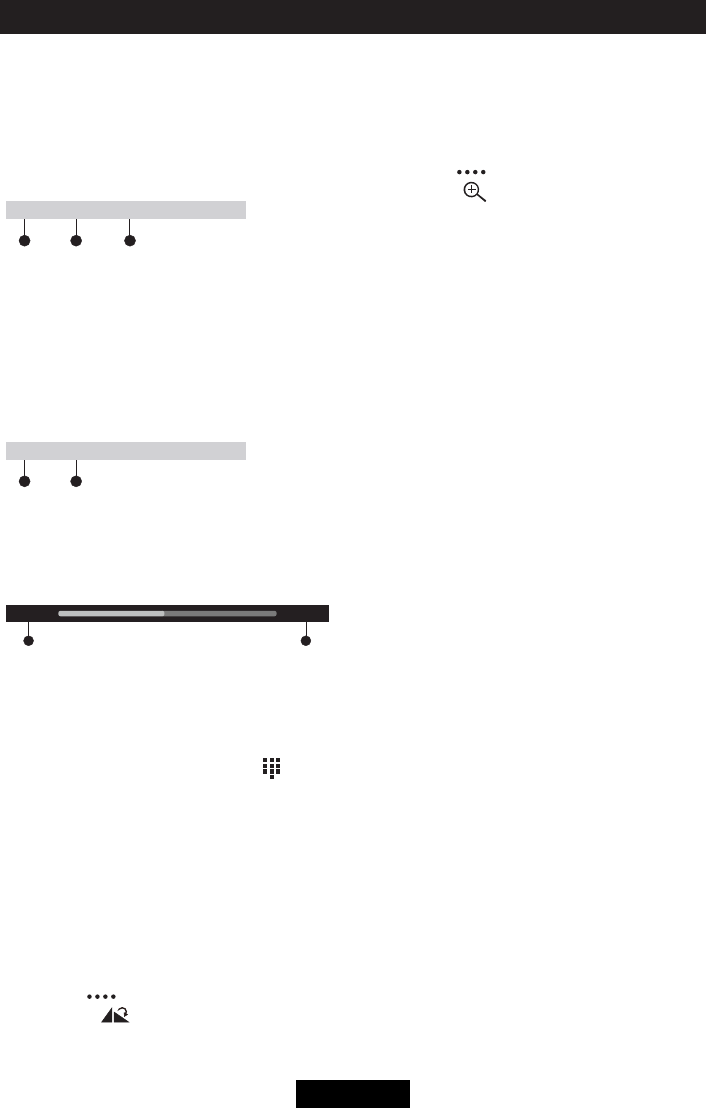
Direct Track Entry
To select a track directly, touch the [ ] icon
on screen control to displaythe direct entry
menu. Enter the desired track using the on-
screennumberpad.Press[OK]tothe
selected track.
Rotate Pictures
1. When you view pictures, touch the
screen to display menu on the screen, if
necessary.
2. Touch [ ] to display the 2nd menu.
3. Touch [ ] repeatedly to rotate the
picture.
Zoom
You can zoom in pictures for a close view.
1. When you view pictures, touch the
screen to display menu on the screen, if
necessary.
2. Touch [ ] to display the 2nd menu.
3. Touch [ ] repeatedly to zoom in the
picture.
EN - 11
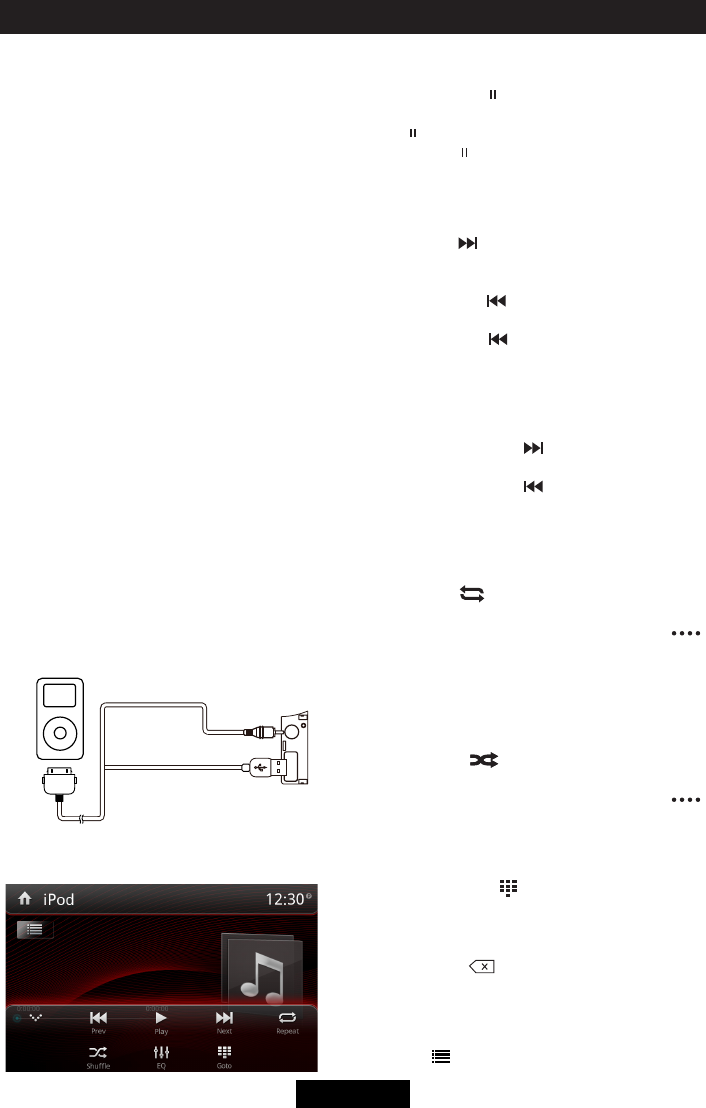
iPod/iPhone Operations
Accessing iPod mode
Connect an iPod or iPhone to the USB
connector via an iPod cable.
Touch [iPod] on the main menu to enter iPod
menu.
Pausing play
1. Touch the [ ] icon on the bottom of the
screen to pause play.
[ ] appears on the screen.
2. Touch [ ] icon again to resume play.
Selecting a track
Track-up
Touch the [ ] icon to move to the beginning
of the next track.
Track-down
1. Touch the [ ] icon to move back to the
beginning of the current track.
2. Touch the [ ] icon twice to move back
to the beginning of the previous track.
Fast forward/Fast backward
Fast forward
Touch and hold the [ ] icon .
Fast backward
Touch and hold the [ ] icon .
Repeat play
This function allows you to play the track
repeatedly.
Touch the [ ] icon to select Repeat one or
Repeat all.
If the icon isn’t on current screen, touch [
]buttontondit.
Random play
This function allows you to play all tracks
recorded in a random order.
Touch the [ ] icon to perform random
play.
If the icon isn’t on current screen, touch [
]buttontondit.
Search function
1. Touch the [ ] icon to enter search
menu.
2 Inputnumber,thentouch[OK]tobegin
searching.
Touch [ ] icon to delete inputted
number.
File List
Touch [ ]icontoshowfolder/lelist.
This unit supports only the following iPod/
iPhone models:
· iPhone 5s
· iPhone 5c
· iPhone 5
· iPhone 4s
· iPhone 4
· iPod touch (5th generation)
· iPod touch (4th generation)
· iPod classic
· iPod nano (7th generation)
· iPod nano (6th generation)
· iPod nano (5th generation)
“MadeforiPod,”and“MadeforiPhone”
mean that an electronic accessory has been
designed to connect specifically to iPod, or
iPhone, respectively, and has been certified
by the developer to meet Apple performance
standards.
Apple is not responsible for the operation of
this device or its compliance with safety and
regulatory standards. Please note that the
use of this accessory with iPod or iPhone
may affect wireless performance.
iPhone and iPod are trademarks of Apple Inc.,
registered in the U.S. and other countries.
EN - 12
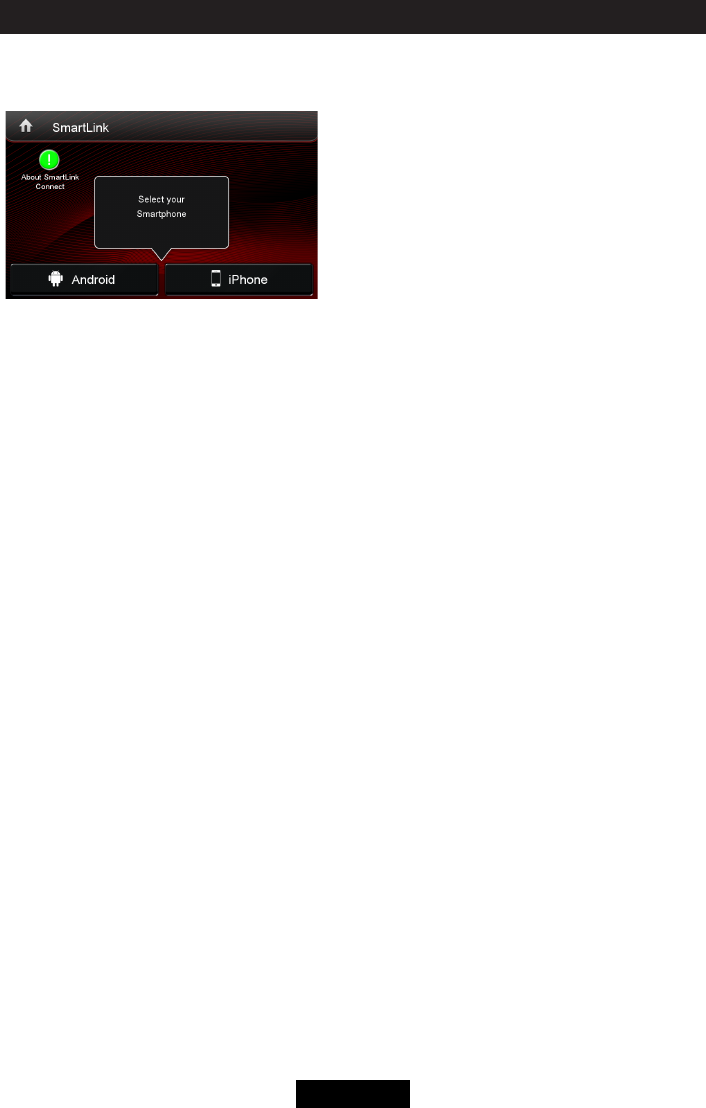
SmartLink
Open the Source Menu and then touch
[ SmartLink ] to enter SmartLink menu.
About SmartLink
By this function, you can synchronize the
screen from your smart phone to the car
device.
And you can also control your phone by the
car device, such as receiving calls, dialing
calls, listening to the music and watching
movies or pictures from your phone, as well
using navigation from the smart phone to the
screen of the car device.
Thefunctiondependsonthecongurationof
your smart phone.
To active the SmartLink function, you need to
connect your smart phone to the car device’s
SmartLink connector via appropriative
cable(sold separately).
Connect with Android Phone
1.
How to get SmartLink APP
Download and install SmartLink Connect
App from Google Play onto your smart
phone.
2.
Cable connection
Connect your Smartphone with this
system via SmartLink cable(sold
separately).
(Some Samsung phones adaptor cable
interface is different to others)
3.
BT Connection
Scan for Bluetooth devices and select this
system for connection.
4.
Touch panel calibration
Launch the SmartLink Connect App on
your smart phone. Select “Touch Screen
Calibration” in the setting menu of the App
in the car device touch screen.
Once the touch screen is calibrated, press
“System settings” to return to the main
SmartLink Connect page. Press “Mobile
Home Page” to access your smart phone
from the touch screen of the car device.
This calibration is performed once per
phone when initially set-up.
Connect with iPhone
Connect your iPhone with this system via
Apple Lightning Digital AV Adapter.
After connect successfully, the screen of your
iPhone will synchronize to the car device.
Note: Your iPhone can’t be controlled by
car device.
Limitations
1.
SmartLink can’t work if car-unit or phone is
Off or in inappropriate operation.
2.
SmartLink can’t work if operated in a wrong
way or without specied adaptor or wiring.
3.
Wireless communication could be shortly
influenced for some phones which can
cause impact on SmartLink.
4.
Inappropriate phones or systems can
cause impact on SmartLink.
5.
If no specied versions of app in phone or
can’t match with the versions of app in car-
unit can cause impact on SmartLink.
6.
SmartLink can limited to third-party
software. (IOS or Android systems
upgrade, treaty of phone port changed,
navigation systems upgrade or the treaty
changed.)
7.
SmartLink can’t work if PIN code is needed
when starting Wi-Fi.
8.
Wire or wireless communication is upset by
weather, busy lines, capacitance, device,
and so on, which may cause inuence on
SmartLink.
9.
Power system and the structure of your
car, car-unit, phone, or damaged wiring
can cause impact on SmartLink.
10.
SmartLink can’t work without available
signal or normal system.
11.
The dpi of phone may cause little deviation
when you control phone with car-unit.
NOTE:
No liability shall be assumed for cases
described above.
EN - 13
SiriusXM® RADIO OPERATION
Only SiriusXM® brings you more of what you
love to listen to, all in one place.
Get over 140 channels, including commercial-
free music plus the best sports, news, talk,
comedy and entertainment. Welcome to the
world of satellite radio. A SiriusXM Vehicle
Tuner and Subscription are required. For
more information, visit www.siriusxm.com.
Activating SiriusXM® Radio
After installing your SiriusXM Connect Vehicle
Tuner and antenna, power on your car device
and select [SXM] mode. You should be able
to hear the SiriusXM preview channel on
Channel 1.
After you can hear the Preview channel, tune
to Channel 0 to find the Radio ID of your
tuner.
Note:TheSiriusXMRadioIDdoesnotinclude
thelettersI,O,SorF.
In the USA, you can activate online or by
calling SiriusXM Listener care:
• Visitwww.siriusxm.com/activatenow
• CallSiriusXMListenerCareat1-866-635-
2349
For Canadian Subscriptions, please contact:
• Visitwww.siriusxm.ca/activatexm
• CallXMcustomerCareat1-877-438-9677
Activation typically takes 10-15 minutes, but
may take up to one hour. It is recommended
toleaveyourvehicleonuntilthe“Subscription
Updated”messageappears.
SiriusXM® User Interface
The on-screen indicators and touch key areas
for SiriusXM® functions are outlined below.
HOME Icon [ ] - Touch to return to the
unit’s Main Menu Screen.
Band indicator (SXM1 icon) - Displays
SiriusXM® radio band currently selected.
Three bands are available: SXM1, SXM2, and
SXM3.
Time Display - This indicator displays the
time as entered by the user in the Settings
Menu.
List Icon [ ] - Touch to select a channel
search criteria. Presets lists preset channels
stored by the user. Channels lists all SXM
channels. Category lists SXM channels by
categories.
More Icon [ ] - Touch to go to SiriusXM®
Menu Page 2.
Previous [ ] Icon - Touch to tune to the
previous channel.
Channel/Category Icon - Touch to toggle the
icon displayed between Category
and Channel. When Channel is displayed,
touching or tunes channels up or down. When
Category is displayed, touching or tunes
channels within a category up or down.
Next [ ] Icon - Touch to tune to the next
channel.
Scan Icon [ ] - Touch to scan all channels
starting at channel 1. The tuner will pause
for approximately five seconds at that
channel. Touch scan again to listen to that
channel. If scan is not touched, the tuner will
automatically seek the next channel.
Band Icon [ ] - Touch to select a band of
preset channels. Three bands are available:
SXM1, SXM2, and SXM3. Each band can
store up to ten preset channels. (Preset
channels are accessed from the List icon.)
More Icon [ ] - Touch to go to SiriusXM®
Menu Page 1.
Save Icon [ ] - Touch to display screen
used to enter current channel into preset
memory.
SiriusXM Satellite Radio Operations
EN - 14
Lock Icon - Touch to display the SXM Lock
Screen.
CHG PWD Icon - Touch to go to the change
password screen.
Direct Entry Icon - Touch to display the
Direct Entry Menu.
EQ Icon - Touch to access the Equalizer level
settings menu.
Switching to SiriusXM® Radio
Touch the top left corner of the screen or
press the [MENU] button on the front panel to
view the Main Menu screen. From the Main
menu screen, touch the [ SXM ] icon.
Selecting the SiriusXM® Band
Touch the Band icon [ ] on the SXM Menu
screen to change between the following
bands: SXM1, SXM2, and SXM3.
Seek Tuning
• Tofastseekthenexthigherchannel,
touch and hold the icon [ ].
• Tofastseekthenextlowerchannel,touch
and hold the icon [ ].
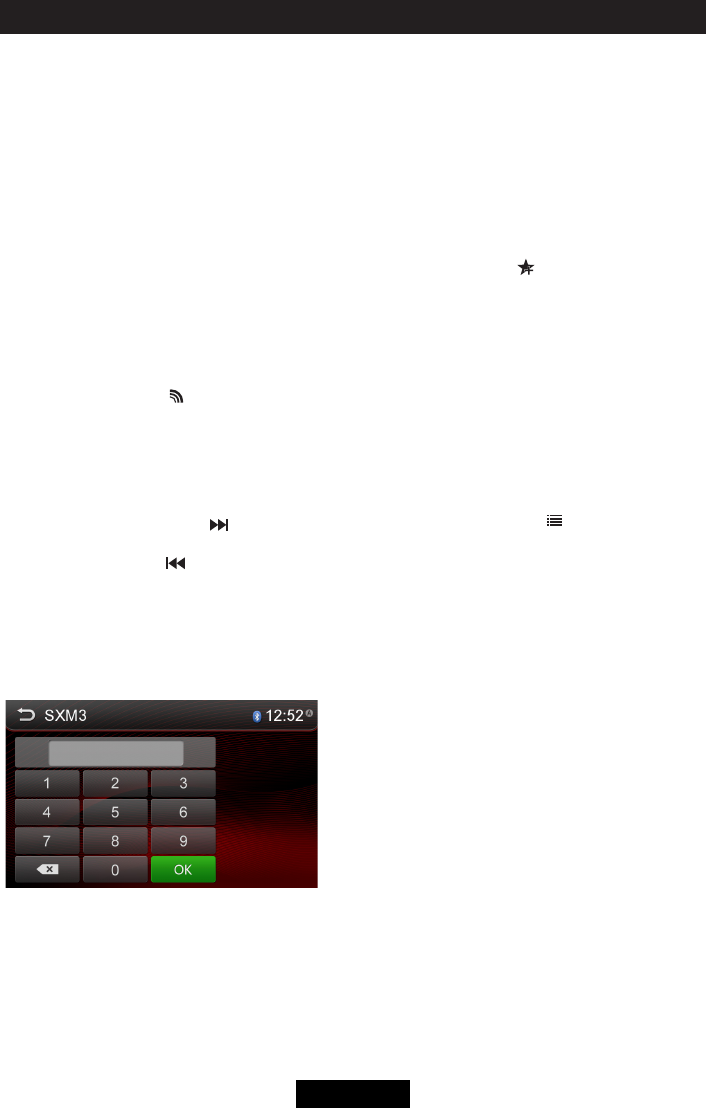
Direct Tuning
To enter a SiriusXM® radio channel directly:
1. On the SiriusXM® menu page 2, touch
the Direct Entry icon to display the Direct
Entry Menu.
2. Enter the desired SiriusXM® radio
channel using the on-screen number pad
then touch the Ok icon. If you wish to
delete an entry number touch the X icon.
3. To exit the screen without changing the
channel, touch the Back icon.
Using Preset Channels
A preset is a channel name that is stored for
instant access to that channel. Ten numbered
preset buttons store and recall channels for
each band.
Storing a Channel
1. Select a band (if needed), then select a
channel.
2. On the SiriusXM® menu page 2, touch
the Save icon [ ] to access the Preset
Channel Screen.
3. Touch the preset number (P1 through
P10) in which you would like to store the
current channel (or touch the Back icon to
cancel and close the menu).
The channel will be stored and displayed
in that preset. Touch the or icon to scroll
up or down the list.
4. Touch the Back icon to return to the SXM
Menu screen.
Recalling a Channel
1. Touch the List icon [ ].
2. Touch the Preset icon to access the
Recall Preset Channel Screen.
3. Touch a channel on the preset channel
list to select the corresponding stored
channel. Touch the or icon to scroll up or
down the list.
Searching for a Channel
Search by Channel
1. On the SirusXM® menu page 1, touch
the Category/Channel icon (if needed) to
select Channel.
2. Touch List to display the Channel Search
Screen:
3. Touch a channel to tune to that channel.
Touch the or icon to scroll up or down the
list.
Search by Category
Categories group music by type such as jazz,
rock, classical, etc. To search by category:
1. On the SirusXM® menu page 1, touch
the Category/Channel icon (if needed) to
select Category.
2. Touch List to display the Category Search
Screen:
SiriusXM Satellite Radio Operations

EN - 15
3. Touch a category item. A channel list
screen appears.
4. Touch a channel to tune to that channel.
Touch the or icon to scroll up or down the
list.
Locking SXM Mature Channels
SiriusXM® attaches a label to channels with
mature content. The radio recognizes these
channelsas“Mature”.TheMatureChannel
Lock option allows you to lock out channels
with“Mature”labels.Thesechannelswillstill
appear in the channel listing (with a lock icon),
but will not be tunable unless the parental
lockout password is correctly entered.
Lock Mature Channels
To lock mature channels:
1. On the SirusXM® menu page 2, touch the
Lock icon.
2. Enter your 4-digit password and then
presstheOKicon.
3. Touch the Lock Mature icon. The mature
channels are now locked.
Temporarily Unlock a Mature Channel
Whentheglobal“MatureLock”isenabled,a
mature channel can be temporarily unlocked.
All mature channels are temporarily unlocked
(but still hidden when channel browsing) until
theSXMsourceischanged,Accy(Key)is
cycledorthe“PowerButton”onfrontpanelof
radio turns the Radio off.
This mode is useful for listening to mature/
adult content on a temporary basis, allowing
you to listen on a locked channel without
havingtodisabletheglobal“MatureLock.”
To temporarily unlock a mature channel:
1. Tune to a mature channel. If the channel
is locked, Ch Locked, Code? will appear
on the SiriusXM® User Interface tuner
screen.
2. Enter the 4-digit password and then press
theOKicontounlockthechanneltotune
it.
Unlock All Mature Channels
To unlock all mature channels:
On the SirusXM® menu page 2, touch the
Lock icon.
1. Enter your 4-digit password and then
press the Ok icon.
2. Touch the Unlock All icon. All channels are
now unlocked.
Locking Individual SXM
Channels
An user can lock individual channels. When
locked, a channel has the lock icon next to it
on the channel list.
Locking a Channel
To lock an individual channel:
1. On the SirusXM® menu page 2, touch the
Lock icon. The following screen appears:
2. Enter your 4-digit password and then
presstheOKicon.The followingscreen
appears:
3. Touch an unlocked icon. The icon is
replaced by a lock icon. The channel is
now locked.
Unlocking a Channel
To unlock an individual channel:
1. On the SirusXM® menu page 2, touch the
Lock icon. The Enter Password Screen
appears appears.
2. Enter your 4-digit password.
3. Touch a lock icon to unlock a channel.
The icon is replaced by an unlocked icon.
The channel is now locked.
Change Lock Password
The Change Lock Password option allows
you to change the password from the default
or current custom password to another
password.
NOTE: The default password is 0, 0, 0, 0.
To change a password:
1. Touch the CHGPWD icon.
2. Enter your 4-digit password and press the
OKicon.
3. Enter the new 4-digit password and press
theOKicon.Thenewpasswordisset.
SiriusXM Satellite Radio Operations
EN - 16
Listen to other devices
You can connect an external audio/video device to the unit.
1. Connect the external device with the supplied AV cable.
2. Touch the upper left corner to display the main menu.
3. Touch [AV-IN 1] or [AV-IN 2] to access external device.
Reset
When the unit hangs up, you can reset it.
Press [ RESET ] with a ball-point pen or similar tool.
Tip
When the unit has been reset, all the settings will return
to default settings.
Replace a Fuse
If there is no power, the fuse may be damaged and need to be replaced.
1. Take out the unit from dashbpard.
2. Check all electrical connections.
3. Buy a fuse that matches the amperage of the damaged fuse.
4. Replace the fuse while the unit’s power is off.
GPS
1. Touch the upper left corner to display home menu.
2. Touch [Navigation], the navigation menu will display.
3. Refer to the map manual to operate the navigation tool.
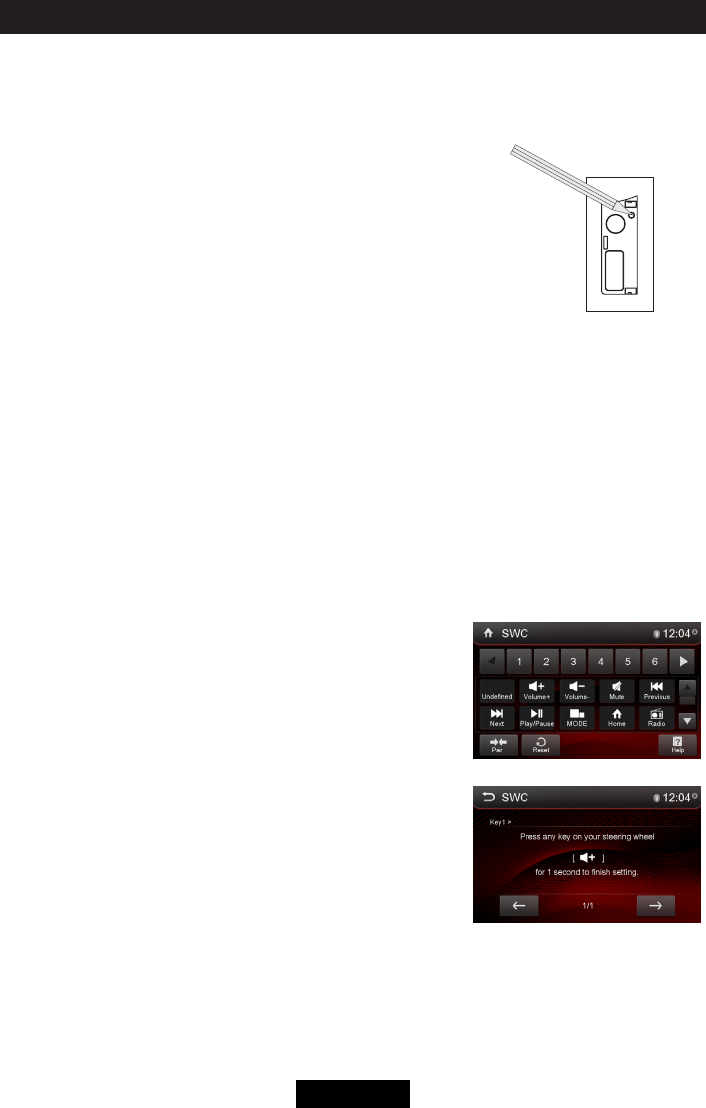
Steering Wheel Control Programming
1. Touch the upper left corner to display home menu.
2. Touch [Settings] on the bottom of the menu.
3. Slide down the General setting list and select [ SWC ].
4. Touch [On] to show the SWC menu.
5. Adjust each key with a individual function.
6. Touch [ Pair ] to program.
7. Press each individual steering wheel control button for each
corresponding function.
8. Oncethenalsteeringwheelcontrolbuttonisprogrammed,
the functions are saved and the programming will end.
9. Touch [ Reset ] to reset the programming.
Other modes
Reset

EN - 17
Setup
Display system
1. Touch the upper left corner to display the main menu.
2. Touch [ ].
The settings menu is displayed.
Adjust general settings
1. Touch [ General ], if necessary.
2. Touch to highlight a setting.
3. Touch to display/select an option.
4. Touch blank area of the screen to exit.
General settings Options Description
Radio region USA/China/Japan/Europe/Eur LW/
OIRT Select one that matches your location.
Sensitivity Local Select Local to receive only stations with extremely
strong signal.
Distance
Blackout Off/120s/20s Set the blackout status.
Dimmer mode Night/Dark/Normal/Bright Set the backlight dimmer of the screen.
OSD Select on-screen display language.
Beep On Turn on the beep sound. Each time you press a button,
the unit beeps.
Off Turn off the beep sound.
Calibration Start Calibrate the touch screen.
Key Color Select the backlight color of the buttons.
GPS path setup Set the path of GPS map.
Calibration
When the touch operation is not sensitive or valid, you should
calibrate the touch screen through calibration setting function.
Adjust the response positions of the touch panel as followings:
1. Press the [ Calibration ] option on the setup menu to enter.
2. Touch [ Start ] to enter.
3. Press and hold the center of [ + ] for 2 seconds, the [ + ] will move automatically.
4. Aim at center of [ +],followthepathasshownofthegure,afterstepsfrom1to5,the
system will exit calibrating automatically.

EN - 18
Adjust video settings
1. Touch [Video].
2. Touch the option to setup.
Video settings Options Description
Parking On Disable video when driving.
Off Enable video when driving.
WheninPark“On”mode,thescreenwilldisplayWARNINGinformationifyouplaythevideo.The
warning screen will prevent the driver from watching videos for safety.
Adjust time settings
1. Touch [ Time ].
2. Touch an option repeatedly to select:
3. Touch blank area of the screen to exit.
Time settings Options Description
Date Year / Mon / Day Touch [ ] or [ ] to set year, month and day.
Clock mode 12Hr/24Hr Touch [12Hr] or [24Hr] to switch clock mode.
Time Hour / Min / AM / PM Touch [ ] or [ ] to set hour and minutes.
Touch [ ] or [ ] to set AM/PM (only for 12Hr).
Adjust DVD rating
1. Touch [ DVD ].
2. Touch an option repeatedly to select.
3. Touch blank area of the screen to exit.
DVD rating Options Description
Set password Set password to restrict the play of discs. The default password is 1234.
Rating level
Kidsafe Acceptable for children.
G Acceptable for general viewers.
PG Parental guidance suggested.
PG-13 Unsuitable for children under age 13.
PG-R Recommend parents to restrict viewing for children under 17.
R Restricted re-parental guidance is advised for children under the age of 17.
NC-17 Unsuitable for children under age 17.
Adult Acceptable for adults only.
Adjust bluetooth settings
1. Touch [ Bluetooth ].
2. Touch an option repeatedly to select:
3. Touch blank area of the screen to exit.
Sound settings Options Description
Bluetooth On/Off Touch [ ] or [ ] to set year, month and day.
Auto connect 12Hr/24Hr Touch [12Hr] or [24Hr] to switch clock mode.
Auto answer Hour / Min / AM / PM Touch [ ] or [ ] to set hour and minutes.
Touch [ ] or [ ] to set AM/PM (only for 12Hr).
Pairing code Set the pairing code.
Microphone Internal/External Choose the microphone.
Setup
EN - 19
Adjust sound settings
1. Touch [ Sound ].
2. Touch an option repeatedly to select.
3. Touch blank area of the screen to exit.
Audio settings Options Description
Sub woofer On Turn on or off the subwoofer.
Off
Subwooferlter
80Hz Select a crossover frequency to set a cut-off frequency for the subwoofer’s LPF
(low-passlter).
120Hz
160Hz
DRC On Turn on or off the Dynamic range control.
Off
Adjust volume settings
You can set different volumes for different modes.
1. Touch [Volume].
The volume setting sub-menu is displayed.
2. Touch to select a source.
3. Select a volume value from 0 to 12.
When switching to the source, the volume increases automatically.
4. Touch blank area to close the sub-menu and touch top left of the screen to exit setting menu.
Adjust system settings
1. Touch [ System ].
2. Touch an option repeatedly to select.
3. Touch blank area of the screen to exit.
System settings Description
Load factory Restore to default settings.
Version Info The Version Sub-menu is used to identify the model and resident operation system as well
as the hardware and software versions.
Setup
EN - 20
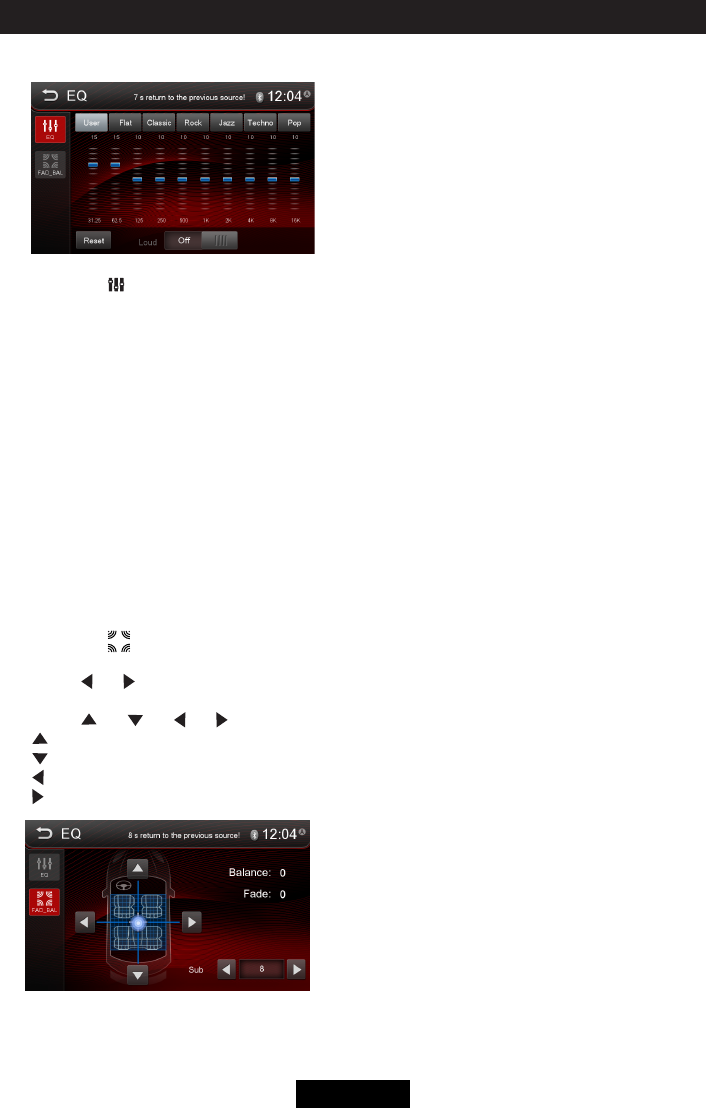
Select preset equalizer
1. Enter the EQ setup mode
Touch the [ ] icon in the user interface and the EQ setup interface will display on the screen.
2. Select EQ mode
Touch to select a desired acoustical preset option ( User / Flat / Classic / Rock / Jazz / Techno
/ Pop ).
Adjust EQ Parameters
To adjust EQ parameters, touch and drag the parameters adjustment bar.
[ User ]: Set the desired audio effect.
[ Reset ]: Cancel the equalizer function settings.
[ Loud: On/Off ]: When listening to music at low volumes, this feature will selectively boost certain
bass and treble frequencies.
Adjust FAD BAL
You can adjust front/back/left/right balance of the speaker and the subwoofer volume to get
balanced listening effect according to the surroundings and your interest.
1. Enter the EQ setup mode
Touch the [ ] icon in the EQ interface.
2. Adjust subwoofer volume
Touch [ ] / [ ] “SUB VOL” to adjust subwoofer volume from -12 to +12.
3. Adjust fader / balance value
Touch [ ] / [ ] / [ ] / [ ] to adjust fader / balance value from -12 to +12.
[ ]: Front speaker
[ ]: Rear speaker
[ ]: Left speaker
[ ]: Right speaker
Notes:
1.TheEQmodewillchangeto‘User’automaticallywhenyouadjustthefrequencyvalueinall
modes besides ‘User’.
2.ThevalueofSubisindependentofEQmodeandcanbeadjustedseparately.
EQ
EN - 21
What appears to be trouble is not always serious. Please check the following points before calling
a service center.
Troubleshooting
Problem Cause Corrective action
General
Unit can not power on
Unit fuse blown. Install new fuse with correct rating.
Car battery fuse blown. Install new fuse with correct rating.
Illegal operation Reset the unit.
No/low audio output
Improper audio output connection. Check wiring and correct.
Volume set too low. Increase volume level.
Speakers damaged. Replace speakers.
Heavily biased volume balance. Adjust the channel balance to center
position.
Speaker wiring is in contact with metal part
of car. Insulate all speaker wiring connections.
Poor sound quality or
distortion
Pirated disc is in use. Use original disc.
Speaker power rating does not match unit. Replace speakers.
Wrong connections. Check wiring and correct.
Speaker is shorted. Check wiring and correct.
Tel-Mute malfunction MUTE wire is grounded. Check the ‘MUTE’ wiring and correct.
Unit resets itself when
engine is off Incorrect connection between ACC and
BATT. Check wiring and correct.
TFT monitor
Warning information is
shown at all times Parking break wiring is not correct. Check wiring and correct.
Flashing image or
interference appears on
screen
The color system of DVD disc does not
match the monitor. Adjust the color system of the DVD
disc playing back or the monitor in use.
Pirated disc is in use. Use original disc.
Video cable damaged. Replace cables.
Improper video signal connections. Check wiring and correct.
Disc playback
Cannot insert disc A disc is already inside the unit. Eject current disc and insert new one.
Disc does not play back
Disc is warped or scratched. Use disc in good condition.
Disc is dirty or wet. Clean disc with soft cloth.
Incompatible disc is used. Use compatible disc.
Disc is inserted upside down. Insert disc with label side up.
Disc region code is not compatible with
unit. Use disc with proper region code.
PBC cannot be used
during VCD playback PBC is not available on the disc. Use disc with PBC available.
Repeat or search
function is invalid during
VCD playback PBC is on. Turn PBC off.
Error messages
No disc
Disc is dirty. Clean disc with soft cloth.
Disc is upside down. Insert disc with label side up.
No disc inside. Insert disc.
Bad disc Disc is dirty. Clean disc with soft cloth.
Disc is upside down. Insert disc with label side up.
Unknown disc Disc format is not compatible with this unit. Use disc with compatible format.
Region Error DVD region code is not compatible with
this unit. Use disc with compatible region code.

EN - 22
Device connections
Notes of connection
●Thisunitisdesignedtobeused in a vehicle witha12-voltbatteryandnegativegrounding.
Before installing this unit to a recreational vehicle, a bus, or a truck, make sure the battery
voltage is appropriate for this unit to be used, otherwise, install a transformer by professional to
convert the output voltage to 12V.
●Toavoidshortcircuitintheelectricalsystem,ensurethatthenegativebatterycableis
disconnected before installation.
●Topreventshortcircuitinthewiringanddamagingtothis unit,secureallwiringswithcable
clamp or adhesive tape. Route the wirings in a secured, out of heating place without touching
any moving parts such as gear shift, handbrake, and seat rails to prevent the wiring insulation
being melted / wore off.
●Neverpasstheyellowpowercordthroughtheinstallationholeintotheenginecompartmentand
connect to the car battery. Otherwise, a high possibility of serious short circuit to the electrical
system may be occurred.
●Replacinganewfusewith15Aratingwhentheoldoneisbroken,usingnofuseorfusewith
improperratingmaycausedamagetothisunitorevenres.If a properfuseisinstalledand
electrical problems still occur, please contact with any professional car shops for inquiry.
●Donotconnectotherequipmentswiththecarbatterytoavoidbatteryoverheating.
●Pleasemakesureallthewiringconnections&thecablesofthespeakersare well-insulated.
Otherwise, this unit may be damaged by short circuit.
●IfthereisnoACCavailable,PleaseconnectACCleadtothepowersupplywithaswitch.
●Ifanexternalpoweramplierisconnected,pleasedon’tconnectP.CONTleadtothepowerlead
oftheexternalpoweramplier,otherwise,electricsparkorotherdamagemayberesulted.
●Nevergroundthespeakeroutputtopreventthedamagetothebuilt-inpoweramplier.
●Theminimumratingofthespeakersconnectedtothisunitis50Wwith4to8Ωimpedance.
Control cables
Auto Brightness Control
To avoid the display being too bright at night time, if the headlight cable is connected to ILLUMI,
turning on the headlight will dim the backlight of the TFT LCD and vice versa.
Telephone Mute
If the MUTE cable is connected to a car phone, other audio outputs mute when one call is
received by the car phone.
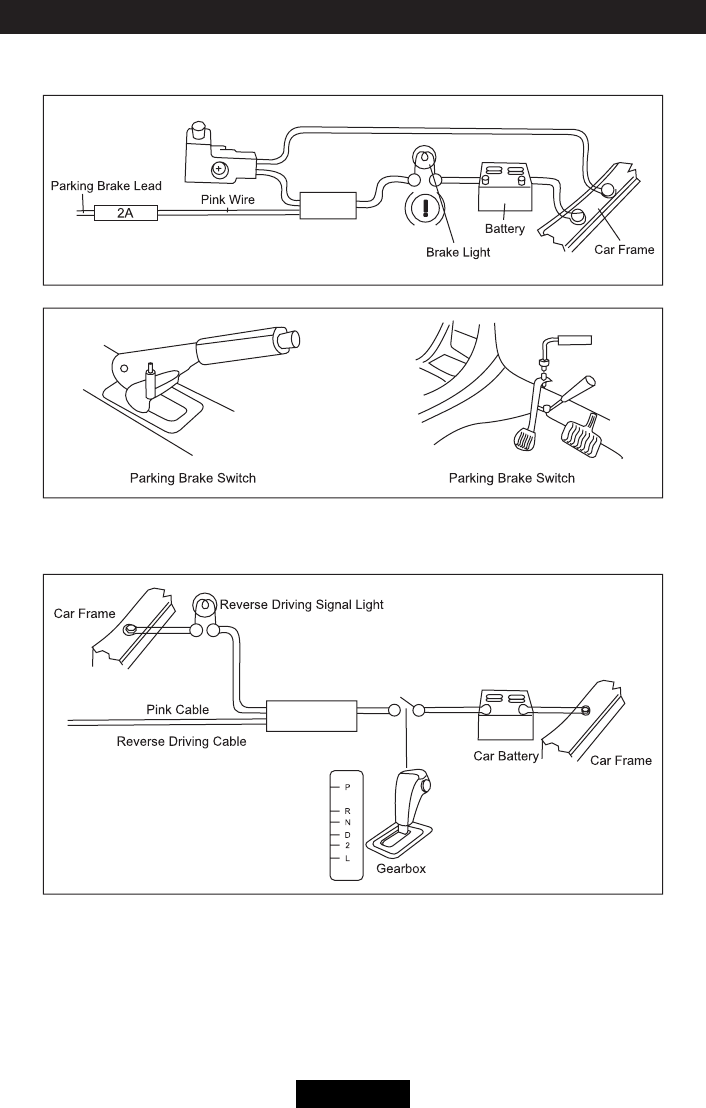
Reverse Driving
If a rear view camera is connected with the unit, the playing source switches to CAMERA
automatically when you start reverse driving.
As the reverse driving is done, the playing source switches to the previous.
Parking Brake
1. If"PRKSW"cableisconnectedtohandbrakeswitch,videodisplayontheTFTmonitorwillbe
controlled by this function.
Parking cable function ceases when the playing source is CAMERA.
2. The monitor displays the blue screen with warning information to prevent the driver watching
video contents during driving, but the passengers at the rear seat can watch video contents
normally.
Region code
According to DVD sale region, the whole world is divided into six regions. A DVD disc can be
played back only when its region code is compatible with that of the player in use.
Region 1:
USA,Canada,EastPacicOceanIslands;
Region 2: Japan, West Europe, North Europe, Egypt, South Africa, Middle East;
Region 3:
TaiwanofChina,HongKongofChina,SouthKorea,Thailand,Indonesia,SouthEastAsia;
Region4:Australia,NewZealand,Mid&southAmerica,SouthPacicOceanIslands/Oceania;
Region 5:
Russia,Mongolia,India,MiddleAsia,EastEurope,NorthKorea,NorthAfrica,NorthWestAsia;
Region 6: Chinese Mainland.
EN - 23
Device connections
Parking brake cable connections
Reverse driving cable connections

EN - 24
Specications
General
Reference Supply Voltage .................................................................... 12V(DC)
Operating Voltage Range ........................................................10.8 - 16.0V(DC)
Max Operating Current ................................................................................. 15A
Grounding System ................................................................................ Negative
Dimensions(WXHXD) ................................................... 178.5X101.5X166.0mm
Weight(main unit) ...................................................................................... 1.8kg
FM
Signal Noise Ratio ..................................................................................≥55dB
Residual Noise Sensitivity (S/N=30dB) ............................................. ≤15dBμV
Frequency Response (±3dB) .......................................................30Hz~15KHz
Station Seeking Level .................................................................... 20~28dBμV
Distortion ................................................................................................≤1.0%
StereoSeparation(1KHz) ......................................................................≥25dB
Antenna Impedance................................................................................... 75Ω
AM
Residual Noise Sensitivity (S/N=20dB) ............................................. ≤35dBμV
Selectivity(±9KHz) .................................................................................≥50dB
Screen
Screen size ............................................................................. 6.2 inches(16:9)
Display resolution ...............................................................................800X480
DVD Player
S/N Ratio ................................................................................................≥75dB
THD+N....................................................................................................≤0.1%
Frequency Response (±3dB) .......................................................20Hz~20KHz
Maximum Output Power......................................................................... 4×40W
Load Impedance .......................................................................................... 4Ω
AUX IN
Distortion ................................................................................................≤0.5%
Frequency Response (±3dB) .......................................................20Hz~20KHz
Audio Input Level .......................................................................................0.5V
Preout
Output Impedance ................................................................................... 10KΩ
Output Level .................................................................................................3V
Video
Normal Video Input Level (CVBS) ......................................................1.0±0.2V
Video Input Impedance .............................................................................. 75Ω
Video Output Impedance ........................................................................... 75Ω
Video Output Level ....................................................................... 1.0±0.2Vp-p
Environment
Operating Temperature ..............................................................-20°C ~ +60°C
Storing Temperature ................................................................. -30°C ~ +80°C
Operating Humidity ......................................................................45°C/80%RH
Storing Humidity ..........................................................................60°C/90%RH
Notice: When the unit is operated to extremes, such as with maximum power output for a long
time, or the temperature is over 70°C, it will enter heat protection mode, the volume will be
reduced automatically. This is normal.
EN - 25
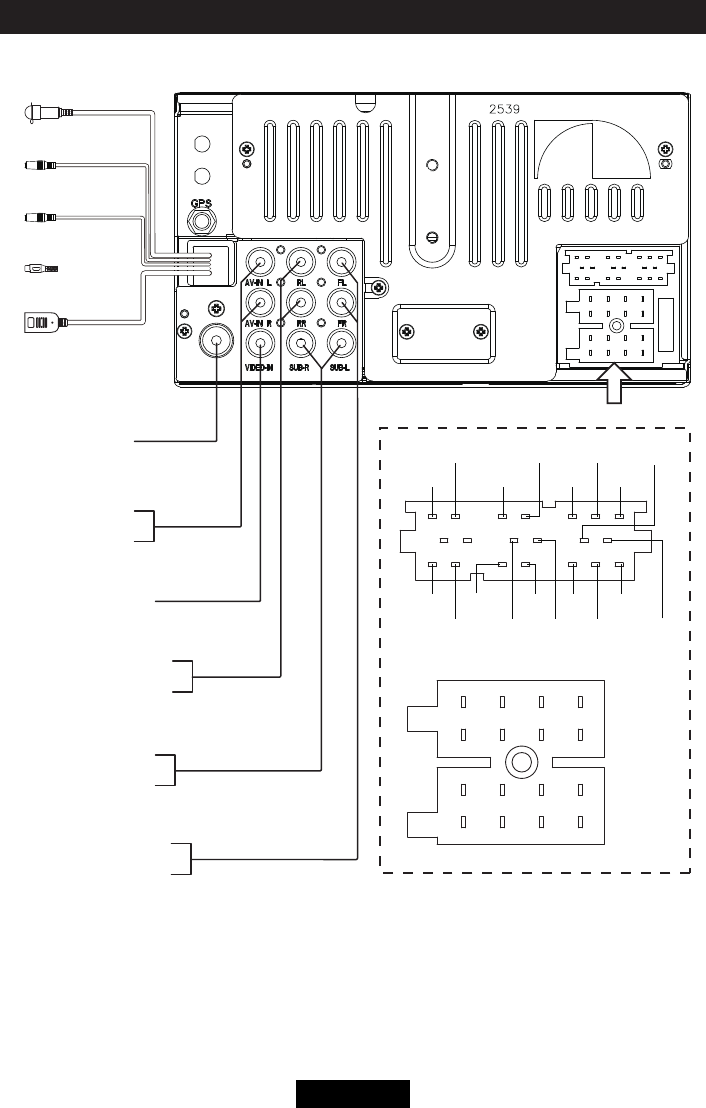
Wiring diagram
Radio Antenna
MIC
SUB OUT 2(Blue)
SUB OUT 1(Blue)
VIDEO IN(Yellow)
LINE OUT RL(White)
LINE OUT RR(Red)
LINE OUT FL(White)
LINE OUT FR(Red)
AV-IN L(White)
AV-IN R(Red)
NC
NC
NC
ACC
P.ANT
ILL
B+
GND
RR+
GND
CAMERA-IN
RR-
FR+
FR-
FL+
FL-
RL+
RL-
GND GND
REVERSE
VIDEO-OUT
P.CONT
KEY 1 KEY 2
PARKING
TX TV-L
AGND
DGND
RX
TV-R
PB+
TV-CVBS
DVR BUS
SmartLink
DVR VIDEO IN
SiriusXM

CLASS 1
LASER PRODUCT
PN:12707500XXXX