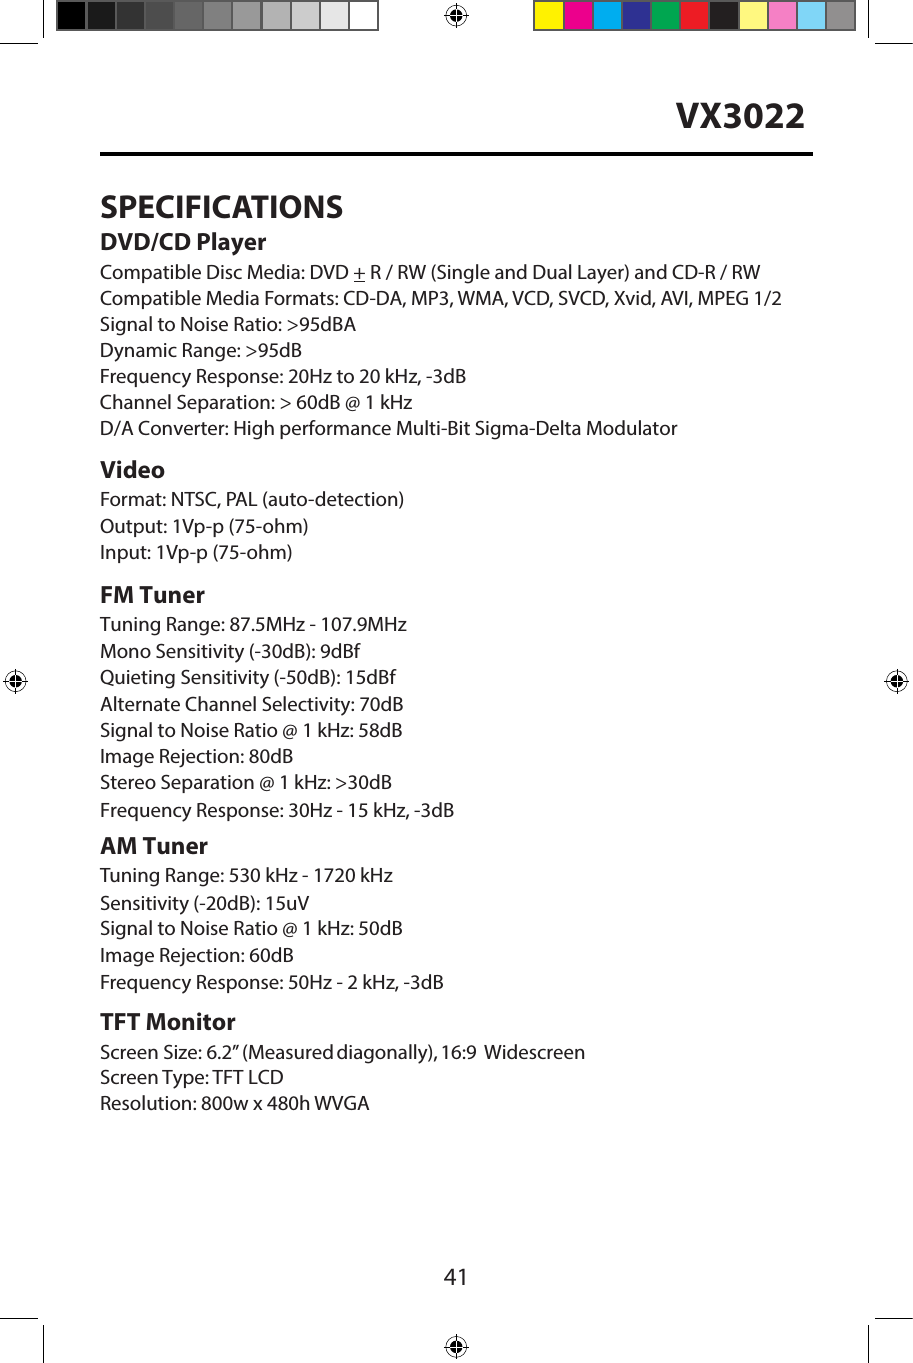
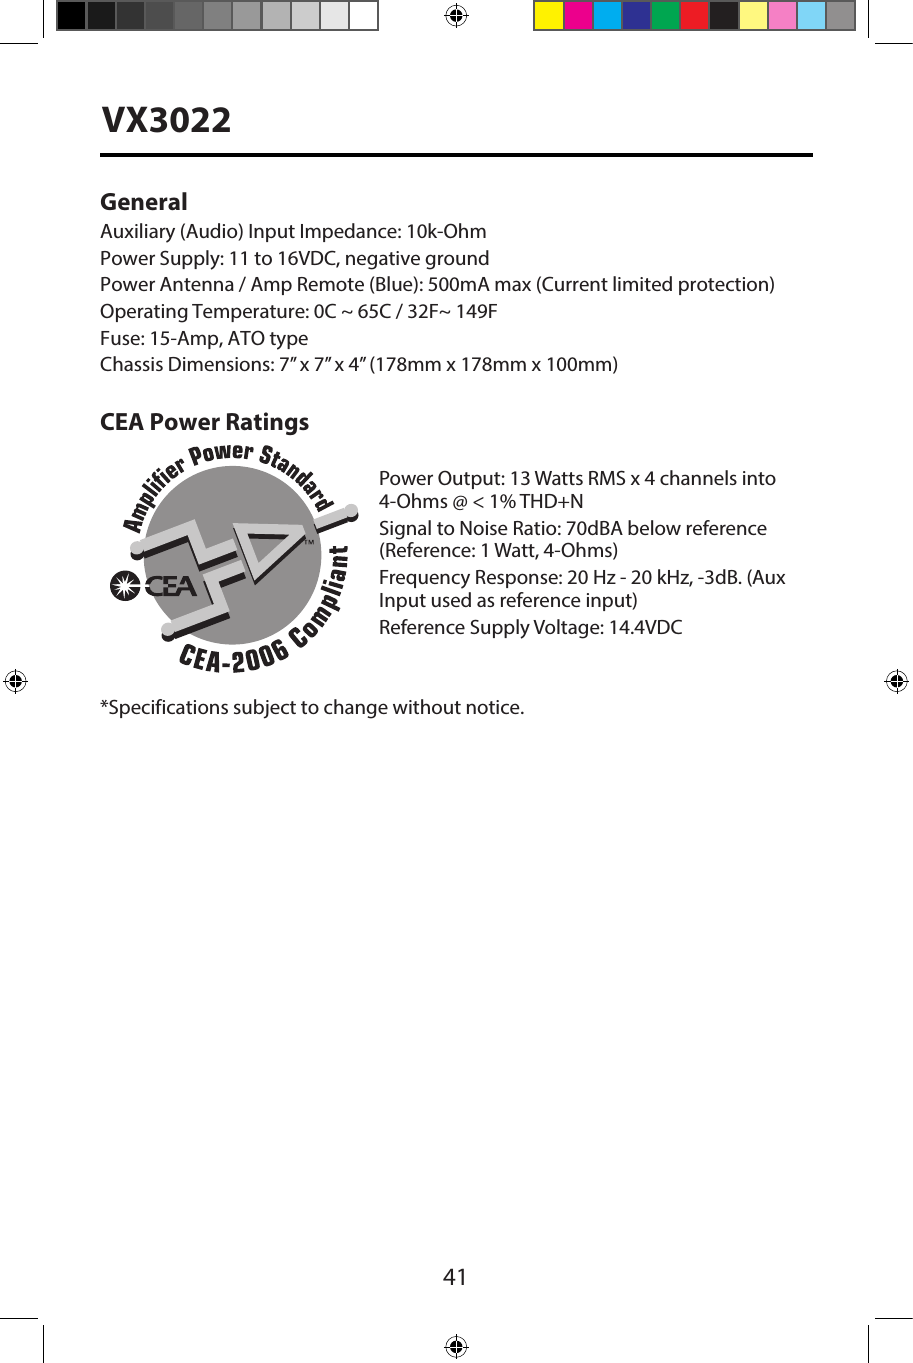
HUIZHOU FORYOU GENERAL ELECTRONICS VX3022 Car Multimedia Player User Manual
HUIZHOU FORYOU GENERAL ELECTRONICS CO.,LTD. Car Multimedia Player Users Manual
UserManual.wiki
>
HUIZHOU FORYOU GENERAL ELECTRONICS
>
VX3022 User Manual
Users Manual
Navigation menu
Upload a User Manual
Namespaces
Wiki Guide
HTML
PDF
Info
Views
User Manual
Discussion / Help
Navigation
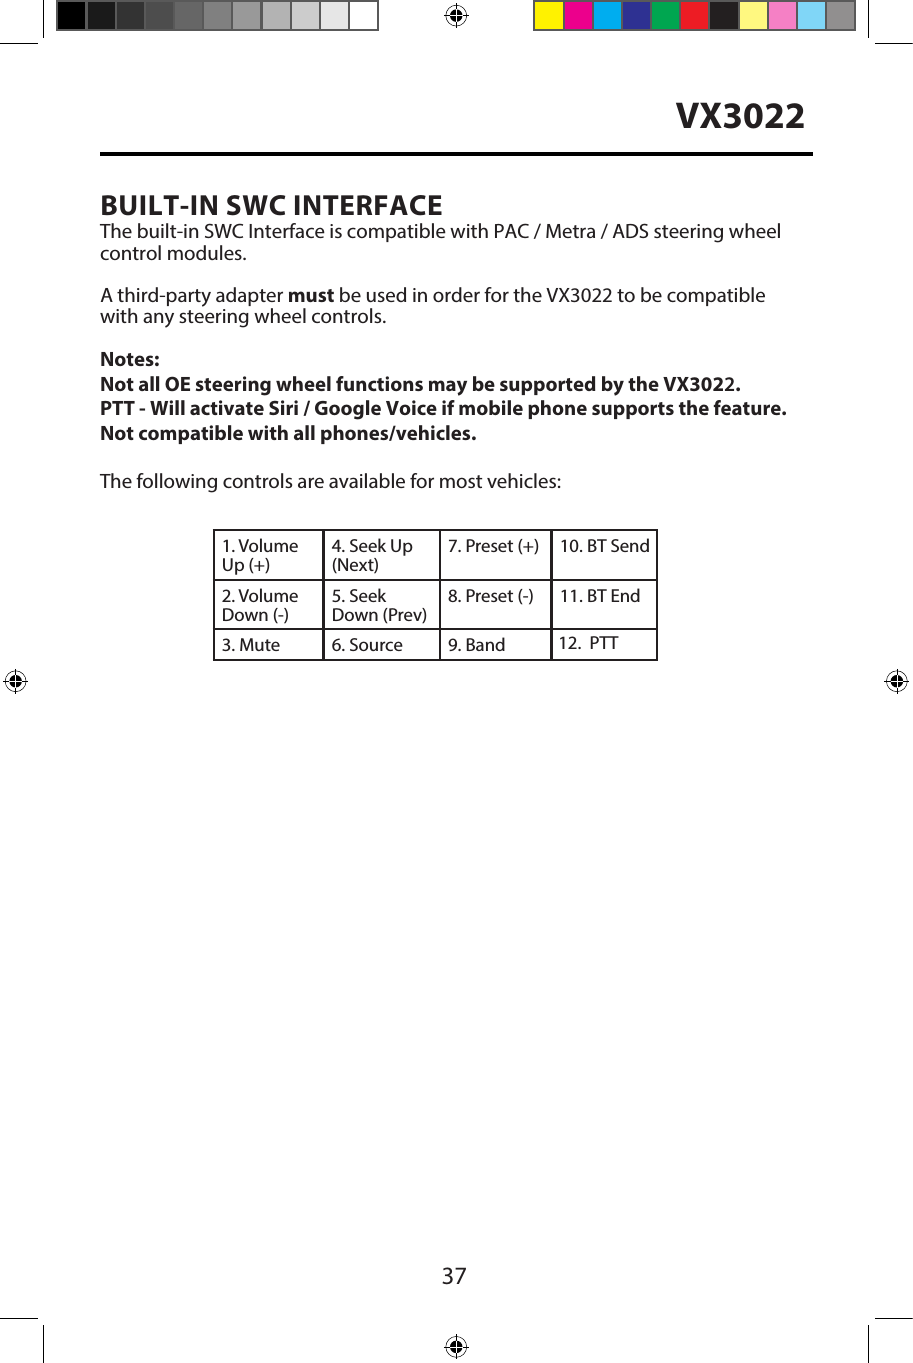
![5VX3022Never expose this unit, amplifier and speakers to moisture or water to prevent electric sparks or fire.Please don't change the fuse on the power cord without professional guidance, using an improper fuse may cause damage to this unit or even cause fire.Please contact your nearest dealer if one of the following symptoms is experienced:(a). Water or other objects enter the unit. (b). There is smoke. (c). Peculiar smell.Only connect the unit to a 12-volt power supply with negative grounding.Never install this unit where the operation & condition for safe driving is impaired.Never use the video display function in the front when driving to prevent the violation of laws & regulations and also to reduce the risk of traffic accident except for using rear view video camera.Please read through these operating instructions so you will know how to operate your model properly. After you’ve finished reading the instructions, keep this manual in a safe place for future reference.To ensure safe driving, please adjust the volume to a safe and comfortable level in case of emergency situations.Safety Precautions1.) Never disassemble or adjust the unit without any professional guidance. For details, please consult any professional car shop / dealer for inquiry.2.) If the front panel or TFT monitor is dirty, please use a clean silicone cloth and neutral detergent to wipe off the spot. Using a rough cloth and non-neutral detergent such as alcohol for cleaning may result in damage to the monitor.3.) If any abnormal behavior of the unit is found, please refer to trouble shooting guide of this manual. If no relevant information is found, please press the [RESET] key on the front panel to resume factory default.4.) If you have parked the car in hot or cold weather for a long time, please wait until the temperature in the car becomes normal before operating the unit.5.) Using the car heater in low temperature environment may result in moisture inside the unit, DO NOT use the unit in this situation. Eject the disc and wipe off the moisture on the disc. If the unit still doesn't work after a few hours, please contact the service center.6.) Do not impact the LCD monitor which could cause damage.7.) To prevent damage to the screen, avoid touching it with sharp objects.8.) To provide a clear demonstration and an alternative for easy understanding to the operation of this unit, graphic illustrations are used. However, some illustrations are different from the actual images displayed on the screen.9.) Operate the unit correctly according to this manual to prevent unnecessary problem. The guarantee won't be valid if the problem is caused by inappropriate operation.](https://usermanual.wiki/HUIZHOU-FORYOU-GENERAL-ELECTRONICS/VX3022/User-Guide-2531473-Page-5.png)
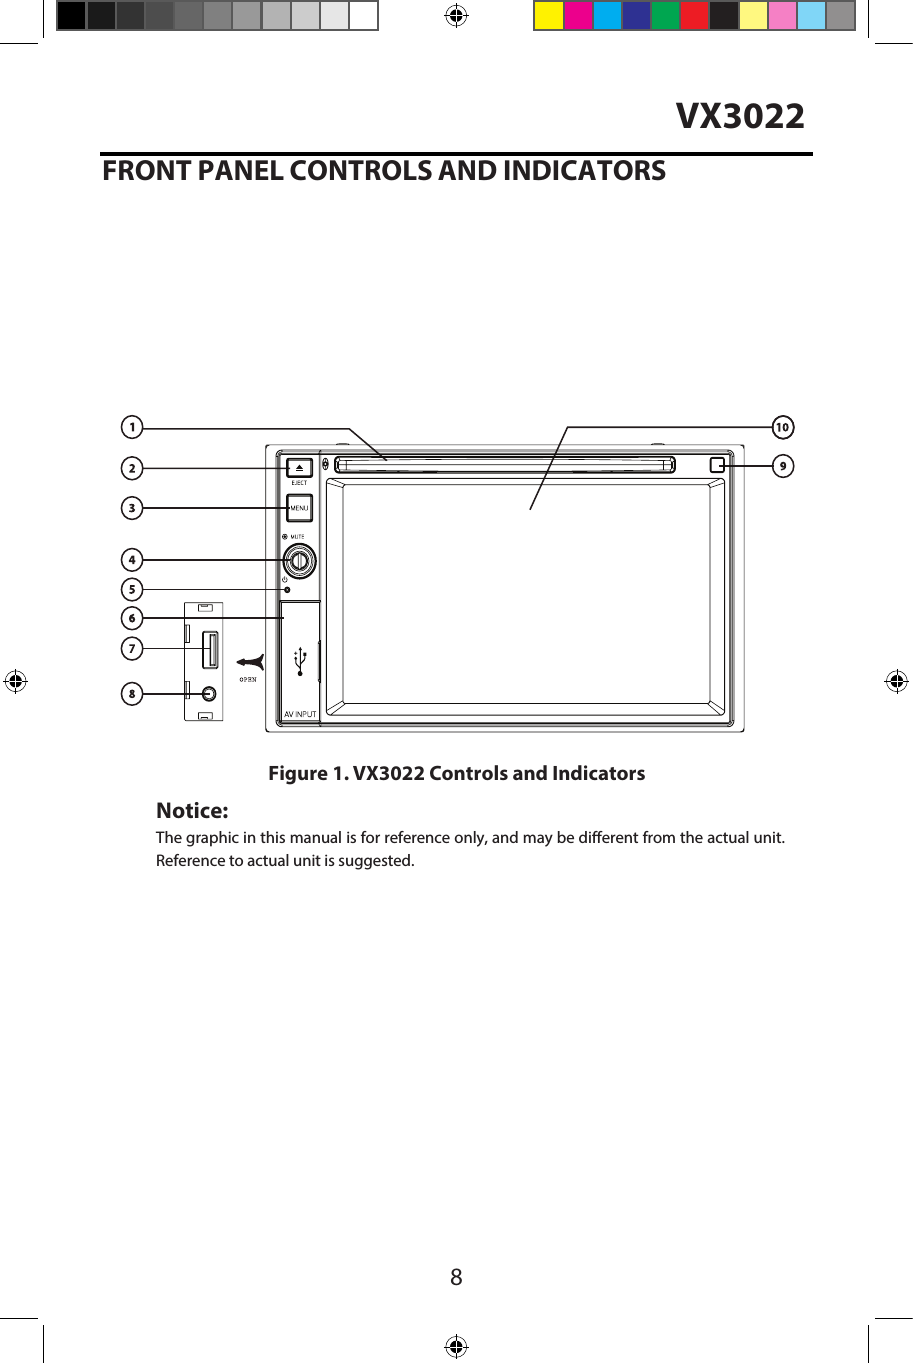
![9VX30221.) DISC SLOT: Accepts DVD/CD/MP3 discs. If the unit is turned on, playback begins when a disc is inserted.2.) EJECT [ ] Button: Press this button to eject a DVD/CD/MP3 disc. Disc play is stopped, the disc is ejected and the unit will change to radio operation. If the disc is not removed from the unit and the button is pressed again, the disc will be re-loaded. If the disc is not removed from the disc slot within 10 seconds of being ejected, it will be automatically reloaded to prevent it from being accidentally damaged.3.) MENU Button: Press the button to display the Main Touch Screen Source Menu. Press this button again to return to the selected source. 4.) ROTARY ENCODER / POWER ON/OFF Knob: Press Rotary Knob to turn the unit ON. Rotate the knob to adjust the volume from 0 to 50. Pressing the knob momentarily will mute and un-mute the audio. Press and hold the knob for 2 seconds to turn the unit OFF. 5.) RESET Button: Press this button to reset the system settings (except password and parental lock settings) and to correct a system halt or other illegal operation. Use the tip of a pen to press the Reset button.6.) USB/AV CONNECTOR COVER: Covers the USB/AV interface connector. 7.) USB: Connect a USB device for playback of music /video files.8.) A/V INPUT: Attach compatible A/V devices.9.) IR REMOTE SENSOR: Used to receive command signals from the remote control.10.) TFT MONITOR](https://usermanual.wiki/HUIZHOU-FORYOU-GENERAL-ELECTRONICS/VX3022/User-Guide-2531473-Page-9.png)
![VX3022Remote Control Function Description1.SOURCE (SRC) Button: Press this button to switch between and select available sources. (Radio/Disc/Bluetooth/USB/BluetoothAudio/SWC/AUX-1/AUX-2/Camera)2. EJECT Button ( ): Press this button to eject a DVD/CD/MP3 disc. Disc play isstopped, the disc is ejected and the unit will change to radio operation. If thedisc is not removed from the unit and the button is pressed again, the disc willbe re-loaded. If the disc is not removed from the disc slot within 10 secondsof being ejected, it will be automatically reloaded to prevent it from beingaccidentally damaged.3. AUDIO Button: Press to display and select the audio language in DVD mode. Each time the button is pressed, the language changes. NOTE: The languages for audio vary from disc to disc.4. VOLUME Button (VOL + and -): Press these buttons to increase or decreasethe playback volume.7. MUTE Button: Press this button to turn the audio output ON and OFF.8. POWER Button ( ): Press this button to turn the unit ON and OFF.9. SUBTITLE Button: Press to display and select the subtitle language in DVDmode. Each time the button is pressed, the subtitle language changes.NOTE: The type and number of languages for subtitles vary from disc to disc.10. MENU Button: – Press this button to access the root menu of a DVD or CDduring playback. The disc will return to normal playback and the root menuwill disappear if no selection is made within 10 seconds. This button is alsoused to select photo mode of an MP3 player.11. FAST FORWARD [ ] Button: Press this button to forward Disc play 2x, 4x, 8xor 20x normal speed. Press this button while in Radio mode to search availableradio station by increasing tuning frequency.5. BAND Button: Press this button to scroll though preset stations or when indisc mode, this button is used for Fast playback / Slow playback. Press thisbutton to answer an incoming Bluetooth phone call.6. REPEAT (RPT) Button: Repeat playback10](https://usermanual.wiki/HUIZHOU-FORYOU-GENERAL-ELECTRONICS/VX3022/User-Guide-2531473-Page-10.png)
![11VX302215. FAST REVERSE [ ] Button: Press this button to reverse Disc play 2x, 4x, 8xor 20x normal speed. Press this button while in Radio mode to search availableradio station by decreasing tuning frequency.16. NUMBER Buttons (1-6): Press these buttons to directly access chapters and tracks, dialing phone numbers, or entering passwords.17. RANDOM (RDM) Button: Press this button to play tracks or chapters inrandom order while playing a disc.NOTES ON REMOTE CONTROL USAGE• Aim the remote control at the TFT/screen.•Remove the battery from the remote control or insert a battery insulator ifthe remote control will not be used for a month or longer.•DO NOT store the remote control in direct sunlight or in a hightemperature environment, or it may not function properly.•The battery will last for 6 months under normal conditions. If the remotecontrol does not work, please change the battery.• Use lithium battery type CR2025 (3V) only.• DO NOT recharge, disassemble, heat or expose the battery to fire.• Insert the battery in the proper direction according to the ( + ) and ( - ) polaritymarks.•Store the battery in a place where children cannot reach it to avoid the riskof an accident.12. NEXT (uul) Button: Press this button to skip to the next chapter, track orsong during playback of a disc. Press this button while in Radio mode tosearch available radio station by increasing tuning frequency.13. PLAY / PAUSE ( ) Button: Press this button to pause the playback of a disc.Press this button again to resume normal playback.14. PREVIOUS (ltt) Button : Press this button to go back to the previous chapter, track or song during playback of a disc. Press this button while in Radio mode to search available radio station by decreasing tuning frequency.](https://usermanual.wiki/HUIZHOU-FORYOU-GENERAL-ELECTRONICS/VX3022/User-Guide-2531473-Page-11.png)
![12VX3022QUICK START GUIDE Turning the Unit ON or OFFPress the front panel Power/Menu button [ / SRC ] to turn the unit ON. To turn the unit OFF, press and hold the front panel Power/Menu button [ / SRC ] for 2 seconds.Selecting an Audio/Video Source, Bluetooth or Backup Camera To access an Audio/Video source:1. Momentarily press the front panel Power/Menu button or touch the Menuicon located in the upper left corner of the display to view the Main Menu Screen.2. Touch the desired source icon on one of the two main menu screens.Screen 1 of 2: Radio, Disc, Bluetooth (BT), USB.Touch page arrow (-->) at the bottom of the screen to access Screen 2 of 2:Bluetooth (Audio), Steering Wheel Control (SWC), AV-IN1, AV-IN2, or Camera.Figure 4. VX3022 Main Menu ScreenScreen 1 Screen 2MENUButton](https://usermanual.wiki/HUIZHOU-FORYOU-GENERAL-ELECTRONICS/VX3022/User-Guide-2531473-Page-12.png)
![13VX3022MutePress the volume knob on the front panel or press the [MUTE] Button on the remote control to mute the volume from the unit.Volume AdjustmentVolume Increase/DecreaseTo increase or decrease the volume level, turn the rotary encoder on the front panel. When the volume level reaches "0" or "50", a beep sounds, indicating that the adjustment limit has been reached. The TFT screen displays the volume level for 3 seconds.Audible Beep ConfirmationAn audible beep tone confirms each function selection. The beep tone can be disabled through the Setup menu. Resetting the SystemSoft Reset - To correct a system halt or other illegal operation, use the tip of a pen to press and release the Reset Button located just below the front panel rotary encoder (volume) knob.For a Hard Reset - Go to "Settings" > DVD tab > Load Factory > Reset. After a "System Reset", the unit will restore all default settings.Change Aspect Ratio (DVD / AV In Sources Only)Press the [WIDE] button on the remote control to adjust the aspect ratio.Image Settings (DVD / AV In Sources Only)1. Enter image setting mode by pressing the [PIC] Button on the remote control.2. Select the item to be adjusted and touch the Left or Right direction icons[ ]/[ ] on the user interface to adjust the value.3. To exit image setting mode, press the [PIC] Button on the remote control againor simply stop making adjustments.[RESET] ButtonFigure 5. System Reset ButtonFigure 6. Image Settings Screen](https://usermanual.wiki/HUIZHOU-FORYOU-GENERAL-ELECTRONICS/VX3022/User-Guide-2531473-Page-13.png)
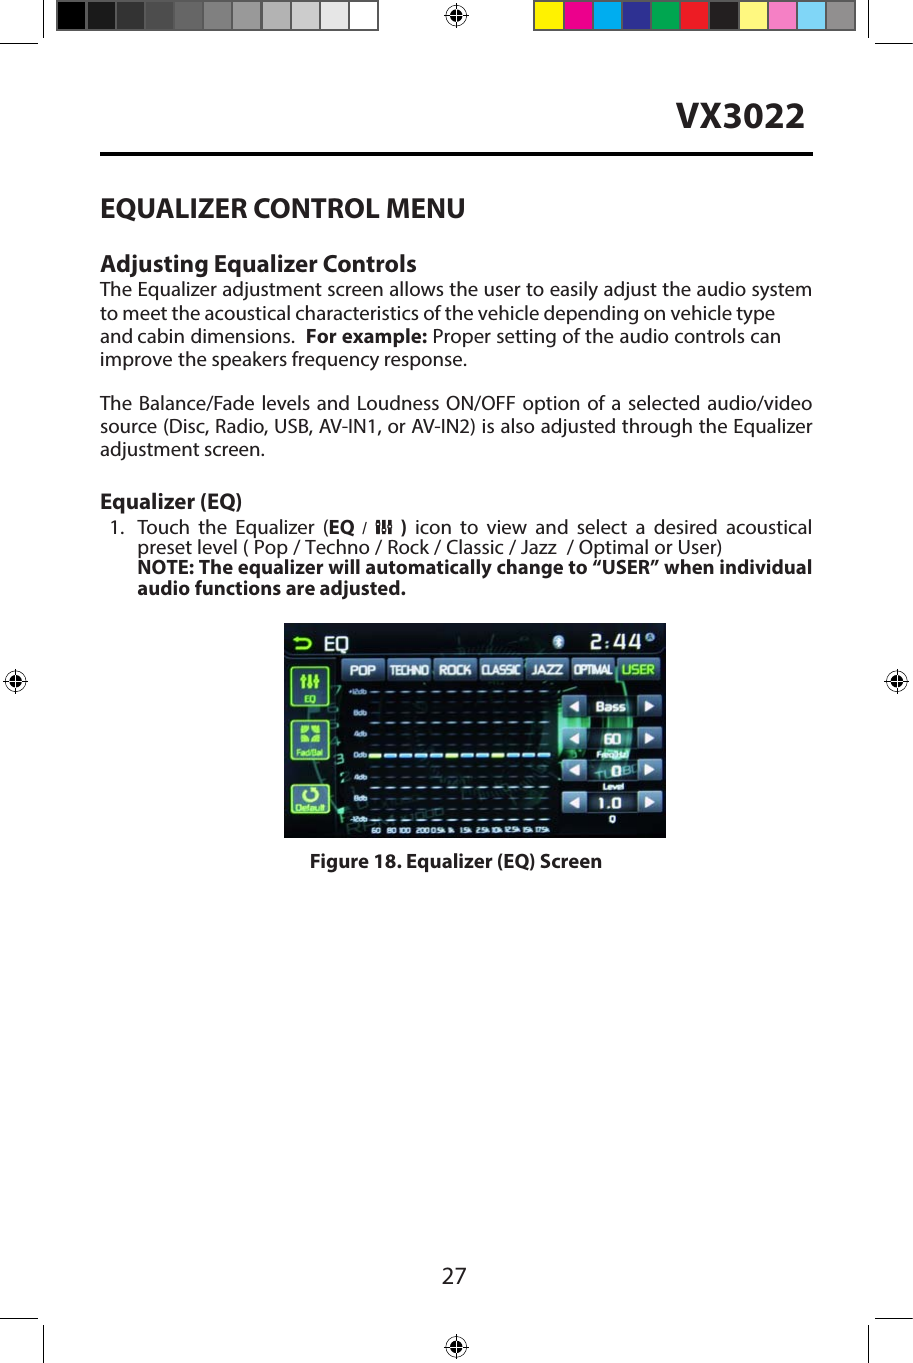
![14VX3022Equalizer ControlsEqualizer (EQ): Adjustment can be made after entering one of the audio/video sources (Disc, Radio, USB, AV-IN1, or AV-IN2) Touch the Equalizer (EQ) icon to view the Equalizer Control Screen to select a desired audio preset level ( Pop / Techno / Rock / Classic / Jazz / Optimal or User), make adjustments to the audio Balance and Fader levels or to turn the Loudness option ON or OFF. Touch the return icon to return to the current source. Playing a DiscTo begin playback of an Audio/Video Disc:1. Press the front panel Power/Volume/Mute control knob to turn the unit ON.2. Insert a disc with the label side facing UP and playback will begin automatically.Parking Brake InhibitWhen the pink “Parking” wire is connected to the vehicle Parking Brake circuit, the front TFT monitor will display video when the Parking Brake is engaged. SYSTEM SETTINGS1. Touch the Menu icon located in the upper left corner of the display to displaythe main menu.2. Touch the Settings icon [ ] and the settings menu is displayed.Figure 7. Settings Menu Screen](https://usermanual.wiki/HUIZHOU-FORYOU-GENERAL-ELECTRONICS/VX3022/User-Guide-2531473-Page-14.png)
![15VX3022General Settings1. Touch [ General ], if necessary.2. Touch to highlight a setting to display/select an option.General settings Options DescriptionRadio region USA/Asia/Japan/Europe/Eur LW/Oirt Select one that matches your location.Radio rangeLocal Select Local to receive only stations with extremely strong signal.DistanceBeepOn Turn-ON the beep sound. Each time you press a button, the unit beeps.O Turn-OFF the beep sound.Calibration Start Calibrate the touch screen.DemoOn Turn-ON Retail Demo Mode.O Turn-OFF Retail Demo Mode4. Touch Menu icon located in the upper left corner of the display to exit.CalibrationCalibrate the touch screen using the calibration setting function. Recalibrating the Touch Screen:1. Press the [ Calibration ] option on the setup menu to enter.2. Touch [ Yes ] to enter.3. Press and hold the center of [ + ] for 5 seconds, the [ + ] will move automatically.4. Aim at center of [ + ], follow the path as shown in the figure. Once steps 1-4 are complete the system will automatically exit calibrating mode.Figure 8. Calibration Screen](https://usermanual.wiki/HUIZHOU-FORYOU-GENERAL-ELECTRONICS/VX3022/User-Guide-2531473-Page-15.png)
![16VX3022Video Settings1. Touch [Video].2. Touch an option repeatedly to select.Video settings Options DescriptionAspect RatioFullAdjust aspect ratio.NormalRear CameraMirrorReverse the camera image as if looking through a rear-view mirror.Normal3. Touch the return icon to exit and return to the previous screen.Time Settings1. Touch [ Time ].2. Touch an option repeatedly to select:Sound settings Options DescriptionDate Year / Mon / Day Touch [ ] or [ ] to set year, month and day.Clock mode 12Hr/24Hr Touch [12Hr] or [24Hr] to switch clock mode.Time Hour / Min / AM / PM Touch [ ] or [ ] to set hour and minutes.Touch [ ] or [ ] to set AM/PM (only for 12Hr).3. Touch the return icon to exit and return to the previous screen.Audio Settings1. Touch [ Audio ].2. Touch an option repeatedly to select.Audio settings Options DescriptionSubwoofer ON Turn-ON the subwoofer.OFF Turn-OFF the subwooferSubwoofer lter80HzSelect a crossover frequency to set a cut-off frequency for the subwoofer’s LPF (low-pass lter).120Hz160HzLoudness SwitchOFFSelect low frequency boost only or high and low frequency boost.Lo BoostHi&LoLoudness Center400HzSelect loudness center frequency.800Hz2.4KHz3. Touch the return icon to exit and return to the previous screen.](https://usermanual.wiki/HUIZHOU-FORYOU-GENERAL-ELECTRONICS/VX3022/User-Guide-2531473-Page-16.png)
![17VX3022Language Settings1. Touch [ Language ].2. Touch an option repeatedly to select.Language settings DescriptionOSD Select on-screen display language.DVD audio Select DVD audio language. Options available depending on DVD disc.DVD subtitle Select DVD subtitle language. Options available depending on DVD disc.Disc menu Select DVD menu language. Options available depending on DVD disc.3. Touch the return icon to exit and return to the previous screen.Bluetooth Settings1. Touch [Bluetooth].2. Touch an option repeatedly to select.Bluetooth settings Options DescriptionBluetoothON Turn-ON the Bluetooth function.OFF Turn-OFF the Bluetooth function.Auto connectON If the pre-paired device is within the eective range, the unit re-connects to pre-paired device automatically.OFF Need to re-connect manually.Auto answerON Answer paired phone call automatically.OFF Answer phone call manually.Pairing code Set the password for pairing the unit with other Bluetooth device.3. Touch the return icon to exit and return to the previous screen.DVD Rating1. Touch [ DVD ].2. Touch an option repeatedly to select.DVD rating Options DescriptionSet password Set password to restrict the play of discs. The default password is 1234.Rating levelKid safe Acceptable for children.G Acceptable for general viewers.PG Parental guidance suggested.PG-13 Unsuitable for children under age 13.PG-R Recommend parents to restrict viewing for children under 17.R Restricted re-parental guidance is advised for children under the age of 17.NC-17 Unsuitable for children under age 17.Adult Acceptable for adults only.](https://usermanual.wiki/HUIZHOU-FORYOU-GENERAL-ELECTRONICS/VX3022/User-Guide-2531473-Page-17.png)
![18VX3022Load factoryVersion InfoRestore to default settings.3. Touch the return icon to exit and return to the previous screen.Adjust Source Volumes (Relative Level) You can set different relative volumes for different sources. 1. Touch the [Volume] icon to display and access the Volume Setting Sub-Menu2. Touch the source to be adjusted.3. Touch [ ] or [ ] to assign value: 0 to 12. Default is "6", which is 0dB. Setting "0" is-6dB. Setting "12" is +6dB.4. Touch the return icon to exit and return to the previous screen.The Version Sub-menu is used to identify the model, hardware and software versions.](https://usermanual.wiki/HUIZHOU-FORYOU-GENERAL-ELECTRONICS/VX3022/User-Guide-2531473-Page-18.png)
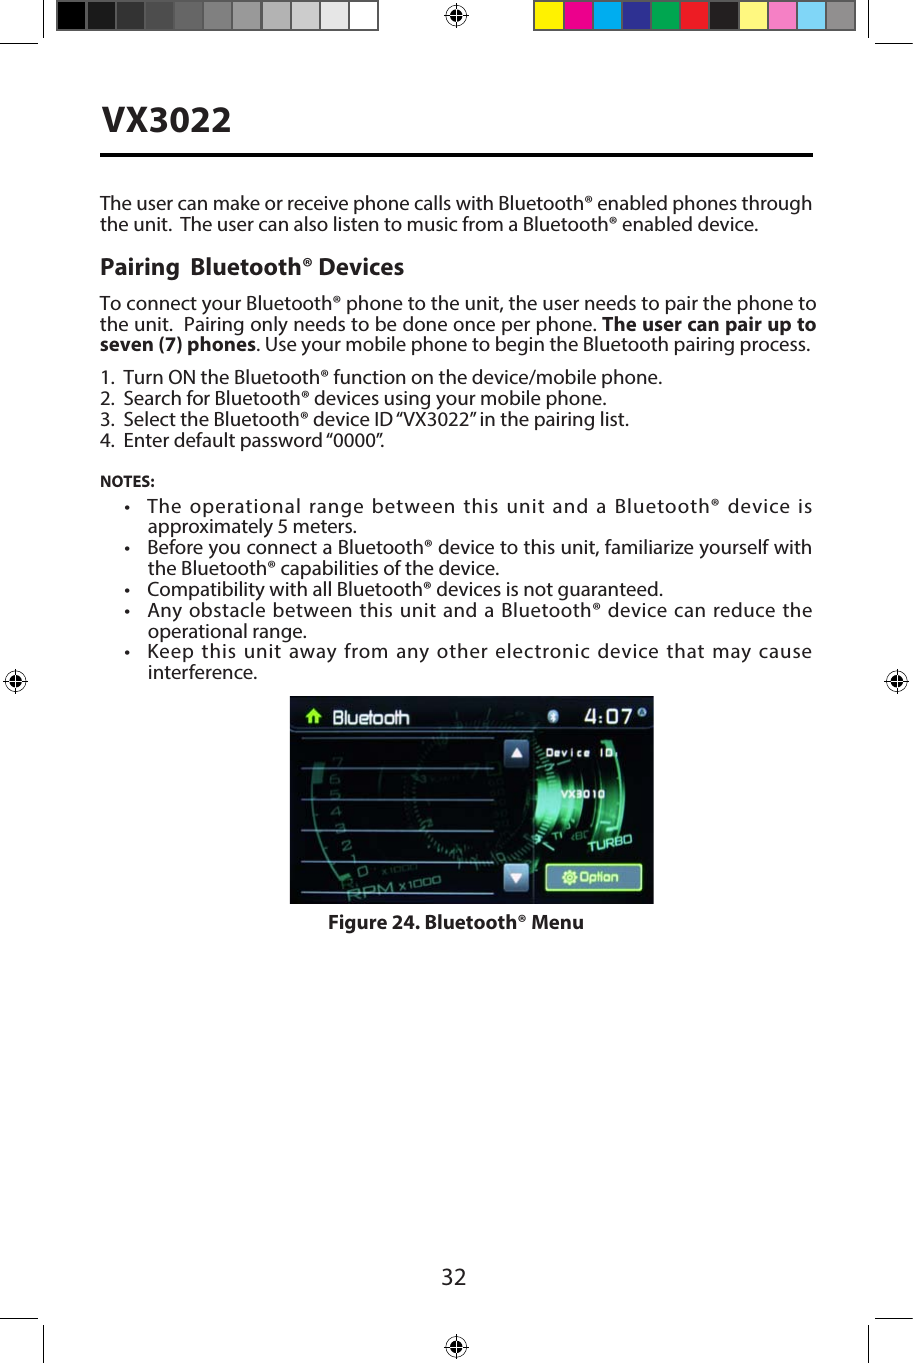
![19VX3022RADIO TUNER MODESelect Radio as Playing SourceOpen the SOURCE MENU and then touch [Radio].Selecting a Radio BandPress the [BAND] Button on the remote control or touch the [ ] icon on the user interface to select one radio band among FM1, FM2, FM3, AM1 and AM2.Tuning AM-FM StationsSeek TuningPress the [ ] / [ ] Buttons on the remote control or touch the [ ] / [ ] icons on the user interface to Seek the next / previous radio station.To stop searching, repeat the operation above or press other buttons having radio functions. NOTE: When a station is received, searching stops and the station is played.Manual TuningMethod 1:Press and hold the [ ] or [ ] icon for 1 second to enter Manual Tuning mode. During manual tuning, the frequency will be changed in steps.Touch the [ ] / [ ] icon on the user interface to tune in a higher / lower station.Method 2:1. Touch the numeric keypad icon [ ]. Numeric keyboard is displayed, touchnumbers to input frequency.2. Touch [ ] to delete the input numbers step by step.3. Touch [ OK ] to enter.Preset StationsThe unit has 5 bands, such as FM1, FM2, FM3, AM1, AM2, and each band can store 6 stations; hence the unit can store 30 stations in total.Storing Radio Stations in Memory1. Tune to a desired station.2. Touch and hold one of the presets (1 to 6) to save the selected station.Figure 9. Radio Screen](https://usermanual.wiki/HUIZHOU-FORYOU-GENERAL-ELECTRONICS/VX3022/User-Guide-2531473-Page-19.png)
![20VX3022Auto Store (AS)Touch the search icon [ ] to search radio stations and store the 6 strongest stations in the current band automatically.Recalling a Station1. Select a band.2. Touch an on-screen preset button to select the corresponding stored station.Local (LOC) / Distance (DX) SettingWhen the Local function is on, only radio stations with a strong local radio signal are played. To activate the Local function in the AM/FM tuner mode, touch [ ] on the screen. The Options tab is revealed. Touch [ ] icon and choose the Radio Local or Distance. When the Local function is active, the LOC indicator at the top of the screen is illuminated. When the Distant function is active, the DX indicator at the top of the screen is illuminated.EQ SelectionTouch the Equalizer [ ] icon and enter the EQ setup.RDSRDS( Radio Data System ) transmits data to the radio which displays information such as station identification, song artist, and song title.RDS service availability varies with areas/regions. If RDS service is not available in your area, the following service will not be available. Adjust RDS Settings1. In Radio menu, touch [ ] and [ Option ].The option menu is displayed.2. Touch on the selected option to change the setting.∙[RDS]: To turn the “RDS” function ON or OFF.∙[CT]: To turn on or off “Clock Time” synchronization function.∙[PTY]: To show PTY list.CT (Clock Time)Some stations broadcast the time and date within the encoded RDS signal. The clock time is automatically adjusted when ‘CT’ is set to ‘ON’.Note: Stations broadcasting close to time zones may not broadcast the correct time in your particular area. In this case, turn CT Off and manually set the time.PTY Function PTY is the abbreviation for Program Type which is the function that displays the program category of the current station such as category (news, sports, talk etc.) Use the scroll bar to select various category codes.Once a category code is selected the PTY options will display on the screen. When one PTY option is touched (e.g. News), auto search for next available PTY by increasing tuning frequency until the PTY of the next station matches the current. If no matched PTY has been found, the unit will return to the original radio frequency.](https://usermanual.wiki/HUIZHOU-FORYOU-GENERAL-ELECTRONICS/VX3022/User-Guide-2531473-Page-20.png)
![21VX3022PLAYBACK OF AUDIO FILESCompatible Audio Discs TypesThis system will play the following types of discs:• DVD - DVDs that contain audio and/or video.•Audio discs - Audio CD's that contain audio files.•MP3 discs - A disc that contains audio, video and image files (for example, a CD-Rwith downloaded MP3 files.NOTE: This unit is designed to play pre-recorded (original) CD/DVDs. Some burned CD / DVDs may not play due to different recording formats.DVD OperationDVD Main MenuNOTE: When properly installed, DVD video cannot be displayed on the main TFT screen unless the parking brake is applied. If you attempt to play a DVD while the vehicle is moving, the TFT screen displays:Warning!!!It is illegal to view videowhile driving or operatinga motor vehicle. Set parkingbrake to view video.From the Main Menu Screen touch the DISC Icon or insert a disc into the disc slot, label side up. Playback begins when a disc is inserted correctly.Insert a discUpon inserting a disc, the unit will switch to [DISP] mode automatically.Eject The DiscPress the [ ] key on the front panel or remote control to eject the disc.Touch Screen ControlsThe touch key areas for DVD playback are outlined below:A: Return to the main menuB: Disc typeC: Time displayD: Play the video and display playback informationE: Display onscreen control menuDEFigure 10. Screen Control Areas](https://usermanual.wiki/HUIZHOU-FORYOU-GENERAL-ELECTRONICS/VX3022/User-Guide-2531473-Page-21.png)
![22VX3022Controlling PlaybackTo access the on-screen controls, touch the screen anywhere except for the upper left corner and touch again to cancel display. Connecting a USB Device1. Open the USB door.2. Connect a USB device into the USB connector. Play starts automatically.NOTES:1. If there are audio files supported on the USB stick, the system will enter the audio files menu automatically.If there are no audio files, but there are video files supported on the USB stick, the system will enter the video files menu automatically.If there are no audio or video files, but there are picture files supported on the USB stick, the system will enter the picture files menu automatically.If there no above audio/video/picture files supported on the USB stick, the screen will display: There are no audio/video/picture files supported.2. Not all USB devices are compatible with the unit.PlayOnce a disc, or a USB device is inserted, play starts automatically.PauseWhen play the audio/video file, press the [ ] key on the remote control or open the on-screen control icons menu and then touch the [ ] icon, press the [ ] again and continue to play.StopFor audio files or video files, press the Stop [■] Button on the remote control or open the on-screen control icons menu and then touch the Stop [■] icon to stop. Press the [ ] to resume from the pausing point.Touch the Stop [■] icon again to stop entirely, and press the Stop [■] Button on the remote control. Press the [ ] to playback from the top fil .Previous/NextTouch [ ] / [ ] key on the screen to skip to previous / next track / chapter.Search for a FolderFor Folder Control1. Touch [ ] to display all available folders.2. Touch a folder, then touch the desired fil .3. Touch the file again o start play.For Audio Files1. Touch [ ] to display all available audiofolders.2. Touch a folder, then touch the desired fil .3. Touch the file again o start play. Figure 11. Folder Screen](https://usermanual.wiki/HUIZHOU-FORYOU-GENERAL-ELECTRONICS/VX3022/User-Guide-2531473-Page-22.png)
![23VX3022Video Files1. Touch Video icon [ ] to display all available video folders.2. Touch a folder, then touch the desired file.3. Touch the file again to start play.Picture Files1. Touch Picture icon [ ] to display all available picture folders.2. Touch a folder, then touch the desired file.3. Touch the file again to start play.Repeat PlaybackPress the Repeat [RPT] Button on the remote control or open the on-screen control icons menu and then touch the Repeat[ ] icon to switch the repeat modes as below:Repeat A-BWhen a DVD, VCD is played back, you can play back the contents between the time points from A to B repeatedly:Random PlayYou can play audio tracks/files in random order. During play CD, press the [RDM] key on the remote control repeatedly to turn Random play ON or OFF.NOTE: When [Shuffle] is off, the unit resumes play from the current sequence.Playback Control FunctionThis function is available for the VCD discs with Playback Control function (Ver 2.0 or higher). Press the [MENU] Button on the remote control or open the on-screen control icons menu and then touch the [ ] icon repeatedly to activate this function.Press again to cancel.Notes:1. When Playback Control is ON, playback goes back to the track list and starts fromthe first track.2. When Playback Control is on, fast motion playback, slow motion playback or skipsearch is available but repeat playback and searching for a particular chapter or track is prohibited.3. If you use random playback, scan playback or searching playback when PlaybackControl is ON, Playback Control will be OFF automatically.Repeat chapter ė Repeat title ėDVDVCD(PBC off) Repeat one ė Repeat all ėRepeat offMP3/WMADisctype RepeatmodePictureCDMPEGRepeat one ėRepeat allėRepeat offRepeat allėRepeat offRepeat one ė Repeat folder ėRepeat allėRepeat offRepeat one ė Repeat folder ėRepeat allėRepeat offRepeat one ė Repeat folder ėRepeat allėRepeat offFigure 12. Repeat Mode Repeat A- ėRepeat A-B RepeatA-B OffėFigure 13. Repeat A-B ON and OFF](https://usermanual.wiki/HUIZHOU-FORYOU-GENERAL-ELECTRONICS/VX3022/User-Guide-2531473-Page-23.png)
![24VX3022Select Audio ModeWhen playing VCDs, the user can select an audio mode (R/L/Stereo).1. During playback, touch the bottom half of the screen to display menu on thescreen.2. Touch the Next icon [ ] to display the 2nd menu.3. Touch the Audio icon [ ] repeatedly until the audio mode is selected.Select Subtitle LanguageFor DVD discs that contain two or more subtitle languages.1. During play, touch the screen to display menu on the screen.2. Touch the Next icon[ ] to display the 2nd menu.3. Touch the Language icon [ ] repeatedly to select a language. The selected language is displayed.Change Viewing AngleSome DVDs contain alternate scenes, such as scenes recorded from different camera angles. For such DVDs, you can select from the available alternate scenes. 1. During playback, touch the screen to display menu on the screen.2. Press the Angle icon [ ] repeatedly on the remote control. The viewing angleis changed.Video SetupTouch the Settings icon [ ] to access video setup mode, touch Left or Right direction icons [ ]/[ ] to set the desired eect. You may set the brightness, contrast, and saturation of the video output from 1 to 20.Playback InformationTouch the screen during playback of a DVD or VCD disc and the playback information will be displayed on the top area of the TFT.For DVD1. Disc type.2. Return to the main menu.3. DVD Title information. “1/6” indicates that this DVD has 6 titles and the titleplaying back now is the first title.4. DVD Chapter information. “2/9” indicates that current title has 9 chapters andthe chapter playing back now is the fi th chapter.5. Time display.Title: 1/6Chapter: 2/9DVD 02:35Figure 14. DVD Information Display](https://usermanual.wiki/HUIZHOU-FORYOU-GENERAL-ELECTRONICS/VX3022/User-Guide-2531473-Page-24.png)
![25VX3022For VCD1. Disc type.2. Return to the main menu.3. VCD Track information. “1/16” indicates that this VCD has 16 tracks and the trackplaying back now is the first title.4. Time display.Elapsed Time1. Elapsed time of the current track.2. Total time of the current track.Direct Track EntryTo select a track directly, touch the [ ] icon on screen control to display the direct entry menu. Enter the desired track using the on-screen number pad. Press [ OK ] to the selected track.Rotate Pictures1. When viewing pictures, touch the screen to display menu on the screen.2. Touch the Rotate Icon [ ] repeatedly to rotate the picture.ZoomThe user can zoom in pictures for a close view.1. When viewing pictures, touch the screen to display menu on the screen.2. Touch [ ] repeatedly to zoom in the picture.Figure 15. VCD Information Display Title: 1/16VCD 02:35Figure 16. Elapsed Time Display Figure 17. Zoom](https://usermanual.wiki/HUIZHOU-FORYOU-GENERAL-ELECTRONICS/VX3022/User-Guide-2531473-Page-25.png)
![28VX3022Adjusting the Fader and BalanceThe user can adjust front/rear fader settings, L/R balance settings, and subwoofer levels here.1. Enter the EQ setup mode.2. Touch the [ ] icon in the EQ interface menu.Balance- This feature is used to balance the audio output levels between the left and right side of the vehicle. Touch the t or u icons to change the balance control settings -12 (Left) to +12 (Right). The setting can also be changed by touching screen within the grid to move the blue sphere. Fader- This feature is used to fade the audio output levels between the front and rear of the vehicle. Touch the p or q icons to change the fade control settings -12 (Rear) to +12 (Front). The setting can also be changed by touching screen within the grid to move the blue sphere. Sub (Subwoofer)- This feature is used to reduce or increase the subwoofer sound level. Touch the slide bar t or u icons to adjust the subwoofer volume from -12 to +12. This setting will vary depending on the input level setting of your subwoofer amplifier.To exit the balance-fader touch the return icon on the top left corner of the screen.Figure 19. Fade-Balance Adjustment ScreenNOTE:•The EQ mode will change to ‘User’ automatically when you adjust the frequencyvalue in all modes besides ‘User’.](https://usermanual.wiki/HUIZHOU-FORYOU-GENERAL-ELECTRONICS/VX3022/User-Guide-2531473-Page-28.png)
![29VX3022iPod®/iPhone® CONTROLSAccessing iPod® ModeThe user can control an iPod®/iPhone® using the touch screen to access albums, songs, etc.NOTE: For audio connectivity, the iPod®/iPhone® must be connected to the VX3022 using the iPod®/iPhone® adapter cable that came with the iPod/iPhone device (also available separately). Be sure your iPod®/iPhone® has the latest Apple firmware installed to avoid connectivity issues.The unit will automatically switch to iPod® mode when an iPod® or iPhone® is plugged into the front panel USB connector. Also the iPod® can be accessed from the Main Menu Screen by touching the iPod® icon (only available when an iPod® or iPhone® is connected to the front panel USB connector)iPod®/iPhone® Main MenuTo access the iPod® mode touch [iPod] on the main menu to enter iPod® menu.Access iPod menu from here. Touch p or q icons to browse menu.1. Return to main menu / 2. File list Drag up/down to scroll / 3. Show Music file4. Show Video files / 5. Show Photo fileNote: Video cannot be viewed using the standard Apple Lightning cable. Figure 20. Connecting the iPod®/iPhone®Figure 21. iPod®/iPhone® Menu45123](https://usermanual.wiki/HUIZHOU-FORYOU-GENERAL-ELECTRONICS/VX3022/User-Guide-2531473-Page-29.png)
![30VX3022Pausing Playback1.Touch the Pause icon [ ] on the bottom of the screen to pause play. “PAUSE” appears in the display, and Pause icon[ ] will switch to a Play icon[ ].2. Touch the Play icon [ ] to resume playback.Selecting a TrackTrack-up Touch the Forward icon [ ] to move to the beginning of the next track.Track-down1. Touch the Back icon [ ] once to move back to the beginning of the currenttrack.2. Touch the Back icon[ ] twice to move back to the beginning of the previoustrack.Fast Forward/Fast ReverseFast forwardTouch and hold the Forward icon [ ] to fast forward a track. Fast reverse Touch and hold the Back icon [ ] to fast reverse a track.Repeat PlayThis function allows the user to play the track repeatedly by touching the Repeat icon [ ] to select Repeat one or Repeat all.Random PlayThis function allows the user to play all tracks recorded in a random order by touching the Random icon [ ] to perform random play.Figure 22. iPod®/iPhone® Play/Pause and Track ControlsFigure 23. iPod®/iPhone® Repeat Play and Random Play Controls](https://usermanual.wiki/HUIZHOU-FORYOU-GENERAL-ELECTRONICS/VX3022/User-Guide-2531473-Page-30.png)
![33VX3022Disconnecting a Bluetooth® DeviceTo disconnect one device, touch [ Disconnect ]. After "Disconnect" is pressed, the radio will display a screen listing paired devices. Pressing the Green "Connect" icon will reconnect a previously paired phone to the VX3022. Pressing the "Wastebin" icon next to a device's name will unpair the phone from the radio.NOTES.• The device will be disconnected when the device is moved beyond theoperational range.• If you want to reconnect the device to the unit, place it within operationalrange.• If you do not want to reconnect the device to the unit automatically, touch [ Options ], then set [ Auto connect ] to [ OFF ].For details, see the “Adjust Bluetooth® Settings” section.Making a Call1.2.3. Search for phone number from the following list: [Phone Book] [Call Log] [Missed calls] [Received calls] [Dialed calls]Or touch the number pad directly, then touch [ ] to dial.Figure 26. Bluetooth® Call Log ControlsFigure 25. Bluetooth® Entry Pad and Option ScreenSelect Bluetooth® function in the home menu.Press "Option". Go to > "Phone Synch". Press "Synch" to import the mobile phone contacts. If you have many contacts, this may take up to 3-4 minutes. Up to 1000 contacts can be imported.](https://usermanual.wiki/HUIZHOU-FORYOU-GENERAL-ELECTRONICS/VX3022/User-Guide-2531473-Page-33.png)
![34VX3022Receiving a CallBy default, all incoming calls are received automatically.1. If there is an incoming call, the screen will display “Incoming call...”.2. Touch the screen to select [ hang up ] or [ Answer ].Speak into the Bluetooth microphone.TipYou can select to receive calls manually by setting[Auto Answer] to [OFF]Adjust Bluetooth Settings1. In Bluetooth menu, touch [ Options ].The option menu is displayed.2. Touch on the selected option to change the setting.∙[Bluetooth]: To turn the “Bluetooth” function ON or OFF.∙[Auto connect]: To turn the “Auto Connect” function ON or OFF .∙[Auto answer]: To turn the “Auto Answer” function ON or OFF .∙[Pairing code]: To set the paring code.∙[Phone synch]: To synchronize phone book, touch [ OK ] on the sub-menuPhonebook synch may take several minutes to load on initial setup.NOTE:• You can also adjust Bluetooth settings in the “Settings” menu.Figure 27. Bluetooth® Incoming Call ScreenFigure 28. Bluetooth® Settings Menu](https://usermanual.wiki/HUIZHOU-FORYOU-GENERAL-ELECTRONICS/VX3022/User-Guide-2531473-Page-34.png)
![36VX3022AV-In 1 / AV-In 2 AV-In 1AV-In 1 is used for playback of audio/video from an external device connectedto the unit through a 3.5mm connector located on the font panel. AV-In 2AV-In 2 is used for playback of audio/video from an external device connected through RCA connectors located on the back of the unit.You can connect an external audio/video device to the unit.1. Connect the external device with an appropriate AV cable.2. Touch the upper left corner to display the main menu.3. Touch [Aux 1] / [Aux 2] to access external device.NOTE: Audio/Video devices must be connected to this unit using an audio/video adapter cable that is available separately. NOTE: Video will only play when the vehicle parking brake is engaged. The parking brake wire must be connected for this feature to operate. Figure 30. Connecting External Devices3.5mmA/V Cable (notincluded)VideoLeft AudioRight AudioGround1234](https://usermanual.wiki/HUIZHOU-FORYOU-GENERAL-ELECTRONICS/VX3022/User-Guide-2531473-Page-36.png)