HUIZHOU FORYOU GENERAL ELECTRONICS VX3024 Car Multimedia Player User Manual
HUIZHOU FORYOU GENERAL ELECTRONICS CO.,LTD. Car Multimedia Player
User manual

VX3024
Operating Instructions
6.2” Double DIN Multimedia Receiver
DVD / Built-in Bluetooth / Compatible with iPhone /
Compatible with iPod / Pandora Link / USB / Aux In

2
VX3024
Contents
Safety Precautions ................................................................................ 3
Front Panel ............................................................................................ 5
Basic Operations ................................................................................... 7
Radio Mode ........................................................................................... 9
Playback Mode .................................................................................... 12
Bluetooth Mode ................................................................................... 18
iPod Mode ........................................................................................... 20
PANDORA® RADIO OPERATION .......................................................... 21
Settings ............................................................................................... 23
Other Modes ........................................................................................ 26
Specications ...................................................................................... 27
Troubleshooting .................................................................................. 29
Wire Connections ................................................................................ 30
Thank you for choosing a Jensen product. We hope you will nd the instructions
in this owner’s manual clear and easy to follow. If you take a few minutes to look
through it, you’ll learn how to use all the features of your new Jensen VX3024
Mobile Multimedia Receiver for maximum enjoyment.
3
VX3024
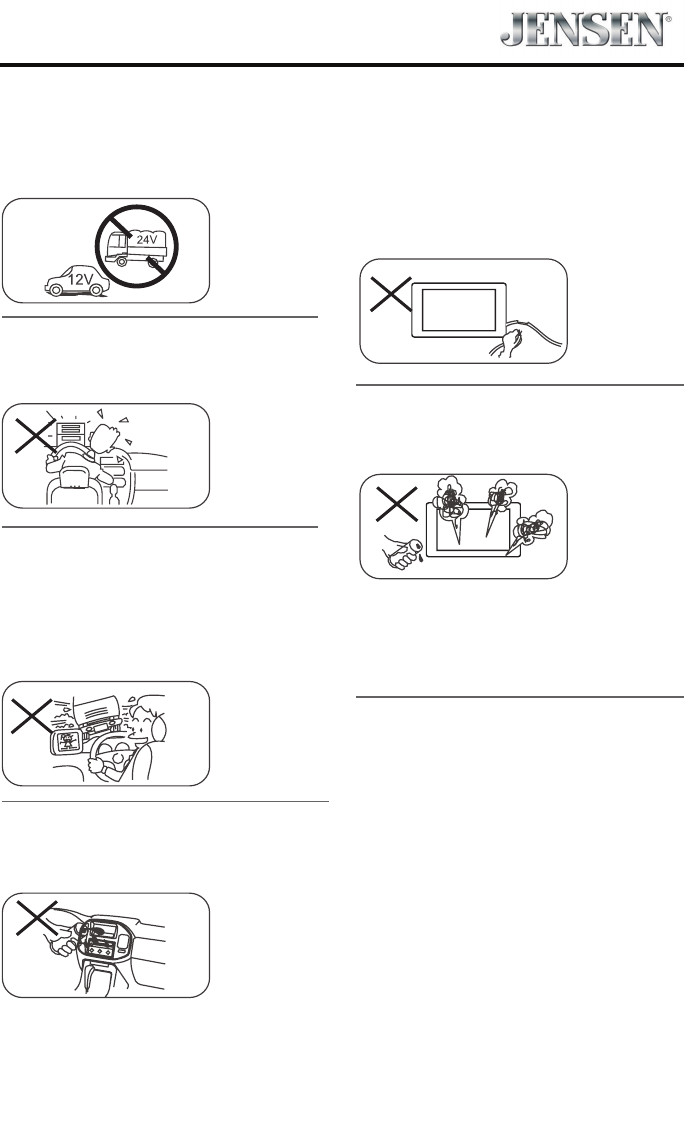
Safety Precautions
Never expose this unit, amplifier,
and speakers to moisture or water to
prevent electric sparks or re.
Please don't change the fuse on
the power cord without professional
guidance, using improper fuse may
cause damage to this unit or even cause
re.
Please contact your nearest dealer
if one of the following symptoms is
experienced:
(a). Water or other objects enters the
unit.
(b). There is smoke.
(c). Peculiar smell.
Only connect the unit to a 12-volt power
supply with negative grounding.
Never install this unit where the
operation & condition for safe driving is
impaired.
Never use the video display function
in the front when driving to prevent the
violation of laws & regulations and also
to reduce the risk of traffic accident
except for using rear view video
camera.
To ensure safe driving, please adjust the
volume to a safe and comfortable level
in case of emergency situations.

4
VX3024
This unit supports only the following iPod/iPhone models:
· iPhone 5
· iPhone 4S
· iPhone 4
· iPod touch (5th generation)
· iPod touch (4th generation)
· iPod nano (7th generation)
· iPod nano (6th generation)
“Made for iPod,” and “Made for iPhone” mean that an electronic accessory has been designed to connect specically to
iPod, or iPhone, respectively, and has been certied by the developer to meet Apple performance standards.
Apple is not responsible for the operation of this device or its compliance with safety and regulatory standards. Please
note that the use of this accessory with iPod or iPhone may aect wireless performance.
iPhone and iPod are trademarks of Apple Inc., registered in the U.S. and other countries.
Pandora® is a registered trademark of Pandora Media, Inc.
1. Never disassemble or adjust the unit without any professional guidance.
For details, please consult any professional car shop / dealer for inquiry.
2. If the front panel or TFT monitor is dirty, please use a clean silicone cloth and neutral detergent to wipe o the
spot. Using a rough cloth and non-neutral detergent such as alcohol for cleaning may result in scratching or
decoloration to the monitor.
3. If any abnormal behavior of the unit is found, please refer to trouble shooting guide of this manual. If no relevant
information is found, please press the [RESET] key on the front panel to resume factory default.
4. If you have parked the car in hot or cold weather for a long time, please wait until the temperature in the car
becomes normal before operating the unit.
5. Using the car heater in low temperature environment may result in moisture inside the unit, DO NOT use the unit
in this situation. Eject the disc and wipe o the moisture on the disc. If the unit still doesn't work after a few hours,
please contact the service center.
6. Do not impact the LCD monitor which could cause damage.
7. To prevent damage to the screen, avoid touching it with sharp objects.
8. To provide a clear demonstration and an alternative for easy understanding to the operation of this unit, graphic
illustrations are used.
However, some illustrations are dierent from the actual images displayed on the screen.
9. Operate the unit correctly according to this manual to prevent unnecessary problem. The guarantee won't be valid
if the problem is caused by inappropriate operation.
FCC STATEMENT
This device complies with Part 15 of the FCC Rules. Operation is subject to the following two conditions:
(1)This device may not cause harmful interference.
(2)This device must accept any interference received, including interference that may cause undesired operation.
Changes or modifications not expressly approved by the party responsible for compliance could void the user’s
authority to operate the equipment.
NOTE:
This equipment has been tested and found to comply with the limits for a Class B digital device, pursuant to Part 15 of
the FCC Rules. These limits are designed to provide reasonable protection against harmful interference in a residential
installation.
This equipment generates uses and can radiate radio frequency energy and, if not installed and used in accordance
with the instructions, may cause harmful interference to radio communications. However, there is no guarantee that
interference will not occur in a particular installation. If this equipment does cause harmful interference to radio or
television reception, which can be determined by turning the equipment o and on, the user is encouraged to try to
correct the interference by one or more of the following measures:
• Reorientorrelocatethereceivingantenna.
• Increasetheseparationbetweentheequipmentandreceiver.
• Connecttheequipmentintoanoutletonacircuitdierentfromthattowhichthereceiverisconnected.
• Consultthedealeroranexperiencedradio/TVtechnicianforhelp.
FCC Radiation Exposure Statement
This equipment complies with FCC radiation exposure limits set forth for an uncontrolled environment. This
equipment should be installed and operated with minimum distance 20cm between the radiator & your body
5
VX3024
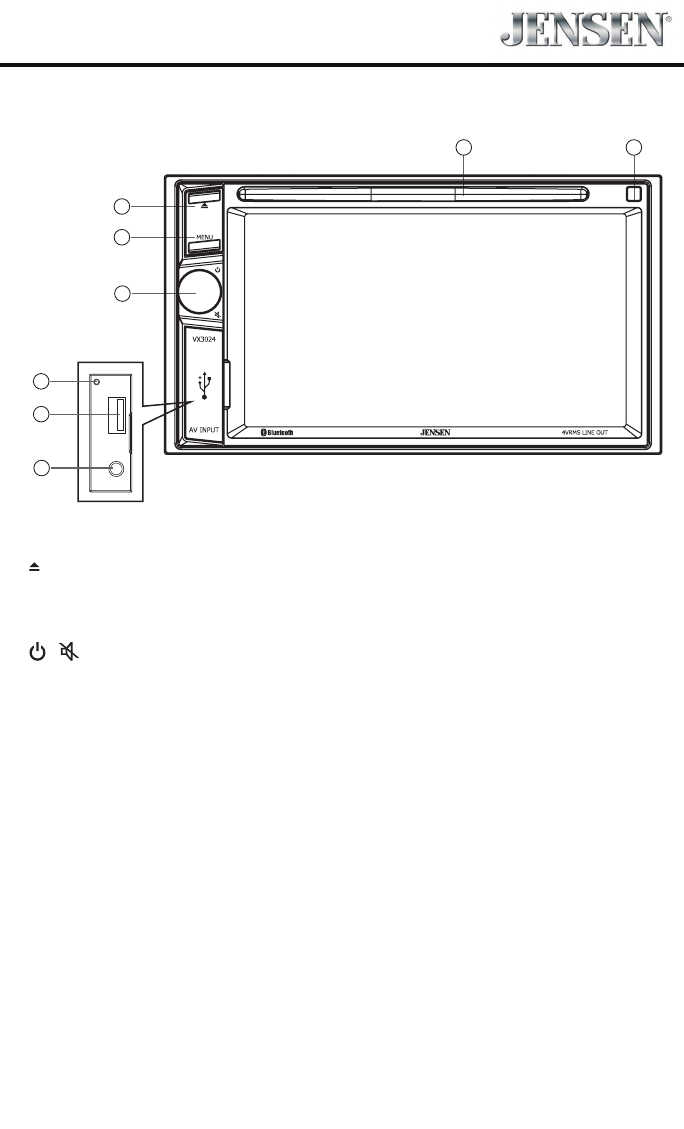
Front Panel
1. [ ] Button
Press to eject a disc.
2. [MENU] Button
Press to switch between the sources menu and the previous source.
3. [ / ] Knob
Rotate to adjust the volume.
Press momentarily to activate the MUTE function. Press again to resume normal listening.
Press to turn the unit ON. Press and hold to turn the unit OFF.
4. Reset Button
Press to reset system settings to factory default (except password and parental lock
settings).
5. USB Connector
Connect a USB device for playback of music/video les.
6. A/V Input
Accepts a 3.5mm jack through which signals from various audio/video devices can be
applied to the unit.
7. Remote Sensor
8. Disc slot
Notice:
The graphic in this manual is for reference only, and may be different
from the actual unit. Reference to actual unit is suggested.
1
2
6
3
4
5
7
8
6
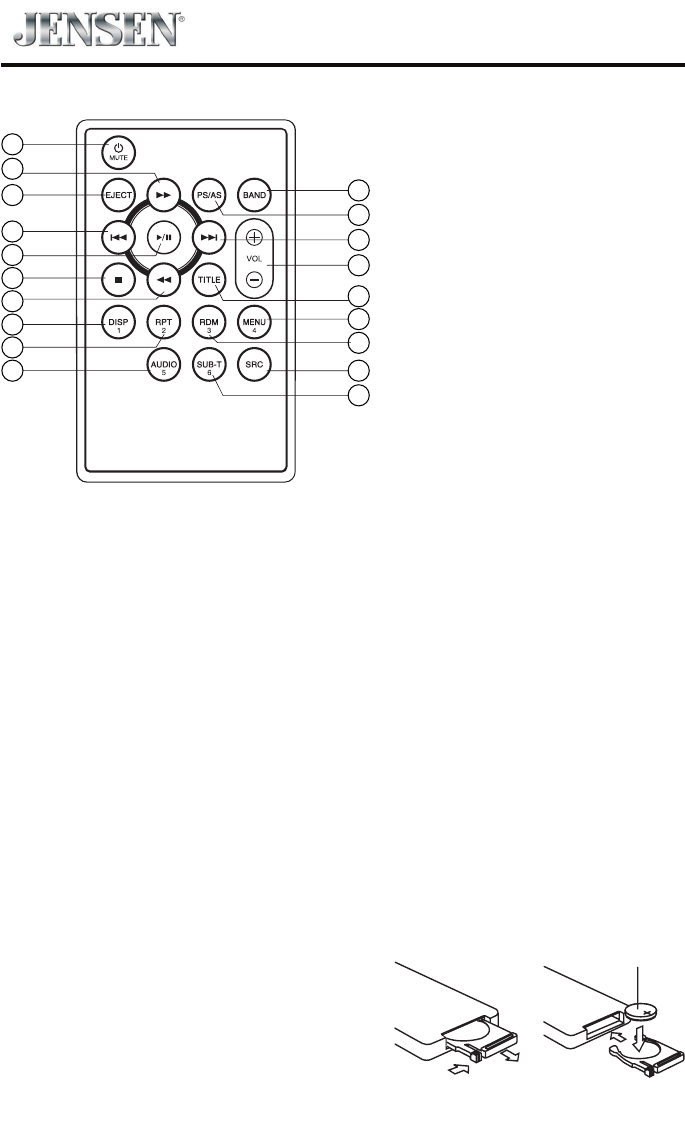
VX3024
1. Power & Mute On/O
2. Fast forward / Station up
3. Eject the disc
4. Previous / Seek down
5. Play / Pause
6. Stop
7. Fast backward / Station down
8. Preset station 1.
9. Repeat play / Preset station 2.
10. DVD/VCD audio stream change /
Preset station 5.
11. DVD subtitle/ Preset station 6.
12. Show main menu.
13. CD/MP3 Random play / Preset
station 3.
14. DVD/VCD root menu/ Preset
station 4.
15. DVD title.
16. Adjust volume level.
17. Next / Seek up
18. Scan play / Preset scan
Auto memory store (long press)
19. Select tuner band.
1
2
3
4
5
6
7
8
9
10
11
12
13
14
15
16
17
18
19
Notes on Remote Control Usage
1. Aim the remote control at the remote sensor on the unit.
2. Replace the battery from the remote control or insert a battery insulator if the battery has not
been used for a month or longer.
3. DO NOT store the remote control in direct sunlight or in a high temperature environment, as it
may not function properly.
4. The battery can last up to for 6 months in normal conditions. If the remote control does not
work, please change the battery.
5. Use“button shaped” lithium battery“CR2025”(3V) only.
6. DO NOT recharge, disassemble, heat or expose the battery to re.
7. Insert the battery in the proper direction according to the ( + ) and ( - ) poles.
8. Store the battery in a place where it cannot be reached by children to avoid the risk of accident.
Replacing the lithium battery
When the range of operation of the card
remote control becomes short or no function, replace the lithium battery with a new one. Make
sure the battery polarity replacement is correct.
1. Pull out the battery holder while pressing the
stopper.
2. Insert the button-type lithium battery with the (+)
mark facing upward. Insert the battery holder into the
remote control.
12
(CR2025)
7
VX3024
Parking Brake Inhibit
• Whenthe“BRAKE” cableisconnected tothe brakeswitch,thedisplayon theTFTmonitor
willdisplayvideoonlywhenthevehicleisapplied.
• ParkingbrakefunctionisoverriddenwhenthevideosourceissettoREVERSE.
• Whentheparkingbrakeinhibitisactive,thefrontmonitordisplaysWarninginformation,
preventingthedriverfromwatchingcontentwhiledriving.Rearvideoscreensarenotaffected.
Mute
Press [ / ] knob to mute the volume from the unit. Press again to restore the volume. [ ] is
displayed on the LCD. Adjusting the volume or using any of the audio setup features cancels the mute
function.
Power On / Off
Pressthe[ / ]knobontheunittoturntheuniton.Thebuttonsonthefrontoftheunitlight
upforamomentandthecurrentmodestatusappearsintheLCD.
Pressandholdthe[ / ]knobtopowerofftheunit.
Demo
Demomodeisusedtoillustratethefunctionsoftheunit.Touchthescreentoexitit.
Demomodeisdefaulton.YoucanturnitoffinSettingmenu.
Audible Beep Conrmation
Anaudiblebeeptoneconrmseachfunctionselection.TheBeeptonecanbedisabledthrough
theSetupmenu.
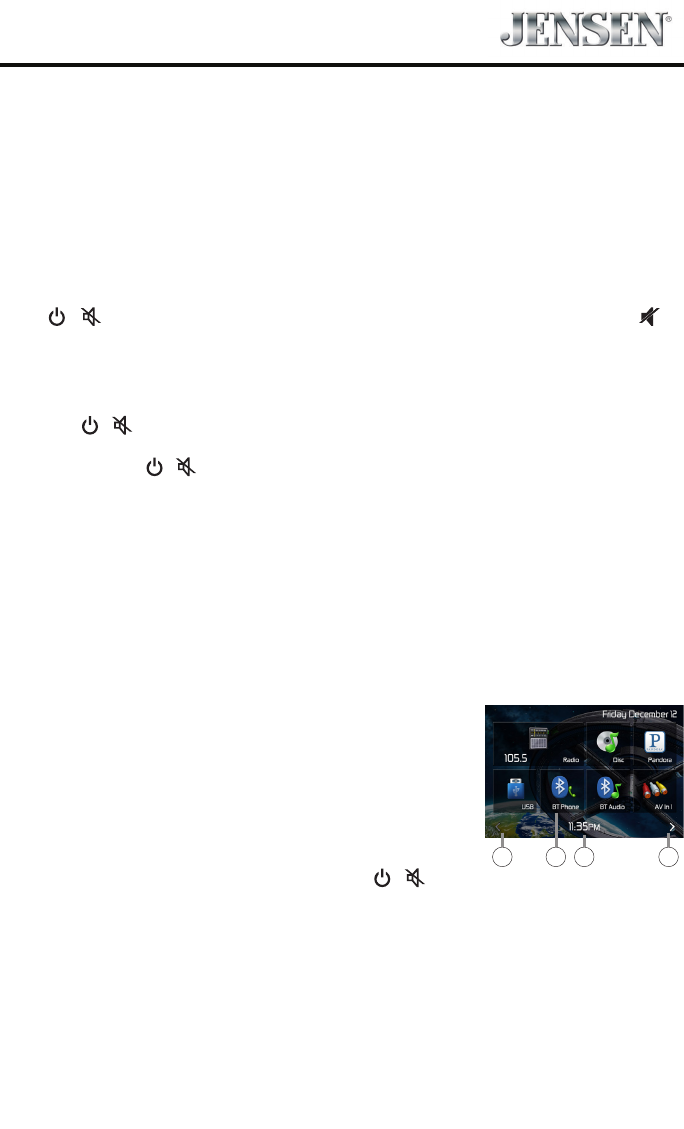
Playing Source Selection
Pressthe[ MENU]buttononthefrontpaneltodisplaytheplaying
sourcemenu.
1. Prev or Next: Touch to view the previous or next page of playing
sources.
2. Playingsource icon: touch to access corresponding work mode.
3. Clock
Volume Adjustment
Toincreaseordecreasethevolumelevel,turnthe[ / ]knob
onthefrontpanel.Thevolumerangeisfrom“0”to“50”.TheLCD
orTFTscreendisplaysthevolumelevelfor3seconds.
1 1
23
Basic Operations
8
VX3024
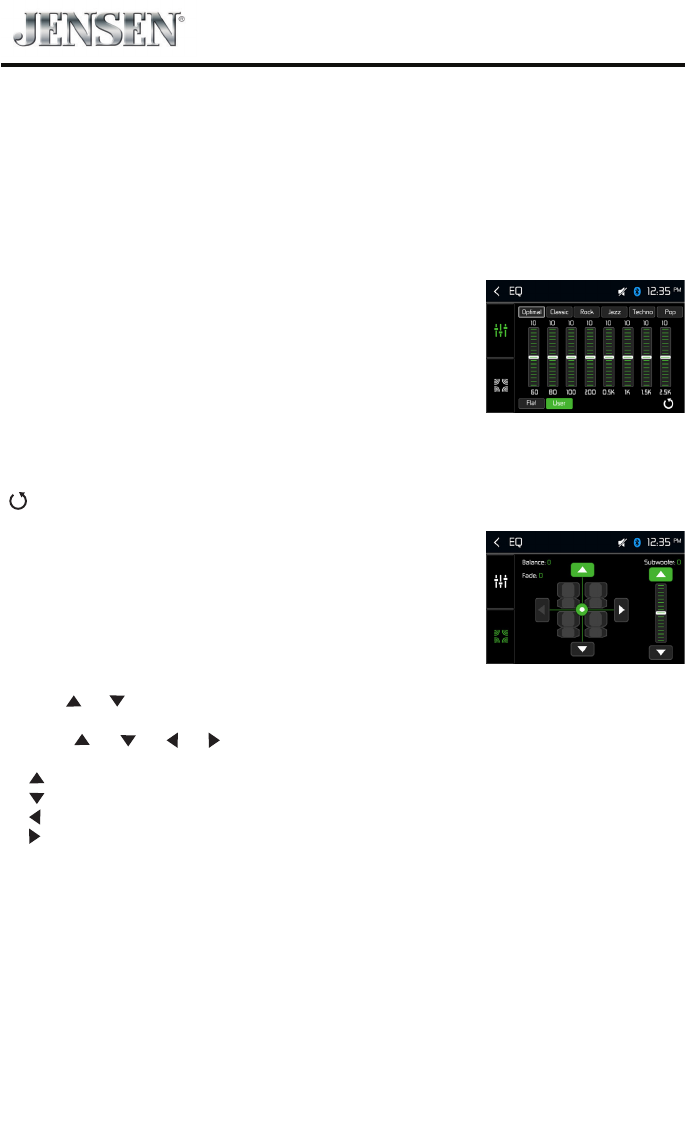
EQ Menu
The Audio Control feature allows you to easily adjust your audio system
to meet the acoustical characteristics of your vehicle, which vary
depending on the type of vehicle and its measurements. Proper setting
of the Fader and Balance boosts the eects of the cabin equalizer.
Select Preset Equalizer
1. Enter the EQ setup mode
Touch the [ EQ ] icon in the user interface and the EQ setup interface
will display on the screen.
2. Select EQ mode
Touch the desired EQ selection: [ Optimal ] / [ Classic ] / [ Rock ] / [
Jazz ] / [ Techno ] / [ Pop ], and the EQ mode will change.
Adjust EQ Parameters
To adjust EQ parameters, touch and drag the parameters adjustment
bar.
[ User ]: Set the desired audio eect.
[ Flat ]: Select the original audio eect.
[ ]: Cancel the equalizer function settings.
Adjust FAD BAL
You can adjust front/back/left/right balance of the speaker and the
subwoofer volume to get balanced listening effect according to the
surroundings and your interest.
1. Enter the EQ setup mode
Touch the [ FAD_BAL ] icon in the user interface and the EQ setup
interface will display on the screen.
2. Adjust subwoofer volume
Touch [ ] / [ ] to adjust subwoofer volume from -8 to +8.
3. Adjust fader / balance value
Touch [ ] / [ ] / [ ] / [ ] to adjust fader / balance value from
-14 to +14.
[ ]: Front speaker
[ ]: Rear speaker
[ ]: Left speaker
[ ]: Right speaker
Notes:
1. The parameters of the EQ modes has been preset and you can not
change them besides ‘User’.
2. The EQ mode will change to ‘User’ automatically when you adjust the
frequency value under the modes besides ‘User’.
3. The value of Sub is independent of EQ mode and can be adjusted
separately.
9
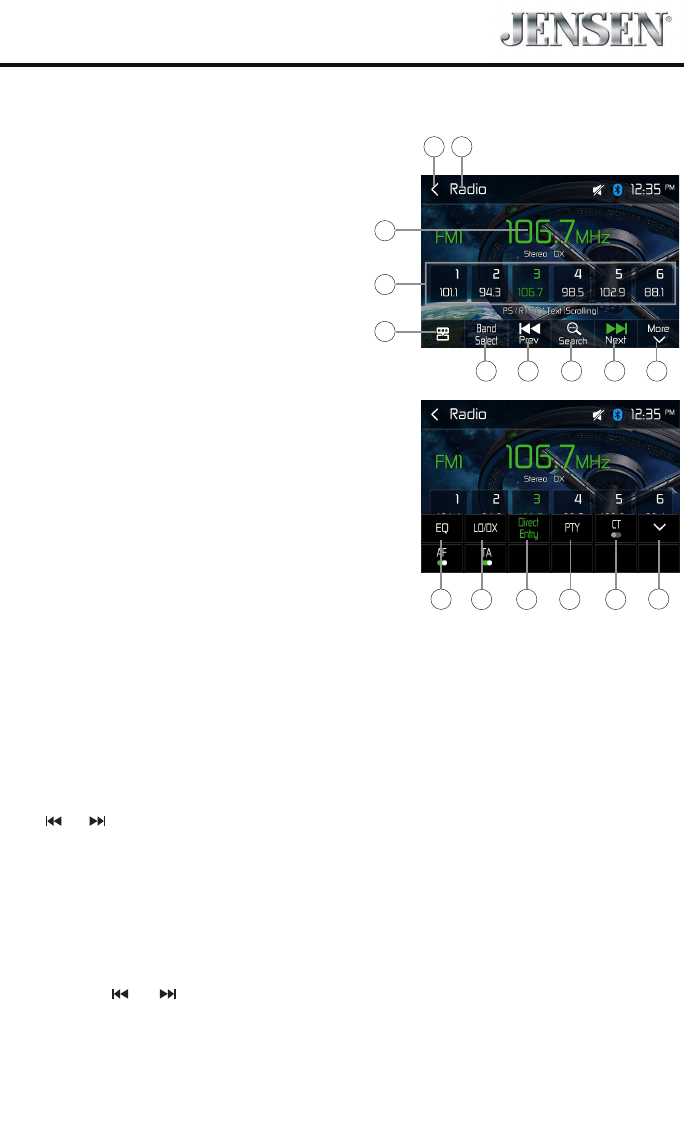
VX3024
Select Radio as Playing Source
Open the Source Menu and then touch [Radio].
Select One Radio Band
Touch the [ Band Select] icon on the user interface to select one radio band among FM1, FM2, FM3,
AM1 and AM2.
Tune
Auto Tuning
Press [ ] / [ ] icon on the user interface to seek a higher / lower station.
To stop searching, repeat the operation above or press other keys having radio functions.
Note:
When a station is received, searching stops and the station is played.
Manual Tuning
Method 1:
During manual tuning, the frequency will be changed in steps.
Press and hold [ ] / [ ] icon on the user interface more than 1 second to tune in a higher / lower
station.
Radio Mode
1. Current radio band indicator.
2. Return to home menu.
3. Current station frequency.
4. Preset stations list.
5. Shortcut.
6. Band switch.
7. Seek backward
Tune backward(long press)
8. Auto searching.
9. Seek forward
Tune forward(long press)
10. Show the next page of options menu.
11. Enter EQ menu.
12. Choose local or distant seeking mode.
13. Enter frequency directly.
14. Show RDS PTY list
15. Turn on/o CT function
16. Return to the rst page of options menu.
Tuner TFT Display 1
4
3
2
5
6 7 8 109
12 13 14 15 16
11
10
VX3024
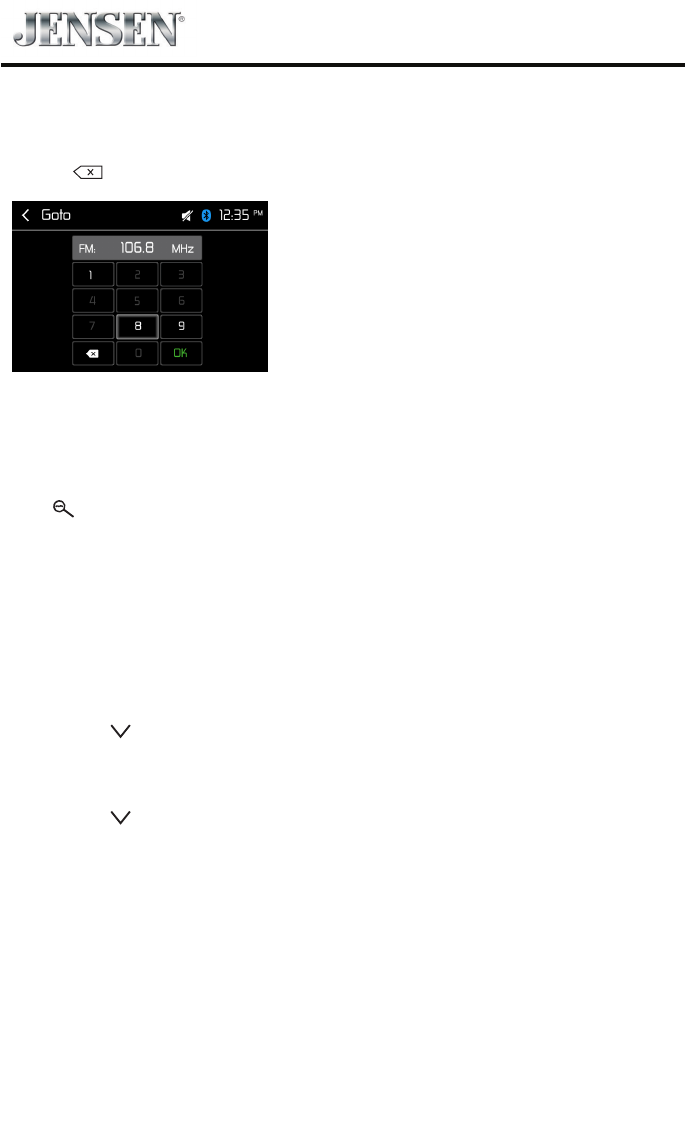
Method 2:
1. Touch the numeric keypad icon [ Direct Entry ]. Numeric keyboard is displayed, touch numbers to
input frequency.
2. Touch [ ] to delete the input numbers step by step.
3. Touch [ OK ] to enter.
Preset Station
The unit has 5 bands, such as FM1, FM2, FM3, AM1, AM2, and each band can store 6 stations; hence the
unit can store 30 stations in total.
Search Stations Automatically
Touch [ Search ] to search station and store 6 strongest stations in current band automatically.
Manual Store
1. Tune to a station.
2. Long press one of the channels 1 to 6 on the screen to save the selected station.
Tune to a Preset Station
1. At radio mode, select a band (if needed).
2. Touch one of the preset channels on the screen.
Local Seeking
Press the [ More ] and [ LO/DX ] icons to choose the Radio Distance or Local .
When the [ Local ] displays, only stations with a strong signal strength will be detected .
EQ Selection
Press the [ More ] and [ EQ ] icon to enter the EQ setup menu.

11
VX3024
RBDS
RBDS (Radio Broadcast Data System) transmits data to the radio which displays information such as
station identication, song artist, and song title.
RBDS service availability varies with areas. If RBDS service is not available in your area, the following
service is not available.
CT (Clock Time)
Some stations broadcast the time and date within the encoded RBDS signal. The clock time is
automatically adjusted when ‘CT’ is set to ‘ON’.
NOTE:
Stations broadcasting close to time zones may not broadcast the correct time in your particular area.
In this case, turn CT O and manually set the time.
PTY Function
PTY is the abbreviation for Program Type which is a code dening the type of program being broadcast
(e.g. News or Rock).
Then PTY options will display on the screen. To view more PTY options, touch the scroll bar and arrows
on the screen.
When one PTY option is touched (e.g. News), auto search for next available PTY by increasing tuning
frequency until the PTY of the next station matches the current. If no matched PTY has been found,
the unit will return to the original radio frequency.
12
VX3024
Basic information
This system will play the following types of discs:
The car sound system can be used to play audio DVDs/CDs and DVD/CD-R/RWs with audio or MP3 les
as well as MP3 or WMA les on USB stick and SD cards.
In addition, you can view movies and images from DVDs/VCDs/CDs, USB stick and SD cards on the
display.
For safety reasons, the playback of movies and images on the integrated monitor is allowed only while
the vehicle is standing and the hand brake is applied. The “PARKING” cable must be connected with the
hand brake connection of the vehicle (see Connection diagram at the end of these instructions).
NOTE:
This unit is designed to play pre-recorded (original) DVDs/VCDs/CDs. Some burned
DVDs/VCDs/CDs may not play due to different recording formats.
Insert a disc
Upon inserting a disc, the unit will switch to [Disc] mode automatically.
Eject a Disc
Press the [ ] key on the front panel to eject the disc.
Touch Screen Controls
The touch key areas for DVD playback are outlined below:
A B C
E
D
A: Return to the main menu
B: Disc type
C: Play the video and display playback information
D: Time display
E: Display onscreen control menu
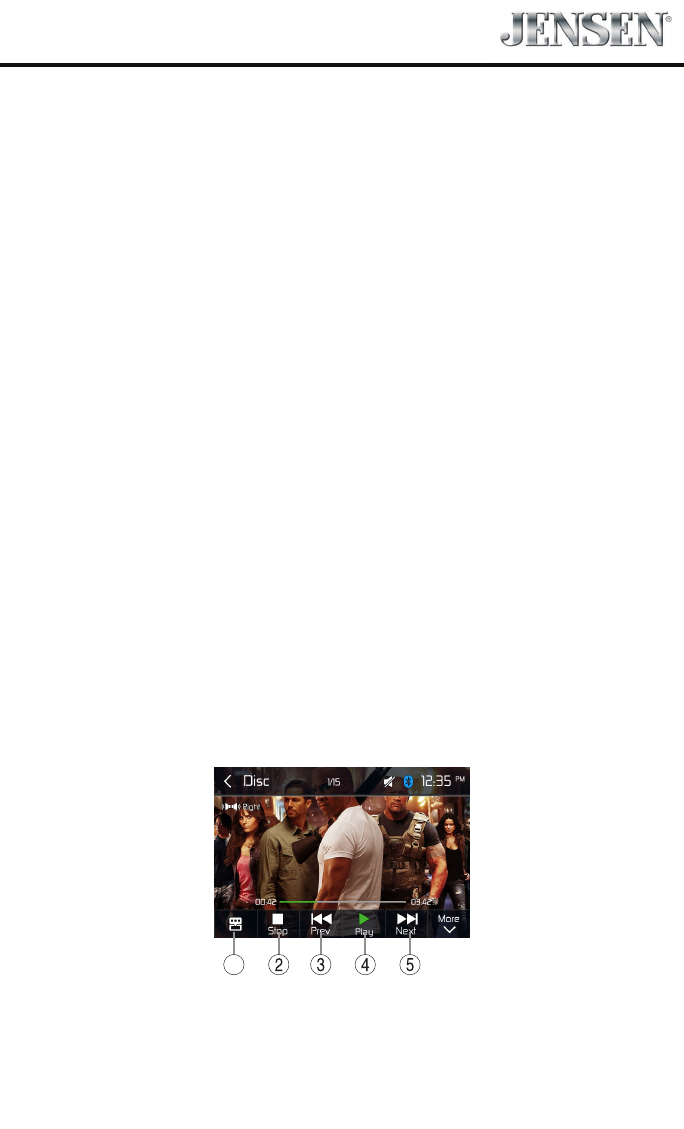
Controlling Playback
To access the on-screen controls, touch the screen anywhere except for the upper left corner and touch
again to cancel display. Touch [ More ] to view all function icons.
Playback Mode
13
VX3024
Connecting the USB Device
1. Open the USB door.
2. Connect an USB device into the USB connector.
Play starts automatically.
NOTES:
1. If there are audio files supported on the USB stick, the system will enter the audio files menu
automatically.
If there are no audio les, but there are video les supported on the USB stick, the system will enter
the video les menu automatically.
If there are no audio or video les, but there are picture les supported on the USB stick, the system
will enter the picture les menu automatically.
If there no above audio/video/picture les supported in the USB stick, the screen will display “Load
Error!”.
2. Not all USB devices are compatible with the unit.
Removing the USB Device
1. Select another source in the main menu.
2. Remove the USB device.
DVD movie playback
The car sound system can play video DVDs and VCDs. After inserting the DVD, the playback starts
automatically.
The DVD menu is displayed.
You can navigate in the DVD menu by touching the corresponding buttons in the DVD menu on the
screen.
After starting the movie via the menu of the DVD, the movie is displayed. The playback menu for DVDs
is hidden.
NOTE:
Briey touch the screen once to display the playback menu again.
The playback menu is shown.
1
1. Shortcut.
2. Stop playback, call up home menu.
3. Select previous chapter.
4. Pause playback and continue playback.
5. Select next chapter.
14
VX3024
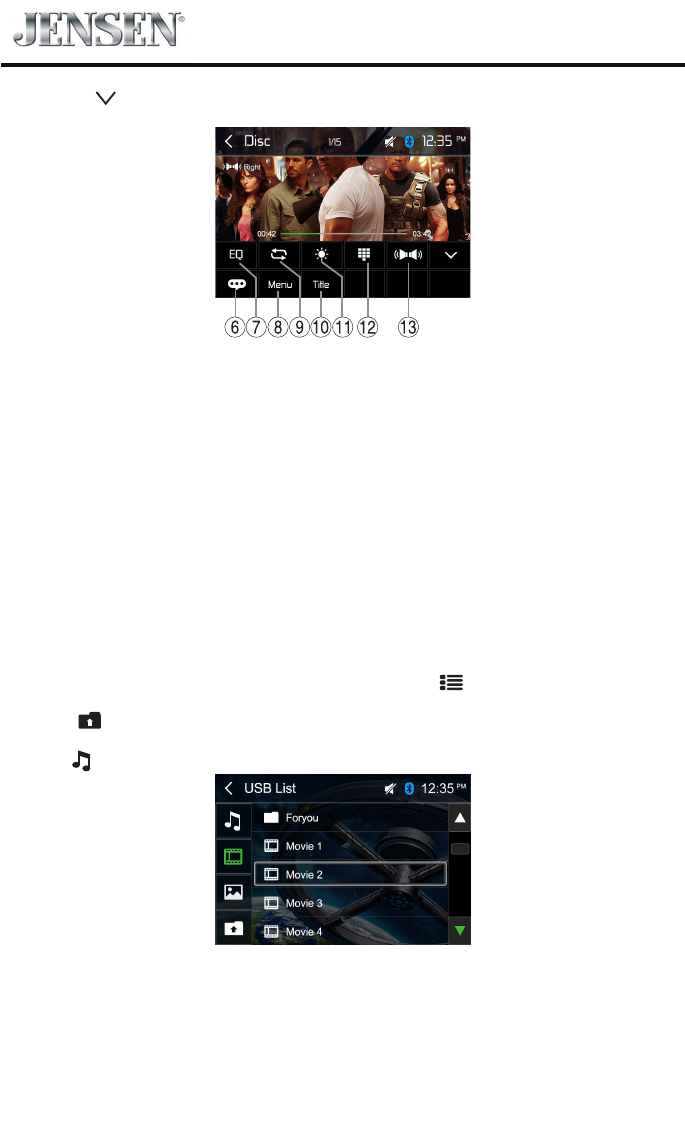
Tap on [ More ] to display additional operating options of the playback menu.
6. Select playback language (only if supported by the DVD).
7. Display equalizer.
8. Return to menu.
9. Start and end REPEAT function.
Repeat mode:
Repeat Chapter → Repeat Title → Repeat All → Repeat O
10. Return to title.
11. Adjust the brightness, contrast, and saturation.
12. Call up keypad for direct selection of titles or chapters.
13. Select playback audio channel (only if supported by the DVD).
Audio playback
The principles of audio playback (MP3/WMA) from data carriers are identical for all sources.
Select the desired source via the main menu.
The device changes to the desired source and the playback starts.
If the playback does not start with the audio playback, touch the [ ] icon to change to the folder/le
list.
Touch the [ ] icon to display all the folders and les of the data carrier.
- Or -
Press the [ ] icon to display all the audio les of the data carrier.
15
VX3024
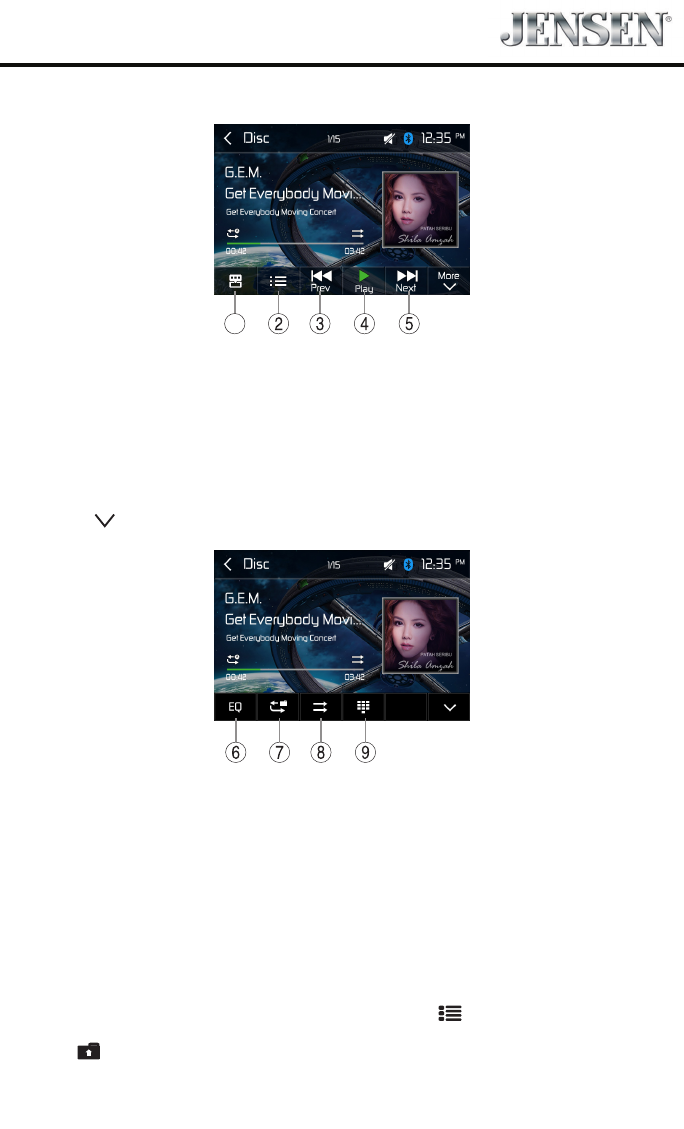
After starting a title, the playback menu is displayed.
1
1. Shortcut.
2. Display the folder/le list.
3. Short press: Previous track.
Long press: Fast backward.
4. Pause playback and continue playback.
5. Short press: Next track.
Long press: Fast forward.
Tap on [ More ] to display additional operating options of the playback menu.
6. Display equalizer.
7. Start and end REPEAT function.
Repeat mode:
Repeat One → Repeat Folder → Repeat All → Repeat O
8. Shue playback.
9. Display keypad to directly enter the number of the desired title.
Video playback
Select the desired source via the main menu.
The device changes to the desired source and the playback starts.
If the playback does not start with the video playback, touch the [ ] icon to change to the folder/le
list.
Touch the [ ] icon to display all the folders and les of the data carrier.

16
VX3024
- Or -
Touch the [ ] icon to display all the audio les of the data carrier.
If you selected a movie, the playback is started. During the movie playback, the playback menu is
hidden.
Briey touch the screen once to display the playback menu again.
The playback menu is shown.
1
1. Shortcut.
2. Display the folder/le list.
3. Short press: Previous movie.
Long press: Fast backward.
4. Pause playback and continue playback.
5. Short press: Next movie.
Long press: Fast forward.
Tap on [ More ] to display additional operating options of the playback menu.
6. Select playback language.
7. Display equalizer.
8. Start and end REPEAT function.
Repeat mode:
Repeat One → Repeat Folder → Repeat All → Repeat O
9. Adjust the brightness, contrast, and saturation.
10. Display keypad to directly enter the number of the desired title.
11. Select playback audio channel.
17
VX3024
Image playback
Select the desired source via the main menu.
The device changes to the desired source and the playback starts.
If the playback does not start with the image playback, touch the [ ] icon to change to the folder/
le list.
Touch the [ ] icon to display all the folders and les of the data carrier.
- Or -
Touch the [ ] icon to display all the images of the data carrier.
If you selected a image, the playback is started. During the playback, the playback menu is hidden.
Briey touch the screen once to display the playback menu again.
The playback menu is shown.
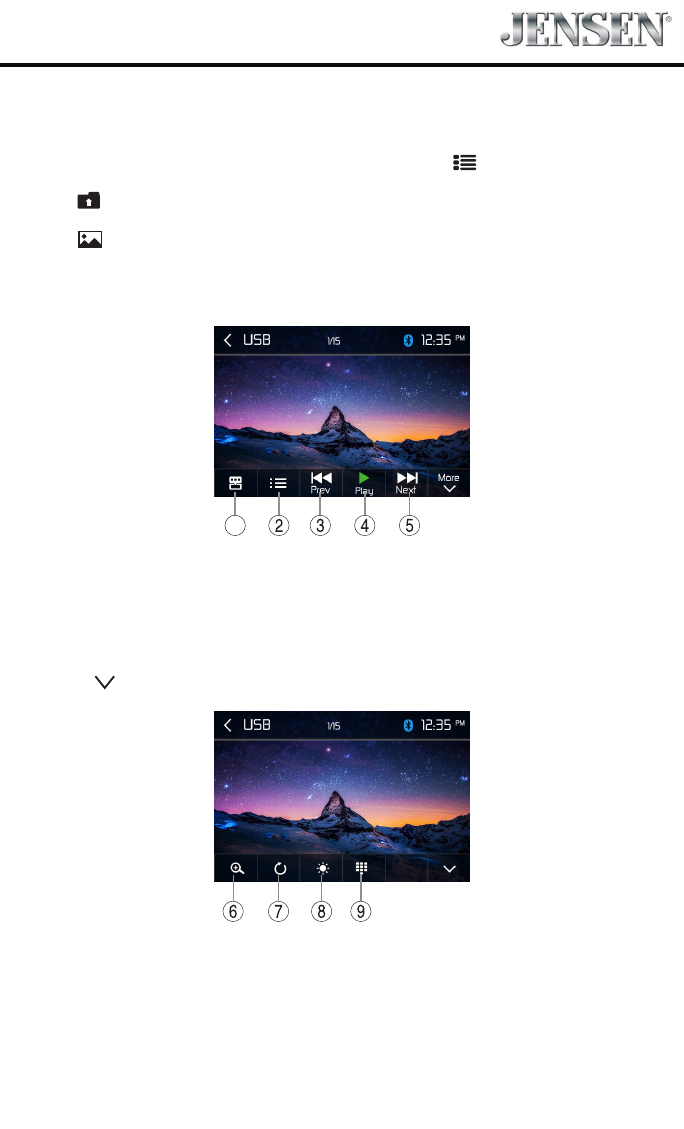
1
1. Shortcut.
2. Display the folder/le list.
3. Previous image.
4. Pause playback and continue playback.
5. Next image.
Tap on [ More ] to display additional operating options of the playback menu.
6. Zoom in/out.
7. Rotate images .
8. Adjust the brightness, contrast, and saturation.
9. Display keypad to directly enter the number of the desired title.
18
VX3024
You can make or receive phone calls with Bluetooth-enabled phones
through the unit. You can also listen to music from a Bluetooth-enabled
device.
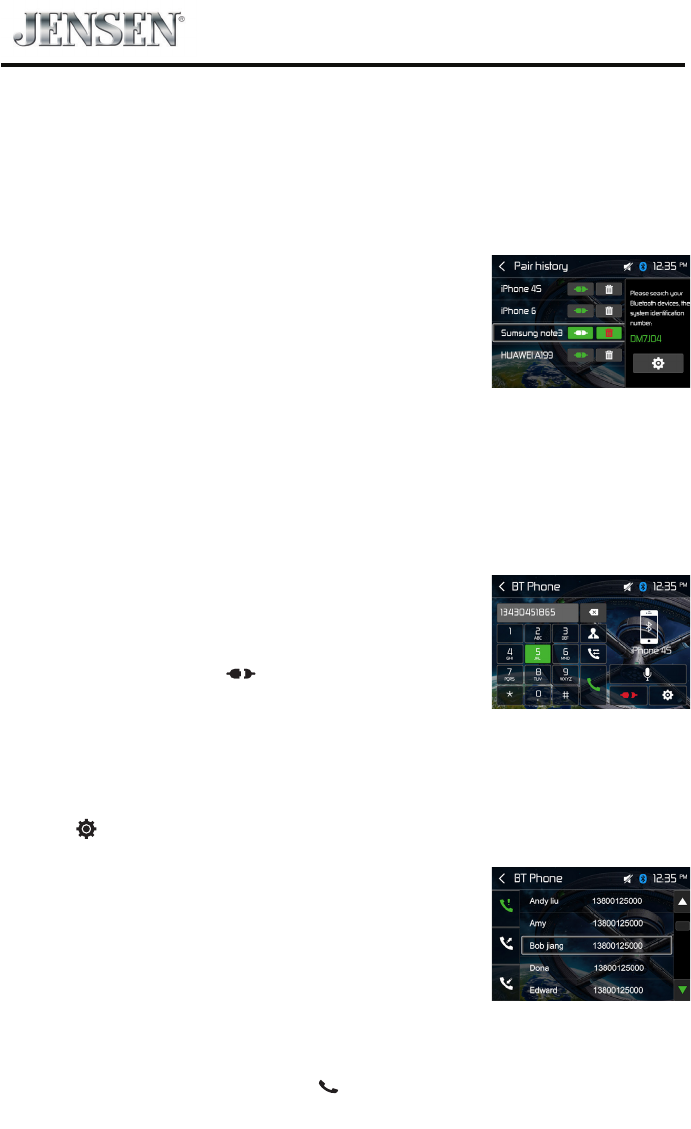
Pair the Bluetooth-enabled Devices
To connect your Bluetooth device to the unit, you need to pair the device
to the unit. Pairing needs only to be done once. You can pair up to ve
devices. You also can search for Bluetooth devices by mobile phone.
1. Turn ON the Bluetooth function on the device.
2. Search for Bluetooth devices by mobile phone.
3. Select the Bluetooth device ID(shown on the screen of the unit) in the
pairing list.
4. Enter default password “5309” if necessary.
Tip:
• TheoperationalrangebetweenthisunitandaBluetoothdeviceis
approximately 5 meters .
• BeforeyouconnectaBluetoothdevicetothisunit,familiarizeyourself
with the Bluetooth capabilities of the device.
• CompatibilitywithallBluetoothdeviceisnotguaranteed.
• AnyobstaclebetweenthisunitandaBluetoothdevicecanreducethe
operational range.
• Keepthisunitawayfromanyotherelectronicdevicethatmaycause
interference.
Disconnect Bluetooth Device
To disconnect one device, touch [ ] .
Tip
• Thedevicewillalsobedisconnectedwhenthedeviceismoved
beyond the operational range.
• Ifyouwanttoreconnectthedevicetotheunit,placeitwithinthe
operational range.
• Ifyoudonotwanttoreconnectthedevicetotheunitautomatically,
touch [ ], then set [ Auto connect ] to Off (the green icon turns
grey).
For details, see the “Adjust Bluetooth Settings” section.
Make a Call
1. Select Bluetooth function in the home menu.
2. Pair the phone with the unit.
3. Search for phone number from the following list:
[Phone Book]
[Call Log]
[Missed calls]
[Received calls]
[Dialed calls]
Or touch the number pad directly, then touch [ ] to dial.
Bluetooth Mode
19
VX3024
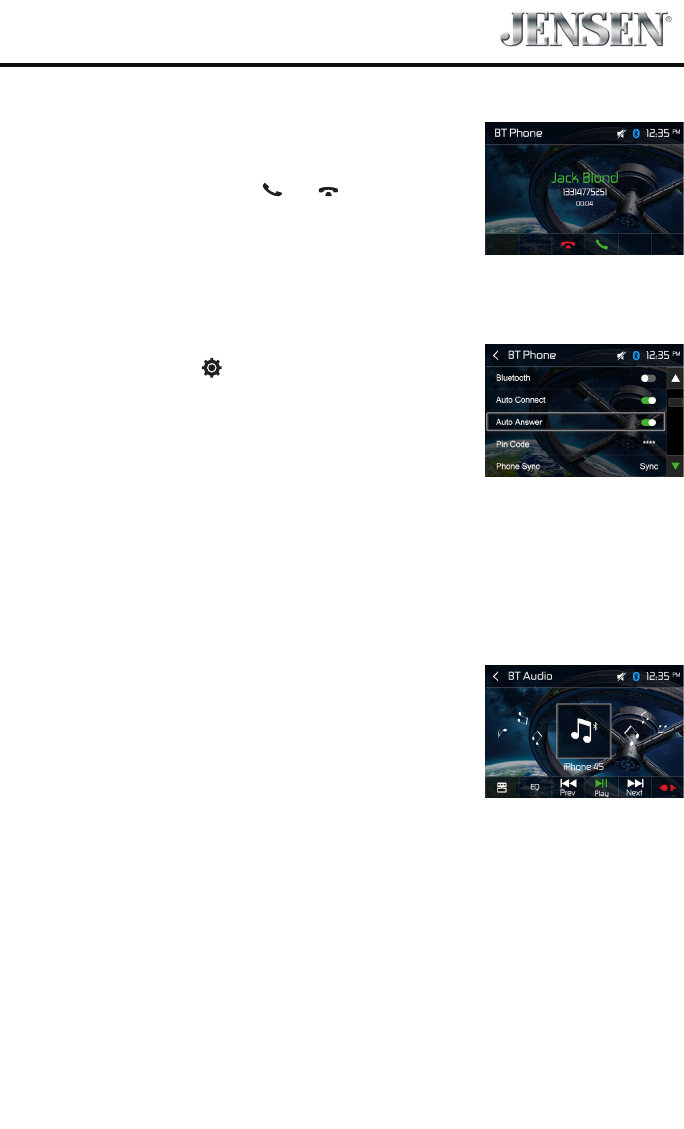
Receive a Call
By default, all incoming calls are received automaticaly.
1. If there is an incoming call, the screen will appear “Incoming
call...”.
2. You may touch the screen to select [ ] or [ ].
Speak into the Bluetooth microphone.
Tip
• Youcanselecttoreceivecallsmanuallybyset[Autoanswer]toO
status.
Adjust Bluetooth Settings
1. In Bluetooth menu, touch [ ].
The option menu is displayed.
2. Touch on the selected option to change the setting.
∙ [Bluetooth]: To turn on or o “Bluetooth” function.
∙ [Auto connect]: To turn on or o “Auto connect” function.
∙ [Auto answer]: To turn on or o “Auto answer” function.
∙ [Pin code]: To set paring code.
∙ [Phone sync]: Phonebook sync may take several minutes to load on
initial setup.
Music Mode
A2DP
A2DP is short for Advanced Audio Distribution Profile. The mobile
phones supporting this function can transmit stereo audio, whereas the
ones not supporting this function can transmit mono audio only.
AVRCP
AVRCP is short for Audio/Video Remote Control Profile. The mobile
phones supporting this function can control the playback of a
Bluetooth audio player.
In the mode of the music player working, if you want to make a phone
call, you can press the number keys on the mobile phone. At the same
time the music player will stop. The TFT screen will display “Calling”, after
the call received, the voice will be transferred to the unit. When the call
ends, the screen will display music playing menu.
If there is an incoming phone call, the music player will stop, and the
screen will display “Incoming”. When the call ends, the screen will
display music playing menu.
20
VX3024
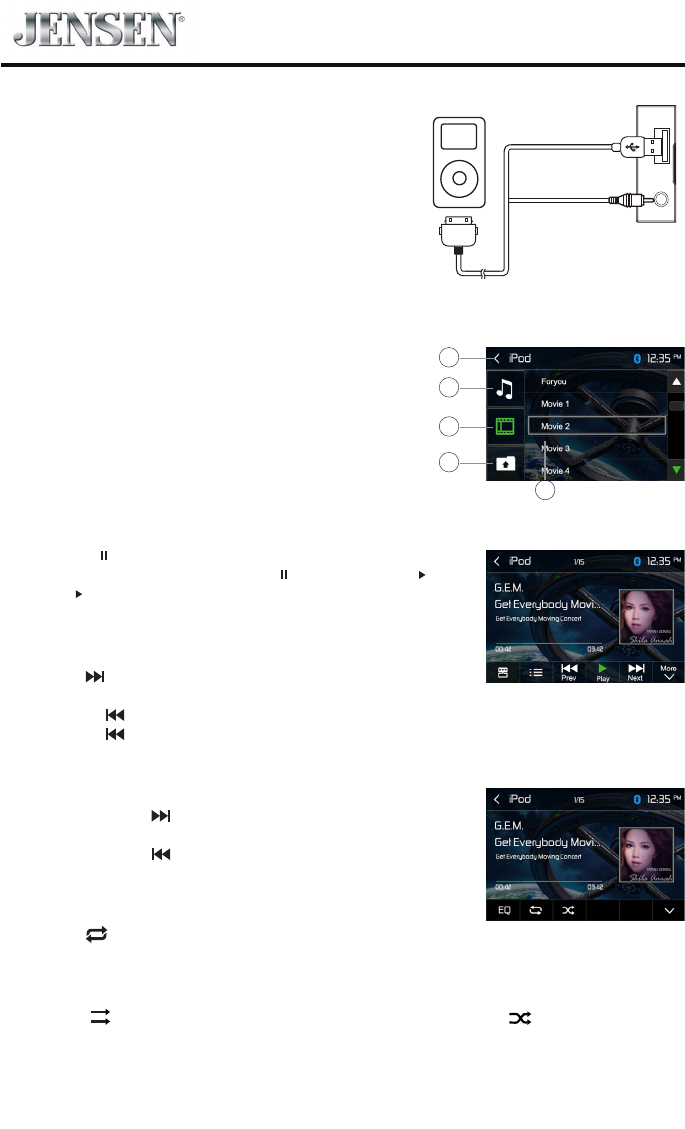
Accessing iPod mode
Touch [iPod] on the main menu to enter iPod menu.
If [iPod] is not on the current source menu, hold the center
of screen and drag left/right to show more icons.
1. Return to main menu
2. Show Music les
3. Show Video les
4. Show Folders
5. File list
Pausing play
1. Touch the [ ] button on the bottom of the screen to pause play.
“ PAUSE” appears in the display, and [ ] button becomes [ ] .
2. Touch [ ] button to resume play.
Selecting a track
Track-up
Touch the [ ] button to move to the beginning of the next track.
Track-down
1. Touch the [ ] button to move back to the beginning of the current track.
2. Touch the [ ] button twice to move back to the beginning of the previous track.
Fast forward/Fast reverse
Fast forward
Touch and hold the [ ] button .
Fast reverse
Touch and hold the [ ] button .
Repeat play
This function allows you to play the track repeatedly.
Touch the [ ] button to select Repeat one or Repeat all.
Random play
This function allows you to play all tracks recorded in a random order.
Touch the [ ] button to perform random play. The icon becomes [ ], touch it to resume
normal play.
Connect an iPod or iPhone to the unit via an iPod cable.
iPod Mode
1
2
3
4
5
21
VX3024
PANDORA® RADIO OPERATION
Pandora Radio is available on your iPhone® / iPod® touch via USB cable or an Android™ device via
Bluetooth®. Data usage may occur.
Note: Pandora is available in the United States, Australia and New Zealand.
Note: The Pandora Radio app must be installed on your iPhone®/iPod® touch or Android device. For
iPod®/ iPhone® connectivity, you can use the cable that comes with your Apple device for audio
connectivity. To play Pandora Radio using an Android device, it is necessary to pair your mobile phone
via Bluetooth to the VX3024. A cable connection for Pandora via Android is not supported.
Pandora Radio
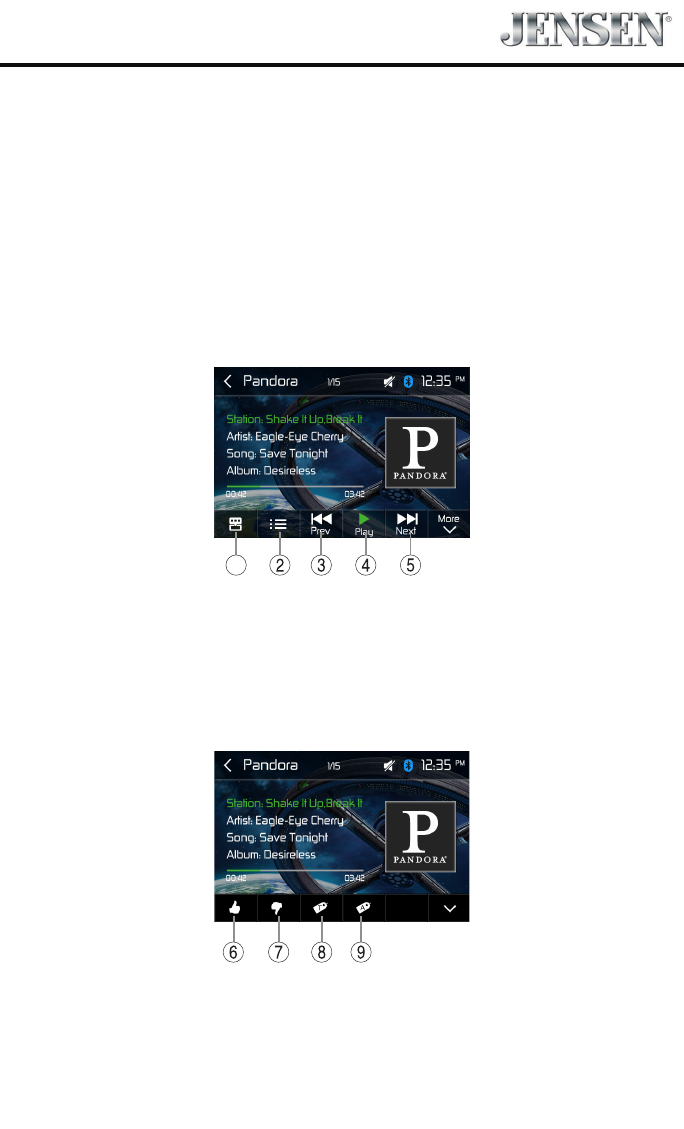
The on-screen indicators and touch key areas for Pandora Radio functions are outlined below.
1
1. Shortcuts
2. Station List Icon - Press this icon to access the Station List Screen.
3. Prev Icon - Press this icon skip a song, subject to the skip limit.
4. Pause / Play Icon - Touch the icon to pause playback. Touch the icon to begin playback.
5. Next Icon - Press this icon skip a song, subject to the skip limit.
Pandora will skip to the next track. If the skip limit has been reached, Pandora will continue to play
but your feedback will be recorded.
6. Thumbs Up Icon - Press thumbs up to tell Pandora you like the track currently playing, and Pandora
will play more tracks like it.
7. Thumbs Down Icon - Press thumbs down to tell Pandora not to play this track.
8. Bookmark Track Icon - Touch to bookmark a track.
9. Bookmark Artist Icon - Touch to bookmark an artist.

22
VX3024
Station List Screen
The Station List Screen allows you to search for music by stations you created.
Touch a station on the list to choose that station.
Touch the Scroll Down ( ) icon to view the next page in the list or the
Scroll Up ( ) icon to view the previous page.
Touch the top left corner of the screen to return to the Pandora Radio user interface screen.
To Launch/Stop Pandora Radio
1. Launch the Pandora app on the iPhone®, iPod® or Android device.
2. Touch the Pandora icon on the main menu screen. If only one device is connected to the radio, the
Pandora Radio user interface screen appears.
3. If both an Android device and iPhone®/ iPod® are connected to the radio, the Select Android or iOS
Screen appears.
4. To stop Pandora, exit the Pandora app on the iPhone®, iPod® or Android device.
23
VX3024
Display System
1. Touch the upper left corner to display main menu.
2. Touch [ Settings ].
The settings menu is displayed.
Adjust General Settings
1. Touch [ General ], if necessary.
2. Touch to highlight a setting.
3. Touch on the option to display/select an option.
General settings Options Description
Radio Region USA/China/Japan/Europe/Europe
(LW)/OIRT Select one that matches your location.
Radio Range Local Select radio local or distance. When select local, only
stations with sucient strength will be detected.
Distance
Beep On Turn on the beep sound. Each time you press a button, the
unit beeps.
O Turn o the beep sound.
Demo On Enable the demo of operations.
O Disable the demo of operations.
Calibration Start Calibrate the touch screen.
Shortcut Seat1/2/3/4 Set the shortcuts in the options menu.
SWC Show the denition of Steering Wheel Control buttons.
Load Factory Restore to default settings.
4. Touch top left of the screen to exit.
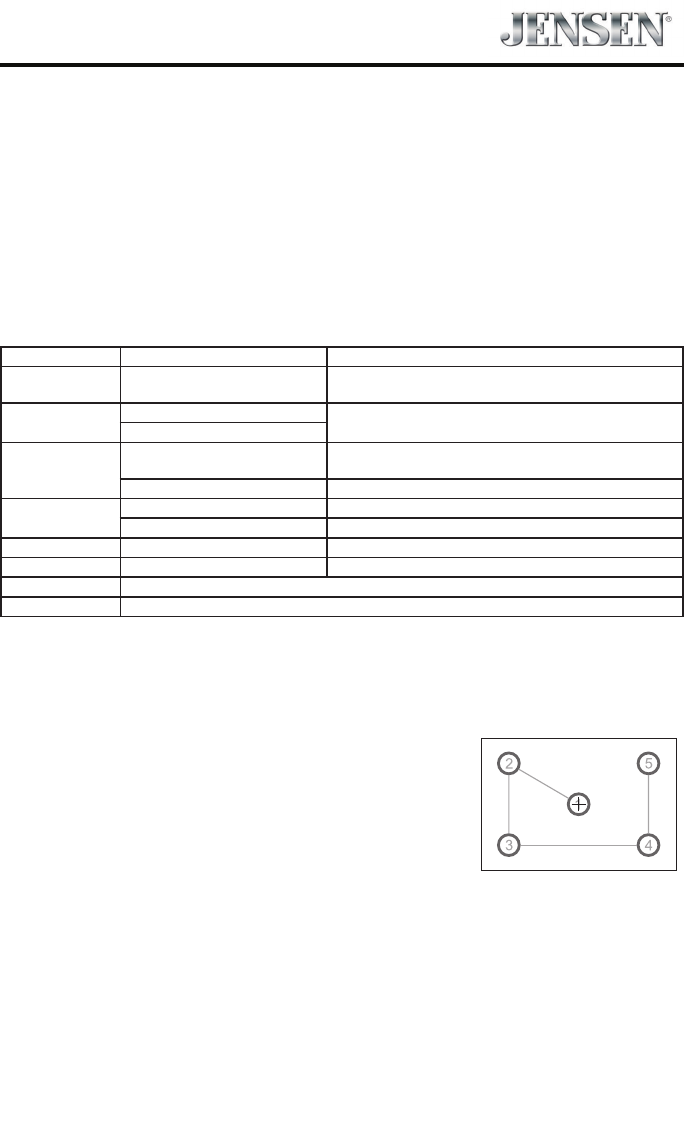
Calibration
Whenthetouchoperationisnotsensitiveorvalid,youshould
calibratethetouchscreenthroughcalibrationsettingfunction.
Adjusttheresponsepositionsofthetouchpanelasfollowings:
1. Pressthe[Calibration]optiononthesetupmenutoenter.
2. Touch[Start]toenter.
3. Pressandholdthecenterof[+]for2seconds,the[+]will
moveautomatically.
4. Aimatcenterof[+],followthepathasshownofthegure,
afterstepsfrom1to5,thesystemwillexitcalibrating
automatically.
Settings
24
VX3024
Adjust sound settings
1. Touch [Audio].
2. Touch an option repeatedly to select:
Sound settings Options Description
Subwoofer On Turn on the subwoofer.
O Turn o the subwoofer
Sub Woofer Filter
80Hz
Select subwoofer lter criteria.120Hz
160Hz
Loudness On Turn on the Loudness.
O Turn o the Loudness
3. Touch top left of the screen to exit.
Adjust Time Settings
1. Touch [ Time ].
2. Touch an option repeatedly to select:
Sound settings Options Description
Date Y/M/D Touch [ ] or [ ] to set year, month and day.
Clock Format 12Hr/24Hr Touch [12Hr] or [24Hr] to switch clock mode.
Time H/M/AM/
PM
Touch [ ] or [ ] to set hour and minute.
Touch [ ] or [ ] to set AM/PM (only for 12Hr).
3. Touch top left of the screen to exit.
Adjust Language Settings
1. Touch [Language].
2. Touch an option repeatedly to select:
Language settings Description
OSD Select on-screen display language.
DVD Audio Select DVD audio language. Options available depend on DVD disc.
DVD Subtitle Select DVD subtitle language. Options available depend on DVD disc.
Disc Menu Select DVD menu language. Options available depend on DVD disc.
3. Touch top left of the screen to exit.

25
VX3024
Adjust Video
1. Touch [video].
2. Touch an option repeatedly to select.
DVD rating Options Description
Aspect Ratio Full Set the Aspect Ratio of the video image.
Normal
Password Set password to restrict the play of discs. The default password is 4321.
Rating
Kid safe Acceptable for children.
G Acceptable for general viewers.
PG Parental guidance suggested.
PG-13 Unsuitable for children under age 13.
PG-R Recommend parents to restrict children under 17 to view.
R Restricted recommend parents to guide children under 17 to view.
NC-17 Unsuitable for children under age 17.
Adult Acceptable for adults only.
Adjust Adjust the Brightness/Contrast/Saturation of the video image.
3. Touch top left of the screen to exit.
Adjust Volume Settings
You can set dierent volume for dierent modes.
1. Touch [Volume].
The volume setting sub-menu is displayed.
2. Touch to select a source.
3. Select a value from 00 to 06.
When switching to the source, the volume increases automatically.
4. Touch top left of the screen to exit.

26
VX3024
Listen to Other Devices
You can connect an external audio/video device to the unit.
1. Connect the external device with the supplied AV cable.
2. Touch the upper left corner to display the main menu.
3. Touch [Aux-1]/[Aux-2] to access external device.
Reset
When the unit hangs up, you can reset it.
Open the cap located on the bottom left of the panel, press [ RESET ]
with a ball-point pen or similar tool.
Tip
When the unit has been reset, all the settings will return
to default settings.
Replace a Fuse
If there is no power, the fuse may be damaged and need to be replaced.
1. Take out the unit from dashbpard.
2. Check all electrical connections.
3. Buy a fuse that matches the amperage of the damaged fuse.
4. Replace the fuse while the units power is disconnected.
Other Modes
Reset

27
VX3024
General
Reference Supply Voltage ........................................................................................................12V(DC)
Operating Voltage Range ......................................................................................... 10.5 - 15.8V(DC)
Max Operating Current .....................................................................................................................15A
Grounding System ................................................................................... Car Battery Negative Pole
Dimensions(WXHXD) ............................................................................................... 178*100*167mm
Weight(main unit) ..........................................................................................................................1.74kg
FM
Signal Noise Ratio ........................................................................................................................≥55dB
Residual Noise Sensitivity (S/N=30dB) .............................................................................. 18dBμV
Frequency Response (±3dB) ....................................................................................20Hz~12.5KHz
Station Seeking Level .......................................................................................................20~28dBμV
Distortion ........................................................................................................................................ ≤1.0%
Stereo Separation (1KHz) ..........................................................................................................≥25dB
Antenna Impedance ........................................................................................................................75Ω
AM
Residual Noise Sensitivity (S/N=20dB) .............................................................................. 30dBμV
Selectivity (±9KHz) .......................................................................................................................≥50dB
LCD
Screen size ....................................................................................................................6.2 inches(16:9)
Display resolution ...........................................................................................................800X480dots
Contrast ratio .................................................................................................................................4000:1
DVD Player
Signal / Noise Ratio ......................................................................................................................... 80dB
Dynamic Range ................................................................................................................................80dB
Distortion (line out) ..................................................................................................................... ≤0.1%
Frequency Response (±3dB) ....................................................................................... 20Hz~20KHz
Maximum Output Power .......................................................................................................... 4×40W
Load Impedance .................................................................................................................................. 4Ω
AUX IN
Distortion ........................................................................................................................................ ≤0.5%
Frequency Response (±3dB) ....................................................................................... 20Hz~20KHz
Audio Input Level ...................................................................................................................... 0.5Vrms
Audio
Audio Output Impedance ........................................................................................................... 100Ω
Audio Output Level ..................................................................................................................... 4Vrms
Video
Normal Video Input Level (CVBS) .......................................................................................1.0±0.2V
Video Input Impedance ..................................................................................................................75Ω
Video Output Impedance ............................................................................................................... 75Ω
Video Output Level ..................................................................................................................1.0±0.2V
Environment
Operating Temperature .............................................................................................. -10°C ~ +60°C
Storing Temperature .................................................................................................... -20°C ~ +70°C
Operating Humidity .......................................................................................................45%~80%RH
Storing Humidity ............................................................................................................. 30%~90%RH
Notice:
When the unit is operated to extremes, such as with maximum power output for a long time, or the
temperature is over 70°C, it will enter heat protection mode, the volume will be reduced automatically. This
is normal.
Specications

28
VX3024
Supported Formats:
·USB or memory le format: FAT16,FAT32
·Mp3 bit rate(date rate): 32-320 Kbps and variable bit rate
·Directory nesting up to a maximum of 8 levels
·Number of albums/folders: maximum 99
·Number of tracks/titles: maximum 999
·ID3 tag v2.0 or later
·File name in Unicode UTF8(maximum length:128 bytes)
Unsupported Formates:
·Empty albums:an empty album is an album that does not contain MP3 les,and is not be shown
in the display.
·Unsupported le formats are skipped.For example,Word documents(.doc) or
Mp3 les with extension.dlf are ignored and not played.
·AAC,WMV,PCM audio les
Supported MP3 Disc Format:
·ISO9660,Joliet
·Maximum title number: 512(depending on le name length)
·Maximum album number: 255
·Supported sampling frequencies: 32kHz,44.1kHz,48kHz
·Supported Bit-rates: 32-320Kbps and variable bit rate
Supported Video Formats:
·DVD
·MP4
Region Code
According to DVD sale region, the whole world is divided into six regions. A DVD disc can be played back
only when its region code is compatible with that of the player in use.
Region 1: USA, Canada, East Pacic Ocean Islands;
Region 2: Japan, West Europe, North Europe, Egypt, South Africa, Middle East;
Region 3: Taiwan of China, Hong Kong of China, South Korea, Thailand, Indonesia, South East Asia;
Region 4: Australia, New Zealand, Mid & south America, South Pacic Ocean Islands/Oceania;
Region 5: Russia, Mongolia, India, Middle Asia, East Europe, North Korea, North Africa, North West Asia;
Region 6: China, Mainland.
Cautions when using Discs
1) DO NOT use irregular shaped disc.
2) Disc Cleaning
Use a dry, soft cloth to wipe the disc from center to edge, only neutral detergent can be used.
3) When playing a new disc
New disc may have some rough spots around the inner and outer edges. If such a disc is used, remove
these rough spots with a pencil or ball-point pen, etc.
29
VX3024
Troubleshooting
What appears to be trouble is not always serious. Please check the following points before calling a
service center.
Problem Cause Corrective action
General
Unitcannotpoweron
Unitfuseblown. Installnewfusewithcorrectrating.
Carbatteryfuseblown. Installnewfusewithcorrectrating.
Illegaloperation Resettheunit.
No/lowaudiooutput
Improperaudiooutputconnection. Checkwiringandcorrect.
Volumesettoolow. Increasevolumelevel.
Speakersdamaged. Replacespeakers.
Heavilybiasedvolumebalance. Adjustthechannelbalancetocenterposition.
Speakerwiringisincontactwithmetalpartofcar. Insulateallspeakerwiringconnections.
Poorsoundqualityor
distortion
Pirateddiscisinuse. Useoriginaldisc.
Speakerpowerratingdoesnotmatchunit. Replacespeakers.
Wrongconnections. Checkwiringandcorrect.
Speakerisshorted. Checkwiringandcorrect.
Tel-Mutemalfunction MUTEwireisgrounded. Checkthe‘MUTE’wiringandcorrect.
Unitresetsitselfwhenengine
isoff IncorrectconnectionbetweenACCandBATT. Checkwiringandcorrect.
TFT monitor
Warninginformationisshown
atalltimes Parkingbreakwiringisnotcorrect. Checkwiringandcorrect.
Flashingimageorinterference
appearsonscreen
ThecolorsystemofDVDdiscdoesnotmatchthe
monitor.
AdjustthecolorsystemoftheDVDdisc
playingbackorthemonitorinuse.
Pirateddiscisinuse. Useoriginaldisc.
Videocabledamaged. Replacecables.
Impropervideosignalconnections. Checkwiringandcorrect.
Disc playback
Cannot insert disc A disc is already inside the unit. Eject current disc and insert new one.
Disc does not play back
Disc is warped or scratched. Use disc in good condition.
Disc is dirty or wet. Clean disc with soft cloth.
Incompatible disc is used. Use compatible disc.
Disc is inserted upside down. Insert disc with label side up.
Disc region code is not compatible with unit. Use disc with proper region code.
PBC cannot be used during VCD
playback PBC is not available on the disc. Use disc with PBC available.
Repeat or search function is
invalid during VCD playback PBC is on. Turn PBC o.
Error messages
No disc
Disc is dirty. Clean disc with soft cloth.
Disc is upside down. Insert disc with label side up.
No disc inside. Insert disc.
Bad disc Disc is dirty. Clean disc with soft cloth.
Disc is upside down. Insert disc with label side up.
Unknown disc Disc format is not compatible with this unit. Use disc with compatible format.
Region Error DVD region code is not compatible with this unit. Use disc with compatible region code.
30
VX3024
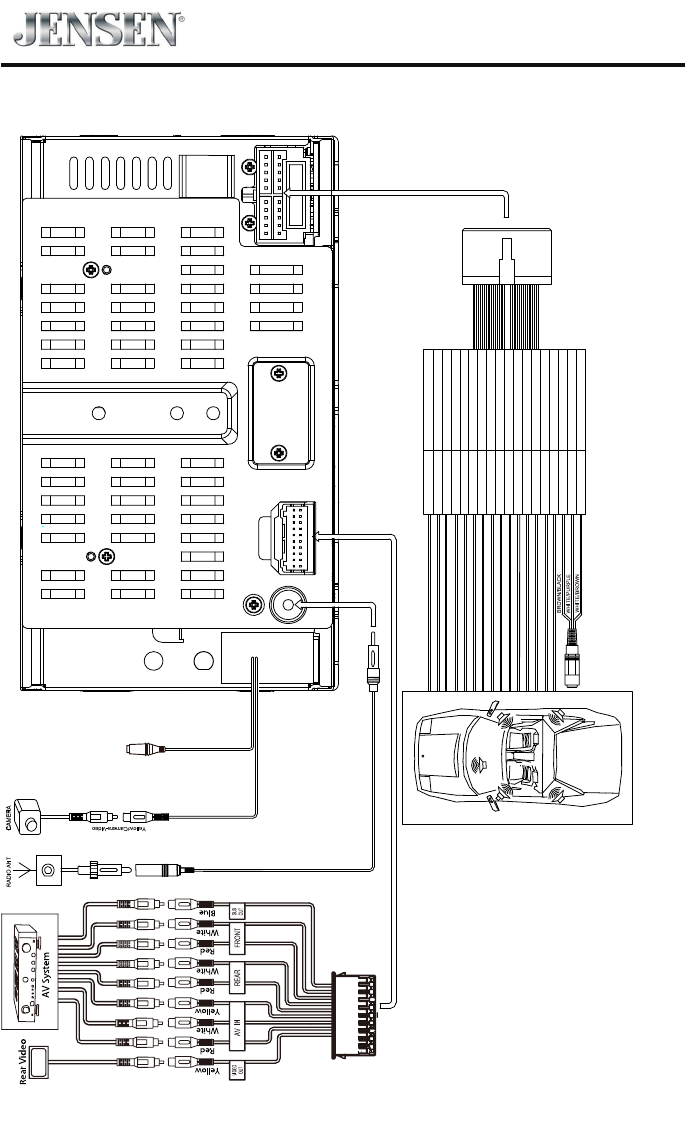
Wire Connections
Black/MICROPHONE
)
SPEAKER (-)
SPEAKER (+)
GROUND
BATTERY 12V (+)
ACC / IGNITION
BRAKE
REVERSE
POWER ANT & AMP. CONT
ILLUMINATION
LEFT FRONT SPEAKER (-)
LEFT FRONT SPEAKER (+)
RIGHT FRONT SPEAKER (-)
RIGHT FRONT SPEAKER (+)
LEFT REAR SPEAKER (-)
LEFT REAR SPEAKER (+)
RIGHT REAR SPEAKER (-)
RIGHT REAR SPEAKER (+)
BLACK
YELLOW
RED
PINK
GREEN/WHITE
BLUE
GRAY/BLACK
GRAY
GREEN/BLACK
GREEN
PURPLE/BLACK
ORANGE
PURPLE
KEY A
KEY B
WHITE/PURPLE
WHITE/BROWN
KEY GNDBROWN/BLACK
WHITE/BLACK
WHITE
SWC (BLACK)
Electronics Corporation
Technical Assistance: 1-888-921-4088
www.jensenmobile.com
© 201
Printed in China
VX3024