HUIZHOU FORYOU GENERAL ELECTRONICS VX6020 Mobile DVD Player with FM/AM Tuner User Manual Manual
HUIZHOU FORYOU GENERAL ELECTRONICS CO.,LTD. Mobile DVD Player with FM/AM Tuner Manual
Manual
VX6020
Operating Instructions
watts peak
40W x 4
Owner’s Manual
128-9243a VX6020 Owner's Manual 08 14 2013.indd 1 8/14/2013 12:06:53 PM

2
VX6020
128-9243a VX6020 Owner's Manual 08 14 2013.indd 2 8/14/2013 12:06:54 PM
3
VX6020
CONTENTS
FEATURES 5
CONTROLS AND INDICATORS 8
REMOTE CONTROL 10
EXTERNAL DEVICES 14
QUICK START 16
EQUALIZER CONTROLS MENU 20
SYSTEM SETTINGS 22
DISC OPERATION 30
RADIO TUNER OPERATION 40
iPod®/iPhone® OPERATION 46
USB AND SD CARD CONTROLS 50
AV-In1/AV-In2 CONTROLS 55
BLUETOOTH OPERATION 56
NAVIGATION QUICK START GUIDE 64
STEERING WHEEL CONTROL (SWC) OPERATION 68
REAR CAMERA OPERATION 69
TROUBLESHOOTING 70
DISC ERROR MESSAGES 73
CARE AND MAINTENANCE 74
SPECIFICATIONS 76
iPod® Control “iPod” is a trademark of Apple Computer, Inc., registered
in the U.S. and other countries. Expanding Systems iPodVTR etc.
Bluetooth® is a trade mark of Bluetooth Special Interest Group (SIG) Inc.
128-9243a VX6020 Owner's Manual 08 14 2013.indd 3 8/14/2013 12:06:54 PM

4
VX6020
128-9243a VX6020 Owner's Manual 08 14 2013.indd 4 8/14/2013 12:06:54 PM
FCC Statement
1. This device complies with Part 15 of the FCC Rules.
Operation is subject to the following two conditions:
(1) This device may not cause harmful interference.
(2) This device must accept any interference received, including interference that may
cause undesired operation.
2. Changes or modi cations not expressly approved by the party responsible for
compliance could void the user's authority to operate the equipment.
NOTE: This equipment has been tested and found to comply with the limits for a Class B
digital device, pursuant to Part 15 of the FCC Rules. These limits are designed to provide
reasonable protection against harmful interference in a residential installation.
This equipment generates uses and can radiate radio frequency energy and, if not
installed and used in accordance with the instructions, may cause harmful interference
to radio communications. However, there is no guarantee that interference will not
occur in a particular installation. If this equipment does cause harmful interference
to radio or television reception, which can be determined by turning the equipment
o and on, the user is encouraged to try to correct the interference by one or more of
the following measures:
• Reorient or relocate the receiving antenna.
• Increase the separation between the equipment and receiver.
• Connect the equipment into an outlet on a circuit different from that to which the
receiver is connected.
• Consult the dealer or an experienced radio/TV technician for help.
FCC Radiation Exposure Statement
This equipment complies with FCC radiation exposure limits set forth for an uncontro-
lled environment. This equipment should be installed and operated with minimum
distance of 20 centimeters between the radiator and your body.

5
VX6020
FEATURES
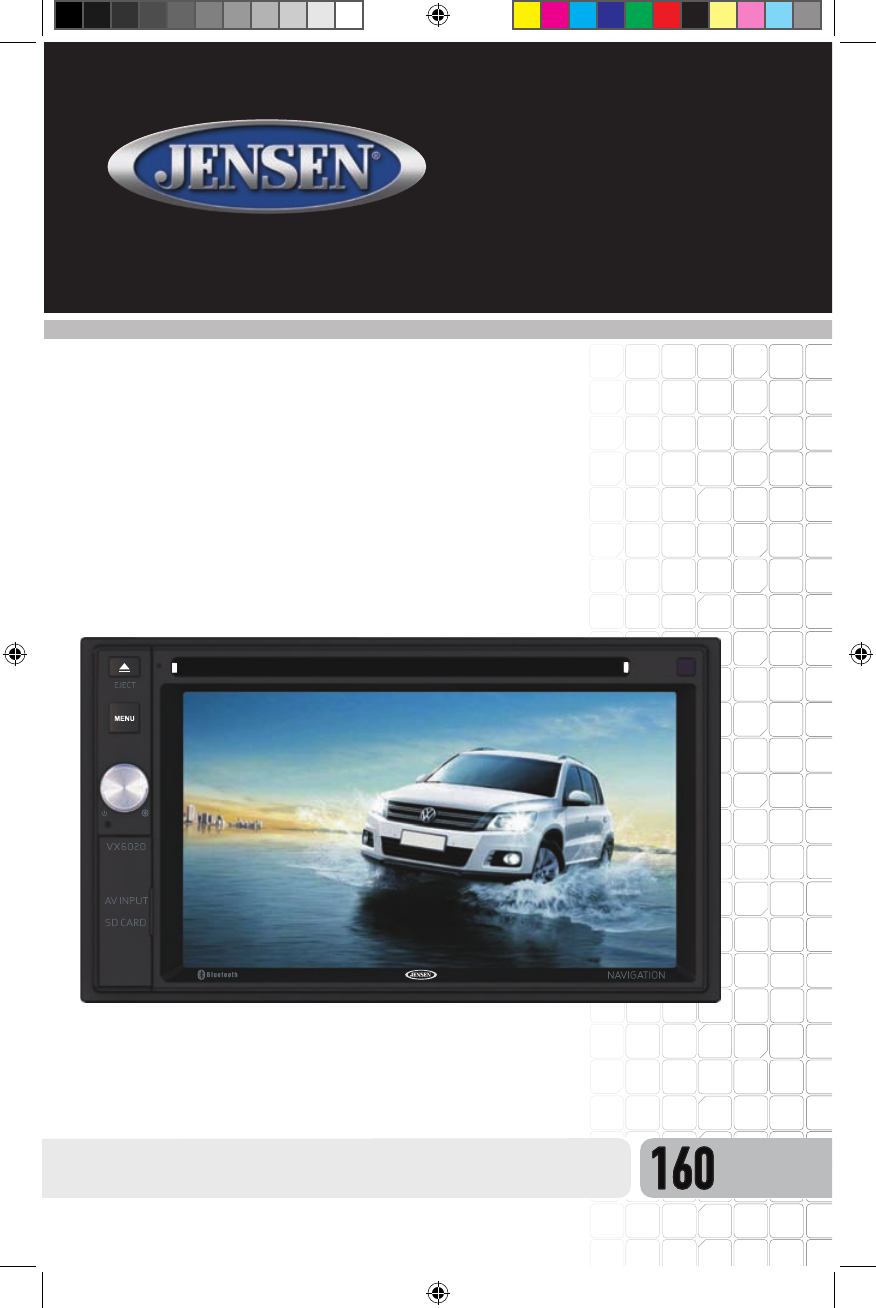
Congratulations on the purchase of the In-Dash Navigation Radio. Please read
the instruction manual for this product before using. The documentation
provided will allow the user to fully enjoy all the features of your new Jensen
VX6020 Mobile Multimedia Receiver. Please read all of the instructions
before beginning the installation and save this manual for future reference.
We recommend having your Jensen VX6020 installed by a reputable installation shop.
DVD
• Audio Equalizer
• Next Chapter and Previous Chapter
• Play/Pause
• Track Direct Entry
• Disc Menu
• Selection Repeat / Track Repeat
• Disc Audio
• Disc Language
• Pic Control
CD / MP3 / WMA
• CD-Text Compatible
• ID3 Tag Compatible
• Directory Search (MP3 / WMA Only)
• Burn up to 1500 MP3 and WMA Files onto a DVD+R / RW
• Audible Forward / Reverse Track Search (CD-DA Only)
• Random, Repeat and Intro
• Play, Pause, Stop, Next Track and Previous Track
AM-FM
• USA, China, Japan, Europe, Europe (LW) and Orient (OIRT)
• 30 Station Presets (18 FM / 12 AM)
• Auto Stereo / Mono
• Local / Distance
• Auto Store / Preview Scan
iPod®/iPhone®
• iPod®/ iPhone® via USB
• High Speed Direct Connect Interface to Access iPod® Playlists, Artists, Albums
and Songs. Play music and view video/photo* les from your iPod®. *Video/photo
playback requires jLink-USB iPod® interface cable (sold separately).
• Power Management Charges iPod® while Connected
128-9243a VX6020 Owner's Manual 08 14 2013.indd 5 8/14/2013 12:06:55 PM

6
VX6020
Chassis
• 2.0 DIN (Import / ISO-DIN Mountable)
• Fixed Front Panel
• 6.2” High Denition TFT LCD
• 1,152,000 Sub Pixels (800 x 3 X 480)
• Beep Tone Conrmation (ON-OFF Option)
General
• Navigation is built in - IGO Primo
• Built-In Bluetooth® providing Hands-Free operation for safety and convenience
and A2DP for streaming music from your smartphone or other Bluetooth®
device.
• One Composite Video Output for Additional Screens
• Front Panel Audio/Video Input
• Ten-Band Tone Equalizer
• Rear Panel Audio/Video RCA Input
• Rear Subwoofer Line Output
• Rear Camera Input
• Touch Screen Calibration Mode
• Rotary Encoder Audio Control
REAR CAMERA
The VX6020 is “camera ready.” Before accessing any camera features, you must
purchase and install a rear video camera.
128-9243a VX6020 Owner's Manual 08 14 2013.indd 6 8/14/2013 12:06:55 PM

7
VX6020
WARNING! Never install this unit where operation and viewing could interfere
with safe driving conditions.
WARNING! To reduce the risk of a trac accident (except when using for rear
view video camera) never use the video display function while driving the vehicle.
This is a violation of federal law.
WARNING! Never disassemble or adjust the unit.
WARNING! To prevent injury from shock or re, never expose this unit to moisture
or water.
WARNING! Never use irregular discs.
WARNING! To prevent damage to the mechanism inside this unit, avoid impact to
the unit’s monitor.
WARNING! Using an improper fuse may cause damage to the unit and result in
re.
128-9243a VX6020 Owner's Manual 08 14 2013.indd 7 8/14/2013 12:06:55 PM
8
VX6020
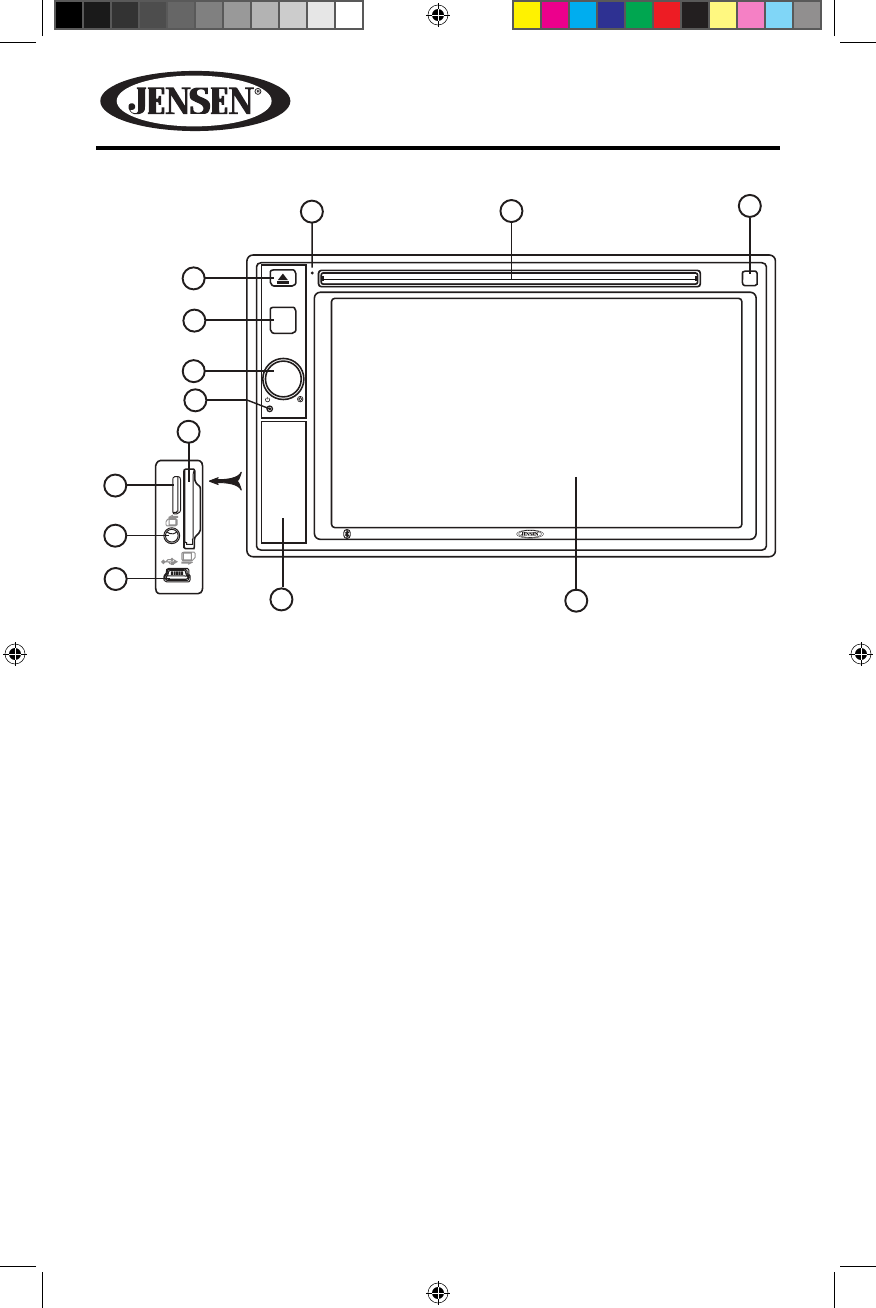
CONTROLS AND INDICATORS
1. DISC Slot: Accepts DVD/CD/MP3 discs. If the unit is turned on, playback
begins when a disc is inserted.
2. REMOTE SENSOR: Used to receive command signals from the remote
control.
3. LCD Screen and Touch Screen: Touch icons on this screen to access
menus or control functions.
4. INTERFACE COVER: Covers the Micro SD/ SD/ Mini USB slots and AV Input
Connector.
5. MINI USB SLOT: Used to connect iPod / MP3 player connection adapter.
6. AV INPUT CONNECTOR: This connector accepts a 3.5 mm jack through
which signals from various audio/video devices can be applied to the unit.
7. MICRO SD CARD SLOT: Used to insert the Micro SD Card for the Navigation
Map (or rmware updates if required) only, not for music or other les.
8. SD CARD SLOT: Used for inserting SD Cards containing photos, audio and
video for playback.
VX6020
SD CARD
AV INPUT
EJECT
MENU
Bluetooth
NAVIGATION
OPEN
AV-
IN
12
11
10
9
7
6
5
4
2
3
1
8
13
Figure 2. VX6020 Controls and Indicators
128-9243a VX6020 Owner's Manual 08 14 2013.indd 8 8/14/2013 12:06:55 PM

9
VX6020
9. RESET Button: Press this button to reset the system settings (except
password and parental lock settings) and to correct a system halt or
other illegal operation. Use the tip of a pen to press the Reset button.
10. ROTARY KNOB ( ) Power ON/OFF, Volume, and Mute Control: Press
the knob to turn the unit ON. Press and hold the knob for 2 seconds to turn the
unit OFF. Rotate the knob to adjust the volume from 0 to 50. Press the knob
momentarily to mute the audio. Press the knob again to restore the audio.
11. MENU Button: Press this button to access the Main touch screen menu.
Press and hold to switch to Navigation screen.
12. Eject ( ) Button: Press this button to eject a DVD/CD/MP3 disc. Disc play is
stopped, the disc is ejected and the unit will change to radio operation. If the
disc is not removed from the unit and the button is pressed again, the disc will
be re-loaded. If the disc is not removed from the disc slot within 10 seconds
of being ejected, it will be automatically reloaded to prevent it from being
accidentally damaged.
13. MICROPHONE: Used for Bluetooth® communication.
128-9243a VX6020 Owner's Manual 08 14 2013.indd 9 8/14/2013 12:06:56 PM
10
VX6020
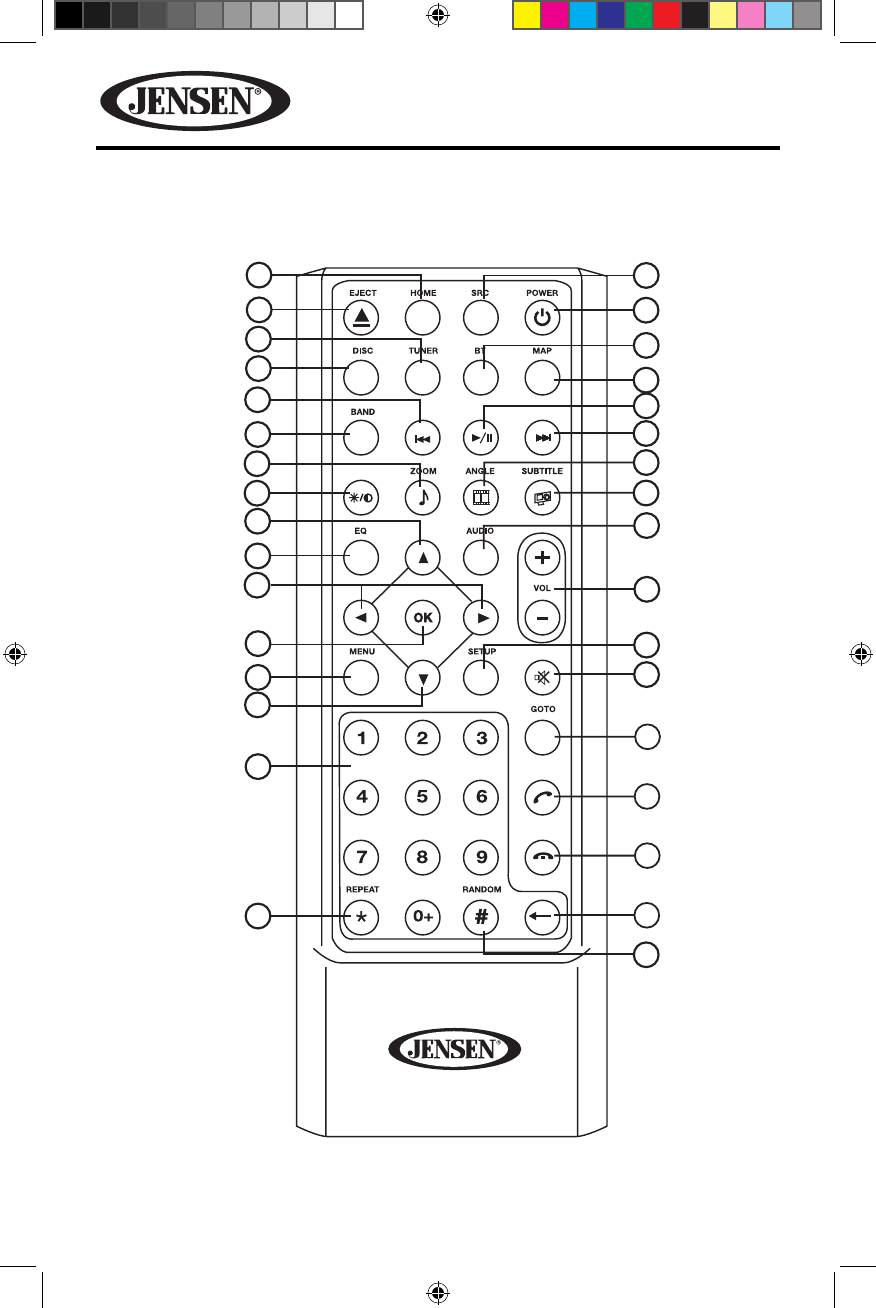
REMOTE CONTROL
30
29
32
31
26
25
28
27
23
20
24
22
21
19
18 16
15
14
13
9
10
7
8
11
12
1
2
3
4
17
5
6
20
Figure 2. VX6020 Remote Control
128-9243a VX6020 Owner's Manual 08 14 2013.indd 10 8/14/2013 12:06:56 PM

11
VX6020
Remote Control Functional Description
1. SOURCE SRC Button: Press this button to switch between and select available
sources. (Radio/Disc/SDHC/USB/Bluetooth/AV-IN1/AV-IN2/Navigation/iPod)
2. POWER Button ( ): Press this button to turn the unit ON and OFF.
3. BLUETOOTH BT Button: Press this button to enter the Bluetooth
feature.
4. MAP Button: Press this button to enter the Navigation feature. Press again to
return to previous source.
5. PLAY / PAUSE Button: Press this button to pause the playback of a disc.
Press this button again to resume normal playback.
6. NEXT FORWARD uul) Button – Press this button to skip to the next chapter,
track or song during playback of a disc. Press this button while in Radio mode
to search available radio station by increasing tuning frequency. Press this
button while in iPod mode to pause playback/starts playback of a music le.
7. ANGLE Button ( ): Press to display and select dierent camera angles
in DVD mode. Each time the button is pressed, the angle changes.
NOTE: The numbers of angles vary from disc to disc. Not all discs contain this
option.
8. SUBTITLE Button ( ): Press to display and select the subtitle language in
DVD mode. Each time the button is pressed, the subtitle language changes.
NOTE: The type and number of languages for subtitles vary from disc to disc.
9. AUDIO Button: Press to display and select the audio language in
DVD mode. Each time the button is pressed, the language changes.
NOTE: The languages for audio vary from disc to disc.
10. VOLUME Button VOL + and : Press these buttons to increase or decrease
the playback volume.
11. SETUP Button: Press to this button to enter the system settings menu.
12. MUTE Button ( ): Press this button to turn the audio output ON and OFF.
13. GOTO Button: Press this button to open direct entry search screen during the
playback of a disc.
14. ANSWER INCOMING PHONE CALL Button ( ): Press this button to answer
an incoming Bluetooth phone call.
128-9243a VX6020 Owner's Manual 08 14 2013.indd 11 8/14/2013 12:06:57 PM
12
VX6020
15. DISCONNECT ACTIVE PHONE CALL Button ( ): Press this button to
disconnect an active Bluetooth phone call.
16. BACKSPACE Button ( ): Press this button to correct invalid number entries
when entering passwords, track/chapter selections or phone numbers using
the remote control.
17. RANDOM Button ( ): Press this button to play tracks or chapters in random
order while playing a disc.
18. REPEAT Button : Press this button to repeat the playback of a current track.
Allows the user to repeat a selected Title, Chapter or Track of a DVD, CD or MP3.
19. NUMBER Buttons (0-9): Press these buttons to directly access chapters and
tracks, dialing phone numbers, or entering passwords.
20. UP (p) / DOWN q) Buttons – Press these buttons to scroll upward and
downward, respectively, in menu options.
21. MENU Button: – Press this button to access the root menu of a DVD or CD
during playback. The disc will return to normal playback and the root menu
will disappear if no selection is made within 10 seconds. This button is also
used to select photo mode of an MP3 player.
22. ENTER Button (OK): Press this button to implement a selected setting or
accept an option.
23. LEFT t / RIGHT u Buttons: – Press these buttons to shift left and right,
respectively, in the menu options
24. EQUALIZER Button (EQ): Press this button to accesses the equalizer menu in
all audio playback modes.
25. SCREEN BACKLIGHT ADJUST BUTTON : Press this button to adjust the
screen backlighting level between low, medium and bright.
26. ZOOM Button ( ): (FOR VIEWING IMAGE FILES)
DISC images -
Press ZOOM button CD Player Performs
Once Enlarge the picture 125% of the original size
2 times Enlarge the picture 150% of the original size
3 times Enlarge the picture 200% of the original size
4 times Picture is returned to original size
128-9243a VX6020 Owner's Manual 08 14 2013.indd 12 8/14/2013 12:06:57 PM

13
VX6020
SD Card images -
Press ZOOM button SD Card Player Performs
Once Enlarge the picture 100% of the original size
2 times Enlarge the picture 200% of the original size
3 times Enlarge the picture 300% of the original size
4 times Picture is returned to original size
27. BAND Button: Press this button to scroll though preset stations.
28. PREVIOUS ltt) Button – Press this button to go back to the previous
chapter, track or song during playback of a disc. Press this button while in
Radio mode to search available radio station by increasing tuning frequency.
Press this button while in iPod mode to pause playback/starts playback of a
music le.
29. DISC Button: Press this button to enter Disc mode radio mode and scroll
though prset stations.
30. TUNER: Press this button to enter Radio mode.
31. EJECT Button ( ): Press this button to eject a DVD/CD/MP3 disc. Disc play is
stopped, the disc is ejected and the unit will change to radio operation. If the
disc is not removed from the unit and the button is pressed again, the disc will
be re-loaded. If the disc is not removed from the disc slot within 10 seconds
of being ejected, it will be automatically reloaded to prevent it from being
accidentally damaged.
32. HOME Button: Press this button to return to the source menu.
128-9243a VX6020 Owner's Manual 08 14 2013.indd 13 8/14/2013 12:06:57 PM
14
VX6020
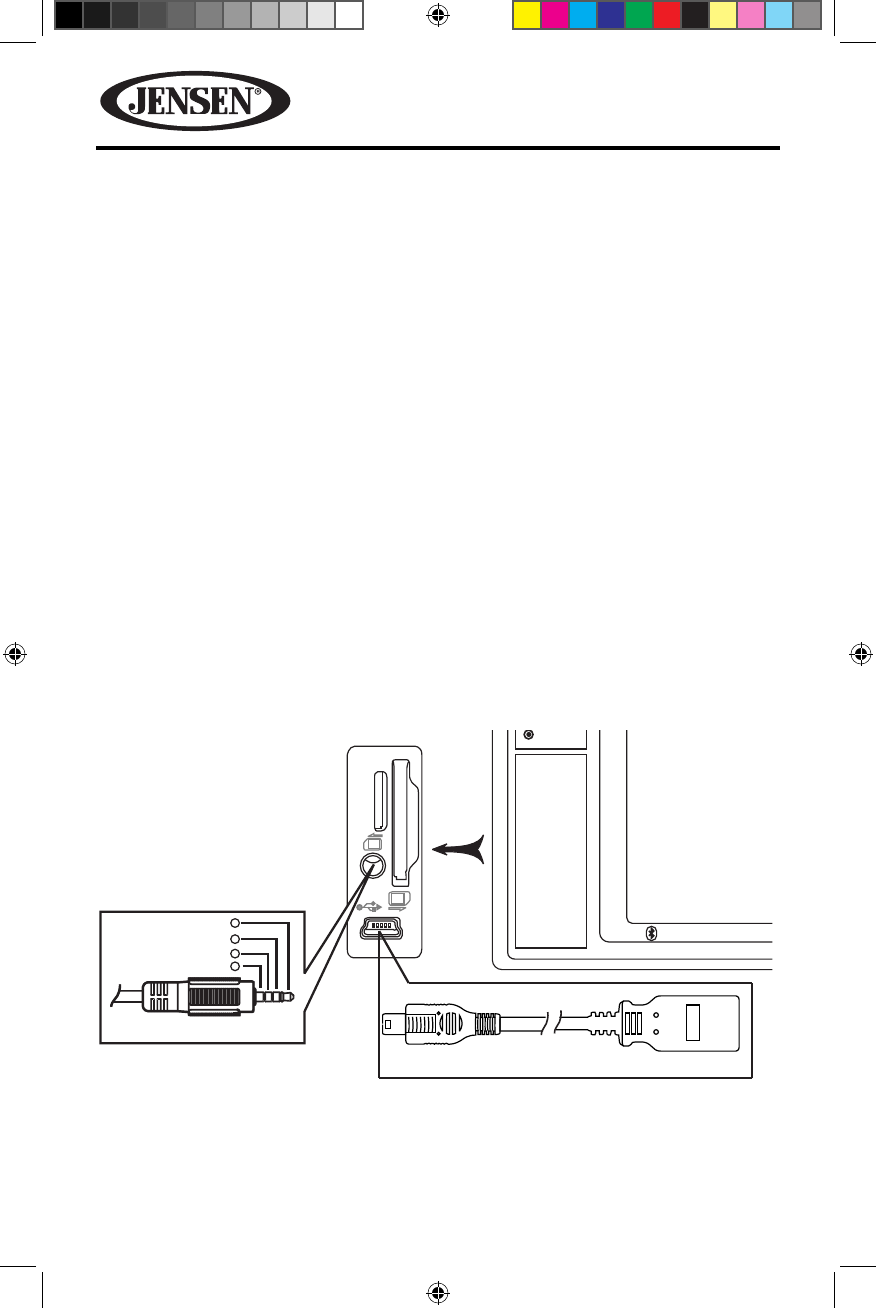
EXTERNAL DEVICES
Connecting External Devices
External devices, including a game console, camcorder, navigation unit, iPod®,
Zune®, etc. can be connected to this unit using its front A/V input 3.5mm jack (AV-
In1), the rear RCA inputs (AV-In2), or the Mini USB input using the supplied USB-A
to Mini USB Adapter.
You cannot directly control external devices connected to the A/V INPUTs using the
front panel controls or this unit’s remote control.
AV-In1
AV-In1 is used for playback of audio/video from an external device connected
to the unit through a 3.5mm jack. The unit can increase or decrease the volume
of the connected device all other controls are done on the connected device.
Select “AV-In 1” mode to access auxiliary devices.
AV-In2
AV-In2 is used for playback of audio/video from an external device connected
through RCA connectors located on the back of the unit (see VX6020 Installation
Guide). The unit can increase or decrease the volume of the connected device all
other controls are done on the connected device. Select “AV-In2” mode to access
auxiliary devices. .
OPEN
AV-
IN
VX6020
SD CARD
AV INPUT
Bluetooth
1
Mini USB to USB Adapter Cable (included)
2
3
4
Figure 3. VX6020 Connecting External Devices
128-9243a VX6020 Owner's Manual 08 14 2013.indd 14 8/14/2013 12:06:57 PM
3.5mm A/V Cable (not included)
V ideo
Right Audio
Left Audio
Ground
15
VX6020
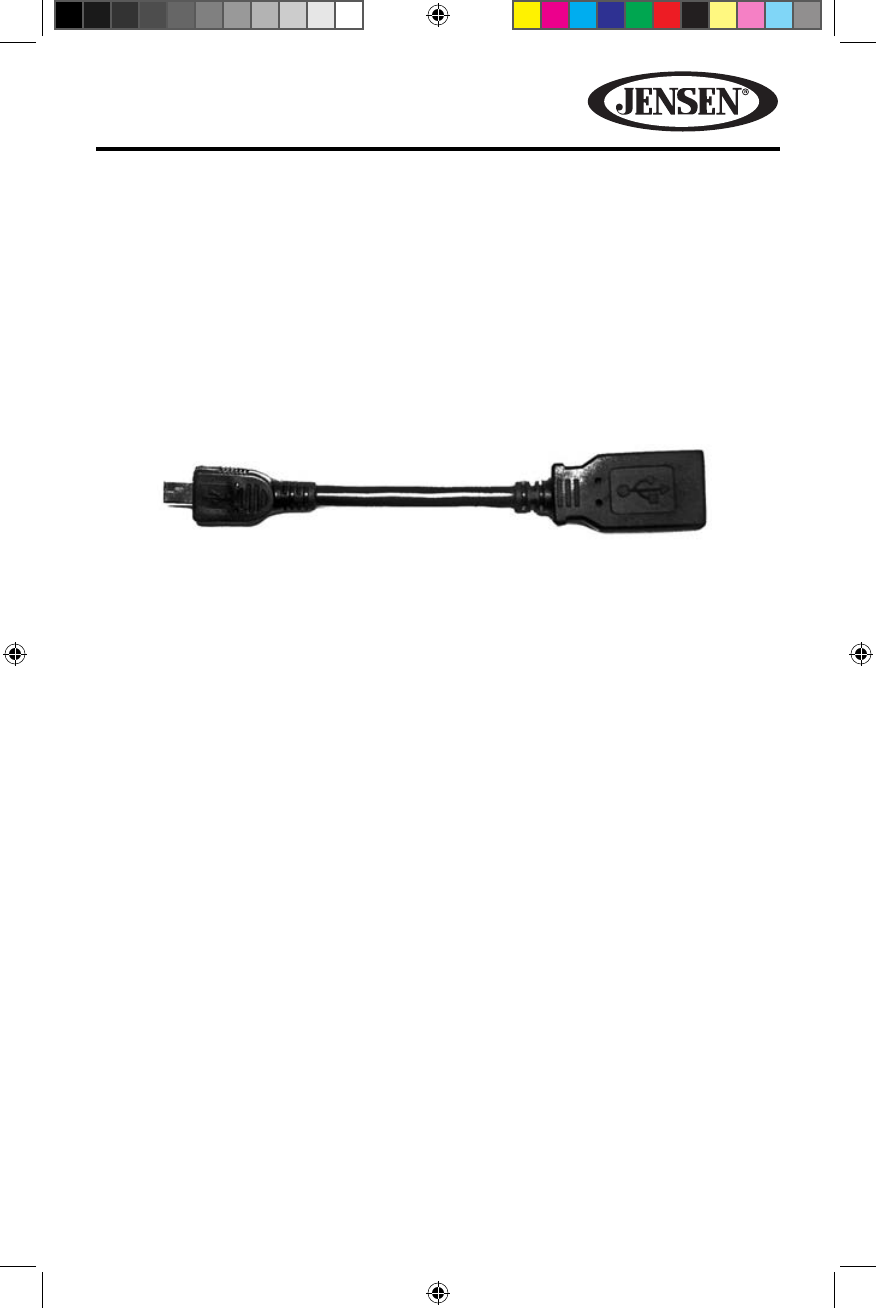
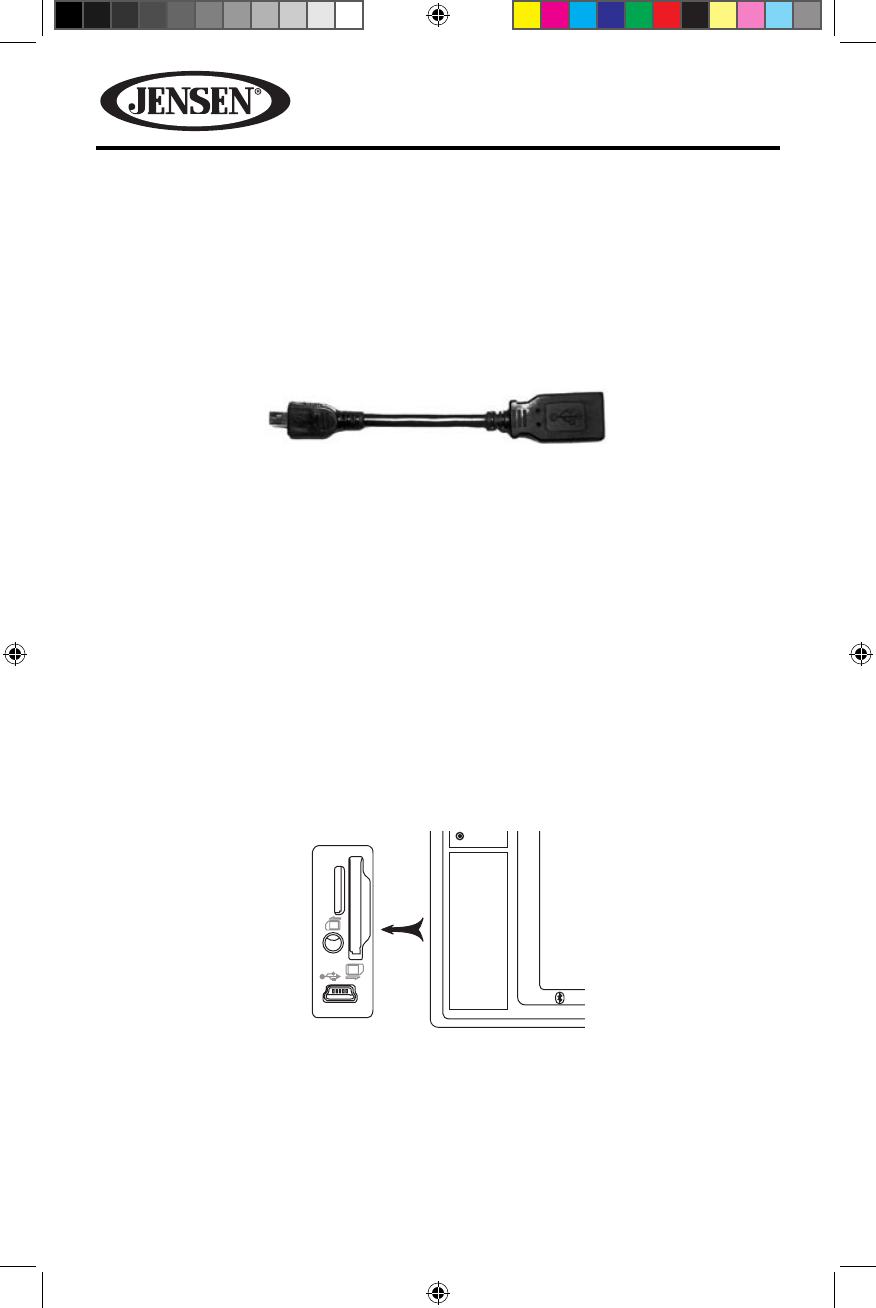
Mini USB to USB Adapter Cable
The unit is supplied with a Mini USB to USB Adapter Cable which can accept
signals from various audio/video devices through a USB connection. The Mini
USB to USB Adapter Cable is installed directly into the front panel of the unit.
NOTE: When connecting an iPod®/iPhone® the user must using the iPod/iPhone
adapter cable that comes with the iPod®/iPhone® or is available separately.
NOTE: When connecting an iPod®/iPhone® to the Mini USB to USB Adapter Cable,
the user must also insert the devices 3.5 mm jack into the A/V input connector for
video playback.
NOTE: If the vehicle is equipped with steering wheel controls for the audio system,
the controls may function dierently than described in the vehicle owners manual.
The Jensen In-Dash Navigation Radio system may function dierently than the
OEM radio due to added features and functions that the OEM radio did not support.
This is normal operation.
Figure 4. Mini USB to USB Adapter Cable
128-9243a VX6020 Owner's Manual 08 14 2013.indd 15 8/14/2013 12:06:58 PM
16
VX6020
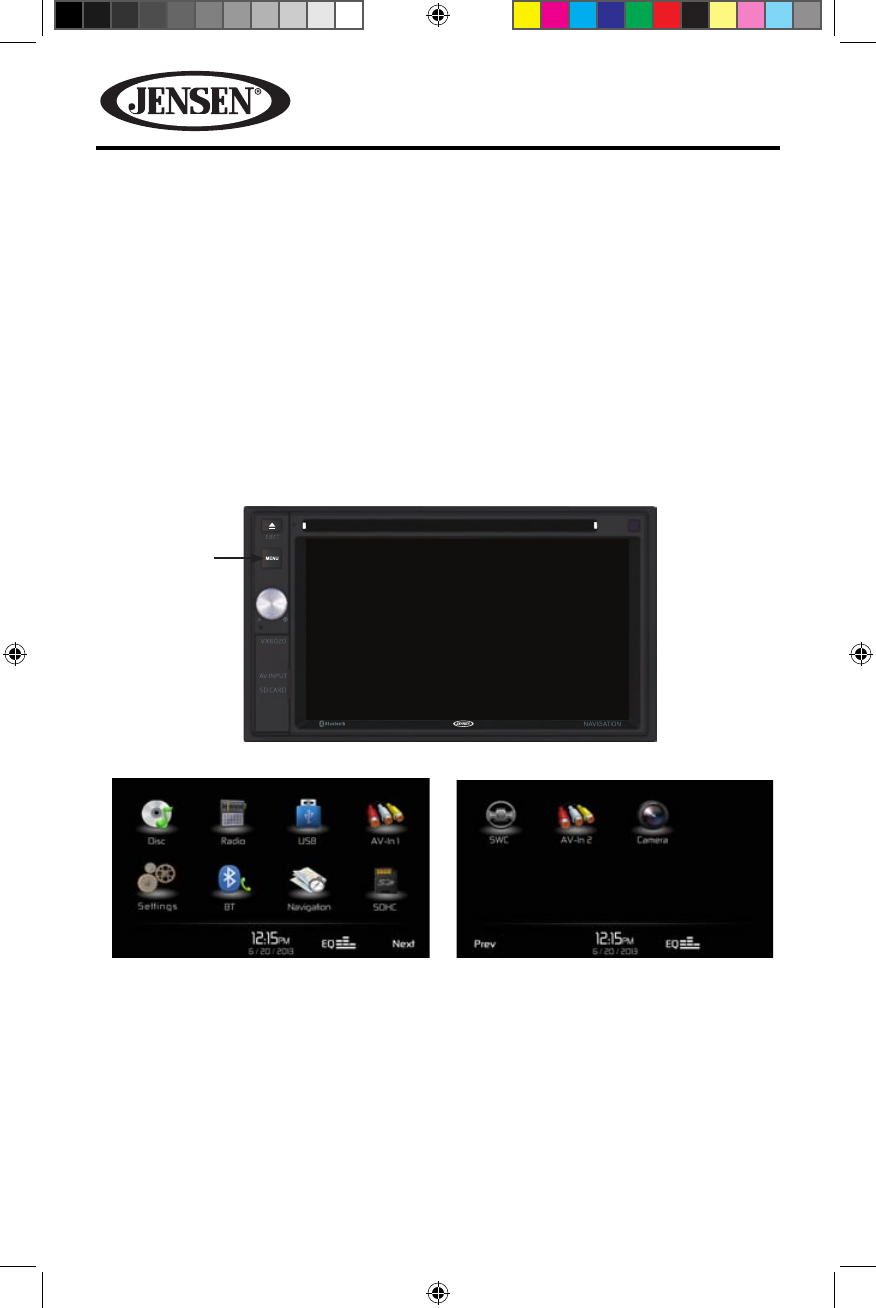
QUICK START GUIDE
Turning the Unit ON or OFF
Press the front panel Power/Volume/Mute control knob to turn the unit ON.
To turn the unit OFF, press and hold the front panel Power/Volume/Mute control
knob for 2 seconds.
Selecting an Audio/Video Source, Bluetooth, Navigation
Steering Wheel Controls or Backup Camera
To access an Audio/Video source:
1. Press the front panel MENU button or touch the SRC icon to view the Main
Menu Screen.
2. Touch the desired source icon on one of the two main menu screens.
Screen 1 of 2: Disc, Radio, USB, AV-IN1, Bluetooth (BT), Navigation, or SDHC.
Touch Next at the bottom of the screen to access Screen 2 of 2: Steering Wheel
Control (SWC), AV-IN2, or Camera.
MENU
Button
Figure 5. VX6020 Main Menu Screen
Screen 1 Screen 2
128-9243a VX6020 Owner's Manual 08 14 2013.indd 16 8/14/2013 12:06:59 PM
17
VX6020
System Settings
To access and adjust system settings:
1. Press the MENU button on the front panel to view the Main Menu Screen.
2. Touch the Settings ( ) icon on the Main Menu screen to enter the SETTINGS
MENU. Sub-menus where adjustments can be made will appear highlighted in
green. (See System Settings Menu)
Volume Adjustment
To increase or decrease the volume level, rotate the front panel Power/Volume/
Mute control knob. The unit’s front panel screen will display the volume level for
3 seconds. The volume level ranges from 0 to 50 (a beep sounds, indicating that the
adjustment limit has been reached).
Navigation and Bluetooth volume can be adjusted independently of the radio
volume by rotating the Power/Volume/Mute control knob. The navigation must be
talking, Bluetooth must be in a call when making the volume adjustment. When
exiting Navigation or Bluetooth the volume will return to the previous source
volume level.
Audible Beep Conrmation
An audible beep tone conrms each function selection. The beep tone can be
disabled through the Setup menu.
Muting the Audio
Press the front panel Power/Volume/Mute control knob to mute the audio from
the unit. Mute icon is displayed on the LCD screen. Press the Power/Volume/Mute
control knob again to restore the audio volume to its previous level. Adjusting the
volume or using any of the audio setup features cancels the mute function.
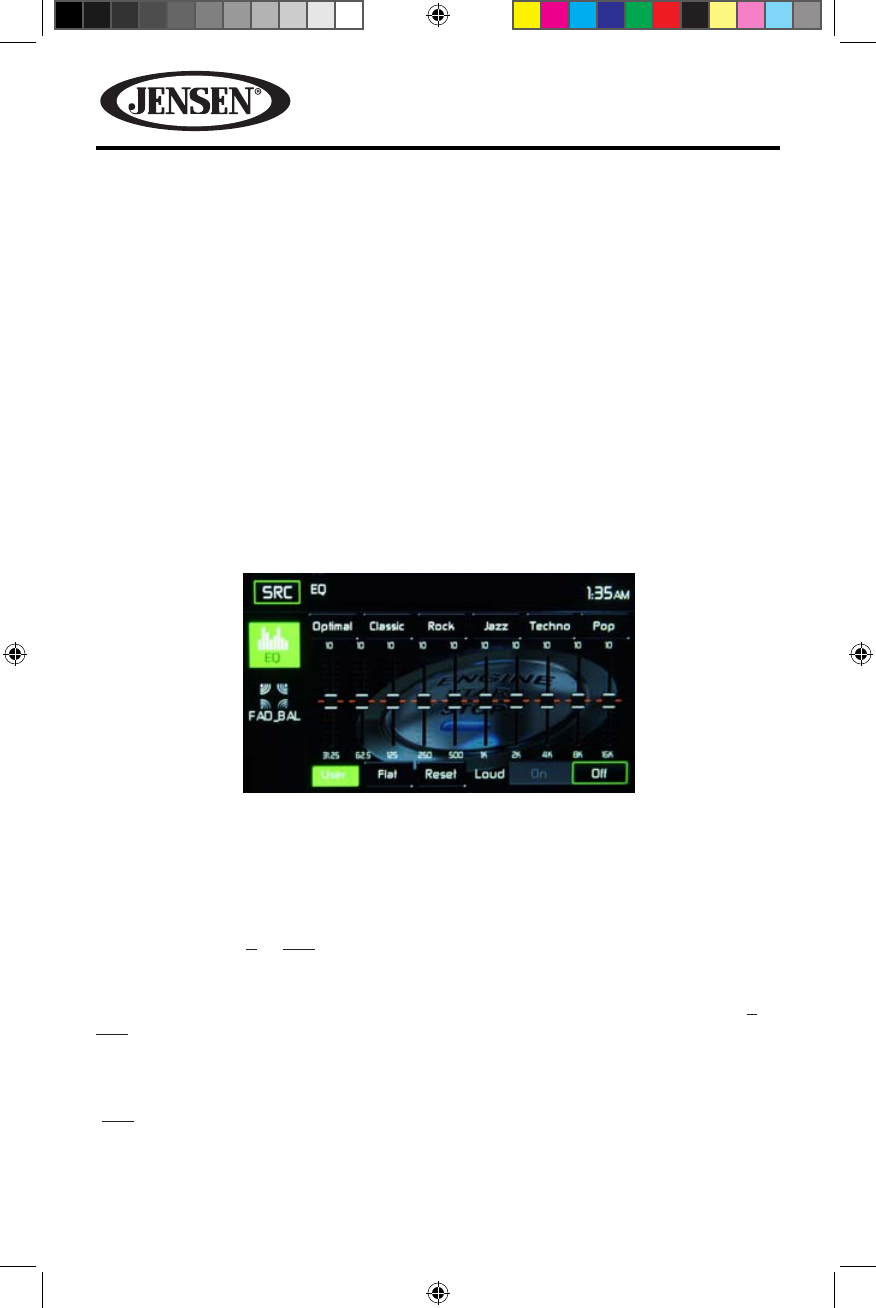
Equalizer Controls
Equalizer (EQ): Adjustment can be made after entering one of the
audio/video sources (Disc, Radio, USB, AV-IN1, SDHC or AV-IN2)
Touch the Equalizer (EQ) icon to view the Equalizer Control Screen to select a
desired audio preset level ( Optimal / Classic / Rock / Jazz / Techno / Pop or Flat),
make adjustments to the audio Balance and Fade levels or to turn the Loudness
option ON or OFF. Touch SRC icon to return to the current source.
(See Equalizer Control Menu)
Playing a Disc
To begin playback of an Audio/Video Disc:
1. Press the front panel Power/Volume/Mute control knob to turn the unit ON.
2. Insert a disc with the label side facing UP and playback will begin
automatically. (See Disc Operation Menu)
128-9243a VX6020 Owner's Manual 08 14 2013.indd 17 8/14/2013 12:07:00 PM
18
VX6020
Resetting the System
Soft Reset - To correct a system halt or other illegal operation, use the tip of a pen to
press and release the reset button located just below the front panel control knob.
For a Hard Reset- Touch the System Reset Icon on the Third Settings Screen.
After a system reset,the unit restores all factory default settings.
NOTE: If the unit is reset while a DVD is playing, the unit will return to Main Menu
once the reset is complete.
Image/Display Settings
Video Output Modes
The table below shows the video output mode for each playing source.
Playing Source Video Output Modes
AM/FM TUNER YCbCr Mode
DVD YCbCr Mode
AUX IN CVBS* Mode
*CVBS – Composite Video Baseband Signal
Parking Brake Inhibit
When the green wire with the white stripe “Parking” wire is connected to the vehicle
Parking Brake circuit, the front TFT monitor will display video when the Parking
Brake is engaged. (When the green wire with the white stripe is grounded via the
Parking Brake circuit, video will be displayed.)
[RESET] Button
Figure 6. System Reset Button
128-9243a VX6020 Owner's Manual 08 14 2013.indd 18 8/14/2013 12:07:00 PM

19
VX6020
This page intentionally left blank
128-9243a VX6020 Owner's Manual 08 14 2013.indd 19 8/14/2013 12:07:00 PM
20
VX6020
EQUALIZER CONTROL MENU
Adjusting Equalizer Controls
The Equalizer adjustment screen allows the user to easily adjust the audio
system to meet the acoustical characteristics of the vehicle. The acoustical
characteristics vary depending on the type of vehicle and measurements.
For example: proper setting of the audio controls can improve the speakers
frequency response to compensate for cabin.
The Balance/Fade levels and Loudness ON/OFF option of a selected audio/video
source (Disc, Radio, USB, AV-IN1, SDHC or AV-IN2) is also adjusted through the
Equalizer adjustment screen.
Equalizer (EQ) (10 Band)
1. Touch the Equalizer (EQ) icon to view and select a desired acoustical preset level
( Optimal / Classic / Rock / Jazz / Techno / Pop or Flat)
NOTE: The equalizer will
automatically change to “USER” when individual audio functions are adjusted.
2. Select a desired frequency range slide bar to be adjusted (31.5, 62, 125, 250,
500, 1K, 2K, 4K, 8K or 16K).
3. Touch and move the slide bar UP or Down to adjust the frequency sound level
settings from 0 to +20.
User Setting
Touch the User icon to customize each of equalizers 10 band frequencies from 0 to
+20.
Flat Setting
Touch the Flat icon to set the equalizers 10 band frequencies to the midpoint
(+10).
Figure 7. Equalizer Adjustment Screen
128-9243a VX6020 Owner's Manual 08 14 2013.indd 20 8/14/2013 12:07:01 PM
21
VX6020
Loud Setting
Touch the Loud icon to turn the loud option ON or OFF. The loud option automatically
alters the frequency response curve of audio to make it sound more natural when
played at a lower volume level.
To exit the Equalizer menu touch SRC icon to return to the current source.
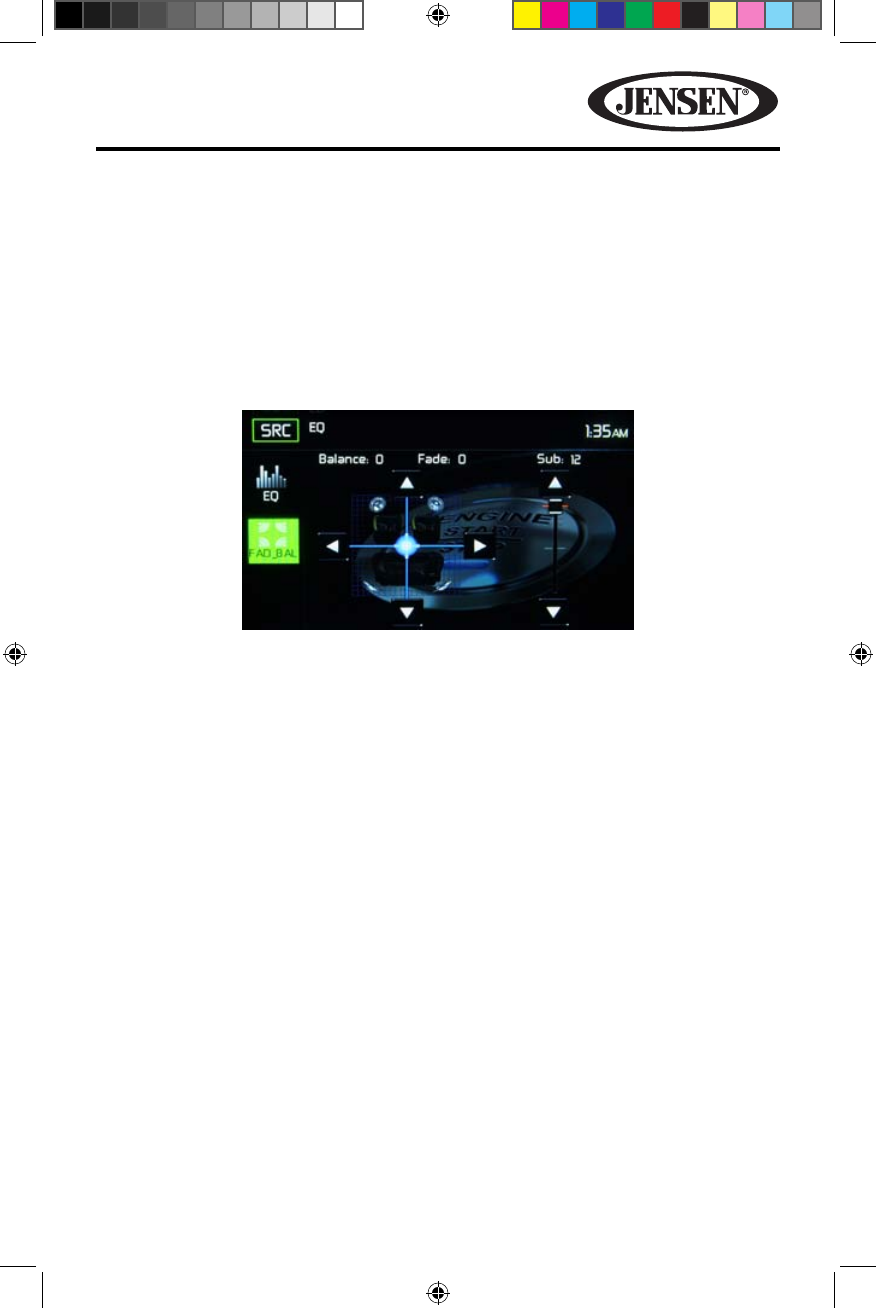
Fade-Balance
Balance-Touch the FAD-BAL icon on the left side of the equalizer screen to display
the balance/fader screen.
Balance- This feature is used to balance the audio output levels between the left
and right side of the vehicle. Touch the t or u icons to change the balance control
settings -18 (Left) to +18 (Right). The setting can also be changed by touching
screen within the grid to move the green sphere.
Fade- This feature is used to fade the audio output levels between the front
and rear of the vehicle. Touch the p or q icons to change the fade control
settings -20 (Rear) to +20 (Front). The setting can also be changed by touching
screen within the grid to move the green sphere.
Sub (Subwoofer)- This feature is used to reduces or increases the subwoofer
sound level. Touch the slide bar p or q icons to adjust the settings.
To exit the balance-fader touch the SRC icon on the top left corner of the screen.
Figure 8. Fade-Balance Adjustment Screen
128-9243a VX6020 Owner's Manual 08 14 2013.indd 21 8/14/2013 12:07:02 PM
22
VX6020
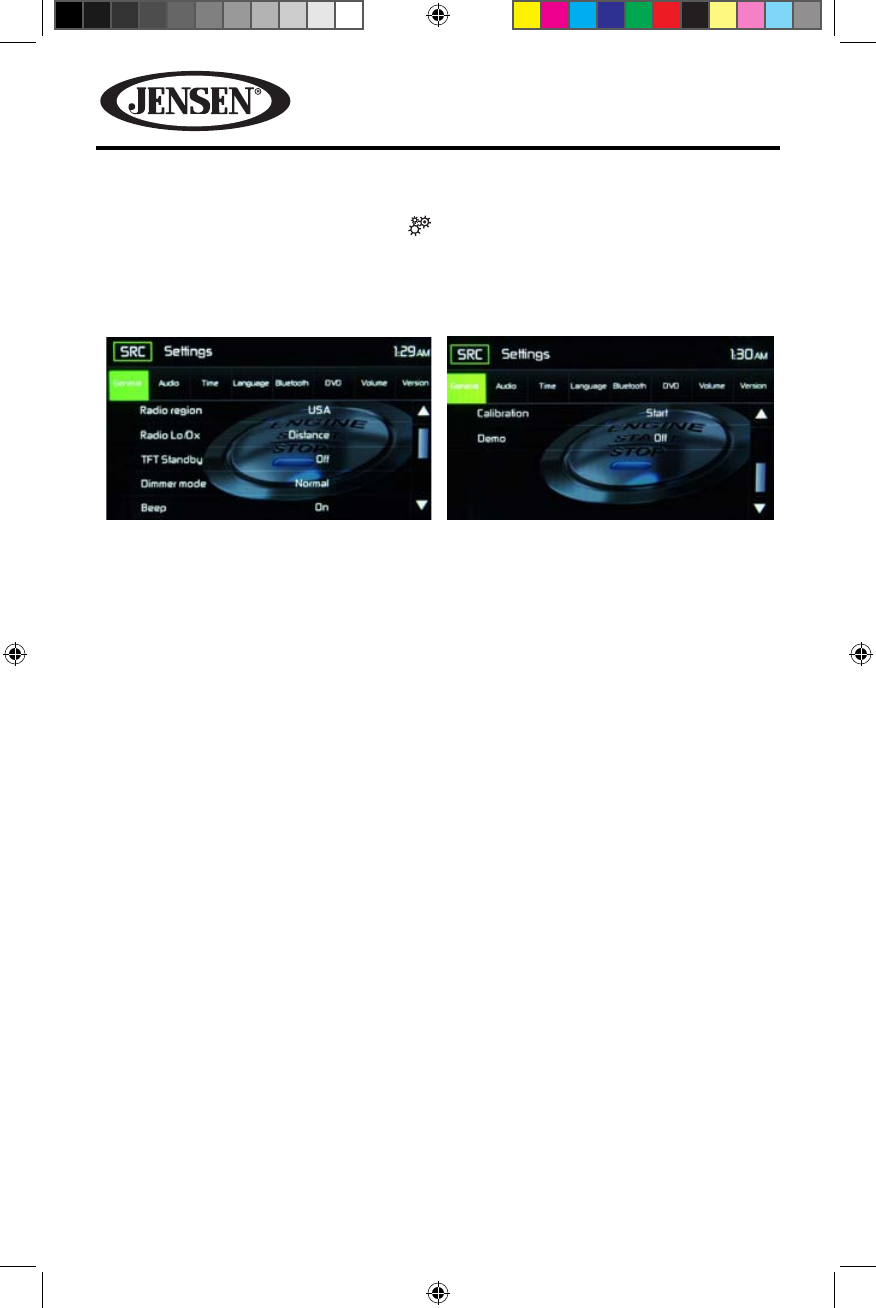
SYSTEM SETTINGS
To access System Settings, touch the icon on the Main Menu screen. There are
eight System Settings Sub-menus that are used to adjust the performance of each
option of the VX6020. Touch a desired Sub-Menu (General, Video, Sound, Time,
Language, Bluetooth, DVD or Volume) and the Sub-menu will appear highlighted
in green. The features available for adjustment will appear on the screen.
Adjusting a Sub-Menu Feature
1. Touch the Sub-Menu feature to be adjusted.
2. Touch the p or q icon to view the previous or next feature page, if applicable.
An options list appears on the right.
3. Touch the desired feature option once to make selection then touch again to
conrm selection.
General Sub-menu Features
Radio Region- USA, China, Japan, Europe, Europe (LW) and Orient (OIRT)
USA frequencies:
• AM Frequency Spacing - 10 kHz
• AM Frequency Band - 530 kHz ~ 1720 kHz
• FM Frequency Spacing - 200 kHz
• FM Frequency Band - 87.5 MHz ~ 107.9 MHz
Radio Range- Touch the Distance or Local to increases or decreases radio tuning
sensitivity to receive local or distant stations.
TFT Standby- Touch OFF, 10s or 20s to set the unit’s front panel TFT LCD screen to
stay ON continuously or to blackout the screen after 10 or 20 seconds.
Dimmer Mode- Touch Night, Day, Normal or Brightness to set the unit’s front panel
TFT LCD screen to be adjusted for day and night conditions.
Beep- Touch OFF or ON to turn the selection conrmation beep ON or OFF.
Figure 9. System Settings Screens
128-9243a VX6020 Owner's Manual 08 14 2013.indd 22 8/14/2013 12:07:03 PM
23
VX6020
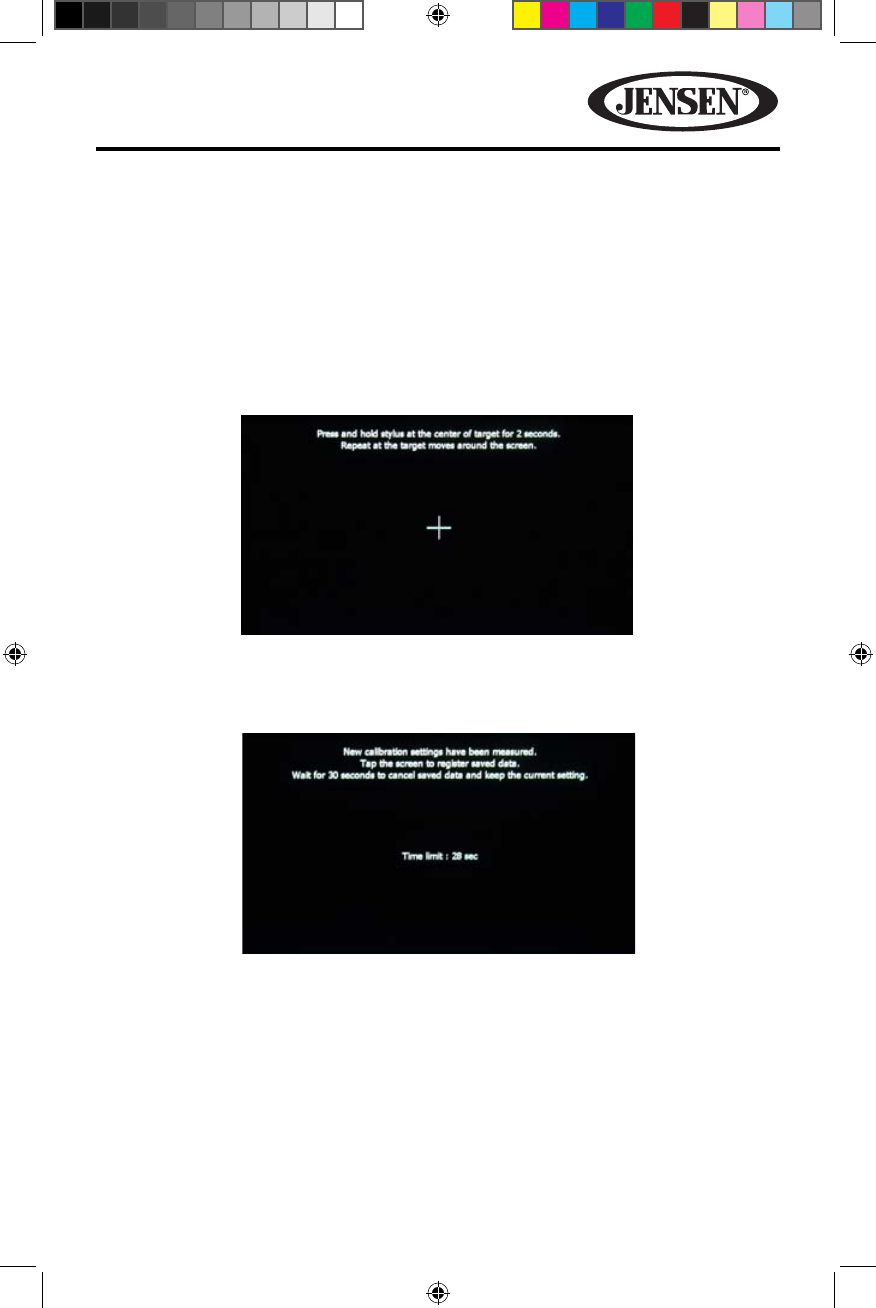
Calibration- The Touch Screen Calibration adjustment is used to set the
parameters of the touch screen to ensure that when the screen is touched, it
corresponds to the feature desired.
NOTE: Never use a pen or sharp object to calibrate the touch screen as this will
damage the panel.
1. Touch the Calibrate icon and the rst screen will appear with instructions.
2. Follow the instructions on the screen touching and momentarily holding nger
or a stylus to the center of the target for 2 seconds. Repeat as the target moves
to each corner of the screen and nally to the center.
3. The second screen will appear:
4. If the screen is touched, the new calibration parameters will be accepted. If
the screen is not touched within thirty seconds, the new parameters will be
disregarded.
Figure 11. Audio Sub-Menu Screen
Figure 10. Calibration Screen
128-9243a VX6020 Owner's Manual 08 14 2013.indd 23 8/14/2013 12:07:05 PM
24
VX6020
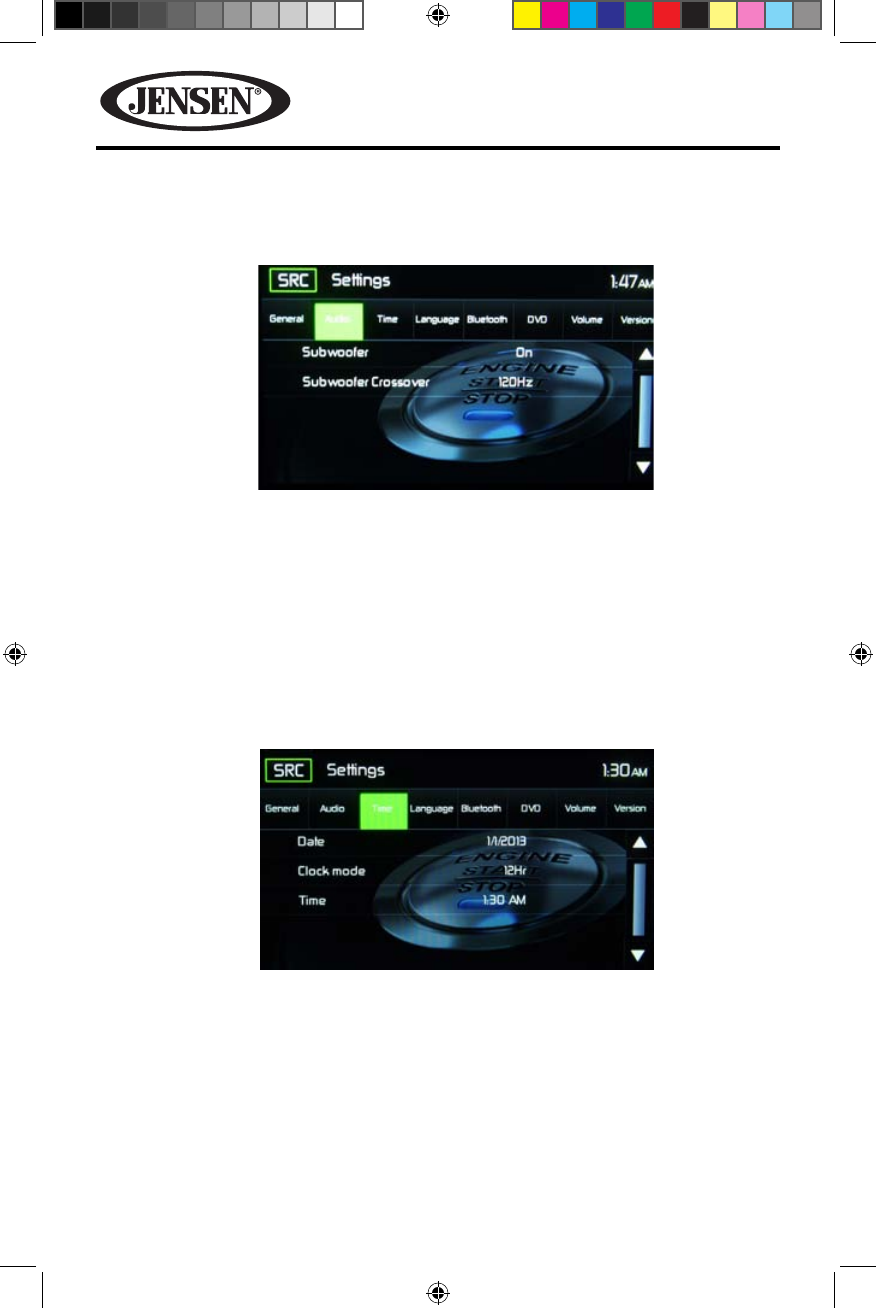
Audio Sub-menu Features
The Audio Sub-menu is used to turn the Subwoofer output ON or OFF and to select
a Subwoofer crossover frequency.
Subwoofer- Touch ON or OFF to turn the subwoofer output ON or OFF.
Subwoofer Crossover- Touch a crossover frequency (80Hz, 120Hz or 160Hz) to
set a cut-o frequency for the subwoofer’s LPF (low-pass lter).
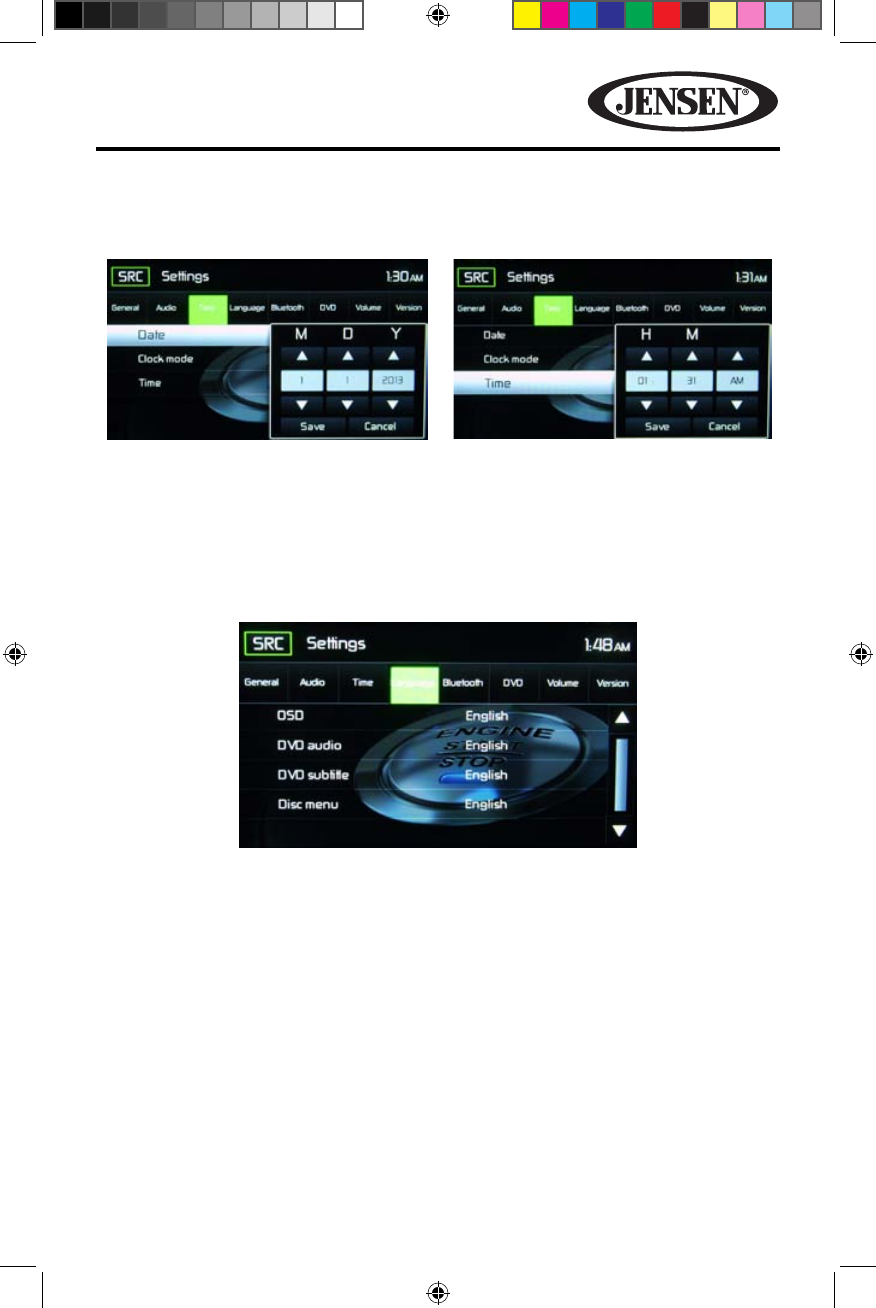
Time Sub-menu Features
Clock appears in the top right corner of the screen during certain operations.
NOTE: The AM/PM indication will change as you continue to adjust the hour past 12.
Date- Touch the Date icon and use the p or q icons to set the day, month, and
year (see gure 13). After setting the date, touch Save. The date will appear to the
right of the Date option.
Clock Mode- Touch 12Hr to set the clock display to 12 hour time intervals using AM
and PM. Touch 24Hr to set the clock display to a 24 hour time interval (or military
time).
Figure 12. Audio Sub-Menu Screen
Figure 13. Time Sub-Menu Screen
128-9243a VX6020 Owner's Manual 08 14 2013.indd 24 8/14/2013 12:07:07 PM
25
VX6020
Time- Touch the Time icon and use the p or q icons to set the hour, minute, and
either AM or PM (see Figure 14). After setting the time, touch Save. The time will
appear to the right of the Date option.
Language Sub-menu Features
If a DVD supports more than one Subtitle or Audio language, all the languages are
available for selection during playback. If the selected language is not supported by
the DVD, then the default language is used.
On Screen Display (OSD)-Touch English, Spanish, or French to select the language
for the OSD Display.
DVD Audio-If available, this feature allows the user to select one of the languages
contained on the disc for the DVD audio.
DVD Subtitle-If available, this feature allows the user to select one of the languages
contained on the disc for the DVD subtitles.
Disc Menu-Allows the user to select one of the languages contained on the disc
menu.
Figure 15. Language Sub-Menu Screen
Figure 14. Date and Time Setting Screens
Date Settings Time Settings
128-9243a VX6020 Owner's Manual 08 14 2013.indd 25 8/14/2013 12:07:10 PM
26
VX6020
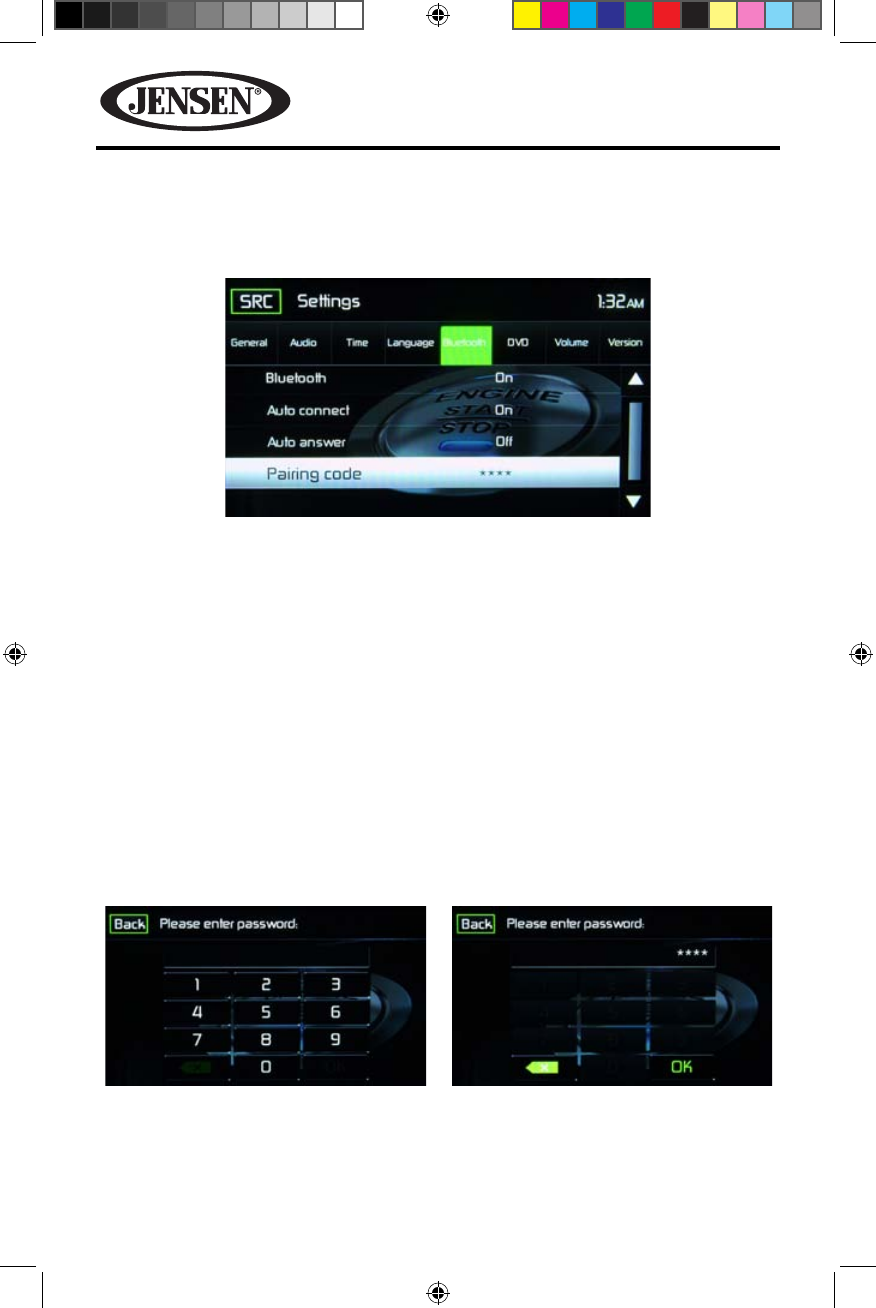
Bluetooth Sub-menu Features
The Bluetooth audio capabilities can be used for wireless phones hands free
applications. Before attempting to use the Bluetooth functions on this unit, please
make sure the wireless phone to be connected supports Bluetooth functions.
Bluetooth- Touch ON or OFF to turn the Bluetooth function ON or OFF.
Auto-Connect-Touch ON or OFF to turn the Bluetooth Auto-Connect function ON
or OFF.
Auto-Answer-Touch ON or OFF to turn the Bluetooth Auto-Answer function ON
or OFF.
Pairing Code- This feature allows the user to create a unique 4 digit code for pairing
Bluetooth devices to the unit.
1. Touch the Paring Code icon and the Pairing Code entry screen will appear.
2. Use the keyboard enter a unique 4 digit Pairing Code. NOTE: If a wrong digit is
entered touching the green arrow will remove the number.
3. Touch OK to conrm 4 digit pairing code.
Figure 16. Bluetooth Pairing Code Screen 2
Figure 17. Pairing Code Screens
Pairing Code Entry Screen Pairing Code Conrmation Screen
128-9243a VX6020 Owner's Manual 08 14 2013.indd 26 8/14/2013 12:07:12 PM
27
VX6020
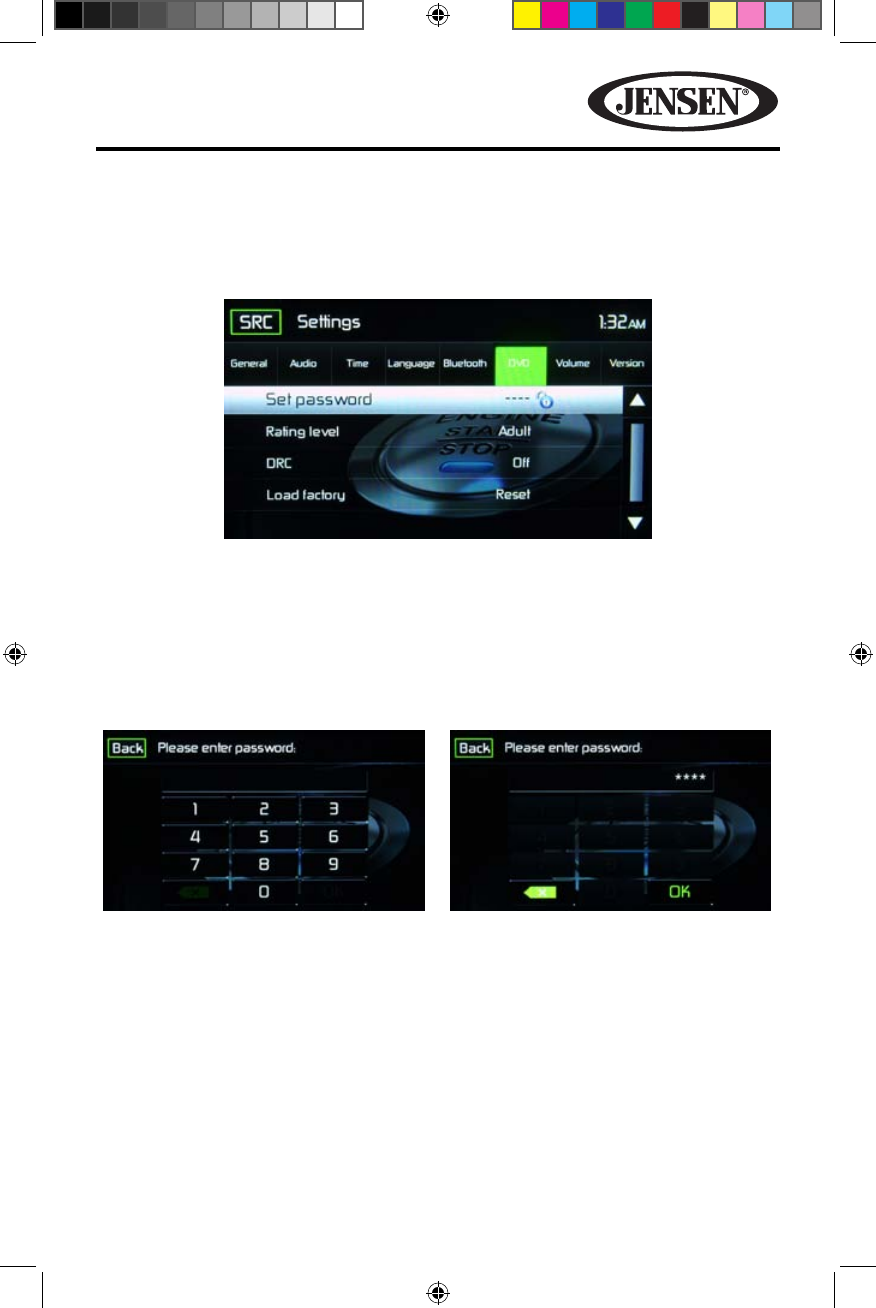
DVD Sub-menu Features
The DVD system has a built-in parental lock feature to prevent unauthorized persons
from viewing restricted disc content. By default, the rating system is unlocked. Once
set up, the parental lock is released only by entering the correct password. Once the
password is entered, rating is available for setup.
Set Password- This feature allows the user to create a unique 4-digit password to
activate or deactivate the “Rating” option.
1. Touch the Set Password Code icon and the Password entry screen will appear.
2. Use the keyboard enter a unique 4 digit Password. NOTE: If a wrong digit is
entered touching the green arrow will remove the number.
3. Touch OK to conrm 4 digit Password.
Rating Level- Select the appropriate rating level for the intended viewing audience.
(Kid Safe, G, PG, PG-13, PG-r, R, Nc-17, and Adult). The user may override higher
ratings by using the password.
DRC- This feature allows the user to turn the Dynamic Range Control ON for better
playback for low volumes or OFF.
Figure 18. DVD Sub-Menu Screen
Figure 19. DVD Password Screens
Password Entry Screen Password Conrmation Screen
128-9243a VX6020 Owner's Manual 08 14 2013.indd 27 8/14/2013 12:07:14 PM
28
VX6020
Load Factory- This feature allows the user to “Reset” to restore the factory default
settings (Rating system only).
To reset the password, access the “RATING” menu and enter the current password.
Once the correct password is entered, you can access the “Password” eld and enter
a new one.
NOTE: Record the password and keep it in a safe place for future reference. The rating
for each disc is marked on the disc, disc packing, or documentation. If the rating is
not available on the disc, the parental lock feature is unavailable. Some discs restrict
only portions of the disc, allowing the appropriate content will play. For details,
please refer to the disc description.
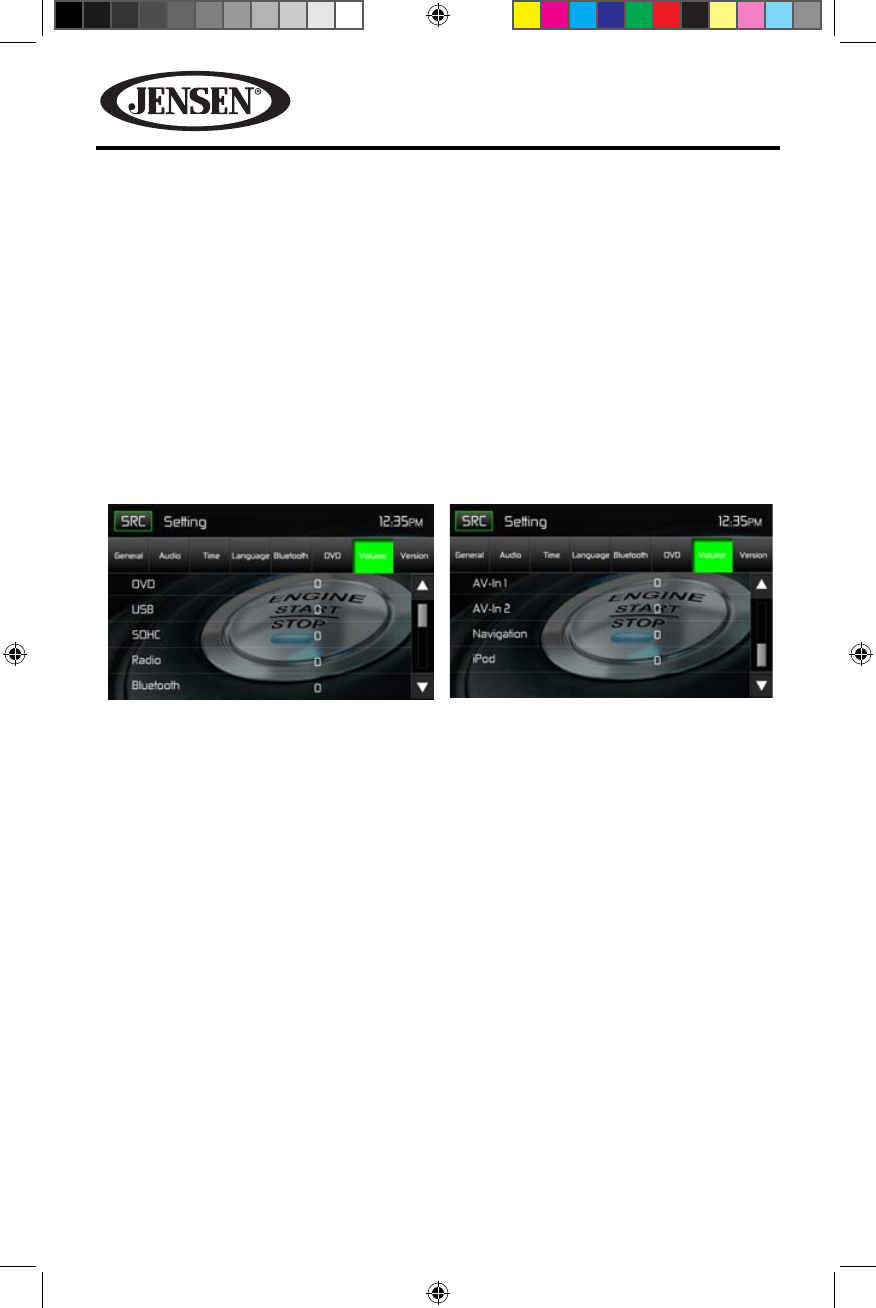
Volume Sub-menu Features
The Volume Sub-menu allows the user to increase or decrease the relative volume
of the audio output of each source individually.
DVD- Touch the DVD icon to enter the setting then use the p or q icons to
increase or decrease the relative volume level between -6 to +6.
USB- Touch the USB icon to enter the setting of the connected device then use the
p or q icons to increase or decrease the relative volume level between -6 to +6.
SDHC- Touch the SDHC icon to enter the setting then use the p or q icons to
increase or decrease the relative volume level between -6 to +6.
Radio-Touch the Radio icon to enter the setting then use the p or q icons to
increase or decrease the relative volume level between -6 to +6.
Bluetooth- Touch the Bluetooth icon to enter the setting of the connected device
then use the p or q icons to increase or decrease the relative volume level
between -6 to +6.
Figure 20. Volume Sub-Menu Screens.
Volume Sub-Menu Screen 1 Volume Sub-Menu Screen 2
128-9243a VX6020 Owner's Manual 08 14 2013.indd 28 8/14/2013 12:07:14 PM
29
VX6020
AV-In1- Touch the AV-In1 icon to enter the setting of the connected device then
use the p or q icons to increase or decrease the relative volume level between
-6 to +6.
AV-In2- Touch the AV-In2 icon to enter the setting of the connected device then
use the p or q icons to increase or decrease the relative volume level between
-6 to +6.
Navigation- Touch the Navigation icon to enter the setting then use the p or q
icons to increase or decrease the relative volume level between -6 to +6.
iPod-Touch the iPod icon to enter the setting then use the p or q icons to increase
or decrease the relative volume level between -6 to +6.
The default relative volume level setting for all available sources is “0”.
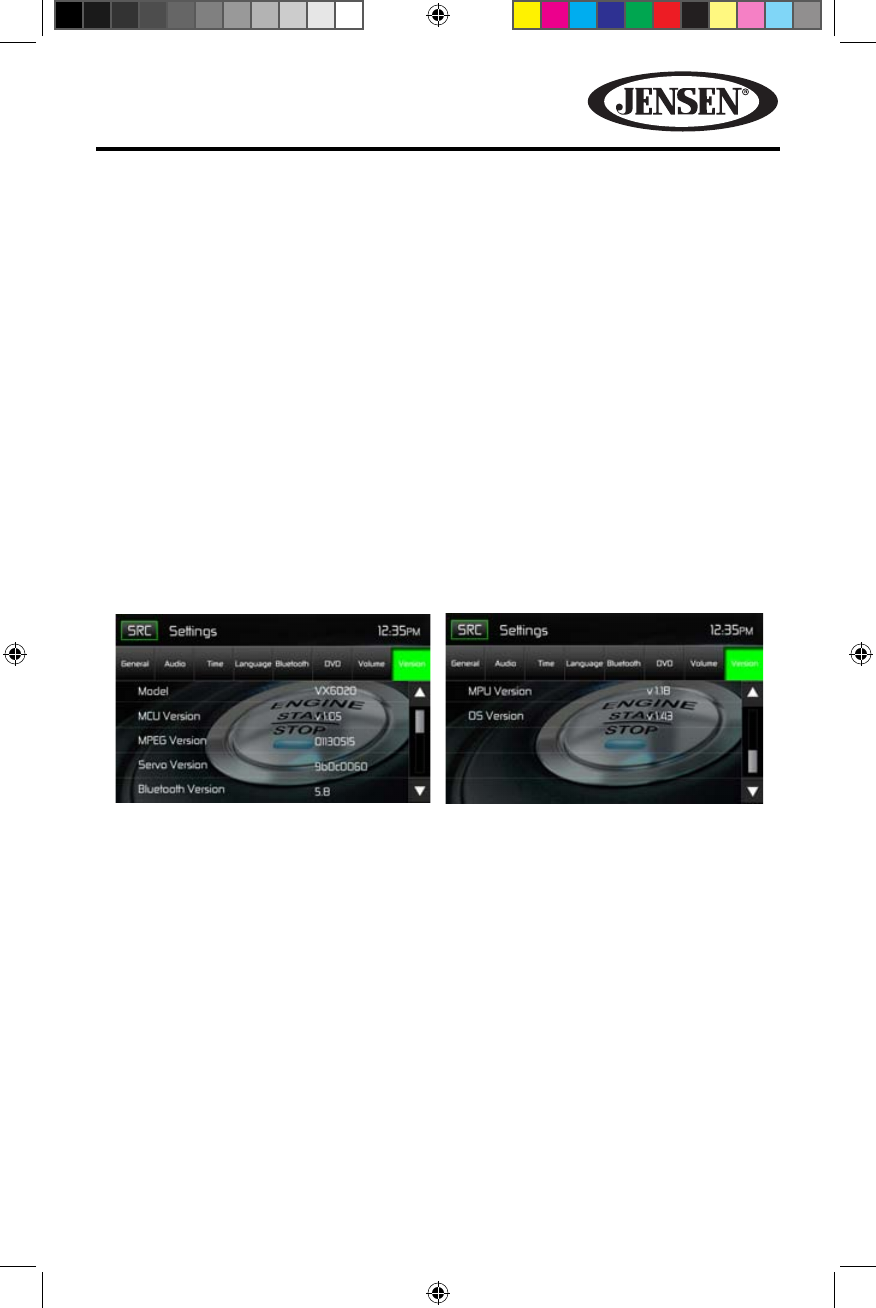
Version Sub-menu Features
The Version Sub-menu is used to identify the model and resident operating system
as well as the hardware and software versions.
Figure 21. Version Sub-Menu Screens 1 and 2.
Exiting the System Setup Menu
To exit setup mode and resume normal playback, touch the SRC icon on the screen.
Version Sub-Menu Screen 1 Version Sub-Menu Screen 2
128-9243a VX6020 Owner's Manual 08 14 2013.indd 29 8/14/2013 12:07:15 PM
30
VX6020
DISC OPERATION
Compatible Audio Discs Types
This system will play the following types of discs:
• DVD - DVD’s that contain audio and/or video.
• Audio discs - Audio CDs that contain audio, video and image les.
• MP3 discs - A disc that contains audio, video and image les (for example,
a CD-R with downloaded MP3 les). MP3 discs can hold a
maximum of 500 songs/folders per disc.
NOTE: This unit is designed to play pre-recorded (original) CD/DVD’s. Some burned
CD / DVD’s may not play due to dierent recording formats and speeds.
DVD Operation
DVD Main Menu
NOTE: When properly installed, DVD video cannot be displayed on the main TFT
screen unless the parking brake is applied. If you attempt to play a DVD while the
vehicle is moving, the TFT screen displays:
Warning!!!
It is illegal to view video
while driving or operating
a motor vehicle. Set parking
brake to view video.
From the Main Menu Screen touch the DISC Icon or insert a disc into the disc slot,
label side up. Playback begins when a disc is inserted correctly.
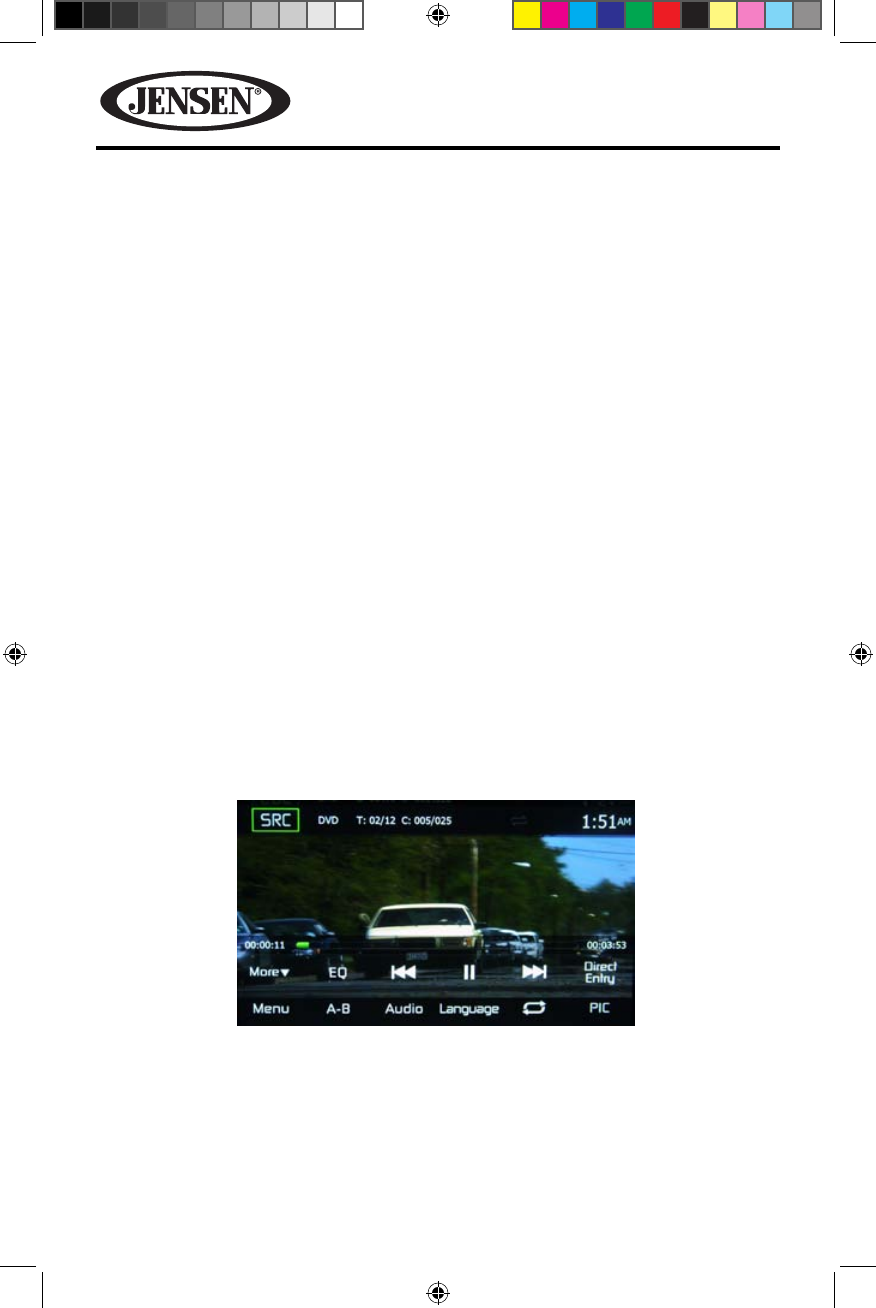
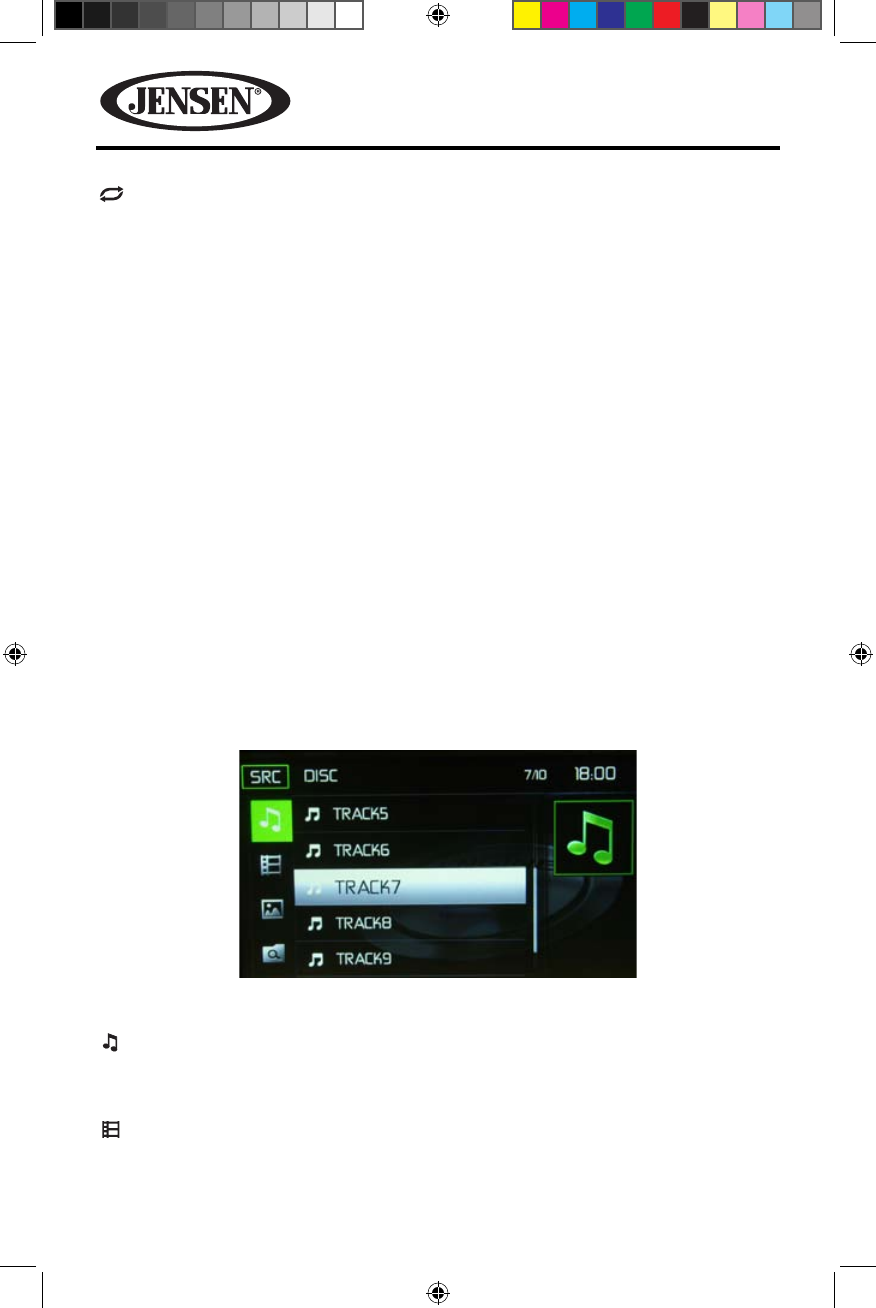
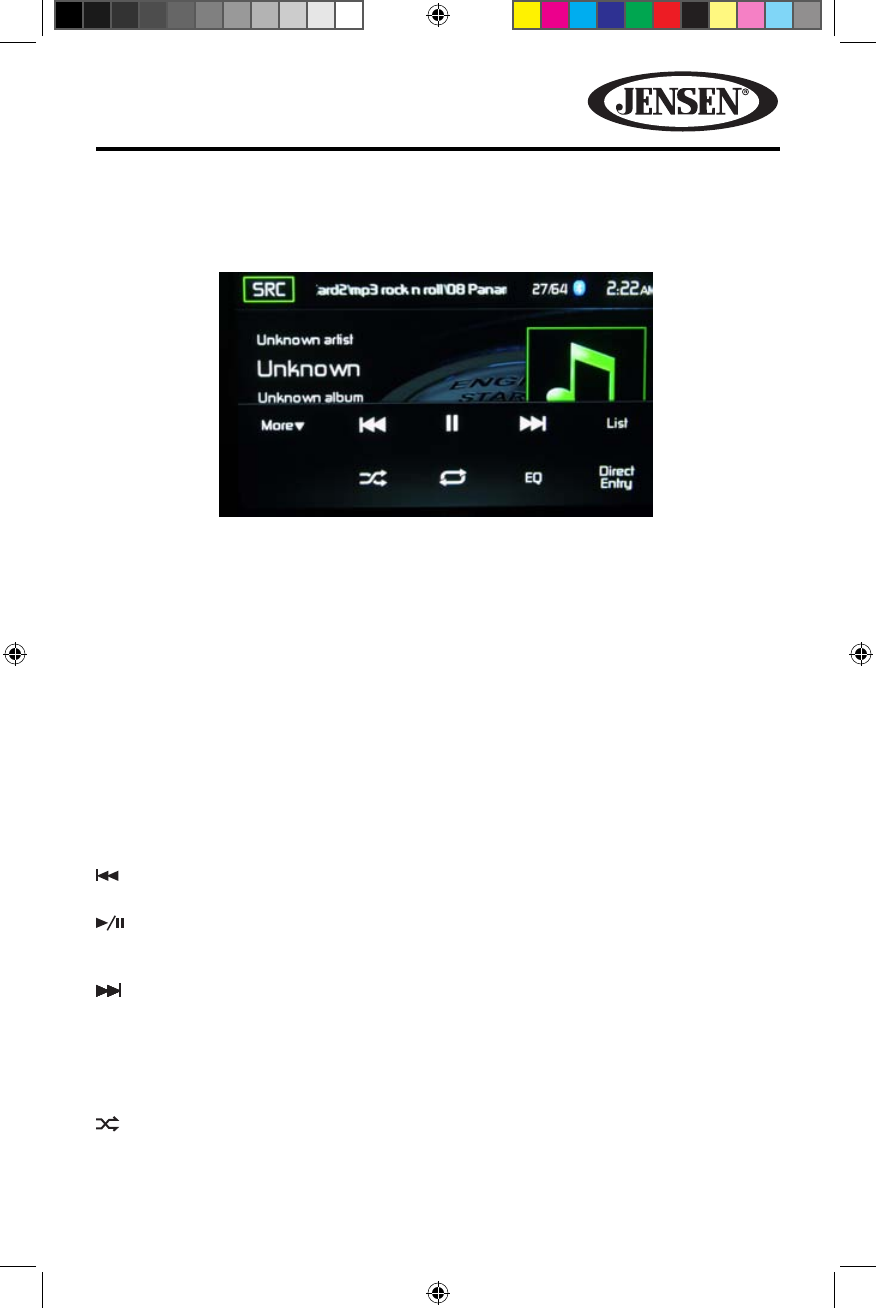
SRC Icon- Touch this icon to return to the Main Menu Screen.
Title/Chapter Information- The title/chapter information displayed is the current
number of the track playing, the total number of tracks on the disc, the current
chapter playing and the total number of chapters on the disc.
Figure 22. DVD Main Menu
128-9243a VX6020 Owner's Manual 08 14 2013.indd 30 8/14/2013 12:07:16 PM
31
VX6020
Time Display- This indicator displays the time as entered by the user in the Settings
Menu.
Chapter Elapsed Playback Time- The elapsed playback time of chapter is displayed
on the screen.
Total Playback Time- The total playback time of disc is displayed on the screen.
More ( p/q )- Touch the p/q icons to display the next or previous page of the
Disc menu.
EQ - Equalizer- Touch this icon to access the Equalizer Control Menu (see “Adjusting
Equalizer Controls”).
Previous-Touch this icon to play the previous track.
Play/Pause-Touch this icon to begin disc playback. Touch this icon again to
pause disc playback.
Next- Touch this icon to play the next track.
Direct Entry-Touch this icon to the display the Direct Entry Screen.
Menu- Touch this icon to view the DVD root menu.
A-B- Touch to repeat a specic portion from point A to point B of the disc. During
playback touch A-B to set the starting point A. Touch A-B a second time to set the
ending point B. The player will repeatedly play the part between Point A and Point
B. Touch A-B a third time to cancel A-B repeat and resume playback.
Audio- Touch this icon to select an audio language for DVD playback. The audio
language selection depends on the languages contained on the disc.
Language- Touch this icon to select a subtitle language for DVD playback. The
subtitle language selection depends on the languages contained on the disc.
Repeat- Touch this icon during playback to repeat the current chapter. The icon
on the screen will light and small letter C will appear below the icon and the chapter
will repeat. Touch this icon a second time to repeat the current title. The icon on the
TFT LCD screen will light and small letter T will appear below the icon and the title
track will repeat. Touch the icon a third time to repeat the title and chapter. The icon
on the main TFT LCD screen will light and small letter A will appear below the icon
and the title and chapter will repeat. Touch the icon again the repeat function will
be cancelled. The icon on the main TFT LCD screen will dim and playback of the
remainder of the disc will resume.
128-9243a VX6020 Owner's Manual 08 14 2013.indd 31 8/14/2013 12:07:16 PM
32
VX6020
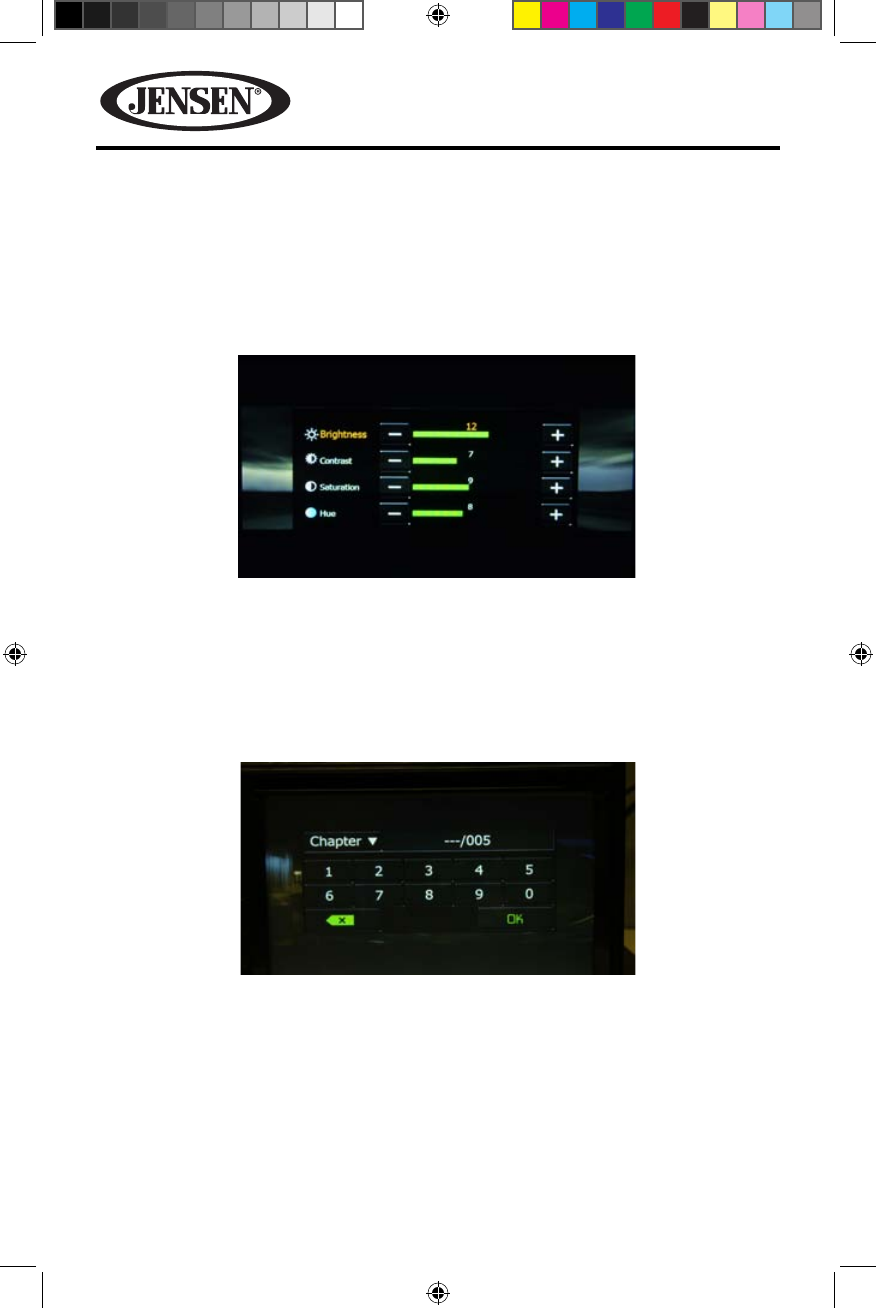
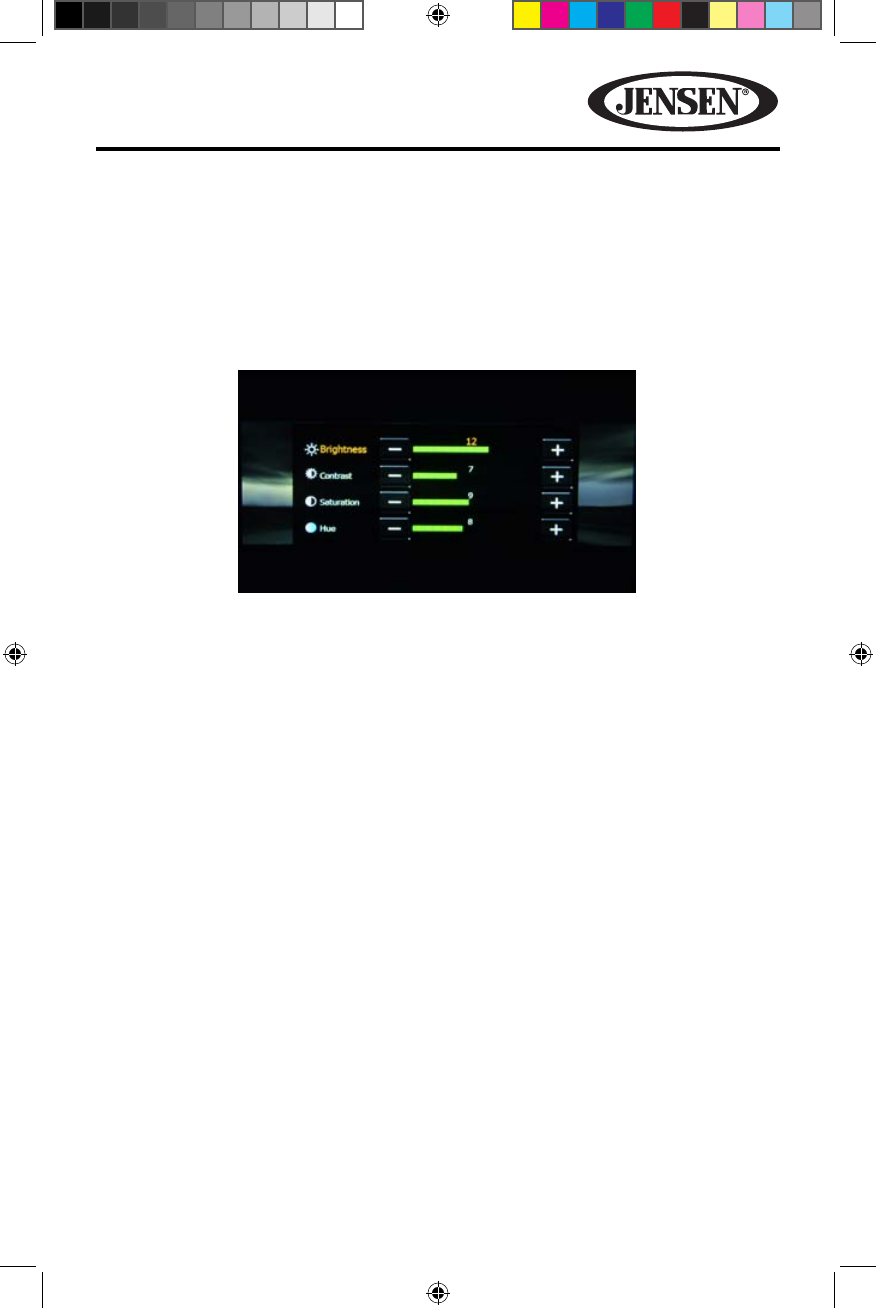
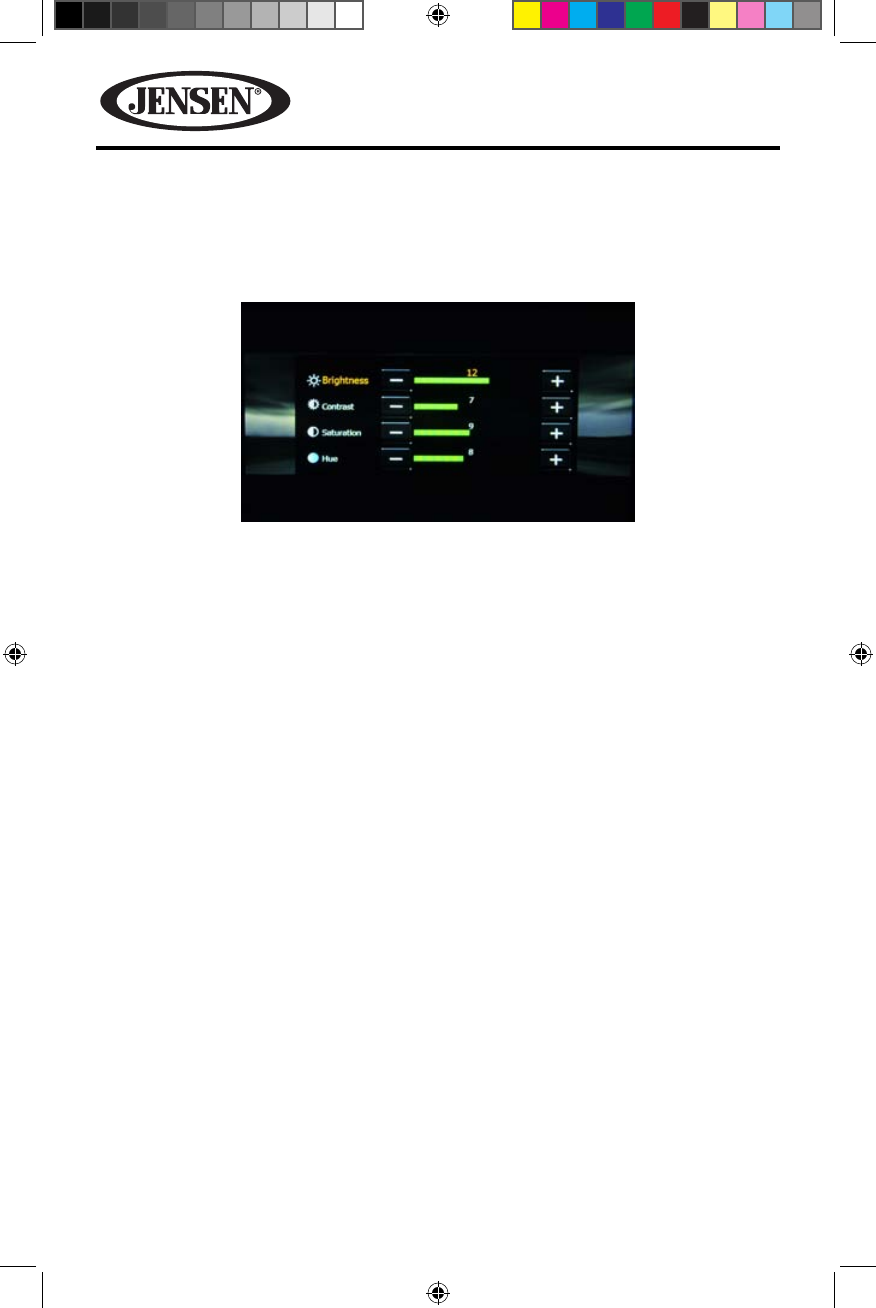
PIC- When the PIC icon is touched the picture adjust screen appears. Touch this
icon during playback to adjust the color brightness, contrast, saturation and hue.
The levels can be adjusted to suit the users preferences. The adjustments are
accomplished by touching the + or - icons to decrease or increase the desired
setting. The settings have range of 1 to 20.
NOTE: The Picture Adjustment Screen will turn OFF automatically if no adjustment
is made within ve seconds or if any other part of the screen is touched icon
is touched.
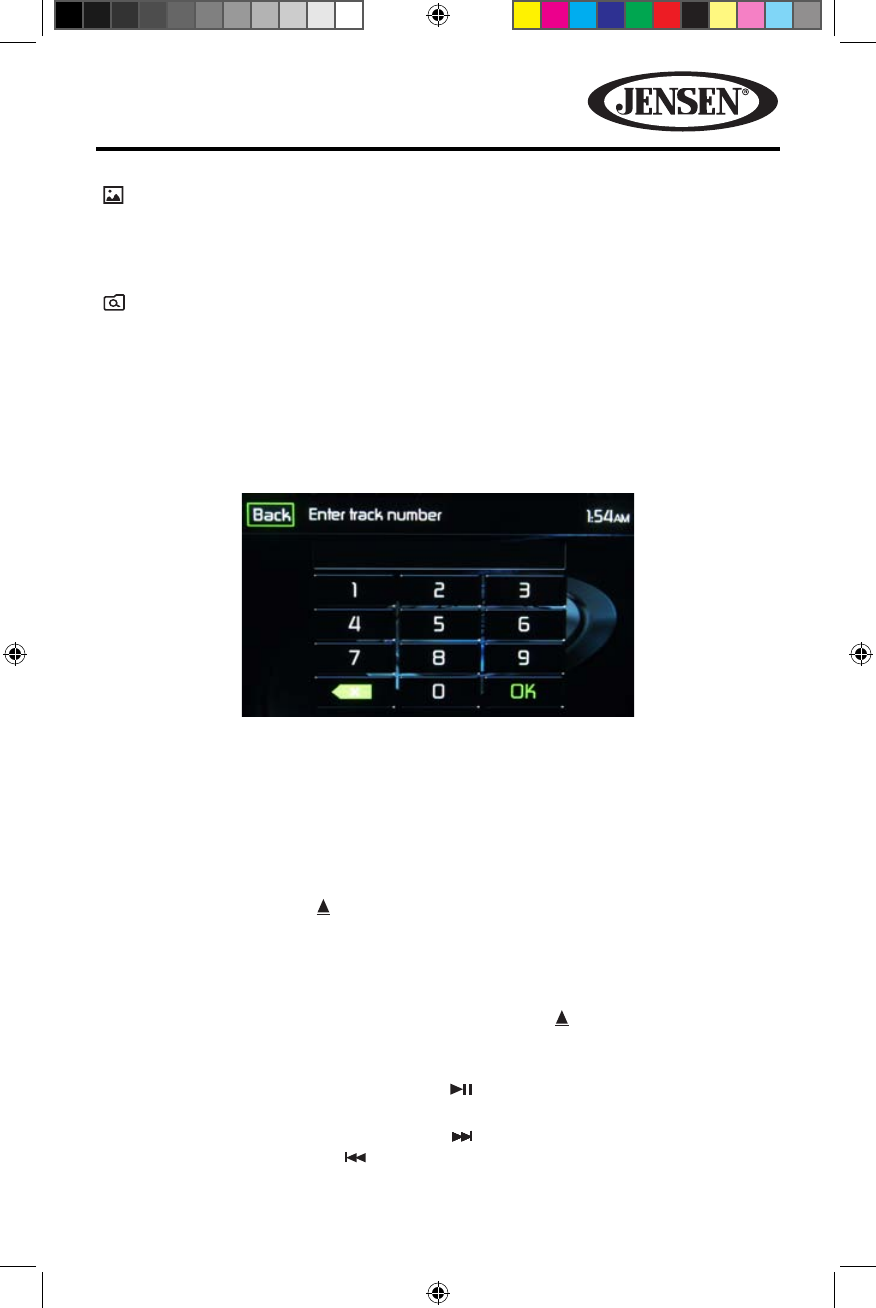
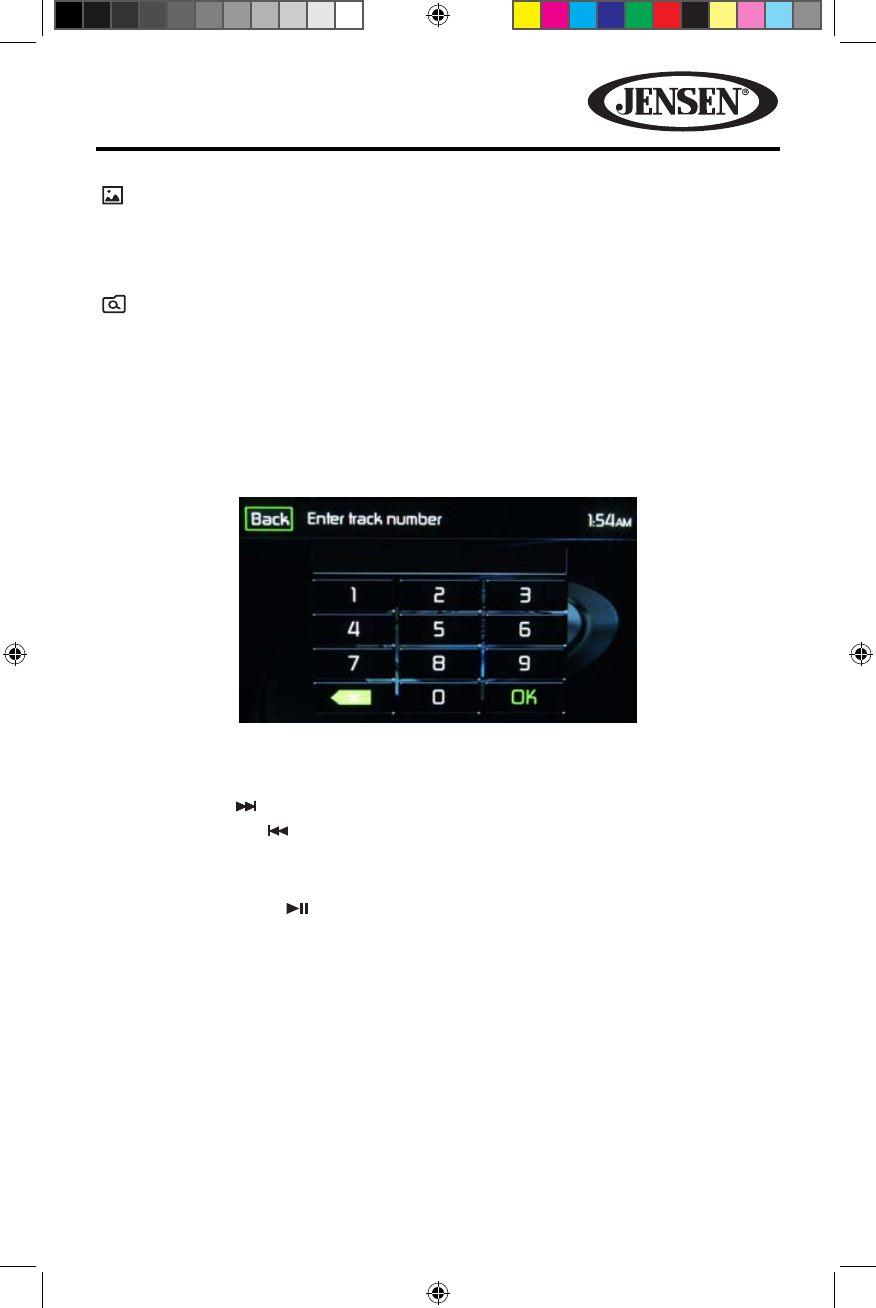
Direct Entry
When the Direct Entry icon is touched the Direct Entry Screen appears. The user
can manually select a title or a chapter. By touching q icon. The user can select a
chapter or title. The title or chapter can be selected by touching the corresponding
number for a title or chapter. After entering the numbers, touch the OK icon. If
a wrong digit is entered touching the green arrow will remove the number. After
touching OK, playback will begin.
Inserting a Disc
Upon inserting a DVD disc, DVD mode is entered and disc play begins. A disc
cannot be inserted if there is already a disc in the unit or if the power is o.
NOTE: If Parental Lock (Rating) is activated and the disc inserted is not authorized,
the 4-digit code must be entered and/or the disc must be authorized (see “Rating
Sub-menu Features”).
NOTE: DVD-R and DVD-RW will not play unless the recording session is nalized and
the DVD is closed.
Figure 23. DVD Picture Adjust Screen
Figure 24. DVD Chapter and Title Direct Entry Screen
128-9243a VX6020 Owner's Manual 08 14 2013.indd 32 8/14/2013 12:07:18 PM

33
VX6020
Ejecting a Disc- Touch on the front of the unit to eject the disc. The unit
automatically reverts to Tuner mode. You may eject a disc with the unit powered
o. The unit will remain o after the disc is ejected.
Resetting the Loading Mechanism- If the disc loads abnormally or an abnormal
core mechanism operation occurs, touch and hold to reset the loading mechanism.
Normal operation resumes.
Accessing DVD Mode- To switch to DVD mode when a disc is already inserted,
touch SRC on the TFT LCD screen to access the source menu. Touch the disc icon.
Viewing an Alternate Picture Angle (DVD Only)
Some DVDs contain scenes that have been shot simultaneously from dierent
angles. For discs recorded with multiple angles, touch Angle on the second page of
DVD on-screen controls to toggle available angles of the on-screen image.
Multi-Language Discs (DVD Only)
Changing Audio Language- If you are watching a disc recorded in multiple
languages, touch AUDIO on the TFT LCD screen to choose a language. Each time
the icon is touched the language will change.
Changing Subtitle Language- If you are watching a disc recorded in multiple
languages with subtitles, touch Language on the TFT LCD screen to choose the
language that you would like the subtitles to appear.
Playback Information
During DVD and VCD playback, touch the TFT LCD screen to display playback
information on the screen, including the current playback time.
DVD Playback Information
• DVD Video – Format of current disc.
• Time 00:01:30/00:36:10 – Indicates the playback time of the current track.
• Title 5/08 – Indicates the fth of 8 titles on the DVD is currently playing.
• Chapter 2/16 – Indicates that the second of 16 chapters on the DVD is currently
playing.
VCD Playback Information
• VCD2.0 – Format of current disc.
• Time 00:01:30/00:36:10 – Indicates the playback time of the current track.
128-9243a VX6020 Owner's Manual 08 14 2013.indd 33 8/14/2013 12:07:18 PM
34
VX6020
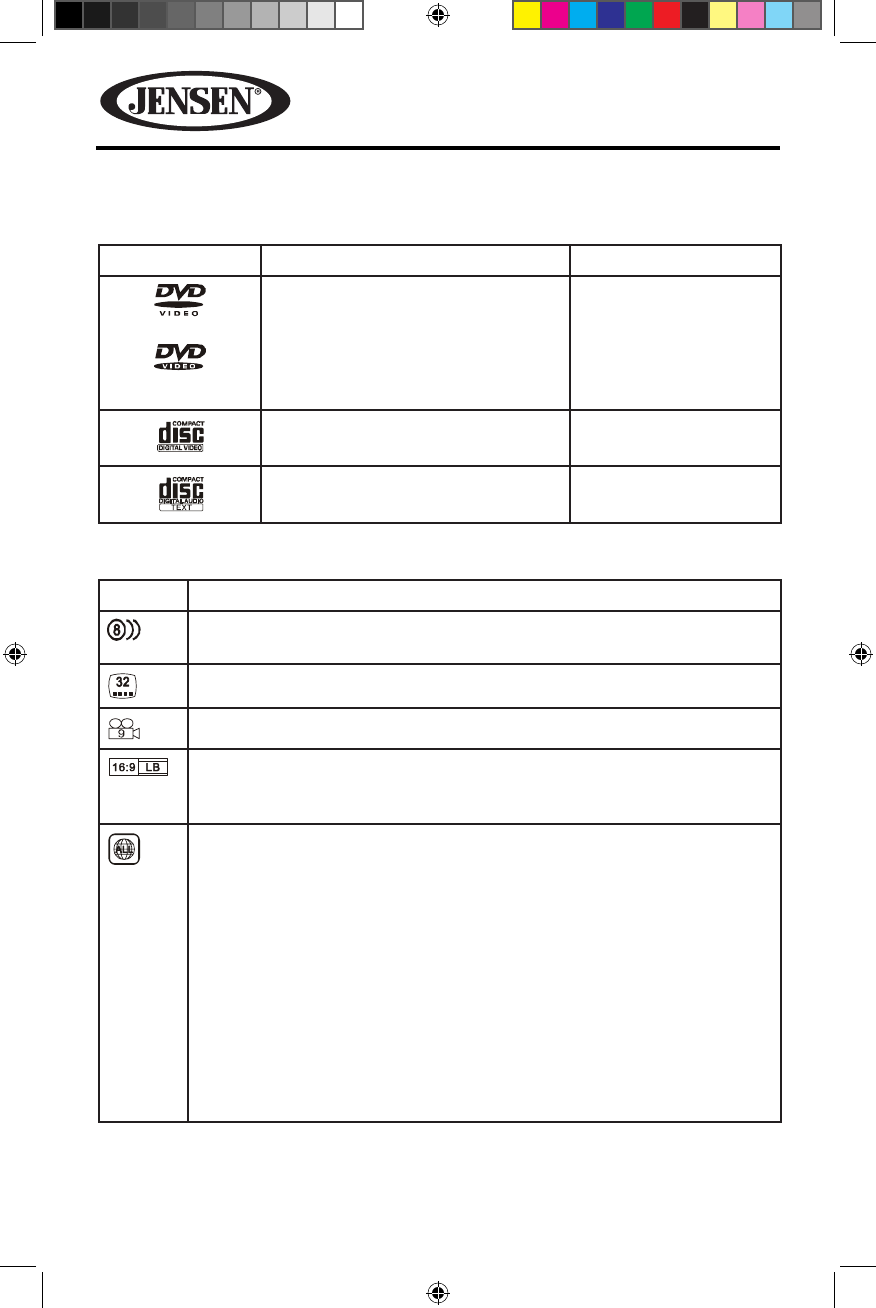
General Disc Information
Disc Properties
Symbol 12cm Disc Properties Max Play Time
Single side single layer (DVD-5)
Single side double layer (DVD-9)
Double side single layer (DVD-10)
Double side double layer (DVD-18)
(MPEG 2 Method)
133 minutes
242 minutes
266 minutes
484 minutes
Single side single layer (VCD) (MPEG 1 Method)
74 minutes
Single side single layer 74 minutes
Disc Symbols
Symbol Meaning
Number of voice languages recorded. The number inside the icon
indicates the number languages on the disc (maximum of 8).
Number of subtitle languages available on the disc (maximum of 32).
Number of angles provided (maximum of 9).
Aspect ratios available. “LB” stands for Letter Box and “PS” stands for
Pan/Scan. In the example on the left, the 16:9 video can be converted
to Letter Box video.
Indicates the region code where the disc can be played.
• Region 1: USA, Canada, East Pacic Ocean Islands
• Region 2: Japan, Western Europe, Northern Europe, Egypt, South
Africa, Middle East
• Region 3: Taiwan, Hong Kong, South Korea, Thailand, Indonesia,
South-East Asia
• Region 4: Australia, New Zealand, Middle and South America,
South Pacic Ocean Islands/Oceania
• Region 5: Russia, Mongolia, India, Middle Asia, Eastern Europe,
North Korea, North Africa, North-West Asia
• Region 6: Mainland China
• ALL: All regions
128-9243a VX6020 Owner's Manual 08 14 2013.indd 34 8/14/2013 12:07:18 PM

35
VX6020
CD OPERATION
CD Main Menu
From the Main Menu Screen touch the DISC icon or insert a CD into the disc slot,
label side up. Playback begins in CD mode when a disc is inserted correctly.
SRC Icon- Touch this icon to return to the Main Menu Screen.
DISC- Displays the current source.
Track Number- Lists the current track playing and the total number of tracks
contained on the disc.
Time Display- This indicator displays the time as entered by the user in the Settings
Menu.
CD Disc Information Display- Displays the artist, the title of the track and the title
of the album.
More ( p/q )- Touch the p/q icons to display the next or previous page of the
Disc menu.
Previous- Touch this icon to play the previous track.
Play/Pause- Touch this icon to begin disc playback. Touch this icon again to
pause disc playback.
Next- Touch this icon to play the next track.
List- Touch this icon to access the list of tracks contained on the disc. Touch a desired
track icon twice and the track will begin playing.
Shue-Touch this icon to play tracks in the directory in a random order. The
icon will light on the main CD screen.
Figure 25. CD Main Menu
128-9243a VX6020 Owner's Manual 08 14 2013.indd 35 8/14/2013 12:07:20 PM
36
VX6020
Repeat- Touch this icon to repeat playback of the current track. The icon on the
TFT LCD screen will light and small number 1 will appear below the icon and the
track will repeat. Touch this icon a second time and the album will repeat. The icon
on the TFT LCD screen will light and small letter a will appear below the icon and
the album will repeat. Touch the icon again the repeat function will be cancelled.
The icon on the TFT LCD screen will dim and playback of the remainder of the disc
will resume.
EQ - Equalizer- Touch this icon to access the Equalizer Control Menu (see “Adjusting
Equalizer Controls”).
Direct Entry- Touch this icon to the display the Direct Entry Screen.
Track Elapsed Playback Time-The elapsed playback time of track is displayed on
the on the TFT LCD screen.
Track Total Playback Time-The total playback time of track is displayed on the
main CD screen.
CD List
Touching the List icon will display the CD List Screen. The CD List Screen illustrates
the contents of a CD disc. The contents are divided into folders and various le
types. The le types are audio tracks, Audio Video Interleave (AVI) les, and image
les such as JPEGS. AVI les is a format designed to store both audio and video data
for simultaneous playback. Touching the icon will display the les present on the
disc.
( ) Audio Files- Touch the audio le icon to display the audio les. Touch the audio
le icon to select a track. Touch the audio le icon again to conrm and playback
will begin.
() Video Files-Touch the video le icon to display the video les. Touch the video
le icon to select a video le. Touch the video le icon again to conrm and playback
will begin.
Figure 26. CD List Screen
128-9243a VX6020 Owner's Manual 08 14 2013.indd 36 8/14/2013 12:07:21 PM
37
VX6020
() Image Files (JPEG etc)- Touch the image icon to display a folder or individual
JPEG les. Touch the image icon to select a folder or an individual JPEG le. In the
case of a JPEG folder touch the folder icon twice and the contents of the folder will
be displayed. Touch the JPEG image icon to select and view an individual JPEG le.
() Folders- Touch the icon to display the folder/le hierarchy. Touch the folder
icon twice and the contents of the folder will be displayed. Touch the le’s icon to
select a le. Touch the icon again to conrm and open the le.
Track Direct Entry
When the Direct Entry icon is touched the Direct Entry Screen appears. The user
can manually select a track by touching the corresponding number. After entering
the track numbers touch the OK icon. If a wrong digit is entered touching the green
arrow will remove the number. After touching OK playback will begin.
Controlling Playback
Inserting a Disc- Upon inserting a CD, disc play begins. You cannot insert a disc if
there is already a disc in the unit or if the power is o.
Ejecting a Disc- Press the icon on the front of the unit to eject the disc. The unit
automatically reverts to Tuner mode. You may eject a disc with the unit powered
o. The unit will remain o after the disc is ejected.
Resetting the Loading Mechanism-If the disc loads abnormally or an abnormal
core mechanism operation occurs, press and hold the icon to reset the loading
mechanism. Normal operation resumes.
Pausing Playback- Touch the Play/Pause ( ) icon to suspend or resume disc play.
Moving Through Tracks- Touch the Next ( ) icon to advance to the next track on
the disc. Touch the Previous ( ) icon to move to the previous track.
Figure 27. CD Track Direct Entry Screen
128-9243a VX6020 Owner's Manual 08 14 2013.indd 37 8/14/2013 12:07:22 PM

38
VX6020
Repeat Playback- Touch the icon to alter repeat mode according to the
following:
• CD-DA: Repeat Track > Repeat Album > Repeat O
• CD-R/RW: Repeat Track > Repeat Album > Repeat O
Random Play Select-Touch the Random ( ) icon to play the tracks on the disc
in a random, shued order. Touch the Random ( ) icon again to cancel Random
Play mode.
NOTE: CD-R and CD-RW will not play unless the recording session is nalized.
MP3/WMA OPERATION
MP3 is a format for storing digital audio. An audio CD-quality song can be
compressed into the MP3 format with very little loss of quality, while taking up
much less space. Insert a MP3 Disc into the disc slot, label side up. Playback begins
in MP3 mode when a disc is inserted correctly. The unit plays the songs in the order
they were burned on to the disc. The unit will play a MP3 disc with up to 500 songs
and/or 200 dierent folders. The menu for playing audio MP3 music les is the same
as previously described for CD discs.
Media and File Requirements
This player allows you to play back MP3 and WMA les recorded onto CD-R/RWs,
DVD+R/RWs, and DVD-R/RWs. For CD-RW discs, please make sure it is formatted
using the full method and not the quick method to prevent illegal disc operation.
For the greatest le capacity, Dual Layer DVD’s can be used when burning music to
a disc.
MP3 Format Compatibility
The le naming formats listed below are compatible with this unit:
• ISO 9660 – le name: 12 characters, le extension: 3 characters
• ISO 9660 – le name: 31 characters, le extension: 3 characters
• Joliet – 64 characters
If the le or folder name does not conform to ISO 9660 le system standards, it
may not be displayed or played back correctly. Use the following settings when
compressing audio data for your MP3 disc:
• Transfer Bit Rate: 128kbps
• Sampling Frequency: 48kHz
When recording MP3 up to the maximum disc capacity, disable additional writing.
For recording on an empty disc up to maximum disc capacity, use the “Disc at once”
setting.
128-9243a VX6020 Owner's Manual 08 14 2013.indd 38 8/14/2013 12:07:23 PM

39
VX6020
MP3 Playing Order
When selected for play, les and folders are accessed in the order they were written
by the CD writer. As a result, the order in which they are expected to be played may
not match the order in which they are actually played. You may be able to set the
order in which MP3/WMA les are to be played by writing them onto a medium
such as a CD-R with their le names beginning with play sequence numbers such
as “01” to “99”.
Controlling Playback
Inserting a Disc- Upon inserting a MP3/WMA disc, disc play begins. You cannot
insert a disc if there is already a disc in the unit or if the power is o.
Ejecting a Disc- Press the icon on the front of the unit to eject the disc. The unit
automatically reverts to Tuner mode. You may eject a disc with the unit powered
o. The unit will remain o after the disc is ejected.
Resetting the Loading Mechanism- If the disc loads abnormally or an abnormal
core mechanism operation occurs, press and hold the icon to reset the loading
mechanism. Normal operation resumes.
Playing MP3/WMA Files- After inserting a MP3/WMA disc, les will play in the
sequence of the “Root’ directory.
NOTE: When burning MP3 / WMA les onto a DVD disc, use the 2X or 4X burning
option, if available. This slower burning speed will help eliminate buer errors and
increase disc reading reliability. Also, use folders when burning large numbers of
songs / les to a disc for easy music navigation. Select the “Disc at Once” option and
close your disc.
NOTE: CD-R and CD-RW will not play unless the recording session is nalized.
Pausing Playback- Touch the Play/Pause ( ) icon to suspend or resume playback.
Moving Through Tracks- Touch the Next ( ) icon to advance to the next track
Touch the Previous ( ) icon to move to the previous track on the MP3 disc.
Repeat Playback- Touch the Repeat ( ) icon to alter repeat mode as follows:
Repeat Single > Repeat Folder > Repeat All > Repeat O.
Random Play Select- Touch the Random ( ) icon to play the tracks on the MP3
disc device in a random, shued order. Touch the Random ( ) icon again to
cancel Random Play mode.
128-9243a VX6020 Owner's Manual 08 14 2013.indd 39 8/14/2013 12:07:23 PM

40
VX6020
RADIO TUNER OPERATION
Radio Tuner TFT Display
SRC: Touch to view the SOURCE MENU and select a new playback source.
Radio: Displays the current source.
Time Display- This indicator displays the time as entered by the user in the
Settings Menu.
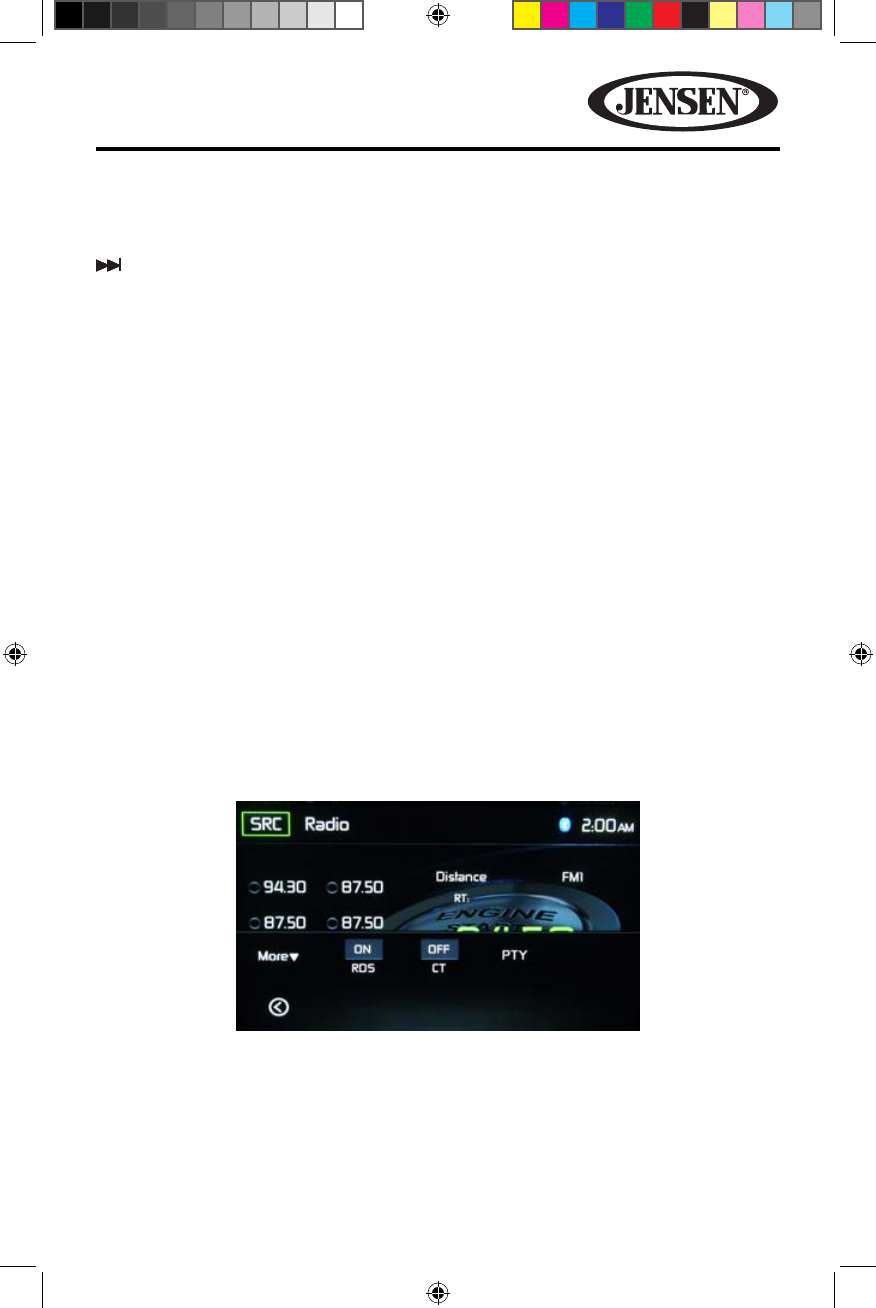
Preset List- Provides a display of the preset frequencies. Touch to recall a preset
station. The radio can store 6 FM1, 6 FM2, 6 FM3, 6 AM1 and 6 AM2 frequency
presets.
Local/Distance- Displays the local distant setting.
Stereo- Displays stereo radio signal reception.
FM1- Displays the current preset frequency band .
P 1 through P6- Displays the current preset frequency within the preset
frequency band that currently playing.
107.7 MHz:- Displays the radio station frequency that is currently playing.
More ( p/q )- Touch the p/q icons to display the next or previous page of the
Disc menu.
Previous/Manual Seek- Touch this icon to momentarily seek the previous
available radio station or touch and hold to manually tune the radio in 200KHz
increments. Default mode is resumed after 10 seconds of inactivity.
Figure 28. Radio Tuner TFT Display Screen
128-9243a VX6020 Owner's Manual 08 14 2013.indd 40 8/14/2013 12:07:24 PM
41
VX6020
AS:
Touch to automatically search and store all strong stations.
Next/Manual Seek- Touch this icon to momentarily seek the next available
radio station or touch and hold to manually tune the radio in 200KHz increments.
Default mode is resumed after 10 seconds of inactivity.
Band- Touch to change between AM/FM bands.
Option- Touch to activate the Clock Time, RDS and program type (PTY) related
search function.
Save- Touch this icon to save a radio station frequency in one or all six preset
stations on FM band 1,2,3 or AM band 1 and 2.
Local/Distance- Touch to select and activate local and distant station reception.
When the Local function is on, only radio stations with a strong local radio signal
are played.
Direct Entry- Touch this icon to the display the Direct Entry Screen.
EQ - Equalizer- Touch this icon to access the Equalizer Control Menu (see “Adjusting
Equalizer Controls”.
Option
Touching the Options icon will display the following RDS, CT and PTY functions on
the Tuner TFT LCD display screen.
CT/RDS- (Clock Time, RDS feature) When enabled the radio system clock is
synchronized with broadcasters time signal setting the clock automatically. In some
regions where daylight savings time is not adhered to, the system clock will be o
by 1 hour. In these cases, set CT to OFF and manually set the clock.
Figure 29. Radio Tuner Option Screen
128-9243a VX6020 Owner's Manual 08 14 2013.indd 41 8/14/2013 12:07:25 PM

42
VX6020
PTY- This function displays the program category of the current station such as
category (news, sports, talk etc.) Use the scroll bar to select various categories.
Touching the Back icon returns the user to main tuner screen.
There are 27 categories in the PTY function.
1. None 8. Adult Hits 15. Jazz 22. Personality
2. News 9. Soft Rock 16. Classic 23. Public
3. Info 10. Top 40 17. RGB 24. College
4. Sports 11. Country 18. Soft RGB 25. Weather
5. Talk 12. Oldies 19. Language 26. Test
6. Rock 13. Soft 20. Religious Music 27. Alert
7. Classic Rock 14. Nostalgia 21. Religious Talk
Direct Entry Tuning
When the Direct Entry icon is touched the Direct Entry Screen appears. The user can
enter the desired radio station frequency using the on-screen number pad. After
entering the radio station frequency touch the OK icon. If a wrong digit is entered
touching the green arrow will remove the number. After touching OK the radio will
tune to the entered station playback will begin.
Figure 30. PTY Screen
Figure 31. Radio Direct Entry Screen
128-9243a VX6020 Owner's Manual 08 14 2013.indd 42 8/14/2013 12:07:25 PM
43
VX6020
Using Preset Stations
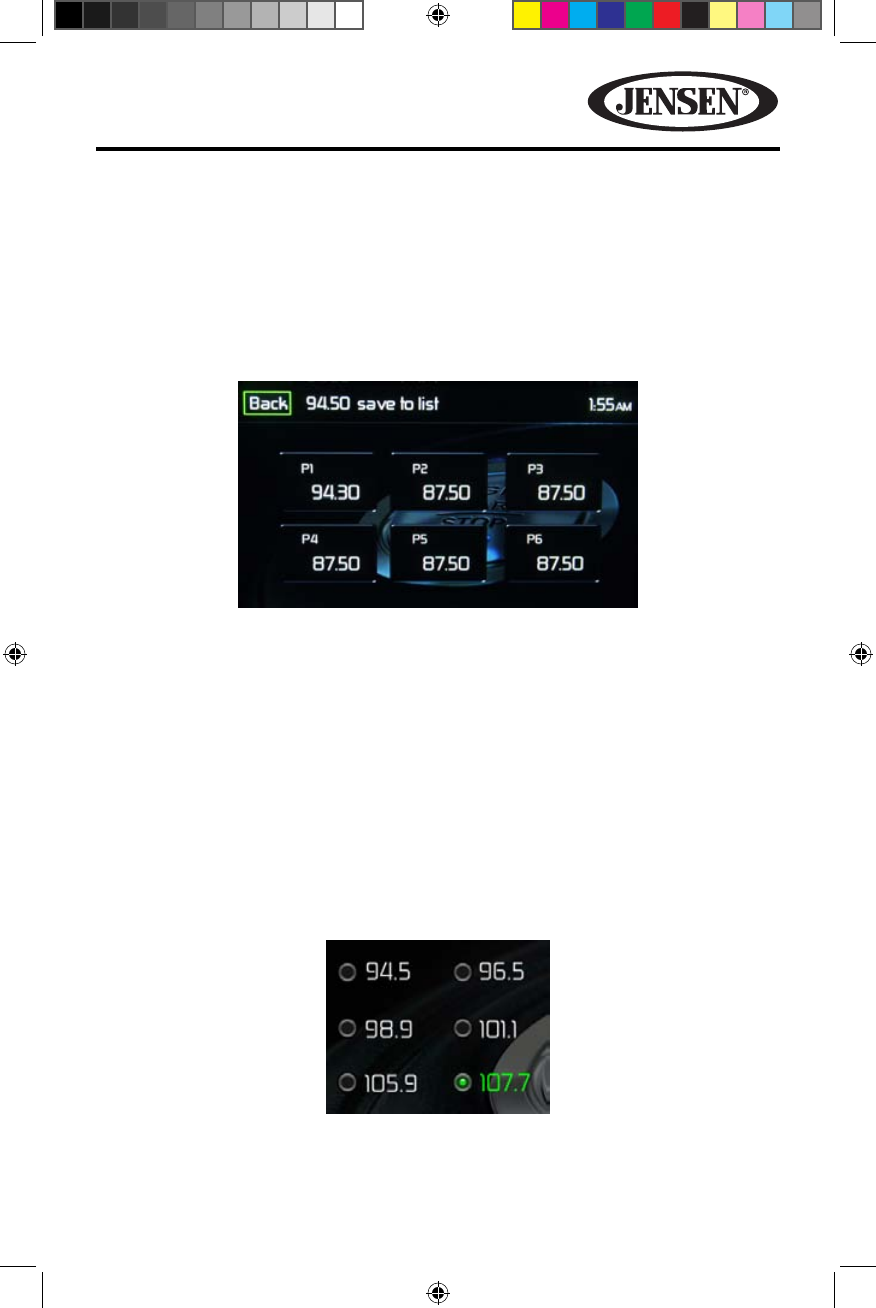
Six numbered preset icons store and recall stations for each band. All six stored
stations (P1 through P6) for the current band appear on the screen.
Storing a Station
1. Select a band (if needed), then tune to a desired radio station frequency.
2. Touch the on-screen Save icon. The following screen will appear.
3. Touch the preset number in which you would like to store the current station.
The station frequency is displayed at the top of the menu. The preset number
will appear highlighted. The station frequency will be stored in the highlighted
preset. The station will be displayed Tuner TFT LCD screen. Station can also be
stored by touching and holding the preset icon to store the station currently
tuned as a preset.
Recalling a Station
1. Select a preset band (if needed).
2. Touch an on-screen preset icons (P1 through P6) to select the corresponding
stored station.
Figure 32. Preset Save Screen
Figure 33. Preset Station Screen
128-9243a VX6020 Owner's Manual 08 14 2013.indd 43 8/14/2013 12:07:26 PM
44
VX6020
Auto Store (AS)
To select six strong stations and store them in the current band. This feature is most
useful when travelling in an area where you are not familiar with the local stations.
1. Select a band (if needed).
2. Touch the AS icon to activate the Auto Store function. FM Band 1 will be lled
rst, then Band 2, Band 3 will be lled if enough stations are detected. The AM
Bands function in a similar manner. As new stations are found they will replace
stations already stored in that band.
NOTE: If stations have already been set as favorites, activating the Auto-
Store feature will erase those stations and enter the new strong stations.
Local/Distance Radio Station Seeking
When the Local function is on, only radio stations with a strong local radio signal
are played. To activate the Local function in the AM/FM tuner mode, touch the
More on the Tuner TFT LCD screen. The Local/Distance icon is revealed. Touch
Local or Distance to turn the local/distance function on or o. When the Local or
Distance function is active, the Local or Distance indicator at the top of the screen
is illuminated.
128-9243a VX6020 Owner's Manual 08 14 2013.indd 44 8/14/2013 12:07:26 PM

45
VX6020
This page intentionally left blank
128-9243a VX6020 Owner's Manual 08 14 2013.indd 45 8/14/2013 12:07:26 PM
46
VX6020
iPod®/iPhone® CONTROLS
Accessing iPod® Mode
The user can control an iPod®/iPhone® using the touch screen to access, albums,
songs, videos, etc.
NOTE: For basic connectivity, the iPod®/iPhone® must be connected to the unit
using the iPod®/iPhone® adapter cable that came with the iPod/iPhone (also
available separately). For iPod®/iPhone® video playback, use an adapter cable
equipped with a USB connector and a 3.5 mm AV jack. Be sure your iPod®/iPhone®
has the latest Apple rmware installed to avoid connectivity issues.
The unit will automatically switch to iPod® mode when an
iPod®
, iPod® touch or
iPhone® is plugged into the front panel mini USB connector. Also the
iPod® can be
accessed from the Main Menu Screen by touching the iPod® icon
(only available
when an iPod® or iPhone® is connected to the front panel mini USB connector)
iPod®/iPhone® Main Menu
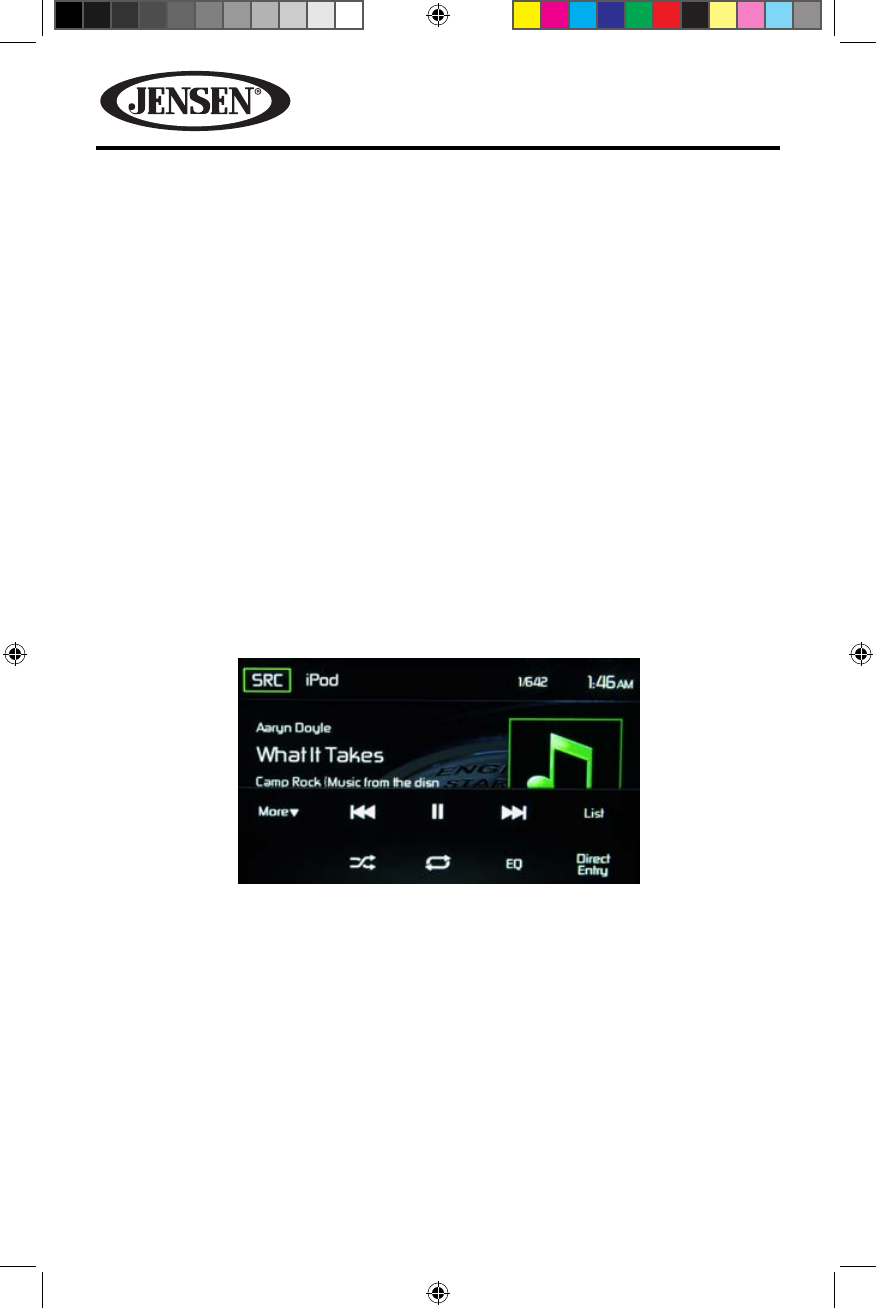
SRC Icon- Touch this icon to return to the Main Menu Screen.
iPod- Displays the current source.
Track Number- Lists the current audio track playing and the total number of audio
tracks in audio mode. Lists the current video folder and the total number of video
folders in video mode.
Time Display- This indicator displays the time as entered by the user in the Settings
Menu.
More ( p/q )- Touch the p/q icons to display the next or previous page of the
iPod® menu.
Figure 34. iPod®/iPhone® Main Menu
128-9243a VX6020 Owner's Manual 08 14 2013.indd 46 8/14/2013 12:07:27 PM
47
VX6020
Previous- Touch this icon to play the previous track.
Play/Pause- Touch this icon to begin playback. Touch this icon again to pause
playback.
Next- Touch this icon to play the next track.
List- Touch this icon to access the list of audio and video les contained on the
iPod®. Touch a folder icon and the contents of the folder will be displayed. Touch a
desired track icon twice and the track will begin playing.
Shue- Touch this icon to play audio or video tracks in a random order. The
icon will light on the main TFT LCD screen.
Repeat- In audio mode touch this icon to repeat playback of the current audio
track. The icon on the main TFT LCD screen will light and a small letter A will
appear below the icon and the all the audio tracks will repeat. Touch this icon again
and single track will repeat. The icon on the TFT LCD screen will light and small
number 1 will appear below the icon. Touch the icon again the repeat function will
be cancelled. The icon on the main TFT LCD screen will dim and playback of the
remainder of the tracks will resume.
EQ - Equalizer- Touch this icon to access the Equalizer Control Menu (see “Adjusting
Equalizer Controls” .
Direct Entry- Touch this icon to the display the Direct Entry Screen.
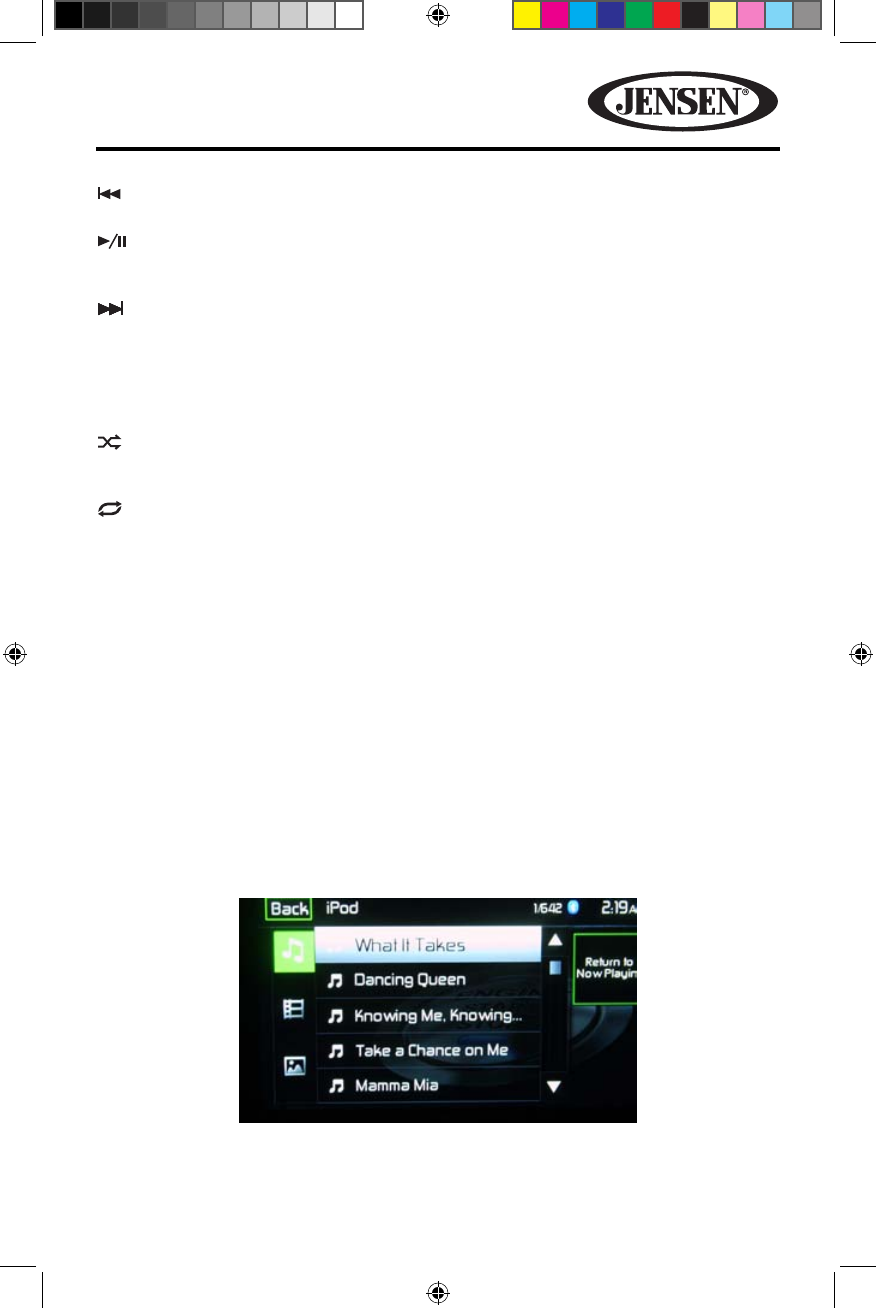
iPod® List
Touching the List icon will display the iPod® List Screen. The iPod® List Screen
illustrates the audio and video les present in the iPod®. The contents are divided
into folders and various le types. The le types consist of audio and video les.
Touching the folder icon will display the les present in the folder.
Figure 35. iPod®/iPhone® List Screen
128-9243a VX6020 Owner's Manual 08 14 2013.indd 47 8/14/2013 12:07:28 PM
48
VX6020
( )Audio Files- Touch the audio le icon to display the audio les. Touch the audio
le icon to select a track. Touch the audio le icon again to conrm and playback
will begin.
( )Video Files- Touch the video le icon to display the video les. Touch the video
le icon to select a video le. Touch the video le icon again to conrm and playback
will begin.
()Image Files (JPEG etc)- Image les are selected and controlled by the iPod®.
Touch the image icon and the following message will appear:
Use the iPod® to control/select photos.
Touch screen to return to the menu.
( )Folders- Touch the icon to display the folder/le hierarchy. Touch the folder
icon and the contents of the folder will be displayed. Touch the le’s icon to select a
le. Touch the icon again to conrm and open the le.
Controlling Playback
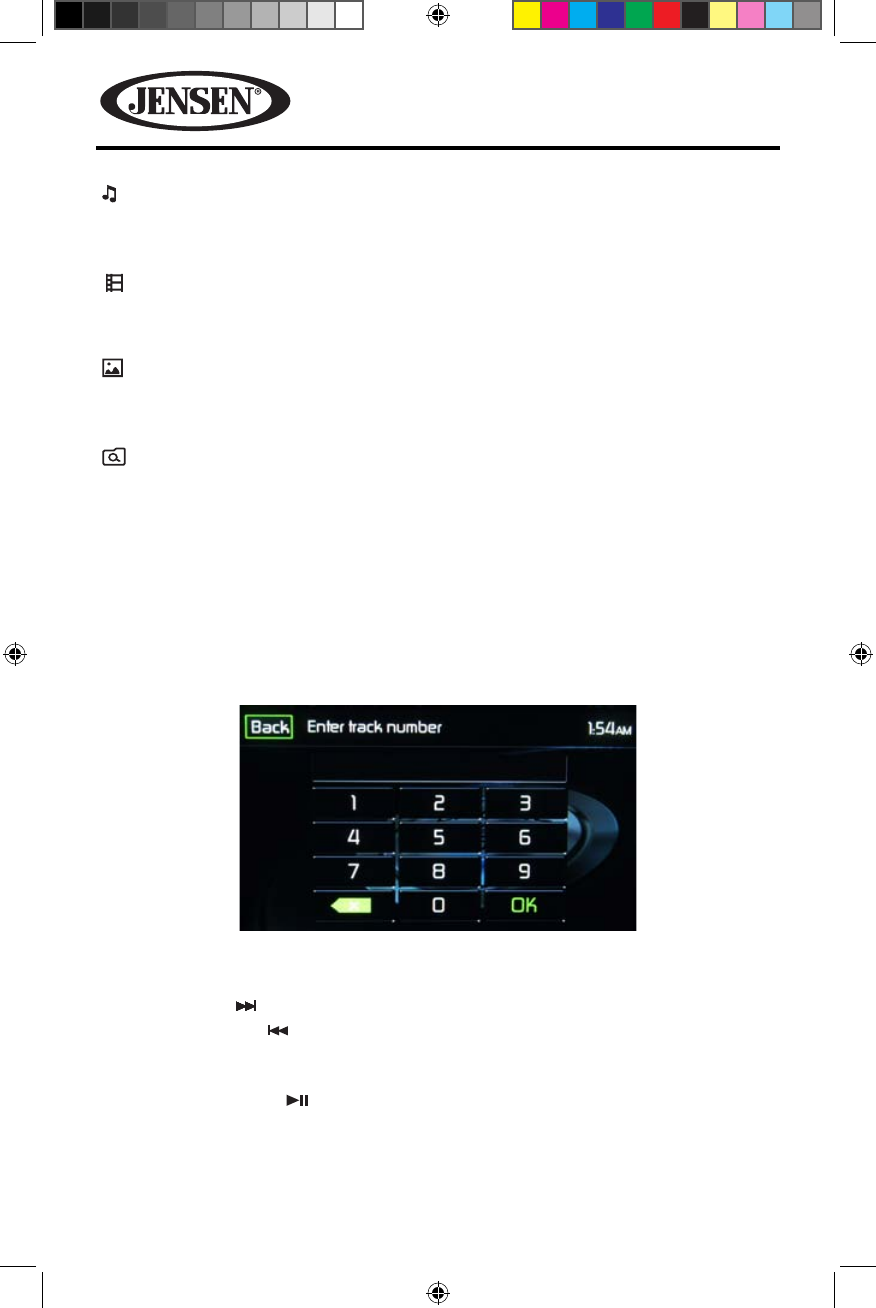
Direct Entry
When the Direct Entry icon is touched the Direct Entry Screen appears. The user
can manually select a track by touching the corresponding number. After entering
the track numbers touch the OK icon. If a wrong digit is entered touching the green
arrow will remove the number. After touching OK playback will begin.
Moving Through Tracks
Touch the Next ( ) icon to advance to the next track on the iPod ®.
Touch the Previous ( ) icon to move to the previous track on the iPod ®.
Pausing Playback
Touch the Play/Pause ( ) icon to suspend or resume playback.
Figure 36. iPod®/iPhone® Track Direct Entry Screen
128-9243a VX6020 Owner's Manual 08 14 2013.indd 48 8/14/2013 12:07:29 PM
49
VX6020
PIC- When the PIC icon is touched the picture adjust screen appears. Touch this
icon during playback to adjust the color brightness, contrast, saturation and hue.
The levels can be adjusted to suit the users preferences. The adjustments are
accomplished by touching the + or - icons to decrease or increase the desired
setting. The settings have range of 1 to 20.
NOTE: The Picture Adjustment Screen will turn OFF automatically if no adjustment
is made within ve seconds or if any other part of the screen is touched.
Figure 37. iPod®/iPhone® DVD Picture Adjust Screen
128-9243a VX6020 Owner's Manual 08 14 2013.indd 49 8/14/2013 12:07:30 PM
50
VX6020
USB AND SD CARD CONTROLS
Inserting a USB or SD Card Device
USB Device
When using a USB memory device, a USB cable adapter is required. The adapter
cable will accept a USB device on one end and connect to unit’s Mini USB connector
on the front panel of the unit.
NOTE:
For iPod®/iPhone® video playback, use an adapter cable equipped with a
USB connector and a 3.5 mm AV jack.
For basic connectivity, the iPod®/iPhone®
must be connected to the unit using the iPod®/iPhone® adapter cable that came
with the iPod/iPhone (also available separately) and a adapter cable to connect
to the unit’s mini USB connector. Be sure your iPod®/iPhone® has the latest Apple
rmware installed to avoid connectivity issues
The USB/SD ports will recognize most
USB/SD ash memory devices and portable hard drives. The unit supports up to
32GB SD cards however SD cards larger than 32GB may not be recognized. Portable
hard drives (hard drives must be formatted to FAT32 and NTFS is not supported).
SD Device
SD cards are inserted into the SD card slot until a click is heard. The click will ensure
that the card is securely inserted to the unit. The unit will read the audio/video les
on USB/SD devices automatically.
1. Locate the USB/SD connector on the front of the radio.
2. Lift the protective cover to reveal the mini USB connector and SD card slot.
3. Insert the USB/SD device into the mini USB/SD connectors.
To remove the USB or SD device, touch the SRC icon or use the SOURCE MENU to
switch to another mode, and then remove the USB or SD device from the connector.
OPEN
AV-
IN
OPEN
AV-
IN
VX6020
SD CARD
AV INPUT
Bluetooth
Figure 39. USB and SD Connector Location
Figure 38. Mini USB to USB Adapter Cable
128-9243a VX6020 Owner's Manual 08 14 2013.indd 50 8/14/2013 12:07:31 PM
51
VX6020
USB and SD Operation
SDHC and USB Main Menu
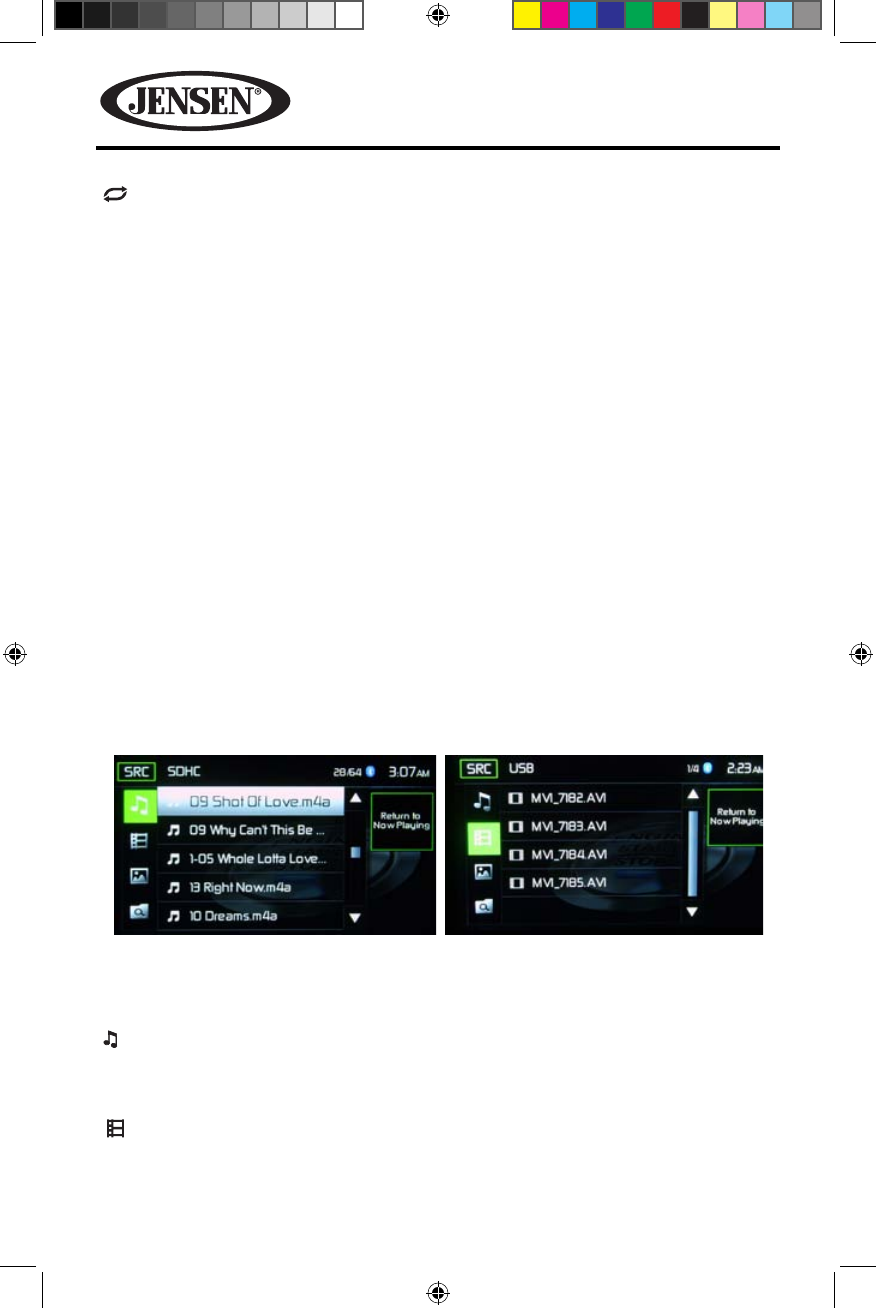
SRC Icon- Touch this icon to return to the Main Menu Screen.
iPod- Displays the current source.
Track Number- Lists the current audio track playing and the total number of audio
tracks in audio mode. Lists the current video folder and the total number of video
folders in video mode.
Time Display- This indicator displays the time as entered by the user in the Settings
Menu.
More ( p/q )- Touch the p/q icons to display the next or previous page of the
SD/USB menu.
Previous- Touch this icon to play the previous track.
Play/Pause- Touch this icon to begin playback. Touch this icon again to pause
playback.
Next-Touch this icon to play the next track.
List- Touch this icon to access the list of audio and video les contained on the
iPod®. Touch a folder icon and the contents of the folder will be displayed. Touch a
desired track icon twice and the track will begin playing.
Shue- Touch this icon to play audio or video tracks in a random order. The icon
will light on the main TFT LCD screen.
Figure 40. SDHC and USB Main Menu
128-9243a VX6020 Owner's Manual 08 14 2013.indd 51 8/14/2013 12:07:32 PM
52
VX6020
( )Repeat- In audio mode touch this icon to repeat playback of the current
audio track. The icon on the main TFT LCD screen will light and a small letter A will
appear below the icon and the all the audio tracks will repeat. Touch this icon again
and single track will repeat. The icon on the TFT LCD screen will light and small
number 1 will appear below the icon. Touch the icon again the repeat function will
be cancelled. The icon on the main TFT LCD screen will dim and playback of the
remainder of the tracks will resume.
In video mode touch this icon during playback to repeat the current track. The icon
on the main TFT LCD screen will light and small number 1 will appear below the icon
and the track will repeat. Touch the icon again to repeat all the tracks will repeat.
The icon on the main TFT LCD screen will light and small letter A will appear below
the icon and all the tracks will repeat. Touch the icon again the repeat function will
be cancelled. The icon on the main TFT LCD screen will dim and playback of the
remainder of the tracks will resume.
(EQ) Equalizer- Touch this icon to access the Equalizer Control Menu (see “Adjusting
Equalizer Controls”.
Direct Entry- Touch this icon to the display the Direct Entry Screen.
SDHC and USB List
Touching the List icon will display the SD/USB List Screen. The SD/USB List Screen
illustrates the audio and video les present in the SD/USB. The contents are divided
into folders and various le types. The le types consist of audio and video les.
Touching the folder icon will display the les present in the folder.
()Audio Files- Touch the audio le icon to display the audio les. Touch the audio
le icon to select a track. Touch the audio le icon again to conrm and playback
will begin.
( )Video Files- Touch the video le icon to display the video les. Touch the video
le icon to select a video le. Touch the video le icon again to conrm and playback
will begin.
Figure 41. SDHC and USB List Screens
SDHC List Screen USB List Screen
128-9243a VX6020 Owner's Manual 08 14 2013.indd 52 8/14/2013 12:07:33 PM
53
VX6020
()Image Files (JPEG etc)- Touch the image icon and the following message will
appear:
Use the SD/USB to control/select photos. Touch screen to return to the
menu.
( )Folders- Touch the icon to display the folder/le hierarchy. Touch the folder
icon and the contents of the folder will be displayed. Touch the le’s icon to select a
le. Touch the icon again to conrm and open the le.
Direct Entry
When the Direct Entry icon is touched the Direct Entry Screen appears. The user
can manually select a track by touching the corresponding number. After entering
the track numbers touch the OK icon. If a wrong digit is entered touching the green
arrow will remove the number. After touching OK playback will begin.
Moving Through Tracks
Touch the Next ( ) icon to advance to the next track on the SD/USB.
Touch the Previous ( ) icon to move to the previous track on the SD/USB.
Pausing Playback
Touch the Play/Pause ( ) icon to suspend or resume playback.
Figure 42. SDHC and USB Track Direct Entry Screen
128-9243a VX6020 Owner's Manual 08 14 2013.indd 53 8/14/2013 12:07:34 PM
54
VX6020
PIC- When the PIC icon is touched the picture adjust screen appears. Touch this
icon during playback to adjust the color brightness, contrast, saturation and hue.
The levels can be adjusted to suit the users preferences. The adjustments are
accomplished by touching the + or - icons to decrease or increase the desired
setting. The settings have range of 1 to 20.
NOTE: The Picture Adjustment Screen will turn OFF automatically if no adjustment
is made within ve seconds or if any other part of the screen is touched.
Figure 43. SDHC and USB Picture Adjust Screen
128-9243a VX6020 Owner's Manual 08 14 2013.indd 54 8/14/2013 12:07:35 PM
55
VX6020
AV-In1/AV-In2 CONTROLS
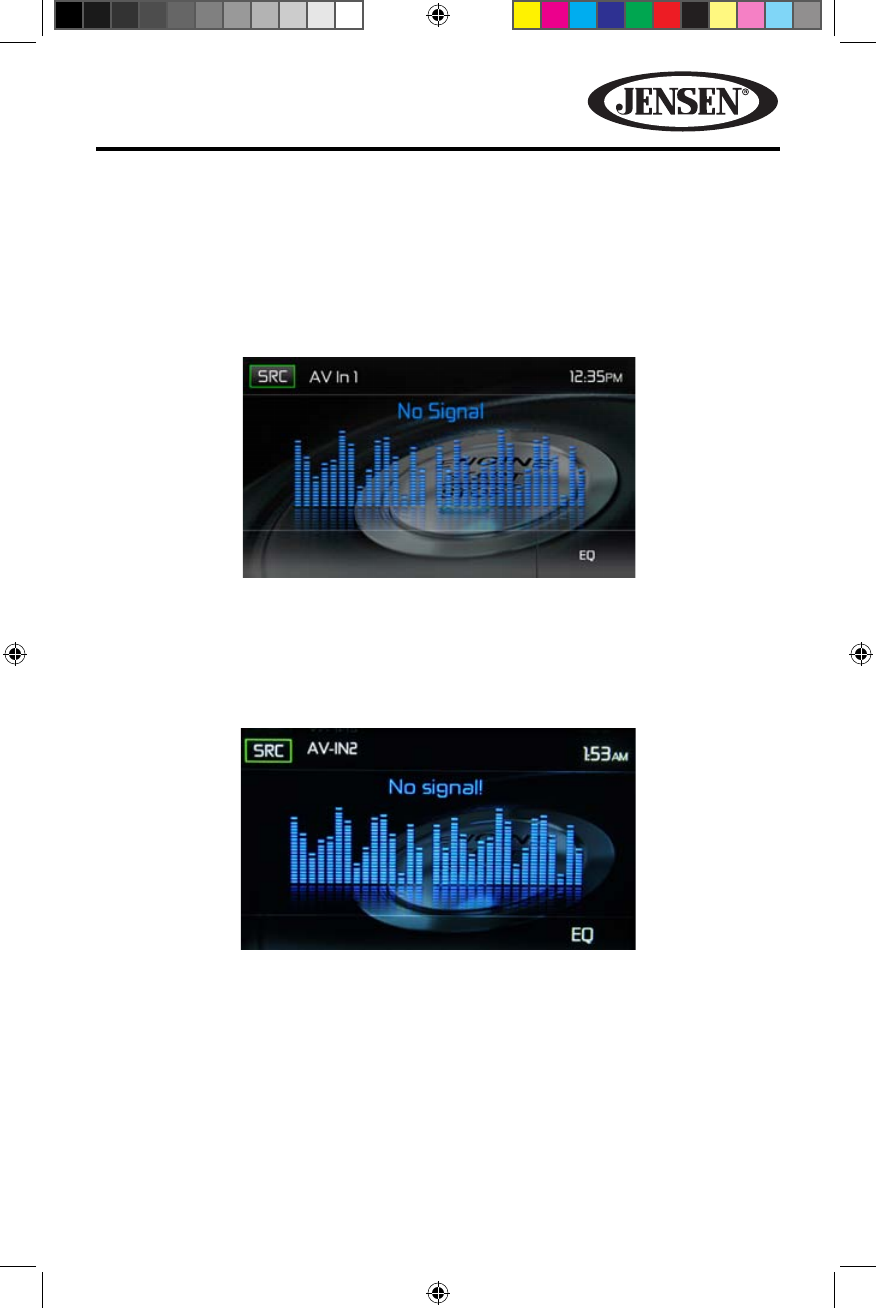
AV-In1
AV-In1 is used for playback of audio/video from an external device connected to
the unit through a 3.5mm jack located on the font panel. The unit can increase or
decrease the volume of the connected device. All other controls are done on the
connected device.
AV-In2
AV-In2 is used for playback of audio/video from an external device connected
through RCA connectors located on the back of the unit. The unit can increase or
decrease the volume of the connected device. All other controls are done on the
connected device.
NOTE: Audio/Video device must be connected to the unit using an audio/video
adapter cable that is available separately.
NOTE: The unit can not directly control external devices connected to the Media
Link. Please refer to the owner’s manual that came with the external device
for instructions.
NOTE: Video will only play when the vehicle parking brake is engaged. This is
designed to meet FMVSS standards and laws. The brake must be connected
for this feature to operate.
Figure 44. AV-In1 Screen (No Signal)
Figure 45. AV-In2 Screen (No Signal)
128-9243a VX6020 Owner's Manual 08 14 2013.indd 55 8/14/2013 12:07:36 PM

56
VX6020
BLUETOOTH OPERATION
Bluetooth® was launched by a special interest group (SIG) comprised of Ericsson
Inc., Intel Corp., Nokia Corp., Toshiba and IBM in 1998, and it is currently developed
by nearly 2,000 companies worldwide. The Bluetooth® word mark and logos
are owned by the Bluetooth® SIG, Inc. and any use of such marks by Audiovox
Corporation is under license. Other trademarks and trade names are those of their
respective owners.
Bluetooth® technology has the capability to wirelessly synchronize and transfer data
among devices. The Bluetooth® audio capabilities can be used for mobile phones
hands free applications. Bluetooth® has many proles and the unit is compatible
with most Bluetooth® enabled mobile phones. Before attempting to use the
Bluetooth® functions on the unit, please make sure your mobile phone supports
Bluetooth® functions.
NOTE: The line-of-sight distance between this unit and your mobile phone must be
8 feet (2.4 meters) or less for sending and receiving voice and data via Bluetooth®
wireless technology.
Please make sure your mobile phone supports Bluetooth® functions (Headset
or Handsfree proles or both). Adhere to the following guidelines for successful
operation.
• Before using Bluetooth® functions, you must pair your mobile phone to the
VX6020 unit (see “Pairing the Bluetooth® System with Your Mobile Phone and
Unit”). To ensure the best reception for pairing and re-connection, please make
sure the mobile phone battery is fully charged before you begin.
• Try to perform pairing within a few minutes of the mobile phone being turned
on.
• Once the unit has been paired with the mobile phone, the unit’s model number,
“VX6020”, will be displayed on the mobile phone.
• To achieve the best performance, always keep the mobile phone within 10 feet
(3 meters) of the unit.
• Always keep a clear path between the mobile phone and the unit. Never place
a metal object or any other obstacle between the mobile phone and the unit.
• Some mobile phones may have a “Power Saving Mode” option. PLEASE DO NOT
use the power saving mode with the VX6020.
• Before accepting or making a call, make sure your mobile phone’s “Bluetooth®
function” is turned on.
• To ensure the best conversation quality/performance, stay within 3 feet
(1 meter) of the units microphone (see gure 2.) when talking.
• To manually disconnect the mobile phone from the unit, touch the “Chain Link”
icon on the Bluetooth® user interface (next to the mobile phone name) and the
Bluetooth® device will be “disconnected”, but still paired.
128-9243a VX6020 Owner's Manual 08 14 2013.indd 56 8/14/2013 12:07:37 PM
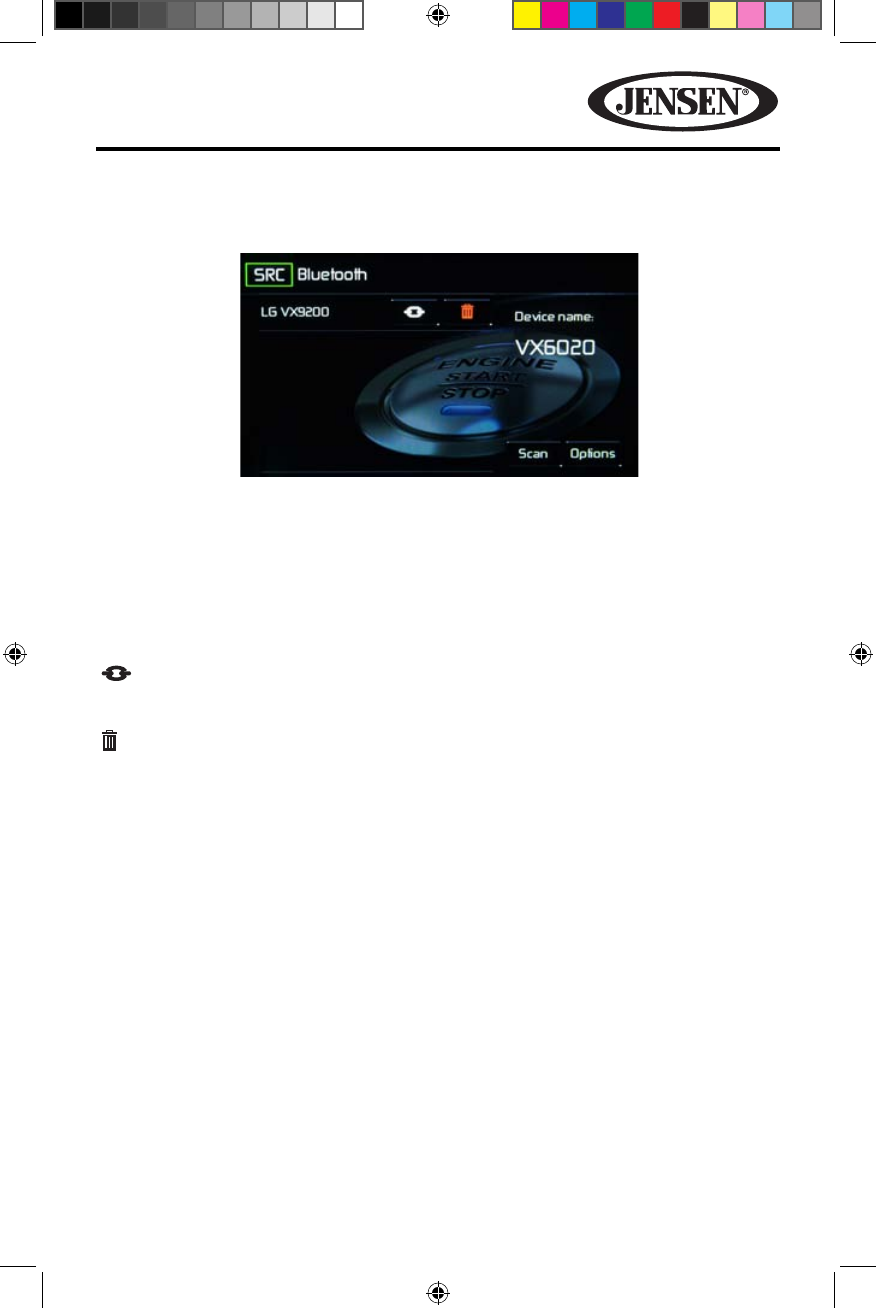
57
VX6020
Bluetooth User Interface
The on-screen icons and information for Bluetooth® functions are outlined below.
SRC Icon- Touch this icon to return to the Main Menu Screen.
Bluetooth- Displays the current source.
LGVX9200- Indicates the device that is paired with the unit.
( )- Indicates whether the unit is connected with a Bluetooth®device. Touch to
connect to a Bluetooth® device.
( )- Touch to disconnect from a Bluetooth® device.
VX6020 Device Name: Provides the name that will appear on the Buetooth®device.
Scan- Touch the icon to search for Bluetooth® devices.
Options- Touch to display the Bluetooth® options page.
Figure 46. Bluetooth User Interface Screen
128-9243a VX6020 Owner's Manual 08 14 2013.indd 57 8/14/2013 12:07:38 PM
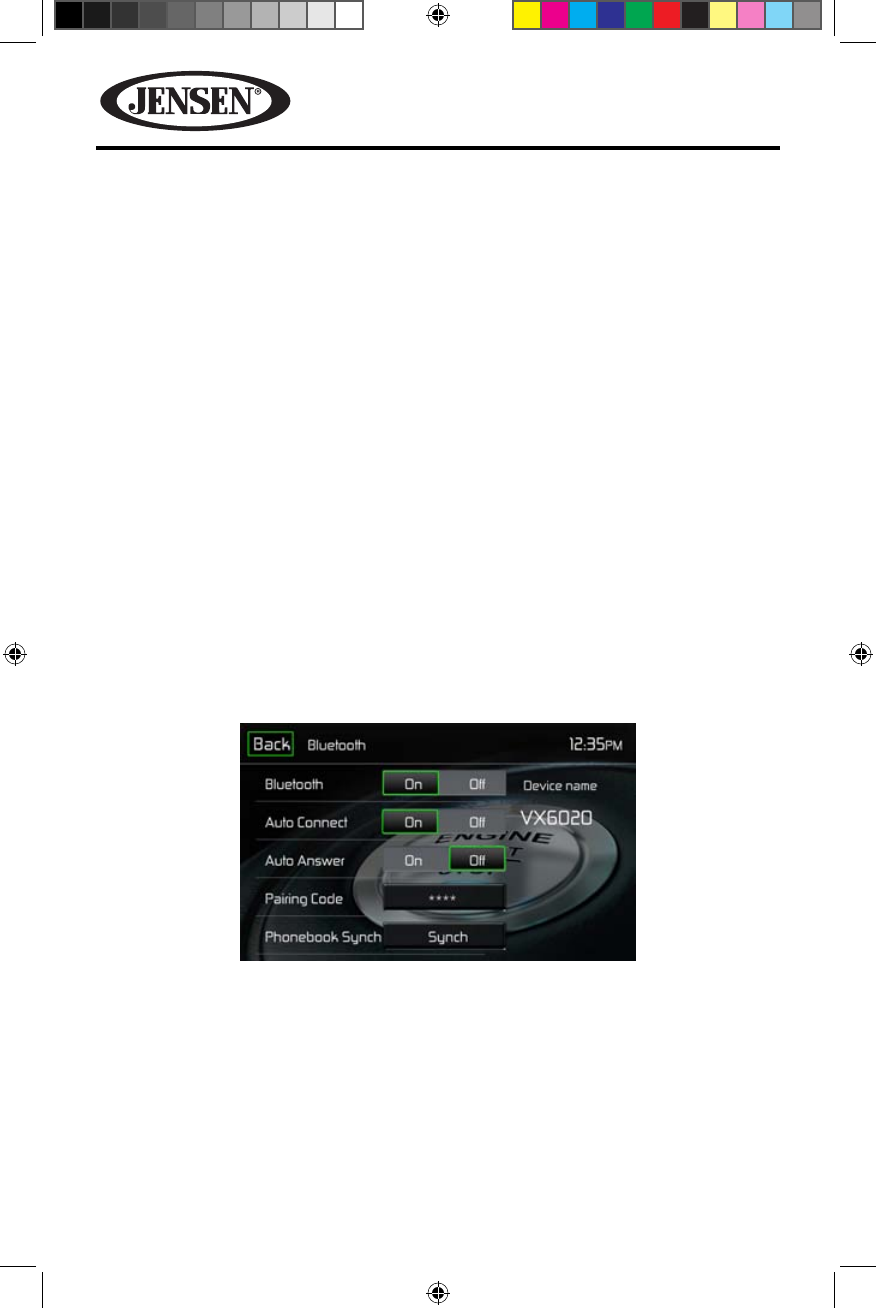
58
VX6020
Hands Free Prole (HFP)
To use a mobile phone with this unit, it is necessary to rst establish a connection
using Bluetooth® wireless technology. The connection is normally established using
Hands Free Prole (HFP), which gives you full control of functions available on the
mobile phone source. However, depending on your mobile phone, the connection
may be made using Head Set Prole (HSP), making some functions unavailable.
This is a limitation of your mobile phone, not the VX6020.
Since there are a number of Bluetooth® mobile phone implementations available
on the market, operations with your Bluetooth® mobile phone using this unit vary
greatly.
Please refer to the instruction manual that came with your Bluetooth® mobile
phone along with this manual while operating your mobile phone with this unit.
Pairing the Your Mobile Phone with the Unit
Your mobile phone can initiate a search for new devices and pair to the unit. The
following paragraphs describes the pairing process.
NOTE: The following procedures are generic. Procedures for pairing mobile phones
may vary slightly from mobile
phone manufacturer to mobile
phone manufacturer.
1. Touch the MENU on the front panel to access the source menu.
2. Touch the BT icon on the source menu and the Bluetooth® user interface screen
will appear.
3. Touch the Options icon and the following screen will appear:
4. On the Options submenu set the Bluetooth function to ON.
5. On the Options submenu set the Auto Connect function to ON.
6. Set the mobile phone Bluetooth® discover mode to ON.
NOTE: Some discovery modes have a time limit usually a minute before they are
automatically turned OFF.
7. Touch the “Scan” icon on the unit’s Bluetooth® user interface screen. Available
devices will appear with the “Pair” icon next to it.
8. Touch the “Pair” icon on the unit’s Bluetooth® user interface screen.
Figure 47. Bluetooth Option Menu
128-9243a VX6020 Owner's Manual 08 14 2013.indd 58 8/14/2013 12:07:38 PM
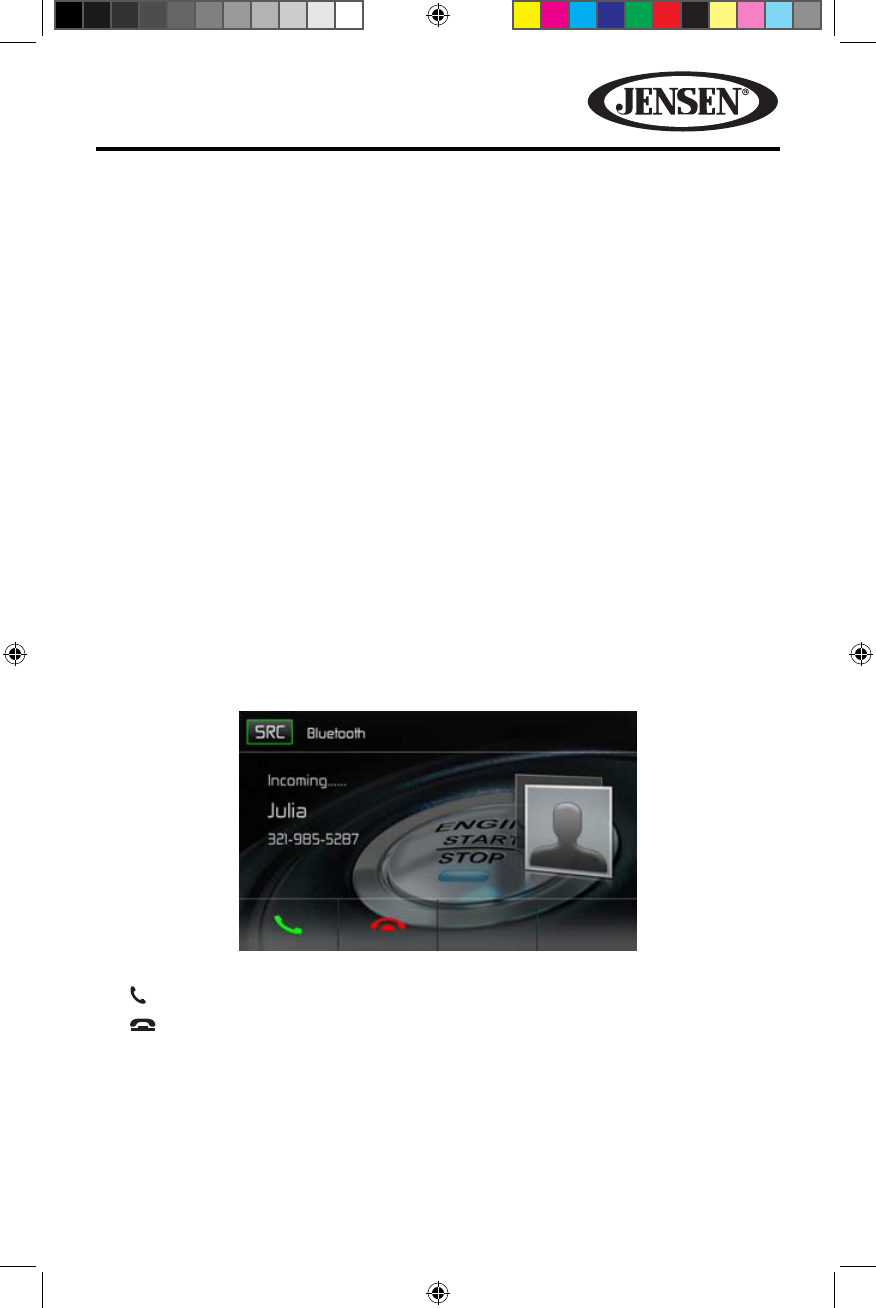
59
VX6020
9. A prompt to pair or bond should appear on your mobile phone. Accept the
request and initiate the process.
NOTE: Some mobile
phones require a “pass key” or pairing code to connect. If
your phone requires a pass key or pairing code, you will need to enter this
number. The default pairing code for many mobile phones is “0000”. The default
code for the unit is “1234”.
10. A prompt to enter a PIN number or passkey for the unit should appear. The
default passkey for the unit is “1234”.
11. At this point a prompt stating pairing successful should appear. Another
prompt should appear asking connect to the unit, Yes or NO. Touch Yes. The
mobile phone and the unit should connect. The mobile phone should display a
message similar to “Device Connected” and the mobile phone and the unit are
now connected. VX6020 will appear on the mobile phone list of devices.
Managing Incoming Calls
When connected to a Bluetooth® mobile phone, the unit will mute audio output,
pause CD play, and change to the Bluetooth® screen below when a call is received.
The incoming phone number or assigned name for that number will appear on the
screen. An audible tone will sound from the unit and a graphic display will appear
on the front panel.
1.
31
icon: Touch to answer an incoming call.
2. icon: Touch to end an in coming call.
Figure 48. Bluetooth Incoming Call Screen
128-9243a VX6020 Owner's Manual 08 14 2013.indd 59 8/14/2013 12:07:39 PM

60
VX6020
Making an Outgoing Call
Outgoing calls can be performed in two manners. The outgoing call can be direct
dialed using the front panel keypad or the by touching the either the Phonebook or
Call History icons, selecting a name and touching the phone number.
Direct Dialing:
1. Press the front panel MENU button and then touch the BLUETOOTH icon to
access the Bluetooth® main menu. The following screen will appear:
2. Use the 0-9, */+, and # icons to input the phone number. If necessary touch the
green arrow icon to clear the last digit or the entire number and start over.
3. After entering the phone number, touch the
31
icon to dial the call. The number
dialed will be displayed on the screen.
4. To end the call, touch the icon.
Answering an Incoming Call
To answer an incoming call touch the
31
icon. For best reception, speak loudly and
clearly into the units microphone (see gure 2.). To end the conversation, touch the
icon.
Rejecting an Incoming Call
Touch the Transfer to Phone icon to reject an incoming call. The call will revert to
your mobile phone and be left for voice mail.
Volume Control
To increase or decrease the volume level of an incoming call, turn the rotary knob
on the front panel or press the VOL+/ VOL- icons on the remote control.
Audio Mute
To mute the phone call audio from the unit when a call is received, press the front
panel rotary knob. Press the front panel rotary knob again and phone call audio will
be restored to the unit.
Figure 49. Bluetooth Direct Dial Screen
128-9243a VX6020 Owner's Manual 08 14 2013.indd 60 8/14/2013 12:07:40 PM
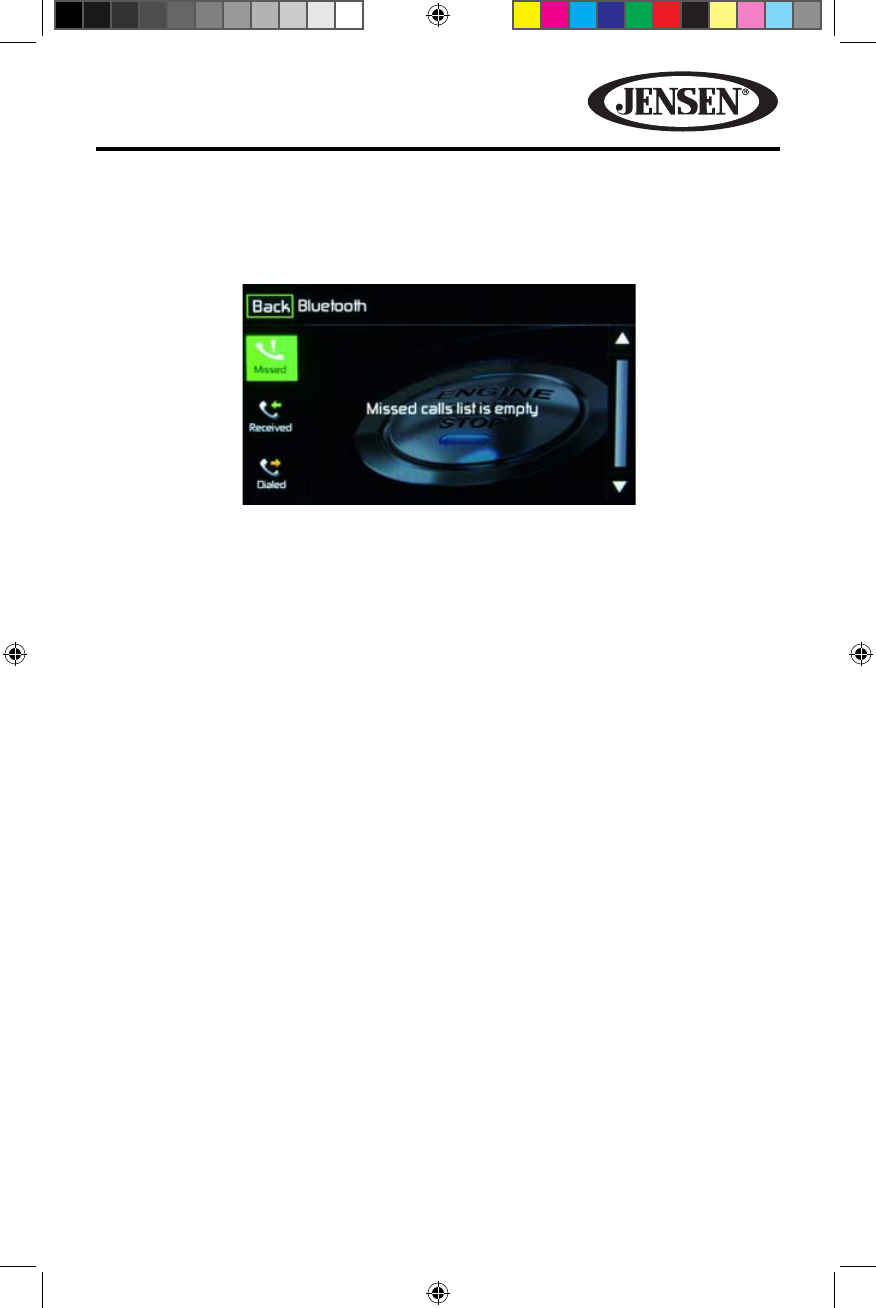
61
VX6020
Call Log
The call log consists of dialed numbers, received calls and missed calls.
NOTE: Not all wireless phones allow access to missed, received or dialed calls and
some will not allow uploading of your wireless phone’s address book.
Missed Calls List- The Missed Calls List retrieves the list of missed numbers from
your wireless phone if your wireless phone allows the function. The last missed
number is the rst number on the list. Touch the Missed Calls menu option to view
the list. To make a call from the Missed Calls list, touch the call’s name. Touch the
phone number and it will be dialed.
Received Calls- The Received Calls list retrieves the received numbers stored on
your wireless phone if your wireless phone allows the function. To access the Re-
ceived list, touch the Received Calls menu option. The last received number is the
rst number on the list. To make a call from the Received Calls list, touch the name.
A new screen will appear with the name on the top and the phone number below.
Touch the phone number and it will be dialed.
Dialed Calls- The Dialed Calls list retrieves the list of dialed numbers from your
wireless phone if your wireless phone allows the function. The last dialed number
is the rst number on the list. Touch the Dialed Calls menu option to view the list.
To make a call from the Dialed Calls list, touch the name. A new screen will appear
with the name on the top and the phone number below. Touch the phone number
and it will be dialed.
Figure 50. Bluetooth Call Log Screen
128-9243a VX6020 Owner's Manual 08 14 2013.indd 61 8/14/2013 12:07:41 PM
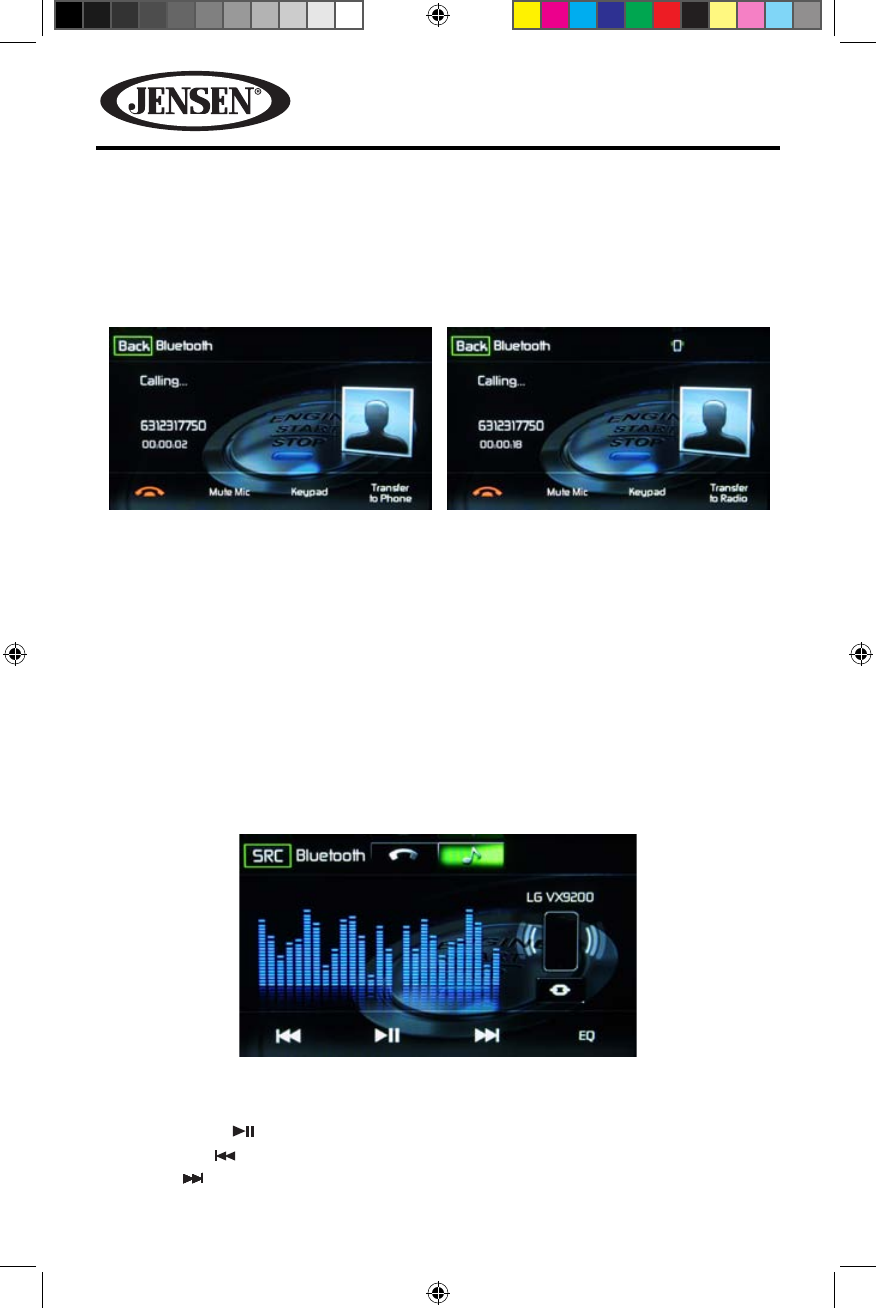
62
VX6020
Call Transfer
While talking, to transfer audio from the unit back to the mobile phone, touch the
Transfer to Phone icon. You can only transfer a call after it has been answered.
Touching the Transfer to Radio icon will return the audio from the mobile phone
to the unit. Touch the Transfer Call icon and the following screen will appear:
Bluetooth Music Function
Bluetooth® provides an Advanced Audio Distribution Prole (A2DP) prole for
streaming music from a mobile phone or a portable multimedia player (PMP),
sometimes referred to as a MP3 player. The unit allows you to play back audio les
from your mobile phone or a PMP using a Bluetooth® connection.
NOTE: Please quit A2DP mode before attempting to make a phone call, as unexpected
results may occur depending on your mobile phone model.
The unit can control a Bluetooth® audio player via Advanced Audio Distribution
Prole (A2DP) or Audio/Video Remote Control Prole (AVRCP). Bluetooth® audio
players (or Bluetooth® adapters) compatible with these proles can be connected
to this unit. The following screen is used for streaming music.
While listening to audio the following functions are available:
1. Pause/Play ( ) icon: Touch to pause playback. Touch again to resume playback.
2. Previous ( ) icon: Touch to play the previous track.
3. Next ( ) icon: Touch to play the next track.
Figure 51. Call Transfer Screens.
Transfer to Phone Screen Transfer to Radio Screen
Figure 52. Bluetooth Audio Control Screen
128-9243a VX6020 Owner's Manual 08 14 2013.indd 62 8/14/2013 12:07:45 PM

63
VX6020
Functionality varies depending on the prole used:
• A2DP:StreamaudiofromyourBluetooth®compatibleaudioplayerandlisten
to the music through the unit.
• AVRCP: Play back, pause, select songs, etc.whilestreamingaudio fromyour
Bluetooth® compatible audio player to the unit.
NOTE: Song information (e.g. elapsed playing time, song title, song index, etc.)
cannot be displayed on this unit. Since there are a number of Bluetooth® audio
players available on the market, operations with your Bluetooth® audio player while
using this unit may vary greatly. Please refer to the instruction manual that came
with your Bluetooth
®
audio player.
When there is an incoming call, the song will be paused. After the incoming call
is nished, the screen will return to the music function screen and playback will
continue.
128-9243a VX6020 Owner's Manual 08 14 2013.indd 63 8/14/2013 12:07:45 PM
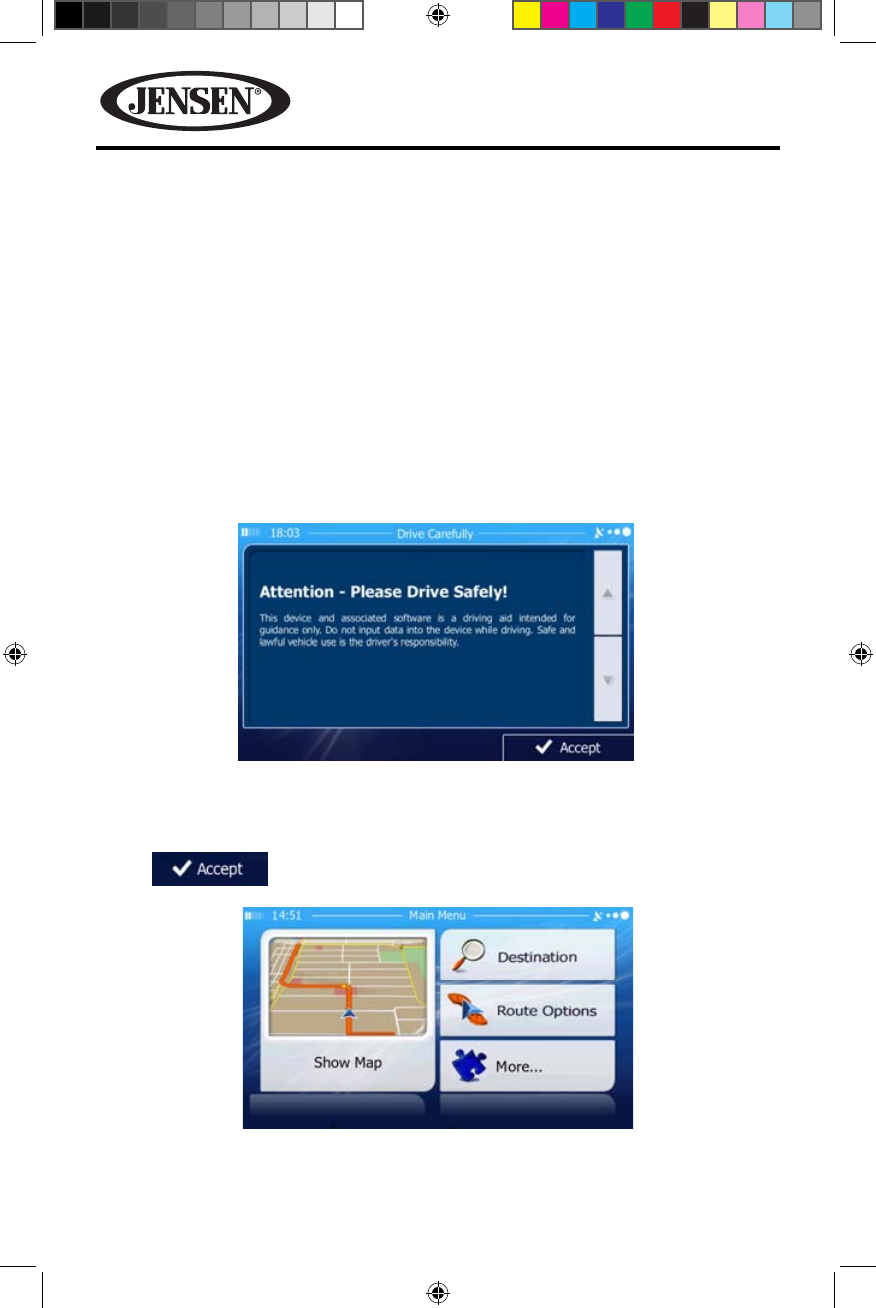
64
VX6020
NAVIGATION QUICK START GUIDE
Follow these six easy steps and you are on your way.
NOTE: Before operating your iGO Primo software, please carefully read and
follow the instructions provided in the “Warnings and Precautions” section of
this manual.
Step 1 - Access the navigation function
To access the Navigation function press the front panel Menu button, then touch
the Navigation icon.
Step 2 - Start Up
After the iGO primo software starts, you will see the reminder
warning to use your iGO Primo software safely and lawfully.
Step 3 - Access the Main Menu
Touch access the Navigation Menu:
Figure 53. Navigation Warning Screen
Figure 54. Navigation Main Menu
128-9243a VX6020 Owner's Manual 08 14 2013.indd 64 8/14/2013 12:07:46 PM
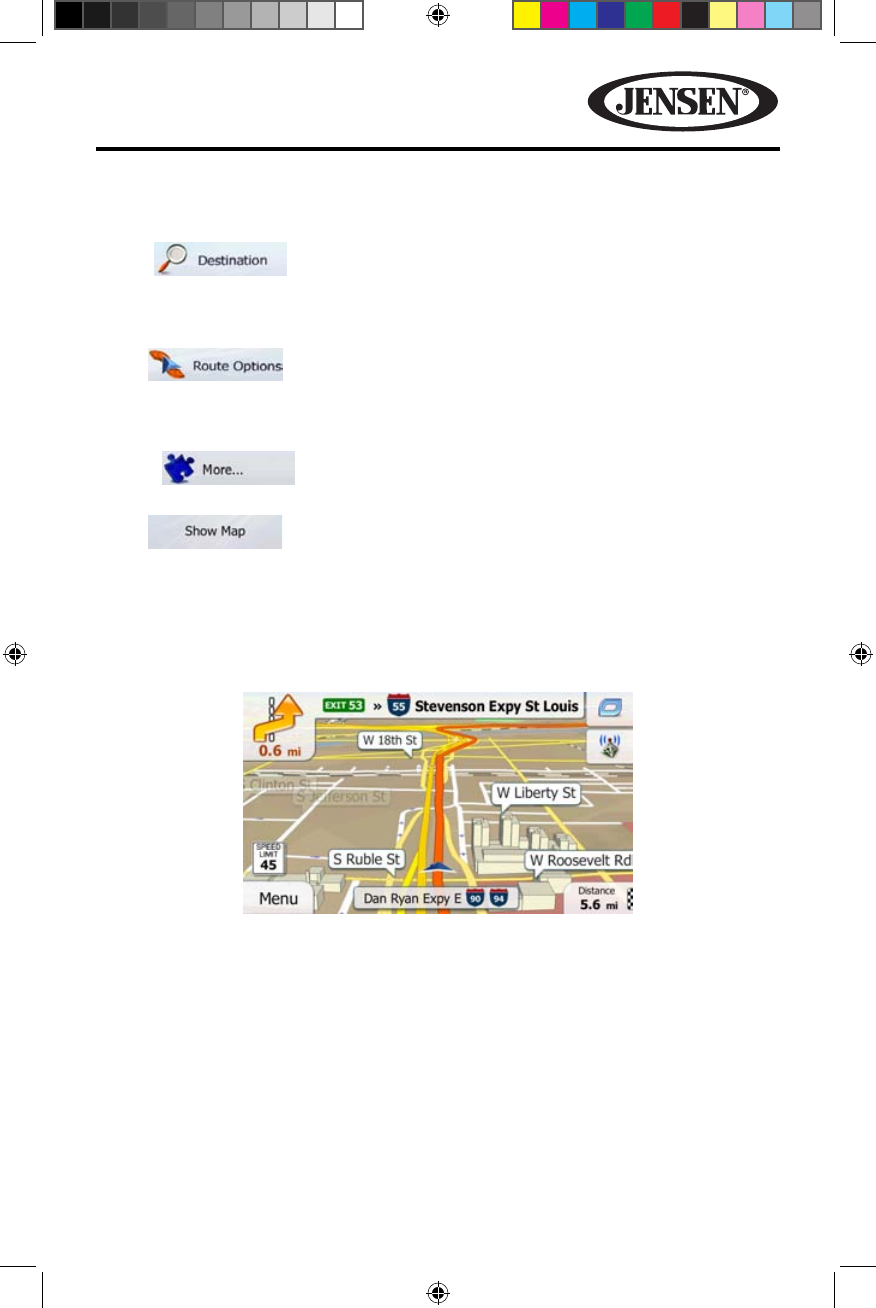
65
VX6020
Step 4 - Select a Destination
You have many ways to select a destination. Select by touching screen:
• Tap to select your destination by entering an address or
selecting a place of interest, a location on the map or one of your Favorite
destinations. You can also look up your recent destinations from the
Smart History, enter a coordinate or use the location saved in a photo.
• Tap to display the route parameters and the route in its full length
on the map. You can also perform route-related actions such as editing or canceling
your route, setting a start point for the route, picking route alternatives, avoiding
parts of the route, simulating navigation or adding the destination to your Favorites.
• Tap to customize the way the navigation software
works, simulate demo routes, or to run some additional applications.
• Tap to start navigating on the map. The icon itself is a miniature
live map that shows your current position, the recommended route and the
surrounding map area. Tap the icon to enlarge the map to the full screen.
Step 5 - Map/Guide Along Route
Proceed to the highlighted route and drive while the iGO Primo software provides
guidance to your destination.
Figure 55. Map/Guide Along Route Screen
128-9243a VX6020 Owner's Manual 08 14 2013.indd 65 8/14/2013 12:07:46 PM
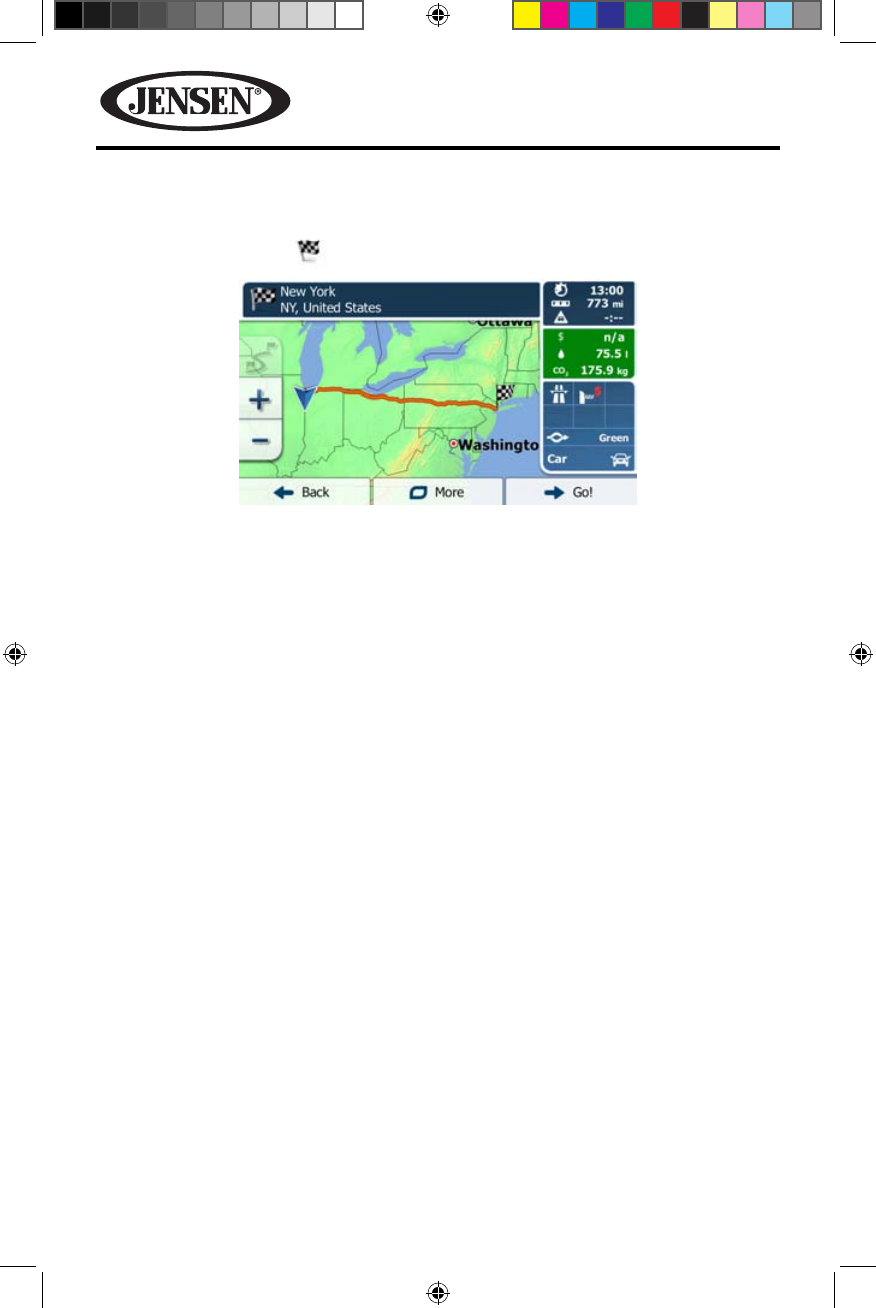
66
VX6020
Step 6 - Arriving at Your Destination
When you are near your destination, the destination is indicated by a
checkered ag symbol .
Refer to the XV6020 Navigation Operating Manual to become familiar with the
many options available on your iGO Primo software.
Figure 56. Destination Arrived Screen
128-9243a VX6020 Owner's Manual 08 14 2013.indd 66 8/14/2013 12:07:47 PM

67
VX6020
This page intentionally left blank
128-9243a VX6020 Owner's Manual 08 14 2013.indd 67 8/14/2013 12:07:47 PM
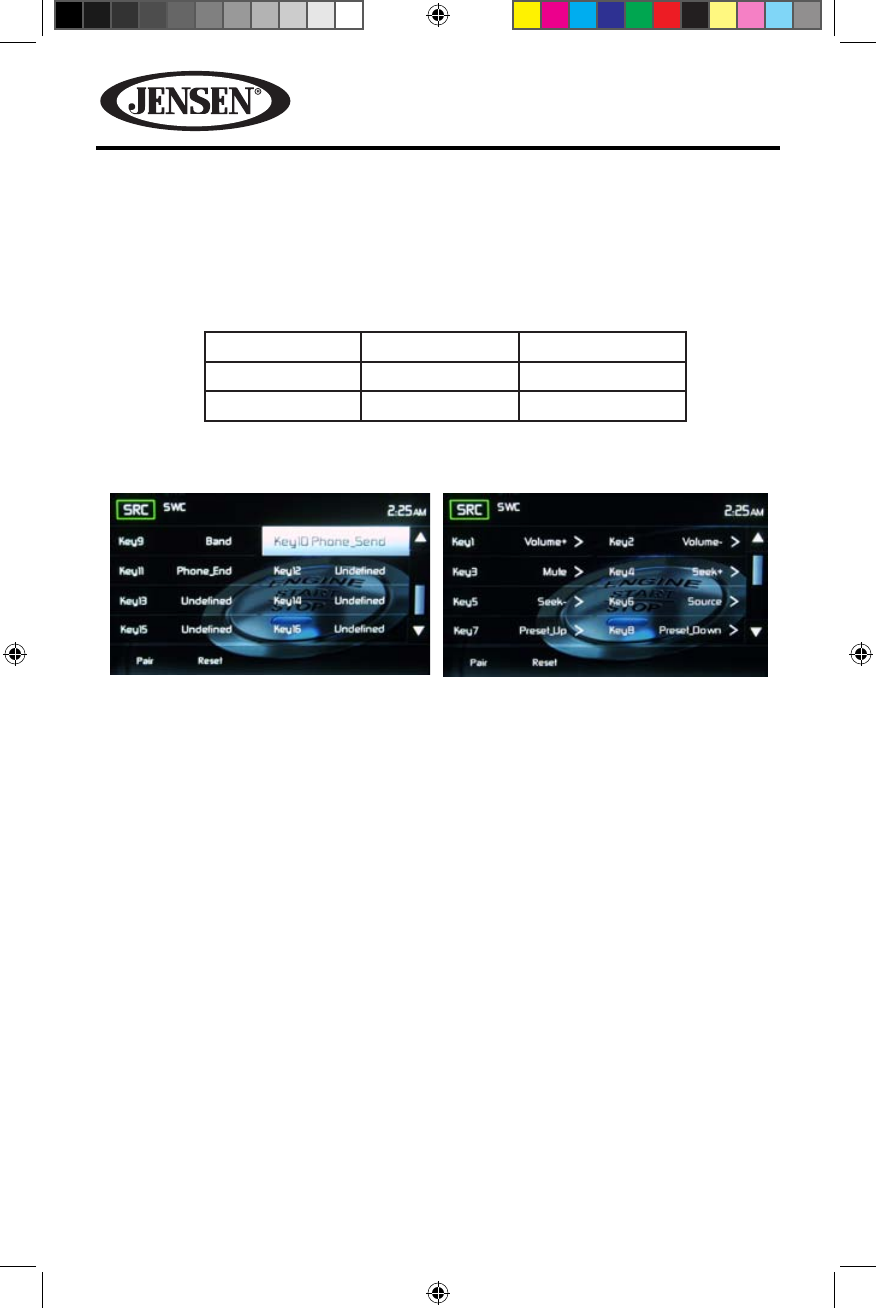
68
VX6020
STEERING WHEEL CONTROL (SWC) OPERATION
(if equipped)
SWC Functions
The following controls are available for most vehicles:
1. Volume Up 4. Seek Up 7. Band
2. Volume Down 5. Seek Down 8. Bluetooth Send
3. Mute 6. Source 9. Bluetooth End
**All SWC functions may not be available on some vehicles.
To access the SWC Controls for programing, touch the Steering Wheel icon on the
second page of the main menu.
SWC Programing
Keys
1. All SWC Keys can be programmed. Keys can be reassigned via the program-
ming interface.
2. Touch a key and a screen of the functions will appear that are assignable to
keys 1-16.
a. Select each key and assign a function to each from the menu displayed.
b. Upon touching last key assignment you will see the original screen with
“pair” and “reset” icons.
c. Touch “pair” icon and then touch each key on the SWC corresponding to
assigned functions 1-16. Then the keys are now reprogrammed.
The Reset icon is used to remove all programming of SWC keys 1-16.
Figure 57. SWC Programing Screens
SWC Programing Screen 1 SWC Programing Screen 2
128-9243a VX6020 Owner's Manual 08 14 2013.indd 68 8/14/2013 12:07:48 PM
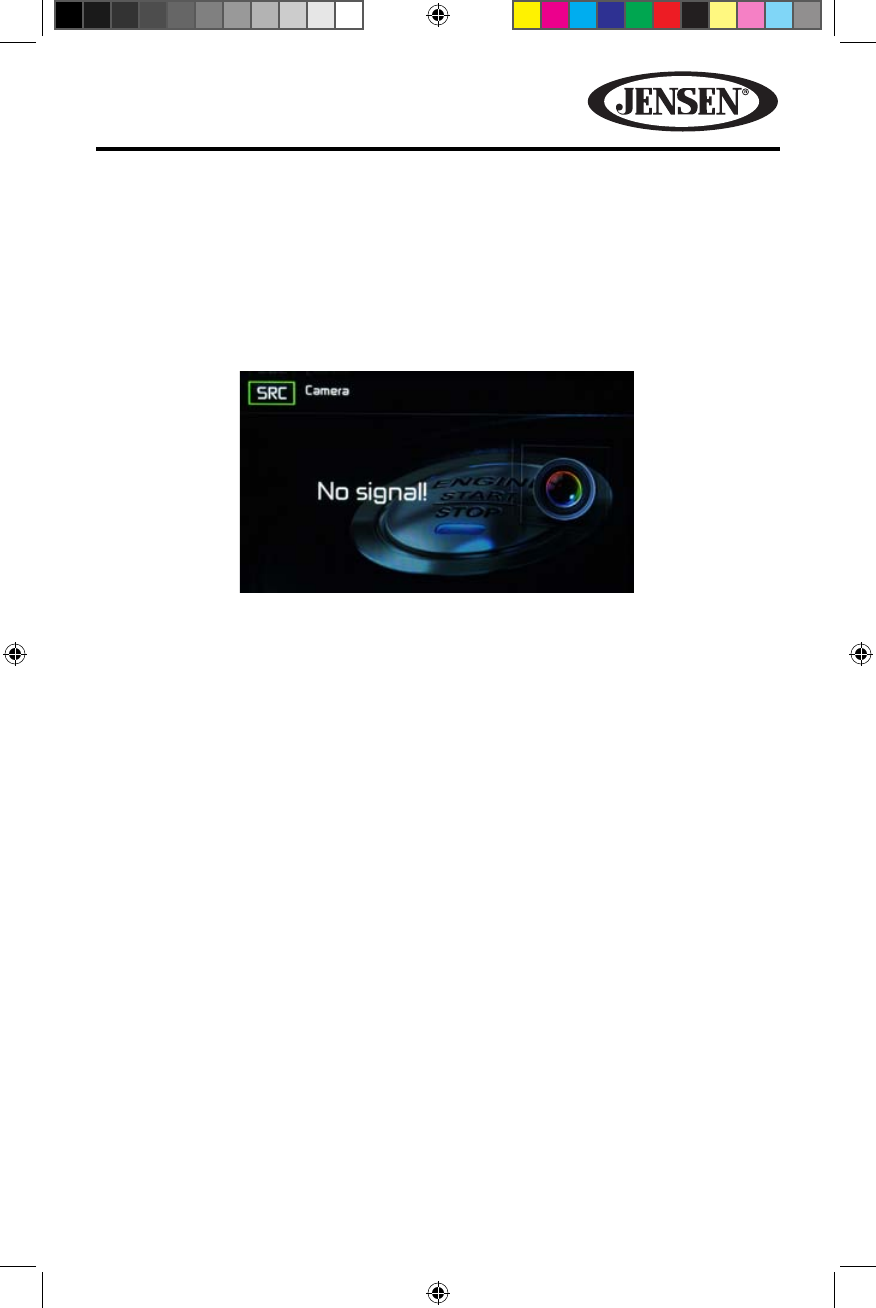
69
VX6020
REAR CAMERA OPERATION
This unit is “camera ready.” Before accessing any camera features, you must install a
rear video camera.
When the camera is not installed and the function is accessed by the gear selector
being placed in reverse or by the unit’s menu, the message “No Signal!” will be
displayed and the following screen will appear.
When the camera is installed, the rear view image of what is behind the vehicle will
appear when the vehicle is placed in reverse gear. When leaving reverse gear, the
unit displays the previous screen.
Figure 58. Rear Camera Screen
128-9243a VX6020 Owner's Manual 08 14 2013.indd 69 8/14/2013 12:07:49 PM
70
VX6020
TROUBLESHOOTING
Troubleshooting
Problem Cause Corrective Action
GENERAL
Unit will not power
on
Radio Fuse open Install new fuse with
correct rating
Car battery fuse open Install new fuse with
correct rating
Illegal operation Press the RESET button
located in the middle
of the left side of the
front panel
No/low audio
output
Improper audio output
connection
Check wiring and
correct
Volume set too low Increase volume level
Improper “MUTE” connection Review wiring diagram
and check “MUTE”
connection
Speakers damaged Replace speakers
Heavily biased volume balance Adjust the channel
balance to the center
position
Speaker wiring is in contact with
metal part of car
Insulate all speaker
wiring connections
Poor sound quality
or distortion
Pirated disc is in use Use original copy
Speaker power rating not
compatible with unit
Connect proper
speakers
Speaker is shorted Check speaker contact
Unit resets itself
when engine is o
Incorrect connection between
ACC and positive battery wire
Check wiring and
correct
128-9243a VX6020 Owner's Manual 08 14 2013.indd 70 8/14/2013 12:07:49 PM
71
VX6020
Problem Cause Corrective Action
TFT Monitor
No image Incorrect connection to parking
brake wire
Check wiring and
correct
Parking brake is not engage Stop vehicle in safe
place and apply
parking brake
Flashing image
or interference
appears on screen
DVD is not compatible with
current TV system settings
Change setup to
accommodate disc
Improper video signal
connections
Check wiring and
correct
Prolonged image or
improper height/
width ratio display
Improper aspect ratio setup Use correct aspect
ratio setting
TUNER
Weak station
searching
Auto antenna is not fully
extended
Extend antenna fully
or connect the auto
antenna control cable
properly
Auto antenna not properly
connected
Connect the auto
antenna control cable
properly
LOCAL function is activated Turn LOCAL function
o
DISC
Cannot insert disc Disc already inside unit Eject current disc and
insert new one
Image blurred,
distorted or dark
Disc is illegally copied Use original disc
128-9243a VX6020 Owner's Manual 08 14 2013.indd 71 8/14/2013 12:07:49 PM
72
VX6020
Problem Cause Corrective Action
Disc does not play
back
Disc is warped or scratched Use disc in good
condition
Clean disc with soft
cloth
Disc is dirty or wet
Laser pickup is dirty Clean laser pickup with
cleaning disc
Incompatible disc is used Use compatible disc
Disc rating exceeds Parental
Lock rating limit
Change Parental Lock
settings to lower
restriction
Disc region code is not
compatible with unit
Use disc with proper
region code
Disc is inserted upside down Insert disc with label
side up
MP3
Interruption
occurred during
playback
Disc is dirty or scratched Clean disc or replace
File is damaged/bad recording Recreate disc with
good les
128-9243a VX6020 Owner's Manual 08 14 2013.indd 72 8/14/2013 12:07:50 PM
73
VX6020
Disc Error Messages
Message Displayed Cause Corrective Action
Loading Disc is being read
No Disc Disc is dirty Clean disc with soft cloth
Disc is upside down Insert disc with label side
up
Disc not present in
loading compartment
Insert disc
Bad Disc Disc is dirty Clean disc with soft cloth
Disc is upside down Insert disc with label side
up
Unknown disc Disc format is not
compatible with this unit
Region Error DVD is not compatible
with region code of unit
Error Illegal mechanism
operation
Press EJECT button for 5
seconds to reset loading
mechanism
128-9243a VX6020 Owner's Manual 08 14 2013.indd 73 8/14/2013 12:07:50 PM

74
VX6020
Care and Maintenance
1. Use only a clean silicone cloth and neutral detergent to clean the front panel or
monitor. A rough cloth and non-neutral detergent (such as alcohol) may result
in scratching or discoloration.
2. Do not get water or cleaning uids on the unit.
3. If the temperature inside the player gets too hot, a protective circuit
automatically stops play of the disc. If this occurs, allow the unit to cool before
operating the player again.
4. Never insert anything other than a 5” (12 cm) compact disc into the player as
the mechanism can be damaged by foreign objects.
5. Do not attempt to use a 3” (8 cm) CD-Single disc in this unit, either with or
without an adaptor, as damage to the player and/or disc may occur. Such
damage is not covered by the Warranty on this product.
6. The CD player may not operate properly in extreme hot or cold. If such conditions
occur, allow the interior of the vehicle to reach a normal temperature before
using player.
7. When the vehicle warms up during cold weather or under damp conditions,
condensation may appear on the LCD panel. Should this occur, the screen will
not operate properly until the moisture has evaporated.
8. We suggest you use a cleaning disc in this unit more frequently than in the unit
in your home due to the environmental conditions of the vehicle.
128-9243a VX6020 Owner's Manual 08 14 2013.indd 74 8/14/2013 12:07:50 PM

75
VX6020
This page intentionally left blank
128-9243a VX6020 Owner's Manual 08 14 2013.indd 75 8/14/2013 12:07:50 PM

76
VX6020
SPECIFICATIONS
DVD/CD Player
Compatible Disc Media: DVD + R / RW (Single and Dual Layer) and CD-R / RW
Compatible Media Formats: CD-DA, MP3, WMA, VCD, SVCD, Xvid, AVI, MPEG 1/2
Signal to Noise Ratio: >95dBA
Dynamic Range: >95dB
Frequency Response: 20Hz to 20 kHz, -3dB
Channel Separation: > 60dB @ 1 kHz
D/A Converter: High performance 24-bit / 192 kHz sample rate, Multi-Bit Sigma-
Delta Modulator
Video
Format: NTSC, PAL (auto-detection)
Output: 1Vp-p (75-ohm)
Input: 1Vp-p (75-ohm)
FM Tuner
Tuning Range: 87.5MHz - 107.9MHz
Mono Sensitivity (-30dB): 9dBf
Quieting Sensitivity (-50dB): 15dBf
Alternate Channel Selectivity: 70dB
Signal to Noise Ratio @ 1 kHz: 58dB
Image Rejection: 80dB
Stereo Separation @ 1 kHz: >30dB
Frequency Response: 30Hz - 15 kHz, -3d
AM Tuner
Tuning Range: 530 kHz - 1720 kHz
Sensitivity (-20dB): 15uV
Signal to Noise Ratio @ 1 kHz: 50dB
Image Rejection: 60dB
Frequency Response: 50Hz - 2 kHz, -3dB
Monitor
Screen Size: 6.2” (Measured diagonally), 16:9 Widescreen
Screen Type: TFT Liquid Crystal Display (LCD) active matrix
Resolution: 1,152,000 sub pixels, 800x3 (W) X 480 (H)
128-9243a VX6020 Owner's Manual 08 14 2013.indd 76 8/14/2013 12:07:50 PM
77
VX6020
General
Auxiliary Input impedance: 10k
Power Supply: 11 to 16VDC, negative ground
Power Antenna (Blue): 500mA max, current limited protection
Amplier Remote (Blue/White): 500mA max, current limited protection
Operating Temperature: -20C ~ 65C
Fuse: 15-amp, mini ATO type
DIN chassis dimensions: 7” X 7” X 4” (178mm x 178mm x 100mm)
CEA Power Ratings
Power Output: 13 Watts RMS x 4 channels into 4-Ohms @ < 1%
THD+N
Signal to Noise Ratio: 70dBA below reference (Reference: 1
Watt, 4-Ohms)
Frequency Response: 20 Hz - 20 kHz, -3dB. (Aux Input used as
reference input)
Reference Supply Voltage: 14.4VDC
*Specications subject to change without notice
128-9243a VX6020 Owner's Manual 08 14 2013.indd 77 8/14/2013 12:07:50 PM

78
VX6020
NOTES
128-9243a VX6020 Owner's Manual 08 14 2013.indd 78 8/14/2013 12:07:50 PM

79
VX6020
128-9243a VX6020 Owner's Manual 08 14 2013.indd 79 8/14/2013 12:07:50 PM

80
VX6020
Audiovox Electronics Corporation
Hauppauge, NY 11788
Technical Assistance: 1-800-323-4815
www.jensenmobile.com
© 2013 Audiovox
Printed in China
VX6020 Common Replacement Parts
Owner’s Manual, Install Manual and Warranty Card 30613880
Wire Harness (Pwr/Spk/GPS Antenna/Line Out/USB
Adapter)
30313880
Trim Ring 30413880
Remote Control 30713880
Hardware Bag 30513880
128-9243a
128-9243a VX6020 Owner's Manual 08 14 2013.indd 80 8/14/2013 12:07:50 PM
PN:127075015388