HYT Science and Technology Co TC-500V Two-Way Radio User Manual TC 500
Shenzhen HYT Science &Technology; Co Ltd Two-Way Radio TC 500
Contents
- 1. Users Manual
- 2. Revised Users Manual
Users Manual
1
THANK YOU!
We are grateful for your purchase of HYT product. We believe this easy–to-use
radio will provide you with dependable and reliable communications. This HYT
portable two-way radio is a precision device. Treat it with care, and you will enjoy
years of reliable operation.
2
Contents
User Safety Information
Product Inspection
Battery Information
Accessory Installation
Getting Started
Features and Operation
Basic Operations
Time-out Timer (TOT)
Battery Save
Low Battery Alert
Monitor
CTCSS & CDCSS
Channel Scan
Busy Channel Lockout
Troubleshooting Guide
Care and Cleaning
Optional Accessories
Frequency Chart

3
User Safety Information
READ THIS IMPORTANT INFORMATION ON SAFE AND EFFICIENT OPERATION
BEFORE USING YOUR HYT PORTABLE TWO-WAY RADIO.
◇ Only qualified technicians are allowed to maintain this product.
◇ To avoid electromagnetic interference and/or compatibility conflicts, turn off your
radio in any place where posted notices instruct you to do so. Hospitals or health
care facilities may be using equipment that is sensitive to external RF energy.
When on aircraft, turn off your radio when airline crew instruct you to do so.
◇ When in vehicles with an airbag, do not place a portable radio in the area over an
airbag or in the airbag deployment area.
◇ Turn off your radio prior to entering any area with a potentially explosive
atmosphere. Do not remove, install, or charge batteries in such areas.
◇ To avoid possible interference with blasting operations, turn off your radio when
you are near electrical blasting caps.
◇ Do not use any portable radio that has a damaged antenna. If a damaged
antenna comes into contact with your skin, a minor burn may result.
◇ Do not expose the radio in direct sunlight for a long time nor place it close to a
heating source.
◇ When transmitting with a portable radio, hold the radio in a vertical position with
its microphone about 5 centimeters away from your mouth.
◇ If you wear a portable two-way radio on your body, ensure that the antenna is at
least 2.5 centimeters from your body when transmitting.
Product Inspection
Thank you for your use of HYT portable two-way radio. Before use, you are recommended
to inspect the product as follows.
First check the shipping carton for any signs of damage. If any damage has occurred,
please contact your dealer immediately. Confirm the supplied product against the packing
slip to assure accuracy.
Available Accessories
Item Qty. (pcs)
Antenna 1
Charger 1
AC Adapter 1
Ni-MH Battery Pack 1
Belt Clip 1
Strap 1
Owner’s Manual 1
*Antenna Mark:
400-420MHz: Red;
450-470MHz: White;

4
136-150MHz: Blue;
150-174MHz: Green.
Battery Information
Battery Charging Information
The battery is not charged by the manufactory. Charge the newly purchased battery or out
of use for more than 2 months battery before use. The battery capacity will be optimum
only after being charged/discharged for two or three times. When the battery power is
lower, please charge it or replace it with a new one.
Notices:
Do not short out the battery terminals or dispose of the battery by fire.
Turn off the radio when charging the battery inside the radio.
Remove the radio and the battery from the charger when charging cycle is over.
Overcharging will shorten the battery life.
Do not continue charging the battery if it is already fully charged. Or the battery life will
be shortened.
Store the battery in a place about 25℃. Charging the battery in less than 10℃
temperature will cause the electrolyte leakage and damage the battery.
Charging the battery in over 35℃ temperature will affect the battery capacity.
Battery Charging
Insert the battery or the radio with battery in the charger, and make sure they connect well.
Charging begins, red LED glows. The battery is fully charged in about 8 hours. If the
battery is charged while the radio is turned on, fully charging time will prolong.
Accessory Installation
Attach the Battery
1. Insert the tabs, at the bottom of the battery, into the slots at the bottom of the radio
chassis.
2. Press the top of the battery towards the radio until a click is heard. (See figure 1)
5
Figure 1
Remove the Battery
1. Turn off the radio.
2. Push the battery latch on the back panel towards the top of the radio.
3. Pull the top of the battery away from the radio chassis, and lift the battery from the
radio. (See figure 2)
Figure 2
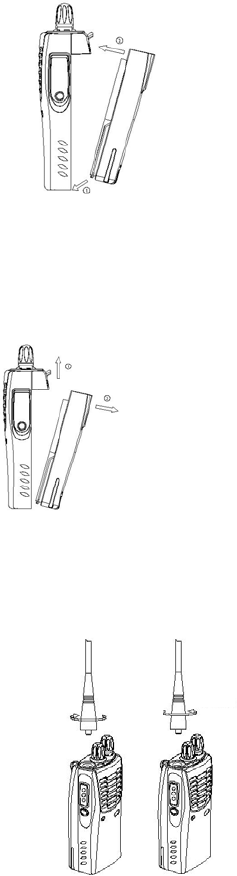
Attach the Antenna
1. Align the threaded end of the antenna with the radio’s antenna connector.
2. Turn the antenna clockwise to tighten. (See figure 3)
Removing the Antenna
1.Turn the antenna counter-clockwise until you can remove it. (See figure 3)
Attach
Remove
Figure 3
Attach the Belt Clip
1. Align the grooves of the belt clip with those of the battery.
2. Press the belt clip down until a click is heard. (See figure 4)
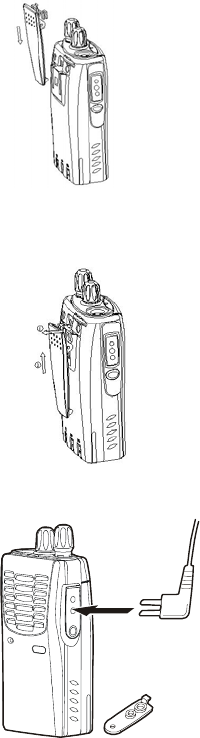
6
Figure 4
Remove the Belt Clip
1. Pull the belt clip tab away from the battery.
2. Slide the belt clip upwards to remove it. (See figure 5)
Figure 5
External Earphone (Optional)
Remove the earphone cover and insert the earphone into the earphone jack.
7
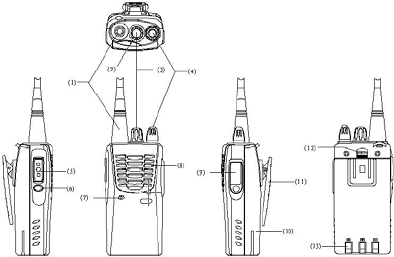
Getting Started
1. Antenna
2. LED indicator
The light will glow red during transmission. The light will glow green during receiving. The
light flashes red when the battery voltage is low.
3. Channel selector knob
Turn the channel selector knob to select from channels 1-16 (Channel 16 can be
programmed by your dealer as scan function).
4. Power/Volume control knob
Rotate the Power/Volume Knob clockwise until a “click” is heard to turn the radio on, fully
counter clockwise until a “click” is heard to turn the radio off. When the radio is on, turn the
knob to adjust volume.
5. PTT key
Press and hold PTT key to talk, release to receive.
6. Monitor key
In receive mode, press Monitor key to monitor activity on the current channel.
7. Microphone
8. Speaker
9. External jack
Remove the jack cover and insert an earphone; or insert programming cable into the jack
to programme the radio via programming software.
10. Battery
11. Belt clip
Used to clip radio on your belt.
12. Battery latch
Used to fasten and remove the battery.
13. Charging connectors
Connect the charging connectors with that on the charger to begin charging.
8
Features and Operation
Basic Operations
1. Turn on the radio: Turn the POWER/VOL knob clockwise until a click is heard.
2. Turn off the radio: Turn the POWER/VOL knob counter clockwise until a click is heard.
3. Adjust the volume: Turn the POWER/VOL knob to adjust the volume while holding
down the Monitor key.
4. Select Channel: Rotate Channel Selector knob to select your desired channel.
5. Transmit: Press and hold PTT, speak into the microphone with normal voice. Keep
microphone about 5cm away from your mouth.
6. Receive: Release PTT, the radio returns to receive mode.
Time-out Timer
Time-out Timer is used to prevent one from using the same channel for a long time and to
prevent the radio from damage due to continuous transmission.
If the transmission exceeds preset time (it’s set by your dealer), transmission will be
stopped and a beep will sound. To stop the beep tone, release PTT. Press PTT again to
transmit.
TOT (Time-out Timer) Reset Time
When this feature is disabled, TOT is immediately reset after transmission stops. When
enabled, TOT won’t reset until preset time (it’s set by your dealer) elapses, even if
transmission has stopped.
TOT Rekey Time
The feature is used to set the duration until transmission is allowed after returning to
receive by TOT. When enabled, transmission will be prohibited until preset time elapses
(it’s set by your dealer).
TOT Alert Time
This timer can be set by your dealer from 1 to 255 seconds in 1 second step. When this
feature is enabled, the radio will call an alert at the set time. Transmission will be
prohibited by TOT after this time.
Battery Save
When there is no activity on the channel and no operation is performed for 10 seconds,
Battery Save feature is turned ON. When a signal is received or an operation is
performed, Battery Save feature is turned OFF automatically.
Low Battery Alert
Low Battery Alert alerts you to recharge or replace the battery.
During transmission, when the battery voltage goes below a preset value, the light will
flash red. When the alert tone sounds, the radio stops transmitting. Please recharge or
replace the battery.
Monitor
Press and hold Monitor key to monitor activities on the current channel. This operation is
especially useful for adjusting volume level or receiving a weak signal.
The light will glow green while the Monitor key is held down.

9
CTCSS & CDCSS
CTCSS/CDCSS allows you to ignore unwanted calls from other parties using the same
channel.
When CTCSS/CDCSS is set, the user can only receive the calls on the same channel with
same CTCSS/CDCSS.
The dealer can preset CTCSS/CDCSS signaling on certain channels.
Note: Although using CTCSS/CDCSS enables you to avoid hearing unwanted calls, it
does not mean your calls will be private.
Channel Scan (This feature can be disabled by your dealer)
Turn channel selector knob to the position “16”, the radio will automatically detect those
channels which have been programmed as scan items in channel 1-15 (your dealer can
set any channel as scan item or non-scan item). When any activity is detected on one
channel, the radio will stop on the active channel for communications.
Priority Channel Scan
Any programmed channel may be set as the priority channel. The radio will detect the
priority channel periodically while stopping on a non-priority channel. When there is any
activity on the priority channel, the radio will turn to the priority channel for
communications.
Scan Revert Channel
When the radio is scanning, press the PTT key, it will transmit in pre-programmed revert
channel.
Revert channel can be programmed by your dealer.
Busy Channel Lockout
If the current channel is set by your dealer as “busy channel lockout”, and this channel is
being used by other users, press PTT, the radio sounds a beep and will not transmit the
signal. To stop the beep, release PTT. When this channel is free, press PTT to transmit.
Troubleshooting Guide
Trouble Solution
No power *Battery may be used up. Please recharge or replace the
battery.
*The battery may not be properly installed. Remove the battery
and attach it again.
Power doesn't last long even if fully
charged
*Battery life is over, please replace it with a new one.
Can't talk to or hear group members *Make sure you are using the same frequency and same
CTCSS/CDCSS as your group members.
*Your group members may be out of the communication range.
Other voice (non-group members)
are present on the channel
*Change CTCSS/CDCSS tone. Make sure your group members
all change to the same tone.
10
Care and Cleaning
* Do not carry your radio by the antenna or remote microphone;
* Wipe the battery contacts with a lint-free cloth to remove dirt, grease, or other material
that may prevent good electrical connection;
* When not in use, keep the accessory jacks covered with the protective caps;
* Clean the shell, controls and keys of your radio with neutral detergent and warm water
after a long period of usage. Avoid using strong chemicals.
Optional Accessories
Leather Case PT-28
Remote Speaker Microphone SM-06M
Antenna
Earphone 158M-G1
Earphone 158M-S1

11
Frequency Chart
Model: ____________________
Serial Number: ________________
Channel Transmit Frequency Transmit CTCSS/CDCSS Receive Frequency
Receive
CTCSS/CDCSS
1
2
3
4
5
6
7
8
9
10
11
12
13
14
15
16
HYT endeavor to achieve the accuracy and completeness of this manual, but cannot
guarantee its accuracy at all times. All the above specifications and design are subject to
change by HYT without notice.
All the reproduction and translation of this manual without authorization of HYT is not
allowed.