HYT Science and Technology Co TC-518U1 TWO-WAY RADIO User Manual TC 518 Owner s manual V00
Shenzhen HYT Science &Technology; Co Ltd TWO-WAY RADIO TC 518 Owner s manual V00
UserManual.wiki
>
HYT Science and Technology Co
>
TC 518U1 User Manual
USERS MANUAL
Navigation menu
Upload a User Manual
Namespaces
Wiki Guide
HTML
PDF
Info
Views
User Manual
Discussion / Help
Navigation
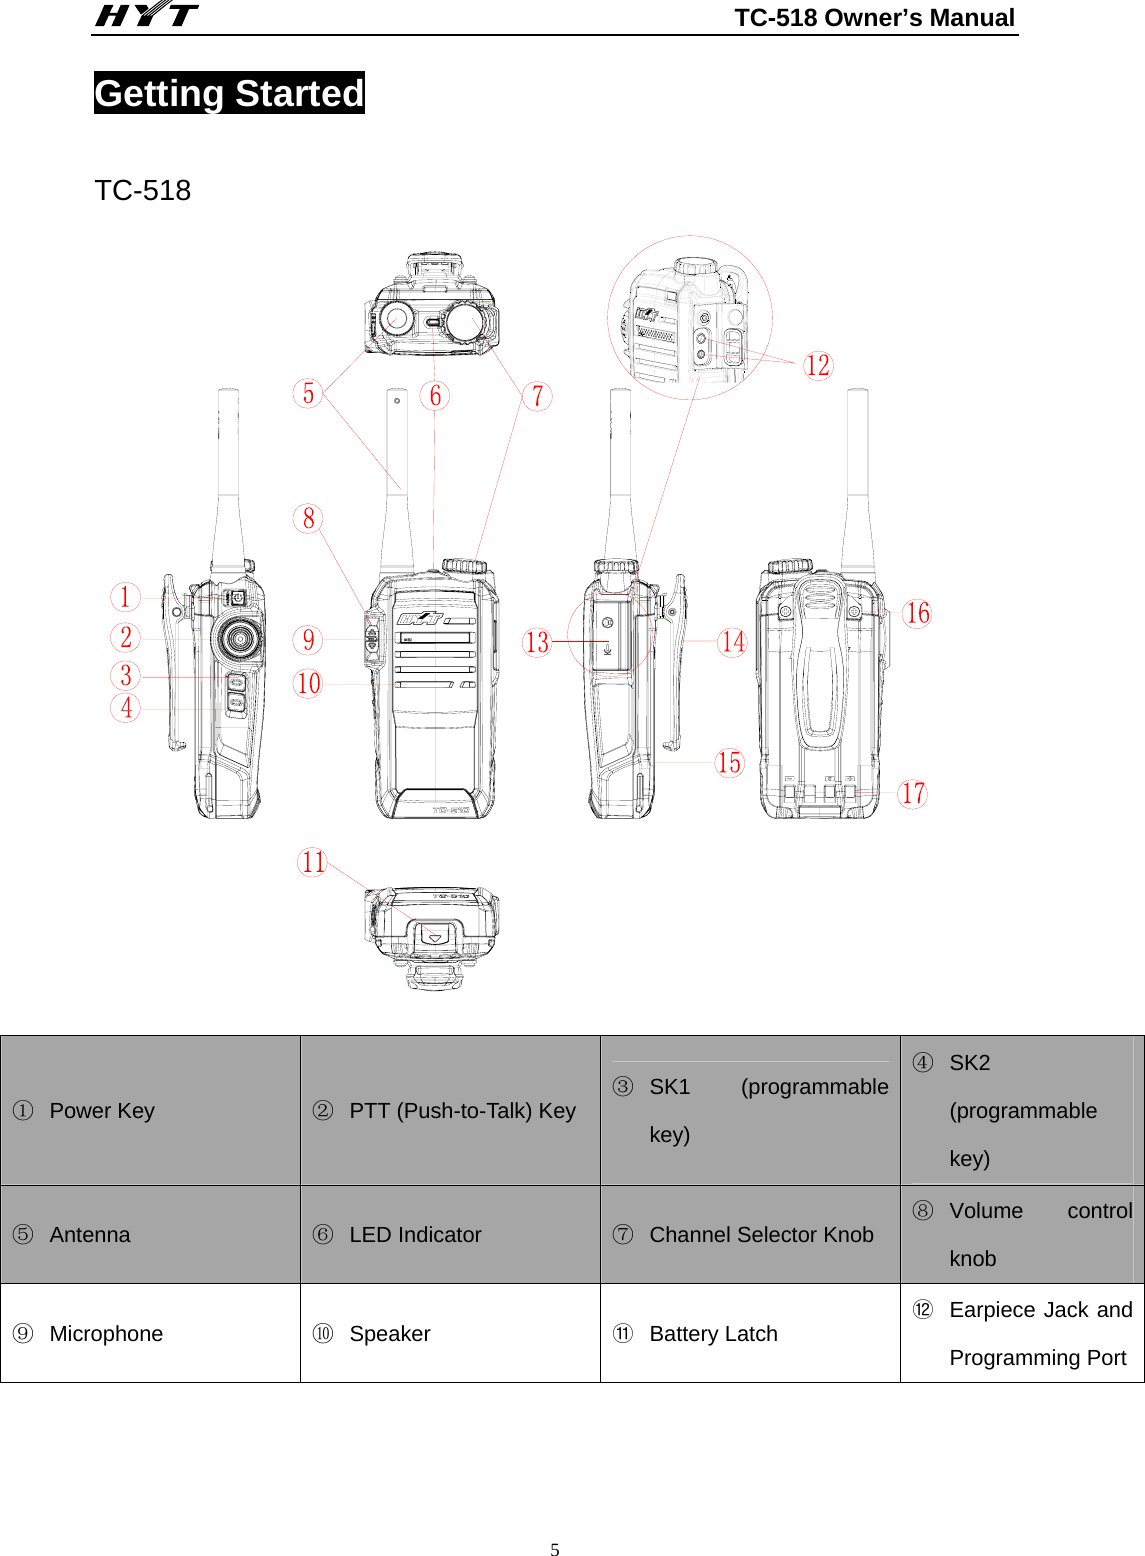
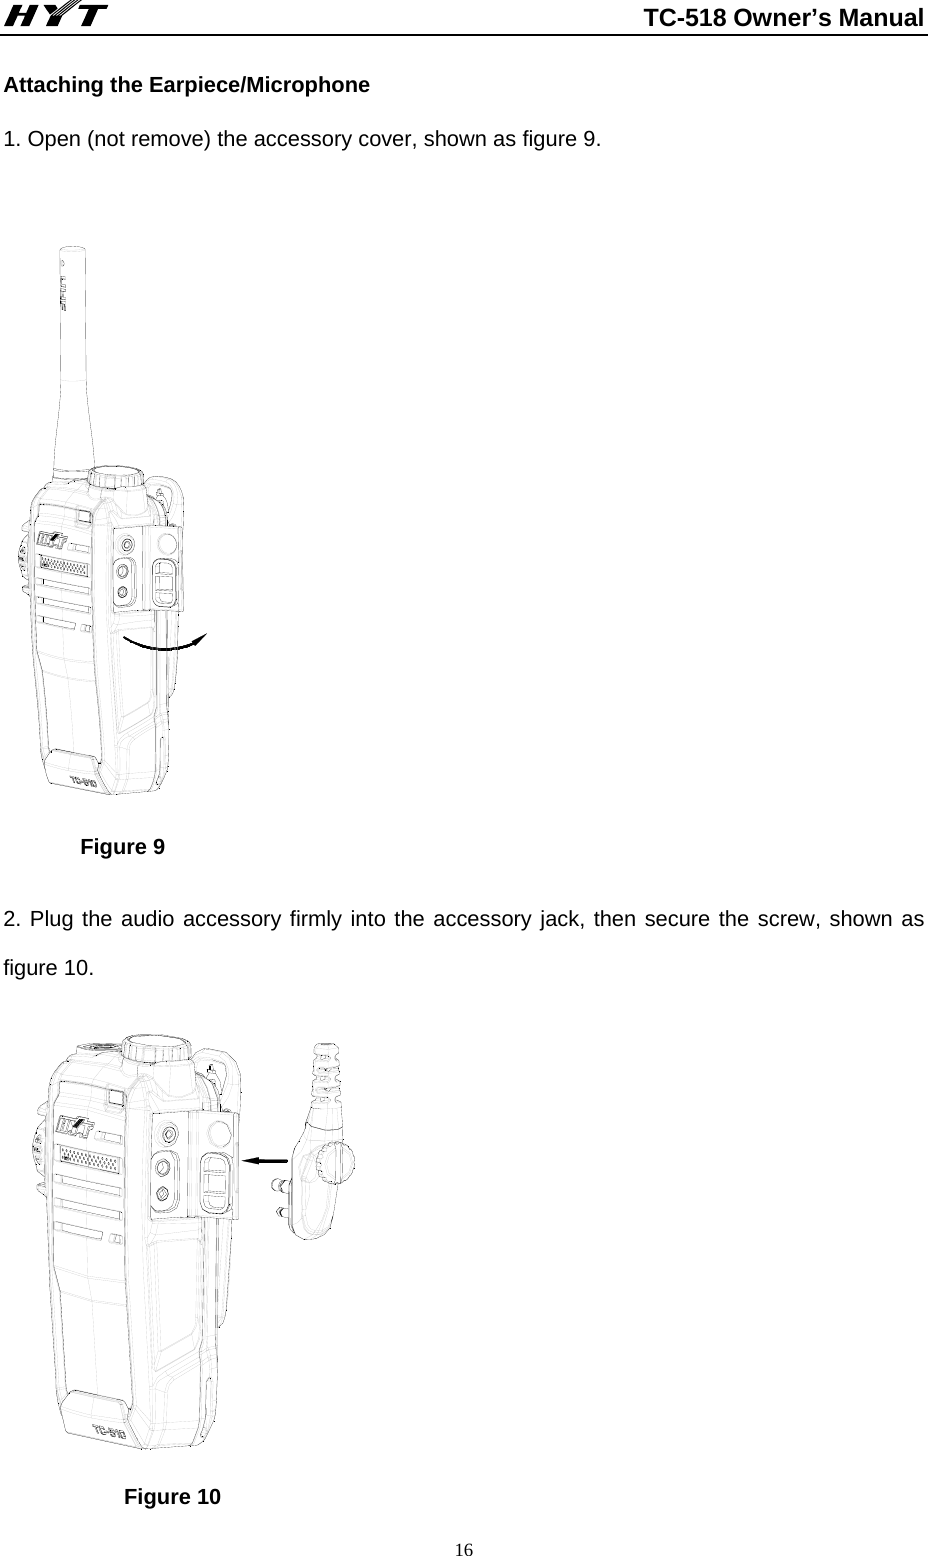
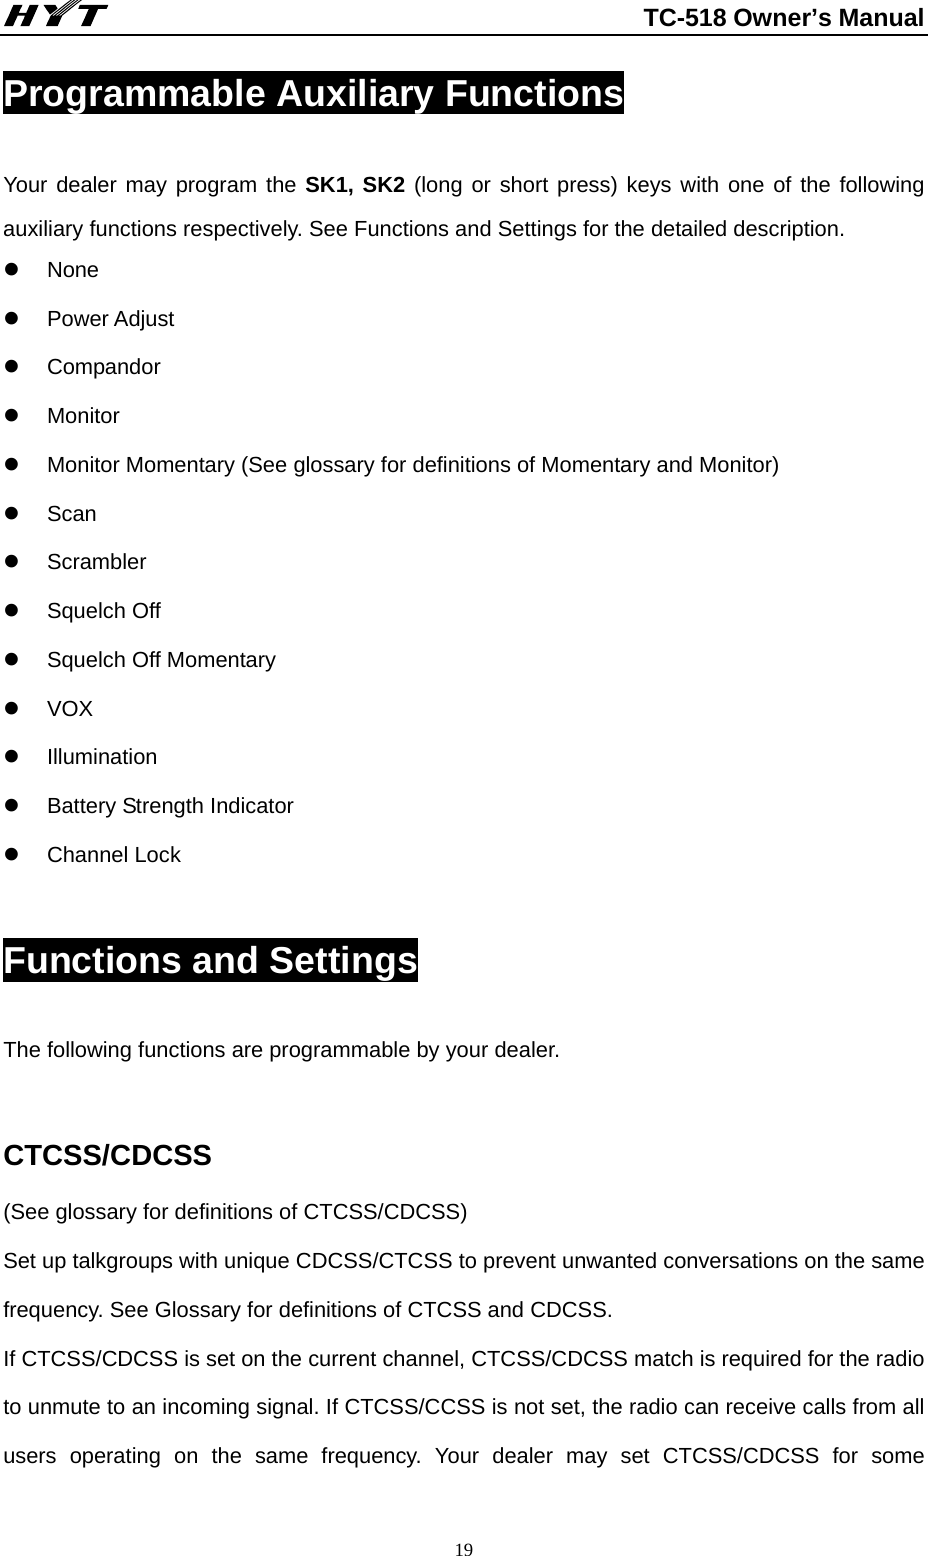
![TC-518 Owner’s Manual 17Removing the Earpiece/Microphone Loosen the screw and then remove the audio accessories. Note: Using the radio with audio accessory may affect the waterproof performance of the radio. General Radio Operations Note: See Glossary for definitions of relevant words. Turn the Radio On/Off Hold down [Power] key for about 2s to turn the radio on/off, and then radio sounds an alert tone. (See figure 1) POWER按键 Figure 1 Adjust the Volume Press the programmable key set as Squelch Off / Squelch Off Momentary to listen the background noise, then turn the volume control knob clockwise/counter-clockwise to increase/decrease the volume. See Glossary for definition of Squelch. As shown in figure 2. Power Key](https://usermanual.wiki/HYT-Science-and-Technology-Co/TC-518U1/User-Guide-966937-Page-19.png)
![TC-518 Owner’s Manual 18 -+ Figure 2 Select a Channel Turn the channel selector knob to select a channel. (See figure 3 below) Figure 3 Transmitting To transmit, press and hold down [PTT] key and talk to microphone to speak. Ensure the radio is 2.5 to 5 centimeters away from your lips. Receiving To receive signal, release the [PTT] key. Talk Range Flat ground with no obstructions Up to 10 kilometers Residential area (close to buildings) Up to 5 kilometers Inside multi-level buildings Up to 20 floors](https://usermanual.wiki/HYT-Science-and-Technology-Co/TC-518U1/User-Guide-966937-Page-20.png)
![TC-518 Owner’s Manual 20channels. This feature does not mean that your conversation will not be heard by others. Radios that set with the same CTCSS/CDCSS, or no CTCSS/CDCSS, can receive from you. Battery Save This feature, when no signal is received or no operation is done, can lower battery consumption (which can be enabled by your dealer). The Battery Save feature is automatically activated once no activity on the channel and no operation performed (no key press and no knob selection), for extended operation time. Pressing any key or receiving a signal will restore the radio to normal operation and exit from Battery Save. See Glossary for the definition of Battery Save. Power Adjust A press of the programmed [Power Adjust] key switches the transmit power level between high and low power. Time-out Timer (TOT) Limits the amount of time the radio user can continuously transmit on a channel. If the user holds down the [PTT] longer than the preprogrammed limit, the radio automatically stops transmitting, and generates a warning tone until the [PTT] is released. Your dealer may program the alert tone that sounds before the TOT timer nearly expires. See Glossary for the definition of Time-out Timer. Battery Strength Indicator The TC-518 allows you to simply press one button to illuminate the LED batter gauge, which emits different indications representing battery strength levels until the key is released.](https://usermanual.wiki/HYT-Science-and-Technology-Co/TC-518U1/User-Guide-966937-Page-22.png)
![TC-518 Owner’s Manual 21Battery Strength LED Indication 70% - 100% Green 50% - 70% Orange 30% - 50% Red 10% - 30% No indication is shown when programmable key is pressed; LED flashes red while radio is operating. While the radio standby, LED flashes red and a low-pitched tone sounds at intervals of a preset time. The interval can be set by programming software. Less than 10% No indication is shown when programmable key is pressed; at the time, radio can only receive or standby (Tx is disabled). While the radio standby, LED flashes red and a low-pitched tone sounds at intervals of a preset time. The interval can be set by programming software. If [PTT] key is held down, an alert tone indicating low-voltage Tx inhibt would sound. Monitor / Squelch Off z Squelch Off Causes the radio to forcibly unmute speaker to here activities on the current channel, whatever the receive condition is. The radio speaker outputs audio when audio signal is present, or background noise will be heard if no audio signal is detected. Press the function key to enter the Squelch Off mode, and press it again to exit. z Squelch Off Momentary Causes the radio to forcibly unmute speaker to here activities on the current channel, whatever the receive condition is. The radio speaker outputs audio when audio signal is present, or background noise will be heard if no audio signal is detected. Holds down the function key to enter the Squelch Off Momentary mode, and release it to exit. z Monitor Carrier condition must be satisfied for the radio to unmute to an incoming call, regardless of](https://usermanual.wiki/HYT-Science-and-Technology-Co/TC-518U1/User-Guide-966937-Page-23.png)
![TC-518 Owner’s Manual 22CTCSS/CDCSS condition. Press the function key to enter Monitor mode, and press it again to exit. z Monitor Momentary Carrier condition must be satisfied for the radio to unmute to an incoming call, regardless of CTCSS/CDCSS condition. Holds down the function key to enter Monitor Momentary mode, and release it to exit. Scan Press the programmed [Scan] key to initiate scanning ascending through the channel numbers in scan list. Green LED flashes during the scan process, and solidly glows when activity is detected on a channel and signalling condition is satisfied. Press the key again to exit scanning. When scanning is active, the radio continuously scans for activity on scan list members. Once activity is detected on a channel, scanning pauses on the active channel for you to receive activity. Your dealer can choose channels that you wish to scan and list them in a scan list. No Priority Channel Assuming a scan list with 6 channels, if all the channels are non-prioritized, the normal scan operation would check for activity in the following sequence, as figure 1 has shown. Figure 1 Priority Channel Scan If you prioritize Channel 2 as Priority 1, the scan operation would change as figure 2 shown below.](https://usermanual.wiki/HYT-Science-and-Technology-Co/TC-518U1/User-Guide-966937-Page-24.png)
![TC-518 Owner’s Manual 23 Figure 2 Scan On/Off You can enter scan mode through the following two methods: 1. Key operation Press the programmed [Scan] key to enter scan mode, provided that there’re no less than 2 members in the scan list. 2. Auto When Auto Scan is enabled for a channel, the radio shall automatically enter scan mode when it is switched to the channel. You can exit scan mode through the following three methods: 1. Key operation Press the programmed [Scan] key to exit scan mode. 2. Auto The radio automatically exits from scan mode when it is switched to another channel. 3. Turn the radio off. z Talk Back You can respond to any calls received during the scan process by pressing the [PTT]. z Priority Channel Scan Enable you to constantly monitor & keep an update on the activities on the most commonly used channel so that messages will not be missed. Check with your dealer for details. When scanning remains on a non-priority channel, the radio continues to monitor activities on the priority channel, and jumps to the priority channel if activity is detected.](https://usermanual.wiki/HYT-Science-and-Technology-Co/TC-518U1/User-Guide-966937-Page-25.png)
![TC-518 Owner’s Manual 24 Busy Channel Lockout (BCL) Avoid interference with the users using the same channel by preventing transmission if another talk group is already on the air. The radio will generate a continuous tone upon [PTT] press if a transmission is not allowed. Release the [PTT] to cancel the tone. See Glossary for definition of BCL. Low Battery Alert For extra convenience, LED flashes red and a low-pitched tone sounds at every ten seconds to alert users to recharge the battery should the battery level run low. Voice Operated Transmit (VOX) You can transmit hands free with the use of optional accessories. The radio will automatically begin transmitting when you speak, and terminate transmitting when you stop talking. See Glossary for definition of [VOX]. Press the programmed [VOX] key to activate or exit the [VOX] feature, with alert tone sounds accordingly. Your dealer can enable/disable the [VOX] feature, and set the [VOX] sensitivity. When [VOX] feature is enabled, the user can transmit hands free with [VOX] accessories: 1. Press the programmed [VOX] key to activate the [VOX] feature. 2. Select the [PTT]/[VOX] switch on the earpiece to [VOX]. 3. Plug the earpiece into the accessory jack. 4. Speaker into the earpiece microphone and your voice will be transmitted. When transmitting with [VOX] accessories, you may here your own voice from the [VOX] earpiece slightly. Press the [PTT] of your radio to disable the [VOX] feature. Turn the radio off on again, or plug the earpiece into the accessory jack again to restore the [VOX] feature. Note: No matter whether the [VOX] feature is enabled, if you select the [PTT]/[VOX] switch on the earpiece to [PTT], you are able to transmit by press of the external [PTT], and you are not allowed to push the switch from [PTT] to [VOX], this action shall cause the radio to continuously](https://usermanual.wiki/HYT-Science-and-Technology-Co/TC-518U1/User-Guide-966937-Page-26.png)
![TC-518 Owner’s Manual 25transmit. When continuous transmission occurs, push the [PTT]/[VOX] switch from [VOX] to [PTT], or turn on the radio again to restore the radio to operation use. Note: to order accessories, please contact your dealer. Compandor This feature secures any clear talk of user in the noisy environment. The feature, programmed by your dealer, can be enabled or disabled through operation of the programmable key. Scrambler Realizing audio encryption, this feature can make any radio without the function receive no real audio so that any private communication of user can highly be protected. The feature, programmed by your dealer, can be enabled or disabled through operation of the programmable key.](https://usermanual.wiki/HYT-Science-and-Technology-Co/TC-518U1/User-Guide-966937-Page-27.png)