HYT Science and Technology Co TC-700U7 Two Way Radio User Manual
Shenzhen HYT Science &Technology; Co Ltd Two Way Radio
UserManual.wiki
>
HYT Science and Technology Co
>
TC 700U7 User Manual
User Manual
Navigation menu
Upload a User Manual
Namespaces
Wiki Guide
HTML
PDF
Info
Views
User Manual
Discussion / Help
Navigation
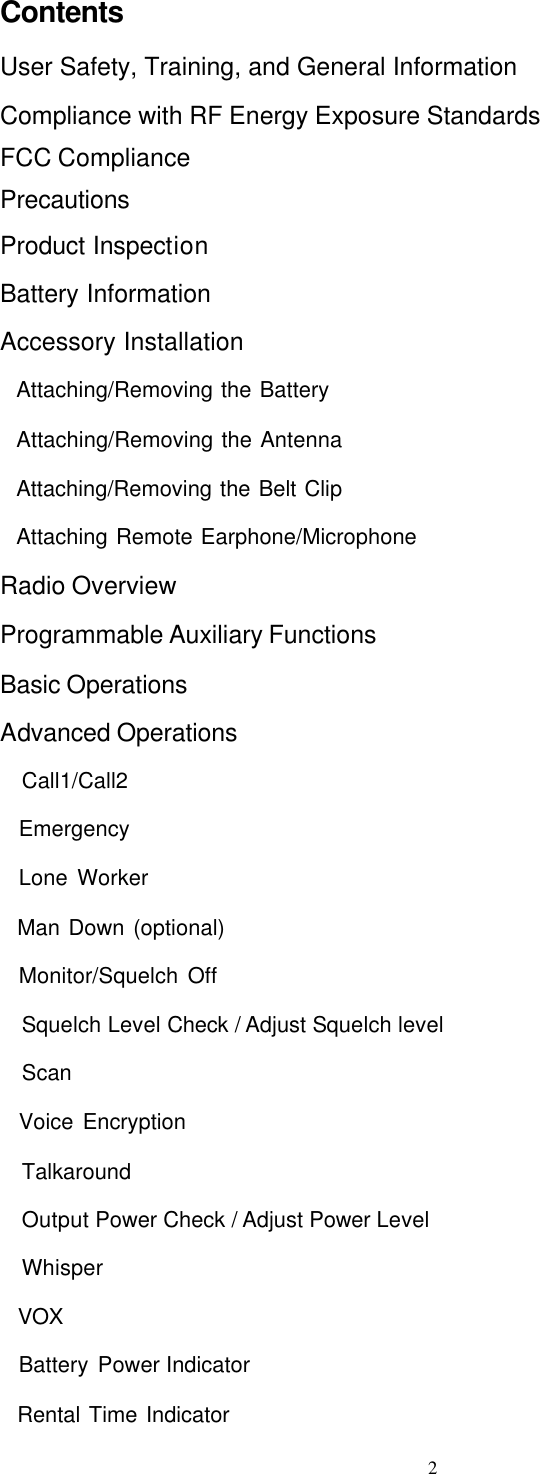

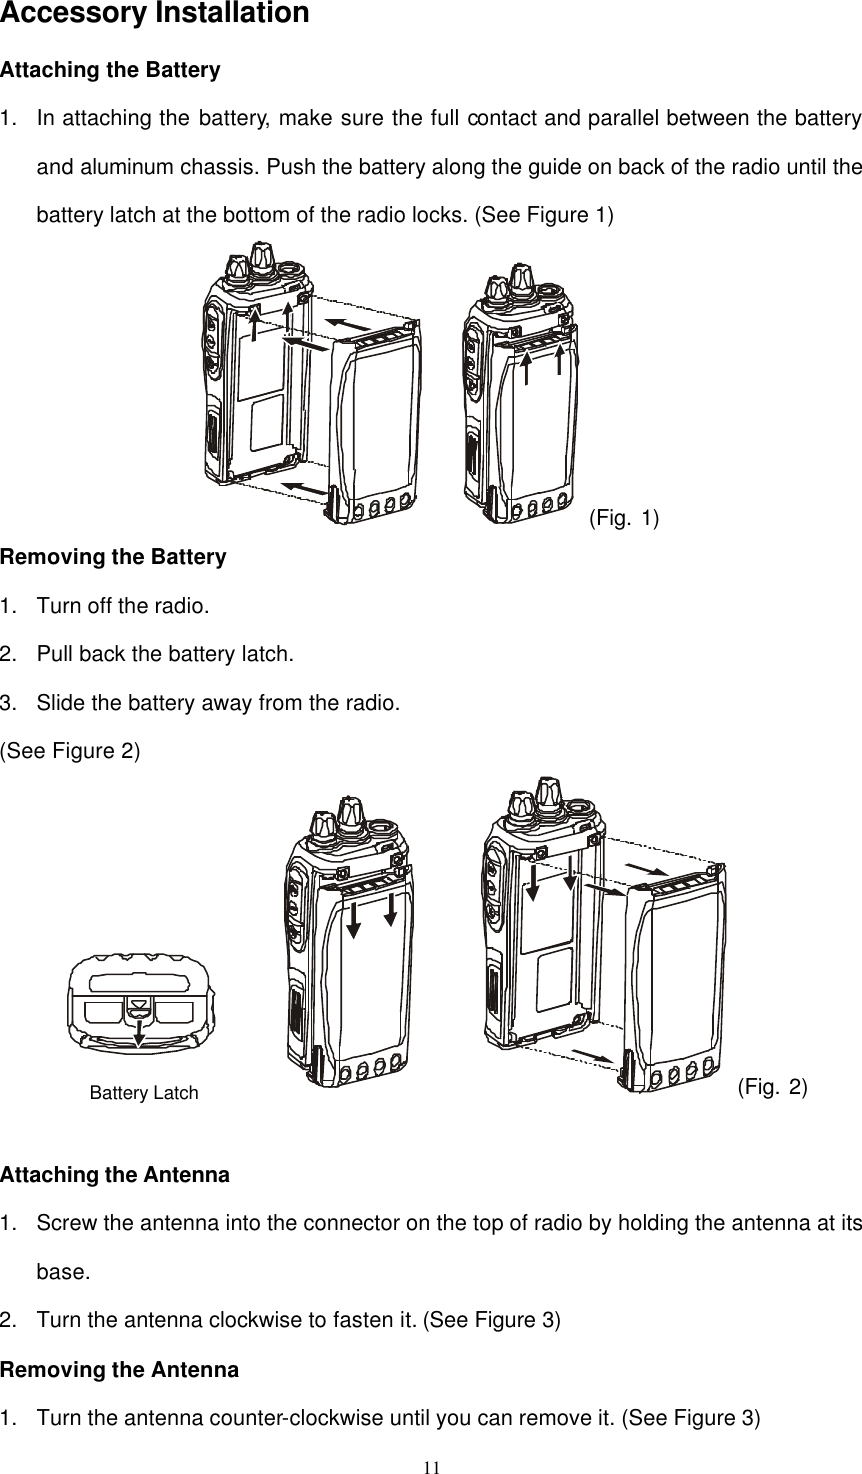

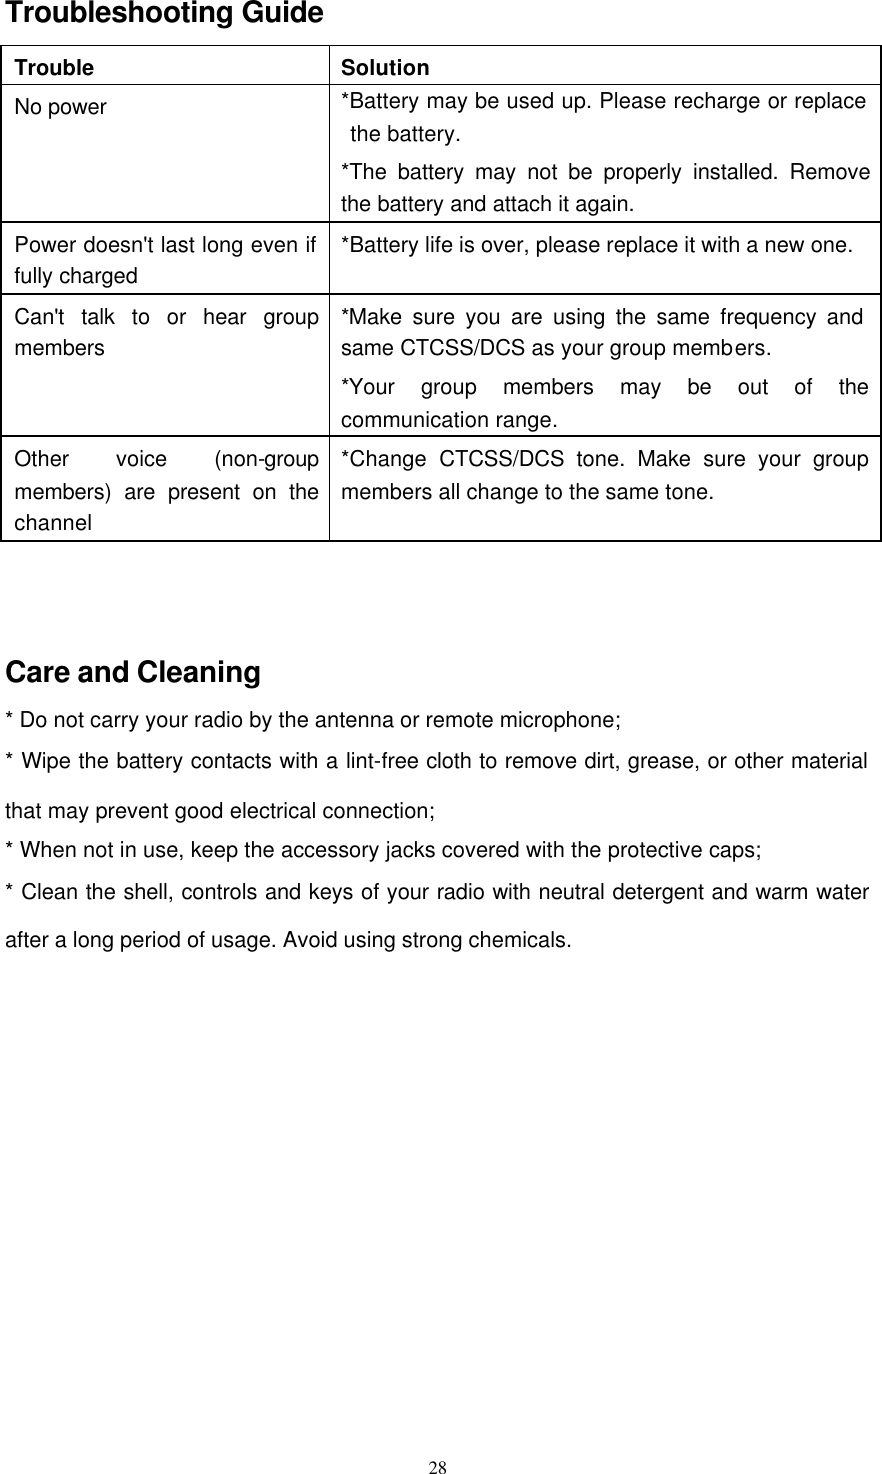
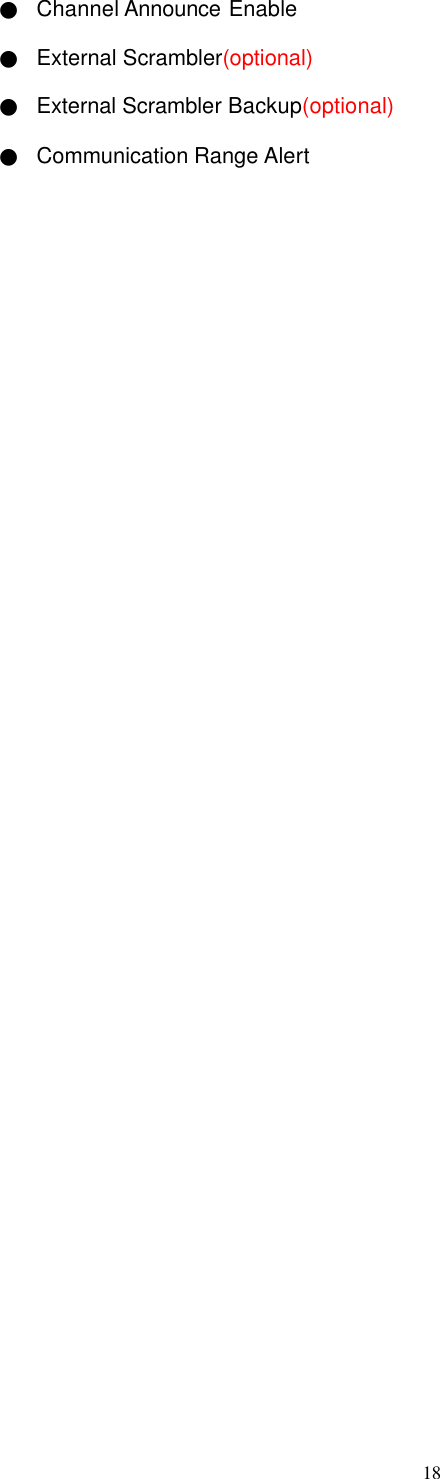
![14 Radio Overview 1234567 8 910131411 161812171415 (1) PTT Key ?To transmit, hold down the [PTT] key and speak into the microphone; Release it to receive. (2) SK1 (Side Key 1) ?This is a programmable function key. (3) SK2 (Side Key 2) ?This is a programmable function key. (4) Antenna (5) Microphone (6) Speaker (7) TK (Top Key) ?This is a programmable function key. (8) Channel Selector Knob ? Rotate the knob to select channel from 1 to 16. (9) Power/Volume Control Knob ? Rotate the knob clockwise until a “click” sounds to turn on the radio; rotate it counter](https://usermanual.wiki/HYT-Science-and-Technology-Co/TC-700U7/User-Guide-699620-Page-14.png)
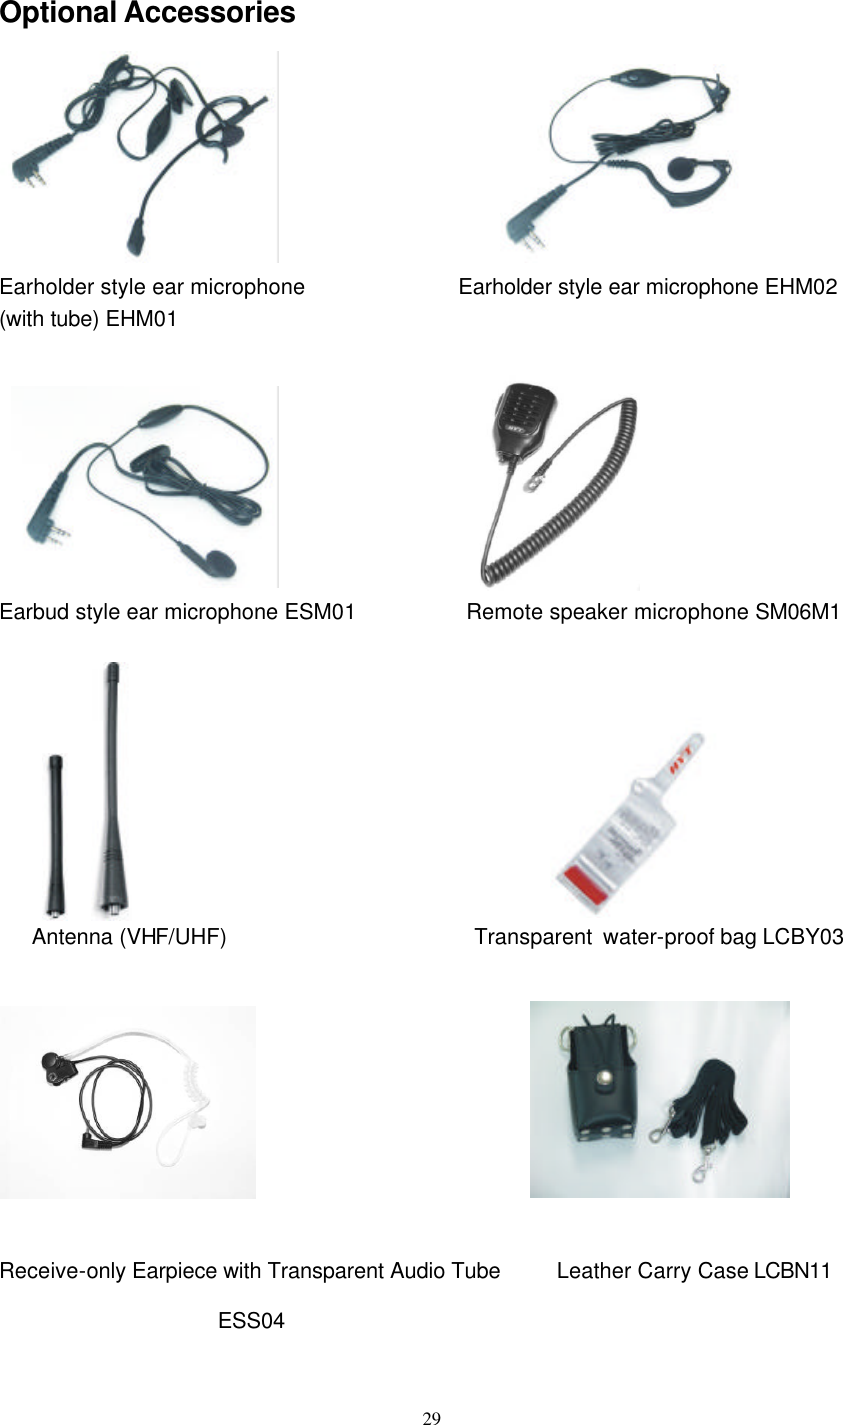
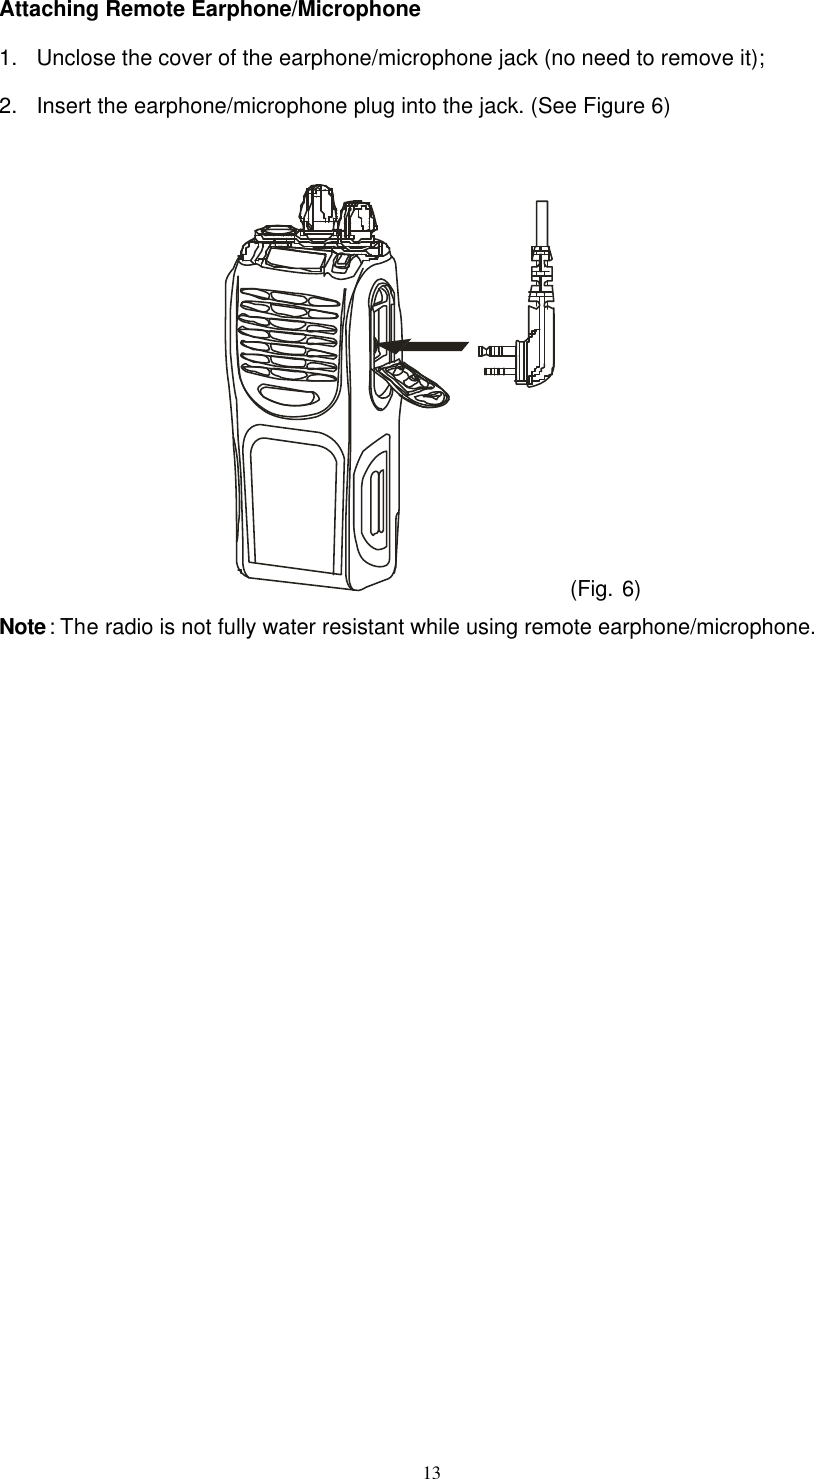
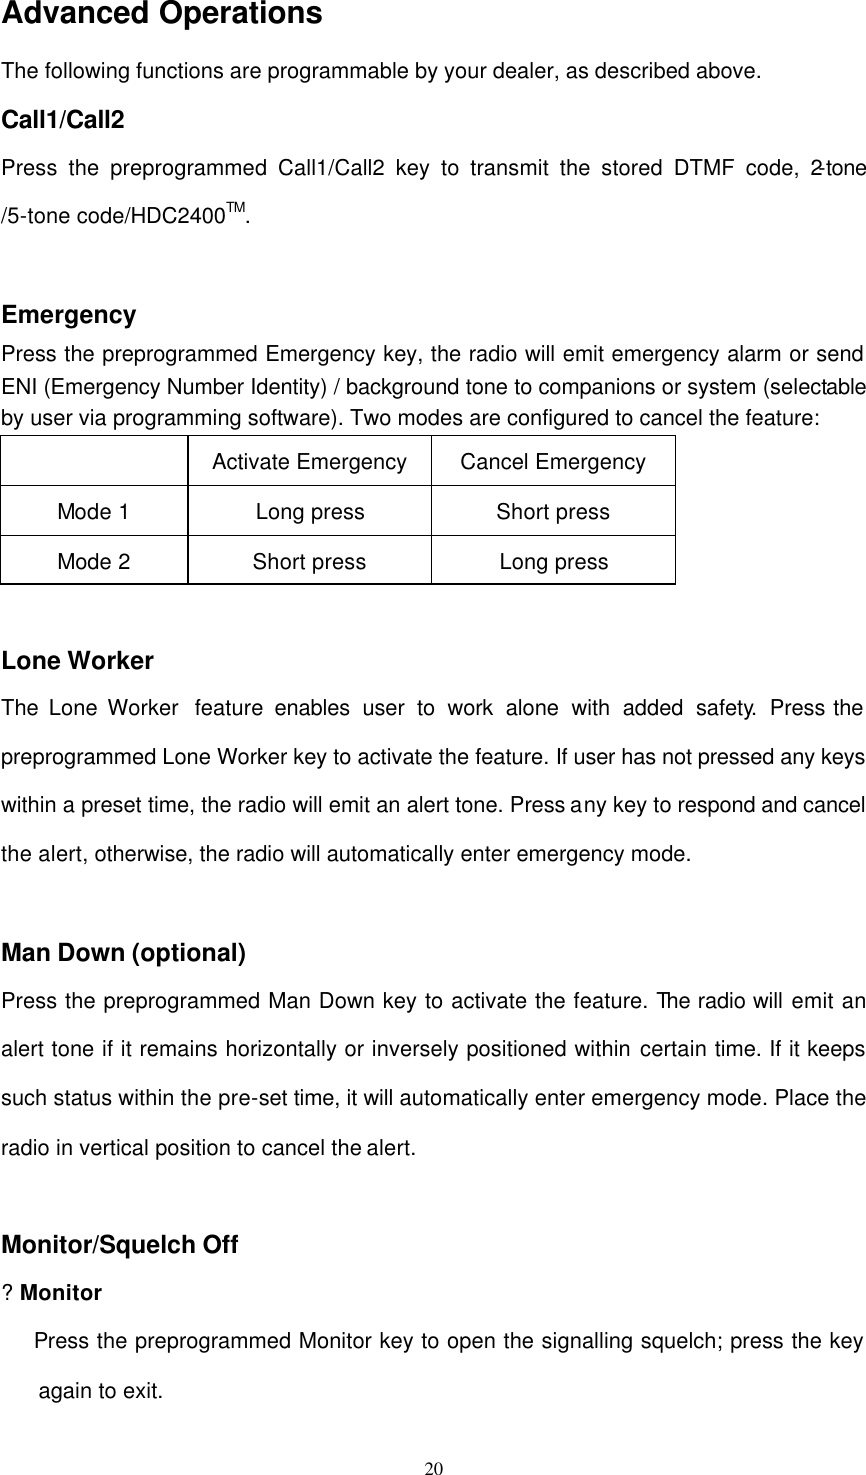
![15 clockwise to turn off the radio. When the radio is on, turn the knob to adjust the volume. (10) LED Indicator Radio status is indicated by LED state/color or alert tone. Source radio is turned on while holding down [PTT+SK2]; directly turn the target radio on. LED flashes orange twice after entering User Wired Clone Mode. Source radio (after the starting of the target radio and the installation of the cloning cable, push PTT on the source radio to begin cloning.) LED solidly glows red during cloning; LED goes out in case of successful cloning; Flash red once every second in case of cloning failure; User Wired Clone Target radio Solidly glow green during cloning; Go out when cloning is completed; Adjust the source and target radios to the same channel. Turn the source and target radios on while holding down [PTT+SK1]. Flash orange once after entering Wireless Clone Mode. Source radio (After the source and target radios are turned on and stay in the same channel, hold down PPT on the source radio to begin cloning.) Solidly glow red during cloning. Wireless Clone Target radio Solidly glow green during cloning; LED flashes green and two Beeps are heard in case of successful cloning; Flash red in case of cloning failure; Power on in User Mode Flash green once Low Battery Alert Solidly glow red; three Beeps every 30s;](https://usermanual.wiki/HYT-Science-and-Technology-Co/TC-700U7/User-Guide-699620-Page-15.png)
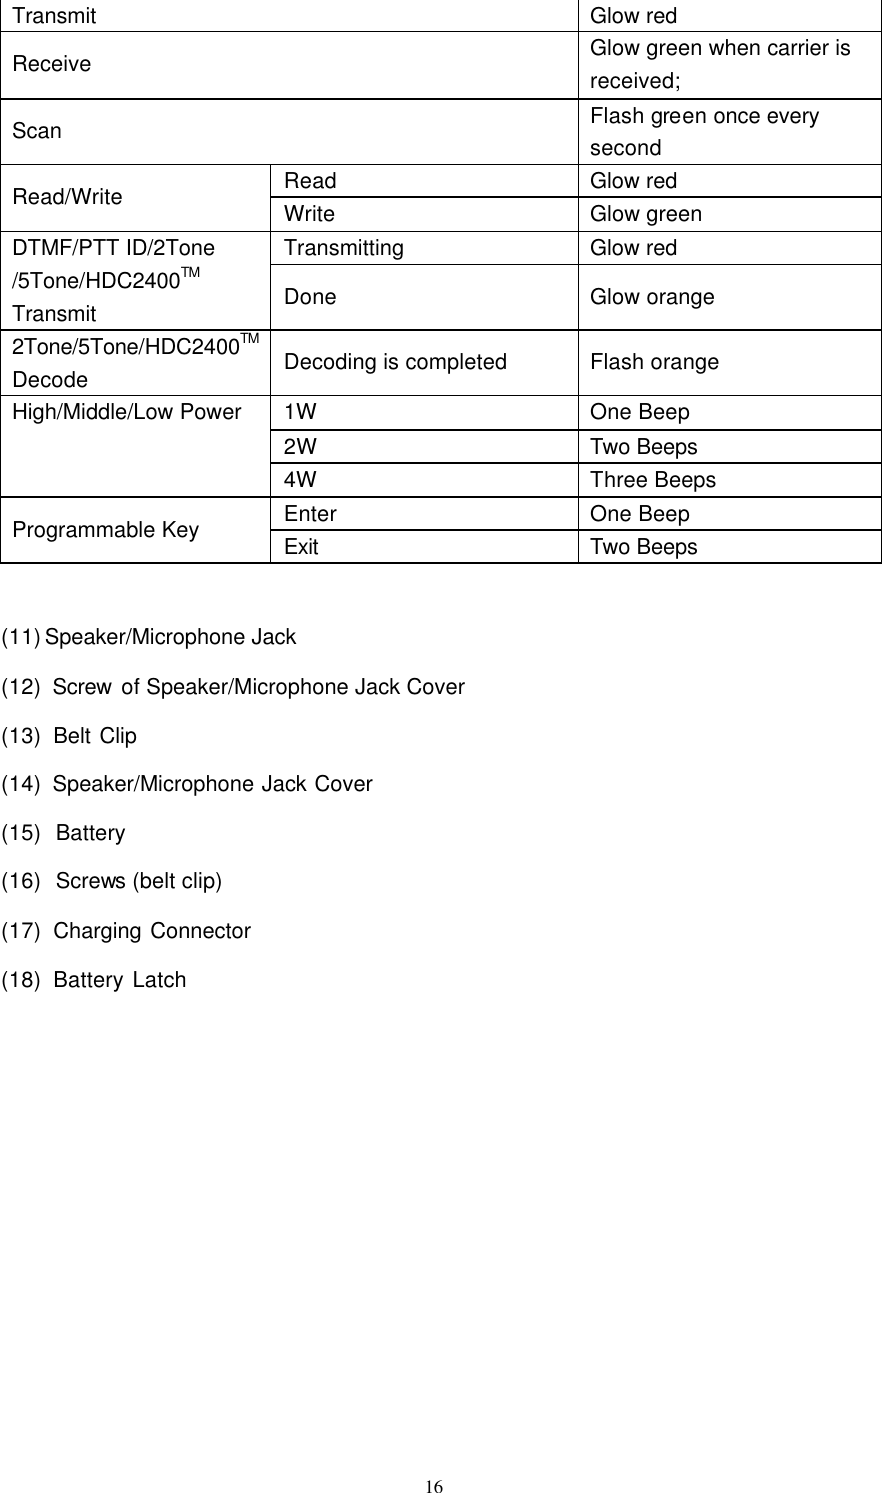
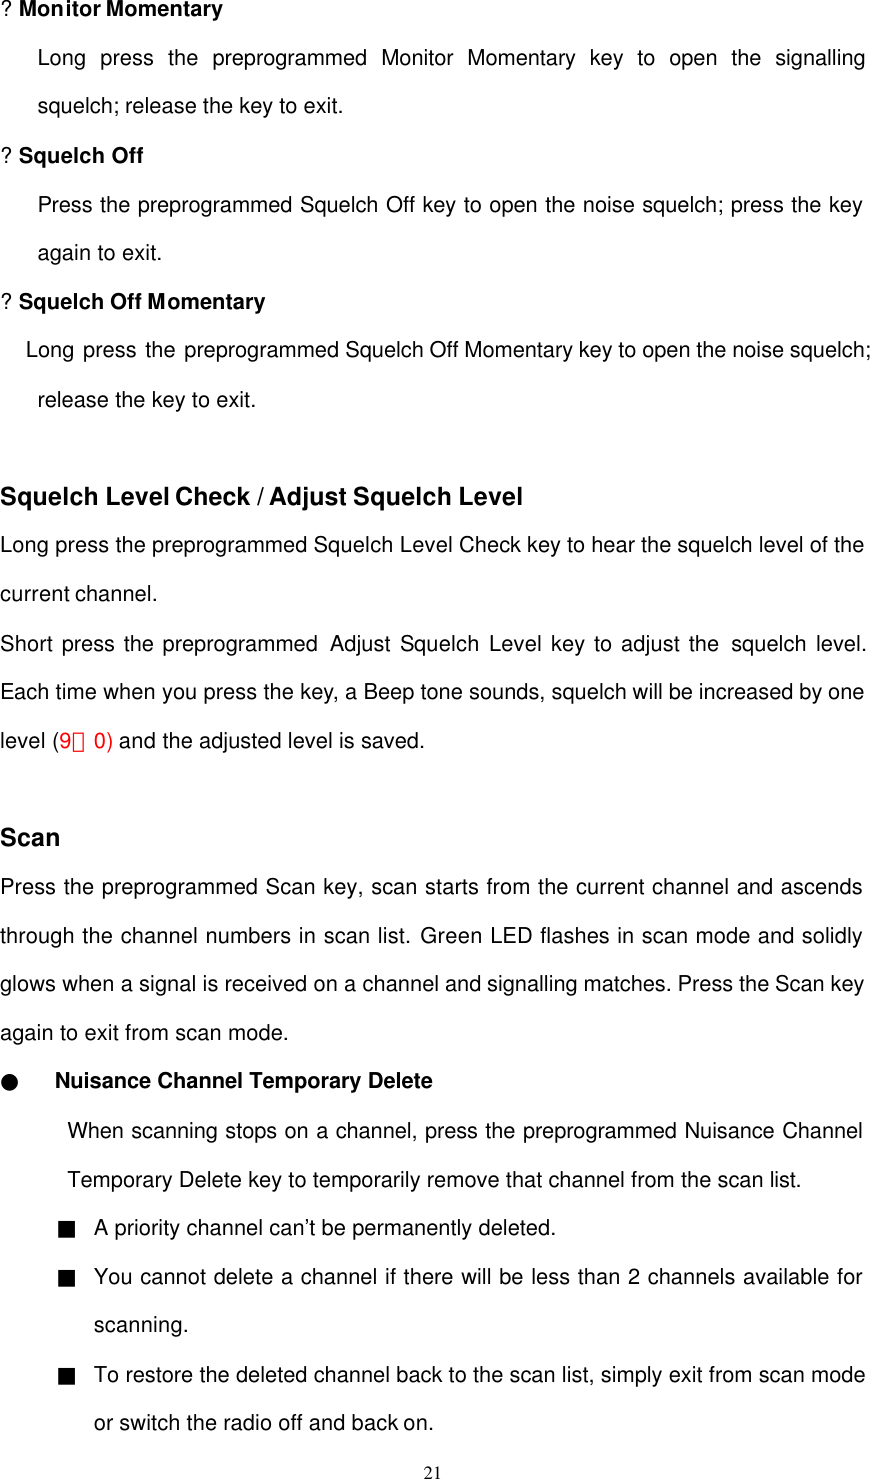
![19 Basic Operations 1. Turn On the Radio Rotate the Power/Volume Control knob clockwise to turn on the radio; green LED flashes one time. ? A Beep sounds if alert tone is set by your dealer. 2. Adjust the Volume If your dealer has programmed Monitor or Squelch Off feature to a programmable key, you can press that key to hear the background noise while adjusting the volume to a comfortable level by rotating the Power/Volume Control Knob. 3. Select a Channel: Rotate Channel Selector Knob to select your desired channel; the radio will report the current channel number when the channel is selected. 4. Transmit Hold down the [PTT] key, speak into the microphone with normal voice. ? Keep microphone about 2.5 to 5cm away from your lips. 5. Receive Release the [PTT] key, the radio returns to receive mode.](https://usermanual.wiki/HYT-Science-and-Technology-Co/TC-700U7/User-Guide-699620-Page-19.png)
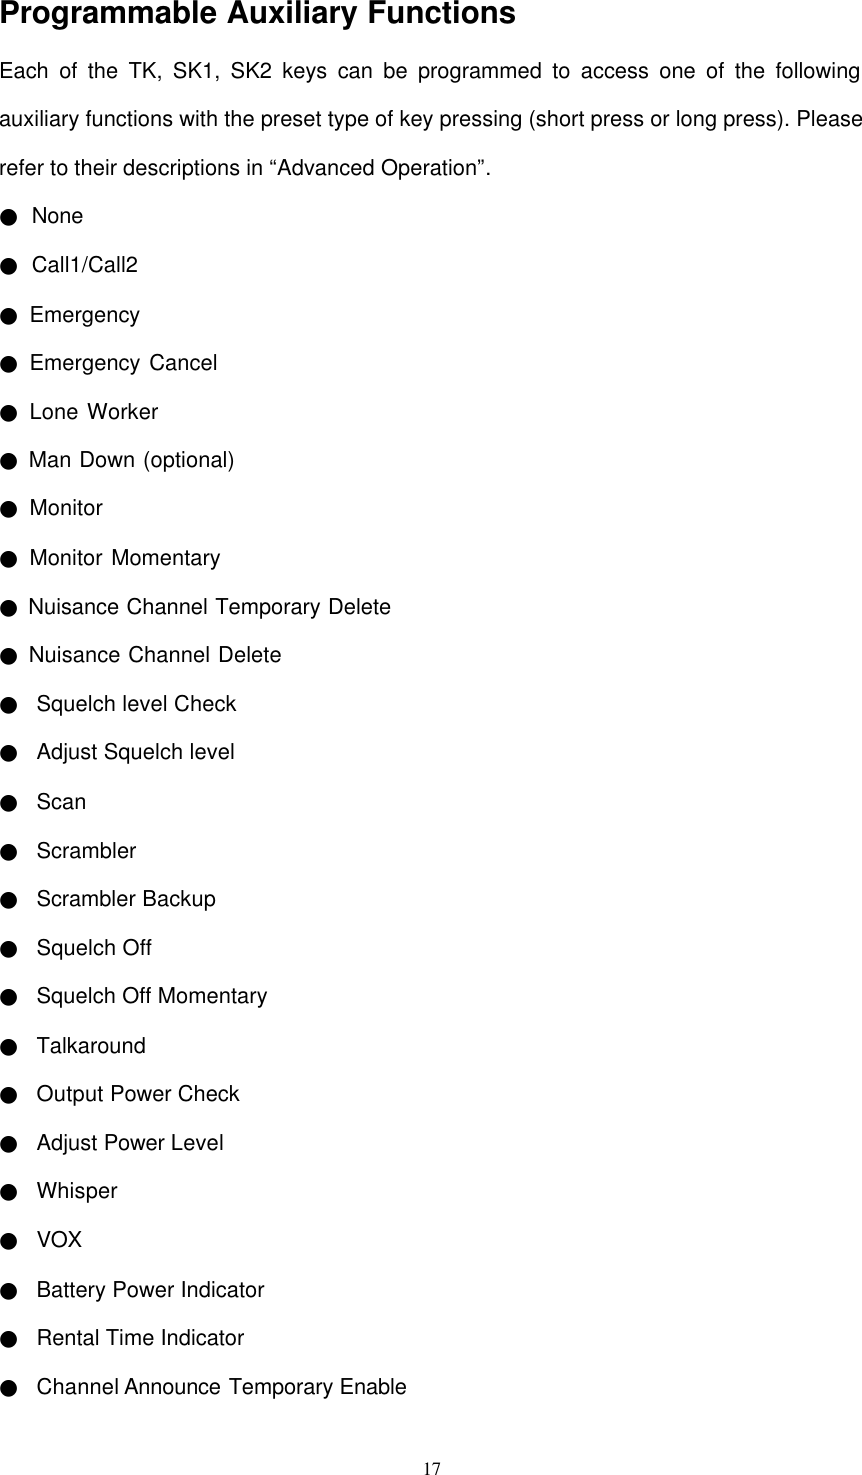
![23 Talkaround Press the preprogrammed Talkaround key, the radio will transmit on the RX frequency. Output Power Check / Adjust Power Level Long press the preprogrammed Output Power Check key, Beep tone sounds to indicate the corresponding power level, a Beep indicates Low power; two Beeps indicate Middle power and three Beeps indicate High power. Short press the preprogrammed Adjust Power Level key to adjust the power level; The output power will toggle among low/middle/high(L~M~H)and the adjusted power level is saved each time when you press the key. Whisper Press the preprogrammed Whisper key, you would be clearly heard even if you speak with low voice. Press the key again to exit. VOX Press the preprogrammed VOX key to activate the VOX feature. User can transmit without holding down [PTT]. Battery Power Indicator Press the preprogrammed Battery Power Indicator key, the radio will report the battery status by audible indication (“1”, “2”, “3”, “4”). Rental Time Indicator In rental mode, the radio is restricted to be used for a preset period of time. Press the preprogrammed Rental Time Indicator key, the radio sounds an audible tone (“1”, “2”, “3”, “4”, “5”) to indicate the remaining time that the user is allowed to use the radio before the preset time expires. The remaining time can be set by your dealer.](https://usermanual.wiki/HYT-Science-and-Technology-Co/TC-700U7/User-Guide-699620-Page-23.png)
![25 Background Operations Time-Out-Timer (TOT) Time-Out-Timer is used to prevent someone from using the same channel for a long time. If the transmission exceeds the preset time (set by your dealer), transmission will be inhibited and an alert tone will sound. To stop the alert tone, release the [PTT] key. Your dealer can program a TOT Pre-Alert feature to alert you just before the TOT elapses. Note:The maximum TOT time is 3 minutes. Busy Channel Lockout (BCL) and Busy Tone Lockout (BTL) When activated, the BCL and BTL feature will prevent you from talking on a channel that is already in use. Press the [PTT] key while the channel is in use, the radio will generate an alert tone and transmission will be inhibited. Release the [PTT] key to stop the alert tone. ■ Carrier: The radio will not transmit when a carrier is detected. ■ CTCSS/DCS: The radio will not transmit while detecting a carrier with wrong CTCSS/DCS code. Alternately, the radio can transmit only when the received CTCSS/DCS code matches the preset code on the selected channel. ■ Opt signalling: The radio can transmit only when the received Opt Signalling code (2-Tone/5-Tone/DTMF/HDC2400TM ) matches the preset code on the selected channel. Battery Save The Battery Save feature is enabled by your dealer to minimize the power consumption. When there is no activity on the channel and no operation (no key is being pressed, and no switch is being turned) is performed for 12 seconds, Battery Save is automatically activated. When a signal is received or an operation is performed, Battery Save is automatically turned off.](https://usermanual.wiki/HYT-Science-and-Technology-Co/TC-700U7/User-Guide-699620-Page-25.png)
![27 activated only when the matching 2-Tone/5-Tone/HDC2400TM signals are received. Likewise, your signals will be received only by parties using the same 2-Tone/5-Tone/ HDC2400TM signals. ● The LED glows red during transmission; when the transmission is completed, the LED solidly glows orange until the preset time elapses. ● The LED glows green during decoding, and flashes orange until the preset time elapses to indicate successful decoding. Signalling AND / OR Logic Signalling "AND"/"OR" sets the audio unmute condition for any channel programmed with CTCSS/DCS or Opt Signalling (2-Tone/5-Tone/HDC2400TM ). CTCSS/DCS AND 2-Tone/5-Tone/DTMF/HDC2400TM: The squelch opens only when both CTCSS/DCS and Opt Signalling (2-Tone/5-Tone/ DTMF/HDC2400TM) are received and matches the preset one on selected channel. CTCSS/DCS OR 2-Tone/5-Tone/DTMF/HDC2400TM: The squelch opens when either CTCSS/DCS or Opt Signalling (2-Tone/5-Tone/DTMF/ HDC2400TM) is received and matches the preset one on selected channel. PTT ID PTT ID (BOT/EOT/Both) is used to access and release repeaters and telephone systems. BOT ID (Beginning of Transmission): The radio transmits the ID code (2-Tone/5-Tone/HDC2400TM) immediately after it begins transmission, when the [PTT] key is pressed. EOT ID (End of Transmission): The radio transmits the ID code (2-Tone/5-Tone/HDC2400TM) just before it ends transmission, when the [PTT] key is released. Both: The radio transmits the ID code when it begins/ ends transmission.](https://usermanual.wiki/HYT-Science-and-Technology-Co/TC-700U7/User-Guide-699620-Page-27.png)