HYUNDAI MOBIS AC1A2D5AN DIGITAL CAR AUDIO SYSTEM User Manual
HYUNDAI MOBIS CO., LTD. DIGITAL CAR AUDIO SYSTEM
User Manual
Audio system
7
AUDIO (With Touch Screen)
(With
Bluetooth
®
Wireless Technology)
D4H3G0000EE/D4H3G0001EE
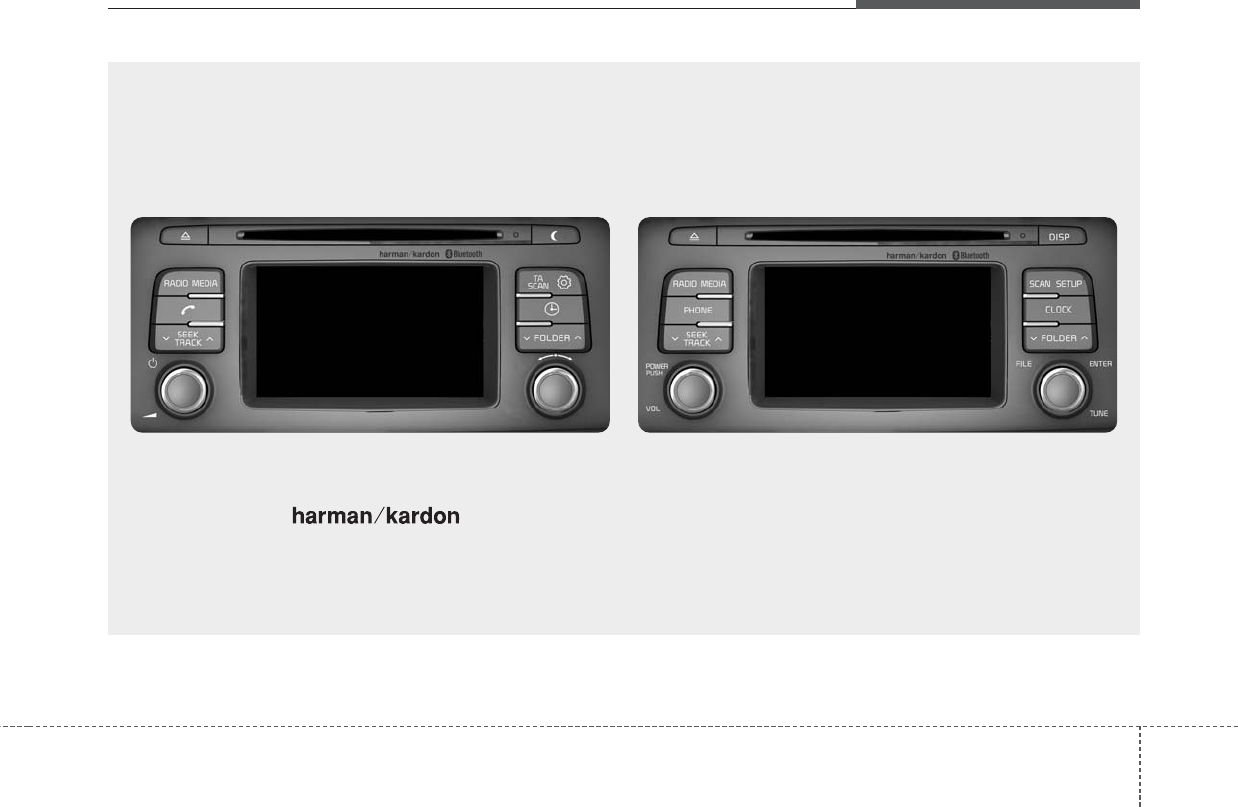
■ Type B-1 ■ Type B-2
❈NO logo will be shown if harman/kardon feature is not supported.
Audio system
8
Feature of Your Audio
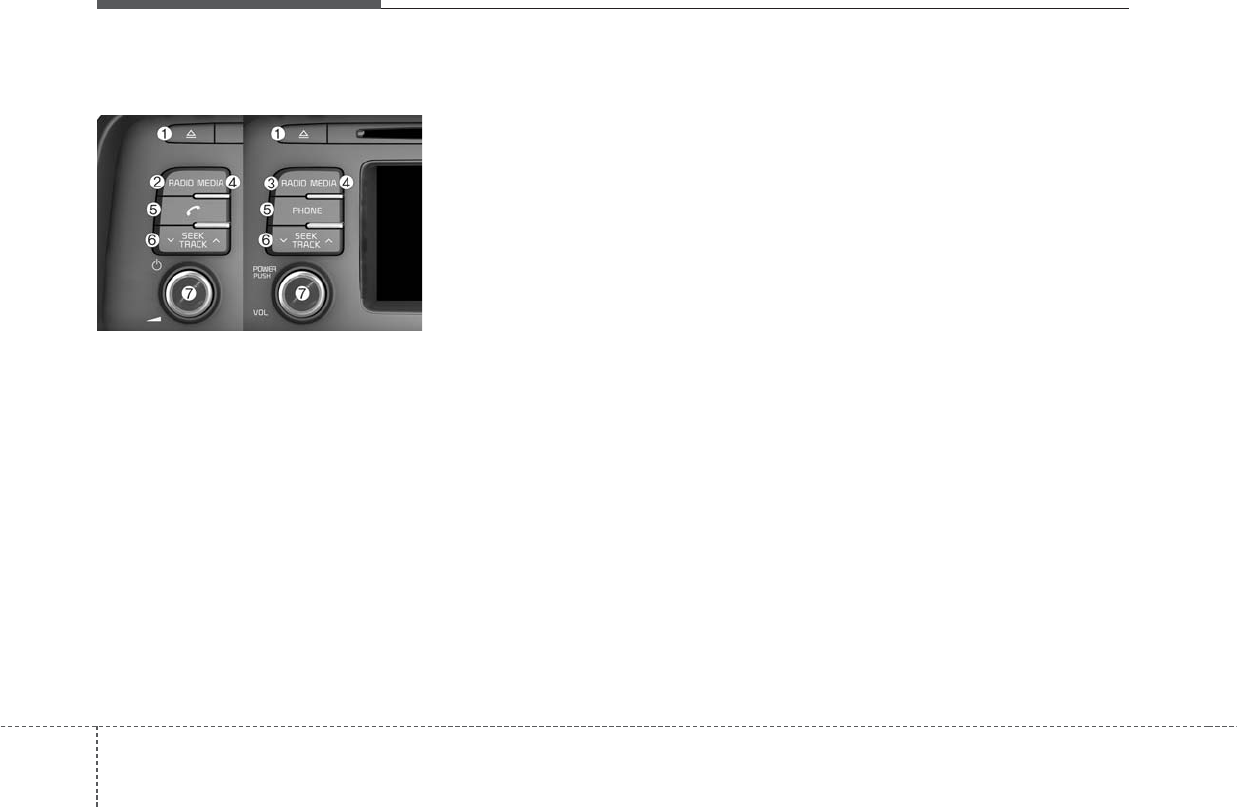
(1) EJECT
• Ejects the disc.
(2) RADIO (Type B-1)
• Changes to FM/AM mode.
• Each time the button is pressed,
the mode is changed in order of
FM1 ➟FM2 ➟FMA ➟AM ➟AMA.
(3) RADIO (Type B-2)
• Changes to FM/AM mode.
• Each time the button is pressed,
the mode is changed in order of
FM1 ➟FM2 ➟AM.
(4) MEDIA
• Changes to CD, USB(iPod®), AUX,
My Music, BT Audio mode.
• Each time the button is pressed, the
mode is changed in order of CD,
USB(iPod®), AUX, My Music, BT
Audio.
(5) PHONE
• Converts to Phone mode.
• When a phone is not connected,
the connection screen is displayed.
(6) SEEK TRACK
When pressed shortly
• Radio mode : plays previous / next
frequency.
• CD, USB, iPod®, My Music, BT Audio
mode : changes the track, Song(file).
When pressed and held
• Radio mode : continuously changes
the frequency. Upon release, plays
the current frequency.
• CD, USB, iPod®, My Music mode :
rewinds or fast forwards the track or
file.
• During a Handsfree call, controls the
call volume.
(7) POWER/VOL knob
• Power knob : Turns power On/Off
by pressing the knob
• Volume knob : Sets volume by
turning the knob left/right
Audio system
9
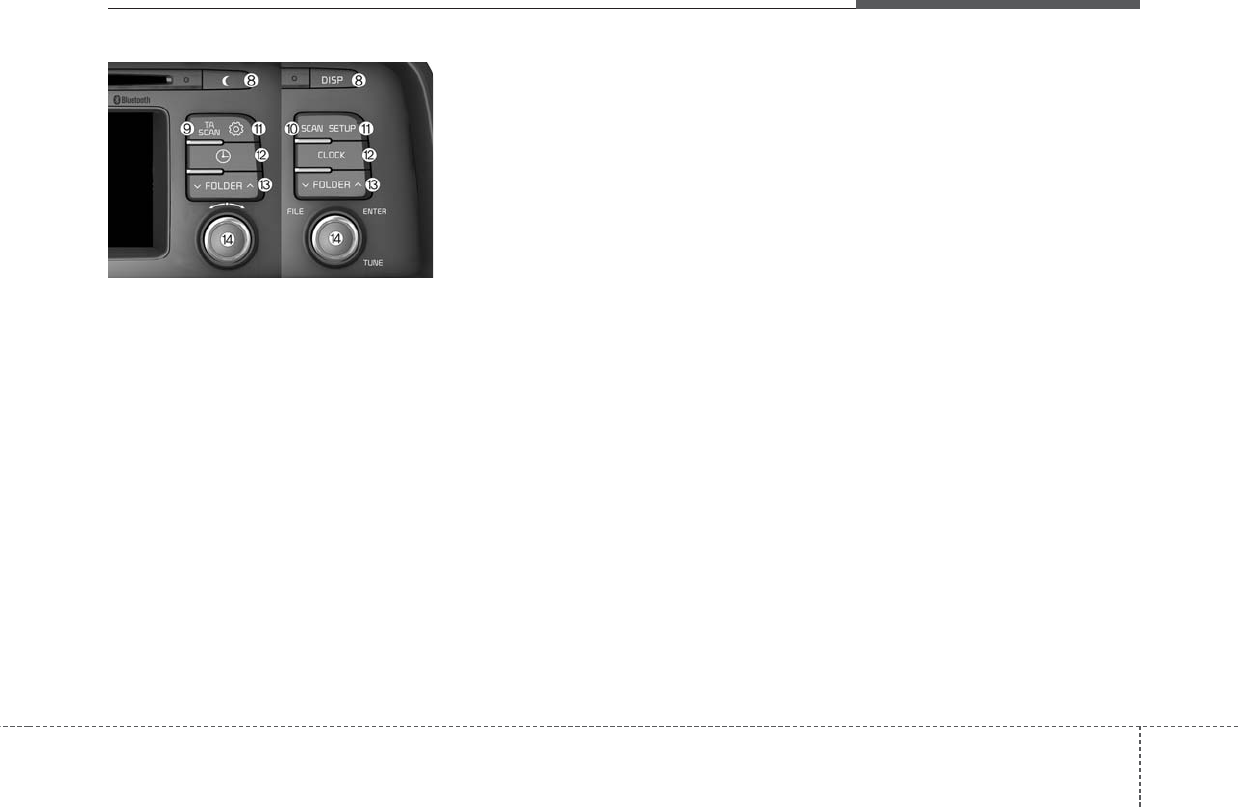
(8) DISP
• Each time the button is shortly
pressed, sets Screen Off ➟Screen
On ➟Screen Off
• Audio operation is maintained and
only the screen will be turned Off.
• In the Screen Off state, press any
button to turn the Screen On again.
(9) TA/SCAN (Type B-1)
• Radio mode
- Shortly press the button : TA
On/Off.
- Press and hold the button :
Previews each broadcast for 5
seconds each.
• CD, USB, My Music mode
- Press and hold the button :
Previews each song (file) for 10
seconds each.
- Press and hold the button again
to continue listening to the cur-
rent song (file).
(10) SCAN (Type B-2)
• Radio mode : previews all receiv-
able broadcasts for 5 seconds
each.
• CD, USB, My Music mode : pre-
views each song (file) for 10 sec-
onds each.
(11) SETUP
• Converts to Setup mode.
(12) CLOCK
• Displays the time/date/day.
(13) FOLDER
• MP3 CD / USB mode : Folder
Search
(14) TUNE knob
• Radio mode : turn to change
broadcast frequencies.
• CD, USB, iPod®, My Music mode :
turn to search tracks/channels/
files.

Audio system
10
✽NOTICE - Using the Discs
• This device has been manufac-
tured to be compatible with soft-
ware bearing the following logo
marks.
• Do not clean discs with chemical
solutions, such as record sprays,
antistatic sprays, antistatic liq-
uids, benzene, or thinners.
• After using a disc, put the disc
back in its original case to prevent
disc scratches.
• Hold discs by their edges or with-
in the center hole to prevent dam-
ages to disc surfaces.
• Do not introduce foreign sub-
stances into the disc insert/eject
slot. Introducing foreign sub-
stances could damage the device
interior.
• Do not insert two discs simultane-
ously.
• When using CD-R/CD-RW discs,
differences in disc reading and
playing times may occur depend-
ing on the disc manufacturer, pro-
duction method and the recording
method as used by the user.
(Continued)
(Continued)
• Clean fingerprints and dust off the
disc surface (coated side) with a
soft cloth.
• The use of CD-R/CD-RW discs
attached with labels may result in
disc slot jams or difficulties in disc
removal. Such discs may also
result in noise while playing.
• Some CD-R/CD-RW discs may
not properly operate depending on
the disc manufacturer, production
method and the record method as
used by the user. If problems per-
sist, trying using a different CD as
continued use may result in mal-
functions.
• The performance of this product
may differ depending on the
CDRW Drive Software.
• Copy-protected CDs such as Stype
CDs may not function in the
device. DATA discs cannot be
played. (However, such discs may
still operate but will do so abnor-
mally.)
(Continued)
(Continued)
• Do not use abnormally shaped discs
(8cm, heart-shaped, octagon-
shaped) as such discs could lead to
malfunctions.
• If the disc is straddled on the disc
slot without removal for 10 sec-
onds, the disc will automatically
be re-inserted into the disc player.
• Only genuine audio CDs are sup-
ported. Other discs may result in
recognition failure (e.g. copy
CDR, CDs with labels)
Audio system
11
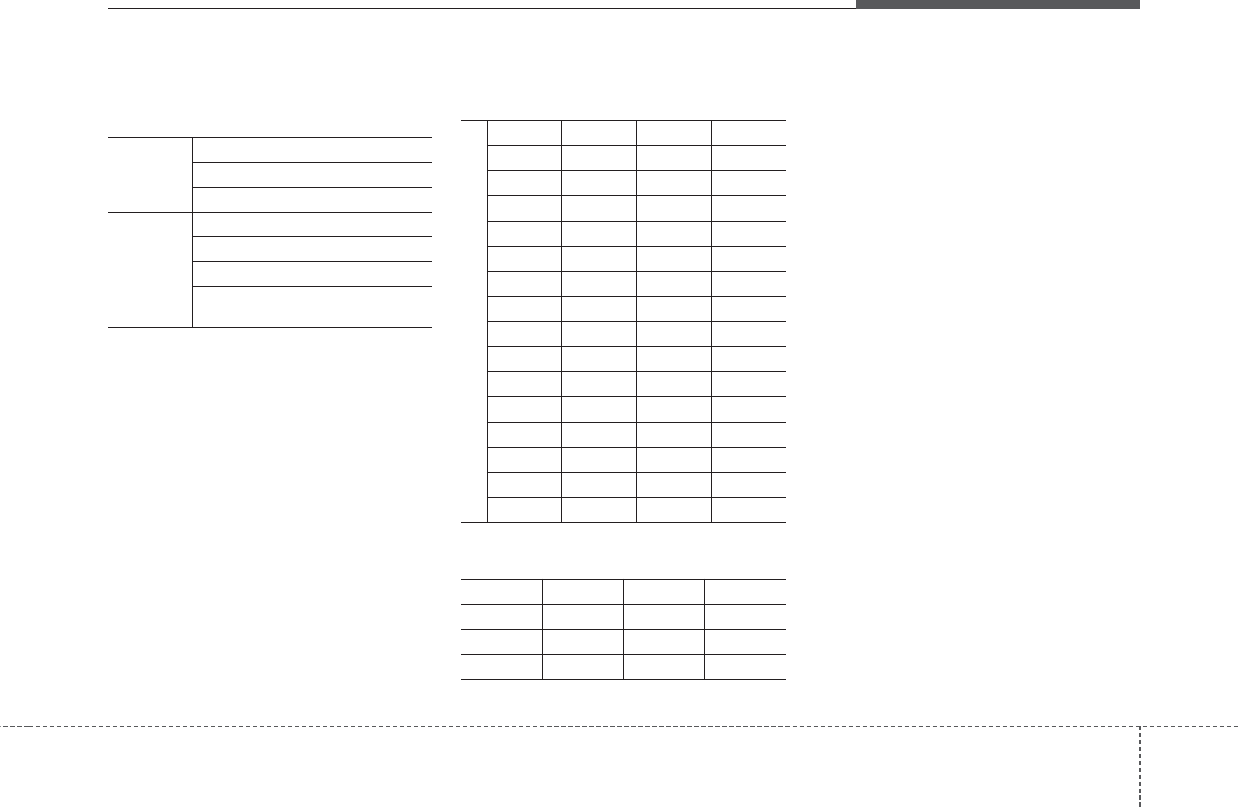
MP3 File Information
• Supported Audio Formats
❈File formats that do not comply
with the above formats may not be
properly recognized or play with-
out properly displaying file names
or other information.
• Support for Compressed Files
1. Supported Bitrates (Kbps)
2. Sampling Frequencies (Hz)
• For MP3/WMA compression files,
differences in sound quality will
occur depending on the bitrate.
(Higher sound quality can be expe-
rienced with higher bitrates.)
• This device only recognizes files
with MP3/WMA extensions. Other
file extensions may not be properly
recognized.
3. Maximum number of recognized
folders and files
- Folder : 255 folders for CD, 2,000
folders for USB
- File : 999 files for CD, 6,000 files
for USB
❈There are no limitations to the
number of recognized folder levels
MPEG1 MPEG2 MPEG2.5 WMA
44100 22050 11025 32000
48000 24000 12000 44100
3000 16000 8000 48000
File System
ISO 9660 Level 1
ISO 9660 Level 2
Romeo / Juliet (128 characters)
Audio
Compression
MPEG1 Audio Layer3
MPEG2 Audio Layer3
MPEG2.5 Audio Layer3
Windows Media Audio Ver 7.X
& 8.X
MPEG1 MPEG2 MPEG2.5 WMA
Layer3 Layer3 Layer3
High Range
32 8 8 48
40 16 16 64
48 24 24 80
56 32 32 96
64 40 40 128
80 48 48 160
96 56 56 192
112 64 64
128 80 80
160 96 96
192 112 112
224 128 128
256 144 144
320 160 160
BIT RATE(kbps)
사양 변경에 따른 수정 사항 있는지 확인 필요합니다.

Audio system
12
• Language Support
(Unicode Support)
1. English : 94 characters
2. Special characters and Symbols :
986 characters
❈Korean, English and Chinese are
supported.
3. Text Display (Based on Unicode)
- File name : Maximum 64 English
characters
- Folder name : Max 32 English
characters
❈Using the scroll feature allows you
to see the entire name of files with
names that are too long to be dis-
played at once.
• Compatibility by Disc Type
1. Playing MIXED CDs : First plays
the audio CD, then plays the com-
pressed file(s).
2. Playing EXTRA CDs : First plays
the audio CD, then plays the com-
pressed file(s).
3. Playing multisession CDs : Plays
in order of sessions
- MIXED CD : CD type in which
both MP3 and audio CD files are
recognized in one disc.
- Multisession CD : CD type that
includes more than two sessions.
Different from Extra CDs, multi-
session CDs are recorded by
sessions and have no media lim-
itation.
• Precautions upon Writing CDs
1. In all cases except when creating
multisession discs, check the
close session option before creat-
ing the disc. Though product mal-
functions will not occur, some time
may be required for the device to
check whether the session state is
closed (approximately 25 sec-
onds). (Additional time may also
be required depending on the
number of folders or files.)
2. Changing the MP3/WMA file
extensions or changing files of
other extensions to MP3/WMA
may result in product malfunction.
3. When naming files with
MP3/WMA file extensions, write
using only Korean and English.
(Korean, English and Chinese are
supported.)
4. Unauthorized use or duplication of
music files are prohibited by law.
5. Prolonged use of CD-R/CD-RW
discs that do not satisfy related
standards and/or specifications
could result in product malfunc-
tion.

Audio system
13
✽NOTICE - Using the USB
Device
• Connect the USB device after
turning on the engine. The USB
device may become damaged if it
is already connected when the
ignition is turned on. The USB
device may not operate properly if
the car ignition is turned on or off
with the USB device connected.
• Heed caution to static electricity
when connecting/disconnecting
USB devices.
• Encoded MP3 Players will not be
recognized when connected as an
external device.
• When connecting an external USB
device, the device may not proper-
ly recognize the USB is in some
states.
• Only products formatted with
byte/sectors under 64Kbyte will be
recognized.
• This device recognizes USB
devices formatted in FAT 12/16/32
file formats. This device does not
recognize files in NTFS file for-
mat.
(Continued)
(Continued)
• Some USB devices may not be sup-
ported due to compatibility issues.
• Avoid contact between the USB
connector with bodily parts or for-
eign objects.
• Repeated connecting/disconnect-
ing of USB devices within short
periods of time may result in prod-
uct malfunction.
• A strange noise may occur when
disconnecting the USB.
• Make sure to connect/disconnect
external USB devices with the
audio power turned off.
• The amount of time required to
recognize the USB device may dif-
fer depending on the type, size or
file formats stored in the USB.
Such differences in time are not
indications of malfunctions.
• The device only supports USB
devices used to play music files.
• USB images and videos are not
supported.
(Continued)
(Continued)
• Do not use the USB I/F to charge
batteries or USB accessories that
generate heat. Such acts may lead
to worsened performance or dam-
age to the device.
• The device may not recognize the
USB device if separately pur-
chased USB hubs and extension
cables are being used. Connect the
USB directly with the multimedia
terminal of the vehicle.
• When using mass storage USB
devices with separate logical
drives, only files saved to the root
drive can be played.
• Files may not properly operate if
application programs are installed
to the USBs.
• The device may not operate nor-
mally if MP3 Players, cellular
phones, digital cameras, or other
electronic devices (USB devices
not recognized as portable disk
drives) are connected with the
device.
(Continued)

Audio system
14
(Continued)
• Charging through the USB may
not work for some mobile devices.
• The device may not support nor-
mal operation when using a USB
memory type besides (Metal
Cover Type) USB Memory.
• The device may not support nor-
mal operation when using formats
such as HDD Type, CF, or SD
Memory.
• The device will not support files
locked by DRM (Digital Rights
Management.)
• USB memory sticks used by con-
necting an Adaptor (SD Type or
CF Type) may not be properly rec-
ognized.
• The device may not operate prop-
erly when using USB HDDs or
USBs subject to connection fail-
ures caused by vehicle vibrations.
(e.g. i-stick type)
(Continued)
(Continued)
• Avoid use of USB
memory products that
can also be used as key
chains or mobile phone
accessories. Use of such products
may cause damage to the USB
jack.
• Connecting an MP3 device or
phone through various channels,
such as AUX/BT or Audio/USB
mode may result in pop noises or
abnormal operation.
✽NOTICE - Using the iPod®
Device
• iPod®is a registered trademark of
Apple Inc.
• In order to use the iPod®while
operating the keys, you must use a
dedicated iPod®cable. (the cable
that is supplied when purchasing
iPod®/iPhone®products)
• If the iPod®is connected to the
vehicle while it is playing, a high
pitch sound could occur for
approximately 1-2 seconds imme-
diately after connecting. If possi-
ble, connect the iPod®to the vehi-
cle with the iPod®stopped/paused.
• During ACC ON state, connecting
the iPod®through the iPod®cable
will charge the iPod®through the
car audio system.
• When connecting with the iPod®
cable, make sure to fully insert the
jack to prevent communication
interference.
(Continued)

Audio system
15
(Continued)
• When the EQ features of an exter-
nal device, such as the iPod®, and
the audio system are both active,
EQ effects could overlap and
cause sound deterioration and dis-
tortion. Whenever possible, turn
off the EQ feature within the
external device upon use by con-
necting with the audio system.
• Noise may occur when an iPod®or
AUX device is connected. When
such devices are not being used,
disconnect the device for storage.
• When the iPod®or AUX device
power is connected to the power
jack, playing the external device
may result in noise. In such cases,
disconnect the power connection
before use.
• Skipping or improper operation
may occur depending on the char-
acteristics of your iPod®/iPhone®
device.
(Continued)
(Continued)
• If your iPhone is connected to both
the Bluetooth®Wireless Technology
and USB, the sound may not be
properly played. In your iPhone,
select the Dock connector or
Bluetooth®Wireless Technology to
change the sound output (source).
• iPod®mode cannot be operated
when the iPod®cannot be recog-
nized due to the playing of ver-
sions that do not support commu-
nication protocols, cases of iPod®
abnormalities and defects.
• For fifth generation iPod®Nano
devices, the iPod®may not be recog-
nized when the battery level is low.
Please charge the iPod®for use.
• Search/play orders shown within the
iPod®device may differ with the
orders shown within the audio sys-
tem.
• If the iPod®malfunctions due to
an iPod®device defect, reset the
iPod®and try again. (To learn
more, refer to your iPod®manual)
(Continued)
(Continued)
• Some iPod®s may not sync with
the System depending on its ver-
sion. If the Media is removed
before the Media is recognized,
then the system may not properly
restore the previously operated
mode. (iPad charging is not sup-
ported.)
• Beside support 1M cable when
purchasing iPod®/iPhone®prod-
ucts, Long Cable cannot be recog-
nized.

Audio system
16
✽NOTICE - Using the
Bluetooth®
Wireless
Technology Audio
Mode
•Bluetooth®Wireless Technology
Audio Mode can be used only
when a Bluetooth®Wireless
Technology phone has been con-
nected.
•Bluetooth®Wireless Technology
Audio Mode will not be available
when connecting mobile phones
that do not support this feature.
• While Bluetooth®Wireless
Technology Audio is playing, if the
Bluetooth®Wireless Technology
phone is connected, then the music
will also stop.
• Moving the Track up/down while
playing Bluetooth®Wireless
Technology audio mode may
result in pop noises in some mobile
phones.
•Bluetooth®Wireless Technology
streaming audio may not be sup-
ported in some mobile phones.
(Continued)
(Continued)
• When returning to Bluetooth®
Wireless Technology Audio mode
after ending a call, the mode may
not automatically restart in some
mobile phones.
• Receiving an incoming call or
making an outgoing call while
playing Bluetooth®Wireless
Technology Audio may result in
audio interference.
✽NOTICE - Using the
Bluetooth®
Wireless
Technology Cellular
Phone
•Bluetooth®Wireless Technology
Handsfree refers to a device which
allows the user to conveniently
make phone calls with Bluetooth®
Wireless Technology mobile
phones through the audio system.
•Bluetooth®Wireless Technology
allows devices to be connected in a
short distance, including hands-
free devices, stereo headsets, wire-
less remote controllers, etc. For
more information, visit the
Bluetooth®Wireless Technology
website at www.Bluetooth.com.
Before using Bluetooth®Wireless
Technology audio features.
• The Bluetooth®word mark and
logos are registered trademarks
owned by Bluetooth®SIG, Inc. and
any use of such marks by Kia is
under license. Other trademarks
and trade names are those of their
respective owners. A Bluetooth®
enabled cell phone is required to
use Bluetooth®Wireless Technology.
(Continued)

Audio system
17
(Continued)
•Bluetooth®Wireless Technology
features supported within the
vehicle are as follows. Some fea-
tures may not be supported
depending on your Bluetooth®
Wireless Technology device.
- Answering and placing
Bluetooth®Wireless Technology
Handsfree calls
- Menu operation during call
(Switch to Private, Switch to call
waiting, Outgoing volume)
- Download Call History
- Download Mobile Phone book
- Phone book/Call History Auto
Download
-Bluetooth®Wireless Technology
device auto connection
-Bluetooth®Wireless Technology
Audio
• Before using Bluetooth®Wireless
Technology related features of the
audio system, refer your phone’s
User’s Manual for phone-side
Bluetooth®Wireless Technology
operations.
(Continued)
(Continued)
• The phone must be paired to the
audio system to use Bluetooth®
Wireless Technology related fea-
tures.
• Pairing and connecting a
Bluetooth®Wireless Technology
enabled mobile phone will work
only when the Bluetooth®Wireless
Technology option within your
mobile phone has been turned on.
(Methods of turning on the
Bluetooth®Wireless Technology
enabled feature may differ
depending on the mobile phone.)
• Do not use a cellular phone or per-
form Bluetooth®Wireless
Technology settings (e.g. pairing a
phone) while driving.
• Even if the phone supports
Bluetooth®Wireless Technology,
the phone will not be found during
device searches if the phone has
been set to hidden state or the
Bluetooth®Wireless Technology
power is turned off. Disable the
hidden state or turn on the
Bluetooth®Wireless Technology
power prior to searching/connect-
ing with the car audio system.
(Continued)
(Continued)
• You will not be able to use the
hands-free feature when your
phone (in the car) is outside of the
cellular service area (e.g. in a tun-
nel, in a underground, in a moun-
tainous area, etc.).
• If the cellular phone signal is poor
or the vehicles interior noise is too
loud, it may be difficult to hear the
other person’s voice during a call.
• Do not place the phone near or
inside metallic objects, otherwise
communications with Bluetooth®
Wireless Technology system or cel-
lular service stations can be dis-
turbed.
• Placing the audio system within an
electromagnetic environment may
result in noise interference.
• Some cellular phones or other
devices may cause interference
noise or malfunction to audio sys-
tem. In this case, store the device
in a different location may resolve
the condition.
(Continued)

Audio system
18
(Continued)
• While a phone is connected
through Bluetooth®Wireless
Technology your phone may dis-
charge quicker than usual for
additional Bluetooth®Wireless
Technology-related operations.
• If Priority is set upon vehicle igni-
tion (IGN/ACC ON), the
Bluetooth®Wireless Technology
phone will be automatically con-
nected. Even if you are outside, the
Bluetooth®Wireless Technology
phone will be automatically con-
nected once you are in the vicinity
of the vehicle. If you do not want
to automatically connect your
Bluetooth®Wireless Technology
phone, try the following.
1) Turn off the Bluetooth®Wireless
Technology feature in your
mobile phone.
2) Turn off the Bluetooth®Wireless
Technology feature in your car
audio system.
(Continued)
(Continued)
- To turn off the Bluetooth®
Wireless Technology feature in
your car audio system, go to
[SETUP] > [Phone] and [turn
off] the Bluetooth®Wireless
Technology feature.
•Bluetooth®Wireless Technology
connection may become intermit-
tently disconnected in some
mobile phones. Follow these steps
to try again.
1) Turn the Bluetooth®Wireless
Technology function within the
mobile phone off/on and try
again.
2) Turn the mobile phone power
Off/On and try again.
3) Completely remove the mobile
phone battery, reboot, and then
again.
4) Reboot the audio system and try
again.
5) Delete all paired devices, pair and
try again.
• It is possible to pair up to five
Bluetooth®Wireless Technology
devices to the car system.
(Continued)
(Continued)
• Phone contact names should be
saved in English or they may not
be displayed correctly.
• The Handsfree call volume and
quality may differ depending on
the mobile phone.
• Only one Bluetooth®Wireless
Technology device can be connect-
ed at a time.
• In some mobile phones, starting
the ignition while talking through
Bluetooth®Wireless Technology
enabled handsfree call will result
in the call becoming disconnected.
(Switch the call back to your
mobile phone when starting the
ignition.)
• If the mobile phone is not paired
or connected, it is not possible to
enter Phone mode. Once a phone
is paired or connected, the guid-
ance screen will be displayed.
Audio system
19
✽NOTICE - Using the Voice
Recognition
• When using the voice recognition
feature, only commands listed
within the user's manual are sup-
ported.
• Be aware that during the opera-
tion of the voice recognition sys-
tem, pressing any key other than
the button or touching the
screen will terminate voice recog-
nition mode.
• For superior voice recognition
performance, position the micro-
phone used for voice recognition
above the head of the driver’s seat
and maintain a proper position
when saying commands.
• Within the following situations,
voice recognition may not function
properly due to external sound.
- When the windows and sunroof
are open
- When the wind of the cooling /
heating device is strong
- When entering and passing
through tunnels
- When driving on rugged and
uneven roads.
(Continued)
(Continued)
- During severe rain (heavy rains,
windstorms)
• Phone related voice commands
can be used only when a Bluetooth®
Wireless Technology device is con-
nected.
• When making calls by stating a
name, the corresponding contact
must be downloaded and stored
within the audio system.
• After downloading the Bluetooth®
Wireless Technology phone book,
it takes some times to convert the
phone book data into voice infor-
mation. During this time, voice
recognition may not properly
operate.
• Pronounce the voice commands
naturally and clearly as if in a nor-
mal conversation.
CAUTION
• Bluetooth®Wireless Technology
Handsfree is a feature that
enables drivers to practice
safe driving. Connecting the
car audio system with a
Bluetooth®Wireless Technology
phone allows the user to con-
veniently make calls, receive
calls, and manage the phone
book. Before using the
Bluetooth®Wireless Technology,
carefully read the contents of
this user’s manual.
• Excessive use or operations
while driving may lead to neg-
ligent driving practices and be
the cause of accidents.
• Do not operate the device
excessively while driving.
• Viewing the screen for pro-
longed periods of time is dan-
gerous and may lead to acci-
dents.
• When driving, view the screen
only for short periods of time.
Audio system
20
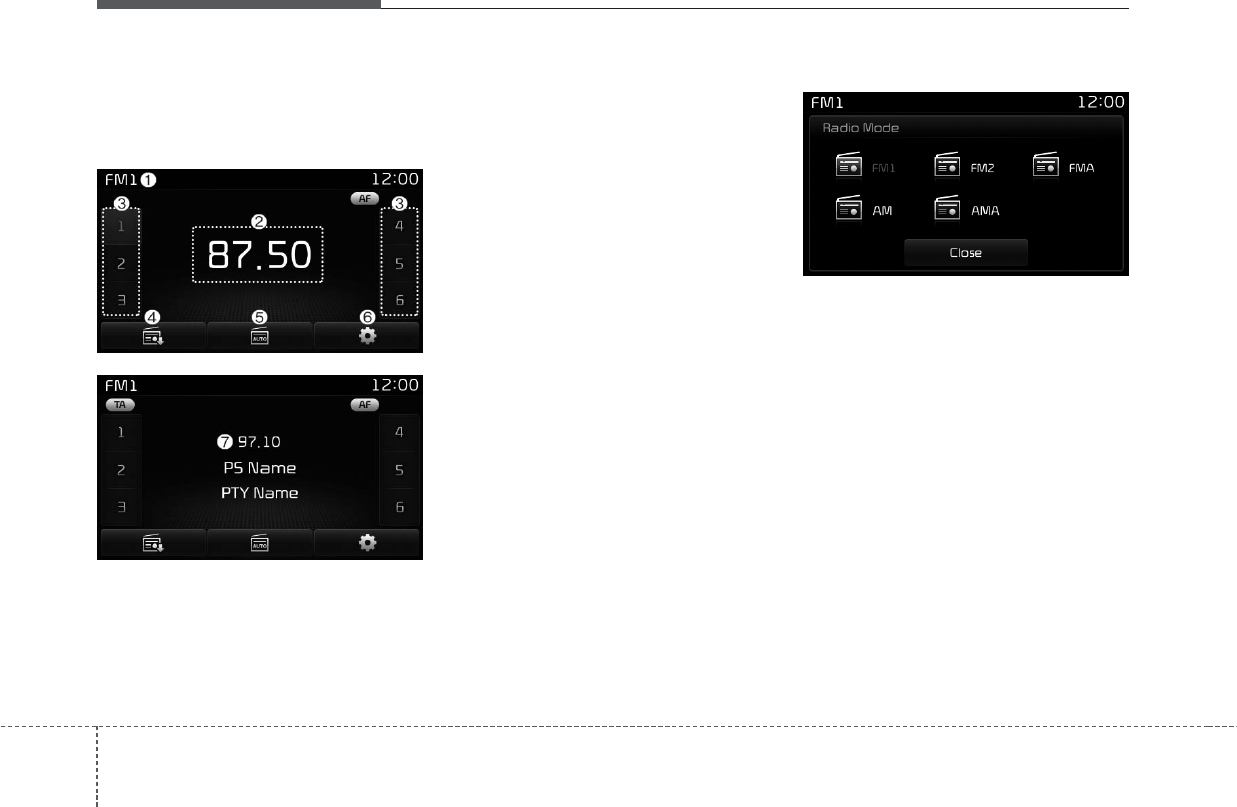
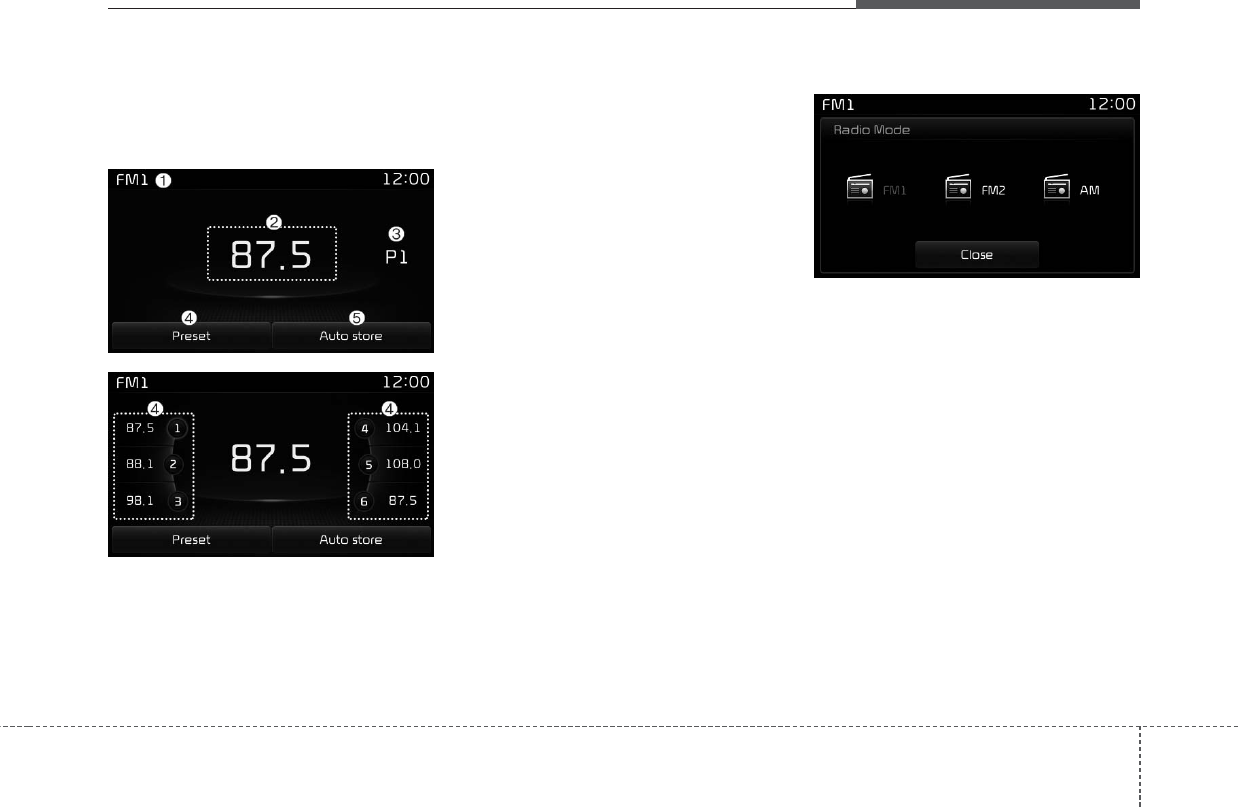
Radio Mode
(Type B-1)
Radio Mode Display Controls
(1) Mode Display
Displays currently operating mode.
(2) Frequency
Displays the current frequency.
(3) Preset
Displays current preset number [1] ~
[6].
(4) Preset Display
Displays saved presets.
(5) Auto store
Automatically saves frequencies with
superior reception to Preset buttons.
(6) RDS Menu
Displays the RDS Menu.
(7) RDS Info
Displays RDS broadcast information.
With the Radio Mode Button
Pressing the [RADIO] button will
change the operating mode in order
of FM1 ➟FM2 ➟FMA ➟AM ➟
AMA.
If [Pop-up Mode] is turned on within
[SETUP] [Display], then pressing
the [RADIO] button will display the
Radio Pop-up Mode screen.
Turn the TUNE knob to move the
focus. Press the knob to select.
D4H3G001EE
D4H3G002EE
D4H3G003EE
Audio system
21
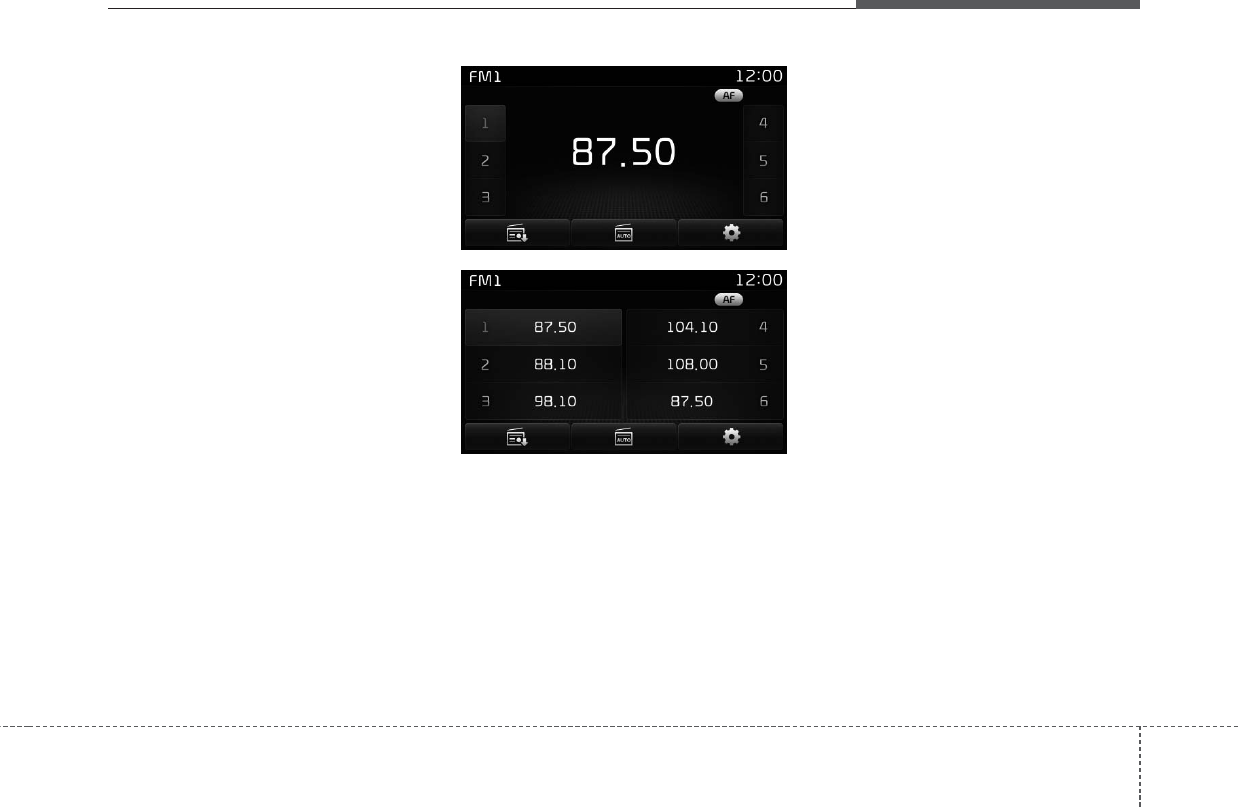
Seek
Press the [SEEK TRACK] button to
play the previous/next frequency.
Tune
Turn the TUNE knob to select the
desired frequency.
Selecting/Saving Presets
Press the [1] ~ [6] buttons to play the
desired preset.
Press the [Preset] button to display
the broadcast information for the fre-
quency saved to each button.
While listening to a frequency you
want to save as a preset, press and
hold one of the [1] ~ [6] preset but-
tons to save the current frequency to
the selected preset.
Auto Store
Press the [Auto store] button to auto-
matically save receivable frequen-
cies to Preset buttons.
While Auto Store is operating, press-
ing the [Auto store] button again will
cancel Auto Store and restore the
previous frequency.
D4H3G004EE
D4H3G005EE
Audio system
22
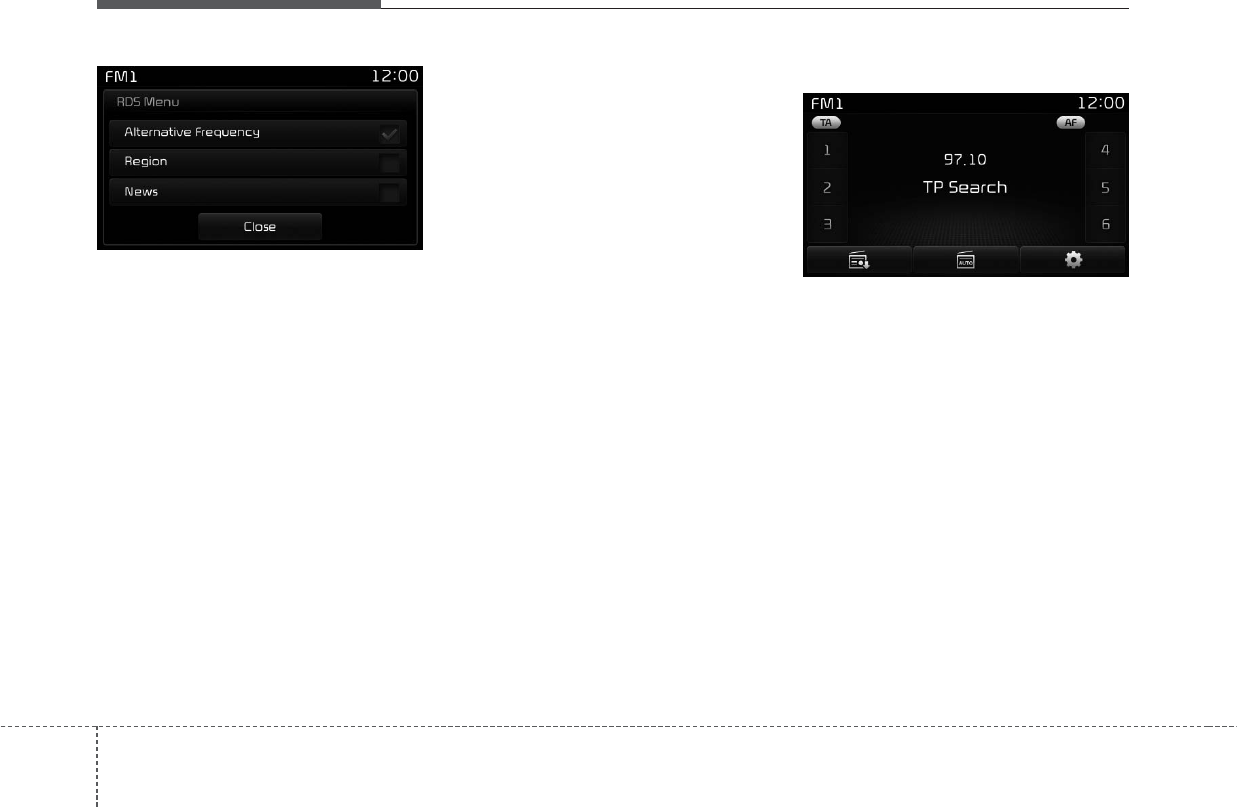
RDS Menu
Press the [RDS Menu] button to set
the AF (Alternative Frequency),
Region and News features.
The RDS Menu is not supported
within AM or AMA mode.
Scan
Press the [TA/SCAN] button :
Previews each broadcast for 5 sec-
onds each
Once scan is complete, the previous
frequency will be restored.
While Scan is operating, pressing
and holding the [TA/SCAN] button
will cancel the scan operation.
TA (Traffic Announcement)
Press the [TA/SCAN] button to turn
the TA (Traffic Announcement) feature
On/Off.
D4H3G006EE D4H3G007EE
Audio system
23
Radio Mode
(Type B-2)
Radio Mode Display Controls
(1) Mode Display
Displays currently operating mode.
(2) Frequency
Displays the current frequency.
(3) Preset
Displays current preset number [1] ~
[6].
(4) Preset Display
Displays preset buttons.
(5) Auto store
Automatically saves frequencies with
superior reception to Preset buttons.
With the Radio Mode Button
Pressing the [RADIO] button will
change the operating mode in order
of FM1 ➟FM2➟AM.
If [Mode Pop-up] is turned on within
[SETUP] [Display], then pressing
the [RADIO] button will display the
Radio Mode Pop-up screen.
Turn the TUNE knob to move the
focus. Press the knob to select.
D4H3G008EE
D4H3G009EE
D4H3G010EE
Audio system
24
Seek
Press the [SEEK TRACK] button to
play the previous/next frequency.
Tune
Turn the TUNE knob to select the
desired frequency.
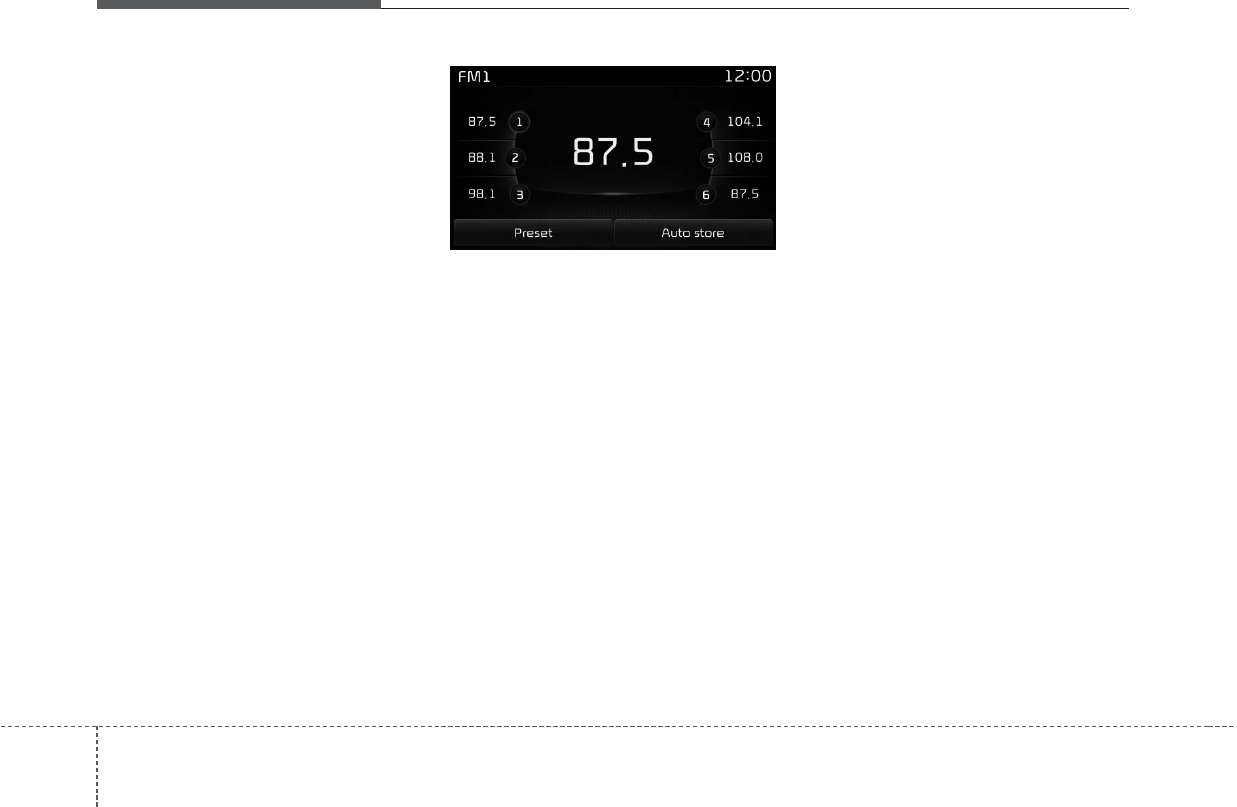
Selecting /Saving Presets
Press the [Preset] button to display
the broadcast information for the fre-
quency saved to each button.
Press the [1] ~ [6] buttons to play the
desired preset.
While listening to a frequency you
want to save as a preset, press and
hold one of the [1] ~ [6] preset but-
tons to save the current frequency to
the selected preset.
Auto Store
Press the [Auto store] button to auto-
matically save receivable frequen-
cies to Preset buttons.
Scan
Press the [SCAN] button to preview
frequencies with superior reception
for 5 seconds each.
Press and hold the [SCAN] button to
preview presets for 5 seconds each.
Once scan is complete, the previous
frequency will be restored.
While Scan is operating, pressing
the [SCAN] button will cancel the
scan operation.
D4H3G011EE

Audio system
25
Media Mode
Media Mode Screen
Pressing the [MEDIA] button will
change the operating mode in order
of CD ➟ USB(iPod®) ➟ AUX ➟ My
Music ➟BT Audio.
If [Pop-up Mode] / [Mode Pop-up] is
turned on within [SETUP]
[Display], then pressing the [MEDIA]
button will display the Media Pop-up
Mode screen.
Turn the TUNE knob to move the
focus. Press the knob to select.
The media mode pop up screen can
be displayed only when there are two
or more media modes turned on.
Mode Display on the Status Bar
When a
Bluetooth®
Wireless
Technology, iPod®, USB or AUX
device is connected or a CD is
inserted, the corresponding mode
icon will be displayed.
Icon Title
Bluetooth®
Wireless Technology
CD
USB(iPod®)
AUX
D4H3G012EE

Audio system
26
MENU : Audio CD
Audio CD Mode Display Controls
(1) Mode
Displays currently operating mode.
(2) Operation State
From Repeat/Random(Shuffle)/Scan,
displays the currently operating func-
tion.
(3) Track Info
Displays information about the cur-
rent track.
(4) Play/Pause
Changes the play/pause state.
(5) Play Time
Displays the current play time.
(6) Info
Shows detailed information about
the current track.
(7) Random(Shuffle)
Turns the Random(Shuffle) feature
on/off.
(8) Repeat
Turns the Repeat feature on/off.
(9) List
Moves to the list screen.
Turn the TUNE knob left/right to
search for tracks. Once the desired
track is displayed, press the knob to
select and play.
■ Type B-2
■ Type B-1
D4H3G013EE
D4H3G014EE
Audio system
27
With the Audio CD Mode
Playing/Pausing CD Tracks
Once an audio CD is inserted, the
mode will automatically start and
begin playing.
While playing, press the [II] button to
pause and press [] button to play.
Only genuine audio CDs are sup-
ported. Other discs may result in
recognition failure (e.g. copy CD-R,
CDs with labels)
The artist and title information are
displayed on the screen if track infor-
mation is included within the audio
CD.
Changing Tracks
Press the [SEEK TRACK] button to
move to the previous or next track.
Pressing the [SEEK TRACK
∨
]but-
ton after the track has been playing
for 2 seconds will start the current
track from the beginning.
Pressing the [SEEK TRACK
∨
]but-
ton before the track has been playing
for 1 second will start the previous
track.
Selecting from the List
Turn the TUNE knob left/right to
search for the desired track.
Once you find the desired track, press
the TUNE knob to start playing.
Rewinding / Fast-forwarding Tracks
While playing, press and hold the
[SEEK TRACK] button to rewind or
fast-forward the current track.
Scan (With RDS)
Press and hold the [TA/SCAN] but-
ton to play the file 10 seconds of
each file.
Press and hold the [TA/SCAN] but-
ton again to turn off.
Scan (Without RDS)
Press the [SCAN] button to play the
first 10 seconds of each file.
Press and hold the [SCAN] button
again to turn off.
D4H3G015EE
유럽/일반/콜롬비아별 화면 다
른지 검토 필요합니다.

Audio system
28
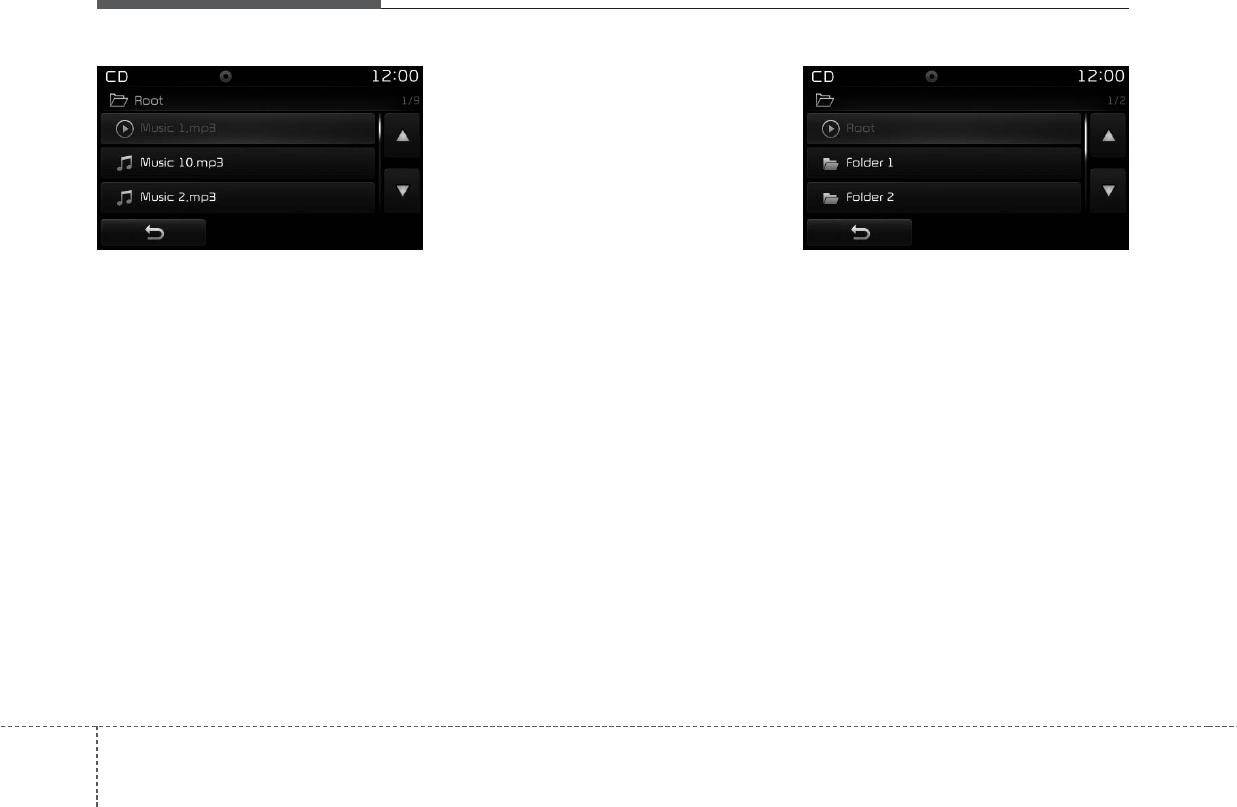
MENU : MP3 CD
MP3 CD Mode Display Controls
(1) Mode
Displays currently operating mode.
(2) Operation State
From Repeat/Random(Shuffle)/Scan,
displays the currently operating func-
tion.
(3) File Index
Displays the current file number.
(4) File Info
Displays information about the cur-
rent file.
(5) Play/Pause
Changes the play/pause state.
(6) Play Time
Displays the current play time.
(7) Info
Shows detailed information about
the current file.
When the ‘Folder File’ option is set as
the default display within Display
setup, the album/artist/file informa-
tion are displayed as detailed file
information.
When the ‘Album Artist Song’ option
is set as the default display, the fold-
er name/file name are displayed as
detailed file information.
The title, artist and album info are
displayed only when such informa-
tion are recorded within the MP3 file
ID3 tag.
■ Type B-2
■ Type B-1
D4H3G016EE
D4H3G017EE

Audio system
29
(8) Random(Shuffle)
Turns the Random(Shuffle) feature
on/off.
Each time the button is pressed, the
feature changes in order of Random
(Shuffle) Folder ➟Random (Shuffle)
All ➟Off.
• Random(Shuffle) Folder : Plays all
files within the current folder in
Random (Shuffle) order.
• Random(Shuffle) All : Plays all files
in Random(Shuffle) order.
(9) Repeat
Turns the Repeat feature on/off.
Each time the button is pressed, the
feature changes in order of Repeat
➟Repeat Folder ➟Off.
• Repeat : Repeats the current file.
• Repeat Folder : Repeats all files
within the current Folder.
(10) Copy
Copies the current file into My Music.
Selecting another feature during
copying will display a pop-up asking
whether you wish to cancel copying.
To cancel, select “Yes”.
(11) List
Moves to the list screen.
Turn the TUNE knob left/right to
search for files. Once the desired file
is displayed, press the knob to select
and play.
With the MP3 CD Mode
Playing/Pausing MP3 Files
Once an MP3 disc is inserted the
mode will automatically start and
being playing.
While playing, press the [II] button to
pause and press [] button to play.
If there are numerous files and fold-
ers within the disc, reading time
could take more than 10 seconds
and the list may not be displayed or
song searches may not operate.
Once loading is complete, try again.
Changing Files
Press the [SEEK TRACK] button to
move to the previous or next file.
Pressing the [SEEK TRACK
∨
]but-
ton after the file has been playing for
2 seconds will start the current file
from the beginning.
Pressing the [SEEK TRACK
∨
]but-
ton before the file has been playing
for 1 second will start the previous
file.
Audio system
30
Selecting from the List
Turn the TUNE knob left/right to
search for the desired file.
Once you find the desired file, press
the TUNE knob to start playing.
Rewinding / Fast-forwarding Files
While playing, press and hold the
[SEEK TRACK] button to rewind or
fast-forward the current file.
Scan (With RDS)
Press and hold the [TA/SCAN] button
to play the file 10 seconds of each file.
Press and hold the [TA/SCAN] button
again to turn off.
Scan (Without RDS)
Press the [SCAN] button to play the
first 10 seconds of each file.
Press the [SCAN] button again to
turn off.
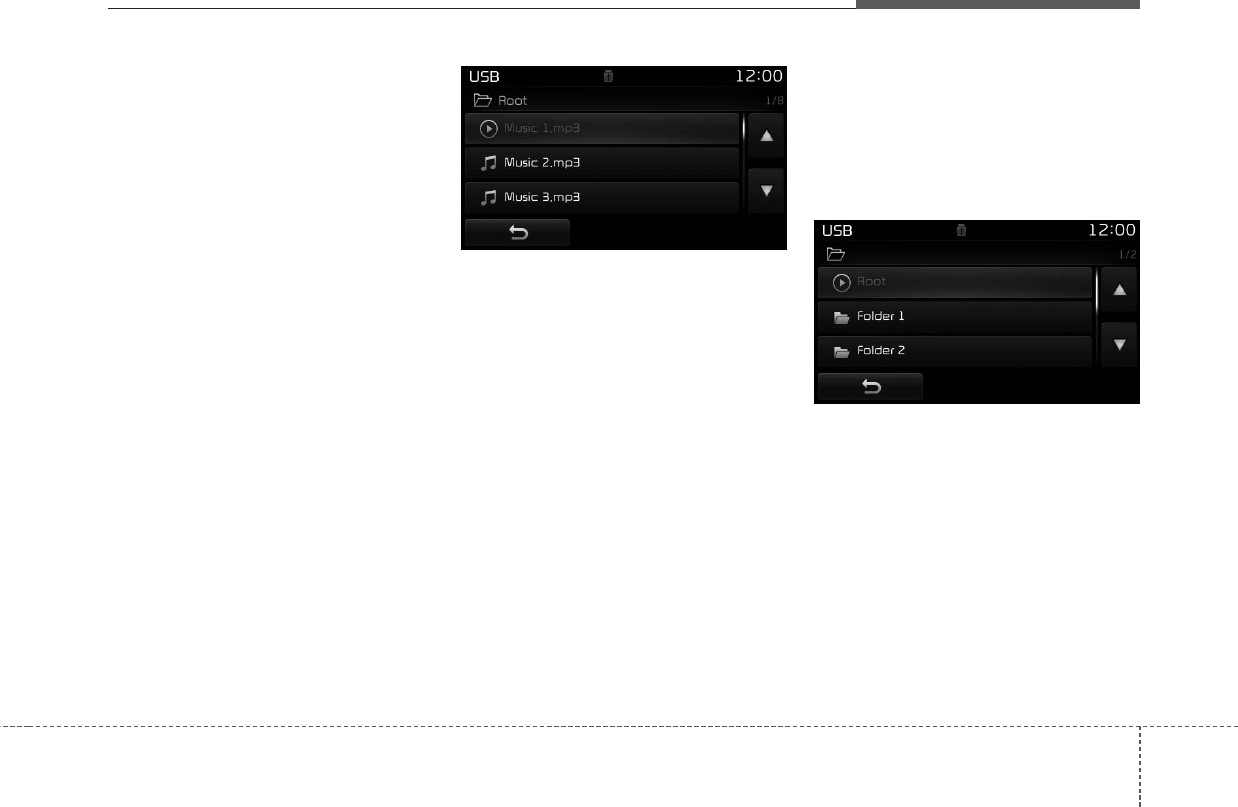
Searching Folders
Press the [FOLDER] button to select
and search folders.
Once the desired folder is displayed,
press the TUNE knob to select.
The first file within the selected fold-
er will begin playing
.
D4H3G018EE D4H3G019EE
유럽/일반/콜롬비아별 화면 다
른지 검토 필요합니다.
유럽/일반/콜롬비아별 화면 다
른지 검토 필요합니다.

Audio system
31
MENU : USB
USB Mode Display Controls
(1) Mode
Displays currently operating mode.
(2) Operation State
From Repeat/Random(Shuffle)/Scan,
displays the currently operating func-
tion.
(3) File Index
Displays the current file number.
(4) File Info
Displays information about the cur-
rent file.
(5) Play/Pause
Changes the play/pause state.
(6) Play Time
Displays the current play time.
(7) Info
Displays detailed information for the
current file.
When the ‘Folder File’ option is set as
the default display within Display
setup, the album/artist/file informa-
tion are displayed as detailed file
information.
When the ‘Album Artist Song’ option
is set as the default display, the fold-
er name/file name are displayed as
detailed file information.
The title, artist and album info are
displayed only when such informa-
tion are recorded within the MP3 file
ID3 tag.
■ Type B-2
■ Type B-1
D4H3G020EE
D4H3G021EE

Audio system
32
(8) Random(Shuffle)
Turns the Random(Shuffle) feature
on/off.
Each time the button is pressed, the
feature changes in order of
Random(Shuffle) Folder ➟Random
(Shuffle) All ➟Off.
• Random(Shuffle) Folder : Plays the
files in the current folder in ran-
dom(Shuffle) order.
• Random(Shuffle) All : Plays all files
in random(Shuffle) order.
(9) Repeat
Turns the Repeat feature on/off.
Each time the button is pressed, the
feature changes in order of Repeat
➟Repeat Folder ➟Off.
• Repeat : Repeats the current file.
• Repeat Folder : Repeats all files
within the current folder.
(10) Copy
Copies the current file into My Music.
Selecting another feature during
copying will display a pop-up asking
whether you wish to cancel copying.
To cancel, select “Yes”.
(11) List
Moves to the list screen.
Turn the TUNE knob left/right to
search for files. Once the desired file
is displayed, press the knob to select
and play.
With the USB Mode
Playing/Pausing USB Files
Once a USB is connected, the mode
will automatically start and begin
playing a USB file.
While playing, press the [II] button to
pause and press [] button to play.
Loading may require additional time
if there are many files and folders
within the USB and result in faulty list
display or file searching. Normal
operations will resume once loading
is complete.
The device may not support normal
operation when using a USB memo-
ry type besides (Metal Cover Type)
USB Memory.
Audio system
33
Changing Files
Press the [SEEK TRACK] button to
move to the previous or next file.
Pressing the [SEEK TRACK
∨
]but-
tonafter the file has been playing for
2 seconds will start the current file
from the beginning.
Pressing the [SEEK TRACK
∨
]but-
ton before the file has been playing
for 1 second will start the previous
file.
Selecting from the List
Turn the TUNE knob left/right to
search for the desired file.
Once you find the desired file, press
the TUNE knob to start playing.
Rewinding / Fast-forwarding Files
While playing, press and hold the
[SEEK TRACK] button to rewind or
fast-forward the current file.
Scan (With RDS)
Press and hold the [TA/SCAN] but-
tonto play the file 10 seconds of each
file.
Press and hold the [TA/SCAN] but-
ton again to turn off.
Scan (Without RDS)
Press the [SCAN] button to play the
first 10 seconds of each file.
Press the [SCAN] button again to
turn off.
Searching Folders
Press the [FOLDER] button to select
and search folders.
Once the desired folder is displayed,
press the TUNE knob to select.
The first file within the selected fold-
er will begin playing.
D4H3G022EE D4H3G023EE
유럽/일반/콜롬비아별 화면 다
른지 검토 필요합니다.
유럽/일반/콜롬비아별 화면 다
른지 검토 필요합니다.
Audio system
34
MENU : iPod®
iPod®Mode Display Controls
(1) Mode
Displays currently operating mode.
(2) Operation State
From Repeat/Random(Shuffle), dis-
plays the currently operating func-
tion.
(3) Song Index
Displays the current song/total num-
ber of songs.
(4) Song Info
Displays information about the cur-
rent song.
(5) Play/Pause
Changes the play/pause state.
(6) Play Time
Displays the current play time.
(7) Random(Shuffle)
Turns the Random(Shuffle) feature
on/off.
• Random(Shuffle) All : Plays all
songs in Random(Shuffle) order.
(8) Repeat
Turns the Repeat feature on/off.
• Repeat : Repeats the current song
(9) List
Moves to the list screen.
Turn the TUNE knob left/right to
search for the desired category.
Once you find the desired category,
press the TUNE knob to select and
play.
■ Type B-2
■ Type B-1
D4H3G024EE
D4H3G025EE
Audio system
35
With the iPod®Mode
Playing/Pausing iPod®Songs
Once an iPod®is connected, the
mode will automatically start and
begin playing an iPod®song.
While playing, press the [II] button to
pause and press [] button to play.
iPod®s with unsupported communi-
cation protocols may not properly
operate in the audio system.
Changing Songs
Press the [SEEK TRACK] button to
move to the previous or next song.
Pressing the [SEEK TRACK
∨
] but-
ton after the song has been playing
for 2 seconds will start the current
song from the beginning.
Pressing the [SEEK TRACK
∨
] but-
ton before the song has been playing
for 1 second will start the previous
song.
Slight time differences may exist
depending your iPod®product.
Rewinding / Fast-forwarding Songs
While playing, press and hold the
[SEEK TRACK] button to rewind or
fast-forward the current song.
Searching Categories
Turn the TUNE knob left/right to
search for the desired category.
Once you find the desired category,
press the TUNE knob to select and
play.
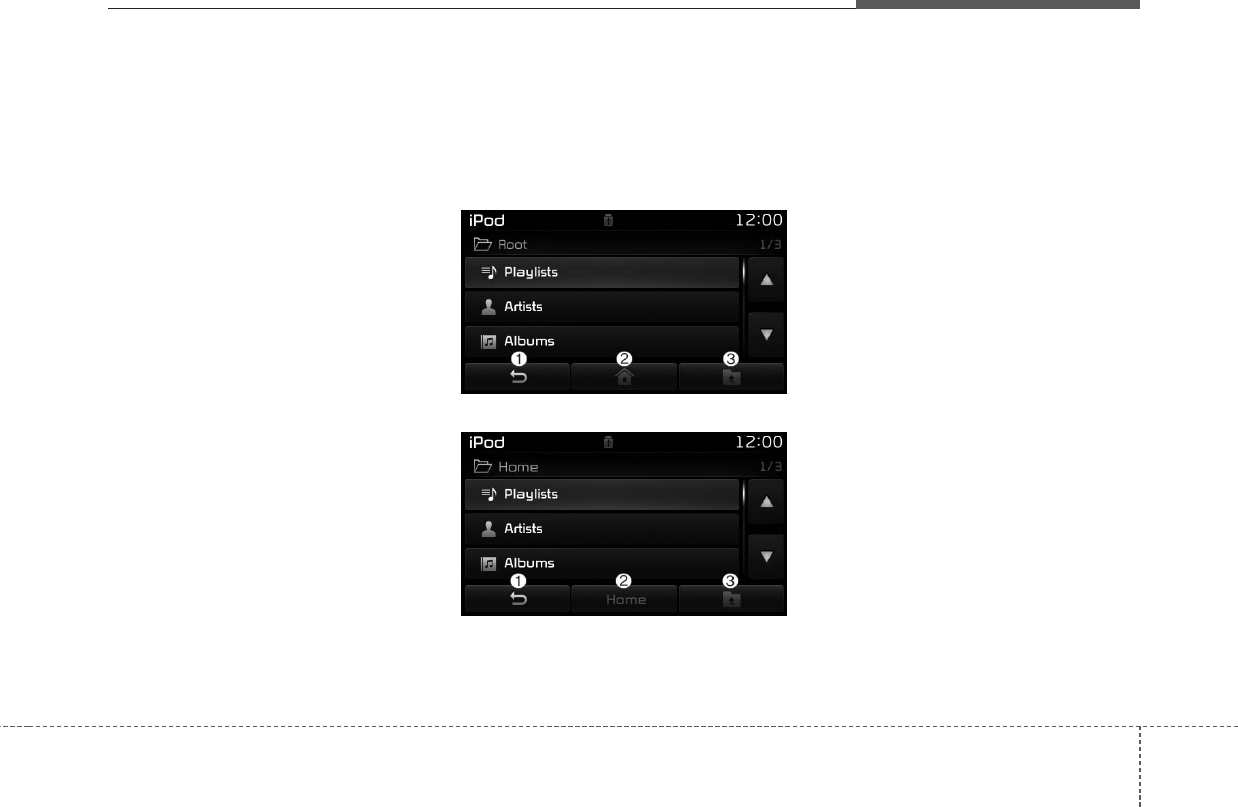
There are eight categories that can be
searched, including Playlists, Artists,
Albums, Genres, Songs, Composers,
Audiobooks and Podcasts.
Category Menu
(1) Displays the play screen.
(2) Moves to the iPod®root category
screen.
(3) Moves to the previous category.
If the search mode is accessed while
playing a song, the most recently
searched category is displayed.
Search steps upon initial connection
may differ depending on the type of
iPod®device.
■ Type B-2
■ Type B-1
D4H3G026EE
D4H3G027EE
Audio system
36
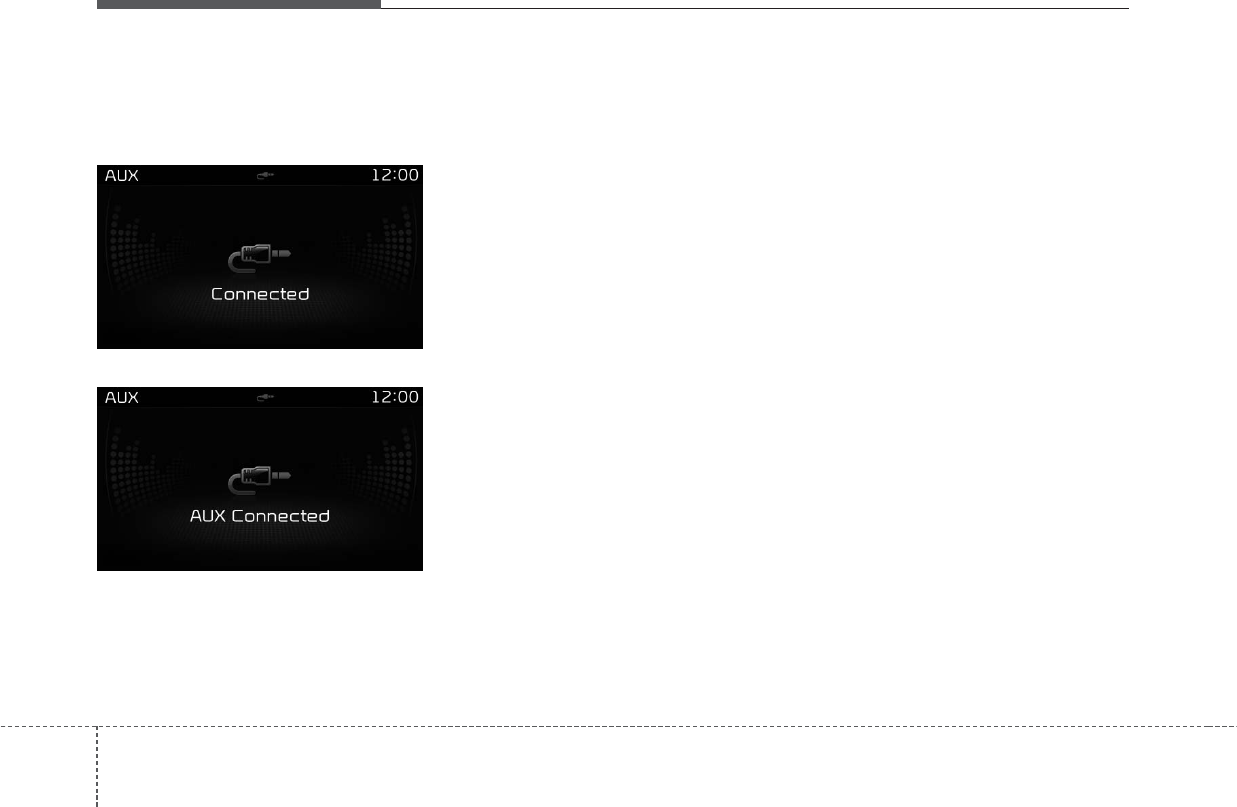
MENU : AUX
AUX Mode Display Controls
Press the [MEDIA] button Select
[AUX]
An external device can be connected
to play music.
Connecting an External Device
External audio players (Camcorders,
car VCR, etc.) can be played through
a dedicated cable.
If an external device connector is
connected with the AUX terminal,
then AUX mode will automatically
operate. Once the connector is dis-
connected, the previous mode will
be restored.
AUX mode can be used only when
an external audio player (camcorder,
car VCR, etc.) has been connected.
The AUX volume can be controlled
separately from other audio modes.
Connecting a connector jack to the
AUX terminal without an external
device will convert the system to
AUX mode, but only output noise.
When an external device is not being
used, also remove the connector
jack.
When the external device power is
connected to the power jack, playing
the external device may output
noise. In such cases, disconnect the
power connection before use.
Fully insert the AUX cable to the AUX
jack upon use.
■ Type B-2
■ Type B-1
D4H3G028EE
D4H3G029EE
Audio system
37
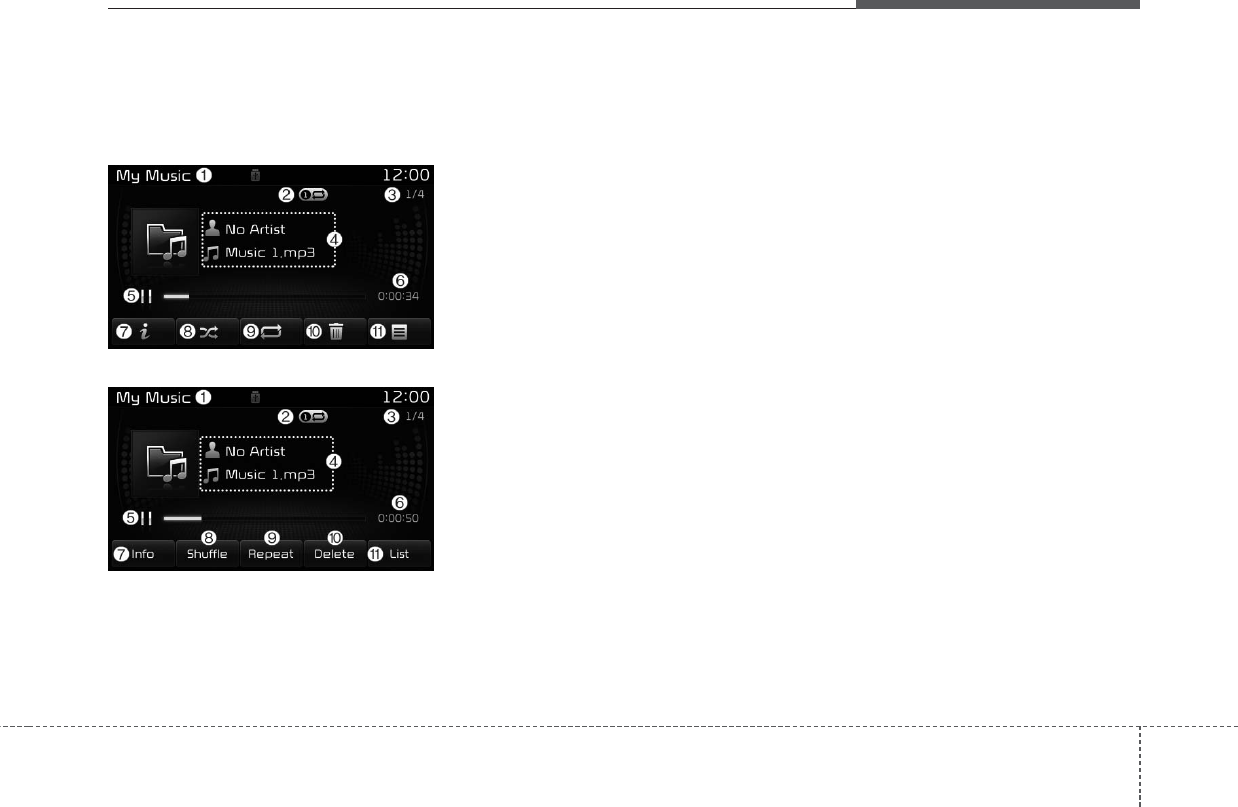
MENU : My Music Mode
My Music Mode Display Controls
(1) Mode
Displays currently operating mode.
(2) Operation State
From Repeat/Random(Shuffle)/Scan,
displays the currently operating func-
tion.
(3) File Index
Displays the current file/total number
of files.
(4) File Info
Displays information about the cur-
rent file.
(5) Play/Pause
Changes the play/pause state.
(6) Play Time
Displays the current play time.
(7) Info
Displays detailed information for the
current file.
The title, artist and album info are
displayed only when such informa-
tion is recorded within the MP3 file
ID3 tag.
(8) Random(Shuffle)
Turns the Random(Shuffle) feature
on/off.
(9) Repeat
Turns the Repeat feature on/off.
(10) Delete
Deletes the current file.
(11) List
Moves to the list screen.
Turn the TUNE knob left/right to
search for files. Once the desired file
is displayed, press the knob to select
and play.
■ Type B-2
■ Type B-1
D4H3G030EE
D4H3G031EE
Audio system
38
With the My Music Mode
Playing/Pausing My Music Files
While playing, press the [II] button to
pause and press [] button to play.
If there are no files saved within My
Music, the [My Music] button will be
disabled.
Changing Files
Press the [SEEK TRACK] button to
move to the previous or next file.
Pressing the [SEEK TRACK
∨
]but-
ton after the file has been playing for
2 seconds will start the current file
from the beginning.
Pressing the [SEEK TRACK
∨
]but-
ton before the file has been playing
for 1 second will start the previous
file. Selecting from the List
Turn the TUNE knob left/right to search
for the desired file.
Once you find the desired file, press the
TUNE knob to start playing.
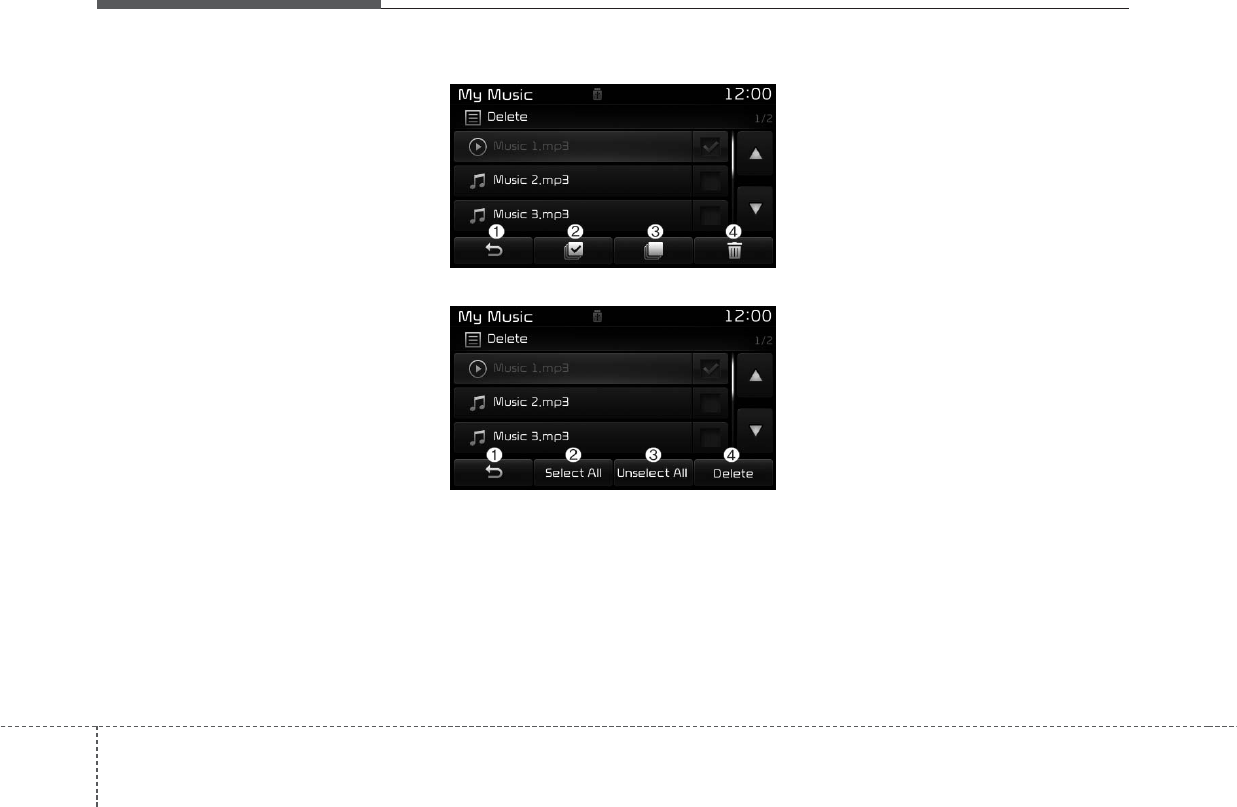
From the List screen, it is possible to
delete files you previously saved into
My Music.
List Menu
(1) Moves to the previous screen.
(2) Selects all files.
(3) Deselects all selected files.
(4) Deletes selected files.
After selecting the files you want to
delete, press the [Delete] button to
delete the selected files.
If there is memory available, up to
6,000 files can be saved. Identical
files cannot be copied more than
1,000 times.
To check memory information, go to
[SETUP] [System] [Memory
Information]
Rewinding / Fast-forwarding Files
While playing, press and hold the
[SEEK TRACK] button to rewind or
fast-forward the current file.
■ Type B-2
■ Type B-1
D4H3G032EE
D4H3G033EE
Audio system
39
Scan (With RDS)
Press and hold the [TA/SCAN] but-
ton to play the file 10 seconds of
each file.
Press and hold the [TA/SCAN] but-
ton again to turn off.
Scan (Without RDS)
Press the [SCAN] button to play the
first 10 seconds of each file.
Press the [SCAN] button again to
turn off.
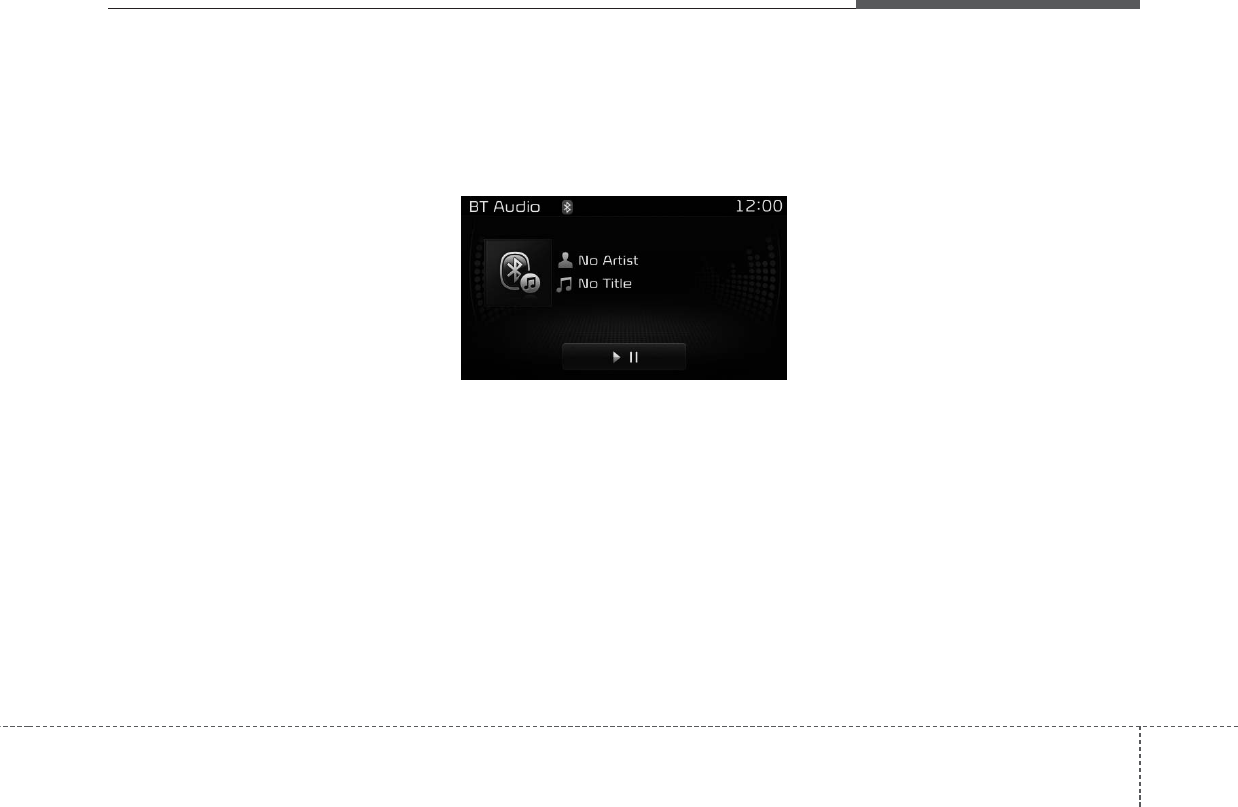
MENU :
Bluetooth
®
Wireless
Technology Audio
Using Bluetooth®Wireless Technology
Audio Mode
Playing/Pausing Bluetooth®Wireless
Technology Audio
Once a
Bluetooth®
Wireless
Technology device is connected, the
mode will automatically start.
While playing, press the [II] button
to pause and press [II] button to
play.
The play/pause feature may operate
differently depending on the mobile
phone.
Changing Files
Press the [SEEK TRACK] button to
move to the previous or next file.
Setting Connection
If a
Bluetooth®
Wireless Technology
device has not been connected,
press the [SETUP] button [Phone]
button to display the
Bluetooth®
Wireless Technology connection
screen.
It is possible to use the pair phone,
connect/disconnect and delete fea-
tures from your
Bluetooth®
Wireless
Technology phone.
If music is not yet playing from your
mobile device after converting to
Bluetooth®
Wireless Technology
Audio mode, pressing the play button
once may start playing the mode.
Check to see that music is playing
from the
Bluetooth®
Wireless
Technology device after converting
to
Bluetooth®
Wireless Technology
Audio Mode.
D4H3G034EE
Audio system
40
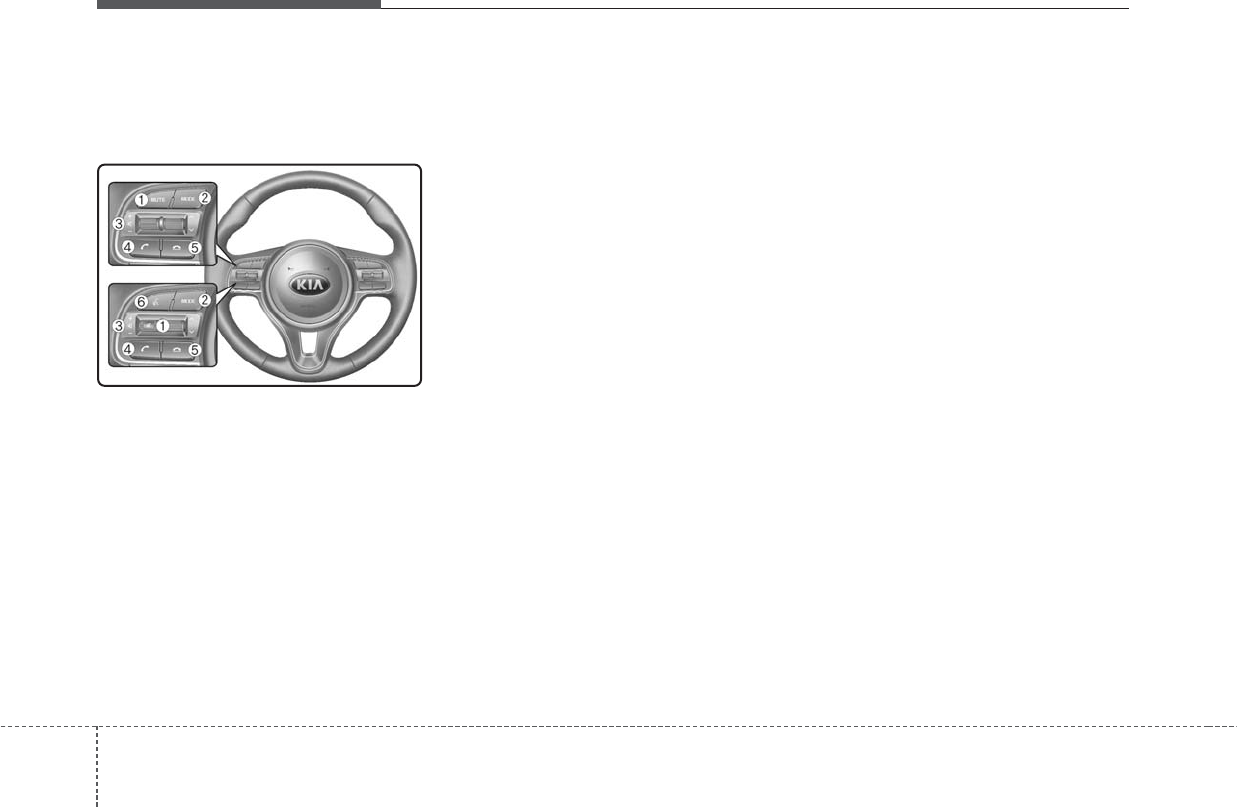
Phone Mode
Making a call using the Steering
wheel controls
❈The actual features in the vehicle
may differ from the illustration.
(1) Mutes audio volume.
(2) Press the button to change audio
source.
FM ➟AM ➟CD ➟USB(iPod®) ➟
AUX ➟My Music ➟BT Audio.
(For RDS Model)
FM1 ➟FM2 ➟FMA ➟AM ➟
AMA ➟CD ➟USB(iPod®) ➟AUX
➟My Music ➟BT Audio.
(3) Used to control volume.
(4) When pressed shortly
- When pressed in the phone screen,
displays call history screen
- When pressed in the dial screen,
makes a call
- When pressed in the incoming call
screen, answers the call
- When pressed during call waiting,
switches to waiting call (Call Waiting)
When pressed and held
- When pressed in the
Bluetooth®
Wireless Technology Handsfree
wait mode, redials the last call
- When pressed during a
Bluetooth®
Wireless Technology Handsfree
call, switches call back to mobile
phone (Private)
- When pressed while calling on the
mobile phone, switches call back to
Bluetooth®
Wireless Technology
Handsfree (Operates only when
Bluetooth®
Wireless Technology
Handsfree is connected)
(5) Ends phone call
(6) (if equipped)
When pressed shortly
- Starts voice recognition
- When selecting during a voice
prompt, stops the prompt and con-
verts to voice command waiting
state
When pressed and held
- Ends voice recognition
Audio system
41
Bluetooth
®
Wireless Technology
(Type B-1)
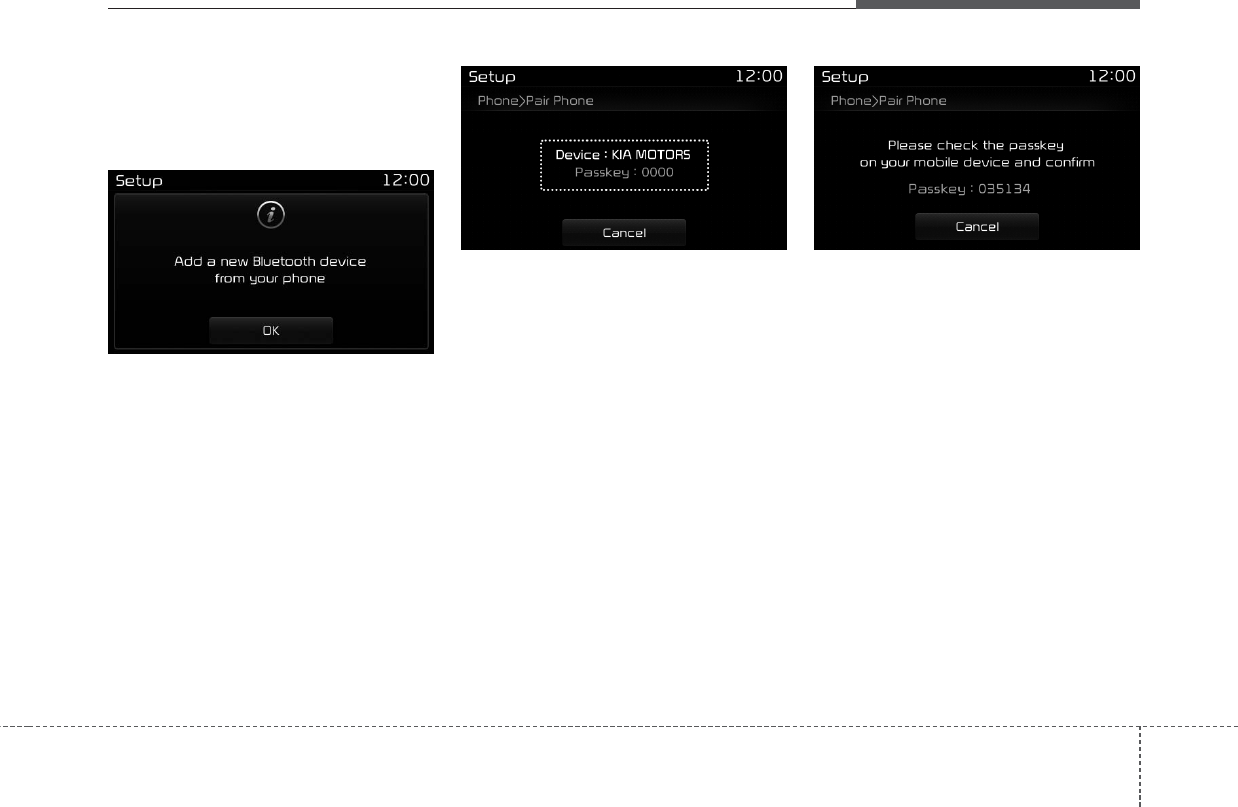
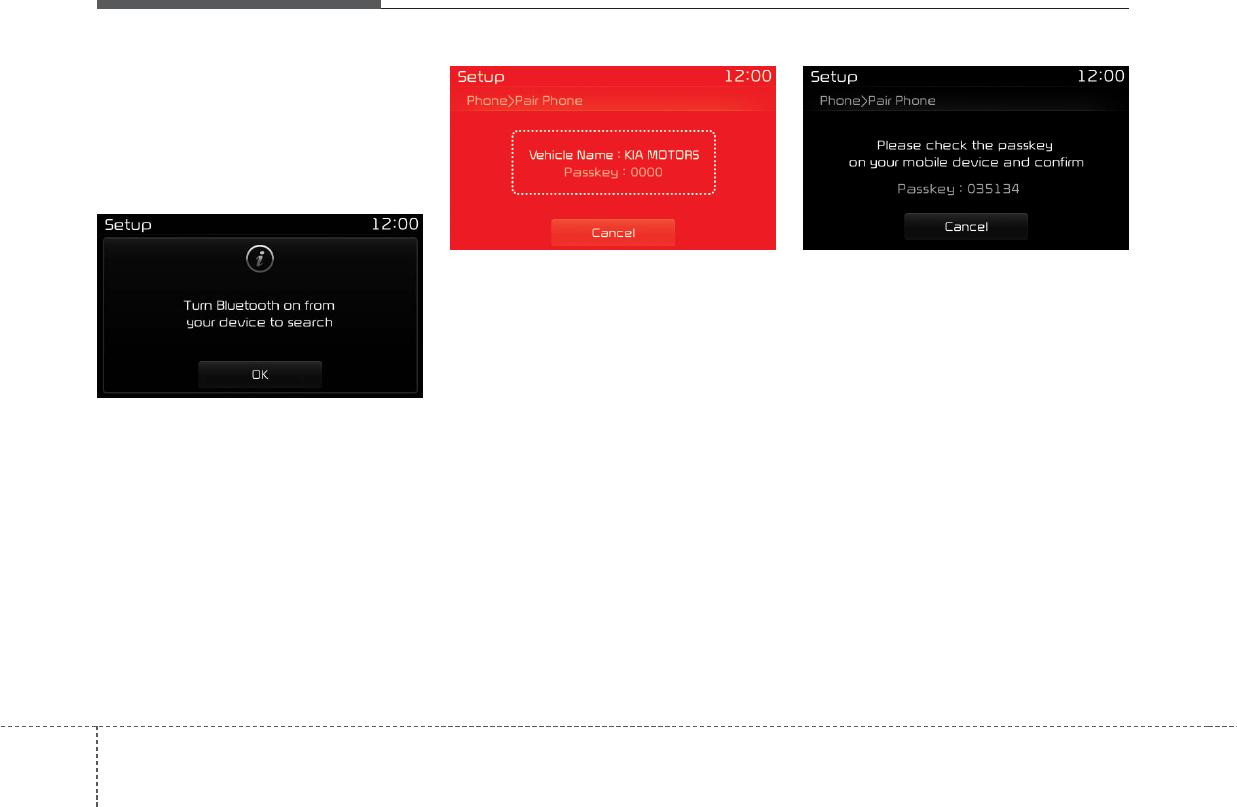
When No Devices have been Paired
➀Press the [PHONE] button or the
[CALL] button on the steering
wheel controls. The following
screen is displayed.
➁Press the [OK] button to enter the
Pair Phone screen.
• Device : Name of device as shown
when searching from your
Bluetooth®
Wireless Technology
device.
• Passkey : Passkey used to pair the
device.
➂From your
Bluetooth®
Wireless
Technology device (i.e. Mobile
Phone), search and select your
car audio system.
❈SSP : Secure Simple Pairing
Non SSP supported device :
➃After a few moments, a screen is
displayed where the passkey is
entered.
Enter the passkey “0000” to pair
your
Bluetooth®
Wireless Technology
device with the car audio system.
SSP supported device :
➃After a few moments, a screen is dis-
played 6 digits passkey.
Check the passkey on your
Bluetooth®
Wireless Technology
device and confirm.
➄Once pairing is complete, the fol-
lowing screen is displayed.
Some phones (i.e., iPhone®, Android
and Blackberry phones) may offer an
option to allow acceptance of all
future Bluetooth connection requests
by default. Visit http://www.kia. com
for additional information on pairing
your Bluetooth-enabled mobile
phone, and to view a phone compat-
ibility list.
D4H3G035EE D4H3G036EE D4H3G037EE

Audio system
42
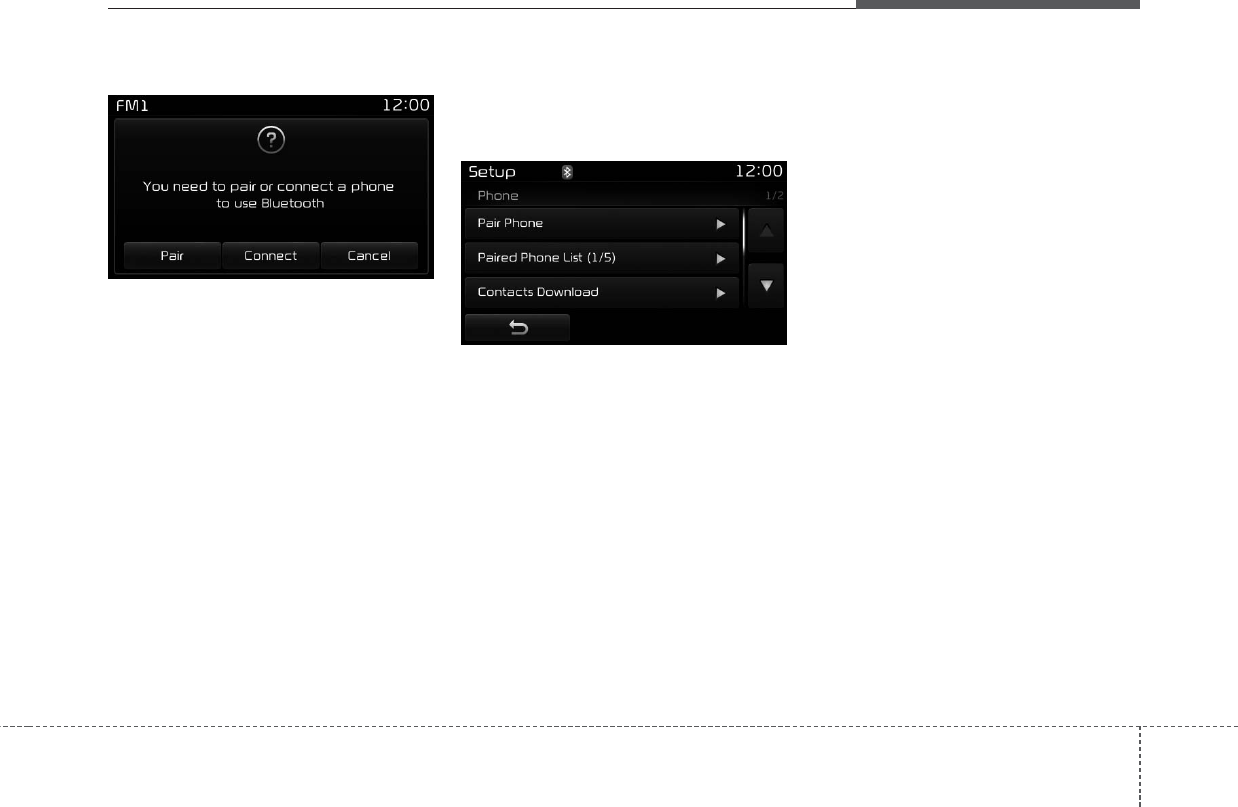
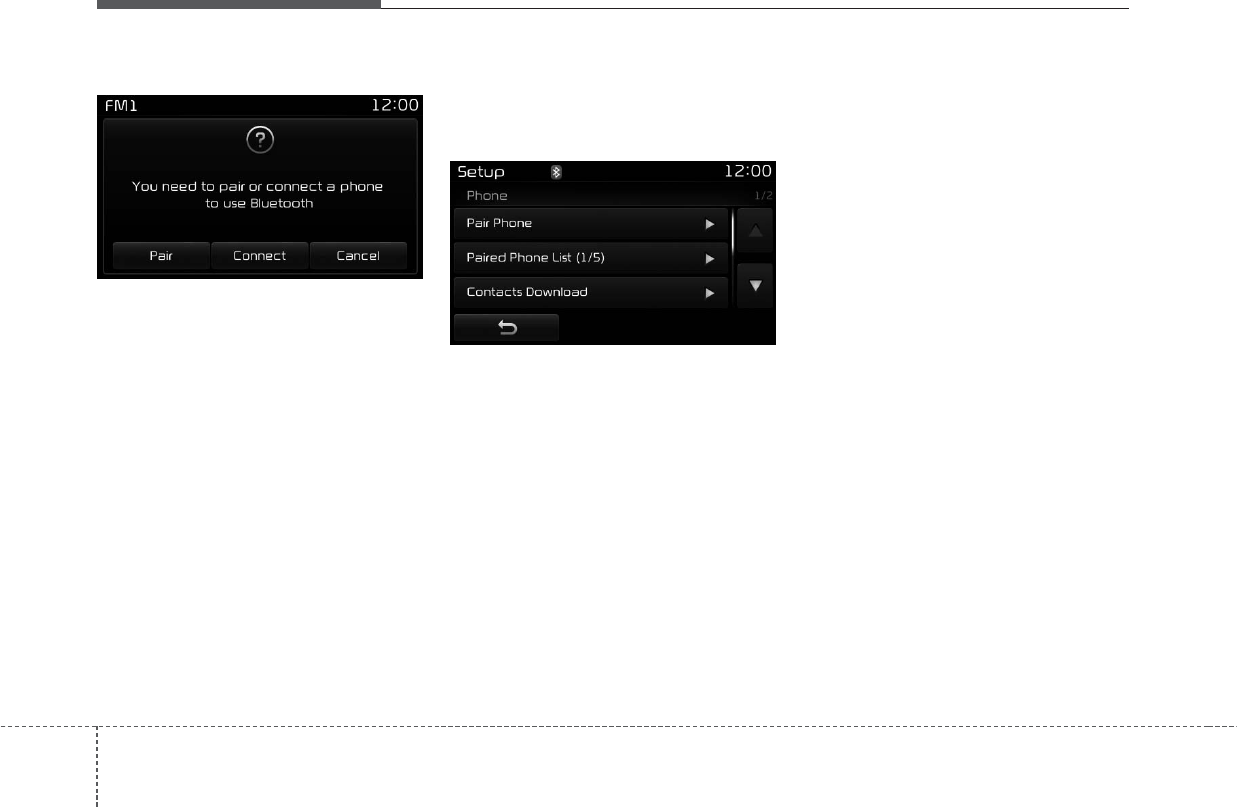
✽NOTICE
If Bluetooth®Wireless Technology
devices are paired but none are cur-
rently connected, pressing the
[PHONE] button or the [CALL] but-
ton on the steering wheel controls
displays the following screen. Press
the [Pair] button to pair a new
device or press the [Connect] to con-
nect a previously paired device.
Pairing through [PHONE] Setup
Press the [SETUP] button Select
[Phone].
Pair Phone
The following steps are the same as
those described in the section “When
No Devices have been Paired” on the
previous page.
✽NOTICE
• The waiting period during phone
pairing will last for one minute.
The pairing process will fail if the
device is not paired within the
given time. If the pairing process
fails, you must start the process
from the beginning.
• Generally, most Bluetooth®
Wireless Technology devices will
automatically connect once pair-
ing is complete. However, some
devices may require a separate
verification process to connect.
Check to see whether Bluetooth®
Wireless Technology has been
properly connected within your
mobile phone.
• List of paired Bluetooth®Wireless
Technology devices can be viewed
at [SETUP] [Phone] [Paired
Phone List].
D4H3G038EE D4H3G039EE
Audio system
43
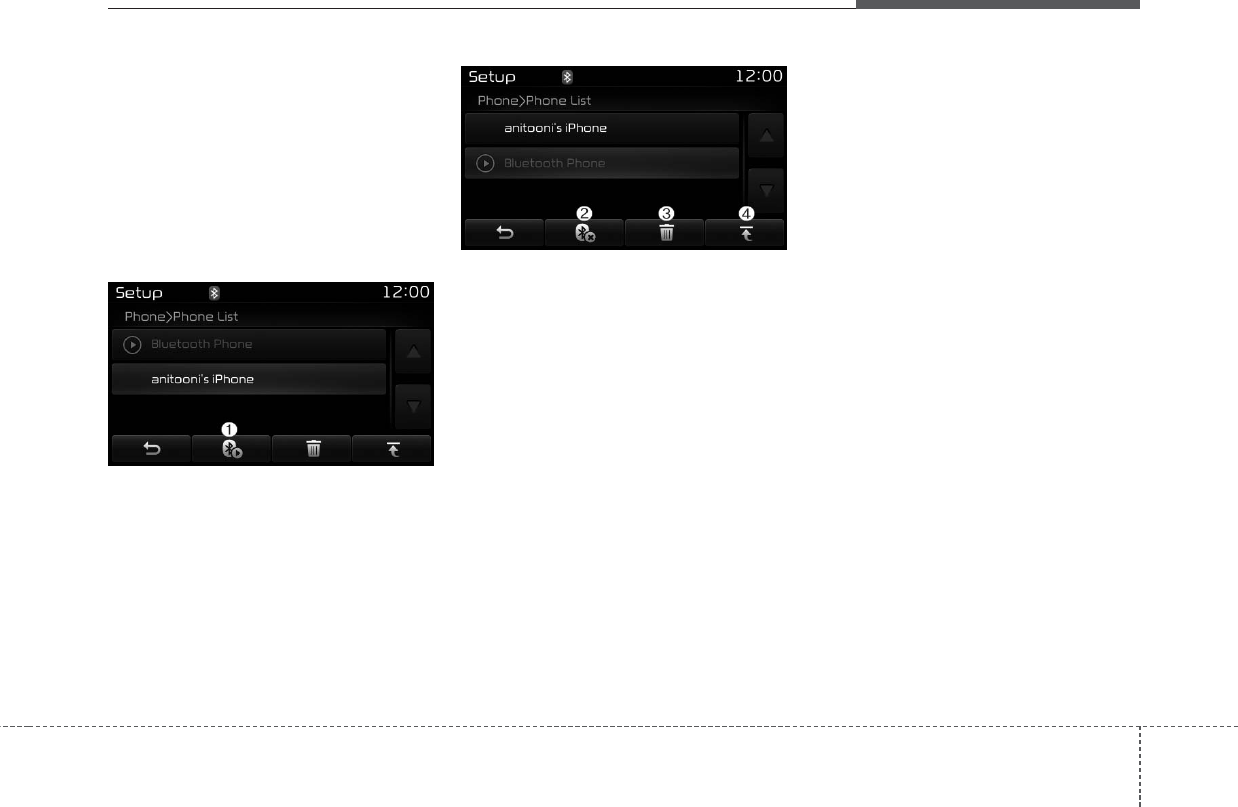
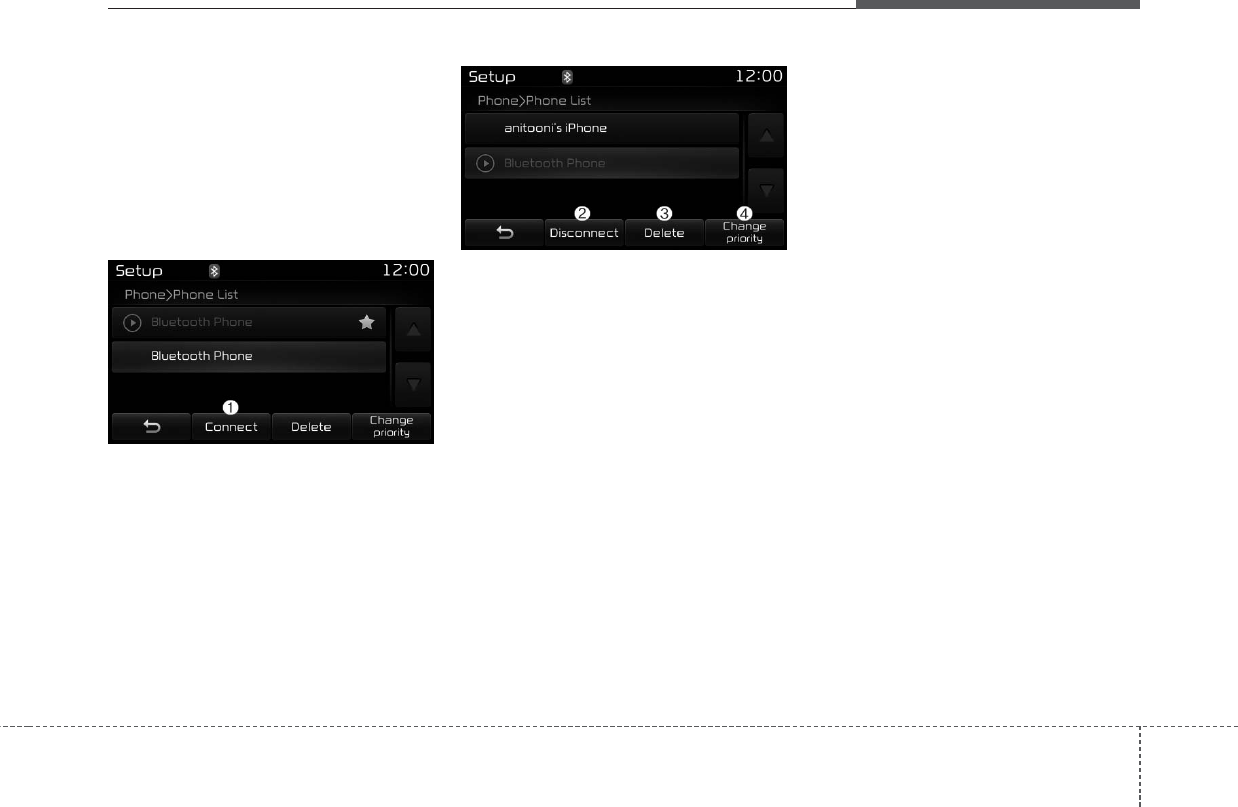
Paired Phone List
Press the [SETUP] button Select
[Phone] Select [Paired Phone
List].
• Connected Phone : Device that is
currently connected.
• Paired Phone : Device that is
paired but not connected.
Connecting a Device
From the paired phone list, select the
device you want to connect and
press the [Connect](1) button.
Disconnecting a Device
From the paired phone list, select the
currently connected device and
press the [Disconnect](2) button.
Deleting a Device
From the paired phone list, select the
device you want to delete and press
the [Delete](3) button.
✽NOTICE
• When deleting the currently con-
nected device, the device will auto-
matically be disconnected to pro-
ceed with the deleting process.
• If a paired Bluetooth®Wireless
Technology device is deleted, the
device’s call history and phone
book data will also be deleted.
• To re-use a deleted device, you
must pair the device again.
D4H3G040EE D4H3G041EE
Audio system
44
Changing Priority
It is possible to pair up to five
Bluetooth®
Wireless Technology
devices with the car audio system.
The “Change Priority” feature is used
to set the connection priority of
paired phones. However, the most
recently connected phone will always
be set as the highest priority.
From the paired phone list, select
the phone you want to switch to the
highest priority, then press the
[Change priority](4) button. The
selected device will be changed to
the highest priority.
When a device is currently connect-
ed, even if you change the priority to
a different device, the currently con-
nected phone will always be set as
the highest priority.
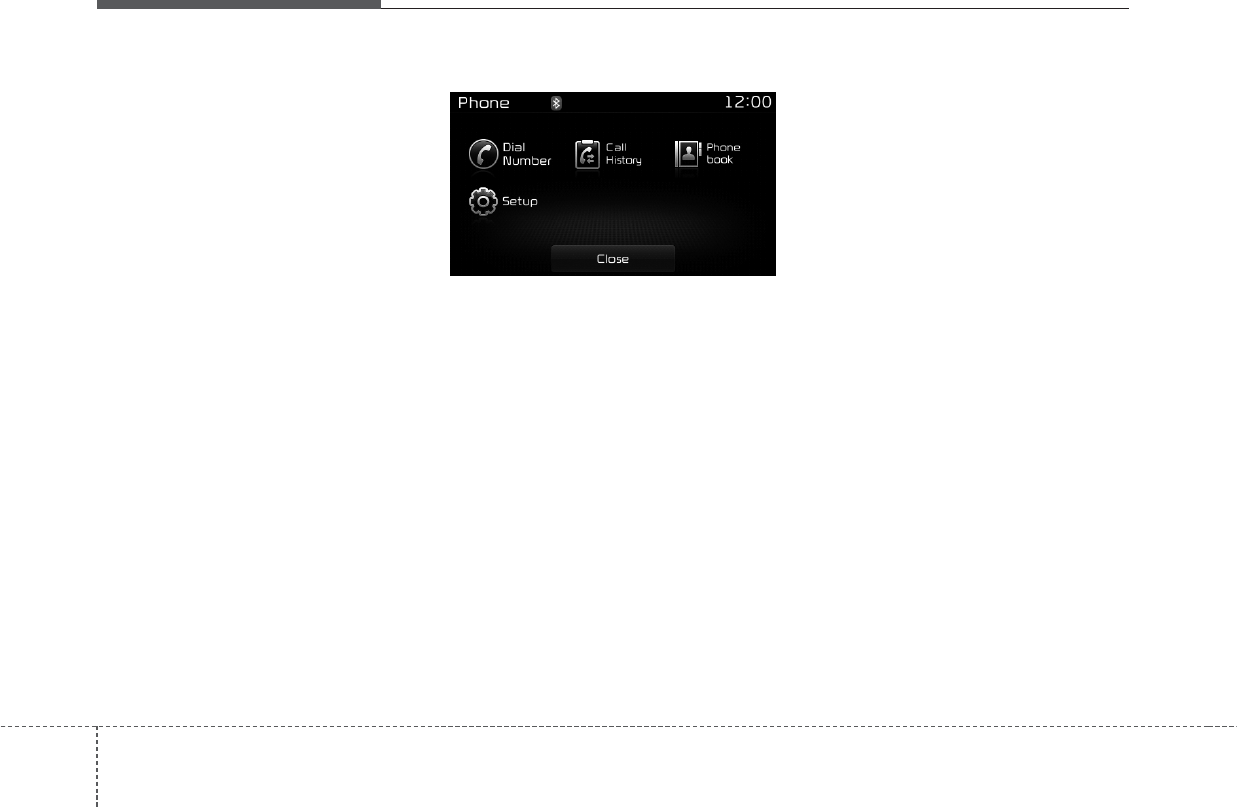
Phone Menu Screen
Phone Menus
With a
Bluetooth®
Wireless
Technology device connected, press
the [PHONE] button to display the
Phone menu screen.
• Dial Number : Displays the dial
screen where numbers can be
dialed to make calls.
• Call History : Displays the call his-
tory list screen.
• Phone book : Displays the Phone
book list screen.
• Setup : Displays Phone related set-
tings.
✽NOTICE
• If you press the [Call History] but-
ton but there is no call history
data, a prompt is displayed which
asks whether to download call his-
tory data.
• If you press the [Phone book] but-
ton but there is no phone book
data, a prompt is displayed which
asks whether to download phone
book data.
• This feature may not be supported
in some mobile phones. For more
information on download support,
refer to your mobile phone user’s
manual.
D4H3G042EE
Audio system
45
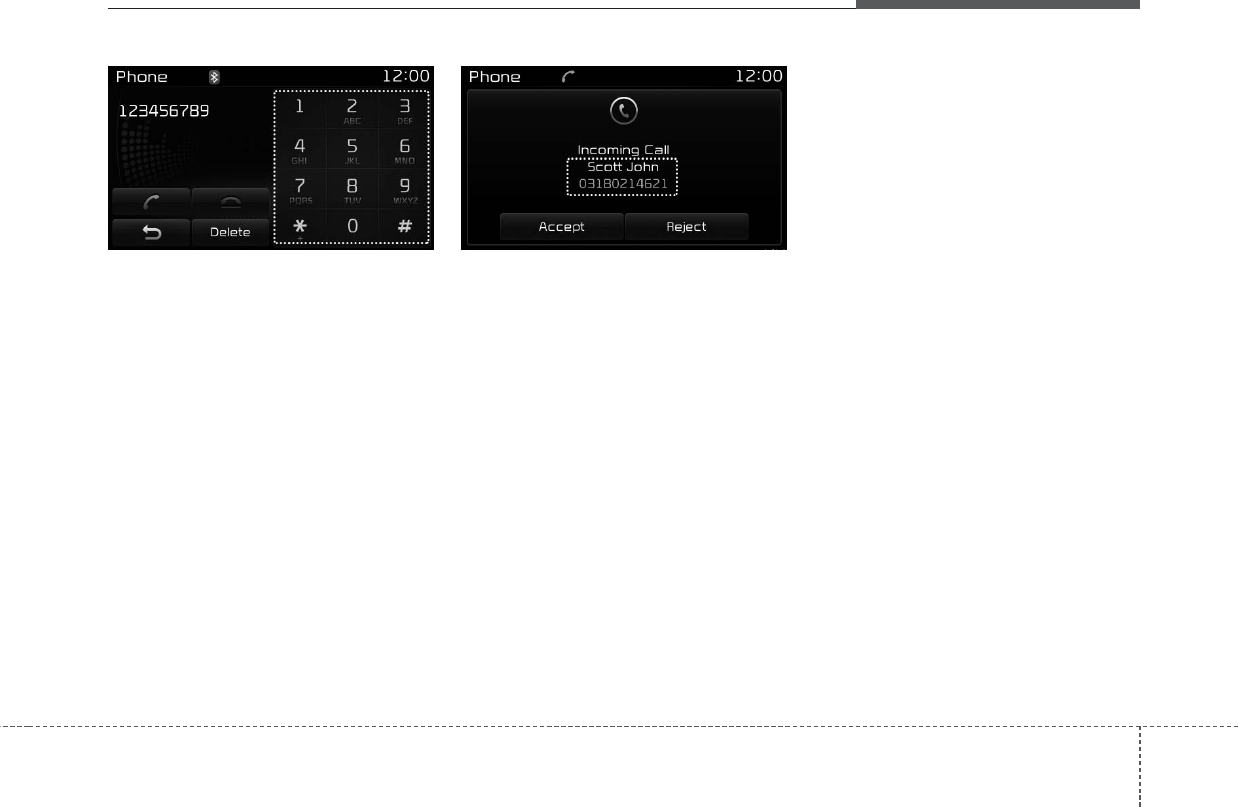
Calling by Dialing a Number
• Dial Pad : Used to enter phone
number.
• Call : If a number has been
entered, calls the number If no
number has been entered, switch-
es to call history screen.
• End : Deletes the entered phone
number.
• Delete : Deletes entered numbers
one digit at a time.
Answering a Call
Answering a call with a
Bluetooth®
Wireless Technology device connect-
ed will display the following screen.
• Caller : Displays the other party’s
name when the incoming caller is
saved within your phone book.
• Incoming Number : Displays the
incoming number.
• Accept : Accepts the incoming call.
• Reject : Rejects the incoming call.
✽NOTICE
• When an incoming call pop-up is
displayed, most Audio and SETUP
mode features are disabled. Only
the call volume will operate.
• The telephone number may not be
properly displayed in some mobile
phones.
• When a call is answered with the
mobile phone, the call mode will
automatically revert to Private
mode.
D4H3G043EE D4H3G044EE
Audio system
46
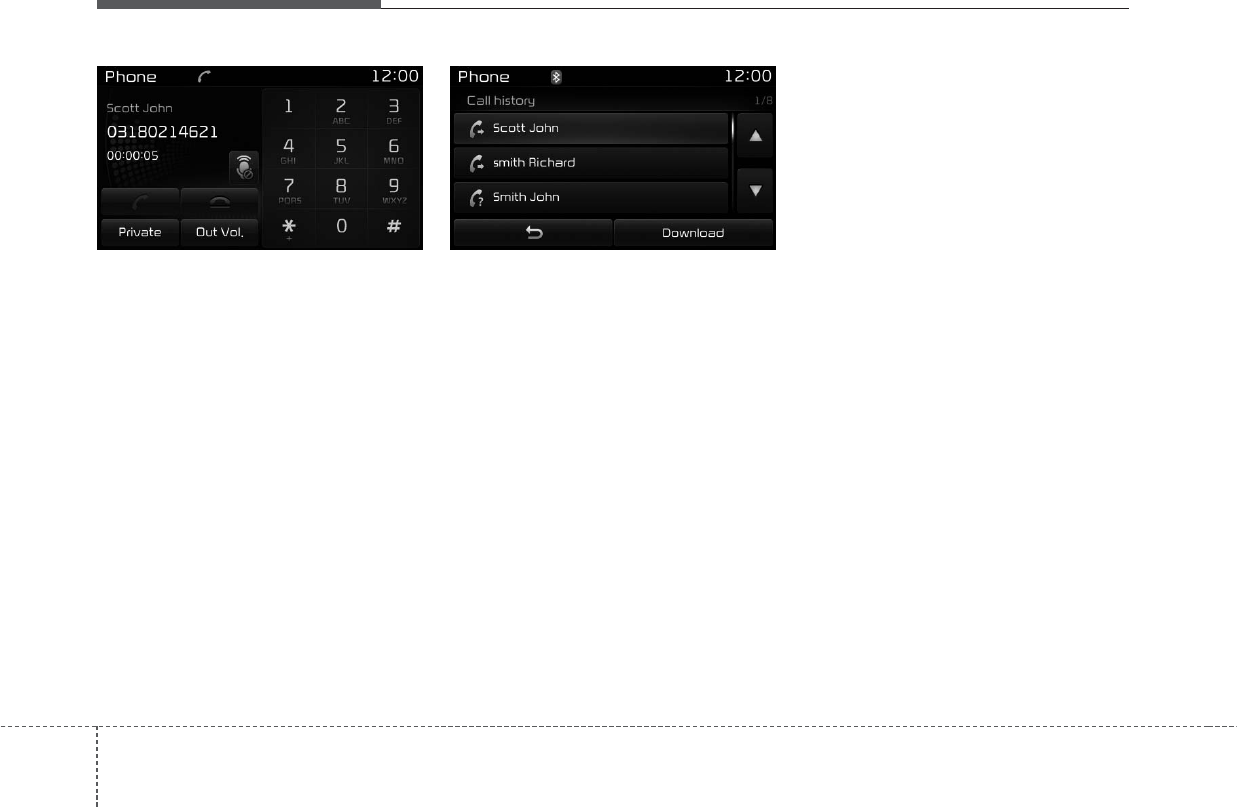
During a Handsfree Call
• Caller : Displays the other party’s
name if the incoming caller is
saved within your phone book.
• Incoming Number : Displays the
incoming number.
• Call time : Displays the call time.
• End : Ends call.
• Private : Converts to Private mode.
• Out Vol. : Sets call volume as heard
by the other party.
• Mute : Turns Mic Mute On/Off.
✽NOTICE
If the mic is muted, the other party
will not be able to hear your voice.
Call History
A list of incoming, outgoing and
missed calls is displayed.
Press the [Download] button to
download the call history.
• Call History :
- Displays recent calls (call history).
- Connects call upon selection.
• Download : Download Recent Call
History.
✽NOTICE
• The call history list will display up
to 50 outgoing, incoming, and
missed calls.
• Upon downloading call histories,
previously saved histories are
deleted.
• Incoming calls with hidden caller
IDs will not be saved in the call
history list.
• Previously saved phone book
entries are stored even if a device
is disconnected and re-connected.
• The download feature may not be
supported in some mobile phones.
Check to see that the Bluetooth®
Wireless Technology device sup-
ports the download feature.
D4H3G045EE D4H3G046EE
Audio system
47
Phone Book
The list of saved phone book entries
is displayed. Press the [Download]
button to download the call history.
• Contact List :
- Displays downloaded phone
book entries.
- Connects call upon selection.
• Download : Download phone book
entries.
✽NOTICE
• Up to 1,000 phone book entries
can be copied into car phone book.
• Upon downloading phone book
data, previously saved phone book
data will be deleted.
• Downloading is not possible if the
phone book download feature is
turned off within the Bluetooth®
Wireless Technology device. Also,
some devices may require device
authorization upon attempting to
download. If downloading cannot
be normally conducted, check the
Bluetooth®Wireless Technology
device setting or the screen state.
• Caller ID information will not be
displayed for unsaved callers.
• The download feature may not be
supported in some mobile phones.
Check to see that the Bluetooth®
Wireless Technology device sup-
ports the download feature.
D4H3G047EE
Audio system
48
Bluetooth
®
Wireless Technology
(Type B-2, Type B-2 For
Colombia without harman/kar-
don)
When No Devices have been Paired
➀Press the [PHONE] button or the
[CALL] button on the steering
wheel controls. The following
screen is displayed.
➁Press the [OK] button to enter the
Pair Phone screen.
•Vehicle Name : Name of device as
shown when searching from your
Bluetooth®
Wireless Technology
device.
• Passkey : Passkey used to pair the
device.
➂From your
Bluetooth®
Wireless
Technology device (i.e. Mobile
Phone), search and select your
car audio system.
❈SSP : Secure Simple Pairing
Non SSP supported device :
➃After a few moments, a screen is
displayed where the passkey is
entered.
Enter the passkey “0000” to pair
your
Bluetooth®
Wireless Technology
device with the car audio system.
SSP supported device :
➃After a few moments, a screen is dis-
played 6 digits passkey.
Check the passkey on your
Bluetooth®
Wireless Technology
device and confirm.
➄Once pairing is complete, the fol-
lowing screen is displayed.
Some phones (i.e., iPhone®, Android
and Blackberry phones) may offer an
option to allow acceptance of all
future Bluetooth connection requests
by default. Visit http://www.kia.com
for additional information on pairing
your Bluetooth-enabled mobile
phone, and to view a phone compat-
ibility list.
D4H3G048EE D4H3G049EE D4H3G050EE
Audio system
49
✽NOTICE
If Bluetooth®Wireless Technology
devices are paired but none are cur-
rently connected, pressing the
[PHONE] button or the [CALL] but-
ton on the steering wheel controls
displays the following screen. Press
the [Pair] button to pair a new
device or press the [Connect] to con-
nect a previously paired device.
Pairing through [PHONE] Setup
Press the [SETUP] button Select
[Phone].
Pair Phone
The following steps are the same as
those described in the section “When
No Devices have been Paired” on the
previous page.
✽NOTICE
• The waiting period during phone
pairing will last for one minute.
The pairing process will fail if the
device is not paired within the
given time. If the pairing process
fails, you must start the process
from the beginning.
• Generally, most Bluetooth®
Wireless Technology devices will
automatically connect once pair-
ing is complete. However, some
devices may require a separate
verification process to connect.
Check to see whether Bluetooth®
Wireless Technology has been
properly connected within your
mobile phone.
• List of paired Bluetooth®Wireless
Technology devices can be viewed
at [SETUP] [Phone] [Paired
Phone List].
D4H3G051EE D4H3G052EE
Audio system
50
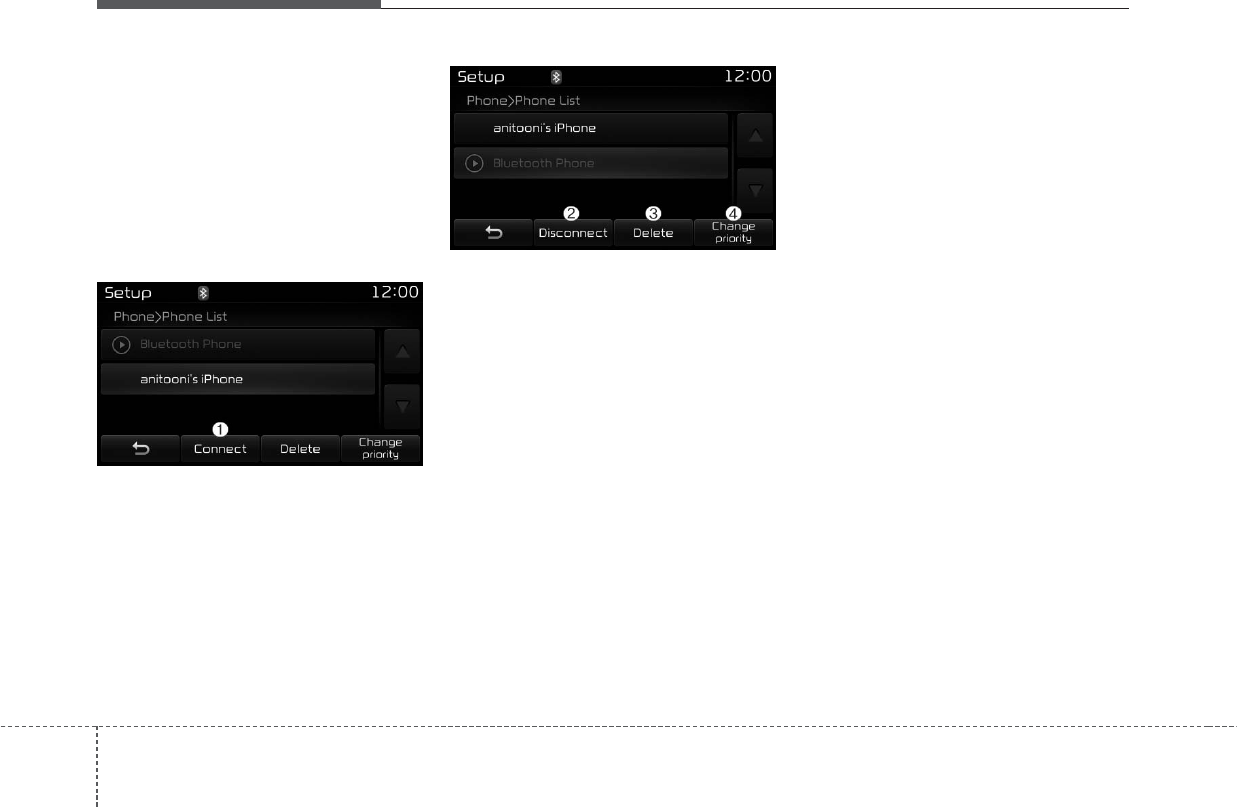
Paired Phone List
Press the [SETUP] button Select
[Phone] Select [Paired Phone
List].
• Connected Phone : Device that is
currently connected.
• Paired Phone : Device that is
paired but not connected.
Connecting a Device
From the paired phone list, select the
device you want to connect and
press the [Connect](1) button.
Disconnecting a Device
From the paired phone list, select the
currently connected device and
press the [Disconnect](2) button.
Deleting a Device
From the paired phone list, select the
device you want to delete and press
the [Delete](3) button.
✽NOTICE
• When deleting the currently con-
nected device, the device will auto-
matically be disconnected to pro-
ceed with the deleting process.
• If a paired Bluetooth®Wireless
Technology device is deleted, the
device’s call history and contacts
data will also be deleted.
• To re-use a deleted device, you
must pair the device again.
D4H3G053EE D4H3G054EE
Audio system
51
Changing Priority
It is possible to pair up to five
Bluetooth®
Wireless Technology
devices with the car audio system.
The “Change Priority” feature is used
to set the connection priority of
paired phones. However, the most
recently connected phone will always
be set as the highest priority.
From the paired phone list, select
the phone you want to switch to the
highest priority, then press the
[Change priority](4) button. The
selected device will be changed to
the highest priority.
When a device is currently connect-
ed, even if you change the priority to
a different device, the currently con-
nected phone will always be set as
the highest priority.
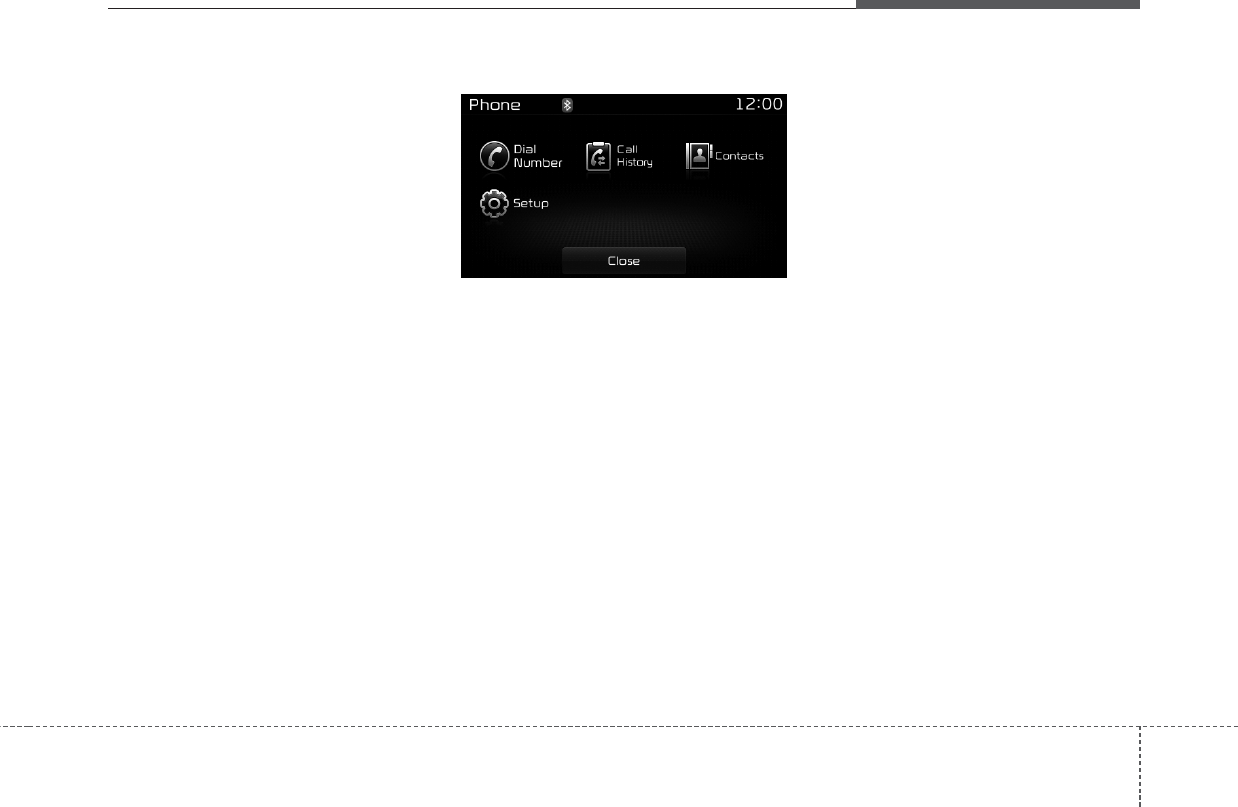
Phone Menu Screen
Phone Menus
With a
Bluetooth®
Wireless Technology
device connected, press the
[PHONE] button to display the
Phone menu screen.
• Dial Number : Displays the dial
screen where numbers can be
dialed to make calls.
• Call History : Displays the call his-
tory list screen.
• Contacts : Displays the Contacts
list screen.
• Setup : Displays Phone related set-
tings.
✽NOTICE
• If you press the [Call History] but-
ton but there is no call history
data, a prompt is displayed which
asks whether to download call his-
tory data.
• If you press the [Contacts] button
but there is no contacts data
stored, a prompt is displayed
which asks whether to download
contacts data.
• This feature may not be supported
in some mobile phones. For more
information on download support,
refer to your mobile phone user’s
manual.
D4H3G055EE
Audio system
52
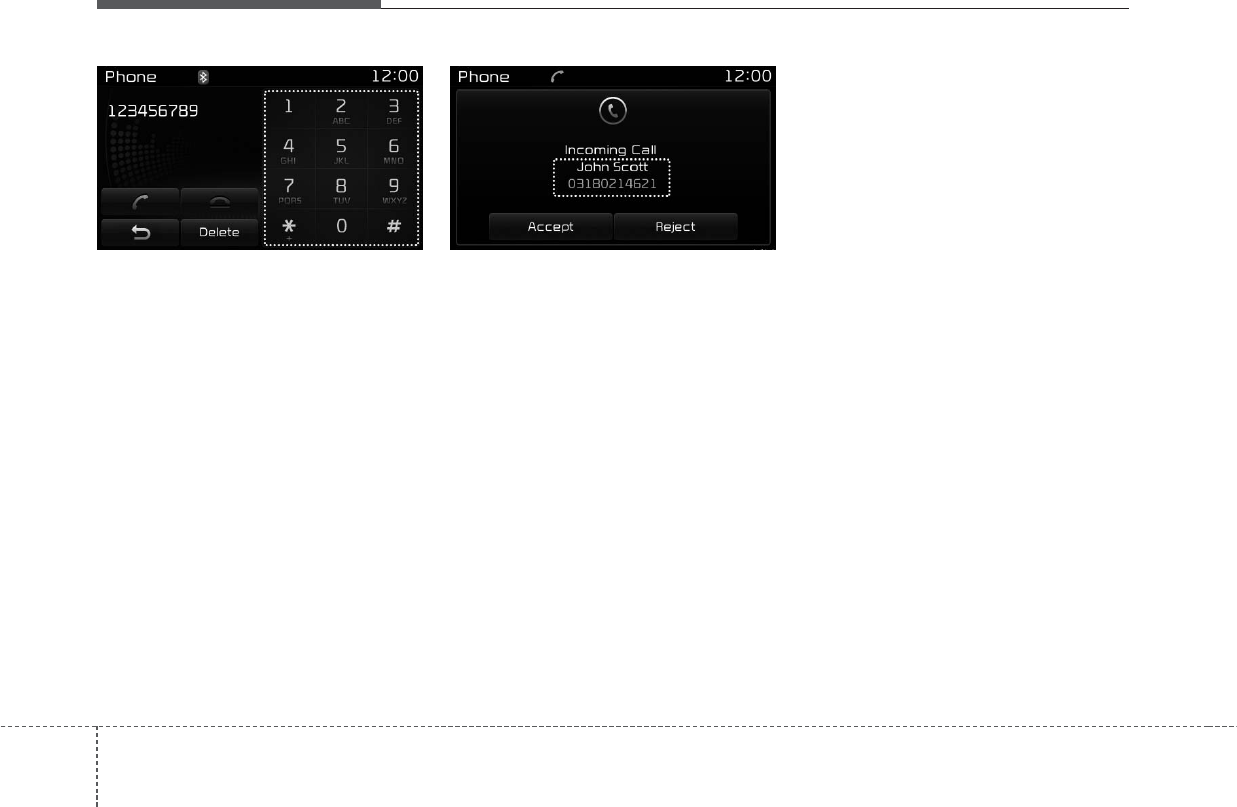
Calling by Dialing a Number
• Dial Pad : Used to enter phone
number.
• Call : If a number has been
entered, calls the number If no
number has been entered, switch-
es to call history screen.
• End : Deletes the entered phone
number.
• Delete : Deletes entered numbers
one digit at a time.
Answering a Call
Answering a call with a
Bluetooth®
Wireless Technology device connect-
ed will display the following screen.
• Caller : Displays the other party’s
name when the incoming caller is
saved within your contacts.
• Incoming Number : Displays the
incoming number.
• Accept : Accepts the incoming call.
• Reject : Rejects the incoming call.
✽NOTICE
• When an incoming call pop-up is
displayed, most Audio and SETUP
mode features are disabled. Only
the call volume will operate.
• The telephone number may not be
properly displayed in some mobile
phones.
• When a call is answered with the
mobile phone, the call mode will
automatically revert to Private
mode.
D4H3G056EE D4H3G057EE

Audio system
53
During a Handsfree Call
• Caller : Displays the other party’s
name if the incoming caller is
saved within your contacts.
• Incoming Number : Displays the
incoming number.
• Call time : Displays the call time.
• End : Ends call.
• Private : Converts to Private mode.
• Out Vol. : Sets call volume as heard
by the other party.
• Mute : Turns Mic Mute On/Off.
✽NOTICE
If the mic is muted, the other party
will not be able to hear your voice.
Call History
A list of incoming, outgoing and
missed calls is displayed.
Press the [Download] button to
download the call history.
• Call History :
- Displays recent calls (call histo-
ry).
- Connects call upon selection.
• Download : Download Recent Call
History.
Contacts
The list of saved phone book entries
is displayed. Press the [Download]
button to download the call history.
• Contacts List :
- Displays downloaded contacts
entries.
- Connects call upon selection.
• Download : Download contacts
entries.
D4H3G058EE D4H3G059EE D4H3G060EE

Audio system
54
✽NOTICE
• Up to 1,000 contacts entries can be
copied into car contacts.
• Upon downloading contacts data,
previously saved contacts data will
be deleted.
• Downloading is not possible if the
contacts download feature is
turned off within the Bluetooth®
Wireless Technology device. Also,
some devices may require device
authorization upon attempting to
download. If downloading cannot
be normally conducted, check the
Bluetooth®Wireless Technology
device setting or the screen state.
• Caller ID information will not be
displayed for unsaved callers.
• The download feature may not be
supported in some mobile phones.
Check to see that the Bluetooth®
Wireless Technology device sup-
ports the download feature.
Audio system
55
Bluetooth
®
Wireless Technology
(Type B-2 For Colombia with
harman/kardon)
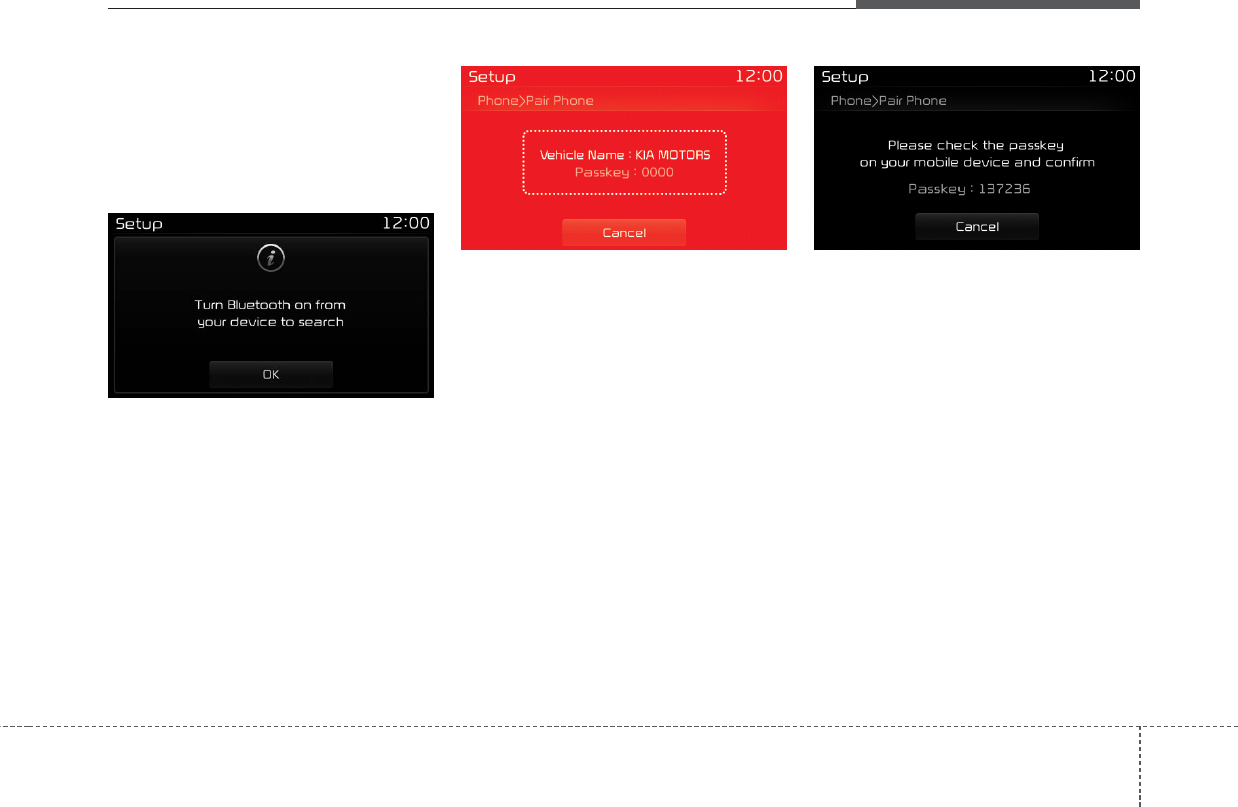
When No Devices have been
Paired
➀Press the [PHONE] button or the
[CALL] button on the steering
wheel controls. The following
screen is displayed.
➁Press the [OK] button to enter the
Pair Phone screen.
•Vehicle Name : Name of device as
shown when searching from your
Bluetooth®
Wireless Technology
device.
• Passkey : Passkey used to pair the
device.
➂From your
Bluetooth®
Wireless
Technology device (i.e. Mobile
Phone), search and select your
car audio system.
❈SSP : Secure Simple Pairing
Non SSP supported device :
➃After a few moments, a screen is
displayed where the passkey is
entered.
Enter the passkey “0000” to pair
your
Bluetooth®
Wireless
Technology device with the car
audio system.
SSP supported device :
➃After a few moments, a screen is
displayed 6 digits passkey.
Check the passkey on your
Bluetooth®
Wireless Technology
device and confirm.
➄Once pairing is complete, the fol-
lowing screen is displayed.
Some phones (i.e., iPhone, Android
and Blackberry phones) may offer an
option to allow acceptance of all
future Bluetooth connection requests
by default. Visit http://www.kia.com
for additional information on pairing
your Bluetooth-enabled mobile
phone, and to view a phone compat-
ibility list.
D4H3G061EE D4H3G062EE D4H3G063EE
Audio system
56
✽NOTICE
If Bluetooth®Wireless Technology
devices are paired but none are cur-
rently connected, pressing the
[PHONE] button or the [CALL] but-
ton on the steering wheel controls
displays the following screen. Press
the [Pair] button to pair a new
device or press the [Connect] to con-
nect a previously paired device.
Pairing through [PHONE] Setup
Press the [SETUP] button Select
[Phone].
Pair Phone
The following steps are the same as
those described in the section “When
No Devices have been Paired” on the
previous page.
✽NOTICE
• The waiting period during phone
pairing will last for one minute.
The pairing process will fail if the
device is not paired within the
given time. If the pairing process
fails, you must start the process
from the beginning.
• Generally, most Bluetooth®
Wireless Technology devices will
automatically connect once pair-
ing is complete. However, some
devices may require a separate
verification process to connect.
Check to see whether Bluetooth®
Wireless Technology has been
properly connected within your
mobile phone.
• List of paired Bluetooth®Wireless
Technology devices can be viewed
at [SETUP] [Phone] [Paired
Phone List].
D4H3G064EE D4H3G065EE
Audio system
57
Paired Phone List
Press the [SETUP] button Select
[Phone] Select [Paired Phone List]
• Connected Phone : Device that is
currently connected.
• Paired Phone : Device that is
paired but not connected.
Connecting a Device
From the paired phone list, select the
device you want to connect and
press the [Connect](1) button.
Disconnecting a Device
From the paired phone list, select the
currently connected device and
press the [Disconnect](2) button.
Deleting a Device
From the paired phone list, select the
device you want to delete and press
the [Delete](3) button.
✽NOTICE
• When deleting the currently con-
nected device, the device will auto-
matically be disconnected to pro-
ceed with the deleting process.
• If a paired Bluetooth®Wireless
Technology device is deleted, the
device’s call history and contacts
data will also be deleted.
• To re-use a deleted device, you
must pair the device again.
D4H3G066EE D4H3G067EE

Audio system
58
Changing Priority
It is possible to pair up to five
Bluetooth®
Wireless Technology
devices with the car audio system.
The “Change Priority” feature is used
to set the connection priority of
paired phones. However, the most
recently connected phone will always
be set as the highest priority.
From the paired phone list, select
the phone you want to switch to the
highest priority, then press the
[Change priority](4) button. The
selected device will be changed to
the highest priority.
When a device is currently connect-
ed, even if you change the priority to
a different device, the currently con-
nected phone will always be set as
the highest priority.
Phone Menu Screen
Phone Menus
With a
Bluetooth®
Wireless Technology
device connected, press the
[PHONE] button to display the
Phone menu screen.
• Favorites : Up to 20 frequently
used contacts saved for easy
access.
• Dial Number : Displays the dial
screen where numbers can be
dialed to make calls.
• Call History : Displays the call his-
tory list screen.
• Contacts : Displays the Contacts
list screen.
• Setup : Displays Phone related set-
tings.
✽NOTICE
• If you press the [Call History] but-
ton but there is no call history
data, a prompt is displayed which
asks whether to download call his-
tory data.
• If you press the [Contacts] button
but there is no contacts data
stored, a prompt is displayed
which asks whether to download
contacts data.
• This feature may not be supported
in some mobile phones. For more
information on download support,
refer to your mobile phone user’s
manual.
D4H3G068EE
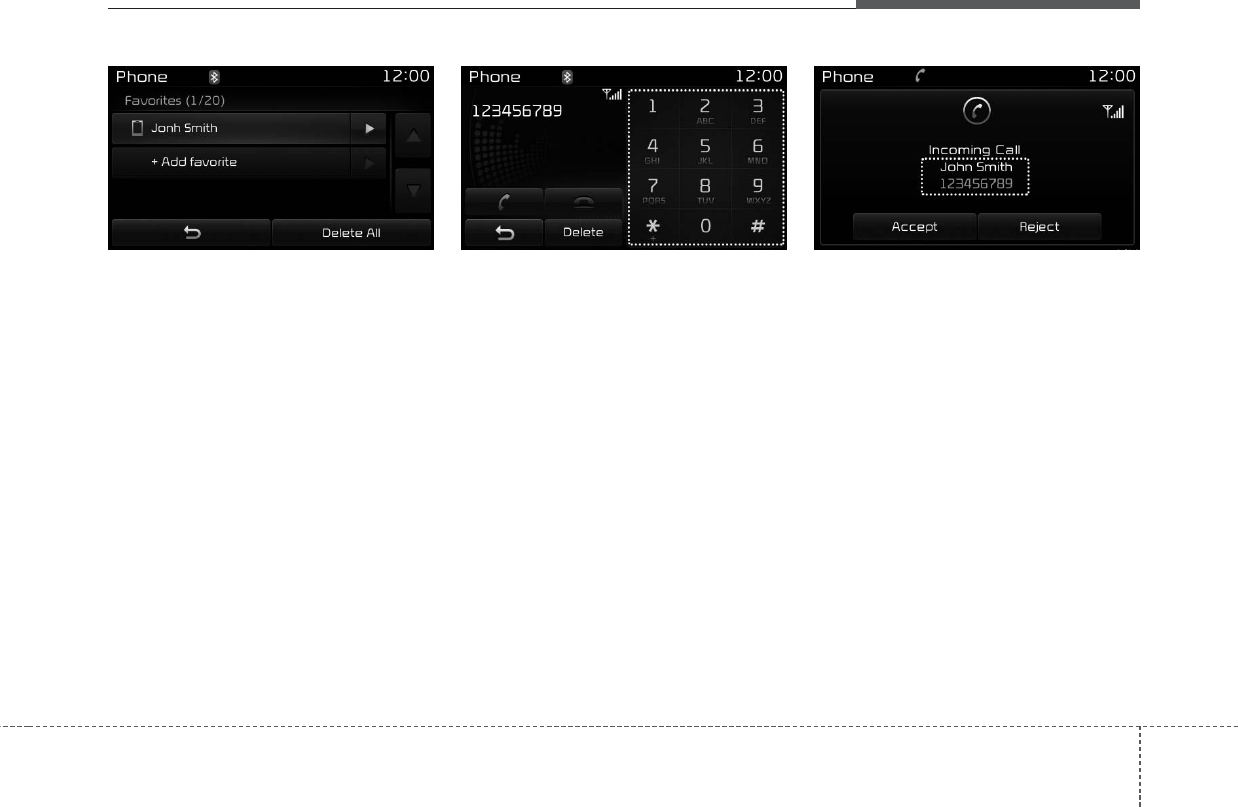
Audio system
59
Favorites
• Saved favorite contact : Connects
call upon selection.
• To add favorite : Downloaded con-
tacts be saved as favorite.
• Delete All : Delete all stored favorite
contacts.
✽NOTICE
• To save Favorite, contacts should
be downloaded.
• Contact saved in Favorites will not
be automatically updated if the
contact has been updated in the
phone. To update Favorites, delete
the Favorite and create a new
Favorite.
Calling by Dialing a Number
• Dial Pad : Used to enter phone
number.
• Call : If a number has been
entered, calls the number If no
number has been entered, switch-
es to call history screen.
• End : Deletes the entered phone
number.
• Delete : Deletes entered numbers
one digit at a time.
Answering a Call
Answering a call with a
Bluetooth®
Wireless Technology device connect-
ed will display the following screen.
• Caller : Displays the other party’s
name when the incoming caller is
saved within your contacts.
• Incoming Number : Displays the
incoming number.
• Accept : Accepts the incoming call.
• Reject : Rejects the incoming call.
D4H3G069EE D4H3G070EE D4H3G071EE

Audio system
60
✽NOTICE
• When an incoming call pop-up is
displayed, most Audio and SETUP
mode features are disabled. Only
the call volume will operate.
• The telephone number may not be
properly displayed in some mobile
phones.
• When a call is answered with the
mobile phone, the call mode will
automatically revert to Private
mode.
During a Handsfree Call
• Caller : Displays the other party’s
name if the incoming caller is
saved within your contacts.
• Incoming Number : Displays the
incoming number.
• Call time : Displays the call time.
• End : Ends call.
• Private : Converts to Private mode.
• Out Vol. : Sets call volume as heard
by the other party.
• Mute : Turns Mic Mute On/Off.
✽NOTICE
If the mic is muted, the other party
will not be able to hear your voice.
Call History
A list of incoming, outgoing and
missed calls is displayed.
Press the [Download] button to
download the call history.
• Call History :
- Displays recent calls (call histo-
ry).
- Connects call upon selection.
• Download : Download Recent Call
History.
D4H3G072EE D4H3G073EE

Audio system
61
Contacts
The list of saved phone book entries
is displayed. Press the [Download]
button to download the call history.
• Contacts List :
- Displays downloaded contacts
entries.
- Connects call upon selection.
• Sort by : Find a contact in an
alphabetical order.
• Download : Download contacts
entries.
✽NOTICE
• Up to 1,000 contacts entries can be
copied into car contacts.
• Upon downloading contacts data,
previously saved contacts data will
be deleted.
• Downloading is not possible if the
contacts download feature is
turned off within the Bluetooth®
Wireless Technology device. Also,
some devices may require device
authorization upon attempting to
download. If downloading cannot
be normally conducted, check the
Bluetooth®Wireless Technology
device setting or the screen state.
• Caller ID information will not be
displayed for unsaved callers.
• The download feature may not be
supported in some mobile phones.
Check to see that the Bluetooth®
Wireless Technology device sup-
ports the download feature.
D4H3G074EE
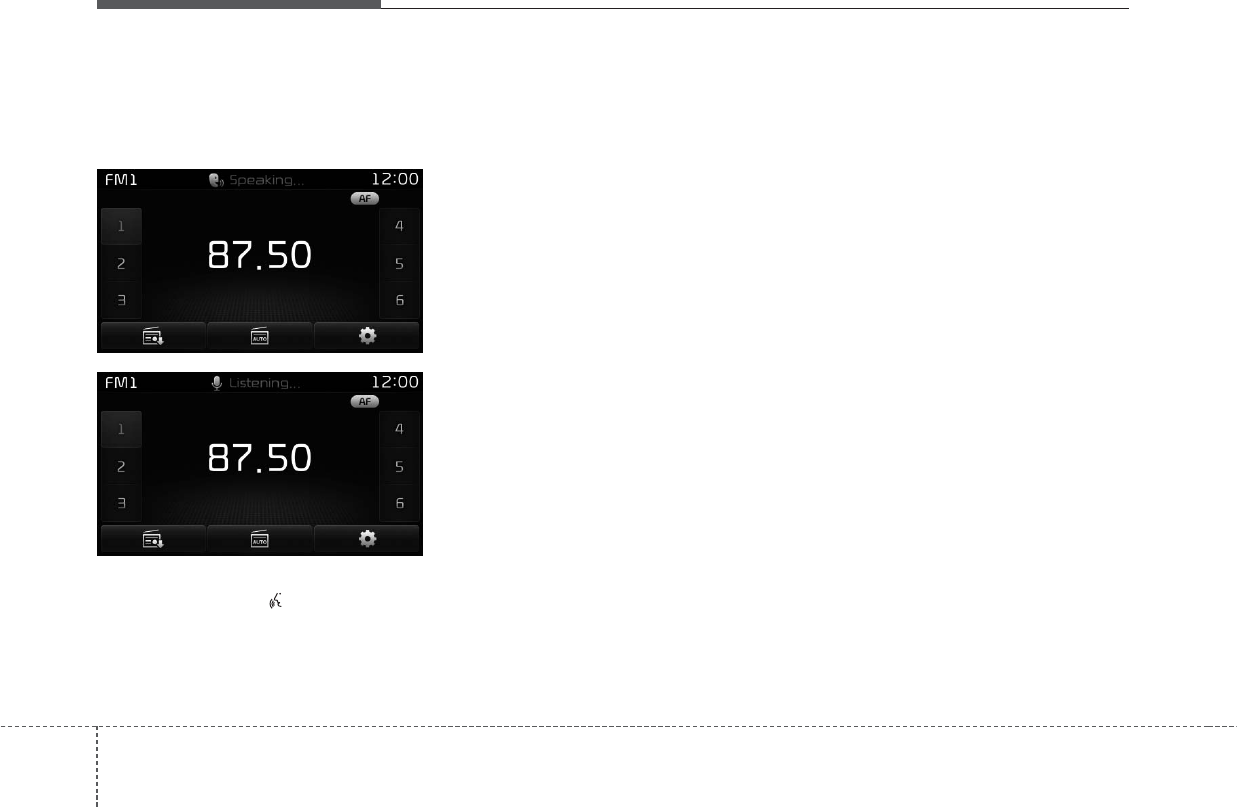
Audio system
62
Voice Recognition Mode
(if equipped)
Using Voice Recognition
Starting Voice Recognition
Shortly press the button on the
steering wheel controls Say a com-
mand.
If voice recognition is in [Normal
Mode], then the system will say
“Please say a command. Ding~”
• If voice recognition is in [Expert
Mode], then the system will only
say a “Ding~”
• To change the Normal Mode/
Expert Mode setting, go to
[SETUP] [System] [Voice
Recognition System].
For proper recognition, say the com-
mand after the voice instruction and
beep tone.
✽NOTICE
Phonebook List Best Practice
1) Do not store single-name entries
(e.g., “Bob”, “Mom”, “Kim”,
etc.). Instead, always use full
names (including first and last
names) for phonebook (e.g., use
“Jacob Stevenson” instead of
“Dad”).
2) Do not use abbreviations (i.e., use
“Lieutenant” instead of “Lt.” or
“Sergeant” instead of “Sgt.”).
3) Do not use acronyms (i.e., use
“County Finance Department”
instead of “CFD”).
4) Do not use special characters
(e.g., “@”, “hyphen -”, “asterisk
*”, ampersand &”).
5) If a name is not recognized from
the phonebook, change it to a
more descriptive name (e.g., use
“Grandpa Joseph” instead of “Pa
Joe”).
D4H3G075EE
D4H3G076EE
Audio system
63
Skipping Prompt Messages
While prompt message is being stat-
ed Shortly press the button on
the steering wheel controls.
The prompt message is immediately
ended and the beep tone will sound.
After the “Ding”, say the voice com-
mand.
Re-starting Voice Recognition
While system waits for a command
Shortly press the button on the
steering wheel controls.
The command wait state is immedi-
ately ended and the beep tone will
sound. After the “Ding”, say the voice
command.
Ending Voice Recognition
While Voice Recognition is operating
Press and hold the button on
the steering wheel controls.
• While using voice command,
pressing a steering wheel controls
or a different button will end voice
command.
• When the system is waiting for a
voice command, say “cancel” or
“end” to end voice command.
• When the system is waiting for a
voice command, press and hold
the button on the steering
wheel controls to end voice com-
mand.
✽NOTICE
Voice Recognition and Phonebook
Tips
The Kia Voice Recognition System
may have difficulty understanding
some accents or uncommon names.
When using Voice Recognition to
place a call, speak in a moderate
tone, with clear pronunciation.
To maximize the use of Voice
Recognition, consider these guide-
lines when storing contacts:
• Do not store single-name entries
(e.g., “Bob”, “Mom”, etc.). Instead,
always use full names (including
first and last names) for these con-
tacts.
• Do not use special characters (e.g.,
'@', '-', '*', '&', etc.).
• Do not use abbreviations (i.e., use
"Lieutenant" instead of "Lt.") or
acronyms (i.e., use "County
Finance Department" instead of
"C. F. D."; Be sure to say the name
exactly as it is entered in the con-
tacts list
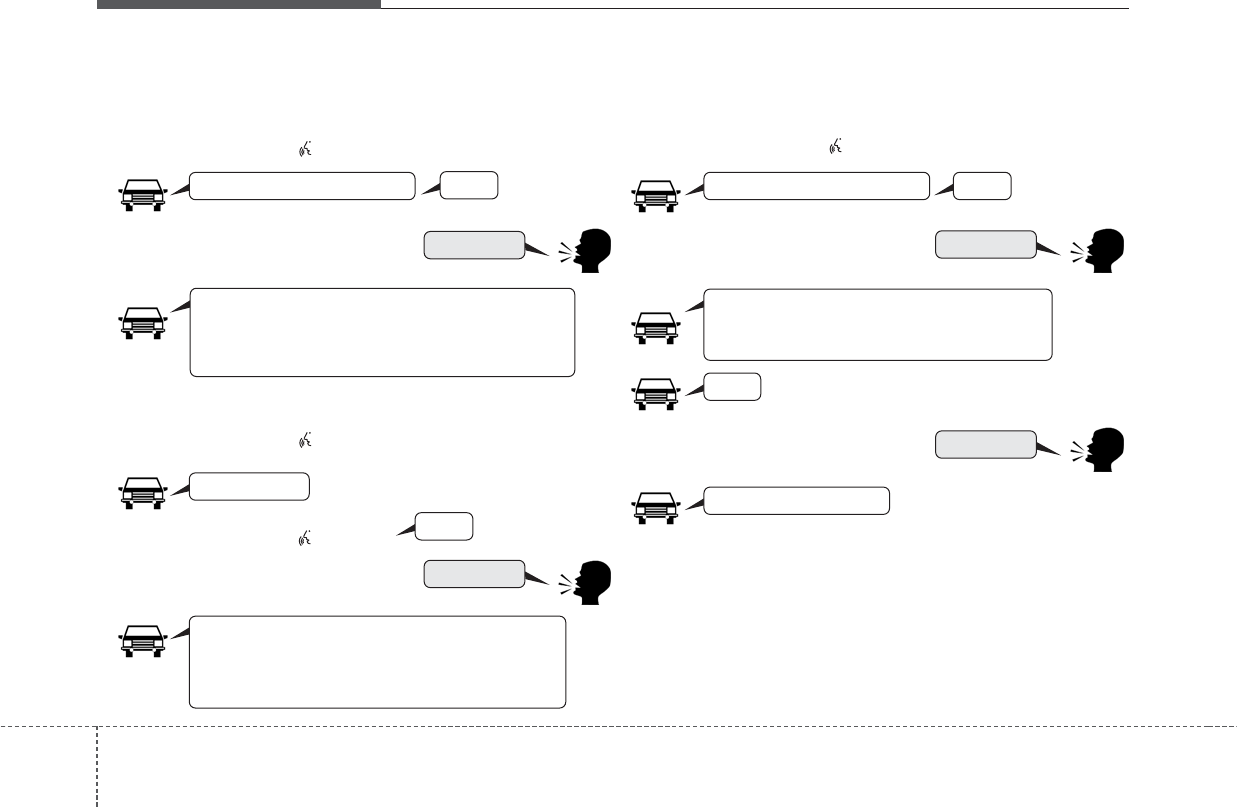
Audio system
64
llustration on Using Voice Recognition
Starting Voice Recognition
Shortly pressing the button :
Skipping Voice Recognition
Shortly pressing the button :
Ending Voice Recognition
Shortly pressing the button :
More Help
More Help
Please say a command
Please say a...
More Help.
You can say Radio, FM, AM, Media, CD, USB, AUX,
My Music, iPod®, Bluetooth Audio, Phone, Call
History or Phone book. Please say a command.
More Help.
You can say Radio, FM, AM, Media, CD, USB, AUX,
My Music, iPod®, Bluetooth Audio, Phone, Call
History or Phone book. Please say a command.
Ding~
Ding~
Shortly pressing the button :
Phone book
Cancel
Please say a command
Phone book.
Please say the name of the phone book you
want to call.
Ding~
Di-Ding~(Cancel Sound)
Ding~
Audio system
65
Voice Command List
Common Commands
These commands can be used in most operations.
(However a few commands may not be available during certain operations)
Command Function
More Help Provides guidance on commands that can be used
anywhere in the system.
Help Provides guidance on commands that can be used
within the current mode.
Call<Name> Calls <Name> saved in phone book
Ex) Call “John Smith”
Phone Provides guidance on Phone related commands.
After saying this command, say “Call History”,
“Phone book”, “Dial Number” to execute corre-
sponding functions.
Call History Displays the Call History screen.
Phone book Displays the phone book screen. After saying this
command, say the name of a phone book saved in
the phone book to automatically connect the call.
Dial Number Displays the Dial number screen. After saying this
command, you can say the number that you want
to call.
Redial Connects the most recently called number.
Radio • When listening to the radio, displays the next
radio screen. (FM1
➟
FM2
➟
FMA
➟
AM
➟
AMA)
• When listening to a different mode, displays the
most recently played radio screen.
Command Function
FM • When currently listening to the FM radio, main-
tains the current state.
• When listening to a different mode, displays the
most recently played FM screen.
FM1(FM One) Displays the FM1 screen.
FM2(FM Two) Displays the FM2 screen.
FMA Displays the FMA screen.
AM Displays the AM screen.
AMA Displays the AMA screen.
FM Preset 1~6 P
lays the most recently played broadcast saved in
FM Preset 1~6.
AM Preset 1~6 P
lays the broadcast saved in AM Preset 1~6.
FM 87.5~107.9 P
lays the FM broadcast of the corresponding fre-
quency.
❈Range can be different by application frequency
of corresponding country.
AM 530~1710 P
lays the AM broadcast of the corresponding fre-
quency.
❈Range can be different by application frequency
of corresponding country.
TA O n Enables Traffic Announcement.
TA Off Disables Traffic Announcement.
Audio system
66
Command Function
News On Enables RDS News feature.
News Off Disables RDS News feature.
M
edia
Moves to the most recently played media screen.
P
lay Track 1~30
If a music CD has been inserted, plays the corre-
sponding track.
CD
Plays the music saved in the CD.
Search CD
Moves to the CD track or file selection screen.
• For audio CDs, move to the screen and say the
track number to play the corresponding track.
• Moves to MP3 CD file selection screen. After
manually operate the device to select and play
music.
USB
Plays USB music.
Search USB
Moves to USB file selection screen. After manu-
ally operate the device to select and play music.
iPod®Plays iPod®music.
Search iPod®
Moves to the
iPod®
file selection screen. After,
manually operate the device to select and play
music.
My Music Plays the music saved in My Music.
Search
My Music
Moves to the My Music file selection screen. After,
manually operate the device to select and play
music.
Command Function
AUX (Auxiliary) Plays the connected external device.
Bluetooth
®
Audio Plays the music saved in connected
Bluetooth®
Wireless Technology
device.
Mute Mutes the radio or music volume.
Pardon? Repeats the most recent comment.
Cancel (Exit) Ends voice command.
Audio system
67
FM/AM Radio Commands
Commands available during FM/AM Radio operation.
Audio CD Commands
Commands available during Audio CD operation.
Command Function
Preset 1~6
P
lays the broadcast saved in Preset 1~6.
Auto Store
Automatically selects radio broadcast frequen-
cies with superior reception and saves in Presets
1~6.
Preset Save 1~6
Saves the current broadcast frequency to Preset
1~6.
Seek up
P
lays the next (higher) receivable broadcast.
Seek down
P
lays the previous (lower) receivable broadcast.
Next Preset
Selects the preset number next to the most
recently selected preset. (Example: When cur-
rently listening to preset no. 3, then preset no. 4
will be selected.)
Previous Preset
Selects the preset number previous to the most
recently selected preset. (Example: When cur-
rently listening to preset no. 3, then preset no. 2
will be selected.)
Scan
S
cans receivable frequencies from the current
broadcast and plays for 10 seconds each.
Preset Scan
Moves to the next preset from the current present
and plays for 10 seconds each.
AF on Enables Alternative Frequency feature.
AF off Disables Alternative Frequency feature.
Region
Enables Region feature.
Region off
Disables Region feature.
Command Function
Random
Randomly plays the tracks within the CD.
Random Off C
ancels random play to play tracks in sequential
order.
Repeat
Repeats the current track.
Repeat Off
Cancels repeat play to play tracks in sequential
order.
Next Track Plays the next track.
Previous Track Plays the
previous
track.
Scan
Scans the tracks from the next track for 10 sec-
onds each.
Track 1~30 Plays the
desired track number.
Information Displays the information screen of the current
track.
Audio system
68
MP3 CD/USB Commands
Commands available during MP3 CD/USB operation.
iPod®Commands
Commands available during iPod®operation.
Command Function
Random Randomly plays the files within the current folder.
All Random Randomly plays all saved files.
Random Off Cancels random play to play files in sequential
order.
Repeat Repeats the current file.
Folder Repeat Repeats all files in the current folder.
Repeat Off Cancels repeat play to play files in sequential
order.
Next File Plays the next file.
Previous File Plays the
previous
file.
Scan Scans the tracks from the next files for 10 seconds
each.
Information Displays the information screen of the current file.
Copy Copies the current file into My Music.
Command Function
All Random Randomly plays all saved songs.
Random Randomly plays the songs within the current cate-
gory.
Random Off Cancels random play to play songs in sequential
order.
Repeat Repeats the current song.
Repeat Off Cancels repeat play to play songs in sequential
order.
Next
Song
Plays the next song.
Previous
Song
Plays the previous song.
Information
Displays the information screen of the current
song.
Audio system
69
My Music Commands
Commands available during My Music operation.
Bluetooth®Wireless Technology Audio Commands
Commands available during
Bluetooth®
Wireless
Technology audio streaming from mobile phone opera-
tion Command Operation.
Command Function
Random Randomly plays all saved files.
Random Off Cancels random play to play files in sequential
order.
Repeat Repeats the current file.
Repeat Off Cancels repeat play to play files in sequential
order.
Next
File
Plays the next file.
Previous
File
Plays the previous file.
Scan Scans the files from the next files for 10 seconds
each.
Information
Displays the information screen of the current file.
Delete
Deletes the current file. You will bypass an addi-
tional confirmation process.
Delete All
Deletes all files saved in My Music. You will bypass
an additional confirmation process.
Command Function
Play Plays the currently paused song.
Pause Pauses the current song.

Audio system
70
Setup Mode
(Type B-1 with harman/kardon)
Press the [SETUP] button to display
the Setup screen.
You can select and control options
related to [Display], [Sound], [Clock/
Day], [Phone] and [System].
With the Display Button
Press the [SETUP] button Select
[Display].
You can select and control options
related to [Brightness], [Pop-up
Mode], [Scroll text] and [Song Info].
Adjusting the Brightness
Use the [Left/Right] buttons to adjust
the screen brightness or set the
Brightness on Automatic, Day or
Night mode.
Press the [Default] button to reset.
• Automatic : Adjusts the brightness
automatically.
• Day : Always maintains the bright-
ness on high.
• Night : Always maintains the bright-
ness on low.
D4H3G077EE D4H3G078EE
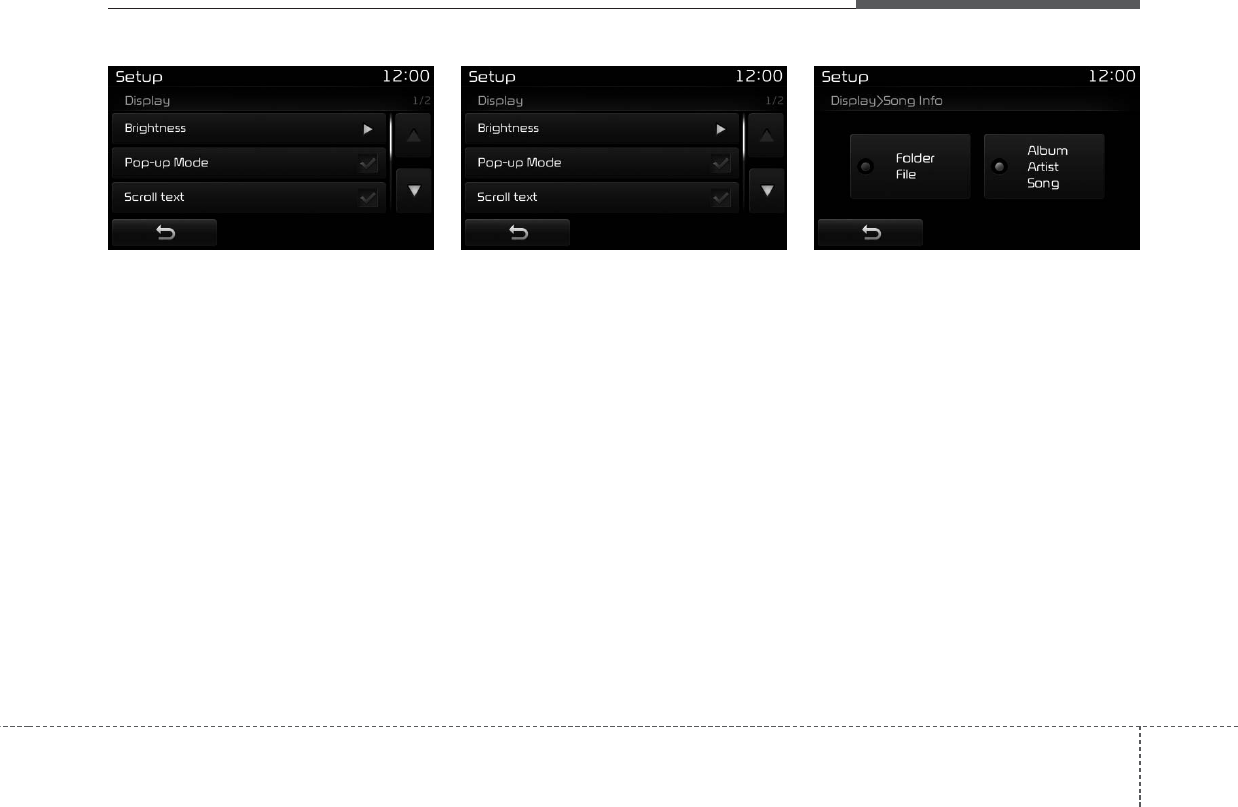
Audio system
71
Pop-up Mode
This feature is used to display the
Pop-up Mode screen when entering
radio and media modes.
When this feature is turned on,
pressing the [RADIO] or [MEDIA]
button will display the Pop-up Mode
screen.
✽NOTICE
The media Pop-up Mode screen can
be displayed only when two or more
media modes have been connected.
Scroll Text
This feature is used to scroll text dis-
played on the screen when it is too
long to be displayed at once.
When turned on, the text is repeat-
edly scrolled. When turned off, the
text is scrolled just once.
Song Info
This feature is used to change the
information displayed within USB
and MP3 CD modes.
• Folder File : Displays file name and
folder name.
• Album Artist Song : Displays album
name/artist name/song.
D4H3G079EE D4H3G080EE D4H3G081EE
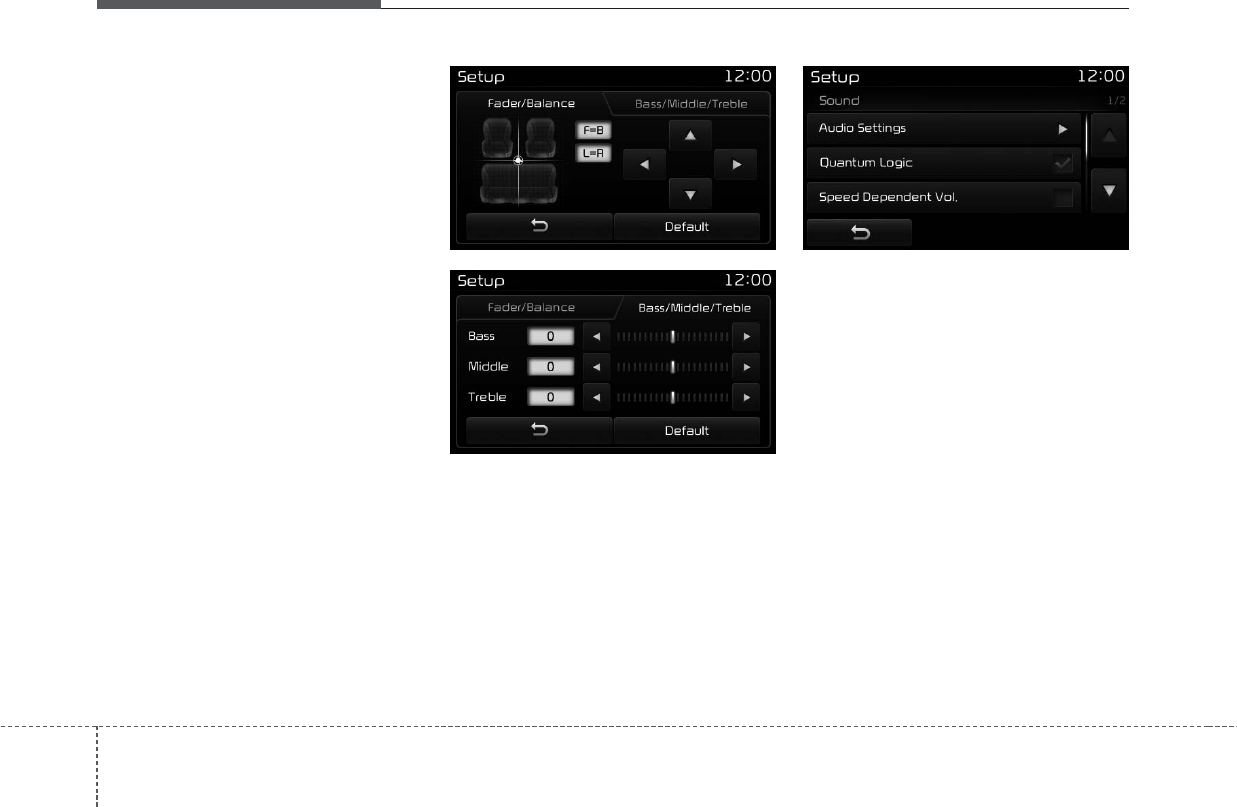
Audio system
72
With the Sound Button
Press the [SETUP] button Select
[Sound].
You can select and control options
related to [Audio Settings], [Quantum
Logic], [Speed Dependent Vol.],
[Volume Dialogue] and [Touch
Screen Beep].
Audio Settings
Use the [Up/Down/Left/Right] but-
tons to adjust the Fader/Balance set-
tings.
Use the [Left/Right] buttons to adjust
the Bass/Middle/Treble settings.
Press the [Default] button to reset.
QLS(Quantum Logic Surround)
QLS can be set by selecting from
On/Off.
D4H3G082EE
D4H3G083EE
D4H3G084EE
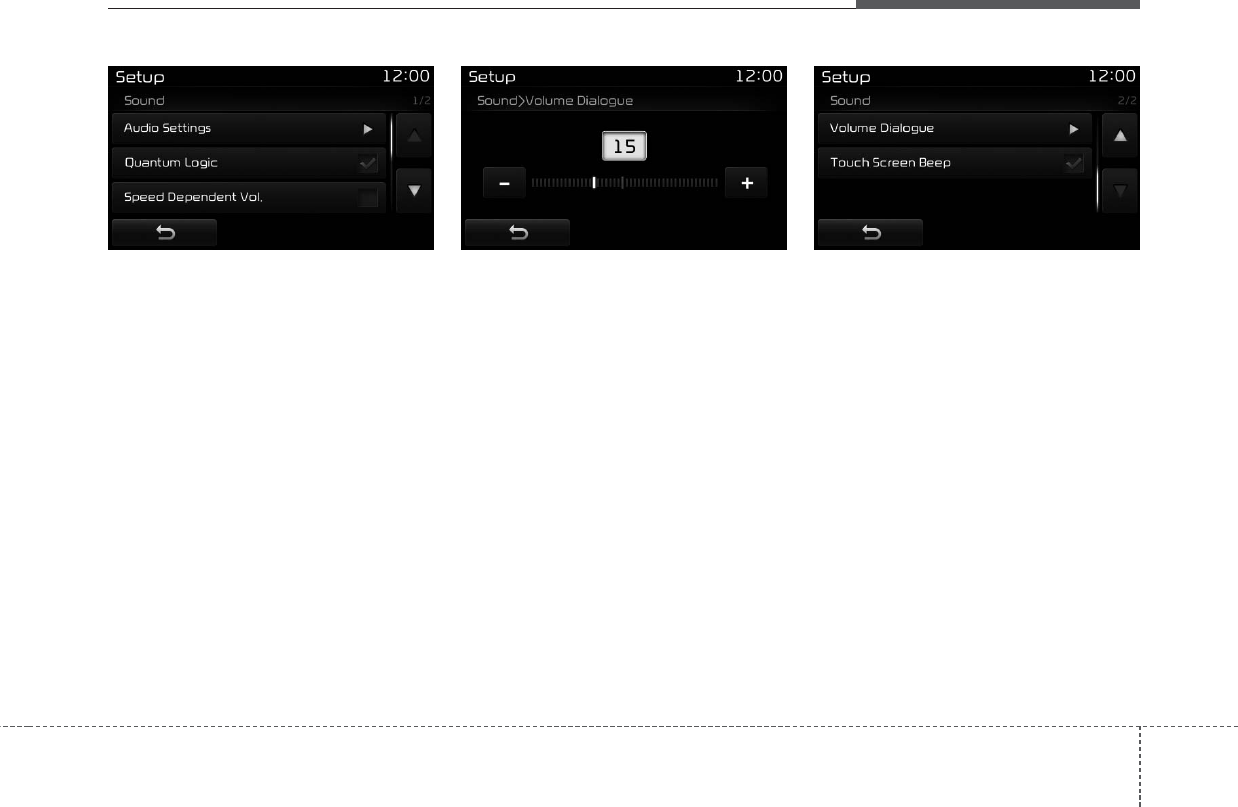
Audio system
73
SDVC (Speed Dependent Volume
Control)
The volume level is controlled auto-
matically according to the vehicle
speed. SDVC can be set by selecting
from On/Off.
Volume Dialogue (if equipped)
Use the [-], [+] buttons to adjust the
Volume Dialog.
Touch Screen Beep
This feature is used to turn the touch
screen beep on/off.
D4H3G085EE D4H3G086EE D4H3G087EE
최소값 1로 변경됨에 따라
도면 변경 필요합니다.
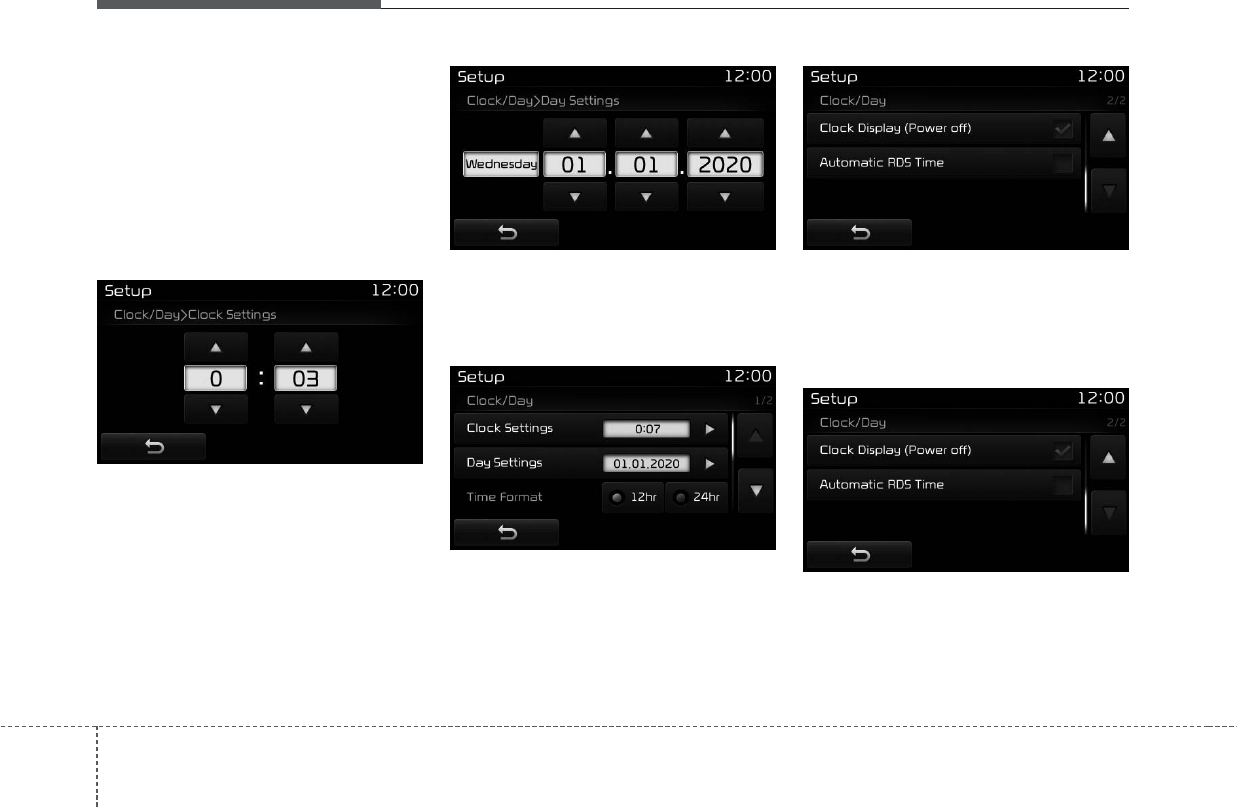
Audio system
74
With the Clock/Day Button
Press the [SETUP] button Select
[Clock/Day].
You can select and control options
related to [Clock Settings], [Day
Settings], [Time Format], [Clock
Display(Power off)] and [Automatic
RDS Time].
Clock Settings
Use the [Up/Down] buttons to set the
Hour, Minutes and AM/PM setting.
Press and hold the [CLOCK] button
(over 0.8 seconds) to display the
Clock/Day screen.
Day Settings
Use the [Up/Down] buttons to set the
Day, Month and Year setting.
Time Format
This feature is used to change the
clock format between 12hr or 24hr.
Clock Display (Power Off)
This feature is used to display a clock
on the screen when the audio sys-
tem is turned off.
Automatic RDS Time
This feature is used to set time auto-
matically by synchronizing with RDS.
D4H3G088EE D4H3G089EE
D4H3G090EE
D4H3G091EE
D4H3G092EE

Audio system
75
With the Phone Button
Press the [SETUP] button Select
[Phone].
You can select and control options
related to [Pair Phone], [Paired
Phone List], [Phone book
Download], [Auto Download],
[Outgoing Volume] and [Bluetooth
System Off]. Pairing a New Device
Bluetooth®
Wireless Technology
devices can be paired with the audio
system.
For more information, refer to the
“Pairing through Phone Setup” sec-
tion within
Bluetooth®
Wireless
Technology.
Viewing Paired Phone List
Press the [SETUP] button Select
[Phone] Select [Paired Phone List]
This feature is used to view mobile
phones that have been paired with
the audio system. Upon selecting a
paired phone, the setup menu is dis-
played.
For more information, refer to the
“Setting
Bluetooth®
Wireless
Technology Connection” section within
Bluetooth®
Wireless Technology.
(1) Moves to the previous screen.
(2) Connect/Disconnects currently
selected phone.
(3) Deeletes the currently selected
phone.
(4) Sets currently selected phone to
highest connection priority.
D4H3G093EE D4H3G094EE

Audio system
76
✽NOTICE - Before
Downloading
Phone Book
• Only phone book within connect-
ed phones can be downloaded.
Also check to see that your mobile
phone supports the download fea-
ture.
• To learn more about whether your
mobile phone supports phone
book downloads, refer to your
mobile phone user’s manual.
• The Phone book for only the con-
nected phone can be downloaded.
Before downloading, check to see
whether your phone supports the
download feature.
Downloading Phone book
As the Phone book is downloaded
from the mobile phone, downloading
Phone book number is displayed.
• Up to 1,000 phone book entries
can be copied into car phone book.
• Up to 1,000 phone book entries
can be saved for each paired
device.
• Upon downloading phone book
data, previously saved phone book
data will be deleted. However,
Phone book entries saved to other
paired phones are not deleted.
Auto Download (Phone Book)
This feature is used to automatically
download mobile phone book entries
once a
Bluetooth®
Wireless Technology
phone is connected.
• The Auto Download feature will
download mobile phone book
entries every time the phone is
connected. The download time
may differ depending on the num-
ber of saved phone book entries
and the communication state.
• When downloading a phone book,
first check to see that your mobile
phone supports the phone book
download feature.
D4H3G095EE D4H3G096EE
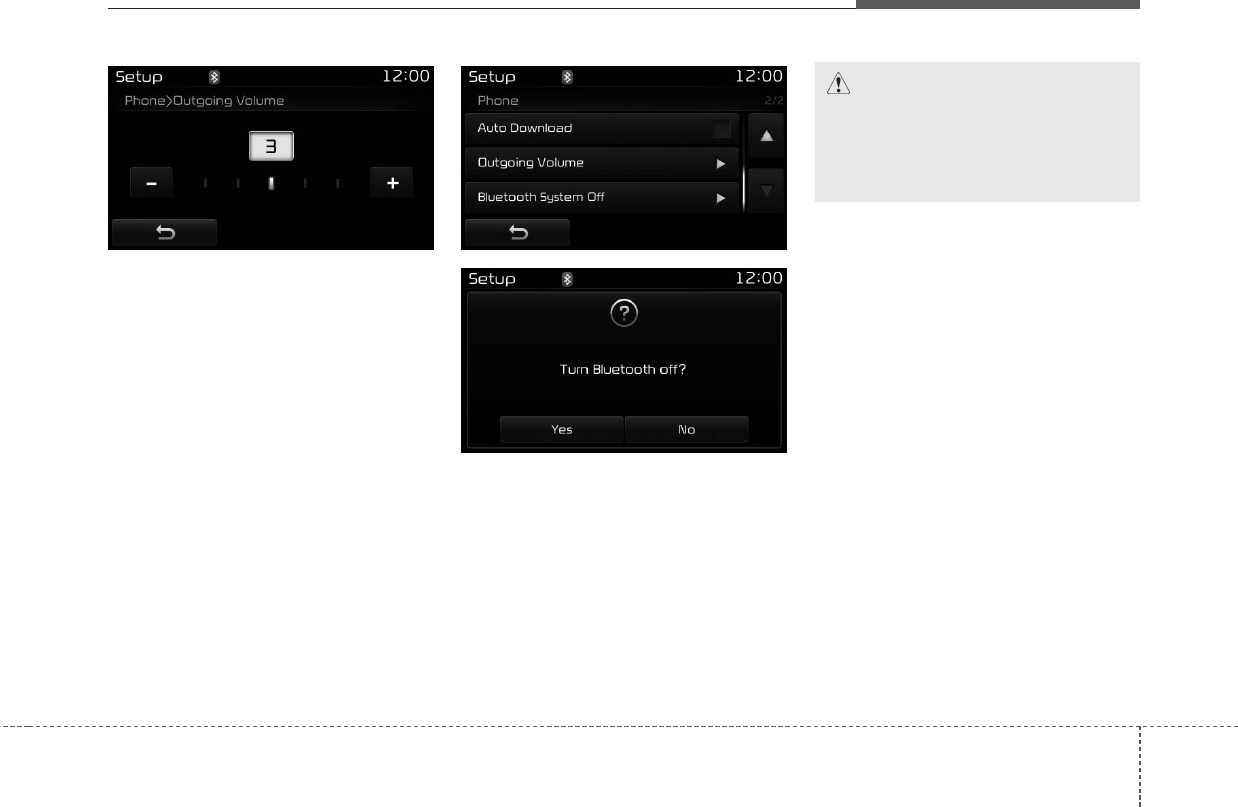
Audio system
77
Outgoing Volume
Use the [-], [+] buttons to adjust the
outgoing volume level.
Turning Bluetooth System Off
Once
Bluetooth®
Wireless Technology
is turned off,
Bluetooth®
Wireless
Technology related features will not be
supported within the audio system.
To turn
Bluetooth®
Wireless Technology
back on, go to [SETUP] [Phone]
and press “Yes”.
CAUTION
Bluetooth®Wireless Technology
audio streaming may not be sup-
ported in some Bluetooth®
Wireless Technology phones.
D4H3G097EE D4H3G098EE
D4H3G099EE
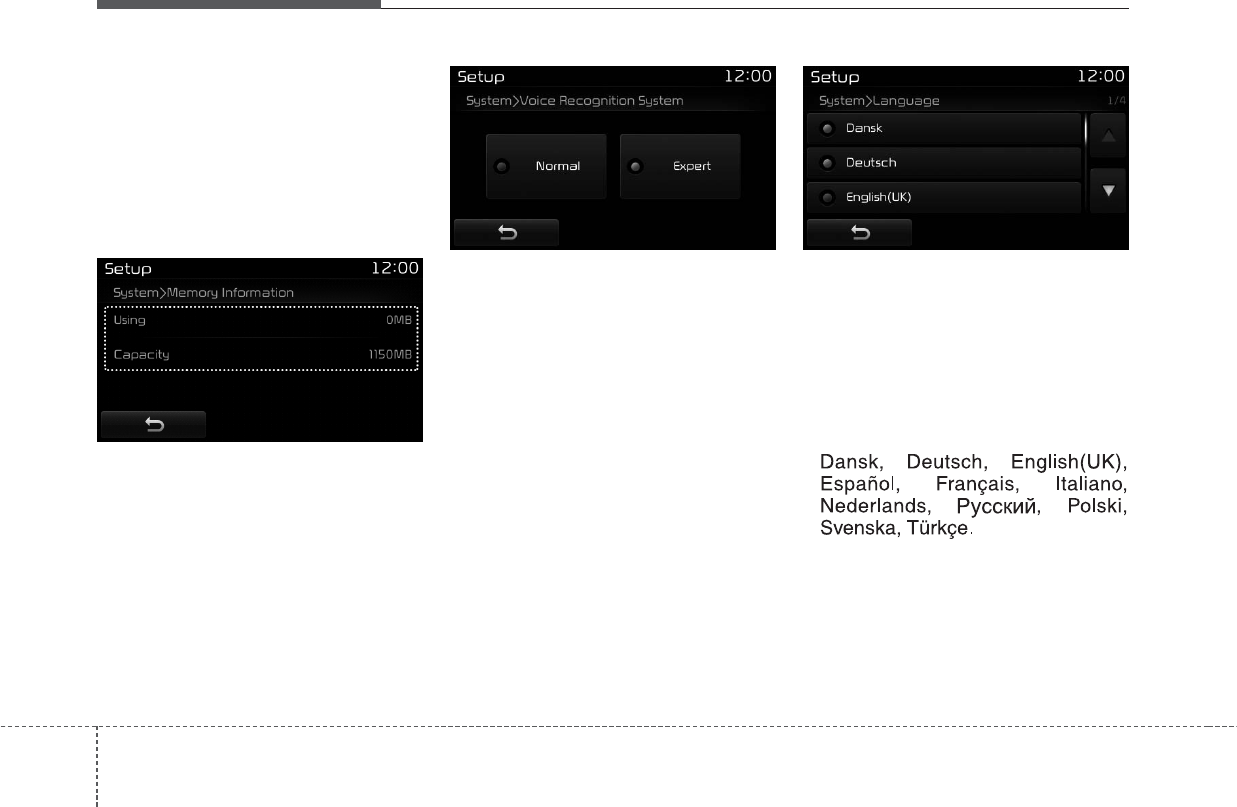
Audio system
78
With the System Button
Press the [SETUP] button Select
[System].
You can select and control options
related to [Memory Information],
[Voice Recognition System] and
[Language].
Memory Information
This feature displays information
related to system memory.
• Using : Displays capacity currently
in use
• Capacity : Displays total capacity
❈May differ depending on the
selected audio.
Voice Recognition Mode Setting
(if equipped)
This feature is used to select the
desired prompt feedback option from
Normal and Expert.
• Normal : When using voice recog-
nition, provides detailed guidance
prompts
• Expert : When using voice recogni-
tion, omits some guidance prompts
Language
This feature is used to change the
system and voice recognition lan-
guage.
If the language is changed, the sys-
tem will restart and apply the select-
ed language.
• Language support by region
D4H3100EE D4H3G101EE D4H3G102EE

Audio system
Setup Mode
(Type B-1 without harman/kar-
don)
Press the [SETUP] button to display
the Setup screen.
You can select and control options
related to [Display], [Sound], [Clock/
Day], [Phone] and [System].
With the Display Button
Press the [SETUP] button Select
[Display].
You can select and control options
related to [Brightness], [Pop-up
Mode], [Scroll text] and [Song Info].
Adjusting the Brightness
Use the [Left/Right] buttons to adjust
the screen brightness or set the
Brightness on Automatic, Day or
Night mode.
Press the [Default] button to reset.
• Automatic : Adjusts the brightness
automatically.
• Day : Always maintains the bright-
ness on high.
• Night : Always maintains the bright-
ness on low.
79
D4H3G103EE D4H3G104EE
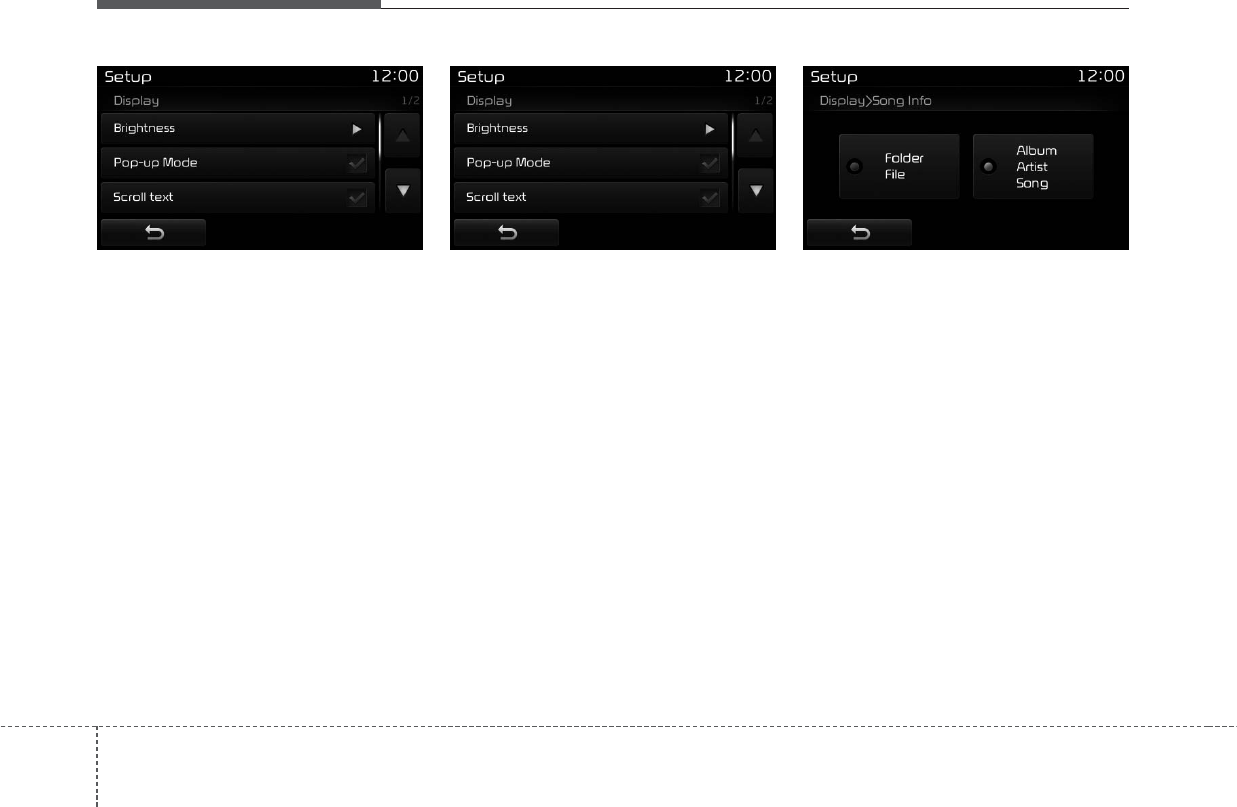
Audio system
Pop-up Mode
This feature is used to display the
Pop-up Mode screen when entering
radio and media modes.
When this feature is turned on,
pressing the [RADIO] or [MEDIA]
button will display the Pop-up Mode
screen.
✽NOTICE
The media Pop-up Mode screen can
be displayed only when two or more
media modes have been connected.
Scroll Text
This feature is used to scroll text dis-
played on the screen when it is too
long to be displayed at once.
When turned on, the text is repeat-
edly scrolled. When turned off, the
text is scrolled just once.
Song Info
This feature is used to change the
information displayed within USB
and MP3 CD modes.
• Folder File : Displays file name and
folder name.
• Album Artist Song : Displays album
name/artist name/song.
80
D4H3G105EE D4H3G106EE D4H3G107EE

Audio system
With the Sound Button
Press the [SETUP] button Select
[Sound].
You can select and control options
related to [Audio Settings], [Speed
Dependent Vol.], [Voice Recognition
Vol.] and [Touch Screen Beep].
Audio Settings
Use the [Up/Down/Left/Right] but-
tons to adjust the Fader/Balance set-
tings.
Use the [Left/Right] buttons to adjust
the Bass/Middle/Treble settings.
Press the [Default] button to reset.
SDVC (Speed Dependent Volume
Control)
The volume level is controlled auto-
matically according to the vehicle
speed. SDVC can be set by selecting
from On/Off.
81
D4H3G108EE
D4H3G109EE
D4H3G110EE
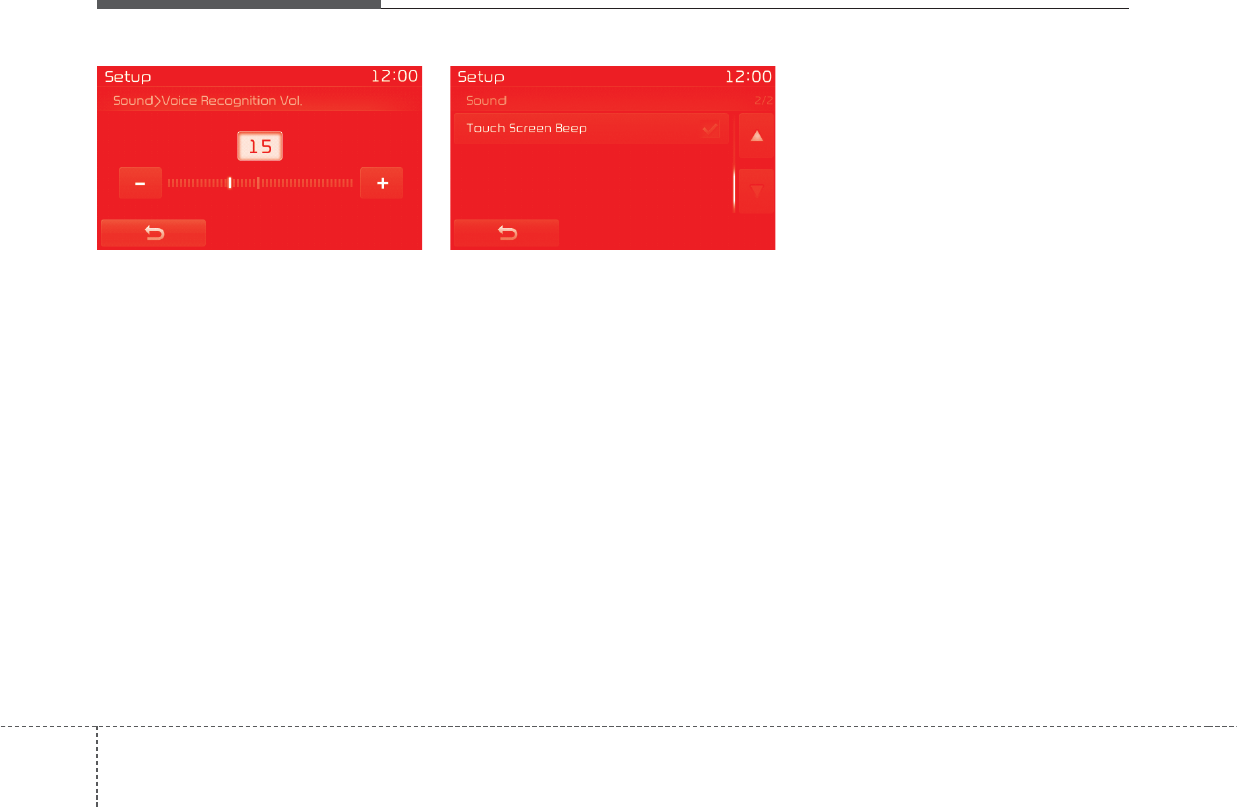
Audio system
Voice Recognition Volume
Use on screen [-], [+] buttons to
adjust the Voice Recognition volume.
Touch Screen Beep
This feature is used to turn the touch
screen beep on/off.
82
D4H3G111EE D4H3G112EE
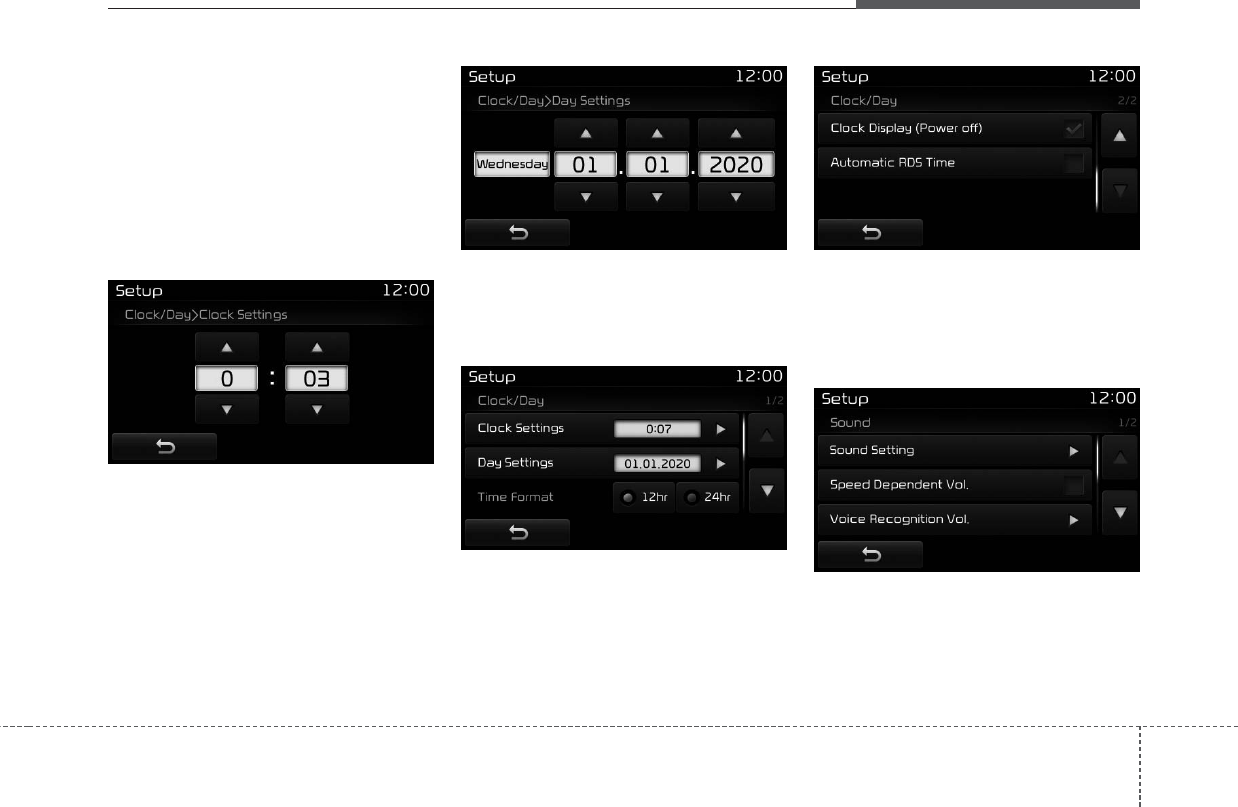
Audio system
With the Clock/Day Button
Press the [SETUP] button Select
[Clock/Day].
You can select and control options
related to [Clock Settings], [Day
Settings], [Time Format], [Clock
Display(Power off)] and [Automatic
RDS Time].
Clock Settings
Use the [Up/Down] buttons to set the
Hour, Minutes and AM/PM setting.
Press and hold the [CLOCK] button
(over 0.8 seconds) to display the
Clock/Day screen.
Day Settings
Use the [Up/Down] buttons to set the
Day, Month and Year setting.
Time Format
This feature is used to change the
clock format between 12hr or 24hr.
Clock Display (Power Off)
This feature is used to display a clock
on the screen when the audio sys-
tem is turned off.
Automatic RDS Time
This feature is used to set time auto-
matically by synchronizing with RDS.
83
D4H3G113EE D4H3G114EE
D4H3G115EE
D4H3G116EE
D4H3G117EE

Audio system
With the Phone Button
Press the [SETUP] button Select
[Phone].
You can select and control options
related to [Pair Phone], [Paired
Phone List], [Phone book
Download], [Auto Download],
[Outgoing Volume] and [Bluetooth
System Off]. Pairing a New Device
Bluetooth®
Wireless Technology
devices can be paired with the audio
system.
For more information, refer to the
“Pairing through Phone Setup” sec-
tion within
Bluetooth®
Wireless
Technology.
Viewing Paired Phone List
Press the [SETUP] button Select
[Phone] Select [Paired Phone List]
This feature is used to view mobile
phones that have been paired with
the audio system. Upon selecting a
paired phone, the setup menu is dis-
played.
For more information, refer to the
“Setting
Bluetooth®
Wireless
Technology Connection” section within
Bluetooth®
Wireless Technology.
(1) Moves to the previous screen.
(2) Connect/Disconnects currently
selected phone.
(3) Deeletes the currently selected
phone.
(4) Sets currently selected phone to
highest connection priority.
84
D4H3G118EE D4H3G119EE

Audio system
✽NOTICE - Before
Downloading
Phone Book
• Only phone book within connect-
ed phones can be downloaded.
Also check to see that your mobile
phone supports the download fea-
ture.
• To learn more about whether your
mobile phone supports phone
book downloads, refer to your
mobile phone user’s manual.
• The Phone book for only the con-
nected phone can be downloaded.
Before downloading, check to see
whether your phone supports the
download feature.
Downloading Phone book
As the Phone book is downloaded
from the mobile phone, downloading
Phone book number is displayed.
• Up to 1,000 phone book entries
can be copied into car phone book.
• Up to 1,000 phone book entries
can be saved for each paired
device.
• Upon downloading phone book
data, previously saved phone book
data will be deleted. However,
Phone book entries saved to other
paired phones are not deleted.
Auto Download (Phone Book)
This feature is used to automatically
download mobile phone book entries
once a
Bluetooth®
Wireless Technology
phone is connected.
• The Auto Download feature will
download mobile phone book
entries every time the phone is
connected. The download time
may differ depending on the num-
ber of saved phone book entries
and the communication state.
• When downloading a phone book,
first check to see that your mobile
phone supports the phone book
download feature.
85
D4H3G120EE D4H3G121EE
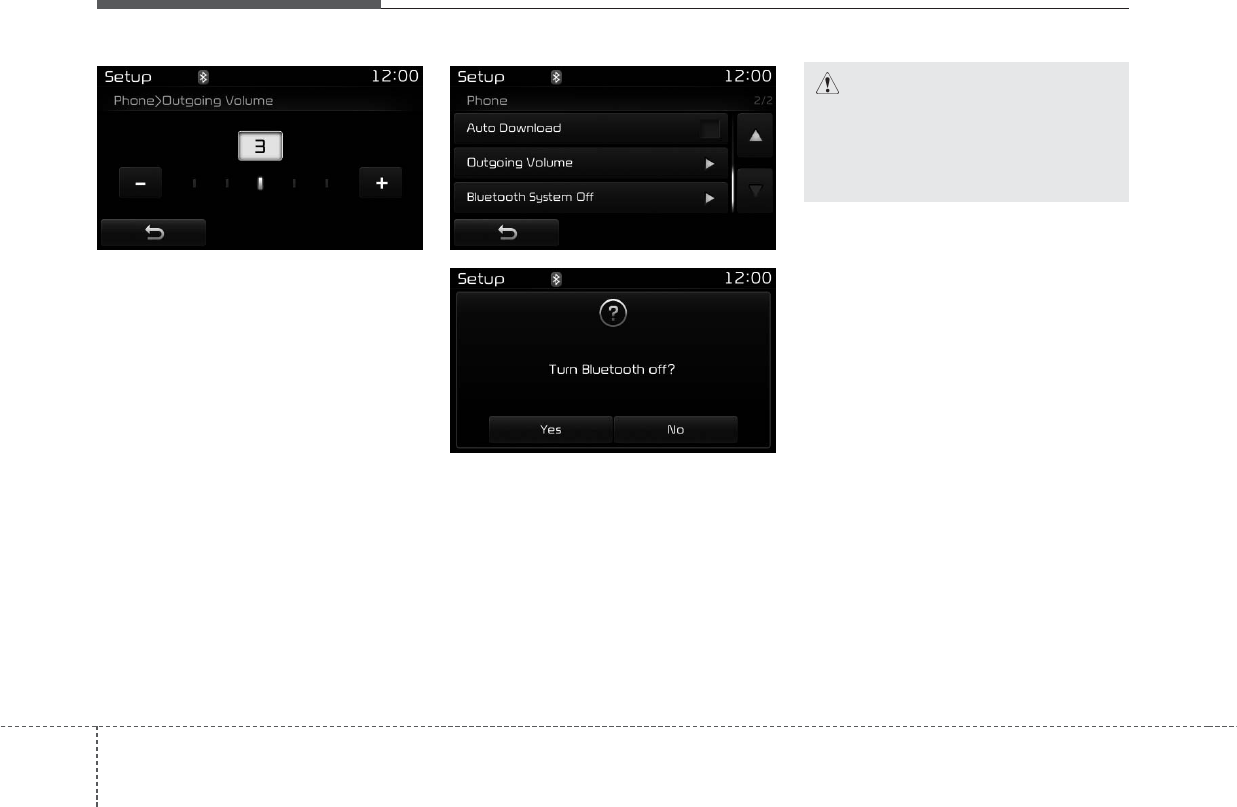
Audio system
Outgoing Volume
Use the [-], [+] buttons to adjust the
outgoing volume level.
Turning Bluetooth System Off
Once
Bluetooth®
Wireless Technology
is turned off,
Bluetooth®
Wireless
Technology related features will not be
supported within the audio system.
To turn
Bluetooth®
Wireless Technology
back on, go to [SETUP] [Phone]
and press “Yes”.
86
CAUTION
Bluetooth®Wireless Technology
audio streaming may not be sup-
ported in some Bluetooth®
Wireless Technology phones.
D4H3G122EE D4H3G123EE
D4H3G124EE
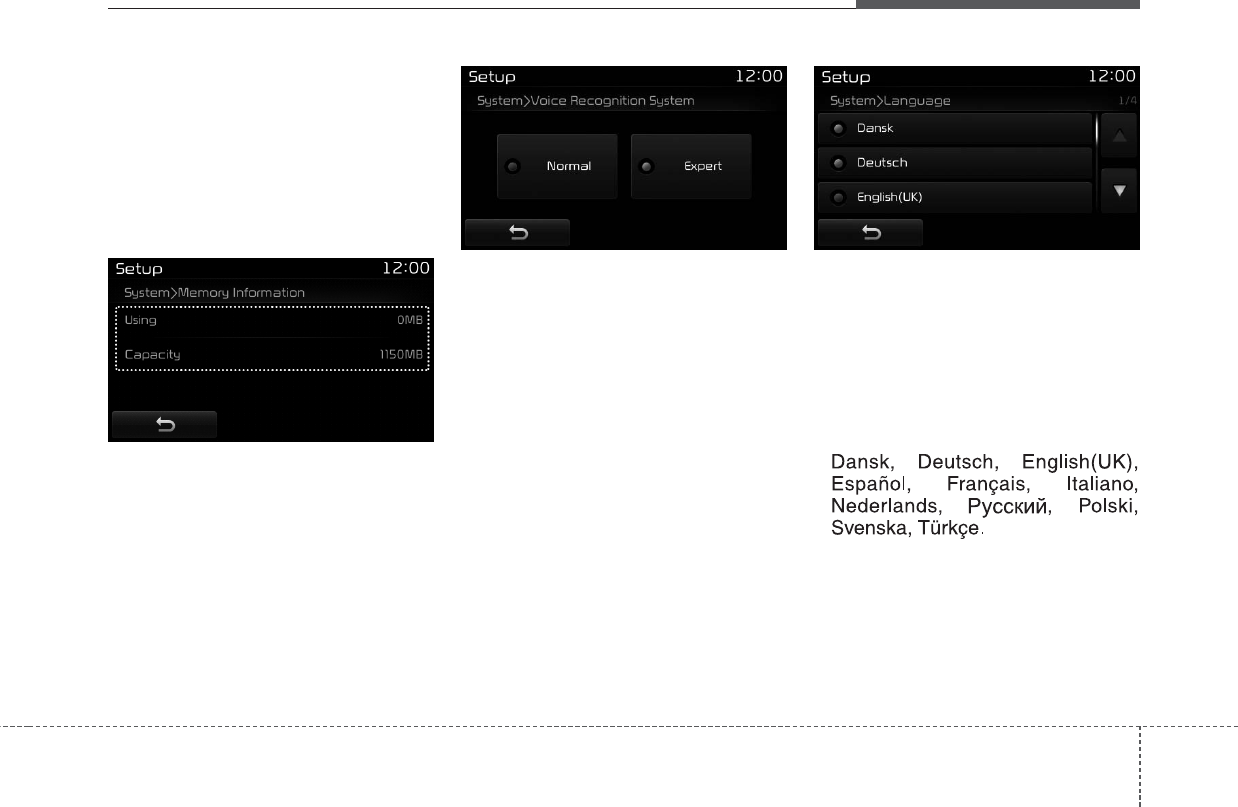
Audio system
With the System Button
Press the [SETUP] button Select
[System].
You can select and control options
related to [Memory Information],
[Voice Recognition System] and
[Language].
Memory Information
This feature displays information
related to system memory.
• Using : Displays capacity currently
in use
• Capacity : Displays total capacity
❈May differ depending on the
selected audio.
Voice Recognition Mode Setting
(if equipped)
This feature is used to select the
desired prompt feedback option from
Normal and Expert.
• Normal : When using voice recog-
nition, provides detailed guidance
prompts
• Expert : When using voice recogni-
tion, omits some guidance prompts
Language
This feature is used to change the
system and voice recognition lan-
guage.
If the language is changed, the sys-
tem will restart and apply the select-
ed language.
• Language support by region
87
D4H3G125EE D4H3G126EE D4H3G127EE
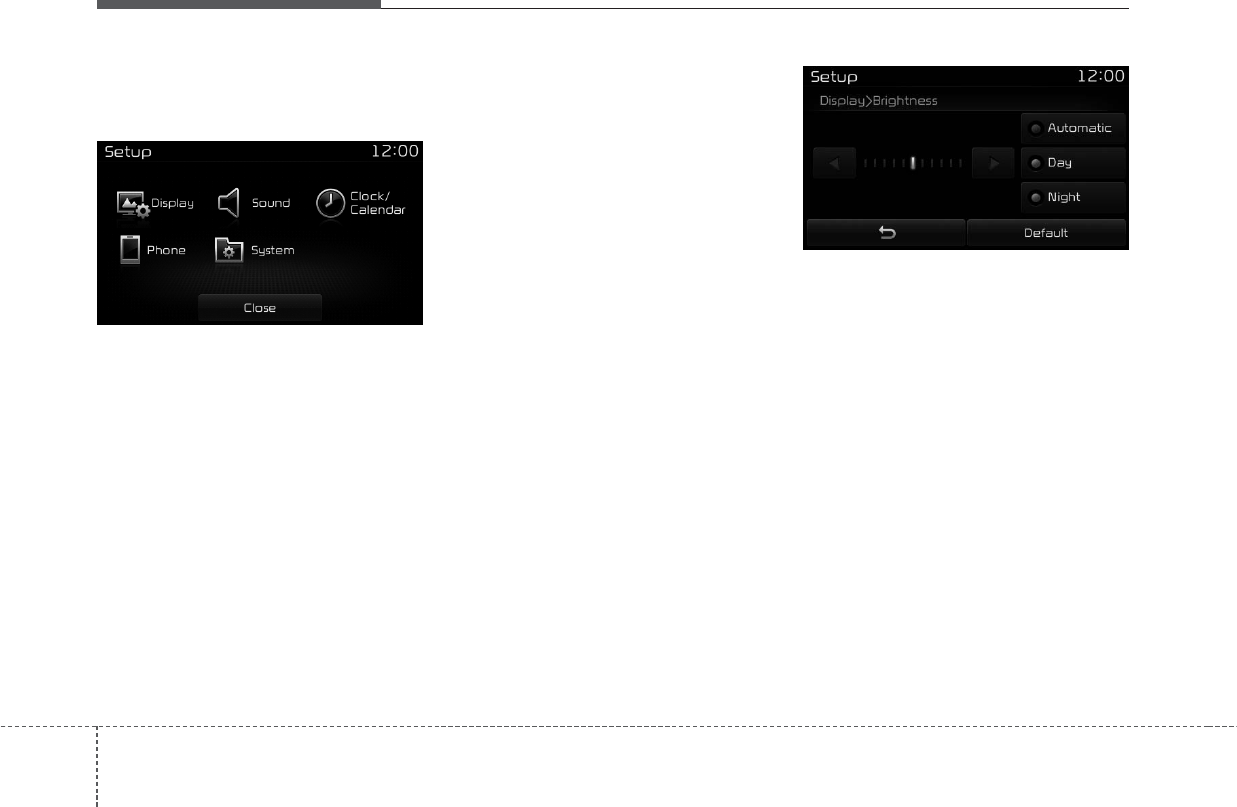
Audio system
88
Setup Mode
(Type B-2 with harman/kardon)
Press the [SETUP] button to display
the Setup screen.
You can select and control options
related to [Display], [Sound],
[Clock/Calendar], [Phone] and
[System].
With the Display Button
Press the [SETUP] button Select
[Display].
You can select and control options
related to [Brightness], [Pop-up
Mode], [Scroll text] and [Media
Display].
Adjusting the Brightness
Use the [Left/Right] buttons to adjust
the screen brightness or set the
Brightness on Automatic, Day or
Night mode.
Press the [Default] button to reset.
• Automatic : Adjusts the brightness
automatically.
• Day : Always maintains the bright-
ness on high.
• Night : Always maintains the bright-
ness on low.
D4H3G128EE D4H3G129EE
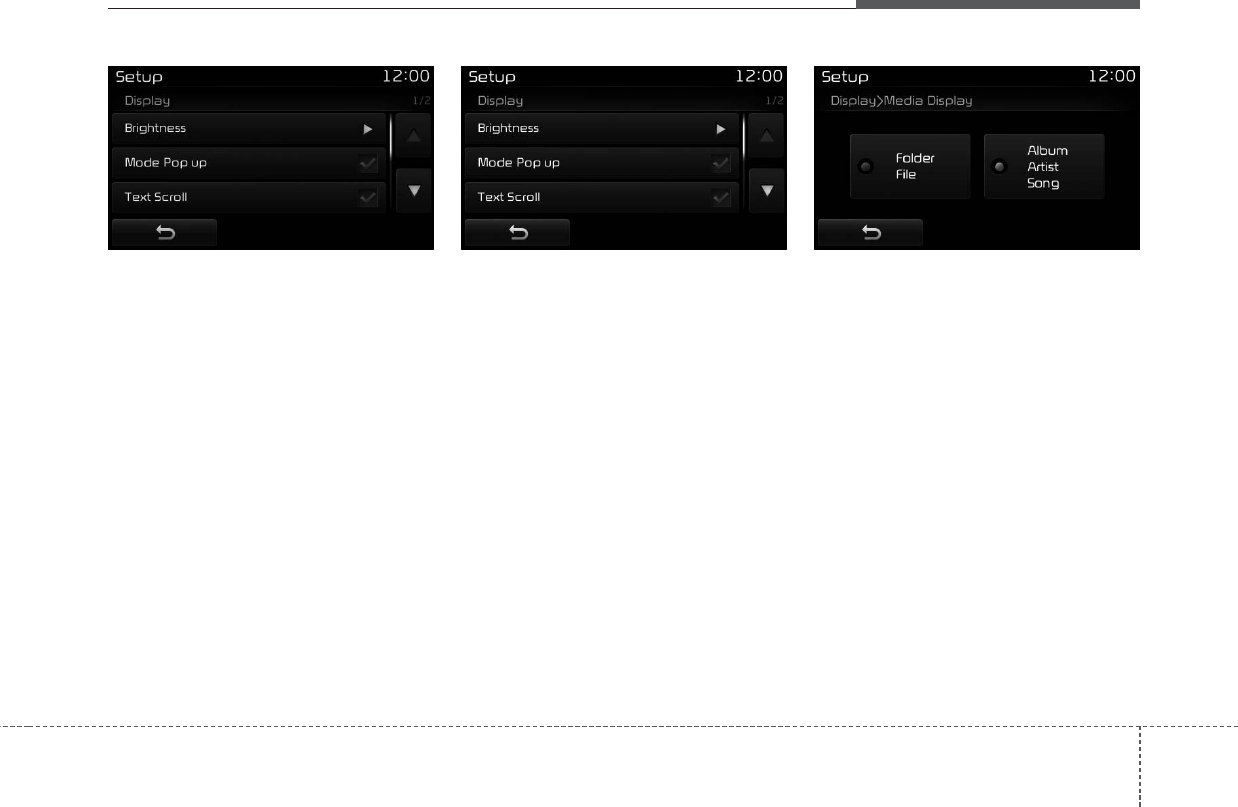
Audio system
89
Mode Pop up
This feature is used to display the
Mode Pop up screen when entering
radio and media modes.
When this feature is turned on,
pressing the [RADIO] or [MEDIA]
button will display the Mode Pop up
screen.
✽NOTICE
The media Mode Pop up screen can
be displayed only when two or more
media modes have been connected.
Text Scroll
This feature is used to scroll text dis-
played on the screen when it is too
long to be displayed at once.
When turned on, the text is repeat-
edly scrolled. When turned off, the
text is scrolled just once.
Media Display
This feature is used to change the
information displayed within USB
and MP3 CD modes.
• Folder File : Displays file name and
folder name.
• Album Artist Song : Displays album
name/artist name/song.
D4H3G130EE D4H3G131EE D4H3G132EE
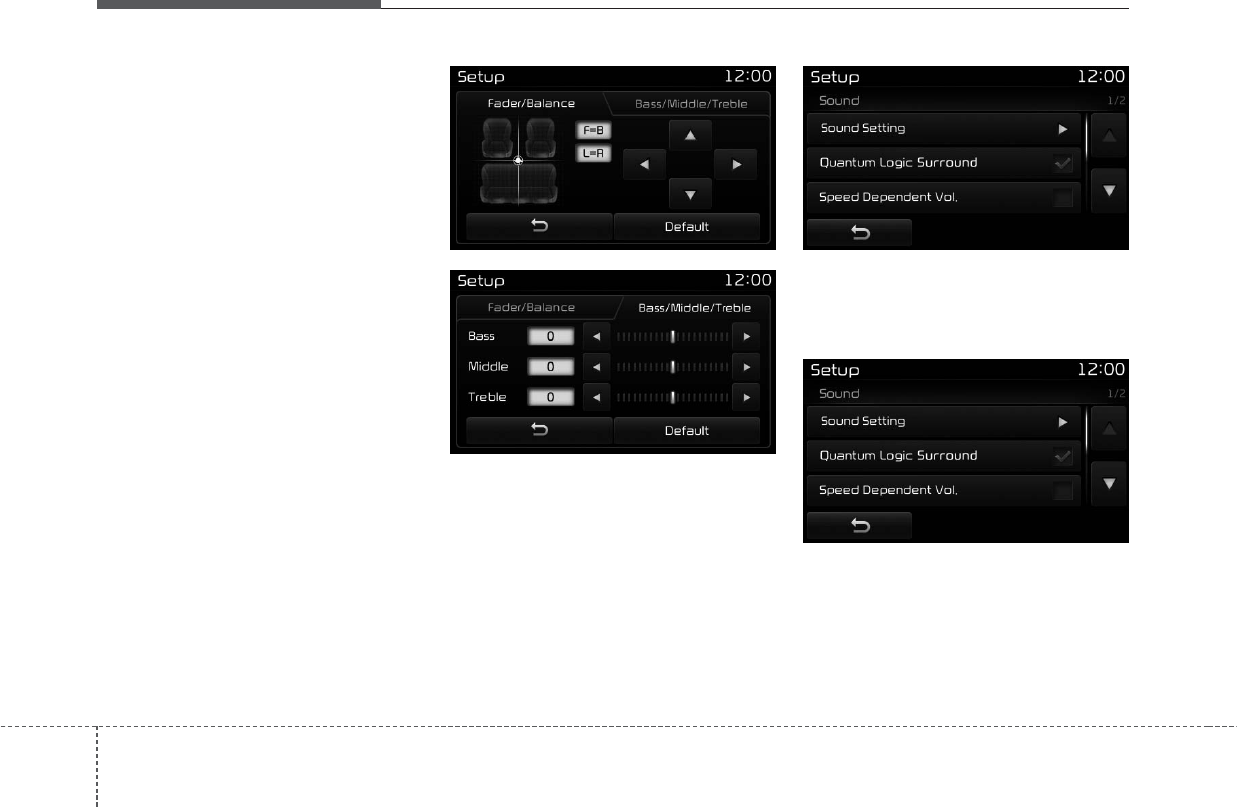
Audio system
90
With the Sound Button
Press the [SETUP] button Select
[Sound].
You can select and control options
related to [Sound Setting], [Quantum
Logic Surround], [Speed Dependent
Vol.] and [Touch Screen Beep].
Sound Setting
Use the [Up/Down/Left/Right] but-
tons to adjust the Fader/Balance set-
tings.
Use the [Left/Right] buttons to adjust
the Bass/Middle/Treble settings.
Press the [Default] button to reset.
QLS(Quantum Logic Surround)
QLS can be set by selecting from
On/Off.
SDVC (Speed Dependent Volume
Control)
The volume level is controlled auto-
matically according to the vehicle
speed. SDVC can be set by selecting
from On/Off.
D4H3G133EE
D4H3G134EE
D4H3G135EE
D4H3G136EE
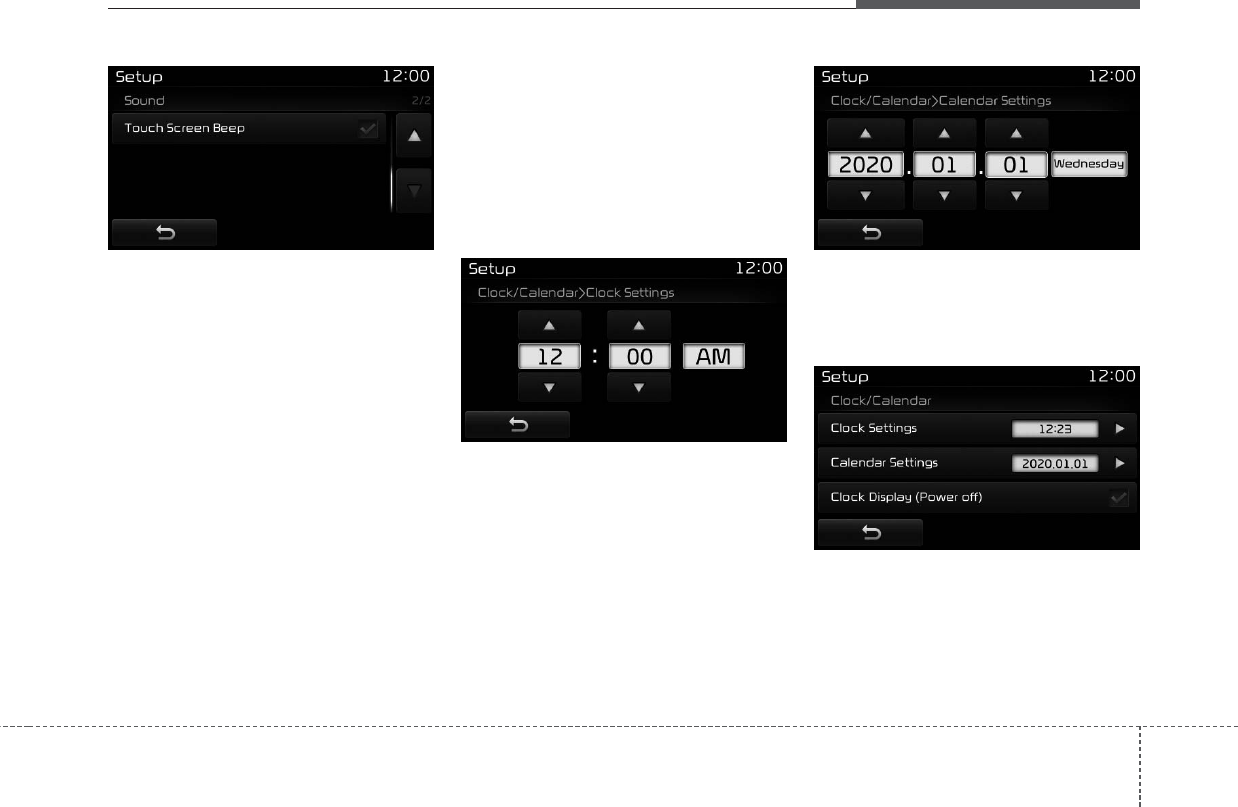
Audio system
91
Touch Screen Beep
This feature is used to turn the touch
screen beep on/off.
With the Clock/Calendar Button
Press the [SETUP] button Select
[Clock/Calendar].
You can select and control options
related to [Clock Settings], [Calendar
Settings], [Time Format] and [Clock
Display(Power off)].
Clock Settings
Use the [Up/Down] buttons to set the
Hour, Minutes and AM/PM setting.
Press and hold the [CLOCK] button
(over 0.8 seconds) to display the
Clock/Calendar screen.
Calendar Settings
Use the [Up/Down] buttons to set the
Year, Month and Day setting.
Clock Display
This feature is used to display a clock
on the screen when the audio sys-
tem is turned off.
D4H3G137EE D4H3G138EE D4H3G139EE
D4H3G140EE
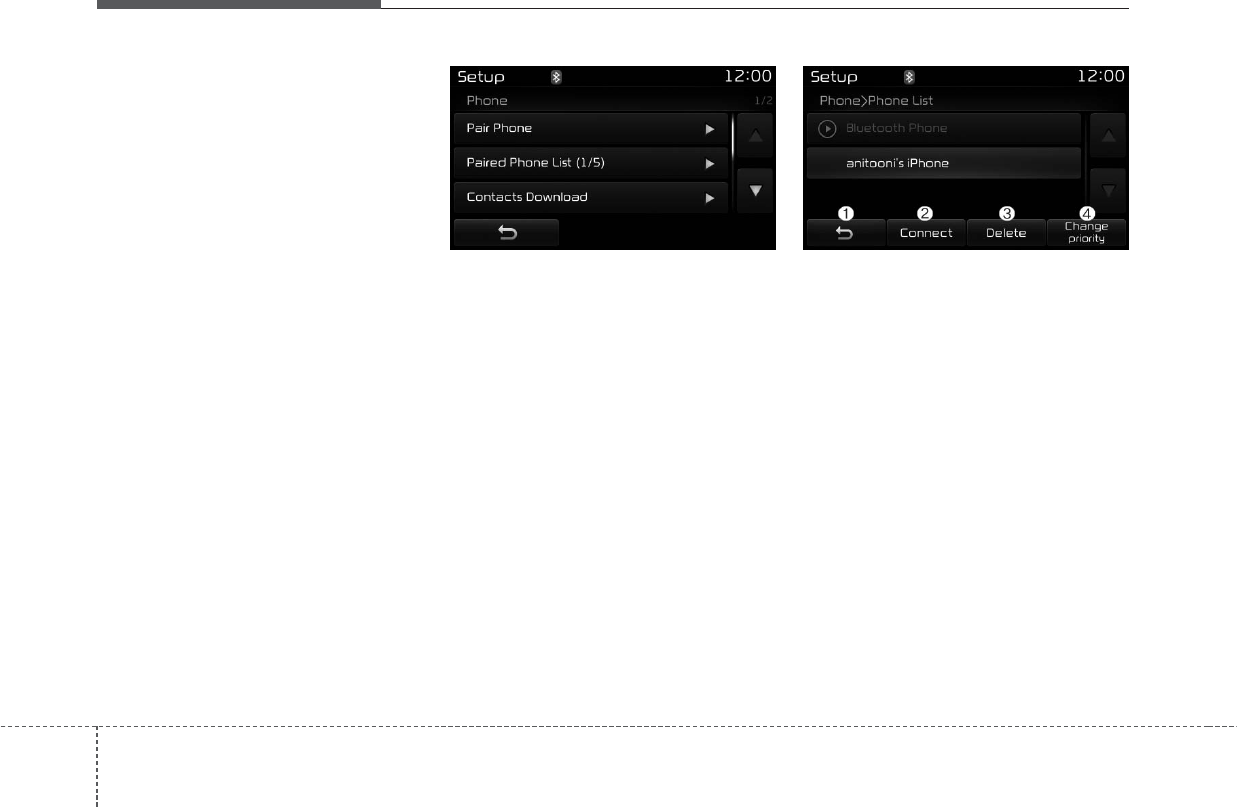
Audio system
92
With the Phone Button
Press the [SETUP] button Select
[Phone].
You can select and control options
related to [Pair Phone], [Paired
Phone List], [Contacts Download],
[Auto Download], [Outgoing Volume]
and [Bluetooth System Off].
Pairing a New Device
Bluetooth®
Wireless Technology
devices can be paired with the audio
system.
For more information, refer to the
“Pairing through Phone Setup” sec-
tion within
Bluetooth®
Wireless
Technology.
Viewing Paired Phone List
This feature is used to view mobile
phones that have been paired with
the audio system. Upon selecting a
paired phone, the setup menu is dis-
played.
For more information, refer to the
“Setting
Bluetooth®
Wireless Technology
Connection” section within
Bluetooth®
Wireless Technology.
(1) Moves to the previous screen.
(2) Connect/disconnects currently
selected phone.
(3) Deletes the currently selected
phone.
(4) Sets currently selected phone to
highest connection priority.
D4H3G141EE D4H3G142EE

Audio system
93
✽NOTICE - Before
Downloading
Contact
• To learn more about whether your
mobile phone supports contacts
downloads, refer to your mobile
phone user’s manual.
• The contacts for only the connect-
ed phone can be downloaded. Downloading Contacts
As the contacts are downloaded
from the mobile phone, downloading
contacts number is displayed.
• Up to 1,000 contacts entries can
be copied into car contacts.
• Up to 1,000 contacts entries can
be saved for each paired device.
• Upon downloading contacts data,
previously saved contacts data will
be deleted. However, contacts
entries saved to other paired
phones are not deleted.
Auto Download (Contacts)
T
his feature is used to automatically
download mobile contacts entries once
a
Bluetooth®
Wireless Technology
phone is connected.
• The Auto Download feature will
download mobile contacts entries
every time the phone is connected.
The download time may differ
depending on the number of saved
contacts entries and the communi-
cation state.
• When downloading a contacts, first
check to see that your mobile
phone supports the contacts
download feature.
D4H3G143EE D4H3G144EE
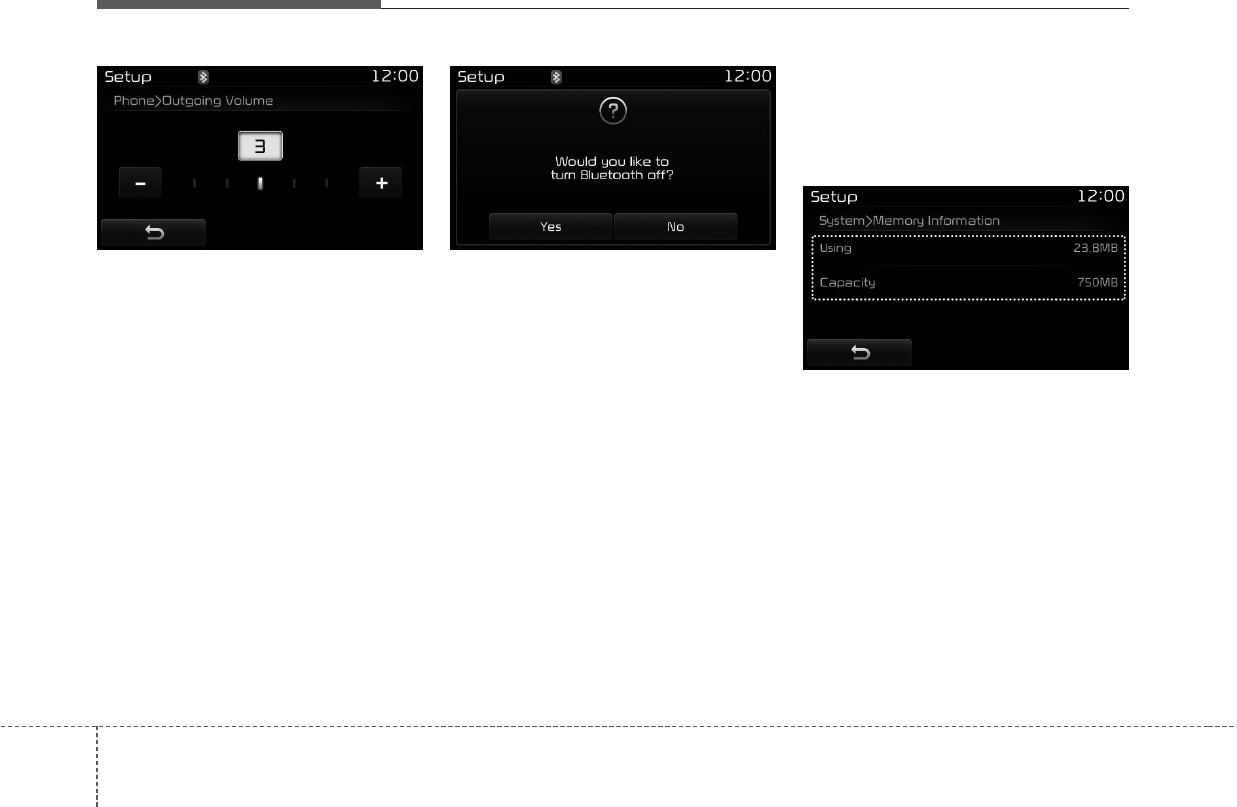
Audio system
94
Outgoing Volume
Use the [-], [+] buttons to adjust the
outgoing volume level.
Turning Bluetooth System Off
Once
Bluetooth®
Wireless Technology
is turned off,
Bluetooth®
Wireless
Technology related features will not be
supported within the audio system.
To turn
Bluetooth®
Wireless
Technology back on, go to [SETUP]
[Phone] and press “Yes”.
With the System Button
Press the
[SETUP] button
Select
[System]
Select [Memory
Information]
.
Memory Information
This feature displays information
related to system memory.
• Using : Displays capacity currently
in use
• Capacity : Displays total capacity
D4H3G145EE D4H3G146EE D4H3G147EE
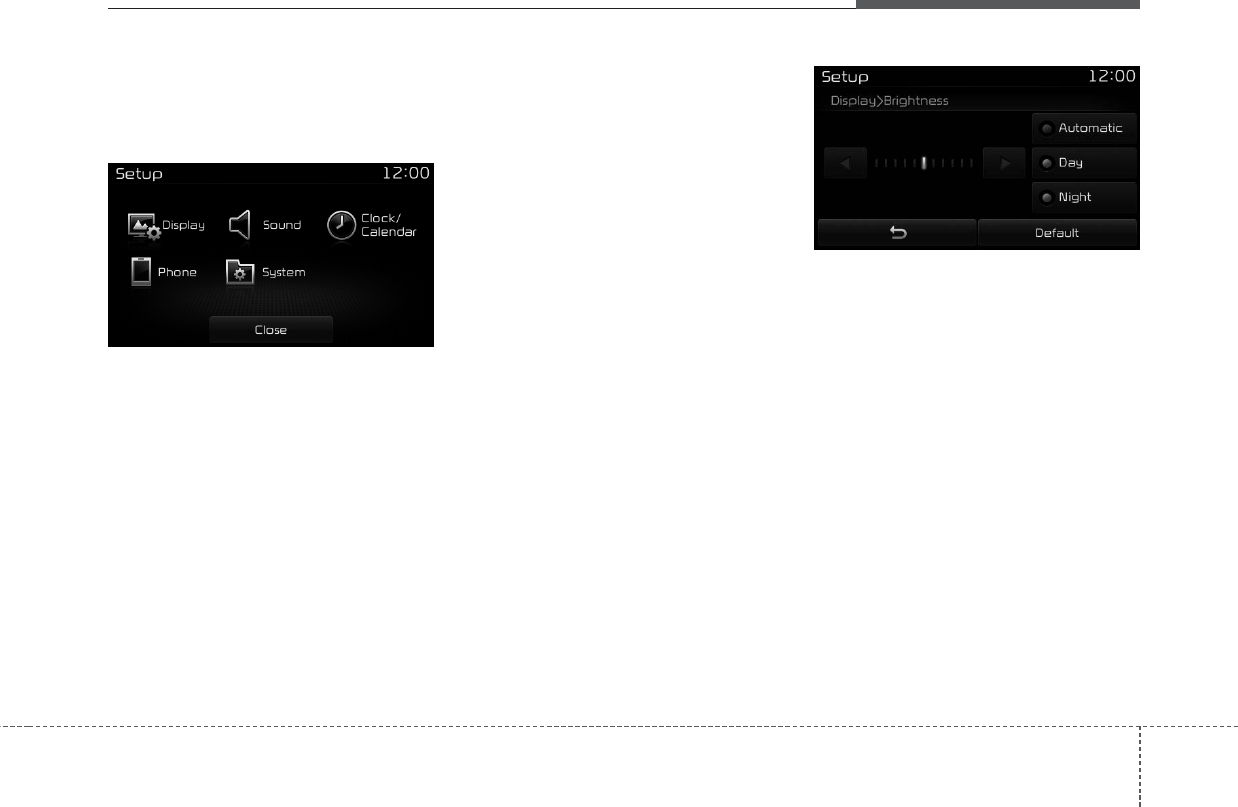
Audio system
95
Setup Mode
(Type B-2 without harman/kar-
don)
Press the [SETUP] button to display
the Setup screen.
You can select and control options
related to [Display], [Sound],
[Clock/Calendar], [Phone] and
[System].
With the Display Button
Press the [SETUP] button Select
[Display].
You can select and control options
related to [Brightness], [Pop-up
Mode], [Scroll text] and [Media
Display].
Adjusting the Brightness
Use the [Left/Right] buttons to adjust
the screen brightness or set the
Brightness on Automatic, Day or
Night mode.
Press the [Default] button to reset.
• Automatic : Adjusts the brightness
automatically.
• Day : Always maintains the bright-
ness on high.
• Night : Always maintains the bright-
ness on low.
D4H3G148EE D4H3G149EE
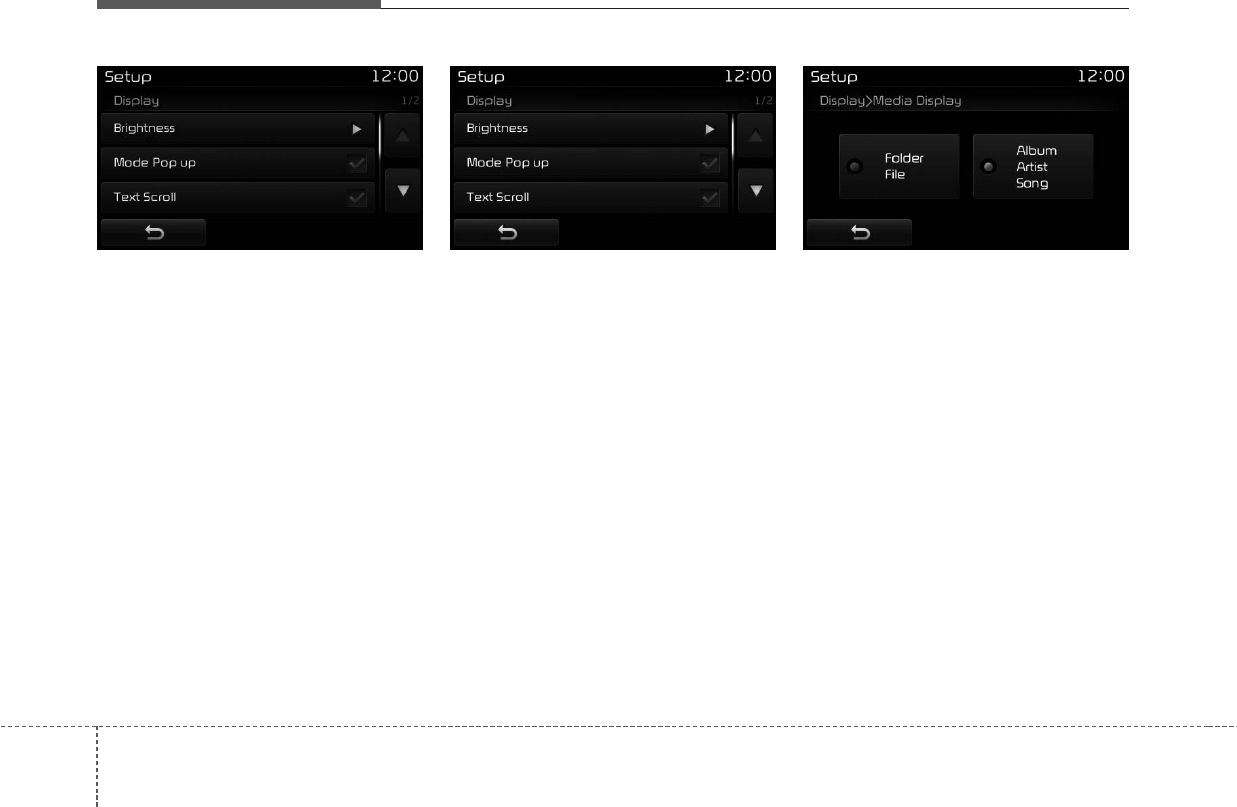
Audio system
96
Mode Pop up
This feature is used to display the
Mode Pop up screen when entering
radio and media modes.
When this feature is turned on,
pressing the [RADIO] or [MEDIA]
button will display the Mode Pop up
screen.
✽NOTICE
The media Mode Pop up screen can
be displayed only when two or more
media modes have been connected.
Text Scroll
This feature is used to scroll text dis-
played on the screen when it is too
long to be displayed at once.
When turned on, the text is repeat-
edly scrolled. When turned off, the
text is scrolled just once.
Media Display
This feature is used to change the
information displayed within USB
and MP3 CD modes.
• Folder File : Displays file name and
folder name.
• Album Artist Song : Displays album
name/artist name/song.
D4H3G150EE D4H3G151EE D4H3G152EE
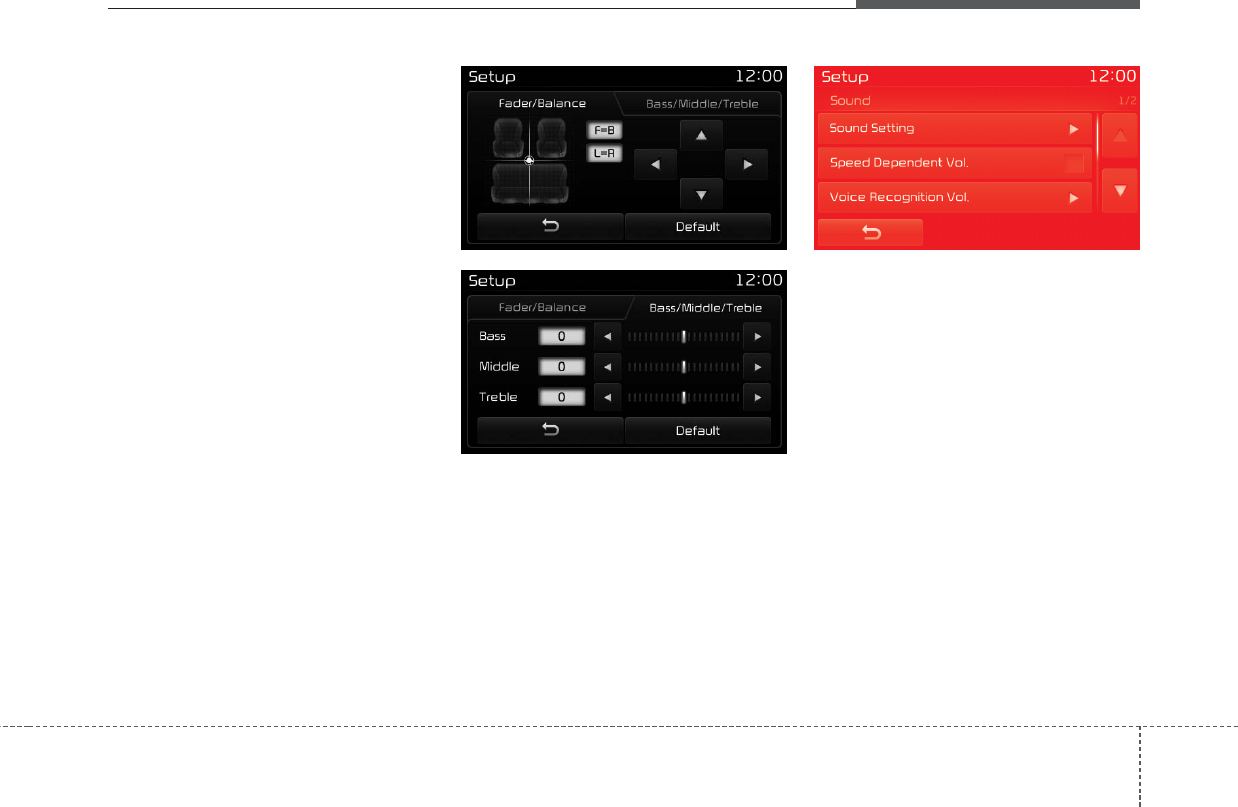
Audio system
97
With the Sound Button
Press the [SETUP] button Select
[Sound].
You can select and control options
related to [Sound Setting], [Speed
Dependent Vol.], [Voice Recognition
Vol.] and [Touch Screen Beep].
Sound Setting
Use the [Up/Down/Left/Right] but-
tons to adjust the Fader/Balance set-
tings.
Use the [Left/Right] buttons to adjust
the Bass/Middle/Treble settings.
Press the [Default] button to reset.
SDVC (Speed Dependent Volume
Control)
The volume level is controlled auto-
matically according to the vehicle
speed. SDVC can be set by selecting
from On/Off.
D4H3G153EE
D4H3G154EE
D4H3G155EE
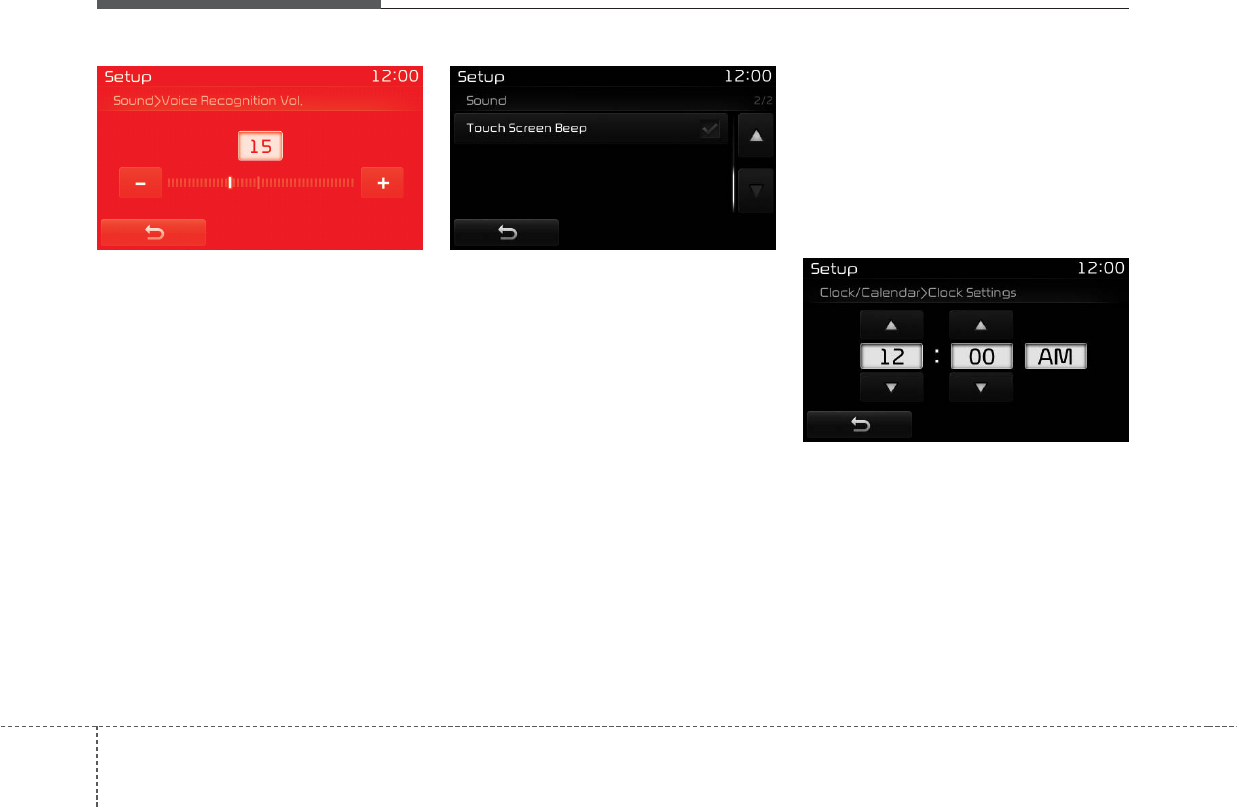
Audio system
98
Voice Recognition Volume
Use on screen [-], [+] buttons to
adjust the Voice Recognition volume.
Touch Screen Beep
This feature is used to turn the touch
screen beep on/off.
With the Clock/Calendar Button
Press the [SETUP] button Select
[Clock/Calendar].
You can select and control options
related to [Clock Settings], [Calendar
Settings], [Time Format] and [Clock
Display(Power off)].
Clock Settings
Use the [Up/Down] buttons to set the
Hour, Minutes and AM/PM setting.
Press and hold the [CLOCK] button
(over 0.8 seconds) to display the
Clock/Calendar screen.
D4H3G156EE D4H3G157EE D4H3G158EE
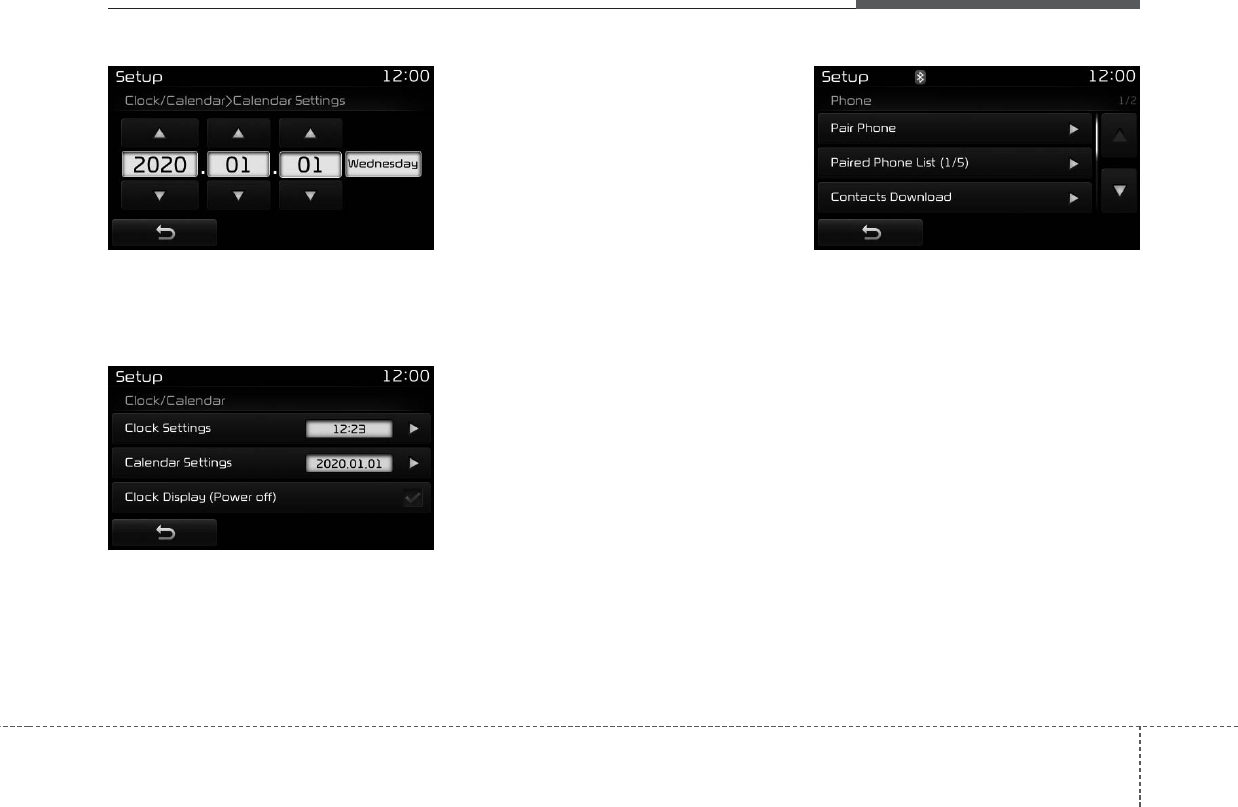
Audio system
99
Calendar Settings
Use the [Up/Down] buttons to set the
Year, Month and Day setting.
Clock Display
This feature is used to display a clock
on the screen when the audio sys-
tem is turned off.
With the Phone Button
Press the [SETUP] button Select
[Phone].
You can select and control options
related to [Pair Phone], [Paired
Phone List], [Contacts Download],
[Auto Download], [Outgoing Volume]
and [Bluetooth System Off].
Pairing a New Device
Bluetooth®
Wireless Technology
devices can be paired with the audio
system.
For more information, refer to the
“Pairing through Phone Setup” sec-
tion within
Bluetooth®
Wireless
Technology.
D4H3G159EE
D4H3G159EE
D4H3G160EE
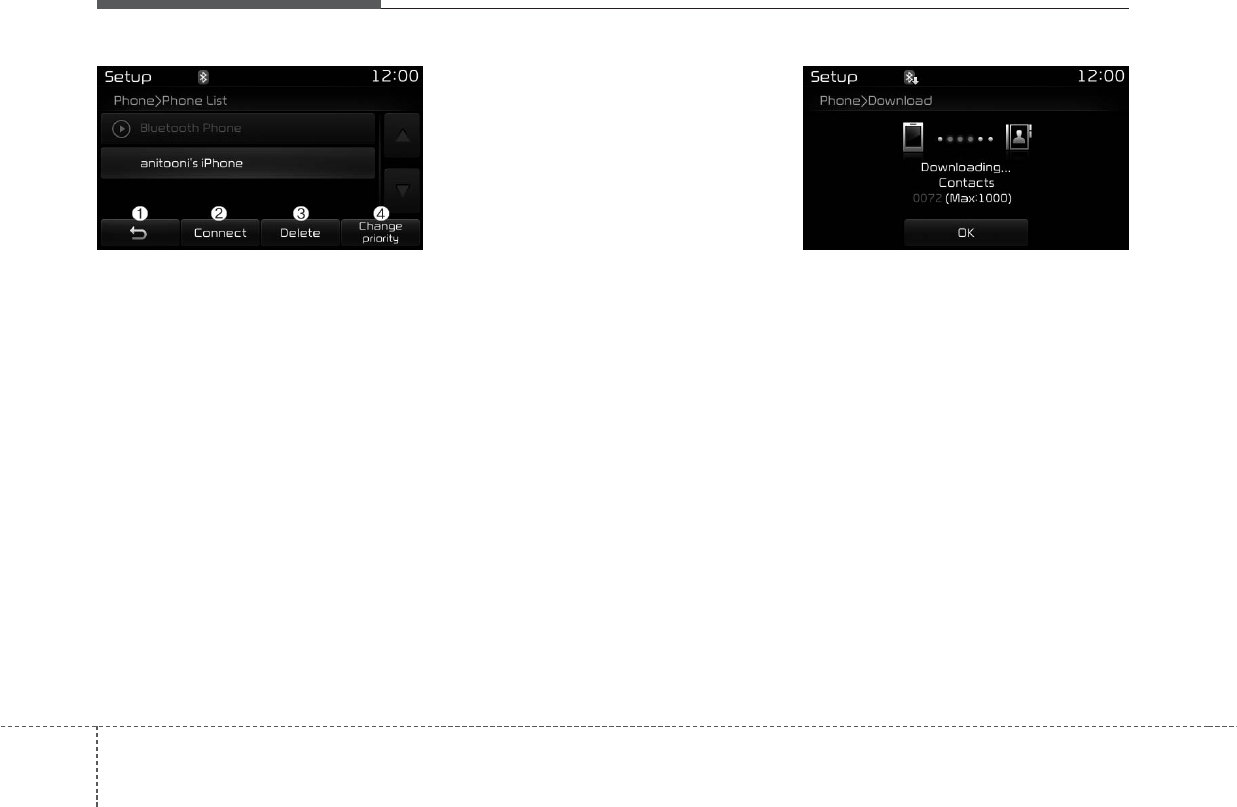
Audio system
100
Viewing Paired Phone List
This feature is used to view mobile
phones that have been paired with
the audio system. Upon selecting a
paired phone, the setup menu is dis-
played.
For more information, refer to the
“Setting
Bluetooth®
Wireless Technology
Connection” section within
Bluetooth®
Wireless Technology.
(1) Moves to the previous screen.
(2) Connect/disconnects currently
selected phone.
(3) Deletes the currently selected
phone.
(4) Sets currently selected phone to
highest connection priority.
✽NOTICE - Before
Downloading
Contact
• To learn more about whether your
mobile phone supports contacts
downloads, refer to your mobile
phone user’s manual.
• The contacts for only the connect-
ed phone can be downloaded. Downloading Contacts
As the contacts are downloaded
from the mobile phone, downloading
contacts number is displayed.
• Up to 1,000 contacts entries can
be copied into car contacts.
• Up to 1,000 contacts entries can
be saved for each paired device.
• Upon downloading contacts data,
previously saved contacts data will
be deleted. However, contacts
entries saved to other paired
phones are not deleted.
D4H3G161EE D4H3G162EE
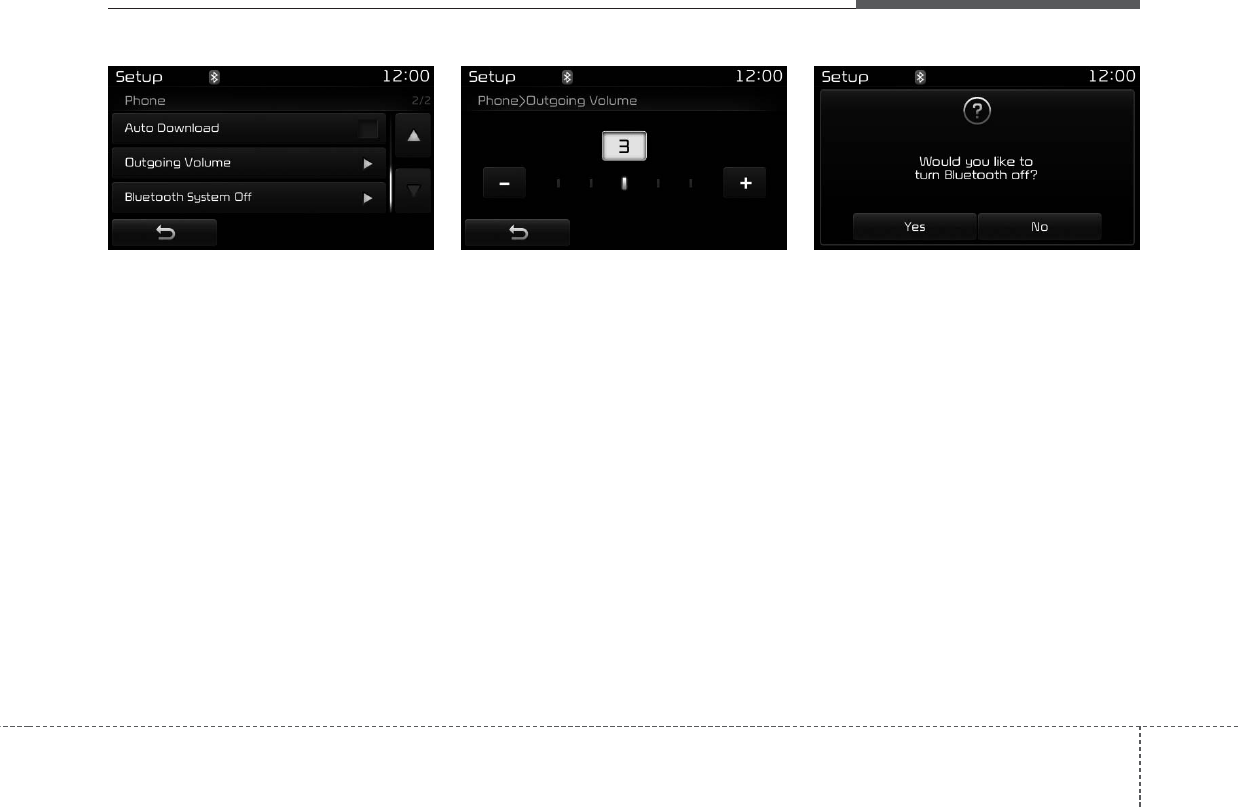
Audio system
101
Auto Download (Contacts)
T
his feature is used to automatically
download mobile contacts entries once
a
Bluetooth®
Wireless Technology
phone is connected.
• The Auto Download feature will
download mobile contacts entries
every time the phone is connected.
The download time may differ
depending on the number of saved
contacts entries and the communi-
cation state.
• When downloading a contacts, first
check to see that your mobile
phone supports the contacts
download feature.
Outgoing Volume
Use the [-], [+] buttons to adjust the
outgoing volume level.
Turning Bluetooth System Off
Once
Bluetooth®
Wireless Technology
is turned off,
Bluetooth®
Wireless
Technology related features will not be
supported within the audio system.
To turn
Bluetooth®
Wireless
Technology back on, go to [SETUP]
[Phone] and press “Yes”.
D4H3G163EE D4H3G164EE D4H3G165EE
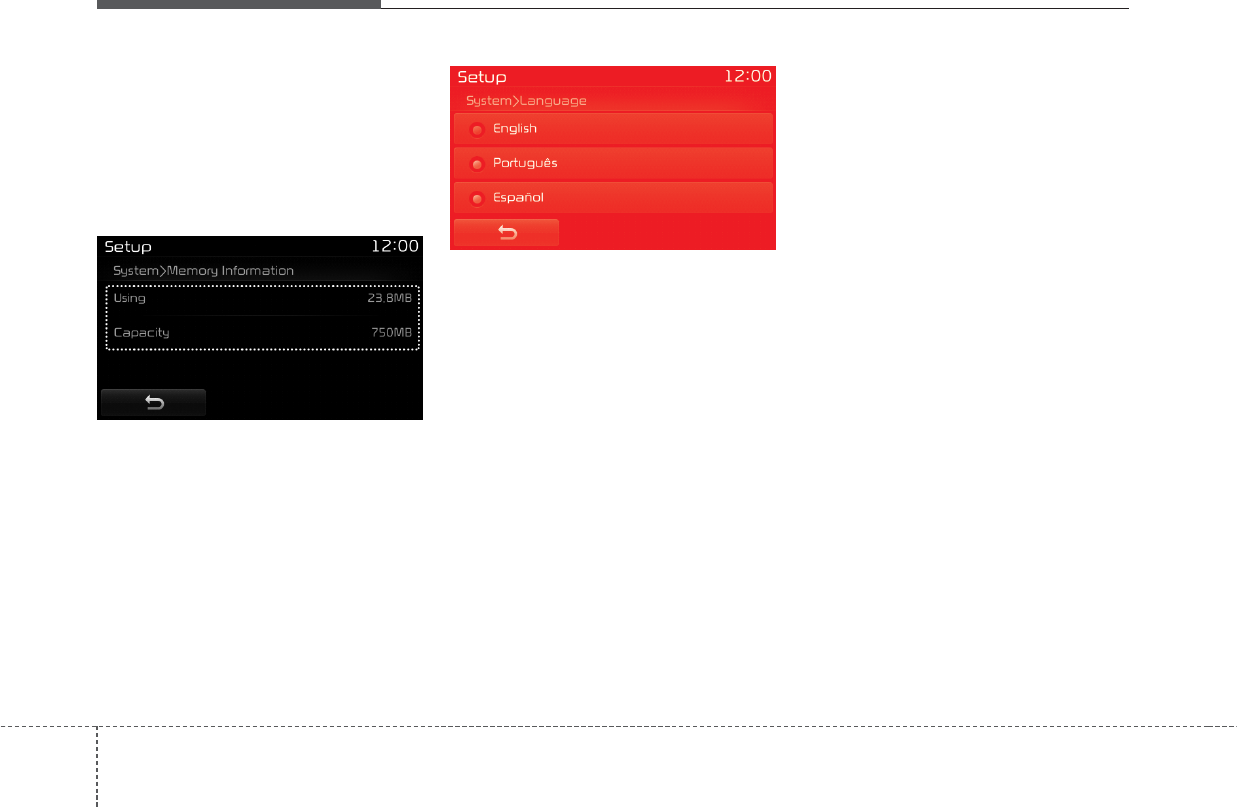
Audio system
102
With the System Button
Press the [SETUP] button Select
[System].
You can select and control options
related to [Memory Information] and
[Language].
Memory Information
This feature displays information
related to system memory.
• Using : Displays capacity currently
in use
• Capacity : Displays total capacity
Language
This feature is used to change the
system language.
If the language is changed, the sys-
tem will restart and apply the select-
ed language.
Language Setting is depend on the
Audio System
D4H3G166EE D4H3G167EE
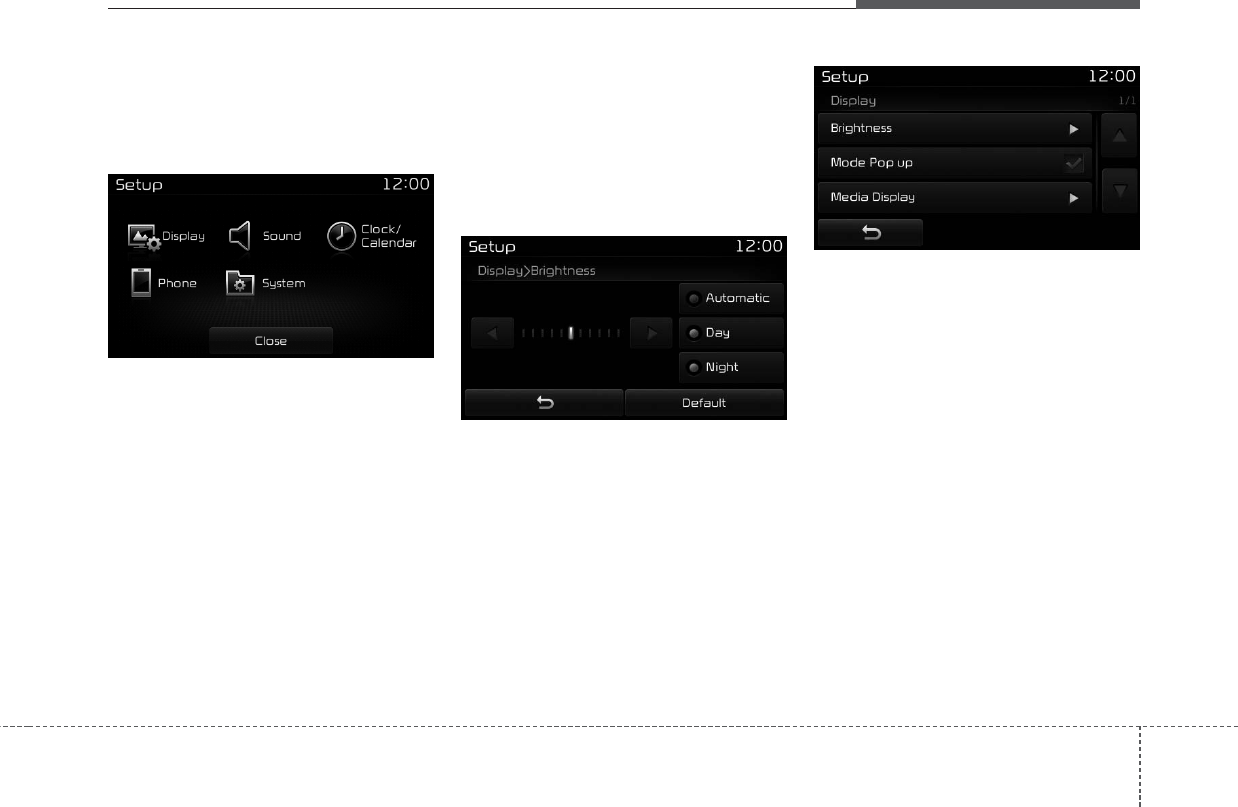
Audio system
103
Setup Mode
(Type B-2 For Colombia with
harman/kardon)
Press the [SETUP] button to display
the Setup screen.
You can select and control options
related to [Display], [Sound] , [Clock/
Calendar], [Phone] and [System].
With the Display Button
Press the [SETUP] button Select
[Display].
You can select and control options
related to [Brightness], [Pop-up
Mode]and [Media Display].
Adjusting the Brightness
Use the [Left/Right] buttons to adjust
the screen brightness or set the
Brightness on Automatic, Day or
Night mode.
Press the [Default] button to reset.
• Automatic : Adjusts the brightness
automatically.
• Day : Always maintains the bright-
ness on high.
• Night : Always maintains the bright-
ness on low.
Mode Pop up
This feature is used to display the
Pop-up Mode screen when entering
radio and media modes.
When this feature is turned on,
pressing the [RADIO] or [MEDIA]
button will display the Mode Pop up
screen.
✽NOTICE
The media Mode Pop up screen can
be displayed only when two or more
media modes have been connected.
D4H3G168EE D4H3G0169EE D4H3G170EE
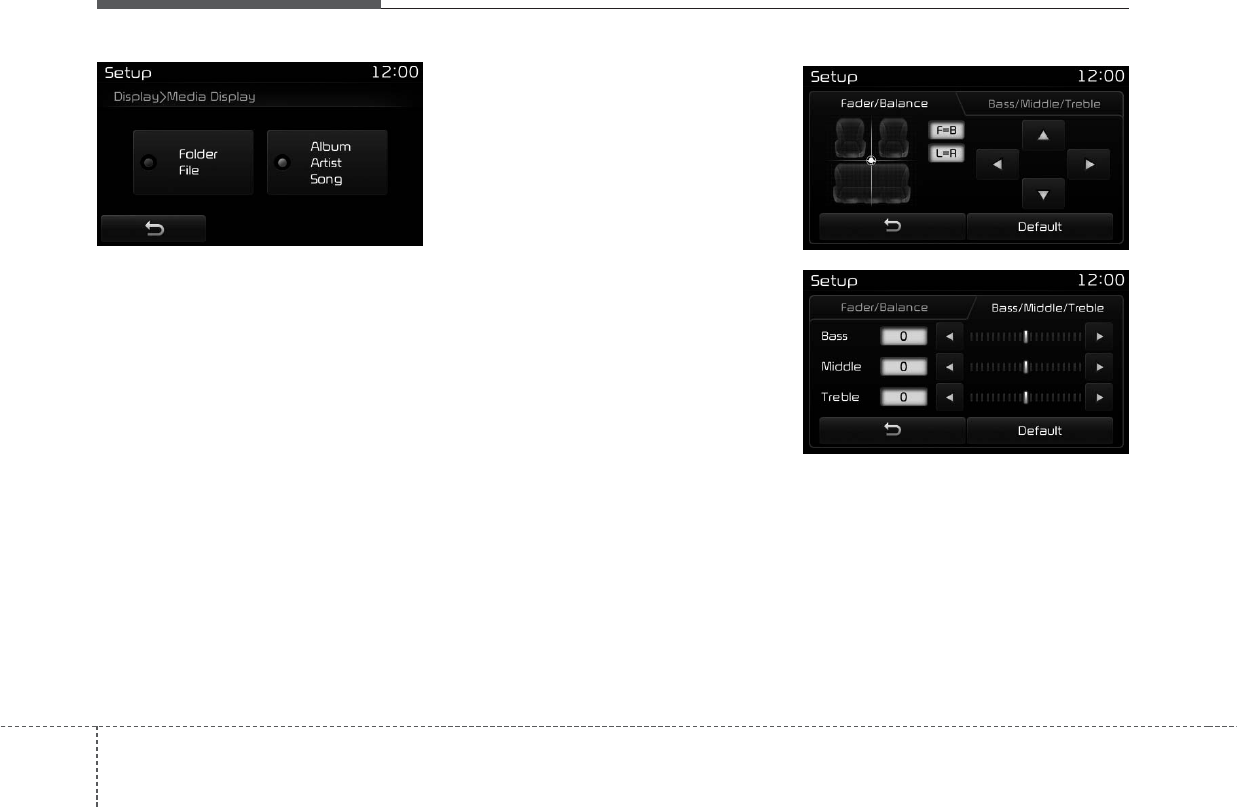
Audio system
104
Media Display
This feature is used to change the
information displayed within USB
and MP3 CD modes.
• Folder File : Displays file name and
folder name
• Album Artist Song : Displays album
name/artist name/song
With the Sound Button
Press the [SETUP] button Select
[Sound].
You can select and control options
related to [Sound Setting], [Quantum
Logic Sound], [Speed Dependent
Vol.] and [Touch Screen Beep].
Sound Setting
Use the [Up/Down/Left/Right] but-
tons to adjust the Fader/Balance set-
tings.
Use the[Left/Right] buttons to adjust
the Bass/Middle/Treble settings.
Press the [Default] button to reset.
D4H3G171EE D4H3G172EE
D4H3G173EE
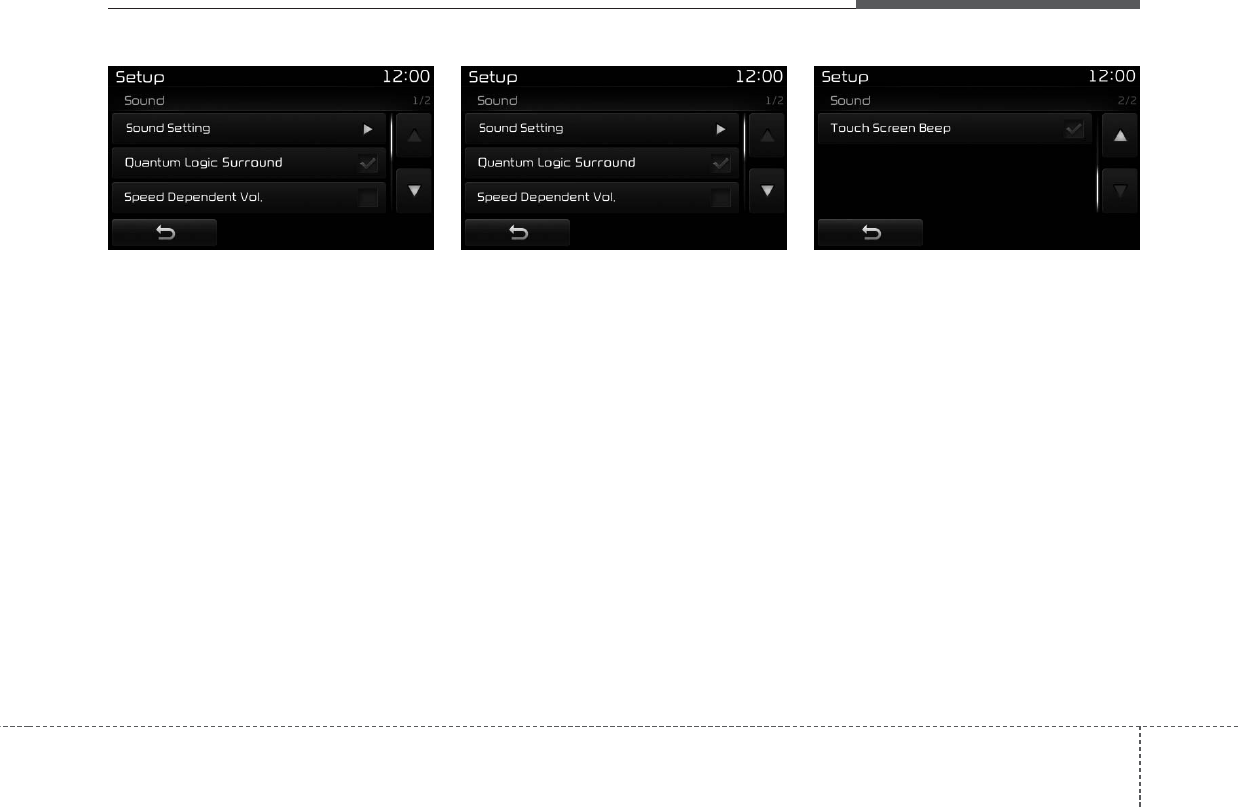
Audio system
105
QLS(Quantum Logic Surround)
QLS can be set by selecting from
On/Off.
SDVC (Speed Dependent Volume
Control)
The volume level is controlled auto-
matically according to the vehicle
speed. SDVC can be set by selecting
from On/Off.
Touch Screen Beep
This feature is used to turn the touch
screen beep on/off.
D4H3G174EE D4H3G175EE D4H3G176EE
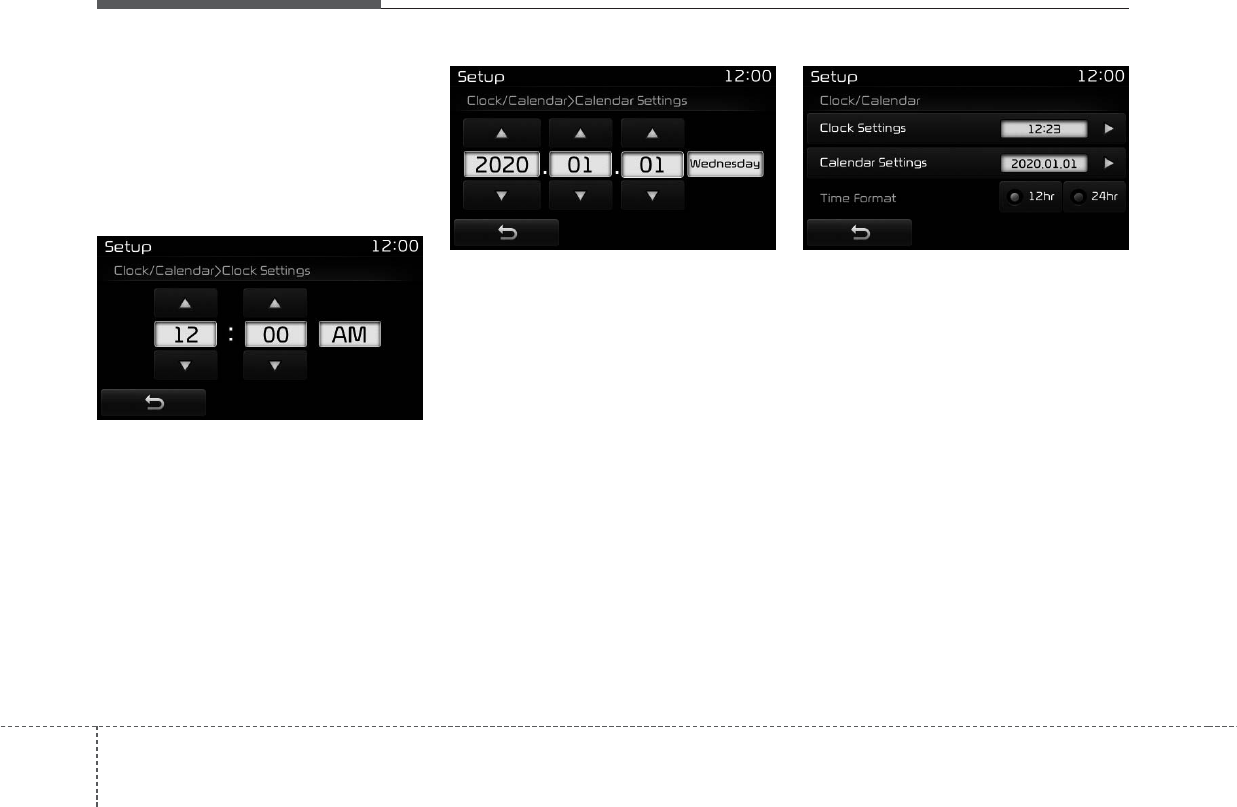
Audio system
106
With the Clock/Calendar Button
Press the [SETUP] button Select
[Clock/Calendar].
You can select and control options
related to [Clock Settings], [Calendar
Settings] and [Time Format].
Clock Settings
Use the [Up/Down] buttons to set the
Hour, Minutes and AM/PM setting.
Press and hold the [CLOCK] button
(over 0.8 seconds) to display the
Clock/ Calendar screen.
Calendar Settings
Use the [Up/Down] buttons to set the
Day, Month and Year setting.
Time Format
This feature is used to change the
clock format between 12hr or 24hr.
D4H3G177EE D4H3G178EE D4H3G179EE

Audio system
107
With the Phone Button
Press the [SETUP] button Select
[Phone].
You can select and control options
related to [Pair Phone], [Paired
Phone List], [Contacts Download],
[Auto Download], [Outgoing Volume]
and [Bluetooth System Off].
Pairing a New Device
Bluetooth®
Wireless Technology
devices can be paired with the audio
system.
For more information, refer to the
“Pairing through Phone Setup” sec-
tion within
Bluetooth®
Wireless
Technology.
Viewing Paired Phone List
This feature is used to view mobile
phones that have been paired with
the audio system. Upon selecting a
paired phone, the setup menu is dis-
played.
For more information, refer to the
“Setting
Bluetooth®
Wireless
Technology Connection” section with-
in
Bluetooth®
Wireless Technology.
(1) Moves to the previous screen.
(2) Connect/disconnects currently
selected phone.
(3) Deletes the currently selected
phone.
(4) Sets currently selected phone to
highest connection priority.
D4H3G180EE D4H3G181EE
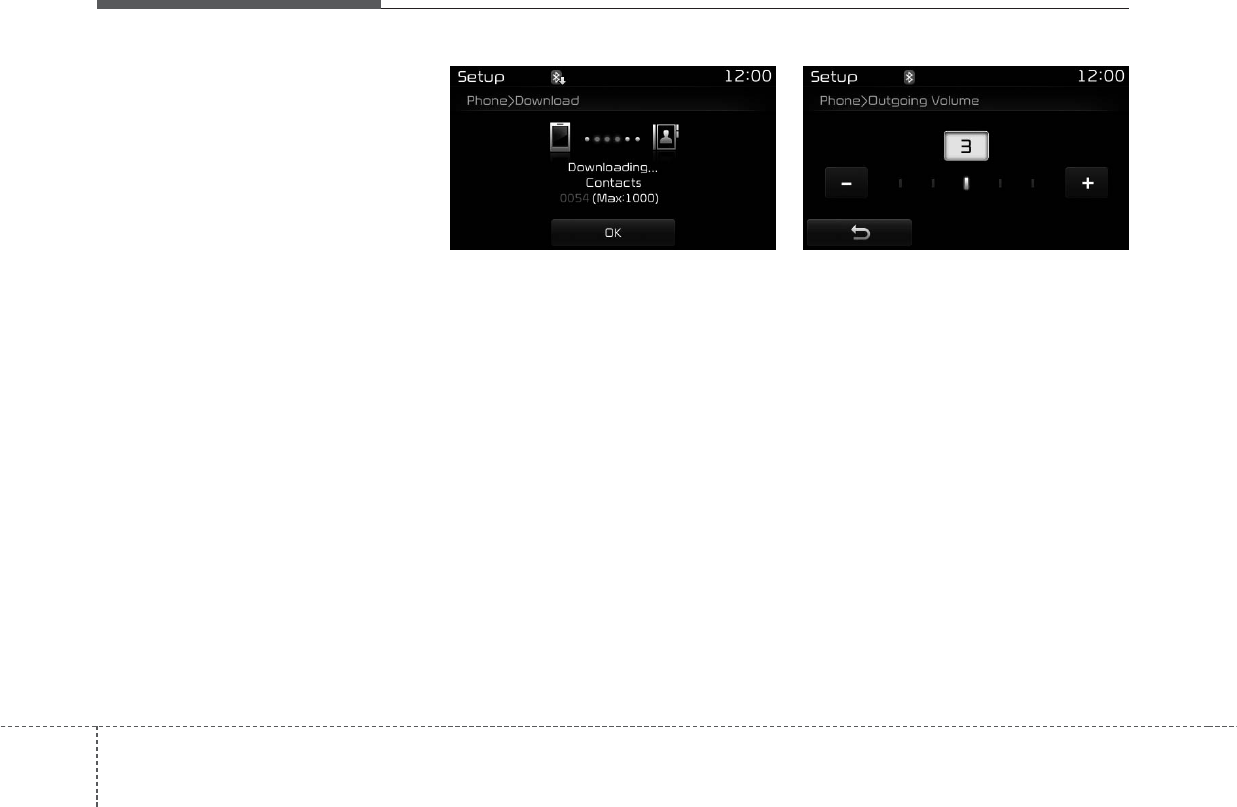
Audio system
108
✽NOTICE - Before
Downloading
Contact
• To learn more about whether your
mobile phone supports contacts
downloads, refer to your mobile
phone user’s manual.
• The contacts for only the connect-
ed phone can be downloaded. Downloading Contacts
As the contacts are downloaded
from the mobile phone, downloading
contacts number is displayed.
• Up to 1,000 contacts entries can
be copied into car contacts.
• Up to 1,000 contacts entries can
be saved for each paired device.
• Upon downloading contacts data,
previously saved contacts data will
be deleted. However, contacts
entries saved to other paired
phones are not deleted.
Outgoing Volume
Use the [-], [+] buttons to adjust the
outgoing volume level.
D4H3G182EE D4H3G183EE
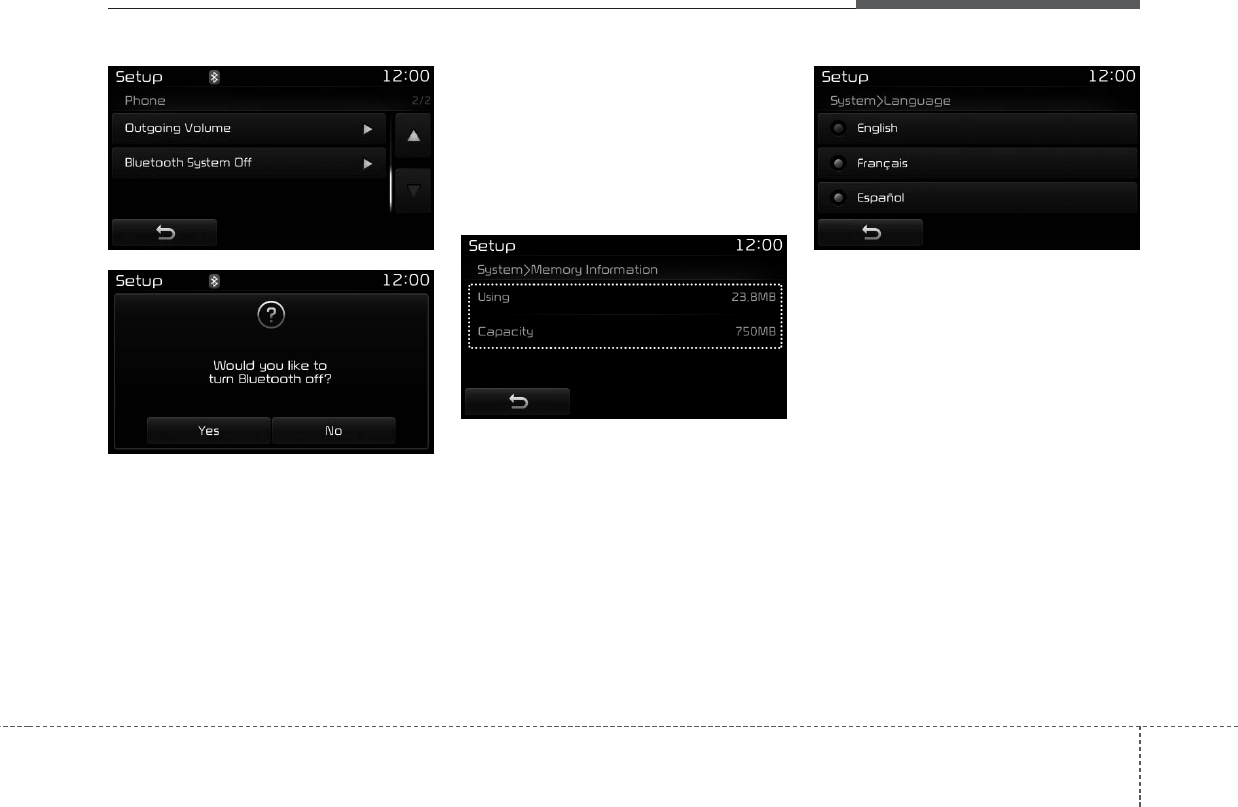
Audio system
109
Turning Bluetooth System Off
Once
Bluetooth®
Wireless Technology
is turned off,
Bluetooth®
Wireless
Technology related features will not be
supported within the audio system.
To turn
Bluetooth®
Wireless
Technology back on, go to [SETUP]
[Phone] and press “Yes”.
With the System Button
Press the [SETUP] button Select
[System].
You can select and control options
related to [Memory Information] and
[Language].
Memory Information
This feature displays information
related to system memory.
• Using : Displays capacity currently
in use
• Capacity : Displays total capacity
Language
This feature is used to change the
system language.
If the language is changed, the sys-
tem will restart and apply the select-
ed language.
Language Setting is depend on the
Audio System.
D4H3G184EE
D4H3G185EE
D4H3G186EE D4H3G187EE
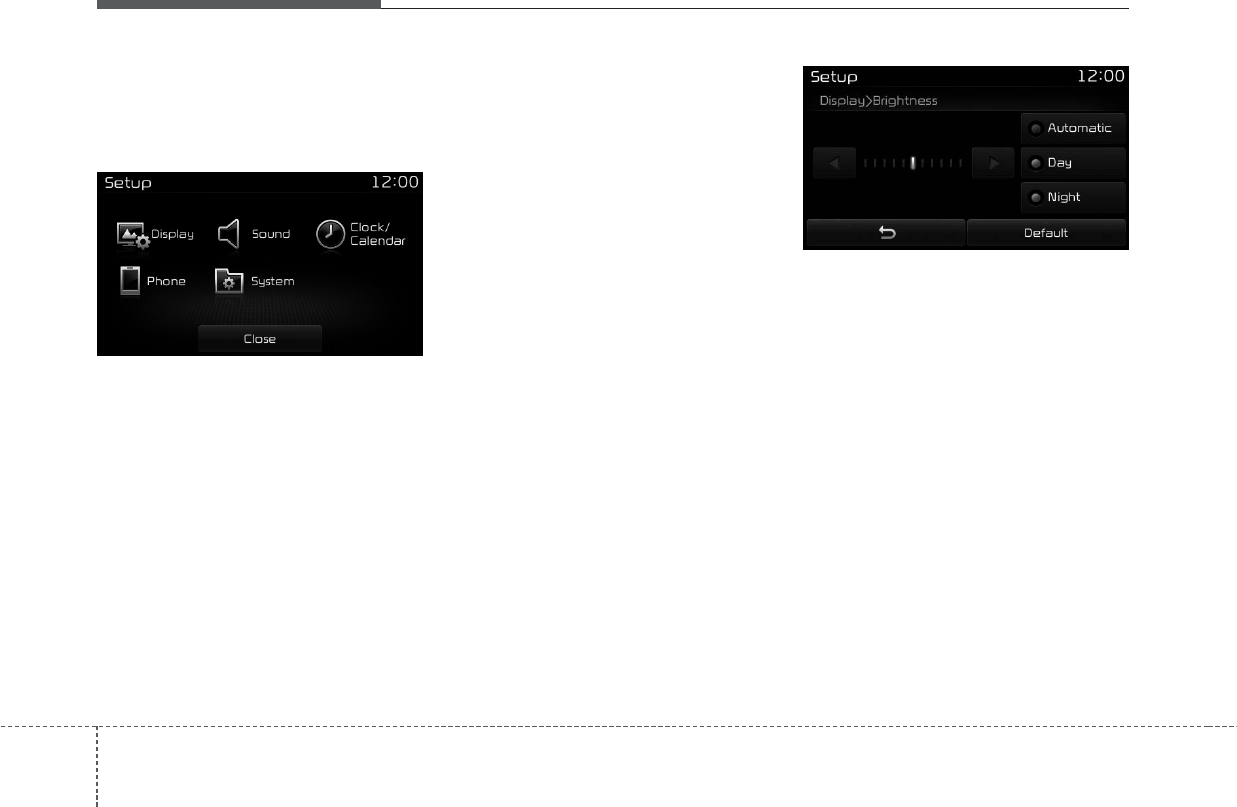
Audio system
Setup Mode
(Type B-2 For Colombia without
harman/kardon)
Press the [SETUP] button to display
the Setup screen.
You can select and control options
related to [Display], [Sound] , [Clock/
Calendar], [Phone] and [System].
With the Display Button
Press the [SETUP] button Select
[Display].
You can select and control options
related to [Brightness], [Pop-up
Mode]and [Media Display].
Adjusting the Brightness
Use the [Left/Right] buttons to adjust
the screen brightness or set the
Brightness on Automatic, Day or
Night mode.
Press the [Default] button to reset.
• Automatic : Adjusts the brightness
automatically.
• Day : Always maintains the bright-
ness on high.
• Night : Always maintains the bright-
ness on low.
110
D4H3G188EE D4H3G189EE
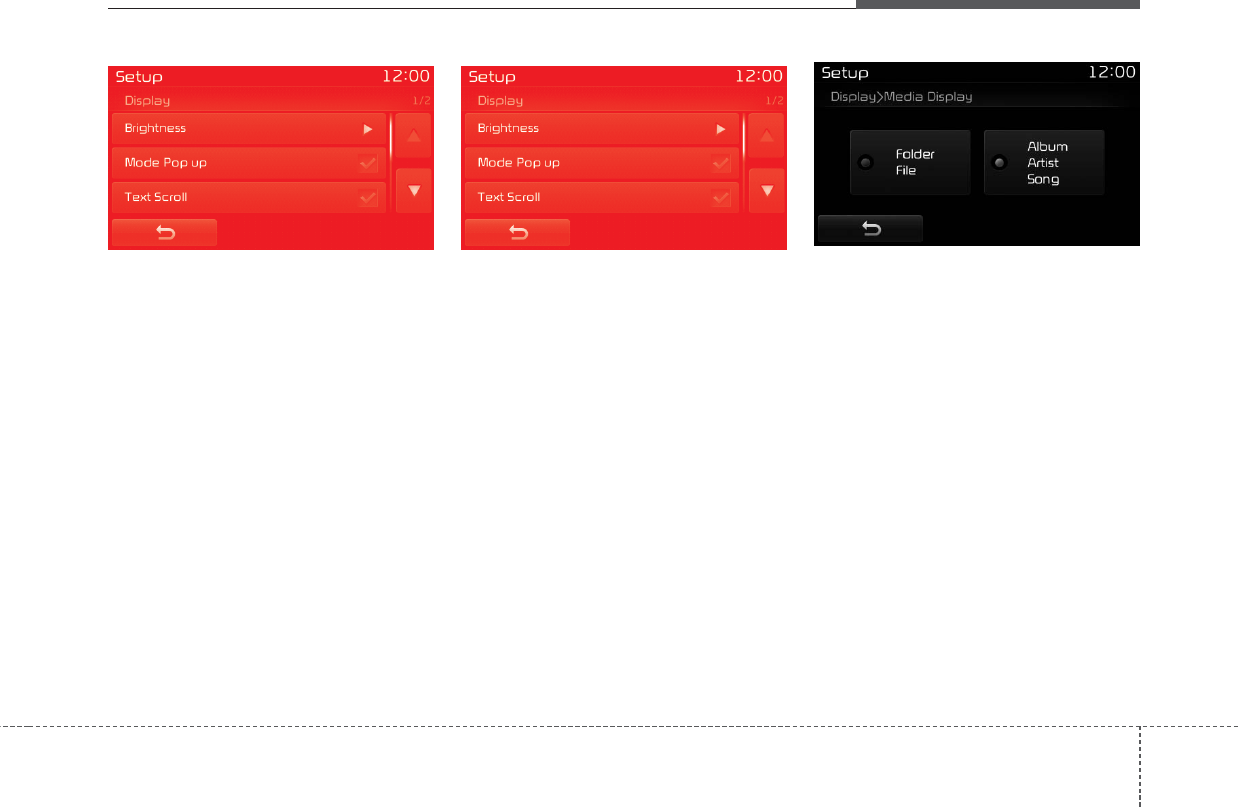
Audio system
Mode Pop up
This feature is used to display the
Pop-up Mode screen when entering
radio and media modes.
When this feature is turned on,
pressing the [RADIO] or [MEDIA]
button will display the Mode Pop up
screen.
✽NOTICE
The media Mode Pop up screen can
be displayed only when two or more
media modes have been connected.
Text Scroll
This feature is used to scroll text dis-
played on the screen when it is too
long to be displayed at once.
When turned on, the text is repeat-
edly scrolled. When turned off, the
text is scrolled just once.
Media Display
This feature is used to change the
information displayed within USB
and MP3 CD modes.
• Folder File : Displays file name and
folder name
• Album Artist Song : Displays album
name/artist name/song
111
D4H3G190EE D4H3G191EE D4H3G192EE
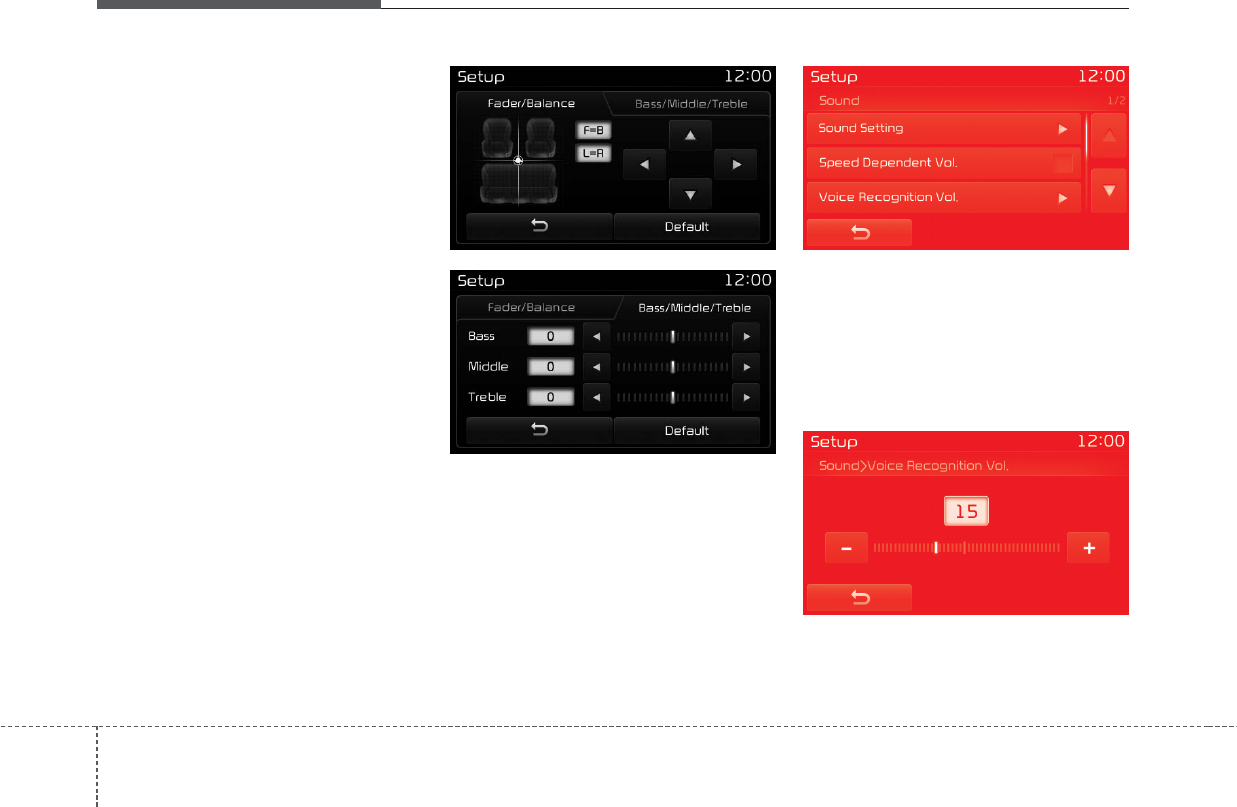
Audio system
With the Sound Button
Press the [SETUP] button Select
[Sound].
You can select and control options
related to [Sound Setting], [Speed
Dependent Vol.], [Voice Recognition
Vol.] and [Touch Screen Beep].
Sound Setting
Use the [Up/Down/Left/Right] but-
tons to adjust the Fader/Balance set-
tings.
Use the[Left/Right] buttons to adjust
the Bass/Middle/Treble settings.
Press the [Default] button to reset.
SDVC (Speed Dependent Volume
Control)
The volume level is controlled auto-
matically according to the vehicle
speed. SDVC can be set by selecting
from On/Off.
Voice Recognition Volume
Use on screen [-], [+] buttons to
adjust the Voice Recognition volume.
112
D4H3G193EE
D4H3G194EE
D4H3G195EE
D4H3G196EE
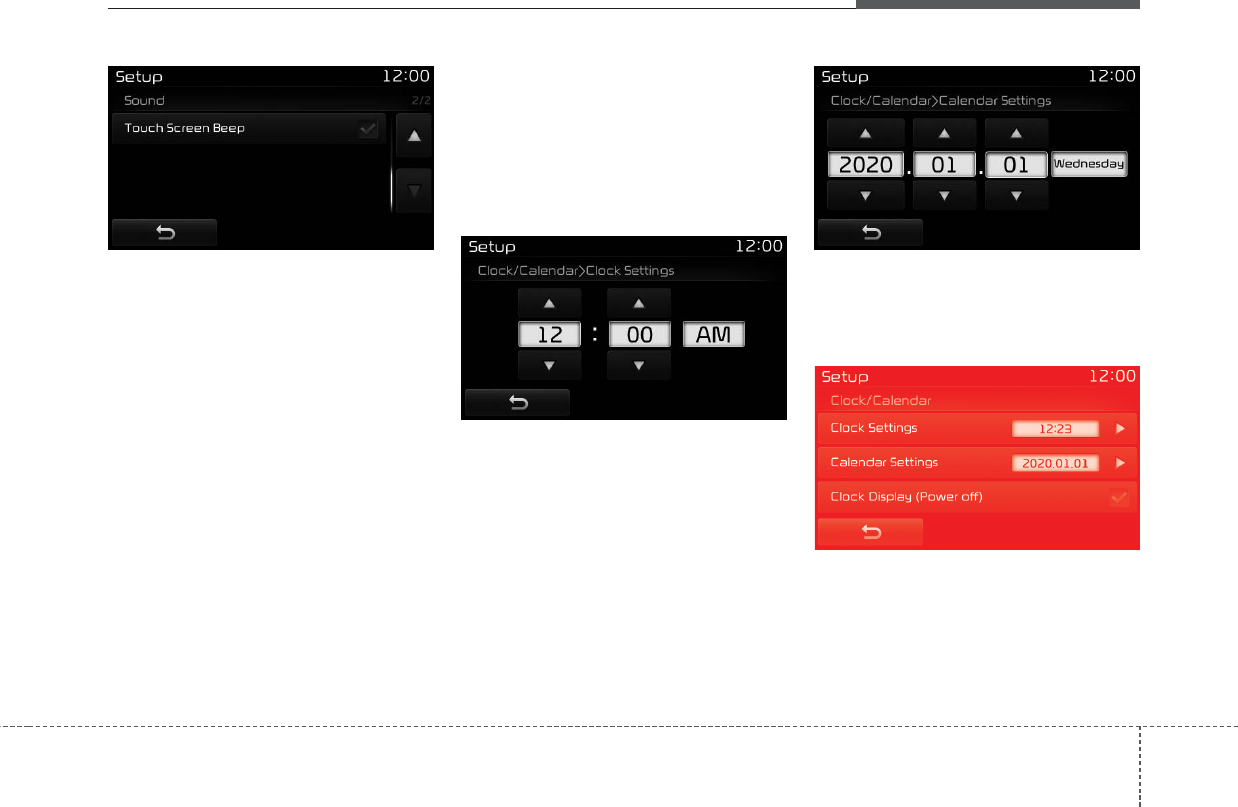
Audio system
Touch Screen Beep
This feature is used to turn the touch
screen beep on/off.
With the Clock/Calendar Button
Press the [SETUP] button Select
[Clock/Calendar].
You can select and control options
related to [Clock Settings], [Calendar
Settings] and [Time Format].
Clock Settings
Use the [Up/Down] buttons to set the
Hour, Minutes and AM/PM setting.
Press and hold the [CLOCK] button
(over 0.8 seconds) to display the
Clock/ Calendar screen.
Calendar Settings
Use the [Up/Down] buttons to set the
Day, Month and Year setting.
Clock Display
This feature is used to display a clock
on the screen when the audio sys-
tem is turned off.
113
D4H3G197EE D4H3G198EE D4H3G199EE
D4H3G200EE
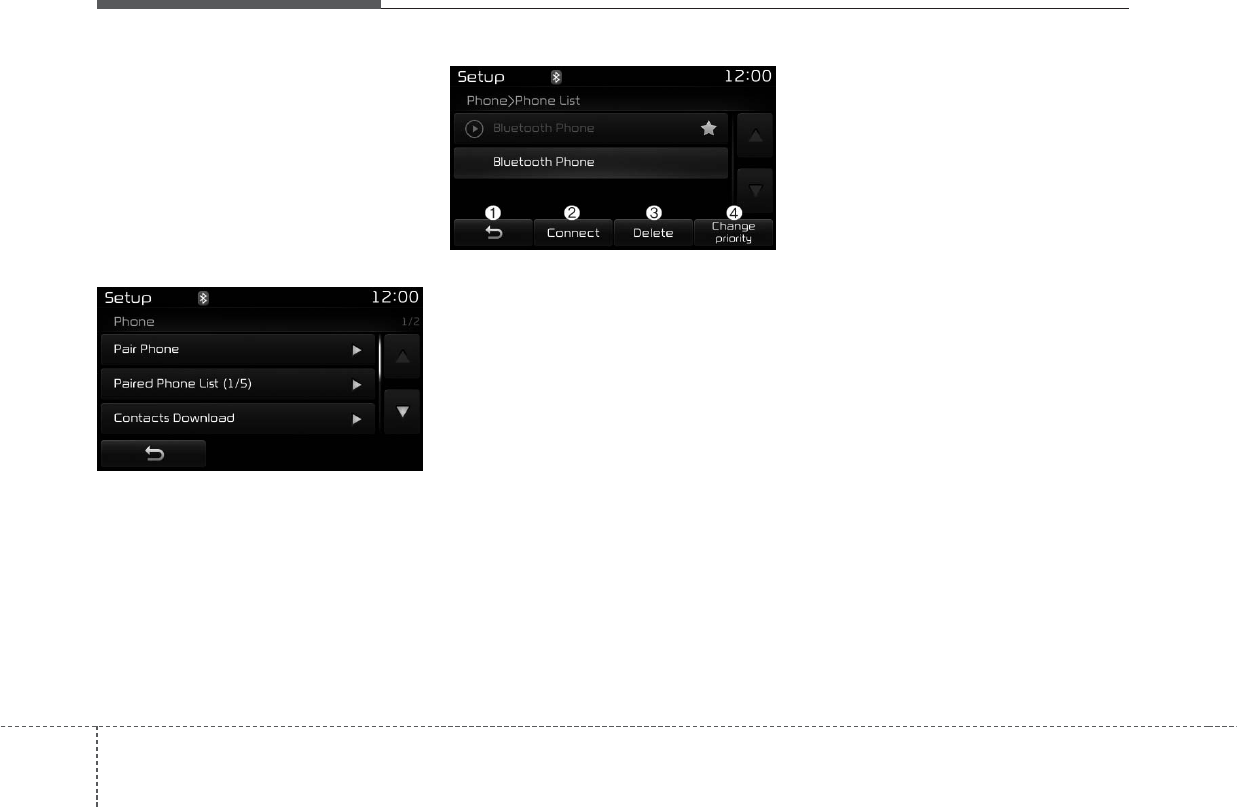
Audio system
With the Phone Button
Press the [SETUP] button Select
[Phone].
You can select and control options
related to [Pair Phone], [Paired
Phone List], [Contacts Download],
[Auto Download], [Outgoing Volume]
and [Bluetooth System Off].
Pairing a New Device
Bluetooth®
Wireless Technology
devices can be paired with the audio
system.
For more information, refer to the
“Pairing through Phone Setup” sec-
tion within
Bluetooth®
Wireless
Technology.
Viewing Paired Phone List
This feature is used to view mobile
phones that have been paired with
the audio system. Upon selecting a
paired phone, the setup menu is dis-
played.
For more information, refer to the
“Setting
Bluetooth®
Wireless
Technology Connection” section with-
in
Bluetooth®
Wireless Technology.
(1) Moves to the previous screen.
(2) Connect/disconnects currently
selected phone.
(3) Deletes the currently selected
phone.
(4) Sets currently selected phone to
highest connection priority.
✽NOTICE - Before
Downloading
Contact
• To learn more about whether your
mobile phone supports contacts
downloads, refer to your mobile
phone user’s manual.
• The contacts for only the connect-
ed phone can be downloaded.
114
D4H3G201EE D4H3G202EE
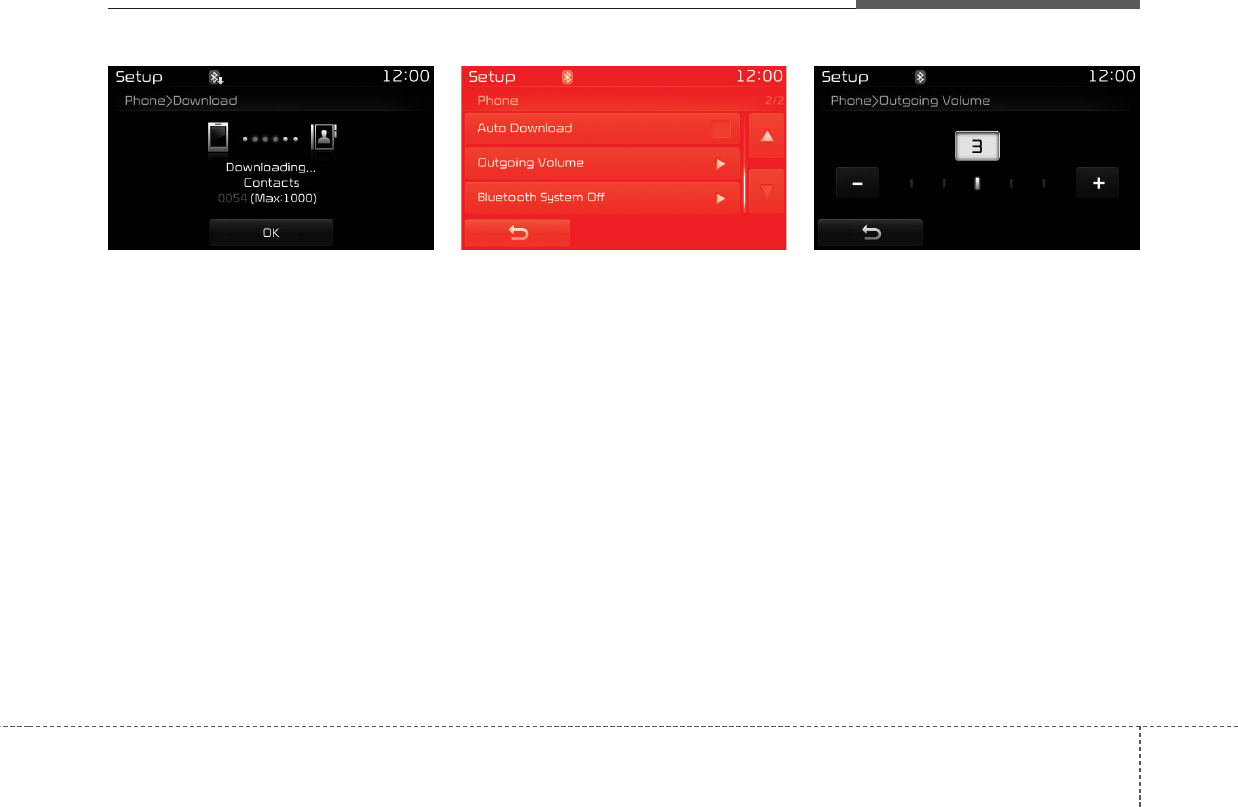
Audio system
Downloading Contacts
As the contacts are downloaded
from the mobile phone, downloading
contacts number is displayed.
• Up to 1,000 contacts entries can
be copied into car contacts.
• Up to 1,000 contacts entries can
be saved for each paired device.
• Upon downloading contacts data,
previously saved contacts data will
be deleted. However, contacts
entries saved to other paired
phones are not deleted.
Auto Download (Contacts)
This feature is used to automatically
download mobile contacts entries
once a
Bluetooth®
Wireless Technology
phone is connected.
• The Auto Download feature will
download mobile contacts entries
every time the phone is connected.
The download time may differ
depending on the number of saved
contacts entries and the communi-
cation state.
• When downloading a contacts, first
check to see that your mobile
phone supports the
Outgoing Volume
Use the [-], [+] buttons to adjust the
outgoing volume level.
115
D4H3G203EE D4H3G204EE D4H3G205EE
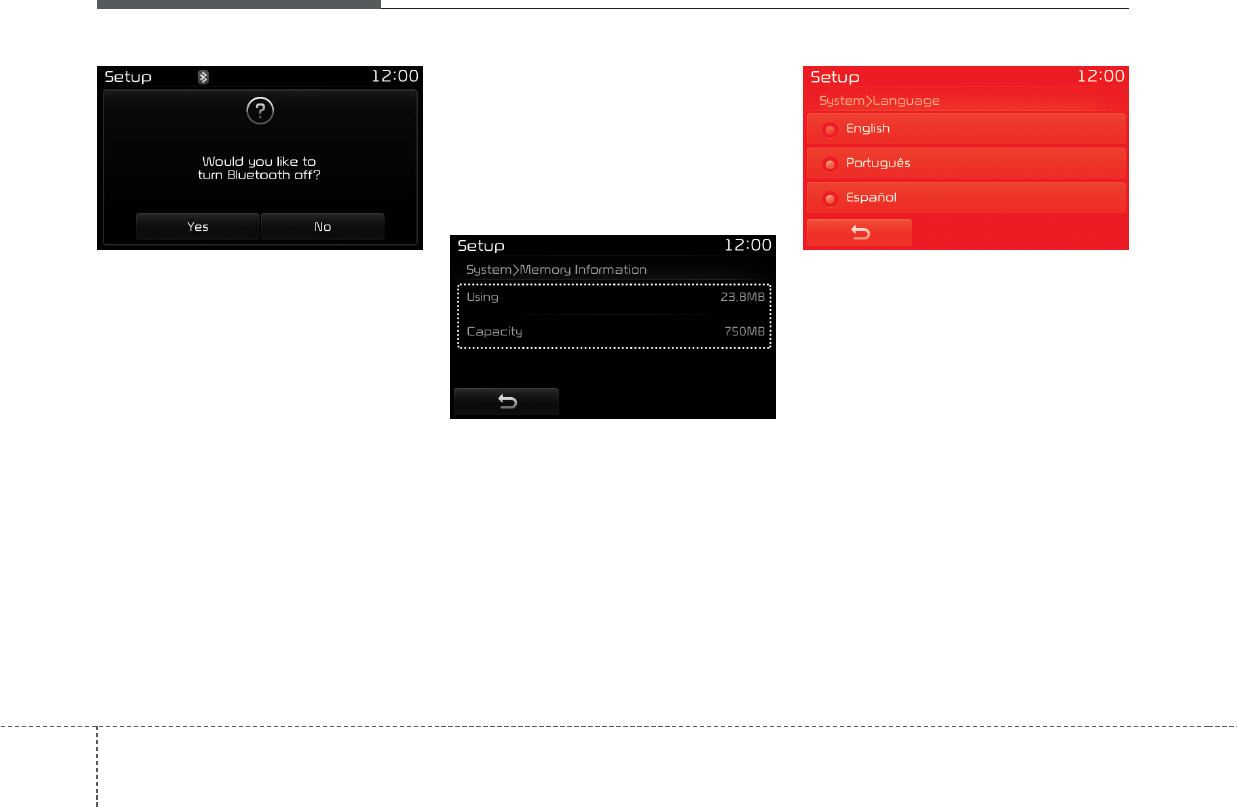
Audio system
Turning Bluetooth System Off
Once
Bluetooth®
Wireless Technology
is turned off,
Bluetooth®
Wireless
Technology related features will not be
supported within the audio system.
To turn
Bluetooth®
Wireless
Technology back on, go to [SETUP]
[Phone] and press “Yes”.
With the System Button
Press the [SETUP] button Select
[System].
You can select and control options
related to [Memory Information] and
[Language].
Memory Information
This feature displays information
related to system memory.
• Using : Displays capacity currently
in use
• Capacity : Displays total capacity
Language
This feature is used to change the
system language.
If the language is changed, the sys-
tem will restart and apply the select-
ed language.
Language Setting is depend on the
Audio System.
116
D4H3G206EE D4H3G207EE D4H3G208EE
DC 14.4V
Bluetooth
®
Wireless Technology
Frequency
Range 2402 ~ 2480 MHz
Supported
Bluetooth
®
Specification
3.0
Supported
Profile Handsfree(1.6), A2DP(1.2), AVRCP(1.4), PBAP(1.0)
Output -6~4dBm (Power Class2, Conducted)
Number of
Channels 79 channels
Power Supply
CAUTION
• The producer and installer cannot provide services related to life safety
as the concerned radio equipment is liable to radio interference.

Audio system
117
FCC
This equipment has been tested and found to comply with the limits for a Class B digital device, pursuant to part 15
of the FCC Rules. These limits are designed to provide reasonable protection against harmful interference in a resi-
dential installation.
This equipment generates, uses and can radiate radio frequency energy and, if not installed and used in accordance
with the instructions,may cause harmful interference to radio communications. However, there is no guarantee that
interference will not occur in a particular installation. If this equipment does cause harmful interference to radio or tel-
evision reception, which can be determined by turning the equipment off and on, the user is encouraged to try to cor-
rect the interference by one or more of the following measures:
• Reorient or relocate the receiving antenna.
• Increase the separation between the equipment and receiver.
• Connect the equipment into an outlet on a circuit different from that to which the receiver is connected.
• Consult the dealer or an experienced radio/TV technician for help.
Caution: Any changes or modifications to this device not explicitly approved by manufacturer could void
your authority to operate this equipment.
Declaration of Conformity

Audio system
118
This device complies with part 15 of the FCC Rules. Operation is subject to the following two conditions :
(1) This device may not cause harmful interference, and (2) this device must accept any interference received, includ-
ing interference that may cause undesired operation.
This equipment complies with FCC radiation exposure limits set forth for an uncontrolled environment.
This equipment should be installed and operatedwith minmum 20cm between the and your body. This transmitter must
not be collocated or operating in conjunction with any other antenna or transmitter unless authorized to do so by the
FCC

IC Warning
“This device complies with Industry Canada licence-exempt RSS standard(s).”
Operation is subject to the following conditions: (1) this device may not cause interference, and (2) this device must accept any interfer-
ence,
including interference that may cause undesired operation of the device.
This equipment should be installed and operated with minimum 20 cm between the radiator and your body.
Le présent appareil est conforme aux CNR d’Industrie Canada applicables aux appareils radio exempts de licence. L’exploitation est
autorisée aux deux conditions suivantes : (1) l’appareil ne doit pas provoquer de brouillage, et (2) l’appareil doit accepter tout brouillage
radioélectrique subi, même si le brouillage est susceptible d’en compromettre le fonctionnement.
Cet équipement doit être installé et utilisé avec un minimum de 20 cm entre le radiateur et votre corps.
K_UM_G4.0[EN]AVN PART 10.indd 10-18K_UM_G4.0[EN]AVN PART 10.indd 10-18 2014-10-02 오후 1:22:592014-10-02 오후 1:22:5