HYUNDAI MOBIS ADC30C6AN-1 DIGITAL CAR AVN SYSTEM User Manual Manual Part 2
HYUNDAI MOBIS CO., LTD. DIGITAL CAR AVN SYSTEM Manual Part 2
Contents
- 1. Manual Part 1
- 2. Manual Part 2
Manual Part 2
5-16 I Navigation
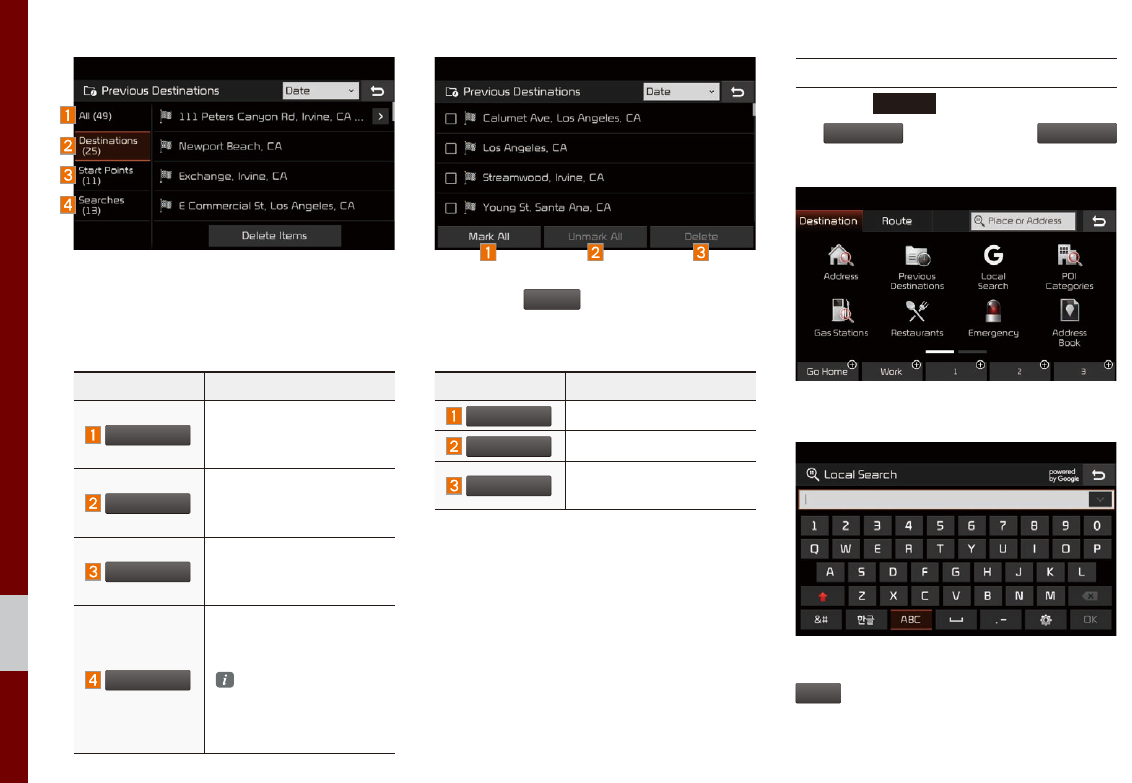
Arrange by all, latest destinations, latest
searched places and latest departing
places. Arrange in order of date and time.
Name Description
All
Display all destinations,
departing places, and
searched places.
Destinations
Display previous desti-
nation places for route
guidance.
Start Points
Display previous depart-
ing places for route
guidance.
Searches
Display previously
searched places for
route guidance.
But, not displayed
when the searched
places are set as
destination.
Press the
Delete
button to delete the
information.
Name Description
Mark All
Select all.
Unmark All
Deselect all.
Delete
Delete the selected
item(s).
Local Search
Press the
NAV
head unit key. ▶ Select
the
Destination
tab. ▶ Select the
Local Search
icon.
Runs Google Local Search.
Enter the desired keywords and press the
OK
button.

Destination Search I 5-17
05
Searching is in progress.
If one or more results are found, the
search results are displayed. Select one of
the search result.
Press the
Start
Guidance
button to start guid-
ance.
If search or guidance fails, the connection
error message is displayed as above.
Please try again.
POI Categories
Press the
NAV
head unit key. ▶ Select
the
Destination
tab. ▶ Select the
POI Categories
icon.
Select the desired item.
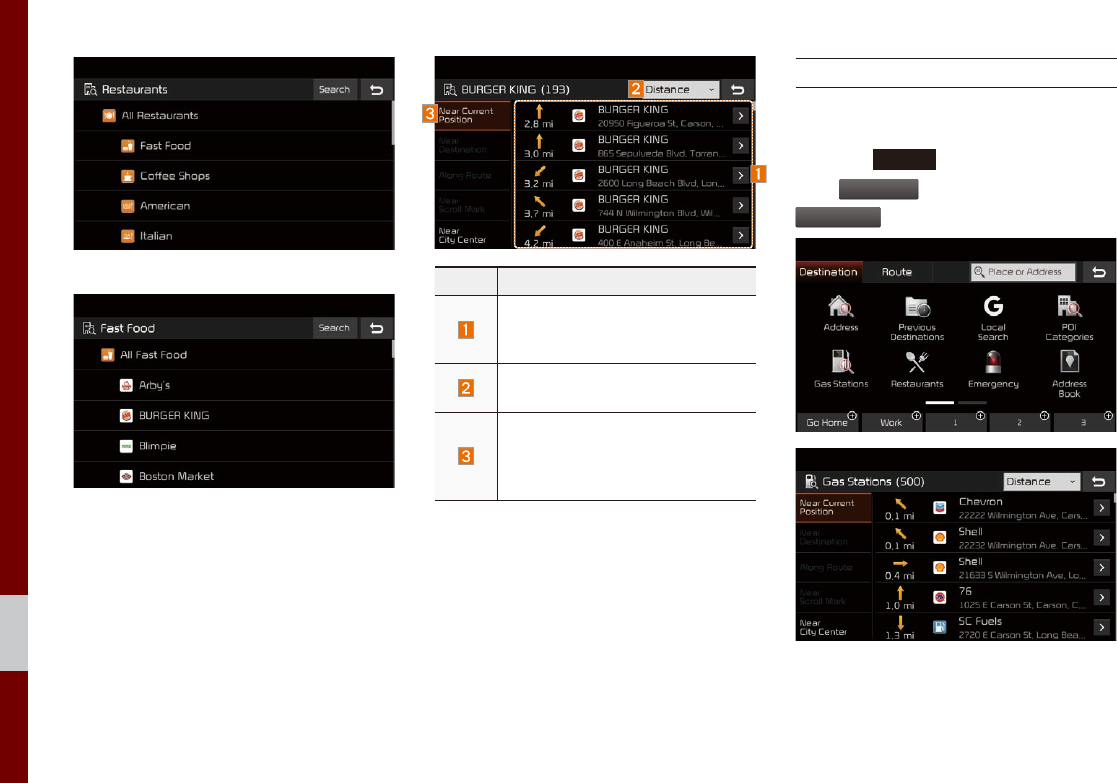
5-18 I Navigation
Select the desired item in the sub-categories. Name Description
Select the desired destination
among the searched items and
add it as a way point.
Arrange in order of Distance and
Name.
Arrange in order of Near Current
Position, Near Destination, Along
Route, Near Scroll Mark and Near
City Center.
Gas Stations
Search for gas stations.
Press the
NAV
head unit key. ▶ Select
the
Destination
tab. ▶ Select the
Gas Stations
icon.
Select the desired destinations among the
search items.
Destination Search I 5-19
05
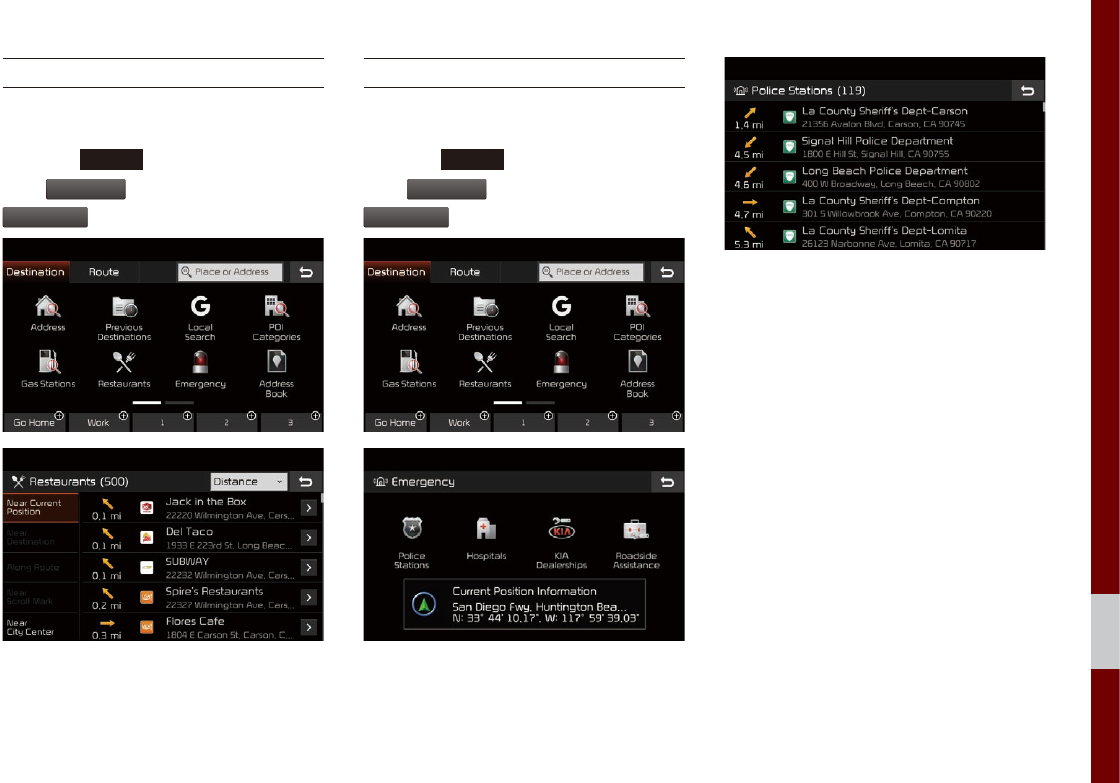
Restaurants
Search restaurants.
Press the
NAV
head unit key. ▶ Select
the
Destination
tab. ▶ Select the
Restaurants
icon.
Select the desired destination among the
searched items.
Emergency
Search emergency facilities.
Press the
NAV
head unit key. ▶ Select
the
Destination
tab. ▶ Select the
Emergency
icon.
Check the current location information and
select the desired item in the sub menu.
(ex. Police Stations)
Select the desired destination among the
searched items.
5-20 I Navigation
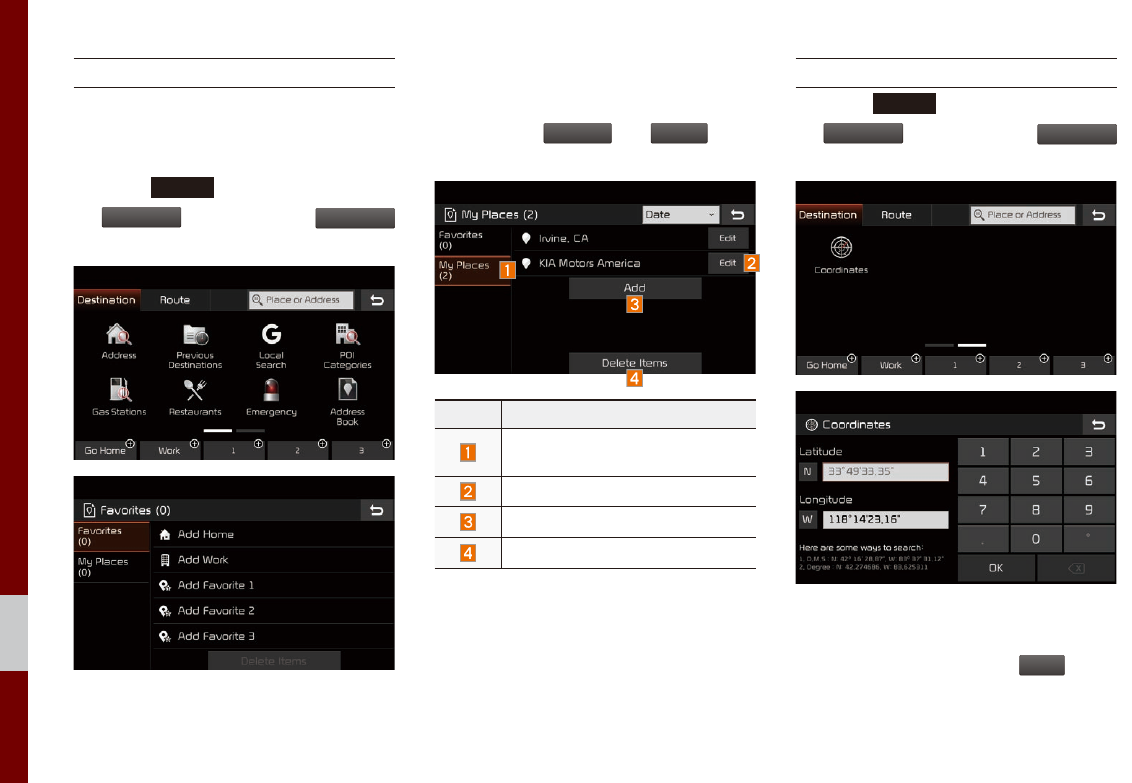
Address Book
Search the destination with the address
book.
Press the
NAV
head unit key. ▶ Select
the
Destination
tab. ▶ Select the
Address Book
icon.
Select the desired group.
If you save address in the Favorites tab, you
can set destinations easily by pressing the
icons such as
Go Home
and
Work
at the
bottom of the Destination menu.
Name Description
Select the desired destination
from the searched items.
Edit the item.
Register a new Address.
Delete the desired item.
Coordinates
Press the
NAV
head unit key. ▶ Select
the
Destination
tab. ▶ Select the
Coordinates
to search by coordinates.
There are two ways to search by coordi-
nates (D.M.S or Decimal Degrees). After
typing coordinates, press the
OK
button
to search.
Destination Search I 5-21
05
Press the
Start
Guidance
button to start guid-
ance.
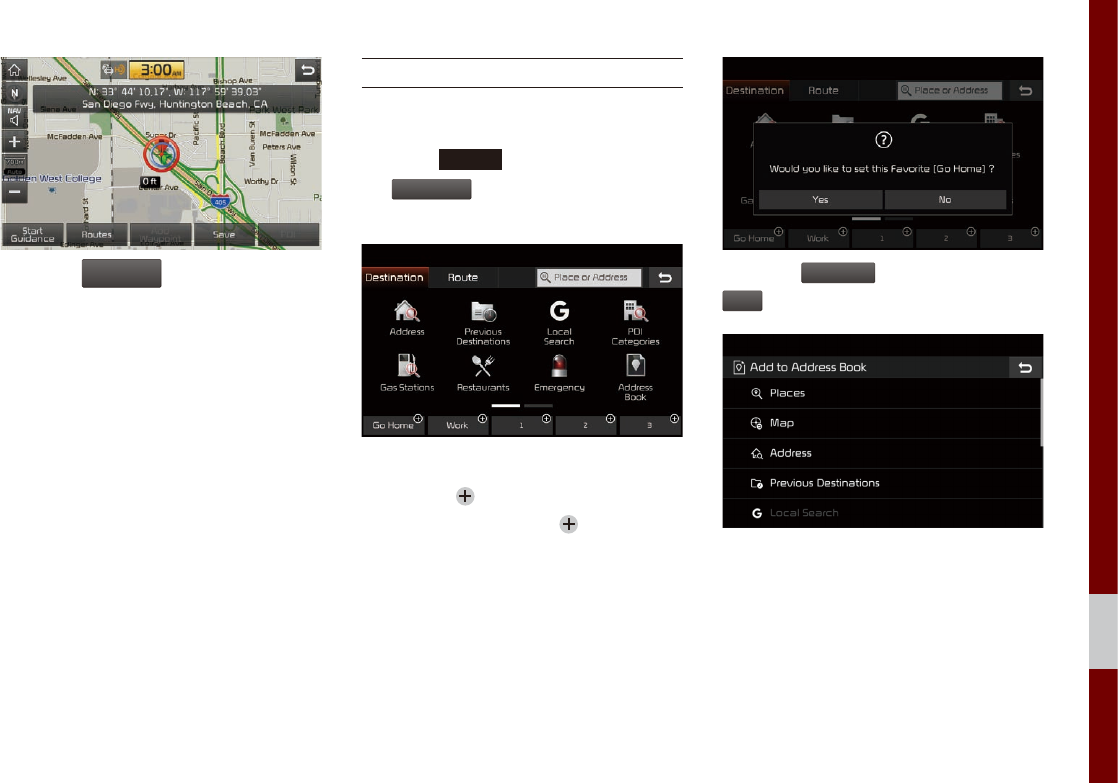
Favorite Places
Set the route using your favorite places.
Press the
NAV
head unit key. ▶ Select
the
Destination
tab. ▶ Select from favorite
places.
On the button where locations are not reg-
istered, the icon is displayed. When a
location is registered, the button disap-
pears and the buttons 1 to 3 are displayed
as your favorite places.
Press the
Go Home
button then press the
Yes
button to set the Favorite ‘Go Home’.
Work, Special 1, Special 2, and Special 3
can also be set as a Favorite using the same
steps.

5-22 I Navigation
Pressing any of the Favorite Place buttons
will start the route guidance to the saved
Favorite address.
Route Setting
The route can be set after searching for a
destination.
While the destination is set, the buttons
Start
Guidance
,
Routes
, and
Add
Waypoint
appear.
Press the desired button to change a des-
tination or add a waypoint.
Destination Setting
After searching the destination, press the
Start
Guidance
button to set the location as a
destination.
Destination Search I 5-23
05
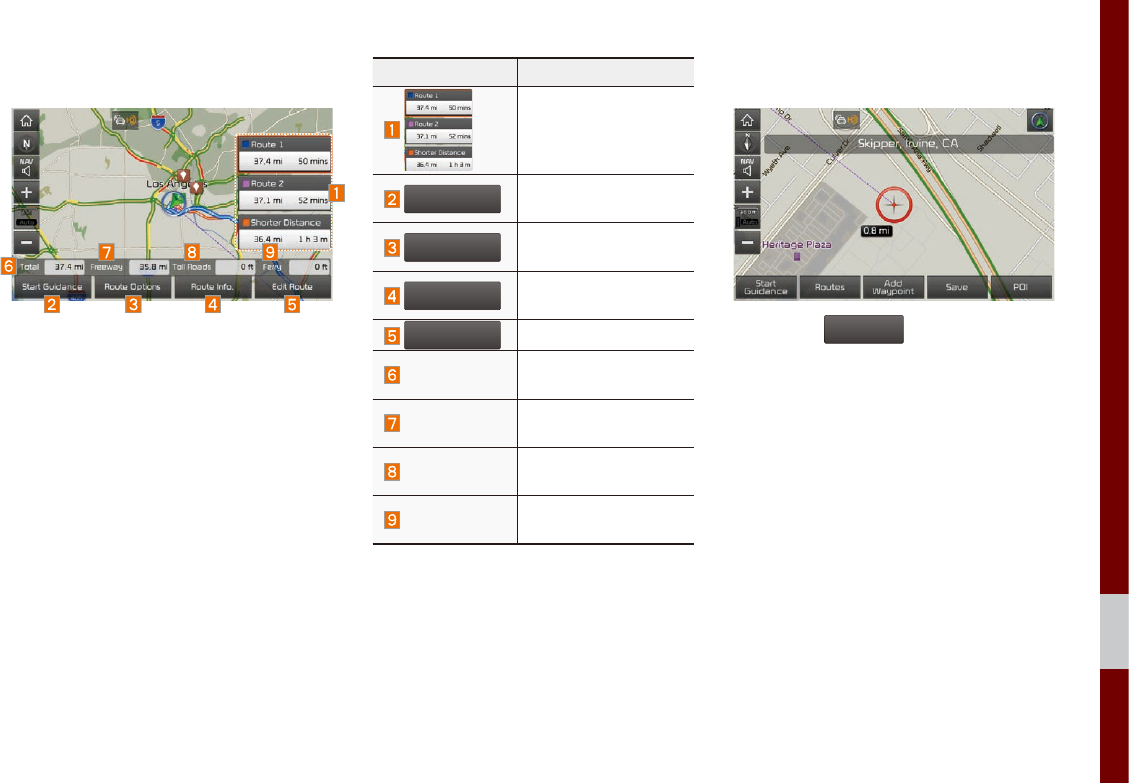
All Routes
Three routing options are displayed based
on real time traffic information and traffic
pattern information and shorter distance.
• Route 1: Select the best route based on
combine real-time traffic information and
traffic pattern data on the map.
• Route 2: Select the best route based on
real-time traffic information.
• Shorter Distance: Select short distance,
regardless of how fast or slow progress
will be calculated.
Name Description
Display total distance,
travel time. Select the
desired route.
Start Guidance
Start the guidance
with the route.
Route Options
Change the route
option.
Route Info.
You can check route
information.
Edit Route
Edit the route.
Total Display total distance
of the route.
Freeway Display length of free-
way on the route.
Toll Road Display length of toll
road on the route.
Ferry Display length of Ferry
route on the route.
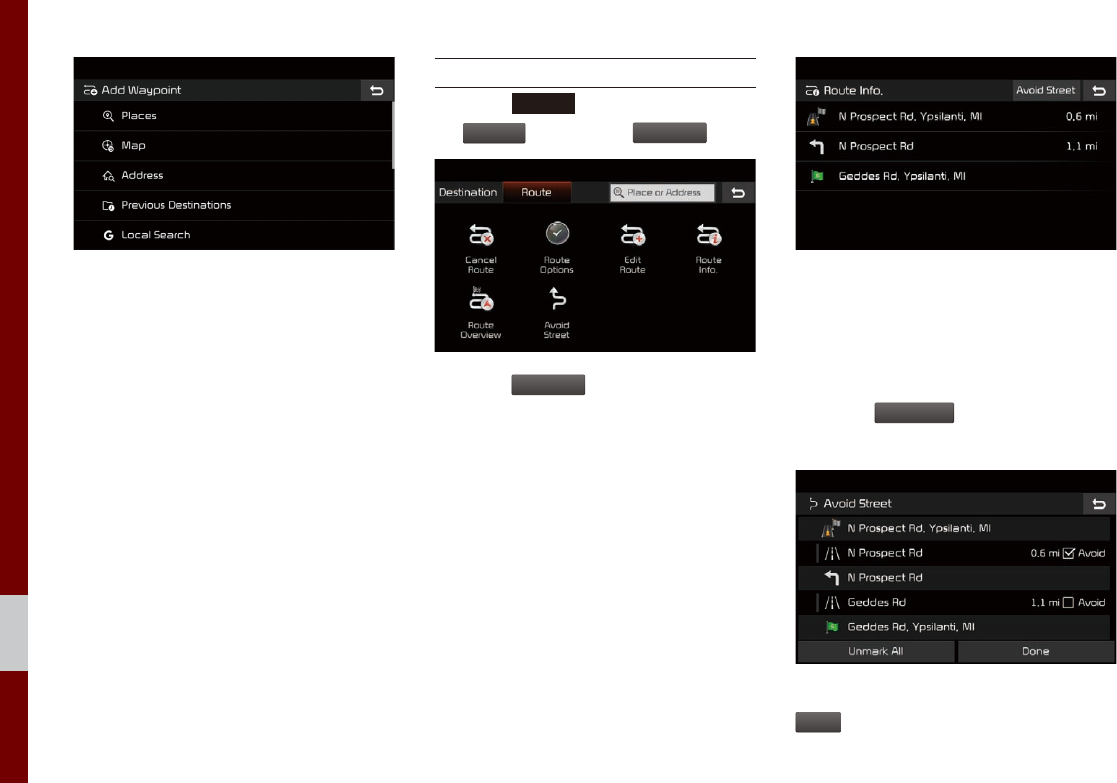
Adding Waypoint
Press the
Add
Waypoint
button to set the
position as a waypoint and search the
route.

5-24 I Navigation
Name Description
Display the selected
point on the map
screen.
Move the selected item
up.
Move the selected item
down.
Delete the selected
item.
Done
Press the button to fin-
ish editing.
Add Waypoint
Press the button to
add waypoint.
Registering Location
Press
Save
at the desired location to
register the location.
Enter the detailed information of the loca-
tion to save.
Route Guidance
Show route guidance detailed information.
Route Guidance Screen
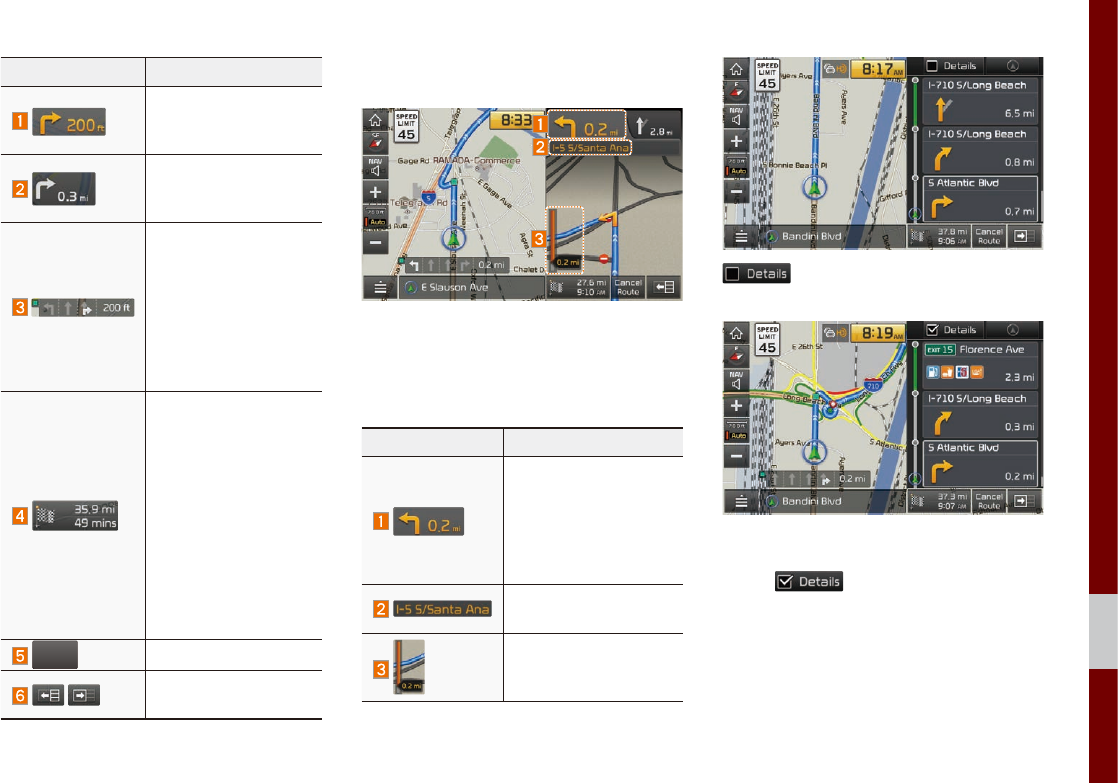
Destination Search I 5-25
05
Name Description
Displays the distance
and direction to the
first turn point.
Displays the distance
and direction to the
second turn point.
Displays the lane infor-
mation at the current
location. Display the
recommended direc-
tion in white, travelable
direction in white, and
the non-travelable
direction in grey.
Displays the distance
to the destination and
the estimated time
of arrival. Press the
button to check the
detailed information. If
no waypoint is set, you
will see the remaining
distance or estimated
time of arrival in turn
each time you click
the button.
Cancel
Route
Cancel the route.
Displays the Turn List.
Closes the Turn List.
Split Screen during Route Guidance
Approaching the turning point, the detailed
road and travel information is automatically
displayed on the right side of the screen.
Name Description
• Turn Point: Displays
direction and shape
to turn shortly.
• Distance to turn:
Displays distance to
next turn point.
Road name to maneu-
ver: Info of the road.
Detail Distance Bar:
Displays distance to
next turn point.
additional info can be displayed
on Freeway.
Additional info of Freeway exit or Rest
area can be displayed by pressing the
button .
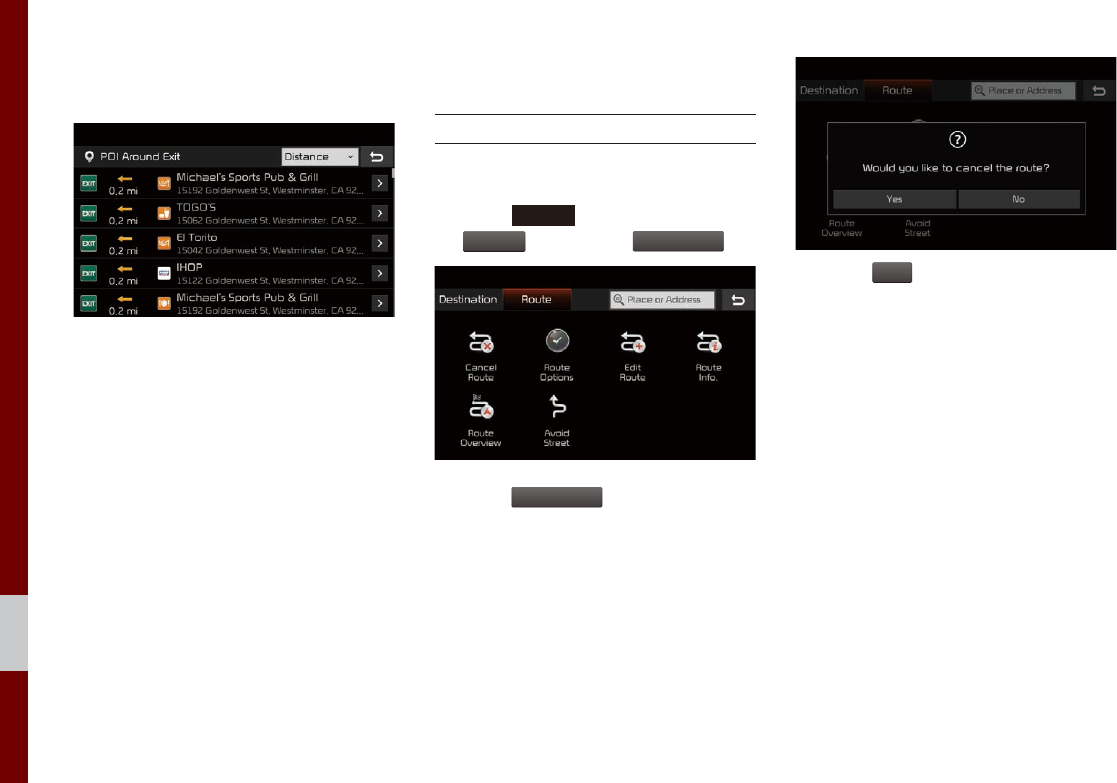
5-26 I Navigation
Detailed information for POIs around free-
way exit is listed by pressing POI symbols.
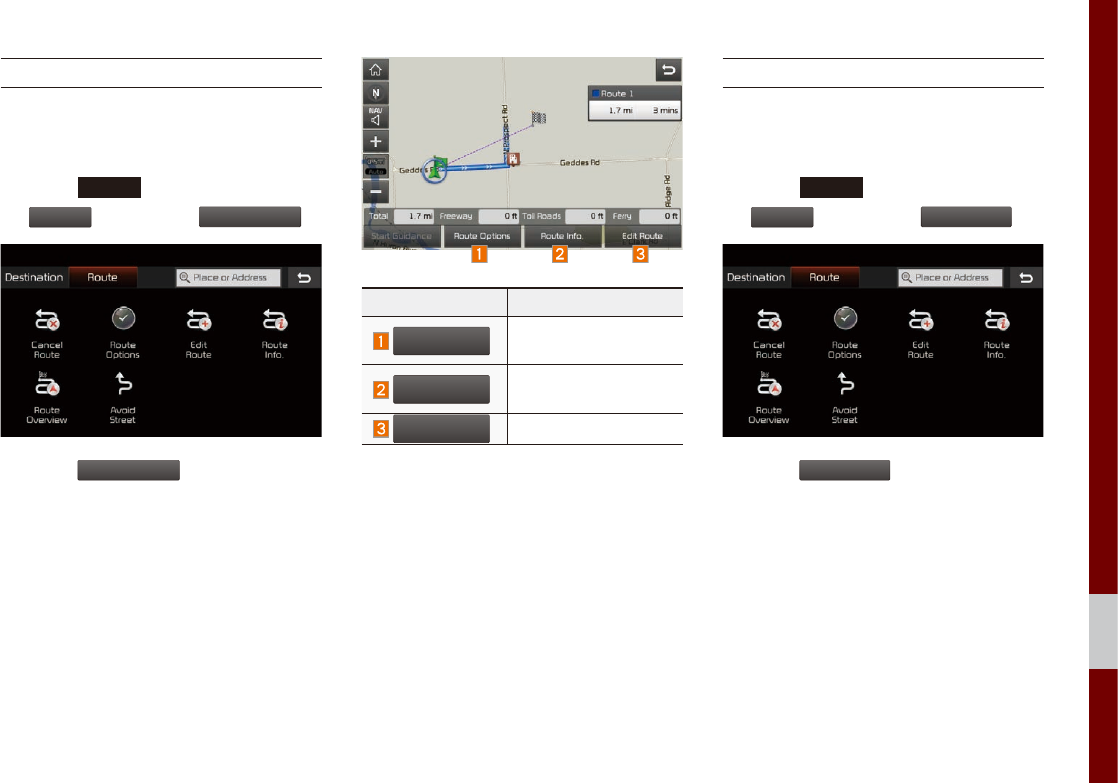
Route Search
Canceling Route
Cancel the route.
Press the
NAV
head unit key. ▶ Select
the
Route
tab. ▶ Select
Cancel Route
.
Press the
Cancel Route
icon.
Press the
Yes
button to cancel the route.

Route Search I 5-27
05
Route Options
Press the
NAV
head unit key. ▶ Select
the
Route
tab. ▶ Select
Route Options
.
Press the
Route Options
icon.
Determine the route options to guide the
route.
Editing Route
Edit the current route.
Press the
NAV
head unit key. ▶ Select
the
Route
tab. ▶ Select
Edit Route
.
Press the
Edit Route
icon.
Name Description
Display the selected
point on the map
screen.
Move the selected item
up.
Move the selected item
down.
Delete the selected
item.
Done
Press the button to fin-
ish editing.
Add Waypoint
Press the button to
add waypoint.
5-28 I Navigation
Add the waypoint through various search-
ing methods.
Display Route Information
Press the
NAV
head unit key. ▶ Select
the
Route
tab. ▶ Select
Route Info.
.
Press the
Route Info.
icon.
Check the information on the map. Select
the desired item to see the map informa-
tion.
Avoiding a road
Click the
Avoid Street
button to avoid the
street or road.
Check the desired item and press the
Done
button to finish.
Route Search I 5-29
05
Route Overview
Check the information on route including
the distance, estimated time, toll fees, etc.
Press the
NAV
head unit key. ▶ Select
the
Route
tab. ▶ Select
Route Overview
.
Press the
Route Overview
icon.
Name Description
Route Options
Change the search
option.
Route Info.
You can check route
information.
Edit Route
Edit the current route.
Avoid Street
Search new route by avoiding the selected
street(s).
Press the
NAV
head unit key. ▶ Select
the
Route
tab. ▶ Select
Avoid Street
.
Press the
Avoid Street
icon.
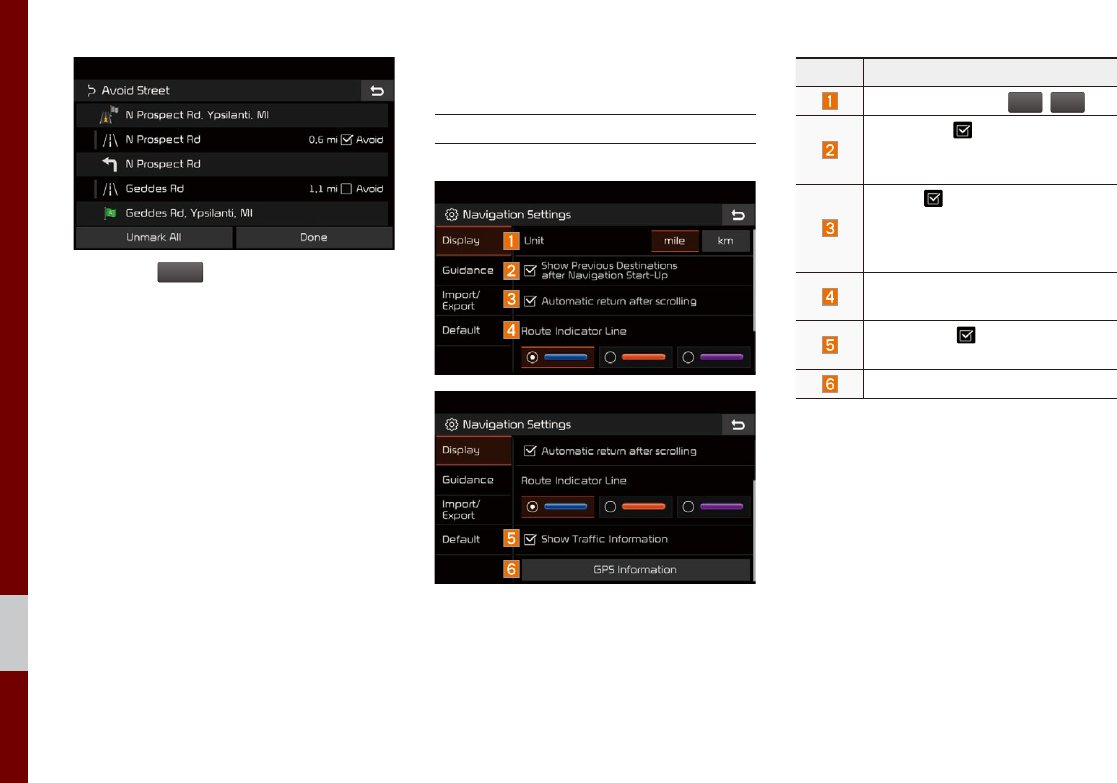
5-30 I Navigation
Press the
Done
to plan new route after
selecting the street(s) that you want to avoid.
Navigation Settings
Display
Change general settings.
Name Description
Change the unit of
mile
,
km
.
Press the button to change
the previous destination view set-
ting when starting the navigation.
When button selected, nav-
igation will automatically return
to current vehicle position after
scrolling through map display.
Change the route guidance line
colors.
Select the button to display
traffic information on the map.
Check the GPS information.
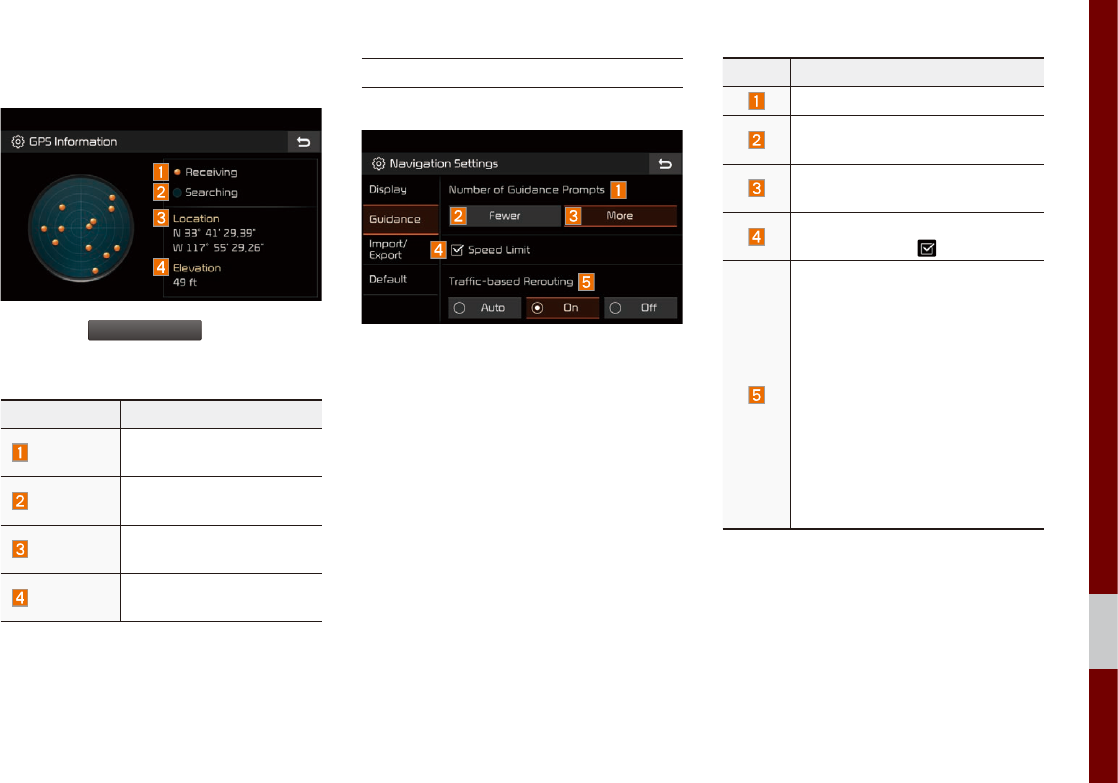
Navigation Settings I 5-31
05
GPS Information
Press the
GPS Information
to display the
detail GPS satellites information.
Name Description
Receiving Active when current posi-
tion is being calculated.
Searching Active when searching for
satellite signal.
Location Display current position of
the vehicle.
Elevation Display current elevation
of the vehicle.
Guidance
Change the guidance setting.
Name Description
Set the frequency of guidance.
Route guidance is given less fre-
quently.
Guidance will be provided fre-
quently.
Change whether to show speed
limit by pressing .
Searching faster routes internally
using traffic information.
• Auto: When set to Auto, during
route guidance, faster route is
automatically changed to avoid
traffic incident.
• On: If set to On, faster route
pop-up option appears during
route guidance.
• Off: If set to Off, no faster
routes are suggested to avoid
traffic incident during route
guidance.
5-32 I Navigation
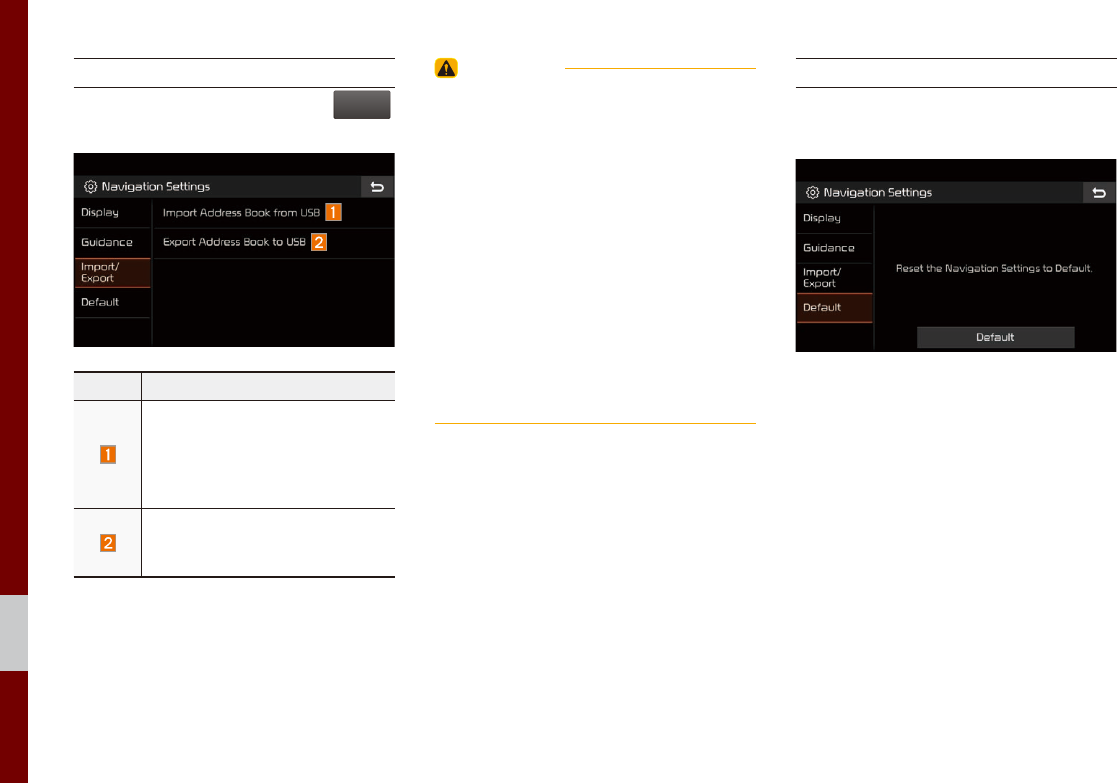
Import/Export
In navigation setting screen, press
Import/
Export
.
Press the desired category.
Name Description
The latest data of Navigation
Address Book which have been
exported to a USB device will
be imported to your navigation
device.
Export the Navigation Address
Book on your navigation device
to a USB device.
WARNING
• The amount of data available for importing to
a USB device is limited based on the number
of address book items supported by the
navigation system.
• If the data stored on the USB device uses
different coordinates than those used by the
current system, the importing location may
change.
• Please make sure that the address book have
been successfully imported before use.
• Only USB devices formatted in FAT16/32 are
supported.
• Certain USB devices may not be supported
due to compatibility issues.
Default
Reset the Navigation Settings to factory
default.

Troubleshooting I 5-33
05
Troubleshooting
The current position as shown on the navigation may differ from
the actual position under the following conditions.
The following occurrences are not malfunctions :
• When driving on Y-shaped roads
with narrow angles the current
position may be displayed in the
opposite direction
• Within city streets, the current posi-
tion may be displayed on the oppo-
site side or on an off-road position
• When changing the zoom level
from maximum to a different level,
the current position may become
displayed on a different road
• If the vehicle is loaded onto a ferry
or a car transport vehicle, the cur-
rent position may become stalled
on the last position prior to loading
• When driving on a spiral-shaped
road
• When driving in mountain regions
with sharp turns or sudden brakes
• When entering a road after passing
an underground parking structure,
building parking structure, or roads
with many rotations
• When driving in heavy traffic with
frequent starts and stops
• When driving under slippery condi-
tions, such as heavy sand, snow, etc.
• When driving on spiral-shaped roads
• When the tires have recently been
replaced (Especially upon use of
spare or studless tires).
• When using tires of improper size
• When the tire pressure for the 4 tires
are different
• When the replacement tire is worn or
used (Especially studless tires hav-
ing passed a second season).
• When driving near high-rise buildings
• When a roof carrier has been
installed
• When a long distance route is calcu-
lated while driving on an expressway
In such cases, continued driving will
automatically enable the system
to conduct map matching or use
updated GPS information to pro-
vide the current position (In such
cases, up to several minutes may be
required)
Correct route guidance may not occur due to search conditions or
driving position.
The following occurrences are not malfunctions :
• Guidance to go straight may be
given while driving on a straight
road
• Guidance may not be given even
when having turned at an inter-
section
• There are certain intersections in
which guidance may not occur
• A route guidance signaling for
a u-turn may occur in some No
u-turn intersections
• Route guidance signaling
entrance into a No-entry zone
may occur (No-entry zone, road
under construction, etc.)
• Guidance may be given to a posi-
tion that is not the actual destina-
tion if roads to reach the actual
destination do not exist or are too
narrow
• Faulty voice guidance may be
given if the vehicle breaks away
from the designated route. (e.g. if
a turn is made at an intersection
while the navigation provided
guidance to go straight.)
These situations may occur after conducting route calculation.
The following occurrences are not malfunctions :
• Guidance may be given to a
position differing from the current
position when turning at an inter-
section
• When driving in high speeds,
route recalculation may take a
longer period of time
• Route guidance signaling for a
u-turn may occur in some No
u-turn intersections
• Route guidance signaling entrance
into No-entry zone may occur.
(No-entry zone, road under construc-
tion, etc.)
• Guidance may be given to a position
removed from the actual destination
if roads to reach the actual destina-
tion do not exist or are too narrow
• Faulty voice guidance may be given
if the vehicle breaks away from the
designated route (e.g. If a turn is
made at an intersection while the
navigation provided guidance to go
straight.)

END USER LICENSE AGREEMENT
PLEASE READ THIS END USER LICENSE AGREEMENT (“EULA”) CAREFULLY BEFORE USING THE NAVIGATION SYSTEM.
This is a license agreement between you and Hyundai MnSoft, INC. including its affiliates (“COMPANY”) regarding a copy of the
COMPANY navigable map database together with associated software, media and explanatory printed documentation published by
COMPANY(jointly the “Product”). The Product is provided for your personal, internal use only and not for resale. It is protected by copyright
and is subject to the following terms which are agreed to by you, on the one hand, and COMPANY and its licensors (and their licensors
and suppliers) (collectively, “Licensors”) on the other hand.
By using the Product, you accept and agree to all terms and conditions in this End User License Agreement (“EULA”). IF YOU DO NOT
AGREE TO THE TERMS OF THIS EULA, YOU MUST PROMPTLY EXIT THE PRODUCT OPERATION PROGRAM AND DO NOT USE
OR ACCESS TO THE PRODUCT. YOU AGREE THAT YOUR RIGHTS UNDER THIS EULA MAY BE TERMINATED AUTOMATICALLY
WITHOUT NOTICE IF YOU FAIL TO COMPLY WITH ANY TERM(S) OF THIS EULA.
Terms and Conditions
Personal Use Only. You agree to use this Product together with COMPANY’s authorized application for the solely personal, non-commer-
cial purposes for which you were licensed, and not for service bureau, time-sharing or other similar purposes. Accordingly, but subject to
the restrictions set forth in the following paragraphs, you agree not to otherwise reproduce, copy, modify, decompile, disassemble, create
any derivative works of, or reverse engineer any portion of this Data, and may not transfer or distribute it in any form, for any purpose,
except to the extent permitted by mandatory laws. You may not assign this EULA or any of the rights or licenses granted under this EULA,
except when installed in the system for which it was created.
Restrictions. Except where you have been specifically licensed to do so by COMPANY, and without limiting the preceding paragraph, you
may not use the Product (i) with any products, systems, or applications installed or otherwise connected to or in communication with vehi-
cles, capable of vehicle navigation, positioning, dispatch, real time route guidance, fleet management or similar applications; or (ii) with or
in communication with any positioning devices or any mobile or wireless-connected electronic or computer devices, including without lim-
itation cellular phones, palmtop and handheld computers, pagers, and personal digital assistants or PDAs.
COPYING OR USE OF THE PRODUCT EXCEPT AS PERMITTED BY THIS EULA IS UNAUTHORIZED AND IS COPYRIGHT
INFRINGEMENT UNDER THE LAWS OF YOUR COUNTRY. IF YOU COPY OR USE THE PRODUCT WITHOUT COMPANY’S
PERMISSION, EXCEPT AS PERMITTED BY THIS EULA, YOU ARE VIOLATING THE LAW AND LIABLE TO COMPANY AND ITS
LICENSORS FOR DAMAGES, AND YOU MAY BE SUBJECT TO CRIMINAL PENALTIES.

THE PRODUCT MAY INCLUDE ENFORCEMENT TECHNOLOGY DESIGNED TO PREVENT (i) UNAUTHORIZED COPYING OF
THE PRODUCT ONTO PHYSICAL STORAGE MEDIA OR VIA TRANSFER OVER THE INTERNET OR OTHER ELECTRONIC
COMMUNICATION MEANS AND/OR (ii) ILLEGAL USAGE OF THE PRODUCT OTHER THAN BY A SPECIFICALLY AHTORIZED
DEVICE. YOU AGREE THAT COMPANY MAY USE THESE MEASURES TO PROTECT COMPANY AND THE LICENSORS AGAINST
COPYRIGHT INFRINGEMENT.
Uploads. The Product may provide functionality through which you are able to upload certain information about your use of the Product
(collectively, “Uploads”) to COMPANY’s servers or receive other services from COMPANY (collectively, the “Services”). If you use such
functionality, you authorize COMPANY to retain your Uploads on its servers. COMPANY will have no obligation to provide any Services,
may change the form and nature of any Services at any time with or without notice to you, will have no liability whatsoever to you for any
failure of the Product or Services to transmit your Uploads to or from COMPANY’s servers, may cease providing any Services at any time
with or without notice to you, and will have no obligation to retain your Uploads (or any other materials you may provide to COMPANY) on
its servers or return your Uploads (or any other materials you may provide to COMPANY) to you before deleting them from its servers.
Storage. The Product may provide functionality through which you are able to store information (such as images) on the device on which
you are using the Product. COMPANY will have no liability whatsoever to you or any third party for any failure of the Product to store any
such information on such device.
Personal Information. By using the Product, you agree to the collection, retention and processing of your personal data (including the loca-
tion of your mobile device) by COMPANY and to the storage and processing of such personal information on computers located outside
of the country in which you reside. Even though COMPANY has taken steps intended to protect your personal information from being
intercepted, accessed, used, or disclosed by unauthorized persons, COMPANY cannot fully eliminate security risks associated with your
personal information and cannot guarantee that its systems will not be breached. See [*] for additional information regarding COMPANY’s
use of your personal information.
WARNING. THE PRODUCT REFLECTS REALITY AS EXISTING BEFORE YOU RECEIVED THE PRODUCT AND IT COMPRISES
DATA AND INFORMATION FROM GOVERNMENT OTHER SOURCES. ACCORDINGLY, THE PRODUCT MAY CONTAIN INACCURATE
OR INCOMPLETE INFORMATION DUE TO THE PASSAGE OF TIME, CHANGING CIRCUMSTANCES, SOURCES USED AND
THE NATURE OF COLLECTING COMPREHENSIVE GEOGRAPHIC PRODUCT, ANY OF WHICH MAY LEAD TO INCORRECT
RESULTS. THE PRODUCT AND SERVICES MAY NOT TO BE USED FOR SAFETY OF LIFE APPLICATIONS, OR FOR ANY OTHER
APPLICATION IN WHICH THE ACCURACY OR RELIABILITY OF THE PRODUCT OR SERVICES COULD CREATE A SITUATION
WHERE PERSONAL INJURY OR DEATH MAY OCCUR. DO NOT ATTEMPT TO CONFIGURE THE PRODUCT OR INPUT
INFORMATION WHILE DRIVING. FAILURE TO PAY FULL ATTENTION TO THE OPERATION OF YOUR VEHICLE COULD RESULT IN
DEATH, SERIOUS INJURY, OR PROPERTY DAMAGE. BY USING THE PRODUCT, YOU ASSUME ALL RESPONSIBILITY AND RISK.

Disclaimer of Warranty. The Product is provided to you “as is,” and you agree to use it at your own risk. SUBJECT TO THE APPLICABLE
LAWS, COMPANY AND THE LICENSORS MAKE NO GUARANTEES, REPRESENTATIONS OR WARRANTIES OF ANY KIND,
EXPRESS OR IMPLIED, ARISING BY LAW OR OTHERWISE, INCLUDING BUT NOT LIMITED TO, CONTENT, QUALITY, ACCURACY,
COMPLETENESS, EFFECTIVENESS, RELIABILITY, PERFORMANCE, MERCHANTABILITY, FITNESS FOR A PARTICULAR
PURPOSE, NON-INFRINGEMENT, USEFULNESS, USE OR RESULTS TO BE OBTAINED FROM THE PRODUCT, OR THAT
THE PRODUCT OR SERVER WILL BE UNINTERRUPTED OR ERROR-FREE, OR THAT ERRORS IN THE PRODUCT OR
NONCONFORMITY TO ITS DOCUMENTATION CAN OR WILL BE CORRECTED. YOU ACKNOWLEDGE THAT THE PROVISIONS OF
THIS SECTION ARE A MATERIAL INDUCEMENT AND CONSIDERATION TO COMPANY AND THE LICENSORS TO GRANT THE
LICENSE CONTAINED IN THIS EULA AND TO PROVIDE YOU WITH ACCESS TO THE SERVICES.
Limitation of Liability: TO THE MAXIMUM EXTENT PERMITTED UNDER THE APPLICABLE LAWS, COMPANY AND THE LICENSORS
SHALL NOT BE LIABLE TO YOU: IN RESPECT OF ANY CLAIM, DEMAND OR ACTION, IRRESPECTIVE OF THE NATURE OF THE
CAUSE OF THE CLAIM, DEMAND OR ACTION ALLEGING ANY LOSS, INJURY OR DAMAGES, DIRECT OR INDIRECT, INCURRED
BY YOU OR ANY THIRD PARTY WHICH MAY ARISE IN CONNECTION WITH OR RESULT FROM THE USE OR POSSESSION OF
THE PRODUCT; OR FOR ANY LOSS OF DATA, PROFIT, REVENUE, CONTRACTS OR SAVINGS, OR OTHER DIRECT, INDIRECT,
INCIDENTAL, SPECIAL OR CONSEQUENTIAL DAMAGES ARISING OUT OF YOUR USE OF OR INABILITY TO USE THE PRODUCT,
ANY DEFECT IN THE PRODUCT, OR THE BREACH OF THESE TERMS OR CONDITIONS, WHETHER IN AN ACTION IN CONTRACT
OR TORT OR BASED ON A WARRANTY, EVEN IF COMPANY OR THE LICENSORS HAVE BEEN ADVISED OF THE POSSIBILITY OF
SUCH DAMAGES AND NOTWITHSTANDING THE FAILURE OF ANY LIMITED REMEDY PROVIDED HEREIN.

Exclusions. Some jurisdictions do not allow certain warranty exclusions or the limitation or exclusion of liability, so to that extent the above
exclusion may not apply to you. To the extent that COMPANY may not, as a matter of applicable law, disclaim any implied warranty or limit
its liabilities, the scope and duration of such warranty and the extent of COMPANY’s liability shall be the minimum permitted under such
applicable law. The disclaimer of warranty and limitation of liability set forth in this EULA does not affect or prejudice your statutory rights
where you have acquired the Product otherwise than in the course of business.
Third-Party Copyright Notices. The third-party sourced data has been incorporated into or made a part of the Product and is being subli-
censed to you subject to the terms and conditions of this EULA. In this regard, you shall not remove or tamper with any intellectual prop-
erty rights notice attached or used in relation to data supplied by the Licensors.
Entire Agreement. This EULA is the entire agreement between COMPANY (and the Licensors) and you pertaining to the subject matter
hereof, and supersedes in their entirety any and all previous written or oral communications or documents (including, if you are obtaining
an update, any agreement that may have been included with an earlier version of the Product) with respect to such subject matter.
Governing Law. This EULA shall be governed by the laws of the jurisdiction in which you reside at the date of acquisition of the Product.
Should you at that moment reside outside the European Union or Switzerland, the law of the jurisdiction within the European Union or
Switzerland where you acquired the Product shall apply. In all other cases, or if the jurisdiction where you acquired the Product cannot
be defined, the laws of the Republic of Korea shall apply. This EULA will not be governed by the U.N. Convention on Contracts for the
International Sale of Goods. The courts competent at your place of residence at the time you acquired the Product shall have jurisdiction
over any dispute arising out of, or relating to this EULA, without prejudice to COMPANY’s right to bring claims at your then current place of
residence.
Export Control. You agree not to export or re-export from anywhere any part of the Product in any form except in compliance with appli-
cable export laws, rules and regulations, including but not limited to the laws, rules and regulations administered by the Office of Foreign
Assets Control of the U.S. Department of Commerce and the Bureau of Industry and Security of the U.S. Department of Commerce.
Miscellaneous. If any provision of this EULA is found to be invalid or unenforceable, it will be enforced to the extent permissible and the
remainder of this EULA will remain in full force and effect. Failure by COMPANY to prosecute any right with respect to a default hereunder
will not constitute a waiver by COMPANY of the right to enforce rights with respect to the same or any other breach. No refunds or replace-
ments will be permitted on damaged Product.
U.S. Government End Users. If the Product is being acquired by or on behalf of the United States Government or any other entity seek-
ing or applying rights similar to those customarily claimed by the United States Government, this Product and related documentation are
“Commercial Items” as that term is defined at 48 C.F.R. (“FAR”) 2.101. This Product and related documentation are licensed to the United
States Government end users (a) only as “Commercial Items” and (b) with only those rights as are granted to all other end users in accor-
dance with this EULA, and each copy of Product delivered or otherwise furnished shall be marked and embedded as appropriate with the
following “Notice of Use,” and shall be treated in accordance with such Notice:
NOTICE OF USE
CONTRACTOR (MANUFACTURER/ SUPPLIER) NAME: Hyundai MnSoft, Inc.
CONTRACTOR (MANUFACTURER/SUPPLIER) ADDRESS: 74 Wonhyo-ro, Yongsan-gu,
Seoul 140-711, Republic of Korea
This Product and related documentation are commercial items as defined in FAR 2.101 and is
subject to this EULA under which this Product is provided.
© 2013 Hyundai MnSoft. All rights reserved.
If the Contracting Officer, federal government agency, or any federal official refuses to use the legend provided herein, the Contracting Offi-
cer, federal government agency, or any federal official must notify COMPANY prior to seeking additional or alternative rights in the Product.

End-User Terms Required by HERE. The Product utilizes map data that COMPANY licenses from HERE and the following copyright
notices apply to such map data (the “HERE Data”): © 2013 HERE. All rights reserved.
The HERE Data for areas of Canada includes information taken with permission from Canadian authorities, including: © Her Majesty the
Queen in Right of Canada, © Queen’s Printer for Ontario, © Canada Post Corporation, GeoBase ®, © Department of Natural Resources
Canada. All rights reserved.
HERE holds a non-exclusive license from the United States Postal Service® to publish and sell ZIP+4® information.
©United States Postal Service® 2010. Prices are not established, controlled or approved by the United States Postal Service®. The follow-
ing trademarks and registrations are owned by the USPS: United States Postal Service, USPS, and ZIP+4.
The HERE Data for Mexico includes certain data from Instituto Nacional de Estadística y Geografía.
Austria: © Bundesamt für Eich- und Vermessungswesen
Croatia, Cyprus, Estonia, Latvia, Lithuania, Moldova, Poland, Slovenia and/or Ukraine: © EuroGeographics
France: source: © IGN 2009 – BD TOPO ®
Germany: Die Grundlagendaten wurden mit Genehmigung der zustaendigen Behoerden entnommen
Great Britain: Contains Ordinance Survey data © Crown copyright and database right 2010, and Royal Mail data © Royal Mail copyright
and database right 2010.
Greece: Copyright Geomatics Ltd.
Italy: La Banca Dati Italiana è stata prodotta usando quale riferimento anche cartografia numerica ed al tratto prodotta e fornita dalla
Regione Toscana.
Norway: Copyright © 2000; Norwegian Mapping Authority
Portugal: Source: IgeoE – Portugal
Spain: Información geográfica propiedad del CNIG
Sweden: Based upon electronic data Ó National Land Survey Sweden
Switzerland: Topografische Grundlage: Ó Bundesamt für Landestopographie

United Kingdom: Contains public sector information licensed under the Open Government Licence v1.0 (see for the license http://www.
nationalarchives.gov.uk/doc/open-government-licence/) and is adapted from data from the office for National Statistics licensed under the
Open Government Licence v.1.0.
Israel: © Survey of Israel data source
Jordan: © Royal Jordanian Geographic Centre. The foregoing notice requirement for Jordan Data is a material term of the Agreement. If
Client or any of its permitted sublicensees (if any) fail to meet such requirement, HERE shall have the right to terminate Client’s license
with respect to the Jordan Data.
Mozambique: Certain Data for Mozambique provided by Cenacarta © 20XX by Cenacarta
Réunion: source: © IGN 2009 - BD TOPO ®
End-User Terms Required by ZENRIN. The Product utilizes map data that COMPANY licenses from ZENRIN and the following copyright
notices apply to such map data (the “ZENRIN Data”):
Europe: Junction View Data provided by ZENRIN CO., LTD. Copyright © 20XX, All Rights Reserved.
Europe: Junction View Data and Exit View Data provided by ZENRIN CO., LTD. Copyright © 20XX, All Rights Reserved.
North America: Junction View Data provided by ZENRIN USA, INC. Copyright © 20XX, All Rights Reserved; Junction View Data fourni par
ZENRIN USA, INC. Copyright © 20XX. Tous droits réservés; Las imágenes de las rutas alternas son proveídas por ZENRIN USA, INC.
Copyright © 20XX. Todos los derechos reservados.
© 2013 Hyundai MnSoft. All rights reserved.

Copyright for Brand Icon
The marks of companies displayed by this product to indicate business locations are the marks of their respective owners. The use of such
marks in this product does not imply any sponsorship, approval, or endorsement by such companies of this product.
Copyright for Junction View
Junction View Data provided by ZENRIN USA, INC. Copyright(C) 20XX, All rights Reserved.
About Map Updates
• You can contact your KIA dealer or call at 1-888-757-0010.
Information
• This product requires regular updates for software corrections, new functions and map updates. Updating may require up to 1 hour
depending on the data size.
• Turning off the power or ejecting the SD card during the update process may result in data loss. Make sure to keep the ignition on and
wait until updating is complete.
CAUTION
• Please use only the SD card that was included with the vehicle purchase.
• The use of a separately purchased SD card may result in damage due to heat related deformation.
• Product malfunctions caused by the use of separately purchased SD cards shall not be covered within the product warranty.
• Repeatedly connecting/disconnecting the SD card in a short period of time may cause damage to the device.

MEMO


6-2 I Voice Recognition
What is Voice Recognition?
The voice recognition feature operates the
multimedia system by recognizing voice
commands and enables hands-free oper-
ation of the system while you are driving
your car.
Not all possible voice commands are rec-
ognized by the system due to technological
limitations. To make up for these limitations,
the system displays the voice commands
that are available for you to use.
There are errors in communication between
people. Likewise, voice recognition some-
times misunderstands your voice command
in some circumstances. If this happens,
either check the screen for the available
options and say the command again, or
manually select and press the button for the
corresponding command on the screen.
Precautions Required
for Successful Voice
Recognition
1. Voice recognition supports only the
commands that are displayed on the
screen and written in the User's Guide.
2. To ensure the correct recognition and
execution of your command, say your
command when you hear the beep after
a voice prompt.
3. Voice recognition automatically ends if:
1) A call is incoming or outgoing
2) A media device (USB or iPod, etc.) is
connected or disconnected
3) The rear view camera is operated
4) The car engine starts or stops
5) A system key, such as
RADIO
key
or
MEDIA
key is selected
4. The microphone used for the voice
recognition system is located in the
headliner directly above the driver's
head. To make your commands better
understood, keep your body straight
in the driver's seat when speaking the
command.
5. Speaking naturally and clearly will
ensure better recognition of your voice
commands.
6. In the following cases voice recognition
will be affected by ambient noise.
1) The sound of the wind if any window
or the sun roof is open.
2) High speed blower from the air vents.
Set climate control to blow lower than
level 3.
3) Vibrations from passing through a
tunnel.
4) Vibrations from driving on an uneven
road.
5) Storms and heavy rain.
Voice Recognition
Starting/Ending and Setting Voice Recognition I 6-3
06
Starting/Ending
and Setting Voice
Recognition
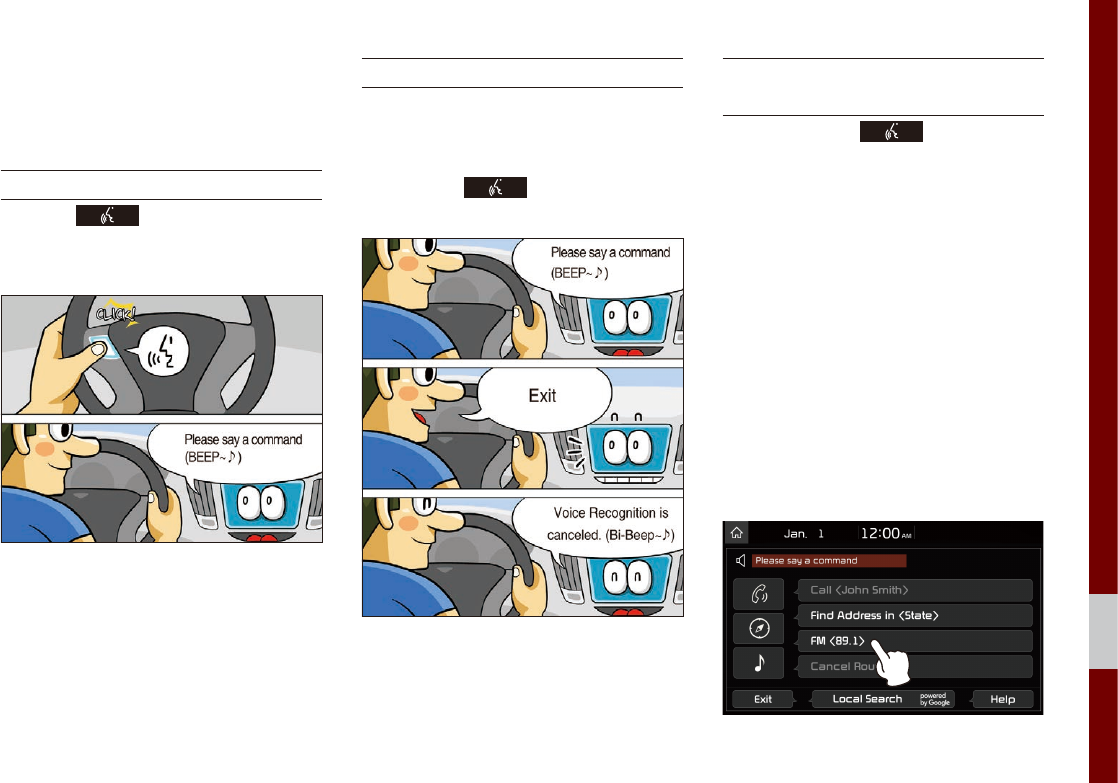
Starting Voice Recognition
Press the key briefly (less than 0.8
seconds) on the steering wheel control to
activate voice recognition.
Ending Voice Recognition
1. Select “Exit” to the left of the bottom to
end voice recognition.
2. Press and hold (more than 0.8 sec-
onds) the key on the steering
wheel control to end voice recognition.
Combining Voice Recognition
with On-Screen Commands
After pressing the key, say a com-
mand after the beep. The voice recognition
system will execute the desired operation
after understanding the command.
Alternatively, you may touch any of the
corresponding Commands on the screen
while the Voice Recognition system is in
operation.
Combining voice recognition with available
on-screen commands is useful when the
system is taking longer than expected or
the voice command did not execute as
desired.
6-4 I Voice Recognition
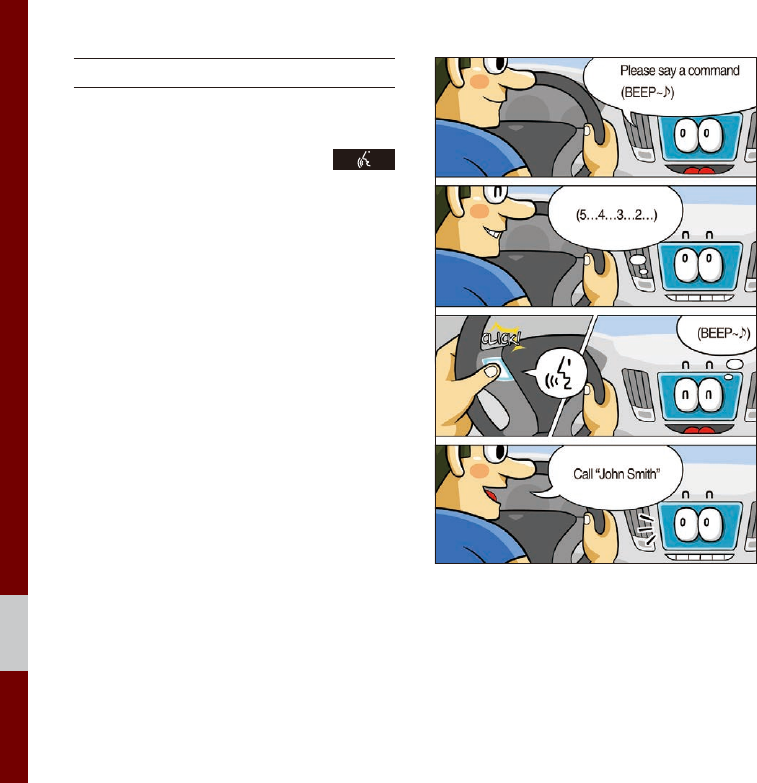
Extending the Listening Time
When the system is waiting for your com-
mand, after the voice prompt and beep
have been heard, if you press the
key (less than 0.8 seconds), then the beep
will sound again and standby mode will
restart.
When activated, voice recognition waits for
your command for 5 seconds. If you say
nothing for 5 seconds, a voice prompt will
ask for your command again.
Starting/Ending and Setting Voice Recognition I 6-5
06
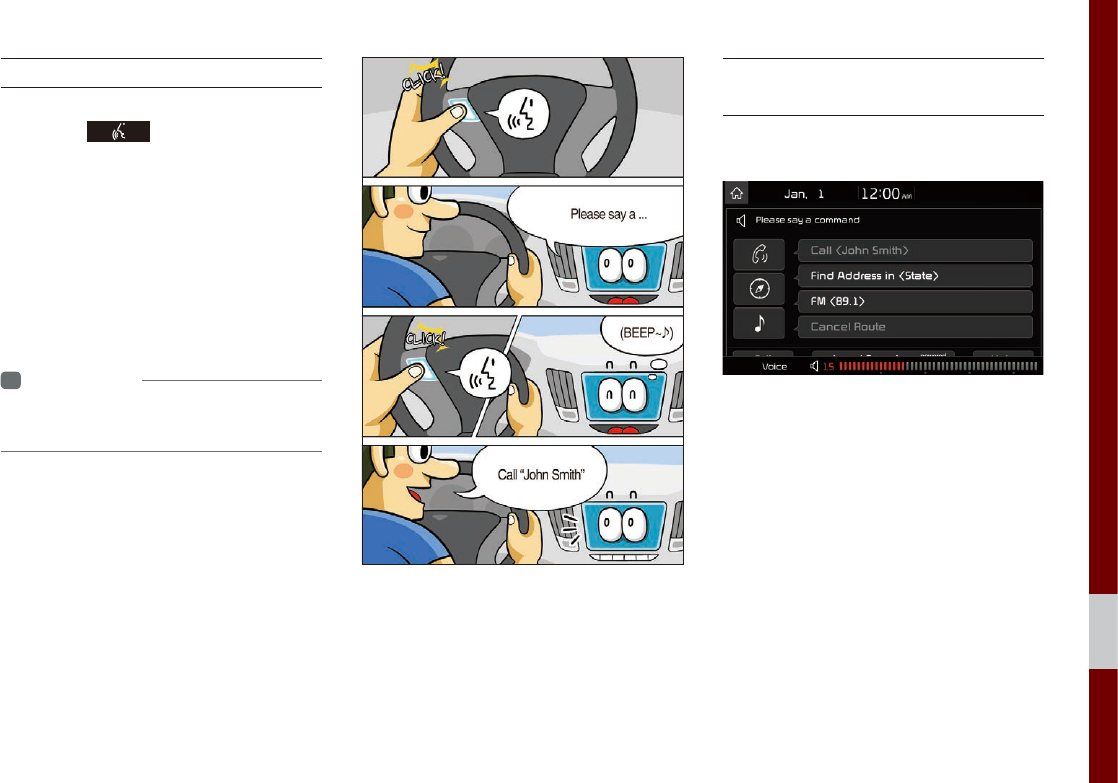
Skipping Prompt Messages
When you hear the prompt message,
press the key on the steering
wheel control to skip the message and go
directly to listening mode to say your com-
mand.
This results in faster operation when
you feel the message is too long or you
already know the command to use.
i
Information
• Refer to Part 9 for instructions on how to
change the Voice Recognition Settings.
Adjusting Voice
Recognition Volume
During voice recognition, rotate the vol-
ume knob to adjust the message volume.
6-6 I Voice Recognition
Voice Recognition
Screen Overview
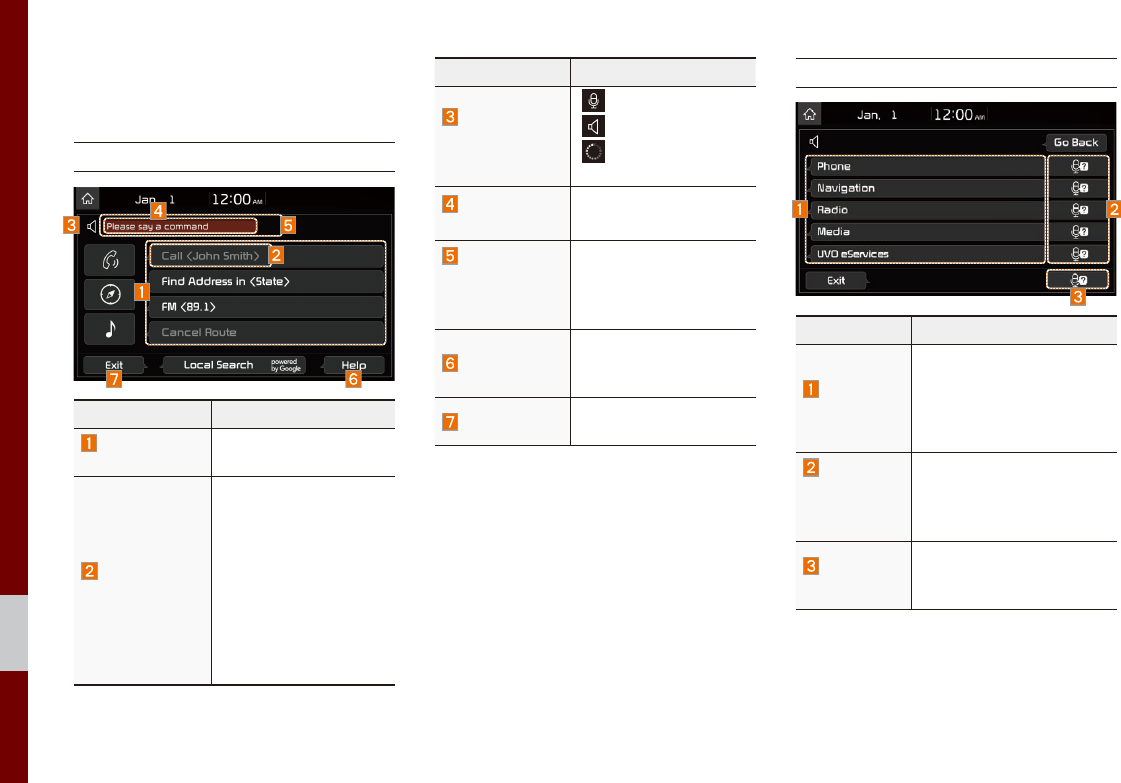
Start Screen
Name Description
Representative
Commands
Displays the represen-
tative commands.
Not available
command
Displays commands
that are not available
due to a failure in
meeting the conditions
for using them and
thus need additional
settings. The conditions
required for using them
will be described briefly
under each command.
Name Description
Voice
recognition
status icons
Standby
Voice guidance
Voice command
process
Recognized
results
Displays the voice rec-
ognition result.
User's
speaking
volume being
recognized
Displays the voice
command volume in
real time.
Help
Displays all available
help commands in a
tree format.
Exit Ends the voice recog-
nition.
Help Display
Name Description
Command
list
• Shows the available
commands.
• Select or say a command
to display additional com-
mands in detail.
How to
use for
selected
item
This section shows how to
use voice recognition for
the selected item.
How to use
in general
This section displays how
to use voice recognition in
general.

Voice Recognition Screen Overview I 6-7
06
Instructions for Using
Voice Recognition
Name Description
Detail
instruction
This section describes
how to use voice recog-
nition in detail.
Close
button
Closes the screen and
restarts voice recognition.
i
Information
• In the instructions screen, no voice is
recognized, so you must manually issue
commands. Because the instructions screen
displays a lot of content, you cannot view it
while driving for safety precautions.

6-8 I Voice Recognition
Voice Commands
Types of Commands
Voice recognition commands are classified as “Global Commands”
and “Local Commands”.
1. Global Commands (●): Commands that can be used immedi-
ately after activating voice recognition.
2. Local Commands (○): Commands that can be used when a
multimedia, navigation or Bluetooth function is running, or dis-
played on the screen, after activating voice recognition.
Call Commands
* Check the following before using call commands:
1. Voice commands related to phone calls can be used after con-
necting a Bluetooth device.
2. To call a person, for example “Call <John Smith>” whose name
is listed in Contacts, you must first download the Contacts list.
For details on downloading contacts, see “Part 3. Bluetooth >
Chapter 3. Bluetooth Phone > 3.10 Contacts”.
3. After downloading the Bluetooth contacts, it will take some time
to convert the Contacts into voice data during which time you
cannot make a call by name yet. The time it takes to convert
voice data may vary depending on the number of Contacts
downloaded on the phone.
Command Operation
●Call Displays downloaded Contacts, after this
you can make a call by saying the name.
●Call <Name> You can directly call a person by <Name> in
the downloaded Contacts.
●Call <Name>
on Mobile
You can call a person <name> directly to
the number that is saved as “Mobile” in the
downloaded Contacts.
e.g.) Call “John Smith” on Mobile
●Call <Name>
at Work
You can call a person <name> directly to the
number that is saved as “Work” in the down-
loaded Contacts.
e.g.) Call “John Smith” at Work
●Call <Name>
at Home
You can call a person <name> directly to
the number that is saved as “Home” in the
downloaded Contacts.
e.g.) Call “John Smith” at Home
●Call <Name>
on Other
You can call a person <name> directly to the
number that is saved as “Other” than “Mobile,
Home, or Work” in the downloaded Contacts.
e.g.) Call “John Smith” on Other
●Dial Number Displays a screen where you can say a
phone number to dial.
●Dial <Phone #> You can directly say the number to call.
e.g.) Dial 111 555 1234
●
Change
Bluetooth
Device
You can switch your Bluetooth connection to
another paired device.

Voice Commands I 6-9
06
Navigation Commands
* Check the following before you use navigation commands:
1. Search for and find addresses located in the state or province
your car is currently in.
If you want to search in another state, say the name of state/
province and then look it up.
Find Address is classified by states/provinces to provide you
with faster service.
2. Some commands such as “Cancel Route” are available only
when the destination is fixed.
Command Operation
●Find Address in
<State>
• Finds the address in <State> and sets it
as the destination.
e.g.) Find Address in California
• To find an address, you should say
"House Number → Street → City"
e.g.) 300 (Three Zero Zero) Main Street,
Almond
●Find Address Finds the address and sets it as the destina-
tion.
●Find POI
Find the points of interest. After this com-
mand, you can find the name of a location
step-by-step.
●Find
<POI>
Immediately finds <POI>. For detail of
<POI>, see “Find <POI>” list.
e.g.) Find “Banks”
Command Operation
●Map Moves to the current position on the naviga-
tion map
●Previous
Points
Displays a list combining Previous Destinations,
Previous Searches, and Previous Starting
Points all together.
You can then set a destination by saying the
list number.
●Previous
Destinations
Displays a list of recent destinations that you
can return to by saying the number in the list.
●Previous
Searches
Displays a list of recent searches, where you
can set a destination by saying the number in
the list.
●Previous
Starting Points
Displays a list of recent starting points that you
can return to by saying the number in the list.
●Traffic
Information Moves to the Traffic Information menu screen.
●Go Home
Set the destination to your home.
Your home must first be set in the Navigation
system.
●Go to Work
Set the destination to your work/office.
Your work/office must first be set in the
Navigation system.

6-10 I Voice Recognition
Command Operation
●Turn Guidance
On Turns on the voice guidance system.
●Turn Guidance
Off Turns off the voice guidance system.
●Zoom In Zooms in on the navigation map.
●Zoom Out Zooms out from the navigation map.
●Cancel Route Cancels the route to the fixed destination and
exits guidance.
●Destination
Information
Tells you the remaining distance and time to
your destination.
●Route Options Moves to the Route Options menu screen.
●Emergency
Services
Displays a list of nearest Police Station,
Hospital, Dealership, or Road Assistance.
You can then set a destination by saying the
list number.
●Police Station
Displays a list of the nearest police stations.
You can then set a destination by saying the
list number.
Command Operation
●Hospital
Displays a list of the nearest hospitals.
You can then set a destination by saying the
list number.
●Dealership
Displays a list of the nearest car dealerships.
You can then set a destination by saying the
list number.
●Road
Assistance
Displays a list of the nearest road assistance
locations.
You can then set a destination by saying the
list number.
●Show Route Displays a map overview of the entire route
to your destination.

Voice Commands I 6-11
06
Radio Commands
Command Operation
●FM
<87.5~107.9>
Tunes to FM <Frequency> according to
what you say.
e.g.) FM 87.5: FM eighty seven point five
●SiriusXM
<0~999>
Tunes to SiriusXM™ Channel <Channel
Number> according to what you say.
e.g.) SiriusXM 23: SiriusXM Twenty three
●AM <530~1710>
Tunes to AM <Frequency> according to
what you say.
e.g.) AM 530: AM Five thirty
UVO eServices Commands List
Command Operation
●Roadside Assist Connect with a Roadside Assist agent.
●Vehicle
Diagnostics
Informs you if diagnostic issues are found
in your vehicle
●My POIs Displays Points of Interest list which were
downloaded from Google Maps and MyUVO
●eService Guide Provides guidance on how to use UVO
eServices

6-12 I Voice Recognition
Other Commands List
(Commands used in List/Help)
Command Operation
●Help
Moves to the voice recognition help screen.
All available commands can then be identi-
fied and used.
○Line 1~4
(One~Four)
When you cannot select a certain name,
you can select it using numbers.
Simple numbers can be recognized, such
as “One” or “Two”.
○Yes/No
When voice recognition is activated, this
command is used when an answer is
requested for a confirmation question.
○Previous/Next
When four or more searched items are
listed, you can move to the previous or
next page using a voice command.
○Manual Input
When Dial entry results are displayed,
this command is used to search manually,
rather than to search with a voice com-
mand.
Voice recognition stops after this command
is used.
○Go Back Moves to the previous screen.
●Exit Ends the voice recognition.

Voice Commands I 6-13
06
“Find <POI>” List
Navigation location names can be changed after an update.
1. Restaurants
Restaurants
Fast Food Restaurants
Arby's
Boston Market
BURGER KING
Carl's Jr
Chick-fil-A
Chipotle
Church's Chicken
Dairy Queen
Firehouse Subs
Fleming's
Hardee's
In-N-Out Burger
IHOP
Jack in the Box
Jimmy John's
KFC
Little Caesars
Long John Silver's
McAlister's Deli
McDonald's
Panda Express
Panera Bread
Popeyes
Quiznos Sub
Schlotzsky's
SONIC
SUBWAY
Taco Bell
Taco John's
Waffle House
Wendy's
White Castle
American Restaurants
Applebee's
Bahama Breeze
Boston's Restaurant & Sports Bar
Cheeseburger in Paradise
Chili's Grill & Bar
Cool River
Denny's
Frisch's Big Boy
Good Eats
III Forks
Lee Roy Selmon's
Lone Star Steakhouse & Saloon
Longhorn Steakhouse
Luckys Cafe
Outback Steakhouse
Ponderosa
Publix
Seasons 52
Sheetz
Silver Fox
Texas Roadhouse
TGI Friday's
The Capital Grille
French Restaurants
Italian Restaurants
Bonefish Grill
Carrabba's Italian Grill
Chuck E Cheese's
Domino's
Olive Garden
Papa John's
Papa Murphy's
Pizza 73
Pizza Hut
pizza pizza
Continental Restaurants
Mexican Restaurants
Cantina Laredo
Chevys
El Chico
Japanese Restaurants
Chinese Restaurants
PF Chang's China Bistro
Korean Restaurants
Vegetarian Restaurants
Seafood Restaurants
Red Lobster
Latin American Restaurants

6-14 I Voice Recognition
Restaurants
Asian Restaurants
African Restaurants
Coffee Shops
Starbucks
Dunkin' Donuts
Tim Hortons
Other Restaurants
Auntie Anne's
Baskin-Robbins
Haagen-Dazs
Hooters
Roy's
TCBY
VAN DER VALK
Automotive
Kia Dealerships
Gas Stations
76
ampm
ARCO
BP
Canadian Tire
Casey's General Store
Cenex
Chevron
CITGO
Conoco
Esso
Exxon
Fleetfuels
GetGo
Giant Gasoline
GTO
Gulf
Husky
Ingles Gas Express
Marathon
Martin's Gasoline
Meijer
Mobil
Murphy Express
Murphy USA
Petro Stopping Centers
PETRO-CANADA
Phillips 66
Pioneer
QuikTrip
Rutter's
Sheetz
Shell
Sinclair
Speedway
Sunoco
Sunoco Canada
TEXACO
TravelCenters of America
Ultramar
Valero
Wawa
Parking
Auto Services
AAA
Advance Auto Parts
America's Tire
AutoZone
BOSCH Car Service
Certigard
Discount Tire
Firestone
GOODYEAR
Kal Tire
Midas
Napa
O'Reilly Auto Parts
Sears Auto Center
Road Assistance
Automobile Dealerships
Auto Parts
Car Washes
Motorcycle Dealerships
2. Automotive

Voice Commands I 6-15
06
Travel
Airports
Hotels
Americas Best Value Inn
AmericInn
Andaz
Ascend Collection
Baymont Inn & Suites
Best Western
Cambria Suites
Canadas Best Value Inn
Candlewood Suites
Clarion Hotel
Comfort INN
Comfort Suites
CONRAD
Country Inn & Suites by Carlson
COURTYARD by Marriott
Crowne Plaza
Days Inn
DELTA
Doubletree
Econo Lodge
Embassy Suites
Grand Residences by Marriott
Hampton Inn
Hampton Inn & Suites
Hawthorn Suites
Hilton
Hilton Garden Inn
Hilton Grand Vacations
Holiday Inn
Holiday Inn Express
Homewood Suites
Hotel Indigo
Howard Johnson
Hyatt Place
Hyatt
Hyatt Summerfield Suites
Intercontinental
JW Marriott
LA QUINTA INN
Lexington
Mainstay Suites
Marriott
Marriott VACATION CLUB
Microtel Inns & Suites
Motel 6
NOVOTEL
Omni Hotels
Park Inn
Park Plaza
QUALITY INN
Radisson
Radisson SAS
RAMADA
Red Roof Inn
Regent Hotels & Resorts
Renaissance
Residence Inn
Ritz-Carlton Club
Rodeway Inn
Sheraton
Sleep Inn
SOFITEL
Staybridge Suites
Studio 6
Suburban Extended Stay
Super 8
Thriftlodge Canada
Travelodge
Travelodge Canada
VAN DER VALK
WALDORF ASTORIA
COLLECTION
Wingate by Wyndham
Wyndham
Rest Areas
Tourist Information
Tourist Attractions
Travel Agents
City Centers
Rental Car Agencies
Alamo
AVIS
Budget
Dollar Rent A Car
Enterprise
Hertz
National
Thrifty
Campgrounds
3. Travel

6-16 I Voice Recognition
Travel
Ferry Terminals
Bus Stations
Local Transit
Train Stations
Shopping
Department Stores
Canadian Tire
Dollar General
Dollar Tree
Family Dollar
JCPenney
Kmart
Kohl's
Nordstrom
Sears
Sears Hometown Store
Target
T.J. Maxx
Walmart
Convenience Stores
7-Eleven
ampm
BP
Circle K
Fleetfuels
GetGo
GTO
Kangaroo Express
Murphy Express
Murphy USA
Petro Stopping Centers
QuikTrip
Rutter's
Sunoco Canada
TravelCenters of America
Wawa
Shopping Centers
Office Depot
Grocery Stores
Giant Eagle
Giant Food Stores
IGA
Ingles Markets
Food Lion
Kroger
Martin's Food Markets
Meijer
Publix
Sav-Mor Foods
Save-A-Lot
SuperValu
Music Stores
Bookstores
Barnes & Noble
Electronics Stores
AT&T
Best Buy
Future Shop
GameStop
Radioshack
Sprint
Staples
T-Mobile
OfficeMax
US Cellular
Verizon
Gift Shops
Sporting Goods Stores
Dick's Sporting Goods
Sports Authority
Home Specialty Stores
ABC Fine Wine & Spirits
Ace Hardware
4. Shopping

Voice Commands I 6-17
06
Shopping
Claire's
Costco
Home Depot
Lowe's
Merle Norman
PETCO
PETSMART
Sally Beauty Supply
SHERWIN-WILLIAMS
True Value
Clothing Shops
Mark's
Shoe Stores
Pharmacies
CVS/pharmacy
Giant Drugstore
Ingles Pharmacy
Kmart Pharmacy
Kroger Pharmacy
Martin's Drugstore
Meijer Pharmacy
Rite Aid
Shoppers Drug Mart
Target Pharmacy
Walgreens
General Merchandise
Recreation
Amusement Parks
Museums
Cinemas
Golf Courses
Sports Complexes
Sports Activities
Wineries
Video & Game Rental
Ski Resorts
Recreation Areas
Other Recreation Areas
Financial Services
Banks
Bank of America
BB&T
Chase
Citibank
Citizens Bank
Fifth Third Bank
Key Bank
PNC Bank
RBC Bank
Regions
SunTrust
TD Bank
TD Canada Trust
US Bank
Wells Fargo
ATMs
Check Cashing Services
Money Transfer
6. Financial Services5. Recreation

6-18 I Voice Recognition
Community
Police Stations
Post Offices
Libraries
Schools
Fire Departments
Churches
Synagogues
Convention Centers
City Halls
Civic Centers
Court Houses
Government Offices
Waste & Sanitary Services
Utilities
Business Facilities
Services
Hospitals
Medical Services
Physicians
Tax Services
Attorneys
Funeral Homes
Hair & Beauty Services
Cleaning & Laundry Services
Social Services
Communication
Dentists
Photography Services
Tailors & Alterations
Movers
Nursing Home
Optical Services
Personal Services
Repair Service
Veterinary Hospital
7. Community 8. Services

UVO Voice Local Search I 6-19
06
UVO Voice Local Search
What is UVO Voice
Local Search?
With UVO network service, you can
search for Google-provided place names
with your voice.
The search is done through network ser-
vices; it is only available when connected
to a communication network & UVO eSer-
vices has been activated.
Starting UVO Voice
Local Search
Press the key briefly (less than 0.8
seconds) on the steering wheel control to
activate voice recognition and say “Local
Search”
Name Description
Example
command
Shows an example to
ask for place search
Manual
switch button
Switches the UVO Voice
Local Search screen to
search.
End button Ends UVO Voice Local
Search.

6-20 I Voice Recognition
Siri Eyes Free
How to start Siri
If you want to use Siri, you have to con-
nect your iOS device to the Multimedia
system through Bluetooth.
(Please check whether your iOS device
supports Siri and turning Siri On)
Then you can use Siri while pressing and
holding key on the steering wheel.
How to use Siri
When you access the Siri screen while
pressing and holding key on the
steering wheel, you can select the
Speak
button and then you can speak what you
want. Note that the Multimedia system
only supports “Phone” related functions.
Other functions will be performed in your
iOS device. If you press voice key quickly,
Siri would re-start. If you hold down voice
key, Siri would be terminated and the
screen would go back to the previous
screen. Eyes-Free mode would be acti-
vated automatically while you are driving.
When shifting gears into P or putting the
Parking brake on, Eyes-Free mode would
be deactivated automatically.
i
Information
• Functions and feedbacks from voice
commands via Siri are executed in the iOS
device. If the iOS version is changed, the
functions and response may be different
according to the iOS device and the latest
version.

HD Radio™ Data
SiriusXM™ Data
part.7 Data Services
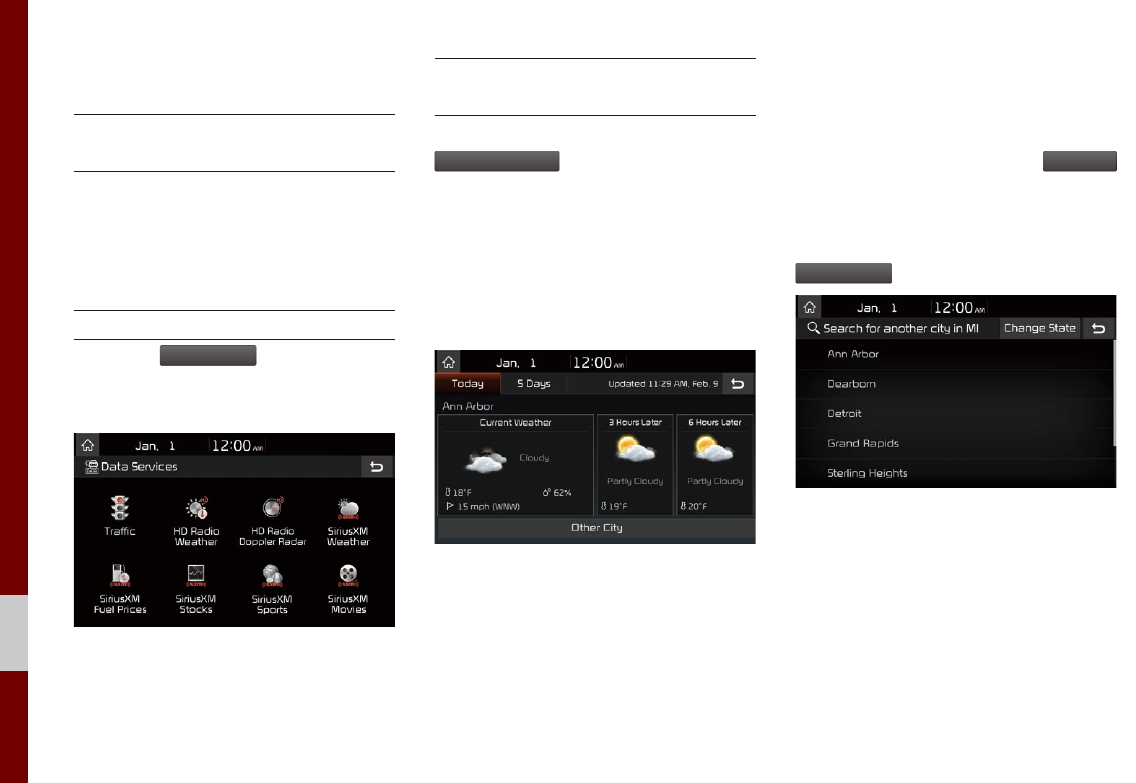
7-2 I Data Services
HD Radio™ Data
About HD Radio™
Data Services
The HD Radio™ Data Service provides
users with information such as Weather,
Doppler Radar and Traffic by using HD
Radio™ Technology.
Accessing HD Radio™ Data
Select the
Data Services
icon after select-
ing “All Menus” to enter Data Services
Mode.
HD Radio™ Weather
Information Mode
At the “Data Services” screen, select the
HD Radio Weather
icon to enter the Weather
Information mode.
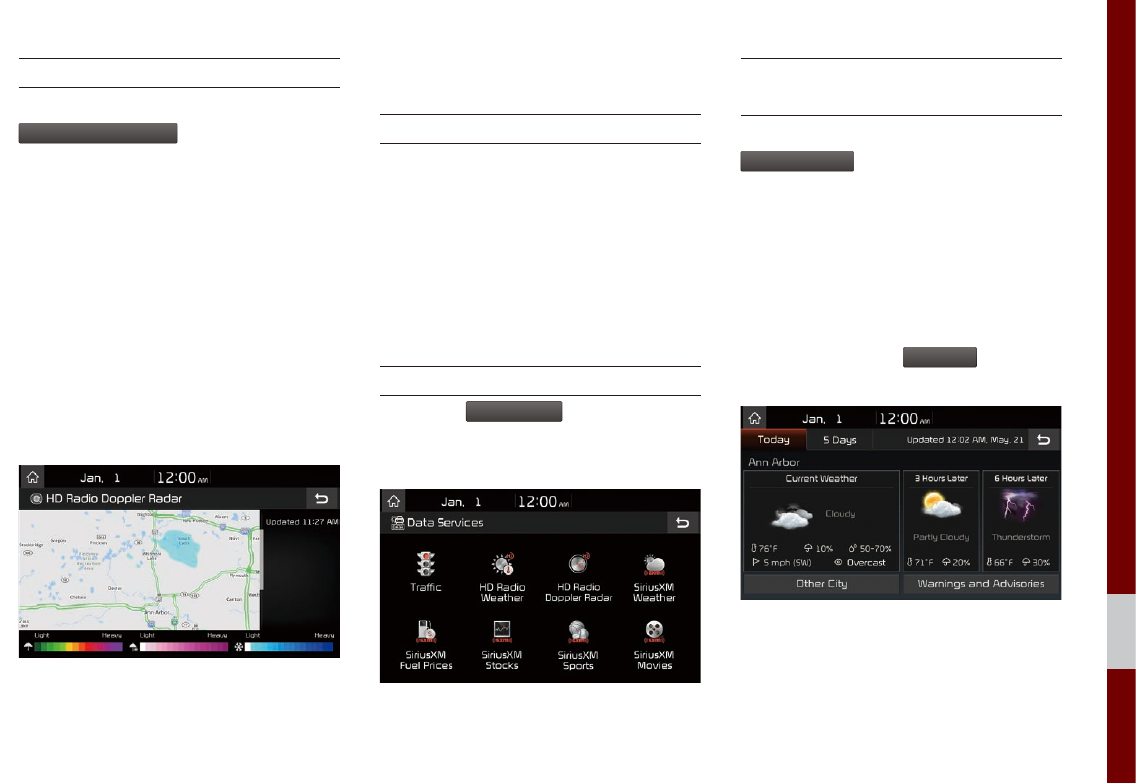
Weather Forecast
This service provides current weather
information and weather forecasts for the
next five days in your city.
Other City Option
This service provides access to weather
information from other cities.
To change the city, select the
Other City
button and select the desired city. From
this screen, there is also an option
to change the state by selecting the
Change State
button.
Data Services
SiriusXM™ Data I 7-3
07
HD Radio™ Doppler Radar
At the “Data Services” screen, select the
HD Radio Doppler Radar
icon to enter the
Doppler Radar mode.
Doppler Radar
This service provides Doppler Radar
views of the current *HD Radio™ cov-
erage market. This screen will change
automatically based on the *HD Radio™
coverage market.
* The HD Radio™ coverage market is the
area with the strongest signal at that time.
SiriusXM™ Data
About SiriusXM™ Data Service
The SiriusXM™ Data Service is a paid
membership satellite radio service that
provides users with information such as
Weather, Sports, Stocks, Fuel Prices and
Movies.
However, weather information is not sup-
ported for vehicles purchased in Canada.
Accessing SiriusXM™ Data
Select the
Data Services
icon after select-
ing All Menus to enter the Data Services
Mode.
SiriusXM™ Weather
Announcement
At the “Data Services” screen, select the
SiriusXM Weather
icon to enter the Weather
Announcement mode.
Weather Forecast
This service provides current weather
information and weather forecasts for the
next five days in your region. To change
the region, select the
Other City
button and
select the desired region.
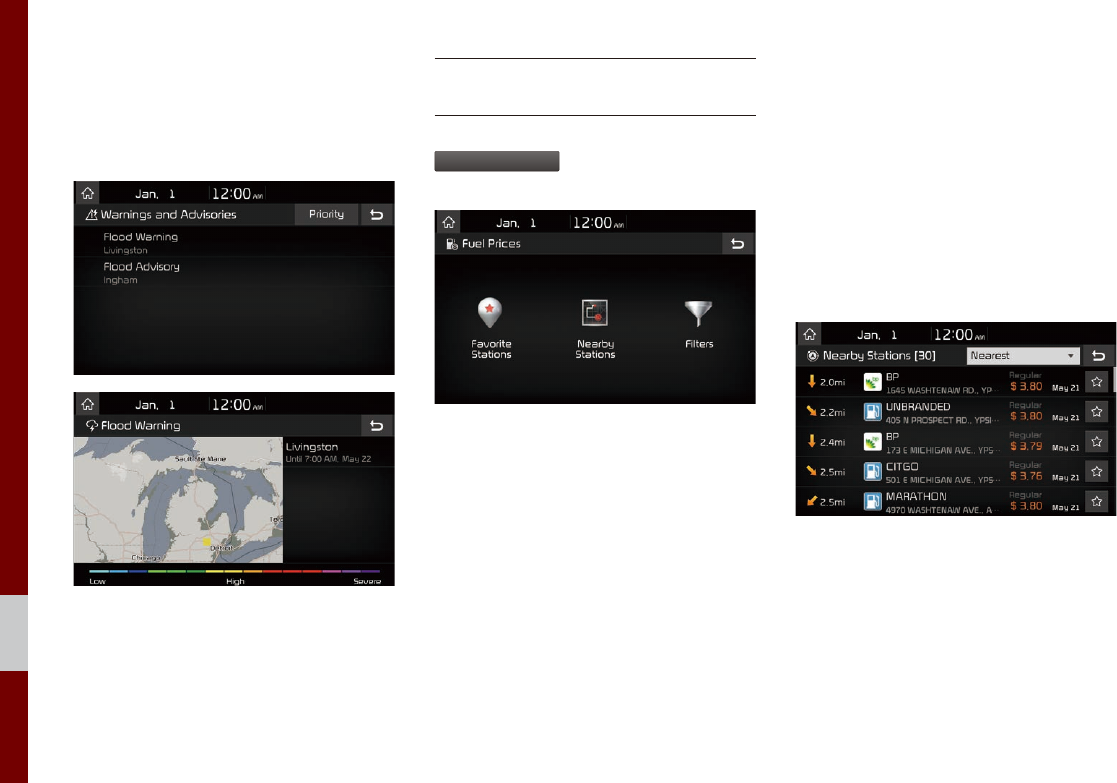
7-4 I Data Services
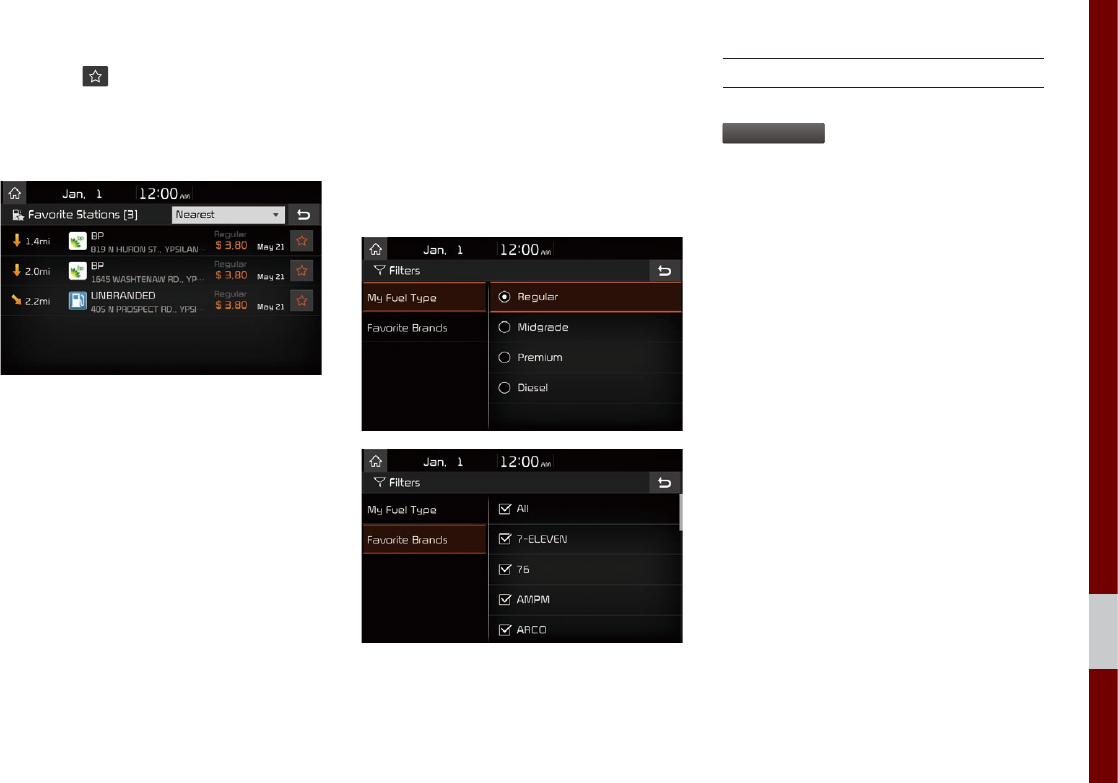
Warnings and Advisories
This service provides weather warnings
and advisories, such as tornado, storm,
flood, etc.
SiriusXM™ Fuel Price
Information
At the “Data Services” screen, select the
SiriusXM Fuel Prices
icon to enter the Fuel
Prices Information mode.
Search for Nearby Stations, and
Register Key Locations as Favorite
Stations.
Search for nearby stations with the “Nearby
Stations” menu.
It shows station locations, starting from the
nearest one, and select “Nearest” menu
on the top right side to further sort them
by price or brand name.
SiriusXM™ Data I 7-5
07
Select the button to the right of the list
to register key locations as a Favorite
Station so that you can go there again with
the “Favorite Stations” menu.
My Fuel Type Settings
With the “Filters” menu, you can select fuel
types and favorite brands.
When searching for Nearby Stations, the
results will reflect selected fuel types and
brand information.
SiriusXM™ Stock Information
In the “Data Services” screen, select the
SiriusXM Stocks
icon to enter the Stocks
mode.
Stocks is a feature that shows the current
value and change of stocks.
For symbols which you are interested in,
select the icon to save the symbol as a
part of the “Saved” symbols which can be
viewed from the “My Favorites” button on
the Stocks Main screen.
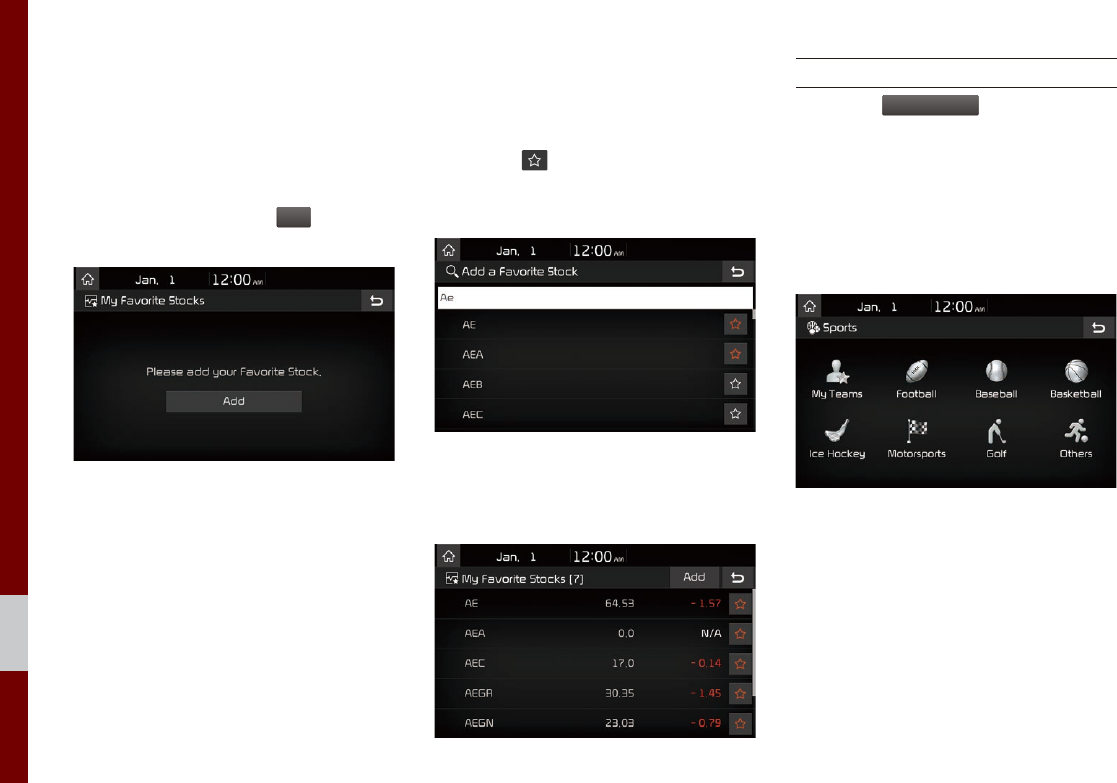
7-6 I Data Services
My Favorites
My Favorites shows a list of stocks added
by the user. When entering the Stocks
menu for the first time, a screen is dis-
played for you to add your favorite stock
information. Select the
Add
button to
move to the stock search screen.
Stock Search
Use the Stock Search menu to search for
specific stocks.
Select the button after searching for
your favorite stocks to save them in “My
Favorites”.
In the My Favorites screen, you can find
the selected stock information that you
registered.
SiriusXM™ Sports Information
Select the
SiriusXM Sports
icon to enter the
Sports mode.
This service provides real-time updated
information on scores and schedules for
major sports, such as NFL, NBA, NCAA
football, NCAA basketball, NHL, MLB,
NASCAR and more.
SiriusXM™ Data I 7-7
07
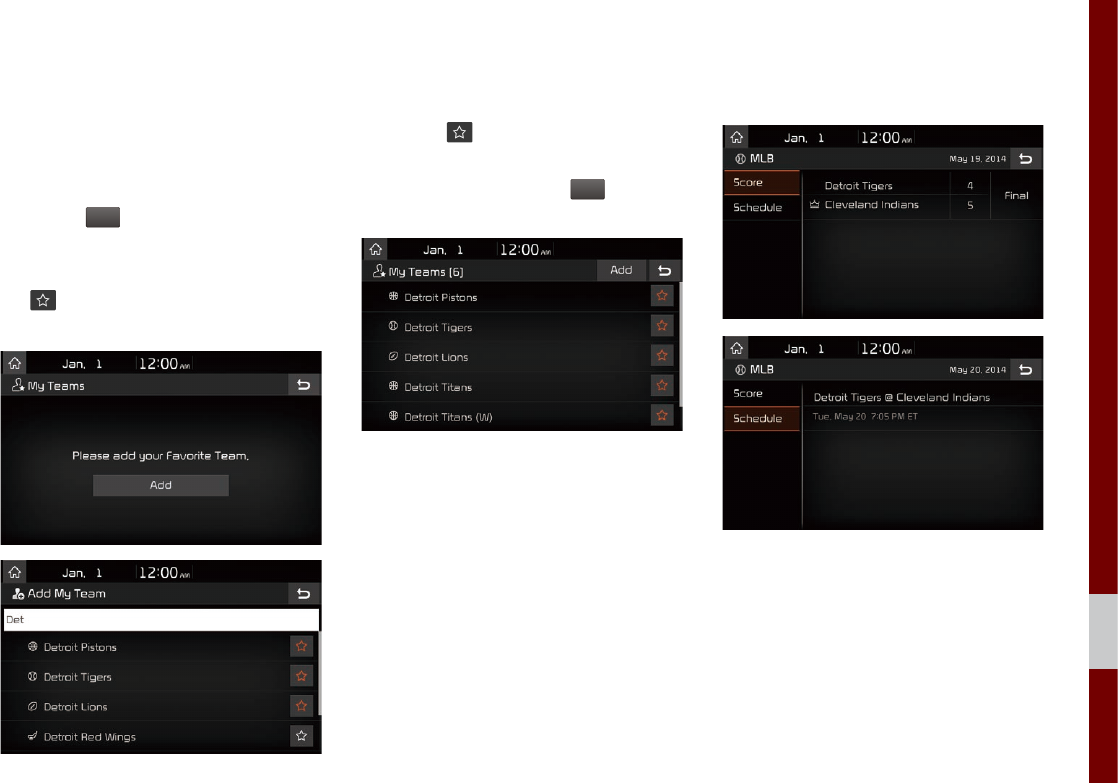
My Teams
You can save teams which you are inter-
ested in as part of My teams to easily view
related scores and schedules.
Select the My Teams menu and then
select the
Add
button to search for and
register your favorite teams.
Search for your favorite teams and select
the button on the right to add it to the
“My Teams” list.
You can always check the list of teams
that you added in the “My Teams” menu.
Select the button on the right side of
the team name to delete the team from
“My Teams” or select the
Add
button to
add other teams.
Select the team name to check daily
results and recent schedules for that team.
7-8 I Data Services
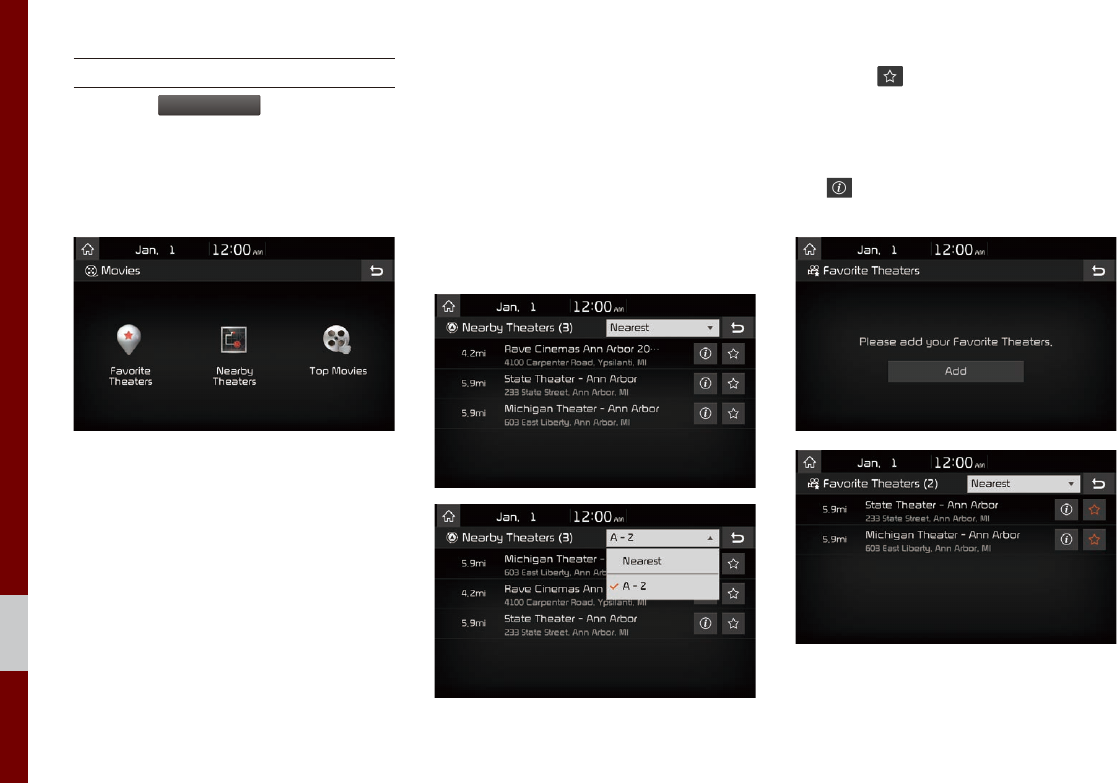
SiriusXM™ Movie Information
Select the
SiriusXM Movies
icon to enter the
Movie mode.
You can check recent movies and nearby
theaters, and also register your favorite
theater locations.
Search for Nearby Theaters, and
Register Any Key Locations as Favorite
Theaters.
In the “Nearby Theaters” menu, you can
search for any nearby theaters.
It shows theaters, starting from the nearest
one, and selecting the “Nearest” menu at
the top right side will sort them by name.
Select the button to the right of the list
to register your favorite theater so that you
can always check it again using the
“Favorite Theaters” menu and selecting
the button to view the current movie
information for that theater.

I 7-9
07
In the “Top Movies” menu, you can check
for any movies that are currently popular.
Select the button to the right of a
movie title to view the plot summary and
any other detailed information.
SiriusXM™ Data I 7-9

MEMO

Climate
Camera
part.8 Other Features
8-2 I Other Features
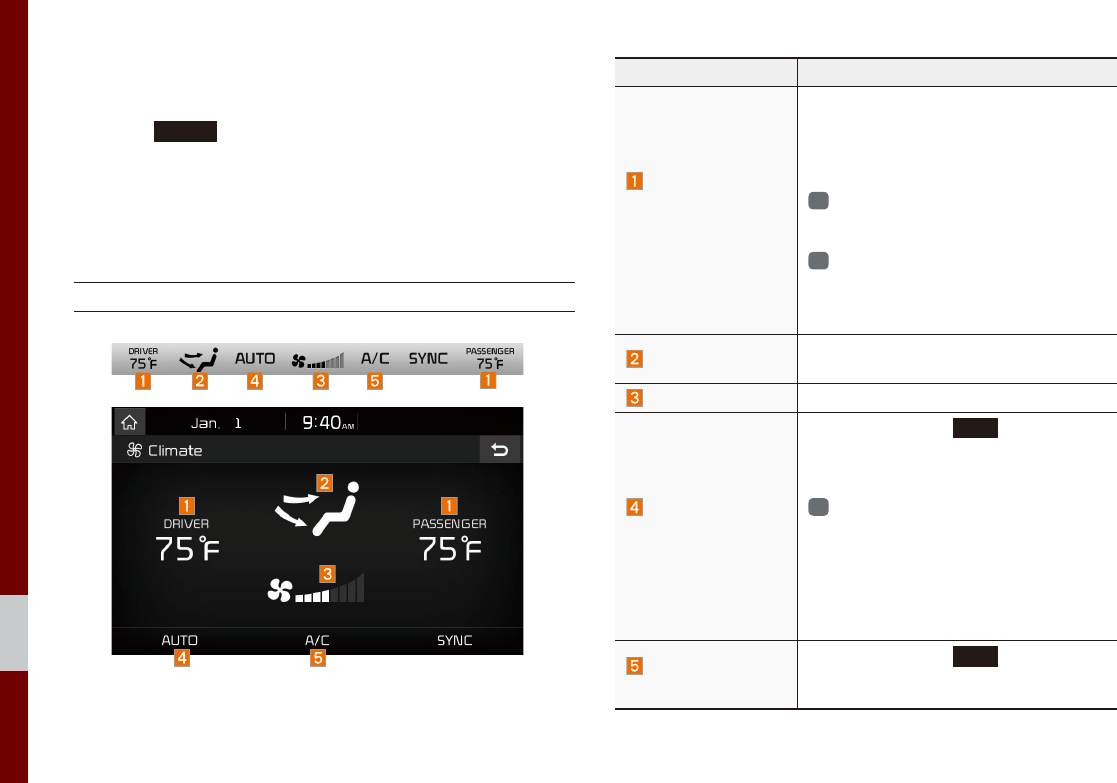
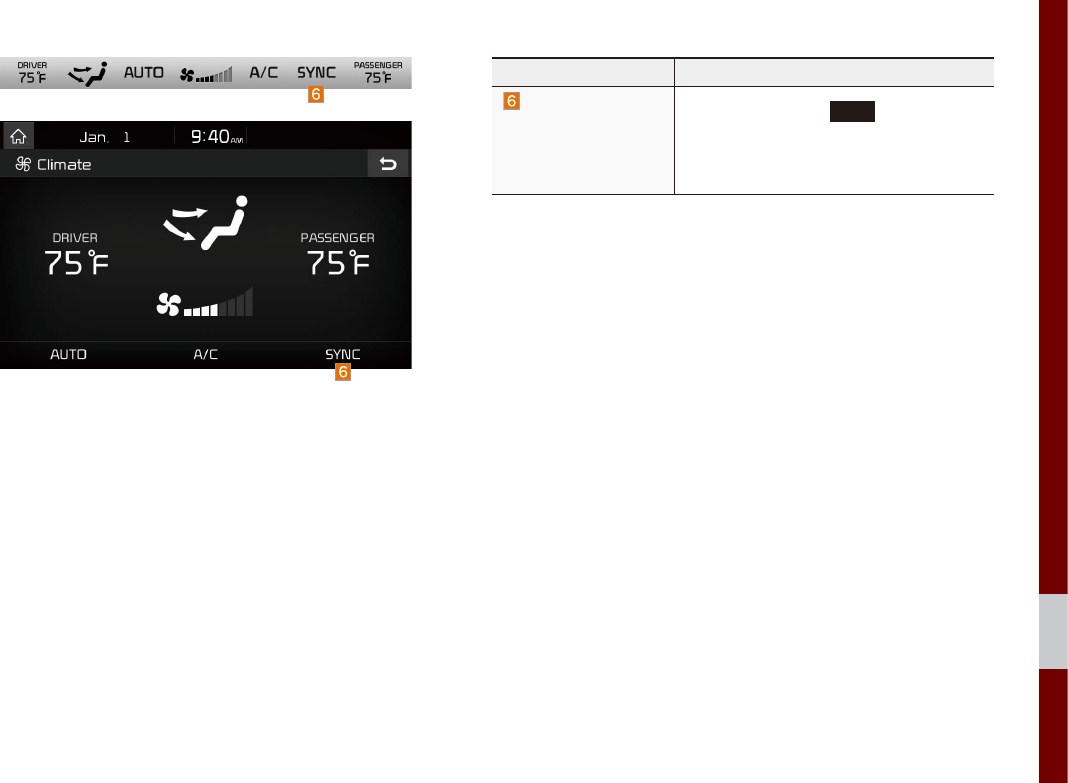
Climate
Press the
CLIMATE
key for the climate system to see status infor-
mation in the full screen display.
While multimedia or navigation is in use, the climate system infor-
mation will be displayed over top when you control the tempera-
ture (TEMP) or turn on the air conditioner (A/C).
Basic Mode Screen
Name Description
Set the tempera-
ture of the driver's
seat and passenger
seats
Displays the configured temperature set-
tings for the driver's seat and the passen-
ger seats. Cooling or heating will continue
until the temperature matches the config-
ured temperature settings.
i
The internal temperaure can be con-
trolled in incrments of 1°F within a range
of 63°F to 89°F.
i
LOW is displayed when the tempera-
ture is set to anything below 63°F, and
HIGH is displayed when it is set to any-
thing above 89°F.
Air direction Displays the configured air direction set-
tings.
Air volume Displays the configured air volume settings
Cooling/heating
control status
(AUTO)
Displayed when the
AUTO
key is pressed
and cooling/heating operates automatically
according to the configured temperature
settings.
i
AUTO will be turned off when you try to
do the following with AUTO on:
- Control the air volume
- Control the air direction
- Turn the air conditioning (A/C) on/off
- Turn on the moisture removal function
for the windshield
Air conditioning
control status
Displayed when the
A/C
key is pressed
and the air conditioning starts cooling/heat-
ing.
Other Features
Climate I 8-3
08
Name Description
Simultaneous tem-
perature settings for
the driver's seat and
the passenger seats
(SYNC)
Displayed when the
SYNC
key is pressed
and the temperatures of the driver's seat
and the passenger seats can be config-
ured at the same time.
8-4 I Other Features
Camera
WARNING
- Backing Up & Using Camera
• Never rely solely on the rear view camera
when backing up. Prior to entering your
vehicle always do a visual check of the area
behind your vehicle, and before backing up be
aware of your surroundings and supplement
the rear view camera by looking over your
shoulders and checking your rear view mir-
rors. Due to the difficulty of ensuring that the
area behind you remains clear, always back
up slowly and stop immediately if you even
suspect that a person, and especially a child,
might be behind you.
i
Information
• The camera screen shown while the system
boots up does not display any text or buttons.
• While the device boots up, shift the gear to "R"
to activate the rear detection cameras. Shift
the gear to another position to deactivate the
rear detection camera.
Steering-linked camera
• This device is connected to a rear
detection camera to see behind the car
for safe reversing.
• The Rear View Camera turns on automat-
ically if you shift the gear to R when the
power is on or the engine has started.
NOTICE
• A wide-angle lens is installed as the rear
detection camera to get a wider view, so
there may be some difference between the
actual distance and the distance that appears.
on-screen. For safety, make sure to view
the back, right, and left sides of the car for
yourself.
• The color of the parking guidelines displayed
in the picture may differ from the actual
screen.
• When booted up, blinking may occur when
you switch to a UI screen.
• If
Back-up Warning Priority
is set in the Sound
Settings, the audio volume is lowered when
your car is driving backward.
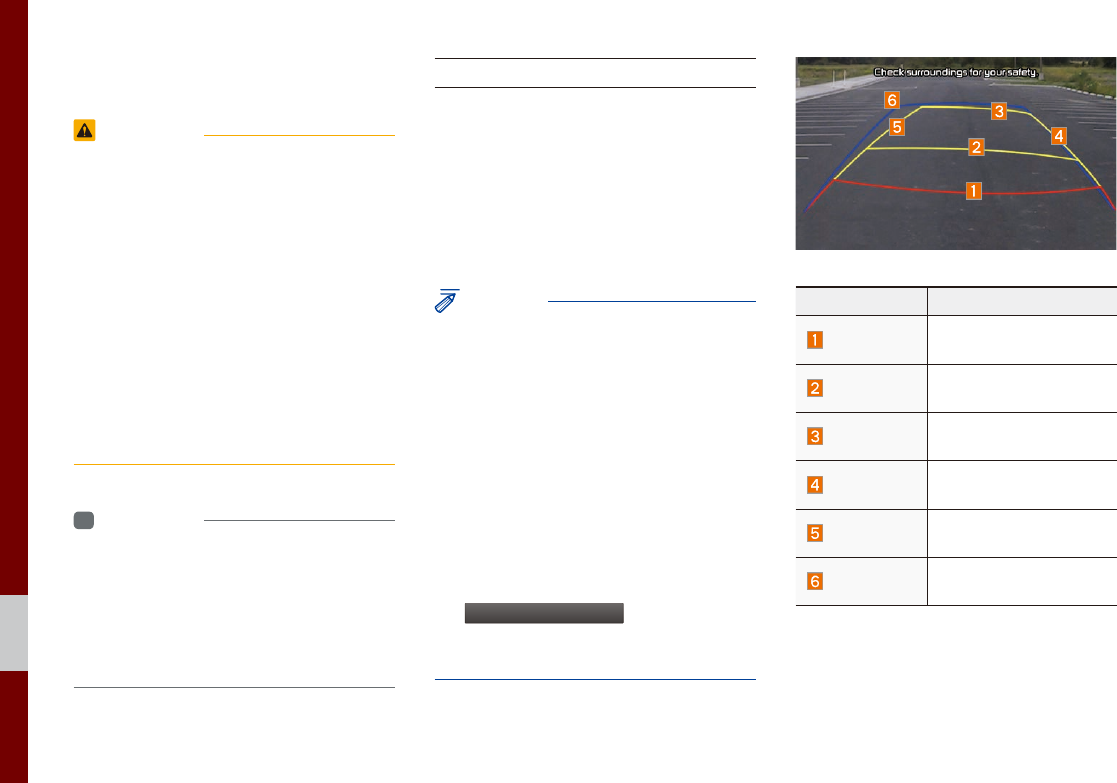
Name Description
Red Line About 0.5m from the rear
bumper
Yellow Line 1 About 1m from the rear
bumper
Yellow Line 2 About 3m from the rear
bumper
Yellow Line 3 Trajectory of the wheel
on the driver’s side
Yellow Line 4 Trajectory of the wheel
on the passenger side
Blue Line Neutral steering trajec-
tory
As you reverse your car and monitor the
area behind your car, the steering-linked
driving trajectory and the neutral driving
trajectory are both displayed.

Setup
Navigation Settings
Sound Settings
Display Settings
Bluetooth Settings
UVO eServices Settings
Phone Projection Settings
Custom Button Settings
Voice Recognition Settings
Date/Time Settings
Language Settings
Keyboard Settings Screen
Saver Settings Advanced
Settings System Info
part.9 Setup
9-2 I Setup
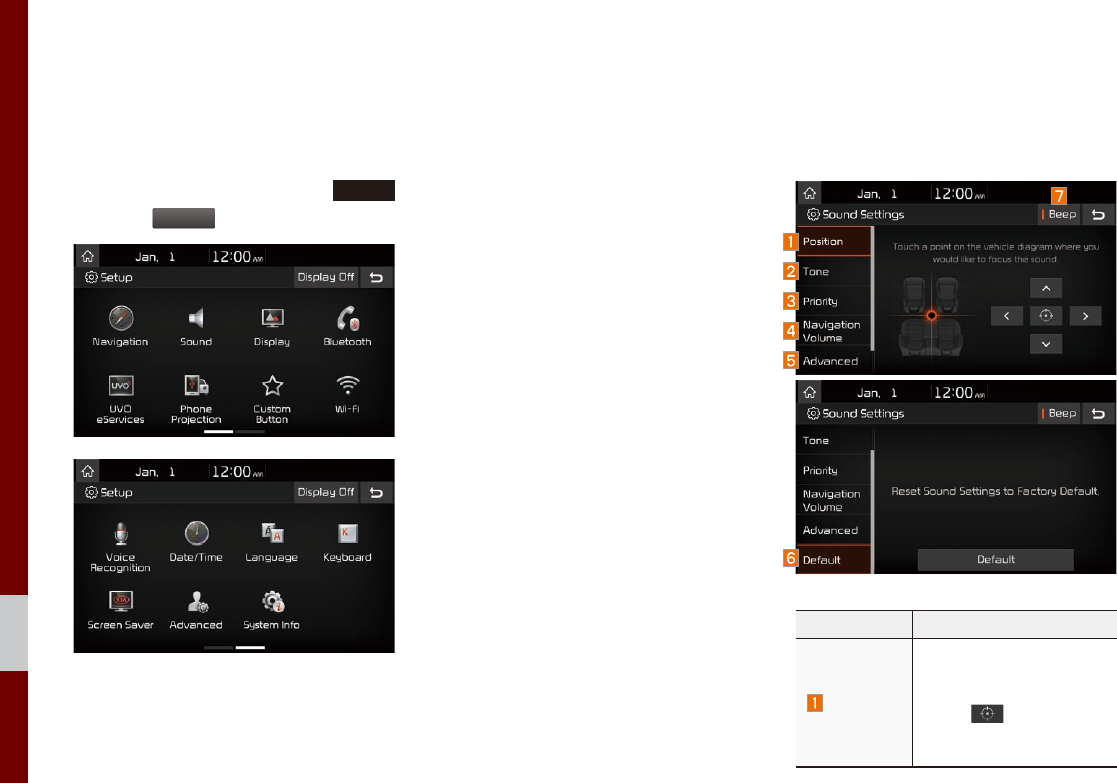
Setup
Setup
Setup is the screen to control Multimedia
system settings.
To enter the screen, press the
SETUP
key or the
Setup
icon in All Menus.
Navigation Settings
For more details, refer to part 5. Navigation
Settings.
Sound Settings
Adjusts the sound effects for the whole
system.
Features Description
Position
Select the Up/Down/Left/
Right button to control
sound positioning.
Select to concentrate
the sound on the center of
vehicle.
Setup I 9-3
09
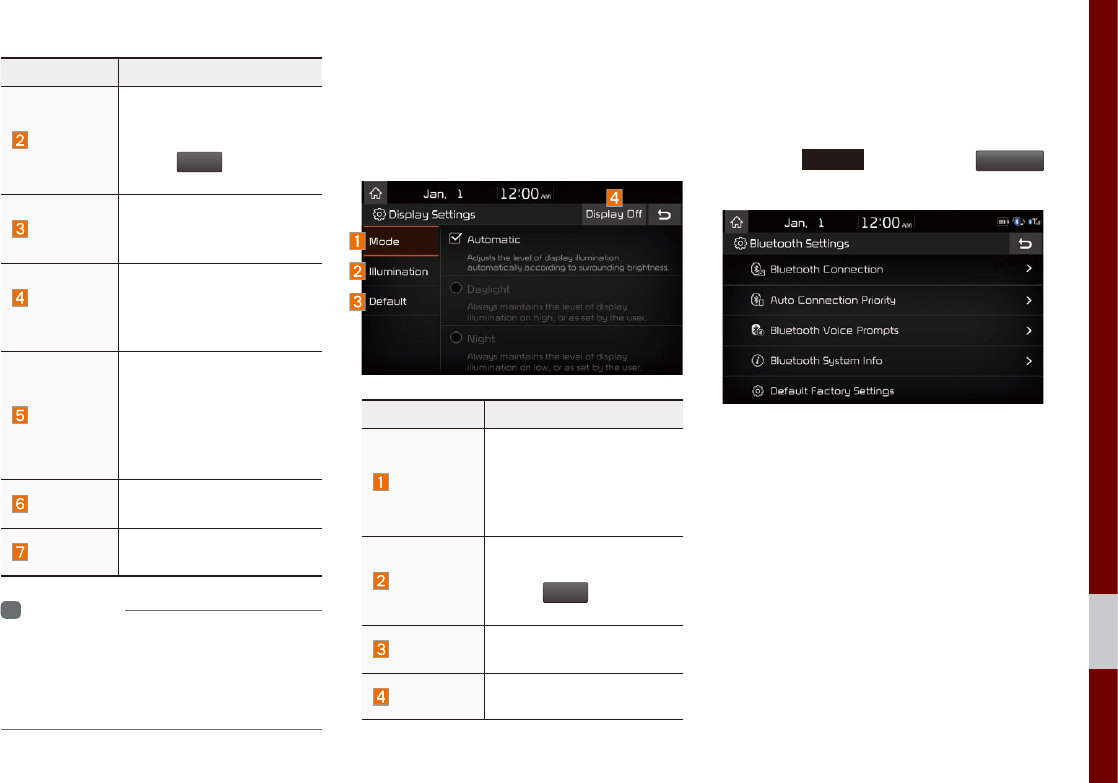
Features Description
Tone
Drag the slide bar to con-
trol Bass/Midrange/Treble
settings.
Select
Center
to initialize
the settings.
Priority
Sets the volume ratio when
reversing the car, turning
on the car’s ignition, etc.
Navigation
Volume
Sets the method of nav-
igation guidance volume
adjustment.
Advanced
Select additional audio
options such as “Speed
Dependent Volume
Control” that automatically
controls Audio volume
according to vehicle speed.
Default Resets the sound to fac-
tory default settings.
Beep Select to activate a beep
when pressing buttons.
i
Information
• Advanced sound settings may differ according
to selected AMP option.
• The seat shape may differ according to
vehicle model.
Display Settings
Adjusts the level of illumination for the
entire system.
Features Description
Mode
Select any of LCD illu-
mination change modes:
Automatic (changes
the level automatically),
Daylight, and Night.
Illumination
Set the levels of illumina-
tion for day and night.
Select
Default
to initialize
the settings.
Default Resets the display to fac-
tory default settings
Display Off Provides the Display Off
(touch activation) function.
Bluetooth Settings
Changes Bluetooth phone settings.
Press the
SETUP
key ▶ Select
Bluetooth
icon.

9-4 I Setup
Bluetooth Connection
Press the
SETUP
key ▶ Select
Bluetooth
▶ Select
Bluetooth Connection
.
Features Description
Paired Device
List
Displays the paired
Bluetooth device list.
When selecting from
the list, the device is
connected or discon-
nected.
Bluetooth
Audio
Connection
Status
An icon appears when
you make a Bluetooth
Audio connection.
Bluetooth
Hands-Free
Connection
Status
An icon appears when
you make a Bluetooth
Hands-free connection.
Add New Register a new
Bluetooth device.
Delete Devices Select and delete a
paired device.
Help
Switches to the
Bluetooth Connection
Help screen.
i
Information
• Up to 5 Bluetooth devices can be paired.
• Only one Bluetooth device can be connected
at a time.
• During a Bluetooth device connection, another
device cannot be paired.
• When you delete a paired device, the Call
History and Contacts stored in the head unit
are also deleted.
• Bluetooth Hands-free and Bluetooth Audio
functions are supported.
• Hands-free and audio-supported devices,
such as a Bluetooth smartphone or audio, will
function normally.
• When a Bluetooth device is connected, if
the Bluetooth connection is unexpectedly
disconnected, due to being out of
communication range, the device powering
off, or a Bluetooth communication error, the
Bluetooth device automatically searches for
and connects to nearby Bluetooth devices.
• If the system is not stable, due to a vehicle-
Bluetooth device communication error, restore
the Default Factory Settings.
• For Default Factory Settings, the Bluetooth
Settings are reset to factory settings.
• Press the
SETUP
key ▶ Select
Bluetooth
▶ Select
Default Factory Settings
.
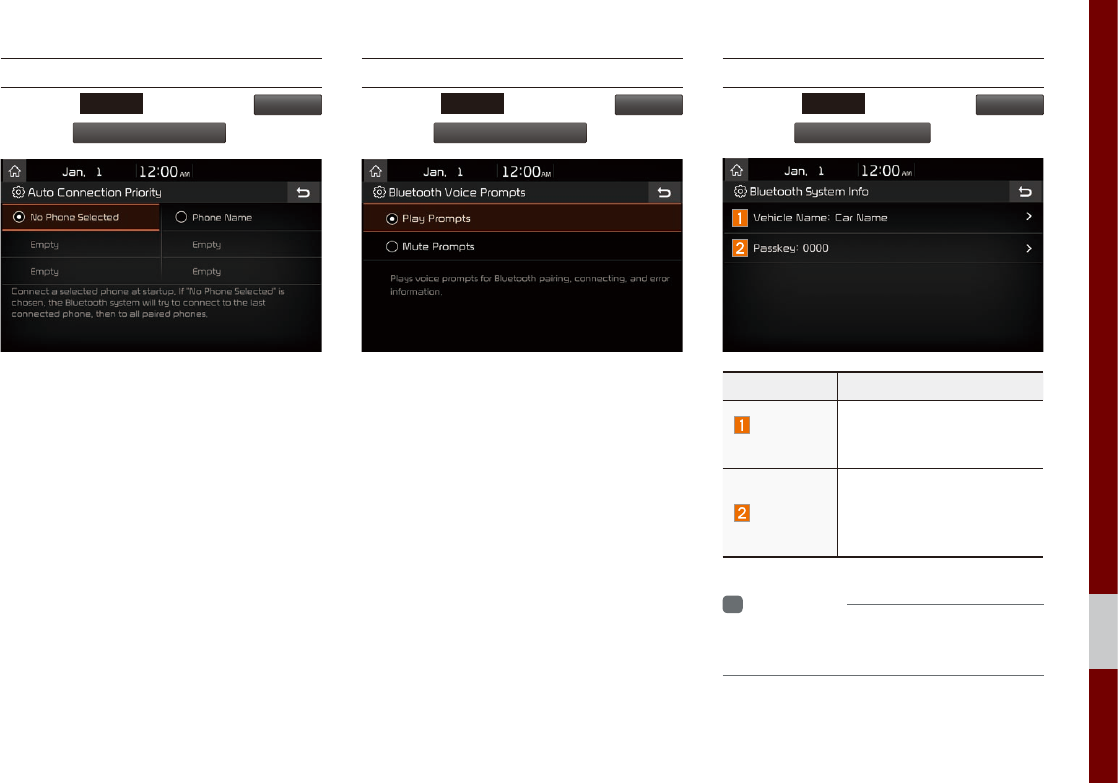
Setup I 9-5
09
Auto Connection Priority
Press the
SETUP
key ▶ Select
Bluetooth
▶ Select
Auto Connection Priority
.
When the engine is running, the selected
Bluetooth device is automatically con-
nected. If you fail to connect the selected
device, the previously-connected device is
automatically connected, and if it also fails,
then it tries to connect all paired devices
sequentially.
Depending on auto connection priority,
connection to a device may take time.
Bluetooth Voice Prompts
Press the
SETUP
key ▶ Select
Bluetooth
▶ Select
Bluetooth Voice Prompts
.
Bluetooth System Info
Press the
SETUP
key ▶ Select
Bluetooth
▶ Select
Bluetooth System Info
.
Features Description
Vehicle
Name
You can change the
Bluetooth device name of
the vehicle.
Passkey
You can change the pass-
key used for Bluetooth
device authentication. the
initial passkey is 0000.
i
Information
• The vehicle name above is an example.
Check the actual information on the product.
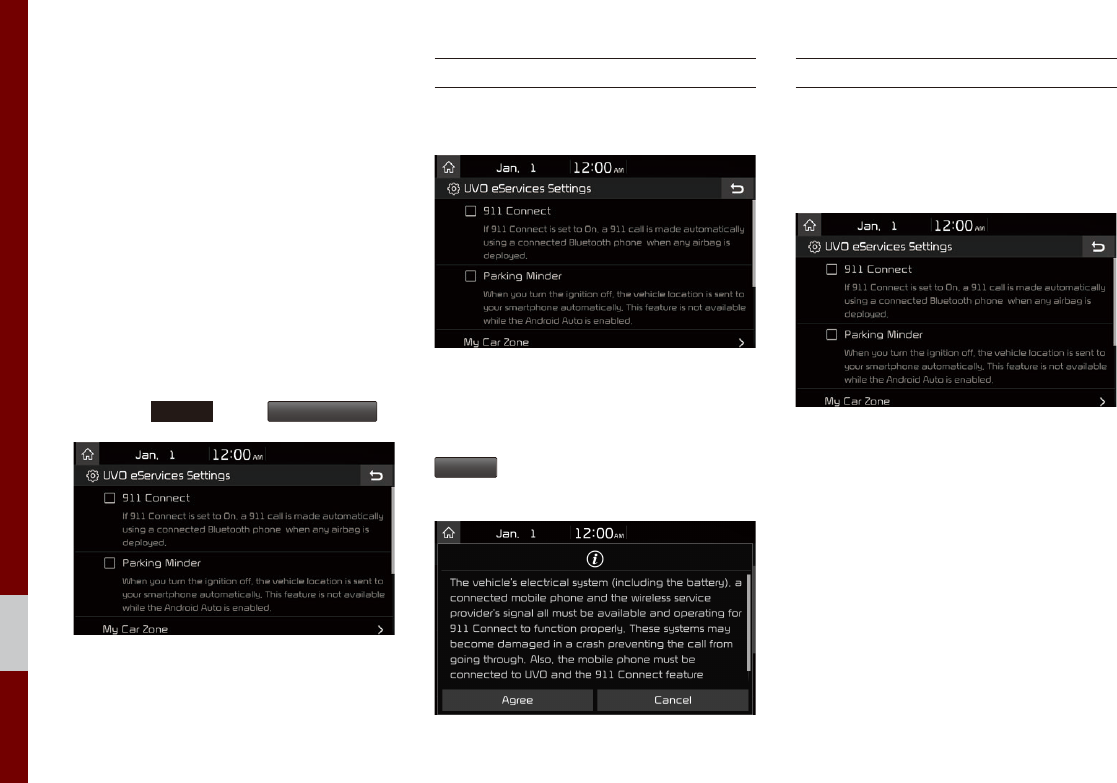
9-6 I Setup
UVO eServices Settings
Within the eServices Settings screen,
UVO eServices related features can be set,
such as activating 911 Connect, Parking
Minder and setting the My Car Zone.
For safety reasons, My Car Zone Settings
cannot be adjusted while driving. Park
the vehicle before making any changes to
your settings.
Press the
SETUP
key ▶
UVO eServices
.
911 Connect
This feature is used to turn on or off the
911 Connect feature.
When enabing this feature, you must first
agree to the 911 Connect tems of use.
After reading the tems of use, press the
Agree
button on the touch screen to
accept.
Parking Minder
If you want to send vehicle location to your
smartphone automatically when you turn
the ignition off, turn the Parking Minder
feature On.
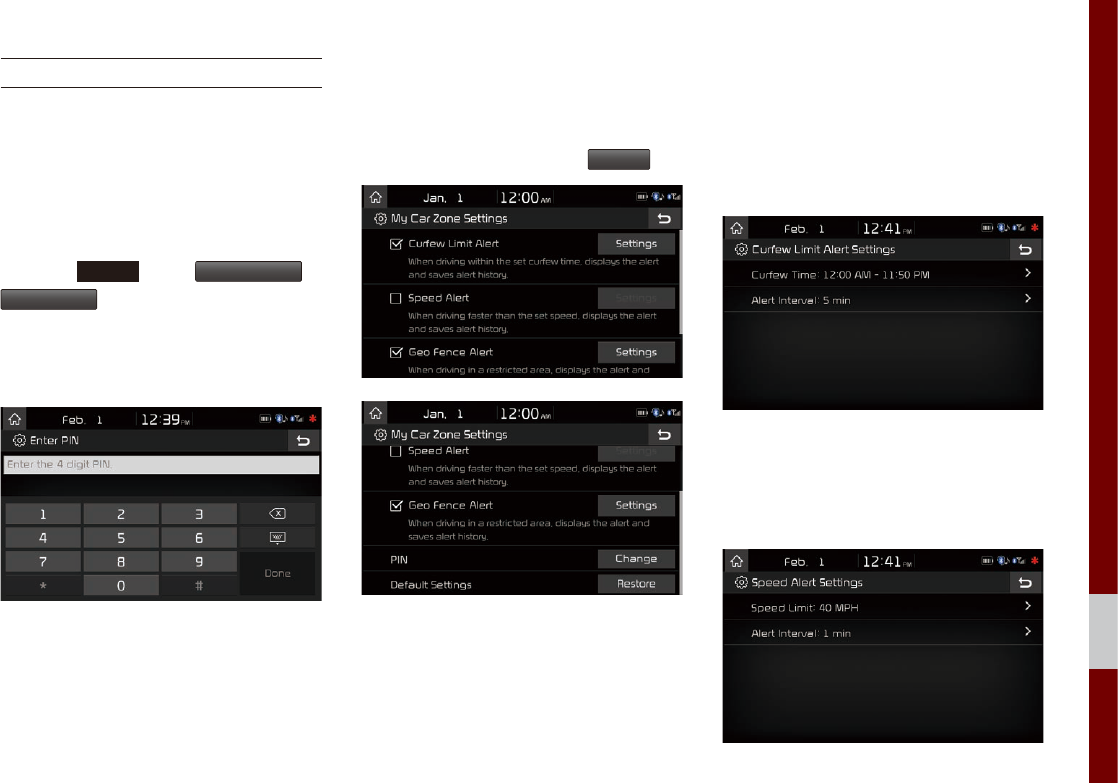
Setup I 9-7
09
My Car Zone
This feature is used to set My Car Zone
(Curfew Limit, Speed) alert conditions.
My Car Zone Settings is unavailable when
UVO eServices has not been activated.
Press the
SETUP
key ▶
UVO eServices
▶
My Car Zone
.
The PIN must be entered to use My Car
Zone Settings.
This screen is used to set Curfew Limit
and Speed Alert features.
Set the alert conditions On ▶
Settings
.
Curfew Limit Alert Settings
Within Curfew Limit Alert Settings, you can
set the Curfew Limit Alert Start and End
Time. You can also set the Alert Interval of
alerts upon Curfew Limit.
Speed Alert Settings
Within Speed Alert Settings, you can set
the vehicle speed limit and Alert Interval of
alerts upon overspeeding.
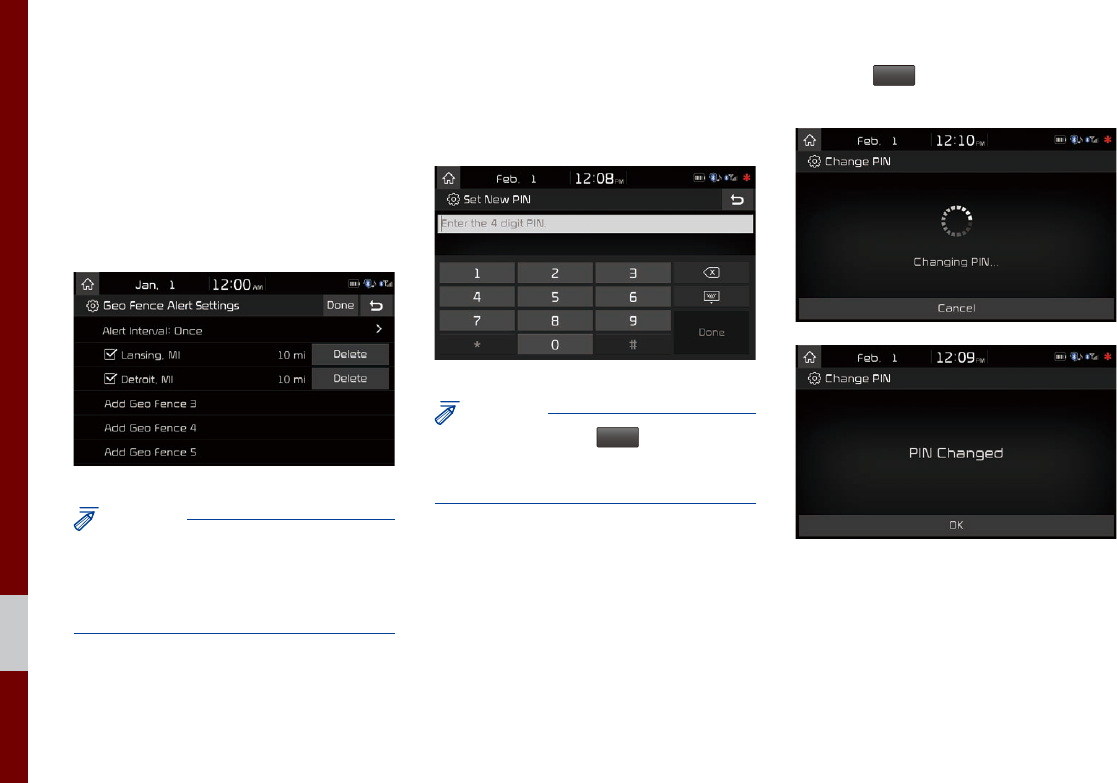
9-8 I Setup
Geo Fence Alert Settings
Within Geo Fence Alert Settings, you can
set entry-restricted areas. Press Add Geo
Fence and set the center point and radius
of the desired Geo Fence on the Map
screen. You can also set the Alert Interval
of alerts upon Geo Fence alerts.
NOTICE
• Geo Fence Alert cannot be set if there is no
SD card with Maps. At least one Geo Fence
must be added to turn on Geo Fence Alert
Settings.
PIN
This feature is used to change the PIN to
enter My Car Zone Settings.
NOTICE
• Before pressing
Done
, ensure your
smartphone is connected to UVO eServices
system via USB cable.
Press the
Done
button to transmit the new
PIN to your My UVO com account.
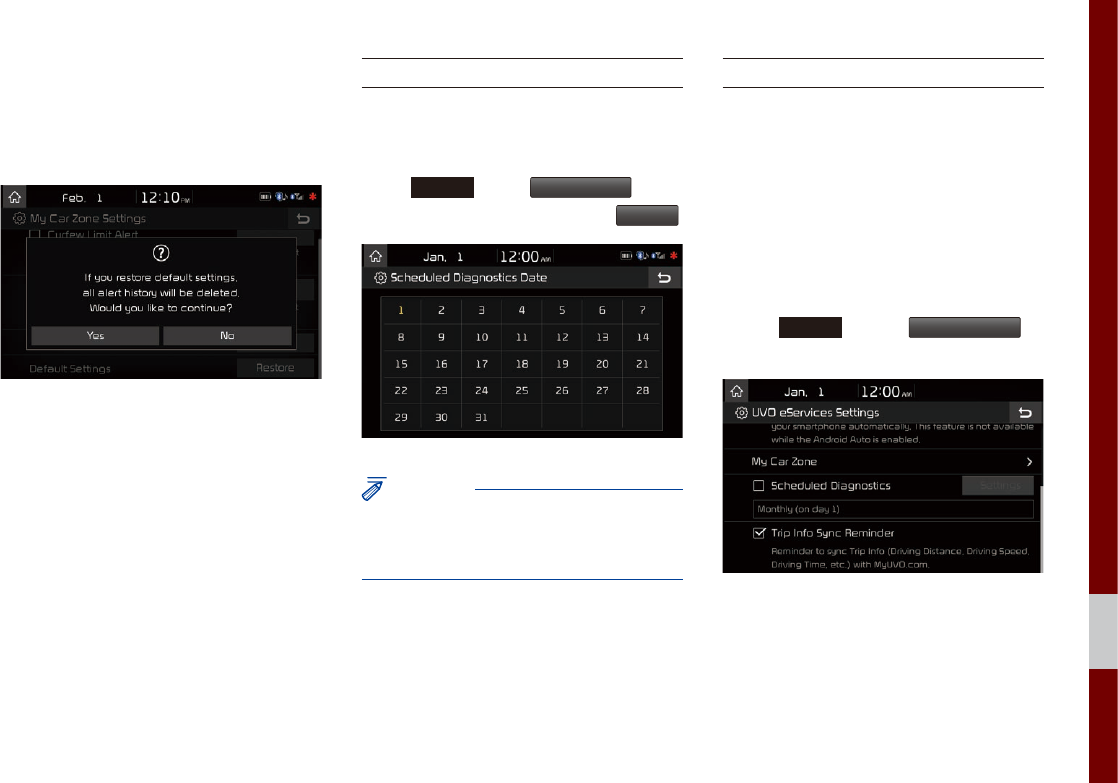
Setup I 9-9
09
Restore Factory Settings
This feature is used to restore all My Car
Zone alert history and settings back to
default state.
Scheduled Diagnostics
This feature is for setting when scheduled
diagnostics alerts display.
Press
SETUP
key ▶
UVO eServices
▶ Set
the Scheduled Diagnostics On ▶
Settings
.
NOTICE
• For months without the corresponding day,
the last day of the month will automatically be
set as the scheduled diagnostics date.
Trip Info Sync Reminder
Trip Info is a feature used to set whether
system displays alert when trip info(Driv-
ing Distance, Driving Speed, Driving Time,
etc). reaches 90% of memory.
UVO eServices must be activated to use
this feature.
Press
SETUP
key ▶
UVO eServices
▶
Set Trip Info Sync Reminder On.
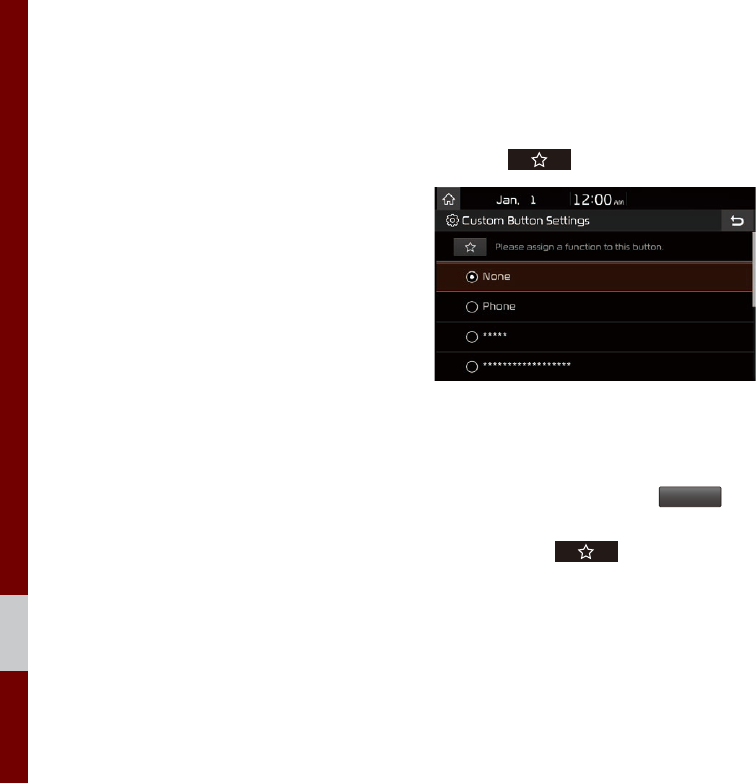
9-10 I Setup
Phone Projection Settings
For more details, refer to Phone Projection
guide.
Custom Button Settings
You can choose the feature to be accessed
when the key is pressed.
Setting it to a feature that you frequently
use will allow you to access the feature
quickly and conveniently anytime.
For example, setting it to
My Menu
will
enable you to access the My Menu screen
by pressing the key.
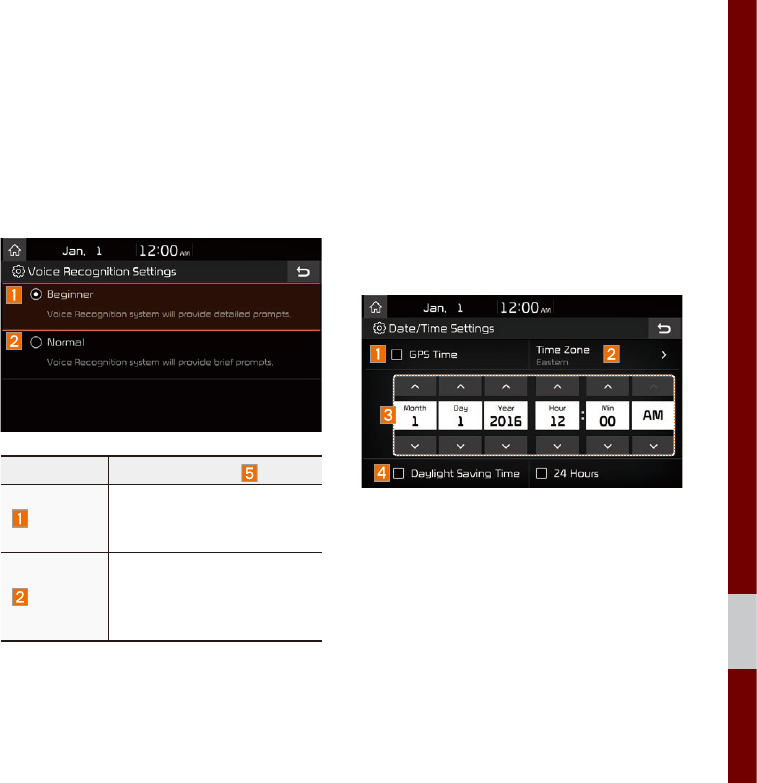
Setup I 9-11
09
Voice Recognition
Settings
Configure how to make a call with
Voice Recognition Guidance and Voice
Recognition.
Features Description
Beginner
For beginners, the voice
recognition system pro-
vides voice prompts.
Normal
For normal users, the
voice recognition system
provides simple and short
voice guidances.
Date/Time Settings
Configure the settings for time and date.
Using the arrow buttons, you can change
the values. Date/Time settings do not
automatically change when crossing into
different time zones. The time must be
changed manually on this screen.
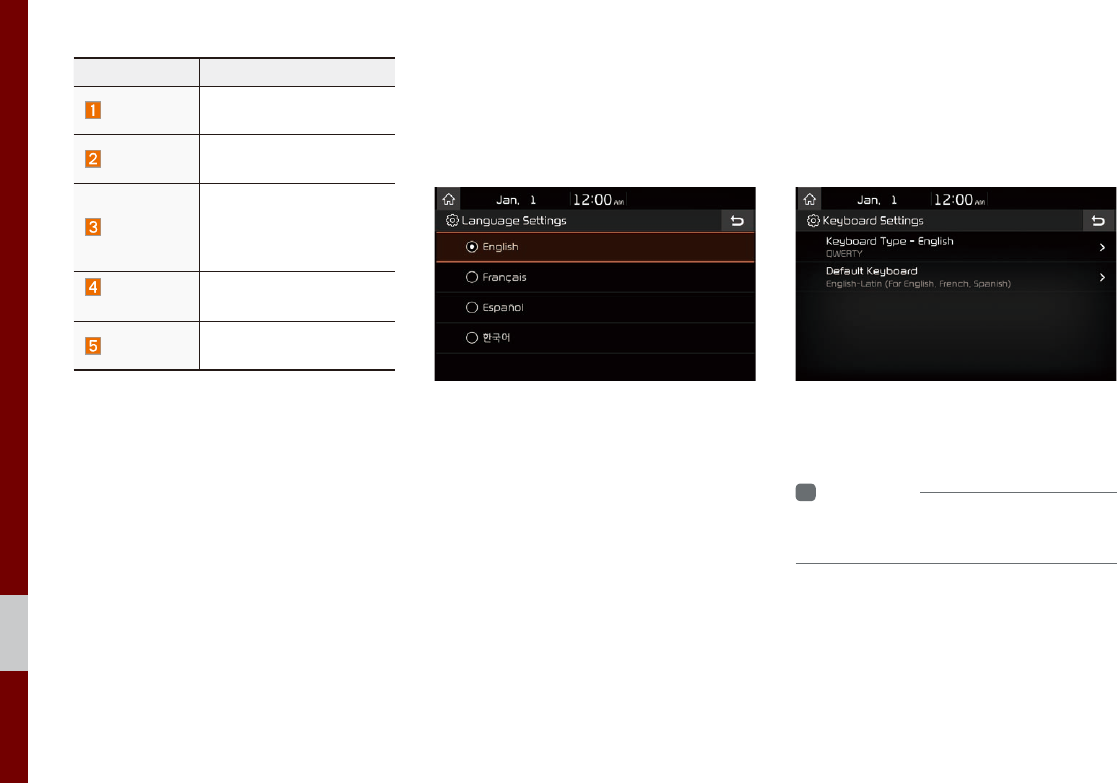
9-12 I Setup
Features Description
GPS Time The time display is set
in GPS Time.
Time Zone Displays the time zone
selected by users.
Direct entry
If you tap any value, you
can directly enter the
number in the following
screen.
Daylight
Saving Time
The daylight saving time
(DST) is applied.
24 Hours The time display is set
in 24-hour format.
Language Settings
You can configure the displayed system
language.
When the language is changed, the sys-
tem language is automatically changed.
Unique data including MP3 file name is
not changed and voice recognition does
not support some languages.
Keyboard Settings
You can configure the keyboard layout for
each language.
You can configure ABCD or QWERTY
keyboards for the system.
i
Information
• Configured keyboard layouts are applied
to all input modes.
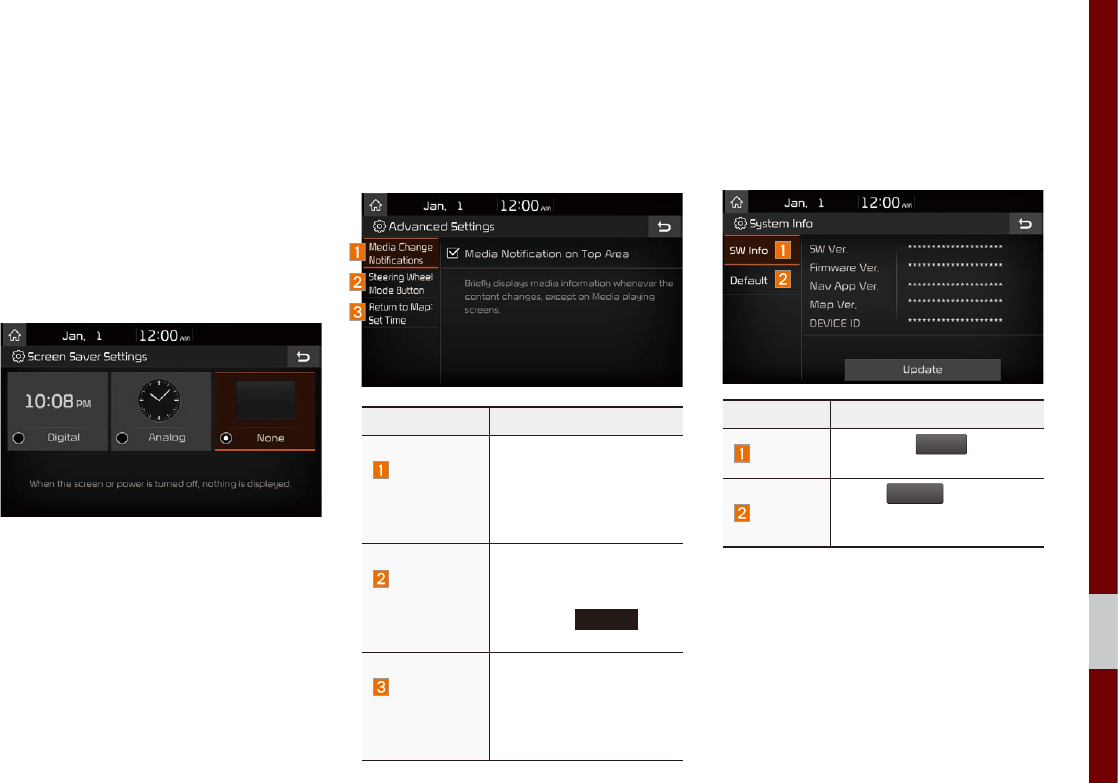
Setup I 9-13
09
Screen Saver Settings
You can select any of the following screen
formats to be displayed when the screen
or power is turned off (press and hold the
Power button).
• Digital clock and date
• Analog clock and date
• None
Advanced Settings
Sets alerts per function if desired by the
user.
Features Description
Media
Change
Notifications
Sets whether to display
media information at the
top of the screen as the
next item is played when
not on the media screen.
Steering
Wheel Mode
Button
Sets the media to be
played when the steer-
ing wheel or rear seat (if
provided)
MODE
but-
ton is pressed.
Return to
Map: Set
Time
Sets the time after which
the screen will return to
the map screen from the
broadcast/music play-
back screen.
System Info
System version information and update
details are available.
Features Description
SW Info Select the
Update
button to
update the system.
Default
When
Default
is selected,
the settings are changed to
factory defaults.

9-14 I Setup
System Update
At the System Info screen, insert the
updated memory (USB or SD card) with
the latest file downloaded, and then select
the
Update
button to begin updating. The
system will then reboot automatically.
i
Information
• This product needs supplemented software
updates and additional functions, which
collectively may take some time to complete,
depending on the amount of data.
NOTICE
• If the power is disconnected or the USB or
SD card is removed during an update, the
data might be damaged. Please wait until the
update is complete while the engine is on.
• When
Default
is selected, it may delete all of
the data and settings so be cautious of your
action.


10-2 I Appendix
Product Specification
TFT-LCD
Screen Size 8 inch (176.4 X 99.36 mm)
Resolution 384000 pixels (Resolution: 800 x 480)
Operating
Method TFT(Thin Film Transistor) Active Matrix
Viewing Angle Left/Right, Top/Bottom: ALL 89°
Internal Lighting LED
Radio
Channels FM: 87.5 MHz ~ 107.9 MHz(Step: 200 kHz)
AM: 530 kHz ~ 1710 kHz(Step: 10 kHz)
Sensitivity FM: Under 10 dBuV/AM: Under 35 dBu EMF
Distortion Factor Within 2 %
Common
Power Supply DC 14.4 V Operating
Power DC 9 V ~ DC 16 V
Sleep Current • 1 mA or less (after 96 hours with ACC OFF)
• 10 mA or less (before 96 hours with ACC OFF)
Operating
Temperature
-20 ~ +70 °C
(-4 ~ +158 °F)
Storage
Temperature
-30 ~ +80 °C
(-22 ~ +176 °F)
Dimensions 178 X 140.2 X 60 mm (Main BOX)
Current
Consumption 2.5 A Weight 1.945 kg
Bluetooth®
Wireless Technology
Frequency
Range 2402 ~ 2480 MHz
Supported
Bluetooth
®
Specification
4.1
Supported
Profile
Handsfree(1.6), A2DP(1.2), AVRCP(1.4),
PBAP(1.0)
Bluetooth
Output Power (Power Class 2 , Conducted)
-3.5 ~ 0 dBm
Number of
Channels 79 channels
Appendix

Appendix I 10-3
10
Troubleshooting
1. Errors which occur during the operation or installation of the
device may be mistaken as a malfunction of the actual device.
2. If you are having problems with the device, try the suggestions
listed below.
3. If the problems persist, contact your Kia dealer.
Problem Possible Cause
There are small red,
blue, or green dots on
the screen
• Because the LCD is manufactured with
technology requiring high point density,
a pixel or lighting deficiency may occur
within 0.01% of total pixels
The sound or image is
not working
•Has the Switch for the vehicle been
turned to [ACC] or [ON]?
• Has the SYSTEM been turned OFF?
The screen is being
displayed but sound is
not working
• Has the volume been set to a low level?
• Has the volume been muted?
When the power is
turned on, the corners
of the screen are dark
•The display appearing somewhat dark
after prolonged periods of use is normal
with LCD panels. It is not a malfunction
•If the screen is very dark, contact your
nearest Kia dealer for assistance
Sound is working from
only one speaker
•Are the positions of Fader or Balance
sound controls adjusted to only one
side?
Problem Possible Cause
Sound does not work in
AUX mode
•Are the audio connector jacks fully
inserted into the AUX terminal?
The external device is
not working
• Is the external device connected with a
standard connector cable?
Upon turning power on,
the most recent mode
screen is not displayed
Within modes that play files by reading
external sources, such as USB, iPod, or
Bluetooth
®
streaming mode, the most
recently played mode screen prior to turn-
ing off power may not properly load
•If the corresponding device is not con-
nected, the mode operated prior to the
most recent mode will operate
•If the previous mode still cannot be
properly played, the mode operated
prior to that will operate

10-4 I Appendix
Problem Possible Cause Countermeasure
The power
does not
turn on
The fuse is discon-
nected
• Replace with a suitable fuse
•If the fuse is disconnected
again, please contact
your point of purchase or
Kia dealer
Device is not properly
connected
• Check to see that the
device has been properly
connected
The system
does not
play
The vehicle battery is
low
• Charge the battery If the
problem persists, contact
your point of purchase or
Kia dealer
Problem Possible Cause Countermeasure
The image
color/tone
quality is
low
• The brightness,
saturation, hue,
and contrast levels
are not set properly
• Properly adjust the bright-
ness, saturation, hue, and
contrast levels through
Display Setup
Sound does
not work
• The volume level
is set to the lowest
level
• The connection is
not proper
• The device is
currently fast-for-
warding, rewinding,
scanning, or play-
ing in slow mode
• Adjust the volume level
• Check to see that the
device has been properly
connected
• The sound will not work
when the device is fast-for-
warding, rewinding, scan-
ning, or playing in slow
mode
The sound
or image
quality is
low
• Vibration is occur-
ring from where
the conversion
switch has been
installed
• Image color/tone
quality is low
• The sound may be
short-circuited and the
image distorted if the
device vibrates
• The device will return to
normal once vibrations stop

Appendix I 10-5
10
Problem Possible Cause Countermeasure
The USB
does not
work
• USB memory is
damaged
• Please use the USB after
formatting it.
• USB memory has
been contaminated
• Remove any foreign sub-
stances on the contact
surface of the USB memory
and multimedia terminal
• A separately pur-
chased USB HUB
is being used
•Directly connect the USB
memory with the multime-
dia terminal on the vehicle
• A USB extension
cable is being
used
• Directly connect the USB
memory with the multime-
dia terminal on the vehicle
• A USB which is
not a Metal Cover
Type USB Memory
is being used
• Use standard USB
Memory
• An HDD type, CF,
SD Memory is
being used
• Use standard USB
Memory
• There are no
music files which
can be played
• Only MP3, WMA file
formats are supported.
Please use only the sup-
ported music file formats
Problem Possible Cause Countermeasure
The iPod is
not recog-
nized even
though it
has been
connected
• There are no titles
which can be
played
• Use iTunes to download
and save MP3 files into the
iPod
• The iPod firmware
version has not
been properly
updated
• Use iTunes to update
the firmware version and
reconnect the iPod with the
device
• The iPod device
does not recog-
nize downloads
• Reset the iPod and recon-
nect with the device
Bluetooth
does not
work or
its limited
functions are
available
• Bluetooth on your
mobile phone is
set to OFF
• Set it to ON
• The Bluetooth
connection is not
made
• Make the connection
active
i
Information
• While operating the device, if an abnormality occurs that cannot be
corrected with the above described measures, press the
RESET
key to
reset the system.
• Press and hold the
RESET
key (more than 1 second). The device power
will turn off and the system will reset.

10-6 I Appendix
FAQ
About Pairing Mobile Phones
Q I cannot pair my mobile phone. What is the cause?
A Check to see that the mobile phone supports Bluetooth® func-
tion. Verify if Bluetooth on the cell phone is set to OFF. If so, set
it to ON. If the cell phone still can’t be registered, try again after
turning Bluetooth off and on, or delete the device registration on
the multimedia system and cell phone and then register the cell
phone again.
Q What is the difference between pairing a mobile phone and con-
necting a mobile phone?
A Pairing occurs through authenticating the head unit and mobile
phone. Mobile phones paired to the head unit can be connected
and disconnected until the paired mobile phone is deleted from
the system. Bluetooth® Handsfree features, such as making/
answering calls or managing contacts, are supported only in
mobile phones connected with the head unit.
Q What is a Passkey?
A A passkey is the password used to authenticate the connection
between the head unit and mobile phone. The passkey only
needs to be entered once when pairing the mobile phone for
the first time.
The initial passkey is 0000. You can change it with
SETUP
▶
Bluetooth
▶
Bluetooth System Info
▶
Passkey
menu options.

Appendix I 10-7
10
About Making/Answering Phone Calls
Q How can I answer a call?
A When there is an incoming call, a notification pop-up will
become displayed. To answer the incoming call, select the
Accept
button on the screen or the key on the steer-
ing
wheel control
.
To reject the call, select the
Reject
button on the screen or
press the key on the steering wheel control.
Q What should I do if I am talking on the Handsfree but want to
switch the call to the mobile phone?
A While on a call, press and hold (more than 0.8 seconds)
the key on the steering
wheel control
or select the
Use Private
button at the bottom of the Phone screen to switch
the call to your mobile phone.
About
Bluetooth
® Wireless Technology/
Multimedia System Use Environment
Q What is the range of my wireless connection?
A The wireless connection can be used within 15 yards.
Q How many mobile phones can be paired?
A It is possible to pair up to five mobile phones.
Q Why is call quality sometimes poor?
A
Check the reception sensitivity of the mobile phone when call
quality becomes worsened. The call quality may deteriorate when
the signal strength is low. Call quality may also worsen if metal
objects, such as beverage cans, are placed near the mobile
phone. Check to see if there are metal objects in the vicinity of
the mobile phone. The call sound and quality may differ depend-
ing on the type of mobile phone.

10-8 I Index
0~9
911 Connect ……………………4-7, 9-6
A
About Bluetooth® Wireless Technology/
Head Unit Use Environment ……… 10-7
About HD Radio™ Data Services … 7-2
About Making/Answering
Phone Calls ………………………… 10-7
About Pairing Mobile Phones ……… 10-6
About SiriusXM™ Data Service…… 7-3
About UVO eServices ……………… 4-4
Accept/Reject Call ………………… 3-7
Accessing HD Radio™ Data ……… 7-2
Accessing SiriusXM™ Data ……… 7-3
Activating UVO eServices ………… 4-6
Address …………………………… 5-14
Address Book ……………………… 5-20
Adjusting Voice Recognition Volume …6-5
Advanced Settings ………………… 9-13
Auto Connection Priority …………… 9-5
Automatic Diagnostics …………… 4-12
AUX ………………………………… 2-24
Avoid Street ………………………… 5-29
B
Basic Features ……………………… 5-2
Basic Mode Screen ………………… 8-2
Battery Warning Message ………… 1-10
Before Playing a USB MP3 ……… 2-11
Before Using the Bluetooth®
Handsfree ………………………… 3-2
Before using UVO eServices ……… 4-5
Bluetooth® Audio …………………… 2-25
Bluetooth Connection ……………3-4, 9-4
Bluetooth Connection Settings …… 2-26
Bluetooth Phone …………………… 3-6
Bluetooth Settings ………………… 9-3
Bluetooth System Info ……………… 9-5
Bluetooth Voice Prompts ………… 9-5
C
Call Commands …………………… 6-8
Call History ………………………… 3-9
Camera …………………………… 8-4
Canceling Route …………………… 5-26
CAUTIONS upon Connecting
Bluetooth® Phone ………………… 3-3
Changing Map View ……………… 5-3
Climate Mode ……………………… 8-2
Combining Voice Recognition with
On-Screen Commands …………… 6-3
Component Names and Functions …1-5
Conducting Vehicle Diagnostics … … 4-9
Connecting an External Device …… 2-24
Connecting Bluetooth ……………… 4-5
Connecting Bluetooth Devices …… 3-4
Connecting to smartphone via USB …4-6
Contacts …………………………… 3-10
Coordinates ………………………… 5-20
Curfew Limit Alert ………………… 4-13
Custom Button Settings …………… 9-10
Index

Index I 10-9
10
D
Date/Time Settings ………………… 9-11
Default ……………………………… 5-32
Deleting Bluetooth Devices ……… 3-5
Destination Search ………………… 5-13
Dial ………………………………… 3-7
Direct Tune ………………………… 2-8
Disconnecting Bluetooth Devices … 3-5
Display ……………………………… 5-30
Display Route Information ………… 5-28
Display Settings …………………… 9-3
E
Editing Route ……………………… 5-27
Emergency ………………………… 5-19
Ending Voice Recognition ………… 6-3
eServices Guide …………………… 4-16
Extending the Listening Time ……… 6-4
F
FAQ ………………………………… 10-6
Favorite Places …………………… 5-21
Favorites …………………………… 3-11
“Find <POI>” List …………………… 6-13
FM/AM ……………………………… 2-2
G
Gas Stations ……………………… 5-18
Geo Fence Alert …………………… 4-14
Guidance …………………………… 5-31
H
HD Radio™ ………………………… 2-5
HD Radio™ Data ………………… 7-2
HD Radio™ Doppler Radar ……… 7-3
HD Radio™ Technology …………… 2-4
HD Radio™ Weather Information
Mode ……………………………… 7-2
Head Unit …………………………… 1-5
Help Display ………………………… 6-6
Home Screen ……………………… 1-11
How to Connect to a Network …… 9-11
How to start Siri …………………… 6-20
How to use Siri …………………… 6-20
I
Import/Export ……………………… 5-32
Initiating a 911 Call ………………… 4-7
Instructions for Using
Voice Recognition ………………… 6-7
iPod ……………………………2-17, 2-21
K
Key Product Features ……………… 1-4
Keyboard Settings ………………… 9-12
L
Language Settings ………………… 9-12
Local Search ……………………… 5-16

10-10 I Index
M
Map Display ………………………… 5-6
Map Scale ………………………… 5-4
My Car Zone ………………… 4-12, 9-7
My POIs …………………………… 4-15
N
Navigation Commands …………… 6-9
Navigation Settings …………… 5-30, 9-2
Navigation Volume ………………… 5-3
O
On-Screen Touch Controls ………… 1-12
Operating Navigation Screen ……… 5-2
Other Commands List
(Commands used in List/Help) …… 6-12
P
Pair a device from
Bluetooth-enabled phone ………… 4-5
Pairing a New Device ……………… 3-4
Parking Minder ……………… 4-15, 9-6
Phone Projection Settings ………… 9-10
Phone Status Icons ………………… 3-6
Places ………………………… 5-3, 5-13
POI ………………………………… 5-6
POI Categories …………………… 5-17
Precautions for Safe Driving ……… 3-2
Precautions Required for Successful
Voice Recognition ………………… 6-2
Previous Destinations ……………… 5-15
Product Specification ……………… 10-2
Q
Quick Menu ………………………… 5-5
R
Radio Commands ………………… 6-11
Restaurants ………………………… 5-19
Restrictions on Features for
Safety Measures …………………… 1-10
Roadside Assist …………………… 4-8
Route ……………………………… 5-5
Route Guidance …………………… 5-24
Route Options ……………………… 5-27
Route Overview …………………… 5-29
Route Search ……………………… 5-26
Route Setting ……………………… 5-22
S
Save ………………………………… 5-12
Schedule Service ………………… 4-10
Scheduled Diagnostics ……… 4-11, 9-9
Screen Saver Settings …………… 9-13
Selecting through Channel/
Category List ……………………… 2-8
Send Report ……………………… 4-10
Sending Parking Location ………… 4-15
Sending Points of Interest to Your
Navigation System ………………… 4-15
Settings …………………………… 5-12
Setup ……………………………… 9-2
Siri Eyes Free ……………………… 6-20
SiriusXM™ ………………………… 2-6
SiriusXM™ Data …………………… 7-3
SiriusXM™ Fuel Price Information …… 7-4
SiriusXM™ Movie Information …… 7-8

Index I 10-11
10
SiriusXM™ Sports Information …… 7-6
SiriusXM™ Stock Information …… 7-5
SiriusXM™ Weather
Announcement …………………… 7-3
Skipping Prompt Messages ……… 6-5
Sound Settings …………………… 9-2
Speed Alert ………………………… 4-14
Start Screen ………………………… 6-6
Starting the System for the
First Time …………………………… 1-9
Starting UVO Voice Local Search … 6-19
Starting Voice Recognition ………… 6-3
Starting/Ending and Setting
Voice Recognition ………………… 6-3
Steering-linked camera …………… 8-4
Steering Wheel Controls …………… 1-7
Supported USB MP3 music
specifications ……………………… 2-13
System Info ………………………… 9-13
System Reset ……………………… 1-9
System Update …………………… 9-14
T
The 911 Connect feature may not operate
in the following situations ………… 4-2
Traffic ……………………………… 5-9
Trip Info Sync Reminder …………… 9-9
Troubleshooting ………………5-33, 10-3
Turning the System On/Off ………… 1-9
Types of Commands ……………… 6-8
U
USB ………………………………… 2-11
USB Music ………………………… 2-14
Using iPod Devices ………………… 2-17
Using the Menu During a
Phone Call ………………………… 3-8
UVO eServices Commands List …6-11
UVO eServices Settings ……… 4-16, 9-6
UVO Voice Local Search ………… 6-19
V
Vehicle Diagnostics ………………… 4-9
Viewing Menu ……………………… 2-8
Voice Commands ………………… 6-8
Voice Recognition Screen Overview …6-6
Voice Recognition Settings ………… 9-11
W
Warnings and Cautions …………… 1-2
What is Bluetooth® Wireless
Technology? ……………………… 3-2
What is UVO Voice Local Search? … 6-19
What is Voice Recognition? ……… 6-2
Z
Zoom In/Zoom Out ………………… 5-4

Important Information
Before using your Multimedia system, read and follow all instructions and safety information provided in this end user manual ("User's
Guide"). Not following precautions found in this User's Guide can lead to an accident or other serious consequences.
Keep User's Guide in Vehicle
When kept in the vehicle, the User's Guide will be a ready reference for you and other users unfamiliar with the Multimedia system. Please
make certain that before using the system for the first time, all persons have access to the User's Guide and read its instructions and
safety information carefully.
Warning
Operating certain parts of this system while driving can distract your attention away from the road, and possibly cause an accident or other
serious consequences. Do not change system settings or enter data non-verbally (using your hands) while driving. Stop the vehicle in a
safe and legal manner before attempting these operations. This is important since while setting up or changing some functions as you may
to distract your attention away from the road and remove your hands from the wheel.

10
General Operation
Voice Command Control
Functions within the Multimedia system may be accomplished using only voice commands. Using voice commands while driving allows
you to operate the system without removing your hands from the wheel.
Prolonged Views of Screen
Do not access any function requiring a prolonged view of the screen while you are driving. Pull over in a safe and legal manner before
attempting to access a function of the system requiring prolonged attention. Even occasional short scans to the screen may be hazardous
if your attention has been diverted away from your driving task at a critical time.
Volume Setting
Do not raise the volume excessively. Keep the volume at a level where you can still hear outside traffic and emergency signals while
driving. Driving while unable to hear these sounds could cause an accident.
Navigation Features
Any navigation features included in the system are intended to provide turn by turn instructions to get you to a desired destination. Please
make certain all persons using this system carefully read and follow instructions and safety information fully.

Distraction Hazard
Some navigation features may require manual (non-verbal) setup. Attempting to perform such set-up or insert data while driving can seri-
ously distract your attention and could cause an accident or other serious consequences. Stop the vehicle in a safe and legal manner
before attempting these operations.
Let Your Judgment Prevail
Any navigation features are provided only as an aid. Make your driving decisions based on your observations of local conditions and exist-
ing traffic regulations. Any such feature is not a substitute for your personal judgment. Any route suggestions made by this system should
never replace any local traffic regulations or your personal judgment or knowledge of safe driving practices.
Route Safety
Do not follow the route suggestions if doing so would result in an unsafe or illegal maneuver, if you would be placed in an unsafe situation,
or if you would be directed into an area that you consider unsafe. The driver is ultimately responsible for the safe operation of the vehicle
and therefore, must evaluate whether it is safe to follow the suggested directions.
Potential Map Inaccuracy
Maps used by this system may be inaccurate because of changes in roads, traffic controls or driving conditions. Always use good judg-
ment and common sense when following the suggested routes.

10
Emergency Services
Do not rely on any navigation features included in the system to route you to emergency services. Ask local authorities or an emergency
services operator for these locations. Not all emergency services such as police, fire stations, hospitals and clinics are contained in the
map database for navigation features.
Use of Speech Recognition Functions
Speech recognition software is inherently a statistical process which is subject to errors. It is your responsibility to monitor any
speech recognition functions included in the system and address any errors.

FCC Warning
This equipment has been tested and found to comply with the limits for a Class B digital device, pursuant to part 15 of the FCC Rules.
These limits are designed to provide reasonable protection against harmful interference in a residential installation.
This equipment generates, uses and can radiate radio frequency energy and, if not installed and used in accordance with the instructions,
may cause harmful interference to radio communications. However, there is no guarantee that interference will not occur in a particular
installation. If this equipment does cause harmful interference to radio or television reception, which can be determined by turning the
equipment off and on, the user is encouraged to try to correct the interference by one or more of the following measures:
• Reorient or relocate the receiving antenna.
• Increase the separation between the equipment and receiver.
• Connect the equipment into an outlet on a circuit different from that to which the receiver is connected.
• Consult the dealer or an experienced radio/TV technician for help
This device complies with part 15 of the FCC Rules. Operation is subject to the following two conditions: (1) This device may not cause
harmful interference, and (2) this device must accept any interference received, including interference that may cause undesired operation.
Caution: Any changes or modifications to this device not expressly approved by the party responsible for compliance could void your
authority to operate the equipment.
This equipment complies with FCC radiation exposure limits set forth for an uncontrolled environment.
This equipment should be installed and operated with minimum 20 cm between the radiator and your body. This transmitter must not be
collocated or operating in conjunction with any other antenna or transmitter unless authorized to do so by the FCC.