HYUNDAI MOBIS AM110B2GG DIGITAL CAR AUDIO SYSTEM User Manual
HYUNDAI MOBIS CO., LTD. DIGITAL CAR AUDIO SYSTEM
Users Manual

459
Features of your vehicle
■
(for EUROPE):
Features of your vehicle
604
■
461
Features of your vehicle
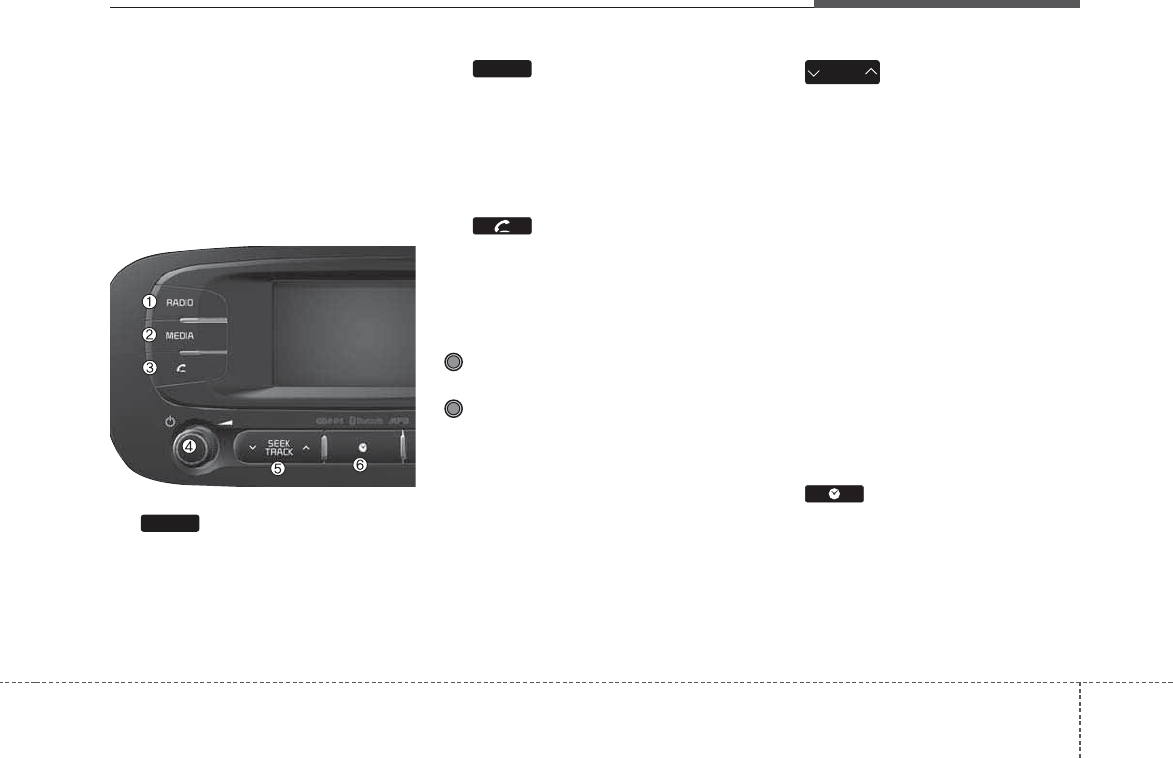
SYSTEM CONTROLLERS
AND FUNCTIONS
❈ Display and settings may differ
depending on the selected audio.
Audio Head Unit
(1)
Converts to Radio(FM/AM) mode.
Each time the key is pressed,the
mode is changed in order of FM1 ➟
FM2 ➟FMA ➟AM ➟AMA.
(2)
Start Media mode
Each time the key is pressed, the
mode is changed in order of
USB(iPod) AUX, My Music, BT
Audio.
(3)
Converts to Phone mode
❈ When a phone is not connected,
the connection screen is displayed.
(4) PWR/VOL knob
Power : Press to turn power
on/off.
Volume : Turn left / right to control
volume.
(5)
When pressed shortly(under 0.8
seconds)
- Radio mode : plays previous / next
frequency.
- Media (USB / iPod / My Music)
modes : changes the track, Song(file)
When pressed and held (0.8 sec-
onds)
- Radio mode : continuously changes
the frequency. Upon release, plays
the current frequency.
- Media(USB / iPod / My Music)
modes : rewinds or fast forwards
the track or file
- During a Handsfree call, controls
the call volume.
(6)
Displays the time/date/day.
SEEK
TRACK
MEDIA
RADIO
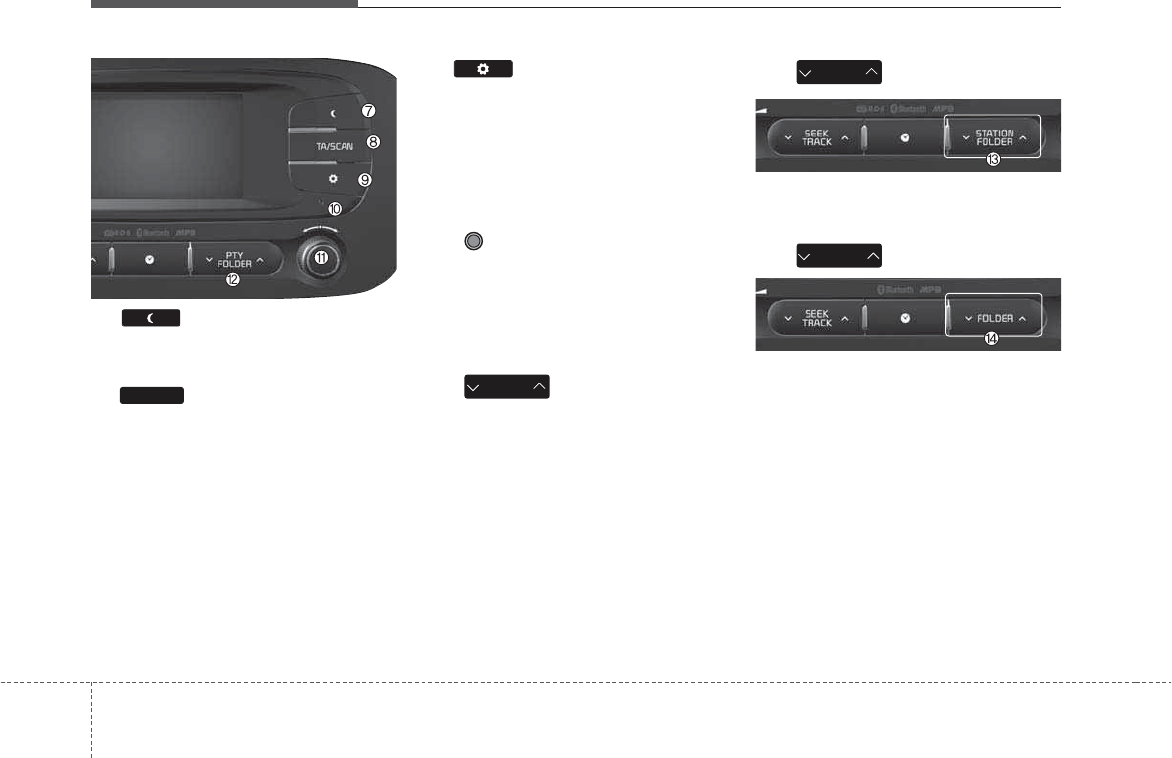
(7)
Turns the monitor display on/off.
(8)
Radio Mode :
- Short key : TA On/Off
- Long key : previews all receivable
broadcasts for 5 seconds each.
Media (USB / iPod / My Music)
modes : previews each song (file) for
10 seconds each.
(9)
Converts to Setup mode.
(10) RESET
Forced system termination and sys-
tem restart.
(11) TUNE knob
Radio mode : turn to change broad-
cast frequencies.
Media (USB / iPod / My Music) modes
: turn to search tracks/channels/files.
(12)
RDS Radio mode : searches RDS
program types.
USB / MP3 modes : searches fold-
ers.
(13)
(14)
USB / MP3 modes : searches fold-
ers.
FOLDER
STATION
FOLDER
PTY
FOLDER
TA/SCAN
Features of your vehicle
624

463
Features of your vehicle
SYSTEM CONTROLLERS
AND FUNCTIONS
❈ Display and settings may differ
depending on the selected audio.
Audio Head Unit
(1)
Converts to Radio(FM/AM) mode.
Each time the key is pressed,the
mode is changed in order of FM1 ➟
FM2 ➟ AM.
(2)
Start Media mode
Each time the key is pressed, the
mode is changed in order of
USB(iPod) AUX, My Music, BT
Audio.
(3)
Converts to Phone mode
❈ When a phone is not connected,
the connection screen is dis-
played.
(4) PWR/VOL knob
Power : Press to turn power
on/off.
Volume : Turn left/right to control
volume.
(5)
When pressed shortly(under 0.8
seconds)
- Radio mode : plays previous/next
frequency.
- Media (USB / iPod / My Music)
modes : changes the track,
Song(file)
When pressed and held (0.8 sec-
onds)
- Radio mode : continuously changes
the frequency. Upon release, plays
the current frequency.
- Media(USB / iPod / My Music)
modes : rewinds or fast forwards
the track or file
- During a Handsfree call, controls
the call volume.
(6)
Displays the time/date/day.
CLOCK
SEEK
TRACK
PHONE
MEDIA
RADIO
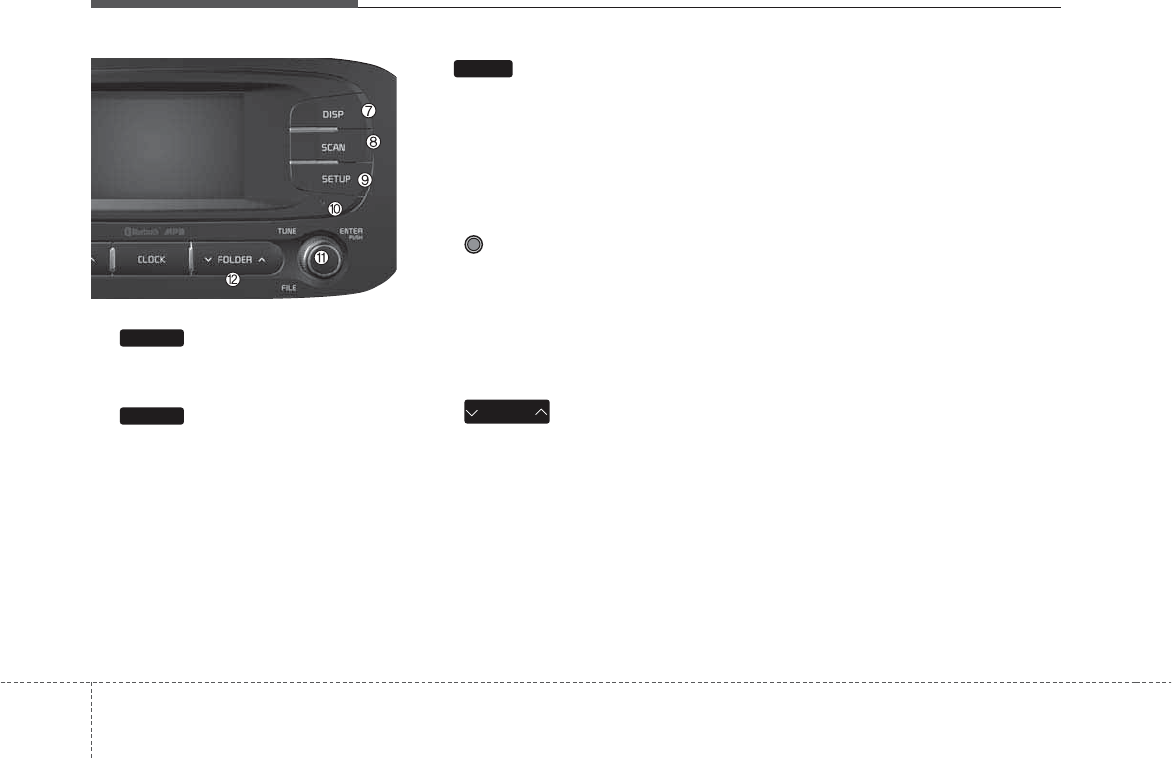
Features of your vehicle
644
(7)
Turns the monitor display on/off.
(8)
Radio Mode : previews all receivable
broadcasts for 5 seconds each
Media (USB / iPod / My Music)
modes : previews each song (file) for
10 seconds each.
(9)
Converts to Setup mode.
(10) RESET
Forced system termination and sys-
tem restart.
(11) TUNE knob
Radio mode : turn to change broad-
cast frequencies.
Media (USB / iPod / My Music)
modes : turn to search tracks/chan-
nels/files.
(12)
USB / MP3 modes : searches fold-
ers.
FOLDER
SETUP
SCAN
DISP

465
Features of your vehicle
Steering remote controller
(1) VOLUME
Used to control volume.
(2) MUTE
Mutes audio volume.
(3) SEEK
When pressed shortly (under 0.8
seconds)
- Radio mode : searches broadcast
frequencies saved to presets.
- Media(USB / iPod / My Music / BT
Audio) modes : changes the track,
file or chapter.
When pressed and held (over 0.8
seconds)
- Radio mode, automatically searches
broadcast frequencies and channels
- Media(USB / iPod / My Music)
modes, rewinds or fast forwards the
track or song(file)
(4) MODE
Each time this key is pressed, the
mode is changed in order of FM1➟
FM2 ➟ FMA➟AM ➟ AMA ➟ USB or
iPod ➟ AUX ➟ My Music➟ BT Audio
If the media is not connected or a
disc is not inserted, corresponding
modes will be disabled.
(5) (if equipped)
When pressed shortly (under 0.8
seconds)
- Starts voice recognition
- When selecting during a voice
prompt, stops the prompt and con-
verts to voice command waiting
state
When pressed and held (over 0.8
seconds)
- Ends voice recognition
.
Features of your vehicle
664
(6)
When pressed shortly (under 0.8 sec-
onds)
- When pressed in the phone screen,
displays call history screen
- When pressed in the dial screen,
makes a call
- When pressed in the incoming call
screen, answers the call
- When pressed during call waiting,
switches to waiting call (Call
Waiting)
When pressed and held (over 0.8
seconds)
- When pressed in the
Bluetooth®
Wireless Technology Handsfree wait
mode, redials the last call
- When pressed during a
Bluetooth®
Wireless Technology Handsfree call,
switches call back to mobile phone
(Private)
- When pressed while calling on the
mobile phone, switches call back to
Bluetooth®
Wireless Technology
Handsfree (Operates only when
Bluetooth®
Wireless Technology
Handsfree is connected)
7)
Ends phone call
467
Features of your vehicle
RADIO MODE
(for RDS model)
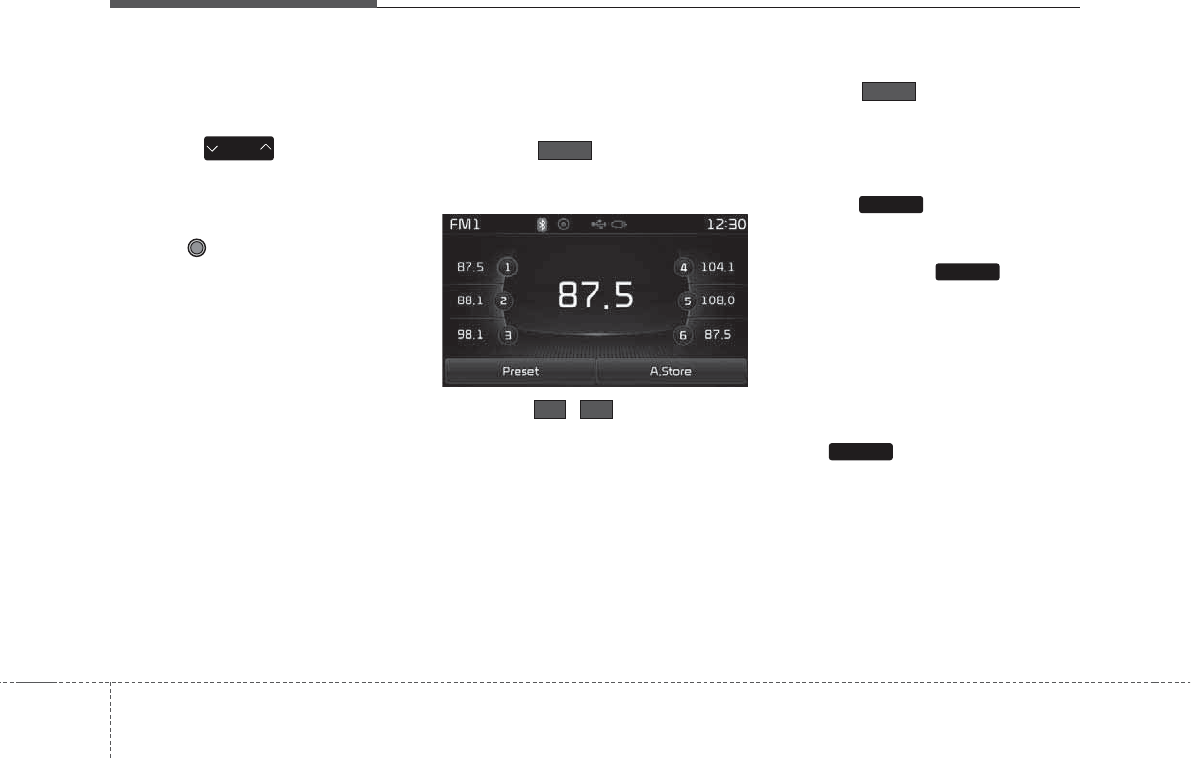
Basic Mode Screen
(1) Mode Display
Displays currently operating mode
(2) Frequency
Displays the current frequency
(3) Preset
Displays current preset number [1] ~
[6]
(4) Preset Display
Displays saved presets
(5) Autostore
Automatically saves frequencies with
superior reception to Preset buttons
(6) RDS Menu
Displays the RDS Menu
(7) RDS Info
Displays RDS broadcast information
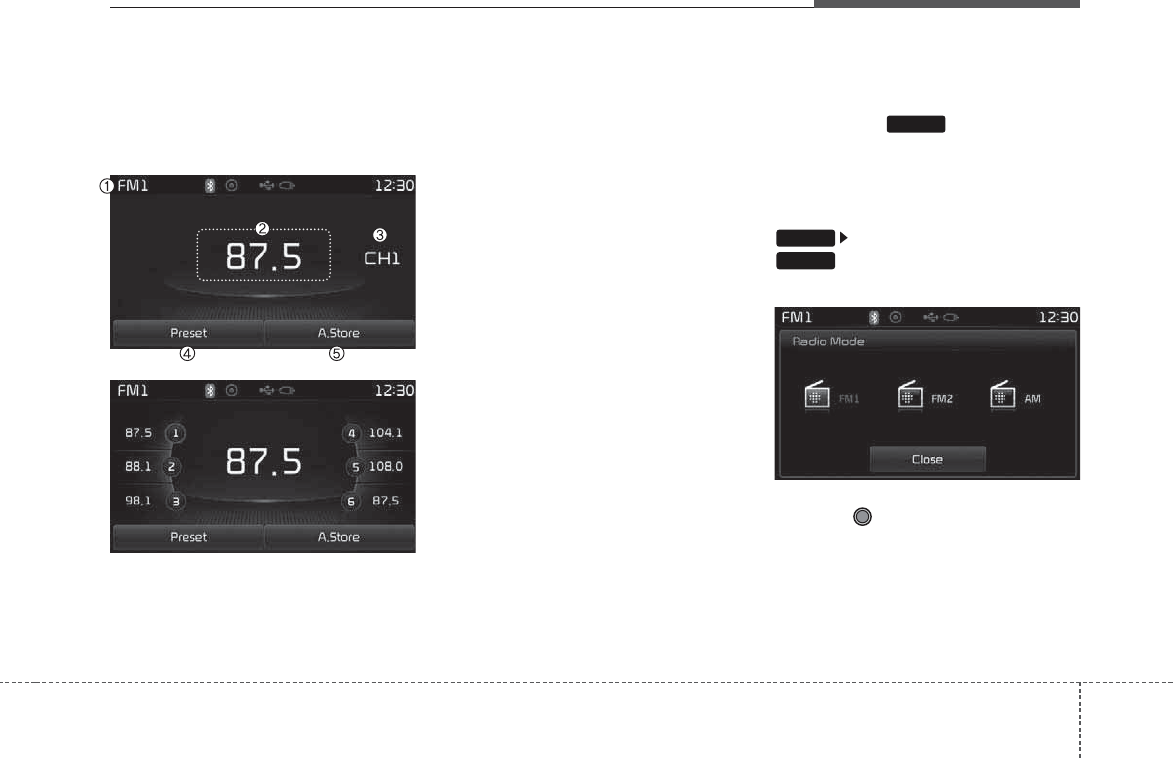
Switching to Radio Mode
Pressing the key will change
the operating mode in order of FM1
➟FM2➟FMA➟AM➟AMA.
If [Pop-up Mode] / [Mode Pop-up] is
turned on within [Display],
then pressing the key will
display the Radio Pop-up Mode
screen.
Turn the TUNE knob to move the
focus. Press the knob to select.
RADIO
SETUP
RADIO
Features of your vehicle
684
Searching Radio Frequencies
Using Seek
Press the key to play the
previous/next frequency.
Using TUNE
Turn the TUNE knob to select the
desired frequency.
• FM : Increases/decreased by 50kHz
• AM : Increases/decreased by 9kHz
Using Radio Mode
Selecting/Saving Presets
Press the ~ buttons to play
the desired preset.
Press the button to display the
broadcast information for the fre-
quency saved to each button.
✽
NOTICE
While listening to a frequency you
want to save as a preset, press and
hold one of the [1] ~ [6] preset but-
tons (over 0.8 seconds) to save the
current frequency to the selected
preset.
Auto Store
Press the button to automati-
cally save receivable frequencies to
Preset buttons.
✽
NOTICE
While Auto Store is operating, press-
ing the [Cancel] button again will
cancel Auto Store and restore the
previous frequency.
61
SEEK
TRACK
469
Features of your vehicle
RDS Menu
Press the button to set the AF
(Alternative Frequency), Region and
News features.
✽
NOTICE
The RDS Menu is not supported
within AM or AMA mode.
Scan
• Radio Mode
- Press the key (under 0.8 seconds):
Previews each broadcast for 5 sec-
onds each
• USB, My Music mode
- Press the key (under 0.8 seconds):
Previews each song (file) for 10
seconds each
❈Press the key again to continue
listening to the current song (file).
✽
NOTICE
Once scan is complete, the previous
frequency will be restored.
While Scan is operating, pressing
the key (under 0.8 seconds)
will cancel the scan operation.
TA/SCAN
Features of your vehicle
704
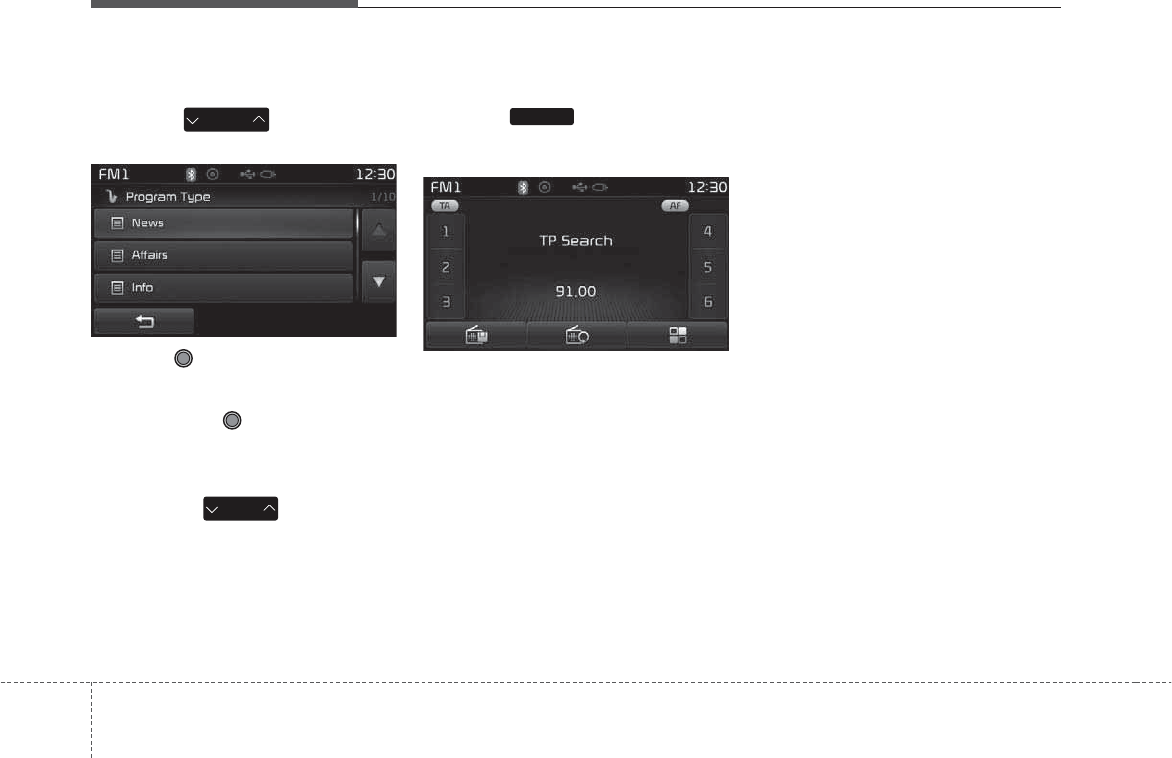
Program Type
Press the key to search
for the desired Program type.
Turn the TUNE knob left/right to
search for the desired program type.
Once you find the desired program
type, press the TUNE knob.
After selecting the desired Program
Type and while the Program Type is
blinking (approximately 5 seconds),
pressing the key will allow
you to select a different Program
Type broadcast.
TA (Traffic Announcement)
Press the key to turn the TA
(Traffic Announcement) feature
On/Off.
TA/SCAN
SEEK
TRACK
PTY
FOLDER
471
Features of your vehicle
RADIO MODE
Basic Mode Screen
(1) Mode Display
Displays currently operating mode
(2) Frequency
Displays the current frequency
(3) Preset
Displays current preset number [1] ~
[6]
(4) Preset Display
Displays preset buttons
(5) Autostore
Automatically saves frequencies with
superior reception to Preset buttons
Switching to Radio Mode
Pressing the key will change
the operating mode in order of FM1
➟FM2➟AM
If [Mode Pop-up] is turned on within
[Display], then pressing the
key will display the Radio
Pop-up Mode screen.
Turn the TUNE knob to move the
focus. Press the knob to select.
RADIO
SETUP
RADIO
Features of your vehicle
724
Searching Radio Frequencies
Using Seek
Press the key to play the
previous/next frequency.
Using TUNE
Turn the TUNE knob to select the
desired frequency.
• FM : Increases/decreased by 100kHz
• AM : Increases/decreased by 9kHz
Using Radio Mode
Selecting /Saving Presets
Press the button to display
the broadcast information for the fre-
quency saved to each button.
Press the ~ buttons to play
the desired preset.
✽
NOTICE
While listening to a frequency you
want to save as a preset, press and
hold one of the [1] ~ [6] preset but-
tons (over 0.8 seconds) to save the
current frequency to the selected
preset.
Auto Store
Press the button to automati-
cally save receivable frequencies to
Preset buttons.
Scan
Press the key to preview fre-
quencies with superior reception for
5 seconds each.
Press and hold the key (over
0.8 seconds) to preview presets for 5
seconds each.
✽
NOTICE
• Once scan is complete, the previous
frequency will be restored.
• While Scan is operating, pressing
the key will cancel the
scan operation.
SCAN
SCAN
SCAN
A.store
61
Preset
SEEK
TRACK
473
Features of your vehicle
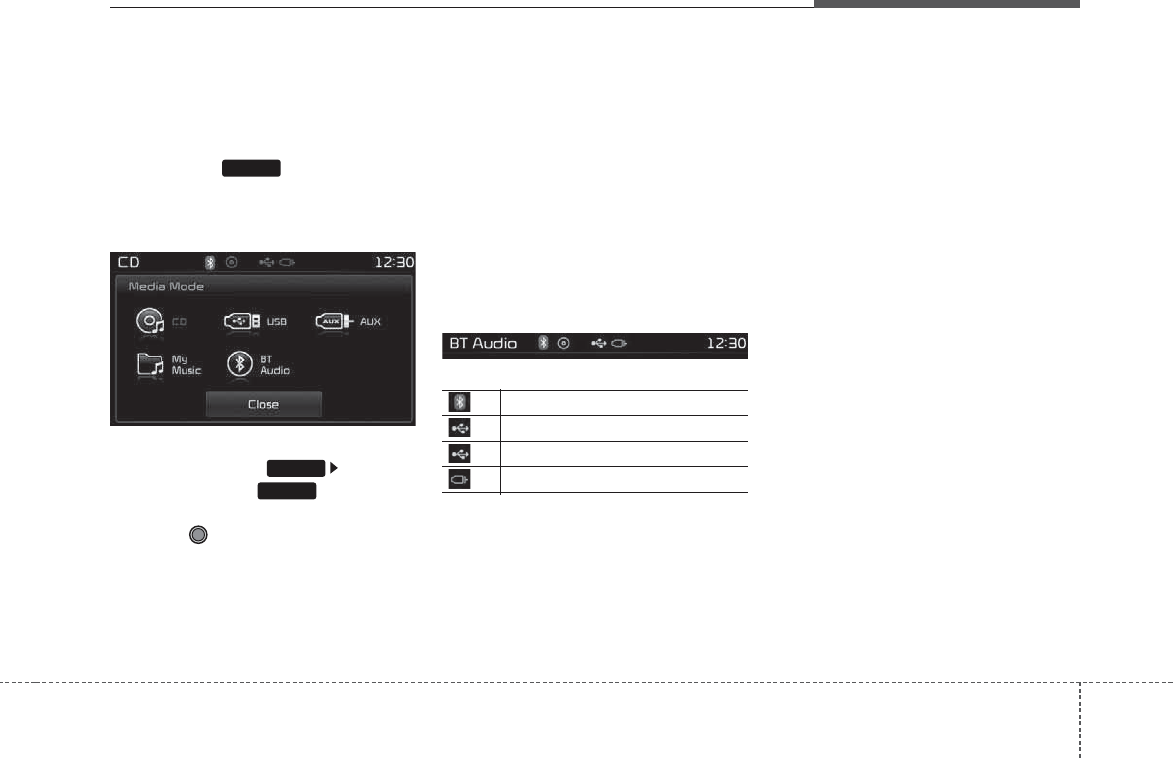
MEDIA MODE
Switching to Media Mode
Pressing the key will change
the operating mode in order of USB
(iPod) ➟ AUX ➟ My Music ➟BT
Audio.
If [Pop-up Mode] / [Mode Pop-up] is
turned on within [Display],
then pressing the key will dis-
play the Media Pop-up Mode screen.
Turn the TUNE knob to move the
focus. Press the knob to select.
✽
NOTICE
The media mode pop up screen can
be displayed only when there are
two or more media modes turned
on.
Title Icon
When a
Bluetooth®
Wireless
Technology, iPod, USB, or AUX
device is connected, the correspon-
ding mode icon will be displayed.
Icon Title
Bluetooth
®
Wireless Technology
iPod
USB
AUX
MEDIA
SETUP
MEDIA

Features of your vehicle
744
✽
NOTICE - USING THE USB
DEVICE
• Connect the USB device after
turning on the engine. The USB
device may become damaged if it
is already connected when the
ignition is turned on.The USB
device may not operate properly if
the car ignition is turned on or off
with the USB device connected.
• Heed caution to static electricity
when connecting/disconnecting
USB devices.
• Encoded MP3 Players will not be
recognized when connected as an
external device.
• When connecting an external USB
device, the device may not proper-
ly recognize the USB is in some
states.
• Only products formatted with
byte/sectors under 64Kbyte will be
recognized.
• This device recognizes USB
devices formatted in FAT 12/16/32
file formats. This device does not
recognize files in NTFS file for-
mat.
(Continued)
(Continued)
• Some USB devices may not be sup-
ported due to compatibility issues.
• Avoid contact between the USB
connector with bodily parts or for-
eign objects.
• Repeated connecting/disconnect-
ing of USB devices within short
periods of time may result in prod-
uct malfunction.
• A strange noise may occur when
disconnecting the USB.
• Make sure to connect/disconnect
external USB devices with the
audio power turned off.
• The amount of time required to
recognize the USB device may dif-
fer depending on the type, size or
file formats stored in the USB.
Such differences in time are not
indications of malfunctions.
• The device only supports USB
devices used to play music files.
• USB images and videos are not
supported.
(Continued)
(Continued)
• Do not use the USB I/F to charge
batteries or USB accessories that
generate heat. Such acts may lead
to worsened performance or dam-
age to the device.
• The device may not recognize the
USB device if separately pur-
chased USB hubs and extension
cables are being used. Connect the
USB directly with the multimedia
terminal of the vehicle.
• When using mass storage USB
devices with separate logical
drives, only files saved to the root
drive can be played.
• Files may not properly operate if
application programs are installed
to the USBs.
• The device may not operate nor-
mally if MP3 Players, cellular
phones, digital cameras, or other
electronic devices (USB devices
not recognized as portable disk
drives) are connected with the
device.
(Continued)
475
Features of your vehicle
(Continued)
• Charging through the USB may
not work for some mobile devices.
• The device may not support nor-
mal operation when using a USB
memory type besides (Metal
Cover Type) USB Memory.
• The device may not support nor-
mal operation when using formats
such as HDD Type, CF, or SD
Memory.
• The device will not support files
locked by DRM (Digital Rights
Management.)
• USB memory sticks used by con-
necting an Adaptor (SD Type or
CF Type) may not be properly rec-
ognized.
• The device may not operate prop-
erly when using USB HDDs or
USBs subject to connection fail-
ures caused by vehicle vibrations.
(e.g. i-stick type)
(Continued)
(Continued)
• Avoid use of USB
memory products that
can also be used as key
chains or mobile phone
accessories. Use of such products
may cause damage to the USB
jack.
• Connecting an MP3 device or
phone through various channels,
such as AUX/BT or Audio/USB
mode may result in pop noises or
abnormal operation.
Features of your vehicle
764
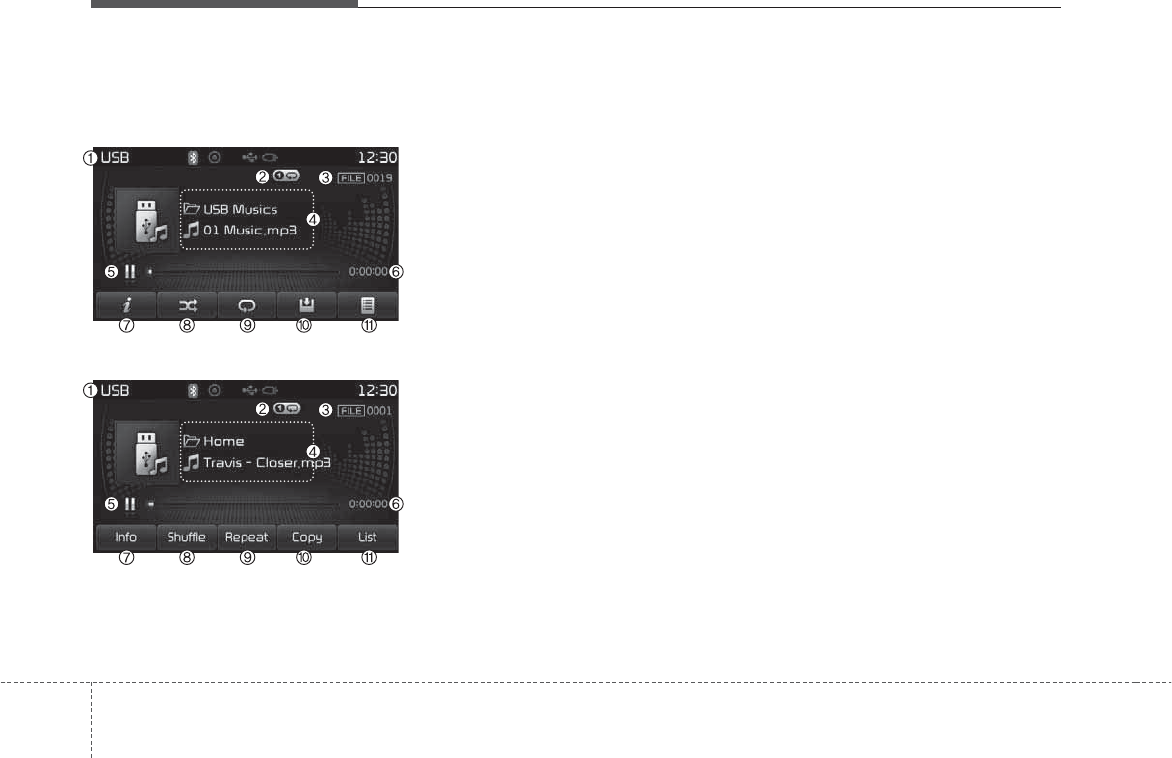
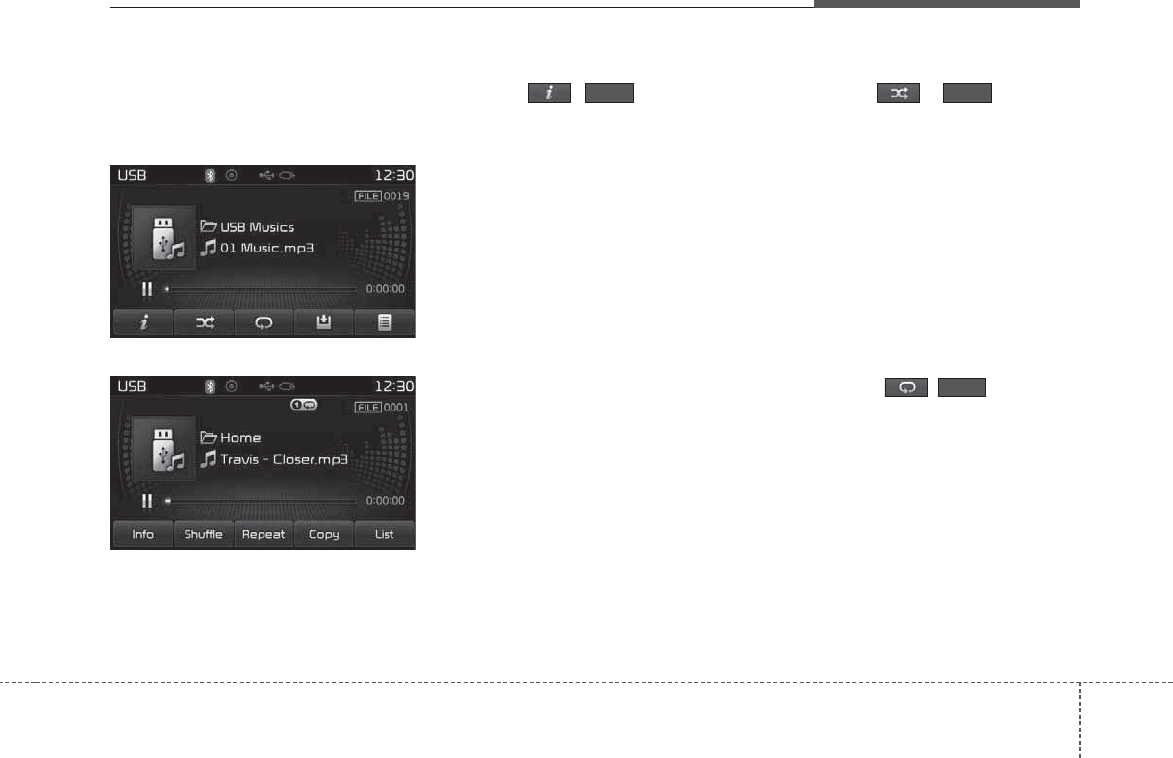
USB MODE
Basic Mode Screen
<for RDS model>
(1) Mode
Displays currently operating mode
(2) Operation State
From Repeat/Random(Shuffle)/ Scan,
displays the currently operating func-
tion
(3) File Index
Displays the current file number
(4) File Info
Displays information about the cur-
rent file
(5) Play/Pause
Changes the play/pause state
(6) Play Time
Displays the current play time
(7) Info
Displays detailed information for the
current file
(8) Random(Shuffle)
Turns the Random(Shuffle) feature
on/off
(9) Repeat
Turns the Repeat feature on/off
(10) Copy
Copies the current file into My Music
(11) List
Moves to the list screen
477
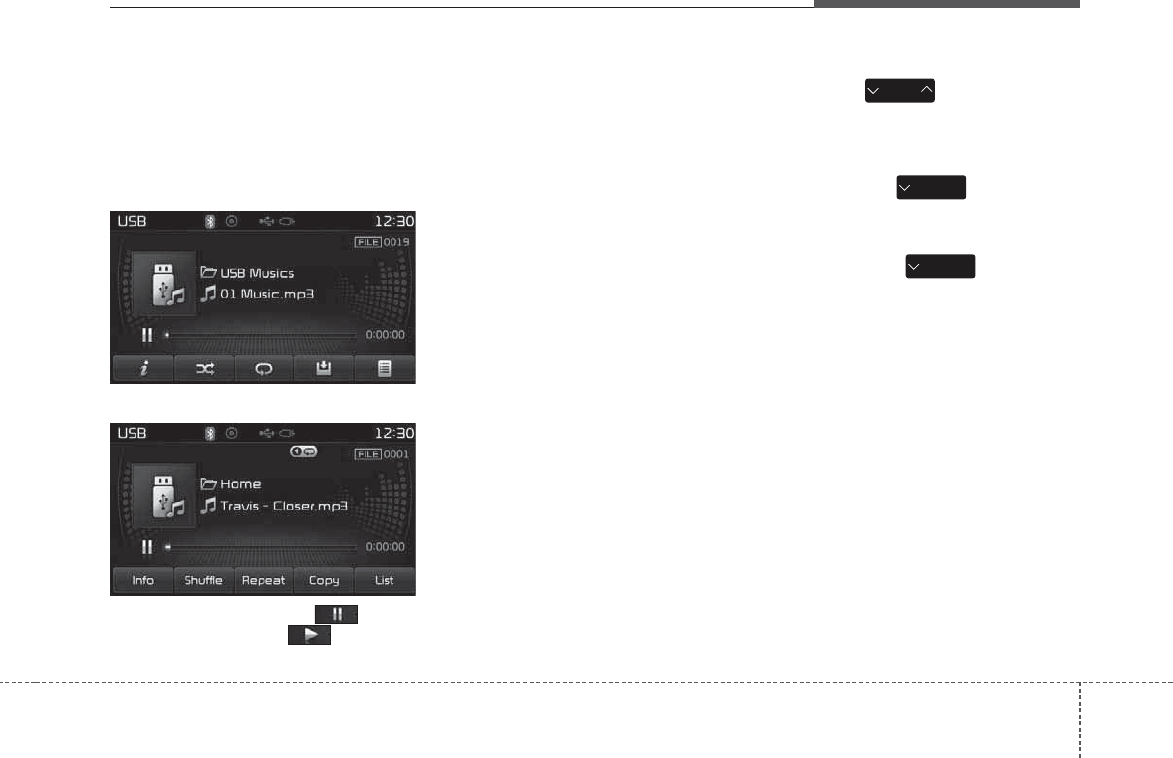
Features of your vehicle
Using USB Mode
Playing/Pausing USB Files
Once a USB is connected, the mode
will automatically start and begin
playing a USB file.
<for RDS model>
While playing, press the button
to pause and press button to
play.
✽
NOTICE
• Loading may require additional
time if there are many files and
folders within the USB and result
in faulty list display or file search-
ing. Normal operations will resume
once loading is complete.
• The device may not support nor-
mal operation when using a USB
memory type besides (Metal Cover
Type) USB Memory.
Changing Files
Press the keys to move to
the previous or next file.
✽
NOTICE
• Pressing the key after the
file has been playing for 2seconds
will start the current file from the
beginning.
• Pressing the key before
the file has been playing for 1sec-
onds will start the previous file.
SEEK
TRACK
SEEK
TRACK
SEEK
TRACK
Features of your vehicle
784
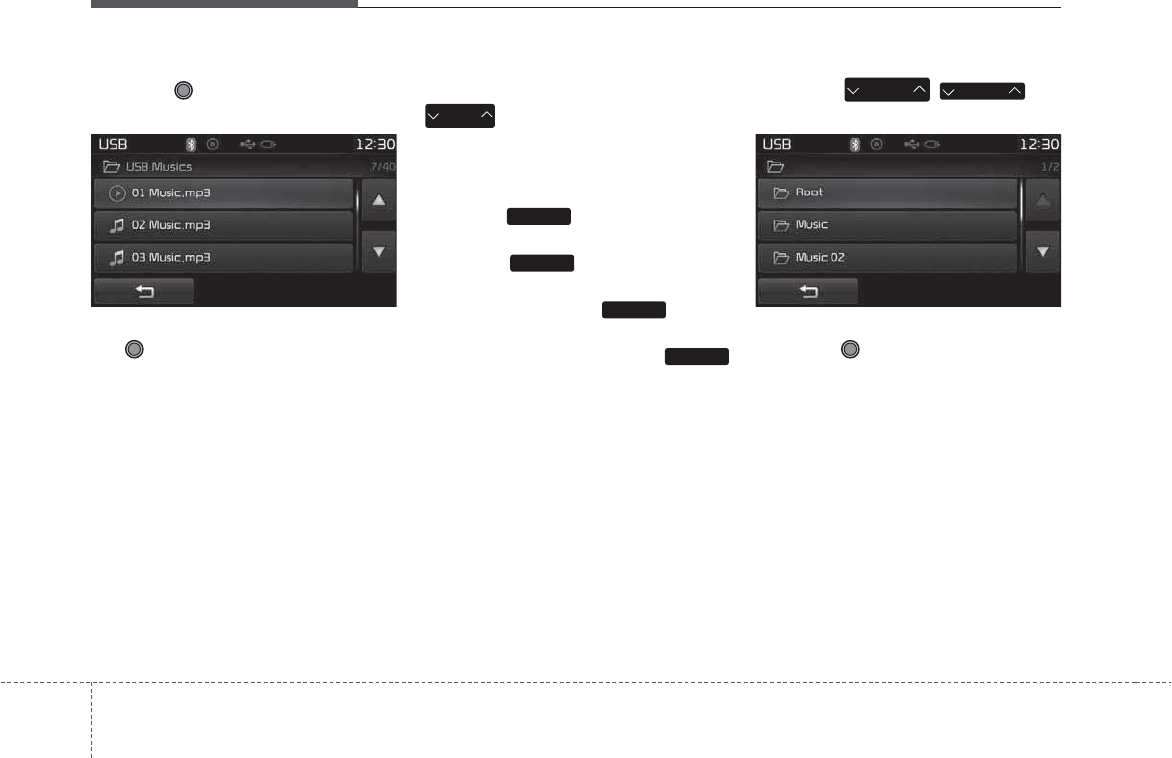
Selecting from the List
Turn the TUNE knob left/right to
search for the desired file.
Once you find the desired file, press
the TUNE knob to start playing.
Rewinding / Fast-forwarding Files
While playing, press and hold the
key (over 0.8 seconds) to
rewind or fast-forward the current file.
Scan
Press the key to play the first
10 seconds of each file.
Press the key again to turn
off.
Press and hold the key to
play the file 10 seconds of each file.
Pressing and holding the
key again to turn off.
Searching Folders
Press the ()key
to select and search folders.
Once the desired folder is displayed,
press the TUNE knob to select.
The first file within the selected fold-
er will begin playing.
FOLDER
PTY
FOLDER
TA/SCAN
TA/SCAN
SCAN
SCAN
SEEK
TRACK
479
Features of your vehicle
USB Mode Menu
Within this mode, you will have
access to the Info, Random(Shuffle),
Repeat, Copy and List features.
<for RDS model>
Info
Press the ( )button to dis-
play details about the current file.
✽
NOTICE
• When the ‘Folder File’ option is set
as the default display within
Display setup, the album/artist/file
information are displayed as
detailed file information.
• When the ‘Album Artist Song’
option is set as the default display,
the folder name/file name are dis-
played as detailed file information.
• The title, artist and album info are
displayed only when such informa-
tion are recorded within the MP3
file ID3 tag.
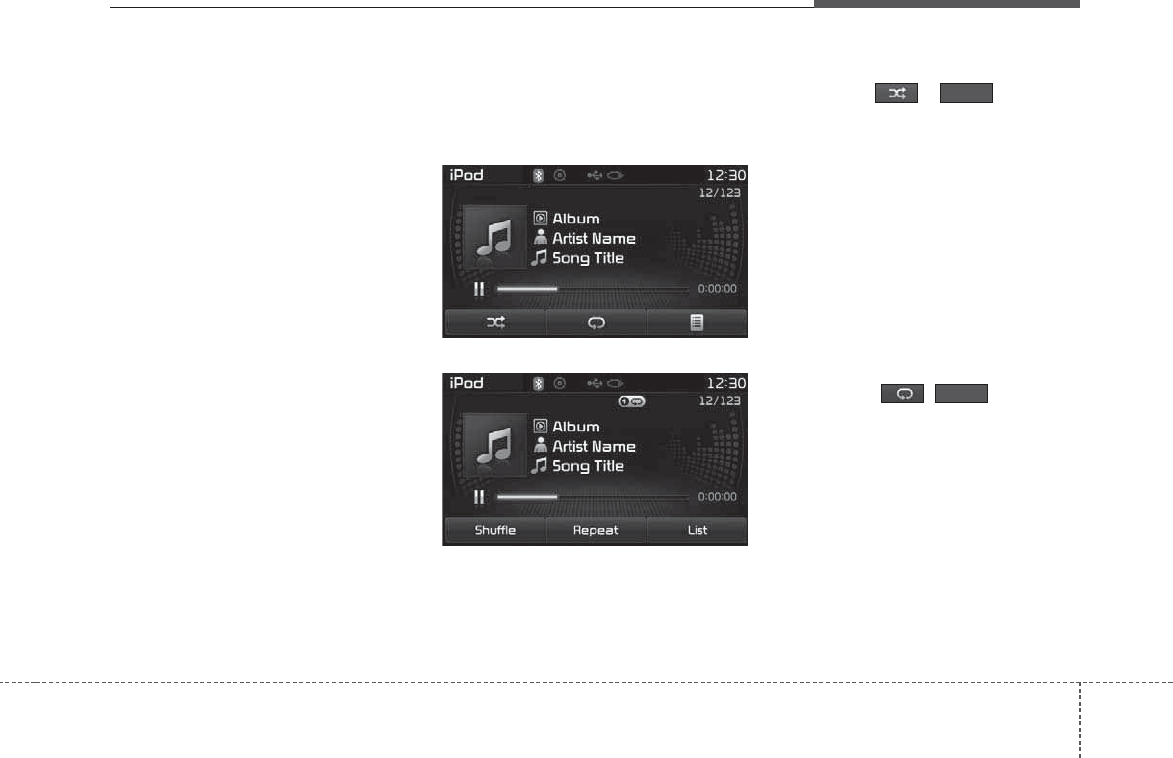
Random(Shuffle)
Press the ( )button to
play files in random(Shuffle) order.
Each time the button is pressed, the
feature changes in order of
Random(Shuffle) Folder➟Random
(Shuffle) All➟Off.
• Random(Shuffle) Folder : Plays the
files in the current folder in ran-
dom(Shuffle) order.
• Random(Shuffle) All : Plays all files
in random(Shuffle) order.
Repeat
Press the ( )button to
repeat the current file or folder.
Each time the button is pressed, the
feature changes in order of Repeat➟
Repeat Folder ➟Off.
• Repeat (Icon) : Repeats the current
file.
• Repeat Folder (Icon) : Repeats all
files within the current folder.
Repeat
ShuffleInfo
Features of your vehicle
804
Copying Files
Press the ( )button to
copy the current file into My Music.
✽
NOTICE
Selecting another feature during
copying will display a pop-up asking
whether you wish to cancel copying.
To cancel, select 'Yes’.
List
Press the ( )button to dis-
play the file list screen.
Turn the TUNE knob left/right to
search for files. Once the desired file
is displayed, press the knob to select
and play.
ListCopy

481
Features of your vehicle
✽
NOTICE - USING THE
iPod®DEVICE
• iPod®is a registered trademark of
Apple Inc.
• In order to use the iPod while
operating the keys, you must use a
dedicated iPod cable. (the cable
that is supplied when purchasing
iPod/iPhone products)
• If the iPod is connected to the
vehicle while it is playing, a high
pitch sound could occur for
approximately 1-2 seconds imme-
diately after connecting. If possi-
ble, connect the iPod to the vehicle
with the iPod stopped/paused.
• During ACC ON state, connecting
the iPod through the iPod cable
will charge the iPod through the
car audio system.
• When connecting with the iPod
cable, make sure to fully insert the
jack to prevent communication
interference.
(Continued)
(Continued)
• When the EQ features of an exter-
nal device, such as the iPod, and the
audio system are both active, EQ
effects could overlap and cause
sound deterioration and distortion.
Whenever possible, turn off the EQ
feature within the external device
upon use by connecting with the
audio system.
• Noise may occur when an iPod or
AUX device is connected. When
such devices are not being used, dis-
connect the device for storage.
• When the iPod or AUX device
power is connected to the power
jack, playing the external device
may result in noise. In such cases,
disconnect the power connection
before use.
• Skipping or improper operation
may occur depending on the charac-
teristics of your iPod/Phone device.
• If your iPhone is connected to both
the Bluetooth®Wireless Technology
and USB, the sound may not be
properly played. In your iPhone,
select the Dock connector or
Bluetooth®Wireless Technology to
change the sound output (source).
(Continued)
(Continued)
• iPod mode cannot be operated
when the iPod cannot be recog-
nized due to the playing of ver-
sions that do not support commu-
nication protocols, cases of iPod
abnormalities and defects.
• For fifth generation iPod Nano
devices, the iPod may not be rec-
ognized when the battery level is
low. Please charge the iPod for
use.
• Search/play orders shown within
the iPod device may differ with the
orders shown within the audio sys-
tem.
• If the iPod malfunctions due to an
iPod device defect, reset the iPod
and try again. (To learn more,
refer to your iPod manual)
• Some iPods may not sync with the
System depending on its version.
If the Media is removed before the
Media is recognized, then the sys-
tem may not properly restore the
previously operated mode. (iPad
charging is not supported.)

Features of your vehicle
824
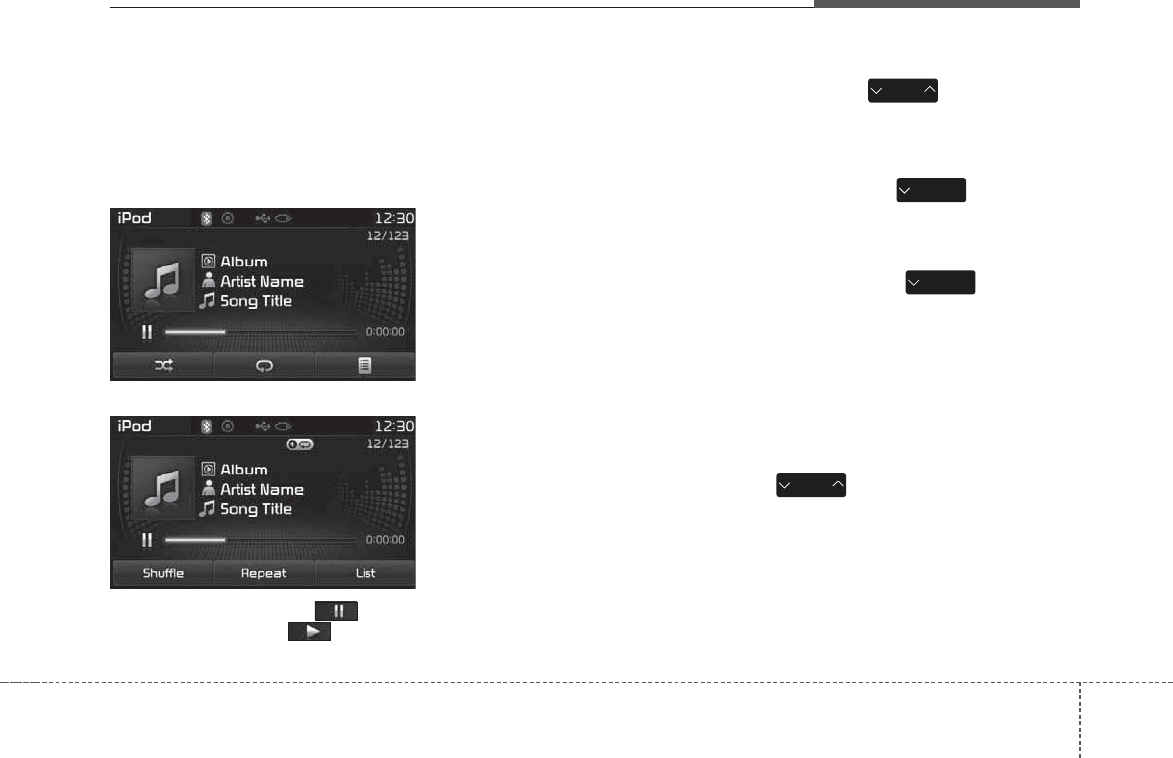
iPod MODE
Basic Mode Screen
<for RDS model>
(1) Mode
Displays currently operating mode
(2) Operation State
From Repeat/Random(Shuffle), dis-
plays the currently operating function
(3) Song Index
Displays the current song/total num-
ber of songs
(4) Song Info
Displays information about the cur-
rent song
(5) Play/Pause
Changes the play/pause state
(6) Play Time
Displays the current play time
(7) Random(Shuffle)
Turns the Random(Shuffle) feature
on/off
(8) Repeat
Turns the Repeat feature on/off
(9) List
Moves to the list screen
483
Features of your vehicle
Using iPod Mode
Playing/Pausing iPod Songs
Once an iPod is connected, the
mode will automatically start and
begin playing an iPod song.
<for RDS model>
While playing, press the button
to pause and press button to
play.
✽
NOTICE
iPods with unsupported communi-
cation protocols may not properly
operate in the audio system.
Changing Songs
Press the key to move to
the previous or next song.
✽
NOTICE
• Pressing the key after the
song has been playing for 2sec-
onds will start the current song
from the beginning.
• Pressing the key before
the song has been playing for 1sec-
onds will start the previous song.
• Slight time differences may exist
depending your iPod product.
Rewinding / Fast-forwarding
Songs
While playing, press and hold the
key (over 0.8 seconds) to
rewind or fast-forward the current
song.
SEEK
TRACK
SEEK
TRACK
SEEK
TRACK
SEEK
TRACK
Features of your vehicle
844
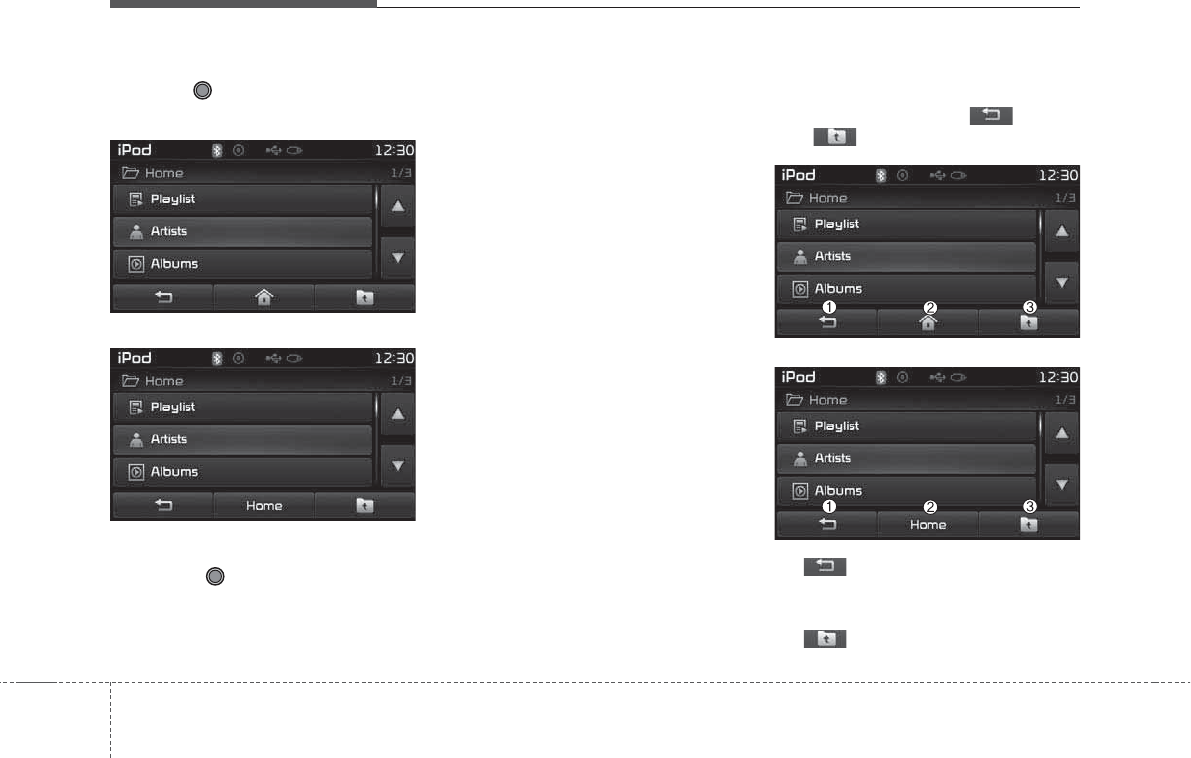
Searching Categories
Turn the TUNE knob left/right to
search for the desired category.
<for RDS model>
Once you find the desired category,
press the TUNE knob to select
and play.
✽
NOTICE
There are eight categories that can
be searched, including Playlists,
Artists, Albums, Genres, Songs,
Composers, Audiobooks and
Podcasts.
Category Menu
Within the iPod Category menu, you
will have access to the , Home,
and features.
<for RDS model>
(1) : Displays the play screen
(2) Home : Moves to the iPod root
category screen
(3) : Moves to the previous cat-
egory
485
Features of your vehicle
✽
NOTICE
• If the search mode is accessed
while playing a song, the most
recently searched category is dis-
played.
• Search steps upon initial connec-
tion may differ depending on the
type of iPod device.
iPod Mode Menu
Within this mode, you will have
access to the Random(Shuffle),
Repeat and List features.
<for RDS model>
Random(Shuffle)
Press the ( )button to
play songs in random(Shuffle) order.
Each time the button is pressed, the
feature changes in order of
Random(Shuffle) Album➟Random
(Shuffle) All➟Off.
• Random(Shuffle) Album : Shuffle
Album plays album in
Random(Shuffle) order.
• Random(Shuffle) All : Plays all
songs in Random(Shuffle) order.
Repeat
Press the ( )button to
repeat the current song. Press the
button again to turn the repeat fea-
ture off.
• Repeat : Repeats the current song
Repeat
Shuffle
Features of your vehicle
864
List
Press the ( )button to dis-
play the Category Menu.
<for RDS model>
Turn the TUNE knob left/right to
search for the desired category.
Once you find the desired category,
press the TUNE knob to select
and play.
AUX MODE
Using AUX Mode
Press the key Select [AUX]
An external device can be connected
to play music.
Connecting an External Device
External audio players (Camcorders,
car VCR, etc.) can be played through
a dedicated cable.
✽
NOTICE
• If an external device connector is
connected with the AUX terminal,
then AUX mode will automatically
operate. Once the connector is dis-
connected, the previous mode will
be restored.
• AUX mode can be used only when
an external audio player (cam-
corder, car VCR, etc.) has been
connected.
• The AUX volume can be con-
trolled separately from other
audio modes.
• Connecting a connector jack to the
AUX terminal without an external
device will convert the system to
AUX mode, but only output noise.
When an external device is not
being used, also remove the con-
nector jack.
• When the external device power is
connected to the power jack, play-
ing the external device may output
noise. In such cases, disconnect the
power connection before use.
• Fully insert the AUX cable to the
AUX jack upon use.
MEDIA
List
487
Features of your vehicle
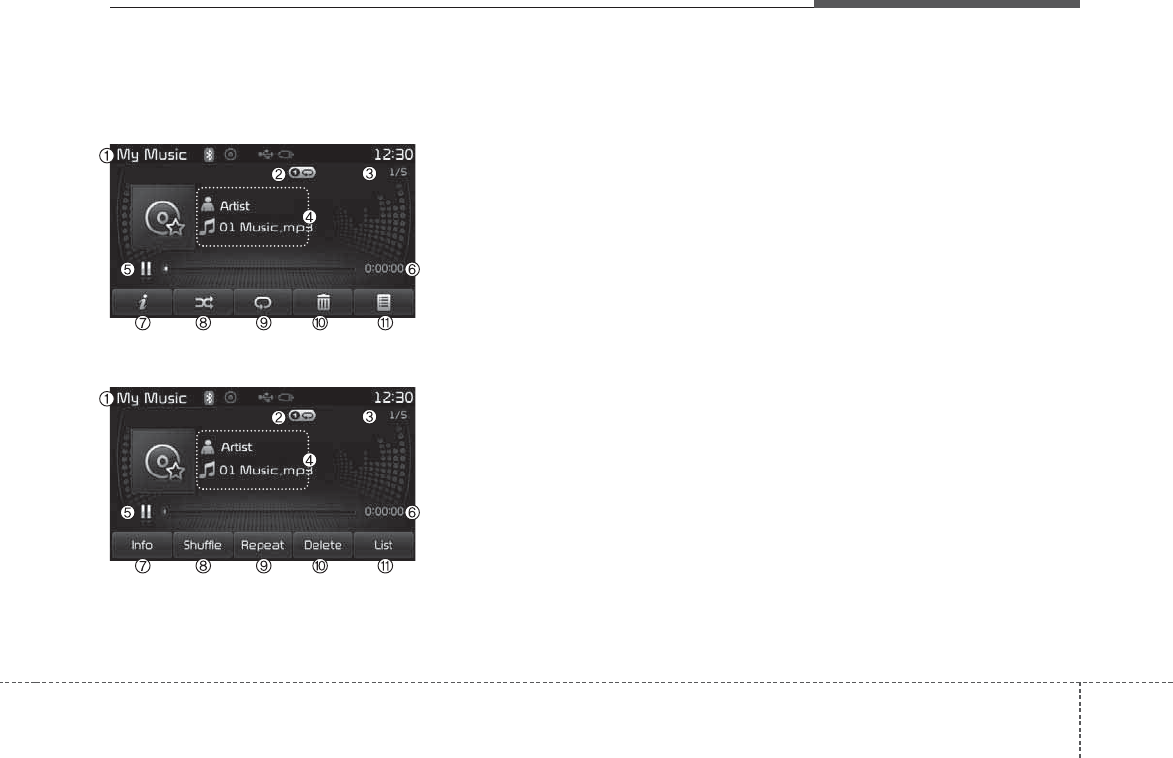
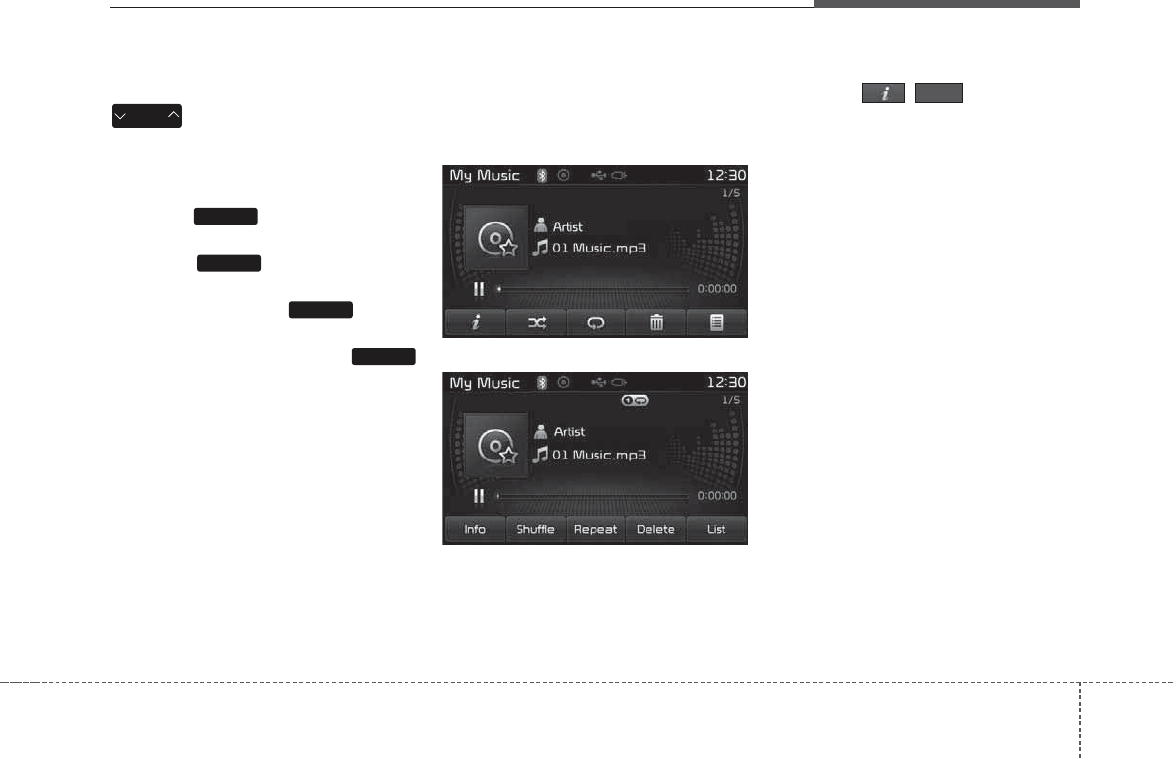
MY MUSIC MODE
Basic Mode Screen
<for RDS model>
(1) Mode
Displays currently operating mode
(2) Operation State
From Repeat/Random(Shuffle)/ Scan,
displays the currently operating func-
tion
(3) File Index
Displays the current file/total number
of files
(4) File Info
Displays information about the cur-
rent file
(5) Play/Pause
Changes the play/pause state
(6) Play Time
Displays the current play time
(7) Info
Displays detailed information for the
current file
(8) Random(Shuffle)
Turns the Random(Shuffle) feature
on/off
(9) Repeat
Turns the Repeat feature on/off
(10) Delete
Deletes the current file
(11) List
Moves to the list screen
Features of your vehicle
884
Using My Music Mode
Playing/Pausing My Music Files
<for RDS model>
While playing, press the button
to pause and press button to
play.
✽
NOTICE
If there are no files saved within My
Music, the [My Music] button will
be disabled.
Changing Files
Press the key to move to
the previous or next file.
✽
NOTICE
• Pressing the key after the
file has been playing for 2seconds
will start the current file from the
beginning.
• Pressing the key before
the file has been playing for 1sec-
onds will start the previous file.
Selecting from the List
Turn the TUNE knob left/right to
search for the desired file.
<for RDS model>
Once you find the desired file, press
the TUNE knob to start playing.
SEEK
TRACK
SEEK
TRACK
SEEK
TRACK
489
Features of your vehicle
Rewinding / Fast-forwarding Files
While playing, press and hold the
key (over 0.8 seconds) to
rewind or fast-forward the current file.
Scan
Press the key to play the first
10 seconds of each file.
Press the key again to turn
off.
Press and hold the key to
play the file 10 seconds of each file.
Pressing and holding the
key again to turn off.
My Music Mode Menu
Within this mode, you will have
access to the Info, Random(Shuffle),
Repeat, Delete and List features.
<for RDS model>
Info
Press the ( )button to dis-
play details about the current file.
✽
NOTICE
The title, artist and album info are
displayed only when such informa-
tion is recorded within the MP3 file
ID3 tag.
Info
TA/SCAN
TA/SCAN
SCAN
SCAN
SEEK
TRACK
Features of your vehicle
904
Random
Press the ( )button to
play files in random order. Press the
button again to turn the Random fea-
ture off.
Repeat
Press the ( )button to
repeat the current song. Press the
button again to turn the repeat fea-
ture off.
Deleting Files
Press the ( )button to
delete the current file.
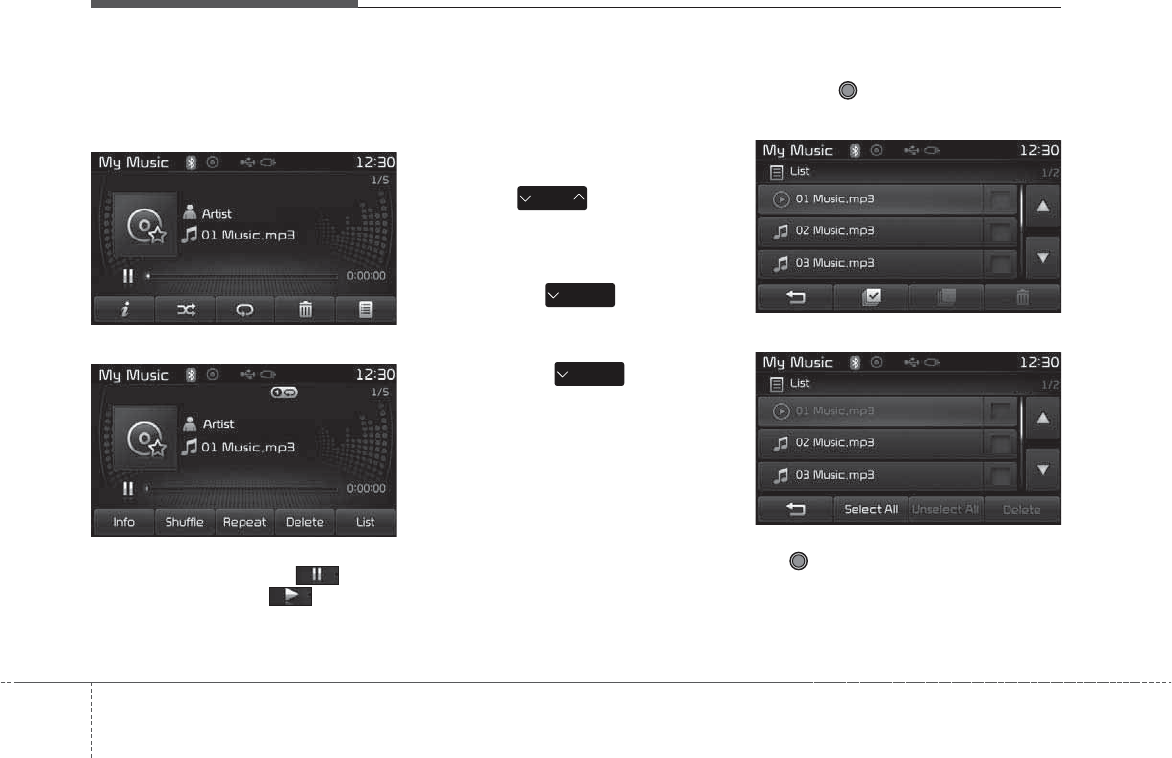
List
Press the ( )button to dis-
play the file list screen.
<for RDS model>
Turn the TUNE knob left/right to
search for files. Once the desired file
is displayed, press the knob to select
and play.
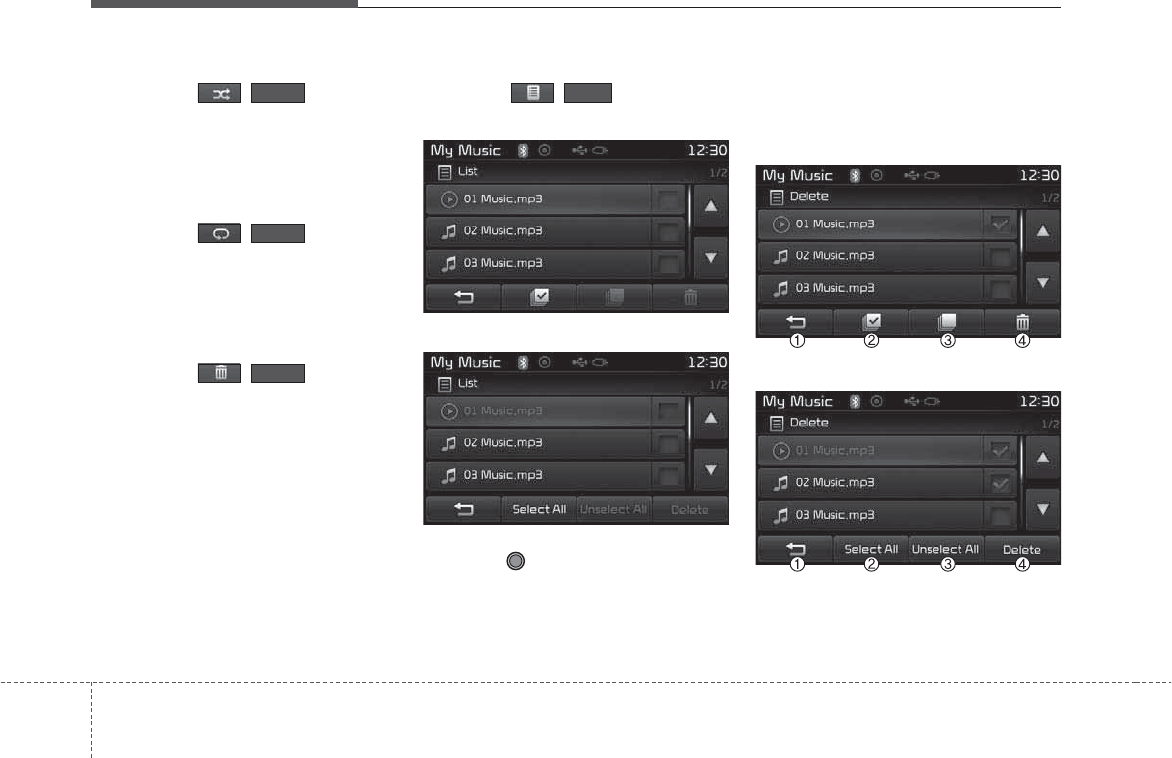
List Menu
From the List screen, it is possible to
delete files you previously saved into
My Music.
<for RDS model>
List
Delete
Repeat
Shuffle
491
Features of your vehicle
Press the ( )button or
individually select the files you want
to delete. Once files are selected, the
( )button and
( )buttons will be enabled.
(1) : Moves to the previous
screen
(2) Sellect All: Selects all files
(3) Unsellet All: Deselects all select-
ed files
(4) Delete: Deletes selected files
After selecting the files you want to
delete, press the ( )but-
ton to delete the selected files.
✽
NOTICE
• If there is memory available, up to
6,000 files can be saved.
• Identical files cannot be copied
more than 1,000 times.
• To check memory information, go
to [System] [Memory
Information]
✽
NOTICE - USING THE
Bluetooth®
Wireless
Technology Audio Mode
•Bluetooth®Wireless Technology
Audio Mode can be used only
when a Bluetooth®Wireless
Technology phone has been con-
nected.
•Bluetooth®Wireless Technology
Audio Mode will not be available
when connecting mobile phones
that do not support this feature.
• While Bluetooth®Wireless
Technology Audio is playing, if the
Bluetooth®Wireless Technology
phone is connected, then the music
will also stop.
• Moving the Track up/down while
playing Bluetooth®Wireless
Technology audio mode may
result in pop noises in some mobile
phones.
•Bluetooth®Wireless Technology
streaming audio may not be sup-
ported in some mobile phones.
(Continued)
(Continued)
• When returning to Bluetooth®
Wireless Technology Audio mode
after ending a call, the mode may
not automatically restart in some
mobile phones.
• Receiving an incoming call or
making an outgoing call while
playing Bluetooth®Wireless
Technology Audio may result in
audio interference.
SETUP
Delete
Delete
Unselect All
Select All
Features of your vehicle
924
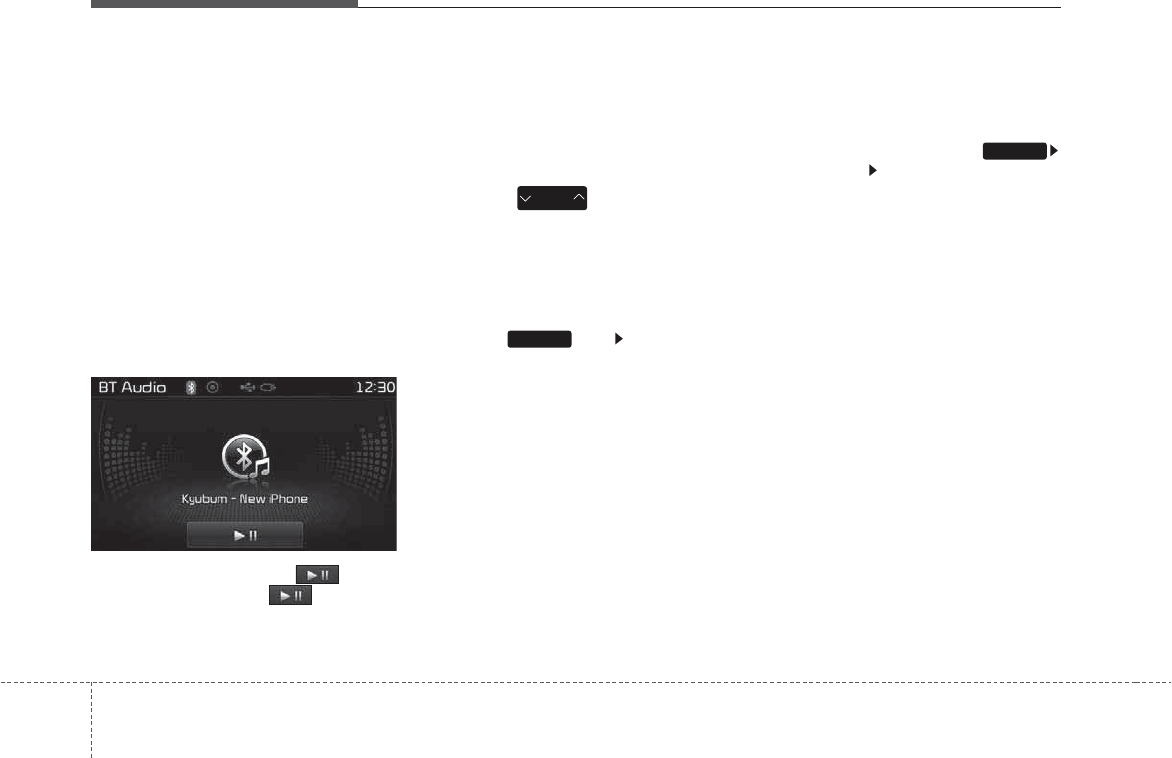
Bluetooth®
Wireless
Technology AUDIO MODE
(for
Bluetooth®
Wireless
Technology equipped model)
Using
Bluetooth®
Wireless
Technology Audio Mode
Playing/Pausing Bluetooth®
Wireless Technology
Audio
Once a
Bluetooth®
Wireless
Technology device is connected, the
mode will automatically start.
While playing, press the button
to pause and press button to
play.
✽
NOTICE
The play/pause feature may operate
differently depending on the mobile
phone.
Changing Files
Press the key to move to
the previous or next file.
Setting Connection
If a
Bluetooth®
Wireless Technology
device has not been connected,
press the key [Phone] but-
ton to display the
Bluetooth®
Wireless Technology connection
screen.
It is possible to use the pair phone,
connect/disconnect and delete fea-
tures from your
Bluetooth®
Wireless
Technology phone.
✽
NOTICE
• If the Bluetooth®Wireless
Technology audio is not operating
properly, check whether the fea-
ture is turned off at
[Phone] [Audio streaming]
(Streaming Audio). If the feature
is off, turn back on and try again.
• If music is not yet playing from
your mobile device after convert-
ing to Bluetooth®Wireless
Technology Audio mode, pressing
the play button once may start
playing the mode. Check to see
that music is playing from the
Bluetooth®Wireless Technology
device after converting to
Bluetooth®Wireless Technology
Audio Mode.
SETUP
SETUP
SEEK
TRACK

493
Features of your vehicle
Bluetooth®
Wireless Technology
(for RDS,
Bluetooth®
Wireless
Technology equipped model)
Using
Bluetooth®
Wireless
Technology Handsfree
•
Bluetooth®
Wireless Technology
refers to a short-distance wireless
networking technology which uses a
2.45GHz frequency to connect vari-
ous devices within a certain dis-
tance.
• Supported within PCs, external
devices,
Bluetooth®
Wireless
Technology phones, PDAs, various
electronic devices, and automotive
environments,
Bluetooth®
Wireless
Technology allows data to be trans-
mitted at high speeds without hav-
ing to use a connector cable.
•
Bluetooth®
Wireless Technology
Handsfree refers to a device which
allows the user to conveniently
make phone calls with
Bluetooth®
Wireless Technology mobile
phones through the audio system.
CAUTION
• Bluetooth®Wireless Technology
Handsfree is a feature that
enables drivers to practice safe
driving. Connecting the car
audio system with a Bluetooth®
Wireless Technology phone
allows the user to conveniently
make calls, receive calls, and
manage the phone book. Before
using the Bluetooth®Wireless
Technology , carefully read the
contents of this user’s manual.
• Excessive use or operations
while driving may lead to negli-
gent driving practices and be
the cause of accidents.
• Do not operate the device
excessively while driving.
• Viewing the screen for pro-
longed periods of time is dan-
gerous and may lead to acci-
dents. When driving, view the
screen only for short periods of
time.

Features of your vehicle
944
✽
NOTICE - USING UPON
CONNECTING
Bluetooth®
Wireless Technology
PHONE
• Before connecting the car audio
system with the mobile phone,
check to see that the mobile phone
supports Bluetooth®Wireless
Technology features.
• Even if the phone supports
Bluetooth®Wireless Technology,
the phone will not be found during
device searches if the phone has
been set to hidden state or the
Bluetooth®Wireless Technology
power is turned off. Disable the
hidden state or turn on the
Bluetooth®Wireless Technology
power prior to searching/connect-
ing with the car audio system.
(Continued)
(Continued)
• If you do not want to automatical-
ly connect your Bluetooth®
Wireless Technology phone, try
the following.
1. Turn off the Bluetooth®Wireless
Technology feature in your
mobile phone.
- For more information on
Bluetooth®Wireless Technology
features within your mobile,
refer to your mobile phone
user’s manual.
2. Turn off the Bluetooth®Wireless
Technology feature in your car
audio system.
- To turn off the Bluetooth®
Wireless Technology feature in
your car audio system, go to
> [Phone] and [turn off]
the Bluetooth®Wireless
Technology feature.
• Park the vehicle when connecting
the car audio system with your
mobile phone.
(Continued)
(Continued)
•Bluetooth®Wireless Technology
connection may become intermit-
tently disconnected in some
mobile phones. Follow these steps
to try again.
1. Turn the Bluetooth®Wireless
Technology function within the
mobile phone off/on and try
again.
2. Turn the mobile phone power
Off/On and try again.
3 Completely remove the mobile
phone battery, reboot, and then
again.
4. Reboot the audio system and try
again.
5. Delete all paired devices, pair
and try again.
• The Handsfree call volume and
quality may differ depending on
the mobile phone.
(Continued)
SETUP

495
Features of your vehicle
(Continued)
•Bluetooth®Wireless Technology
features supported within the
vehicle are as follows. Some fea-
tures may not be supported
depending on your Bluetooth®
Wireless Technology device.
- Answering and placing
Bluetooth®Wireless Technology
Handsfree calls
- Menu operation during call
(Switch to Private, Switch to call
waiting, Outgoing volume)
- Download Call History
- Download Mobile Phone book
- Phone book/Call History Auto
Download
-Bluetooth®Wireless Technology
device auto connection -
Bluetooth®Wireless Technology
Audio
• It is possible to pair up to five
Bluetooth®Wireless Technology
devices to the car system.
• Only one Bluetooth®Wireless
Technology device can be connect-
ed at a time.
(Continued)
(Continued)
• Other devices cannot be paired
while a Bluetooth®Wireless
Technologydevice is already con-
nected.
• When a Bluetooth®Wireless
Technology device is being con-
nected, the connection process
cannot be canceled.
• Only Bluetooth®Wireless
Technology Handsfree and
Bluetooth®Wireless Technology
audio related features will operate
within this system.
• Normal operation is possible only
for devices that support Handsfree
or audio features, such as a
Bluetooth®Wireless Technology
mobile phone or a Bluetooth®
Wireless Technology audio device.
• Only one function can be used at a
time between the Bluetooth®
Wireless Technology Handsfree
and Bluetooth®Wireless
Technology audio. (While playing
Bluetooth®Wireless Technology
audio, streaming will end upon
entering the Bluetooth®Wireless
Technology phone screen.)
(Continued)
(Continued)
• If a connected Bluetooth®Wireless
Technology device becomes dis-
connected for various reasons,
such as being out of range, turning
the device OFF, or a Bluetooth®
Wireless Technology communica-
tion error, Bluetooth®Wireless
Technology devices are automati-
cally searched and connected.
• Placing the audio system within an
electromagnetic environment may
result in noise interference.
Features of your vehicle
964
Pairing a
Bluetooth®
Wireless
Technology wireless technology
Device
What is
Bluetooth®
Wireless
Technology Pairing?
Pairing refers to the process of syn-
chronizing your
Bluetooth®
Wireless
Technology phone or device with the
car audio system for connection.
Pairing is necessary to connect and
use the
Bluetooth®
Wireless
Technology feature.
Pairing Key / Key
on the Steering Remote
Controller
When No Devices have been
Paired
1. Press the key or the
key on the steering remote con-
troller. The following screen is dis-
played.
2. Press the button to enter the
Pair Phone screen.
(1) Device : Name of device as
shown when searching from your
Bluetooth®
Wireless Technology
device
(2) Passkey : Passkey used to pair
the device
3. From your
Bluetooth®
Wireless
Technology device (i.e. Mobile
Phone), search and select your
car audio system.
4. After a few moments, a screen is
displayed where the passkey is
entered.
Here, enter the passkey “0000” to
pair your
Bluetooth®
Wireless
Technology device with the car
audio system.
PHONE
PHONE
497
Features of your vehicle
5. Once pairing is complete, the fol-
lowing screen is displayed.
✽
NOTICE
• If Bluetooth®Wireless Technology
devices are paired but none are
currently connected, pressing the
key or the key on the
steering remote controller displays
the following screen. Press the
[Pair] button to pair a new device
or press the [Connect] to connect a
previously pair device.
Pairing through [PHONE]
Setup
Press the key Select
[Phone] Select [Pair Phone]
Select TUNE knob
1. The following steps are the same
as the steps described in the
“When No Devices have been
Paired” section.
✽
NOTICE
• The waiting period during phone
pairing will last for one minute.
The pairing process will fail if the
device is not paired within the
given time. If the pairing process
fails, you must start the process
from the beginning.
• Generally, most Bluetooth®
Wireless Technology devices will
automatically connect once pairing
is complete. However, some devices
may require a separate verification
process to connect. Check to see
whether Bluetooth®Wireless
Technology has been properly con-
nected within your mobile phone.
• List of paired Bluetooth®Wireless
Technology devices can be viewed
at [Phone] [Paired Phone
List].
SETUP
SETUP
PHONE
Features of your vehicle
984
Connecting a Device
Press the key Select
[Phone] Select [Paired Phone List]
(1) Connected Phone : Device that is
currently connected
(2) Paired Phone : Device that is
paired but not connected
From the paired phone list, select the
device you want to connect and
press the button.
SETUP
499
Features of your vehicle
Changing Priority
What is Priority?
It is possible to pair up to five
Bluetooth®
Wireless Technology
devices with the car audio system.
As a result, the “Change Priority’ fea-
ture is used to set the connection pri-
ority of paired phones. However, the
most recently connected phone will
always be set as the highest priority.
Press the key Select
[Phone] Select [Paired Phone List]
From the paired phone list, select
the phone you want to change to the
highest priority, then press the
button from the Menu. The selected
device will be changed to the high-
est priority.
✽
NOTICE
When a device is currently connected,
even if you change the priority to a
different device, the currently con-
nected phone will always be set as the
highest priority.
Disconnecting a Device
Press the key Select
[Phone] Select [Paired Phone List]
From the paired phone list, select the
currently connected device and
press the button.
SETUP
SETUP
Features of your vehicle
1004
Deleting a Device
Press the key Select
[Phone] Select [Paired Phone List]
From the paired phone list, select the
device you want to delete and press
the button.
✽
NOTICE
• When deleting the currently connect-
ed device, the device will automatical-
ly be disconnected to proceed with the
deleting process.
• If a paired Bluetooth®Wireless
Technology device is deleted, the
device’s call history and phone
book data will also be deleted.
• To re-use a deleted device, you
must pair the device again.
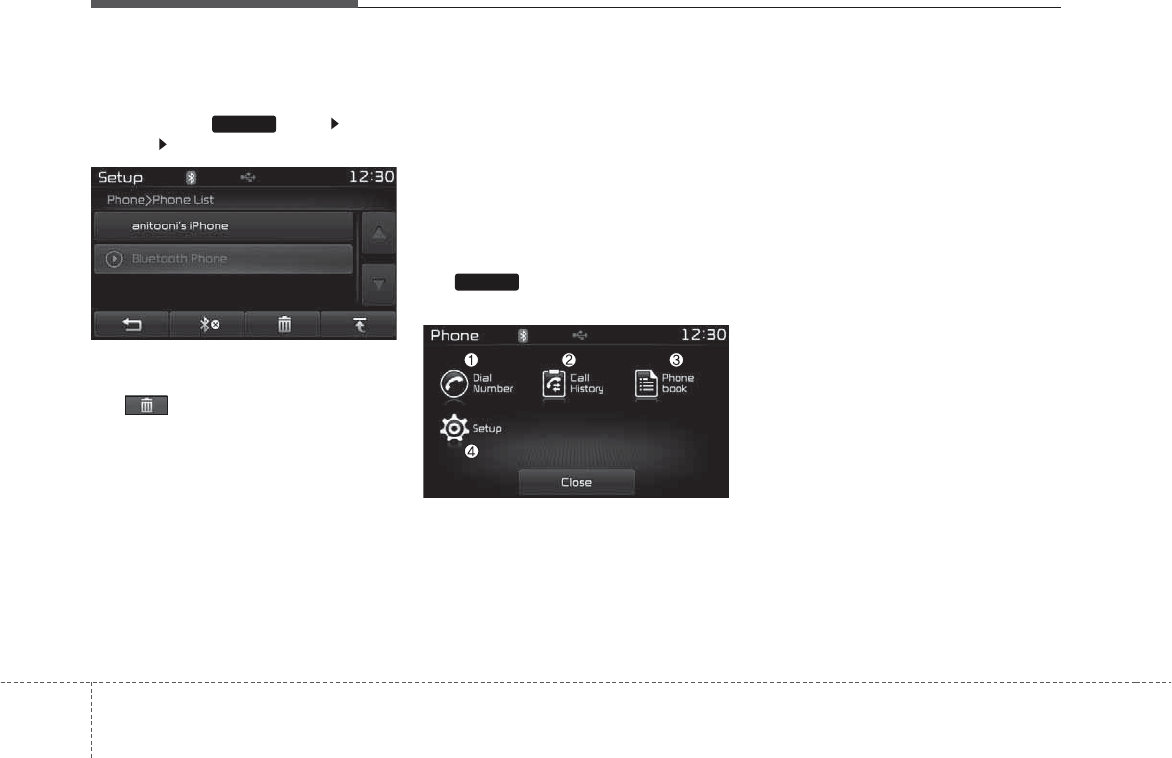
USING
Bluetooth®
Wireless
Technology
Phone Menu Screen
Phone Menus
With a
Bluetooth®
Wireless
Technology device connected, press
the key to display the Phone
menu screen.
(1) Dial Number : Displays the dial
screen where numbers can be
dialed to make calls
(2) Call History : Displays the call
history list screen
(3) Phone book : Displays the Phone
book list screen
(4) Setup : Displays Phone related
settings
✽
NOTICE
• If you press the [Call History] but-
ton but there is no call history
data, a prompt is displayed which
asks whether to download call his-
tory data.
• If you press the [Phone book] but-
ton but there is no phone book
data, a prompt is displayed which
asks whether to download phone
book data.
• This feature may not be supported
in some mobile phones. For more
information on download support,
refer to your mobile phone user’s
manual.
PHONE
SETUP
4 101
Features of your vehicle
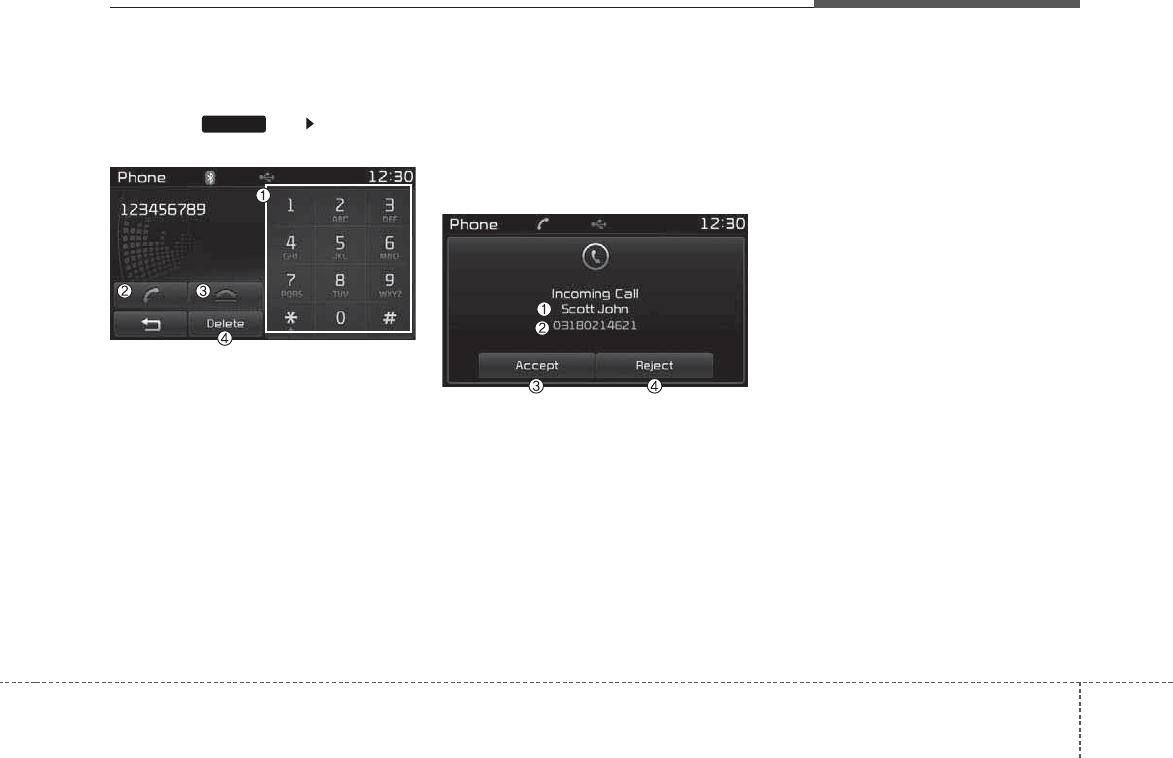
Calling by Dialing a Number
Press the key Select [Dial
Number]
(1) Dial Pad : Used to enter phone
number
(2) Call : If a number has been
entered, calls the number If no
number has been entered,
switches to call history screen
(3) End : Deletes the entered phone
number
(4) Delete : Deletes entered numbers
one digit at a time
Answering Calls
Answering a Call
Answering a call with a
Bluetooth®
Wireless Technology device connect-
ed will display the following screen.
(1) Caller : Displays the other part’s
name when the incoming caller is
saved within your phone book
(2) Incoming Number : Displays the
incoming number
(3) Accept : Accept the incoming call
(4) Reject : Reject the incoming call
✽
NOTICE
• When the incoming call pop-up is
displayed, most Audio and
SETUP mode features will not
operate. Only the call volume can
be operated.
• The telephone number may not be
properly displayed in some mobile
phones.
• When a call is answered with the
mobile phone, the call mode will
automatically convert to Private
mode.
PHONE
Features of your vehicle
1024
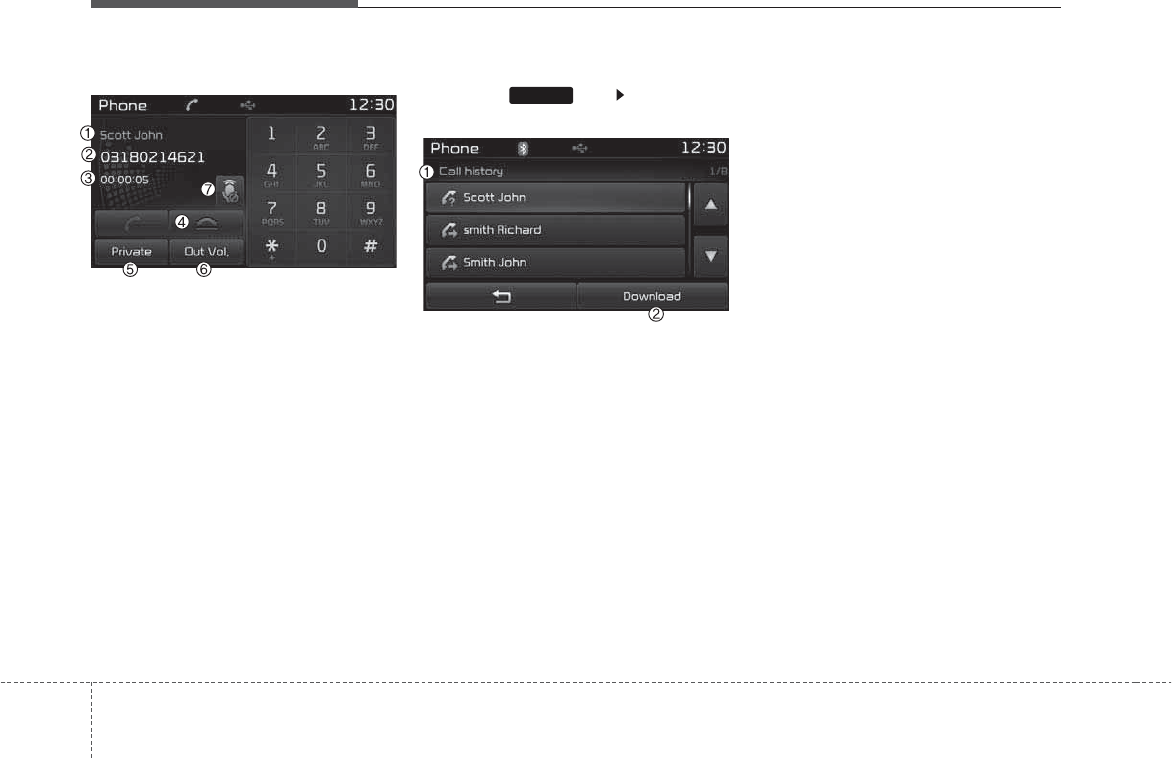
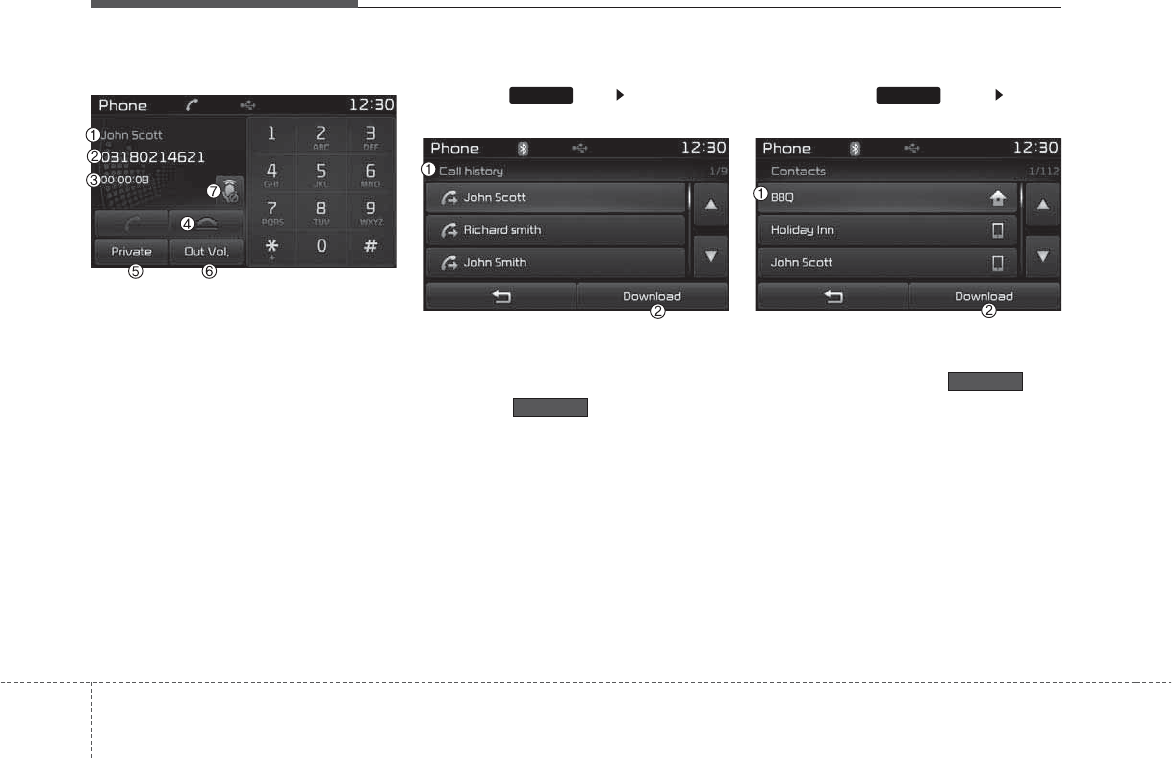
During a Handsfree Call
(1) Caller : Displays the other party’s
name if the incoming caller is
saved within your phone book
(2) Incoming Number : Displays the
incoming number
(3) Call time : Displays the call time
(4) End : Ends call
(5) Private : Converts to Private mode
(6) Out Vol. : Sets call volume as
heard by the other party
(7) Mute : Turns Mic Mute On/Off
✽
NOTICE
If the mic is muted, the other party
will not be able to hear your voice.
Call History
Press the key Select [Call
History]
A list of incoming, outgoing and
missed calls is displayed.
Press the [Download] button to
download the call history.
(1) Call History :
- Displays recent calls (call history)
- Connects call upon selection
(2) Download : Download Recent
Call History
✽
NOTICE
• The call history list will display up
to 30 outgoing, incoming, and
missed calls.
• Upon downloading call histories,
previously saved histories are
deleted.
• Incoming calls with hidden caller
IDs will not be saved in the call
history list.
• Previously saved phone book
entries are stored even if a device
is disconnected and re-connected.
• The download feature may not be
supported in some mobile phones.
Check to see that the Bluetooth®
Wireless Technology device sup-
ports the download feature.
PHONE
4 103
Features of your vehicle
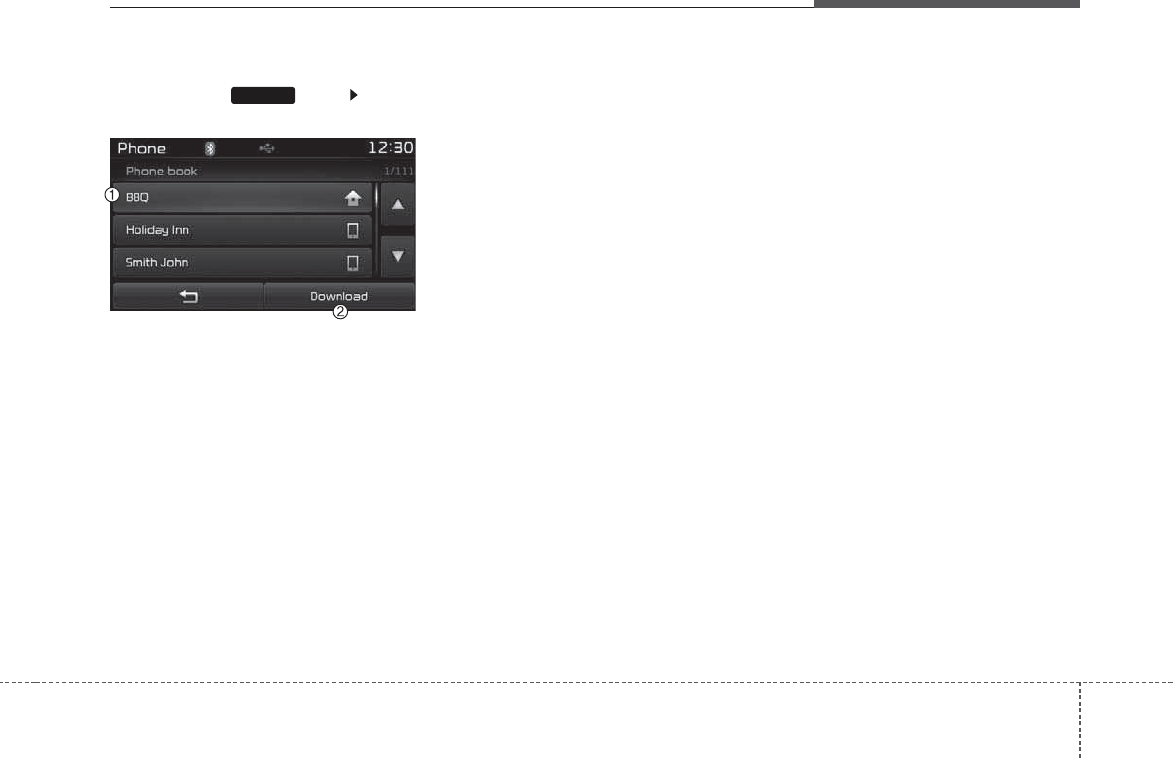
Phone Book
Press the key Select
[Phone book]
The list of saved phone book entries
is displayed. Press the [Download]
button to download the call history.
(1) Contact List :
- Displays downloaded phone
book entries
- Connects call upon selection
(2) Download : Download phone
book entries
✽
NOTICE
• Up to 1,000 phone book entries can
be copied into car phone book.
• Upon downloading phone book
data, previously saved phone book
data will be deleted.
• Downloading is not possible if the
phone book download feature is
turned off within the Bluetooth®
Wireless Technology device. Also,
some devices may require device
authorization upon attempting to
download. If downloading cannot
be normally conducted, check the
Bluetooth®Wireless Technology
device setting or the screen state.
• Caller ID information will not be
displayed for unsaved callers.
• The download feature may not be
supported in some mobile phones.
Check to see that the Bluetooth®
Wireless Technology device sup-
ports the download feature.
PHONE
Features of your vehicle
1044
Bluetooth®
Wireless Technology
(for
Bluetooth®
Wireless
Technology equipped model)
Pairing a
Bluetooth®
Wireless
Technology wireless technolo-
gy Device
What is
Bluetooth®
Wireless
Technology Pairing?
Pairing refers to the process of syn-
chronizing your
Bluetooth®
Wireless
Technology phone or device with the
car audio system for connection.
Pairing is necessary to connect and
use the
Bluetooth®
Wireless
Technology feature.
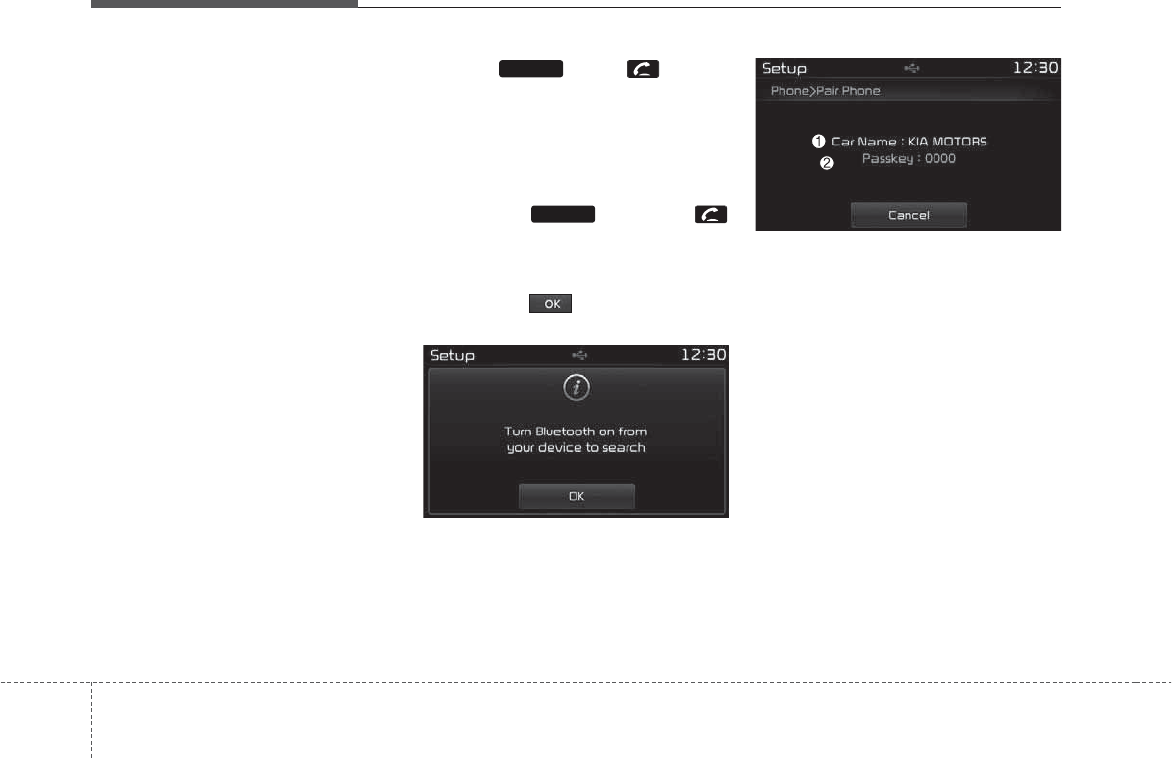
Pairing Key / Key
on the Steering Remote
Controller
When No Devices have been
Paired
1. Press the key or the
key on the steering remote con-
troller. The following screen is dis-
played.
2. Press the button to enter the
Pair Phone screen.
(1) Car Name : Name of device as
shown when searching from your
Bluetooth®
Wireless Technology
device
(2) Passkey : Passkey used to pair
the device
3. From your
Bluetooth®
Wireless
Technology device (i.e. Mobile
Phone), search and select your
car audio system.
4. After a few moments, a screen is
displayed where the passkey is
entered.
Here, enter the passkey “0000” to
pair your
Bluetooth®
Wireless
Technology device with the car
audio system.
5. Once pairing is complete, the fol-
lowing screen is displayed.
PHONE
PHONE
4 105
Features of your vehicle
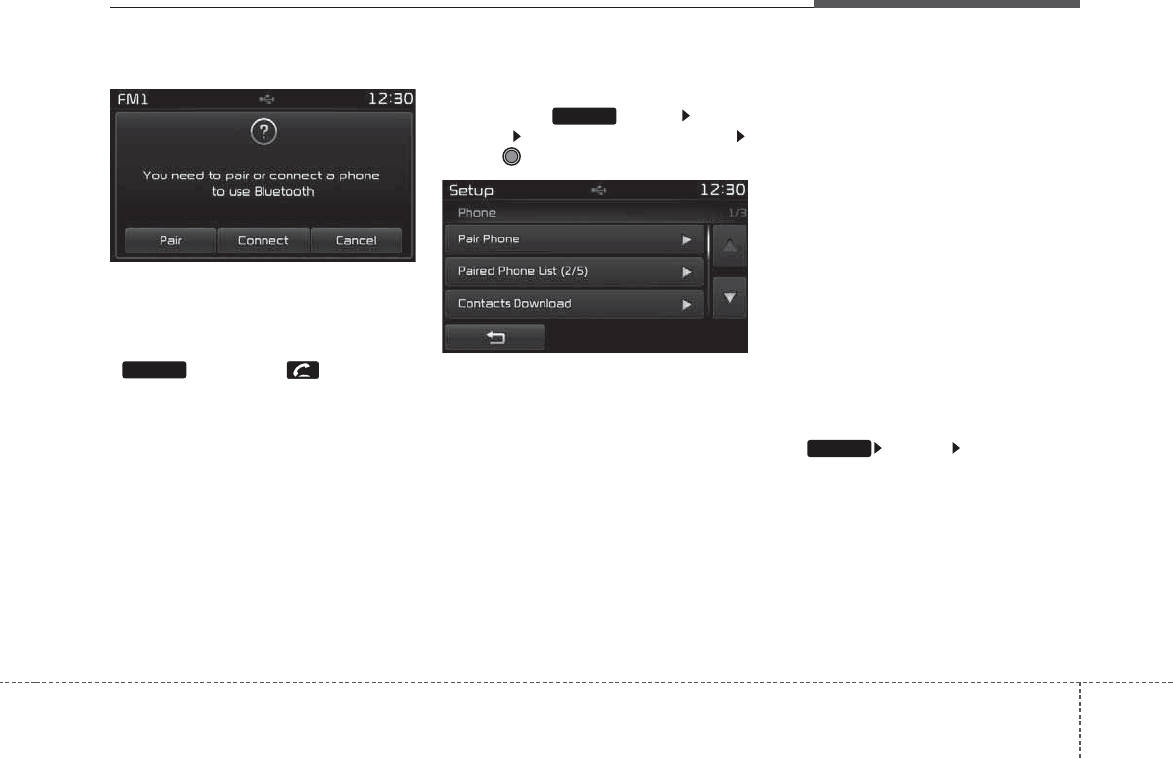
✽
NOTICE
• If Bluetooth®Wireless Technology
devices are paired but none are
currently connected, pressing the
key or the key on the
steering remote controller displays
the following screen. Press the
[Pair] button to pair a new device
or press the [Connect] to connect a
previously pair device.
Pairing through [PHONE]
Setup
Press the key Select
[Phone] Select [Pair Phone]
Select TUNE knob
The following steps are the same as
the steps described in the “When No
Devices have been Paired” section.
✽
NOTICE
• The waiting period during phone
pairing will last for one minute.
The pairing process will fail if the
device is not paired within the
given time. If the pairing process
fails, you must start the process
from the beginning.
• Generally, most Bluetooth®
Wireless Technology devices will
automatically connect once pairing
is complete. However, some devices
may require a separate verification
process to connect. Check to see
whether Bluetooth®Wireless
Technology has been properly con-
nected within your mobile phone.
• List of paired Bluetooth®Wireless
Technology devices can be viewed
at [Phone] [Paired Phone
List].
SETUP
SETUP
PHONE
Features of your vehicle
1064
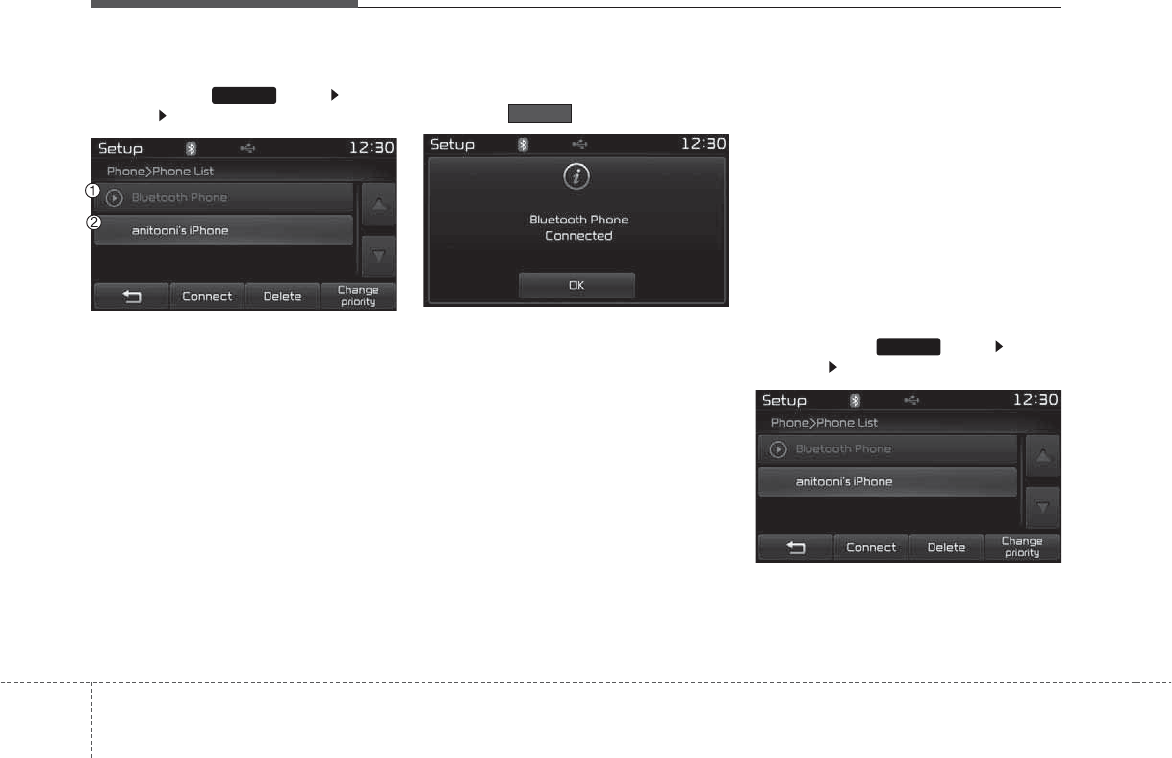
Connecting a Device
Press the key Select
[Phone] Select [Paired Phone List]
(1) Connected Phone : Device that is
currently connected
(2) Paired Phone : Device that is
paired but not connected
From the paired phone list, select the
device you want to connect and
press the button.
Changing Priority
What is Priority?
It is possible to pair up to five
Bluetooth®
Wireless Technology
devices with the car audio system.
As a result, the “Change Priority’ fea-
ture is used to set the connection pri-
ority of paired phones. However, the
most recently connected phone will
always be set as the highest priority.
Press the key Select
[Phone] Select [Paired Phone List]
SETUP
Connect
SETUP

4 107
Features of your vehicle
From the paired phone list, select
the phone you want to change to the
highest priority, then press the
button from the Menu.
The selected device will be changed
to the highest priority.
✽
NOTICE
When a device is currently connected,
even if you change the priority to a
different device, the currently con-
nected phone will always be set as the
highest priority.
Disconnecting a Device
Press the key Select
[Phone] Select [Paired Phone List]
From the paired phone list, select the
currently connected device and
press the button.
Deleting a Device
Press the key Select
[Phone] Select [Paired Phone List]
From the paired phone list, select the
device you want to delete and press
the button.
Delete
SETUP
Disconnect
SETUP
Change priority

Features of your vehicle
1084
✽
NOTICE
• When deleting the currently con-
nected device, the device will auto-
matically be disconnected to pro-
ceed with the deleting process.
• If a paired Bluetooth®Wireless
Technology device is deleted, the
device’s call history and contacts
data will also be deleted.
• To re-use a deleted device, you
must pair the device again.
USING
Bluetooth®
Wireless
Technology
Phone Menu Screen
Phone Menus
With a
Bluetooth®
Wireless
Technology device connected, press
the key to display the Phone
menu screen.
(1) Dial Number : Displays the dial
screen where numbers can be
dialed to make calls
(2) Call History : Displays the call
history list screen
(3) Contacts : Displays the Contacts
list screen
(4) Setup : Displays Phone related
settings
✽
NOTICE
• If you press the [Call History] but-
ton but there is no call history
data, a prompt is displayed which
asks whether to download call his-
tory data.
• If you press the [contacts] button
but there is no contacs data, a
prompt is displayed which asks
whether to download contacts
data.
• This feature may not be supported
in some mobile phones. For more
information on download support,
refer to your mobile phone user’s
manual.
PHONE

4 109
Features of your vehicle
Calling by Dialing a Number
Press the key Select [Dial
Number]
(1) Dial Pad : Used to enter phone
number
(2) Call : If a number has been
entered, calls the number If no
number has been entered,
switches to call history screen
(3) End : Deletes the entered phone
number
(4) Delete : Deletes entered numbers
one digit at a time
Answering Calls
Answering a Call
Answering a call with a
Bluetooth®
Wireless Technology device connect-
ed will display the following screen.
(1) Caller : Displays the other part’s
name when the incoming caller is
saved within your contacts
(2) Incoming Number : Displays the
incoming number
(3) Accept : Accept the incoming call
(4) Reject : Reject the incoming call
✽
NOTICE
• When the incoming call pop-up is
displayed, most Audio and
SETUP mode features will not
operate. Only the call volume can
be operated.
• The telephone number may not be
properly displayed in some mobile
phones.
• When a call is answered with the
mobile phone, the call mode will
automatically convert to Private
mode.
PHONE
Features of your vehicle
1104
During a Handsfree Call
(1) Caller : Displays the other party’s
name if the incoming caller is
saved within your contacts
(2) Incoming Number : Displays the
incoming number
(3) Call time : Displays the call time
(4) End : Ends call
(5) Private : Converts to Private mode
(6) Out Vol. : Sets call volume as
heard by the other party
(7) Mute : Turns Mic Mute On/Off
✽
NOTICE
If the mic is muted, the other party
will not be able to hear your voice.
Call History
Press the key Select [Call
History]
A list of incoming, outgoing and
missed calls is displayed.
Press the button to down-
load the call history.
(1) Call History :
- Displays recent calls (call history)
- Connects call upon selection
(2) Download : Download Recent
Call History
Contacts
Press the key Select
[Contacts]
The list of saved phone book entries
is displayed. Press the but-
ton to download the call history.
(1) Contacts List :
- Displays downloaded contacts
entries
- Connects call upon selection
(2) Download : Download contacts
entries
Download
PHONE
Download
PHONE

4 111
Features of your vehicle
✽
NOTICE
• Up to 1,000 contacts entries can be
copied into car contacts.
• Upon downloading contacts data,
previously saved contacts data will
be deleted.
• Downloading is not possible if the
contacts download feature is
turned off within the Bluetooth®
Wireless Technology device. Also,
some devices may require device
authorization upon attempting to
download. If downloading cannot
be normally conducted, check the
Bluetooth®Wireless Technology
device setting or the screen state.
• Caller ID information will not be
displayed for unsaved callers.
• The download feature may not be
supported in some mobile phones.
Check to see that the Bluetooth®
Wireless Technology device sup-
ports the download feature.

Features of your vehicle
1124
✽
NOTICE - USING THE
Voice Recognition
• When using the voice recognition
feature, only commands listed
within the user's manual are sup-
ported.
• Be aware that during the opera-
tion of the voice recognition sys-
tem, pressing any key other than
the key or touching the screen
will terminate voice recognition
mode.
• For superior voice recognition
performance, position the micro-
phone used for voice recognition
above the head of the driver’s seat
and maintain a proper position
when saying commands.
• Within the following situations,
voice recognition may not function
properly due to external sound.
- When the windows and sunroof
are open
- When the wind of the cooling /
heating device is strong
- When entering and passing
through tunnels
- When driving on rugged and
uneven roads
(Continued)
(Continued)
- During severe rain (heavy rains,
windstorms)
• Phone related voice commands
can be used only when a
Bluetooth®Wireless Technology
device is connected.
• When making calls by stating a
name, the corresponding contact
must be downloaded and stored
within the audio system.
• After downloading the Bluetooth®
Wireless Technology phone book,
it takes some times to convert the
phone book data into voice infor-
mation. During this time, voice
recognition may not properly
operate.
• Pronounce the voice commands
naturally and clearly as if in a nor-
mal conversation.
4 113
Features of your vehicle
VOICE RECOGNITION
Using Voice Recognition
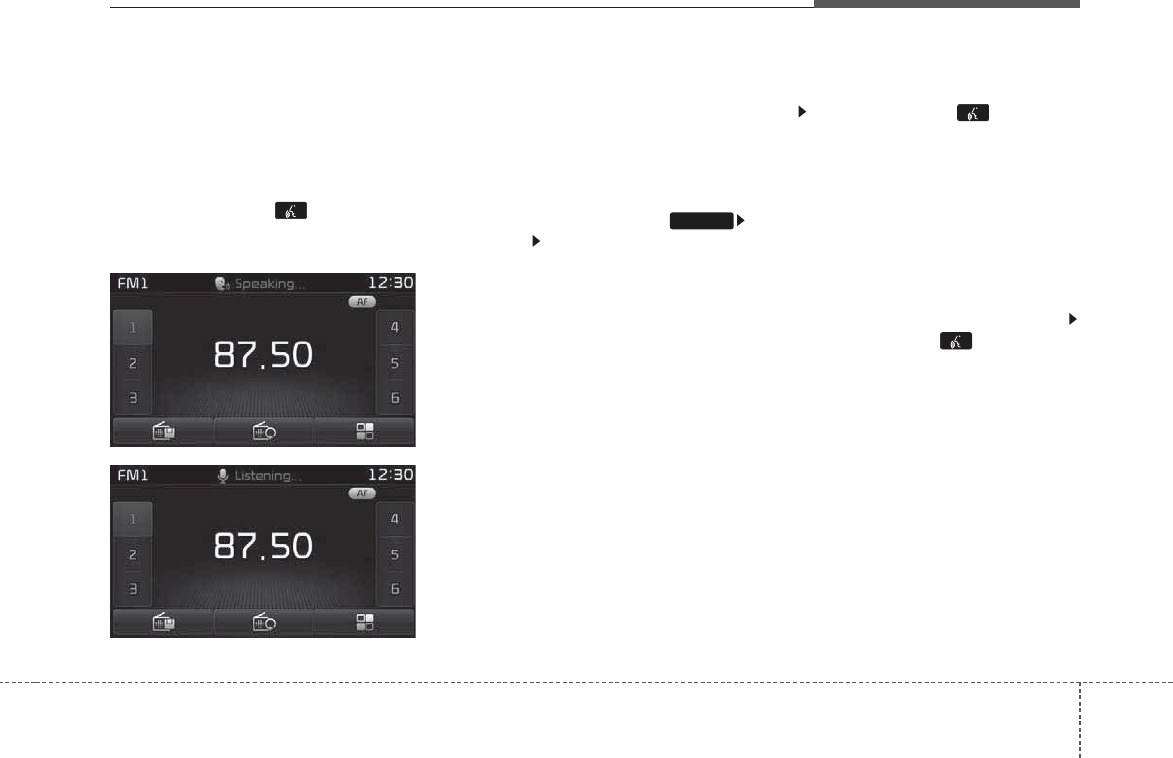
Starting Voice Recognition
Shortly press the key on the
steering remote controller .Say a
command
If voice recognition is in [Normal
Mode], then the system will say
“Please say a command. Beep~”
• If voice recognition is in [Expert
Mode], then the system will only
say a “Beep~”
• To change the Normal Mode/Expert
Mode setting, go to
[System] [Prompt Feedback]/[Voice
Recognition System].
✽
NOTICE
For proper recognition, say the com-
mand after the voice instruction and
beep tone.
Skipping Prompt Messages
While prompt message is being stat-
ed Shortly press the key on the
steering remote controller (under 0.8
seconds)
The prompt message is immediately
ended and the beep tone will sound.
After the “beep”, say the voice com-
mand.
Re-starting Voice Recognition
While system waits for a command
Shortly press the key on the
steering remote controller (under 0.8
seconds)
The command wait state is immedi-
ately ended and the beep ton will
sound. After the “beep”, say the voice
command.
SETUP

Features of your vehicle
1144
ENDING VOICE
RECOGNITION
While Voice Recognition is operating
Press and hold the key on the
steering remote controller (over 0.8
seconds)
✽
NOTICE
• While using voice command,
pressing a steering wheel remote
control or a different key will end
voice command.
• In a state where the system is wait-
ing for a voice command, say
“cancel” or “end” to end voice
command.
• In a state where the system is wait-
ing for a voice command, press
and hold the key on the steer-
ing remote controller to end voice
command.
4 115
Features of your vehicle
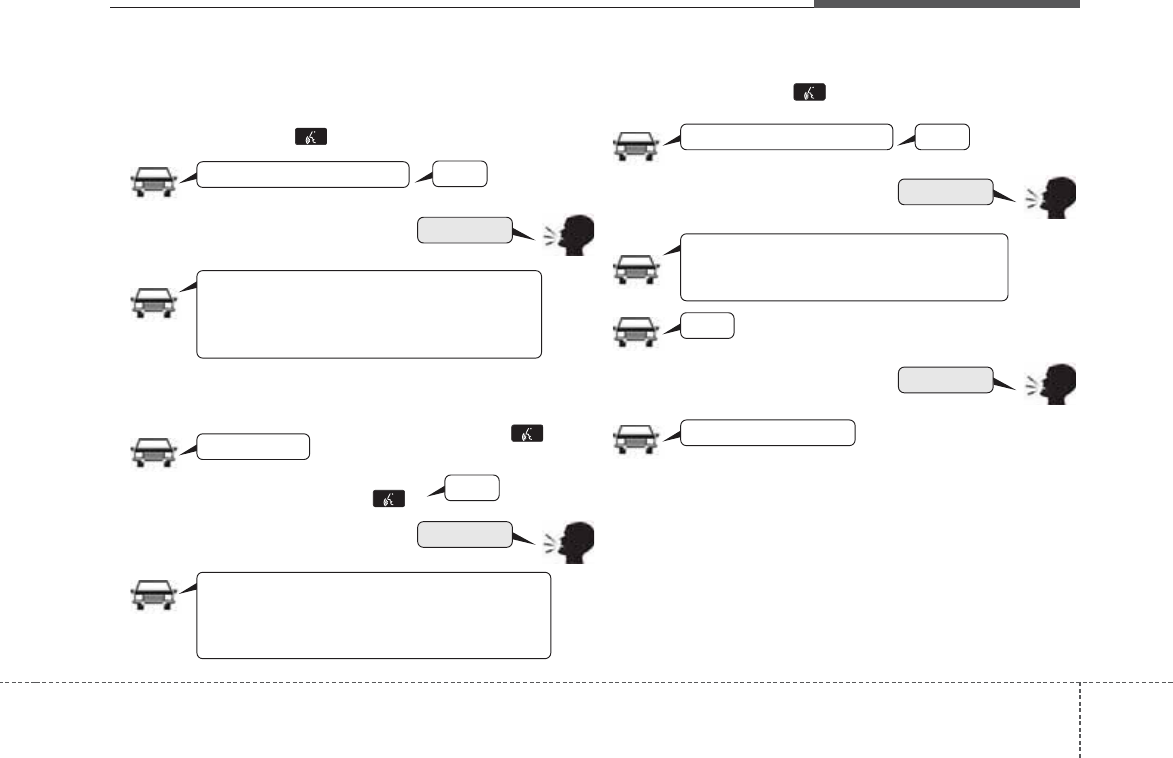
❈ Illustration on using voice commands
• Starting voice command.
Shortly pressing the key (under 0.8 seconds):
• Skipping Voice Recognition
Shortly pressing the key
(under 0.8 seconds):
• End voice command.
Shortly pressing the key (under 0.8 seconds):
More Help
More Help
Please say a command
Please say a...
More Help.
You can say Radio, FM, AM, Media, USB, Aux, My
Music, iPod, Bluetooth Audio, Phone, Call History
or Phone book. Please say a command.
More Help.
You can say Radio, FM, AM, Media, USB, Aux, My
Music, iPod, Bluetooth Audio, Phone, Call History or
Phone book. Please say a command.
Ding~
Ding~
Shortly pressing the
key (under 0.8 seconds)
Phone book
Cancel
Please say a command
Phone book.
Please say the name of the phone book you
want to call.
Ding~
Di-Ding~(Cancel Sound)
Ding~
Features of your vehicle
1164
Voice Command List
• Common Commands: These are commands that can be used in all situations. (However, some commands may not
be supported in special circumstances.)
Command Function
More Help Provides guidance on commands that can be
used anywhere in the system.
Help Provides guidance on commands that can be
used within the current mode.
Call<Name> Calls <Name> saved in
phone book
Ex) Call “John”
Phone Provides guidance on Phone related com-
mands. After saying this command, say “Call
History”, “
Phone book
”, “Dial Number” to exe-
cute corresponding functions.
Call History Displays the Call History screen.
Phone book
Displays the
phone book
screen. After saying
this command, say the name of a
phone book
saved in the
phone book
to automatically con-
nect the call.
Dial Number Display the Dial number screen. After saying
this command, you can say the number what
you want to call.
Redial Connects the most recently called number.
Radio
•
When listening to the radio, displays the next
radio screen. (FM1➟FM2➟FMA ➟ AM ➟
AMA)
•
When listening to a different mode, displays
the most recently played radio screen.
Command Function
FM
•
When currently listening to the FM radio,
maintains the current state.
•
When listening to a different mode, displays
the most recently played FM screen.
FM1(FM One) Displays the FM1 screen.
FM2(FM Two) Displays the FM2 screen.
FMA Displays the FMA screen.
AM Displays the AM screen.
AMA Displays the AMA screen.
FM Preset 1~6 Plays the most recently played broadcast
saved in FM Preset 1~6.
AM Preset 1~6 Plays the broadcast saved in AM Preset 1~6.
FM 87.5~107.9 Plays the FM broadcast of the corresponding
frequency.
AM 530~1710 Plays the AM broadcast of the corresponding
frequency.
TA on Enable Traffic Announcement
TA off Disable Traffic Announcement
News on Enable RDS News feature
News off Disable RDS News feature
4 117
Features of your vehicle
Command Function
Media Moves to the most recently played media
screen.
USB Plays USB music.
Search USB Moves to USB file selection screen. After
manually operate the device to select and play
music.
iPod Plays iPod music.
Search iPod Moves to the iPod file selection screen. After,
manually operate the device to select and play
music.
My Music Plays the music saved in My Music.
Search My Music Moves to My Music file selection screen. After
manually operate the device to select and play
music.
AUX (Auxiliary) Plays the connected external device.
Bluetooth Audio Plays the music saved in connected
Bluetooth®
Wireless Technology
device.
Mute Mutes the radio or music volume.
Pardon? Repeats the most recent comment.
Cancel (Exit) Ends voice command.
Features of your vehicle
1184
• FM/AM radio commands: Commands that can be
used while listening to FM, AM radio.
• USB commands: Commands that can be used while lis-
tening to music files saved in USB.
Command Function
Preset 1~6 Plays the broadcast saved in Preset 1~6.
Auto Store Automatically selects radio broadcast fre-
quencies with superior reception and saves in
Presets 1~6.
Preset Save 1~6 Saves the current broadcast frequency to
Preset 1~6.
Seek up Plays the next receivable broadcast.
Seek down Plays the previous receivable broadcast.
Next Preset Selects the preset number next to the most
recently selected preset. (Example: When cur-
rently listening to preset no. 3, then preset no.
4 will be selected.)
Previous Preset Selects the preset number previous to the
most recently selected preset. (Example:
When currently listening to preset no. 3, then
preset no. 2 will be selected.)
Scan Scans receivable frequencies from the current
broadcast and plays for 10 seconds each.
Preset Scan Moves to the next preset from the current
present and plays for 10 seconds each.
AF on Enable Alternative Frequency feature
AF off Disable Alternative Frequency feature
Region Enable Region feature
Command Function
Random Randomly plays the files within the current
folder.
All Random Randomly plays all saved files.
Random Off Cancels random play to play files in sequential
order.
Repeat Repeats the current file.
Folder Repeat Repeats all files in the current folder.
Repeat Off Cancels repeat play to play files in sequential
order.
Next File Plays the next file.
Previous File Plays the previous file.
Scan Scans the files from the next files for 10 sec-
onds each.
Search File Moves to the file selection screen.
Search Folder Moves to the folder selection screen.
Information Displays the information screen of the current
file.
Copy Copies the current file into My Music.
4 119
Features of your vehicle
• iPod Commands: Commands that can be used while
playing iPod.
• My Music Commands: Commands that can be used
while playing My Music.
Command Function
All Random Randomly plays all saved songs.
Random Randomly plays the songs within the current
category.
Random Off Cancels random play to play songs in sequen-
tial order.
Repeat Repeats the current song.
Repeat Off Cancels repeat play to play songs in sequen-
tial order.
Next Song Plays the next song.
Previous Song Plays the previous song.
Search Song Moves to the song selection screen.
Information Displays the information screen of the current
song.
Command Function
Random Randomly plays all saved files.
Random Off Cancels random play to play files in sequential
order.
Repeat Repeats the current file.
Repeat Off Cancels repeat play to play files in sequential
order.
Next File Plays the next file.
Previous File Plays the previous file.
Scan Scans the files from the next files for 10 sec-
onds each.
Search File Moves to the file selection screen.
Information Displays the information screen of the current
file.
Delete Deletes the current file. You will bypass an
additional confirmation process.
Delete All Deletes all files saved in My Music. You will
bypass an additional confirmation process.
Command Function
Play Plays the currently paused song.
Pause Pauses the current song.
Features of your vehicle
1204
•
Bluetooth®
Wireless Technology Audio Commands:
Commands that can be used while playing Phone
Music.
4 121
Features of your vehicle
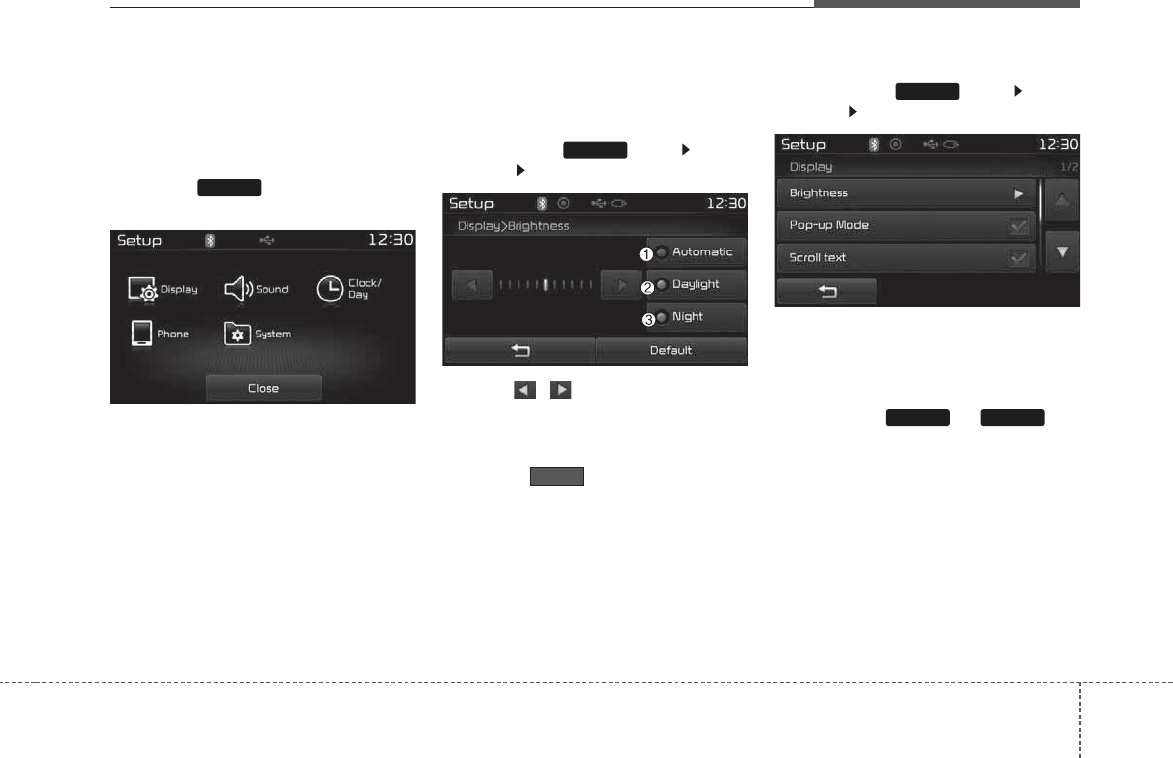
SETUP
(for RDS model)
Starting Mode
Press the key to display the
Setup screen.
You can select and control options
related to [Display], [Sound],
[Clock/Day], [Phone] and [System].
Display Settings
Adjusting the Brightness
Press the key Select
[Display] Select [Brightness]
Use the , buttons to adjust the
screen brightness or set the
Brightness on Automatic, Day, or
Night mode.
Press the button to reset.
(1) Automatic : Adjusts the bright-
ness automatically
(2) Day : Always maintains the
brightness on high
(3) Night : Always maintains the
brightness on low
Pop-up Mode
Press the key Select
[Display] Select [Pop-up Mode]
This feature is used to display the
Pop-up Mode screen when entering
radio and media modes.
When this feature is turned on,
pressing the or key
will display the Pop-up Mode screen.
✽
NOTICE
The media Pop-up Mode screen can
be displayed only when two or more
media modes have been connected.
MEDIA RADIO
SETUP
Default
SETUP
SETUP

Features of your vehicle
1224
Scroll Text
Press the key Select
[Display] Select [Scroll text]
This feature is used to scroll text dis-
played on the screen when it is too
long to be displayed at once.
When turned on, the text is repeat-
edly scrolled. When turned off, the
text is scrolled just once.
MP3 Information Display
Press the key Select
[Display] Select [Song Info]
This feature is used to change the
information displayed within USB
modes.
(1) Folder File : Displays file name
and folder name
(2) Album Artist Song : Displays
album name/artist name/song
SETUP SETUP
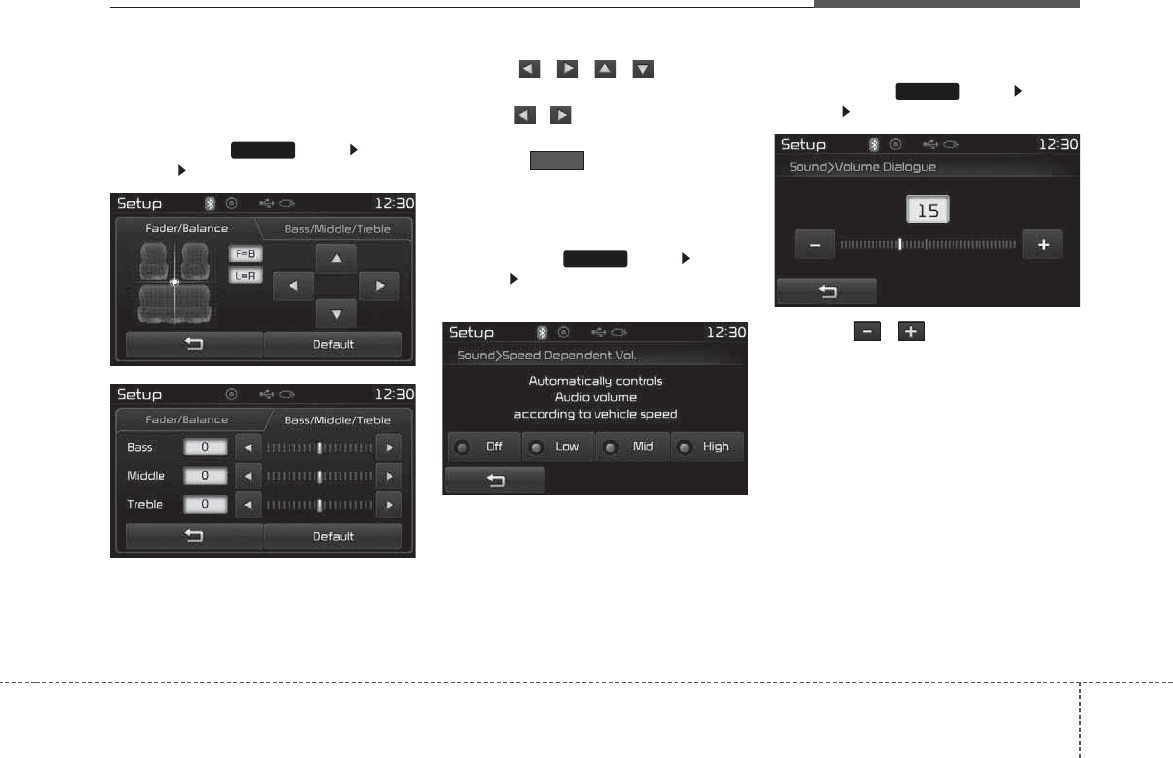
4 123
Features of your vehicle
Sound Settings
Sound Settings
Press the key Select
[Sound] Select [Audio Setting]
Use the , , , buttons to
adjust the Fader/Balance settings.
Use the , buttons to adjust the
Bass/Middle/Treble settings.
Press the button to reset.
SDVC (Speed Dependent Volume
Control)
Press the key Select
[Sound] Select [Speed Dependent
Vol.]
The volume level is controlled auto-
matically according to the vehicle
speed. SDVC can be set by selecting
from Off/Low/Mid/High.
Voice Recognition Setting
Press the key Select
[Sound] Select [Volume Dialogue]
Use the , buttons to adjust
the Volume Dialog.
SETUP
SETUP
Default
SETUP
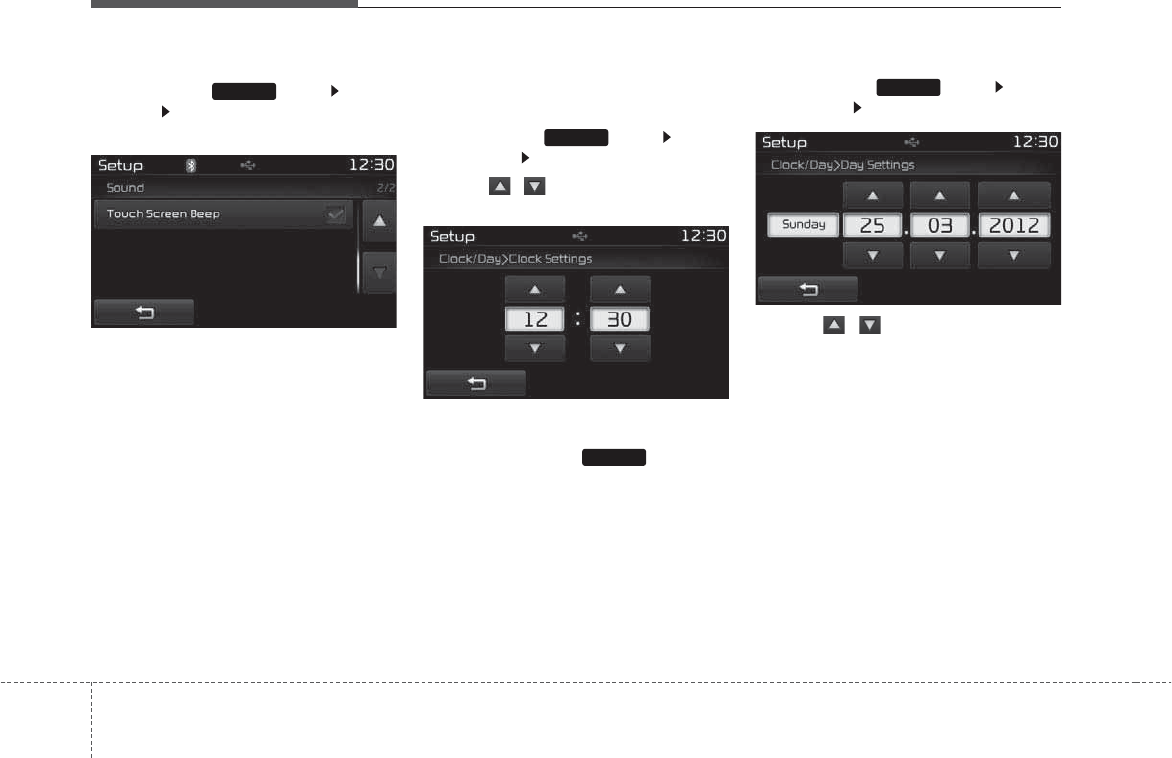
Features of your vehicle
1244
Touch Screen Beep
Press the key Select
[Sound] Select [Touch Screen
Beep]
This feature is used to turn the touch
screen beep on/off.
Clock/Day Setting
Clock Setting
Press the key Select
[Clock/Day] Select [Clock Settings]
Use the , buttons to set the Hour,
Minutes and AM/PM setting.
✽
NOTICE
Press and hold the key (over
0.8 seconds) to display the
Clock/Day screen.
Calendar Setting
Press the key Select
[Clock/Day] Select [Day Settings]
Use the , buttons to set the Day,
Month and Year setting.
SETUP
CLOCK
SETUP
SETUP
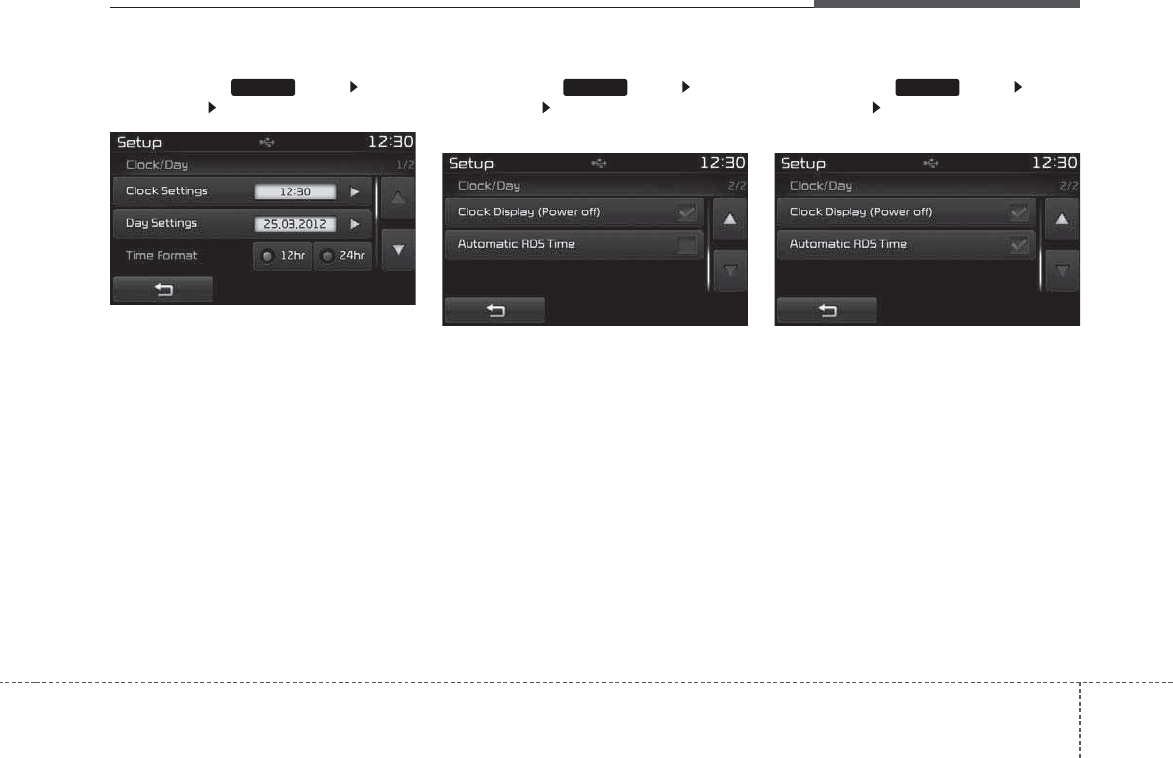
4 125
Features of your vehicle
Time Format
Press the key Select
[Clock/Day] Select [Time Format]
This feature is used to change the clock
format between 12hr or 24hr.
Clock Display
Press the key Select
[Clock/Day] Select [Clock Display
(Power off)]
This feature is used to display a clock on
the screen when the audio system is
turned off.
Automatic RDS Time
Press the key Select
[Clock/Day] Select [Automatic RDS
Time]
This feature is used to set time automat-
ically by synchronizing with RDS.
SETUP SETUP SETUP
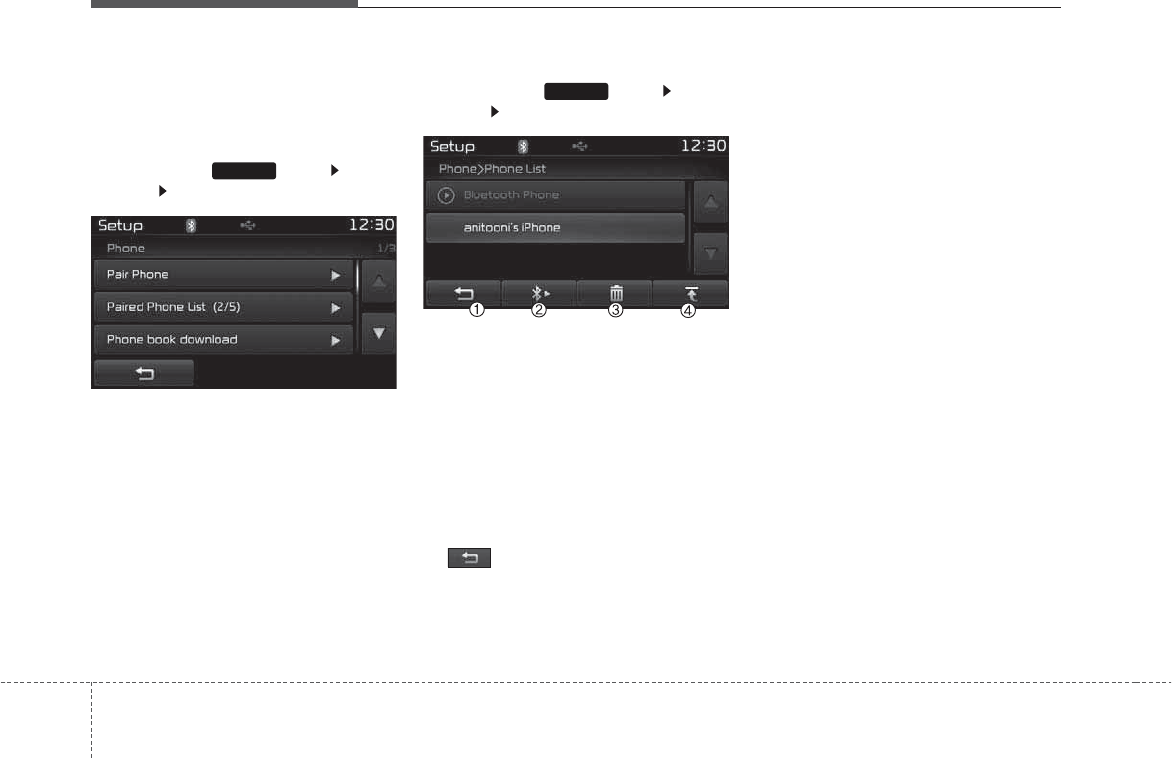
Features of your vehicle
1264
Bluetooth®
Wireless
Technology Setting
Pairing a New Device
Press the key Select
[Phone] Select [Pair Phone]
Bluetooth®
Wireless Technology devices
can be paired with the audio system.
For more information, refer to the
“Pairing through Phone Setup” sec-
tion within
Bluetooth®
Wireless
Technology.
Viewing Paired Phone List
Press the key Select
[Phone] Select [Paired Phone List]
This feature is used to view mobile
phones that have been paired with
the audio system. Upon selecting a
paired phone, the setup menu is dis-
played.
For more information, refer to the
“Setting
Bluetooth®
Wireless
Technology Connection” section with-
in
Bluetooth®
Wireless Technology.
1) : Moves to the previous
screen
2) Connect/Disconnect Phone :
Connect/ disconnects currently
selected phone
3) Delete : Deletes the currently
selected phone
4) Change Priority : Sets currently
selected phone to highest connec-
tion priority
✽
NOTICE BEFORE DOWN-
LOADING PHONE BOOKS
• Only phone books within connect-
ed phones can be downloaded.
Also check to see that your mobile
phone supports the download fea-
ture.
• To learn more about whether your
mobile phone supports phone
book downloads, refer to your
mobile phone user’s manual.
• The Phone book for only the con-
nected phone can be downloaded.
Before downloading, check to see
whether your phone supports the
download feature.
SETUP
SETUP
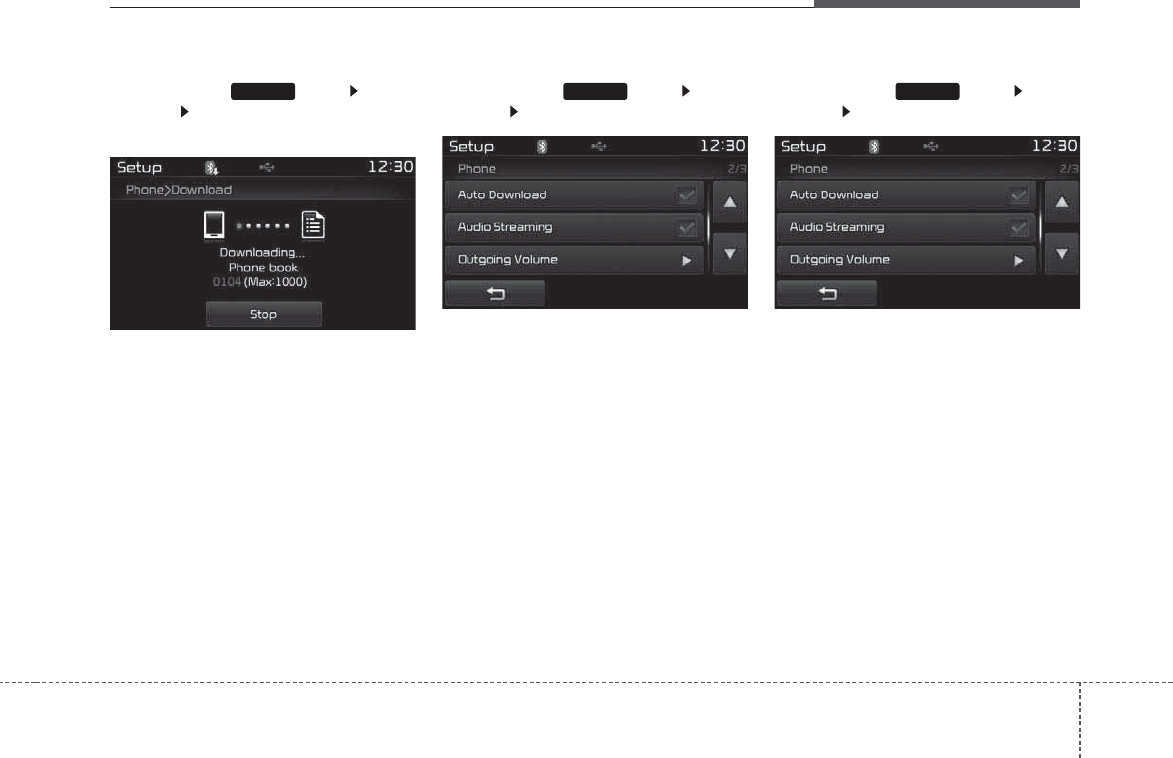
4 127
Features of your vehicle
Downloading Phone books
Press the key Select
[Phone] Select [Phone book
Download]
The Phone book is downloaded from
the mobile phone and the download
progress is displayed.
✽
NOTICE
• Up to 1,000 phone book entries
can be copied into car phone book.
• Up to 1,000 phone book entries
can be saved for each paired
device.
• Upon downloading phone book
data, previously saved phone book
data will be deleted. However,
Phone book entries saved to other
paired phones are not deleted.
Auto Download (Phone Book)
Press the key Select
[Phone] Select [Auto Download]
This feature is used to automatically
download mobile phone book entries
once a
Bluetooth®
Wireless
Technology phone is connected.
✽
NOTICE
• The Auto Download feature will
download mobile phone book
entries every time the phone is
connected. The download time
may differ depending on the num-
ber of saved phone book entries
and the communication state.
• When downloading a phone book,
first check to see that your mobile
phone supports the phone book
download feature.
Audio Streaming
Press the key Select
[Phone] Select [Audio Streaming]
When Audio Streaming is turned on,
you can play music files saved in
your
Bluetooth®
Wireless
Technology device from the car.
SETUP SETUP SETUP
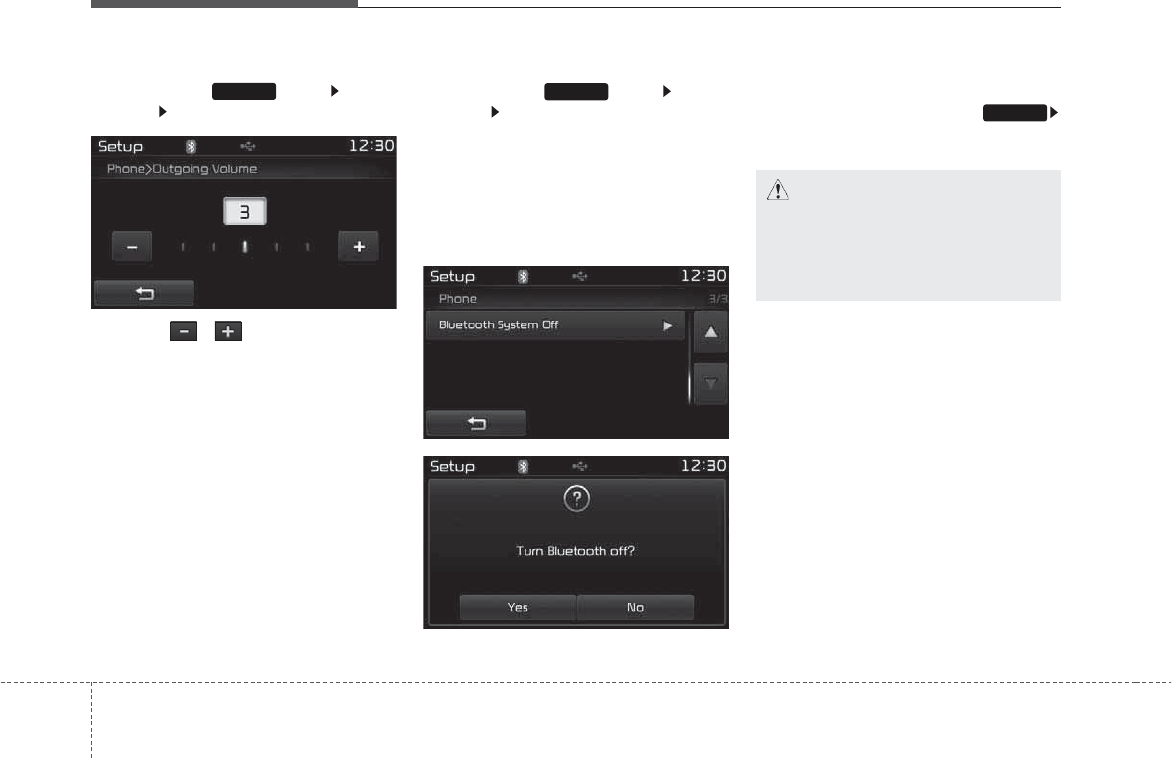
Features of your vehicle
1284
Outgoing Volume
Press the key Select
[Phone] Select [Outgoing Volume]
Use the , buttons to adjust
the outgoing volume level.
Turning Bluetooth System Off
Press the key Select
[Phone] Select [Bluetooth System
Off]
Once
Bluetooth®
Wireless
Technology is turned off,
Bluetooth®
Wireless Technology related features
will not be supported within the audio
system.
✽
NOTICE
To turn Bluetooth®Wireless
Technology back on, go to
[Phone] and press “Yes”.
SETUP
SETUP
SETUP
CAUTION
Bluetooth®Wireless Technology
audio streaming may not be sup-
ported in some Bluetooth®
Wireless Technology phones.
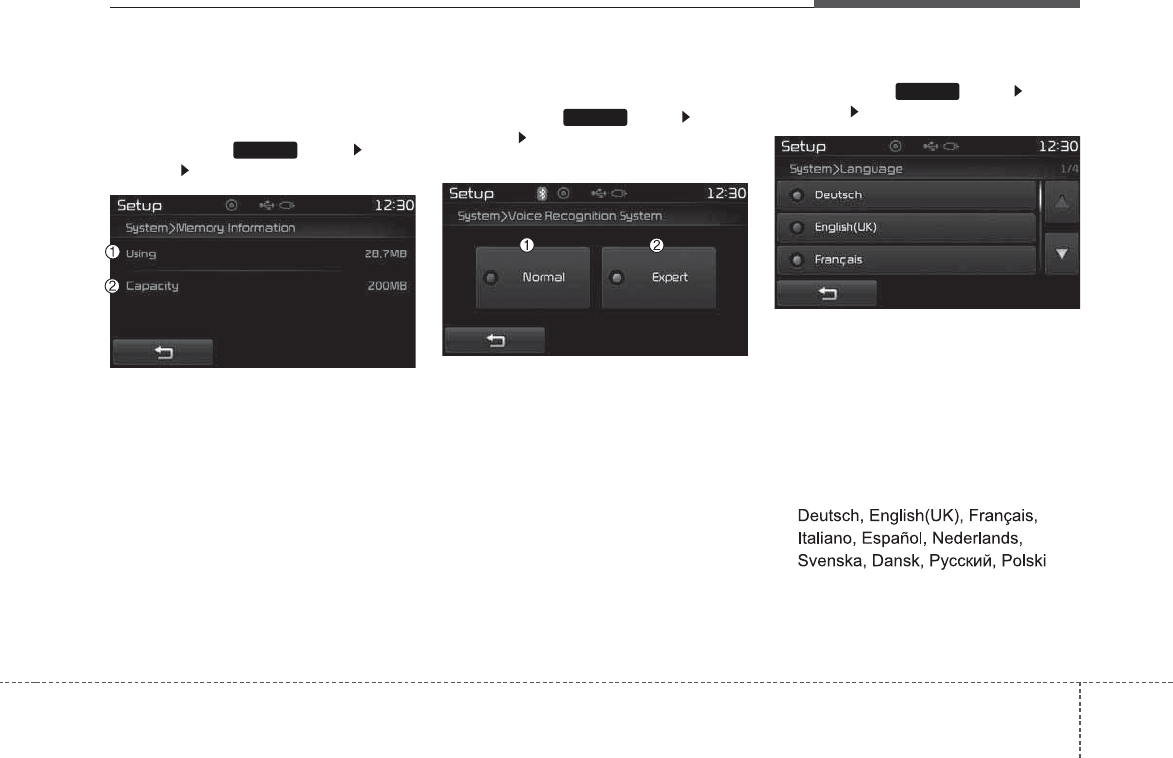
4 129
Features of your vehicle
System Setting
Memory Information
Press the key Select
[System] Select [Memory Information]
This feature displays information
related to system memory.
(1) Using : Displays capacity current-
ly in use
(2) Capacity : Displays total capacity
Voice Recognition Mode Setting
(if equipped)
Press the key Select
[System] Select [Voice Recognition
System]
This feature is used to select the
desired prompt feedback option from
Normal and Expert.
(1) Normal : When using voice
recognition, provides detailed
guidance prompts
(2) Expert : When using voice recog-
nition, omits some guidance
prompts
✽
NOTICE
Voice Recognition is depend on the
Audio System.
Language
Press the key Select
[System] Select [Language]
This feature is used to change the
system and voice recognition lan-
guage.
If the language is changed, the sys-
tem will restart and apply the select-
ed language.
❈ Language support by region
SETUP
SETUP
SETUP
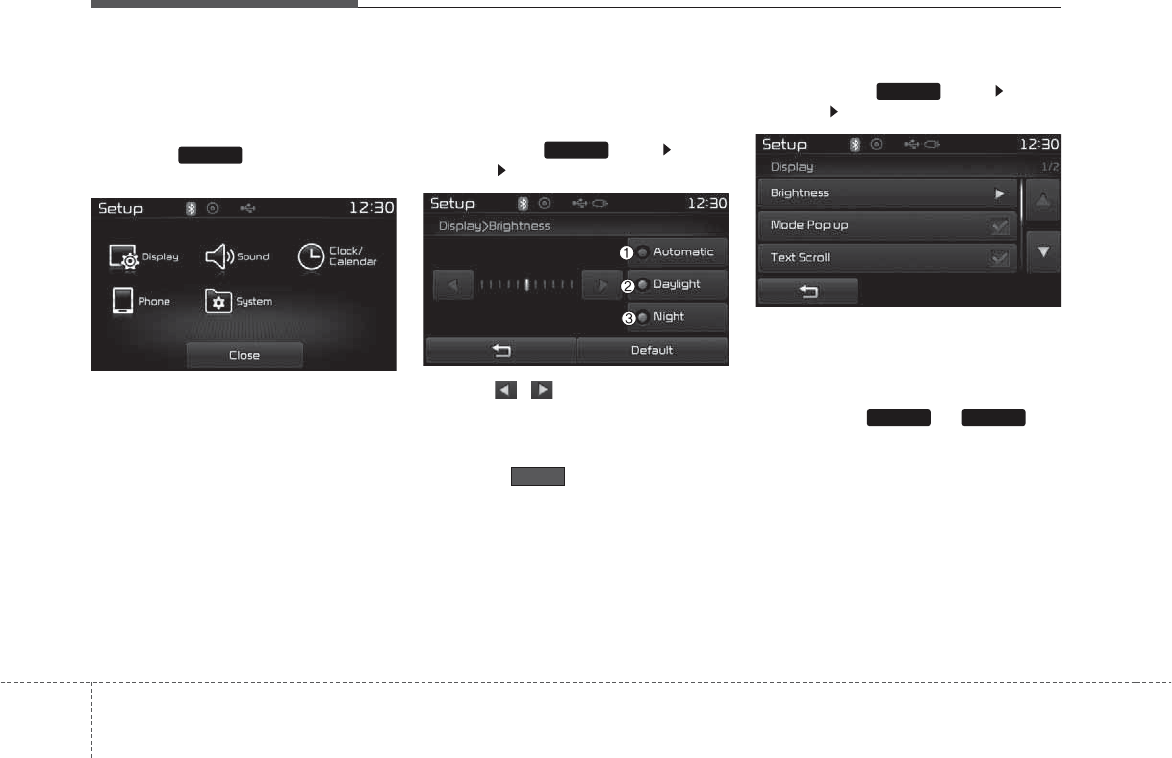
Features of your vehicle
1304
SETUP
Starting Mode
Press the key to display the
Setup screen.
You can select and control options
related to [Display], [Sound],
[Clock/Day], [Phone] and [System].
Display Settings
Adjusting the Brightness
Press the key Select
[Display] Select [Brightness]
Use the , buttons to adjust the
screen brightness or set the
Brightness on Automatic, Daylight, or
Night mode.
Press the button to reset.
(1) Automatic : Adjusts the bright-
ness automatically
(2) Daylight : Always maintains the
brightness on high
(3) Night : Always maintains the
brightness on low
Pop-up Mode
Press the key Select
[Display] Select [Mode Pop up]
This feature is used to display the
Pop-up Mode screen when entering
radio and media modes.
When this feature is turned on,
pressing the or key
will display the Pop-up Mode screen.
✽
NOTICE
The media Pop-up Mode screen can
be displayed only when two or more
media modes have been connected.
MEDIA RADIO
SETUP
Default
SETUP
SETUP
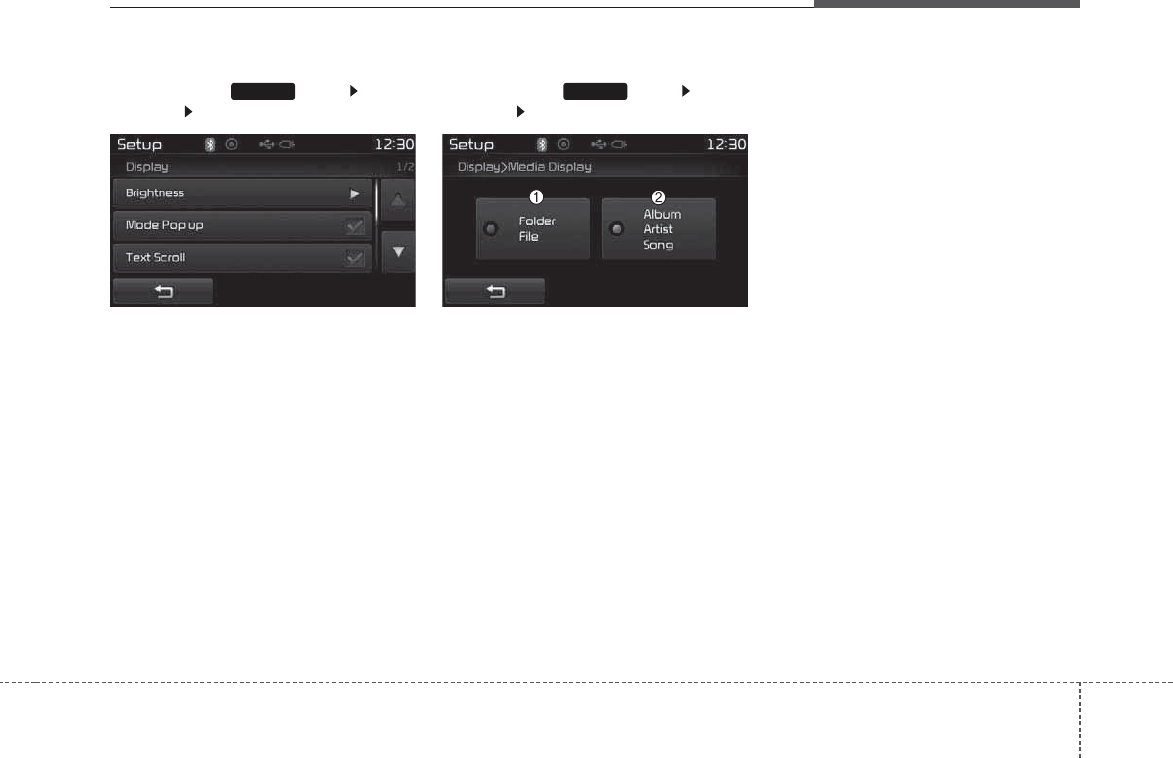
4 131
Features of your vehicle
Text Scroll
Press the key Select
[Display] Select [Text Scroll]
This feature is used to scroll text dis-
played on the screen when it is too
long to be displayed at once.
When turned on, the text is repeat-
edly scrolled. When turned off, the
text is scrolled just once.
MP3 Information Display
Press the key Select
[Display] Select [Media Display]
This feature is used to change the
information displayed within USB
modes.
(1) Folder File : Displays file name
and folder name
(2) Album Artist Song : Displays
album name/artist name/song
SETUP SETUP
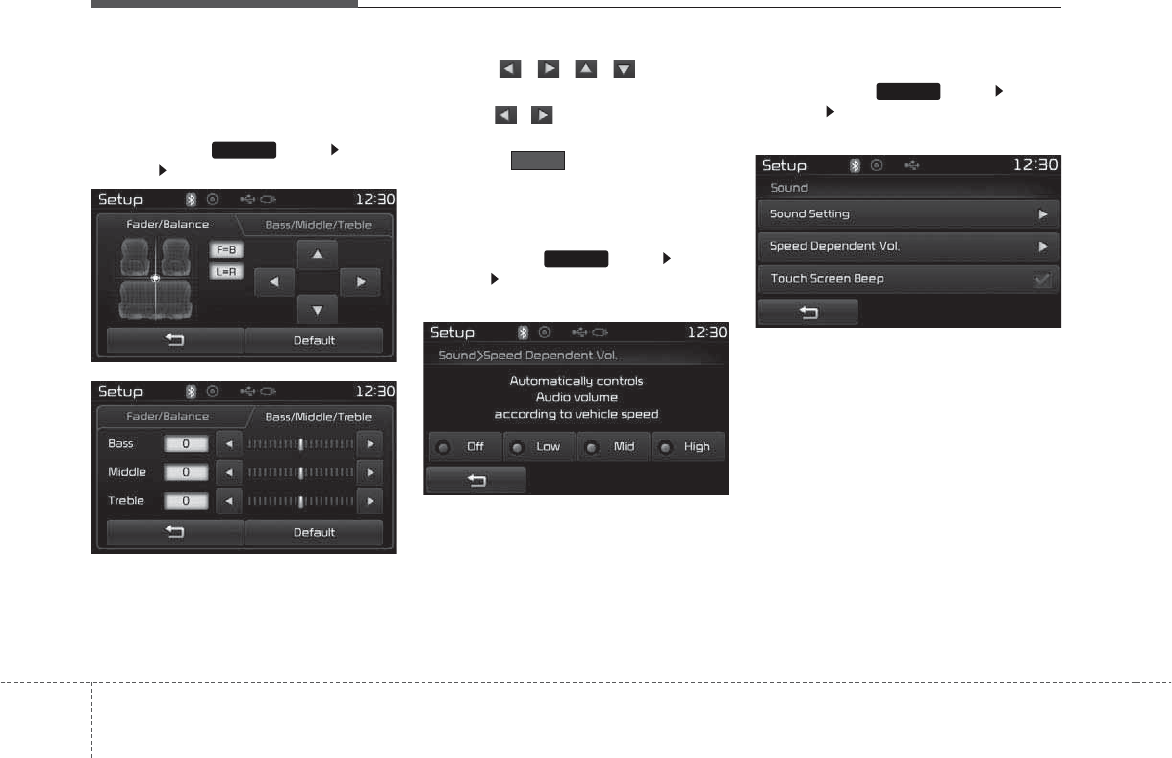
Features of your vehicle
1324
Sound Settings
Sound Settings
Press the key Select
[Sound] Select [Sound Setting]
Use the , , , buttons to
adjust the Fader/Balance settings.
Use the , buttons to adjust the
Bass/Middle/Treble settings.
Press the button to reset.
SDVC (Speed Dependent Volume
Control)
Press the key Select
[Sound] Select [Speed Dependent
Vol.]
The volume level is controlled auto-
matically according to the vehicle
speed. SDVC can be set by selecting
from Off/Low/Mid/High.
Touch Screen Beep
Press the key Select
[Sound] Select [Touch Screen
Beep]
This feature is used to turn the touch
screen beep on/off.
SETUP
SETUP
Default
SETUP
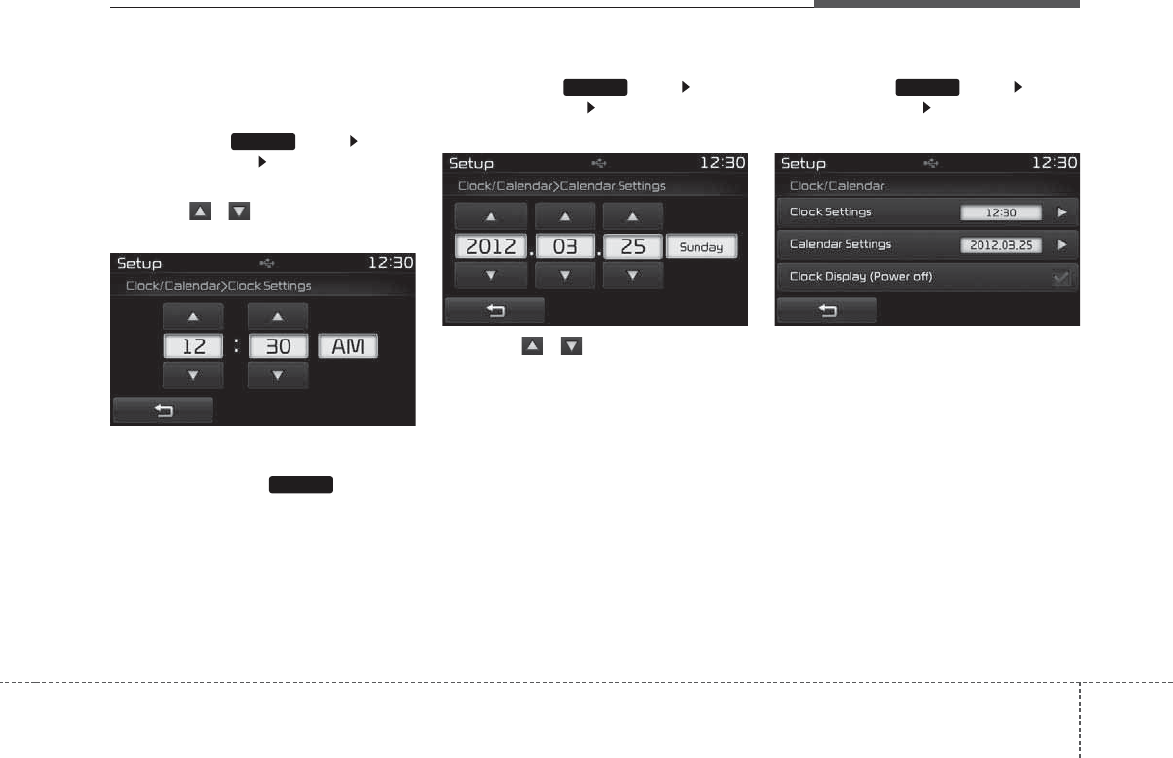
4 133
Features of your vehicle
Clock/Calendar Setting
Clock Setting
Press the key Select
[Clock/Calendar] Select [Clock
Settings]
Use the , buttons to set the
Hour, Minutes and AM/PM setting.
✽
NOTICE
Press and hold the key (over
0.8 seconds) to set the
Clock/Calendar screen.
Calendar Setting
Press the key Select
[Clock/Calendar] Select [Calendar
Settings]
Use the , buttons to set the
Day, Month and Year setting.
Clock Display
Press the key Select
[Clock/Calendar] Select [Clock
Display (Power off)]
This feature is used to display a clock
on the screen when the audio sys-
tem is turned off.
SETUP SETUP
CLOCK
SETUP

Features of your vehicle
1344
Bluetooth®
Wireless
Technology Setting
Pairing a New Device
Press the key Select
[Phone] Select [Pair Phone]
Bluetooth®
Wireless Technology
devices can be paired with the audio
system.
For more information, refer to the
“Pairing through Phone Setup” sec-
tion within
Bluetooth®
Wireless
Technology.
Viewing Paired Phone List
Press the key Select
[Phone] Select [Paired Phone List]
This feature is used to view mobile
phones that have been paired with
the audio system. Upon selecting a
paired phone, the setup menu is dis-
played.
For more information, refer to the
“Setting
Bluetooth®
Wireless
Technology Connection” section with-
in
Bluetooth®
Wireless Technology.
(1) : Moves to the previous
screen
(2) Connect/Disconnect Phone :
Connect/disconnects currently
selected phone
(3) Delete : Deletes the currently
selected phone
(4) Change Priority : Sets currently
selected phone to highest connec-
tion priority
✽
NOTICE BEFORE DOWN-
LOADING CONTACTS
• Only contacts within connected
phones can be downloaded. Also
check to see that your mobile
phone supports the download fea-
ture.
• To learn more about whether your
mobile phone supports contacts
downloads, refer to your mobile
phone user’s manual.
• The contacts for only the connect-
ed phone can be downloaded.
Before downloading, check to see
whether your phone supports the
download feature.
SETUP
SETUP
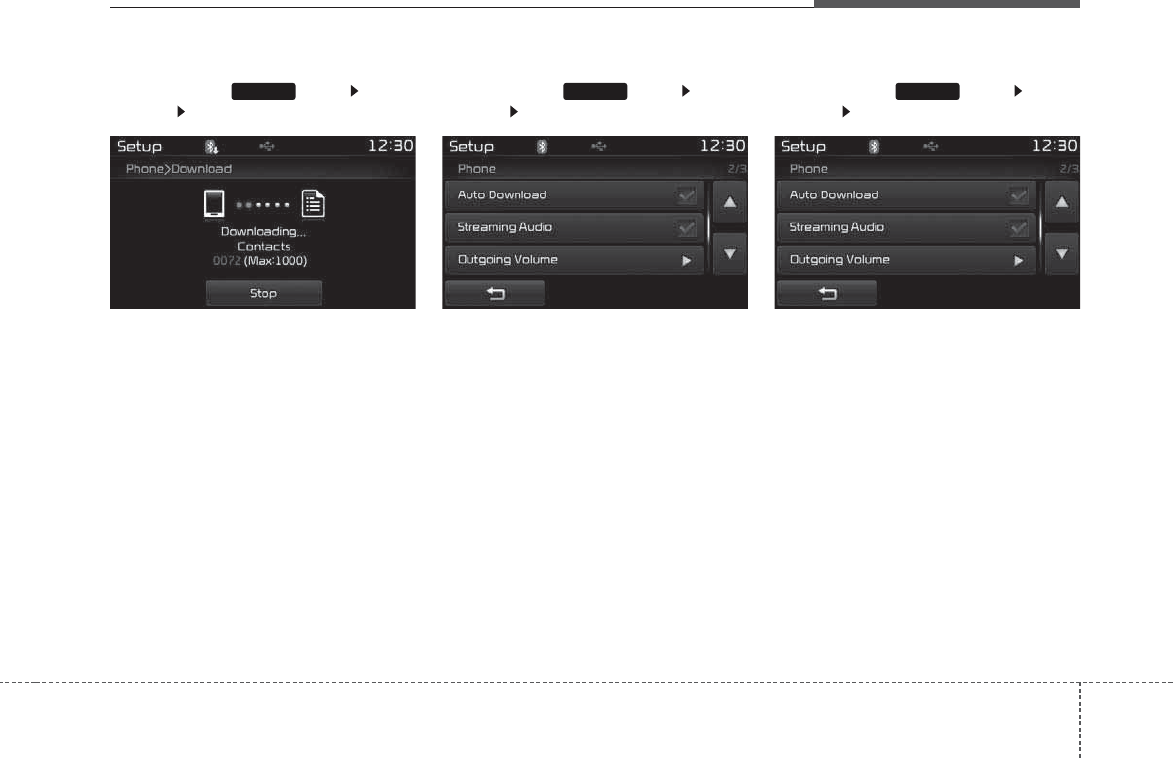
4 135
Features of your vehicle
Downloading Contacts
Press the key Select
[Phone] Select [Contacts Download]
The contacts is downloaded from the
mobile phone and the download
progress is displayed.
✽
NOTICE
• Up to 1,000 contacts entries can be
copied into car contacts.
• Up to 1,000 contacts entries can be
saved for each paired device.
• Upon downloading contacts data,
previously saved contacts data
will be deleted. However, contacts
entries saved to other paired
phones are not deleted.
Auto Download (Contacts)
Press the key Select
[Phone] Select [Auto Download]
T
his feature is used to automatically
download mobile contacts entries once
a
Bluetooth
®
Wireless Technology
phone is connected.
✽
NOTICE
• The Auto Download feature will
download mobile contacts entries
every time the phone is connected.
The download time may differ
depending on the number of saved
contacts entries and the communi-
cation state.
• When downloading a contacts,
first check to see that your mobile
phone supports the contacts
download feature.
Streaming Audio
Press the key Select
[Phone] Select [Streaming Audio]
When Streaming Audio is turned on,
you can play music files saved in
your
Bluetooth®
Wireless Technology
device from the car.
SETUP SETUP SETUP
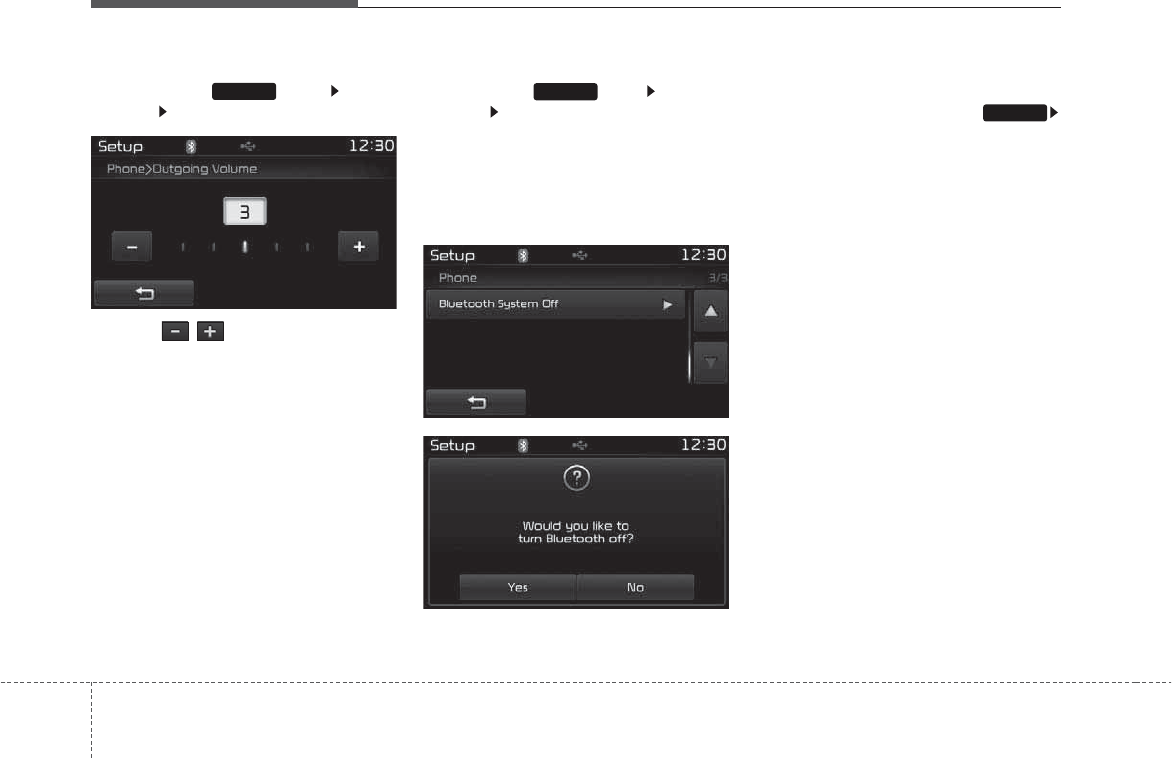
Features of your vehicle
1364
Outgoing Volume
Press the key Select
[Phone] Select [Outgoing Volume]
Use the , buttons to adjust the
outgoing volume level.
Turning Bluetooth System Off
Press the key Select
[Phone] Select [Bluetooth System
Off]
Once
Bluetooth
®
Wireless Technology
is turned off,
Bluetooth
®
Wireless
Technology related features will not be
supported within the audio system.
✽
NOTICE
To turn Bluetooth®Wireless
Technology back on, go to
[Phone] and press “Yes”.
SETUP
SETUP
SETUP
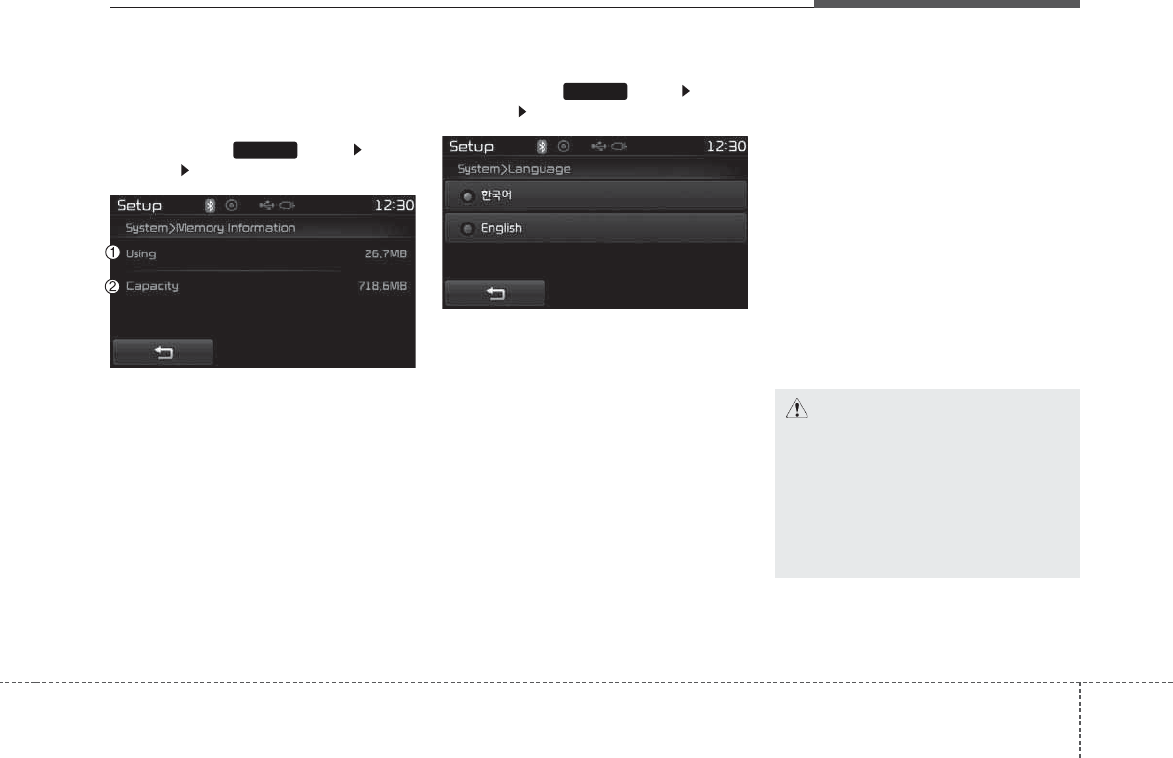
4 137
Features of your vehicle
System Setting
Memory Information
Press the key Select
[System] Select [Memory Information]
This feature displays information
related to system memory.
(1) Using : Displays capacity currently
in use
(2) Capacity : Displays total capacity
Language
Press the key Select
[System] Select [Language]
This feature is used to change the
system and voice recognition lan-
guage.
If the language is changed, the sys-
tem will restart and apply the select-
ed language.
REAR VIEW CAMERA
(if equipped)
• The system has been equipped
with a rear view camera for user
safety by allowing a wider rear
range of vision.
• The rear view camera will automat-
ically operate when the ignition key
is turned ON and the transmission
lever is set to R.
• The rear view camera will automat-
ically stop operating when set to a
different lever.
SETUP
SETUP
CAUTION
The rear view camera has been
equipped with an optical lens to
provide a wider range of vision
and may appear different from
the actual distance. For safety,
directly check the rear and
left/right sides.

4 138
Features of your vehicle
APPENDIX
Name Description
12hr 12 HOUR
24hr 24 HOUR
AST(A.Store) AUTO STORE
AMA AM RADIO (AUTO STORE)
FMA FM RADIO (AUTO STORE)
AUX External Audio mode
BASS BASS
TREBLE TREBLE
BT Bluetooth
PRESET PRESET
RDS Search Radio Data System Search
TA Traffic Announcement
Radio Radio
FM/AM/USB FM/AM/USB
Max MAXIMUM
Min minimum
Low Low
Mid Middle
On On
Off Off
PowerBass PowerBass
Setting Setting
OK OK
MENU MENU
PowerTreble PowerTreble
Name Description
SDVC Speed Dependent
VolumeControl
Setup Setup
Service Following Service Following
CURRENT CURRENT
Current/Total Current/Total
DEVICE NAME DEVICE NAME
NAME NAME
NAME HERE NAME HERE
NUMBER NUMBER
PHONE NAME PHONE NAME
Received Date Received Date
Received Received Message
Message
Received Time Received Time
TIME TIME
AST AUTO STORE
AM AM RADIO
CD COMPACT DISC
FM FM RADIO(AUTO STORE)
L=R LEFT=RIGHT
Middle Middle
My Music My Music
Track Track
USB USB
4 139
Features of your vehicle
APPENDIX
Name Description
Phone Phone
Engineering Mode Engineering Mode
SEEK SEEK
Icon Icon

Appendix Homologation
FCC Compliance Statement.
This device complies with part 15 of the FCC Rules.
Operation is subject to the following two conditions :
(1) This device may not cause harmful interference, and
(2) This device must accept any interference received, including
interferencethat may cause undesired operation.
This equipment has been tested and found to comply with the limits for a Class B digital
device, pursuant to part 15 of the FCC Rules. These limits are designed to provide
reasonable protection against harmful interference in a residential installation.
This equipment generates, uses and can radiate radio frequency energy and, if not
installed and used in accordance with the instructions, may cause harmful interference to
radio communications. However, there is no guarantee that interference will not occur in a
particular installation. If this equipment does cause harmful interference to radio or
television reception, which can be determined by turning the equipment off and on, the
user is encouraged to try to correct the interference by one or more of the following
measures:
- Reorient or relocate the receiving antenna.
- Increase the separation between the equipment and receiver.
- Connect the equipment into an outlet on a circuit different from that to which the
receiver is connected.
- Consult the dealer or an experienced radio/TV technician for help.
Do Not
Any changes or modifications to the equipment not expressly
approved by the party responsible for compliance could void
user’s authority to operate the equipment.
G
Be sure
G
The antenna(s) used for this device must be installed to provide a separation distance of
at least 20 cm from all persons and must not be co-located or operating in conjunction
with any other antenna or transmitter.

IC Compliance Statement.
Le present appareil est conforme aux CNR d’Industrie Canada applicables aux appareils radio
exempts de licence. L’exploitation est autorisee aux deux conditions suivantes :
(1) l’appareil ne doit pas produire de brouillage, et
(2) l’utilisateur de l’appareil doit accepter tout brouillage radioelectrique subi, meme si le
brouillage est susceptible d’en compromettre le fonctionnement.
This device complies with Industry Canada licence-exempt RSS standard(s).
Operation is subject to the following two conditions:
(1) this device may not cause interference, and
(2) this device must accept any interference, including interference that may
cause undesired operation of the device.