HYUNDAI MOBIS AN240DKAN CAR AVN User Manual 1 of 2
HYUNDAI MOBIS CO., LTD. CAR AVN Users Manual 1 of 2
UserManual.wiki
>
HYUNDAI MOBIS
>
AN240DKAN User Manual
>
Users Manual - 1 of 2
Contents
1.
Users Manual - 1 of 2
2.
Users Manual - 2 of 2
Users Manual - 1 of 2
Navigation menu
Upload a User Manual
Namespaces
Wiki Guide
HTML
PDF
Info
Views
User Manual
Discussion / Help
Navigation


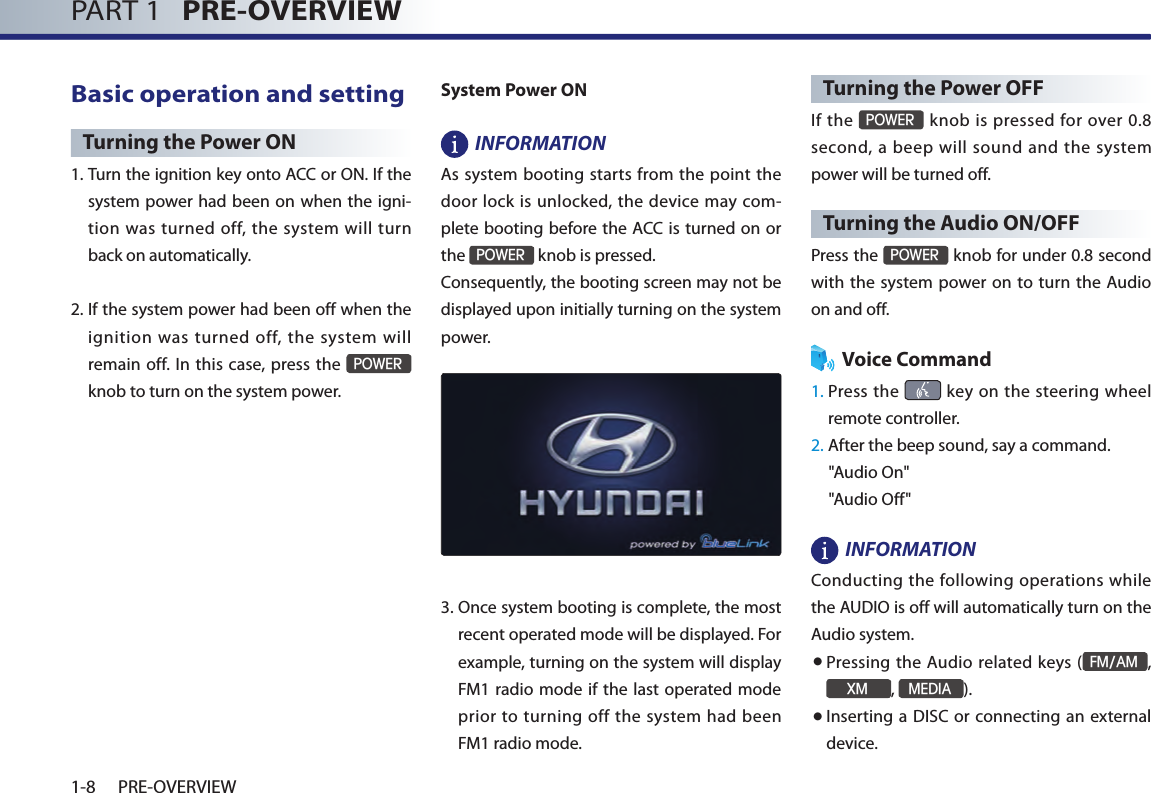

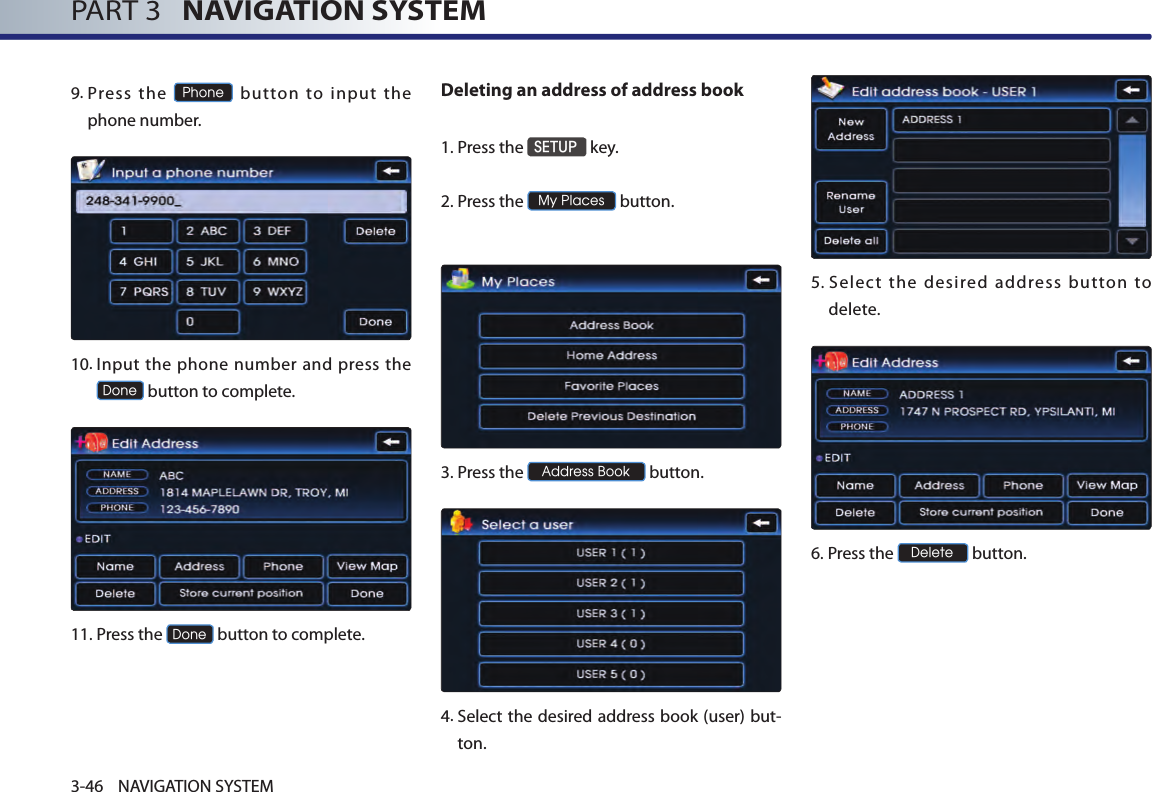
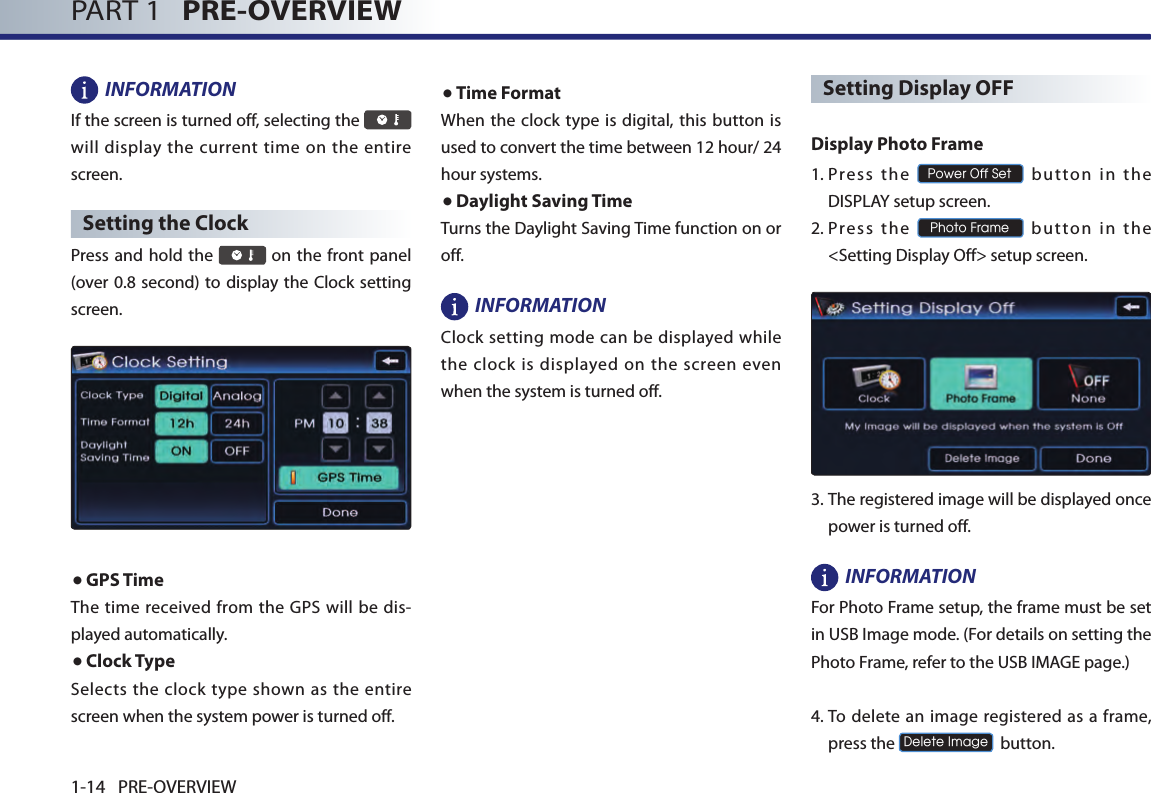
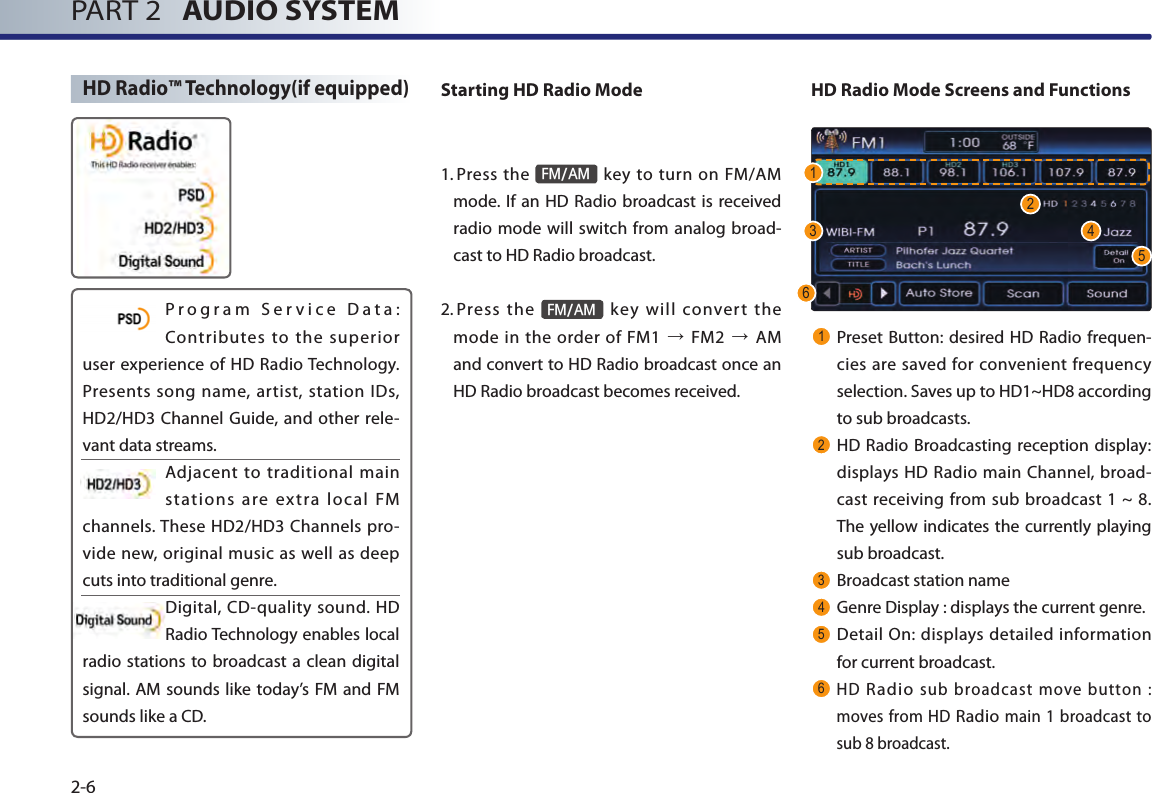
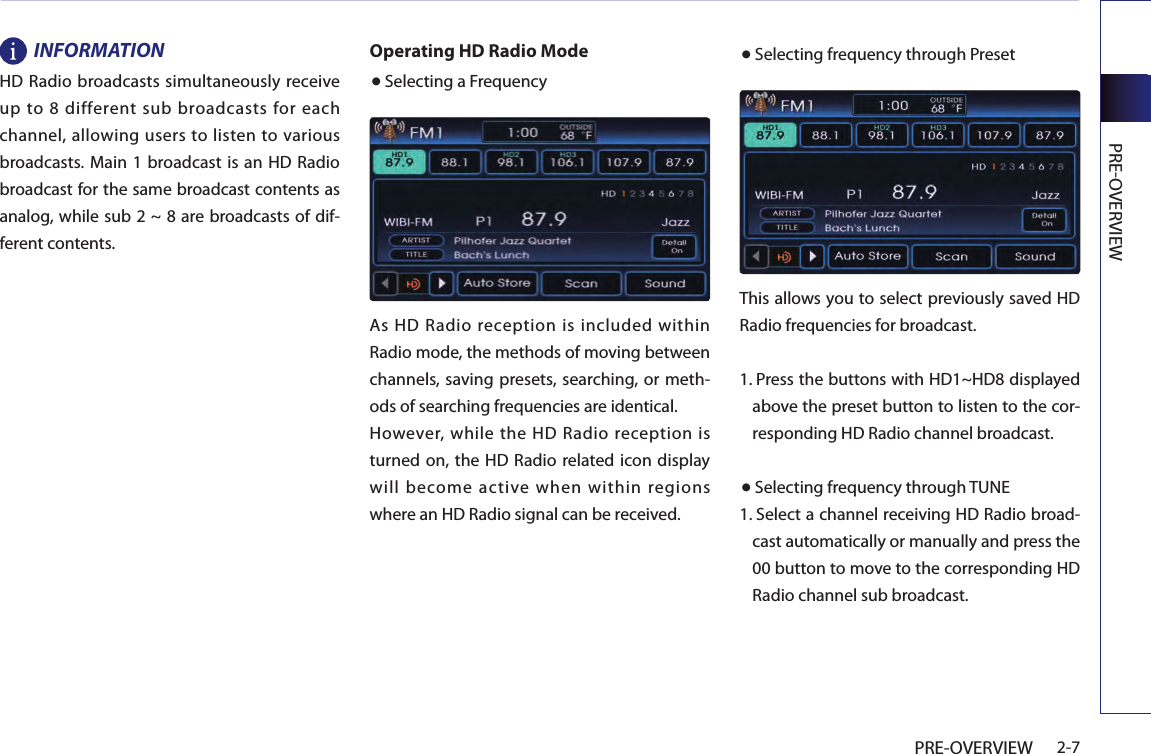
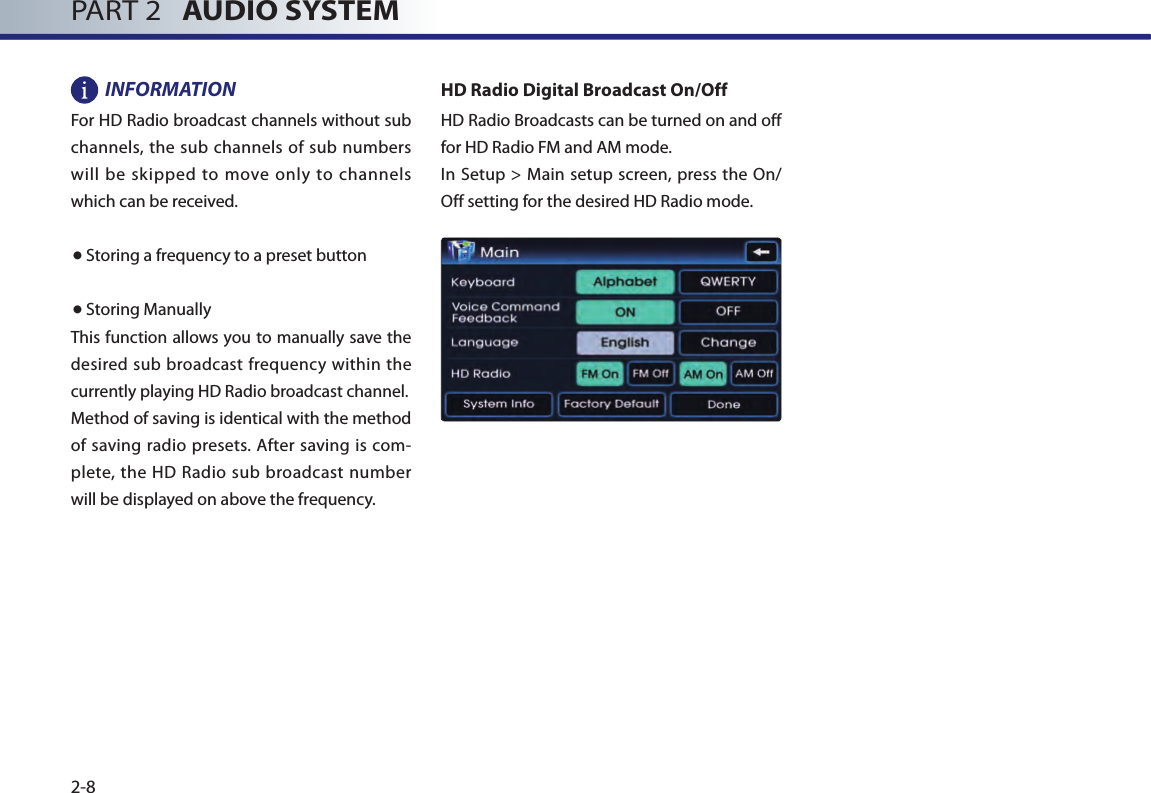
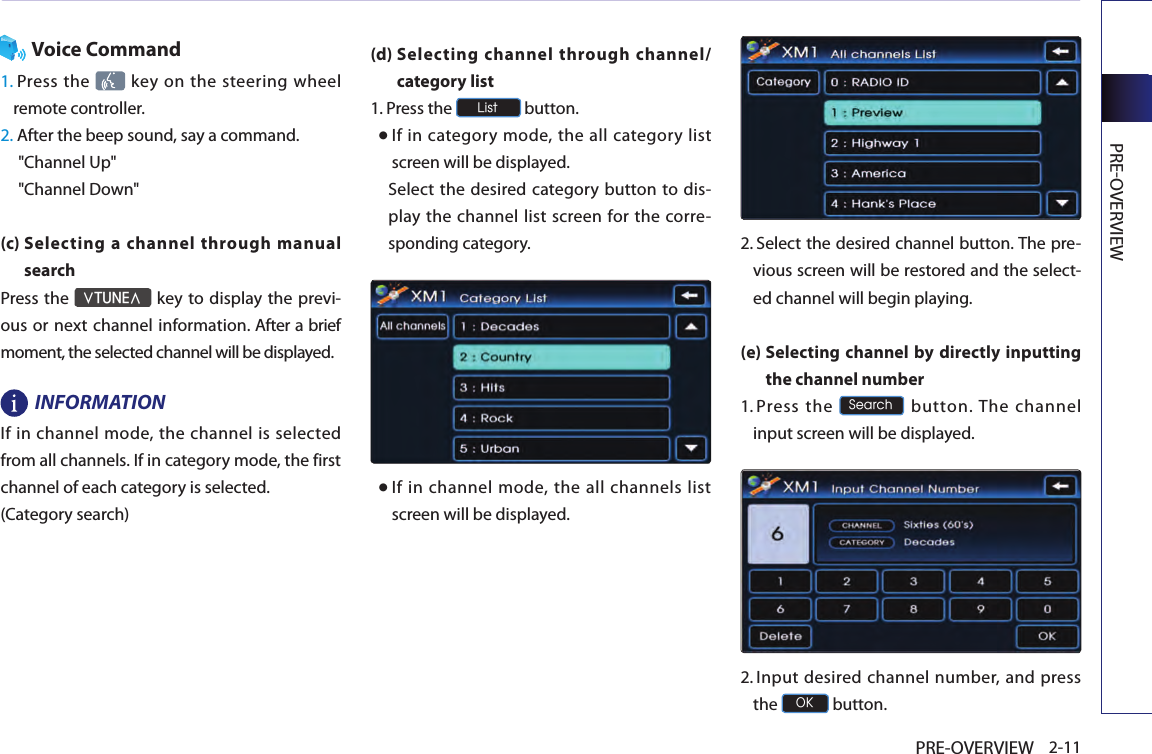
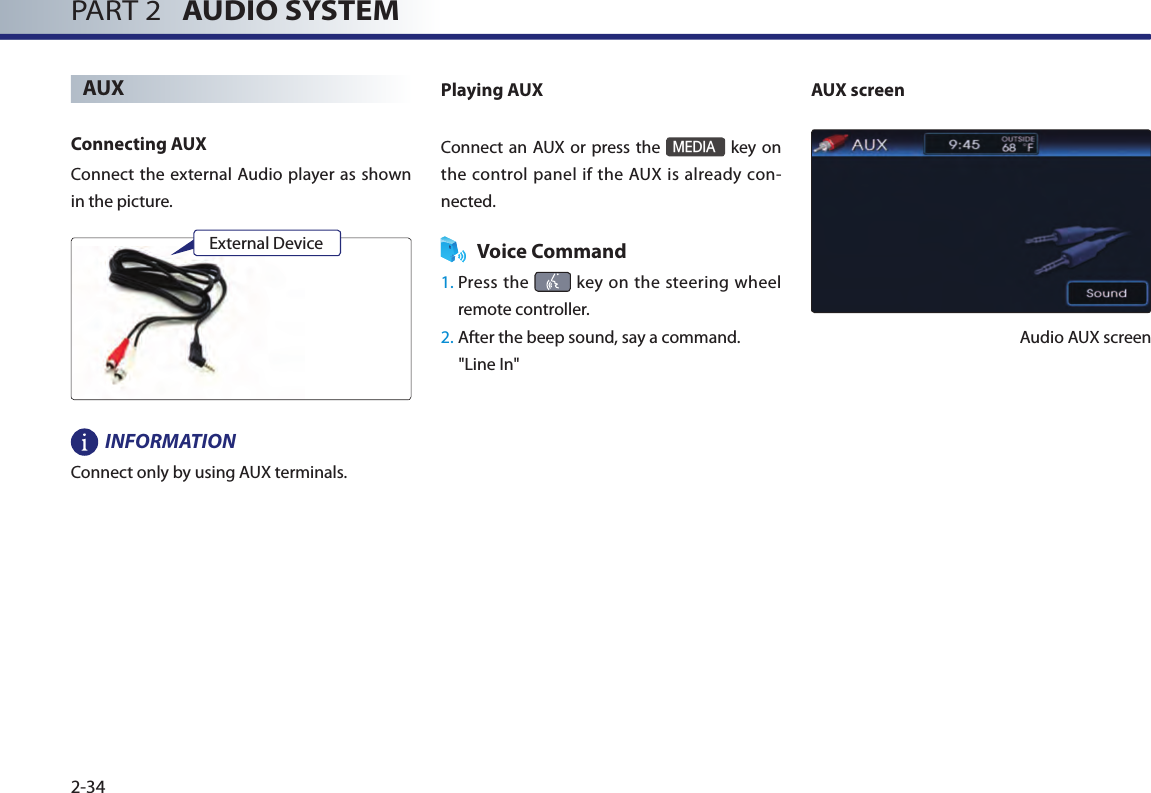
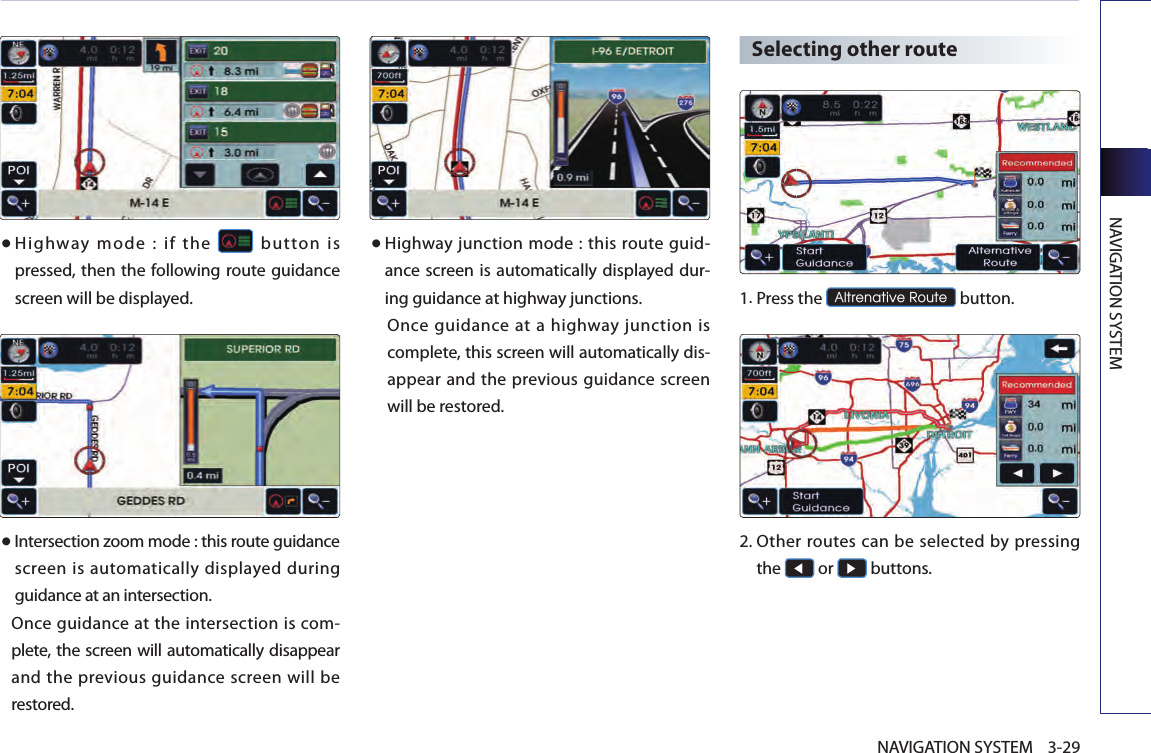
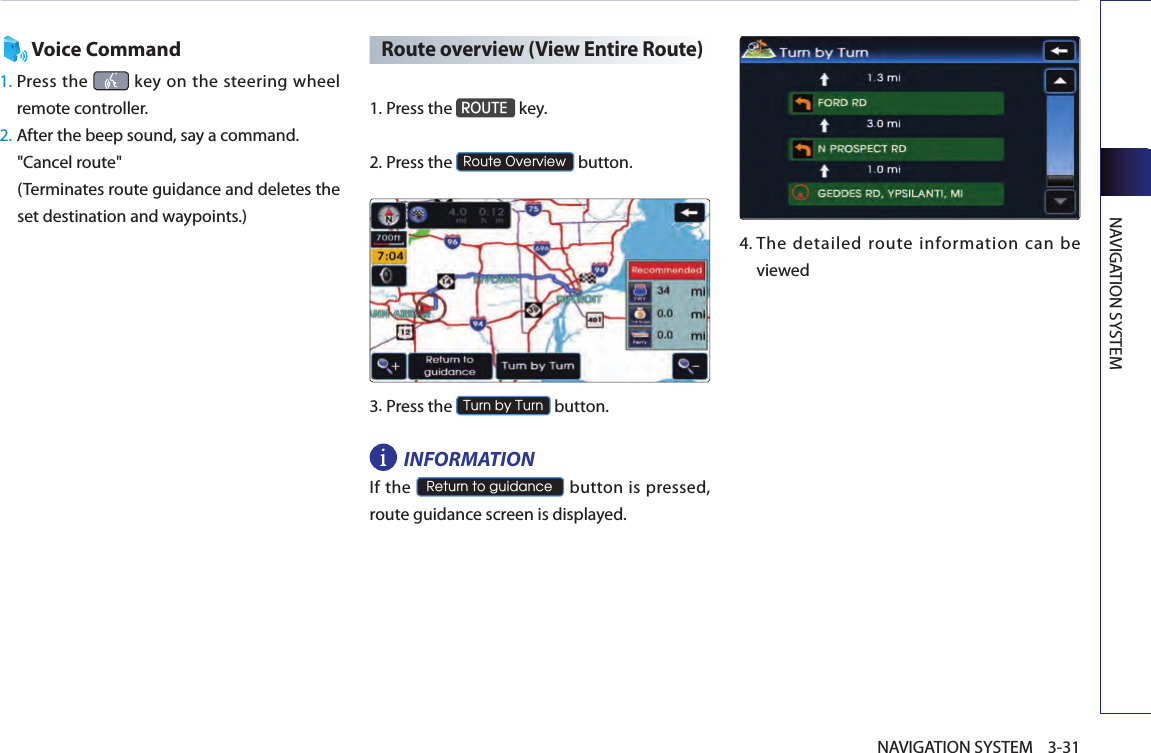
![PRE-OVERVIEW1-11PRE-OVERVIEWGiving voice command1. Press the key on the steering wheel remote controller. A voice command window will be displayed on the lower side of the screen followed by a "Command please" system voice com-ment. 2. Once the icon changes into the icon on the pop-up screen with a beep sound, say the desired voice command. [Voice command list], page 5-6.[ Searching a destination by voice com-mand], page 5-19. INFORMATIONPress the key shortly to input the desired voice command. The system voice instruction comment will immediately terminate. When the icon changes into the icon with a beep sound, it is possible to input voice com-mands. Sound settingPress the Sound button on the main screen of each Audio mode (FM/AM, XM, CD, MP3, USB, iPod) to display the Sound setting screen. FAD/BALThe position of the sound can be adjusted by using the up-down and left-right (▲, ▼, ▶, ◀) buttons on the left side of the screen. Press the Center button to position the sound in the center of the vehicle.](https://usermanual.wiki/HYUNDAI-MOBIS/AN240DKAN.Users-Manual-1-of-2/User-Guide-1523733-Page-13.png)

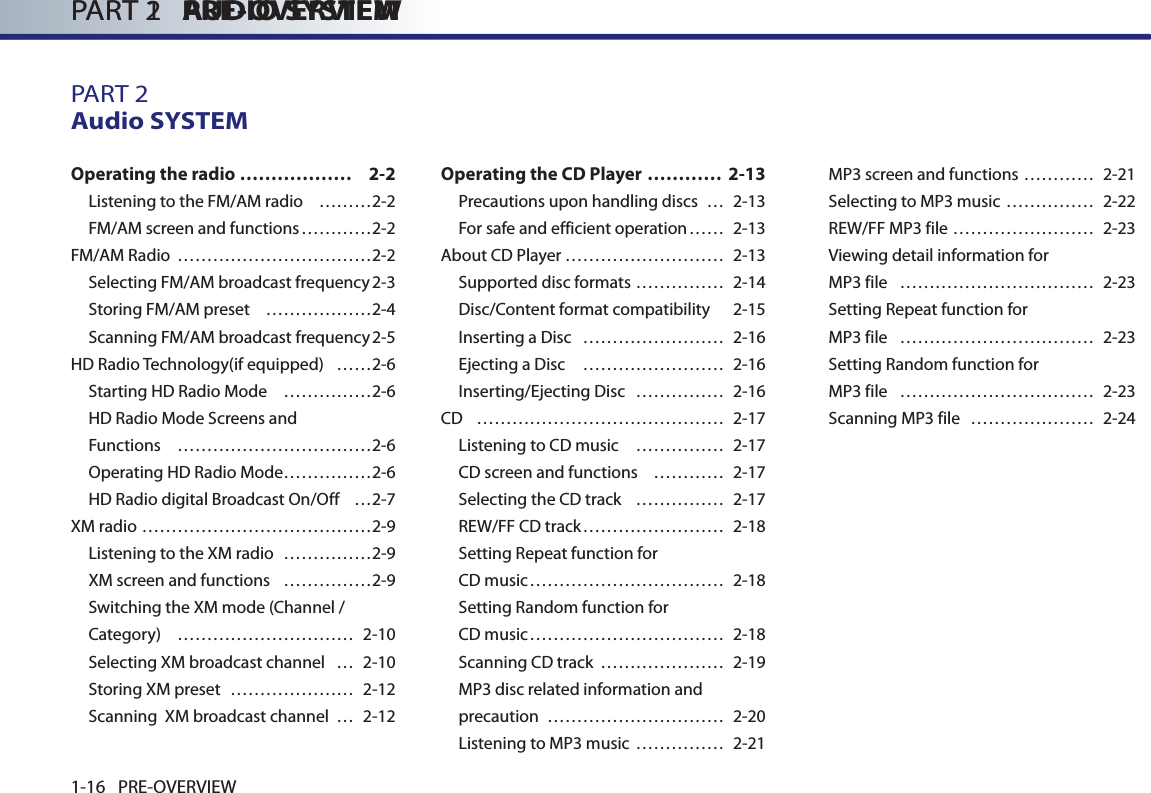
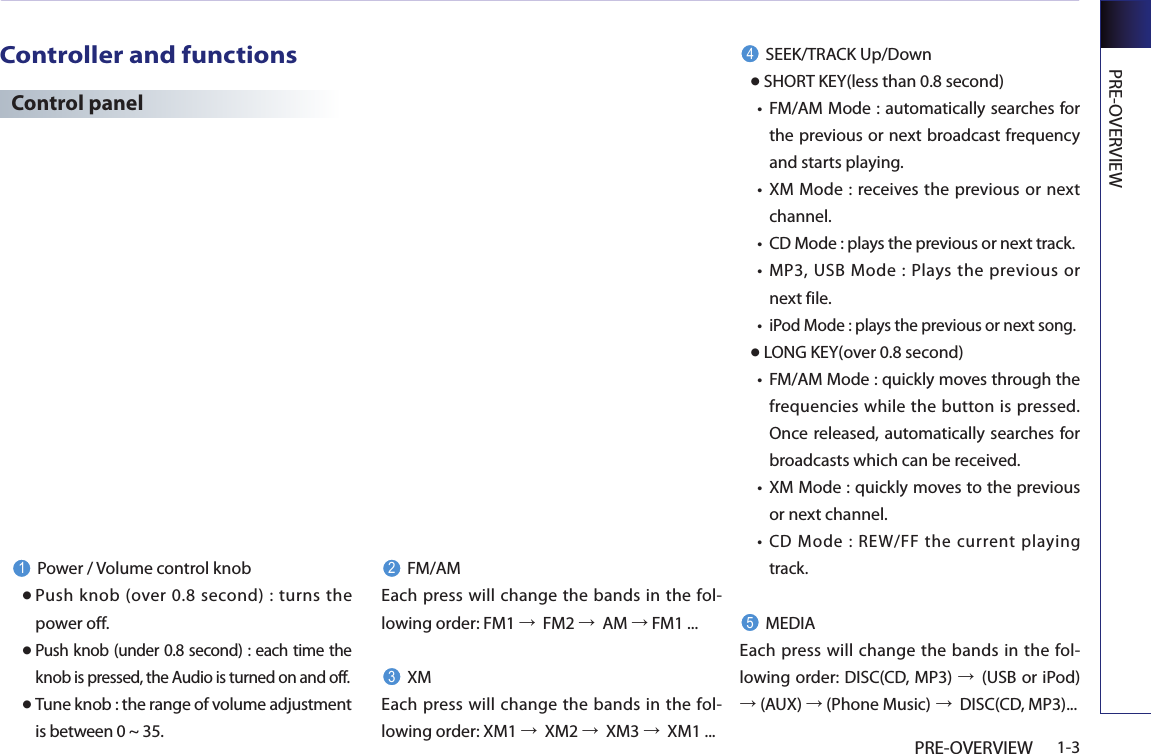
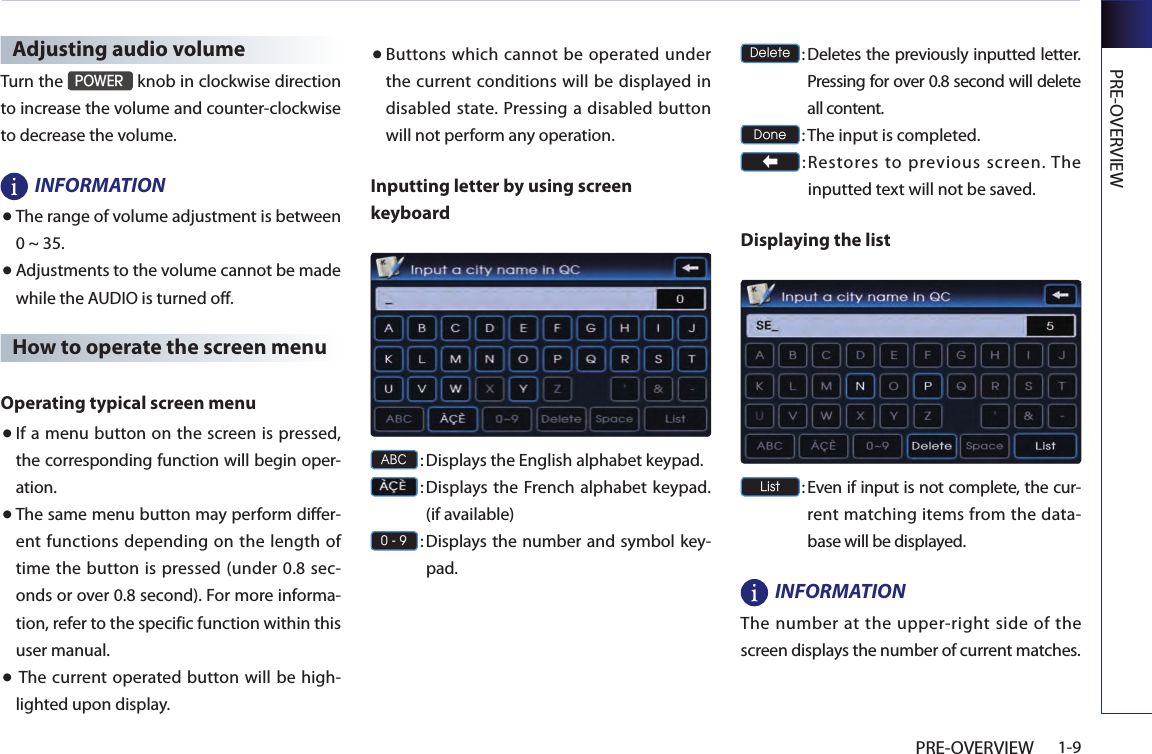
![PART 2 AUDIO SYSTEM2-2Operating the radio FM/AM RadioListening to the FM/AM radio1. Press the FM/AM key on the control panel. The FM/AM radio band of the most recent listened station will be displayed. 2. Pres s the FM/AM ke y to cha nge the desired radio band. Each press will change the bands in the following order: FM1 → FM2 → AM → FM1 ...3. Select the desired broadcast frequency. [Selecting FM/AM broadcast frequency], page 2-3.Voice Command1. Press the key on the steering wheel remote controller.2. After the beep sound, say a command. " Radio""(Radio) AM""(Radio) FM""(Radio) FM <1 or 2>""AM Frequency <530 to 1710>""FM Frequency <87.5 to 107.9>""AM Preset <1 to 6>""FM <1 or 2> Preset <1 to 6>"FM/AM screen and functions 1Mode display : displays the FM1/FM2/ AM modes. 2SEEK/SCAN/PRESET SCAN/AUTO PRESET indicator : if SEEK/SCAN/PRESET SCAN /AUTO PRESET is operating, the switch is displayed. 11994465322bccddeeaa7](https://usermanual.wiki/HYUNDAI-MOBIS/AN240DKAN.Users-Manual-1-of-2/User-Guide-1523733-Page-20.png)
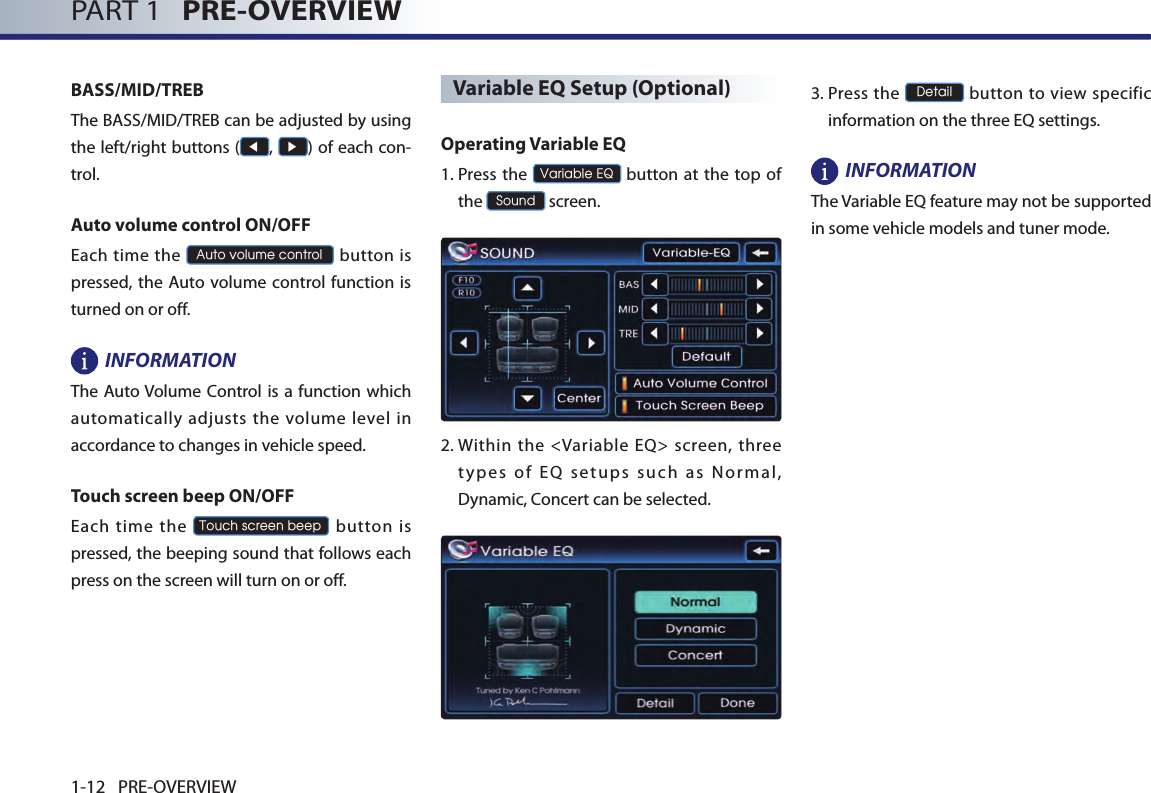
![PREOVERVIEW2-3PRE-OVERVIEW3Program Service name : displays the pro-gram service name if data is being broad-cast.4Frequency : displays the current playing frequency. 5Program type name : displays the program type name if data is being broadcast.6Radio Text : displays the radio text infor-mation if data is being broadcast.7Frequency Bar : displays the position of the current frequency within the total fre-quency range.8Current time : displays the current time manually automatically according to the GPS time.a Preset buttons : the desired frequency can be preset and selected. [Storing FM/AM preset], page 2-4.b R-Text ON/OFF button : turns the Radio Text information on and off. INFORMATIONIf the R-Text is on OFF state, text will not be displayed even if there is text being transmit-ted from the broadcast station.If the R-Text is on ON state, the frequency bar will not be displayed. Even if the R-Text in on ON state, text may not be displayed if text is not being received from the broadcast station.c Auto Store button : searches the 6 fre-quencies with the most superior reception and automatically stores as preset buttons in corresponding order.[Storing FM/AM preset], page 2-4.d Scan button : scans all frequencies or just the preset frequencies for 5 seconds each. [Scanning FM/AM broadcast frequency], page 2-5.e Sound button : adjusts the FAD/BAL, BASS/MID/TREB controls.[Sound setting], page 1-12.Selecting FM/AM broadcast frequencyThere are 3 ways to select the broadcast fre-quency - (a) selecting through preset, (b) selecting through SEEK, (c) selecting through manual search.(a) Selecting a frequency through presetPress the preset button of the desired broad-cast frequency. INFORMATION ● Press the ∧ or ∨ key on the steering wheel remote controller shortly. The preset frequencies of the current band will be select-ed in order.● There are 6 preset frequencies each for FM1, FM2, and AM modes. [Storing FM/AM preset], page 2-4.Voice Command1. Press the key on the steering wheel remote controller.2. After the beep sound, say a command."Preset <1 to 6>""Preset Up""Preset Down"](https://usermanual.wiki/HYUNDAI-MOBIS/AN240DKAN.Users-Manual-1-of-2/User-Guide-1523733-Page-21.png)
![PART 2 AUDIO SYSTEM2-4(b) S el ec ti ng a Br oa dc as t freque nc y through SEEKPress the key on the control panel for less than 0.8 second. Once the SEEK function is operating (SEEK indicator blinking), the next or previous broadcast frequency with superior reception will be searched automatically.INFORMATION● Press the key on the control panel or steering wheel remote controller for more than 0.8 second to quickly move to the nearest desired frequency. Once the button is released, the next frequency with superior reception will be searched auto-matically.● If the SEEK function is operating, pressing the key on the control panel again will terminate SEEK operation and select the current frequency. Voice Command1. Press the key on the steering wheel remote controller.2. After the beep sound, say a command. "Seek Up""Seek Down"(c) Selecting a broadcast frequency through manual search Press the ∨TUNE∧ key to search for desired frequency.Each click on the ∨TUNE∧ key will increase or decrease the frequency by 1 step (FM: 0.2 MHz, AM: 10 kHz). Storing FM/AM presetThere are 2 ways to store preset frequencies - (a) storing manually and (b) auto store. (a) Storing manually1. Select the desired frequency. [Selecting FM/AM broadcast frequency], page 2-3.2. Press the preset button to store for over 0.8 second. The frequency will become stored along with a beep sound. INFORMATIONSix preset frequencies each for FM1/ FM2/AM modes can be stored using the above instruc-tions.(b) Auto storeAfter selecting the desired band, press the Auto store button. The 6 frequencies with the most superior reception will be stored as pre-set buttons in corresponding order. INFORMATION If the Auto store button is pressed again while operating Auto Store, then the Auto Store operation will be terminated and the previously played frequency will be restored.](https://usermanual.wiki/HYUNDAI-MOBIS/AN240DKAN.Users-Manual-1-of-2/User-Guide-1523733-Page-22.png)
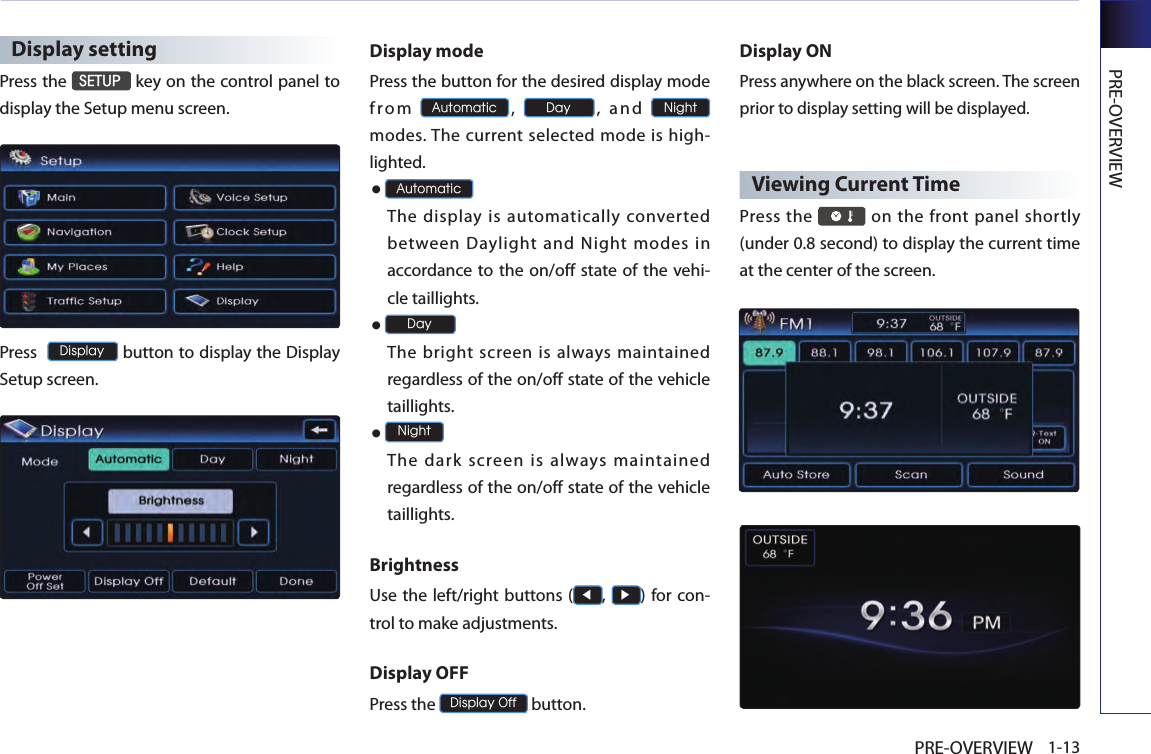
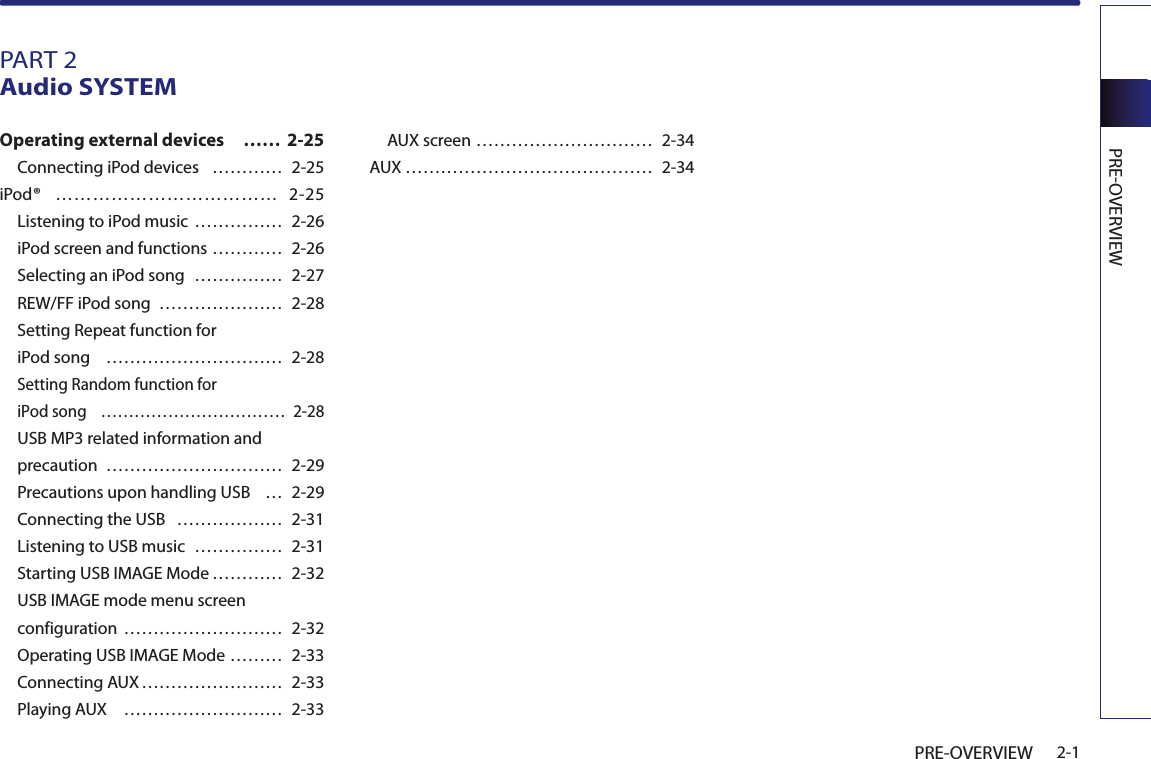
![PREOVERVIEW2-9PRE-OVERVIEWXM radioListening to the XM radio1. Press the XM key on the control panel. The XM radio band screen of the most recent listened station will be displayed. 2. Press the XM key to change the desired radio band. Each press will change the bands in the following order: XM1 → XM2 → XM3 → XM1 ...3. Select the desired broadcast channel. [Selecting XM broadcast channel], page 2-10.Voice Command1. Press the key on the steering wheel remote controller.2. After the beep sound, say a command. "XM""XM <1 or 2 or 3>""XM Channel <0 to 255>""XM <1 or 2 or 3> Preset <1 to 6>"XM screen and functions1Mode display : displays the XM1/XM2/ XM3 modes. 2SCAN/PRESET SCAN indicator : if SCAN/PRESET SCAN is operating, the switch is displayed. 3Channel number : displays the current playing channel.4Channel mode indicator : displays the channel mode in orange. 5Category mode indicator : displays the cat-egory mode in orange. 6Channel name : displays the channel name.7NAME : displays the artist and other relat-ed information.8Title name : displays the title name.9Category name : displays the category name.10Current time : displays the current time manually automatically according to the GPS time.a Preset buttons : the desired channel can be preset and selected. [Storing XM preset], page 2-10.b Mode buttons : switches between channel mode and category mode.[Switching the XM mode], page 2-10.1234105b c d e fa6879](https://usermanual.wiki/HYUNDAI-MOBIS/AN240DKAN.Users-Manual-1-of-2/User-Guide-1523733-Page-27.png)
![PART 2 AUDIO SYSTEM2-10c List button : displays the channel or category list. [Selecting XM broadcast channel], page 2-10.d Search button : selects the channel by directly inputting the channel number.[Selecting XM broadcast channel], page 2-10.e Scan button : scans all frequencies or just the preset channels for 5 seconds each. [Scanning XM broadcast channel], page 2-10.f Sound button : adjusts the FAD/BAL, BASS/MID/TREB controls. [Sound setting], page 1-12.Switching the XM mode (Channel / Category)Each time the Mode button is pressed, the mode will switch between channel mode and category mode. Use the tune knob to change categories and press the tune knob change to selected cate-gory.Selecting XM broadcast channelThere are 5 ways to select a broadcast channel - (a) selecting through preset, (b) selecting with channel Up/Down, (c) Selecting a chan-nel through manual search, (d) selecting through channel/ category list, (e) selecting by directly inputting the channel number.(a) Selecting a channel through presetPress the preset button of the desired chan-nel.INFORMATION● Press the ∧ or ∨ key on the steering wheel remote controller for less than 0.8 second. The preset channels of the current band will be selected in order. ● There are 6 preset channels each for XM1, XM2, and XM3.[Storing XM preset], page 2-12.Voice Command1. Press the key on the steering wheel remote controller.2. After the beep sound, say a command. "Preset <1 to 6>""Preset Up""Preset Down"(b) Selecting with Channel Up/DownPress the key on the control panel for less than 0.8 second.The previous or next channel will be selected. INFORMATION● If in Channel mode, the channel is selected from all channels. If in Category mode, the first channel of each category is selected. ● Press the key on the control panel or steering wheel remote controller for more than 0.8 second to quickly move to the nearest desired channel. Once the but-ton is released, the current channel will be selected.](https://usermanual.wiki/HYUNDAI-MOBIS/AN240DKAN.Users-Manual-1-of-2/User-Guide-1523733-Page-28.png)
![PART 2 AUDIO SYSTEM2-12The previous screen will be restored and the selected channel will begin playing.INFORMATION To prevent inputting a channel which exceeds the channel range, numbers which cannot be inputted are set to disabled state.Voice Command1. Press the key on the steering wheel remote controller.2. After the beep sound, say a command. "Channel<0 to 255>"Storing XM preset1. Select the desired channel. [Selecting XM broadcast channel], page 2-7.2. Press the preset button for over 0.8 second. The frequency will be saved along with beep sound. INFORMATION Six preset frequencies each for XM1/ XM2/ XM3 modes can be stored using the above instructions. Scanning XM broadcast channel1. Press the Scan button. ● SCAN (under 0.8 second): scans all channels for 5 seconds each if in channel mode. If in category mode, scans all channels within the current category for 5 seconds each. Voice Command1. Press the key on the steering wheel remote controller.2. After the beep sound, say a command. "Scan"● PRESET SCAN (over 0.8 second): scans the 6 preset channels within the current band for 5 seconds each. Voice Command1. Press the key on the steering wheel remote controller.2. After the beep sound, say a command. "Preset Scan"1. Press the Scan button again to continue playing the channel. The scan will be termi-nated and the current channel will continue to be played. INFORMATION● When scanning has completed an entire revolution, the scan function is automatical-ly terminated and the previous played chan-nel will be restored. ● Channel 0 is the radio ID and contains infor-mation required for XM Activation.](https://usermanual.wiki/HYUNDAI-MOBIS/AN240DKAN.Users-Manual-1-of-2/User-Guide-1523733-Page-30.png)

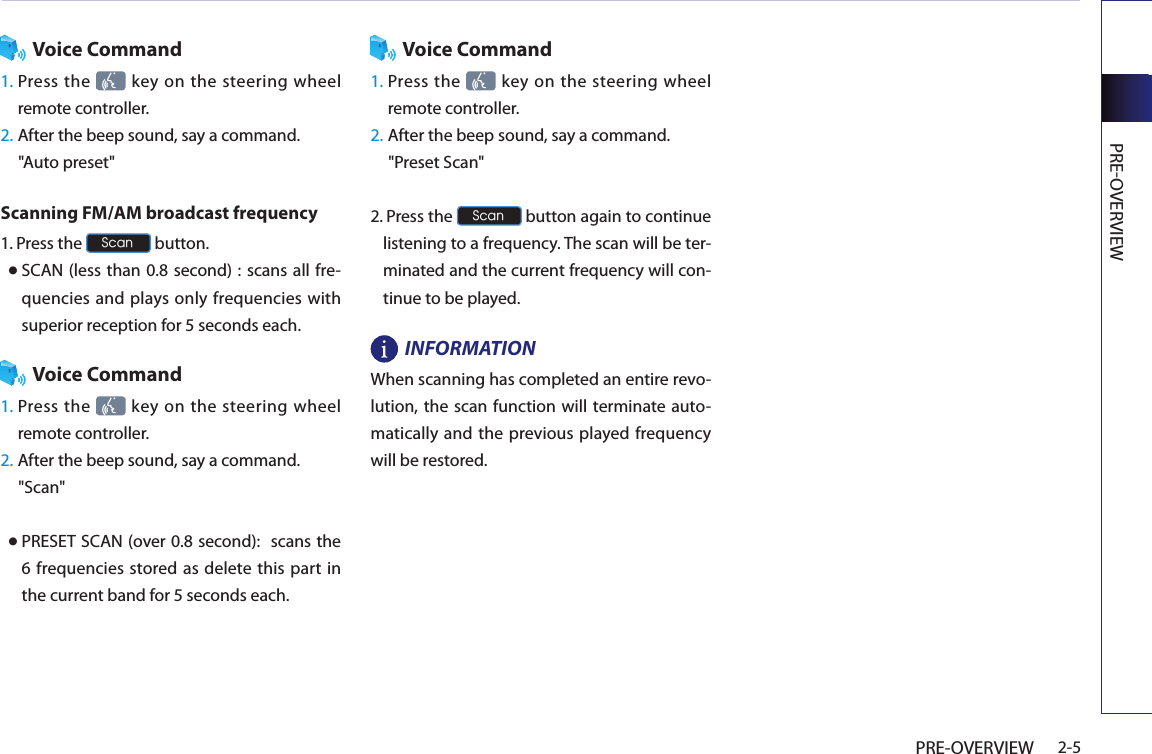
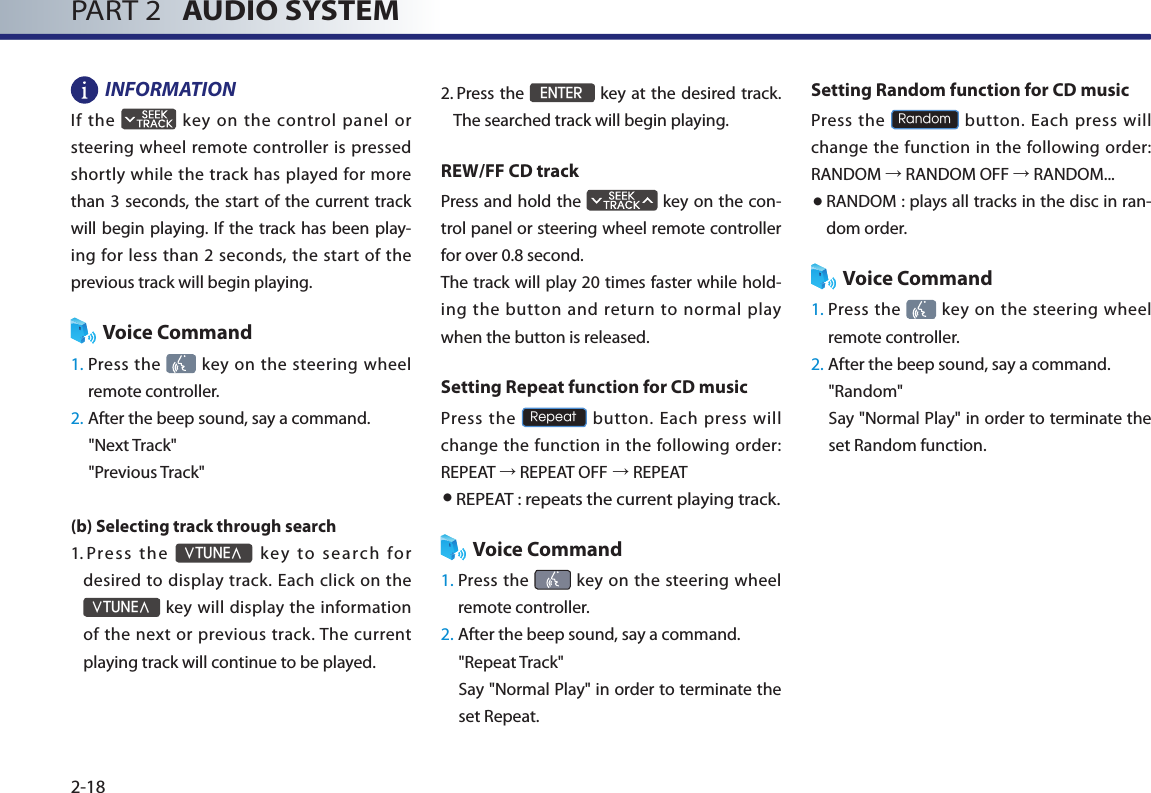
![PREOVERVIEW2-17PRE-OVERVIEWCDListening to CD music1. Insert the CD or press the MEDIA key on the control panel if the CD is already inserted.2. Select the desired track. [Selecting the CD track], page 2-15.Voice Command1. Press the key on the steering wheel remote controller.2. After the beep sound, say a command."DISC""CD""CD Track <1 to 665>"CD screen and functions1Mode display : displays that the current mode is CD mode.2REPEAT/RANDOM/SCAN indicator : if REPEAT/RANDOM/SCAN is operating, the switch is displayed. 3Track number : displays the track number.4Play Time : displays the play time.5Current time : displays the current time manually automatically according to the GPS time.a Repeat buttons : repeat the current play-ing track. [Setting Repeat function for CD music], page 2-18.b Random button : plays the tracks on the disc in random order. [Setting Random function for CD music], page 2-18.c Scan button : scans all tracks on the disc for 10 seconds each. [Scanning CD track], page 2-19.d Sound button : adjusts the FAD/BAL, BAS, MID, TRE controls. [Sound setting], page 1-12.Selecting the CD trackThere are 2 ways to select a CD Track - (a) selecting through Track Up/Down, (b) select-ing through searching Track.(a) Selecting through Track Up / DownPress the key on the control panel or steering wheel remote controller for less than 0.8 second. The next or previous track will begin playing. a cb d15243](https://usermanual.wiki/HYUNDAI-MOBIS/AN240DKAN.Users-Manual-1-of-2/User-Guide-1523733-Page-35.png)
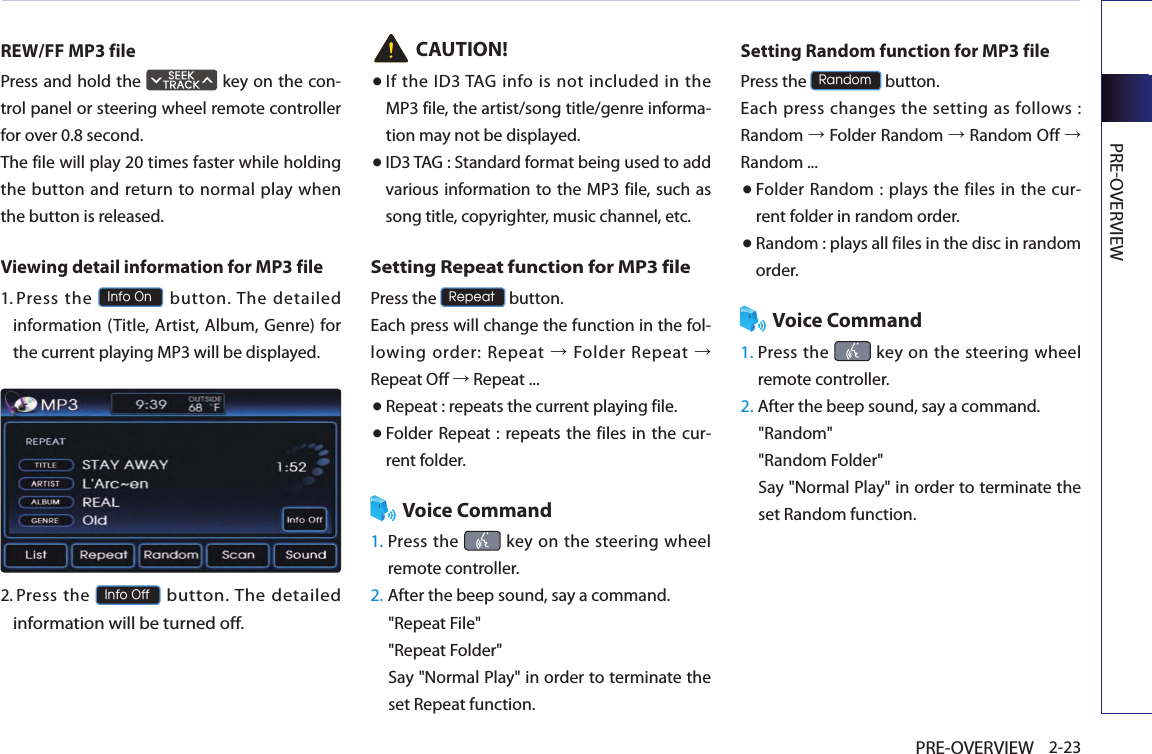
![PREOVERVIEW2-21PRE-OVERVIEWListening to MP3 music1. Insert the MP3 disc or press the MEDIA key on the control panel if the MP3 disc is already inserted.2. Select the desired file. [Selecting the MP3 file], page 2-19.Voice Command1. Press the key on the steering wheel remote controller.2. After the beep sound, say a command."DISC""CD""MP3"MP3 screen and functions1Mode display : displays that the current mode is MP3 disc mode. (MP3 files on DVD discs are not supported.)2REPEAT/RANDOM/SCAN indicator : if REPEAT/RANDOM/SCAN is operating, the switch is displayed.3Play Time : displays the play time.4 Folder name : displays the folder name.5 File name : displays the file name. 6Current time : displays the current time manually automatically according to the GPS time.aInfo On/Off button : displays or hides the detailed file information for the current playing file. [Viewing detail information for MP3 file], page 2-23.b List button : displays the MP3 folders and file lists for the disc. [Selecting the MP3 file], page 2-21.c Repeat button : repeats the current play-ing folder or file. [Setting repeat function for MP3 file], page 2-23.d Random button : plays all files on the disc or folder in random order. [Setting random function for MP3 file], page 2-23.f Scan button : scans all files on the disc or folder for 10 seconds each. abcdef162453](https://usermanual.wiki/HYUNDAI-MOBIS/AN240DKAN.Users-Manual-1-of-2/User-Guide-1523733-Page-39.png)
![PART 2 AUDIO SYSTEM2-26Listening to iPod music1. Connect the iPod or press the MEDIA key on the control panel if the iPod is already connected.INFORMATIONEven if the iPod is connected, message may be displayed if an error has occurred. In such a case, reconnect the iPod. 2. Select the desired song. [Selecting an iPod song], page 2-27.Voice Command1. Press the key on the steering wheel remote controller.2. After the beep sound, say a command. "iPod"iPod screen and functions1Mode display : displays that the current mode is iPod mode.2REPEAT/RANDOM indicator : if REPEAT/ RANDOM is operating, the switch is dis-played.3Title name : displays the title name of the playing file. 4Play Time : displays the play time. 5Artist name : displays the artist name of the playing file. 6Album name : displays the album name of the playing file.7Current time : displays the current time manually automatically according to the GPS time.a Menu button : converts to the search menu screen. [Selecting an iPod song], page 2-27.b Repeat buttons : repeats the current playing song. [Setting repeat function for iPod song], page 2-28.c Random button : plays all songs in the current playing list in random order or ran-domly in album unit. [Setting random function for iPod song], page 2-28.d Sound button : adjusts the FAD/BAL, BASS/MID/TREB controls.[Sound setting], page 1-12.PART 2 AUDIO SYSTEMabcd1735624](https://usermanual.wiki/HYUNDAI-MOBIS/AN240DKAN.Users-Manual-1-of-2/User-Guide-1523733-Page-44.png)
![PREOVERVIEW2-31PRE-OVERVIEWIn addition, certain USB devices are config-ured with a separate drive used to install application programs and songs from such drives may not be possible to play for the reasons as described above. ● The device may not support normal opera-tion if MP3 Players, cellular phones, digital cameras, or other electronic devices (USB devices not recognized as portable disk drives) are connected to the device. ● The device may not support normal opera-tion when using a USB memory type besides the Metal Cover Type USB Memory. ● The device may not support normal opera-tion when using formats such as HDD Type, CF, or SD Memory. ● The device will not support files locked by DRM (Digital Rights Management).● The device many not support normal opera-tion if the proper connection with the USB memory fails due to vibrations caused by the vehicle. (i-stick type, etc.)● Please avoid using USB memory products which can be used as key chains or cellular phone accessories as they could cause dam-age to the USB jack. Please make certain only to use plug type connector products as shown below.Connecting the USBConnect the USB as shown in the picture. Listening to USB music1. Connect a USB or press the MEDIA key on the control panel if the USB is already con-nected.2. Select the desired file. [Selecting the MP3 file], page 2-19.INFORMATIONThe USB screen and operation method is the same with MP3 mode. Please refer to the MP3 mode section for more information. Plug Type Connector](https://usermanual.wiki/HYUNDAI-MOBIS/AN240DKAN.Users-Manual-1-of-2/User-Guide-1523733-Page-49.png)

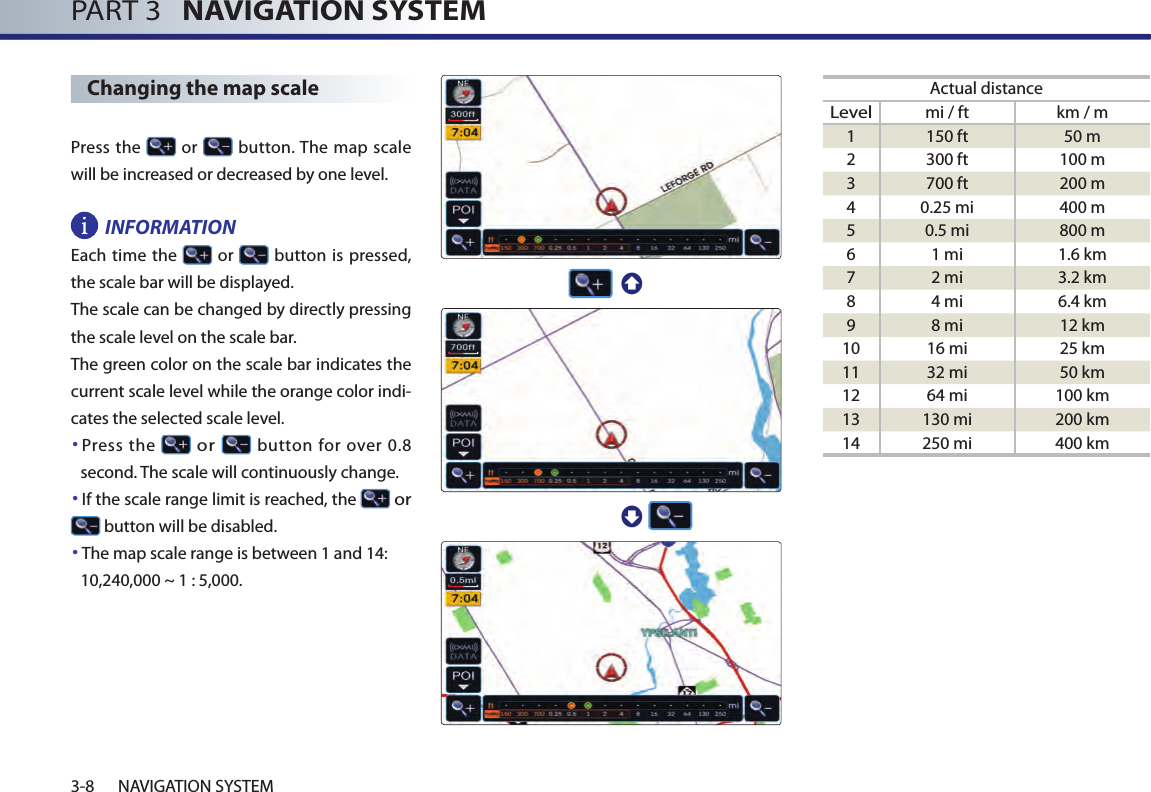
![NAVIGATION SYSTEM3-5NAVIGATION SYSTEMStarting navigation system Press the Navigation mode key (MAPVOICE, DEST, ROUTE, SETUP). The Caution screen will always be displayed when first entering into Navigation mode. Read the contents of the caution screen carefully and press the Agree button.Map Functions Current position map screen (without route)Press the MAPVOICE key on the control panel to display the map of current position and the neighboring area.1GPS signal state indicator : displays the state of GPS signal reception.[Viewing GPS signal state], page 3-7. 2Map scale level indicator : displays the cur-rent map scale.[Changing the map scale], page 3-8.3 Landmark icons : landmark icons are dis-played on the map when the map scale level is set to under 300 ft (100m depend-ing on map data)[Appendix : landmark icons], page 10-7.4 POI icons : POI icons are displayed on the map when the map scale level is set to under 0.5 mi (800m).[Appendix : POI icons], page 10-5.5Current vehicle position icon : displays the current position of the vehicle.2345abc1](https://usermanual.wiki/HYUNDAI-MOBIS/AN240DKAN.Users-Manual-1-of-2/User-Guide-1523733-Page-59.png)
![PART 3 NAVIGATION SYSTEM3-6 NAVIGATION SYSTEMaNorth Up / Heading Up switch : displays the current map mode and the map mode can be switched between North Up and Heading Up. [Switching map mode], page 3-6.bPOI : displays or hides the POI icon on the map.[Displaying/Hiding POI icons on the map], page 3-9.cMap scale : increases or decreases the map scale. [Changing the map scale], page 3-8.Switching map mode (North Up / Heading Up)Each time the compass button is pressed, the screen will switch in the order shown below. Heading Up → North Up → Heading Up ...INFORMATION All map screens (map screen after setting des-tination & whole route display screen) except the current position screen will always be dis-played in North Up mode. ● North Up : displays the map always facing the North direction regardless of the direc-tion which the vehicle is traveling. The vehicle icon is displayed in the center position of the map. ● Heading Up : displays the map always fac-ing the direction which the vehicle is travel-ing. The vehicle icon is displayed in the lower center position of the map.Voice Command1. Press the key on the steering wheel remote controller.2. After the beep sound, say a command."North Up""Heading Up"](https://usermanual.wiki/HYUNDAI-MOBIS/AN240DKAN.Users-Manual-1-of-2/User-Guide-1523733-Page-60.png)
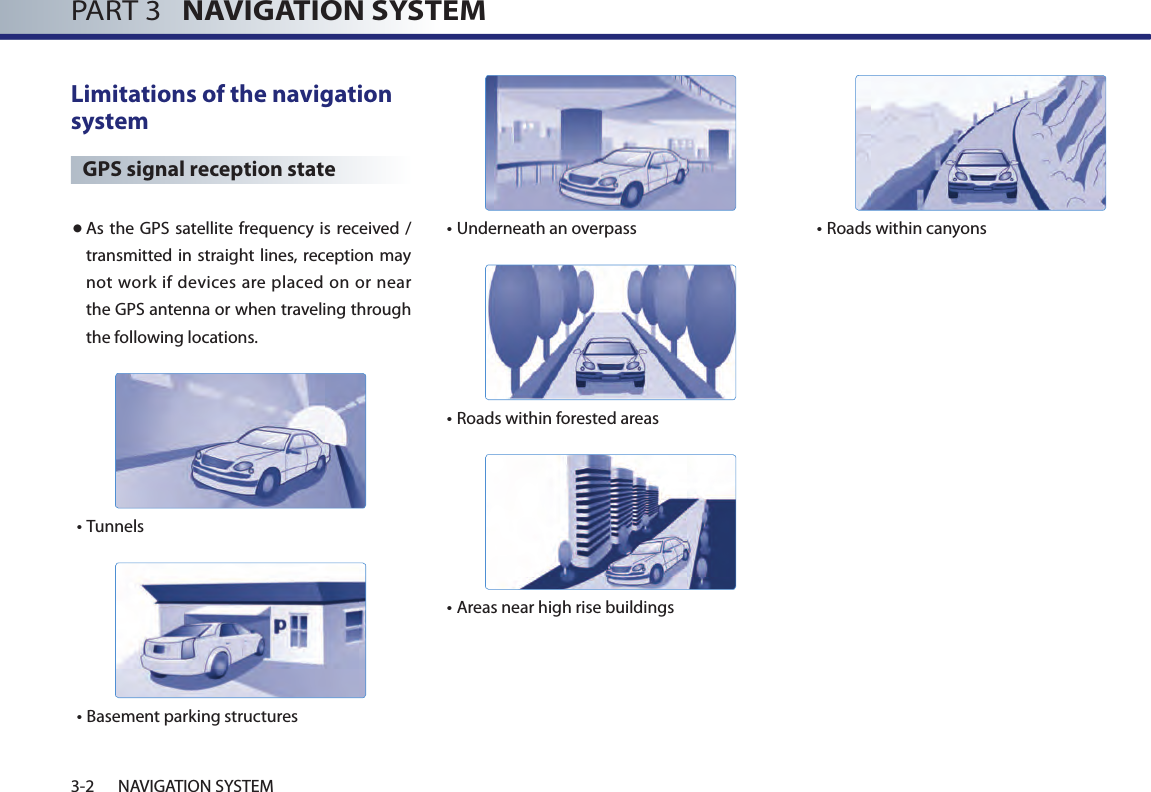
![NAVIGATION SYSTEM3-7NAVIGATION SYSTEMViewing GPS signal stateThe state of GPS signal reception is displayed as shown below.● (active) : GPS reception is satisfactory.● (inactive) : GPS reception is unsatisfactory. [System information and update], page 3-51.INFORMATION● GPS (Global Position System) : GPS is a sys-tem developed and operated by the United States which determines the current loca-tion of the user (longitude, latitude, etc.) by generally using 4 or more satellites. This system is used with related GPS informa-tion, various sensors, road map data, and other navigation related information.● GPS information may not operate under thefollowing conditions. • When buildings, tunnels, or other obstruc-tions block satellite signals.• When materials are placed above the GPS antenna and block satellite signals.• When the satellite does not transmit sig-nals (signal transmission is controlled by the satellite control center in the United States and may not transmit when under repair, modification, etc). • When a digital cellular phone (1.5GHz) is placed near the GPS antenna.● This system uses GPS information, various sensors, road map data, and other related information to display the current position. Errors may occur if the satellite is transmit-ting inaccurate signals or only two or less satellite signals can be received. Errors which occur in such conditions can-not be corrected.](https://usermanual.wiki/HYUNDAI-MOBIS/AN240DKAN.Users-Manual-1-of-2/User-Guide-1523733-Page-61.png)
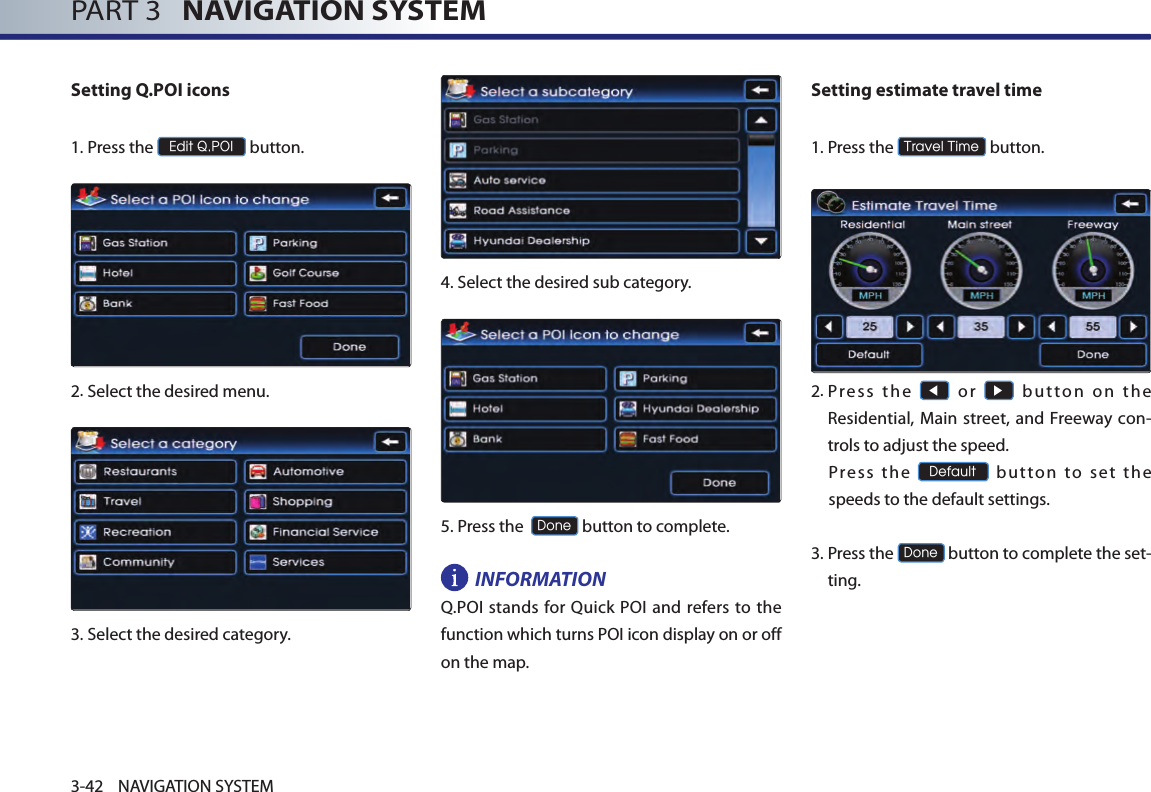
![NAVIGATION SYSTEM3-9NAVIGATION SYSTEMVoice Command1. Press the key on the steering wheel remote controller.2. After the beep sound, say a command."Zoom In""Zoom Out""Zoom Maximum""Zoom Minimum""Zoom level <1 to 14>""Zoom <actual distance>"" (ex. Zoom 700ft)"Displaying / Hiding POI icons on the mapDisplaying/Hiding Q.POI icons1. Press the POI ▼ button. Related menu buttons will be displayed at the bottom of the screen. INFORMATION The Q.POI icons are set to - Gas Station, - Parking, - Hotel, - Golf Course, - Bank, - Fast Food (6 icons) by default. This setting can be changed in SETUP. [Setting Q.POI icons], page 3-42. 2. Press the icon buttons to display or hide. To turn off all POI icons displayed on the map, press the ALL OFF button. INFORMATION ● The current displayed POI icons are high-lighted while the icons not being displayed are shown as normal buttons.● If there are no POI icons being displayed, the ALL OFF button will be disabled. ● POI icons are displayed when the scale is under 0.5 mi (800m). Displaying / Hiding icons other than Q.POI icons1. Press the POI ▼ button. Related menu buttons will be displayed at the bottom of the screen. 2.Press the Others button. INFORMATIONQ.POI stands for Quick POI and refers to the function which turns POI icon display on or off on the map.](https://usermanual.wiki/HYUNDAI-MOBIS/AN240DKAN.Users-Manual-1-of-2/User-Guide-1523733-Page-63.png)
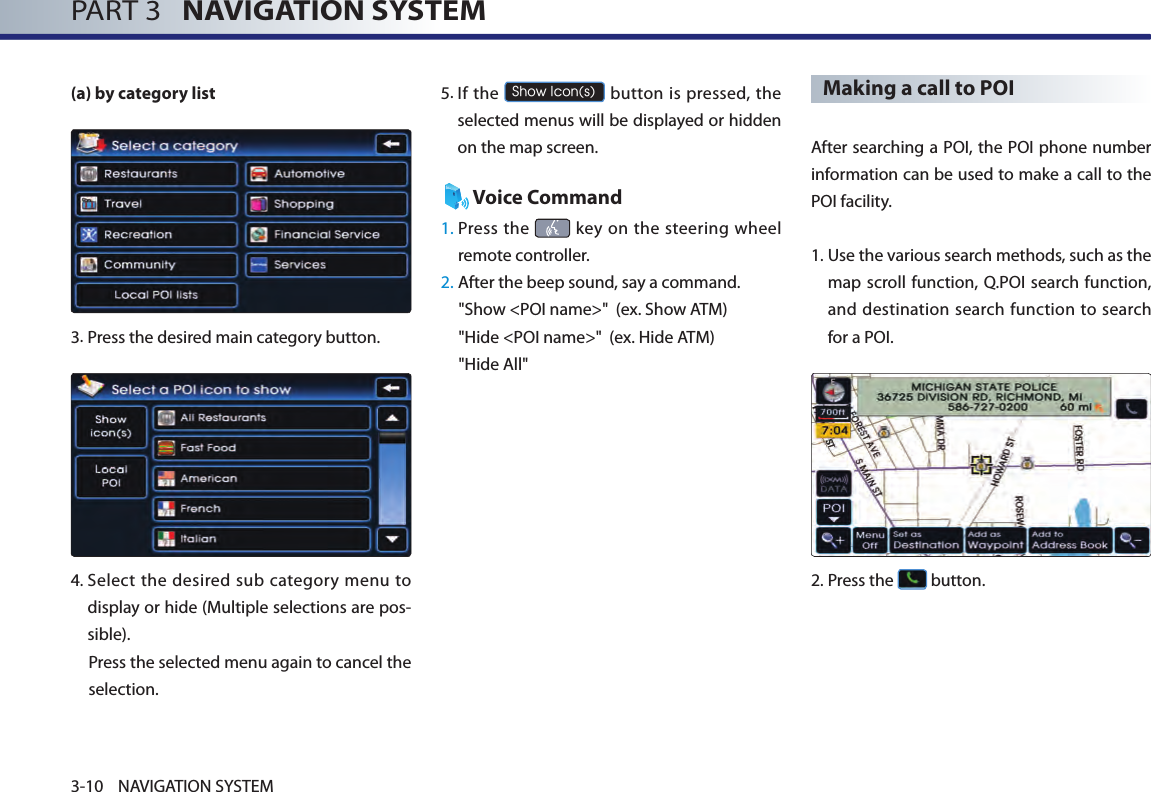
![NAVIGATION SYSTEM3-11NAVIGATION SYSTEM3. Bluetooth is used to make a call to the POI facility.4. Once the call is ended, the map is restored to the current vehicle location. INFORMATION● Making a call is not possible if there is no telephone information for a POI or if there is no mobile phone connected through Bluetooth.● For more information of mobile phone authentication through Bluetooth or detailed information on conducting search, re fe r to [Pairing and connecting a Bluetooth phone], page 5-4.Scrolling map Press the map area on the map screen. The selected point will be centered on the screen and the scroll mark will be displayed. Information about the marked point and straight line distance from the current posi-tion will be displayed at the top of the screen. INFORMATION If a map area on the map screen is pressed, the map will continuously scroll in the corre-sponding direction until the pressing is released.](https://usermanual.wiki/HYUNDAI-MOBIS/AN240DKAN.Users-Manual-1-of-2/User-Guide-1523733-Page-65.png)
![PART 3 NAVIGATION SYSTEM3-12 NAVIGATION SYSTEMSetting a destination Destination menu screen and functionsPress the DEST key on the control panel to display the destination menu screen. aAddress : sets the destination through address search. [Searching an Address], page 3-13.bPrevious Dest : sets the destination through the previous destination list. [Searching a Previous Destination], page 3-17 .cIntersection : sets the destination through intersection search. [Searching an Intersection], page 3-17.dPOI Search : sets the destination through POI Category search. [Searching a POI], page 3-20 .eAddress Book : sets the destination through address book search. [Searching from Address book], page 3-24 .fEmergency : sets the destination through emergency facilities search. [Searching for Emergency facilities], page 3-25 .gHOME : sets the stored HOME as the desti-nation. [Searching your Home], page 3-25 .h Favorite place 1 ~ 5 : sets the destina-tion with one of the stored favorite places. [Searching favorite places], page 3-26 .adghbecf](https://usermanual.wiki/HYUNDAI-MOBIS/AN240DKAN.Users-Manual-1-of-2/User-Guide-1523733-Page-66.png)

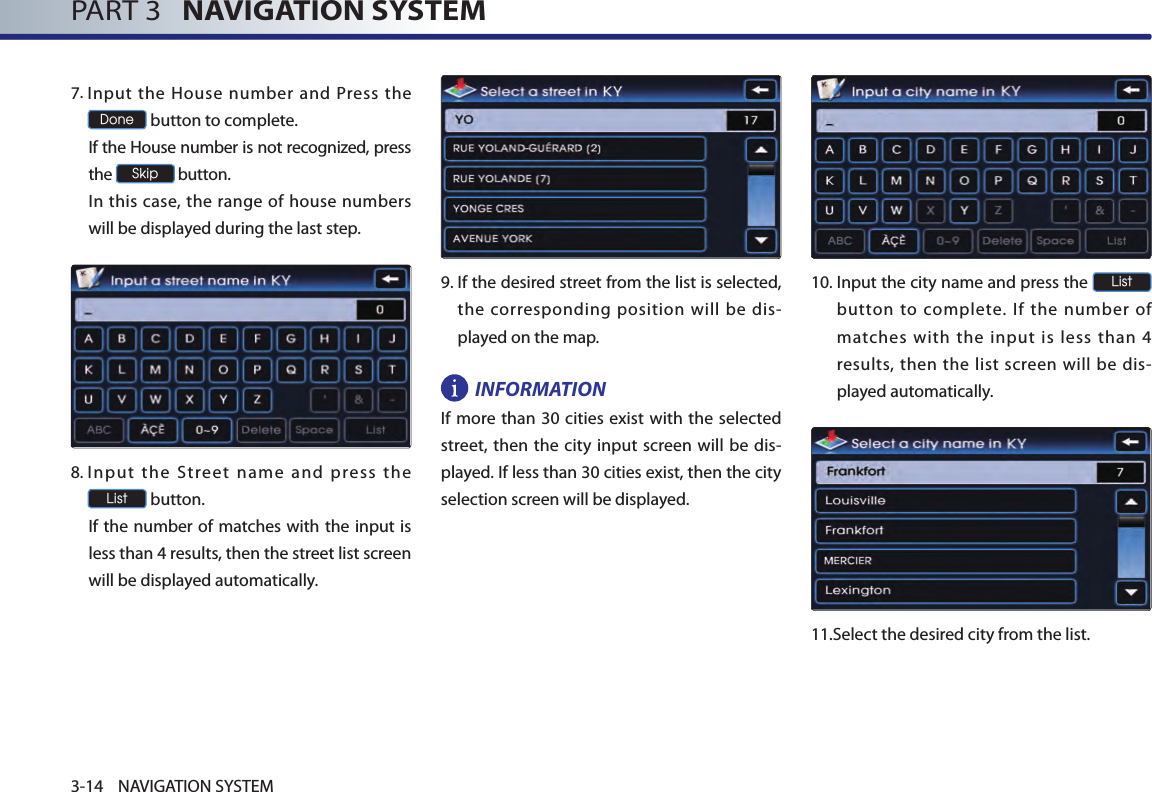
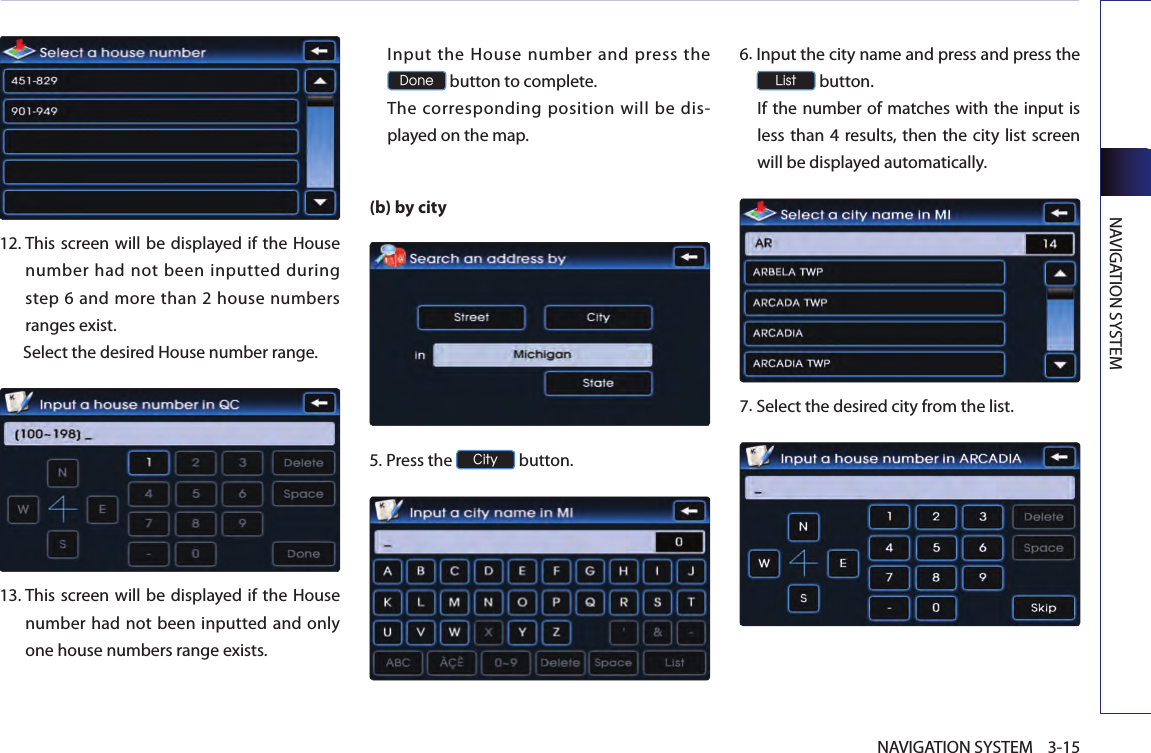
![PART 3 NAVIGATION SYSTEM3-16 NAVIGATION SYSTEM8. Input the house number and press the Done button to complete. If the House number is not recognized, press the Skip button. In this case, the range of house numbers will be displayed during the last step.9. Input the Street name and press the List button to complete. If the number of matches with the input is less than 4 results, then the street list screen will be displayed automatically.10. Select the desired street from the list and the corresponding position will be dis-played on the map. 11. This screen will be displayed if the House number had not been inputted during step 8 and more than 2 House number ranges exist. Select the desired House number range.12. This screen will be displayed if the House number had not been inputted during step H and only one House number range exists. Select the house number range and Press the Done button to complete. The corresponding position will be dis-played on the map.Voice Command1. Press the key on the steering wheel remote controller.2. After the beep sound, say a command. "Find address" [Find address], page 5-19.](https://usermanual.wiki/HYUNDAI-MOBIS/AN240DKAN.Users-Manual-1-of-2/User-Guide-1523733-Page-70.png)
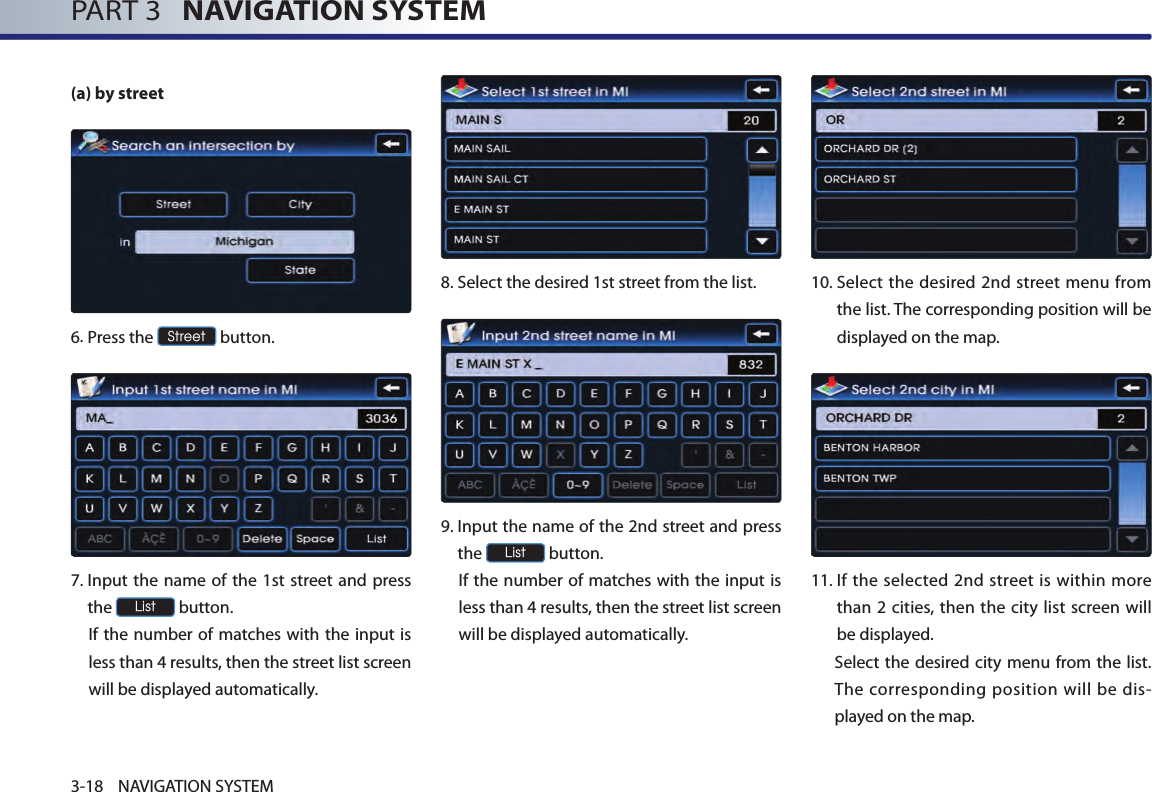
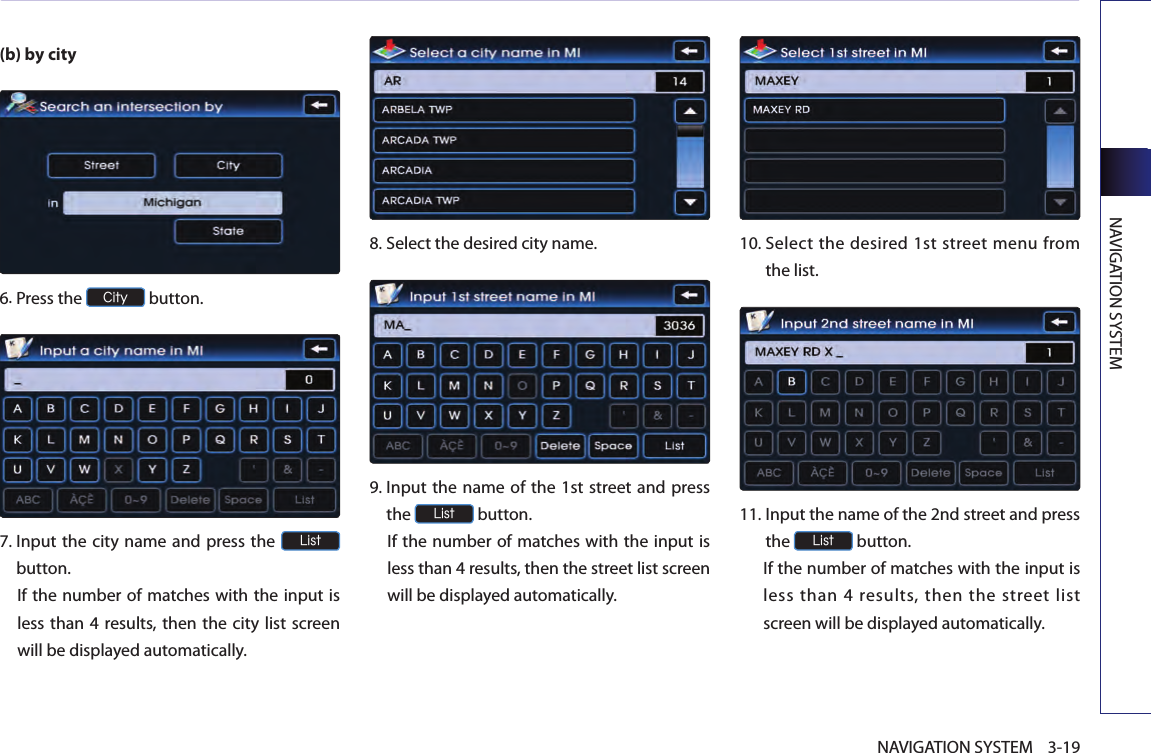
![NAVIGATION SYSTEM3-17NAVIGATION SYSTEMSearching a Previous Destination1.Press the DEST key.2.Press the Previous Dest button.3. Select the desired previous destination. The corresponding position will be displayed on the map. Voice Command1. Press the key on the steering wheel remote controller.2. After the beep sound, say a command."Previous destination"[Previous destination], page 5-24. "Previous start point"[Previous start point], page 5-25. Searching an Intersection There are two ways to set the destination through intersection search-(a) by street, (b) by city. 1.Press the DEST key. 2.Press the Intersection button. 3. Press the State button to change the state. 4. Input the state name and press the List button. If the number of matches with the input is less than 4 results, then the state list screen will be displayed automatically. If the number of matches is only one result, then the state will automatically be changed without having to manually select the state.5. Select the desired state from the list to change the state.](https://usermanual.wiki/HYUNDAI-MOBIS/AN240DKAN.Users-Manual-1-of-2/User-Guide-1523733-Page-71.png)
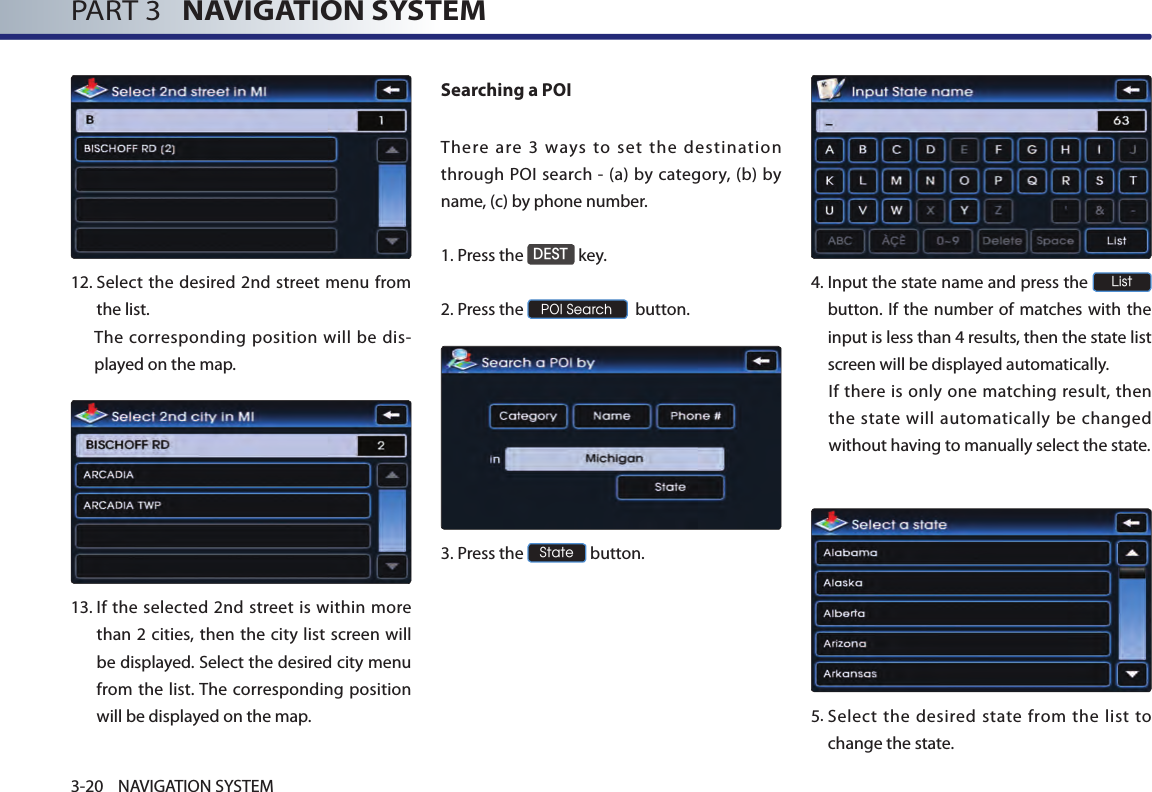
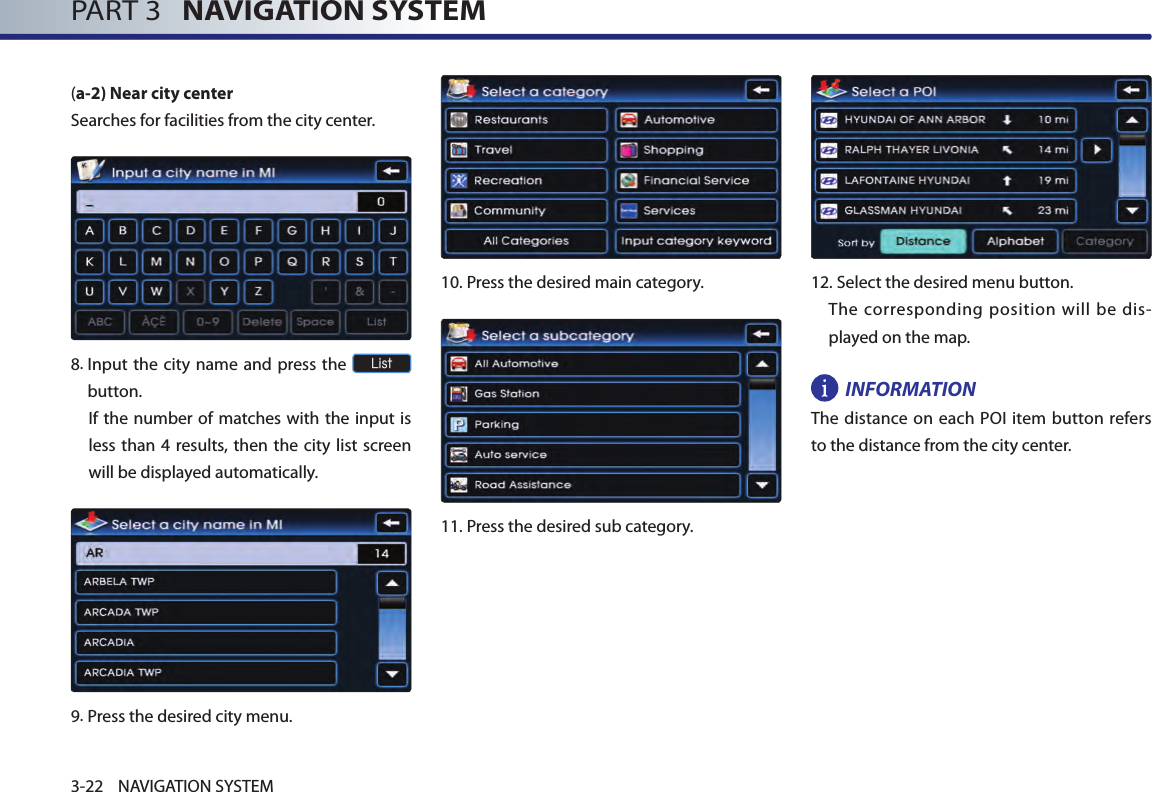
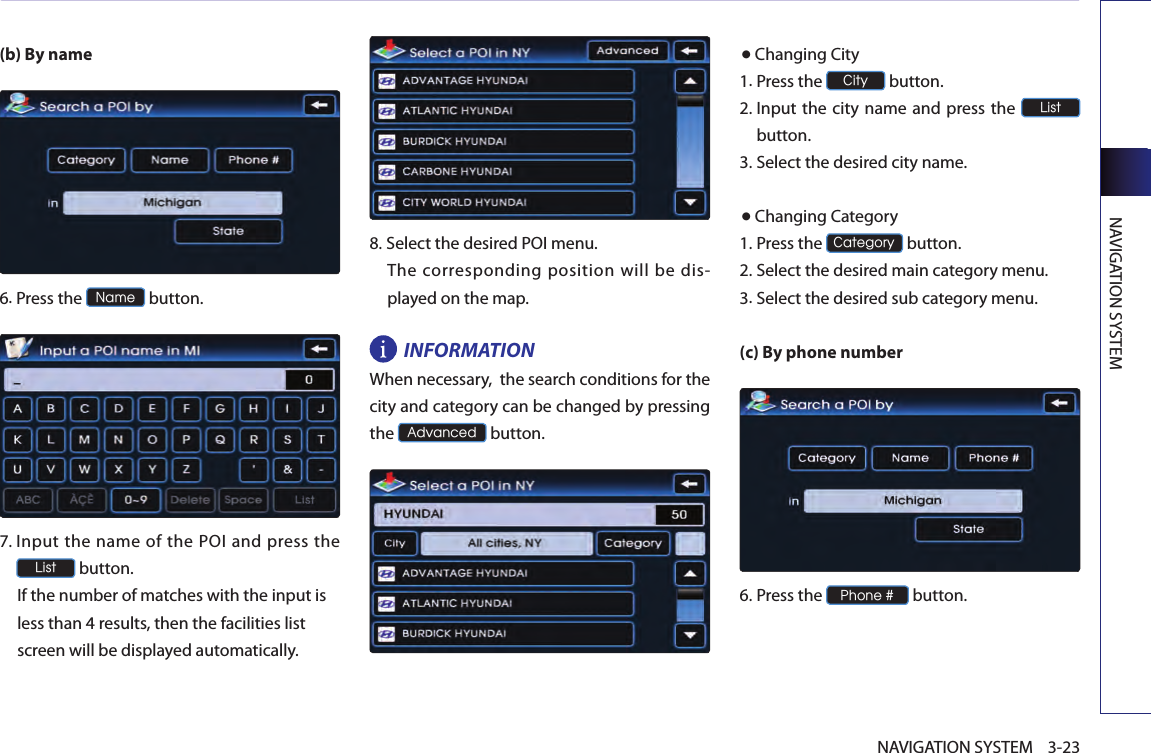
![NAVIGATION SYSTEM3-21NAVIGATION SYSTEM(a) By category Searches for facilities nearby the current posi-tion or from the city center.6.Press the Category button.7. Press the Near current position button to search for facilities nearby the current posi-tion, or press the Near city center button to search for facilities in the near city center. (a-1) Near current position Searches for facilities within a 50 mi (80Km) radius of the current position. 8.Press the desired main category menu. Voice Command1. Press the key on the steering wheel remote controller.2. After the beep sound, say a command. "Find nearest POI"[Find nearest POI], page 5-20.9. Press the desired sub category menu. 10.Select the desired menu button. The corresponding position will be dis-played on the map.](https://usermanual.wiki/HYUNDAI-MOBIS/AN240DKAN.Users-Manual-1-of-2/User-Guide-1523733-Page-75.png)
![PART 3 NAVIGATION SYSTEM3-24 NAVIGATION SYSTEM7. Input the phone number and Press the Done button to complete. The corresponding position will be dis-played on the map. Voice Command1. Press the key on the steering wheel remote controller.2. After the beep sound, say a command."Destination POI by Phone Number"[Destination POI by phone number], page 5-22.Searching from Address book1.Press the DEST key.2.Press the Address book button.3. Select the desired address book (user) menu. INFORMATIONThis system provides 5 address books. Each addresses book can hold up to 200 entries. 4. Select the desired address name from the list. The corresponding position will be displayed on the map. [Registering new address in address book], page 3-43.Voice Command1. Press the key on the steering wheel remote controller.2. After the beep sound, say a command. "Destination by address book"[Destination by address book], page 5-24.](https://usermanual.wiki/HYUNDAI-MOBIS/AN240DKAN.Users-Manual-1-of-2/User-Guide-1523733-Page-78.png)
![NAVIGATION SYSTEM3-25NAVIGATION SYSTEMSearching for Emergency facilities1.Press the DEST key.2.Press the Emergency button.3.Select the desired facility category. 4.Select the desired facility. The corresponding position will be dis-played on the map. Voice Command1. Press the key on the steering wheel remote controller.2. After the beep sound, say a command. "Find emergency <Category>" [Find emergency <Category>], page 5-23. Searching your Home1.Press the DEST key.2.Press the HOME button. The Home position will be displayed on the map. INFORMATION If the Home address is not registered, then the HOME button will not be displayed. [Registering home address], page 3-48.Voice Command1. Press the key on the steering wheel remote controller.2. After the beep sound, say a command."Go home" [Go home], page 5-25.](https://usermanual.wiki/HYUNDAI-MOBIS/AN240DKAN.Users-Manual-1-of-2/User-Guide-1523733-Page-79.png)
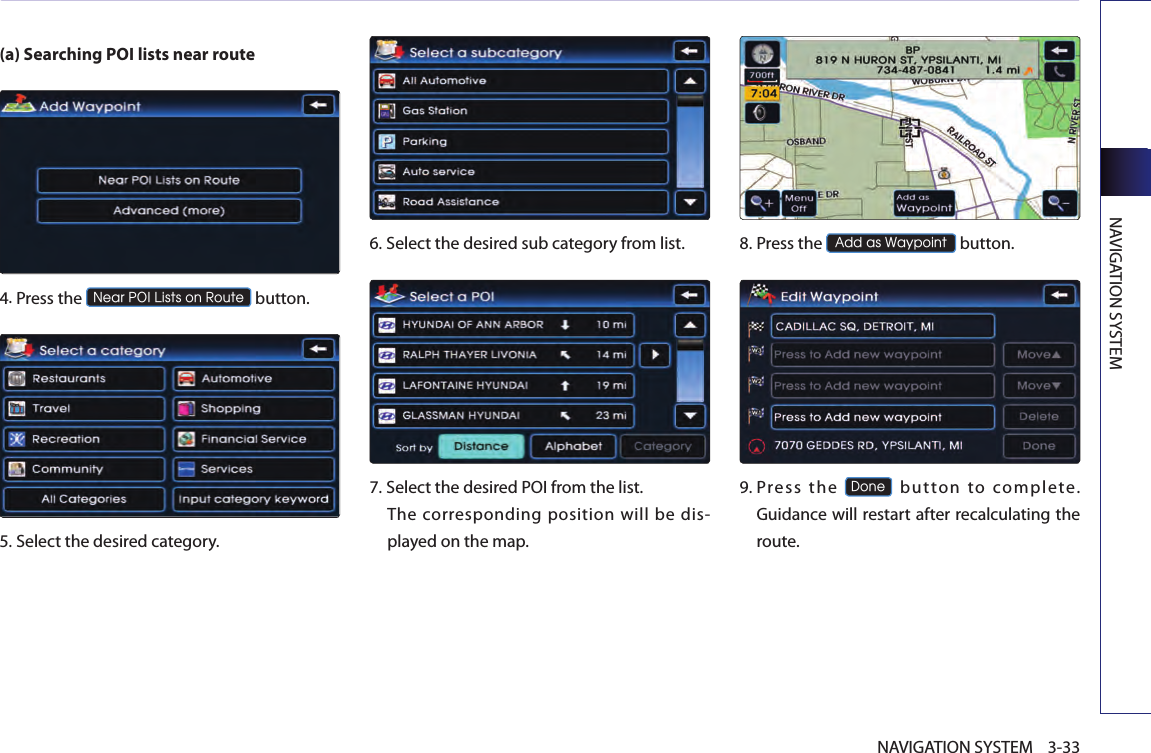
![PART 3 NAVIGATION SYSTEM3-26 NAVIGATION SYSTEMSearching favorite places1.Press the DEST key.2. Select the desired button from 1 ~ 5 .The corresponding position will be dis-played on the map. INFORMATIONIf the address of the Favorite place is not regis-tered, then the 1 ~ 5 buttons without registered addresses will be disabled.[Registering favorite place], page 3-49.Voice Command1. Press the key on the steering wheel remote controller.2. After the beep sound, say a command. "Destination by memory point <1 to 5>"[Destination by memory point <1 to 5>], page 5-25.Searching from MAP Position the scroll mark at the destination by scrolling the map on the map screen. Searching POI by local POI list1. Press the POI ▼ button on the map screen. 2.Press the Others button.3.Press the Local POI lists button.4.Select the desired POI menu. The corresponding position will be dis-played on the map. Voice Command1. Press the key on the steering wheel remote controller.2. After the beep sound, say a command. "Find nearest <POI name>"[Find nearest <POI name>], page 5-21.](https://usermanual.wiki/HYUNDAI-MOBIS/AN240DKAN.Users-Manual-1-of-2/User-Guide-1523733-Page-80.png)
![NAVIGATION SYSTEM3-27NAVIGATION SYSTEMOperating after searching a destinationChanging destination position : Changes the position of the destination by scrolling the map. [Scrolling map], page 3-11.Setting as Destination / waypoint :Sets the position as the destination or way-point. Voice Command1. Press the key on the steering wheel remote controller.2. After the beep sound, say a command. "Start guidance" (Sets the position of the scroll mark as the destination and begins route guidance.)Adding to address book : Saves the position in the address book. [Registering new address in address book], page 3-43. Voice Command1. Press the key on the steering wheel remote controller.2. After the beep sound, say a command. "Store Marked Location to <text tag>"](https://usermanual.wiki/HYUNDAI-MOBIS/AN240DKAN.Users-Manual-1-of-2/User-Guide-1523733-Page-81.png)
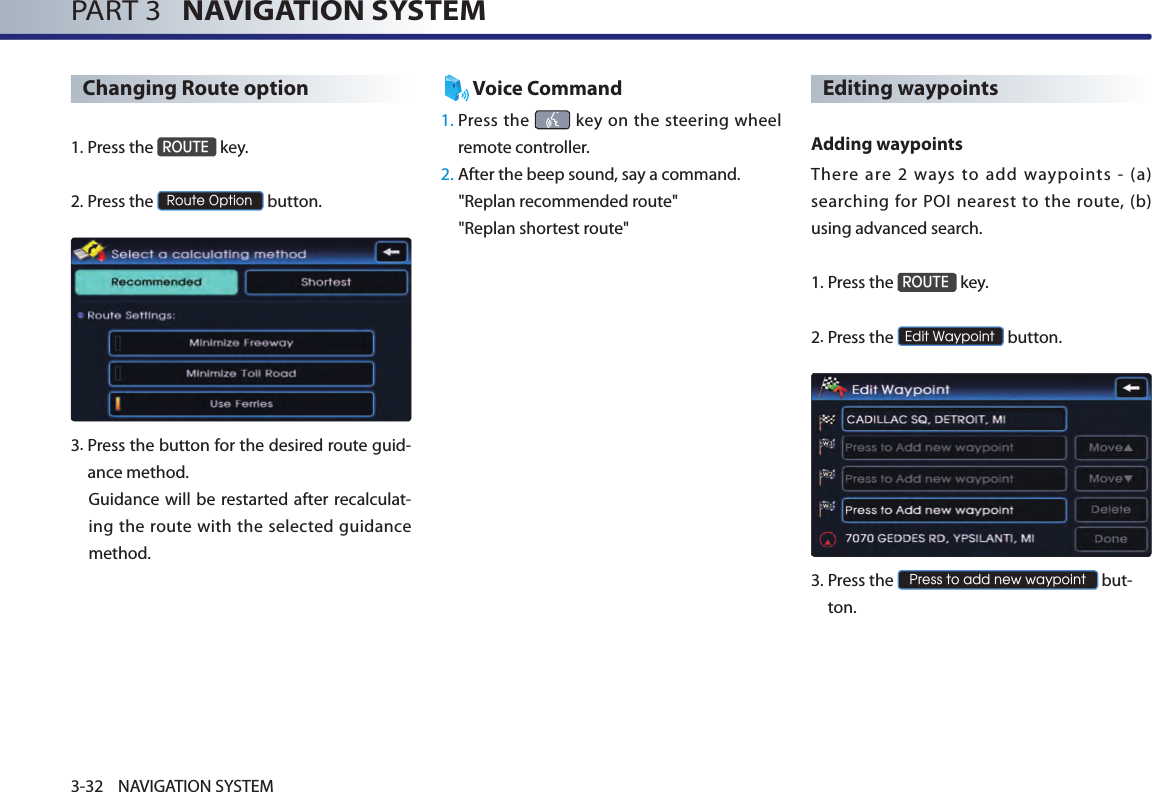
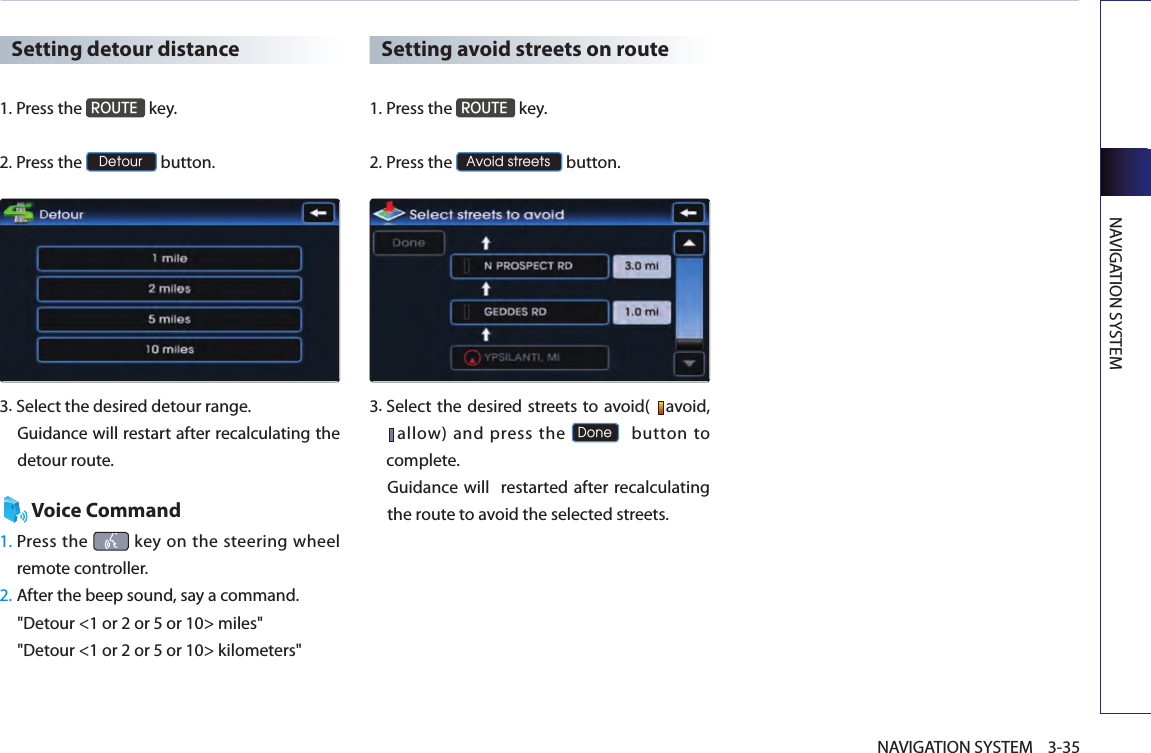
![PART 3 NAVIGATION SYSTEM3-30 NAVIGATION SYSTEMRoute guidance Route menu screen and functionsPress the ROUTE key on the control panel. The ROUTE menu screen will be displayed. aCancel Route: deletes destination, way-points and terminates route guidance. [Finishing route guidance], page 3-30 .bRoute Overview: displays the entire route and route detailed.[Route overview], page 3-31 .cRoute Option: the route option can be changed. [Changing Route option], page 3-32 .dEdit Waypoint: waypoints can be added/deleted and the order can be changed. [Editing waypoints], page 3-32 . eDetour : searches detour routes. [Setting detour distance], page 3-35 .fAvoid Streets: searches routes which avoid the selected streets. [Setting avoid streets on route], page 3-35. Finishing route guidance (Delete Destination)1. Press the ROUTE key.2. Press the Cancel Route button. 3.Press the Yes button. The destination and waypoints are deleted and the route guidance is terminated.[Finishing route guidance], page 3-30 .adbecf](https://usermanual.wiki/HYUNDAI-MOBIS/AN240DKAN.Users-Manual-1-of-2/User-Guide-1523733-Page-84.png)
![PART 3 NAVIGATION SYSTEM3-34 NAVIGATION SYSTEM(b) Using advanced Search The method for searching waypoints through the Advanced(more) button is the same method as searching destination.[Searching a Destination], page 3-13.Deleting waypoints1. Press the ROUTE key.2.Press the Edit waypoint button. 3. Select the waypoint and press the Delete button. 4.Press the Yes button.5. After deleting, press the Done button to complete. Guidance will be restart after recalculating the route. Re-ordering waypoints1.Press the ROUTE key.2.Press the Edit waypoint button. 3. Select the desired waypoint and use the Move ▲, Move ▼ buttons to change the order. 4. Once re-ordering is complete, press the Done button to complete. Guidance will restart after recalculating the route.](https://usermanual.wiki/HYUNDAI-MOBIS/AN240DKAN.Users-Manual-1-of-2/User-Guide-1523733-Page-88.png)
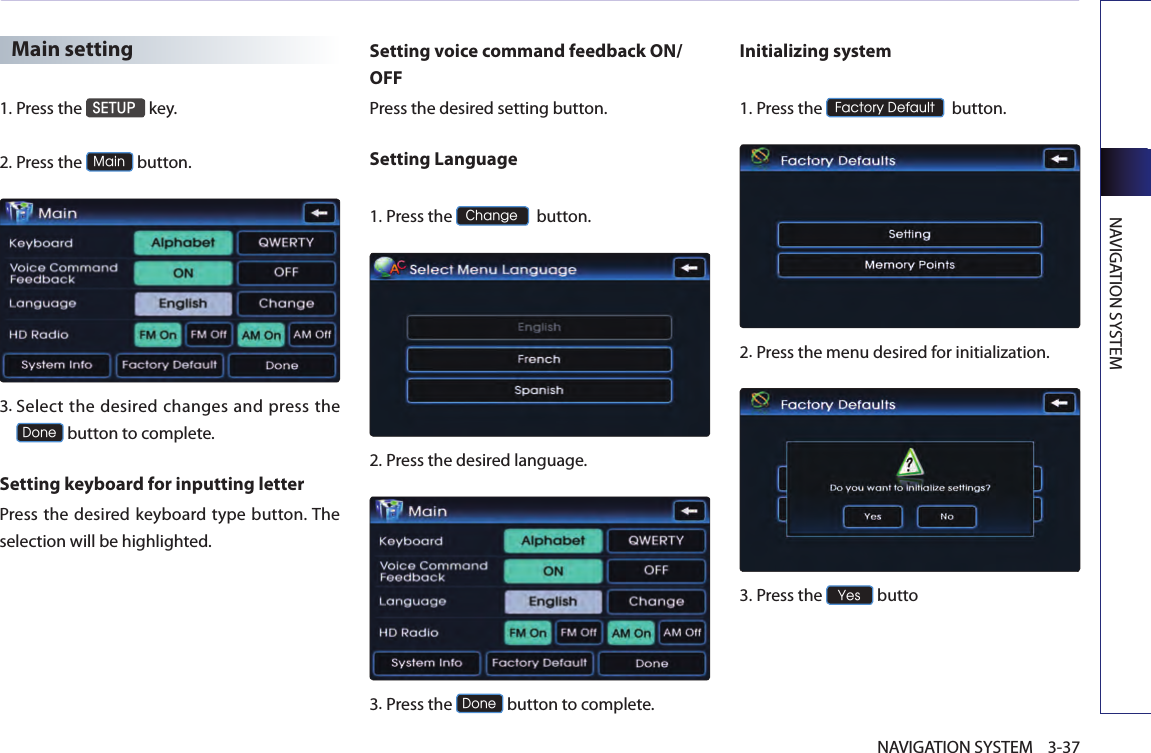
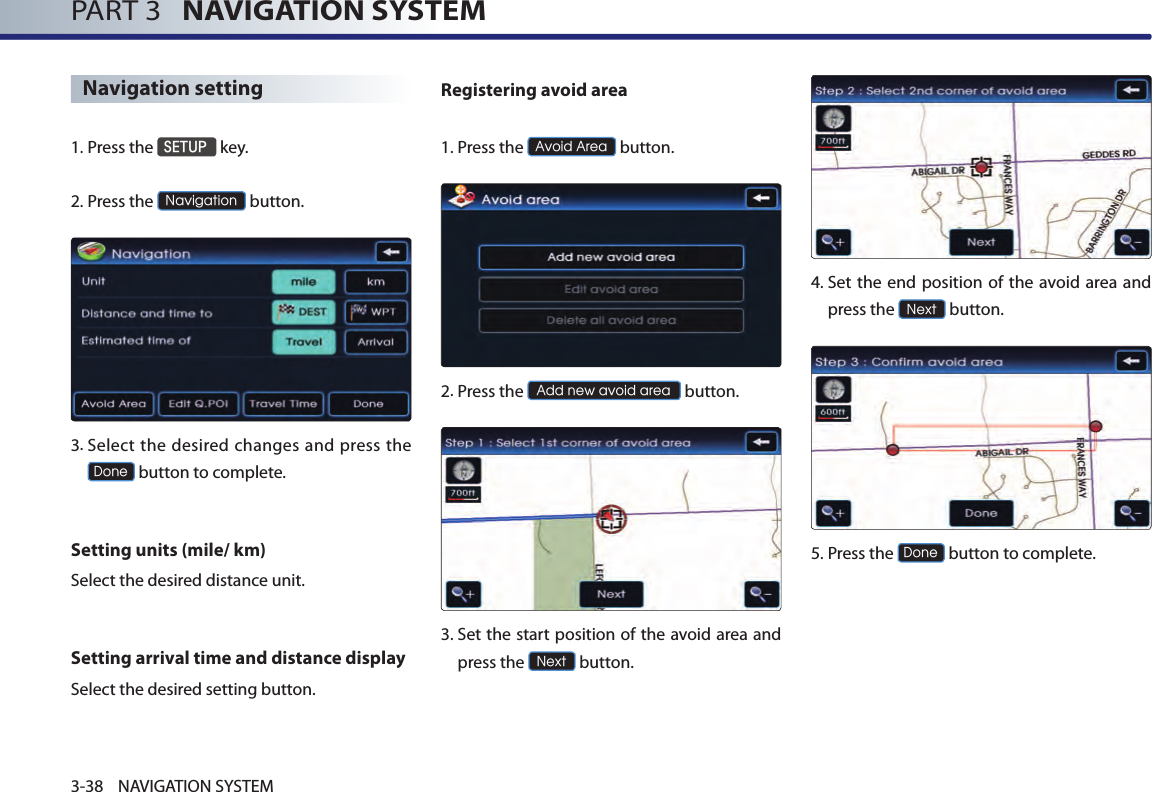
![PART 3 NAVIGATION SYSTEM3-36 NAVIGATION SYSTEMSetup and Information Setup menu screen and functionsPress the SETUP key on the control panel to display the setup menu screen.a Main button : changes to the input key-board type, voice command feedback ON/OFF settings and system initialization can be made. [Main setting], page 3-36 .b Voice Setup button : adjusts the Navigation guidance volume. [Voice guidance volume setting], page 3-51.c Navigation button : navigation related set-tings can be set. [Navigation setting], page 3-38 .d Clock Setup buttone My Places button : the Address book, Home address, Favorite places, Previous destina-tion can be edited. [My places setting], page 3-43 .f Help button : the help contents can be viewed. [Help], page 3-54 .g Traffic Setup : sets to display traffic informa-tion on map, or to provide upcoming traffic information voice guidance, and or to dis-play the detour route popup showing upcoming traffic information. abcdefg](https://usermanual.wiki/HYUNDAI-MOBIS/AN240DKAN.Users-Manual-1-of-2/User-Guide-1523733-Page-90.png)
![NAVIGATION SYSTEM3-43NAVIGATION SYSTEMMy places settingRegistering new address in address bookThere are 3 ways to register a new address in the address book - (a) by DEST menu, (b) by registering address in address book, (c) from map scroll. (a) by DEST menu1.Press the DEST key.2.Search through the desired method. The search process is the same as the meth-od for destination search.[Searching a destination], page 3-13.3.Press the Add to Address Book button.4. Press the desired address book (user) but-ton. 5.Input the name and telephone information and press the Done button to complete.[Editing an address of address book], page 3-45.(b) by registering in the address book 1.Press the SETUP key.2.Press the My Places button.3.Press the Address Book button.4. Press the desired address book (user) but-ton.](https://usermanual.wiki/HYUNDAI-MOBIS/AN240DKAN.Users-Manual-1-of-2/User-Guide-1523733-Page-97.png)
![PART 3 NAVIGATION SYSTEM3-44 NAVIGATION SYSTEM5.Press the New Address button.6. Press the Address button to search the address. [Searching an address], page 3-13.INFORMATION Press the Store current position button to input the address of the current position. 7. Input the name and telephone information and press the Done button to complete.[Editing an address of address book], page 3-45. (c) from map scroll1. In the map screen, scroll the map to the desired position. 2.Press the Add to Address Book button.3. Press the desired address book (user) but-ton. 4. Input the name and telephone information and press the Done button to complete.[Editing an address of address book], page 3-45.](https://usermanual.wiki/HYUNDAI-MOBIS/AN240DKAN.Users-Manual-1-of-2/User-Guide-1523733-Page-98.png)
![NAVIGATION SYSTEM3-45NAVIGATION SYSTEMEditing an address of address book1.Press the SETUP key.2. Press the My Places button.3.Press the Address Book button.4. Select the desired address book (user) but-ton .5.Select the desired address to edit. 6. Press the Name button to input the address name.7. Input the address name and press the Done button to complete.8. Press the Address button to search the address. The process is the same as the method for searching an address.[Searching an Address] , page 3-13.INFORMATIONPress the Store current position button to input the address of the current position.](https://usermanual.wiki/HYUNDAI-MOBIS/AN240DKAN.Users-Manual-1-of-2/User-Guide-1523733-Page-99.png)