HYUNDAI MOBIS AN310ETMG CAR AVN User Manual 1
HYUNDAI MOBIS CO., LTD. CAR AVN 1
UserManual.wiki
>
HYUNDAI MOBIS
>
AN310ETMG User Manual
>
User manual -1
Contents
1.
User manual -1
2.
User manual -2
User manual -1
Navigation menu
Upload a User Manual
Namespaces
Wiki Guide
HTML
PDF
Info
Views
User Manual
Discussion / Help
Navigation

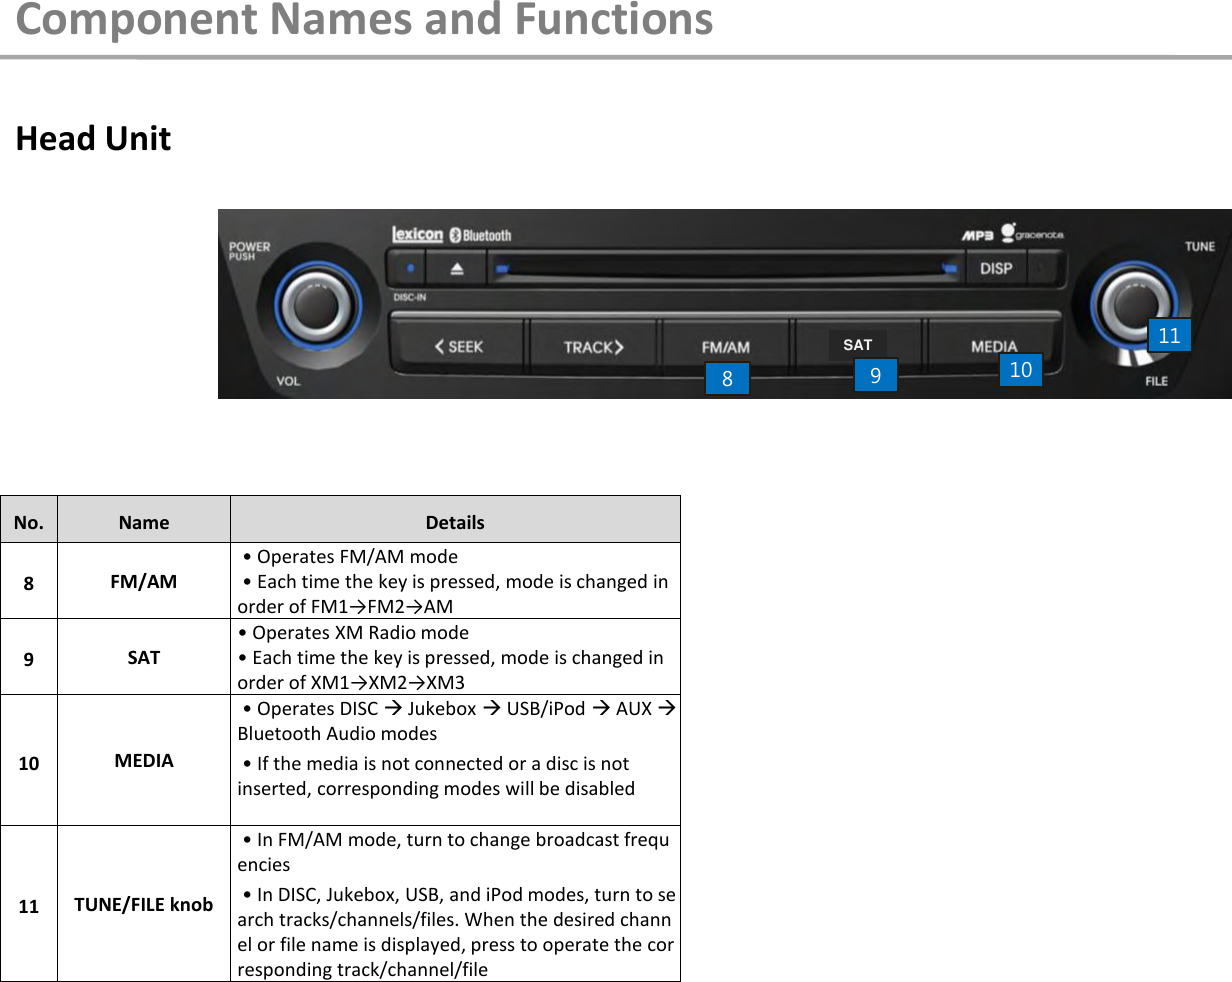
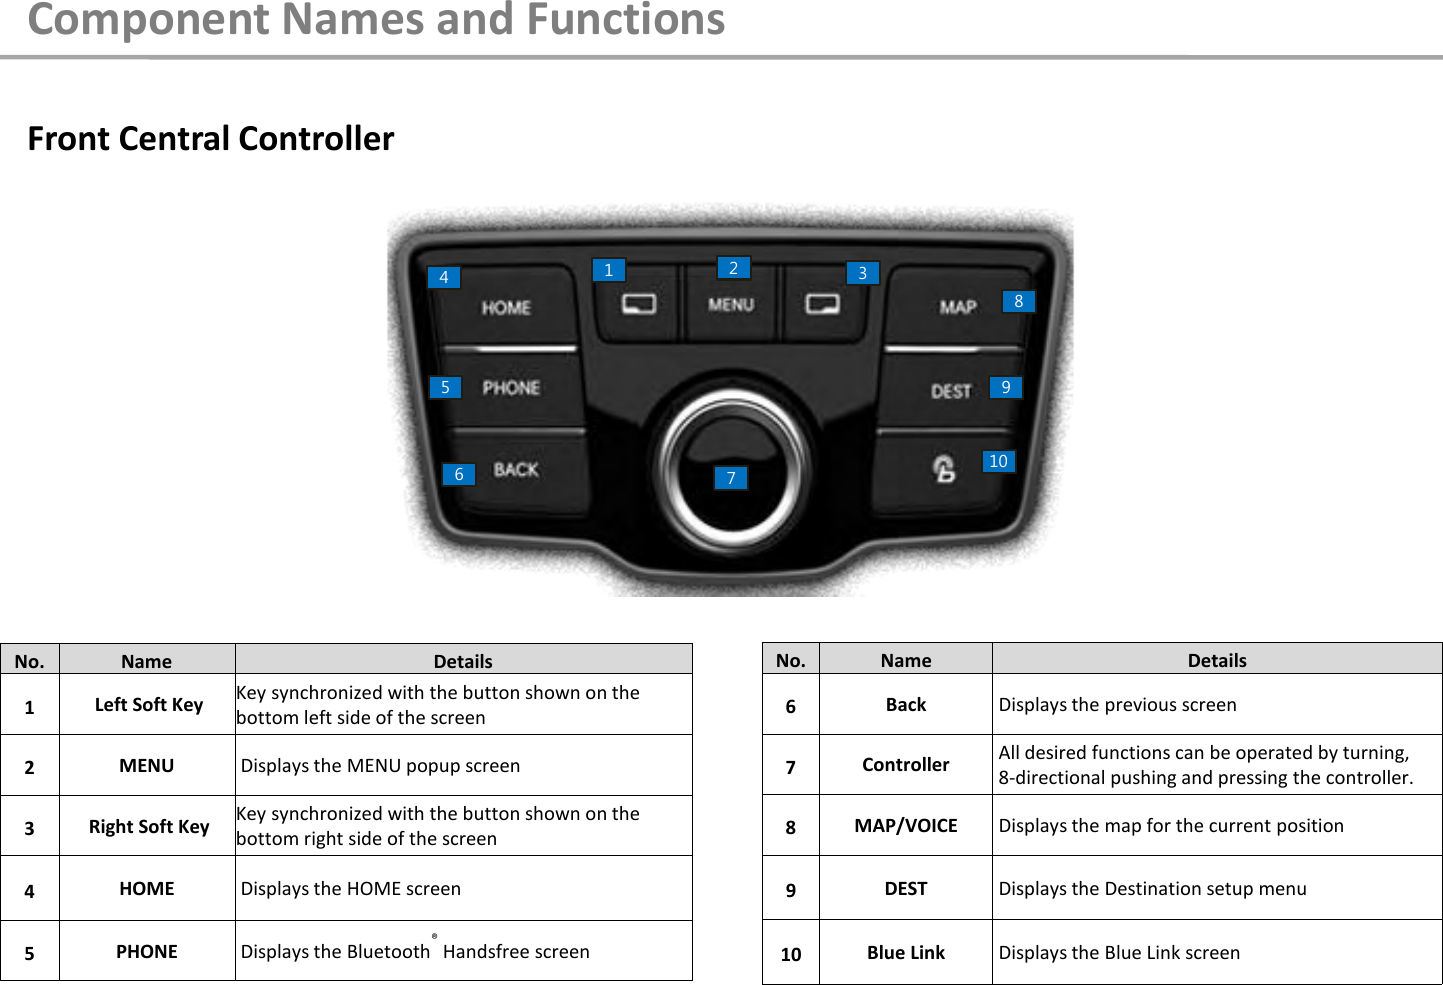
![No. Name Details 1 DISC-IN LED Displays the DISC insert state 2 DISC OUT DISC eject key 3 DISC Insert Slot DISC insert/eject slot 4 DISP Turns off the screen or displays the default image 5 Power/Volume • Used to turn device power ON/OFF and control volume • When power is off, press to turn power on • When power is on, press and hold (over 0.8 seconds) to turn power off • When power is on, press shortly (under 0.8 seconds) to turn AV off • Turn left/right to adjust volume Head Unit No. Name Details 6 SEEK/TRACK When the [∧SEEK] [TRACK∨] keys are pressed shortly (under 0.8 seconds) • In FM/AM mode, searches broadcast frequencies • In XM Radio mode, changes to the previous/next channel • In DVDP CD/MP3/DVD and Jukebox/USB/iPod modes, changes the track, file or chapter When the [∧SEEK] [TRACK∨] keys are pressed and held (over 0.8 seconds) • In FM/AM mode, automatically searches broadcast frequencies. Once released, searches and begins playing the next broadcast frequency • In DVDP CD/MP3/DVD and Jukebox/USB/iPod modes, rewinds or fast forwards the track or file Component Names and Functions SAT 2 1 3 4 5 6](https://usermanual.wiki/HYUNDAI-MOBIS/AN310ETMG.User-manual-1/User-Guide-1768145-Page-5.png)
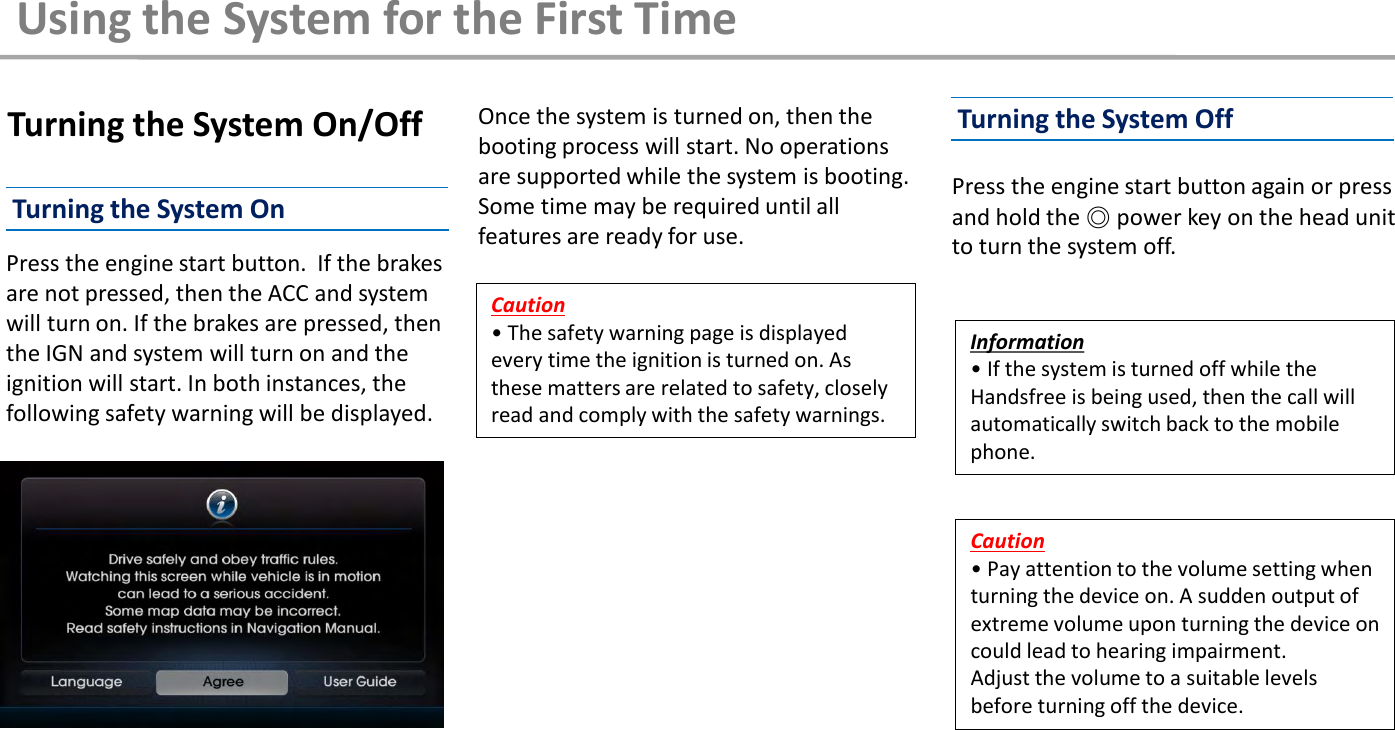
![Battery Warning Message This feature is used to reset the system in the occurrence of an unforeseen error or problem. While pressing and holding the [1] key, press the [2] key twice and then press the [3] key twice. Use the system only when the engine is running. If the system is turned on with the engine off, then the following warning will be displayed. This message will automatically disappear once the engine is turned on. When using the DVD, VCD, or another video mode, the display will be turned off for safety. A related message screen is also displayed. Auto Video Lock Even if the screen is turned off, the media sound will continue to be played. The screen will automatically turn back on once the gear is set to P or the parking brake is turned On. <While In USB Video Mode> Resetting the System Information • Upon resetting the system, saved data and settings information (radio frequencies, volume and display settings, etc.) will be restored back to the default factory state. Such are not indications of malfunctions. Information • Using the system for prolonged periods of time without the engine running may result in battery discharge. Using the System for the First Time 1 2 3](https://usermanual.wiki/HYUNDAI-MOBIS/AN310ETMG.User-manual-1/User-Guide-1768145-Page-9.png)
![Press the [HOME] key to display the System Home screen. HOME Screen Icon Description FM AM XM DISC Jukebox USB Turn the controller left/right to select the desired mode. While in the Home screen, press the [LFT] key to enter Sound Settings and the [RHT] key to enter Display Settings. Icon Description iPod AUX Bluetooth Audio Navigation PHONE INFO/Settings Blue Link Using the System for the First Time](https://usermanual.wiki/HYUNDAI-MOBIS/AN310ETMG.User-manual-1/User-Guide-1768145-Page-10.png)
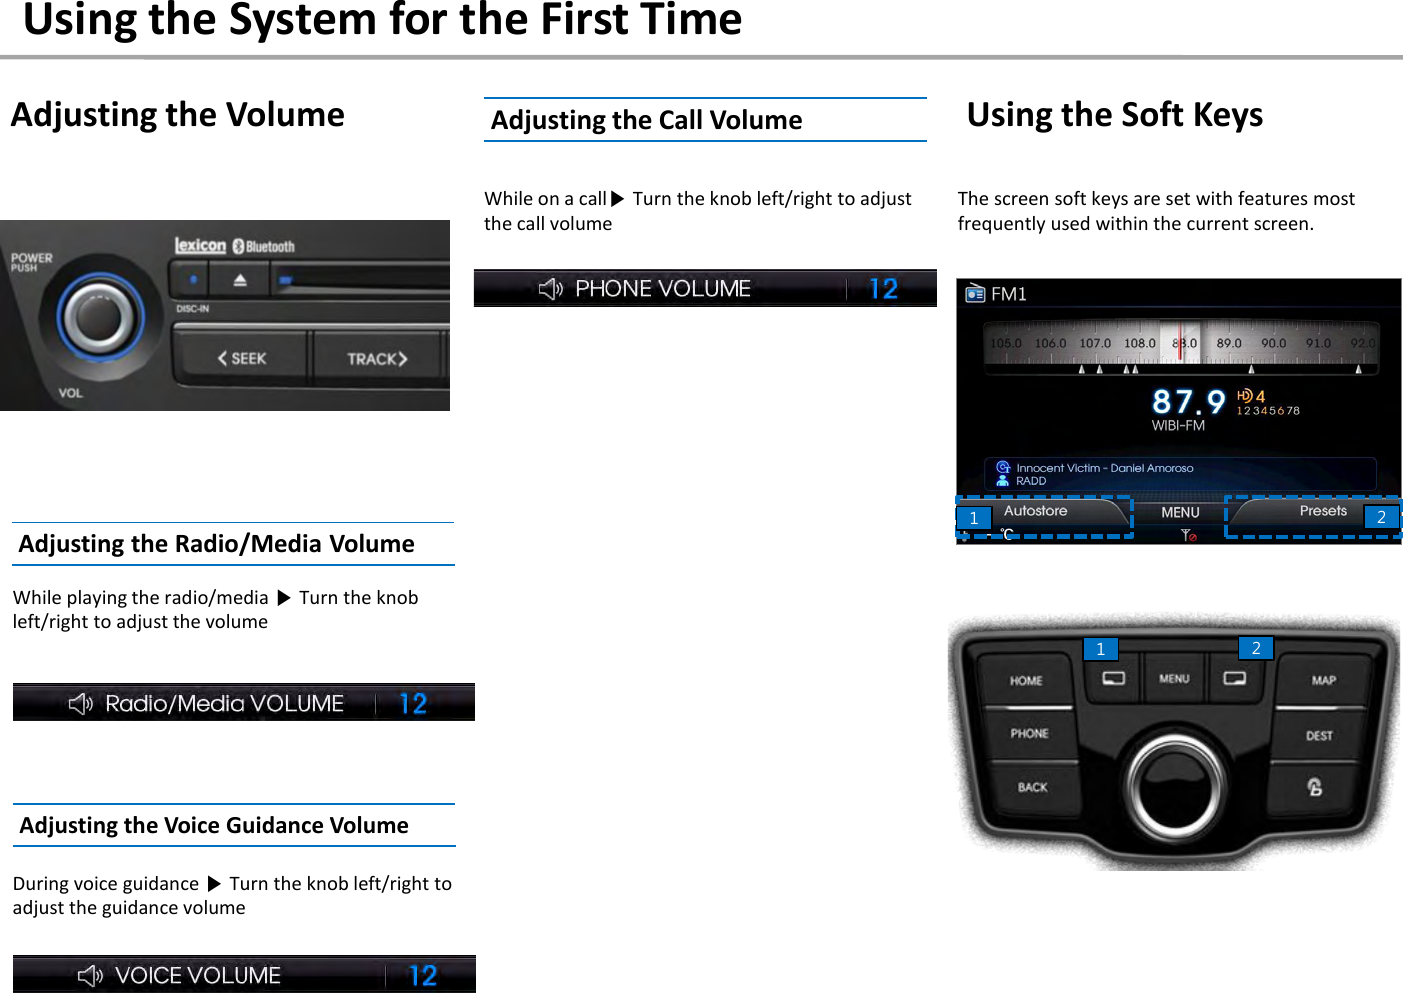
![1. Turn the controller left/right to select the desired character. 2. Press the controller to input the selected text. 3. Pressing the left soft key will delete one character at a time. 4. Pressing the right soft key will complete text inputting. The Text Input screen supports two inputting methods. 1. Within the keyboard screen, the (1) area can be operated by touching the screen. 2. Press the desired characters to input on the screen. Inputting Text with the Controller Inputting Text with Touch Buttons Inputting Text No. Name Details 1 [LFT] If the left soft key is pressed, the function displayed on the bottom left side of the current screen is operated. For example, pressing the left soft key within the Radio Screen will operate the [Autostore] feature. 2 [RHT] If the right soft key is pressed, the function displayed on the bottom right side of the current screen is operated. For example, pressing the left soft key within the Radio Screen will display the [Preset List] screen. Caution • Inputting text while driving may lead to negligent driving practices and lead to accidents. For safety, use this feature after the vehicle has been parked. Information • Inputting text with touch buttons is supported only within the keyboard screen. • All screens with the exception of the keyboard screen do not support the touch input feature. Using the System for the First Time 1](https://usermanual.wiki/HYUNDAI-MOBIS/AN310ETMG.User-manual-1/User-Guide-1768145-Page-13.png)

![Press the [HOME] key ▶Select the FM or AM button. Pressing the [FM/AM] key on the head unit to change the mode in order of FM1 →FM2→ AM.Information•Pressing the [FM/AM] key while the power is off will automatically turn the device on and start radio mode.Switching to Tune ModeIn the radio screen ▶Push the controller up to enter Tune mode. Within the tune mode, it is possible to manually search for frequencies by turning the controller left/right.Starting ModeIn the radio screen ▶Push the controller down to enter Preset mode.In Preset mode, turn the controller left/right to search broadcasts saved as presets.Switching to Preset ModeFM/AM Radio](https://usermanual.wiki/HYUNDAI-MOBIS/AN310ETMG.User-manual-1/User-Guide-1768145-Page-16.png)
![• FM1 / FM2: Increases/decreased by 200kHz• AM: Increases/decreased by 10kHz In the Tune mode ▶Turn the controller left/right to select the desired frequency.Or turn the [○] TUNE knob left/right on the head unit to select the desired frequencySearching BroadcastsManuallySearching BroadcastsAutomaticallyIn the radio screen ▶Push the controller left/right to search for frequenciesIn addition, operations can also be made from the head unit.Press the [<SEEK],[TRACK>] keys toautomatically search for frequencies.• Shortly press the key (under 0.8 seconds):Plays previous/next frequency• Press and hold the key (under 0.8 seconds): While pressed, changes the frequency. Upon release, receives the previous/next broadcast.The frequency is continuously changed while the controller is pushed. Once the controller is released, the following broadcast frequency and station is automatically searched.FM/AM RadioSAT](https://usermanual.wiki/HYUNDAI-MOBIS/AN310ETMG.User-manual-1/User-Guide-1768145-Page-17.png)
![In the radio screen ▶Press the [LFT] Autostore button• A total of 36 frequencies with 12 preset frequencies each for FM1/FM2/AM modes can be saved.InformationWhile Autostore is operating, pressing the controller will cancel the function and return to the previous frequency.In addition, the preset list is also maintained.Saving Radio FrequenciesSaving Automatically (Autostore)Select the desired frequency ▶Press and hold the controller ▶Select position to save stationInformationStations can also be saved manually by pressing the [MENU] key ▶Selecting [Save Station].Saving Stations ManuallyIn the radio screen ▶Press the [RHT] keyPresetsTurn the controller left/right to select the desired station. Once found, press the controller to start listening.FM/AM Radio](https://usermanual.wiki/HYUNDAI-MOBIS/AN310ETMG.User-manual-1/User-Guide-1768145-Page-18.png)
![Press the [MENU] key ▶Select [Scan]The mode can be changed between FM1 and FM2. InformationWhile Scan is operating, pressing the controller will cancel the function and return to the previous frequency.Using the Menu KeyIn the radio screen ▶Press the [MENU] key ▶Select [FM1] or [FM2]- Tune mode: Starting from the current frequency, frequencies with superior reception are scanned for 5 seconds .- Preset mode: Previews saved presets for 5 seconds each. FM1/FM2Scanning Radio FrequenciesRadio text On/OffIn the radio screen ▶Press the [MENU] key ▶Select [Radio Text]If the current broadcast includes Radio Text information, then the text information is displayed on the screen.Changing HD Radio stationsTurn the Controller ([○] TUNE knob) left/right to select the desired HD Radio station. If HD Radio stations do not exist, frequencies will be searched manually. Information•HD Radio Technology is a digital radio technology used by AM and FM radio stations to transmit audio and data via a digital signal in conjunction with their analog signals. •While listening to the radio, the HD Radio icon will become displayed if receiving an HD Radio broadcast. In the radio screen ▶Press the [MENU] key ▶Select [HD Radio]You can select HD Radio from the menu and listen to HD Radio Broadcasts.HD Radio may differ depending on the system.HD Radio On/OffFM/AM RadioTaggingTagging](https://usermanual.wiki/HYUNDAI-MOBIS/AN310ETMG.User-manual-1/User-Guide-1768145-Page-19.png)
![HD RadioTM Technology Program Service Data: Contributes to the superior user experience of HD Radio Technology. Presents song name, artist, station IDs, HD2/HD3 Channel Guide, and other relevant data streams.Adjacent to traditional main stations are extra local FM channels. These HD2/HD3 Channels provide new, original music as well as deep cuts into traditional genre.Digital, CD-quality sound. HD Radio Technology enables local radio stations to broadcast a clean digital signal. AM sounds like today’s FM and FM sounds like a CD.In the radio screen ▶Press the [MENU] key ▶Select [View Ch. Info] to view information on the current station.In the radio screen ▶Press the [MENU] key ▶Select [Save Station]The current frequency can be saved.Save StationViewing channel informationInformationThis feature is supported only when HD Radio is active.FM/AM RadioIn the radio screen ▶Press the [MENU] key ▶Select [Tagging]TaggingTagging a song playing on HD RadioMaximum 50 song can be tagged.When the iPod is connected to system, Automatically tagging information are downloaded to the iPod.Information•Tagging information can be found on iTunes•Tagging may support depending on the iPod device.](https://usermanual.wiki/HYUNDAI-MOBIS/AN310ETMG.User-manual-1/User-Guide-1768145-Page-20.png)
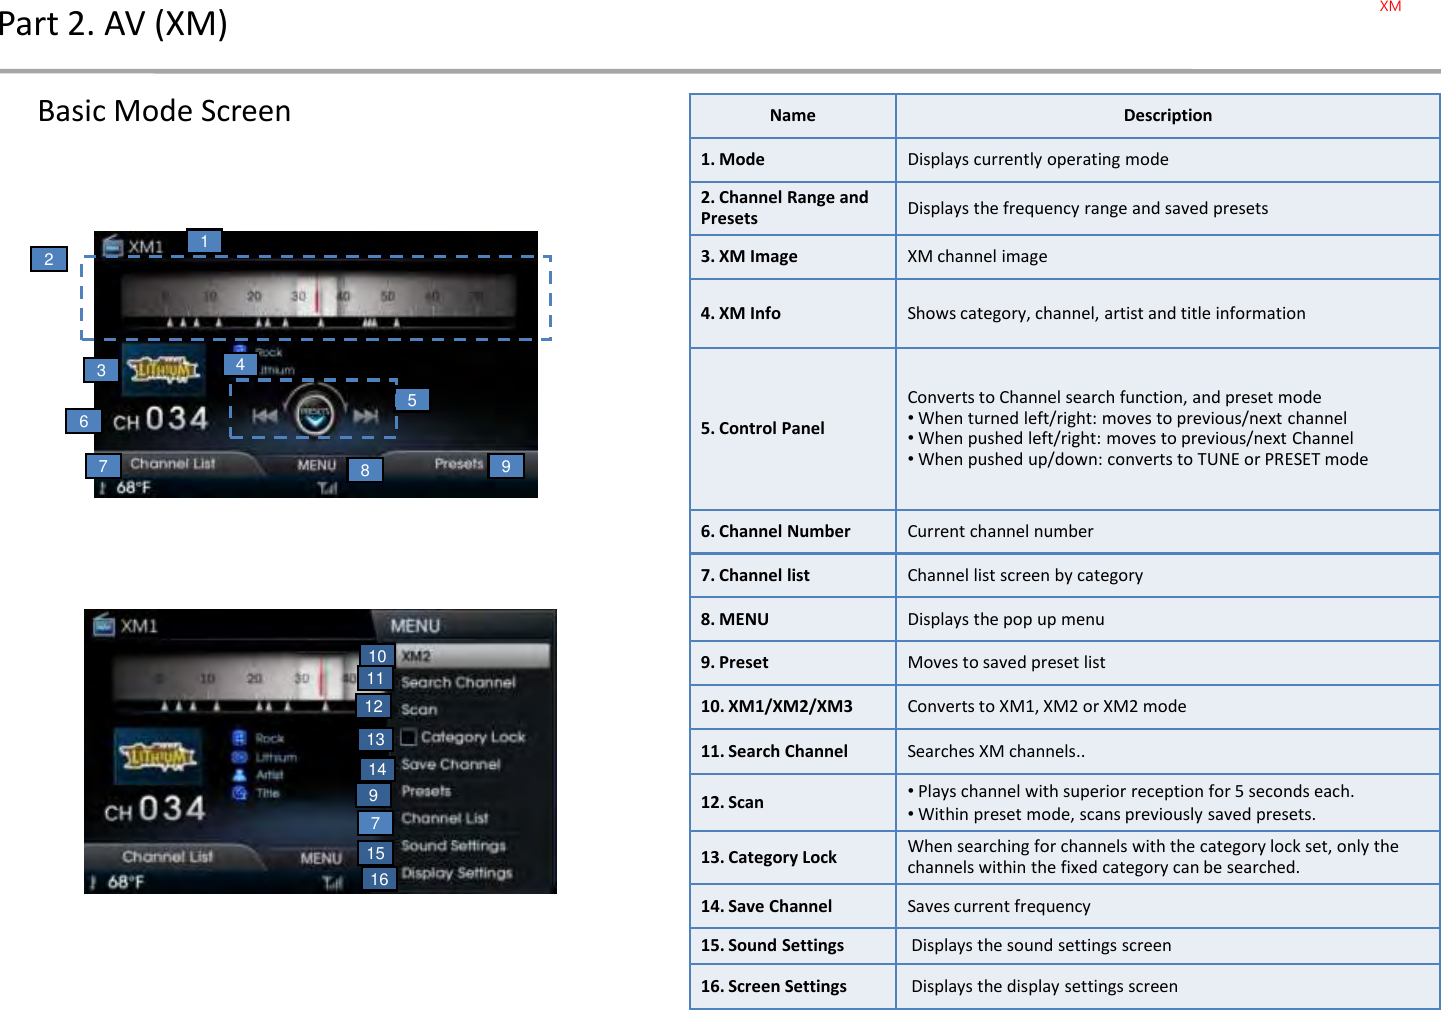
![Press the [HOME] key ▶Select the XM button.Press the [XM] key on the head unit to change the mode in order of XM1 →XM2→ XM3Information•Pressing the [XM] key while the power is off will automatically turn the device on and start radio mode.Part 2. AV (XM)Starting Mode Switching to Tune ModeIn the XM screen ▶Push the controller up to enter Tune mode. Within the tune mode, it is possible to manually search for channel by turning the controller left/right.In the XM screen ▶Push the controller down to enter Preset mode.In Preset mode, turn the controller left/right to search channel saved as presets.Switching to Preset ModeXM](https://usermanual.wiki/HYUNDAI-MOBIS/AN310ETMG.User-manual-1/User-Guide-1768145-Page-22.png)
![Part 2. AV (XM)In the Tune mode ▶Turn the controller left/right to select the desired channel.Or turn the ◎TUNE knob left/right on the head unit to select the desired channel.Searching ChannelsIn the XM screen ▶Push the controller left/right to change the channelIn addition, operations can also be made from the head unit.Press the [<SEEK], [TRACK>] keys tochange the channel.• Shortly press the key (under 0.8 seconds):Plays previous/next channel.• Press and hold the key (under 0.8 seconds): The channel is continuously changed while the controller is pushed.The channel is continuously changed while the controller is pushed.XM](https://usermanual.wiki/HYUNDAI-MOBIS/AN310ETMG.User-manual-1/User-Guide-1768145-Page-23.png)
![Part 2. AV (XM)Once you select a category shown on the left column, lists of channels included within the selected category are displayed on the right column.Select the desired channel from the right column. In the XM screen ▶Press the [LFT] Channel List buttonChannel ListIn the XM screen ▶Press the [RHT] Presets button.PresetsSelect the desired channel ▶Press and hold the controller ▶Select position to save channelInformationchannel can also be saved by pressing the [MENU] key ▶Selecting [Save channel].Turn the controller left/right to select the desired channel. Once found, press the controller to start listening.Saving channelInformationChannel list can also be selected by pressing the [MENU] key ▶Selecting [Channel list].XM](https://usermanual.wiki/HYUNDAI-MOBIS/AN310ETMG.User-manual-1/User-Guide-1768145-Page-24.png)
![Part 2. AV (XM)Using the Menu KeyThe mode can be changed to XM1, XM2 and XM3 In the XM screen ▶Press the [MENU] key ▶Select [XM1] or [XM2] or [XM3]XM1/XM2/XM3 Searching a ChannelIn the XM screen ▶Press the [MENU] key ▶Select [Search Channel]- Turn the controller to enter the desired channel number.- Press the [RHT] or the [Back] key to return to the main screen.Scan- Tune Mode : Starting from the current channel, channels with superior reception are scanned for 5 seconds .- Preset mode : Previews saved presets for 5 seconds each. Press the [MENU] key ▶Select [Scan]InformationWhile Scan is operating, pressing the controller will cancel the function and return to the previous frequency.XM](https://usermanual.wiki/HYUNDAI-MOBIS/AN310ETMG.User-manual-1/User-Guide-1768145-Page-25.png)
![Once Category Lock is turned on, the Category Lock icon is displayed on the main screen. Upon operating seek with the Lock on, only channels within the category are searched.Information• Performing the below operations in Lock ON state will search only the channels within the current category.- Operating Scan in Tune mode- Changing channels by turning the controller in Tune mode- Changing channels by turning the TUNE knob in Tune mode - Searching channels through Seek Up/Down• The below operations are not affected by the Category Lock feature. - Selecting saved Preset channels- Changing channels by turning the controller in Preset mode- Changing channels from the Channel List- Changing channels through voice recognitionPart 2. AV (XM)Category LockPress the [MENU] key ▶Select [Category Lock]XM](https://usermanual.wiki/HYUNDAI-MOBIS/AN310ETMG.User-manual-1/User-Guide-1768145-Page-26.png)

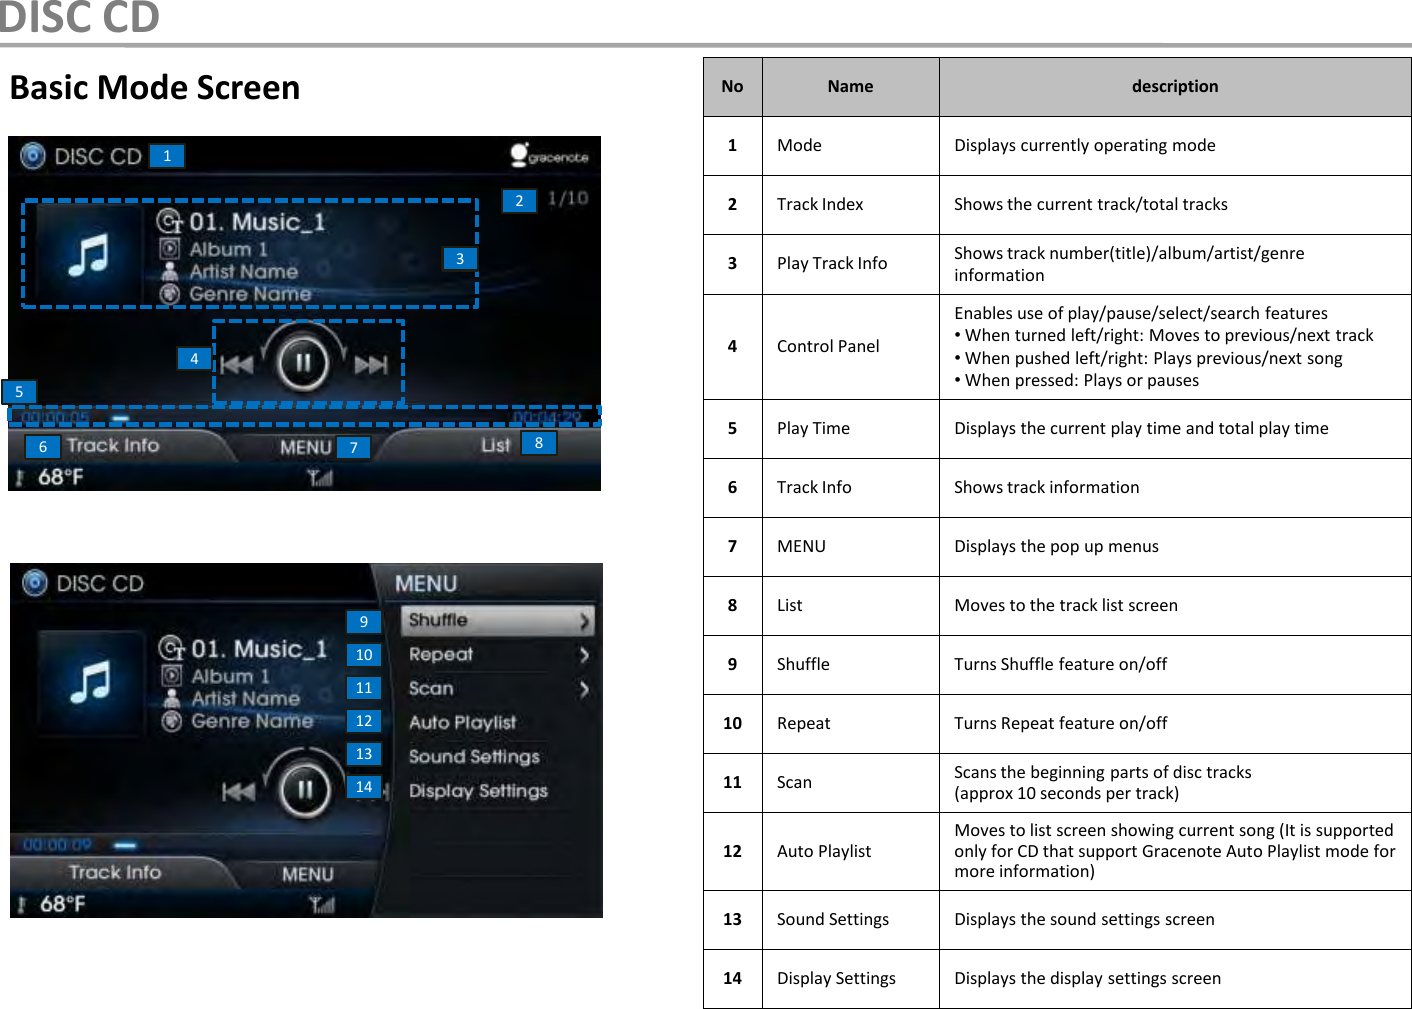
![Starting ModeDISC mode will automatically start once a CD is inserted.Press the controller to play or pause the track.Press the [HOME] Key ▶Select theDISC button.While playing ▶Shortly push the controller left/right (under 0.8 seconds) or shortly press the [<SEEK], [TRACK>] keys to select the previous/next track.While Gracenote checks CD information, the message “Indexing.” will blink at the top right side.Once Indexing is complete, song information is displayed on the screen for songs supported by Gracenote.Playing a CD Selecting a TrackDISC CD](https://usermanual.wiki/HYUNDAI-MOBIS/AN310ETMG.User-manual-1/User-Guide-1768145-Page-33.png)
![While playing ▶Push and hold the controller left/right (under 0.8 seconds) or press and hold the [<SEEK],[TRACK>] keys to rewind/fast-forward the track.While playing ▶Turn the controller (○TUNE knob) left/right to search for tracksPress the [LFT] Play Info key to view the track information.To return to the previous screen, select the [LFT] Play Info button.Fast-forwarding or Rewinding CD Tracks Searching CD Tracks Track Info/Play InforDuring search, the track name is displayed. Press the controller (○TUNE knob) to play the selected track.DISC CD](https://usermanual.wiki/HYUNDAI-MOBIS/AN310ETMG.User-manual-1/User-Guide-1768145-Page-34.png)
![Press the [Menu] button to set theShuffle, Repeat, Scan, Auto Playlist, Sound Settings and Display Settings.Using the Menu KeyPress the [MENU] key ▶Select [Shuffle] ▶Select [Shuffle All]Press the [RHT] List button to select from the list. Select the desired track by turning the controller. Once the desired track has been found, press the controller to play the track.The [LFT] Category up and [RHT] CD Home button will be enabled when playing a CD that supports Gracenoteand songs can be selected through Category Searches.Songs within the current playlist are played in random order. Select the [Off] button to turn the shuffle option off.CD List ShuffleDISC CD](https://usermanual.wiki/HYUNDAI-MOBIS/AN310ETMG.User-manual-1/User-Guide-1768145-Page-35.png)
![Press the [MENU] key ▶Select [Repeat] ▶Select [Repeat]The current track is repeated. Select the [Off] button to turn off repeat.The beginning (approx 10 seconds) of all tracks within the CD are scanned.Select the [Off] button or press the controller to turn off scan.Press the [MENU] key ▶Select [Scan] ▶Select [Scan All]Repeat ScanDISC CD](https://usermanual.wiki/HYUNDAI-MOBIS/AN310ETMG.User-manual-1/User-Guide-1768145-Page-36.png)
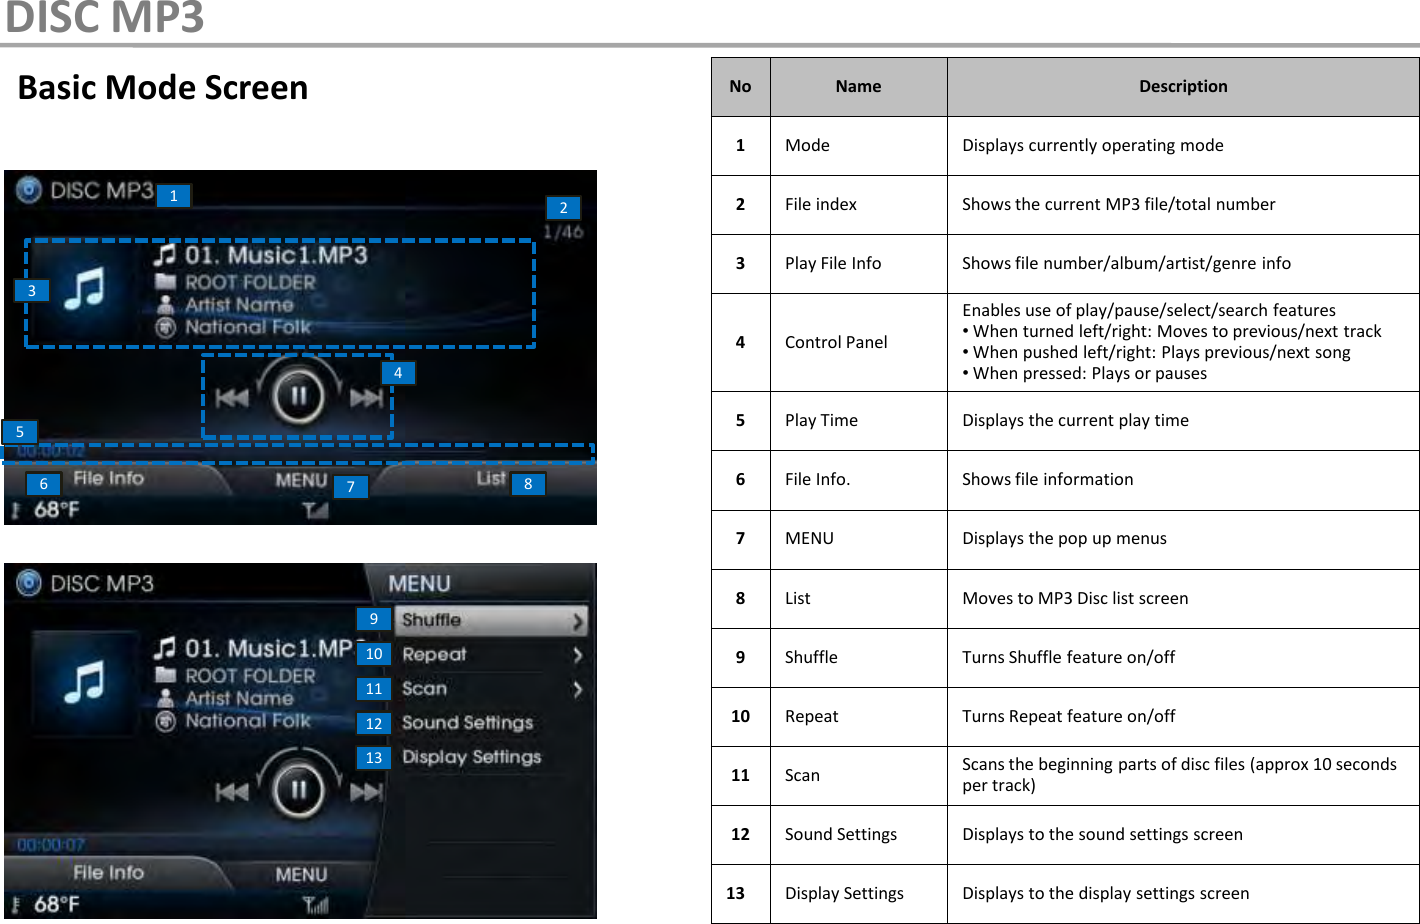
![Starting ModeDISC MP3 mode will automatically start once a MP3 disc is inserted.While playing ▶Shortly push the controller left/right (under 0.8 seconds) or shortly press the [<SEEK], [TRACK>] keys to select the previous/next file.Information• If there are numerous songs and folders within the disc, reading time could take more than 10 seconds and the list may not be displayed or song searches may not operate. Once loading is complete, try again.Press the [HOME] Key ▶Select DISC button.Press the controller to play or pause the DISC MP3.DISC MP3 do not display the play graph and total time information.DISC MP3 Playing DISC MP3 Selecting DISC MP3 files](https://usermanual.wiki/HYUNDAI-MOBIS/AN310ETMG.User-manual-1/User-Guide-1768145-Page-38.png)
![While playing ▶Push and hold the controller left/right (over 0.8 seconds) or press and hold the [<SEEK], [TRACK>] keys to rewind/fast-forward the file.While playing ▶Turn the controller (○TUNE knob) left/right to search for files.During search, the file name is displayed. Press the controller (○TUNE knob) to play the selected file.To return to the previous screen, select the [LFT] Play Info button.DISC MP3 Fast-forwarding or Rewinding DISC MP3 FilesSearching DISC MP3 File Info/Play InfoPress the [LFT] Play File button to view the file information.](https://usermanual.wiki/HYUNDAI-MOBIS/AN310ETMG.User-manual-1/User-Guide-1768145-Page-39.png)
![Press the [MENU] key to use the Shuffle, Repeat, Scan, Sound Settings and Display Settings.Using the Menu KeyPress the [RHT] List button to select the list and check the playlist.Turn the controller left/right to select and play the desired file. Once the desired file has been found, press the controller to play the file.Pressing the [MENU] key and the |Now Playing| button within the list screen will move the focus to the currently playing file.DISC MP3 MP3 ListNo Name Description1Shuffle Folder Plays current folder in random order2Shuffle All Plays all files in random order3Off Turn the Shuffle feature off.Press the [MENU] key ▶Select [Shuffle] ▶Select [Shuffle Folder] or [Shuffle All]12All songs or songs within the current folder can be played in random order.3Shuffle](https://usermanual.wiki/HYUNDAI-MOBIS/AN310ETMG.User-manual-1/User-Guide-1768145-Page-40.png)
![Press the [MENU] key ▶Select [Repeat] ▶Select [Repeat] or [Repeat Folder]The current song or the all files within the folder can be repeated.The beginning part (approximately first 10 seconds) of all files within the current folder or the entire DISC MP3 are scanned.Press the [MENU] key ▶Select [Scan] ▶Select [Scan All] or [Scan Folder] 1212No Name Description1Repeat Repeat current song2Repeat Folder Repeat current folder3Off Turn the Repeat feature off.No Name Description1Scan AllScans the beginning parts (approx 10 seconds) of all files2Folder ScanScans the beginning parts (approx 10 seconds) of all files within the current folder3Off Turn the Scan feature off.33DISC MP3 Repeat ScanMP3](https://usermanual.wiki/HYUNDAI-MOBIS/AN310ETMG.User-manual-1/User-Guide-1768145-Page-41.png)
![Starting ModePress the controller to play or pause the DVD.While playing ▶Shortly push the controller left/right (under 0.8 seconds) or shortly press the [<SEEK], [TRACK>] keys to select the previous/next chapter.Press the [HOME] Key ▶Select theDISC button.DVD do not display the play graph and total time information.Playing a DVD Selecting a ChapterDVDDVD mode will automatically start once a DVD disc is inserted.](https://usermanual.wiki/HYUNDAI-MOBIS/AN310ETMG.User-manual-1/User-Guide-1768145-Page-43.png)
![While playing ▶Push and hold the controller left/right (over 0.8 seconds) or press and hold the [<SEEK], [TRACK>] key to rewind/fast-forward the current DVD.While playing ▶Turn the controller (○TUNE knob) left/right to search for chapters.Press the [LFT] Full Screen to view the DVD in full screen.Information•If there are no operations for 10 seconds, the screen menu will automatically disappear.Fast-forwarding or Rewinding Chapter Searching Chapter Viewing in Full ScreenDVDDuring search, the file name is displayed. Press the controller (○TUNE knob) to play the selected chapter.](https://usermanual.wiki/HYUNDAI-MOBIS/AN310ETMG.User-manual-1/User-Guide-1768145-Page-44.png)
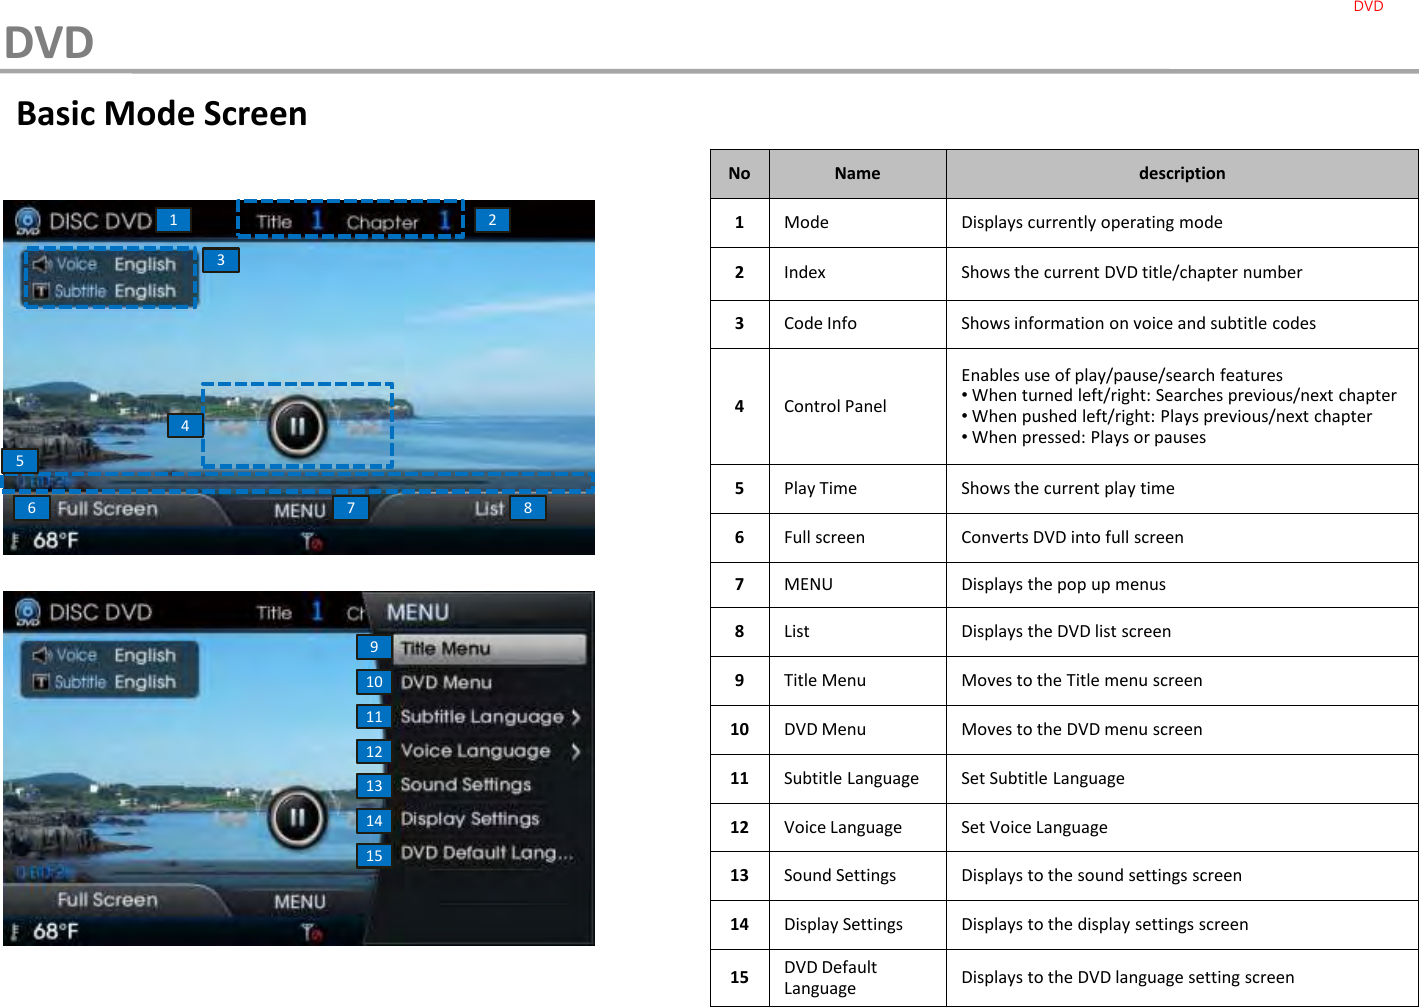
![•Searching TitlesPress the [RHT] List button to search DVD titles and chapters.Press the [LFT] Previous Title and the [RHT] Next Title button to change to the previous or next title. •Searching ChaptersTurn the controller left/right or shortly press the [<SEEK], [TRACK>] keys (under 0.8 seconds) to select the previous/next chapter. Press the [MENU] key to set the Title Menu, DVD Menu, Subtitle Language, Voice Language, Sound Settings, Display Settings and DVD Default Language.Using the Menu KeyInformation• The [1] displays the number of currently playing title and the total number of titles within the DVD disc.• The [2] displays the number of currently playing chapter and the total number of chapters within the current title.Information•The Title Menu and DVD Menu options can only be used within DVDs that support these features. For DVD Menus, different DVD titles may have different menu organizations.12Searching Titles/ChaptersDVD](https://usermanual.wiki/HYUNDAI-MOBIS/AN310ETMG.User-manual-1/User-Guide-1768145-Page-45.png)
![Push the controller up/down/left/right directions to select the desired menu and press the [OK] button.Press the [MENU] key ▶Select [Title Menu] or [DVD Menu] buttonPress the controller to change the subtitle language.Press the [MENU] key ▶Select[Subtitle Language]Press the [MENU] key ▶Select [Voice Language]Press the controller to change the voice language.Information•Supported subtitle and voice languages may differ according to DVD title.Title/DVD Menu Subtitle Language Voice LanguageDVD](https://usermanual.wiki/HYUNDAI-MOBIS/AN310ETMG.User-manual-1/User-Guide-1768145-Page-46.png)
![Press the [MENU] key ▶Select [DVD Default Language]DVD Default LanguageDVDThis menu is used to set the languages used when playing the DVD.If you select ‘Others’ from the list of languages, the desired language can be searched by directly entering the corresponding language code.](https://usermanual.wiki/HYUNDAI-MOBIS/AN310ETMG.User-manual-1/User-Guide-1768145-Page-47.png)
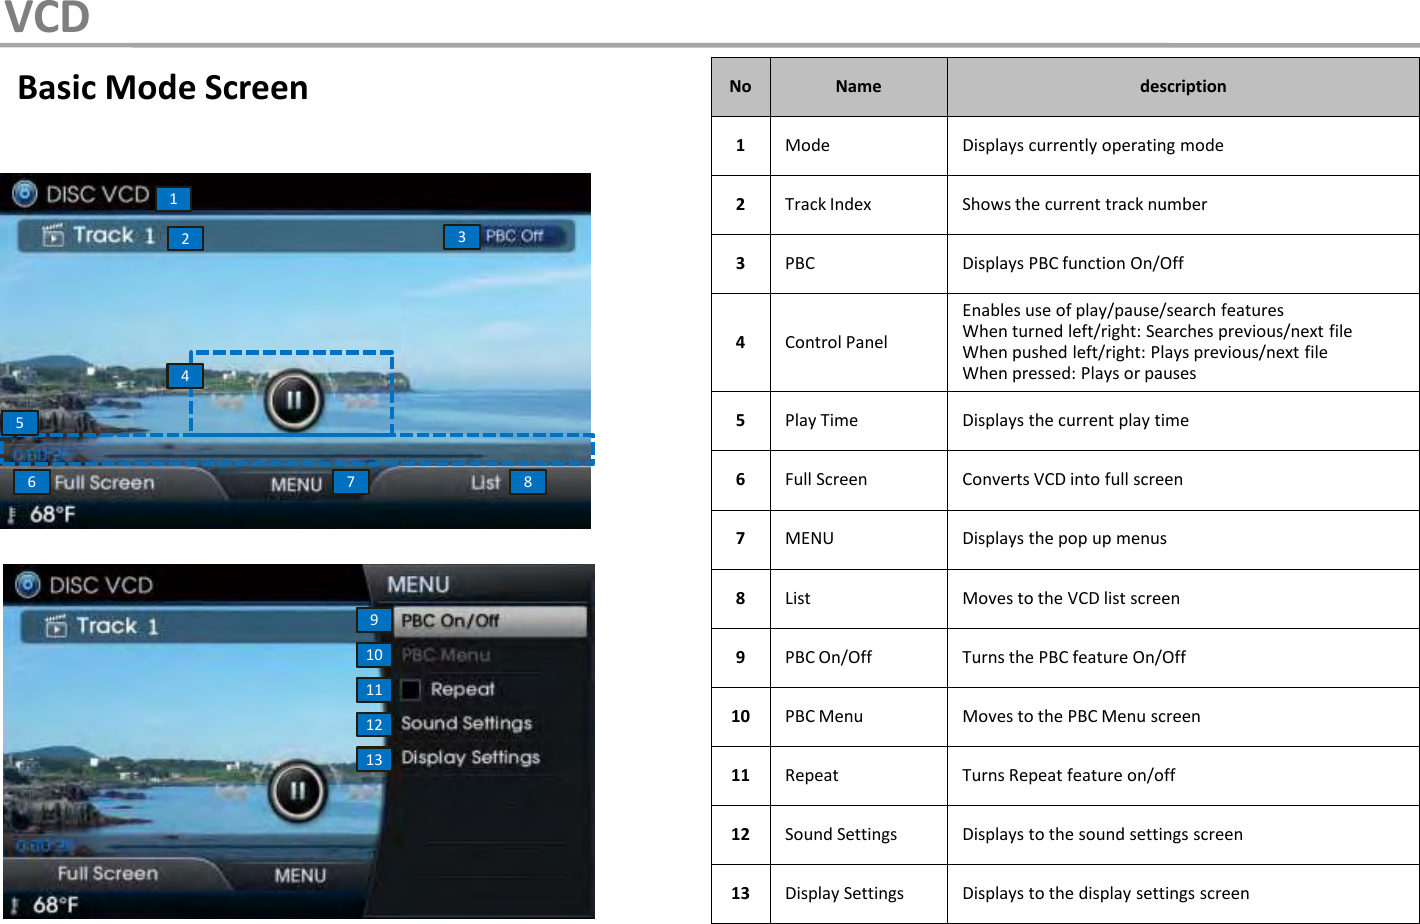
![Starting ModeVCD mode will automatically start once a VCD disc is inserted.Press the controller to play or pause the VCD.Press the [HOME] Key ▶Select DISC button.While playing ▶Shortly push the controller left/right (under 0.8 seconds) or shortly press the [<SEEK], [TRACK>] keys to select the previous/next track.Playing a VCD Selecting VCD tracksVCDVCD do not display the play graph and total time information.](https://usermanual.wiki/HYUNDAI-MOBIS/AN310ETMG.User-manual-1/User-Guide-1768145-Page-49.png)
![While playing ▶Turn the controller (○TUNE knob) left/right to search for tracks.During search, the track name is displayed. Press the controller (○TUNE knob) to play the selected track.While playing ▶Push and hold the controller left/right (over 0.8 seconds) or press and hold the [<SEEK], [TRACK>] keys to rewind/fast-forward the current VCD.Press the [LFT] Full Screen button to view the VCD in full screen.Information•If there are no operations for 10 seconds, the screen menu will automatically disappear.Searching VCD tracks Viewing in Full ScreenFast-forwarding or Rewinding VCD tracksVCD](https://usermanual.wiki/HYUNDAI-MOBIS/AN310ETMG.User-manual-1/User-Guide-1768145-Page-50.png)
![Press the [RHT] List button to view the play list.Press the [MENU] key to use the PBC On/Off, PBC Menu, Repeat, Sound Settings and Display Settings.Using the Menu KeyPress the [MENU] key ▶Select [PBC On/Off] ▶Select the [0]~[9] buttons ▶Set and press [Done] button.Within PBC ON state, press the [PBC Menu] button to display the PBC menu screen.PBC On/OffVCD ListVCDSelect the desired track by turning the controller. Once the desired track has been found, press the controller to play the track.VCD](https://usermanual.wiki/HYUNDAI-MOBIS/AN310ETMG.User-manual-1/User-Guide-1768145-Page-51.png)
![Press the [MENU] key ▶Select [Repeat] The current track is repeated. Information• Press the *PBC On/Off+ button to turn the PBC setting OFF.• Press the *<<+ *>>+ buttons to move to the previous/next list menu page.Information•Press the [Repeat] button again to turn off repeat.RepeatVCDVCD](https://usermanual.wiki/HYUNDAI-MOBIS/AN310ETMG.User-manual-1/User-Guide-1768145-Page-52.png)
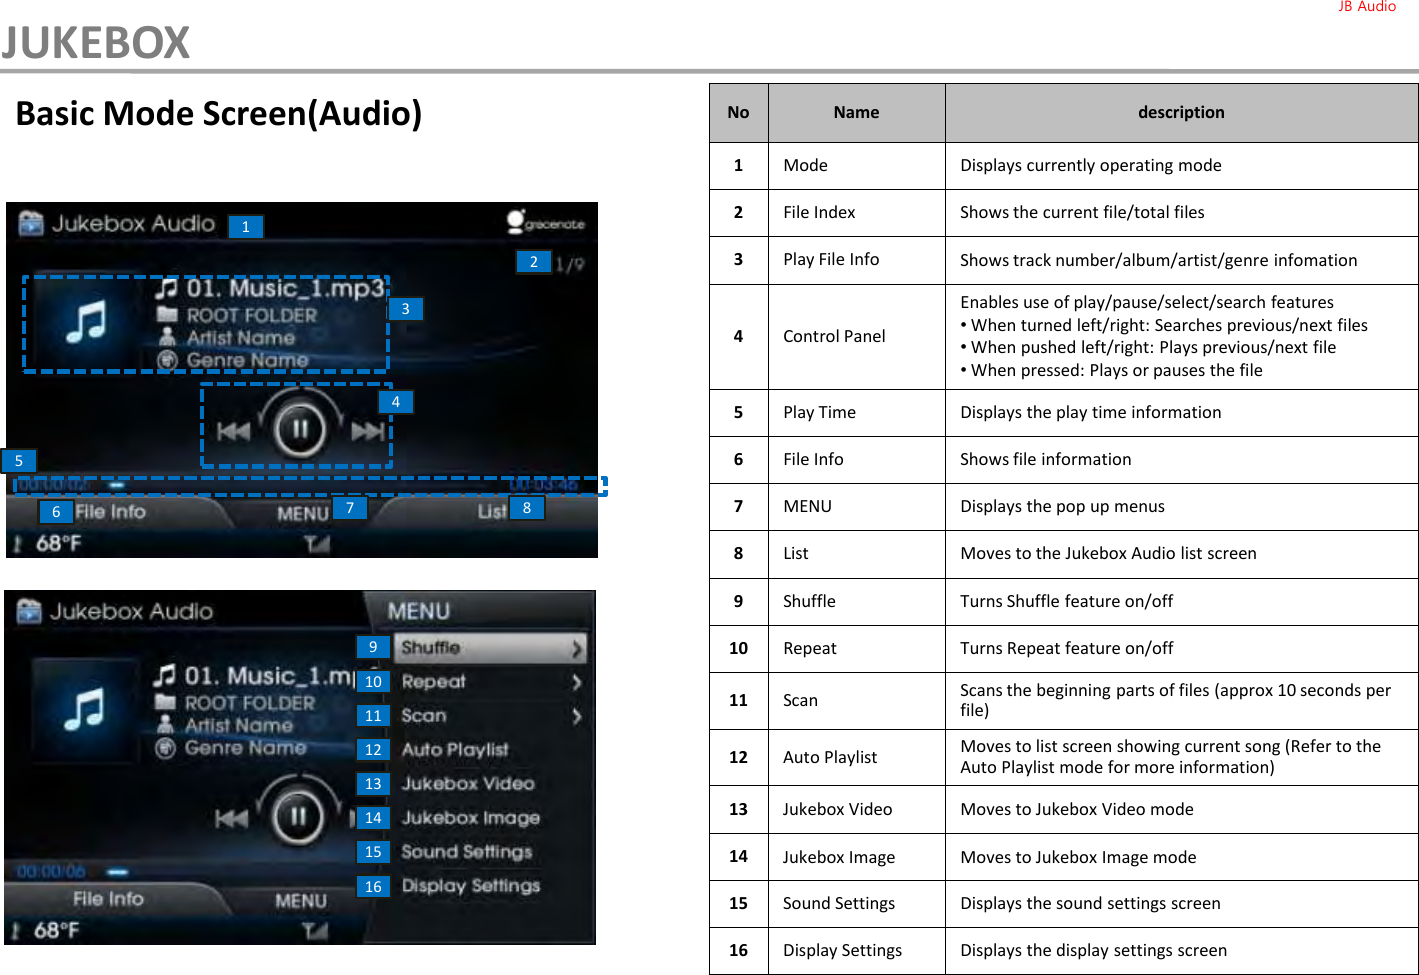
![Starting ModePress the [HOME] key ▶Select the Jukebox button.If there are files saved within the Jukebox, then the Jukebox menu will be enabled. Once Jukebox is selected, the most recently operated mode (Audio, Image, and Video) will operate.Information• If Jukebox is being operated for the first time, then Jukebox Audio mode will begin to operate.Press the controller to play or pause the current file. While playing ▶Shortly push the controller left/right (under 0.8 seconds) or shortly press the [<SEEK], [TRACK>] keys to select the previous/next file.Playing Jukebox AudioSelecting Jukebox Audio FilesJUKEBOXWhile Gracenote checks the music information, the message “Indexing.” will blink at the top right side.Once Indexing is complete, song information is displayed on the screen for songs supported by Gracenote.Jukebox Audio ModeJB Audio](https://usermanual.wiki/HYUNDAI-MOBIS/AN310ETMG.User-manual-1/User-Guide-1768145-Page-56.png)
![While playing ▶Press and hold the controller in left/right (over 0.8 seconds) or press and hold the [<SEEK], [TRACK>] keys to rewind/fast-forward the current file.While playing ▶Turn the controller (○TUNE knob) left/right to search for files. Press the [LFT] File Info button to view file information.During search, the file name is displayed. Press the controller(○TUNE knob) to play the selected file.To return to the previous screen, select the [LFT] Play Info button. Searching Jukebox Audio Files File Info/Play InfoFast-forwarding or Rewinding Jukebox Audio FilesJUKEBOXJB Audio](https://usermanual.wiki/HYUNDAI-MOBIS/AN310ETMG.User-manual-1/User-Guide-1768145-Page-57.png)
![Press the [RHT] List button to select from the list.Once Gracenote indexing (checking for song information) is complete, songs can be selected by searching through categories from the root list screen.Using the Menu KeyPress the [MENU] key to use the Shuffle, Repeat, Scan, Auto Playlist, Sound Settings and Display Settings. This menu is also used to move to other Jukebox modes. Press the [MENU] key ▶Select [Shuffle] ▶Select [Shuffle All]This option is used to play audio files within the Jukebox in random order.No Name Description1Shuffle All Play audio files within the Jukebox in random order2Off Turn the Shuffle feature offJukebox Audio List ShuffleJUKEBOXSelect the desired file by turning the controller. Once the desired file has been found, press the controller to play the file.JB Audio12](https://usermanual.wiki/HYUNDAI-MOBIS/AN310ETMG.User-manual-1/User-Guide-1768145-Page-58.png)
![Press the [MENU] key ▶Select [Repeat]▶Select [Repeat]The current song can be repeated.Press the [MENU] key ▶Select [Scan]▶Select [Scan All]The beginning part (approximately first 10 seconds) of all files are played.No Name Description1Scan All Previews the first 10 seconds of all files2Off Turn the Scan feature offNo Name Description1Repeat Repeats play of currently playing file2Off Turn the Repeat feature offRepeat ScanJUKEBOXJB Audio1212](https://usermanual.wiki/HYUNDAI-MOBIS/AN310ETMG.User-manual-1/User-Guide-1768145-Page-59.png)
![Using the List Menu KeyFrom the list screen ▶Press the [MENU] key ▶Select [Now Playing]The focus is moved to the currently playing file.From the list screen ▶Press the [MENU] key ▶Select [Delete]The selected file is deleted. From the list screen ▶Press the [MENU] key ▶Select [Storage Space]From the list screen ▶Press the [MENU] key ▶Select [Delete All]All files saved within Jukebox Audio are deleted.The total memory and available memory is displayed.Now PlayingStorage SpaceDeleteDelete AllJUKEBOXFrom the List screen, press the [MENU] key to use the Now Playing, Storage, Delete, and Delete All options. JB Audio](https://usermanual.wiki/HYUNDAI-MOBIS/AN310ETMG.User-manual-1/User-Guide-1768145-Page-60.png)
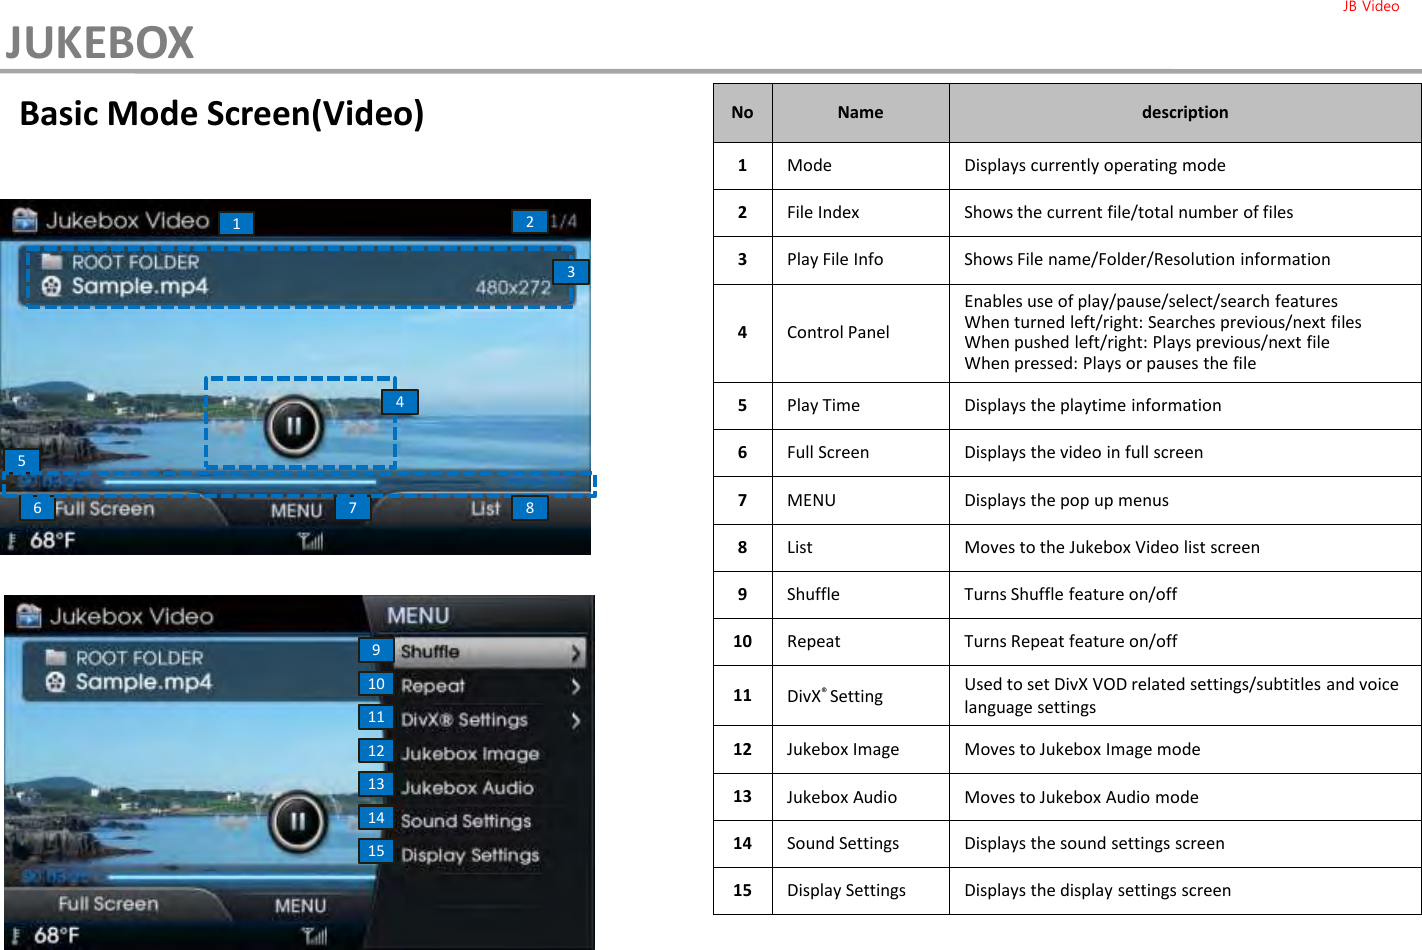
![Jukebox Video ModeWhile playing ▶Shortly push the controller left/right (under 0.8 seconds) or shortly press the [<SEEK], [TRACK>] keys to select the previous/next file. While playing ▶Press and hold the controller in left/right direction (over 0.8 seconds) or press and hold the [<SEEK], [TRACK>] keys to rewind/fast-forward the current file.Once the controller or [SEEK/TRACK] key is released, the file will begin playing at normal speed.Selecting Jukebox Video Files Fast-forwarding or Rewinding Jukebox Video FilesPlaying Jukebox VideoJUKEBOXJB VideoPress the controller to play or pause the Jukebox Video.](https://usermanual.wiki/HYUNDAI-MOBIS/AN310ETMG.User-manual-1/User-Guide-1768145-Page-61.png)
![While playing ▶Turn the controller (○TUNE knob) left/right to search for files.Press the [LFT] Full Screen button to view the file in full screen.Press the [RHT] List button to select from the list. Searching Jukebox Video Files Viewing in Full Screen Jukebox Video ListsJUKEBOXInformation•If there are no operations for 10 seconds, the menu will automatically disappear.Select the desired file by turning the controller. Once the desired file has been found, press the controller to play the file.During search, the image name is displayed. Press the controller (○TUNE knob) to play the selected file. JB Video](https://usermanual.wiki/HYUNDAI-MOBIS/AN310ETMG.User-manual-1/User-Guide-1768145-Page-62.png)
![Using the Menu KeyPress the [MENU] ▶Select [Shuffle] ▶Select [Shuffle All]No Name Description1Shuffle All Plays all files in random order2Off Turn the Shuffle feature offNo Name Description1Repeat Repeats play of currently playing file.2Off Turn the Repeat feature offPress the [MENU] ▶Select [Repeat]▶Select [Repeat]Press the [MENU] key to use the Shuffle,Repeat, DivX® Settings, Sound Settingsand Display Settings. This menu is alsoused to move to other Jukebox modes.This option is used to play video files within the Jukebox in random order.The current song or the all files within the folder can be repeated.Shuffle RepeatJUKEBOXJB Video1212](https://usermanual.wiki/HYUNDAI-MOBIS/AN310ETMG.User-manual-1/User-Guide-1768145-Page-63.png)
![Press the [MENU] key ▶Select [DivX® Settings]No Name Description1DivXⓇVOD Set DivX VOD related options2SubtitleLanguage Set Subtitle language3Voice Language Set Voice languageUpon first use of this feature, you must register your product through the DivXwebsite. DivX ⓇSettingsJUKEBOXJB Video123](https://usermanual.wiki/HYUNDAI-MOBIS/AN310ETMG.User-manual-1/User-Guide-1768145-Page-64.png)
![Using the List Menu KeyJUKEBOXFrom the List screen, press the [MENU] key to use the Now Playing, Storage, Delete, and Delete All options. JB Video※Refer to the 'Using the List Menu Key' of the Jukebox Audio for more information.](https://usermanual.wiki/HYUNDAI-MOBIS/AN310ETMG.User-manual-1/User-Guide-1768145-Page-65.png)
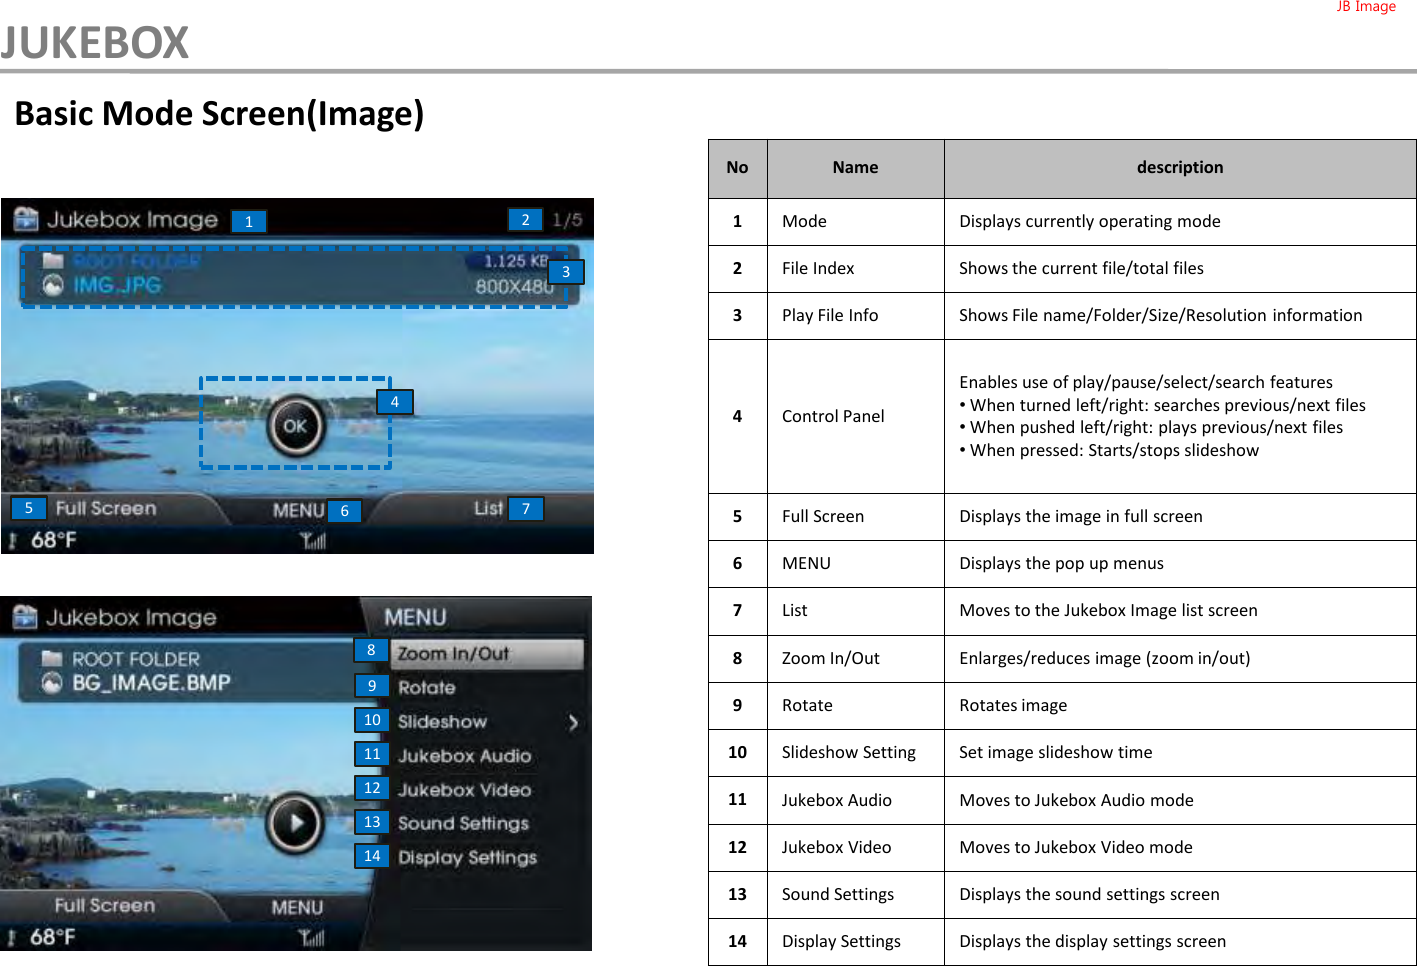
![Jukebox Image ModeWhile Playing▶Turn the controller (○TUNE knob) left/right ▶Search filesPress the controller to start the slideshow.During search, the image name is displayed. Press the controller (○TUNEknob) to play the selected image. Searching Jukebox Image Files Slideshow Selecting Jukebox Image FilesJUKEBOXWhile playing ▶Shortly push the controller left/right (under 0.8 seconds) or shortly press the [<SEEK], [TRACK>] keys to select the previous/next fileJB Image](https://usermanual.wiki/HYUNDAI-MOBIS/AN310ETMG.User-manual-1/User-Guide-1768145-Page-66.png)
![Press the [LFT] Full Screen button to view the Jukebox Video in full screen. Jukebox Image ListViewing in Full ScreenJUKEBOXInformation•If there are no operations for 10 seconds, the menu will automatically disappear.Press the [RHT] List button to select from the list. Select the desired file by turning the controller. Once the desired file has been found, press the controller to play the file.JB Image](https://usermanual.wiki/HYUNDAI-MOBIS/AN310ETMG.User-manual-1/User-Guide-1768145-Page-67.png)
![Using the Menu KeyPress the [MENU] key ▶Select [Zoom In/Out] Press the [MENU] key ▶Select [Rotate]Turn the controller left/right to enlarge or reduce the image size. The scale can be changed to 25%, 50%, 100%, 200%, 400%.Each time the controller is turned, the image is rotated from 0˚, 90˚, 180˚, 270˚. Information• Press the controller to restore the original image size. • When the image is not entirely displayed on the screen, different areas of the current image can be viewed by pushing the controller up/down/left/right.Information• Press the controller to restore the original image size.Zoom In/Out RotateJUKEBOXPress the [MENU] key to use the Zoom In/Out, Rotate, Slideshow Setting, Sound Settings and Display Settings. This menu is also used to move to other Jukebox modes. JB Image](https://usermanual.wiki/HYUNDAI-MOBIS/AN310ETMG.User-manual-1/User-Guide-1768145-Page-68.png)
![Press the [MENU] key ▶Select [Slideshow]Image slideshow intervals can be set at [5secs], [10secs], [20secs], [30secs] intervals.Slideshow SettingJUKEBOXJB Image](https://usermanual.wiki/HYUNDAI-MOBIS/AN310ETMG.User-manual-1/User-Guide-1768145-Page-69.png)
![Using the List Menu KeyJUKEBOXFrom the List screen, press the [MENU] key to use the Now Playing, Storage Space, Delete, and Delete All options. JB Image※Refer to the 'Using the List Menu Key' of the Jukebox Audio for more information.](https://usermanual.wiki/HYUNDAI-MOBIS/AN310ETMG.User-manual-1/User-Guide-1768145-Page-70.png)
![Starting ModePress the [HOME] button ▶Select the USB button.Information• If a previously played USB is reconnected, then the song after the most recently played song is played. However, if a different USB is connected or the file information within the USB was changed, then the USB file order information is deleted and will start playing from the first song within the USB.Notice• If the USB is not connected, then the USB button will be disabled.USB Audio ModePress the controller to play or pause the USB Audio.Playing USB AudioUSBWhile Gracenote checks the music information, the message “Indexing.” will blink at the top right side.Once Indexing is complete, song information is displayed on the screen for songs supported by Gracenote.USB AudioUSB mode will automatically start once a USB is inserted.](https://usermanual.wiki/HYUNDAI-MOBIS/AN310ETMG.User-manual-1/User-Guide-1768145-Page-77.png)
![While playing ▶Shortly push the controller left/right (under 0.8 seconds) or shortly press the [SEEK]/[TRACK] key to select the previous/next file.While playing ▶Push and hold the controller left/right (over 0.8 seconds) or press and hold the [SEEK]TRACK] key to rewind /fast-forward the current file.While playing ▶Turn the controller (○TUNE knob) left/right to search for files. During search, the file name is displayed. Press the controller (○TUNE knob) to play the selected file.Selecting USB Audio Files Fast-forwarding or Rewinding USB Audio Files Searching USB Audio FilesUSBUSB Audio](https://usermanual.wiki/HYUNDAI-MOBIS/AN310ETMG.User-manual-1/User-Guide-1768145-Page-78.png)
![Press the [MENU] key to use the Shuffle, Repeat, Scan, Auto Playlist, Copy, Sound Settings and Display Settings. This menu is also used to move to other USB play modes.Using the Menu KeyPress the [LFT] File Info button to view the file information.To return to the previous screen, select the [LFT] Play Info button. Information•Information is not displayed when ID3 tag or Gracenote song information does not exist.File Info/Play Info USB Audio List USBPress the [RHT] List button to select from the list.Select the desired file by turning the controller. Once the desired file has been found, press the controller to play the file.You can move to the previous folder or the root list screen by pressing the [LFT] Category Up button and the [RHT] USB Home button.Once Gracenote indexing (checking for song information) is complete, files can be selected by searching through categories from the root list screen.USB Audio](https://usermanual.wiki/HYUNDAI-MOBIS/AN310ETMG.User-manual-1/User-Guide-1768145-Page-79.png)
![Shuffle Repeat ScanPress the [MENU] key ▶Select [Shuffle] ▶Select [Shuffle Folder] or [Shuffle All]12No Name Description1Shuffle Folder Plays files within the current folder in random order.2Shuffle All Plays files within the USB in random order.3Off Turn the Shuffle feature off.No Name Description1Repeat Repeats play of currently playing file.2Repeat Folder Repeats the files in the current folder.3Off Turn the Repeat feature off.No Name Description1Scan All Scans files within the USB in random order.2Scan Folder Searches files within the current folder.3Off Turn the Scan feature off.Press the [MENU] key ▶Select [Repeat] ▶Select [Repeat] or [Repeat Folder]The current song or the all files within the folder can be repeated.The beginning part (approximately first 10 seconds) of all files within the current folder or the entire USB are scanned.Press the [MENU] key ▶Select [Scan] ▶Select [Scan All] or [Scan Folder]3123123All files within the folder or USB can be played in random order. If songs are played by artists, albums, Songs or genres from the root list, shuffle menus are displayed as [Shuffle] and [Off],USBIf songs are played by artists, albums, songs or genres from the root list, repeat menus are displayed as [Repeat] and [Off],If songs are played by artists, albums, Songs or genres from the root list, scan menus are displayed as [Scan Playlist] and [Off],USB Audio](https://usermanual.wiki/HYUNDAI-MOBIS/AN310ETMG.User-manual-1/User-Guide-1768145-Page-80.png)
![Press the [MENU] key ▶Select [Copy]▶Set copy optionsCopying to JukeboxUSBIf [Select Files] is selected, desired files can be selected to copy into the Jukebox. Turn the controller to select files. Once files are selected, press the [RHT] Copy Selected File button to copy selected files into the Jukebox.12312USB AudioNo Name Description1Now Playing Copy currently playing file into the Jukebox2Select Files Select desired files from the list to copy3CurrentSelectionCopies currently selected files](https://usermanual.wiki/HYUNDAI-MOBIS/AN310ETMG.User-manual-1/User-Guide-1768145-Page-81.png)
![USBInformation•Copying will be canceled if you move to a different mode while copying is in progress.USB AudioInformation•The [Select Files] button can be used to select files within the current folder.While copying is in progress, press the [OK] button to display the play screen. Within the play screen, press the [MENU] key and [Cancel Copy] button to cancel copying.](https://usermanual.wiki/HYUNDAI-MOBIS/AN310ETMG.User-manual-1/User-Guide-1768145-Page-82.png)
![Using the List Menu Key USB Video ModePress the controller to play or pause the USB Video.While playing ▶Shortly push the controller left/right (under 0.8 seconds) or shortly press the [SEEK], [TRACK] key to select the previous/next file.CopyNow PlayingPlaying USB VideoSelecting USB Video FilesUSBFrom the List screen, press the [MENU] key to use the Copy and Now Playing options.From the list screen ▶Press the [MENU] key ▶Select [Copy]※Refer to the section of copying within the Jukebox section.From the list screen ▶Press the [MENU] key ▶Select [Now Playing]The focus is moved to the currently playing file.USB Video](https://usermanual.wiki/HYUNDAI-MOBIS/AN310ETMG.User-manual-1/User-Guide-1768145-Page-83.png)
![While playing ▶Push and hold the controller left/right (over 0.8 seconds) or press and hold the [SEEK], [TRACK] key to rewind/fast-forward the current file.While playing ▶Turn the controller (○TUNE knob) left/right to search for files. During search, the file name is displayed. Press the controller (○TUNE knob) to play the selected file and display the basic display info.Press the [LFT] Full Screen button to view the file in full screen. Information•If there are no operations for 10 seconds, the menu will automatically disappear.Searching USB Video FilesFast-forwarding or Rewinding USB Video FilesViewing in Full ScreenUSBUSB VideoOnce the controller or (SEEK/TRACK) key is released, the file will begin playing at normal speed.](https://usermanual.wiki/HYUNDAI-MOBIS/AN310ETMG.User-manual-1/User-Guide-1768145-Page-84.png)
![Press the [MENU] key to use the Shuffle, Repeat, Copy, DivX®Settings, Sound Settings and Display Settings. This menu is also used to move to other USB play modes.Press the [MENU] key ▶Select [Shuffle] ▶[Shuffle Folder] or [Shuffle All]Using the Menu Key12No Name Description1Shuffle Folder Plays files within the current folder in random order.2Shuffle All Plays files within the USB in random order.3Off Turn the Shuffle feature off.USB Video List Shuffle3Folders or All files within the USB can be played in random order.USBPress the [RHT] List button to select from the list. Select the desired file by turning the controller. Once the desired file has been found, press the controller to play the file.You can move to the previous folder or the root list screen by pressing the [LFT] Category Up and [RHT] USB Home buttons.USB Video](https://usermanual.wiki/HYUNDAI-MOBIS/AN310ETMG.User-manual-1/User-Guide-1768145-Page-85.png)
![Press the [MENU] key ▶Select [Repeat] ▶Select [Repeat] or [Repeat Folder]The current song or the all files within the folder can be repeated.Press the [MENU] key ▶Select [Copy]▶Set copy options12No Name Description1Repeat Repeats play of currently playing file.2Repeat Folder Repeats the files in the current folder.3Off Turn the Repeat feature off.Repeat Copying to JukeboxUSB3USB Video※Refer to the USB Audio 'Copying to Jukebox' section for more information.](https://usermanual.wiki/HYUNDAI-MOBIS/AN310ETMG.User-manual-1/User-Guide-1768145-Page-86.png)
![Press the [MENU] key ▶Select [DivX® Settings]123No Name Description1DivX® VOD Set DivX® VOD features2SubtitleLanguage Set subtitle language3Voice Language Set Voice languageDivX SettingUSBWhen using DivX for the first time, you must register the product through the DivXwebsite.USB Video](https://usermanual.wiki/HYUNDAI-MOBIS/AN310ETMG.User-manual-1/User-Guide-1768145-Page-87.png)
![While playing ▶Shortly push the controller left/right (under 0.8 seconds) or shortly press the [SEEK], [TRACK] key to select the previous/next file.USB Image ModeWhile playing ▶Turn the controller (○TUNE knob) left/right to search for files. During search, the image name is displayed. Press the controller (○TUNE knob) to play the selected image. Searching USB Image FilesSelecting USB Image FilesUSBUSB Image](https://usermanual.wiki/HYUNDAI-MOBIS/AN310ETMG.User-manual-1/User-Guide-1768145-Page-88.png)
![Press the [LFT] Full Screen button to view the file in full screen. Information•If there are no operations for 10 seconds, the menu will automatically disappear.Slideshow Show Viewing in Full Screen USB Image List USBPress the controller and select the [▶]button to start the slideshow.Press the [RHT] List button to select from the list. Select the desired file by turning the controller. Once the desired file has been found, press the controller to play the file.You can move to the previous folder or the root list screen by pressing the [LFT] and [RHT] keys. USB Image](https://usermanual.wiki/HYUNDAI-MOBIS/AN310ETMG.User-manual-1/User-Guide-1768145-Page-89.png)
![Press the [MENU] key to use the Zoom In/Out, Rotate, Slideshow, Copy, Sound Settings and Display Settings options. This menu is also used to move to other USB play modes.Press the [MENU] key ▶Select [Zoom In/Out]Turn the controller left/right to enlarge or reduce the image size. The scale can be changed to 25%, 50%, 100%, 200%, and 400%. Press the [MENU] key ▶Select [Rotate]Each time the controller is rotated, the image is rotated from 0˚, 90˚, 180˚, 270˚.Information• Press the controller to restore the original image size.• When images are not all displayed on the screen, pushing the controller in up/down/left/right directions will display other images. Information• Press the controller to restore the original image state.Using the Menu Key Zoom In/Out RotateUSBUSB Image](https://usermanual.wiki/HYUNDAI-MOBIS/AN310ETMG.User-manual-1/User-Guide-1768145-Page-90.png)
![Press the [MENU] key ▶Select [Copy]▶Set copy optionsPress the [MENU] key ▶Select [Slideshow]Image slideshow intervals can be set at[5secs], [10secs], [20secs], [30secs] intervals.Copying to JukeboxSlideshow SettingUSBUSB Image※Refer to the USB Audio 'Copying to Jukebox' section for more information.Information•Copying will be canceled if you move to a different mode while copying is in progress.](https://usermanual.wiki/HYUNDAI-MOBIS/AN310ETMG.User-manual-1/User-Guide-1768145-Page-91.png)
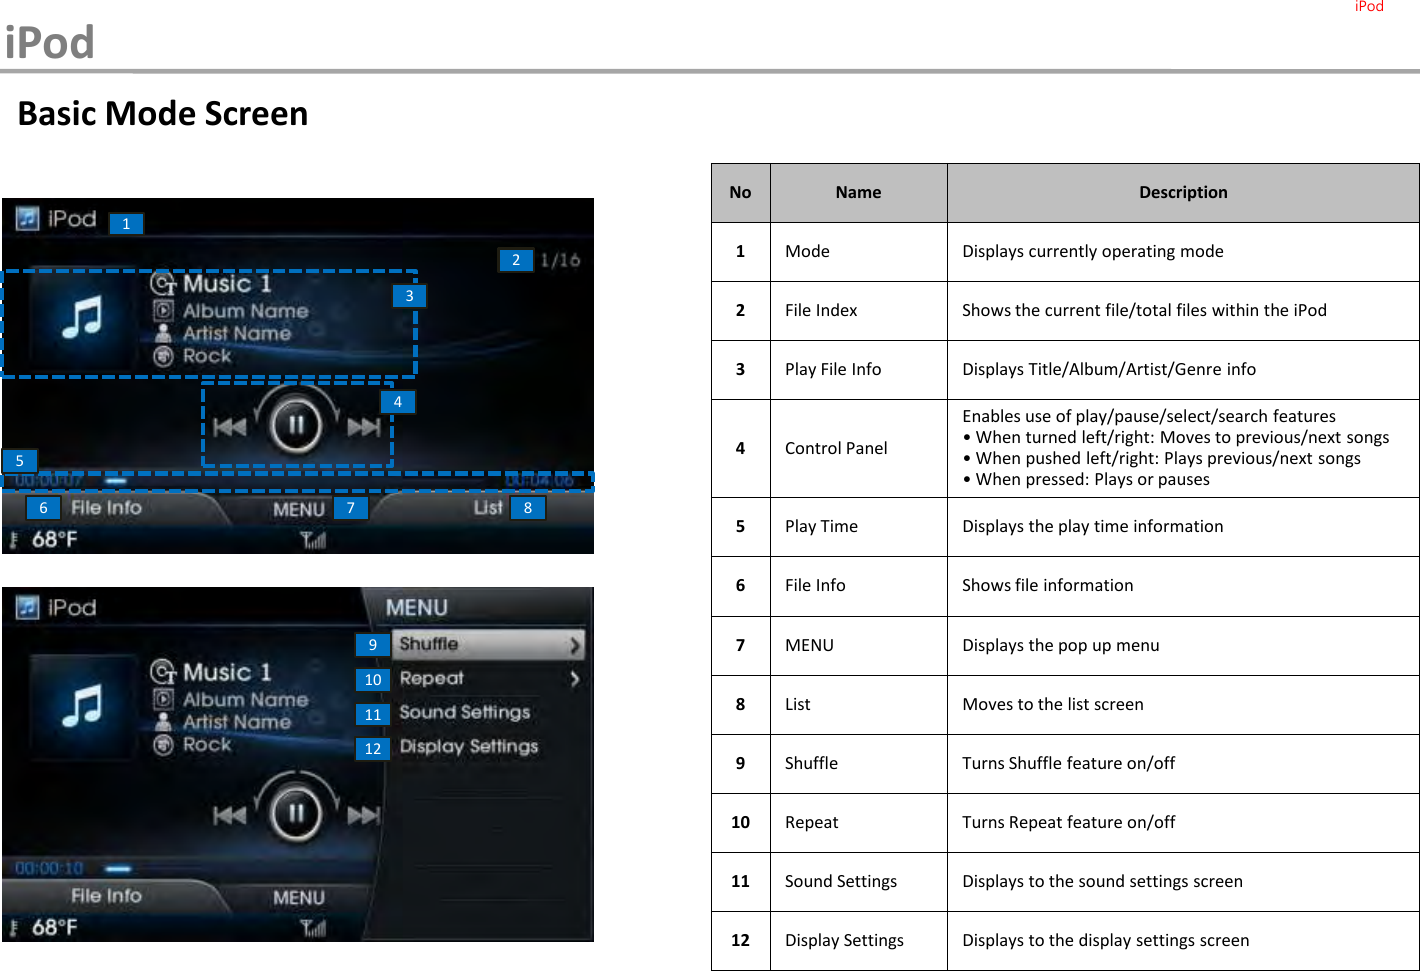
![Starting ModePress the [HOME] button ▶Select [iPod]iPod mode will automatically start once an iPod is connected.While playing ▶Shortly push the controller left/right (under 0.8 seconds) or shortly press the [SEEK], [TRACK] key to select the previous/next song.Information•Some iPods with unsupported communication protocols may not properly operate within the system.Playing iPod Selecting iPod FileiPodiPodPress the controller to play or pause the iPod.](https://usermanual.wiki/HYUNDAI-MOBIS/AN310ETMG.User-manual-1/User-Guide-1768145-Page-95.png)
![While playing ▶Push and hold the controller left/right (over 0.8 seconds) or press and hold the [SEEK], [TRACK] key to rewind/fast-forward the current song.While playing ▶Turn the controller (○TUNE knob) left/right to search for songs.During search, the song name is displayed. Press the controller (○TUNE knob) to play the selected song.Press the [LHT] File Info button to select Play Info to view the file information.To return to the previous screen, select the [LFT] Play Info button.Information• No information are shown for MP3 files without file information.Fast-forwarding or Rewinding iPod FilesSearching iPod Files File Info/Play InfoiPodiPod](https://usermanual.wiki/HYUNDAI-MOBIS/AN310ETMG.User-manual-1/User-Guide-1768145-Page-96.png)
![Press the [MENU] key to use the Shuffle, Repeat, Sound Settings and Display Settings.Using the Menu KeyPress the [MENU] key ▶Select [Shuffle] ▶Select [Shuffle] or [Shuffle Album]12Information• If the search mode is accessed while playing a song, the most recently searched step will become displayed.• Upon initial connection, the search steps may differ depending on the type of iPod device.No Name Description1Shuffle Plays songs within play list in random order2Shuffle AlbumPlays albums in random order (plays songs within the album in sequential order)3Off Turn the Shuffle feature off.3Searching iPod List ShuffleiPodPress the [RHT] key to select from the list. Songs can be searched from various categories, including Playlist, Artists, Albums, Genres, Songs Composers, Audiobooks, and Podcasts..You can move to the previous category or the root list screen by pressing the [LFT] Category Up and [RHT] iPod Home buttons. iPod](https://usermanual.wiki/HYUNDAI-MOBIS/AN310ETMG.User-manual-1/User-Guide-1768145-Page-97.png)
![Press the [MENU] key ▶Select [Repeat] ▶Select [Repeat]The current song is repeated.No Name Description1Repeat Repeats play of currently playing file.2Off Turn the Repeat feature off.12RepeatiPodiPod](https://usermanual.wiki/HYUNDAI-MOBIS/AN310ETMG.User-manual-1/User-Guide-1768145-Page-98.png)
![Starting ModePress the [HOME] button ▶Select the AUX button.External AUDIO and VIDEO players (Camcorders, car VCR, etc.) can be played through a dedicated cable. The position of the AUX jack is at the top of the gear box located between the driver and passenger seats.Information• If an external device connector is connected with the AUX terminal, then AUX mode will automatically operate. Once the connector is disconnected, the previous mode will be restored.• AUX mode can be used only when an external audio/video player (camcorder, car VCR, etc.) has been connected.• The AUX volume can be controlled separately from other AV modes.Notice• Connecting a connector jack to the AUX terminal without an external device will convert the system to AUX mode, but only output noise. When an external device is not being used, also remove the connector jack.• When the external device power is connected to the power jack, playing the external device may output noise. In such cases, disconnect the power connection before use.Notice•This device supports the NTSC color system. Other color systems are not supported.AUXAUX](https://usermanual.wiki/HYUNDAI-MOBIS/AN310ETMG.User-manual-1/User-Guide-1768145-Page-99.png)
![About Using Bluetooth® Audio•Bluetooth® Audio Mode can be used only when a Bluetooth® phone has been connected.•While Bluetooth® Audio is playing, disconnecting the Bluetooth® phone will also terminate Bluetooth music.•Bluetooth® streaming audio may not be supported in some mobile phones.•If you switch to the Bluetooth mode screen while playing streaming audio, then the streaming audio will stop and the previous AV mode will be restored. Starting ModePress the [HOME] button ▶Select the [Bluetooth Audio] button.Press the controller to begin playing Bluetooth Audio. Pressing the controller again will pause the Bluetooth Audio.Notice•If the Bluetooth® device is not connected, then the [Bluetooth Audio] button will be disabled.Notice•If Bluetooth Audio Streaming is used simultaneously with another music application, then the display and sound may operate abnormally. Playing Bluetooth AudioBluetooth AudioBT Audio](https://usermanual.wiki/HYUNDAI-MOBIS/AN310ETMG.User-manual-1/User-Guide-1768145-Page-100.png)